Embed Size (px)
Citation preview

A© 2020 Riley Blake Designs and Jill Howarth. All Rights Reserved.
THE CASTLE
THE CASTLE
Growing up, I loved reading the original versions of fairy tales, as scary as they sometimes were. Beauty, as she is called in the actual book, has a story similar to Cinderella. She has two evil, selfish sisters and a kind, loving father. When I decided to do this collection, I wanted to represent Beast as he is in the original, a sad, lonely figure, not really very menacing, just well... beastly. He showers Beauty with gifts, asking her to marry him over and over until she ultimately realizes she loves him. I hope you enjoy creating with this classic tale of finding true love.
1© 2020 Riley Blake Designs and Jill Howarth. All Rights Reserved.
THE CASTLE
Cut 1 strip 63/4" x WOF. Sub-cut from strip: 1 - 63/4" x 151/2" rectangle (AB) 1 - 61/2" x 9" rectangle (AE) 1 - 5" x 91/2" rectangle (Y)Cut 1 strip 61/2" x WOF. Sub-cut from strip: 1 - 61/2" x 211/2" rectangle (AF) 1 - 61/2" x 161/2" rectangle (AG)Cut 1 strip 33/4" x WOF. Sub-cut from strip: 4 - 33/4" squares (M) 8 - 31/4" squares (O)Cut 1 strip 21/2" x WOF. Sub-cut from strip: 6 - 21/2" squares (Q) 12 - 2" squares (S)Cut 1 strip 2" x WOF. Sub-cut from strip: 1 - 2" x 83/4" rectangle (U) 1 - 2" x 61/2" rectangle (AD) 2 - 2" x 5" rectangles (AC)Cut 8 strips 2" x WOF for Border.
Cream MainCut 1 strip 111/2" x 21". Sub-cut from strip: 2 - 7 x 111/2" rectangles (F)
Gold WindowsCut 1 strip 22" x WOF. Sub-cut from strip: 1 - 22" x 30" rectangle (AH)
Light Blue WindowsCut 1 strip 111/2" x WOF. Sub-cut from strip: 4 - 41/4" x 111/2" rectangles (G) Cut the remaining strip into 2 - 5" x WOF and sub-cut: 2 - 5" x 9" rectangles (I) 2 - 5" x 71/2" rectangles (H) 2 - 5" x 31/4" rectangles (J)Cut 1 strip 4" x WOF. Sub-cut from strip: 1 - 4" x 9" rectangle (D) 2 - 4" x 71/2" rectangles (C) 1 - 4" x 31/4" rectangle (E)
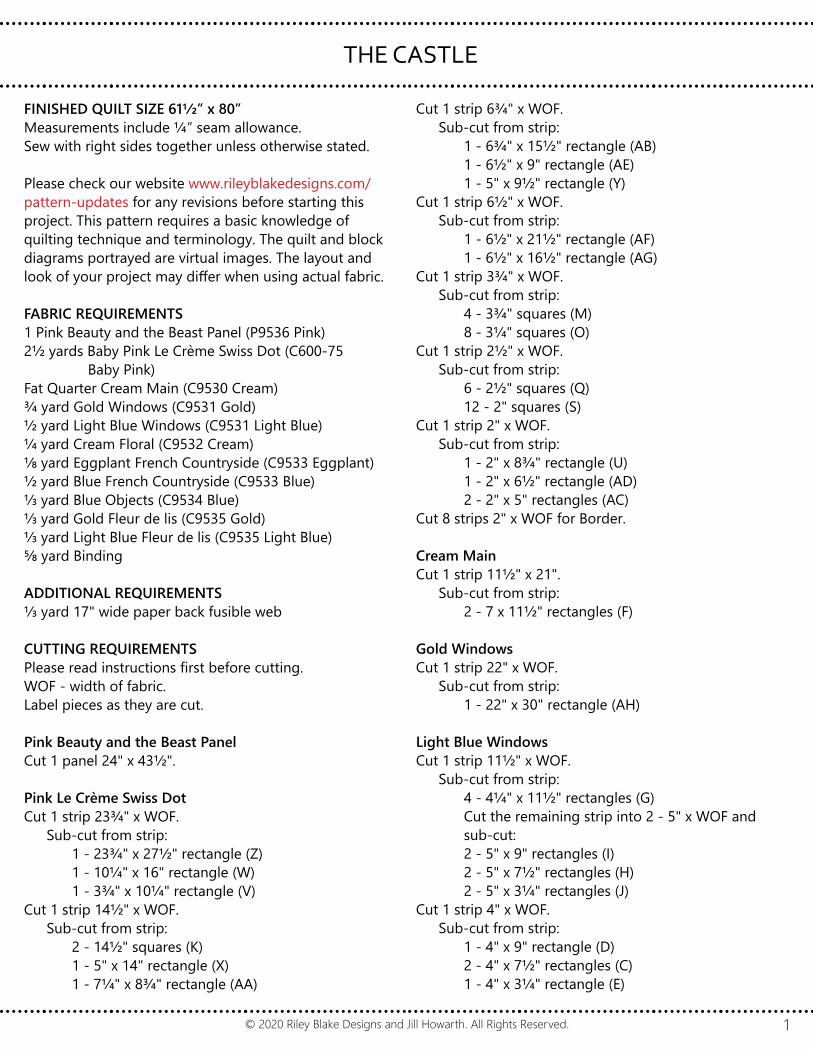
FINISHED QUILT SIZE 611/2” x 80”Measurements include ¼” seam allowance.Sew with right sides together unless otherwise stated.
Please check our website www.rileyblakedesigns.com/ pattern-updates for any revisions before starting this project. This pattern requires a basic knowledge of quilting technique and terminology. The quilt and block diagrams portrayed are virtual images. The layout and look of your project may differ when using actual fabric.
FABRIC REQUIREMENTS1 Pink Beauty and the Beast Panel (P9536 Pink)21/2 yards Baby Pink Le Crème Swiss Dot (C600-75 Baby Pink)Fat Quarter Cream Main (C9530 Cream)3/4 yard Gold Windows (C9531 Gold)1/2 yard Light Blue Windows (C9531 Light Blue)1/4 yard Cream Floral (C9532 Cream)1/8 yard Eggplant French Countryside (C9533 Eggplant)1/2 yard Blue French Countryside (C9533 Blue)1/3 yard Blue Objects (C9534 Blue)1/3 yard Gold Fleur de lis (C9535 Gold)1/3 yard Light Blue Fleur de lis (C9535 Light Blue)5/8 yard Binding
ADDITIONAL REQUIREMENTS1/3 yard 17" wide paper back fusible web
CUTTING REQUIREMENTSPlease read instructions first before cutting. WOF - width of fabric.Label pieces as they are cut.
Pink Beauty and the Beast PanelCut 1 panel 24" x 431/2".
Pink Le Crème Swiss DotCut 1 strip 233/4" x WOF. Sub-cut from strip: 1 - 233/4" x 271/2" rectangle (Z) 1 - 101/4" x 16" rectangle (W) 1 - 33/4" x 101/4" rectangle (V)Cut 1 strip 141/2" x WOF. Sub-cut from strip: 2 - 141/2" squares (K) 1 - 5" x 14" rectangle (X) 1 - 71/4" x 83/4" rectangle (AA)
2© 2020 Riley Blake Designs and Jill Howarth. All Rights Reserved.
THE CASTLE
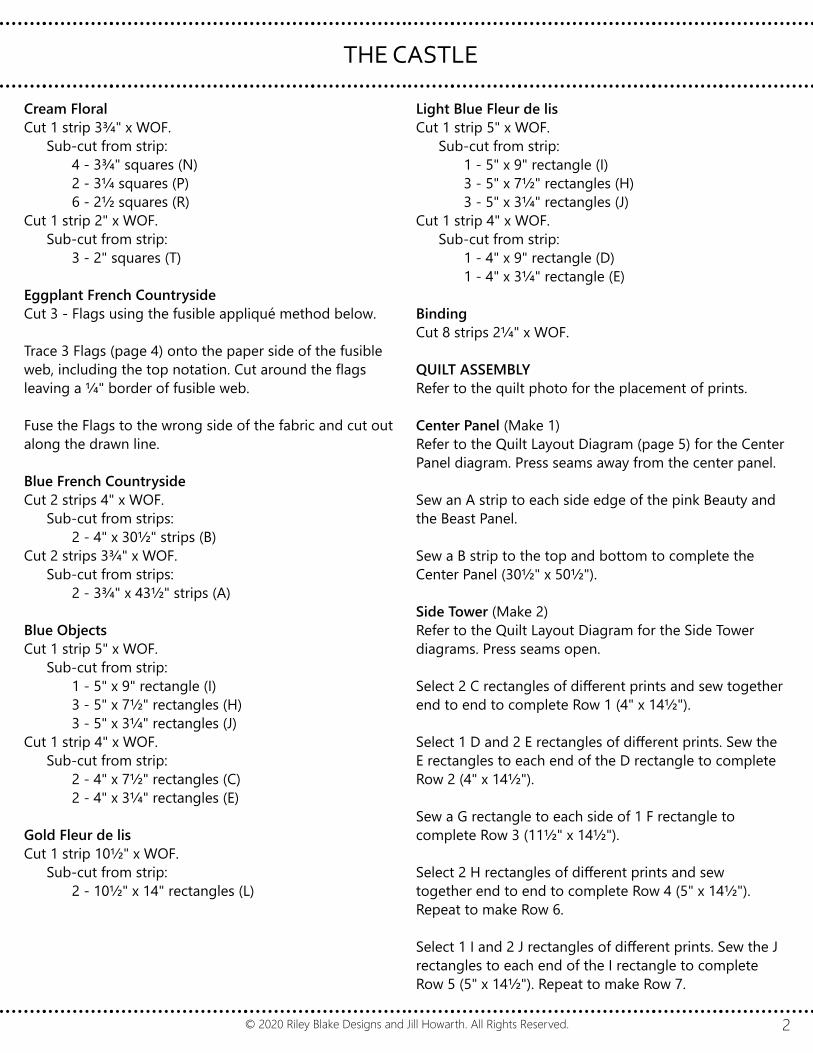
Cream FloralCut 1 strip 33/4" x WOF. Sub-cut from strip: 4 - 33/4" squares (N) 2 - 31/4 squares (P) 6 - 21/2 squares (R)Cut 1 strip 2" x WOF. Sub-cut from strip: 3 - 2" squares (T) Eggplant French CountrysideCut 3 - Flags using the fusible appliqué method below.
Trace 3 Flags (page 4) onto the paper side of the fusible web, including the top notation. Cut around the flags leaving a 1/4" border of fusible web.
Fuse the Flags to the wrong side of the fabric and cut out along the drawn line.
Blue French CountrysideCut 2 strips 4" x WOF. Sub-cut from strips: 2 - 4" x 301/2" strips (B)Cut 2 strips 33/4" x WOF. Sub-cut from strips: 2 - 33/4" x 431/2" strips (A)
Blue ObjectsCut 1 strip 5" x WOF. Sub-cut from strip: 1 - 5" x 9" rectangle (I) 3 - 5" x 71/2" rectangles (H) 3 - 5" x 31/4" rectangles (J)Cut 1 strip 4" x WOF. Sub-cut from strip: 2 - 4" x 71/2" rectangles (C) 2 - 4" x 31/4" rectangles (E)
Gold Fleur de lisCut 1 strip 101/2" x WOF. Sub-cut from strip: 2 - 101/2" x 14" rectangles (L)
Light Blue Fleur de lisCut 1 strip 5" x WOF. Sub-cut from strip: 1 - 5" x 9" rectangle (I) 3 - 5" x 71/2" rectangles (H) 3 - 5" x 31/4" rectangles (J)Cut 1 strip 4" x WOF. Sub-cut from strip: 1 - 4" x 9" rectangle (D) 1 - 4" x 31/4" rectangle (E)
BindingCut 8 strips 21/4" x WOF.
QUILT ASSEMBLYRefer to the quilt photo for the placement of prints.
Center Panel (Make 1)Refer to the Quilt Layout Diagram (page 5) for the Center Panel diagram. Press seams away from the center panel.
Sew an A strip to each side edge of the pink Beauty and the Beast Panel.
Sew a B strip to the top and bottom to complete the Center Panel (301/2" x 501/2").
Side Tower (Make 2)Refer to the Quilt Layout Diagram for the Side Tower diagrams. Press seams open.
Select 2 C rectangles of different prints and sew together end to end to complete Row 1 (4" x 141/2").
Select 1 D and 2 E rectangles of different prints. Sew the E rectangles to each end of the D rectangle to complete Row 2 (4" x 141/2").
Sew a G rectangle to each side of 1 F rectangle to complete Row 3 (111/2" x 141/2").
Select 2 H rectangles of different prints and sew together end to end to complete Row 4 (5" x 141/2"). Repeat to make Row 6.
Select 1 I and 2 J rectangles of different prints. Sew the J rectangles to each end of the I rectangle to complete Row 5 (5" x 141/2"). Repeat to make Row 7.
3© 2020 Riley Blake Designs and Jill Howarth. All Rights Reserved.
THE CASTLE
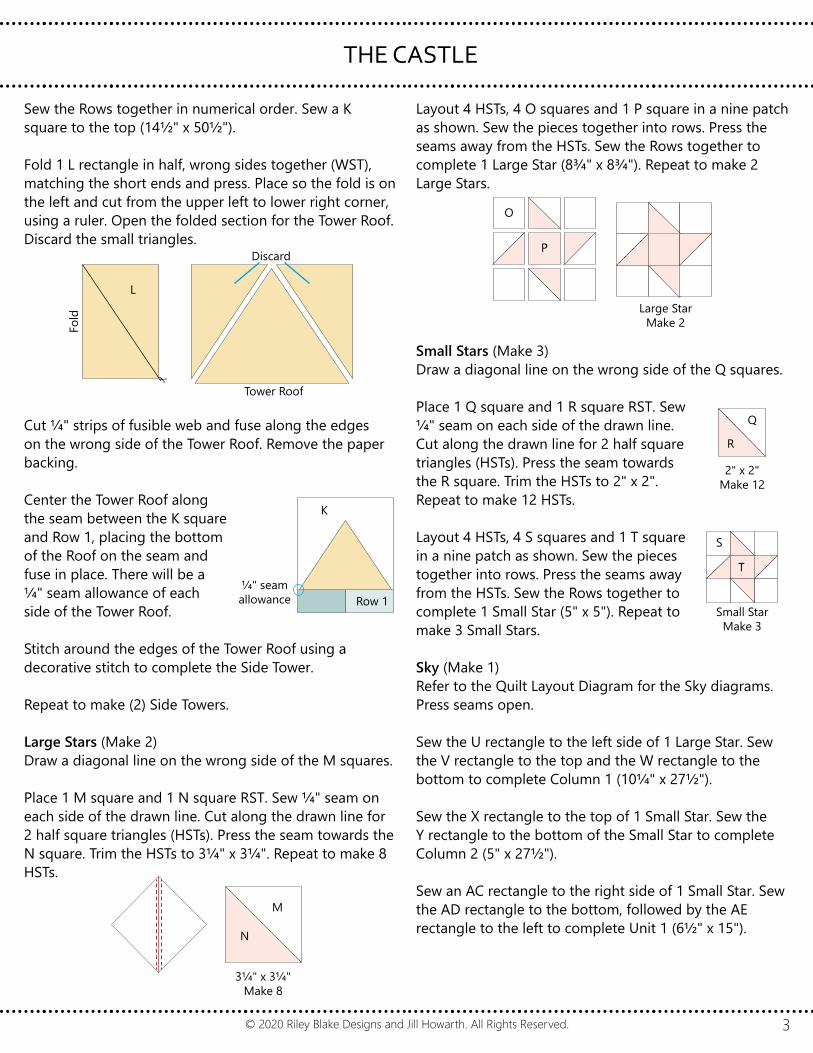
Sew the Rows together in numerical order. Sew a K square to the top (141/2" x 501/2").
Fold 1 L rectangle in half, wrong sides together (WST), matching the short ends and press. Place so the fold is on the left and cut from the upper left to lower right corner, using a ruler. Open the folded section for the Tower Roof. Discard the small triangles.
Cut 1/4" strips of fusible web and fuse along the edges on the wrong side of the Tower Roof. Remove the paper backing.
Center the Tower Roof along the seam between the K square and Row 1, placing the bottom of the Roof on the seam and fuse in place. There will be a 1/4" seam allowance of each side of the Tower Roof.
Stitch around the edges of the Tower Roof using a decorative stitch to complete the Side Tower.
Repeat to make (2) Side Towers.
Large Stars (Make 2)Draw a diagonal line on the wrong side of the M squares.
Place 1 M square and 1 N square RST. Sew 1/4" seam on each side of the drawn line. Cut along the drawn line for 2 half square triangles (HSTs). Press the seam towards the N square. Trim the HSTs to 31/4" x 31/4". Repeat to make 8 HSTs.
Layout 4 HSTs, 4 O squares and 1 P square in a nine patch as shown. Sew the pieces together into rows. Press the seams away from the HSTs. Sew the Rows together to complete 1 Large Star (83/4" x 83/4"). Repeat to make 2 Large Stars.
Small Stars (Make 3)Draw a diagonal line on the wrong side of the Q squares.
Place 1 Q square and 1 R square RST. Sew 1/4" seam on each side of the drawn line. Cut along the drawn line for 2 half square triangles (HSTs). Press the seam towards the R square. Trim the HSTs to 2" x 2". Repeat to make 12 HSTs.
Layout 4 HSTs, 4 S squares and 1 T square in a nine patch as shown. Sew the pieces together into rows. Press the seams away from the HSTs. Sew the Rows together to complete 1 Small Star (5" x 5"). Repeat to make 3 Small Stars.
Sky (Make 1)Refer to the Quilt Layout Diagram for the Sky diagrams. Press seams open.
Sew the U rectangle to the left side of 1 Large Star. Sew the V rectangle to the top and the W rectangle to the bottom to complete Column 1 (101/4" x 271/2").
Sew the X rectangle to the top of 1 Small Star. Sew the Y rectangle to the bottom of the Small Star to complete Column 2 (5" x 271/2").
Sew an AC rectangle to the right side of 1 Small Star. Sew the AD rectangle to the bottom, followed by the AE rectangle to the left to complete Unit 1 (61/2" x 15").
Tower Roof
Discard
Fold
L
Row 1
K
1/4" seam allowance
31/4" x 31/4"Make 8
M
N
Large StarMake 2
P
O
Small StarMake 3
T
S
2" x 2"Make 12
Q
R

4© 2020 Riley Blake Designs and Jill Howarth. All Rights Reserved.
THE CASTLE
Sew the AA rectangle to the bottom of 1 Large Star. Sew the AB rectangle to the right side to complete Unit 2 (15" x 151/2").
Sew 1 AC rectangle to the top of 1 Small Star. Sew the AG rectangle to the right side to complete Unit 3 (61/2" x 21").
Sew Unit 1 to the top of Unit 2. Sew the AF rectangle to the left side, followed by Unit 3 to the top to complete Column 3 (21" x 271/2").
Sew together, in order from left to right, Column 1, Column 2, the Z rectangle and Column 3 to complete the Sky (271/2" x 581/2").
Quilt CenterPress the seams towards the Center Panel.
Sew a Side Tower to each side of the Center Panel as shown in the Quilt Layout Diagram.
Sew the Sky to the top of the Center Panel.
Fold the AH rectangle in half, WST, matching the short ends and press. Place so the fold is on the left and cut from the upper left to lower right corner. Open the folded section for the Main Roof. Discard the small triangles.
Cut 1/4" strips of fusible web and fuse along the edges on the wrong side of the Main Roof. Remove the paper backing.
Center the Main Roof over the Center Panel, placing the bottom of the Roof on the seam between the Sky and Center Panel and fuse in place.
Stitch around the edges of the Main Roof using a decorative stitch to complete.
BordersSeam allowances vary so measure through the center of the quilt before cutting border pieces. Sew side borders first. Press seams towards the borders. Side borders should be 771/2". Top and bottom borders should be 611/2".
Appliqué FlagsUsing an erasable fabric marker, draw a 45/8" long vertical line from above the point of the Main Roof. Fuse a Flag to the right of the drawn line, matching the top of the Flag with the top of the line. Stitch around the flag using a straight stitch and along the drawn line using a narrow satin stitch.
Repeat to add a Flag to the top of each Side Tower.
Finish quilt by layering the quilt top, batting, and back. Bind with your favorite Beauty and the Beast print. Have fun with your colors and enjoy the journey of making your quilt.
Main Roof
Discard
Fold
AH
45/8"
Flag Template
Top
1” square.Measure to
ensure correct size.
5© 2020 Riley Blake Designs and Jill Howarth. All Rights Reserved.
THE CASTLE
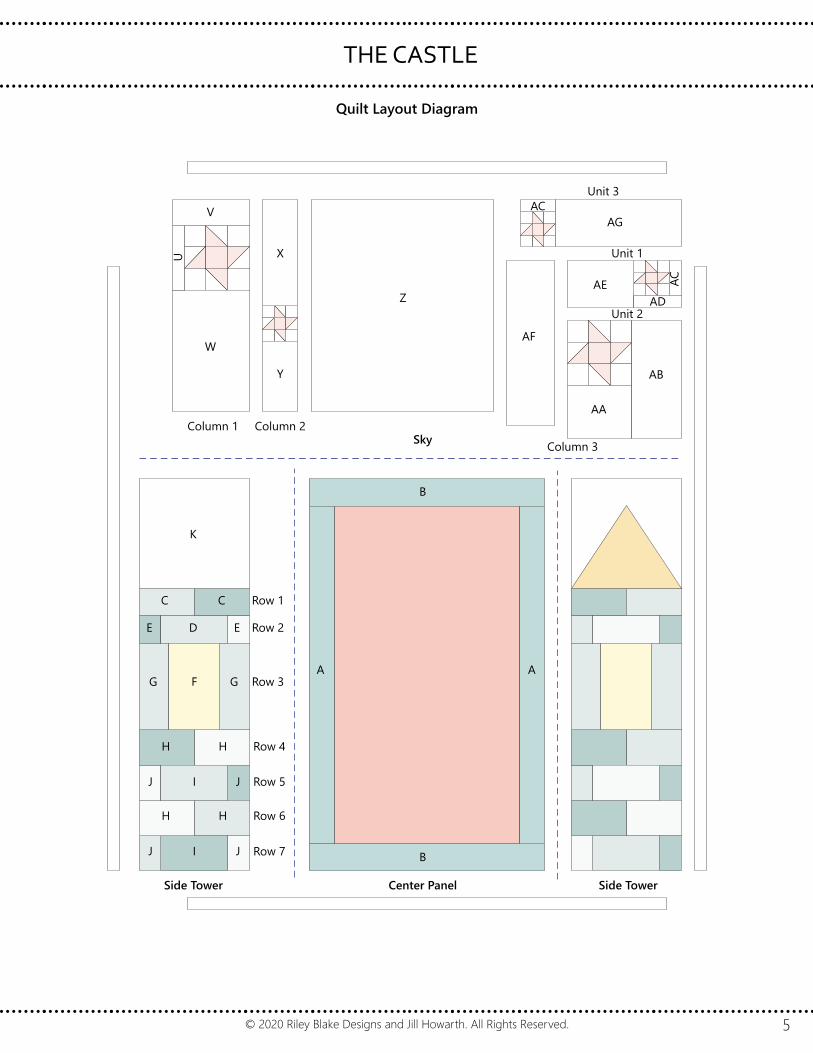
Quilt Layout Diagram
Center PanelSide Tower Side Tower
SkyColumn 1 Column 2
Column 3
Unit 3
Unit 1
Unit 2
AA
AB
AF
AG
AEAD
AC
AC
Z
X
Y
V
W
U
K
C C
D EE
H H
I JJ
H H
I JJ
F GG
Row 1
Row 2
Row 3
Row 4
Row 5
Row 6
Row 7
A A
B
B