Embed Size (px)
Citation preview

SHEET 1 OF 1
Wichita, Kansas USA 67219The Coleman Company, Inc.
COMPOSITE- NO
REVISION
CRITICAL DIMENSION
cm3
REV.
MATERIAL: SEE NOTES
SEE NOTES
1:1 26-DEC-14
Black
Program: InDesign CS6
Rainy X
Instruction Sheet for Fast Ptich Cabin with a Closet, EN/FR
ID 014010042227
SCALE:
NAME:
DATE: DRAWN BY: APPROVED BY: REVISION
FINISHSPEC.:
DATE NAME ECN NO.MODIFICATIONSgrams
g/cm3
This drawing contains proprietary information and trade secrets of The Coleman Company, Inc.Unauthorized use or copying is prohibited.
METRIC[INCH]
CHECKING IS COMPULSORY
VOLUME 01 26-DEC-14 Rainy X 20044356NEW
MASS
DENSITY
GENERAL TOLERANCESEXCEPT AS NOTED
0 TO 6mm = ±0.1>6 TO 30mm = ±0.2>30 TO 80mm = ±0.3>80 TO 180mm = ±0.4>180mm = ±0.5
ANGULAR = ± 3°
PARTNO.:
DO NOT PRINT THIS PAGE
Printing Notes:Material: White washable and tear resistant non-woven fabric, such as Tyvek.Ink: BlackResolution: 150 DPI or abovePrinting method: Offset PrintingSize: 8.27 x 11.69 in (W x H) A4
B
Fast Pitch Cabin with a Closet(The product may look different from yours. It is for illustration purpose only.)
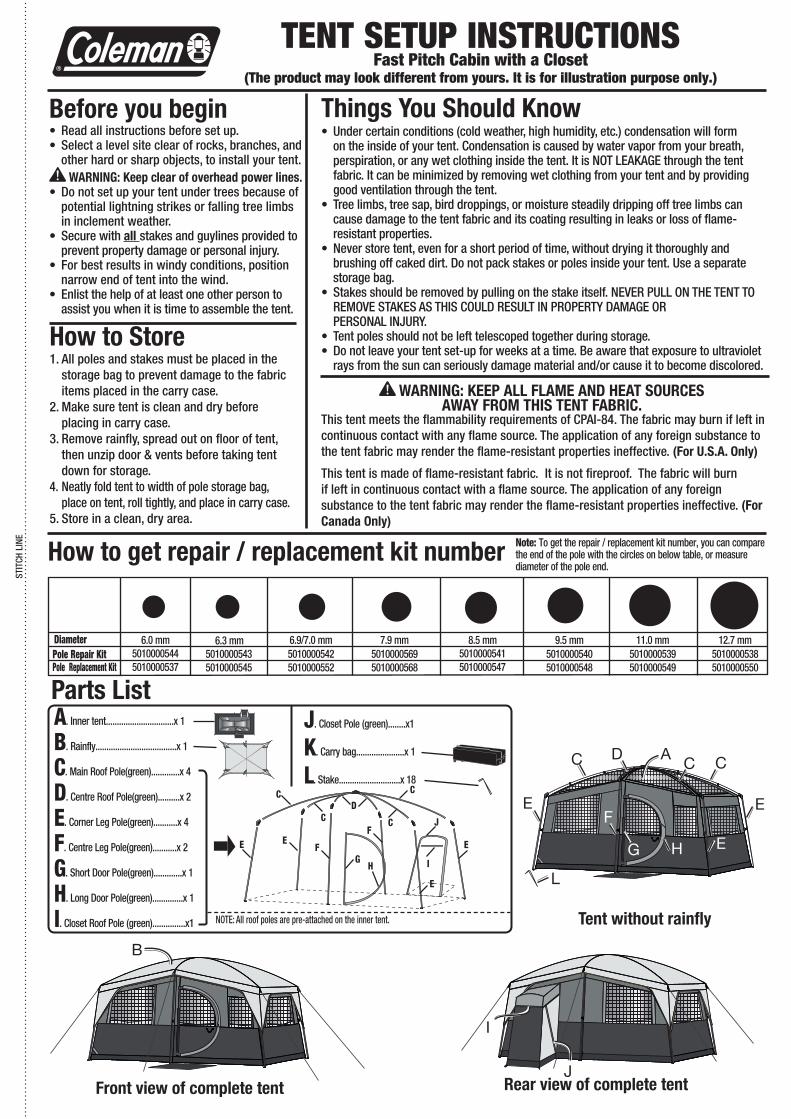
Rear view of complete tentFront view of complete tent
Tent without rainfly
J
I
C CC
E
L
E
E
F
G H
AD
STIT
CH L
INE
TENT SETUP INSTRUCTIONS
Parts ListA. Inner tent...............................x 1
B. Rainfly.....................................x 1
C. Main Roof Pole(green).............x 4
D. Centre Roof Pole(green)..........x 2
E. Corner Leg Pole(green)...........x 4
F. Centre Leg Pole(green)...........x 2
G. Short Door Pole(green).............x 1
H. Long Door Pole(green)..............x 1
I. Closet Roof Pole (green)...............x1
J. Closet Pole (green)........x1
K. Carry bag......................x 1
L. Stake............................x 18
How to get repair / replacement kit number Note: To get the repair / replacement kit number, you can compare the end of the pole with the circles on below table, or measure diameter of the pole end.
50100005445010000537
6.0 mm 6.3 mm50100005435010000545
6.9/7.0 mm50100005425010000552
7.9 mm50100005695010000568
Pole Repair KitDiameter
Pole Replacement Kit50100005415010000547
8.5 mm 9.5 mm50100005405010000548
11.0 mm50100005395010000549
12.7 mm50100005385010000550
C C
CCD
J
E E
E
EF
IGF
H
NOTE: All roof poles are pre-attached on the inner tent.
Before you begin•Read all instructions before set up.• Select a level site clear of rocks, branches, and
other hard or sharp objects, to install your tent. WARNING: Keep clear of overhead power lines.
•Do not set up your tent under trees because of potential lightning strikes or falling tree limbs in inclement weather.
• Secure with all stakes and guylines provided to prevent property damage or personal injury.
• For best results in windy conditions, position narrow end of tent into the wind.
• Enlist the help of at least one other person to assist you when it is time to assemble the tent.
Things You Should Know• Under certain conditions (cold weather, high humidity, etc.) condensation will form
on the inside of your tent. Condensation is caused by water vapor from your breath, perspiration, or any wet clothing inside the tent. It is NOT LEAKAGE through the tent fabric. It can be minimized by removing wet clothing from your tent and by providing good ventilation through the tent.
• Tree limbs, tree sap, bird droppings, or moisture steadily dripping off tree limbs can cause damage to the tent fabric and its coating resulting in leaks or loss of flame-resistant properties.
• Never store tent, even for a short period of time, without drying it thoroughly and brushing off caked dirt. Do not pack stakes or poles inside your tent. Use a separate storage bag.
• Stakes should be removed by pulling on the stake itself. NEVER PULL ON THE TENT TO REMOVE STAKES AS THIS COULD RESULT IN PROPERTY DAMAGE OR PERSONAL INJURY.
• Tent poles should not be left telescoped together during storage.• Do not leave your tent set-up for weeks at a time. Be aware that exposure to ultraviolet
rays from the sun can seriously damage material and/or cause it to become discolored.1. All poles and stakes must be placed in the storage bag to prevent damage to the fabric items placed in the carry case.
2. Make sure tent is clean and dry before placing in carry case.
3. Remove rainfly, spread out on floor of tent, then unzip door & vents before taking tent down for storage.
4. Neatly fold tent to width of pole storage bag, place on tent, roll tightly, and place in carry case.
5. Store in a clean, dry area.
How to Store
This tent meets the flammability requirements of CPAI-84. The fabric may burn if left in continuous contact with any flame source. The application of any foreign substance to the tent fabric may render the flame-resistant properties ineffective. (For U.S.A. Only)
This tent is made of flame-resistant fabric. It is not fireproof. The fabric will burn if left in continuous contact with a flame source. The application of any foreign substance to the tent fabric may render the flame-resistant properties ineffective. (For Canada Only)
WARNING: KeeP ALL FLAme ANd HeAT SOURCeS AWAY FROm THIS TeNT FABRIC.

STIT
CH L
INE
TheColemanCompany,Inc.•3600NorthHydraulic•Wichita,Kansas67219U.S.A.1-800-835-3278intheUnitedStates•www.coleman.com
© 2014 The Coleman Company, Inc. All rights reserved.Coleman®, and are registered trademarks of The Coleman Company, Inc.
4010042227 (ECN20044356-01)
How to Set Up and disassembleLayOUT & POSITIONINg OF TENT
POSITIONINg OF POLES aND CONNECT LEg POLES
aTTaCh RaINFLy
STaKE DOwN ThE TENT
DISaSSEMBLy
1
2
5
4
3
L x 10
Guyline x 6 Loop x 2
Top side of Rainfly
Pole Connector x 2
Yellow mark
Red mark
Roof Connector Underside
of Rainfly
Underside of RainflyVelcro x 10
S Hook x 6
Pole
Velcro Strap
Clip
I
To take down the tent, follow the previous steps andillustrations in the reverse order.
ClipPole
Blue mark
Pole Connector x 4
Close the zippers.
G
H
Connector x 6
Pole
ClipPole
J
Pin x 2J
Underside of Inner tent
Loop
S Hook
Loop Guyline
L
electrical Cord
B
J
I
C CC
E
L
E
E
F
G H
AD
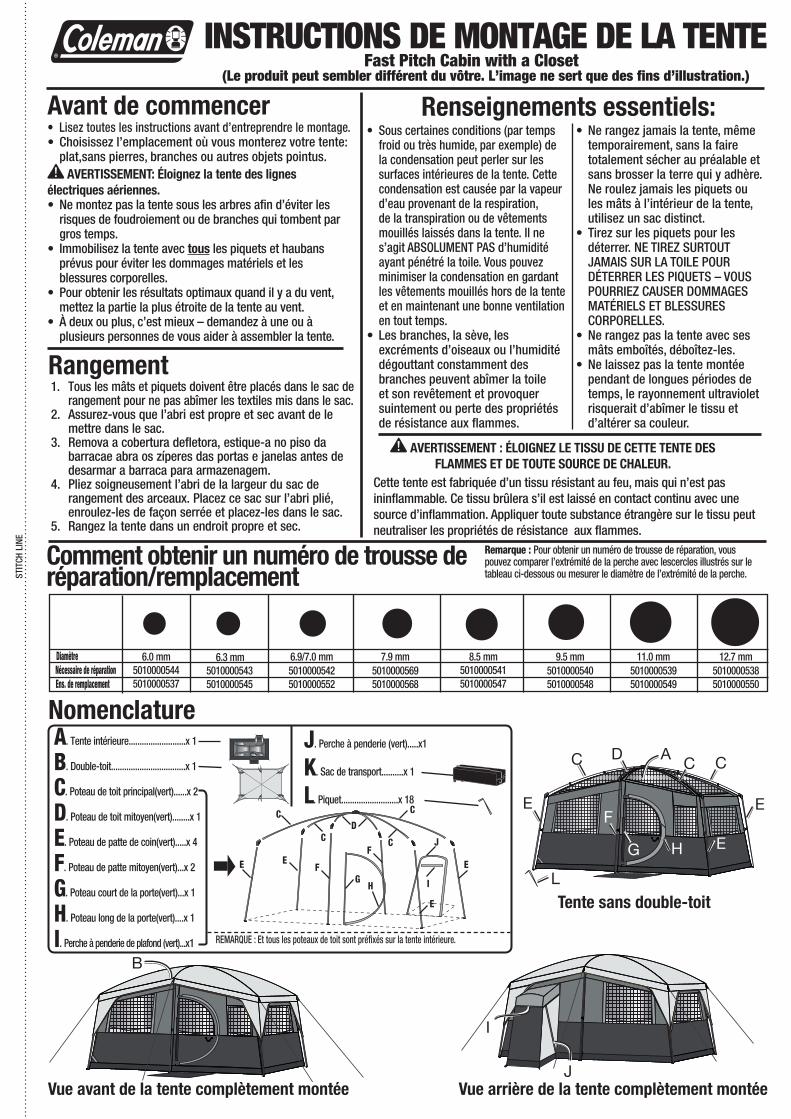
Nomenclature
Tente sans double-toit
Vue arrière de la tente complètement montéeVue avant de la tente complètement montée
STIT
CH L
INE
A. Tente intérieure..........................x 1
B. Double-toit..................................x 1
C. Poteau de toit principal(vert)......x 2
D. Poteau de toit mitoyen(vert)........x 1
E. Poteau de patte de coin(vert).....x 4
F. Poteau de patte mitoyen(vert)...x 2
G. Poteau court de la porte(vert)...x 1
H. Poteau long de la porte(vert)....x 1
I. Perche à penderie de plafond (vert)...x1
J. Perche à penderie (vert).....x1
K. Sac de transport..........x 1
L. Piquet..........................x 18C C
CCD
J
E E
E
EF
IGF
H
REMARQUE : Et tous les poteaux de toit sont préfixés sur la tente intérieure.
Fast Pitch Cabin with a Closet(Le produit peut sembler différent du vôtre. L’image ne sert que des fins d’illustration.)
1. Tous les mâts et piquets doivent être placés dans le sac de rangement pour ne pas abîmer les textiles mis dans le sac.
2. Assurez-vous que l’abri est propre et sec avant de le mettre dans le sac.
3. Remova a cobertura defletora, estique-a no piso da barracae abra os zíperes das portas e janelas antes de desarmar a barraca para armazenagem.
4. Pliez soigneusement l’abri de la largeur du sac de rangement des arceaux. Placez ce sac sur l’abri plié, enroulez-les de façon serrée et placez-les dans le sac.
5. Rangez la tente dans un endroit propre et sec.
Rangement
Renseignements essentiels:• Sous certaines conditions (par temps
froid ou très humide, par exemple) de la condensation peut perler sur les surfaces intérieures de la tente. Cette condensation est causée par la vapeur d’eau provenant de la respiration, de la transpiration ou de vêtements mouillés laissés dans la tente. Il ne s’agit ABSOLUMENT PAS d’humidité ayant pénétré la toile. Vous pouvez minimiser la condensation en gardant les vêtements mouillés hors de la tente et en maintenant une bonne ventilation en tout temps.
• Les branches, la sève, les excréments d’oiseaux ou l’humidité dégouttant constamment des branches peuvent abîmer la toile et son revêtement et provoquer suintement ou perte des propriétés de résistance aux flammes.
Cette tente est fabriquée d’un tissu résistant au feu, mais qui n’est pas ininflammable. Ce tissu brûlera s’il est laissé en contact continu avec une source d’inflammation. Appliquer toute substance étrangère sur le tissu peut neutraliser les propriétés de résistance aux flammes.
AVeRTISSemeNT : ÉLOIGNez Le TISSU de CeTTe TeNTe deS FLAmmeS eT de TOUTe SOURCe de CHALeUR.
•Ne rangez jamais la tente, même temporairement, sans la faire totalement sécher au préalable et sans brosser la terre qui y adhère. Ne roulez jamais les piquets ou les mâts à l’intérieur de la tente, utilisez un sac distinct.
• Tirez sur les piquets pour les déterrer. NE TIREZ SURTOUT JAMAIS SUR LA TOILE POUR DÉTERRER LES PIQUETS – VOUS POURRIEZ CAUSER DOMMAGES MATÉRIELS ET BLESSURES CORPORELLES.
•Ne rangez pas la tente avec ses mâts emboîtés, déboîtez-les.
•Ne laissez pas la tente montée pendant de longues périodes de temps, le rayonnement ultraviolet risquerait d’abîmer le tissu et d’altérer sa couleur.
Avant de commencer• Lisez toutes les instructions avant d’entreprendre le montage.• Choisissez l’emplacement où vous monterez votre tente:
plat,sans pierres, branches ou autres objets pointus. AVeRTISSemeNT: Éloignez la tente des lignes
électriques aériennes.• Ne montez pas la tente sous les arbres afin d’éviter les
risques de foudroiement ou de branches qui tombent par gros temps.
• Immobilisez la tente avec tous les piquets et haubans prévus pour éviter les dommages matériels et les blessures corporelles.
• Pour obtenir les résultats optimaux quand il y a du vent, mettez la partie la plus étroite de la tente au vent.
• À deux ou plus, c’est mieux – demandez à une ou à plusieurs personnes de vous aider à assembler la tente.
INSTRUCTIONS DE MONTagE DE La TENTE
50100005445010000537
6.0 mm 6.3 mm50100005435010000545
6.9/7.0 mm50100005425010000552
7.9 mm50100005695010000568
50100005415010000547
8.5 mm 9.5 mm50100005405010000548
11.0 mm50100005395010000549
12.7 mm50100005385010000550
Remarque : Pour obtenir un numéro de trousse de réparation, vous pouvez comparer l’extrémité de la perche avec lescercles illustrés sur le tableau ci-dessous ou mesurer le diamètre de l’extrémité de la perche.
Nécessaire de réparationEns. de remplacement
Diamètre
Comment obtenir un numéro de trousse de réparation/remplacement

Crochet
STIT
CH L
INE
1
2
5
4
3
L x 10
Hauban x 6 Boucle x 2
Connecteur de toi
I
G
H
Connecteur x 6
J
J
Boucle
Boucle
L
Comment procéder au montage et au démontageMISE EN PLaCE ET POSITIONNEMENT DE La TENTE aTTaChEz LE DOUBLE TOIT
POSITION DES POTEaUx ET RaCCORDEMENT DES POTEaUx DE PaTTE
mât
mât
mât
Crochet
Crochet
marque jaune
marque rouge
Connecteur de poteaux 2
marque bleu
Connecteur de poteau x 4
Fermer la fermeture
éclair
Côté inférieur du double-toit
Goupille x 2
Côté inférieur du double-toit
Sangle x 10
Crochet en «S» x 6
mât
Sangle
Côté inférieur du double-toit
Crocheten «S»
PIqUETS aU BaS DE La TENTE
dessus du double toit
Cordon d’alimentation
4010042227 (ECN20044356-01)
SunbeamCorporation(Canada)Limited•DBAJardenConsumerSolutions20BHerefordStreet•Brampton,ONL6Y0M1
1-800-387-6161auCanada•www.coleman.com
© 2014 The Coleman Company, Inc. Tous droits réservés.Coleman®, et sont des marques déposées de The Coleman Company, Inc.
DÉMONTagE
Pour démonter la tente, suivez les étapes et illustrations relatives au montage, mais en sens inverse.
Hauban