Embed Size (px)
Citation preview

8/14/2019 Tensioner V1.0 Install Guide
http://slidepdf.com/reader/full/tensioner-v10-install-guide 1/5
Hybrid-Racing K-Series Chain TensionerInstall Tips:
Features:
Stainless Steel HousingChromoly InternalsDual Ratchet MechanismsUpgraded Oil Passageways
Package Contents:
K-Series Timing Chain TensionerMounting Bolts (2)
Install Tips:This chain tensioner installs much like an OEM Honda/Acura unit, with the exception of a fewdetails. The tips shown below and on the following pages are not meant as a complete installguide, but do illustrate several critical steps. For additional information, please consult a Hondaor Acura Shop Manual.
Below you will find tips on how to install your new Hybrid Racing chain tensioner into a Honda K seriesengine. *This chain tensioner may not be legal for highway use. Hybrid Racing is not responsible for anydirect or indirect, actual or incidental expense attributed to the use of any performance parts sold by HybridRacing LLC. Purchasers agree to all of the terms of this agreement upon the purchase of parts.More information can be found at www.hybrid-racing.com.
It’s recommended that the timing chain tensioner beinstalled while the motor is OUT OF the vehicle. Installingit while the motor is installed in a vehicle is possible, butdifficult. These install tips are written assuming themotor is out of a vehicle.
Please read the entire install guide before beginning your installation to get a good grasp of what lies ahead of you . If you feel as if you cannot complete thisinstallation please consult a professional mechanic. IFTHIS PRODUCT IS INSTALLED IMPROPERLLY YOU RISK BLOWING UP YOUR ENGINE, so take your time read theinstall guide and call us if you have questions.
Step 1: Once the timing chain cover has been removed,reinstall the crank pulley retaining bolt using a 19mmsocket or wrench. This will be used to turn the motorover manually. If you are replacing a tensioner that failedand caused the chain to become slack or skip teeth, it'simportant to inspect the chain guides. If the guides havebecome chipped, cracked, gouged or damaged in anyway, they should be replaced with new or undamagedguides, to avoid any timing chain related problems.

8/14/2019 Tensioner V1.0 Install Guide
http://slidepdf.com/reader/full/tensioner-v10-install-guide 2/5
Step 2: Using a 19mm socket andratchet or breaker bar, turn the crank clockwise. Notice as you turn the crank
that the left chain guide moves from side to side. This will be less noticeable if stock cams are being used. Turn the crank until
the left chain guide is as close to the rightchain guide aspossible.
Step 3: Wrap a zip around the two chain guides where theyare closest to one another andpull it closed. Tighten it asmuch as possible. This will hold
the chain in place while you areinstalling the new tensioner.Note that if the
timing chain slips or comes off the guides during this process, you will need to redo the timingas per the OEM Honda orHelms manuals.
Step 4: Using a 10mm socket orwrench, remove the 2 bolts(indicated) that hold the OEM ten-sioner onto the motor. Once theseare removed, the OEM tensionercan be taken off of the motor.
8/14/2019 Tensioner V1.0 Install Guide
http://slidepdf.com/reader/full/tensioner-v10-install-guide 3/5
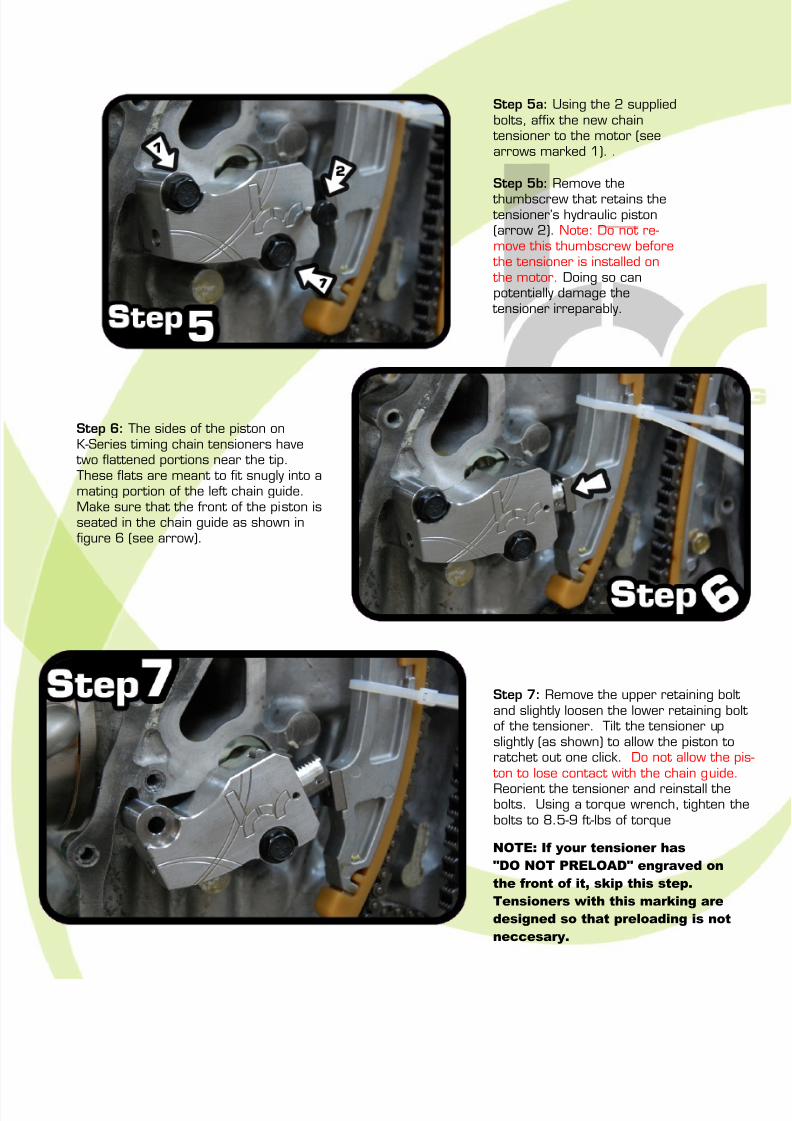
Step 5a: Using the 2 suppliedbolts, affix the new chain
tensioner to the motor (seearrows marked 1). .
Step 5b: Remove the thumbscrew that retains the tensioner’s hydraulic piston(arrow 2). Note: Do not re-move this thumbscrew before
the tensioner is installed on the motor. Doing so canpotentially damage the
tensioner irreparably.
Step 6: The sides of the piston onK-Series timing chain tensioners have
two flattened portions near the tip.These flats are meant to fit snugly into amating portion of the left chain guide.Make sure that the front of the piston isseated in the chain guide as shown infigure 6 (see arrow).
Step 7: Remove the upper retaining boltand slightly loosen the lower retaining boltof the tensioner. Tilt the tensioner upslightly (as shown) to allow the piston toratchet out one click. Do not allow the pis-
ton to lose contact with the chain guide. Reorient the tensioner and reinstall thebolts. Using a torque wrench, tighten thebolts to 8.5-9 ft-lbs of torque
NOTE: If your tensioner has"DO NOT PRELOAD" engraved onthe front of it, skip this step.Tensioners with this marking aredesigned so that preloading is notneccesary.
8/14/2019 Tensioner V1.0 Install Guide
http://slidepdf.com/reader/full/tensioner-v10-install-guide 4/5
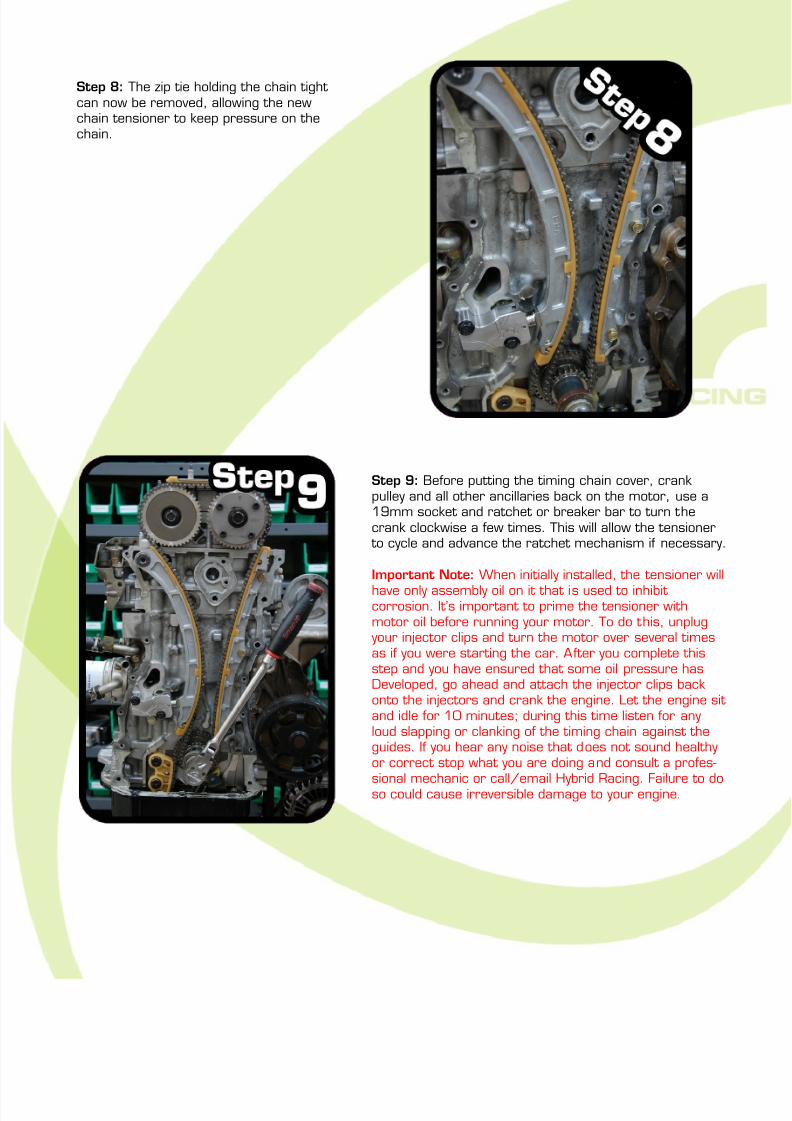
Step 9: Before putting the timing chain cover, crank pulley and all other ancillaries back on the motor, use a19mm socket and ratchet or breaker bar to turn thecrank clockwise a few times. This will allow the tensioner
to cycle and advance the ratchet mechanism if necessary.
Important Note: When initially installed, the tensioner willhave only assembly oil on it that is used to inhibitcorrosion. It’s important to prime the tensioner withmotor oil before running your motor. To do this, unplug
your injector clips and turn the motor over several timesas if you were starting the car. After you complete thisstep and you have ensured that some oil pressure hasDeveloped, go ahead and attach the injector clips back onto the injectors and crank the engine. Let the engine sitand idle for 10 minutes; during this time listen for anyloud slapping or clanking of the timing chain against theguides. If you hear any noise that does not sound healthyor correct stop what you are doing and consult a profes-sional mechanic or call/email Hybrid Racing. Failure to doso could cause irreversible damage to your engine.
Step 8: The zip tie holding the chain tightcan now be removed, allowing the newchain tensioner to keep pressure on thechain.

8/14/2019 Tensioner V1.0 Install Guide
http://slidepdf.com/reader/full/tensioner-v10-install-guide 5/5
If you have any questions or comments, please email [email protected] call us at 225-932-9588
Legal Disclaimer
Users assume all cost and risk associated with these or any other items purchased from Hybrid Racing LLC.
Parts sold or manufactured by Hybrid Racing LLC may not meet legal requirements for use on public roads.People thinking about purchasing product(s) from Hybrid Racing LLC should check with their local and stateauthorities for legality. It is the user’s responsibility to know and comply with all local and federal laws andregulations. Use or installation of Hybrid Racing LLC products may affect user insurance and/or vehiclewarranty coverage. It is the user’s sole responsibility for consequences that may occur due to having theproduct installed in his/her vehicle.
Hybrid Racing LLC assumes no legal responsibilities and/or liabilities, whether to user’s vehicle, engine,person(s), and/or property(s), that result from the use of, or servicing of a vehicle of which a Hybrid RacingLLC product has been installed/attempted to be installed, or to any other vehicle(s) and/or person(s),regardless of whether or not this product has any involvement directly or indirectly and/or liability, and/orwhether or not proper installation has been carried forth.
All engines, engine parts and electrical components are for OFF ROAD USE ONLY/RACING VEHICLES ONLY.They are not for or to be used on public roads in the USA.
Acquisition of a Hybrid Racing LLC product will act as an acknowledgement of the legal disclaimer statedherein.
Hybrid Racing LLC reserves the right to change this disclaimer at any time without any prior consent ornotification.
Should you need to contact us our details are as follows:Hybrid Racing LLC, 3348 Drusilla Lane, Suite 2C, Baton Rouge, LA 70809
www.hybrid-racing.com