Embed Size (px)
Citation preview
Taleo Enterprise Edition Administrator WebTop User Manual
Version 7.5
March 2010

Confidential Information
It shall be agreed by the recipient of the document (hereafter referred to as “the other party”) that confidential information disclosed by Taleo through its documents shall be retained in confidence by the other party, and its respective employees, affiliates and/or subsidiaries, pursuant to the following terms and conditions:
For the purpose herein, the term “Confidential Information” shall mean the following:
i. Any information, know-how, data, process, technique, design, drawing, program, formula or test data, work in process, business plan, sales, suppliers, customer, employee, investor or business information contained in a document, whether in written, graphic, or electronic form; or
ii. Any document, diagram, or drawing which is either conspicuously marked as “Confidential”, known or reasonably known by the other party to be confidential, or is of a proprietary nature, and is learned or disclosed in the course of discussions, demonstrations, or other collaboration under-taken between the parties.
© 2010 Taleo Corporation. Do not reproduce without the written permission of Taleo Corporation.

Administrator WebTop User Manual Revision History
CONFIDENTIAL INFORMATION i
Revision History
The table below provides information on the modifications that were made to the manual.
Date Modifications Chapter and Page Number
October 2007 Added information on capture resume settings and on how to create and activate capture resume flows.
“Capture Resume Settings” on page 4-24
Removed the User Types chapter and put it in the SmartOrg Administration Manual.
Added information on candidate list fitters. This section was removed by mistake.
“Candidate List Filters” on page 7-11
Updated the information on the Merge Forms feature.
“Merge Forms (Fill Out Forms Action in CAD)” on page 8-60
Added information regarding the different step progression levels.
“Step Progression Level” on page 8-24
October 24, 2007 Added enhancements done in SP2:• Added information regarding
the All requisition type.
“Requisition Types” on page 4-28
• Added the setting “Job application status from which candidates will be excluded from search results”.
“Display” on page 8-4
• Added information on the most advanced progression status.
“Most Advanced Progression Status” on page 7-8
November 2007 Added information regarding the DPI setting.
“DPI Setting” on page 1-4
January 2008 Modified a recommendation regarding the Most Advanced Progression Status feature.
Added information on contextualized fields.
“Most Advanced Progression Status” on page 7-8
“Associating Fields to the OLF” on page 5-6

Administrator WebTop User Manual Revision History
CONFIDENTIAL INFORMATION ii
January 2008 Added enhancements done in SP4:• Added information on how to
automatically trigger Passport screening services.
“Automatically Trigerring Passport Screening Services” on page 15-10
• Removed the Attached File Format section. This section is now available in the Career Section Administration module, under Career Section Settings.
• Added a chapter on Contingent Staffing.
“Contingent Staffing” on page 10-0
• Added the new Contingent requisition type.
“Requisition Types” on page 4-28
• Added the Minority Women Business Owned setting.
“Creating Agencies” on page 4-2
July 2008 Added subsection to Variables and added cross-references to Paragraph Mode and Template Mode.
“Standard Variables” on page 13-22
Added new standard variables and information block variables
“List of Available Standard Variables” on page 13-24
Added Greek to ISO languages “Regional Settings” on page 6-0
Added note that Selection Lists are now located in SmartOrg.
“Overview” on page 16-1
October 2008 Added the When creating requisitions, differentiate prescreening for internal and external candidates setting.
“Questions and Skills Settings” on page 4-20
Added the Default value for the requisition list filter setting.
“Global Manager WebTop Settings” on page 9-7
January 2009 A step has been added for the Help text displayed in Career Section field in each subsection of the Creating Custom Fields section. In other words, the additional step is found in six subsections.
“Creating Custom Fields” on page 5-13
Date Modifications Chapter and Page Number

Administrator WebTop User Manual Revision History
CONFIDENTIAL INFORMATION iii
Added explanation of the Indicate if the start date is tentative or not by default setting.
“Offer Settings” on page 4-9
Added explanation of Session Time-out to the “Introduction” chapter.
“Session Time-out” on page 1-4
Deleted all references to archiving in the “Automated Tasks” section.
“Automated Tasks” on page 17-0
February 2009 Corrected description for Job-Specific Referral, Agent in the Correspondence Manager.
“Job-Specific Referral, Agent” on page 13-20
March 2009 All occurrences of “CUDFs can contain up to 482 characters” have been replaced by “CUDFs can contain up to 1,000 characters”.In the exact same sections, all occurrences of a sentence were replaced by “Help text for CUDFs is not displayed in the preview of the Custom Field Editor, nor is it displayed in the Staffing WebTop or Manager WebTop. This new Help text is displayed in the career section Preview (Career Section URL).”
“Creating Custom Fields” on page 5-13
May 2009 Text added in a note: “Files attached to system generated messages triggered by career section events (such as Job-Specific Application Acknowledgements, Profile Acknowledgements, Referral Acknowledgements, Forgot Username and Forgot Password) are not included in the messages candidates receive.”
"Creating a Message Template" on page 13-5
June 2009 New setting, “Display Reply To”, has been added to Administrator WebTop > Setup > Global Setup > Correspondence Manager.
“Correspondence Manager Settings” on page 4-7
Date Modifications Chapter and Page Number

Administrator WebTop User Manual Revision History
CONFIDENTIAL INFORMATION iv
An explanation of the Reply To field on the Contents tab of the Create/Edit Message Template page has been added.
"Creating a Message Template" on page 13-5
November 2009 Details added to Unsolicited Capture Resume Acknowledgement, Registered Candidate.
“Unsolicited Capture Resume Acknowledgement, Registered Candidate” on page 13-18
The following sentence was added: If no selection is made for this setting, the user will be taken to the list of available flows.
“Activated flow for the quick capture of candidate profiles (default flow from My WebTop)” on page 4-26
A note was added to the “List of Standard Actions” section.
“List of Standard Actions” on page 8-42
The passage “Before you can delete an agent...” was added to the “Deleting an Agency” section.
“Deleting an Agency” on page 4-4
“Deleting Agents” section was added.
“Deleting Agents” on page 4-5
“Visibility” description was expanded.
“Corporate Sources Tab” on page 12-2
The following passage was added to Pay Basis: To activate this field...
“List of Available Fields” on page 7-6
Information was added to step 4. “Creating Large Custom Selection Elements” on page 5-31
Added Display Reply To setting. "Settings" on page 13-4
March 2010 Added a Correspondence Manager variable: {REQUISITION_NO}.
“List of Available Standard Variables” on page 13-24
June 15, 2010 Second series of steps was removed from the “Merge Forms in Candidate Selection Workflows” section.
"Merge Forms in Candidate Selection Workflows" on page 8-64
Date Modifications Chapter and Page Number

CONFIDENTIAL INFORMATION i
Table of Contents
Revision History .....................................................................................................1-i
IntroductionAbout the Administrator WebTop .......................................................................... 1-1
Symbols Used in the Manual ................................................................................ 1-3
Pop-Up Blockers.................................................................................................. 1-4
DPI Setting .......................................................................................................... 1-4
Virus Scan........................................................................................................... 1-4
Online Help........................................................................................................ 1-4
Session Time-out ................................................................................................. 1-4
New Release Information ..................................................................................... 1-6
Buttons and IconsButtons and Icons ............................................................................................... 2-2
Attention Indicator Flag (AIF)......................................................................... 2-4
Operation ModeOverview ............................................................................................................ 3-1
Types of Mode .................................................................................................... 3-2Implementation Mode .................................................................................. 3-2Production Mode ......................................................................................... 3-2Maintenance Mode...................................................................................... 3-3
Modifying the Mode ............................................................................................ 3-3

CONFIDENTIAL INFORMATION ii
Configuration Settings Overview ............................................................................................................ 4-1
Agencies and Agents ........................................................................................... 4-2Creating Agencies ....................................................................................... 4-2Setting Agency Options ................................................................................ 4-3Editing an Agency ........................................................................................ 4-4Deleting an Agency...................................................................................... 4-4Creating Agents........................................................................................... 4-4Deleting Agents ........................................................................................... 4-5
Correspondence Manager Settings ....................................................................... 4-7
HRMS Settings..................................................................................................... 4-8
Offer Settings ...................................................................................................... 4-9
Requisitions Settings........................................................................................... 4-12
Questions and Skills Settings .............................................................................. 4-20
Records Settings ................................................................................................ 4-22
Regulation Settings ............................................................................................ 4-23
Capture Resume Settings.................................................................................... 4-24Creating a Capture Resume Flow................................................................ 4-24Activating Capture Resume Flows................................................................ 4-25
Requisition Types ............................................................................................... 4-28
Systems Tools Settings........................................................................................ 4-29
Tracking Event Categories .................................................................................. 4-30
Staffing Station Settings and User Permissions ...................................................... 4-30
Duplicate Check................................................................................................ 4-32
Fields Overview ............................................................................................................ 5-1
Field Types.......................................................................................................... 5-2Candidate Fields ......................................................................................... 5-2Department Fields........................................................................................ 5-3Offer Fields ................................................................................................. 5-4Requisition Fields ......................................................................................... 5-4Selections.................................................................................................... 5-6Associating Fields to the OLF........................................................................ 5-6
Contextualized Fields............................................................................. 5-7
Standard Fields ................................................................................................. 5-10Making Standard Fields Available ............................................................... 5-10

CONFIDENTIAL INFORMATION iii
Custom Fields ................................................................................................... 5-13Creating Custom Fields .............................................................................. 5-13
Creating Text Fields............................................................................. 5-14Creating Multilingual Text Fields........................................................... 5-15Creating Number Fields....................................................................... 5-16Creating Date Fields............................................................................ 5-18Creating Standard Predefined Selections ............................................... 5-21Creating Custom Selections ................................................................. 5-23
Deleting Custom Fields .............................................................................. 5-26
Selections Overview........................................................................................... 5-26Small Standard Selections........................................................................... 5-26
Adding Elements to a Small Standard Selection...................................... 5-26Removing Elements from a Small Standard Selection.............................. 5-27Creating New Elements for a Small Standard Selection........................... 5-27Deleting an Element from a Small Standard Selection............................. 5-28
Small Custom Selections ............................................................................ 5-28Creating Small Custom Selections ........................................................ 5-28Modifying Elements in Small Custom Selections ..................................... 5-29
Large Custom Selections (LUDS).................................................................. 5-29Standard Large Selections List Description ............................................. 5-29Selection Element List Description ......................................................... 5-30Creating Large Custom Selections ........................................................ 5-30Editing Large Custom Selections ........................................................... 5-31Deleting Large Custom Selections......................................................... 5-31Activating Effective Dating in a Large Custom Selection .......................... 5-31Creating Large Custom Selection Elements............................................ 5-31Editing Large Custom Selection Elements............................................... 5-32Deleting Large Custom Selection Elements ............................................ 5-32
Field Layout ...................................................................................................... 5-32Candidate................................................................................................. 5-32
Displaying a Custom Candidate Field ................................................... 5-32Adding Candidate Fields to a Form ...................................................... 5-33Removing Candidate Fields from a Form............................................... 5-33
Department ............................................................................................... 5-33Displaying a Custom Department Field ................................................. 5-33Adding a Department Field to a Form................................................... 5-33Removing a Department Field from a Form ........................................... 5-33
Offer ........................................................................................................ 5-34Displaying Standard Offer Fields .......................................................... 5-34Adding Custom Offer Fields to a form................................................... 5-34Removing Custom Offer Fields from the Application............................... 5-34
Requisitions ............................................................................................... 5-34Displaying Standard and/or Custom Requisition Fields ........................... 5-34Adding Custom Requisition Fields to a form........................................... 5-35

CONFIDENTIAL INFORMATION iv
Removing Custom Requisition Fields from the Application....................... 5-35
Custom Report Universe..................................................................................... 5-35Selecting Custom Report Custom Fields ....................................................... 5-35
Regional Settings Overview ............................................................................................................ 6-1
Configuring Regional Settings............................................................................... 6-2Number Tab................................................................................................ 6-2Currency Tab .............................................................................................. 6-2Date Tab .................................................................................................... 6-3
Important Notes about Date Formats ...................................................... 6-4General Tab................................................................................................ 6-5
Generic Locale Identifiers....................................................................... 6-5Specific Language Identifier Codes and Country Codes............................ 6-5
Candidate List FormatOverview ............................................................................................................ 7-1
Standard Candidate List Formats by Context .......................................................... 7-2
Creating Candidate List Formats by Context........................................................... 7-3Selecting a Context Details ........................................................................... 7-3
Creating a New List Format .................................................................................. 7-4Selecting Columns in Contexts ...................................................................... 7-4List of Available Fields .................................................................................. 7-6Most Advanced Progression Status ................................................................ 7-8Personal List Format ................................................................................... 7-10
Candidate List Filters.......................................................................................... 7-11
Candidate Selection (CSW)Overview ............................................................................................................ 8-1
Candidate Selection Settings ................................................................................ 8-2Actions ................................................................................................. 8-2Display................................................................................................. 8-4
Search Page Content ........................................................................................... 8-5Permissions........................................................................................... 8-5
Matching Requisitions to Candidates ..................................................................... 8-6Rules for Matching Criteria ........................................................................... 8-6Job Field, Location, Organization (OLF) and Place of Residence Criteria .......... 8-7Basic Profile Criteria..................................................................................... 8-7

CONFIDENTIAL INFORMATION v
Skills and Questions Criteria ........................................................................ 8-7Skills .................................................................................................... 8-8Questions............................................................................................. 8-8
Workflows, Steps, Statuses and Other Technical Definitions..................................... 8-8
Workflows........................................................................................................... 8-9Reference Workflows.................................................................................... 8-9Standard Workflows (Sequential Workflows) ................................................... 8-9Before Creating Workflows ........................................................................... 8-9Creating a Candidate Selection Workflow.................................................... 8-10Associating a Candidate Selection Workflow to an OLF ................................ 8-10
How to determine a workflow’s compatibility with a requisition................ 8-11Workflow Priority ................................................................................. 8-11
Adding Steps to a New Workflow ................................................................ 8-14Removing Steps from a New Workflow ........................................................ 8-14Configuring Steps Details in a New Workflow............................................... 8-15
Notification......................................................................................... 8-18Editing an Existing Workflow ....................................................................... 8-18Duplicating a Workflow.............................................................................. 8-19
Steps ................................................................................................................ 8-20Creating a New Step.................................................................................. 8-20Adding Statuses to a Step ........................................................................... 8-22Defining Status Details in a Step.................................................................. 8-23Removing Statuses from a Step ................................................................... 8-31Actions in a Step........................................................................................ 8-31
Reordering Actions in a Step ................................................................ 8-32Removing Actions from a Step.............................................................. 8-33
Editing an Existing Step............................................................................... 8-33Duplicating a Step ..................................................................................... 8-34
Statuses ............................................................................................................ 8-35Creating a Status ....................................................................................... 8-36
Adding Qualifier Groups to a Status ..................................................... 8-38Editing a Status.......................................................................................... 8-38Duplicating a Status ................................................................................... 8-39
Actions ............................................................................................................. 8-41Making Actions Available and Comments Mandatory ................................... 8-41
List of Standard Actions........................................................................ 8-42
Qualifier Groups............................................................................................... 8-42Creating Qualifier Groups.......................................................................... 8-42Adding Qualifiers to a Qualifier Group ....................................................... 8-43Removing Qualifiers from a Qualifier Group ............................................... 8-43

CONFIDENTIAL INFORMATION vi
Qualifiers ......................................................................................................... 8-44Creating a Qualifier................................................................................... 8-44Editing a Qualifier ..................................................................................... 8-45
Forms............................................................................................................... 8-46Associating a Form to the Candidate Selection Workflow .............................. 8-46
RSOffer Step ..................................................................................................... 8-46Overview .................................................................................................. 8-46Offer Step Permissions and Privileges .......................................................... 8-47Adding the RSOffer Step to a Sequential Workflow ....................................... 8-47
Steps.................................................................................................. 8-48Statuses Details ................................................................................... 8-48Statuses Usages .................................................................................. 8-48Actions Usage..................................................................................... 8-50RSOffer Statuses.................................................................................. 8-51Qualifier Groups and Qualifiers........................................................... 8-52
RSOffer Settings......................................................................................... 8-52RSOffer Fields ........................................................................................... 8-53
Field Layout-Offer ............................................................................... 8-53
Interview Scheduling .......................................................................................... 8-55Overview .................................................................................................. 8-55Calendar Products ..................................................................................... 8-55Permissions and Settings............................................................................. 8-56
Time Zone.......................................................................................... 8-56Activate Interview Management ............................................................ 8-57Confine the meeting attendees (organizer & attendees) to members of the group to which a user belongs ....................................................................... 8-58Activating Interview Scheduling Behavior in a Candidate Selection Workflow 8-58 Selecting Interview Scheduling Messages in the Correspondence Manager.. 8-59
Merge Forms (Fill Out Forms Action in CAD) ....................................................... 8-60Company Settings (cieSettings).................................................................... 8-60Settings ..................................................................................................... 8-60Merge Forms............................................................................................. 8-61Pre-Filled PDF Forms.................................................................................. 8-61Adding a Merge Form to the Merge Forms List ............................................. 8-63Editing a Merge Form ................................................................................ 8-63Deleting a Merge Form .............................................................................. 8-63Merge Forms in Candidate Selection Workflows ........................................... 8-64List of Available Variables for PDF Forms .................................................... 8-64

CONFIDENTIAL INFORMATION vii
Manager WebTop Overview ............................................................................................................ 9-1
Settings and Permissions ...................................................................................... 9-2Candidate Selection Process Settings ...................................................... 9-2Integration Settings................................................................................ 9-2
Requisitions Flow Builder ...................................................................................... 9-3Creating Requisition Flows............................................................................ 9-3Adding Pages to a Requisition Flow ............................................................... 9-4Adding Information Blocks and Custom Fields................................................ 9-4Editing Pages and Information Blocks ............................................................ 9-5Making a Requisition Flow Available ............................................................. 9-6Duplicating a Requisition Flow ...................................................................... 9-6Deleting a Requisition Flow........................................................................... 9-6
Global Manager WebTop Settings ........................................................................ 9-7
E-learning Settings............................................................................................. 9-10
Contingent Staffing Overview .......................................................................................................... 10-1
Configuring Contingent Staffing.......................................................................... 10-2Activating the ContingentActivation Company Setting.................................... 10-2Activating the Contingent Requisition Type ................................................... 10-2Adjusting User Permissions ......................................................................... 10-2Adjusting Settings....................................................................................... 10-2Configuring the Manager WebTop Contingent Requisition Flow..................... 10-2Creating an Agency Portal .......................................................................... 10-4Creating Agency and Agents....................................................................... 10-4Configuring the Candidate Selection Workflow ............................................ 10-5Configuring the Agent Confirmation Request................................................ 10-6Configuring the Associated Correspondence Template.................................. 10-6Creating a Contingent Requisition Template................................................. 10-8Setting Position Justifications ....................................................................... 10-9
NotificationsOverview .......................................................................................................... 11-1
Enabling Notifications ........................................................................................ 11-2
Notifications List ................................................................................................ 11-3
Activating Event Notification for Users ................................................................. 11-5

CONFIDENTIAL INFORMATION viii
Source TrackingOverview .......................................................................................................... 12-1
Source Tracking Description ............................................................................... 12-2Corporate Sources Tab .............................................................................. 12-2Source Types Tab ...................................................................................... 12-3Settings Tab .............................................................................................. 12-3
Creating a New Source...................................................................................... 12-3
Viewing and Editing a Source ............................................................................. 12-5
Adding Sources to the Corporate Sources Tab ..................................................... 12-5
Removing Sources from the Corporate Sources Tab.............................................. 12-5
Editing Source Type Names ................................................................................ 12-6
Settings............................................................................................................. 12-6
Event Tracking................................................................................................... 12-7Creating Events ......................................................................................... 12-7Viewing and Editing Events ......................................................................... 12-7Removing Events........................................................................................ 12-8
Correspondence ManagerOverview .......................................................................................................... 13-1
Important Note to System Administrators.............................................................. 13-2
Permissions and Settings .................................................................................... 13-3Permissions ............................................................................................... 13-3Settings .................................................................................................... 13-4
Paragraph Mode ............................................................................................... 13-5Message Template List ............................................................................... 13-5Creating a Message Template .................................................................... 13-5Creating a Message Template that is Sent When Candidates Reach Specific Step/Sta-tus............................................................................................................ 13-9Adding Paragraphs to a Message Template ................................................. 13-9Removing Paragraphs from a Message Template.......................................... 13-9Creating New Paragraphs ........................................................................ 13-10Reordering Paragraphs............................................................................. 13-10Translating Message Templates................................................................. 13-11Editing a Message Template ..................................................................... 13-12Duplicating a Message Template .............................................................. 13-12Deleting a Message Template................................................................... 13-12
Template Mode............................................................................................... 13-13

CONFIDENTIAL INFORMATION ix
Creating a Message Template .................................................................. 13-13Translating Message Templates................................................................. 13-15Editing a Message Template ..................................................................... 13-15Duplicating a Message Template .............................................................. 13-15Deleting a Message Template................................................................... 13-16
List of Available Message Templates.................................................................. 13-17
Variables ........................................................................................................ 13-22Standard Variables................................................................................... 13-22Custom Variables .................................................................................... 13-23
List of Available Standard Variables................................................................... 13-24
Sourcing - Matching Candidates to Requisitions
Sourcing Configuration Settings .......................................................................... 14-1
Matching Candidates......................................................................................... 14-2Job Posting Notifications–Additional Information .......................................... 14-2Criteria ..................................................................................................... 14-2
Rules for Matching Criteria................................................................... 14-3Job Field, Location, Organization and Place of Residence Criteria ................. 14-3Skills and Questions Criteria ....................................................................... 14-3
Skills .................................................................................................. 14-3Questions........................................................................................... 14-4
Basic Profile Criteria................................................................................... 14-4
Filters ............................................................................................................... 14-5
Preview............................................................................................................. 14-6
Screening Services and Job Board AccountsAccessing the Integration Console....................................................................... 15-1
Screening Services Overview .............................................................................. 15-1Permissions and Settings............................................................................. 15-2
User Type ........................................................................................... 15-2User Permissions ................................................................................. 15-2Settings .............................................................................................. 15-2
Screening Services List Description............................................................... 15-2Buttons and Icons................................................................................ 15-3Columns ............................................................................................ 15-3
Adding Screening Services .......................................................................... 15-3Deactivating a Screening Service................................................................. 15-4
CONFIDENTIAL INFORMATION x
Configuring Screening Services ................................................................... 15-4General Tab....................................................................................... 15-4Account Tab ....................................................................................... 15-6Labels Tab.......................................................................................... 15-6Input Fields Tab .................................................................................. 15-6Result Fields Tab ................................................................................. 15-7Correspondence Tab........................................................................... 15-7
Creating Large User Defined Selections (LUDs) for Screening Services ............ 15-8Adding Screening Services to an Application Flow ........................................ 15-8Adding Screening Services to a Candidate Selection Workflow ...................... 15-8
Special Rules .................................................................................... 15-10Automatically Trigerring Passport Screening Services ................................... 15-10
Job Board Accounts......................................................................................... 15-12
Job Board Account List..................................................................................... 15-12
Creating Job Board Accounts ........................................................................... 15-12
Editing Job Board Accounts .............................................................................. 15-14
Deleting a Job Board Account .......................................................................... 15-15
Estimated Price of Direct Job Boards ................................................................. 15-15
Selection ToolsOverview .......................................................................................................... 16-1
Show List .......................................................................................................... 16-2
Selector Windows .............................................................................................. 16-2Left Pane................................................................................................... 16-3Right Pane................................................................................................. 16-3Single Selection and Multiple Selections....................................................... 16-3
Using Selector Windows..................................................................................... 16-4
Special Notes on Selectors Windows ................................................................... 16-4Template Selector ............................................................................... 16-4Skill Selector ....................................................................................... 16-4Agent Selector .................................................................................... 16-5
Selector Window Criteria.................................................................................... 16-5Organization Selector (single or multiple)..................................................... 16-5Job Field Selector (single or multiple)........................................................... 16-5Location Selector (single or multiple) ........................................................... 16-6Skill Selector.............................................................................................. 16-6Question Selector (single or multiple) .......................................................... 16-7Agent Selector (single or multiple) ............................................................... 16-7Requisition Selector.................................................................................... 16-7

CONFIDENTIAL INFORMATION xi
Position Selector ........................................................................................ 16-8Department Selector .................................................................................. 16-8Job Template Selector ................................................................................ 16-8User Selector (Single and Multiple) .............................................................. 16-9Employer Selector ...................................................................................... 16-9Institution Selector...................................................................................... 16-9Program Selector ..................................................................................... 16-10Time Zone Selector .................................................................................. 16-10Source Selector........................................................................................ 16-10
Organization-Location-Job (OLF) Group Sections .............................................. 16-11Job Group Section................................................................................... 16-11Organization Group Section..................................................................... 16-11Primary Location Group Section................................................................ 16-12
Automated TasksOverview .......................................................................................................... 17-1
Delete (all data can later be restored).................................................................. 17-3
Delete (nonidentifying data can later be used for reporting purposes)..................... 17-3
Permanently Delete............................................................................................ 17-3
Creating an Automated Task .............................................................................. 17-4
Key Benefits ...................................................................................................... 17-4
Things to Consider ............................................................................................ 17-5
Release Note InformationOverview .......................................................................................................... 18-1
Editing the Properties of the Pop-up Message....................................................... 18-1
Customizing the Pop-up Message ....................................................................... 18-2


Introduction

CONFIDENTIAL INFORMATION Page 1-1
Administrator WebTop User Manual Chapter 1 - Introduction
About the Administrator WebTop
The Administrator WebTop is a powerful tool that allows system administrators to configure and manage the Staffing WebTop, the Manager WebTop and Career Sections.
The Administrator WebTop User Manual and the Administrator WebTop Online Help describe features delivered with the application and used by most organizations.
If you have any questions on your organization’s particular configuration, please contact your Taleo representative.
The table below provides a brief description of the actions that you can perform in each module.
Setup Customize the Staffing WebTop.Customize the Manager WebTop.Customize offers and custom reports.Create and customize candidate list formatsCreate and customize candidate records.Manage agencies.Manage the Correspondence Manager.Manage questions and skills.Manage notifications.Manage fields.
Career Sections Build, customize and maintain internal and external Career Sections. For more information, see Career Sections Administration Manual.
Taleo Performance Configure and manage Performance Management, Succession Planning, Goals Management and Career Planning. For more information, see Performance Management Administration Guide.
SmartOrg Create, modify and delete users.Manage User Groups and User Types. Configure access permissions for job requisitions, candidate information, offer information and features through predefined User Types with role-based permissions.Designate temporary or permanent alternate users.Create, edit and manage Organization-Location-Job Field (OLF) as well as Department structure and elements. Create, edit and manage job templates. For more information, see SmartOrg Administration Manual.
Corresp. Manager Create, customize and edit system-generated messages that are sent to candidates as well as Staffing WebTop and Manager WebTop users during the hiring process. See “Correspondence Manager” on page 13-0.
Source Tracking Create, edit and manage sources (billboards, magazines and trade publications agencies, job boards, mailing lists, etc.) where jobs are posted. Select settings related to sources.See “Source Tracking” on page 12-0.

CONFIDENTIAL INFORMATION Page 1-2
Administrator WebTop User Manual Chapter 1 - Introduction
Integration Import data from Human Resources Management (HRMS) systems using the Integration tool. Manage screening services.See “Screening Services and Job Board Accounts” on page 15-0.
Automated Task Manage the creation of automated tasks to delete and archive information contained in the WebTop database.See “Automated Tasks” on page 17-0.
Operation Mode Implement and ensure maintenance of the system.Manage and update Organization-Location-Job Field (OLF) structure. Indicates the number of users using the application. Put the system in Maintenance mode to manage OLFs, SSA/DSA settings.Recover deleted departments.Note: Default setting: Production mode.See “Operation Mode” on page 3-0.
CONFIDENTIAL INFORMATION Page 1-3
Administrator WebTop User Manual Chapter 1 - Introduction
Symbols Used in the Manual
Information that merits particular attention.
A useful tip when performing a particular operation.
A best practice to adopt.

CONFIDENTIAL INFORMATION Page 1-4
Administrator WebTop User Manual Chapter 1 - Introduction
Pop-Up Blockers
It is recommended to not use pop-up blockers as they may interfere with the application.
DPI Setting
To make sure that the Taleo application displays page content properly, it is recommended to set the DPI setting of your computer to 96 DPI.
Virus Scan
The McAfee virus scanning program used when attaching documents to a candidate file is updated once a day at night. For more information, see “Duplicate Check” on page 4-32.
Online Help
You have ongoing access to online help in the Administrator WebTop. The help icon is displayed on almost every page. Click the icon to access context-sensitive information about the task you are performing or about the feature you are in.
The Administrator WebTop Online Help describes features delivered with the application and used by most organizations. Because Taleo products allow custom configurations and custom fields, you may not see components in the Administrator WebTop that are mentioned in the online help. For questions on your organization’s specific configuration, please contact your Taleo representative.
Session Time-out
A pop-up window directs users to a session expiration alert in the application when a time-out is imminent. This modification to the feature ensures a uniform experience to users across browsers, such as Internet Explorer 7 or Firefox.
Extending a Session
A pop-up window notifies the user that the application requires attention when the session approaches the maximum idle time of 30 minutes.
1. Click Access the application.

CONFIDENTIAL INFORMATION Page 1-5
Administrator WebTop User Manual Chapter 1 - Introduction
The application displays a pop-up window indicating the time remaining before the session expires.
2. Click OK to extend the session.

CONFIDENTIAL INFORMATION Page 1-6
Administrator WebTop User Manual Chapter 1 - Introduction
New Release Information
A pop-up message containing new release information or other important information appears when you log in the Administrator WebTop. The message will only appear once per day or when a change has been made to the text displayed.
When the pop-up message is activated, the following window appears.
You can deactivate the pop-up message by selecting the option at the bottom of the page. The pop-up message will reappear when new release information or other important information is available. If you do not select the option, the pop-up message will appear once per day. A day is from 12AM to 12AM the next day according to the time zone set in your user preferences.
This feature must be activated in the Administrator WebTop. See “Release Note Information” on page 18-0.

Buttons and Icons

Administrator WebTop User Manual Chapter 2 - Buttons and Icons
CONFIDENTIAL INFORMATION Page 2-2
Buttons and Icons
Return to the Welcome page. Return to the Requisition List.
Return to the Search window. Return to the top of a list.
Create a new item or element. Edit an existing item or element.
Close an active window without saving the changes.
Close an active window and save the changes.
Close an active window and save the changes.
Save the information or changes and close the active window.
Add a an item or element to a list of available elements.
Remove an item or element from a list of selected elements.
Return to the previous page or window.
Access the following page or window.
Applies the changes without closing the active window.
Refresh the content of a list or page.
Save a requisition in Draft mode. You can edit requisitions in draft status.
Move from one page to another or move directly to the first page or to the last page of a list.
In the HTML Editor, view a correspondence message or a job description or qualifications text.
Paste information that was entered in the Internal Page to the External Page.
Apply an existing model for questions and skills.
Print the requisition.

CONFIDENTIAL INFORMATION Page 2-3
Administrator WebTop User Manual Chapter 2 - Buttons and Icons
End the requisition creation process and close the requisition.
Open selector windows (user, department, job template, skills, questions, etc.).
Open a selection menu. Customize candidate lists.
Add selected candidates to a requisition.
Add comments in a candidate file.
Attach a file (resume, presentation letter, or any type of document) to a candidate file.
Select an action (enter grade, add comments, or attach a file), enter details (grade%) and enter comments.
Create a new requisition. Click to cancel a requisition.
Send information or comments to the recruiter.
Duplicate a requisition or a candidate.
Copy text information to and from Internal and External Description and Qualifications in the Description tab in Job Templates.
Expand (+) / Collapse (-) Headers
Expand and collapse headers in a Requisition or in a Candidate File.
Clear a search result or a selection.
Open the calendar. .
Match a candidate to a requisition. Share a candidate with other users.
Add items to a list.
Remove items from a list.
Print a requisition, a requisition list, a candidate file, candidate list or a preview page.
Reorder questions and skills included in a template.
Save as default search parameters in Candidate Search.
Send information to other users via email.
Administrator WebTop User Manual Chapter 2 - Buttons and Icons
CONFIDENTIAL INFORMATION Page 2-4
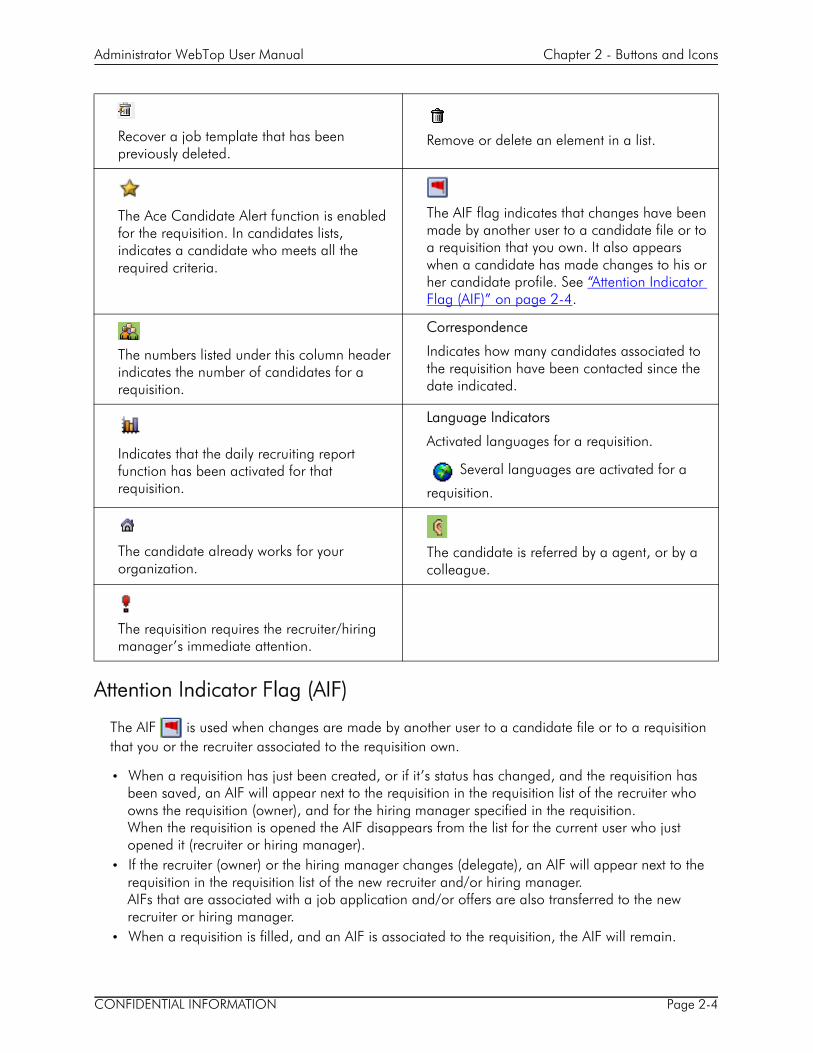
Attention Indicator Flag (AIF)
The AIF is used when changes are made by another user to a candidate file or to a requisition that you or the recruiter associated to the requisition own.
• When a requisition has just been created, or if it’s status has changed, and the requisition has been saved, an AIF will appear next to the requisition in the requisition list of the recruiter who owns the requisition (owner), and for the hiring manager specified in the requisition. When the requisition is opened the AIF disappears from the list for the current user who just opened it (recruiter or hiring manager).
• If the recruiter (owner) or the hiring manager changes (delegate), an AIF will appear next to the requisition in the requisition list of the new recruiter and/or hiring manager. AIFs that are associated with a job application and/or offers are also transferred to the new recruiter or hiring manager.
• When a requisition is filled, and an AIF is associated to the requisition, the AIF will remain.
Recover a job template that has been previously deleted.
Remove or delete an element in a list.
The Ace Candidate Alert function is enabled for the requisition. In candidates lists, indicates a candidate who meets all the required criteria.
The AIF flag indicates that changes have been made by another user to a candidate file or to a requisition that you own. It also appears when a candidate has made changes to his or her candidate profile. See “Attention Indicator Flag (AIF)” on page 2-4.
The numbers listed under this column header indicates the number of candidates for a requisition.
Correspondence
Indicates how many candidates associated to the requisition have been contacted since the date indicated.
Indicates that the daily recruiting report function has been activated for that requisition.
Language Indicators
Activated languages for a requisition.
Several languages are activated for a
requisition.
The candidate already works for your organization.
The candidate is referred by a agent, or by a colleague.
The requisition requires the recruiter/hiring manager’s immediate attention.

CONFIDENTIAL INFORMATION Page 2-5
Administrator WebTop User Manual Chapter 2 - Buttons and Icons
• When a requisition is cancelled, if an AIF is associated to the requisition, the AIF will remain. The AIFs associated to job application and offers related to that requisition are deleted.
• When an AIF is associated to a requisition workflow, the AIF is displayed when a task is created for a user. When the task is performed, the AIF is deleted.
• When a requisition is filled, the AIF associated to the requisition remain. Only AIFs associated to the job applications related to the requisition are deleted.
• When a requisition is cancelled , the AIF associated to the requisition remains. Only AIFs associated to job applications and offers related to the requisition are deleted.


Operation Mode

CONFIDENTIAL INFORMATION Page 3-1
Administrator WebTop User Manual Chapter 3 - Operation Mode
Overview
The Operation Mode control panel allows you to select the mode of operation for the application. To access it, click the traffic light icon located on the upper right side of the Administrator WebTop page.
Three modes are available: Implementation mode, Production mode and Maintenance mode. See “Types of Mode” on page 3-2.
Column Description
Product Indicates the products that are currently up and running.
Number of Connected Users
Indicates the number of users currently using each product (Career Sections, Staffing WebTop, Manager WebTop and Administrator WebTop).

CONFIDENTIAL INFORMATION Page 3-2
Administrator WebTop User Manual Chapter 3 - Operation Mode
Types of Mode
Three modes are available: Implementation mode, Production mode and Maintenance mode.
Implementation ModeThe Implementation mode is only available during the initial configuration and implementation stages of the application. Once the implementation is completed, the Implementation mode is no longer available.
The following tasks are performed in Implementation mode:
• Create, delete and modify the Organization, Location and Job Field (OLF) structure. • Create, delete and modify levels in the OLF structure.• Create, delete and modify elements in the OLF structure.
See the SmartOrg Administration Manual.
Your Taleo representative can provide assistance and documentation when preparing the structure of your organization.
Production ModeThe Production mode is the normal operating mode. All Staffing WebTop users, Manager WebTop users as well as guests, agents, and system administrators have access to the application, to requisitions and to all work items.
The traffic light icon is green when the application is in Production mode.
When in Production mode, you can perform the following tasks.
• View structure elements for Organization, Location and Job Fields. • Select and view elements in Element Management for Organization, Location and Job Fields. • Create and edit job templates.• Select and view position.• Create and edit departments.
You cannot create or edit the structure (Structure Management), elements (Element Management), and positions.
All tasks listed above can also be performed in Maintenance Mode and in Implementation Mode.
When the implementation process is completed, it is no longer possible to create structure elements and add structure levels. All changes to the structure levels will be performed in Maintenance mode. See “Maintenance Mode” on page 3-3.
If changes need to be made to the structure of the database after implementation, please contact your Taleo representative.

CONFIDENTIAL INFORMATION Page 3-3
Administrator WebTop User Manual Chapter 3 - Operation Mode
Maintenance ModeIn Maintenance mode, you can manage and edit Organization, Location and Job Fields (OLF), Job Templates, Positions and Departments. When the system is in Maintenance mode, the application is inactive. All users, except the system administrator, are logged out automatically. The application displays a message to Staffing WebTop and Manager WebTop users as well as to all candidates in Career Sections, indicating that the application is in Maintenance mode.
The traffic light icon is red when the application is inactive and unavailable to users.
Here are some of the changes that you can make to the OLF structure when in Maintenance mode.
• Change the name of the levels in Organization, Location and Job Fields.• Change the default view in Organization, Location and Job Fields. • Create and edit elements in Element Management.
Modifying the Mode
1. Click the traffic light icon. The Operation Mode window opens.
2. In the Mode Setting section, select the desired mode (Maintenance or Production).
3. Click Apply.

Configuration Settings

CONFIDENTIAL INFORMATION Page 4-1
Administrator WebTop User Manual Chapter 4 - Configuration Settings
Overview
The Configuration Settings chapter presents various settings used to configure the behavior and appearance of the Staffing WebTop, Manager WebTop, Career Sections as well as Regulations, Security and System Tools. Settings included in this chapter are related to topics that are not documented in specific chapters of the present Administrator WebTop User Manual.
The settings are organized into folders and subfolders in the left pane of the Administrator WebTop pages. Click a folder to view its contents in the right pane.
Settings described in the following pages are found in the Setup module, under Global Setup. Click a folder to view its contents in the right pane.

CONFIDENTIAL INFORMATION Page 4-2
Administrator WebTop User Manual Chapter 4 - Configuration Settings
Agencies and Agents
Path: Setup/Global Setup/Agencies
Once your agent portal career section is created, you must create agencies and agents if they have not already been created in the system. Agents can refer candidates for jobs or requisitions available in your organization. Each agent must belong to an agency and each agent is linked to a specific agent portal. For information on how to create agent portal career section, consult the Career Section Administration Guide.
The following business rules apply to agencies and agents:
• An agency cannot be linked to an agent portal. Only agents are linked to agent portals.• An agent can only be associated to one agency. The agency must offer staffing services.• An agent has access to only one agent portal career section.• An agent is given a specialty, which is determined by organizations, locations, and job fields (OLFs)
to which he or she is associated. OLFs are linked to the territory covered by the agent, or to his or her expertise in specific job fields. OLFs will be used in the Posting to Staffing Agents (in the Staffing WebTop and Manager WebTop), to help determine if the agents’ names will be displayed in the default list.
• An agent with no OLF specialties may not appear in the agent default list, but can be selected from the Candidate Sourcing Manager regardless of location, organization, or job type.
• All agents created in the system are valid sources for source tracking. Sources are consolidated with agencies under Source Type Agency.
• The system administrator determines if a source is public or internal. • Recruiters and hiring managers can post requisitions to selected agents. A customized invitation
email can be sent to agents through the Correspondence Manager. • The invitation to refer a candidate is based on: the agent, the requisition on which the agent is
invited, and the posting period during which referrals are accepted.• A candidate referred by an agent is considered agent-owned and is marked as such in the
Candidate List and in the Candidate File.
Creating AgenciesPath: Setup/Global Setup/Agencies/Agencies tab
1. In the Agency Management page, click New... The New Agency page opens.
2. In the Properties tab, enter the Agency Name (mandatory). Translate the name of the agency in all available languages.
3. Select the visibility of this source.
• Internal: The source will appear in source tracking lists displayed only to users (Staffing WebTop, Manager WebTop and Agent Portal)

CONFIDENTIAL INFORMATION Page 4-3
Administrator WebTop User Manual Chapter 4 - Configuration Settings
• Public: The source will appear in all source tracking lists including those displayed to candidates.
It is recommended to select Internal.
4. Enter the email address of the agency (mandatory), the contact person’s name and phone number.
5. The Services section is used to designate the "gateway" agencies traditionally used in the Candidate Sourcing Manager. Select the type of services the agency will provide (at least one selection is mandatory):
• Sourcing Strategy
• Internet Mining: When a recruiter clicks Request Internal Mining in the Candidate Sourcing Manager page of the Staffing WebTop, the agency will be available for selection in the Agency Name list along with other agencies that provide Internet mining services.
• Media Placement
• Staffing: When you select Staffing, the Sourcing Strategy, Internet Mining, and Media Placement are automatically included. Staffing must be selected if you want to designate this agency as an agency portal, and if you want to attach agents to this agency.
Select only one of the three if you also want to have the Staffing agency used in the Candidate Sourcing Manager.
• Contingent Staffing: Type of agency used for contingent staffing. MWBE means Minority Women Business Owned. This is a flag available when exporting the agency information to an external system where billing occurs.
6. Click the Job tab if you wish to associate the agency to a specific job field. Click Add..., select a job field, then click Done.
7. Click the Location tab if you wish to associate the agency to a specific location. Click Add..., select a location, then click Done.
8. Click the Organization tab if you wish to associate the agency to a specific organization. Click Add..., select an organization, then click Done.
9. Click Done.
Setting Agency OptionsPath: Setup/Global Setup/Agencies/Agencies tab
Once an agency is created, click Options... Agency options will help you select preferred agencies for sourcing, for internet mining, and for media placement, as well as let you select candidate referral options.
1. In the Agency Management page, click Options... The Agency Options page opens.

CONFIDENTIAL INFORMATION Page 4-4
Administrator WebTop User Manual Chapter 4 - Configuration Settings
2. In the Preferences tab, select:
• A Preferred Agency for Sourcing Strategy: Choose an agency to help you manage your candidate sourcing strategy.
• A Preferred Agency for Internet Mining: Choose an agency to help you manage your job posting strategy on the Internet.
• A Preferred Agency for Media Placement: Choose an agency to help you manage job posting services for non-electronic media, such as newspapers and magazines.
3. In the Candidate Referrals tab, specify the a number of days during which agents own rights over referrals. Select Unlimited if you want the agent to own the referral for an unlimited or undetermined period of time.
4. For contingent staffing, specify the number of days during which agents own rights over referrals. Select Unlimited if you want the agent to own the referral for an unlimited or undetermined period of time.
5. Click Done.
Editing an AgencyPath: Setup/Global Setup/Agencies/Agencies tab
1. In the Agency Management page, click the name of the agency you want to edit. The Edit Agency page opens.
2. Edit the information.
3. Click Done.
Deleting an AgencyPath: Setup/Global Setup/Agencies/Agencies tab
Before deleting an agency, the agents associated with the agency must first be deleted or transferred to another agency. (If you need to delete an agent, see “Deleting Agents” on page 4-5.)
1. In the Agency Management page, select the check box next to the agency you want to delete.
2. Click the Trashcan icon.
Creating AgentsPath: Setup/Global Setup/Agencies/Agents tab
There are three ways to create new agents:
• If you have just created an agency and you have selected staffing services, click the Agents tab. Click New... then enter all agent information on the Identity, Login, Job, Location, and Organization tabs.
• If you have just created an agency, click the Agents tab in the Agency Management page. Click New... then enter all agent information on the Identity, Login, Job, Location, and Organization tabs.
• In the Agency Management page, on the Agencies tab, in the Agents column, click the number corresponding to the agency to which you want to add agents. The Edit Agency page opens. Click

CONFIDENTIAL INFORMATION Page 4-5
Administrator WebTop User Manual Chapter 4 - Configuration Settings
New... then enter all agent information on the Identity, Login, Job, Location, and Organization tabs.
To create a new agent:
1. In the Agency Management page, click the Agents tab.
2. Click New... The New Agent page opens.
3. Complete the Identity tab:
4. Enter the agent information (fields marked with an asterisk (*) are mandatory).
• Select a preferred language of correspondence.
• Specify the name of the agency to which the agent belongs.
• Indicate the visibility of the source:
• Internal: The agent’s name appears in source tracking lists available only to users (Staffing WebTop, Manager WebTop and Agent Portal).
• Public: The agent’s name appears in all source tracking lists, including those available to candidates.
5. On the Login tab, select a portal. If you do not select a portal, the agent will be considered inactive. Recruiters will not be able to invite this agent to refer candidates.
6. Enter the email address for the agent.
7. Provide a password for the agent.
8. Enter the password a second time to validate the password.
9. Click the Job tab if you wish to associate the agency to a specific job field. Click Add..., select a job field, then click Done.
10. Click the Location tab if you wish to associate the agency to a specific location. Click Add..., select a location, then click Done.
11. Click the Organization tab if you wish to associate the agency to a specific organization. Click Add..., select an organization, then click Done.
12. Click Done.
If an agent is associated to specific OLFs, when the recruiter posts a requisition to agents from the Candidate Sourcing Manager (CSM), the system will automatically show the agents associated to the specified OLFs.
If an agent is assigned to more than one OLF, the requisition/agent mapping must satisfy all associated OLFs of the requisition to appear on the list. If they are not listed, the recruiter can Path add and search the entire list.
Deleting AgentsPath: Setup/Global Setup/Agencies/Agencies tab

CONFIDENTIAL INFORMATION Page 4-6
Administrator WebTop User Manual Chapter 4 - Configuration Settings
1. Before you can delete an agent, you have to place the zone in Maintenance mode.
If other users are using the zone, they will be disconnected automatically when you place the zone in Maintenance mode. For this reason, before you perform this action, it is important to advise all users who might be using Taleo products that they will be disconnected.
Click the “traffic light” icon in the upper-right corner.
2. Click the radio button next to Maintenance and then click Apply.
3. In the window that appears, click Yes.
4. Click Setup > Global Setup > Agencies > Agencies tab.
5. In the Agents column, click the number that corresponds to the agency that included the agent you want to delete.
6. Click the check box next to the agent you want to delete.
7. Click the “trash can” (Delete) icon.
8. Click Yes and then click Done.
9. You would typically place the zone back in Production mode so that your users can access Taleo products anew.

CONFIDENTIAL INFORMATION Page 4-7
Administrator WebTop User Manual Chapter 4 - Configuration Settings
Correspondence Manager Settings
Path: Setup/Global Setup/Correspondence Manager
Setting Values Default Value
Description
Display Reply To
(Setting implemented in service pack 9 and later.)
Yes, No No If the setting is set to Yes, Taleo clients can add a Reply To field to email correspondence, which enables candidates to reply directly to the message they receive.

CONFIDENTIAL INFORMATION Page 4-8
Administrator WebTop User Manual Chapter 4 - Configuration Settings
HRMS Settings
Path: Setup/Global Setup/Integration/HRMS
Setting Values Default Value
Description
Activate Department Management in WebTop products
Yes, No No If set to Yes:• Activates Department functionality throughout the
system.• Activates Department in Administrator WebTop. • Activates Department quick selector in Requisition
and Job Template.• Activates Department quick selector at Users/User
List/Edit User/Identity.• Cannot delete Department if actively used (in a
requisition, user table, etc.) but the user can replace the Department by another one, then delete the original one.
If set to No:• Functionality is consistent with version 5.1.• Disables access to Department pages in
Administrator WebTop.• Department fields in Requisition and Job Template
are freeform fields.
Activate position-related functionality in WebTop products
Yes, No No If set to Yes:• Access position pages as read-only in Administrator
WebTop. • Requisition fields are auto-filled from Position.• Activates Position selector in Requisition.• Deactivates Job Template field in Requisition.If set to No:• Activates Job Template selector in Requisition.• Position fields in Requisition are freeform fields.• Deactivates Position functionality.
Attribute this flow type to imported requisitions owned by hiring managers
With Internal Posting,Without Internal Posting
Without Internal Posting
Select the flow type that will be used to import requisitions owned by hiring managers. To enable hiring managers to modify imported information from HRMS, the following permissions must be selected:Path: User Management/Types tab/Administration tab/General:Modify department information imported from HRMSModify user information imported from HRMS

CONFIDENTIAL INFORMATION Page 4-9
Administrator WebTop User Manual Chapter 4 - Configuration Settings
Offer Settings
Path: Setup/Global Setup/Process/Offers/Customization
Setting Values Default Value
Description
Default expiration date No default,1 day,2 days,3 days,1 week,2 weeks
No default
Select a default expiration date for an offer.
Prevent the modification of the actual start date once it is no longer tentative
Yes, No No Once the start date has been set to final, it can no longer be changed.
Remind user to confirm employee presence X days before the start date of a new hire
No reminder, 1 to 7
No reminder
The user must confirm the presence of the employee to finalize the offer process.
Remind user to finalize the start date when a candidate accepts an offer but the start date is tentative
Yes, No No Remind the user to enter a final start date when the candidate accepts an offer.
Remind user to complete the selection process when a candidate accepts an offer but pending issues are preventing the hiring
Yes, No No Remind the user to complete pending tasks in the selection process. If pending tasks are not completed, the offer process will remain incomplete.
Number of days after start date when candidate auto-hire occurs
No Auto-hire, 1 to 7
No Auto-hire
Select a number of days after the start date that will launch the Auto hire process (automatically send specific candidate information to HRMS).
Activate the offer approval process
No,Optional,Mandatory
No Determine if the offer approval process is optional or mandatory.
Allow a request for approval only if an offer letter has been selected
Yes, No No Request for approval cannot be launched by the user, unless an offer letter is included in the offer approval.
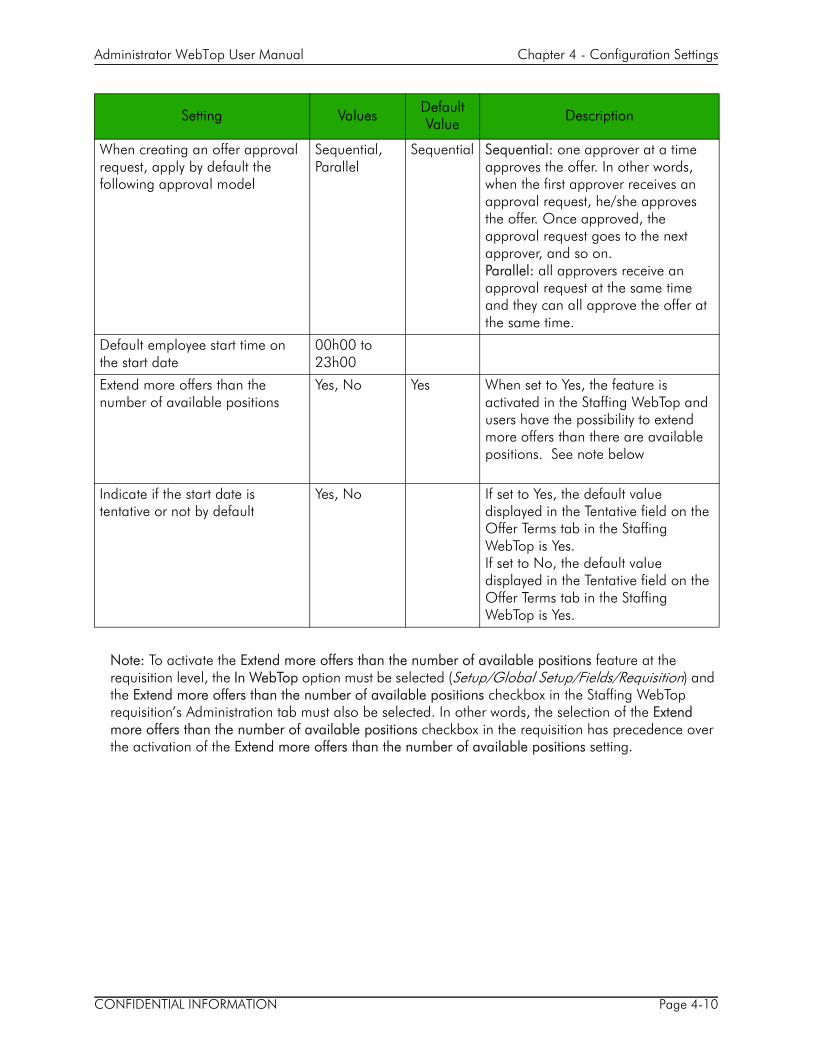
CONFIDENTIAL INFORMATION Page 4-10
Administrator WebTop User Manual Chapter 4 - Configuration Settings
Note: To activate the Extend more offers than the number of available positions feature at the requisition level, the In WebTop option must be selected (Setup/Global Setup/Fields/Requisition) and the Extend more offers than the number of available positions checkbox in the Staffing WebTop requisition’s Administration tab must also be selected. In other words, the selection of the Extend more offers than the number of available positions checkbox in the requisition has precedence over the activation of the Extend more offers than the number of available positions setting.
When creating an offer approval request, apply by default the following approval model
Sequential,Parallel
Sequential Sequential: one approver at a time approves the offer. In other words, when the first approver receives an approval request, he/she approves the offer. Once approved, the approval request goes to the next approver, and so on.Parallel: all approvers receive an approval request at the same time and they can all approve the offer at the same time.
Default employee start time on the start date
00h00 to 23h00
Extend more offers than the number of available positions
Yes, No Yes When set to Yes, the feature is activated in the Staffing WebTop and users have the possibility to extend more offers than there are available positions. See note below
Indicate if the start date is tentative or not by default
Yes, No If set to Yes, the default value displayed in the Tentative field on the Offer Terms tab in the Staffing WebTop is Yes.If set to No, the default value displayed in the Tentative field on the Offer Terms tab in the Staffing WebTop is Yes.
Setting Values Default Value Description

CONFIDENTIAL INFORMATION Page 4-11
Administrator WebTop User Manual Chapter 4 - Configuration Settings
The following table helps you understand when the feature is activated at the requisition level:
Extend more offers than the number of available positions = Yes
The feature is activated for all requisitions. The Extend more offers than the number of available positions checkbox is not available in the requisition’s Administration tab.
Extend more offers than the number of available positions = Yes/No
The feature is activated for this specific requisition.
Extend more offers than the number of available positions = Yes
The feature is NOT activated for this specific requisition.

CONFIDENTIAL INFORMATION Page 4-12
Administrator WebTop User Manual Chapter 4 - Configuration Settings
Requisitions Settings
Path: Setup/Global Setup/Process/Requisitions
Requisitions settings let you configure requisitions and job templates as they will be used in the Staffing WebTop.
Setting Values Default Value Description
Path: Setup/Global Setup/Process/Requisitions
Allow users to apply templates or position-related information to requisitions in approval process but not to posted requisitions
Yes, No No Allow users to apply templates to requisitions during the approval process, but not after they have posted the requisition.
Prevent the modification of the following fields in imported requisitions: Title (by manager), Title, Description (internal and external), Qualifications (internal and external), and Job Board Summary Description
Yes, No Yes Prevent users from modifying fields in an imported requisition.
Apply this status to new job templates
Draft,Active,Inactive
Inactive Job Template status can be:• draft• active and available for use. When
creating a Job Template, it is possible to select a specific period during which it will be active (Active From - To).
• inactive and not available for use. Default for new job templates

CONFIDENTIAL INFORMATION Page 4-13
Administrator WebTop User Manual Chapter 4 - Configuration Settings
In requisitions and templates, link the Organization field to the organization specified for the Department
Yes, No No • Links Department and Organization fields in requisitions and job templates.
• The Organization field must be available and all department elements must be mapped to organization elements before this setting can be activated.
Note: This is an internal setting and can only be changed by the Configuration Management Team.
• If to Yes and Department management is activated (see “HRMS Settings” on page 4-8), then the Organization data in the Requisition and Job Templates comes from Department.
• If set to Yes, the Organization selector in Requisition and Job Template becomes read only.
In requisitions and templates, link the Location field to the location specified for the Department
Yes, No No • Links Department and Location fields in requisitions and job templates.
• The Organization field must be available and all department elements must be mapped to organization elements before this setting can be activated.
Note: This is an internal setting and can only be changed by the Configuration Management Team.
• If this setting is set to Yes and Department management is activated (see “HRMS Settings” on page 4-8), then the Organization data in the Requisition and Job Templates comes from Department.
• If this setting is set to Yes, the Organization selector in Requisition and Job Template becomes read only.
Setting Values Default Value Description

CONFIDENTIAL INFORMATION Page 4-14
Administrator WebTop User Manual Chapter 4 - Configuration Settings
In requisitions, require a department that is currently in its validity period as follows
Not Required,Required for Approval,Required for Saving,Required for Sourcing
Not Required Note: Department replaces Cost Center. This setting used to be in Cost Center Function. Not Required: The validity period of the department is not required. Required for Approval: The validity period of the department must be effective to request approval of the requisition. Required for Saving: The validity period of the department must be effective to save the requisition.Required for Sourcing: The validity period of the department must be effective for sourcing.
Activate the automatic filling of department-related fields in requisitions
Yes, No No Note: Department replaces Cost Center.• Displays the Department field in the
Requisition Wizard.• Enables Auto-fill of Requisitions
based on Department information.• Displays the data overwrite dialog
when user changes department in Requisition.
• Department, Manager, Recruiter, Pay Factor fields are moved to Department.
Require that prescreening questionnaires contain at least one question or skill for requisitions to be valid for sourcing
Yes, No No If set to Yes: The user must include at least one question or skill in the prescreening questionnaires in order to make the requisition available for posting. If set to No: It is possible to post a requisition even if there are no questions or skills in the prescreening questionnaire. Note: Must be set to No for Staffing Station. See “Staffing Station Settings and User Permissions” on page 4-30.
Setting Values Default Value Description

CONFIDENTIAL INFORMATION Page 4-15
Administrator WebTop User Manual Chapter 4 - Configuration Settings
By default, activate this view in the Skill Selector
Taleo,{Your company skills},Skill Library
Skill Library This setting determines the default filter setting of the Skill Selector window in the requisition file and job template file. Taleo: The complete Taleo skills library classified according to generic Job fields.{Your company skills}: Skills resulting from the mapping of your company Job fields to the Taleo Job fields. As a result, the skills list contains skills that are considered relevant for your company. Skill Library: Skills selected by your company among the Taleo skills library. These skills are classified according to the Location and Job fields of your company.
Allow contextualized display of the requisition fields
Yes, No Yes Requisition fields can be contextualized (that is, associated to Organizations, Locationsand Job Fields) in order to make them relevant according to the requisition context. You can specify a specific context for most requisition fields. Therefore, when creating a requisition in the Staffing WebTop and Manager WebTop, only fields relevant to the context are displayed.
Allow customization of font face, size, color and style for requisition descriptions and qualifications.
Yes, No Yes Affects functionalities available in the HTML Editor of the Description and Qualifications fields (available in the requisition and job template).When set to No, the following functionnalities are not available:
• Font drop-down • Font Size drop-down • Bold button • Italic button • Underline button • Text Color button • Background Color button
Setting Values Default Value Description

CONFIDENTIAL INFORMATION Page 4-16
Administrator WebTop User Manual Chapter 4 - Configuration Settings
Path: Setup/Global Setup/Process/Requisitions/Customization
Pay Basis Selectable,Yearly
Selectable The pay basis can be Selectable (weekly, monthly, etc.), or Yearly (annual).Selectable applies on a requisition by requisition basis. Yearly applies to all requisitions.
Allow the field "Title (by Manager)" to be unilingual
Yes, No No The requisition’s title defined by the manager (actual label is Title (by Manager)) can be unilingual. When the field is set to be unilingual, the value of the Title (by Manager)field is copied in all active languages.
Path: Setup/Global Setup/Process/Requisitions/Number Format
Requisition number control By the User, By the Users or the System, By the System
By the User Determine if the configuration of requisition numbers is generated by the user, by the user or the system, or only by the system. Configures requisition numbers generated by the system.
Prefix base• Job • Location•Organization• Year of Creation• No Prefix
Location
Sequence typeNumericAlphanumeric
Numeric
Sequence length (characters)
3, 4, 5, 6, 7, 8
Number of characters.
Initial value 1 Select an initial value.
Validate the requisition number format
Yes, No No
Setting Values Default Value Description

CONFIDENTIAL INFORMATION Page 4-17
Administrator WebTop User Manual Chapter 4 - Configuration Settings
Path: Setup/Global Setup/Process/Requisitions/Requisition Wizard
When creating a Staffing WebTop user, activate the use of the requisition “autofill” functionality by default
Yes, No Yes When the manager creates a requisition, some fields will automatically be filled depending on the selection made in the Requisition Autofill page in the Requisition Wizard. A user permission is associated to this setting:Path: User Management/Users tab /Preferences tab/Requisitions tab/ Requisition Wizard - I want to use the "automatic filling" option of the requisition wizard
When creating a Manager WebTop user, activate the use of the requisition “autofill” functionality by default
Yes, No Yes The hiring manager will be able to create requisitions using the requisition wizard.A user permission is associated to this setting:Path: User Management/Users tab /Preferences tab/Requisitions tab/ Requisition Wizard - I want to use the “automatic filling” option of the requisition wizard
Setting Values Default Value Description

There is only ONE approval loop. If the initial approval request is sent out as a Position Approval, the owner will have to complete the requisition content with other languages if necessary. The system will not allow the user to go ahead then send out for a second round of approvals.
CONFIDENTIAL INFORMATION Page 4-18
Administrator WebTop User Manual Chapter 4 - Configuration Settings
These apply only to concepts available in the context of use. For example, no validation is applied to the Requisition Number if auto Requisition number generation is set to System in the setup.
Path: Setup/Global Setup/Process/Requisitions/Workflow
Activate this type of approval path
None,Position Approval,Content Approval
None: Allows requisitions to be imported with the Approved detailed status. Determines if job approvals are based on the requisition or on specific fields.Position Approval: • Allows requisitions to be imported
with the Approved detailed status.• Allows recruiters and hiring
managers to request approval for the Position aimed by the Requisition being created.
• Allows hiring managers and recruiters to request approval when the content is only present in the base language.
Content Approval: • Allows requisitions to be imported
with the Approved detailed status.• Allows hiring managers and
recruiters to request approval for the Content of the Requisition being created.
• Allows hiring managers and recruiters to request approval ONLY when the content is present in ALL languages.
Requisition Field Off Position Content
Required for saving (S), Required for Approval (A)
Temporary Title S S S
Job Field S S S
Location S S S
Number of position S S S
Group S S S
Setting Values Default Value Description

CONFIDENTIAL INFORMATION Page 4-19
Administrator WebTop User Manual Chapter 4 - Configuration Settings
Global Settings – Requisitions – Workflows (Continued)
Path: Setup/Global Setup/Process/Requisitions/Workflow (Continued)
Justification A A A
Hiring Manager A A A
Requisition Number A
Number of Positions A
Requisition Title A
At least one description(internal or external)
A
At least one question or skill A
EEO/EE information A
Setting Values Default Value Description
Include questions, skills, and scoring criteria in e-share approval request
Yes, No No Allow users to include questions, skills and scoring criteria in e-share approval requests.
Allow the reopening of filled and canceled requisitions
Yes, No No Allow users to reopen requisitions that were filled or canceled.
If an approval requested by a Staffing WebTop user is rejected, assign work item to approved requisition recipient instead of originator
Yes, No No If an approval is rejected, the requisition will be sent to the approved requisition recipient, instead of to the person who originated the request.
When creating a requisition approval request, apply by default the following approval model
SequentialParallel
Sequential Sequential: one approver at a time approves the offer. In other words, when the first approver receives an approval request, he/she approves the offer. Once approved, the approval request goes to the next approver, and so on.Parallel: all approvers receive an approval request at the same time and they can all approve the offer at the same time.
Requisition Field Off Position Content

CONFIDENTIAL INFORMATION Page 4-20
Administrator WebTop User Manual Chapter 4 - Configuration Settings
Questions and Skills Settings
Path: Setup/Global Setup/Questions and Skills
Questions and skills settings let you configure the use of questions and skills as they will be used in the prescreening process in the Staffing WebTop.
Setting Values Default Value Description
Path: Setup/Global Setup/Questions and Skills
Differentiate internal and external profilers
Yes, No No When set to Yes, create different profiler questions for internal candidates.When set to No, use the same profiler questions for internal and external candidates.
When creating requisitions, differentiate prescreening for internal and external candidates
Yes, No No If Yes is selected, Staffing WebTop users can designate questions, disqualification questions and skills as items for internal candidates, external candidates, or for both internal and external candidates by default. If Yes is selected, Staffing WebTop users and Manager WebTop users can add a question, disqualification question or skill to a requisition and then change the default designation (Internal Candidates, External Candidates, All Candidates) to another value. If No is selected, questions, disqualification questions and skills added to a requisition are displayed to all candidates with no distinction made between internal and external candidates.You can deactivate the When creating requisitions, differentiate prescreening for internal and external candidates setting in the Administrator WebTop at any time but this does not “reset” any changes you made to disqualification questions, questions or skills. For example, if you set a skill for External Candidates, and later deactivated the When creating requisitions, differentiate prescreening for internal and external candidates setting, the External Candidates designation would remain in effect for the skill.
Path: Setup/Global Setup/Questions and Skills/Skills

CONFIDENTIAL INFORMATION Page 4-21
Administrator WebTop User Manual Chapter 4 - Configuration Settings
Use this skill assessment format
Simple,Detailed,Simple or Detailed
Detailed Note: To configure these settings, the system must be in Maintenance Mode.Simple Skill questionnaires present questions with a choice of skills (Proficiency and Experience) presented with check boxes. In career sections, when candidates assess their skills in a prescreening questionnaire, they will be presented with a question and a choice skills to select (check boxes). Detailed Skill questionnaires include skills, with Proficiency, Experience, Last Used and Interest levels (lists). In career sections, when candidates assess their skills in a prescreening questionnaire, they will be presented with lists for each skill they have to assess. Simple Skill with voluntary Detailed Skill includes a Detailed Skills button to access detailed skills that include lists. When both formats are selected, candidates will have the choice of using the Simple Skill or will be able to use the lists to provide more information on specific skills.
Express Proficiency collected via simple skills format in terms of the following minimum level
Beginner, Intermediate, Advanced,Expert
Intermediate
Specify minimum proficiency levels for Simple Skill format.
Express Experience collected via simple skills format in terms of the following minimum level
Less than 1 year, 1 - 3 years, 3 - 5 years, 5 years or +
1- 3 years Specify minimum experience levels for Simple Skill format.
Setting Values Default Value Description

CONFIDENTIAL INFORMATION Page 4-22
Administrator WebTop User Manual Chapter 4 - Configuration Settings
Records Settings
Path: Setup/Global Setup/Records
Records settings lets you select a display mode and lets you select identifiers for candidate records that will be used by recruiters in the Staffing WebTop.
Setting Values Default Value Description
Path: Setup/Global Setup/Records/Identifiers
In the Record Identifiers window, select candidate record identifiers. Select a sorting key.
Path: Setup/Global Setup/Records/Opening/Candidate
By default, when a user navigates from a candidate file to another, display the following tab
The Tab Displayed When Navigating from a List,The Tab Displayed in the Previous File
The Tab Displayed in the Previous File
The candidate file format will have the same tabs as the list tabs.
The candidate file format will have the same tabs as the tabs in the previous file.

CONFIDENTIAL INFORMATION Page 4-23
Administrator WebTop User Manual Chapter 4 - Configuration Settings
Regulation Settings
Path: Setup/Global Setup/Regulations
Regulation settings let you activate settings that will help your organization collect and information related to EEO (USA) and EE (Canada) regulations (if your company is required to provide this type of information)
Setting Values Default Value Description
Path: Setup/Global Setup/Regulations/USA (EEO/Affirmative Action)
Collect the EEO/Affirmative Action information when an applicant has reached the selected status
Never, New, Reviewed, 1st Interview, 2nd Interview, 3rd Interview, Testing, Offer
New Determine at which point the system requests EEO/Affirmative Action information.

CONFIDENTIAL INFORMATION Page 4-24
Administrator WebTop User Manual Chapter 4 - Configuration Settings
Capture Resume Settings
Path: Setup/Global Setup/Process/Capture Resume
The Capture Resume component allows you to create capture resume flows that are made available in the Staffing WebTop, under the Candidate Capture tab. The Capture Resume component consists of two sections:
• Flow List: displays capture resume flows that are activated.• Settings: displays settings used to create capture resume flows.
Creating a Capture Resume FlowPath: Setup/Global Setup/Process/Capture Resume/Flow List
1. In the Capture Resume Flow List, click New... The Capture Resume Flow Builder opens.
2. Enter a name for the flow. The name must be unique.
3. Click Save.
4. Leave the status to Not Available for now. You must first create all flow pages. Once the status is set to Available, it is no longer possible to modify, edit, reorder or delete pages, information blocks and actions.
5. In the Page ordering section, click New.... The Page Builder opens, displaying the General tab.
6. Enter the page name, page title and page header. The page title appears in the title bar of the browser when the page is displayed in the Career Section. It is also used if the page is bookmarked. The page header appears at the top of the page under the standard header.
7. Add the information blocks that will appear in the flow. If desired, reorder information blocks using the up and down arrows.
The Candidate Personal Information block is mandatory and it must appear on the first page.
8. Add actions in the Available Actions list (for example, sending an email message) . If desired, reorder actions using the up and down arrows.
9. Click Done.
10. Click the Properties tab. The Properties tab is used to select values for different settings that will apply to pages, information blocks and actions associated with a page. The settings on the Properties tab are divided into three sections:
• Page: include settings that apply to the page regardless of which blocks and actions are included.
• Blocks: include settings that apply to blocks included on a page.
• Actions: include settings that apply to actions that are associated to a page.
11. Select appropriate values for each setting.
12. Click Done.

CONFIDENTIAL INFORMATION Page 4-25
Administrator WebTop User Manual Chapter 4 - Configuration Settings
13. Click the Fields tab. The Fields tab is used to select values for different settings that apply to customizable information blocks. There are three columns on the Fields tab:
• Settings: displays the list of customizable fields.
• Position Title: displays lists that are used to set the position of the fields in each block.
• Values: displays, for each setting, a list of possible values (No, Optional, Mandatory).
If a page contains no customizable information blocks, the Fields tab is empty.
14. In the Position Title column, select the vertical position for each field.
15. In the Position Title column, select the horizontal position for each field.
Fields are always aligned to the left of the page. If a field is alone on a line and you select Position = 2 or 3 for this field, it will be displayed on the left of the page.
16. In the Values column, select the status for each field.
• No: the field does not appear.
• Optional: the field is optional.
• Mandatory: the field is mandatory.
If a field is left empty, the relative position of the other fields remains unchanged. However, the visible fields will be shifted to the left, eliminating empty spaces. The vertical position is also automatically adjusted so that there are no empty rows.
17. Click Done.
18. In the Capture Resume Flow Builder page, make the flow available. Select Available in the Status field.
Activating Capture Resume FlowsPath: Setup/Global Setup/Process/Capture Resume/Settings
Once capture resume flows are created, you need to tie them to different types of flow. Nine flows can be activated to capture candidate information, but five general flows are available:
• flow for the quick capture of candidate profiles• flow for capturing candidate profiles • flow for capturing job-specific applications • flow for capturing a referral through the general profile• flow for capturing a referral through a job-specific application
1. For each type of capture resume flow, select the desired flow you created.

CONFIDENTIAL INFORMATION Page 4-26
Administrator WebTop User Manual Chapter 4 - Configuration Settings
2. Click Save.
Setting Description
Path: Setup/Global Setup/Process/Capture Resume/Settings
Activated flow for the quick capture of candidate profiles (default flow from My WebTop)
The selected flow is the flow that will be available in My WebTop/Create Candidate when a user wants to create a candidate. If no selection is made for this setting, the system displays the list of available flows instead.
First activated flow for capturing candidate profiles
The first flow that will be available on Candidates tab/Capture tab/Capture Candidate when a user wants to capture a new candidate in a regular profiler.
Second activated flow for capturing candidate profiles
The second flow that will be available on Candidates tab/Capture tab/Capture Candidate when a user wants to capture a candidate profile.
Third activated flow for capturing candidate profiles
The third flow that will be available on Candidates tab/Capture tab/Capture Candidate when a user wants to capture a new candidate in a regular profiler
Fourth activated flow for capturing candidate profiles
The fourth flow that will be available on Candidates tab/Capture tab/Capture Candidate when a user wants to capture a new candidate in a Regular Profiler
First activated flow for capturing job-specific applications
The first flow that will be available on Candidates tab/Capture tab/Capture Candidate when a user wants to capture a new candidate in a Job-specific Application profiler.
Second activated flow for capturing job-specific applications
The second flow that will be available on Candidates tab/Capture tab/Capture Candidate when a user wants to capture a new candidate in a Job-specific Application profiler.
Third activated flow for capturing job-specific applications
The third flow that will be available on Candidates tab/Capture tab/Capture Candidate when a user wants to capture a new candidate in a Job-specific Application profiler.
Fourth activated flow for capturing job-specific applications
The fourth flow that will be available on Candidates tab/Capture tab/Capture Candidate when a user wants to capture a new candidate in a Job-specific Application profiler.
Activated flow for capturing referrer and candidate profiles
Activated flow for capturing referrer profiles and job-specific applications

CONFIDENTIAL INFORMATION Page 4-27
Administrator WebTop User Manual Chapter 4 - Configuration Settings

CONFIDENTIAL INFORMATION Page 4-28
Administrator WebTop User Manual Chapter 4 - Configuration Settings
Requisition Types
Path: Setup/Global Setup/Requisition Types
You can assign a requisition type to a requisition to determine the type of candidates that you want to hire. For example, you can create a requisition for students.
Five requisition types are available:
When a recruiter creates a requisition, if more than one requisition type is enabled, the recruiter will be asked to select a requisition type.
When a requisition type is no longer available, it cannot be selected, but requisitions created with that type keep their original requisition type.
For Integration purposes: Campus requisitions and hourly requisitions must be identified by your Taleo representative in order for the integration team to change requisition type with a manual script.
Requisition Type Description
Professional Requisitions for most professional employees (professionals, technicians, clerical, etc.).
Campus Requisitions for students or campus job fairs.
Hourly Requisitions for hourly employees.
Contingent Requisitions for contingent staffing (see “Contingent Staffing” on page 10-0. Note that the Contingent requisition type will appear in the Administrator WebTop if your organization has asked Taleo to activate a specific company setting.
Executives Requisitions for executives.
All Requisitions that can be used for all types of requisition. For example, this type of requisition could be used to create hourly, professional or executive requisitions.
These categories may be used to meet the specific needs or your organization. For example, students and professionals may be employed as hourly personnel in some work environments.

CONFIDENTIAL INFORMATION Page 4-29
Administrator WebTop User Manual Chapter 4 - Configuration Settings
This will be allowed only once by customer. If more than one requisition type is active, import files must be modified.
Systems Tools Settings
Path: Setup/Global Setup/System Tools
Systems Tools settings let you select information related to salaries that will be used in the Salary Calculator.
Setting Values Default Value
Description
Manage Requisition Types The user can activate one or several requisition types:
• Professional• Hourly• Campus• Executives• All
Exclude campus-type requisitions from standard reports.
YesNo
Yes Campus type requisitions are excluded from standard reports (except 8.2.33, 34, 44 and 45, – EEO detail for specific requisition), except if they are open requisitions.
Settings Values Default Value Description
In the salary calculator, assume that employees work X hours per day
N/A 8.0 Enter a number of hours per day
In the salary calculator, assume that employees work X days per week
N/A 5.0 Enter a number of work days per week.

CONFIDENTIAL INFORMATION Page 4-30
Administrator WebTop User Manual Chapter 4 - Configuration Settings
Tracking Event Categories
Path: Setup/Global Setup/Tracking Event Categories
The Tracking Event Categories settings control the default event tracking categories displayed on the candidate file’s Tracking tab. Also, any change to those displayed categories made by a Staffing WebTop or a Manager WebTop user during a session is now saved, no matter where the user navigates within the WebTop.
To specify which event tracking categories will be activated by default in the Staffing WebTop:
1. Select the desired event categories.
2. Click Default.
Staffing WebTop and Manager WebTop users will see changes made by the system administrator to event categories only after they log in again.
Staffing Station Settings and User Permissions
The following settings are related to Staffing Station.
Contact your Taleo representative to review Staffing Station Company Settings (cieSettings). For more information on Staffing Station, contact your Taleo representative.
Settings Values Default Value
Description
Permissions
Path: SmartOrg/User Accounts/General Preferences/Notification
Send faxable messages to this user by fax, not by email
Not selected
Used for Staffing Station only. Users will be able to receive messages by fax if they do not have access to the Internet.
Settings
Path: Setup/Global Setup/Process/Requisitions –Require that prescreening questionnaires contain at least one question or skill for requisitions to be valid for sourcing
Yes, No No It is possible to post a requisition even if there are no questions or skills in the prescreening questionnaire. Note: Mandatory setting for Staffing Station. Value must be set to No.

CONFIDENTIAL INFORMATION Page 4-31
Administrator WebTop User Manual Chapter 4 - Configuration Settings
Path: Setup/Global Setup/Fields/Selections/Large Selections /Custom [click New...]
N/A N/A To import Staffing Station candidates, we need to create the following Large User Defined Selections (LUDS):AAWT_Bands:
• Code: AAWT_Bands• Name: Assessment Band
AAWT_Dimensions • Code: AAWT_Dimensions • Name: Assessment Dimensions
Leave the remaining options to their default settings. This large selection will be populated by the Assessment Platform. For more information, contact your Taleo representative.
Path: Integration/Screening Services List [select Staffing Station]
N/A N/A Activate Staffing Station Service.For more information, see .“Screening Services Overview” on page 15-1
Path: SmartOrg/SmartOrg Home Page/Job Fields/Element Management
N/A N/A Type/IDs are used by the Staffing Station provider (Landel) and included in candidate files. The Type/IDs assigned to the various “Job Fields” must be synchronized /sent to the Staffing Station provider (Landel script).Create Job Field elements. For more information, see the SmartOrg Administration Manual.
Settings Values Default Value Description
CONFIDENTIAL INFORMATION Page 4-32
Administrator WebTop User Manual Chapter 4 - Configuration Settings
Duplicate Check
Path: Administrator WebTop/Setup/Global Setup/Duplicate Check
A duplicate check is performed to verify if candidates already exist in the system. System administrators must specify the fields that are used for the duplicate check.
Default duplicate check criteria are:
• First Name• Last Name• Street Address• City• Zip/Postal Code
The duplicate check action can be used for the agency portal and the Merged Candidate Files feature.

Fields

CONFIDENTIAL INFORMATION Page 5-1
Administrator WebTop User Manual Chapter 5 - Fields
Overview
Fields are used throughout the Staffing WebTop, Manager WebTop and Career Sections. They allow organizations to include information in requisitions and candidate files according to their specific needs and requirements.
The Fields component provides the tools to:
• Create and customize various types of fields to collect information about candidates or display information about job offers in Career Sections.
• Add information in job offers and candidate files that will be used in the Staffing WebTop and Manager WebTop.
• Create new information units in candidate files.• Create requisition fields that are not displayed to candidates.• Create fields used to collect information internally about candidates.• Create and customize selections used in various fields.• Select active elements from selections used in various field types.• Manage large user-defined selections (LUDS).
CONFIDENTIAL INFORMATION Page 5-2
Administrator WebTop User Manual Chapter 5 - Fields
Field Types
Path: Setup/Global Setup/Fields
The Fields component is divided into five field categories based on where they are used in the application to collect information:
• Candidate • Department• Offer• Requisition • Selections (including LUDS)
Candidate FieldsCandidate fields are used in Career Sections, Staffing WebTop and Manager WebTop to collect candidate information that is not already available in the system.
Path: Setup/Global Setup/Fields/Candidate
Tab Description
Standard
Custom
Personal Info
Work Experience
Education
Certifications
References
Contingent Staffing
Predefined fields provided by the system.Note: Standard fields cannot be customized nor edited. They can only be made available in the Staffing WebTop or Career Sections.
Customized fields that you can create to collect information according to specific organization requirements.
Fields used to collect personal information on candidates in the Personal Information, Referrer Personal Information and Basic Profile blocks of the Career Sections.
Fields used to collect information related to work experience, employers, responsibilities, etc.
Fields used to collect information on education, training and institutions in the Education Highlights block.
Fields used to collect certification information.
Fields used to collect reference information.
Fields used to collect contingent information.

CONFIDENTIAL INFORMATION Page 5-3
Administrator WebTop User Manual Chapter 5 - Fields
Department FieldsDepartment fields are used to provide additional information about departments or to include information that will be used by recruiters and hiring managers. The information can be displayed in the Staffing WebTop, Manager WebTop and Career Sections.
Department fields can be contextualized, that is associated to locations, organizations and job fields.
Path: Setup/Global Setup/Fields/Departments
Tab Description
Custom
Column Description
Field Label
WebTop
Career Section
Reports
Contextualized Display
Column Description
Field Label Name displayed to candidates in the Career Section, and to recruiters and hiring managers in the Requisition Wizard. Click the field label link to open the Field Editor.
WebTop Indicates if the field is available in the Staffing WebTop (Available/Not Available).
Career Section Indicates if the field is available in the Career Section (Available/Not Available).
Reports Indicates if the field is available in Custom Reports Universe. This column is only available on the Custom tab.
Customized fields that you can create to collect information to meet specific organization requirements related to departments.
Indicates the field name (unique identifier.) Click the field label link to open the Field Editor.
Indicates if the field is available in the Staffing WebTop (Available/Not Available).
Indicates if the field is available in Career Sections (Available/Not Available).
Indicates if the field is available in Custom Reports Universe. This column is only available on the Custom tab and if the user has the permissions to generate custom reports.
Indicates if the field is associated to locations, organizations and job fields. See “Associating Fields to the OLF” on page 5-6.

CONFIDENTIAL INFORMATION Page 5-4
Administrator WebTop User Manual Chapter 5 - Fields
Offer FieldsOffer fields are used to provide additional information on offer terms, competitive information, candidate’s expectations, or to include information that will be used by recruiters and hiring managers when preparing a job offer to a candidate.
Offer fields can be contextualized, that is associated to locations, organizations and job fields.
Path: Setup/Global Setup/Fields/Offer
Tab Description
Standard
Custom
In All Tabs
Terms
Competitive
Expectations
Requisition
Column Description
Field Label
WebTop
Career Section
Reports
Contextualized Display
Requisition FieldsRequisition fields are used to provide additional information about requisitions or to include information that will be used by recruiters and hiring managers and that is not available in the system. The information can also be displayed in requisitions and Career Sections.
Requisition fields can be contextualized, that is associated to locations, organizations and job fields.
Predefined fields provided by the system.Note: Standard fields cannot be customized or edited. They can only be made available in the Staffing WebTop or Career Sections.
Customized fields that you can create to collect information to meet specific organization requirements.
Fields that are common to all the other tabs.
Information related to the terms of the offer such as expiration date and letter used.
Information on competitive offers made to the candidate.
Information related to candidate expectations.
Information from the requisition such as maximum salary.
Indicates the field name (unique identifier.) Click the field label link to open the Field Editor.
Indicates if the field is available in the Staffing WebTop (Available/Not Available).
Indicates if the field is available in Career Sections (Available/Not Available).
Indicates if the field is available in Custom Reports Universe (Available/Not Available). This column is only available on the Custom tab and if the user has the permissions to generate custom reports.
Indicates if the field is associated to locations, organizations and job fields. See “Associating Fields to the OLF” on page 5-6.

CONFIDENTIAL INFORMATION Page 5-5
Administrator WebTop User Manual Chapter 5 - Fields
Path: Setup/Global Setup/Fields/Requisition
Tab Description
Standard
Custom
Column Description
Field Label
WebTop
Career Section
Reports
Contextualized Display
Predefined fields provided by the system. Note: Standard fields cannot be customized or edited. They can only be made available in the Staffing WebTop or Career Sections.
Customized fields that you can create to collect information to meet specific organization requirements.
Indicates the field name (unique identifier.) Click the field label link to open the Field Editor.
Indicates if the field is available in the Staffing WebTop (Available/Not Available).
Indicates if the field is available in Career Sections (Available/Not Available).
Indicates if the field is available in Custom Reports Universe (Available/Not Available). This column is only available on the Custom tab and if the user has the permissions to generate custom reports.
Indicates if the field is associated to locations, organizations and job fields. See “Associating Fields to the OLF” on page 5-6.

CONFIDENTIAL INFORMATION Page 5-6
Administrator WebTop User Manual Chapter 5 - Fields
SelectionsA selection is a list of available elements that can be used in fields throughout the application. For example, the selection used in the Employee Status field contains the following elements: Regular, Temporary, Contractual, etc. The list of elements is displayed in the Employee Status field. This field can be accessed by a Staffing WebTop user or by a candidate in a Career Section. Selections are used to define fields.
Associating Fields to the OLFCertain fields can be contextualized that is, associated to organizations, locations and job fields in order to make them relevant according to the context.
When managing fields in the Administrator WebTop, you can specify a specific context for certain fields. Therefore, when creating a requisition in the Staffing WebTop and Manager WebTop, only fields relevant to the context are displayed.
Not all fields can be contextualized. See “Contextualized Fields” on page 5-7. However, all user-defined fields could be contextualized.
The following setting must be activated: Allow contextualized display of the requisition fields (see “Requisitions Settings” on page 4-12).
To view the properties of a field as well as its Organization, Location and Job Field associations, click on the name of a field. The following page appears.
Tab Description
Standard Predefined selections provided by the system. Standard selections cannot be customized nor edited. They can only be made available in the Staffing WebTop or Career Sections. You can add elements to a standard selection. You can also remove elements from a standard selection.
Custom Selections that you can create or edit to collect information based on specific organization requirements. You can add elements to custom selections.
Small Selections
The Selection Editor lets you create and edit selections that contain elements.
Large Selections
The Selection Editor lets you create and edit large user-defined selections (LUDS) and selection elements.

CONFIDENTIAL INFORMATION Page 5-7
Administrator WebTop User Manual Chapter 5 - Fields
To edit the properties of a field, simply click Edit in the Field Properties section. The Field Editor window opens. From this window, you can define the field availability (In WebTop or In Career Section, Criterion in Candidate Search, In Custom Report Universe).
To edit the organizations, locations and job fields associated to a field, click Edit in the Display Context section. The Display Context window opens. From this window, you can add and remove organizations, locations and job fields.
The system applies the AND operator between Organizations, Locations and Job Fields entities. However, the OR operator is applied between elements of the same entity.
In the following example, a field would be displayed if Canada (or any of its children) AND Architecture were selected.
In the following example, a field would be displayed if Canada AND Architecture were selected, or if United States AND Architecture were selected.
Contextualized Fields
The table below indicates fields that can be contextualized and those that cannot. Note that all requisition, offer and department user-defined-fields can be contextualized.
Location CanadaJob Field Architecture
Location CanadaLocation United StatesJob Field Architecture

CONFIDENTIAL INFORMATION Page 5-8
Administrator WebTop User Manual Chapter 5 - Fields
Tab FieldName ContextualizableLogistics Abstract YesLogistics Collaborators YesLogistics Department NoLogistics Education Level YesLogistics Education Program YesLogistics Employee Status YesLogistics Hiring Manager YesLogistics Hiring Manager Assistant YesLogistics Job NoLogistics Job Level YesLogistics Job Type YesLogistics Justification YesLogistics Number of Openings NoLogistics Number of Openings - Unlimited YesLogistics Organization NoLogistics Position NoLogistics Primary Location NoLogistics Recruiter YesLogistics Recruiter Assistant YesLogistics Requisition Number NoLogistics Schedule YesLogistics Shift YesLogistics Target Start Date YesLogistics Template Used NoLogistics Title NoLogistics Title (by Manager) NoLogistics Travel YesLogistics User Group No Administration Additional Information Yes Administration Annual Bonus Yes Administration Attached Files Yes Administration Automatically change status to declined Yes Administration Automatically reject all applications Yes Administration Extend more offers Yes Administration Candidate Selection Workflow No Administration Car Allowance Yes Administration Citizenship Status Yes Administration Commission Yes Administration Commission Package No Administration Currency - Bonus Section No Administration Currency - Budget Section No Administration Currency - Compensation Section No Administration EEO Establishment No Administration EEO Job Category No Administration EEO Job Group No Administration Employee Referral Bonus Activated Yes

CONFIDENTIAL INFORMATION Page 5-9
Administrator WebTop User Manual Chapter 5 - Fields
Tab FieldName Contextualizable Administration Employee Referral Bonus Amount No Administration Employment Equity Occupational Group No Administration Expense Account Yes Administration High Quartile Salary Yes Administration Job Grade Yes Administration Low Quartile Salary Yes Administration Maximum Salary Yes Administration Midpoint Salary Yes Administration Minimum Salary Yes Administration Option Package No Administration Options Yes Administration Other Bonus Yes Administration Other Compensation Yes Administration Other Costs Yes Administration Overtime Status Yes Administration Pay Basis No Administration Public Referral Bonus Activated Yes Administration Public Referral Bonus Amount No Administration Relocation Amount Yes Administration Relocation Costs Yes Administration Relocation Package No Administration Sign-on Bonus Yes Administration Sourcing Budget Yes Administration Stock Yes Administration Stock Package No Administration Travel Costs Yes Administration Vacation Yes Administration Vacation Units No Description (Internal) Closing Date (Period for Applying) - Internal Yes Description (Internal) Contact Email - Internal Yes Description (Internal) Contact Name - Internal Yes Description (Internal) Description - Internal No Description (Internal) Opening Date (Period for Applying) - Internal Yes Description (Internal) Qualifications - Internal Yes Description (External) Closing Date (Period for Applying) - External Yes Description (External) Contact Email - External Yes Description (External) Contact Name - External Yes Description (External) Description - External No Description (External) Job Board Summary Yes Description (External) Opening Date (Period for Applying) - External Yes Description (External) Qualifications - External Yes

CONFIDENTIAL INFORMATION Page 5-10
Administrator WebTop User Manual Chapter 5 - Fields
Standard Fields
Standard fields are predefined fields provided by the system used in the Staffing WebTop, Manager WebTop and Career Sections to display information that will be used by other recruiters and hiring managers and that is not already available in the application.
It is not possible to add, create or modify standard fields. It is only possible to make them available.
Making Standard Fields AvailableEach standard field can be made available in the Staffing WebTop, Manager WebTop and Career Sections and can be used as search criterion.
Path: Setup/Global Setup/Fields/Candidate/Standard tab
The standard field description applies to: Candidate, Offer, Requisition and Selections. Standard fields are not available for Department.
1. Select Candidate, then select the Standard tab.
2. In the Candidate Fields list, select a field. The Field Editor opens.
3. In the Availability section, you can choose to make the field available in the WebTop (Staffing WebTop and Manager WebTop), and/or Career Sections.
4. Select Criterion in Candidate Search if you also want to use a standard field as a search criterion.
5. Click Done.
Criterion in Candidate Search is not available for Offer and Requisition fields.

CONFIDENTIAL INFORMATION Page 5-11
Administrator WebTop User Manual Chapter 5 - Fields
Fields will impact various parts of the application.
Fields can also be used as variables in the Correspondence Manager.
Fields will impact various parts of the application. The following table gives a brief summary of these impacts.
Candidates
Availability Impact
Career Section Staffing WebTop and Manager WebTop
Career Section Staffing WebTop and Manager WebTop
Yes Yes Editable in appropriate blocks Editable in candidate files
Yes No Editable in appropriate blocks Read-only in candidate files
No Yes N/A Editable in candidate files
No No N/A N/A
Requisitions
Availability Impact
Career Section Staffing WebTop and Manager WebTop
Career Section Staffing WebTop and Manager WebTop
Yes Yes Read-only in job descriptionEditable in the Requisition Wizard
Yes No Impossible combination
No Yes N/AEditable in the Requisition Wizard
No No N/A N/A
Requisitions
Type of Field Staffing WebTop and Manager WebTop Career Sections Setup
Personal Information (PI)
Resume tab in Candidate File (read-only and edit mode)
Personal Information, Referrer Personal Information, and Basic Profile Information Blocks
On the Fields tab of the Application Flows (CSB) for 3 blocks: PI, RPI, BP
Education (ED)Resume tab in Candidate File (read-only and edit mode)
EducationOn the Fields tab of the Application Flows (CSB) for 1block: ED
Work Experience (WE)Resume tab in Candidate File (read-only and edit mode)
Work ExperienceOn the Fields tab of the Application Flows (CSB) for 1block: WE
RequisitionLogistics, Administration, Description (External and Internal)
At the end of the Job Description Page (read-only)
On the Job Description Properties tab for CSB

CONFIDENTIAL INFORMATION Page 5-12
Administrator WebTop User Manual Chapter 5 - Fields
Requisitions
Type of Field Staffing WebTop and Manager WebTop Career Section Setup
LogisticsEditable on the Logistics tab of the Requisition Wizard
Read-only in the Job Description Page of a Career Section
On the Job Description Properties tab of the Career Section Builder
AdministrationEditable on the Administration tab of the Requisition Wizard
Read-only in the Job Description Page of a Career Section
On the Job Description Properties tab of the Career Section Builder
Internal DescriptionEditable on the Internal Description tab of the Requisition Wizard
Read-only in the Job Description Page of a Career Section
On the Job Description Properties tab of the Career Section Builder
External DescriptionEditable on the External Description tab of the Requisition Wizard
Read-only in the Job Description Page of a Career Section
On the Job Description Properties tab of the Career Section Builder

CONFIDENTIAL INFORMATION Page 5-13
Administrator WebTop User Manual Chapter 5 - Fields
Custom Fields
Custom fields are used throughout the Staffing WebTop, Manager WebTop and Career Sections. The Field Editor lets you create customized information that can be included in job templates and in requisitions. You can also create fields that will be used to collect information from candidates according to your specific needs and requirements.
Using the Field Editor, you can create new fields, and edit or delete existing fields.
Custom fields are divided in three groups:
• Basic Types • Standard Predefined Selections• Custom Selections
The maximum number of custom fields for each type of field is as follows:
• Candidate: 50• Department: 50• Offer: 50• Requisition: 50
Creating Custom FieldsPath: Setup/Global Setup/Fields/select an element/Custom tab
1. Click New... The Field Editor opens.
The Custom Field description sequence varies from one type of field to another (Candidate, Department, Offer and Requisition).
If you are using HTML tags for custom fields, verify that all tags are properly written to prevent inappropriate page behavior in Candidate Files, Capture Resume and Career Sections.
You can create the following basic types of fields:
• Text• Multilingual Text• Number• Date• Selection (Elements created by the system administrator for specific requirements).
Basic type fields are displayed at the top of the Type list, before the first divider.

CONFIDENTIAL INFORMATION Page 5-14
Administrator WebTop User Manual Chapter 5 - Fields
Creating Text Fields
1. In the Type list, select Text.
2. In the Availability block:
• Select In WebTop if you want to make the new field available in the Staffing WebTop and the Manager WebTop.
• Select In Career Section if you want to make the new field available in Career Sections. • Select Criterion in Candidate Search if you want to use the field as a search criteria in
Candidate Search.
Criterion in Candidate Search is not available for Department and Offer custom fields.
• Select In Candidate Tracking if you want to track changes made to custom candidate fields.• Select In Custom Report Universe if you want to make the field available in custom reports.
The maximum number of custom fields available for the Custom Report Universe is 50.
3. Enter a field name (for internal use). The name in this field must be unique. The name appears as a link in the list of selections.
4. If you’re creating a custom Candidate tab for Personal Info, Work Experience or Education, you can enter Help text in the Help text displayed in Career Section field. The Help text will be displayed in the career section directly below the user-defined field, providing candidates with an explanation of the field.
Taleo clients who have activated multiple languages will typically enter translations of the Help text for those languages. If translations are not provided, the system copies the Help text into the other languages and adds the wording “not translated” at the end.
Help text for CUDFs can contain up to 1,000 characters (spaces count as characters). It is recommended, however, that Help text be kept as short as possible: this improves readability and ensures that the text does not compete against more important information for the user’s attention.
Help text for CUDFs is not displayed in the preview of the Custom Field Editor, nor is it displayed in the Staffing WebTop or Manager WebTop. This new Help text is displayed in the career section Preview (Career Section URL).
5. Enter a label name. This is the name that will be displayed to candidates in the Career Section, and to recruiters and hiring managers in the Requisition Wizard.

CONFIDENTIAL INFORMATION Page 5-15
Administrator WebTop User Manual Chapter 5 - Fields
6. Enter a short label. This label name will be used in lists.
Short Label is not available for Department, Requisition and Offer custom fields.
7. Translate the label into all available languages. Click the language icons or flags available at the upper right of the page.
8. Enter information in the Attributes section.
• Max. Num. Chars.: Enter a number to set the maximum number of characters in this field.• Width: Enter a number to set the width of the field in terms of characters. For example, a
value of 20 means that the field will be 20-character wide. • Num. of lines: Enter a total number of lines for this field.• Default: Enter the default text that will appear in the Text field when it is displayed. The text
must respect the format settings listed previously. 9. Click Preview to view the new field. If you want to make changes, close the Preview window and
make all the changes necessary.
10. Click Save.
Creating Multilingual Text Fields
1. In the Type list, select Multilingual Text.
2. In the Availability section:
• Select In WebTop if you want to make the new field available in the Staffing WebTop and Manager WebTop.
• Select In Career Section if you want to make the new field available in Career Sections. • Select Criterion in Candidate Search if you want to use the field as a search criteria in
Candidate Search.
Criterion in Candidate Search is not available for Department, and Offer custom fields.
• Select In Candidate Tracking if you want to track changes made to custom candidate fields.• Select In Custom Report Universe if you want to make the field available in custom reports.
The maximum number of custom fields available for the Custom Report Universe is 50.
3. Enter a field name (for internal use). The name in this field must be unique. The name appears as a link in the list of Selections.
4. If you’re creating a custom Candidate tab for Personal Info, Work Experience or Education, you can enter Help text in the Help text displayed in Career Section field. The Help text will be
CONFIDENTIAL INFORMATION Page 5-16
Administrator WebTop User Manual Chapter 5 - Fields
displayed in the career section directly below the user-defined field, providing candidates with an explanation of the field.
Taleo clients who have activated multiple languages will typically enter translations of the Help text for those languages. If translations are not provided, the system copies the Help text into the other languages and adds the wording “not translated” at the end.
Help text for CUDFs can contain up to 1,000 characters (spaces count as characters). It is recommended, however, that Help text be kept as short as possible: this improves readability and ensures that the text does not compete against more important information for the user’s attention.
Help text for CUDFs is not displayed in the preview of the Custom Field Editor, nor is it displayed in the Staffing WebTop or Manager WebTop. This new Help text is displayed in the career section Preview (Career Section URL).
5. Enter a label name. This is the name that will be displayed to candidates in the Career Section, and to recruiters and hiring managers in the Requisition Wizard.
6. Enter a short label. This label name will be used in lists.
Short Label is not available for Department, Requisition, and Offer custom fields.
7. Translate the label into all available languages. Click the language icons or flags available at the upper right of the page.
8. Enter information in the Attributes section.
• Max. Num. Chars.: Enter a number to set the maximum number of characters in this field.• Width: Enter a number to set the width of the field in terms of characters.
For example, a value of 20 means that the field will be 20-character wide. • Num. of lines: Total number of lines for this field.• Default: Enter the default text that will appear in the Text field when it is displayed. The text
must respect the format settings listed previously. 9. Click Preview to view the new field. If you want to make changes, close the Preview window and
make all the changes necessary.
10. Click Save.
Creating Number Fields
1. In the Type list, select Number.
2. In the Availability block:
• Select In WebTop if you want to make the new field available in the Staffing WebTop and Manager WebTop.
• Select In Career Section if you want to make the new field available in Career Sections.

CONFIDENTIAL INFORMATION Page 5-17
Administrator WebTop User Manual Chapter 5 - Fields
• Select Criterion in Candidate Search if you want to use the field as a search criteria in Candidate Search.
Criterion in Candidate Search is not available for Department and Offer custom fields.
• Select In Candidate Tracking if you want to track changes made to custom candidate fields.• Select In Custom Report Universe if you want to make the field available in custom reports.
The maximum number of custom fields available for the Custom Report Universe is 50.
3. Enter a field name (for internal use). The name in this field must be unique. The name appears as a link in the list of Selections.
4. If you’re creating a custom Candidate tab for Personal Info, Work Experience or Education, you can enter Help text in the Help text displayed in Career Section field. The Help text will be displayed in the career section directly below the user-defined field, providing candidates with an explanation of the field.
Taleo clients who have activated multiple languages will typically enter translations of the Help text for those languages. If translations are not provided, the system copies the Help text into the other languages and adds the wording “not translated” at the end.
Help text for CUDFs can contain up to 1,000 characters (spaces count as characters). It is recommended, however, that Help text be kept as short as possible: this improves readability and ensures that the text does not compete against more important information for the user’s attention.
Help text for CUDFs is not displayed in the preview of the Custom Field Editor, nor is it displayed in the Staffing WebTop or Manager WebTop. This new Help text is displayed in the career section Preview (Career Section URL).
5. Enter a label name. This is the name that will be displayed to candidates in the Career Section, and to recruiters and hiring managers in the Requisition Wizard.
6. Enter a short label. This label name will be used in lists.
Short Label is not available for Department, Requisition, and Offer custom fields.
7. Translate the label into all available languages. Click the language icons or flags available at the upper right of the page.
8. Enter information in the Attributes section:
• Specific Number Type: Select a number type: Not Specified, Number, Amount.
CONFIDENTIAL INFORMATION Page 5-18
Administrator WebTop User Manual Chapter 5 - Fields
• Num. of Decimals: Enter a number to set the maximum number of decimals in this field (numeric value only).
Decimals count as digits. Therefore, the value entered in Num. of Decimals must or lower to the number entered in the Maximum field.
• Width: Enter a number to set the width of the field in terms of characters. For example, a value of 20 means that the field will be 20-character wide.
• Maximum: Enter a number to set the maximum number of digits in this field, including decimals.
• Default: Enter the number that will appear in the Number field by default. This number must reflect the settings entered previously. The Default value must be equal to, or higher, or lower than the maximum number of digits.
9. Click Preview to view the new field. If you want to make changes, close the Preview window and make all the changes necessary.
10. Click Save.
Creating Date Fields
1. In the Type list, select Date.
2. In the Availability block:
The maximum number of available custom fields for Candidates is 50. Once you have reached this number, the following error message is displayed: The maximum number of custom fields has been reached.
• Select In WebTop if you want to make the new field available in the Staffing WebTop and the Manager WebTop.
• Select In Career Section if you want to make the new field available in Career Sections. • Select Criterion in Candidate Search if you want to use the field as a search criterion in
Candidate Search.
Criterion in Candidate Search is not available for Department and Offer custom fields.
• Select In Candidate Tracking if you want to track changes made to custom candidate fields.• Select In Custom Report Universe if you want to make the field available in custom reports.
The maximum number of custom fields available for the Custom Report Universe is 50.

CONFIDENTIAL INFORMATION Page 5-19
Administrator WebTop User Manual Chapter 5 - Fields
3. Enter a field name (for internal use). The name in this field must be unique. The name appears as a link in the list of Selections.
4. If you’re creating a custom Candidate tab for Personal Info, Work Experience or Education, you can enter Help text in the Help text displayed in Career Section field. The Help text will be displayed in the career section directly below the user-defined field, providing candidates with an explanation of the field.
Taleo clients who have activated multiple languages will typically enter translations of the Help text for those languages. If translations are not provided, the system copies the Help text into the other languages and adds the wording “not translated” at the end.
Help text for CUDFs can contain up to 1,000 characters (spaces count as characters). It is recommended, however, that Help text be kept as short as possible: this improves readability and ensures that the text does not compete against more important information for the user’s attention.
Help text for CUDFs is not displayed in the preview of the Custom Field Editor, nor is it displayed in the Staffing WebTop or Manager WebTop. This new Help text is displayed in the career section Preview (Career Section URL).
5. Enter a label name. This is the name that will be displayed to candidates in the Career Section, and to recruiters and hiring managers in the Requisition Wizard.
6. Enter a short label. This label name will be used in lists.
Short Label is not available for Department, Requisition, and Offer custom fields.
7. Translate the label into all available languages. Click the language icons or flags available at the upper right of the page.
8. Enter the information in the Attributes section.
• First Year in Range: Select the earliest year to be displayed.• Last Year in Range: Select the last year to be displayed.• Display Order: Select the order in which the years will be displayed. • Day Displayed: Select this check box to display the day.
9. Click Preview to view the new field. If you want to make changes, close the Preview window and make all the changes necessary.
10. Click Save.
Maximum number of custom fields for Candidate: 50 Maximum number of custom fields for Department: 50 Maximum number of custom fields for Offer: 50 Maximum number of custom fields for Requisition: 50
Creating Selections
1. In the Type list, select Selection. The Field Editor opens.
2. In the Availability block:
CONFIDENTIAL INFORMATION Page 5-20
Administrator WebTop User Manual Chapter 5 - Fields
• Select In WebTop if you want to make the new field available in the Staffing WebTop and Manager WebTop.
• Select In Career Section if you want to make the new field available in Career Sections. • Select Criterion in Candidate Search if you want to use the field as a search criteria in
Candidate Search.
Criterion in Candidate Search is not available for Department and Offer custom fields.
• Select In Candidate Tracking if you want to track changes made to custom candidate fields.• Select In Custom Report Universe if you want to make the field available in custom reports.
The maximum number of custom fields available for the Custom Report Universe is 50.
3. Enter a field name (for internal use). The name in this field must be unique. The name appears as a link in the list of Selections.
4. If you’re creating a custom Candidate tab for Personal Info, Work Experience or Education, you can enter Help text in the Help text displayed in Career Section field. The Help text will be displayed in the career section directly below the user-defined field, providing candidates with an explanation of the field.
Taleo clients who have activated multiple languages will typically enter translations of the Help text for those languages. If translations are not provided, the system copies the Help text into the other languages and adds the wording “not translated” at the end.
Help text for CUDFs can contain up to 1,000 characters (spaces count as characters). It is recommended, however, that Help text be kept as short as possible: this improves readability and ensures that the text does not compete against more important information for the user’s attention.
Help text for CUDFs is not displayed in the preview of the Custom Field Editor, nor is it displayed in the Staffing WebTop or Manager WebTop. This new Help text is displayed in the career section Preview (Career Section URL).
5. Enter a label name. This is the name that will be displayed to candidates in the Career Section, and to recruiters and hiring managers in the Requisition Wizard.
6. Enter a short label. This label name will be used in lists.
Short Label is not available for Department, Requisition, and Offer custom fields.
7. Translate the label into all available languages. Click the language icons or flags available at the upper right of the page.

CONFIDENTIAL INFORMATION Page 5-21
Administrator WebTop User Manual Chapter 5 - Fields
8. In the New/Modified Element field, enter new elements. Click Apply after entering each new element.
9. To modify an existing element, select the element in the Available Elements list. The element will appear in the New/Modify Element field. Make the necessary changes and click Apply.
10. To activate an available element, select the desired element in the Available Elements list. Click Add. The available element appears in the Active Element list.
11. To deactivate an active element, click the desired element in the Active Element list. Click Remove. The element appears in the Available Elements list.
12. To reorder active elements, click the Up or Down arrows.
13. Select the answer format in the Single Answer and Multiple Answers blocks then click Save.
• Single Answer: Bullets or list.• Multiple answers: Check box or list.
14. Click Preview to view the new field. If you want to make changes, close the Preview window and make all the changes necessary.
15. When all the changes are made, click Done.
Creating Standard Predefined Selections
Standard Predefined Selections are always available. They appear under the first divider in the Type list. It is possible to select a default element in the list of available elements related to a Standard Selection Field:
• Advance Notice• Currency• Education Level • Employee Status• Job Level• Job Type• Minimum Salary• Schedule• Shift• Travel

CONFIDENTIAL INFORMATION Page 5-22
Administrator WebTop User Manual Chapter 5 - Fields
To create Standard Predefined selections:
1. In the Type list, select Education Level. A list of all available education level elements appears.
2. In the Availability block:
• Select In WebTop if you want to make the new field available in the Staffing WebTop and Manager WebTop.
• Select In Career Section if you want to make the new field available in Career Sections. • Select Criterion in Candidate Search if you want to use the field as a search criterion in
Candidate Search.
Criterion in Candidate Search is not available for Department and Offer custom fields.
• Select In Candidate Tracking if you want to track changes made to custom candidate fields.• Select In Custom Report Universe if you want to make the field available in custom reports.
The maximum number of custom fields available for the Custom Report Universe is 50.
3. Enter a field name (for internal use). The name in this field must be unique. The name appears as a link in the list of Selections.
4. If you’re creating a custom Candidate tab for Personal Info, Work Experience or Education, you can enter Help text in the Help text displayed in Career Section field. The Help text will be displayed in the career section directly below the user-defined field, providing candidates with an explanation of the field.
Taleo clients who have activated multiple languages will typically enter translations of the Help text for those languages. If translations are not provided, the system copies the Help text into the other languages and adds the wording “not translated” at the end.
Help text for CUDFs can contain up to 1,000 characters (spaces count as characters). It is recommended, however, that Help text be kept as short as possible: this improves readability and ensures that the text does not compete against more important information for the user’s attention.
Help text for CUDFs is not displayed in the preview of the Custom Field Editor, nor is it displayed in the Staffing WebTop or Manager WebTop. This new Help text is displayed in the career section Preview (Career Section URL).
5. Enter a label name. This is the name that will be displayed to candidates in the Career Section, and to recruiters and hiring managers in the Requisition Wizard.
Education Level is used as an example.

CONFIDENTIAL INFORMATION Page 5-23
Administrator WebTop User Manual Chapter 5 - Fields
6. Enter a short label. This label name will be used in lists.
Short Label is not available for Department, Requisition, and Offer custom fields.
7. Translate the label into all available languages. Click the language icons or flags available at the upper right of the page.
8. Select an active element.
This list of elements will vary depending on the type of Predefined Selection you have chosen.
9. Select the answer format in the Single Answer and Multiple Answers blocks then click Save.
• Single Answer: Bullets or list.• Multiple answers: Check box or list.
The information requested in this section will vary depending on the type of Predefined Selection you have chosen.
10. Click Preview to view the new field. If you want to make changes, close the Preview window and make all the changes necessary.
11. When all the changes are made, click Done.
Creating Custom Selections
Custom selections are available for all fields, including large user-defined selections (LUDS). They are displayed at the bottom of the Type list, after the second divider.
1. In the Type list, under the second divider line, select an already created custom selection.
The Type list determines the type of data that will be collected from candidates. The Type cannot be modified once the field has been saved.
2. In the Availability block:
• Select In WebTop if you want to make the new field available in the Staffing WebTop and Manager WebTop.
• Select In Career Section if you want to make the new field available in Career Sections.

CONFIDENTIAL INFORMATION Page 5-24
Administrator WebTop User Manual Chapter 5 - Fields
• Select Criterion in Candidate Search if you want to use the field as a search criteria in Candidate Search.
Criterion in Candidate Search is not available for Department and Offer custom fields.
• Select In Candidate Tracking if you want to track changes made to custom candidate fields.• Select In Custom Report Universe if you want to make the field available in custom reports.
The maximum number of custom fields available for the Custom Report Universe is 50.
3. Enter a field name (for internal use). The name in this field must be unique. The name appears as a link in the list of selections.
4. If you’re creating a custom Candidate tab for Personal Info, Work Experience or Education, you can enter Help text in the Help text displayed in Career Section field. The Help text will be displayed in the career section directly below the user-defined field, providing candidates with an explanation of the field.
Taleo clients who have activated multiple languages will typically enter translations of the Help text for those languages. If translations are not provided, the system copies the Help text into the other languages and adds the wording “not translated” at the end.
Help text for CUDFs can contain up to 1,000 characters (spaces count as characters). It is recommended, however, that Help text be kept as short as possible: this improves readability and ensures that the text does not compete against more important information for the user’s attention.
Help text for CUDFs is not displayed in the preview of the Custom Field Editor, nor is it displayed in the Staffing WebTop or Manager WebTop. This new Help text is displayed in the career section Preview (Career Section URL).
5. Enter a label name. This is the name that will be displayed to candidates in the Career Section, and to recruiters and hiring managers in the Requisition Wizard.
6. Enter a short label. This label name will be used in lists.
Short Label is not available for Department, Requisition, and Offer custom fields.
7. Translate the label into all available languages. Click the language icons or flags available at the upper right of the page.
8. In the Attributes section, select the Quick Entry Properties.
• Display: To display the Code and/or the Description • Validation: To validate the Code and/or the Description
CONFIDENTIAL INFORMATION Page 5-25
Administrator WebTop User Manual Chapter 5 - Fields
9. Select the selector window properties.
• Display the folder tree: If you want to view folders and sub folders.• Display Start Date and End Date: If you want to view the start date and end date.
The information in this section will vary depending on the selection Type you have chosen.
10. Click Preview to view the new field. If you want to make changes, close the Preview window and make all the changes necessary.
11. When all the changes are made, click Done.

CONFIDENTIAL INFORMATION Page 5-26
Administrator WebTop User Manual Chapter 5 - Fields
Deleting Custom FieldsPath: Setup/Global Setup/Fields
1. In Candidate, Department, Offer, Requisition or Selection, click the Custom tab.
2. Select the field that you want to delete. The Field Editor opens.
3. Click .
It is not possible to delete a custom field that has been used (on which data has already been collected) or that is available in career sections.
It is not possible to delete a standard field.
Selections Overview
A selection is a list of available elements that can be used in fields throughout the application. For example, the selection used in the Employee Status field contains the following elements: Regular, Temporary, Contractual, etc. The list of elements is displayed in the Employee Status field. This field can be accessed by a Staffing WebTop user or by a candidate in a Career Section. Selections are used to define fields.
There are two types of selections:
• Standard selections: Standard selections are predefined selections provided by the system. Standard selections cannot be created, customized nor edited. They can only be made available in the Staffing WebTop or Career Sections. You can add or remove elements from standard selection.
• Custom selections: You can create or edit custom selections (customized selections) to collect information according to specific organization requirements. You can add or remove elements from custom selections.
Small Standard SelectionsPath: Setup/Global Setup/Fields/Selections/Small Selections tab/Standard tab
Adding Elements to a Small Standard Selection
Path: Setup/Global Setup/Fields/Selections/Small Selections tab/Standard tab
1. In the Selection List, select a standard selection. The Selection Editor opens.
2. Select an element in the Available Elements list.
3. Click Add. The selected element appears in the Active Elements list.
4. When all elements are selected, click Done.

CONFIDENTIAL INFORMATION Page 5-27
Administrator WebTop User Manual Chapter 5 - Fields
Information on Currency
The currency listed first in the Active Elements section will be used as the default currency in the Regional Settings.
For example, if US Dollar (USD) is the first currency listed in the Active Elements list, US Dollar (USD) will be the default currency in the Regional Settings (Path: Setup/Global Setup/Regional Settings).
Countries with specific country codes (for example en-EN, en-GB, en-AU) have specific default currency values as defined in Regional settings. In this case, the currency in Regional Settings overrides the default currency in Setup/Global Setup/Fields/Selections/Small Selections/Standard/Currency.
The currency selected in Setup/Global Setup/Fields/Selections/Small Selections/ Standard/Currency will apply to all countries that do not have a specific country code.
Removing Elements from a Small Standard Selection
Path: Setup/Global Setup/Fields/Selections/Small Selections tab/Standard tab
1. In the Selection List, select a standard selection. The Selection Editor opens.
2. Select an element in the Active Elements list.
3. Click Remove. The selected element appears in the Available Elements list.
4. When all elements are removed, click Done.
Creating New Elements for a Small Standard Selection
You can create new elements for the following small standards selections:
• Commission Package• Option Package• Relocation Package• Stock PackagePath: Setup/Global Setup/Fields/Selections/Standard tab/Small Selections tab
The following procedure also applies to Commission Package, Option Package, Relocation Package and Stock Package.
1. In the Selection List, select Commission Package. The Selection Editor opens
2. Enter a new name in the New/Modified Element field.
3. Click Apply. The new element will appear in the Available Elements list.
4. To activate the new element, select the element in Available Elements, then click Add. The selected element will appear in Active Elements.
CONFIDENTIAL INFORMATION Page 5-28
Administrator WebTop User Manual Chapter 5 - Fields
Deleting an Element from a Small Standard Selection
You can delete elements from the following small standards selections:
• Commission Package• Option Package• Relocation Package• Stock PackagePath: Setup/Global Setup/Fields/Selections/Standard tab/Small Selections tab
The following procedure also applies to Commission Package, Option Package, Relocation Package and Stock Package.
1. In the Selection List, select Commission Package. The Selection Editor opens.
2. In Available Elements, select an element.
3. Click Delete. The element is removed from the list.
Elements that have already been saved cannot be deleted. They can only be removed from the Active Elements list.
Small Custom SelectionsThe Selection Editor lets you:
• Create new custom selections.• Edit and delete existing custom selections.• Create, modify and delete elements in a custom selection.• Add available elements to the active elements list.• Remove available elements from the Active Elements list.• Delete available elements.
Creating Small Custom Selections
Path: Setup/Global Setup/Fields/Selections/Custom tab
1. In the Selection List, click the Custom tab, then click New... The Selection Editor opens.
2. Enter a name in the Name field. Each selection has a unique ID (Name). The selection name appears as a link in the Selection List.
The name of the selection cannot be modified once the selection is saved.
3. Enter a name in the New/Modified Element field.

CONFIDENTIAL INFORMATION Page 5-29
Administrator WebTop User Manual Chapter 5 - Fields
4. Click Apply to save the new element name. The name of the new element is automatically displayed in the Available Elements list.
5. To make an existing element available, select the element from the Available Elements list then click Add.
6. To remove an active element, select the element from the Available Elements list then click Remove.
7. To reorder elements in the Active Elements list, use the Up and Down arrows.
8. Click Done.
To delete an element, first remove the element from the Active Element list. Select the element from the Available Elements list. The selected element appears in the New/Modified Element field. Click Delete.
Modifying Elements in Small Custom Selections
Path: Setup/Global Setup/Fields/Selections/Custom tab/Selection Editor
1. In the Selection List, click the Custom tab, then click the name of the selection you want to modify. The Selection Editor opens.
2. In the Available Elements list, select the element you want to modify. The name of the selected element will appear in the New/Modified Element field.
3. Modify the element name, then click Apply to confirm the modification.
It is not possible to delete an element from a selection once it has been saved.
Large Custom Selections (LUDS)The Selection Editor lets you create and edit large custom selections (Large User-Defined Selections–LUDS) and selection elements. The Integration Toolkit allows you to import LUDS when in Maintenance Mode.
Standard Large Selections List Description
Path: Setup/Global Setup/Fields/Selections/Large Selections tab/ Standard tab
It is not possible to delete an element from a selection once the selection has been saved.
Column Description
Code Lists selections by code name. The code is also a means of sorting selections in the Selection List.
Name Indicates the name of the Large Selection.

CONFIDENTIAL INFORMATION Page 5-30
Administrator WebTop User Manual Chapter 5 - Fields
Selection Element List Description
The Selection Element List displays information such as Code, Description, Status as well as Start Date and End Date for selection elements.
Path: Setup/Global Setup/Fields/Selections/Selection List/Large Selections tab/Custom tab – In the Selection List, click a number in the Number of Elements column
The Show list allows you to filter element list by code, description or status.
Creating Large Custom Selections
Path: Setup/Global Setup/Fields/Selections/Large Selections tab/Custom tab
1. In the Selection List, click New... The Selection Editor opens.
2. In the Identification section, enter a code to identify the large selection with a unique code. The code is also a means of sorting selections in the Selection List.
3. Enter a name in the Name field.
4. In the Language Requirements section, specify if descriptions are required in WebTop languages or if they are required in WebTop and content languages. After the large custom selection is created (including activated elements), it is no longer possible to edit this section.
If you the selection to be displayed in a career section, you must select “Require descriptions in WebTop and content languages”. This will enable you to translate the large custom selection into all languages available for the career section.
5. Select Activate effective dating if you want selections to be activated for specific periods of time.
6. Indicate the mapping structure type (Organization, Location or Job) for the selections. Select the information that will allow the system to map properly the selection to the elements within the application.
Number of Elements
Indicates the number of elements included in each Large Custom Selection.
Column Description
Code Lists the elements by code name.
Description Provides a description of the Large selection.
Active Indicates if the Large Selection is active (check mark) or inactive (no check mark).
Start Date Indicates when the element will start being used.
End Date Indicates when the elements will stop being used.
Start Date and End Date will be available only if selections have a start date and an end date. Start Date and End Date will not be available if the selection is Always Active.

CONFIDENTIAL INFORMATION Page 5-31
Administrator WebTop User Manual Chapter 5 - Fields
7. Select Require mapping for every element if you want every element to be mapped to the Associated Structure Type selected.
8. Click Done.
Editing Large Custom Selections
Path: Setup/Global Setup/Fields/Selections/Large Selections tab/Custom tab
1. In the Selection List, click the selection you want to edit. The Selection Editor opens.
2. Make the changes in the Identification, Language Requirements, Effective Dating, and Mapping sections.
3. Click Done.
Deleting Large Custom Selections
Path: Setup/Global Setup/Fields/Selections/Large Selections tab/Custom tab
1. In the Selection List, select the check box next to the selection you want to delete.
2. Click .
Activating Effective Dating in a Large Custom Selection
Path: Setup/Global Setup/Fields/Selections/Large Selections tab/Standard tab
1. In the Selection List, select a selection. The Selection Editor opens.
2. In the Effective Dating section, select Activate effective dating.
3. Click Done.
Creating Large Custom Selection Elements
Path: Setup/Global Setup/Fields/Selections/Large Selections tab/Custom tab
1. In the Selection List, click the number in the Number of Elements column. The Selection Element List opens.
2. Click New... The Selection Element Editor opens.
3. In the Identification section, enter a code and a description.
4. In the Activation section, determine if the element is always active or inactive.
5. Click Add. The new element appears in the Created Elements list.
6. Create as many elements as necessary.
7. When all elements are created, click Done.
You can add or modify large selections when the Maintenance mode is activated. See “Maintenance Mode” on page 3-3.

CONFIDENTIAL INFORMATION Page 5-32
Administrator WebTop User Manual Chapter 5 - Fields
Editing Large Custom Selection Elements
Path: Setup/Global Setup/Fields/Selections/Large Selections tab/Custom tab
1. In the Selection List, choose a selection and click the corresponding number in the Number of Elements list. The Selection Element List opens.
2. In the Selection Element List, select an element. The Selection Element Editor opens.
3. Make the necessary changes in the Identification and Activation sections.
4. When all changes are made, click Done.
Deleting Large Custom Selection Elements
Path: Setup/Global Setup/Fields/Selections/Large Selections tab/Custom tab
1. In the Selection List, choose a selection, then click the corresponding number in the Number of Elements list. The Selection Element List opens.
2. In the Selection Element List, select the check box next to the element you want to delete.
3. Click .
Field Layout
Field Layout lets you determine the position of standard and custom fields in the Staffing WebTop, Manager WebTop or Career Sections.
The Field Layout component is divided into four categories:
• Candidate • Department• Offer• Requisition
Candidate
Displaying a Custom Candidate Field
Path: Setup/Global Setup/Field Layout/Candidate
1. Select the Personal Information, Experience or Education tab.
2. Select a Custom field in the Field Label list.
3. Select the line and position location to determine the relative position of the field in the Staffing WebTop Candidate File or Resume tab.
4. Click Apply.

CONFIDENTIAL INFORMATION Page 5-33
Administrator WebTop User Manual Chapter 5 - Fields
Adding Candidate Fields to a Form
Path: Setup/Global Setup/Field Layout/Candidate
1. Click the Personal Information, Experience or Education tab.
2. Click Add... The Select Fields to Include in Form page opens.
3. In the Available Fields section, select a field, then click Add. The selected field will appear in the Selected Fields section.
4. Click Done.
Removing Candidate Fields from a Form
Path: Setup/Global Setup/Field Layout/Candidate
1. Click the Personal Information, Experience or Education tab.
2. In the Field Label list, select a field.
3. Click Remove.
Department
Displaying a Custom Department Field
Path: Setup/Global Setup/Field Layout/Department
1. Select a field the Field Label list.
2. Select the line and position location to determine the relative position of the field in the Staffing WebTop.
3. Click Apply.
Adding a Department Field to a Form
Path: Setup/Global Setup/Field Layout/Department
1. In Field Layout, click Add... The Select Fields to Include in Form page opens.
2. In the Available Fields section, select a field, then click Add. The field will appear in the Selected Fields section.
3. Click Done.
Removing a Department Field from a Form
Path: Setup/Global Setup/Field Layout/Department
1. In the Field Label list, select a field.
2. Click Remove.

CONFIDENTIAL INFORMATION Page 5-34
Administrator WebTop User Manual Chapter 5 - Fields
Offer
Displaying Standard Offer Fields
Path: Setup/Global Setup/Field Layout/Offer
1. Click the Standard tab.
2. Select a field in the Field Label list.
3. Select a category from the pull-down menu.
4. Select the display setting for the offer field from the pull-down menu.
• Always Displayed: the field will always be displayed.• Hidden by Default if Empty: the field will appear only if it contains information.
5. Click Apply.
Adding Custom Offer Fields to a form
Path: Setup/Global Setup/Field Layout/Offer
1. In Field Layout, click Add... The Select Fields to Include in Form page opens.
2. In the Available Fields section, select a field, then click Add. The field will appear in the Selected Fields section.
3. Click Done.
Removing Custom Offer Fields from the Application
Path: Setup/Global Setup/Field Layout/Offer
1. In the Field Label list, select a field.
2. Click Remove.
Requisitions
Displaying Standard and/or Custom Requisition Fields
Path: Setup/Global Setup/Field Layout/Requisition
1. Select the Logistics, Administration, Description (Internal) or Description (External) tab.
2. Click the Standard or Custom tab.
3. Select a field in the Field Label list.
4. In the Content Required list, determine if the selected field is:
• Not Required• Required for Saving• Required for Approval• Required for Sourcing
5. Click Apply.

CONFIDENTIAL INFORMATION Page 5-35
Administrator WebTop User Manual Chapter 5 - Fields
Adding Custom Requisition Fields to a form
Path: Setup/Global Setup/Field Layout/Requisition
1. Select the Logistics, Administration, Description (Internal) or Description (External) tab.
2. Select the Custom tab.
3. Click Add... The Select Fields to Include in Form page opens.
4. In the Available Fields section, select a field, then click Add. The field will appear in the Selected Fields section.
5. Click Done. The field will appear in the Field Label list.
6. Add or remove fields as necessary.
7. Click Save.
Removing Custom Requisition Fields from the Application
Path: Setup/Global Setup/Field Layout/Requisition
1. Select the Logistics, Administration, Description (Internal) or Description (External) tab.
2. Select the Custom tab.
3. In the Field Label list, select a field.
4. Click Remove.
Custom Report Universe
Path: Setup/Global Setup/Custom Report Universe
The Custom Report Universe feature lets you reorder custom fields that are available for reporting in the Custom Report Universe.
Selecting Custom Report Custom FieldsPath: Setup/Global Setup/Custom Report Universe
1. Click the Requisition, Candidate, Department, Offer, Experience or Education tab.
2. For the desired fields, select a Business Objects identification number (BO ID column).
3. Click Reorder.
To add fields in this list, select In Custom Report Universe in the Availability block of the Field Editor.

Regional Settings
CONFIDENTIAL INFORMATION Page 6-1
Administrator WebTop User Manual Chapter 6 - Regional Settings
Overview
The Regional Settings page allows you can configure languages, date and number formats, as well as currency formats that will be used throughout the application including in Career Sections.
Path: Setup/Global Setup/Regional Settings
The Regional Settings page contains the following columns:
In versions prior to 5.1.0, Default Currencies and Date Formats were configured by the system administrator on a Career Section-by-Career Section basis (Path: Setup/Career Sections Setup/Career Sections/select a Career Section/Career Section Builder/Properties tab.) Locale Identifiers, Currencies and Date formats must be configured in Regional Settings.
Column Description
Locale Identifier ISO 639-1language code identifier.Generic: Language codes representing the available languages in the application: en (English), fr (French), es (Spanish), de (German), it (Italian), ja (Japanese), nl (Dutch), el (Greek).Specific: Language codes with specific country or region: en-US (English-USA), en-GB (English-Great-Britain), fr-FR (French-France), fr-CA (French-Canada), zh-CN (Chinese), pt-BR (Portuguese), da (Danish), sv (Swedish).
Number Indicates if the Number format is the same as the Default Number format or is customized depending on the Locale Identifier.
Currency Indicates if the Currency format is the default format or a customized format depending on the Locale Identifier.
Date Indicates if the Date format is the default format or a customized format depending on the Locale Identifier.
General Indicates if the General parameter is the default format or a customized format depending on the Locale Identifier.
The Locale Identifier list will vary according to languages activated for the Staffing WebTop and Career Sections. For example, if your organization only supports English (en) and French (fr), the Locale Identifiers listed will be en and fr, as well as all Specific Locale identifiers related to fr and en (fr-FR, fr-CA, en-GB, en-Au, etc.) currently supported by the system.

CONFIDENTIAL INFORMATION Page 6-2
Administrator WebTop User Manual Chapter 6 - Regional Settings
Configuring Regional Settings
Number TabPath: Setup/Global Setup/Regional Settings/Number tab
1. Click the Number tab.
2. Enter a decimal symbol. The decimal symbol is used to represent the decimal point.
• One character, no spaces. • Must be different from the negative sign symbol and digit grouping symbol.
3. Select a digit grouping format. The digit grouping represents the format for the number of digits per digit group.
4. Select a digit grouping symbol that will separate digit groups.
• Must be different from the decimal symbol and negative sign symbol.5. Select the display leading zeroes format. The display leading zeroes represents the number of
non significant leading zeroes (0) before the decimal symbol.
• Will be the same as the symbol selected in Decimal symbol.6. Enter a maximum number of decimals.
• Up to 15 significant digits including decimal digits.7. Select a negative number format for negative numbers.
8. Enter a negative sign symbol that will indicate negative numbers.
• One character, no spaces. • Must be different from the decimal symbol and digit grouping symbol.
9. Click Default to reset the default number format values.
Click Done only when you have completed your selections in the Number, Currency, Date and General tabs. Changes will not be saved until you click Done.
Currency TabPath: Setup/Global Setup/Regional Settings/Currency tab
1. Click the Currency tab.
2. Enter a decimal symbol. The decimal symbol is used to represent the decimal point.
• One character, no spaces. • Must be different from the digit grouping symbol and negative sign symbol.
3. Select a default currency. This currency will be used for this region from the list of available currencies used by your organization.
4. Select a digit grouping format. The digit grouping represents the format for the number of digits per digit group.
5. Select a digit grouping symbol that will separate digit groups.
• Must be different from the decimal symbol and the negative sign symbol.

CONFIDENTIAL INFORMATION Page 6-3
Administrator WebTop User Manual Chapter 6 - Regional Settings
6. Enter a maximum number of decimals.
• Up to 15 significant digits including decimal places.7. Select a negative number format for negative numbers.
8. Enter a negative sign symbol that will indicate negative numbers.
• One character, no spaces. • Must be different from the decimal symbol and digit grouping symbol.
9. Click Default to reset the default currency format values.
Click Done only when you have completed your selections in the Number, Currency, Date and General tabs. Changes will not be saved until you click Done.
Date TabPath: Setup/Global Setup/Regional Settings/Date tab
1. Click the Date tab.
2. Enter a full date format i.e., the date format as it will appear in full (day, month, year).
• Maximum number of characters: 2553. Enter a long date format.
• Maximum number of characters: 255 (numbers and/or text.)4. Select a medium date format.
• Maximum number of characters: 255 (numbers and/or text.)• In the case of regions that do not use commas, periods or slashes with dates, an additional
format is included that is specific to the region. 5. Select a short date format. Short date formats are used for lists and calendars.
• Numeric values only. 6. Select a shortest date format. Shortest date format are used in candidate files and other lists that
include many columns.
7. Click Default to set the default date format.
Click Done only when you have completed your selections in the Number, Currency, Date and General tabs. Changes will not be saved until you click Done.
By default, dates generated by the system will automatically appear in the format selected at implementation.

CONFIDENTIAL INFORMATION Page 6-4
Administrator WebTop User Manual Chapter 6 - Regional Settings
Important Notes about Date Formats
The following table summarizes the date format syntax used in the application. Examples are based on the US locale.
Text A date element that always appears in the form of text, such as days of the week, will be displayed in long form if four letters are used for its representation on the Date tab. If less than four letters are used, the date element will appear in an abbreviated form. For example, configuring a date format using “EEE” would produce “Fri” for Friday, while using “EEEE” would produce the long form “Friday”.
Numbers The system adds zeroes to single numbers in certain cases. For example, if the date element “DD” is part of the date format, the ninth day of the month will be displayed with a leading zero, thus, “09”. If the date element is “D”, however, the system will display “9” without a leading zero.
Text and Numbers When the date format element is composed of one or two characters, a numeric value results. For example, if the date format element is “M” or “MM”, the month of February will be depicted as “2” and “02” respectively. On the other hand, a date format element made up of three or more characters will result in a textual representation of the date: in the case of “MMM”, February will appear as “FEB”, if “MMMM” is used, February will be displayed as “February”.
Symbol Meaning Presentation Example
Y Year Numeric 2002
M Month of the year Alphanumeric July, Jul. or 07
D Day of the month Numeric 10
H Hour AM/PM (1-12) Numeric 12
h Hour of the day (0-23) Numeric 22
m Minute of the hour Numeric 38
s Seconds Numeric 59
E Day of the week Textual Tue, Tuesday
a AM/PM marker Textual PM
K Hour in AM/PM (0-11) Numeric 0
‘ Escape for text Delimiter
‘‘ Single quotation mark (twice the escape character)
Literal ’

CONFIDENTIAL INFORMATION Page 6-5
Administrator WebTop User Manual Chapter 6 - Regional Settings
General Tab Path: Setup/Global Setup/Regional Settings/General tab
The list of Locale Identifiers will vary according to languages activated in the Staffing WebTop and Career Sections. For example, if your organization only supports English (en) and French (fr), the Locale Identifiers listed will be en and fr, as well as all Specific Locale identifiers related to fr (fr-FR, fr-CN, fr-CH, fr-LU) and en (en-US, en-GB, en-Au, etc.).
With each Locale Identifier comes a set of predefined values that are specific to the specified language, regardless of the country or region.
Generic Locale Identifiers
• da provides access to a Career Section in Danish• de provides access to a Career Section in German • el provides access to a Career Section in Greek• en provides access to a Career Section in English
• es provides access to a Career Section in Spanish • fr provides access to a Career Section in French • it provides access to a Career Section in Italian • ja provides access to a Career Section in Japanese
• nl provides access to a Career Section in Dutch • pl provides access to a Career Section in Polish• pt provides access to a Career Section in Portuguese
• ru provides access to a Career Section in Russian• sv provides access to a Career Section in Swedish
Specific Language Identifier Codes and Country Codes
To set specific currencies and number formats, it is necessary to add a Specific Locale Identifier (country) that will determine the preferred currency, date and number formats.
For example, English is spoken in a number of countries that use different currencies and different date and number formats. To specify these values, it is necessary to refer to the country. The capital letters in the specific locale identifier (en-US) represent the Specific Locale Identifiers.
Below are examples of Specific Locale Identifiers:
• da-DK provides access to a Career Section in Danish (Danemark• en-US provides access to a Career Section in English (USA)
• en-GB provides access to a Career Section in English (Great-Britain)
• fr-FR provides access to a Career Section in French (France)• fr-CA provides access to a Career Section in French (Canada)
There are no default currencies for Generic Locale Identifiers. The system will automatically select the first currency from the Active Elements list unless otherwise configured in Regional Settings.

CONFIDENTIAL INFORMATION Page 6-6
Administrator WebTop User Manual Chapter 6 - Regional Settings
• es-SP provides access to a Career Section in Spanish (Spain)• es-MX provides access to a Career Section in Spanish (Mexico)• pt-BR provides access to a Career Section in Portuguese (Brazil)
It is possible to select only a Specific Language Identifier. For example, fr-Fr or en-GB.


Candidate List Format

CONFIDENTIAL INFORMATION Page 7-1
Administrator WebTop User Manual Chapter 7 - Candidate List Format
Overview
Searching and organizing candidate information is a key element of the recruiting process. To help recruiters and hiring managers improve the organization of their candidate lists, you can define and customize list formats that will help speed up candidate evaluation, and improve the recruiting process.
The Candidate List Format feature helps you define list formats according to context. For example, lists can be organized for specific types of candidates: students, professionals, management, etc. Single and multi-column sorting is available.
The system provides a selection of formats that are ready for use. You can also create new formats and list formats that can be personalized by the user.
List formats will be available in the Staffing WebTop and in the Manager WebTop.
Staffing WebTop and Manager WebTop users must have a special permission to use Configurable List Formats and to configure their own candidate lists. This permission is: Create personal list formats for the candidate list.
Path: SmartOrg/User Type List/Candidates/General–Create personal list formats for the candidate list
Users who have the permission to use lists formats will have access to a List Format icon in the upper right hand corner of the screen. This icon will be available in contexts specified in List Format.

CONFIDENTIAL INFORMATION Page 7-2
Administrator WebTop User Manual Chapter 7 - Candidate List Format
Standard Candidate List Formats by Context
The following Candidate List Formats by Context are provided with the application.
Each time you create a new Candidate Selection Step that is specific to your organization, a new context will be generated. The new context will be available for both the Staffing WebTop and the Manager WebTop.
Candidate List Formats by Context
All Candidates /By Folder All Candidates /By Requisition All Candidates / By Offer
Candidate Capture /Possible Duplicates
Requisition-specific Candidate List - New
Requisition-specific Candidate List - Prescreen
Requisition-specific Candidate List - Phone Screen
Requisition-specific Candidate List - HM Screening
Requisition-specific Candidate List - 1st, 2nd, 3rd Interview
Requisition-specific Candidate List - Test
Requisition-specific Candidate List - Decision
Requisition-specific Candidate List - Reference Check
Requisition-specific Candidate List - Background Check
Requisition-specific Candidate List - Immigration Check
Requisition-specific Candidate List - Medical check
Requisition-specific Candidate List - HM Interview
Requisition-specific Candidate List - Peer Interview
Requisition-specific Candidate List - Director Interview
Requisition-specific Candidate List - Verbal Offer
Requisition-specific Candidate List - Written Offer
Requisition-specific Candidate List - Hire
Requisition-specific Candidate List - Rejected
Requisition-specific Candidate List - Declined
Search Results / Quick Search
Search Results / Advanced Search
Search Results / Conceptual Search

CONFIDENTIAL INFORMATION Page 7-3
Administrator WebTop User Manual Chapter 7 - Candidate List Format
Creating Candidate List Formats by Context
Path: Setup/Global Setup/List format/Candidate List/Candidate List Format by Context
The Candidate List Format by Context provides a list of pre-defined contexts that are available for use. It is not possible to create new contexts, and you cannot edit or delete contexts.
Selecting a Context DetailsPath: Setup/Global Setup/List format/Candidate List/Candidate List Format by Context
1. On the Staffing WebTop tab (or on the Manager WebTop tab), select a context in the Context Name column. The Context Details page opens. The following information is displayed on the Context Details heading:
• Product: Indicates the name of the product where the context is available. • Context Name: Indicates the name of the context (as listed on the Candidate List by Format
in the Context Name column). • Maximum number of Active Formats: Indicates the maximum number of active formats that
can be made available in this context. • Offers Personal Format: Indicates that it is possible to create Personal Formats in this
context. • Candidate file tab displayed by default: Lets you select the tab that will be displayed by
default when you open a candidate file.
There is one exception to this rule. When you create a new Candidate Selection Step that is specific to your organization, a new context will be generated. The new context will be available for both the Staffing WebTop and the Manager WebTop.

CONFIDENTIAL INFORMATION Page 7-4
Administrator WebTop User Manual Chapter 7 - Candidate List Format
Creating a New List Format
Path: Setup/Global Setup/List format/Candidate List/Candidate List Format by Context
1. On the Formats for this Context tab, click New... The Format Details page opens.
2. Enter a format name in the Name field.
3. Translate the name in each available language.
4. Select Active to make the format available for use.
5. Select Default format for this context, if you want to use this format as the default one.
6. Select a number in the Sequence Number lists to change sequence number of the formats, then click Reorder.
7. In Columns and Sorting, select Group records by first sort criterion (defined below) if you want candidates to be grouped by sorting criterion when they are displayed in the Staffing WebTop or in the Hiring Manager.
8. Sort By columns:
• If you want Single Sorting, click the sorting icon in the First Sort By column. • If you want Multi-sorting, click the sorting icon in the First Sort By column, then click the
sorting icon in the Then By column, then click the sorting icon in the second column, then in the third, and so on.
• To select Ascending or Descending sorting, click the sort button twice. At least one sorting element must be selected.
• To disable sorting for a specific column, click the sort button again. 9. In the Sequence Number list, select a number to select the order of the columns.
10. Click Preview to view an example of the List Heading as it will appear in the Staffing WebTop or Manager WebTop.
11. In the Displayed column, select the columns that you want to appear in the Staffing WebTop or Manager WebTop.
12. Click Done to save the format details.
The following three columns are always available for all list formats: Item Requiring Attention Icon, Disqualification Question Result, Candidate Record Identifier.
Selecting Columns in ContextsPath: Setup/Global Setup/List Format/Candidate List Format/Staffing WebTop tab/Columns in this Context tab
You can select columns that will be available for each context.
1. In Candidate List Format By Context, select a context in the Context Name column. The Context Details window opens.
2. Select the Columns in this Context tab.
3. Click Add... The Select Columns to Add to Context page opens.
4. Select a Field Group.

CONFIDENTIAL INFORMATION Page 7-5
Administrator WebTop User Manual Chapter 7 - Candidate List Format
• Select fields in the Available Fields list, then click Add. The selected fields will be listed in the Selected Fields list. To make multiple selections, hold down the CTRL keyboard key and select available fields in the Available Fields list.
• Click Done to return to Columns in this Context.5. If you want to remove columns, click the check box next to the column you want to remove, then
click Remove.
6. Select a number in the Sequence Number lists to change the sequence number of the fields, then click Reorder.
7. Click Done when all the columns are selected. The selected columns will be available for the context.
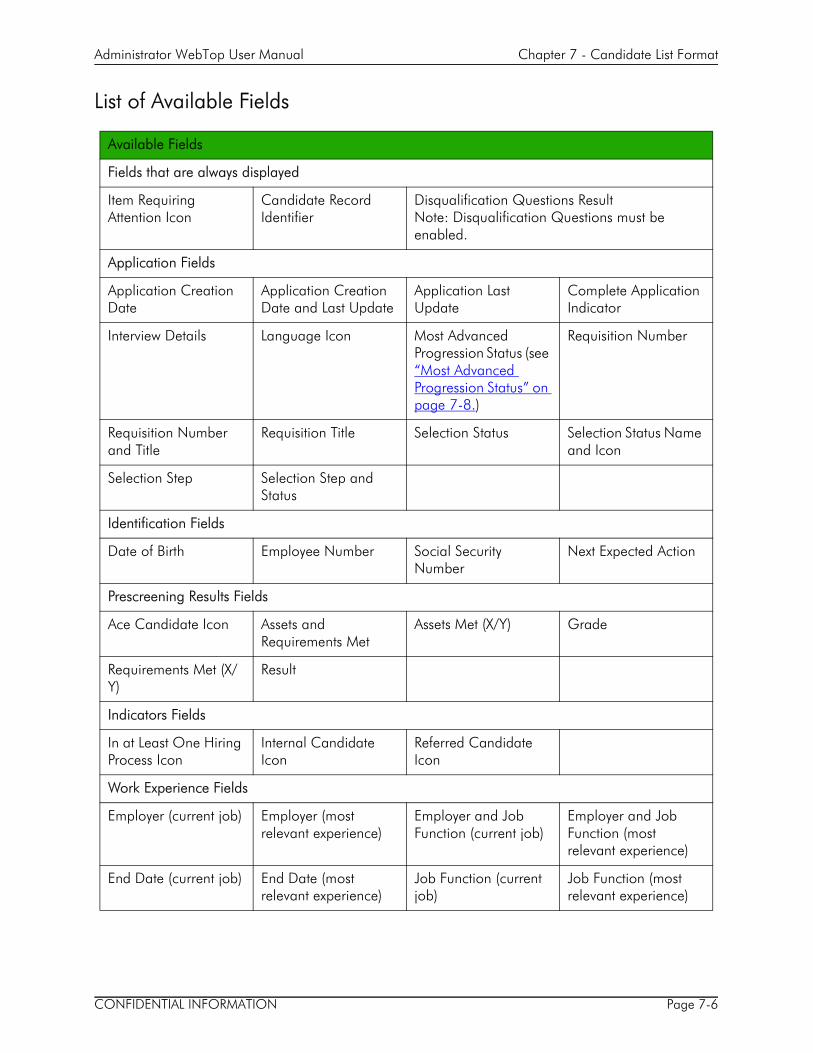
CONFIDENTIAL INFORMATION Page 7-6
Administrator WebTop User Manual Chapter 7 - Candidate List Format
List of Available Fields
Available Fields
Fields that are always displayed
Item Requiring Attention Icon
Candidate Record Identifier
Disqualification Questions ResultNote: Disqualification Questions must be enabled.
Application Fields
Application Creation Date
Application Creation Date and Last Update
Application Last Update
Complete Application Indicator
Interview Details Language Icon Most Advanced Progression Status (see “Most Advanced Progression Status” on page 7-8.)
Requisition Number
Requisition Number and Title
Requisition Title Selection Status Selection Status Name and Icon
Selection Step Selection Step and Status
Identification Fields
Date of Birth Employee Number Social Security Number
Next Expected Action
Prescreening Results Fields
Ace Candidate Icon Assets and Requirements Met
Assets Met (X/Y) Grade
Requirements Met (X/Y)
Result
Indicators Fields
In at Least One Hiring Process Icon
Internal Candidate Icon
Referred Candidate Icon
Work Experience Fields
Employer (current job) Employer (most relevant experience)
Employer and Job Function (current job)
Employer and Job Function (most relevant experience)
End Date (current job) End Date (most relevant experience)
Job Function (current job)
Job Function (most relevant experience)

CONFIDENTIAL INFORMATION Page 7-7
Administrator WebTop User Manual Chapter 7 - Candidate List Format
Start Date (current job) Start Date (most relevant experience)
Start Date and End Date (current job)
Start Date and End Date (most relevant experience)
Education Fields
Education Level (most relevant education
Education Start Date (most relevant education)
GPA (most relevant education)
Graduation Date (most relevant education)
Institution (most relevant education)
Level and Institution (most relevant education)
Level and Program (most relevant education)
Program (most relevant education)
Program and GPA (most relevant education)
Program and Institution (most relevant education)
Address Fields
Address (line 1) Address (line 2) City Country
Country and State/Province
Place of Residence Region State/Province
State/Province and City
Zip/Postal Code
Telephone Numbers Fields
Cellular Number Fax Number Home and Work Phone
Home Phone
Home Phone and Email Address
Pager Number Work Phone
Electronic Contact Information Fields
Email Address Web Page Address
Basic Profile Fields
Advance Notice Contingent Contractual Date of Availability
Date of Availability and Advance Notice
Education Level (Preferred)
Employee Status Full-time
Job Level Job Shift Job Type Limited Term
Minimum Annual Salary
Part-time Per Diem Regular
Schedule Temporary Travel Worksharing
Available Fields

CONFIDENTIAL INFORMATION Page 7-8
Administrator WebTop User Manual Chapter 7 - Candidate List Format
Most Advanced Progression StatusPath: Setup/Global Setup/List format/Candidate List/Format by Context [select a candidate list format by context]/Columns in this Context tab
The objective of this feature is to provide the most advanced progression status of a candidate on other requisitions to take enlightened decisions.
Source and Medium
Source Name Source Name and Event
Event ID
Date and Sender (most recent message)
Date Sent (most recent message)
Most Recent Message Sender (most recent message)
Offer Fields
Annual Bonus Annualized Salary Approval Date Car Allowance
Commission Commission Package Expense Account Expiration Date
Extension Date Letter Used Offer Creation Date Option Package
Options Pay Basis(To activate this field, the fields Minimum Salary and Maximum Salary must be activated. You can deactivate the field in a similar manner.)
Relocation Amount Relocation Package
Sign-on Bonus Start Date Stock
Stock Package Target Start Date Vacation
Other Fields: Includes all Custom Fields (UDFs)
It is recommended to remove the tracking solution (staircase icon) and to replace it with the Most Advanced Progression Status feature in general candidate lists (such as search result lists, folder lists) if you allow users to view the content of requisitions to which a candidate has applied and to which the user has access. In a job-specific candidate list, the staircase icon is visible only when there is at least one concurrent active job application, and the most advanced progression status icon is visible as soon as there is one active job application.
Available Fields

A new column is available when setting a list format: Most Advanced Progression Status. When this column is selected, an icon appears in the Staffing WebTop and Manager WebTop indicating the furthest active progression status of a candidate across all positions where he/she is being considered.
Statuses are based on the reference workflow and there is one icon for each of the possible job application status of the application workflow. Icons are displayed for active candidates on active requisitions.
In the scenario below, a candidate has applied to four jobs:
The icon that would appear for this candidate across all contexts would be Interview 1 because it is the furthest active progression status on an active job.
To use this new feature, you need to map your Candidate Selection Workflow steps to the reference workflow steps.
Icon DescriptionNew
Reviewed
First, second and third interview
Testing
Offer
Hired
Job Job Status Candidate Status 1 Active for sourcing New > To be Reviewed 2 Closed Interview 2 > To be Scheduled3 Active for sourcing Offer > Rejected4 Active for sourcing Interview 1 > To be scheduled
Both requisition status and candidate status must be active to be considered for the furthest active progression status.

CONFIDENTIAL INFORMATION Page 7-10
Administrator WebTop User Manual Chapter 7 - Candidate List Format
This new column is disabled by default for all list formats. It can be considered as an alternative and more informative version of the current tracking status icon (the staircase icon).
Personal List FormatYou can create a Personal List Format that allows users to select their own choice of columns and let them determine in what order sequence (from left to right) these columns will be displayed. Staffing WebTop and Manager WebTop users can create up to three Personalized Formats per context.

CONFIDENTIAL INFORMATION Page 7-11
Administrator WebTop User Manual Chapter 7 - Candidate List Format
Candidate List Filters
Path: Setup/Global Setup/List Format/Candidate List/Filters
Setting Description
By default, apply the filter “In Selection Process” (the user preferences override this setting)
This setting allows recruiters to rapidly filter candidates that are in selection process.
By default, this setting is not enabled.
When enabled, this setting automatically filters In Selection Process candidates in a candidate list.
The same setting is available in the Staffing WebTop and Manager WebTop. When enabled, it overrides the setting in the Administrator WebTop:
Path: Staffing WebTop/My Setup/My Candidates/Display Preferences section
Path: Manager WebTop/Modify My Setup/My Candidates/Display Preferences section
In the following contexts, the In Selection Process filter is automatically enabled and only candidates that are in selection process are displayed: In the Staffing WebTop: • Candidates/Manage All/By Requisition • Candidates/Manage by Offer/By Offer
Status• Candidates/Manage by Offer/By
Requisition• Requisition list, click a number in the
Candidates column In the Manager WebTop: • My Candidates• My Requisitions (click a number in the
Candidates column)

CONFIDENTIAL INFORMATION Page 7-12
Administrator WebTop User Manual Chapter 7 - Candidate List Format
By default, apply the filter "Last Activity Date"• Show only candidate files whose last
activity date has occurred during the last X days (0 = today):
This setting allows recruiters to use the candidate's last activity date as the default filter.
When this setting is enabled, the Last Activity Date filter is displayed in every candidate lists.
The setting Show only candidate files whose last activity date has occurred during the last X days (0 = today): is used to set the filter default value. Candidates for whom the Last Activity Date does not match this filter are not displayed.
The filter applies to all requisitions in the list, regardless of the requisition type (that is, hourly, professional, campus, executives, etc.). A drop-down list allows users to change their interest period filter value, for example when a less restrictive filter is required for a professional requisition.
The Last Activity Date filter allows you to represent the time period a candidate is considered as relevant for hiring. This time period is reset every time a Last Activity is performed on a candidate.
The Last Activity Date is the date and time of the last action performed on a candidate. It is the most recent of the 3 following dates: Last Update on a general application, Last Update on a specific application, Last update of the CSW tracking.
Setting Description

Candidate Selection (CSW)

CONFIDENTIAL INFORMATION Page 8-1
Administrator WebTop User Manual Chapter 8 - Candidate Selection (CSW)
Overview
Candidate Selection allows recruiters and hiring managers to move a candidate file through the selection process. An analogy can be drawn between the Candidate Selection and moving candidate resumes from one pile to another as the selection progresses and the number of resumes retained is reduced.
Steps, which represent selection steps in the hiring process, contain the candidate files. Recruiters and hiring managers who have the permissions to do so can move candidate files through the candidate selection process.

CONFIDENTIAL INFORMATION Page 8-2
Administrator WebTop User Manual Chapter 8 - Candidate Selection (CSW)
Candidate Selection Settings
Path: Setup/Global Setup/Process/Candidate Selection
There are specific settings related to Candidate Selection. They should be set before workflows are created.
Actions
Path: Setup/Global Setup/Process/Candidate Selection/Actions
Actions settings provide users with ways to automatically perform actions that will improve the efficiency of the candidate selection process.
To activate the Actions settings:
1. Select the desired value, then click Save.
2. To reset the default settings, click Default.
SettingPossible Values
Default Value Description
Review candidate files and check for potential ace candidate alert every X hours (0: never check)
0, 1, 2, 4, 8, 24
4 Determines the number of hours between Ace Alert candidate checks.
Confine candidate sharing to members of the groups to which a user belongs
Yes / No No Determines if a recruiter can share candidates with other recruiters outside of his or her assigned group.
When a candidate is hired for a requisition, automatically change his/her status to declined for all other requisitions
Yes / No No Automatically changes the candidate status when someone is hired for a requisition.
Automatically reject all applications when the requisition is filled or canceled
Yes / No No When a requisition is filled, all other applications for this requisition are rejected.
Send rejection letter to candidates automatically rejected when a requisition is filled or canceled
Yes / No No When a requisition is filled or cancelled, a rejection letter is sent to all candidates who had applied for this job.

CONFIDENTIAL INFORMATION Page 8-3
Administrator WebTop User Manual Chapter 8 - Candidate Selection (CSW)
Send a rejection letter to matched candidates only when their job application reaches the following status
Never/New/1st Interview/2nd Interview/3rd Interview/Testing/Offer
New You have the ability to specify if system generated (automatic) rejection letters will be sent to candidates that were matched to requisitions. You can choose to never send rejection letters or to send them when a candidate reaches specific step/status in the candidate selection workflow. For this setting to work, the following setting must be set to Yes: Send rejection letter to candidates automatically rejected when a requisition is filled or canceled Path: Administrator WebTop/Setup/Global Setup/Process/Candidate Selection/Actions
Activate interview management functionality in WebTop products.
Yes / No No During the selection process, the user can schedule interviews with candidates and other users using Microsoft® Outlook® or Lotus Notes®. Note: If the permission is disabled, the user will no longer be able to schedule new interviews but will still be able to update existing ones.
Allow meeting requests to be sent only to the members of the groups to which a user belongs
Yes / No No Determines whether meeting requests can be sent to other recruiters outside the user’s assigned group.
When scheduling interviews, share the candidate file and the requisition
Via email/Via Taleo e-share Center
Via Taleo e-share Center
When activated, Schedule an Interview contains two options: Share candidate file with attendees (but not with the candidate) and Share requisition with attendees (but not with the candidate).
When a candidate is hired for a requisition and the start date has been reached, automatically consider this candidate as an internal candidate
Yes / No No When scheduling an interview, the invited attendees must belong to the same group as the user.
Setting Possible Values
Default Value Description

CONFIDENTIAL INFORMATION Page 8-4
Administrator WebTop User Manual Chapter 8 - Candidate Selection (CSW)
Display
Path: Setup/Global Setup/Process/Candidate Selection/Display
Display settings enable users to refine candidate search.
To activate the Display settings:
1. Select the desired value, then click Save.
2. To reset the default settings, click Default.
SettingPossible Values
Default Value Description
Exclude candidates in selection process on open requisitions from candidate search results (does not apply to Quick Search)
Yes / No No Limit the search to candidates who are not already in the hiring process, on open requisitions. Applies to Advanced Search and Conceptual Search, and More Like This in Staffing WebTop.
Include candidates whose identification is missing in candidate list and in candidate search results (does not apply to Quick Search)
Yes / No Yes Include candidates who did not provide identification information Applies to Advanced Search and Conceptual Search, and More Like This in Staffing WebTop
By default, show new candidates in selection process when displaying the candidate list
Yes / No Yes By default, displays new candidates who are in a selection process in the candidate list.
Highlight keywords in candidate files after a candidate Advanced search
Yes / No No By default, highlight words entered in the keyword field, found in candidate records (including 3 most recent attachments by candidates, and 2 most recent attachments by recruiter or hiring manager).
Job application status from which candidates will be excluded from search results
NewReviewed1st Interview2nd Interview,3rd Interview,TestingOffer
New This setting works in conjunction with the user permission Allow users to recruit candidates that are being considered in other active requisitions. If the candidate has reached the selected status, the candidate will no longer be displayed in the search results, based on the permission of the user type.

CONFIDENTIAL INFORMATION Page 8-5
Administrator WebTop User Manual Chapter 8 - Candidate Selection (CSW)
Search Page Content
Path: Setup/Global Setup/Fields [select a field type]/Standard tab or Custom tab [select a field]/Availability–select Criterion in Candidate Search.
The Search Page Content lets you select fields that will be available in the Staffing WebTop and in the Manager WebTop to perform search queries. These fields will be available in Candidate Search when using Search functions.
For more information, see “Custom Fields” on page 5-13, and “Standard Fields” on page 5-10.
Permissions
The following permissions must be enabled:
• Access requisition-specific candidate lists: This permission must be selected if you want hiring managers to have access to the View My Candidates link on the Welcome page in the Manager WebTop. (SmartOrg/User Type List [select a user type]/Candidates tab)
• General User Type permissions related to candidates (for example Share candidates, or Add comments in tracking summary) apply to requisition specific candidate lists in the Staffing WebTop and to View My Candidates in the Manager WebTop. (SmartOrg/User Type List [select a user type]/Candidates tab)
• In Manager WebTop, view candidates in steps whose confidentiality level is "Restricted" (SmartOrg/User Type List [select a user type]/Candidates tab/Candidate Selection Workflow)
This permission must be selected if you want a user to run searches on candidates. If this permission is not selected, Candidate Search will not be available.
To select fields that will appear in Search functions:
1. Select the Staffing WebTop or Manager WebTop tab.
2. Select a field group, in the Field Group list.
3. From the Available Fields list select fields that you want to appear in the form. Click Add. To select multiple fields, hold down the Ctrl or Alt keys while selecting the fields. The selected fields will appear in the Selected Fields list.
4. Use the Up and Down arrows to reorder selected fields.
5. Click Save when all the fields are selected.
6. To remove fields, select fields from the Selected Fields list then click Remove. To select multiple fields, hold down the Ctrl or Alt keys while selecting the fields.
7. If you want to add fields for other field groups, select a new Field Group, and repeat steps 1. to 3. for each group.
The fields must first be made available in the Fields Component.

CONFIDENTIAL INFORMATION Page 8-6
Administrator WebTop User Manual Chapter 8 - Candidate Selection (CSW)
Matching Requisitions to Candidates
Path: Setup/Global Setup/Process/Matching Requisitions Criteria
The Matching Requisitions Criteria lets you select criteria that will guide the system on how to match requisitions to candidates who are in the Candidate Selection process. To efficiently match requisitions to qualified candidates, you can select matching criteria that will improve the quality of your results. Matching is done by comparing the contents of the candidate file to the criteria selected for each requisition. The matching criteria include:
Matching criteria include:
• Job (Category, Specialty, Function)• Locations (Country, State, Region, City)• Organization (Company, Sector, Department, Division)• Locations for Place of Residence (Country, State/Province, Region)• Skills• Questions• Basic Profile
• Job Level (Executive, Manager, etc.)
• Job Type (Professional, Internship, Hourly, etc.)
• Schedule (Full-time, Part-time)
• Shift (Day, Evening, Night, etc.)
• Employee Status (Regular, Contractual, Temporary, etc.)
• Education Level (High School, College, etc.)
• Travel (None, Yes, 5% of the time, etc.)
• Minimum Salary (Minimum salary indicated in the Requisition Salary in Career Section).
Conversion of currencies is automatically done to reflect the currency selected for the career section.
For each criteria, you can determine if the selection is Required or Desired. If the criteria is set to Required, it is mandatory. The candidate will have to meet this specific criteria to be considered. If a criteria is set to Desired, the criteria will be considered as an asset. A candidate who does not have an asset will be matched as long as he or she meets all the Required criteria.
Sorting is determined by the number of Desired criteria in the candidate profiler in relation with the number of Desired criteria specified in the search. Sorting is only relevant when presenting candidates in the Preview Matching Candidate list.
Rules for Matching CriteriaMatching is done by comparing answers provided by candidates to criteria specified in the requisition by the recruiter or the hiring manager.
Criteria can be marked as Desired or Required (except for Skills and Questions).

CONFIDENTIAL INFORMATION Page 8-7
Administrator WebTop User Manual Chapter 8 - Candidate Selection (CSW)
Required: Mandatory criteria. The candidate must match the criteria.
• Candidates who meet all the Required criteria will automatically be matched to the selected requisition, and will appear in Preview Matching Candidates.
Desired: Not mandatory
• If a candidate does not match a Desired criteria, he or she will not be rejected.
Candidates who meet all the Required criteria and who also meet some Desired criteria, will appear at the top of the Preview Matching Candidates list. Desired criteria are considered as a plus.
Job Field, Location, Organization (OLF) and Place of Residence Criteria
The following criteria (Job Field, Location, Organization and Place of Residence) are mandatory. These criteria must be selected and are always Required. Candidates must provide exact matches to these criteria to be matched to the requisition and to appear on the Candidate list.
Basic Profile CriteriaThe Basic Profile criteria are considered as wildcards. If these criteria are not selected as Required in the requisition, or if a candidate does not enter answers for these criteria, the answers will still be considered. Answering these criteria will help determine the position of the candidate on the candidate list.
Matching is done by equality for the following criteria:
• Employee Status• Schedule• Shift• Job Type• Job Level• Education Level• Travel%: Matching is done by equality or higher • Minimum Salary: Matching is done by equality or lower.
Basic Profile criteria may vary according to your selected criteria at your organization.
Skills and Questions CriteriaSkills and Questions criteria are considered as wildcards. If these criteria are not selected as Required in the requisition, or if a candidate does not enter answers for these criteria, the answers will still be considered. The candidate will be matched if he or she matches all the other required criteria. Answering these criteria will help determine the position of the candidate on the candidate list. Skills and Questions criteria can be set to Based on answers marked as required, or Based on answers marked as required AND answers marked asset.

CONFIDENTIAL INFORMATION Page 8-8
Administrator WebTop User Manual Chapter 8 - Candidate Selection (CSW)
Skills
• Based on answers marked as required: Skills marked as required in the requisition are mandatory. Candidates who do not match the selected skills will automatically be rejected. If no answer is provided, the absence of value will act as a wildcard and will not be considered.
• Based on answers marked as required AND answers marked as asset: Candidates who do not match the skills marked as Assets in the requisition will automatically be rejected. If no answer is provided, the absence of value will act as a wildcard and will not be considered.
Candidate’s Skills, Proficiency Level and Experience Level must be equal to, or greater than the level selected in the requisition.
Questions
• Based on answers marked as required: Questions selected in the requisition are mandatory. Candidates must provide a correct answer to the question. Candidates who do not correctly answer the questions will automatically be rejected. If no answer is provided, the absence of value will act as a wildcard and will not be considered.
• Based on answers marked as required AND answers marked as asset: Candidates who do not answer the questions correctly will be considered if they meet all the required criteria. If no answer is provided, the absence of value will act as a wildcard and will not be considered.
Workflows, Steps, Statuses and Other Technical Definitions
The Selection Workflow is a procedure that includes steps, statuses and actions that the recruiter must go through before hiring a candidate. Workflows include such Steps as Interviews, Background Checks, Offers, Decision, etc. Each selection workflow can be modified.
Selection Workflows are comprised of selection Steps. Each Step represents a specific selection level in the process. Steps include Statuses, Actions, and Qualifiers, and they can be modified to meet your organization’s specific needs.
Each candidate file in a step has a Status. Statuses indicate the position (1st Interview, To be scheduled, Offer pending, Waiting for test results, etc.), and the progression level (Not started, In progress, Completed) of the candidate in the selection process.
Actions can be performed on a Candidate File. They are based on the selection step. Each Action is linked to a specific step. Actions cannot be created or deleted. They can only be added or removed.
Qualifiers and Qualifier Groups are used with Statuses. They provide additional information needed to move a candidate in a selection workflow or to change the status of a candidate. Qualifiers can be grouped in Qualifier Groups. It is possible to create new Qualifiers and Qualifier Groups.
Forms can be tied to the workflows, steps and statuses of the Candidate Selection Workflow (CSW).

CONFIDENTIAL INFORMATION Page 8-9
Administrator WebTop User Manual Chapter 8 - Candidate Selection (CSW)
Workflows
Workflows are used to provide the framework to move candidates from one step to another during the selection process. They include Steps, Statuses, Actions, Qualifier Groups, and Qualifiers. Selection Workflows are applied to Candidate Files. Candidate Files in each Step can have a Status. Specific Actions can be performed on these candidate files depending on the Steps and Statuses. Workflows can be modified to meet your organization’s specific needs.
Reference WorkflowsThe Reference Workflow 4.1 was originally created for migration purposes for Version 4.1. There is only one step in this workflow (Global). The Reference Workflow is used when migrating requisitions for existing customers and for mapping Statuses in Custom Workflows to the Statuses in the Reference Workflow. The Reference Workflow is the basic workflow that includes the following statuses: New, Reviewed, 1st Interview, 2nd Interview, 3rd Interview, Testing, Offer, and Hire.
Standard Workflows (Sequential Workflows) Standard Workflows, also referred to as Sequential workflows, can be used as templates to create customized workflows. Standard workflows include Steps, Statuses, Actions and Qualifiers most commonly used by recruiters and hiring managers for specific types of requisitions. Here is a list of Standard workflows available with the application.
• Campus/Student• Executive• Executive/Agency• Internal• Master • Standard• Temporary/Contract• Sequential Workflow 4.1
Before Creating Workflows• Determine your organization’s needs.• Determine if the process is feasible with the workflow. • Select existing workflows that can be used as a starting point. • If you are creating more than one workflow, determine what steps are identical for all workflows.
Create new steps only if necessary.• Standardize workflows as much as possible to produce efficient, easy to use reports.• Provide the Recommended Mapping to the Reference Model to recruiters and to hiring managers.
For more information, see “Reference Model” on page 8-21
Modifying or editing the Reference Workflow is not recommended. If you want to use this workflow as a template, duplicate it first, then edit the duplicate.

CONFIDENTIAL INFORMATION Page 8-10
Administrator WebTop User Manual Chapter 8 - Candidate Selection (CSW)
Creating a Candidate Selection WorkflowPath: Setup/Global Setup/Process/Candidate Selection/Workflows/Workflows tab
1. On the Workflows tab, click New... The New Workflow page opens.
2. Enter a Name. Translate the name in all available languages.
3. Enter a code in the Code field.
The code is the main workflow element identifier. It must be created for each flow. All initial sorting is based on the code.
4. Add comments in the Comments field if necessary.
5. Select Available to make the workflow available in the Requisition Wizard, in the Staffing WebTop.
6. Select Default Workflow to make this workflow the default workflow in the Requisition Wizard.
Associating a Candidate Selection Workflow to an OLFPath: Setup/Global Setup/Process/Candidate Selection/Workflows
It is possible to associate one or several organizations, locations and job fields (OLF) to a workflow. As a result, when creating a requisition, the recruiter sees a list of workflows according to the OLF selected for the requisition (instead of all workflows of the company). The system to select the most appropriate workflow according to the OLF selection in the requisition.
If you do not associate a workflow to any OLF elements, this means that the workflow is associated to all OLF elements.
The Display Context section of the Workflow Details page will only be visible if the EnableCSWWorkflowClassification company setting is activated.
To associate a workflow to a job, an organization or a location:
1. Open an existing workflow or create a new one.
1. Click Add in the desired Jobs, Organizations or Locations section.
2. In the selector window that opens, select all elements to be associated to your workflow.
3. The elements are now displayed.
To remove an element (job, organization or location) from the list:
1. Click Remove beside the element you want to remove.
To remove all elements (jobs, organizations or locations):
1. In the proper category (Jobs, Organizations or Locations), click Remove All.
There is no warning to confirm your decision, so be careful when you select Remove All.

CONFIDENTIAL INFORMATION Page 8-11
Administrator WebTop User Manual Chapter 8 - Candidate Selection (CSW)
How to determine a workflow’s compatibility with a requisition
The more specific the level of a workflow is, the more compatible the workflow will be with a requisition. Only workflows that are compatible with the requisition will be displayed and available for selection. Moreover, the system will automatically select the workflow which provides the highest degree of compatibility with the requisition. For example, a workflow that is compatible with a requisition down to the region level would be automatically selected over one that is compatible only at the country level.
For example:
A requisition has the following Organization, Location and Field (OLF) elements:
One workflow has the following OLF elements:
This workflow will not be associated with the requisition, because the last level of its Location does not match that of the requisition.
However, another workflow that has the following OLF elements will be associated with the requisition:
The parent element of the lowest level of the requisition for each dimension (Organization, Location or Field) must be the same as the lowest level of the workflow for each dimension.
The default workflow will always be associated with the requisition.
Workflow Priority
In the case where the EnableCSWWorkflowClassification company setting is activated, the system sorts workflows according to the level of compatibility and ensures that the most appropriate workflow is selected in the Candidate Selection Workflow field.
The system administrator can and must still identify one workflow as the company default workflow. But, instead of always being pre-selected by default, this workflow will be preselected only if no other workflow is found to be compatible to the requisition or if other workflows are compatible because they are linked to all Organization, Location and Job Field (all-all-all).
The system automatically pre-selects the most compatible workflow as follows:
To determine the priority of a workflow, the system makes the sum of the differences between the levels specified in the workflow and in the requisition. The workflow with the least differences will be
Organization Location Job Field
Urban Transportation United States/California/Los Angeles Bus Driver
Organization Location Job Field
Urban Transportation United States/California/San Jose
Bus Driver
Organization Location Job FieldUrban Transportation United States Bus Driver

CONFIDENTIAL INFORMATION Page 8-12
Administrator WebTop User Manual Chapter 8 - Candidate Selection (CSW)
the one displayed in the Candidate Selection Workflow field. In case of a tie, the sort will be performed on the code of the workflows.
It is also important to note that a workflow with no value (Null) for a dimension (Organization, Location or Job Field) will consequently be associated to all structure elements from that dimension. However, associating a workflow to no specific value (equivalent to all) will penalize its level of compatibility. Hence, a workflow tied to all-all-all will be much less pertinent than a workflow with the slightest specificity in its categorization.
Here is an example to help you understand how it works.
Requisition:
Workflow 1:
There is no difference between the OLF information of this workflow and that of the requisition.
Workflow 2:
Because there is no job field, the sum of the differences is 20.
Workflow 3:
There is a difference of one level in the Organization dimension, and a difference of two levels in the Location dimension, so the sum of the differences is 3.
Organization Location Job FieldFood Processing/Food Production
United States/California/Los Angeles
Cashier
Code Organization Location Job Field
z_csw1
Food Processing/Food Production
United States/California/Los Angeles
Cashier
Difference (0) (0) (0)
Code Organization Location Job Field
CSW2
Food Processing/Food Production
United States/California/Los Angeles
All
Difference (0) (0) (20)
Code Organization Location Job Field
CSW3Food Processing United States Cashier
Difference (1) (2) (0)

CONFIDENTIAL INFORMATION Page 8-13
Administrator WebTop User Manual Chapter 8 - Candidate Selection (CSW)
Workflow 4:
There is no difference between the OLF information of this workflow and that of the requisition.
Workflow 5:
Since no dimension is specified in this workflow, the sum of the differences is 60.
Workflow 6 (default workflow):
Once again, since no dimension is specified in this workflow, the sum of the differences is 60. However, this is the default workflow.
Workflow 7:
The location of this workflow is not compatible with that of the requisition. This means that this workflow is excluded.
In this example, the workflow that would be displayed in the Candidate Selection Workflow field is Workflow 4 (a_csw4), because even though Workflow 1 (z_csw1) and 4 are tied and have he lowest sum of differences, Workflow 4 will be displayed first when a sort is performed on the code.
Code Organization Location Job Field
a_csw4
Food Processing/Food Production
United States/California/Los Angeles
Cashier
Difference (0) (0) (0)
Code Organization Location Job FieldCSW5 All All All
Difference (20) (20) (20)
Code Organization Location Job FieldCSW6 All All All
Difference (20) (20) (20)
Code Organization Location Job Field
1_CSW7
Food Processing/Food Production
United States/California/San Jose
Cashier
Difference
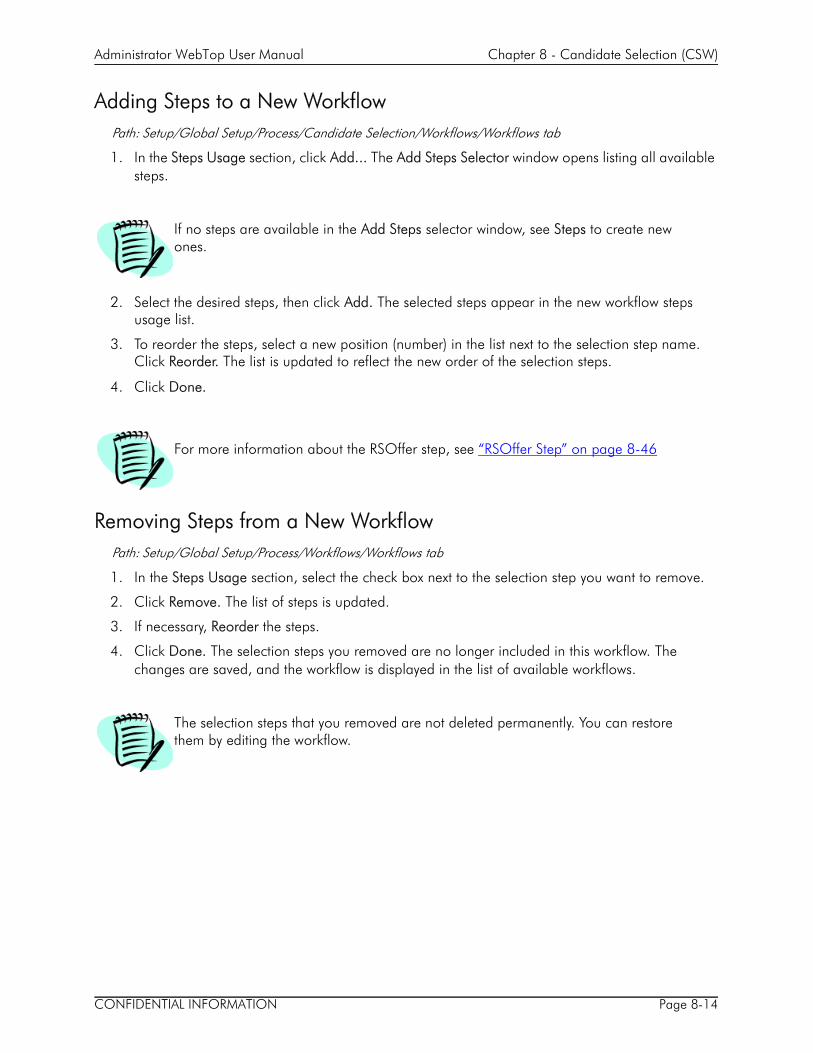
CONFIDENTIAL INFORMATION Page 8-14
Administrator WebTop User Manual Chapter 8 - Candidate Selection (CSW)
Adding Steps to a New WorkflowPath: Setup/Global Setup/Process/Candidate Selection/Workflows/Workflows tab
1. In the Steps Usage section, click Add... The Add Steps Selector window opens listing all available steps.
If no steps are available in the Add Steps selector window, see Steps to create new ones.
2. Select the desired steps, then click Add. The selected steps appear in the new workflow steps usage list.
3. To reorder the steps, select a new position (number) in the list next to the selection step name. Click Reorder. The list is updated to reflect the new order of the selection steps.
4. Click Done.
For more information about the RSOffer step, see “RSOffer Step” on page 8-46
Removing Steps from a New WorkflowPath: Setup/Global Setup/Process/Workflows/Workflows tab
1. In the Steps Usage section, select the check box next to the selection step you want to remove.
2. Click Remove. The list of steps is updated.
3. If necessary, Reorder the steps.
4. Click Done. The selection steps you removed are no longer included in this workflow. The changes are saved, and the workflow is displayed in the list of available workflows.
The selection steps that you removed are not deleted permanently. You can restore them by editing the workflow.

CONFIDENTIAL INFORMATION Page 8-15
Administrator WebTop User Manual Chapter 8 - Candidate Selection (CSW)
Configuring Steps Details in a New WorkflowPath: Setup/Global Setup/Process/Candidate Selection/Workflows/Workflows tab/ Steps Usage/Steps Details
In the Steps Usage section, select a step by clicking its name. The Steps Details page opens.
Mandatory
If you want recruiters and hiring managers to complete a specific step during the selection process (for example, 1st Interview, Offer, Decision, Hire) you must make this step mandatory.
To make a step Mandatory:
1. In the Steps Usage section, select a step. The Step Details page opens.
2. Select Mandatory. From now on, this step will be mandatory in this workflow.
When configuring an existing step in a selection workflow, the Name, Short Name, Code, Comments, and Reference Model cannot be modified.

CONFIDENTIAL INFORMATION Page 8-16
Administrator WebTop User Manual Chapter 8 - Candidate Selection (CSW)
Confidentiality Level
In many organizations, hiring managers are not involved in the earliest steps of the candidate selection process. Recruiters are responsible for evaluating new applications and only submit qualified candidates to the hiring managers. You can configure candidate selection steps to prevent hiring managers from viewing specific selection steps (such as New) in the candidate list, in the Manager WebTop.
To prevent a step from being visible in the Candidate List of the Manager WebTop, select The confidentiality level of this step is “Restricted”.
In the Manager WebTop, the “restricted” step will be grayed out.
Allow Conditional Entry in a Step
In a workflow, you can define and order steps, statuses, and actions that recruiters and hiring managers usually perform when selecting candidates for a job. You can order steps to ensure that recruiters and hiring managers do not overlook or skip steps that must be performed.
The setting Allow candidates to enter a step even if some activities from previous steps remain pending allows users to move candidates from one step to another and to complete unfinished tasks at a later time in the selection process.
If you want to restrict Manager WebTop users from having access to the selected step, clear the following user type permission: Path: User Management/Types tab [select a user type]/Candidates tab/Candidate Selection Workflow section–In Manager WebTop, view candidates in steps whose confidentiality level is “Restricted”.

CONFIDENTIAL INFORMATION Page 8-17
Administrator WebTop User Manual Chapter 8 - Candidate Selection (CSW)

CONFIDENTIAL INFORMATION Page 8-18
Administrator WebTop User Manual Chapter 8 - Candidate Selection (CSW)
If Allow Conditional Entry is enabled in the Check References step, the recruiter will be able to start tasks related to this step.
Notification
You can send a message to users to let them know when the step is reached.
Notification Instructions
Recipient
Select who will receive the notification message. Available choices are:
• None: The message will not be sent to anyone. • Recruiter: Send the message only to the recruiter. • Hiring Manager: Send the message only to the hiring manager• Recruiter and Hiring Manager: Send the same message to the recruiter and hiring manager at the
same time.
Message Type
You can send different types of messages to recruiters and hiring managers. Available choices are:
• Application Progression Notification: Send a message that will include the progress of the candidate in the selection process.
• Application Summary (faxable): Send a summary of the application. This message may be faxed to the user.
Editing an Existing WorkflowYou can modify information contained in a workflow.
Path: Setup/Global Setup/Process/Candidate Selection/Workflows/Workflows tab
1. On the Workflows tab, select the workflow you want to edit. The Workflow Details page opens.
2. If necessary, enter a new name in the Name field.
The setting applies to the step that you want to move on to.
The Allow candidates to enter this step even if some activities from previous steps remain pending must be enabled in the Decision step. This setting can be enabled in the Steps Progression Level in Statuses Details.
It is not recommended to modify standard workflows. It is preferable to duplicate a standard workflow, then to edit the duplicate.

CONFIDENTIAL INFORMATION Page 8-19
Administrator WebTop User Manual Chapter 8 - Candidate Selection (CSW)
3. If necessary, enter a new code in the Code field.
The code is the main Workflow element identifier. It must be created for each workflow. All initial sorting is based on the code.
The code cannot be changed in standard workflows.
4. If necessary, add comments in the Comments field.
5. In the Steps Usage section, select steps that you want to make mandatory.
6. In the Steps Usage section, select steps to which you want to allow conditional entry.
7. In the Steps Usage section, add or remove steps, then reorder the steps if necessary.
8. Select Available if you want to make the workflow available for use with requisitions.
9. Select Default Workflow if you want to make this workflow the default workflow for all requisitions.
10. When all the changes are made, click Done. The changes are saved, and the workflow is displayed in the list of available workflows.
If you have modified the name of a standard workflow (for example, Executive Workflow, Internal, Union), you can revert to the default values of the standard workflow. Click Default next to the Name field before you click Done. The default values are restored.
Duplicating a WorkflowPath: Setup/Global Setup/Process/Candidate Selection/Workflows/Workflows tab
1. On the Workflow tab, select the workflow you want to duplicate. The Workflow Details page opens.
2. Click Duplicate. The New Workflow page opens.
3. Enter a new name in the Name field or modify the existing name.
4. Enter a new code in the Code field.
The code is the main workflow element identifier. It must be created for each workflow. All initial sorting is based on the code.
5. If necessary, enter comments in the Comments field.
6. Select Available if you want to make the workflow available in the Staffing WebTop.
7. In the Steps Usage section, select steps that you want to make mandatory.

CONFIDENTIAL INFORMATION Page 8-20
Administrator WebTop User Manual Chapter 8 - Candidate Selection (CSW)
8. In the Steps Usage section, select steps for which you want to allow conditional entry.
9. In the Steps Usage section, add or remove steps, then reorder the steps if necessary.
10. Select Default Workflow if you want to make this workflow the default workflow.
11. When all the changes are made, click Done.
Steps
Workflows are comprised of steps that represent the levels that candidates reach as they progress through the selection process. You can create, modify, remove or delete steps.
A candidate can have only one status in a step. The actions that can be performed on a candidate file are related to the step.
Creating a New StepPath: Setup/Global Setup/Process/Candidate Selection/Workflows/Steps Tab
1. Click the Steps tab. The list of available steps opens.
2. Click New... The New Step page opens.
3. Enter a name in the Name field. Translate the name in all available languages.
4. Enter a code in the Code field.
The code is the main step element identifier. It must be created for each step. All initial sorting is based on the code.
When you modify a step, the change is reflected in all the workflows that include the step.
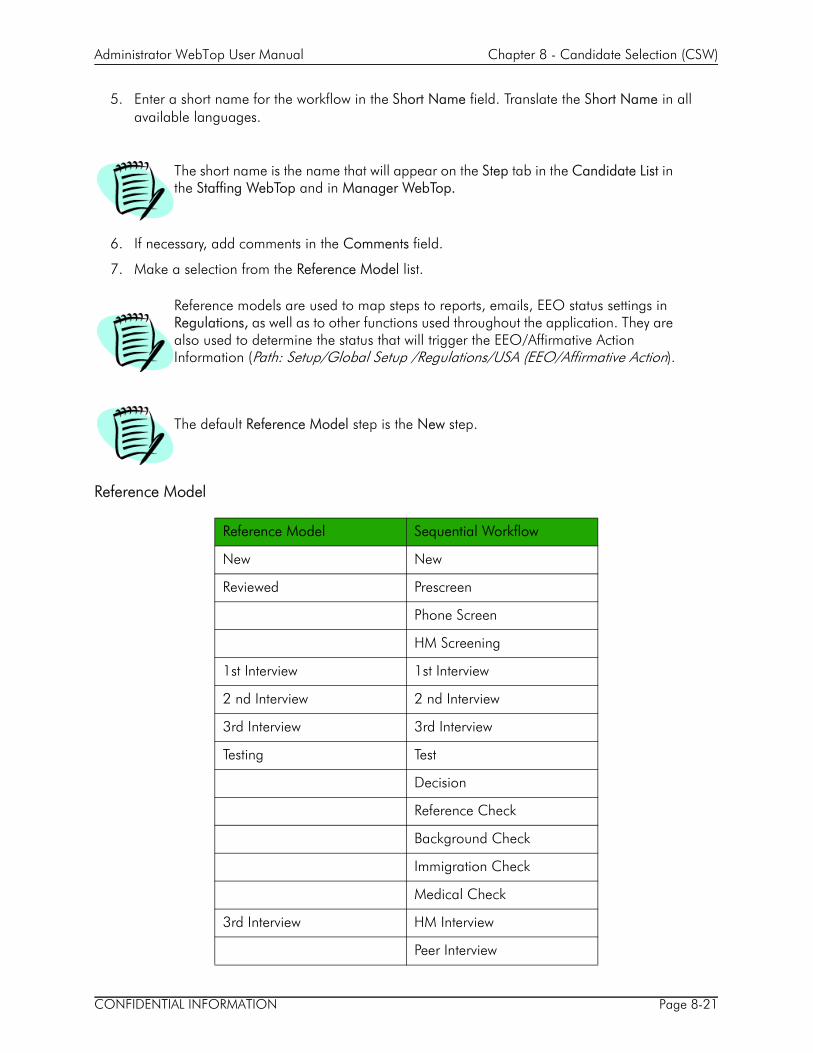
CONFIDENTIAL INFORMATION Page 8-21
Administrator WebTop User Manual Chapter 8 - Candidate Selection (CSW)
5. Enter a short name for the workflow in the Short Name field. Translate the Short Name in all available languages.
The short name is the name that will appear on the Step tab in the Candidate List in the Staffing WebTop and in Manager WebTop.
6. If necessary, add comments in the Comments field.
7. Make a selection from the Reference Model list.
Reference models are used to map steps to reports, emails, EEO status settings in Regulations, as well as to other functions used throughout the application. They are also used to determine the status that will trigger the EEO/Affirmative Action Information (Path: Setup/Global Setup /Regulations/USA (EEO/Affirmative Action).
The default Reference Model step is the New step.
Reference Model
Reference Model Sequential Workflow
New New
Reviewed Prescreen
Phone Screen
HM Screening
1st Interview 1st Interview
2 nd Interview 2 nd Interview
3rd Interview 3rd Interview
Testing Test
Decision
Reference Check
Background Check
Immigration Check
Medical Check
3rd Interview HM Interview
Peer Interview

CONFIDENTIAL INFORMATION Page 8-22
Administrator WebTop User Manual Chapter 8 - Candidate Selection (CSW)
8. Click Available to make the step available for use in candidate selection workflows.
9. If necessary, add and reorder statuses (if this is a new step).
10. If necessary, add and reorder actions.
11. Click Done to save the new step and return to the step list.
Adding Statuses to a StepPath: Setup/Global Setup/Process/Candidate Selection/Workflows/Steps tab/Statuses Usage tab
Director Interview
Offer Verbal Offer
Written Offer
Hire Hire
Rejected Rejected
Declined Declined
Reference Model Sequential Workflow

CONFIDENTIAL INFORMATION Page 8-23
Administrator WebTop User Manual Chapter 8 - Candidate Selection (CSW)
1. On the Steps tab, select a step. The Step Details page opens.
2. On the Statuses Usage tab, click Add.... The Add Statuses Selector window opens.
The statuses in this list can be edited from the Statuses tab.
3. Select the statuses you want to add (multiple selections are possible).
4. Click Add. The selected statuses appear in the Statuses Usage list.
5. If necessary, use the drop-down numbers to reorder the statuses, then click Reorder.
6. Click Done to return to the step list. The new statuses will be available when this step is used.
Defining Status Details in a StepPath: Setup/Global Setup/Process/Candidate Selection/Workflows/Steps tab/Statuses Usage tab

CONFIDENTIAL INFORMATION Page 8-24
Administrator WebTop User Manual Chapter 8 - Candidate Selection (CSW)
Initial Status
When a candidate is moved to a new step, a default status is available. This status is called the Initial status.
To assign the initial status to a step:
1. On the Steps tab list, select a step. The Step Details page opens.
2. On the Statuses Usage tab, select the status that you want to use as the initial status in a step.
3. Select This is the initial status for this step.
4. Click Done to return to the Step Details page. The initial status will be the default status in the Action Dialog window for the selected step.
Step Progression Level
Progression levels indicate whether a step is not started, in progress or completed.
Allow completion even if some activities remain pending
This setting allows users to move candidates from one step to another even if some activities are not completed in the step (missing information, waiting for an approval, waiting to confirm an interview date, waiting for test results, etc.).
• When you enable this setting, the recruiter will be able to enable the following setting in the Candidate Action Dialog (CAD) in the Staffing WebTop: Complete this step even if some activities remain pending.
Progression Level Description
Not Started Is used for any status to indicate that the step has not started yet.Example: For the 1st Interview step, "To be Scheduled" is a Not Started status because the interview has not been scheduled and the step has not officially started.
In Progress Is used for any status to indicate that the step is "In Progress". Example: For the 1st Interview step, "Scheduled" is an In Progress status.
Completed Is used for any status that completes the step. It allows candidates to move to another step in the workflow. It is possible to have two completion statuses if:
• There are two activities that complete a step. For example, in the Hire step, you have "Hired - External" and "Hired - Internal".
• You have the conditional completion activated. For example, in the References step, the step can be completed if the completion status "References Initiated, Proceed Conditionally" is reached (all the configurations to activate the conditional completion feature would have to be activated). A conditionally completed step means that you can go back to that step later and record status changes. In that same step, you could have the ACTUAL non-conditional completion status of "References Completed", once this status is reached, you could not go back into that step to record any status changes.

CONFIDENTIAL INFORMATION Page 8-25
Administrator WebTop User Manual Chapter 8 - Candidate Selection (CSW)
• If this setting is enabled, the recruiter or hiring manager will be able to return to the step and eventually complete unfinished activities. The step will not be completed until all activities are finished.
• This setting can be enabled for more than one status in a step. The setting must be used with a status that has a completed status: contacted, scheduled, waiting for results, standby, etc.
The Allow Conditional Entry must be enabled in the step the user wants to move on to. If this setting is not enabled, users will not be able to move candidates even if the Allow completion even if some activities remain pending is enabled.
Status Change Buttons
Select a button that will be used as a shortcut to change the status of a candidate directly in a candidate file without having to open the Action Dialog window. The selected buttons will appear in the Staffing WebTop and in the Manager WebTop toolbar.
Qualifiers and Comments
You can add qualifiers and comments when changing the status of a candidate in the Action Dialog window (CAD).
Ask for a qualifier
In the list, select if you want qualifiers (motives) to be:
• Optional: In the CAD, the user can add a qualifier if desired.• Mandatory: In the CAD, the user must enter a qualifier.• Single Selection: When the user moves a candidate from one step to another, he or she will be
able to add only one qualifier.• Multiple Selection: When the user moves a candidate from one step to another, he or she will be
able to select more than one qualifier.
If Ask for a qualifier is set to Single Selection, and several qualifiers are imported, only the first one will be saved (no error message will be generated).
An error message is generated when a user moves a candidate to a selection workflow step and that Ask for a qualifier is set to Mandatory but no qualifiers are available.
Qualifiers must be associated to a status, otherwise Ask for a qualifier will not be available.
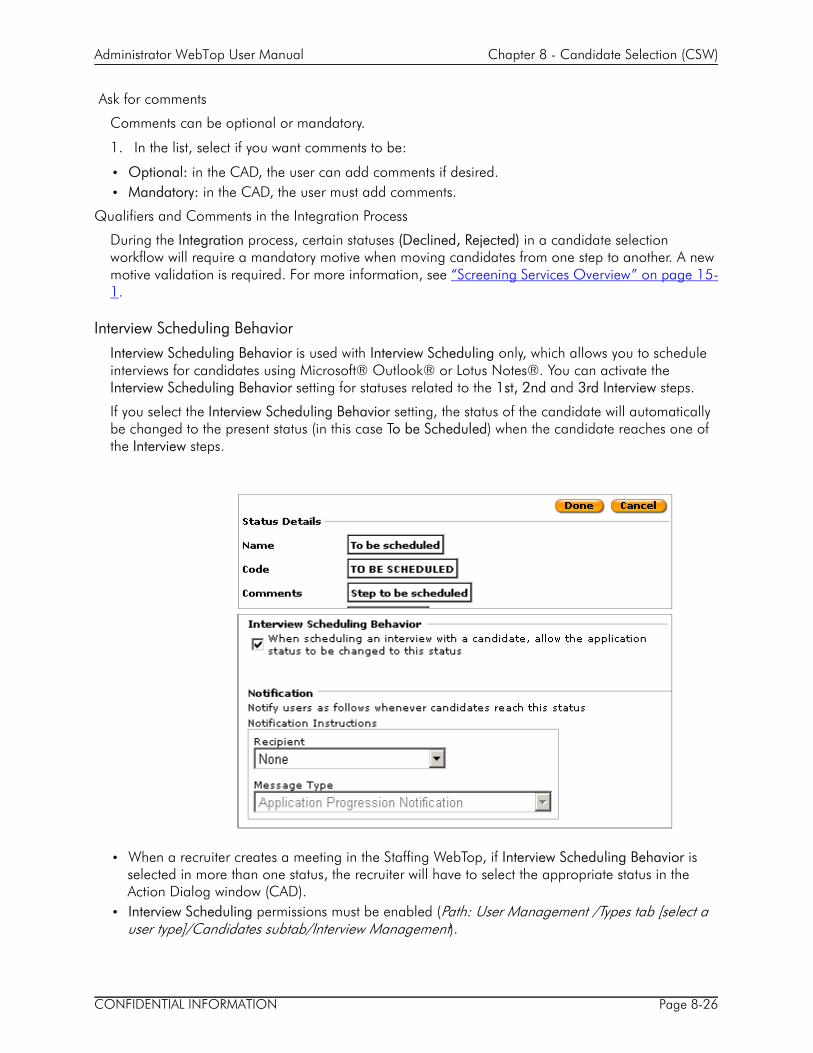
CONFIDENTIAL INFORMATION Page 8-26
Administrator WebTop User Manual Chapter 8 - Candidate Selection (CSW)
Ask for comments
Comments can be optional or mandatory.
1. In the list, select if you want comments to be:
• Optional: in the CAD, the user can add comments if desired.• Mandatory: in the CAD, the user must add comments.
Qualifiers and Comments in the Integration Process
During the Integration process, certain statuses (Declined, Rejected) in a candidate selection workflow will require a mandatory motive when moving candidates from one step to another. A new motive validation is required. For more information, see “Screening Services Overview” on page 15-1.
Interview Scheduling Behavior
Interview Scheduling Behavior is used with Interview Scheduling only, which allows you to schedule interviews for candidates using Microsoft® Outlook® or Lotus Notes®. You can activate the Interview Scheduling Behavior setting for statuses related to the 1st, 2nd and 3rd Interview steps.
If you select the Interview Scheduling Behavior setting, the status of the candidate will automatically be changed to the present status (in this case To be Scheduled) when the candidate reaches one of the Interview steps.
• When a recruiter creates a meeting in the Staffing WebTop, if Interview Scheduling Behavior is selected in more than one status, the recruiter will have to select the appropriate status in the Action Dialog window (CAD).
• Interview Scheduling permissions must be enabled (Path: User Management /Types tab [select a user type]/Candidates subtab/Interview Management).

CONFIDENTIAL INFORMATION Page 8-27
Administrator WebTop User Manual Chapter 8 - Candidate Selection (CSW)
Notification
You can send a message to users to let them know when the step is reached.
Notification Instructions
Recipient
Select who will receive the notification message. Available choices are:
• None: The message will not be sent to anyone. • Recruiter: Send the message only to the recruiter. • Hiring Manager: Send the message only to the hiring manager• Recruiter and Hiring Manager: Send the same message to the recruiter and hiring manager at the
same time.
Message Type
The user can send different types of messages. Available choices are:
• Application Progression Notification: Send a message that includes information on the progress of the candidate in the selection process. If the sender is a recruiter or a hiring manager, he or she will not receive the message.
• Application Summary (faxable): The message includes a summary of the application. This message may be faxed to the recipient. If the sender is a recruiter or a hiring manager, he or she will automatically receive a copy of the message.
This setting is used for Staffing Stations only.
Automatic Progression of Applications (Auto-Flow and Passport)
If you select Allow candidates to reach this status automatically when the (optional) conditions specified below are met, candidate who meet the specified conditions or constraints will be allowed to automatically reach this status. You can create and edit conditions that will be used to identify candidates who are allowed to reach this status automatically.
Passport is responsible for handling requests to and from external service providers. It communicates with other modules in order to maintain requests up to date and interacts with the assessment platform to request assessment evaluations.

Conditions are related to screening services only.
CONFIDENTIAL INFORMATION Page 8-28
Administrator WebTop User Manual Chapter 8 - Candidate Selection (CSW)
The automatic progression of applications automates the CSW process based on the results obtained by Passport external services.
• All Conditions (And): All the conditions must be met to automatically move on to the next step.• Any Condition (Or): At least one of the conditions must be met to automatically move on to the
next step.• Create a Condition
CONFIDENTIAL INFORMATION Page 8-29
Administrator WebTop User Manual Chapter 8 - Candidate Selection (CSW)
1. Click Create a Condition... The New Condition page opens.
2. Enter the Name of the condition.
3. In the Condition Statement section, in the first list, select a condition statement (constraint provider) from the list. Available choices are:
• All: Select all the condition providers. Applies to all services requested for a candidate (pre-selection application).
• List of available condition providers: Select one of the condition providers in the list.
The list of available condition providers will vary according to the providers selected at your organization. Assessment is used as an example. Information will vary according to service selected. For more information on available services, please contact your Taleo representative.
Service Provider Name (condition provider)
Request Status Values
All All Requests are terminated: The candidate has completed all the conditions
True; False
Assessment Completed: the request is completed. True; False
Provider Response Timeout: The service provider timeout delay has expired
True; False
Sent to candidate: The request has been sent to the candidate.
True; False
Unable to process: The system is unable to process the request
True: Resend if necessary; False
Waiting for provider response: the service provider has not returned the results of the request.
True; False

CONFIDENTIAL INFORMATION Page 8-30
Administrator WebTop User Manual Chapter 8 - Candidate Selection (CSW)
The following values may also be available depending on service provider and context: Error: An error occurred during the screening process. Possible Values: True or False.
• In Progress: The screening process is in progress. • Pending: The candidate’s results have not been returned. Possible Values: True or False.• Requested: The candidate’s results are requested. • Score (percentile): Select a value that reflects the candidate’s results compared to the passing
score. 4. Click Done to save the changes, or click Cancel to return to the Status Details page without
saving the changes.
Edit a Condition
1. Click Edit... The Edit a Condition page opens.
2. If necessary, make changes to the selected condition.
3. Click Done to save the changes, or click Cancel to return to the Status Details page without saving the changes.
You can only edit one condition at a time.
Remove a condition.
1. In the Conditions section, select the condition you want to remove, then click Remove.
2. If you want to remove all the conditions at once, select Conditions above the list of conditions. All the conditions are selected.
3. Click Remove.
Details: Is: enter a boolean value specific to the conditionContains: enter the details of the condition.
Exceptional True; False
Passed True; False
Score: Enter a score Is Equal to; Is Greater than; Is Greater than or Equal to; Is Less than; Is Less than or Equal to; Is not Equal to
Assessment (Post Application)
Same as Assessment Same as Assessment
Service Provider Name (condition provider)
Request Status Values

CONFIDENTIAL INFORMATION Page 8-31
Administrator WebTop User Manual Chapter 8 - Candidate Selection (CSW)
Removing Statuses from a StepPath: Setup/Global Setup/Process/Candidate Selection/Workflows/Steps tab/Statuses Usage tab
To remove a Status from a Step:
1. On the Steps tab, select a step. The Step Details page opens.
2. On the Statuses Usage tab, select the check box next to the status that you want to remove (multiple selections are possible).
3. Click Remove. The system automatically removes the selected status.
4. Click Done to save changes. The status you removed is no longer available in this selection step.
You cannot remove a status that was selected as the Initial Status. You must first select another status that will become the Initial Status.
Statuses that you removed are not deleted permanently. You can restore them in the selection step.
Actions in a StepRecruiters and hiring managers must perform certain actions during the hiring process. A list of actions is available on the Actions tab. You can select actions and make them available in a step, or

CONFIDENTIAL INFORMATION Page 8-32
Administrator WebTop User Manual Chapter 8 - Candidate Selection (CSW)
you can remove actions from a step. You can also edit existing actions, but you cannot create or completely delete actions.
Path: Setup/Global Setup/Process/Candidate Selection/Workflows/Steps tab/Actions Usage tab
Reordering Actions in a Step
To reorder actions in a step:
1. On the Steps tab, select a step. The Step Details page opens.
2. On the Actions Usage tab, use the number list to select the position of the actions, then click Reorder.
The actions that appear in this list can be edited from the Actions tab.
3. Click Done to return to the Steps list. The new actions will be available when this step is used.
Reordering actions in a step will not affect the order of the actions in the More Actions menu.

CONFIDENTIAL INFORMATION Page 8-33
Administrator WebTop User Manual Chapter 8 - Candidate Selection (CSW)
Removing Actions from a Step
Path: Setup/Global Setup/Process/Candidate Selection/Workflows/Steps tab/Actions Usage tab
1. On the Steps tab, select a step. The Step Details page opens.
2. On the Actions Usage tab, select the actions you want to remove (multiple selections are possible).
3. Click Remove. The system automatically removes the selected actions and updates the Actions Usage list.
4. Click Done. The actions you removed are no longer available in this selection step.
The actions that you removed are not permanently deleted; you can restore them by editing the step.
Editing an Existing StepPath: Setup/Global Setup/Candidate Selection/Workflows/Steps tab
1. On the Steps tab, select the step you want to modify. The Step Details page opens.
2. If necessary, enter a new name in the Name field.
3. Enter a code in the Code field.
The code is the main step element identifier. It must be created for each step. All initial sorting is based on the code.
The code cannot be modified if it is a standard step.
4. If necessary, modify the short name.

CONFIDENTIAL INFORMATION Page 8-34
Administrator WebTop User Manual Chapter 8 - Candidate Selection (CSW)
5. If necessary, add comments in the Comments field.
6. If necessary, add statuses on the Statuses Usage tab.
7. If necessary, reorder the statuses.
8. If necessary, remove actions from the Actions Usage tab.
9. If necessary, reorder the actions.
If you have modified the name of a standard step, and you want to revert to the default values of the step, click Default next to the Name field before you click Done. The default values will be restored.
10. When all the changes are made, click Done. The changes are saved and the new step appears in the step list.
When a step is used in more than one workflow, the following link is displayed in the upper-left corner of the Step Details page: This step is used in # of workflows. Click # of workflows to see in which workflows this step is used.
Duplicating a Step1. On the Steps tab, select the step you want to duplicate in the list of available steps. The Step
Details page opens.
2. Click Duplicate. The New Step page opens.
3. Enter a new name in the Name field or modify the existing one.
4. Enter a code in the Code field.
The code is the main step element identifier. It must be created for each step. All initial sorting is based on the code.
5. Enter comments in the Comments field if desired.
6. Select Available if you want to make the step available in candidate selection workflows.
7. If necessary, add, remove or reorder statuses on the Statuses Usage tab.
8. If necessary, remove or reorder actions on the Actions Usage tab.
9. When all the changes are made, click Done. The duplicate step appears in the Steps list.

CONFIDENTIAL INFORMATION Page 8-35
Administrator WebTop User Manual Chapter 8 - Candidate Selection (CSW)
Statuses
Statuses indicate the position or state (Approved, In Process, Negotiating, Waiting for results, Hired) a candidate has reached in the Selection step. You can create, modify, remove or delete statuses. A candidate can have only one status at a time in each step.
Status Description
Approved A requisition, candidate, or offer has been approved.
Contacted The recruiter or hiring manager has contacted the candidate, but the contact was inconclusive enough to apply a status other than Contacted.
Has Declined The candidate has removed his or her application on a specific requisition.
Hired The candidate is hired.
In Process The selection process is in progress.
Left a Message The recruiter or hiring manager has left a message for a candidate, and is waiting for an answer.
Negotiating The negotiating process is in progress.
Offer Countered
A previous offer existed and was refused. A counter offer has been made.
Offer Rescinded The recruiter or hiring manager has revoked the offer
Offer Reneged The candidate refuses the offer after having previously accepted (goes back on his or her word).
Passed The candidate has successfully passed an interview, a test, a reference or medical check, etc.
Offer Pending The recruiter or hiring manager has made an offer and is waiting for an answer from the candidate.
Qualified The candidate has qualified to reach this step.
Rejected The recruiter or hiring manager has rejected the application for the current requisition. A message is automatically sent to the candidate if this option is activated.
Scheduled The recruiter or hiring manager has scheduled the main action for the current step.
Short List The candidate has made it to the short list of candidates selected to move on to the next step.
Standby The recruiter or hiring manager has put the candidate on hold. For example, the candidate has hinted that he or she may withdraw his or her application.

CONFIDENTIAL INFORMATION Page 8-36
Administrator WebTop User Manual Chapter 8 - Candidate Selection (CSW)
Creating a StatusPath: Setup/Global Setup/Process/Candidate Selection/Workflows/Statuses tab
To be... This contextual status indicates that the main action for a step has yet to be performed. The wording depends on the step.
To Be Scheduled
This status is used with the 1st, 2nd, and 3rd Interview steps to schedule interviews using the Interview Scheduling feature. For more information, see “Interview Scheduling” on page 8-55
Under Consideration
The candidate meets the required criteria but certain elements still need to be evaluated.
Verbal Offer The recruiter or hiring manager has made a verbal offer to a candidate and is waiting for an answer.
Waiting for Info The recruiter or hiring manager is waiting for additional information on a candidate.
Waiting for Results
The recruiter or hiring manager is waiting for results (test, background check, medical check, reference check, etc.)
Written Offer The recruiter or hiring manager has made a written offer and is waiting for an answer from the candidate.
Waiting for Approval
The recruiter or hiring manager has made a written offer and is waiting for an approval.
Status Description

CONFIDENTIAL INFORMATION Page 8-37
Administrator WebTop User Manual Chapter 8 - Candidate Selection (CSW)
1. On the Statuses tab, click New... The New Status page opens.
2. Enter a name in the Name field. The name must be translated into all available languages.
3. Enter a code in the Code field.
The code is the main status element identifier. It must be created for each status. All initial sorting is based on the code.
4. If necessary, add comments in the Comments field.
5. Select a reference model (not required for a status).
Reference models are used to map statuses to reports, emails, EEO status settings in regulations, as well as other functions used throughout the application. They are also used to determine the status that will trigger the EEO/Affirmative Action Information (Path: Setup/Global Setup/Regulations/USA (EEO/Affirmative Action).
The default reference model is Not Specified.
6. Select Available to make the status available in steps and in candidate selection workflows.
7. Select Activate the corresponding action to activate a status shortcut in the Action Dialog window in the Staffing WebTop.
When the Activate the corresponding action check box is greyed out, no shortcut is available for this status.
8. Select Allow event date entry and modification if you want to allow recruiters and hiring managers (must be logged in the Staffing WebTop) to enter the date on which an event was performed, rather than the date on which an event was recorded (interview, offer, date, test, etc.).
The event date can only be changed for actions that result in a change of status (Change Status, Move, Bypass, as well as Offer, Hire a Candidate, Candidate has Declined, Reject Candidate. The results displayed in reports will reflect the actual dates on which events were performed. To allow a user to set candidate selection workflow event dates, you must enable the appropriate permissions in User Management (Path: User Management/Types/Candidates tab).
9. If necessary, add or remove qualifier groups.
10. If necessary, use the drop-down numbers to reorder the qualifier groups, then click Reorder.
CONFIDENTIAL INFORMATION Page 8-38
Administrator WebTop User Manual Chapter 8 - Candidate Selection (CSW)
11. Click Done. The system displays the Statuses list, which now includes the newly added status. The new status can now be used in workflows.
Adding Qualifier Groups to a Status
Path: Setup/Global Setup/Process/Candidate Selection/Workflows/Statuses tab
1. On the Statuses tab, select a status. The Status Details page opens.
2. In the Qualifier Groups section, click Add... The Add Qualifier Groups window opens.
3. Select a qualifier group (multiple selection is possible).
4. Click Add. The selected qualifier groups are displayed in the Qualifier Groups list.
5. If necessary, reorder the qualifier groups.
6. Click Done.
Editing a StatusPath: Setup/Global Setup/Process/Candidate Selection/Workflows/Statuses tab
1. On the Statuses tab, select a status.
2. If necessary, enter a new name in the Name field.
3. If necessary, enter a new code in the Code field.
The code is the main status element identifier. It must be created for each status. All initial sorting is based on the code.
The code cannot be changed if it is a standard status.
4. If necessary, add new comments in the Comments field.
5. If necessary, change the reference model.
The code cannot be changed if it is a standard status.
Reference models are used to map steps to reports, emails, EEO Status settings in regulations, as well as other functions used throughout the application.They are also used to determine the status that will trigger the EEO/Affirmative Action Information (Path: Setup/Global Setup /Regulations/USA (EEO/Affirmative Action).

The default reference model is: Not Specified.
CONFIDENTIAL INFORMATION Page 8-39
Administrator WebTop User Manual Chapter 8 - Candidate Selection (CSW)
6. Select Available, to make the status is available in steps and in candidate selection workflows.
7. Select Activate the corresponding action to activate a status shortcut in the Candidate Action Dialog in the Staffing WebTop or the Manager WebTop.
If the Activate the corresponding action check box is greyed out, the shortcut is not available for this status.
8. Select Activate Event Date Entry if you want to allow recruiters and hiring managers to enter the date on which an event was performed, rather than the date on which an event was recorded (interview, offer, date, test, etc.).
The event date can only be changed for actions that result in a change of status (Change Status, Move, Bypass), as well as for the following shortcuts: Make an Offer, Hire a Candidate, Candidate has Declined, Reject Candidate. The results displayed in reports will reflect the actual dates on which events were performed. To allow a user to set candidate selection workflow event dates, you must enable the appropriate permissions in User Management (Path: User Management/Types/Candidates tab).
9. If necessary, add or remove qualifier groups.
10. If necessary, reorder the qualifier groups.
If you want to revert to the default status name, click Default, then click Done. The default status name appears and the system displays the Statuses list (for standard elements only).
11. Click Done to return to the Statuses list. The modified status is now available for use in workflows.
Duplicating a Status1. On the Status tab, select the status that you want to duplicate. The Status Details page opens.
2. Click Duplicate. The New Status page opens.
3. If necessary, enter a new name in the Name field.
4. Enter a code in the Code field.
CONFIDENTIAL INFORMATION Page 8-40
Administrator WebTop User Manual Chapter 8 - Candidate Selection (CSW)
5. If necessary, enter comments in the Comments field.
6. Select Available to make the status available in steps and in candidate selection workflows.
7. If necessary, select Activate the corresponding action.
8. Select Activate Event Date Entry if you want to allow recruiters and hiring managers to enter the date on which an event was performed, rather than the date on which an event was recorded (interview, offer, date, test, etc.).
The event date can only be changed for actions that result in a change of status (Change Status, Move, Bypass), as well as for the following shortcuts: Make an Offer, Hire a Candidate, Candidate has Declined, Reject Candidate. The results displayed in reports will reflect the actual dates on which events were performed. To allow a user to set candidate selection workflow event dates, you must enable the appropriate permissions in User Management (Path: User Management/Types/Candidates tab).
9. If necessary, add or remove qualifiers position groups.
10. If necessary, reorder qualifier groups.
11. Click Done to save the changes.
The code is the main status element identifier. It must be created for each status. All initial sorting is based on the code.

CONFIDENTIAL INFORMATION Page 8-41
Administrator WebTop User Manual Chapter 8 - Candidate Selection (CSW)
Actions
During the selection process, certain actions can be performed by the recruiter or the hiring manager (send correspondence to a candidate, call a candidate for an interview, set a interview date, etc.). You can select actions and make them available in a step. It is also possible to edit comments in an action.
Making Actions Available and Comments MandatoryPath: Setup/Global Setup/Process/Candidate Selection/Workflows/Actions tab
1. On the Actions tab, select an action. The Action Details page opens.
2. Select the Available check box.
Workflow-type actions are always available. The Available check box is greyed out to indicate that such actions cannot be made unavailable. It is only possible to edit comments and to make them mandatory or optional.
3. Enter comments in the Comments field.
4. Select Make comments mandatory if you require users to add comments for this specific action.
5. The following link is displayed in the upper-left corner of the Action Details page: This action is used in # of steps. Click the # of steps to open the list of uses to see in which steps this action is used.
6. Click Done to return to the Actions list.

CONFIDENTIAL INFORMATION Page 8-42
Administrator WebTop User Manual Chapter 8 - Candidate Selection (CSW)
List of Standard Actions
7. The following actions are available when the user clicks Match from a candidate file.
The actions; Move, Change status, Revert, Undelete, Exporte to SAP and Bypass cannot be removed from the available action list. User type permissions can, however, be configured to prevent users of a certain user type from performing theses actions (please consult the SmartOrg documentation for more information).
Qualifier Groups
A qualifier group is a collection of qualifiers that can be used by recruiters and hiring managers to explain why a candidate was hired or rejected, or indicate the reasons a candidate gave for declining a job offer. For example, a candidate may have declined a job for personal reasons, because he/she does not want to relocate, or because he/she has accepted another position.
Creating Qualifier GroupsPath: Setup/Global Setup/Process/Candidate Selection/Workflows/Qualifier Groups tab
1. On the Qualifier Groups tab, click New... The New Qualifier Groups page opens.
2. Enter a name in the Name field. Translate the name in all available languages.
3. Enter a code in the Code field.
The code is the main qualifier groups element identifier. It must be created for each flow. All initial sorting is based on the code.
Actions Table
Add Comments Add comments to candidate files.
Attach Files Attach a document to the candidate’s file.
Bypass Bypass a selection step in a selection workflow without restriction.
Change Status Change the status of a step in a selection workflow.
Export to SAP Export the candidate file to SAP human resources management system (HRMS).
Fill Out Form Add a PDF form to a candidate file. The candidate will be required to fill out the form. For more information, see “Merge Forms” on page 8-61.
Grade Enter or remove a grade in a candidate file.
Move Move a candidate from one selection step to another.
Revert Undo the last action in a selection step.
Send Correspondence
Send a correspondence to a candidate.
Undelete Undelete a candidate file.

CONFIDENTIAL INFORMATION Page 8-43
Administrator WebTop User Manual Chapter 8 - Candidate Selection (CSW)
4. To make the Qualifier Groups available, select the Available check box.
Adding Qualifiers to a Qualifier Group Path: Setup/Global Setup/Process/Candidate Selection/Workflows/Qualifier Groups tab
1. On the Qualifier Groups tab, select a qualifier group. The Qualifier Groups Details page opens.
2. Click Add... The Add Qualifier Selector window opens.
3. Select qualifiers in the Add Qualifiers list. Click Add. The selected qualifiers appear in the Qualifiers list.
4. If necessary, reorder the qualifier groups.
5. Click Done.
The following link is displayed in the upper-left corner of the Qualifier Groups Details page: This qualifier group is associated to # statuses. Click the link to open the list of uses to see in which statuses this qualifier groups is used.
Removing Qualifiers from a Qualifier GroupPath: Setup/Global Setup/Process/Candidate Selection/Workflows/Qualifier Groups tab
1. On the Qualifier Groups tab, select a qualifier group. The Qualifier Groups Details page opens. Multiple selections are possible.
2. Click Remove. The selected qualifiers are removed from the list.
3. If necessary, reorder the qualifier groups.
Click Done to return to Qualifier Groups.

CONFIDENTIAL INFORMATION Page 8-44
Administrator WebTop User Manual Chapter 8 - Candidate Selection (CSW)
Qualifiers
Qualifiers are reasons that the recruiter or hiring manager provide for hiring or rejecting a candidate, or for explaining why a candidate declined a job offer. Examples of qualifiers are: Not willing to relocate, Not willing to travel, Feels that salary is insufficient, No reason given, etc. Qualifiers are grouped in qualifier groups and are used in Statuses.
Creating a Qualifier Path: Setup/Global Setup/Process/Candidate Selection/Workflows/Qualifier Groups tab
1. On the Qualifiers Groups tab, select a qualifier group. The Qualifier Group Details opens.
2. In the Qualifiers section, click New... The New Qualifier page opens.
3. Enter a name in the Name field. Translate the name in all available languages.
4. Enter a code in the Code field.
The code is the main qualifier element identifier. It must be created for each status. All initial sorting is based on the code.
5. If necessary, enter comments in the Comments field.
6. Select Available to make the new qualifier available.
7. Click Done to return to the Qualifier Groups Details page. The new qualifier will appear in the Qualifiers list.
8. If necessary, click the drop-down numbers to reorder the qualifiers, then click Reorder.
9. Click Done to save the new qualifier and return to the Qualifier Groups list.
The qualifier you have just created using Qualifier Groups will appear on the list on the Qualifiers tab.
OR,
Path: Setup/Global Setup/Process/Candidate Selection/Workflows/Qualifiers
1. On the Qualifiers tab, click New...The New Qualifiers page opens.
2. Repeat steps 3 to 7.
3. Click Done to save the new qualifier and return to the Qualifiers tab.

CONFIDENTIAL INFORMATION Page 8-45
Administrator WebTop User Manual Chapter 8 - Candidate Selection (CSW)
Editing a Qualifier Path: Setup/Global Setup/Process/Candidate Selection/Workflows/Qualifiers tab
1. TOn the Qualifiers tab, select a qualifier. The Qualifier Details page opens
2. If necessary, change the name in the Name field.
3. If necessary, change the code in the Code field.
The code is the main qualifier element identifier. It must be created for each flow. All initial sorting is based on the code.
The qualifier code cannot be changed if it is a standard qualifier code.
4. If necessary, modify comments in the Comments field.
5. To make the Qualifier available, select the Available check box.
6. Click Done.
The following link is displayed in the upper-left corner of the Qualifier Details page: This qualifier is used in # qualifier groups. Click the link to open the list of uses to see in which qualifier group this qualifier is used.

CONFIDENTIAL INFORMATION Page 8-46
Administrator WebTop User Manual Chapter 8 - Candidate Selection (CSW)
Forms
Forms can be tied to the workflows, steps and statuses of the Candidate Selection Workflow (CSW).
PDF forms are first added to the Administrator WebTop via the Merge Forms option (Path: Setup/Global Setup/Merge Forms). They are then available in the Forms tab. See “Adding a Merge Form to the Merge Forms List” on page 8-63.
Associating a Form to the Candidate Selection WorkflowSystem administrators have the ability to tie forms to the workflows, steps and statuses of the Candidate Selection Workflow (CSW).
Path: Setup/Global Setup/Process/Candidate Selection/Workflows/Forms tab
1. On the Forms tab, click on the desired form.
2. Indicate if the form is “always” available or if it is associated to the “selected workflow, step or status” context.
3. To associate a form to more than one context, select the appropriate workflow, step and status then click Add. Your selection is displayed in the Selected Workflows, Application Steps, and Application Statuses field.
4. To remove a selected workflow, step or status context, select the context then click Remove.
5. Click Done to complete the process.
RSOffer Step
OverviewThe RSOffer step is a step that can be included in a candidate selection workflow to enhance the offer procedure. The RSOffer step cannot be customized or edited (except for qualifier groups and qualifiers that can be added to specific statuses). It is recommended to activate the RSOffer step in a Sequential workflow.
PDF forms are first added in the Administrator WebTop via the Merge Forms option. They are then available in the Forms tab. See “Merge Forms (Fill Out Forms Action in CAD)” on page 8-60.
Do not add the RSOffer step to a Reference workflow.

CONFIDENTIAL INFORMATION Page 8-47
Administrator WebTop User Manual Chapter 8 - Candidate Selection (CSW)
Offer Step Permissions and PrivilegesOffer permissions let you determine which types of users will be able to create and extend offers to candidates when the RSOffer step is added to a candidate selection workflow.
Before adding the RSOffer step in a Sequential workflow, review all user type permissions.
Path: User Management/Types – Select a user type/Requisitions tab
Path: User Management/Types – Select a user type/Candidates tab
Path: User Management/Types – Select a user type/Offers tab
To change permissions and privileges related to RSOffer step, review permissions on Requisitions tab, Candidates tab, and Offers tab.
Adding the RSOffer Step to a Sequential WorkflowPath: Setup/Global Setup/Process/Candidate Selection/Workflows/Workflows tab
1. Select a sequential workflow. The Workflows Details page opens.
2. In the Steps Usage page, select the Offer step (Code: Offer). Click Remove.
It is recommended to remove the Offer step to avoid having two offer steps in the same workflow.
3. In the Steps Usage page, select the RSOffer step (Code: RSOffer).
4. Click Add, then click Reorder to reorder steps if necessary. If possible, place RSOffer at the same position as the Offer step you previously removed in step 2.
5. In the Steps Usage section, select RSOffer. The Steps Details page opens.
6. In Steps Details, you can:
• Allow conditional entry• Make the step mandatory• Select users who will be notified when a new candidate is moved to this step7. Click Done to save the step and return to the Workflows page.
It is not possible to add, or edit statuses in the RSOffer step. You can only add qualifier groups and qualifiers to the following statuses:
• Negotiating• Canceled• Refused• Rescinded• Reneged
You may also determine if a step is mandatory and you can allow conditional entry in a step.

CONFIDENTIAL INFORMATION Page 8-48
Administrator WebTop User Manual Chapter 8 - Candidate Selection (CSW)
Steps
On the Steps tab, select RSOffer.
In Steps Details, the step can only be edited to a certain extent. In Steps Details, you can:
• Change the name of the step• Change the short name of the step• Add comments in the Comments field• Select Available to make the RSOffer step available in candidate selection workflows.
You cannot:
• Delete or add statuses (Statuses Usage).
Statuses Details
Path: Setup/Global Setup/Process/Candidate Selection/Workflows/Steps tab/Steps Details
Statuses Usages
Open Statuses Usages and make the necessary changes. Some statuses for the RSOffer step cannot be modified.

CONFIDENTIAL INFORMATION Page 8-49
Administrator WebTop User Manual Chapter 8 - Candidate Selection (CSW)
Path: Setup/Global Setup/Process/Candidate Selection/Workflows/Steps tab/Steps Details/Statuses Usage tab
In the following statuses (RSOffer Rejected, RSOffer Declined), you can:
• Make comments mandatory• Change the step progression level
In the following status details (RSOffer to be Made, RSOffer Rejected, RSOffer Declined), you can:
• Make comments mandatory

CONFIDENTIAL INFORMATION Page 8-50
Administrator WebTop User Manual Chapter 8 - Candidate Selection (CSW)
You cannot make any changes in the following status details:
• RSOffer Draft • RSOffer Canceled • RSOffer Pending • RSOffer Rejected • RSOffer Approved • RSOffer Extended • RSOffer Rescinded • RSOffer Negotiating • RSOffer Refused • RSOffer Accepted • RSOffer Reneged
Actions Usage
Open Statuses Usages and make necessary changes.
Path: Setup/Global Setup/Process/Candidate Selection/Workflows/Steps tab/Steps Details
Select actions for the RSOffer step.

CONFIDENTIAL INFORMATION Page 8-51
Administrator WebTop User Manual Chapter 8 - Candidate Selection (CSW)
RSOffer Statuses
RSOffer statuses are always available on the Statuses tab.
Path: Setup/Global Setup/Process/Candidate Selection/Workflows/Statuses tab
1. Select an RSOffer status. The Status Details page opens.
2. Add qualifier groups and qualifiers.
You can only add qualifier groups and qualifiers to the following statuses:• Negotiating• Canceled• Refused• Rescinded• Reneged
CONFIDENTIAL INFORMATION Page 8-52
Administrator WebTop User Manual Chapter 8 - Candidate Selection (CSW)
Path: Setup/Global Setup/Process/Candidate Selection/Workflows/Statuses tab/Statuses Details
1. Click Add... The Qualifier Groups selector opens.
2. Click Done to save changes.
Qualifier Groups and Qualifiers
To add qualifiers to qualifier groups, see the Qualifier Groups section earlier in this chapter.
RSOffer SettingsRSOffer settings, which are specific to the RSOffer step, let you enable specific actions related to the RSOffer step: approval, expiration dates, start dates, confirmation of employee presence, as well as pending tasks in the offer selection process.
Setting Values Default Values
Description & Tips
Setup/Global Setup/Process/Offers/Customization
Default Expiration Date No default, 1 day, 2 days, 3 days, 1 week, 2 weeks
3 days Select a default expiration date for an offer.
Prevent the modification of the actual start date once it is no longer tentative
Yes, No
No Once the start date has been set to final, it can no longer be changed.

CONFIDENTIAL INFORMATION Page 8-53
Administrator WebTop User Manual Chapter 8 - Candidate Selection (CSW)
RSOffer FieldsOffer fields can be made available in the Offer grid of the Staffing WebTop. These fields will include information on offer terms, competitive information, candidate expectations, and on information included in the requisition.
Field Layout-Offer
The Field Layout-Offer window lets you select the display mode that will be available in the Offer grid of the Staffing WebTop.
Remind user to confirm employee presence X days before the start date of a new hire
No reminder, 1 to 7
No reminder
The user must confirm the presence of the employee to finalize the offer process.
Remind user to finalize the start date when a candidate accepts an offer but the start date is tentative
Yes, No
Yes Remind the user to enter a final start date when the candidate accepts an offer.
Remind user to complete the selection process when a candidate accepts an offer but pending issues are preventing the hiring
Yes, No
Yes Remind the user to complete pending tasks in the selection process. If pending tasks are not completed, the offer process will remain incomplete.
Number of days after start date when candidate auto-hire occurs
No Auto-hire, 1 to 7
No Auto-hire
Select a number of days after the start date that will launch the auto-hire process.
Activate the offer approval process No, Optional, Mandatory
Optional Determine if the offer approval process is optional or mandatory.
Allow a request for approval only if an offer letter has been selected
Yes, No
No Request for approval cannot be launched by the user, unless an offer letter is included in the offer approval.
Default employee start time on start date
00h00 to 23h00
Indicate the time when the employee is expected to arrive to work on his/her first day of work.
Setting Values Default Values
Description & Tips

CONFIDENTIAL INFORMATION Page 8-54
Administrator WebTop User Manual Chapter 8 - Candidate Selection (CSW)
Path: Setup/Global Setup/Field Layout/Offer
Category
For each field label, select a category:
• Top Section: Selected field labels will appear in the top section of the Offer grid.• General Terms: Selected field labels will appear in the General Terms section of the Offer grid.• Bonuses: Selected field labels will appear in the Bonuses section of the Offer grid.• Details: Selected field labels will appear in the Details section of the Offer grid.
Display Mode
For each field label, select a display mode.
• Always Displayed: The selected field label is always displayed in the offer form and on the Offer grid. Always Displayed is mostly used for generic fields.
• Hidden by Default if Empty: The field label will be hidden if the content is empty. For instance, if there is no salary in the salary field, the field will be hidden. This is mostly used for special type of information. These fields will automatically be displayed if they are not empty. However, if the field is empty, the user will have to expand the corresponding category using the + button in order to see the field and enter information in it.
You may create a unique (corporate-wide) offer form that includes only the most generic fields. Make sure that only the most generic fields are set to Always Displayed. Select Hidden by Default if Empty for all other fields.
When a requisition is created, (Path: Staffing WebTop/Requisitions tab/Administration tab/Compensation section), you can import (using integration) or manually enter all offer and compensation information, as well as special offer terms specific to that requisition (that would correspond to the Hidden by Default if Empty fields).
Since the information in the compensation section of the requisition is meant to serve as the guideline for creating an offer (for example, minimum and maximum salary information), the user creates an offer based on the requisition. The Always Displayed and Hidden by Default if Empty offer

CONFIDENTIAL INFORMATION Page 8-55
Administrator WebTop User Manual Chapter 8 - Candidate Selection (CSW)
fields are prepopulated with the compensation information pulled from the requisition. The fields now contain data.
All other fields left empty are not displayed unless the user presses the corresponding + button. Each time a recruiter creates an offer based on the requisition, the offer form adjusts according to the selected requisition (and displays all specific offer and compensation information pertaining to the specific requisition).
When the category and display mode have been selected, click Apply.
Interview Scheduling
OverviewInterview Scheduling provides users with the functions needed to schedule interviews in the Staffing WebTop and in the Manager WebTop. This features integrates Microsoft® Outlook® and Lotus Notes®.
Each time an interview is scheduled, updated or canceled in the Staffing WebTop or Manager WebTop, an email message is sent to selected attendees. Recipients can click the message and add the meeting to their Microsoft® Outlook® and Lotus Notes®.
The following actions can be performed in Interview Scheduling:
• Scheduling an interview• Updating an interview• Cancelling an interview
Calendar ProductsThe following calender products have been tested for use with Interview Scheduling:
• Microsoft Outlook 2000 and higher • Lotus Notes 5.5 and higher. The iCalender plug-in has been tested with Lotus Notes 5.5 and
higher.
Events occurring in Microsoft Outlook and Lotus Notes are not managed by the Staffing WebTop or Manager WebTop. For example, if an interview meeting is modified in Outlook (meeting request accepted or declined), the new information will not appear in the Staffing WebTop or Manager WebTop. The Staffing WebTop or Manager WebTop user will receive the information via Outlook or Lotus Notes.

CONFIDENTIAL INFORMATION Page 8-56
Administrator WebTop User Manual Chapter 8 - Candidate Selection (CSW)
Permissions and SettingsThe following permissions must be enabled for users to schedule, update, and cancel interview meetings.
Path: User Management/Types [User Type]/Candidates/Interview Management
Manage interviews: Enable the user to manage interview request meetings in the candidate selection workflow.
• Only if user owns the requisition: The user can manage interviews only if he or she is the owner of the requisition.
• Only if user's group owns the requisition: The user can manage interviews only for requisitions that are owned by the group to which he or she belongs.
• Without restriction: The user can manage interviews for any requisition, without restriction.
Send candidate files and requisitions to attendees: The user can attach the candidate file and requisition to the interview meeting being scheduled. If not selected, the Send candidate file to attendees and Send requisition to attendees options will not be available when scheduling or updating an interview meeting.
• If this permission is not enabled, the Send candidate file to attendees and Send requisition to attendees options will not be available when scheduling an interview in the Staffing WebTop and in the Manager WebTop.
• If you select this setting, attendees might receive information they do not normally have access to.• The candidate file will not include information from the following candidate file tabs: Offer,
Tracking, and Regulations.
Time Zone
When scheduling an interview meeting, the time zone of the person scheduling the meeting is used as a reference value. This means that the time of the meeting in the Staffing WebTop and Manager WebTop is displayed according to the time zone selected by the person who scheduled the meeting, but the time of the meeting in Outlook or Lotus Notes is displayed according to the time zone set in Windows settings. For example, a user living in San Francisco schedules an interview from 2 p.m. to 3 p.m. Pacific Time. For an attendee living in New-York, the time of the meeting in the Staffing WebTop is from 2 p.m. to 3 p.m. Pacific Time, but the time of the meeting in Outlook is from 5 p.m. to 6 p.m. Eastern Time.

CONFIDENTIAL INFORMATION Page 8-57
Administrator WebTop User Manual Chapter 8 - Candidate Selection (CSW)
Path: User Management/Users [New]/Preferences/Regional Settings/Time Zone
To select a time zone:
1. Click Search... to open the Time Zone Selector window.
2. Select a time zone, then click Done. The selected time zone appears in the Time Zone field.
3. When the time is selected, click Save to save the changes, or click Done to make other changes in the user file, or click Cancel to close the user file without saving the changes.
User Delete and User Transfer
You can delete a user only if he or she does not own any requisitions and if no actions are assigned to this user. If the user owns requisitions, the ownership of the requisitions including scheduled interviews must be transferred to another user.
Activate Interview Management
Activate the Interview Management for the Staffing WebTop and Manager WebTop users. This setting will enable users to schedule interviews when moving candidates in the selection process.
Path: Setup/Global Setup/Process/Candidate Selection/Actions
1. Activate the interview management functionality in WebTop products
2. Select Yes. (The default value is No)
3. Click Save to save the changes.
If you enable the interview setting then decide to disable it, the user will not be able to schedule new interview meetings, but will be able to update or cancel existing ones.
CONFIDENTIAL INFORMATION Page 8-58
Administrator WebTop User Manual Chapter 8 - Candidate Selection (CSW)
Confine the meeting attendees (organizer & attendees) to members of the group to which a user belongs
Path: Setup/Global Setup/Process/Candidate Selection/Actions
When the user selects the organizer and the attendees of the meeting, only the members of the group to which the user belongs will appear in the User Selector window if the setting is set to Yes.
Path: Staffing WebTop/Candidates tab [Select a candidate–1st Interview]/Candidate File [More Actions list–Schedule an Interview]/ Organizer/Attendees – click Search to open the User Selector window).
Activating Interview Scheduling Behavior in a Candidate Selection Workflow
You can activate Interview Scheduling Behavior in the candidate selection workflow. When the candidate reaches one of the following steps (1st Interview, 2nd Interview, 3rd Interview) in a candidate selection workflow, the user can schedule an interview for the candidate and for other attendees.
Path: Setup/Global Setup/Process/Candidate Selection/Workflows
To activate the interview scheduling behavior in a candidate selection step:
1. On the Steps tab, select 1st, 2nd, or 3rd Interview. Interview scheduling should be linked to 1st, 2nd, or 3rd Interview. The Step Detail window opens.
2. On the Statuses Usage tab, select To be scheduled. The Status Details window opens.
3. In the Interview Scheduling Behavior section, select When scheduling an interview with a candidate, allow the application status to be changed to this status. The user will be able to schedule an interview when the candidate reaches the selected status.
Configure only one interview schedule status per step.
Configure all the interview steps with the Interview Scheduling action.
Interview Scheduling is available on all steps mapped to 1st, 2nd, 3rd Interview reference steps.
Completion status should indicate that the interview has been completed successfully (Passed, Successful, etc.) to prevent interviews that are passed due from being forgotten.

CONFIDENTIAL INFORMATION Page 8-59
Administrator WebTop User Manual Chapter 8 - Candidate Selection (CSW)
Selecting Interview Scheduling Messages in the Correspondence Manager
An interview notification message template is available in the Correspondence Manager when scheduling interviews. This message template can be used when inviting candidates and other participants to an interview meeting. You can edit or duplicate the message template, or you can create your own interview notification message.
Path: Correspondence Manager/Message Template List/
1. In the Show list, select Used in Status.
2. In the is drop-down menu, select Interview Scheduled, then click Refresh.
3. Select a message template. Create/Edit Message Template opens.
4. Fill information on the Properties tab.
Set Delivery Method to Automatic and a Triggering Event.
5. On the Content tab, select existing paragraphs, or create new ones.
For more information on creating messages and message templates, see “Correspondence Manager” on page 13-0.
The To, Cc, Bcc and Subject fields of the Create/Edit Message Template do not appear in the email message sent to the attendees. Only the information contained in the meeting editor appears in the message.
There are no limitations to the number of interview meetings that can be scheduled for a candidate. However, a candidate cannot be scheduled on more than one interview meeting at the time. If a candidate has submitted more than one application, he or she can be scheduled on one interview for each submitted application.

CONFIDENTIAL INFORMATION Page 8-60
Administrator WebTop User Manual Chapter 8 - Candidate Selection (CSW)
Merge Forms (Fill Out Forms Action in CAD)
Hiring managers who work in retail stores and distribution centers need the ability to produce specific human resources pre-filled forms and documents when hiring candidates. Managers need these forms and documents during in-person interviews with the candidates. Since managers have limited access to administrative support, they need an efficient method to select, print and deliver documents or forms that will be filled and signed by candidates. These forms can be prepopulated with candidate information.
Merge forms:
• Meet the legal requirement for a candidate to provide a signature on an application. • Are available in the Staffing WebTop and in the Manager WebTop. • May be available in any language. Merged data is available in English only. You can use Fields,
Custom Fields (UDFs) and Correspondence Variables in merge forms. • Are available from a candidate file. You can only use merge forms for one candidate at a time.• Are not tracked in the candidate files Tracking tab.
Company Settings (cieSettings)The following Company Settings (cieSettings) must be enabled:
• HiringDocumentsFeatureActivation: Enables the Merge Form functionality• HiringDocumentsMaximumSize: Determines the maximum size (in Bytes) of the documents:
Maximum size available: 512000.• HiringDocumentsNbPerPage: Determines the maximum number of pages per document.
Maximum number of pages available: 14
SettingsConfigure your candidate selection workflow to enable Fill Out Form in Actions.
Path: Setup/Global Setup/Process/Candidate Selection /Workflows/Forms tab
1. In the forms list, click on the desired form. The Form Details page appears.
2. Select the desired workflow, step and status.
3. Click Done.
Path: Setup/Global Setup/Process/Candidate Selection/Workflows/Steps tab/
1. In the Steps tab, select a step. The Step Details window opens.
2. In the Actions Usage tab, select FillOutForm.
3. Reorder Actions if necessary.
CONFIDENTIAL INFORMATION Page 8-61
Administrator WebTop User Manual Chapter 8 - Candidate Selection (CSW)
Merge FormsWhen you select Merge Forms, the list of available merge forms is displayed. You can create, edit and delete merge forms but you cannot duplicate merge forms.
Path: Setup/Global Setup/Merge Form
Pre-Filled PDF FormsSystem administrators have the ability to take a PDF form (such as the I-9 form) and insert Taleo variables that will automatically pull information from the candidate file. For example, instead of typing the name of a candidate, the name would automatically appear in the form.
For a list of variables that can be inserted in PDF forms, see “List of Available Variables for PDF Forms” on page 8-64.
To insert variables in a PDF form:
1. Using Adobe Acrobat, open the PDF form in which you want to insert user-defined fields.
2. In the Advanced menu, select Forms, then Edit Fillable Form.
3. In the Edit Fillable Form window, select Acrobat’s Forms Tools then click OK. The Forms toolbox appears.
Text Field Tool
4. To insert a field, click the Text Field Tool icon in the Forms toolbox.
5. Draw a field. The Text Field Properties window appears.
Column Description
Code Indicates the code of the form.
Title Indicates the title of the form.
Status Indicates if the form is available for use in the Staffing WebTop and in the Manager WebTop.

CONFIDENTIAL INFORMATION Page 8-62
Administrator WebTop User Manual Chapter 8 - Candidate Selection (CSW)
6. In the General tab, enter the variable in the Name field. See “List of Available Variables for PDF Forms” on page 8-64. In the example below, the {CANDIDATE_LAST_NAME} variable is used to extract the candidate last name automatically.
Variables are case sensitive. All symbols (brackets, underscore, etc.) must be copied accurately.
7. Enter any other information, such as a tooltip or if the field is required.
8. Click Close.
Tip to insert variables:Instead of typing the variable, copy the variable in the “List of Available Variables for PDF Forms” on page 8-64 and paste it in the Name field of the Text Field Properties window.
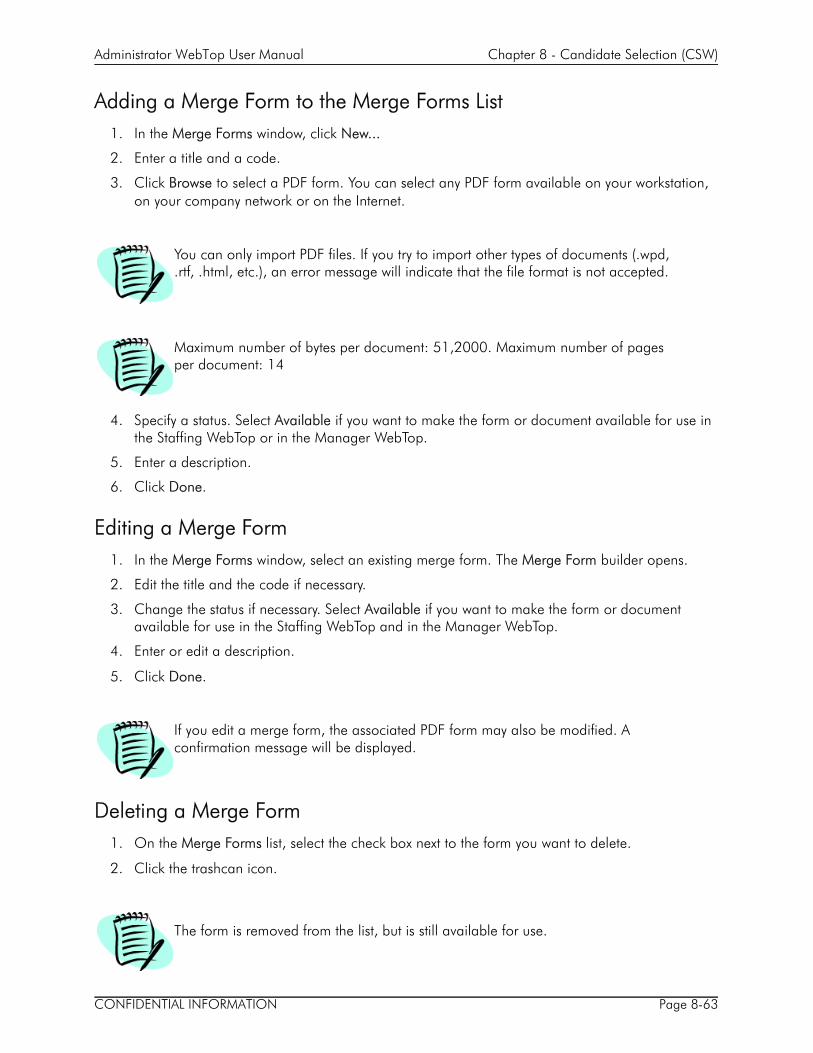
CONFIDENTIAL INFORMATION Page 8-63
Administrator WebTop User Manual Chapter 8 - Candidate Selection (CSW)
Adding a Merge Form to the Merge Forms List1. In the Merge Forms window, click New...
2. Enter a title and a code.
3. Click Browse to select a PDF form. You can select any PDF form available on your workstation, on your company network or on the Internet.
You can only import PDF files. If you try to import other types of documents (.wpd, .rtf, .html, etc.), an error message will indicate that the file format is not accepted.
Maximum number of bytes per document: 51,2000. Maximum number of pages per document: 14
4. Specify a status. Select Available if you want to make the form or document available for use in the Staffing WebTop or in the Manager WebTop.
5. Enter a description.
6. Click Done.
Editing a Merge Form1. In the Merge Forms window, select an existing merge form. The Merge Form builder opens.
2. Edit the title and the code if necessary.
3. Change the status if necessary. Select Available if you want to make the form or document available for use in the Staffing WebTop and in the Manager WebTop.
4. Enter or edit a description.
5. Click Done.
If you edit a merge form, the associated PDF form may also be modified. A confirmation message will be displayed.
Deleting a Merge Form1. On the Merge Forms list, select the check box next to the form you want to delete.
2. Click the trashcan icon.
The form is removed from the list, but is still available for use.

CONFIDENTIAL INFORMATION Page 8-64
Administrator WebTop User Manual Chapter 8 - Candidate Selection (CSW)
Merge Forms in Candidate Selection WorkflowsYou can include forms or documents in a candidate selection workflow using the Fill Out Form action.
Path: Setup/Global Setup/Process/Candidate Selection/Workflows/Forms tab
1. In the forms list, click on the desired form. The Form Details page appears.
2. Select the desired workflow, step and status.
3. Click Done.
List of Available Variables for PDF Forms
Variables
Agency
{AGENT_LAST_NAME} {AGENCY_NAME} {AGENT_EMAIL}
{AGENT_FAX} {AGENT_FIRST_NAME} {AGENT_FULL_NAME}
{AGENT_WORK_PHONE} {AGENT_HOME_PHONE} {AGENT_MOBILE_PHONE}
{AGENT_PAGER_PHONE} {AGENT_JOB_DESCRIPTION_ URL}
{AGENT_JOB_LIST_URL}
Application
{APPLICATION_STATUS} {APPLICATION_DATE}
Candidate
{CANDIDATE_ADDRESS} {CANDIDATE_ADDRESS_2} {CANDIDATE_AVAILABILITY}
{CANDIDATE_BIRTH_DATE} {CANDIDATE_CITY} {CANDIDATE_COUNTRY}
{CANDIDATE_EMAIL_OR_ OPERATOR_EMAIL}
{CANDIDATE_EMAIL} {CANDIDATE_EMPLOYEE_NUMBER}
{CANDIDATE_FAX} {CANDIDATE_FIRST_NAME} {CANDIDATE_FIRST_NAME_OR_CANDIDATE_EMAIL}
{CANDIDATE_FULL_NAME} {CANDIDATE_FULL_NAME_OR_ CANDIDATE_EMAIL}
{CANDIDATE_HIRE_START_DATE}
{CANDIDATE_HOME_PHONE} {CANDIDATE_IDENTIFICATION_NUMBER}
{CANDIDATE_LAST_NAME}
{CANDIDATE_LAST_NAME_OR_ CANDIDATE_EMAIL}
{CANDIDATE_MIDDLE_NAME} {CANDIDATE_MOBILE_PHONE}
{CANDIDATE_PAGER_PHONE} {CANDIDATE_REGION} {CANDIDATE_SECURITY_CODE}
{CANDIDATE_SOCIAL_SECURITY_NUMBER}
{CANDIDATE_STATE} {CANDIDATE_TRAVEL}
{CANDIDATE_USERNAME} {CANDIDATE_WORK_PHONE} {CANDIDATE_ZIPCODE}

CONFIDENTIAL INFORMATION Page 8-65
Administrator WebTop User Manual Chapter 8 - Candidate Selection (CSW)
{CAREER_SECTION_URL} {CHANGE_PASSWORD_URL} {COMPANY_LOGO_01} (01 to 30)
{COMPANY_NAME} {COMPANY_STATIC_PAGE} {CONTEST_NUMBER}
{CUDF_uniqueld} {CURRENT_DATE} {FULL_COMPANY_NAME}
{HMGR_EMAIL} {HMGR_NAME} {HMGR_PHONE}
Job
{JOB_DESCRIPTION_EXTERNAL} {JOB_DESCRIPTION_INTERNAL} {JOB_DESCRIPTION_URL}
{JOB_ISI_URL} {JOB_OFFER_NB_VACATION_ DAYS}
{JOB_OFFER_SALARY}
{JOB_QUALIFICATIONS_ EXTERNAL}
{JOB_QUALIFICATIONS_INTERNAL}
{JOB_RMI_URL}
{JOB_TITLE} {JOB_TO_FRIEND_COMMENTS}
{JOB_TO_FRIEND_ DESCRIPTION}
{JOB_TO_FRIEND_QUALIFICATIONS}
{JOB_URL}
{JOBFIELD_STRUCTURE} {LOCATION_STRUCTURE} {MAXIMUM_ATTACHMENTS}
{MAXIMUM_ATTACHMENT_SIZE} {MEETING ATTENDEES} {MEETING_COMMENTS}
Online Scheduling
{MEETING_DATE AND TIME} {MEETING_LOCATION} {MEETING_ORGANIZER}
{MEETING_SUBJECT} {OFFER_ACTUAL_START_DATE} {OFFER_ANNUAL_BONUS}
Offer
{OFFER_CAR_ALLOWANCE} {OFFER_COMMISSION_AMOUNT
{OFFER_COMMISSION_TYPE}
{OFFER_CREATION_DATE} {OFFER_EXPENSE_ACCOUNT} {OFFER_EXPIRY_DATE}
{OFFER_EXTEND_DATE} {OFFER_OPTIONS_TYPE} {OFFER_OPTIONS}
{OFFER_OTHER_BONUS} {OFFER_OTHER_ COMPENSATION}
{OFFER_PAY_BASIS}
{OFFER_PAY} {OFFER_RELOCATION_ AMOUNT}
{OFFER_RELOCATION_TYPE}
{OFFER_SALARY_CURRENCY} {OFFER_SALARY} {OFFER_SIGN_ON_BONUS}
{OFFER_STOCK_AMOUNT} {OFFER_STOCK_TYPE} {OFFER_TARGET_START_DATE}
{OFFER_VACATION_UNIT} {OFFER_VACATION} {OPERATOR_EMAIL}
{OPERATOR_PHONE} {OPERATOR_NAME} {ORGANISATION_STRUCTURE}
{PAGE_BREAK} {PRODUCT_NAME} {PROFILER_URL}
{RECRUITER_EMAIL} {RECRUITER_NAME} {RECRUITER_PHONE}
Variables

CONFIDENTIAL INFORMATION Page 8-66
Administrator WebTop User Manual Chapter 8 - Candidate Selection (CSW)
Referral
{REFERRAL_VALIDITY_PERIOD} {REQUISITION_EMPLOYEE_ REFERRAL_BONUS}
{REQUISITION_PUBLIC_ REFERRAL_BONUS}
{REFERRER_EMAIL} {REFERRER_FIRST_NAME} {REFERRER_MIDDLE_NAME}
{REFERRER_LAST_NAME}
Requisition
{RUDF_uniqueld} {REQUEST_MORE_INFO_DATA} {REQUISITION_NUMBER}
{REQUISITION_ANNUAL_ BONUS}
{REQUISITION_CAR_ ALLOWANCE}
{REQUISITION_CLOSING_DATE}
{REQUISITION_COMMISSION_ TYPE}
{REQUISITION_COMMISSION} {REQUISITION_EMPLOYEE_ STATUS}
{REQUISITION_EXPENSE_ ACCOUNT}
{REQUISITION_HIGH_QUARTILE_SALARY}
{REQUISITION_JOB_GRADE}
{REQUISITION_JOB_LEVEL} {REQUISITION_JOB_SCHEDULE} {REQUISITION_JOB_SHIFT}
{REQUISITION_JOB_TYPE} {REQUISITION_LOW_QUARTILE_SALARY}
{REQUISITION_MAXIMUM_ SALARY}
{REQUISITION_MIDPOINT_SALARY}
{REQUISITION_MINIMUM_SALARY}
{REQUISITION_OTHER_ COMPENSATION}
{REQUISITION_OPENING_DATE} {REQUISITION_OTHER_BONUS} {REQUISITION_VACATION}
{REQUISITION_PUBLIC_ REFFERRAL_BONUS}
{REQUISITION_RELOCATION_TYPE}
{REQUISITION_RELOCATION}
{REQUISITION_SHARES_TYPE} {REQUISITION_SHARES} {REQUISITION_SIGN_ON_ BONUS}
{REQUISITION_STOCK_ OPTIONS_TYPES
{REQUISITION_STOCK_OPTIONS}
{REQUISITION_EDUCATION_ LEVEL}
{REQUISITION_TARGET_START_ DATE}
{REQUISITION_VACATION_TYPE}
{SUPPORTED_ATTACHMENT_ FORMAT}
{UNSUBSCRIBE_NOW_URL}
User
{USER_EMAIL} {USER_FIRST NAME} {USER_FULL_NAME}
{USER_LAST_NAME} {USER_PASSWORD} {USER_USERNAME}
{USER_MIDDLE_NAME} {USER_WEBTOP_SUITE_URL}
Variables

Manager WebTop

CONFIDENTIAL INFORMATION Page 9-1
Administrator WebTop User Manual Chapter 9 - Manager WebTop
Overview
The Manager WebTop settings allow hiring managers and users who have the appropriate permissions to create requisitions that are used in the Manager WebTop.
The requisition editing process in the Manager WebTop provides users with a sequence of pages that can be configured to create step-by-step requisitions that will be used throughout the hiring process.
Global Manager WebTop Settings include settings that will affect requisitions, scoring information, correspondence to internal candidates and posting options.
The Requisition Flow Builder includes tools that let you:
• Create, edit, and activate Requisition Flows, Pages, Information Blocks, and Fields.• Edit default requisition flows provided with the application. • Reorder pages and information blocks.• Activate and deactivate optional fields included in information blocks.• Select Flow Types.

CONFIDENTIAL INFORMATION Page 9-2
Administrator WebTop User Manual Chapter 9 - Manager WebTop
Settings and Permissions
Review settings and user permissions related to the Manager WebTop.
Candidate Selection Process Settings
Path: Setup/Global Setup/Process/Candidate Selection/Actions
• Automatically reject all applications when the requisition is filled or canceled.• Send rejection letter to candidates automatically rejected when a requisition is filled or canceled.
Integration Settings
Select a flow type (Without Internal Posting or With Internal Posting) for requisitions that will be imported from HRMS and that will be owned by hiring managers.
Path: Setup/Integration/HRMS/Attribute this flow type to imported requisitions owned by hiring managers
CONFIDENTIAL INFORMATION Page 9-3
Administrator WebTop User Manual Chapter 9 - Manager WebTop
Requisitions Flow Builder
The Requisition Flow Builder includes tools that let you:
• Create, edit, and activate Requisition Flows, Pages, Information Blocks, and Fields.• Edit default requisition flows provided with the application. • Reorder pages and information blocks.• Activate and deactivate optional fields included in information blocks.• Select Flow Types.
Creating Requisition FlowsPath: Setup/Manager WebTop/Requisition Flow Builder
1. Under Setup, click Global Setup then Requisition Flow Builder.
2. In the Requisition Flow List, click New… The Requisition Flow Builder opens.
3. Enter a flow name.
4. Select a flow type.
• With Automatic Internal Posting: Manager WebTop users can create requisitions that will automatically be posted on internal career sections.
• With Internal Posting and External Posting Options: Manager WebTop users can create requisitions that will be posted on internal and external career sections. When creating a requisition in the Manager WebTop, the user will have the possibility to select internal and external career sections on the Specify Where to Post This Requisition page at the end of the requisition creation process.
• Without Posting: Manager WebTop users can create requisitions that will not be posted or that will require the approval of another user before being posted.
In the Manager WebTop, hiring managers can select one of the posting options when creating a new requisition.
If With internal and External Posting Options is selected, this flow will be available to all hiring managers who have the permission to post.
By default, Requisition Flows with posting options are not available. They must be selected in Global Manager WebTop Settings.
Because this requisition flow is available only to users who have the permission to approve and post a requisition, it is not possible to request an approval when using a flow with internal and external posting.
5. Select a status.
• The status can be set to Available or Not Available. When the status is set to Available, the requisition flow will be available for use in the Manager WebTop.
6. Enter a description and any other information about the flow in the Description field.
7. Click Save.
Do not change the status to Available until the requisition flow is completely configured and validated. Leave the status to Not Available.

CONFIDENTIAL INFORMATION Page 9-4
Administrator WebTop User Manual Chapter 9 - Manager WebTop
Adding Pages to a Requisition FlowPath: Setup/Manager WebTop/Requisition Flow Builder/select a requisition flow
To add pages to a flow:
1. In the Requisition Flow Builder, click New... under the Page Ordering list. The Page Builder opens.
2. On the General tab, enter a page name, a page title, and a page header.
3. Select information blocks in the Available Information Blocks section, then click Add. Selected blocks will appear in the Selected Information Blocks section. For more information, see “Adding Information Blocks and Custom Fields” on page 9-4.
4. Click Done.
Adding Information Blocks and Custom FieldsThe following information blocks, some of which are mandatory, can be used to create requisition flows. Some information blocks require no information from the hiring manager.
Information Block Contents / Purpose Optional Fields (can be displayed or not in the Manager WebTop)
Administration Information on citizenship and overtime status.
Additional Information, Citizenship Status, Overtime Status
Administration Custom Fields
Custom fields specified for citizenship and overtime status
Custom fields
Assignment Lets the user select a recruiter (if workflow is off) or define an approval path (if workflow is on)
Assignee, approvers
Attached Files Lets the user attach files to the requisition.
Compensation Compensation information for the job. Bonus, Car Allowance, Commission, Expense Account, Maximum Salary, Minimum Salary, Other Compensation, Pay Basis, Shares, Stock Options
External Description
Job description information for external career sections
Closing Date, Contact Email, Contact Name, Description, Opening Date, Qualifications, Job Board Summary Description
External Description Custom Fields
Custom fields for job description for external career sections
Custom fields
Identification Requisition Identification information (Title, Requisition Number, Justification, Number of Openings, etc.)
Title, Requisition Number, Justification, Number of Openings, etc.
Internal Description
Job description information for internal career sections
Closing Date, Contact Email, Contact Name, Description, Opening Date, Qualifications

CONFIDENTIAL INFORMATION Page 9-5
Administrator WebTop User Manual Chapter 9 - Manager WebTop
Information blocks contain optional fields that can be enabled in the Properties tab. The information blocks you select determine the contents of the Properties tab. If a block contains optional fields, these fields will appear on the Properties tab where you can determine if they will be displayed or hidden in the Manager WebTop.
Path: Setup/Manager WebTop/Requisition Flow Builder/Requisition Flow Builder/Page Builder/Properties tab
Editing Pages and Information BlocksPath: Setup/Manager WebTop/Requisition Flow Builder/Requisition Flow List
1. In the Requisition Flow List, select a requisition flow. The Requisition Flow Builder opens.
2. In the Page Ordering list, select a Page then click Edit... The Page Builder opens.
3. In the Available Information Blocks list, add or remove information blocks if necessary.
4. Reorder information blocks if necessary.
Internal Description Custom Fields
Custom fields for job description for internal career sections.
Custom fields
Logistics Custom Fields
Custom fields for information related to logistics
Custom fields
Owners and Collaborators
Lets the user select owners and collaborators.Note: The Owners and Collaborators block must be placed before the Assignment block.
Prescreening Information related to the prescreening or the candidates.
Disqualification questions, skills and questions used to evaluate the candidate.
Profile Information related to the profile of the candidate
Education Level, Education Program, Employee Status, Job Level, Schedule, Shift, Job Type, Target Start Date, Travel
Requisition Preview
Preview of the completed requisition at the end of the flow
N/A
Rules and Regulations
EEO / Affirmative Action fields (USA) and Employment Equity fields (Canada)
EEO and EE fields
Screening Screening services provided by external partners.
Background Check, Assessment, Tax Eligibility, etc.
Structure Group, Job, Organization, Location(s), Position, and Templates
Fields related to OLFs, groups, positions and templates.
Information Block Contents / Purpose Optional Fields (can be displayed or not in the Manager WebTop)

CONFIDENTIAL INFORMATION Page 9-6
Administrator WebTop User Manual Chapter 9 - Manager WebTop
Making a Requisition Flow AvailableWhen a requisition flow is complete, you can set the status to Available. When the status is set to Available, the flow will be available for selection in Global Manager WebTop Settings.
You can have as many available flows as you need, but only one flow will be activated for each Flow Type.
Path: Setup/Manager WebTop/Requisition Flow List/Requisition Flow Builder
1. In the Requisition Flow List, select the requisition flow you want to make available. The Requisition Flow Builder opens.
2. In the Status list, select Available, then click Done. The flow is now included in the list of available requisition flows, and is available for selection in Global Manager WebTop Settings.
Duplicating a Requisition FlowPath: Setup/Manager WebTop/Requisition Flow List/Requisition Flow Builder
1. In the Requisition Flow List, select the check box next to the flow you want to duplicate.
2. Click Duplicate. The Requisition Flow Builder opens.
3. Enter a new flow name.
4. Select the type.
5. Add, edit or delete pages as necessary.
6. In the Page Builder, review information on the General tab and review settings in the Properties tab.
7. Click Done.
8. Select the status.
9. Click Done.
The text that you enter as Page Header will appear at the top of the page in the Manager WebTop.
Deleting a Requisition FlowPath: Setup/Manager WebTop/Requisition Flow Builder/Requisition Flow List
1. Select the check box next to the requisition flow that you want to delete.
2. Click . The requisition flow is automatically deleted.
If the flow cannot be made available, the reason will be explained in the error message that appears. Make the necessary corrections to make the flow available.

CONFIDENTIAL INFORMATION Page 9-7
Administrator WebTop User Manual Chapter 9 - Manager WebTop
Global Manager WebTop Settings
Global Manager WebTop Settings include settings related to posting, to scoring information, and to email correspondence to candidates.
Path: Setup/Manager WebTop/Global Manager WebTop Settings
You can activate only ONE of the Available Requisition Flows for each flow type.
Setting Description and Tips
Allow hiring managers to create requisitions only form the selection of a template
• Universal (all requisition types, except contingent )
• Contingent recruitment
Yes: The hiring manager must select a template to create a new requisitions. He or she cannot create a requisition from scratch. No: The hiring manager can create a requisition from scratch.
Display scoring information (weight and result columns)
Determine if Manager WebTop users will have access to scoring and results in candidate lists and in candidate files in the Manager WebTop. Yes: Hiring managers can see candidate scores and weights. No: Hiring managers do not have access to scoring information. Default value.If your company previously used scoring and decided to turn it off:
• All scores will be retained but will no longer be visible.
• All candidate records previously saved with scoring enabled will not be taken into account in determining the ACE designation of the newly saved application.
Scoring information will only be disabled for Manager WebTop users, and does not affect Staffing WebTop users.
Email job postings to matching internal candidates
Yes: When a new job is posted on internal career sections, matching internal candidates will receive an email indicating that a new job matching their skills and qualifications has been posted. No: Internal candidates will not be advised of new job postings matching their skills and qualifications.

CONFIDENTIAL INFORMATION Page 9-8
Administrator WebTop User Manual Chapter 9 - Manager WebTop
Use this flow for requisition creation with posting
• Universal (all requisition types, except contingent )
• Contingent recruitment
Select which requisition flow will be activated for posting (internal and external). Available choices are:None: No requisition flow is available for internal posting.With Automatic Internal Posting: Requisition using this flow will automatically be posted on all available internal career sections. With Internal and External Posting Options: Requisitions using this flow will be posted on selected internal and external career sections (Specify where you want to post this requisition) at the end of the requisition creation process)If Activate this type of approval path is set to Position Approval, a requisition created by a hiring manager who does not have the permission to approve requisitions will automatically be saved as Draft until the approval process is completed. (Path: Administrator WebTop[/Setup/Global Setup/Process/Requisitions/Workflow–Activate this type of approval path) (Path: User Management/Types [select Hiring Manager]/Requisitions tab/Approval–Approve requisitions).Custom requisition flows: Select from the list of custom requisition flows. Flow Type must be With Automatic Internal Posting. Status must be set to Available.
Use this flow for requisition creation without posting
• Universal (all requisition types, except contingent )
• Contingent recruitment
Select which requisition flow will be without posting. Available choices are: None: No requisition flow is available for external posting.Without Posting: Requisitions using this flow will not be posted on internal or external career sections (default flow) for external posting). Custom requisition flows: Select from the list of custom requisition flows that have the Without Internal Posting Type, status must be set to Available. The default value is Yes.
Activate group-transparent behavior for Hiring Managers
Setting Description and Tips

CONFIDENTIAL INFORMATION Page 9-9
Administrator WebTop User Manual Chapter 9 - Manager WebTop
The following rules apply when creating or modifying a requisition flow for the Hiring Manager WebTop:
• All fields activated in the Manager WebTop must be activated in the Staffing WebTop.• If you use the Maximum Salary or Minimum Salary fields, you must also use the Pay Basis field.• The Internal Description is required if the setting Activate this type of approval path is set to
Content Approval; it is always required in a flow meant for Internal Posting.• The External Description is required if the setting Activate this type of approval path is set to
Content Approval; this field is necessary for approval.• At least one field per block must be activated; empty information blocks are not allowed in flows.• The Structure block is mandatory and must be placed at the beginning of the first page of the flow.• The Identification block is mandatory and must be placed on the second page of the flow.• The Assignment block is mandatory and must be placed on the last page or on first to last page of
the flow.• Each Custom Fields block must be placed after the corresponding standard block (for example,
Administration Custom Fields after the Administration block) and on the same page as the corresponding Standard block.
• The first page must contain only the Structure block (which includes Template information if it is used).
• The Regulations block is mandatory in a flow meant for Internal Posting. However, if your organization is not using Employment Equity tracking, the Regulations block will not appear in the requisition form.
• The Preview block must be on the last page of the flow and must be the only block on that page.• The Prescreening block is mandatory in a flow meant for Internal Posting.• The Screening block is mandatory.• The Posting Block is mandatory in a flow with Internal/External posting.
Default value for the requisition list filter This setting determines which requisitions are displayed by default in requisition lists to Manager WebTop users.Values are:I ownI collaborate onI own or collaborate onI was requested to contribute to
The system default filter is I own or collaborate on.
If your organization uses the collaborators feature to help collaborate candidates from store to store in a retail setting, the I own filter is recommended for Default Value.
Path: Administrator WebTop > Setup > Manager WebTop >Global Manager WebTop
Setting Description and Tips
CONFIDENTIAL INFORMATION Page 9-10
Administrator WebTop User Manual Chapter 9 - Manager WebTop
E-learning Settings
An extensive E-learning program was developed to provide training for future Manager WebTop users. The configuration of this function is coordinated by your Taleo representative.
To enable E-learning, the Manager WebTop Elearning Link must be activated. If this setting is not activated for your organization (Null), the E-learning button does not appear in the interface.
If you need more information about E-learning, please contact your Taleo representative.

Contingent Staffing

CONFIDENTIAL INFORMATION Page 10-1
Administrator WebTop User Manual Chapter 10 - Contingent Staffing
Overview
Managers and recruiters can use the Taleo Enterprise Edition solution to acquire contingent workers. A Contingent requisition type is available. This requisition type offers more functionalities than other requisition types as it has its own set of requisition fields, requisition flow, candidate selection workflow, supplier invitation to submit candidates using the agency portal, confirmation of availability and specific candidate ownership rules.
Contingent staffing is not configured by default. Everything has to be configured from scratch by the system administrator once a company setting has been activated.
Also, the configuration of contingent is an extensive task and numerous aspects have to be taken into consideration. The following pages describe the tasks to be done in logical order. You might want to change it slightly, but you do have to respect some logic, like, for example, creating your agent portal before associating the agent to the portal.
This feature is available for an additional fee.

CONFIDENTIAL INFORMATION Page 10-2
Administrator WebTop User Manual Chapter 10 - Contingent Staffing
Configuring Contingent Staffing
Activating the ContingentActivation Company SettingWhen the ContingentActivation company setting is activated, the Contingent requisition type becomes available and requisition flows and candidate selection workflows have to be configured. Note that the activation of company settings is done through Taleo Web Support.
Activating the Contingent Requisition TypeA requisition type is available: Contingent. When selected, this requisition type becomes available when creating a requisition and a requisition template in the Staffing WebTop and Manager WebTop.
Path: Administrator WebTop > Setup > Global Setup > Requisition Types
Note that the Contingent requisition type will appear in the Administrator WebTop if your organization has asked Taleo to activate a specific company setting. See “Activating the ContingentActivation Company Setting” on page 10-2.
Adjusting User PermissionsA requisition type permission is available: Allow access to contingent requisitions.
Path: Administrator WebTop > SmartOrg > User Type List [select a user type] > Requisitions tab > Requisition types section
A block permission is available: See "Contingent Staffing" block information. When this permission is activated, the user has access to the Contingent Staffing section in the candidate file Profile tab.
Path: Administrator WebTop > SmartOrg > User Type List [select a user type] > Candidates tab > Candidate information section
A bill rate permission is available: Edit bill rates. Users who have this permission have the ability to edit three contingent fields: Midpoint Hourly Rate, Maximum Hourly Rate and Requested Hourly Rate.
Path: Administrator WebTop > SmartOrg > User Type List [select a user type] > Requisitions tab > General section
Adjusting SettingsA setting is available: Allow hiring managers to create requisitions only from the selection of a template/Contingent recruitment. This setting forces hiring managers to use a template while creating a requisition.
Path: Administrator WebTop > Setup > Manager WebTop > Global Manager WebTop Settings
Configuring the Manager WebTop Contingent Requisition FlowTwo requisition flows are available for the contingent requisition type:
• Contingent with internal and external posting• Contingent without posting
Path: Administrator WebTop > Setup > Manager WebTop > Requisition Flow Builder

CONFIDENTIAL INFORMATION Page 10-3
Administrator WebTop User Manual Chapter 10 - Contingent Staffing
These two flows are necessary because hiring managers need a really streamlined flow where they have access to only a few information blocks. The recruiter, or a similar actor provided by a business partner, will complete the requisition, source it and maybe even do the screening to obtain a candidate at the end.
When creating a requisition flow, you must decide if you will create a flow for all types of requisitions or only for contingent requisitions. The Contingent recruitment option was added in the Requisition Flow Builder page.
For contingent requisition flows, a contingent block containing information about rates, duration and costs is available. Note that the edition of the rates is subject to a specific permission. See “Adjusting User Permissions” on page 10-2.
Under Global Manager WebTop Settings, you can specify if you want to allow hiring managers to create contingent requisitions only from the selection of a template. You can also specify which contingent flow you want to use for the creation of requisitions with posting and without posting.

CONFIDENTIAL INFORMATION Page 10-4
Administrator WebTop User Manual Chapter 10 - Contingent Staffing
Creating an Agency PortalAgency portals are created and managed like other portals. Agents, whether for contingent or professional hiring, will have to access their generic or specific agency portal.
Path: Administrator WebTop > Career Sections > Career Sections > Create
When creating an agency portal, you must select Agency Portal in the Type field located in the General section.
In the Posting section, the Default Posting Start Date field provides more granular options, which allows the posting to be phased by few days rather than by a week.
In the Application Flows section, select the appropriate agency flow and profile.
Creating Agency and AgentsThe creation of contingent agency and agents is similar to the creation of professional agencies and agents. You must create an agency, select the contingent type and decide whether or not this agency is MWBE, which means Minority Women Business Owned. This is a flag available when exporting the agency information to an external system where billing occurs.
Path: Administrator WebTop > Setup > Global Setup > Agencies > New
CONFIDENTIAL INFORMATION Page 10-5
Administrator WebTop User Manual Chapter 10 - Contingent Staffing
When creating agents, do not forget to select a portal and to associate it to each agent. Otherwise, you will not be able to invite agents to submit candidates.
Configuring the Candidate Selection WorkflowIt is recommended to create a candidate selection workflow specific to contingent staffing. This workflow will, by definition, differ from the standard professional workflow. Once created, you will be able to tie specific notifications to the workflow, like the agent configuration request which is an important step of the contingent staffing.
Path: Administrator WebTop > Setup > Global Setup > Process > Candidate Selection > Workflows

CONFIDENTIAL INFORMATION Page 10-6
Administrator WebTop User Manual Chapter 10 - Contingent Staffing
Configuring the Agent Confirmation RequestThis step is optional, but highly recommended. It allows the configuration of the confirmation step, usually at time of hiring. When deciding to go ahead with a specific contingent worker, the system can be configured to send a request to the agent to confirm the candidate’s availability. The agent will receive an email and will be brought back to the candidate file where the confirmation will occur and will most likely move the candidate to the hired status.
To achieve this important feedback loop in the contingent process, you need to configure the confirmation request. This is done in the new Agent Confirmation Requests section in the Career Section Administration module. You need to specify the step in a specific candidate selection workflow.
Path: Administrator WebTop > Career Sections > Agent Confirmation Requests > Create
Configuring the Associated Correspondence TemplateA default correspondence template is not provided for this function. It has to be created from scratch or you can use template 78 as a starting point.
Path: Administrator WebTop > Corresp. Manager > New
1. In the Properties tab, select Agent as the recipient for the message.
2. Tie the template to a triggering event associated with the Candidate Selection Workflow.
3. Select a workflow, step and status.

CONFIDENTIAL INFORMATION Page 10-7
Administrator WebTop User Manual Chapter 10 - Contingent Staffing
For example, a message could be sent to the agent when the candidate reaches the approved status. The agent will then come back to the agency portal and confirm the availability of the candidate. The candidate will then be moved automatically to the next status.
1. In the Contents tab, the recipient in the To: field will be the agent once again. Use the {AGENT_EMAIL} variable.

CONFIDENTIAL INFORMATION Page 10-8
Administrator WebTop User Manual Chapter 10 - Contingent Staffing
2. Create the template with the content of your choice. However, make sure to include the right returning URL using the new variable {AGENT_REFERRAL_URL}.
Creating a Contingent Requisition TemplateAs for any other requisition type, it is possible to create contingent templates in the Administrator WebTop.
Path: Administrator WebTop > SmartOrg > Job Template List > Create Template
1. In the first window of the Template Wizard, select Contingent recruitment then click OK.
2. Enter information in the fields. A new block is available: Compensation - Contingent Staffing, which contains the following fields:
• Currency• Midpoint Hourly Rate• Maximum Hourly Rate• Requested Hourly Rate• Estimated Expenses• Expenses Reimbursable
When creating a requisition template, note that the Universal (all requisition types) requisition type does not include contingent requisitions.

CONFIDENTIAL INFORMATION Page 10-9
Administrator WebTop User Manual Chapter 10 - Contingent Staffing
3. Click Save.
Requisitions based on the template you create will inherit from the rates entered. Note that there is a permission specific to the edition of these rates (see “Adjusting User Permissions” on page 10-2). Therefore, it might be important to fill these fields if your hiring managers cannot enter any information, which would lead them to create requisitions without any rate. Users who have the permission to edit these rates will be able to change them before inviting agents to submit candidates.
Setting Position JustificationsPosition justifications are available for contingent requisitions as well as for the other types of requisition. By default, the original values are activated.
Path: Administrator WebTop > Setup > Global Setup > Fields > Selections > Small Selections > Standard [click on Justification]
To select justifications, select an element in the Available Elements list, then click Add. Click Done once all elements have been selected.
Available values are:
• New Position (default)• Replacement (default)• Modification (default)• Extension (default)• Audit• Backfill• Jury Duty• Special Project• Vacation• Leave of Absence• Succession Planning

Notifications

CONFIDENTIAL INFORMATION Page 11-1
Administrator WebTop User Manual Chapter 11 - Notifications
Overview
Workflow Event Notifications are email messages that are sent automatically by the system to notify recruiters, hiring managers, E-share users, and candidates of key events affecting the status of their requisitions. These messages are sent at different times during the recruiting and hiring process.
The system can send email notifications that are specific to the various stages of the recruiting and hiring cycle:
• Approval Process Notifications• Approval decision taken by approver• Approval granted• Approval rejected
• Posting and Sourcing Notifications• New posting scheduled• Requisition posted• Posting expired• Posting terminated• Posting about to expire
• Candidate Selection Notifications• New application received• Interview scheduled• Offer accepted• Offer made• Candidate hired
• Requisition Closing/On Hold Notifications• Requisition put on hold or reactivated• Requisition closed
• New User Notification• Notification sent when a new user account is created by the system administrator

CONFIDENTIAL INFORMATION Page 11-2
Administrator WebTop User Manual Chapter 11 - Notifications
Enabling Notifications
The settings you choose will determine which email messages will be available for sending and which constraints will apply to each message.
Path: Setup/Global Setup/Notifications
To enable notifications:
1. In the Event Notification page, select check boxes and option buttons that correspond to the configuration you want.
2. Click Save to confirm the configuration of the notifications.
Once the configuration is completed, Staffing WebTop and Manager WebTop users will be able use notifications.
CONFIDENTIAL INFORMATION Page 11-3
Administrator WebTop User Manual Chapter 11 - Notifications
Notifications List
Path: Setup/Global Setup/Notifications
Section Setting Possible Values
Approval Process Notification
Send notification about the approval process
• Every time an approval event (decision or termination) occurs
• But not if the user chooses to pass• Only when final (the status changes to
Approved or Rejected) • But not if approval is granted
Posting Notification
Send notification about new postings
• Only for the first postings• For every new posting
End of Sourcing notification
Send notification when sourcing ends
• But only if it has expired
Send notification when posting is about to expire
Candidate Selection Notification
Send notification when candidates apply
• But only if they have all the required criteria
• But only if they are Ace candidates• Do not notify users to whom an ACE
candidate alert is sent
Send notification when a candidate starts or completes an Interview step
Send notification when an offer is made
Send notification when a candidate is hired
Requisition Closing Notification
Send notification when a requisition closes
• But only if it is canceled
Requisition On Hold Notification
Send notification when a requisition is put on hold or reactivated
• But only if it is posted
New User Notification
Send notification to new users when their account is created
Assessment Notification - ePredix (Proctored Screening Assessment)
Send an assessment request notification to the candidate

CONFIDENTIAL INFORMATION Page 11-4
Administrator WebTop User Manual Chapter 11 - Notifications
Send notification to the recruiter if the candidate cannot receive the assessment request notification because he/she has not provided an email address
Section Setting Possible Values
CONFIDENTIAL INFORMATION Page 11-5
Administrator WebTop User Manual Chapter 11 - Notifications
Activating Event Notification for Users
Once the global settings are configured, it is necessary to enable notifications for each user
Path: SmartOrg/SmartOrg Home Page/User Accounts/General Preferences
1. In the SmartOrg Home Page, click User Accounts.
2. Click Edit next to Preferences.
3. Select Keep this user informed of workflow events by email.
Once Event Notification is selected, users will begin receiving email messages related to workflow events. Each type of event triggers a specific type of email message. Messages include the following information:
• Requisition number• Requisition title• User name• Department• Decision and/or comments• Other information relevant to the specific type of event might be included.
Repeat the operation for all the users who need to receive notifications by email.
Event Notification is either enabled or disabled. If enabled, the system will automatically trigger all different types of messages that the system administrator has enabled. It is not possible to select specific types of messages for specific users.
On the History tab of the candidate file, the system will convert all hyperlinks found in sent correspondences to active links that will open a window displaying the full URL string.
Only recruiters and hiring managers can receive Event Notification messages.

Source Tracking

CONFIDENTIAL INFORMATION Page 12-1
Administrator WebTop User Manual Chapter 12 - Source Tracking
Overview
A source is a medium or event through which a candidate has heard about the job you are posting or about your company. The candidate may also have applied on a job through different sources.
Sources may be as diverse as Internet job boards, job fairs, magazines and specialized trade publications, newspapers, professional associations, mailing lists, recruiting agencies, etc.
Whether for budgeting purposes or to make better decisions as to where to post jobs, data on the performance of each source is precious. Your organization needs to know, among other things, how many candidates applied through each source.
To collect sourcing data, you can configure the application to ask candidates where they heard about the job they are applying for. You can specify the choice of answers for each job you post.
Staffing WebTop users can then view data in various layouts of the Source Tracking Report.

CONFIDENTIAL INFORMATION Page 12-2
Administrator WebTop User Manual Chapter 12 - Source Tracking
Source Tracking Description
In the Administrator WebTop, click Source Tracking. The Corporate Sources List page opens.
The Source Tracking module contains three tabs:
• Corporate Sources• Source Types• Settings
Corporate Sources TabThe Corporate Sources tab displays sources associated by default to every job posting.
Corporate sources are classified according to the Organization, Location and Job Fields (OLF) structure. The OLF tree on the left pane helps classify and also browse sources.
The Show list filters sources according to the source name, source ID, source type, source status (Active or Inactive), source origin, source visibility (internal or public) and whether the source is used in the profiler or the requisition.
When recruiters post a job, only the sources that are relevant to the context are included and available for candidates to choose from.
Column Description
Source The source name. Click the source to view and edit properties.
In Profiler The checkmark indicates that the source is available to candidates when entering their profile in a Career Section.
In Requisition The checkmark indicates that the source is available to recruiters when creating a requisition. Sources are available via the Sources selector window. When a recruiter posts a requisition for the first time, sources for which the In Requisition option is selected and that also match the OLF of the requisition are available in the selector window.
ID The source ID.
Type The source type. For example, agency, billboard, job board.
Origin The source can be user-defined or system. User-defined: sources that you can create, edit and remove.System: sources provided with the application.
Visibility Possible choices are Public and Internal. Public: Displayed to all candidates. Internal: Displayed only to internal candidates.
Events Events associated to the source. An Event is a specific advertisement in a trade magazine, a recruiting event on a university campus (job fair), or a special recruiting event at your organization.
Status Possible choices are Active and Inactive.

CONFIDENTIAL INFORMATION Page 12-3
Administrator WebTop User Manual Chapter 12 - Source Tracking
Source Types TabThe Source Types tab lists the available source types. You can also control how source types are named in the Staffing WebTop, as well as in your career section.
Settings TabYou can modify the settings on the Settings tab to control the source tracking function.
Creating a New Source
Path: Source Tracking/Corporate Sources
1. On the Corporate Sources tab, click New… The Source Creation Wizard opens.
2. In Step 1, select a source type and click Next.
3. In Step 2, enter your source properties.
• Enter a source name. • Select the source visibility:
• Internal: Select Internal if you do not want candidates to see the source in a requisition. The source will be visible only in the Staffing WebTop and not in career sections. For example, you can use it for an Agent Portal type career section. When an agent refers a candidate, the name of the agent will automatically appear as the source in the Profile in the candidate file. If you select Internal, the source (name of the agency and of the agent) will not be visible in career sections, but only in the candidate file in the Staffing WebTop.
• Public: The name of the source will be visible by recruiters and candidates in internal and external career sections.
• Determine whether the source will be used in the candidate profiler (In Profiler) and/or a requisition (In Requisition).
• If the type of source selected is a non-electronic media (for example, newspaper, broadcast, billboards, etc.), provide the company name, phone number and address in the provided fields.
• If necessary, follow the instructions to create a multilingual source.4. Click Next.
5. In Step 3, associate your source to the Organization-Location-Job Field structure by clicking Add.
6. Click Next.
Actions The Remove button allows system administrators to remove the selected source from a branch of the OLF structure.
Agencies and agents cannot be created with the Source Creation Wizard. They can only be created in the Setup module (Path: Setup/Global Setup/Agencies).
Column Description
CONFIDENTIAL INFORMATION Page 12-4
Administrator WebTop User Manual Chapter 12 - Source Tracking
7. A summary of your source is displayed. Click Previous if you want to correct some information, or click Finish to complete your source creation. Your new source will appear on the Corporate Sources tab.

CONFIDENTIAL INFORMATION Page 12-5
Administrator WebTop User Manual Chapter 12 - Source Tracking
Viewing and Editing a Source
Path: Source Tracking/Corporate Sources
1. On the Corporate Source tab, click a source name. The source page opens.
2. Review the information.
3. If necessary, edit the content of each information block. Source properties as well as Organization-Location-Job Field (OLF) association can be modified.
4. Click Done.
Adding Sources to the Corporate Sources Tab
Path: Source Tracking/Corporate Sources
1. On the Corporate Sources tab, click Add… The Sources Selector window opens.
2. Select sources in the Available Sources list.
3. Click Done.
Removing Sources from the Corporate Sources Tab
Taleo system sources can be removed (not permanently deleted) from the Corporate Sources list.
1. On the Corporate Sources tab, select the check box next to the sources that you want to remove.
2. Click Remove.
If several modifications must be done to the OLF of a source (for example, adding new OLF associations or removing existing ones), it is preferable and more efficient to make the modifications in the source edition window (instead of going from branch to branch to make the modifications).
For agencies and agents, only the In Profiler and In Requisition options can be modified via the edition window. To modify other properties as well as OLF associations, you must access the Setup module (Path: Setup/Global Setup/Agencies).
For Taleo system sources, the In Profiler and In Requisition options as well as the OLF associations can be modified via the edition window. Other properties cannot be modified.

CONFIDENTIAL INFORMATION Page 12-6
Administrator WebTop User Manual Chapter 12 - Source Tracking
Editing Source Type Names
You can control how source types are displayed not only in the Staffing WebTop, but also in career sections.
1. On the Source Types tab, select a source type. The Edit Source Type page opens.
2. In the Display As field, change the source type name. The name entered in the Display As field is the source name that will be displayed in career sections.
3. Click Done.
Settings
Path: Source Tracking/Settings tab
User-defined sources can be deleted from the Corporate Sources list.When deleted, the source is still available and can be reactivated. Also, if a user-defined source is used (for example, the source was selected by a candidate), the source cannot be deleted. Instead, the source will be deactivated and it will be possible to reactivate it.
Agencies and agents cannot be added nor removed from the Corporate Sources List. To remove or add an agency or an agent, you must access the Setup module (Path: Setup/Global Setup/Agencies).
Setting Description and Tips
Use not only the Source but also the Source Type list to capture or display source information
Yes, NoIf set to YES, applicants will be able to select a source from more than one source included in a list.
Source Tracking question mandatory in Career section
Yes, NoIf set to YES, applicants will have to provide information on where they heard about the job.
Ask applicant source only once within the same session
Yes, NoIf set to YES, applicants will only have to answer the question once within the same session.
Update applicant profile with new source information every time candidate applies
Yes, NoIf set to YES, the applicant’s source information will be updated each time he or she applies.
Level of detail for Source Tracking You can specify if Source Tracking is to be Event-driven or Source-driven.

CONFIDENTIAL INFORMATION Page 12-7
Administrator WebTop User Manual Chapter 12 - Source Tracking
Event Tracking
An Event is a specific advertisement in a trade magazine, a recruiting event on a university campus (job fair), or a special recruiting event at your organization.
The system administrator can determine at what level the tracking will take place:
• Source: Sourcing performance is measured in terms of the source only.• Event: Sourcing performance is measured in terms of a specific event related to a source.
Creating EventsPath: Source Tracking/Corporate Sources tab
1. On the Corporate Sources tab, click the number next to the appropriate source in the Events column. The Events page opens.
2. Click New... The Create/Edit Event page opens.
3. Fill in the fields.
4. Click Save and New if you want to continue creating events.
5. Click Done to return to the Events list.
Viewing and Editing EventsPath: Source Tracking/Corporate Sources tab
1. On the Corporate Sources tab, click the number next to the appropriate source in the Events column. The Events page opens.
2. Click the link of the appropriate event. The Create/Edit Event page opens.
3. Review event information.
4. If necessary, edit information such as name, date active, and internal and external contact information.
5. Click Done to return to the list of Events, or click Save and New if you want to create other events.
Even if the selected number is zero, click the number to open the Events page.
Even if the selected number is zero, click the number to open the Events page.

CONFIDENTIAL INFORMATION Page 12-8
Administrator WebTop User Manual Chapter 12 - Source Tracking
Removing EventsPath: Source Tracking/Corporate Sources tab
1. On the Corporate Source tab, click the number next to the appropriate source in the Events column. The Events page opens.
2. Select the check box next to the event you want to remove.
3. Click .
4. Click Done to return to the Corporate Source tab.
Select the check box next to the ID title to remove all events displayed on the page for that specific source. Repeat for each page if necessary.

Correspondence Manager

Administrator WebTop User Manual Chapter 13 - Correspondence Manager
CONFIDENTIAL INFORMATION Page 13-1
Overview
Throughout the hiring process, users need to send different types of correspondence to candidates. For example, recruiters may need to provide information to candidates on the status of their application or may need to request more information from candidates to complete an application.
From the Correspondence Manager, you can customize and create system-generated email messages. The system also provides message templates that can be customized.
The Correspondence Manager provides two types of messages:
• System: Automatically sent by the system when a specific triggering event occurs during the hiring process. For example, a message is automatically sent when a candidate is matched to a requisition.
• User-defined: The user selects a message template to customize a message that will be sent to a candidate. User-defined messages are used to send correspondence to candidates in an ad hoc manner.
In the Correspondence Manager, you can:
• Control the content of messages sent by the system automatically to candidates throughout the hiring process.
• Create standard user-defined message templates. • Customize the content of system-defined message templates.
When a user activates the Correspondence Manager function, a message template selection window, as well as a paragraph selection window (to select and organize paragraphs), are automatically launched. The user can also review the message before sending it.

CONFIDENTIAL INFORMATION Page 13-2
Administrator WebTop User Manual Chapter 13 - Correspondence Manager
Important Note to System Administrators
The Correspondence Manager enables you to customize and create system-generated messages. In previous versions, the creation and customization of new messages required some knowledge of HTML. Starting in version 6.0, an HTML Editor helps you create letter-quality correspondence.
The Correspondence Manager also gives you the possibility to work in Paragraph Mode or in Template Mode.
In Paragraph Mode, you can create separate paragraphs that can be used in different message templates. The Paragraph mode is the default mode used in previous versions. If your organization is migrating from 5.1, your correspondence manager is actually in Paragraph Mode. There will be no changes at migration time. See “Paragraph Mode” on page 13-5.
The Template Mode lets you create a single message template which includes the entire content of the letter. The template mode eliminates the process of having to create and include paragraphs in the template. You can create a complete message template in a single operation and view the result immediately in the Preview window. See “Template Mode” on page 13-13.
If you want to change from Paragraph Mode to Template Mode, please contact your Taleo Representative.

Administrator WebTop User Manual Chapter 13 - Correspondence Manager
CONFIDENTIAL INFORMATION Page 13-3
Permissions and Settings
PermissionsUsers must be granted specific permissions to have the right to create, edit and send correspondence to other users or candidates. For detailed information on User Type permissions, see the SmartOrg Administration Manual.
Once you have selected values for these settings, you can start creating, editing or deleting message templates in the Correspondence Manager.
Setting Values Default Values
Description and Tips
Path: SmartOrg/User Type List/Candidates tab
Send Correspondence (using the Send Correspondence action)
Selected, Not selected
Selected The user can send correspondence to a candidate directly from the candidate file.
Send correspondence (while changing the status of a candidate in a workflow) • Only if this user is an owner of the requisitions or a collaborator
Selected, Not selected
Selected
The user can send correspondence to a candidate when changing the candidate status • Only the user who owns or collaborates on the requisition can send correspondence to a candidate
Customize messages before sending (using the Send Correspondence action)
Selected, Not selected
Not selected
The user can edit an existing message before sending it to a candidate directly from the Send Correspondence action in the Candidate file.
Customize messages before sending (while changing the status of a candidate in a workflow)
Selected, Not selected
Not selected
The user can edit a message before sending it to a candidate when changing the candidate status
Send message created from scratch (using the Send Correspondence action)
Selected, Not selected
Not selected
The user can create a new message before sending it to a candidate directly from the Send Correspondence action in the Candidate file.
Send message created from scratch (while changing the status of a candidate in a workflow)
Selected, Not selected
Not selected
The user can create a new message before sending it to a candidate directly from the Send Correspondence action in the Candidate file.
View confidential messagesSelected, Not selected
Not selected
The user can view confidential messages sent by other users

CONFIDENTIAL INFORMATION Page 13-4
Administrator WebTop User Manual Chapter 13 - Correspondence Manager
Settings
Path: Setup/Global Setup/Correspondence Manager/Correspondence Manager
Setting Values Default Values Description and Tips
Display Reply To Yes, No No
You have the option of displaying or hiding the Reply To: field in message templates in the Correspondence Manager and in email messages that Staffing WebTop users create or edit. If the setting is set to Yes, Taleo clients can add a Reply To field to email correspondence, which enables candidates to reply directly to the message they receive.
When two or more message templates are equally relevant, select the nearest match in the following order
By Job, By Location, By Organization
By Job, By Organization, By Location
By Location, By Job, By Organization
By Location, By Organization, By Job
By Job, By Location, By Organization
By Organization, By Job, By Location
By Organization, By Location, By Job
By Job, By Location, By Organization

Administrator WebTop User Manual Chapter 13 - Correspondence Manager
CONFIDENTIAL INFORMATION Page 13-5
Paragraph Mode
The Paragraph Mode lets you create separate paragraphs that can be used in different message templates. The Paragraph mode is the default mode used in previous versions. If your organization is migrating from 5.1, your correspondence manager is actually in Paragraph Mode. There will be no changes at migration time.
Message Template ListPath: Correspondence Manager/Message Template List
The Message Template List includes all message templates available at your organization.
The left pane displays the different types of message templates available by job, location or organization. To change the search order, select By Job, By Location or By Organization in the Display list. Click Refresh to confirm the new selection. To display sub-folders, select the Show Sub-folder Contents option.
See “List of Available Message Templates” on page 13-17.
Creating a Message TemplatePath: Correspondence Manager/Message Template List
1. In the left pane, select a folder.
2. In the Message Template List, click New… The Create/Edit Message Template page opens.
3. In the Properties tab, enter a name for the message template (maximum number of characters: 100).
4. Enter an alphanumeric code (maximum 25 characters) that will be used to identify the message template used when moving steps in a candidate selection workflow in integration processes. For more information, see “Accessing the Integration Console” on page 15-1.
5. Enter a status.
Column Description
Code For Integration purposes. Identifies the message template that will be used when moving candidate selection steps in a candidate selection workflow.
Message Template
Lists available message templates by name.
Status Indicates if the message template is Active or Inactive.
Delivery Indicates if the message template will be sent manually (by the Staffing WebTop user) or automatically (by the system, triggered by a specific condition).
Origin Indicates whether the message template was created by a user (User Defined) or provided by default. Note: System message templates cannot be deleted.
Created Indicates the creation date of the message template.
Modified Indicates the date when the message template was last modified.

CONFIDENTIAL INFORMATION Page 13-6
Administrator WebTop User Manual Chapter 13 - Correspondence Manager
• Active: The message can be sent to candidates.• Inactive: The message cannot be sent to candidates.• When sent by email, this message will be packaged as a read-only attachment: When
selected, the message will be converted into a read-only PDF file that will be attached to the email. This will prevent the candidate and other users from modifying the message.
• Once sent, this message is confidential: Users can send messages that are identified as confidential. These messages can only be viewed by the author of the message, and by specific users who have the required permissions (Path: Candidate Management/Types tab [select a user type]/Candidates tab/General–View Confidential Messages). In Candidate Tracking, users can view that a confidential message was sent, but cannot view the content if they don’t have the required permissions.
6. Specify for whom the message is intended for.
• All candidates• Internal candidates• External candidates• Referrer• Agent
7. Specify the delivery method.
• Automatic: The message is sent automatically by the system. If Automatic is selected, you must select a triggering event. For example, an acknowledgement message is automatically sent when the recruiter receives a candidate application, or when a candidate is matched to a requisition.
• Manual: The message is sent by the Staffing WebTop user. Indicate if the template is always available or if it is available in a specific context (You can link the message template to a specific Candidate Selection Workflow, Step and Status context. You can also link a message template to more than one Candidate Selection Workflow, Step and Status context.
8. Specify where the message template belongs (i.e., Job, Organization, Primary Location).
You may want to prepare different sets of automatic template messages for different types of candidates applying to your organization. For example, it is possible to send different acknowledgement letters for a computer engineer position, and for an accounting position. This can be achieved by preparing automatically-sent message templates with the same triggering event, and by carefully placing them in the Job, Location, and Organization structures. When the triggering event occurs, the system will use the template message closest to the associated requisition in the Job, Location, and Organization structures. A global setting is available to specify in which structure the system will first look for the message template (Path: Setup/Global Setup/ Correspondence Manager).
It is recommended to associate actions with manually-sent messages. Actions are automatically proposed to Staffing WebTop users when they perform tasks related to specific events during the hiring process. For example, when a recruiter changes a candidate's status from 1st Interview to 2nd Interview, the invitation message templates proposed by the system will include templates associated to 2nd Interview as an associated action. The system will also take into consideration the location of the message template versus the location of the requisition in the Job, Location, and Organization structures.

Administrator WebTop User Manual Chapter 13 - Correspondence Manager
CONFIDENTIAL INFORMATION Page 13-7
9. Look at the information regarding when and by whom the template was created.
• Created on: Date when the message template was created.• Last Modified on: Date when the message template was last modified.• Created by: Name of the user who created the message template.• Last Modified by: Name of the user who last modified the message template.
10. Enter a short description of the template message (maximum 255 characters) in the Description field.
11. On the Contents tab, complete information for To, Cc, Bcc, and Subject fields. Copy and paste required variables.
Field Description
To
To specify the recipient of the message. You can edit the To field and manually enter any email address. Maximum number of characters: 1,000. Most often used variables:{CANDIDATE_EMAIL_OR_OPERATOR_EMAIL} {CANDIDATE_EMAIL}
Cc
To enter the email address of another person (recruiter or hiring manager) to whom he or she would like to send a copy of the message. Maximum number of characters: 1,000. Most often used variables:{AGENT_EMAIL} {AGENT_EMAIL_OR_BLANK}
Bcc
To enter the address of another person (recruiter, or hiring manager), to whom he or she would like to send a blind copy of the message. The address in the Bcc field will not appear on the message that the candidate receives. In addition to system variables, the Bcc field also accepts any email address.Maximum number of characters is: 1,000. Most often used variables:{HMGR_EMAIL} {OPERATOR_EMAIL} {RECRUITER_EMAIL}

CONFIDENTIAL INFORMATION Page 13-8
Administrator WebTop User Manual Chapter 13 - Correspondence Manager
For more information, see “Variables” on page 13-22.
12. Add existing paragraphs in the template. See “Adding Paragraphs to a Message Template” on page 13-9.
13. OR, create new paragraphs and insert them in the template. See “Creating New Paragraphs” on page 13-10.
14. Place the paragraphs in the appropriate order. See “Reordering Paragraphs” on page 13-10.
15. You can attach files to message templates provided your user type has been granted the “Allow users to attach documents to correspondence template” permission (Administration tab). To add file attachments to the template, perform the following steps.
Click the Attachments tab.
Click Browse..., select the file you want to attach and then click Open. Your organization might support some or all of the following file formats: .doc (MS-Word), .txt (text), .rtf (rich text format), .pdf (Adobe PDF), .html and .htm.
Reply To
Mail systems often reject email messages when the From address differs from the domain from which the message originated. Adding a Reply To: address to these messages avoids this problem. In addition, when you or a Staffing WebTop or Manager WebTop user add a Reply To: field to email correspondence, this enables candidates to reply directly to the message they receive.
As the system administrator, you can enter a specific electronic address in the Reply To: field in a correspondence manager template or you can copy an email address token into the field, and the recruiter or manager (provided they have the required user type permission) can add and edit the Reply To: address before sending the message.
You can also leave the field empty where the Reply To: field is not useful or not desired.
Note: The Reply To field is only displayed in message templates and messages created from scratch in the WebTops provided the Display Reply To setting (Administrator WebTop > Global Setup > Correspondence Manager) is set to Yes.
Note: This field is implemented in service pack 9 and later.
Subject
This field is mandatory and may contain a combination of variables and text.Maximum number of characters: 255. Most often used variables:{COMPANY_NAME} {CONTEST_NUMBER} {JOB_TITLE} {REQUISITION_NUMBER
Field Description
Administrator WebTop User Manual Chapter 13 - Correspondence Manager
CONFIDENTIAL INFORMATION Page 13-9
Click Attach. You can attach multiple files but they must be less than the maximum file size you specified in the Administrator WebTop.
Files attached to system generated messages triggered by career section events (such as Job-Specific Application Acknowledgements, Profile Acknowledgements, Referral Acknowledgements, Forgot Username and Forgot Password) are not included in the messages candidates receive.
16. Click Done.
Creating a Message Template that is Sent When Candidates Reach Specific Step/Status
System administrators have the ability to specify if the system will automatically send messages when a candidate reaches specific steps/status in the Candidate Selection Workflow.
1. Follow steps 1 to 6 of “Creating a Message Template” on page 13-5.
2. Select the automatic delivery method.
3. In the Triggering Event list, select Candidate Selection Workflow Context.
4. The Workflow/Step/Status section becomes available. You can then link the message to a specific Candidate Selection Workflow, Step and Status context.
Adding Paragraphs to a Message TemplatePath: Correspondence Manager/Create/Edit Message Template/Contents tab
1. In the left-hand pane, select a folder. The Message Template List opens.
2. In the Message Template List, select an existing template. The Create/Edit Message Template page opens.
3. On the Contents tab, click Add… The Adding a Paragraph page opens. The list of available paragraphs is displayed.
4. Select the appropriate paragraphs.
5. Click Done. The selected paragraphs will be displayed in the paragraph list of the Create/Edit Message page.
Removing Paragraphs from a Message TemplatePath: Correspondence Manager/Create/Edit Message Template/Contents tab
1. In the Message Template List, select an existing template. The Create/Edit Message Template page opens.
2. On the Contents tab, in the Paragraph section, select the check box next to the paragraphs that you want to remove and the lick Remove.
3. The paragraphs are removed automatically from the Paragraph list.
4. If necessary, reorder the remaining paragraphs.

CONFIDENTIAL INFORMATION Page 13-10
Administrator WebTop User Manual Chapter 13 - Correspondence Manager
Creating New ParagraphsPath: Correspondence Manager/Create/Edit Message Template/Contents tab
1. In the left-hand pane, select a folder. The Message Template List opens in the right pane.
2. Select a message template in the Message Template List. The Create/Edit Message Template page opens.
3. On the Contents tab, click Add… The Adding a Paragraph page lists the available paragraphs.
4. Click New… The Create/Edit Paragraph page opens.
5. In the Name field, enter a new name for the paragraph.
6. In the HTML Editor, type and edit your text. The HTML Editor provides all the basic tools to help you create and enhance correspondence sent to candidates. You can:
• Change font and background color• Align and indent paragraphs• Add bullets and numbered lists• Insert special characters • Add tables• Cut, copy, and paste text. It is no longer necessary to import text. You can open an existing
document, and use the Cut, Copy and Paste actions in the HTML Editor. Formats will carry over.
• Insert links. The Hyperlink icon lets you insert different types of hyperlinks in your paragraph. • Find a word on a page. The Find icon lets you search for a specific word, a group of words
or a string of characters in the HTML Editor field.• Spell check your text. The spell checker lets you review your text in the following languages:
English (US, UK), French (CND, FR), Dutch, German, Italian, Portuguese (BZL), Spanish, Swedish, Danish.
• Insert variables in a paragraph. See “Variables” on page 13-22. • Remove conflicting code in pasted text.
The Enlarged View icon opens a full page view of your message. You can edit and format text directly in the enlarged view page. When in Enlarged View, you can select Normal View to return to the regular view of your paragraph.
The Show HTML Codes icon lets you view your message in HTML code.
Reordering ParagraphsPath: Correspondence Manager/Create/Edit Message Template/Contents tab
Once you have added all the paragraphs you want to include in the message template, determine the order in which they will appear in the message.
1. In the Message Template List, select a template. The Create/Edit Message Template page opens.
There is no maximum number of characters.The HTML Editor is not a document editor. There are no headers or footers. Page numbering and table of contents are not available.

Administrator WebTop User Manual Chapter 13 - Correspondence Manager
CONFIDENTIAL INFORMATION Page 13-11
2. Click the Paragraphs tab. The list of paragraphs attached to the message appears. Beside each paragraph’s name is a list composed of numbers. Use the list to specify the order of the paragraphs.
3. Click Reorder. The paragraphs will appear in the order you specified.
4. Click Done.
Translating Message TemplatesPath: Correspondence Manager/Create/Edit Message Template
If your organization supports more than one language, the message templates that you create can be translated into one or more languages.
By default, message templates and paragraphs are created in the first company language.
The first language is the only active language and also acts as the Base language. The Base Language is the language upon which all translations are based. It can be changed later on.
The Language of Correspondence is the language used for correspondence between the user and the candidates (Path: User Management/Users /Preferences tab—Language of Correspondence).
To translate message templates:
1. In the Message Template List, select the template you want to translate. The Create/Edit Message Template page opens.
2. In the upper-right corner of the Create/Edit Message Template page, click the Manage Language Configuration icon. The Language Configuration window opens.
3. In the Activated column, select the languages you want to activate.
4. In the Base column, select a base language.
5. In the Selected column, select the language into which the message template will be translated.
6. Click Done.
In the Create/Edit Message Template page as well as in the Create/Edit Paragraph page, the multilingual controls are located in the upper-right corner.
Multilingual controls include (from left to right):
• The selected language (written in full).• The Incomplete hyperlink, if the translation in the current language is incomplete. Click the
Incomplete hyperlink to open a window that indicates the fields that have not been translated.• The Activated languages (flags or abbreviations). Click a language icon to switch to the
language.• The Manage Language Configuration icon which opens the Language Configuration window to
specify the base language, the activated languages, and the selected languages.
Global language settings are managed by your configuration management group. Each organization can choose:
• Available languages • Priority of each language• Default language

CONFIDENTIAL INFORMATION Page 13-12
Administrator WebTop User Manual Chapter 13 - Correspondence Manager
• In the Message Template list, as well as in the Paragraph lists, elements which translations are incomplete appear in red indicating incomplete languages.
Editing a Message TemplatePath: Correspondence Manager/Create/Edit Message Template
1. In the Message Template List, select the message template you want to edit. The Create/Edit Message Template page opens.
2. On the Properties tab, make all the necessary changes in the message template.
3. On the Contents tab, edit, add, remove reorder or create new paragraphs if necessary.
4. Click Done.
Duplicating a Message TemplatePath: Correspondence Manager/Create/Edit Message Template
1. In the Message Template List, select the message template you want to duplicate. The Create/Edit Message Template page opens.
2. Click Duplicate. Click OK on the first pop-up message if you want to duplicate the message. A second pop-up message opens.
• Click OK if you want to, then click OK on the second message if you want to create a copy of the paragraphs included in the original template, and link the copy to the new set of paragraphs.
• Click Cancel if you want to link the template copy to the original set of paragraphs. 3. On the Properties tab, change the name of the message template and make all necessary
changes in the message template.
4. On the Contents tab, edit, add, remove reorder or create new paragraphs if necessary.
5. When all the changes are made, click Done. The new message template will appear in the Message Template List.
Deleting a Message TemplatePath: Correspondence Manager/Create/Edit Message Template
1. In the Message Template List, select the check box next to the message template you want to delete.
2. Click . The message will be removed automatically from the Message Template List.
If you delete a message template, messages that have already been sent out will be saved as is.Deleting a message template or a message will not delete paragraphs that are linked to this specific message. Paragraphs are available for use with all message templates. They can be linked to one or more different templates or messages.If the paragraph is not used in another message template, the system will ask you if you want to delete the paragraph permanently.
Administrator WebTop User Manual Chapter 13 - Correspondence Manager
CONFIDENTIAL INFORMATION Page 13-13
Template Mode
Path: Correspondence Manager/Create/Edit Message Template
The Template Mode lets you create a single template which includes the entire content of the letter. To enable Template Mode for your organization, please contact your Taleo representative.
Creating a Message Template1. In the left pane, select a folder.
2. In the Message Template List, click New… The Create/Edit Message Template page opens.
3. In the Properties tab, enter a name for the message template (maximum number of characters: 100).
4. Enter an alphanumeric code (maximum 25 characters) that will be used to identify the message template used when moving steps in a candidate selection workflow in integration processes. For more information, see “Accessing the Integration Console” on page 15-1.
5. Enter a status.
• Active: The message can be sent to candidates.• Inactive: The message cannot be sent to candidates.• When sent by email, this message will be packaged as a read-only attachment: When
selected, the message will be converted into a read-only PDF file that will be attached to the email. This will prevent the candidate and other users from modifying the message.
• Once sent, this message is confidential: Users can send messages that are identified as confidential. These messages can only be viewed by the author of the message, and by specific users who have the required permissions (Path: Candidate Management/Types tab [select a user type]/Candidates tab/General–View Confidential Messages). In Candidate Tracking, users can view that a confidential message was sent, but cannot view the content if they don’t have the required permissions.
6. Specify for whom the message is intended for.
• All candidates• Internal candidates• External candidates• Referrer• Agent
7. Specify the delivery method.
• Automatic: The message is sent automatically by the system. If Automatic is selected, you must select a triggering event. For example, an acknowledgement message is automatically sent when the recruiter receives a candidate application, or when a candidate is matched to a requisition.
• Manual: The message is sent by the Staffing WebTop user. Indicate if the template is always available or if it is available in a specific context (You can link the message template to a

CONFIDENTIAL INFORMATION Page 13-14
Administrator WebTop User Manual Chapter 13 - Correspondence Manager
specific Candidate Selection Workflow, Step and Status context. You can also link a message template to more than one Candidate Selection Workflow, Step and Status context.
8. Specify where the message template belongs (i.e., Job, Organization, Primary Location).
You may want to prepare different sets of automatic template messages for different types of candidates applying to your organization. For example, it is possible to send different acknowledgement letters for a computer engineer position, and for an accounting position. This can be achieved by preparing automatically-sent message templates with the same triggering event, and by carefully placing them in the Job, Location, and Organization structures. When the triggering event occurs, the system will use the template message closest to the associated requisition in the Job, Location, and Organization structures. A global setting is available to specify in which structure the system will first look for the message template (Path: Setup/Global Setup/ Correspondence Manager).
9. Look at the information regarding when and by whom the template was created.
• Created on: Date when the message template was created.• Last Modified on: Date when the message template was last modified.• Created by: Name of the user who created the message template.• Last Modified by: Name of the user who last modified the message template.
10. Enter a short description of the template message (maximum 255 characters) in the Description field.
11. On the Content tab, complete information for To, Cc, Bcc, and Subject fields. Copy and paste required variables.
It is recommended to associate actions with manually-sent messages. Actions are automatically proposed to Staffing WebTop users when they perform tasks related to specific events during the hiring process. For example, when a recruiter changes a candidate's status from 1st Interview to 2nd Interview, the invitation message templates proposed by the system will include templates associated to 2nd Interview as an associated action. The system will also take into consideration the location of the message template versus the location of the requisition in the Job, Location, and Organization structures.
Field Description
To
To specify the recipient of the message. You can edit the To field and manually enter any email address. Maximum number of characters: 1,000. Most often used variables:{CANDIDATE_EMAIL_OR_OPERATOR_EMAIL} {CANDIDATE_EMAIL}
Cc
To enter the email address of another person (recruiter or hiring manager) to whom he or she would like to send a copy of the message. Maximum number of characters: 1,000. Most often used variables:{AGENT_EMAIL} {AGENT_EMAIL_OR_BLANK}

Administrator WebTop User Manual Chapter 13 - Correspondence Manager
CONFIDENTIAL INFORMATION Page 13-15
For more information, see “Variables” on page 13-22.
12. In the HTML Editor section, type your message. Insert variables where necessary. See “Variables” on page 13-22.
13. Click Preview to view your message as it will appear.
14. When your message template is complete, click Done.
Translating Message TemplatesPath: Correspondence Manager/Create/Edit Message Template
Follow the same procedure as in Paragraph mode. See “Translating Message Templates” on page 13-11.
Editing a Message TemplatePath: Correspondence Manager/Create/Edit Message Template
Follow the same procedure as in Paragraph mode. See “Editing a Message Template” on page 13-12.
Duplicating a Message TemplatePath: Correspondence Manager/Create/Edit Message Template
Follow the same procedure as in Paragraph mode. See “Duplicating a Message Template” on page 13-12.
Bcc
To enter the address of another person (recruiter, or hiring manager), to whom he or she would like to send a blind copy of the message. The address in the Bcc field will not appear on the message that the candidate receives. In addition to system variables, the Bcc field also accepts any email address.Maximum number of characters is: 1,000. Most often used variables:{HMGR_EMAIL} {OPERATOR_EMAIL} {RECRUITER_EMAIL}
Subject
This field is mandatory and may contain a combination of variables and text.Maximum number of characters: 255. Most often used variables:{COMPANY_NAME} {CONTEST_NUMBER} {JOB_TITLE} {REQUISITION_NUMBER
Field Description

CONFIDENTIAL INFORMATION Page 13-16
Administrator WebTop User Manual Chapter 13 - Correspondence Manager
Deleting a Message TemplatePath: Correspondence Manager/Create/Edit Message Template
Follow the same procedure as in Paragraph mode. See “Deleting a Message Template” on page 13-12.

Administrator WebTop User Manual Chapter 13 - Correspondence Manager
CONFIDENTIAL INFORMATION Page 13-17
List of Available Message Templates
The Message Templates List provides a library of system generated message templates that you can use as is, or customize to meet specific requirements.
Message Template Description DuplicateYes/No
OLFYes/No
Note:
• All message templates are available in all languages except where indicated. • All message templates are automatically sent by the system, except where indicated.
Candidates
Job Posting NotificationMessage sent to candidates when the user has selected Email this job posting to matching candidates on the Sourcing page.
Yes Yes
Forgot Password
Message sent to candidates when they click Forgot Password on the Login page of a career section. The candidate must enter an email address before clicking Forgot Password.
Yes No
Job-Specific Application Acknowledgement
Automatic message sent to candidates who have submitted an application for a specific job.
Yes No
Request More Info
Message sent when the overall score (required and desired criteria) of a candidate is above the threshold set on the Alerts tab on a requisition. The candidate is asked to provide additional information regarding his or her qualifications.
Yes Yes
Candidate Matched to Requisition
When matching requisitions to candidates (Match button), the user selects Request More Information. The message will inform candidates that they have been matched to a requisition based on their qualifications and interests.
Yes Yes
Send Job to a Friend
Message sent when candidates select Send this job to a friend at the bottom of the job description page in an application workflow in a career section.
Yes No
Job-Specific Capture Resume Acknowledgement, New Candidate
Message sent to inform candidates that a recruiter has manually entered the candidate’s application (using Capture Resume).
Yes Yes
Job-Specific Capture Resume Acknowledgement, Registered Candidate
Message sent to candidates who are already in the system that their candidate profiler has been updated (using Capture Resume) and matched to a specific job.
Yes Yes

CONFIDENTIAL INFORMATION Page 13-18
Administrator WebTop User Manual Chapter 13 - Correspondence Manager
Unsolicited Capture Resume Acknowledgement New Candidate
Message sent to new candidates to inform them that their candidate profile has been entered in the general database (using Capture Resume)
Yes No
Unsolicited Capture Resume Acknowledgement, Registered Candidate
Message sent to candidates who are already in the database when a user updates the candidate profiler for the first time using Capture Resume. No message is sent for subsequent changes; this is to minimize the number of messages candidates receive.
Yes No
EEO, Invitation to Self Identify
Candidate will be asked to provide additional identification information and EEO information (US only). This message is triggered when candidate reach a specific status in the Candidate Selection Workflow.
Yes Yes
ERT, Unsolicited Referral, New Candidate
Message sent to a candidate who was referred to the company.
Yes No
ERT, Unsolicited Referral, Registered Candidate
Message sent to candidates who have already submitted their candidate profile and someone tries to refer them to the company.
Yes No
Rejection Letter (Manual)
When the status of a candidate is changed to Rejected, the user can select Send Correspondence. A rejection message will be sent to the candidate. Note: This message is not automatically triggered.
Yes No
ERT, Job-specific Referral, New Candidate
Message sent to candidates when they have been referred on a specific job. Yes Yes
ERT, Job-specific Referral, Registered Candidate
Message sent to candidates who are already in the system for a specific job, when someone tried to refer them on a specific job.
Yes Yes
Unsolicited Application Acknowledgement
Message sent to candidates to acknowledge receipt of candidate profiler information. Yes No
Send Job to a FriendWhen candidates select Send Job to a Friend, a message will be sent to the person of their choice.
Yes No
Message Template Description DuplicateYes/No
OLFYes/No

Administrator WebTop User Manual Chapter 13 - Correspondence Manager
CONFIDENTIAL INFORMATION Page 13-19
Rejection Letter - Job/Requisition Closed
When a requisition is filled, a rejection message can automatically be sent to candidates who are still active on that requisition. The requisition is considered filled when the last hire on a candidate is completed. The following setting must be enabled: Path: Setup/Global Setup/Process /Candidate Selection/Actions – Send Rejection letter to candidates automatically rejected when a requisition is filled or cancelled– Automatically reject applications when the requisition is filled or cancelled
Yes Yes
Fax Cover Sheet A correspondence that can be used as a fax cover sheet.
Yes No
Selection Assessment Request (candidate)
Yes Yes
Interview Invitation
Message used with Interview Scheduling to invite a candidate and other attendees to an interview. Note: The same message is used for all attendees. Format and text should be generic for all attendees and for candidates. Note: Create different message templates for 1st, 2nd and 3rd Interview.
Yes Yes
Unsolicited Email Application Acknowledgement, Candidate
Message sent to a candidate to acknowledge the receipt of an application by email. Yes Yes
Duplicated Candidate Email, Candidate
Message sent to a candidate to indicate that the email of the candidate is already in the system database.
Yes Yes
Resume Parsing Service Unavailable, Candidate
Message sent to candidates indicating that Resume Parsing is not available. Yes Yes
Attached File Contains Virus, Candidate
Message sent to inform a candidate that the attached document contains a virus. Yes Yes
Attached File Contains Invalid Resume Information, Candidate
Message sent to inform an agent that a file attached to an application contains information that is not relevant in a resume.
Yes Yes
Error in Attachments, Candidate
Message sent to a candidate to indicate that there is an error in the document attached to the application.
Yes Yes
Completing Online Screening Questionnaire
Message sent to inform candidates that they must complete an Online Screening Questionnaire.
Yes Yes
Message Template Description DuplicateYes/No
OLFYes/No

CONFIDENTIAL INFORMATION Page 13-20
Administrator WebTop User Manual Chapter 13 - Correspondence Manager
Forgot User NameMessage sent to candidates when they selected Forgot User Name in the Sign In page in a career section.
Yes No
Referrers
ERT, Unsolicited, ReferrerMessage sent to a referrer to acknowledge the receipt of the candidate profile he or she referred to the company.
Yes No
ERT, Job-specific, Referrer
Message sent to a referrer to acknowledge the receipt of an application for a specific job candidate application he or she referred to the company.
Yes Yes
Agents
Agent Invitation Message sent to agents to invite them to refer candidates through the Agent Portal. Yes Yes
Unsolicited Email Application Acknowledgement, Agent
Message sent to agents to acknowledge the receipt of an unsolicited email application. Yes Yes
Duplicated Candidate Email, Agent
Message sent to inform an agent that the candidate email address is already in the system database.
Yes Yes
Job-Specific Referral, Agent
Message sent to an agent to acknowledge the receipt of an application for a specific job candidate application he or she referred to the company.
Yes Yes
Resume Parsing Service Unavailable, Agent
Message sent to inform the agent that the Resume Parsing service is not available. Yes Yes
Attached File Contains Virus, Agent
Message sent to inform an agent that a file attached to an application contains a virus. Yes Yes
Attached File Contains Invalid Resume Information, Agent
Message sent to inform an agent that a file attached to an application contains irrelevant information in a resume.
Yes Yes
Error in Attachments, AgentMessage sent to inform an agent that a file attached to an application contains an error. Yes Yes
WebTop Users
Welcome Letter - New Taleo User
Message sent to new users (recruiters, hiring managers, system administrators, agents, guests, etc.) of the Taleo application.
No No
Forgot Password - Taleo UserMessage sent to users when they click the Forgot Password in the User Sign In page. User name must be entered first.
No No
WebTop Password Change Instructions
Message sent to users to provide instructions on how to change the user password. No No
Message Template Description DuplicateYes/No
OLFYes/No
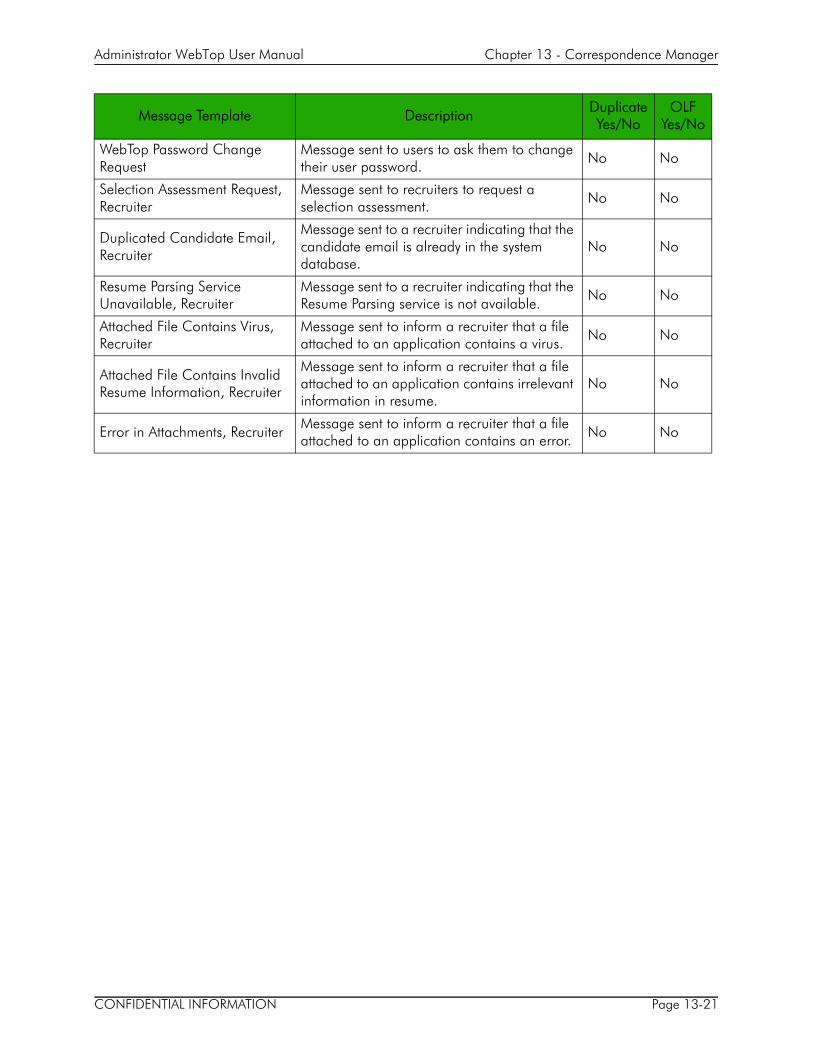
Administrator WebTop User Manual Chapter 13 - Correspondence Manager
CONFIDENTIAL INFORMATION Page 13-21
WebTop Password Change Request
Message sent to users to ask them to change their user password.
No No
Selection Assessment Request, Recruiter
Message sent to recruiters to request a selection assessment.
No No
Duplicated Candidate Email, Recruiter
Message sent to a recruiter indicating that the candidate email is already in the system database.
No No
Resume Parsing Service Unavailable, Recruiter
Message sent to a recruiter indicating that the Resume Parsing service is not available. No No
Attached File Contains Virus, Recruiter
Message sent to inform a recruiter that a file attached to an application contains a virus. No No
Attached File Contains Invalid Resume Information, Recruiter
Message sent to inform a recruiter that a file attached to an application contains irrelevant information in resume.
No No
Error in Attachments, Recruiter Message sent to inform a recruiter that a file attached to an application contains an error. No No
Message Template Description DuplicateYes/No
OLFYes/No

CONFIDENTIAL INFORMATION Page 13-22
Administrator WebTop User Manual Chapter 13 - Correspondence Manager
Variables
Variables are strings of text replaced by contextual data that you can include in a message just before sending it. They are very useful in the creation of customized messages. When creating message templates, you can choose from the list of variables or you can create custom variables. In a paragraph, make sure to insert your variables between the HTML tags <body> and </body>. If variables or text are not inserted between these tags, an error will occur.
Standard VariablesStandard variables are included in the system and represent a specific value in the database. For example, a message template contains the standard variable {CANDIDATE_LAST_NAME}. Just before sending the message to a candidate, the system will replace the variable by the candidate’s last name.
Standard variables are most often used in paragraphs within the body of a message but they can also be inserted in the To, Cc, Bcc, and Subject fields. To add standard variables, use the cut and paste function.
Path: Correspondence Manager/Create/Edit Message Template/Message Template List/Contents tab
1. In the list of paragraphs, select a paragraph.
2. In the list of variables, select a variable (including parentheses) and press Ctrl + C simultaneously on the keyboard.
3. In the Text field, place the cursor where you want to insert the variable and press Ctrl + V simultaneously on the keyboard.
• The data is missing; the variable place holder will be left blank.• The variable is invalid in the context; the variable will be replaced by a blank
for automatically sent messages. • For manually sent messages, the variable will be left untouched (not
replaced).
The system may be unable to replace a variable because:
For the complete list of variables, see “List of Available Standard Variables” on page 13-24.
Administrator WebTop User Manual Chapter 13 - Correspondence Manager
CONFIDENTIAL INFORMATION Page 13-23
Custom VariablesIf you do not find the variables you need in the list of available standard variables provided by the system, you can enter custom variables in your paragraphs. Custom variables must have the same format as standard variables.
• Custom variables must be inserted between the HTML tags <body> and </body>• Custom variables must be enclosed in curly braces ('{' and '}') • Valid characters for custom variables are capital letters (A-Z), numbers (0-9) and the underscore
symbol (_)
Custom variables should only be used in messages sent manually since user intervention is required to replace the variables by text strings just before the message is sent.

CONFIDENTIAL INFORMATION Page 13-24
Administrator WebTop User Manual Chapter 13 - Correspondence Manager
List of Available Standard Variables
Variable Description
{AGENCY_NAME} Name of the agency to which the staffing agent belongs as stored in the agent file.
{AGENT_EMAIL_OR_BLANK}
In the case where the staffing agent can be identified, this variable will be replaced by the staffing agent’s email address. When the staffing agent cannot be identified, or is simply not an agent, this variable will be ignored (but will not cause an UNRESOLVED occurrence.
{AGENT_EMAIL} Staffing agent’s email as stored in the agent’s file.
{AGENT_FAX} Staffing agent’s fax number as stored in the agent file.
{AGENT_FIRST_NAME} Staffing agent’s first name as stored in the agent file.
{AGENT_FULL_NAME} Staffing agent’s full name in the format [first name] [last name] as stored in the agent file.
{AGENT_WORK_PHONE} Staffing agent’s work phone as stored in the agent file.
{AGENT_HOME_PHONE} Staffing agent’s home phone as stored in the agent file.
{AGENT_MOBILE_PHONE} Staffing agent’s mobile phone as stored in the agent file.
{AGENT_PAGER_PHONE} Staffing agent’s pager phone as stored in the agent file.
{AGENT_JOB_DESCRIPTION_URL}
This variable is used in the case of a specific agent and requisition posting - in a message informing an agent that a new requisition was posted on his or her portal, for example. This variable inserts a URL that directs the agent to the page (on the agent portal) that provides a description of the job. (The agent will be requested to login in before the person can actually view the job description page). It is recommended that you place the URL an href HTML tag. For example: Click the following link to view the <a href="{AGENT_JOB_ DESCRIPTION_URL}">job description</a> and refer...
{AGENT_JOB_LIST_URL}
This variable is used in cases where the agent can be identified. This variable inserts a URL that directs the agent to the list of all current job openings for which the agent is invited to refer candidates. (The agent will be asked to log in before he or she can actually view the job list page.) It is recommended that you place this URL inside an href HTML tag. For example: You might also want to take a look at the list of all current <a href="{AGENT_JOB_LIST_URL}">job openings</a>.

Administrator WebTop User Manual Chapter 13 - Correspondence Manager
CONFIDENTIAL INFORMATION Page 13-25
{AGENT_LAST_NAME}Staffing agent’s last name as stored in the agent’s file. This variable should only be used in correspondence intended directly to (To), or indirectly to (Cc, Bcc) to an agent.
{APPLICATION_DATE} Date when the candidate applied for the job.
{APPLICATION_STATUS} Candidate’s current status for the job.
{CANDIDATE_ADDRESS} Candidate’s street address.
{CANDIDATE_ADDRESS_2} Second line dedicated to the candidate’s street address.
{CANDIDATE_AVAILABILITY}
Date when the candidate would be available to start a new job.
{CANDIDATE_BIRTH_DATE} Candidate’s birth date.
{CANDIDATE_CITY} Candidate’s home city.
{CANDIDATE_COUNTRY} Candidate’s home country.
{CANDIDATE_EMAIL_OR_OPERATOR_EMAIL}
When generating the message, the system will replace this variable with the candidate’s email address. If the candidate’s email address is missing, the system will use the operator’s email address. The operator is the Staffing WebTop user who is sending the message.
{CANDIDATE_EMAIL} Candidate’s email address.
{CANDIDATE_EMPLOYEE_NUMBER} Candidate’s employee number.
{CANDIDATE_FAX} Candidate’s fax number.
{CANDIDATE_FIRST_NAME} Candidate’s first name.
{CANDIDATE_FIRST_NAME_OR_CANDIDATE_EMAIL}
When generating the message, the system will replace this variable with the candidate’s first name. If the candidate’s first name is missing or invalid, the system will use the candidate’s email address.
{CANDIDATE_FULL_NAME} Candidate’s full name in the format: [first name] [middle initial]. [last name].
{CANDIDATE_FULL_NAME_OR_CANDIDATE_EMAIL}
When generating the message, the system will replace this variable with the candidate’s full name (in the format – [first name] [middle initial]. [last name]). If the candidate’s full name is missing or invalid, the system will use the candidate’s email address.
{CANDIDATE_HIRE_START_DATE} Start date entered when the candidate status is Hired.
{CANDIDATE_HOME_PHONE} Candidate’s home phone number.
{CANDIDATE_IDENTIFICATION_NUMBER} Candidate’s identification number.

CONFIDENTIAL INFORMATION Page 13-26
Administrator WebTop User Manual Chapter 13 - Correspondence Manager
{CANDIDATE_LAST_NAME} Candidate’s last name.
{CANDIDATE_LAST_NAME_OR_CANDIDATE_EMAIL}
When generating the message, the system will replace this variable with the candidate’s last name. If the candidate’s last name is missing, the system will use the candidate’s email address.
{CANDIDATE_MIDDLE_NAME}
Candidate’s middle initial.
{CANDIDATE_MOBILE_PHONE} Candidate’s mobile phone number.
{CANDIDATE_PAGER_PHONE} Candidat’s pager phone number.
{CANDIDATE_REGION} Candidate’s region.
{CANDIDATE_SECURITY_CODE}
Security code that the candidate has to enter when changing his or her password.
{CANDIDATE_SOCIAL_SECURITY_NUMBER} Candidate’s social security number.
{CANDIDATE_STATE} Candidate’s home state/province.
{CANDIDATE_TRAVEL} Level of the candidate’s willingness to travel in the job.
{CANDIDATE_USERNAME}Candidate’s user name, which corresponds to candidate’s email address. If the candidate does not have an email address, this variable is replaced by the Candidate Identification Number.
{CANDIDATE_WORK_PHONE} Candidate’s work number.
{CANDIDATE_ZIPCODE} Candidate’s zip code.
{CAREER_SECTION_URL}
URL of the job list page. The URL points to the most relevant job list page (depending on the related application, if any), or to the one that is highest in priority. It is recommended that you use this URL inside an href HTML tag. Here is an example of proper syntax: You can also <a href="{CAREER_SECTION_URL}">click here</a> to visit our…
{CHANGE_PASSWORD_URL}
URL of the Change Password page. It is recommended that you use this URL inside an "href" HTML tag. Here is an example of proper syntax: To change your password, <a href="{CHANGE_PASSWORD_URL}">click here</a>, then…
{COMPANY_LOGO_01} (01 to 30)
Inserts your organization logo. Your organization can provide up to 30 logos. Before you use this variable, make sure you have supplied your organization logo image files to your Taleo representative. Make sure that you logo files are numbered accordingly.

Administrator WebTop User Manual Chapter 13 - Correspondence Manager
CONFIDENTIAL INFORMATION Page 13-27
{COMPANY_NAME}
The name of your organization as stored in the application ShortCompanyName field of the organization’s settings table. Before you use this variable, make sure you supplied the appropriate data to the Configuration Management group.
{COMPANY_STATIC_PAGE} Returns the organization’s web site address which is stored in the Client Setting: CorporateWebAddress.
{CONTEST_NUMBER} The synonym of requisition number.
{CUDF_uniqueld}
Value of the Candidate User-Defined Field whose name is uniqueId. For example, to access the value of a user-defined field such as: Driver’s Licence Number, the administrator would use the variable {CUDF_Driver’s Licence Number}.
{CURRENT_DATE} Current date when the message is generated (date format depends on the language of the message).
{EXTERNAL_SERVICE_QUESTIONNAIRE_URL}
Screening services.
{FULL_COMPANY_NAME}
The name of your organization as stored in the application FullCompanyName field of the organization’s settings table. Before you use this variable, make sure you supplied the appropriate data to the Configuration Management group
{HMGR_EMAIL} Email address of the hiring manager specified in the requisition.
{HMGR_NAME} First name followed by the last name of the hiring manager specified in the requisition.
{HMGR_PHONE} Telephone number of the hiring manager specified in the requisition.
{JOB_DESCRIPTION_EXTERNAL} External description of the job, as entered in the Requisition Wizard.
{JOB_DESCRIPTION_INTERNAL} Internal description of the job, as entered in the Requisition Wizard.
{JOB_DESCRIPTION_URL}
This variable is used to insert a URL that points directly to the page that contains the job description. External candidates are directed to the highest priority external career section. Internal candidates are directed to the highest priority internal career section. It is recommended that you place this URL inside a herf HTML tag. For example: From the <a href="{JOB_DESCRIPTION_URL}">job description </a>page, you can apply online. Though quite similar to {JOB_URL}, {JOB_DESCRIPTION_URL}does not require candidates to log in before they can view the job description page.

CONFIDENTIAL INFORMATION Page 13-28
Administrator WebTop User Manual Chapter 13 - Correspondence Manager
{JOB_ISI_URL}
This variable is used in the Invitation to Self-Identify message. It inserts a URL that points to the entry page of the application flow devoted to the Invitation to Self-Identify feature: To activate the feature, the Activate EEO setting, must be set to YES.Other settings permit the user to specify (1) the status the candidate must attain before the Invitation to self-Identify message is sent, (2) whether or not to ask about veteran status, and (3) whether or not to ask if the individual has disabilities. Path: Setup/Career Section Setup/Application FlowsThe user can create and modify application flows of type Invitation to Self Identify.Path: Setup/Global Career Section SettingsThe user can select which application will be used for the Invitation to Self-Identify.Place the {JOB_ISI_URL} inside an href HTML tag. For example: To go directly to the appropriate page, <a href="{JOB_ISI_URL}">click here</a> then…
{JOB_OFFER_NB_VACATION_DAYS}
Number of vacation days offered to the candidate when an offer is made. This variable is intended to be used in offer templates. When using this variable, make sure that the Change to Offer action is associated with the template. This will ensure that the system prompts the operator to enter a valid value before sending the message.
{JOB_OFFER_SALARY}
Salary offered to the candidate when an offer is made. This variable is intended to be used in offer templates. When using this variable, make sure that the Change to Offer action is associated with the template. This will ensure that the system prompts the operator to enter a valid value before sending the message.
{JOB_QUALIFICATIONS_EXTERNAL}
Qualifications required for the job for external candidates, as entered in the Requisition Wizard.
{JOB_QUALIFICATIONS_INTERNAL}
Qualifications required for the job for internal candidates, as entered in the Requisition Wizard.

Administrator WebTop User Manual Chapter 13 - Correspondence Manager
CONFIDENTIAL INFORMATION Page 13-29
{JOB_RMI_URL}
URL of the application flow dedicated to the Request More Information functionality. It inserts a URL that points to the entry page of the Request More Information application flow. The Request More Information flow is a feature that automatically requests more information from interesting candidates. Path: Setup/Career Section Setup/Application FlowsCreate and modify application flows of the type Request More Information.Path: Setup/Global Career Section SettingsSelect which application flow will be used for the Request More Information.Add a list of missing information items (information blocks that are present in the Request More Information flow, but for which the candidate did not provide an answer. To generate a list of missing information items, use the following variable: {REQUEST_MORE_INFO_DATA}. Place the JOB_RMI_URL inside an href HTML tag. For example: To go directly to the appropriate page, <a href="{JOB_RMI_URL}">click here</a> then…
{JOB_TITLE}Job title of the requisition (depending on the context, it may be a requisition for which the candidate applied, a requisition for which the organization invited the candidate to apply, etc.)
{JOB_TO_FRIEND_COMMENTS}
Comments of the person sending the job posting to a friend.
{JOB_TO_FRIEND_DESCRIPTION}
Description of the job, as seen by the person sending a job posting to a friend.
{JOB_TO_FRIEND_QUALIFICATIONS}
Qualifications for the job, as seen by the person sending a job posting to a friend.
{JOB_URL}
URL of the page, in the Career Section, where the selected requisition is posted (a requisition for which the candidate applied, a requisition for which the organization invited the candidate to apply, etc.). It is recommended that you use this URL inside an href HTML tag. For example: You can also <a href="{JOB_URL}">click here</a> to Path…
{JOBFIELD_STRUCTURE} Path, in the job field structure, where the selected requisition is placed.
{LOCATION_STRUCTURE}Path, in the location structure, where the selected requisition is placed.
{MAXIMUM_ATTACHMENT} Maximum number of attachments permitted in Interview Scheduling.
{MAXIMUM_ATTACHMENT_SIZE} Maximum size of attachments in Interview Scheduling.
{MEETING ATTENDEES} In Interview Scheduling, add the name of meeting attendees.
{MEETING_COMMENTS} In Interview Scheduling, add comments in the meeting request.

CONFIDENTIAL INFORMATION Page 13-30
Administrator WebTop User Manual Chapter 13 - Correspondence Manager
{MEETING_DATE AND TIME} In Interview Scheduling, enter date and time of the meeting.
{MEETING_LOCATION} In Interview Scheduling, enter the location of the meeting.
{MEETING_ORGANIZER} In Interview Scheduling, enter the name of the organizer of the meeting.
{MEETING_SUBJECT} In Interview Scheduling, enter the subject of the meeting.
{OFFER_ACTUAL_START_DATE}
Actual Start Date when an offer is made. This variable is intended to be used in offer templates. When using this variable, make sure that the Change to Offer action is associated with the template. This will ensure that the system prompts the operator to enter a valid value before sending the message.
{OFFER_ANNUAL_BONUS}
Actual Annual Bonus when an offer is made. This variable is intended to be used in offer templates. When using this variable, make sure that the Change to Offer action is associated with the template. This will ensure that the system prompts the operator to enter a valid value before sending the message.
{OFFER_CAR_ALLOWANCE}
Actual Car Allowance when an offer is made. This variable is intended to be used in offer templates. When using this variable, make sure that the Change to Offer action is associated with the template. This will ensure that the system prompts the operator to enter a valid value before sending the message.
{OFFER_COMMISSION_AMOUNT
Actual Commission Amount when an offer is made. This variable is intended to be used in offer templates. When using this variable, make sure that the Change to Offer action is associated with the template. This will ensure that the system prompts the operator to enter a valid value before sending the message.
{OFFER_COMMISSION_TYPE}
Actual Commission Type when an offer is made. This variable is intended to be used in offer templates. When using this variable, make sure that the Change to Offer action is associated with the template. This will ensure that the system prompts the operator to enter a valid value before sending the message.
{OFFER_CREATION_DATE}
Actual Creation Date when an offer is made. This variable is intended to be used in offer templates. When using this variable, make sure that the Change to Offer action is associated with the template. This will ensure that the system prompts the operator to enter a valid value before sending the message.
{OFFER_EXPENSE_ ACCOUNT}
Actual Expense Account when an offer is made. This variable is intended to be used in offer templates. When using this variable, make sure that the Change to Offer action is associated with the template. This will ensure that the system prompts the operator to enter a valid value before sending the message.

Administrator WebTop User Manual Chapter 13 - Correspondence Manager
CONFIDENTIAL INFORMATION Page 13-31
{OFFER_EXPIRY_DATE}
Actual Expiry Date when an offer is made. This variable is intended to be used in offer templates. When using this variable, make sure that the Change to Offer action is associated with the template. This will ensure that the system prompts the operator to enter a valid value before sending the message.
{OFFER_EXTEND_DATE}
Actual Extend Date when an offer is made. This variable is intended to be used in offer templates. When using this variable, make sure that the Change to Offer action is associated with the template. This will ensure that the system prompts the operator to enter a valid value before sending the message.
{OFFER_OPTIONS_TYPE}
Actual Option Type when an offer is made. This variable is intended to be used in offer templates. When using this variable, make sure that the Change to Offer action is associated with the template. This will ensure that the system prompts the operator to enter a valid value before sending the message.
{OFFER_OPTIONS}
Actual Options when an offer is made. This variable is intended to be used in offer templates. When using this variable, make sure that the Change to Offer action is associated with the template. This will ensure that the system prompts the operator to enter a valid value before sending the message.
{OFFER_OTHER_BONUS}
Actual Other Bonus when an offer is made. This variable is intended to be used in offer templates. When using this variable, make sure that the Change to Offer action is associated with the template. This will ensure that the system prompts the operator to enter a valid value before sending the message.
{OFFER_OTHER_COMPENSATION}
Actual Other Compensation when an offer is made. This variable is intended to be used in offer templates. When using this variable, make sure that the Change to Offer action is associated with the template. This will ensure that the system prompts the operator to enter a valid value before sending the message.
{OFFER_PAY_BASIS}
Actual Pay Basis when an offer is made. This variable is intended to be used in offer templates. When using this variable, make sure that the Change to Offer action is associated with the template. This will ensure that the system prompts the operator to enter a valid value before sending the message.
{OFFER_PAY}
Actual Pay when an offer is made. This variable is intended to be used in offer templates. When using this variable, make sure that the Change to Offer action is associated with the template. This will ensure that the system prompts the operator to enter a valid value before sending the message.
{OFFER_RELOCATION_AMOUNT}
Actual Relocation Amount when an offer is made. This variable is intended to be used in offer templates. When using this variable, make sure that the Change to Offer action is associated with the template. This will ensure that the system prompts the operator to enter a valid value before sending the message.

CONFIDENTIAL INFORMATION Page 13-32
Administrator WebTop User Manual Chapter 13 - Correspondence Manager
{OFFER_RELOCATION_TYPE}
Actual Relocation Type when an offer is made. This variable is intended to be used in offer templates. When using this variable, make sure that the Change to Offer action is associated with the template. This will ensure that the system prompts the operator to enter a valid value before sending the message.
{OFFER_SALARY_CURRENCY}
Actual Salary Currency when an offer is made. This variable is intended to be used in offer templates. When using this variable, make sure that the Change to Offer action is associated with the template. This will ensure that the system prompts the operator to enter a valid value before sending the message.
{OFFER_SALARY}
Actual Salary when an offer is made. This variable is intended to be used in offer templates. When using this variable, make sure that the Change to Offer action is associated with the template. This will ensure that the system prompts the operator to enter a valid value before sending the message.
{OFFER_SIGN_ON_BONUS}
Actual Sign-on Bonus when an offer is made. This variable is intended to be used in offer templates. When using this variable, make sure that the Change to Offer action is associated with the template. This will ensure that the system prompts the operator to enter a valid value before sending the message.
{OFFER_STOCK_AMOUNT}
Actual Stock Amount when an offer is made. This variable is intended to be used in offer templates. When using this variable, make sure that the Change to Offer action is associated with the template. This will ensure that the system prompts the operator to enter a valid value before sending the message.
{OFFER_STOCK_TYPE}
Actual Stock Type when an offer is made. This variable is intended to be used in offer templates. When using this variable, make sure that the Change to Offer action is associated with the template. This will ensure that the system prompts the operator to enter a valid value before sending the message.
{OFFER_TARGET_START_DATE}
Actual Target Start Date when an offer is made. This variable is intended to be used in offer templates. When using this variable, make sure that the Change to Offer action is associated with the template. This will ensure that the system prompts the operator to enter a valid value before sending the message.
{OFFER_VACATION_UNIT}
Actual Vacation Unit when an offer is made. This variable is intended to be used in offer templates. When using this variable, make sure that the Change to Offer action is associated with the template. This will ensure that the system prompts the operator to enter a valid value before sending the message.
{OFFER_VACATION}
Actual Vacation when an offer is made. This variable is intended to be used in offer templates. When using this variable, make sure that the Change to Offer action is associated with the template. This will ensure that the system prompts the operator to enter a valid value before sending the message.

Administrator WebTop User Manual Chapter 13 - Correspondence Manager
CONFIDENTIAL INFORMATION Page 13-33
{OPERATOR_EMAIL}Email address of the Staffing WebTop user who is sending the message. This variable should be used only in manually-sent messages.
{OPERATOR_PHONE}Phone number of the Staffing WebTop user who is sending the message. This variable should be used only in manually-sent messages.
{OPERATOR_NAME} Name of the Staffing WebTop user who is sending the message. This variable should be used only in manually-sent messages.
{ORGANISATION_STRUCTURE}
Path, in the organization structure, where the selected requisition is placed.
{PAGE_BREAK} Page break where the variable is placed.
{PRODUCT_NAME}Name of the product to which the user has access (Staffing WebTop, Manager WebTop, Administrator WebTop or None) as specified in the user file.
{PROFILER_URL}
URL of the candidate profiler page. The URL points to the most relevant profiler application flow (depending on the related application, if any), or to the one that is highest in priority. It is recommended that you use this URL inside an "href" HTML tag. Here is an example of proper syntax: You can also <a href="{PROFILER_URL}">click here</a> to visit our…
{RECRUITER_EMAIL} Email address of the recruiter (owner) specified in the requisition.
{RECRUITER_NAME} First name followed by the last name of the recruiter (owner) specified in the requisition.
{RECRUITER_PHONE}Telephone number of the recruiter (owner) specified in the requisition.

CONFIDENTIAL INFORMATION Page 13-34
Administrator WebTop User Manual Chapter 13 - Correspondence Manager
{REFERRAL_VALIDITY_PERIOD}
End of the period during which the referrer (or staffing agent) will own the rights of a candidate. This variable is used in the ERT, Job-specific, Referrer message and in the ERT, Unsolicited, Referrer message. For example, the variable could be used in a sentence such as: Your rights as the referrer of this person are valid {REFERRAL_VALIDITY_PERIOD}. The two messages would be sent to referrers as well as to staffing agents. For the ERT program, the duration of the ownership period is set (in days) in the ERTReferralValidityPeriod field of the organization setting table (Only the Configuration Management group can edit this setting table.)For Staffing Agencies, you can set the duration (in days) of the ownership period or leave it set to unlimited. When the ownership is set in terms of days, the variable {REFERRAL_VALIDITY_PERIOD} will be replaced by "until [calculated date]" (in the appropriate language.)When the ownership is set to Unlimited, the variable {REFERRAL_VALIDITY_PERIOD} will be replaced by "for an unlimited period" (in the appropriate language.) Date until which the referent will own the rights over the selected candidate (date format depends on the language of the message).
{REFERRER_EMAIL} Email address of the person who referred the selected candidate.
{REFERRER_FIRST_NAME} First name of the person who referred the selected candidate.
{REFERRER_MIDDLE_NAME} Middle initial of the person who referred the selected candidate.
{REFERRER_LAST_NAME} Last name of the person who referred the selected candidate.
{REQUEST_MORE_INFO_DATA}
Request More Information is a feature that requests automatically more information from interesting candidates. For this feature to be available in the Staffing WebTop, the Request More Info setting (Path: Setup/Career Section Setup/Global Career Section Settings) must be set to ON. In the Staffing WebTop, the user can turn on Request More Info, and set thresholds upon which the information request email will be sent to the candidate. The email message includes a URL that, when selected by the candidate, leads to an application flow dedicated to the Request More Information function (see the variable {JOB_RMI_URL}). In the email, it is recommended to list the information items missing to fill in the application flow dedicated to the Request More Information functionality. To generate the list of missing information items, use the variable {REQUEST_MORE_INFO_DATA}.
{REQUISITION_ANNUAL_BONUS}
Annual Bonus offered in the job compensation package, as entered in the Requisition Wizard.

Administrator WebTop User Manual Chapter 13 - Correspondence Manager
CONFIDENTIAL INFORMATION Page 13-35
{REQUISITION_CAR_ALLOWANCE}
Car allowance offered in the job compensation package, as entered in the Requisition Wizard.
{REQUISITION_CLOSING_DATE}
External closing date of the requisition, as entered in the Requisition Wizard.
{REQUISITION_COMMISSION_TYPE}
Commission Type offered in the job compensation package, as entered in the Requisition Wizard.
{REQUISITION_COMMISSION}
Commission offered in the job compensation package, as entered in the Requisition Wizard.
{REQUISITION_EMPLOYEE_REFERRAL_BONUS}
Employee referral bonus amount that was entered in the Requisition Wizard.
{REQUISITION_EMPLOYEE_STATUS}
Employee status specified in the requisition, as entered in the Requisition Wizard.
{REQUISITION_EXPENSE_ACCOUNT}
Expense account offered in the job compensation package, as entered in the Requisition Wizard.
{REQUISITION_HIGH_QUARTILE_SALARY}
High Quartile Salary offered in the job compensation package, as entered in the Requisition Wizard.
{REQUISITION_JOB_GRADE}
Job grade that was entered in the Requisition Wizard.
{REQUISITION_JOB_LEVEL} Job level that was entered in the Requisition Wizard.
{REQUISITION_JOB_SCHEDULE} Job schedule that was entered in the Requisition Wizard.
{REQUISITION_JOB_SHIFT} Job shift that was entered in the Requisition Wizard.
{REQUISITION_JOB_TYPE} Job type that was entered in the Requisition Wizard.
{REQUISITION_LOW_QUARTILE_SALARY}
Low Quartile Salary offered in the job compensation package, as entered in the Requisition Wizard.
{REQUISITION_MAXIMUM_SALARY} Maximum salary that was entered in the Requisition Wizard.
{REQUISITION_MIDPOINT_SALARY} Mid-point salary that was entered in the Requisition Wizard.
{REQUISITION_MINIMUM_SALARY} Minimum salary that was entered in the Requisition Wizard.
{REQUISITION_NO}
{REQUISITION_NUMBER}Requisition number as shown in the Requisition Wizard (a requisition for which the candidate applied, a requisition that the organization invited the candidate to apply for, etc.)

CONFIDENTIAL INFORMATION Page 13-36
Administrator WebTop User Manual Chapter 13 - Correspondence Manager
{REQUISITION_OPENING_DATE}
Requisition’s external opening date, as entered in the Requisition Wizard.
{REQUISITION_OTHER_BONUS}
Other bonus specified in the requisition, as entered in the Requisition Wizard.
{REQUISITION_OTHER_COMPENSATION}
Other compensation specified in the requisition, as entered in the Requisition Wizard.
{REQUISITION_PUBLIC_REFFERRAL_BONUS}
Public referral bonus amount that was entered in the Requisition Wizard
{REQUISITION_RELOCATION_TYPE} Type of relocation offered, as entered in the Requisition Wizard.
{REQUISITION_RELOCATION}
Relocation specified in the requisition, as entered in the Requisition Wizard.
{REQUISITION_SHARES_TYPE}
Share type specified in the requisition, as entered in the Requisition Wizard.
{REQUISITION_SHARES} Shares specified in the requisition, as entered in the Requisition Wizard.
{REQUISITION_SIGN_ON_BONUS}
Sign-on bonus specified in the requisition, as entered in the Requisition Wizard.
{REQUISITION_STOCK_OPTIONS_TYPES}
Stock option types specified in the requisition, as entered in the Requisition Wizard.
{REQUISITION_STOCK_OPTIONS}
Stock options specified in the requisition, as entered in the Requisition Wizard.
{REQUISITION_EDUCATION_LEVEL}
Education level specified in the requisition, as entered in the Requisition Wizard.
{REQUISITION_TARGET_START_DATE}
Proposed date of the first day of work of the person who will fill the requisition, as entered in the Requisition Wizard.
{REQUISITION_VACATION_TYPE}
Vacation type specified in the requisition, as entered in the Requisition Wizard.
{REQUISITION_VACATION}
Vacation specified in the requisition, as entered in the Requisition Wizard.
{RUDF_uniqueld}
Value of the Requisition User-Defined Field whose name is uniqueId. For example, to access the value of a user-defined field whose name is "Dept. Billing Code", the administrator would use the variable {RUDF_Dept. Billing Code}.
{SUPPORTED_ATTACHMENT_FORMAT}
Format of attached documents. Used with Resume Parsing, Assessment, Interview Scheduling, etc.
{UNSUBSCRIBE_NOW_URL}
Inserts a URL that points to an unsubscribe message included in job posting notifications email messages.

{USER_EMAIL}Email of the user as specified in his or her user file. This variable is used in the New User message and in the Forgot Password message. In other messages it will be UNRESOLVED.
{USER_FIRST NAME}First name of the user as specified in the user file. This variable is used in the New User message and in the Forgot Password message. In other messages it will be UNRESOLVED.
{USER_FORGOT_PWD_URL}
This variable inserts a URL leading to a page where the user can change his or her password. This variable is used in the Forgot Password message. In other messages it will be UNRESOLVED. It is recommended that you place this URL in an href HTML tag. For example: To change your password, <a href="{USER_FORGOT_PWD_URL}">click here</a>, then...
{USER_FULL_NAME} Full name of the user as specified in the user file. Format: [first name] [middle name] [last name].
{USER_LAST_NAME} Last name of the user as specified in the user file.
{USER_MIDDLE_NAME} Middle name of the user as specified in the user file.
{USER_PASSWORD} When used in the New User message, this variable will insert the password of the user as specified in the user file.
{USER_USERNAME} Username of the user as specified in the user file.
{USER_WEBTOP_SUITE_URL}
This variable inserts a URL that points to the Staffing WebTop products entry page. This variable is used in the New User message. When used in other messages, it will be unresolved. It is recommended that you place this URL in an href HTML tag. For example: To log in to the {PRODUCT_NAME}, <a href="{USER_WEBTOP_SUITE_URL}" >click here</a>.

Sourcing - Matching Candidates to
Requisitions

CONFIDENTIAL INFORMATION Page 14-1
Administrator WebTop User Manual Chapter 14 - Sourcing - Matching Candidates to Requisitions
Sourcing Configuration Settings
There are three configuration settings for Sourcing.
Path: Setup/Global Setup/Process/Sourcing/General
Settings Possible Values
Default Values
Description and Tips
Path: Setup/Global Setup/Process/Sourcing/General
By default, check the “Email this job posting to matching candidates” check box (in Staffing WebTop)
Yes / No No If set to Yes, the E-mail this job posting to matching candidates check box will be selected by default when the recruiter selects Career Sections in the Candidate Sourcing Manager.
Reminder to extend posting generated x days before posting expires (Off: no reminder)
Off 1, 2, 3, 4, 5, 6, 7
Off Controls whether or not a message appears in My WebTop, to remind the recruiter that a requisition posting will expire shortly.
Display "Estimated Price" column in the "Direct Job Boards" section
Yes / No Yes Determine if the estimated price column will appear in the Direct Job Boards section in the Candidate Sourcing Manager.
Allow to change the Apply Online option when posting to corporate career sections.
Yes / No No Allow users to view the Apply Online Option column in the Staffing WebTop.

CONFIDENTIAL INFORMATION Page 14-2
Administrator WebTop User Manual Chapter 14 - Sourcing - Matching Candidates to Requisitions
Matching Candidates
In Matching Candidates, you can configure the default criteria that will be used by the system to find matching candidates who will be notified that a new job is posted (Job Posting Notification). Staffing WebTop and Manager WebTop users can view matching candidates on the Preview Matching Candidates list.
Job Posting Notifications–Additional InformationWhen Email this job posting to matching candidates is enabled in the Staffing WebTop, the system matches all the candidates that have the Required criteria to the requisition being posted. Candidates who have all the Required criteria will receive an email inviting them to apply on the job that is posted.
To receive a Job Posting Notification, the candidate must:
• Have selected Please email job postings in the candidate profiler• Have a valid email address• Not have applied on this requisition yet• Not have been invited to apply on this requisition yet• Match the selections marked as required in the requisitionPath: Setup/Global Setup/Process/Sourcing/General–By default, check the “Email this job posting to matching candidates” check box (in Staffing WebTop
If the job requisition is posted on a least one External career section, (whether or not it is posted on an Internal career section), all the candidates that match the Required criteria will receive a Job Posting Notification.
If the job requisition is posted only on an Internal career section, only the internal candidates will receive a Job Posting Notification.
CriteriaPath: Setup/Global Setup/Process/Sourcing/Matching Candidates/Criteria
Matching criteria lets you select criteria that will guide the system on how to match candidates to requisitions. To efficiently match best qualified candidates to requisitions, you can select matching criteria that will improve the quality of your results. Matching is done by comparing the contents of the candidate profiler to the criteria selected for each requisition.
Matching criteria include:
• Job• Location (Country, State, Region, City)• Organization (Company, Sector, Department, Division)• Locations for Place of Residence (Country, State/Province, Region)
Internal candidate profiles are entered through the Intranet, or have an Employee Identification number.

CONFIDENTIAL INFORMATION Page 14-3
Administrator WebTop User Manual Chapter 14 - Sourcing - Matching Candidates to Requisitions
• Skills• Questions• Basic Profile
For each criteria, you can determine if the selection is Required or Desired. If the criteria is set to Required, the criteria is mandatory. The candidate will have to meet this specific criteria to be considered by the Job Posting Notification and to appear on the Preview Matching Candidates.
If a criteria is set to Desired, the criteria will be considered as an asset. A candidate who does not have an asset will be matched as long as he or she meets all the required criteria.
Sorting is determined by the number of Desired criteria in the candidate profiler in relation with the number of Desired criteria specified in the search. Sorting is only relevant when presenting candidates in the Preview Matching Candidate list.
Rules for Matching Criteria
Matching is done by comparing answers provided by candidates in a career section to criteria specified in the requisition by the recruiter or the hiring manager.
Criteria can be marked as Desired or Required in the requisition.
Required: Mandatory criteria. The candidate must match the criteria.
• Candidates who meet all the Required criteria will automatically be matched to the selected requisition, and will appear in Preview Matching Candidates.
Desired: Not mandatory
• Candidates who do not match a Desired criteria will not be rejected. • Candidates who meet all the Required criteria and who also meet some of the Desired criteria,
will appear at the top of the Preview Matching Candidates list. Desired criteria are considered as a plus.
Job Field, Location, Organization and Place of Residence CriteriaThe following criteria (Job Field, Location, Organization and Place of Residence) are mandatory:
These criteria must be set to Required. Candidates must provide exact matches to these criteria to be matched to the requisition and to appear on the Candidate list.
Skills and Questions CriteriaSkills and Questions criteria are considered as wildcards. If these criteria are not set to Required in the requisition, or if a candidate does not enter answers for these criteria, the answers will still be considered. The candidate will be matched if he or she matches all the other required criteria. Answering these criteria will help determine the position of the candidate on the candidate list. Skills and Questions criteria can be set to Based on answers marked as required, or Based on answers marked as required AND on answers marked as Asset.
Skills
• Based on skills marked as required: Skills marked as required in the requisition are mandatory. Candidates who do not match the selected skills will automatically be rejected. If no answer is provided, the absence of value will act as a wildcard and will not be considered.
CONFIDENTIAL INFORMATION Page 14-4
Administrator WebTop User Manual Chapter 14 - Sourcing - Matching Candidates to Requisitions
• Based on skills marked as required AND skills marked as asset: Candidates who do not match the skills marked as Asset in the requisition will automatically be rejected. If no answer is provided, the absence of value will act as a wildcard and will not be considered.
Questions
• Based on answers marked as required: Questions selected in the requisition are mandatory. Candidates must provide a correct answer to the question. Candidates who do not correctly answer the questions will automatically be rejected. If no answer is provided, the absence of value will act as a wildcard and will not be considered.
• Based on answers marked as required AND answers marked as asset: Candidates who do not answer the questions correctly will be considered if they meet all the required criteria. If no answer is provided, the absence of value will act as a wildcard and will not be considered.
Basic Profile CriteriaBasic Profile criteria are considered as wildcards. If these criteria are not set as Required in the requisition, or if a candidate does not enter answers for these criteria, the answers will still be considered. Answering these criteria will help determine the position of the candidate on the candidate list.
Matching is done by equality for the following criteria:
• Job Level• Job Type• Schedule• Shift• Employee Status• Education Level• Travel%: Matching is done by equality or higher • Minimum Salary: Matching is done by equality or lower.
Candidate’s Skills, Proficiency Level and Experience Level must be equal to, or greater than, the level selected in the requisition.

CONFIDENTIAL INFORMATION Page 14-5
Administrator WebTop User Manual Chapter 14 - Sourcing - Matching Candidates to Requisitions
Filters
Path: Setup/Global Setup/Process/Sourcing/Matching Candidates/Filters
You can configure default filters in the Default Filters for Matching Candidates. To configure default selections, make selections from the fields and lists.
Selections made in this page will be considered the default selections for every requisition. However, the Staffing WebTop user can override these selections for a specific requisition on a case-by-case basis. Configuring these filters will help the user to narrow down the list of matching candidates.
Setting Description
Invite Internal Candidates Specify that the job is open to internal candidates. Internal candidates will be included in the Candidate Preview List. Organizations that want to prevent inter-department solicitation should disable this setting.
Invite Candidates living in Restrict candidates who will appear on the list to those who live in the area (country, state/province, region) where the requisition was created or to all countries.
Invite only candidates whose information has been modified during the last
Exclude candidates who have modified their candidate profiler during the selected period. Available choices are: 3, 6, 12, 18, 24 or 36 months.
Do not invite candidates who have an incomplete profile that has not been modified during the last
Exclude candidates who have an incomplete profile and who have not updated their profile for the selected period of time. Available choices are: 1, 3, 6, 12 months.
Do not invite candidates who have at least one application with any of the selected statuses
Exclude candidates who have reached a status selected in the list on at least one application in the hiring process (you can select more than one status).
Invite/Do not invite Exclude candidates who have applied at least once through the following source types and sources. Source Types and Sources lists contain all source types offered by Taleo.
Available Source TypesAvailable SourcesSelected Source Types; Sources
To add source types and sources: In the Available Source Types list, select a source type then click Add. If desired, select a source then click Add. The Selected Source Types; Sources displays your selections.
To remove source types and sources: In the Selected Source Types; Sources list, select source types and /or sources then click Remove.
To remove all the selections at once, click Remove All without making any selection.

CONFIDENTIAL INFORMATION Page 14-6
Administrator WebTop User Manual Chapter 14 - Sourcing - Matching Candidates to Requisitions
Preview
Path: Setup/Global Setup/Process/Sourcing/Matching Candidates/Preview
From the Preview Matching Candidates page, you can select the countries for which the Candidate Preview List will be activated. For example, if Canada and United States appear in the list of selected countries, only the requisitions whose locations are in Canada and the United States will provide access to the Candidate Preview List.
• To add countries to the Selected Countries list, select a country from the Available Countries list then click Add.
• To add more than one country at a time, hold down the CTRL key, select the countries then click Add.
• To add all countries, click Add All. • To remove countries, select countries from the Selected Countries list then click Remove. • To remove more than one country, hold down the CTRL key, select the countries then click
Remove.• To remove all countries, click Remove All. • Click Save to save your changes or click Cancel to close the Preview window without saving your
changes.

Screening Services and Job Board Accounts

CONFIDENTIAL INFORMATION Page 15-1
Administrator WebTop User Manual Chapter 15 - Screening Services and Job Board Accounts
Accessing the Integration Console
In the Administrator WebTop, click Integration. The Integration window opens.
The following user permissions must be granted to have access to the Integration Console and screening services:
Path: SmartOrg/User Type List [select Integration Manager]/Administrator tab
• Access Integration Console• Access Screening Services
Screening Services Overview
Screening Services lets you use evaluation or screening services such as background check, tax credit eligibility, interview guides, candidate assessment, etc. provided by third party vendors.
Screening services and Ace assessment are designed to provide validated assessment tests to identify and measure a candidate’s qualifications, motivations and abilities. These tests may include personality tests, cognitive ability tests, behavioral tests, etc. Tests are created by industrial and organizational experts. Content providers can be vendors (ePredix, Shaker, iTax), or experts from human resources services in large organizations. Tests must be objective and legally defendable. Assessment tests are used to evaluate candidates that have reached a certain level (Short List, Prescreening, Interview) in the candidate selection process. Assessment can be used with Hourly, Professional, Campus requisition types and for internal and internal candidates. For more information, see “Requisition Types” on page 4-28.
Screening information blocks can be included in application flows in Career Sections.
Once the screening tests are completed, results will be analyzed and evaluated by the screening service provider and will be returned to the recruiter or hiring manager.
Here are the Ace assessment components:
• Assessment Workflow: Attaches assessment content to requisition application flows, and stores results in candidate profile.
• ACE Assessment WebTop™: Enables industrial/organizational psychologists to build assessment content, setup scoring, weighting and banding, and extract assessment results.
• ACE Assessment Engine: Deploys specific assessment content from any content source to candidates from the application flow and scores the results.
• Taleo Hourly Assessments: ACE Retail Assessments™, designed, developed and validated by Taleo’s own I/O Psychologist – Nathan Mondragon
• Passport: Manages the flow of information between screening service providers, candidates who apply on Career Sections (and fill screening tests, questionnaires, or forms), and recruiters and hiring managers who must access test results in the Staffing WebTop and in the Manager WebTop.
Ace Assessment WebTop™, Ace Assessment Engine, Passport, and Taleo Hourly Assessments are separate platforms of the Taleo Enterprise Edition solution. For more information, please contact your Taleo representative.

CONFIDENTIAL INFORMATION Page 15-2
Administrator WebTop User Manual Chapter 15 - Screening Services and Job Board Accounts
Permissions and Settings
User Type
The System Integration user type has access to screening services.
User Permissions
Path: SmartOrg/User Type List/Other tab/Background Check
• Request services from Taleo partners: Allow the user to select a screening service from a third party vendor
• Access Taleo partner summary results: Allow the user to view candidate screening test results• Edit Taleo partner summary results: Allow the user to edit summary of the test results• Access Taleo partner detailed results: Allow the user to access the screening test results• Access information about the cost of Taleo partner services: The user can access cost information
on screening services from third party vendors
Settings
Please review all company settings (cieSettings) with your Taleo representative.
Career SectionsPath: Career Sections/Application Flows [select a flow]/Application Properties [click Edit]
Add the Screening block in the career section application flow.
Fields
Select or create fields that will be used in screening services.
Select or create Large User Defined Fields (LUDS). The names used are pre-defined by the service provider. For more information, see “Field Types” on page 5-2, and “Large Custom Selections (LUDS)” on page 5-29.
Screening Services List DescriptionScreening services are included in the Integration module. To access screening services, click the Integration icon, then click Screening Services List. The Screening Services List displays the list of screening services activated for your organization.
Available languages depend on the languages used by the service providers and vendors.
• iTax services are available in English and Spanish.• Hire Right and ePredix services are available in most European languages.

CONFIDENTIAL INFORMATION Page 15-3
Administrator WebTop User Manual Chapter 15 - Screening Services and Job Board Accounts
Buttons and Icons
Columns
Adding Screening ServicesPath: Integration/Screening Services List
1. Click Add... The Services Selector window opens. For more information, see “Using Selector Windows” on page 16-4.
2. Select a service in the list, then click Done. The selected service will appear in the Screening Services List.
Buttons and Icons
Description
Refresh Refreshes the list according to selected criteria.
Close Closes the Screening Services list and returns you to the integration menu.
Add Opens the Services Selector window to let you add a new service.
Remove Removes a screening service from the list.
Done Saves the changes and lets you remain in the screening service page.
Save Saves the changes and returns you to the Screening Services List.
Cancel Returns you to the Screening Services List without saving the changes.
Preview Opens the Preview page for the Service.
Columns Description
Name Indicates the name of the screening service.
Provider Indicates the name of the screening service provider.
Type Indicates the type of service provided.

CONFIDENTIAL INFORMATION Page 15-4
Administrator WebTop User Manual Chapter 15 - Screening Services and Job Board Accounts
Deactivating a Screening ServicePath: Integration/Screening Services List
Select a service on the Screening Services List, then click Remove. This service will no longer be available on the Screening Services List.
Configuring Screening ServicesPath: Integration/Screening Services List
1. In the Screening Services List, select a service.
General Tab
The General tab lets you select general conditions that will help you configure and manage the screening services of the selected service partner and lets you configure how screening services will be used by Staffing WebTop and Manager WebTop users.
1. Enter the name provided by the service vendor in the Customer Identifier field. If necessary, the Customer Identifier will be updated by Technical Support.
If the name is changed, integration will fail.
2. Select Display results from this service in candidate files to display screening results in candidate files. Results will be displayed on the Screening tab of the candidate file in the Staffing WebTop and in the Manager WebTop.
3. Select This service is mandatory for new requisitions and for those updated while in “Draft” status if desired.
4. Select Results of this service are editable to allow users to edit screening results on the Screening tab (Edit button) in candidate files. Available only in the Staffing WebTop.
5. Select This service is available as an action for inclusion in career section flows to display the screening service as an action in application flows in career sections (Candidate Action Dialog in Staffing WebTop and in Manager WebTop).
6. Select Display this service in the Prescreening / Services tab: Tests results will be displayed on the Screening tab of candidate files (Staffing WebTop and Manager WebTop).
When you remove a screening from the list, it is not permanently deleted. It is only deactivated. You can retrieve it from the Services Selector window at any time by adding it back to the list. See “Adding Screening Services” on page 15-3.
Information requested in the Service page may vary according to the type of service selected and to the configuration of your organization.

CONFIDENTIAL INFORMATION Page 15-5
Administrator WebTop User Manual Chapter 15 - Screening Services and Job Board Accounts
7. Select Provide a link to "screened candidates" from requisition-specific candidate lists to display a link to screened candidates in the requisition-specific candidate lists of the Staffing WebTop and Manager WebTop.
Only one service at time can be linked to a requisition-specific candidate list. If this setting is already enabled for another service, you will not be able to select this checkbox.
8. Select This service cannot be requested without user input if you want the user to manually add a screening service in an application flow. The screening test will not automatically be included in the application flow. Available in the Staffing WebTop and in the Manager WebTop.
9. Select This service can be requested manually, one candidate at a time to select a screening service for only one candidate at a time. Available in the Staffing WebTop and in the Manager WebTop.
10. Select This service can be requested for several candidates in batch to select a screening service for more than one candidate at a time. Available in the Staffing WebTop and in the Manager WebTop).
11. Select Access this service through the browser full-screen mode to force the partner's window to open in full screen in the career section. (For Assessment and Tax Credit services.)
12. Select Partner Response Timeout Delay to determine a period of time given to the screening service partner to provide a response. Available choices are:
• Not Specified: There is no specific delay to receive an response from a partner. • Seconds: Number of seconds allowed for a partner to respond. • Minutes: Number of minutes allowed for a partner to respond.• Hours: Number of hours allowed for a partner to respond.• Days: Number of days allowed for a partner to respond.
When you send a request to a partner, if the partner does not answer within the specified delay, the request takes the timed out status but remains active. If the partner answers after the delay, the answers will still be valid and be used in the system. The timed out status can be used to create conditions in the automatic progression of applications feature.
13. Select a Results Validity Period during which the results are valid. Available choices are:
• Always valid: Results are always valid. • Number of days: Results are valid for the selected number of days.
Special Rules for Results Validity Period
• A user can make a request to a partner about a candidate (for example asking for background check), and results are returned by the partner. If the same candidate applies for other jobs within the organization on the Career Section, he or she will not see the partner's block as long as the results remain valide. He or she will not need to provide the information all over again.
• If a recruiter sends a request to a partner about a specific candidate, and the partner has already returned results for that candidate, a warning message will be displayed, but the user will still be able to send the request.

CONFIDENTIAL INFORMATION Page 15-6
Administrator WebTop User Manual Chapter 15 - Screening Services and Job Board Accounts
Account Tab
The Account tab lets you enter login and password information required by the partner for identification purposes. Some services may not require a password.
1. Enter the Client Account Name provided by the partner.
2. Enter the Client Password provided by the partner.
3. Click Save to save the changes without closing the window. Click Done to save the changes and close the window, or click Cancel to close the window without saving the changes.
If this password is changed, integration will fail.
Labels Tab
The Labels tab lets you enter text information that will appear in information blocks of application flows in Career Sections. The information must be translated in all available languages. (Path: Setup/Career Section Setup/Application Flows).
The Labels tab includes the labels that will be used to access third party vendor screening services in career sections.
1. Enter the following information in the labels tab:
• Title: Enter the title of the screening service information block. • Label (1, 2, and 3): Enter the text that will appear in the screening service information
blocks in the career section. • Label Before Link to Service: Enter the text that will appear before the link to service in the
screening service information block of the Career Section.• Link to Service: Enter the text that will be used for the link to access the screening service
from the information block in the career section. • Tooltip for Link to Service: Enter the tooltip text that will appear when the user rolls over the
service name in the Career Section. 2. Translate all the texts in all the fields in all available languages.
3. Click Preview to see how the screening service information block will appear to users in Career Sections.
Input Fields Tab
Input fields let you select fields specific to a screening service as they will be displayed in requisition forms.
1. Select a label in the Select Input Field list. This drop-down list contains the list of input parameters that are defined for this service.
2. Select the appropriate check box to make the input field mandatory and visible on the “Screening” tab of the requisition.
3. Select the Input Field Default Value. An input field default value is required when the input field is configured as mandatory and not visible. An input field represents data that must be entered by recruiters when they activate a service for a requisition. The default value enables you to specify a default value for this field. This is mostly used when the field is mandatory, but that you don’t

CONFIDENTIAL INFORMATION Page 15-7
Administrator WebTop User Manual Chapter 15 - Screening Services and Job Board Accounts
want to show it to the recruiter since only one value is possible. You specify the default value that will be sent to the partner when the service is requested.
4. In the Field Editor section:
• According to the selected label, the appropriate type will automatically be displayed (date, number, etc.) in the Type field.
• In the Field Name field, enter the name that will be used in requisition forms. • In the Label field, enter the name that will appear in the candidate file headers. • The contents of the Attributes section will vary according to the selection made in the Label
field. You may see information such as Quick Entry Properties, Active Elements, Selector Window Properties, etc.
5. Click Preview if you want to see the page as it will appear to users in requisitions.
Result Fields Tab
Result fields are used to display results that will appear to users on Candidate Lists and Candidate Files in the Staffing WebTop and in the Manager WebTop.
1. Select a label from the list.
2. In the Field Editor section:
• The type will be displayed according to the label selected. • Enter a field name that will be used in Results forms. • In the Label field, enter the name that will appear in candidate file headers.• In the Short Label (used in lists) field, enter the name that will appear in candidate lists.
3. The contents of the Attributes section will vary according to the selection made in the Name Field. You may see information such as Attributes, Active Elements, etc.
4. Click Preview if you want to see the page as it will appear to users in candidate files and in candidate lists.
Correspondence Tab
When corresponding with candidates, message templates are available per service for both internal and external candidates.
1. Select a message template (for internal and/or external candidates) using the Search... button.

CONFIDENTIAL INFORMATION Page 15-8
Administrator WebTop User Manual Chapter 15 - Screening Services and Job Board Accounts
Creating Large User Defined Selections (LUDs) for Screening ServicesBefore using Screening Services, it may be necessary to create Large User Defined Selections (LUDs) for certain service providers (for example, HireRight and iTax).
The LUDs names are predefined by technical support.
The code name is synchronized with the service provider and is transmitted through a request message through integration.
For more information, see “Large Custom Selections (LUDS)” on page 5-29.
Adding Screening Services to an Application FlowIf you want candidates to fill assessment tests or screening tests when they apply on a Career Section, you must first add the desired tests or questionnaires in an application flow.
• Screening information blocks should be added to the Screening Page or to the Thank You page. • You can add multiple screening information blocks in an application flow. • Screening blocks should be placed after Questions and Skills blocks. (Questions and Skills blocks
are required to evaluate criteria to match ACE candidates.
For more information, see the Career Section Administration Manual.
Adding Screening Services to a Candidate Selection WorkflowRecruiters and hiring managers can add screening tests or assessment tests during the candidate selection process. Users will view test results in candidate files.
Path: Setup/Global Setup/Process/Candidate Selection/Workflows
To enable screening services in a candidate selection workflow:
1. Create a step related to screening services.
2. On the Steps tab, select an existing tab or click New to create a new step.
3. In Statuses Usage, click Add... to add new statuses. (Passed and Qualified are statuses that can be associated to screening).
4. Select the status you have just added (for example Passed). The Status Details window opens.
5. Select a Step Progression Level.
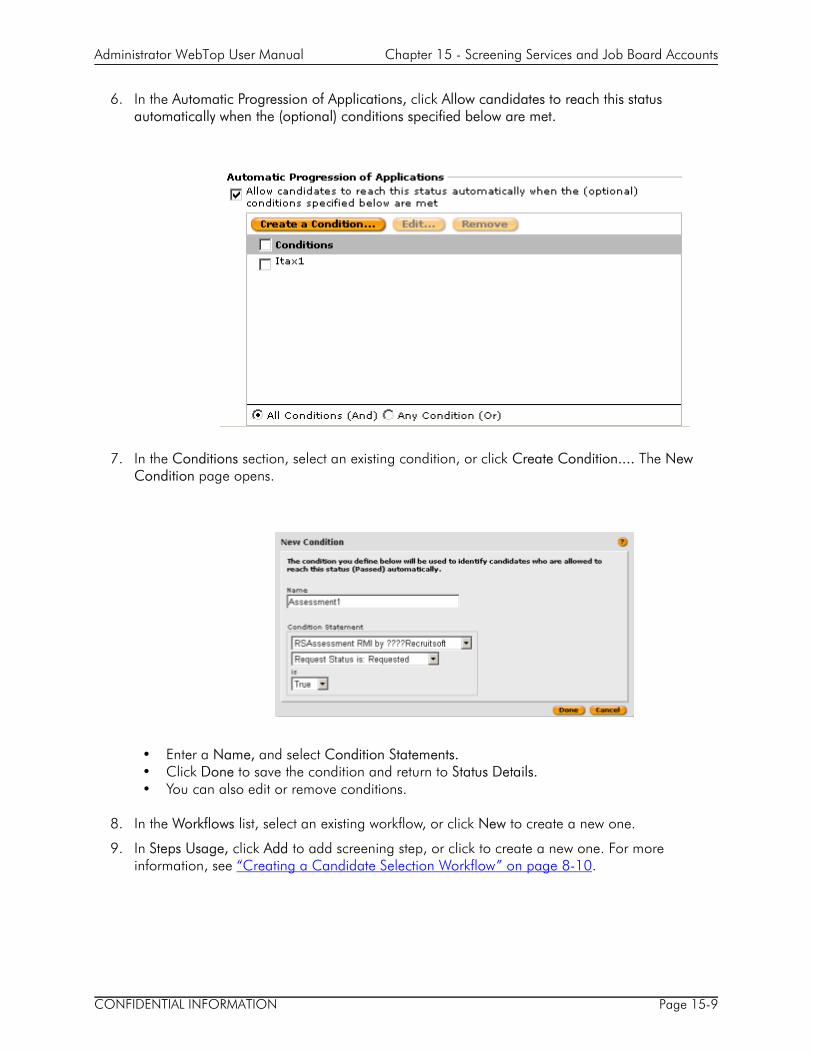
CONFIDENTIAL INFORMATION Page 15-9
Administrator WebTop User Manual Chapter 15 - Screening Services and Job Board Accounts
6. In the Automatic Progression of Applications, click Allow candidates to reach this status automatically when the (optional) conditions specified below are met.
7. In the Conditions section, select an existing condition, or click Create Condition.... The New Condition page opens.
• Enter a Name, and select Condition Statements.• Click Done to save the condition and return to Status Details.• You can also edit or remove conditions.
8. In the Workflows list, select an existing workflow, or click New to create a new one.
9. In Steps Usage, click Add to add screening step, or click to create a new one. For more information, see “Creating a Candidate Selection Workflow” on page 8-10.

CONFIDENTIAL INFORMATION Page 15-10
Administrator WebTop User Manual Chapter 15 - Screening Services and Job Board Accounts
Special Rules
• Build a step that will be used to follow up on service requests (for example Background Check, Assessment, etc.)
• In a candidate selection workflow, candidates who have a Failed status cannot be automatically moved forward in the selection process, but it is possible to manually move a candidate through the rest of the selection process.
• Candidates may be prevented from taking an assessment test during a specified lockout period • Some assessments must be completed in a specific period of time.
Automatically Trigerring Passport Screening ServicesPath: Administrator WebTop/Integration/Screening Services List
System administrators can automatically trigger Passport screening services when a candidate reaches a certain step and status within a candidate selection workflow.
To take advantage of this feature, Passport service providers need to update their service.
1. In the Screening Services page, click on the screening service that you wish to trigger automatically.
2. Click on the new CSW tab.
3. Select the workflow, step and status combination that will automatically trigger the screening service. The workflows, steps and statuses available are the ones configured in the Taleo zone.
4. Select an action. The action corresponds to the list of actions configured in the Third Party Partner certification sourcing file. Three possible actions are supported (note that Action labels may vary per Passport partner since the label is configurable at certification time):
• Create a new request• Triggers a new service request to the third party partner.
• Trigger a new phase• In order to choose a phase, the concept of phases needs to be implemented between the Third Party
partner and Taleo. Upon selection of this action, the Phase drop-down list becomes available and displays the list of phases available.
• Triggers a specific phase within a service request to the Third Party partner (this implies that the Third Party already received an initial “new” request for the specific candidate). If this action is selected, a corresponding phase needs to be selected in the Phase drop-down list.
• Phases are associated to a LUDS. The LUDS code will then be passed to the Third Party partner depending on which phase is chosen in the Phase drop-down list.
• Simulate Hyperlink
It is recommended to take advantage of this feature via the Taleo Passport certification process. Consult your functional consultant or Taleo Customer Support to know if and when your Passport service can leverage this new feature.
To benefit from this feature, modifications of the sourcing file are required, which means that the Partner certification needs to leverage these new framework features.
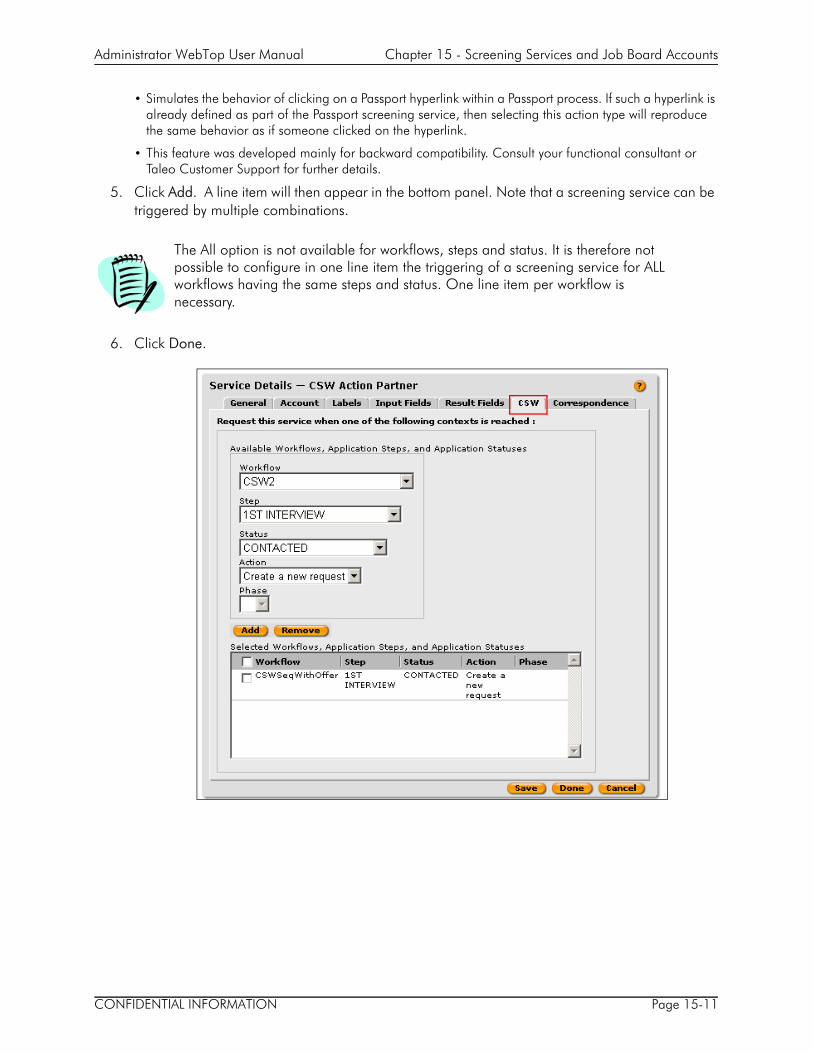
CONFIDENTIAL INFORMATION Page 15-11
Administrator WebTop User Manual Chapter 15 - Screening Services and Job Board Accounts
• Simulates the behavior of clicking on a Passport hyperlink within a Passport process. If such a hyperlink is already defined as part of the Passport screening service, then selecting this action type will reproduce the same behavior as if someone clicked on the hyperlink.
• This feature was developed mainly for backward compatibility. Consult your functional consultant or Taleo Customer Support for further details.
5. Click Add. A line item will then appear in the bottom panel. Note that a screening service can be triggered by multiple combinations.
The All option is not available for workflows, steps and status. It is therefore not possible to configure in one line item the triggering of a screening service for ALL workflows having the same steps and status. One line item per workflow is necessary.
6. Click Done.

CONFIDENTIAL INFORMATION Page 15-12
Administrator WebTop User Manual Chapter 15 - Screening Services and Job Board Accounts
Job Board Accounts
Job board accounts are created during implementation. The Job Board Accounts functions let you create new accounts or edit information in existing ones.
You can create as many accounts as you need for each job board. Also, if a user has access to several accounts, every account that applies to this user will be shown.
Job Board Account List
Path: Integration/Job Board Account List
The Job Board Accounts list shows all job board accounts available at your organization.
Creating Job Board Accounts
1. In the Job Board Accounts list, click New... The New Account page opens.
2. Click the Properties tab.
Mandatory fields are marked with an asterisk (*).
3. In the Supplier Information section, select the name of a Supplier that will manage job postings.
4. If Monster is selected, two additional fields will appear:
• FTP File Name (.txt file): Enter the FTP file name that was provided when the account was setup with Monster. The .txt extension lets you modify the name of a Monster job board.
• This account includes a Custom Apply Online service: If you are a registered user at Monster, Monster will provide candidates who apply online with a Taleo generated link. Candidates who click this link will automatically be redirected to the Taleo system where they can apply for the position.
5. Select the Account Language* for the new account. The language selected here is the default language for this account.
Column Description
Account Name Indicates the name of the account.
Supplier Indicates the name of the service which manages the posting of jobs.
Login Name Indicates the name used to log into a particular account.
Estimated Price Indicates the estimated price the job board will charge to post a requisition.

CONFIDENTIAL INFORMATION Page 15-13
Administrator WebTop User Manual Chapter 15 - Screening Services and Job Board Accounts
6. In the Description field, enter an Account-specific name, and select a language. In the Staffing WebTop, in the Candidate Sourcing Manager, the user will be able to choose a language from a list directly in the list of available job boards.
7. Translate the account name into all available languages.
8. Click the Login tab.
9. Enter the login name in the Login Name field. The login name must be unique for each supplier.
When Monster is selected on the Properties tab, a login name is not required.
10. Enter a password in the Password field.
11. Repeat the password in the Confirm Password field to confirm this information.
When Monster is selected on the Properties tab, the fields on the Login tab will be unavailable.
12. Click the Permissions tab.
13. Click This is the default account for this supplier to designate this account as the default account. Click Done.
Only one account can be designated as the default account for a specific supplier.
Or:

CONFIDENTIAL INFORMATION Page 15-14
Administrator WebTop User Manual Chapter 15 - Screening Services and Job Board Accounts
14. Click This account is used by the Organization, Groups, and Users selected below, and proceed to the next step.
An account can be associated to any number of organizations, groups and users at the same time.
The following steps apply only if you chose This account is used by the Organization, Groups, and Users selected below.
15. On the Organizations tab, select a Company, Department, Sector, and a Division.
16. On the Groups tab, select a group from the Available Groups list.
17. Click Add.
18. To view more information on a group, select it in the Available Groups list, then click Details. The Group Details list opens.
19. On the Users tab, click Add... The User Selector window opens.
20. From the Available Users list, select the users you want to add. Click Add. The selected users will appear in the Selected Users list.
21. In the Selected Users list, select a user, then click Add (in the lower right side of the window).
22. When all of the users are displayed in the Selected Users section, click Done.
23. When all the information in the New Account page is entered, click Save.
Editing Job Board Accounts
1. Open the Job Board Accounts list.
2. Select a Job Board Account in the list.
3. Edit the information found on the Properties, Login and Permissions tabs.
For Monster only: in Edit Account, certain fields cannot be modified (for example, the Supplier field).
4. Click Done.

CONFIDENTIAL INFORMATION Page 15-15
Administrator WebTop User Manual Chapter 15 - Screening Services and Job Board Accounts
Deleting a Job Board Account
1. Open the Job Board Accounts list.
2. Select the check box next to the account you want to delete.
3. Click the Trashcan icon.
Estimated Price of Direct Job Boards
Path: Setup/Global Setup/Process/Sourcing/General
1. Set the Display “Estimated Price” column in the Direct Job Boards section to Yes.

Selection Tools
CONFIDENTIAL INFORMATION Page 16-1
Administrator WebTop User Manual Chapter 16 - Selection Tools
Overview
The Administrator WebTop provides selection tools, such as selector windows and Show lists, to let you quickly find and sort elements. Show list and selector windows, found throughout the Administrator WebTop, are used to make selections. The type of selector window varies according to the type of selection that is required.
The following selection lists are located in SmartOrg: Education Levels, Employee Statuses, Job Levels, Job Types, Schedules, Shifts, Travels.

CONFIDENTIAL INFORMATION Page 16-2
Administrator WebTop User Manual Chapter 16 - Selection Tools
Show List
Using the Show list is efficient because it limits the items displayed on the list to those that meet criteria you specify. The Show list helps you select criteria to filter your search. The list of available criteria varies according to the type of selection.
The Show list displays different menu boxes according to the selected criteria.
Click Refresh to update the results list (Templates, Candidates, Requisitions, Owners, etc.) based on the search criteria provided in the lists.
Selector Windows
Selector windows enable you to quickly find and select single or multiple items in a list. Selector windows have a variety of different names and are found throughout the application.
There are two types of selector window:
• Selector windows with a single pane which consists of a Show list and a list of items in a single window.
• Selector windows with a left pane and a right pane.
More Criteria
Click to add search criteria fields.
Less Criteria Click - to use less criteria.
Contains You can refine your search by entering a specific name or number in the contains field. The content of the contains fields may vary according to context and to selected search criteria.
Is Certain search criteria such as Institution, Program, ACE Candidate, Status, Effective, etc. will display an is field. You must choose from selections that are available in a list.
Any Criteria (Or)
When selected, the search results return at least one of the specified criteria.
All Criteria (All)
When selected, the search results return all specified criteria.
Available xx Shows the search results according to the selected criteria.

CONFIDENTIAL INFORMATION Page 16-3
Administrator WebTop User Manual Chapter 16 - Selection Tools
Left Pane
• By Job: Displays the requisitions by job title.• By Location: Displays the requisitions by location.• By Organization: Displays the requisitions by organization.
Selector windows containing a tree structure in the left pane have a button to collapse and
expand the tree structure. By default, these selector windows are collapsed at entry, simplifying the interface and leaving that much more room for information in the list. When the tree structure is collapsed, the name of the item selected in the tree is displayed in the header.
Right PaneThe right pane contains a Show list and a list of elements associated with the folder or sub-folders selected in the left pane. When you click a folder or a sub-folder in the left pane, the list associated with the folder or sub-folders appears in the right pane.
Single Selection and Multiple SelectionsDepending on the context, either the Single or Multiple Selector window will open. Single Selector windows contain the Available section and radio buttons. Multiple selector windows contain the Available and Selected sections and check boxes.
Show This list is used to select the elements display order.
Show Parent Folder Contents
Displays all elements in the parent folder of the tree structure. This option might not always be available.
Show Sub-folder Contents
Displays elements in the sub-sections of the tree structure.
Tree Structure
Represents your organizational hierarchy.
More Criteria
Click to add search criteria fields.
Any Criteria When selected, the search results return at least one of the specified criteria.
All Criteria When selected, the search results return all specified criteria.
Available xx Shows the search results according to the selected criteria.

CONFIDENTIAL INFORMATION Page 16-4
Administrator WebTop User Manual Chapter 16 - Selection Tools
Using Selector Windows
Below is the standard procedure for using selector windows. The Job Field Selector is used as an example.
To select a job field:
1. In the left pane, from the Show list, select the structure display.
2. Select Show Sub-folder Contents if required.
3. Click Refresh.
4. In the right pane, from the Show list, select the search criteria. Click More Criteria to add search criteria.
4a) Select Any Criteria or All Criteria.
5. Click Refresh.
6. For a single selection, select the job field in the Available Job Fields section.
7. For multiple selections, select the job fields in the Available Job Fields section. Click Add. The selected job fields now appear in the Selected Job Fields section.
8. Click Done.
Special Notes on Selectors Windows
Template Selector
When you select a template in the Template Selector, the data included in the requisition template, can overwrite data you have already entered while creating your requisition or template.
The Job Template Selector only shows general templates or templates that have the same level of precision as the requisition you are currently creating, based on the Organization, Location and Job Fields selection.
Skill Selector
The left pane of the Skill Selector window slightly differs from that of other selector windows: it contains an additional list called Show Skills from. This list contains the following options:
Taleo The complete Taleo skills library classified according to generic Job fields.
{Company} Skills resulting from the mapping of your company Job fields to the Taleo Job fields. As a result, the {Company} skill list contains skills that are considered relevant for your company.
Skill Library Skills selected by your company among the Taleo skills library (that is, skills identified as pertinent by your company). These skills are classified according to the Location and Job fields of your company.
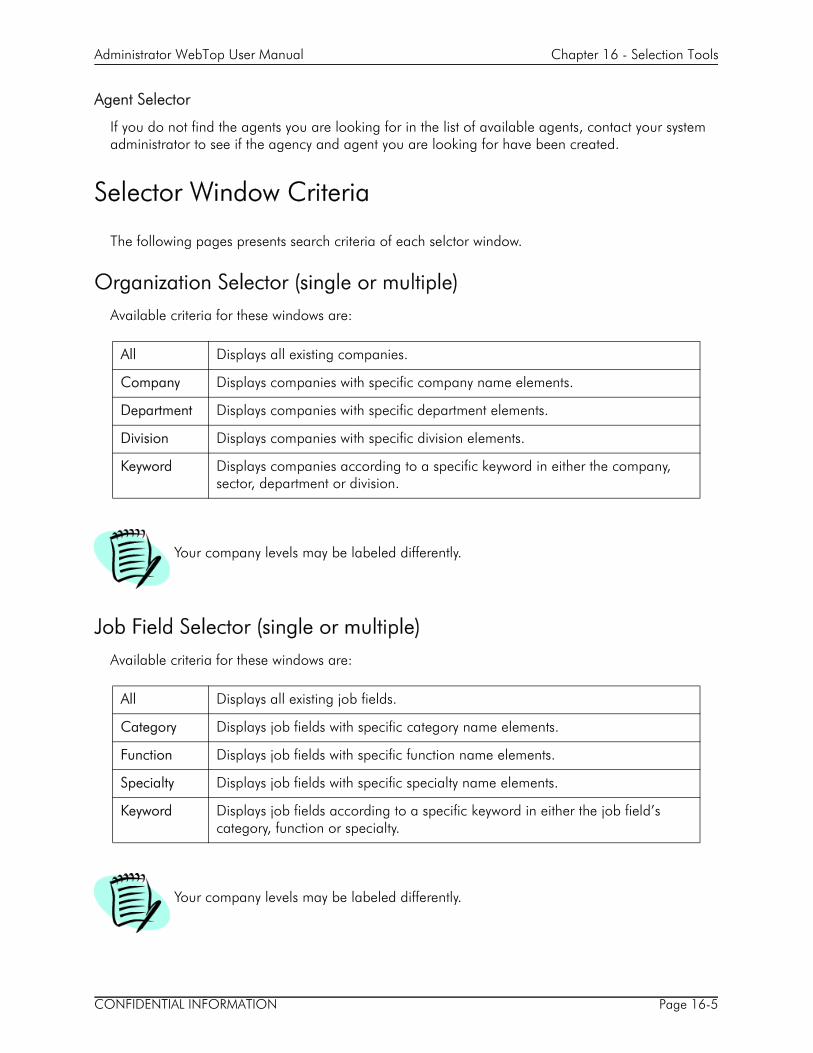
CONFIDENTIAL INFORMATION Page 16-5
Administrator WebTop User Manual Chapter 16 - Selection Tools
Agent Selector
If you do not find the agents you are looking for in the list of available agents, contact your system administrator to see if the agency and agent you are looking for have been created.
Selector Window Criteria
The following pages presents search criteria of each selctor window.
Organization Selector (single or multiple)Available criteria for these windows are:
Job Field Selector (single or multiple)Available criteria for these windows are:
All Displays all existing companies.
Company Displays companies with specific company name elements.
Department Displays companies with specific department elements.
Division Displays companies with specific division elements.
Keyword Displays companies according to a specific keyword in either the company, sector, department or division.
Your company levels may be labeled differently.
All Displays all existing job fields.
Category Displays job fields with specific category name elements.
Function Displays job fields with specific function name elements.
Specialty Displays job fields with specific specialty name elements.
Keyword Displays job fields according to a specific keyword in either the job field’s category, function or specialty.
Your company levels may be labeled differently.

CONFIDENTIAL INFORMATION Page 16-6
Administrator WebTop User Manual Chapter 16 - Selection Tools
Location Selector (single or multiple)Available criteria for these windows are:
Skill SelectorAvailable criteria for these windows are:
All Displays all existing locations.
World Region
Displays locations with specific world region name elements.
Country Displays locations with specific country name elements.
State/Province
Displays locations with specific state or province name elements.
City Displays locations with specific city name elements.
Keyword Displays locations according to a specific keyword in either the location’s country, state, province, region or city.
Your company levels may be labeled differently.
All Displays all available skills.
Technical Skill
Displays skills with specific name elements.
Primary Skill of
Displays skills that are primary skills for a “category” and contain a specific element.
Keyword Displays skills with a specific keyword
Visible by Displays skills visible by all candidates, external candidates or internal candidates.
Skill Library Allows users to search for Taleo skills or {Company} skills that are not already defined in the company’s Prescreening Skill Library.

CONFIDENTIAL INFORMATION Page 16-7
Administrator WebTop User Manual Chapter 16 - Selection Tools
Question Selector (single or multiple)Available criteria for these windows are:
Agent Selector (single or multiple)Available criteria for these windows are:
Requisition SelectorAvailable criteria for these windows are:
All Displays all questions.
Question Displays questions with specific elements.
Answer Displays questions with specific answer elements.
All Displays all existing agents.
Name Displays agents with specific name elements.
Agency Displays agents who belong to a specific agency.
Specialties Displays agents whose specialty matches the requisition’s structure.
All Displays all existing requisitions.
Requisition Number
Displays requisitions with a specific requisition number.
Recruiter Displays requisitions with a specific recruiter name element.
Job Title Displays requisitions with a specific title element.
Department Displays requisitions with a specific department element.
Status Displays requisitions with a specific status element.
Status Details
Displays requisitions with a specific status detail element.
Requiring Attention
Displays requisitions that need urgent attention (AIF Flag).
Keyword Displays requisitions with a specific keyword.
Matching Requisitions
This option is available when matching candidates. It lets you modify the criteria used to associate requisitions and candidates.

CONFIDENTIAL INFORMATION Page 16-8
Administrator WebTop User Manual Chapter 16 - Selection Tools
Position SelectorAvailable criteria for these windows are:
Department SelectorAvailable criteria for these windows are:
Job Template SelectorAvailable criteria for these windows are:
All Displays all existing positions.
Position ID Displays positions with a specific ID element.
Job Code Displays positions with a specific job code element.
Title Displays positions with a specific title element.
All Displays all existing departments.
Department Number
Displays departments with a specific department number element.
Department Name
Displays departments with a specific department name element.
Hiring Manager
Displays departments with a specific hiring manager name element.
Recruiter Displays departments with a specific recruiter name element.
Effective Displays departments that are effective for a specific time period.
All Displays all existing job templates.
Job Code Displays job templates with a specific job code element.
Owner Displays job templates with a specific owner name element.
Effective Displays job templates with a specific effective date element.
Title Displays job templates with a specific title element.
Keyword Display job templates with a specific keyword.

CONFIDENTIAL INFORMATION Page 16-9
Administrator WebTop User Manual Chapter 16 - Selection Tools
User Selector (Single and Multiple)Available criteria for these windows are:
Employer SelectorAvailable criteria for these windows are:
Institution SelectorAvailable criteria for these windows are:
All Displays all existing users.
Frequent Collaborators
Displays the list of collaborators defined in My Setup.To be available, the Collaborators field must be activated by your system administrator.
Suggested Users
Diplays the owners (recruiter, recruiter assistant, hiring manager, hiring manager assistant), the collaborators and the frequent collaborators associated to the requisition. However, only users who are able to complete the selected action and who have the required permission are available for selection. To be available, the Collaborators field must be activated by your system administrator and you must access the User Selector from a requisition.
Name Displays users with specific name element.
Email Address
Displays users with a specific email element.
Employee ID Displays users with a specific employee ID number element.
Title Displays users with a specific title element.
Department Displays users with a specific department element.
User Type Displays users with a specific user type element.
Group Displays users from a specific user group.
All Displays all existing employers.
Employer Displays employers with a specific name element.
All Displays all existing institutions.
Institution Displays institutions with a specific name element.
Type Displays institutions with a specific type element.

CONFIDENTIAL INFORMATION Page 16-10
Administrator WebTop User Manual Chapter 16 - Selection Tools
Program SelectorAvailable criteria for these windows are:
Time Zone SelectorAvailable criteria for this window are:
Source SelectorAvailable criteria for these windows are:
All Displays all existing programs.
Program Displays programs with a specific name element.
All Displays all available time zones.
Location Displays time zones with a specific location element.
Time Zone Description
Displays time zones with a specific description element.
GMT +/- Displays time zones with a specific Greenwich Mean Time element.
All Displays all sources.
Source Name
Displays sources with a specific name element.
ID Displays sources with a specific ID.
Type Displays sources of a specific type. For example, job boards, billboards, news groups, magazine and trade publications, professional associations, etc.
Visibility Displays sources that are internal or external.
Origin Displays sources with a specific name element (Taleo system sources or user-defined sources).

CONFIDENTIAL INFORMATION Page 16-11
Administrator WebTop User Manual Chapter 16 - Selection Tools
Organization-Location-Job (OLF) Group Sections
Job Group Section1. Click Select... The Selection Menu opens.
2. Use the lists to select a job category, function, and specialty. Click Done. The selected values appear in the Job section.
3. Click to clear the selections.
Or
1. Enter a value in the field and click .
2. If there is an exact match, all fields above it are filled automatically. For example, if you select a specialty and there is an exact match, the Category and Function fields are filled automatically.
If there is no exact match, the Job Field Selector window opens. Select the job field.
The selected values appear in the Job section.
3. Click to clear the selections.
Or
1. Click . The Job Field Selector window opens.
2. Select a category, function and specialty. Click Done. The selected values appear in the Job section.
3. Click to clear the selections.
Organization Group Section1. Click Select... The Selection Menu opens.
2. Use the lists to select a company, sector, department, and division. Click Done. The selected values appear in the Organization section.
3. Click to clear the selections.
Or
1. Enter a value in the field and click .
2. If there is an exact match, all fields above it are filled automatically. For example, if you enter a division, and there is an exact match, the Sector and Department fields are filled automatically.
If there is no exact match, the Organization Selector window opens. Select the company, sector, department, and division.
The selected values appear in the Organization section.
3. Click to clear the selections.

CONFIDENTIAL INFORMATION Page 16-12
Administrator WebTop User Manual Chapter 16 - Selection Tools
Or
1. Click . The Organization Selector window opens.
2. Select an organization, sector, department, and division. Click Done. The selected values appear in the Organization section.
3. Click to clear the selections.
Primary Location Group Section1. Click Select... The Selection Menu opens.
2. Use the lists to select a country, state/province, region, and city. Click Done. The selected values appear in the Location section.
3. Click to clear the selections.
Or
1. Enter a value in the field and click .
2. If there is an exact match, all fields above it are filled automatically. For example, if you select a region, the name of the state/province and country are filled automatically.
If there is no exact match, the Location Selector window opens. Select the country, state/province, region, and city.
The selected values appear in the Location section.
3. Click to clear the selections.
Or
1. Click . The Location Selector window opens.
2. Select the country, state/province, region, and city. Click Done. The values you selected appear in the Location section.
3. Click to clear the selections.


Automated Tasks

CONFIDENTIAL INFORMATION Page 17-1
Administrator WebTop User Manual Chapter 17 - Automated Tasks
Overview
This chapter presents information about the creation of automated tasks to delete contained in the WebTop database.
Path: Automated Tasks
The Automated Tasks page provides the following information:
To access the Automated Task module, the following permission must be enabled: Access Automated Tasks (Path: User Management/Types tab/Administration tab)
Column Description
Name Name of the task.
Data Type Type of data that is deleted (candidate files, requisitions, etc.)
Status Indicates if the task is active or inactive.
Recurrence Indicates how often the task is performed (daily, weekly, semimonthly, monthly, quarterly, biannually, annually).
Last Task Execution The most recent date on which the task started.
Next Task Execution The next date on which the task will start.
Processing The current processing status of the automated task (Scheduled, Pending, Running, Error, Stopped, Completed).
Actions System administrators can delete a specific automated task by clicking Delete Task in this column. You can create automated tasks used to permanently delete data from Taleo’s databases.

CONFIDENTIAL INFORMATION Page 17-2
Administrator WebTop User Manual Chapter 17 - Automated Tasks
Here are the types of data you can perform tasks on:
• Candidates• Requisitions• Templates• Questions• History of users, groups or user types
When you create tasks that delete candidates, requisitions, templates, questions or tracking history, you can schedule them to be run automatically, once or on a recurring basis, or you can run them manually.
You can choose from a variety of criteria when configuring tasks to ensure that only specific items are deleted.
You can also view the items that would be deleted if the tasks were run immediately. This feature enables you to verify if the task has been configured to target the correct items.
With respect to candidates, you can create tasks that use any one of three types of “delete” (see “Important later“ in this chapter):
1. Delete (all data can later be restored)
2. Delete candidate files (nonidentifying data can later be used for reporting purposes)
3. Permanently delete candidate files
• Delete candidates (which will delete the answers associated to questions).• Delete requisitions and templates.• Then, you can delete obsolete and unreferenced questions.
Questions that are used in requisitions cannot be deleted manually nor through the Automated Task module. Before cleaning up the question library, you have to:

CONFIDENTIAL INFORMATION Page 17-3
Administrator WebTop User Manual Chapter 17 - Automated Tasks
Delete (all data can later be restored)
You can create tasks that “delete” candidate files from the Staffing WebTop or Manager WebTop.
Furthermore, you can restore one, several, or all candidate files that users delete in the Staffing WebTop or Manager WebTop (providing the fils have not been permanently deleted by another task).
Delete (nonidentifying data can later be used for reporting purposes)
You can create tasks that delete candidate files, yet retain nonidentifying information for reporting purposes. Some countries have strict laws governing the length of time that personal information can be held in databases. Users who do business in such countries can delete candidate information in a manner that complies with such legislation by creating tasks that use Delete (nonidentifying data can later be used for reporting purposes) (or Permanently Delete described in the next paragraph) to ensure that personal information they have stored in Taleo’s databases complies with the legislation of the countries in which they do business.
Permanently Delete
You can create tasks that permanently delete candidate files from Taleo’s databases.
IMPORTANT: Taleo clients located in the United States are subject to the Office of Federal Contract Compliance Programs (OFCCP) regulations regarding the collection of candidates’ gender, race and ethnicity data. Among other things, the regulations require these organizations to keep information such as the criteria used in candidate searches for a period of two years. The OFCCP auditor can use this information to monitor compliance with the regulations.
If clients have requested Taleo to activate the company setting that adds candidate search results to the candidate search log, the results will remain in the log for a period of two years and tasks created to delete candidate files will delete all files that satisfy all of the tasks’ criteria, with the exception of the files that are included in the log.
When a candidate is deleted, it is as if the candidate never existed from a user point of view. Therefore, if a candidate applies for second time, the candidate would need to create a whole new candidate record. The old record would not be available (unless the system administrator would have reactivated it).

CONFIDENTIAL INFORMATION Page 17-4
Administrator WebTop User Manual Chapter 17 - Automated Tasks
Creating an Automated Task
To create an automated task that is performed on WebTop data, click New Task... The Automated Task Wizard will guide you through the different steps.
Key Benefits
• Users of the Staffing WebTop and Manager WebTop can “delete” candidate files so that the files no longer appear but system administrators are able to restore the “deleted” files should the need arise. (On the other hand, candidate files that are deleted with tasks that use “Delete candidate files (nonidentifying data can later be used for reporting purposes)” or “Permanently delete candidate files” cannot be restored afterward.)
• Users can create tasks in the Administrator WebTop that “delete” candidate files automatically. If system administrators select “Delete candidate files (all data can later be restored)” when creating an automated task, the files deleted by such a task will no longer appear in the Staffing WebTop or Manager WebTop but they will not actually be purged from the database. The system administrator can restore a particular candidate file, several files, or even all the files “deleted” by an iteration of the task if necessary. System administrators, when creating a task, can limit the task's scope to elements that meet specific criteria. They can also specify when the task is to start and indicate whether the task is to be run on a recurring basis.
• Should users want to delete candidate files while retaining nonidentifying information for reporting purposes, system administrators can choose “Delete candidate files (nonidentifying data can later be used for reporting purposes)”.
• Users can delete permanently from their (Taleo) databases candidate files that they consider too old to be useful. They can also delete permanently requisitions, templates, questions, and history tracking that are no longer required.
• The “Permanently delete…” function in the Automated Tasks module enables users to create tasks that perform these actions automatically. System administrators, when creating a task, can limit the task's scope to files that meet specific criteria. They can also specify when the task is to start and indicate whether the task is to be run on a recurring basis.

CONFIDENTIAL INFORMATION Page 17-5
Administrator WebTop User Manual Chapter 17 - Automated Tasks
• As the number of candidate files, requisitions, templates, questions, and history tracking has increased, the size of Taleo clients’ databases has grown proportionally. The impact on system performance has resulted in clients requesting ways to improve the latter. The “Permanently delete candidate files” function provides Taleo clients with a highly configurable tool that can result in significantly improved system performance: faster candidate searches, quicker report generation, pages and lists that are displayed more rapidly. All of these performance improvements will result in greater productivity with respect to recruiters and hiring managers.
• Better compliance with regulations around the world. Some countries have strict laws governing the length of time that personal information can be held in databases. Taleo clients who do business in such countries will be able to delete candidate information in a manner that complies with such legislation. Taleo clients can create tasks that use the “Delete candidate files (nonidentifying data can later be used for reporting purposes)” and “Permanently delete candidate files” functions in particular to ensure that the personal information they have stored in Taleo’s databases conforms to the legislation in the countries in which they do business.
Things to Consider
Although the “Permanently delete...” function is extremely useful, care should always be exercised when creating tasks that include it: the candidate files, requisitions, templates, questions, and history tracking targeted by this function cannot be restored afterward.
When a candidate is deleted, his/her user name becomes “available”. Suppose for example that candidate Steve Powell was deleted and that his user name was “spowell”. Because “spowell” would be “available”, another candidate, Susan Powell, could choose it for her user name. If this happened and candidate Steve Powell was restored afterward, the system would generate a new user name for Steve (for example, WSER23). In other words, Steve would be unable to use his old user name. There is an exception in respect to clients who use social security numbers as user names: if a candidate is deleted then another candidate happens to choose the first candidate’s SSN as a user name (an unlikely event), the first candidate cannot be restored afterward.

Release Note Information

CONFIDENTIAL INFORMATION Page 18-1
Administrator WebTop User Manual Chapter 18 - Release Note Information
Overview
This chapter presents information about the creation of a pop-up message containing new release information or other important information. This pop-up message is displayed when users log into the Staffing WebTop, the Manager WebTop and the Administrator WebTop.
Path: Setup/Global Setup/Release Notes Informations
The Release Note Information Editor window allows system administrators to:
• Display or not the pop-up message. If system administrators decide to display the message, they have the possibility to display the default release note information provided by Taleo or to display customized information (modified release note information or other important information).
• Select the user types for which the pop-up message is displayed.• Specify the period when the pop-up message is displayed.• Specify for which WebTop modules (Staffing WebTop, Manager WebTop and/or Administrator
WebTop) the pop-up message is displayed.
Release note information provided by Taleo is available in English and French only.
Editing the Properties of the Pop-up Message
Path: Setup/Global Setup/Release Notes Information/Release Note Information
1. Click Release Note Information in the Release Note Information page.
2. Click Edit... The Release Note Information Editor page opens.
3. Click Preview to see the information that will appear in the pop-up message.
4. Specify if you want to display or not release note information by selecting the appropriate radio button. If you decide to display the message, specify if you wish to display the default release note information provided by Taleo or to display customized information. See “Customizing the Pop-up Message” on page 18-2.
5. Specify for which WebTop modules (Staffing WebTop, Manager WebTop and/or Administrator WebTop) the pop-up message is displayed.
6. Select the user types for which the pop-up message is displayed. Use the Add button to add user types and the Remove button to remove user types.
7. Specify the period when the pop-up message is displayed. Use the calendar to select a start date and an end date.
8. Click Done.

CONFIDENTIAL INFORMATION Page 18-2
Administrator WebTop User Manual Chapter 18 - Release Note Information
Customizing the Pop-up Message
Path: Setup/Global Setup/Release Notes Information/Release Note Information
1. Click Release Note Information in the Release Note Information page.
2. Click Edit... The Release Note Information Editor page opens.
3. Click Customize... in the Release Note Information Editor page.
4. In the large field, enter the information that will be displayed in the pop-up message.
5. To display the information in other languages, select the desired language icons and enter the appropriate information.
6. Click Preview to see how the information will appear in the pop-up message.
7. Click Done.