Embed Size (px)
Citation preview
Phone: (800) 869-7800 • Email: [email protected]
TIPTECH
Connect with us:
BADGE CREATION — PRINT & MERGE IN CORELDRAWThe print/merge feature in CorelDRAW will allow you to enter repeat data easily and quickly while giving you freedom to make unique changes to each item, if needed. There are 2 methods to accomplish this. Using an Excel file with your data or creating your data directly inside CorelDRAW.
Method 1: Using Excel File for the Data1. Having the customer provide you with an Excel file saved in
a .csv format is the best route.
2. To do this in Excel, the first row needs to contain your ‘Field’ names. This example contains 2 columns, one column for “Names” and one for “Title”. Enter in your data similar to the image.
3. To save the file, go to File>Save As. A new window will appear. Give the file a name. Use the drop down arrow for file type. Scroll through the file types listed and select CSV (Comma delimited) (*.csv). Click SAVE.
4. The file is now saved as a file that CorelDRAW can recognize and will be used in the print/merge.
To Create the Badges in CorelDRAW5. Launch CorelDRAW. Set the canvas size to
the same size you wish to engrave the end product. For example, if the name badges are 3" by 1.5", set the canvas size to this same dimension.
6. Create the outline (cut line) of the end product. Be sure the outline is a red hairline and it is at the 0, 0 origin to match the exterior of the canvas. Add any items that will be the same from badge to badge such as a logo, etc.
3"
1.5"
Phone: (800) 869-7800 • Email: [email protected]
Connect with us:
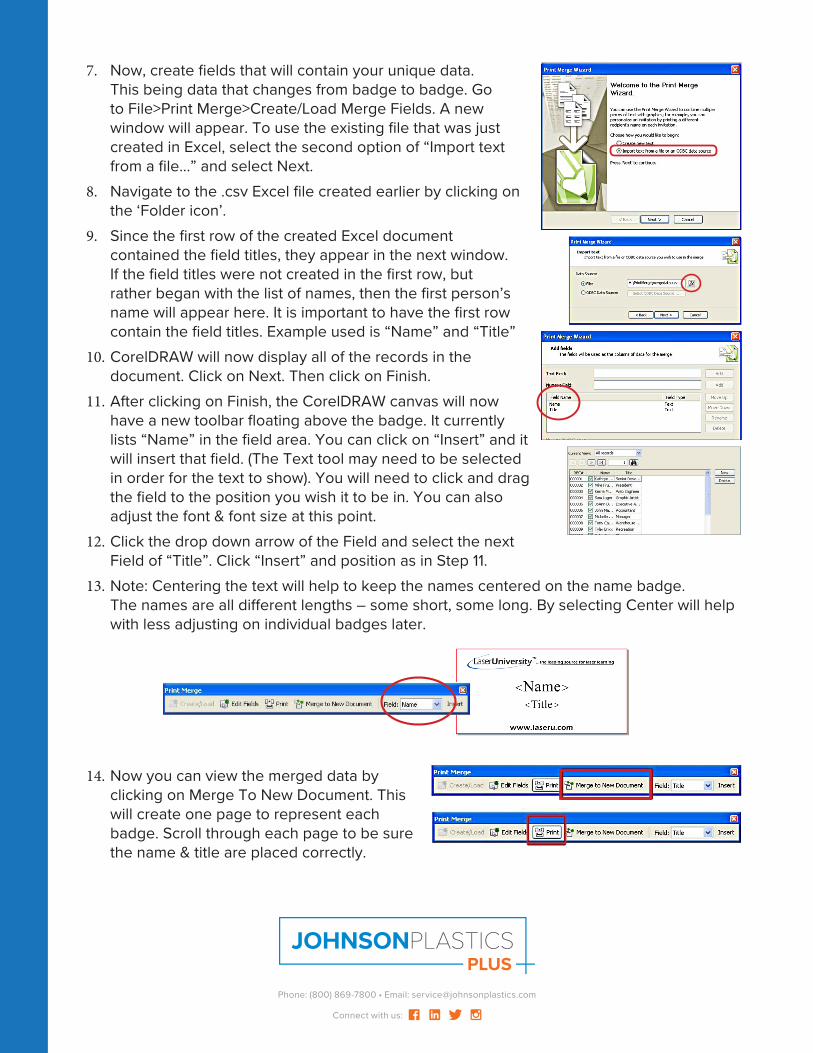
7. Now, create fields that will contain your unique data. This being data that changes from badge to badge. Go to File>Print Merge>Create/Load Merge Fields. A new window will appear. To use the existing file that was just created in Excel, select the second option of “Import text from a file…” and select Next.
8. Navigate to the .csv Excel file created earlier by clicking on the ‘Folder icon’.
9. Since the first row of the created Excel document contained the field titles, they appear in the next window. If the field titles were not created in the first row, but rather began with the list of names, then the first person’s name will appear here. It is important to have the first row contain the field titles. Example used is “Name” and “Title”
10. CorelDRAW will now display all of the records in the document. Click on Next. Then click on Finish.
11. After clicking on Finish, the CorelDRAW canvas will now have a new toolbar floating above the badge. It currently lists “Name” in the field area. You can click on “Insert” and it will insert that field. (The Text tool may need to be selected in order for the text to show). You will need to click and drag the field to the position you wish it to be in. You can also adjust the font & font size at this point.
12. Click the drop down arrow of the Field and select the next Field of “Title”. Click “Insert” and position as in Step 11.
13. Note: Centering the text will help to keep the names centered on the name badge. The names are all different lengths – some short, some long. By selecting Center will help with less adjusting on individual badges later.
14. Now you can view the merged data by clicking on Merge To New Document. This will create one page to represent each badge. Scroll through each page to be sure the name & title are placed correctly.

Phone: (800) 869-7800 • Email: [email protected]
Connect with us:
15. Now, merge all of the data. Click on Print in the Print Merge Toolbar. (Sometimes after using the Merge to New Document button the Print button is dark and does not operate. Don’t panic, simply go to File>Print).
16. The print dialog window will appear. Click on the layout tab. Then select Edit.
17. After clicking Edit, a new window will appear. This shows us our first badge. Using the controls (outlined in red) add in the other badges. The controls allow us to create rows & columns. There are 15 badges, so all 15 need to be represented. The plastic sheet being used is 24” x 12” and each badge is 3” wide, therefore, 8 badges will fit across. With 8 across and 2 down, all 15 badges are represented.
18. When done, click on the Done Editing green checkmark near the top left of the screen.
19. Now go back to the General tab and click on the double arrows next to Print Preview (in blue)
20. After the double arrows are selected, you will see that currently the badges will print in the middle of the page. This, of course would waste product. Depending on the Laser being used, this step may vary. The end result is to have the badges print in the upper left corner of the sheet of plastic.
Phone: (800) 869-7800 • Email: [email protected]
Connect with us:
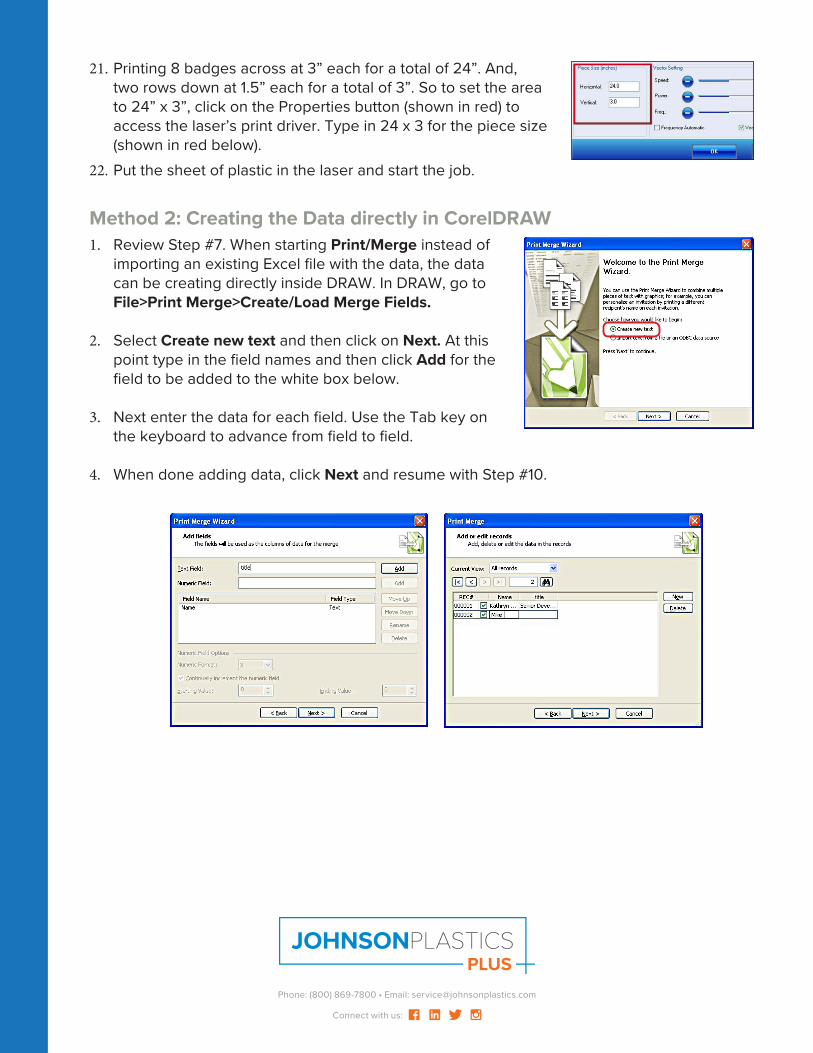
21. Printing 8 badges across at 3” each for a total of 24”. And, two rows down at 1.5” each for a total of 3”. So to set the area to 24” x 3”, click on the Properties button (shown in red) to access the laser’s print driver. Type in 24 x 3 for the piece size (shown in red below).
22. Put the sheet of plastic in the laser and start the job.
Method 2: Creating the Data directly in CorelDRAW1. Review Step #7. When starting Print/Merge instead of
importing an existing Excel file with the data, the data can be creating directly inside DRAW. In DRAW, go to File>Print Merge>Create/Load Merge Fields.
2. Select Create new text and then click on Next. At this point type in the field names and then click Add for the field to be added to the white box below.
3. Next enter the data for each field. Use the Tab key on the keyboard to advance from field to field.
4. When done adding data, click Next and resume with Step #10.


![CorelDRAW Graphics Suite 2020product.corel.com/help/CorelDRAW/540111137/Main/ES/Quick... · 2020. 3. 9. · Guía de inicio rápido [ 1 ] CorelDRAW Graphics Suite 2020 CorelDRAW®](https://img.pdfslide.us/doc/110x75/6131b8e41ecc51586944ea31/coreldraw-graphics-suite-2020-3-9-gua-de-inicio-rpido-1-coreldraw-graphics.jpg)