Embed Size (px)
Citation preview
TeamWorks Travel and Expense Powered By Concur Technologies
TTE Local Admin: Shared User Administration Handbook 2017
2 | P a g e T e a m W o r k s T r a v e l & E x p e n s e Version Date: 06/06/2017 S h a r e d U s e r A d m i n i s t r a t i o n
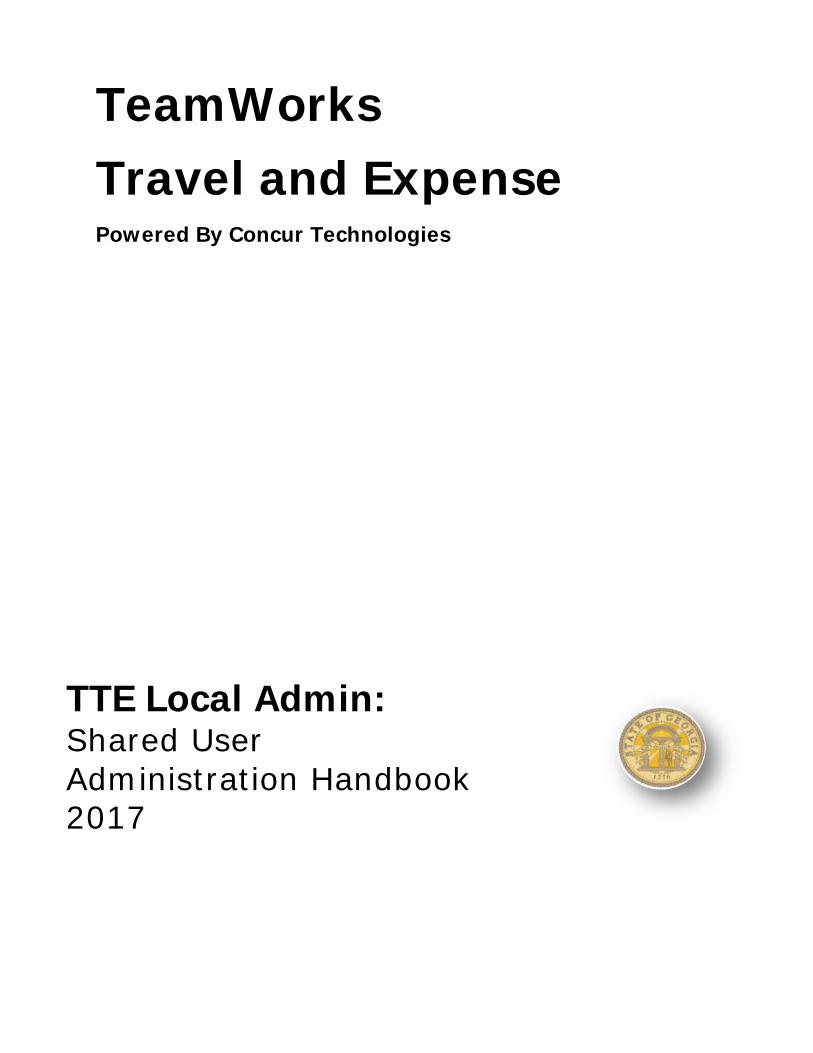
Table of Contents Shared User Administration Section 1: Permissions ............................................................................................... 4
Section 2: Overview ................................................................................................... 4
User Administration in Travel, Expense, and Request ......................................................... 4 User Administration Related Roles and Access .................................................................. 4 Role Assignment: Access and Related Product Assignments ................................................ 5 Segregating the User Administration Duties...................................................................... 6
Two Frameworks for User Permissions ............................................................................. 6 Suppressing Assignment of Roles Using Role Check Boxes in User Details ............................ 6
Two Methods of Managing Roles in User Permissions ......................................................... 7
The Password Manager Roles .......................................................................................... 7 Suppressing Access to the Password Function ................................................................... 8
Section 3: Available Permissions and Roles ............................................................... 9
Travel Tab .................................................................................................................... 9
Expense Tab ................................................................................................................ 10
Request Tab ................................................................................................................ 14
Reporting Tab .............................................................................................................. 15
Section 4: User Administration Page ........................................................................ 16
Before You Begin ......................................................................................................... 16
Accessing User Admin ................................................................................................... 16
Searching for Existing Users .......................................................................................... 17 Searching for Employees Without Managers .................................................................... 17 Searching for Test Users ............................................................................................... 17
Adding New Users ........................................................................................................ 19
Modifying Existing Users ............................................................................................... 19 Update General Information .......................................................................................... 19 Update Mobile Settings ................................................................................................. 20
Add or Change Expense Approvers ................................................................................. 20
Add or Change Request Approvers.................................................................................. 21 Add or Change Expense Preferences ............................................................................... 22 Add or Change Request Preferences ............................................................................... 22 Add Expense and Request Delegates .............................................................................. 22 Delete a User's Delegate Assignments ............................................................................ 23
Reactivating a User ...................................................................................................... 24
Section 5: User Permissions ..................................................................................... 26
Accessing the User Permissions Page .............................................................................. 26
Managing Roles by User Name ....................................................................................... 26
Managing Roles by Role ................................................................................................ 31
Section 6: Special Cases ........................................................................................... 35
When a Payee is Terminated During the Reimbursement Process ....................................... 35
3 | P a g e T e a m W o r k s T r a v e l & E x p e n s e Version Date: 06/06/2017 S h a r e d U s e r A d m i n i s t r a t i o n
Document History
Date Notes/Comments/Changes
02/07/12 First release of SOG Local Administrator Shared User Administration Handbook. Adapted from Concur Technologies, Inc. materials.
03/31/12
Updated for software updates: new Report Detailing Changes Made to an Employee, change in Delegate window in screenshots, new note on Expense Cash Administrator role. Also, enhanced Document History section, updated and increased screen shots in Section 4: User Permissions to improve clarity.
11/07/13 Updated branding, changed references from Travel Request to Request, renamed document TTE Local Administration: Shared User Administration Handbook.
12/31/14 Added information about: • UI Preview role/permission • Two user interfaces
07/06/15 Removed two user interface sections
07/27/15 Updated screenshots
09/22/15 Minor formatting adjustments.
06/06/17 Updated for current Local Administrator usage
4 | P a g e T e a m W o r k s T r a v e l & E x p e n s e Version Date: 06/06/2017 S h a r e d U s e r A d m i n i s t r a t i o n
Section 1: Permissions
An agency administrator may or may not have the correct permissions to use this feature. The administrator may have limited permissions, for example, he/she can affect only certain groups and/or use only certain options (view but not create or edit).
If an agency administrator needs to use this feature and does not have the proper permissions, he/she should contact the TTE Global Administrator.
Also, the administrator should be aware that some of the tasks described in this guide can be completed only by Concur. In this case, the client must initiate a service request with TTE Global Administrator.
Section 2: Overview
The user administration section of Company Administration is used by Travel, Expense, and Request administrators to modify user profiles. The user administration page contains the fields used on the Employee Profile form in Expense and/or the Travel Preferences fields from Travel. The fields displayed will vary depending on the user role selected for the new user.
NOTE: The User administrator can be restricted from editing his/her own user profile. To enable this setting, contact TTE Global Administrator to have the appropriate module property updated.
The User Permissions functionality allows administrators to assign Travel, Expense, and Request user roles. This feature is available to users with the Role Administrator Expense role or Permissions Administrator role.
User Administration in Travel, Expense, and Request
Administering users can now be controlled by the type of user, allowing for administrators that can access only Travel users, and administrators that can access only Expense, or Request users.
NOTE: This feature does not prevent the client from administrating all types of users at one time under a single role; instead this feature provides an additional method of dividing the responsibility of administering users.
User Administration Related Roles and Access
The user assigned the Employee Administrator role has access to the User Administration menu and access to the Expense and Request-related users and functions:
• Expense/ Request user search • Expense/ Request User role check boxes* • Expense/ Request Approver role check boxes* • Expense/ Request Settings • Primary fields on the user details page • Can view users from their assigned employee groups and employee group configurations
when using the Expense Advanced Filters

5 | P a g e T e a m W o r k s T r a v e l & E x p e n s e Version Date: 06/06/2017 S h a r e d U s e r A d m i n i s t r a t i o n
• Can view and optionally edit and register a car on behalf of a user • Can be restricted to read-only access for auditing purposes
* Check boxes can be removed from display to prevent assignment by the role – refer to Suppressing Assignment of Roles Using Role Check Boxes in User Details in this document for more information.
The user assigned the User Administration role has access to the User Administration menu and access to the Travel-related functions:
• Travel user search • Travel Wizard User role check box • Travel Settings • Primary fields on the user details page • Can view users from all groups unless the Divisional View setting restricts them to only
employees in groups they are a member of • Can be restricted to read-only access for auditing purposes
TIP: Provide both the Employee Administrator and the User Administration roles for administrators that need access to Travel, Expense, and Request users.
NOTE: Role Hierarchy- The various user administration roles have greater and lesser amounts of control over user accounts. If a user is assigned more than one user administration role, the role with the highest amount of control determines the user's access, and the lower roles are not applied.
The user administration role hierarchy, from greatest control to least, is:
1. User Administration/Employee Administrator 2. Employee Maintenance 3. User Admin (read only)/Employee Administrator (Read only) 4. Password Administrator
Role Assignment: Access and Related Product Assignments
When assigning either the Role Administrator or Permissions Administrator roles, keep in mind the following logic used by the system to assign the role within other modules as well.
• Role Administrator: A user with the Role Administrator role has access to the User Permissions menu and access to the Expense, Request, and Reporting tabs.
♦ ASSIGN: Assign from the Expense, or Request tab. Assigns Role Administrator to the specified user, and additionally assigns the Permissions Administrator role under Travel.
♦ REMOVE: Remove from the Expense, or Request tab; removes the role from all excepting the Permissions Administrator role under Travel.
• Permissions Administrator: A user with the Permissions Administrator role has access to the User Permissions menu and access to the Travel tab.
♦ ASSIGN: Assign from the Travel tab. Assigns Permissions Administrator to the specified user, Travel only.
♦ REMOVE: Remove from the Travel tab. Removes Permissions Administrator from the specified user, Travel only.
6 | P a g e T e a m W o r k s T r a v e l & E x p e n s e Version Date: 06/06/2017 S h a r e d U s e r A d m i n i s t r a t i o n
TIP: Provide both the Employee Administrator and the User Administration roles for administrators that need access to Travel, Expense, and Request users.
Segregating the User Administration Duties
Best Practice for user security is to segregate the duties for:
• Creating users • Assigning roles to users • Maintaining user roles and preferences • Auditing records under read-only roles
IMPORTANT: An administrator should not be able to create a user and assign the extended user roles. The basic user roles (Expense User, Invoice User, etc.) can be assigned on the user details page by the Employee/User Administrator.
These roles allow segregation of these duties:
• Employee Administrator/User Admin: Provides access to the User Administration function. The user can assign only the basic user roles (Expense User, Travel User), using the check boxes in the user details page that appears when you open a user for administration.
TIP: You can have these check boxes removed from display, preventing assignment of these roles – see Suppressing Assignment of Roles Using Role Check Boxes in User Details in this document for more information.
• Role Administrator/Permission Admin: Provides access to the User Permissions function.
• User Maintenance/Employee Maintenance (Travel and all else, respectively): Provides access to the User Permissions function, but without the ability to create a new user account.
Two Frameworks for User Permissions
How user permissions are named and managed depends on the module:
• Permissions: Travel related roles are called permissions and are managed from the Travel tab in the user permissions section.
• Roles: Expense, Concur Insight (formerly Analysis/Intelligence), and Request-related roles are called roles and are managed from the Expense, Request, Reporting tabs in the user permissions section.
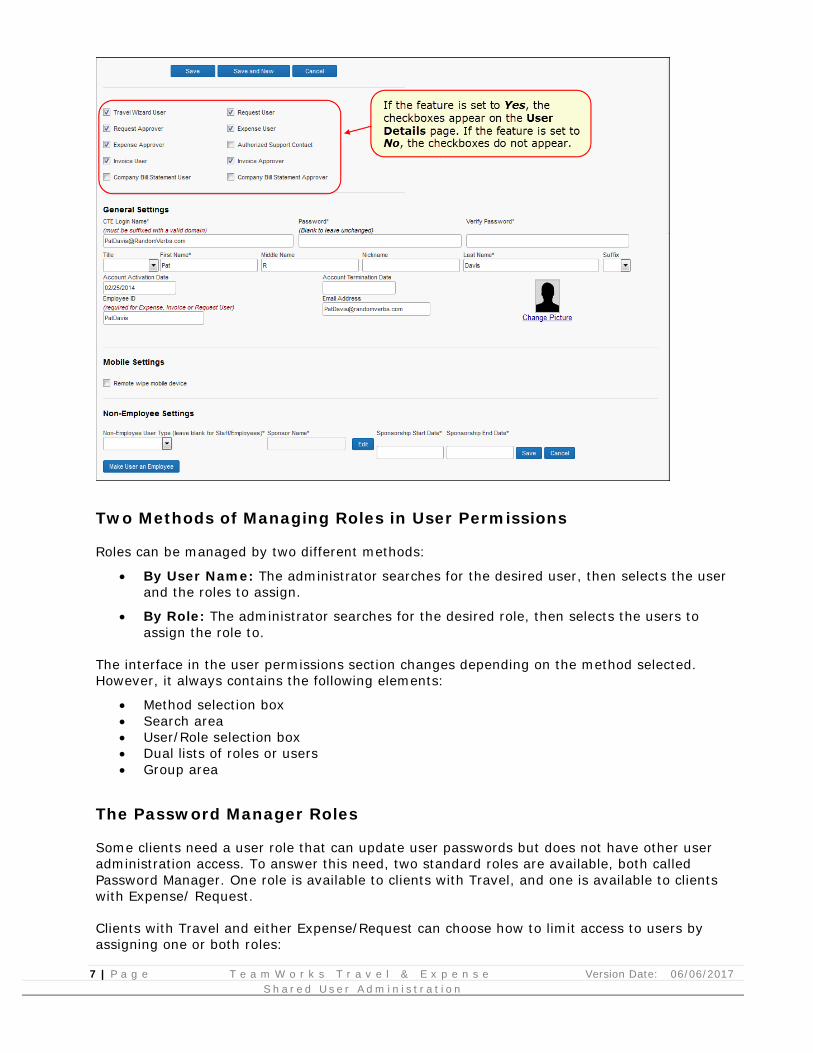
Suppressing Assignment of Roles Using Role Check Boxes in User Details
The user assignment check boxes can be removed from display to allow tighter security control of role assignment, preventing a scenario where approval of a substantial amount via a purchase order or expense is granted by way of role assignment with intent to defraud.
The feature works by suppressing the display of the check boxes. To do this, contact the TTE Global Administrator requesting that the Allow User Admin to Add/Update Expense Roles Console (HMC) setting be set to No.
7 | P a g e T e a m W o r k s T r a v e l & E x p e n s e Version Date: 06/06/2017 S h a r e d U s e r A d m i n i s t r a t i o n
Two Methods of Managing Roles in User Permissions
Roles can be managed by two different methods:
• By User Name: The administrator searches for the desired user, then selects the user and the roles to assign.
• By Role: The administrator searches for the desired role, then selects the users to assign the role to.
The interface in the user permissions section changes depending on the method selected. However, it always contains the following elements:
• Method selection box • Search area • User/Role selection box • Dual lists of roles or users • Group area
The Password Manager Roles
Some clients need a user role that can update user passwords but does not have other user administration access. To answer this need, two standard roles are available, both called Password Manager. One role is available to clients with Travel, and one is available to clients with Expense/ Request.
Clients with Travel and either Expense/Request can choose how to limit access to users by assigning one or both roles:
8 | P a g e T e a m W o r k s T r a v e l & E x p e n s e Version Date: 06/06/2017 S h a r e d U s e r A d m i n i s t r a t i o n
• The role on the Travel tab in the user permissions section will grant access to the users with the Travel feature enabled. If the Travel settings are set to use Divisional Access, the user will only be able to view and update users in their divisions.
• The role on the Expense or Request tab in the user permissions section will grant access to the users with Expense or Request enabled. The administrator can select the Expense groups (Request uses Expense groups) the user has access to when assigning the role.
• If both roles are assigned, the user will be able to view and update users that match their Travel divisional access (if enabled) and selected Expense group (Request uses Expense groups).
NOTE: The users with Travel and either Expense and Request have one password for all applications. When any of the Password Manager roles changes a password, it changes for all applications.
Users with these roles will see the Password Manager link on the Company Administrator page. These roles have the following access in Password Manager:
• User search functionality found in the user administration section • Modify access to the Password fields on the user details page • Read-only access to the Title, First Name, Middle Name, Nickname, Last Name, Suffix,
and Email fields on the user details page
All other fields on the user details page are hidden.
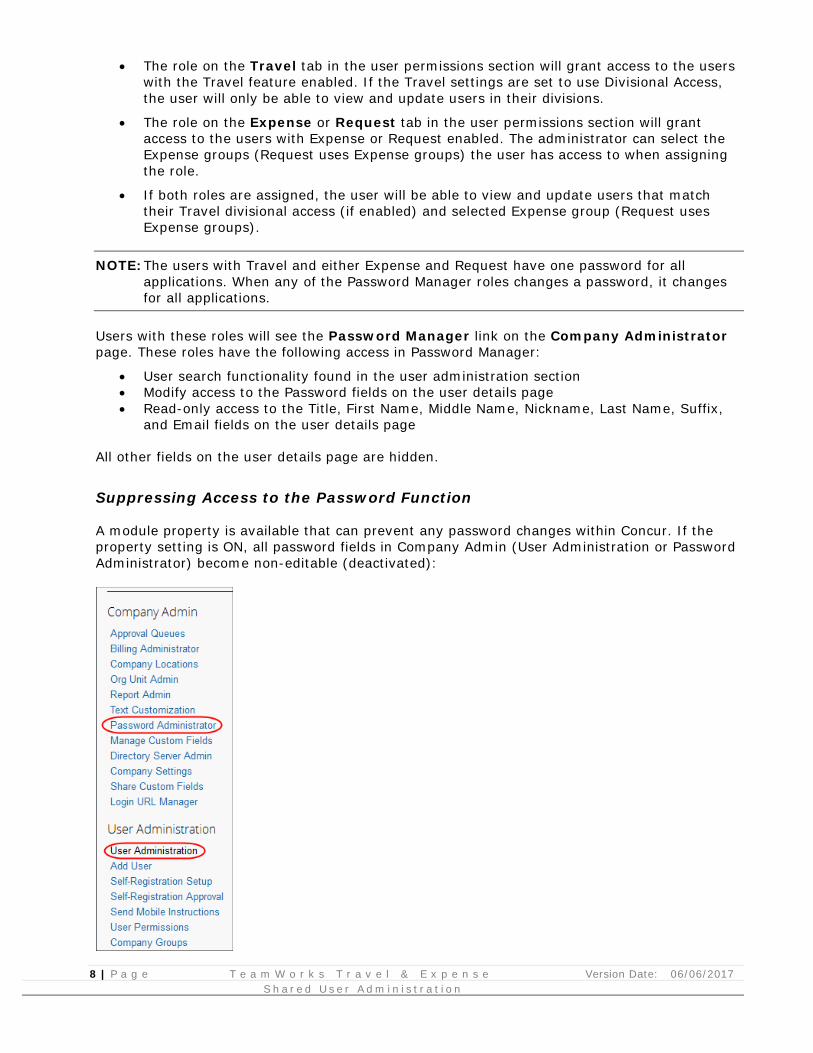
Suppressing Access to the Password Function
A module property is available that can prevent any password changes within Concur. If the property setting is ON, all password fields in Company Admin (User Administration or Password Administrator) become non-editable (deactivated):
9 | P a g e T e a m W o r k s T r a v e l & E x p e n s e Version Date: 06/06/2017 S h a r e d U s e r A d m i n i s t r a t i o n
When a new user is added via the import the system provides a password (last 4 digits of their Social Security number) that must be changed when they first access the system.
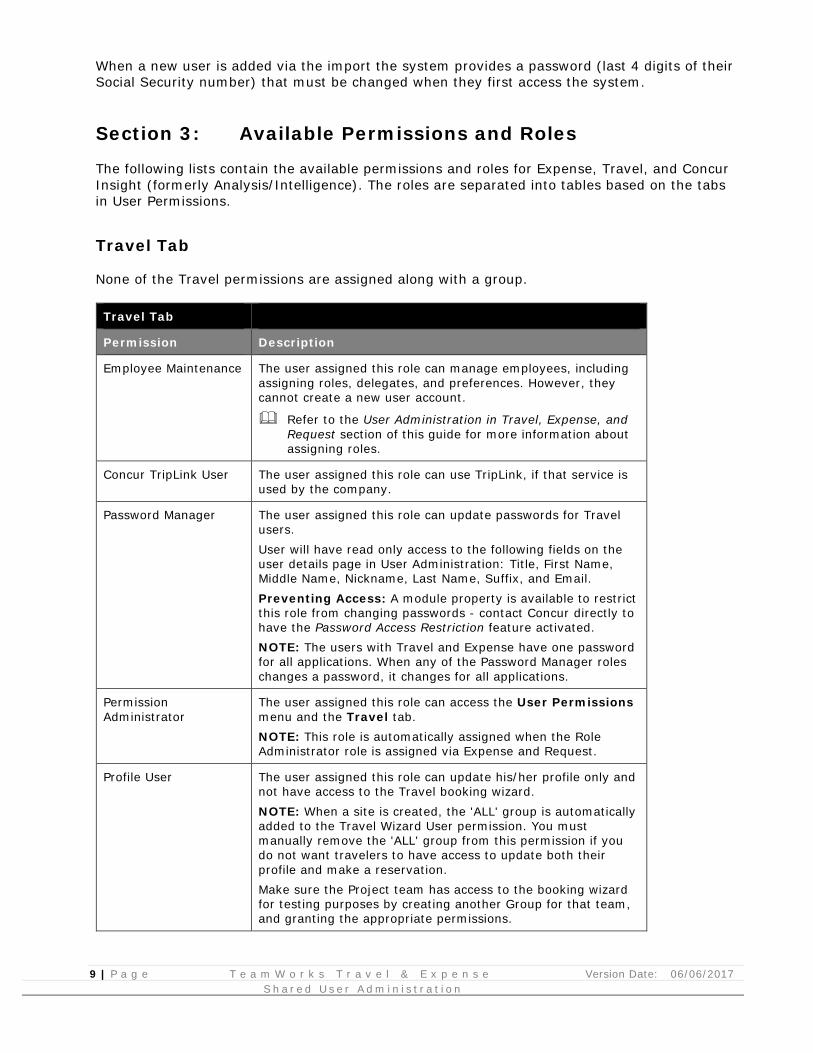
Section 3: Available Permissions and Roles
The following lists contain the available permissions and roles for Expense, Travel, and Concur Insight (formerly Analysis/Intelligence). The roles are separated into tables based on the tabs in User Permissions.
Travel Tab
None of the Travel permissions are assigned along with a group. Travel Tab
Permission Description
Employee Maintenance The user assigned this role can manage employees, including assigning roles, delegates, and preferences. However, they cannot create a new user account.
Refer to the User Administration in Travel, Expense, and Request section of this guide for more information about assigning roles.
Concur TripLink User The user assigned this role can use TripLink, if that service is used by the company.
Password Manager The user assigned this role can update passwords for Travel users. User will have read only access to the following fields on the user details page in User Administration: Title, First Name, Middle Name, Nickname, Last Name, Suffix, and Email. Preventing Access: A module property is available to restrict this role from changing passwords - contact Concur directly to have the Password Access Restriction feature activated. NOTE: The users with Travel and Expense have one password for all applications. When any of the Password Manager roles changes a password, it changes for all applications.
Permission Administrator
The user assigned this role can access the User Permissions menu and the Travel tab. NOTE: This role is automatically assigned when the Role Administrator role is assigned via Expense and Request.
Profile User The user assigned this role can update his/her profile only and not have access to the Travel booking wizard. NOTE: When a site is created, the 'ALL' group is automatically added to the Travel Wizard User permission. You must manually remove the 'ALL' group from this permission if you do not want travelers to have access to update both their profile and make a reservation. Make sure the Project team has access to the booking wizard for testing purposes by creating another Group for that team, and granting the appropriate permissions.
10 | P a g e T e a m W o r k s T r a v e l & E x p e n s e Version Date: 06/06/2017 S h a r e d U s e r A d m i n i s t r a t i o n
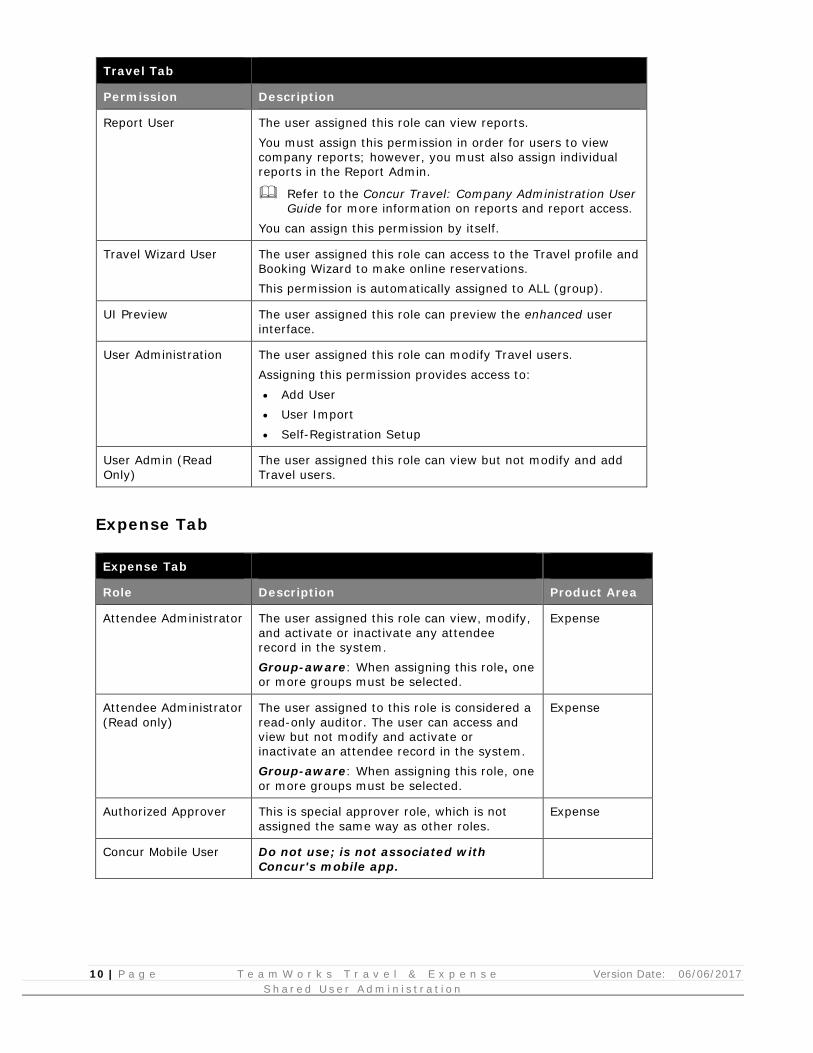
Travel Tab
Permission Description
Report User The user assigned this role can view reports. You must assign this permission in order for users to view company reports; however, you must also assign individual reports in the Report Admin.
Refer to the Concur Travel: Company Administration User Guide for more information on reports and report access.
You can assign this permission by itself.
Travel Wizard User The user assigned this role can access to the Travel profile and Booking Wizard to make online reservations. This permission is automatically assigned to ALL (group).
UI Preview The user assigned this role can preview the enhanced user interface.
User Administration The user assigned this role can modify Travel users. Assigning this permission provides access to: • Add User • User Import • Self-Registration Setup
User Admin (Read Only)
The user assigned this role can view but not modify and add Travel users.
Expense Tab Expense Tab
Role Description Product Area
Attendee Administrator The user assigned this role can view, modify, and activate or inactivate any attendee record in the system. Group-aware: When assigning this role, one or more groups must be selected.
Expense
Attendee Administrator (Read only)
The user assigned to this role is considered a read-only auditor. The user can access and view but not modify and activate or inactivate an attendee record in the system. Group-aware: When assigning this role, one or more groups must be selected.
Expense
Authorized Approver This is special approver role, which is not assigned the same way as other roles.
Expense
Concur Mobile User Do not use; is not associated with Concur's mobile app.

11 | P a g e T e a m W o r k s T r a v e l & E x p e n s e Version Date: 06/06/2017 S h a r e d U s e r A d m i n i s t r a t i o n
Expense Tab
Role Description Product Area
Employee Administrator
The user assigned this role can add and manage employees, including assigning roles, delegates, and preferences. The user can only assign the basic user roles (Expense User, Travel User), using the check boxes on the User Details page. They may also view and optionally edit and register cars on behalf of a user. Group-aware: When assigning this role, one or more groups must be selected.
Refer to the User Administration in Travel, Expense and Request section of this guide for more information about assigning roles.
Refer to Expense: Car Configuration Setup Guide for information about configuration and managing cars for the user.
Shared with two or more Concur products
Employee Administrator (Read Only)
The user assigned to this role is considered a read-only auditor. The user can view but not add or edit employee records. Group-aware: When assigning this role, one or more groups must be selected.
Refer to the User Administration in Travel, Expense and Request section of this guide for more information about assigning roles.
Shared with two or more Concur products
Employee Maintenance The user assigned this role can manage employees, including assigning roles, delegates, and preferences. However, they cannot create a new user account. Group-aware: When assigning this role, one or more groups must be selected.
Refer to the User Administration in Travel, Expense and Request section of this guide for more information about assigning roles.
Shared with two or more Concur products
Expense Approver The user assigned this role can approve expense reports within an assigned group. NOTE: This approver is also automatically assigned as the Travel Approver if the employee is a Travel user.
Expense
Expense Cash Advance Administrator
The user assigned this role can view, issue, and manage cash advance requests. Group-aware: When assigning this role, one or more groups must be selected.
Expense
12 | P a g e T e a m W o r k s T r a v e l & E x p e n s e Version Date: 06/06/2017 S h a r e d U s e r A d m i n i s t r a t i o n
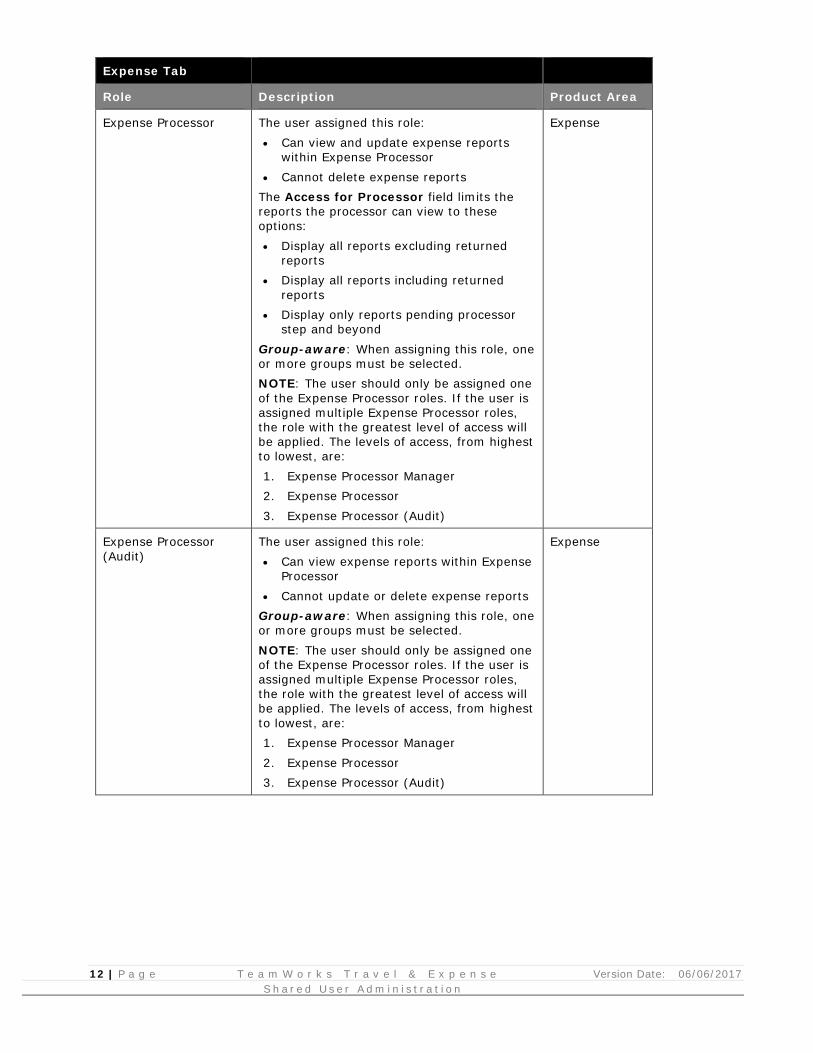
Expense Tab
Role Description Product Area
Expense Processor The user assigned this role: • Can view and update expense reports
within Expense Processor • Cannot delete expense reports
The Access for Processor field limits the reports the processor can view to these options: • Display all reports excluding returned
reports • Display all reports including returned
reports • Display only reports pending processor
step and beyond Group-aware: When assigning this role, one or more groups must be selected. NOTE: The user should only be assigned one of the Expense Processor roles. If the user is assigned multiple Expense Processor roles, the role with the greatest level of access will be applied. The levels of access, from highest to lowest, are: 1. Expense Processor Manager 2. Expense Processor 3. Expense Processor (Audit)
Expense
Expense Processor (Audit)
The user assigned this role: • Can view expense reports within Expense
Processor • Cannot update or delete expense reports
Group-aware: When assigning this role, one or more groups must be selected. NOTE: The user should only be assigned one of the Expense Processor roles. If the user is assigned multiple Expense Processor roles, the role with the greatest level of access will be applied. The levels of access, from highest to lowest, are: 1. Expense Processor Manager 2. Expense Processor 3. Expense Processor (Audit)
Expense
13 | P a g e T e a m W o r k s T r a v e l & E x p e n s e Version Date: 06/06/2017 S h a r e d U s e r A d m i n i s t r a t i o n
Expense Tab
Role Description Product Area
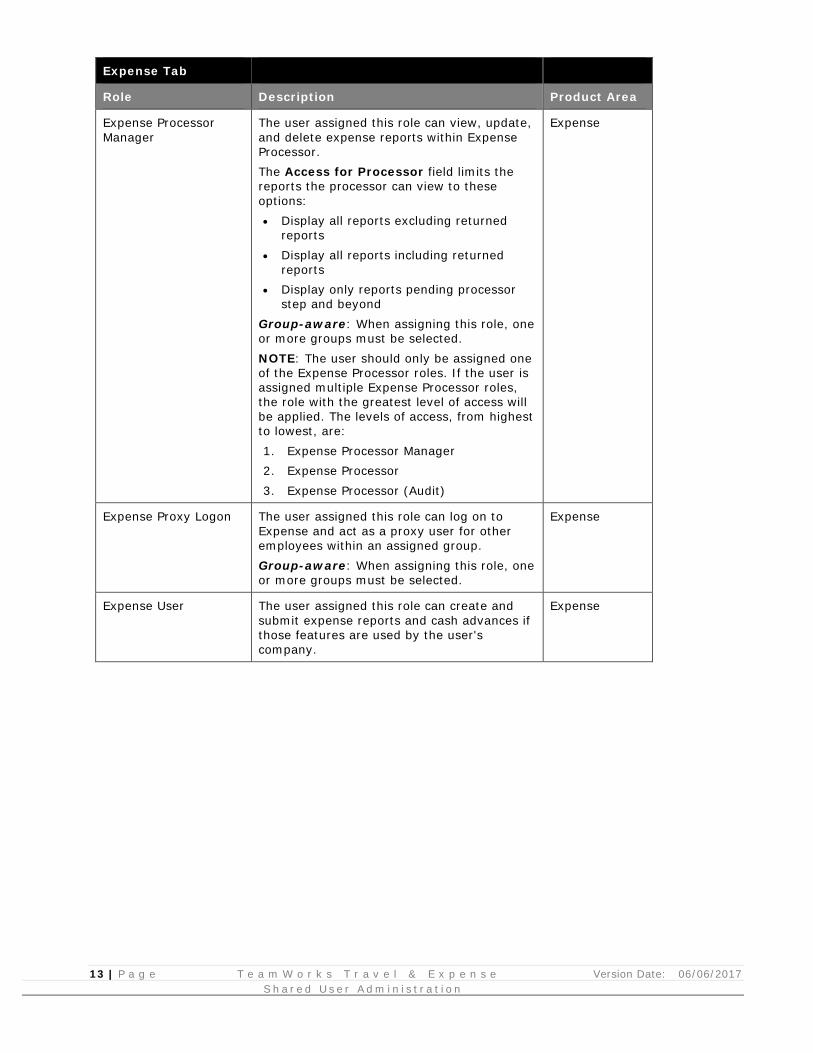
Expense Processor Manager
The user assigned this role can view, update, and delete expense reports within Expense Processor. The Access for Processor field limits the reports the processor can view to these options: • Display all reports excluding returned
reports • Display all reports including returned
reports • Display only reports pending processor
step and beyond Group-aware: When assigning this role, one or more groups must be selected. NOTE: The user should only be assigned one of the Expense Processor roles. If the user is assigned multiple Expense Processor roles, the role with the greatest level of access will be applied. The levels of access, from highest to lowest, are: 1. Expense Processor Manager 2. Expense Processor 3. Expense Processor (Audit)
Expense
Expense Proxy Logon The user assigned this role can log on to Expense and act as a proxy user for other employees within an assigned group. Group-aware: When assigning this role, one or more groups must be selected.
Expense
Expense User The user assigned this role can create and submit expense reports and cash advances if those features are used by the user's company.
Expense
14 | P a g e T e a m W o r k s T r a v e l & E x p e n s e Version Date: 06/06/2017 S h a r e d U s e r A d m i n i s t r a t i o n
Expense Tab
Role Description Product Area
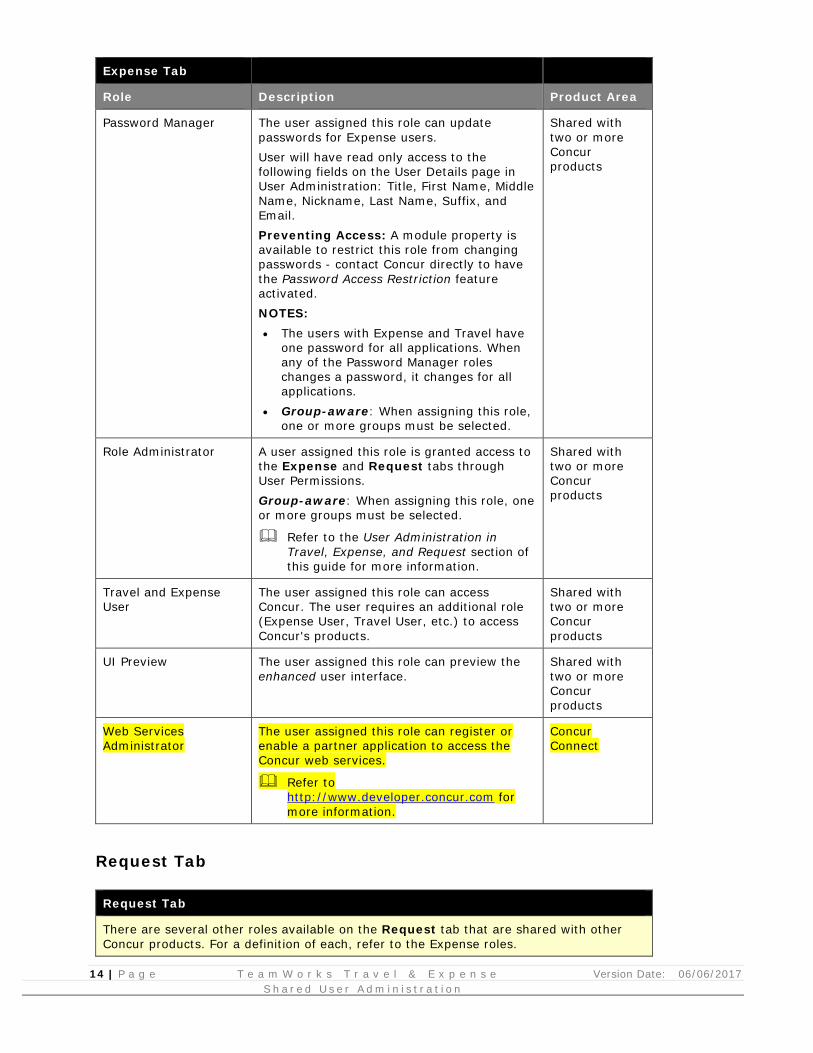
Password Manager The user assigned this role can update passwords for Expense users. User will have read only access to the following fields on the User Details page in User Administration: Title, First Name, Middle Name, Nickname, Last Name, Suffix, and Email. Preventing Access: A module property is available to restrict this role from changing passwords - contact Concur directly to have the Password Access Restriction feature activated. NOTES: • The users with Expense and Travel have
one password for all applications. When any of the Password Manager roles changes a password, it changes for all applications.
• Group-aware: When assigning this role, one or more groups must be selected.
Shared with two or more Concur products
Role Administrator A user assigned this role is granted access to the Expense and Request tabs through User Permissions. Group-aware: When assigning this role, one or more groups must be selected.
Refer to the User Administration in Travel, Expense, and Request section of this guide for more information.
Shared with two or more Concur products
Travel and Expense User
The user assigned this role can access Concur. The user requires an additional role (Expense User, Travel User, etc.) to access Concur's products.
Shared with two or more Concur products
UI Preview The user assigned this role can preview the enhanced user interface.
Shared with two or more Concur products
Web Services Administrator
The user assigned this role can register or enable a partner application to access the Concur web services.
Refer to http://www.developer.concur.com for more information.
Concur Connect
Request Tab Request Tab
There are several other roles available on the Request tab that are shared with other Concur products. For a definition of each, refer to the Expense roles.

15 | P a g e T e a m W o r k s T r a v e l & E x p e n s e Version Date: 06/06/2017 S h a r e d U s e r A d m i n i s t r a t i o n
Role Description
Request Administrator This is one of the Request processor roles. The user assigned this role can view and fully manage virtually all requests. Group-aware: When assigning this role, one or more groups must be selected.
Request Approver The user assigned this role can approve requests within his/her assigned group.
Request Auditor This is one of the Request processor roles. This is a read-only role. The Concur client can assign this role to TMCs, to its own internal travel agent(s), or to any other user that needs read-only access to requests. Group-aware: When assigning this role, one or more groups must be selected.
Request Proxy Logon The user assigned this role can log on to Request and act as a proxy user for other employees within an assigned group. Group-aware: When assigning this role, one or more groups must be selected.
Request User The user assigned this role can create and submit requests.
Reporting Tab Reporting Tab
Role Description
Cognos Business Author The user assigned this role: • Can use Concur Insight (formerly Analysis/Intelligence) to
view data for reports submitted at all hierarchical levels within their assigned groups (as well as any data not group-related)
• Are assigned the Business license type, which restricts the features to which they have access
• Can: ♦ Run existing reports ♦ Create new reports or modify existing basic reports
using the basic tool – Query Studio Group-aware: When assigning this role, one or more groups must be selected.
Cognos Consumer The user assigned this role: • Can use Concur Insight (formerly Analysis/Intelligence) to
view data for reports submitted at all hierarchical levels within their assigned groups (as well as any data not group-related)
• Are assigned the Consumer license type, which further restricts the features to which they have access
• Can run existing reports, with read-only access Group-aware: When assigning this role, one or more groups must be selected.
16 | P a g e T e a m W o r k s T r a v e l & E x p e n s e Version Date: 06/06/2017 S h a r e d U s e r A d m i n i s t r a t i o n
Reporting Tab
Role Description
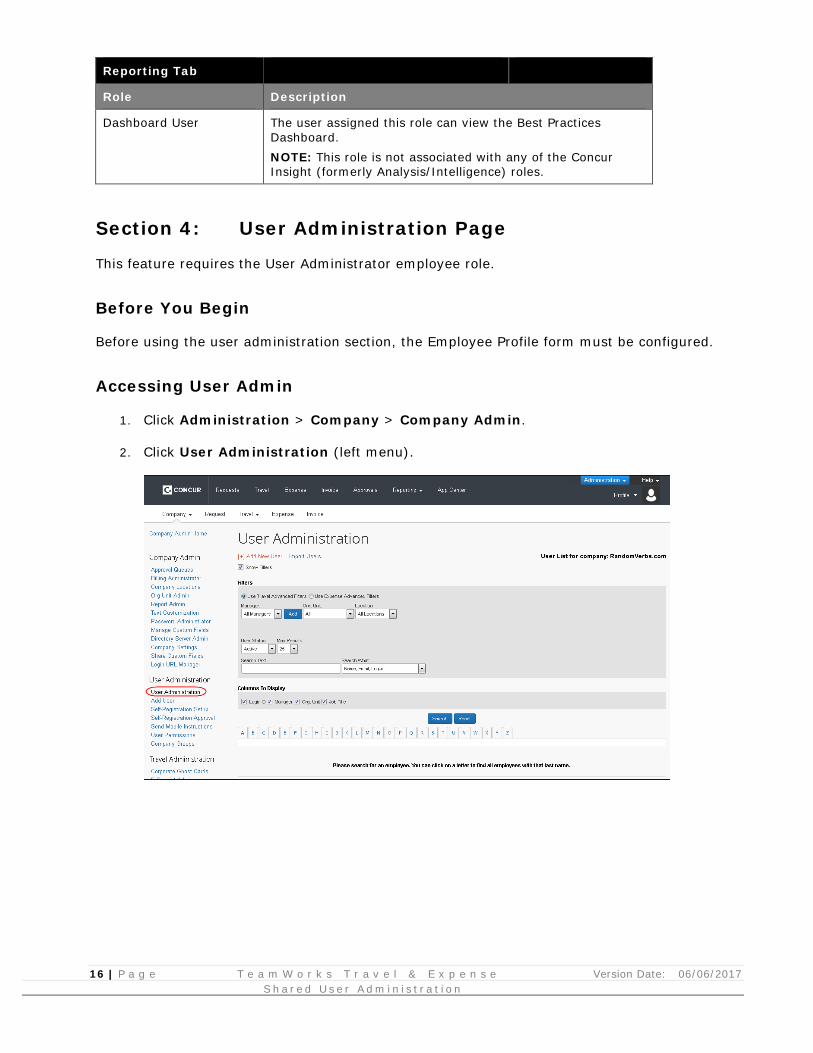
Dashboard User The user assigned this role can view the Best Practices Dashboard. NOTE: This role is not associated with any of the Concur Insight (formerly Analysis/Intelligence) roles.
Section 4: User Administration Page
This feature requires the User Administrator employee role.
Before You Begin
Before using the user administration section, the Employee Profile form must be configured.
Accessing User Admin
1. Click Administration > Company > Company Admin.
2. Click User Administration (left menu).
17 | P a g e T e a m W o r k s T r a v e l & E x p e n s e Version Date: 06/06/2017 S h a r e d U s e r A d m i n i s t r a t i o n
Searching for Existing Users
The User administrator can search for existing Travel or Expense users. Users with access to both applications will appear in either search.
Searching for Employees Without Managers
The Managers field in the search options is used to find employees that do not have a manager/approver assigned.
• When Expense Advanced Filters is selected, the No Manager option in the Managers field will cause users who meet all the other search criteria and do not have an Expense manager/approver to display.
• When Travel Advanced Filters is selected, the No Manager option in the Managers field will cause users who meet all the other search criteria and do not have a Travel manager/approver to display.
• Select the All Managers option in the Managers field to display users regardless of whether they have a manager assigned.
Searching for Test Users
The Expense Test Users field in the search options is used to include or exclude employees of type Test User if any users of this type exist in the system (that is, it will not appear is the system does not detect one or more Test Users).
• All Users: The filter is ignored, and all test users are returned.
• Exclude Test Users: Return the search results without including any Test Users.
• Only Test Users: Include only Test Users in the results of the search.
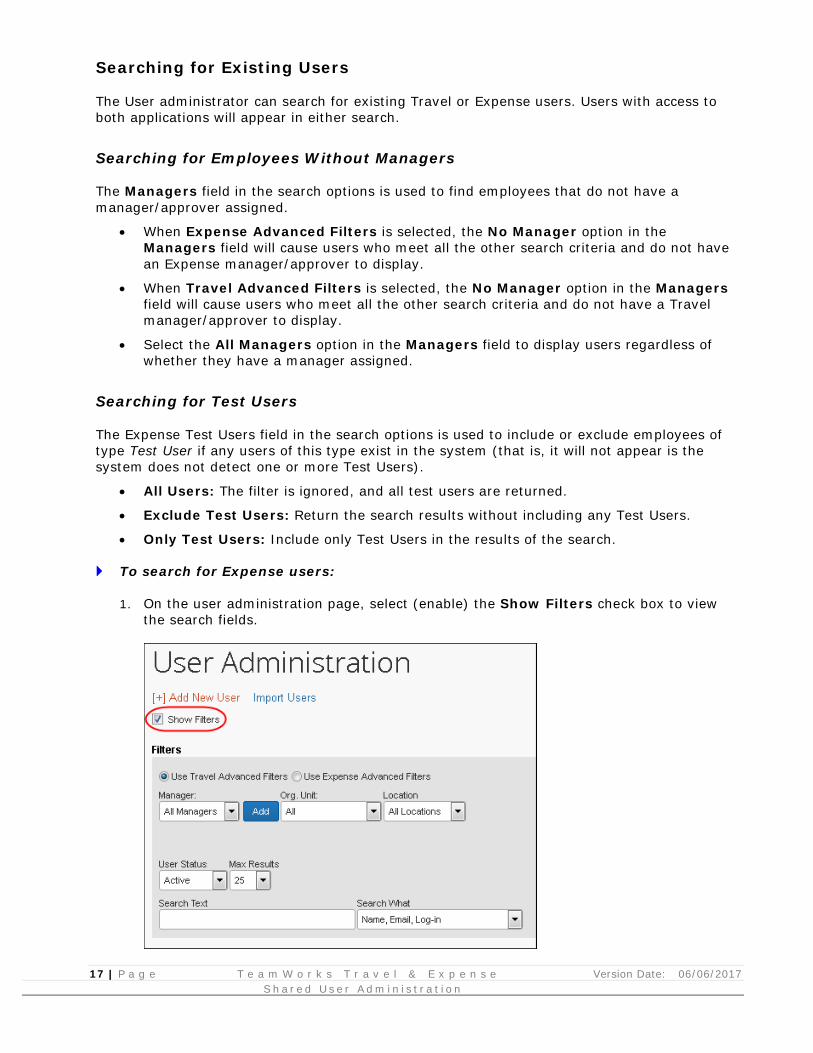
To search for Expense users:
1. On the user administration page, select (enable) the Show Filters check box to view the search fields.
18 | P a g e T e a m W o r k s T r a v e l & E x p e n s e Version Date: 06/06/2017 S h a r e d U s e r A d m i n i s t r a t i o n
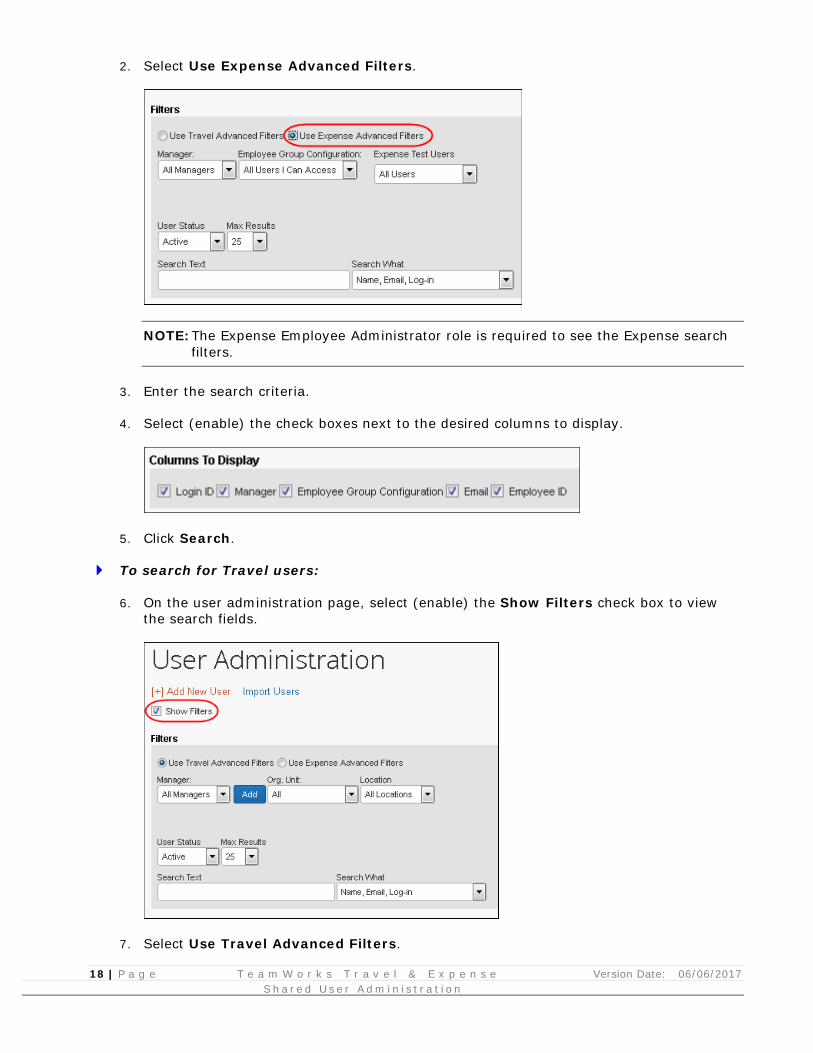
2. Select Use Expense Advanced Filters.
NOTE: The Expense Employee Administrator role is required to see the Expense search filters.
3. Enter the search criteria.
4. Select (enable) the check boxes next to the desired columns to display.
5. Click Search.
To search for Travel users:
6. On the user administration page, select (enable) the Show Filters check box to view the search fields.
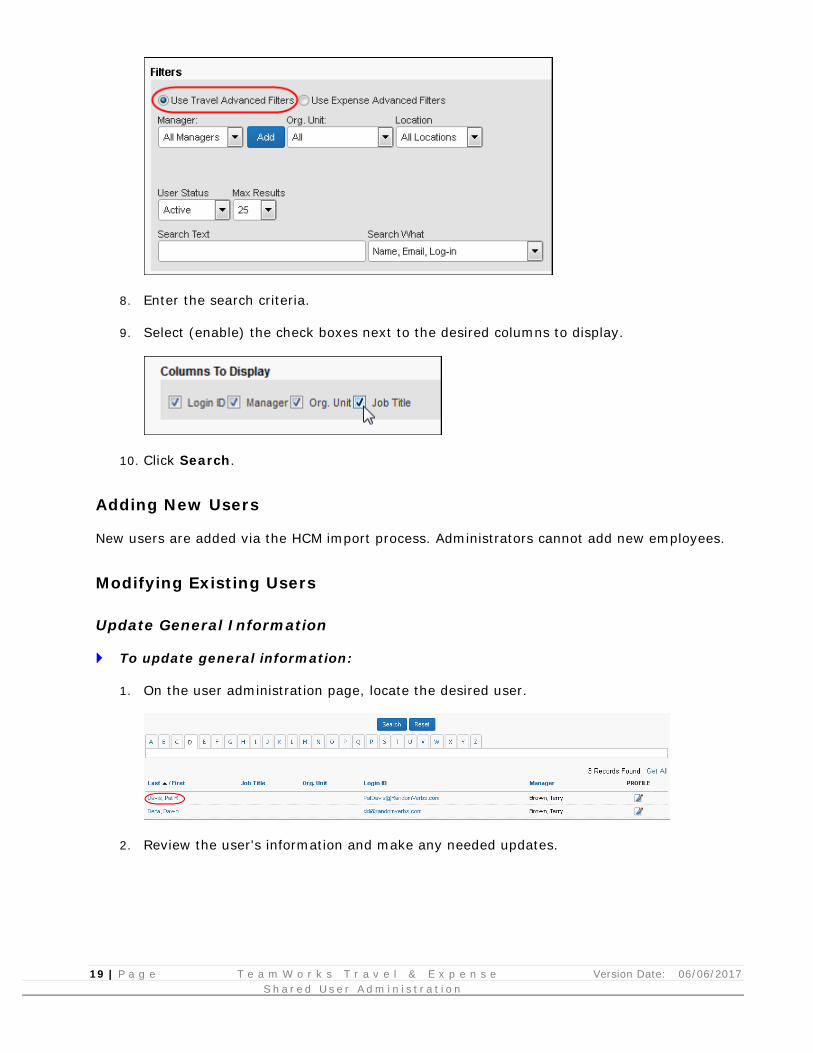
7. Select Use Travel Advanced Filters.
19 | P a g e T e a m W o r k s T r a v e l & E x p e n s e Version Date: 06/06/2017 S h a r e d U s e r A d m i n i s t r a t i o n
8. Enter the search criteria.
9. Select (enable) the check boxes next to the desired columns to display.
10. Click Search.
Adding New Users
New users are added via the HCM import process. Administrators cannot add new employees.
Modifying Existing Users
Update General Information
To update general information:
1. On the user administration page, locate the desired user.
2. Review the user's information and make any needed updates.
20 | P a g e T e a m W o r k s T r a v e l & E x p e n s e Version Date: 06/06/2017 S h a r e d U s e r A d m i n i s t r a t i o n
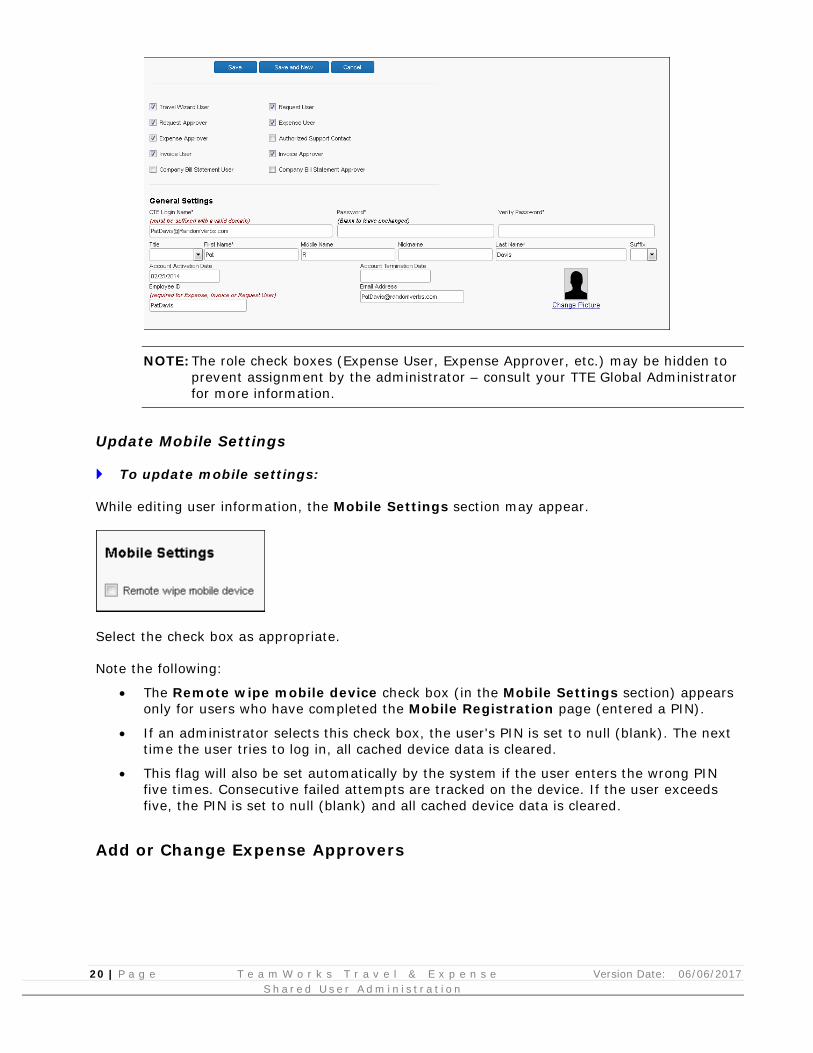
NOTE: The role check boxes (Expense User, Expense Approver, etc.) may be hidden to prevent assignment by the administrator – consult your TTE Global Administrator for more information.
Update Mobile Settings
To update mobile settings:
While editing user information, the Mobile Settings section may appear.
Select the check box as appropriate.
Note the following:
• The Remote wipe mobile device check box (in the Mobile Settings section) appears only for users who have completed the Mobile Registration page (entered a PIN).
• If an administrator selects this check box, the user's PIN is set to null (blank). The next time the user tries to log in, all cached device data is cleared.
• This flag will also be set automatically by the system if the user enters the wrong PIN five times. Consecutive failed attempts are tracked on the device. If the user exceeds five, the PIN is set to null (blank) and all cached device data is cleared.
Add or Change Expense Approvers
21 | P a g e T e a m W o r k s T r a v e l & E x p e n s e Version Date: 06/06/2017 S h a r e d U s e r A d m i n i s t r a t i o n
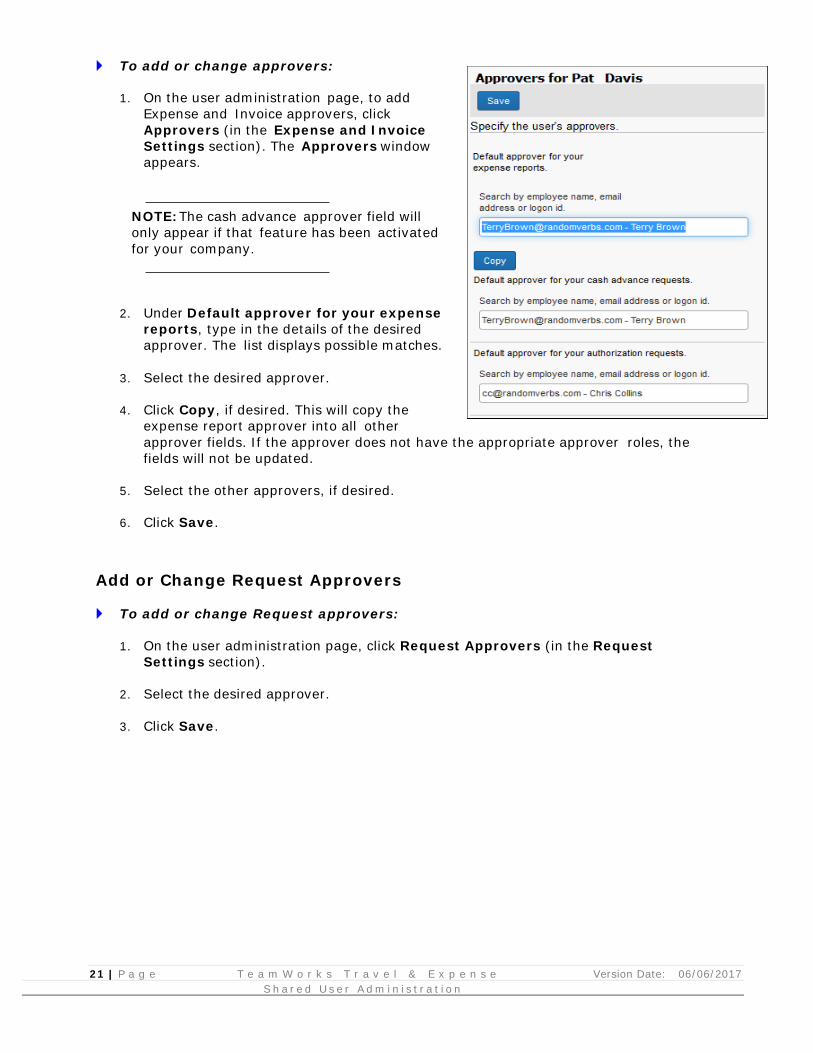
To add or change approvers:
1. On the user administration page, to add Expense and Invoice approvers, click Approvers (in the Expense and Invoice Settings section). The Approvers window appears.
NOTE: The cash advance approver field will only appear if that feature has been activated for your company.
2. Under Default approver for your expense reports, type in the details of the desired approver. The list displays possible matches.
3. Select the desired approver.
4. Click Copy, if desired. This will copy the expense report approver into all other approver fields. If the approver does not have the appropriate approver roles, the fields will not be updated.
5. Select the other approvers, if desired.
6. Click Save.
Add or Change Request Approvers
To add or change Request approvers:
1. On the user administration page, click Request Approvers (in the Request Settings section).
2. Select the desired approver.
3. Click Save.
22 | P a g e T e a m W o r k s T r a v e l & E x p e n s e Version Date: 06/06/2017 S h a r e d U s e r A d m i n i s t r a t i o n
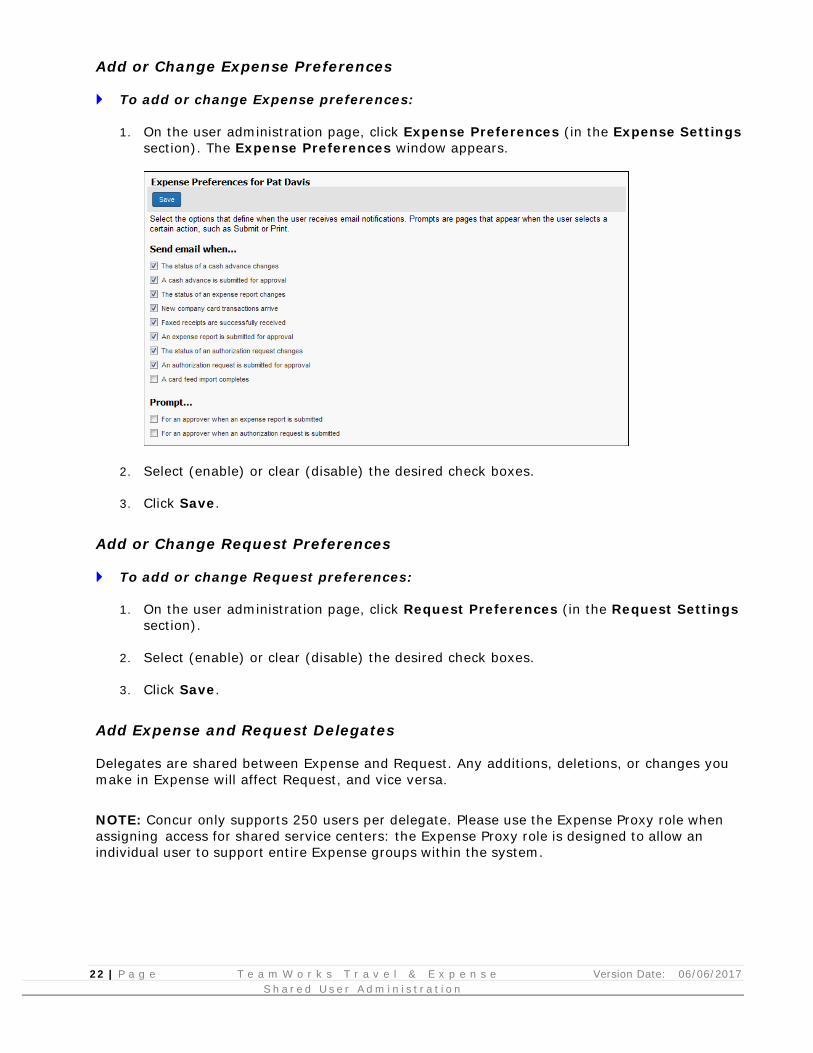
Add or Change Expense Preferences
To add or change Expense preferences:
1. On the user administration page, click Expense Preferences (in the Expense Settings section). The Expense Preferences window appears.
2. Select (enable) or clear (disable) the desired check boxes.
3. Click Save.
Add or Change Request Preferences
To add or change Request preferences:
1. On the user administration page, click Request Preferences (in the Request Settings section).
2. Select (enable) or clear (disable) the desired check boxes.
3. Click Save.
Add Expense and Request Delegates
Delegates are shared between Expense and Request. Any additions, deletions, or changes you make in Expense will affect Request, and vice versa.
NOTE: Concur only supports 250 users per delegate. Please use the Expense Proxy role when assigning access for shared service centers: the Expense Proxy role is designed to allow an individual user to support entire Expense groups within the system.
23 | P a g e T e a m W o r k s T r a v e l & E x p e n s e Version Date: 06/06/2017 S h a r e d U s e r A d m i n i s t r a t i o n
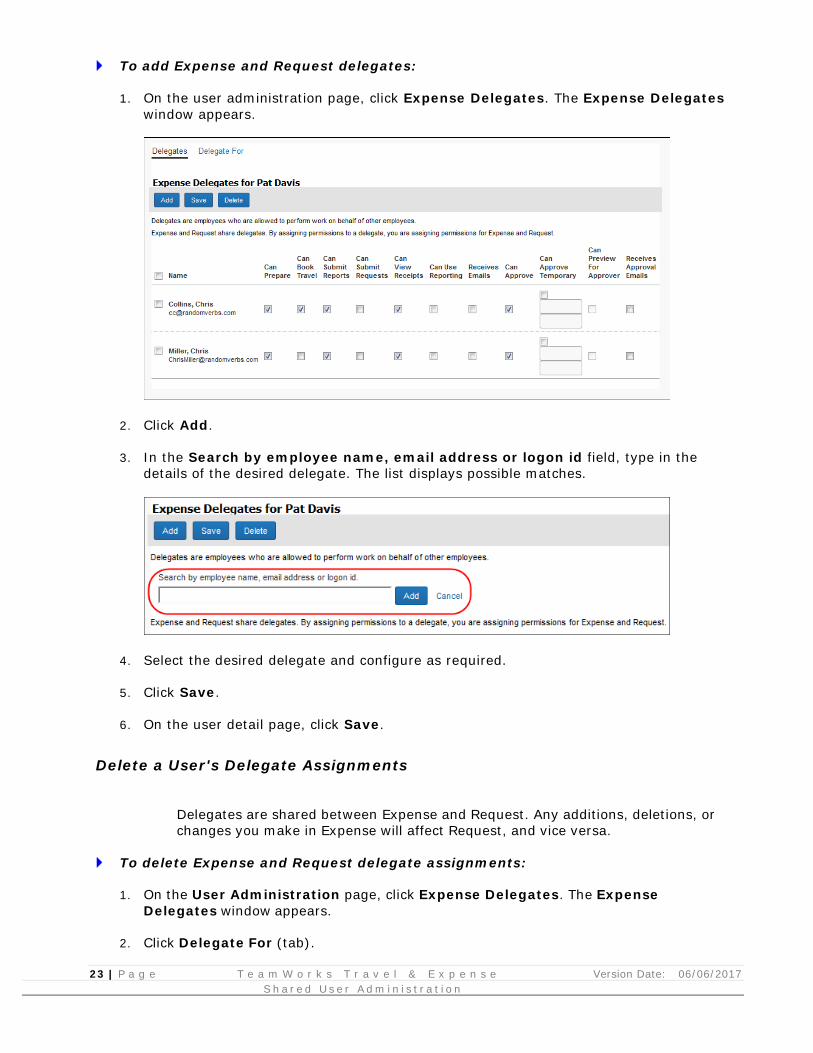
To add Expense and Request delegates:
1. On the user administration page, click Expense Delegates. The Expense Delegates window appears.
2. Click Add.
3. In the Search by employee name, email address or logon id field, type in the details of the desired delegate. The list displays possible matches.
4. Select the desired delegate and configure as required.
5. Click Save.
6. On the user detail page, click Save.
Delete a User's Delegate Assignments
Delegates are shared between Expense and Request. Any additions, deletions, or changes you make in Expense will affect Request, and vice versa.
To delete Expense and Request delegate assignments:
1. On the User Administration page, click Expense Delegates. The Expense Delegates window appears.
2. Click Delegate For (tab).
24 | P a g e T e a m W o r k s T r a v e l & E x p e n s e Version Date: 06/06/2017 S h a r e d U s e r A d m i n i s t r a t i o n
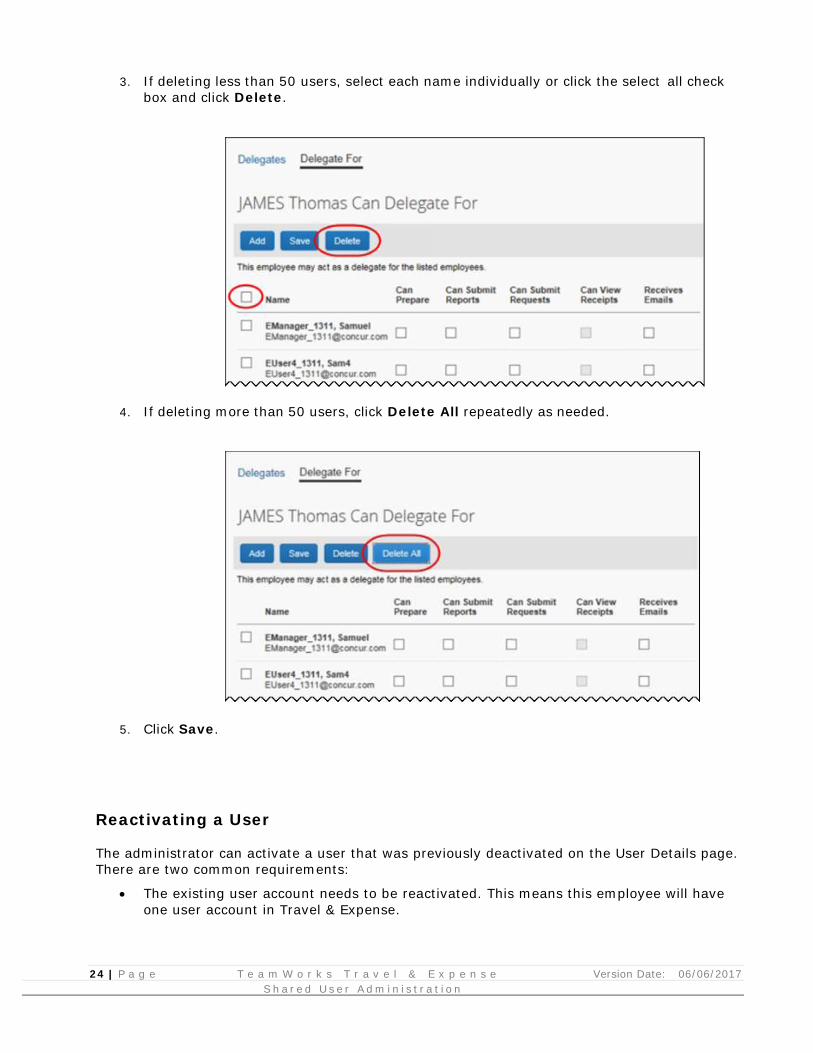
3. If deleting less than 50 users, select each name individually or click the select all check
box and click Delete.
4. If deleting more than 50 users, click Delete All repeatedly as needed.
5. Click Save.
Reactivating a User
The administrator can activate a user that was previously deactivated on the User Details page. There are two common requirements:
• The existing user account needs to be reactivated. This means this employee will have one user account in Travel & Expense.
25 | P a g e T e a m W o r k s T r a v e l & E x p e n s e Version Date: 06/06/2017 S h a r e d U s e r A d m i n i s t r a t i o n
• A new user account needs to be created, using the original login and email address but keeping the original, now deactivated user. This means this employee will have two user accounts in Travel & Expense.
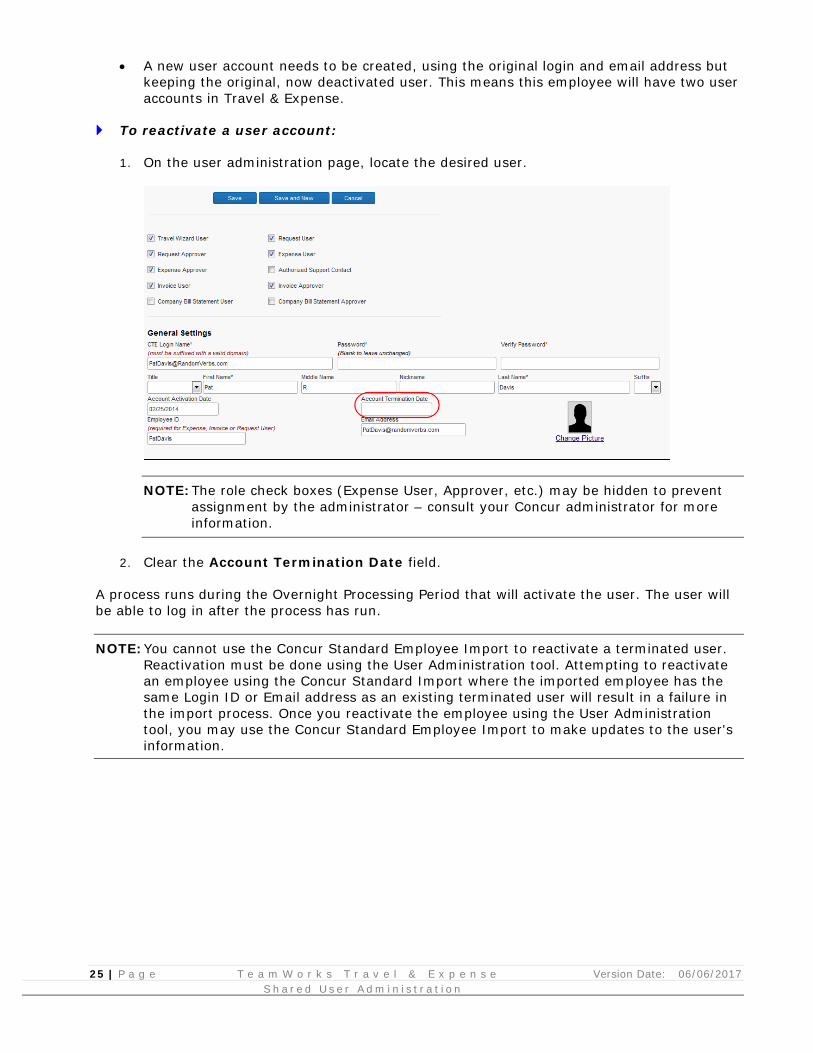
To reactivate a user account:
1. On the user administration page, locate the desired user.
NOTE: The role check boxes (Expense User, Approver, etc.) may be hidden to prevent assignment by the administrator – consult your Concur administrator for more information.
2. Clear the Account Termination Date field.
A process runs during the Overnight Processing Period that will activate the user. The user will be able to log in after the process has run.
NOTE: You cannot use the Concur Standard Employee Import to reactivate a terminated user. Reactivation must be done using the User Administration tool. Attempting to reactivate an employee using the Concur Standard Import where the imported employee has the same Login ID or Email address as an existing terminated user will result in a failure in the import process. Once you reactivate the employee using the User Administration tool, you may use the Concur Standard Employee Import to make updates to the user's information.
26 | P a g e T e a m W o r k s T r a v e l & E x p e n s e Version Date: 06/06/2017 S h a r e d U s e r A d m i n i s t r a t i o n
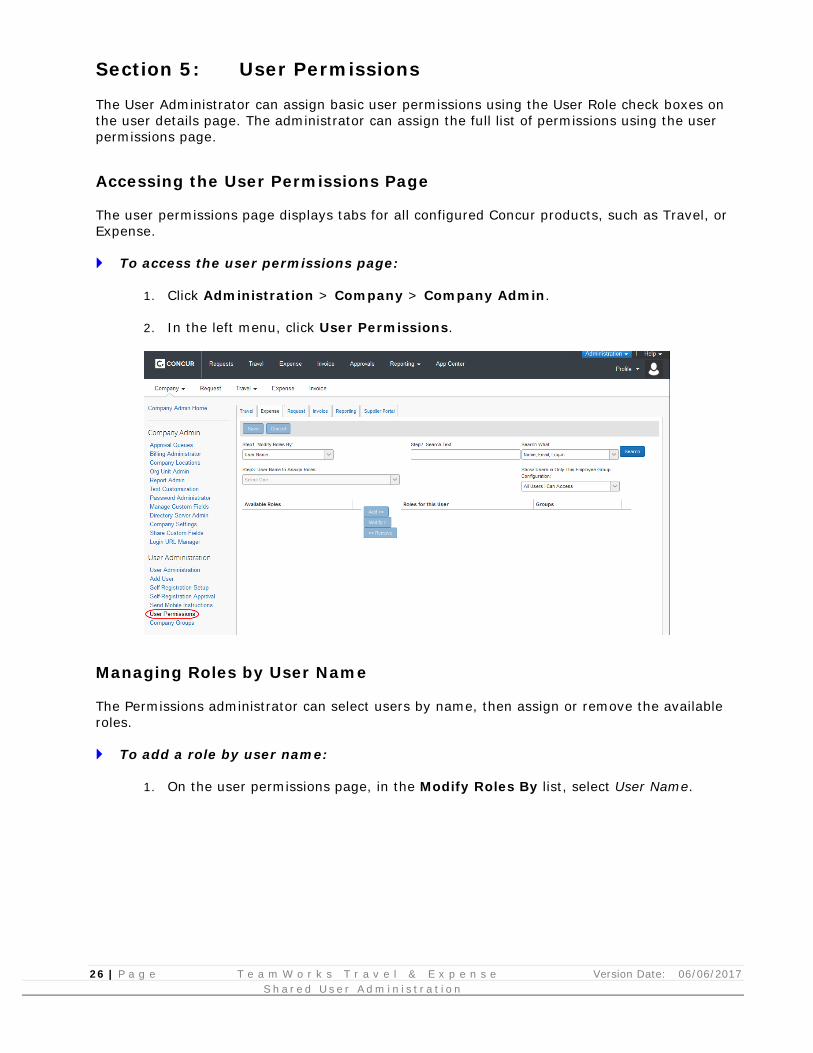
Section 5: User Permissions
The User Administrator can assign basic user permissions using the User Role check boxes on the user details page. The administrator can assign the full list of permissions using the user permissions page.
Accessing the User Permissions Page
The user permissions page displays tabs for all configured Concur products, such as Travel, or Expense.
To access the user permissions page:
1. Click Administration > Company > Company Admin.
2. In the left menu, click User Permissions.
Managing Roles by User Name
The Permissions administrator can select users by name, then assign or remove the available roles.
To add a role by user name:
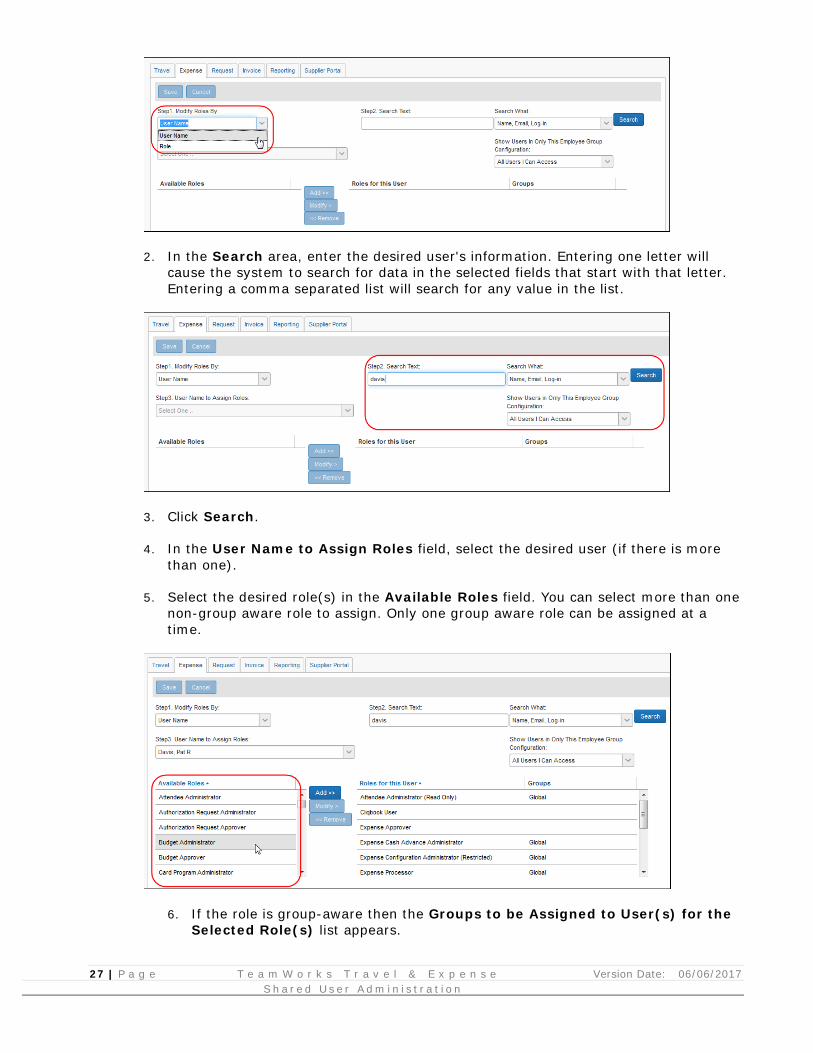
1. On the user permissions page, in the Modify Roles By list, select User Name.
27 | P a g e T e a m W o r k s T r a v e l & E x p e n s e Version Date: 06/06/2017 S h a r e d U s e r A d m i n i s t r a t i o n
2. In the Search area, enter the desired user's information. Entering one letter will cause the system to search for data in the selected fields that start with that letter. Entering a comma separated list will search for any value in the list.
3. Click Search.
4. In the User Name to Assign Roles field, select the desired user (if there is more than one).
5. Select the desired role(s) in the Available Roles field. You can select more than one non-group aware role to assign. Only one group aware role can be assigned at a time.
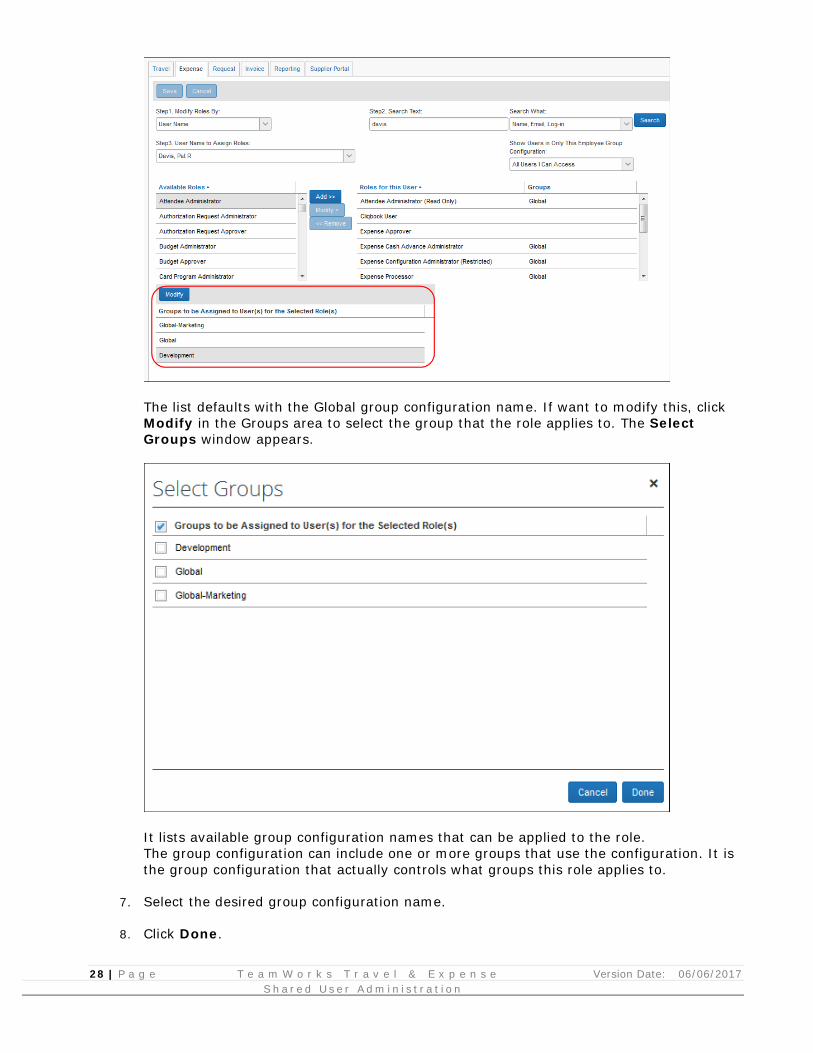
6. If the role is group-aware then the Groups to be Assigned to User(s) for the Selected Role(s) list appears.
28 | P a g e T e a m W o r k s T r a v e l & E x p e n s e Version Date: 06/06/2017 S h a r e d U s e r A d m i n i s t r a t i o n
The list defaults with the Global group configuration name. If want to modify this, click Modify in the Groups area to select the group that the role applies to. The Select Groups window appears.
It lists available group configuration names that can be applied to the role. The group configuration can include one or more groups that use the configuration. It is the group configuration that actually controls what groups this role applies to.
7. Select the desired group configuration name.
8. Click Done.
29 | P a g e T e a m W o r k s T r a v e l & E x p e n s e Version Date: 06/06/2017 S h a r e d U s e r A d m i n i s t r a t i o n
9. Click Add to assign the role(s) to the user.
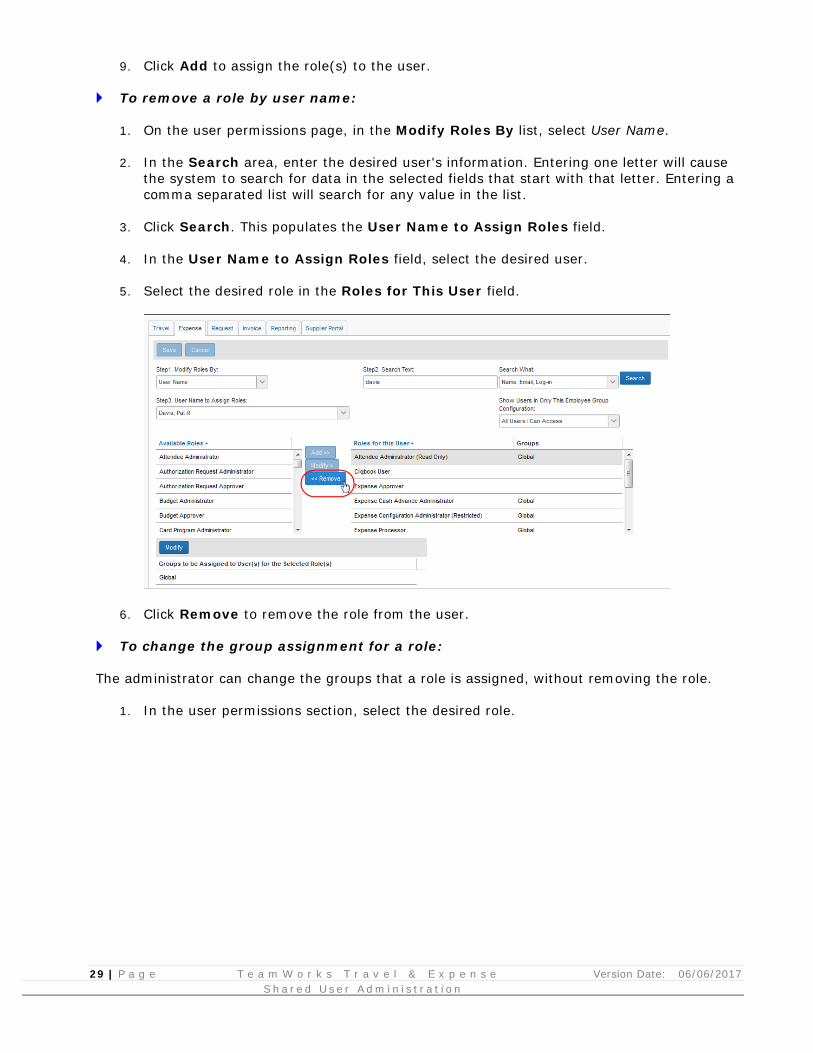
To remove a role by user name:
1. On the user permissions page, in the Modify Roles By list, select User Name.
2. In the Search area, enter the desired user's information. Entering one letter will cause the system to search for data in the selected fields that start with that letter. Entering a comma separated list will search for any value in the list.
3. Click Search. This populates the User Name to Assign Roles field.
4. In the User Name to Assign Roles field, select the desired user.
5. Select the desired role in the Roles for This User field.
6. Click Remove to remove the role from the user.
To change the group assignment for a role:
The administrator can change the groups that a role is assigned, without removing the role.
1. In the user permissions section, select the desired role.
30 | P a g e T e a m W o r k s T r a v e l & E x p e n s e Version Date: 06/06/2017 S h a r e d U s e r A d m i n i s t r a t i o n
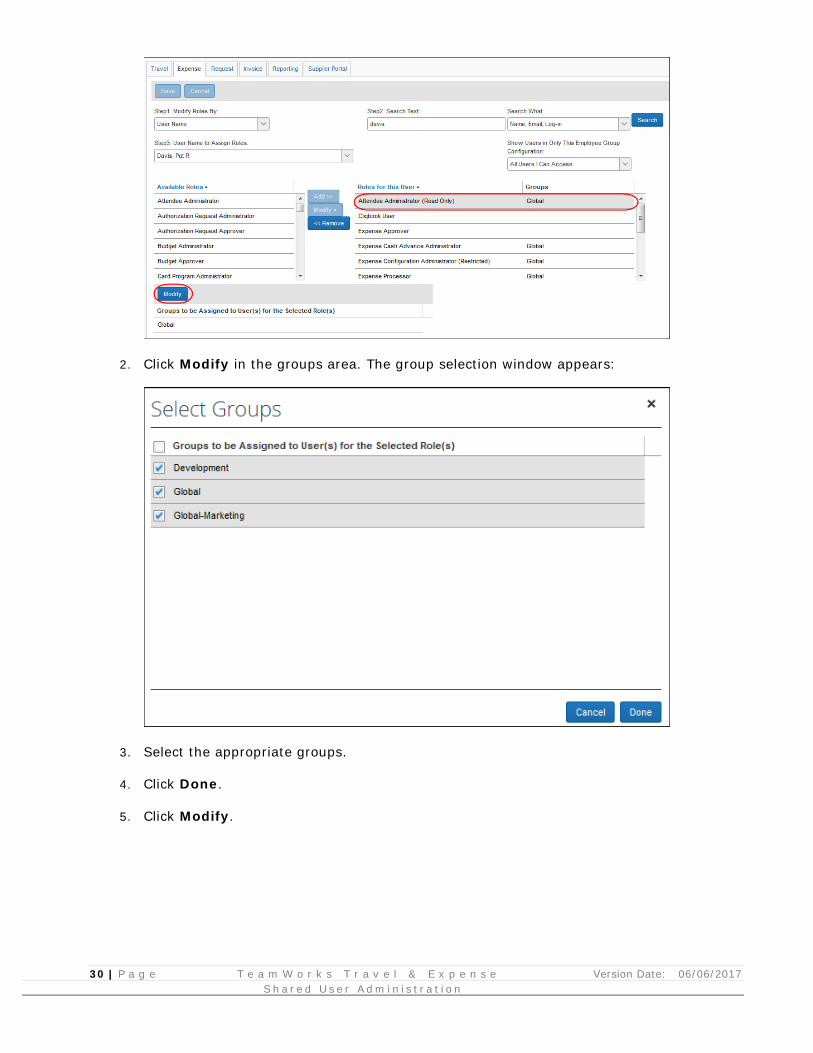
2. Click Modify in the groups area. The group selection window appears:
3. Select the appropriate groups.
4. Click Done.
5. Click Modify.
31 | P a g e T e a m W o r k s T r a v e l & E x p e n s e Version Date: 06/06/2017 S h a r e d U s e r A d m i n i s t r a t i o n
6. Click Save.
Managing Roles by Role
The Permissions administrator can select roles by name, view all users with the role, and assign users to the role.
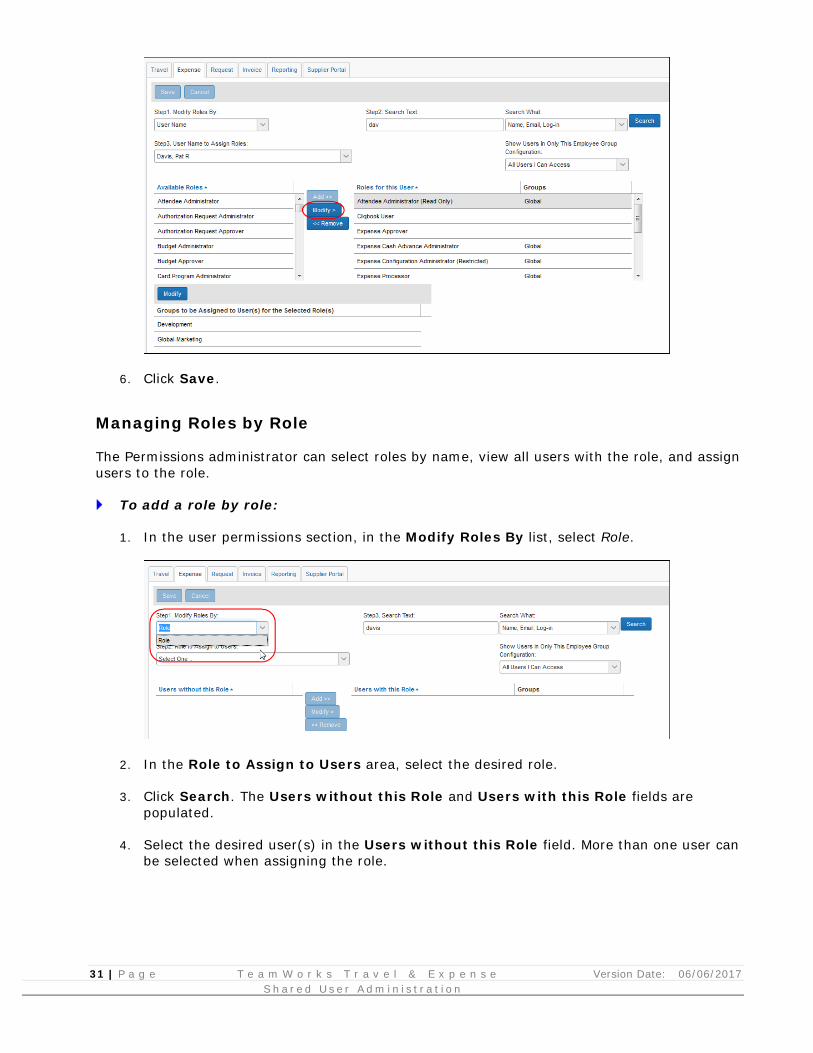
To add a role by role:
1. In the user permissions section, in the Modify Roles By list, select Role.
2. In the Role to Assign to Users area, select the desired role.
3. Click Search. The Users without this Role and Users with this Role fields are populated.
4. Select the desired user(s) in the Users without this Role field. More than one user can be selected when assigning the role.
32 | P a g e T e a m W o r k s T r a v e l & E x p e n s e Version Date: 06/06/2017 S h a r e d U s e r A d m i n i s t r a t i o n
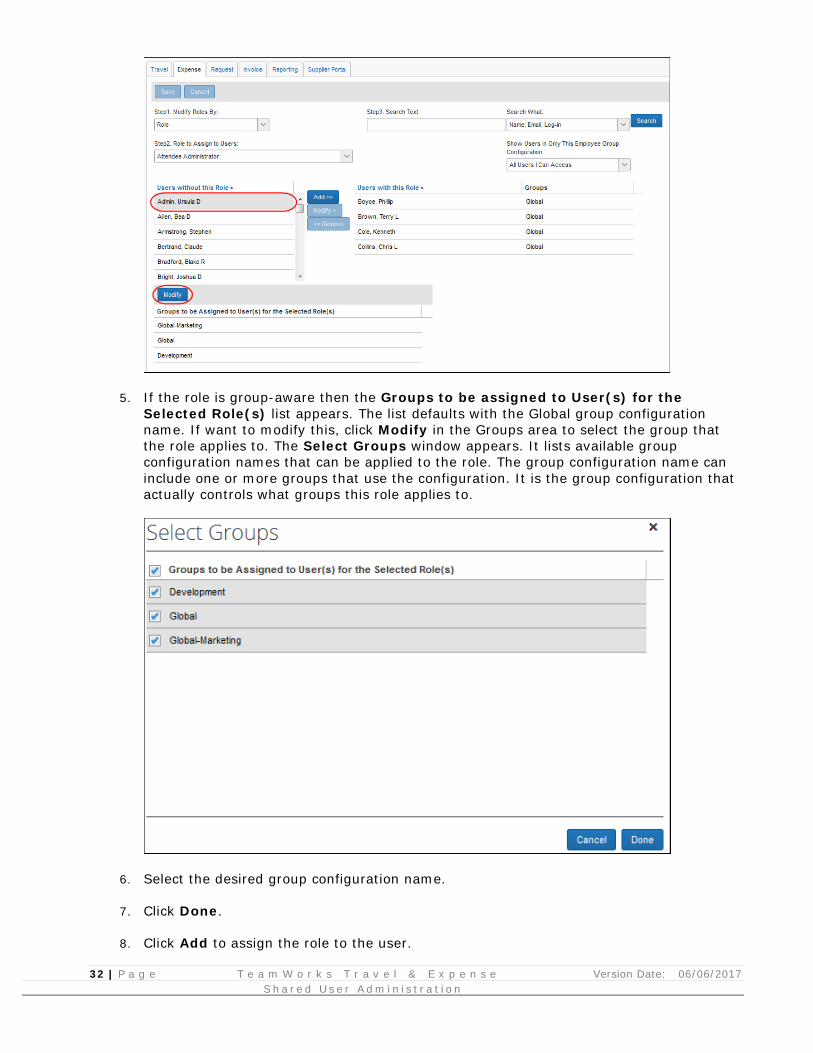
5. If the role is group-aware then the Groups to be assigned to User(s) for the Selected Role(s) list appears. The list defaults with the Global group configuration name. If want to modify this, click Modify in the Groups area to select the group that the role applies to. The Select Groups window appears. It lists available group configuration names that can be applied to the role. The group configuration name can include one or more groups that use the configuration. It is the group configuration that actually controls what groups this role applies to.
6. Select the desired group configuration name.
7. Click Done.
8. Click Add to assign the role to the user.
33 | P a g e T e a m W o r k s T r a v e l & E x p e n s e Version Date: 06/06/2017 S h a r e d U s e r A d m i n i s t r a t i o n
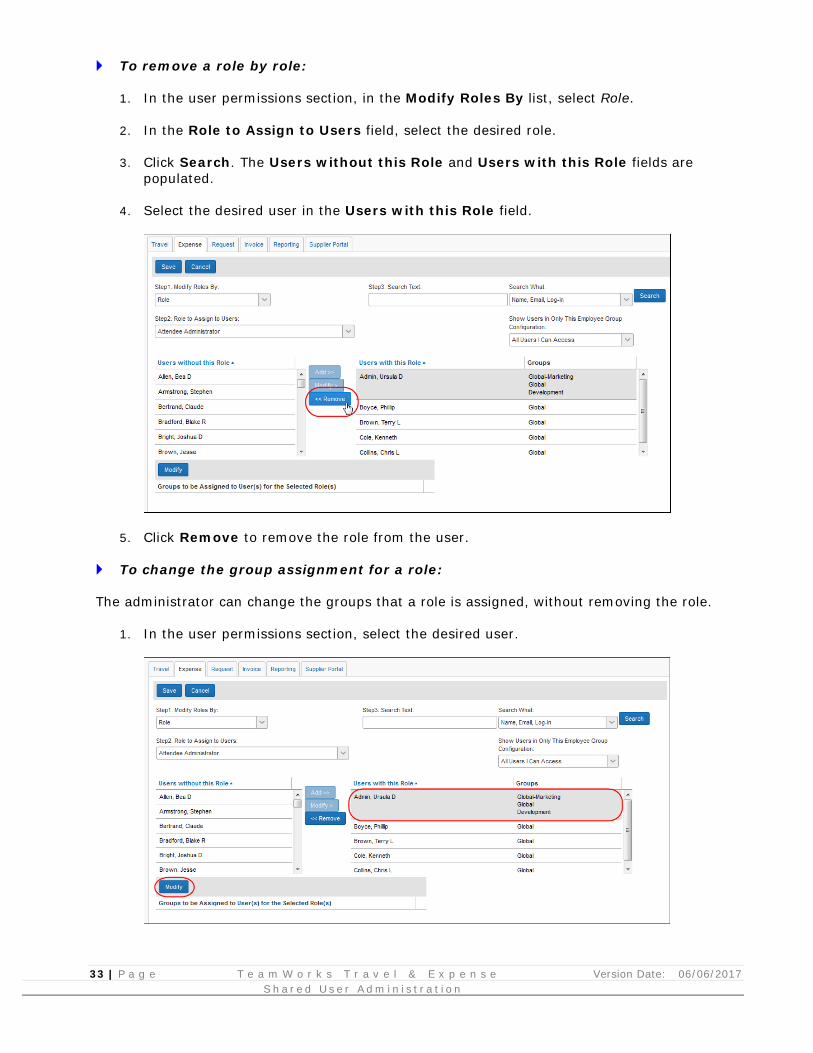
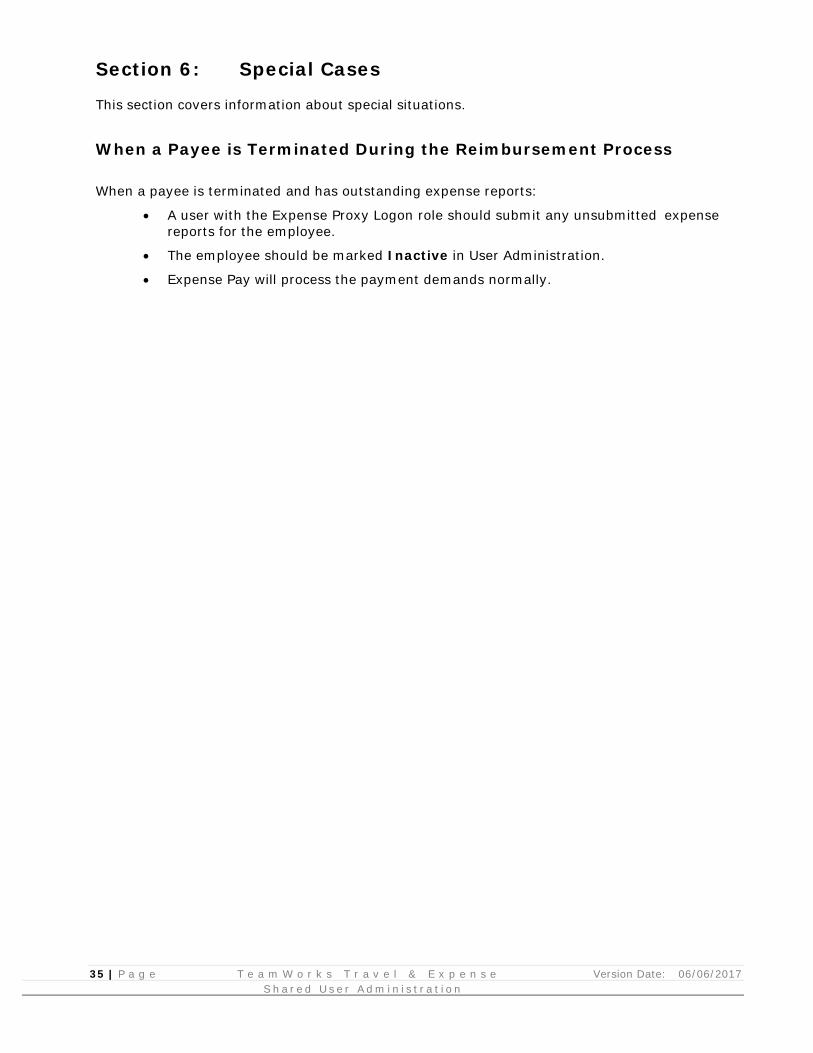
To remove a role by role:
1. In the user permissions section, in the Modify Roles By list, select Role.
2. In the Role to Assign to Users field, select the desired role.
3. Click Search. The Users without this Role and Users with this Role fields are populated.
4. Select the desired user in the Users with this Role field.
5. Click Remove to remove the role from the user.
To change the group assignment for a role:
The administrator can change the groups that a role is assigned, without removing the role.
1. In the user permissions section, select the desired user.
34 | P a g e T e a m W o r k s T r a v e l & E x p e n s e Version Date: 06/06/2017 S h a r e d U s e r A d m i n i s t r a t i o n
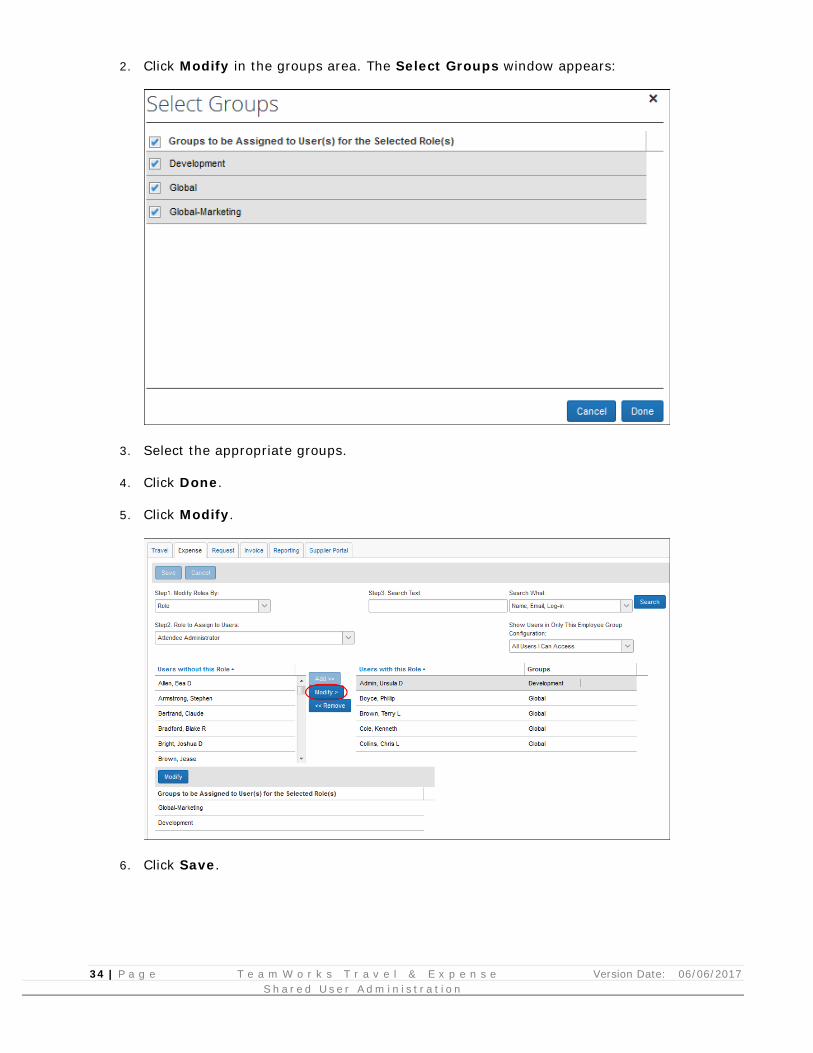
2. Click Modify in the groups area. The Select Groups window appears:
3. Select the appropriate groups.
4. Click Done.
5. Click Modify.
6. Click Save.
35 | P a g e T e a m W o r k s T r a v e l & E x p e n s e Version Date: 06/06/2017 S h a r e d U s e r A d m i n i s t r a t i o n
Section 6: Special Cases
This section covers information about special situations.
When a Payee is Terminated During the Reimbursement Process
When a payee is terminated and has outstanding expense reports:
• A user with the Expense Proxy Logon role should submit any unsubmitted expense reports for the employee.
• The employee should be marked Inactive in User Administration.
• Expense Pay will process the payment demands normally.