Embed Size (px)
Citation preview
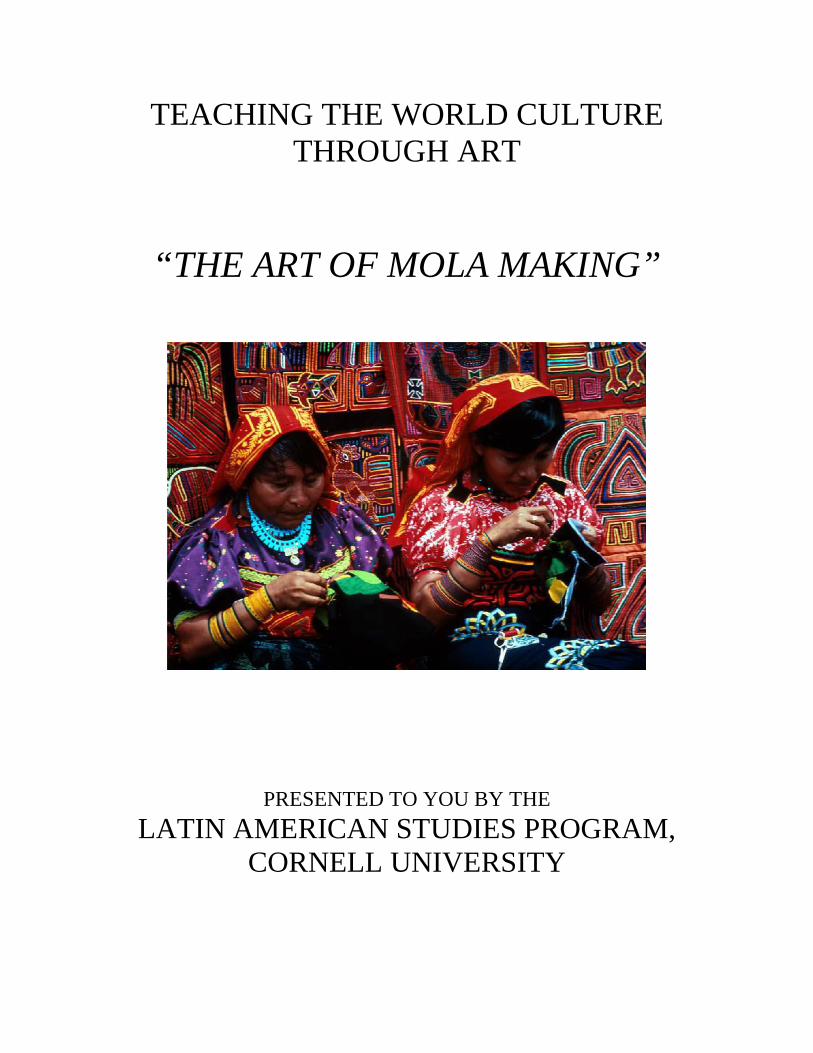
TEACHING THE WORLD CULTURE THROUGH ART
“THE ART OF MOLA MAKING”
PRESENTED TO YOU BY THE LATIN AMERICAN STUDIES PROGRAM,
CORNELL UNIVERSITY
The Art of Mola Making Level-Elementary 2 Latin American Studies Program
MOLAS-ELEMENTARY LEVEL LESSON PLAN
Subject of the Lesson: Mola Creation Theme(s) of the Lesson: Latin American art, personal representation through art Lesson Goals: The goals of this project are to help students develop a sense of aesthetic, to learn how to create art that is personally significant and expressive, and to expose the students to the rich culture and heritage of Latin America through a hands-on approach. New York State Standards:
• Standard 4: Understanding the Cultural Contributions of the Arts o Students will develop an understanding of the personal and cultural forces
that shape artistic communication and how the arts in turn shape the diverse cultures of past and present society.
• Grade 5 Social Studies: History of the United States, Canada, and Latin America
o Different ethnic, national, and religious groups, including Native American Indians, have contributed to the cultural diversity of these nations and regions by sharing their customs, traditions, beliefs, ideas, and languages.
Organization and Timeline: This project should be completed in 3 days Day 1
• Introduce Kuna culture and molas. • Explain significance of mola and its representation of everyday objects. • Show your pre-made construction paper mola and explain its personal
significance. • Students start brainstorming ideas and drawing them on paper • Students decide on a personal design idea for the project • Explain how to make a mola • Students cut out the first layer of their molas
Day 2 • Students continue to cut out their molas • After design is complete, students glue it down
Day 3 • Students present their mola and its personal significance.
Interdisciplinary Component: Can be used in conjunction with Latin America social studies unit. Resources Needed and Preparation:
• Scrap Paper • Construction Paper (at least red, black and orange) • Pencil
The Art of Mola Making Level-Elementary 3 Latin American Studies Program
• Scissors • Glue
Teacher Resources:
• Background Information about Molas: o http://en.wikipedia.org/wiki/Mola_(art_form)
• How to Make a Mola Resources: o http://www.charlottepatera.com/html/molashowmade.html (more advanced) o http://www.dickblick.com/multicultural/mola/ o http://thorup.com/makeamola.html o http://www.yale.edu/ynhti/curriculum/units/1987/1/87.01.02.x.html#b
• Examples of Grade 5 Student Molas: o http://www.hipark.austin.isd.tenet.edu/special/kidstudio/molas/molas.html
Content Knowledge and Skills: Students will need to know how to cut paper and basic drawing/sketching skills. Introductory “Hook”: Show powerpoint presentation (via digital media or paper) of molas, with Kuna ones on one side and student-made ones on the other. Explain a little bit about the significance of molas as a means for showing others how you see the world. This will transition into handing out the attached project sheet. Lesson Content: For the teacher:
1. Make a simple construction paper mola to show to the class as an example. 2. Explain a brief history of the mola in Panama and Colombia and how it is an
artistic representation of the everyday objects of the Kuna culture. For the students:
3. Sketch a design to be used for the mola on the scrap paper. 4. Trace or copy it onto construction paper. 5. Cut out the shapes. 6. Arrange the shapes in an attractive design with a solid piece of construction paper
as the background. 7. Using the shapes as a template, design a second layer using the scraps from before
and/or new pieces of paper to introduce new colors. This is where you can have a lot of fun and be creative!
8. Once you have the design you want, glue the pieces down and you have your mola!
**Usable Project Sheet attached** Conclusion: The lesson goals will be emphasized by having presentations at the end of the project. These presentations should be well thought out so that the student has the opportunity to really reflect on the significance of his/her mola. The teacher will reiterate the goals by continuously encouraging the students to create a project that is personally meaningful. Also the teacher will continuously emphasize that the ancient craft of mola making has been a way for the Kuna people to express themselves for generations.

The Art of Mola Making Level-Elementary 4 Latin American Studies Program
Evaluation: Through presentation you evaluate if the students understood the lesson goals by using the attached evaluation sheet.

The Art of Mola Making Level-Elementary 5 Latin American Studies Program
INTRODUCTORY HOOK SLIDES (available in PowerPoint format)
The Art of Mola Making Level-Elementary 6 Latin American Studies Program
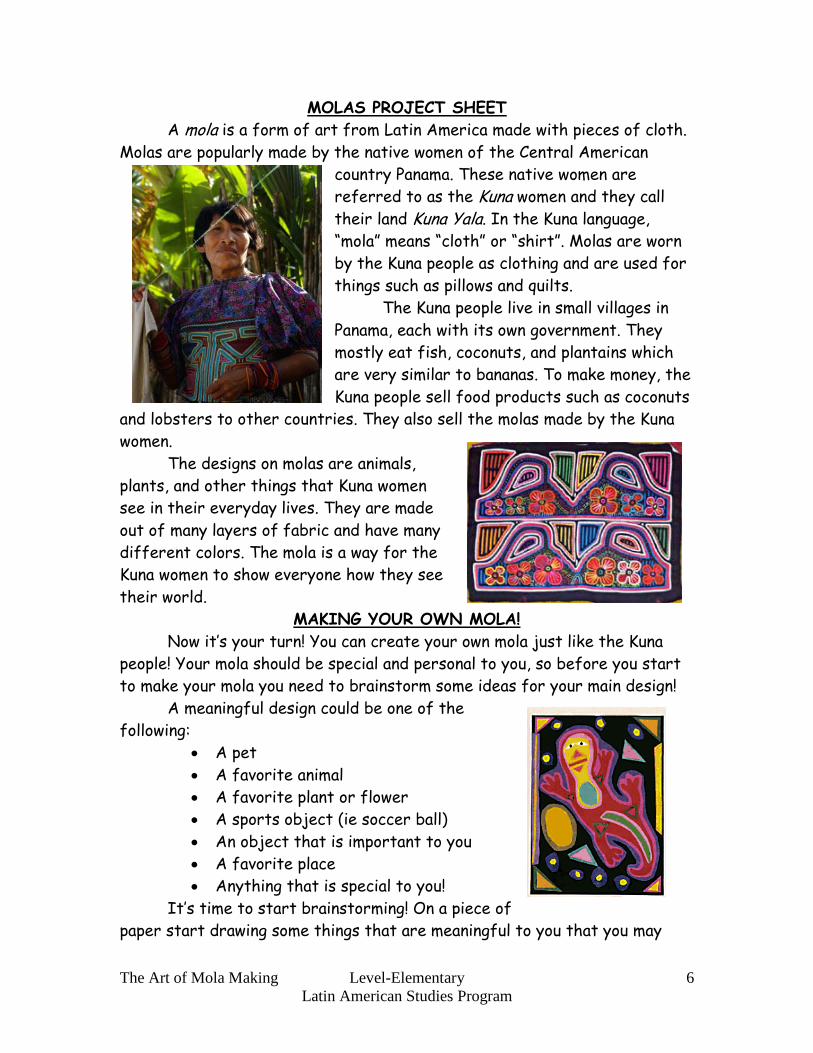
A mola is a form of art from Latin America made with pieces of cloth. Molas are popularly made by the native women of the Central American
country Panama. These native women are referred to as the Kuna women and they call their land Kuna Yala. In the Kuna language, “mola” means “cloth” or “shirt”. Molas are worn by the Kuna people as clothing and are used for things such as pillows and quilts.
MOLAS PROJECT SHEET
The Kuna people live in small villages in Panama, each with its own government. They mostly eat fish, coconuts, and plantains which are very similar to bananas. To make money, the Kuna people sell food products such as coconuts
and lobsters to other countries. They also sell the molas made by the Kuna women. The designs on molas are animals, plants, and other things that Kuna women see in their everyday lives. They are made out of many layers of fabric and have many different colors. The mola is a way for the Kuna women to show everyone how they see their world.
Now it’s your turn! You can create your own mola just like the Kuna people! Your mola should be special and personal to you, so before you start to make your mola you need to brainstorm some ideas for your main design!
MAKING YOUR OWN MOLA!
A meaningful design could be one of the following:
• A pet • A favorite animal • A favorite plant or flower • A sports object (ie soccer ball) • An object that is important to you • A favorite place • Anything that is special to you!
It’s time to start brainstorming! On a piece of paper start drawing some things that are meaningful to you that you may

The Art of Mola Making Level-Elementary 7 Latin American Studies Program
want as your main mola design! When you are done draw your final design in the box below:
Now that you have your main design, it’s time to start making your mola! Draw the above design on a piece of construction paper. Cut out the design. Do not throw away any piece of your construction paper.
Trace your design again and cut it out again, only this time bigger than before so that you can see it like a border. Glue these pieces together. You can do this as many times as you want! Paste your image to a whole piece of construction paper. This is now your template, or the image that you will work from to build your beautiful mola!
Now is the time for you go get creative. You have your mola template, and now you get to decorate it however you wish! The thing that makes molas so unique is that you use the negative of the design to create a shape and then decorate where the positive image would have been! Below is an example of another person’s mola and how it was created:
TIME TO GET CREATIVE!
OK! Now that you have seen how a mola is made, it’s your turn to make your special mola!

The Art of Mola Making Level-Elementary 8 Latin American Studies Program
EVALUATION Lesson Goals
1. to help students develop a sense of aesthetic :
2. to learn how to create works of art that are attractive as well as personally significant and expressive
3. to expose the students to the rich culture and heritage of Latin America through a hands-on approach
Evaluation for Goal 1
• Does the student’s project have aesthetic quality in terms of color composition? • Does the student’s project have a coherent composition of shapes? (i.e. do the
shapes fit in one another properly?) Evaluation for Goal 2
• Can the student explain the meaning behind his/her mola design during the presentation?
Evaluation for Goal 3
• Do the students seem to understand the relationship between their projects and the craft of the Kuna women?
Ask specific questions to the class such as, “Do you all see how the Kuna women use their molas to tell a story?

The Art of Mola Making Level-Middle School 9 Latin American Studies Program
MOLAS-MIDDLE SCHOOL LEVEL LESSON PLAN
Subject of the Lesson: Mola Creation Theme(s) of the Lesson: Latin American art, personal representation through art Lesson Goals: The goals of this project are to help students develop a sense of aesthetic including color harmony and consistency, to learn create art that is personally significant and expressive, and to expose the students to the rich culture and heritage of Latin America through a hands-on approach. New York State Standards:
• Standard 4: Understanding the Cultural Contributions of the Arts o Students will develop an understanding of the personal and cultural forces
that shape artistic communication and how the arts in turn shape the diverse cultures of past and present society.
• Grade 7/8 Social Studies: Geographic Factors Influence Culture o To identify and compare the physical, human, and cultural characteristics
of different regions and people o To understand the geography of settlement patterns and the development
of cultural patterns Organization and Timeline: This project should be completed in a maximum of 5 days Day 1
• Introduce Kuna culture and their use of molas. • Explain significance of mola and its representation of Kuna women’s perspective
on everyday objects. • Show your pre-made pillow mola and explain its personal significance for you. • Students start brainstorming ideas and drawing them on paper • Students decide on a personal design idea for the project • Explain how to make a mola • Students sketch their design ideas
Day 2 • Students continue sketching design ideas • After design is complete, students cut out the final design in cloth • Students begin to construct and glue their final cloth mola
Day 3 • Students continue gluing their mola design • After the mola design is complete, students sew it into a pillow case • Students stuff and close pillow case
Day 4 • Students continue to finish up, stuff and close pillow case • Presentations begin
Day 5 • Presentations continue (if needed)

The Art of Mola Making Level-Middle School 10 Latin American Studies Program
Interdisciplinary Component: Can be used in conjunction with Latin America social studies unit and home economics sewing unit. Resources Needed and Preparation:
• Scrap Paper • Construction Paper (at least red, black and orange) • Pencil • Scissors • Cloth (correlating to construction paper colors; good opportunity to use scrap
cloth materials to be recycled) • Fabric Glue • Needle • Thread
Teacher Resources:
• Background Information about Molas: o http://en.wikipedia.org/wiki/Mola_(art_form)
• How to Make a Mola Resources: o http://www.charlottepatera.com/html/molashowmade.html (more advanced) o http://www.dickblick.com/multicultural/mola/ o http://thorup.com/makeamola.html o http://www.yale.edu/ynhti/curriculum/units/1987/1/87.01.02.x.html#b
• Examples of Grade 5 Student Molas: o http://www.hipark.austin.isd.tenet.edu/special/kidstudio/molas/molas.html
Content Knowledge and Skills: Students will need to know the difference between the positive and negative parts of an image, how to cut paper, basic drawing/sketching skills, basic sewing skills, and have a basic concept of design and aesthetic composition. Introductory “Hook”: Show powerpoint presentation (via digital media or paper) of the elements of Kuna Yala and its mola interpretation. Explain a little bit about the significance of molas as a means for showing others how you see the world. This will transition into handing out the attached project sheet. Lesson Content: For the teacher:
1. Pre-size and pre-cut background cloth to be used by the students; at least 2 pieces per student so that they may complete a pillow.
2. Make a pillow mola to show to the class as an example. 3. Explain a brief history of the mola in Panama and Colombia and how it is an
artistic representation of how the Kuna women artisans see the everyday objects of the Kuna culture.
For the students: 4. Sketch a design to be used for the mola on the scrap paper. 5. Trace or copy it onto cloth.

The Art of Mola Making Level-Middle School 11 Latin American Studies Program
6. Cut out the shapes. 7. Arrange the negative shapes in an attractive design with a pre-sized and pre-cut
cloth piece for the background. 8. Using the negative shapes as a template, design a second layer to fit into the
positive spaces using the scraps from before and/or new pieces of paper to introduce new colors. This is where you can have a lot of fun and be creative!
9. Once you have the design you want, glue the design together using fabric glue. 10. Sew the mola design into a pillow using another piece of pre-sized pre-cut cloth.
**Usable Project Sheet attached** Conclusion: The lesson goals will be emphasized by having presentations at the end of the project. These presentations should be well thought out so that the student has the opportunity to really reflect on the significance of his/her mola. The teacher will reiterate the goals by continuously encouraging the students to create a project that is personally meaningful and by emphasizing that the ancient craft of mola making has been a way for the Kuna people to express themselves for generations. Evaluation: Through presentation you evaluate if the students understood the lesson goals by using the attached evaluation sheet.

The Art of Mola Making Level-Middle School 12 Latin American Studies Program
INTRODUCTORY HOOK SLIDES (available in PowerPoint format)
The Art of Mola Making Level-Middle School 13 Latin American Studies Program
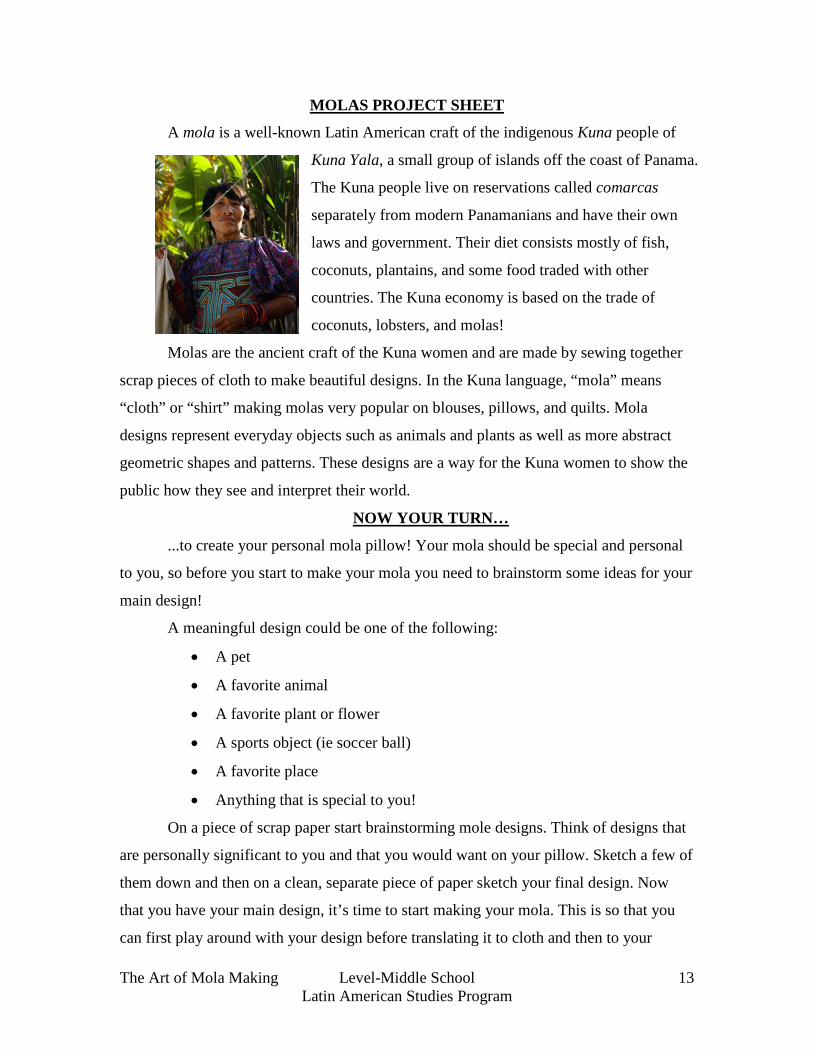
A mola is a well-known Latin American craft of the indigenous Kuna people of
Kuna Yala, a small group of islands off the coast of Panama.
The Kuna people live on reservations called comarcas
separately from modern Panamanians and have their own
laws and government. Their diet consists mostly of fish,
coconuts, plantains, and some food traded with other
countries. The Kuna economy is based on the trade of
coconuts, lobsters, and molas!
MOLAS PROJECT SHEET
Molas are the ancient craft of the Kuna women and are made by sewing together
scrap pieces of cloth to make beautiful designs. In the Kuna language, “mola” means
“cloth” or “shirt” making molas very popular on blouses, pillows, and quilts. Mola
designs represent everyday objects such as animals and plants as well as more abstract
geometric shapes and patterns. These designs are a way for the Kuna women to show the
public how they see and interpret their world.
...to create your personal mola pillow! Your mola should be special and personal
to you, so before you start to make your mola you need to brainstorm some ideas for your
main design!
NOW YOUR TURN…
A meaningful design could be one of the following:
• A pet
• A favorite animal
• A favorite plant or flower
• A sports object (ie soccer ball)
• A favorite place
• Anything that is special to you!
On a piece of scrap paper start brainstorming mole designs. Think of designs that
are personally significant to you and that you would want on your pillow. Sketch a few of
them down and then on a clean, separate piece of paper sketch your final design. Now
that you have your main design, it’s time to start making your mola. This is so that you
can first play around with your design before translating it to cloth and then to your
The Art of Mola Making Level-Middle School 14 Latin American Studies Program
pillow. Draw your design on a piece of fabric and cut it out. Do not throw away any piece
of your construction paper.
Paste the negative image (not the shape you cut out but the background) to
another piece of cloth and retrace it, only this time a different size so that you can see it
from behind your original shape or vice-versa, forming a border. Repeat this as many
times as you would like. This is now your template, or the image that you will work from
to build your final design.
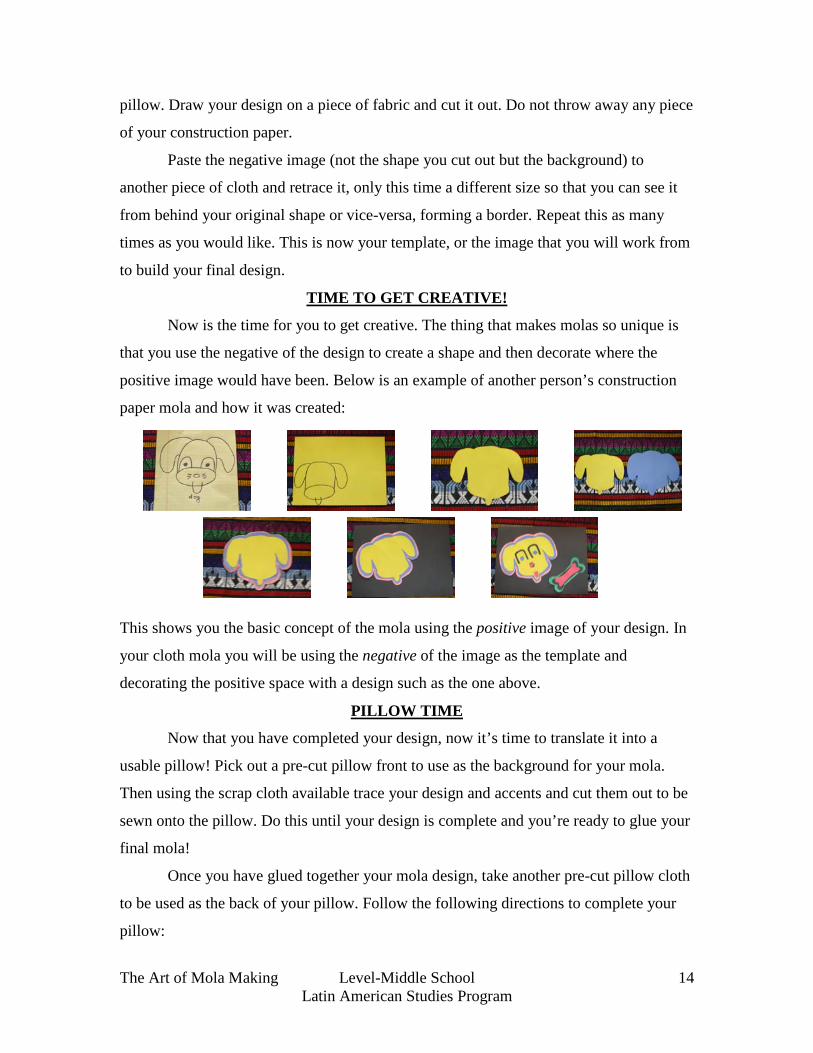
Now is the time for you to get creative. The thing that makes molas so unique is
that you use the negative of the design to create a shape and then decorate where the
positive image would have been. Below is an example of another person’s construction
paper mola and how it was created:
TIME TO GET CREATIVE!
This shows you the basic concept of the mola using the positive image of your design. In
your cloth mola you will be using the negative of the image as the template and
decorating the positive space with a design such as the one above.
Now that you have completed your design, now it’s time to translate it into a
usable pillow! Pick out a pre-cut pillow front to use as the background for your mola.
Then using the scrap cloth available trace your design and accents and cut them out to be
sewn onto the pillow. Do this until your design is complete and you’re ready to glue your
final mola!
PILLOW TIME
Once you have glued together your mola design, take another pre-cut pillow cloth
to be used as the back of your pillow. Follow the following directions to complete your
pillow:

The Art of Mola Making Level-Middle School 15 Latin American Studies Program
1. Take the cloth and place the mola piece down so that the front is touching the
other piece of cloth.
2. Sew three sides together.
3. Turn the pillow right side out and stuff with the material provided.
4. When you're finished stuffing the pillow, sew the fourth side closed.

The Art of Mola Making Level-Middle School 16 Latin American Studies Program
EVALUATION
• The goals of this project are to help students develop a sense of aesthetic including color harmony and consistency,
Lesson Goals:
• to learn how to create works of art that are attractive as well as personally significant and expressive,
• to expose the students to the rich culture and heritage of Latin America through a hands-on approach.
Goal 1
• Do the colors and patterns come together to produce an aesthetically pleasing product?
Goal 2
• Does the student’s explanation show self-reflection and personal significance? Goal 3
• Does the student’s final product show and understanding of the use of molas in the Kuna culture?
o Is the image one from the student’s everyday environment? o Does the student seem to have an understanding of the work that goes into
making a mola?

The Art of Mola Making Level-High School 17 Latin American Studies Program
MOLAS-HIGH SCHOOL LEVEL LESSON PLAN
Subject of the Lesson: Mola Creation Theme(s) of the Lesson: Latin American art, personal representation through art Lesson Goals: The goals of this project are to expose the students to the rich culture and heritage of Latin America through a hands-on approach, to encourage self-reflection, to explore a wide variety of artistic mediums, and to have the students take the basic concept of layering and use it to express personal point of view of the surrounding environment through creative artistic means. New York State Standards:
• Standard 4: Understanding the Cultural Contributions of the Arts o Students will develop an understanding of the personal and cultural forces
that shape artistic communication and how the arts in turn shape the diverse cultures of past and present society.
• Commencement-Major Sequence Visual Art Curriculum o Students will explore art and artifacts from various historical periods and
world cultures to discover the roles that art plays in the lives of people of a given time and place and to understand how the time and place influence the visual characteristics of the art work. Students will explore art to understand the social, cultural, and environmental dimensions of human society.
Organization and Timeline: This project should be completed in 2.5-3 weeks. Week 1 Day 1
• Introduce Kuna culture and their use of molas. • Explain significance of mola, its emphasis on layering and the negative image,
and its representation of Kuna women’s perspective on everyday objects. • Students research mola design and use, using both library and online resources,
and sketching examples in a notebook. Emphasize the versatility of use and variations of designs and the factors that contribute to these wide ranges of uses and designs. This should be started in class and be assigned as homework to be continued outside of class.
Day 2 • Students continue to research mola design/use and sketching in their notebooks. • Hand out project sheets and have students begin brainstorming ideas for project.
Day 3-5 • Continue with design and medium brainstorming. • Set up individual meetings with students to approve design and medium. • Start working on project.
Week 2 Day 1-5
The Art of Mola Making Level-High School 18 Latin American Studies Program
• Students continue working on project, setting up periodic checkpoints with the teacher to evaluate progress and direction and to give feedback
Week 3 Day 1-3
• Completed Projects and Personal Reflection Analysis due. • Presentations begin.
Day 4-5 • Presentations complete.
Interdisciplinary Component: Can be used in conjunction with Latin America social studies unit, any art history unit, and English curriculum units with an emphasis on self-reflection and individuality. Resources Needed and Preparation:
• Library and computer access • Sketch book • A variety of artistic mediums and corresponding supplies (painting, sewing, paper
mache, etc) • Reference materials on molas and the concept of layering in artistic expression
(optional but highly encouraged) Teacher Resources:
• Background Information about Molas complete with images: o http://en.wikipedia.org/wiki/Mola_(art_form) o http://en.wikipedia.org/wiki/Applique o Salvador, Mari Lyn
1997 The Art of Being Kuna - Layers of Meaning Among the Kuna of Panamá. Los Angeles: UCLA Fowler Museum of Cultural History
o http://benton.uconn.edu/molas/index.htm# o http://patriot.net/~kunamola/ o http://patriot.net/~kunamola/reading.html (possible references for the
classroom) o http://www.nmai.si.edu/exhibitions/the_art_of_being_kuna/eng/exhibit/index.
htm o http://www.quiltersmuse.com/Mola2.htm
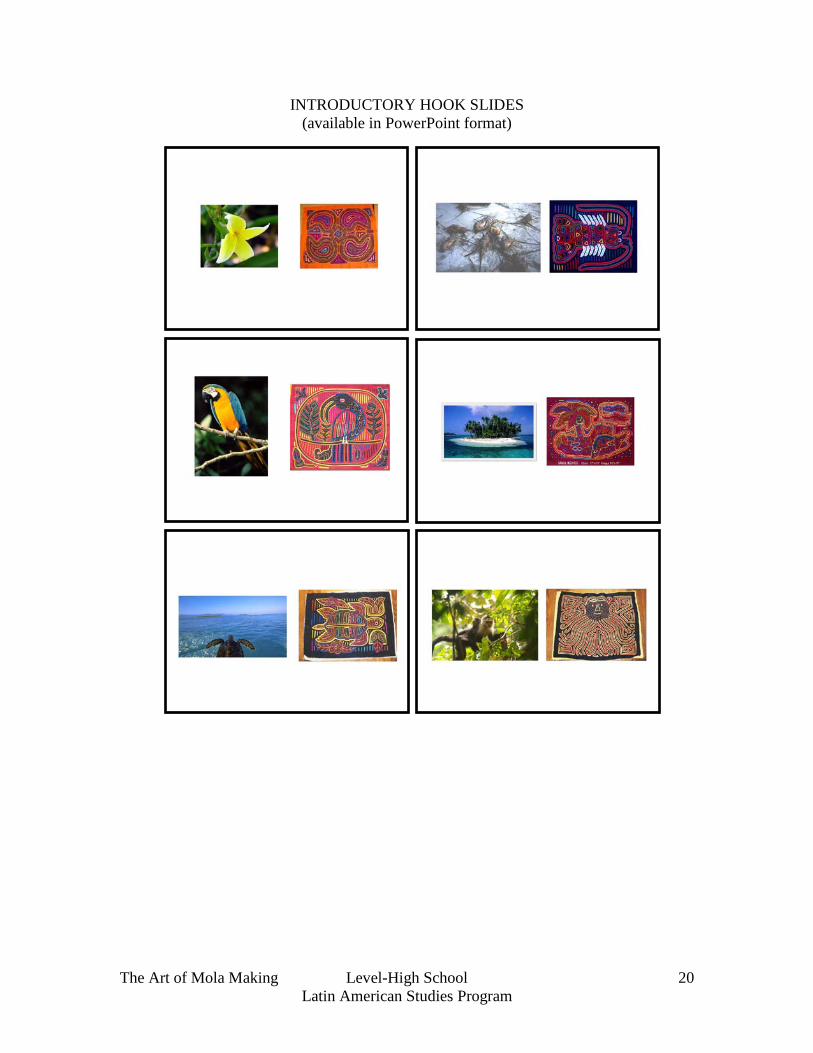
Content Knowledge and Skills: Students will need to be of advanced art level, to have advanced skills in sketching, to have prior experience with multiple mediums and mastery of at least one medium, to have prior experience with self-reflection and expressing it through an artistic medium, and to be well acquainted with library and online research. Introductory “Hook”: Put pictures of Kuna Yala environment up. Then show pictures of molas that represent what’s in those pictures (birds, animals, etc). This emphasizes molas as a vessel for personal expression of individual perspective on the surrounding environment.
The Art of Mola Making Level-High School 19 Latin American Studies Program
Lesson Content:
1. Introduction of Kuna culture and how molas are layers that each add to the whole and create a vessel for self expression and documentation of surrounding environment.
2. Library and computer research on mola design and meaning. 3. Students sketch personal mola designs, choose final design, and have it approved
by teacher 4. Explore different mediums (paint, sewing, paper mache, etc) that can be used in
layers 5. Choose a medium (or combination of mediums), write explanation of why
students chose the medium and have it approved by teacher 6. Start working on project 7. After project is complete students write an analysis of their project using the
guidelines mentioned in Appendix A **Usable Project Sheet attached**
Conclusion: The lesson goals will be emphasized by having presentations at the end of the project. These presentations should be well thought out so that the student has the opportunity to really reflect on the significance of his/her mola. The teacher will reiterate the goals by continuously encouraging the students to create a project that is personally meaningful, creative. The students must stay true to the nature of the project, which is using layers to express personal point of view about the surrounding environment. Evaluation: Through presentation you evaluate if the students understood the lesson goals by using the attached evaluation sheet.
The Art of Mola Making Level-High School 20 Latin American Studies Program
INTRODUCTORY HOOK SLIDES (available in PowerPoint format)
The Art of Mola Making Level-High School 21 Latin American Studies Program
MOLA PROJECT SHEET
For centuries the Kuna women of Kuna Yala located within the Panamanian borders have been creating molas, crafts made from material scraps using a reverse appliqué technique. Molas have been a way for the Kuna women to show the world how they see their reality through their own eyes and to be sure not to waste usable materials. The reverse appliqué technique is based on layers, with each layer on its own being insignificant but when put together tell a comprehensive story and image.
The purpose of this project is to understand the idea and concept of a mola, what it represents, and why it is a popular craft and then to translate this concept into your own personal “mola”. Your mola should be made from a medium (or a combination of mediums) that you feel best fits this project and that allows you to use layers to tell your story through one powerful image.
After the project is complete, you will be required to write a written analysis and do an oral presentation explaining your mola in terms of your personal reality and how it relates to the molas of the Kuna women. Guidelines for analysis and presentation:
1. What story does your mola tell about your reality? 2. Explain your layers and how each contributes to the whole of the image. 3. Explain the meaning of your mola in terms of your research done on the Kuna
culture. 4. Explain the significance of the medium(s) you chose.
Here is the timeline for this project: : Library research of molas and the Kuna culture : Final sketch due to be approved by teacher : Time to explore different mediums : Medium(s) much be finalized and approved by teacher : Time to work on project : Presentations begin; analysis due at time of presentation Your Presentation Date:
The Art of Mola Making Level-High School 22 Latin American Studies Program
EVALUATION Lesson Goals
• to expose the students to the rich culture and heritage of Latin America through a hands-on approach
:
• to encourage self-reflection, to explore a wide variety of artistic mediums • to have the students take the basic concept of layering and use it to express
personal point of view of the surrounding environment through creative artistic means
Goal 1:
• Does the student explain the meaning of his/her mola in terms of the research s/he did on the Kuna culture in an understanding way?
Goal 2
• Does the analysis and presentation answer questions 1 and 4 in the guidelines in a genuine and understanding manner?
Goal 3
• Does the answer to question 2 in the guidelines show the student understands the concept and significance of layers?