Embed Size (px)
Citation preview

Teaching the 4 Out/1 In Motion Offense
(With Drills) Overview This handout is a supplement to my other handouts on the 4 Out/1 In motion
offense. This handout deals with exactly how to implement the 4 Out Motion offense and
some drills to use in teaching it. As I have said before, the motion stuff I have is NOT the
end all be all in terms of motion offense. Most of it is stuff I have stolen over the years
from other coaches. There are many better teachers of the offense out there than I, so use
what I have, but seek out knowledge from other coaches as well. Some of the coaches I
have stolen from are Rick Majerus, Don Meyer, Bill Herrion, Bob Huggins, Bob Knight,
Jon Murphy (Seymour HS WI), and Todd Fergot (LaCrosse Central HS, WI - who I had
the privilege of working under). Most of my motion stuff has come from these great men.
The following hand out will be broken down into some theory on how to teach it (or how
I teach it) and then the drills that I use to teach it. I’m going to try to include some
teaching points. Hopefully this helps you and gives you a little more direction in teaching
it. Many of these things are things I believe I touched on in my first work, but am
reiterating and elaborating on more here.
Theory I personally like using the whole-part-whole method to teach the motion offense. I
think that players need to see the big picture before they do the breakdown drills; but at
the same time they need the breakdown drills to help them get better at the big picture.
They need to have in their mind exactly what the breakdown drill represents in the big
picture for it to click. So when I teach the offense, I will start out the year with some 5-0
stuff VERY early in the season (first practice and preseason), move to some breakdown
drills before we start the season, then as the season goes on introduce it again 5vs0 and
5vs5 just before the games starts while sprinkling in breakdown drills. As the season
progresses use 5v0, 5v5, and breakdown drills together.
When you are in practice working on your offense during the season, I really like
to go whole-part-whole in one practice. If for instance in a 2 hour practice you have 25
minutes set aside to work on your man to man motion offense for the day. You might do
5 minutes of 5v0 (whole), 10 minutes of breakdown drills (part), and then go 10 minutes
of 5v5 (whole) in a controlled setting to practice the offense. You can tweak the time
allotments for the three sessions as you see fit. I like doing the entire 25 minute sequence
right in a row. I feel that it helps players put the pieces together. Also, when you are
practicing your team defense, you can have your defenders go against your 4 Out so that
you are getting more reps on your motion. It also makes it harder to play defense and will
improve your defense because there is no patter to “cheat” on or memorize. Another
thing to do with the offense is run it against 6 or 7 defenders to get your players really
good at making hard cuts and good screens to get open as well as read the defense. It will
also help your players to run this offense against pressure. If you go 6, have one player
constantly trapping the ball, if you go with 7 have one trapping and the other trying to
deny cutters and passes. I’ve found this very helpful in the past.
Something that I’ve heard lots of coaches talk about against motion is that they
don’t like the fact that some of their less talented players are always open, driving to the

basket, or taking the long shots. With motion you have to help your players define their
roles and who they are as players – help to raise their basketball IQs. Players should
know where their shots should be coming from and what type of player they are. Are they
a three point shooter? Are they a player that can drive? Should they be setting a lot of
screens? As a coach, you have to let your players know where they stand. If a player isn’t
a three point shooter, you have to let him know he’s not a three point shooter, and maybe
should be looking to get his points in the lane or inside the arc. If you have a kid that isn’t
a great ball handler, you have to let him know his role on the team isn’t driving to the
basket. You just have to teach players to use their heads when they are playing and know
their roles. For instance, if there are two players on the backside, one is a great shooter,
one is not, I would hope the backside action would result in the non shooter setting a
screen for the shooter. Just using some common sense is going to go a long way in
making this offense productive.
A note on practicing your motion offense 5-0. When you are doing this you really
should stress the same things you would in 5 on 5. It shouldn’t be approached as any
different or any more lax than you would in a game. Really stress players just making
those decisions and going with it. Also, it would not be a bad idea to run 5 on 0 as a
progression. Start with pass and cut, then pass and cut or screen, then pass and cut,
screen, or call for screen depending on what options you leave your players available.
Also introduce some backside actions. For posts have hold, then pop, then screen in and
out or something similar.
One of the biggest things to convey to your players when teaching this offense is
that they can NOT make a wrong decision. The only thing they can do wrong is not make
a decision, indecisiveness KILLS when you are running motion. Of course you want
them to make the right read on the cut off a screen or a cut to the basket, but if they don’t,
nothing is lost in the big picture. The flow of the offense will continue. But if they
hesitate too long coming off that screen because they are indecisive, that kills the flow
and kills the offense.
Teaching communication is also imperative to run the offense. Teach them to talk
and communicate verbally and non-verbally to each other about spacing, cuts they run off
the screens, when the screen is coming, etc. It is especially important to call your cuts off
of screens so that the passer knows where the potential pass may be and the screener
knows how to roll. If you run 5 on 0 and all you hear is the squeaking of the shoes, you
are in big trouble. They should be loud when they are running motion no matter the
situation.
You MUST take into account the level you are coaching when deciding how to
teach the motion offense and what to include. The younger you get, the more simple you
must keep it for two reasons: 1)They may not understand and 2) I feel at the younger
levels you should be devoting tons of practice time to skill development instead of
learning a fancy offense. I would say that 2nd
-6th
grade should be taught just the pass, cut,
and space part of the motion in my opinion along with driving to the rim and then
shooting or kicking out. Keeping it simple and looking to score off the cut, the post entry,
or on the drive. Really work at this age level on communication, spacing off each other,
learning to basket cut, and learning to take your man off the dribble. As well as posting
up and getting the ball into the post; at this age I would keep the post on the blocks and
maybe keep them on one side.

Grades 7th
-10th
you can work on the pass and either cut or screen away along with
maybe 1 backside option. At the 7th
-10th
grade level, you can give the post the option of
popping out high or to the corner along with posting up. He should spend the majority of
his time on the block, but should start learning how to flash high or to the side as well as
screen. The 11th
& 12th
grade level I would introduce calling for a screen after a pass,
another backside option or two, and having the post player screen his way in and out of
the post.
When/if I am fortunate enough to have my own high school program, I am going
to teach/implement the motion offense as follows. Freshmen year they learn to pass, cut,
space. Screening will be introduced about 2/3 of the way through the year if they are
ready. I may also introduce the back side wing flashing to the ball and spacing out (same
concepts as pass, cut, and space). Post players stay on the block and are introduced to
popping about 2/3 of the way through the year.
The Soph team will use the pass and cut or screen away options along with a back
side option and back side flash. The perimeters will get introduced to calling for a screen
at the end of the year. The posts will post on the block, pop, and will get introduced to
back screening in and out of the post at the end of the year.
The JV team (assuming we have 4 teams, if we have 3 then scratch this) will learn
to refine the skills above as well as add some dribble over options.
The varsity team will basically refine those skills further and use the ones that are
most contusive to the success of the team. If they aren’t understanding a certain aspect of
the offense (ie: getting confused with the three options after the pass) that will be
addressed here. Also roles will be more defined for players at this level, especially the
post players. Post players that are better at popping will pop more, true post players (if I
am that lucky) will be instructed to spend more time on the block. If certain perimeter
players are better without certain options that will be addressed as well (ie- player isn’t a
shooter he won’t be calling for screens often). Another example, if you have a team that
doesn’t have great shooters, you’ll be running basket cuts off the pass and a lot more curl
cuts when the opportunity presents it self on the screen. Also there will be more flashing
in and out from the back side perimeter players in order to get the ball into the post. At
the varsity level I will also work on a dribble over option (maybe 2).
When teaching it at the beginning of a season, I would ease the team into it. Start
with pass and cut on the first day and build into all the options you want, taking into
account what stage of learning the offense the team is in. If it’s an experienced varsity
team that has run it in the past, you might just have to reintroduce the available options
on the first day stressing what you want stressed. If it’s a varsity team learning it for the
first time however, you may stay with pass, cut, and space for a 2-3 days and add options
as you feel they are necessary. In this case, adding options can happen once the players
seem to have mastered the step before. So once they understand how to pass, cut, and
space you might introduce pass and then cut or screen away (with all the cut options) and
so on for as much as they can handle. If they are struggling to master the pass, cut, and
space, don’t introduce the option to pass and cut or screen away. You can however, add
the option to flash from the back side and space because once again it demonstrates
similar skills of cutting and spacing.
Also, you must take into account the IQ of the players you have. If you are
coaching a JV team that has players with poor basketball IQ, the motion will be kept very

simple for better understanding. Maybe they can’t handle learning three options yet, so
you give two to them. Most of this gets done on the varsity level, but as with any program
you can tell differences between year classes and players in basketball IQ and these
differences can be addressed in order to help the varsity down the road. For example, you
have a bunch of sophs with poor IQ, keep it simple and understand that for this group it is
going to be simple all the way up.
At every single level I’m going to talk about, and emphasize, back cutting when
being denied. I believe that the back cut against pressure is a staple of a good motion
team and should always be stressed. If your players don’t/won’t run a back cut when they
are being denied the ball, it’s going to make you easy go guard and your offense stagnant.
You won’t be able to run your offense effectively and will commit atrocious amounts of
turnovers. If your players don’t back cut when they are being denied, you will end up
throwing out the offense by the third game. On the other hand, if you do back cut against
pressure you are going to open up the offense, create better passing, and love it. You are
going to beat an aggressive defense for a few easy buckets and then they will back off
(usually). And if you don’t get the back cut, the next player over will be filling and
hopefully be more open. I think the 4 out motion offense is really great for back cuts
because the middle of the floor is open and it’s easier to get the lay up when running a
back cut than it is when running a 3 out sometimes. There is less of a cluster in the lane.
The rule to use with your players on back cutting is that if they are being denied and they
are three steps above the three point line they should back cut. If they are getting denied
that far out (3 steps) then that is their signal to back cut and get out of there. Also, a back
cut isn’t 2 steps to the basket and pop back out, once you start a back cut you finish it to
the FRONT OF THE RIM (looking for the ball the entire time), then you space out away
from the ball, just as you would in a basket cut situation. Also, anytime a teammate gives
you a pass fake, that is another sign to back cut to the rim and get out. It means you aren’t
open enough to get the ball. If the player gives you a pass fake you MUST back cut all
the way to the rim and get out, no exceptions.
Post play is something that needs to be addressed. A few tips for post players in
this system are read the defense, play to your strengths, and pick your spots. If a player
starts to drive, have the post either pop to the corner or go to the opposite block to open
the driving lane and get ready to score if their man doubles. Sometimes it’s better, when
the ball is swung, to stay on one side and work on pinning your man as the ball is swung
back to the other side. Once again, not every time, but pick and choose the spots to do it.
Also, it is sometimes a good idea to stay on the back side for a second or two, then flash
to the ball when the defender’s head is turned in help defense. As a coach, you can decide
where your posts can move. I’ve seen it done where the posts don’t change sides at all, or
can only change sides 1x per possession. The bottom line for your post is that you have to
play to their strengths. If your post is a back to the basket, 7-3 300# stud then they should
basically be going block to block looking for the ball. If they are a smaller player,
screening in and out of the post, as well as popping with some back to the basket stuff is
more appropriate. If they are a smaller player with a monster guarding them, a lot of
screening in and out of the post as well as popping is in order to draw the big post away
from the basket. The post also should not be predictable. If he’s mainly a back to the
basket guy, cutting block to block like clockwork won’t be the most effective way to go,
no matter how good he is. He should do things like cutting from the block, to the elbow
on the new ball side, and then down to the block. Or he could hold on the back side until
the ball was re swung, or he could delay his cut. Another move to use is for him to cut to
the short corner than immediately cut back to the rim and post deep in the lane. Against a
bigger defender, a smaller guy can beat him back to the rim for a layup at times.
Whatever he does, the post should realize his strengths and his role on the team and adapt
to that. A rule of thumb also that I stole from Hubie Brown: if you have a good post
player, slow the ball down, if you have a poor post player, speed the ball up.
An important thing to discuss with your team when teaching this offense is the
rebounding aspect. As coaches we all know that offensive rebounds can make or break a
game. With the 4 Out, the defense is spread out and is susceptible to the offense crashing
in front of them for rebounds. You should remind your players that who ever finds
themselves on the back side wing and guard should crash to the back and front of the rim
respectively looking to control those areas for rebounds. If the post is on the ball side he
should try to control the shooters side, if on the back side he should help to control the
back side of the rim.
One of the key problems with the basket cut and the back cut I have found is that
the cutter doesn’t always do three key things 1) doesn’t look for the ball the entire time
he cuts, 2) doesn’t cut all the way to the front of the rim, and 3) doesn’t cut in FRONT of
the defender (does not apply for back cuts). You must stress these three things when
teaching basket cuts off the pass and #1 and #2 when teaching the back cut against
pressure. The reason that #3 doesn’t work when back cutting is because the defender is
denying and so far in front it would be redundant to try and cut in front, you would be
fighting the pressure when there was no need to. Many times players don’t receive a pass
on the first 2-3 steps and just give up on the play; breaking off their cut. Often if they cut
to the front if the rim hard they would be open but they don’t do it. Sometimes, they cut
to the front of the rim, but turn away from the ball after not receiving the pass after 2-3
steps. I’ve seen many times where the passer throws them a wide open pass just as they
turn their head and the ball goes out of bounds. Lastly, on the basket cut off the pass, they
offense will often take the route of cutting behind the defender. This is because it is the
easier cut to make for them, but it’s important to try and cut in front because a defender
that’s not over pressuring the player will be able to just sink into the lane with the cutter.
BUT, if the cutter cuts in front of the defender they have a better shot of getting the ball
and doing something with it. Sometimes it helps to set the cut up by taking 2 steps or so
away from the pass then cutting back in front of the defender. You should never just cut
to cut, cut every time with the purpose of scoring.
Another thing to stress is using L and V cuts to get open when necessary.
Sometimes, filling the open spot is easiest and most effective with a straight line cut and
that is perfectly fine. But once again, if you are playing a team that plays aggressive
denial defense, a V or L cut is needed to get open. Also, if you have been standing for a
while (shouldn’t happen) and the ball is passed to the person next to you, you may have
to V or L cut to create movement and get open. You also L or V cut on every wing to
guard pass. I do however, have a suggestion for my players that you can only V cut or L
cut once, if you are not open on that V or L cut you should probably back cut. Doesn’t
have to happen every time, but you shouldn’t V or L cut 6 times.
Something that I hear questions on often are when to run the various cuts off of
the screens. I’ve talked about running cuts while reading the defense, but I should explain

when to run the various cuts. When to run the cuts are talked about in my original four
out material, but I’ll go over them again, with one change. Straight cut: this is a cut to
run when the defender is trailing the screen if you are a shooter (the difference from my
other stuff), if the defender is sagging deep in the lane, or if you are not sure what to run.
Curl cut: This is the cut to run when the defender trails the screen (especially if not a
shooter). Flair cut: This cut is run if the defender is going under the screen or sagging in
the lane. Back cut: Run this cut when the defense is cheating over the top of the screens.
Lastly, I like to use some set plays at times as entries into the motion. I think you
can use set plays to get looks that are not normally there. You can also use sets to get
different shots for different players as you see fit. They are also vital at the end of a close
game where you need to know who is taking the shots from where. While it should not
replace your motion by any means, sprinkling a few sets in is a great thing.

Drills to Teach the 4 Out Motion This will be some of the drills I use to teach the motion offense. They are all the
breakdown drills that I use. Now 5 on 0 is 5 on 0 and 5 on 5 is 5 on 5 so that basically
takes care of itself. They are obviously not all the drills you can use. Be creative and
come up with your own, steal more from other coaches, do whatever you can to improve
on what I have here. I like breakdown drills with defenders an much as possible.
Scramble
This is a VERY simple drill, but a good one. I wouldn’t spend 10 minutes on this
drill, but a few minutes once or twice a week, for 2-5 minutes each day can be helpful. It
stresses communication between players, spacing out, and reading the teammates and the
floor. I have done this with 4th
graders and had success. What you do is you take 4
perimeter players and put them in one area of the four out. Then you instruct them that
they have X seconds (5-10) to spread out so that everyone is in one spot. Do this several
times, switching spots and decreasing the time with each rep. After you do that, then you
take them, put them all in one spot and run the drill 4 times in a row, the catch is that they
can NOT end up in the same spot twice, they must go to a different spot every time when
you run it 4 times in a row. You will see that the players really have to communicate
about who is going where to get to the right spots in time. This also simulates game like
conditions when two players somehow end up in the same spot. You can also run the drill
where you just put two in one spot, have them close their eyes, rearrange the other two,
then they open their eyes and the two guys have to scramble to fill the open spot
(communicating about who stays and who goes). You can do it with 3 in one spot and 1
stationary whatever works. As I said, this drill is about communicating with each other to
be spaced properly. You can easily add your post to the drill and have him just go to a
different post spot each time.
L Cut Back Cut Series
Right now I am coaching a freshmen team and all we do is pass, cut, and space in
our offense; work on the attacking with the dribble and stuff of that nature. This drill is
one of the drills I use to teach the aspect of cutting and spacing in the four out. The drill
works purely on the cutting aspect of the 4 Out offense. Good starter drill at the
beginning of the season and for younger grades.
Player starts with the ball under the basket, another player starts at the guard spot
lane line extended. The player with the ball throws a chest pass out to the player at the
guard spot, runs an L cut to the wing on the ball side and then you do the following series
(change on coaches command):
*Guard passes to the L cutter
-Passer Back Cuts for Lay-up (1A)
-L-cutter drives, passer recognizes it and pops back out for a kick out three (1B)
*Guard Fake Passes to L Cutter and L Cutter Back Cuts (1C)
Points of Emphasis: Hard and crisp cuts (should hear squeak of shoes), cut at sharp
angles, catch ball into triple threat (square on catch), look at the rim on the catch, good
hard passes, good passing form, make your lay-ups, really sell the pass fake and back cut.
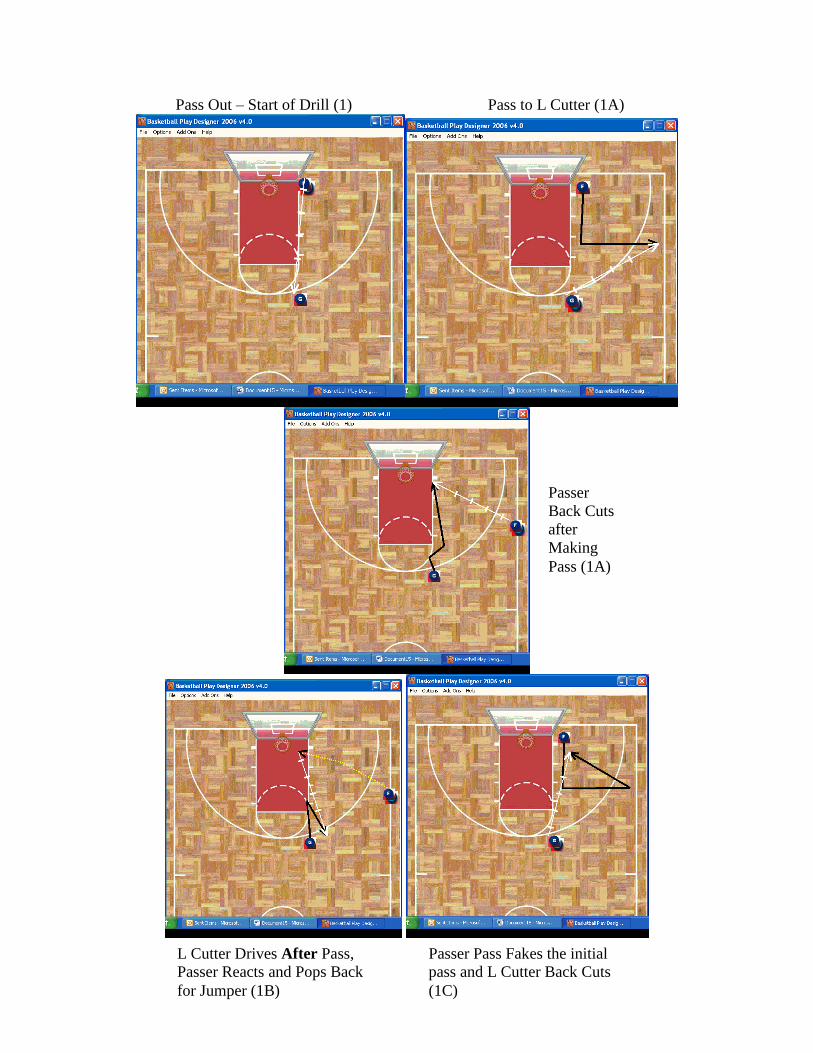
Pass Out – Start of Drill (1) Pass to L Cutter (1A)
L Cutter Drives After Pass,
Passer Reacts and Pops Back
for Jumper (1B)
Passer Pass Fakes the initial
pass and L Cutter Back Cuts
(1C)
Passer
Back Cuts
after
Making
Pass (1A)

Screen Shooting
This drill is a very basic drill that gets players used to shooting off the catch while
coming off a screen and to get open and score as a screener. It also teaches players how
to set up the screen, use it properly, and run the 4 cuts (straight, curl, back, and flair) that
you can run off a screen in motion offense. I also like it because it’s a drill that serves a
dual purpose, getting players lots of shots while still working on a part of your offense. I
love motion drills that also drill fundamentals.
The drill can (and should) be run where the cutter is cutting from the wing to
guard as well as from guard to guard to simulate both looks they would get in a game.
Even though the diagrams only show the screen being set on the right side of the floor, I
would obviously run this drill where the screens are set at the same places on the left side
When you run this drill, there should be TWO passers at the back side wing or
guard with a ball. One passes to the cutter and one passes to the screener on the
separation so that both of them get shots in the drill. This further emphasizes to our
players that you can be a screener AND have a chance to score. The rotation for this drill
goes passer to passer to screener to shooter to passer.
The drill starts with the screener setting a screen for the shooter; it will either be a
guard to wing or guard to guard screen (obviously). The screener comes off the screen
(calling the cut), catches and shoots the ball. As the cutter clears the screen, the screener
should separate off the screen, receive a pass and shoot as well. The cut the cutter runs
will dictate the separation.
Now if you don’t have a lot of players per basket, you can run this drill with one
passer, one cutter, and use a manager/coach/chair/garbage can for the screener and just
pass to the shooter. You can also add a defender to the drill to help the cutter with the
skill of reading the defender, I like doing that – the choice is yours on what you want to
do with the drill, there are many different ins and outs you can add to change it
throughout the year. I would also run the drill where the guard calls for the screen to
practice the options and looks off the pass and call for a screen option (if you run that).
*Points of Emphasis: Play low to high and not high to low to high – catch the
ball with knees bent (low) – rip the ball to the shot pocket and get off a quick shot, square
to the basket on the catch, eyes on the rim, straight up and down on the shot, proper
shooting mechanics.
Guard-Guard Screen Guard-Wing Screen

2v2 Cut, Screen, and Separate
This is a drill I feel is a fundamental breakdown drill for building motion offense.
It teaches kids about screening, cutting, moving, spacing, and working with a partner to
get open. It really breaks down the two man interactions that can happen and is a good
way to practice the back side interactions – although the use is NOT limited to that. I
would use this as a staple drill for my team.
In this drill, you use 2 players on offense, 2 players on defense and another
player/manager/coach at a guard spot with a ball. The 2 players on offense try to cut,
screen, and separate off the screen to get a shot and score. They either can cut or screen
for each other - guard to wing, guard to guard, or wing to guard screens. If the defense
overplays, they should back cut to the rim and space out. The rule of the drill is that a
score MUST come off a cut – either a basket cut, back cut or cut off a screen. The
offensive can’t dribble unless they are taking one dribble to score a layup (early catch off
a cut). If you incorporate dribble drive principles into your offense you can allow players
to drive and kick. If they get open, the passer gets them the ball and they look to either
shoot or pass to their teammate for a shot. If they pass to their teammate, they must move
(cut) to get open. If no options are available, the pass it back to the passer and go to work.
Run cuts based on how the defense plays the screen. If the player comes off the screen
and doesn’t get the ball, they can either basket cut, set another screen, or call for a screen.
The offense has a set time limit to try to score, and then defense goes to offense. You can
make it competitive and play games to X number of baskets if you want. You could play
a mini game were each team gets X number of possessions and whoever scores on the
most possessions wins.
Also, if you are strapped for baskets and don’t want kids waiting around to get in
(I HATE standing around in drills), you can have a two passers, both at the top of the
key, and use both sides of the court. The spacing won’t be PERFECT between players
and passers, but it will work just fine.
Note: When starting this drill, as I mentioned, I don’t allow dribbles. But as the
drill is mastered and the level of the players increases, I’ll allow dribbles for things such
as driving to the basket, drive and kick, dribble over (shallow cuts and basket cuts), and
euro-screens. As long as the dribble has a purpose and it’s not more than 3-4 dribbles
total I’m fine with it. Stick with no dribble unless on a lay up at first, but as the mastery
of the offense in general increases, add dribbles to this drill but put a cap on the amount.
You can run this drill a couple of different ways. You can put the passer above the
top of the key and let the players utilize all 4 perimeter positions. Or you can put the
passer at one of the four perimeter positions and let the cutters occupy the other three. It’s
up to you.
*Points of Emphasis: Catch and square – look for the shot or the pass, set good
screens, set up the screens, back cut against pressure or overplay of the screens,
communicate the cut and the separation, communicate screens, screener separates hard
looking for the ball, catch and shoot quickly (play low-high not high-low-high), look for
partner if not open, maintain proper spacing off cuts and screens, move hard and with a
purpose, cut in angles and not circles.

Post Entry Series
This is a two player drill where the perimeter players really focus on their post
entry skills and what to do when they enter the ball. Sometimes our guards, for lack of
anything better to do, stand around when they feed the ball into the post making it easy
for their defender to dig and recover out. There is a post and perimeter defender in this
drill as well to help with realism of the situation. The post should either side front high,
side front low, or play behind for now. You don’t want to be a mannequin when you are a
defender though, give the post a challenge and make him work to receive a pass. If the
post can’t get the ball, he should work on his skills to get open – repost, cut and come
back, etc. The perimeter player should pressure the ball when being passed in and dig
hard, if he knows what option is coming he shouldn’t cheat it however because it destroys
the realism of the drill. The drill should be run with the ball on the wing position. The
following progression will be worked on:
1. Post Entry and Score – The post gets open, post entry pass is made, and the
post shoots.
2. Post Entry and Cut – Post gets open, ball is passed inside, the guard cuts (on
the opposite side of his defender that’s digging), gets a pass and scores a lay
up.
3. Post Entry, Cut, and Score – Post gets open, gets the ball, guard cuts, post
fakes the pass and shoots.
4. Post Entry, Cut, and Pop – Post gets open, ball goes inside, guard starts to cut
to the basket (defense plays the cut), guard pops back out and gets a pass out
for a shot.
5. Post Entry and Reposition Kick Out – Post gets open, gets the ball, guard
repositions low or high (preferably the opposite of where his defender is
digging), receives a pass back and takes a three.
6. Post Entry and Reposition, Reentry – Post gets open, gets the ball, guard
repositions, post passes out, reposts, gets a second pass back and scores. (This
really works on the two man game)
7. Guard Drive and Post Dump – Wing drives to the rim, the post cuts to the
backside block and receives a pass for a lay-up.
Now you don’t have to do all 7 every day, or the progression every day, pick the
days you want to do it and the ones you want. Now if you used groups of 4 per basket (2
offense, 2 defense), and did it for 2 minutes for each of the seven (1 min per group), in 14
minutes you could get done quite a bit for your guard-post relationship, especially if you
did the progression 2x a week – once on the right and once on the left. The thing I like
best is it really stresses how the perimeters should enter it into the post which is a skill
that must be worked on. If you have a limited number of post players, keep the post
players on offense the entire time and rotate three guards as perimeter defender, post
defender, perimeter offense.
*Points of Emphasis: Proper post entry – pass AWAY from the defender – give
hand target – throw to hand target – catch and keep the ball high, make move quickly,
good post moves, when passing out of the post pass to the shot pocket, catch and rip to
shot pocket for the guard.
Perimeter 3 on 3 Scoring-

This is basically like 2v2 cut, screen, and separate, but now 3v3. The other
difference is that there is no “passer” in the drill. Players start at the two guard spots and
one wing, defenders match up. Guard that is next to the wing starts with the ball. This
drill incorporates all of our motion principles.
Rules of the drill are this: guard with the ball can do whatever he wants after
passing, he can cut, screen away, or call for a screen (depending on where you are in
teaching your motion obviously – if you don’t do call for a screen you won’t run it!).
Scoring can happen at any juncture if player is open. 3 offensive players try to get open
by cutting and screening for each other. Cutters can isolate in the post, screeners separate
as would our normal motion. Offensive players can only occupy the 2 guard and 1 wing
spot, although, either wing spot can be occupied (will take communication so they don’t
occupy both wings at the same time). Player with the ball has the option of dribbling the
ball to move it; if this is done, player being dribbled at can execute any of the dribble
options (again, depending on what YOU teach). If player is being denied a pass, they
have the option to back cut at any point and space out. Players run for turnovers.
Points of Emphasis: Communication, good screens, working to get teammates
open in the right spots, good cuts, calling your screen, separating hard, catching in triple
threat each time, good passes, back cut against denial, fake passes, proper footwork on
cuts.
Individual Post Work Progression-
This is a basic drill to run when you are doing post/perimeter breakdown drills.
The guards used in the drill can be other posts, managers, or coaches. All drills done with
a defender and I would recommend using both sides of the basket for the players so they
work on both their right and left side moves.
Part 1 – 1 on 1 post moves. Player gets a post feed from the wing, reads defender,
makes a post move and scores. Do this one heavily to start the drill and have perimeter’s
reposition for kick out (even though they aren’t going to get it).
Part 2 – 1 on 1 with cutter. Post player gets a post feed, and hits a cutter. Do this
progression only a few times to get them used to the pass.
Part 3 – Post and repost – player gets a post entry pass, passes back out and
reposts on the block. You can do this drill as you see fit, the more the better.
Part 4 – Post and pop – Player posts up and then after a kick out or no pass in, the
player cuts either high post or corner, gets a pass, and makes a move to the rim or shoots
a jumper (depending on talent).
Part 5 – Post and pop w/ cut – same as above except instead of shooting or going
1 on 1, post passes back out and runs a basket cut for either a score or post up depending
on if he beats his defender. Have defense play VERY tight on this drill.
Points of Emphasis: Proper post up technique, repost with high hands and then leg
whip, give hand target, keep ball high, good pass to cutter.
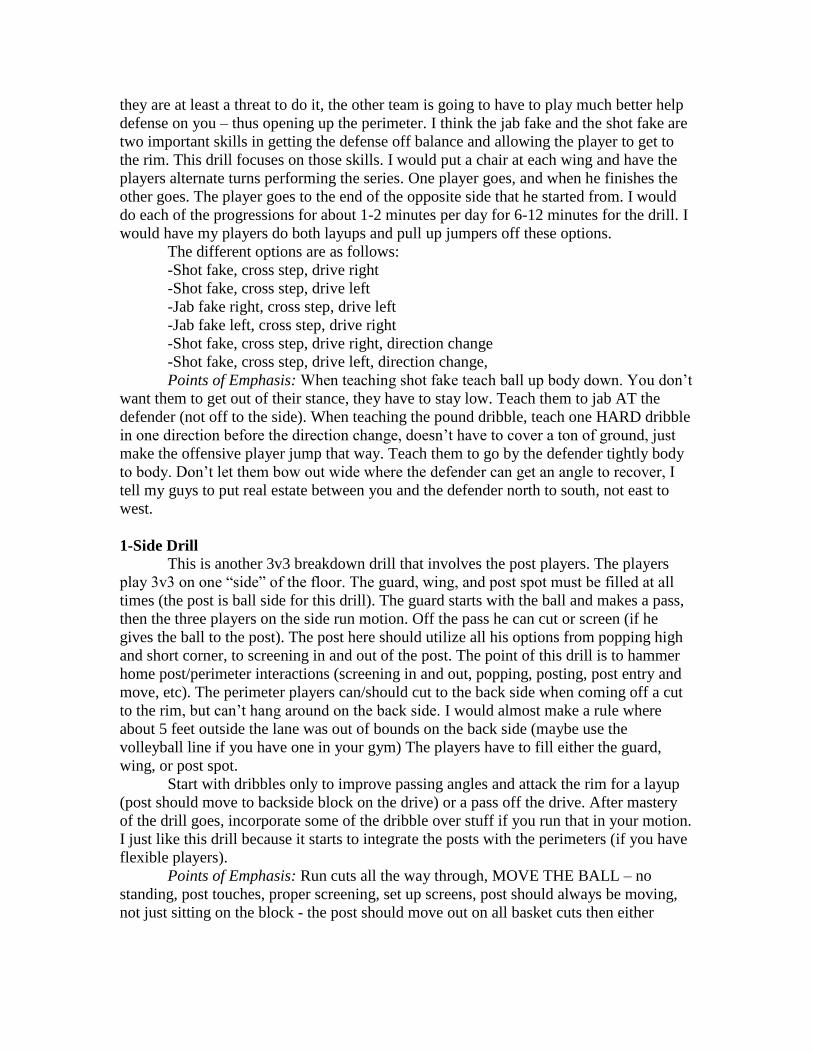
Wing Attack Series
I personally feel that developing 1 on 1 skill is important in the 4 out motion for
post players and guards alike. With all that room to drive, if you have guys that can put it
on the floor and create shots for teammates your team is going to be that much better.
Now I’m not saying your guys should drive every time they get the ball obviously, but if
they are at least a threat to do it, the other team is going to have to play much better help
defense on you – thus opening up the perimeter. I think the jab fake and the shot fake are
two important skills in getting the defense off balance and allowing the player to get to
the rim. This drill focuses on those skills. I would put a chair at each wing and have the
players alternate turns performing the series. One player goes, and when he finishes the
other goes. The player goes to the end of the opposite side that he started from. I would
do each of the progressions for about 1-2 minutes per day for 6-12 minutes for the drill. I
would have my players do both layups and pull up jumpers off these options.
The different options are as follows:
-Shot fake, cross step, drive right
-Shot fake, cross step, drive left
-Jab fake right, cross step, drive left
-Jab fake left, cross step, drive right
-Shot fake, cross step, drive right, direction change
-Shot fake, cross step, drive left, direction change,
Points of Emphasis: When teaching shot fake teach ball up body down. You don’t
want them to get out of their stance, they have to stay low. Teach them to jab AT the
defender (not off to the side). When teaching the pound dribble, teach one HARD dribble
in one direction before the direction change, doesn’t have to cover a ton of ground, just
make the offensive player jump that way. Teach them to go by the defender tightly body
to body. Don’t let them bow out wide where the defender can get an angle to recover, I
tell my guys to put real estate between you and the defender north to south, not east to
west.
1-Side Drill
This is another 3v3 breakdown drill that involves the post players. The players
play 3v3 on one “side” of the floor. The guard, wing, and post spot must be filled at all
times (the post is ball side for this drill). The guard starts with the ball and makes a pass,
then the three players on the side run motion. Off the pass he can cut or screen (if he
gives the ball to the post). The post here should utilize all his options from popping high
and short corner, to screening in and out of the post. The point of this drill is to hammer
home post/perimeter interactions (screening in and out, popping, posting, post entry and
move, etc). The perimeter players can/should cut to the back side when coming off a cut
to the rim, but can’t hang around on the back side. I would almost make a rule where
about 5 feet outside the lane was out of bounds on the back side (maybe use the
volleyball line if you have one in your gym) The players have to fill either the guard,
wing, or post spot.
Start with dribbles only to improve passing angles and attack the rim for a layup
(post should move to backside block on the drive) or a pass off the drive. After mastery
of the drill goes, incorporate some of the dribble over stuff if you run that in your motion.
I just like this drill because it starts to integrate the posts with the perimeters (if you have
flexible players).
Points of Emphasis: Run cuts all the way through, MOVE THE BALL – no
standing, post touches, proper screening, set up screens, post should always be moving,
not just sitting on the block - the post should move out on all basket cuts then either
receive a pass or dive back in to the post after the cutter goes through, enter the ball to the
post from the wing usually (unless you go wing to top and dump in for a seal).
5 on 6 or 5 on 7
A good way to work on your motion offense it to run it against 6 or even 7
defenders. If you run the motion against 6 defenders, have the extra defender trapping the
ball at all times, this puts more pressure on your ball handlers and makes them have to
make better decisions.
If you do this drill with 7, one player is doubling the ball as you would with 6, the
7th
defender is trying to cut off the next pass and take the option away. This makes the
decision making of the player with the ball even more tricky. You will find that in these
pressure situations, your post flashing high or to the corner will help relieve pressure, you
will find this translates to the game as well.
After running this a few times, make it competitive and give the offense a set
length of time (45 seconds to start then increase) a set number of passes in a row (10 to
start and increase as mastery goes up) a turnover before they reach that, they have
running/situps. If they score in that time/pass limit that’s as good as reaching the goal.
Points of Emphasis: Pass fakes, pass before the trap comes, look into the post,
post pop to relieve pressure, good post entry passes, constant moving – standing will kill
you, catch in triple threat, eyes up – see the floor, back cut against pressure, back side
wing flash to ball in open space.
15 Pass Drill
This drill is not only a good motion drill, but a great passing drill in general. I
would run it 2v2, 3v3, 4v4, and 5v5. Each has a little different flavor to it, but they are
great drills to learn how to pass, cut, space. The goal of the drill is NOT to score here,
and it is one of the few where we don’t. Also, limit the number of dribbles that players
can use. I would include my post players in all the drills because you can never be a good
enough passer as a post player. Another way to increase mastery is to add an extra
defender trapping the ball, so have it 3 v 4, 4v5, and 5v6.
2v2 – This is a GREAT drill to really focus on making good hard L and V cuts to
get open. In this one, the 2 offensive players get ½ of the half court to move around (I
like to go 2 groups of 4 per hoop). They have to make 15 successful passes (you can start
with 10 if you wish), or else they have pushups/running. If they make 15 passes, the
defense has pushups/running. It is a workout for your guys, so run this no more than five
minutes
3v3 – It is the same basics as 2v2, but now there is the screening element added to
the drill. Players can cut to get open, or screen for each other, but they have to make 15
successful passes.
4v4 – Now you use the entire ½ court with cutting and screening options. If 15 is
to easy for the 4, you can amp it up to 20.
5v5 – Now you add the post player screening in and out of the post, flashing to
the corner and high post. For 5v5 I will play to 20 passes (increase the total as you see fit)
and allow shooting. The rule is 1 made basket (2 or 3) will result in dropping 4 passes off
their total; however, if the shot is missed and they don’t get the offensive rebound they
ADD an additional 4 passes to their total so it becomes a double edged sword for the

players. Do they want to gamble? This makes for a fun game and you can use this in your
5v5 time to spice things up a little bit!
Points of Emphasis: Back cut against pressure, finish cuts, lead your target, give
hand targets, set good screens, set up screens, catch the ball into triple threat, pass fakes,
cut in ANGLES, hard cuts, 2 speeds two directions on the cuts.
Hot Hand
This is a concept that I stole from Coach Knight. What you do when running your
offense 5v5 is you give certain situations, certain people with the “hot hand”. So for
instance, lets say that “Jimmy” is your best shooter. You tell your players that you are
running your offense until Jimmy gets an open three. So Jimmy should be thinking here,
when he passes the ball he should be calling for a screen, when someone else passes the
ball they should be going to screen Jimmy, when Jimmy is on the back side someone
should be screening for him to get him open. Now I wouldn’t have Jimmy be the hot
hand every time, let all the players have a crack at getting a shot in their range (makes it
fun for the team as well). For Todd, your athletic wing, it might be getting him a shot
going to the basket. So Todd will run lots of basket cuts, get back screens from the post,
and run curls off the screens he gets. You can run it looking for specific players getting
specific shots, or you can just run it getting shots of a player period. You can run it where
2 or 3 players at a time are “hot hands” and 1 of the three has to take the shot. This also
can translate well to a late game situation, when you need a score. Your players will be
used to working to get a specified player the ball in a specific spot and when you want
your star shooting the ball at the end of the game this will help take care of that. One of
the major complaints of anti-motion coaches is that they always find their least talented
players with the ball in critical situations. If you work this drill, in a critical situation the
ball will find it’s way into the right hands. This drill can also help players to define their
role on the team more and get them used to looking for THEIR shots.
You also set different “hot hand” parameters. For instance you can say that before
anyone shoots, you want at least 1 post touch. You could say that you want everyone to
touch the ball once. You may say that we have to score in the paint. Whatever you can
think of, add to this drill!
Situations
This is another way to spice up the 5 on 0 that is similar to the “Hot Hand” drill.
This time you give your players a situation, for example you are up 2 with 45 seconds
left. Then you go on to tell them what motion looks we are really looking for, for
example “we are up 2 with 45 seconds left and really want to eat some time off the clock.
We want to continually get guys open, so lets run lots of pass and screen away to insure
that we are getting guys open. In addition to that, we are running our offense high and
wide, which means we should get some great back door looks if they overplay us”. Just
go through some situations with your team and give them what you are looking for out of
the motion.Another situation would be you are down 2 with 45 seconds left – what kinds
of shots do you want for your players? Who do you want to shoot the ball?
Yet another thing to look at is a broader, longer situation. We are down 10 with 5
minutes left, these are the shots we want, etc. Now you don’t have to run it for five
minutes, but get them feeling what it would be like in that situation.
This is a good rill to help define roles of players. It helps players figure out who
they are and how they fit into the team.
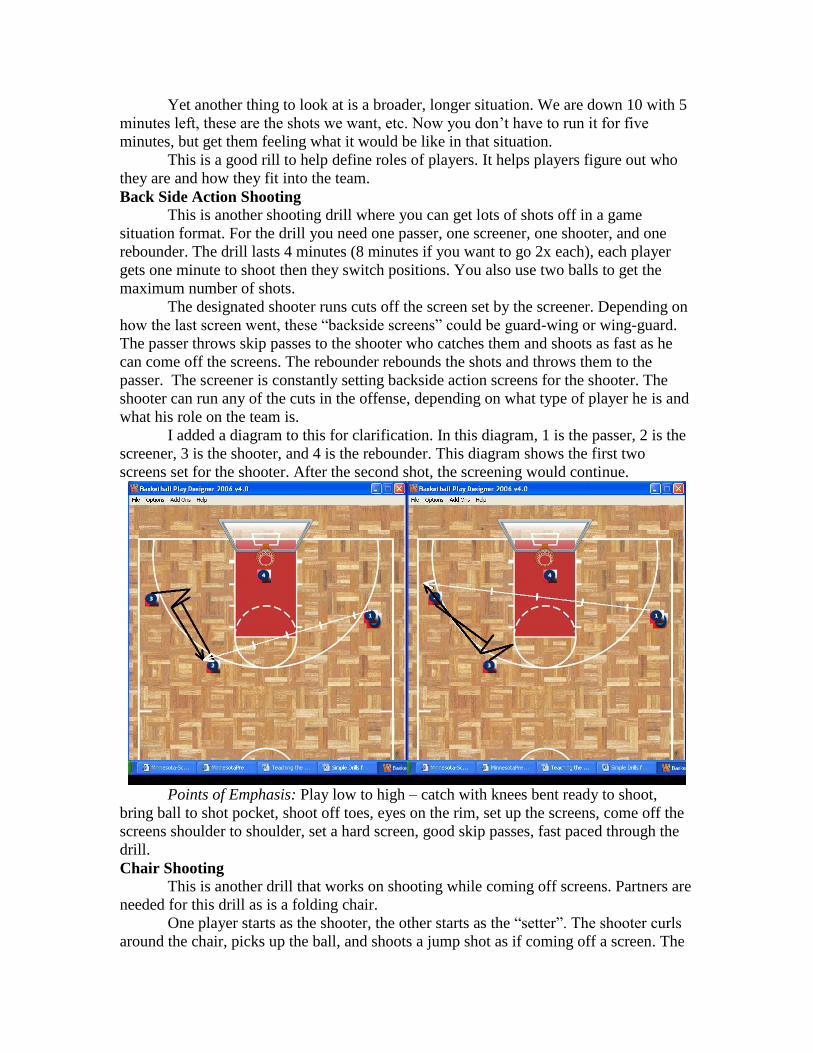
Back Side Action Shooting
This is another shooting drill where you can get lots of shots off in a game
situation format. For the drill you need one passer, one screener, one shooter, and one
rebounder. The drill lasts 4 minutes (8 minutes if you want to go 2x each), each player
gets one minute to shoot then they switch positions. You also use two balls to get the
maximum number of shots.
The designated shooter runs cuts off the screen set by the screener. Depending on
how the last screen went, these “backside screens” could be guard-wing or wing-guard.
The passer throws skip passes to the shooter who catches them and shoots as fast as he
can come off the screens. The rebounder rebounds the shots and throws them to the
passer. The screener is constantly setting backside action screens for the shooter. The
shooter can run any of the cuts in the offense, depending on what type of player he is and
what his role on the team is.
I added a diagram to this for clarification. In this diagram, 1 is the passer, 2 is the
screener, 3 is the shooter, and 4 is the rebounder. This diagram shows the first two
screens set for the shooter. After the second shot, the screening would continue.
Points of Emphasis: Play low to high – catch with knees bent ready to shoot,
bring ball to shot pocket, shoot off toes, eyes on the rim, set up the screens, come off the
screens shoulder to shoulder, set a hard screen, good skip passes, fast paced through the
drill.
Chair Shooting
This is another drill that works on shooting while coming off screens. Partners are
needed for this drill as is a folding chair.
One player starts as the shooter, the other starts as the “setter”. The shooter curls
around the chair, picks up the ball, and shoots a jump shot as if coming off a screen. The

shooter then gets his own rebound, passes back to the setter and curls off the chair in the
opposite direction. I would run this drill for one hard minute at a time and would run it 2-
3 times per partner (4-6 minutes total). Not rebounding gives the setting a chance to get
his legs back. If you are strapped for baskets, put one group on each side of the court and
have them switch sides after each partner as gone.
Points of Emphasis: Play low to high, rip ball to the shot pocket, turn inside foot
45 degrees on the square up, square to the basket, proper shooting mechanics.
2 on 1 Drive
This is a simple drill to work on your post-perimeter relationship on drives to the
rim. In this drill, there is only a player defending the post, and he has to make decision:
help or stay with your player. After reading some Vance Walberg stuff (not a dribble
drive motion fan, but he has some good thoughts), I do like the post player to go to the
opposite block on the drive and if the drive is stopped before the lane, I like my post to
sometimes come to the opposite high post looking for the ball.
So this drill starts with a player at the wing, a post on the block, and a post
defender. The guard drives and the post goes to the back side block, the post defender
either steps up to help, or stays with his man. If he steps up, the perimeter should dump
the ball to the post for a score (defender tries to recover), and if the defender stays the
guard should drive all the way and score.
Points of Emphasis: Make proper passes for situation, get to the rim in 2 dribbles
MAX, eyes up entire time, post-perimeter players communicate with eye contact.
Overplay
Simple drill to work on back cutting against pressure, which is a skill that must be
drilled but is hard to. Players start out at both guard spots and a wing. The guard on the
opposite side of the wing has the ball. The guard without the ball runs a V cut and tries to
get the ball, the defense isn’t letting them get the ball on the V cut. If the offense gets the
ball on the V cut, the defender has sit-ups/push-ups/sprints. The offensive player takes 3
steps above the three point line, he immediately back cuts to the rim and filters out away
from the ball. The wing fills the guard and tries to get the ball. Again the defender denies
the ball and does sprints/sit-ups/push-ups if the offense gets the ball on the initial cut. The
offensive player now again cuts three steps above the three point line and back cuts. Run
this however many times you want and end with one of the offensive players getting a
back cut layup. The defender does not have to do pushups/situps/sprints if they get beat
on the back cut
I believe it’s important to have defense do sprints/push-ups/sit-ups because this
emphasizes the idea that they are going to overplay extremely and not let the offense get
the ball on the initial cut and forces the offense to back cut. Also, make sure that the
offense isn’t just back cutting, that they are actually taking 2-3 steps above the three point
line (as they would in a game) and then cutting. Another thing to emphasize is that they
cut ALL THE WAY to the rim and LOOK FOR THE BALL the entire time. You can run
it where the offense tries to score every time and the defense tries to recover every time
or you can say after X number of rotations the players score on the back cut. It’s up to
you.
Flash Series
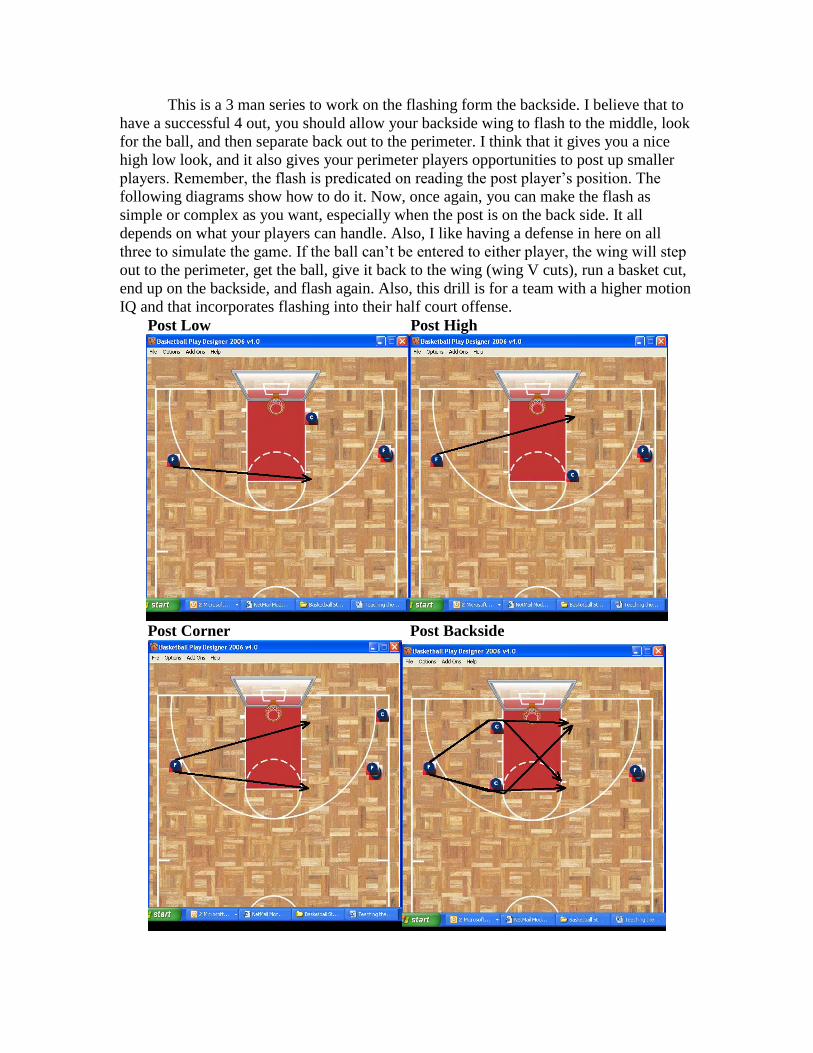
This is a 3 man series to work on the flashing form the backside. I believe that to
have a successful 4 out, you should allow your backside wing to flash to the middle, look
for the ball, and then separate back out to the perimeter. I think that it gives you a nice
high low look, and it also gives your perimeter players opportunities to post up smaller
players. Remember, the flash is predicated on reading the post player’s position. The
following diagrams show how to do it. Now, once again, you can make the flash as
simple or complex as you want, especially when the post is on the back side. It all
depends on what your players can handle. Also, I like having a defense in here on all
three to simulate the game. If the ball can’t be entered to either player, the wing will step
out to the perimeter, get the ball, give it back to the wing (wing V cuts), run a basket cut,
end up on the backside, and flash again. Also, this drill is for a team with a higher motion
IQ and that incorporates flashing into their half court offense.
Post Low Post High
Post Corner Post Backside
POST LOW – This shows where the backside wing flashes when the post is in the
low post. He flashes to the high post looking for the ball. If the ball gets into the high or
low post, they play off each other. Teach the player without the ball to read the other. If
the ball is passed into the high post, you can have the high post look for a high low (great
look with no backside help), the high post can drive and the low reacts to his defender.
Really work in teaching your guys how to read the defense and play off each other. Also,
low post could step up and screen high post.
POST HIGH – Same deal as above, except this time the post player is in the high
post. If ball is passed into low post off the entry or high-low, the high post, as above, can
always cut to the opposite block of his player doubles, or look for a jump shot if he can
shoot that shot.
POST CORNER – Same deal once again. Teach the players what you can do off
each other in this situation. The flashing perimeter can also step out and backscreen the
post in this situation if they are denying the ball.
POST BACKSIDE – This is where you can get complicated if you CHOOSE to
(depending on your skill level). The post CAN set a screen for the perimeter if you chose
to incorporate it. Or you can just have the perimeter flash to either block and then play off
each other. One thing to teach here, if the post is on the backside high post, having the
perimeter set a cross, back screen for the high post.
Conclusion As I said in the beginning, this isn’t the end all be all of motion offense. Keep
looking and adding to your collection as I do. I am constantly adapting and changing my
thoughts the more I learn about this great offense.
I think the drills I have listed will help in the mastery of this offense. You don’t
have to use all the drills, but use the ones you like. Also, adapt the drills I have mentioned
if you see a better way to do them. Take what I have and use what you want, throw what
you don’t.
If you have a secondary break, or set plays, I would advise having them flow
naturally into your offense so they are harder to scout. Also, have your out of bounds
plays flow nicely into the motion. The advantage here is if you have a great secondary
break, set play, or out of bounds play, if it flows into motion, it’s going to be harder to
scout; where does the play end and motion begin?
Overall though, teaching the motion offense is about giving the players the
tools/options and then defining the roles of your players to perform within the offense. I
firmly believe that this offense is the best one to run because it’s fun, it’s unpredictable,
and it teaches your kids how to play.
If you have any questions, I encourage you to send me (John Carrier) an e-mail at
[email protected] (or [email protected] after 11/2009). I will do
my best to help you, and if I can’t I’ll direct you to someone who can.