Embed Size (px)
Citation preview
FEDERAL INLAND REVENUE SERVICE
COMPANY INCOME TAX (CIT) USER GUIDE FOR (TAXPAYERS/CONSULTANTS) TAXPRO-MAX SOLUTION
TAX RETURNS FILING AND PAYMENT PROCESSES
(CIT, EDT AND NITDEF)
2. FILING OF CIT RETURNS BY TAXPAYERS
Step-By-Step Filing and Payment Process
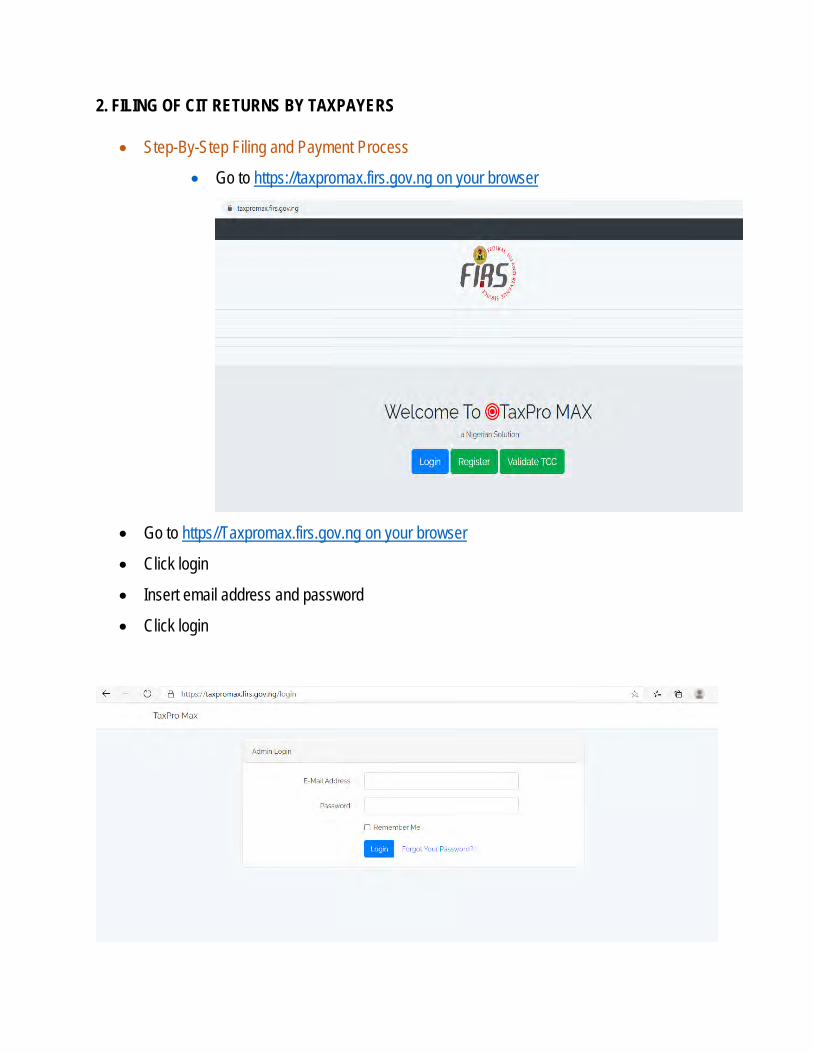
Go to https://taxpromax.firs.gov.ng on your browser
Go to https//Taxpromax.firs.gov.ng on your browser
Click login
Insert email address and password
Click login
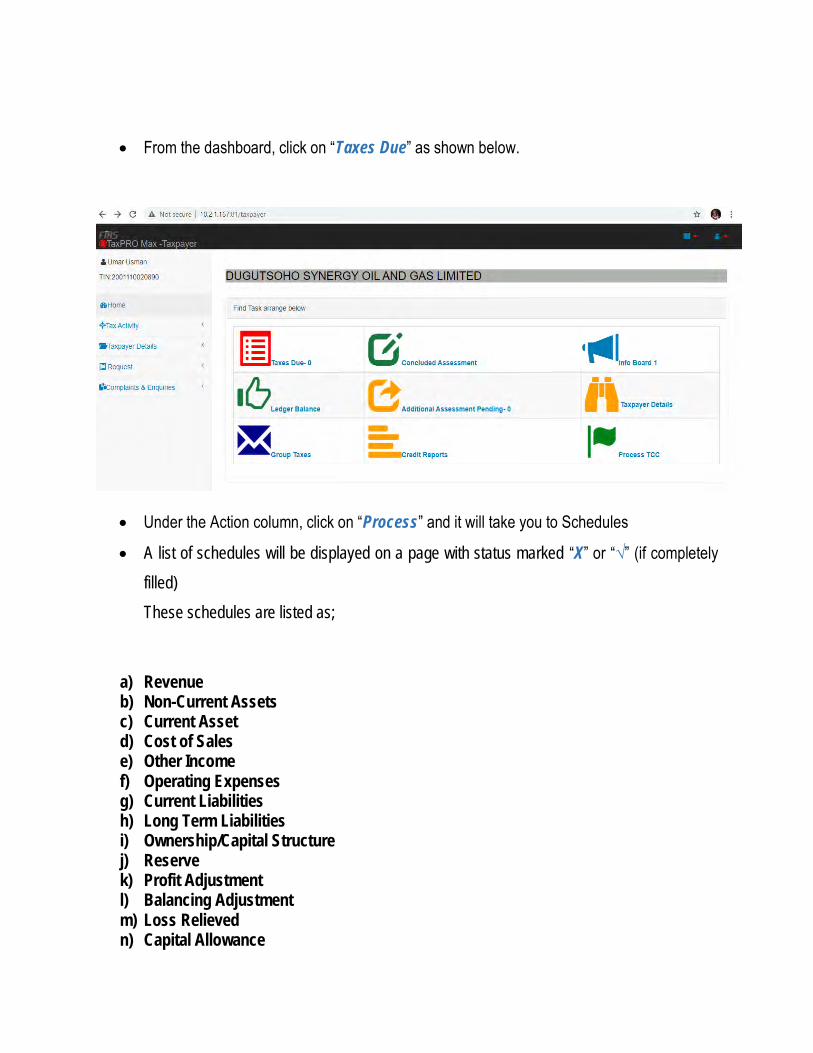
From the dashboard, click on “Taxes Due” as shown below.
Under the Action column, click on “Process” and it will take you to Schedules
A list of schedules will be displayed on a page with status marked “X” or “√” (if completely
filled)
These schedules are listed as;
a) Revenue b) Non-Current Assets c) Current Asset d) Cost of Sales e) Other Income f) Operating Expenses g) Current Liabilities h) Long Term Liabilities i) Ownership/Capital Structure j) Reserve k) Profit Adjustment l) Balancing Adjustment m) Loss Relieved n) Capital Allowance
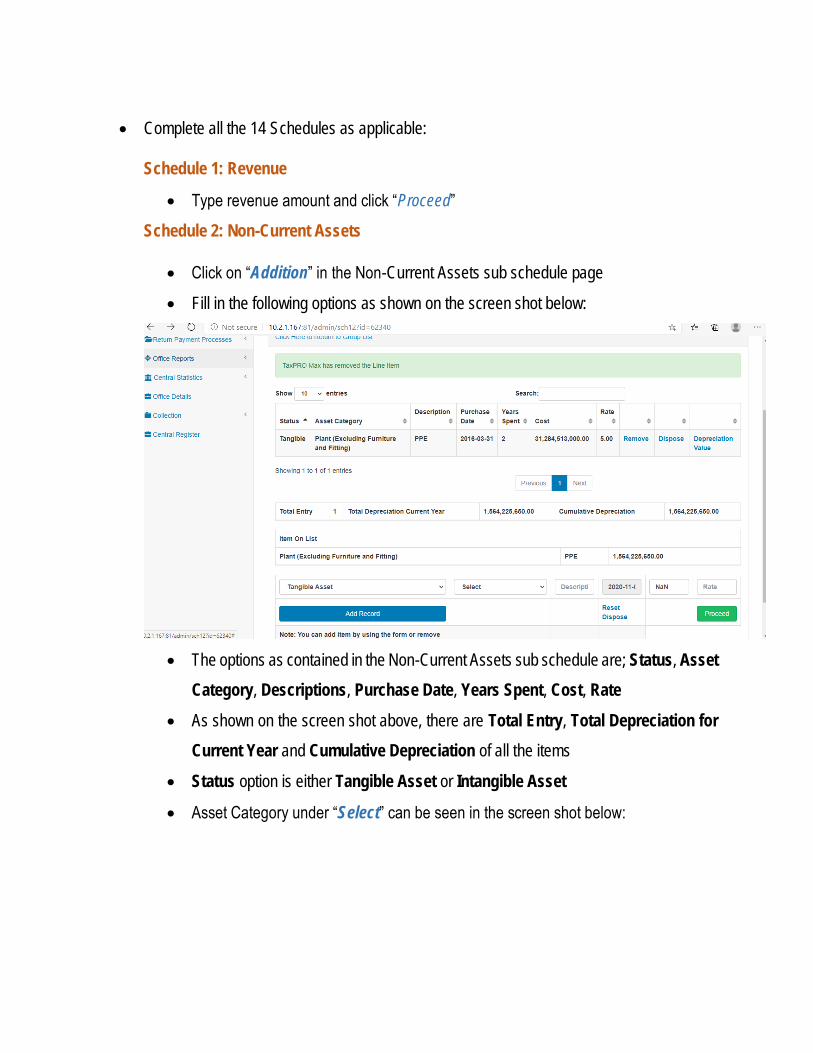
Complete all the 14 Schedules as applicable:
Schedule 1: Revenue
Type revenue amount and click “Proceed”
Schedule 2: Non-Current Assets
Click on “Addition” in the Non-Current Assets sub schedule page
Fill in the following options as shown on the screen shot below:
The options as contained in the Non-Current Assets sub schedule are; Status, Asset
Category, Descriptions, Purchase Date, Years Spent, Cost, Rate
As shown on the screen shot above, there are Total Entry, Total Depreciation for
Current Year and Cumulative Depreciation of all the items
Status option is either Tangible Asset or Intangible Asset
Asset Category under “Select” can be seen in the screen shot below:

Description option is for brief explanation of the specific asset category
Purchase Date option is the date asset was purchased
Years spent option is the year asset has been put to use
Cost option is the original cost of the asset
Rate option is the percentage value of the asset lifetime
“Remove” option is for taking off the existing asset line
“Dispose” option is used for taking off items/assets that have been sold or disposed and are
no longer in existence in the current accounting period
“Depreciation” option has the amortization/depreciation value, cumulative depreciation or
brought forward value, and depreciation/amortization annual rate for write off as seen below;
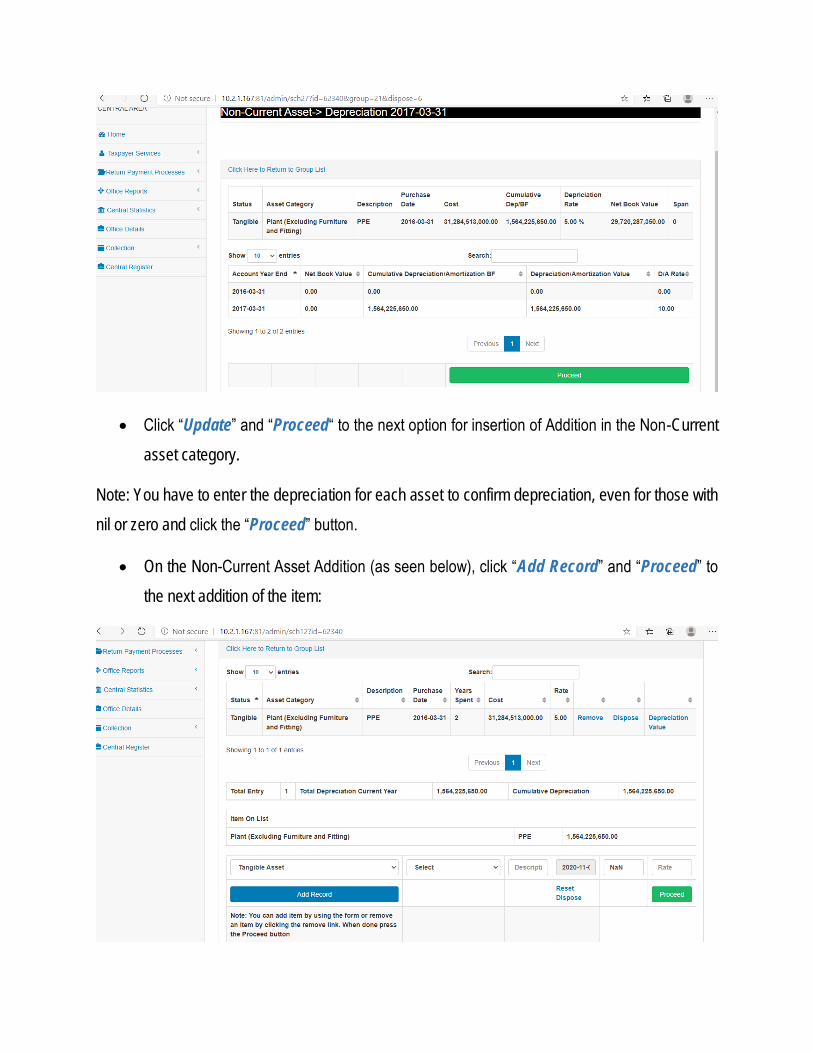
Click “Update” and “Proceed“ to the next option for insertion of Addition in the Non-Current
asset category.
Note: You have to enter the depreciation for each asset to confirm depreciation, even for those with
nil or zero and click the “Proceed” button.
On the Non-Current Asset Addition (as seen below), click “Add Record” and “Proceed” to
the next addition of the item:
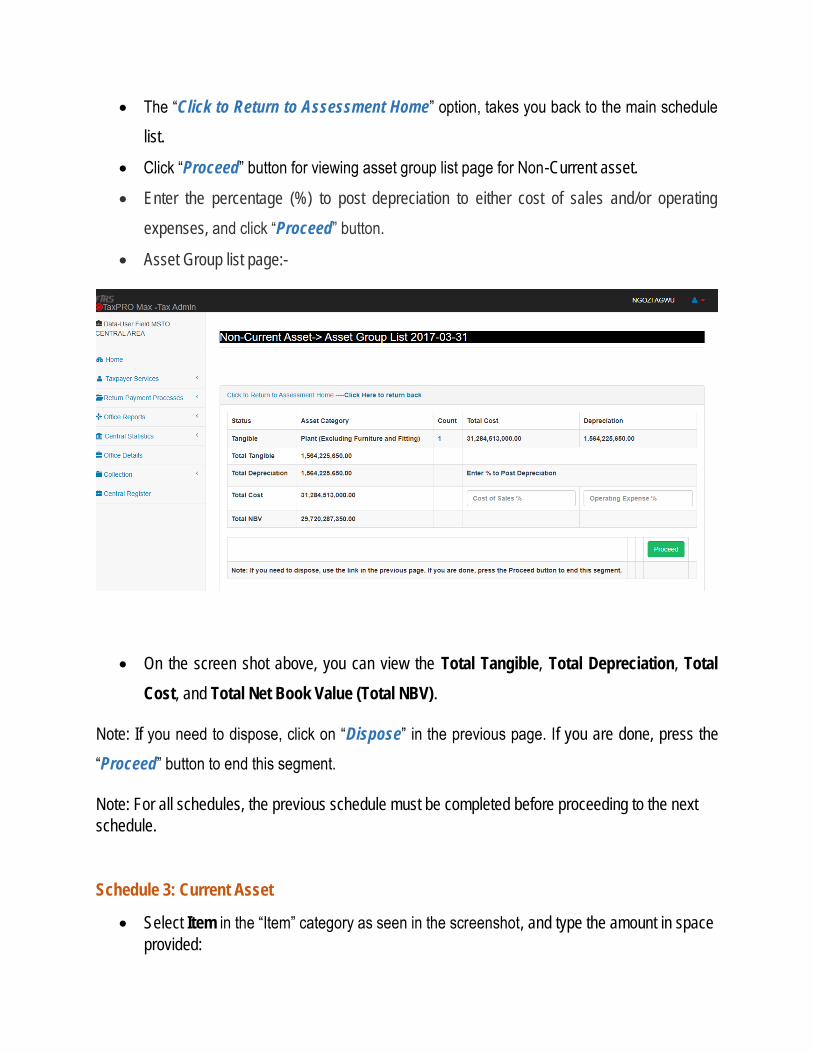
The “Click to Return to Assessment Home” option, takes you back to the main schedule
list.
Click “Proceed” button for viewing asset group list page for Non-Current asset.
Enter the percentage (%) to post depreciation to either cost of sales and/or operating
expenses, and click “Proceed” button.
Asset Group list page:-
On the screen shot above, you can view the Total Tangible, Total Depreciation, Total
Cost, and Total Net Book Value (Total NBV).
Note: If you need to dispose, click on “Dispose” in the previous page. If you are done, press the
“Proceed” button to end this segment.
Note: For all schedules, the previous schedule must be completed before proceeding to the next
schedule.
Schedule 3: Current Asset
Select Item in the “Item” category as seen in the screenshot, and type the amount in space
provided:
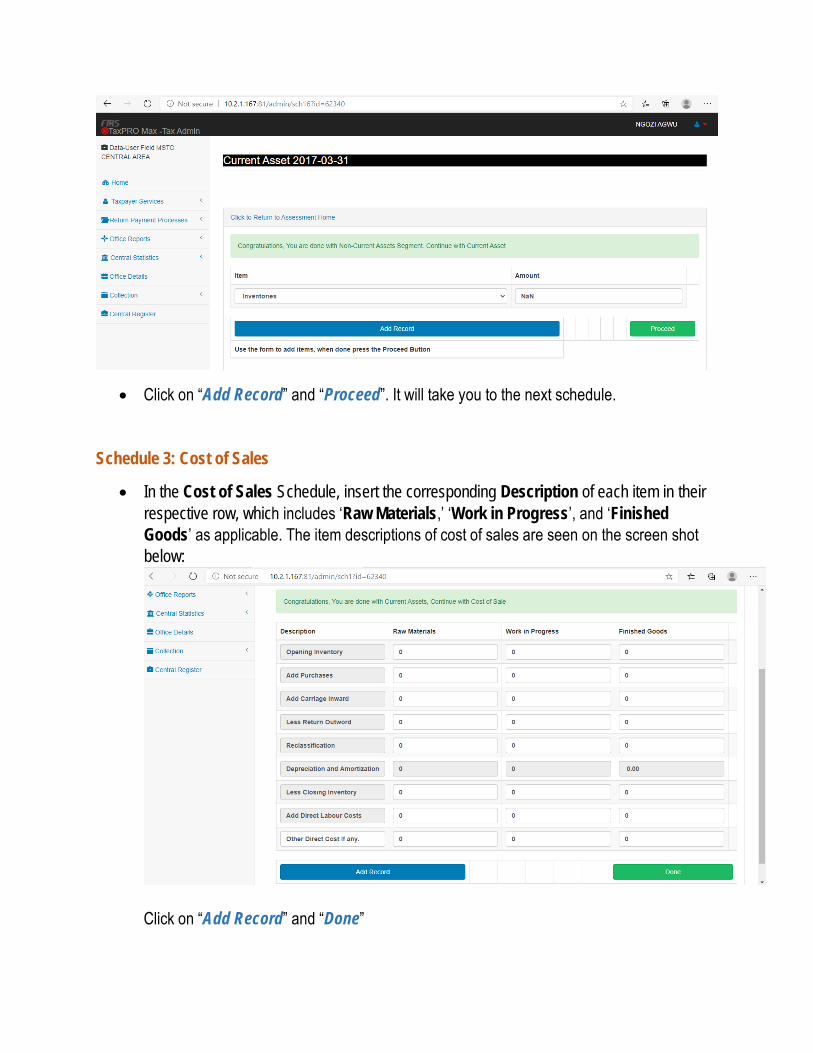
Click on “Add Record” and “Proceed”. It will take you to the next schedule.
Schedule 3: Cost of Sales
In the Cost of Sales Schedule, insert the corresponding Description of each item in their
respective row, which includes ‘Raw Materials,’ ‘Work in Progress’, and ‘Finished
Goods’ as applicable. The item descriptions of cost of sales are seen on the screen shot
below:
Click on “Add Record” and “Done”
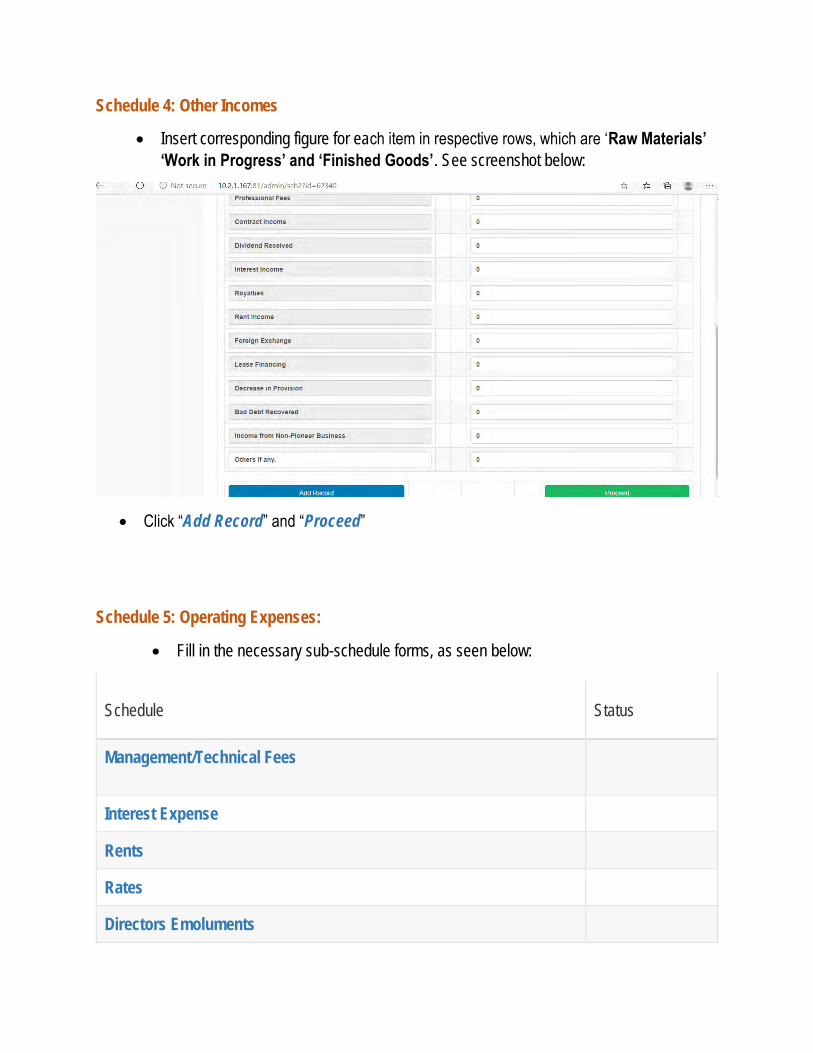
Schedule 4: Other Incomes
Insert corresponding figure for each item in respective rows, which are ‘Raw Materials’
‘Work in Progress’ and ‘Finished Goods’. See screenshot below:
Click “Add Record” and “Proceed”
Schedule 5: Operating Expenses:
Fill in the necessary sub-schedule forms, as seen below:
Schedule Status
Management/Technical Fees
Interest Expense
Rents
Rates
Directors Emoluments
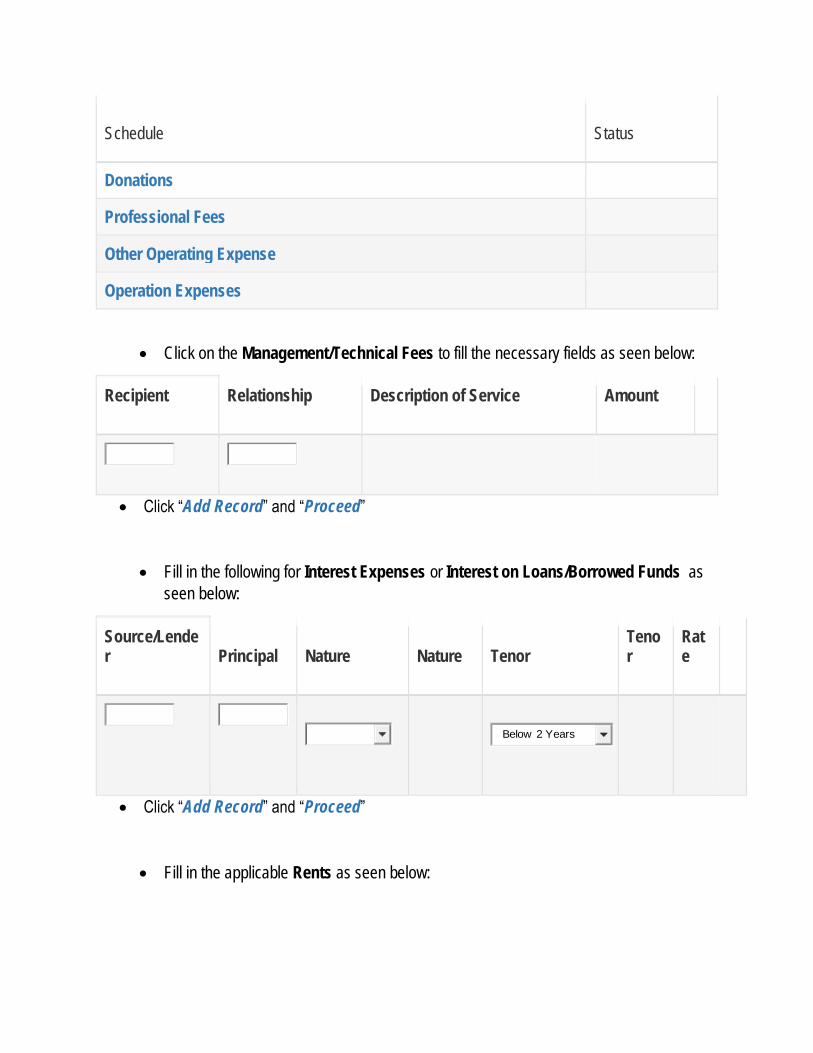
Schedule Status
Donations
Professional Fees
Other Operating Expense
Operation Expenses
Click on the Management/Technical Fees to fill the necessary fields as seen below:
Recipient Relationship Description of Service Amount
Click “Add Record” and “Proceed”
Fill in the following for Interest Expenses or Interest on Loans/Borrowed Funds as
seen below:
Source/Lender Principal Nature Nature Tenor
Tenor
Rate
Below 2 Years
Click “Add Record” and “Proceed”
Fill in the applicable Rents as seen below:
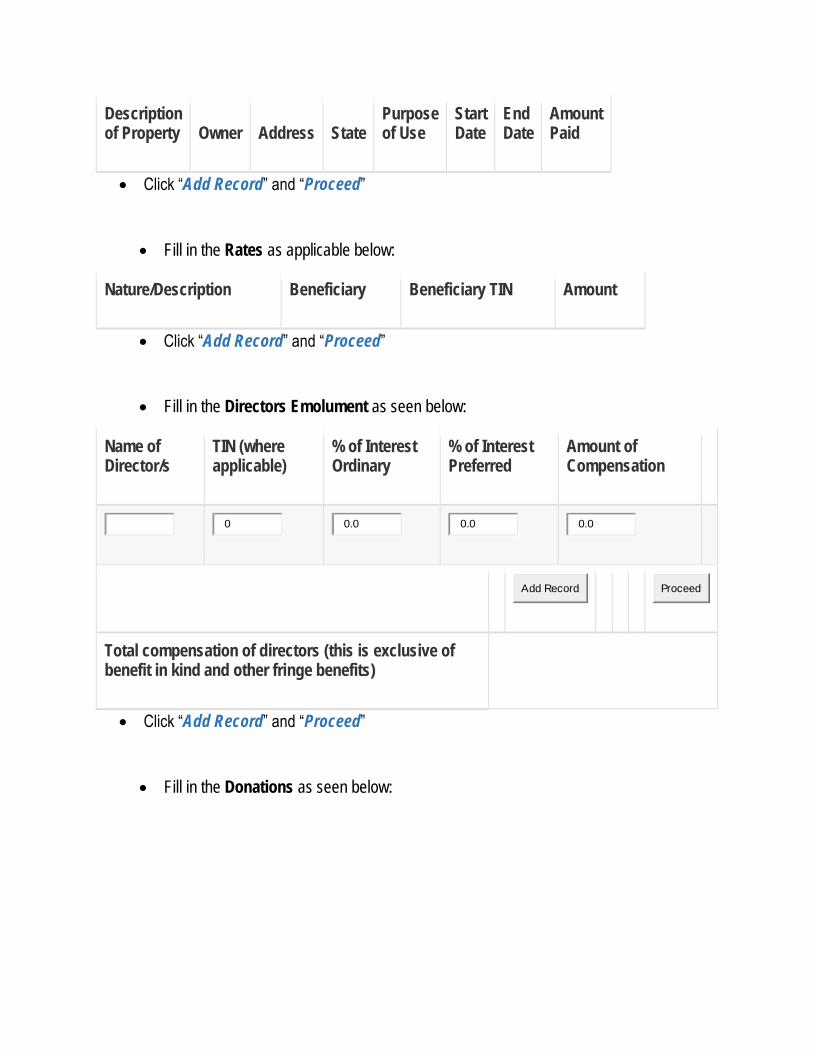
Description of Property Owner Address State
Purpose of Use
Start Date
End Date
Amount Paid
Click “Add Record” and “Proceed”
Fill in the Rates as applicable below:
Nature/Description Beneficiary Beneficiary TIN Amount
Click “Add Record” and “Proceed”
Fill in the Directors Emolument as seen below:
Name of Director/s
TIN (where applicable)
% of Interest Ordinary
% of Interest Preferred
Amount of Compensation
0
0.0
0.0
0.0
Add Record
Proceed
Total compensation of directors (this is exclusive of benefit in kind and other fringe benefits)
Click “Add Record” and “Proceed”
Fill in the Donations as seen below:
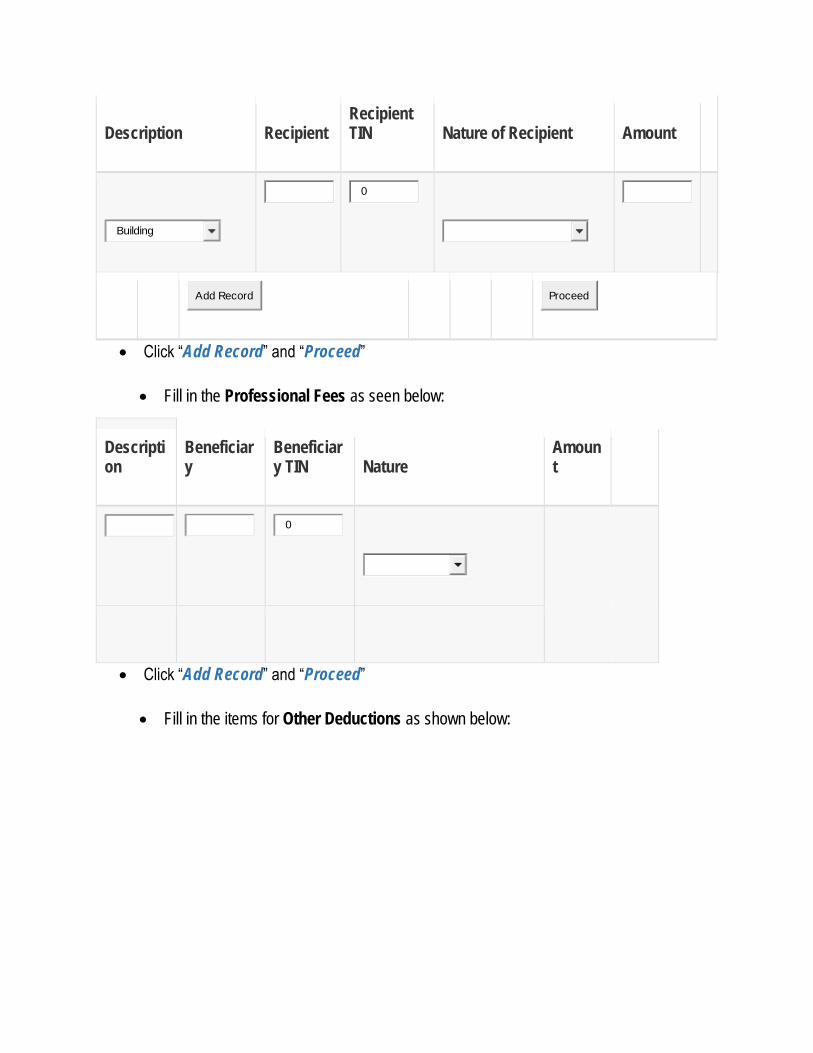
Description Recipient Recipient TIN Nature of Recipient Amount
Building
0
Add Record
Proceed
Click “Add Record” and “Proceed”
Fill in the Professional Fees as seen below:
Description
Beneficiary
Beneficiary TIN Nature
Amount
0
Click “Add Record” and “Proceed”
Fill in the items for Other Deductions as shown below:
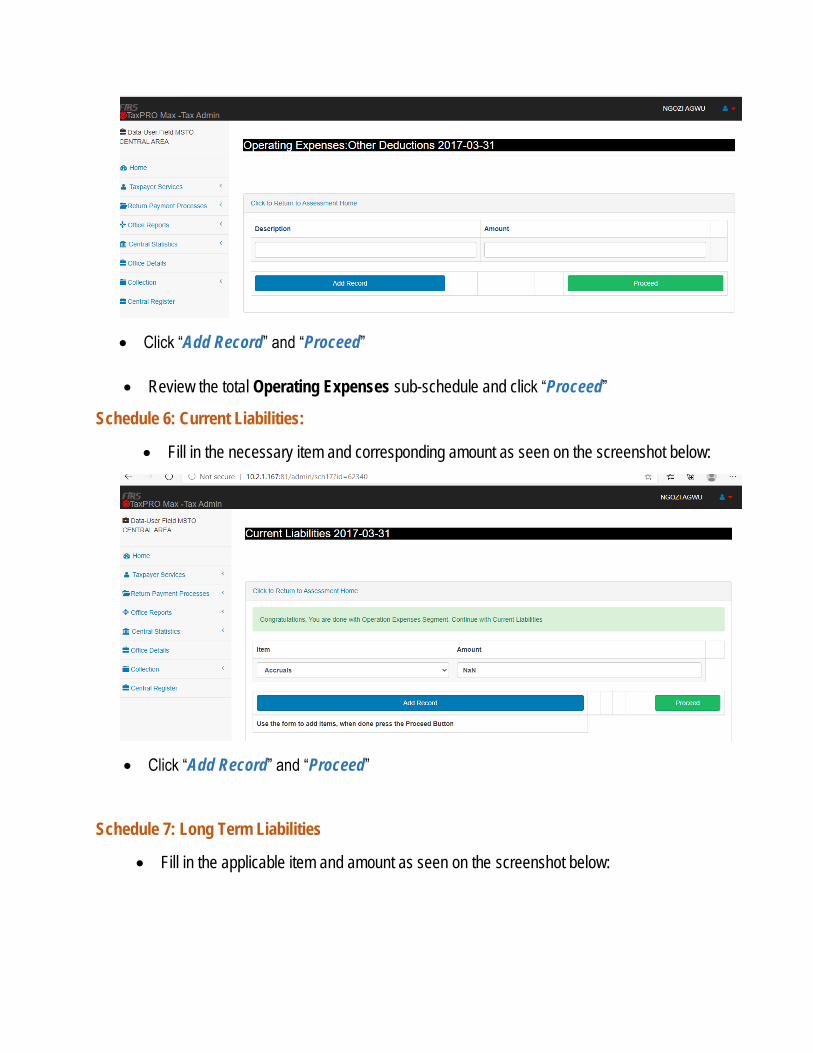
Click “Add Record” and “Proceed”
Review the total Operating Expenses sub-schedule and click “Proceed”
Schedule 6: Current Liabilities:
Fill in the necessary item and corresponding amount as seen on the screenshot below:
Click “Add Record” and “Proceed”
Schedule 7: Long Term Liabilities
Fill in the applicable item and amount as seen on the screenshot below:

Click “Add Record” and “Proceed”
Schedule 8: Ownership/Capital Structure
Fill in the applicable item as seen on the screenshots below: Note: Ownership Capital
structure must be greater than Zero.
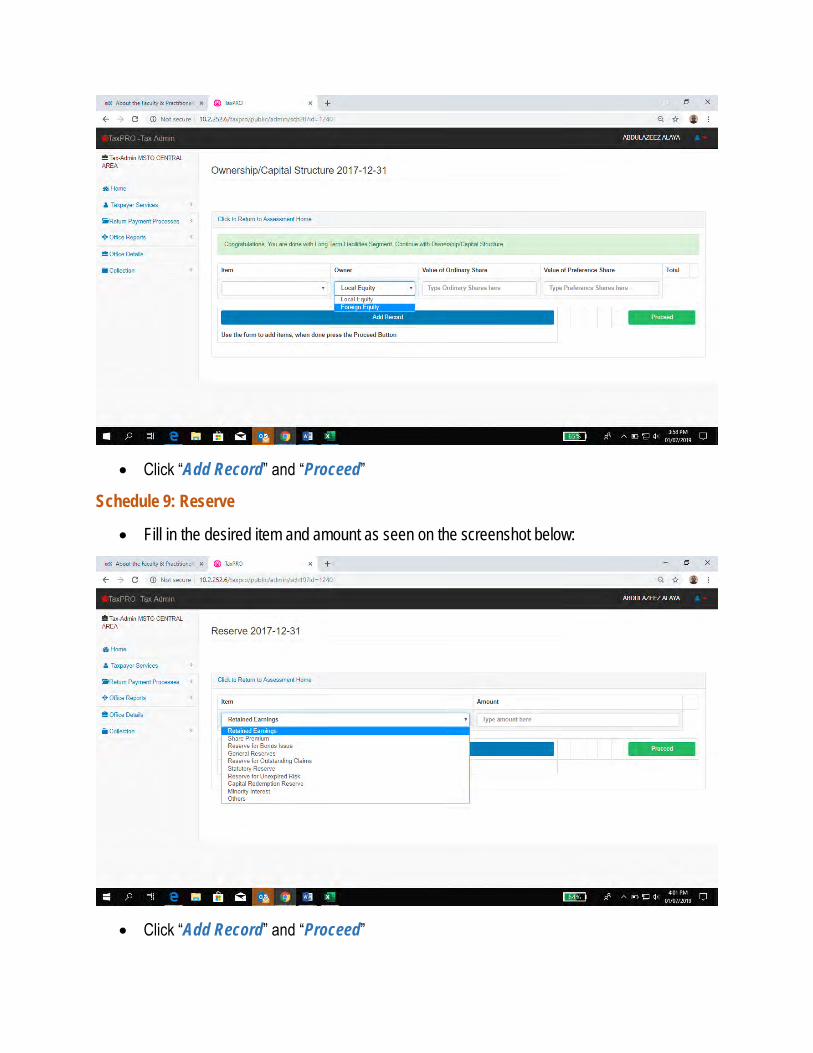
Click “Add Record” and “Proceed”
Schedule 9: Reserve
Fill in the desired item and amount as seen on the screenshot below:
Click “Add Record” and “Proceed”
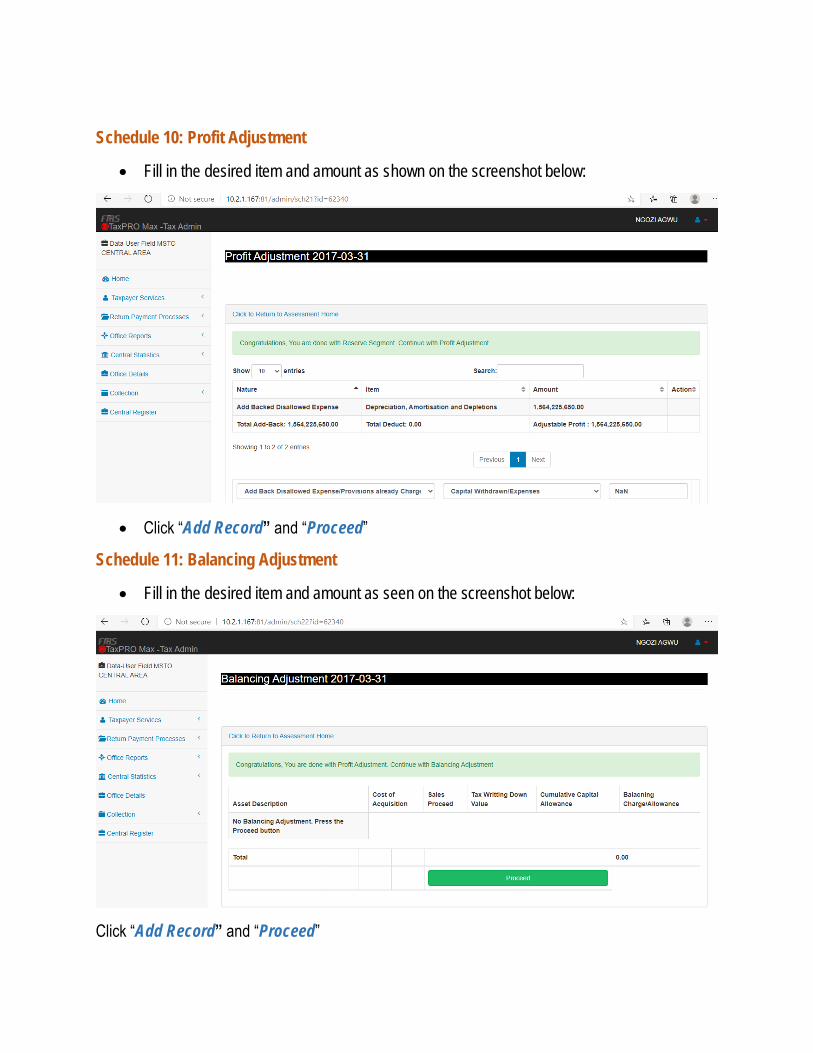
Schedule 10: Profit Adjustment
Fill in the desired item and amount as shown on the screenshot below:
Click “Add Record” and “Proceed”
Schedule 11: Balancing Adjustment
Fill in the desired item and amount as seen on the screenshot below:
Click “Add Record” and “Proceed”
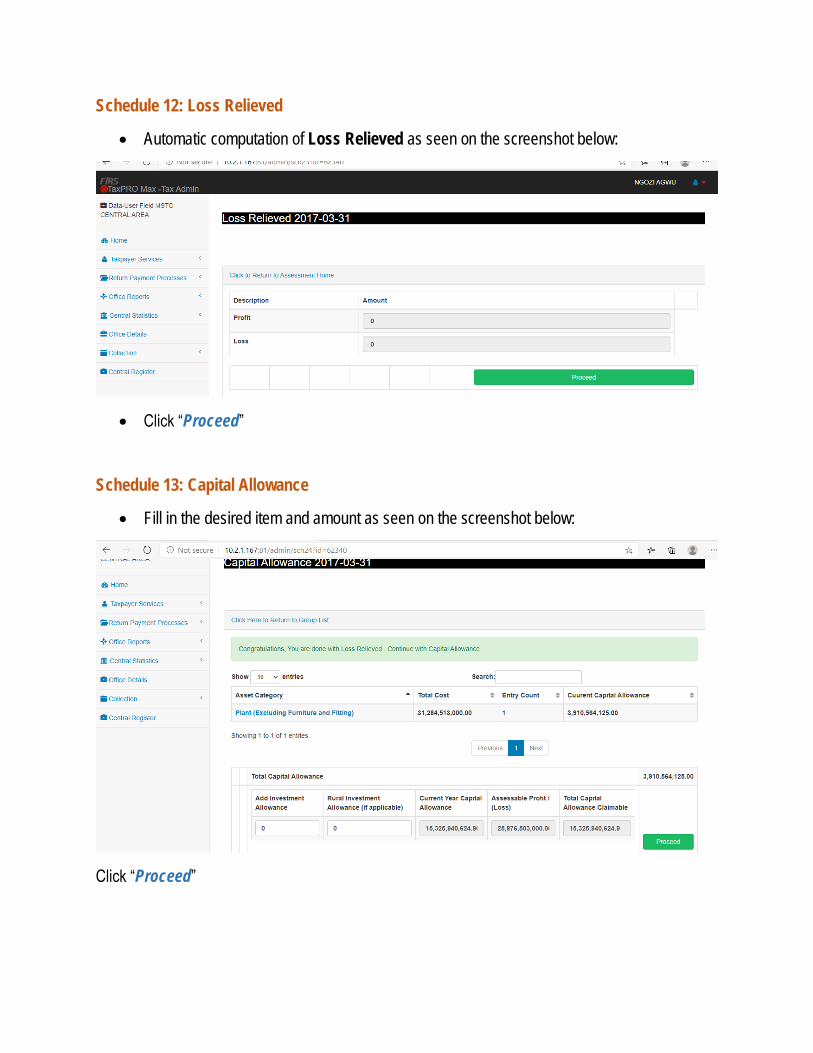
Schedule 12: Loss Relieved
Automatic computation of Loss Relieved as seen on the screenshot below:
Click “Proceed”
Schedule 13: Capital Allowance
Fill in the desired item and amount as seen on the screenshot below:
Click “Proceed”
Company Income Tax Form:
The Company Income Tax (CIT) form will be generated and displayed after the
completion of all the schedules.
Select the currency type (i.e. NGN, GBP, USD, CFA, EUR ), under “Returning
Currency”
Insert the total revenue amount on the first box of the generated form. This will
automatically fill the remaining pre-fill boxes.
Beneath the generated CIT form, click on “Declaration” to declare that the
information is correct and in accordance to the relevant Tax Act.
Select payment options; Full-Payment, 2 Installments, 3 Installments, or 4
Installments, accordingly.
Click on “Submit”
Company Income Tax Assessment Page:
Review the CIT assessment as seen below:
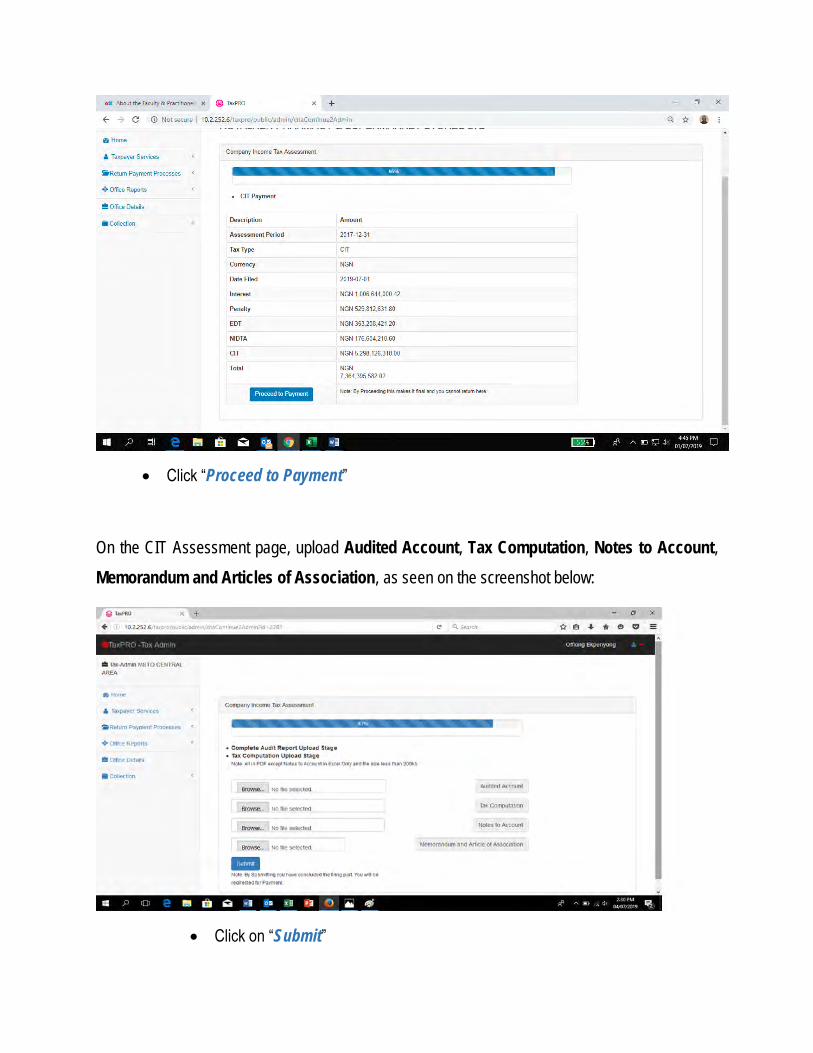
Click “Proceed to Payment”
On the CIT Assessment page, upload Audited Account, Tax Computation, Notes to Account,
Memorandum and Articles of Association, as seen on the screenshot below:
Click on “Submit”
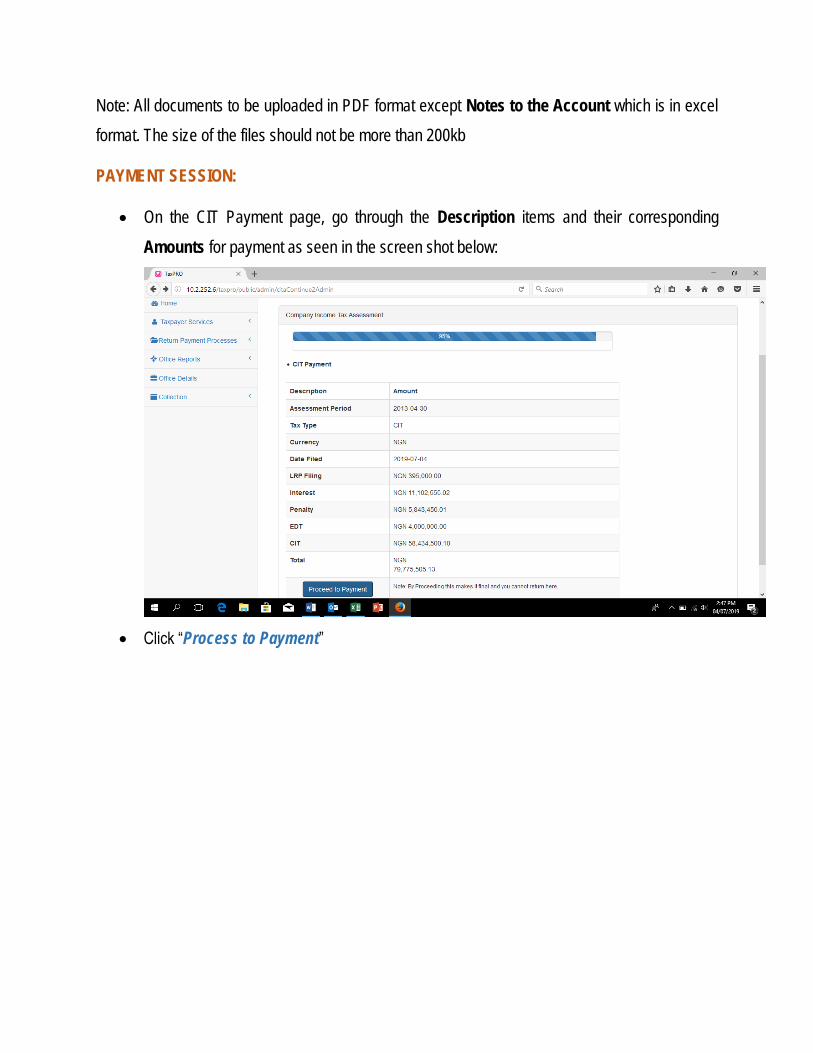
Note: All documents to be uploaded in PDF format except Notes to the Account which is in excel
format. The size of the files should not be more than 200kb
PAYMENT SESSION:
On the CIT Payment page, go through the Description items and their corresponding
Amounts for payment as seen in the screen shot below:
Click “Process to Payment”
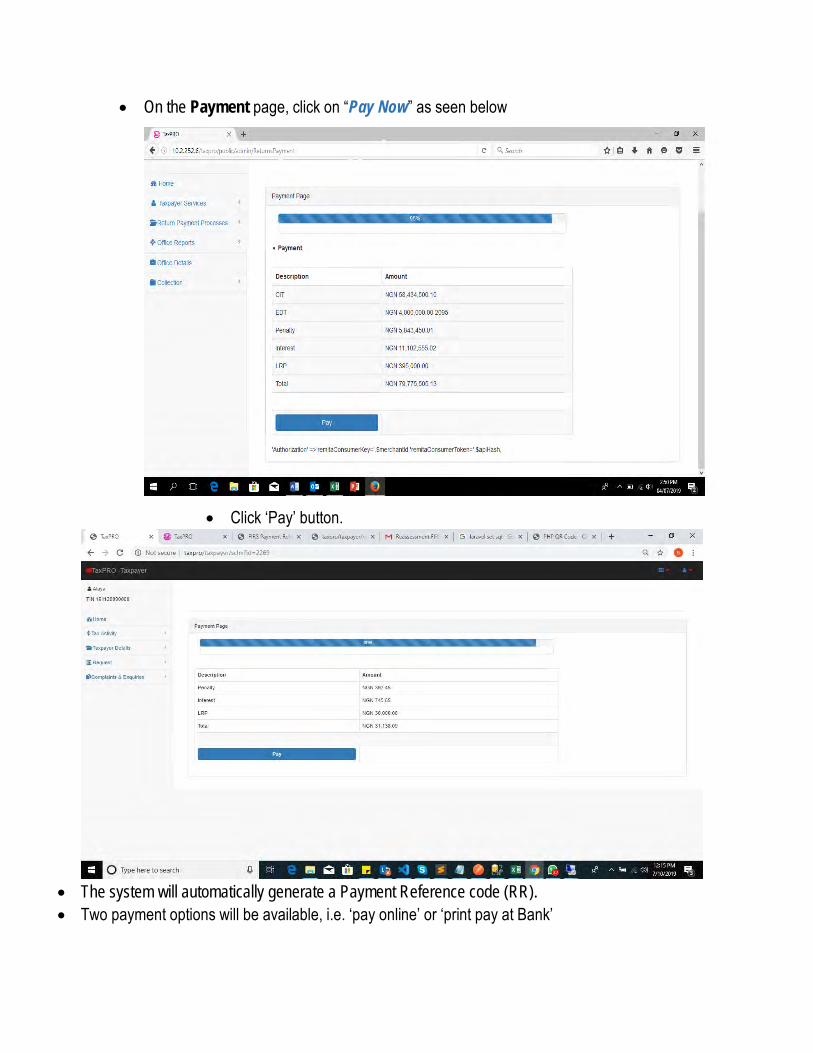
On the Payment page, click on “Pay Now” as seen below
Click ‘Pay’ button.
The system will automatically generate a Payment Reference code (RR).
Two payment options will be available, i.e. ‘pay online’ or ‘print pay at Bank’
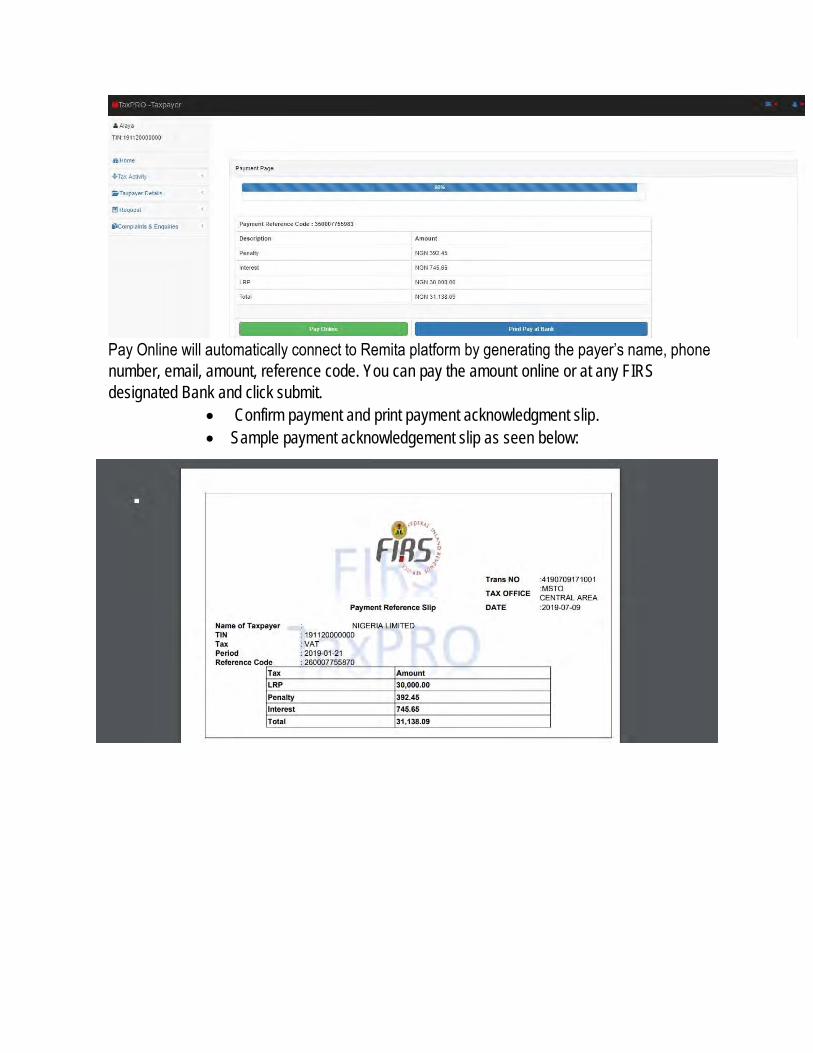
Pay Online will automatically connect to Remita platform by generating the payer’s name, phone
number, email, amount, reference code. You can pay the amount online or at any FIRS
designated Bank and click submit.
Confirm payment and print payment acknowledgment slip.
Sample payment acknowledgement slip as seen below: