Embed Size (px)
Citation preview

Tap amp Hold the screen to show the top bar
HOME Tap to return to the app home page
How to
use this
app
Tap amp Hold the screen to show the top bar
Swipe Horizontally to quickly navigate pages Tap selected page to View
Swipe
Horizontally
to go to the
next page
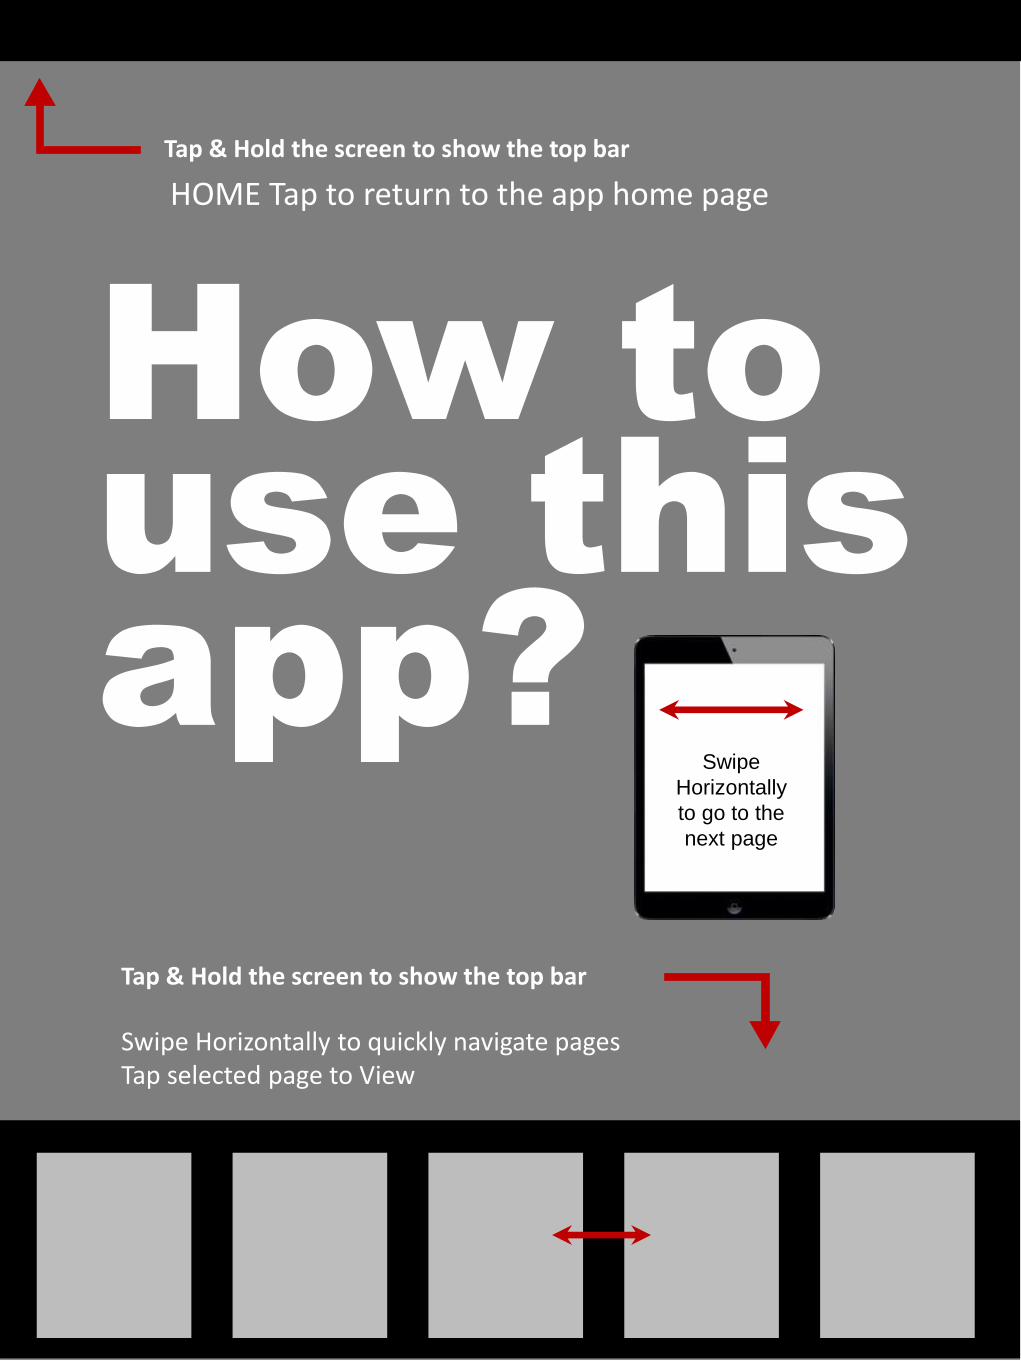
CONTENTS EDITORrsquoS NOTE
FEATURED JEWELRY MAKING TUTORIALS
bull DIY Anthro-Inspired Matchstick Earrings by Jamie Hannigan
bull Wire Wrapped Pendant by Wanda Epps
JEWELRY BIZ
bull Should You Sell at The Marketplace
FEATURED JEWELRY MAKING TUTORIALS
bull LOVE-ly Earstuds by Jeske Hendriks
bull Flower Tale Earrings by Iulia Postica
bull Liberty Earrings by Mariella Martella
bull Jade Necklace by Sky Aldovino
bull Atomic Ring by Sky Aldovino
FEATURED ARTICLE
RECOMMENDED JEWELRY MAKING SUPPLIES bull Bead Swarovski Faceted Rondelle
bull Turquoise Oval CAB Cabochon
bull Bead Swarovski crystal Mint Alabaster
bull Bead turquoise (imitation)
BLOG DIY BEADING MAGAZINE ISSUE 32 BLOG WWWHANDMADE-JEWELRY-CLUBCOM MEMBERSHIP WWWDIYBEADINGCLUBCOM
CONTENTS
FEATURED JEWELRY MAKING TUTORIALS
bull Something Blue Necklace and Earring Tutorial by Margit Vogel
RECOMMENDED READINGS
bull Making Jewelry with Gemstone Beads
bull Convertible Crystal Jewelry Reverse it Twist it
Wear it Many Ways
bull Wire Jewelry Masterclass Wrapped Coiled and
Woven Pieces Using Fine Materials
bull Timeless Wire Weaving The Complete Course
FEATURED INTERVIEW
bull Getting Down and Personal With Gianna
BLOG DIY BEADING MAGAZINE ISSUE 32 BLOG WWWHANDMADE-JEWELRY-CLUBCOM MEMBERSHIP WWWDIYBEADINGCLUBCOM
Blog wwwhandmade-jewelry-clubcom
Membership wwwdiybeadingclubcom
Join The Fun
Its a new month and are you craving for
something more in your jewelry style Then it is
the righ time as we have jewelry tutorials that will not be out of fashion Come and learn with
us in style and luxury In this new issue of DIY
Beading Magazine we will unleash the beauty
of gemstones and crystals just for you Ready to
be the centre of attention with your sparkles
Now is the time to get noticed with gemstones
and crystals with that hint of personal touch
Editorrsquos Note
Welcome to DIY Beading Magazine
Jane Chew
BLOG DIY BEADING MAGAZINE ISSUE 32 BLOG WWWHANDMADE-JEWELRY-CLUBCOM MEMBERSHIP WWWDIYBEADINGCLUBCOM
BLOG DIY BEADING MAGAZINE ISSUE 32 BLOG WWWHANDMADE-JEWELRY-CLUBCOM MEMBERSHIP WWWDIYBEADINGCLUBCOM
DIY Anthro-Inspired Matchstick
Earrings
This project is inspired by Anthropologiersquos Herkimer Matchstick Earrings Materials - 18 ga gold wire - 24 ga gold wire - Small clear or white crystal beads (I used 4mm snow quartz) - Gold earring hooks - Round nose pliers - Flat or chain nose pliers - Wire cutters - Ball peen hammer - Surface to hammer on (I use a small metal block)
BLOG DIY BEADING MAGAZINE ISSUE 32 BLOG WWWHANDMADE-JEWELRY-CLUBCOM MEMBERSHIP WWWDIYBEADINGCLUBCOM
DIY Anthro-Inspired Matchstick
Earrings
Start by cutting two 6 pieces of 18 gauge gold wire Make a round loop at the top and start forming the shape of the earring frame It should be about 2 long
Finish the shape of your earring frame and bring the end of the wire to the loop you created Criss cross the ends so that the loop is sandwiched in between
BLOG DIY BEADING MAGAZINE ISSUE 32 BLOG WWWHANDMADE-JEWELRY-CLUBCOM MEMBERSHIP WWWDIYBEADINGCLUBCOM
DIY Anthro-Inspired Matchstick
Earrings
Pull the ends tight so that the frame is secure then snip off the excess wire
Repeat with the other piece of wire for your second earring frame Check as you go to make sure they are as close to identical as possible
BLOG DIY BEADING MAGAZINE ISSUE 32 BLOG WWWHANDMADE-JEWELRY-CLUBCOM MEMBERSHIP WWWDIYBEADINGCLUBCOM
DIY Anthro-Inspired Matchstick
Earrings
Place your earring frames on your hammering surface and hammer with the ball peen hammer until they lay flat This will also strengthen the wire and make
them less likely to bend
Cut a 10 piece of 24 gauge wire and wrap the end around the bottom of your earring frame String on beads until you fill the space
BLOG DIY BEADING MAGAZINE ISSUE 32 BLOG WWWHANDMADE-JEWELRY-CLUBCOM MEMBERSHIP WWWDIYBEADINGCLUBCOM
DIY Anthro-Inspired Matchstick
Earrings
Secure the wire at the top by wrapping it near the loop Repeat on the second earring
Add earring hooks of choice and yoursquore done
Advertisement
DIY Anthro-Inspired Matchstick
Earrings
BLOG DIY BEADING MAGAZINE ISSUE 32 BLOG WWWHANDMADE-JEWELRY-CLUBCOM MEMBERSHIP WWWDIYBEADINGCLUBCOM
About the Author
Jamie Hannigan
Perhaps Irsquom just easily fascinated but I often see magic and wonder in things other might consider mundane Irsquom a very imaginative person and as a child I often created fictional
narratives to go along with places or objects
My inspiration comes from all over Sometimes Irsquom really into nature like toadstools and mushrooms Sometimes Irsquom really into man-made things like ships Sometimes Irsquom really
into concepts and themes like astrology or mythology
I go through phases and Irsquove learned to embrace that in my work I create the things I want to make at that exact moment If just one other person finds enjoyment in what my
imagination led me to produce I consider it a success
To see more jewelry tutorials and my other work visit jamiebhannigancom and check my Etsy shop at
httpswwwetsycomshopjamiebhannigan
Wire Wrapped Gemstone
Pendant
BLOG WWWHANDMADE-JEWELRY-CLUBCOM MEMBERSHIP WWWDIYBEADINGCLUBCOM
You will usually find these more natural gemstones at bead shows vs your local bead shop
Wire Jewelry Making Skill Level Intermediate
Wire Jewelry Making Supplies - two lengths of 22 gauge round dead soft wire (4 times the length of your bead) - one 3 inch (76 cm) length of 20 gauge half round half hard (HH) wire (wrapping wire) - one gemstone bead - three 6mm beads (I used amethyst Swarovskireg crystals - three one inch (25 cm) head pins - one ink pen (used as a mandrel) - one marker pen - blue painters tape - jewelers polishing cloth - ruler Jewelry Making Tools - wire cutters - round nose pliers - chain nose pliers
BLOG DIY BEADING MAGAZINE ISSUE 32
Wire Wrapped Gemstone
Pendant
BLOG WWWHANDMADE-JEWELRY-CLUBCOM MEMBERSHIP WWWDIYBEADINGCLUBCOM
1 Using a ruler measure the length of your bead and note the measurement
Multiply the measurement by 4 My bead is 3 inches (76 cm) long so my final measurement is 12 inches (305 cm)
BLOG DIY BEADING MAGAZINE ISSUE 32
2 Tear off two pieces of blue painters tape from the roll and temporarily tape them to your work surface
Using the wire cutters cut two lengths of the 22 gauge round wire measuring the length of your
final measurement (I cut two 12 inch (305 cm) lengths of wire)
Clean and straighten both wires by pulling them through a jewelers polishing cloth (not pictured)
With both wires side by side with the ends even with one another use the torn tape lengths to tape the wires together (This will temporarily hold them together while you to wire wrap them)
With the marker pen mark the center of both wires
Wire Wrapped Gemstone
Pendant
BLOG WWWHANDMADE-JEWELRY-CLUBCOM MEMBERSHIP WWWDIYBEADINGCLUBCOM
3 Using the wire cutters cut one 3 inch (76 cm) length of 20 gauge half round half hard wire This is the wrapping wire
With the flat side of the wire facing you use the chain nose pliers to make a 14 inch (06 cm) bend
towards you and at a slight angle in one end of the wire This makes a hook in the wire The flat sides of the wire should face one another
BLOG DIY BEADING MAGAZINE ISSUE 32
4 Pick up the taped wires at their center between your fore finger and thumb Place the hook of the half round wire slightly to the right of the center mark on the two round
wires
5 Holding the long end and the tail of the half round wire hook use the tip of the chain nose pliers to squeeze the bend of the hook against the round wires This sets or secures the wrapping wire
Wire Wrapped Gemstone
Pendant
BLOG WWWHANDMADE-JEWELRY-CLUBCOM MEMBERSHIP WWWDIYBEADINGCLUBCOM
6 Bend the long end of the half round wire up over the two round wires You have created one wire wrap
BLOG DIY BEADING MAGAZINE ISSUE 32
7 Bend the long end of the half round wire down and behind the two round wires
8 Continue to repeat Steps 6 and 7 until you have made three (3) to five (5) complete wire wraps around the round wires (I made five (5) wire wraps) After making one or two wire wraps secure
the wraps against the round wires as in Step 5
The front of the wrap (as pictured below) will be the side where the half round wrapping wire is not cut
Wire Wrapped Gemstone
Pendant
BLOG WWWHANDMADE-JEWELRY-CLUBCOM MEMBERSHIP WWWDIYBEADINGCLUBCOM
9 Use wire cutters to cut the excess half round wire Cut the wire about half way behind the round wires so that the ends will not be seen from the front side of the wire wrap
BLOG DIY BEADING MAGAZINE ISSUE 32
10 With the wire wrap at the bottom center of your bead use your fingers to gently shape the wires around the bottom along the sides and to the top of the bead
11 Use the chain nose pliers to secure all the wraps against the round wires
Wire Wrapped Gemstone
Pendant
BLOG WWWHANDMADE-JEWELRY-CLUBCOM MEMBERSHIP WWWDIYBEADINGCLUBCOM
12 Slide the chain nose pliers in between the round wires where they meet the wire wrap and spread the wires apart
BLOG DIY BEADING MAGAZINE ISSUE 32
Spreading the wires apart begins to create the cage for the bead
13 With its bottom center resting against the wire wrap place your bead or gemstone inside the cage
Gather all four of the wires around the bead so that it is encased within them and so that the wires
meet at the top of the bead Hold all four wires between your forefinger and thumb (like you are pinching the wires)
Wire Wrapped Gemstone
Pendant
BLOG WWWHANDMADE-JEWELRY-CLUBCOM MEMBERSHIP WWWDIYBEADINGCLUBCOM
14 Decide which side will be the front of the pendant Locate the wire that is in front of all the wires and with your fingers bend it downward at a 45 degree angle
BLOG DIY BEADING MAGAZINE ISSUE 32
15 Use your fingers or the chain nose pliers to wrap the bent wire around the other three wires where they all meet or cross one another
16 Continue wrapping the wire around the other three to secure them End the wrapping at the back of the pendant
Using the chain nose pliers tuck the wire into the wraps (not pictured)
Wire Wrapped Gemstone
Pendant
BLOG WWWHANDMADE-JEWELRY-CLUBCOM MEMBERSHIP WWWDIYBEADINGCLUBCOM
17 Make sure that the wires are evenly spread around the beads Now we need to tighten the wires that encase the bead
On one of wires about halfway up the wire place the jaws of the round nose pliers on either side
of the wire Now rotate the pliers making a double bend in the wire Repeat on the other three wires making one or two double bends in each wire When youre done shake the bead to make sure it cannot fall out of the wires
BLOG DIY BEADING MAGAZINE ISSUE 32
18 Now decorate two of the top wires Almost anything is possible Try making a few different bends curls or twists in the wire
I decided to loosely coil the top wires around an ink pen
19 Gently untighten the coil by pulling the end of the wire downward Using the round nose pliers make a simple wire loop on the end of the coil
Wire Wrapped Gemstone
Pendant
BLOG WWWHANDMADE-JEWELRY-CLUBCOM MEMBERSHIP WWWDIYBEADINGCLUBCOM
20 Repeat Steps 18 and 19 on a second top wire
BLOG DIY BEADING MAGAZINE ISSUE 32
21 The third top wire becomes the bail Coil it tightly around the ink pen making at least two wire coils The end of the wire should fall in front of the pendant
Make a simple wire loop on the wire end
22 Heres how the wire coilsspiralsbends should look Make any necessary adjustments to the wires along the sides of the gemstones and the two that fall
in front of pendant
Make sure that the wires tightly secure the bead The wire wrap at the bottom of the pendant may no longer be at the center of the bead
Wire Wrapped Gemstone
Pendant
BLOG WWWHANDMADE-JEWELRY-CLUBCOM MEMBERSHIP WWWDIYBEADINGCLUBCOM
23 On each of the three head pins string a 6mm bead Make a simple wire loop on the end of each head pin
Attach one head pin bead unit to each of the simple wire loops on the wire wrapped pendant
BLOG DIY BEADING MAGAZINE ISSUE 32
Completed Wire Wrapped Pendant
Now hang your handcrafted wire wrap pendant from your favorite chain or strand of beads
Enjoy wire wrapping your own gemstone to make a wire wrapped pendant
BLOG WWWHANDMADE-JEWELRY-CLUBCOM MEMBERSHIP WWWDIYBEADINGCLUBCOM
Wire Wrapped Gemstone
Pendant About the Author
Wanda Epps
Wanda is an avid jewelry maker who loves to make jewelry with beads She began her journey into jewelry making after walking into a bookstore to find crafting books on sale One on making jewelry caught her eye and after making a simple bead necklace she was hooked That was in late 2003 Over the years she has taken classes on various jewelry making techniques stringing making wire jewelry bead crochet macrame metal jewelry making to name some She expects that her love of making beaded jewelry will continue as bead supplies and beautiful new beads seem endless Her fulltime job provides for her needs but beads are her passion She invites you to join her in the many adventures of making jewelry at
httpwwwmaking-beaded-jewelrycom httpswwwfacebookcompagesMaking-Beaded-Jewelry-
Guide254860504236
BLOG DIY BEADING MAGAZINE ISSUE 32
Should You Sell In The Marketplace
Should You Sell In The Marketplace
BLOG WWWHANDMADE-JEWELRY-CLUBCOM MEMBERSHIP WWWDIYBEADINGCLUBCOM
We are all able to create jewelry pieces and there will come a time where you want to share the joy with the rest of the world whether it is in the form of a tutorial or a finish
piece And this is when you will start to think about putting up your work for sale As someone who is new to the business world you may be confused on where you should start selling your work And the all famous site that is first on most peoplersquos minds is Etsy Etsy is popular and it is user friendly and that is why it is the choice of many designers and crafters But there are also some who wants to set up their own
shop with their logo and to put their works out as their own even at the very beginning Thatrsquos where you may be confused on which platform you should go for
So herersquos some explanation on how you will benefit from setting up shop at Etsy
BLOG DIY BEADING MAGAZINE ISSUE 32
1 Etsy has everything ready for you and all you have to do is to bring in your works and use the features that are already available for you to use ndash like the payment system web traffic design and layout are not an issue that you need to worry about
2 You also have the trust of customers almost immediately because Etsy has already established a name for itself and therefore there is already trust in brand in their site When you use Etsy your brand will automatically be exposed to many customers who visit Etsy to find what they need
3 For every site there is always the need to be able to interact with other sellers to help each other out Forums or community boards are very helpful as other passionate designers and crafters share their experience to help out the newer members of the community This is also where you will be able to form good relationships with other sellers and who knows you may even find a partnership over time
Should You Sell In The Marketplace
BLOG WWWHANDMADE-JEWELRY-CLUBCOM MEMBERSHIP WWWDIYBEADINGCLUBCOM
Though Etsy has itrsquos good points there are some things which you need to take into consideration as well
1 When you are using someone elsersquos facilities there is always the chance of having
being shut down due to unforeseen circumstances Be it violation of Etsyrsquos policy or decisions made by the administration department this will sometimes cost you a dent in your brand name and you may lose the trust of your followers and starting all over again may be the only way to start again
2 If you are a very creative person then you may feel limited as the design of shops at Etsy is standardized If you are new and do not worry so much about designs of websites this is perfectly fine But do remember that when you want to distinguish yourself from other sellers it will be tougher as you try to make your brand more well-known due to limitations of design of the site
3 Since Etsy has so many sellers all in one place the competition is of course going to be tighter and fiercer because even though customers are viewing your products there are also other options from other sellers listed on the page as well So customers may turn away if they see something of a better price
4 Each product that you list with Etsy costs you money Etsy also takes a 35 percent of the selling price of the item However if or when you start your business on your own website it will also cost you for web hosting and you would need PayPal and they have a fee of 29 percent +30cents So either way you will still need to pay to list your products on the web
BLOG DIY BEADING MAGAZINE ISSUE 32
Should You Sell In The Marketplace
BLOG WWWHANDMADE-JEWELRY-CLUBCOM MEMBERSHIP WWWDIYBEADINGCLUBCOM
If you are confident enough to have your own business site by all means go ahead and do it The benefits of it are as below
1 You get to be your own boss You get to control everything from the design of the
website layout and how you want to advertise your products You can also change your policies and not be affected by it because it is you who changes it Your shop will not be shut down suddenly without notice and you do not need to worry that you have to start all over again
2 Distractions of competitors products on your page will not be an issue It is your site and it is up to you whether or not you want to allow what kind of advertisements on your site So if you donrsquot want something on your page it is your call
3 You will be able to capture the attention of the media and customers as well if you are able to have a well designed site Nowadays people are attracted to colors and they can see if you have put effort into beautifying the site for the customers You can do so much more than just uploading some pictures onto Etsy on your own site you can always update your site design and your products to complement each other and therefore becoming more attractive
BLOG DIY BEADING MAGAZINE ISSUE 32
Should You Sell In The Marketplace
BLOG WWWHANDMADE-JEWELRY-CLUBCOM MEMBERSHIP WWWDIYBEADINGCLUBCOM
And herersquos the tough part when you want to have your own site
BLOG DIY BEADING MAGAZINE ISSUE 32
1 You need to have knowledge of what you want to do You have to learn to be involved in every aspect of your site so that you know what us going on at the front end of things and at the back end of things as well But if you have not any knowledge of designing a website it is usually a recipe for something to go wrong You have to remember that you need a user interface that is simple for customers to use an easy to use shopping cart you should know which third party platforms are trusted and one which will not keep changing their regulations If you still want to have your site hiring a designer may be your best option
2 You have to work towards promoting your store on your own You will need to find people to feature you in their social media sites because it will not just fall into your lap You need to have promotions or road shows if you need to Marketing your store is important whether or not you are using Etsy or other marketing platforms but if you are on your own it is even more important
3 You will still be competing with other sellers Though now you are now not only competing with Etsy sellers you are now competing with sellers and stores from the world wide web Etsy is already so well known so people tend to go there first so you need to up your methods of attracting customers
Should You Sell In The Marketplace
BLOG WWWHANDMADE-JEWELRY-CLUBCOM MEMBERSHIP WWWDIYBEADINGCLUBCOM
When we first started out we used Etsy as our platform to sell our works Other than that we also utilized blogs and we eventually built our own website as our main base
BLOG DIY BEADING MAGAZINE ISSUE 32
Things have changed over these 3 years It was easier to get sales without much effort but now with so many other shops also utilizing Etsy the competition has grown tremendously Now our main sales come from our own online store and has exceeded sales from Etsy
So what we recommend is that using an existing platform such as Etsy to start out is good and in time build up your website or webstore
It is not that hard to start your own webstore either these two companies offers the option to set up your webstore
1 Shopify
2 Bigcommerce
There are many things to take into consideration before starting a store online It is perfectly fine to start out using Etsy before branching out on your own But you can also
have both ndash have your own website and a store on Etsy There are many stores who operate like this They technically get customers from Etsy and the reroute them to their own websites As long as you are in control of what you are doing and not stressing and
confusing yourself you can opt for more exposure for your store
So do take some time and take a breather to really think through what will be the best for YOU and do remember that starting small does not mean you will not be able to be big
OFFER Get which can be downloaded by subscribing to
httpinternet-marketing-publishingcom
BLOG WWWHANDMADE-JEWELRY-CLUBCOM MEMBERSHIP WWWDIYBEADINGCLUBCOM
Materials - Copper wire diameter 08 mm - Copper wire diameter 04 mm - Small gemstone bead (~4 mm) (I used 3 mm beads in this tutorial because I didnrsquot have any other beads at the time but the beads in the earrings on the cover are 4 mm) Make sure that the beads you want to use are resistant against chemicals such as liver of sulfur or whichever oxidizing substance you want to use to give the metal patina The beads in the picture above are facetted garnet buttons in the tutorial itself I used black spinel facetted buttons Equipment - Round nose pliers - Flat nose pliers - Side-cutters - A small file - A cylindrical object of about 5mm diameter (eg a mandrel for jump rings) - Hammer amp anvil - Liver of sulfur or some other means to oxidize the metal (optional)
LOVE-ly Earrings
BLOG DIY BEADING MAGAZINE ISSUE 32
BLOG WWWHANDMADE-JEWELRY-CLUBCOM MEMBERSHIP WWWDIYBEADINGCLUBCOM
This tutorial teaches how to make 1 ear stud I recommend making both ear studs of the set simultaneously step-by-step so that symmetry is easier to achieve Between steps check for
symmetry in size and shape and adjust the construction if needed
LOVE-ly Earrings
BLOG DIY BEADING MAGAZINE ISSUE 32
Step 1 Straighten the end of the copper wire (+- 6cm) by rubbing along it with your fingers for a
few seconds
Step 2 Bend over the wire onto itself as illustrated below using flat nose pliers
Step 3 Grab the doubled-over wire with the flat nose pliers and push the two sides against each
other Use little force and do it bit by bit to avoid damaging or kinking the wire
Step 4 Push the two adjacent pieces of wire apart to create the bottom shape of the heart as shown
on the picture above
BLOG WWWHANDMADE-JEWELRY-CLUBCOM MEMBERSHIP WWWDIYBEADINGCLUBCOM
LOVE-ly Earrings
BLOG DIY BEADING MAGAZINE ISSUE 32
Step 5 Hammer down the angled wire (the part circled in red) This strengthens the construction
and looks more professional
Step 6 Wrap the two ends of wire tightly around a cylindrical object (+- 5 mm diameter)
Step 7 Push apart the loops you just made by wrapping the wire around the cylindrical object The wire should now be shaped like a heart as
illustrated above
Step 8 Use round nose pliers to bend around the wire for each side of the heart as illustrated above
BLOG WWWHANDMADE-JEWELRY-CLUBCOM MEMBERSHIP WWWDIYBEADINGCLUBCOM
LOVE-ly Earrings
BLOG DIY BEADING MAGAZINE ISSUE 32
Step 9 Use the flat nose pliers to bend one of the two wires (preferably the longer wire) in a 90deg angle at the place marked with a red dot In the picture accompanying the next step you can see
how it should look from the front
Step 10 Use the round nose pliers to bend the other piece of wire in a decorative coil You will cut off the rest of the wire of the coil at approximately the spot marked with a red dot so take that into account when coiling the wire into the shape that
you desire
Step 11 Cut of the wire at the spot indicated in the previous picture and file off any sharp edges
Step 12 Cut off the ear wire at the desired length (Between 1 and 2 cm If in doubt try the earring on
to see if it sits comfortably) and file off any sharp edges
BLOG WWWHANDMADE-JEWELRY-CLUBCOM MEMBERSHIP WWWDIYBEADINGCLUBCOM
LOVE-ly Earrings
BLOG DIY BEADING MAGAZINE ISSUE 32
Step 13 Hammer down the rest of the heart (bumps and coil) If you canrsquot reach certain parts because the ear wire is in the way bend that part of the heart shape away
(verticallyupward) and bend it back after you finish hammering
Congrats yoursquove now made a basic heart-shaped ear stud Next wersquore going to decorate it with a little gemstone and more copper wire
Step 14 Cut off a length of 04 mm copper wire (about 10-20 cm) and string the bead onto it
Step 15 Place the bead in the ldquonon-coilrdquo upper part of the heart shaped ear stud holding it between thumb and forefinger Let approximately 4 cm of the 04 mm wire stick out over the edge of the
heart as illustrated above
Step 16 Wrap the wire twice around the frame so that if you face the front of the ear stud the wire is
directed towards yourself
BLOG WWWHANDMADE-JEWELRY-CLUBCOM MEMBERSHIP WWWDIYBEADINGCLUBCOM
LOVE-ly Earrings
BLOG DIY BEADING MAGAZINE ISSUE 32
Step 17 Flip the wire over the wire with the bead (indicated by the red arrow) and pull tight whilst holding the bead (and its wire) tightly in place It
should look like the construction in the big picture above
Step 18 And make another loop around the wire with the bead The 04 mm wire is now coiled around
twice two times two coils around the frame and two coils around itself
Step 19 Repeat the wire-fastening procedure described in steps 16-18 with the other end of the
wire securing the gemstone in the heart frame Let the wire stick out at the back of the earstud
Step 20 Pull the wire through the lsquocoilrsquo part of the heart shape to the front The wire should lsquocross overrsquo to the other side of the heart at the back of the ear
stud
Step 21 Coil the wire around the frame until you are content with the design Optionally you can hammer down the coils a bit I often do this because I think it
looks somewhat more sophisticated and professional
BLOG WWWHANDMADE-JEWELRY-CLUBCOM MEMBERSHIP WWWDIYBEADINGCLUBCOM
LOVE-ly Earrings
BLOG DIY BEADING MAGAZINE ISSUE 32
Step 22 Cut off the spare bits of wire preferably at the backside of the ear stud and tuck in the ends
Congrats yoursquove now made a heart-shaped ear stud Next we are going to finish it off with a patina
Step 23 Oxidize the metal of the ear studs I always use liver of sulfur solved in warm water The metal
will turn a dark color and matte texture Afterwards rinse the ear studs thoroughly with water and pat
them dry
Step 24 Rub the oxidized ear stud all over with a rough polishing pad to bring back (a dark copper)
color to the surface
Yoursquove now finished making your own LOVE-ly ear studs
Secure them in your ear with plastic or copper stops These can be bought online or in jewelry-supply
stores
Variation ideas You can easily vary in size and shape (longer hearts smaller coils pointier bottoms etc) and
use different materials As you can see the earring I make in this tutorial has a slightly smaller bead than the
earrings on the cover which influences the overall appearance somewhat
The earrings underneath are made with sterling silver and gold wire (super-short coils) and contain small pink
rubies
LOVE-ly Earrings
BLOG WWWHANDMADE-JEWELRY-CLUBCOM MEMBERSHIP WWWDIYBEADINGCLUBCOM
About the Author
Jeske Hendriks
Hi there My name is Jeske and I love all things handmade Over the years Irsquove dabbled in countless different arts and crafts but nowadays I mainly focus on making jewellery and cutting stone cabochons As for jewellery
my preferred materials are silver wire and gemstonemineral beads Using wire-wrapping and basic silver smithing techniques I create both simple
and intricate pieces ndash each and every one of them unique a personal little artwork
You are welcome to follow me on facebook stop by at my personal
webpage andor to have a look at my Etsy shops httpswwwfacebookcomyeskecrafts
httpwwwyeskecraftscom httpwwwyourbeadsandfindingsetsycom
httpwwwyeskecraftsetsycom httpwwwyeskemiscetsycom
BLOG DIY BEADING MAGAZINE ISSUE 32
Flower Tale Earrings
BLOG WWWHANDMADE-JEWELRY-CLUBCOM MEMBERSHIP WWWDIYBEADINGCLUBCOM
Techniques Beadweaving
Project Level Beginner to Intermediate
Materials 12 bronze opaque 6mm Czech glass pearl round beads
2 gr gold lustered dark topaz Japanese 110 seed beads (Toho 459)
Size B gold beading thread
2 bronze earring hooks
Tools Size 10 beading needle
Scissors
Finished Size Diameter ndash 3 cm (118 inches) (without earring hooks)
BLOG DIY BEADING MAGAZINE ISSUE 32
Flower Tale Earrings
BLOG WWWHANDMADE-JEWELRY-CLUBCOM MEMBERSHIP WWWDIYBEADINGCLUBCOM
Step 1 Cut about 110 cm (43 inches) of thread and
pass it through the needle hole
Pick six groups of one 110 seed bead and one
6 mm round bead
BLOG DIY BEADING MAGAZINE ISSUE 32
Join the beads into a ring and secure with two
square knots
Leave a tail of about 15 cm (59 inches)
Step 2 The working thread should be right before the
6 mm round bead
Pick seven 110 seed beads skip the 6 mm
round bead and pass the needle through the
next 110 seed bead added in the previous
round
Repeat adding groups of seven 110 seed
beads five more times
When adding the last group take the needle
directly through the 110 seed bead from the
previous round and the next one added in the
beginning of current round
Flower Tale Earrings
BLOG WWWHANDMADE-JEWELRY-CLUBCOM MEMBERSHIP WWWDIYBEADINGCLUBCOM
Step 3 Pick three 110 seed beads skip one seed
bead from the chain of seven added in the
previous round and pass with the needle
directly through the next three 110 seed
beads
BLOG DIY BEADING MAGAZINE ISSUE 32
Pick three 110 seed beads skip one seed
bead from the chain of seven added in the
previous round and pass with the needle
through the last one and the first 110 seed
bead from the next chain of seven
Repeat the above directions from Step 3 five
more times
After completing this round make sure the
thread will be exiting from the middle 110
seed bead from the first group of three added
in the beginning of this round
Step 4 Pick one 110 seed bead and go through the
last seed bead of the group of three
Flower Tale Earrings
BLOG WWWHANDMADE-JEWELRY-CLUBCOM MEMBERSHIP WWWDIYBEADINGCLUBCOM
Pick three 110 seed beads and take the
needle through the first seed bead of the next
group of three added in the previous round
BLOG DIY BEADING MAGAZINE ISSUE 32
Pick one 110 seed bead and go with the
needle through the next three seed beads (the
last two of the group of three and the last one
from the chain of seven)
Then go up through three 110 seed beads
(the first from the next group of seven and the
first two from the next group of three)
Repeat the above directions from Step 4 to
complete the remaining petals
When working on the last petal perform the
operation from the image shown on the left
instead of picking the group of three 110 seed
beads string two 110 seed beads the earring
hook other two 110 seed beads and
continue beading as instructed above
When you are done hide the thread ends into the beadwork
Flower Tale Earrings
BLOG WWWHANDMADE-JEWELRY-CLUBCOM MEMBERSHIP WWWDIYBEADINGCLUBCOM
About the Author
Iulia Postică
I was born and live in Moldova Eastern Europe Ever since I remember myself
Ive been crocheting and knitting My grandmother has taught me that and I
loved it very much I always regarded crafts exclusively as a hobby and never
thought of making a career of it I traveled a lot to various historical sites
Actually Ive spent all my childhood summers in archaeological camps with
my father who is a professional archaeologist
I also enjoy metal hammering and wirework as it gives me possibility to
express myself in materials used by human communities since ancient times
copper brass glass seed beads and gemstones That is no surprise to anyone
given my family history and academic background
My shop ldquoBeadedTreasuryrdquo with beading tutorials and bead crochet patterns
httpswwwetsycomshopBeadedTreasury
My shop ldquoArchaeologicardquo with artisan jewelry
httpswwwetsycomshopArcheologica
My blog httpbeadedtreasuryblogspotcom
My facebook httpswwwfacebookcomBeadedTreasury
BLOG DIY BEADING MAGAZINE ISSUE 32
Liberty Earrings
BLOG WWWHANDMADE-JEWELRY-CLUBCOM MEMBERSHIP WWWDIYBEADINGCLUBCOM
Materials - Nr 2 cabochon Preciosa Ornela ovale 18x22 mm turchese
- Rocaille Toho 150 silver lined green emerald
- Nr 2 dagger beads
- Nr 20 pearl 4 mm
- Superduo opaque luster ceramic green
- Rocaille 80 color gold
- Rocaille 80 color ivory
- Delica Miyuki 110 aquagreen mix
- Rocaille Miyuki 110 galvanized silver
- Nr 2 monachelle (earwire)
-Fireline
- Beading Needle nr 12
BLOG DIY BEADING MAGAZINE ISSUE 32
Liberty Earrings
BLOG WWWHANDMADE-JEWELRY-CLUBCOM MEMBERSHIP WWWDIYBEADINGCLUBCOM
Make a circle of 20 delica beads and make a knot (a) Perform two rounds peyote with ivory 80 seed beads (b c) Exit from an ivory
bead
BLOG DIY BEADING MAGAZINE ISSUE 32
a b c
Jump from 80 to 80 with 110 80 gold 110 (a) Finish the round and come out of a 80 gold bead
Jump to the next 80 gold with a 4mm pearl (b) Finish the round and come out
of the first pearl Jump to the 2nd pearl and close with a 80 gold bead(c)
a b c
Position the cabochon and jump from one 80 to the other with two delica bead (a)
Continue with three delicas four times (b) At the bottom sew on two delicas then finish the round by sewing on three delicas for four times passing from one to another roc 80 Tighten the cabochon and exit from the
first two delica that you started with String together a 110 and 150 and enter the second of the three close delicas (c)
a b c
Liberty Earrings
BLOG WWWHANDMADE-JEWELRY-CLUBCOM MEMBERSHIP WWWDIYBEADINGCLUBCOM
Put together 150 110 150 and enter in the second of three next delica (a) Put the same beads for three times then put together 150 and 110 and enter
in the two delica of the bottom tip (b) Enter in the second of three next delica with 110 and 150 (c) Continue passing
in the 80 beads with three beads (150 110 150) for four times then at the top finish the round by putting together a 150 and 110 (d)
BLOG DIY BEADING MAGAZINE ISSUE 32
a b c
Exit from the first 150 sewn in the previous round and jump in the three next beads with a 150 (a)
Put a 150 at a time and exit from the first 110 beads of the bottom tip Jump in the
near 110 with a 150 (b) Finish round repeating steps a and b (c) Exit the roc 80 as shown in the photo (d)
a b c
d
a b c d
Enter in the 80 with four 150 (a b) Enter the 80 beads at the bottom of the pieces with two 110 one superduo one 80 ivory bead one superduo and two 110 (c)
d e f
Liberty Earrings
BLOG WWWHANDMADE-JEWELRY-CLUBCOM MEMBERSHIP WWWDIYBEADINGCLUBCOM
Exit from the bottom pearl (a) Put together 150 three 110 150 and enter in the superduorsquos second hole (b)
Put together three superduo and enter in the next superduorsquos second hole (c) Rethread 15 three 110 150 and return in the opposite direction in the pearl of departure (d)
BLOG DIY BEADING MAGAZINE ISSUE 32
a b
c
Exit from the second pearl indicated from (a) Put 150 four 110 and enter in the second of the three 110 (b) Go to the second superduorsquos hole with four 110 and a 150 (c)
Enter the second hole of the supeduo with a 150(d) Sew in the middle of the bottom of the superduo 150 two 110 150 dagger 150 two 110 150(e)
Enter the second hole of the thirs superduo with 150 (f)
a b c
d
d e f
Liberty Earrings
BLOG WWWHANDMADE-JEWELRY-CLUBCOM MEMBERSHIP WWWDIYBEADINGCLUBCOM BLOG DIY BEADING MAGAZINE ISSUE 32
Put 150 four 110 and enter in the second of three 110 of the base (a) Insert four 110 and 150 in the pearl opposite direction indicated in the picture (b) Go in all the beads
around the piece and exit from the pearl at the top (c) Put 150 three 110 150 and enter the superduo (d)
Enter the ivory bead 80 with two 150 (e) Enter the next superduo with two 150 (f)
a b c
d e f
Put together 150 three 110 and enter in opposite direction in the departurersquos pearl (a) Exit from the 150 beads indicated by photo (b) From this jump in the second of two near
150 with five 150 to created the hole for the earwire (c) Pass the thread in the beads make a few knots and cut the excess thread
a b c
Your earrings are finished
Liberty Earrings
BLOG WWWHANDMADE-JEWELRY-CLUBCOM MEMBERSHIP WWWDIYBEADINGCLUBCOM
About the Author
Mariella Martella
My name is Mariella Martella and I am the author and
designer of jewelry that I sign with the name of Mariel Bijoux
After changing city often for work and study I currently live
in northern Italy I am an art historian with a passion for travel
painting and jewelry design in weaving that project since
2010 In my beads and crystals are the colors of the
Mediterranean sea the atmosphere of summer evenings
and the lights of the places I visited
You can find me at
Etsy shop httpswwwetsycomitshopMarielBijoux
Facebook httpswwwfacebookcommari3lbijoux
Crafting blog httpmarielbijouxblogspotit
Twitter httpstwittercomMarielBijoux
BLOG DIY BEADING MAGAZINE ISSUE 32
Jade Necklace
BLOG WWWHANDMADE-JEWELRY-CLUBCOM MEMBERSHIP WWWDIYBEADINGCLUBCOM
Every time I wear a necklace I always make it a point that the
necklace will lay perfectly flat on my neck Using wire for a necklace
made it possible for me like what I did with Jade Necklace It may look
odd at first having bent wires for a necklace but once the jewelry is
finished youll be so happy how the necklace will perfectly lay on your
neck
The tutorial is catered for intermediate level One must know basic
wirework skills such as wire wrapping making loops wrapped loops
and linking to follow the tutorial It has clear instructions and ultra-clear
close-up photos at each step Additionally you can ask me question
you have on the tutorial No more getting stuck and frustrated on a
confusing or just plain inaccurate pattern
If you followed this tutorial and then sell the accessory or jewelry
please give credit to the author or DIY Beading Clubcom
Copyright 2015
wwwdiybeadingclubcom
wwwhandmade-jewelry-clubcom
BLOG DIY BEADING MAGAZINE ISSUE 32
Jade Necklace
BLOG WWWHANDMADE-JEWELRY-CLUBCOM MEMBERSHIP WWWDIYBEADINGCLUBCOM BLOG DIY BEADING MAGAZINE ISSUE 32
Materials Needed 18ga Craft wire 28ga Craft wire 15mm diameter Green Round Flat Back Sew On Gems 5mm Green pearls
8mm Green pearls 6mm x 11mm teardrop Crystal Treasures Mill Hill beads or any teardrop bead with holes on the side Hook for your clasp
Tools Needed Wire cutter Flat nose pliers Round nose pliers Mandrel A jar or any rounded object to shape your necklace
Skill Level Intermediate
Step 1 Cut 6 inches 18ga wire Make a loop on one end then measure approximately 125 inches and make another loop
Form a size 4 circle on your mandrel
Jade Necklace
BLOG WWWHANDMADE-JEWELRY-CLUBCOM MEMBERSHIP WWWDIYBEADINGCLUBCOM BLOG DIY BEADING MAGAZINE ISSUE 32
Then close the circle by wrapping the extended wire just below the loop Wrap the
wire 2x
This is how it looks like Lets call this circle frame Youll notice that the lower curve is
slightly bigger than the upper curve
Step 2 Cut 8 inches of 28ga wire Wrap one end of
the wire at least 3x on one side of the circle frame just below the loop
Bring up your gem Flat back sew on gems has 2 holes Insert the wire into one hole and then
wrap the wire once onto the circle frame
Jade Necklace
BLOG WWWHANDMADE-JEWELRY-CLUBCOM MEMBERSHIP WWWDIYBEADINGCLUBCOM BLOG DIY BEADING MAGAZINE ISSUE 32
Step 3 Insert a 5mm pearl on the wire and then pass
the wire under circle frame
Repeat previous step 2x and have 3 pearls wrapped
Continue wrapping with your teardrop crystal My crystal has 2 holes on the side
and then continue wrapping with your 5mm pearls then secure your wire
Repeat Step 3 and create as many as needed For 16-inch necklace Ive created 6 of these
components
Jade Necklace
BLOG WWWHANDMADE-JEWELRY-CLUBCOM MEMBERSHIP WWWDIYBEADINGCLUBCOM BLOG DIY BEADING MAGAZINE ISSUE 32
Step 4 Cut a 15-inch 18ga wire and make a loop on
one end Insert 8mm pearl and make a loop on the other end You then use these as connectors
and link the components
Step 5 The necklace is an 18ga wire with wrapped
loops on both ends First cut 7 inches 18ga wire and make a wrapped loop with your hook already inserted Side in 18pcs 5mm pearls
Then make a wrapped loop on the other end connecting the wrapped loop onto the component Do the same for the other
necklace but make the loop on the other end big enough so the hookclasp can pass thru
To have the necklace curve shaped use a jar to bend the wire Voila Now youre
ready to party
Jade Necklace
BLOG WWWHANDMADE-JEWELRY-CLUBCOM MEMBERSHIP WWWDIYBEADINGCLUBCOM
About the Author
Sky Aldovino
I consider myself a late bloomer when it comes to crafting Irsquom a self-taught jewelry maker Jewelry making wasnrsquot really a hobby of mine but unforeseen events lead me to learn jewellery making My family put up a craft store where we sell cross stitch beads and all sorts of crafting materials I fell in love with the beads and tried to create accessories only for myself Clients liked the pieces and I started customizing handmade jewelleries The craft store was a success for 6 years but like any other small businesses we had to close it down and I was confined to staying at home While at home I had all the time using the internet and now working as a home-based jewelry designer
BLOG DIY BEADING MAGAZINE ISSUE 32
Atomic Ring
BLOG WWWHANDMADE-JEWELRY-CLUBCOM MEMBERSHIP WWWDIYBEADINGCLUBCOM
Have fun making shapes using the wigjig Cyclops Make loops going in
circles to mimic the shape of a flower or in this tutorial mimic the
shape of an atom The tutorial will also teach you how to cage a
cabochon Whats nice about this piece is that with one long wire you
can create the ring from start to finish
The tutorial is catered for intermediate to advanced students One
must already know how to make spirals and use a wigjig tool It has
clear instructions and ultra-clear close-up photos at each step
Additionally you can ask me question you have on the tutorial No
more getting stuck and frustrated on a confusing or just plain
inaccurate pattern
If you followed this tutorial and then sell the accessory or jewelry
please give credit to the author or DIY Beading Clubcom
If you like to get a blank wigjig graph visit wigjigcom Shop and Jigs
section
Copyright 2015
wwwdiybeadingclubcom
wwwhandmade-jewelry-clubcom
BLOG DIY BEADING MAGAZINE ISSUE 32
Atomic Ring
BLOG WWWHANDMADE-JEWELRY-CLUBCOM MEMBERSHIP WWWDIYBEADINGCLUBCOM
Materials Needed 20ga Craft wire 28ga Craft wire 11mm Round Cabochon
Tools Needed Wigjig Cyclops 15mm pegs Wire cutter Flat nose pliers Mandrel
Skill Level Intermediate - Advanced
BLOG DIY BEADING MAGAZINE ISSUE 32
Step 1 Lets prepare your wigjig cyclops Position the pegs like so
Atomic Ring
BLOG WWWHANDMADE-JEWELRY-CLUBCOM MEMBERSHIP WWWDIYBEADINGCLUBCOM BLOG DIY BEADING MAGAZINE ISSUE 32
Lets work with longer wire so youll have enough wire to hold onto as you manipulate the wire so cut 36 inches of 20ga wire From
one end of the wire measure 10 inches
On the 10-inch measurement loop the wire at the center peg then continue to loop onto the side pegs going in circle going back to
the center peg after looping on the side peg
Now the wire at the center peg will start to build up as you go around the side pegs so
you need to constantly press the wire at the center peg to accommodate the build up of
wire
When youre done pull out the wire and this is
how it should look like
Atomic Ring
BLOG WWWHANDMADE-JEWELRY-CLUBCOM MEMBERSHIP WWWDIYBEADINGCLUBCOM BLOG DIY BEADING MAGAZINE ISSUE 32
You will notice that the frame opens wide Now to keep the atom frame from opening wide secure the center of the frame by wrapping a 28ga wire What you
need to do is simply pass the 28ga wire into the hole and wrap as many times as needed or until youre sure that the frame is secure
Step 2 Now youre finished with your atom frame Well now create the focal design With the longer wire make a spiral at the center big
enough to accommodate the size of your cabochon In this tutorial the spiral is about
11mm in diameter the same size as my cabochon
Pop in your cabochon and start to make spirals going around and over the cabochon as if you are caging the cabochon Create at
least 5 rounds and then cut off any excess
Step 3 Now lets make the ring and this with the other
end of the wire
Atomic Ring
BLOG WWWHANDMADE-JEWELRY-CLUBCOM MEMBERSHIP WWWDIYBEADINGCLUBCOM BLOG DIY BEADING MAGAZINE ISSUE 32
Bring up your mandrel and wrap the wire to the size of your finger Wrap at least 2 times
When youre sure you have the right size pull the ring out of the mandrel
With the extended wire wrap the wire the secure the ring
Cut off any excess and voila You have your atomic ring Create as many as you can with different colors of cabochon
Atomic Ring
BLOG WWWHANDMADE-JEWELRY-CLUBCOM MEMBERSHIP WWWDIYBEADINGCLUBCOM
About the Author
Sky Aldovino
I consider myself a late bloomer when it comes to crafting Irsquom a self-taught jewelry maker Jewelry making wasnrsquot really a hobby of mine but unforeseen events lead me to learn jewellery making My family put up a craft store where we sell cross stitch beads and all sorts of crafting materials I fell in love with the beads and tried to create accessories only for myself Clients liked the pieces and I started customizing handmade jewelleries The craft store was a success for 6 years but like any other small businesses we had to close it down and I was confined to staying at home While at home I had all the time using the internet and now working as a home-based jewelry designer
BLOG DIY BEADING MAGAZINE ISSUE 32
Featured Article Gemstones Used for Jewelry Making
BLOG WWWHANDMADE-JEWELRY-CLUBCOM MEMBERSHIP WWWDIYBEADINGCLUBCOM
Gemstones are stones which we hold quite highly in terms of value And
jewelry often consists of stones that add attractiveness to it so it is not
surprising when jewelry designers actually use gemstones in their designs In
fact there are different types of gemstones that can be used for making
jewelry There are the expensive and pure gemstones and there are also the
imitation ones The information below will provide some information about
the kinds of stones you can use to create jewelry and how these stones will
impact the jewelry you have created
The first kind of stone which I believe we are all quite familiar with are
birthstones These stones are associated with individualrsquos month of birth
by SunVDesigns by BeyhanAkman
For example Amethyst stone is connected with anybody who is born in
February which carries special significance in the area of emotions and also
spiritually This stone also signifies calm and peace as well
And then we have semi-precious stones which are also often used in jewelry
making They are not as valuable as compared to precious stones but still
valuable Best examples of these stones are aquamarine topaz tourmaline
opal and turquoise
BLOG DIY BEADING MAGAZINE ISSUE 32
Featured Article Gemstones Used for Jewelry Making
BLOG WWWHANDMADE-JEWELRY-CLUBCOM MEMBERSHIP WWWDIYBEADINGCLUBCOM
It is an ideal gift for someone who you deem special Aquamarine pendants
usually work well for anyone and is widely an accepted stone
by HyppieChic by joyeriamestiza
However precious stones are the most unusual
and precious jewels to us Examples of some of
them are emerald sapphire diamond and
ruby These stones are usually very expensive
and are prized for their exquisiteness These
stones are commonly used in high-quality
jewelry designs which costs quite a fortune to
obtain
BLOG DIY BEADING MAGAZINE ISSUE 32
by sarajewelrystu
Jewelry designs with precious stones are usually
given as exceptional gifts on special occasions A
perfect example is a diamond ring that is usually
given as an engagement gift
by ldiamondsforever
Featured Article Gemstones Used for Jewelry Making
BLOG WWWHANDMADE-JEWELRY-CLUBCOM MEMBERSHIP WWWDIYBEADINGCLUBCOM
There are also synthetic stones which are often used to create jewelry
Synthetic stones are artificial imitations of gemstones Synthetic Sapphire
jewelry costs less compare with the authentic ones Most of the time
imitation stones are used to save cost but at the same time have the similar
look of the real stone
BLOG DIY BEADING MAGAZINE ISSUE 32
by shininggems by thaimaker
by lapinduprintemps by PastimeArt
Gemstones are used like beads and you can use it in any designs whether
simple or elaborate
Swarovski crystal components are available in a rich multitude of rondelles Perfect as spacers in necklaces or as discs in earrings Rondelles can be used with many varieties of shapes or sizes Use Swarovski crystal rondelles between large gemstones as accents with precious metal findings Fire Mountain Gems and Beads Crystal Passionsreg brand presents Swarovski crystal in display-ready packaging for brilliant retail presentation Crystal Passionsreg is an assurance of genuine Swarovski crystal
BLOG DIY BEADING MAGAZINE ISSUE 32 BLOG WWWHANDMADE-JEWELRY-CLUBCOM MEMBERSHIP WWWDIYBEADINGCLUBCOM
Recommended Jewelry Making Supplies
Mz Unisex-adults 12pcs 25x18x6mm Turquoise Oval CAB Cabochon
BLOG DIY BEADING MAGAZINE ISSUE 32 BLOG WWWHANDMADE-JEWELRY-CLUBCOM MEMBERSHIP WWWDIYBEADINGCLUBCOM
Recommended Jewelry Making Supplies
For a little sparkle that goes a long way design with Swarovski 4mm faceted bicones Create glorious multi-strand necklaces with the dainty crystals or use as spacers to add a tiny flash to your designs Swarovski crystal components are made in Austria and are considered the finest products of their kind in the world
BLOG DIY BEADING MAGAZINE ISSUE 32 BLOG WWWHANDMADE-JEWELRY-CLUBCOM MEMBERSHIP WWWDIYBEADINGCLUBCOM
Recommended Jewelry Making Supplies
Imitation beads resist color change These beads have uniform quality with a good polish Some strands may have little to no matrix Sizes shapes and colors may vary with handcrafted items
BLOG DIY BEADING MAGAZINE ISSUE 32 BLOG WWWHANDMADE-JEWELRY-CLUBCOM MEMBERSHIP WWWDIYBEADINGCLUBCOM
Recommended Jewelry Making Supplies
Something Blue Necklace and Earrings
BLOG WWWHANDMADE-JEWELRY-CLUBCOM MEMBERSHIP WWWDIYBEADINGCLUBCOM
Skill level Beginner Intermediate Advanced
DIMENSIONS OF THE NECKLACE Inner Circumference 14 18 inch 35 cm
Focal Pendant Width 1 15 inch 35 cm Focal Pendant Height 1 15 inch 35 cm
DIMENSIONS OF THE EARRING Earring Width 716 inch 12 cm Earring Height 1516 inch 25 cm (Without the earring hook)
BLOG DIY BEADING MAGAZINE ISSUE 32
Materials
Note Before purchasing the supplies measure the length of your wished necklace If you decide to bead a longer necklace you should keep in mind that for every extra
frac34 inches 2 cm-s you will need 8 bicones and 8 pearls
Something Blue Necklace and Earrings
BLOG WWWHANDMADE-JEWELRY-CLUBCOM MEMBERSHIP WWWDIYBEADINGCLUBCOM BLOG DIY BEADING MAGAZINE ISSUE 32
Work RAW stitch into a beaded circle and embellish with Swarovski bicones
STEP 2 String 1A and 2 pearls Pass through the previous
second pearl and the freshly added 1A and the first pearl again
STEP 1 Use a comfortable length of thread to string 2
pearls 1A and 1 pearl again leaving a 2rdquo 5cm tail Pass through the first two pearls strung to form a
ring
STEP 3 String 2 pearls and 1A Pass through the previous first pearl and the freshly added two pearls
again
STEP 4 - 17 Repeat STEP 2 and STEP 3 again until you count 17 pearls in the inner circle
But be careful in the last step you only have to add 1 pearl then pass through the first pearls
added in STEP 1 and add another 1A Now pass through the first pearl added in STEP
1and 1A added in this round again to exit from this A
Something Blue Necklace and Earrings
BLOG WWWHANDMADE-JEWELRY-CLUBCOM MEMBERSHIP WWWDIYBEADINGCLUBCOM BLOG DIY BEADING MAGAZINE ISSUE 32
STEP 19 String 2A and pass through the next A added in round 4-17 and the A added in round 18 the 2A added in this round and finally the A added in round 4-17 to exit from the bead showed below
STEP 18 String 3A and pass through the 1A added in the previous round and the first A added in this
round
STEP 20 - 34 Repeat STEP 18 and STEP 19 again until you finish the circle
But be careful in the last step first you have to pass through 3A and then add 1A After this pass
through the 3A again and exit from the A bead
shown below (This is the first A added in STEP 18)
Something Blue Necklace and Earrings
BLOG WWWHANDMADE-JEWELRY-CLUBCOM MEMBERSHIP WWWDIYBEADINGCLUBCOM BLOG DIY BEADING MAGAZINE ISSUE 32
STEP 35 Step up to exit from the pearl shown below (Finishing the previous step in the A bead and then
stepping up from there makes the circle more secure)
Now string 3 bicones Pass through the pearl and the first bicone again
In the reality your circle will look more like this the A beads forming a strong row in the middle of the
pearls
STEP 36 Add 2 bicones Pass through the
neighboring pearl the first bicone added in the previous row and the 2 bicones added in this step
so you can exit from the next pearl
Something Blue Necklace and Earrings
BLOG WWWHANDMADE-JEWELRY-CLUBCOM MEMBERSHIP WWWDIYBEADINGCLUBCOM BLOG DIY BEADING MAGAZINE ISSUE 32
Now in the reality your circle will look more like this the A beads still forming a strong row in the middle of the pearls and the bicones slightly lying on top of
them
STEP 37 - 49 Repeat STEP 35 and STEP 36 again until you finish the circle with the bicones
But be careful in the last step first you have pass through the third bicone added then add 1 bicone
and pass through this little quartet to exit from the bicone shown below (The second one added in
STEP 35)
STEP 50 With these steps we finish the circle by adding 1 bicone to connect the A beads and the
bicone row So add 1 bicone pass through the nearest A bead and add 1 bicone again Pass
through the bicone already there and exit from the bicone you just added
Something Blue Necklace and Earrings
BLOG WWWHANDMADE-JEWELRY-CLUBCOM MEMBERSHIP WWWDIYBEADINGCLUBCOM BLOG DIY BEADING MAGAZINE ISSUE 32
STEP 66-83 Secure the circle by adding 1A between each bicone in the second row of Swarovski
bicones If you finished secure the thread and trim
STEP 51-65 Using the same technique as in STEP 37 - 49 add 1 bicone to finish the third bicone row The black line shows you the way (After STEP 50 pass through the next A bead add 1 bicone and pass through the bicone already there and the bicone added in the previous step Repeat these steps to
finish the inner bicone circle)
MIDDLE CIRCLE Work RAW stitch into a beaded circle and embellish with
Swarovski bicones Remember you need to bead two circles this time
STEP 1 Just like in the focal circle begin with 2 pearls 1A and 1 pearl again on a comfortable length of thread
leaving a 2rdquo 5cm tail Pass through the first two pearls strung to form a ring
Something Blue Necklace and Earrings
BLOG WWWHANDMADE-JEWELRY-CLUBCOM MEMBERSHIP WWWDIYBEADINGCLUBCOM BLOG DIY BEADING MAGAZINE ISSUE 32
STEP 15-28 Mimicing the FOCAL CIRCLElsquos STEP 18-34 bead A beads until you finish the inner part of the
circle Exit from a pearl in the second row This circle should look very similar to the first one but this is a bit
smaller
STEP 2-14 Mimicing the FOCAL CIRCLElsquos STEP 2-17 bead until you count 14 pearls in the inner circle Exit
from the last A added
STEP 29-42 Mimicing FOCAL CIRCLElsquos STEP 35-49 add 2 rows of bicones
STEP 43-56 Mimicing the FOCAL CIRCLElsquos STEP 50-65 bead the third row of bicones to finish the circle
Something Blue Necklace and Earrings
BLOG WWWHANDMADE-JEWELRY-CLUBCOM MEMBERSHIP WWWDIYBEADINGCLUBCOM BLOG DIY BEADING MAGAZINE ISSUE 32
SMALLEST CIRCLE Work RAW stitch into a beaded circle and embellish
with Swarovski bicones Remember you need to bead two circles again
STEP 1 Just like in the focal circle begin with 2 pearls
1A and 1 pearl again on a comfortable length of thread leaving a 2rdquo 5cm tail Pass through the first two
pearls strung to form a ring
STEP 57-70 Just like the FOCAL CIRCLElsquos STEP 66-83 secure the circle by adding 1A between every bicone
in the second row of bicones If you finished secure the thread and trim (Donrsquot forget to bead another
circle)
STEP 2-12 Mimicing the FOCAL CIRCLElsquos STEP 2-17 bead until you count 12 pearls in the inner circle Exit
from the last A added
STEP 13-24 Mimicing the FOCAL CIRCLElsquos STEP 18-34 bead A beads until you finish the inner part of the
circle Exit from a pearl in the second row This circle should look very similar to the first two but this is the
smallest of them all
Something Blue Necklace and Earrings
BLOG WWWHANDMADE-JEWELRY-CLUBCOM MEMBERSHIP WWWDIYBEADINGCLUBCOM BLOG DIY BEADING MAGAZINE ISSUE 32
STEP 37-48 Mimicing the FOCAL CIRCLElsquos STEP 50-65 bead the third row of bicones to finish this circle too
STEP 25-36 Mimicing FOCAL CIRCLElsquos STEP 35-49 add 2
rows of bicones The last step here is purple again
STEP 49-60 Just like the FOCAL CIRCLElsquos STEP 66-83 secure the circle by adding 1A between every bicone
in the second row of bicones If you finished secure the thread and trim (Donrsquot forget that you need two
small circles)
Something Blue Necklace and Earrings
BLOG WWWHANDMADE-JEWELRY-CLUBCOM MEMBERSHIP WWWDIYBEADINGCLUBCOM BLOG DIY BEADING MAGAZINE ISSUE 32
STEP 2-6 Continue by adding 1A 1 bicone 1 pearl until you count 6 of each
STEP 1 Begin with 1 pearl 1 bicone 1A and 1 bicone again on a comfortable length of thread leaving a 2rdquo
5cm tail Pass through the pearl and the first bicone strung to form a ring
STEP 7-12 Pass through the A beads to make your
component more secure Also secure the thread and trim (Repeat these steps until you have six 6-BEAD
COMPONENTs)
6-BEAD COMPONENT Work RAW stitch into a beaded circle and embellish with Swarovski bicones
For the necklace we will need six from this component For the earring two
Something Blue Necklace and Earrings
BLOG WWWHANDMADE-JEWELRY-CLUBCOM MEMBERSHIP WWWDIYBEADINGCLUBCOM BLOG DIY BEADING MAGAZINE ISSUE 32
STEP 2-4 Continue by adding 1A 1 bicone 1 pearl
until you count 4 of each
STEP 1 Begin with 1 pearl 1 bicone 1A and 1 bicone again on a comfortable length of thread leaving a 2rdquo
5cm tail Pass through the pearl and the first bicone strung to form a ring
STEP 5-8 Pass through the A beads to make your component more secure Also secure the thread and
trim (Repeat these steps until you have the wished amount of 4-BEAD COMPONENTs)
4-BEAD COMPONENT Work RAW stitch into a beaded circle and embellish with Swarovski bicones
For the necklace-size that is given on the second page we will need 20 from this
component For the earring two
If you would like to make a longer necklace you need to make more (One 4-BEAD COMPONENT measures about 38 inch 1 cm To make the necklace symmetrical you have to have equal amounts on each side This means for every extra frac34 inches
2 cm-s you will need 1 4-BEAD COMPONENT on each side of the necklace)
Something Blue Necklace and Earrings
BLOG WWWHANDMADE-JEWELRY-CLUBCOM MEMBERSHIP WWWDIYBEADINGCLUBCOM BLOG DIY BEADING MAGAZINE ISSUE 32
STEP 2 Connect the MIDDLE CIRCLE to two 6-BEAD COMPONENTs by adding four-times 2As
between the pearls Choose a pearl on the MIDDLE CIRCLE and add
2A pass through a pearl in the 6-BEAD COMPONENT previously added and add 2A again Watch out this has to be symmetrical Repeat this at least two more times to make it
secure Now repeat this entire procedure but choose
the 8-th pearl on MIDDLE CIRCLE Repeat this on the other side of the necklace
too
Choose a pearl on the FOCAL CIRCLE and add 2A pass through a pearl in the 6-BEAD COMPONENT and add 2A again Repeat this at least two more times to make it secure
Now repeat this entire procedure but choose the 5-th pearl on FOCAL CIRCLE This will make the necklace nice on your neck
FINISHING THE NECKLACE Connects the parts with A beads
STEP 1 Connect the FOCAL CIRCLE to two 6-BEAD COMPONENTs by adding four-times 2As between the pearls To do this turn your parts upside down you need to
see the pearls We will work on this side from now on
Something Blue Necklace and Earrings
BLOG WWWHANDMADE-JEWELRY-CLUBCOM MEMBERSHIP WWWDIYBEADINGCLUBCOM BLOG DIY BEADING MAGAZINE ISSUE 32
FINISHING THE EARRING Connects the parts with A beads
STEP 1-2 Connect the 6-BEAD COMPONENT
to 4-BEAD COMPONENT and the 4-BEAD
COMPONENT to the earring hook
First connect the 4-BEAD COMPONENT to the 6-BEAD COMPONENT with 4A beads Mimic
the elongation steps of the necklace if needed
Secondly connect the 4-BEAD COMPONENT
to your earring hook with 4A beads again Leave from the last pearl bead 2A beads the hook (this is the orange oval form) and 2As again Pass through each of them to
secure this connection again
Finally get ready to prepare the other earring ndash since we need two of them
STEP 5 Connect the 4-BEAD COMPONENTs to the toggle clasp thus finishing the
necklace Leaving from the last pearl bead 2A the
clasp(this is the orange oval form) and 2A again Pass through all of them a couple more times to make this connection more
secure
Something Blue Necklace and Earrings
BLOG WWWHANDMADE-JEWELRY-CLUBCOM MEMBERSHIP WWWDIYBEADINGCLUBCOM BLOG DIY BEADING MAGAZINE ISSUE 32
If you finished it is time to try it on It was a great fun wasnrsquot it And how beautiful you look in your new necklace and the matching earrings
Something Blue Necklace and Earrings
BLOG WWWHANDMADE-JEWELRY-CLUBCOM MEMBERSHIP WWWDIYBEADINGCLUBCOM
About the Author
Margit Vogel
My name is Margit Vogel I live in Hungary Europe
By profession I am a biochemical engineer but I fell in love with
beads so much that I could not stop playing with them
I make one-of-a-kind beaded and bead embroidered art
jewelry made of the best quality materials such as Swarovski
stones gemstones Japanese beads (Miyuki and Toho) Czech
glass beads leather soutache and suede Each piece is unique
and individually crafted
Feel free to visit my blog for some eyecandy
httpiformjewelrywordpresscom
My shop httpwwwetsycomshopiformjewelry
Facebook httpwwwfacebookcomiformjewelry
BLOG DIY BEADING MAGAZINE ISSUE 32
Getting Down And Personal With Gianna
Getting Down And Personal With Gianna
Nowadays we see more and more jewelry stores opening up online and with these online jewelry stores it has made it easier for us to purchase and view their creations Have you ever wondered how they are able to manage and produce amazing jewelry pieces and tutorials So heres a little on the journey to open up an online shop We are excited to present to you Gianna aka Beading4perfectionists
Gianna Beader amp Youtuber
Unlike most jewelry makers and beadweavers Gianna did not start beading as a hobby but as a means to make ends meet With goals in trying to
fill the financial gap she did everything she could to expand her earnings ndash working as a security guard
and at the same time learning how to bead and selling her pieces at fair trades and flea markets
Since many were asking if she does home beading workshops she started on exploring how to teach people to bead She loves Scott Bakula and has always loved him till now and this served as her
inspiration to start making a beading video tutorial
Gianna started creating videos because she was at the point in her life where everything seemed to be falling apart And at that moment of time she had difficulties financially and selling jewelry was the only way for her to stay afloat financially She is a big Scott Bakula fan and when she went to the UK to see him on stage that was when it hit her that she is already able to edit videos and
taught herself Photoshop and done workshops at bead fairs so why not put these together and see what happens on Youtube She knew that if she gets enough subscribers and views ndash though no one knew what the exact numbers were you would be invited to become a Youtube partner This way she could monetize her videos with advertisements and hopefully she would be able to be a Youtube partner and be able to pay her bills
BLOG WWWHANDMADE-JEWELRY-CLUBCOM MEMBERSHIP WWWDIYBEADINGCLUBCOM BLOG DIY BEADING MAGAZINE ISSUE 32
Getting Down And Personal With Gianna
Her Youtube channel is popular and the reason why she chose Youtube is because Youtube is the biggest platform and reached almost to the whole world Everyone already knows about it and it was growing rapidly as compared to other platforms like Dailymotion so she figured that Youtube was the way to go Her advice to new designers is that when you start out go to the platforms on the top of your list first then work your way down your list if you do not get accepted by your first choice
After loyally putting up one video every week for about 8 months in a row she became a Youtube partner and monetized her videos She knew she needed at least $100 to get her first payout She managed to reach $100 after 3 months The process was not easy she worked hard lack sleep skipped meals and who knows what happened to Ridge in the Bold and the Beautiful because she stopped watching
On Youtube you can monetize your videos Google pays straight to your bank account and at other countries where they also have the option of getting checks among other options In order to get paid you have to reach the $100 mark and after 3 months For Gianna she thinks that you cannot say that Etsy is better than Youtube or Youtube is better than Etsy Her reasoning is because on Youtube she has many followers which will eventually check out her Etsy shop And to start an Etsy shop you need an audience
BLOG WWWHANDMADE-JEWELRY-CLUBCOM MEMBERSHIP WWWDIYBEADINGCLUBCOM BLOG DIY BEADING MAGAZINE ISSUE 32
television and dedicated her spare time (as she had another job) to Youtube She re-registered at the chamber of commerce after receiving her first payout Her work at Youtube now is not a full time job and things have changed on Youtube It is easier to become a parter but there are some countries that need to wait for an invitation to be a Youtube partner Take Italy for instance Italians would have to work just as hard as she did if they want to become a Youtube partner
Getting Down And Personal With Gianna
With her 60000 subscribers on her b4pbakup Youtube channel it is possible to sell at least 60 patterns on the first day on Etsy after promoting the PDF file on her Youtube channel Though you may think that 60 out of 60000 is not much you have to remember that not everyone has the means to purchase the PDF file and a lot of people still rather watch her carry out the tutorial(for free) on Youtube instead of reading the patterns or paying for the patterns even if the pattern is for a fundraiser and only cost $2 Her insights on Youtube is that Youtube is not what it used to be 6 years ago Instead of making more money every month she is making less and less because advertisers have more options of where they want to advertise their ads Ads do not pay as much as they used to Back in the days you could get 25 cents per ad Now you count yourself lucky if you could get 5 cents roll in after two hours
BLOG WWWHANDMADE-JEWELRY-CLUBCOM MEMBERSHIP WWWDIYBEADINGCLUBCOM BLOG DIY BEADING MAGAZINE ISSUE 32
And on top of that adblockers are destroying Youtube channel owners Youtube will start making changes to the channels where there will be ldquopaid subscriptionrdquo channels This has already been implemented in some countries but not in her country The Netherlands This means there will no longer be ads for her monthly paying subscribers She hopes that Youtube will add on a paid per video option feature The option to be a paid channel or free channel or to start a new channel for paying customers is yours to choose Gianna is not happy with Youtube because many others like her have worked so hard and for some years to become Youtube partners(which was something to be proud of) has lost their status
Getting Down And Personal With Gianna
Her advice for those who want to go on Youtube is 1 Do it because you want to teach
2 Do it because you want a career with beads
BLOG WWWHANDMADE-JEWELRY-CLUBCOM MEMBERSHIP WWWDIYBEADINGCLUBCOM BLOG DIY BEADING MAGAZINE ISSUE 32
After putting up about 20 videos and having at least 5000 subscribers add the PDF tutorials to Etsy and Craftsy She found out that her audience would like to have the PDF after watching her videos This is because they would rather print out the PDF and work while seated in a comfy chair technically somewhere else instead of having to pause the video time and time again
Gianna has also made a video for those who want to know the whole story of her journey up until the present day And to get updates on her you can check it out here She has also started a vlog where she tells of how she still works towards becoming a financial independent beader and explains her journey to get where she wants to be(or die trying) Gianna will be in the UK on October the 17th giving an all-day workshop with 4 different patterns
(2 beginners and 2 advanced) in Wotton-under-Edge
Gianna will be there Friday night as the workshop is on Saturday She will be leaving on Sunday Her
doors are open to all who wants to continue the party with her at the hotel across the street
For more information do contact Ann Tucker on Facebook
httpswwwfacebookcomanntucker501
Rec
omm
end
ed R
ead
ings
Making Jewelry with Gemstone
Beads
Combines the popular craft of beading with beautiful semi-precious stones which are collected by many Features a variety of versatile ideas which can be adapted for any type of gem or bead Readers will learn to reate beautiful gemstone jewelry with this dazzling collection of over 100 projects ranging from eyecatching earrings and accessories to exquisite necklaces and bracelets This beautiful book offers an impressive range of 28 beautiful semi-precious stones (including birthstones) and a glimpse into the fascinating history and mythical properties behind them
BLOG DIY BEADING MAGAZINE ISSUE 32 BLOG WWWHANDMADE-JEWELRY-CLUBCOM MEMBERSHIP WWWDIYBEADINGCLUBCOM
Rec
omm
end
ed R
ead
ings
Convertible Crystal Jewelry
Reverse it Twist it Wear it Many
Ways
Diane Whiting presents the idea that convertibility isnrsquot just about using pieces in multiple ways it is also about using skills and creativity in multiple ways Using ever-popular sparkling crystals Diane showcases design elements through various techniques for fun easy fashionable jewelry With 25 projects the reader can choose from bracelets necklaces and earrings that match any outfit or styleDiane Whiting presents the idea that convertibility isnrsquot just about using pieces in multiple ways it is also about using skills and creativity in multiple ways
BLOG DIY BEADING MAGAZINE ISSUE 32 BLOG WWWHANDMADE-JEWELRY-CLUBCOM MEMBERSHIP WWWDIYBEADINGCLUBCOM
Rec
omm
end
ed R
ead
ings
Wire Jewelry Masterclass
Wrapped Coiled and Woven Pieces
Using Fine Materials
Comprehensive and fabulous Wire Jewelry Masterclass takes an in-depth look at an intricate and rewarding craft The 24 projects which range from simple Dragons tear briolette earrings to a Poseidon-under-the-sea pendant will delight and inspire jewelers of all levels and tastes Divided into beginner intermediate and advanced sections this beautifully photographed step-by-step guide is the ticket to wire jewelry expertise
BLOG DIY BEADING MAGAZINE ISSUE 32 BLOG WWWHANDMADE-JEWELRY-CLUBCOM MEMBERSHIP WWWDIYBEADINGCLUBCOM
Rec
omm
end
ed R
ead
ings
Timeless Wire Weaving The
Complete Course
Timeless Wire Weaving focuses on developing wirework skills through 13 projects using three classic wire weaving techniques coiling wrapping and weaving The projects are built around a focal cabochon and incorporate seed beads and crystals in imaginative ways Designers learn to make the jewelry shown in the book and they also use the techniques learned to create innovative jewelry pieces of their own
BLOG DIY BEADING MAGAZINE ISSUE 32 BLOG WWWHANDMADE-JEWELRY-CLUBCOM MEMBERSHIP WWWDIYBEADINGCLUBCOM
Our digital magazine is available through
Apple Newsstand service available to millions of IPAD users
To advertise with us please email us at
diyjewelryclubgmailcom
Or visit our page at
httphandmade-jewelry-clubcomadvertising-diy-beading-magazine

BLOG DIY BEADING MAGAZINE ISSUE 32 BLOG WWWHANDMADE-JEWELRY-CLUBCOM MEMBERSHIP WWWDIYBEADINGCLUBCOM
DIY Anthro-Inspired Matchstick
Earrings
This project is inspired by Anthropologiersquos Herkimer Matchstick Earrings Materials - 18 ga gold wire - 24 ga gold wire - Small clear or white crystal beads (I used 4mm snow quartz) - Gold earring hooks - Round nose pliers - Flat or chain nose pliers - Wire cutters - Ball peen hammer - Surface to hammer on (I use a small metal block)
BLOG DIY BEADING MAGAZINE ISSUE 32 BLOG WWWHANDMADE-JEWELRY-CLUBCOM MEMBERSHIP WWWDIYBEADINGCLUBCOM
DIY Anthro-Inspired Matchstick
Earrings
Start by cutting two 6 pieces of 18 gauge gold wire Make a round loop at the top and start forming the shape of the earring frame It should be about 2 long
Finish the shape of your earring frame and bring the end of the wire to the loop you created Criss cross the ends so that the loop is sandwiched in between
BLOG DIY BEADING MAGAZINE ISSUE 32 BLOG WWWHANDMADE-JEWELRY-CLUBCOM MEMBERSHIP WWWDIYBEADINGCLUBCOM
DIY Anthro-Inspired Matchstick
Earrings
Pull the ends tight so that the frame is secure then snip off the excess wire
Repeat with the other piece of wire for your second earring frame Check as you go to make sure they are as close to identical as possible
BLOG DIY BEADING MAGAZINE ISSUE 32 BLOG WWWHANDMADE-JEWELRY-CLUBCOM MEMBERSHIP WWWDIYBEADINGCLUBCOM
DIY Anthro-Inspired Matchstick
Earrings
Place your earring frames on your hammering surface and hammer with the ball peen hammer until they lay flat This will also strengthen the wire and make
them less likely to bend
Cut a 10 piece of 24 gauge wire and wrap the end around the bottom of your earring frame String on beads until you fill the space
BLOG DIY BEADING MAGAZINE ISSUE 32 BLOG WWWHANDMADE-JEWELRY-CLUBCOM MEMBERSHIP WWWDIYBEADINGCLUBCOM
DIY Anthro-Inspired Matchstick
Earrings
Secure the wire at the top by wrapping it near the loop Repeat on the second earring
Add earring hooks of choice and yoursquore done
Advertisement
DIY Anthro-Inspired Matchstick
Earrings
BLOG DIY BEADING MAGAZINE ISSUE 32 BLOG WWWHANDMADE-JEWELRY-CLUBCOM MEMBERSHIP WWWDIYBEADINGCLUBCOM
About the Author
Jamie Hannigan
Perhaps Irsquom just easily fascinated but I often see magic and wonder in things other might consider mundane Irsquom a very imaginative person and as a child I often created fictional
narratives to go along with places or objects
My inspiration comes from all over Sometimes Irsquom really into nature like toadstools and mushrooms Sometimes Irsquom really into man-made things like ships Sometimes Irsquom really
into concepts and themes like astrology or mythology
I go through phases and Irsquove learned to embrace that in my work I create the things I want to make at that exact moment If just one other person finds enjoyment in what my
imagination led me to produce I consider it a success
To see more jewelry tutorials and my other work visit jamiebhannigancom and check my Etsy shop at
httpswwwetsycomshopjamiebhannigan
Wire Wrapped Gemstone
Pendant
BLOG WWWHANDMADE-JEWELRY-CLUBCOM MEMBERSHIP WWWDIYBEADINGCLUBCOM
You will usually find these more natural gemstones at bead shows vs your local bead shop
Wire Jewelry Making Skill Level Intermediate
Wire Jewelry Making Supplies - two lengths of 22 gauge round dead soft wire (4 times the length of your bead) - one 3 inch (76 cm) length of 20 gauge half round half hard (HH) wire (wrapping wire) - one gemstone bead - three 6mm beads (I used amethyst Swarovskireg crystals - three one inch (25 cm) head pins - one ink pen (used as a mandrel) - one marker pen - blue painters tape - jewelers polishing cloth - ruler Jewelry Making Tools - wire cutters - round nose pliers - chain nose pliers
BLOG DIY BEADING MAGAZINE ISSUE 32
Wire Wrapped Gemstone
Pendant
BLOG WWWHANDMADE-JEWELRY-CLUBCOM MEMBERSHIP WWWDIYBEADINGCLUBCOM
1 Using a ruler measure the length of your bead and note the measurement
Multiply the measurement by 4 My bead is 3 inches (76 cm) long so my final measurement is 12 inches (305 cm)
BLOG DIY BEADING MAGAZINE ISSUE 32
2 Tear off two pieces of blue painters tape from the roll and temporarily tape them to your work surface
Using the wire cutters cut two lengths of the 22 gauge round wire measuring the length of your
final measurement (I cut two 12 inch (305 cm) lengths of wire)
Clean and straighten both wires by pulling them through a jewelers polishing cloth (not pictured)
With both wires side by side with the ends even with one another use the torn tape lengths to tape the wires together (This will temporarily hold them together while you to wire wrap them)
With the marker pen mark the center of both wires
Wire Wrapped Gemstone
Pendant
BLOG WWWHANDMADE-JEWELRY-CLUBCOM MEMBERSHIP WWWDIYBEADINGCLUBCOM
3 Using the wire cutters cut one 3 inch (76 cm) length of 20 gauge half round half hard wire This is the wrapping wire
With the flat side of the wire facing you use the chain nose pliers to make a 14 inch (06 cm) bend
towards you and at a slight angle in one end of the wire This makes a hook in the wire The flat sides of the wire should face one another
BLOG DIY BEADING MAGAZINE ISSUE 32
4 Pick up the taped wires at their center between your fore finger and thumb Place the hook of the half round wire slightly to the right of the center mark on the two round
wires
5 Holding the long end and the tail of the half round wire hook use the tip of the chain nose pliers to squeeze the bend of the hook against the round wires This sets or secures the wrapping wire
Wire Wrapped Gemstone
Pendant
BLOG WWWHANDMADE-JEWELRY-CLUBCOM MEMBERSHIP WWWDIYBEADINGCLUBCOM
6 Bend the long end of the half round wire up over the two round wires You have created one wire wrap
BLOG DIY BEADING MAGAZINE ISSUE 32
7 Bend the long end of the half round wire down and behind the two round wires
8 Continue to repeat Steps 6 and 7 until you have made three (3) to five (5) complete wire wraps around the round wires (I made five (5) wire wraps) After making one or two wire wraps secure
the wraps against the round wires as in Step 5
The front of the wrap (as pictured below) will be the side where the half round wrapping wire is not cut
Wire Wrapped Gemstone
Pendant
BLOG WWWHANDMADE-JEWELRY-CLUBCOM MEMBERSHIP WWWDIYBEADINGCLUBCOM
9 Use wire cutters to cut the excess half round wire Cut the wire about half way behind the round wires so that the ends will not be seen from the front side of the wire wrap
BLOG DIY BEADING MAGAZINE ISSUE 32
10 With the wire wrap at the bottom center of your bead use your fingers to gently shape the wires around the bottom along the sides and to the top of the bead
11 Use the chain nose pliers to secure all the wraps against the round wires
Wire Wrapped Gemstone
Pendant
BLOG WWWHANDMADE-JEWELRY-CLUBCOM MEMBERSHIP WWWDIYBEADINGCLUBCOM
12 Slide the chain nose pliers in between the round wires where they meet the wire wrap and spread the wires apart
BLOG DIY BEADING MAGAZINE ISSUE 32
Spreading the wires apart begins to create the cage for the bead
13 With its bottom center resting against the wire wrap place your bead or gemstone inside the cage
Gather all four of the wires around the bead so that it is encased within them and so that the wires
meet at the top of the bead Hold all four wires between your forefinger and thumb (like you are pinching the wires)
Wire Wrapped Gemstone
Pendant
BLOG WWWHANDMADE-JEWELRY-CLUBCOM MEMBERSHIP WWWDIYBEADINGCLUBCOM
14 Decide which side will be the front of the pendant Locate the wire that is in front of all the wires and with your fingers bend it downward at a 45 degree angle
BLOG DIY BEADING MAGAZINE ISSUE 32
15 Use your fingers or the chain nose pliers to wrap the bent wire around the other three wires where they all meet or cross one another
16 Continue wrapping the wire around the other three to secure them End the wrapping at the back of the pendant
Using the chain nose pliers tuck the wire into the wraps (not pictured)
Wire Wrapped Gemstone
Pendant
BLOG WWWHANDMADE-JEWELRY-CLUBCOM MEMBERSHIP WWWDIYBEADINGCLUBCOM
17 Make sure that the wires are evenly spread around the beads Now we need to tighten the wires that encase the bead
On one of wires about halfway up the wire place the jaws of the round nose pliers on either side
of the wire Now rotate the pliers making a double bend in the wire Repeat on the other three wires making one or two double bends in each wire When youre done shake the bead to make sure it cannot fall out of the wires
BLOG DIY BEADING MAGAZINE ISSUE 32
18 Now decorate two of the top wires Almost anything is possible Try making a few different bends curls or twists in the wire
I decided to loosely coil the top wires around an ink pen
19 Gently untighten the coil by pulling the end of the wire downward Using the round nose pliers make a simple wire loop on the end of the coil
Wire Wrapped Gemstone
Pendant
BLOG WWWHANDMADE-JEWELRY-CLUBCOM MEMBERSHIP WWWDIYBEADINGCLUBCOM
20 Repeat Steps 18 and 19 on a second top wire
BLOG DIY BEADING MAGAZINE ISSUE 32
21 The third top wire becomes the bail Coil it tightly around the ink pen making at least two wire coils The end of the wire should fall in front of the pendant
Make a simple wire loop on the wire end
22 Heres how the wire coilsspiralsbends should look Make any necessary adjustments to the wires along the sides of the gemstones and the two that fall
in front of pendant
Make sure that the wires tightly secure the bead The wire wrap at the bottom of the pendant may no longer be at the center of the bead
Wire Wrapped Gemstone
Pendant
BLOG WWWHANDMADE-JEWELRY-CLUBCOM MEMBERSHIP WWWDIYBEADINGCLUBCOM
23 On each of the three head pins string a 6mm bead Make a simple wire loop on the end of each head pin
Attach one head pin bead unit to each of the simple wire loops on the wire wrapped pendant
BLOG DIY BEADING MAGAZINE ISSUE 32
Completed Wire Wrapped Pendant
Now hang your handcrafted wire wrap pendant from your favorite chain or strand of beads
Enjoy wire wrapping your own gemstone to make a wire wrapped pendant
BLOG WWWHANDMADE-JEWELRY-CLUBCOM MEMBERSHIP WWWDIYBEADINGCLUBCOM
Wire Wrapped Gemstone
Pendant About the Author
Wanda Epps
Wanda is an avid jewelry maker who loves to make jewelry with beads She began her journey into jewelry making after walking into a bookstore to find crafting books on sale One on making jewelry caught her eye and after making a simple bead necklace she was hooked That was in late 2003 Over the years she has taken classes on various jewelry making techniques stringing making wire jewelry bead crochet macrame metal jewelry making to name some She expects that her love of making beaded jewelry will continue as bead supplies and beautiful new beads seem endless Her fulltime job provides for her needs but beads are her passion She invites you to join her in the many adventures of making jewelry at
httpwwwmaking-beaded-jewelrycom httpswwwfacebookcompagesMaking-Beaded-Jewelry-
Guide254860504236
BLOG DIY BEADING MAGAZINE ISSUE 32
Should You Sell In The Marketplace
Should You Sell In The Marketplace
BLOG WWWHANDMADE-JEWELRY-CLUBCOM MEMBERSHIP WWWDIYBEADINGCLUBCOM
We are all able to create jewelry pieces and there will come a time where you want to share the joy with the rest of the world whether it is in the form of a tutorial or a finish
piece And this is when you will start to think about putting up your work for sale As someone who is new to the business world you may be confused on where you should start selling your work And the all famous site that is first on most peoplersquos minds is Etsy Etsy is popular and it is user friendly and that is why it is the choice of many designers and crafters But there are also some who wants to set up their own
shop with their logo and to put their works out as their own even at the very beginning Thatrsquos where you may be confused on which platform you should go for
So herersquos some explanation on how you will benefit from setting up shop at Etsy
BLOG DIY BEADING MAGAZINE ISSUE 32
1 Etsy has everything ready for you and all you have to do is to bring in your works and use the features that are already available for you to use ndash like the payment system web traffic design and layout are not an issue that you need to worry about
2 You also have the trust of customers almost immediately because Etsy has already established a name for itself and therefore there is already trust in brand in their site When you use Etsy your brand will automatically be exposed to many customers who visit Etsy to find what they need
3 For every site there is always the need to be able to interact with other sellers to help each other out Forums or community boards are very helpful as other passionate designers and crafters share their experience to help out the newer members of the community This is also where you will be able to form good relationships with other sellers and who knows you may even find a partnership over time
Should You Sell In The Marketplace
BLOG WWWHANDMADE-JEWELRY-CLUBCOM MEMBERSHIP WWWDIYBEADINGCLUBCOM
Though Etsy has itrsquos good points there are some things which you need to take into consideration as well
1 When you are using someone elsersquos facilities there is always the chance of having
being shut down due to unforeseen circumstances Be it violation of Etsyrsquos policy or decisions made by the administration department this will sometimes cost you a dent in your brand name and you may lose the trust of your followers and starting all over again may be the only way to start again
2 If you are a very creative person then you may feel limited as the design of shops at Etsy is standardized If you are new and do not worry so much about designs of websites this is perfectly fine But do remember that when you want to distinguish yourself from other sellers it will be tougher as you try to make your brand more well-known due to limitations of design of the site
3 Since Etsy has so many sellers all in one place the competition is of course going to be tighter and fiercer because even though customers are viewing your products there are also other options from other sellers listed on the page as well So customers may turn away if they see something of a better price
4 Each product that you list with Etsy costs you money Etsy also takes a 35 percent of the selling price of the item However if or when you start your business on your own website it will also cost you for web hosting and you would need PayPal and they have a fee of 29 percent +30cents So either way you will still need to pay to list your products on the web
BLOG DIY BEADING MAGAZINE ISSUE 32
Should You Sell In The Marketplace
BLOG WWWHANDMADE-JEWELRY-CLUBCOM MEMBERSHIP WWWDIYBEADINGCLUBCOM
If you are confident enough to have your own business site by all means go ahead and do it The benefits of it are as below
1 You get to be your own boss You get to control everything from the design of the
website layout and how you want to advertise your products You can also change your policies and not be affected by it because it is you who changes it Your shop will not be shut down suddenly without notice and you do not need to worry that you have to start all over again
2 Distractions of competitors products on your page will not be an issue It is your site and it is up to you whether or not you want to allow what kind of advertisements on your site So if you donrsquot want something on your page it is your call
3 You will be able to capture the attention of the media and customers as well if you are able to have a well designed site Nowadays people are attracted to colors and they can see if you have put effort into beautifying the site for the customers You can do so much more than just uploading some pictures onto Etsy on your own site you can always update your site design and your products to complement each other and therefore becoming more attractive
BLOG DIY BEADING MAGAZINE ISSUE 32
Should You Sell In The Marketplace
BLOG WWWHANDMADE-JEWELRY-CLUBCOM MEMBERSHIP WWWDIYBEADINGCLUBCOM
And herersquos the tough part when you want to have your own site
BLOG DIY BEADING MAGAZINE ISSUE 32
1 You need to have knowledge of what you want to do You have to learn to be involved in every aspect of your site so that you know what us going on at the front end of things and at the back end of things as well But if you have not any knowledge of designing a website it is usually a recipe for something to go wrong You have to remember that you need a user interface that is simple for customers to use an easy to use shopping cart you should know which third party platforms are trusted and one which will not keep changing their regulations If you still want to have your site hiring a designer may be your best option
2 You have to work towards promoting your store on your own You will need to find people to feature you in their social media sites because it will not just fall into your lap You need to have promotions or road shows if you need to Marketing your store is important whether or not you are using Etsy or other marketing platforms but if you are on your own it is even more important
3 You will still be competing with other sellers Though now you are now not only competing with Etsy sellers you are now competing with sellers and stores from the world wide web Etsy is already so well known so people tend to go there first so you need to up your methods of attracting customers
Should You Sell In The Marketplace
BLOG WWWHANDMADE-JEWELRY-CLUBCOM MEMBERSHIP WWWDIYBEADINGCLUBCOM
When we first started out we used Etsy as our platform to sell our works Other than that we also utilized blogs and we eventually built our own website as our main base
BLOG DIY BEADING MAGAZINE ISSUE 32
Things have changed over these 3 years It was easier to get sales without much effort but now with so many other shops also utilizing Etsy the competition has grown tremendously Now our main sales come from our own online store and has exceeded sales from Etsy
So what we recommend is that using an existing platform such as Etsy to start out is good and in time build up your website or webstore
It is not that hard to start your own webstore either these two companies offers the option to set up your webstore
1 Shopify
2 Bigcommerce
There are many things to take into consideration before starting a store online It is perfectly fine to start out using Etsy before branching out on your own But you can also
have both ndash have your own website and a store on Etsy There are many stores who operate like this They technically get customers from Etsy and the reroute them to their own websites As long as you are in control of what you are doing and not stressing and
confusing yourself you can opt for more exposure for your store
So do take some time and take a breather to really think through what will be the best for YOU and do remember that starting small does not mean you will not be able to be big
OFFER Get which can be downloaded by subscribing to
httpinternet-marketing-publishingcom
BLOG WWWHANDMADE-JEWELRY-CLUBCOM MEMBERSHIP WWWDIYBEADINGCLUBCOM
Materials - Copper wire diameter 08 mm - Copper wire diameter 04 mm - Small gemstone bead (~4 mm) (I used 3 mm beads in this tutorial because I didnrsquot have any other beads at the time but the beads in the earrings on the cover are 4 mm) Make sure that the beads you want to use are resistant against chemicals such as liver of sulfur or whichever oxidizing substance you want to use to give the metal patina The beads in the picture above are facetted garnet buttons in the tutorial itself I used black spinel facetted buttons Equipment - Round nose pliers - Flat nose pliers - Side-cutters - A small file - A cylindrical object of about 5mm diameter (eg a mandrel for jump rings) - Hammer amp anvil - Liver of sulfur or some other means to oxidize the metal (optional)
LOVE-ly Earrings
BLOG DIY BEADING MAGAZINE ISSUE 32
BLOG WWWHANDMADE-JEWELRY-CLUBCOM MEMBERSHIP WWWDIYBEADINGCLUBCOM
This tutorial teaches how to make 1 ear stud I recommend making both ear studs of the set simultaneously step-by-step so that symmetry is easier to achieve Between steps check for
symmetry in size and shape and adjust the construction if needed
LOVE-ly Earrings
BLOG DIY BEADING MAGAZINE ISSUE 32
Step 1 Straighten the end of the copper wire (+- 6cm) by rubbing along it with your fingers for a
few seconds
Step 2 Bend over the wire onto itself as illustrated below using flat nose pliers
Step 3 Grab the doubled-over wire with the flat nose pliers and push the two sides against each
other Use little force and do it bit by bit to avoid damaging or kinking the wire
Step 4 Push the two adjacent pieces of wire apart to create the bottom shape of the heart as shown
on the picture above
BLOG WWWHANDMADE-JEWELRY-CLUBCOM MEMBERSHIP WWWDIYBEADINGCLUBCOM
LOVE-ly Earrings
BLOG DIY BEADING MAGAZINE ISSUE 32
Step 5 Hammer down the angled wire (the part circled in red) This strengthens the construction
and looks more professional
Step 6 Wrap the two ends of wire tightly around a cylindrical object (+- 5 mm diameter)
Step 7 Push apart the loops you just made by wrapping the wire around the cylindrical object The wire should now be shaped like a heart as
illustrated above
Step 8 Use round nose pliers to bend around the wire for each side of the heart as illustrated above
BLOG WWWHANDMADE-JEWELRY-CLUBCOM MEMBERSHIP WWWDIYBEADINGCLUBCOM
LOVE-ly Earrings
BLOG DIY BEADING MAGAZINE ISSUE 32
Step 9 Use the flat nose pliers to bend one of the two wires (preferably the longer wire) in a 90deg angle at the place marked with a red dot In the picture accompanying the next step you can see
how it should look from the front
Step 10 Use the round nose pliers to bend the other piece of wire in a decorative coil You will cut off the rest of the wire of the coil at approximately the spot marked with a red dot so take that into account when coiling the wire into the shape that
you desire
Step 11 Cut of the wire at the spot indicated in the previous picture and file off any sharp edges
Step 12 Cut off the ear wire at the desired length (Between 1 and 2 cm If in doubt try the earring on
to see if it sits comfortably) and file off any sharp edges
BLOG WWWHANDMADE-JEWELRY-CLUBCOM MEMBERSHIP WWWDIYBEADINGCLUBCOM
LOVE-ly Earrings
BLOG DIY BEADING MAGAZINE ISSUE 32
Step 13 Hammer down the rest of the heart (bumps and coil) If you canrsquot reach certain parts because the ear wire is in the way bend that part of the heart shape away
(verticallyupward) and bend it back after you finish hammering
Congrats yoursquove now made a basic heart-shaped ear stud Next wersquore going to decorate it with a little gemstone and more copper wire
Step 14 Cut off a length of 04 mm copper wire (about 10-20 cm) and string the bead onto it
Step 15 Place the bead in the ldquonon-coilrdquo upper part of the heart shaped ear stud holding it between thumb and forefinger Let approximately 4 cm of the 04 mm wire stick out over the edge of the
heart as illustrated above
Step 16 Wrap the wire twice around the frame so that if you face the front of the ear stud the wire is
directed towards yourself
BLOG WWWHANDMADE-JEWELRY-CLUBCOM MEMBERSHIP WWWDIYBEADINGCLUBCOM
LOVE-ly Earrings
BLOG DIY BEADING MAGAZINE ISSUE 32
Step 17 Flip the wire over the wire with the bead (indicated by the red arrow) and pull tight whilst holding the bead (and its wire) tightly in place It
should look like the construction in the big picture above
Step 18 And make another loop around the wire with the bead The 04 mm wire is now coiled around
twice two times two coils around the frame and two coils around itself
Step 19 Repeat the wire-fastening procedure described in steps 16-18 with the other end of the
wire securing the gemstone in the heart frame Let the wire stick out at the back of the earstud
Step 20 Pull the wire through the lsquocoilrsquo part of the heart shape to the front The wire should lsquocross overrsquo to the other side of the heart at the back of the ear
stud
Step 21 Coil the wire around the frame until you are content with the design Optionally you can hammer down the coils a bit I often do this because I think it
looks somewhat more sophisticated and professional
BLOG WWWHANDMADE-JEWELRY-CLUBCOM MEMBERSHIP WWWDIYBEADINGCLUBCOM
LOVE-ly Earrings
BLOG DIY BEADING MAGAZINE ISSUE 32
Step 22 Cut off the spare bits of wire preferably at the backside of the ear stud and tuck in the ends
Congrats yoursquove now made a heart-shaped ear stud Next we are going to finish it off with a patina
Step 23 Oxidize the metal of the ear studs I always use liver of sulfur solved in warm water The metal
will turn a dark color and matte texture Afterwards rinse the ear studs thoroughly with water and pat
them dry
Step 24 Rub the oxidized ear stud all over with a rough polishing pad to bring back (a dark copper)
color to the surface
Yoursquove now finished making your own LOVE-ly ear studs
Secure them in your ear with plastic or copper stops These can be bought online or in jewelry-supply
stores
Variation ideas You can easily vary in size and shape (longer hearts smaller coils pointier bottoms etc) and
use different materials As you can see the earring I make in this tutorial has a slightly smaller bead than the
earrings on the cover which influences the overall appearance somewhat
The earrings underneath are made with sterling silver and gold wire (super-short coils) and contain small pink
rubies
LOVE-ly Earrings
BLOG WWWHANDMADE-JEWELRY-CLUBCOM MEMBERSHIP WWWDIYBEADINGCLUBCOM
About the Author
Jeske Hendriks
Hi there My name is Jeske and I love all things handmade Over the years Irsquove dabbled in countless different arts and crafts but nowadays I mainly focus on making jewellery and cutting stone cabochons As for jewellery
my preferred materials are silver wire and gemstonemineral beads Using wire-wrapping and basic silver smithing techniques I create both simple
and intricate pieces ndash each and every one of them unique a personal little artwork
You are welcome to follow me on facebook stop by at my personal
webpage andor to have a look at my Etsy shops httpswwwfacebookcomyeskecrafts
httpwwwyeskecraftscom httpwwwyourbeadsandfindingsetsycom
httpwwwyeskecraftsetsycom httpwwwyeskemiscetsycom
BLOG DIY BEADING MAGAZINE ISSUE 32
Flower Tale Earrings
BLOG WWWHANDMADE-JEWELRY-CLUBCOM MEMBERSHIP WWWDIYBEADINGCLUBCOM
Techniques Beadweaving
Project Level Beginner to Intermediate
Materials 12 bronze opaque 6mm Czech glass pearl round beads
2 gr gold lustered dark topaz Japanese 110 seed beads (Toho 459)
Size B gold beading thread
2 bronze earring hooks
Tools Size 10 beading needle
Scissors
Finished Size Diameter ndash 3 cm (118 inches) (without earring hooks)
BLOG DIY BEADING MAGAZINE ISSUE 32
Flower Tale Earrings
BLOG WWWHANDMADE-JEWELRY-CLUBCOM MEMBERSHIP WWWDIYBEADINGCLUBCOM
Step 1 Cut about 110 cm (43 inches) of thread and
pass it through the needle hole
Pick six groups of one 110 seed bead and one
6 mm round bead
BLOG DIY BEADING MAGAZINE ISSUE 32
Join the beads into a ring and secure with two
square knots
Leave a tail of about 15 cm (59 inches)
Step 2 The working thread should be right before the
6 mm round bead
Pick seven 110 seed beads skip the 6 mm
round bead and pass the needle through the
next 110 seed bead added in the previous
round
Repeat adding groups of seven 110 seed
beads five more times
When adding the last group take the needle
directly through the 110 seed bead from the
previous round and the next one added in the
beginning of current round
Flower Tale Earrings
BLOG WWWHANDMADE-JEWELRY-CLUBCOM MEMBERSHIP WWWDIYBEADINGCLUBCOM
Step 3 Pick three 110 seed beads skip one seed
bead from the chain of seven added in the
previous round and pass with the needle
directly through the next three 110 seed
beads
BLOG DIY BEADING MAGAZINE ISSUE 32
Pick three 110 seed beads skip one seed
bead from the chain of seven added in the
previous round and pass with the needle
through the last one and the first 110 seed
bead from the next chain of seven
Repeat the above directions from Step 3 five
more times
After completing this round make sure the
thread will be exiting from the middle 110
seed bead from the first group of three added
in the beginning of this round
Step 4 Pick one 110 seed bead and go through the
last seed bead of the group of three
Flower Tale Earrings
BLOG WWWHANDMADE-JEWELRY-CLUBCOM MEMBERSHIP WWWDIYBEADINGCLUBCOM
Pick three 110 seed beads and take the
needle through the first seed bead of the next
group of three added in the previous round
BLOG DIY BEADING MAGAZINE ISSUE 32
Pick one 110 seed bead and go with the
needle through the next three seed beads (the
last two of the group of three and the last one
from the chain of seven)
Then go up through three 110 seed beads
(the first from the next group of seven and the
first two from the next group of three)
Repeat the above directions from Step 4 to
complete the remaining petals
When working on the last petal perform the
operation from the image shown on the left
instead of picking the group of three 110 seed
beads string two 110 seed beads the earring
hook other two 110 seed beads and
continue beading as instructed above
When you are done hide the thread ends into the beadwork
Flower Tale Earrings
BLOG WWWHANDMADE-JEWELRY-CLUBCOM MEMBERSHIP WWWDIYBEADINGCLUBCOM
About the Author
Iulia Postică
I was born and live in Moldova Eastern Europe Ever since I remember myself
Ive been crocheting and knitting My grandmother has taught me that and I
loved it very much I always regarded crafts exclusively as a hobby and never
thought of making a career of it I traveled a lot to various historical sites
Actually Ive spent all my childhood summers in archaeological camps with
my father who is a professional archaeologist
I also enjoy metal hammering and wirework as it gives me possibility to
express myself in materials used by human communities since ancient times
copper brass glass seed beads and gemstones That is no surprise to anyone
given my family history and academic background
My shop ldquoBeadedTreasuryrdquo with beading tutorials and bead crochet patterns
httpswwwetsycomshopBeadedTreasury
My shop ldquoArchaeologicardquo with artisan jewelry
httpswwwetsycomshopArcheologica
My blog httpbeadedtreasuryblogspotcom
My facebook httpswwwfacebookcomBeadedTreasury
BLOG DIY BEADING MAGAZINE ISSUE 32
Liberty Earrings
BLOG WWWHANDMADE-JEWELRY-CLUBCOM MEMBERSHIP WWWDIYBEADINGCLUBCOM
Materials - Nr 2 cabochon Preciosa Ornela ovale 18x22 mm turchese
- Rocaille Toho 150 silver lined green emerald
- Nr 2 dagger beads
- Nr 20 pearl 4 mm
- Superduo opaque luster ceramic green
- Rocaille 80 color gold
- Rocaille 80 color ivory
- Delica Miyuki 110 aquagreen mix
- Rocaille Miyuki 110 galvanized silver
- Nr 2 monachelle (earwire)
-Fireline
- Beading Needle nr 12
BLOG DIY BEADING MAGAZINE ISSUE 32
Liberty Earrings
BLOG WWWHANDMADE-JEWELRY-CLUBCOM MEMBERSHIP WWWDIYBEADINGCLUBCOM
Make a circle of 20 delica beads and make a knot (a) Perform two rounds peyote with ivory 80 seed beads (b c) Exit from an ivory
bead
BLOG DIY BEADING MAGAZINE ISSUE 32
a b c
Jump from 80 to 80 with 110 80 gold 110 (a) Finish the round and come out of a 80 gold bead
Jump to the next 80 gold with a 4mm pearl (b) Finish the round and come out
of the first pearl Jump to the 2nd pearl and close with a 80 gold bead(c)
a b c
Position the cabochon and jump from one 80 to the other with two delica bead (a)
Continue with three delicas four times (b) At the bottom sew on two delicas then finish the round by sewing on three delicas for four times passing from one to another roc 80 Tighten the cabochon and exit from the
first two delica that you started with String together a 110 and 150 and enter the second of the three close delicas (c)
a b c
Liberty Earrings
BLOG WWWHANDMADE-JEWELRY-CLUBCOM MEMBERSHIP WWWDIYBEADINGCLUBCOM
Put together 150 110 150 and enter in the second of three next delica (a) Put the same beads for three times then put together 150 and 110 and enter
in the two delica of the bottom tip (b) Enter in the second of three next delica with 110 and 150 (c) Continue passing
in the 80 beads with three beads (150 110 150) for four times then at the top finish the round by putting together a 150 and 110 (d)
BLOG DIY BEADING MAGAZINE ISSUE 32
a b c
Exit from the first 150 sewn in the previous round and jump in the three next beads with a 150 (a)
Put a 150 at a time and exit from the first 110 beads of the bottom tip Jump in the
near 110 with a 150 (b) Finish round repeating steps a and b (c) Exit the roc 80 as shown in the photo (d)
a b c
d
a b c d
Enter in the 80 with four 150 (a b) Enter the 80 beads at the bottom of the pieces with two 110 one superduo one 80 ivory bead one superduo and two 110 (c)
d e f
Liberty Earrings
BLOG WWWHANDMADE-JEWELRY-CLUBCOM MEMBERSHIP WWWDIYBEADINGCLUBCOM
Exit from the bottom pearl (a) Put together 150 three 110 150 and enter in the superduorsquos second hole (b)
Put together three superduo and enter in the next superduorsquos second hole (c) Rethread 15 three 110 150 and return in the opposite direction in the pearl of departure (d)
BLOG DIY BEADING MAGAZINE ISSUE 32
a b
c
Exit from the second pearl indicated from (a) Put 150 four 110 and enter in the second of the three 110 (b) Go to the second superduorsquos hole with four 110 and a 150 (c)
Enter the second hole of the supeduo with a 150(d) Sew in the middle of the bottom of the superduo 150 two 110 150 dagger 150 two 110 150(e)
Enter the second hole of the thirs superduo with 150 (f)
a b c
d
d e f
Liberty Earrings
BLOG WWWHANDMADE-JEWELRY-CLUBCOM MEMBERSHIP WWWDIYBEADINGCLUBCOM BLOG DIY BEADING MAGAZINE ISSUE 32
Put 150 four 110 and enter in the second of three 110 of the base (a) Insert four 110 and 150 in the pearl opposite direction indicated in the picture (b) Go in all the beads
around the piece and exit from the pearl at the top (c) Put 150 three 110 150 and enter the superduo (d)
Enter the ivory bead 80 with two 150 (e) Enter the next superduo with two 150 (f)
a b c
d e f
Put together 150 three 110 and enter in opposite direction in the departurersquos pearl (a) Exit from the 150 beads indicated by photo (b) From this jump in the second of two near
150 with five 150 to created the hole for the earwire (c) Pass the thread in the beads make a few knots and cut the excess thread
a b c
Your earrings are finished
Liberty Earrings
BLOG WWWHANDMADE-JEWELRY-CLUBCOM MEMBERSHIP WWWDIYBEADINGCLUBCOM
About the Author
Mariella Martella
My name is Mariella Martella and I am the author and
designer of jewelry that I sign with the name of Mariel Bijoux
After changing city often for work and study I currently live
in northern Italy I am an art historian with a passion for travel
painting and jewelry design in weaving that project since
2010 In my beads and crystals are the colors of the
Mediterranean sea the atmosphere of summer evenings
and the lights of the places I visited
You can find me at
Etsy shop httpswwwetsycomitshopMarielBijoux
Facebook httpswwwfacebookcommari3lbijoux
Crafting blog httpmarielbijouxblogspotit
Twitter httpstwittercomMarielBijoux
BLOG DIY BEADING MAGAZINE ISSUE 32
Jade Necklace
BLOG WWWHANDMADE-JEWELRY-CLUBCOM MEMBERSHIP WWWDIYBEADINGCLUBCOM
Every time I wear a necklace I always make it a point that the
necklace will lay perfectly flat on my neck Using wire for a necklace
made it possible for me like what I did with Jade Necklace It may look
odd at first having bent wires for a necklace but once the jewelry is
finished youll be so happy how the necklace will perfectly lay on your
neck
The tutorial is catered for intermediate level One must know basic
wirework skills such as wire wrapping making loops wrapped loops
and linking to follow the tutorial It has clear instructions and ultra-clear
close-up photos at each step Additionally you can ask me question
you have on the tutorial No more getting stuck and frustrated on a
confusing or just plain inaccurate pattern
If you followed this tutorial and then sell the accessory or jewelry
please give credit to the author or DIY Beading Clubcom
Copyright 2015
wwwdiybeadingclubcom
wwwhandmade-jewelry-clubcom
BLOG DIY BEADING MAGAZINE ISSUE 32
Jade Necklace
BLOG WWWHANDMADE-JEWELRY-CLUBCOM MEMBERSHIP WWWDIYBEADINGCLUBCOM BLOG DIY BEADING MAGAZINE ISSUE 32
Materials Needed 18ga Craft wire 28ga Craft wire 15mm diameter Green Round Flat Back Sew On Gems 5mm Green pearls
8mm Green pearls 6mm x 11mm teardrop Crystal Treasures Mill Hill beads or any teardrop bead with holes on the side Hook for your clasp
Tools Needed Wire cutter Flat nose pliers Round nose pliers Mandrel A jar or any rounded object to shape your necklace
Skill Level Intermediate
Step 1 Cut 6 inches 18ga wire Make a loop on one end then measure approximately 125 inches and make another loop
Form a size 4 circle on your mandrel
Jade Necklace
BLOG WWWHANDMADE-JEWELRY-CLUBCOM MEMBERSHIP WWWDIYBEADINGCLUBCOM BLOG DIY BEADING MAGAZINE ISSUE 32
Then close the circle by wrapping the extended wire just below the loop Wrap the
wire 2x
This is how it looks like Lets call this circle frame Youll notice that the lower curve is
slightly bigger than the upper curve
Step 2 Cut 8 inches of 28ga wire Wrap one end of
the wire at least 3x on one side of the circle frame just below the loop
Bring up your gem Flat back sew on gems has 2 holes Insert the wire into one hole and then
wrap the wire once onto the circle frame
Jade Necklace
BLOG WWWHANDMADE-JEWELRY-CLUBCOM MEMBERSHIP WWWDIYBEADINGCLUBCOM BLOG DIY BEADING MAGAZINE ISSUE 32
Step 3 Insert a 5mm pearl on the wire and then pass
the wire under circle frame
Repeat previous step 2x and have 3 pearls wrapped
Continue wrapping with your teardrop crystal My crystal has 2 holes on the side
and then continue wrapping with your 5mm pearls then secure your wire
Repeat Step 3 and create as many as needed For 16-inch necklace Ive created 6 of these
components
Jade Necklace
BLOG WWWHANDMADE-JEWELRY-CLUBCOM MEMBERSHIP WWWDIYBEADINGCLUBCOM BLOG DIY BEADING MAGAZINE ISSUE 32
Step 4 Cut a 15-inch 18ga wire and make a loop on
one end Insert 8mm pearl and make a loop on the other end You then use these as connectors
and link the components
Step 5 The necklace is an 18ga wire with wrapped
loops on both ends First cut 7 inches 18ga wire and make a wrapped loop with your hook already inserted Side in 18pcs 5mm pearls
Then make a wrapped loop on the other end connecting the wrapped loop onto the component Do the same for the other
necklace but make the loop on the other end big enough so the hookclasp can pass thru
To have the necklace curve shaped use a jar to bend the wire Voila Now youre
ready to party
Jade Necklace
BLOG WWWHANDMADE-JEWELRY-CLUBCOM MEMBERSHIP WWWDIYBEADINGCLUBCOM
About the Author
Sky Aldovino
I consider myself a late bloomer when it comes to crafting Irsquom a self-taught jewelry maker Jewelry making wasnrsquot really a hobby of mine but unforeseen events lead me to learn jewellery making My family put up a craft store where we sell cross stitch beads and all sorts of crafting materials I fell in love with the beads and tried to create accessories only for myself Clients liked the pieces and I started customizing handmade jewelleries The craft store was a success for 6 years but like any other small businesses we had to close it down and I was confined to staying at home While at home I had all the time using the internet and now working as a home-based jewelry designer
BLOG DIY BEADING MAGAZINE ISSUE 32
Atomic Ring
BLOG WWWHANDMADE-JEWELRY-CLUBCOM MEMBERSHIP WWWDIYBEADINGCLUBCOM
Have fun making shapes using the wigjig Cyclops Make loops going in
circles to mimic the shape of a flower or in this tutorial mimic the
shape of an atom The tutorial will also teach you how to cage a
cabochon Whats nice about this piece is that with one long wire you
can create the ring from start to finish
The tutorial is catered for intermediate to advanced students One
must already know how to make spirals and use a wigjig tool It has
clear instructions and ultra-clear close-up photos at each step
Additionally you can ask me question you have on the tutorial No
more getting stuck and frustrated on a confusing or just plain
inaccurate pattern
If you followed this tutorial and then sell the accessory or jewelry
please give credit to the author or DIY Beading Clubcom
If you like to get a blank wigjig graph visit wigjigcom Shop and Jigs
section
Copyright 2015
wwwdiybeadingclubcom
wwwhandmade-jewelry-clubcom
BLOG DIY BEADING MAGAZINE ISSUE 32
Atomic Ring
BLOG WWWHANDMADE-JEWELRY-CLUBCOM MEMBERSHIP WWWDIYBEADINGCLUBCOM
Materials Needed 20ga Craft wire 28ga Craft wire 11mm Round Cabochon
Tools Needed Wigjig Cyclops 15mm pegs Wire cutter Flat nose pliers Mandrel
Skill Level Intermediate - Advanced
BLOG DIY BEADING MAGAZINE ISSUE 32
Step 1 Lets prepare your wigjig cyclops Position the pegs like so
Atomic Ring
BLOG WWWHANDMADE-JEWELRY-CLUBCOM MEMBERSHIP WWWDIYBEADINGCLUBCOM BLOG DIY BEADING MAGAZINE ISSUE 32
Lets work with longer wire so youll have enough wire to hold onto as you manipulate the wire so cut 36 inches of 20ga wire From
one end of the wire measure 10 inches
On the 10-inch measurement loop the wire at the center peg then continue to loop onto the side pegs going in circle going back to
the center peg after looping on the side peg
Now the wire at the center peg will start to build up as you go around the side pegs so
you need to constantly press the wire at the center peg to accommodate the build up of
wire
When youre done pull out the wire and this is
how it should look like
Atomic Ring
BLOG WWWHANDMADE-JEWELRY-CLUBCOM MEMBERSHIP WWWDIYBEADINGCLUBCOM BLOG DIY BEADING MAGAZINE ISSUE 32
You will notice that the frame opens wide Now to keep the atom frame from opening wide secure the center of the frame by wrapping a 28ga wire What you
need to do is simply pass the 28ga wire into the hole and wrap as many times as needed or until youre sure that the frame is secure
Step 2 Now youre finished with your atom frame Well now create the focal design With the longer wire make a spiral at the center big
enough to accommodate the size of your cabochon In this tutorial the spiral is about
11mm in diameter the same size as my cabochon
Pop in your cabochon and start to make spirals going around and over the cabochon as if you are caging the cabochon Create at
least 5 rounds and then cut off any excess
Step 3 Now lets make the ring and this with the other
end of the wire
Atomic Ring
BLOG WWWHANDMADE-JEWELRY-CLUBCOM MEMBERSHIP WWWDIYBEADINGCLUBCOM BLOG DIY BEADING MAGAZINE ISSUE 32
Bring up your mandrel and wrap the wire to the size of your finger Wrap at least 2 times
When youre sure you have the right size pull the ring out of the mandrel
With the extended wire wrap the wire the secure the ring
Cut off any excess and voila You have your atomic ring Create as many as you can with different colors of cabochon
Atomic Ring
BLOG WWWHANDMADE-JEWELRY-CLUBCOM MEMBERSHIP WWWDIYBEADINGCLUBCOM
About the Author
Sky Aldovino
I consider myself a late bloomer when it comes to crafting Irsquom a self-taught jewelry maker Jewelry making wasnrsquot really a hobby of mine but unforeseen events lead me to learn jewellery making My family put up a craft store where we sell cross stitch beads and all sorts of crafting materials I fell in love with the beads and tried to create accessories only for myself Clients liked the pieces and I started customizing handmade jewelleries The craft store was a success for 6 years but like any other small businesses we had to close it down and I was confined to staying at home While at home I had all the time using the internet and now working as a home-based jewelry designer
BLOG DIY BEADING MAGAZINE ISSUE 32
Featured Article Gemstones Used for Jewelry Making
BLOG WWWHANDMADE-JEWELRY-CLUBCOM MEMBERSHIP WWWDIYBEADINGCLUBCOM
Gemstones are stones which we hold quite highly in terms of value And
jewelry often consists of stones that add attractiveness to it so it is not
surprising when jewelry designers actually use gemstones in their designs In
fact there are different types of gemstones that can be used for making
jewelry There are the expensive and pure gemstones and there are also the
imitation ones The information below will provide some information about
the kinds of stones you can use to create jewelry and how these stones will
impact the jewelry you have created
The first kind of stone which I believe we are all quite familiar with are
birthstones These stones are associated with individualrsquos month of birth
by SunVDesigns by BeyhanAkman
For example Amethyst stone is connected with anybody who is born in
February which carries special significance in the area of emotions and also
spiritually This stone also signifies calm and peace as well
And then we have semi-precious stones which are also often used in jewelry
making They are not as valuable as compared to precious stones but still
valuable Best examples of these stones are aquamarine topaz tourmaline
opal and turquoise
BLOG DIY BEADING MAGAZINE ISSUE 32
Featured Article Gemstones Used for Jewelry Making
BLOG WWWHANDMADE-JEWELRY-CLUBCOM MEMBERSHIP WWWDIYBEADINGCLUBCOM
It is an ideal gift for someone who you deem special Aquamarine pendants
usually work well for anyone and is widely an accepted stone
by HyppieChic by joyeriamestiza
However precious stones are the most unusual
and precious jewels to us Examples of some of
them are emerald sapphire diamond and
ruby These stones are usually very expensive
and are prized for their exquisiteness These
stones are commonly used in high-quality
jewelry designs which costs quite a fortune to
obtain
BLOG DIY BEADING MAGAZINE ISSUE 32
by sarajewelrystu
Jewelry designs with precious stones are usually
given as exceptional gifts on special occasions A
perfect example is a diamond ring that is usually
given as an engagement gift
by ldiamondsforever
Featured Article Gemstones Used for Jewelry Making
BLOG WWWHANDMADE-JEWELRY-CLUBCOM MEMBERSHIP WWWDIYBEADINGCLUBCOM
There are also synthetic stones which are often used to create jewelry
Synthetic stones are artificial imitations of gemstones Synthetic Sapphire
jewelry costs less compare with the authentic ones Most of the time
imitation stones are used to save cost but at the same time have the similar
look of the real stone
BLOG DIY BEADING MAGAZINE ISSUE 32
by shininggems by thaimaker
by lapinduprintemps by PastimeArt
Gemstones are used like beads and you can use it in any designs whether
simple or elaborate
Swarovski crystal components are available in a rich multitude of rondelles Perfect as spacers in necklaces or as discs in earrings Rondelles can be used with many varieties of shapes or sizes Use Swarovski crystal rondelles between large gemstones as accents with precious metal findings Fire Mountain Gems and Beads Crystal Passionsreg brand presents Swarovski crystal in display-ready packaging for brilliant retail presentation Crystal Passionsreg is an assurance of genuine Swarovski crystal
BLOG DIY BEADING MAGAZINE ISSUE 32 BLOG WWWHANDMADE-JEWELRY-CLUBCOM MEMBERSHIP WWWDIYBEADINGCLUBCOM
Recommended Jewelry Making Supplies
Mz Unisex-adults 12pcs 25x18x6mm Turquoise Oval CAB Cabochon
BLOG DIY BEADING MAGAZINE ISSUE 32 BLOG WWWHANDMADE-JEWELRY-CLUBCOM MEMBERSHIP WWWDIYBEADINGCLUBCOM
Recommended Jewelry Making Supplies
For a little sparkle that goes a long way design with Swarovski 4mm faceted bicones Create glorious multi-strand necklaces with the dainty crystals or use as spacers to add a tiny flash to your designs Swarovski crystal components are made in Austria and are considered the finest products of their kind in the world
BLOG DIY BEADING MAGAZINE ISSUE 32 BLOG WWWHANDMADE-JEWELRY-CLUBCOM MEMBERSHIP WWWDIYBEADINGCLUBCOM
Recommended Jewelry Making Supplies
Imitation beads resist color change These beads have uniform quality with a good polish Some strands may have little to no matrix Sizes shapes and colors may vary with handcrafted items
BLOG DIY BEADING MAGAZINE ISSUE 32 BLOG WWWHANDMADE-JEWELRY-CLUBCOM MEMBERSHIP WWWDIYBEADINGCLUBCOM
Recommended Jewelry Making Supplies
Something Blue Necklace and Earrings
BLOG WWWHANDMADE-JEWELRY-CLUBCOM MEMBERSHIP WWWDIYBEADINGCLUBCOM
Skill level Beginner Intermediate Advanced
DIMENSIONS OF THE NECKLACE Inner Circumference 14 18 inch 35 cm
Focal Pendant Width 1 15 inch 35 cm Focal Pendant Height 1 15 inch 35 cm
DIMENSIONS OF THE EARRING Earring Width 716 inch 12 cm Earring Height 1516 inch 25 cm (Without the earring hook)
BLOG DIY BEADING MAGAZINE ISSUE 32
Materials
Note Before purchasing the supplies measure the length of your wished necklace If you decide to bead a longer necklace you should keep in mind that for every extra
frac34 inches 2 cm-s you will need 8 bicones and 8 pearls
Something Blue Necklace and Earrings
BLOG WWWHANDMADE-JEWELRY-CLUBCOM MEMBERSHIP WWWDIYBEADINGCLUBCOM BLOG DIY BEADING MAGAZINE ISSUE 32
Work RAW stitch into a beaded circle and embellish with Swarovski bicones
STEP 2 String 1A and 2 pearls Pass through the previous
second pearl and the freshly added 1A and the first pearl again
STEP 1 Use a comfortable length of thread to string 2
pearls 1A and 1 pearl again leaving a 2rdquo 5cm tail Pass through the first two pearls strung to form a
ring
STEP 3 String 2 pearls and 1A Pass through the previous first pearl and the freshly added two pearls
again
STEP 4 - 17 Repeat STEP 2 and STEP 3 again until you count 17 pearls in the inner circle
But be careful in the last step you only have to add 1 pearl then pass through the first pearls
added in STEP 1 and add another 1A Now pass through the first pearl added in STEP
1and 1A added in this round again to exit from this A
Something Blue Necklace and Earrings
BLOG WWWHANDMADE-JEWELRY-CLUBCOM MEMBERSHIP WWWDIYBEADINGCLUBCOM BLOG DIY BEADING MAGAZINE ISSUE 32
STEP 19 String 2A and pass through the next A added in round 4-17 and the A added in round 18 the 2A added in this round and finally the A added in round 4-17 to exit from the bead showed below
STEP 18 String 3A and pass through the 1A added in the previous round and the first A added in this
round
STEP 20 - 34 Repeat STEP 18 and STEP 19 again until you finish the circle
But be careful in the last step first you have to pass through 3A and then add 1A After this pass
through the 3A again and exit from the A bead
shown below (This is the first A added in STEP 18)
Something Blue Necklace and Earrings
BLOG WWWHANDMADE-JEWELRY-CLUBCOM MEMBERSHIP WWWDIYBEADINGCLUBCOM BLOG DIY BEADING MAGAZINE ISSUE 32
STEP 35 Step up to exit from the pearl shown below (Finishing the previous step in the A bead and then
stepping up from there makes the circle more secure)
Now string 3 bicones Pass through the pearl and the first bicone again
In the reality your circle will look more like this the A beads forming a strong row in the middle of the
pearls
STEP 36 Add 2 bicones Pass through the
neighboring pearl the first bicone added in the previous row and the 2 bicones added in this step
so you can exit from the next pearl
Something Blue Necklace and Earrings
BLOG WWWHANDMADE-JEWELRY-CLUBCOM MEMBERSHIP WWWDIYBEADINGCLUBCOM BLOG DIY BEADING MAGAZINE ISSUE 32
Now in the reality your circle will look more like this the A beads still forming a strong row in the middle of the pearls and the bicones slightly lying on top of
them
STEP 37 - 49 Repeat STEP 35 and STEP 36 again until you finish the circle with the bicones
But be careful in the last step first you have pass through the third bicone added then add 1 bicone
and pass through this little quartet to exit from the bicone shown below (The second one added in
STEP 35)
STEP 50 With these steps we finish the circle by adding 1 bicone to connect the A beads and the
bicone row So add 1 bicone pass through the nearest A bead and add 1 bicone again Pass
through the bicone already there and exit from the bicone you just added
Something Blue Necklace and Earrings
BLOG WWWHANDMADE-JEWELRY-CLUBCOM MEMBERSHIP WWWDIYBEADINGCLUBCOM BLOG DIY BEADING MAGAZINE ISSUE 32
STEP 66-83 Secure the circle by adding 1A between each bicone in the second row of Swarovski
bicones If you finished secure the thread and trim
STEP 51-65 Using the same technique as in STEP 37 - 49 add 1 bicone to finish the third bicone row The black line shows you the way (After STEP 50 pass through the next A bead add 1 bicone and pass through the bicone already there and the bicone added in the previous step Repeat these steps to
finish the inner bicone circle)
MIDDLE CIRCLE Work RAW stitch into a beaded circle and embellish with
Swarovski bicones Remember you need to bead two circles this time
STEP 1 Just like in the focal circle begin with 2 pearls 1A and 1 pearl again on a comfortable length of thread
leaving a 2rdquo 5cm tail Pass through the first two pearls strung to form a ring
Something Blue Necklace and Earrings
BLOG WWWHANDMADE-JEWELRY-CLUBCOM MEMBERSHIP WWWDIYBEADINGCLUBCOM BLOG DIY BEADING MAGAZINE ISSUE 32
STEP 15-28 Mimicing the FOCAL CIRCLElsquos STEP 18-34 bead A beads until you finish the inner part of the
circle Exit from a pearl in the second row This circle should look very similar to the first one but this is a bit
smaller
STEP 2-14 Mimicing the FOCAL CIRCLElsquos STEP 2-17 bead until you count 14 pearls in the inner circle Exit
from the last A added
STEP 29-42 Mimicing FOCAL CIRCLElsquos STEP 35-49 add 2 rows of bicones
STEP 43-56 Mimicing the FOCAL CIRCLElsquos STEP 50-65 bead the third row of bicones to finish the circle
Something Blue Necklace and Earrings
BLOG WWWHANDMADE-JEWELRY-CLUBCOM MEMBERSHIP WWWDIYBEADINGCLUBCOM BLOG DIY BEADING MAGAZINE ISSUE 32
SMALLEST CIRCLE Work RAW stitch into a beaded circle and embellish
with Swarovski bicones Remember you need to bead two circles again
STEP 1 Just like in the focal circle begin with 2 pearls
1A and 1 pearl again on a comfortable length of thread leaving a 2rdquo 5cm tail Pass through the first two
pearls strung to form a ring
STEP 57-70 Just like the FOCAL CIRCLElsquos STEP 66-83 secure the circle by adding 1A between every bicone
in the second row of bicones If you finished secure the thread and trim (Donrsquot forget to bead another
circle)
STEP 2-12 Mimicing the FOCAL CIRCLElsquos STEP 2-17 bead until you count 12 pearls in the inner circle Exit
from the last A added
STEP 13-24 Mimicing the FOCAL CIRCLElsquos STEP 18-34 bead A beads until you finish the inner part of the
circle Exit from a pearl in the second row This circle should look very similar to the first two but this is the
smallest of them all
Something Blue Necklace and Earrings
BLOG WWWHANDMADE-JEWELRY-CLUBCOM MEMBERSHIP WWWDIYBEADINGCLUBCOM BLOG DIY BEADING MAGAZINE ISSUE 32
STEP 37-48 Mimicing the FOCAL CIRCLElsquos STEP 50-65 bead the third row of bicones to finish this circle too
STEP 25-36 Mimicing FOCAL CIRCLElsquos STEP 35-49 add 2
rows of bicones The last step here is purple again
STEP 49-60 Just like the FOCAL CIRCLElsquos STEP 66-83 secure the circle by adding 1A between every bicone
in the second row of bicones If you finished secure the thread and trim (Donrsquot forget that you need two
small circles)
Something Blue Necklace and Earrings
BLOG WWWHANDMADE-JEWELRY-CLUBCOM MEMBERSHIP WWWDIYBEADINGCLUBCOM BLOG DIY BEADING MAGAZINE ISSUE 32
STEP 37-48 Mimicing the FOCAL CIRCLElsquos STEP 50-65 bead the third row of bicones to finish this circle too
STEP 25-36 Mimicing FOCAL CIRCLElsquos STEP 35-49 add 2
rows of bicones The last step here is purple again
STEP 49-60 Just like the FOCAL CIRCLElsquos STEP 66-83 secure the circle by adding 1A between every bicone
in the second row of bicones If you finished secure the thread and trim (Donrsquot forget that you need two
small circles)
Something Blue Necklace and Earrings
BLOG WWWHANDMADE-JEWELRY-CLUBCOM MEMBERSHIP WWWDIYBEADINGCLUBCOM BLOG DIY BEADING MAGAZINE ISSUE 32
STEP 2-6 Continue by adding 1A 1 bicone 1 pearl until you count 6 of each
STEP 1 Begin with 1 pearl 1 bicone 1A and 1 bicone again on a comfortable length of thread leaving a 2rdquo
5cm tail Pass through the pearl and the first bicone strung to form a ring
STEP 7-12 Pass through the A beads to make your
component more secure Also secure the thread and trim (Repeat these steps until you have six 6-BEAD
COMPONENTs)
6-BEAD COMPONENT Work RAW stitch into a beaded circle and embellish with Swarovski bicones
For the necklace we will need six from this component For the earring two
Something Blue Necklace and Earrings
BLOG WWWHANDMADE-JEWELRY-CLUBCOM MEMBERSHIP WWWDIYBEADINGCLUBCOM BLOG DIY BEADING MAGAZINE ISSUE 32
STEP 2-4 Continue by adding 1A 1 bicone 1 pearl
until you count 4 of each
STEP 1 Begin with 1 pearl 1 bicone 1A and 1 bicone again on a comfortable length of thread leaving a 2rdquo
5cm tail Pass through the pearl and the first bicone strung to form a ring
STEP 5-8 Pass through the A beads to make your component more secure Also secure the thread and
trim (Repeat these steps until you have the wished amount of 4-BEAD COMPONENTs)
4-BEAD COMPONENT Work RAW stitch into a beaded circle and embellish with Swarovski bicones
For the necklace-size that is given on the second page we will need 20 from this
component For the earring two
If you would like to make a longer necklace you need to make more (One 4-BEAD COMPONENT measures about 38 inch 1 cm To make the necklace symmetrical you have to have equal amounts on each side This means for every extra frac34 inches
2 cm-s you will need 1 4-BEAD COMPONENT on each side of the necklace)
Something Blue Necklace and Earrings
BLOG WWWHANDMADE-JEWELRY-CLUBCOM MEMBERSHIP WWWDIYBEADINGCLUBCOM BLOG DIY BEADING MAGAZINE ISSUE 32
STEP 2 Connect the MIDDLE CIRCLE to two 6-BEAD COMPONENTs by adding four-times 2As
between the pearls Choose a pearl on the MIDDLE CIRCLE and add
2A pass through a pearl in the 6-BEAD COMPONENT previously added and add 2A again Watch out this has to be symmetrical Repeat this at least two more times to make it
secure Now repeat this entire procedure but choose
the 8-th pearl on MIDDLE CIRCLE Repeat this on the other side of the necklace
too
Choose a pearl on the FOCAL CIRCLE and add 2A pass through a pearl in the 6-BEAD COMPONENT and add 2A again Repeat this at least two more times to make it secure
Now repeat this entire procedure but choose the 5-th pearl on FOCAL CIRCLE This will make the necklace nice on your neck
FINISHING THE NECKLACE Connects the parts with A beads
STEP 1 Connect the FOCAL CIRCLE to two 6-BEAD COMPONENTs by adding four-times 2As between the pearls To do this turn your parts upside down you need to
see the pearls We will work on this side from now on
Something Blue Necklace and Earrings
BLOG WWWHANDMADE-JEWELRY-CLUBCOM MEMBERSHIP WWWDIYBEADINGCLUBCOM BLOG DIY BEADING MAGAZINE ISSUE 32
FINISHING THE EARRING Connects the parts with A beads
STEP 1-2 Connect the 6-BEAD COMPONENT
to 4-BEAD COMPONENT and the 4-BEAD
COMPONENT to the earring hook
First connect the 4-BEAD COMPONENT to the 6-BEAD COMPONENT with 4A beads Mimic
the elongation steps of the necklace if needed
Secondly connect the 4-BEAD COMPONENT
to your earring hook with 4A beads again Leave from the last pearl bead 2A beads the hook (this is the orange oval form) and 2As again Pass through each of them to
secure this connection again
Finally get ready to prepare the other earring ndash since we need two of them
STEP 5 Connect the 4-BEAD COMPONENTs to the toggle clasp thus finishing the
necklace Leaving from the last pearl bead 2A the
clasp(this is the orange oval form) and 2A again Pass through all of them a couple more times to make this connection more
secure
Something Blue Necklace and Earrings
BLOG WWWHANDMADE-JEWELRY-CLUBCOM MEMBERSHIP WWWDIYBEADINGCLUBCOM BLOG DIY BEADING MAGAZINE ISSUE 32
If you finished it is time to try it on It was a great fun wasnrsquot it And how beautiful you look in your new necklace and the matching earrings
Something Blue Necklace and Earrings
BLOG WWWHANDMADE-JEWELRY-CLUBCOM MEMBERSHIP WWWDIYBEADINGCLUBCOM
About the Author
Margit Vogel
My name is Margit Vogel I live in Hungary Europe
By profession I am a biochemical engineer but I fell in love with
beads so much that I could not stop playing with them
I make one-of-a-kind beaded and bead embroidered art
jewelry made of the best quality materials such as Swarovski
stones gemstones Japanese beads (Miyuki and Toho) Czech
glass beads leather soutache and suede Each piece is unique
and individually crafted
Feel free to visit my blog for some eyecandy
httpiformjewelrywordpresscom
My shop httpwwwetsycomshopiformjewelry
Facebook httpwwwfacebookcomiformjewelry
BLOG DIY BEADING MAGAZINE ISSUE 32
Getting Down And Personal With Gianna
Getting Down And Personal With Gianna
Nowadays we see more and more jewelry stores opening up online and with these online jewelry stores it has made it easier for us to purchase and view their creations Have you ever wondered how they are able to manage and produce amazing jewelry pieces and tutorials So heres a little on the journey to open up an online shop We are excited to present to you Gianna aka Beading4perfectionists
Gianna Beader amp Youtuber
Unlike most jewelry makers and beadweavers Gianna did not start beading as a hobby but as a means to make ends meet With goals in trying to
fill the financial gap she did everything she could to expand her earnings ndash working as a security guard
and at the same time learning how to bead and selling her pieces at fair trades and flea markets
Since many were asking if she does home beading workshops she started on exploring how to teach people to bead She loves Scott Bakula and has always loved him till now and this served as her
inspiration to start making a beading video tutorial
Gianna started creating videos because she was at the point in her life where everything seemed to be falling apart And at that moment of time she had difficulties financially and selling jewelry was the only way for her to stay afloat financially She is a big Scott Bakula fan and when she went to the UK to see him on stage that was when it hit her that she is already able to edit videos and
taught herself Photoshop and done workshops at bead fairs so why not put these together and see what happens on Youtube She knew that if she gets enough subscribers and views ndash though no one knew what the exact numbers were you would be invited to become a Youtube partner This way she could monetize her videos with advertisements and hopefully she would be able to be a Youtube partner and be able to pay her bills
BLOG WWWHANDMADE-JEWELRY-CLUBCOM MEMBERSHIP WWWDIYBEADINGCLUBCOM BLOG DIY BEADING MAGAZINE ISSUE 32
Getting Down And Personal With Gianna
Her Youtube channel is popular and the reason why she chose Youtube is because Youtube is the biggest platform and reached almost to the whole world Everyone already knows about it and it was growing rapidly as compared to other platforms like Dailymotion so she figured that Youtube was the way to go Her advice to new designers is that when you start out go to the platforms on the top of your list first then work your way down your list if you do not get accepted by your first choice
After loyally putting up one video every week for about 8 months in a row she became a Youtube partner and monetized her videos She knew she needed at least $100 to get her first payout She managed to reach $100 after 3 months The process was not easy she worked hard lack sleep skipped meals and who knows what happened to Ridge in the Bold and the Beautiful because she stopped watching
On Youtube you can monetize your videos Google pays straight to your bank account and at other countries where they also have the option of getting checks among other options In order to get paid you have to reach the $100 mark and after 3 months For Gianna she thinks that you cannot say that Etsy is better than Youtube or Youtube is better than Etsy Her reasoning is because on Youtube she has many followers which will eventually check out her Etsy shop And to start an Etsy shop you need an audience
BLOG WWWHANDMADE-JEWELRY-CLUBCOM MEMBERSHIP WWWDIYBEADINGCLUBCOM BLOG DIY BEADING MAGAZINE ISSUE 32
television and dedicated her spare time (as she had another job) to Youtube She re-registered at the chamber of commerce after receiving her first payout Her work at Youtube now is not a full time job and things have changed on Youtube It is easier to become a parter but there are some countries that need to wait for an invitation to be a Youtube partner Take Italy for instance Italians would have to work just as hard as she did if they want to become a Youtube partner
Getting Down And Personal With Gianna
With her 60000 subscribers on her b4pbakup Youtube channel it is possible to sell at least 60 patterns on the first day on Etsy after promoting the PDF file on her Youtube channel Though you may think that 60 out of 60000 is not much you have to remember that not everyone has the means to purchase the PDF file and a lot of people still rather watch her carry out the tutorial(for free) on Youtube instead of reading the patterns or paying for the patterns even if the pattern is for a fundraiser and only cost $2 Her insights on Youtube is that Youtube is not what it used to be 6 years ago Instead of making more money every month she is making less and less because advertisers have more options of where they want to advertise their ads Ads do not pay as much as they used to Back in the days you could get 25 cents per ad Now you count yourself lucky if you could get 5 cents roll in after two hours
BLOG WWWHANDMADE-JEWELRY-CLUBCOM MEMBERSHIP WWWDIYBEADINGCLUBCOM BLOG DIY BEADING MAGAZINE ISSUE 32
And on top of that adblockers are destroying Youtube channel owners Youtube will start making changes to the channels where there will be ldquopaid subscriptionrdquo channels This has already been implemented in some countries but not in her country The Netherlands This means there will no longer be ads for her monthly paying subscribers She hopes that Youtube will add on a paid per video option feature The option to be a paid channel or free channel or to start a new channel for paying customers is yours to choose Gianna is not happy with Youtube because many others like her have worked so hard and for some years to become Youtube partners(which was something to be proud of) has lost their status
Getting Down And Personal With Gianna
Her advice for those who want to go on Youtube is 1 Do it because you want to teach
2 Do it because you want a career with beads
BLOG WWWHANDMADE-JEWELRY-CLUBCOM MEMBERSHIP WWWDIYBEADINGCLUBCOM BLOG DIY BEADING MAGAZINE ISSUE 32
After putting up about 20 videos and having at least 5000 subscribers add the PDF tutorials to Etsy and Craftsy She found out that her audience would like to have the PDF after watching her videos This is because they would rather print out the PDF and work while seated in a comfy chair technically somewhere else instead of having to pause the video time and time again
Gianna has also made a video for those who want to know the whole story of her journey up until the present day And to get updates on her you can check it out here She has also started a vlog where she tells of how she still works towards becoming a financial independent beader and explains her journey to get where she wants to be(or die trying) Gianna will be in the UK on October the 17th giving an all-day workshop with 4 different patterns
(2 beginners and 2 advanced) in Wotton-under-Edge
Gianna will be there Friday night as the workshop is on Saturday She will be leaving on Sunday Her
doors are open to all who wants to continue the party with her at the hotel across the street
For more information do contact Ann Tucker on Facebook
httpswwwfacebookcomanntucker501
Rec
omm
end
ed R
ead
ings
Making Jewelry with Gemstone
Beads
Combines the popular craft of beading with beautiful semi-precious stones which are collected by many Features a variety of versatile ideas which can be adapted for any type of gem or bead Readers will learn to reate beautiful gemstone jewelry with this dazzling collection of over 100 projects ranging from eyecatching earrings and accessories to exquisite necklaces and bracelets This beautiful book offers an impressive range of 28 beautiful semi-precious stones (including birthstones) and a glimpse into the fascinating history and mythical properties behind them
BLOG DIY BEADING MAGAZINE ISSUE 32 BLOG WWWHANDMADE-JEWELRY-CLUBCOM MEMBERSHIP WWWDIYBEADINGCLUBCOM
Rec
omm
end
ed R
ead
ings
Convertible Crystal Jewelry
Reverse it Twist it Wear it Many
Ways
Diane Whiting presents the idea that convertibility isnrsquot just about using pieces in multiple ways it is also about using skills and creativity in multiple ways Using ever-popular sparkling crystals Diane showcases design elements through various techniques for fun easy fashionable jewelry With 25 projects the reader can choose from bracelets necklaces and earrings that match any outfit or styleDiane Whiting presents the idea that convertibility isnrsquot just about using pieces in multiple ways it is also about using skills and creativity in multiple ways
BLOG DIY BEADING MAGAZINE ISSUE 32 BLOG WWWHANDMADE-JEWELRY-CLUBCOM MEMBERSHIP WWWDIYBEADINGCLUBCOM
Rec
omm
end
ed R
ead
ings
Wire Jewelry Masterclass
Wrapped Coiled and Woven Pieces
Using Fine Materials
Comprehensive and fabulous Wire Jewelry Masterclass takes an in-depth look at an intricate and rewarding craft The 24 projects which range from simple Dragons tear briolette earrings to a Poseidon-under-the-sea pendant will delight and inspire jewelers of all levels and tastes Divided into beginner intermediate and advanced sections this beautifully photographed step-by-step guide is the ticket to wire jewelry expertise
BLOG DIY BEADING MAGAZINE ISSUE 32 BLOG WWWHANDMADE-JEWELRY-CLUBCOM MEMBERSHIP WWWDIYBEADINGCLUBCOM
Rec
omm
end
ed R
ead
ings
Timeless Wire Weaving The
Complete Course
Timeless Wire Weaving focuses on developing wirework skills through 13 projects using three classic wire weaving techniques coiling wrapping and weaving The projects are built around a focal cabochon and incorporate seed beads and crystals in imaginative ways Designers learn to make the jewelry shown in the book and they also use the techniques learned to create innovative jewelry pieces of their own
BLOG DIY BEADING MAGAZINE ISSUE 32 BLOG WWWHANDMADE-JEWELRY-CLUBCOM MEMBERSHIP WWWDIYBEADINGCLUBCOM
Our digital magazine is available through
Apple Newsstand service available to millions of IPAD users
To advertise with us please email us at
diyjewelryclubgmailcom
Or visit our page at
httphandmade-jewelry-clubcomadvertising-diy-beading-magazine
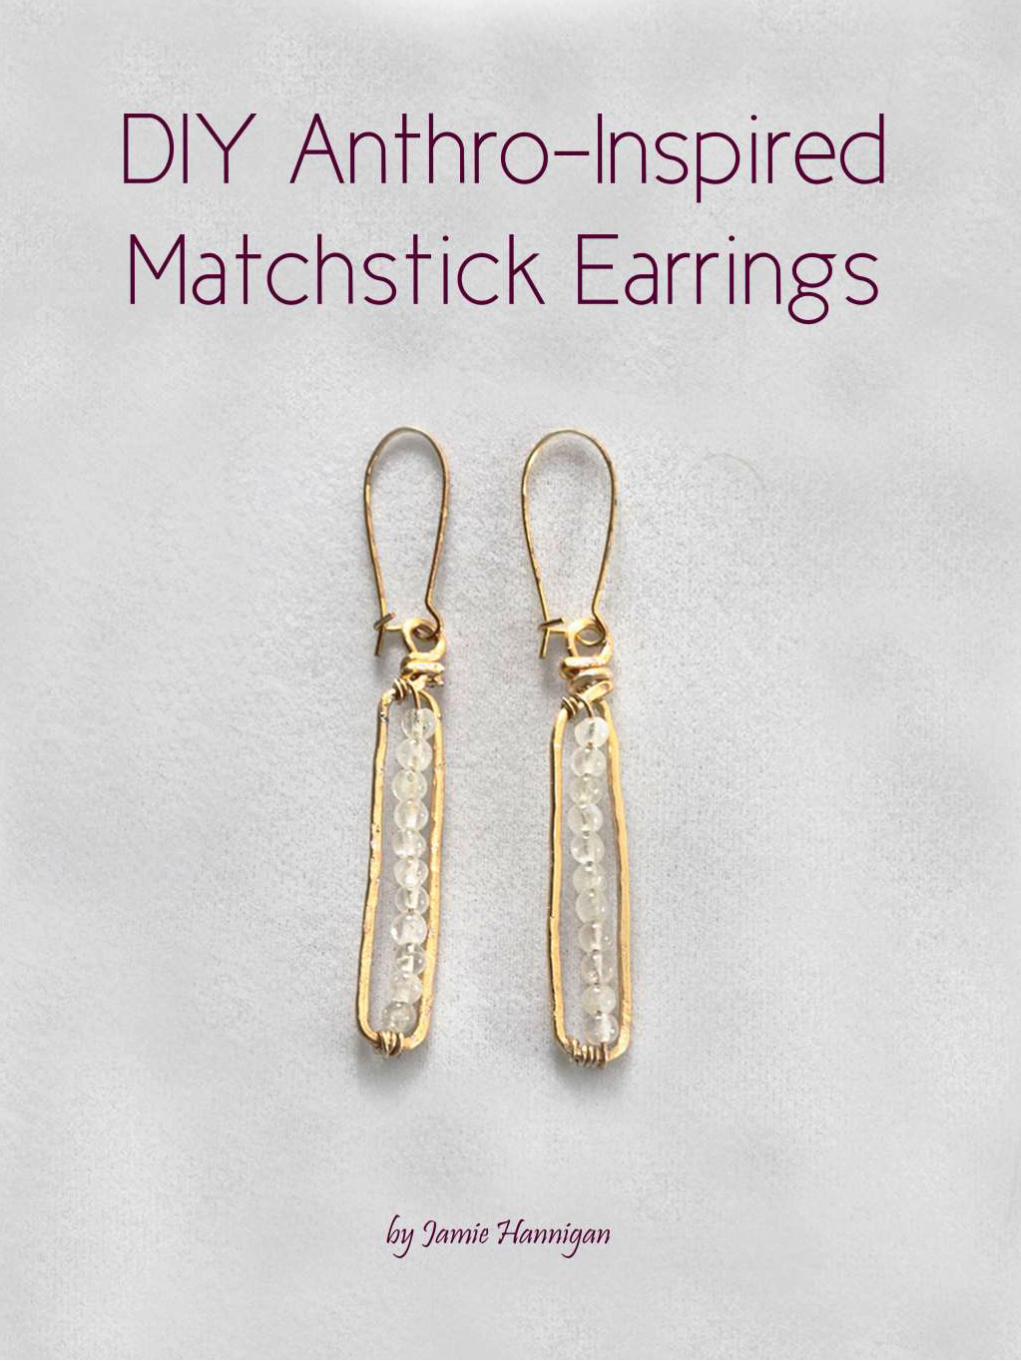
BLOG DIY BEADING MAGAZINE ISSUE 32 BLOG WWWHANDMADE-JEWELRY-CLUBCOM MEMBERSHIP WWWDIYBEADINGCLUBCOM
DIY Anthro-Inspired Matchstick
Earrings
Start by cutting two 6 pieces of 18 gauge gold wire Make a round loop at the top and start forming the shape of the earring frame It should be about 2 long
Finish the shape of your earring frame and bring the end of the wire to the loop you created Criss cross the ends so that the loop is sandwiched in between
BLOG DIY BEADING MAGAZINE ISSUE 32 BLOG WWWHANDMADE-JEWELRY-CLUBCOM MEMBERSHIP WWWDIYBEADINGCLUBCOM
DIY Anthro-Inspired Matchstick
Earrings
Pull the ends tight so that the frame is secure then snip off the excess wire
Repeat with the other piece of wire for your second earring frame Check as you go to make sure they are as close to identical as possible
BLOG DIY BEADING MAGAZINE ISSUE 32 BLOG WWWHANDMADE-JEWELRY-CLUBCOM MEMBERSHIP WWWDIYBEADINGCLUBCOM
DIY Anthro-Inspired Matchstick
Earrings
Place your earring frames on your hammering surface and hammer with the ball peen hammer until they lay flat This will also strengthen the wire and make
them less likely to bend
Cut a 10 piece of 24 gauge wire and wrap the end around the bottom of your earring frame String on beads until you fill the space
BLOG DIY BEADING MAGAZINE ISSUE 32 BLOG WWWHANDMADE-JEWELRY-CLUBCOM MEMBERSHIP WWWDIYBEADINGCLUBCOM
DIY Anthro-Inspired Matchstick
Earrings
Secure the wire at the top by wrapping it near the loop Repeat on the second earring
Add earring hooks of choice and yoursquore done
Advertisement
DIY Anthro-Inspired Matchstick
Earrings
BLOG DIY BEADING MAGAZINE ISSUE 32 BLOG WWWHANDMADE-JEWELRY-CLUBCOM MEMBERSHIP WWWDIYBEADINGCLUBCOM
About the Author
Jamie Hannigan
Perhaps Irsquom just easily fascinated but I often see magic and wonder in things other might consider mundane Irsquom a very imaginative person and as a child I often created fictional
narratives to go along with places or objects
My inspiration comes from all over Sometimes Irsquom really into nature like toadstools and mushrooms Sometimes Irsquom really into man-made things like ships Sometimes Irsquom really
into concepts and themes like astrology or mythology
I go through phases and Irsquove learned to embrace that in my work I create the things I want to make at that exact moment If just one other person finds enjoyment in what my
imagination led me to produce I consider it a success
To see more jewelry tutorials and my other work visit jamiebhannigancom and check my Etsy shop at
httpswwwetsycomshopjamiebhannigan
Wire Wrapped Gemstone
Pendant
BLOG WWWHANDMADE-JEWELRY-CLUBCOM MEMBERSHIP WWWDIYBEADINGCLUBCOM
You will usually find these more natural gemstones at bead shows vs your local bead shop
Wire Jewelry Making Skill Level Intermediate
Wire Jewelry Making Supplies - two lengths of 22 gauge round dead soft wire (4 times the length of your bead) - one 3 inch (76 cm) length of 20 gauge half round half hard (HH) wire (wrapping wire) - one gemstone bead - three 6mm beads (I used amethyst Swarovskireg crystals - three one inch (25 cm) head pins - one ink pen (used as a mandrel) - one marker pen - blue painters tape - jewelers polishing cloth - ruler Jewelry Making Tools - wire cutters - round nose pliers - chain nose pliers
BLOG DIY BEADING MAGAZINE ISSUE 32
Wire Wrapped Gemstone
Pendant
BLOG WWWHANDMADE-JEWELRY-CLUBCOM MEMBERSHIP WWWDIYBEADINGCLUBCOM
1 Using a ruler measure the length of your bead and note the measurement
Multiply the measurement by 4 My bead is 3 inches (76 cm) long so my final measurement is 12 inches (305 cm)
BLOG DIY BEADING MAGAZINE ISSUE 32
2 Tear off two pieces of blue painters tape from the roll and temporarily tape them to your work surface
Using the wire cutters cut two lengths of the 22 gauge round wire measuring the length of your
final measurement (I cut two 12 inch (305 cm) lengths of wire)
Clean and straighten both wires by pulling them through a jewelers polishing cloth (not pictured)
With both wires side by side with the ends even with one another use the torn tape lengths to tape the wires together (This will temporarily hold them together while you to wire wrap them)
With the marker pen mark the center of both wires
Wire Wrapped Gemstone
Pendant
BLOG WWWHANDMADE-JEWELRY-CLUBCOM MEMBERSHIP WWWDIYBEADINGCLUBCOM
3 Using the wire cutters cut one 3 inch (76 cm) length of 20 gauge half round half hard wire This is the wrapping wire
With the flat side of the wire facing you use the chain nose pliers to make a 14 inch (06 cm) bend
towards you and at a slight angle in one end of the wire This makes a hook in the wire The flat sides of the wire should face one another
BLOG DIY BEADING MAGAZINE ISSUE 32
4 Pick up the taped wires at their center between your fore finger and thumb Place the hook of the half round wire slightly to the right of the center mark on the two round
wires
5 Holding the long end and the tail of the half round wire hook use the tip of the chain nose pliers to squeeze the bend of the hook against the round wires This sets or secures the wrapping wire
Wire Wrapped Gemstone
Pendant
BLOG WWWHANDMADE-JEWELRY-CLUBCOM MEMBERSHIP WWWDIYBEADINGCLUBCOM
6 Bend the long end of the half round wire up over the two round wires You have created one wire wrap
BLOG DIY BEADING MAGAZINE ISSUE 32
7 Bend the long end of the half round wire down and behind the two round wires
8 Continue to repeat Steps 6 and 7 until you have made three (3) to five (5) complete wire wraps around the round wires (I made five (5) wire wraps) After making one or two wire wraps secure
the wraps against the round wires as in Step 5
The front of the wrap (as pictured below) will be the side where the half round wrapping wire is not cut
Wire Wrapped Gemstone
Pendant
BLOG WWWHANDMADE-JEWELRY-CLUBCOM MEMBERSHIP WWWDIYBEADINGCLUBCOM
9 Use wire cutters to cut the excess half round wire Cut the wire about half way behind the round wires so that the ends will not be seen from the front side of the wire wrap
BLOG DIY BEADING MAGAZINE ISSUE 32
10 With the wire wrap at the bottom center of your bead use your fingers to gently shape the wires around the bottom along the sides and to the top of the bead
11 Use the chain nose pliers to secure all the wraps against the round wires
Wire Wrapped Gemstone
Pendant
BLOG WWWHANDMADE-JEWELRY-CLUBCOM MEMBERSHIP WWWDIYBEADINGCLUBCOM
12 Slide the chain nose pliers in between the round wires where they meet the wire wrap and spread the wires apart
BLOG DIY BEADING MAGAZINE ISSUE 32
Spreading the wires apart begins to create the cage for the bead
13 With its bottom center resting against the wire wrap place your bead or gemstone inside the cage
Gather all four of the wires around the bead so that it is encased within them and so that the wires
meet at the top of the bead Hold all four wires between your forefinger and thumb (like you are pinching the wires)
Wire Wrapped Gemstone
Pendant
BLOG WWWHANDMADE-JEWELRY-CLUBCOM MEMBERSHIP WWWDIYBEADINGCLUBCOM
14 Decide which side will be the front of the pendant Locate the wire that is in front of all the wires and with your fingers bend it downward at a 45 degree angle
BLOG DIY BEADING MAGAZINE ISSUE 32
15 Use your fingers or the chain nose pliers to wrap the bent wire around the other three wires where they all meet or cross one another
16 Continue wrapping the wire around the other three to secure them End the wrapping at the back of the pendant
Using the chain nose pliers tuck the wire into the wraps (not pictured)
Wire Wrapped Gemstone
Pendant
BLOG WWWHANDMADE-JEWELRY-CLUBCOM MEMBERSHIP WWWDIYBEADINGCLUBCOM
17 Make sure that the wires are evenly spread around the beads Now we need to tighten the wires that encase the bead
On one of wires about halfway up the wire place the jaws of the round nose pliers on either side
of the wire Now rotate the pliers making a double bend in the wire Repeat on the other three wires making one or two double bends in each wire When youre done shake the bead to make sure it cannot fall out of the wires
BLOG DIY BEADING MAGAZINE ISSUE 32
18 Now decorate two of the top wires Almost anything is possible Try making a few different bends curls or twists in the wire
I decided to loosely coil the top wires around an ink pen
19 Gently untighten the coil by pulling the end of the wire downward Using the round nose pliers make a simple wire loop on the end of the coil
Wire Wrapped Gemstone
Pendant
BLOG WWWHANDMADE-JEWELRY-CLUBCOM MEMBERSHIP WWWDIYBEADINGCLUBCOM
20 Repeat Steps 18 and 19 on a second top wire
BLOG DIY BEADING MAGAZINE ISSUE 32
21 The third top wire becomes the bail Coil it tightly around the ink pen making at least two wire coils The end of the wire should fall in front of the pendant
Make a simple wire loop on the wire end
22 Heres how the wire coilsspiralsbends should look Make any necessary adjustments to the wires along the sides of the gemstones and the two that fall
in front of pendant
Make sure that the wires tightly secure the bead The wire wrap at the bottom of the pendant may no longer be at the center of the bead
Wire Wrapped Gemstone
Pendant
BLOG WWWHANDMADE-JEWELRY-CLUBCOM MEMBERSHIP WWWDIYBEADINGCLUBCOM
23 On each of the three head pins string a 6mm bead Make a simple wire loop on the end of each head pin
Attach one head pin bead unit to each of the simple wire loops on the wire wrapped pendant
BLOG DIY BEADING MAGAZINE ISSUE 32
Completed Wire Wrapped Pendant
Now hang your handcrafted wire wrap pendant from your favorite chain or strand of beads
Enjoy wire wrapping your own gemstone to make a wire wrapped pendant
BLOG WWWHANDMADE-JEWELRY-CLUBCOM MEMBERSHIP WWWDIYBEADINGCLUBCOM
Wire Wrapped Gemstone
Pendant About the Author
Wanda Epps
Wanda is an avid jewelry maker who loves to make jewelry with beads She began her journey into jewelry making after walking into a bookstore to find crafting books on sale One on making jewelry caught her eye and after making a simple bead necklace she was hooked That was in late 2003 Over the years she has taken classes on various jewelry making techniques stringing making wire jewelry bead crochet macrame metal jewelry making to name some She expects that her love of making beaded jewelry will continue as bead supplies and beautiful new beads seem endless Her fulltime job provides for her needs but beads are her passion She invites you to join her in the many adventures of making jewelry at
httpwwwmaking-beaded-jewelrycom httpswwwfacebookcompagesMaking-Beaded-Jewelry-
Guide254860504236
BLOG DIY BEADING MAGAZINE ISSUE 32
Should You Sell In The Marketplace
Should You Sell In The Marketplace
BLOG WWWHANDMADE-JEWELRY-CLUBCOM MEMBERSHIP WWWDIYBEADINGCLUBCOM
We are all able to create jewelry pieces and there will come a time where you want to share the joy with the rest of the world whether it is in the form of a tutorial or a finish
piece And this is when you will start to think about putting up your work for sale As someone who is new to the business world you may be confused on where you should start selling your work And the all famous site that is first on most peoplersquos minds is Etsy Etsy is popular and it is user friendly and that is why it is the choice of many designers and crafters But there are also some who wants to set up their own
shop with their logo and to put their works out as their own even at the very beginning Thatrsquos where you may be confused on which platform you should go for
So herersquos some explanation on how you will benefit from setting up shop at Etsy
BLOG DIY BEADING MAGAZINE ISSUE 32
1 Etsy has everything ready for you and all you have to do is to bring in your works and use the features that are already available for you to use ndash like the payment system web traffic design and layout are not an issue that you need to worry about
2 You also have the trust of customers almost immediately because Etsy has already established a name for itself and therefore there is already trust in brand in their site When you use Etsy your brand will automatically be exposed to many customers who visit Etsy to find what they need
3 For every site there is always the need to be able to interact with other sellers to help each other out Forums or community boards are very helpful as other passionate designers and crafters share their experience to help out the newer members of the community This is also where you will be able to form good relationships with other sellers and who knows you may even find a partnership over time
Should You Sell In The Marketplace
BLOG WWWHANDMADE-JEWELRY-CLUBCOM MEMBERSHIP WWWDIYBEADINGCLUBCOM
Though Etsy has itrsquos good points there are some things which you need to take into consideration as well
1 When you are using someone elsersquos facilities there is always the chance of having
being shut down due to unforeseen circumstances Be it violation of Etsyrsquos policy or decisions made by the administration department this will sometimes cost you a dent in your brand name and you may lose the trust of your followers and starting all over again may be the only way to start again
2 If you are a very creative person then you may feel limited as the design of shops at Etsy is standardized If you are new and do not worry so much about designs of websites this is perfectly fine But do remember that when you want to distinguish yourself from other sellers it will be tougher as you try to make your brand more well-known due to limitations of design of the site
3 Since Etsy has so many sellers all in one place the competition is of course going to be tighter and fiercer because even though customers are viewing your products there are also other options from other sellers listed on the page as well So customers may turn away if they see something of a better price
4 Each product that you list with Etsy costs you money Etsy also takes a 35 percent of the selling price of the item However if or when you start your business on your own website it will also cost you for web hosting and you would need PayPal and they have a fee of 29 percent +30cents So either way you will still need to pay to list your products on the web
BLOG DIY BEADING MAGAZINE ISSUE 32
Should You Sell In The Marketplace
BLOG WWWHANDMADE-JEWELRY-CLUBCOM MEMBERSHIP WWWDIYBEADINGCLUBCOM
If you are confident enough to have your own business site by all means go ahead and do it The benefits of it are as below
1 You get to be your own boss You get to control everything from the design of the
website layout and how you want to advertise your products You can also change your policies and not be affected by it because it is you who changes it Your shop will not be shut down suddenly without notice and you do not need to worry that you have to start all over again
2 Distractions of competitors products on your page will not be an issue It is your site and it is up to you whether or not you want to allow what kind of advertisements on your site So if you donrsquot want something on your page it is your call
3 You will be able to capture the attention of the media and customers as well if you are able to have a well designed site Nowadays people are attracted to colors and they can see if you have put effort into beautifying the site for the customers You can do so much more than just uploading some pictures onto Etsy on your own site you can always update your site design and your products to complement each other and therefore becoming more attractive
BLOG DIY BEADING MAGAZINE ISSUE 32
Should You Sell In The Marketplace
BLOG WWWHANDMADE-JEWELRY-CLUBCOM MEMBERSHIP WWWDIYBEADINGCLUBCOM
And herersquos the tough part when you want to have your own site
BLOG DIY BEADING MAGAZINE ISSUE 32
1 You need to have knowledge of what you want to do You have to learn to be involved in every aspect of your site so that you know what us going on at the front end of things and at the back end of things as well But if you have not any knowledge of designing a website it is usually a recipe for something to go wrong You have to remember that you need a user interface that is simple for customers to use an easy to use shopping cart you should know which third party platforms are trusted and one which will not keep changing their regulations If you still want to have your site hiring a designer may be your best option
2 You have to work towards promoting your store on your own You will need to find people to feature you in their social media sites because it will not just fall into your lap You need to have promotions or road shows if you need to Marketing your store is important whether or not you are using Etsy or other marketing platforms but if you are on your own it is even more important
3 You will still be competing with other sellers Though now you are now not only competing with Etsy sellers you are now competing with sellers and stores from the world wide web Etsy is already so well known so people tend to go there first so you need to up your methods of attracting customers
Should You Sell In The Marketplace
BLOG WWWHANDMADE-JEWELRY-CLUBCOM MEMBERSHIP WWWDIYBEADINGCLUBCOM
When we first started out we used Etsy as our platform to sell our works Other than that we also utilized blogs and we eventually built our own website as our main base
BLOG DIY BEADING MAGAZINE ISSUE 32
Things have changed over these 3 years It was easier to get sales without much effort but now with so many other shops also utilizing Etsy the competition has grown tremendously Now our main sales come from our own online store and has exceeded sales from Etsy
So what we recommend is that using an existing platform such as Etsy to start out is good and in time build up your website or webstore
It is not that hard to start your own webstore either these two companies offers the option to set up your webstore
1 Shopify
2 Bigcommerce
There are many things to take into consideration before starting a store online It is perfectly fine to start out using Etsy before branching out on your own But you can also
have both ndash have your own website and a store on Etsy There are many stores who operate like this They technically get customers from Etsy and the reroute them to their own websites As long as you are in control of what you are doing and not stressing and
confusing yourself you can opt for more exposure for your store
So do take some time and take a breather to really think through what will be the best for YOU and do remember that starting small does not mean you will not be able to be big
OFFER Get which can be downloaded by subscribing to
httpinternet-marketing-publishingcom
BLOG WWWHANDMADE-JEWELRY-CLUBCOM MEMBERSHIP WWWDIYBEADINGCLUBCOM
Materials - Copper wire diameter 08 mm - Copper wire diameter 04 mm - Small gemstone bead (~4 mm) (I used 3 mm beads in this tutorial because I didnrsquot have any other beads at the time but the beads in the earrings on the cover are 4 mm) Make sure that the beads you want to use are resistant against chemicals such as liver of sulfur or whichever oxidizing substance you want to use to give the metal patina The beads in the picture above are facetted garnet buttons in the tutorial itself I used black spinel facetted buttons Equipment - Round nose pliers - Flat nose pliers - Side-cutters - A small file - A cylindrical object of about 5mm diameter (eg a mandrel for jump rings) - Hammer amp anvil - Liver of sulfur or some other means to oxidize the metal (optional)
LOVE-ly Earrings
BLOG DIY BEADING MAGAZINE ISSUE 32
BLOG WWWHANDMADE-JEWELRY-CLUBCOM MEMBERSHIP WWWDIYBEADINGCLUBCOM
This tutorial teaches how to make 1 ear stud I recommend making both ear studs of the set simultaneously step-by-step so that symmetry is easier to achieve Between steps check for
symmetry in size and shape and adjust the construction if needed
LOVE-ly Earrings
BLOG DIY BEADING MAGAZINE ISSUE 32
Step 1 Straighten the end of the copper wire (+- 6cm) by rubbing along it with your fingers for a
few seconds
Step 2 Bend over the wire onto itself as illustrated below using flat nose pliers
Step 3 Grab the doubled-over wire with the flat nose pliers and push the two sides against each
other Use little force and do it bit by bit to avoid damaging or kinking the wire
Step 4 Push the two adjacent pieces of wire apart to create the bottom shape of the heart as shown
on the picture above
BLOG WWWHANDMADE-JEWELRY-CLUBCOM MEMBERSHIP WWWDIYBEADINGCLUBCOM
LOVE-ly Earrings
BLOG DIY BEADING MAGAZINE ISSUE 32
Step 5 Hammer down the angled wire (the part circled in red) This strengthens the construction
and looks more professional
Step 6 Wrap the two ends of wire tightly around a cylindrical object (+- 5 mm diameter)
Step 7 Push apart the loops you just made by wrapping the wire around the cylindrical object The wire should now be shaped like a heart as
illustrated above
Step 8 Use round nose pliers to bend around the wire for each side of the heart as illustrated above
BLOG WWWHANDMADE-JEWELRY-CLUBCOM MEMBERSHIP WWWDIYBEADINGCLUBCOM
LOVE-ly Earrings
BLOG DIY BEADING MAGAZINE ISSUE 32
Step 9 Use the flat nose pliers to bend one of the two wires (preferably the longer wire) in a 90deg angle at the place marked with a red dot In the picture accompanying the next step you can see
how it should look from the front
Step 10 Use the round nose pliers to bend the other piece of wire in a decorative coil You will cut off the rest of the wire of the coil at approximately the spot marked with a red dot so take that into account when coiling the wire into the shape that
you desire
Step 11 Cut of the wire at the spot indicated in the previous picture and file off any sharp edges
Step 12 Cut off the ear wire at the desired length (Between 1 and 2 cm If in doubt try the earring on
to see if it sits comfortably) and file off any sharp edges
BLOG WWWHANDMADE-JEWELRY-CLUBCOM MEMBERSHIP WWWDIYBEADINGCLUBCOM
LOVE-ly Earrings
BLOG DIY BEADING MAGAZINE ISSUE 32
Step 13 Hammer down the rest of the heart (bumps and coil) If you canrsquot reach certain parts because the ear wire is in the way bend that part of the heart shape away
(verticallyupward) and bend it back after you finish hammering
Congrats yoursquove now made a basic heart-shaped ear stud Next wersquore going to decorate it with a little gemstone and more copper wire
Step 14 Cut off a length of 04 mm copper wire (about 10-20 cm) and string the bead onto it
Step 15 Place the bead in the ldquonon-coilrdquo upper part of the heart shaped ear stud holding it between thumb and forefinger Let approximately 4 cm of the 04 mm wire stick out over the edge of the
heart as illustrated above
Step 16 Wrap the wire twice around the frame so that if you face the front of the ear stud the wire is
directed towards yourself
BLOG WWWHANDMADE-JEWELRY-CLUBCOM MEMBERSHIP WWWDIYBEADINGCLUBCOM
LOVE-ly Earrings
BLOG DIY BEADING MAGAZINE ISSUE 32
Step 17 Flip the wire over the wire with the bead (indicated by the red arrow) and pull tight whilst holding the bead (and its wire) tightly in place It
should look like the construction in the big picture above
Step 18 And make another loop around the wire with the bead The 04 mm wire is now coiled around
twice two times two coils around the frame and two coils around itself
Step 19 Repeat the wire-fastening procedure described in steps 16-18 with the other end of the
wire securing the gemstone in the heart frame Let the wire stick out at the back of the earstud
Step 20 Pull the wire through the lsquocoilrsquo part of the heart shape to the front The wire should lsquocross overrsquo to the other side of the heart at the back of the ear
stud
Step 21 Coil the wire around the frame until you are content with the design Optionally you can hammer down the coils a bit I often do this because I think it
looks somewhat more sophisticated and professional
BLOG WWWHANDMADE-JEWELRY-CLUBCOM MEMBERSHIP WWWDIYBEADINGCLUBCOM
LOVE-ly Earrings
BLOG DIY BEADING MAGAZINE ISSUE 32
Step 22 Cut off the spare bits of wire preferably at the backside of the ear stud and tuck in the ends
Congrats yoursquove now made a heart-shaped ear stud Next we are going to finish it off with a patina
Step 23 Oxidize the metal of the ear studs I always use liver of sulfur solved in warm water The metal
will turn a dark color and matte texture Afterwards rinse the ear studs thoroughly with water and pat
them dry
Step 24 Rub the oxidized ear stud all over with a rough polishing pad to bring back (a dark copper)
color to the surface
Yoursquove now finished making your own LOVE-ly ear studs
Secure them in your ear with plastic or copper stops These can be bought online or in jewelry-supply
stores
Variation ideas You can easily vary in size and shape (longer hearts smaller coils pointier bottoms etc) and
use different materials As you can see the earring I make in this tutorial has a slightly smaller bead than the
earrings on the cover which influences the overall appearance somewhat
The earrings underneath are made with sterling silver and gold wire (super-short coils) and contain small pink
rubies
LOVE-ly Earrings
BLOG WWWHANDMADE-JEWELRY-CLUBCOM MEMBERSHIP WWWDIYBEADINGCLUBCOM
About the Author
Jeske Hendriks
Hi there My name is Jeske and I love all things handmade Over the years Irsquove dabbled in countless different arts and crafts but nowadays I mainly focus on making jewellery and cutting stone cabochons As for jewellery
my preferred materials are silver wire and gemstonemineral beads Using wire-wrapping and basic silver smithing techniques I create both simple
and intricate pieces ndash each and every one of them unique a personal little artwork
You are welcome to follow me on facebook stop by at my personal
webpage andor to have a look at my Etsy shops httpswwwfacebookcomyeskecrafts
httpwwwyeskecraftscom httpwwwyourbeadsandfindingsetsycom
httpwwwyeskecraftsetsycom httpwwwyeskemiscetsycom
BLOG DIY BEADING MAGAZINE ISSUE 32
Flower Tale Earrings
BLOG WWWHANDMADE-JEWELRY-CLUBCOM MEMBERSHIP WWWDIYBEADINGCLUBCOM
Techniques Beadweaving
Project Level Beginner to Intermediate
Materials 12 bronze opaque 6mm Czech glass pearl round beads
2 gr gold lustered dark topaz Japanese 110 seed beads (Toho 459)
Size B gold beading thread
2 bronze earring hooks
Tools Size 10 beading needle
Scissors
Finished Size Diameter ndash 3 cm (118 inches) (without earring hooks)
BLOG DIY BEADING MAGAZINE ISSUE 32
Flower Tale Earrings
BLOG WWWHANDMADE-JEWELRY-CLUBCOM MEMBERSHIP WWWDIYBEADINGCLUBCOM
Step 1 Cut about 110 cm (43 inches) of thread and
pass it through the needle hole
Pick six groups of one 110 seed bead and one
6 mm round bead
BLOG DIY BEADING MAGAZINE ISSUE 32
Join the beads into a ring and secure with two
square knots
Leave a tail of about 15 cm (59 inches)
Step 2 The working thread should be right before the
6 mm round bead
Pick seven 110 seed beads skip the 6 mm
round bead and pass the needle through the
next 110 seed bead added in the previous
round
Repeat adding groups of seven 110 seed
beads five more times
When adding the last group take the needle
directly through the 110 seed bead from the
previous round and the next one added in the
beginning of current round
Flower Tale Earrings
BLOG WWWHANDMADE-JEWELRY-CLUBCOM MEMBERSHIP WWWDIYBEADINGCLUBCOM
Step 3 Pick three 110 seed beads skip one seed
bead from the chain of seven added in the
previous round and pass with the needle
directly through the next three 110 seed
beads
BLOG DIY BEADING MAGAZINE ISSUE 32
Pick three 110 seed beads skip one seed
bead from the chain of seven added in the
previous round and pass with the needle
through the last one and the first 110 seed
bead from the next chain of seven
Repeat the above directions from Step 3 five
more times
After completing this round make sure the
thread will be exiting from the middle 110
seed bead from the first group of three added
in the beginning of this round
Step 4 Pick one 110 seed bead and go through the
last seed bead of the group of three
Flower Tale Earrings
BLOG WWWHANDMADE-JEWELRY-CLUBCOM MEMBERSHIP WWWDIYBEADINGCLUBCOM
Pick three 110 seed beads and take the
needle through the first seed bead of the next
group of three added in the previous round
BLOG DIY BEADING MAGAZINE ISSUE 32
Pick one 110 seed bead and go with the
needle through the next three seed beads (the
last two of the group of three and the last one
from the chain of seven)
Then go up through three 110 seed beads
(the first from the next group of seven and the
first two from the next group of three)
Repeat the above directions from Step 4 to
complete the remaining petals
When working on the last petal perform the
operation from the image shown on the left
instead of picking the group of three 110 seed
beads string two 110 seed beads the earring
hook other two 110 seed beads and
continue beading as instructed above
When you are done hide the thread ends into the beadwork
Flower Tale Earrings
BLOG WWWHANDMADE-JEWELRY-CLUBCOM MEMBERSHIP WWWDIYBEADINGCLUBCOM
About the Author
Iulia Postică
I was born and live in Moldova Eastern Europe Ever since I remember myself
Ive been crocheting and knitting My grandmother has taught me that and I
loved it very much I always regarded crafts exclusively as a hobby and never
thought of making a career of it I traveled a lot to various historical sites
Actually Ive spent all my childhood summers in archaeological camps with
my father who is a professional archaeologist
I also enjoy metal hammering and wirework as it gives me possibility to
express myself in materials used by human communities since ancient times
copper brass glass seed beads and gemstones That is no surprise to anyone
given my family history and academic background
My shop ldquoBeadedTreasuryrdquo with beading tutorials and bead crochet patterns
httpswwwetsycomshopBeadedTreasury
My shop ldquoArchaeologicardquo with artisan jewelry
httpswwwetsycomshopArcheologica
My blog httpbeadedtreasuryblogspotcom
My facebook httpswwwfacebookcomBeadedTreasury
BLOG DIY BEADING MAGAZINE ISSUE 32
Liberty Earrings
BLOG WWWHANDMADE-JEWELRY-CLUBCOM MEMBERSHIP WWWDIYBEADINGCLUBCOM
Materials - Nr 2 cabochon Preciosa Ornela ovale 18x22 mm turchese
- Rocaille Toho 150 silver lined green emerald
- Nr 2 dagger beads
- Nr 20 pearl 4 mm
- Superduo opaque luster ceramic green
- Rocaille 80 color gold
- Rocaille 80 color ivory
- Delica Miyuki 110 aquagreen mix
- Rocaille Miyuki 110 galvanized silver
- Nr 2 monachelle (earwire)
-Fireline
- Beading Needle nr 12
BLOG DIY BEADING MAGAZINE ISSUE 32
Liberty Earrings
BLOG WWWHANDMADE-JEWELRY-CLUBCOM MEMBERSHIP WWWDIYBEADINGCLUBCOM
Make a circle of 20 delica beads and make a knot (a) Perform two rounds peyote with ivory 80 seed beads (b c) Exit from an ivory
bead
BLOG DIY BEADING MAGAZINE ISSUE 32
a b c
Jump from 80 to 80 with 110 80 gold 110 (a) Finish the round and come out of a 80 gold bead
Jump to the next 80 gold with a 4mm pearl (b) Finish the round and come out
of the first pearl Jump to the 2nd pearl and close with a 80 gold bead(c)
a b c
Position the cabochon and jump from one 80 to the other with two delica bead (a)
Continue with three delicas four times (b) At the bottom sew on two delicas then finish the round by sewing on three delicas for four times passing from one to another roc 80 Tighten the cabochon and exit from the
first two delica that you started with String together a 110 and 150 and enter the second of the three close delicas (c)
a b c
Liberty Earrings
BLOG WWWHANDMADE-JEWELRY-CLUBCOM MEMBERSHIP WWWDIYBEADINGCLUBCOM
Put together 150 110 150 and enter in the second of three next delica (a) Put the same beads for three times then put together 150 and 110 and enter
in the two delica of the bottom tip (b) Enter in the second of three next delica with 110 and 150 (c) Continue passing
in the 80 beads with three beads (150 110 150) for four times then at the top finish the round by putting together a 150 and 110 (d)
BLOG DIY BEADING MAGAZINE ISSUE 32
a b c
Exit from the first 150 sewn in the previous round and jump in the three next beads with a 150 (a)
Put a 150 at a time and exit from the first 110 beads of the bottom tip Jump in the
near 110 with a 150 (b) Finish round repeating steps a and b (c) Exit the roc 80 as shown in the photo (d)
a b c
d
a b c d
Enter in the 80 with four 150 (a b) Enter the 80 beads at the bottom of the pieces with two 110 one superduo one 80 ivory bead one superduo and two 110 (c)
d e f
Liberty Earrings
BLOG WWWHANDMADE-JEWELRY-CLUBCOM MEMBERSHIP WWWDIYBEADINGCLUBCOM
Exit from the bottom pearl (a) Put together 150 three 110 150 and enter in the superduorsquos second hole (b)
Put together three superduo and enter in the next superduorsquos second hole (c) Rethread 15 three 110 150 and return in the opposite direction in the pearl of departure (d)
BLOG DIY BEADING MAGAZINE ISSUE 32
a b
c
Exit from the second pearl indicated from (a) Put 150 four 110 and enter in the second of the three 110 (b) Go to the second superduorsquos hole with four 110 and a 150 (c)
Enter the second hole of the supeduo with a 150(d) Sew in the middle of the bottom of the superduo 150 two 110 150 dagger 150 two 110 150(e)
Enter the second hole of the thirs superduo with 150 (f)
a b c
d
d e f
Liberty Earrings
BLOG WWWHANDMADE-JEWELRY-CLUBCOM MEMBERSHIP WWWDIYBEADINGCLUBCOM BLOG DIY BEADING MAGAZINE ISSUE 32
Put 150 four 110 and enter in the second of three 110 of the base (a) Insert four 110 and 150 in the pearl opposite direction indicated in the picture (b) Go in all the beads
around the piece and exit from the pearl at the top (c) Put 150 three 110 150 and enter the superduo (d)
Enter the ivory bead 80 with two 150 (e) Enter the next superduo with two 150 (f)
a b c
d e f
Put together 150 three 110 and enter in opposite direction in the departurersquos pearl (a) Exit from the 150 beads indicated by photo (b) From this jump in the second of two near
150 with five 150 to created the hole for the earwire (c) Pass the thread in the beads make a few knots and cut the excess thread
a b c
Your earrings are finished
Liberty Earrings
BLOG WWWHANDMADE-JEWELRY-CLUBCOM MEMBERSHIP WWWDIYBEADINGCLUBCOM
About the Author
Mariella Martella
My name is Mariella Martella and I am the author and
designer of jewelry that I sign with the name of Mariel Bijoux
After changing city often for work and study I currently live
in northern Italy I am an art historian with a passion for travel
painting and jewelry design in weaving that project since
2010 In my beads and crystals are the colors of the
Mediterranean sea the atmosphere of summer evenings
and the lights of the places I visited
You can find me at
Etsy shop httpswwwetsycomitshopMarielBijoux
Facebook httpswwwfacebookcommari3lbijoux
Crafting blog httpmarielbijouxblogspotit
Twitter httpstwittercomMarielBijoux
BLOG DIY BEADING MAGAZINE ISSUE 32
Jade Necklace
BLOG WWWHANDMADE-JEWELRY-CLUBCOM MEMBERSHIP WWWDIYBEADINGCLUBCOM
Every time I wear a necklace I always make it a point that the
necklace will lay perfectly flat on my neck Using wire for a necklace
made it possible for me like what I did with Jade Necklace It may look
odd at first having bent wires for a necklace but once the jewelry is
finished youll be so happy how the necklace will perfectly lay on your
neck
The tutorial is catered for intermediate level One must know basic
wirework skills such as wire wrapping making loops wrapped loops
and linking to follow the tutorial It has clear instructions and ultra-clear
close-up photos at each step Additionally you can ask me question
you have on the tutorial No more getting stuck and frustrated on a
confusing or just plain inaccurate pattern
If you followed this tutorial and then sell the accessory or jewelry
please give credit to the author or DIY Beading Clubcom
Copyright 2015
wwwdiybeadingclubcom
wwwhandmade-jewelry-clubcom
BLOG DIY BEADING MAGAZINE ISSUE 32
Jade Necklace
BLOG WWWHANDMADE-JEWELRY-CLUBCOM MEMBERSHIP WWWDIYBEADINGCLUBCOM BLOG DIY BEADING MAGAZINE ISSUE 32
Materials Needed 18ga Craft wire 28ga Craft wire 15mm diameter Green Round Flat Back Sew On Gems 5mm Green pearls
8mm Green pearls 6mm x 11mm teardrop Crystal Treasures Mill Hill beads or any teardrop bead with holes on the side Hook for your clasp
Tools Needed Wire cutter Flat nose pliers Round nose pliers Mandrel A jar or any rounded object to shape your necklace
Skill Level Intermediate
Step 1 Cut 6 inches 18ga wire Make a loop on one end then measure approximately 125 inches and make another loop
Form a size 4 circle on your mandrel
Jade Necklace
BLOG WWWHANDMADE-JEWELRY-CLUBCOM MEMBERSHIP WWWDIYBEADINGCLUBCOM BLOG DIY BEADING MAGAZINE ISSUE 32
Then close the circle by wrapping the extended wire just below the loop Wrap the
wire 2x
This is how it looks like Lets call this circle frame Youll notice that the lower curve is
slightly bigger than the upper curve
Step 2 Cut 8 inches of 28ga wire Wrap one end of
the wire at least 3x on one side of the circle frame just below the loop
Bring up your gem Flat back sew on gems has 2 holes Insert the wire into one hole and then
wrap the wire once onto the circle frame
Jade Necklace
BLOG WWWHANDMADE-JEWELRY-CLUBCOM MEMBERSHIP WWWDIYBEADINGCLUBCOM BLOG DIY BEADING MAGAZINE ISSUE 32
Step 3 Insert a 5mm pearl on the wire and then pass
the wire under circle frame
Repeat previous step 2x and have 3 pearls wrapped
Continue wrapping with your teardrop crystal My crystal has 2 holes on the side
and then continue wrapping with your 5mm pearls then secure your wire
Repeat Step 3 and create as many as needed For 16-inch necklace Ive created 6 of these
components
Jade Necklace
BLOG WWWHANDMADE-JEWELRY-CLUBCOM MEMBERSHIP WWWDIYBEADINGCLUBCOM BLOG DIY BEADING MAGAZINE ISSUE 32
Step 4 Cut a 15-inch 18ga wire and make a loop on
one end Insert 8mm pearl and make a loop on the other end You then use these as connectors
and link the components
Step 5 The necklace is an 18ga wire with wrapped
loops on both ends First cut 7 inches 18ga wire and make a wrapped loop with your hook already inserted Side in 18pcs 5mm pearls
Then make a wrapped loop on the other end connecting the wrapped loop onto the component Do the same for the other
necklace but make the loop on the other end big enough so the hookclasp can pass thru
To have the necklace curve shaped use a jar to bend the wire Voila Now youre
ready to party
Jade Necklace
BLOG WWWHANDMADE-JEWELRY-CLUBCOM MEMBERSHIP WWWDIYBEADINGCLUBCOM
About the Author
Sky Aldovino
I consider myself a late bloomer when it comes to crafting Irsquom a self-taught jewelry maker Jewelry making wasnrsquot really a hobby of mine but unforeseen events lead me to learn jewellery making My family put up a craft store where we sell cross stitch beads and all sorts of crafting materials I fell in love with the beads and tried to create accessories only for myself Clients liked the pieces and I started customizing handmade jewelleries The craft store was a success for 6 years but like any other small businesses we had to close it down and I was confined to staying at home While at home I had all the time using the internet and now working as a home-based jewelry designer
BLOG DIY BEADING MAGAZINE ISSUE 32
Atomic Ring
BLOG WWWHANDMADE-JEWELRY-CLUBCOM MEMBERSHIP WWWDIYBEADINGCLUBCOM
Have fun making shapes using the wigjig Cyclops Make loops going in
circles to mimic the shape of a flower or in this tutorial mimic the
shape of an atom The tutorial will also teach you how to cage a
cabochon Whats nice about this piece is that with one long wire you
can create the ring from start to finish
The tutorial is catered for intermediate to advanced students One
must already know how to make spirals and use a wigjig tool It has
clear instructions and ultra-clear close-up photos at each step
Additionally you can ask me question you have on the tutorial No
more getting stuck and frustrated on a confusing or just plain
inaccurate pattern
If you followed this tutorial and then sell the accessory or jewelry
please give credit to the author or DIY Beading Clubcom
If you like to get a blank wigjig graph visit wigjigcom Shop and Jigs
section
Copyright 2015
wwwdiybeadingclubcom
wwwhandmade-jewelry-clubcom
BLOG DIY BEADING MAGAZINE ISSUE 32
Atomic Ring
BLOG WWWHANDMADE-JEWELRY-CLUBCOM MEMBERSHIP WWWDIYBEADINGCLUBCOM
Materials Needed 20ga Craft wire 28ga Craft wire 11mm Round Cabochon
Tools Needed Wigjig Cyclops 15mm pegs Wire cutter Flat nose pliers Mandrel
Skill Level Intermediate - Advanced
BLOG DIY BEADING MAGAZINE ISSUE 32
Step 1 Lets prepare your wigjig cyclops Position the pegs like so
Atomic Ring
BLOG WWWHANDMADE-JEWELRY-CLUBCOM MEMBERSHIP WWWDIYBEADINGCLUBCOM BLOG DIY BEADING MAGAZINE ISSUE 32
Lets work with longer wire so youll have enough wire to hold onto as you manipulate the wire so cut 36 inches of 20ga wire From
one end of the wire measure 10 inches
On the 10-inch measurement loop the wire at the center peg then continue to loop onto the side pegs going in circle going back to
the center peg after looping on the side peg
Now the wire at the center peg will start to build up as you go around the side pegs so
you need to constantly press the wire at the center peg to accommodate the build up of
wire
When youre done pull out the wire and this is
how it should look like
Atomic Ring
BLOG WWWHANDMADE-JEWELRY-CLUBCOM MEMBERSHIP WWWDIYBEADINGCLUBCOM BLOG DIY BEADING MAGAZINE ISSUE 32
You will notice that the frame opens wide Now to keep the atom frame from opening wide secure the center of the frame by wrapping a 28ga wire What you
need to do is simply pass the 28ga wire into the hole and wrap as many times as needed or until youre sure that the frame is secure
Step 2 Now youre finished with your atom frame Well now create the focal design With the longer wire make a spiral at the center big
enough to accommodate the size of your cabochon In this tutorial the spiral is about
11mm in diameter the same size as my cabochon
Pop in your cabochon and start to make spirals going around and over the cabochon as if you are caging the cabochon Create at
least 5 rounds and then cut off any excess
Step 3 Now lets make the ring and this with the other
end of the wire
Atomic Ring
BLOG WWWHANDMADE-JEWELRY-CLUBCOM MEMBERSHIP WWWDIYBEADINGCLUBCOM BLOG DIY BEADING MAGAZINE ISSUE 32
Bring up your mandrel and wrap the wire to the size of your finger Wrap at least 2 times
When youre sure you have the right size pull the ring out of the mandrel
With the extended wire wrap the wire the secure the ring
Cut off any excess and voila You have your atomic ring Create as many as you can with different colors of cabochon
Atomic Ring
BLOG WWWHANDMADE-JEWELRY-CLUBCOM MEMBERSHIP WWWDIYBEADINGCLUBCOM
About the Author
Sky Aldovino
I consider myself a late bloomer when it comes to crafting Irsquom a self-taught jewelry maker Jewelry making wasnrsquot really a hobby of mine but unforeseen events lead me to learn jewellery making My family put up a craft store where we sell cross stitch beads and all sorts of crafting materials I fell in love with the beads and tried to create accessories only for myself Clients liked the pieces and I started customizing handmade jewelleries The craft store was a success for 6 years but like any other small businesses we had to close it down and I was confined to staying at home While at home I had all the time using the internet and now working as a home-based jewelry designer
BLOG DIY BEADING MAGAZINE ISSUE 32
Featured Article Gemstones Used for Jewelry Making
BLOG WWWHANDMADE-JEWELRY-CLUBCOM MEMBERSHIP WWWDIYBEADINGCLUBCOM
Gemstones are stones which we hold quite highly in terms of value And
jewelry often consists of stones that add attractiveness to it so it is not
surprising when jewelry designers actually use gemstones in their designs In
fact there are different types of gemstones that can be used for making
jewelry There are the expensive and pure gemstones and there are also the
imitation ones The information below will provide some information about
the kinds of stones you can use to create jewelry and how these stones will
impact the jewelry you have created
The first kind of stone which I believe we are all quite familiar with are
birthstones These stones are associated with individualrsquos month of birth
by SunVDesigns by BeyhanAkman
For example Amethyst stone is connected with anybody who is born in
February which carries special significance in the area of emotions and also
spiritually This stone also signifies calm and peace as well
And then we have semi-precious stones which are also often used in jewelry
making They are not as valuable as compared to precious stones but still
valuable Best examples of these stones are aquamarine topaz tourmaline
opal and turquoise
BLOG DIY BEADING MAGAZINE ISSUE 32
Featured Article Gemstones Used for Jewelry Making
BLOG WWWHANDMADE-JEWELRY-CLUBCOM MEMBERSHIP WWWDIYBEADINGCLUBCOM
It is an ideal gift for someone who you deem special Aquamarine pendants
usually work well for anyone and is widely an accepted stone
by HyppieChic by joyeriamestiza
However precious stones are the most unusual
and precious jewels to us Examples of some of
them are emerald sapphire diamond and
ruby These stones are usually very expensive
and are prized for their exquisiteness These
stones are commonly used in high-quality
jewelry designs which costs quite a fortune to
obtain
BLOG DIY BEADING MAGAZINE ISSUE 32
by sarajewelrystu
Jewelry designs with precious stones are usually
given as exceptional gifts on special occasions A
perfect example is a diamond ring that is usually
given as an engagement gift
by ldiamondsforever
Featured Article Gemstones Used for Jewelry Making
BLOG WWWHANDMADE-JEWELRY-CLUBCOM MEMBERSHIP WWWDIYBEADINGCLUBCOM
There are also synthetic stones which are often used to create jewelry
Synthetic stones are artificial imitations of gemstones Synthetic Sapphire
jewelry costs less compare with the authentic ones Most of the time
imitation stones are used to save cost but at the same time have the similar
look of the real stone
BLOG DIY BEADING MAGAZINE ISSUE 32
by shininggems by thaimaker
by lapinduprintemps by PastimeArt
Gemstones are used like beads and you can use it in any designs whether
simple or elaborate
Swarovski crystal components are available in a rich multitude of rondelles Perfect as spacers in necklaces or as discs in earrings Rondelles can be used with many varieties of shapes or sizes Use Swarovski crystal rondelles between large gemstones as accents with precious metal findings Fire Mountain Gems and Beads Crystal Passionsreg brand presents Swarovski crystal in display-ready packaging for brilliant retail presentation Crystal Passionsreg is an assurance of genuine Swarovski crystal
BLOG DIY BEADING MAGAZINE ISSUE 32 BLOG WWWHANDMADE-JEWELRY-CLUBCOM MEMBERSHIP WWWDIYBEADINGCLUBCOM
Recommended Jewelry Making Supplies
Mz Unisex-adults 12pcs 25x18x6mm Turquoise Oval CAB Cabochon
BLOG DIY BEADING MAGAZINE ISSUE 32 BLOG WWWHANDMADE-JEWELRY-CLUBCOM MEMBERSHIP WWWDIYBEADINGCLUBCOM
Recommended Jewelry Making Supplies
For a little sparkle that goes a long way design with Swarovski 4mm faceted bicones Create glorious multi-strand necklaces with the dainty crystals or use as spacers to add a tiny flash to your designs Swarovski crystal components are made in Austria and are considered the finest products of their kind in the world
BLOG DIY BEADING MAGAZINE ISSUE 32 BLOG WWWHANDMADE-JEWELRY-CLUBCOM MEMBERSHIP WWWDIYBEADINGCLUBCOM
Recommended Jewelry Making Supplies
Imitation beads resist color change These beads have uniform quality with a good polish Some strands may have little to no matrix Sizes shapes and colors may vary with handcrafted items
BLOG DIY BEADING MAGAZINE ISSUE 32 BLOG WWWHANDMADE-JEWELRY-CLUBCOM MEMBERSHIP WWWDIYBEADINGCLUBCOM
Recommended Jewelry Making Supplies
Something Blue Necklace and Earrings
BLOG WWWHANDMADE-JEWELRY-CLUBCOM MEMBERSHIP WWWDIYBEADINGCLUBCOM
Skill level Beginner Intermediate Advanced
DIMENSIONS OF THE NECKLACE Inner Circumference 14 18 inch 35 cm
Focal Pendant Width 1 15 inch 35 cm Focal Pendant Height 1 15 inch 35 cm
DIMENSIONS OF THE EARRING Earring Width 716 inch 12 cm Earring Height 1516 inch 25 cm (Without the earring hook)
BLOG DIY BEADING MAGAZINE ISSUE 32
Materials
Note Before purchasing the supplies measure the length of your wished necklace If you decide to bead a longer necklace you should keep in mind that for every extra
frac34 inches 2 cm-s you will need 8 bicones and 8 pearls
Something Blue Necklace and Earrings
BLOG WWWHANDMADE-JEWELRY-CLUBCOM MEMBERSHIP WWWDIYBEADINGCLUBCOM BLOG DIY BEADING MAGAZINE ISSUE 32
Work RAW stitch into a beaded circle and embellish with Swarovski bicones
STEP 2 String 1A and 2 pearls Pass through the previous
second pearl and the freshly added 1A and the first pearl again
STEP 1 Use a comfortable length of thread to string 2
pearls 1A and 1 pearl again leaving a 2rdquo 5cm tail Pass through the first two pearls strung to form a
ring
STEP 3 String 2 pearls and 1A Pass through the previous first pearl and the freshly added two pearls
again
STEP 4 - 17 Repeat STEP 2 and STEP 3 again until you count 17 pearls in the inner circle
But be careful in the last step you only have to add 1 pearl then pass through the first pearls
added in STEP 1 and add another 1A Now pass through the first pearl added in STEP
1and 1A added in this round again to exit from this A
Something Blue Necklace and Earrings
BLOG WWWHANDMADE-JEWELRY-CLUBCOM MEMBERSHIP WWWDIYBEADINGCLUBCOM BLOG DIY BEADING MAGAZINE ISSUE 32
STEP 19 String 2A and pass through the next A added in round 4-17 and the A added in round 18 the 2A added in this round and finally the A added in round 4-17 to exit from the bead showed below
STEP 18 String 3A and pass through the 1A added in the previous round and the first A added in this
round
STEP 20 - 34 Repeat STEP 18 and STEP 19 again until you finish the circle
But be careful in the last step first you have to pass through 3A and then add 1A After this pass
through the 3A again and exit from the A bead
shown below (This is the first A added in STEP 18)
Something Blue Necklace and Earrings
BLOG WWWHANDMADE-JEWELRY-CLUBCOM MEMBERSHIP WWWDIYBEADINGCLUBCOM BLOG DIY BEADING MAGAZINE ISSUE 32
STEP 35 Step up to exit from the pearl shown below (Finishing the previous step in the A bead and then
stepping up from there makes the circle more secure)
Now string 3 bicones Pass through the pearl and the first bicone again
In the reality your circle will look more like this the A beads forming a strong row in the middle of the
pearls
STEP 36 Add 2 bicones Pass through the
neighboring pearl the first bicone added in the previous row and the 2 bicones added in this step
so you can exit from the next pearl
Something Blue Necklace and Earrings
BLOG WWWHANDMADE-JEWELRY-CLUBCOM MEMBERSHIP WWWDIYBEADINGCLUBCOM BLOG DIY BEADING MAGAZINE ISSUE 32
Now in the reality your circle will look more like this the A beads still forming a strong row in the middle of the pearls and the bicones slightly lying on top of
them
STEP 37 - 49 Repeat STEP 35 and STEP 36 again until you finish the circle with the bicones
But be careful in the last step first you have pass through the third bicone added then add 1 bicone
and pass through this little quartet to exit from the bicone shown below (The second one added in
STEP 35)
STEP 50 With these steps we finish the circle by adding 1 bicone to connect the A beads and the
bicone row So add 1 bicone pass through the nearest A bead and add 1 bicone again Pass
through the bicone already there and exit from the bicone you just added
Something Blue Necklace and Earrings
BLOG WWWHANDMADE-JEWELRY-CLUBCOM MEMBERSHIP WWWDIYBEADINGCLUBCOM BLOG DIY BEADING MAGAZINE ISSUE 32
STEP 66-83 Secure the circle by adding 1A between each bicone in the second row of Swarovski
bicones If you finished secure the thread and trim
STEP 51-65 Using the same technique as in STEP 37 - 49 add 1 bicone to finish the third bicone row The black line shows you the way (After STEP 50 pass through the next A bead add 1 bicone and pass through the bicone already there and the bicone added in the previous step Repeat these steps to
finish the inner bicone circle)
MIDDLE CIRCLE Work RAW stitch into a beaded circle and embellish with
Swarovski bicones Remember you need to bead two circles this time
STEP 1 Just like in the focal circle begin with 2 pearls 1A and 1 pearl again on a comfortable length of thread
leaving a 2rdquo 5cm tail Pass through the first two pearls strung to form a ring
Something Blue Necklace and Earrings
BLOG WWWHANDMADE-JEWELRY-CLUBCOM MEMBERSHIP WWWDIYBEADINGCLUBCOM BLOG DIY BEADING MAGAZINE ISSUE 32
STEP 15-28 Mimicing the FOCAL CIRCLElsquos STEP 18-34 bead A beads until you finish the inner part of the
circle Exit from a pearl in the second row This circle should look very similar to the first one but this is a bit
smaller
STEP 2-14 Mimicing the FOCAL CIRCLElsquos STEP 2-17 bead until you count 14 pearls in the inner circle Exit
from the last A added
STEP 29-42 Mimicing FOCAL CIRCLElsquos STEP 35-49 add 2 rows of bicones
STEP 43-56 Mimicing the FOCAL CIRCLElsquos STEP 50-65 bead the third row of bicones to finish the circle
Something Blue Necklace and Earrings
BLOG WWWHANDMADE-JEWELRY-CLUBCOM MEMBERSHIP WWWDIYBEADINGCLUBCOM BLOG DIY BEADING MAGAZINE ISSUE 32
SMALLEST CIRCLE Work RAW stitch into a beaded circle and embellish
with Swarovski bicones Remember you need to bead two circles again
STEP 1 Just like in the focal circle begin with 2 pearls
1A and 1 pearl again on a comfortable length of thread leaving a 2rdquo 5cm tail Pass through the first two
pearls strung to form a ring
STEP 57-70 Just like the FOCAL CIRCLElsquos STEP 66-83 secure the circle by adding 1A between every bicone
in the second row of bicones If you finished secure the thread and trim (Donrsquot forget to bead another
circle)
STEP 2-12 Mimicing the FOCAL CIRCLElsquos STEP 2-17 bead until you count 12 pearls in the inner circle Exit
from the last A added
STEP 13-24 Mimicing the FOCAL CIRCLElsquos STEP 18-34 bead A beads until you finish the inner part of the
circle Exit from a pearl in the second row This circle should look very similar to the first two but this is the
smallest of them all
Something Blue Necklace and Earrings
BLOG WWWHANDMADE-JEWELRY-CLUBCOM MEMBERSHIP WWWDIYBEADINGCLUBCOM BLOG DIY BEADING MAGAZINE ISSUE 32
STEP 37-48 Mimicing the FOCAL CIRCLElsquos STEP 50-65 bead the third row of bicones to finish this circle too
STEP 25-36 Mimicing FOCAL CIRCLElsquos STEP 35-49 add 2
rows of bicones The last step here is purple again
STEP 49-60 Just like the FOCAL CIRCLElsquos STEP 66-83 secure the circle by adding 1A between every bicone
in the second row of bicones If you finished secure the thread and trim (Donrsquot forget that you need two
small circles)
Something Blue Necklace and Earrings
BLOG WWWHANDMADE-JEWELRY-CLUBCOM MEMBERSHIP WWWDIYBEADINGCLUBCOM BLOG DIY BEADING MAGAZINE ISSUE 32
STEP 37-48 Mimicing the FOCAL CIRCLElsquos STEP 50-65 bead the third row of bicones to finish this circle too
STEP 25-36 Mimicing FOCAL CIRCLElsquos STEP 35-49 add 2
rows of bicones The last step here is purple again
STEP 49-60 Just like the FOCAL CIRCLElsquos STEP 66-83 secure the circle by adding 1A between every bicone
in the second row of bicones If you finished secure the thread and trim (Donrsquot forget that you need two
small circles)
Something Blue Necklace and Earrings
BLOG WWWHANDMADE-JEWELRY-CLUBCOM MEMBERSHIP WWWDIYBEADINGCLUBCOM BLOG DIY BEADING MAGAZINE ISSUE 32
STEP 2-6 Continue by adding 1A 1 bicone 1 pearl until you count 6 of each
STEP 1 Begin with 1 pearl 1 bicone 1A and 1 bicone again on a comfortable length of thread leaving a 2rdquo
5cm tail Pass through the pearl and the first bicone strung to form a ring
STEP 7-12 Pass through the A beads to make your
component more secure Also secure the thread and trim (Repeat these steps until you have six 6-BEAD
COMPONENTs)
6-BEAD COMPONENT Work RAW stitch into a beaded circle and embellish with Swarovski bicones
For the necklace we will need six from this component For the earring two
Something Blue Necklace and Earrings
BLOG WWWHANDMADE-JEWELRY-CLUBCOM MEMBERSHIP WWWDIYBEADINGCLUBCOM BLOG DIY BEADING MAGAZINE ISSUE 32
STEP 2-4 Continue by adding 1A 1 bicone 1 pearl
until you count 4 of each
STEP 1 Begin with 1 pearl 1 bicone 1A and 1 bicone again on a comfortable length of thread leaving a 2rdquo
5cm tail Pass through the pearl and the first bicone strung to form a ring
STEP 5-8 Pass through the A beads to make your component more secure Also secure the thread and
trim (Repeat these steps until you have the wished amount of 4-BEAD COMPONENTs)
4-BEAD COMPONENT Work RAW stitch into a beaded circle and embellish with Swarovski bicones
For the necklace-size that is given on the second page we will need 20 from this
component For the earring two
If you would like to make a longer necklace you need to make more (One 4-BEAD COMPONENT measures about 38 inch 1 cm To make the necklace symmetrical you have to have equal amounts on each side This means for every extra frac34 inches
2 cm-s you will need 1 4-BEAD COMPONENT on each side of the necklace)
Something Blue Necklace and Earrings
BLOG WWWHANDMADE-JEWELRY-CLUBCOM MEMBERSHIP WWWDIYBEADINGCLUBCOM BLOG DIY BEADING MAGAZINE ISSUE 32
STEP 2 Connect the MIDDLE CIRCLE to two 6-BEAD COMPONENTs by adding four-times 2As
between the pearls Choose a pearl on the MIDDLE CIRCLE and add
2A pass through a pearl in the 6-BEAD COMPONENT previously added and add 2A again Watch out this has to be symmetrical Repeat this at least two more times to make it
secure Now repeat this entire procedure but choose
the 8-th pearl on MIDDLE CIRCLE Repeat this on the other side of the necklace
too
Choose a pearl on the FOCAL CIRCLE and add 2A pass through a pearl in the 6-BEAD COMPONENT and add 2A again Repeat this at least two more times to make it secure
Now repeat this entire procedure but choose the 5-th pearl on FOCAL CIRCLE This will make the necklace nice on your neck
FINISHING THE NECKLACE Connects the parts with A beads
STEP 1 Connect the FOCAL CIRCLE to two 6-BEAD COMPONENTs by adding four-times 2As between the pearls To do this turn your parts upside down you need to
see the pearls We will work on this side from now on
Something Blue Necklace and Earrings
BLOG WWWHANDMADE-JEWELRY-CLUBCOM MEMBERSHIP WWWDIYBEADINGCLUBCOM BLOG DIY BEADING MAGAZINE ISSUE 32
FINISHING THE EARRING Connects the parts with A beads
STEP 1-2 Connect the 6-BEAD COMPONENT
to 4-BEAD COMPONENT and the 4-BEAD
COMPONENT to the earring hook
First connect the 4-BEAD COMPONENT to the 6-BEAD COMPONENT with 4A beads Mimic
the elongation steps of the necklace if needed
Secondly connect the 4-BEAD COMPONENT
to your earring hook with 4A beads again Leave from the last pearl bead 2A beads the hook (this is the orange oval form) and 2As again Pass through each of them to
secure this connection again
Finally get ready to prepare the other earring ndash since we need two of them
STEP 5 Connect the 4-BEAD COMPONENTs to the toggle clasp thus finishing the
necklace Leaving from the last pearl bead 2A the
clasp(this is the orange oval form) and 2A again Pass through all of them a couple more times to make this connection more
secure
Something Blue Necklace and Earrings
BLOG WWWHANDMADE-JEWELRY-CLUBCOM MEMBERSHIP WWWDIYBEADINGCLUBCOM BLOG DIY BEADING MAGAZINE ISSUE 32
If you finished it is time to try it on It was a great fun wasnrsquot it And how beautiful you look in your new necklace and the matching earrings
Something Blue Necklace and Earrings
BLOG WWWHANDMADE-JEWELRY-CLUBCOM MEMBERSHIP WWWDIYBEADINGCLUBCOM
About the Author
Margit Vogel
My name is Margit Vogel I live in Hungary Europe
By profession I am a biochemical engineer but I fell in love with
beads so much that I could not stop playing with them
I make one-of-a-kind beaded and bead embroidered art
jewelry made of the best quality materials such as Swarovski
stones gemstones Japanese beads (Miyuki and Toho) Czech
glass beads leather soutache and suede Each piece is unique
and individually crafted
Feel free to visit my blog for some eyecandy
httpiformjewelrywordpresscom
My shop httpwwwetsycomshopiformjewelry
Facebook httpwwwfacebookcomiformjewelry
BLOG DIY BEADING MAGAZINE ISSUE 32
Getting Down And Personal With Gianna
Getting Down And Personal With Gianna
Nowadays we see more and more jewelry stores opening up online and with these online jewelry stores it has made it easier for us to purchase and view their creations Have you ever wondered how they are able to manage and produce amazing jewelry pieces and tutorials So heres a little on the journey to open up an online shop We are excited to present to you Gianna aka Beading4perfectionists
Gianna Beader amp Youtuber
Unlike most jewelry makers and beadweavers Gianna did not start beading as a hobby but as a means to make ends meet With goals in trying to
fill the financial gap she did everything she could to expand her earnings ndash working as a security guard
and at the same time learning how to bead and selling her pieces at fair trades and flea markets
Since many were asking if she does home beading workshops she started on exploring how to teach people to bead She loves Scott Bakula and has always loved him till now and this served as her
inspiration to start making a beading video tutorial
Gianna started creating videos because she was at the point in her life where everything seemed to be falling apart And at that moment of time she had difficulties financially and selling jewelry was the only way for her to stay afloat financially She is a big Scott Bakula fan and when she went to the UK to see him on stage that was when it hit her that she is already able to edit videos and
taught herself Photoshop and done workshops at bead fairs so why not put these together and see what happens on Youtube She knew that if she gets enough subscribers and views ndash though no one knew what the exact numbers were you would be invited to become a Youtube partner This way she could monetize her videos with advertisements and hopefully she would be able to be a Youtube partner and be able to pay her bills
BLOG WWWHANDMADE-JEWELRY-CLUBCOM MEMBERSHIP WWWDIYBEADINGCLUBCOM BLOG DIY BEADING MAGAZINE ISSUE 32
Getting Down And Personal With Gianna
Her Youtube channel is popular and the reason why she chose Youtube is because Youtube is the biggest platform and reached almost to the whole world Everyone already knows about it and it was growing rapidly as compared to other platforms like Dailymotion so she figured that Youtube was the way to go Her advice to new designers is that when you start out go to the platforms on the top of your list first then work your way down your list if you do not get accepted by your first choice
After loyally putting up one video every week for about 8 months in a row she became a Youtube partner and monetized her videos She knew she needed at least $100 to get her first payout She managed to reach $100 after 3 months The process was not easy she worked hard lack sleep skipped meals and who knows what happened to Ridge in the Bold and the Beautiful because she stopped watching
On Youtube you can monetize your videos Google pays straight to your bank account and at other countries where they also have the option of getting checks among other options In order to get paid you have to reach the $100 mark and after 3 months For Gianna she thinks that you cannot say that Etsy is better than Youtube or Youtube is better than Etsy Her reasoning is because on Youtube she has many followers which will eventually check out her Etsy shop And to start an Etsy shop you need an audience
BLOG WWWHANDMADE-JEWELRY-CLUBCOM MEMBERSHIP WWWDIYBEADINGCLUBCOM BLOG DIY BEADING MAGAZINE ISSUE 32
television and dedicated her spare time (as she had another job) to Youtube She re-registered at the chamber of commerce after receiving her first payout Her work at Youtube now is not a full time job and things have changed on Youtube It is easier to become a parter but there are some countries that need to wait for an invitation to be a Youtube partner Take Italy for instance Italians would have to work just as hard as she did if they want to become a Youtube partner
Getting Down And Personal With Gianna
With her 60000 subscribers on her b4pbakup Youtube channel it is possible to sell at least 60 patterns on the first day on Etsy after promoting the PDF file on her Youtube channel Though you may think that 60 out of 60000 is not much you have to remember that not everyone has the means to purchase the PDF file and a lot of people still rather watch her carry out the tutorial(for free) on Youtube instead of reading the patterns or paying for the patterns even if the pattern is for a fundraiser and only cost $2 Her insights on Youtube is that Youtube is not what it used to be 6 years ago Instead of making more money every month she is making less and less because advertisers have more options of where they want to advertise their ads Ads do not pay as much as they used to Back in the days you could get 25 cents per ad Now you count yourself lucky if you could get 5 cents roll in after two hours
BLOG WWWHANDMADE-JEWELRY-CLUBCOM MEMBERSHIP WWWDIYBEADINGCLUBCOM BLOG DIY BEADING MAGAZINE ISSUE 32
And on top of that adblockers are destroying Youtube channel owners Youtube will start making changes to the channels where there will be ldquopaid subscriptionrdquo channels This has already been implemented in some countries but not in her country The Netherlands This means there will no longer be ads for her monthly paying subscribers She hopes that Youtube will add on a paid per video option feature The option to be a paid channel or free channel or to start a new channel for paying customers is yours to choose Gianna is not happy with Youtube because many others like her have worked so hard and for some years to become Youtube partners(which was something to be proud of) has lost their status
Getting Down And Personal With Gianna
Her advice for those who want to go on Youtube is 1 Do it because you want to teach
2 Do it because you want a career with beads
BLOG WWWHANDMADE-JEWELRY-CLUBCOM MEMBERSHIP WWWDIYBEADINGCLUBCOM BLOG DIY BEADING MAGAZINE ISSUE 32
After putting up about 20 videos and having at least 5000 subscribers add the PDF tutorials to Etsy and Craftsy She found out that her audience would like to have the PDF after watching her videos This is because they would rather print out the PDF and work while seated in a comfy chair technically somewhere else instead of having to pause the video time and time again
Gianna has also made a video for those who want to know the whole story of her journey up until the present day And to get updates on her you can check it out here She has also started a vlog where she tells of how she still works towards becoming a financial independent beader and explains her journey to get where she wants to be(or die trying) Gianna will be in the UK on October the 17th giving an all-day workshop with 4 different patterns
(2 beginners and 2 advanced) in Wotton-under-Edge
Gianna will be there Friday night as the workshop is on Saturday She will be leaving on Sunday Her
doors are open to all who wants to continue the party with her at the hotel across the street
For more information do contact Ann Tucker on Facebook
httpswwwfacebookcomanntucker501
Rec
omm
end
ed R
ead
ings
Making Jewelry with Gemstone
Beads
Combines the popular craft of beading with beautiful semi-precious stones which are collected by many Features a variety of versatile ideas which can be adapted for any type of gem or bead Readers will learn to reate beautiful gemstone jewelry with this dazzling collection of over 100 projects ranging from eyecatching earrings and accessories to exquisite necklaces and bracelets This beautiful book offers an impressive range of 28 beautiful semi-precious stones (including birthstones) and a glimpse into the fascinating history and mythical properties behind them
BLOG DIY BEADING MAGAZINE ISSUE 32 BLOG WWWHANDMADE-JEWELRY-CLUBCOM MEMBERSHIP WWWDIYBEADINGCLUBCOM
Rec
omm
end
ed R
ead
ings
Convertible Crystal Jewelry
Reverse it Twist it Wear it Many
Ways
Diane Whiting presents the idea that convertibility isnrsquot just about using pieces in multiple ways it is also about using skills and creativity in multiple ways Using ever-popular sparkling crystals Diane showcases design elements through various techniques for fun easy fashionable jewelry With 25 projects the reader can choose from bracelets necklaces and earrings that match any outfit or styleDiane Whiting presents the idea that convertibility isnrsquot just about using pieces in multiple ways it is also about using skills and creativity in multiple ways
BLOG DIY BEADING MAGAZINE ISSUE 32 BLOG WWWHANDMADE-JEWELRY-CLUBCOM MEMBERSHIP WWWDIYBEADINGCLUBCOM
Rec
omm
end
ed R
ead
ings
Wire Jewelry Masterclass
Wrapped Coiled and Woven Pieces
Using Fine Materials
Comprehensive and fabulous Wire Jewelry Masterclass takes an in-depth look at an intricate and rewarding craft The 24 projects which range from simple Dragons tear briolette earrings to a Poseidon-under-the-sea pendant will delight and inspire jewelers of all levels and tastes Divided into beginner intermediate and advanced sections this beautifully photographed step-by-step guide is the ticket to wire jewelry expertise
BLOG DIY BEADING MAGAZINE ISSUE 32 BLOG WWWHANDMADE-JEWELRY-CLUBCOM MEMBERSHIP WWWDIYBEADINGCLUBCOM
Rec
omm
end
ed R
ead
ings
Timeless Wire Weaving The
Complete Course
Timeless Wire Weaving focuses on developing wirework skills through 13 projects using three classic wire weaving techniques coiling wrapping and weaving The projects are built around a focal cabochon and incorporate seed beads and crystals in imaginative ways Designers learn to make the jewelry shown in the book and they also use the techniques learned to create innovative jewelry pieces of their own
BLOG DIY BEADING MAGAZINE ISSUE 32 BLOG WWWHANDMADE-JEWELRY-CLUBCOM MEMBERSHIP WWWDIYBEADINGCLUBCOM
Our digital magazine is available through
Apple Newsstand service available to millions of IPAD users
To advertise with us please email us at
diyjewelryclubgmailcom
Or visit our page at
httphandmade-jewelry-clubcomadvertising-diy-beading-magazine
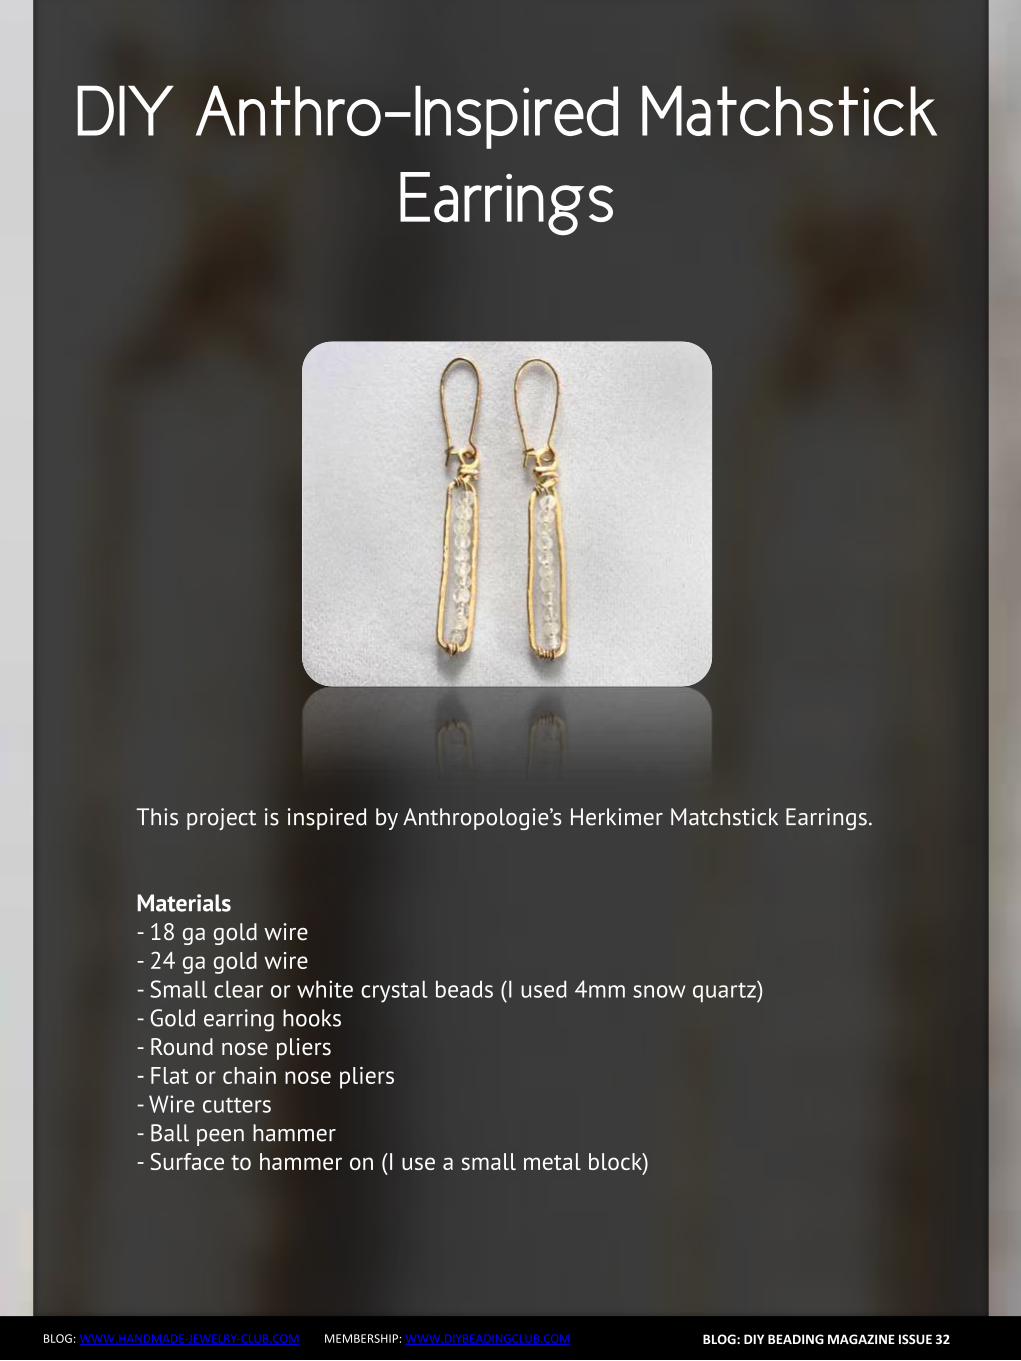
BLOG DIY BEADING MAGAZINE ISSUE 32 BLOG WWWHANDMADE-JEWELRY-CLUBCOM MEMBERSHIP WWWDIYBEADINGCLUBCOM
DIY Anthro-Inspired Matchstick
Earrings
Pull the ends tight so that the frame is secure then snip off the excess wire
Repeat with the other piece of wire for your second earring frame Check as you go to make sure they are as close to identical as possible
BLOG DIY BEADING MAGAZINE ISSUE 32 BLOG WWWHANDMADE-JEWELRY-CLUBCOM MEMBERSHIP WWWDIYBEADINGCLUBCOM
DIY Anthro-Inspired Matchstick
Earrings
Place your earring frames on your hammering surface and hammer with the ball peen hammer until they lay flat This will also strengthen the wire and make
them less likely to bend
Cut a 10 piece of 24 gauge wire and wrap the end around the bottom of your earring frame String on beads until you fill the space
BLOG DIY BEADING MAGAZINE ISSUE 32 BLOG WWWHANDMADE-JEWELRY-CLUBCOM MEMBERSHIP WWWDIYBEADINGCLUBCOM
DIY Anthro-Inspired Matchstick
Earrings
Secure the wire at the top by wrapping it near the loop Repeat on the second earring
Add earring hooks of choice and yoursquore done
Advertisement
DIY Anthro-Inspired Matchstick
Earrings
BLOG DIY BEADING MAGAZINE ISSUE 32 BLOG WWWHANDMADE-JEWELRY-CLUBCOM MEMBERSHIP WWWDIYBEADINGCLUBCOM
About the Author
Jamie Hannigan
Perhaps Irsquom just easily fascinated but I often see magic and wonder in things other might consider mundane Irsquom a very imaginative person and as a child I often created fictional
narratives to go along with places or objects
My inspiration comes from all over Sometimes Irsquom really into nature like toadstools and mushrooms Sometimes Irsquom really into man-made things like ships Sometimes Irsquom really
into concepts and themes like astrology or mythology
I go through phases and Irsquove learned to embrace that in my work I create the things I want to make at that exact moment If just one other person finds enjoyment in what my
imagination led me to produce I consider it a success
To see more jewelry tutorials and my other work visit jamiebhannigancom and check my Etsy shop at
httpswwwetsycomshopjamiebhannigan
Wire Wrapped Gemstone
Pendant
BLOG WWWHANDMADE-JEWELRY-CLUBCOM MEMBERSHIP WWWDIYBEADINGCLUBCOM
You will usually find these more natural gemstones at bead shows vs your local bead shop
Wire Jewelry Making Skill Level Intermediate
Wire Jewelry Making Supplies - two lengths of 22 gauge round dead soft wire (4 times the length of your bead) - one 3 inch (76 cm) length of 20 gauge half round half hard (HH) wire (wrapping wire) - one gemstone bead - three 6mm beads (I used amethyst Swarovskireg crystals - three one inch (25 cm) head pins - one ink pen (used as a mandrel) - one marker pen - blue painters tape - jewelers polishing cloth - ruler Jewelry Making Tools - wire cutters - round nose pliers - chain nose pliers
BLOG DIY BEADING MAGAZINE ISSUE 32
Wire Wrapped Gemstone
Pendant
BLOG WWWHANDMADE-JEWELRY-CLUBCOM MEMBERSHIP WWWDIYBEADINGCLUBCOM
1 Using a ruler measure the length of your bead and note the measurement
Multiply the measurement by 4 My bead is 3 inches (76 cm) long so my final measurement is 12 inches (305 cm)
BLOG DIY BEADING MAGAZINE ISSUE 32
2 Tear off two pieces of blue painters tape from the roll and temporarily tape them to your work surface
Using the wire cutters cut two lengths of the 22 gauge round wire measuring the length of your
final measurement (I cut two 12 inch (305 cm) lengths of wire)
Clean and straighten both wires by pulling them through a jewelers polishing cloth (not pictured)
With both wires side by side with the ends even with one another use the torn tape lengths to tape the wires together (This will temporarily hold them together while you to wire wrap them)
With the marker pen mark the center of both wires
Wire Wrapped Gemstone
Pendant
BLOG WWWHANDMADE-JEWELRY-CLUBCOM MEMBERSHIP WWWDIYBEADINGCLUBCOM
3 Using the wire cutters cut one 3 inch (76 cm) length of 20 gauge half round half hard wire This is the wrapping wire
With the flat side of the wire facing you use the chain nose pliers to make a 14 inch (06 cm) bend
towards you and at a slight angle in one end of the wire This makes a hook in the wire The flat sides of the wire should face one another
BLOG DIY BEADING MAGAZINE ISSUE 32
4 Pick up the taped wires at their center between your fore finger and thumb Place the hook of the half round wire slightly to the right of the center mark on the two round
wires
5 Holding the long end and the tail of the half round wire hook use the tip of the chain nose pliers to squeeze the bend of the hook against the round wires This sets or secures the wrapping wire
Wire Wrapped Gemstone
Pendant
BLOG WWWHANDMADE-JEWELRY-CLUBCOM MEMBERSHIP WWWDIYBEADINGCLUBCOM
6 Bend the long end of the half round wire up over the two round wires You have created one wire wrap
BLOG DIY BEADING MAGAZINE ISSUE 32
7 Bend the long end of the half round wire down and behind the two round wires
8 Continue to repeat Steps 6 and 7 until you have made three (3) to five (5) complete wire wraps around the round wires (I made five (5) wire wraps) After making one or two wire wraps secure
the wraps against the round wires as in Step 5
The front of the wrap (as pictured below) will be the side where the half round wrapping wire is not cut
Wire Wrapped Gemstone
Pendant
BLOG WWWHANDMADE-JEWELRY-CLUBCOM MEMBERSHIP WWWDIYBEADINGCLUBCOM
9 Use wire cutters to cut the excess half round wire Cut the wire about half way behind the round wires so that the ends will not be seen from the front side of the wire wrap
BLOG DIY BEADING MAGAZINE ISSUE 32
10 With the wire wrap at the bottom center of your bead use your fingers to gently shape the wires around the bottom along the sides and to the top of the bead
11 Use the chain nose pliers to secure all the wraps against the round wires
Wire Wrapped Gemstone
Pendant
BLOG WWWHANDMADE-JEWELRY-CLUBCOM MEMBERSHIP WWWDIYBEADINGCLUBCOM
12 Slide the chain nose pliers in between the round wires where they meet the wire wrap and spread the wires apart
BLOG DIY BEADING MAGAZINE ISSUE 32
Spreading the wires apart begins to create the cage for the bead
13 With its bottom center resting against the wire wrap place your bead or gemstone inside the cage
Gather all four of the wires around the bead so that it is encased within them and so that the wires
meet at the top of the bead Hold all four wires between your forefinger and thumb (like you are pinching the wires)
Wire Wrapped Gemstone
Pendant
BLOG WWWHANDMADE-JEWELRY-CLUBCOM MEMBERSHIP WWWDIYBEADINGCLUBCOM
14 Decide which side will be the front of the pendant Locate the wire that is in front of all the wires and with your fingers bend it downward at a 45 degree angle
BLOG DIY BEADING MAGAZINE ISSUE 32
15 Use your fingers or the chain nose pliers to wrap the bent wire around the other three wires where they all meet or cross one another
16 Continue wrapping the wire around the other three to secure them End the wrapping at the back of the pendant
Using the chain nose pliers tuck the wire into the wraps (not pictured)
Wire Wrapped Gemstone
Pendant
BLOG WWWHANDMADE-JEWELRY-CLUBCOM MEMBERSHIP WWWDIYBEADINGCLUBCOM
17 Make sure that the wires are evenly spread around the beads Now we need to tighten the wires that encase the bead
On one of wires about halfway up the wire place the jaws of the round nose pliers on either side
of the wire Now rotate the pliers making a double bend in the wire Repeat on the other three wires making one or two double bends in each wire When youre done shake the bead to make sure it cannot fall out of the wires
BLOG DIY BEADING MAGAZINE ISSUE 32
18 Now decorate two of the top wires Almost anything is possible Try making a few different bends curls or twists in the wire
I decided to loosely coil the top wires around an ink pen
19 Gently untighten the coil by pulling the end of the wire downward Using the round nose pliers make a simple wire loop on the end of the coil
Wire Wrapped Gemstone
Pendant
BLOG WWWHANDMADE-JEWELRY-CLUBCOM MEMBERSHIP WWWDIYBEADINGCLUBCOM
20 Repeat Steps 18 and 19 on a second top wire
BLOG DIY BEADING MAGAZINE ISSUE 32
21 The third top wire becomes the bail Coil it tightly around the ink pen making at least two wire coils The end of the wire should fall in front of the pendant
Make a simple wire loop on the wire end
22 Heres how the wire coilsspiralsbends should look Make any necessary adjustments to the wires along the sides of the gemstones and the two that fall
in front of pendant
Make sure that the wires tightly secure the bead The wire wrap at the bottom of the pendant may no longer be at the center of the bead
Wire Wrapped Gemstone
Pendant
BLOG WWWHANDMADE-JEWELRY-CLUBCOM MEMBERSHIP WWWDIYBEADINGCLUBCOM
23 On each of the three head pins string a 6mm bead Make a simple wire loop on the end of each head pin
Attach one head pin bead unit to each of the simple wire loops on the wire wrapped pendant
BLOG DIY BEADING MAGAZINE ISSUE 32
Completed Wire Wrapped Pendant
Now hang your handcrafted wire wrap pendant from your favorite chain or strand of beads
Enjoy wire wrapping your own gemstone to make a wire wrapped pendant
BLOG WWWHANDMADE-JEWELRY-CLUBCOM MEMBERSHIP WWWDIYBEADINGCLUBCOM
Wire Wrapped Gemstone
Pendant About the Author
Wanda Epps
Wanda is an avid jewelry maker who loves to make jewelry with beads She began her journey into jewelry making after walking into a bookstore to find crafting books on sale One on making jewelry caught her eye and after making a simple bead necklace she was hooked That was in late 2003 Over the years she has taken classes on various jewelry making techniques stringing making wire jewelry bead crochet macrame metal jewelry making to name some She expects that her love of making beaded jewelry will continue as bead supplies and beautiful new beads seem endless Her fulltime job provides for her needs but beads are her passion She invites you to join her in the many adventures of making jewelry at
httpwwwmaking-beaded-jewelrycom httpswwwfacebookcompagesMaking-Beaded-Jewelry-
Guide254860504236
BLOG DIY BEADING MAGAZINE ISSUE 32
Should You Sell In The Marketplace
Should You Sell In The Marketplace
BLOG WWWHANDMADE-JEWELRY-CLUBCOM MEMBERSHIP WWWDIYBEADINGCLUBCOM
We are all able to create jewelry pieces and there will come a time where you want to share the joy with the rest of the world whether it is in the form of a tutorial or a finish
piece And this is when you will start to think about putting up your work for sale As someone who is new to the business world you may be confused on where you should start selling your work And the all famous site that is first on most peoplersquos minds is Etsy Etsy is popular and it is user friendly and that is why it is the choice of many designers and crafters But there are also some who wants to set up their own
shop with their logo and to put their works out as their own even at the very beginning Thatrsquos where you may be confused on which platform you should go for
So herersquos some explanation on how you will benefit from setting up shop at Etsy
BLOG DIY BEADING MAGAZINE ISSUE 32
1 Etsy has everything ready for you and all you have to do is to bring in your works and use the features that are already available for you to use ndash like the payment system web traffic design and layout are not an issue that you need to worry about
2 You also have the trust of customers almost immediately because Etsy has already established a name for itself and therefore there is already trust in brand in their site When you use Etsy your brand will automatically be exposed to many customers who visit Etsy to find what they need
3 For every site there is always the need to be able to interact with other sellers to help each other out Forums or community boards are very helpful as other passionate designers and crafters share their experience to help out the newer members of the community This is also where you will be able to form good relationships with other sellers and who knows you may even find a partnership over time
Should You Sell In The Marketplace
BLOG WWWHANDMADE-JEWELRY-CLUBCOM MEMBERSHIP WWWDIYBEADINGCLUBCOM
Though Etsy has itrsquos good points there are some things which you need to take into consideration as well
1 When you are using someone elsersquos facilities there is always the chance of having
being shut down due to unforeseen circumstances Be it violation of Etsyrsquos policy or decisions made by the administration department this will sometimes cost you a dent in your brand name and you may lose the trust of your followers and starting all over again may be the only way to start again
2 If you are a very creative person then you may feel limited as the design of shops at Etsy is standardized If you are new and do not worry so much about designs of websites this is perfectly fine But do remember that when you want to distinguish yourself from other sellers it will be tougher as you try to make your brand more well-known due to limitations of design of the site
3 Since Etsy has so many sellers all in one place the competition is of course going to be tighter and fiercer because even though customers are viewing your products there are also other options from other sellers listed on the page as well So customers may turn away if they see something of a better price
4 Each product that you list with Etsy costs you money Etsy also takes a 35 percent of the selling price of the item However if or when you start your business on your own website it will also cost you for web hosting and you would need PayPal and they have a fee of 29 percent +30cents So either way you will still need to pay to list your products on the web
BLOG DIY BEADING MAGAZINE ISSUE 32
Should You Sell In The Marketplace
BLOG WWWHANDMADE-JEWELRY-CLUBCOM MEMBERSHIP WWWDIYBEADINGCLUBCOM
If you are confident enough to have your own business site by all means go ahead and do it The benefits of it are as below
1 You get to be your own boss You get to control everything from the design of the
website layout and how you want to advertise your products You can also change your policies and not be affected by it because it is you who changes it Your shop will not be shut down suddenly without notice and you do not need to worry that you have to start all over again
2 Distractions of competitors products on your page will not be an issue It is your site and it is up to you whether or not you want to allow what kind of advertisements on your site So if you donrsquot want something on your page it is your call
3 You will be able to capture the attention of the media and customers as well if you are able to have a well designed site Nowadays people are attracted to colors and they can see if you have put effort into beautifying the site for the customers You can do so much more than just uploading some pictures onto Etsy on your own site you can always update your site design and your products to complement each other and therefore becoming more attractive
BLOG DIY BEADING MAGAZINE ISSUE 32
Should You Sell In The Marketplace
BLOG WWWHANDMADE-JEWELRY-CLUBCOM MEMBERSHIP WWWDIYBEADINGCLUBCOM
And herersquos the tough part when you want to have your own site
BLOG DIY BEADING MAGAZINE ISSUE 32
1 You need to have knowledge of what you want to do You have to learn to be involved in every aspect of your site so that you know what us going on at the front end of things and at the back end of things as well But if you have not any knowledge of designing a website it is usually a recipe for something to go wrong You have to remember that you need a user interface that is simple for customers to use an easy to use shopping cart you should know which third party platforms are trusted and one which will not keep changing their regulations If you still want to have your site hiring a designer may be your best option
2 You have to work towards promoting your store on your own You will need to find people to feature you in their social media sites because it will not just fall into your lap You need to have promotions or road shows if you need to Marketing your store is important whether or not you are using Etsy or other marketing platforms but if you are on your own it is even more important
3 You will still be competing with other sellers Though now you are now not only competing with Etsy sellers you are now competing with sellers and stores from the world wide web Etsy is already so well known so people tend to go there first so you need to up your methods of attracting customers
Should You Sell In The Marketplace
BLOG WWWHANDMADE-JEWELRY-CLUBCOM MEMBERSHIP WWWDIYBEADINGCLUBCOM
When we first started out we used Etsy as our platform to sell our works Other than that we also utilized blogs and we eventually built our own website as our main base
BLOG DIY BEADING MAGAZINE ISSUE 32
Things have changed over these 3 years It was easier to get sales without much effort but now with so many other shops also utilizing Etsy the competition has grown tremendously Now our main sales come from our own online store and has exceeded sales from Etsy
So what we recommend is that using an existing platform such as Etsy to start out is good and in time build up your website or webstore
It is not that hard to start your own webstore either these two companies offers the option to set up your webstore
1 Shopify
2 Bigcommerce
There are many things to take into consideration before starting a store online It is perfectly fine to start out using Etsy before branching out on your own But you can also
have both ndash have your own website and a store on Etsy There are many stores who operate like this They technically get customers from Etsy and the reroute them to their own websites As long as you are in control of what you are doing and not stressing and
confusing yourself you can opt for more exposure for your store
So do take some time and take a breather to really think through what will be the best for YOU and do remember that starting small does not mean you will not be able to be big
OFFER Get which can be downloaded by subscribing to
httpinternet-marketing-publishingcom
BLOG WWWHANDMADE-JEWELRY-CLUBCOM MEMBERSHIP WWWDIYBEADINGCLUBCOM
Materials - Copper wire diameter 08 mm - Copper wire diameter 04 mm - Small gemstone bead (~4 mm) (I used 3 mm beads in this tutorial because I didnrsquot have any other beads at the time but the beads in the earrings on the cover are 4 mm) Make sure that the beads you want to use are resistant against chemicals such as liver of sulfur or whichever oxidizing substance you want to use to give the metal patina The beads in the picture above are facetted garnet buttons in the tutorial itself I used black spinel facetted buttons Equipment - Round nose pliers - Flat nose pliers - Side-cutters - A small file - A cylindrical object of about 5mm diameter (eg a mandrel for jump rings) - Hammer amp anvil - Liver of sulfur or some other means to oxidize the metal (optional)
LOVE-ly Earrings
BLOG DIY BEADING MAGAZINE ISSUE 32
BLOG WWWHANDMADE-JEWELRY-CLUBCOM MEMBERSHIP WWWDIYBEADINGCLUBCOM
This tutorial teaches how to make 1 ear stud I recommend making both ear studs of the set simultaneously step-by-step so that symmetry is easier to achieve Between steps check for
symmetry in size and shape and adjust the construction if needed
LOVE-ly Earrings
BLOG DIY BEADING MAGAZINE ISSUE 32
Step 1 Straighten the end of the copper wire (+- 6cm) by rubbing along it with your fingers for a
few seconds
Step 2 Bend over the wire onto itself as illustrated below using flat nose pliers
Step 3 Grab the doubled-over wire with the flat nose pliers and push the two sides against each
other Use little force and do it bit by bit to avoid damaging or kinking the wire
Step 4 Push the two adjacent pieces of wire apart to create the bottom shape of the heart as shown
on the picture above
BLOG WWWHANDMADE-JEWELRY-CLUBCOM MEMBERSHIP WWWDIYBEADINGCLUBCOM
LOVE-ly Earrings
BLOG DIY BEADING MAGAZINE ISSUE 32
Step 5 Hammer down the angled wire (the part circled in red) This strengthens the construction
and looks more professional
Step 6 Wrap the two ends of wire tightly around a cylindrical object (+- 5 mm diameter)
Step 7 Push apart the loops you just made by wrapping the wire around the cylindrical object The wire should now be shaped like a heart as
illustrated above
Step 8 Use round nose pliers to bend around the wire for each side of the heart as illustrated above
BLOG WWWHANDMADE-JEWELRY-CLUBCOM MEMBERSHIP WWWDIYBEADINGCLUBCOM
LOVE-ly Earrings
BLOG DIY BEADING MAGAZINE ISSUE 32
Step 9 Use the flat nose pliers to bend one of the two wires (preferably the longer wire) in a 90deg angle at the place marked with a red dot In the picture accompanying the next step you can see
how it should look from the front
Step 10 Use the round nose pliers to bend the other piece of wire in a decorative coil You will cut off the rest of the wire of the coil at approximately the spot marked with a red dot so take that into account when coiling the wire into the shape that
you desire
Step 11 Cut of the wire at the spot indicated in the previous picture and file off any sharp edges
Step 12 Cut off the ear wire at the desired length (Between 1 and 2 cm If in doubt try the earring on
to see if it sits comfortably) and file off any sharp edges
BLOG WWWHANDMADE-JEWELRY-CLUBCOM MEMBERSHIP WWWDIYBEADINGCLUBCOM
LOVE-ly Earrings
BLOG DIY BEADING MAGAZINE ISSUE 32
Step 13 Hammer down the rest of the heart (bumps and coil) If you canrsquot reach certain parts because the ear wire is in the way bend that part of the heart shape away
(verticallyupward) and bend it back after you finish hammering
Congrats yoursquove now made a basic heart-shaped ear stud Next wersquore going to decorate it with a little gemstone and more copper wire
Step 14 Cut off a length of 04 mm copper wire (about 10-20 cm) and string the bead onto it
Step 15 Place the bead in the ldquonon-coilrdquo upper part of the heart shaped ear stud holding it between thumb and forefinger Let approximately 4 cm of the 04 mm wire stick out over the edge of the
heart as illustrated above
Step 16 Wrap the wire twice around the frame so that if you face the front of the ear stud the wire is
directed towards yourself
BLOG WWWHANDMADE-JEWELRY-CLUBCOM MEMBERSHIP WWWDIYBEADINGCLUBCOM
LOVE-ly Earrings
BLOG DIY BEADING MAGAZINE ISSUE 32
Step 17 Flip the wire over the wire with the bead (indicated by the red arrow) and pull tight whilst holding the bead (and its wire) tightly in place It
should look like the construction in the big picture above
Step 18 And make another loop around the wire with the bead The 04 mm wire is now coiled around
twice two times two coils around the frame and two coils around itself
Step 19 Repeat the wire-fastening procedure described in steps 16-18 with the other end of the
wire securing the gemstone in the heart frame Let the wire stick out at the back of the earstud
Step 20 Pull the wire through the lsquocoilrsquo part of the heart shape to the front The wire should lsquocross overrsquo to the other side of the heart at the back of the ear
stud
Step 21 Coil the wire around the frame until you are content with the design Optionally you can hammer down the coils a bit I often do this because I think it
looks somewhat more sophisticated and professional
BLOG WWWHANDMADE-JEWELRY-CLUBCOM MEMBERSHIP WWWDIYBEADINGCLUBCOM
LOVE-ly Earrings
BLOG DIY BEADING MAGAZINE ISSUE 32
Step 22 Cut off the spare bits of wire preferably at the backside of the ear stud and tuck in the ends
Congrats yoursquove now made a heart-shaped ear stud Next we are going to finish it off with a patina
Step 23 Oxidize the metal of the ear studs I always use liver of sulfur solved in warm water The metal
will turn a dark color and matte texture Afterwards rinse the ear studs thoroughly with water and pat
them dry
Step 24 Rub the oxidized ear stud all over with a rough polishing pad to bring back (a dark copper)
color to the surface
Yoursquove now finished making your own LOVE-ly ear studs
Secure them in your ear with plastic or copper stops These can be bought online or in jewelry-supply
stores
Variation ideas You can easily vary in size and shape (longer hearts smaller coils pointier bottoms etc) and
use different materials As you can see the earring I make in this tutorial has a slightly smaller bead than the
earrings on the cover which influences the overall appearance somewhat
The earrings underneath are made with sterling silver and gold wire (super-short coils) and contain small pink
rubies
LOVE-ly Earrings
BLOG WWWHANDMADE-JEWELRY-CLUBCOM MEMBERSHIP WWWDIYBEADINGCLUBCOM
About the Author
Jeske Hendriks
Hi there My name is Jeske and I love all things handmade Over the years Irsquove dabbled in countless different arts and crafts but nowadays I mainly focus on making jewellery and cutting stone cabochons As for jewellery
my preferred materials are silver wire and gemstonemineral beads Using wire-wrapping and basic silver smithing techniques I create both simple
and intricate pieces ndash each and every one of them unique a personal little artwork
You are welcome to follow me on facebook stop by at my personal
webpage andor to have a look at my Etsy shops httpswwwfacebookcomyeskecrafts
httpwwwyeskecraftscom httpwwwyourbeadsandfindingsetsycom
httpwwwyeskecraftsetsycom httpwwwyeskemiscetsycom
BLOG DIY BEADING MAGAZINE ISSUE 32
Flower Tale Earrings
BLOG WWWHANDMADE-JEWELRY-CLUBCOM MEMBERSHIP WWWDIYBEADINGCLUBCOM
Techniques Beadweaving
Project Level Beginner to Intermediate
Materials 12 bronze opaque 6mm Czech glass pearl round beads
2 gr gold lustered dark topaz Japanese 110 seed beads (Toho 459)
Size B gold beading thread
2 bronze earring hooks
Tools Size 10 beading needle
Scissors
Finished Size Diameter ndash 3 cm (118 inches) (without earring hooks)
BLOG DIY BEADING MAGAZINE ISSUE 32
Flower Tale Earrings
BLOG WWWHANDMADE-JEWELRY-CLUBCOM MEMBERSHIP WWWDIYBEADINGCLUBCOM
Step 1 Cut about 110 cm (43 inches) of thread and
pass it through the needle hole
Pick six groups of one 110 seed bead and one
6 mm round bead
BLOG DIY BEADING MAGAZINE ISSUE 32
Join the beads into a ring and secure with two
square knots
Leave a tail of about 15 cm (59 inches)
Step 2 The working thread should be right before the
6 mm round bead
Pick seven 110 seed beads skip the 6 mm
round bead and pass the needle through the
next 110 seed bead added in the previous
round
Repeat adding groups of seven 110 seed
beads five more times
When adding the last group take the needle
directly through the 110 seed bead from the
previous round and the next one added in the
beginning of current round
Flower Tale Earrings
BLOG WWWHANDMADE-JEWELRY-CLUBCOM MEMBERSHIP WWWDIYBEADINGCLUBCOM
Step 3 Pick three 110 seed beads skip one seed
bead from the chain of seven added in the
previous round and pass with the needle
directly through the next three 110 seed
beads
BLOG DIY BEADING MAGAZINE ISSUE 32
Pick three 110 seed beads skip one seed
bead from the chain of seven added in the
previous round and pass with the needle
through the last one and the first 110 seed
bead from the next chain of seven
Repeat the above directions from Step 3 five
more times
After completing this round make sure the
thread will be exiting from the middle 110
seed bead from the first group of three added
in the beginning of this round
Step 4 Pick one 110 seed bead and go through the
last seed bead of the group of three
Flower Tale Earrings
BLOG WWWHANDMADE-JEWELRY-CLUBCOM MEMBERSHIP WWWDIYBEADINGCLUBCOM
Pick three 110 seed beads and take the
needle through the first seed bead of the next
group of three added in the previous round
BLOG DIY BEADING MAGAZINE ISSUE 32
Pick one 110 seed bead and go with the
needle through the next three seed beads (the
last two of the group of three and the last one
from the chain of seven)
Then go up through three 110 seed beads
(the first from the next group of seven and the
first two from the next group of three)
Repeat the above directions from Step 4 to
complete the remaining petals
When working on the last petal perform the
operation from the image shown on the left
instead of picking the group of three 110 seed
beads string two 110 seed beads the earring
hook other two 110 seed beads and
continue beading as instructed above
When you are done hide the thread ends into the beadwork
Flower Tale Earrings
BLOG WWWHANDMADE-JEWELRY-CLUBCOM MEMBERSHIP WWWDIYBEADINGCLUBCOM
About the Author
Iulia Postică
I was born and live in Moldova Eastern Europe Ever since I remember myself
Ive been crocheting and knitting My grandmother has taught me that and I
loved it very much I always regarded crafts exclusively as a hobby and never
thought of making a career of it I traveled a lot to various historical sites
Actually Ive spent all my childhood summers in archaeological camps with
my father who is a professional archaeologist
I also enjoy metal hammering and wirework as it gives me possibility to
express myself in materials used by human communities since ancient times
copper brass glass seed beads and gemstones That is no surprise to anyone
given my family history and academic background
My shop ldquoBeadedTreasuryrdquo with beading tutorials and bead crochet patterns
httpswwwetsycomshopBeadedTreasury
My shop ldquoArchaeologicardquo with artisan jewelry
httpswwwetsycomshopArcheologica
My blog httpbeadedtreasuryblogspotcom
My facebook httpswwwfacebookcomBeadedTreasury
BLOG DIY BEADING MAGAZINE ISSUE 32
Liberty Earrings
BLOG WWWHANDMADE-JEWELRY-CLUBCOM MEMBERSHIP WWWDIYBEADINGCLUBCOM
Materials - Nr 2 cabochon Preciosa Ornela ovale 18x22 mm turchese
- Rocaille Toho 150 silver lined green emerald
- Nr 2 dagger beads
- Nr 20 pearl 4 mm
- Superduo opaque luster ceramic green
- Rocaille 80 color gold
- Rocaille 80 color ivory
- Delica Miyuki 110 aquagreen mix
- Rocaille Miyuki 110 galvanized silver
- Nr 2 monachelle (earwire)
-Fireline
- Beading Needle nr 12
BLOG DIY BEADING MAGAZINE ISSUE 32
Liberty Earrings
BLOG WWWHANDMADE-JEWELRY-CLUBCOM MEMBERSHIP WWWDIYBEADINGCLUBCOM
Make a circle of 20 delica beads and make a knot (a) Perform two rounds peyote with ivory 80 seed beads (b c) Exit from an ivory
bead
BLOG DIY BEADING MAGAZINE ISSUE 32
a b c
Jump from 80 to 80 with 110 80 gold 110 (a) Finish the round and come out of a 80 gold bead
Jump to the next 80 gold with a 4mm pearl (b) Finish the round and come out
of the first pearl Jump to the 2nd pearl and close with a 80 gold bead(c)
a b c
Position the cabochon and jump from one 80 to the other with two delica bead (a)
Continue with three delicas four times (b) At the bottom sew on two delicas then finish the round by sewing on three delicas for four times passing from one to another roc 80 Tighten the cabochon and exit from the
first two delica that you started with String together a 110 and 150 and enter the second of the three close delicas (c)
a b c
Liberty Earrings
BLOG WWWHANDMADE-JEWELRY-CLUBCOM MEMBERSHIP WWWDIYBEADINGCLUBCOM
Put together 150 110 150 and enter in the second of three next delica (a) Put the same beads for three times then put together 150 and 110 and enter
in the two delica of the bottom tip (b) Enter in the second of three next delica with 110 and 150 (c) Continue passing
in the 80 beads with three beads (150 110 150) for four times then at the top finish the round by putting together a 150 and 110 (d)
BLOG DIY BEADING MAGAZINE ISSUE 32
a b c
Exit from the first 150 sewn in the previous round and jump in the three next beads with a 150 (a)
Put a 150 at a time and exit from the first 110 beads of the bottom tip Jump in the
near 110 with a 150 (b) Finish round repeating steps a and b (c) Exit the roc 80 as shown in the photo (d)
a b c
d
a b c d
Enter in the 80 with four 150 (a b) Enter the 80 beads at the bottom of the pieces with two 110 one superduo one 80 ivory bead one superduo and two 110 (c)
d e f
Liberty Earrings
BLOG WWWHANDMADE-JEWELRY-CLUBCOM MEMBERSHIP WWWDIYBEADINGCLUBCOM
Exit from the bottom pearl (a) Put together 150 three 110 150 and enter in the superduorsquos second hole (b)
Put together three superduo and enter in the next superduorsquos second hole (c) Rethread 15 three 110 150 and return in the opposite direction in the pearl of departure (d)
BLOG DIY BEADING MAGAZINE ISSUE 32
a b
c
Exit from the second pearl indicated from (a) Put 150 four 110 and enter in the second of the three 110 (b) Go to the second superduorsquos hole with four 110 and a 150 (c)
Enter the second hole of the supeduo with a 150(d) Sew in the middle of the bottom of the superduo 150 two 110 150 dagger 150 two 110 150(e)
Enter the second hole of the thirs superduo with 150 (f)
a b c
d
d e f
Liberty Earrings
BLOG WWWHANDMADE-JEWELRY-CLUBCOM MEMBERSHIP WWWDIYBEADINGCLUBCOM BLOG DIY BEADING MAGAZINE ISSUE 32
Put 150 four 110 and enter in the second of three 110 of the base (a) Insert four 110 and 150 in the pearl opposite direction indicated in the picture (b) Go in all the beads
around the piece and exit from the pearl at the top (c) Put 150 three 110 150 and enter the superduo (d)
Enter the ivory bead 80 with two 150 (e) Enter the next superduo with two 150 (f)
a b c
d e f
Put together 150 three 110 and enter in opposite direction in the departurersquos pearl (a) Exit from the 150 beads indicated by photo (b) From this jump in the second of two near
150 with five 150 to created the hole for the earwire (c) Pass the thread in the beads make a few knots and cut the excess thread
a b c
Your earrings are finished
Liberty Earrings
BLOG WWWHANDMADE-JEWELRY-CLUBCOM MEMBERSHIP WWWDIYBEADINGCLUBCOM
About the Author
Mariella Martella
My name is Mariella Martella and I am the author and
designer of jewelry that I sign with the name of Mariel Bijoux
After changing city often for work and study I currently live
in northern Italy I am an art historian with a passion for travel
painting and jewelry design in weaving that project since
2010 In my beads and crystals are the colors of the
Mediterranean sea the atmosphere of summer evenings
and the lights of the places I visited
You can find me at
Etsy shop httpswwwetsycomitshopMarielBijoux
Facebook httpswwwfacebookcommari3lbijoux
Crafting blog httpmarielbijouxblogspotit
Twitter httpstwittercomMarielBijoux
BLOG DIY BEADING MAGAZINE ISSUE 32
Jade Necklace
BLOG WWWHANDMADE-JEWELRY-CLUBCOM MEMBERSHIP WWWDIYBEADINGCLUBCOM
Every time I wear a necklace I always make it a point that the
necklace will lay perfectly flat on my neck Using wire for a necklace
made it possible for me like what I did with Jade Necklace It may look
odd at first having bent wires for a necklace but once the jewelry is
finished youll be so happy how the necklace will perfectly lay on your
neck
The tutorial is catered for intermediate level One must know basic
wirework skills such as wire wrapping making loops wrapped loops
and linking to follow the tutorial It has clear instructions and ultra-clear
close-up photos at each step Additionally you can ask me question
you have on the tutorial No more getting stuck and frustrated on a
confusing or just plain inaccurate pattern
If you followed this tutorial and then sell the accessory or jewelry
please give credit to the author or DIY Beading Clubcom
Copyright 2015
wwwdiybeadingclubcom
wwwhandmade-jewelry-clubcom
BLOG DIY BEADING MAGAZINE ISSUE 32
Jade Necklace
BLOG WWWHANDMADE-JEWELRY-CLUBCOM MEMBERSHIP WWWDIYBEADINGCLUBCOM BLOG DIY BEADING MAGAZINE ISSUE 32
Materials Needed 18ga Craft wire 28ga Craft wire 15mm diameter Green Round Flat Back Sew On Gems 5mm Green pearls
8mm Green pearls 6mm x 11mm teardrop Crystal Treasures Mill Hill beads or any teardrop bead with holes on the side Hook for your clasp
Tools Needed Wire cutter Flat nose pliers Round nose pliers Mandrel A jar or any rounded object to shape your necklace
Skill Level Intermediate
Step 1 Cut 6 inches 18ga wire Make a loop on one end then measure approximately 125 inches and make another loop
Form a size 4 circle on your mandrel
Jade Necklace
BLOG WWWHANDMADE-JEWELRY-CLUBCOM MEMBERSHIP WWWDIYBEADINGCLUBCOM BLOG DIY BEADING MAGAZINE ISSUE 32
Then close the circle by wrapping the extended wire just below the loop Wrap the
wire 2x
This is how it looks like Lets call this circle frame Youll notice that the lower curve is
slightly bigger than the upper curve
Step 2 Cut 8 inches of 28ga wire Wrap one end of
the wire at least 3x on one side of the circle frame just below the loop
Bring up your gem Flat back sew on gems has 2 holes Insert the wire into one hole and then
wrap the wire once onto the circle frame
Jade Necklace
BLOG WWWHANDMADE-JEWELRY-CLUBCOM MEMBERSHIP WWWDIYBEADINGCLUBCOM BLOG DIY BEADING MAGAZINE ISSUE 32
Step 3 Insert a 5mm pearl on the wire and then pass
the wire under circle frame
Repeat previous step 2x and have 3 pearls wrapped
Continue wrapping with your teardrop crystal My crystal has 2 holes on the side
and then continue wrapping with your 5mm pearls then secure your wire
Repeat Step 3 and create as many as needed For 16-inch necklace Ive created 6 of these
components
Jade Necklace
BLOG WWWHANDMADE-JEWELRY-CLUBCOM MEMBERSHIP WWWDIYBEADINGCLUBCOM BLOG DIY BEADING MAGAZINE ISSUE 32
Step 4 Cut a 15-inch 18ga wire and make a loop on
one end Insert 8mm pearl and make a loop on the other end You then use these as connectors
and link the components
Step 5 The necklace is an 18ga wire with wrapped
loops on both ends First cut 7 inches 18ga wire and make a wrapped loop with your hook already inserted Side in 18pcs 5mm pearls
Then make a wrapped loop on the other end connecting the wrapped loop onto the component Do the same for the other
necklace but make the loop on the other end big enough so the hookclasp can pass thru
To have the necklace curve shaped use a jar to bend the wire Voila Now youre
ready to party
Jade Necklace
BLOG WWWHANDMADE-JEWELRY-CLUBCOM MEMBERSHIP WWWDIYBEADINGCLUBCOM
About the Author
Sky Aldovino
I consider myself a late bloomer when it comes to crafting Irsquom a self-taught jewelry maker Jewelry making wasnrsquot really a hobby of mine but unforeseen events lead me to learn jewellery making My family put up a craft store where we sell cross stitch beads and all sorts of crafting materials I fell in love with the beads and tried to create accessories only for myself Clients liked the pieces and I started customizing handmade jewelleries The craft store was a success for 6 years but like any other small businesses we had to close it down and I was confined to staying at home While at home I had all the time using the internet and now working as a home-based jewelry designer
BLOG DIY BEADING MAGAZINE ISSUE 32
Atomic Ring
BLOG WWWHANDMADE-JEWELRY-CLUBCOM MEMBERSHIP WWWDIYBEADINGCLUBCOM
Have fun making shapes using the wigjig Cyclops Make loops going in
circles to mimic the shape of a flower or in this tutorial mimic the
shape of an atom The tutorial will also teach you how to cage a
cabochon Whats nice about this piece is that with one long wire you
can create the ring from start to finish
The tutorial is catered for intermediate to advanced students One
must already know how to make spirals and use a wigjig tool It has
clear instructions and ultra-clear close-up photos at each step
Additionally you can ask me question you have on the tutorial No
more getting stuck and frustrated on a confusing or just plain
inaccurate pattern
If you followed this tutorial and then sell the accessory or jewelry
please give credit to the author or DIY Beading Clubcom
If you like to get a blank wigjig graph visit wigjigcom Shop and Jigs
section
Copyright 2015
wwwdiybeadingclubcom
wwwhandmade-jewelry-clubcom
BLOG DIY BEADING MAGAZINE ISSUE 32
Atomic Ring
BLOG WWWHANDMADE-JEWELRY-CLUBCOM MEMBERSHIP WWWDIYBEADINGCLUBCOM
Materials Needed 20ga Craft wire 28ga Craft wire 11mm Round Cabochon
Tools Needed Wigjig Cyclops 15mm pegs Wire cutter Flat nose pliers Mandrel
Skill Level Intermediate - Advanced
BLOG DIY BEADING MAGAZINE ISSUE 32
Step 1 Lets prepare your wigjig cyclops Position the pegs like so
Atomic Ring
BLOG WWWHANDMADE-JEWELRY-CLUBCOM MEMBERSHIP WWWDIYBEADINGCLUBCOM BLOG DIY BEADING MAGAZINE ISSUE 32
Lets work with longer wire so youll have enough wire to hold onto as you manipulate the wire so cut 36 inches of 20ga wire From
one end of the wire measure 10 inches
On the 10-inch measurement loop the wire at the center peg then continue to loop onto the side pegs going in circle going back to
the center peg after looping on the side peg
Now the wire at the center peg will start to build up as you go around the side pegs so
you need to constantly press the wire at the center peg to accommodate the build up of
wire
When youre done pull out the wire and this is
how it should look like
Atomic Ring
BLOG WWWHANDMADE-JEWELRY-CLUBCOM MEMBERSHIP WWWDIYBEADINGCLUBCOM BLOG DIY BEADING MAGAZINE ISSUE 32
You will notice that the frame opens wide Now to keep the atom frame from opening wide secure the center of the frame by wrapping a 28ga wire What you
need to do is simply pass the 28ga wire into the hole and wrap as many times as needed or until youre sure that the frame is secure
Step 2 Now youre finished with your atom frame Well now create the focal design With the longer wire make a spiral at the center big
enough to accommodate the size of your cabochon In this tutorial the spiral is about
11mm in diameter the same size as my cabochon
Pop in your cabochon and start to make spirals going around and over the cabochon as if you are caging the cabochon Create at
least 5 rounds and then cut off any excess
Step 3 Now lets make the ring and this with the other
end of the wire
Atomic Ring
BLOG WWWHANDMADE-JEWELRY-CLUBCOM MEMBERSHIP WWWDIYBEADINGCLUBCOM BLOG DIY BEADING MAGAZINE ISSUE 32
Bring up your mandrel and wrap the wire to the size of your finger Wrap at least 2 times
When youre sure you have the right size pull the ring out of the mandrel
With the extended wire wrap the wire the secure the ring
Cut off any excess and voila You have your atomic ring Create as many as you can with different colors of cabochon
Atomic Ring
BLOG WWWHANDMADE-JEWELRY-CLUBCOM MEMBERSHIP WWWDIYBEADINGCLUBCOM
About the Author
Sky Aldovino
I consider myself a late bloomer when it comes to crafting Irsquom a self-taught jewelry maker Jewelry making wasnrsquot really a hobby of mine but unforeseen events lead me to learn jewellery making My family put up a craft store where we sell cross stitch beads and all sorts of crafting materials I fell in love with the beads and tried to create accessories only for myself Clients liked the pieces and I started customizing handmade jewelleries The craft store was a success for 6 years but like any other small businesses we had to close it down and I was confined to staying at home While at home I had all the time using the internet and now working as a home-based jewelry designer
BLOG DIY BEADING MAGAZINE ISSUE 32
Featured Article Gemstones Used for Jewelry Making
BLOG WWWHANDMADE-JEWELRY-CLUBCOM MEMBERSHIP WWWDIYBEADINGCLUBCOM
Gemstones are stones which we hold quite highly in terms of value And
jewelry often consists of stones that add attractiveness to it so it is not
surprising when jewelry designers actually use gemstones in their designs In
fact there are different types of gemstones that can be used for making
jewelry There are the expensive and pure gemstones and there are also the
imitation ones The information below will provide some information about
the kinds of stones you can use to create jewelry and how these stones will
impact the jewelry you have created
The first kind of stone which I believe we are all quite familiar with are
birthstones These stones are associated with individualrsquos month of birth
by SunVDesigns by BeyhanAkman
For example Amethyst stone is connected with anybody who is born in
February which carries special significance in the area of emotions and also
spiritually This stone also signifies calm and peace as well
And then we have semi-precious stones which are also often used in jewelry
making They are not as valuable as compared to precious stones but still
valuable Best examples of these stones are aquamarine topaz tourmaline
opal and turquoise
BLOG DIY BEADING MAGAZINE ISSUE 32
Featured Article Gemstones Used for Jewelry Making
BLOG WWWHANDMADE-JEWELRY-CLUBCOM MEMBERSHIP WWWDIYBEADINGCLUBCOM
It is an ideal gift for someone who you deem special Aquamarine pendants
usually work well for anyone and is widely an accepted stone
by HyppieChic by joyeriamestiza
However precious stones are the most unusual
and precious jewels to us Examples of some of
them are emerald sapphire diamond and
ruby These stones are usually very expensive
and are prized for their exquisiteness These
stones are commonly used in high-quality
jewelry designs which costs quite a fortune to
obtain
BLOG DIY BEADING MAGAZINE ISSUE 32
by sarajewelrystu
Jewelry designs with precious stones are usually
given as exceptional gifts on special occasions A
perfect example is a diamond ring that is usually
given as an engagement gift
by ldiamondsforever
Featured Article Gemstones Used for Jewelry Making
BLOG WWWHANDMADE-JEWELRY-CLUBCOM MEMBERSHIP WWWDIYBEADINGCLUBCOM
There are also synthetic stones which are often used to create jewelry
Synthetic stones are artificial imitations of gemstones Synthetic Sapphire
jewelry costs less compare with the authentic ones Most of the time
imitation stones are used to save cost but at the same time have the similar
look of the real stone
BLOG DIY BEADING MAGAZINE ISSUE 32
by shininggems by thaimaker
by lapinduprintemps by PastimeArt
Gemstones are used like beads and you can use it in any designs whether
simple or elaborate
Swarovski crystal components are available in a rich multitude of rondelles Perfect as spacers in necklaces or as discs in earrings Rondelles can be used with many varieties of shapes or sizes Use Swarovski crystal rondelles between large gemstones as accents with precious metal findings Fire Mountain Gems and Beads Crystal Passionsreg brand presents Swarovski crystal in display-ready packaging for brilliant retail presentation Crystal Passionsreg is an assurance of genuine Swarovski crystal
BLOG DIY BEADING MAGAZINE ISSUE 32 BLOG WWWHANDMADE-JEWELRY-CLUBCOM MEMBERSHIP WWWDIYBEADINGCLUBCOM
Recommended Jewelry Making Supplies
Mz Unisex-adults 12pcs 25x18x6mm Turquoise Oval CAB Cabochon
BLOG DIY BEADING MAGAZINE ISSUE 32 BLOG WWWHANDMADE-JEWELRY-CLUBCOM MEMBERSHIP WWWDIYBEADINGCLUBCOM
Recommended Jewelry Making Supplies
For a little sparkle that goes a long way design with Swarovski 4mm faceted bicones Create glorious multi-strand necklaces with the dainty crystals or use as spacers to add a tiny flash to your designs Swarovski crystal components are made in Austria and are considered the finest products of their kind in the world
BLOG DIY BEADING MAGAZINE ISSUE 32 BLOG WWWHANDMADE-JEWELRY-CLUBCOM MEMBERSHIP WWWDIYBEADINGCLUBCOM
Recommended Jewelry Making Supplies
Imitation beads resist color change These beads have uniform quality with a good polish Some strands may have little to no matrix Sizes shapes and colors may vary with handcrafted items
BLOG DIY BEADING MAGAZINE ISSUE 32 BLOG WWWHANDMADE-JEWELRY-CLUBCOM MEMBERSHIP WWWDIYBEADINGCLUBCOM
Recommended Jewelry Making Supplies
Something Blue Necklace and Earrings
BLOG WWWHANDMADE-JEWELRY-CLUBCOM MEMBERSHIP WWWDIYBEADINGCLUBCOM
Skill level Beginner Intermediate Advanced
DIMENSIONS OF THE NECKLACE Inner Circumference 14 18 inch 35 cm
Focal Pendant Width 1 15 inch 35 cm Focal Pendant Height 1 15 inch 35 cm
DIMENSIONS OF THE EARRING Earring Width 716 inch 12 cm Earring Height 1516 inch 25 cm (Without the earring hook)
BLOG DIY BEADING MAGAZINE ISSUE 32
Materials
Note Before purchasing the supplies measure the length of your wished necklace If you decide to bead a longer necklace you should keep in mind that for every extra
frac34 inches 2 cm-s you will need 8 bicones and 8 pearls
Something Blue Necklace and Earrings
BLOG WWWHANDMADE-JEWELRY-CLUBCOM MEMBERSHIP WWWDIYBEADINGCLUBCOM BLOG DIY BEADING MAGAZINE ISSUE 32
Work RAW stitch into a beaded circle and embellish with Swarovski bicones
STEP 2 String 1A and 2 pearls Pass through the previous
second pearl and the freshly added 1A and the first pearl again
STEP 1 Use a comfortable length of thread to string 2
pearls 1A and 1 pearl again leaving a 2rdquo 5cm tail Pass through the first two pearls strung to form a
ring
STEP 3 String 2 pearls and 1A Pass through the previous first pearl and the freshly added two pearls
again
STEP 4 - 17 Repeat STEP 2 and STEP 3 again until you count 17 pearls in the inner circle
But be careful in the last step you only have to add 1 pearl then pass through the first pearls
added in STEP 1 and add another 1A Now pass through the first pearl added in STEP
1and 1A added in this round again to exit from this A
Something Blue Necklace and Earrings
BLOG WWWHANDMADE-JEWELRY-CLUBCOM MEMBERSHIP WWWDIYBEADINGCLUBCOM BLOG DIY BEADING MAGAZINE ISSUE 32
STEP 19 String 2A and pass through the next A added in round 4-17 and the A added in round 18 the 2A added in this round and finally the A added in round 4-17 to exit from the bead showed below
STEP 18 String 3A and pass through the 1A added in the previous round and the first A added in this
round
STEP 20 - 34 Repeat STEP 18 and STEP 19 again until you finish the circle
But be careful in the last step first you have to pass through 3A and then add 1A After this pass
through the 3A again and exit from the A bead
shown below (This is the first A added in STEP 18)
Something Blue Necklace and Earrings
BLOG WWWHANDMADE-JEWELRY-CLUBCOM MEMBERSHIP WWWDIYBEADINGCLUBCOM BLOG DIY BEADING MAGAZINE ISSUE 32
STEP 35 Step up to exit from the pearl shown below (Finishing the previous step in the A bead and then
stepping up from there makes the circle more secure)
Now string 3 bicones Pass through the pearl and the first bicone again
In the reality your circle will look more like this the A beads forming a strong row in the middle of the
pearls
STEP 36 Add 2 bicones Pass through the
neighboring pearl the first bicone added in the previous row and the 2 bicones added in this step
so you can exit from the next pearl
Something Blue Necklace and Earrings
BLOG WWWHANDMADE-JEWELRY-CLUBCOM MEMBERSHIP WWWDIYBEADINGCLUBCOM BLOG DIY BEADING MAGAZINE ISSUE 32
Now in the reality your circle will look more like this the A beads still forming a strong row in the middle of the pearls and the bicones slightly lying on top of
them
STEP 37 - 49 Repeat STEP 35 and STEP 36 again until you finish the circle with the bicones
But be careful in the last step first you have pass through the third bicone added then add 1 bicone
and pass through this little quartet to exit from the bicone shown below (The second one added in
STEP 35)
STEP 50 With these steps we finish the circle by adding 1 bicone to connect the A beads and the
bicone row So add 1 bicone pass through the nearest A bead and add 1 bicone again Pass
through the bicone already there and exit from the bicone you just added
Something Blue Necklace and Earrings
BLOG WWWHANDMADE-JEWELRY-CLUBCOM MEMBERSHIP WWWDIYBEADINGCLUBCOM BLOG DIY BEADING MAGAZINE ISSUE 32
STEP 66-83 Secure the circle by adding 1A between each bicone in the second row of Swarovski
bicones If you finished secure the thread and trim
STEP 51-65 Using the same technique as in STEP 37 - 49 add 1 bicone to finish the third bicone row The black line shows you the way (After STEP 50 pass through the next A bead add 1 bicone and pass through the bicone already there and the bicone added in the previous step Repeat these steps to
finish the inner bicone circle)
MIDDLE CIRCLE Work RAW stitch into a beaded circle and embellish with
Swarovski bicones Remember you need to bead two circles this time
STEP 1 Just like in the focal circle begin with 2 pearls 1A and 1 pearl again on a comfortable length of thread
leaving a 2rdquo 5cm tail Pass through the first two pearls strung to form a ring
Something Blue Necklace and Earrings
BLOG WWWHANDMADE-JEWELRY-CLUBCOM MEMBERSHIP WWWDIYBEADINGCLUBCOM BLOG DIY BEADING MAGAZINE ISSUE 32
STEP 15-28 Mimicing the FOCAL CIRCLElsquos STEP 18-34 bead A beads until you finish the inner part of the
circle Exit from a pearl in the second row This circle should look very similar to the first one but this is a bit
smaller
STEP 2-14 Mimicing the FOCAL CIRCLElsquos STEP 2-17 bead until you count 14 pearls in the inner circle Exit
from the last A added
STEP 29-42 Mimicing FOCAL CIRCLElsquos STEP 35-49 add 2 rows of bicones
STEP 43-56 Mimicing the FOCAL CIRCLElsquos STEP 50-65 bead the third row of bicones to finish the circle
Something Blue Necklace and Earrings
BLOG WWWHANDMADE-JEWELRY-CLUBCOM MEMBERSHIP WWWDIYBEADINGCLUBCOM BLOG DIY BEADING MAGAZINE ISSUE 32
SMALLEST CIRCLE Work RAW stitch into a beaded circle and embellish
with Swarovski bicones Remember you need to bead two circles again
STEP 1 Just like in the focal circle begin with 2 pearls
1A and 1 pearl again on a comfortable length of thread leaving a 2rdquo 5cm tail Pass through the first two
pearls strung to form a ring
STEP 57-70 Just like the FOCAL CIRCLElsquos STEP 66-83 secure the circle by adding 1A between every bicone
in the second row of bicones If you finished secure the thread and trim (Donrsquot forget to bead another
circle)
STEP 2-12 Mimicing the FOCAL CIRCLElsquos STEP 2-17 bead until you count 12 pearls in the inner circle Exit
from the last A added
STEP 13-24 Mimicing the FOCAL CIRCLElsquos STEP 18-34 bead A beads until you finish the inner part of the
circle Exit from a pearl in the second row This circle should look very similar to the first two but this is the
smallest of them all
Something Blue Necklace and Earrings
BLOG WWWHANDMADE-JEWELRY-CLUBCOM MEMBERSHIP WWWDIYBEADINGCLUBCOM BLOG DIY BEADING MAGAZINE ISSUE 32
STEP 37-48 Mimicing the FOCAL CIRCLElsquos STEP 50-65 bead the third row of bicones to finish this circle too
STEP 25-36 Mimicing FOCAL CIRCLElsquos STEP 35-49 add 2
rows of bicones The last step here is purple again
STEP 49-60 Just like the FOCAL CIRCLElsquos STEP 66-83 secure the circle by adding 1A between every bicone
in the second row of bicones If you finished secure the thread and trim (Donrsquot forget that you need two
small circles)
Something Blue Necklace and Earrings
BLOG WWWHANDMADE-JEWELRY-CLUBCOM MEMBERSHIP WWWDIYBEADINGCLUBCOM BLOG DIY BEADING MAGAZINE ISSUE 32
STEP 37-48 Mimicing the FOCAL CIRCLElsquos STEP 50-65 bead the third row of bicones to finish this circle too
STEP 25-36 Mimicing FOCAL CIRCLElsquos STEP 35-49 add 2
rows of bicones The last step here is purple again
STEP 49-60 Just like the FOCAL CIRCLElsquos STEP 66-83 secure the circle by adding 1A between every bicone
in the second row of bicones If you finished secure the thread and trim (Donrsquot forget that you need two
small circles)
Something Blue Necklace and Earrings
BLOG WWWHANDMADE-JEWELRY-CLUBCOM MEMBERSHIP WWWDIYBEADINGCLUBCOM BLOG DIY BEADING MAGAZINE ISSUE 32
STEP 2-6 Continue by adding 1A 1 bicone 1 pearl until you count 6 of each
STEP 1 Begin with 1 pearl 1 bicone 1A and 1 bicone again on a comfortable length of thread leaving a 2rdquo
5cm tail Pass through the pearl and the first bicone strung to form a ring
STEP 7-12 Pass through the A beads to make your
component more secure Also secure the thread and trim (Repeat these steps until you have six 6-BEAD
COMPONENTs)
6-BEAD COMPONENT Work RAW stitch into a beaded circle and embellish with Swarovski bicones
For the necklace we will need six from this component For the earring two
Something Blue Necklace and Earrings
BLOG WWWHANDMADE-JEWELRY-CLUBCOM MEMBERSHIP WWWDIYBEADINGCLUBCOM BLOG DIY BEADING MAGAZINE ISSUE 32
STEP 2-4 Continue by adding 1A 1 bicone 1 pearl
until you count 4 of each
STEP 1 Begin with 1 pearl 1 bicone 1A and 1 bicone again on a comfortable length of thread leaving a 2rdquo
5cm tail Pass through the pearl and the first bicone strung to form a ring
STEP 5-8 Pass through the A beads to make your component more secure Also secure the thread and
trim (Repeat these steps until you have the wished amount of 4-BEAD COMPONENTs)
4-BEAD COMPONENT Work RAW stitch into a beaded circle and embellish with Swarovski bicones
For the necklace-size that is given on the second page we will need 20 from this
component For the earring two
If you would like to make a longer necklace you need to make more (One 4-BEAD COMPONENT measures about 38 inch 1 cm To make the necklace symmetrical you have to have equal amounts on each side This means for every extra frac34 inches
2 cm-s you will need 1 4-BEAD COMPONENT on each side of the necklace)
Something Blue Necklace and Earrings
BLOG WWWHANDMADE-JEWELRY-CLUBCOM MEMBERSHIP WWWDIYBEADINGCLUBCOM BLOG DIY BEADING MAGAZINE ISSUE 32
STEP 2 Connect the MIDDLE CIRCLE to two 6-BEAD COMPONENTs by adding four-times 2As
between the pearls Choose a pearl on the MIDDLE CIRCLE and add
2A pass through a pearl in the 6-BEAD COMPONENT previously added and add 2A again Watch out this has to be symmetrical Repeat this at least two more times to make it
secure Now repeat this entire procedure but choose
the 8-th pearl on MIDDLE CIRCLE Repeat this on the other side of the necklace
too
Choose a pearl on the FOCAL CIRCLE and add 2A pass through a pearl in the 6-BEAD COMPONENT and add 2A again Repeat this at least two more times to make it secure
Now repeat this entire procedure but choose the 5-th pearl on FOCAL CIRCLE This will make the necklace nice on your neck
FINISHING THE NECKLACE Connects the parts with A beads
STEP 1 Connect the FOCAL CIRCLE to two 6-BEAD COMPONENTs by adding four-times 2As between the pearls To do this turn your parts upside down you need to
see the pearls We will work on this side from now on
Something Blue Necklace and Earrings
BLOG WWWHANDMADE-JEWELRY-CLUBCOM MEMBERSHIP WWWDIYBEADINGCLUBCOM BLOG DIY BEADING MAGAZINE ISSUE 32
FINISHING THE EARRING Connects the parts with A beads
STEP 1-2 Connect the 6-BEAD COMPONENT
to 4-BEAD COMPONENT and the 4-BEAD
COMPONENT to the earring hook
First connect the 4-BEAD COMPONENT to the 6-BEAD COMPONENT with 4A beads Mimic
the elongation steps of the necklace if needed
Secondly connect the 4-BEAD COMPONENT
to your earring hook with 4A beads again Leave from the last pearl bead 2A beads the hook (this is the orange oval form) and 2As again Pass through each of them to
secure this connection again
Finally get ready to prepare the other earring ndash since we need two of them
STEP 5 Connect the 4-BEAD COMPONENTs to the toggle clasp thus finishing the
necklace Leaving from the last pearl bead 2A the
clasp(this is the orange oval form) and 2A again Pass through all of them a couple more times to make this connection more
secure
Something Blue Necklace and Earrings
BLOG WWWHANDMADE-JEWELRY-CLUBCOM MEMBERSHIP WWWDIYBEADINGCLUBCOM BLOG DIY BEADING MAGAZINE ISSUE 32
If you finished it is time to try it on It was a great fun wasnrsquot it And how beautiful you look in your new necklace and the matching earrings
Something Blue Necklace and Earrings
BLOG WWWHANDMADE-JEWELRY-CLUBCOM MEMBERSHIP WWWDIYBEADINGCLUBCOM
About the Author
Margit Vogel
My name is Margit Vogel I live in Hungary Europe
By profession I am a biochemical engineer but I fell in love with
beads so much that I could not stop playing with them
I make one-of-a-kind beaded and bead embroidered art
jewelry made of the best quality materials such as Swarovski
stones gemstones Japanese beads (Miyuki and Toho) Czech
glass beads leather soutache and suede Each piece is unique
and individually crafted
Feel free to visit my blog for some eyecandy
httpiformjewelrywordpresscom
My shop httpwwwetsycomshopiformjewelry
Facebook httpwwwfacebookcomiformjewelry
BLOG DIY BEADING MAGAZINE ISSUE 32
Getting Down And Personal With Gianna
Getting Down And Personal With Gianna
Nowadays we see more and more jewelry stores opening up online and with these online jewelry stores it has made it easier for us to purchase and view their creations Have you ever wondered how they are able to manage and produce amazing jewelry pieces and tutorials So heres a little on the journey to open up an online shop We are excited to present to you Gianna aka Beading4perfectionists
Gianna Beader amp Youtuber
Unlike most jewelry makers and beadweavers Gianna did not start beading as a hobby but as a means to make ends meet With goals in trying to
fill the financial gap she did everything she could to expand her earnings ndash working as a security guard
and at the same time learning how to bead and selling her pieces at fair trades and flea markets
Since many were asking if she does home beading workshops she started on exploring how to teach people to bead She loves Scott Bakula and has always loved him till now and this served as her
inspiration to start making a beading video tutorial
Gianna started creating videos because she was at the point in her life where everything seemed to be falling apart And at that moment of time she had difficulties financially and selling jewelry was the only way for her to stay afloat financially She is a big Scott Bakula fan and when she went to the UK to see him on stage that was when it hit her that she is already able to edit videos and
taught herself Photoshop and done workshops at bead fairs so why not put these together and see what happens on Youtube She knew that if she gets enough subscribers and views ndash though no one knew what the exact numbers were you would be invited to become a Youtube partner This way she could monetize her videos with advertisements and hopefully she would be able to be a Youtube partner and be able to pay her bills
BLOG WWWHANDMADE-JEWELRY-CLUBCOM MEMBERSHIP WWWDIYBEADINGCLUBCOM BLOG DIY BEADING MAGAZINE ISSUE 32
Getting Down And Personal With Gianna
Her Youtube channel is popular and the reason why she chose Youtube is because Youtube is the biggest platform and reached almost to the whole world Everyone already knows about it and it was growing rapidly as compared to other platforms like Dailymotion so she figured that Youtube was the way to go Her advice to new designers is that when you start out go to the platforms on the top of your list first then work your way down your list if you do not get accepted by your first choice
After loyally putting up one video every week for about 8 months in a row she became a Youtube partner and monetized her videos She knew she needed at least $100 to get her first payout She managed to reach $100 after 3 months The process was not easy she worked hard lack sleep skipped meals and who knows what happened to Ridge in the Bold and the Beautiful because she stopped watching
On Youtube you can monetize your videos Google pays straight to your bank account and at other countries where they also have the option of getting checks among other options In order to get paid you have to reach the $100 mark and after 3 months For Gianna she thinks that you cannot say that Etsy is better than Youtube or Youtube is better than Etsy Her reasoning is because on Youtube she has many followers which will eventually check out her Etsy shop And to start an Etsy shop you need an audience
BLOG WWWHANDMADE-JEWELRY-CLUBCOM MEMBERSHIP WWWDIYBEADINGCLUBCOM BLOG DIY BEADING MAGAZINE ISSUE 32
television and dedicated her spare time (as she had another job) to Youtube She re-registered at the chamber of commerce after receiving her first payout Her work at Youtube now is not a full time job and things have changed on Youtube It is easier to become a parter but there are some countries that need to wait for an invitation to be a Youtube partner Take Italy for instance Italians would have to work just as hard as she did if they want to become a Youtube partner
Getting Down And Personal With Gianna
With her 60000 subscribers on her b4pbakup Youtube channel it is possible to sell at least 60 patterns on the first day on Etsy after promoting the PDF file on her Youtube channel Though you may think that 60 out of 60000 is not much you have to remember that not everyone has the means to purchase the PDF file and a lot of people still rather watch her carry out the tutorial(for free) on Youtube instead of reading the patterns or paying for the patterns even if the pattern is for a fundraiser and only cost $2 Her insights on Youtube is that Youtube is not what it used to be 6 years ago Instead of making more money every month she is making less and less because advertisers have more options of where they want to advertise their ads Ads do not pay as much as they used to Back in the days you could get 25 cents per ad Now you count yourself lucky if you could get 5 cents roll in after two hours
BLOG WWWHANDMADE-JEWELRY-CLUBCOM MEMBERSHIP WWWDIYBEADINGCLUBCOM BLOG DIY BEADING MAGAZINE ISSUE 32
And on top of that adblockers are destroying Youtube channel owners Youtube will start making changes to the channels where there will be ldquopaid subscriptionrdquo channels This has already been implemented in some countries but not in her country The Netherlands This means there will no longer be ads for her monthly paying subscribers She hopes that Youtube will add on a paid per video option feature The option to be a paid channel or free channel or to start a new channel for paying customers is yours to choose Gianna is not happy with Youtube because many others like her have worked so hard and for some years to become Youtube partners(which was something to be proud of) has lost their status
Getting Down And Personal With Gianna
Her advice for those who want to go on Youtube is 1 Do it because you want to teach
2 Do it because you want a career with beads
BLOG WWWHANDMADE-JEWELRY-CLUBCOM MEMBERSHIP WWWDIYBEADINGCLUBCOM BLOG DIY BEADING MAGAZINE ISSUE 32
After putting up about 20 videos and having at least 5000 subscribers add the PDF tutorials to Etsy and Craftsy She found out that her audience would like to have the PDF after watching her videos This is because they would rather print out the PDF and work while seated in a comfy chair technically somewhere else instead of having to pause the video time and time again
Gianna has also made a video for those who want to know the whole story of her journey up until the present day And to get updates on her you can check it out here She has also started a vlog where she tells of how she still works towards becoming a financial independent beader and explains her journey to get where she wants to be(or die trying) Gianna will be in the UK on October the 17th giving an all-day workshop with 4 different patterns
(2 beginners and 2 advanced) in Wotton-under-Edge
Gianna will be there Friday night as the workshop is on Saturday She will be leaving on Sunday Her
doors are open to all who wants to continue the party with her at the hotel across the street
For more information do contact Ann Tucker on Facebook
httpswwwfacebookcomanntucker501
Rec
omm
end
ed R
ead
ings
Making Jewelry with Gemstone
Beads
Combines the popular craft of beading with beautiful semi-precious stones which are collected by many Features a variety of versatile ideas which can be adapted for any type of gem or bead Readers will learn to reate beautiful gemstone jewelry with this dazzling collection of over 100 projects ranging from eyecatching earrings and accessories to exquisite necklaces and bracelets This beautiful book offers an impressive range of 28 beautiful semi-precious stones (including birthstones) and a glimpse into the fascinating history and mythical properties behind them
BLOG DIY BEADING MAGAZINE ISSUE 32 BLOG WWWHANDMADE-JEWELRY-CLUBCOM MEMBERSHIP WWWDIYBEADINGCLUBCOM
Rec
omm
end
ed R
ead
ings
Convertible Crystal Jewelry
Reverse it Twist it Wear it Many
Ways
Diane Whiting presents the idea that convertibility isnrsquot just about using pieces in multiple ways it is also about using skills and creativity in multiple ways Using ever-popular sparkling crystals Diane showcases design elements through various techniques for fun easy fashionable jewelry With 25 projects the reader can choose from bracelets necklaces and earrings that match any outfit or styleDiane Whiting presents the idea that convertibility isnrsquot just about using pieces in multiple ways it is also about using skills and creativity in multiple ways
BLOG DIY BEADING MAGAZINE ISSUE 32 BLOG WWWHANDMADE-JEWELRY-CLUBCOM MEMBERSHIP WWWDIYBEADINGCLUBCOM
Rec
omm
end
ed R
ead
ings
Wire Jewelry Masterclass
Wrapped Coiled and Woven Pieces
Using Fine Materials
Comprehensive and fabulous Wire Jewelry Masterclass takes an in-depth look at an intricate and rewarding craft The 24 projects which range from simple Dragons tear briolette earrings to a Poseidon-under-the-sea pendant will delight and inspire jewelers of all levels and tastes Divided into beginner intermediate and advanced sections this beautifully photographed step-by-step guide is the ticket to wire jewelry expertise
BLOG DIY BEADING MAGAZINE ISSUE 32 BLOG WWWHANDMADE-JEWELRY-CLUBCOM MEMBERSHIP WWWDIYBEADINGCLUBCOM
Rec
omm
end
ed R
ead
ings
Timeless Wire Weaving The
Complete Course
Timeless Wire Weaving focuses on developing wirework skills through 13 projects using three classic wire weaving techniques coiling wrapping and weaving The projects are built around a focal cabochon and incorporate seed beads and crystals in imaginative ways Designers learn to make the jewelry shown in the book and they also use the techniques learned to create innovative jewelry pieces of their own
BLOG DIY BEADING MAGAZINE ISSUE 32 BLOG WWWHANDMADE-JEWELRY-CLUBCOM MEMBERSHIP WWWDIYBEADINGCLUBCOM
Our digital magazine is available through
Apple Newsstand service available to millions of IPAD users
To advertise with us please email us at
diyjewelryclubgmailcom
Or visit our page at
httphandmade-jewelry-clubcomadvertising-diy-beading-magazine
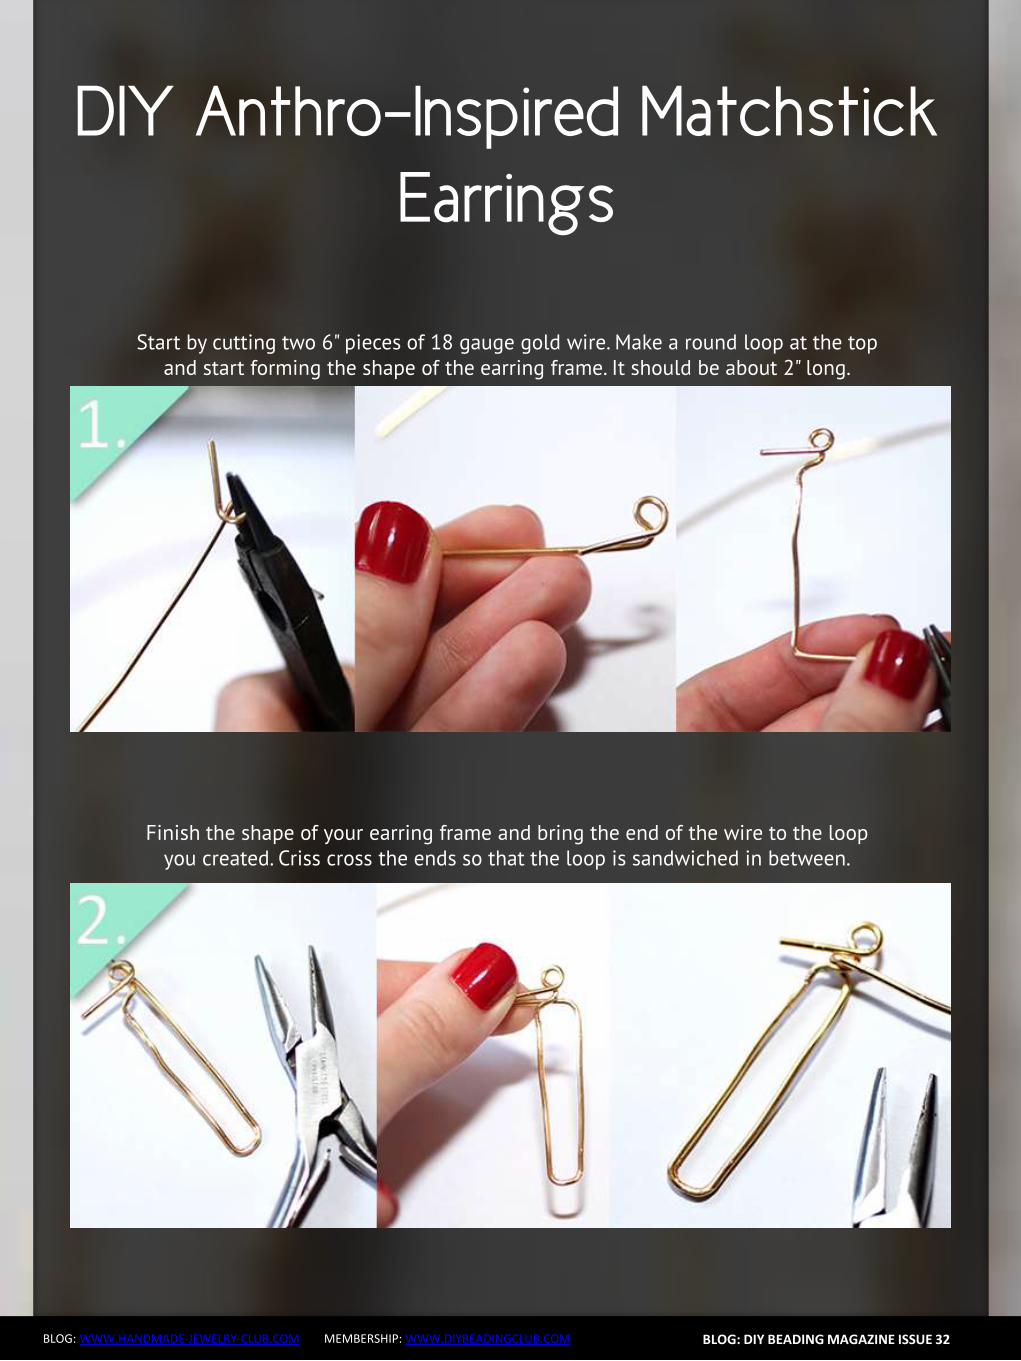
BLOG DIY BEADING MAGAZINE ISSUE 32 BLOG WWWHANDMADE-JEWELRY-CLUBCOM MEMBERSHIP WWWDIYBEADINGCLUBCOM
DIY Anthro-Inspired Matchstick
Earrings
Place your earring frames on your hammering surface and hammer with the ball peen hammer until they lay flat This will also strengthen the wire and make
them less likely to bend
Cut a 10 piece of 24 gauge wire and wrap the end around the bottom of your earring frame String on beads until you fill the space
BLOG DIY BEADING MAGAZINE ISSUE 32 BLOG WWWHANDMADE-JEWELRY-CLUBCOM MEMBERSHIP WWWDIYBEADINGCLUBCOM
DIY Anthro-Inspired Matchstick
Earrings
Secure the wire at the top by wrapping it near the loop Repeat on the second earring
Add earring hooks of choice and yoursquore done
Advertisement
DIY Anthro-Inspired Matchstick
Earrings
BLOG DIY BEADING MAGAZINE ISSUE 32 BLOG WWWHANDMADE-JEWELRY-CLUBCOM MEMBERSHIP WWWDIYBEADINGCLUBCOM
About the Author
Jamie Hannigan
Perhaps Irsquom just easily fascinated but I often see magic and wonder in things other might consider mundane Irsquom a very imaginative person and as a child I often created fictional
narratives to go along with places or objects
My inspiration comes from all over Sometimes Irsquom really into nature like toadstools and mushrooms Sometimes Irsquom really into man-made things like ships Sometimes Irsquom really
into concepts and themes like astrology or mythology
I go through phases and Irsquove learned to embrace that in my work I create the things I want to make at that exact moment If just one other person finds enjoyment in what my
imagination led me to produce I consider it a success
To see more jewelry tutorials and my other work visit jamiebhannigancom and check my Etsy shop at
httpswwwetsycomshopjamiebhannigan
Wire Wrapped Gemstone
Pendant
BLOG WWWHANDMADE-JEWELRY-CLUBCOM MEMBERSHIP WWWDIYBEADINGCLUBCOM
You will usually find these more natural gemstones at bead shows vs your local bead shop
Wire Jewelry Making Skill Level Intermediate
Wire Jewelry Making Supplies - two lengths of 22 gauge round dead soft wire (4 times the length of your bead) - one 3 inch (76 cm) length of 20 gauge half round half hard (HH) wire (wrapping wire) - one gemstone bead - three 6mm beads (I used amethyst Swarovskireg crystals - three one inch (25 cm) head pins - one ink pen (used as a mandrel) - one marker pen - blue painters tape - jewelers polishing cloth - ruler Jewelry Making Tools - wire cutters - round nose pliers - chain nose pliers
BLOG DIY BEADING MAGAZINE ISSUE 32
Wire Wrapped Gemstone
Pendant
BLOG WWWHANDMADE-JEWELRY-CLUBCOM MEMBERSHIP WWWDIYBEADINGCLUBCOM
1 Using a ruler measure the length of your bead and note the measurement
Multiply the measurement by 4 My bead is 3 inches (76 cm) long so my final measurement is 12 inches (305 cm)
BLOG DIY BEADING MAGAZINE ISSUE 32
2 Tear off two pieces of blue painters tape from the roll and temporarily tape them to your work surface
Using the wire cutters cut two lengths of the 22 gauge round wire measuring the length of your
final measurement (I cut two 12 inch (305 cm) lengths of wire)
Clean and straighten both wires by pulling them through a jewelers polishing cloth (not pictured)
With both wires side by side with the ends even with one another use the torn tape lengths to tape the wires together (This will temporarily hold them together while you to wire wrap them)
With the marker pen mark the center of both wires
Wire Wrapped Gemstone
Pendant
BLOG WWWHANDMADE-JEWELRY-CLUBCOM MEMBERSHIP WWWDIYBEADINGCLUBCOM
3 Using the wire cutters cut one 3 inch (76 cm) length of 20 gauge half round half hard wire This is the wrapping wire
With the flat side of the wire facing you use the chain nose pliers to make a 14 inch (06 cm) bend
towards you and at a slight angle in one end of the wire This makes a hook in the wire The flat sides of the wire should face one another
BLOG DIY BEADING MAGAZINE ISSUE 32
4 Pick up the taped wires at their center between your fore finger and thumb Place the hook of the half round wire slightly to the right of the center mark on the two round
wires
5 Holding the long end and the tail of the half round wire hook use the tip of the chain nose pliers to squeeze the bend of the hook against the round wires This sets or secures the wrapping wire
Wire Wrapped Gemstone
Pendant
BLOG WWWHANDMADE-JEWELRY-CLUBCOM MEMBERSHIP WWWDIYBEADINGCLUBCOM
6 Bend the long end of the half round wire up over the two round wires You have created one wire wrap
BLOG DIY BEADING MAGAZINE ISSUE 32
7 Bend the long end of the half round wire down and behind the two round wires
8 Continue to repeat Steps 6 and 7 until you have made three (3) to five (5) complete wire wraps around the round wires (I made five (5) wire wraps) After making one or two wire wraps secure
the wraps against the round wires as in Step 5
The front of the wrap (as pictured below) will be the side where the half round wrapping wire is not cut
Wire Wrapped Gemstone
Pendant
BLOG WWWHANDMADE-JEWELRY-CLUBCOM MEMBERSHIP WWWDIYBEADINGCLUBCOM
9 Use wire cutters to cut the excess half round wire Cut the wire about half way behind the round wires so that the ends will not be seen from the front side of the wire wrap
BLOG DIY BEADING MAGAZINE ISSUE 32
10 With the wire wrap at the bottom center of your bead use your fingers to gently shape the wires around the bottom along the sides and to the top of the bead
11 Use the chain nose pliers to secure all the wraps against the round wires
Wire Wrapped Gemstone
Pendant
BLOG WWWHANDMADE-JEWELRY-CLUBCOM MEMBERSHIP WWWDIYBEADINGCLUBCOM
12 Slide the chain nose pliers in between the round wires where they meet the wire wrap and spread the wires apart
BLOG DIY BEADING MAGAZINE ISSUE 32
Spreading the wires apart begins to create the cage for the bead
13 With its bottom center resting against the wire wrap place your bead or gemstone inside the cage
Gather all four of the wires around the bead so that it is encased within them and so that the wires
meet at the top of the bead Hold all four wires between your forefinger and thumb (like you are pinching the wires)
Wire Wrapped Gemstone
Pendant
BLOG WWWHANDMADE-JEWELRY-CLUBCOM MEMBERSHIP WWWDIYBEADINGCLUBCOM
14 Decide which side will be the front of the pendant Locate the wire that is in front of all the wires and with your fingers bend it downward at a 45 degree angle
BLOG DIY BEADING MAGAZINE ISSUE 32
15 Use your fingers or the chain nose pliers to wrap the bent wire around the other three wires where they all meet or cross one another
16 Continue wrapping the wire around the other three to secure them End the wrapping at the back of the pendant
Using the chain nose pliers tuck the wire into the wraps (not pictured)
Wire Wrapped Gemstone
Pendant
BLOG WWWHANDMADE-JEWELRY-CLUBCOM MEMBERSHIP WWWDIYBEADINGCLUBCOM
17 Make sure that the wires are evenly spread around the beads Now we need to tighten the wires that encase the bead
On one of wires about halfway up the wire place the jaws of the round nose pliers on either side
of the wire Now rotate the pliers making a double bend in the wire Repeat on the other three wires making one or two double bends in each wire When youre done shake the bead to make sure it cannot fall out of the wires
BLOG DIY BEADING MAGAZINE ISSUE 32
18 Now decorate two of the top wires Almost anything is possible Try making a few different bends curls or twists in the wire
I decided to loosely coil the top wires around an ink pen
19 Gently untighten the coil by pulling the end of the wire downward Using the round nose pliers make a simple wire loop on the end of the coil
Wire Wrapped Gemstone
Pendant
BLOG WWWHANDMADE-JEWELRY-CLUBCOM MEMBERSHIP WWWDIYBEADINGCLUBCOM
20 Repeat Steps 18 and 19 on a second top wire
BLOG DIY BEADING MAGAZINE ISSUE 32
21 The third top wire becomes the bail Coil it tightly around the ink pen making at least two wire coils The end of the wire should fall in front of the pendant
Make a simple wire loop on the wire end
22 Heres how the wire coilsspiralsbends should look Make any necessary adjustments to the wires along the sides of the gemstones and the two that fall
in front of pendant
Make sure that the wires tightly secure the bead The wire wrap at the bottom of the pendant may no longer be at the center of the bead
Wire Wrapped Gemstone
Pendant
BLOG WWWHANDMADE-JEWELRY-CLUBCOM MEMBERSHIP WWWDIYBEADINGCLUBCOM
23 On each of the three head pins string a 6mm bead Make a simple wire loop on the end of each head pin
Attach one head pin bead unit to each of the simple wire loops on the wire wrapped pendant
BLOG DIY BEADING MAGAZINE ISSUE 32
Completed Wire Wrapped Pendant
Now hang your handcrafted wire wrap pendant from your favorite chain or strand of beads
Enjoy wire wrapping your own gemstone to make a wire wrapped pendant
BLOG WWWHANDMADE-JEWELRY-CLUBCOM MEMBERSHIP WWWDIYBEADINGCLUBCOM
Wire Wrapped Gemstone
Pendant About the Author
Wanda Epps
Wanda is an avid jewelry maker who loves to make jewelry with beads She began her journey into jewelry making after walking into a bookstore to find crafting books on sale One on making jewelry caught her eye and after making a simple bead necklace she was hooked That was in late 2003 Over the years she has taken classes on various jewelry making techniques stringing making wire jewelry bead crochet macrame metal jewelry making to name some She expects that her love of making beaded jewelry will continue as bead supplies and beautiful new beads seem endless Her fulltime job provides for her needs but beads are her passion She invites you to join her in the many adventures of making jewelry at
httpwwwmaking-beaded-jewelrycom httpswwwfacebookcompagesMaking-Beaded-Jewelry-
Guide254860504236
BLOG DIY BEADING MAGAZINE ISSUE 32
Should You Sell In The Marketplace
Should You Sell In The Marketplace
BLOG WWWHANDMADE-JEWELRY-CLUBCOM MEMBERSHIP WWWDIYBEADINGCLUBCOM
We are all able to create jewelry pieces and there will come a time where you want to share the joy with the rest of the world whether it is in the form of a tutorial or a finish
piece And this is when you will start to think about putting up your work for sale As someone who is new to the business world you may be confused on where you should start selling your work And the all famous site that is first on most peoplersquos minds is Etsy Etsy is popular and it is user friendly and that is why it is the choice of many designers and crafters But there are also some who wants to set up their own
shop with their logo and to put their works out as their own even at the very beginning Thatrsquos where you may be confused on which platform you should go for
So herersquos some explanation on how you will benefit from setting up shop at Etsy
BLOG DIY BEADING MAGAZINE ISSUE 32
1 Etsy has everything ready for you and all you have to do is to bring in your works and use the features that are already available for you to use ndash like the payment system web traffic design and layout are not an issue that you need to worry about
2 You also have the trust of customers almost immediately because Etsy has already established a name for itself and therefore there is already trust in brand in their site When you use Etsy your brand will automatically be exposed to many customers who visit Etsy to find what they need
3 For every site there is always the need to be able to interact with other sellers to help each other out Forums or community boards are very helpful as other passionate designers and crafters share their experience to help out the newer members of the community This is also where you will be able to form good relationships with other sellers and who knows you may even find a partnership over time
Should You Sell In The Marketplace
BLOG WWWHANDMADE-JEWELRY-CLUBCOM MEMBERSHIP WWWDIYBEADINGCLUBCOM
Though Etsy has itrsquos good points there are some things which you need to take into consideration as well
1 When you are using someone elsersquos facilities there is always the chance of having
being shut down due to unforeseen circumstances Be it violation of Etsyrsquos policy or decisions made by the administration department this will sometimes cost you a dent in your brand name and you may lose the trust of your followers and starting all over again may be the only way to start again
2 If you are a very creative person then you may feel limited as the design of shops at Etsy is standardized If you are new and do not worry so much about designs of websites this is perfectly fine But do remember that when you want to distinguish yourself from other sellers it will be tougher as you try to make your brand more well-known due to limitations of design of the site
3 Since Etsy has so many sellers all in one place the competition is of course going to be tighter and fiercer because even though customers are viewing your products there are also other options from other sellers listed on the page as well So customers may turn away if they see something of a better price
4 Each product that you list with Etsy costs you money Etsy also takes a 35 percent of the selling price of the item However if or when you start your business on your own website it will also cost you for web hosting and you would need PayPal and they have a fee of 29 percent +30cents So either way you will still need to pay to list your products on the web
BLOG DIY BEADING MAGAZINE ISSUE 32
Should You Sell In The Marketplace
BLOG WWWHANDMADE-JEWELRY-CLUBCOM MEMBERSHIP WWWDIYBEADINGCLUBCOM
If you are confident enough to have your own business site by all means go ahead and do it The benefits of it are as below
1 You get to be your own boss You get to control everything from the design of the
website layout and how you want to advertise your products You can also change your policies and not be affected by it because it is you who changes it Your shop will not be shut down suddenly without notice and you do not need to worry that you have to start all over again
2 Distractions of competitors products on your page will not be an issue It is your site and it is up to you whether or not you want to allow what kind of advertisements on your site So if you donrsquot want something on your page it is your call
3 You will be able to capture the attention of the media and customers as well if you are able to have a well designed site Nowadays people are attracted to colors and they can see if you have put effort into beautifying the site for the customers You can do so much more than just uploading some pictures onto Etsy on your own site you can always update your site design and your products to complement each other and therefore becoming more attractive
BLOG DIY BEADING MAGAZINE ISSUE 32
Should You Sell In The Marketplace
BLOG WWWHANDMADE-JEWELRY-CLUBCOM MEMBERSHIP WWWDIYBEADINGCLUBCOM
And herersquos the tough part when you want to have your own site
BLOG DIY BEADING MAGAZINE ISSUE 32
1 You need to have knowledge of what you want to do You have to learn to be involved in every aspect of your site so that you know what us going on at the front end of things and at the back end of things as well But if you have not any knowledge of designing a website it is usually a recipe for something to go wrong You have to remember that you need a user interface that is simple for customers to use an easy to use shopping cart you should know which third party platforms are trusted and one which will not keep changing their regulations If you still want to have your site hiring a designer may be your best option
2 You have to work towards promoting your store on your own You will need to find people to feature you in their social media sites because it will not just fall into your lap You need to have promotions or road shows if you need to Marketing your store is important whether or not you are using Etsy or other marketing platforms but if you are on your own it is even more important
3 You will still be competing with other sellers Though now you are now not only competing with Etsy sellers you are now competing with sellers and stores from the world wide web Etsy is already so well known so people tend to go there first so you need to up your methods of attracting customers
Should You Sell In The Marketplace
BLOG WWWHANDMADE-JEWELRY-CLUBCOM MEMBERSHIP WWWDIYBEADINGCLUBCOM
When we first started out we used Etsy as our platform to sell our works Other than that we also utilized blogs and we eventually built our own website as our main base
BLOG DIY BEADING MAGAZINE ISSUE 32
Things have changed over these 3 years It was easier to get sales without much effort but now with so many other shops also utilizing Etsy the competition has grown tremendously Now our main sales come from our own online store and has exceeded sales from Etsy
So what we recommend is that using an existing platform such as Etsy to start out is good and in time build up your website or webstore
It is not that hard to start your own webstore either these two companies offers the option to set up your webstore
1 Shopify
2 Bigcommerce
There are many things to take into consideration before starting a store online It is perfectly fine to start out using Etsy before branching out on your own But you can also
have both ndash have your own website and a store on Etsy There are many stores who operate like this They technically get customers from Etsy and the reroute them to their own websites As long as you are in control of what you are doing and not stressing and
confusing yourself you can opt for more exposure for your store
So do take some time and take a breather to really think through what will be the best for YOU and do remember that starting small does not mean you will not be able to be big
OFFER Get which can be downloaded by subscribing to
httpinternet-marketing-publishingcom
BLOG WWWHANDMADE-JEWELRY-CLUBCOM MEMBERSHIP WWWDIYBEADINGCLUBCOM
Materials - Copper wire diameter 08 mm - Copper wire diameter 04 mm - Small gemstone bead (~4 mm) (I used 3 mm beads in this tutorial because I didnrsquot have any other beads at the time but the beads in the earrings on the cover are 4 mm) Make sure that the beads you want to use are resistant against chemicals such as liver of sulfur or whichever oxidizing substance you want to use to give the metal patina The beads in the picture above are facetted garnet buttons in the tutorial itself I used black spinel facetted buttons Equipment - Round nose pliers - Flat nose pliers - Side-cutters - A small file - A cylindrical object of about 5mm diameter (eg a mandrel for jump rings) - Hammer amp anvil - Liver of sulfur or some other means to oxidize the metal (optional)
LOVE-ly Earrings
BLOG DIY BEADING MAGAZINE ISSUE 32
BLOG WWWHANDMADE-JEWELRY-CLUBCOM MEMBERSHIP WWWDIYBEADINGCLUBCOM
This tutorial teaches how to make 1 ear stud I recommend making both ear studs of the set simultaneously step-by-step so that symmetry is easier to achieve Between steps check for
symmetry in size and shape and adjust the construction if needed
LOVE-ly Earrings
BLOG DIY BEADING MAGAZINE ISSUE 32
Step 1 Straighten the end of the copper wire (+- 6cm) by rubbing along it with your fingers for a
few seconds
Step 2 Bend over the wire onto itself as illustrated below using flat nose pliers
Step 3 Grab the doubled-over wire with the flat nose pliers and push the two sides against each
other Use little force and do it bit by bit to avoid damaging or kinking the wire
Step 4 Push the two adjacent pieces of wire apart to create the bottom shape of the heart as shown
on the picture above
BLOG WWWHANDMADE-JEWELRY-CLUBCOM MEMBERSHIP WWWDIYBEADINGCLUBCOM
LOVE-ly Earrings
BLOG DIY BEADING MAGAZINE ISSUE 32
Step 5 Hammer down the angled wire (the part circled in red) This strengthens the construction
and looks more professional
Step 6 Wrap the two ends of wire tightly around a cylindrical object (+- 5 mm diameter)
Step 7 Push apart the loops you just made by wrapping the wire around the cylindrical object The wire should now be shaped like a heart as
illustrated above
Step 8 Use round nose pliers to bend around the wire for each side of the heart as illustrated above
BLOG WWWHANDMADE-JEWELRY-CLUBCOM MEMBERSHIP WWWDIYBEADINGCLUBCOM
LOVE-ly Earrings
BLOG DIY BEADING MAGAZINE ISSUE 32
Step 9 Use the flat nose pliers to bend one of the two wires (preferably the longer wire) in a 90deg angle at the place marked with a red dot In the picture accompanying the next step you can see
how it should look from the front
Step 10 Use the round nose pliers to bend the other piece of wire in a decorative coil You will cut off the rest of the wire of the coil at approximately the spot marked with a red dot so take that into account when coiling the wire into the shape that
you desire
Step 11 Cut of the wire at the spot indicated in the previous picture and file off any sharp edges
Step 12 Cut off the ear wire at the desired length (Between 1 and 2 cm If in doubt try the earring on
to see if it sits comfortably) and file off any sharp edges
BLOG WWWHANDMADE-JEWELRY-CLUBCOM MEMBERSHIP WWWDIYBEADINGCLUBCOM
LOVE-ly Earrings
BLOG DIY BEADING MAGAZINE ISSUE 32
Step 13 Hammer down the rest of the heart (bumps and coil) If you canrsquot reach certain parts because the ear wire is in the way bend that part of the heart shape away
(verticallyupward) and bend it back after you finish hammering
Congrats yoursquove now made a basic heart-shaped ear stud Next wersquore going to decorate it with a little gemstone and more copper wire
Step 14 Cut off a length of 04 mm copper wire (about 10-20 cm) and string the bead onto it
Step 15 Place the bead in the ldquonon-coilrdquo upper part of the heart shaped ear stud holding it between thumb and forefinger Let approximately 4 cm of the 04 mm wire stick out over the edge of the
heart as illustrated above
Step 16 Wrap the wire twice around the frame so that if you face the front of the ear stud the wire is
directed towards yourself
BLOG WWWHANDMADE-JEWELRY-CLUBCOM MEMBERSHIP WWWDIYBEADINGCLUBCOM
LOVE-ly Earrings
BLOG DIY BEADING MAGAZINE ISSUE 32
Step 17 Flip the wire over the wire with the bead (indicated by the red arrow) and pull tight whilst holding the bead (and its wire) tightly in place It
should look like the construction in the big picture above
Step 18 And make another loop around the wire with the bead The 04 mm wire is now coiled around
twice two times two coils around the frame and two coils around itself
Step 19 Repeat the wire-fastening procedure described in steps 16-18 with the other end of the
wire securing the gemstone in the heart frame Let the wire stick out at the back of the earstud
Step 20 Pull the wire through the lsquocoilrsquo part of the heart shape to the front The wire should lsquocross overrsquo to the other side of the heart at the back of the ear
stud
Step 21 Coil the wire around the frame until you are content with the design Optionally you can hammer down the coils a bit I often do this because I think it
looks somewhat more sophisticated and professional
BLOG WWWHANDMADE-JEWELRY-CLUBCOM MEMBERSHIP WWWDIYBEADINGCLUBCOM
LOVE-ly Earrings
BLOG DIY BEADING MAGAZINE ISSUE 32
Step 22 Cut off the spare bits of wire preferably at the backside of the ear stud and tuck in the ends
Congrats yoursquove now made a heart-shaped ear stud Next we are going to finish it off with a patina
Step 23 Oxidize the metal of the ear studs I always use liver of sulfur solved in warm water The metal
will turn a dark color and matte texture Afterwards rinse the ear studs thoroughly with water and pat
them dry
Step 24 Rub the oxidized ear stud all over with a rough polishing pad to bring back (a dark copper)
color to the surface
Yoursquove now finished making your own LOVE-ly ear studs
Secure them in your ear with plastic or copper stops These can be bought online or in jewelry-supply
stores
Variation ideas You can easily vary in size and shape (longer hearts smaller coils pointier bottoms etc) and
use different materials As you can see the earring I make in this tutorial has a slightly smaller bead than the
earrings on the cover which influences the overall appearance somewhat
The earrings underneath are made with sterling silver and gold wire (super-short coils) and contain small pink
rubies
LOVE-ly Earrings
BLOG WWWHANDMADE-JEWELRY-CLUBCOM MEMBERSHIP WWWDIYBEADINGCLUBCOM
About the Author
Jeske Hendriks
Hi there My name is Jeske and I love all things handmade Over the years Irsquove dabbled in countless different arts and crafts but nowadays I mainly focus on making jewellery and cutting stone cabochons As for jewellery
my preferred materials are silver wire and gemstonemineral beads Using wire-wrapping and basic silver smithing techniques I create both simple
and intricate pieces ndash each and every one of them unique a personal little artwork
You are welcome to follow me on facebook stop by at my personal
webpage andor to have a look at my Etsy shops httpswwwfacebookcomyeskecrafts
httpwwwyeskecraftscom httpwwwyourbeadsandfindingsetsycom
httpwwwyeskecraftsetsycom httpwwwyeskemiscetsycom
BLOG DIY BEADING MAGAZINE ISSUE 32
Flower Tale Earrings
BLOG WWWHANDMADE-JEWELRY-CLUBCOM MEMBERSHIP WWWDIYBEADINGCLUBCOM
Techniques Beadweaving
Project Level Beginner to Intermediate
Materials 12 bronze opaque 6mm Czech glass pearl round beads
2 gr gold lustered dark topaz Japanese 110 seed beads (Toho 459)
Size B gold beading thread
2 bronze earring hooks
Tools Size 10 beading needle
Scissors
Finished Size Diameter ndash 3 cm (118 inches) (without earring hooks)
BLOG DIY BEADING MAGAZINE ISSUE 32
Flower Tale Earrings
BLOG WWWHANDMADE-JEWELRY-CLUBCOM MEMBERSHIP WWWDIYBEADINGCLUBCOM
Step 1 Cut about 110 cm (43 inches) of thread and
pass it through the needle hole
Pick six groups of one 110 seed bead and one
6 mm round bead
BLOG DIY BEADING MAGAZINE ISSUE 32
Join the beads into a ring and secure with two
square knots
Leave a tail of about 15 cm (59 inches)
Step 2 The working thread should be right before the
6 mm round bead
Pick seven 110 seed beads skip the 6 mm
round bead and pass the needle through the
next 110 seed bead added in the previous
round
Repeat adding groups of seven 110 seed
beads five more times
When adding the last group take the needle
directly through the 110 seed bead from the
previous round and the next one added in the
beginning of current round
Flower Tale Earrings
BLOG WWWHANDMADE-JEWELRY-CLUBCOM MEMBERSHIP WWWDIYBEADINGCLUBCOM
Step 3 Pick three 110 seed beads skip one seed
bead from the chain of seven added in the
previous round and pass with the needle
directly through the next three 110 seed
beads
BLOG DIY BEADING MAGAZINE ISSUE 32
Pick three 110 seed beads skip one seed
bead from the chain of seven added in the
previous round and pass with the needle
through the last one and the first 110 seed
bead from the next chain of seven
Repeat the above directions from Step 3 five
more times
After completing this round make sure the
thread will be exiting from the middle 110
seed bead from the first group of three added
in the beginning of this round
Step 4 Pick one 110 seed bead and go through the
last seed bead of the group of three
Flower Tale Earrings
BLOG WWWHANDMADE-JEWELRY-CLUBCOM MEMBERSHIP WWWDIYBEADINGCLUBCOM
Pick three 110 seed beads and take the
needle through the first seed bead of the next
group of three added in the previous round
BLOG DIY BEADING MAGAZINE ISSUE 32
Pick one 110 seed bead and go with the
needle through the next three seed beads (the
last two of the group of three and the last one
from the chain of seven)
Then go up through three 110 seed beads
(the first from the next group of seven and the
first two from the next group of three)
Repeat the above directions from Step 4 to
complete the remaining petals
When working on the last petal perform the
operation from the image shown on the left
instead of picking the group of three 110 seed
beads string two 110 seed beads the earring
hook other two 110 seed beads and
continue beading as instructed above
When you are done hide the thread ends into the beadwork
Flower Tale Earrings
BLOG WWWHANDMADE-JEWELRY-CLUBCOM MEMBERSHIP WWWDIYBEADINGCLUBCOM
About the Author
Iulia Postică
I was born and live in Moldova Eastern Europe Ever since I remember myself
Ive been crocheting and knitting My grandmother has taught me that and I
loved it very much I always regarded crafts exclusively as a hobby and never
thought of making a career of it I traveled a lot to various historical sites
Actually Ive spent all my childhood summers in archaeological camps with
my father who is a professional archaeologist
I also enjoy metal hammering and wirework as it gives me possibility to
express myself in materials used by human communities since ancient times
copper brass glass seed beads and gemstones That is no surprise to anyone
given my family history and academic background
My shop ldquoBeadedTreasuryrdquo with beading tutorials and bead crochet patterns
httpswwwetsycomshopBeadedTreasury
My shop ldquoArchaeologicardquo with artisan jewelry
httpswwwetsycomshopArcheologica
My blog httpbeadedtreasuryblogspotcom
My facebook httpswwwfacebookcomBeadedTreasury
BLOG DIY BEADING MAGAZINE ISSUE 32
Liberty Earrings
BLOG WWWHANDMADE-JEWELRY-CLUBCOM MEMBERSHIP WWWDIYBEADINGCLUBCOM
Materials - Nr 2 cabochon Preciosa Ornela ovale 18x22 mm turchese
- Rocaille Toho 150 silver lined green emerald
- Nr 2 dagger beads
- Nr 20 pearl 4 mm
- Superduo opaque luster ceramic green
- Rocaille 80 color gold
- Rocaille 80 color ivory
- Delica Miyuki 110 aquagreen mix
- Rocaille Miyuki 110 galvanized silver
- Nr 2 monachelle (earwire)
-Fireline
- Beading Needle nr 12
BLOG DIY BEADING MAGAZINE ISSUE 32
Liberty Earrings
BLOG WWWHANDMADE-JEWELRY-CLUBCOM MEMBERSHIP WWWDIYBEADINGCLUBCOM
Make a circle of 20 delica beads and make a knot (a) Perform two rounds peyote with ivory 80 seed beads (b c) Exit from an ivory
bead
BLOG DIY BEADING MAGAZINE ISSUE 32
a b c
Jump from 80 to 80 with 110 80 gold 110 (a) Finish the round and come out of a 80 gold bead
Jump to the next 80 gold with a 4mm pearl (b) Finish the round and come out
of the first pearl Jump to the 2nd pearl and close with a 80 gold bead(c)
a b c
Position the cabochon and jump from one 80 to the other with two delica bead (a)
Continue with three delicas four times (b) At the bottom sew on two delicas then finish the round by sewing on three delicas for four times passing from one to another roc 80 Tighten the cabochon and exit from the
first two delica that you started with String together a 110 and 150 and enter the second of the three close delicas (c)
a b c
Liberty Earrings
BLOG WWWHANDMADE-JEWELRY-CLUBCOM MEMBERSHIP WWWDIYBEADINGCLUBCOM
Put together 150 110 150 and enter in the second of three next delica (a) Put the same beads for three times then put together 150 and 110 and enter
in the two delica of the bottom tip (b) Enter in the second of three next delica with 110 and 150 (c) Continue passing
in the 80 beads with three beads (150 110 150) for four times then at the top finish the round by putting together a 150 and 110 (d)
BLOG DIY BEADING MAGAZINE ISSUE 32
a b c
Exit from the first 150 sewn in the previous round and jump in the three next beads with a 150 (a)
Put a 150 at a time and exit from the first 110 beads of the bottom tip Jump in the
near 110 with a 150 (b) Finish round repeating steps a and b (c) Exit the roc 80 as shown in the photo (d)
a b c
d
a b c d
Enter in the 80 with four 150 (a b) Enter the 80 beads at the bottom of the pieces with two 110 one superduo one 80 ivory bead one superduo and two 110 (c)
d e f
Liberty Earrings
BLOG WWWHANDMADE-JEWELRY-CLUBCOM MEMBERSHIP WWWDIYBEADINGCLUBCOM
Exit from the bottom pearl (a) Put together 150 three 110 150 and enter in the superduorsquos second hole (b)
Put together three superduo and enter in the next superduorsquos second hole (c) Rethread 15 three 110 150 and return in the opposite direction in the pearl of departure (d)
BLOG DIY BEADING MAGAZINE ISSUE 32
a b
c
Exit from the second pearl indicated from (a) Put 150 four 110 and enter in the second of the three 110 (b) Go to the second superduorsquos hole with four 110 and a 150 (c)
Enter the second hole of the supeduo with a 150(d) Sew in the middle of the bottom of the superduo 150 two 110 150 dagger 150 two 110 150(e)
Enter the second hole of the thirs superduo with 150 (f)
a b c
d
d e f
Liberty Earrings
BLOG WWWHANDMADE-JEWELRY-CLUBCOM MEMBERSHIP WWWDIYBEADINGCLUBCOM BLOG DIY BEADING MAGAZINE ISSUE 32
Put 150 four 110 and enter in the second of three 110 of the base (a) Insert four 110 and 150 in the pearl opposite direction indicated in the picture (b) Go in all the beads
around the piece and exit from the pearl at the top (c) Put 150 three 110 150 and enter the superduo (d)
Enter the ivory bead 80 with two 150 (e) Enter the next superduo with two 150 (f)
a b c
d e f
Put together 150 three 110 and enter in opposite direction in the departurersquos pearl (a) Exit from the 150 beads indicated by photo (b) From this jump in the second of two near
150 with five 150 to created the hole for the earwire (c) Pass the thread in the beads make a few knots and cut the excess thread
a b c
Your earrings are finished
Liberty Earrings
BLOG WWWHANDMADE-JEWELRY-CLUBCOM MEMBERSHIP WWWDIYBEADINGCLUBCOM
About the Author
Mariella Martella
My name is Mariella Martella and I am the author and
designer of jewelry that I sign with the name of Mariel Bijoux
After changing city often for work and study I currently live
in northern Italy I am an art historian with a passion for travel
painting and jewelry design in weaving that project since
2010 In my beads and crystals are the colors of the
Mediterranean sea the atmosphere of summer evenings
and the lights of the places I visited
You can find me at
Etsy shop httpswwwetsycomitshopMarielBijoux
Facebook httpswwwfacebookcommari3lbijoux
Crafting blog httpmarielbijouxblogspotit
Twitter httpstwittercomMarielBijoux
BLOG DIY BEADING MAGAZINE ISSUE 32
Jade Necklace
BLOG WWWHANDMADE-JEWELRY-CLUBCOM MEMBERSHIP WWWDIYBEADINGCLUBCOM
Every time I wear a necklace I always make it a point that the
necklace will lay perfectly flat on my neck Using wire for a necklace
made it possible for me like what I did with Jade Necklace It may look
odd at first having bent wires for a necklace but once the jewelry is
finished youll be so happy how the necklace will perfectly lay on your
neck
The tutorial is catered for intermediate level One must know basic
wirework skills such as wire wrapping making loops wrapped loops
and linking to follow the tutorial It has clear instructions and ultra-clear
close-up photos at each step Additionally you can ask me question
you have on the tutorial No more getting stuck and frustrated on a
confusing or just plain inaccurate pattern
If you followed this tutorial and then sell the accessory or jewelry
please give credit to the author or DIY Beading Clubcom
Copyright 2015
wwwdiybeadingclubcom
wwwhandmade-jewelry-clubcom
BLOG DIY BEADING MAGAZINE ISSUE 32
Jade Necklace
BLOG WWWHANDMADE-JEWELRY-CLUBCOM MEMBERSHIP WWWDIYBEADINGCLUBCOM BLOG DIY BEADING MAGAZINE ISSUE 32
Materials Needed 18ga Craft wire 28ga Craft wire 15mm diameter Green Round Flat Back Sew On Gems 5mm Green pearls
8mm Green pearls 6mm x 11mm teardrop Crystal Treasures Mill Hill beads or any teardrop bead with holes on the side Hook for your clasp
Tools Needed Wire cutter Flat nose pliers Round nose pliers Mandrel A jar or any rounded object to shape your necklace
Skill Level Intermediate
Step 1 Cut 6 inches 18ga wire Make a loop on one end then measure approximately 125 inches and make another loop
Form a size 4 circle on your mandrel
Jade Necklace
BLOG WWWHANDMADE-JEWELRY-CLUBCOM MEMBERSHIP WWWDIYBEADINGCLUBCOM BLOG DIY BEADING MAGAZINE ISSUE 32
Then close the circle by wrapping the extended wire just below the loop Wrap the
wire 2x
This is how it looks like Lets call this circle frame Youll notice that the lower curve is
slightly bigger than the upper curve
Step 2 Cut 8 inches of 28ga wire Wrap one end of
the wire at least 3x on one side of the circle frame just below the loop
Bring up your gem Flat back sew on gems has 2 holes Insert the wire into one hole and then
wrap the wire once onto the circle frame
Jade Necklace
BLOG WWWHANDMADE-JEWELRY-CLUBCOM MEMBERSHIP WWWDIYBEADINGCLUBCOM BLOG DIY BEADING MAGAZINE ISSUE 32
Step 3 Insert a 5mm pearl on the wire and then pass
the wire under circle frame
Repeat previous step 2x and have 3 pearls wrapped
Continue wrapping with your teardrop crystal My crystal has 2 holes on the side
and then continue wrapping with your 5mm pearls then secure your wire
Repeat Step 3 and create as many as needed For 16-inch necklace Ive created 6 of these
components
Jade Necklace
BLOG WWWHANDMADE-JEWELRY-CLUBCOM MEMBERSHIP WWWDIYBEADINGCLUBCOM BLOG DIY BEADING MAGAZINE ISSUE 32
Step 4 Cut a 15-inch 18ga wire and make a loop on
one end Insert 8mm pearl and make a loop on the other end You then use these as connectors
and link the components
Step 5 The necklace is an 18ga wire with wrapped
loops on both ends First cut 7 inches 18ga wire and make a wrapped loop with your hook already inserted Side in 18pcs 5mm pearls
Then make a wrapped loop on the other end connecting the wrapped loop onto the component Do the same for the other
necklace but make the loop on the other end big enough so the hookclasp can pass thru
To have the necklace curve shaped use a jar to bend the wire Voila Now youre
ready to party
Jade Necklace
BLOG WWWHANDMADE-JEWELRY-CLUBCOM MEMBERSHIP WWWDIYBEADINGCLUBCOM
About the Author
Sky Aldovino
I consider myself a late bloomer when it comes to crafting Irsquom a self-taught jewelry maker Jewelry making wasnrsquot really a hobby of mine but unforeseen events lead me to learn jewellery making My family put up a craft store where we sell cross stitch beads and all sorts of crafting materials I fell in love with the beads and tried to create accessories only for myself Clients liked the pieces and I started customizing handmade jewelleries The craft store was a success for 6 years but like any other small businesses we had to close it down and I was confined to staying at home While at home I had all the time using the internet and now working as a home-based jewelry designer
BLOG DIY BEADING MAGAZINE ISSUE 32
Atomic Ring
BLOG WWWHANDMADE-JEWELRY-CLUBCOM MEMBERSHIP WWWDIYBEADINGCLUBCOM
Have fun making shapes using the wigjig Cyclops Make loops going in
circles to mimic the shape of a flower or in this tutorial mimic the
shape of an atom The tutorial will also teach you how to cage a
cabochon Whats nice about this piece is that with one long wire you
can create the ring from start to finish
The tutorial is catered for intermediate to advanced students One
must already know how to make spirals and use a wigjig tool It has
clear instructions and ultra-clear close-up photos at each step
Additionally you can ask me question you have on the tutorial No
more getting stuck and frustrated on a confusing or just plain
inaccurate pattern
If you followed this tutorial and then sell the accessory or jewelry
please give credit to the author or DIY Beading Clubcom
If you like to get a blank wigjig graph visit wigjigcom Shop and Jigs
section
Copyright 2015
wwwdiybeadingclubcom
wwwhandmade-jewelry-clubcom
BLOG DIY BEADING MAGAZINE ISSUE 32
Atomic Ring
BLOG WWWHANDMADE-JEWELRY-CLUBCOM MEMBERSHIP WWWDIYBEADINGCLUBCOM
Materials Needed 20ga Craft wire 28ga Craft wire 11mm Round Cabochon
Tools Needed Wigjig Cyclops 15mm pegs Wire cutter Flat nose pliers Mandrel
Skill Level Intermediate - Advanced
BLOG DIY BEADING MAGAZINE ISSUE 32
Step 1 Lets prepare your wigjig cyclops Position the pegs like so
Atomic Ring
BLOG WWWHANDMADE-JEWELRY-CLUBCOM MEMBERSHIP WWWDIYBEADINGCLUBCOM BLOG DIY BEADING MAGAZINE ISSUE 32
Lets work with longer wire so youll have enough wire to hold onto as you manipulate the wire so cut 36 inches of 20ga wire From
one end of the wire measure 10 inches
On the 10-inch measurement loop the wire at the center peg then continue to loop onto the side pegs going in circle going back to
the center peg after looping on the side peg
Now the wire at the center peg will start to build up as you go around the side pegs so
you need to constantly press the wire at the center peg to accommodate the build up of
wire
When youre done pull out the wire and this is
how it should look like
Atomic Ring
BLOG WWWHANDMADE-JEWELRY-CLUBCOM MEMBERSHIP WWWDIYBEADINGCLUBCOM BLOG DIY BEADING MAGAZINE ISSUE 32
You will notice that the frame opens wide Now to keep the atom frame from opening wide secure the center of the frame by wrapping a 28ga wire What you
need to do is simply pass the 28ga wire into the hole and wrap as many times as needed or until youre sure that the frame is secure
Step 2 Now youre finished with your atom frame Well now create the focal design With the longer wire make a spiral at the center big
enough to accommodate the size of your cabochon In this tutorial the spiral is about
11mm in diameter the same size as my cabochon
Pop in your cabochon and start to make spirals going around and over the cabochon as if you are caging the cabochon Create at
least 5 rounds and then cut off any excess
Step 3 Now lets make the ring and this with the other
end of the wire
Atomic Ring
BLOG WWWHANDMADE-JEWELRY-CLUBCOM MEMBERSHIP WWWDIYBEADINGCLUBCOM BLOG DIY BEADING MAGAZINE ISSUE 32
Bring up your mandrel and wrap the wire to the size of your finger Wrap at least 2 times
When youre sure you have the right size pull the ring out of the mandrel
With the extended wire wrap the wire the secure the ring
Cut off any excess and voila You have your atomic ring Create as many as you can with different colors of cabochon
Atomic Ring
BLOG WWWHANDMADE-JEWELRY-CLUBCOM MEMBERSHIP WWWDIYBEADINGCLUBCOM
About the Author
Sky Aldovino
I consider myself a late bloomer when it comes to crafting Irsquom a self-taught jewelry maker Jewelry making wasnrsquot really a hobby of mine but unforeseen events lead me to learn jewellery making My family put up a craft store where we sell cross stitch beads and all sorts of crafting materials I fell in love with the beads and tried to create accessories only for myself Clients liked the pieces and I started customizing handmade jewelleries The craft store was a success for 6 years but like any other small businesses we had to close it down and I was confined to staying at home While at home I had all the time using the internet and now working as a home-based jewelry designer
BLOG DIY BEADING MAGAZINE ISSUE 32
Featured Article Gemstones Used for Jewelry Making
BLOG WWWHANDMADE-JEWELRY-CLUBCOM MEMBERSHIP WWWDIYBEADINGCLUBCOM
Gemstones are stones which we hold quite highly in terms of value And
jewelry often consists of stones that add attractiveness to it so it is not
surprising when jewelry designers actually use gemstones in their designs In
fact there are different types of gemstones that can be used for making
jewelry There are the expensive and pure gemstones and there are also the
imitation ones The information below will provide some information about
the kinds of stones you can use to create jewelry and how these stones will
impact the jewelry you have created
The first kind of stone which I believe we are all quite familiar with are
birthstones These stones are associated with individualrsquos month of birth
by SunVDesigns by BeyhanAkman
For example Amethyst stone is connected with anybody who is born in
February which carries special significance in the area of emotions and also
spiritually This stone also signifies calm and peace as well
And then we have semi-precious stones which are also often used in jewelry
making They are not as valuable as compared to precious stones but still
valuable Best examples of these stones are aquamarine topaz tourmaline
opal and turquoise
BLOG DIY BEADING MAGAZINE ISSUE 32
Featured Article Gemstones Used for Jewelry Making
BLOG WWWHANDMADE-JEWELRY-CLUBCOM MEMBERSHIP WWWDIYBEADINGCLUBCOM
It is an ideal gift for someone who you deem special Aquamarine pendants
usually work well for anyone and is widely an accepted stone
by HyppieChic by joyeriamestiza
However precious stones are the most unusual
and precious jewels to us Examples of some of
them are emerald sapphire diamond and
ruby These stones are usually very expensive
and are prized for their exquisiteness These
stones are commonly used in high-quality
jewelry designs which costs quite a fortune to
obtain
BLOG DIY BEADING MAGAZINE ISSUE 32
by sarajewelrystu
Jewelry designs with precious stones are usually
given as exceptional gifts on special occasions A
perfect example is a diamond ring that is usually
given as an engagement gift
by ldiamondsforever
Featured Article Gemstones Used for Jewelry Making
BLOG WWWHANDMADE-JEWELRY-CLUBCOM MEMBERSHIP WWWDIYBEADINGCLUBCOM
There are also synthetic stones which are often used to create jewelry
Synthetic stones are artificial imitations of gemstones Synthetic Sapphire
jewelry costs less compare with the authentic ones Most of the time
imitation stones are used to save cost but at the same time have the similar
look of the real stone
BLOG DIY BEADING MAGAZINE ISSUE 32
by shininggems by thaimaker
by lapinduprintemps by PastimeArt
Gemstones are used like beads and you can use it in any designs whether
simple or elaborate
Swarovski crystal components are available in a rich multitude of rondelles Perfect as spacers in necklaces or as discs in earrings Rondelles can be used with many varieties of shapes or sizes Use Swarovski crystal rondelles between large gemstones as accents with precious metal findings Fire Mountain Gems and Beads Crystal Passionsreg brand presents Swarovski crystal in display-ready packaging for brilliant retail presentation Crystal Passionsreg is an assurance of genuine Swarovski crystal
BLOG DIY BEADING MAGAZINE ISSUE 32 BLOG WWWHANDMADE-JEWELRY-CLUBCOM MEMBERSHIP WWWDIYBEADINGCLUBCOM
Recommended Jewelry Making Supplies
Mz Unisex-adults 12pcs 25x18x6mm Turquoise Oval CAB Cabochon
BLOG DIY BEADING MAGAZINE ISSUE 32 BLOG WWWHANDMADE-JEWELRY-CLUBCOM MEMBERSHIP WWWDIYBEADINGCLUBCOM
Recommended Jewelry Making Supplies
For a little sparkle that goes a long way design with Swarovski 4mm faceted bicones Create glorious multi-strand necklaces with the dainty crystals or use as spacers to add a tiny flash to your designs Swarovski crystal components are made in Austria and are considered the finest products of their kind in the world
BLOG DIY BEADING MAGAZINE ISSUE 32 BLOG WWWHANDMADE-JEWELRY-CLUBCOM MEMBERSHIP WWWDIYBEADINGCLUBCOM
Recommended Jewelry Making Supplies
Imitation beads resist color change These beads have uniform quality with a good polish Some strands may have little to no matrix Sizes shapes and colors may vary with handcrafted items
BLOG DIY BEADING MAGAZINE ISSUE 32 BLOG WWWHANDMADE-JEWELRY-CLUBCOM MEMBERSHIP WWWDIYBEADINGCLUBCOM
Recommended Jewelry Making Supplies
Something Blue Necklace and Earrings
BLOG WWWHANDMADE-JEWELRY-CLUBCOM MEMBERSHIP WWWDIYBEADINGCLUBCOM
Skill level Beginner Intermediate Advanced
DIMENSIONS OF THE NECKLACE Inner Circumference 14 18 inch 35 cm
Focal Pendant Width 1 15 inch 35 cm Focal Pendant Height 1 15 inch 35 cm
DIMENSIONS OF THE EARRING Earring Width 716 inch 12 cm Earring Height 1516 inch 25 cm (Without the earring hook)
BLOG DIY BEADING MAGAZINE ISSUE 32
Materials
Note Before purchasing the supplies measure the length of your wished necklace If you decide to bead a longer necklace you should keep in mind that for every extra
frac34 inches 2 cm-s you will need 8 bicones and 8 pearls
Something Blue Necklace and Earrings
BLOG WWWHANDMADE-JEWELRY-CLUBCOM MEMBERSHIP WWWDIYBEADINGCLUBCOM BLOG DIY BEADING MAGAZINE ISSUE 32
Work RAW stitch into a beaded circle and embellish with Swarovski bicones
STEP 2 String 1A and 2 pearls Pass through the previous
second pearl and the freshly added 1A and the first pearl again
STEP 1 Use a comfortable length of thread to string 2
pearls 1A and 1 pearl again leaving a 2rdquo 5cm tail Pass through the first two pearls strung to form a
ring
STEP 3 String 2 pearls and 1A Pass through the previous first pearl and the freshly added two pearls
again
STEP 4 - 17 Repeat STEP 2 and STEP 3 again until you count 17 pearls in the inner circle
But be careful in the last step you only have to add 1 pearl then pass through the first pearls
added in STEP 1 and add another 1A Now pass through the first pearl added in STEP
1and 1A added in this round again to exit from this A
Something Blue Necklace and Earrings
BLOG WWWHANDMADE-JEWELRY-CLUBCOM MEMBERSHIP WWWDIYBEADINGCLUBCOM BLOG DIY BEADING MAGAZINE ISSUE 32
STEP 19 String 2A and pass through the next A added in round 4-17 and the A added in round 18 the 2A added in this round and finally the A added in round 4-17 to exit from the bead showed below
STEP 18 String 3A and pass through the 1A added in the previous round and the first A added in this
round
STEP 20 - 34 Repeat STEP 18 and STEP 19 again until you finish the circle
But be careful in the last step first you have to pass through 3A and then add 1A After this pass
through the 3A again and exit from the A bead
shown below (This is the first A added in STEP 18)
Something Blue Necklace and Earrings
BLOG WWWHANDMADE-JEWELRY-CLUBCOM MEMBERSHIP WWWDIYBEADINGCLUBCOM BLOG DIY BEADING MAGAZINE ISSUE 32
STEP 35 Step up to exit from the pearl shown below (Finishing the previous step in the A bead and then
stepping up from there makes the circle more secure)
Now string 3 bicones Pass through the pearl and the first bicone again
In the reality your circle will look more like this the A beads forming a strong row in the middle of the
pearls
STEP 36 Add 2 bicones Pass through the
neighboring pearl the first bicone added in the previous row and the 2 bicones added in this step
so you can exit from the next pearl
Something Blue Necklace and Earrings
BLOG WWWHANDMADE-JEWELRY-CLUBCOM MEMBERSHIP WWWDIYBEADINGCLUBCOM BLOG DIY BEADING MAGAZINE ISSUE 32
Now in the reality your circle will look more like this the A beads still forming a strong row in the middle of the pearls and the bicones slightly lying on top of
them
STEP 37 - 49 Repeat STEP 35 and STEP 36 again until you finish the circle with the bicones
But be careful in the last step first you have pass through the third bicone added then add 1 bicone
and pass through this little quartet to exit from the bicone shown below (The second one added in
STEP 35)
STEP 50 With these steps we finish the circle by adding 1 bicone to connect the A beads and the
bicone row So add 1 bicone pass through the nearest A bead and add 1 bicone again Pass
through the bicone already there and exit from the bicone you just added
Something Blue Necklace and Earrings
BLOG WWWHANDMADE-JEWELRY-CLUBCOM MEMBERSHIP WWWDIYBEADINGCLUBCOM BLOG DIY BEADING MAGAZINE ISSUE 32
STEP 66-83 Secure the circle by adding 1A between each bicone in the second row of Swarovski
bicones If you finished secure the thread and trim
STEP 51-65 Using the same technique as in STEP 37 - 49 add 1 bicone to finish the third bicone row The black line shows you the way (After STEP 50 pass through the next A bead add 1 bicone and pass through the bicone already there and the bicone added in the previous step Repeat these steps to
finish the inner bicone circle)
MIDDLE CIRCLE Work RAW stitch into a beaded circle and embellish with
Swarovski bicones Remember you need to bead two circles this time
STEP 1 Just like in the focal circle begin with 2 pearls 1A and 1 pearl again on a comfortable length of thread
leaving a 2rdquo 5cm tail Pass through the first two pearls strung to form a ring
Something Blue Necklace and Earrings
BLOG WWWHANDMADE-JEWELRY-CLUBCOM MEMBERSHIP WWWDIYBEADINGCLUBCOM BLOG DIY BEADING MAGAZINE ISSUE 32
STEP 15-28 Mimicing the FOCAL CIRCLElsquos STEP 18-34 bead A beads until you finish the inner part of the
circle Exit from a pearl in the second row This circle should look very similar to the first one but this is a bit
smaller
STEP 2-14 Mimicing the FOCAL CIRCLElsquos STEP 2-17 bead until you count 14 pearls in the inner circle Exit
from the last A added
STEP 29-42 Mimicing FOCAL CIRCLElsquos STEP 35-49 add 2 rows of bicones
STEP 43-56 Mimicing the FOCAL CIRCLElsquos STEP 50-65 bead the third row of bicones to finish the circle
Something Blue Necklace and Earrings
BLOG WWWHANDMADE-JEWELRY-CLUBCOM MEMBERSHIP WWWDIYBEADINGCLUBCOM BLOG DIY BEADING MAGAZINE ISSUE 32
SMALLEST CIRCLE Work RAW stitch into a beaded circle and embellish
with Swarovski bicones Remember you need to bead two circles again
STEP 1 Just like in the focal circle begin with 2 pearls
1A and 1 pearl again on a comfortable length of thread leaving a 2rdquo 5cm tail Pass through the first two
pearls strung to form a ring
STEP 57-70 Just like the FOCAL CIRCLElsquos STEP 66-83 secure the circle by adding 1A between every bicone
in the second row of bicones If you finished secure the thread and trim (Donrsquot forget to bead another
circle)
STEP 2-12 Mimicing the FOCAL CIRCLElsquos STEP 2-17 bead until you count 12 pearls in the inner circle Exit
from the last A added
STEP 13-24 Mimicing the FOCAL CIRCLElsquos STEP 18-34 bead A beads until you finish the inner part of the
circle Exit from a pearl in the second row This circle should look very similar to the first two but this is the
smallest of them all
Something Blue Necklace and Earrings
BLOG WWWHANDMADE-JEWELRY-CLUBCOM MEMBERSHIP WWWDIYBEADINGCLUBCOM BLOG DIY BEADING MAGAZINE ISSUE 32
STEP 37-48 Mimicing the FOCAL CIRCLElsquos STEP 50-65 bead the third row of bicones to finish this circle too
STEP 25-36 Mimicing FOCAL CIRCLElsquos STEP 35-49 add 2
rows of bicones The last step here is purple again
STEP 49-60 Just like the FOCAL CIRCLElsquos STEP 66-83 secure the circle by adding 1A between every bicone
in the second row of bicones If you finished secure the thread and trim (Donrsquot forget that you need two
small circles)
Something Blue Necklace and Earrings
BLOG WWWHANDMADE-JEWELRY-CLUBCOM MEMBERSHIP WWWDIYBEADINGCLUBCOM BLOG DIY BEADING MAGAZINE ISSUE 32
STEP 37-48 Mimicing the FOCAL CIRCLElsquos STEP 50-65 bead the third row of bicones to finish this circle too
STEP 25-36 Mimicing FOCAL CIRCLElsquos STEP 35-49 add 2
rows of bicones The last step here is purple again
STEP 49-60 Just like the FOCAL CIRCLElsquos STEP 66-83 secure the circle by adding 1A between every bicone
in the second row of bicones If you finished secure the thread and trim (Donrsquot forget that you need two
small circles)
Something Blue Necklace and Earrings
BLOG WWWHANDMADE-JEWELRY-CLUBCOM MEMBERSHIP WWWDIYBEADINGCLUBCOM BLOG DIY BEADING MAGAZINE ISSUE 32
STEP 2-6 Continue by adding 1A 1 bicone 1 pearl until you count 6 of each
STEP 1 Begin with 1 pearl 1 bicone 1A and 1 bicone again on a comfortable length of thread leaving a 2rdquo
5cm tail Pass through the pearl and the first bicone strung to form a ring
STEP 7-12 Pass through the A beads to make your
component more secure Also secure the thread and trim (Repeat these steps until you have six 6-BEAD
COMPONENTs)
6-BEAD COMPONENT Work RAW stitch into a beaded circle and embellish with Swarovski bicones
For the necklace we will need six from this component For the earring two
Something Blue Necklace and Earrings
BLOG WWWHANDMADE-JEWELRY-CLUBCOM MEMBERSHIP WWWDIYBEADINGCLUBCOM BLOG DIY BEADING MAGAZINE ISSUE 32
STEP 2-4 Continue by adding 1A 1 bicone 1 pearl
until you count 4 of each
STEP 1 Begin with 1 pearl 1 bicone 1A and 1 bicone again on a comfortable length of thread leaving a 2rdquo
5cm tail Pass through the pearl and the first bicone strung to form a ring
STEP 5-8 Pass through the A beads to make your component more secure Also secure the thread and
trim (Repeat these steps until you have the wished amount of 4-BEAD COMPONENTs)
4-BEAD COMPONENT Work RAW stitch into a beaded circle and embellish with Swarovski bicones
For the necklace-size that is given on the second page we will need 20 from this
component For the earring two
If you would like to make a longer necklace you need to make more (One 4-BEAD COMPONENT measures about 38 inch 1 cm To make the necklace symmetrical you have to have equal amounts on each side This means for every extra frac34 inches
2 cm-s you will need 1 4-BEAD COMPONENT on each side of the necklace)
Something Blue Necklace and Earrings
BLOG WWWHANDMADE-JEWELRY-CLUBCOM MEMBERSHIP WWWDIYBEADINGCLUBCOM BLOG DIY BEADING MAGAZINE ISSUE 32
STEP 2 Connect the MIDDLE CIRCLE to two 6-BEAD COMPONENTs by adding four-times 2As
between the pearls Choose a pearl on the MIDDLE CIRCLE and add
2A pass through a pearl in the 6-BEAD COMPONENT previously added and add 2A again Watch out this has to be symmetrical Repeat this at least two more times to make it
secure Now repeat this entire procedure but choose
the 8-th pearl on MIDDLE CIRCLE Repeat this on the other side of the necklace
too
Choose a pearl on the FOCAL CIRCLE and add 2A pass through a pearl in the 6-BEAD COMPONENT and add 2A again Repeat this at least two more times to make it secure
Now repeat this entire procedure but choose the 5-th pearl on FOCAL CIRCLE This will make the necklace nice on your neck
FINISHING THE NECKLACE Connects the parts with A beads
STEP 1 Connect the FOCAL CIRCLE to two 6-BEAD COMPONENTs by adding four-times 2As between the pearls To do this turn your parts upside down you need to
see the pearls We will work on this side from now on
Something Blue Necklace and Earrings
BLOG WWWHANDMADE-JEWELRY-CLUBCOM MEMBERSHIP WWWDIYBEADINGCLUBCOM BLOG DIY BEADING MAGAZINE ISSUE 32
FINISHING THE EARRING Connects the parts with A beads
STEP 1-2 Connect the 6-BEAD COMPONENT
to 4-BEAD COMPONENT and the 4-BEAD
COMPONENT to the earring hook
First connect the 4-BEAD COMPONENT to the 6-BEAD COMPONENT with 4A beads Mimic
the elongation steps of the necklace if needed
Secondly connect the 4-BEAD COMPONENT
to your earring hook with 4A beads again Leave from the last pearl bead 2A beads the hook (this is the orange oval form) and 2As again Pass through each of them to
secure this connection again
Finally get ready to prepare the other earring ndash since we need two of them
STEP 5 Connect the 4-BEAD COMPONENTs to the toggle clasp thus finishing the
necklace Leaving from the last pearl bead 2A the
clasp(this is the orange oval form) and 2A again Pass through all of them a couple more times to make this connection more
secure
Something Blue Necklace and Earrings
BLOG WWWHANDMADE-JEWELRY-CLUBCOM MEMBERSHIP WWWDIYBEADINGCLUBCOM BLOG DIY BEADING MAGAZINE ISSUE 32
If you finished it is time to try it on It was a great fun wasnrsquot it And how beautiful you look in your new necklace and the matching earrings
Something Blue Necklace and Earrings
BLOG WWWHANDMADE-JEWELRY-CLUBCOM MEMBERSHIP WWWDIYBEADINGCLUBCOM
About the Author
Margit Vogel
My name is Margit Vogel I live in Hungary Europe
By profession I am a biochemical engineer but I fell in love with
beads so much that I could not stop playing with them
I make one-of-a-kind beaded and bead embroidered art
jewelry made of the best quality materials such as Swarovski
stones gemstones Japanese beads (Miyuki and Toho) Czech
glass beads leather soutache and suede Each piece is unique
and individually crafted
Feel free to visit my blog for some eyecandy
httpiformjewelrywordpresscom
My shop httpwwwetsycomshopiformjewelry
Facebook httpwwwfacebookcomiformjewelry
BLOG DIY BEADING MAGAZINE ISSUE 32
Getting Down And Personal With Gianna
Getting Down And Personal With Gianna
Nowadays we see more and more jewelry stores opening up online and with these online jewelry stores it has made it easier for us to purchase and view their creations Have you ever wondered how they are able to manage and produce amazing jewelry pieces and tutorials So heres a little on the journey to open up an online shop We are excited to present to you Gianna aka Beading4perfectionists
Gianna Beader amp Youtuber
Unlike most jewelry makers and beadweavers Gianna did not start beading as a hobby but as a means to make ends meet With goals in trying to
fill the financial gap she did everything she could to expand her earnings ndash working as a security guard
and at the same time learning how to bead and selling her pieces at fair trades and flea markets
Since many were asking if she does home beading workshops she started on exploring how to teach people to bead She loves Scott Bakula and has always loved him till now and this served as her
inspiration to start making a beading video tutorial
Gianna started creating videos because she was at the point in her life where everything seemed to be falling apart And at that moment of time she had difficulties financially and selling jewelry was the only way for her to stay afloat financially She is a big Scott Bakula fan and when she went to the UK to see him on stage that was when it hit her that she is already able to edit videos and
taught herself Photoshop and done workshops at bead fairs so why not put these together and see what happens on Youtube She knew that if she gets enough subscribers and views ndash though no one knew what the exact numbers were you would be invited to become a Youtube partner This way she could monetize her videos with advertisements and hopefully she would be able to be a Youtube partner and be able to pay her bills
BLOG WWWHANDMADE-JEWELRY-CLUBCOM MEMBERSHIP WWWDIYBEADINGCLUBCOM BLOG DIY BEADING MAGAZINE ISSUE 32
Getting Down And Personal With Gianna
Her Youtube channel is popular and the reason why she chose Youtube is because Youtube is the biggest platform and reached almost to the whole world Everyone already knows about it and it was growing rapidly as compared to other platforms like Dailymotion so she figured that Youtube was the way to go Her advice to new designers is that when you start out go to the platforms on the top of your list first then work your way down your list if you do not get accepted by your first choice
After loyally putting up one video every week for about 8 months in a row she became a Youtube partner and monetized her videos She knew she needed at least $100 to get her first payout She managed to reach $100 after 3 months The process was not easy she worked hard lack sleep skipped meals and who knows what happened to Ridge in the Bold and the Beautiful because she stopped watching
On Youtube you can monetize your videos Google pays straight to your bank account and at other countries where they also have the option of getting checks among other options In order to get paid you have to reach the $100 mark and after 3 months For Gianna she thinks that you cannot say that Etsy is better than Youtube or Youtube is better than Etsy Her reasoning is because on Youtube she has many followers which will eventually check out her Etsy shop And to start an Etsy shop you need an audience
BLOG WWWHANDMADE-JEWELRY-CLUBCOM MEMBERSHIP WWWDIYBEADINGCLUBCOM BLOG DIY BEADING MAGAZINE ISSUE 32
television and dedicated her spare time (as she had another job) to Youtube She re-registered at the chamber of commerce after receiving her first payout Her work at Youtube now is not a full time job and things have changed on Youtube It is easier to become a parter but there are some countries that need to wait for an invitation to be a Youtube partner Take Italy for instance Italians would have to work just as hard as she did if they want to become a Youtube partner
Getting Down And Personal With Gianna
With her 60000 subscribers on her b4pbakup Youtube channel it is possible to sell at least 60 patterns on the first day on Etsy after promoting the PDF file on her Youtube channel Though you may think that 60 out of 60000 is not much you have to remember that not everyone has the means to purchase the PDF file and a lot of people still rather watch her carry out the tutorial(for free) on Youtube instead of reading the patterns or paying for the patterns even if the pattern is for a fundraiser and only cost $2 Her insights on Youtube is that Youtube is not what it used to be 6 years ago Instead of making more money every month she is making less and less because advertisers have more options of where they want to advertise their ads Ads do not pay as much as they used to Back in the days you could get 25 cents per ad Now you count yourself lucky if you could get 5 cents roll in after two hours
BLOG WWWHANDMADE-JEWELRY-CLUBCOM MEMBERSHIP WWWDIYBEADINGCLUBCOM BLOG DIY BEADING MAGAZINE ISSUE 32
And on top of that adblockers are destroying Youtube channel owners Youtube will start making changes to the channels where there will be ldquopaid subscriptionrdquo channels This has already been implemented in some countries but not in her country The Netherlands This means there will no longer be ads for her monthly paying subscribers She hopes that Youtube will add on a paid per video option feature The option to be a paid channel or free channel or to start a new channel for paying customers is yours to choose Gianna is not happy with Youtube because many others like her have worked so hard and for some years to become Youtube partners(which was something to be proud of) has lost their status
Getting Down And Personal With Gianna
Her advice for those who want to go on Youtube is 1 Do it because you want to teach
2 Do it because you want a career with beads
BLOG WWWHANDMADE-JEWELRY-CLUBCOM MEMBERSHIP WWWDIYBEADINGCLUBCOM BLOG DIY BEADING MAGAZINE ISSUE 32
After putting up about 20 videos and having at least 5000 subscribers add the PDF tutorials to Etsy and Craftsy She found out that her audience would like to have the PDF after watching her videos This is because they would rather print out the PDF and work while seated in a comfy chair technically somewhere else instead of having to pause the video time and time again
Gianna has also made a video for those who want to know the whole story of her journey up until the present day And to get updates on her you can check it out here She has also started a vlog where she tells of how she still works towards becoming a financial independent beader and explains her journey to get where she wants to be(or die trying) Gianna will be in the UK on October the 17th giving an all-day workshop with 4 different patterns
(2 beginners and 2 advanced) in Wotton-under-Edge
Gianna will be there Friday night as the workshop is on Saturday She will be leaving on Sunday Her
doors are open to all who wants to continue the party with her at the hotel across the street
For more information do contact Ann Tucker on Facebook
httpswwwfacebookcomanntucker501
Rec
omm
end
ed R
ead
ings
Making Jewelry with Gemstone
Beads
Combines the popular craft of beading with beautiful semi-precious stones which are collected by many Features a variety of versatile ideas which can be adapted for any type of gem or bead Readers will learn to reate beautiful gemstone jewelry with this dazzling collection of over 100 projects ranging from eyecatching earrings and accessories to exquisite necklaces and bracelets This beautiful book offers an impressive range of 28 beautiful semi-precious stones (including birthstones) and a glimpse into the fascinating history and mythical properties behind them
BLOG DIY BEADING MAGAZINE ISSUE 32 BLOG WWWHANDMADE-JEWELRY-CLUBCOM MEMBERSHIP WWWDIYBEADINGCLUBCOM
Rec
omm
end
ed R
ead
ings
Convertible Crystal Jewelry
Reverse it Twist it Wear it Many
Ways
Diane Whiting presents the idea that convertibility isnrsquot just about using pieces in multiple ways it is also about using skills and creativity in multiple ways Using ever-popular sparkling crystals Diane showcases design elements through various techniques for fun easy fashionable jewelry With 25 projects the reader can choose from bracelets necklaces and earrings that match any outfit or styleDiane Whiting presents the idea that convertibility isnrsquot just about using pieces in multiple ways it is also about using skills and creativity in multiple ways
BLOG DIY BEADING MAGAZINE ISSUE 32 BLOG WWWHANDMADE-JEWELRY-CLUBCOM MEMBERSHIP WWWDIYBEADINGCLUBCOM
Rec
omm
end
ed R
ead
ings
Wire Jewelry Masterclass
Wrapped Coiled and Woven Pieces
Using Fine Materials
Comprehensive and fabulous Wire Jewelry Masterclass takes an in-depth look at an intricate and rewarding craft The 24 projects which range from simple Dragons tear briolette earrings to a Poseidon-under-the-sea pendant will delight and inspire jewelers of all levels and tastes Divided into beginner intermediate and advanced sections this beautifully photographed step-by-step guide is the ticket to wire jewelry expertise
BLOG DIY BEADING MAGAZINE ISSUE 32 BLOG WWWHANDMADE-JEWELRY-CLUBCOM MEMBERSHIP WWWDIYBEADINGCLUBCOM
Rec
omm
end
ed R
ead
ings
Timeless Wire Weaving The
Complete Course
Timeless Wire Weaving focuses on developing wirework skills through 13 projects using three classic wire weaving techniques coiling wrapping and weaving The projects are built around a focal cabochon and incorporate seed beads and crystals in imaginative ways Designers learn to make the jewelry shown in the book and they also use the techniques learned to create innovative jewelry pieces of their own
BLOG DIY BEADING MAGAZINE ISSUE 32 BLOG WWWHANDMADE-JEWELRY-CLUBCOM MEMBERSHIP WWWDIYBEADINGCLUBCOM
Our digital magazine is available through
Apple Newsstand service available to millions of IPAD users
To advertise with us please email us at
diyjewelryclubgmailcom
Or visit our page at
httphandmade-jewelry-clubcomadvertising-diy-beading-magazine
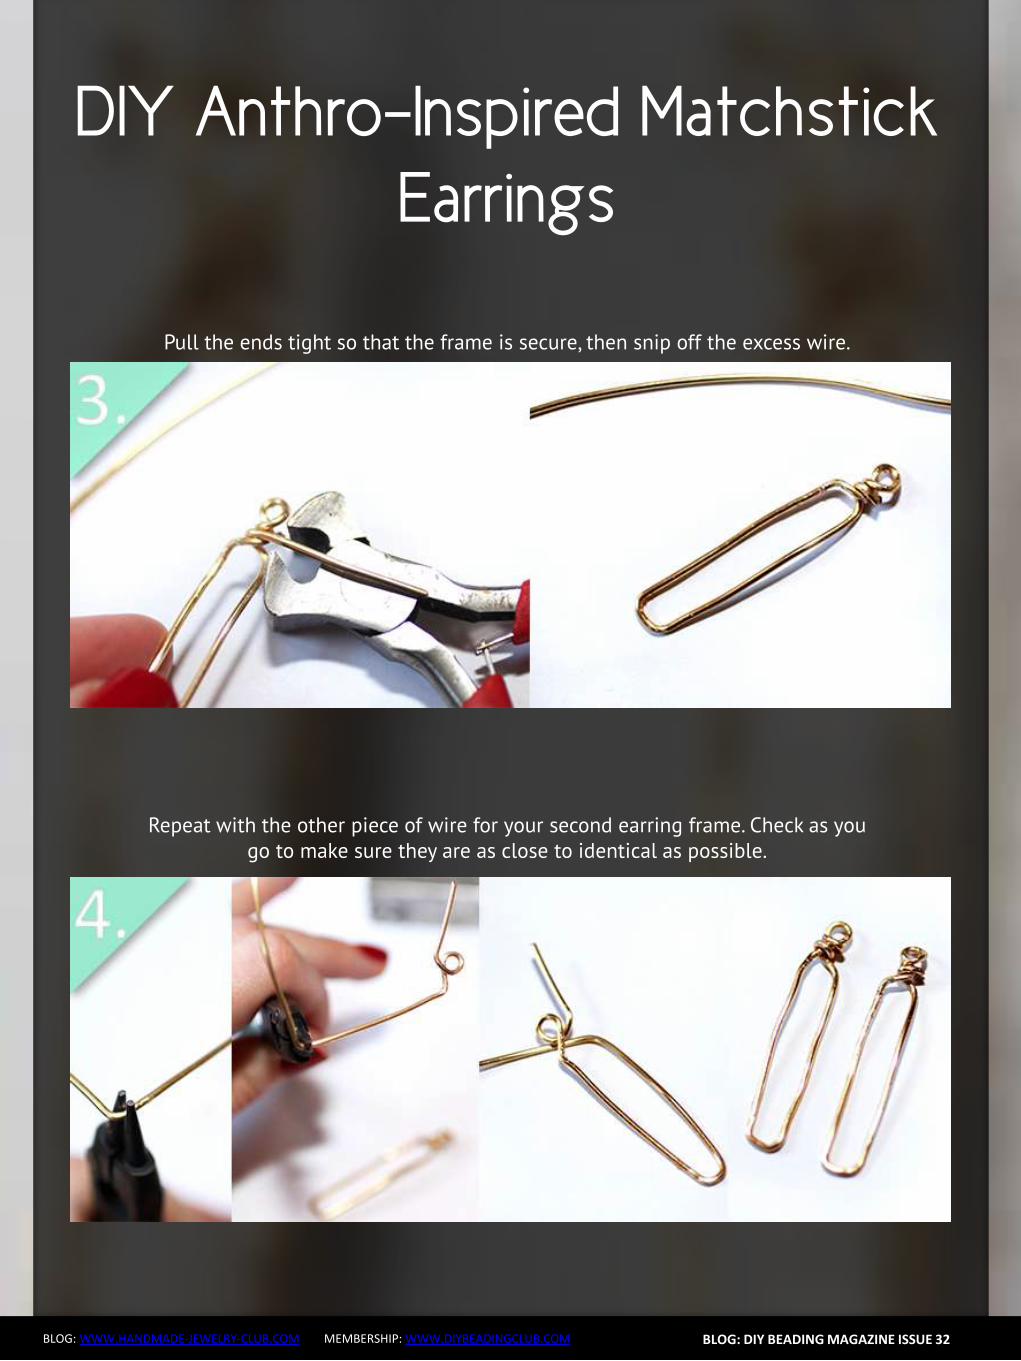
BLOG DIY BEADING MAGAZINE ISSUE 32 BLOG WWWHANDMADE-JEWELRY-CLUBCOM MEMBERSHIP WWWDIYBEADINGCLUBCOM
DIY Anthro-Inspired Matchstick
Earrings
Secure the wire at the top by wrapping it near the loop Repeat on the second earring
Add earring hooks of choice and yoursquore done
Advertisement
DIY Anthro-Inspired Matchstick
Earrings
BLOG DIY BEADING MAGAZINE ISSUE 32 BLOG WWWHANDMADE-JEWELRY-CLUBCOM MEMBERSHIP WWWDIYBEADINGCLUBCOM
About the Author
Jamie Hannigan
Perhaps Irsquom just easily fascinated but I often see magic and wonder in things other might consider mundane Irsquom a very imaginative person and as a child I often created fictional
narratives to go along with places or objects
My inspiration comes from all over Sometimes Irsquom really into nature like toadstools and mushrooms Sometimes Irsquom really into man-made things like ships Sometimes Irsquom really
into concepts and themes like astrology or mythology
I go through phases and Irsquove learned to embrace that in my work I create the things I want to make at that exact moment If just one other person finds enjoyment in what my
imagination led me to produce I consider it a success
To see more jewelry tutorials and my other work visit jamiebhannigancom and check my Etsy shop at
httpswwwetsycomshopjamiebhannigan
Wire Wrapped Gemstone
Pendant
BLOG WWWHANDMADE-JEWELRY-CLUBCOM MEMBERSHIP WWWDIYBEADINGCLUBCOM
You will usually find these more natural gemstones at bead shows vs your local bead shop
Wire Jewelry Making Skill Level Intermediate
Wire Jewelry Making Supplies - two lengths of 22 gauge round dead soft wire (4 times the length of your bead) - one 3 inch (76 cm) length of 20 gauge half round half hard (HH) wire (wrapping wire) - one gemstone bead - three 6mm beads (I used amethyst Swarovskireg crystals - three one inch (25 cm) head pins - one ink pen (used as a mandrel) - one marker pen - blue painters tape - jewelers polishing cloth - ruler Jewelry Making Tools - wire cutters - round nose pliers - chain nose pliers
BLOG DIY BEADING MAGAZINE ISSUE 32
Wire Wrapped Gemstone
Pendant
BLOG WWWHANDMADE-JEWELRY-CLUBCOM MEMBERSHIP WWWDIYBEADINGCLUBCOM
1 Using a ruler measure the length of your bead and note the measurement
Multiply the measurement by 4 My bead is 3 inches (76 cm) long so my final measurement is 12 inches (305 cm)
BLOG DIY BEADING MAGAZINE ISSUE 32
2 Tear off two pieces of blue painters tape from the roll and temporarily tape them to your work surface
Using the wire cutters cut two lengths of the 22 gauge round wire measuring the length of your
final measurement (I cut two 12 inch (305 cm) lengths of wire)
Clean and straighten both wires by pulling them through a jewelers polishing cloth (not pictured)
With both wires side by side with the ends even with one another use the torn tape lengths to tape the wires together (This will temporarily hold them together while you to wire wrap them)
With the marker pen mark the center of both wires
Wire Wrapped Gemstone
Pendant
BLOG WWWHANDMADE-JEWELRY-CLUBCOM MEMBERSHIP WWWDIYBEADINGCLUBCOM
3 Using the wire cutters cut one 3 inch (76 cm) length of 20 gauge half round half hard wire This is the wrapping wire
With the flat side of the wire facing you use the chain nose pliers to make a 14 inch (06 cm) bend
towards you and at a slight angle in one end of the wire This makes a hook in the wire The flat sides of the wire should face one another
BLOG DIY BEADING MAGAZINE ISSUE 32
4 Pick up the taped wires at their center between your fore finger and thumb Place the hook of the half round wire slightly to the right of the center mark on the two round
wires
5 Holding the long end and the tail of the half round wire hook use the tip of the chain nose pliers to squeeze the bend of the hook against the round wires This sets or secures the wrapping wire
Wire Wrapped Gemstone
Pendant
BLOG WWWHANDMADE-JEWELRY-CLUBCOM MEMBERSHIP WWWDIYBEADINGCLUBCOM
6 Bend the long end of the half round wire up over the two round wires You have created one wire wrap
BLOG DIY BEADING MAGAZINE ISSUE 32
7 Bend the long end of the half round wire down and behind the two round wires
8 Continue to repeat Steps 6 and 7 until you have made three (3) to five (5) complete wire wraps around the round wires (I made five (5) wire wraps) After making one or two wire wraps secure
the wraps against the round wires as in Step 5
The front of the wrap (as pictured below) will be the side where the half round wrapping wire is not cut
Wire Wrapped Gemstone
Pendant
BLOG WWWHANDMADE-JEWELRY-CLUBCOM MEMBERSHIP WWWDIYBEADINGCLUBCOM
9 Use wire cutters to cut the excess half round wire Cut the wire about half way behind the round wires so that the ends will not be seen from the front side of the wire wrap
BLOG DIY BEADING MAGAZINE ISSUE 32
10 With the wire wrap at the bottom center of your bead use your fingers to gently shape the wires around the bottom along the sides and to the top of the bead
11 Use the chain nose pliers to secure all the wraps against the round wires
Wire Wrapped Gemstone
Pendant
BLOG WWWHANDMADE-JEWELRY-CLUBCOM MEMBERSHIP WWWDIYBEADINGCLUBCOM
12 Slide the chain nose pliers in between the round wires where they meet the wire wrap and spread the wires apart
BLOG DIY BEADING MAGAZINE ISSUE 32
Spreading the wires apart begins to create the cage for the bead
13 With its bottom center resting against the wire wrap place your bead or gemstone inside the cage
Gather all four of the wires around the bead so that it is encased within them and so that the wires
meet at the top of the bead Hold all four wires between your forefinger and thumb (like you are pinching the wires)
Wire Wrapped Gemstone
Pendant
BLOG WWWHANDMADE-JEWELRY-CLUBCOM MEMBERSHIP WWWDIYBEADINGCLUBCOM
14 Decide which side will be the front of the pendant Locate the wire that is in front of all the wires and with your fingers bend it downward at a 45 degree angle
BLOG DIY BEADING MAGAZINE ISSUE 32
15 Use your fingers or the chain nose pliers to wrap the bent wire around the other three wires where they all meet or cross one another
16 Continue wrapping the wire around the other three to secure them End the wrapping at the back of the pendant
Using the chain nose pliers tuck the wire into the wraps (not pictured)
Wire Wrapped Gemstone
Pendant
BLOG WWWHANDMADE-JEWELRY-CLUBCOM MEMBERSHIP WWWDIYBEADINGCLUBCOM
17 Make sure that the wires are evenly spread around the beads Now we need to tighten the wires that encase the bead
On one of wires about halfway up the wire place the jaws of the round nose pliers on either side
of the wire Now rotate the pliers making a double bend in the wire Repeat on the other three wires making one or two double bends in each wire When youre done shake the bead to make sure it cannot fall out of the wires
BLOG DIY BEADING MAGAZINE ISSUE 32
18 Now decorate two of the top wires Almost anything is possible Try making a few different bends curls or twists in the wire
I decided to loosely coil the top wires around an ink pen
19 Gently untighten the coil by pulling the end of the wire downward Using the round nose pliers make a simple wire loop on the end of the coil
Wire Wrapped Gemstone
Pendant
BLOG WWWHANDMADE-JEWELRY-CLUBCOM MEMBERSHIP WWWDIYBEADINGCLUBCOM
20 Repeat Steps 18 and 19 on a second top wire
BLOG DIY BEADING MAGAZINE ISSUE 32
21 The third top wire becomes the bail Coil it tightly around the ink pen making at least two wire coils The end of the wire should fall in front of the pendant
Make a simple wire loop on the wire end
22 Heres how the wire coilsspiralsbends should look Make any necessary adjustments to the wires along the sides of the gemstones and the two that fall
in front of pendant
Make sure that the wires tightly secure the bead The wire wrap at the bottom of the pendant may no longer be at the center of the bead
Wire Wrapped Gemstone
Pendant
BLOG WWWHANDMADE-JEWELRY-CLUBCOM MEMBERSHIP WWWDIYBEADINGCLUBCOM
23 On each of the three head pins string a 6mm bead Make a simple wire loop on the end of each head pin
Attach one head pin bead unit to each of the simple wire loops on the wire wrapped pendant
BLOG DIY BEADING MAGAZINE ISSUE 32
Completed Wire Wrapped Pendant
Now hang your handcrafted wire wrap pendant from your favorite chain or strand of beads
Enjoy wire wrapping your own gemstone to make a wire wrapped pendant
BLOG WWWHANDMADE-JEWELRY-CLUBCOM MEMBERSHIP WWWDIYBEADINGCLUBCOM
Wire Wrapped Gemstone
Pendant About the Author
Wanda Epps
Wanda is an avid jewelry maker who loves to make jewelry with beads She began her journey into jewelry making after walking into a bookstore to find crafting books on sale One on making jewelry caught her eye and after making a simple bead necklace she was hooked That was in late 2003 Over the years she has taken classes on various jewelry making techniques stringing making wire jewelry bead crochet macrame metal jewelry making to name some She expects that her love of making beaded jewelry will continue as bead supplies and beautiful new beads seem endless Her fulltime job provides for her needs but beads are her passion She invites you to join her in the many adventures of making jewelry at
httpwwwmaking-beaded-jewelrycom httpswwwfacebookcompagesMaking-Beaded-Jewelry-
Guide254860504236
BLOG DIY BEADING MAGAZINE ISSUE 32
Should You Sell In The Marketplace
Should You Sell In The Marketplace
BLOG WWWHANDMADE-JEWELRY-CLUBCOM MEMBERSHIP WWWDIYBEADINGCLUBCOM
We are all able to create jewelry pieces and there will come a time where you want to share the joy with the rest of the world whether it is in the form of a tutorial or a finish
piece And this is when you will start to think about putting up your work for sale As someone who is new to the business world you may be confused on where you should start selling your work And the all famous site that is first on most peoplersquos minds is Etsy Etsy is popular and it is user friendly and that is why it is the choice of many designers and crafters But there are also some who wants to set up their own
shop with their logo and to put their works out as their own even at the very beginning Thatrsquos where you may be confused on which platform you should go for
So herersquos some explanation on how you will benefit from setting up shop at Etsy
BLOG DIY BEADING MAGAZINE ISSUE 32
1 Etsy has everything ready for you and all you have to do is to bring in your works and use the features that are already available for you to use ndash like the payment system web traffic design and layout are not an issue that you need to worry about
2 You also have the trust of customers almost immediately because Etsy has already established a name for itself and therefore there is already trust in brand in their site When you use Etsy your brand will automatically be exposed to many customers who visit Etsy to find what they need
3 For every site there is always the need to be able to interact with other sellers to help each other out Forums or community boards are very helpful as other passionate designers and crafters share their experience to help out the newer members of the community This is also where you will be able to form good relationships with other sellers and who knows you may even find a partnership over time
Should You Sell In The Marketplace
BLOG WWWHANDMADE-JEWELRY-CLUBCOM MEMBERSHIP WWWDIYBEADINGCLUBCOM
Though Etsy has itrsquos good points there are some things which you need to take into consideration as well
1 When you are using someone elsersquos facilities there is always the chance of having
being shut down due to unforeseen circumstances Be it violation of Etsyrsquos policy or decisions made by the administration department this will sometimes cost you a dent in your brand name and you may lose the trust of your followers and starting all over again may be the only way to start again
2 If you are a very creative person then you may feel limited as the design of shops at Etsy is standardized If you are new and do not worry so much about designs of websites this is perfectly fine But do remember that when you want to distinguish yourself from other sellers it will be tougher as you try to make your brand more well-known due to limitations of design of the site
3 Since Etsy has so many sellers all in one place the competition is of course going to be tighter and fiercer because even though customers are viewing your products there are also other options from other sellers listed on the page as well So customers may turn away if they see something of a better price
4 Each product that you list with Etsy costs you money Etsy also takes a 35 percent of the selling price of the item However if or when you start your business on your own website it will also cost you for web hosting and you would need PayPal and they have a fee of 29 percent +30cents So either way you will still need to pay to list your products on the web
BLOG DIY BEADING MAGAZINE ISSUE 32
Should You Sell In The Marketplace
BLOG WWWHANDMADE-JEWELRY-CLUBCOM MEMBERSHIP WWWDIYBEADINGCLUBCOM
If you are confident enough to have your own business site by all means go ahead and do it The benefits of it are as below
1 You get to be your own boss You get to control everything from the design of the
website layout and how you want to advertise your products You can also change your policies and not be affected by it because it is you who changes it Your shop will not be shut down suddenly without notice and you do not need to worry that you have to start all over again
2 Distractions of competitors products on your page will not be an issue It is your site and it is up to you whether or not you want to allow what kind of advertisements on your site So if you donrsquot want something on your page it is your call
3 You will be able to capture the attention of the media and customers as well if you are able to have a well designed site Nowadays people are attracted to colors and they can see if you have put effort into beautifying the site for the customers You can do so much more than just uploading some pictures onto Etsy on your own site you can always update your site design and your products to complement each other and therefore becoming more attractive
BLOG DIY BEADING MAGAZINE ISSUE 32
Should You Sell In The Marketplace
BLOG WWWHANDMADE-JEWELRY-CLUBCOM MEMBERSHIP WWWDIYBEADINGCLUBCOM
And herersquos the tough part when you want to have your own site
BLOG DIY BEADING MAGAZINE ISSUE 32
1 You need to have knowledge of what you want to do You have to learn to be involved in every aspect of your site so that you know what us going on at the front end of things and at the back end of things as well But if you have not any knowledge of designing a website it is usually a recipe for something to go wrong You have to remember that you need a user interface that is simple for customers to use an easy to use shopping cart you should know which third party platforms are trusted and one which will not keep changing their regulations If you still want to have your site hiring a designer may be your best option
2 You have to work towards promoting your store on your own You will need to find people to feature you in their social media sites because it will not just fall into your lap You need to have promotions or road shows if you need to Marketing your store is important whether or not you are using Etsy or other marketing platforms but if you are on your own it is even more important
3 You will still be competing with other sellers Though now you are now not only competing with Etsy sellers you are now competing with sellers and stores from the world wide web Etsy is already so well known so people tend to go there first so you need to up your methods of attracting customers
Should You Sell In The Marketplace
BLOG WWWHANDMADE-JEWELRY-CLUBCOM MEMBERSHIP WWWDIYBEADINGCLUBCOM
When we first started out we used Etsy as our platform to sell our works Other than that we also utilized blogs and we eventually built our own website as our main base
BLOG DIY BEADING MAGAZINE ISSUE 32
Things have changed over these 3 years It was easier to get sales without much effort but now with so many other shops also utilizing Etsy the competition has grown tremendously Now our main sales come from our own online store and has exceeded sales from Etsy
So what we recommend is that using an existing platform such as Etsy to start out is good and in time build up your website or webstore
It is not that hard to start your own webstore either these two companies offers the option to set up your webstore
1 Shopify
2 Bigcommerce
There are many things to take into consideration before starting a store online It is perfectly fine to start out using Etsy before branching out on your own But you can also
have both ndash have your own website and a store on Etsy There are many stores who operate like this They technically get customers from Etsy and the reroute them to their own websites As long as you are in control of what you are doing and not stressing and
confusing yourself you can opt for more exposure for your store
So do take some time and take a breather to really think through what will be the best for YOU and do remember that starting small does not mean you will not be able to be big
OFFER Get which can be downloaded by subscribing to
httpinternet-marketing-publishingcom
BLOG WWWHANDMADE-JEWELRY-CLUBCOM MEMBERSHIP WWWDIYBEADINGCLUBCOM
Materials - Copper wire diameter 08 mm - Copper wire diameter 04 mm - Small gemstone bead (~4 mm) (I used 3 mm beads in this tutorial because I didnrsquot have any other beads at the time but the beads in the earrings on the cover are 4 mm) Make sure that the beads you want to use are resistant against chemicals such as liver of sulfur or whichever oxidizing substance you want to use to give the metal patina The beads in the picture above are facetted garnet buttons in the tutorial itself I used black spinel facetted buttons Equipment - Round nose pliers - Flat nose pliers - Side-cutters - A small file - A cylindrical object of about 5mm diameter (eg a mandrel for jump rings) - Hammer amp anvil - Liver of sulfur or some other means to oxidize the metal (optional)
LOVE-ly Earrings
BLOG DIY BEADING MAGAZINE ISSUE 32
BLOG WWWHANDMADE-JEWELRY-CLUBCOM MEMBERSHIP WWWDIYBEADINGCLUBCOM
This tutorial teaches how to make 1 ear stud I recommend making both ear studs of the set simultaneously step-by-step so that symmetry is easier to achieve Between steps check for
symmetry in size and shape and adjust the construction if needed
LOVE-ly Earrings
BLOG DIY BEADING MAGAZINE ISSUE 32
Step 1 Straighten the end of the copper wire (+- 6cm) by rubbing along it with your fingers for a
few seconds
Step 2 Bend over the wire onto itself as illustrated below using flat nose pliers
Step 3 Grab the doubled-over wire with the flat nose pliers and push the two sides against each
other Use little force and do it bit by bit to avoid damaging or kinking the wire
Step 4 Push the two adjacent pieces of wire apart to create the bottom shape of the heart as shown
on the picture above
BLOG WWWHANDMADE-JEWELRY-CLUBCOM MEMBERSHIP WWWDIYBEADINGCLUBCOM
LOVE-ly Earrings
BLOG DIY BEADING MAGAZINE ISSUE 32
Step 5 Hammer down the angled wire (the part circled in red) This strengthens the construction
and looks more professional
Step 6 Wrap the two ends of wire tightly around a cylindrical object (+- 5 mm diameter)
Step 7 Push apart the loops you just made by wrapping the wire around the cylindrical object The wire should now be shaped like a heart as
illustrated above
Step 8 Use round nose pliers to bend around the wire for each side of the heart as illustrated above
BLOG WWWHANDMADE-JEWELRY-CLUBCOM MEMBERSHIP WWWDIYBEADINGCLUBCOM
LOVE-ly Earrings
BLOG DIY BEADING MAGAZINE ISSUE 32
Step 9 Use the flat nose pliers to bend one of the two wires (preferably the longer wire) in a 90deg angle at the place marked with a red dot In the picture accompanying the next step you can see
how it should look from the front
Step 10 Use the round nose pliers to bend the other piece of wire in a decorative coil You will cut off the rest of the wire of the coil at approximately the spot marked with a red dot so take that into account when coiling the wire into the shape that
you desire
Step 11 Cut of the wire at the spot indicated in the previous picture and file off any sharp edges
Step 12 Cut off the ear wire at the desired length (Between 1 and 2 cm If in doubt try the earring on
to see if it sits comfortably) and file off any sharp edges
BLOG WWWHANDMADE-JEWELRY-CLUBCOM MEMBERSHIP WWWDIYBEADINGCLUBCOM
LOVE-ly Earrings
BLOG DIY BEADING MAGAZINE ISSUE 32
Step 13 Hammer down the rest of the heart (bumps and coil) If you canrsquot reach certain parts because the ear wire is in the way bend that part of the heart shape away
(verticallyupward) and bend it back after you finish hammering
Congrats yoursquove now made a basic heart-shaped ear stud Next wersquore going to decorate it with a little gemstone and more copper wire
Step 14 Cut off a length of 04 mm copper wire (about 10-20 cm) and string the bead onto it
Step 15 Place the bead in the ldquonon-coilrdquo upper part of the heart shaped ear stud holding it between thumb and forefinger Let approximately 4 cm of the 04 mm wire stick out over the edge of the
heart as illustrated above
Step 16 Wrap the wire twice around the frame so that if you face the front of the ear stud the wire is
directed towards yourself
BLOG WWWHANDMADE-JEWELRY-CLUBCOM MEMBERSHIP WWWDIYBEADINGCLUBCOM
LOVE-ly Earrings
BLOG DIY BEADING MAGAZINE ISSUE 32
Step 17 Flip the wire over the wire with the bead (indicated by the red arrow) and pull tight whilst holding the bead (and its wire) tightly in place It
should look like the construction in the big picture above
Step 18 And make another loop around the wire with the bead The 04 mm wire is now coiled around
twice two times two coils around the frame and two coils around itself
Step 19 Repeat the wire-fastening procedure described in steps 16-18 with the other end of the
wire securing the gemstone in the heart frame Let the wire stick out at the back of the earstud
Step 20 Pull the wire through the lsquocoilrsquo part of the heart shape to the front The wire should lsquocross overrsquo to the other side of the heart at the back of the ear
stud
Step 21 Coil the wire around the frame until you are content with the design Optionally you can hammer down the coils a bit I often do this because I think it
looks somewhat more sophisticated and professional
BLOG WWWHANDMADE-JEWELRY-CLUBCOM MEMBERSHIP WWWDIYBEADINGCLUBCOM
LOVE-ly Earrings
BLOG DIY BEADING MAGAZINE ISSUE 32
Step 22 Cut off the spare bits of wire preferably at the backside of the ear stud and tuck in the ends
Congrats yoursquove now made a heart-shaped ear stud Next we are going to finish it off with a patina
Step 23 Oxidize the metal of the ear studs I always use liver of sulfur solved in warm water The metal
will turn a dark color and matte texture Afterwards rinse the ear studs thoroughly with water and pat
them dry
Step 24 Rub the oxidized ear stud all over with a rough polishing pad to bring back (a dark copper)
color to the surface
Yoursquove now finished making your own LOVE-ly ear studs
Secure them in your ear with plastic or copper stops These can be bought online or in jewelry-supply
stores
Variation ideas You can easily vary in size and shape (longer hearts smaller coils pointier bottoms etc) and
use different materials As you can see the earring I make in this tutorial has a slightly smaller bead than the
earrings on the cover which influences the overall appearance somewhat
The earrings underneath are made with sterling silver and gold wire (super-short coils) and contain small pink
rubies
LOVE-ly Earrings
BLOG WWWHANDMADE-JEWELRY-CLUBCOM MEMBERSHIP WWWDIYBEADINGCLUBCOM
About the Author
Jeske Hendriks
Hi there My name is Jeske and I love all things handmade Over the years Irsquove dabbled in countless different arts and crafts but nowadays I mainly focus on making jewellery and cutting stone cabochons As for jewellery
my preferred materials are silver wire and gemstonemineral beads Using wire-wrapping and basic silver smithing techniques I create both simple
and intricate pieces ndash each and every one of them unique a personal little artwork
You are welcome to follow me on facebook stop by at my personal
webpage andor to have a look at my Etsy shops httpswwwfacebookcomyeskecrafts
httpwwwyeskecraftscom httpwwwyourbeadsandfindingsetsycom
httpwwwyeskecraftsetsycom httpwwwyeskemiscetsycom
BLOG DIY BEADING MAGAZINE ISSUE 32
Flower Tale Earrings
BLOG WWWHANDMADE-JEWELRY-CLUBCOM MEMBERSHIP WWWDIYBEADINGCLUBCOM
Techniques Beadweaving
Project Level Beginner to Intermediate
Materials 12 bronze opaque 6mm Czech glass pearl round beads
2 gr gold lustered dark topaz Japanese 110 seed beads (Toho 459)
Size B gold beading thread
2 bronze earring hooks
Tools Size 10 beading needle
Scissors
Finished Size Diameter ndash 3 cm (118 inches) (without earring hooks)
BLOG DIY BEADING MAGAZINE ISSUE 32
Flower Tale Earrings
BLOG WWWHANDMADE-JEWELRY-CLUBCOM MEMBERSHIP WWWDIYBEADINGCLUBCOM
Step 1 Cut about 110 cm (43 inches) of thread and
pass it through the needle hole
Pick six groups of one 110 seed bead and one
6 mm round bead
BLOG DIY BEADING MAGAZINE ISSUE 32
Join the beads into a ring and secure with two
square knots
Leave a tail of about 15 cm (59 inches)
Step 2 The working thread should be right before the
6 mm round bead
Pick seven 110 seed beads skip the 6 mm
round bead and pass the needle through the
next 110 seed bead added in the previous
round
Repeat adding groups of seven 110 seed
beads five more times
When adding the last group take the needle
directly through the 110 seed bead from the
previous round and the next one added in the
beginning of current round
Flower Tale Earrings
BLOG WWWHANDMADE-JEWELRY-CLUBCOM MEMBERSHIP WWWDIYBEADINGCLUBCOM
Step 3 Pick three 110 seed beads skip one seed
bead from the chain of seven added in the
previous round and pass with the needle
directly through the next three 110 seed
beads
BLOG DIY BEADING MAGAZINE ISSUE 32
Pick three 110 seed beads skip one seed
bead from the chain of seven added in the
previous round and pass with the needle
through the last one and the first 110 seed
bead from the next chain of seven
Repeat the above directions from Step 3 five
more times
After completing this round make sure the
thread will be exiting from the middle 110
seed bead from the first group of three added
in the beginning of this round
Step 4 Pick one 110 seed bead and go through the
last seed bead of the group of three
Flower Tale Earrings
BLOG WWWHANDMADE-JEWELRY-CLUBCOM MEMBERSHIP WWWDIYBEADINGCLUBCOM
Pick three 110 seed beads and take the
needle through the first seed bead of the next
group of three added in the previous round
BLOG DIY BEADING MAGAZINE ISSUE 32
Pick one 110 seed bead and go with the
needle through the next three seed beads (the
last two of the group of three and the last one
from the chain of seven)
Then go up through three 110 seed beads
(the first from the next group of seven and the
first two from the next group of three)
Repeat the above directions from Step 4 to
complete the remaining petals
When working on the last petal perform the
operation from the image shown on the left
instead of picking the group of three 110 seed
beads string two 110 seed beads the earring
hook other two 110 seed beads and
continue beading as instructed above
When you are done hide the thread ends into the beadwork
Flower Tale Earrings
BLOG WWWHANDMADE-JEWELRY-CLUBCOM MEMBERSHIP WWWDIYBEADINGCLUBCOM
About the Author
Iulia Postică
I was born and live in Moldova Eastern Europe Ever since I remember myself
Ive been crocheting and knitting My grandmother has taught me that and I
loved it very much I always regarded crafts exclusively as a hobby and never
thought of making a career of it I traveled a lot to various historical sites
Actually Ive spent all my childhood summers in archaeological camps with
my father who is a professional archaeologist
I also enjoy metal hammering and wirework as it gives me possibility to
express myself in materials used by human communities since ancient times
copper brass glass seed beads and gemstones That is no surprise to anyone
given my family history and academic background
My shop ldquoBeadedTreasuryrdquo with beading tutorials and bead crochet patterns
httpswwwetsycomshopBeadedTreasury
My shop ldquoArchaeologicardquo with artisan jewelry
httpswwwetsycomshopArcheologica
My blog httpbeadedtreasuryblogspotcom
My facebook httpswwwfacebookcomBeadedTreasury
BLOG DIY BEADING MAGAZINE ISSUE 32
Liberty Earrings
BLOG WWWHANDMADE-JEWELRY-CLUBCOM MEMBERSHIP WWWDIYBEADINGCLUBCOM
Materials - Nr 2 cabochon Preciosa Ornela ovale 18x22 mm turchese
- Rocaille Toho 150 silver lined green emerald
- Nr 2 dagger beads
- Nr 20 pearl 4 mm
- Superduo opaque luster ceramic green
- Rocaille 80 color gold
- Rocaille 80 color ivory
- Delica Miyuki 110 aquagreen mix
- Rocaille Miyuki 110 galvanized silver
- Nr 2 monachelle (earwire)
-Fireline
- Beading Needle nr 12
BLOG DIY BEADING MAGAZINE ISSUE 32
Liberty Earrings
BLOG WWWHANDMADE-JEWELRY-CLUBCOM MEMBERSHIP WWWDIYBEADINGCLUBCOM
Make a circle of 20 delica beads and make a knot (a) Perform two rounds peyote with ivory 80 seed beads (b c) Exit from an ivory
bead
BLOG DIY BEADING MAGAZINE ISSUE 32
a b c
Jump from 80 to 80 with 110 80 gold 110 (a) Finish the round and come out of a 80 gold bead
Jump to the next 80 gold with a 4mm pearl (b) Finish the round and come out
of the first pearl Jump to the 2nd pearl and close with a 80 gold bead(c)
a b c
Position the cabochon and jump from one 80 to the other with two delica bead (a)
Continue with three delicas four times (b) At the bottom sew on two delicas then finish the round by sewing on three delicas for four times passing from one to another roc 80 Tighten the cabochon and exit from the
first two delica that you started with String together a 110 and 150 and enter the second of the three close delicas (c)
a b c
Liberty Earrings
BLOG WWWHANDMADE-JEWELRY-CLUBCOM MEMBERSHIP WWWDIYBEADINGCLUBCOM
Put together 150 110 150 and enter in the second of three next delica (a) Put the same beads for three times then put together 150 and 110 and enter
in the two delica of the bottom tip (b) Enter in the second of three next delica with 110 and 150 (c) Continue passing
in the 80 beads with three beads (150 110 150) for four times then at the top finish the round by putting together a 150 and 110 (d)
BLOG DIY BEADING MAGAZINE ISSUE 32
a b c
Exit from the first 150 sewn in the previous round and jump in the three next beads with a 150 (a)
Put a 150 at a time and exit from the first 110 beads of the bottom tip Jump in the
near 110 with a 150 (b) Finish round repeating steps a and b (c) Exit the roc 80 as shown in the photo (d)
a b c
d
a b c d
Enter in the 80 with four 150 (a b) Enter the 80 beads at the bottom of the pieces with two 110 one superduo one 80 ivory bead one superduo and two 110 (c)
d e f
Liberty Earrings
BLOG WWWHANDMADE-JEWELRY-CLUBCOM MEMBERSHIP WWWDIYBEADINGCLUBCOM
Exit from the bottom pearl (a) Put together 150 three 110 150 and enter in the superduorsquos second hole (b)
Put together three superduo and enter in the next superduorsquos second hole (c) Rethread 15 three 110 150 and return in the opposite direction in the pearl of departure (d)
BLOG DIY BEADING MAGAZINE ISSUE 32
a b
c
Exit from the second pearl indicated from (a) Put 150 four 110 and enter in the second of the three 110 (b) Go to the second superduorsquos hole with four 110 and a 150 (c)
Enter the second hole of the supeduo with a 150(d) Sew in the middle of the bottom of the superduo 150 two 110 150 dagger 150 two 110 150(e)
Enter the second hole of the thirs superduo with 150 (f)
a b c
d
d e f
Liberty Earrings
BLOG WWWHANDMADE-JEWELRY-CLUBCOM MEMBERSHIP WWWDIYBEADINGCLUBCOM BLOG DIY BEADING MAGAZINE ISSUE 32
Put 150 four 110 and enter in the second of three 110 of the base (a) Insert four 110 and 150 in the pearl opposite direction indicated in the picture (b) Go in all the beads
around the piece and exit from the pearl at the top (c) Put 150 three 110 150 and enter the superduo (d)
Enter the ivory bead 80 with two 150 (e) Enter the next superduo with two 150 (f)
a b c
d e f
Put together 150 three 110 and enter in opposite direction in the departurersquos pearl (a) Exit from the 150 beads indicated by photo (b) From this jump in the second of two near
150 with five 150 to created the hole for the earwire (c) Pass the thread in the beads make a few knots and cut the excess thread
a b c
Your earrings are finished
Liberty Earrings
BLOG WWWHANDMADE-JEWELRY-CLUBCOM MEMBERSHIP WWWDIYBEADINGCLUBCOM
About the Author
Mariella Martella
My name is Mariella Martella and I am the author and
designer of jewelry that I sign with the name of Mariel Bijoux
After changing city often for work and study I currently live
in northern Italy I am an art historian with a passion for travel
painting and jewelry design in weaving that project since
2010 In my beads and crystals are the colors of the
Mediterranean sea the atmosphere of summer evenings
and the lights of the places I visited
You can find me at
Etsy shop httpswwwetsycomitshopMarielBijoux
Facebook httpswwwfacebookcommari3lbijoux
Crafting blog httpmarielbijouxblogspotit
Twitter httpstwittercomMarielBijoux
BLOG DIY BEADING MAGAZINE ISSUE 32
Jade Necklace
BLOG WWWHANDMADE-JEWELRY-CLUBCOM MEMBERSHIP WWWDIYBEADINGCLUBCOM
Every time I wear a necklace I always make it a point that the
necklace will lay perfectly flat on my neck Using wire for a necklace
made it possible for me like what I did with Jade Necklace It may look
odd at first having bent wires for a necklace but once the jewelry is
finished youll be so happy how the necklace will perfectly lay on your
neck
The tutorial is catered for intermediate level One must know basic
wirework skills such as wire wrapping making loops wrapped loops
and linking to follow the tutorial It has clear instructions and ultra-clear
close-up photos at each step Additionally you can ask me question
you have on the tutorial No more getting stuck and frustrated on a
confusing or just plain inaccurate pattern
If you followed this tutorial and then sell the accessory or jewelry
please give credit to the author or DIY Beading Clubcom
Copyright 2015
wwwdiybeadingclubcom
wwwhandmade-jewelry-clubcom
BLOG DIY BEADING MAGAZINE ISSUE 32
Jade Necklace
BLOG WWWHANDMADE-JEWELRY-CLUBCOM MEMBERSHIP WWWDIYBEADINGCLUBCOM BLOG DIY BEADING MAGAZINE ISSUE 32
Materials Needed 18ga Craft wire 28ga Craft wire 15mm diameter Green Round Flat Back Sew On Gems 5mm Green pearls
8mm Green pearls 6mm x 11mm teardrop Crystal Treasures Mill Hill beads or any teardrop bead with holes on the side Hook for your clasp
Tools Needed Wire cutter Flat nose pliers Round nose pliers Mandrel A jar or any rounded object to shape your necklace
Skill Level Intermediate
Step 1 Cut 6 inches 18ga wire Make a loop on one end then measure approximately 125 inches and make another loop
Form a size 4 circle on your mandrel
Jade Necklace
BLOG WWWHANDMADE-JEWELRY-CLUBCOM MEMBERSHIP WWWDIYBEADINGCLUBCOM BLOG DIY BEADING MAGAZINE ISSUE 32
Then close the circle by wrapping the extended wire just below the loop Wrap the
wire 2x
This is how it looks like Lets call this circle frame Youll notice that the lower curve is
slightly bigger than the upper curve
Step 2 Cut 8 inches of 28ga wire Wrap one end of
the wire at least 3x on one side of the circle frame just below the loop
Bring up your gem Flat back sew on gems has 2 holes Insert the wire into one hole and then
wrap the wire once onto the circle frame
Jade Necklace
BLOG WWWHANDMADE-JEWELRY-CLUBCOM MEMBERSHIP WWWDIYBEADINGCLUBCOM BLOG DIY BEADING MAGAZINE ISSUE 32
Step 3 Insert a 5mm pearl on the wire and then pass
the wire under circle frame
Repeat previous step 2x and have 3 pearls wrapped
Continue wrapping with your teardrop crystal My crystal has 2 holes on the side
and then continue wrapping with your 5mm pearls then secure your wire
Repeat Step 3 and create as many as needed For 16-inch necklace Ive created 6 of these
components
Jade Necklace
BLOG WWWHANDMADE-JEWELRY-CLUBCOM MEMBERSHIP WWWDIYBEADINGCLUBCOM BLOG DIY BEADING MAGAZINE ISSUE 32
Step 4 Cut a 15-inch 18ga wire and make a loop on
one end Insert 8mm pearl and make a loop on the other end You then use these as connectors
and link the components
Step 5 The necklace is an 18ga wire with wrapped
loops on both ends First cut 7 inches 18ga wire and make a wrapped loop with your hook already inserted Side in 18pcs 5mm pearls
Then make a wrapped loop on the other end connecting the wrapped loop onto the component Do the same for the other
necklace but make the loop on the other end big enough so the hookclasp can pass thru
To have the necklace curve shaped use a jar to bend the wire Voila Now youre
ready to party
Jade Necklace
BLOG WWWHANDMADE-JEWELRY-CLUBCOM MEMBERSHIP WWWDIYBEADINGCLUBCOM
About the Author
Sky Aldovino
I consider myself a late bloomer when it comes to crafting Irsquom a self-taught jewelry maker Jewelry making wasnrsquot really a hobby of mine but unforeseen events lead me to learn jewellery making My family put up a craft store where we sell cross stitch beads and all sorts of crafting materials I fell in love with the beads and tried to create accessories only for myself Clients liked the pieces and I started customizing handmade jewelleries The craft store was a success for 6 years but like any other small businesses we had to close it down and I was confined to staying at home While at home I had all the time using the internet and now working as a home-based jewelry designer
BLOG DIY BEADING MAGAZINE ISSUE 32
Atomic Ring
BLOG WWWHANDMADE-JEWELRY-CLUBCOM MEMBERSHIP WWWDIYBEADINGCLUBCOM
Have fun making shapes using the wigjig Cyclops Make loops going in
circles to mimic the shape of a flower or in this tutorial mimic the
shape of an atom The tutorial will also teach you how to cage a
cabochon Whats nice about this piece is that with one long wire you
can create the ring from start to finish
The tutorial is catered for intermediate to advanced students One
must already know how to make spirals and use a wigjig tool It has
clear instructions and ultra-clear close-up photos at each step
Additionally you can ask me question you have on the tutorial No
more getting stuck and frustrated on a confusing or just plain
inaccurate pattern
If you followed this tutorial and then sell the accessory or jewelry
please give credit to the author or DIY Beading Clubcom
If you like to get a blank wigjig graph visit wigjigcom Shop and Jigs
section
Copyright 2015
wwwdiybeadingclubcom
wwwhandmade-jewelry-clubcom
BLOG DIY BEADING MAGAZINE ISSUE 32
Atomic Ring
BLOG WWWHANDMADE-JEWELRY-CLUBCOM MEMBERSHIP WWWDIYBEADINGCLUBCOM
Materials Needed 20ga Craft wire 28ga Craft wire 11mm Round Cabochon
Tools Needed Wigjig Cyclops 15mm pegs Wire cutter Flat nose pliers Mandrel
Skill Level Intermediate - Advanced
BLOG DIY BEADING MAGAZINE ISSUE 32
Step 1 Lets prepare your wigjig cyclops Position the pegs like so
Atomic Ring
BLOG WWWHANDMADE-JEWELRY-CLUBCOM MEMBERSHIP WWWDIYBEADINGCLUBCOM BLOG DIY BEADING MAGAZINE ISSUE 32
Lets work with longer wire so youll have enough wire to hold onto as you manipulate the wire so cut 36 inches of 20ga wire From
one end of the wire measure 10 inches
On the 10-inch measurement loop the wire at the center peg then continue to loop onto the side pegs going in circle going back to
the center peg after looping on the side peg
Now the wire at the center peg will start to build up as you go around the side pegs so
you need to constantly press the wire at the center peg to accommodate the build up of
wire
When youre done pull out the wire and this is
how it should look like
Atomic Ring
BLOG WWWHANDMADE-JEWELRY-CLUBCOM MEMBERSHIP WWWDIYBEADINGCLUBCOM BLOG DIY BEADING MAGAZINE ISSUE 32
You will notice that the frame opens wide Now to keep the atom frame from opening wide secure the center of the frame by wrapping a 28ga wire What you
need to do is simply pass the 28ga wire into the hole and wrap as many times as needed or until youre sure that the frame is secure
Step 2 Now youre finished with your atom frame Well now create the focal design With the longer wire make a spiral at the center big
enough to accommodate the size of your cabochon In this tutorial the spiral is about
11mm in diameter the same size as my cabochon
Pop in your cabochon and start to make spirals going around and over the cabochon as if you are caging the cabochon Create at
least 5 rounds and then cut off any excess
Step 3 Now lets make the ring and this with the other
end of the wire
Atomic Ring
BLOG WWWHANDMADE-JEWELRY-CLUBCOM MEMBERSHIP WWWDIYBEADINGCLUBCOM BLOG DIY BEADING MAGAZINE ISSUE 32
Bring up your mandrel and wrap the wire to the size of your finger Wrap at least 2 times
When youre sure you have the right size pull the ring out of the mandrel
With the extended wire wrap the wire the secure the ring
Cut off any excess and voila You have your atomic ring Create as many as you can with different colors of cabochon
Atomic Ring
BLOG WWWHANDMADE-JEWELRY-CLUBCOM MEMBERSHIP WWWDIYBEADINGCLUBCOM
About the Author
Sky Aldovino
I consider myself a late bloomer when it comes to crafting Irsquom a self-taught jewelry maker Jewelry making wasnrsquot really a hobby of mine but unforeseen events lead me to learn jewellery making My family put up a craft store where we sell cross stitch beads and all sorts of crafting materials I fell in love with the beads and tried to create accessories only for myself Clients liked the pieces and I started customizing handmade jewelleries The craft store was a success for 6 years but like any other small businesses we had to close it down and I was confined to staying at home While at home I had all the time using the internet and now working as a home-based jewelry designer
BLOG DIY BEADING MAGAZINE ISSUE 32
Featured Article Gemstones Used for Jewelry Making
BLOG WWWHANDMADE-JEWELRY-CLUBCOM MEMBERSHIP WWWDIYBEADINGCLUBCOM
Gemstones are stones which we hold quite highly in terms of value And
jewelry often consists of stones that add attractiveness to it so it is not
surprising when jewelry designers actually use gemstones in their designs In
fact there are different types of gemstones that can be used for making
jewelry There are the expensive and pure gemstones and there are also the
imitation ones The information below will provide some information about
the kinds of stones you can use to create jewelry and how these stones will
impact the jewelry you have created
The first kind of stone which I believe we are all quite familiar with are
birthstones These stones are associated with individualrsquos month of birth
by SunVDesigns by BeyhanAkman
For example Amethyst stone is connected with anybody who is born in
February which carries special significance in the area of emotions and also
spiritually This stone also signifies calm and peace as well
And then we have semi-precious stones which are also often used in jewelry
making They are not as valuable as compared to precious stones but still
valuable Best examples of these stones are aquamarine topaz tourmaline
opal and turquoise
BLOG DIY BEADING MAGAZINE ISSUE 32
Featured Article Gemstones Used for Jewelry Making
BLOG WWWHANDMADE-JEWELRY-CLUBCOM MEMBERSHIP WWWDIYBEADINGCLUBCOM
It is an ideal gift for someone who you deem special Aquamarine pendants
usually work well for anyone and is widely an accepted stone
by HyppieChic by joyeriamestiza
However precious stones are the most unusual
and precious jewels to us Examples of some of
them are emerald sapphire diamond and
ruby These stones are usually very expensive
and are prized for their exquisiteness These
stones are commonly used in high-quality
jewelry designs which costs quite a fortune to
obtain
BLOG DIY BEADING MAGAZINE ISSUE 32
by sarajewelrystu
Jewelry designs with precious stones are usually
given as exceptional gifts on special occasions A
perfect example is a diamond ring that is usually
given as an engagement gift
by ldiamondsforever
Featured Article Gemstones Used for Jewelry Making
BLOG WWWHANDMADE-JEWELRY-CLUBCOM MEMBERSHIP WWWDIYBEADINGCLUBCOM
There are also synthetic stones which are often used to create jewelry
Synthetic stones are artificial imitations of gemstones Synthetic Sapphire
jewelry costs less compare with the authentic ones Most of the time
imitation stones are used to save cost but at the same time have the similar
look of the real stone
BLOG DIY BEADING MAGAZINE ISSUE 32
by shininggems by thaimaker
by lapinduprintemps by PastimeArt
Gemstones are used like beads and you can use it in any designs whether
simple or elaborate
Swarovski crystal components are available in a rich multitude of rondelles Perfect as spacers in necklaces or as discs in earrings Rondelles can be used with many varieties of shapes or sizes Use Swarovski crystal rondelles between large gemstones as accents with precious metal findings Fire Mountain Gems and Beads Crystal Passionsreg brand presents Swarovski crystal in display-ready packaging for brilliant retail presentation Crystal Passionsreg is an assurance of genuine Swarovski crystal
BLOG DIY BEADING MAGAZINE ISSUE 32 BLOG WWWHANDMADE-JEWELRY-CLUBCOM MEMBERSHIP WWWDIYBEADINGCLUBCOM
Recommended Jewelry Making Supplies
Mz Unisex-adults 12pcs 25x18x6mm Turquoise Oval CAB Cabochon
BLOG DIY BEADING MAGAZINE ISSUE 32 BLOG WWWHANDMADE-JEWELRY-CLUBCOM MEMBERSHIP WWWDIYBEADINGCLUBCOM
Recommended Jewelry Making Supplies
For a little sparkle that goes a long way design with Swarovski 4mm faceted bicones Create glorious multi-strand necklaces with the dainty crystals or use as spacers to add a tiny flash to your designs Swarovski crystal components are made in Austria and are considered the finest products of their kind in the world
BLOG DIY BEADING MAGAZINE ISSUE 32 BLOG WWWHANDMADE-JEWELRY-CLUBCOM MEMBERSHIP WWWDIYBEADINGCLUBCOM
Recommended Jewelry Making Supplies
Imitation beads resist color change These beads have uniform quality with a good polish Some strands may have little to no matrix Sizes shapes and colors may vary with handcrafted items
BLOG DIY BEADING MAGAZINE ISSUE 32 BLOG WWWHANDMADE-JEWELRY-CLUBCOM MEMBERSHIP WWWDIYBEADINGCLUBCOM
Recommended Jewelry Making Supplies
Something Blue Necklace and Earrings
BLOG WWWHANDMADE-JEWELRY-CLUBCOM MEMBERSHIP WWWDIYBEADINGCLUBCOM
Skill level Beginner Intermediate Advanced
DIMENSIONS OF THE NECKLACE Inner Circumference 14 18 inch 35 cm
Focal Pendant Width 1 15 inch 35 cm Focal Pendant Height 1 15 inch 35 cm
DIMENSIONS OF THE EARRING Earring Width 716 inch 12 cm Earring Height 1516 inch 25 cm (Without the earring hook)
BLOG DIY BEADING MAGAZINE ISSUE 32
Materials
Note Before purchasing the supplies measure the length of your wished necklace If you decide to bead a longer necklace you should keep in mind that for every extra
frac34 inches 2 cm-s you will need 8 bicones and 8 pearls
Something Blue Necklace and Earrings
BLOG WWWHANDMADE-JEWELRY-CLUBCOM MEMBERSHIP WWWDIYBEADINGCLUBCOM BLOG DIY BEADING MAGAZINE ISSUE 32
Work RAW stitch into a beaded circle and embellish with Swarovski bicones
STEP 2 String 1A and 2 pearls Pass through the previous
second pearl and the freshly added 1A and the first pearl again
STEP 1 Use a comfortable length of thread to string 2
pearls 1A and 1 pearl again leaving a 2rdquo 5cm tail Pass through the first two pearls strung to form a
ring
STEP 3 String 2 pearls and 1A Pass through the previous first pearl and the freshly added two pearls
again
STEP 4 - 17 Repeat STEP 2 and STEP 3 again until you count 17 pearls in the inner circle
But be careful in the last step you only have to add 1 pearl then pass through the first pearls
added in STEP 1 and add another 1A Now pass through the first pearl added in STEP
1and 1A added in this round again to exit from this A
Something Blue Necklace and Earrings
BLOG WWWHANDMADE-JEWELRY-CLUBCOM MEMBERSHIP WWWDIYBEADINGCLUBCOM BLOG DIY BEADING MAGAZINE ISSUE 32
STEP 19 String 2A and pass through the next A added in round 4-17 and the A added in round 18 the 2A added in this round and finally the A added in round 4-17 to exit from the bead showed below
STEP 18 String 3A and pass through the 1A added in the previous round and the first A added in this
round
STEP 20 - 34 Repeat STEP 18 and STEP 19 again until you finish the circle
But be careful in the last step first you have to pass through 3A and then add 1A After this pass
through the 3A again and exit from the A bead
shown below (This is the first A added in STEP 18)
Something Blue Necklace and Earrings
BLOG WWWHANDMADE-JEWELRY-CLUBCOM MEMBERSHIP WWWDIYBEADINGCLUBCOM BLOG DIY BEADING MAGAZINE ISSUE 32
STEP 35 Step up to exit from the pearl shown below (Finishing the previous step in the A bead and then
stepping up from there makes the circle more secure)
Now string 3 bicones Pass through the pearl and the first bicone again
In the reality your circle will look more like this the A beads forming a strong row in the middle of the
pearls
STEP 36 Add 2 bicones Pass through the
neighboring pearl the first bicone added in the previous row and the 2 bicones added in this step
so you can exit from the next pearl
Something Blue Necklace and Earrings
BLOG WWWHANDMADE-JEWELRY-CLUBCOM MEMBERSHIP WWWDIYBEADINGCLUBCOM BLOG DIY BEADING MAGAZINE ISSUE 32
Now in the reality your circle will look more like this the A beads still forming a strong row in the middle of the pearls and the bicones slightly lying on top of
them
STEP 37 - 49 Repeat STEP 35 and STEP 36 again until you finish the circle with the bicones
But be careful in the last step first you have pass through the third bicone added then add 1 bicone
and pass through this little quartet to exit from the bicone shown below (The second one added in
STEP 35)
STEP 50 With these steps we finish the circle by adding 1 bicone to connect the A beads and the
bicone row So add 1 bicone pass through the nearest A bead and add 1 bicone again Pass
through the bicone already there and exit from the bicone you just added
Something Blue Necklace and Earrings
BLOG WWWHANDMADE-JEWELRY-CLUBCOM MEMBERSHIP WWWDIYBEADINGCLUBCOM BLOG DIY BEADING MAGAZINE ISSUE 32
STEP 66-83 Secure the circle by adding 1A between each bicone in the second row of Swarovski
bicones If you finished secure the thread and trim
STEP 51-65 Using the same technique as in STEP 37 - 49 add 1 bicone to finish the third bicone row The black line shows you the way (After STEP 50 pass through the next A bead add 1 bicone and pass through the bicone already there and the bicone added in the previous step Repeat these steps to
finish the inner bicone circle)
MIDDLE CIRCLE Work RAW stitch into a beaded circle and embellish with
Swarovski bicones Remember you need to bead two circles this time
STEP 1 Just like in the focal circle begin with 2 pearls 1A and 1 pearl again on a comfortable length of thread
leaving a 2rdquo 5cm tail Pass through the first two pearls strung to form a ring
Something Blue Necklace and Earrings
BLOG WWWHANDMADE-JEWELRY-CLUBCOM MEMBERSHIP WWWDIYBEADINGCLUBCOM BLOG DIY BEADING MAGAZINE ISSUE 32
STEP 15-28 Mimicing the FOCAL CIRCLElsquos STEP 18-34 bead A beads until you finish the inner part of the
circle Exit from a pearl in the second row This circle should look very similar to the first one but this is a bit
smaller
STEP 2-14 Mimicing the FOCAL CIRCLElsquos STEP 2-17 bead until you count 14 pearls in the inner circle Exit
from the last A added
STEP 29-42 Mimicing FOCAL CIRCLElsquos STEP 35-49 add 2 rows of bicones
STEP 43-56 Mimicing the FOCAL CIRCLElsquos STEP 50-65 bead the third row of bicones to finish the circle
Something Blue Necklace and Earrings
BLOG WWWHANDMADE-JEWELRY-CLUBCOM MEMBERSHIP WWWDIYBEADINGCLUBCOM BLOG DIY BEADING MAGAZINE ISSUE 32
SMALLEST CIRCLE Work RAW stitch into a beaded circle and embellish
with Swarovski bicones Remember you need to bead two circles again
STEP 1 Just like in the focal circle begin with 2 pearls
1A and 1 pearl again on a comfortable length of thread leaving a 2rdquo 5cm tail Pass through the first two
pearls strung to form a ring
STEP 57-70 Just like the FOCAL CIRCLElsquos STEP 66-83 secure the circle by adding 1A between every bicone
in the second row of bicones If you finished secure the thread and trim (Donrsquot forget to bead another
circle)
STEP 2-12 Mimicing the FOCAL CIRCLElsquos STEP 2-17 bead until you count 12 pearls in the inner circle Exit
from the last A added
STEP 13-24 Mimicing the FOCAL CIRCLElsquos STEP 18-34 bead A beads until you finish the inner part of the
circle Exit from a pearl in the second row This circle should look very similar to the first two but this is the
smallest of them all
Something Blue Necklace and Earrings
BLOG WWWHANDMADE-JEWELRY-CLUBCOM MEMBERSHIP WWWDIYBEADINGCLUBCOM BLOG DIY BEADING MAGAZINE ISSUE 32
STEP 37-48 Mimicing the FOCAL CIRCLElsquos STEP 50-65 bead the third row of bicones to finish this circle too
STEP 25-36 Mimicing FOCAL CIRCLElsquos STEP 35-49 add 2
rows of bicones The last step here is purple again
STEP 49-60 Just like the FOCAL CIRCLElsquos STEP 66-83 secure the circle by adding 1A between every bicone
in the second row of bicones If you finished secure the thread and trim (Donrsquot forget that you need two
small circles)
Something Blue Necklace and Earrings
BLOG WWWHANDMADE-JEWELRY-CLUBCOM MEMBERSHIP WWWDIYBEADINGCLUBCOM BLOG DIY BEADING MAGAZINE ISSUE 32
STEP 37-48 Mimicing the FOCAL CIRCLElsquos STEP 50-65 bead the third row of bicones to finish this circle too
STEP 25-36 Mimicing FOCAL CIRCLElsquos STEP 35-49 add 2
rows of bicones The last step here is purple again
STEP 49-60 Just like the FOCAL CIRCLElsquos STEP 66-83 secure the circle by adding 1A between every bicone
in the second row of bicones If you finished secure the thread and trim (Donrsquot forget that you need two
small circles)
Something Blue Necklace and Earrings
BLOG WWWHANDMADE-JEWELRY-CLUBCOM MEMBERSHIP WWWDIYBEADINGCLUBCOM BLOG DIY BEADING MAGAZINE ISSUE 32
STEP 2-6 Continue by adding 1A 1 bicone 1 pearl until you count 6 of each
STEP 1 Begin with 1 pearl 1 bicone 1A and 1 bicone again on a comfortable length of thread leaving a 2rdquo
5cm tail Pass through the pearl and the first bicone strung to form a ring
STEP 7-12 Pass through the A beads to make your
component more secure Also secure the thread and trim (Repeat these steps until you have six 6-BEAD
COMPONENTs)
6-BEAD COMPONENT Work RAW stitch into a beaded circle and embellish with Swarovski bicones
For the necklace we will need six from this component For the earring two
Something Blue Necklace and Earrings
BLOG WWWHANDMADE-JEWELRY-CLUBCOM MEMBERSHIP WWWDIYBEADINGCLUBCOM BLOG DIY BEADING MAGAZINE ISSUE 32
STEP 2-4 Continue by adding 1A 1 bicone 1 pearl
until you count 4 of each
STEP 1 Begin with 1 pearl 1 bicone 1A and 1 bicone again on a comfortable length of thread leaving a 2rdquo
5cm tail Pass through the pearl and the first bicone strung to form a ring
STEP 5-8 Pass through the A beads to make your component more secure Also secure the thread and
trim (Repeat these steps until you have the wished amount of 4-BEAD COMPONENTs)
4-BEAD COMPONENT Work RAW stitch into a beaded circle and embellish with Swarovski bicones
For the necklace-size that is given on the second page we will need 20 from this
component For the earring two
If you would like to make a longer necklace you need to make more (One 4-BEAD COMPONENT measures about 38 inch 1 cm To make the necklace symmetrical you have to have equal amounts on each side This means for every extra frac34 inches
2 cm-s you will need 1 4-BEAD COMPONENT on each side of the necklace)
Something Blue Necklace and Earrings
BLOG WWWHANDMADE-JEWELRY-CLUBCOM MEMBERSHIP WWWDIYBEADINGCLUBCOM BLOG DIY BEADING MAGAZINE ISSUE 32
STEP 2 Connect the MIDDLE CIRCLE to two 6-BEAD COMPONENTs by adding four-times 2As
between the pearls Choose a pearl on the MIDDLE CIRCLE and add
2A pass through a pearl in the 6-BEAD COMPONENT previously added and add 2A again Watch out this has to be symmetrical Repeat this at least two more times to make it
secure Now repeat this entire procedure but choose
the 8-th pearl on MIDDLE CIRCLE Repeat this on the other side of the necklace
too
Choose a pearl on the FOCAL CIRCLE and add 2A pass through a pearl in the 6-BEAD COMPONENT and add 2A again Repeat this at least two more times to make it secure
Now repeat this entire procedure but choose the 5-th pearl on FOCAL CIRCLE This will make the necklace nice on your neck
FINISHING THE NECKLACE Connects the parts with A beads
STEP 1 Connect the FOCAL CIRCLE to two 6-BEAD COMPONENTs by adding four-times 2As between the pearls To do this turn your parts upside down you need to
see the pearls We will work on this side from now on
Something Blue Necklace and Earrings
BLOG WWWHANDMADE-JEWELRY-CLUBCOM MEMBERSHIP WWWDIYBEADINGCLUBCOM BLOG DIY BEADING MAGAZINE ISSUE 32
FINISHING THE EARRING Connects the parts with A beads
STEP 1-2 Connect the 6-BEAD COMPONENT
to 4-BEAD COMPONENT and the 4-BEAD
COMPONENT to the earring hook
First connect the 4-BEAD COMPONENT to the 6-BEAD COMPONENT with 4A beads Mimic
the elongation steps of the necklace if needed
Secondly connect the 4-BEAD COMPONENT
to your earring hook with 4A beads again Leave from the last pearl bead 2A beads the hook (this is the orange oval form) and 2As again Pass through each of them to
secure this connection again
Finally get ready to prepare the other earring ndash since we need two of them
STEP 5 Connect the 4-BEAD COMPONENTs to the toggle clasp thus finishing the
necklace Leaving from the last pearl bead 2A the
clasp(this is the orange oval form) and 2A again Pass through all of them a couple more times to make this connection more
secure
Something Blue Necklace and Earrings
BLOG WWWHANDMADE-JEWELRY-CLUBCOM MEMBERSHIP WWWDIYBEADINGCLUBCOM BLOG DIY BEADING MAGAZINE ISSUE 32
If you finished it is time to try it on It was a great fun wasnrsquot it And how beautiful you look in your new necklace and the matching earrings
Something Blue Necklace and Earrings
BLOG WWWHANDMADE-JEWELRY-CLUBCOM MEMBERSHIP WWWDIYBEADINGCLUBCOM
About the Author
Margit Vogel
My name is Margit Vogel I live in Hungary Europe
By profession I am a biochemical engineer but I fell in love with
beads so much that I could not stop playing with them
I make one-of-a-kind beaded and bead embroidered art
jewelry made of the best quality materials such as Swarovski
stones gemstones Japanese beads (Miyuki and Toho) Czech
glass beads leather soutache and suede Each piece is unique
and individually crafted
Feel free to visit my blog for some eyecandy
httpiformjewelrywordpresscom
My shop httpwwwetsycomshopiformjewelry
Facebook httpwwwfacebookcomiformjewelry
BLOG DIY BEADING MAGAZINE ISSUE 32
Getting Down And Personal With Gianna
Getting Down And Personal With Gianna
Nowadays we see more and more jewelry stores opening up online and with these online jewelry stores it has made it easier for us to purchase and view their creations Have you ever wondered how they are able to manage and produce amazing jewelry pieces and tutorials So heres a little on the journey to open up an online shop We are excited to present to you Gianna aka Beading4perfectionists
Gianna Beader amp Youtuber
Unlike most jewelry makers and beadweavers Gianna did not start beading as a hobby but as a means to make ends meet With goals in trying to
fill the financial gap she did everything she could to expand her earnings ndash working as a security guard
and at the same time learning how to bead and selling her pieces at fair trades and flea markets
Since many were asking if she does home beading workshops she started on exploring how to teach people to bead She loves Scott Bakula and has always loved him till now and this served as her
inspiration to start making a beading video tutorial
Gianna started creating videos because she was at the point in her life where everything seemed to be falling apart And at that moment of time she had difficulties financially and selling jewelry was the only way for her to stay afloat financially She is a big Scott Bakula fan and when she went to the UK to see him on stage that was when it hit her that she is already able to edit videos and
taught herself Photoshop and done workshops at bead fairs so why not put these together and see what happens on Youtube She knew that if she gets enough subscribers and views ndash though no one knew what the exact numbers were you would be invited to become a Youtube partner This way she could monetize her videos with advertisements and hopefully she would be able to be a Youtube partner and be able to pay her bills
BLOG WWWHANDMADE-JEWELRY-CLUBCOM MEMBERSHIP WWWDIYBEADINGCLUBCOM BLOG DIY BEADING MAGAZINE ISSUE 32
Getting Down And Personal With Gianna
Her Youtube channel is popular and the reason why she chose Youtube is because Youtube is the biggest platform and reached almost to the whole world Everyone already knows about it and it was growing rapidly as compared to other platforms like Dailymotion so she figured that Youtube was the way to go Her advice to new designers is that when you start out go to the platforms on the top of your list first then work your way down your list if you do not get accepted by your first choice
After loyally putting up one video every week for about 8 months in a row she became a Youtube partner and monetized her videos She knew she needed at least $100 to get her first payout She managed to reach $100 after 3 months The process was not easy she worked hard lack sleep skipped meals and who knows what happened to Ridge in the Bold and the Beautiful because she stopped watching
On Youtube you can monetize your videos Google pays straight to your bank account and at other countries where they also have the option of getting checks among other options In order to get paid you have to reach the $100 mark and after 3 months For Gianna she thinks that you cannot say that Etsy is better than Youtube or Youtube is better than Etsy Her reasoning is because on Youtube she has many followers which will eventually check out her Etsy shop And to start an Etsy shop you need an audience
BLOG WWWHANDMADE-JEWELRY-CLUBCOM MEMBERSHIP WWWDIYBEADINGCLUBCOM BLOG DIY BEADING MAGAZINE ISSUE 32
television and dedicated her spare time (as she had another job) to Youtube She re-registered at the chamber of commerce after receiving her first payout Her work at Youtube now is not a full time job and things have changed on Youtube It is easier to become a parter but there are some countries that need to wait for an invitation to be a Youtube partner Take Italy for instance Italians would have to work just as hard as she did if they want to become a Youtube partner
Getting Down And Personal With Gianna
With her 60000 subscribers on her b4pbakup Youtube channel it is possible to sell at least 60 patterns on the first day on Etsy after promoting the PDF file on her Youtube channel Though you may think that 60 out of 60000 is not much you have to remember that not everyone has the means to purchase the PDF file and a lot of people still rather watch her carry out the tutorial(for free) on Youtube instead of reading the patterns or paying for the patterns even if the pattern is for a fundraiser and only cost $2 Her insights on Youtube is that Youtube is not what it used to be 6 years ago Instead of making more money every month she is making less and less because advertisers have more options of where they want to advertise their ads Ads do not pay as much as they used to Back in the days you could get 25 cents per ad Now you count yourself lucky if you could get 5 cents roll in after two hours
BLOG WWWHANDMADE-JEWELRY-CLUBCOM MEMBERSHIP WWWDIYBEADINGCLUBCOM BLOG DIY BEADING MAGAZINE ISSUE 32
And on top of that adblockers are destroying Youtube channel owners Youtube will start making changes to the channels where there will be ldquopaid subscriptionrdquo channels This has already been implemented in some countries but not in her country The Netherlands This means there will no longer be ads for her monthly paying subscribers She hopes that Youtube will add on a paid per video option feature The option to be a paid channel or free channel or to start a new channel for paying customers is yours to choose Gianna is not happy with Youtube because many others like her have worked so hard and for some years to become Youtube partners(which was something to be proud of) has lost their status
Getting Down And Personal With Gianna
Her advice for those who want to go on Youtube is 1 Do it because you want to teach
2 Do it because you want a career with beads
BLOG WWWHANDMADE-JEWELRY-CLUBCOM MEMBERSHIP WWWDIYBEADINGCLUBCOM BLOG DIY BEADING MAGAZINE ISSUE 32
After putting up about 20 videos and having at least 5000 subscribers add the PDF tutorials to Etsy and Craftsy She found out that her audience would like to have the PDF after watching her videos This is because they would rather print out the PDF and work while seated in a comfy chair technically somewhere else instead of having to pause the video time and time again
Gianna has also made a video for those who want to know the whole story of her journey up until the present day And to get updates on her you can check it out here She has also started a vlog where she tells of how she still works towards becoming a financial independent beader and explains her journey to get where she wants to be(or die trying) Gianna will be in the UK on October the 17th giving an all-day workshop with 4 different patterns
(2 beginners and 2 advanced) in Wotton-under-Edge
Gianna will be there Friday night as the workshop is on Saturday She will be leaving on Sunday Her
doors are open to all who wants to continue the party with her at the hotel across the street
For more information do contact Ann Tucker on Facebook
httpswwwfacebookcomanntucker501
Rec
omm
end
ed R
ead
ings
Making Jewelry with Gemstone
Beads
Combines the popular craft of beading with beautiful semi-precious stones which are collected by many Features a variety of versatile ideas which can be adapted for any type of gem or bead Readers will learn to reate beautiful gemstone jewelry with this dazzling collection of over 100 projects ranging from eyecatching earrings and accessories to exquisite necklaces and bracelets This beautiful book offers an impressive range of 28 beautiful semi-precious stones (including birthstones) and a glimpse into the fascinating history and mythical properties behind them
BLOG DIY BEADING MAGAZINE ISSUE 32 BLOG WWWHANDMADE-JEWELRY-CLUBCOM MEMBERSHIP WWWDIYBEADINGCLUBCOM
Rec
omm
end
ed R
ead
ings
Convertible Crystal Jewelry
Reverse it Twist it Wear it Many
Ways
Diane Whiting presents the idea that convertibility isnrsquot just about using pieces in multiple ways it is also about using skills and creativity in multiple ways Using ever-popular sparkling crystals Diane showcases design elements through various techniques for fun easy fashionable jewelry With 25 projects the reader can choose from bracelets necklaces and earrings that match any outfit or styleDiane Whiting presents the idea that convertibility isnrsquot just about using pieces in multiple ways it is also about using skills and creativity in multiple ways
BLOG DIY BEADING MAGAZINE ISSUE 32 BLOG WWWHANDMADE-JEWELRY-CLUBCOM MEMBERSHIP WWWDIYBEADINGCLUBCOM
Rec
omm
end
ed R
ead
ings
Wire Jewelry Masterclass
Wrapped Coiled and Woven Pieces
Using Fine Materials
Comprehensive and fabulous Wire Jewelry Masterclass takes an in-depth look at an intricate and rewarding craft The 24 projects which range from simple Dragons tear briolette earrings to a Poseidon-under-the-sea pendant will delight and inspire jewelers of all levels and tastes Divided into beginner intermediate and advanced sections this beautifully photographed step-by-step guide is the ticket to wire jewelry expertise
BLOG DIY BEADING MAGAZINE ISSUE 32 BLOG WWWHANDMADE-JEWELRY-CLUBCOM MEMBERSHIP WWWDIYBEADINGCLUBCOM
Rec
omm
end
ed R
ead
ings
Timeless Wire Weaving The
Complete Course
Timeless Wire Weaving focuses on developing wirework skills through 13 projects using three classic wire weaving techniques coiling wrapping and weaving The projects are built around a focal cabochon and incorporate seed beads and crystals in imaginative ways Designers learn to make the jewelry shown in the book and they also use the techniques learned to create innovative jewelry pieces of their own
BLOG DIY BEADING MAGAZINE ISSUE 32 BLOG WWWHANDMADE-JEWELRY-CLUBCOM MEMBERSHIP WWWDIYBEADINGCLUBCOM
Our digital magazine is available through
Apple Newsstand service available to millions of IPAD users
To advertise with us please email us at
diyjewelryclubgmailcom
Or visit our page at
httphandmade-jewelry-clubcomadvertising-diy-beading-magazine
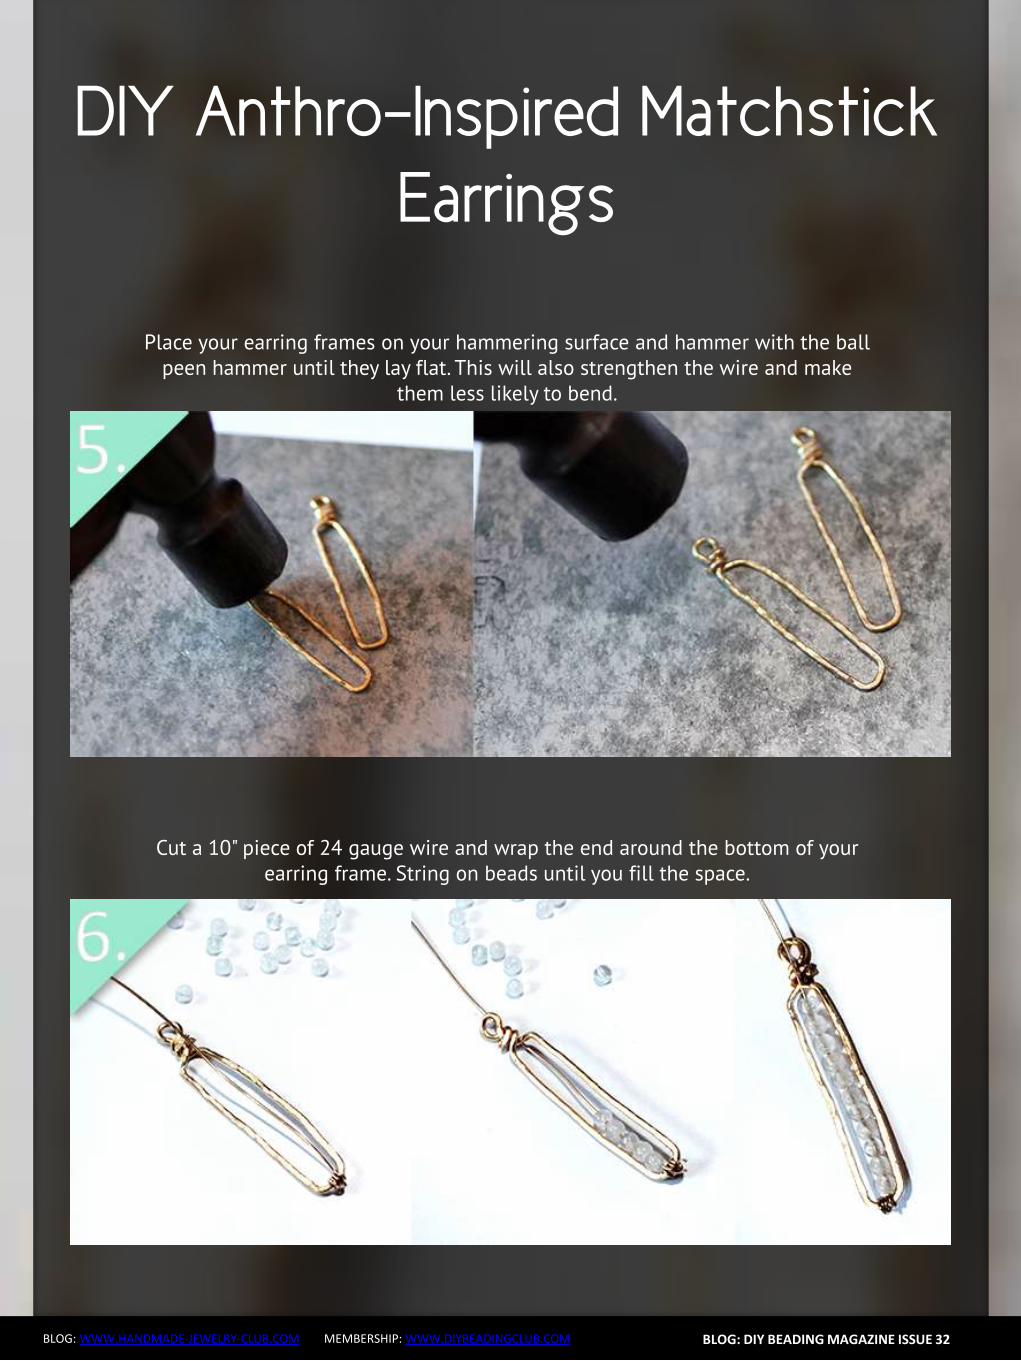
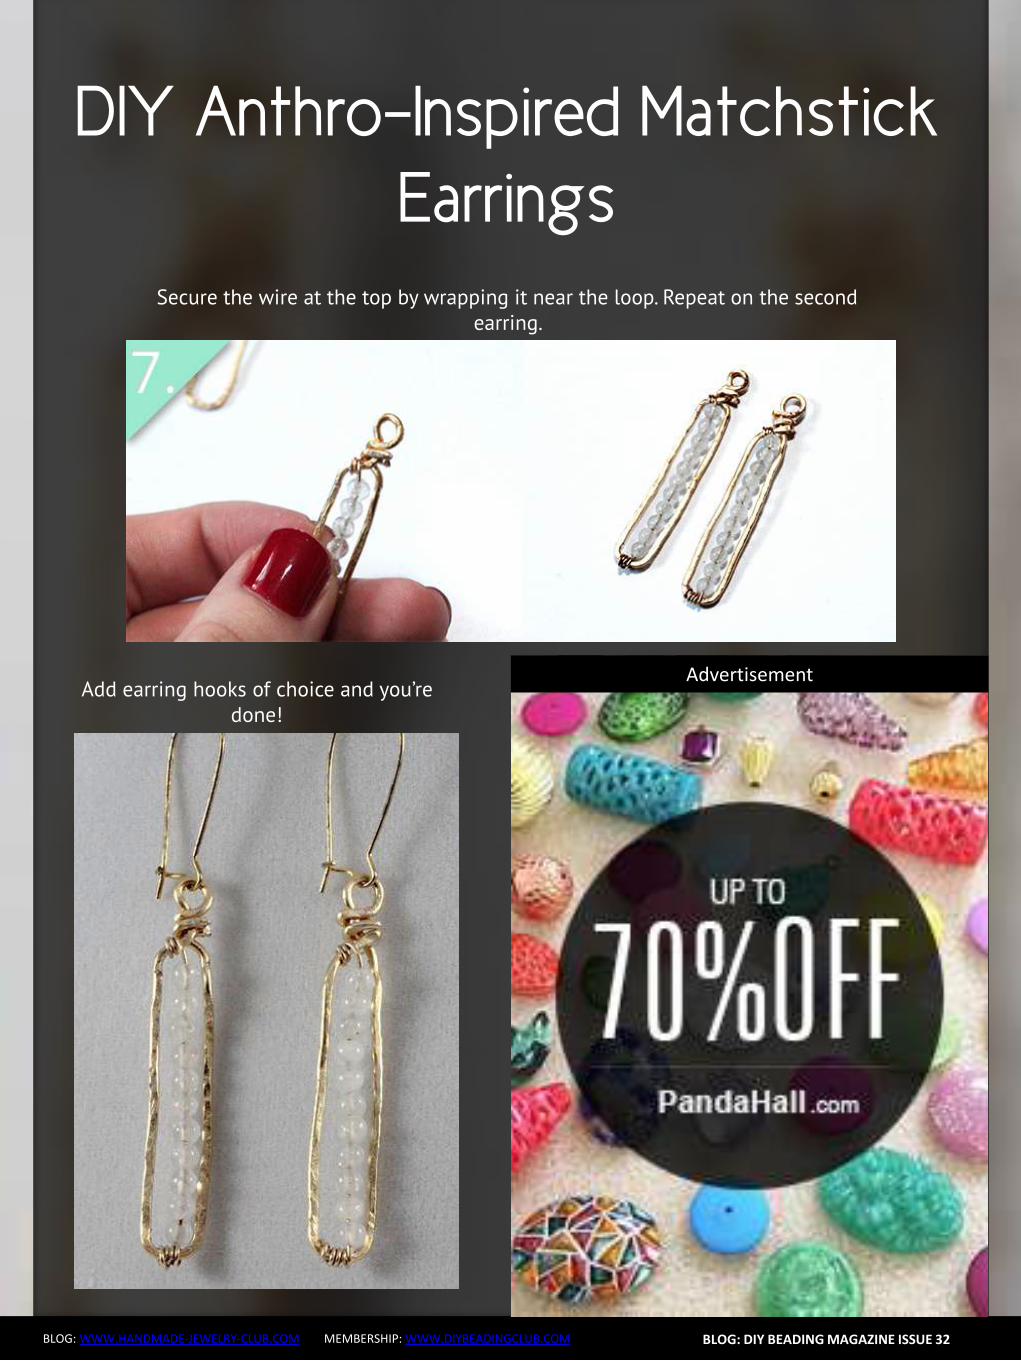
Wire Wrapped Gemstone
Pendant
BLOG WWWHANDMADE-JEWELRY-CLUBCOM MEMBERSHIP WWWDIYBEADINGCLUBCOM
1 Using a ruler measure the length of your bead and note the measurement
Multiply the measurement by 4 My bead is 3 inches (76 cm) long so my final measurement is 12 inches (305 cm)
BLOG DIY BEADING MAGAZINE ISSUE 32
2 Tear off two pieces of blue painters tape from the roll and temporarily tape them to your work surface
Using the wire cutters cut two lengths of the 22 gauge round wire measuring the length of your
final measurement (I cut two 12 inch (305 cm) lengths of wire)
Clean and straighten both wires by pulling them through a jewelers polishing cloth (not pictured)
With both wires side by side with the ends even with one another use the torn tape lengths to tape the wires together (This will temporarily hold them together while you to wire wrap them)
With the marker pen mark the center of both wires
Wire Wrapped Gemstone
Pendant
BLOG WWWHANDMADE-JEWELRY-CLUBCOM MEMBERSHIP WWWDIYBEADINGCLUBCOM
3 Using the wire cutters cut one 3 inch (76 cm) length of 20 gauge half round half hard wire This is the wrapping wire
With the flat side of the wire facing you use the chain nose pliers to make a 14 inch (06 cm) bend
towards you and at a slight angle in one end of the wire This makes a hook in the wire The flat sides of the wire should face one another
BLOG DIY BEADING MAGAZINE ISSUE 32
4 Pick up the taped wires at their center between your fore finger and thumb Place the hook of the half round wire slightly to the right of the center mark on the two round
wires
5 Holding the long end and the tail of the half round wire hook use the tip of the chain nose pliers to squeeze the bend of the hook against the round wires This sets or secures the wrapping wire
Wire Wrapped Gemstone
Pendant
BLOG WWWHANDMADE-JEWELRY-CLUBCOM MEMBERSHIP WWWDIYBEADINGCLUBCOM
6 Bend the long end of the half round wire up over the two round wires You have created one wire wrap
BLOG DIY BEADING MAGAZINE ISSUE 32
7 Bend the long end of the half round wire down and behind the two round wires
8 Continue to repeat Steps 6 and 7 until you have made three (3) to five (5) complete wire wraps around the round wires (I made five (5) wire wraps) After making one or two wire wraps secure
the wraps against the round wires as in Step 5
The front of the wrap (as pictured below) will be the side where the half round wrapping wire is not cut
Wire Wrapped Gemstone
Pendant
BLOG WWWHANDMADE-JEWELRY-CLUBCOM MEMBERSHIP WWWDIYBEADINGCLUBCOM
9 Use wire cutters to cut the excess half round wire Cut the wire about half way behind the round wires so that the ends will not be seen from the front side of the wire wrap
BLOG DIY BEADING MAGAZINE ISSUE 32
10 With the wire wrap at the bottom center of your bead use your fingers to gently shape the wires around the bottom along the sides and to the top of the bead
11 Use the chain nose pliers to secure all the wraps against the round wires
Wire Wrapped Gemstone
Pendant
BLOG WWWHANDMADE-JEWELRY-CLUBCOM MEMBERSHIP WWWDIYBEADINGCLUBCOM
12 Slide the chain nose pliers in between the round wires where they meet the wire wrap and spread the wires apart
BLOG DIY BEADING MAGAZINE ISSUE 32
Spreading the wires apart begins to create the cage for the bead
13 With its bottom center resting against the wire wrap place your bead or gemstone inside the cage
Gather all four of the wires around the bead so that it is encased within them and so that the wires
meet at the top of the bead Hold all four wires between your forefinger and thumb (like you are pinching the wires)
Wire Wrapped Gemstone
Pendant
BLOG WWWHANDMADE-JEWELRY-CLUBCOM MEMBERSHIP WWWDIYBEADINGCLUBCOM
14 Decide which side will be the front of the pendant Locate the wire that is in front of all the wires and with your fingers bend it downward at a 45 degree angle
BLOG DIY BEADING MAGAZINE ISSUE 32
15 Use your fingers or the chain nose pliers to wrap the bent wire around the other three wires where they all meet or cross one another
16 Continue wrapping the wire around the other three to secure them End the wrapping at the back of the pendant
Using the chain nose pliers tuck the wire into the wraps (not pictured)
Wire Wrapped Gemstone
Pendant
BLOG WWWHANDMADE-JEWELRY-CLUBCOM MEMBERSHIP WWWDIYBEADINGCLUBCOM
17 Make sure that the wires are evenly spread around the beads Now we need to tighten the wires that encase the bead
On one of wires about halfway up the wire place the jaws of the round nose pliers on either side
of the wire Now rotate the pliers making a double bend in the wire Repeat on the other three wires making one or two double bends in each wire When youre done shake the bead to make sure it cannot fall out of the wires
BLOG DIY BEADING MAGAZINE ISSUE 32
18 Now decorate two of the top wires Almost anything is possible Try making a few different bends curls or twists in the wire
I decided to loosely coil the top wires around an ink pen
19 Gently untighten the coil by pulling the end of the wire downward Using the round nose pliers make a simple wire loop on the end of the coil
Wire Wrapped Gemstone
Pendant
BLOG WWWHANDMADE-JEWELRY-CLUBCOM MEMBERSHIP WWWDIYBEADINGCLUBCOM
20 Repeat Steps 18 and 19 on a second top wire
BLOG DIY BEADING MAGAZINE ISSUE 32
21 The third top wire becomes the bail Coil it tightly around the ink pen making at least two wire coils The end of the wire should fall in front of the pendant
Make a simple wire loop on the wire end
22 Heres how the wire coilsspiralsbends should look Make any necessary adjustments to the wires along the sides of the gemstones and the two that fall
in front of pendant
Make sure that the wires tightly secure the bead The wire wrap at the bottom of the pendant may no longer be at the center of the bead
Wire Wrapped Gemstone
Pendant
BLOG WWWHANDMADE-JEWELRY-CLUBCOM MEMBERSHIP WWWDIYBEADINGCLUBCOM
23 On each of the three head pins string a 6mm bead Make a simple wire loop on the end of each head pin
Attach one head pin bead unit to each of the simple wire loops on the wire wrapped pendant
BLOG DIY BEADING MAGAZINE ISSUE 32
Completed Wire Wrapped Pendant
Now hang your handcrafted wire wrap pendant from your favorite chain or strand of beads
Enjoy wire wrapping your own gemstone to make a wire wrapped pendant
BLOG WWWHANDMADE-JEWELRY-CLUBCOM MEMBERSHIP WWWDIYBEADINGCLUBCOM
Wire Wrapped Gemstone
Pendant About the Author
Wanda Epps
Wanda is an avid jewelry maker who loves to make jewelry with beads She began her journey into jewelry making after walking into a bookstore to find crafting books on sale One on making jewelry caught her eye and after making a simple bead necklace she was hooked That was in late 2003 Over the years she has taken classes on various jewelry making techniques stringing making wire jewelry bead crochet macrame metal jewelry making to name some She expects that her love of making beaded jewelry will continue as bead supplies and beautiful new beads seem endless Her fulltime job provides for her needs but beads are her passion She invites you to join her in the many adventures of making jewelry at
httpwwwmaking-beaded-jewelrycom httpswwwfacebookcompagesMaking-Beaded-Jewelry-
Guide254860504236
BLOG DIY BEADING MAGAZINE ISSUE 32
Should You Sell In The Marketplace
Should You Sell In The Marketplace
BLOG WWWHANDMADE-JEWELRY-CLUBCOM MEMBERSHIP WWWDIYBEADINGCLUBCOM
We are all able to create jewelry pieces and there will come a time where you want to share the joy with the rest of the world whether it is in the form of a tutorial or a finish
piece And this is when you will start to think about putting up your work for sale As someone who is new to the business world you may be confused on where you should start selling your work And the all famous site that is first on most peoplersquos minds is Etsy Etsy is popular and it is user friendly and that is why it is the choice of many designers and crafters But there are also some who wants to set up their own
shop with their logo and to put their works out as their own even at the very beginning Thatrsquos where you may be confused on which platform you should go for
So herersquos some explanation on how you will benefit from setting up shop at Etsy
BLOG DIY BEADING MAGAZINE ISSUE 32
1 Etsy has everything ready for you and all you have to do is to bring in your works and use the features that are already available for you to use ndash like the payment system web traffic design and layout are not an issue that you need to worry about
2 You also have the trust of customers almost immediately because Etsy has already established a name for itself and therefore there is already trust in brand in their site When you use Etsy your brand will automatically be exposed to many customers who visit Etsy to find what they need
3 For every site there is always the need to be able to interact with other sellers to help each other out Forums or community boards are very helpful as other passionate designers and crafters share their experience to help out the newer members of the community This is also where you will be able to form good relationships with other sellers and who knows you may even find a partnership over time
Should You Sell In The Marketplace
BLOG WWWHANDMADE-JEWELRY-CLUBCOM MEMBERSHIP WWWDIYBEADINGCLUBCOM
Though Etsy has itrsquos good points there are some things which you need to take into consideration as well
1 When you are using someone elsersquos facilities there is always the chance of having
being shut down due to unforeseen circumstances Be it violation of Etsyrsquos policy or decisions made by the administration department this will sometimes cost you a dent in your brand name and you may lose the trust of your followers and starting all over again may be the only way to start again
2 If you are a very creative person then you may feel limited as the design of shops at Etsy is standardized If you are new and do not worry so much about designs of websites this is perfectly fine But do remember that when you want to distinguish yourself from other sellers it will be tougher as you try to make your brand more well-known due to limitations of design of the site
3 Since Etsy has so many sellers all in one place the competition is of course going to be tighter and fiercer because even though customers are viewing your products there are also other options from other sellers listed on the page as well So customers may turn away if they see something of a better price
4 Each product that you list with Etsy costs you money Etsy also takes a 35 percent of the selling price of the item However if or when you start your business on your own website it will also cost you for web hosting and you would need PayPal and they have a fee of 29 percent +30cents So either way you will still need to pay to list your products on the web
BLOG DIY BEADING MAGAZINE ISSUE 32
Should You Sell In The Marketplace
BLOG WWWHANDMADE-JEWELRY-CLUBCOM MEMBERSHIP WWWDIYBEADINGCLUBCOM
If you are confident enough to have your own business site by all means go ahead and do it The benefits of it are as below
1 You get to be your own boss You get to control everything from the design of the
website layout and how you want to advertise your products You can also change your policies and not be affected by it because it is you who changes it Your shop will not be shut down suddenly without notice and you do not need to worry that you have to start all over again
2 Distractions of competitors products on your page will not be an issue It is your site and it is up to you whether or not you want to allow what kind of advertisements on your site So if you donrsquot want something on your page it is your call
3 You will be able to capture the attention of the media and customers as well if you are able to have a well designed site Nowadays people are attracted to colors and they can see if you have put effort into beautifying the site for the customers You can do so much more than just uploading some pictures onto Etsy on your own site you can always update your site design and your products to complement each other and therefore becoming more attractive
BLOG DIY BEADING MAGAZINE ISSUE 32
Should You Sell In The Marketplace
BLOG WWWHANDMADE-JEWELRY-CLUBCOM MEMBERSHIP WWWDIYBEADINGCLUBCOM
And herersquos the tough part when you want to have your own site
BLOG DIY BEADING MAGAZINE ISSUE 32
1 You need to have knowledge of what you want to do You have to learn to be involved in every aspect of your site so that you know what us going on at the front end of things and at the back end of things as well But if you have not any knowledge of designing a website it is usually a recipe for something to go wrong You have to remember that you need a user interface that is simple for customers to use an easy to use shopping cart you should know which third party platforms are trusted and one which will not keep changing their regulations If you still want to have your site hiring a designer may be your best option
2 You have to work towards promoting your store on your own You will need to find people to feature you in their social media sites because it will not just fall into your lap You need to have promotions or road shows if you need to Marketing your store is important whether or not you are using Etsy or other marketing platforms but if you are on your own it is even more important
3 You will still be competing with other sellers Though now you are now not only competing with Etsy sellers you are now competing with sellers and stores from the world wide web Etsy is already so well known so people tend to go there first so you need to up your methods of attracting customers
Should You Sell In The Marketplace
BLOG WWWHANDMADE-JEWELRY-CLUBCOM MEMBERSHIP WWWDIYBEADINGCLUBCOM
When we first started out we used Etsy as our platform to sell our works Other than that we also utilized blogs and we eventually built our own website as our main base
BLOG DIY BEADING MAGAZINE ISSUE 32
Things have changed over these 3 years It was easier to get sales without much effort but now with so many other shops also utilizing Etsy the competition has grown tremendously Now our main sales come from our own online store and has exceeded sales from Etsy
So what we recommend is that using an existing platform such as Etsy to start out is good and in time build up your website or webstore
It is not that hard to start your own webstore either these two companies offers the option to set up your webstore
1 Shopify
2 Bigcommerce
There are many things to take into consideration before starting a store online It is perfectly fine to start out using Etsy before branching out on your own But you can also
have both ndash have your own website and a store on Etsy There are many stores who operate like this They technically get customers from Etsy and the reroute them to their own websites As long as you are in control of what you are doing and not stressing and
confusing yourself you can opt for more exposure for your store
So do take some time and take a breather to really think through what will be the best for YOU and do remember that starting small does not mean you will not be able to be big
OFFER Get which can be downloaded by subscribing to
httpinternet-marketing-publishingcom
BLOG WWWHANDMADE-JEWELRY-CLUBCOM MEMBERSHIP WWWDIYBEADINGCLUBCOM
Materials - Copper wire diameter 08 mm - Copper wire diameter 04 mm - Small gemstone bead (~4 mm) (I used 3 mm beads in this tutorial because I didnrsquot have any other beads at the time but the beads in the earrings on the cover are 4 mm) Make sure that the beads you want to use are resistant against chemicals such as liver of sulfur or whichever oxidizing substance you want to use to give the metal patina The beads in the picture above are facetted garnet buttons in the tutorial itself I used black spinel facetted buttons Equipment - Round nose pliers - Flat nose pliers - Side-cutters - A small file - A cylindrical object of about 5mm diameter (eg a mandrel for jump rings) - Hammer amp anvil - Liver of sulfur or some other means to oxidize the metal (optional)
LOVE-ly Earrings
BLOG DIY BEADING MAGAZINE ISSUE 32
BLOG WWWHANDMADE-JEWELRY-CLUBCOM MEMBERSHIP WWWDIYBEADINGCLUBCOM
This tutorial teaches how to make 1 ear stud I recommend making both ear studs of the set simultaneously step-by-step so that symmetry is easier to achieve Between steps check for
symmetry in size and shape and adjust the construction if needed
LOVE-ly Earrings
BLOG DIY BEADING MAGAZINE ISSUE 32
Step 1 Straighten the end of the copper wire (+- 6cm) by rubbing along it with your fingers for a
few seconds
Step 2 Bend over the wire onto itself as illustrated below using flat nose pliers
Step 3 Grab the doubled-over wire with the flat nose pliers and push the two sides against each
other Use little force and do it bit by bit to avoid damaging or kinking the wire
Step 4 Push the two adjacent pieces of wire apart to create the bottom shape of the heart as shown
on the picture above
BLOG WWWHANDMADE-JEWELRY-CLUBCOM MEMBERSHIP WWWDIYBEADINGCLUBCOM
LOVE-ly Earrings
BLOG DIY BEADING MAGAZINE ISSUE 32
Step 5 Hammer down the angled wire (the part circled in red) This strengthens the construction
and looks more professional
Step 6 Wrap the two ends of wire tightly around a cylindrical object (+- 5 mm diameter)
Step 7 Push apart the loops you just made by wrapping the wire around the cylindrical object The wire should now be shaped like a heart as
illustrated above
Step 8 Use round nose pliers to bend around the wire for each side of the heart as illustrated above
BLOG WWWHANDMADE-JEWELRY-CLUBCOM MEMBERSHIP WWWDIYBEADINGCLUBCOM
LOVE-ly Earrings
BLOG DIY BEADING MAGAZINE ISSUE 32
Step 9 Use the flat nose pliers to bend one of the two wires (preferably the longer wire) in a 90deg angle at the place marked with a red dot In the picture accompanying the next step you can see
how it should look from the front
Step 10 Use the round nose pliers to bend the other piece of wire in a decorative coil You will cut off the rest of the wire of the coil at approximately the spot marked with a red dot so take that into account when coiling the wire into the shape that
you desire
Step 11 Cut of the wire at the spot indicated in the previous picture and file off any sharp edges
Step 12 Cut off the ear wire at the desired length (Between 1 and 2 cm If in doubt try the earring on
to see if it sits comfortably) and file off any sharp edges
BLOG WWWHANDMADE-JEWELRY-CLUBCOM MEMBERSHIP WWWDIYBEADINGCLUBCOM
LOVE-ly Earrings
BLOG DIY BEADING MAGAZINE ISSUE 32
Step 13 Hammer down the rest of the heart (bumps and coil) If you canrsquot reach certain parts because the ear wire is in the way bend that part of the heart shape away
(verticallyupward) and bend it back after you finish hammering
Congrats yoursquove now made a basic heart-shaped ear stud Next wersquore going to decorate it with a little gemstone and more copper wire
Step 14 Cut off a length of 04 mm copper wire (about 10-20 cm) and string the bead onto it
Step 15 Place the bead in the ldquonon-coilrdquo upper part of the heart shaped ear stud holding it between thumb and forefinger Let approximately 4 cm of the 04 mm wire stick out over the edge of the
heart as illustrated above
Step 16 Wrap the wire twice around the frame so that if you face the front of the ear stud the wire is
directed towards yourself
BLOG WWWHANDMADE-JEWELRY-CLUBCOM MEMBERSHIP WWWDIYBEADINGCLUBCOM
LOVE-ly Earrings
BLOG DIY BEADING MAGAZINE ISSUE 32
Step 17 Flip the wire over the wire with the bead (indicated by the red arrow) and pull tight whilst holding the bead (and its wire) tightly in place It
should look like the construction in the big picture above
Step 18 And make another loop around the wire with the bead The 04 mm wire is now coiled around
twice two times two coils around the frame and two coils around itself
Step 19 Repeat the wire-fastening procedure described in steps 16-18 with the other end of the
wire securing the gemstone in the heart frame Let the wire stick out at the back of the earstud
Step 20 Pull the wire through the lsquocoilrsquo part of the heart shape to the front The wire should lsquocross overrsquo to the other side of the heart at the back of the ear
stud
Step 21 Coil the wire around the frame until you are content with the design Optionally you can hammer down the coils a bit I often do this because I think it
looks somewhat more sophisticated and professional
BLOG WWWHANDMADE-JEWELRY-CLUBCOM MEMBERSHIP WWWDIYBEADINGCLUBCOM
LOVE-ly Earrings
BLOG DIY BEADING MAGAZINE ISSUE 32
Step 22 Cut off the spare bits of wire preferably at the backside of the ear stud and tuck in the ends
Congrats yoursquove now made a heart-shaped ear stud Next we are going to finish it off with a patina
Step 23 Oxidize the metal of the ear studs I always use liver of sulfur solved in warm water The metal
will turn a dark color and matte texture Afterwards rinse the ear studs thoroughly with water and pat
them dry
Step 24 Rub the oxidized ear stud all over with a rough polishing pad to bring back (a dark copper)
color to the surface
Yoursquove now finished making your own LOVE-ly ear studs
Secure them in your ear with plastic or copper stops These can be bought online or in jewelry-supply
stores
Variation ideas You can easily vary in size and shape (longer hearts smaller coils pointier bottoms etc) and
use different materials As you can see the earring I make in this tutorial has a slightly smaller bead than the
earrings on the cover which influences the overall appearance somewhat
The earrings underneath are made with sterling silver and gold wire (super-short coils) and contain small pink
rubies
LOVE-ly Earrings
BLOG WWWHANDMADE-JEWELRY-CLUBCOM MEMBERSHIP WWWDIYBEADINGCLUBCOM
About the Author
Jeske Hendriks
Hi there My name is Jeske and I love all things handmade Over the years Irsquove dabbled in countless different arts and crafts but nowadays I mainly focus on making jewellery and cutting stone cabochons As for jewellery
my preferred materials are silver wire and gemstonemineral beads Using wire-wrapping and basic silver smithing techniques I create both simple
and intricate pieces ndash each and every one of them unique a personal little artwork
You are welcome to follow me on facebook stop by at my personal
webpage andor to have a look at my Etsy shops httpswwwfacebookcomyeskecrafts
httpwwwyeskecraftscom httpwwwyourbeadsandfindingsetsycom
httpwwwyeskecraftsetsycom httpwwwyeskemiscetsycom
BLOG DIY BEADING MAGAZINE ISSUE 32
Flower Tale Earrings
BLOG WWWHANDMADE-JEWELRY-CLUBCOM MEMBERSHIP WWWDIYBEADINGCLUBCOM
Techniques Beadweaving
Project Level Beginner to Intermediate
Materials 12 bronze opaque 6mm Czech glass pearl round beads
2 gr gold lustered dark topaz Japanese 110 seed beads (Toho 459)
Size B gold beading thread
2 bronze earring hooks
Tools Size 10 beading needle
Scissors
Finished Size Diameter ndash 3 cm (118 inches) (without earring hooks)
BLOG DIY BEADING MAGAZINE ISSUE 32
Flower Tale Earrings
BLOG WWWHANDMADE-JEWELRY-CLUBCOM MEMBERSHIP WWWDIYBEADINGCLUBCOM
Step 1 Cut about 110 cm (43 inches) of thread and
pass it through the needle hole
Pick six groups of one 110 seed bead and one
6 mm round bead
BLOG DIY BEADING MAGAZINE ISSUE 32
Join the beads into a ring and secure with two
square knots
Leave a tail of about 15 cm (59 inches)
Step 2 The working thread should be right before the
6 mm round bead
Pick seven 110 seed beads skip the 6 mm
round bead and pass the needle through the
next 110 seed bead added in the previous
round
Repeat adding groups of seven 110 seed
beads five more times
When adding the last group take the needle
directly through the 110 seed bead from the
previous round and the next one added in the
beginning of current round
Flower Tale Earrings
BLOG WWWHANDMADE-JEWELRY-CLUBCOM MEMBERSHIP WWWDIYBEADINGCLUBCOM
Step 3 Pick three 110 seed beads skip one seed
bead from the chain of seven added in the
previous round and pass with the needle
directly through the next three 110 seed
beads
BLOG DIY BEADING MAGAZINE ISSUE 32
Pick three 110 seed beads skip one seed
bead from the chain of seven added in the
previous round and pass with the needle
through the last one and the first 110 seed
bead from the next chain of seven
Repeat the above directions from Step 3 five
more times
After completing this round make sure the
thread will be exiting from the middle 110
seed bead from the first group of three added
in the beginning of this round
Step 4 Pick one 110 seed bead and go through the
last seed bead of the group of three
Flower Tale Earrings
BLOG WWWHANDMADE-JEWELRY-CLUBCOM MEMBERSHIP WWWDIYBEADINGCLUBCOM
Pick three 110 seed beads and take the
needle through the first seed bead of the next
group of three added in the previous round
BLOG DIY BEADING MAGAZINE ISSUE 32
Pick one 110 seed bead and go with the
needle through the next three seed beads (the
last two of the group of three and the last one
from the chain of seven)
Then go up through three 110 seed beads
(the first from the next group of seven and the
first two from the next group of three)
Repeat the above directions from Step 4 to
complete the remaining petals
When working on the last petal perform the
operation from the image shown on the left
instead of picking the group of three 110 seed
beads string two 110 seed beads the earring
hook other two 110 seed beads and
continue beading as instructed above
When you are done hide the thread ends into the beadwork
Flower Tale Earrings
BLOG WWWHANDMADE-JEWELRY-CLUBCOM MEMBERSHIP WWWDIYBEADINGCLUBCOM
About the Author
Iulia Postică
I was born and live in Moldova Eastern Europe Ever since I remember myself
Ive been crocheting and knitting My grandmother has taught me that and I
loved it very much I always regarded crafts exclusively as a hobby and never
thought of making a career of it I traveled a lot to various historical sites
Actually Ive spent all my childhood summers in archaeological camps with
my father who is a professional archaeologist
I also enjoy metal hammering and wirework as it gives me possibility to
express myself in materials used by human communities since ancient times
copper brass glass seed beads and gemstones That is no surprise to anyone
given my family history and academic background
My shop ldquoBeadedTreasuryrdquo with beading tutorials and bead crochet patterns
httpswwwetsycomshopBeadedTreasury
My shop ldquoArchaeologicardquo with artisan jewelry
httpswwwetsycomshopArcheologica
My blog httpbeadedtreasuryblogspotcom
My facebook httpswwwfacebookcomBeadedTreasury
BLOG DIY BEADING MAGAZINE ISSUE 32
Liberty Earrings
BLOG WWWHANDMADE-JEWELRY-CLUBCOM MEMBERSHIP WWWDIYBEADINGCLUBCOM
Materials - Nr 2 cabochon Preciosa Ornela ovale 18x22 mm turchese
- Rocaille Toho 150 silver lined green emerald
- Nr 2 dagger beads
- Nr 20 pearl 4 mm
- Superduo opaque luster ceramic green
- Rocaille 80 color gold
- Rocaille 80 color ivory
- Delica Miyuki 110 aquagreen mix
- Rocaille Miyuki 110 galvanized silver
- Nr 2 monachelle (earwire)
-Fireline
- Beading Needle nr 12
BLOG DIY BEADING MAGAZINE ISSUE 32
Liberty Earrings
BLOG WWWHANDMADE-JEWELRY-CLUBCOM MEMBERSHIP WWWDIYBEADINGCLUBCOM
Make a circle of 20 delica beads and make a knot (a) Perform two rounds peyote with ivory 80 seed beads (b c) Exit from an ivory
bead
BLOG DIY BEADING MAGAZINE ISSUE 32
a b c
Jump from 80 to 80 with 110 80 gold 110 (a) Finish the round and come out of a 80 gold bead
Jump to the next 80 gold with a 4mm pearl (b) Finish the round and come out
of the first pearl Jump to the 2nd pearl and close with a 80 gold bead(c)
a b c
Position the cabochon and jump from one 80 to the other with two delica bead (a)
Continue with three delicas four times (b) At the bottom sew on two delicas then finish the round by sewing on three delicas for four times passing from one to another roc 80 Tighten the cabochon and exit from the
first two delica that you started with String together a 110 and 150 and enter the second of the three close delicas (c)
a b c
Liberty Earrings
BLOG WWWHANDMADE-JEWELRY-CLUBCOM MEMBERSHIP WWWDIYBEADINGCLUBCOM
Put together 150 110 150 and enter in the second of three next delica (a) Put the same beads for three times then put together 150 and 110 and enter
in the two delica of the bottom tip (b) Enter in the second of three next delica with 110 and 150 (c) Continue passing
in the 80 beads with three beads (150 110 150) for four times then at the top finish the round by putting together a 150 and 110 (d)
BLOG DIY BEADING MAGAZINE ISSUE 32
a b c
Exit from the first 150 sewn in the previous round and jump in the three next beads with a 150 (a)
Put a 150 at a time and exit from the first 110 beads of the bottom tip Jump in the
near 110 with a 150 (b) Finish round repeating steps a and b (c) Exit the roc 80 as shown in the photo (d)
a b c
d
a b c d
Enter in the 80 with four 150 (a b) Enter the 80 beads at the bottom of the pieces with two 110 one superduo one 80 ivory bead one superduo and two 110 (c)
d e f
Liberty Earrings
BLOG WWWHANDMADE-JEWELRY-CLUBCOM MEMBERSHIP WWWDIYBEADINGCLUBCOM
Exit from the bottom pearl (a) Put together 150 three 110 150 and enter in the superduorsquos second hole (b)
Put together three superduo and enter in the next superduorsquos second hole (c) Rethread 15 three 110 150 and return in the opposite direction in the pearl of departure (d)
BLOG DIY BEADING MAGAZINE ISSUE 32
a b
c
Exit from the second pearl indicated from (a) Put 150 four 110 and enter in the second of the three 110 (b) Go to the second superduorsquos hole with four 110 and a 150 (c)
Enter the second hole of the supeduo with a 150(d) Sew in the middle of the bottom of the superduo 150 two 110 150 dagger 150 two 110 150(e)
Enter the second hole of the thirs superduo with 150 (f)
a b c
d
d e f
Liberty Earrings
BLOG WWWHANDMADE-JEWELRY-CLUBCOM MEMBERSHIP WWWDIYBEADINGCLUBCOM BLOG DIY BEADING MAGAZINE ISSUE 32
Put 150 four 110 and enter in the second of three 110 of the base (a) Insert four 110 and 150 in the pearl opposite direction indicated in the picture (b) Go in all the beads
around the piece and exit from the pearl at the top (c) Put 150 three 110 150 and enter the superduo (d)
Enter the ivory bead 80 with two 150 (e) Enter the next superduo with two 150 (f)
a b c
d e f
Put together 150 three 110 and enter in opposite direction in the departurersquos pearl (a) Exit from the 150 beads indicated by photo (b) From this jump in the second of two near
150 with five 150 to created the hole for the earwire (c) Pass the thread in the beads make a few knots and cut the excess thread
a b c
Your earrings are finished
Liberty Earrings
BLOG WWWHANDMADE-JEWELRY-CLUBCOM MEMBERSHIP WWWDIYBEADINGCLUBCOM
About the Author
Mariella Martella
My name is Mariella Martella and I am the author and
designer of jewelry that I sign with the name of Mariel Bijoux
After changing city often for work and study I currently live
in northern Italy I am an art historian with a passion for travel
painting and jewelry design in weaving that project since
2010 In my beads and crystals are the colors of the
Mediterranean sea the atmosphere of summer evenings
and the lights of the places I visited
You can find me at
Etsy shop httpswwwetsycomitshopMarielBijoux
Facebook httpswwwfacebookcommari3lbijoux
Crafting blog httpmarielbijouxblogspotit
Twitter httpstwittercomMarielBijoux
BLOG DIY BEADING MAGAZINE ISSUE 32
Jade Necklace
BLOG WWWHANDMADE-JEWELRY-CLUBCOM MEMBERSHIP WWWDIYBEADINGCLUBCOM
Every time I wear a necklace I always make it a point that the
necklace will lay perfectly flat on my neck Using wire for a necklace
made it possible for me like what I did with Jade Necklace It may look
odd at first having bent wires for a necklace but once the jewelry is
finished youll be so happy how the necklace will perfectly lay on your
neck
The tutorial is catered for intermediate level One must know basic
wirework skills such as wire wrapping making loops wrapped loops
and linking to follow the tutorial It has clear instructions and ultra-clear
close-up photos at each step Additionally you can ask me question
you have on the tutorial No more getting stuck and frustrated on a
confusing or just plain inaccurate pattern
If you followed this tutorial and then sell the accessory or jewelry
please give credit to the author or DIY Beading Clubcom
Copyright 2015
wwwdiybeadingclubcom
wwwhandmade-jewelry-clubcom
BLOG DIY BEADING MAGAZINE ISSUE 32
Jade Necklace
BLOG WWWHANDMADE-JEWELRY-CLUBCOM MEMBERSHIP WWWDIYBEADINGCLUBCOM BLOG DIY BEADING MAGAZINE ISSUE 32
Materials Needed 18ga Craft wire 28ga Craft wire 15mm diameter Green Round Flat Back Sew On Gems 5mm Green pearls
8mm Green pearls 6mm x 11mm teardrop Crystal Treasures Mill Hill beads or any teardrop bead with holes on the side Hook for your clasp
Tools Needed Wire cutter Flat nose pliers Round nose pliers Mandrel A jar or any rounded object to shape your necklace
Skill Level Intermediate
Step 1 Cut 6 inches 18ga wire Make a loop on one end then measure approximately 125 inches and make another loop
Form a size 4 circle on your mandrel
Jade Necklace
BLOG WWWHANDMADE-JEWELRY-CLUBCOM MEMBERSHIP WWWDIYBEADINGCLUBCOM BLOG DIY BEADING MAGAZINE ISSUE 32
Then close the circle by wrapping the extended wire just below the loop Wrap the
wire 2x
This is how it looks like Lets call this circle frame Youll notice that the lower curve is
slightly bigger than the upper curve
Step 2 Cut 8 inches of 28ga wire Wrap one end of
the wire at least 3x on one side of the circle frame just below the loop
Bring up your gem Flat back sew on gems has 2 holes Insert the wire into one hole and then
wrap the wire once onto the circle frame
Jade Necklace
BLOG WWWHANDMADE-JEWELRY-CLUBCOM MEMBERSHIP WWWDIYBEADINGCLUBCOM BLOG DIY BEADING MAGAZINE ISSUE 32
Step 3 Insert a 5mm pearl on the wire and then pass
the wire under circle frame
Repeat previous step 2x and have 3 pearls wrapped
Continue wrapping with your teardrop crystal My crystal has 2 holes on the side
and then continue wrapping with your 5mm pearls then secure your wire
Repeat Step 3 and create as many as needed For 16-inch necklace Ive created 6 of these
components
Jade Necklace
BLOG WWWHANDMADE-JEWELRY-CLUBCOM MEMBERSHIP WWWDIYBEADINGCLUBCOM BLOG DIY BEADING MAGAZINE ISSUE 32
Step 4 Cut a 15-inch 18ga wire and make a loop on
one end Insert 8mm pearl and make a loop on the other end You then use these as connectors
and link the components
Step 5 The necklace is an 18ga wire with wrapped
loops on both ends First cut 7 inches 18ga wire and make a wrapped loop with your hook already inserted Side in 18pcs 5mm pearls
Then make a wrapped loop on the other end connecting the wrapped loop onto the component Do the same for the other
necklace but make the loop on the other end big enough so the hookclasp can pass thru
To have the necklace curve shaped use a jar to bend the wire Voila Now youre
ready to party
Jade Necklace
BLOG WWWHANDMADE-JEWELRY-CLUBCOM MEMBERSHIP WWWDIYBEADINGCLUBCOM
About the Author
Sky Aldovino
I consider myself a late bloomer when it comes to crafting Irsquom a self-taught jewelry maker Jewelry making wasnrsquot really a hobby of mine but unforeseen events lead me to learn jewellery making My family put up a craft store where we sell cross stitch beads and all sorts of crafting materials I fell in love with the beads and tried to create accessories only for myself Clients liked the pieces and I started customizing handmade jewelleries The craft store was a success for 6 years but like any other small businesses we had to close it down and I was confined to staying at home While at home I had all the time using the internet and now working as a home-based jewelry designer
BLOG DIY BEADING MAGAZINE ISSUE 32
Atomic Ring
BLOG WWWHANDMADE-JEWELRY-CLUBCOM MEMBERSHIP WWWDIYBEADINGCLUBCOM
Have fun making shapes using the wigjig Cyclops Make loops going in
circles to mimic the shape of a flower or in this tutorial mimic the
shape of an atom The tutorial will also teach you how to cage a
cabochon Whats nice about this piece is that with one long wire you
can create the ring from start to finish
The tutorial is catered for intermediate to advanced students One
must already know how to make spirals and use a wigjig tool It has
clear instructions and ultra-clear close-up photos at each step
Additionally you can ask me question you have on the tutorial No
more getting stuck and frustrated on a confusing or just plain
inaccurate pattern
If you followed this tutorial and then sell the accessory or jewelry
please give credit to the author or DIY Beading Clubcom
If you like to get a blank wigjig graph visit wigjigcom Shop and Jigs
section
Copyright 2015
wwwdiybeadingclubcom
wwwhandmade-jewelry-clubcom
BLOG DIY BEADING MAGAZINE ISSUE 32
Atomic Ring
BLOG WWWHANDMADE-JEWELRY-CLUBCOM MEMBERSHIP WWWDIYBEADINGCLUBCOM
Materials Needed 20ga Craft wire 28ga Craft wire 11mm Round Cabochon
Tools Needed Wigjig Cyclops 15mm pegs Wire cutter Flat nose pliers Mandrel
Skill Level Intermediate - Advanced
BLOG DIY BEADING MAGAZINE ISSUE 32
Step 1 Lets prepare your wigjig cyclops Position the pegs like so
Atomic Ring
BLOG WWWHANDMADE-JEWELRY-CLUBCOM MEMBERSHIP WWWDIYBEADINGCLUBCOM BLOG DIY BEADING MAGAZINE ISSUE 32
Lets work with longer wire so youll have enough wire to hold onto as you manipulate the wire so cut 36 inches of 20ga wire From
one end of the wire measure 10 inches
On the 10-inch measurement loop the wire at the center peg then continue to loop onto the side pegs going in circle going back to
the center peg after looping on the side peg
Now the wire at the center peg will start to build up as you go around the side pegs so
you need to constantly press the wire at the center peg to accommodate the build up of
wire
When youre done pull out the wire and this is
how it should look like
Atomic Ring
BLOG WWWHANDMADE-JEWELRY-CLUBCOM MEMBERSHIP WWWDIYBEADINGCLUBCOM BLOG DIY BEADING MAGAZINE ISSUE 32
You will notice that the frame opens wide Now to keep the atom frame from opening wide secure the center of the frame by wrapping a 28ga wire What you
need to do is simply pass the 28ga wire into the hole and wrap as many times as needed or until youre sure that the frame is secure
Step 2 Now youre finished with your atom frame Well now create the focal design With the longer wire make a spiral at the center big
enough to accommodate the size of your cabochon In this tutorial the spiral is about
11mm in diameter the same size as my cabochon
Pop in your cabochon and start to make spirals going around and over the cabochon as if you are caging the cabochon Create at
least 5 rounds and then cut off any excess
Step 3 Now lets make the ring and this with the other
end of the wire
Atomic Ring
BLOG WWWHANDMADE-JEWELRY-CLUBCOM MEMBERSHIP WWWDIYBEADINGCLUBCOM BLOG DIY BEADING MAGAZINE ISSUE 32
Bring up your mandrel and wrap the wire to the size of your finger Wrap at least 2 times
When youre sure you have the right size pull the ring out of the mandrel
With the extended wire wrap the wire the secure the ring
Cut off any excess and voila You have your atomic ring Create as many as you can with different colors of cabochon
Atomic Ring
BLOG WWWHANDMADE-JEWELRY-CLUBCOM MEMBERSHIP WWWDIYBEADINGCLUBCOM
About the Author
Sky Aldovino
I consider myself a late bloomer when it comes to crafting Irsquom a self-taught jewelry maker Jewelry making wasnrsquot really a hobby of mine but unforeseen events lead me to learn jewellery making My family put up a craft store where we sell cross stitch beads and all sorts of crafting materials I fell in love with the beads and tried to create accessories only for myself Clients liked the pieces and I started customizing handmade jewelleries The craft store was a success for 6 years but like any other small businesses we had to close it down and I was confined to staying at home While at home I had all the time using the internet and now working as a home-based jewelry designer
BLOG DIY BEADING MAGAZINE ISSUE 32
Featured Article Gemstones Used for Jewelry Making
BLOG WWWHANDMADE-JEWELRY-CLUBCOM MEMBERSHIP WWWDIYBEADINGCLUBCOM
Gemstones are stones which we hold quite highly in terms of value And
jewelry often consists of stones that add attractiveness to it so it is not
surprising when jewelry designers actually use gemstones in their designs In
fact there are different types of gemstones that can be used for making
jewelry There are the expensive and pure gemstones and there are also the
imitation ones The information below will provide some information about
the kinds of stones you can use to create jewelry and how these stones will
impact the jewelry you have created
The first kind of stone which I believe we are all quite familiar with are
birthstones These stones are associated with individualrsquos month of birth
by SunVDesigns by BeyhanAkman
For example Amethyst stone is connected with anybody who is born in
February which carries special significance in the area of emotions and also
spiritually This stone also signifies calm and peace as well
And then we have semi-precious stones which are also often used in jewelry
making They are not as valuable as compared to precious stones but still
valuable Best examples of these stones are aquamarine topaz tourmaline
opal and turquoise
BLOG DIY BEADING MAGAZINE ISSUE 32
Featured Article Gemstones Used for Jewelry Making
BLOG WWWHANDMADE-JEWELRY-CLUBCOM MEMBERSHIP WWWDIYBEADINGCLUBCOM
It is an ideal gift for someone who you deem special Aquamarine pendants
usually work well for anyone and is widely an accepted stone
by HyppieChic by joyeriamestiza
However precious stones are the most unusual
and precious jewels to us Examples of some of
them are emerald sapphire diamond and
ruby These stones are usually very expensive
and are prized for their exquisiteness These
stones are commonly used in high-quality
jewelry designs which costs quite a fortune to
obtain
BLOG DIY BEADING MAGAZINE ISSUE 32
by sarajewelrystu
Jewelry designs with precious stones are usually
given as exceptional gifts on special occasions A
perfect example is a diamond ring that is usually
given as an engagement gift
by ldiamondsforever
Featured Article Gemstones Used for Jewelry Making
BLOG WWWHANDMADE-JEWELRY-CLUBCOM MEMBERSHIP WWWDIYBEADINGCLUBCOM
There are also synthetic stones which are often used to create jewelry
Synthetic stones are artificial imitations of gemstones Synthetic Sapphire
jewelry costs less compare with the authentic ones Most of the time
imitation stones are used to save cost but at the same time have the similar
look of the real stone
BLOG DIY BEADING MAGAZINE ISSUE 32
by shininggems by thaimaker
by lapinduprintemps by PastimeArt
Gemstones are used like beads and you can use it in any designs whether
simple or elaborate
Swarovski crystal components are available in a rich multitude of rondelles Perfect as spacers in necklaces or as discs in earrings Rondelles can be used with many varieties of shapes or sizes Use Swarovski crystal rondelles between large gemstones as accents with precious metal findings Fire Mountain Gems and Beads Crystal Passionsreg brand presents Swarovski crystal in display-ready packaging for brilliant retail presentation Crystal Passionsreg is an assurance of genuine Swarovski crystal
BLOG DIY BEADING MAGAZINE ISSUE 32 BLOG WWWHANDMADE-JEWELRY-CLUBCOM MEMBERSHIP WWWDIYBEADINGCLUBCOM
Recommended Jewelry Making Supplies
Mz Unisex-adults 12pcs 25x18x6mm Turquoise Oval CAB Cabochon
BLOG DIY BEADING MAGAZINE ISSUE 32 BLOG WWWHANDMADE-JEWELRY-CLUBCOM MEMBERSHIP WWWDIYBEADINGCLUBCOM
Recommended Jewelry Making Supplies
For a little sparkle that goes a long way design with Swarovski 4mm faceted bicones Create glorious multi-strand necklaces with the dainty crystals or use as spacers to add a tiny flash to your designs Swarovski crystal components are made in Austria and are considered the finest products of their kind in the world
BLOG DIY BEADING MAGAZINE ISSUE 32 BLOG WWWHANDMADE-JEWELRY-CLUBCOM MEMBERSHIP WWWDIYBEADINGCLUBCOM
Recommended Jewelry Making Supplies
Imitation beads resist color change These beads have uniform quality with a good polish Some strands may have little to no matrix Sizes shapes and colors may vary with handcrafted items
BLOG DIY BEADING MAGAZINE ISSUE 32 BLOG WWWHANDMADE-JEWELRY-CLUBCOM MEMBERSHIP WWWDIYBEADINGCLUBCOM
Recommended Jewelry Making Supplies
Something Blue Necklace and Earrings
BLOG WWWHANDMADE-JEWELRY-CLUBCOM MEMBERSHIP WWWDIYBEADINGCLUBCOM
Skill level Beginner Intermediate Advanced
DIMENSIONS OF THE NECKLACE Inner Circumference 14 18 inch 35 cm
Focal Pendant Width 1 15 inch 35 cm Focal Pendant Height 1 15 inch 35 cm
DIMENSIONS OF THE EARRING Earring Width 716 inch 12 cm Earring Height 1516 inch 25 cm (Without the earring hook)
BLOG DIY BEADING MAGAZINE ISSUE 32
Materials
Note Before purchasing the supplies measure the length of your wished necklace If you decide to bead a longer necklace you should keep in mind that for every extra
frac34 inches 2 cm-s you will need 8 bicones and 8 pearls
Something Blue Necklace and Earrings
BLOG WWWHANDMADE-JEWELRY-CLUBCOM MEMBERSHIP WWWDIYBEADINGCLUBCOM BLOG DIY BEADING MAGAZINE ISSUE 32
Work RAW stitch into a beaded circle and embellish with Swarovski bicones
STEP 2 String 1A and 2 pearls Pass through the previous
second pearl and the freshly added 1A and the first pearl again
STEP 1 Use a comfortable length of thread to string 2
pearls 1A and 1 pearl again leaving a 2rdquo 5cm tail Pass through the first two pearls strung to form a
ring
STEP 3 String 2 pearls and 1A Pass through the previous first pearl and the freshly added two pearls
again
STEP 4 - 17 Repeat STEP 2 and STEP 3 again until you count 17 pearls in the inner circle
But be careful in the last step you only have to add 1 pearl then pass through the first pearls
added in STEP 1 and add another 1A Now pass through the first pearl added in STEP
1and 1A added in this round again to exit from this A
Something Blue Necklace and Earrings
BLOG WWWHANDMADE-JEWELRY-CLUBCOM MEMBERSHIP WWWDIYBEADINGCLUBCOM BLOG DIY BEADING MAGAZINE ISSUE 32
STEP 19 String 2A and pass through the next A added in round 4-17 and the A added in round 18 the 2A added in this round and finally the A added in round 4-17 to exit from the bead showed below
STEP 18 String 3A and pass through the 1A added in the previous round and the first A added in this
round
STEP 20 - 34 Repeat STEP 18 and STEP 19 again until you finish the circle
But be careful in the last step first you have to pass through 3A and then add 1A After this pass
through the 3A again and exit from the A bead
shown below (This is the first A added in STEP 18)
Something Blue Necklace and Earrings
BLOG WWWHANDMADE-JEWELRY-CLUBCOM MEMBERSHIP WWWDIYBEADINGCLUBCOM BLOG DIY BEADING MAGAZINE ISSUE 32
STEP 35 Step up to exit from the pearl shown below (Finishing the previous step in the A bead and then
stepping up from there makes the circle more secure)
Now string 3 bicones Pass through the pearl and the first bicone again
In the reality your circle will look more like this the A beads forming a strong row in the middle of the
pearls
STEP 36 Add 2 bicones Pass through the
neighboring pearl the first bicone added in the previous row and the 2 bicones added in this step
so you can exit from the next pearl
Something Blue Necklace and Earrings
BLOG WWWHANDMADE-JEWELRY-CLUBCOM MEMBERSHIP WWWDIYBEADINGCLUBCOM BLOG DIY BEADING MAGAZINE ISSUE 32
Now in the reality your circle will look more like this the A beads still forming a strong row in the middle of the pearls and the bicones slightly lying on top of
them
STEP 37 - 49 Repeat STEP 35 and STEP 36 again until you finish the circle with the bicones
But be careful in the last step first you have pass through the third bicone added then add 1 bicone
and pass through this little quartet to exit from the bicone shown below (The second one added in
STEP 35)
STEP 50 With these steps we finish the circle by adding 1 bicone to connect the A beads and the
bicone row So add 1 bicone pass through the nearest A bead and add 1 bicone again Pass
through the bicone already there and exit from the bicone you just added
Something Blue Necklace and Earrings
BLOG WWWHANDMADE-JEWELRY-CLUBCOM MEMBERSHIP WWWDIYBEADINGCLUBCOM BLOG DIY BEADING MAGAZINE ISSUE 32
STEP 66-83 Secure the circle by adding 1A between each bicone in the second row of Swarovski
bicones If you finished secure the thread and trim
STEP 51-65 Using the same technique as in STEP 37 - 49 add 1 bicone to finish the third bicone row The black line shows you the way (After STEP 50 pass through the next A bead add 1 bicone and pass through the bicone already there and the bicone added in the previous step Repeat these steps to
finish the inner bicone circle)
MIDDLE CIRCLE Work RAW stitch into a beaded circle and embellish with
Swarovski bicones Remember you need to bead two circles this time
STEP 1 Just like in the focal circle begin with 2 pearls 1A and 1 pearl again on a comfortable length of thread
leaving a 2rdquo 5cm tail Pass through the first two pearls strung to form a ring
Something Blue Necklace and Earrings
BLOG WWWHANDMADE-JEWELRY-CLUBCOM MEMBERSHIP WWWDIYBEADINGCLUBCOM BLOG DIY BEADING MAGAZINE ISSUE 32
STEP 15-28 Mimicing the FOCAL CIRCLElsquos STEP 18-34 bead A beads until you finish the inner part of the
circle Exit from a pearl in the second row This circle should look very similar to the first one but this is a bit
smaller
STEP 2-14 Mimicing the FOCAL CIRCLElsquos STEP 2-17 bead until you count 14 pearls in the inner circle Exit
from the last A added
STEP 29-42 Mimicing FOCAL CIRCLElsquos STEP 35-49 add 2 rows of bicones
STEP 43-56 Mimicing the FOCAL CIRCLElsquos STEP 50-65 bead the third row of bicones to finish the circle
Something Blue Necklace and Earrings
BLOG WWWHANDMADE-JEWELRY-CLUBCOM MEMBERSHIP WWWDIYBEADINGCLUBCOM BLOG DIY BEADING MAGAZINE ISSUE 32
SMALLEST CIRCLE Work RAW stitch into a beaded circle and embellish
with Swarovski bicones Remember you need to bead two circles again
STEP 1 Just like in the focal circle begin with 2 pearls
1A and 1 pearl again on a comfortable length of thread leaving a 2rdquo 5cm tail Pass through the first two
pearls strung to form a ring
STEP 57-70 Just like the FOCAL CIRCLElsquos STEP 66-83 secure the circle by adding 1A between every bicone
in the second row of bicones If you finished secure the thread and trim (Donrsquot forget to bead another
circle)
STEP 2-12 Mimicing the FOCAL CIRCLElsquos STEP 2-17 bead until you count 12 pearls in the inner circle Exit
from the last A added
STEP 13-24 Mimicing the FOCAL CIRCLElsquos STEP 18-34 bead A beads until you finish the inner part of the
circle Exit from a pearl in the second row This circle should look very similar to the first two but this is the
smallest of them all
Something Blue Necklace and Earrings
BLOG WWWHANDMADE-JEWELRY-CLUBCOM MEMBERSHIP WWWDIYBEADINGCLUBCOM BLOG DIY BEADING MAGAZINE ISSUE 32
STEP 37-48 Mimicing the FOCAL CIRCLElsquos STEP 50-65 bead the third row of bicones to finish this circle too
STEP 25-36 Mimicing FOCAL CIRCLElsquos STEP 35-49 add 2
rows of bicones The last step here is purple again
STEP 49-60 Just like the FOCAL CIRCLElsquos STEP 66-83 secure the circle by adding 1A between every bicone
in the second row of bicones If you finished secure the thread and trim (Donrsquot forget that you need two
small circles)
Something Blue Necklace and Earrings
BLOG WWWHANDMADE-JEWELRY-CLUBCOM MEMBERSHIP WWWDIYBEADINGCLUBCOM BLOG DIY BEADING MAGAZINE ISSUE 32
STEP 37-48 Mimicing the FOCAL CIRCLElsquos STEP 50-65 bead the third row of bicones to finish this circle too
STEP 25-36 Mimicing FOCAL CIRCLElsquos STEP 35-49 add 2
rows of bicones The last step here is purple again
STEP 49-60 Just like the FOCAL CIRCLElsquos STEP 66-83 secure the circle by adding 1A between every bicone
in the second row of bicones If you finished secure the thread and trim (Donrsquot forget that you need two
small circles)
Something Blue Necklace and Earrings
BLOG WWWHANDMADE-JEWELRY-CLUBCOM MEMBERSHIP WWWDIYBEADINGCLUBCOM BLOG DIY BEADING MAGAZINE ISSUE 32
STEP 2-6 Continue by adding 1A 1 bicone 1 pearl until you count 6 of each
STEP 1 Begin with 1 pearl 1 bicone 1A and 1 bicone again on a comfortable length of thread leaving a 2rdquo
5cm tail Pass through the pearl and the first bicone strung to form a ring
STEP 7-12 Pass through the A beads to make your
component more secure Also secure the thread and trim (Repeat these steps until you have six 6-BEAD
COMPONENTs)
6-BEAD COMPONENT Work RAW stitch into a beaded circle and embellish with Swarovski bicones
For the necklace we will need six from this component For the earring two
Something Blue Necklace and Earrings
BLOG WWWHANDMADE-JEWELRY-CLUBCOM MEMBERSHIP WWWDIYBEADINGCLUBCOM BLOG DIY BEADING MAGAZINE ISSUE 32
STEP 2-4 Continue by adding 1A 1 bicone 1 pearl
until you count 4 of each
STEP 1 Begin with 1 pearl 1 bicone 1A and 1 bicone again on a comfortable length of thread leaving a 2rdquo
5cm tail Pass through the pearl and the first bicone strung to form a ring
STEP 5-8 Pass through the A beads to make your component more secure Also secure the thread and
trim (Repeat these steps until you have the wished amount of 4-BEAD COMPONENTs)
4-BEAD COMPONENT Work RAW stitch into a beaded circle and embellish with Swarovski bicones
For the necklace-size that is given on the second page we will need 20 from this
component For the earring two
If you would like to make a longer necklace you need to make more (One 4-BEAD COMPONENT measures about 38 inch 1 cm To make the necklace symmetrical you have to have equal amounts on each side This means for every extra frac34 inches
2 cm-s you will need 1 4-BEAD COMPONENT on each side of the necklace)
Something Blue Necklace and Earrings
BLOG WWWHANDMADE-JEWELRY-CLUBCOM MEMBERSHIP WWWDIYBEADINGCLUBCOM BLOG DIY BEADING MAGAZINE ISSUE 32
STEP 2 Connect the MIDDLE CIRCLE to two 6-BEAD COMPONENTs by adding four-times 2As
between the pearls Choose a pearl on the MIDDLE CIRCLE and add
2A pass through a pearl in the 6-BEAD COMPONENT previously added and add 2A again Watch out this has to be symmetrical Repeat this at least two more times to make it
secure Now repeat this entire procedure but choose
the 8-th pearl on MIDDLE CIRCLE Repeat this on the other side of the necklace
too
Choose a pearl on the FOCAL CIRCLE and add 2A pass through a pearl in the 6-BEAD COMPONENT and add 2A again Repeat this at least two more times to make it secure
Now repeat this entire procedure but choose the 5-th pearl on FOCAL CIRCLE This will make the necklace nice on your neck
FINISHING THE NECKLACE Connects the parts with A beads
STEP 1 Connect the FOCAL CIRCLE to two 6-BEAD COMPONENTs by adding four-times 2As between the pearls To do this turn your parts upside down you need to
see the pearls We will work on this side from now on
Something Blue Necklace and Earrings
BLOG WWWHANDMADE-JEWELRY-CLUBCOM MEMBERSHIP WWWDIYBEADINGCLUBCOM BLOG DIY BEADING MAGAZINE ISSUE 32
FINISHING THE EARRING Connects the parts with A beads
STEP 1-2 Connect the 6-BEAD COMPONENT
to 4-BEAD COMPONENT and the 4-BEAD
COMPONENT to the earring hook
First connect the 4-BEAD COMPONENT to the 6-BEAD COMPONENT with 4A beads Mimic
the elongation steps of the necklace if needed
Secondly connect the 4-BEAD COMPONENT
to your earring hook with 4A beads again Leave from the last pearl bead 2A beads the hook (this is the orange oval form) and 2As again Pass through each of them to
secure this connection again
Finally get ready to prepare the other earring ndash since we need two of them
STEP 5 Connect the 4-BEAD COMPONENTs to the toggle clasp thus finishing the
necklace Leaving from the last pearl bead 2A the
clasp(this is the orange oval form) and 2A again Pass through all of them a couple more times to make this connection more
secure
Something Blue Necklace and Earrings
BLOG WWWHANDMADE-JEWELRY-CLUBCOM MEMBERSHIP WWWDIYBEADINGCLUBCOM BLOG DIY BEADING MAGAZINE ISSUE 32
If you finished it is time to try it on It was a great fun wasnrsquot it And how beautiful you look in your new necklace and the matching earrings
Something Blue Necklace and Earrings
BLOG WWWHANDMADE-JEWELRY-CLUBCOM MEMBERSHIP WWWDIYBEADINGCLUBCOM
About the Author
Margit Vogel
My name is Margit Vogel I live in Hungary Europe
By profession I am a biochemical engineer but I fell in love with
beads so much that I could not stop playing with them
I make one-of-a-kind beaded and bead embroidered art
jewelry made of the best quality materials such as Swarovski
stones gemstones Japanese beads (Miyuki and Toho) Czech
glass beads leather soutache and suede Each piece is unique
and individually crafted
Feel free to visit my blog for some eyecandy
httpiformjewelrywordpresscom
My shop httpwwwetsycomshopiformjewelry
Facebook httpwwwfacebookcomiformjewelry
BLOG DIY BEADING MAGAZINE ISSUE 32
Getting Down And Personal With Gianna
Getting Down And Personal With Gianna
Nowadays we see more and more jewelry stores opening up online and with these online jewelry stores it has made it easier for us to purchase and view their creations Have you ever wondered how they are able to manage and produce amazing jewelry pieces and tutorials So heres a little on the journey to open up an online shop We are excited to present to you Gianna aka Beading4perfectionists
Gianna Beader amp Youtuber
Unlike most jewelry makers and beadweavers Gianna did not start beading as a hobby but as a means to make ends meet With goals in trying to
fill the financial gap she did everything she could to expand her earnings ndash working as a security guard
and at the same time learning how to bead and selling her pieces at fair trades and flea markets
Since many were asking if she does home beading workshops she started on exploring how to teach people to bead She loves Scott Bakula and has always loved him till now and this served as her
inspiration to start making a beading video tutorial
Gianna started creating videos because she was at the point in her life where everything seemed to be falling apart And at that moment of time she had difficulties financially and selling jewelry was the only way for her to stay afloat financially She is a big Scott Bakula fan and when she went to the UK to see him on stage that was when it hit her that she is already able to edit videos and
taught herself Photoshop and done workshops at bead fairs so why not put these together and see what happens on Youtube She knew that if she gets enough subscribers and views ndash though no one knew what the exact numbers were you would be invited to become a Youtube partner This way she could monetize her videos with advertisements and hopefully she would be able to be a Youtube partner and be able to pay her bills
BLOG WWWHANDMADE-JEWELRY-CLUBCOM MEMBERSHIP WWWDIYBEADINGCLUBCOM BLOG DIY BEADING MAGAZINE ISSUE 32
Getting Down And Personal With Gianna
Her Youtube channel is popular and the reason why she chose Youtube is because Youtube is the biggest platform and reached almost to the whole world Everyone already knows about it and it was growing rapidly as compared to other platforms like Dailymotion so she figured that Youtube was the way to go Her advice to new designers is that when you start out go to the platforms on the top of your list first then work your way down your list if you do not get accepted by your first choice
After loyally putting up one video every week for about 8 months in a row she became a Youtube partner and monetized her videos She knew she needed at least $100 to get her first payout She managed to reach $100 after 3 months The process was not easy she worked hard lack sleep skipped meals and who knows what happened to Ridge in the Bold and the Beautiful because she stopped watching
On Youtube you can monetize your videos Google pays straight to your bank account and at other countries where they also have the option of getting checks among other options In order to get paid you have to reach the $100 mark and after 3 months For Gianna she thinks that you cannot say that Etsy is better than Youtube or Youtube is better than Etsy Her reasoning is because on Youtube she has many followers which will eventually check out her Etsy shop And to start an Etsy shop you need an audience
BLOG WWWHANDMADE-JEWELRY-CLUBCOM MEMBERSHIP WWWDIYBEADINGCLUBCOM BLOG DIY BEADING MAGAZINE ISSUE 32
television and dedicated her spare time (as she had another job) to Youtube She re-registered at the chamber of commerce after receiving her first payout Her work at Youtube now is not a full time job and things have changed on Youtube It is easier to become a parter but there are some countries that need to wait for an invitation to be a Youtube partner Take Italy for instance Italians would have to work just as hard as she did if they want to become a Youtube partner
Getting Down And Personal With Gianna
With her 60000 subscribers on her b4pbakup Youtube channel it is possible to sell at least 60 patterns on the first day on Etsy after promoting the PDF file on her Youtube channel Though you may think that 60 out of 60000 is not much you have to remember that not everyone has the means to purchase the PDF file and a lot of people still rather watch her carry out the tutorial(for free) on Youtube instead of reading the patterns or paying for the patterns even if the pattern is for a fundraiser and only cost $2 Her insights on Youtube is that Youtube is not what it used to be 6 years ago Instead of making more money every month she is making less and less because advertisers have more options of where they want to advertise their ads Ads do not pay as much as they used to Back in the days you could get 25 cents per ad Now you count yourself lucky if you could get 5 cents roll in after two hours
BLOG WWWHANDMADE-JEWELRY-CLUBCOM MEMBERSHIP WWWDIYBEADINGCLUBCOM BLOG DIY BEADING MAGAZINE ISSUE 32
And on top of that adblockers are destroying Youtube channel owners Youtube will start making changes to the channels where there will be ldquopaid subscriptionrdquo channels This has already been implemented in some countries but not in her country The Netherlands This means there will no longer be ads for her monthly paying subscribers She hopes that Youtube will add on a paid per video option feature The option to be a paid channel or free channel or to start a new channel for paying customers is yours to choose Gianna is not happy with Youtube because many others like her have worked so hard and for some years to become Youtube partners(which was something to be proud of) has lost their status
Getting Down And Personal With Gianna
Her advice for those who want to go on Youtube is 1 Do it because you want to teach
2 Do it because you want a career with beads
BLOG WWWHANDMADE-JEWELRY-CLUBCOM MEMBERSHIP WWWDIYBEADINGCLUBCOM BLOG DIY BEADING MAGAZINE ISSUE 32
After putting up about 20 videos and having at least 5000 subscribers add the PDF tutorials to Etsy and Craftsy She found out that her audience would like to have the PDF after watching her videos This is because they would rather print out the PDF and work while seated in a comfy chair technically somewhere else instead of having to pause the video time and time again
Gianna has also made a video for those who want to know the whole story of her journey up until the present day And to get updates on her you can check it out here She has also started a vlog where she tells of how she still works towards becoming a financial independent beader and explains her journey to get where she wants to be(or die trying) Gianna will be in the UK on October the 17th giving an all-day workshop with 4 different patterns
(2 beginners and 2 advanced) in Wotton-under-Edge
Gianna will be there Friday night as the workshop is on Saturday She will be leaving on Sunday Her
doors are open to all who wants to continue the party with her at the hotel across the street
For more information do contact Ann Tucker on Facebook
httpswwwfacebookcomanntucker501
Rec
omm
end
ed R
ead
ings
Making Jewelry with Gemstone
Beads
Combines the popular craft of beading with beautiful semi-precious stones which are collected by many Features a variety of versatile ideas which can be adapted for any type of gem or bead Readers will learn to reate beautiful gemstone jewelry with this dazzling collection of over 100 projects ranging from eyecatching earrings and accessories to exquisite necklaces and bracelets This beautiful book offers an impressive range of 28 beautiful semi-precious stones (including birthstones) and a glimpse into the fascinating history and mythical properties behind them
BLOG DIY BEADING MAGAZINE ISSUE 32 BLOG WWWHANDMADE-JEWELRY-CLUBCOM MEMBERSHIP WWWDIYBEADINGCLUBCOM
Rec
omm
end
ed R
ead
ings
Convertible Crystal Jewelry
Reverse it Twist it Wear it Many
Ways
Diane Whiting presents the idea that convertibility isnrsquot just about using pieces in multiple ways it is also about using skills and creativity in multiple ways Using ever-popular sparkling crystals Diane showcases design elements through various techniques for fun easy fashionable jewelry With 25 projects the reader can choose from bracelets necklaces and earrings that match any outfit or styleDiane Whiting presents the idea that convertibility isnrsquot just about using pieces in multiple ways it is also about using skills and creativity in multiple ways
BLOG DIY BEADING MAGAZINE ISSUE 32 BLOG WWWHANDMADE-JEWELRY-CLUBCOM MEMBERSHIP WWWDIYBEADINGCLUBCOM
Rec
omm
end
ed R
ead
ings
Wire Jewelry Masterclass
Wrapped Coiled and Woven Pieces
Using Fine Materials
Comprehensive and fabulous Wire Jewelry Masterclass takes an in-depth look at an intricate and rewarding craft The 24 projects which range from simple Dragons tear briolette earrings to a Poseidon-under-the-sea pendant will delight and inspire jewelers of all levels and tastes Divided into beginner intermediate and advanced sections this beautifully photographed step-by-step guide is the ticket to wire jewelry expertise
BLOG DIY BEADING MAGAZINE ISSUE 32 BLOG WWWHANDMADE-JEWELRY-CLUBCOM MEMBERSHIP WWWDIYBEADINGCLUBCOM
Rec
omm
end
ed R
ead
ings
Timeless Wire Weaving The
Complete Course
Timeless Wire Weaving focuses on developing wirework skills through 13 projects using three classic wire weaving techniques coiling wrapping and weaving The projects are built around a focal cabochon and incorporate seed beads and crystals in imaginative ways Designers learn to make the jewelry shown in the book and they also use the techniques learned to create innovative jewelry pieces of their own
BLOG DIY BEADING MAGAZINE ISSUE 32 BLOG WWWHANDMADE-JEWELRY-CLUBCOM MEMBERSHIP WWWDIYBEADINGCLUBCOM
Our digital magazine is available through
Apple Newsstand service available to millions of IPAD users
To advertise with us please email us at
diyjewelryclubgmailcom
Or visit our page at
httphandmade-jewelry-clubcomadvertising-diy-beading-magazine
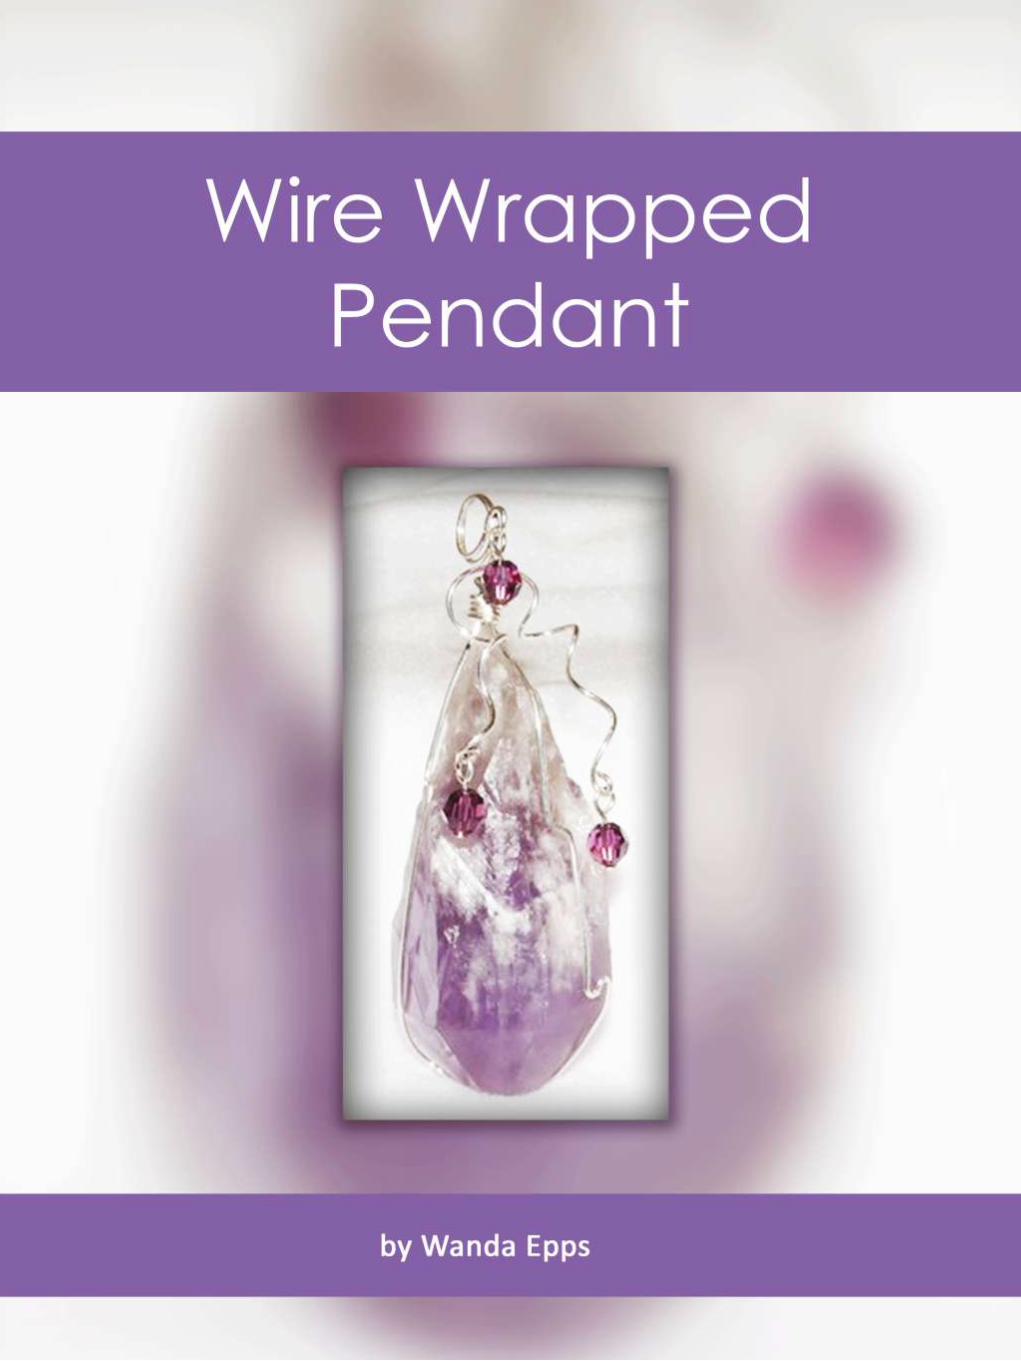
Wire Wrapped Gemstone
Pendant
BLOG WWWHANDMADE-JEWELRY-CLUBCOM MEMBERSHIP WWWDIYBEADINGCLUBCOM
3 Using the wire cutters cut one 3 inch (76 cm) length of 20 gauge half round half hard wire This is the wrapping wire
With the flat side of the wire facing you use the chain nose pliers to make a 14 inch (06 cm) bend
towards you and at a slight angle in one end of the wire This makes a hook in the wire The flat sides of the wire should face one another
BLOG DIY BEADING MAGAZINE ISSUE 32
4 Pick up the taped wires at their center between your fore finger and thumb Place the hook of the half round wire slightly to the right of the center mark on the two round
wires
5 Holding the long end and the tail of the half round wire hook use the tip of the chain nose pliers to squeeze the bend of the hook against the round wires This sets or secures the wrapping wire
Wire Wrapped Gemstone
Pendant
BLOG WWWHANDMADE-JEWELRY-CLUBCOM MEMBERSHIP WWWDIYBEADINGCLUBCOM
6 Bend the long end of the half round wire up over the two round wires You have created one wire wrap
BLOG DIY BEADING MAGAZINE ISSUE 32
7 Bend the long end of the half round wire down and behind the two round wires
8 Continue to repeat Steps 6 and 7 until you have made three (3) to five (5) complete wire wraps around the round wires (I made five (5) wire wraps) After making one or two wire wraps secure
the wraps against the round wires as in Step 5
The front of the wrap (as pictured below) will be the side where the half round wrapping wire is not cut
Wire Wrapped Gemstone
Pendant
BLOG WWWHANDMADE-JEWELRY-CLUBCOM MEMBERSHIP WWWDIYBEADINGCLUBCOM
9 Use wire cutters to cut the excess half round wire Cut the wire about half way behind the round wires so that the ends will not be seen from the front side of the wire wrap
BLOG DIY BEADING MAGAZINE ISSUE 32
10 With the wire wrap at the bottom center of your bead use your fingers to gently shape the wires around the bottom along the sides and to the top of the bead
11 Use the chain nose pliers to secure all the wraps against the round wires
Wire Wrapped Gemstone
Pendant
BLOG WWWHANDMADE-JEWELRY-CLUBCOM MEMBERSHIP WWWDIYBEADINGCLUBCOM
12 Slide the chain nose pliers in between the round wires where they meet the wire wrap and spread the wires apart
BLOG DIY BEADING MAGAZINE ISSUE 32
Spreading the wires apart begins to create the cage for the bead
13 With its bottom center resting against the wire wrap place your bead or gemstone inside the cage
Gather all four of the wires around the bead so that it is encased within them and so that the wires
meet at the top of the bead Hold all four wires between your forefinger and thumb (like you are pinching the wires)
Wire Wrapped Gemstone
Pendant
BLOG WWWHANDMADE-JEWELRY-CLUBCOM MEMBERSHIP WWWDIYBEADINGCLUBCOM
14 Decide which side will be the front of the pendant Locate the wire that is in front of all the wires and with your fingers bend it downward at a 45 degree angle
BLOG DIY BEADING MAGAZINE ISSUE 32
15 Use your fingers or the chain nose pliers to wrap the bent wire around the other three wires where they all meet or cross one another
16 Continue wrapping the wire around the other three to secure them End the wrapping at the back of the pendant
Using the chain nose pliers tuck the wire into the wraps (not pictured)
Wire Wrapped Gemstone
Pendant
BLOG WWWHANDMADE-JEWELRY-CLUBCOM MEMBERSHIP WWWDIYBEADINGCLUBCOM
17 Make sure that the wires are evenly spread around the beads Now we need to tighten the wires that encase the bead
On one of wires about halfway up the wire place the jaws of the round nose pliers on either side
of the wire Now rotate the pliers making a double bend in the wire Repeat on the other three wires making one or two double bends in each wire When youre done shake the bead to make sure it cannot fall out of the wires
BLOG DIY BEADING MAGAZINE ISSUE 32
18 Now decorate two of the top wires Almost anything is possible Try making a few different bends curls or twists in the wire
I decided to loosely coil the top wires around an ink pen
19 Gently untighten the coil by pulling the end of the wire downward Using the round nose pliers make a simple wire loop on the end of the coil
Wire Wrapped Gemstone
Pendant
BLOG WWWHANDMADE-JEWELRY-CLUBCOM MEMBERSHIP WWWDIYBEADINGCLUBCOM
20 Repeat Steps 18 and 19 on a second top wire
BLOG DIY BEADING MAGAZINE ISSUE 32
21 The third top wire becomes the bail Coil it tightly around the ink pen making at least two wire coils The end of the wire should fall in front of the pendant
Make a simple wire loop on the wire end
22 Heres how the wire coilsspiralsbends should look Make any necessary adjustments to the wires along the sides of the gemstones and the two that fall
in front of pendant
Make sure that the wires tightly secure the bead The wire wrap at the bottom of the pendant may no longer be at the center of the bead
Wire Wrapped Gemstone
Pendant
BLOG WWWHANDMADE-JEWELRY-CLUBCOM MEMBERSHIP WWWDIYBEADINGCLUBCOM
23 On each of the three head pins string a 6mm bead Make a simple wire loop on the end of each head pin
Attach one head pin bead unit to each of the simple wire loops on the wire wrapped pendant
BLOG DIY BEADING MAGAZINE ISSUE 32
Completed Wire Wrapped Pendant
Now hang your handcrafted wire wrap pendant from your favorite chain or strand of beads
Enjoy wire wrapping your own gemstone to make a wire wrapped pendant
BLOG WWWHANDMADE-JEWELRY-CLUBCOM MEMBERSHIP WWWDIYBEADINGCLUBCOM
Wire Wrapped Gemstone
Pendant About the Author
Wanda Epps
Wanda is an avid jewelry maker who loves to make jewelry with beads She began her journey into jewelry making after walking into a bookstore to find crafting books on sale One on making jewelry caught her eye and after making a simple bead necklace she was hooked That was in late 2003 Over the years she has taken classes on various jewelry making techniques stringing making wire jewelry bead crochet macrame metal jewelry making to name some She expects that her love of making beaded jewelry will continue as bead supplies and beautiful new beads seem endless Her fulltime job provides for her needs but beads are her passion She invites you to join her in the many adventures of making jewelry at
httpwwwmaking-beaded-jewelrycom httpswwwfacebookcompagesMaking-Beaded-Jewelry-
Guide254860504236
BLOG DIY BEADING MAGAZINE ISSUE 32
Should You Sell In The Marketplace
Should You Sell In The Marketplace
BLOG WWWHANDMADE-JEWELRY-CLUBCOM MEMBERSHIP WWWDIYBEADINGCLUBCOM
We are all able to create jewelry pieces and there will come a time where you want to share the joy with the rest of the world whether it is in the form of a tutorial or a finish
piece And this is when you will start to think about putting up your work for sale As someone who is new to the business world you may be confused on where you should start selling your work And the all famous site that is first on most peoplersquos minds is Etsy Etsy is popular and it is user friendly and that is why it is the choice of many designers and crafters But there are also some who wants to set up their own
shop with their logo and to put their works out as their own even at the very beginning Thatrsquos where you may be confused on which platform you should go for
So herersquos some explanation on how you will benefit from setting up shop at Etsy
BLOG DIY BEADING MAGAZINE ISSUE 32
1 Etsy has everything ready for you and all you have to do is to bring in your works and use the features that are already available for you to use ndash like the payment system web traffic design and layout are not an issue that you need to worry about
2 You also have the trust of customers almost immediately because Etsy has already established a name for itself and therefore there is already trust in brand in their site When you use Etsy your brand will automatically be exposed to many customers who visit Etsy to find what they need
3 For every site there is always the need to be able to interact with other sellers to help each other out Forums or community boards are very helpful as other passionate designers and crafters share their experience to help out the newer members of the community This is also where you will be able to form good relationships with other sellers and who knows you may even find a partnership over time
Should You Sell In The Marketplace
BLOG WWWHANDMADE-JEWELRY-CLUBCOM MEMBERSHIP WWWDIYBEADINGCLUBCOM
Though Etsy has itrsquos good points there are some things which you need to take into consideration as well
1 When you are using someone elsersquos facilities there is always the chance of having
being shut down due to unforeseen circumstances Be it violation of Etsyrsquos policy or decisions made by the administration department this will sometimes cost you a dent in your brand name and you may lose the trust of your followers and starting all over again may be the only way to start again
2 If you are a very creative person then you may feel limited as the design of shops at Etsy is standardized If you are new and do not worry so much about designs of websites this is perfectly fine But do remember that when you want to distinguish yourself from other sellers it will be tougher as you try to make your brand more well-known due to limitations of design of the site
3 Since Etsy has so many sellers all in one place the competition is of course going to be tighter and fiercer because even though customers are viewing your products there are also other options from other sellers listed on the page as well So customers may turn away if they see something of a better price
4 Each product that you list with Etsy costs you money Etsy also takes a 35 percent of the selling price of the item However if or when you start your business on your own website it will also cost you for web hosting and you would need PayPal and they have a fee of 29 percent +30cents So either way you will still need to pay to list your products on the web
BLOG DIY BEADING MAGAZINE ISSUE 32
Should You Sell In The Marketplace
BLOG WWWHANDMADE-JEWELRY-CLUBCOM MEMBERSHIP WWWDIYBEADINGCLUBCOM
If you are confident enough to have your own business site by all means go ahead and do it The benefits of it are as below
1 You get to be your own boss You get to control everything from the design of the
website layout and how you want to advertise your products You can also change your policies and not be affected by it because it is you who changes it Your shop will not be shut down suddenly without notice and you do not need to worry that you have to start all over again
2 Distractions of competitors products on your page will not be an issue It is your site and it is up to you whether or not you want to allow what kind of advertisements on your site So if you donrsquot want something on your page it is your call
3 You will be able to capture the attention of the media and customers as well if you are able to have a well designed site Nowadays people are attracted to colors and they can see if you have put effort into beautifying the site for the customers You can do so much more than just uploading some pictures onto Etsy on your own site you can always update your site design and your products to complement each other and therefore becoming more attractive
BLOG DIY BEADING MAGAZINE ISSUE 32
Should You Sell In The Marketplace
BLOG WWWHANDMADE-JEWELRY-CLUBCOM MEMBERSHIP WWWDIYBEADINGCLUBCOM
And herersquos the tough part when you want to have your own site
BLOG DIY BEADING MAGAZINE ISSUE 32
1 You need to have knowledge of what you want to do You have to learn to be involved in every aspect of your site so that you know what us going on at the front end of things and at the back end of things as well But if you have not any knowledge of designing a website it is usually a recipe for something to go wrong You have to remember that you need a user interface that is simple for customers to use an easy to use shopping cart you should know which third party platforms are trusted and one which will not keep changing their regulations If you still want to have your site hiring a designer may be your best option
2 You have to work towards promoting your store on your own You will need to find people to feature you in their social media sites because it will not just fall into your lap You need to have promotions or road shows if you need to Marketing your store is important whether or not you are using Etsy or other marketing platforms but if you are on your own it is even more important
3 You will still be competing with other sellers Though now you are now not only competing with Etsy sellers you are now competing with sellers and stores from the world wide web Etsy is already so well known so people tend to go there first so you need to up your methods of attracting customers
Should You Sell In The Marketplace
BLOG WWWHANDMADE-JEWELRY-CLUBCOM MEMBERSHIP WWWDIYBEADINGCLUBCOM
When we first started out we used Etsy as our platform to sell our works Other than that we also utilized blogs and we eventually built our own website as our main base
BLOG DIY BEADING MAGAZINE ISSUE 32
Things have changed over these 3 years It was easier to get sales without much effort but now with so many other shops also utilizing Etsy the competition has grown tremendously Now our main sales come from our own online store and has exceeded sales from Etsy
So what we recommend is that using an existing platform such as Etsy to start out is good and in time build up your website or webstore
It is not that hard to start your own webstore either these two companies offers the option to set up your webstore
1 Shopify
2 Bigcommerce
There are many things to take into consideration before starting a store online It is perfectly fine to start out using Etsy before branching out on your own But you can also
have both ndash have your own website and a store on Etsy There are many stores who operate like this They technically get customers from Etsy and the reroute them to their own websites As long as you are in control of what you are doing and not stressing and
confusing yourself you can opt for more exposure for your store
So do take some time and take a breather to really think through what will be the best for YOU and do remember that starting small does not mean you will not be able to be big
OFFER Get which can be downloaded by subscribing to
httpinternet-marketing-publishingcom
BLOG WWWHANDMADE-JEWELRY-CLUBCOM MEMBERSHIP WWWDIYBEADINGCLUBCOM
Materials - Copper wire diameter 08 mm - Copper wire diameter 04 mm - Small gemstone bead (~4 mm) (I used 3 mm beads in this tutorial because I didnrsquot have any other beads at the time but the beads in the earrings on the cover are 4 mm) Make sure that the beads you want to use are resistant against chemicals such as liver of sulfur or whichever oxidizing substance you want to use to give the metal patina The beads in the picture above are facetted garnet buttons in the tutorial itself I used black spinel facetted buttons Equipment - Round nose pliers - Flat nose pliers - Side-cutters - A small file - A cylindrical object of about 5mm diameter (eg a mandrel for jump rings) - Hammer amp anvil - Liver of sulfur or some other means to oxidize the metal (optional)
LOVE-ly Earrings
BLOG DIY BEADING MAGAZINE ISSUE 32
BLOG WWWHANDMADE-JEWELRY-CLUBCOM MEMBERSHIP WWWDIYBEADINGCLUBCOM
This tutorial teaches how to make 1 ear stud I recommend making both ear studs of the set simultaneously step-by-step so that symmetry is easier to achieve Between steps check for
symmetry in size and shape and adjust the construction if needed
LOVE-ly Earrings
BLOG DIY BEADING MAGAZINE ISSUE 32
Step 1 Straighten the end of the copper wire (+- 6cm) by rubbing along it with your fingers for a
few seconds
Step 2 Bend over the wire onto itself as illustrated below using flat nose pliers
Step 3 Grab the doubled-over wire with the flat nose pliers and push the two sides against each
other Use little force and do it bit by bit to avoid damaging or kinking the wire
Step 4 Push the two adjacent pieces of wire apart to create the bottom shape of the heart as shown
on the picture above
BLOG WWWHANDMADE-JEWELRY-CLUBCOM MEMBERSHIP WWWDIYBEADINGCLUBCOM
LOVE-ly Earrings
BLOG DIY BEADING MAGAZINE ISSUE 32
Step 5 Hammer down the angled wire (the part circled in red) This strengthens the construction
and looks more professional
Step 6 Wrap the two ends of wire tightly around a cylindrical object (+- 5 mm diameter)
Step 7 Push apart the loops you just made by wrapping the wire around the cylindrical object The wire should now be shaped like a heart as
illustrated above
Step 8 Use round nose pliers to bend around the wire for each side of the heart as illustrated above
BLOG WWWHANDMADE-JEWELRY-CLUBCOM MEMBERSHIP WWWDIYBEADINGCLUBCOM
LOVE-ly Earrings
BLOG DIY BEADING MAGAZINE ISSUE 32
Step 9 Use the flat nose pliers to bend one of the two wires (preferably the longer wire) in a 90deg angle at the place marked with a red dot In the picture accompanying the next step you can see
how it should look from the front
Step 10 Use the round nose pliers to bend the other piece of wire in a decorative coil You will cut off the rest of the wire of the coil at approximately the spot marked with a red dot so take that into account when coiling the wire into the shape that
you desire
Step 11 Cut of the wire at the spot indicated in the previous picture and file off any sharp edges
Step 12 Cut off the ear wire at the desired length (Between 1 and 2 cm If in doubt try the earring on
to see if it sits comfortably) and file off any sharp edges
BLOG WWWHANDMADE-JEWELRY-CLUBCOM MEMBERSHIP WWWDIYBEADINGCLUBCOM
LOVE-ly Earrings
BLOG DIY BEADING MAGAZINE ISSUE 32
Step 13 Hammer down the rest of the heart (bumps and coil) If you canrsquot reach certain parts because the ear wire is in the way bend that part of the heart shape away
(verticallyupward) and bend it back after you finish hammering
Congrats yoursquove now made a basic heart-shaped ear stud Next wersquore going to decorate it with a little gemstone and more copper wire
Step 14 Cut off a length of 04 mm copper wire (about 10-20 cm) and string the bead onto it
Step 15 Place the bead in the ldquonon-coilrdquo upper part of the heart shaped ear stud holding it between thumb and forefinger Let approximately 4 cm of the 04 mm wire stick out over the edge of the
heart as illustrated above
Step 16 Wrap the wire twice around the frame so that if you face the front of the ear stud the wire is
directed towards yourself
BLOG WWWHANDMADE-JEWELRY-CLUBCOM MEMBERSHIP WWWDIYBEADINGCLUBCOM
LOVE-ly Earrings
BLOG DIY BEADING MAGAZINE ISSUE 32
Step 17 Flip the wire over the wire with the bead (indicated by the red arrow) and pull tight whilst holding the bead (and its wire) tightly in place It
should look like the construction in the big picture above
Step 18 And make another loop around the wire with the bead The 04 mm wire is now coiled around
twice two times two coils around the frame and two coils around itself
Step 19 Repeat the wire-fastening procedure described in steps 16-18 with the other end of the
wire securing the gemstone in the heart frame Let the wire stick out at the back of the earstud
Step 20 Pull the wire through the lsquocoilrsquo part of the heart shape to the front The wire should lsquocross overrsquo to the other side of the heart at the back of the ear
stud
Step 21 Coil the wire around the frame until you are content with the design Optionally you can hammer down the coils a bit I often do this because I think it
looks somewhat more sophisticated and professional
BLOG WWWHANDMADE-JEWELRY-CLUBCOM MEMBERSHIP WWWDIYBEADINGCLUBCOM
LOVE-ly Earrings
BLOG DIY BEADING MAGAZINE ISSUE 32
Step 22 Cut off the spare bits of wire preferably at the backside of the ear stud and tuck in the ends
Congrats yoursquove now made a heart-shaped ear stud Next we are going to finish it off with a patina
Step 23 Oxidize the metal of the ear studs I always use liver of sulfur solved in warm water The metal
will turn a dark color and matte texture Afterwards rinse the ear studs thoroughly with water and pat
them dry
Step 24 Rub the oxidized ear stud all over with a rough polishing pad to bring back (a dark copper)
color to the surface
Yoursquove now finished making your own LOVE-ly ear studs
Secure them in your ear with plastic or copper stops These can be bought online or in jewelry-supply
stores
Variation ideas You can easily vary in size and shape (longer hearts smaller coils pointier bottoms etc) and
use different materials As you can see the earring I make in this tutorial has a slightly smaller bead than the
earrings on the cover which influences the overall appearance somewhat
The earrings underneath are made with sterling silver and gold wire (super-short coils) and contain small pink
rubies
LOVE-ly Earrings
BLOG WWWHANDMADE-JEWELRY-CLUBCOM MEMBERSHIP WWWDIYBEADINGCLUBCOM
About the Author
Jeske Hendriks
Hi there My name is Jeske and I love all things handmade Over the years Irsquove dabbled in countless different arts and crafts but nowadays I mainly focus on making jewellery and cutting stone cabochons As for jewellery
my preferred materials are silver wire and gemstonemineral beads Using wire-wrapping and basic silver smithing techniques I create both simple
and intricate pieces ndash each and every one of them unique a personal little artwork
You are welcome to follow me on facebook stop by at my personal
webpage andor to have a look at my Etsy shops httpswwwfacebookcomyeskecrafts
httpwwwyeskecraftscom httpwwwyourbeadsandfindingsetsycom
httpwwwyeskecraftsetsycom httpwwwyeskemiscetsycom
BLOG DIY BEADING MAGAZINE ISSUE 32
Flower Tale Earrings
BLOG WWWHANDMADE-JEWELRY-CLUBCOM MEMBERSHIP WWWDIYBEADINGCLUBCOM
Techniques Beadweaving
Project Level Beginner to Intermediate
Materials 12 bronze opaque 6mm Czech glass pearl round beads
2 gr gold lustered dark topaz Japanese 110 seed beads (Toho 459)
Size B gold beading thread
2 bronze earring hooks
Tools Size 10 beading needle
Scissors
Finished Size Diameter ndash 3 cm (118 inches) (without earring hooks)
BLOG DIY BEADING MAGAZINE ISSUE 32
Flower Tale Earrings
BLOG WWWHANDMADE-JEWELRY-CLUBCOM MEMBERSHIP WWWDIYBEADINGCLUBCOM
Step 1 Cut about 110 cm (43 inches) of thread and
pass it through the needle hole
Pick six groups of one 110 seed bead and one
6 mm round bead
BLOG DIY BEADING MAGAZINE ISSUE 32
Join the beads into a ring and secure with two
square knots
Leave a tail of about 15 cm (59 inches)
Step 2 The working thread should be right before the
6 mm round bead
Pick seven 110 seed beads skip the 6 mm
round bead and pass the needle through the
next 110 seed bead added in the previous
round
Repeat adding groups of seven 110 seed
beads five more times
When adding the last group take the needle
directly through the 110 seed bead from the
previous round and the next one added in the
beginning of current round
Flower Tale Earrings
BLOG WWWHANDMADE-JEWELRY-CLUBCOM MEMBERSHIP WWWDIYBEADINGCLUBCOM
Step 3 Pick three 110 seed beads skip one seed
bead from the chain of seven added in the
previous round and pass with the needle
directly through the next three 110 seed
beads
BLOG DIY BEADING MAGAZINE ISSUE 32
Pick three 110 seed beads skip one seed
bead from the chain of seven added in the
previous round and pass with the needle
through the last one and the first 110 seed
bead from the next chain of seven
Repeat the above directions from Step 3 five
more times
After completing this round make sure the
thread will be exiting from the middle 110
seed bead from the first group of three added
in the beginning of this round
Step 4 Pick one 110 seed bead and go through the
last seed bead of the group of three
Flower Tale Earrings
BLOG WWWHANDMADE-JEWELRY-CLUBCOM MEMBERSHIP WWWDIYBEADINGCLUBCOM
Pick three 110 seed beads and take the
needle through the first seed bead of the next
group of three added in the previous round
BLOG DIY BEADING MAGAZINE ISSUE 32
Pick one 110 seed bead and go with the
needle through the next three seed beads (the
last two of the group of three and the last one
from the chain of seven)
Then go up through three 110 seed beads
(the first from the next group of seven and the
first two from the next group of three)
Repeat the above directions from Step 4 to
complete the remaining petals
When working on the last petal perform the
operation from the image shown on the left
instead of picking the group of three 110 seed
beads string two 110 seed beads the earring
hook other two 110 seed beads and
continue beading as instructed above
When you are done hide the thread ends into the beadwork
Flower Tale Earrings
BLOG WWWHANDMADE-JEWELRY-CLUBCOM MEMBERSHIP WWWDIYBEADINGCLUBCOM
About the Author
Iulia Postică
I was born and live in Moldova Eastern Europe Ever since I remember myself
Ive been crocheting and knitting My grandmother has taught me that and I
loved it very much I always regarded crafts exclusively as a hobby and never
thought of making a career of it I traveled a lot to various historical sites
Actually Ive spent all my childhood summers in archaeological camps with
my father who is a professional archaeologist
I also enjoy metal hammering and wirework as it gives me possibility to
express myself in materials used by human communities since ancient times
copper brass glass seed beads and gemstones That is no surprise to anyone
given my family history and academic background
My shop ldquoBeadedTreasuryrdquo with beading tutorials and bead crochet patterns
httpswwwetsycomshopBeadedTreasury
My shop ldquoArchaeologicardquo with artisan jewelry
httpswwwetsycomshopArcheologica
My blog httpbeadedtreasuryblogspotcom
My facebook httpswwwfacebookcomBeadedTreasury
BLOG DIY BEADING MAGAZINE ISSUE 32
Liberty Earrings
BLOG WWWHANDMADE-JEWELRY-CLUBCOM MEMBERSHIP WWWDIYBEADINGCLUBCOM
Materials - Nr 2 cabochon Preciosa Ornela ovale 18x22 mm turchese
- Rocaille Toho 150 silver lined green emerald
- Nr 2 dagger beads
- Nr 20 pearl 4 mm
- Superduo opaque luster ceramic green
- Rocaille 80 color gold
- Rocaille 80 color ivory
- Delica Miyuki 110 aquagreen mix
- Rocaille Miyuki 110 galvanized silver
- Nr 2 monachelle (earwire)
-Fireline
- Beading Needle nr 12
BLOG DIY BEADING MAGAZINE ISSUE 32
Liberty Earrings
BLOG WWWHANDMADE-JEWELRY-CLUBCOM MEMBERSHIP WWWDIYBEADINGCLUBCOM
Make a circle of 20 delica beads and make a knot (a) Perform two rounds peyote with ivory 80 seed beads (b c) Exit from an ivory
bead
BLOG DIY BEADING MAGAZINE ISSUE 32
a b c
Jump from 80 to 80 with 110 80 gold 110 (a) Finish the round and come out of a 80 gold bead
Jump to the next 80 gold with a 4mm pearl (b) Finish the round and come out
of the first pearl Jump to the 2nd pearl and close with a 80 gold bead(c)
a b c
Position the cabochon and jump from one 80 to the other with two delica bead (a)
Continue with three delicas four times (b) At the bottom sew on two delicas then finish the round by sewing on three delicas for four times passing from one to another roc 80 Tighten the cabochon and exit from the
first two delica that you started with String together a 110 and 150 and enter the second of the three close delicas (c)
a b c
Liberty Earrings
BLOG WWWHANDMADE-JEWELRY-CLUBCOM MEMBERSHIP WWWDIYBEADINGCLUBCOM
Put together 150 110 150 and enter in the second of three next delica (a) Put the same beads for three times then put together 150 and 110 and enter
in the two delica of the bottom tip (b) Enter in the second of three next delica with 110 and 150 (c) Continue passing
in the 80 beads with three beads (150 110 150) for four times then at the top finish the round by putting together a 150 and 110 (d)
BLOG DIY BEADING MAGAZINE ISSUE 32
a b c
Exit from the first 150 sewn in the previous round and jump in the three next beads with a 150 (a)
Put a 150 at a time and exit from the first 110 beads of the bottom tip Jump in the
near 110 with a 150 (b) Finish round repeating steps a and b (c) Exit the roc 80 as shown in the photo (d)
a b c
d
a b c d
Enter in the 80 with four 150 (a b) Enter the 80 beads at the bottom of the pieces with two 110 one superduo one 80 ivory bead one superduo and two 110 (c)
d e f
Liberty Earrings
BLOG WWWHANDMADE-JEWELRY-CLUBCOM MEMBERSHIP WWWDIYBEADINGCLUBCOM
Exit from the bottom pearl (a) Put together 150 three 110 150 and enter in the superduorsquos second hole (b)
Put together three superduo and enter in the next superduorsquos second hole (c) Rethread 15 three 110 150 and return in the opposite direction in the pearl of departure (d)
BLOG DIY BEADING MAGAZINE ISSUE 32
a b
c
Exit from the second pearl indicated from (a) Put 150 four 110 and enter in the second of the three 110 (b) Go to the second superduorsquos hole with four 110 and a 150 (c)
Enter the second hole of the supeduo with a 150(d) Sew in the middle of the bottom of the superduo 150 two 110 150 dagger 150 two 110 150(e)
Enter the second hole of the thirs superduo with 150 (f)
a b c
d
d e f
Liberty Earrings
BLOG WWWHANDMADE-JEWELRY-CLUBCOM MEMBERSHIP WWWDIYBEADINGCLUBCOM BLOG DIY BEADING MAGAZINE ISSUE 32
Put 150 four 110 and enter in the second of three 110 of the base (a) Insert four 110 and 150 in the pearl opposite direction indicated in the picture (b) Go in all the beads
around the piece and exit from the pearl at the top (c) Put 150 three 110 150 and enter the superduo (d)
Enter the ivory bead 80 with two 150 (e) Enter the next superduo with two 150 (f)
a b c
d e f
Put together 150 three 110 and enter in opposite direction in the departurersquos pearl (a) Exit from the 150 beads indicated by photo (b) From this jump in the second of two near
150 with five 150 to created the hole for the earwire (c) Pass the thread in the beads make a few knots and cut the excess thread
a b c
Your earrings are finished
Liberty Earrings
BLOG WWWHANDMADE-JEWELRY-CLUBCOM MEMBERSHIP WWWDIYBEADINGCLUBCOM
About the Author
Mariella Martella
My name is Mariella Martella and I am the author and
designer of jewelry that I sign with the name of Mariel Bijoux
After changing city often for work and study I currently live
in northern Italy I am an art historian with a passion for travel
painting and jewelry design in weaving that project since
2010 In my beads and crystals are the colors of the
Mediterranean sea the atmosphere of summer evenings
and the lights of the places I visited
You can find me at
Etsy shop httpswwwetsycomitshopMarielBijoux
Facebook httpswwwfacebookcommari3lbijoux
Crafting blog httpmarielbijouxblogspotit
Twitter httpstwittercomMarielBijoux
BLOG DIY BEADING MAGAZINE ISSUE 32
Jade Necklace
BLOG WWWHANDMADE-JEWELRY-CLUBCOM MEMBERSHIP WWWDIYBEADINGCLUBCOM
Every time I wear a necklace I always make it a point that the
necklace will lay perfectly flat on my neck Using wire for a necklace
made it possible for me like what I did with Jade Necklace It may look
odd at first having bent wires for a necklace but once the jewelry is
finished youll be so happy how the necklace will perfectly lay on your
neck
The tutorial is catered for intermediate level One must know basic
wirework skills such as wire wrapping making loops wrapped loops
and linking to follow the tutorial It has clear instructions and ultra-clear
close-up photos at each step Additionally you can ask me question
you have on the tutorial No more getting stuck and frustrated on a
confusing or just plain inaccurate pattern
If you followed this tutorial and then sell the accessory or jewelry
please give credit to the author or DIY Beading Clubcom
Copyright 2015
wwwdiybeadingclubcom
wwwhandmade-jewelry-clubcom
BLOG DIY BEADING MAGAZINE ISSUE 32
Jade Necklace
BLOG WWWHANDMADE-JEWELRY-CLUBCOM MEMBERSHIP WWWDIYBEADINGCLUBCOM BLOG DIY BEADING MAGAZINE ISSUE 32
Materials Needed 18ga Craft wire 28ga Craft wire 15mm diameter Green Round Flat Back Sew On Gems 5mm Green pearls
8mm Green pearls 6mm x 11mm teardrop Crystal Treasures Mill Hill beads or any teardrop bead with holes on the side Hook for your clasp
Tools Needed Wire cutter Flat nose pliers Round nose pliers Mandrel A jar or any rounded object to shape your necklace
Skill Level Intermediate
Step 1 Cut 6 inches 18ga wire Make a loop on one end then measure approximately 125 inches and make another loop
Form a size 4 circle on your mandrel
Jade Necklace
BLOG WWWHANDMADE-JEWELRY-CLUBCOM MEMBERSHIP WWWDIYBEADINGCLUBCOM BLOG DIY BEADING MAGAZINE ISSUE 32
Then close the circle by wrapping the extended wire just below the loop Wrap the
wire 2x
This is how it looks like Lets call this circle frame Youll notice that the lower curve is
slightly bigger than the upper curve
Step 2 Cut 8 inches of 28ga wire Wrap one end of
the wire at least 3x on one side of the circle frame just below the loop
Bring up your gem Flat back sew on gems has 2 holes Insert the wire into one hole and then
wrap the wire once onto the circle frame
Jade Necklace
BLOG WWWHANDMADE-JEWELRY-CLUBCOM MEMBERSHIP WWWDIYBEADINGCLUBCOM BLOG DIY BEADING MAGAZINE ISSUE 32
Step 3 Insert a 5mm pearl on the wire and then pass
the wire under circle frame
Repeat previous step 2x and have 3 pearls wrapped
Continue wrapping with your teardrop crystal My crystal has 2 holes on the side
and then continue wrapping with your 5mm pearls then secure your wire
Repeat Step 3 and create as many as needed For 16-inch necklace Ive created 6 of these
components
Jade Necklace
BLOG WWWHANDMADE-JEWELRY-CLUBCOM MEMBERSHIP WWWDIYBEADINGCLUBCOM BLOG DIY BEADING MAGAZINE ISSUE 32
Step 4 Cut a 15-inch 18ga wire and make a loop on
one end Insert 8mm pearl and make a loop on the other end You then use these as connectors
and link the components
Step 5 The necklace is an 18ga wire with wrapped
loops on both ends First cut 7 inches 18ga wire and make a wrapped loop with your hook already inserted Side in 18pcs 5mm pearls
Then make a wrapped loop on the other end connecting the wrapped loop onto the component Do the same for the other
necklace but make the loop on the other end big enough so the hookclasp can pass thru
To have the necklace curve shaped use a jar to bend the wire Voila Now youre
ready to party
Jade Necklace
BLOG WWWHANDMADE-JEWELRY-CLUBCOM MEMBERSHIP WWWDIYBEADINGCLUBCOM
About the Author
Sky Aldovino
I consider myself a late bloomer when it comes to crafting Irsquom a self-taught jewelry maker Jewelry making wasnrsquot really a hobby of mine but unforeseen events lead me to learn jewellery making My family put up a craft store where we sell cross stitch beads and all sorts of crafting materials I fell in love with the beads and tried to create accessories only for myself Clients liked the pieces and I started customizing handmade jewelleries The craft store was a success for 6 years but like any other small businesses we had to close it down and I was confined to staying at home While at home I had all the time using the internet and now working as a home-based jewelry designer
BLOG DIY BEADING MAGAZINE ISSUE 32
Atomic Ring
BLOG WWWHANDMADE-JEWELRY-CLUBCOM MEMBERSHIP WWWDIYBEADINGCLUBCOM
Have fun making shapes using the wigjig Cyclops Make loops going in
circles to mimic the shape of a flower or in this tutorial mimic the
shape of an atom The tutorial will also teach you how to cage a
cabochon Whats nice about this piece is that with one long wire you
can create the ring from start to finish
The tutorial is catered for intermediate to advanced students One
must already know how to make spirals and use a wigjig tool It has
clear instructions and ultra-clear close-up photos at each step
Additionally you can ask me question you have on the tutorial No
more getting stuck and frustrated on a confusing or just plain
inaccurate pattern
If you followed this tutorial and then sell the accessory or jewelry
please give credit to the author or DIY Beading Clubcom
If you like to get a blank wigjig graph visit wigjigcom Shop and Jigs
section
Copyright 2015
wwwdiybeadingclubcom
wwwhandmade-jewelry-clubcom
BLOG DIY BEADING MAGAZINE ISSUE 32
Atomic Ring
BLOG WWWHANDMADE-JEWELRY-CLUBCOM MEMBERSHIP WWWDIYBEADINGCLUBCOM
Materials Needed 20ga Craft wire 28ga Craft wire 11mm Round Cabochon
Tools Needed Wigjig Cyclops 15mm pegs Wire cutter Flat nose pliers Mandrel
Skill Level Intermediate - Advanced
BLOG DIY BEADING MAGAZINE ISSUE 32
Step 1 Lets prepare your wigjig cyclops Position the pegs like so
Atomic Ring
BLOG WWWHANDMADE-JEWELRY-CLUBCOM MEMBERSHIP WWWDIYBEADINGCLUBCOM BLOG DIY BEADING MAGAZINE ISSUE 32
Lets work with longer wire so youll have enough wire to hold onto as you manipulate the wire so cut 36 inches of 20ga wire From
one end of the wire measure 10 inches
On the 10-inch measurement loop the wire at the center peg then continue to loop onto the side pegs going in circle going back to
the center peg after looping on the side peg
Now the wire at the center peg will start to build up as you go around the side pegs so
you need to constantly press the wire at the center peg to accommodate the build up of
wire
When youre done pull out the wire and this is
how it should look like
Atomic Ring
BLOG WWWHANDMADE-JEWELRY-CLUBCOM MEMBERSHIP WWWDIYBEADINGCLUBCOM BLOG DIY BEADING MAGAZINE ISSUE 32
You will notice that the frame opens wide Now to keep the atom frame from opening wide secure the center of the frame by wrapping a 28ga wire What you
need to do is simply pass the 28ga wire into the hole and wrap as many times as needed or until youre sure that the frame is secure
Step 2 Now youre finished with your atom frame Well now create the focal design With the longer wire make a spiral at the center big
enough to accommodate the size of your cabochon In this tutorial the spiral is about
11mm in diameter the same size as my cabochon
Pop in your cabochon and start to make spirals going around and over the cabochon as if you are caging the cabochon Create at
least 5 rounds and then cut off any excess
Step 3 Now lets make the ring and this with the other
end of the wire
Atomic Ring
BLOG WWWHANDMADE-JEWELRY-CLUBCOM MEMBERSHIP WWWDIYBEADINGCLUBCOM BLOG DIY BEADING MAGAZINE ISSUE 32
Bring up your mandrel and wrap the wire to the size of your finger Wrap at least 2 times
When youre sure you have the right size pull the ring out of the mandrel
With the extended wire wrap the wire the secure the ring
Cut off any excess and voila You have your atomic ring Create as many as you can with different colors of cabochon
Atomic Ring
BLOG WWWHANDMADE-JEWELRY-CLUBCOM MEMBERSHIP WWWDIYBEADINGCLUBCOM
About the Author
Sky Aldovino
I consider myself a late bloomer when it comes to crafting Irsquom a self-taught jewelry maker Jewelry making wasnrsquot really a hobby of mine but unforeseen events lead me to learn jewellery making My family put up a craft store where we sell cross stitch beads and all sorts of crafting materials I fell in love with the beads and tried to create accessories only for myself Clients liked the pieces and I started customizing handmade jewelleries The craft store was a success for 6 years but like any other small businesses we had to close it down and I was confined to staying at home While at home I had all the time using the internet and now working as a home-based jewelry designer
BLOG DIY BEADING MAGAZINE ISSUE 32
Featured Article Gemstones Used for Jewelry Making
BLOG WWWHANDMADE-JEWELRY-CLUBCOM MEMBERSHIP WWWDIYBEADINGCLUBCOM
Gemstones are stones which we hold quite highly in terms of value And
jewelry often consists of stones that add attractiveness to it so it is not
surprising when jewelry designers actually use gemstones in their designs In
fact there are different types of gemstones that can be used for making
jewelry There are the expensive and pure gemstones and there are also the
imitation ones The information below will provide some information about
the kinds of stones you can use to create jewelry and how these stones will
impact the jewelry you have created
The first kind of stone which I believe we are all quite familiar with are
birthstones These stones are associated with individualrsquos month of birth
by SunVDesigns by BeyhanAkman
For example Amethyst stone is connected with anybody who is born in
February which carries special significance in the area of emotions and also
spiritually This stone also signifies calm and peace as well
And then we have semi-precious stones which are also often used in jewelry
making They are not as valuable as compared to precious stones but still
valuable Best examples of these stones are aquamarine topaz tourmaline
opal and turquoise
BLOG DIY BEADING MAGAZINE ISSUE 32
Featured Article Gemstones Used for Jewelry Making
BLOG WWWHANDMADE-JEWELRY-CLUBCOM MEMBERSHIP WWWDIYBEADINGCLUBCOM
It is an ideal gift for someone who you deem special Aquamarine pendants
usually work well for anyone and is widely an accepted stone
by HyppieChic by joyeriamestiza
However precious stones are the most unusual
and precious jewels to us Examples of some of
them are emerald sapphire diamond and
ruby These stones are usually very expensive
and are prized for their exquisiteness These
stones are commonly used in high-quality
jewelry designs which costs quite a fortune to
obtain
BLOG DIY BEADING MAGAZINE ISSUE 32
by sarajewelrystu
Jewelry designs with precious stones are usually
given as exceptional gifts on special occasions A
perfect example is a diamond ring that is usually
given as an engagement gift
by ldiamondsforever
Featured Article Gemstones Used for Jewelry Making
BLOG WWWHANDMADE-JEWELRY-CLUBCOM MEMBERSHIP WWWDIYBEADINGCLUBCOM
There are also synthetic stones which are often used to create jewelry
Synthetic stones are artificial imitations of gemstones Synthetic Sapphire
jewelry costs less compare with the authentic ones Most of the time
imitation stones are used to save cost but at the same time have the similar
look of the real stone
BLOG DIY BEADING MAGAZINE ISSUE 32
by shininggems by thaimaker
by lapinduprintemps by PastimeArt
Gemstones are used like beads and you can use it in any designs whether
simple or elaborate
Swarovski crystal components are available in a rich multitude of rondelles Perfect as spacers in necklaces or as discs in earrings Rondelles can be used with many varieties of shapes or sizes Use Swarovski crystal rondelles between large gemstones as accents with precious metal findings Fire Mountain Gems and Beads Crystal Passionsreg brand presents Swarovski crystal in display-ready packaging for brilliant retail presentation Crystal Passionsreg is an assurance of genuine Swarovski crystal
BLOG DIY BEADING MAGAZINE ISSUE 32 BLOG WWWHANDMADE-JEWELRY-CLUBCOM MEMBERSHIP WWWDIYBEADINGCLUBCOM
Recommended Jewelry Making Supplies
Mz Unisex-adults 12pcs 25x18x6mm Turquoise Oval CAB Cabochon
BLOG DIY BEADING MAGAZINE ISSUE 32 BLOG WWWHANDMADE-JEWELRY-CLUBCOM MEMBERSHIP WWWDIYBEADINGCLUBCOM
Recommended Jewelry Making Supplies
For a little sparkle that goes a long way design with Swarovski 4mm faceted bicones Create glorious multi-strand necklaces with the dainty crystals or use as spacers to add a tiny flash to your designs Swarovski crystal components are made in Austria and are considered the finest products of their kind in the world
BLOG DIY BEADING MAGAZINE ISSUE 32 BLOG WWWHANDMADE-JEWELRY-CLUBCOM MEMBERSHIP WWWDIYBEADINGCLUBCOM
Recommended Jewelry Making Supplies
Imitation beads resist color change These beads have uniform quality with a good polish Some strands may have little to no matrix Sizes shapes and colors may vary with handcrafted items
BLOG DIY BEADING MAGAZINE ISSUE 32 BLOG WWWHANDMADE-JEWELRY-CLUBCOM MEMBERSHIP WWWDIYBEADINGCLUBCOM
Recommended Jewelry Making Supplies
Something Blue Necklace and Earrings
BLOG WWWHANDMADE-JEWELRY-CLUBCOM MEMBERSHIP WWWDIYBEADINGCLUBCOM
Skill level Beginner Intermediate Advanced
DIMENSIONS OF THE NECKLACE Inner Circumference 14 18 inch 35 cm
Focal Pendant Width 1 15 inch 35 cm Focal Pendant Height 1 15 inch 35 cm
DIMENSIONS OF THE EARRING Earring Width 716 inch 12 cm Earring Height 1516 inch 25 cm (Without the earring hook)
BLOG DIY BEADING MAGAZINE ISSUE 32
Materials
Note Before purchasing the supplies measure the length of your wished necklace If you decide to bead a longer necklace you should keep in mind that for every extra
frac34 inches 2 cm-s you will need 8 bicones and 8 pearls
Something Blue Necklace and Earrings
BLOG WWWHANDMADE-JEWELRY-CLUBCOM MEMBERSHIP WWWDIYBEADINGCLUBCOM BLOG DIY BEADING MAGAZINE ISSUE 32
Work RAW stitch into a beaded circle and embellish with Swarovski bicones
STEP 2 String 1A and 2 pearls Pass through the previous
second pearl and the freshly added 1A and the first pearl again
STEP 1 Use a comfortable length of thread to string 2
pearls 1A and 1 pearl again leaving a 2rdquo 5cm tail Pass through the first two pearls strung to form a
ring
STEP 3 String 2 pearls and 1A Pass through the previous first pearl and the freshly added two pearls
again
STEP 4 - 17 Repeat STEP 2 and STEP 3 again until you count 17 pearls in the inner circle
But be careful in the last step you only have to add 1 pearl then pass through the first pearls
added in STEP 1 and add another 1A Now pass through the first pearl added in STEP
1and 1A added in this round again to exit from this A
Something Blue Necklace and Earrings
BLOG WWWHANDMADE-JEWELRY-CLUBCOM MEMBERSHIP WWWDIYBEADINGCLUBCOM BLOG DIY BEADING MAGAZINE ISSUE 32
STEP 19 String 2A and pass through the next A added in round 4-17 and the A added in round 18 the 2A added in this round and finally the A added in round 4-17 to exit from the bead showed below
STEP 18 String 3A and pass through the 1A added in the previous round and the first A added in this
round
STEP 20 - 34 Repeat STEP 18 and STEP 19 again until you finish the circle
But be careful in the last step first you have to pass through 3A and then add 1A After this pass
through the 3A again and exit from the A bead
shown below (This is the first A added in STEP 18)
Something Blue Necklace and Earrings
BLOG WWWHANDMADE-JEWELRY-CLUBCOM MEMBERSHIP WWWDIYBEADINGCLUBCOM BLOG DIY BEADING MAGAZINE ISSUE 32
STEP 35 Step up to exit from the pearl shown below (Finishing the previous step in the A bead and then
stepping up from there makes the circle more secure)
Now string 3 bicones Pass through the pearl and the first bicone again
In the reality your circle will look more like this the A beads forming a strong row in the middle of the
pearls
STEP 36 Add 2 bicones Pass through the
neighboring pearl the first bicone added in the previous row and the 2 bicones added in this step
so you can exit from the next pearl
Something Blue Necklace and Earrings
BLOG WWWHANDMADE-JEWELRY-CLUBCOM MEMBERSHIP WWWDIYBEADINGCLUBCOM BLOG DIY BEADING MAGAZINE ISSUE 32
Now in the reality your circle will look more like this the A beads still forming a strong row in the middle of the pearls and the bicones slightly lying on top of
them
STEP 37 - 49 Repeat STEP 35 and STEP 36 again until you finish the circle with the bicones
But be careful in the last step first you have pass through the third bicone added then add 1 bicone
and pass through this little quartet to exit from the bicone shown below (The second one added in
STEP 35)
STEP 50 With these steps we finish the circle by adding 1 bicone to connect the A beads and the
bicone row So add 1 bicone pass through the nearest A bead and add 1 bicone again Pass
through the bicone already there and exit from the bicone you just added
Something Blue Necklace and Earrings
BLOG WWWHANDMADE-JEWELRY-CLUBCOM MEMBERSHIP WWWDIYBEADINGCLUBCOM BLOG DIY BEADING MAGAZINE ISSUE 32
STEP 66-83 Secure the circle by adding 1A between each bicone in the second row of Swarovski
bicones If you finished secure the thread and trim
STEP 51-65 Using the same technique as in STEP 37 - 49 add 1 bicone to finish the third bicone row The black line shows you the way (After STEP 50 pass through the next A bead add 1 bicone and pass through the bicone already there and the bicone added in the previous step Repeat these steps to
finish the inner bicone circle)
MIDDLE CIRCLE Work RAW stitch into a beaded circle and embellish with
Swarovski bicones Remember you need to bead two circles this time
STEP 1 Just like in the focal circle begin with 2 pearls 1A and 1 pearl again on a comfortable length of thread
leaving a 2rdquo 5cm tail Pass through the first two pearls strung to form a ring
Something Blue Necklace and Earrings
BLOG WWWHANDMADE-JEWELRY-CLUBCOM MEMBERSHIP WWWDIYBEADINGCLUBCOM BLOG DIY BEADING MAGAZINE ISSUE 32
STEP 15-28 Mimicing the FOCAL CIRCLElsquos STEP 18-34 bead A beads until you finish the inner part of the
circle Exit from a pearl in the second row This circle should look very similar to the first one but this is a bit
smaller
STEP 2-14 Mimicing the FOCAL CIRCLElsquos STEP 2-17 bead until you count 14 pearls in the inner circle Exit
from the last A added
STEP 29-42 Mimicing FOCAL CIRCLElsquos STEP 35-49 add 2 rows of bicones
STEP 43-56 Mimicing the FOCAL CIRCLElsquos STEP 50-65 bead the third row of bicones to finish the circle
Something Blue Necklace and Earrings
BLOG WWWHANDMADE-JEWELRY-CLUBCOM MEMBERSHIP WWWDIYBEADINGCLUBCOM BLOG DIY BEADING MAGAZINE ISSUE 32
SMALLEST CIRCLE Work RAW stitch into a beaded circle and embellish
with Swarovski bicones Remember you need to bead two circles again
STEP 1 Just like in the focal circle begin with 2 pearls
1A and 1 pearl again on a comfortable length of thread leaving a 2rdquo 5cm tail Pass through the first two
pearls strung to form a ring
STEP 57-70 Just like the FOCAL CIRCLElsquos STEP 66-83 secure the circle by adding 1A between every bicone
in the second row of bicones If you finished secure the thread and trim (Donrsquot forget to bead another
circle)
STEP 2-12 Mimicing the FOCAL CIRCLElsquos STEP 2-17 bead until you count 12 pearls in the inner circle Exit
from the last A added
STEP 13-24 Mimicing the FOCAL CIRCLElsquos STEP 18-34 bead A beads until you finish the inner part of the
circle Exit from a pearl in the second row This circle should look very similar to the first two but this is the
smallest of them all
Something Blue Necklace and Earrings
BLOG WWWHANDMADE-JEWELRY-CLUBCOM MEMBERSHIP WWWDIYBEADINGCLUBCOM BLOG DIY BEADING MAGAZINE ISSUE 32
STEP 37-48 Mimicing the FOCAL CIRCLElsquos STEP 50-65 bead the third row of bicones to finish this circle too
STEP 25-36 Mimicing FOCAL CIRCLElsquos STEP 35-49 add 2
rows of bicones The last step here is purple again
STEP 49-60 Just like the FOCAL CIRCLElsquos STEP 66-83 secure the circle by adding 1A between every bicone
in the second row of bicones If you finished secure the thread and trim (Donrsquot forget that you need two
small circles)
Something Blue Necklace and Earrings
BLOG WWWHANDMADE-JEWELRY-CLUBCOM MEMBERSHIP WWWDIYBEADINGCLUBCOM BLOG DIY BEADING MAGAZINE ISSUE 32
STEP 37-48 Mimicing the FOCAL CIRCLElsquos STEP 50-65 bead the third row of bicones to finish this circle too
STEP 25-36 Mimicing FOCAL CIRCLElsquos STEP 35-49 add 2
rows of bicones The last step here is purple again
STEP 49-60 Just like the FOCAL CIRCLElsquos STEP 66-83 secure the circle by adding 1A between every bicone
in the second row of bicones If you finished secure the thread and trim (Donrsquot forget that you need two
small circles)
Something Blue Necklace and Earrings
BLOG WWWHANDMADE-JEWELRY-CLUBCOM MEMBERSHIP WWWDIYBEADINGCLUBCOM BLOG DIY BEADING MAGAZINE ISSUE 32
STEP 2-6 Continue by adding 1A 1 bicone 1 pearl until you count 6 of each
STEP 1 Begin with 1 pearl 1 bicone 1A and 1 bicone again on a comfortable length of thread leaving a 2rdquo
5cm tail Pass through the pearl and the first bicone strung to form a ring
STEP 7-12 Pass through the A beads to make your
component more secure Also secure the thread and trim (Repeat these steps until you have six 6-BEAD
COMPONENTs)
6-BEAD COMPONENT Work RAW stitch into a beaded circle and embellish with Swarovski bicones
For the necklace we will need six from this component For the earring two
Something Blue Necklace and Earrings
BLOG WWWHANDMADE-JEWELRY-CLUBCOM MEMBERSHIP WWWDIYBEADINGCLUBCOM BLOG DIY BEADING MAGAZINE ISSUE 32
STEP 2-4 Continue by adding 1A 1 bicone 1 pearl
until you count 4 of each
STEP 1 Begin with 1 pearl 1 bicone 1A and 1 bicone again on a comfortable length of thread leaving a 2rdquo
5cm tail Pass through the pearl and the first bicone strung to form a ring
STEP 5-8 Pass through the A beads to make your component more secure Also secure the thread and
trim (Repeat these steps until you have the wished amount of 4-BEAD COMPONENTs)
4-BEAD COMPONENT Work RAW stitch into a beaded circle and embellish with Swarovski bicones
For the necklace-size that is given on the second page we will need 20 from this
component For the earring two
If you would like to make a longer necklace you need to make more (One 4-BEAD COMPONENT measures about 38 inch 1 cm To make the necklace symmetrical you have to have equal amounts on each side This means for every extra frac34 inches
2 cm-s you will need 1 4-BEAD COMPONENT on each side of the necklace)
Something Blue Necklace and Earrings
BLOG WWWHANDMADE-JEWELRY-CLUBCOM MEMBERSHIP WWWDIYBEADINGCLUBCOM BLOG DIY BEADING MAGAZINE ISSUE 32
STEP 2 Connect the MIDDLE CIRCLE to two 6-BEAD COMPONENTs by adding four-times 2As
between the pearls Choose a pearl on the MIDDLE CIRCLE and add
2A pass through a pearl in the 6-BEAD COMPONENT previously added and add 2A again Watch out this has to be symmetrical Repeat this at least two more times to make it
secure Now repeat this entire procedure but choose
the 8-th pearl on MIDDLE CIRCLE Repeat this on the other side of the necklace
too
Choose a pearl on the FOCAL CIRCLE and add 2A pass through a pearl in the 6-BEAD COMPONENT and add 2A again Repeat this at least two more times to make it secure
Now repeat this entire procedure but choose the 5-th pearl on FOCAL CIRCLE This will make the necklace nice on your neck
FINISHING THE NECKLACE Connects the parts with A beads
STEP 1 Connect the FOCAL CIRCLE to two 6-BEAD COMPONENTs by adding four-times 2As between the pearls To do this turn your parts upside down you need to
see the pearls We will work on this side from now on
Something Blue Necklace and Earrings
BLOG WWWHANDMADE-JEWELRY-CLUBCOM MEMBERSHIP WWWDIYBEADINGCLUBCOM BLOG DIY BEADING MAGAZINE ISSUE 32
FINISHING THE EARRING Connects the parts with A beads
STEP 1-2 Connect the 6-BEAD COMPONENT
to 4-BEAD COMPONENT and the 4-BEAD
COMPONENT to the earring hook
First connect the 4-BEAD COMPONENT to the 6-BEAD COMPONENT with 4A beads Mimic
the elongation steps of the necklace if needed
Secondly connect the 4-BEAD COMPONENT
to your earring hook with 4A beads again Leave from the last pearl bead 2A beads the hook (this is the orange oval form) and 2As again Pass through each of them to
secure this connection again
Finally get ready to prepare the other earring ndash since we need two of them
STEP 5 Connect the 4-BEAD COMPONENTs to the toggle clasp thus finishing the
necklace Leaving from the last pearl bead 2A the
clasp(this is the orange oval form) and 2A again Pass through all of them a couple more times to make this connection more
secure
Something Blue Necklace and Earrings
BLOG WWWHANDMADE-JEWELRY-CLUBCOM MEMBERSHIP WWWDIYBEADINGCLUBCOM BLOG DIY BEADING MAGAZINE ISSUE 32
If you finished it is time to try it on It was a great fun wasnrsquot it And how beautiful you look in your new necklace and the matching earrings
Something Blue Necklace and Earrings
BLOG WWWHANDMADE-JEWELRY-CLUBCOM MEMBERSHIP WWWDIYBEADINGCLUBCOM
About the Author
Margit Vogel
My name is Margit Vogel I live in Hungary Europe
By profession I am a biochemical engineer but I fell in love with
beads so much that I could not stop playing with them
I make one-of-a-kind beaded and bead embroidered art
jewelry made of the best quality materials such as Swarovski
stones gemstones Japanese beads (Miyuki and Toho) Czech
glass beads leather soutache and suede Each piece is unique
and individually crafted
Feel free to visit my blog for some eyecandy
httpiformjewelrywordpresscom
My shop httpwwwetsycomshopiformjewelry
Facebook httpwwwfacebookcomiformjewelry
BLOG DIY BEADING MAGAZINE ISSUE 32
Getting Down And Personal With Gianna
Getting Down And Personal With Gianna
Nowadays we see more and more jewelry stores opening up online and with these online jewelry stores it has made it easier for us to purchase and view their creations Have you ever wondered how they are able to manage and produce amazing jewelry pieces and tutorials So heres a little on the journey to open up an online shop We are excited to present to you Gianna aka Beading4perfectionists
Gianna Beader amp Youtuber
Unlike most jewelry makers and beadweavers Gianna did not start beading as a hobby but as a means to make ends meet With goals in trying to
fill the financial gap she did everything she could to expand her earnings ndash working as a security guard
and at the same time learning how to bead and selling her pieces at fair trades and flea markets
Since many were asking if she does home beading workshops she started on exploring how to teach people to bead She loves Scott Bakula and has always loved him till now and this served as her
inspiration to start making a beading video tutorial
Gianna started creating videos because she was at the point in her life where everything seemed to be falling apart And at that moment of time she had difficulties financially and selling jewelry was the only way for her to stay afloat financially She is a big Scott Bakula fan and when she went to the UK to see him on stage that was when it hit her that she is already able to edit videos and
taught herself Photoshop and done workshops at bead fairs so why not put these together and see what happens on Youtube She knew that if she gets enough subscribers and views ndash though no one knew what the exact numbers were you would be invited to become a Youtube partner This way she could monetize her videos with advertisements and hopefully she would be able to be a Youtube partner and be able to pay her bills
BLOG WWWHANDMADE-JEWELRY-CLUBCOM MEMBERSHIP WWWDIYBEADINGCLUBCOM BLOG DIY BEADING MAGAZINE ISSUE 32
Getting Down And Personal With Gianna
Her Youtube channel is popular and the reason why she chose Youtube is because Youtube is the biggest platform and reached almost to the whole world Everyone already knows about it and it was growing rapidly as compared to other platforms like Dailymotion so she figured that Youtube was the way to go Her advice to new designers is that when you start out go to the platforms on the top of your list first then work your way down your list if you do not get accepted by your first choice
After loyally putting up one video every week for about 8 months in a row she became a Youtube partner and monetized her videos She knew she needed at least $100 to get her first payout She managed to reach $100 after 3 months The process was not easy she worked hard lack sleep skipped meals and who knows what happened to Ridge in the Bold and the Beautiful because she stopped watching
On Youtube you can monetize your videos Google pays straight to your bank account and at other countries where they also have the option of getting checks among other options In order to get paid you have to reach the $100 mark and after 3 months For Gianna she thinks that you cannot say that Etsy is better than Youtube or Youtube is better than Etsy Her reasoning is because on Youtube she has many followers which will eventually check out her Etsy shop And to start an Etsy shop you need an audience
BLOG WWWHANDMADE-JEWELRY-CLUBCOM MEMBERSHIP WWWDIYBEADINGCLUBCOM BLOG DIY BEADING MAGAZINE ISSUE 32
television and dedicated her spare time (as she had another job) to Youtube She re-registered at the chamber of commerce after receiving her first payout Her work at Youtube now is not a full time job and things have changed on Youtube It is easier to become a parter but there are some countries that need to wait for an invitation to be a Youtube partner Take Italy for instance Italians would have to work just as hard as she did if they want to become a Youtube partner
Getting Down And Personal With Gianna
With her 60000 subscribers on her b4pbakup Youtube channel it is possible to sell at least 60 patterns on the first day on Etsy after promoting the PDF file on her Youtube channel Though you may think that 60 out of 60000 is not much you have to remember that not everyone has the means to purchase the PDF file and a lot of people still rather watch her carry out the tutorial(for free) on Youtube instead of reading the patterns or paying for the patterns even if the pattern is for a fundraiser and only cost $2 Her insights on Youtube is that Youtube is not what it used to be 6 years ago Instead of making more money every month she is making less and less because advertisers have more options of where they want to advertise their ads Ads do not pay as much as they used to Back in the days you could get 25 cents per ad Now you count yourself lucky if you could get 5 cents roll in after two hours
BLOG WWWHANDMADE-JEWELRY-CLUBCOM MEMBERSHIP WWWDIYBEADINGCLUBCOM BLOG DIY BEADING MAGAZINE ISSUE 32
And on top of that adblockers are destroying Youtube channel owners Youtube will start making changes to the channels where there will be ldquopaid subscriptionrdquo channels This has already been implemented in some countries but not in her country The Netherlands This means there will no longer be ads for her monthly paying subscribers She hopes that Youtube will add on a paid per video option feature The option to be a paid channel or free channel or to start a new channel for paying customers is yours to choose Gianna is not happy with Youtube because many others like her have worked so hard and for some years to become Youtube partners(which was something to be proud of) has lost their status
Getting Down And Personal With Gianna
Her advice for those who want to go on Youtube is 1 Do it because you want to teach
2 Do it because you want a career with beads
BLOG WWWHANDMADE-JEWELRY-CLUBCOM MEMBERSHIP WWWDIYBEADINGCLUBCOM BLOG DIY BEADING MAGAZINE ISSUE 32
After putting up about 20 videos and having at least 5000 subscribers add the PDF tutorials to Etsy and Craftsy She found out that her audience would like to have the PDF after watching her videos This is because they would rather print out the PDF and work while seated in a comfy chair technically somewhere else instead of having to pause the video time and time again
Gianna has also made a video for those who want to know the whole story of her journey up until the present day And to get updates on her you can check it out here She has also started a vlog where she tells of how she still works towards becoming a financial independent beader and explains her journey to get where she wants to be(or die trying) Gianna will be in the UK on October the 17th giving an all-day workshop with 4 different patterns
(2 beginners and 2 advanced) in Wotton-under-Edge
Gianna will be there Friday night as the workshop is on Saturday She will be leaving on Sunday Her
doors are open to all who wants to continue the party with her at the hotel across the street
For more information do contact Ann Tucker on Facebook
httpswwwfacebookcomanntucker501
Rec
omm
end
ed R
ead
ings
Making Jewelry with Gemstone
Beads
Combines the popular craft of beading with beautiful semi-precious stones which are collected by many Features a variety of versatile ideas which can be adapted for any type of gem or bead Readers will learn to reate beautiful gemstone jewelry with this dazzling collection of over 100 projects ranging from eyecatching earrings and accessories to exquisite necklaces and bracelets This beautiful book offers an impressive range of 28 beautiful semi-precious stones (including birthstones) and a glimpse into the fascinating history and mythical properties behind them
BLOG DIY BEADING MAGAZINE ISSUE 32 BLOG WWWHANDMADE-JEWELRY-CLUBCOM MEMBERSHIP WWWDIYBEADINGCLUBCOM
Rec
omm
end
ed R
ead
ings
Convertible Crystal Jewelry
Reverse it Twist it Wear it Many
Ways
Diane Whiting presents the idea that convertibility isnrsquot just about using pieces in multiple ways it is also about using skills and creativity in multiple ways Using ever-popular sparkling crystals Diane showcases design elements through various techniques for fun easy fashionable jewelry With 25 projects the reader can choose from bracelets necklaces and earrings that match any outfit or styleDiane Whiting presents the idea that convertibility isnrsquot just about using pieces in multiple ways it is also about using skills and creativity in multiple ways
BLOG DIY BEADING MAGAZINE ISSUE 32 BLOG WWWHANDMADE-JEWELRY-CLUBCOM MEMBERSHIP WWWDIYBEADINGCLUBCOM
Rec
omm
end
ed R
ead
ings
Wire Jewelry Masterclass
Wrapped Coiled and Woven Pieces
Using Fine Materials
Comprehensive and fabulous Wire Jewelry Masterclass takes an in-depth look at an intricate and rewarding craft The 24 projects which range from simple Dragons tear briolette earrings to a Poseidon-under-the-sea pendant will delight and inspire jewelers of all levels and tastes Divided into beginner intermediate and advanced sections this beautifully photographed step-by-step guide is the ticket to wire jewelry expertise
BLOG DIY BEADING MAGAZINE ISSUE 32 BLOG WWWHANDMADE-JEWELRY-CLUBCOM MEMBERSHIP WWWDIYBEADINGCLUBCOM
Rec
omm
end
ed R
ead
ings
Timeless Wire Weaving The
Complete Course
Timeless Wire Weaving focuses on developing wirework skills through 13 projects using three classic wire weaving techniques coiling wrapping and weaving The projects are built around a focal cabochon and incorporate seed beads and crystals in imaginative ways Designers learn to make the jewelry shown in the book and they also use the techniques learned to create innovative jewelry pieces of their own
BLOG DIY BEADING MAGAZINE ISSUE 32 BLOG WWWHANDMADE-JEWELRY-CLUBCOM MEMBERSHIP WWWDIYBEADINGCLUBCOM
Our digital magazine is available through
Apple Newsstand service available to millions of IPAD users
To advertise with us please email us at
diyjewelryclubgmailcom
Or visit our page at
httphandmade-jewelry-clubcomadvertising-diy-beading-magazine
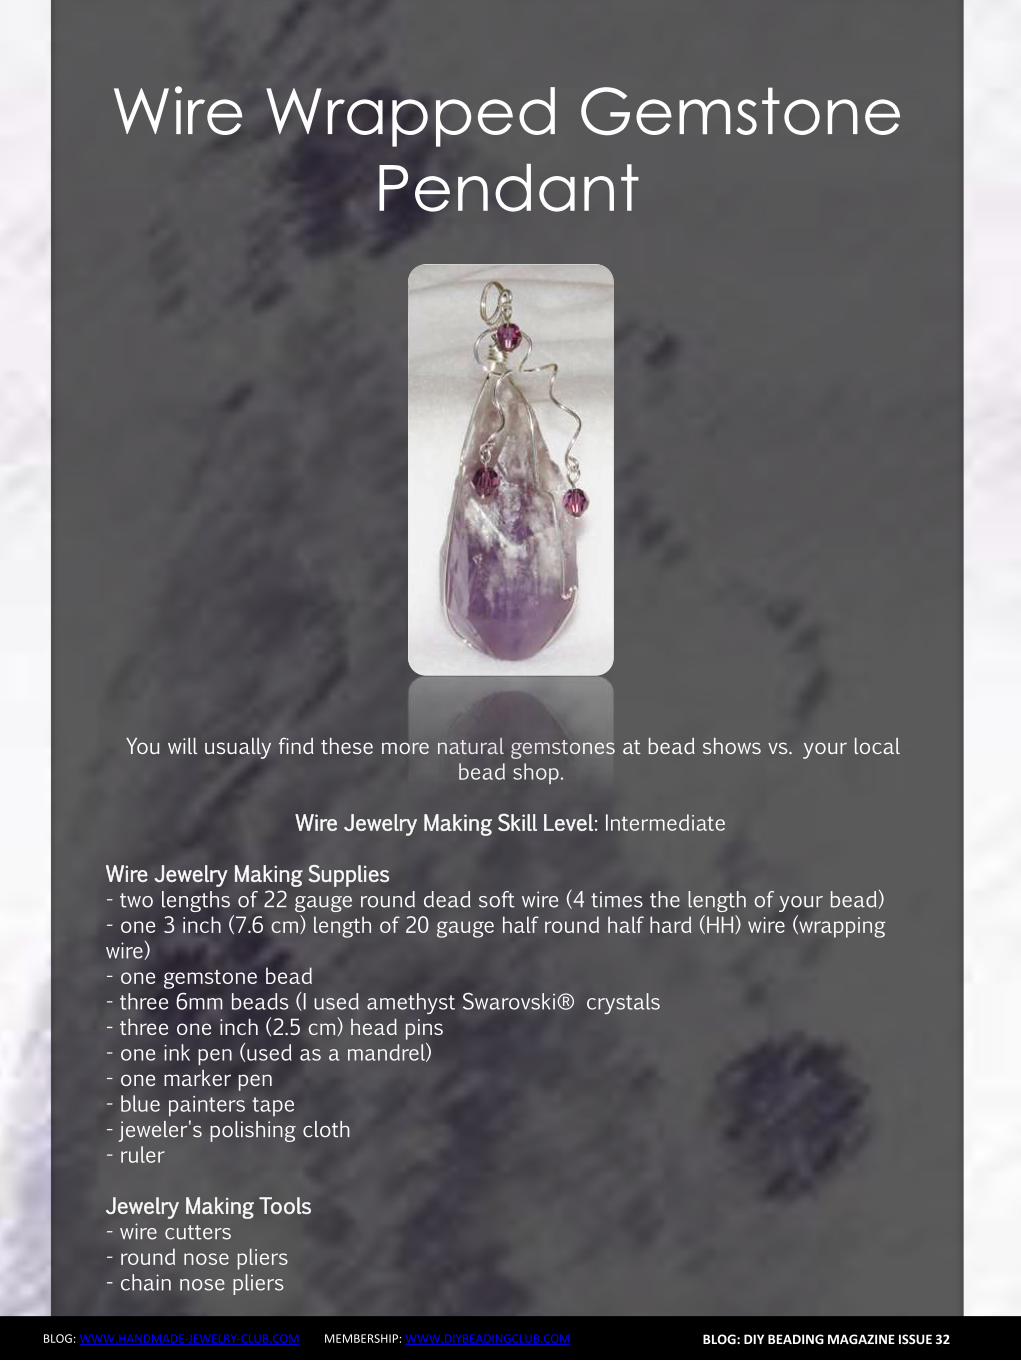
Wire Wrapped Gemstone
Pendant
BLOG WWWHANDMADE-JEWELRY-CLUBCOM MEMBERSHIP WWWDIYBEADINGCLUBCOM
9 Use wire cutters to cut the excess half round wire Cut the wire about half way behind the round wires so that the ends will not be seen from the front side of the wire wrap
BLOG DIY BEADING MAGAZINE ISSUE 32
10 With the wire wrap at the bottom center of your bead use your fingers to gently shape the wires around the bottom along the sides and to the top of the bead
11 Use the chain nose pliers to secure all the wraps against the round wires
Wire Wrapped Gemstone
Pendant
BLOG WWWHANDMADE-JEWELRY-CLUBCOM MEMBERSHIP WWWDIYBEADINGCLUBCOM
12 Slide the chain nose pliers in between the round wires where they meet the wire wrap and spread the wires apart
BLOG DIY BEADING MAGAZINE ISSUE 32
Spreading the wires apart begins to create the cage for the bead
13 With its bottom center resting against the wire wrap place your bead or gemstone inside the cage
Gather all four of the wires around the bead so that it is encased within them and so that the wires
meet at the top of the bead Hold all four wires between your forefinger and thumb (like you are pinching the wires)
Wire Wrapped Gemstone
Pendant
BLOG WWWHANDMADE-JEWELRY-CLUBCOM MEMBERSHIP WWWDIYBEADINGCLUBCOM
14 Decide which side will be the front of the pendant Locate the wire that is in front of all the wires and with your fingers bend it downward at a 45 degree angle
BLOG DIY BEADING MAGAZINE ISSUE 32
15 Use your fingers or the chain nose pliers to wrap the bent wire around the other three wires where they all meet or cross one another
16 Continue wrapping the wire around the other three to secure them End the wrapping at the back of the pendant
Using the chain nose pliers tuck the wire into the wraps (not pictured)
Wire Wrapped Gemstone
Pendant
BLOG WWWHANDMADE-JEWELRY-CLUBCOM MEMBERSHIP WWWDIYBEADINGCLUBCOM
17 Make sure that the wires are evenly spread around the beads Now we need to tighten the wires that encase the bead
On one of wires about halfway up the wire place the jaws of the round nose pliers on either side
of the wire Now rotate the pliers making a double bend in the wire Repeat on the other three wires making one or two double bends in each wire When youre done shake the bead to make sure it cannot fall out of the wires
BLOG DIY BEADING MAGAZINE ISSUE 32
18 Now decorate two of the top wires Almost anything is possible Try making a few different bends curls or twists in the wire
I decided to loosely coil the top wires around an ink pen
19 Gently untighten the coil by pulling the end of the wire downward Using the round nose pliers make a simple wire loop on the end of the coil
Wire Wrapped Gemstone
Pendant
BLOG WWWHANDMADE-JEWELRY-CLUBCOM MEMBERSHIP WWWDIYBEADINGCLUBCOM
20 Repeat Steps 18 and 19 on a second top wire
BLOG DIY BEADING MAGAZINE ISSUE 32
21 The third top wire becomes the bail Coil it tightly around the ink pen making at least two wire coils The end of the wire should fall in front of the pendant
Make a simple wire loop on the wire end
22 Heres how the wire coilsspiralsbends should look Make any necessary adjustments to the wires along the sides of the gemstones and the two that fall
in front of pendant
Make sure that the wires tightly secure the bead The wire wrap at the bottom of the pendant may no longer be at the center of the bead
Wire Wrapped Gemstone
Pendant
BLOG WWWHANDMADE-JEWELRY-CLUBCOM MEMBERSHIP WWWDIYBEADINGCLUBCOM
23 On each of the three head pins string a 6mm bead Make a simple wire loop on the end of each head pin
Attach one head pin bead unit to each of the simple wire loops on the wire wrapped pendant
BLOG DIY BEADING MAGAZINE ISSUE 32
Completed Wire Wrapped Pendant
Now hang your handcrafted wire wrap pendant from your favorite chain or strand of beads
Enjoy wire wrapping your own gemstone to make a wire wrapped pendant
BLOG WWWHANDMADE-JEWELRY-CLUBCOM MEMBERSHIP WWWDIYBEADINGCLUBCOM
Wire Wrapped Gemstone
Pendant About the Author
Wanda Epps
Wanda is an avid jewelry maker who loves to make jewelry with beads She began her journey into jewelry making after walking into a bookstore to find crafting books on sale One on making jewelry caught her eye and after making a simple bead necklace she was hooked That was in late 2003 Over the years she has taken classes on various jewelry making techniques stringing making wire jewelry bead crochet macrame metal jewelry making to name some She expects that her love of making beaded jewelry will continue as bead supplies and beautiful new beads seem endless Her fulltime job provides for her needs but beads are her passion She invites you to join her in the many adventures of making jewelry at
httpwwwmaking-beaded-jewelrycom httpswwwfacebookcompagesMaking-Beaded-Jewelry-
Guide254860504236
BLOG DIY BEADING MAGAZINE ISSUE 32
Should You Sell In The Marketplace
Should You Sell In The Marketplace
BLOG WWWHANDMADE-JEWELRY-CLUBCOM MEMBERSHIP WWWDIYBEADINGCLUBCOM
We are all able to create jewelry pieces and there will come a time where you want to share the joy with the rest of the world whether it is in the form of a tutorial or a finish
piece And this is when you will start to think about putting up your work for sale As someone who is new to the business world you may be confused on where you should start selling your work And the all famous site that is first on most peoplersquos minds is Etsy Etsy is popular and it is user friendly and that is why it is the choice of many designers and crafters But there are also some who wants to set up their own
shop with their logo and to put their works out as their own even at the very beginning Thatrsquos where you may be confused on which platform you should go for
So herersquos some explanation on how you will benefit from setting up shop at Etsy
BLOG DIY BEADING MAGAZINE ISSUE 32
1 Etsy has everything ready for you and all you have to do is to bring in your works and use the features that are already available for you to use ndash like the payment system web traffic design and layout are not an issue that you need to worry about
2 You also have the trust of customers almost immediately because Etsy has already established a name for itself and therefore there is already trust in brand in their site When you use Etsy your brand will automatically be exposed to many customers who visit Etsy to find what they need
3 For every site there is always the need to be able to interact with other sellers to help each other out Forums or community boards are very helpful as other passionate designers and crafters share their experience to help out the newer members of the community This is also where you will be able to form good relationships with other sellers and who knows you may even find a partnership over time
Should You Sell In The Marketplace
BLOG WWWHANDMADE-JEWELRY-CLUBCOM MEMBERSHIP WWWDIYBEADINGCLUBCOM
Though Etsy has itrsquos good points there are some things which you need to take into consideration as well
1 When you are using someone elsersquos facilities there is always the chance of having
being shut down due to unforeseen circumstances Be it violation of Etsyrsquos policy or decisions made by the administration department this will sometimes cost you a dent in your brand name and you may lose the trust of your followers and starting all over again may be the only way to start again
2 If you are a very creative person then you may feel limited as the design of shops at Etsy is standardized If you are new and do not worry so much about designs of websites this is perfectly fine But do remember that when you want to distinguish yourself from other sellers it will be tougher as you try to make your brand more well-known due to limitations of design of the site
3 Since Etsy has so many sellers all in one place the competition is of course going to be tighter and fiercer because even though customers are viewing your products there are also other options from other sellers listed on the page as well So customers may turn away if they see something of a better price
4 Each product that you list with Etsy costs you money Etsy also takes a 35 percent of the selling price of the item However if or when you start your business on your own website it will also cost you for web hosting and you would need PayPal and they have a fee of 29 percent +30cents So either way you will still need to pay to list your products on the web
BLOG DIY BEADING MAGAZINE ISSUE 32
Should You Sell In The Marketplace
BLOG WWWHANDMADE-JEWELRY-CLUBCOM MEMBERSHIP WWWDIYBEADINGCLUBCOM
If you are confident enough to have your own business site by all means go ahead and do it The benefits of it are as below
1 You get to be your own boss You get to control everything from the design of the
website layout and how you want to advertise your products You can also change your policies and not be affected by it because it is you who changes it Your shop will not be shut down suddenly without notice and you do not need to worry that you have to start all over again
2 Distractions of competitors products on your page will not be an issue It is your site and it is up to you whether or not you want to allow what kind of advertisements on your site So if you donrsquot want something on your page it is your call
3 You will be able to capture the attention of the media and customers as well if you are able to have a well designed site Nowadays people are attracted to colors and they can see if you have put effort into beautifying the site for the customers You can do so much more than just uploading some pictures onto Etsy on your own site you can always update your site design and your products to complement each other and therefore becoming more attractive
BLOG DIY BEADING MAGAZINE ISSUE 32
Should You Sell In The Marketplace
BLOG WWWHANDMADE-JEWELRY-CLUBCOM MEMBERSHIP WWWDIYBEADINGCLUBCOM
And herersquos the tough part when you want to have your own site
BLOG DIY BEADING MAGAZINE ISSUE 32
1 You need to have knowledge of what you want to do You have to learn to be involved in every aspect of your site so that you know what us going on at the front end of things and at the back end of things as well But if you have not any knowledge of designing a website it is usually a recipe for something to go wrong You have to remember that you need a user interface that is simple for customers to use an easy to use shopping cart you should know which third party platforms are trusted and one which will not keep changing their regulations If you still want to have your site hiring a designer may be your best option
2 You have to work towards promoting your store on your own You will need to find people to feature you in their social media sites because it will not just fall into your lap You need to have promotions or road shows if you need to Marketing your store is important whether or not you are using Etsy or other marketing platforms but if you are on your own it is even more important
3 You will still be competing with other sellers Though now you are now not only competing with Etsy sellers you are now competing with sellers and stores from the world wide web Etsy is already so well known so people tend to go there first so you need to up your methods of attracting customers
Should You Sell In The Marketplace
BLOG WWWHANDMADE-JEWELRY-CLUBCOM MEMBERSHIP WWWDIYBEADINGCLUBCOM
When we first started out we used Etsy as our platform to sell our works Other than that we also utilized blogs and we eventually built our own website as our main base
BLOG DIY BEADING MAGAZINE ISSUE 32
Things have changed over these 3 years It was easier to get sales without much effort but now with so many other shops also utilizing Etsy the competition has grown tremendously Now our main sales come from our own online store and has exceeded sales from Etsy
So what we recommend is that using an existing platform such as Etsy to start out is good and in time build up your website or webstore
It is not that hard to start your own webstore either these two companies offers the option to set up your webstore
1 Shopify
2 Bigcommerce
There are many things to take into consideration before starting a store online It is perfectly fine to start out using Etsy before branching out on your own But you can also
have both ndash have your own website and a store on Etsy There are many stores who operate like this They technically get customers from Etsy and the reroute them to their own websites As long as you are in control of what you are doing and not stressing and
confusing yourself you can opt for more exposure for your store
So do take some time and take a breather to really think through what will be the best for YOU and do remember that starting small does not mean you will not be able to be big
OFFER Get which can be downloaded by subscribing to
httpinternet-marketing-publishingcom
BLOG WWWHANDMADE-JEWELRY-CLUBCOM MEMBERSHIP WWWDIYBEADINGCLUBCOM
Materials - Copper wire diameter 08 mm - Copper wire diameter 04 mm - Small gemstone bead (~4 mm) (I used 3 mm beads in this tutorial because I didnrsquot have any other beads at the time but the beads in the earrings on the cover are 4 mm) Make sure that the beads you want to use are resistant against chemicals such as liver of sulfur or whichever oxidizing substance you want to use to give the metal patina The beads in the picture above are facetted garnet buttons in the tutorial itself I used black spinel facetted buttons Equipment - Round nose pliers - Flat nose pliers - Side-cutters - A small file - A cylindrical object of about 5mm diameter (eg a mandrel for jump rings) - Hammer amp anvil - Liver of sulfur or some other means to oxidize the metal (optional)
LOVE-ly Earrings
BLOG DIY BEADING MAGAZINE ISSUE 32
BLOG WWWHANDMADE-JEWELRY-CLUBCOM MEMBERSHIP WWWDIYBEADINGCLUBCOM
This tutorial teaches how to make 1 ear stud I recommend making both ear studs of the set simultaneously step-by-step so that symmetry is easier to achieve Between steps check for
symmetry in size and shape and adjust the construction if needed
LOVE-ly Earrings
BLOG DIY BEADING MAGAZINE ISSUE 32
Step 1 Straighten the end of the copper wire (+- 6cm) by rubbing along it with your fingers for a
few seconds
Step 2 Bend over the wire onto itself as illustrated below using flat nose pliers
Step 3 Grab the doubled-over wire with the flat nose pliers and push the two sides against each
other Use little force and do it bit by bit to avoid damaging or kinking the wire
Step 4 Push the two adjacent pieces of wire apart to create the bottom shape of the heart as shown
on the picture above
BLOG WWWHANDMADE-JEWELRY-CLUBCOM MEMBERSHIP WWWDIYBEADINGCLUBCOM
LOVE-ly Earrings
BLOG DIY BEADING MAGAZINE ISSUE 32
Step 5 Hammer down the angled wire (the part circled in red) This strengthens the construction
and looks more professional
Step 6 Wrap the two ends of wire tightly around a cylindrical object (+- 5 mm diameter)
Step 7 Push apart the loops you just made by wrapping the wire around the cylindrical object The wire should now be shaped like a heart as
illustrated above
Step 8 Use round nose pliers to bend around the wire for each side of the heart as illustrated above
BLOG WWWHANDMADE-JEWELRY-CLUBCOM MEMBERSHIP WWWDIYBEADINGCLUBCOM
LOVE-ly Earrings
BLOG DIY BEADING MAGAZINE ISSUE 32
Step 9 Use the flat nose pliers to bend one of the two wires (preferably the longer wire) in a 90deg angle at the place marked with a red dot In the picture accompanying the next step you can see
how it should look from the front
Step 10 Use the round nose pliers to bend the other piece of wire in a decorative coil You will cut off the rest of the wire of the coil at approximately the spot marked with a red dot so take that into account when coiling the wire into the shape that
you desire
Step 11 Cut of the wire at the spot indicated in the previous picture and file off any sharp edges
Step 12 Cut off the ear wire at the desired length (Between 1 and 2 cm If in doubt try the earring on
to see if it sits comfortably) and file off any sharp edges
BLOG WWWHANDMADE-JEWELRY-CLUBCOM MEMBERSHIP WWWDIYBEADINGCLUBCOM
LOVE-ly Earrings
BLOG DIY BEADING MAGAZINE ISSUE 32
Step 13 Hammer down the rest of the heart (bumps and coil) If you canrsquot reach certain parts because the ear wire is in the way bend that part of the heart shape away
(verticallyupward) and bend it back after you finish hammering
Congrats yoursquove now made a basic heart-shaped ear stud Next wersquore going to decorate it with a little gemstone and more copper wire
Step 14 Cut off a length of 04 mm copper wire (about 10-20 cm) and string the bead onto it
Step 15 Place the bead in the ldquonon-coilrdquo upper part of the heart shaped ear stud holding it between thumb and forefinger Let approximately 4 cm of the 04 mm wire stick out over the edge of the
heart as illustrated above
Step 16 Wrap the wire twice around the frame so that if you face the front of the ear stud the wire is
directed towards yourself
BLOG WWWHANDMADE-JEWELRY-CLUBCOM MEMBERSHIP WWWDIYBEADINGCLUBCOM
LOVE-ly Earrings
BLOG DIY BEADING MAGAZINE ISSUE 32
Step 17 Flip the wire over the wire with the bead (indicated by the red arrow) and pull tight whilst holding the bead (and its wire) tightly in place It
should look like the construction in the big picture above
Step 18 And make another loop around the wire with the bead The 04 mm wire is now coiled around
twice two times two coils around the frame and two coils around itself
Step 19 Repeat the wire-fastening procedure described in steps 16-18 with the other end of the
wire securing the gemstone in the heart frame Let the wire stick out at the back of the earstud
Step 20 Pull the wire through the lsquocoilrsquo part of the heart shape to the front The wire should lsquocross overrsquo to the other side of the heart at the back of the ear
stud
Step 21 Coil the wire around the frame until you are content with the design Optionally you can hammer down the coils a bit I often do this because I think it
looks somewhat more sophisticated and professional
BLOG WWWHANDMADE-JEWELRY-CLUBCOM MEMBERSHIP WWWDIYBEADINGCLUBCOM
LOVE-ly Earrings
BLOG DIY BEADING MAGAZINE ISSUE 32
Step 22 Cut off the spare bits of wire preferably at the backside of the ear stud and tuck in the ends
Congrats yoursquove now made a heart-shaped ear stud Next we are going to finish it off with a patina
Step 23 Oxidize the metal of the ear studs I always use liver of sulfur solved in warm water The metal
will turn a dark color and matte texture Afterwards rinse the ear studs thoroughly with water and pat
them dry
Step 24 Rub the oxidized ear stud all over with a rough polishing pad to bring back (a dark copper)
color to the surface
Yoursquove now finished making your own LOVE-ly ear studs
Secure them in your ear with plastic or copper stops These can be bought online or in jewelry-supply
stores
Variation ideas You can easily vary in size and shape (longer hearts smaller coils pointier bottoms etc) and
use different materials As you can see the earring I make in this tutorial has a slightly smaller bead than the
earrings on the cover which influences the overall appearance somewhat
The earrings underneath are made with sterling silver and gold wire (super-short coils) and contain small pink
rubies
LOVE-ly Earrings
BLOG WWWHANDMADE-JEWELRY-CLUBCOM MEMBERSHIP WWWDIYBEADINGCLUBCOM
About the Author
Jeske Hendriks
Hi there My name is Jeske and I love all things handmade Over the years Irsquove dabbled in countless different arts and crafts but nowadays I mainly focus on making jewellery and cutting stone cabochons As for jewellery
my preferred materials are silver wire and gemstonemineral beads Using wire-wrapping and basic silver smithing techniques I create both simple
and intricate pieces ndash each and every one of them unique a personal little artwork
You are welcome to follow me on facebook stop by at my personal
webpage andor to have a look at my Etsy shops httpswwwfacebookcomyeskecrafts
httpwwwyeskecraftscom httpwwwyourbeadsandfindingsetsycom
httpwwwyeskecraftsetsycom httpwwwyeskemiscetsycom
BLOG DIY BEADING MAGAZINE ISSUE 32
Flower Tale Earrings
BLOG WWWHANDMADE-JEWELRY-CLUBCOM MEMBERSHIP WWWDIYBEADINGCLUBCOM
Techniques Beadweaving
Project Level Beginner to Intermediate
Materials 12 bronze opaque 6mm Czech glass pearl round beads
2 gr gold lustered dark topaz Japanese 110 seed beads (Toho 459)
Size B gold beading thread
2 bronze earring hooks
Tools Size 10 beading needle
Scissors
Finished Size Diameter ndash 3 cm (118 inches) (without earring hooks)
BLOG DIY BEADING MAGAZINE ISSUE 32
Flower Tale Earrings
BLOG WWWHANDMADE-JEWELRY-CLUBCOM MEMBERSHIP WWWDIYBEADINGCLUBCOM
Step 1 Cut about 110 cm (43 inches) of thread and
pass it through the needle hole
Pick six groups of one 110 seed bead and one
6 mm round bead
BLOG DIY BEADING MAGAZINE ISSUE 32
Join the beads into a ring and secure with two
square knots
Leave a tail of about 15 cm (59 inches)
Step 2 The working thread should be right before the
6 mm round bead
Pick seven 110 seed beads skip the 6 mm
round bead and pass the needle through the
next 110 seed bead added in the previous
round
Repeat adding groups of seven 110 seed
beads five more times
When adding the last group take the needle
directly through the 110 seed bead from the
previous round and the next one added in the
beginning of current round
Flower Tale Earrings
BLOG WWWHANDMADE-JEWELRY-CLUBCOM MEMBERSHIP WWWDIYBEADINGCLUBCOM
Step 3 Pick three 110 seed beads skip one seed
bead from the chain of seven added in the
previous round and pass with the needle
directly through the next three 110 seed
beads
BLOG DIY BEADING MAGAZINE ISSUE 32
Pick three 110 seed beads skip one seed
bead from the chain of seven added in the
previous round and pass with the needle
through the last one and the first 110 seed
bead from the next chain of seven
Repeat the above directions from Step 3 five
more times
After completing this round make sure the
thread will be exiting from the middle 110
seed bead from the first group of three added
in the beginning of this round
Step 4 Pick one 110 seed bead and go through the
last seed bead of the group of three
Flower Tale Earrings
BLOG WWWHANDMADE-JEWELRY-CLUBCOM MEMBERSHIP WWWDIYBEADINGCLUBCOM
Pick three 110 seed beads and take the
needle through the first seed bead of the next
group of three added in the previous round
BLOG DIY BEADING MAGAZINE ISSUE 32
Pick one 110 seed bead and go with the
needle through the next three seed beads (the
last two of the group of three and the last one
from the chain of seven)
Then go up through three 110 seed beads
(the first from the next group of seven and the
first two from the next group of three)
Repeat the above directions from Step 4 to
complete the remaining petals
When working on the last petal perform the
operation from the image shown on the left
instead of picking the group of three 110 seed
beads string two 110 seed beads the earring
hook other two 110 seed beads and
continue beading as instructed above
When you are done hide the thread ends into the beadwork
Flower Tale Earrings
BLOG WWWHANDMADE-JEWELRY-CLUBCOM MEMBERSHIP WWWDIYBEADINGCLUBCOM
About the Author
Iulia Postică
I was born and live in Moldova Eastern Europe Ever since I remember myself
Ive been crocheting and knitting My grandmother has taught me that and I
loved it very much I always regarded crafts exclusively as a hobby and never
thought of making a career of it I traveled a lot to various historical sites
Actually Ive spent all my childhood summers in archaeological camps with
my father who is a professional archaeologist
I also enjoy metal hammering and wirework as it gives me possibility to
express myself in materials used by human communities since ancient times
copper brass glass seed beads and gemstones That is no surprise to anyone
given my family history and academic background
My shop ldquoBeadedTreasuryrdquo with beading tutorials and bead crochet patterns
httpswwwetsycomshopBeadedTreasury
My shop ldquoArchaeologicardquo with artisan jewelry
httpswwwetsycomshopArcheologica
My blog httpbeadedtreasuryblogspotcom
My facebook httpswwwfacebookcomBeadedTreasury
BLOG DIY BEADING MAGAZINE ISSUE 32
Liberty Earrings
BLOG WWWHANDMADE-JEWELRY-CLUBCOM MEMBERSHIP WWWDIYBEADINGCLUBCOM
Materials - Nr 2 cabochon Preciosa Ornela ovale 18x22 mm turchese
- Rocaille Toho 150 silver lined green emerald
- Nr 2 dagger beads
- Nr 20 pearl 4 mm
- Superduo opaque luster ceramic green
- Rocaille 80 color gold
- Rocaille 80 color ivory
- Delica Miyuki 110 aquagreen mix
- Rocaille Miyuki 110 galvanized silver
- Nr 2 monachelle (earwire)
-Fireline
- Beading Needle nr 12
BLOG DIY BEADING MAGAZINE ISSUE 32
Liberty Earrings
BLOG WWWHANDMADE-JEWELRY-CLUBCOM MEMBERSHIP WWWDIYBEADINGCLUBCOM
Make a circle of 20 delica beads and make a knot (a) Perform two rounds peyote with ivory 80 seed beads (b c) Exit from an ivory
bead
BLOG DIY BEADING MAGAZINE ISSUE 32
a b c
Jump from 80 to 80 with 110 80 gold 110 (a) Finish the round and come out of a 80 gold bead
Jump to the next 80 gold with a 4mm pearl (b) Finish the round and come out
of the first pearl Jump to the 2nd pearl and close with a 80 gold bead(c)
a b c
Position the cabochon and jump from one 80 to the other with two delica bead (a)
Continue with three delicas four times (b) At the bottom sew on two delicas then finish the round by sewing on three delicas for four times passing from one to another roc 80 Tighten the cabochon and exit from the
first two delica that you started with String together a 110 and 150 and enter the second of the three close delicas (c)
a b c
Liberty Earrings
BLOG WWWHANDMADE-JEWELRY-CLUBCOM MEMBERSHIP WWWDIYBEADINGCLUBCOM
Put together 150 110 150 and enter in the second of three next delica (a) Put the same beads for three times then put together 150 and 110 and enter
in the two delica of the bottom tip (b) Enter in the second of three next delica with 110 and 150 (c) Continue passing
in the 80 beads with three beads (150 110 150) for four times then at the top finish the round by putting together a 150 and 110 (d)
BLOG DIY BEADING MAGAZINE ISSUE 32
a b c
Exit from the first 150 sewn in the previous round and jump in the three next beads with a 150 (a)
Put a 150 at a time and exit from the first 110 beads of the bottom tip Jump in the
near 110 with a 150 (b) Finish round repeating steps a and b (c) Exit the roc 80 as shown in the photo (d)
a b c
d
a b c d
Enter in the 80 with four 150 (a b) Enter the 80 beads at the bottom of the pieces with two 110 one superduo one 80 ivory bead one superduo and two 110 (c)
d e f
Liberty Earrings
BLOG WWWHANDMADE-JEWELRY-CLUBCOM MEMBERSHIP WWWDIYBEADINGCLUBCOM
Exit from the bottom pearl (a) Put together 150 three 110 150 and enter in the superduorsquos second hole (b)
Put together three superduo and enter in the next superduorsquos second hole (c) Rethread 15 three 110 150 and return in the opposite direction in the pearl of departure (d)
BLOG DIY BEADING MAGAZINE ISSUE 32
a b
c
Exit from the second pearl indicated from (a) Put 150 four 110 and enter in the second of the three 110 (b) Go to the second superduorsquos hole with four 110 and a 150 (c)
Enter the second hole of the supeduo with a 150(d) Sew in the middle of the bottom of the superduo 150 two 110 150 dagger 150 two 110 150(e)
Enter the second hole of the thirs superduo with 150 (f)
a b c
d
d e f
Liberty Earrings
BLOG WWWHANDMADE-JEWELRY-CLUBCOM MEMBERSHIP WWWDIYBEADINGCLUBCOM BLOG DIY BEADING MAGAZINE ISSUE 32
Put 150 four 110 and enter in the second of three 110 of the base (a) Insert four 110 and 150 in the pearl opposite direction indicated in the picture (b) Go in all the beads
around the piece and exit from the pearl at the top (c) Put 150 three 110 150 and enter the superduo (d)
Enter the ivory bead 80 with two 150 (e) Enter the next superduo with two 150 (f)
a b c
d e f
Put together 150 three 110 and enter in opposite direction in the departurersquos pearl (a) Exit from the 150 beads indicated by photo (b) From this jump in the second of two near
150 with five 150 to created the hole for the earwire (c) Pass the thread in the beads make a few knots and cut the excess thread
a b c
Your earrings are finished
Liberty Earrings
BLOG WWWHANDMADE-JEWELRY-CLUBCOM MEMBERSHIP WWWDIYBEADINGCLUBCOM
About the Author
Mariella Martella
My name is Mariella Martella and I am the author and
designer of jewelry that I sign with the name of Mariel Bijoux
After changing city often for work and study I currently live
in northern Italy I am an art historian with a passion for travel
painting and jewelry design in weaving that project since
2010 In my beads and crystals are the colors of the
Mediterranean sea the atmosphere of summer evenings
and the lights of the places I visited
You can find me at
Etsy shop httpswwwetsycomitshopMarielBijoux
Facebook httpswwwfacebookcommari3lbijoux
Crafting blog httpmarielbijouxblogspotit
Twitter httpstwittercomMarielBijoux
BLOG DIY BEADING MAGAZINE ISSUE 32
Jade Necklace
BLOG WWWHANDMADE-JEWELRY-CLUBCOM MEMBERSHIP WWWDIYBEADINGCLUBCOM
Every time I wear a necklace I always make it a point that the
necklace will lay perfectly flat on my neck Using wire for a necklace
made it possible for me like what I did with Jade Necklace It may look
odd at first having bent wires for a necklace but once the jewelry is
finished youll be so happy how the necklace will perfectly lay on your
neck
The tutorial is catered for intermediate level One must know basic
wirework skills such as wire wrapping making loops wrapped loops
and linking to follow the tutorial It has clear instructions and ultra-clear
close-up photos at each step Additionally you can ask me question
you have on the tutorial No more getting stuck and frustrated on a
confusing or just plain inaccurate pattern
If you followed this tutorial and then sell the accessory or jewelry
please give credit to the author or DIY Beading Clubcom
Copyright 2015
wwwdiybeadingclubcom
wwwhandmade-jewelry-clubcom
BLOG DIY BEADING MAGAZINE ISSUE 32
Jade Necklace
BLOG WWWHANDMADE-JEWELRY-CLUBCOM MEMBERSHIP WWWDIYBEADINGCLUBCOM BLOG DIY BEADING MAGAZINE ISSUE 32
Materials Needed 18ga Craft wire 28ga Craft wire 15mm diameter Green Round Flat Back Sew On Gems 5mm Green pearls
8mm Green pearls 6mm x 11mm teardrop Crystal Treasures Mill Hill beads or any teardrop bead with holes on the side Hook for your clasp
Tools Needed Wire cutter Flat nose pliers Round nose pliers Mandrel A jar or any rounded object to shape your necklace
Skill Level Intermediate
Step 1 Cut 6 inches 18ga wire Make a loop on one end then measure approximately 125 inches and make another loop
Form a size 4 circle on your mandrel
Jade Necklace
BLOG WWWHANDMADE-JEWELRY-CLUBCOM MEMBERSHIP WWWDIYBEADINGCLUBCOM BLOG DIY BEADING MAGAZINE ISSUE 32
Then close the circle by wrapping the extended wire just below the loop Wrap the
wire 2x
This is how it looks like Lets call this circle frame Youll notice that the lower curve is
slightly bigger than the upper curve
Step 2 Cut 8 inches of 28ga wire Wrap one end of
the wire at least 3x on one side of the circle frame just below the loop
Bring up your gem Flat back sew on gems has 2 holes Insert the wire into one hole and then
wrap the wire once onto the circle frame
Jade Necklace
BLOG WWWHANDMADE-JEWELRY-CLUBCOM MEMBERSHIP WWWDIYBEADINGCLUBCOM BLOG DIY BEADING MAGAZINE ISSUE 32
Step 3 Insert a 5mm pearl on the wire and then pass
the wire under circle frame
Repeat previous step 2x and have 3 pearls wrapped
Continue wrapping with your teardrop crystal My crystal has 2 holes on the side
and then continue wrapping with your 5mm pearls then secure your wire
Repeat Step 3 and create as many as needed For 16-inch necklace Ive created 6 of these
components
Jade Necklace
BLOG WWWHANDMADE-JEWELRY-CLUBCOM MEMBERSHIP WWWDIYBEADINGCLUBCOM BLOG DIY BEADING MAGAZINE ISSUE 32
Step 4 Cut a 15-inch 18ga wire and make a loop on
one end Insert 8mm pearl and make a loop on the other end You then use these as connectors
and link the components
Step 5 The necklace is an 18ga wire with wrapped
loops on both ends First cut 7 inches 18ga wire and make a wrapped loop with your hook already inserted Side in 18pcs 5mm pearls
Then make a wrapped loop on the other end connecting the wrapped loop onto the component Do the same for the other
necklace but make the loop on the other end big enough so the hookclasp can pass thru
To have the necklace curve shaped use a jar to bend the wire Voila Now youre
ready to party
Jade Necklace
BLOG WWWHANDMADE-JEWELRY-CLUBCOM MEMBERSHIP WWWDIYBEADINGCLUBCOM
About the Author
Sky Aldovino
I consider myself a late bloomer when it comes to crafting Irsquom a self-taught jewelry maker Jewelry making wasnrsquot really a hobby of mine but unforeseen events lead me to learn jewellery making My family put up a craft store where we sell cross stitch beads and all sorts of crafting materials I fell in love with the beads and tried to create accessories only for myself Clients liked the pieces and I started customizing handmade jewelleries The craft store was a success for 6 years but like any other small businesses we had to close it down and I was confined to staying at home While at home I had all the time using the internet and now working as a home-based jewelry designer
BLOG DIY BEADING MAGAZINE ISSUE 32
Atomic Ring
BLOG WWWHANDMADE-JEWELRY-CLUBCOM MEMBERSHIP WWWDIYBEADINGCLUBCOM
Have fun making shapes using the wigjig Cyclops Make loops going in
circles to mimic the shape of a flower or in this tutorial mimic the
shape of an atom The tutorial will also teach you how to cage a
cabochon Whats nice about this piece is that with one long wire you
can create the ring from start to finish
The tutorial is catered for intermediate to advanced students One
must already know how to make spirals and use a wigjig tool It has
clear instructions and ultra-clear close-up photos at each step
Additionally you can ask me question you have on the tutorial No
more getting stuck and frustrated on a confusing or just plain
inaccurate pattern
If you followed this tutorial and then sell the accessory or jewelry
please give credit to the author or DIY Beading Clubcom
If you like to get a blank wigjig graph visit wigjigcom Shop and Jigs
section
Copyright 2015
wwwdiybeadingclubcom
wwwhandmade-jewelry-clubcom
BLOG DIY BEADING MAGAZINE ISSUE 32
Atomic Ring
BLOG WWWHANDMADE-JEWELRY-CLUBCOM MEMBERSHIP WWWDIYBEADINGCLUBCOM
Materials Needed 20ga Craft wire 28ga Craft wire 11mm Round Cabochon
Tools Needed Wigjig Cyclops 15mm pegs Wire cutter Flat nose pliers Mandrel
Skill Level Intermediate - Advanced
BLOG DIY BEADING MAGAZINE ISSUE 32
Step 1 Lets prepare your wigjig cyclops Position the pegs like so
Atomic Ring
BLOG WWWHANDMADE-JEWELRY-CLUBCOM MEMBERSHIP WWWDIYBEADINGCLUBCOM BLOG DIY BEADING MAGAZINE ISSUE 32
Lets work with longer wire so youll have enough wire to hold onto as you manipulate the wire so cut 36 inches of 20ga wire From
one end of the wire measure 10 inches
On the 10-inch measurement loop the wire at the center peg then continue to loop onto the side pegs going in circle going back to
the center peg after looping on the side peg
Now the wire at the center peg will start to build up as you go around the side pegs so
you need to constantly press the wire at the center peg to accommodate the build up of
wire
When youre done pull out the wire and this is
how it should look like
Atomic Ring
BLOG WWWHANDMADE-JEWELRY-CLUBCOM MEMBERSHIP WWWDIYBEADINGCLUBCOM BLOG DIY BEADING MAGAZINE ISSUE 32
You will notice that the frame opens wide Now to keep the atom frame from opening wide secure the center of the frame by wrapping a 28ga wire What you
need to do is simply pass the 28ga wire into the hole and wrap as many times as needed or until youre sure that the frame is secure
Step 2 Now youre finished with your atom frame Well now create the focal design With the longer wire make a spiral at the center big
enough to accommodate the size of your cabochon In this tutorial the spiral is about
11mm in diameter the same size as my cabochon
Pop in your cabochon and start to make spirals going around and over the cabochon as if you are caging the cabochon Create at
least 5 rounds and then cut off any excess
Step 3 Now lets make the ring and this with the other
end of the wire
Atomic Ring
BLOG WWWHANDMADE-JEWELRY-CLUBCOM MEMBERSHIP WWWDIYBEADINGCLUBCOM BLOG DIY BEADING MAGAZINE ISSUE 32
Bring up your mandrel and wrap the wire to the size of your finger Wrap at least 2 times
When youre sure you have the right size pull the ring out of the mandrel
With the extended wire wrap the wire the secure the ring
Cut off any excess and voila You have your atomic ring Create as many as you can with different colors of cabochon
Atomic Ring
BLOG WWWHANDMADE-JEWELRY-CLUBCOM MEMBERSHIP WWWDIYBEADINGCLUBCOM
About the Author
Sky Aldovino
I consider myself a late bloomer when it comes to crafting Irsquom a self-taught jewelry maker Jewelry making wasnrsquot really a hobby of mine but unforeseen events lead me to learn jewellery making My family put up a craft store where we sell cross stitch beads and all sorts of crafting materials I fell in love with the beads and tried to create accessories only for myself Clients liked the pieces and I started customizing handmade jewelleries The craft store was a success for 6 years but like any other small businesses we had to close it down and I was confined to staying at home While at home I had all the time using the internet and now working as a home-based jewelry designer
BLOG DIY BEADING MAGAZINE ISSUE 32
Featured Article Gemstones Used for Jewelry Making
BLOG WWWHANDMADE-JEWELRY-CLUBCOM MEMBERSHIP WWWDIYBEADINGCLUBCOM
Gemstones are stones which we hold quite highly in terms of value And
jewelry often consists of stones that add attractiveness to it so it is not
surprising when jewelry designers actually use gemstones in their designs In
fact there are different types of gemstones that can be used for making
jewelry There are the expensive and pure gemstones and there are also the
imitation ones The information below will provide some information about
the kinds of stones you can use to create jewelry and how these stones will
impact the jewelry you have created
The first kind of stone which I believe we are all quite familiar with are
birthstones These stones are associated with individualrsquos month of birth
by SunVDesigns by BeyhanAkman
For example Amethyst stone is connected with anybody who is born in
February which carries special significance in the area of emotions and also
spiritually This stone also signifies calm and peace as well
And then we have semi-precious stones which are also often used in jewelry
making They are not as valuable as compared to precious stones but still
valuable Best examples of these stones are aquamarine topaz tourmaline
opal and turquoise
BLOG DIY BEADING MAGAZINE ISSUE 32
Featured Article Gemstones Used for Jewelry Making
BLOG WWWHANDMADE-JEWELRY-CLUBCOM MEMBERSHIP WWWDIYBEADINGCLUBCOM
It is an ideal gift for someone who you deem special Aquamarine pendants
usually work well for anyone and is widely an accepted stone
by HyppieChic by joyeriamestiza
However precious stones are the most unusual
and precious jewels to us Examples of some of
them are emerald sapphire diamond and
ruby These stones are usually very expensive
and are prized for their exquisiteness These
stones are commonly used in high-quality
jewelry designs which costs quite a fortune to
obtain
BLOG DIY BEADING MAGAZINE ISSUE 32
by sarajewelrystu
Jewelry designs with precious stones are usually
given as exceptional gifts on special occasions A
perfect example is a diamond ring that is usually
given as an engagement gift
by ldiamondsforever
Featured Article Gemstones Used for Jewelry Making
BLOG WWWHANDMADE-JEWELRY-CLUBCOM MEMBERSHIP WWWDIYBEADINGCLUBCOM
There are also synthetic stones which are often used to create jewelry
Synthetic stones are artificial imitations of gemstones Synthetic Sapphire
jewelry costs less compare with the authentic ones Most of the time
imitation stones are used to save cost but at the same time have the similar
look of the real stone
BLOG DIY BEADING MAGAZINE ISSUE 32
by shininggems by thaimaker
by lapinduprintemps by PastimeArt
Gemstones are used like beads and you can use it in any designs whether
simple or elaborate
Swarovski crystal components are available in a rich multitude of rondelles Perfect as spacers in necklaces or as discs in earrings Rondelles can be used with many varieties of shapes or sizes Use Swarovski crystal rondelles between large gemstones as accents with precious metal findings Fire Mountain Gems and Beads Crystal Passionsreg brand presents Swarovski crystal in display-ready packaging for brilliant retail presentation Crystal Passionsreg is an assurance of genuine Swarovski crystal
BLOG DIY BEADING MAGAZINE ISSUE 32 BLOG WWWHANDMADE-JEWELRY-CLUBCOM MEMBERSHIP WWWDIYBEADINGCLUBCOM
Recommended Jewelry Making Supplies
Mz Unisex-adults 12pcs 25x18x6mm Turquoise Oval CAB Cabochon
BLOG DIY BEADING MAGAZINE ISSUE 32 BLOG WWWHANDMADE-JEWELRY-CLUBCOM MEMBERSHIP WWWDIYBEADINGCLUBCOM
Recommended Jewelry Making Supplies
For a little sparkle that goes a long way design with Swarovski 4mm faceted bicones Create glorious multi-strand necklaces with the dainty crystals or use as spacers to add a tiny flash to your designs Swarovski crystal components are made in Austria and are considered the finest products of their kind in the world
BLOG DIY BEADING MAGAZINE ISSUE 32 BLOG WWWHANDMADE-JEWELRY-CLUBCOM MEMBERSHIP WWWDIYBEADINGCLUBCOM
Recommended Jewelry Making Supplies
Imitation beads resist color change These beads have uniform quality with a good polish Some strands may have little to no matrix Sizes shapes and colors may vary with handcrafted items
BLOG DIY BEADING MAGAZINE ISSUE 32 BLOG WWWHANDMADE-JEWELRY-CLUBCOM MEMBERSHIP WWWDIYBEADINGCLUBCOM
Recommended Jewelry Making Supplies
Something Blue Necklace and Earrings
BLOG WWWHANDMADE-JEWELRY-CLUBCOM MEMBERSHIP WWWDIYBEADINGCLUBCOM
Skill level Beginner Intermediate Advanced
DIMENSIONS OF THE NECKLACE Inner Circumference 14 18 inch 35 cm
Focal Pendant Width 1 15 inch 35 cm Focal Pendant Height 1 15 inch 35 cm
DIMENSIONS OF THE EARRING Earring Width 716 inch 12 cm Earring Height 1516 inch 25 cm (Without the earring hook)
BLOG DIY BEADING MAGAZINE ISSUE 32
Materials
Note Before purchasing the supplies measure the length of your wished necklace If you decide to bead a longer necklace you should keep in mind that for every extra
frac34 inches 2 cm-s you will need 8 bicones and 8 pearls
Something Blue Necklace and Earrings
BLOG WWWHANDMADE-JEWELRY-CLUBCOM MEMBERSHIP WWWDIYBEADINGCLUBCOM BLOG DIY BEADING MAGAZINE ISSUE 32
Work RAW stitch into a beaded circle and embellish with Swarovski bicones
STEP 2 String 1A and 2 pearls Pass through the previous
second pearl and the freshly added 1A and the first pearl again
STEP 1 Use a comfortable length of thread to string 2
pearls 1A and 1 pearl again leaving a 2rdquo 5cm tail Pass through the first two pearls strung to form a
ring
STEP 3 String 2 pearls and 1A Pass through the previous first pearl and the freshly added two pearls
again
STEP 4 - 17 Repeat STEP 2 and STEP 3 again until you count 17 pearls in the inner circle
But be careful in the last step you only have to add 1 pearl then pass through the first pearls
added in STEP 1 and add another 1A Now pass through the first pearl added in STEP
1and 1A added in this round again to exit from this A
Something Blue Necklace and Earrings
BLOG WWWHANDMADE-JEWELRY-CLUBCOM MEMBERSHIP WWWDIYBEADINGCLUBCOM BLOG DIY BEADING MAGAZINE ISSUE 32
STEP 19 String 2A and pass through the next A added in round 4-17 and the A added in round 18 the 2A added in this round and finally the A added in round 4-17 to exit from the bead showed below
STEP 18 String 3A and pass through the 1A added in the previous round and the first A added in this
round
STEP 20 - 34 Repeat STEP 18 and STEP 19 again until you finish the circle
But be careful in the last step first you have to pass through 3A and then add 1A After this pass
through the 3A again and exit from the A bead
shown below (This is the first A added in STEP 18)
Something Blue Necklace and Earrings
BLOG WWWHANDMADE-JEWELRY-CLUBCOM MEMBERSHIP WWWDIYBEADINGCLUBCOM BLOG DIY BEADING MAGAZINE ISSUE 32
STEP 35 Step up to exit from the pearl shown below (Finishing the previous step in the A bead and then
stepping up from there makes the circle more secure)
Now string 3 bicones Pass through the pearl and the first bicone again
In the reality your circle will look more like this the A beads forming a strong row in the middle of the
pearls
STEP 36 Add 2 bicones Pass through the
neighboring pearl the first bicone added in the previous row and the 2 bicones added in this step
so you can exit from the next pearl
Something Blue Necklace and Earrings
BLOG WWWHANDMADE-JEWELRY-CLUBCOM MEMBERSHIP WWWDIYBEADINGCLUBCOM BLOG DIY BEADING MAGAZINE ISSUE 32
Now in the reality your circle will look more like this the A beads still forming a strong row in the middle of the pearls and the bicones slightly lying on top of
them
STEP 37 - 49 Repeat STEP 35 and STEP 36 again until you finish the circle with the bicones
But be careful in the last step first you have pass through the third bicone added then add 1 bicone
and pass through this little quartet to exit from the bicone shown below (The second one added in
STEP 35)
STEP 50 With these steps we finish the circle by adding 1 bicone to connect the A beads and the
bicone row So add 1 bicone pass through the nearest A bead and add 1 bicone again Pass
through the bicone already there and exit from the bicone you just added
Something Blue Necklace and Earrings
BLOG WWWHANDMADE-JEWELRY-CLUBCOM MEMBERSHIP WWWDIYBEADINGCLUBCOM BLOG DIY BEADING MAGAZINE ISSUE 32
STEP 66-83 Secure the circle by adding 1A between each bicone in the second row of Swarovski
bicones If you finished secure the thread and trim
STEP 51-65 Using the same technique as in STEP 37 - 49 add 1 bicone to finish the third bicone row The black line shows you the way (After STEP 50 pass through the next A bead add 1 bicone and pass through the bicone already there and the bicone added in the previous step Repeat these steps to
finish the inner bicone circle)
MIDDLE CIRCLE Work RAW stitch into a beaded circle and embellish with
Swarovski bicones Remember you need to bead two circles this time
STEP 1 Just like in the focal circle begin with 2 pearls 1A and 1 pearl again on a comfortable length of thread
leaving a 2rdquo 5cm tail Pass through the first two pearls strung to form a ring
Something Blue Necklace and Earrings
BLOG WWWHANDMADE-JEWELRY-CLUBCOM MEMBERSHIP WWWDIYBEADINGCLUBCOM BLOG DIY BEADING MAGAZINE ISSUE 32
STEP 15-28 Mimicing the FOCAL CIRCLElsquos STEP 18-34 bead A beads until you finish the inner part of the
circle Exit from a pearl in the second row This circle should look very similar to the first one but this is a bit
smaller
STEP 2-14 Mimicing the FOCAL CIRCLElsquos STEP 2-17 bead until you count 14 pearls in the inner circle Exit
from the last A added
STEP 29-42 Mimicing FOCAL CIRCLElsquos STEP 35-49 add 2 rows of bicones
STEP 43-56 Mimicing the FOCAL CIRCLElsquos STEP 50-65 bead the third row of bicones to finish the circle
Something Blue Necklace and Earrings
BLOG WWWHANDMADE-JEWELRY-CLUBCOM MEMBERSHIP WWWDIYBEADINGCLUBCOM BLOG DIY BEADING MAGAZINE ISSUE 32
SMALLEST CIRCLE Work RAW stitch into a beaded circle and embellish
with Swarovski bicones Remember you need to bead two circles again
STEP 1 Just like in the focal circle begin with 2 pearls
1A and 1 pearl again on a comfortable length of thread leaving a 2rdquo 5cm tail Pass through the first two
pearls strung to form a ring
STEP 57-70 Just like the FOCAL CIRCLElsquos STEP 66-83 secure the circle by adding 1A between every bicone
in the second row of bicones If you finished secure the thread and trim (Donrsquot forget to bead another
circle)
STEP 2-12 Mimicing the FOCAL CIRCLElsquos STEP 2-17 bead until you count 12 pearls in the inner circle Exit
from the last A added
STEP 13-24 Mimicing the FOCAL CIRCLElsquos STEP 18-34 bead A beads until you finish the inner part of the
circle Exit from a pearl in the second row This circle should look very similar to the first two but this is the
smallest of them all
Something Blue Necklace and Earrings
BLOG WWWHANDMADE-JEWELRY-CLUBCOM MEMBERSHIP WWWDIYBEADINGCLUBCOM BLOG DIY BEADING MAGAZINE ISSUE 32
STEP 37-48 Mimicing the FOCAL CIRCLElsquos STEP 50-65 bead the third row of bicones to finish this circle too
STEP 25-36 Mimicing FOCAL CIRCLElsquos STEP 35-49 add 2
rows of bicones The last step here is purple again
STEP 49-60 Just like the FOCAL CIRCLElsquos STEP 66-83 secure the circle by adding 1A between every bicone
in the second row of bicones If you finished secure the thread and trim (Donrsquot forget that you need two
small circles)
Something Blue Necklace and Earrings
BLOG WWWHANDMADE-JEWELRY-CLUBCOM MEMBERSHIP WWWDIYBEADINGCLUBCOM BLOG DIY BEADING MAGAZINE ISSUE 32
STEP 37-48 Mimicing the FOCAL CIRCLElsquos STEP 50-65 bead the third row of bicones to finish this circle too
STEP 25-36 Mimicing FOCAL CIRCLElsquos STEP 35-49 add 2
rows of bicones The last step here is purple again
STEP 49-60 Just like the FOCAL CIRCLElsquos STEP 66-83 secure the circle by adding 1A between every bicone
in the second row of bicones If you finished secure the thread and trim (Donrsquot forget that you need two
small circles)
Something Blue Necklace and Earrings
BLOG WWWHANDMADE-JEWELRY-CLUBCOM MEMBERSHIP WWWDIYBEADINGCLUBCOM BLOG DIY BEADING MAGAZINE ISSUE 32
STEP 2-6 Continue by adding 1A 1 bicone 1 pearl until you count 6 of each
STEP 1 Begin with 1 pearl 1 bicone 1A and 1 bicone again on a comfortable length of thread leaving a 2rdquo
5cm tail Pass through the pearl and the first bicone strung to form a ring
STEP 7-12 Pass through the A beads to make your
component more secure Also secure the thread and trim (Repeat these steps until you have six 6-BEAD
COMPONENTs)
6-BEAD COMPONENT Work RAW stitch into a beaded circle and embellish with Swarovski bicones
For the necklace we will need six from this component For the earring two
Something Blue Necklace and Earrings
BLOG WWWHANDMADE-JEWELRY-CLUBCOM MEMBERSHIP WWWDIYBEADINGCLUBCOM BLOG DIY BEADING MAGAZINE ISSUE 32
STEP 2-4 Continue by adding 1A 1 bicone 1 pearl
until you count 4 of each
STEP 1 Begin with 1 pearl 1 bicone 1A and 1 bicone again on a comfortable length of thread leaving a 2rdquo
5cm tail Pass through the pearl and the first bicone strung to form a ring
STEP 5-8 Pass through the A beads to make your component more secure Also secure the thread and
trim (Repeat these steps until you have the wished amount of 4-BEAD COMPONENTs)
4-BEAD COMPONENT Work RAW stitch into a beaded circle and embellish with Swarovski bicones
For the necklace-size that is given on the second page we will need 20 from this
component For the earring two
If you would like to make a longer necklace you need to make more (One 4-BEAD COMPONENT measures about 38 inch 1 cm To make the necklace symmetrical you have to have equal amounts on each side This means for every extra frac34 inches
2 cm-s you will need 1 4-BEAD COMPONENT on each side of the necklace)
Something Blue Necklace and Earrings
BLOG WWWHANDMADE-JEWELRY-CLUBCOM MEMBERSHIP WWWDIYBEADINGCLUBCOM BLOG DIY BEADING MAGAZINE ISSUE 32
STEP 2 Connect the MIDDLE CIRCLE to two 6-BEAD COMPONENTs by adding four-times 2As
between the pearls Choose a pearl on the MIDDLE CIRCLE and add
2A pass through a pearl in the 6-BEAD COMPONENT previously added and add 2A again Watch out this has to be symmetrical Repeat this at least two more times to make it
secure Now repeat this entire procedure but choose
the 8-th pearl on MIDDLE CIRCLE Repeat this on the other side of the necklace
too
Choose a pearl on the FOCAL CIRCLE and add 2A pass through a pearl in the 6-BEAD COMPONENT and add 2A again Repeat this at least two more times to make it secure
Now repeat this entire procedure but choose the 5-th pearl on FOCAL CIRCLE This will make the necklace nice on your neck
FINISHING THE NECKLACE Connects the parts with A beads
STEP 1 Connect the FOCAL CIRCLE to two 6-BEAD COMPONENTs by adding four-times 2As between the pearls To do this turn your parts upside down you need to
see the pearls We will work on this side from now on
Something Blue Necklace and Earrings
BLOG WWWHANDMADE-JEWELRY-CLUBCOM MEMBERSHIP WWWDIYBEADINGCLUBCOM BLOG DIY BEADING MAGAZINE ISSUE 32
FINISHING THE EARRING Connects the parts with A beads
STEP 1-2 Connect the 6-BEAD COMPONENT
to 4-BEAD COMPONENT and the 4-BEAD
COMPONENT to the earring hook
First connect the 4-BEAD COMPONENT to the 6-BEAD COMPONENT with 4A beads Mimic
the elongation steps of the necklace if needed
Secondly connect the 4-BEAD COMPONENT
to your earring hook with 4A beads again Leave from the last pearl bead 2A beads the hook (this is the orange oval form) and 2As again Pass through each of them to
secure this connection again
Finally get ready to prepare the other earring ndash since we need two of them
STEP 5 Connect the 4-BEAD COMPONENTs to the toggle clasp thus finishing the
necklace Leaving from the last pearl bead 2A the
clasp(this is the orange oval form) and 2A again Pass through all of them a couple more times to make this connection more
secure
Something Blue Necklace and Earrings
BLOG WWWHANDMADE-JEWELRY-CLUBCOM MEMBERSHIP WWWDIYBEADINGCLUBCOM BLOG DIY BEADING MAGAZINE ISSUE 32
If you finished it is time to try it on It was a great fun wasnrsquot it And how beautiful you look in your new necklace and the matching earrings
Something Blue Necklace and Earrings
BLOG WWWHANDMADE-JEWELRY-CLUBCOM MEMBERSHIP WWWDIYBEADINGCLUBCOM
About the Author
Margit Vogel
My name is Margit Vogel I live in Hungary Europe
By profession I am a biochemical engineer but I fell in love with
beads so much that I could not stop playing with them
I make one-of-a-kind beaded and bead embroidered art
jewelry made of the best quality materials such as Swarovski
stones gemstones Japanese beads (Miyuki and Toho) Czech
glass beads leather soutache and suede Each piece is unique
and individually crafted
Feel free to visit my blog for some eyecandy
httpiformjewelrywordpresscom
My shop httpwwwetsycomshopiformjewelry
Facebook httpwwwfacebookcomiformjewelry
BLOG DIY BEADING MAGAZINE ISSUE 32
Getting Down And Personal With Gianna
Getting Down And Personal With Gianna
Nowadays we see more and more jewelry stores opening up online and with these online jewelry stores it has made it easier for us to purchase and view their creations Have you ever wondered how they are able to manage and produce amazing jewelry pieces and tutorials So heres a little on the journey to open up an online shop We are excited to present to you Gianna aka Beading4perfectionists
Gianna Beader amp Youtuber
Unlike most jewelry makers and beadweavers Gianna did not start beading as a hobby but as a means to make ends meet With goals in trying to
fill the financial gap she did everything she could to expand her earnings ndash working as a security guard
and at the same time learning how to bead and selling her pieces at fair trades and flea markets
Since many were asking if she does home beading workshops she started on exploring how to teach people to bead She loves Scott Bakula and has always loved him till now and this served as her
inspiration to start making a beading video tutorial
Gianna started creating videos because she was at the point in her life where everything seemed to be falling apart And at that moment of time she had difficulties financially and selling jewelry was the only way for her to stay afloat financially She is a big Scott Bakula fan and when she went to the UK to see him on stage that was when it hit her that she is already able to edit videos and
taught herself Photoshop and done workshops at bead fairs so why not put these together and see what happens on Youtube She knew that if she gets enough subscribers and views ndash though no one knew what the exact numbers were you would be invited to become a Youtube partner This way she could monetize her videos with advertisements and hopefully she would be able to be a Youtube partner and be able to pay her bills
BLOG WWWHANDMADE-JEWELRY-CLUBCOM MEMBERSHIP WWWDIYBEADINGCLUBCOM BLOG DIY BEADING MAGAZINE ISSUE 32
Getting Down And Personal With Gianna
Her Youtube channel is popular and the reason why she chose Youtube is because Youtube is the biggest platform and reached almost to the whole world Everyone already knows about it and it was growing rapidly as compared to other platforms like Dailymotion so she figured that Youtube was the way to go Her advice to new designers is that when you start out go to the platforms on the top of your list first then work your way down your list if you do not get accepted by your first choice
After loyally putting up one video every week for about 8 months in a row she became a Youtube partner and monetized her videos She knew she needed at least $100 to get her first payout She managed to reach $100 after 3 months The process was not easy she worked hard lack sleep skipped meals and who knows what happened to Ridge in the Bold and the Beautiful because she stopped watching
On Youtube you can monetize your videos Google pays straight to your bank account and at other countries where they also have the option of getting checks among other options In order to get paid you have to reach the $100 mark and after 3 months For Gianna she thinks that you cannot say that Etsy is better than Youtube or Youtube is better than Etsy Her reasoning is because on Youtube she has many followers which will eventually check out her Etsy shop And to start an Etsy shop you need an audience
BLOG WWWHANDMADE-JEWELRY-CLUBCOM MEMBERSHIP WWWDIYBEADINGCLUBCOM BLOG DIY BEADING MAGAZINE ISSUE 32
television and dedicated her spare time (as she had another job) to Youtube She re-registered at the chamber of commerce after receiving her first payout Her work at Youtube now is not a full time job and things have changed on Youtube It is easier to become a parter but there are some countries that need to wait for an invitation to be a Youtube partner Take Italy for instance Italians would have to work just as hard as she did if they want to become a Youtube partner
Getting Down And Personal With Gianna
With her 60000 subscribers on her b4pbakup Youtube channel it is possible to sell at least 60 patterns on the first day on Etsy after promoting the PDF file on her Youtube channel Though you may think that 60 out of 60000 is not much you have to remember that not everyone has the means to purchase the PDF file and a lot of people still rather watch her carry out the tutorial(for free) on Youtube instead of reading the patterns or paying for the patterns even if the pattern is for a fundraiser and only cost $2 Her insights on Youtube is that Youtube is not what it used to be 6 years ago Instead of making more money every month she is making less and less because advertisers have more options of where they want to advertise their ads Ads do not pay as much as they used to Back in the days you could get 25 cents per ad Now you count yourself lucky if you could get 5 cents roll in after two hours
BLOG WWWHANDMADE-JEWELRY-CLUBCOM MEMBERSHIP WWWDIYBEADINGCLUBCOM BLOG DIY BEADING MAGAZINE ISSUE 32
And on top of that adblockers are destroying Youtube channel owners Youtube will start making changes to the channels where there will be ldquopaid subscriptionrdquo channels This has already been implemented in some countries but not in her country The Netherlands This means there will no longer be ads for her monthly paying subscribers She hopes that Youtube will add on a paid per video option feature The option to be a paid channel or free channel or to start a new channel for paying customers is yours to choose Gianna is not happy with Youtube because many others like her have worked so hard and for some years to become Youtube partners(which was something to be proud of) has lost their status
Getting Down And Personal With Gianna
Her advice for those who want to go on Youtube is 1 Do it because you want to teach
2 Do it because you want a career with beads
BLOG WWWHANDMADE-JEWELRY-CLUBCOM MEMBERSHIP WWWDIYBEADINGCLUBCOM BLOG DIY BEADING MAGAZINE ISSUE 32
After putting up about 20 videos and having at least 5000 subscribers add the PDF tutorials to Etsy and Craftsy She found out that her audience would like to have the PDF after watching her videos This is because they would rather print out the PDF and work while seated in a comfy chair technically somewhere else instead of having to pause the video time and time again
Gianna has also made a video for those who want to know the whole story of her journey up until the present day And to get updates on her you can check it out here She has also started a vlog where she tells of how she still works towards becoming a financial independent beader and explains her journey to get where she wants to be(or die trying) Gianna will be in the UK on October the 17th giving an all-day workshop with 4 different patterns
(2 beginners and 2 advanced) in Wotton-under-Edge
Gianna will be there Friday night as the workshop is on Saturday She will be leaving on Sunday Her
doors are open to all who wants to continue the party with her at the hotel across the street
For more information do contact Ann Tucker on Facebook
httpswwwfacebookcomanntucker501
Rec
omm
end
ed R
ead
ings
Making Jewelry with Gemstone
Beads
Combines the popular craft of beading with beautiful semi-precious stones which are collected by many Features a variety of versatile ideas which can be adapted for any type of gem or bead Readers will learn to reate beautiful gemstone jewelry with this dazzling collection of over 100 projects ranging from eyecatching earrings and accessories to exquisite necklaces and bracelets This beautiful book offers an impressive range of 28 beautiful semi-precious stones (including birthstones) and a glimpse into the fascinating history and mythical properties behind them
BLOG DIY BEADING MAGAZINE ISSUE 32 BLOG WWWHANDMADE-JEWELRY-CLUBCOM MEMBERSHIP WWWDIYBEADINGCLUBCOM
Rec
omm
end
ed R
ead
ings
Convertible Crystal Jewelry
Reverse it Twist it Wear it Many
Ways
Diane Whiting presents the idea that convertibility isnrsquot just about using pieces in multiple ways it is also about using skills and creativity in multiple ways Using ever-popular sparkling crystals Diane showcases design elements through various techniques for fun easy fashionable jewelry With 25 projects the reader can choose from bracelets necklaces and earrings that match any outfit or styleDiane Whiting presents the idea that convertibility isnrsquot just about using pieces in multiple ways it is also about using skills and creativity in multiple ways
BLOG DIY BEADING MAGAZINE ISSUE 32 BLOG WWWHANDMADE-JEWELRY-CLUBCOM MEMBERSHIP WWWDIYBEADINGCLUBCOM
Rec
omm
end
ed R
ead
ings
Wire Jewelry Masterclass
Wrapped Coiled and Woven Pieces
Using Fine Materials
Comprehensive and fabulous Wire Jewelry Masterclass takes an in-depth look at an intricate and rewarding craft The 24 projects which range from simple Dragons tear briolette earrings to a Poseidon-under-the-sea pendant will delight and inspire jewelers of all levels and tastes Divided into beginner intermediate and advanced sections this beautifully photographed step-by-step guide is the ticket to wire jewelry expertise
BLOG DIY BEADING MAGAZINE ISSUE 32 BLOG WWWHANDMADE-JEWELRY-CLUBCOM MEMBERSHIP WWWDIYBEADINGCLUBCOM
Rec
omm
end
ed R
ead
ings
Timeless Wire Weaving The
Complete Course
Timeless Wire Weaving focuses on developing wirework skills through 13 projects using three classic wire weaving techniques coiling wrapping and weaving The projects are built around a focal cabochon and incorporate seed beads and crystals in imaginative ways Designers learn to make the jewelry shown in the book and they also use the techniques learned to create innovative jewelry pieces of their own
BLOG DIY BEADING MAGAZINE ISSUE 32 BLOG WWWHANDMADE-JEWELRY-CLUBCOM MEMBERSHIP WWWDIYBEADINGCLUBCOM
Our digital magazine is available through
Apple Newsstand service available to millions of IPAD users
To advertise with us please email us at
diyjewelryclubgmailcom
Or visit our page at
httphandmade-jewelry-clubcomadvertising-diy-beading-magazine
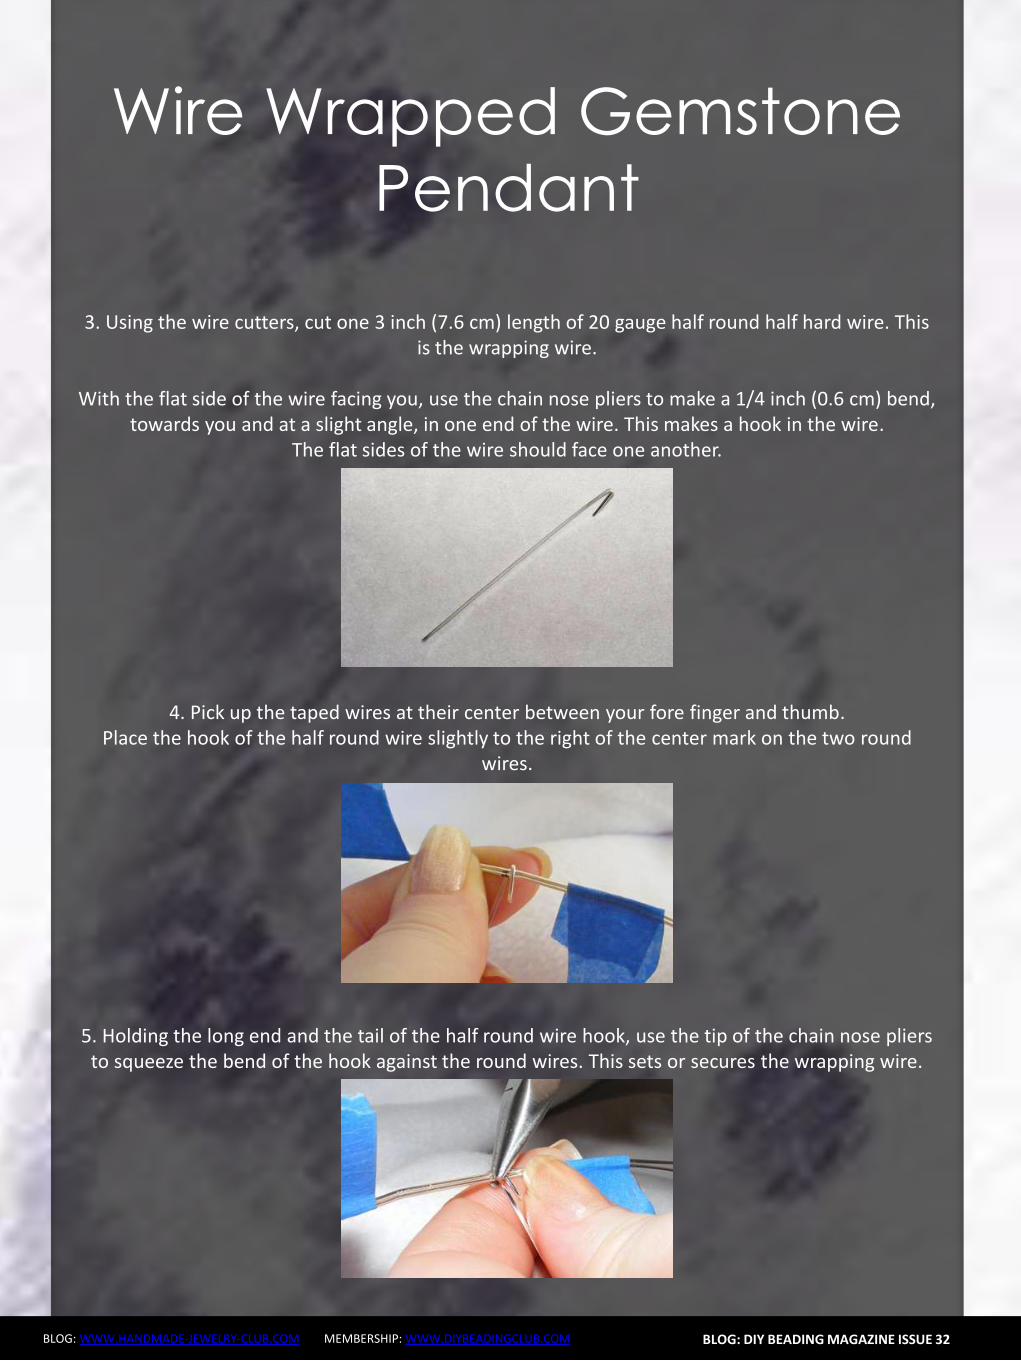
Wire Wrapped Gemstone
Pendant
BLOG WWWHANDMADE-JEWELRY-CLUBCOM MEMBERSHIP WWWDIYBEADINGCLUBCOM
12 Slide the chain nose pliers in between the round wires where they meet the wire wrap and spread the wires apart
BLOG DIY BEADING MAGAZINE ISSUE 32
Spreading the wires apart begins to create the cage for the bead
13 With its bottom center resting against the wire wrap place your bead or gemstone inside the cage
Gather all four of the wires around the bead so that it is encased within them and so that the wires
meet at the top of the bead Hold all four wires between your forefinger and thumb (like you are pinching the wires)
Wire Wrapped Gemstone
Pendant
BLOG WWWHANDMADE-JEWELRY-CLUBCOM MEMBERSHIP WWWDIYBEADINGCLUBCOM
14 Decide which side will be the front of the pendant Locate the wire that is in front of all the wires and with your fingers bend it downward at a 45 degree angle
BLOG DIY BEADING MAGAZINE ISSUE 32
15 Use your fingers or the chain nose pliers to wrap the bent wire around the other three wires where they all meet or cross one another
16 Continue wrapping the wire around the other three to secure them End the wrapping at the back of the pendant
Using the chain nose pliers tuck the wire into the wraps (not pictured)
Wire Wrapped Gemstone
Pendant
BLOG WWWHANDMADE-JEWELRY-CLUBCOM MEMBERSHIP WWWDIYBEADINGCLUBCOM
17 Make sure that the wires are evenly spread around the beads Now we need to tighten the wires that encase the bead
On one of wires about halfway up the wire place the jaws of the round nose pliers on either side
of the wire Now rotate the pliers making a double bend in the wire Repeat on the other three wires making one or two double bends in each wire When youre done shake the bead to make sure it cannot fall out of the wires
BLOG DIY BEADING MAGAZINE ISSUE 32
18 Now decorate two of the top wires Almost anything is possible Try making a few different bends curls or twists in the wire
I decided to loosely coil the top wires around an ink pen
19 Gently untighten the coil by pulling the end of the wire downward Using the round nose pliers make a simple wire loop on the end of the coil
Wire Wrapped Gemstone
Pendant
BLOG WWWHANDMADE-JEWELRY-CLUBCOM MEMBERSHIP WWWDIYBEADINGCLUBCOM
20 Repeat Steps 18 and 19 on a second top wire
BLOG DIY BEADING MAGAZINE ISSUE 32
21 The third top wire becomes the bail Coil it tightly around the ink pen making at least two wire coils The end of the wire should fall in front of the pendant
Make a simple wire loop on the wire end
22 Heres how the wire coilsspiralsbends should look Make any necessary adjustments to the wires along the sides of the gemstones and the two that fall
in front of pendant
Make sure that the wires tightly secure the bead The wire wrap at the bottom of the pendant may no longer be at the center of the bead
Wire Wrapped Gemstone
Pendant
BLOG WWWHANDMADE-JEWELRY-CLUBCOM MEMBERSHIP WWWDIYBEADINGCLUBCOM
23 On each of the three head pins string a 6mm bead Make a simple wire loop on the end of each head pin
Attach one head pin bead unit to each of the simple wire loops on the wire wrapped pendant
BLOG DIY BEADING MAGAZINE ISSUE 32
Completed Wire Wrapped Pendant
Now hang your handcrafted wire wrap pendant from your favorite chain or strand of beads
Enjoy wire wrapping your own gemstone to make a wire wrapped pendant
BLOG WWWHANDMADE-JEWELRY-CLUBCOM MEMBERSHIP WWWDIYBEADINGCLUBCOM
Wire Wrapped Gemstone
Pendant About the Author
Wanda Epps
Wanda is an avid jewelry maker who loves to make jewelry with beads She began her journey into jewelry making after walking into a bookstore to find crafting books on sale One on making jewelry caught her eye and after making a simple bead necklace she was hooked That was in late 2003 Over the years she has taken classes on various jewelry making techniques stringing making wire jewelry bead crochet macrame metal jewelry making to name some She expects that her love of making beaded jewelry will continue as bead supplies and beautiful new beads seem endless Her fulltime job provides for her needs but beads are her passion She invites you to join her in the many adventures of making jewelry at
httpwwwmaking-beaded-jewelrycom httpswwwfacebookcompagesMaking-Beaded-Jewelry-
Guide254860504236
BLOG DIY BEADING MAGAZINE ISSUE 32
Should You Sell In The Marketplace
Should You Sell In The Marketplace
BLOG WWWHANDMADE-JEWELRY-CLUBCOM MEMBERSHIP WWWDIYBEADINGCLUBCOM
We are all able to create jewelry pieces and there will come a time where you want to share the joy with the rest of the world whether it is in the form of a tutorial or a finish
piece And this is when you will start to think about putting up your work for sale As someone who is new to the business world you may be confused on where you should start selling your work And the all famous site that is first on most peoplersquos minds is Etsy Etsy is popular and it is user friendly and that is why it is the choice of many designers and crafters But there are also some who wants to set up their own
shop with their logo and to put their works out as their own even at the very beginning Thatrsquos where you may be confused on which platform you should go for
So herersquos some explanation on how you will benefit from setting up shop at Etsy
BLOG DIY BEADING MAGAZINE ISSUE 32
1 Etsy has everything ready for you and all you have to do is to bring in your works and use the features that are already available for you to use ndash like the payment system web traffic design and layout are not an issue that you need to worry about
2 You also have the trust of customers almost immediately because Etsy has already established a name for itself and therefore there is already trust in brand in their site When you use Etsy your brand will automatically be exposed to many customers who visit Etsy to find what they need
3 For every site there is always the need to be able to interact with other sellers to help each other out Forums or community boards are very helpful as other passionate designers and crafters share their experience to help out the newer members of the community This is also where you will be able to form good relationships with other sellers and who knows you may even find a partnership over time
Should You Sell In The Marketplace
BLOG WWWHANDMADE-JEWELRY-CLUBCOM MEMBERSHIP WWWDIYBEADINGCLUBCOM
Though Etsy has itrsquos good points there are some things which you need to take into consideration as well
1 When you are using someone elsersquos facilities there is always the chance of having
being shut down due to unforeseen circumstances Be it violation of Etsyrsquos policy or decisions made by the administration department this will sometimes cost you a dent in your brand name and you may lose the trust of your followers and starting all over again may be the only way to start again
2 If you are a very creative person then you may feel limited as the design of shops at Etsy is standardized If you are new and do not worry so much about designs of websites this is perfectly fine But do remember that when you want to distinguish yourself from other sellers it will be tougher as you try to make your brand more well-known due to limitations of design of the site
3 Since Etsy has so many sellers all in one place the competition is of course going to be tighter and fiercer because even though customers are viewing your products there are also other options from other sellers listed on the page as well So customers may turn away if they see something of a better price
4 Each product that you list with Etsy costs you money Etsy also takes a 35 percent of the selling price of the item However if or when you start your business on your own website it will also cost you for web hosting and you would need PayPal and they have a fee of 29 percent +30cents So either way you will still need to pay to list your products on the web
BLOG DIY BEADING MAGAZINE ISSUE 32
Should You Sell In The Marketplace
BLOG WWWHANDMADE-JEWELRY-CLUBCOM MEMBERSHIP WWWDIYBEADINGCLUBCOM
If you are confident enough to have your own business site by all means go ahead and do it The benefits of it are as below
1 You get to be your own boss You get to control everything from the design of the
website layout and how you want to advertise your products You can also change your policies and not be affected by it because it is you who changes it Your shop will not be shut down suddenly without notice and you do not need to worry that you have to start all over again
2 Distractions of competitors products on your page will not be an issue It is your site and it is up to you whether or not you want to allow what kind of advertisements on your site So if you donrsquot want something on your page it is your call
3 You will be able to capture the attention of the media and customers as well if you are able to have a well designed site Nowadays people are attracted to colors and they can see if you have put effort into beautifying the site for the customers You can do so much more than just uploading some pictures onto Etsy on your own site you can always update your site design and your products to complement each other and therefore becoming more attractive
BLOG DIY BEADING MAGAZINE ISSUE 32
Should You Sell In The Marketplace
BLOG WWWHANDMADE-JEWELRY-CLUBCOM MEMBERSHIP WWWDIYBEADINGCLUBCOM
And herersquos the tough part when you want to have your own site
BLOG DIY BEADING MAGAZINE ISSUE 32
1 You need to have knowledge of what you want to do You have to learn to be involved in every aspect of your site so that you know what us going on at the front end of things and at the back end of things as well But if you have not any knowledge of designing a website it is usually a recipe for something to go wrong You have to remember that you need a user interface that is simple for customers to use an easy to use shopping cart you should know which third party platforms are trusted and one which will not keep changing their regulations If you still want to have your site hiring a designer may be your best option
2 You have to work towards promoting your store on your own You will need to find people to feature you in their social media sites because it will not just fall into your lap You need to have promotions or road shows if you need to Marketing your store is important whether or not you are using Etsy or other marketing platforms but if you are on your own it is even more important
3 You will still be competing with other sellers Though now you are now not only competing with Etsy sellers you are now competing with sellers and stores from the world wide web Etsy is already so well known so people tend to go there first so you need to up your methods of attracting customers
Should You Sell In The Marketplace
BLOG WWWHANDMADE-JEWELRY-CLUBCOM MEMBERSHIP WWWDIYBEADINGCLUBCOM
When we first started out we used Etsy as our platform to sell our works Other than that we also utilized blogs and we eventually built our own website as our main base
BLOG DIY BEADING MAGAZINE ISSUE 32
Things have changed over these 3 years It was easier to get sales without much effort but now with so many other shops also utilizing Etsy the competition has grown tremendously Now our main sales come from our own online store and has exceeded sales from Etsy
So what we recommend is that using an existing platform such as Etsy to start out is good and in time build up your website or webstore
It is not that hard to start your own webstore either these two companies offers the option to set up your webstore
1 Shopify
2 Bigcommerce
There are many things to take into consideration before starting a store online It is perfectly fine to start out using Etsy before branching out on your own But you can also
have both ndash have your own website and a store on Etsy There are many stores who operate like this They technically get customers from Etsy and the reroute them to their own websites As long as you are in control of what you are doing and not stressing and
confusing yourself you can opt for more exposure for your store
So do take some time and take a breather to really think through what will be the best for YOU and do remember that starting small does not mean you will not be able to be big
OFFER Get which can be downloaded by subscribing to
httpinternet-marketing-publishingcom
BLOG WWWHANDMADE-JEWELRY-CLUBCOM MEMBERSHIP WWWDIYBEADINGCLUBCOM
Materials - Copper wire diameter 08 mm - Copper wire diameter 04 mm - Small gemstone bead (~4 mm) (I used 3 mm beads in this tutorial because I didnrsquot have any other beads at the time but the beads in the earrings on the cover are 4 mm) Make sure that the beads you want to use are resistant against chemicals such as liver of sulfur or whichever oxidizing substance you want to use to give the metal patina The beads in the picture above are facetted garnet buttons in the tutorial itself I used black spinel facetted buttons Equipment - Round nose pliers - Flat nose pliers - Side-cutters - A small file - A cylindrical object of about 5mm diameter (eg a mandrel for jump rings) - Hammer amp anvil - Liver of sulfur or some other means to oxidize the metal (optional)
LOVE-ly Earrings
BLOG DIY BEADING MAGAZINE ISSUE 32
BLOG WWWHANDMADE-JEWELRY-CLUBCOM MEMBERSHIP WWWDIYBEADINGCLUBCOM
This tutorial teaches how to make 1 ear stud I recommend making both ear studs of the set simultaneously step-by-step so that symmetry is easier to achieve Between steps check for
symmetry in size and shape and adjust the construction if needed
LOVE-ly Earrings
BLOG DIY BEADING MAGAZINE ISSUE 32
Step 1 Straighten the end of the copper wire (+- 6cm) by rubbing along it with your fingers for a
few seconds
Step 2 Bend over the wire onto itself as illustrated below using flat nose pliers
Step 3 Grab the doubled-over wire with the flat nose pliers and push the two sides against each
other Use little force and do it bit by bit to avoid damaging or kinking the wire
Step 4 Push the two adjacent pieces of wire apart to create the bottom shape of the heart as shown
on the picture above
BLOG WWWHANDMADE-JEWELRY-CLUBCOM MEMBERSHIP WWWDIYBEADINGCLUBCOM
LOVE-ly Earrings
BLOG DIY BEADING MAGAZINE ISSUE 32
Step 5 Hammer down the angled wire (the part circled in red) This strengthens the construction
and looks more professional
Step 6 Wrap the two ends of wire tightly around a cylindrical object (+- 5 mm diameter)
Step 7 Push apart the loops you just made by wrapping the wire around the cylindrical object The wire should now be shaped like a heart as
illustrated above
Step 8 Use round nose pliers to bend around the wire for each side of the heart as illustrated above
BLOG WWWHANDMADE-JEWELRY-CLUBCOM MEMBERSHIP WWWDIYBEADINGCLUBCOM
LOVE-ly Earrings
BLOG DIY BEADING MAGAZINE ISSUE 32
Step 9 Use the flat nose pliers to bend one of the two wires (preferably the longer wire) in a 90deg angle at the place marked with a red dot In the picture accompanying the next step you can see
how it should look from the front
Step 10 Use the round nose pliers to bend the other piece of wire in a decorative coil You will cut off the rest of the wire of the coil at approximately the spot marked with a red dot so take that into account when coiling the wire into the shape that
you desire
Step 11 Cut of the wire at the spot indicated in the previous picture and file off any sharp edges
Step 12 Cut off the ear wire at the desired length (Between 1 and 2 cm If in doubt try the earring on
to see if it sits comfortably) and file off any sharp edges
BLOG WWWHANDMADE-JEWELRY-CLUBCOM MEMBERSHIP WWWDIYBEADINGCLUBCOM
LOVE-ly Earrings
BLOG DIY BEADING MAGAZINE ISSUE 32
Step 13 Hammer down the rest of the heart (bumps and coil) If you canrsquot reach certain parts because the ear wire is in the way bend that part of the heart shape away
(verticallyupward) and bend it back after you finish hammering
Congrats yoursquove now made a basic heart-shaped ear stud Next wersquore going to decorate it with a little gemstone and more copper wire
Step 14 Cut off a length of 04 mm copper wire (about 10-20 cm) and string the bead onto it
Step 15 Place the bead in the ldquonon-coilrdquo upper part of the heart shaped ear stud holding it between thumb and forefinger Let approximately 4 cm of the 04 mm wire stick out over the edge of the
heart as illustrated above
Step 16 Wrap the wire twice around the frame so that if you face the front of the ear stud the wire is
directed towards yourself
BLOG WWWHANDMADE-JEWELRY-CLUBCOM MEMBERSHIP WWWDIYBEADINGCLUBCOM
LOVE-ly Earrings
BLOG DIY BEADING MAGAZINE ISSUE 32
Step 17 Flip the wire over the wire with the bead (indicated by the red arrow) and pull tight whilst holding the bead (and its wire) tightly in place It
should look like the construction in the big picture above
Step 18 And make another loop around the wire with the bead The 04 mm wire is now coiled around
twice two times two coils around the frame and two coils around itself
Step 19 Repeat the wire-fastening procedure described in steps 16-18 with the other end of the
wire securing the gemstone in the heart frame Let the wire stick out at the back of the earstud
Step 20 Pull the wire through the lsquocoilrsquo part of the heart shape to the front The wire should lsquocross overrsquo to the other side of the heart at the back of the ear
stud
Step 21 Coil the wire around the frame until you are content with the design Optionally you can hammer down the coils a bit I often do this because I think it
looks somewhat more sophisticated and professional
BLOG WWWHANDMADE-JEWELRY-CLUBCOM MEMBERSHIP WWWDIYBEADINGCLUBCOM
LOVE-ly Earrings
BLOG DIY BEADING MAGAZINE ISSUE 32
Step 22 Cut off the spare bits of wire preferably at the backside of the ear stud and tuck in the ends
Congrats yoursquove now made a heart-shaped ear stud Next we are going to finish it off with a patina
Step 23 Oxidize the metal of the ear studs I always use liver of sulfur solved in warm water The metal
will turn a dark color and matte texture Afterwards rinse the ear studs thoroughly with water and pat
them dry
Step 24 Rub the oxidized ear stud all over with a rough polishing pad to bring back (a dark copper)
color to the surface
Yoursquove now finished making your own LOVE-ly ear studs
Secure them in your ear with plastic or copper stops These can be bought online or in jewelry-supply
stores
Variation ideas You can easily vary in size and shape (longer hearts smaller coils pointier bottoms etc) and
use different materials As you can see the earring I make in this tutorial has a slightly smaller bead than the
earrings on the cover which influences the overall appearance somewhat
The earrings underneath are made with sterling silver and gold wire (super-short coils) and contain small pink
rubies
LOVE-ly Earrings
BLOG WWWHANDMADE-JEWELRY-CLUBCOM MEMBERSHIP WWWDIYBEADINGCLUBCOM
About the Author
Jeske Hendriks
Hi there My name is Jeske and I love all things handmade Over the years Irsquove dabbled in countless different arts and crafts but nowadays I mainly focus on making jewellery and cutting stone cabochons As for jewellery
my preferred materials are silver wire and gemstonemineral beads Using wire-wrapping and basic silver smithing techniques I create both simple
and intricate pieces ndash each and every one of them unique a personal little artwork
You are welcome to follow me on facebook stop by at my personal
webpage andor to have a look at my Etsy shops httpswwwfacebookcomyeskecrafts
httpwwwyeskecraftscom httpwwwyourbeadsandfindingsetsycom
httpwwwyeskecraftsetsycom httpwwwyeskemiscetsycom
BLOG DIY BEADING MAGAZINE ISSUE 32
Flower Tale Earrings
BLOG WWWHANDMADE-JEWELRY-CLUBCOM MEMBERSHIP WWWDIYBEADINGCLUBCOM
Techniques Beadweaving
Project Level Beginner to Intermediate
Materials 12 bronze opaque 6mm Czech glass pearl round beads
2 gr gold lustered dark topaz Japanese 110 seed beads (Toho 459)
Size B gold beading thread
2 bronze earring hooks
Tools Size 10 beading needle
Scissors
Finished Size Diameter ndash 3 cm (118 inches) (without earring hooks)
BLOG DIY BEADING MAGAZINE ISSUE 32
Flower Tale Earrings
BLOG WWWHANDMADE-JEWELRY-CLUBCOM MEMBERSHIP WWWDIYBEADINGCLUBCOM
Step 1 Cut about 110 cm (43 inches) of thread and
pass it through the needle hole
Pick six groups of one 110 seed bead and one
6 mm round bead
BLOG DIY BEADING MAGAZINE ISSUE 32
Join the beads into a ring and secure with two
square knots
Leave a tail of about 15 cm (59 inches)
Step 2 The working thread should be right before the
6 mm round bead
Pick seven 110 seed beads skip the 6 mm
round bead and pass the needle through the
next 110 seed bead added in the previous
round
Repeat adding groups of seven 110 seed
beads five more times
When adding the last group take the needle
directly through the 110 seed bead from the
previous round and the next one added in the
beginning of current round
Flower Tale Earrings
BLOG WWWHANDMADE-JEWELRY-CLUBCOM MEMBERSHIP WWWDIYBEADINGCLUBCOM
Step 3 Pick three 110 seed beads skip one seed
bead from the chain of seven added in the
previous round and pass with the needle
directly through the next three 110 seed
beads
BLOG DIY BEADING MAGAZINE ISSUE 32
Pick three 110 seed beads skip one seed
bead from the chain of seven added in the
previous round and pass with the needle
through the last one and the first 110 seed
bead from the next chain of seven
Repeat the above directions from Step 3 five
more times
After completing this round make sure the
thread will be exiting from the middle 110
seed bead from the first group of three added
in the beginning of this round
Step 4 Pick one 110 seed bead and go through the
last seed bead of the group of three
Flower Tale Earrings
BLOG WWWHANDMADE-JEWELRY-CLUBCOM MEMBERSHIP WWWDIYBEADINGCLUBCOM
Pick three 110 seed beads and take the
needle through the first seed bead of the next
group of three added in the previous round
BLOG DIY BEADING MAGAZINE ISSUE 32
Pick one 110 seed bead and go with the
needle through the next three seed beads (the
last two of the group of three and the last one
from the chain of seven)
Then go up through three 110 seed beads
(the first from the next group of seven and the
first two from the next group of three)
Repeat the above directions from Step 4 to
complete the remaining petals
When working on the last petal perform the
operation from the image shown on the left
instead of picking the group of three 110 seed
beads string two 110 seed beads the earring
hook other two 110 seed beads and
continue beading as instructed above
When you are done hide the thread ends into the beadwork
Flower Tale Earrings
BLOG WWWHANDMADE-JEWELRY-CLUBCOM MEMBERSHIP WWWDIYBEADINGCLUBCOM
About the Author
Iulia Postică
I was born and live in Moldova Eastern Europe Ever since I remember myself
Ive been crocheting and knitting My grandmother has taught me that and I
loved it very much I always regarded crafts exclusively as a hobby and never
thought of making a career of it I traveled a lot to various historical sites
Actually Ive spent all my childhood summers in archaeological camps with
my father who is a professional archaeologist
I also enjoy metal hammering and wirework as it gives me possibility to
express myself in materials used by human communities since ancient times
copper brass glass seed beads and gemstones That is no surprise to anyone
given my family history and academic background
My shop ldquoBeadedTreasuryrdquo with beading tutorials and bead crochet patterns
httpswwwetsycomshopBeadedTreasury
My shop ldquoArchaeologicardquo with artisan jewelry
httpswwwetsycomshopArcheologica
My blog httpbeadedtreasuryblogspotcom
My facebook httpswwwfacebookcomBeadedTreasury
BLOG DIY BEADING MAGAZINE ISSUE 32
Liberty Earrings
BLOG WWWHANDMADE-JEWELRY-CLUBCOM MEMBERSHIP WWWDIYBEADINGCLUBCOM
Materials - Nr 2 cabochon Preciosa Ornela ovale 18x22 mm turchese
- Rocaille Toho 150 silver lined green emerald
- Nr 2 dagger beads
- Nr 20 pearl 4 mm
- Superduo opaque luster ceramic green
- Rocaille 80 color gold
- Rocaille 80 color ivory
- Delica Miyuki 110 aquagreen mix
- Rocaille Miyuki 110 galvanized silver
- Nr 2 monachelle (earwire)
-Fireline
- Beading Needle nr 12
BLOG DIY BEADING MAGAZINE ISSUE 32
Liberty Earrings
BLOG WWWHANDMADE-JEWELRY-CLUBCOM MEMBERSHIP WWWDIYBEADINGCLUBCOM
Make a circle of 20 delica beads and make a knot (a) Perform two rounds peyote with ivory 80 seed beads (b c) Exit from an ivory
bead
BLOG DIY BEADING MAGAZINE ISSUE 32
a b c
Jump from 80 to 80 with 110 80 gold 110 (a) Finish the round and come out of a 80 gold bead
Jump to the next 80 gold with a 4mm pearl (b) Finish the round and come out
of the first pearl Jump to the 2nd pearl and close with a 80 gold bead(c)
a b c
Position the cabochon and jump from one 80 to the other with two delica bead (a)
Continue with three delicas four times (b) At the bottom sew on two delicas then finish the round by sewing on three delicas for four times passing from one to another roc 80 Tighten the cabochon and exit from the
first two delica that you started with String together a 110 and 150 and enter the second of the three close delicas (c)
a b c
Liberty Earrings
BLOG WWWHANDMADE-JEWELRY-CLUBCOM MEMBERSHIP WWWDIYBEADINGCLUBCOM
Put together 150 110 150 and enter in the second of three next delica (a) Put the same beads for three times then put together 150 and 110 and enter
in the two delica of the bottom tip (b) Enter in the second of three next delica with 110 and 150 (c) Continue passing
in the 80 beads with three beads (150 110 150) for four times then at the top finish the round by putting together a 150 and 110 (d)
BLOG DIY BEADING MAGAZINE ISSUE 32
a b c
Exit from the first 150 sewn in the previous round and jump in the three next beads with a 150 (a)
Put a 150 at a time and exit from the first 110 beads of the bottom tip Jump in the
near 110 with a 150 (b) Finish round repeating steps a and b (c) Exit the roc 80 as shown in the photo (d)
a b c
d
a b c d
Enter in the 80 with four 150 (a b) Enter the 80 beads at the bottom of the pieces with two 110 one superduo one 80 ivory bead one superduo and two 110 (c)
d e f
Liberty Earrings
BLOG WWWHANDMADE-JEWELRY-CLUBCOM MEMBERSHIP WWWDIYBEADINGCLUBCOM
Exit from the bottom pearl (a) Put together 150 three 110 150 and enter in the superduorsquos second hole (b)
Put together three superduo and enter in the next superduorsquos second hole (c) Rethread 15 three 110 150 and return in the opposite direction in the pearl of departure (d)
BLOG DIY BEADING MAGAZINE ISSUE 32
a b
c
Exit from the second pearl indicated from (a) Put 150 four 110 and enter in the second of the three 110 (b) Go to the second superduorsquos hole with four 110 and a 150 (c)
Enter the second hole of the supeduo with a 150(d) Sew in the middle of the bottom of the superduo 150 two 110 150 dagger 150 two 110 150(e)
Enter the second hole of the thirs superduo with 150 (f)
a b c
d
d e f
Liberty Earrings
BLOG WWWHANDMADE-JEWELRY-CLUBCOM MEMBERSHIP WWWDIYBEADINGCLUBCOM BLOG DIY BEADING MAGAZINE ISSUE 32
Put 150 four 110 and enter in the second of three 110 of the base (a) Insert four 110 and 150 in the pearl opposite direction indicated in the picture (b) Go in all the beads
around the piece and exit from the pearl at the top (c) Put 150 three 110 150 and enter the superduo (d)
Enter the ivory bead 80 with two 150 (e) Enter the next superduo with two 150 (f)
a b c
d e f
Put together 150 three 110 and enter in opposite direction in the departurersquos pearl (a) Exit from the 150 beads indicated by photo (b) From this jump in the second of two near
150 with five 150 to created the hole for the earwire (c) Pass the thread in the beads make a few knots and cut the excess thread
a b c
Your earrings are finished
Liberty Earrings
BLOG WWWHANDMADE-JEWELRY-CLUBCOM MEMBERSHIP WWWDIYBEADINGCLUBCOM
About the Author
Mariella Martella
My name is Mariella Martella and I am the author and
designer of jewelry that I sign with the name of Mariel Bijoux
After changing city often for work and study I currently live
in northern Italy I am an art historian with a passion for travel
painting and jewelry design in weaving that project since
2010 In my beads and crystals are the colors of the
Mediterranean sea the atmosphere of summer evenings
and the lights of the places I visited
You can find me at
Etsy shop httpswwwetsycomitshopMarielBijoux
Facebook httpswwwfacebookcommari3lbijoux
Crafting blog httpmarielbijouxblogspotit
Twitter httpstwittercomMarielBijoux
BLOG DIY BEADING MAGAZINE ISSUE 32
Jade Necklace
BLOG WWWHANDMADE-JEWELRY-CLUBCOM MEMBERSHIP WWWDIYBEADINGCLUBCOM
Every time I wear a necklace I always make it a point that the
necklace will lay perfectly flat on my neck Using wire for a necklace
made it possible for me like what I did with Jade Necklace It may look
odd at first having bent wires for a necklace but once the jewelry is
finished youll be so happy how the necklace will perfectly lay on your
neck
The tutorial is catered for intermediate level One must know basic
wirework skills such as wire wrapping making loops wrapped loops
and linking to follow the tutorial It has clear instructions and ultra-clear
close-up photos at each step Additionally you can ask me question
you have on the tutorial No more getting stuck and frustrated on a
confusing or just plain inaccurate pattern
If you followed this tutorial and then sell the accessory or jewelry
please give credit to the author or DIY Beading Clubcom
Copyright 2015
wwwdiybeadingclubcom
wwwhandmade-jewelry-clubcom
BLOG DIY BEADING MAGAZINE ISSUE 32
Jade Necklace
BLOG WWWHANDMADE-JEWELRY-CLUBCOM MEMBERSHIP WWWDIYBEADINGCLUBCOM BLOG DIY BEADING MAGAZINE ISSUE 32
Materials Needed 18ga Craft wire 28ga Craft wire 15mm diameter Green Round Flat Back Sew On Gems 5mm Green pearls
8mm Green pearls 6mm x 11mm teardrop Crystal Treasures Mill Hill beads or any teardrop bead with holes on the side Hook for your clasp
Tools Needed Wire cutter Flat nose pliers Round nose pliers Mandrel A jar or any rounded object to shape your necklace
Skill Level Intermediate
Step 1 Cut 6 inches 18ga wire Make a loop on one end then measure approximately 125 inches and make another loop
Form a size 4 circle on your mandrel
Jade Necklace
BLOG WWWHANDMADE-JEWELRY-CLUBCOM MEMBERSHIP WWWDIYBEADINGCLUBCOM BLOG DIY BEADING MAGAZINE ISSUE 32
Then close the circle by wrapping the extended wire just below the loop Wrap the
wire 2x
This is how it looks like Lets call this circle frame Youll notice that the lower curve is
slightly bigger than the upper curve
Step 2 Cut 8 inches of 28ga wire Wrap one end of
the wire at least 3x on one side of the circle frame just below the loop
Bring up your gem Flat back sew on gems has 2 holes Insert the wire into one hole and then
wrap the wire once onto the circle frame
Jade Necklace
BLOG WWWHANDMADE-JEWELRY-CLUBCOM MEMBERSHIP WWWDIYBEADINGCLUBCOM BLOG DIY BEADING MAGAZINE ISSUE 32
Step 3 Insert a 5mm pearl on the wire and then pass
the wire under circle frame
Repeat previous step 2x and have 3 pearls wrapped
Continue wrapping with your teardrop crystal My crystal has 2 holes on the side
and then continue wrapping with your 5mm pearls then secure your wire
Repeat Step 3 and create as many as needed For 16-inch necklace Ive created 6 of these
components
Jade Necklace
BLOG WWWHANDMADE-JEWELRY-CLUBCOM MEMBERSHIP WWWDIYBEADINGCLUBCOM BLOG DIY BEADING MAGAZINE ISSUE 32
Step 4 Cut a 15-inch 18ga wire and make a loop on
one end Insert 8mm pearl and make a loop on the other end You then use these as connectors
and link the components
Step 5 The necklace is an 18ga wire with wrapped
loops on both ends First cut 7 inches 18ga wire and make a wrapped loop with your hook already inserted Side in 18pcs 5mm pearls
Then make a wrapped loop on the other end connecting the wrapped loop onto the component Do the same for the other
necklace but make the loop on the other end big enough so the hookclasp can pass thru
To have the necklace curve shaped use a jar to bend the wire Voila Now youre
ready to party
Jade Necklace
BLOG WWWHANDMADE-JEWELRY-CLUBCOM MEMBERSHIP WWWDIYBEADINGCLUBCOM
About the Author
Sky Aldovino
I consider myself a late bloomer when it comes to crafting Irsquom a self-taught jewelry maker Jewelry making wasnrsquot really a hobby of mine but unforeseen events lead me to learn jewellery making My family put up a craft store where we sell cross stitch beads and all sorts of crafting materials I fell in love with the beads and tried to create accessories only for myself Clients liked the pieces and I started customizing handmade jewelleries The craft store was a success for 6 years but like any other small businesses we had to close it down and I was confined to staying at home While at home I had all the time using the internet and now working as a home-based jewelry designer
BLOG DIY BEADING MAGAZINE ISSUE 32
Atomic Ring
BLOG WWWHANDMADE-JEWELRY-CLUBCOM MEMBERSHIP WWWDIYBEADINGCLUBCOM
Have fun making shapes using the wigjig Cyclops Make loops going in
circles to mimic the shape of a flower or in this tutorial mimic the
shape of an atom The tutorial will also teach you how to cage a
cabochon Whats nice about this piece is that with one long wire you
can create the ring from start to finish
The tutorial is catered for intermediate to advanced students One
must already know how to make spirals and use a wigjig tool It has
clear instructions and ultra-clear close-up photos at each step
Additionally you can ask me question you have on the tutorial No
more getting stuck and frustrated on a confusing or just plain
inaccurate pattern
If you followed this tutorial and then sell the accessory or jewelry
please give credit to the author or DIY Beading Clubcom
If you like to get a blank wigjig graph visit wigjigcom Shop and Jigs
section
Copyright 2015
wwwdiybeadingclubcom
wwwhandmade-jewelry-clubcom
BLOG DIY BEADING MAGAZINE ISSUE 32
Atomic Ring
BLOG WWWHANDMADE-JEWELRY-CLUBCOM MEMBERSHIP WWWDIYBEADINGCLUBCOM
Materials Needed 20ga Craft wire 28ga Craft wire 11mm Round Cabochon
Tools Needed Wigjig Cyclops 15mm pegs Wire cutter Flat nose pliers Mandrel
Skill Level Intermediate - Advanced
BLOG DIY BEADING MAGAZINE ISSUE 32
Step 1 Lets prepare your wigjig cyclops Position the pegs like so
Atomic Ring
BLOG WWWHANDMADE-JEWELRY-CLUBCOM MEMBERSHIP WWWDIYBEADINGCLUBCOM BLOG DIY BEADING MAGAZINE ISSUE 32
Lets work with longer wire so youll have enough wire to hold onto as you manipulate the wire so cut 36 inches of 20ga wire From
one end of the wire measure 10 inches
On the 10-inch measurement loop the wire at the center peg then continue to loop onto the side pegs going in circle going back to
the center peg after looping on the side peg
Now the wire at the center peg will start to build up as you go around the side pegs so
you need to constantly press the wire at the center peg to accommodate the build up of
wire
When youre done pull out the wire and this is
how it should look like
Atomic Ring
BLOG WWWHANDMADE-JEWELRY-CLUBCOM MEMBERSHIP WWWDIYBEADINGCLUBCOM BLOG DIY BEADING MAGAZINE ISSUE 32
You will notice that the frame opens wide Now to keep the atom frame from opening wide secure the center of the frame by wrapping a 28ga wire What you
need to do is simply pass the 28ga wire into the hole and wrap as many times as needed or until youre sure that the frame is secure
Step 2 Now youre finished with your atom frame Well now create the focal design With the longer wire make a spiral at the center big
enough to accommodate the size of your cabochon In this tutorial the spiral is about
11mm in diameter the same size as my cabochon
Pop in your cabochon and start to make spirals going around and over the cabochon as if you are caging the cabochon Create at
least 5 rounds and then cut off any excess
Step 3 Now lets make the ring and this with the other
end of the wire
Atomic Ring
BLOG WWWHANDMADE-JEWELRY-CLUBCOM MEMBERSHIP WWWDIYBEADINGCLUBCOM BLOG DIY BEADING MAGAZINE ISSUE 32
Bring up your mandrel and wrap the wire to the size of your finger Wrap at least 2 times
When youre sure you have the right size pull the ring out of the mandrel
With the extended wire wrap the wire the secure the ring
Cut off any excess and voila You have your atomic ring Create as many as you can with different colors of cabochon
Atomic Ring
BLOG WWWHANDMADE-JEWELRY-CLUBCOM MEMBERSHIP WWWDIYBEADINGCLUBCOM
About the Author
Sky Aldovino
I consider myself a late bloomer when it comes to crafting Irsquom a self-taught jewelry maker Jewelry making wasnrsquot really a hobby of mine but unforeseen events lead me to learn jewellery making My family put up a craft store where we sell cross stitch beads and all sorts of crafting materials I fell in love with the beads and tried to create accessories only for myself Clients liked the pieces and I started customizing handmade jewelleries The craft store was a success for 6 years but like any other small businesses we had to close it down and I was confined to staying at home While at home I had all the time using the internet and now working as a home-based jewelry designer
BLOG DIY BEADING MAGAZINE ISSUE 32
Featured Article Gemstones Used for Jewelry Making
BLOG WWWHANDMADE-JEWELRY-CLUBCOM MEMBERSHIP WWWDIYBEADINGCLUBCOM
Gemstones are stones which we hold quite highly in terms of value And
jewelry often consists of stones that add attractiveness to it so it is not
surprising when jewelry designers actually use gemstones in their designs In
fact there are different types of gemstones that can be used for making
jewelry There are the expensive and pure gemstones and there are also the
imitation ones The information below will provide some information about
the kinds of stones you can use to create jewelry and how these stones will
impact the jewelry you have created
The first kind of stone which I believe we are all quite familiar with are
birthstones These stones are associated with individualrsquos month of birth
by SunVDesigns by BeyhanAkman
For example Amethyst stone is connected with anybody who is born in
February which carries special significance in the area of emotions and also
spiritually This stone also signifies calm and peace as well
And then we have semi-precious stones which are also often used in jewelry
making They are not as valuable as compared to precious stones but still
valuable Best examples of these stones are aquamarine topaz tourmaline
opal and turquoise
BLOG DIY BEADING MAGAZINE ISSUE 32
Featured Article Gemstones Used for Jewelry Making
BLOG WWWHANDMADE-JEWELRY-CLUBCOM MEMBERSHIP WWWDIYBEADINGCLUBCOM
It is an ideal gift for someone who you deem special Aquamarine pendants
usually work well for anyone and is widely an accepted stone
by HyppieChic by joyeriamestiza
However precious stones are the most unusual
and precious jewels to us Examples of some of
them are emerald sapphire diamond and
ruby These stones are usually very expensive
and are prized for their exquisiteness These
stones are commonly used in high-quality
jewelry designs which costs quite a fortune to
obtain
BLOG DIY BEADING MAGAZINE ISSUE 32
by sarajewelrystu
Jewelry designs with precious stones are usually
given as exceptional gifts on special occasions A
perfect example is a diamond ring that is usually
given as an engagement gift
by ldiamondsforever
Featured Article Gemstones Used for Jewelry Making
BLOG WWWHANDMADE-JEWELRY-CLUBCOM MEMBERSHIP WWWDIYBEADINGCLUBCOM
There are also synthetic stones which are often used to create jewelry
Synthetic stones are artificial imitations of gemstones Synthetic Sapphire
jewelry costs less compare with the authentic ones Most of the time
imitation stones are used to save cost but at the same time have the similar
look of the real stone
BLOG DIY BEADING MAGAZINE ISSUE 32
by shininggems by thaimaker
by lapinduprintemps by PastimeArt
Gemstones are used like beads and you can use it in any designs whether
simple or elaborate
Swarovski crystal components are available in a rich multitude of rondelles Perfect as spacers in necklaces or as discs in earrings Rondelles can be used with many varieties of shapes or sizes Use Swarovski crystal rondelles between large gemstones as accents with precious metal findings Fire Mountain Gems and Beads Crystal Passionsreg brand presents Swarovski crystal in display-ready packaging for brilliant retail presentation Crystal Passionsreg is an assurance of genuine Swarovski crystal
BLOG DIY BEADING MAGAZINE ISSUE 32 BLOG WWWHANDMADE-JEWELRY-CLUBCOM MEMBERSHIP WWWDIYBEADINGCLUBCOM
Recommended Jewelry Making Supplies
Mz Unisex-adults 12pcs 25x18x6mm Turquoise Oval CAB Cabochon
BLOG DIY BEADING MAGAZINE ISSUE 32 BLOG WWWHANDMADE-JEWELRY-CLUBCOM MEMBERSHIP WWWDIYBEADINGCLUBCOM
Recommended Jewelry Making Supplies
For a little sparkle that goes a long way design with Swarovski 4mm faceted bicones Create glorious multi-strand necklaces with the dainty crystals or use as spacers to add a tiny flash to your designs Swarovski crystal components are made in Austria and are considered the finest products of their kind in the world
BLOG DIY BEADING MAGAZINE ISSUE 32 BLOG WWWHANDMADE-JEWELRY-CLUBCOM MEMBERSHIP WWWDIYBEADINGCLUBCOM
Recommended Jewelry Making Supplies
Imitation beads resist color change These beads have uniform quality with a good polish Some strands may have little to no matrix Sizes shapes and colors may vary with handcrafted items
BLOG DIY BEADING MAGAZINE ISSUE 32 BLOG WWWHANDMADE-JEWELRY-CLUBCOM MEMBERSHIP WWWDIYBEADINGCLUBCOM
Recommended Jewelry Making Supplies
Something Blue Necklace and Earrings
BLOG WWWHANDMADE-JEWELRY-CLUBCOM MEMBERSHIP WWWDIYBEADINGCLUBCOM
Skill level Beginner Intermediate Advanced
DIMENSIONS OF THE NECKLACE Inner Circumference 14 18 inch 35 cm
Focal Pendant Width 1 15 inch 35 cm Focal Pendant Height 1 15 inch 35 cm
DIMENSIONS OF THE EARRING Earring Width 716 inch 12 cm Earring Height 1516 inch 25 cm (Without the earring hook)
BLOG DIY BEADING MAGAZINE ISSUE 32
Materials
Note Before purchasing the supplies measure the length of your wished necklace If you decide to bead a longer necklace you should keep in mind that for every extra
frac34 inches 2 cm-s you will need 8 bicones and 8 pearls
Something Blue Necklace and Earrings
BLOG WWWHANDMADE-JEWELRY-CLUBCOM MEMBERSHIP WWWDIYBEADINGCLUBCOM BLOG DIY BEADING MAGAZINE ISSUE 32
Work RAW stitch into a beaded circle and embellish with Swarovski bicones
STEP 2 String 1A and 2 pearls Pass through the previous
second pearl and the freshly added 1A and the first pearl again
STEP 1 Use a comfortable length of thread to string 2
pearls 1A and 1 pearl again leaving a 2rdquo 5cm tail Pass through the first two pearls strung to form a
ring
STEP 3 String 2 pearls and 1A Pass through the previous first pearl and the freshly added two pearls
again
STEP 4 - 17 Repeat STEP 2 and STEP 3 again until you count 17 pearls in the inner circle
But be careful in the last step you only have to add 1 pearl then pass through the first pearls
added in STEP 1 and add another 1A Now pass through the first pearl added in STEP
1and 1A added in this round again to exit from this A
Something Blue Necklace and Earrings
BLOG WWWHANDMADE-JEWELRY-CLUBCOM MEMBERSHIP WWWDIYBEADINGCLUBCOM BLOG DIY BEADING MAGAZINE ISSUE 32
STEP 19 String 2A and pass through the next A added in round 4-17 and the A added in round 18 the 2A added in this round and finally the A added in round 4-17 to exit from the bead showed below
STEP 18 String 3A and pass through the 1A added in the previous round and the first A added in this
round
STEP 20 - 34 Repeat STEP 18 and STEP 19 again until you finish the circle
But be careful in the last step first you have to pass through 3A and then add 1A After this pass
through the 3A again and exit from the A bead
shown below (This is the first A added in STEP 18)
Something Blue Necklace and Earrings
BLOG WWWHANDMADE-JEWELRY-CLUBCOM MEMBERSHIP WWWDIYBEADINGCLUBCOM BLOG DIY BEADING MAGAZINE ISSUE 32
STEP 35 Step up to exit from the pearl shown below (Finishing the previous step in the A bead and then
stepping up from there makes the circle more secure)
Now string 3 bicones Pass through the pearl and the first bicone again
In the reality your circle will look more like this the A beads forming a strong row in the middle of the
pearls
STEP 36 Add 2 bicones Pass through the
neighboring pearl the first bicone added in the previous row and the 2 bicones added in this step
so you can exit from the next pearl
Something Blue Necklace and Earrings
BLOG WWWHANDMADE-JEWELRY-CLUBCOM MEMBERSHIP WWWDIYBEADINGCLUBCOM BLOG DIY BEADING MAGAZINE ISSUE 32
Now in the reality your circle will look more like this the A beads still forming a strong row in the middle of the pearls and the bicones slightly lying on top of
them
STEP 37 - 49 Repeat STEP 35 and STEP 36 again until you finish the circle with the bicones
But be careful in the last step first you have pass through the third bicone added then add 1 bicone
and pass through this little quartet to exit from the bicone shown below (The second one added in
STEP 35)
STEP 50 With these steps we finish the circle by adding 1 bicone to connect the A beads and the
bicone row So add 1 bicone pass through the nearest A bead and add 1 bicone again Pass
through the bicone already there and exit from the bicone you just added
Something Blue Necklace and Earrings
BLOG WWWHANDMADE-JEWELRY-CLUBCOM MEMBERSHIP WWWDIYBEADINGCLUBCOM BLOG DIY BEADING MAGAZINE ISSUE 32
STEP 66-83 Secure the circle by adding 1A between each bicone in the second row of Swarovski
bicones If you finished secure the thread and trim
STEP 51-65 Using the same technique as in STEP 37 - 49 add 1 bicone to finish the third bicone row The black line shows you the way (After STEP 50 pass through the next A bead add 1 bicone and pass through the bicone already there and the bicone added in the previous step Repeat these steps to
finish the inner bicone circle)
MIDDLE CIRCLE Work RAW stitch into a beaded circle and embellish with
Swarovski bicones Remember you need to bead two circles this time
STEP 1 Just like in the focal circle begin with 2 pearls 1A and 1 pearl again on a comfortable length of thread
leaving a 2rdquo 5cm tail Pass through the first two pearls strung to form a ring
Something Blue Necklace and Earrings
BLOG WWWHANDMADE-JEWELRY-CLUBCOM MEMBERSHIP WWWDIYBEADINGCLUBCOM BLOG DIY BEADING MAGAZINE ISSUE 32
STEP 15-28 Mimicing the FOCAL CIRCLElsquos STEP 18-34 bead A beads until you finish the inner part of the
circle Exit from a pearl in the second row This circle should look very similar to the first one but this is a bit
smaller
STEP 2-14 Mimicing the FOCAL CIRCLElsquos STEP 2-17 bead until you count 14 pearls in the inner circle Exit
from the last A added
STEP 29-42 Mimicing FOCAL CIRCLElsquos STEP 35-49 add 2 rows of bicones
STEP 43-56 Mimicing the FOCAL CIRCLElsquos STEP 50-65 bead the third row of bicones to finish the circle
Something Blue Necklace and Earrings
BLOG WWWHANDMADE-JEWELRY-CLUBCOM MEMBERSHIP WWWDIYBEADINGCLUBCOM BLOG DIY BEADING MAGAZINE ISSUE 32
SMALLEST CIRCLE Work RAW stitch into a beaded circle and embellish
with Swarovski bicones Remember you need to bead two circles again
STEP 1 Just like in the focal circle begin with 2 pearls
1A and 1 pearl again on a comfortable length of thread leaving a 2rdquo 5cm tail Pass through the first two
pearls strung to form a ring
STEP 57-70 Just like the FOCAL CIRCLElsquos STEP 66-83 secure the circle by adding 1A between every bicone
in the second row of bicones If you finished secure the thread and trim (Donrsquot forget to bead another
circle)
STEP 2-12 Mimicing the FOCAL CIRCLElsquos STEP 2-17 bead until you count 12 pearls in the inner circle Exit
from the last A added
STEP 13-24 Mimicing the FOCAL CIRCLElsquos STEP 18-34 bead A beads until you finish the inner part of the
circle Exit from a pearl in the second row This circle should look very similar to the first two but this is the
smallest of them all
Something Blue Necklace and Earrings
BLOG WWWHANDMADE-JEWELRY-CLUBCOM MEMBERSHIP WWWDIYBEADINGCLUBCOM BLOG DIY BEADING MAGAZINE ISSUE 32
STEP 37-48 Mimicing the FOCAL CIRCLElsquos STEP 50-65 bead the third row of bicones to finish this circle too
STEP 25-36 Mimicing FOCAL CIRCLElsquos STEP 35-49 add 2
rows of bicones The last step here is purple again
STEP 49-60 Just like the FOCAL CIRCLElsquos STEP 66-83 secure the circle by adding 1A between every bicone
in the second row of bicones If you finished secure the thread and trim (Donrsquot forget that you need two
small circles)
Something Blue Necklace and Earrings
BLOG WWWHANDMADE-JEWELRY-CLUBCOM MEMBERSHIP WWWDIYBEADINGCLUBCOM BLOG DIY BEADING MAGAZINE ISSUE 32
STEP 37-48 Mimicing the FOCAL CIRCLElsquos STEP 50-65 bead the third row of bicones to finish this circle too
STEP 25-36 Mimicing FOCAL CIRCLElsquos STEP 35-49 add 2
rows of bicones The last step here is purple again
STEP 49-60 Just like the FOCAL CIRCLElsquos STEP 66-83 secure the circle by adding 1A between every bicone
in the second row of bicones If you finished secure the thread and trim (Donrsquot forget that you need two
small circles)
Something Blue Necklace and Earrings
BLOG WWWHANDMADE-JEWELRY-CLUBCOM MEMBERSHIP WWWDIYBEADINGCLUBCOM BLOG DIY BEADING MAGAZINE ISSUE 32
STEP 2-6 Continue by adding 1A 1 bicone 1 pearl until you count 6 of each
STEP 1 Begin with 1 pearl 1 bicone 1A and 1 bicone again on a comfortable length of thread leaving a 2rdquo
5cm tail Pass through the pearl and the first bicone strung to form a ring
STEP 7-12 Pass through the A beads to make your
component more secure Also secure the thread and trim (Repeat these steps until you have six 6-BEAD
COMPONENTs)
6-BEAD COMPONENT Work RAW stitch into a beaded circle and embellish with Swarovski bicones
For the necklace we will need six from this component For the earring two
Something Blue Necklace and Earrings
BLOG WWWHANDMADE-JEWELRY-CLUBCOM MEMBERSHIP WWWDIYBEADINGCLUBCOM BLOG DIY BEADING MAGAZINE ISSUE 32
STEP 2-4 Continue by adding 1A 1 bicone 1 pearl
until you count 4 of each
STEP 1 Begin with 1 pearl 1 bicone 1A and 1 bicone again on a comfortable length of thread leaving a 2rdquo
5cm tail Pass through the pearl and the first bicone strung to form a ring
STEP 5-8 Pass through the A beads to make your component more secure Also secure the thread and
trim (Repeat these steps until you have the wished amount of 4-BEAD COMPONENTs)
4-BEAD COMPONENT Work RAW stitch into a beaded circle and embellish with Swarovski bicones
For the necklace-size that is given on the second page we will need 20 from this
component For the earring two
If you would like to make a longer necklace you need to make more (One 4-BEAD COMPONENT measures about 38 inch 1 cm To make the necklace symmetrical you have to have equal amounts on each side This means for every extra frac34 inches
2 cm-s you will need 1 4-BEAD COMPONENT on each side of the necklace)
Something Blue Necklace and Earrings
BLOG WWWHANDMADE-JEWELRY-CLUBCOM MEMBERSHIP WWWDIYBEADINGCLUBCOM BLOG DIY BEADING MAGAZINE ISSUE 32
STEP 2 Connect the MIDDLE CIRCLE to two 6-BEAD COMPONENTs by adding four-times 2As
between the pearls Choose a pearl on the MIDDLE CIRCLE and add
2A pass through a pearl in the 6-BEAD COMPONENT previously added and add 2A again Watch out this has to be symmetrical Repeat this at least two more times to make it
secure Now repeat this entire procedure but choose
the 8-th pearl on MIDDLE CIRCLE Repeat this on the other side of the necklace
too
Choose a pearl on the FOCAL CIRCLE and add 2A pass through a pearl in the 6-BEAD COMPONENT and add 2A again Repeat this at least two more times to make it secure
Now repeat this entire procedure but choose the 5-th pearl on FOCAL CIRCLE This will make the necklace nice on your neck
FINISHING THE NECKLACE Connects the parts with A beads
STEP 1 Connect the FOCAL CIRCLE to two 6-BEAD COMPONENTs by adding four-times 2As between the pearls To do this turn your parts upside down you need to
see the pearls We will work on this side from now on
Something Blue Necklace and Earrings
BLOG WWWHANDMADE-JEWELRY-CLUBCOM MEMBERSHIP WWWDIYBEADINGCLUBCOM BLOG DIY BEADING MAGAZINE ISSUE 32
FINISHING THE EARRING Connects the parts with A beads
STEP 1-2 Connect the 6-BEAD COMPONENT
to 4-BEAD COMPONENT and the 4-BEAD
COMPONENT to the earring hook
First connect the 4-BEAD COMPONENT to the 6-BEAD COMPONENT with 4A beads Mimic
the elongation steps of the necklace if needed
Secondly connect the 4-BEAD COMPONENT
to your earring hook with 4A beads again Leave from the last pearl bead 2A beads the hook (this is the orange oval form) and 2As again Pass through each of them to
secure this connection again
Finally get ready to prepare the other earring ndash since we need two of them
STEP 5 Connect the 4-BEAD COMPONENTs to the toggle clasp thus finishing the
necklace Leaving from the last pearl bead 2A the
clasp(this is the orange oval form) and 2A again Pass through all of them a couple more times to make this connection more
secure
Something Blue Necklace and Earrings
BLOG WWWHANDMADE-JEWELRY-CLUBCOM MEMBERSHIP WWWDIYBEADINGCLUBCOM BLOG DIY BEADING MAGAZINE ISSUE 32
If you finished it is time to try it on It was a great fun wasnrsquot it And how beautiful you look in your new necklace and the matching earrings
Something Blue Necklace and Earrings
BLOG WWWHANDMADE-JEWELRY-CLUBCOM MEMBERSHIP WWWDIYBEADINGCLUBCOM
About the Author
Margit Vogel
My name is Margit Vogel I live in Hungary Europe
By profession I am a biochemical engineer but I fell in love with
beads so much that I could not stop playing with them
I make one-of-a-kind beaded and bead embroidered art
jewelry made of the best quality materials such as Swarovski
stones gemstones Japanese beads (Miyuki and Toho) Czech
glass beads leather soutache and suede Each piece is unique
and individually crafted
Feel free to visit my blog for some eyecandy
httpiformjewelrywordpresscom
My shop httpwwwetsycomshopiformjewelry
Facebook httpwwwfacebookcomiformjewelry
BLOG DIY BEADING MAGAZINE ISSUE 32
Getting Down And Personal With Gianna
Getting Down And Personal With Gianna
Nowadays we see more and more jewelry stores opening up online and with these online jewelry stores it has made it easier for us to purchase and view their creations Have you ever wondered how they are able to manage and produce amazing jewelry pieces and tutorials So heres a little on the journey to open up an online shop We are excited to present to you Gianna aka Beading4perfectionists
Gianna Beader amp Youtuber
Unlike most jewelry makers and beadweavers Gianna did not start beading as a hobby but as a means to make ends meet With goals in trying to
fill the financial gap she did everything she could to expand her earnings ndash working as a security guard
and at the same time learning how to bead and selling her pieces at fair trades and flea markets
Since many were asking if she does home beading workshops she started on exploring how to teach people to bead She loves Scott Bakula and has always loved him till now and this served as her
inspiration to start making a beading video tutorial
Gianna started creating videos because she was at the point in her life where everything seemed to be falling apart And at that moment of time she had difficulties financially and selling jewelry was the only way for her to stay afloat financially She is a big Scott Bakula fan and when she went to the UK to see him on stage that was when it hit her that she is already able to edit videos and
taught herself Photoshop and done workshops at bead fairs so why not put these together and see what happens on Youtube She knew that if she gets enough subscribers and views ndash though no one knew what the exact numbers were you would be invited to become a Youtube partner This way she could monetize her videos with advertisements and hopefully she would be able to be a Youtube partner and be able to pay her bills
BLOG WWWHANDMADE-JEWELRY-CLUBCOM MEMBERSHIP WWWDIYBEADINGCLUBCOM BLOG DIY BEADING MAGAZINE ISSUE 32
Getting Down And Personal With Gianna
Her Youtube channel is popular and the reason why she chose Youtube is because Youtube is the biggest platform and reached almost to the whole world Everyone already knows about it and it was growing rapidly as compared to other platforms like Dailymotion so she figured that Youtube was the way to go Her advice to new designers is that when you start out go to the platforms on the top of your list first then work your way down your list if you do not get accepted by your first choice
After loyally putting up one video every week for about 8 months in a row she became a Youtube partner and monetized her videos She knew she needed at least $100 to get her first payout She managed to reach $100 after 3 months The process was not easy she worked hard lack sleep skipped meals and who knows what happened to Ridge in the Bold and the Beautiful because she stopped watching
On Youtube you can monetize your videos Google pays straight to your bank account and at other countries where they also have the option of getting checks among other options In order to get paid you have to reach the $100 mark and after 3 months For Gianna she thinks that you cannot say that Etsy is better than Youtube or Youtube is better than Etsy Her reasoning is because on Youtube she has many followers which will eventually check out her Etsy shop And to start an Etsy shop you need an audience
BLOG WWWHANDMADE-JEWELRY-CLUBCOM MEMBERSHIP WWWDIYBEADINGCLUBCOM BLOG DIY BEADING MAGAZINE ISSUE 32
television and dedicated her spare time (as she had another job) to Youtube She re-registered at the chamber of commerce after receiving her first payout Her work at Youtube now is not a full time job and things have changed on Youtube It is easier to become a parter but there are some countries that need to wait for an invitation to be a Youtube partner Take Italy for instance Italians would have to work just as hard as she did if they want to become a Youtube partner
Getting Down And Personal With Gianna
With her 60000 subscribers on her b4pbakup Youtube channel it is possible to sell at least 60 patterns on the first day on Etsy after promoting the PDF file on her Youtube channel Though you may think that 60 out of 60000 is not much you have to remember that not everyone has the means to purchase the PDF file and a lot of people still rather watch her carry out the tutorial(for free) on Youtube instead of reading the patterns or paying for the patterns even if the pattern is for a fundraiser and only cost $2 Her insights on Youtube is that Youtube is not what it used to be 6 years ago Instead of making more money every month she is making less and less because advertisers have more options of where they want to advertise their ads Ads do not pay as much as they used to Back in the days you could get 25 cents per ad Now you count yourself lucky if you could get 5 cents roll in after two hours
BLOG WWWHANDMADE-JEWELRY-CLUBCOM MEMBERSHIP WWWDIYBEADINGCLUBCOM BLOG DIY BEADING MAGAZINE ISSUE 32
And on top of that adblockers are destroying Youtube channel owners Youtube will start making changes to the channels where there will be ldquopaid subscriptionrdquo channels This has already been implemented in some countries but not in her country The Netherlands This means there will no longer be ads for her monthly paying subscribers She hopes that Youtube will add on a paid per video option feature The option to be a paid channel or free channel or to start a new channel for paying customers is yours to choose Gianna is not happy with Youtube because many others like her have worked so hard and for some years to become Youtube partners(which was something to be proud of) has lost their status
Getting Down And Personal With Gianna
Her advice for those who want to go on Youtube is 1 Do it because you want to teach
2 Do it because you want a career with beads
BLOG WWWHANDMADE-JEWELRY-CLUBCOM MEMBERSHIP WWWDIYBEADINGCLUBCOM BLOG DIY BEADING MAGAZINE ISSUE 32
After putting up about 20 videos and having at least 5000 subscribers add the PDF tutorials to Etsy and Craftsy She found out that her audience would like to have the PDF after watching her videos This is because they would rather print out the PDF and work while seated in a comfy chair technically somewhere else instead of having to pause the video time and time again
Gianna has also made a video for those who want to know the whole story of her journey up until the present day And to get updates on her you can check it out here She has also started a vlog where she tells of how she still works towards becoming a financial independent beader and explains her journey to get where she wants to be(or die trying) Gianna will be in the UK on October the 17th giving an all-day workshop with 4 different patterns
(2 beginners and 2 advanced) in Wotton-under-Edge
Gianna will be there Friday night as the workshop is on Saturday She will be leaving on Sunday Her
doors are open to all who wants to continue the party with her at the hotel across the street
For more information do contact Ann Tucker on Facebook
httpswwwfacebookcomanntucker501
Rec
omm
end
ed R
ead
ings
Making Jewelry with Gemstone
Beads
Combines the popular craft of beading with beautiful semi-precious stones which are collected by many Features a variety of versatile ideas which can be adapted for any type of gem or bead Readers will learn to reate beautiful gemstone jewelry with this dazzling collection of over 100 projects ranging from eyecatching earrings and accessories to exquisite necklaces and bracelets This beautiful book offers an impressive range of 28 beautiful semi-precious stones (including birthstones) and a glimpse into the fascinating history and mythical properties behind them
BLOG DIY BEADING MAGAZINE ISSUE 32 BLOG WWWHANDMADE-JEWELRY-CLUBCOM MEMBERSHIP WWWDIYBEADINGCLUBCOM
Rec
omm
end
ed R
ead
ings
Convertible Crystal Jewelry
Reverse it Twist it Wear it Many
Ways
Diane Whiting presents the idea that convertibility isnrsquot just about using pieces in multiple ways it is also about using skills and creativity in multiple ways Using ever-popular sparkling crystals Diane showcases design elements through various techniques for fun easy fashionable jewelry With 25 projects the reader can choose from bracelets necklaces and earrings that match any outfit or styleDiane Whiting presents the idea that convertibility isnrsquot just about using pieces in multiple ways it is also about using skills and creativity in multiple ways
BLOG DIY BEADING MAGAZINE ISSUE 32 BLOG WWWHANDMADE-JEWELRY-CLUBCOM MEMBERSHIP WWWDIYBEADINGCLUBCOM
Rec
omm
end
ed R
ead
ings
Wire Jewelry Masterclass
Wrapped Coiled and Woven Pieces
Using Fine Materials
Comprehensive and fabulous Wire Jewelry Masterclass takes an in-depth look at an intricate and rewarding craft The 24 projects which range from simple Dragons tear briolette earrings to a Poseidon-under-the-sea pendant will delight and inspire jewelers of all levels and tastes Divided into beginner intermediate and advanced sections this beautifully photographed step-by-step guide is the ticket to wire jewelry expertise
BLOG DIY BEADING MAGAZINE ISSUE 32 BLOG WWWHANDMADE-JEWELRY-CLUBCOM MEMBERSHIP WWWDIYBEADINGCLUBCOM
Rec
omm
end
ed R
ead
ings
Timeless Wire Weaving The
Complete Course
Timeless Wire Weaving focuses on developing wirework skills through 13 projects using three classic wire weaving techniques coiling wrapping and weaving The projects are built around a focal cabochon and incorporate seed beads and crystals in imaginative ways Designers learn to make the jewelry shown in the book and they also use the techniques learned to create innovative jewelry pieces of their own
BLOG DIY BEADING MAGAZINE ISSUE 32 BLOG WWWHANDMADE-JEWELRY-CLUBCOM MEMBERSHIP WWWDIYBEADINGCLUBCOM
Our digital magazine is available through
Apple Newsstand service available to millions of IPAD users
To advertise with us please email us at
diyjewelryclubgmailcom
Or visit our page at
httphandmade-jewelry-clubcomadvertising-diy-beading-magazine
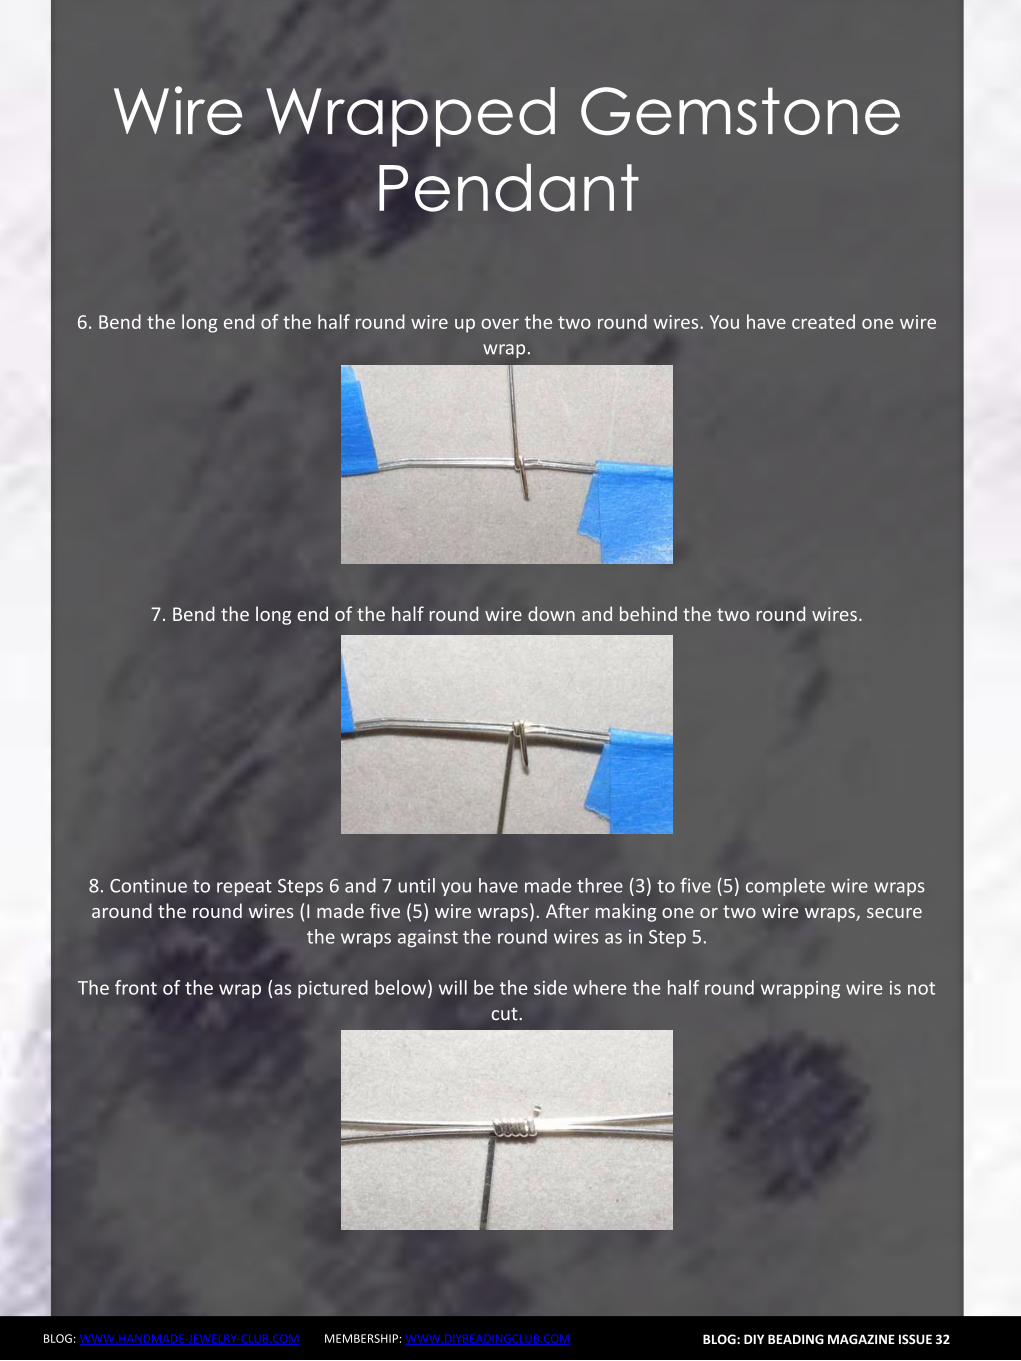
Wire Wrapped Gemstone
Pendant
BLOG WWWHANDMADE-JEWELRY-CLUBCOM MEMBERSHIP WWWDIYBEADINGCLUBCOM
14 Decide which side will be the front of the pendant Locate the wire that is in front of all the wires and with your fingers bend it downward at a 45 degree angle
BLOG DIY BEADING MAGAZINE ISSUE 32
15 Use your fingers or the chain nose pliers to wrap the bent wire around the other three wires where they all meet or cross one another
16 Continue wrapping the wire around the other three to secure them End the wrapping at the back of the pendant
Using the chain nose pliers tuck the wire into the wraps (not pictured)
Wire Wrapped Gemstone
Pendant
BLOG WWWHANDMADE-JEWELRY-CLUBCOM MEMBERSHIP WWWDIYBEADINGCLUBCOM
17 Make sure that the wires are evenly spread around the beads Now we need to tighten the wires that encase the bead
On one of wires about halfway up the wire place the jaws of the round nose pliers on either side
of the wire Now rotate the pliers making a double bend in the wire Repeat on the other three wires making one or two double bends in each wire When youre done shake the bead to make sure it cannot fall out of the wires
BLOG DIY BEADING MAGAZINE ISSUE 32
18 Now decorate two of the top wires Almost anything is possible Try making a few different bends curls or twists in the wire
I decided to loosely coil the top wires around an ink pen
19 Gently untighten the coil by pulling the end of the wire downward Using the round nose pliers make a simple wire loop on the end of the coil
Wire Wrapped Gemstone
Pendant
BLOG WWWHANDMADE-JEWELRY-CLUBCOM MEMBERSHIP WWWDIYBEADINGCLUBCOM
20 Repeat Steps 18 and 19 on a second top wire
BLOG DIY BEADING MAGAZINE ISSUE 32
21 The third top wire becomes the bail Coil it tightly around the ink pen making at least two wire coils The end of the wire should fall in front of the pendant
Make a simple wire loop on the wire end
22 Heres how the wire coilsspiralsbends should look Make any necessary adjustments to the wires along the sides of the gemstones and the two that fall
in front of pendant
Make sure that the wires tightly secure the bead The wire wrap at the bottom of the pendant may no longer be at the center of the bead
Wire Wrapped Gemstone
Pendant
BLOG WWWHANDMADE-JEWELRY-CLUBCOM MEMBERSHIP WWWDIYBEADINGCLUBCOM
23 On each of the three head pins string a 6mm bead Make a simple wire loop on the end of each head pin
Attach one head pin bead unit to each of the simple wire loops on the wire wrapped pendant
BLOG DIY BEADING MAGAZINE ISSUE 32
Completed Wire Wrapped Pendant
Now hang your handcrafted wire wrap pendant from your favorite chain or strand of beads
Enjoy wire wrapping your own gemstone to make a wire wrapped pendant
BLOG WWWHANDMADE-JEWELRY-CLUBCOM MEMBERSHIP WWWDIYBEADINGCLUBCOM
Wire Wrapped Gemstone
Pendant About the Author
Wanda Epps
Wanda is an avid jewelry maker who loves to make jewelry with beads She began her journey into jewelry making after walking into a bookstore to find crafting books on sale One on making jewelry caught her eye and after making a simple bead necklace she was hooked That was in late 2003 Over the years she has taken classes on various jewelry making techniques stringing making wire jewelry bead crochet macrame metal jewelry making to name some She expects that her love of making beaded jewelry will continue as bead supplies and beautiful new beads seem endless Her fulltime job provides for her needs but beads are her passion She invites you to join her in the many adventures of making jewelry at
httpwwwmaking-beaded-jewelrycom httpswwwfacebookcompagesMaking-Beaded-Jewelry-
Guide254860504236
BLOG DIY BEADING MAGAZINE ISSUE 32
Should You Sell In The Marketplace
Should You Sell In The Marketplace
BLOG WWWHANDMADE-JEWELRY-CLUBCOM MEMBERSHIP WWWDIYBEADINGCLUBCOM
We are all able to create jewelry pieces and there will come a time where you want to share the joy with the rest of the world whether it is in the form of a tutorial or a finish
piece And this is when you will start to think about putting up your work for sale As someone who is new to the business world you may be confused on where you should start selling your work And the all famous site that is first on most peoplersquos minds is Etsy Etsy is popular and it is user friendly and that is why it is the choice of many designers and crafters But there are also some who wants to set up their own
shop with their logo and to put their works out as their own even at the very beginning Thatrsquos where you may be confused on which platform you should go for
So herersquos some explanation on how you will benefit from setting up shop at Etsy
BLOG DIY BEADING MAGAZINE ISSUE 32
1 Etsy has everything ready for you and all you have to do is to bring in your works and use the features that are already available for you to use ndash like the payment system web traffic design and layout are not an issue that you need to worry about
2 You also have the trust of customers almost immediately because Etsy has already established a name for itself and therefore there is already trust in brand in their site When you use Etsy your brand will automatically be exposed to many customers who visit Etsy to find what they need
3 For every site there is always the need to be able to interact with other sellers to help each other out Forums or community boards are very helpful as other passionate designers and crafters share their experience to help out the newer members of the community This is also where you will be able to form good relationships with other sellers and who knows you may even find a partnership over time
Should You Sell In The Marketplace
BLOG WWWHANDMADE-JEWELRY-CLUBCOM MEMBERSHIP WWWDIYBEADINGCLUBCOM
Though Etsy has itrsquos good points there are some things which you need to take into consideration as well
1 When you are using someone elsersquos facilities there is always the chance of having
being shut down due to unforeseen circumstances Be it violation of Etsyrsquos policy or decisions made by the administration department this will sometimes cost you a dent in your brand name and you may lose the trust of your followers and starting all over again may be the only way to start again
2 If you are a very creative person then you may feel limited as the design of shops at Etsy is standardized If you are new and do not worry so much about designs of websites this is perfectly fine But do remember that when you want to distinguish yourself from other sellers it will be tougher as you try to make your brand more well-known due to limitations of design of the site
3 Since Etsy has so many sellers all in one place the competition is of course going to be tighter and fiercer because even though customers are viewing your products there are also other options from other sellers listed on the page as well So customers may turn away if they see something of a better price
4 Each product that you list with Etsy costs you money Etsy also takes a 35 percent of the selling price of the item However if or when you start your business on your own website it will also cost you for web hosting and you would need PayPal and they have a fee of 29 percent +30cents So either way you will still need to pay to list your products on the web
BLOG DIY BEADING MAGAZINE ISSUE 32
Should You Sell In The Marketplace
BLOG WWWHANDMADE-JEWELRY-CLUBCOM MEMBERSHIP WWWDIYBEADINGCLUBCOM
If you are confident enough to have your own business site by all means go ahead and do it The benefits of it are as below
1 You get to be your own boss You get to control everything from the design of the
website layout and how you want to advertise your products You can also change your policies and not be affected by it because it is you who changes it Your shop will not be shut down suddenly without notice and you do not need to worry that you have to start all over again
2 Distractions of competitors products on your page will not be an issue It is your site and it is up to you whether or not you want to allow what kind of advertisements on your site So if you donrsquot want something on your page it is your call
3 You will be able to capture the attention of the media and customers as well if you are able to have a well designed site Nowadays people are attracted to colors and they can see if you have put effort into beautifying the site for the customers You can do so much more than just uploading some pictures onto Etsy on your own site you can always update your site design and your products to complement each other and therefore becoming more attractive
BLOG DIY BEADING MAGAZINE ISSUE 32
Should You Sell In The Marketplace
BLOG WWWHANDMADE-JEWELRY-CLUBCOM MEMBERSHIP WWWDIYBEADINGCLUBCOM
And herersquos the tough part when you want to have your own site
BLOG DIY BEADING MAGAZINE ISSUE 32
1 You need to have knowledge of what you want to do You have to learn to be involved in every aspect of your site so that you know what us going on at the front end of things and at the back end of things as well But if you have not any knowledge of designing a website it is usually a recipe for something to go wrong You have to remember that you need a user interface that is simple for customers to use an easy to use shopping cart you should know which third party platforms are trusted and one which will not keep changing their regulations If you still want to have your site hiring a designer may be your best option
2 You have to work towards promoting your store on your own You will need to find people to feature you in their social media sites because it will not just fall into your lap You need to have promotions or road shows if you need to Marketing your store is important whether or not you are using Etsy or other marketing platforms but if you are on your own it is even more important
3 You will still be competing with other sellers Though now you are now not only competing with Etsy sellers you are now competing with sellers and stores from the world wide web Etsy is already so well known so people tend to go there first so you need to up your methods of attracting customers
Should You Sell In The Marketplace
BLOG WWWHANDMADE-JEWELRY-CLUBCOM MEMBERSHIP WWWDIYBEADINGCLUBCOM
When we first started out we used Etsy as our platform to sell our works Other than that we also utilized blogs and we eventually built our own website as our main base
BLOG DIY BEADING MAGAZINE ISSUE 32
Things have changed over these 3 years It was easier to get sales without much effort but now with so many other shops also utilizing Etsy the competition has grown tremendously Now our main sales come from our own online store and has exceeded sales from Etsy
So what we recommend is that using an existing platform such as Etsy to start out is good and in time build up your website or webstore
It is not that hard to start your own webstore either these two companies offers the option to set up your webstore
1 Shopify
2 Bigcommerce
There are many things to take into consideration before starting a store online It is perfectly fine to start out using Etsy before branching out on your own But you can also
have both ndash have your own website and a store on Etsy There are many stores who operate like this They technically get customers from Etsy and the reroute them to their own websites As long as you are in control of what you are doing and not stressing and
confusing yourself you can opt for more exposure for your store
So do take some time and take a breather to really think through what will be the best for YOU and do remember that starting small does not mean you will not be able to be big
OFFER Get which can be downloaded by subscribing to
httpinternet-marketing-publishingcom
BLOG WWWHANDMADE-JEWELRY-CLUBCOM MEMBERSHIP WWWDIYBEADINGCLUBCOM
Materials - Copper wire diameter 08 mm - Copper wire diameter 04 mm - Small gemstone bead (~4 mm) (I used 3 mm beads in this tutorial because I didnrsquot have any other beads at the time but the beads in the earrings on the cover are 4 mm) Make sure that the beads you want to use are resistant against chemicals such as liver of sulfur or whichever oxidizing substance you want to use to give the metal patina The beads in the picture above are facetted garnet buttons in the tutorial itself I used black spinel facetted buttons Equipment - Round nose pliers - Flat nose pliers - Side-cutters - A small file - A cylindrical object of about 5mm diameter (eg a mandrel for jump rings) - Hammer amp anvil - Liver of sulfur or some other means to oxidize the metal (optional)
LOVE-ly Earrings
BLOG DIY BEADING MAGAZINE ISSUE 32
BLOG WWWHANDMADE-JEWELRY-CLUBCOM MEMBERSHIP WWWDIYBEADINGCLUBCOM
This tutorial teaches how to make 1 ear stud I recommend making both ear studs of the set simultaneously step-by-step so that symmetry is easier to achieve Between steps check for
symmetry in size and shape and adjust the construction if needed
LOVE-ly Earrings
BLOG DIY BEADING MAGAZINE ISSUE 32
Step 1 Straighten the end of the copper wire (+- 6cm) by rubbing along it with your fingers for a
few seconds
Step 2 Bend over the wire onto itself as illustrated below using flat nose pliers
Step 3 Grab the doubled-over wire with the flat nose pliers and push the two sides against each
other Use little force and do it bit by bit to avoid damaging or kinking the wire
Step 4 Push the two adjacent pieces of wire apart to create the bottom shape of the heart as shown
on the picture above
BLOG WWWHANDMADE-JEWELRY-CLUBCOM MEMBERSHIP WWWDIYBEADINGCLUBCOM
LOVE-ly Earrings
BLOG DIY BEADING MAGAZINE ISSUE 32
Step 5 Hammer down the angled wire (the part circled in red) This strengthens the construction
and looks more professional
Step 6 Wrap the two ends of wire tightly around a cylindrical object (+- 5 mm diameter)
Step 7 Push apart the loops you just made by wrapping the wire around the cylindrical object The wire should now be shaped like a heart as
illustrated above
Step 8 Use round nose pliers to bend around the wire for each side of the heart as illustrated above
BLOG WWWHANDMADE-JEWELRY-CLUBCOM MEMBERSHIP WWWDIYBEADINGCLUBCOM
LOVE-ly Earrings
BLOG DIY BEADING MAGAZINE ISSUE 32
Step 9 Use the flat nose pliers to bend one of the two wires (preferably the longer wire) in a 90deg angle at the place marked with a red dot In the picture accompanying the next step you can see
how it should look from the front
Step 10 Use the round nose pliers to bend the other piece of wire in a decorative coil You will cut off the rest of the wire of the coil at approximately the spot marked with a red dot so take that into account when coiling the wire into the shape that
you desire
Step 11 Cut of the wire at the spot indicated in the previous picture and file off any sharp edges
Step 12 Cut off the ear wire at the desired length (Between 1 and 2 cm If in doubt try the earring on
to see if it sits comfortably) and file off any sharp edges
BLOG WWWHANDMADE-JEWELRY-CLUBCOM MEMBERSHIP WWWDIYBEADINGCLUBCOM
LOVE-ly Earrings
BLOG DIY BEADING MAGAZINE ISSUE 32
Step 13 Hammer down the rest of the heart (bumps and coil) If you canrsquot reach certain parts because the ear wire is in the way bend that part of the heart shape away
(verticallyupward) and bend it back after you finish hammering
Congrats yoursquove now made a basic heart-shaped ear stud Next wersquore going to decorate it with a little gemstone and more copper wire
Step 14 Cut off a length of 04 mm copper wire (about 10-20 cm) and string the bead onto it
Step 15 Place the bead in the ldquonon-coilrdquo upper part of the heart shaped ear stud holding it between thumb and forefinger Let approximately 4 cm of the 04 mm wire stick out over the edge of the
heart as illustrated above
Step 16 Wrap the wire twice around the frame so that if you face the front of the ear stud the wire is
directed towards yourself
BLOG WWWHANDMADE-JEWELRY-CLUBCOM MEMBERSHIP WWWDIYBEADINGCLUBCOM
LOVE-ly Earrings
BLOG DIY BEADING MAGAZINE ISSUE 32
Step 17 Flip the wire over the wire with the bead (indicated by the red arrow) and pull tight whilst holding the bead (and its wire) tightly in place It
should look like the construction in the big picture above
Step 18 And make another loop around the wire with the bead The 04 mm wire is now coiled around
twice two times two coils around the frame and two coils around itself
Step 19 Repeat the wire-fastening procedure described in steps 16-18 with the other end of the
wire securing the gemstone in the heart frame Let the wire stick out at the back of the earstud
Step 20 Pull the wire through the lsquocoilrsquo part of the heart shape to the front The wire should lsquocross overrsquo to the other side of the heart at the back of the ear
stud
Step 21 Coil the wire around the frame until you are content with the design Optionally you can hammer down the coils a bit I often do this because I think it
looks somewhat more sophisticated and professional
BLOG WWWHANDMADE-JEWELRY-CLUBCOM MEMBERSHIP WWWDIYBEADINGCLUBCOM
LOVE-ly Earrings
BLOG DIY BEADING MAGAZINE ISSUE 32
Step 22 Cut off the spare bits of wire preferably at the backside of the ear stud and tuck in the ends
Congrats yoursquove now made a heart-shaped ear stud Next we are going to finish it off with a patina
Step 23 Oxidize the metal of the ear studs I always use liver of sulfur solved in warm water The metal
will turn a dark color and matte texture Afterwards rinse the ear studs thoroughly with water and pat
them dry
Step 24 Rub the oxidized ear stud all over with a rough polishing pad to bring back (a dark copper)
color to the surface
Yoursquove now finished making your own LOVE-ly ear studs
Secure them in your ear with plastic or copper stops These can be bought online or in jewelry-supply
stores
Variation ideas You can easily vary in size and shape (longer hearts smaller coils pointier bottoms etc) and
use different materials As you can see the earring I make in this tutorial has a slightly smaller bead than the
earrings on the cover which influences the overall appearance somewhat
The earrings underneath are made with sterling silver and gold wire (super-short coils) and contain small pink
rubies
LOVE-ly Earrings
BLOG WWWHANDMADE-JEWELRY-CLUBCOM MEMBERSHIP WWWDIYBEADINGCLUBCOM
About the Author
Jeske Hendriks
Hi there My name is Jeske and I love all things handmade Over the years Irsquove dabbled in countless different arts and crafts but nowadays I mainly focus on making jewellery and cutting stone cabochons As for jewellery
my preferred materials are silver wire and gemstonemineral beads Using wire-wrapping and basic silver smithing techniques I create both simple
and intricate pieces ndash each and every one of them unique a personal little artwork
You are welcome to follow me on facebook stop by at my personal
webpage andor to have a look at my Etsy shops httpswwwfacebookcomyeskecrafts
httpwwwyeskecraftscom httpwwwyourbeadsandfindingsetsycom
httpwwwyeskecraftsetsycom httpwwwyeskemiscetsycom
BLOG DIY BEADING MAGAZINE ISSUE 32
Flower Tale Earrings
BLOG WWWHANDMADE-JEWELRY-CLUBCOM MEMBERSHIP WWWDIYBEADINGCLUBCOM
Techniques Beadweaving
Project Level Beginner to Intermediate
Materials 12 bronze opaque 6mm Czech glass pearl round beads
2 gr gold lustered dark topaz Japanese 110 seed beads (Toho 459)
Size B gold beading thread
2 bronze earring hooks
Tools Size 10 beading needle
Scissors
Finished Size Diameter ndash 3 cm (118 inches) (without earring hooks)
BLOG DIY BEADING MAGAZINE ISSUE 32
Flower Tale Earrings
BLOG WWWHANDMADE-JEWELRY-CLUBCOM MEMBERSHIP WWWDIYBEADINGCLUBCOM
Step 1 Cut about 110 cm (43 inches) of thread and
pass it through the needle hole
Pick six groups of one 110 seed bead and one
6 mm round bead
BLOG DIY BEADING MAGAZINE ISSUE 32
Join the beads into a ring and secure with two
square knots
Leave a tail of about 15 cm (59 inches)
Step 2 The working thread should be right before the
6 mm round bead
Pick seven 110 seed beads skip the 6 mm
round bead and pass the needle through the
next 110 seed bead added in the previous
round
Repeat adding groups of seven 110 seed
beads five more times
When adding the last group take the needle
directly through the 110 seed bead from the
previous round and the next one added in the
beginning of current round
Flower Tale Earrings
BLOG WWWHANDMADE-JEWELRY-CLUBCOM MEMBERSHIP WWWDIYBEADINGCLUBCOM
Step 3 Pick three 110 seed beads skip one seed
bead from the chain of seven added in the
previous round and pass with the needle
directly through the next three 110 seed
beads
BLOG DIY BEADING MAGAZINE ISSUE 32
Pick three 110 seed beads skip one seed
bead from the chain of seven added in the
previous round and pass with the needle
through the last one and the first 110 seed
bead from the next chain of seven
Repeat the above directions from Step 3 five
more times
After completing this round make sure the
thread will be exiting from the middle 110
seed bead from the first group of three added
in the beginning of this round
Step 4 Pick one 110 seed bead and go through the
last seed bead of the group of three
Flower Tale Earrings
BLOG WWWHANDMADE-JEWELRY-CLUBCOM MEMBERSHIP WWWDIYBEADINGCLUBCOM
Pick three 110 seed beads and take the
needle through the first seed bead of the next
group of three added in the previous round
BLOG DIY BEADING MAGAZINE ISSUE 32
Pick one 110 seed bead and go with the
needle through the next three seed beads (the
last two of the group of three and the last one
from the chain of seven)
Then go up through three 110 seed beads
(the first from the next group of seven and the
first two from the next group of three)
Repeat the above directions from Step 4 to
complete the remaining petals
When working on the last petal perform the
operation from the image shown on the left
instead of picking the group of three 110 seed
beads string two 110 seed beads the earring
hook other two 110 seed beads and
continue beading as instructed above
When you are done hide the thread ends into the beadwork
Flower Tale Earrings
BLOG WWWHANDMADE-JEWELRY-CLUBCOM MEMBERSHIP WWWDIYBEADINGCLUBCOM
About the Author
Iulia Postică
I was born and live in Moldova Eastern Europe Ever since I remember myself
Ive been crocheting and knitting My grandmother has taught me that and I
loved it very much I always regarded crafts exclusively as a hobby and never
thought of making a career of it I traveled a lot to various historical sites
Actually Ive spent all my childhood summers in archaeological camps with
my father who is a professional archaeologist
I also enjoy metal hammering and wirework as it gives me possibility to
express myself in materials used by human communities since ancient times
copper brass glass seed beads and gemstones That is no surprise to anyone
given my family history and academic background
My shop ldquoBeadedTreasuryrdquo with beading tutorials and bead crochet patterns
httpswwwetsycomshopBeadedTreasury
My shop ldquoArchaeologicardquo with artisan jewelry
httpswwwetsycomshopArcheologica
My blog httpbeadedtreasuryblogspotcom
My facebook httpswwwfacebookcomBeadedTreasury
BLOG DIY BEADING MAGAZINE ISSUE 32
Liberty Earrings
BLOG WWWHANDMADE-JEWELRY-CLUBCOM MEMBERSHIP WWWDIYBEADINGCLUBCOM
Materials - Nr 2 cabochon Preciosa Ornela ovale 18x22 mm turchese
- Rocaille Toho 150 silver lined green emerald
- Nr 2 dagger beads
- Nr 20 pearl 4 mm
- Superduo opaque luster ceramic green
- Rocaille 80 color gold
- Rocaille 80 color ivory
- Delica Miyuki 110 aquagreen mix
- Rocaille Miyuki 110 galvanized silver
- Nr 2 monachelle (earwire)
-Fireline
- Beading Needle nr 12
BLOG DIY BEADING MAGAZINE ISSUE 32
Liberty Earrings
BLOG WWWHANDMADE-JEWELRY-CLUBCOM MEMBERSHIP WWWDIYBEADINGCLUBCOM
Make a circle of 20 delica beads and make a knot (a) Perform two rounds peyote with ivory 80 seed beads (b c) Exit from an ivory
bead
BLOG DIY BEADING MAGAZINE ISSUE 32
a b c
Jump from 80 to 80 with 110 80 gold 110 (a) Finish the round and come out of a 80 gold bead
Jump to the next 80 gold with a 4mm pearl (b) Finish the round and come out
of the first pearl Jump to the 2nd pearl and close with a 80 gold bead(c)
a b c
Position the cabochon and jump from one 80 to the other with two delica bead (a)
Continue with three delicas four times (b) At the bottom sew on two delicas then finish the round by sewing on three delicas for four times passing from one to another roc 80 Tighten the cabochon and exit from the
first two delica that you started with String together a 110 and 150 and enter the second of the three close delicas (c)
a b c
Liberty Earrings
BLOG WWWHANDMADE-JEWELRY-CLUBCOM MEMBERSHIP WWWDIYBEADINGCLUBCOM
Put together 150 110 150 and enter in the second of three next delica (a) Put the same beads for three times then put together 150 and 110 and enter
in the two delica of the bottom tip (b) Enter in the second of three next delica with 110 and 150 (c) Continue passing
in the 80 beads with three beads (150 110 150) for four times then at the top finish the round by putting together a 150 and 110 (d)
BLOG DIY BEADING MAGAZINE ISSUE 32
a b c
Exit from the first 150 sewn in the previous round and jump in the three next beads with a 150 (a)
Put a 150 at a time and exit from the first 110 beads of the bottom tip Jump in the
near 110 with a 150 (b) Finish round repeating steps a and b (c) Exit the roc 80 as shown in the photo (d)
a b c
d
a b c d
Enter in the 80 with four 150 (a b) Enter the 80 beads at the bottom of the pieces with two 110 one superduo one 80 ivory bead one superduo and two 110 (c)
d e f
Liberty Earrings
BLOG WWWHANDMADE-JEWELRY-CLUBCOM MEMBERSHIP WWWDIYBEADINGCLUBCOM
Exit from the bottom pearl (a) Put together 150 three 110 150 and enter in the superduorsquos second hole (b)
Put together three superduo and enter in the next superduorsquos second hole (c) Rethread 15 three 110 150 and return in the opposite direction in the pearl of departure (d)
BLOG DIY BEADING MAGAZINE ISSUE 32
a b
c
Exit from the second pearl indicated from (a) Put 150 four 110 and enter in the second of the three 110 (b) Go to the second superduorsquos hole with four 110 and a 150 (c)
Enter the second hole of the supeduo with a 150(d) Sew in the middle of the bottom of the superduo 150 two 110 150 dagger 150 two 110 150(e)
Enter the second hole of the thirs superduo with 150 (f)
a b c
d
d e f
Liberty Earrings
BLOG WWWHANDMADE-JEWELRY-CLUBCOM MEMBERSHIP WWWDIYBEADINGCLUBCOM BLOG DIY BEADING MAGAZINE ISSUE 32
Put 150 four 110 and enter in the second of three 110 of the base (a) Insert four 110 and 150 in the pearl opposite direction indicated in the picture (b) Go in all the beads
around the piece and exit from the pearl at the top (c) Put 150 three 110 150 and enter the superduo (d)
Enter the ivory bead 80 with two 150 (e) Enter the next superduo with two 150 (f)
a b c
d e f
Put together 150 three 110 and enter in opposite direction in the departurersquos pearl (a) Exit from the 150 beads indicated by photo (b) From this jump in the second of two near
150 with five 150 to created the hole for the earwire (c) Pass the thread in the beads make a few knots and cut the excess thread
a b c
Your earrings are finished
Liberty Earrings
BLOG WWWHANDMADE-JEWELRY-CLUBCOM MEMBERSHIP WWWDIYBEADINGCLUBCOM
About the Author
Mariella Martella
My name is Mariella Martella and I am the author and
designer of jewelry that I sign with the name of Mariel Bijoux
After changing city often for work and study I currently live
in northern Italy I am an art historian with a passion for travel
painting and jewelry design in weaving that project since
2010 In my beads and crystals are the colors of the
Mediterranean sea the atmosphere of summer evenings
and the lights of the places I visited
You can find me at
Etsy shop httpswwwetsycomitshopMarielBijoux
Facebook httpswwwfacebookcommari3lbijoux
Crafting blog httpmarielbijouxblogspotit
Twitter httpstwittercomMarielBijoux
BLOG DIY BEADING MAGAZINE ISSUE 32
Jade Necklace
BLOG WWWHANDMADE-JEWELRY-CLUBCOM MEMBERSHIP WWWDIYBEADINGCLUBCOM
Every time I wear a necklace I always make it a point that the
necklace will lay perfectly flat on my neck Using wire for a necklace
made it possible for me like what I did with Jade Necklace It may look
odd at first having bent wires for a necklace but once the jewelry is
finished youll be so happy how the necklace will perfectly lay on your
neck
The tutorial is catered for intermediate level One must know basic
wirework skills such as wire wrapping making loops wrapped loops
and linking to follow the tutorial It has clear instructions and ultra-clear
close-up photos at each step Additionally you can ask me question
you have on the tutorial No more getting stuck and frustrated on a
confusing or just plain inaccurate pattern
If you followed this tutorial and then sell the accessory or jewelry
please give credit to the author or DIY Beading Clubcom
Copyright 2015
wwwdiybeadingclubcom
wwwhandmade-jewelry-clubcom
BLOG DIY BEADING MAGAZINE ISSUE 32
Jade Necklace
BLOG WWWHANDMADE-JEWELRY-CLUBCOM MEMBERSHIP WWWDIYBEADINGCLUBCOM BLOG DIY BEADING MAGAZINE ISSUE 32
Materials Needed 18ga Craft wire 28ga Craft wire 15mm diameter Green Round Flat Back Sew On Gems 5mm Green pearls
8mm Green pearls 6mm x 11mm teardrop Crystal Treasures Mill Hill beads or any teardrop bead with holes on the side Hook for your clasp
Tools Needed Wire cutter Flat nose pliers Round nose pliers Mandrel A jar or any rounded object to shape your necklace
Skill Level Intermediate
Step 1 Cut 6 inches 18ga wire Make a loop on one end then measure approximately 125 inches and make another loop
Form a size 4 circle on your mandrel
Jade Necklace
BLOG WWWHANDMADE-JEWELRY-CLUBCOM MEMBERSHIP WWWDIYBEADINGCLUBCOM BLOG DIY BEADING MAGAZINE ISSUE 32
Then close the circle by wrapping the extended wire just below the loop Wrap the
wire 2x
This is how it looks like Lets call this circle frame Youll notice that the lower curve is
slightly bigger than the upper curve
Step 2 Cut 8 inches of 28ga wire Wrap one end of
the wire at least 3x on one side of the circle frame just below the loop
Bring up your gem Flat back sew on gems has 2 holes Insert the wire into one hole and then
wrap the wire once onto the circle frame
Jade Necklace
BLOG WWWHANDMADE-JEWELRY-CLUBCOM MEMBERSHIP WWWDIYBEADINGCLUBCOM BLOG DIY BEADING MAGAZINE ISSUE 32
Step 3 Insert a 5mm pearl on the wire and then pass
the wire under circle frame
Repeat previous step 2x and have 3 pearls wrapped
Continue wrapping with your teardrop crystal My crystal has 2 holes on the side
and then continue wrapping with your 5mm pearls then secure your wire
Repeat Step 3 and create as many as needed For 16-inch necklace Ive created 6 of these
components
Jade Necklace
BLOG WWWHANDMADE-JEWELRY-CLUBCOM MEMBERSHIP WWWDIYBEADINGCLUBCOM BLOG DIY BEADING MAGAZINE ISSUE 32
Step 4 Cut a 15-inch 18ga wire and make a loop on
one end Insert 8mm pearl and make a loop on the other end You then use these as connectors
and link the components
Step 5 The necklace is an 18ga wire with wrapped
loops on both ends First cut 7 inches 18ga wire and make a wrapped loop with your hook already inserted Side in 18pcs 5mm pearls
Then make a wrapped loop on the other end connecting the wrapped loop onto the component Do the same for the other
necklace but make the loop on the other end big enough so the hookclasp can pass thru
To have the necklace curve shaped use a jar to bend the wire Voila Now youre
ready to party
Jade Necklace
BLOG WWWHANDMADE-JEWELRY-CLUBCOM MEMBERSHIP WWWDIYBEADINGCLUBCOM
About the Author
Sky Aldovino
I consider myself a late bloomer when it comes to crafting Irsquom a self-taught jewelry maker Jewelry making wasnrsquot really a hobby of mine but unforeseen events lead me to learn jewellery making My family put up a craft store where we sell cross stitch beads and all sorts of crafting materials I fell in love with the beads and tried to create accessories only for myself Clients liked the pieces and I started customizing handmade jewelleries The craft store was a success for 6 years but like any other small businesses we had to close it down and I was confined to staying at home While at home I had all the time using the internet and now working as a home-based jewelry designer
BLOG DIY BEADING MAGAZINE ISSUE 32
Atomic Ring
BLOG WWWHANDMADE-JEWELRY-CLUBCOM MEMBERSHIP WWWDIYBEADINGCLUBCOM
Have fun making shapes using the wigjig Cyclops Make loops going in
circles to mimic the shape of a flower or in this tutorial mimic the
shape of an atom The tutorial will also teach you how to cage a
cabochon Whats nice about this piece is that with one long wire you
can create the ring from start to finish
The tutorial is catered for intermediate to advanced students One
must already know how to make spirals and use a wigjig tool It has
clear instructions and ultra-clear close-up photos at each step
Additionally you can ask me question you have on the tutorial No
more getting stuck and frustrated on a confusing or just plain
inaccurate pattern
If you followed this tutorial and then sell the accessory or jewelry
please give credit to the author or DIY Beading Clubcom
If you like to get a blank wigjig graph visit wigjigcom Shop and Jigs
section
Copyright 2015
wwwdiybeadingclubcom
wwwhandmade-jewelry-clubcom
BLOG DIY BEADING MAGAZINE ISSUE 32
Atomic Ring
BLOG WWWHANDMADE-JEWELRY-CLUBCOM MEMBERSHIP WWWDIYBEADINGCLUBCOM
Materials Needed 20ga Craft wire 28ga Craft wire 11mm Round Cabochon
Tools Needed Wigjig Cyclops 15mm pegs Wire cutter Flat nose pliers Mandrel
Skill Level Intermediate - Advanced
BLOG DIY BEADING MAGAZINE ISSUE 32
Step 1 Lets prepare your wigjig cyclops Position the pegs like so
Atomic Ring
BLOG WWWHANDMADE-JEWELRY-CLUBCOM MEMBERSHIP WWWDIYBEADINGCLUBCOM BLOG DIY BEADING MAGAZINE ISSUE 32
Lets work with longer wire so youll have enough wire to hold onto as you manipulate the wire so cut 36 inches of 20ga wire From
one end of the wire measure 10 inches
On the 10-inch measurement loop the wire at the center peg then continue to loop onto the side pegs going in circle going back to
the center peg after looping on the side peg
Now the wire at the center peg will start to build up as you go around the side pegs so
you need to constantly press the wire at the center peg to accommodate the build up of
wire
When youre done pull out the wire and this is
how it should look like
Atomic Ring
BLOG WWWHANDMADE-JEWELRY-CLUBCOM MEMBERSHIP WWWDIYBEADINGCLUBCOM BLOG DIY BEADING MAGAZINE ISSUE 32
You will notice that the frame opens wide Now to keep the atom frame from opening wide secure the center of the frame by wrapping a 28ga wire What you
need to do is simply pass the 28ga wire into the hole and wrap as many times as needed or until youre sure that the frame is secure
Step 2 Now youre finished with your atom frame Well now create the focal design With the longer wire make a spiral at the center big
enough to accommodate the size of your cabochon In this tutorial the spiral is about
11mm in diameter the same size as my cabochon
Pop in your cabochon and start to make spirals going around and over the cabochon as if you are caging the cabochon Create at
least 5 rounds and then cut off any excess
Step 3 Now lets make the ring and this with the other
end of the wire
Atomic Ring
BLOG WWWHANDMADE-JEWELRY-CLUBCOM MEMBERSHIP WWWDIYBEADINGCLUBCOM BLOG DIY BEADING MAGAZINE ISSUE 32
Bring up your mandrel and wrap the wire to the size of your finger Wrap at least 2 times
When youre sure you have the right size pull the ring out of the mandrel
With the extended wire wrap the wire the secure the ring
Cut off any excess and voila You have your atomic ring Create as many as you can with different colors of cabochon
Atomic Ring
BLOG WWWHANDMADE-JEWELRY-CLUBCOM MEMBERSHIP WWWDIYBEADINGCLUBCOM
About the Author
Sky Aldovino
I consider myself a late bloomer when it comes to crafting Irsquom a self-taught jewelry maker Jewelry making wasnrsquot really a hobby of mine but unforeseen events lead me to learn jewellery making My family put up a craft store where we sell cross stitch beads and all sorts of crafting materials I fell in love with the beads and tried to create accessories only for myself Clients liked the pieces and I started customizing handmade jewelleries The craft store was a success for 6 years but like any other small businesses we had to close it down and I was confined to staying at home While at home I had all the time using the internet and now working as a home-based jewelry designer
BLOG DIY BEADING MAGAZINE ISSUE 32
Featured Article Gemstones Used for Jewelry Making
BLOG WWWHANDMADE-JEWELRY-CLUBCOM MEMBERSHIP WWWDIYBEADINGCLUBCOM
Gemstones are stones which we hold quite highly in terms of value And
jewelry often consists of stones that add attractiveness to it so it is not
surprising when jewelry designers actually use gemstones in their designs In
fact there are different types of gemstones that can be used for making
jewelry There are the expensive and pure gemstones and there are also the
imitation ones The information below will provide some information about
the kinds of stones you can use to create jewelry and how these stones will
impact the jewelry you have created
The first kind of stone which I believe we are all quite familiar with are
birthstones These stones are associated with individualrsquos month of birth
by SunVDesigns by BeyhanAkman
For example Amethyst stone is connected with anybody who is born in
February which carries special significance in the area of emotions and also
spiritually This stone also signifies calm and peace as well
And then we have semi-precious stones which are also often used in jewelry
making They are not as valuable as compared to precious stones but still
valuable Best examples of these stones are aquamarine topaz tourmaline
opal and turquoise
BLOG DIY BEADING MAGAZINE ISSUE 32
Featured Article Gemstones Used for Jewelry Making
BLOG WWWHANDMADE-JEWELRY-CLUBCOM MEMBERSHIP WWWDIYBEADINGCLUBCOM
It is an ideal gift for someone who you deem special Aquamarine pendants
usually work well for anyone and is widely an accepted stone
by HyppieChic by joyeriamestiza
However precious stones are the most unusual
and precious jewels to us Examples of some of
them are emerald sapphire diamond and
ruby These stones are usually very expensive
and are prized for their exquisiteness These
stones are commonly used in high-quality
jewelry designs which costs quite a fortune to
obtain
BLOG DIY BEADING MAGAZINE ISSUE 32
by sarajewelrystu
Jewelry designs with precious stones are usually
given as exceptional gifts on special occasions A
perfect example is a diamond ring that is usually
given as an engagement gift
by ldiamondsforever
Featured Article Gemstones Used for Jewelry Making
BLOG WWWHANDMADE-JEWELRY-CLUBCOM MEMBERSHIP WWWDIYBEADINGCLUBCOM
There are also synthetic stones which are often used to create jewelry
Synthetic stones are artificial imitations of gemstones Synthetic Sapphire
jewelry costs less compare with the authentic ones Most of the time
imitation stones are used to save cost but at the same time have the similar
look of the real stone
BLOG DIY BEADING MAGAZINE ISSUE 32
by shininggems by thaimaker
by lapinduprintemps by PastimeArt
Gemstones are used like beads and you can use it in any designs whether
simple or elaborate
Swarovski crystal components are available in a rich multitude of rondelles Perfect as spacers in necklaces or as discs in earrings Rondelles can be used with many varieties of shapes or sizes Use Swarovski crystal rondelles between large gemstones as accents with precious metal findings Fire Mountain Gems and Beads Crystal Passionsreg brand presents Swarovski crystal in display-ready packaging for brilliant retail presentation Crystal Passionsreg is an assurance of genuine Swarovski crystal
BLOG DIY BEADING MAGAZINE ISSUE 32 BLOG WWWHANDMADE-JEWELRY-CLUBCOM MEMBERSHIP WWWDIYBEADINGCLUBCOM
Recommended Jewelry Making Supplies
Mz Unisex-adults 12pcs 25x18x6mm Turquoise Oval CAB Cabochon
BLOG DIY BEADING MAGAZINE ISSUE 32 BLOG WWWHANDMADE-JEWELRY-CLUBCOM MEMBERSHIP WWWDIYBEADINGCLUBCOM
Recommended Jewelry Making Supplies
For a little sparkle that goes a long way design with Swarovski 4mm faceted bicones Create glorious multi-strand necklaces with the dainty crystals or use as spacers to add a tiny flash to your designs Swarovski crystal components are made in Austria and are considered the finest products of their kind in the world
BLOG DIY BEADING MAGAZINE ISSUE 32 BLOG WWWHANDMADE-JEWELRY-CLUBCOM MEMBERSHIP WWWDIYBEADINGCLUBCOM
Recommended Jewelry Making Supplies
Imitation beads resist color change These beads have uniform quality with a good polish Some strands may have little to no matrix Sizes shapes and colors may vary with handcrafted items
BLOG DIY BEADING MAGAZINE ISSUE 32 BLOG WWWHANDMADE-JEWELRY-CLUBCOM MEMBERSHIP WWWDIYBEADINGCLUBCOM
Recommended Jewelry Making Supplies
Something Blue Necklace and Earrings
BLOG WWWHANDMADE-JEWELRY-CLUBCOM MEMBERSHIP WWWDIYBEADINGCLUBCOM
Skill level Beginner Intermediate Advanced
DIMENSIONS OF THE NECKLACE Inner Circumference 14 18 inch 35 cm
Focal Pendant Width 1 15 inch 35 cm Focal Pendant Height 1 15 inch 35 cm
DIMENSIONS OF THE EARRING Earring Width 716 inch 12 cm Earring Height 1516 inch 25 cm (Without the earring hook)
BLOG DIY BEADING MAGAZINE ISSUE 32
Materials
Note Before purchasing the supplies measure the length of your wished necklace If you decide to bead a longer necklace you should keep in mind that for every extra
frac34 inches 2 cm-s you will need 8 bicones and 8 pearls
Something Blue Necklace and Earrings
BLOG WWWHANDMADE-JEWELRY-CLUBCOM MEMBERSHIP WWWDIYBEADINGCLUBCOM BLOG DIY BEADING MAGAZINE ISSUE 32
Work RAW stitch into a beaded circle and embellish with Swarovski bicones
STEP 2 String 1A and 2 pearls Pass through the previous
second pearl and the freshly added 1A and the first pearl again
STEP 1 Use a comfortable length of thread to string 2
pearls 1A and 1 pearl again leaving a 2rdquo 5cm tail Pass through the first two pearls strung to form a
ring
STEP 3 String 2 pearls and 1A Pass through the previous first pearl and the freshly added two pearls
again
STEP 4 - 17 Repeat STEP 2 and STEP 3 again until you count 17 pearls in the inner circle
But be careful in the last step you only have to add 1 pearl then pass through the first pearls
added in STEP 1 and add another 1A Now pass through the first pearl added in STEP
1and 1A added in this round again to exit from this A
Something Blue Necklace and Earrings
BLOG WWWHANDMADE-JEWELRY-CLUBCOM MEMBERSHIP WWWDIYBEADINGCLUBCOM BLOG DIY BEADING MAGAZINE ISSUE 32
STEP 19 String 2A and pass through the next A added in round 4-17 and the A added in round 18 the 2A added in this round and finally the A added in round 4-17 to exit from the bead showed below
STEP 18 String 3A and pass through the 1A added in the previous round and the first A added in this
round
STEP 20 - 34 Repeat STEP 18 and STEP 19 again until you finish the circle
But be careful in the last step first you have to pass through 3A and then add 1A After this pass
through the 3A again and exit from the A bead
shown below (This is the first A added in STEP 18)
Something Blue Necklace and Earrings
BLOG WWWHANDMADE-JEWELRY-CLUBCOM MEMBERSHIP WWWDIYBEADINGCLUBCOM BLOG DIY BEADING MAGAZINE ISSUE 32
STEP 35 Step up to exit from the pearl shown below (Finishing the previous step in the A bead and then
stepping up from there makes the circle more secure)
Now string 3 bicones Pass through the pearl and the first bicone again
In the reality your circle will look more like this the A beads forming a strong row in the middle of the
pearls
STEP 36 Add 2 bicones Pass through the
neighboring pearl the first bicone added in the previous row and the 2 bicones added in this step
so you can exit from the next pearl
Something Blue Necklace and Earrings
BLOG WWWHANDMADE-JEWELRY-CLUBCOM MEMBERSHIP WWWDIYBEADINGCLUBCOM BLOG DIY BEADING MAGAZINE ISSUE 32
Now in the reality your circle will look more like this the A beads still forming a strong row in the middle of the pearls and the bicones slightly lying on top of
them
STEP 37 - 49 Repeat STEP 35 and STEP 36 again until you finish the circle with the bicones
But be careful in the last step first you have pass through the third bicone added then add 1 bicone
and pass through this little quartet to exit from the bicone shown below (The second one added in
STEP 35)
STEP 50 With these steps we finish the circle by adding 1 bicone to connect the A beads and the
bicone row So add 1 bicone pass through the nearest A bead and add 1 bicone again Pass
through the bicone already there and exit from the bicone you just added
Something Blue Necklace and Earrings
BLOG WWWHANDMADE-JEWELRY-CLUBCOM MEMBERSHIP WWWDIYBEADINGCLUBCOM BLOG DIY BEADING MAGAZINE ISSUE 32
STEP 66-83 Secure the circle by adding 1A between each bicone in the second row of Swarovski
bicones If you finished secure the thread and trim
STEP 51-65 Using the same technique as in STEP 37 - 49 add 1 bicone to finish the third bicone row The black line shows you the way (After STEP 50 pass through the next A bead add 1 bicone and pass through the bicone already there and the bicone added in the previous step Repeat these steps to
finish the inner bicone circle)
MIDDLE CIRCLE Work RAW stitch into a beaded circle and embellish with
Swarovski bicones Remember you need to bead two circles this time
STEP 1 Just like in the focal circle begin with 2 pearls 1A and 1 pearl again on a comfortable length of thread
leaving a 2rdquo 5cm tail Pass through the first two pearls strung to form a ring
Something Blue Necklace and Earrings
BLOG WWWHANDMADE-JEWELRY-CLUBCOM MEMBERSHIP WWWDIYBEADINGCLUBCOM BLOG DIY BEADING MAGAZINE ISSUE 32
STEP 15-28 Mimicing the FOCAL CIRCLElsquos STEP 18-34 bead A beads until you finish the inner part of the
circle Exit from a pearl in the second row This circle should look very similar to the first one but this is a bit
smaller
STEP 2-14 Mimicing the FOCAL CIRCLElsquos STEP 2-17 bead until you count 14 pearls in the inner circle Exit
from the last A added
STEP 29-42 Mimicing FOCAL CIRCLElsquos STEP 35-49 add 2 rows of bicones
STEP 43-56 Mimicing the FOCAL CIRCLElsquos STEP 50-65 bead the third row of bicones to finish the circle
Something Blue Necklace and Earrings
BLOG WWWHANDMADE-JEWELRY-CLUBCOM MEMBERSHIP WWWDIYBEADINGCLUBCOM BLOG DIY BEADING MAGAZINE ISSUE 32
SMALLEST CIRCLE Work RAW stitch into a beaded circle and embellish
with Swarovski bicones Remember you need to bead two circles again
STEP 1 Just like in the focal circle begin with 2 pearls
1A and 1 pearl again on a comfortable length of thread leaving a 2rdquo 5cm tail Pass through the first two
pearls strung to form a ring
STEP 57-70 Just like the FOCAL CIRCLElsquos STEP 66-83 secure the circle by adding 1A between every bicone
in the second row of bicones If you finished secure the thread and trim (Donrsquot forget to bead another
circle)
STEP 2-12 Mimicing the FOCAL CIRCLElsquos STEP 2-17 bead until you count 12 pearls in the inner circle Exit
from the last A added
STEP 13-24 Mimicing the FOCAL CIRCLElsquos STEP 18-34 bead A beads until you finish the inner part of the
circle Exit from a pearl in the second row This circle should look very similar to the first two but this is the
smallest of them all
Something Blue Necklace and Earrings
BLOG WWWHANDMADE-JEWELRY-CLUBCOM MEMBERSHIP WWWDIYBEADINGCLUBCOM BLOG DIY BEADING MAGAZINE ISSUE 32
STEP 37-48 Mimicing the FOCAL CIRCLElsquos STEP 50-65 bead the third row of bicones to finish this circle too
STEP 25-36 Mimicing FOCAL CIRCLElsquos STEP 35-49 add 2
rows of bicones The last step here is purple again
STEP 49-60 Just like the FOCAL CIRCLElsquos STEP 66-83 secure the circle by adding 1A between every bicone
in the second row of bicones If you finished secure the thread and trim (Donrsquot forget that you need two
small circles)
Something Blue Necklace and Earrings
BLOG WWWHANDMADE-JEWELRY-CLUBCOM MEMBERSHIP WWWDIYBEADINGCLUBCOM BLOG DIY BEADING MAGAZINE ISSUE 32
STEP 37-48 Mimicing the FOCAL CIRCLElsquos STEP 50-65 bead the third row of bicones to finish this circle too
STEP 25-36 Mimicing FOCAL CIRCLElsquos STEP 35-49 add 2
rows of bicones The last step here is purple again
STEP 49-60 Just like the FOCAL CIRCLElsquos STEP 66-83 secure the circle by adding 1A between every bicone
in the second row of bicones If you finished secure the thread and trim (Donrsquot forget that you need two
small circles)
Something Blue Necklace and Earrings
BLOG WWWHANDMADE-JEWELRY-CLUBCOM MEMBERSHIP WWWDIYBEADINGCLUBCOM BLOG DIY BEADING MAGAZINE ISSUE 32
STEP 2-6 Continue by adding 1A 1 bicone 1 pearl until you count 6 of each
STEP 1 Begin with 1 pearl 1 bicone 1A and 1 bicone again on a comfortable length of thread leaving a 2rdquo
5cm tail Pass through the pearl and the first bicone strung to form a ring
STEP 7-12 Pass through the A beads to make your
component more secure Also secure the thread and trim (Repeat these steps until you have six 6-BEAD
COMPONENTs)
6-BEAD COMPONENT Work RAW stitch into a beaded circle and embellish with Swarovski bicones
For the necklace we will need six from this component For the earring two
Something Blue Necklace and Earrings
BLOG WWWHANDMADE-JEWELRY-CLUBCOM MEMBERSHIP WWWDIYBEADINGCLUBCOM BLOG DIY BEADING MAGAZINE ISSUE 32
STEP 2-4 Continue by adding 1A 1 bicone 1 pearl
until you count 4 of each
STEP 1 Begin with 1 pearl 1 bicone 1A and 1 bicone again on a comfortable length of thread leaving a 2rdquo
5cm tail Pass through the pearl and the first bicone strung to form a ring
STEP 5-8 Pass through the A beads to make your component more secure Also secure the thread and
trim (Repeat these steps until you have the wished amount of 4-BEAD COMPONENTs)
4-BEAD COMPONENT Work RAW stitch into a beaded circle and embellish with Swarovski bicones
For the necklace-size that is given on the second page we will need 20 from this
component For the earring two
If you would like to make a longer necklace you need to make more (One 4-BEAD COMPONENT measures about 38 inch 1 cm To make the necklace symmetrical you have to have equal amounts on each side This means for every extra frac34 inches
2 cm-s you will need 1 4-BEAD COMPONENT on each side of the necklace)
Something Blue Necklace and Earrings
BLOG WWWHANDMADE-JEWELRY-CLUBCOM MEMBERSHIP WWWDIYBEADINGCLUBCOM BLOG DIY BEADING MAGAZINE ISSUE 32
STEP 2 Connect the MIDDLE CIRCLE to two 6-BEAD COMPONENTs by adding four-times 2As
between the pearls Choose a pearl on the MIDDLE CIRCLE and add
2A pass through a pearl in the 6-BEAD COMPONENT previously added and add 2A again Watch out this has to be symmetrical Repeat this at least two more times to make it
secure Now repeat this entire procedure but choose
the 8-th pearl on MIDDLE CIRCLE Repeat this on the other side of the necklace
too
Choose a pearl on the FOCAL CIRCLE and add 2A pass through a pearl in the 6-BEAD COMPONENT and add 2A again Repeat this at least two more times to make it secure
Now repeat this entire procedure but choose the 5-th pearl on FOCAL CIRCLE This will make the necklace nice on your neck
FINISHING THE NECKLACE Connects the parts with A beads
STEP 1 Connect the FOCAL CIRCLE to two 6-BEAD COMPONENTs by adding four-times 2As between the pearls To do this turn your parts upside down you need to
see the pearls We will work on this side from now on
Something Blue Necklace and Earrings
BLOG WWWHANDMADE-JEWELRY-CLUBCOM MEMBERSHIP WWWDIYBEADINGCLUBCOM BLOG DIY BEADING MAGAZINE ISSUE 32
FINISHING THE EARRING Connects the parts with A beads
STEP 1-2 Connect the 6-BEAD COMPONENT
to 4-BEAD COMPONENT and the 4-BEAD
COMPONENT to the earring hook
First connect the 4-BEAD COMPONENT to the 6-BEAD COMPONENT with 4A beads Mimic
the elongation steps of the necklace if needed
Secondly connect the 4-BEAD COMPONENT
to your earring hook with 4A beads again Leave from the last pearl bead 2A beads the hook (this is the orange oval form) and 2As again Pass through each of them to
secure this connection again
Finally get ready to prepare the other earring ndash since we need two of them
STEP 5 Connect the 4-BEAD COMPONENTs to the toggle clasp thus finishing the
necklace Leaving from the last pearl bead 2A the
clasp(this is the orange oval form) and 2A again Pass through all of them a couple more times to make this connection more
secure
Something Blue Necklace and Earrings
BLOG WWWHANDMADE-JEWELRY-CLUBCOM MEMBERSHIP WWWDIYBEADINGCLUBCOM BLOG DIY BEADING MAGAZINE ISSUE 32
If you finished it is time to try it on It was a great fun wasnrsquot it And how beautiful you look in your new necklace and the matching earrings
Something Blue Necklace and Earrings
BLOG WWWHANDMADE-JEWELRY-CLUBCOM MEMBERSHIP WWWDIYBEADINGCLUBCOM
About the Author
Margit Vogel
My name is Margit Vogel I live in Hungary Europe
By profession I am a biochemical engineer but I fell in love with
beads so much that I could not stop playing with them
I make one-of-a-kind beaded and bead embroidered art
jewelry made of the best quality materials such as Swarovski
stones gemstones Japanese beads (Miyuki and Toho) Czech
glass beads leather soutache and suede Each piece is unique
and individually crafted
Feel free to visit my blog for some eyecandy
httpiformjewelrywordpresscom
My shop httpwwwetsycomshopiformjewelry
Facebook httpwwwfacebookcomiformjewelry
BLOG DIY BEADING MAGAZINE ISSUE 32
Getting Down And Personal With Gianna
Getting Down And Personal With Gianna
Nowadays we see more and more jewelry stores opening up online and with these online jewelry stores it has made it easier for us to purchase and view their creations Have you ever wondered how they are able to manage and produce amazing jewelry pieces and tutorials So heres a little on the journey to open up an online shop We are excited to present to you Gianna aka Beading4perfectionists
Gianna Beader amp Youtuber
Unlike most jewelry makers and beadweavers Gianna did not start beading as a hobby but as a means to make ends meet With goals in trying to
fill the financial gap she did everything she could to expand her earnings ndash working as a security guard
and at the same time learning how to bead and selling her pieces at fair trades and flea markets
Since many were asking if she does home beading workshops she started on exploring how to teach people to bead She loves Scott Bakula and has always loved him till now and this served as her
inspiration to start making a beading video tutorial
Gianna started creating videos because she was at the point in her life where everything seemed to be falling apart And at that moment of time she had difficulties financially and selling jewelry was the only way for her to stay afloat financially She is a big Scott Bakula fan and when she went to the UK to see him on stage that was when it hit her that she is already able to edit videos and
taught herself Photoshop and done workshops at bead fairs so why not put these together and see what happens on Youtube She knew that if she gets enough subscribers and views ndash though no one knew what the exact numbers were you would be invited to become a Youtube partner This way she could monetize her videos with advertisements and hopefully she would be able to be a Youtube partner and be able to pay her bills
BLOG WWWHANDMADE-JEWELRY-CLUBCOM MEMBERSHIP WWWDIYBEADINGCLUBCOM BLOG DIY BEADING MAGAZINE ISSUE 32
Getting Down And Personal With Gianna
Her Youtube channel is popular and the reason why she chose Youtube is because Youtube is the biggest platform and reached almost to the whole world Everyone already knows about it and it was growing rapidly as compared to other platforms like Dailymotion so she figured that Youtube was the way to go Her advice to new designers is that when you start out go to the platforms on the top of your list first then work your way down your list if you do not get accepted by your first choice
After loyally putting up one video every week for about 8 months in a row she became a Youtube partner and monetized her videos She knew she needed at least $100 to get her first payout She managed to reach $100 after 3 months The process was not easy she worked hard lack sleep skipped meals and who knows what happened to Ridge in the Bold and the Beautiful because she stopped watching
On Youtube you can monetize your videos Google pays straight to your bank account and at other countries where they also have the option of getting checks among other options In order to get paid you have to reach the $100 mark and after 3 months For Gianna she thinks that you cannot say that Etsy is better than Youtube or Youtube is better than Etsy Her reasoning is because on Youtube she has many followers which will eventually check out her Etsy shop And to start an Etsy shop you need an audience
BLOG WWWHANDMADE-JEWELRY-CLUBCOM MEMBERSHIP WWWDIYBEADINGCLUBCOM BLOG DIY BEADING MAGAZINE ISSUE 32
television and dedicated her spare time (as she had another job) to Youtube She re-registered at the chamber of commerce after receiving her first payout Her work at Youtube now is not a full time job and things have changed on Youtube It is easier to become a parter but there are some countries that need to wait for an invitation to be a Youtube partner Take Italy for instance Italians would have to work just as hard as she did if they want to become a Youtube partner
Getting Down And Personal With Gianna
With her 60000 subscribers on her b4pbakup Youtube channel it is possible to sell at least 60 patterns on the first day on Etsy after promoting the PDF file on her Youtube channel Though you may think that 60 out of 60000 is not much you have to remember that not everyone has the means to purchase the PDF file and a lot of people still rather watch her carry out the tutorial(for free) on Youtube instead of reading the patterns or paying for the patterns even if the pattern is for a fundraiser and only cost $2 Her insights on Youtube is that Youtube is not what it used to be 6 years ago Instead of making more money every month she is making less and less because advertisers have more options of where they want to advertise their ads Ads do not pay as much as they used to Back in the days you could get 25 cents per ad Now you count yourself lucky if you could get 5 cents roll in after two hours
BLOG WWWHANDMADE-JEWELRY-CLUBCOM MEMBERSHIP WWWDIYBEADINGCLUBCOM BLOG DIY BEADING MAGAZINE ISSUE 32
And on top of that adblockers are destroying Youtube channel owners Youtube will start making changes to the channels where there will be ldquopaid subscriptionrdquo channels This has already been implemented in some countries but not in her country The Netherlands This means there will no longer be ads for her monthly paying subscribers She hopes that Youtube will add on a paid per video option feature The option to be a paid channel or free channel or to start a new channel for paying customers is yours to choose Gianna is not happy with Youtube because many others like her have worked so hard and for some years to become Youtube partners(which was something to be proud of) has lost their status
Getting Down And Personal With Gianna
Her advice for those who want to go on Youtube is 1 Do it because you want to teach
2 Do it because you want a career with beads
BLOG WWWHANDMADE-JEWELRY-CLUBCOM MEMBERSHIP WWWDIYBEADINGCLUBCOM BLOG DIY BEADING MAGAZINE ISSUE 32
After putting up about 20 videos and having at least 5000 subscribers add the PDF tutorials to Etsy and Craftsy She found out that her audience would like to have the PDF after watching her videos This is because they would rather print out the PDF and work while seated in a comfy chair technically somewhere else instead of having to pause the video time and time again
Gianna has also made a video for those who want to know the whole story of her journey up until the present day And to get updates on her you can check it out here She has also started a vlog where she tells of how she still works towards becoming a financial independent beader and explains her journey to get where she wants to be(or die trying) Gianna will be in the UK on October the 17th giving an all-day workshop with 4 different patterns
(2 beginners and 2 advanced) in Wotton-under-Edge
Gianna will be there Friday night as the workshop is on Saturday She will be leaving on Sunday Her
doors are open to all who wants to continue the party with her at the hotel across the street
For more information do contact Ann Tucker on Facebook
httpswwwfacebookcomanntucker501
Rec
omm
end
ed R
ead
ings
Making Jewelry with Gemstone
Beads
Combines the popular craft of beading with beautiful semi-precious stones which are collected by many Features a variety of versatile ideas which can be adapted for any type of gem or bead Readers will learn to reate beautiful gemstone jewelry with this dazzling collection of over 100 projects ranging from eyecatching earrings and accessories to exquisite necklaces and bracelets This beautiful book offers an impressive range of 28 beautiful semi-precious stones (including birthstones) and a glimpse into the fascinating history and mythical properties behind them
BLOG DIY BEADING MAGAZINE ISSUE 32 BLOG WWWHANDMADE-JEWELRY-CLUBCOM MEMBERSHIP WWWDIYBEADINGCLUBCOM
Rec
omm
end
ed R
ead
ings
Convertible Crystal Jewelry
Reverse it Twist it Wear it Many
Ways
Diane Whiting presents the idea that convertibility isnrsquot just about using pieces in multiple ways it is also about using skills and creativity in multiple ways Using ever-popular sparkling crystals Diane showcases design elements through various techniques for fun easy fashionable jewelry With 25 projects the reader can choose from bracelets necklaces and earrings that match any outfit or styleDiane Whiting presents the idea that convertibility isnrsquot just about using pieces in multiple ways it is also about using skills and creativity in multiple ways
BLOG DIY BEADING MAGAZINE ISSUE 32 BLOG WWWHANDMADE-JEWELRY-CLUBCOM MEMBERSHIP WWWDIYBEADINGCLUBCOM
Rec
omm
end
ed R
ead
ings
Wire Jewelry Masterclass
Wrapped Coiled and Woven Pieces
Using Fine Materials
Comprehensive and fabulous Wire Jewelry Masterclass takes an in-depth look at an intricate and rewarding craft The 24 projects which range from simple Dragons tear briolette earrings to a Poseidon-under-the-sea pendant will delight and inspire jewelers of all levels and tastes Divided into beginner intermediate and advanced sections this beautifully photographed step-by-step guide is the ticket to wire jewelry expertise
BLOG DIY BEADING MAGAZINE ISSUE 32 BLOG WWWHANDMADE-JEWELRY-CLUBCOM MEMBERSHIP WWWDIYBEADINGCLUBCOM
Rec
omm
end
ed R
ead
ings
Timeless Wire Weaving The
Complete Course
Timeless Wire Weaving focuses on developing wirework skills through 13 projects using three classic wire weaving techniques coiling wrapping and weaving The projects are built around a focal cabochon and incorporate seed beads and crystals in imaginative ways Designers learn to make the jewelry shown in the book and they also use the techniques learned to create innovative jewelry pieces of their own
BLOG DIY BEADING MAGAZINE ISSUE 32 BLOG WWWHANDMADE-JEWELRY-CLUBCOM MEMBERSHIP WWWDIYBEADINGCLUBCOM
Our digital magazine is available through
Apple Newsstand service available to millions of IPAD users
To advertise with us please email us at
diyjewelryclubgmailcom
Or visit our page at
httphandmade-jewelry-clubcomadvertising-diy-beading-magazine
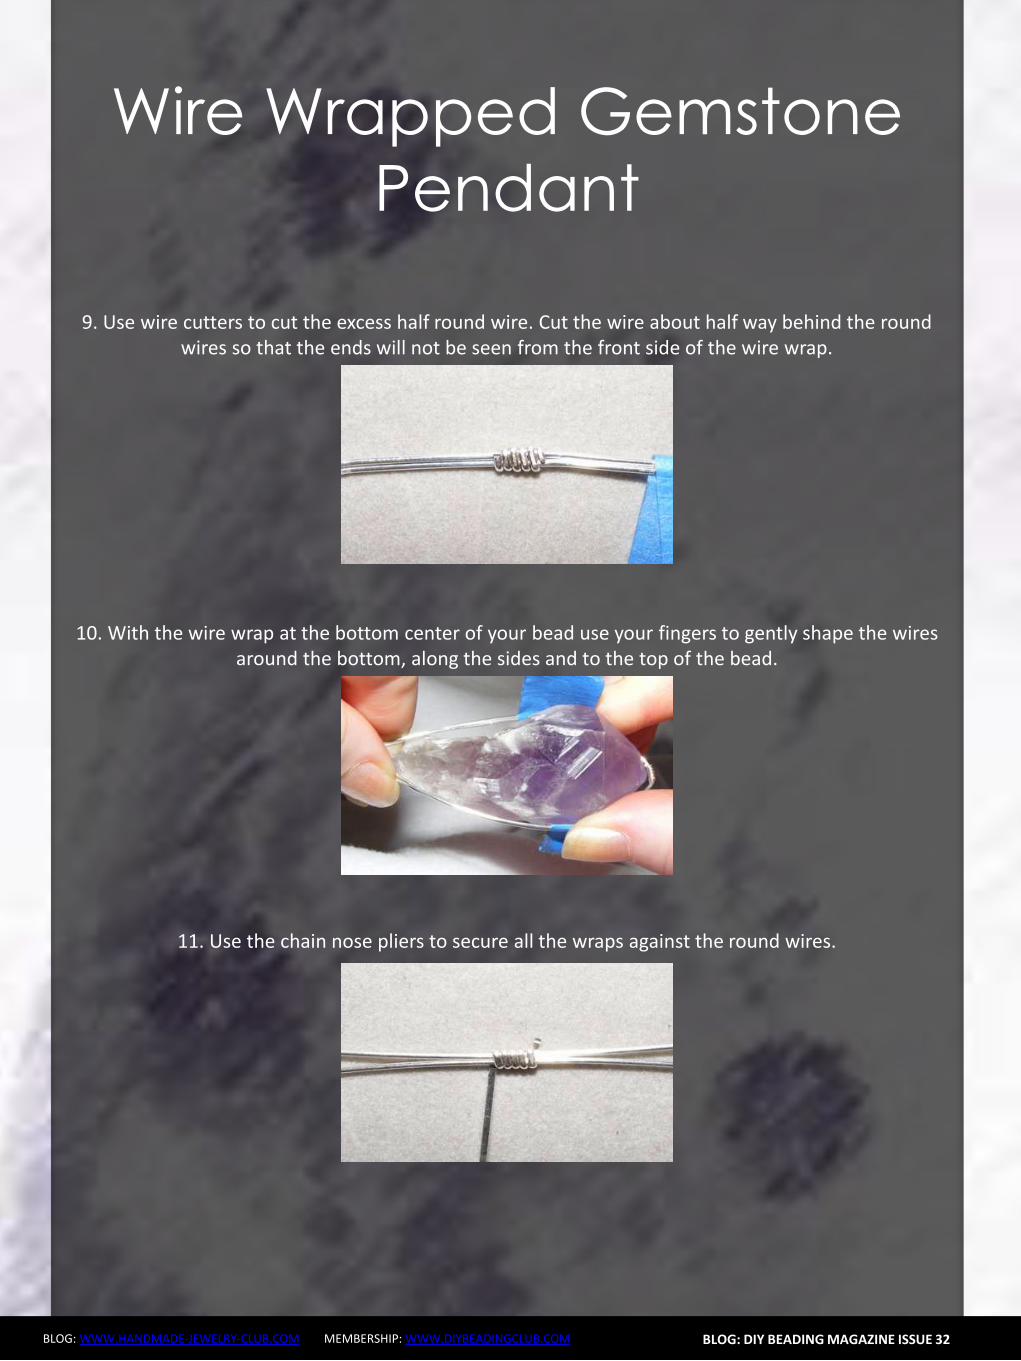
Wire Wrapped Gemstone
Pendant
BLOG WWWHANDMADE-JEWELRY-CLUBCOM MEMBERSHIP WWWDIYBEADINGCLUBCOM
17 Make sure that the wires are evenly spread around the beads Now we need to tighten the wires that encase the bead
On one of wires about halfway up the wire place the jaws of the round nose pliers on either side
of the wire Now rotate the pliers making a double bend in the wire Repeat on the other three wires making one or two double bends in each wire When youre done shake the bead to make sure it cannot fall out of the wires
BLOG DIY BEADING MAGAZINE ISSUE 32
18 Now decorate two of the top wires Almost anything is possible Try making a few different bends curls or twists in the wire
I decided to loosely coil the top wires around an ink pen
19 Gently untighten the coil by pulling the end of the wire downward Using the round nose pliers make a simple wire loop on the end of the coil
Wire Wrapped Gemstone
Pendant
BLOG WWWHANDMADE-JEWELRY-CLUBCOM MEMBERSHIP WWWDIYBEADINGCLUBCOM
20 Repeat Steps 18 and 19 on a second top wire
BLOG DIY BEADING MAGAZINE ISSUE 32
21 The third top wire becomes the bail Coil it tightly around the ink pen making at least two wire coils The end of the wire should fall in front of the pendant
Make a simple wire loop on the wire end
22 Heres how the wire coilsspiralsbends should look Make any necessary adjustments to the wires along the sides of the gemstones and the two that fall
in front of pendant
Make sure that the wires tightly secure the bead The wire wrap at the bottom of the pendant may no longer be at the center of the bead
Wire Wrapped Gemstone
Pendant
BLOG WWWHANDMADE-JEWELRY-CLUBCOM MEMBERSHIP WWWDIYBEADINGCLUBCOM
23 On each of the three head pins string a 6mm bead Make a simple wire loop on the end of each head pin
Attach one head pin bead unit to each of the simple wire loops on the wire wrapped pendant
BLOG DIY BEADING MAGAZINE ISSUE 32
Completed Wire Wrapped Pendant
Now hang your handcrafted wire wrap pendant from your favorite chain or strand of beads
Enjoy wire wrapping your own gemstone to make a wire wrapped pendant
BLOG WWWHANDMADE-JEWELRY-CLUBCOM MEMBERSHIP WWWDIYBEADINGCLUBCOM
Wire Wrapped Gemstone
Pendant About the Author
Wanda Epps
Wanda is an avid jewelry maker who loves to make jewelry with beads She began her journey into jewelry making after walking into a bookstore to find crafting books on sale One on making jewelry caught her eye and after making a simple bead necklace she was hooked That was in late 2003 Over the years she has taken classes on various jewelry making techniques stringing making wire jewelry bead crochet macrame metal jewelry making to name some She expects that her love of making beaded jewelry will continue as bead supplies and beautiful new beads seem endless Her fulltime job provides for her needs but beads are her passion She invites you to join her in the many adventures of making jewelry at
httpwwwmaking-beaded-jewelrycom httpswwwfacebookcompagesMaking-Beaded-Jewelry-
Guide254860504236
BLOG DIY BEADING MAGAZINE ISSUE 32
Should You Sell In The Marketplace
Should You Sell In The Marketplace
BLOG WWWHANDMADE-JEWELRY-CLUBCOM MEMBERSHIP WWWDIYBEADINGCLUBCOM
We are all able to create jewelry pieces and there will come a time where you want to share the joy with the rest of the world whether it is in the form of a tutorial or a finish
piece And this is when you will start to think about putting up your work for sale As someone who is new to the business world you may be confused on where you should start selling your work And the all famous site that is first on most peoplersquos minds is Etsy Etsy is popular and it is user friendly and that is why it is the choice of many designers and crafters But there are also some who wants to set up their own
shop with their logo and to put their works out as their own even at the very beginning Thatrsquos where you may be confused on which platform you should go for
So herersquos some explanation on how you will benefit from setting up shop at Etsy
BLOG DIY BEADING MAGAZINE ISSUE 32
1 Etsy has everything ready for you and all you have to do is to bring in your works and use the features that are already available for you to use ndash like the payment system web traffic design and layout are not an issue that you need to worry about
2 You also have the trust of customers almost immediately because Etsy has already established a name for itself and therefore there is already trust in brand in their site When you use Etsy your brand will automatically be exposed to many customers who visit Etsy to find what they need
3 For every site there is always the need to be able to interact with other sellers to help each other out Forums or community boards are very helpful as other passionate designers and crafters share their experience to help out the newer members of the community This is also where you will be able to form good relationships with other sellers and who knows you may even find a partnership over time
Should You Sell In The Marketplace
BLOG WWWHANDMADE-JEWELRY-CLUBCOM MEMBERSHIP WWWDIYBEADINGCLUBCOM
Though Etsy has itrsquos good points there are some things which you need to take into consideration as well
1 When you are using someone elsersquos facilities there is always the chance of having
being shut down due to unforeseen circumstances Be it violation of Etsyrsquos policy or decisions made by the administration department this will sometimes cost you a dent in your brand name and you may lose the trust of your followers and starting all over again may be the only way to start again
2 If you are a very creative person then you may feel limited as the design of shops at Etsy is standardized If you are new and do not worry so much about designs of websites this is perfectly fine But do remember that when you want to distinguish yourself from other sellers it will be tougher as you try to make your brand more well-known due to limitations of design of the site
3 Since Etsy has so many sellers all in one place the competition is of course going to be tighter and fiercer because even though customers are viewing your products there are also other options from other sellers listed on the page as well So customers may turn away if they see something of a better price
4 Each product that you list with Etsy costs you money Etsy also takes a 35 percent of the selling price of the item However if or when you start your business on your own website it will also cost you for web hosting and you would need PayPal and they have a fee of 29 percent +30cents So either way you will still need to pay to list your products on the web
BLOG DIY BEADING MAGAZINE ISSUE 32
Should You Sell In The Marketplace
BLOG WWWHANDMADE-JEWELRY-CLUBCOM MEMBERSHIP WWWDIYBEADINGCLUBCOM
If you are confident enough to have your own business site by all means go ahead and do it The benefits of it are as below
1 You get to be your own boss You get to control everything from the design of the
website layout and how you want to advertise your products You can also change your policies and not be affected by it because it is you who changes it Your shop will not be shut down suddenly without notice and you do not need to worry that you have to start all over again
2 Distractions of competitors products on your page will not be an issue It is your site and it is up to you whether or not you want to allow what kind of advertisements on your site So if you donrsquot want something on your page it is your call
3 You will be able to capture the attention of the media and customers as well if you are able to have a well designed site Nowadays people are attracted to colors and they can see if you have put effort into beautifying the site for the customers You can do so much more than just uploading some pictures onto Etsy on your own site you can always update your site design and your products to complement each other and therefore becoming more attractive
BLOG DIY BEADING MAGAZINE ISSUE 32
Should You Sell In The Marketplace
BLOG WWWHANDMADE-JEWELRY-CLUBCOM MEMBERSHIP WWWDIYBEADINGCLUBCOM
And herersquos the tough part when you want to have your own site
BLOG DIY BEADING MAGAZINE ISSUE 32
1 You need to have knowledge of what you want to do You have to learn to be involved in every aspect of your site so that you know what us going on at the front end of things and at the back end of things as well But if you have not any knowledge of designing a website it is usually a recipe for something to go wrong You have to remember that you need a user interface that is simple for customers to use an easy to use shopping cart you should know which third party platforms are trusted and one which will not keep changing their regulations If you still want to have your site hiring a designer may be your best option
2 You have to work towards promoting your store on your own You will need to find people to feature you in their social media sites because it will not just fall into your lap You need to have promotions or road shows if you need to Marketing your store is important whether or not you are using Etsy or other marketing platforms but if you are on your own it is even more important
3 You will still be competing with other sellers Though now you are now not only competing with Etsy sellers you are now competing with sellers and stores from the world wide web Etsy is already so well known so people tend to go there first so you need to up your methods of attracting customers
Should You Sell In The Marketplace
BLOG WWWHANDMADE-JEWELRY-CLUBCOM MEMBERSHIP WWWDIYBEADINGCLUBCOM
When we first started out we used Etsy as our platform to sell our works Other than that we also utilized blogs and we eventually built our own website as our main base
BLOG DIY BEADING MAGAZINE ISSUE 32
Things have changed over these 3 years It was easier to get sales without much effort but now with so many other shops also utilizing Etsy the competition has grown tremendously Now our main sales come from our own online store and has exceeded sales from Etsy
So what we recommend is that using an existing platform such as Etsy to start out is good and in time build up your website or webstore
It is not that hard to start your own webstore either these two companies offers the option to set up your webstore
1 Shopify
2 Bigcommerce
There are many things to take into consideration before starting a store online It is perfectly fine to start out using Etsy before branching out on your own But you can also
have both ndash have your own website and a store on Etsy There are many stores who operate like this They technically get customers from Etsy and the reroute them to their own websites As long as you are in control of what you are doing and not stressing and
confusing yourself you can opt for more exposure for your store
So do take some time and take a breather to really think through what will be the best for YOU and do remember that starting small does not mean you will not be able to be big
OFFER Get which can be downloaded by subscribing to
httpinternet-marketing-publishingcom
BLOG WWWHANDMADE-JEWELRY-CLUBCOM MEMBERSHIP WWWDIYBEADINGCLUBCOM
Materials - Copper wire diameter 08 mm - Copper wire diameter 04 mm - Small gemstone bead (~4 mm) (I used 3 mm beads in this tutorial because I didnrsquot have any other beads at the time but the beads in the earrings on the cover are 4 mm) Make sure that the beads you want to use are resistant against chemicals such as liver of sulfur or whichever oxidizing substance you want to use to give the metal patina The beads in the picture above are facetted garnet buttons in the tutorial itself I used black spinel facetted buttons Equipment - Round nose pliers - Flat nose pliers - Side-cutters - A small file - A cylindrical object of about 5mm diameter (eg a mandrel for jump rings) - Hammer amp anvil - Liver of sulfur or some other means to oxidize the metal (optional)
LOVE-ly Earrings
BLOG DIY BEADING MAGAZINE ISSUE 32
BLOG WWWHANDMADE-JEWELRY-CLUBCOM MEMBERSHIP WWWDIYBEADINGCLUBCOM
This tutorial teaches how to make 1 ear stud I recommend making both ear studs of the set simultaneously step-by-step so that symmetry is easier to achieve Between steps check for
symmetry in size and shape and adjust the construction if needed
LOVE-ly Earrings
BLOG DIY BEADING MAGAZINE ISSUE 32
Step 1 Straighten the end of the copper wire (+- 6cm) by rubbing along it with your fingers for a
few seconds
Step 2 Bend over the wire onto itself as illustrated below using flat nose pliers
Step 3 Grab the doubled-over wire with the flat nose pliers and push the two sides against each
other Use little force and do it bit by bit to avoid damaging or kinking the wire
Step 4 Push the two adjacent pieces of wire apart to create the bottom shape of the heart as shown
on the picture above
BLOG WWWHANDMADE-JEWELRY-CLUBCOM MEMBERSHIP WWWDIYBEADINGCLUBCOM
LOVE-ly Earrings
BLOG DIY BEADING MAGAZINE ISSUE 32
Step 5 Hammer down the angled wire (the part circled in red) This strengthens the construction
and looks more professional
Step 6 Wrap the two ends of wire tightly around a cylindrical object (+- 5 mm diameter)
Step 7 Push apart the loops you just made by wrapping the wire around the cylindrical object The wire should now be shaped like a heart as
illustrated above
Step 8 Use round nose pliers to bend around the wire for each side of the heart as illustrated above
BLOG WWWHANDMADE-JEWELRY-CLUBCOM MEMBERSHIP WWWDIYBEADINGCLUBCOM
LOVE-ly Earrings
BLOG DIY BEADING MAGAZINE ISSUE 32
Step 9 Use the flat nose pliers to bend one of the two wires (preferably the longer wire) in a 90deg angle at the place marked with a red dot In the picture accompanying the next step you can see
how it should look from the front
Step 10 Use the round nose pliers to bend the other piece of wire in a decorative coil You will cut off the rest of the wire of the coil at approximately the spot marked with a red dot so take that into account when coiling the wire into the shape that
you desire
Step 11 Cut of the wire at the spot indicated in the previous picture and file off any sharp edges
Step 12 Cut off the ear wire at the desired length (Between 1 and 2 cm If in doubt try the earring on
to see if it sits comfortably) and file off any sharp edges
BLOG WWWHANDMADE-JEWELRY-CLUBCOM MEMBERSHIP WWWDIYBEADINGCLUBCOM
LOVE-ly Earrings
BLOG DIY BEADING MAGAZINE ISSUE 32
Step 13 Hammer down the rest of the heart (bumps and coil) If you canrsquot reach certain parts because the ear wire is in the way bend that part of the heart shape away
(verticallyupward) and bend it back after you finish hammering
Congrats yoursquove now made a basic heart-shaped ear stud Next wersquore going to decorate it with a little gemstone and more copper wire
Step 14 Cut off a length of 04 mm copper wire (about 10-20 cm) and string the bead onto it
Step 15 Place the bead in the ldquonon-coilrdquo upper part of the heart shaped ear stud holding it between thumb and forefinger Let approximately 4 cm of the 04 mm wire stick out over the edge of the
heart as illustrated above
Step 16 Wrap the wire twice around the frame so that if you face the front of the ear stud the wire is
directed towards yourself
BLOG WWWHANDMADE-JEWELRY-CLUBCOM MEMBERSHIP WWWDIYBEADINGCLUBCOM
LOVE-ly Earrings
BLOG DIY BEADING MAGAZINE ISSUE 32
Step 17 Flip the wire over the wire with the bead (indicated by the red arrow) and pull tight whilst holding the bead (and its wire) tightly in place It
should look like the construction in the big picture above
Step 18 And make another loop around the wire with the bead The 04 mm wire is now coiled around
twice two times two coils around the frame and two coils around itself
Step 19 Repeat the wire-fastening procedure described in steps 16-18 with the other end of the
wire securing the gemstone in the heart frame Let the wire stick out at the back of the earstud
Step 20 Pull the wire through the lsquocoilrsquo part of the heart shape to the front The wire should lsquocross overrsquo to the other side of the heart at the back of the ear
stud
Step 21 Coil the wire around the frame until you are content with the design Optionally you can hammer down the coils a bit I often do this because I think it
looks somewhat more sophisticated and professional
BLOG WWWHANDMADE-JEWELRY-CLUBCOM MEMBERSHIP WWWDIYBEADINGCLUBCOM
LOVE-ly Earrings
BLOG DIY BEADING MAGAZINE ISSUE 32
Step 22 Cut off the spare bits of wire preferably at the backside of the ear stud and tuck in the ends
Congrats yoursquove now made a heart-shaped ear stud Next we are going to finish it off with a patina
Step 23 Oxidize the metal of the ear studs I always use liver of sulfur solved in warm water The metal
will turn a dark color and matte texture Afterwards rinse the ear studs thoroughly with water and pat
them dry
Step 24 Rub the oxidized ear stud all over with a rough polishing pad to bring back (a dark copper)
color to the surface
Yoursquove now finished making your own LOVE-ly ear studs
Secure them in your ear with plastic or copper stops These can be bought online or in jewelry-supply
stores
Variation ideas You can easily vary in size and shape (longer hearts smaller coils pointier bottoms etc) and
use different materials As you can see the earring I make in this tutorial has a slightly smaller bead than the
earrings on the cover which influences the overall appearance somewhat
The earrings underneath are made with sterling silver and gold wire (super-short coils) and contain small pink
rubies
LOVE-ly Earrings
BLOG WWWHANDMADE-JEWELRY-CLUBCOM MEMBERSHIP WWWDIYBEADINGCLUBCOM
About the Author
Jeske Hendriks
Hi there My name is Jeske and I love all things handmade Over the years Irsquove dabbled in countless different arts and crafts but nowadays I mainly focus on making jewellery and cutting stone cabochons As for jewellery
my preferred materials are silver wire and gemstonemineral beads Using wire-wrapping and basic silver smithing techniques I create both simple
and intricate pieces ndash each and every one of them unique a personal little artwork
You are welcome to follow me on facebook stop by at my personal
webpage andor to have a look at my Etsy shops httpswwwfacebookcomyeskecrafts
httpwwwyeskecraftscom httpwwwyourbeadsandfindingsetsycom
httpwwwyeskecraftsetsycom httpwwwyeskemiscetsycom
BLOG DIY BEADING MAGAZINE ISSUE 32
Flower Tale Earrings
BLOG WWWHANDMADE-JEWELRY-CLUBCOM MEMBERSHIP WWWDIYBEADINGCLUBCOM
Techniques Beadweaving
Project Level Beginner to Intermediate
Materials 12 bronze opaque 6mm Czech glass pearl round beads
2 gr gold lustered dark topaz Japanese 110 seed beads (Toho 459)
Size B gold beading thread
2 bronze earring hooks
Tools Size 10 beading needle
Scissors
Finished Size Diameter ndash 3 cm (118 inches) (without earring hooks)
BLOG DIY BEADING MAGAZINE ISSUE 32
Flower Tale Earrings
BLOG WWWHANDMADE-JEWELRY-CLUBCOM MEMBERSHIP WWWDIYBEADINGCLUBCOM
Step 1 Cut about 110 cm (43 inches) of thread and
pass it through the needle hole
Pick six groups of one 110 seed bead and one
6 mm round bead
BLOG DIY BEADING MAGAZINE ISSUE 32
Join the beads into a ring and secure with two
square knots
Leave a tail of about 15 cm (59 inches)
Step 2 The working thread should be right before the
6 mm round bead
Pick seven 110 seed beads skip the 6 mm
round bead and pass the needle through the
next 110 seed bead added in the previous
round
Repeat adding groups of seven 110 seed
beads five more times
When adding the last group take the needle
directly through the 110 seed bead from the
previous round and the next one added in the
beginning of current round
Flower Tale Earrings
BLOG WWWHANDMADE-JEWELRY-CLUBCOM MEMBERSHIP WWWDIYBEADINGCLUBCOM
Step 3 Pick three 110 seed beads skip one seed
bead from the chain of seven added in the
previous round and pass with the needle
directly through the next three 110 seed
beads
BLOG DIY BEADING MAGAZINE ISSUE 32
Pick three 110 seed beads skip one seed
bead from the chain of seven added in the
previous round and pass with the needle
through the last one and the first 110 seed
bead from the next chain of seven
Repeat the above directions from Step 3 five
more times
After completing this round make sure the
thread will be exiting from the middle 110
seed bead from the first group of three added
in the beginning of this round
Step 4 Pick one 110 seed bead and go through the
last seed bead of the group of three
Flower Tale Earrings
BLOG WWWHANDMADE-JEWELRY-CLUBCOM MEMBERSHIP WWWDIYBEADINGCLUBCOM
Pick three 110 seed beads and take the
needle through the first seed bead of the next
group of three added in the previous round
BLOG DIY BEADING MAGAZINE ISSUE 32
Pick one 110 seed bead and go with the
needle through the next three seed beads (the
last two of the group of three and the last one
from the chain of seven)
Then go up through three 110 seed beads
(the first from the next group of seven and the
first two from the next group of three)
Repeat the above directions from Step 4 to
complete the remaining petals
When working on the last petal perform the
operation from the image shown on the left
instead of picking the group of three 110 seed
beads string two 110 seed beads the earring
hook other two 110 seed beads and
continue beading as instructed above
When you are done hide the thread ends into the beadwork
Flower Tale Earrings
BLOG WWWHANDMADE-JEWELRY-CLUBCOM MEMBERSHIP WWWDIYBEADINGCLUBCOM
About the Author
Iulia Postică
I was born and live in Moldova Eastern Europe Ever since I remember myself
Ive been crocheting and knitting My grandmother has taught me that and I
loved it very much I always regarded crafts exclusively as a hobby and never
thought of making a career of it I traveled a lot to various historical sites
Actually Ive spent all my childhood summers in archaeological camps with
my father who is a professional archaeologist
I also enjoy metal hammering and wirework as it gives me possibility to
express myself in materials used by human communities since ancient times
copper brass glass seed beads and gemstones That is no surprise to anyone
given my family history and academic background
My shop ldquoBeadedTreasuryrdquo with beading tutorials and bead crochet patterns
httpswwwetsycomshopBeadedTreasury
My shop ldquoArchaeologicardquo with artisan jewelry
httpswwwetsycomshopArcheologica
My blog httpbeadedtreasuryblogspotcom
My facebook httpswwwfacebookcomBeadedTreasury
BLOG DIY BEADING MAGAZINE ISSUE 32
Liberty Earrings
BLOG WWWHANDMADE-JEWELRY-CLUBCOM MEMBERSHIP WWWDIYBEADINGCLUBCOM
Materials - Nr 2 cabochon Preciosa Ornela ovale 18x22 mm turchese
- Rocaille Toho 150 silver lined green emerald
- Nr 2 dagger beads
- Nr 20 pearl 4 mm
- Superduo opaque luster ceramic green
- Rocaille 80 color gold
- Rocaille 80 color ivory
- Delica Miyuki 110 aquagreen mix
- Rocaille Miyuki 110 galvanized silver
- Nr 2 monachelle (earwire)
-Fireline
- Beading Needle nr 12
BLOG DIY BEADING MAGAZINE ISSUE 32
Liberty Earrings
BLOG WWWHANDMADE-JEWELRY-CLUBCOM MEMBERSHIP WWWDIYBEADINGCLUBCOM
Make a circle of 20 delica beads and make a knot (a) Perform two rounds peyote with ivory 80 seed beads (b c) Exit from an ivory
bead
BLOG DIY BEADING MAGAZINE ISSUE 32
a b c
Jump from 80 to 80 with 110 80 gold 110 (a) Finish the round and come out of a 80 gold bead
Jump to the next 80 gold with a 4mm pearl (b) Finish the round and come out
of the first pearl Jump to the 2nd pearl and close with a 80 gold bead(c)
a b c
Position the cabochon and jump from one 80 to the other with two delica bead (a)
Continue with three delicas four times (b) At the bottom sew on two delicas then finish the round by sewing on three delicas for four times passing from one to another roc 80 Tighten the cabochon and exit from the
first two delica that you started with String together a 110 and 150 and enter the second of the three close delicas (c)
a b c
Liberty Earrings
BLOG WWWHANDMADE-JEWELRY-CLUBCOM MEMBERSHIP WWWDIYBEADINGCLUBCOM
Put together 150 110 150 and enter in the second of three next delica (a) Put the same beads for three times then put together 150 and 110 and enter
in the two delica of the bottom tip (b) Enter in the second of three next delica with 110 and 150 (c) Continue passing
in the 80 beads with three beads (150 110 150) for four times then at the top finish the round by putting together a 150 and 110 (d)
BLOG DIY BEADING MAGAZINE ISSUE 32
a b c
Exit from the first 150 sewn in the previous round and jump in the three next beads with a 150 (a)
Put a 150 at a time and exit from the first 110 beads of the bottom tip Jump in the
near 110 with a 150 (b) Finish round repeating steps a and b (c) Exit the roc 80 as shown in the photo (d)
a b c
d
a b c d
Enter in the 80 with four 150 (a b) Enter the 80 beads at the bottom of the pieces with two 110 one superduo one 80 ivory bead one superduo and two 110 (c)
d e f
Liberty Earrings
BLOG WWWHANDMADE-JEWELRY-CLUBCOM MEMBERSHIP WWWDIYBEADINGCLUBCOM
Exit from the bottom pearl (a) Put together 150 three 110 150 and enter in the superduorsquos second hole (b)
Put together three superduo and enter in the next superduorsquos second hole (c) Rethread 15 three 110 150 and return in the opposite direction in the pearl of departure (d)
BLOG DIY BEADING MAGAZINE ISSUE 32
a b
c
Exit from the second pearl indicated from (a) Put 150 four 110 and enter in the second of the three 110 (b) Go to the second superduorsquos hole with four 110 and a 150 (c)
Enter the second hole of the supeduo with a 150(d) Sew in the middle of the bottom of the superduo 150 two 110 150 dagger 150 two 110 150(e)
Enter the second hole of the thirs superduo with 150 (f)
a b c
d
d e f
Liberty Earrings
BLOG WWWHANDMADE-JEWELRY-CLUBCOM MEMBERSHIP WWWDIYBEADINGCLUBCOM BLOG DIY BEADING MAGAZINE ISSUE 32
Put 150 four 110 and enter in the second of three 110 of the base (a) Insert four 110 and 150 in the pearl opposite direction indicated in the picture (b) Go in all the beads
around the piece and exit from the pearl at the top (c) Put 150 three 110 150 and enter the superduo (d)
Enter the ivory bead 80 with two 150 (e) Enter the next superduo with two 150 (f)
a b c
d e f
Put together 150 three 110 and enter in opposite direction in the departurersquos pearl (a) Exit from the 150 beads indicated by photo (b) From this jump in the second of two near
150 with five 150 to created the hole for the earwire (c) Pass the thread in the beads make a few knots and cut the excess thread
a b c
Your earrings are finished
Liberty Earrings
BLOG WWWHANDMADE-JEWELRY-CLUBCOM MEMBERSHIP WWWDIYBEADINGCLUBCOM
About the Author
Mariella Martella
My name is Mariella Martella and I am the author and
designer of jewelry that I sign with the name of Mariel Bijoux
After changing city often for work and study I currently live
in northern Italy I am an art historian with a passion for travel
painting and jewelry design in weaving that project since
2010 In my beads and crystals are the colors of the
Mediterranean sea the atmosphere of summer evenings
and the lights of the places I visited
You can find me at
Etsy shop httpswwwetsycomitshopMarielBijoux
Facebook httpswwwfacebookcommari3lbijoux
Crafting blog httpmarielbijouxblogspotit
Twitter httpstwittercomMarielBijoux
BLOG DIY BEADING MAGAZINE ISSUE 32
Jade Necklace
BLOG WWWHANDMADE-JEWELRY-CLUBCOM MEMBERSHIP WWWDIYBEADINGCLUBCOM
Every time I wear a necklace I always make it a point that the
necklace will lay perfectly flat on my neck Using wire for a necklace
made it possible for me like what I did with Jade Necklace It may look
odd at first having bent wires for a necklace but once the jewelry is
finished youll be so happy how the necklace will perfectly lay on your
neck
The tutorial is catered for intermediate level One must know basic
wirework skills such as wire wrapping making loops wrapped loops
and linking to follow the tutorial It has clear instructions and ultra-clear
close-up photos at each step Additionally you can ask me question
you have on the tutorial No more getting stuck and frustrated on a
confusing or just plain inaccurate pattern
If you followed this tutorial and then sell the accessory or jewelry
please give credit to the author or DIY Beading Clubcom
Copyright 2015
wwwdiybeadingclubcom
wwwhandmade-jewelry-clubcom
BLOG DIY BEADING MAGAZINE ISSUE 32
Jade Necklace
BLOG WWWHANDMADE-JEWELRY-CLUBCOM MEMBERSHIP WWWDIYBEADINGCLUBCOM BLOG DIY BEADING MAGAZINE ISSUE 32
Materials Needed 18ga Craft wire 28ga Craft wire 15mm diameter Green Round Flat Back Sew On Gems 5mm Green pearls
8mm Green pearls 6mm x 11mm teardrop Crystal Treasures Mill Hill beads or any teardrop bead with holes on the side Hook for your clasp
Tools Needed Wire cutter Flat nose pliers Round nose pliers Mandrel A jar or any rounded object to shape your necklace
Skill Level Intermediate
Step 1 Cut 6 inches 18ga wire Make a loop on one end then measure approximately 125 inches and make another loop
Form a size 4 circle on your mandrel
Jade Necklace
BLOG WWWHANDMADE-JEWELRY-CLUBCOM MEMBERSHIP WWWDIYBEADINGCLUBCOM BLOG DIY BEADING MAGAZINE ISSUE 32
Then close the circle by wrapping the extended wire just below the loop Wrap the
wire 2x
This is how it looks like Lets call this circle frame Youll notice that the lower curve is
slightly bigger than the upper curve
Step 2 Cut 8 inches of 28ga wire Wrap one end of
the wire at least 3x on one side of the circle frame just below the loop
Bring up your gem Flat back sew on gems has 2 holes Insert the wire into one hole and then
wrap the wire once onto the circle frame
Jade Necklace
BLOG WWWHANDMADE-JEWELRY-CLUBCOM MEMBERSHIP WWWDIYBEADINGCLUBCOM BLOG DIY BEADING MAGAZINE ISSUE 32
Step 3 Insert a 5mm pearl on the wire and then pass
the wire under circle frame
Repeat previous step 2x and have 3 pearls wrapped
Continue wrapping with your teardrop crystal My crystal has 2 holes on the side
and then continue wrapping with your 5mm pearls then secure your wire
Repeat Step 3 and create as many as needed For 16-inch necklace Ive created 6 of these
components
Jade Necklace
BLOG WWWHANDMADE-JEWELRY-CLUBCOM MEMBERSHIP WWWDIYBEADINGCLUBCOM BLOG DIY BEADING MAGAZINE ISSUE 32
Step 4 Cut a 15-inch 18ga wire and make a loop on
one end Insert 8mm pearl and make a loop on the other end You then use these as connectors
and link the components
Step 5 The necklace is an 18ga wire with wrapped
loops on both ends First cut 7 inches 18ga wire and make a wrapped loop with your hook already inserted Side in 18pcs 5mm pearls
Then make a wrapped loop on the other end connecting the wrapped loop onto the component Do the same for the other
necklace but make the loop on the other end big enough so the hookclasp can pass thru
To have the necklace curve shaped use a jar to bend the wire Voila Now youre
ready to party
Jade Necklace
BLOG WWWHANDMADE-JEWELRY-CLUBCOM MEMBERSHIP WWWDIYBEADINGCLUBCOM
About the Author
Sky Aldovino
I consider myself a late bloomer when it comes to crafting Irsquom a self-taught jewelry maker Jewelry making wasnrsquot really a hobby of mine but unforeseen events lead me to learn jewellery making My family put up a craft store where we sell cross stitch beads and all sorts of crafting materials I fell in love with the beads and tried to create accessories only for myself Clients liked the pieces and I started customizing handmade jewelleries The craft store was a success for 6 years but like any other small businesses we had to close it down and I was confined to staying at home While at home I had all the time using the internet and now working as a home-based jewelry designer
BLOG DIY BEADING MAGAZINE ISSUE 32
Atomic Ring
BLOG WWWHANDMADE-JEWELRY-CLUBCOM MEMBERSHIP WWWDIYBEADINGCLUBCOM
Have fun making shapes using the wigjig Cyclops Make loops going in
circles to mimic the shape of a flower or in this tutorial mimic the
shape of an atom The tutorial will also teach you how to cage a
cabochon Whats nice about this piece is that with one long wire you
can create the ring from start to finish
The tutorial is catered for intermediate to advanced students One
must already know how to make spirals and use a wigjig tool It has
clear instructions and ultra-clear close-up photos at each step
Additionally you can ask me question you have on the tutorial No
more getting stuck and frustrated on a confusing or just plain
inaccurate pattern
If you followed this tutorial and then sell the accessory or jewelry
please give credit to the author or DIY Beading Clubcom
If you like to get a blank wigjig graph visit wigjigcom Shop and Jigs
section
Copyright 2015
wwwdiybeadingclubcom
wwwhandmade-jewelry-clubcom
BLOG DIY BEADING MAGAZINE ISSUE 32
Atomic Ring
BLOG WWWHANDMADE-JEWELRY-CLUBCOM MEMBERSHIP WWWDIYBEADINGCLUBCOM
Materials Needed 20ga Craft wire 28ga Craft wire 11mm Round Cabochon
Tools Needed Wigjig Cyclops 15mm pegs Wire cutter Flat nose pliers Mandrel
Skill Level Intermediate - Advanced
BLOG DIY BEADING MAGAZINE ISSUE 32
Step 1 Lets prepare your wigjig cyclops Position the pegs like so
Atomic Ring
BLOG WWWHANDMADE-JEWELRY-CLUBCOM MEMBERSHIP WWWDIYBEADINGCLUBCOM BLOG DIY BEADING MAGAZINE ISSUE 32
Lets work with longer wire so youll have enough wire to hold onto as you manipulate the wire so cut 36 inches of 20ga wire From
one end of the wire measure 10 inches
On the 10-inch measurement loop the wire at the center peg then continue to loop onto the side pegs going in circle going back to
the center peg after looping on the side peg
Now the wire at the center peg will start to build up as you go around the side pegs so
you need to constantly press the wire at the center peg to accommodate the build up of
wire
When youre done pull out the wire and this is
how it should look like
Atomic Ring
BLOG WWWHANDMADE-JEWELRY-CLUBCOM MEMBERSHIP WWWDIYBEADINGCLUBCOM BLOG DIY BEADING MAGAZINE ISSUE 32
You will notice that the frame opens wide Now to keep the atom frame from opening wide secure the center of the frame by wrapping a 28ga wire What you
need to do is simply pass the 28ga wire into the hole and wrap as many times as needed or until youre sure that the frame is secure
Step 2 Now youre finished with your atom frame Well now create the focal design With the longer wire make a spiral at the center big
enough to accommodate the size of your cabochon In this tutorial the spiral is about
11mm in diameter the same size as my cabochon
Pop in your cabochon and start to make spirals going around and over the cabochon as if you are caging the cabochon Create at
least 5 rounds and then cut off any excess
Step 3 Now lets make the ring and this with the other
end of the wire
Atomic Ring
BLOG WWWHANDMADE-JEWELRY-CLUBCOM MEMBERSHIP WWWDIYBEADINGCLUBCOM BLOG DIY BEADING MAGAZINE ISSUE 32
Bring up your mandrel and wrap the wire to the size of your finger Wrap at least 2 times
When youre sure you have the right size pull the ring out of the mandrel
With the extended wire wrap the wire the secure the ring
Cut off any excess and voila You have your atomic ring Create as many as you can with different colors of cabochon
Atomic Ring
BLOG WWWHANDMADE-JEWELRY-CLUBCOM MEMBERSHIP WWWDIYBEADINGCLUBCOM
About the Author
Sky Aldovino
I consider myself a late bloomer when it comes to crafting Irsquom a self-taught jewelry maker Jewelry making wasnrsquot really a hobby of mine but unforeseen events lead me to learn jewellery making My family put up a craft store where we sell cross stitch beads and all sorts of crafting materials I fell in love with the beads and tried to create accessories only for myself Clients liked the pieces and I started customizing handmade jewelleries The craft store was a success for 6 years but like any other small businesses we had to close it down and I was confined to staying at home While at home I had all the time using the internet and now working as a home-based jewelry designer
BLOG DIY BEADING MAGAZINE ISSUE 32
Featured Article Gemstones Used for Jewelry Making
BLOG WWWHANDMADE-JEWELRY-CLUBCOM MEMBERSHIP WWWDIYBEADINGCLUBCOM
Gemstones are stones which we hold quite highly in terms of value And
jewelry often consists of stones that add attractiveness to it so it is not
surprising when jewelry designers actually use gemstones in their designs In
fact there are different types of gemstones that can be used for making
jewelry There are the expensive and pure gemstones and there are also the
imitation ones The information below will provide some information about
the kinds of stones you can use to create jewelry and how these stones will
impact the jewelry you have created
The first kind of stone which I believe we are all quite familiar with are
birthstones These stones are associated with individualrsquos month of birth
by SunVDesigns by BeyhanAkman
For example Amethyst stone is connected with anybody who is born in
February which carries special significance in the area of emotions and also
spiritually This stone also signifies calm and peace as well
And then we have semi-precious stones which are also often used in jewelry
making They are not as valuable as compared to precious stones but still
valuable Best examples of these stones are aquamarine topaz tourmaline
opal and turquoise
BLOG DIY BEADING MAGAZINE ISSUE 32
Featured Article Gemstones Used for Jewelry Making
BLOG WWWHANDMADE-JEWELRY-CLUBCOM MEMBERSHIP WWWDIYBEADINGCLUBCOM
It is an ideal gift for someone who you deem special Aquamarine pendants
usually work well for anyone and is widely an accepted stone
by HyppieChic by joyeriamestiza
However precious stones are the most unusual
and precious jewels to us Examples of some of
them are emerald sapphire diamond and
ruby These stones are usually very expensive
and are prized for their exquisiteness These
stones are commonly used in high-quality
jewelry designs which costs quite a fortune to
obtain
BLOG DIY BEADING MAGAZINE ISSUE 32
by sarajewelrystu
Jewelry designs with precious stones are usually
given as exceptional gifts on special occasions A
perfect example is a diamond ring that is usually
given as an engagement gift
by ldiamondsforever
Featured Article Gemstones Used for Jewelry Making
BLOG WWWHANDMADE-JEWELRY-CLUBCOM MEMBERSHIP WWWDIYBEADINGCLUBCOM
There are also synthetic stones which are often used to create jewelry
Synthetic stones are artificial imitations of gemstones Synthetic Sapphire
jewelry costs less compare with the authentic ones Most of the time
imitation stones are used to save cost but at the same time have the similar
look of the real stone
BLOG DIY BEADING MAGAZINE ISSUE 32
by shininggems by thaimaker
by lapinduprintemps by PastimeArt
Gemstones are used like beads and you can use it in any designs whether
simple or elaborate
Swarovski crystal components are available in a rich multitude of rondelles Perfect as spacers in necklaces or as discs in earrings Rondelles can be used with many varieties of shapes or sizes Use Swarovski crystal rondelles between large gemstones as accents with precious metal findings Fire Mountain Gems and Beads Crystal Passionsreg brand presents Swarovski crystal in display-ready packaging for brilliant retail presentation Crystal Passionsreg is an assurance of genuine Swarovski crystal
BLOG DIY BEADING MAGAZINE ISSUE 32 BLOG WWWHANDMADE-JEWELRY-CLUBCOM MEMBERSHIP WWWDIYBEADINGCLUBCOM
Recommended Jewelry Making Supplies
Mz Unisex-adults 12pcs 25x18x6mm Turquoise Oval CAB Cabochon
BLOG DIY BEADING MAGAZINE ISSUE 32 BLOG WWWHANDMADE-JEWELRY-CLUBCOM MEMBERSHIP WWWDIYBEADINGCLUBCOM
Recommended Jewelry Making Supplies
For a little sparkle that goes a long way design with Swarovski 4mm faceted bicones Create glorious multi-strand necklaces with the dainty crystals or use as spacers to add a tiny flash to your designs Swarovski crystal components are made in Austria and are considered the finest products of their kind in the world
BLOG DIY BEADING MAGAZINE ISSUE 32 BLOG WWWHANDMADE-JEWELRY-CLUBCOM MEMBERSHIP WWWDIYBEADINGCLUBCOM
Recommended Jewelry Making Supplies
Imitation beads resist color change These beads have uniform quality with a good polish Some strands may have little to no matrix Sizes shapes and colors may vary with handcrafted items
BLOG DIY BEADING MAGAZINE ISSUE 32 BLOG WWWHANDMADE-JEWELRY-CLUBCOM MEMBERSHIP WWWDIYBEADINGCLUBCOM
Recommended Jewelry Making Supplies
Something Blue Necklace and Earrings
BLOG WWWHANDMADE-JEWELRY-CLUBCOM MEMBERSHIP WWWDIYBEADINGCLUBCOM
Skill level Beginner Intermediate Advanced
DIMENSIONS OF THE NECKLACE Inner Circumference 14 18 inch 35 cm
Focal Pendant Width 1 15 inch 35 cm Focal Pendant Height 1 15 inch 35 cm
DIMENSIONS OF THE EARRING Earring Width 716 inch 12 cm Earring Height 1516 inch 25 cm (Without the earring hook)
BLOG DIY BEADING MAGAZINE ISSUE 32
Materials
Note Before purchasing the supplies measure the length of your wished necklace If you decide to bead a longer necklace you should keep in mind that for every extra
frac34 inches 2 cm-s you will need 8 bicones and 8 pearls
Something Blue Necklace and Earrings
BLOG WWWHANDMADE-JEWELRY-CLUBCOM MEMBERSHIP WWWDIYBEADINGCLUBCOM BLOG DIY BEADING MAGAZINE ISSUE 32
Work RAW stitch into a beaded circle and embellish with Swarovski bicones
STEP 2 String 1A and 2 pearls Pass through the previous
second pearl and the freshly added 1A and the first pearl again
STEP 1 Use a comfortable length of thread to string 2
pearls 1A and 1 pearl again leaving a 2rdquo 5cm tail Pass through the first two pearls strung to form a
ring
STEP 3 String 2 pearls and 1A Pass through the previous first pearl and the freshly added two pearls
again
STEP 4 - 17 Repeat STEP 2 and STEP 3 again until you count 17 pearls in the inner circle
But be careful in the last step you only have to add 1 pearl then pass through the first pearls
added in STEP 1 and add another 1A Now pass through the first pearl added in STEP
1and 1A added in this round again to exit from this A
Something Blue Necklace and Earrings
BLOG WWWHANDMADE-JEWELRY-CLUBCOM MEMBERSHIP WWWDIYBEADINGCLUBCOM BLOG DIY BEADING MAGAZINE ISSUE 32
STEP 19 String 2A and pass through the next A added in round 4-17 and the A added in round 18 the 2A added in this round and finally the A added in round 4-17 to exit from the bead showed below
STEP 18 String 3A and pass through the 1A added in the previous round and the first A added in this
round
STEP 20 - 34 Repeat STEP 18 and STEP 19 again until you finish the circle
But be careful in the last step first you have to pass through 3A and then add 1A After this pass
through the 3A again and exit from the A bead
shown below (This is the first A added in STEP 18)
Something Blue Necklace and Earrings
BLOG WWWHANDMADE-JEWELRY-CLUBCOM MEMBERSHIP WWWDIYBEADINGCLUBCOM BLOG DIY BEADING MAGAZINE ISSUE 32
STEP 35 Step up to exit from the pearl shown below (Finishing the previous step in the A bead and then
stepping up from there makes the circle more secure)
Now string 3 bicones Pass through the pearl and the first bicone again
In the reality your circle will look more like this the A beads forming a strong row in the middle of the
pearls
STEP 36 Add 2 bicones Pass through the
neighboring pearl the first bicone added in the previous row and the 2 bicones added in this step
so you can exit from the next pearl
Something Blue Necklace and Earrings
BLOG WWWHANDMADE-JEWELRY-CLUBCOM MEMBERSHIP WWWDIYBEADINGCLUBCOM BLOG DIY BEADING MAGAZINE ISSUE 32
Now in the reality your circle will look more like this the A beads still forming a strong row in the middle of the pearls and the bicones slightly lying on top of
them
STEP 37 - 49 Repeat STEP 35 and STEP 36 again until you finish the circle with the bicones
But be careful in the last step first you have pass through the third bicone added then add 1 bicone
and pass through this little quartet to exit from the bicone shown below (The second one added in
STEP 35)
STEP 50 With these steps we finish the circle by adding 1 bicone to connect the A beads and the
bicone row So add 1 bicone pass through the nearest A bead and add 1 bicone again Pass
through the bicone already there and exit from the bicone you just added
Something Blue Necklace and Earrings
BLOG WWWHANDMADE-JEWELRY-CLUBCOM MEMBERSHIP WWWDIYBEADINGCLUBCOM BLOG DIY BEADING MAGAZINE ISSUE 32
STEP 66-83 Secure the circle by adding 1A between each bicone in the second row of Swarovski
bicones If you finished secure the thread and trim
STEP 51-65 Using the same technique as in STEP 37 - 49 add 1 bicone to finish the third bicone row The black line shows you the way (After STEP 50 pass through the next A bead add 1 bicone and pass through the bicone already there and the bicone added in the previous step Repeat these steps to
finish the inner bicone circle)
MIDDLE CIRCLE Work RAW stitch into a beaded circle and embellish with
Swarovski bicones Remember you need to bead two circles this time
STEP 1 Just like in the focal circle begin with 2 pearls 1A and 1 pearl again on a comfortable length of thread
leaving a 2rdquo 5cm tail Pass through the first two pearls strung to form a ring
Something Blue Necklace and Earrings
BLOG WWWHANDMADE-JEWELRY-CLUBCOM MEMBERSHIP WWWDIYBEADINGCLUBCOM BLOG DIY BEADING MAGAZINE ISSUE 32
STEP 15-28 Mimicing the FOCAL CIRCLElsquos STEP 18-34 bead A beads until you finish the inner part of the
circle Exit from a pearl in the second row This circle should look very similar to the first one but this is a bit
smaller
STEP 2-14 Mimicing the FOCAL CIRCLElsquos STEP 2-17 bead until you count 14 pearls in the inner circle Exit
from the last A added
STEP 29-42 Mimicing FOCAL CIRCLElsquos STEP 35-49 add 2 rows of bicones
STEP 43-56 Mimicing the FOCAL CIRCLElsquos STEP 50-65 bead the third row of bicones to finish the circle
Something Blue Necklace and Earrings
BLOG WWWHANDMADE-JEWELRY-CLUBCOM MEMBERSHIP WWWDIYBEADINGCLUBCOM BLOG DIY BEADING MAGAZINE ISSUE 32
SMALLEST CIRCLE Work RAW stitch into a beaded circle and embellish
with Swarovski bicones Remember you need to bead two circles again
STEP 1 Just like in the focal circle begin with 2 pearls
1A and 1 pearl again on a comfortable length of thread leaving a 2rdquo 5cm tail Pass through the first two
pearls strung to form a ring
STEP 57-70 Just like the FOCAL CIRCLElsquos STEP 66-83 secure the circle by adding 1A between every bicone
in the second row of bicones If you finished secure the thread and trim (Donrsquot forget to bead another
circle)
STEP 2-12 Mimicing the FOCAL CIRCLElsquos STEP 2-17 bead until you count 12 pearls in the inner circle Exit
from the last A added
STEP 13-24 Mimicing the FOCAL CIRCLElsquos STEP 18-34 bead A beads until you finish the inner part of the
circle Exit from a pearl in the second row This circle should look very similar to the first two but this is the
smallest of them all
Something Blue Necklace and Earrings
BLOG WWWHANDMADE-JEWELRY-CLUBCOM MEMBERSHIP WWWDIYBEADINGCLUBCOM BLOG DIY BEADING MAGAZINE ISSUE 32
STEP 37-48 Mimicing the FOCAL CIRCLElsquos STEP 50-65 bead the third row of bicones to finish this circle too
STEP 25-36 Mimicing FOCAL CIRCLElsquos STEP 35-49 add 2
rows of bicones The last step here is purple again
STEP 49-60 Just like the FOCAL CIRCLElsquos STEP 66-83 secure the circle by adding 1A between every bicone
in the second row of bicones If you finished secure the thread and trim (Donrsquot forget that you need two
small circles)
Something Blue Necklace and Earrings
BLOG WWWHANDMADE-JEWELRY-CLUBCOM MEMBERSHIP WWWDIYBEADINGCLUBCOM BLOG DIY BEADING MAGAZINE ISSUE 32
STEP 37-48 Mimicing the FOCAL CIRCLElsquos STEP 50-65 bead the third row of bicones to finish this circle too
STEP 25-36 Mimicing FOCAL CIRCLElsquos STEP 35-49 add 2
rows of bicones The last step here is purple again
STEP 49-60 Just like the FOCAL CIRCLElsquos STEP 66-83 secure the circle by adding 1A between every bicone
in the second row of bicones If you finished secure the thread and trim (Donrsquot forget that you need two
small circles)
Something Blue Necklace and Earrings
BLOG WWWHANDMADE-JEWELRY-CLUBCOM MEMBERSHIP WWWDIYBEADINGCLUBCOM BLOG DIY BEADING MAGAZINE ISSUE 32
STEP 2-6 Continue by adding 1A 1 bicone 1 pearl until you count 6 of each
STEP 1 Begin with 1 pearl 1 bicone 1A and 1 bicone again on a comfortable length of thread leaving a 2rdquo
5cm tail Pass through the pearl and the first bicone strung to form a ring
STEP 7-12 Pass through the A beads to make your
component more secure Also secure the thread and trim (Repeat these steps until you have six 6-BEAD
COMPONENTs)
6-BEAD COMPONENT Work RAW stitch into a beaded circle and embellish with Swarovski bicones
For the necklace we will need six from this component For the earring two
Something Blue Necklace and Earrings
BLOG WWWHANDMADE-JEWELRY-CLUBCOM MEMBERSHIP WWWDIYBEADINGCLUBCOM BLOG DIY BEADING MAGAZINE ISSUE 32
STEP 2-4 Continue by adding 1A 1 bicone 1 pearl
until you count 4 of each
STEP 1 Begin with 1 pearl 1 bicone 1A and 1 bicone again on a comfortable length of thread leaving a 2rdquo
5cm tail Pass through the pearl and the first bicone strung to form a ring
STEP 5-8 Pass through the A beads to make your component more secure Also secure the thread and
trim (Repeat these steps until you have the wished amount of 4-BEAD COMPONENTs)
4-BEAD COMPONENT Work RAW stitch into a beaded circle and embellish with Swarovski bicones
For the necklace-size that is given on the second page we will need 20 from this
component For the earring two
If you would like to make a longer necklace you need to make more (One 4-BEAD COMPONENT measures about 38 inch 1 cm To make the necklace symmetrical you have to have equal amounts on each side This means for every extra frac34 inches
2 cm-s you will need 1 4-BEAD COMPONENT on each side of the necklace)
Something Blue Necklace and Earrings
BLOG WWWHANDMADE-JEWELRY-CLUBCOM MEMBERSHIP WWWDIYBEADINGCLUBCOM BLOG DIY BEADING MAGAZINE ISSUE 32
STEP 2 Connect the MIDDLE CIRCLE to two 6-BEAD COMPONENTs by adding four-times 2As
between the pearls Choose a pearl on the MIDDLE CIRCLE and add
2A pass through a pearl in the 6-BEAD COMPONENT previously added and add 2A again Watch out this has to be symmetrical Repeat this at least two more times to make it
secure Now repeat this entire procedure but choose
the 8-th pearl on MIDDLE CIRCLE Repeat this on the other side of the necklace
too
Choose a pearl on the FOCAL CIRCLE and add 2A pass through a pearl in the 6-BEAD COMPONENT and add 2A again Repeat this at least two more times to make it secure
Now repeat this entire procedure but choose the 5-th pearl on FOCAL CIRCLE This will make the necklace nice on your neck
FINISHING THE NECKLACE Connects the parts with A beads
STEP 1 Connect the FOCAL CIRCLE to two 6-BEAD COMPONENTs by adding four-times 2As between the pearls To do this turn your parts upside down you need to
see the pearls We will work on this side from now on
Something Blue Necklace and Earrings
BLOG WWWHANDMADE-JEWELRY-CLUBCOM MEMBERSHIP WWWDIYBEADINGCLUBCOM BLOG DIY BEADING MAGAZINE ISSUE 32
FINISHING THE EARRING Connects the parts with A beads
STEP 1-2 Connect the 6-BEAD COMPONENT
to 4-BEAD COMPONENT and the 4-BEAD
COMPONENT to the earring hook
First connect the 4-BEAD COMPONENT to the 6-BEAD COMPONENT with 4A beads Mimic
the elongation steps of the necklace if needed
Secondly connect the 4-BEAD COMPONENT
to your earring hook with 4A beads again Leave from the last pearl bead 2A beads the hook (this is the orange oval form) and 2As again Pass through each of them to
secure this connection again
Finally get ready to prepare the other earring ndash since we need two of them
STEP 5 Connect the 4-BEAD COMPONENTs to the toggle clasp thus finishing the
necklace Leaving from the last pearl bead 2A the
clasp(this is the orange oval form) and 2A again Pass through all of them a couple more times to make this connection more
secure
Something Blue Necklace and Earrings
BLOG WWWHANDMADE-JEWELRY-CLUBCOM MEMBERSHIP WWWDIYBEADINGCLUBCOM BLOG DIY BEADING MAGAZINE ISSUE 32
If you finished it is time to try it on It was a great fun wasnrsquot it And how beautiful you look in your new necklace and the matching earrings
Something Blue Necklace and Earrings
BLOG WWWHANDMADE-JEWELRY-CLUBCOM MEMBERSHIP WWWDIYBEADINGCLUBCOM
About the Author
Margit Vogel
My name is Margit Vogel I live in Hungary Europe
By profession I am a biochemical engineer but I fell in love with
beads so much that I could not stop playing with them
I make one-of-a-kind beaded and bead embroidered art
jewelry made of the best quality materials such as Swarovski
stones gemstones Japanese beads (Miyuki and Toho) Czech
glass beads leather soutache and suede Each piece is unique
and individually crafted
Feel free to visit my blog for some eyecandy
httpiformjewelrywordpresscom
My shop httpwwwetsycomshopiformjewelry
Facebook httpwwwfacebookcomiformjewelry
BLOG DIY BEADING MAGAZINE ISSUE 32
Getting Down And Personal With Gianna
Getting Down And Personal With Gianna
Nowadays we see more and more jewelry stores opening up online and with these online jewelry stores it has made it easier for us to purchase and view their creations Have you ever wondered how they are able to manage and produce amazing jewelry pieces and tutorials So heres a little on the journey to open up an online shop We are excited to present to you Gianna aka Beading4perfectionists
Gianna Beader amp Youtuber
Unlike most jewelry makers and beadweavers Gianna did not start beading as a hobby but as a means to make ends meet With goals in trying to
fill the financial gap she did everything she could to expand her earnings ndash working as a security guard
and at the same time learning how to bead and selling her pieces at fair trades and flea markets
Since many were asking if she does home beading workshops she started on exploring how to teach people to bead She loves Scott Bakula and has always loved him till now and this served as her
inspiration to start making a beading video tutorial
Gianna started creating videos because she was at the point in her life where everything seemed to be falling apart And at that moment of time she had difficulties financially and selling jewelry was the only way for her to stay afloat financially She is a big Scott Bakula fan and when she went to the UK to see him on stage that was when it hit her that she is already able to edit videos and
taught herself Photoshop and done workshops at bead fairs so why not put these together and see what happens on Youtube She knew that if she gets enough subscribers and views ndash though no one knew what the exact numbers were you would be invited to become a Youtube partner This way she could monetize her videos with advertisements and hopefully she would be able to be a Youtube partner and be able to pay her bills
BLOG WWWHANDMADE-JEWELRY-CLUBCOM MEMBERSHIP WWWDIYBEADINGCLUBCOM BLOG DIY BEADING MAGAZINE ISSUE 32
Getting Down And Personal With Gianna
Her Youtube channel is popular and the reason why she chose Youtube is because Youtube is the biggest platform and reached almost to the whole world Everyone already knows about it and it was growing rapidly as compared to other platforms like Dailymotion so she figured that Youtube was the way to go Her advice to new designers is that when you start out go to the platforms on the top of your list first then work your way down your list if you do not get accepted by your first choice
After loyally putting up one video every week for about 8 months in a row she became a Youtube partner and monetized her videos She knew she needed at least $100 to get her first payout She managed to reach $100 after 3 months The process was not easy she worked hard lack sleep skipped meals and who knows what happened to Ridge in the Bold and the Beautiful because she stopped watching
On Youtube you can monetize your videos Google pays straight to your bank account and at other countries where they also have the option of getting checks among other options In order to get paid you have to reach the $100 mark and after 3 months For Gianna she thinks that you cannot say that Etsy is better than Youtube or Youtube is better than Etsy Her reasoning is because on Youtube she has many followers which will eventually check out her Etsy shop And to start an Etsy shop you need an audience
BLOG WWWHANDMADE-JEWELRY-CLUBCOM MEMBERSHIP WWWDIYBEADINGCLUBCOM BLOG DIY BEADING MAGAZINE ISSUE 32
television and dedicated her spare time (as she had another job) to Youtube She re-registered at the chamber of commerce after receiving her first payout Her work at Youtube now is not a full time job and things have changed on Youtube It is easier to become a parter but there are some countries that need to wait for an invitation to be a Youtube partner Take Italy for instance Italians would have to work just as hard as she did if they want to become a Youtube partner
Getting Down And Personal With Gianna
With her 60000 subscribers on her b4pbakup Youtube channel it is possible to sell at least 60 patterns on the first day on Etsy after promoting the PDF file on her Youtube channel Though you may think that 60 out of 60000 is not much you have to remember that not everyone has the means to purchase the PDF file and a lot of people still rather watch her carry out the tutorial(for free) on Youtube instead of reading the patterns or paying for the patterns even if the pattern is for a fundraiser and only cost $2 Her insights on Youtube is that Youtube is not what it used to be 6 years ago Instead of making more money every month she is making less and less because advertisers have more options of where they want to advertise their ads Ads do not pay as much as they used to Back in the days you could get 25 cents per ad Now you count yourself lucky if you could get 5 cents roll in after two hours
BLOG WWWHANDMADE-JEWELRY-CLUBCOM MEMBERSHIP WWWDIYBEADINGCLUBCOM BLOG DIY BEADING MAGAZINE ISSUE 32
And on top of that adblockers are destroying Youtube channel owners Youtube will start making changes to the channels where there will be ldquopaid subscriptionrdquo channels This has already been implemented in some countries but not in her country The Netherlands This means there will no longer be ads for her monthly paying subscribers She hopes that Youtube will add on a paid per video option feature The option to be a paid channel or free channel or to start a new channel for paying customers is yours to choose Gianna is not happy with Youtube because many others like her have worked so hard and for some years to become Youtube partners(which was something to be proud of) has lost their status
Getting Down And Personal With Gianna
Her advice for those who want to go on Youtube is 1 Do it because you want to teach
2 Do it because you want a career with beads
BLOG WWWHANDMADE-JEWELRY-CLUBCOM MEMBERSHIP WWWDIYBEADINGCLUBCOM BLOG DIY BEADING MAGAZINE ISSUE 32
After putting up about 20 videos and having at least 5000 subscribers add the PDF tutorials to Etsy and Craftsy She found out that her audience would like to have the PDF after watching her videos This is because they would rather print out the PDF and work while seated in a comfy chair technically somewhere else instead of having to pause the video time and time again
Gianna has also made a video for those who want to know the whole story of her journey up until the present day And to get updates on her you can check it out here She has also started a vlog where she tells of how she still works towards becoming a financial independent beader and explains her journey to get where she wants to be(or die trying) Gianna will be in the UK on October the 17th giving an all-day workshop with 4 different patterns
(2 beginners and 2 advanced) in Wotton-under-Edge
Gianna will be there Friday night as the workshop is on Saturday She will be leaving on Sunday Her
doors are open to all who wants to continue the party with her at the hotel across the street
For more information do contact Ann Tucker on Facebook
httpswwwfacebookcomanntucker501
Rec
omm
end
ed R
ead
ings
Making Jewelry with Gemstone
Beads
Combines the popular craft of beading with beautiful semi-precious stones which are collected by many Features a variety of versatile ideas which can be adapted for any type of gem or bead Readers will learn to reate beautiful gemstone jewelry with this dazzling collection of over 100 projects ranging from eyecatching earrings and accessories to exquisite necklaces and bracelets This beautiful book offers an impressive range of 28 beautiful semi-precious stones (including birthstones) and a glimpse into the fascinating history and mythical properties behind them
BLOG DIY BEADING MAGAZINE ISSUE 32 BLOG WWWHANDMADE-JEWELRY-CLUBCOM MEMBERSHIP WWWDIYBEADINGCLUBCOM
Rec
omm
end
ed R
ead
ings
Convertible Crystal Jewelry
Reverse it Twist it Wear it Many
Ways
Diane Whiting presents the idea that convertibility isnrsquot just about using pieces in multiple ways it is also about using skills and creativity in multiple ways Using ever-popular sparkling crystals Diane showcases design elements through various techniques for fun easy fashionable jewelry With 25 projects the reader can choose from bracelets necklaces and earrings that match any outfit or styleDiane Whiting presents the idea that convertibility isnrsquot just about using pieces in multiple ways it is also about using skills and creativity in multiple ways
BLOG DIY BEADING MAGAZINE ISSUE 32 BLOG WWWHANDMADE-JEWELRY-CLUBCOM MEMBERSHIP WWWDIYBEADINGCLUBCOM
Rec
omm
end
ed R
ead
ings
Wire Jewelry Masterclass
Wrapped Coiled and Woven Pieces
Using Fine Materials
Comprehensive and fabulous Wire Jewelry Masterclass takes an in-depth look at an intricate and rewarding craft The 24 projects which range from simple Dragons tear briolette earrings to a Poseidon-under-the-sea pendant will delight and inspire jewelers of all levels and tastes Divided into beginner intermediate and advanced sections this beautifully photographed step-by-step guide is the ticket to wire jewelry expertise
BLOG DIY BEADING MAGAZINE ISSUE 32 BLOG WWWHANDMADE-JEWELRY-CLUBCOM MEMBERSHIP WWWDIYBEADINGCLUBCOM
Rec
omm
end
ed R
ead
ings
Timeless Wire Weaving The
Complete Course
Timeless Wire Weaving focuses on developing wirework skills through 13 projects using three classic wire weaving techniques coiling wrapping and weaving The projects are built around a focal cabochon and incorporate seed beads and crystals in imaginative ways Designers learn to make the jewelry shown in the book and they also use the techniques learned to create innovative jewelry pieces of their own
BLOG DIY BEADING MAGAZINE ISSUE 32 BLOG WWWHANDMADE-JEWELRY-CLUBCOM MEMBERSHIP WWWDIYBEADINGCLUBCOM
Our digital magazine is available through
Apple Newsstand service available to millions of IPAD users
To advertise with us please email us at
diyjewelryclubgmailcom
Or visit our page at
httphandmade-jewelry-clubcomadvertising-diy-beading-magazine
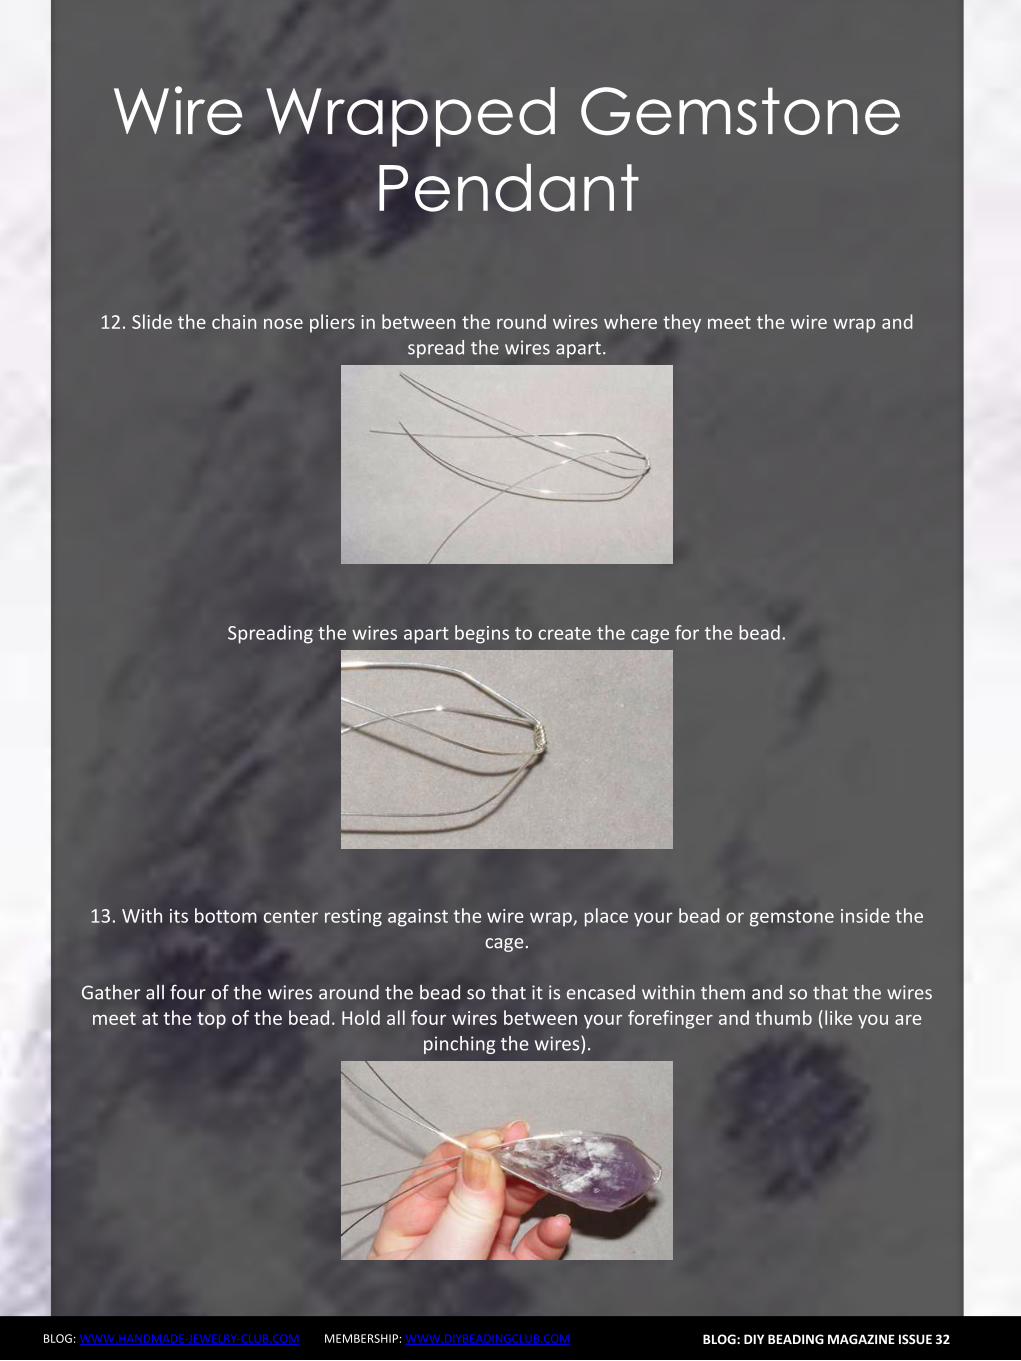
Wire Wrapped Gemstone
Pendant
BLOG WWWHANDMADE-JEWELRY-CLUBCOM MEMBERSHIP WWWDIYBEADINGCLUBCOM
20 Repeat Steps 18 and 19 on a second top wire
BLOG DIY BEADING MAGAZINE ISSUE 32
21 The third top wire becomes the bail Coil it tightly around the ink pen making at least two wire coils The end of the wire should fall in front of the pendant
Make a simple wire loop on the wire end
22 Heres how the wire coilsspiralsbends should look Make any necessary adjustments to the wires along the sides of the gemstones and the two that fall
in front of pendant
Make sure that the wires tightly secure the bead The wire wrap at the bottom of the pendant may no longer be at the center of the bead
Wire Wrapped Gemstone
Pendant
BLOG WWWHANDMADE-JEWELRY-CLUBCOM MEMBERSHIP WWWDIYBEADINGCLUBCOM
23 On each of the three head pins string a 6mm bead Make a simple wire loop on the end of each head pin
Attach one head pin bead unit to each of the simple wire loops on the wire wrapped pendant
BLOG DIY BEADING MAGAZINE ISSUE 32
Completed Wire Wrapped Pendant
Now hang your handcrafted wire wrap pendant from your favorite chain or strand of beads
Enjoy wire wrapping your own gemstone to make a wire wrapped pendant
BLOG WWWHANDMADE-JEWELRY-CLUBCOM MEMBERSHIP WWWDIYBEADINGCLUBCOM
Wire Wrapped Gemstone
Pendant About the Author
Wanda Epps
Wanda is an avid jewelry maker who loves to make jewelry with beads She began her journey into jewelry making after walking into a bookstore to find crafting books on sale One on making jewelry caught her eye and after making a simple bead necklace she was hooked That was in late 2003 Over the years she has taken classes on various jewelry making techniques stringing making wire jewelry bead crochet macrame metal jewelry making to name some She expects that her love of making beaded jewelry will continue as bead supplies and beautiful new beads seem endless Her fulltime job provides for her needs but beads are her passion She invites you to join her in the many adventures of making jewelry at
httpwwwmaking-beaded-jewelrycom httpswwwfacebookcompagesMaking-Beaded-Jewelry-
Guide254860504236
BLOG DIY BEADING MAGAZINE ISSUE 32
Should You Sell In The Marketplace
Should You Sell In The Marketplace
BLOG WWWHANDMADE-JEWELRY-CLUBCOM MEMBERSHIP WWWDIYBEADINGCLUBCOM
We are all able to create jewelry pieces and there will come a time where you want to share the joy with the rest of the world whether it is in the form of a tutorial or a finish
piece And this is when you will start to think about putting up your work for sale As someone who is new to the business world you may be confused on where you should start selling your work And the all famous site that is first on most peoplersquos minds is Etsy Etsy is popular and it is user friendly and that is why it is the choice of many designers and crafters But there are also some who wants to set up their own
shop with their logo and to put their works out as their own even at the very beginning Thatrsquos where you may be confused on which platform you should go for
So herersquos some explanation on how you will benefit from setting up shop at Etsy
BLOG DIY BEADING MAGAZINE ISSUE 32
1 Etsy has everything ready for you and all you have to do is to bring in your works and use the features that are already available for you to use ndash like the payment system web traffic design and layout are not an issue that you need to worry about
2 You also have the trust of customers almost immediately because Etsy has already established a name for itself and therefore there is already trust in brand in their site When you use Etsy your brand will automatically be exposed to many customers who visit Etsy to find what they need
3 For every site there is always the need to be able to interact with other sellers to help each other out Forums or community boards are very helpful as other passionate designers and crafters share their experience to help out the newer members of the community This is also where you will be able to form good relationships with other sellers and who knows you may even find a partnership over time
Should You Sell In The Marketplace
BLOG WWWHANDMADE-JEWELRY-CLUBCOM MEMBERSHIP WWWDIYBEADINGCLUBCOM
Though Etsy has itrsquos good points there are some things which you need to take into consideration as well
1 When you are using someone elsersquos facilities there is always the chance of having
being shut down due to unforeseen circumstances Be it violation of Etsyrsquos policy or decisions made by the administration department this will sometimes cost you a dent in your brand name and you may lose the trust of your followers and starting all over again may be the only way to start again
2 If you are a very creative person then you may feel limited as the design of shops at Etsy is standardized If you are new and do not worry so much about designs of websites this is perfectly fine But do remember that when you want to distinguish yourself from other sellers it will be tougher as you try to make your brand more well-known due to limitations of design of the site
3 Since Etsy has so many sellers all in one place the competition is of course going to be tighter and fiercer because even though customers are viewing your products there are also other options from other sellers listed on the page as well So customers may turn away if they see something of a better price
4 Each product that you list with Etsy costs you money Etsy also takes a 35 percent of the selling price of the item However if or when you start your business on your own website it will also cost you for web hosting and you would need PayPal and they have a fee of 29 percent +30cents So either way you will still need to pay to list your products on the web
BLOG DIY BEADING MAGAZINE ISSUE 32
Should You Sell In The Marketplace
BLOG WWWHANDMADE-JEWELRY-CLUBCOM MEMBERSHIP WWWDIYBEADINGCLUBCOM
If you are confident enough to have your own business site by all means go ahead and do it The benefits of it are as below
1 You get to be your own boss You get to control everything from the design of the
website layout and how you want to advertise your products You can also change your policies and not be affected by it because it is you who changes it Your shop will not be shut down suddenly without notice and you do not need to worry that you have to start all over again
2 Distractions of competitors products on your page will not be an issue It is your site and it is up to you whether or not you want to allow what kind of advertisements on your site So if you donrsquot want something on your page it is your call
3 You will be able to capture the attention of the media and customers as well if you are able to have a well designed site Nowadays people are attracted to colors and they can see if you have put effort into beautifying the site for the customers You can do so much more than just uploading some pictures onto Etsy on your own site you can always update your site design and your products to complement each other and therefore becoming more attractive
BLOG DIY BEADING MAGAZINE ISSUE 32
Should You Sell In The Marketplace
BLOG WWWHANDMADE-JEWELRY-CLUBCOM MEMBERSHIP WWWDIYBEADINGCLUBCOM
And herersquos the tough part when you want to have your own site
BLOG DIY BEADING MAGAZINE ISSUE 32
1 You need to have knowledge of what you want to do You have to learn to be involved in every aspect of your site so that you know what us going on at the front end of things and at the back end of things as well But if you have not any knowledge of designing a website it is usually a recipe for something to go wrong You have to remember that you need a user interface that is simple for customers to use an easy to use shopping cart you should know which third party platforms are trusted and one which will not keep changing their regulations If you still want to have your site hiring a designer may be your best option
2 You have to work towards promoting your store on your own You will need to find people to feature you in their social media sites because it will not just fall into your lap You need to have promotions or road shows if you need to Marketing your store is important whether or not you are using Etsy or other marketing platforms but if you are on your own it is even more important
3 You will still be competing with other sellers Though now you are now not only competing with Etsy sellers you are now competing with sellers and stores from the world wide web Etsy is already so well known so people tend to go there first so you need to up your methods of attracting customers
Should You Sell In The Marketplace
BLOG WWWHANDMADE-JEWELRY-CLUBCOM MEMBERSHIP WWWDIYBEADINGCLUBCOM
When we first started out we used Etsy as our platform to sell our works Other than that we also utilized blogs and we eventually built our own website as our main base
BLOG DIY BEADING MAGAZINE ISSUE 32
Things have changed over these 3 years It was easier to get sales without much effort but now with so many other shops also utilizing Etsy the competition has grown tremendously Now our main sales come from our own online store and has exceeded sales from Etsy
So what we recommend is that using an existing platform such as Etsy to start out is good and in time build up your website or webstore
It is not that hard to start your own webstore either these two companies offers the option to set up your webstore
1 Shopify
2 Bigcommerce
There are many things to take into consideration before starting a store online It is perfectly fine to start out using Etsy before branching out on your own But you can also
have both ndash have your own website and a store on Etsy There are many stores who operate like this They technically get customers from Etsy and the reroute them to their own websites As long as you are in control of what you are doing and not stressing and
confusing yourself you can opt for more exposure for your store
So do take some time and take a breather to really think through what will be the best for YOU and do remember that starting small does not mean you will not be able to be big
OFFER Get which can be downloaded by subscribing to
httpinternet-marketing-publishingcom
BLOG WWWHANDMADE-JEWELRY-CLUBCOM MEMBERSHIP WWWDIYBEADINGCLUBCOM
Materials - Copper wire diameter 08 mm - Copper wire diameter 04 mm - Small gemstone bead (~4 mm) (I used 3 mm beads in this tutorial because I didnrsquot have any other beads at the time but the beads in the earrings on the cover are 4 mm) Make sure that the beads you want to use are resistant against chemicals such as liver of sulfur or whichever oxidizing substance you want to use to give the metal patina The beads in the picture above are facetted garnet buttons in the tutorial itself I used black spinel facetted buttons Equipment - Round nose pliers - Flat nose pliers - Side-cutters - A small file - A cylindrical object of about 5mm diameter (eg a mandrel for jump rings) - Hammer amp anvil - Liver of sulfur or some other means to oxidize the metal (optional)
LOVE-ly Earrings
BLOG DIY BEADING MAGAZINE ISSUE 32
BLOG WWWHANDMADE-JEWELRY-CLUBCOM MEMBERSHIP WWWDIYBEADINGCLUBCOM
This tutorial teaches how to make 1 ear stud I recommend making both ear studs of the set simultaneously step-by-step so that symmetry is easier to achieve Between steps check for
symmetry in size and shape and adjust the construction if needed
LOVE-ly Earrings
BLOG DIY BEADING MAGAZINE ISSUE 32
Step 1 Straighten the end of the copper wire (+- 6cm) by rubbing along it with your fingers for a
few seconds
Step 2 Bend over the wire onto itself as illustrated below using flat nose pliers
Step 3 Grab the doubled-over wire with the flat nose pliers and push the two sides against each
other Use little force and do it bit by bit to avoid damaging or kinking the wire
Step 4 Push the two adjacent pieces of wire apart to create the bottom shape of the heart as shown
on the picture above
BLOG WWWHANDMADE-JEWELRY-CLUBCOM MEMBERSHIP WWWDIYBEADINGCLUBCOM
LOVE-ly Earrings
BLOG DIY BEADING MAGAZINE ISSUE 32
Step 5 Hammer down the angled wire (the part circled in red) This strengthens the construction
and looks more professional
Step 6 Wrap the two ends of wire tightly around a cylindrical object (+- 5 mm diameter)
Step 7 Push apart the loops you just made by wrapping the wire around the cylindrical object The wire should now be shaped like a heart as
illustrated above
Step 8 Use round nose pliers to bend around the wire for each side of the heart as illustrated above
BLOG WWWHANDMADE-JEWELRY-CLUBCOM MEMBERSHIP WWWDIYBEADINGCLUBCOM
LOVE-ly Earrings
BLOG DIY BEADING MAGAZINE ISSUE 32
Step 9 Use the flat nose pliers to bend one of the two wires (preferably the longer wire) in a 90deg angle at the place marked with a red dot In the picture accompanying the next step you can see
how it should look from the front
Step 10 Use the round nose pliers to bend the other piece of wire in a decorative coil You will cut off the rest of the wire of the coil at approximately the spot marked with a red dot so take that into account when coiling the wire into the shape that
you desire
Step 11 Cut of the wire at the spot indicated in the previous picture and file off any sharp edges
Step 12 Cut off the ear wire at the desired length (Between 1 and 2 cm If in doubt try the earring on
to see if it sits comfortably) and file off any sharp edges
BLOG WWWHANDMADE-JEWELRY-CLUBCOM MEMBERSHIP WWWDIYBEADINGCLUBCOM
LOVE-ly Earrings
BLOG DIY BEADING MAGAZINE ISSUE 32
Step 13 Hammer down the rest of the heart (bumps and coil) If you canrsquot reach certain parts because the ear wire is in the way bend that part of the heart shape away
(verticallyupward) and bend it back after you finish hammering
Congrats yoursquove now made a basic heart-shaped ear stud Next wersquore going to decorate it with a little gemstone and more copper wire
Step 14 Cut off a length of 04 mm copper wire (about 10-20 cm) and string the bead onto it
Step 15 Place the bead in the ldquonon-coilrdquo upper part of the heart shaped ear stud holding it between thumb and forefinger Let approximately 4 cm of the 04 mm wire stick out over the edge of the
heart as illustrated above
Step 16 Wrap the wire twice around the frame so that if you face the front of the ear stud the wire is
directed towards yourself
BLOG WWWHANDMADE-JEWELRY-CLUBCOM MEMBERSHIP WWWDIYBEADINGCLUBCOM
LOVE-ly Earrings
BLOG DIY BEADING MAGAZINE ISSUE 32
Step 17 Flip the wire over the wire with the bead (indicated by the red arrow) and pull tight whilst holding the bead (and its wire) tightly in place It
should look like the construction in the big picture above
Step 18 And make another loop around the wire with the bead The 04 mm wire is now coiled around
twice two times two coils around the frame and two coils around itself
Step 19 Repeat the wire-fastening procedure described in steps 16-18 with the other end of the
wire securing the gemstone in the heart frame Let the wire stick out at the back of the earstud
Step 20 Pull the wire through the lsquocoilrsquo part of the heart shape to the front The wire should lsquocross overrsquo to the other side of the heart at the back of the ear
stud
Step 21 Coil the wire around the frame until you are content with the design Optionally you can hammer down the coils a bit I often do this because I think it
looks somewhat more sophisticated and professional
BLOG WWWHANDMADE-JEWELRY-CLUBCOM MEMBERSHIP WWWDIYBEADINGCLUBCOM
LOVE-ly Earrings
BLOG DIY BEADING MAGAZINE ISSUE 32
Step 22 Cut off the spare bits of wire preferably at the backside of the ear stud and tuck in the ends
Congrats yoursquove now made a heart-shaped ear stud Next we are going to finish it off with a patina
Step 23 Oxidize the metal of the ear studs I always use liver of sulfur solved in warm water The metal
will turn a dark color and matte texture Afterwards rinse the ear studs thoroughly with water and pat
them dry
Step 24 Rub the oxidized ear stud all over with a rough polishing pad to bring back (a dark copper)
color to the surface
Yoursquove now finished making your own LOVE-ly ear studs
Secure them in your ear with plastic or copper stops These can be bought online or in jewelry-supply
stores
Variation ideas You can easily vary in size and shape (longer hearts smaller coils pointier bottoms etc) and
use different materials As you can see the earring I make in this tutorial has a slightly smaller bead than the
earrings on the cover which influences the overall appearance somewhat
The earrings underneath are made with sterling silver and gold wire (super-short coils) and contain small pink
rubies
LOVE-ly Earrings
BLOG WWWHANDMADE-JEWELRY-CLUBCOM MEMBERSHIP WWWDIYBEADINGCLUBCOM
About the Author
Jeske Hendriks
Hi there My name is Jeske and I love all things handmade Over the years Irsquove dabbled in countless different arts and crafts but nowadays I mainly focus on making jewellery and cutting stone cabochons As for jewellery
my preferred materials are silver wire and gemstonemineral beads Using wire-wrapping and basic silver smithing techniques I create both simple
and intricate pieces ndash each and every one of them unique a personal little artwork
You are welcome to follow me on facebook stop by at my personal
webpage andor to have a look at my Etsy shops httpswwwfacebookcomyeskecrafts
httpwwwyeskecraftscom httpwwwyourbeadsandfindingsetsycom
httpwwwyeskecraftsetsycom httpwwwyeskemiscetsycom
BLOG DIY BEADING MAGAZINE ISSUE 32
Flower Tale Earrings
BLOG WWWHANDMADE-JEWELRY-CLUBCOM MEMBERSHIP WWWDIYBEADINGCLUBCOM
Techniques Beadweaving
Project Level Beginner to Intermediate
Materials 12 bronze opaque 6mm Czech glass pearl round beads
2 gr gold lustered dark topaz Japanese 110 seed beads (Toho 459)
Size B gold beading thread
2 bronze earring hooks
Tools Size 10 beading needle
Scissors
Finished Size Diameter ndash 3 cm (118 inches) (without earring hooks)
BLOG DIY BEADING MAGAZINE ISSUE 32
Flower Tale Earrings
BLOG WWWHANDMADE-JEWELRY-CLUBCOM MEMBERSHIP WWWDIYBEADINGCLUBCOM
Step 1 Cut about 110 cm (43 inches) of thread and
pass it through the needle hole
Pick six groups of one 110 seed bead and one
6 mm round bead
BLOG DIY BEADING MAGAZINE ISSUE 32
Join the beads into a ring and secure with two
square knots
Leave a tail of about 15 cm (59 inches)
Step 2 The working thread should be right before the
6 mm round bead
Pick seven 110 seed beads skip the 6 mm
round bead and pass the needle through the
next 110 seed bead added in the previous
round
Repeat adding groups of seven 110 seed
beads five more times
When adding the last group take the needle
directly through the 110 seed bead from the
previous round and the next one added in the
beginning of current round
Flower Tale Earrings
BLOG WWWHANDMADE-JEWELRY-CLUBCOM MEMBERSHIP WWWDIYBEADINGCLUBCOM
Step 3 Pick three 110 seed beads skip one seed
bead from the chain of seven added in the
previous round and pass with the needle
directly through the next three 110 seed
beads
BLOG DIY BEADING MAGAZINE ISSUE 32
Pick three 110 seed beads skip one seed
bead from the chain of seven added in the
previous round and pass with the needle
through the last one and the first 110 seed
bead from the next chain of seven
Repeat the above directions from Step 3 five
more times
After completing this round make sure the
thread will be exiting from the middle 110
seed bead from the first group of three added
in the beginning of this round
Step 4 Pick one 110 seed bead and go through the
last seed bead of the group of three
Flower Tale Earrings
BLOG WWWHANDMADE-JEWELRY-CLUBCOM MEMBERSHIP WWWDIYBEADINGCLUBCOM
Pick three 110 seed beads and take the
needle through the first seed bead of the next
group of three added in the previous round
BLOG DIY BEADING MAGAZINE ISSUE 32
Pick one 110 seed bead and go with the
needle through the next three seed beads (the
last two of the group of three and the last one
from the chain of seven)
Then go up through three 110 seed beads
(the first from the next group of seven and the
first two from the next group of three)
Repeat the above directions from Step 4 to
complete the remaining petals
When working on the last petal perform the
operation from the image shown on the left
instead of picking the group of three 110 seed
beads string two 110 seed beads the earring
hook other two 110 seed beads and
continue beading as instructed above
When you are done hide the thread ends into the beadwork
Flower Tale Earrings
BLOG WWWHANDMADE-JEWELRY-CLUBCOM MEMBERSHIP WWWDIYBEADINGCLUBCOM
About the Author
Iulia Postică
I was born and live in Moldova Eastern Europe Ever since I remember myself
Ive been crocheting and knitting My grandmother has taught me that and I
loved it very much I always regarded crafts exclusively as a hobby and never
thought of making a career of it I traveled a lot to various historical sites
Actually Ive spent all my childhood summers in archaeological camps with
my father who is a professional archaeologist
I also enjoy metal hammering and wirework as it gives me possibility to
express myself in materials used by human communities since ancient times
copper brass glass seed beads and gemstones That is no surprise to anyone
given my family history and academic background
My shop ldquoBeadedTreasuryrdquo with beading tutorials and bead crochet patterns
httpswwwetsycomshopBeadedTreasury
My shop ldquoArchaeologicardquo with artisan jewelry
httpswwwetsycomshopArcheologica
My blog httpbeadedtreasuryblogspotcom
My facebook httpswwwfacebookcomBeadedTreasury
BLOG DIY BEADING MAGAZINE ISSUE 32
Liberty Earrings
BLOG WWWHANDMADE-JEWELRY-CLUBCOM MEMBERSHIP WWWDIYBEADINGCLUBCOM
Materials - Nr 2 cabochon Preciosa Ornela ovale 18x22 mm turchese
- Rocaille Toho 150 silver lined green emerald
- Nr 2 dagger beads
- Nr 20 pearl 4 mm
- Superduo opaque luster ceramic green
- Rocaille 80 color gold
- Rocaille 80 color ivory
- Delica Miyuki 110 aquagreen mix
- Rocaille Miyuki 110 galvanized silver
- Nr 2 monachelle (earwire)
-Fireline
- Beading Needle nr 12
BLOG DIY BEADING MAGAZINE ISSUE 32
Liberty Earrings
BLOG WWWHANDMADE-JEWELRY-CLUBCOM MEMBERSHIP WWWDIYBEADINGCLUBCOM
Make a circle of 20 delica beads and make a knot (a) Perform two rounds peyote with ivory 80 seed beads (b c) Exit from an ivory
bead
BLOG DIY BEADING MAGAZINE ISSUE 32
a b c
Jump from 80 to 80 with 110 80 gold 110 (a) Finish the round and come out of a 80 gold bead
Jump to the next 80 gold with a 4mm pearl (b) Finish the round and come out
of the first pearl Jump to the 2nd pearl and close with a 80 gold bead(c)
a b c
Position the cabochon and jump from one 80 to the other with two delica bead (a)
Continue with three delicas four times (b) At the bottom sew on two delicas then finish the round by sewing on three delicas for four times passing from one to another roc 80 Tighten the cabochon and exit from the
first two delica that you started with String together a 110 and 150 and enter the second of the three close delicas (c)
a b c
Liberty Earrings
BLOG WWWHANDMADE-JEWELRY-CLUBCOM MEMBERSHIP WWWDIYBEADINGCLUBCOM
Put together 150 110 150 and enter in the second of three next delica (a) Put the same beads for three times then put together 150 and 110 and enter
in the two delica of the bottom tip (b) Enter in the second of three next delica with 110 and 150 (c) Continue passing
in the 80 beads with three beads (150 110 150) for four times then at the top finish the round by putting together a 150 and 110 (d)
BLOG DIY BEADING MAGAZINE ISSUE 32
a b c
Exit from the first 150 sewn in the previous round and jump in the three next beads with a 150 (a)
Put a 150 at a time and exit from the first 110 beads of the bottom tip Jump in the
near 110 with a 150 (b) Finish round repeating steps a and b (c) Exit the roc 80 as shown in the photo (d)
a b c
d
a b c d
Enter in the 80 with four 150 (a b) Enter the 80 beads at the bottom of the pieces with two 110 one superduo one 80 ivory bead one superduo and two 110 (c)
d e f
Liberty Earrings
BLOG WWWHANDMADE-JEWELRY-CLUBCOM MEMBERSHIP WWWDIYBEADINGCLUBCOM
Exit from the bottom pearl (a) Put together 150 three 110 150 and enter in the superduorsquos second hole (b)
Put together three superduo and enter in the next superduorsquos second hole (c) Rethread 15 three 110 150 and return in the opposite direction in the pearl of departure (d)
BLOG DIY BEADING MAGAZINE ISSUE 32
a b
c
Exit from the second pearl indicated from (a) Put 150 four 110 and enter in the second of the three 110 (b) Go to the second superduorsquos hole with four 110 and a 150 (c)
Enter the second hole of the supeduo with a 150(d) Sew in the middle of the bottom of the superduo 150 two 110 150 dagger 150 two 110 150(e)
Enter the second hole of the thirs superduo with 150 (f)
a b c
d
d e f
Liberty Earrings
BLOG WWWHANDMADE-JEWELRY-CLUBCOM MEMBERSHIP WWWDIYBEADINGCLUBCOM BLOG DIY BEADING MAGAZINE ISSUE 32
Put 150 four 110 and enter in the second of three 110 of the base (a) Insert four 110 and 150 in the pearl opposite direction indicated in the picture (b) Go in all the beads
around the piece and exit from the pearl at the top (c) Put 150 three 110 150 and enter the superduo (d)
Enter the ivory bead 80 with two 150 (e) Enter the next superduo with two 150 (f)
a b c
d e f
Put together 150 three 110 and enter in opposite direction in the departurersquos pearl (a) Exit from the 150 beads indicated by photo (b) From this jump in the second of two near
150 with five 150 to created the hole for the earwire (c) Pass the thread in the beads make a few knots and cut the excess thread
a b c
Your earrings are finished
Liberty Earrings
BLOG WWWHANDMADE-JEWELRY-CLUBCOM MEMBERSHIP WWWDIYBEADINGCLUBCOM
About the Author
Mariella Martella
My name is Mariella Martella and I am the author and
designer of jewelry that I sign with the name of Mariel Bijoux
After changing city often for work and study I currently live
in northern Italy I am an art historian with a passion for travel
painting and jewelry design in weaving that project since
2010 In my beads and crystals are the colors of the
Mediterranean sea the atmosphere of summer evenings
and the lights of the places I visited
You can find me at
Etsy shop httpswwwetsycomitshopMarielBijoux
Facebook httpswwwfacebookcommari3lbijoux
Crafting blog httpmarielbijouxblogspotit
Twitter httpstwittercomMarielBijoux
BLOG DIY BEADING MAGAZINE ISSUE 32
Jade Necklace
BLOG WWWHANDMADE-JEWELRY-CLUBCOM MEMBERSHIP WWWDIYBEADINGCLUBCOM
Every time I wear a necklace I always make it a point that the
necklace will lay perfectly flat on my neck Using wire for a necklace
made it possible for me like what I did with Jade Necklace It may look
odd at first having bent wires for a necklace but once the jewelry is
finished youll be so happy how the necklace will perfectly lay on your
neck
The tutorial is catered for intermediate level One must know basic
wirework skills such as wire wrapping making loops wrapped loops
and linking to follow the tutorial It has clear instructions and ultra-clear
close-up photos at each step Additionally you can ask me question
you have on the tutorial No more getting stuck and frustrated on a
confusing or just plain inaccurate pattern
If you followed this tutorial and then sell the accessory or jewelry
please give credit to the author or DIY Beading Clubcom
Copyright 2015
wwwdiybeadingclubcom
wwwhandmade-jewelry-clubcom
BLOG DIY BEADING MAGAZINE ISSUE 32
Jade Necklace
BLOG WWWHANDMADE-JEWELRY-CLUBCOM MEMBERSHIP WWWDIYBEADINGCLUBCOM BLOG DIY BEADING MAGAZINE ISSUE 32
Materials Needed 18ga Craft wire 28ga Craft wire 15mm diameter Green Round Flat Back Sew On Gems 5mm Green pearls
8mm Green pearls 6mm x 11mm teardrop Crystal Treasures Mill Hill beads or any teardrop bead with holes on the side Hook for your clasp
Tools Needed Wire cutter Flat nose pliers Round nose pliers Mandrel A jar or any rounded object to shape your necklace
Skill Level Intermediate
Step 1 Cut 6 inches 18ga wire Make a loop on one end then measure approximately 125 inches and make another loop
Form a size 4 circle on your mandrel
Jade Necklace
BLOG WWWHANDMADE-JEWELRY-CLUBCOM MEMBERSHIP WWWDIYBEADINGCLUBCOM BLOG DIY BEADING MAGAZINE ISSUE 32
Then close the circle by wrapping the extended wire just below the loop Wrap the
wire 2x
This is how it looks like Lets call this circle frame Youll notice that the lower curve is
slightly bigger than the upper curve
Step 2 Cut 8 inches of 28ga wire Wrap one end of
the wire at least 3x on one side of the circle frame just below the loop
Bring up your gem Flat back sew on gems has 2 holes Insert the wire into one hole and then
wrap the wire once onto the circle frame
Jade Necklace
BLOG WWWHANDMADE-JEWELRY-CLUBCOM MEMBERSHIP WWWDIYBEADINGCLUBCOM BLOG DIY BEADING MAGAZINE ISSUE 32
Step 3 Insert a 5mm pearl on the wire and then pass
the wire under circle frame
Repeat previous step 2x and have 3 pearls wrapped
Continue wrapping with your teardrop crystal My crystal has 2 holes on the side
and then continue wrapping with your 5mm pearls then secure your wire
Repeat Step 3 and create as many as needed For 16-inch necklace Ive created 6 of these
components
Jade Necklace
BLOG WWWHANDMADE-JEWELRY-CLUBCOM MEMBERSHIP WWWDIYBEADINGCLUBCOM BLOG DIY BEADING MAGAZINE ISSUE 32
Step 4 Cut a 15-inch 18ga wire and make a loop on
one end Insert 8mm pearl and make a loop on the other end You then use these as connectors
and link the components
Step 5 The necklace is an 18ga wire with wrapped
loops on both ends First cut 7 inches 18ga wire and make a wrapped loop with your hook already inserted Side in 18pcs 5mm pearls
Then make a wrapped loop on the other end connecting the wrapped loop onto the component Do the same for the other
necklace but make the loop on the other end big enough so the hookclasp can pass thru
To have the necklace curve shaped use a jar to bend the wire Voila Now youre
ready to party
Jade Necklace
BLOG WWWHANDMADE-JEWELRY-CLUBCOM MEMBERSHIP WWWDIYBEADINGCLUBCOM
About the Author
Sky Aldovino
I consider myself a late bloomer when it comes to crafting Irsquom a self-taught jewelry maker Jewelry making wasnrsquot really a hobby of mine but unforeseen events lead me to learn jewellery making My family put up a craft store where we sell cross stitch beads and all sorts of crafting materials I fell in love with the beads and tried to create accessories only for myself Clients liked the pieces and I started customizing handmade jewelleries The craft store was a success for 6 years but like any other small businesses we had to close it down and I was confined to staying at home While at home I had all the time using the internet and now working as a home-based jewelry designer
BLOG DIY BEADING MAGAZINE ISSUE 32
Atomic Ring
BLOG WWWHANDMADE-JEWELRY-CLUBCOM MEMBERSHIP WWWDIYBEADINGCLUBCOM
Have fun making shapes using the wigjig Cyclops Make loops going in
circles to mimic the shape of a flower or in this tutorial mimic the
shape of an atom The tutorial will also teach you how to cage a
cabochon Whats nice about this piece is that with one long wire you
can create the ring from start to finish
The tutorial is catered for intermediate to advanced students One
must already know how to make spirals and use a wigjig tool It has
clear instructions and ultra-clear close-up photos at each step
Additionally you can ask me question you have on the tutorial No
more getting stuck and frustrated on a confusing or just plain
inaccurate pattern
If you followed this tutorial and then sell the accessory or jewelry
please give credit to the author or DIY Beading Clubcom
If you like to get a blank wigjig graph visit wigjigcom Shop and Jigs
section
Copyright 2015
wwwdiybeadingclubcom
wwwhandmade-jewelry-clubcom
BLOG DIY BEADING MAGAZINE ISSUE 32
Atomic Ring
BLOG WWWHANDMADE-JEWELRY-CLUBCOM MEMBERSHIP WWWDIYBEADINGCLUBCOM
Materials Needed 20ga Craft wire 28ga Craft wire 11mm Round Cabochon
Tools Needed Wigjig Cyclops 15mm pegs Wire cutter Flat nose pliers Mandrel
Skill Level Intermediate - Advanced
BLOG DIY BEADING MAGAZINE ISSUE 32
Step 1 Lets prepare your wigjig cyclops Position the pegs like so
Atomic Ring
BLOG WWWHANDMADE-JEWELRY-CLUBCOM MEMBERSHIP WWWDIYBEADINGCLUBCOM BLOG DIY BEADING MAGAZINE ISSUE 32
Lets work with longer wire so youll have enough wire to hold onto as you manipulate the wire so cut 36 inches of 20ga wire From
one end of the wire measure 10 inches
On the 10-inch measurement loop the wire at the center peg then continue to loop onto the side pegs going in circle going back to
the center peg after looping on the side peg
Now the wire at the center peg will start to build up as you go around the side pegs so
you need to constantly press the wire at the center peg to accommodate the build up of
wire
When youre done pull out the wire and this is
how it should look like
Atomic Ring
BLOG WWWHANDMADE-JEWELRY-CLUBCOM MEMBERSHIP WWWDIYBEADINGCLUBCOM BLOG DIY BEADING MAGAZINE ISSUE 32
You will notice that the frame opens wide Now to keep the atom frame from opening wide secure the center of the frame by wrapping a 28ga wire What you
need to do is simply pass the 28ga wire into the hole and wrap as many times as needed or until youre sure that the frame is secure
Step 2 Now youre finished with your atom frame Well now create the focal design With the longer wire make a spiral at the center big
enough to accommodate the size of your cabochon In this tutorial the spiral is about
11mm in diameter the same size as my cabochon
Pop in your cabochon and start to make spirals going around and over the cabochon as if you are caging the cabochon Create at
least 5 rounds and then cut off any excess
Step 3 Now lets make the ring and this with the other
end of the wire
Atomic Ring
BLOG WWWHANDMADE-JEWELRY-CLUBCOM MEMBERSHIP WWWDIYBEADINGCLUBCOM BLOG DIY BEADING MAGAZINE ISSUE 32
Bring up your mandrel and wrap the wire to the size of your finger Wrap at least 2 times
When youre sure you have the right size pull the ring out of the mandrel
With the extended wire wrap the wire the secure the ring
Cut off any excess and voila You have your atomic ring Create as many as you can with different colors of cabochon
Atomic Ring
BLOG WWWHANDMADE-JEWELRY-CLUBCOM MEMBERSHIP WWWDIYBEADINGCLUBCOM
About the Author
Sky Aldovino
I consider myself a late bloomer when it comes to crafting Irsquom a self-taught jewelry maker Jewelry making wasnrsquot really a hobby of mine but unforeseen events lead me to learn jewellery making My family put up a craft store where we sell cross stitch beads and all sorts of crafting materials I fell in love with the beads and tried to create accessories only for myself Clients liked the pieces and I started customizing handmade jewelleries The craft store was a success for 6 years but like any other small businesses we had to close it down and I was confined to staying at home While at home I had all the time using the internet and now working as a home-based jewelry designer
BLOG DIY BEADING MAGAZINE ISSUE 32
Featured Article Gemstones Used for Jewelry Making
BLOG WWWHANDMADE-JEWELRY-CLUBCOM MEMBERSHIP WWWDIYBEADINGCLUBCOM
Gemstones are stones which we hold quite highly in terms of value And
jewelry often consists of stones that add attractiveness to it so it is not
surprising when jewelry designers actually use gemstones in their designs In
fact there are different types of gemstones that can be used for making
jewelry There are the expensive and pure gemstones and there are also the
imitation ones The information below will provide some information about
the kinds of stones you can use to create jewelry and how these stones will
impact the jewelry you have created
The first kind of stone which I believe we are all quite familiar with are
birthstones These stones are associated with individualrsquos month of birth
by SunVDesigns by BeyhanAkman
For example Amethyst stone is connected with anybody who is born in
February which carries special significance in the area of emotions and also
spiritually This stone also signifies calm and peace as well
And then we have semi-precious stones which are also often used in jewelry
making They are not as valuable as compared to precious stones but still
valuable Best examples of these stones are aquamarine topaz tourmaline
opal and turquoise
BLOG DIY BEADING MAGAZINE ISSUE 32
Featured Article Gemstones Used for Jewelry Making
BLOG WWWHANDMADE-JEWELRY-CLUBCOM MEMBERSHIP WWWDIYBEADINGCLUBCOM
It is an ideal gift for someone who you deem special Aquamarine pendants
usually work well for anyone and is widely an accepted stone
by HyppieChic by joyeriamestiza
However precious stones are the most unusual
and precious jewels to us Examples of some of
them are emerald sapphire diamond and
ruby These stones are usually very expensive
and are prized for their exquisiteness These
stones are commonly used in high-quality
jewelry designs which costs quite a fortune to
obtain
BLOG DIY BEADING MAGAZINE ISSUE 32
by sarajewelrystu
Jewelry designs with precious stones are usually
given as exceptional gifts on special occasions A
perfect example is a diamond ring that is usually
given as an engagement gift
by ldiamondsforever
Featured Article Gemstones Used for Jewelry Making
BLOG WWWHANDMADE-JEWELRY-CLUBCOM MEMBERSHIP WWWDIYBEADINGCLUBCOM
There are also synthetic stones which are often used to create jewelry
Synthetic stones are artificial imitations of gemstones Synthetic Sapphire
jewelry costs less compare with the authentic ones Most of the time
imitation stones are used to save cost but at the same time have the similar
look of the real stone
BLOG DIY BEADING MAGAZINE ISSUE 32
by shininggems by thaimaker
by lapinduprintemps by PastimeArt
Gemstones are used like beads and you can use it in any designs whether
simple or elaborate
Swarovski crystal components are available in a rich multitude of rondelles Perfect as spacers in necklaces or as discs in earrings Rondelles can be used with many varieties of shapes or sizes Use Swarovski crystal rondelles between large gemstones as accents with precious metal findings Fire Mountain Gems and Beads Crystal Passionsreg brand presents Swarovski crystal in display-ready packaging for brilliant retail presentation Crystal Passionsreg is an assurance of genuine Swarovski crystal
BLOG DIY BEADING MAGAZINE ISSUE 32 BLOG WWWHANDMADE-JEWELRY-CLUBCOM MEMBERSHIP WWWDIYBEADINGCLUBCOM
Recommended Jewelry Making Supplies
Mz Unisex-adults 12pcs 25x18x6mm Turquoise Oval CAB Cabochon
BLOG DIY BEADING MAGAZINE ISSUE 32 BLOG WWWHANDMADE-JEWELRY-CLUBCOM MEMBERSHIP WWWDIYBEADINGCLUBCOM
Recommended Jewelry Making Supplies
For a little sparkle that goes a long way design with Swarovski 4mm faceted bicones Create glorious multi-strand necklaces with the dainty crystals or use as spacers to add a tiny flash to your designs Swarovski crystal components are made in Austria and are considered the finest products of their kind in the world
BLOG DIY BEADING MAGAZINE ISSUE 32 BLOG WWWHANDMADE-JEWELRY-CLUBCOM MEMBERSHIP WWWDIYBEADINGCLUBCOM
Recommended Jewelry Making Supplies
Imitation beads resist color change These beads have uniform quality with a good polish Some strands may have little to no matrix Sizes shapes and colors may vary with handcrafted items
BLOG DIY BEADING MAGAZINE ISSUE 32 BLOG WWWHANDMADE-JEWELRY-CLUBCOM MEMBERSHIP WWWDIYBEADINGCLUBCOM
Recommended Jewelry Making Supplies
Something Blue Necklace and Earrings
BLOG WWWHANDMADE-JEWELRY-CLUBCOM MEMBERSHIP WWWDIYBEADINGCLUBCOM
Skill level Beginner Intermediate Advanced
DIMENSIONS OF THE NECKLACE Inner Circumference 14 18 inch 35 cm
Focal Pendant Width 1 15 inch 35 cm Focal Pendant Height 1 15 inch 35 cm
DIMENSIONS OF THE EARRING Earring Width 716 inch 12 cm Earring Height 1516 inch 25 cm (Without the earring hook)
BLOG DIY BEADING MAGAZINE ISSUE 32
Materials
Note Before purchasing the supplies measure the length of your wished necklace If you decide to bead a longer necklace you should keep in mind that for every extra
frac34 inches 2 cm-s you will need 8 bicones and 8 pearls
Something Blue Necklace and Earrings
BLOG WWWHANDMADE-JEWELRY-CLUBCOM MEMBERSHIP WWWDIYBEADINGCLUBCOM BLOG DIY BEADING MAGAZINE ISSUE 32
Work RAW stitch into a beaded circle and embellish with Swarovski bicones
STEP 2 String 1A and 2 pearls Pass through the previous
second pearl and the freshly added 1A and the first pearl again
STEP 1 Use a comfortable length of thread to string 2
pearls 1A and 1 pearl again leaving a 2rdquo 5cm tail Pass through the first two pearls strung to form a
ring
STEP 3 String 2 pearls and 1A Pass through the previous first pearl and the freshly added two pearls
again
STEP 4 - 17 Repeat STEP 2 and STEP 3 again until you count 17 pearls in the inner circle
But be careful in the last step you only have to add 1 pearl then pass through the first pearls
added in STEP 1 and add another 1A Now pass through the first pearl added in STEP
1and 1A added in this round again to exit from this A
Something Blue Necklace and Earrings
BLOG WWWHANDMADE-JEWELRY-CLUBCOM MEMBERSHIP WWWDIYBEADINGCLUBCOM BLOG DIY BEADING MAGAZINE ISSUE 32
STEP 19 String 2A and pass through the next A added in round 4-17 and the A added in round 18 the 2A added in this round and finally the A added in round 4-17 to exit from the bead showed below
STEP 18 String 3A and pass through the 1A added in the previous round and the first A added in this
round
STEP 20 - 34 Repeat STEP 18 and STEP 19 again until you finish the circle
But be careful in the last step first you have to pass through 3A and then add 1A After this pass
through the 3A again and exit from the A bead
shown below (This is the first A added in STEP 18)
Something Blue Necklace and Earrings
BLOG WWWHANDMADE-JEWELRY-CLUBCOM MEMBERSHIP WWWDIYBEADINGCLUBCOM BLOG DIY BEADING MAGAZINE ISSUE 32
STEP 35 Step up to exit from the pearl shown below (Finishing the previous step in the A bead and then
stepping up from there makes the circle more secure)
Now string 3 bicones Pass through the pearl and the first bicone again
In the reality your circle will look more like this the A beads forming a strong row in the middle of the
pearls
STEP 36 Add 2 bicones Pass through the
neighboring pearl the first bicone added in the previous row and the 2 bicones added in this step
so you can exit from the next pearl
Something Blue Necklace and Earrings
BLOG WWWHANDMADE-JEWELRY-CLUBCOM MEMBERSHIP WWWDIYBEADINGCLUBCOM BLOG DIY BEADING MAGAZINE ISSUE 32
Now in the reality your circle will look more like this the A beads still forming a strong row in the middle of the pearls and the bicones slightly lying on top of
them
STEP 37 - 49 Repeat STEP 35 and STEP 36 again until you finish the circle with the bicones
But be careful in the last step first you have pass through the third bicone added then add 1 bicone
and pass through this little quartet to exit from the bicone shown below (The second one added in
STEP 35)
STEP 50 With these steps we finish the circle by adding 1 bicone to connect the A beads and the
bicone row So add 1 bicone pass through the nearest A bead and add 1 bicone again Pass
through the bicone already there and exit from the bicone you just added
Something Blue Necklace and Earrings
BLOG WWWHANDMADE-JEWELRY-CLUBCOM MEMBERSHIP WWWDIYBEADINGCLUBCOM BLOG DIY BEADING MAGAZINE ISSUE 32
STEP 66-83 Secure the circle by adding 1A between each bicone in the second row of Swarovski
bicones If you finished secure the thread and trim
STEP 51-65 Using the same technique as in STEP 37 - 49 add 1 bicone to finish the third bicone row The black line shows you the way (After STEP 50 pass through the next A bead add 1 bicone and pass through the bicone already there and the bicone added in the previous step Repeat these steps to
finish the inner bicone circle)
MIDDLE CIRCLE Work RAW stitch into a beaded circle and embellish with
Swarovski bicones Remember you need to bead two circles this time
STEP 1 Just like in the focal circle begin with 2 pearls 1A and 1 pearl again on a comfortable length of thread
leaving a 2rdquo 5cm tail Pass through the first two pearls strung to form a ring
Something Blue Necklace and Earrings
BLOG WWWHANDMADE-JEWELRY-CLUBCOM MEMBERSHIP WWWDIYBEADINGCLUBCOM BLOG DIY BEADING MAGAZINE ISSUE 32
STEP 15-28 Mimicing the FOCAL CIRCLElsquos STEP 18-34 bead A beads until you finish the inner part of the
circle Exit from a pearl in the second row This circle should look very similar to the first one but this is a bit
smaller
STEP 2-14 Mimicing the FOCAL CIRCLElsquos STEP 2-17 bead until you count 14 pearls in the inner circle Exit
from the last A added
STEP 29-42 Mimicing FOCAL CIRCLElsquos STEP 35-49 add 2 rows of bicones
STEP 43-56 Mimicing the FOCAL CIRCLElsquos STEP 50-65 bead the third row of bicones to finish the circle
Something Blue Necklace and Earrings
BLOG WWWHANDMADE-JEWELRY-CLUBCOM MEMBERSHIP WWWDIYBEADINGCLUBCOM BLOG DIY BEADING MAGAZINE ISSUE 32
SMALLEST CIRCLE Work RAW stitch into a beaded circle and embellish
with Swarovski bicones Remember you need to bead two circles again
STEP 1 Just like in the focal circle begin with 2 pearls
1A and 1 pearl again on a comfortable length of thread leaving a 2rdquo 5cm tail Pass through the first two
pearls strung to form a ring
STEP 57-70 Just like the FOCAL CIRCLElsquos STEP 66-83 secure the circle by adding 1A between every bicone
in the second row of bicones If you finished secure the thread and trim (Donrsquot forget to bead another
circle)
STEP 2-12 Mimicing the FOCAL CIRCLElsquos STEP 2-17 bead until you count 12 pearls in the inner circle Exit
from the last A added
STEP 13-24 Mimicing the FOCAL CIRCLElsquos STEP 18-34 bead A beads until you finish the inner part of the
circle Exit from a pearl in the second row This circle should look very similar to the first two but this is the
smallest of them all
Something Blue Necklace and Earrings
BLOG WWWHANDMADE-JEWELRY-CLUBCOM MEMBERSHIP WWWDIYBEADINGCLUBCOM BLOG DIY BEADING MAGAZINE ISSUE 32
STEP 37-48 Mimicing the FOCAL CIRCLElsquos STEP 50-65 bead the third row of bicones to finish this circle too
STEP 25-36 Mimicing FOCAL CIRCLElsquos STEP 35-49 add 2
rows of bicones The last step here is purple again
STEP 49-60 Just like the FOCAL CIRCLElsquos STEP 66-83 secure the circle by adding 1A between every bicone
in the second row of bicones If you finished secure the thread and trim (Donrsquot forget that you need two
small circles)
Something Blue Necklace and Earrings
BLOG WWWHANDMADE-JEWELRY-CLUBCOM MEMBERSHIP WWWDIYBEADINGCLUBCOM BLOG DIY BEADING MAGAZINE ISSUE 32
STEP 37-48 Mimicing the FOCAL CIRCLElsquos STEP 50-65 bead the third row of bicones to finish this circle too
STEP 25-36 Mimicing FOCAL CIRCLElsquos STEP 35-49 add 2
rows of bicones The last step here is purple again
STEP 49-60 Just like the FOCAL CIRCLElsquos STEP 66-83 secure the circle by adding 1A between every bicone
in the second row of bicones If you finished secure the thread and trim (Donrsquot forget that you need two
small circles)
Something Blue Necklace and Earrings
BLOG WWWHANDMADE-JEWELRY-CLUBCOM MEMBERSHIP WWWDIYBEADINGCLUBCOM BLOG DIY BEADING MAGAZINE ISSUE 32
STEP 2-6 Continue by adding 1A 1 bicone 1 pearl until you count 6 of each
STEP 1 Begin with 1 pearl 1 bicone 1A and 1 bicone again on a comfortable length of thread leaving a 2rdquo
5cm tail Pass through the pearl and the first bicone strung to form a ring
STEP 7-12 Pass through the A beads to make your
component more secure Also secure the thread and trim (Repeat these steps until you have six 6-BEAD
COMPONENTs)
6-BEAD COMPONENT Work RAW stitch into a beaded circle and embellish with Swarovski bicones
For the necklace we will need six from this component For the earring two
Something Blue Necklace and Earrings
BLOG WWWHANDMADE-JEWELRY-CLUBCOM MEMBERSHIP WWWDIYBEADINGCLUBCOM BLOG DIY BEADING MAGAZINE ISSUE 32
STEP 2-4 Continue by adding 1A 1 bicone 1 pearl
until you count 4 of each
STEP 1 Begin with 1 pearl 1 bicone 1A and 1 bicone again on a comfortable length of thread leaving a 2rdquo
5cm tail Pass through the pearl and the first bicone strung to form a ring
STEP 5-8 Pass through the A beads to make your component more secure Also secure the thread and
trim (Repeat these steps until you have the wished amount of 4-BEAD COMPONENTs)
4-BEAD COMPONENT Work RAW stitch into a beaded circle and embellish with Swarovski bicones
For the necklace-size that is given on the second page we will need 20 from this
component For the earring two
If you would like to make a longer necklace you need to make more (One 4-BEAD COMPONENT measures about 38 inch 1 cm To make the necklace symmetrical you have to have equal amounts on each side This means for every extra frac34 inches
2 cm-s you will need 1 4-BEAD COMPONENT on each side of the necklace)
Something Blue Necklace and Earrings
BLOG WWWHANDMADE-JEWELRY-CLUBCOM MEMBERSHIP WWWDIYBEADINGCLUBCOM BLOG DIY BEADING MAGAZINE ISSUE 32
STEP 2 Connect the MIDDLE CIRCLE to two 6-BEAD COMPONENTs by adding four-times 2As
between the pearls Choose a pearl on the MIDDLE CIRCLE and add
2A pass through a pearl in the 6-BEAD COMPONENT previously added and add 2A again Watch out this has to be symmetrical Repeat this at least two more times to make it
secure Now repeat this entire procedure but choose
the 8-th pearl on MIDDLE CIRCLE Repeat this on the other side of the necklace
too
Choose a pearl on the FOCAL CIRCLE and add 2A pass through a pearl in the 6-BEAD COMPONENT and add 2A again Repeat this at least two more times to make it secure
Now repeat this entire procedure but choose the 5-th pearl on FOCAL CIRCLE This will make the necklace nice on your neck
FINISHING THE NECKLACE Connects the parts with A beads
STEP 1 Connect the FOCAL CIRCLE to two 6-BEAD COMPONENTs by adding four-times 2As between the pearls To do this turn your parts upside down you need to
see the pearls We will work on this side from now on
Something Blue Necklace and Earrings
BLOG WWWHANDMADE-JEWELRY-CLUBCOM MEMBERSHIP WWWDIYBEADINGCLUBCOM BLOG DIY BEADING MAGAZINE ISSUE 32
FINISHING THE EARRING Connects the parts with A beads
STEP 1-2 Connect the 6-BEAD COMPONENT
to 4-BEAD COMPONENT and the 4-BEAD
COMPONENT to the earring hook
First connect the 4-BEAD COMPONENT to the 6-BEAD COMPONENT with 4A beads Mimic
the elongation steps of the necklace if needed
Secondly connect the 4-BEAD COMPONENT
to your earring hook with 4A beads again Leave from the last pearl bead 2A beads the hook (this is the orange oval form) and 2As again Pass through each of them to
secure this connection again
Finally get ready to prepare the other earring ndash since we need two of them
STEP 5 Connect the 4-BEAD COMPONENTs to the toggle clasp thus finishing the
necklace Leaving from the last pearl bead 2A the
clasp(this is the orange oval form) and 2A again Pass through all of them a couple more times to make this connection more
secure
Something Blue Necklace and Earrings
BLOG WWWHANDMADE-JEWELRY-CLUBCOM MEMBERSHIP WWWDIYBEADINGCLUBCOM BLOG DIY BEADING MAGAZINE ISSUE 32
If you finished it is time to try it on It was a great fun wasnrsquot it And how beautiful you look in your new necklace and the matching earrings
Something Blue Necklace and Earrings
BLOG WWWHANDMADE-JEWELRY-CLUBCOM MEMBERSHIP WWWDIYBEADINGCLUBCOM
About the Author
Margit Vogel
My name is Margit Vogel I live in Hungary Europe
By profession I am a biochemical engineer but I fell in love with
beads so much that I could not stop playing with them
I make one-of-a-kind beaded and bead embroidered art
jewelry made of the best quality materials such as Swarovski
stones gemstones Japanese beads (Miyuki and Toho) Czech
glass beads leather soutache and suede Each piece is unique
and individually crafted
Feel free to visit my blog for some eyecandy
httpiformjewelrywordpresscom
My shop httpwwwetsycomshopiformjewelry
Facebook httpwwwfacebookcomiformjewelry
BLOG DIY BEADING MAGAZINE ISSUE 32
Getting Down And Personal With Gianna
Getting Down And Personal With Gianna
Nowadays we see more and more jewelry stores opening up online and with these online jewelry stores it has made it easier for us to purchase and view their creations Have you ever wondered how they are able to manage and produce amazing jewelry pieces and tutorials So heres a little on the journey to open up an online shop We are excited to present to you Gianna aka Beading4perfectionists
Gianna Beader amp Youtuber
Unlike most jewelry makers and beadweavers Gianna did not start beading as a hobby but as a means to make ends meet With goals in trying to
fill the financial gap she did everything she could to expand her earnings ndash working as a security guard
and at the same time learning how to bead and selling her pieces at fair trades and flea markets
Since many were asking if she does home beading workshops she started on exploring how to teach people to bead She loves Scott Bakula and has always loved him till now and this served as her
inspiration to start making a beading video tutorial
Gianna started creating videos because she was at the point in her life where everything seemed to be falling apart And at that moment of time she had difficulties financially and selling jewelry was the only way for her to stay afloat financially She is a big Scott Bakula fan and when she went to the UK to see him on stage that was when it hit her that she is already able to edit videos and
taught herself Photoshop and done workshops at bead fairs so why not put these together and see what happens on Youtube She knew that if she gets enough subscribers and views ndash though no one knew what the exact numbers were you would be invited to become a Youtube partner This way she could monetize her videos with advertisements and hopefully she would be able to be a Youtube partner and be able to pay her bills
BLOG WWWHANDMADE-JEWELRY-CLUBCOM MEMBERSHIP WWWDIYBEADINGCLUBCOM BLOG DIY BEADING MAGAZINE ISSUE 32
Getting Down And Personal With Gianna
Her Youtube channel is popular and the reason why she chose Youtube is because Youtube is the biggest platform and reached almost to the whole world Everyone already knows about it and it was growing rapidly as compared to other platforms like Dailymotion so she figured that Youtube was the way to go Her advice to new designers is that when you start out go to the platforms on the top of your list first then work your way down your list if you do not get accepted by your first choice
After loyally putting up one video every week for about 8 months in a row she became a Youtube partner and monetized her videos She knew she needed at least $100 to get her first payout She managed to reach $100 after 3 months The process was not easy she worked hard lack sleep skipped meals and who knows what happened to Ridge in the Bold and the Beautiful because she stopped watching
On Youtube you can monetize your videos Google pays straight to your bank account and at other countries where they also have the option of getting checks among other options In order to get paid you have to reach the $100 mark and after 3 months For Gianna she thinks that you cannot say that Etsy is better than Youtube or Youtube is better than Etsy Her reasoning is because on Youtube she has many followers which will eventually check out her Etsy shop And to start an Etsy shop you need an audience
BLOG WWWHANDMADE-JEWELRY-CLUBCOM MEMBERSHIP WWWDIYBEADINGCLUBCOM BLOG DIY BEADING MAGAZINE ISSUE 32
television and dedicated her spare time (as she had another job) to Youtube She re-registered at the chamber of commerce after receiving her first payout Her work at Youtube now is not a full time job and things have changed on Youtube It is easier to become a parter but there are some countries that need to wait for an invitation to be a Youtube partner Take Italy for instance Italians would have to work just as hard as she did if they want to become a Youtube partner
Getting Down And Personal With Gianna
With her 60000 subscribers on her b4pbakup Youtube channel it is possible to sell at least 60 patterns on the first day on Etsy after promoting the PDF file on her Youtube channel Though you may think that 60 out of 60000 is not much you have to remember that not everyone has the means to purchase the PDF file and a lot of people still rather watch her carry out the tutorial(for free) on Youtube instead of reading the patterns or paying for the patterns even if the pattern is for a fundraiser and only cost $2 Her insights on Youtube is that Youtube is not what it used to be 6 years ago Instead of making more money every month she is making less and less because advertisers have more options of where they want to advertise their ads Ads do not pay as much as they used to Back in the days you could get 25 cents per ad Now you count yourself lucky if you could get 5 cents roll in after two hours
BLOG WWWHANDMADE-JEWELRY-CLUBCOM MEMBERSHIP WWWDIYBEADINGCLUBCOM BLOG DIY BEADING MAGAZINE ISSUE 32
And on top of that adblockers are destroying Youtube channel owners Youtube will start making changes to the channels where there will be ldquopaid subscriptionrdquo channels This has already been implemented in some countries but not in her country The Netherlands This means there will no longer be ads for her monthly paying subscribers She hopes that Youtube will add on a paid per video option feature The option to be a paid channel or free channel or to start a new channel for paying customers is yours to choose Gianna is not happy with Youtube because many others like her have worked so hard and for some years to become Youtube partners(which was something to be proud of) has lost their status
Getting Down And Personal With Gianna
Her advice for those who want to go on Youtube is 1 Do it because you want to teach
2 Do it because you want a career with beads
BLOG WWWHANDMADE-JEWELRY-CLUBCOM MEMBERSHIP WWWDIYBEADINGCLUBCOM BLOG DIY BEADING MAGAZINE ISSUE 32
After putting up about 20 videos and having at least 5000 subscribers add the PDF tutorials to Etsy and Craftsy She found out that her audience would like to have the PDF after watching her videos This is because they would rather print out the PDF and work while seated in a comfy chair technically somewhere else instead of having to pause the video time and time again
Gianna has also made a video for those who want to know the whole story of her journey up until the present day And to get updates on her you can check it out here She has also started a vlog where she tells of how she still works towards becoming a financial independent beader and explains her journey to get where she wants to be(or die trying) Gianna will be in the UK on October the 17th giving an all-day workshop with 4 different patterns
(2 beginners and 2 advanced) in Wotton-under-Edge
Gianna will be there Friday night as the workshop is on Saturday She will be leaving on Sunday Her
doors are open to all who wants to continue the party with her at the hotel across the street
For more information do contact Ann Tucker on Facebook
httpswwwfacebookcomanntucker501
Rec
omm
end
ed R
ead
ings
Making Jewelry with Gemstone
Beads
Combines the popular craft of beading with beautiful semi-precious stones which are collected by many Features a variety of versatile ideas which can be adapted for any type of gem or bead Readers will learn to reate beautiful gemstone jewelry with this dazzling collection of over 100 projects ranging from eyecatching earrings and accessories to exquisite necklaces and bracelets This beautiful book offers an impressive range of 28 beautiful semi-precious stones (including birthstones) and a glimpse into the fascinating history and mythical properties behind them
BLOG DIY BEADING MAGAZINE ISSUE 32 BLOG WWWHANDMADE-JEWELRY-CLUBCOM MEMBERSHIP WWWDIYBEADINGCLUBCOM
Rec
omm
end
ed R
ead
ings
Convertible Crystal Jewelry
Reverse it Twist it Wear it Many
Ways
Diane Whiting presents the idea that convertibility isnrsquot just about using pieces in multiple ways it is also about using skills and creativity in multiple ways Using ever-popular sparkling crystals Diane showcases design elements through various techniques for fun easy fashionable jewelry With 25 projects the reader can choose from bracelets necklaces and earrings that match any outfit or styleDiane Whiting presents the idea that convertibility isnrsquot just about using pieces in multiple ways it is also about using skills and creativity in multiple ways
BLOG DIY BEADING MAGAZINE ISSUE 32 BLOG WWWHANDMADE-JEWELRY-CLUBCOM MEMBERSHIP WWWDIYBEADINGCLUBCOM
Rec
omm
end
ed R
ead
ings
Wire Jewelry Masterclass
Wrapped Coiled and Woven Pieces
Using Fine Materials
Comprehensive and fabulous Wire Jewelry Masterclass takes an in-depth look at an intricate and rewarding craft The 24 projects which range from simple Dragons tear briolette earrings to a Poseidon-under-the-sea pendant will delight and inspire jewelers of all levels and tastes Divided into beginner intermediate and advanced sections this beautifully photographed step-by-step guide is the ticket to wire jewelry expertise
BLOG DIY BEADING MAGAZINE ISSUE 32 BLOG WWWHANDMADE-JEWELRY-CLUBCOM MEMBERSHIP WWWDIYBEADINGCLUBCOM
Rec
omm
end
ed R
ead
ings
Timeless Wire Weaving The
Complete Course
Timeless Wire Weaving focuses on developing wirework skills through 13 projects using three classic wire weaving techniques coiling wrapping and weaving The projects are built around a focal cabochon and incorporate seed beads and crystals in imaginative ways Designers learn to make the jewelry shown in the book and they also use the techniques learned to create innovative jewelry pieces of their own
BLOG DIY BEADING MAGAZINE ISSUE 32 BLOG WWWHANDMADE-JEWELRY-CLUBCOM MEMBERSHIP WWWDIYBEADINGCLUBCOM
Our digital magazine is available through
Apple Newsstand service available to millions of IPAD users
To advertise with us please email us at
diyjewelryclubgmailcom
Or visit our page at
httphandmade-jewelry-clubcomadvertising-diy-beading-magazine
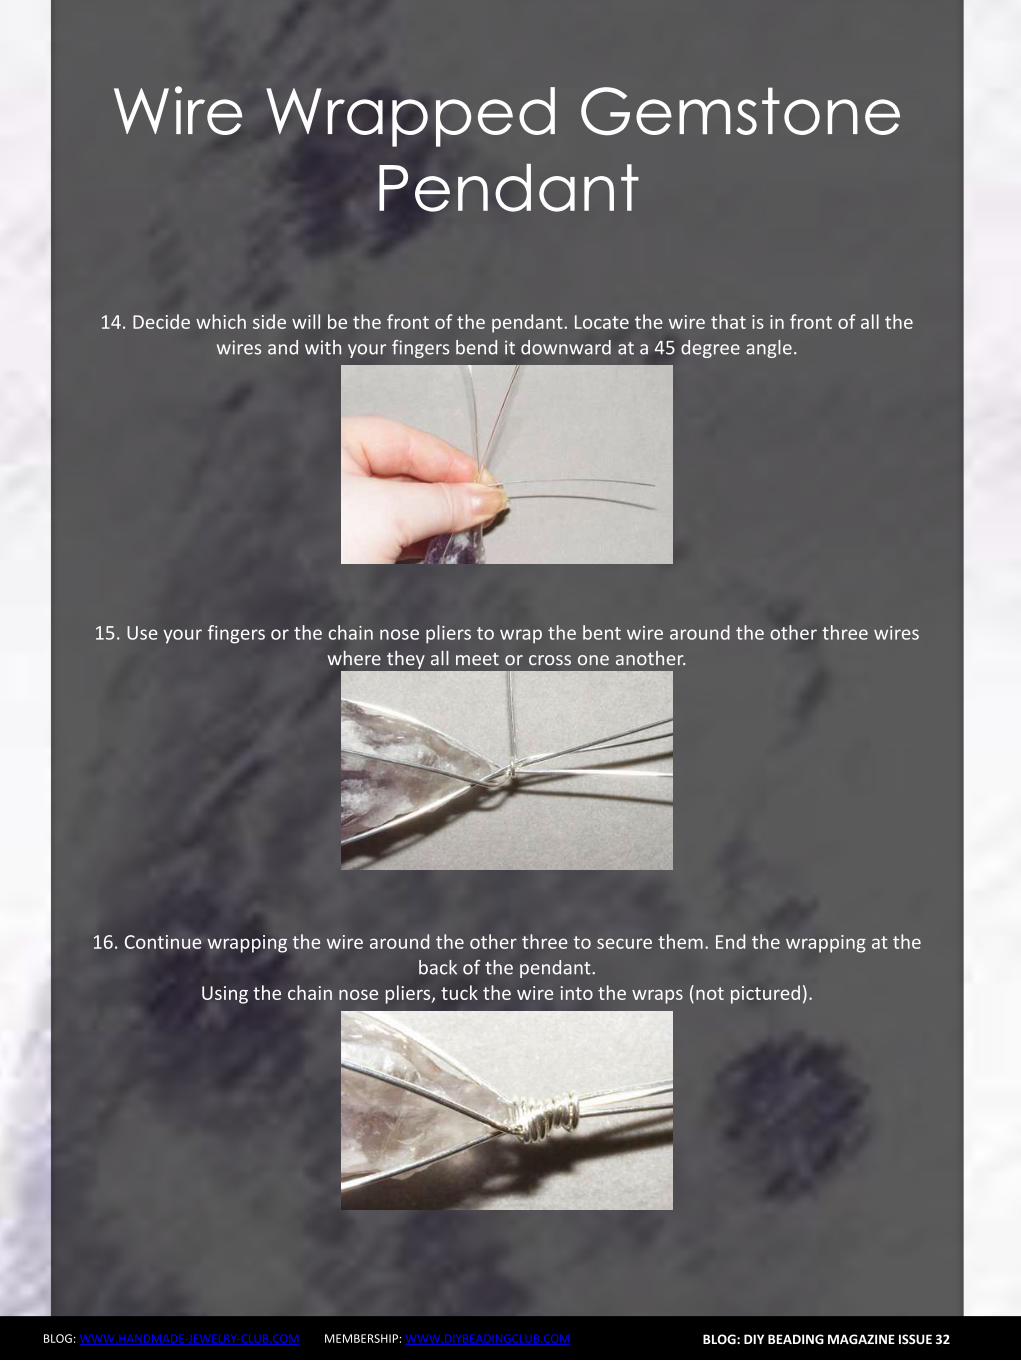
Wire Wrapped Gemstone
Pendant
BLOG WWWHANDMADE-JEWELRY-CLUBCOM MEMBERSHIP WWWDIYBEADINGCLUBCOM
23 On each of the three head pins string a 6mm bead Make a simple wire loop on the end of each head pin
Attach one head pin bead unit to each of the simple wire loops on the wire wrapped pendant
BLOG DIY BEADING MAGAZINE ISSUE 32
Completed Wire Wrapped Pendant
Now hang your handcrafted wire wrap pendant from your favorite chain or strand of beads
Enjoy wire wrapping your own gemstone to make a wire wrapped pendant
BLOG WWWHANDMADE-JEWELRY-CLUBCOM MEMBERSHIP WWWDIYBEADINGCLUBCOM
Wire Wrapped Gemstone
Pendant About the Author
Wanda Epps
Wanda is an avid jewelry maker who loves to make jewelry with beads She began her journey into jewelry making after walking into a bookstore to find crafting books on sale One on making jewelry caught her eye and after making a simple bead necklace she was hooked That was in late 2003 Over the years she has taken classes on various jewelry making techniques stringing making wire jewelry bead crochet macrame metal jewelry making to name some She expects that her love of making beaded jewelry will continue as bead supplies and beautiful new beads seem endless Her fulltime job provides for her needs but beads are her passion She invites you to join her in the many adventures of making jewelry at
httpwwwmaking-beaded-jewelrycom httpswwwfacebookcompagesMaking-Beaded-Jewelry-
Guide254860504236
BLOG DIY BEADING MAGAZINE ISSUE 32
Should You Sell In The Marketplace
Should You Sell In The Marketplace
BLOG WWWHANDMADE-JEWELRY-CLUBCOM MEMBERSHIP WWWDIYBEADINGCLUBCOM
We are all able to create jewelry pieces and there will come a time where you want to share the joy with the rest of the world whether it is in the form of a tutorial or a finish
piece And this is when you will start to think about putting up your work for sale As someone who is new to the business world you may be confused on where you should start selling your work And the all famous site that is first on most peoplersquos minds is Etsy Etsy is popular and it is user friendly and that is why it is the choice of many designers and crafters But there are also some who wants to set up their own
shop with their logo and to put their works out as their own even at the very beginning Thatrsquos where you may be confused on which platform you should go for
So herersquos some explanation on how you will benefit from setting up shop at Etsy
BLOG DIY BEADING MAGAZINE ISSUE 32
1 Etsy has everything ready for you and all you have to do is to bring in your works and use the features that are already available for you to use ndash like the payment system web traffic design and layout are not an issue that you need to worry about
2 You also have the trust of customers almost immediately because Etsy has already established a name for itself and therefore there is already trust in brand in their site When you use Etsy your brand will automatically be exposed to many customers who visit Etsy to find what they need
3 For every site there is always the need to be able to interact with other sellers to help each other out Forums or community boards are very helpful as other passionate designers and crafters share their experience to help out the newer members of the community This is also where you will be able to form good relationships with other sellers and who knows you may even find a partnership over time
Should You Sell In The Marketplace
BLOG WWWHANDMADE-JEWELRY-CLUBCOM MEMBERSHIP WWWDIYBEADINGCLUBCOM
Though Etsy has itrsquos good points there are some things which you need to take into consideration as well
1 When you are using someone elsersquos facilities there is always the chance of having
being shut down due to unforeseen circumstances Be it violation of Etsyrsquos policy or decisions made by the administration department this will sometimes cost you a dent in your brand name and you may lose the trust of your followers and starting all over again may be the only way to start again
2 If you are a very creative person then you may feel limited as the design of shops at Etsy is standardized If you are new and do not worry so much about designs of websites this is perfectly fine But do remember that when you want to distinguish yourself from other sellers it will be tougher as you try to make your brand more well-known due to limitations of design of the site
3 Since Etsy has so many sellers all in one place the competition is of course going to be tighter and fiercer because even though customers are viewing your products there are also other options from other sellers listed on the page as well So customers may turn away if they see something of a better price
4 Each product that you list with Etsy costs you money Etsy also takes a 35 percent of the selling price of the item However if or when you start your business on your own website it will also cost you for web hosting and you would need PayPal and they have a fee of 29 percent +30cents So either way you will still need to pay to list your products on the web
BLOG DIY BEADING MAGAZINE ISSUE 32
Should You Sell In The Marketplace
BLOG WWWHANDMADE-JEWELRY-CLUBCOM MEMBERSHIP WWWDIYBEADINGCLUBCOM
If you are confident enough to have your own business site by all means go ahead and do it The benefits of it are as below
1 You get to be your own boss You get to control everything from the design of the
website layout and how you want to advertise your products You can also change your policies and not be affected by it because it is you who changes it Your shop will not be shut down suddenly without notice and you do not need to worry that you have to start all over again
2 Distractions of competitors products on your page will not be an issue It is your site and it is up to you whether or not you want to allow what kind of advertisements on your site So if you donrsquot want something on your page it is your call
3 You will be able to capture the attention of the media and customers as well if you are able to have a well designed site Nowadays people are attracted to colors and they can see if you have put effort into beautifying the site for the customers You can do so much more than just uploading some pictures onto Etsy on your own site you can always update your site design and your products to complement each other and therefore becoming more attractive
BLOG DIY BEADING MAGAZINE ISSUE 32
Should You Sell In The Marketplace
BLOG WWWHANDMADE-JEWELRY-CLUBCOM MEMBERSHIP WWWDIYBEADINGCLUBCOM
And herersquos the tough part when you want to have your own site
BLOG DIY BEADING MAGAZINE ISSUE 32
1 You need to have knowledge of what you want to do You have to learn to be involved in every aspect of your site so that you know what us going on at the front end of things and at the back end of things as well But if you have not any knowledge of designing a website it is usually a recipe for something to go wrong You have to remember that you need a user interface that is simple for customers to use an easy to use shopping cart you should know which third party platforms are trusted and one which will not keep changing their regulations If you still want to have your site hiring a designer may be your best option
2 You have to work towards promoting your store on your own You will need to find people to feature you in their social media sites because it will not just fall into your lap You need to have promotions or road shows if you need to Marketing your store is important whether or not you are using Etsy or other marketing platforms but if you are on your own it is even more important
3 You will still be competing with other sellers Though now you are now not only competing with Etsy sellers you are now competing with sellers and stores from the world wide web Etsy is already so well known so people tend to go there first so you need to up your methods of attracting customers
Should You Sell In The Marketplace
BLOG WWWHANDMADE-JEWELRY-CLUBCOM MEMBERSHIP WWWDIYBEADINGCLUBCOM
When we first started out we used Etsy as our platform to sell our works Other than that we also utilized blogs and we eventually built our own website as our main base
BLOG DIY BEADING MAGAZINE ISSUE 32
Things have changed over these 3 years It was easier to get sales without much effort but now with so many other shops also utilizing Etsy the competition has grown tremendously Now our main sales come from our own online store and has exceeded sales from Etsy
So what we recommend is that using an existing platform such as Etsy to start out is good and in time build up your website or webstore
It is not that hard to start your own webstore either these two companies offers the option to set up your webstore
1 Shopify
2 Bigcommerce
There are many things to take into consideration before starting a store online It is perfectly fine to start out using Etsy before branching out on your own But you can also
have both ndash have your own website and a store on Etsy There are many stores who operate like this They technically get customers from Etsy and the reroute them to their own websites As long as you are in control of what you are doing and not stressing and
confusing yourself you can opt for more exposure for your store
So do take some time and take a breather to really think through what will be the best for YOU and do remember that starting small does not mean you will not be able to be big
OFFER Get which can be downloaded by subscribing to
httpinternet-marketing-publishingcom
BLOG WWWHANDMADE-JEWELRY-CLUBCOM MEMBERSHIP WWWDIYBEADINGCLUBCOM
Materials - Copper wire diameter 08 mm - Copper wire diameter 04 mm - Small gemstone bead (~4 mm) (I used 3 mm beads in this tutorial because I didnrsquot have any other beads at the time but the beads in the earrings on the cover are 4 mm) Make sure that the beads you want to use are resistant against chemicals such as liver of sulfur or whichever oxidizing substance you want to use to give the metal patina The beads in the picture above are facetted garnet buttons in the tutorial itself I used black spinel facetted buttons Equipment - Round nose pliers - Flat nose pliers - Side-cutters - A small file - A cylindrical object of about 5mm diameter (eg a mandrel for jump rings) - Hammer amp anvil - Liver of sulfur or some other means to oxidize the metal (optional)
LOVE-ly Earrings
BLOG DIY BEADING MAGAZINE ISSUE 32
BLOG WWWHANDMADE-JEWELRY-CLUBCOM MEMBERSHIP WWWDIYBEADINGCLUBCOM
This tutorial teaches how to make 1 ear stud I recommend making both ear studs of the set simultaneously step-by-step so that symmetry is easier to achieve Between steps check for
symmetry in size and shape and adjust the construction if needed
LOVE-ly Earrings
BLOG DIY BEADING MAGAZINE ISSUE 32
Step 1 Straighten the end of the copper wire (+- 6cm) by rubbing along it with your fingers for a
few seconds
Step 2 Bend over the wire onto itself as illustrated below using flat nose pliers
Step 3 Grab the doubled-over wire with the flat nose pliers and push the two sides against each
other Use little force and do it bit by bit to avoid damaging or kinking the wire
Step 4 Push the two adjacent pieces of wire apart to create the bottom shape of the heart as shown
on the picture above
BLOG WWWHANDMADE-JEWELRY-CLUBCOM MEMBERSHIP WWWDIYBEADINGCLUBCOM
LOVE-ly Earrings
BLOG DIY BEADING MAGAZINE ISSUE 32
Step 5 Hammer down the angled wire (the part circled in red) This strengthens the construction
and looks more professional
Step 6 Wrap the two ends of wire tightly around a cylindrical object (+- 5 mm diameter)
Step 7 Push apart the loops you just made by wrapping the wire around the cylindrical object The wire should now be shaped like a heart as
illustrated above
Step 8 Use round nose pliers to bend around the wire for each side of the heart as illustrated above
BLOG WWWHANDMADE-JEWELRY-CLUBCOM MEMBERSHIP WWWDIYBEADINGCLUBCOM
LOVE-ly Earrings
BLOG DIY BEADING MAGAZINE ISSUE 32
Step 9 Use the flat nose pliers to bend one of the two wires (preferably the longer wire) in a 90deg angle at the place marked with a red dot In the picture accompanying the next step you can see
how it should look from the front
Step 10 Use the round nose pliers to bend the other piece of wire in a decorative coil You will cut off the rest of the wire of the coil at approximately the spot marked with a red dot so take that into account when coiling the wire into the shape that
you desire
Step 11 Cut of the wire at the spot indicated in the previous picture and file off any sharp edges
Step 12 Cut off the ear wire at the desired length (Between 1 and 2 cm If in doubt try the earring on
to see if it sits comfortably) and file off any sharp edges
BLOG WWWHANDMADE-JEWELRY-CLUBCOM MEMBERSHIP WWWDIYBEADINGCLUBCOM
LOVE-ly Earrings
BLOG DIY BEADING MAGAZINE ISSUE 32
Step 13 Hammer down the rest of the heart (bumps and coil) If you canrsquot reach certain parts because the ear wire is in the way bend that part of the heart shape away
(verticallyupward) and bend it back after you finish hammering
Congrats yoursquove now made a basic heart-shaped ear stud Next wersquore going to decorate it with a little gemstone and more copper wire
Step 14 Cut off a length of 04 mm copper wire (about 10-20 cm) and string the bead onto it
Step 15 Place the bead in the ldquonon-coilrdquo upper part of the heart shaped ear stud holding it between thumb and forefinger Let approximately 4 cm of the 04 mm wire stick out over the edge of the
heart as illustrated above
Step 16 Wrap the wire twice around the frame so that if you face the front of the ear stud the wire is
directed towards yourself
BLOG WWWHANDMADE-JEWELRY-CLUBCOM MEMBERSHIP WWWDIYBEADINGCLUBCOM
LOVE-ly Earrings
BLOG DIY BEADING MAGAZINE ISSUE 32
Step 17 Flip the wire over the wire with the bead (indicated by the red arrow) and pull tight whilst holding the bead (and its wire) tightly in place It
should look like the construction in the big picture above
Step 18 And make another loop around the wire with the bead The 04 mm wire is now coiled around
twice two times two coils around the frame and two coils around itself
Step 19 Repeat the wire-fastening procedure described in steps 16-18 with the other end of the
wire securing the gemstone in the heart frame Let the wire stick out at the back of the earstud
Step 20 Pull the wire through the lsquocoilrsquo part of the heart shape to the front The wire should lsquocross overrsquo to the other side of the heart at the back of the ear
stud
Step 21 Coil the wire around the frame until you are content with the design Optionally you can hammer down the coils a bit I often do this because I think it
looks somewhat more sophisticated and professional
BLOG WWWHANDMADE-JEWELRY-CLUBCOM MEMBERSHIP WWWDIYBEADINGCLUBCOM
LOVE-ly Earrings
BLOG DIY BEADING MAGAZINE ISSUE 32
Step 22 Cut off the spare bits of wire preferably at the backside of the ear stud and tuck in the ends
Congrats yoursquove now made a heart-shaped ear stud Next we are going to finish it off with a patina
Step 23 Oxidize the metal of the ear studs I always use liver of sulfur solved in warm water The metal
will turn a dark color and matte texture Afterwards rinse the ear studs thoroughly with water and pat
them dry
Step 24 Rub the oxidized ear stud all over with a rough polishing pad to bring back (a dark copper)
color to the surface
Yoursquove now finished making your own LOVE-ly ear studs
Secure them in your ear with plastic or copper stops These can be bought online or in jewelry-supply
stores
Variation ideas You can easily vary in size and shape (longer hearts smaller coils pointier bottoms etc) and
use different materials As you can see the earring I make in this tutorial has a slightly smaller bead than the
earrings on the cover which influences the overall appearance somewhat
The earrings underneath are made with sterling silver and gold wire (super-short coils) and contain small pink
rubies
LOVE-ly Earrings
BLOG WWWHANDMADE-JEWELRY-CLUBCOM MEMBERSHIP WWWDIYBEADINGCLUBCOM
About the Author
Jeske Hendriks
Hi there My name is Jeske and I love all things handmade Over the years Irsquove dabbled in countless different arts and crafts but nowadays I mainly focus on making jewellery and cutting stone cabochons As for jewellery
my preferred materials are silver wire and gemstonemineral beads Using wire-wrapping and basic silver smithing techniques I create both simple
and intricate pieces ndash each and every one of them unique a personal little artwork
You are welcome to follow me on facebook stop by at my personal
webpage andor to have a look at my Etsy shops httpswwwfacebookcomyeskecrafts
httpwwwyeskecraftscom httpwwwyourbeadsandfindingsetsycom
httpwwwyeskecraftsetsycom httpwwwyeskemiscetsycom
BLOG DIY BEADING MAGAZINE ISSUE 32
Flower Tale Earrings
BLOG WWWHANDMADE-JEWELRY-CLUBCOM MEMBERSHIP WWWDIYBEADINGCLUBCOM
Techniques Beadweaving
Project Level Beginner to Intermediate
Materials 12 bronze opaque 6mm Czech glass pearl round beads
2 gr gold lustered dark topaz Japanese 110 seed beads (Toho 459)
Size B gold beading thread
2 bronze earring hooks
Tools Size 10 beading needle
Scissors
Finished Size Diameter ndash 3 cm (118 inches) (without earring hooks)
BLOG DIY BEADING MAGAZINE ISSUE 32
Flower Tale Earrings
BLOG WWWHANDMADE-JEWELRY-CLUBCOM MEMBERSHIP WWWDIYBEADINGCLUBCOM
Step 1 Cut about 110 cm (43 inches) of thread and
pass it through the needle hole
Pick six groups of one 110 seed bead and one
6 mm round bead
BLOG DIY BEADING MAGAZINE ISSUE 32
Join the beads into a ring and secure with two
square knots
Leave a tail of about 15 cm (59 inches)
Step 2 The working thread should be right before the
6 mm round bead
Pick seven 110 seed beads skip the 6 mm
round bead and pass the needle through the
next 110 seed bead added in the previous
round
Repeat adding groups of seven 110 seed
beads five more times
When adding the last group take the needle
directly through the 110 seed bead from the
previous round and the next one added in the
beginning of current round
Flower Tale Earrings
BLOG WWWHANDMADE-JEWELRY-CLUBCOM MEMBERSHIP WWWDIYBEADINGCLUBCOM
Step 3 Pick three 110 seed beads skip one seed
bead from the chain of seven added in the
previous round and pass with the needle
directly through the next three 110 seed
beads
BLOG DIY BEADING MAGAZINE ISSUE 32
Pick three 110 seed beads skip one seed
bead from the chain of seven added in the
previous round and pass with the needle
through the last one and the first 110 seed
bead from the next chain of seven
Repeat the above directions from Step 3 five
more times
After completing this round make sure the
thread will be exiting from the middle 110
seed bead from the first group of three added
in the beginning of this round
Step 4 Pick one 110 seed bead and go through the
last seed bead of the group of three
Flower Tale Earrings
BLOG WWWHANDMADE-JEWELRY-CLUBCOM MEMBERSHIP WWWDIYBEADINGCLUBCOM
Pick three 110 seed beads and take the
needle through the first seed bead of the next
group of three added in the previous round
BLOG DIY BEADING MAGAZINE ISSUE 32
Pick one 110 seed bead and go with the
needle through the next three seed beads (the
last two of the group of three and the last one
from the chain of seven)
Then go up through three 110 seed beads
(the first from the next group of seven and the
first two from the next group of three)
Repeat the above directions from Step 4 to
complete the remaining petals
When working on the last petal perform the
operation from the image shown on the left
instead of picking the group of three 110 seed
beads string two 110 seed beads the earring
hook other two 110 seed beads and
continue beading as instructed above
When you are done hide the thread ends into the beadwork
Flower Tale Earrings
BLOG WWWHANDMADE-JEWELRY-CLUBCOM MEMBERSHIP WWWDIYBEADINGCLUBCOM
About the Author
Iulia Postică
I was born and live in Moldova Eastern Europe Ever since I remember myself
Ive been crocheting and knitting My grandmother has taught me that and I
loved it very much I always regarded crafts exclusively as a hobby and never
thought of making a career of it I traveled a lot to various historical sites
Actually Ive spent all my childhood summers in archaeological camps with
my father who is a professional archaeologist
I also enjoy metal hammering and wirework as it gives me possibility to
express myself in materials used by human communities since ancient times
copper brass glass seed beads and gemstones That is no surprise to anyone
given my family history and academic background
My shop ldquoBeadedTreasuryrdquo with beading tutorials and bead crochet patterns
httpswwwetsycomshopBeadedTreasury
My shop ldquoArchaeologicardquo with artisan jewelry
httpswwwetsycomshopArcheologica
My blog httpbeadedtreasuryblogspotcom
My facebook httpswwwfacebookcomBeadedTreasury
BLOG DIY BEADING MAGAZINE ISSUE 32
Liberty Earrings
BLOG WWWHANDMADE-JEWELRY-CLUBCOM MEMBERSHIP WWWDIYBEADINGCLUBCOM
Materials - Nr 2 cabochon Preciosa Ornela ovale 18x22 mm turchese
- Rocaille Toho 150 silver lined green emerald
- Nr 2 dagger beads
- Nr 20 pearl 4 mm
- Superduo opaque luster ceramic green
- Rocaille 80 color gold
- Rocaille 80 color ivory
- Delica Miyuki 110 aquagreen mix
- Rocaille Miyuki 110 galvanized silver
- Nr 2 monachelle (earwire)
-Fireline
- Beading Needle nr 12
BLOG DIY BEADING MAGAZINE ISSUE 32
Liberty Earrings
BLOG WWWHANDMADE-JEWELRY-CLUBCOM MEMBERSHIP WWWDIYBEADINGCLUBCOM
Make a circle of 20 delica beads and make a knot (a) Perform two rounds peyote with ivory 80 seed beads (b c) Exit from an ivory
bead
BLOG DIY BEADING MAGAZINE ISSUE 32
a b c
Jump from 80 to 80 with 110 80 gold 110 (a) Finish the round and come out of a 80 gold bead
Jump to the next 80 gold with a 4mm pearl (b) Finish the round and come out
of the first pearl Jump to the 2nd pearl and close with a 80 gold bead(c)
a b c
Position the cabochon and jump from one 80 to the other with two delica bead (a)
Continue with three delicas four times (b) At the bottom sew on two delicas then finish the round by sewing on three delicas for four times passing from one to another roc 80 Tighten the cabochon and exit from the
first two delica that you started with String together a 110 and 150 and enter the second of the three close delicas (c)
a b c
Liberty Earrings
BLOG WWWHANDMADE-JEWELRY-CLUBCOM MEMBERSHIP WWWDIYBEADINGCLUBCOM
Put together 150 110 150 and enter in the second of three next delica (a) Put the same beads for three times then put together 150 and 110 and enter
in the two delica of the bottom tip (b) Enter in the second of three next delica with 110 and 150 (c) Continue passing
in the 80 beads with three beads (150 110 150) for four times then at the top finish the round by putting together a 150 and 110 (d)
BLOG DIY BEADING MAGAZINE ISSUE 32
a b c
Exit from the first 150 sewn in the previous round and jump in the three next beads with a 150 (a)
Put a 150 at a time and exit from the first 110 beads of the bottom tip Jump in the
near 110 with a 150 (b) Finish round repeating steps a and b (c) Exit the roc 80 as shown in the photo (d)
a b c
d
a b c d
Enter in the 80 with four 150 (a b) Enter the 80 beads at the bottom of the pieces with two 110 one superduo one 80 ivory bead one superduo and two 110 (c)
d e f
Liberty Earrings
BLOG WWWHANDMADE-JEWELRY-CLUBCOM MEMBERSHIP WWWDIYBEADINGCLUBCOM
Exit from the bottom pearl (a) Put together 150 three 110 150 and enter in the superduorsquos second hole (b)
Put together three superduo and enter in the next superduorsquos second hole (c) Rethread 15 three 110 150 and return in the opposite direction in the pearl of departure (d)
BLOG DIY BEADING MAGAZINE ISSUE 32
a b
c
Exit from the second pearl indicated from (a) Put 150 four 110 and enter in the second of the three 110 (b) Go to the second superduorsquos hole with four 110 and a 150 (c)
Enter the second hole of the supeduo with a 150(d) Sew in the middle of the bottom of the superduo 150 two 110 150 dagger 150 two 110 150(e)
Enter the second hole of the thirs superduo with 150 (f)
a b c
d
d e f
Liberty Earrings
BLOG WWWHANDMADE-JEWELRY-CLUBCOM MEMBERSHIP WWWDIYBEADINGCLUBCOM BLOG DIY BEADING MAGAZINE ISSUE 32
Put 150 four 110 and enter in the second of three 110 of the base (a) Insert four 110 and 150 in the pearl opposite direction indicated in the picture (b) Go in all the beads
around the piece and exit from the pearl at the top (c) Put 150 three 110 150 and enter the superduo (d)
Enter the ivory bead 80 with two 150 (e) Enter the next superduo with two 150 (f)
a b c
d e f
Put together 150 three 110 and enter in opposite direction in the departurersquos pearl (a) Exit from the 150 beads indicated by photo (b) From this jump in the second of two near
150 with five 150 to created the hole for the earwire (c) Pass the thread in the beads make a few knots and cut the excess thread
a b c
Your earrings are finished
Liberty Earrings
BLOG WWWHANDMADE-JEWELRY-CLUBCOM MEMBERSHIP WWWDIYBEADINGCLUBCOM
About the Author
Mariella Martella
My name is Mariella Martella and I am the author and
designer of jewelry that I sign with the name of Mariel Bijoux
After changing city often for work and study I currently live
in northern Italy I am an art historian with a passion for travel
painting and jewelry design in weaving that project since
2010 In my beads and crystals are the colors of the
Mediterranean sea the atmosphere of summer evenings
and the lights of the places I visited
You can find me at
Etsy shop httpswwwetsycomitshopMarielBijoux
Facebook httpswwwfacebookcommari3lbijoux
Crafting blog httpmarielbijouxblogspotit
Twitter httpstwittercomMarielBijoux
BLOG DIY BEADING MAGAZINE ISSUE 32
Jade Necklace
BLOG WWWHANDMADE-JEWELRY-CLUBCOM MEMBERSHIP WWWDIYBEADINGCLUBCOM
Every time I wear a necklace I always make it a point that the
necklace will lay perfectly flat on my neck Using wire for a necklace
made it possible for me like what I did with Jade Necklace It may look
odd at first having bent wires for a necklace but once the jewelry is
finished youll be so happy how the necklace will perfectly lay on your
neck
The tutorial is catered for intermediate level One must know basic
wirework skills such as wire wrapping making loops wrapped loops
and linking to follow the tutorial It has clear instructions and ultra-clear
close-up photos at each step Additionally you can ask me question
you have on the tutorial No more getting stuck and frustrated on a
confusing or just plain inaccurate pattern
If you followed this tutorial and then sell the accessory or jewelry
please give credit to the author or DIY Beading Clubcom
Copyright 2015
wwwdiybeadingclubcom
wwwhandmade-jewelry-clubcom
BLOG DIY BEADING MAGAZINE ISSUE 32
Jade Necklace
BLOG WWWHANDMADE-JEWELRY-CLUBCOM MEMBERSHIP WWWDIYBEADINGCLUBCOM BLOG DIY BEADING MAGAZINE ISSUE 32
Materials Needed 18ga Craft wire 28ga Craft wire 15mm diameter Green Round Flat Back Sew On Gems 5mm Green pearls
8mm Green pearls 6mm x 11mm teardrop Crystal Treasures Mill Hill beads or any teardrop bead with holes on the side Hook for your clasp
Tools Needed Wire cutter Flat nose pliers Round nose pliers Mandrel A jar or any rounded object to shape your necklace
Skill Level Intermediate
Step 1 Cut 6 inches 18ga wire Make a loop on one end then measure approximately 125 inches and make another loop
Form a size 4 circle on your mandrel
Jade Necklace
BLOG WWWHANDMADE-JEWELRY-CLUBCOM MEMBERSHIP WWWDIYBEADINGCLUBCOM BLOG DIY BEADING MAGAZINE ISSUE 32
Then close the circle by wrapping the extended wire just below the loop Wrap the
wire 2x
This is how it looks like Lets call this circle frame Youll notice that the lower curve is
slightly bigger than the upper curve
Step 2 Cut 8 inches of 28ga wire Wrap one end of
the wire at least 3x on one side of the circle frame just below the loop
Bring up your gem Flat back sew on gems has 2 holes Insert the wire into one hole and then
wrap the wire once onto the circle frame
Jade Necklace
BLOG WWWHANDMADE-JEWELRY-CLUBCOM MEMBERSHIP WWWDIYBEADINGCLUBCOM BLOG DIY BEADING MAGAZINE ISSUE 32
Step 3 Insert a 5mm pearl on the wire and then pass
the wire under circle frame
Repeat previous step 2x and have 3 pearls wrapped
Continue wrapping with your teardrop crystal My crystal has 2 holes on the side
and then continue wrapping with your 5mm pearls then secure your wire
Repeat Step 3 and create as many as needed For 16-inch necklace Ive created 6 of these
components
Jade Necklace
BLOG WWWHANDMADE-JEWELRY-CLUBCOM MEMBERSHIP WWWDIYBEADINGCLUBCOM BLOG DIY BEADING MAGAZINE ISSUE 32
Step 4 Cut a 15-inch 18ga wire and make a loop on
one end Insert 8mm pearl and make a loop on the other end You then use these as connectors
and link the components
Step 5 The necklace is an 18ga wire with wrapped
loops on both ends First cut 7 inches 18ga wire and make a wrapped loop with your hook already inserted Side in 18pcs 5mm pearls
Then make a wrapped loop on the other end connecting the wrapped loop onto the component Do the same for the other
necklace but make the loop on the other end big enough so the hookclasp can pass thru
To have the necklace curve shaped use a jar to bend the wire Voila Now youre
ready to party
Jade Necklace
BLOG WWWHANDMADE-JEWELRY-CLUBCOM MEMBERSHIP WWWDIYBEADINGCLUBCOM
About the Author
Sky Aldovino
I consider myself a late bloomer when it comes to crafting Irsquom a self-taught jewelry maker Jewelry making wasnrsquot really a hobby of mine but unforeseen events lead me to learn jewellery making My family put up a craft store where we sell cross stitch beads and all sorts of crafting materials I fell in love with the beads and tried to create accessories only for myself Clients liked the pieces and I started customizing handmade jewelleries The craft store was a success for 6 years but like any other small businesses we had to close it down and I was confined to staying at home While at home I had all the time using the internet and now working as a home-based jewelry designer
BLOG DIY BEADING MAGAZINE ISSUE 32
Atomic Ring
BLOG WWWHANDMADE-JEWELRY-CLUBCOM MEMBERSHIP WWWDIYBEADINGCLUBCOM
Have fun making shapes using the wigjig Cyclops Make loops going in
circles to mimic the shape of a flower or in this tutorial mimic the
shape of an atom The tutorial will also teach you how to cage a
cabochon Whats nice about this piece is that with one long wire you
can create the ring from start to finish
The tutorial is catered for intermediate to advanced students One
must already know how to make spirals and use a wigjig tool It has
clear instructions and ultra-clear close-up photos at each step
Additionally you can ask me question you have on the tutorial No
more getting stuck and frustrated on a confusing or just plain
inaccurate pattern
If you followed this tutorial and then sell the accessory or jewelry
please give credit to the author or DIY Beading Clubcom
If you like to get a blank wigjig graph visit wigjigcom Shop and Jigs
section
Copyright 2015
wwwdiybeadingclubcom
wwwhandmade-jewelry-clubcom
BLOG DIY BEADING MAGAZINE ISSUE 32
Atomic Ring
BLOG WWWHANDMADE-JEWELRY-CLUBCOM MEMBERSHIP WWWDIYBEADINGCLUBCOM
Materials Needed 20ga Craft wire 28ga Craft wire 11mm Round Cabochon
Tools Needed Wigjig Cyclops 15mm pegs Wire cutter Flat nose pliers Mandrel
Skill Level Intermediate - Advanced
BLOG DIY BEADING MAGAZINE ISSUE 32
Step 1 Lets prepare your wigjig cyclops Position the pegs like so
Atomic Ring
BLOG WWWHANDMADE-JEWELRY-CLUBCOM MEMBERSHIP WWWDIYBEADINGCLUBCOM BLOG DIY BEADING MAGAZINE ISSUE 32
Lets work with longer wire so youll have enough wire to hold onto as you manipulate the wire so cut 36 inches of 20ga wire From
one end of the wire measure 10 inches
On the 10-inch measurement loop the wire at the center peg then continue to loop onto the side pegs going in circle going back to
the center peg after looping on the side peg
Now the wire at the center peg will start to build up as you go around the side pegs so
you need to constantly press the wire at the center peg to accommodate the build up of
wire
When youre done pull out the wire and this is
how it should look like
Atomic Ring
BLOG WWWHANDMADE-JEWELRY-CLUBCOM MEMBERSHIP WWWDIYBEADINGCLUBCOM BLOG DIY BEADING MAGAZINE ISSUE 32
You will notice that the frame opens wide Now to keep the atom frame from opening wide secure the center of the frame by wrapping a 28ga wire What you
need to do is simply pass the 28ga wire into the hole and wrap as many times as needed or until youre sure that the frame is secure
Step 2 Now youre finished with your atom frame Well now create the focal design With the longer wire make a spiral at the center big
enough to accommodate the size of your cabochon In this tutorial the spiral is about
11mm in diameter the same size as my cabochon
Pop in your cabochon and start to make spirals going around and over the cabochon as if you are caging the cabochon Create at
least 5 rounds and then cut off any excess
Step 3 Now lets make the ring and this with the other
end of the wire
Atomic Ring
BLOG WWWHANDMADE-JEWELRY-CLUBCOM MEMBERSHIP WWWDIYBEADINGCLUBCOM BLOG DIY BEADING MAGAZINE ISSUE 32
Bring up your mandrel and wrap the wire to the size of your finger Wrap at least 2 times
When youre sure you have the right size pull the ring out of the mandrel
With the extended wire wrap the wire the secure the ring
Cut off any excess and voila You have your atomic ring Create as many as you can with different colors of cabochon
Atomic Ring
BLOG WWWHANDMADE-JEWELRY-CLUBCOM MEMBERSHIP WWWDIYBEADINGCLUBCOM
About the Author
Sky Aldovino
I consider myself a late bloomer when it comes to crafting Irsquom a self-taught jewelry maker Jewelry making wasnrsquot really a hobby of mine but unforeseen events lead me to learn jewellery making My family put up a craft store where we sell cross stitch beads and all sorts of crafting materials I fell in love with the beads and tried to create accessories only for myself Clients liked the pieces and I started customizing handmade jewelleries The craft store was a success for 6 years but like any other small businesses we had to close it down and I was confined to staying at home While at home I had all the time using the internet and now working as a home-based jewelry designer
BLOG DIY BEADING MAGAZINE ISSUE 32
Featured Article Gemstones Used for Jewelry Making
BLOG WWWHANDMADE-JEWELRY-CLUBCOM MEMBERSHIP WWWDIYBEADINGCLUBCOM
Gemstones are stones which we hold quite highly in terms of value And
jewelry often consists of stones that add attractiveness to it so it is not
surprising when jewelry designers actually use gemstones in their designs In
fact there are different types of gemstones that can be used for making
jewelry There are the expensive and pure gemstones and there are also the
imitation ones The information below will provide some information about
the kinds of stones you can use to create jewelry and how these stones will
impact the jewelry you have created
The first kind of stone which I believe we are all quite familiar with are
birthstones These stones are associated with individualrsquos month of birth
by SunVDesigns by BeyhanAkman
For example Amethyst stone is connected with anybody who is born in
February which carries special significance in the area of emotions and also
spiritually This stone also signifies calm and peace as well
And then we have semi-precious stones which are also often used in jewelry
making They are not as valuable as compared to precious stones but still
valuable Best examples of these stones are aquamarine topaz tourmaline
opal and turquoise
BLOG DIY BEADING MAGAZINE ISSUE 32
Featured Article Gemstones Used for Jewelry Making
BLOG WWWHANDMADE-JEWELRY-CLUBCOM MEMBERSHIP WWWDIYBEADINGCLUBCOM
It is an ideal gift for someone who you deem special Aquamarine pendants
usually work well for anyone and is widely an accepted stone
by HyppieChic by joyeriamestiza
However precious stones are the most unusual
and precious jewels to us Examples of some of
them are emerald sapphire diamond and
ruby These stones are usually very expensive
and are prized for their exquisiteness These
stones are commonly used in high-quality
jewelry designs which costs quite a fortune to
obtain
BLOG DIY BEADING MAGAZINE ISSUE 32
by sarajewelrystu
Jewelry designs with precious stones are usually
given as exceptional gifts on special occasions A
perfect example is a diamond ring that is usually
given as an engagement gift
by ldiamondsforever
Featured Article Gemstones Used for Jewelry Making
BLOG WWWHANDMADE-JEWELRY-CLUBCOM MEMBERSHIP WWWDIYBEADINGCLUBCOM
There are also synthetic stones which are often used to create jewelry
Synthetic stones are artificial imitations of gemstones Synthetic Sapphire
jewelry costs less compare with the authentic ones Most of the time
imitation stones are used to save cost but at the same time have the similar
look of the real stone
BLOG DIY BEADING MAGAZINE ISSUE 32
by shininggems by thaimaker
by lapinduprintemps by PastimeArt
Gemstones are used like beads and you can use it in any designs whether
simple or elaborate
Swarovski crystal components are available in a rich multitude of rondelles Perfect as spacers in necklaces or as discs in earrings Rondelles can be used with many varieties of shapes or sizes Use Swarovski crystal rondelles between large gemstones as accents with precious metal findings Fire Mountain Gems and Beads Crystal Passionsreg brand presents Swarovski crystal in display-ready packaging for brilliant retail presentation Crystal Passionsreg is an assurance of genuine Swarovski crystal
BLOG DIY BEADING MAGAZINE ISSUE 32 BLOG WWWHANDMADE-JEWELRY-CLUBCOM MEMBERSHIP WWWDIYBEADINGCLUBCOM
Recommended Jewelry Making Supplies
Mz Unisex-adults 12pcs 25x18x6mm Turquoise Oval CAB Cabochon
BLOG DIY BEADING MAGAZINE ISSUE 32 BLOG WWWHANDMADE-JEWELRY-CLUBCOM MEMBERSHIP WWWDIYBEADINGCLUBCOM
Recommended Jewelry Making Supplies
For a little sparkle that goes a long way design with Swarovski 4mm faceted bicones Create glorious multi-strand necklaces with the dainty crystals or use as spacers to add a tiny flash to your designs Swarovski crystal components are made in Austria and are considered the finest products of their kind in the world
BLOG DIY BEADING MAGAZINE ISSUE 32 BLOG WWWHANDMADE-JEWELRY-CLUBCOM MEMBERSHIP WWWDIYBEADINGCLUBCOM
Recommended Jewelry Making Supplies
Imitation beads resist color change These beads have uniform quality with a good polish Some strands may have little to no matrix Sizes shapes and colors may vary with handcrafted items
BLOG DIY BEADING MAGAZINE ISSUE 32 BLOG WWWHANDMADE-JEWELRY-CLUBCOM MEMBERSHIP WWWDIYBEADINGCLUBCOM
Recommended Jewelry Making Supplies
Something Blue Necklace and Earrings
BLOG WWWHANDMADE-JEWELRY-CLUBCOM MEMBERSHIP WWWDIYBEADINGCLUBCOM
Skill level Beginner Intermediate Advanced
DIMENSIONS OF THE NECKLACE Inner Circumference 14 18 inch 35 cm
Focal Pendant Width 1 15 inch 35 cm Focal Pendant Height 1 15 inch 35 cm
DIMENSIONS OF THE EARRING Earring Width 716 inch 12 cm Earring Height 1516 inch 25 cm (Without the earring hook)
BLOG DIY BEADING MAGAZINE ISSUE 32
Materials
Note Before purchasing the supplies measure the length of your wished necklace If you decide to bead a longer necklace you should keep in mind that for every extra
frac34 inches 2 cm-s you will need 8 bicones and 8 pearls
Something Blue Necklace and Earrings
BLOG WWWHANDMADE-JEWELRY-CLUBCOM MEMBERSHIP WWWDIYBEADINGCLUBCOM BLOG DIY BEADING MAGAZINE ISSUE 32
Work RAW stitch into a beaded circle and embellish with Swarovski bicones
STEP 2 String 1A and 2 pearls Pass through the previous
second pearl and the freshly added 1A and the first pearl again
STEP 1 Use a comfortable length of thread to string 2
pearls 1A and 1 pearl again leaving a 2rdquo 5cm tail Pass through the first two pearls strung to form a
ring
STEP 3 String 2 pearls and 1A Pass through the previous first pearl and the freshly added two pearls
again
STEP 4 - 17 Repeat STEP 2 and STEP 3 again until you count 17 pearls in the inner circle
But be careful in the last step you only have to add 1 pearl then pass through the first pearls
added in STEP 1 and add another 1A Now pass through the first pearl added in STEP
1and 1A added in this round again to exit from this A
Something Blue Necklace and Earrings
BLOG WWWHANDMADE-JEWELRY-CLUBCOM MEMBERSHIP WWWDIYBEADINGCLUBCOM BLOG DIY BEADING MAGAZINE ISSUE 32
STEP 19 String 2A and pass through the next A added in round 4-17 and the A added in round 18 the 2A added in this round and finally the A added in round 4-17 to exit from the bead showed below
STEP 18 String 3A and pass through the 1A added in the previous round and the first A added in this
round
STEP 20 - 34 Repeat STEP 18 and STEP 19 again until you finish the circle
But be careful in the last step first you have to pass through 3A and then add 1A After this pass
through the 3A again and exit from the A bead
shown below (This is the first A added in STEP 18)
Something Blue Necklace and Earrings
BLOG WWWHANDMADE-JEWELRY-CLUBCOM MEMBERSHIP WWWDIYBEADINGCLUBCOM BLOG DIY BEADING MAGAZINE ISSUE 32
STEP 35 Step up to exit from the pearl shown below (Finishing the previous step in the A bead and then
stepping up from there makes the circle more secure)
Now string 3 bicones Pass through the pearl and the first bicone again
In the reality your circle will look more like this the A beads forming a strong row in the middle of the
pearls
STEP 36 Add 2 bicones Pass through the
neighboring pearl the first bicone added in the previous row and the 2 bicones added in this step
so you can exit from the next pearl
Something Blue Necklace and Earrings
BLOG WWWHANDMADE-JEWELRY-CLUBCOM MEMBERSHIP WWWDIYBEADINGCLUBCOM BLOG DIY BEADING MAGAZINE ISSUE 32
Now in the reality your circle will look more like this the A beads still forming a strong row in the middle of the pearls and the bicones slightly lying on top of
them
STEP 37 - 49 Repeat STEP 35 and STEP 36 again until you finish the circle with the bicones
But be careful in the last step first you have pass through the third bicone added then add 1 bicone
and pass through this little quartet to exit from the bicone shown below (The second one added in
STEP 35)
STEP 50 With these steps we finish the circle by adding 1 bicone to connect the A beads and the
bicone row So add 1 bicone pass through the nearest A bead and add 1 bicone again Pass
through the bicone already there and exit from the bicone you just added
Something Blue Necklace and Earrings
BLOG WWWHANDMADE-JEWELRY-CLUBCOM MEMBERSHIP WWWDIYBEADINGCLUBCOM BLOG DIY BEADING MAGAZINE ISSUE 32
STEP 66-83 Secure the circle by adding 1A between each bicone in the second row of Swarovski
bicones If you finished secure the thread and trim
STEP 51-65 Using the same technique as in STEP 37 - 49 add 1 bicone to finish the third bicone row The black line shows you the way (After STEP 50 pass through the next A bead add 1 bicone and pass through the bicone already there and the bicone added in the previous step Repeat these steps to
finish the inner bicone circle)
MIDDLE CIRCLE Work RAW stitch into a beaded circle and embellish with
Swarovski bicones Remember you need to bead two circles this time
STEP 1 Just like in the focal circle begin with 2 pearls 1A and 1 pearl again on a comfortable length of thread
leaving a 2rdquo 5cm tail Pass through the first two pearls strung to form a ring
Something Blue Necklace and Earrings
BLOG WWWHANDMADE-JEWELRY-CLUBCOM MEMBERSHIP WWWDIYBEADINGCLUBCOM BLOG DIY BEADING MAGAZINE ISSUE 32
STEP 15-28 Mimicing the FOCAL CIRCLElsquos STEP 18-34 bead A beads until you finish the inner part of the
circle Exit from a pearl in the second row This circle should look very similar to the first one but this is a bit
smaller
STEP 2-14 Mimicing the FOCAL CIRCLElsquos STEP 2-17 bead until you count 14 pearls in the inner circle Exit
from the last A added
STEP 29-42 Mimicing FOCAL CIRCLElsquos STEP 35-49 add 2 rows of bicones
STEP 43-56 Mimicing the FOCAL CIRCLElsquos STEP 50-65 bead the third row of bicones to finish the circle
Something Blue Necklace and Earrings
BLOG WWWHANDMADE-JEWELRY-CLUBCOM MEMBERSHIP WWWDIYBEADINGCLUBCOM BLOG DIY BEADING MAGAZINE ISSUE 32
SMALLEST CIRCLE Work RAW stitch into a beaded circle and embellish
with Swarovski bicones Remember you need to bead two circles again
STEP 1 Just like in the focal circle begin with 2 pearls
1A and 1 pearl again on a comfortable length of thread leaving a 2rdquo 5cm tail Pass through the first two
pearls strung to form a ring
STEP 57-70 Just like the FOCAL CIRCLElsquos STEP 66-83 secure the circle by adding 1A between every bicone
in the second row of bicones If you finished secure the thread and trim (Donrsquot forget to bead another
circle)
STEP 2-12 Mimicing the FOCAL CIRCLElsquos STEP 2-17 bead until you count 12 pearls in the inner circle Exit
from the last A added
STEP 13-24 Mimicing the FOCAL CIRCLElsquos STEP 18-34 bead A beads until you finish the inner part of the
circle Exit from a pearl in the second row This circle should look very similar to the first two but this is the
smallest of them all
Something Blue Necklace and Earrings
BLOG WWWHANDMADE-JEWELRY-CLUBCOM MEMBERSHIP WWWDIYBEADINGCLUBCOM BLOG DIY BEADING MAGAZINE ISSUE 32
STEP 37-48 Mimicing the FOCAL CIRCLElsquos STEP 50-65 bead the third row of bicones to finish this circle too
STEP 25-36 Mimicing FOCAL CIRCLElsquos STEP 35-49 add 2
rows of bicones The last step here is purple again
STEP 49-60 Just like the FOCAL CIRCLElsquos STEP 66-83 secure the circle by adding 1A between every bicone
in the second row of bicones If you finished secure the thread and trim (Donrsquot forget that you need two
small circles)
Something Blue Necklace and Earrings
BLOG WWWHANDMADE-JEWELRY-CLUBCOM MEMBERSHIP WWWDIYBEADINGCLUBCOM BLOG DIY BEADING MAGAZINE ISSUE 32
STEP 37-48 Mimicing the FOCAL CIRCLElsquos STEP 50-65 bead the third row of bicones to finish this circle too
STEP 25-36 Mimicing FOCAL CIRCLElsquos STEP 35-49 add 2
rows of bicones The last step here is purple again
STEP 49-60 Just like the FOCAL CIRCLElsquos STEP 66-83 secure the circle by adding 1A between every bicone
in the second row of bicones If you finished secure the thread and trim (Donrsquot forget that you need two
small circles)
Something Blue Necklace and Earrings
BLOG WWWHANDMADE-JEWELRY-CLUBCOM MEMBERSHIP WWWDIYBEADINGCLUBCOM BLOG DIY BEADING MAGAZINE ISSUE 32
STEP 2-6 Continue by adding 1A 1 bicone 1 pearl until you count 6 of each
STEP 1 Begin with 1 pearl 1 bicone 1A and 1 bicone again on a comfortable length of thread leaving a 2rdquo
5cm tail Pass through the pearl and the first bicone strung to form a ring
STEP 7-12 Pass through the A beads to make your
component more secure Also secure the thread and trim (Repeat these steps until you have six 6-BEAD
COMPONENTs)
6-BEAD COMPONENT Work RAW stitch into a beaded circle and embellish with Swarovski bicones
For the necklace we will need six from this component For the earring two
Something Blue Necklace and Earrings
BLOG WWWHANDMADE-JEWELRY-CLUBCOM MEMBERSHIP WWWDIYBEADINGCLUBCOM BLOG DIY BEADING MAGAZINE ISSUE 32
STEP 2-4 Continue by adding 1A 1 bicone 1 pearl
until you count 4 of each
STEP 1 Begin with 1 pearl 1 bicone 1A and 1 bicone again on a comfortable length of thread leaving a 2rdquo
5cm tail Pass through the pearl and the first bicone strung to form a ring
STEP 5-8 Pass through the A beads to make your component more secure Also secure the thread and
trim (Repeat these steps until you have the wished amount of 4-BEAD COMPONENTs)
4-BEAD COMPONENT Work RAW stitch into a beaded circle and embellish with Swarovski bicones
For the necklace-size that is given on the second page we will need 20 from this
component For the earring two
If you would like to make a longer necklace you need to make more (One 4-BEAD COMPONENT measures about 38 inch 1 cm To make the necklace symmetrical you have to have equal amounts on each side This means for every extra frac34 inches
2 cm-s you will need 1 4-BEAD COMPONENT on each side of the necklace)
Something Blue Necklace and Earrings
BLOG WWWHANDMADE-JEWELRY-CLUBCOM MEMBERSHIP WWWDIYBEADINGCLUBCOM BLOG DIY BEADING MAGAZINE ISSUE 32
STEP 2 Connect the MIDDLE CIRCLE to two 6-BEAD COMPONENTs by adding four-times 2As
between the pearls Choose a pearl on the MIDDLE CIRCLE and add
2A pass through a pearl in the 6-BEAD COMPONENT previously added and add 2A again Watch out this has to be symmetrical Repeat this at least two more times to make it
secure Now repeat this entire procedure but choose
the 8-th pearl on MIDDLE CIRCLE Repeat this on the other side of the necklace
too
Choose a pearl on the FOCAL CIRCLE and add 2A pass through a pearl in the 6-BEAD COMPONENT and add 2A again Repeat this at least two more times to make it secure
Now repeat this entire procedure but choose the 5-th pearl on FOCAL CIRCLE This will make the necklace nice on your neck
FINISHING THE NECKLACE Connects the parts with A beads
STEP 1 Connect the FOCAL CIRCLE to two 6-BEAD COMPONENTs by adding four-times 2As between the pearls To do this turn your parts upside down you need to
see the pearls We will work on this side from now on
Something Blue Necklace and Earrings
BLOG WWWHANDMADE-JEWELRY-CLUBCOM MEMBERSHIP WWWDIYBEADINGCLUBCOM BLOG DIY BEADING MAGAZINE ISSUE 32
FINISHING THE EARRING Connects the parts with A beads
STEP 1-2 Connect the 6-BEAD COMPONENT
to 4-BEAD COMPONENT and the 4-BEAD
COMPONENT to the earring hook
First connect the 4-BEAD COMPONENT to the 6-BEAD COMPONENT with 4A beads Mimic
the elongation steps of the necklace if needed
Secondly connect the 4-BEAD COMPONENT
to your earring hook with 4A beads again Leave from the last pearl bead 2A beads the hook (this is the orange oval form) and 2As again Pass through each of them to
secure this connection again
Finally get ready to prepare the other earring ndash since we need two of them
STEP 5 Connect the 4-BEAD COMPONENTs to the toggle clasp thus finishing the
necklace Leaving from the last pearl bead 2A the
clasp(this is the orange oval form) and 2A again Pass through all of them a couple more times to make this connection more
secure
Something Blue Necklace and Earrings
BLOG WWWHANDMADE-JEWELRY-CLUBCOM MEMBERSHIP WWWDIYBEADINGCLUBCOM BLOG DIY BEADING MAGAZINE ISSUE 32
If you finished it is time to try it on It was a great fun wasnrsquot it And how beautiful you look in your new necklace and the matching earrings
Something Blue Necklace and Earrings
BLOG WWWHANDMADE-JEWELRY-CLUBCOM MEMBERSHIP WWWDIYBEADINGCLUBCOM
About the Author
Margit Vogel
My name is Margit Vogel I live in Hungary Europe
By profession I am a biochemical engineer but I fell in love with
beads so much that I could not stop playing with them
I make one-of-a-kind beaded and bead embroidered art
jewelry made of the best quality materials such as Swarovski
stones gemstones Japanese beads (Miyuki and Toho) Czech
glass beads leather soutache and suede Each piece is unique
and individually crafted
Feel free to visit my blog for some eyecandy
httpiformjewelrywordpresscom
My shop httpwwwetsycomshopiformjewelry
Facebook httpwwwfacebookcomiformjewelry
BLOG DIY BEADING MAGAZINE ISSUE 32
Getting Down And Personal With Gianna
Getting Down And Personal With Gianna
Nowadays we see more and more jewelry stores opening up online and with these online jewelry stores it has made it easier for us to purchase and view their creations Have you ever wondered how they are able to manage and produce amazing jewelry pieces and tutorials So heres a little on the journey to open up an online shop We are excited to present to you Gianna aka Beading4perfectionists
Gianna Beader amp Youtuber
Unlike most jewelry makers and beadweavers Gianna did not start beading as a hobby but as a means to make ends meet With goals in trying to
fill the financial gap she did everything she could to expand her earnings ndash working as a security guard
and at the same time learning how to bead and selling her pieces at fair trades and flea markets
Since many were asking if she does home beading workshops she started on exploring how to teach people to bead She loves Scott Bakula and has always loved him till now and this served as her
inspiration to start making a beading video tutorial
Gianna started creating videos because she was at the point in her life where everything seemed to be falling apart And at that moment of time she had difficulties financially and selling jewelry was the only way for her to stay afloat financially She is a big Scott Bakula fan and when she went to the UK to see him on stage that was when it hit her that she is already able to edit videos and
taught herself Photoshop and done workshops at bead fairs so why not put these together and see what happens on Youtube She knew that if she gets enough subscribers and views ndash though no one knew what the exact numbers were you would be invited to become a Youtube partner This way she could monetize her videos with advertisements and hopefully she would be able to be a Youtube partner and be able to pay her bills
BLOG WWWHANDMADE-JEWELRY-CLUBCOM MEMBERSHIP WWWDIYBEADINGCLUBCOM BLOG DIY BEADING MAGAZINE ISSUE 32
Getting Down And Personal With Gianna
Her Youtube channel is popular and the reason why she chose Youtube is because Youtube is the biggest platform and reached almost to the whole world Everyone already knows about it and it was growing rapidly as compared to other platforms like Dailymotion so she figured that Youtube was the way to go Her advice to new designers is that when you start out go to the platforms on the top of your list first then work your way down your list if you do not get accepted by your first choice
After loyally putting up one video every week for about 8 months in a row she became a Youtube partner and monetized her videos She knew she needed at least $100 to get her first payout She managed to reach $100 after 3 months The process was not easy she worked hard lack sleep skipped meals and who knows what happened to Ridge in the Bold and the Beautiful because she stopped watching
On Youtube you can monetize your videos Google pays straight to your bank account and at other countries where they also have the option of getting checks among other options In order to get paid you have to reach the $100 mark and after 3 months For Gianna she thinks that you cannot say that Etsy is better than Youtube or Youtube is better than Etsy Her reasoning is because on Youtube she has many followers which will eventually check out her Etsy shop And to start an Etsy shop you need an audience
BLOG WWWHANDMADE-JEWELRY-CLUBCOM MEMBERSHIP WWWDIYBEADINGCLUBCOM BLOG DIY BEADING MAGAZINE ISSUE 32
television and dedicated her spare time (as she had another job) to Youtube She re-registered at the chamber of commerce after receiving her first payout Her work at Youtube now is not a full time job and things have changed on Youtube It is easier to become a parter but there are some countries that need to wait for an invitation to be a Youtube partner Take Italy for instance Italians would have to work just as hard as she did if they want to become a Youtube partner
Getting Down And Personal With Gianna
With her 60000 subscribers on her b4pbakup Youtube channel it is possible to sell at least 60 patterns on the first day on Etsy after promoting the PDF file on her Youtube channel Though you may think that 60 out of 60000 is not much you have to remember that not everyone has the means to purchase the PDF file and a lot of people still rather watch her carry out the tutorial(for free) on Youtube instead of reading the patterns or paying for the patterns even if the pattern is for a fundraiser and only cost $2 Her insights on Youtube is that Youtube is not what it used to be 6 years ago Instead of making more money every month she is making less and less because advertisers have more options of where they want to advertise their ads Ads do not pay as much as they used to Back in the days you could get 25 cents per ad Now you count yourself lucky if you could get 5 cents roll in after two hours
BLOG WWWHANDMADE-JEWELRY-CLUBCOM MEMBERSHIP WWWDIYBEADINGCLUBCOM BLOG DIY BEADING MAGAZINE ISSUE 32
And on top of that adblockers are destroying Youtube channel owners Youtube will start making changes to the channels where there will be ldquopaid subscriptionrdquo channels This has already been implemented in some countries but not in her country The Netherlands This means there will no longer be ads for her monthly paying subscribers She hopes that Youtube will add on a paid per video option feature The option to be a paid channel or free channel or to start a new channel for paying customers is yours to choose Gianna is not happy with Youtube because many others like her have worked so hard and for some years to become Youtube partners(which was something to be proud of) has lost their status
Getting Down And Personal With Gianna
Her advice for those who want to go on Youtube is 1 Do it because you want to teach
2 Do it because you want a career with beads
BLOG WWWHANDMADE-JEWELRY-CLUBCOM MEMBERSHIP WWWDIYBEADINGCLUBCOM BLOG DIY BEADING MAGAZINE ISSUE 32
After putting up about 20 videos and having at least 5000 subscribers add the PDF tutorials to Etsy and Craftsy She found out that her audience would like to have the PDF after watching her videos This is because they would rather print out the PDF and work while seated in a comfy chair technically somewhere else instead of having to pause the video time and time again
Gianna has also made a video for those who want to know the whole story of her journey up until the present day And to get updates on her you can check it out here She has also started a vlog where she tells of how she still works towards becoming a financial independent beader and explains her journey to get where she wants to be(or die trying) Gianna will be in the UK on October the 17th giving an all-day workshop with 4 different patterns
(2 beginners and 2 advanced) in Wotton-under-Edge
Gianna will be there Friday night as the workshop is on Saturday She will be leaving on Sunday Her
doors are open to all who wants to continue the party with her at the hotel across the street
For more information do contact Ann Tucker on Facebook
httpswwwfacebookcomanntucker501
Rec
omm
end
ed R
ead
ings
Making Jewelry with Gemstone
Beads
Combines the popular craft of beading with beautiful semi-precious stones which are collected by many Features a variety of versatile ideas which can be adapted for any type of gem or bead Readers will learn to reate beautiful gemstone jewelry with this dazzling collection of over 100 projects ranging from eyecatching earrings and accessories to exquisite necklaces and bracelets This beautiful book offers an impressive range of 28 beautiful semi-precious stones (including birthstones) and a glimpse into the fascinating history and mythical properties behind them
BLOG DIY BEADING MAGAZINE ISSUE 32 BLOG WWWHANDMADE-JEWELRY-CLUBCOM MEMBERSHIP WWWDIYBEADINGCLUBCOM
Rec
omm
end
ed R
ead
ings
Convertible Crystal Jewelry
Reverse it Twist it Wear it Many
Ways
Diane Whiting presents the idea that convertibility isnrsquot just about using pieces in multiple ways it is also about using skills and creativity in multiple ways Using ever-popular sparkling crystals Diane showcases design elements through various techniques for fun easy fashionable jewelry With 25 projects the reader can choose from bracelets necklaces and earrings that match any outfit or styleDiane Whiting presents the idea that convertibility isnrsquot just about using pieces in multiple ways it is also about using skills and creativity in multiple ways
BLOG DIY BEADING MAGAZINE ISSUE 32 BLOG WWWHANDMADE-JEWELRY-CLUBCOM MEMBERSHIP WWWDIYBEADINGCLUBCOM
Rec
omm
end
ed R
ead
ings
Wire Jewelry Masterclass
Wrapped Coiled and Woven Pieces
Using Fine Materials
Comprehensive and fabulous Wire Jewelry Masterclass takes an in-depth look at an intricate and rewarding craft The 24 projects which range from simple Dragons tear briolette earrings to a Poseidon-under-the-sea pendant will delight and inspire jewelers of all levels and tastes Divided into beginner intermediate and advanced sections this beautifully photographed step-by-step guide is the ticket to wire jewelry expertise
BLOG DIY BEADING MAGAZINE ISSUE 32 BLOG WWWHANDMADE-JEWELRY-CLUBCOM MEMBERSHIP WWWDIYBEADINGCLUBCOM
Rec
omm
end
ed R
ead
ings
Timeless Wire Weaving The
Complete Course
Timeless Wire Weaving focuses on developing wirework skills through 13 projects using three classic wire weaving techniques coiling wrapping and weaving The projects are built around a focal cabochon and incorporate seed beads and crystals in imaginative ways Designers learn to make the jewelry shown in the book and they also use the techniques learned to create innovative jewelry pieces of their own
BLOG DIY BEADING MAGAZINE ISSUE 32 BLOG WWWHANDMADE-JEWELRY-CLUBCOM MEMBERSHIP WWWDIYBEADINGCLUBCOM
Our digital magazine is available through
Apple Newsstand service available to millions of IPAD users
To advertise with us please email us at
diyjewelryclubgmailcom
Or visit our page at
httphandmade-jewelry-clubcomadvertising-diy-beading-magazine
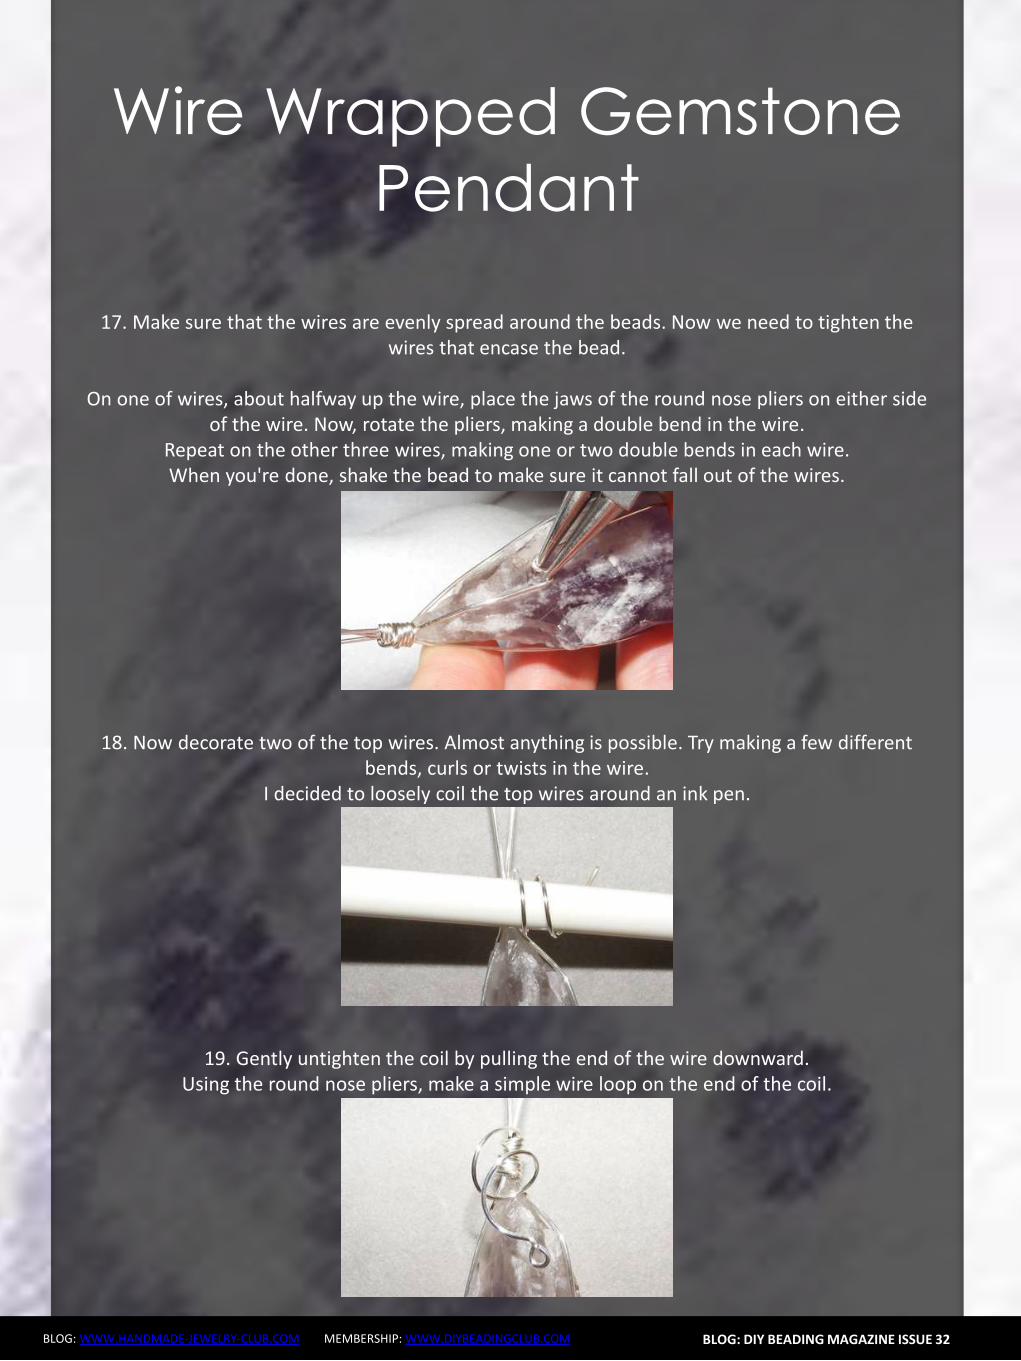
BLOG WWWHANDMADE-JEWELRY-CLUBCOM MEMBERSHIP WWWDIYBEADINGCLUBCOM
Wire Wrapped Gemstone
Pendant About the Author
Wanda Epps
Wanda is an avid jewelry maker who loves to make jewelry with beads She began her journey into jewelry making after walking into a bookstore to find crafting books on sale One on making jewelry caught her eye and after making a simple bead necklace she was hooked That was in late 2003 Over the years she has taken classes on various jewelry making techniques stringing making wire jewelry bead crochet macrame metal jewelry making to name some She expects that her love of making beaded jewelry will continue as bead supplies and beautiful new beads seem endless Her fulltime job provides for her needs but beads are her passion She invites you to join her in the many adventures of making jewelry at
httpwwwmaking-beaded-jewelrycom httpswwwfacebookcompagesMaking-Beaded-Jewelry-
Guide254860504236
BLOG DIY BEADING MAGAZINE ISSUE 32
Should You Sell In The Marketplace
Should You Sell In The Marketplace
BLOG WWWHANDMADE-JEWELRY-CLUBCOM MEMBERSHIP WWWDIYBEADINGCLUBCOM
We are all able to create jewelry pieces and there will come a time where you want to share the joy with the rest of the world whether it is in the form of a tutorial or a finish
piece And this is when you will start to think about putting up your work for sale As someone who is new to the business world you may be confused on where you should start selling your work And the all famous site that is first on most peoplersquos minds is Etsy Etsy is popular and it is user friendly and that is why it is the choice of many designers and crafters But there are also some who wants to set up their own
shop with their logo and to put their works out as their own even at the very beginning Thatrsquos where you may be confused on which platform you should go for
So herersquos some explanation on how you will benefit from setting up shop at Etsy
BLOG DIY BEADING MAGAZINE ISSUE 32
1 Etsy has everything ready for you and all you have to do is to bring in your works and use the features that are already available for you to use ndash like the payment system web traffic design and layout are not an issue that you need to worry about
2 You also have the trust of customers almost immediately because Etsy has already established a name for itself and therefore there is already trust in brand in their site When you use Etsy your brand will automatically be exposed to many customers who visit Etsy to find what they need
3 For every site there is always the need to be able to interact with other sellers to help each other out Forums or community boards are very helpful as other passionate designers and crafters share their experience to help out the newer members of the community This is also where you will be able to form good relationships with other sellers and who knows you may even find a partnership over time
Should You Sell In The Marketplace
BLOG WWWHANDMADE-JEWELRY-CLUBCOM MEMBERSHIP WWWDIYBEADINGCLUBCOM
Though Etsy has itrsquos good points there are some things which you need to take into consideration as well
1 When you are using someone elsersquos facilities there is always the chance of having
being shut down due to unforeseen circumstances Be it violation of Etsyrsquos policy or decisions made by the administration department this will sometimes cost you a dent in your brand name and you may lose the trust of your followers and starting all over again may be the only way to start again
2 If you are a very creative person then you may feel limited as the design of shops at Etsy is standardized If you are new and do not worry so much about designs of websites this is perfectly fine But do remember that when you want to distinguish yourself from other sellers it will be tougher as you try to make your brand more well-known due to limitations of design of the site
3 Since Etsy has so many sellers all in one place the competition is of course going to be tighter and fiercer because even though customers are viewing your products there are also other options from other sellers listed on the page as well So customers may turn away if they see something of a better price
4 Each product that you list with Etsy costs you money Etsy also takes a 35 percent of the selling price of the item However if or when you start your business on your own website it will also cost you for web hosting and you would need PayPal and they have a fee of 29 percent +30cents So either way you will still need to pay to list your products on the web
BLOG DIY BEADING MAGAZINE ISSUE 32
Should You Sell In The Marketplace
BLOG WWWHANDMADE-JEWELRY-CLUBCOM MEMBERSHIP WWWDIYBEADINGCLUBCOM
If you are confident enough to have your own business site by all means go ahead and do it The benefits of it are as below
1 You get to be your own boss You get to control everything from the design of the
website layout and how you want to advertise your products You can also change your policies and not be affected by it because it is you who changes it Your shop will not be shut down suddenly without notice and you do not need to worry that you have to start all over again
2 Distractions of competitors products on your page will not be an issue It is your site and it is up to you whether or not you want to allow what kind of advertisements on your site So if you donrsquot want something on your page it is your call
3 You will be able to capture the attention of the media and customers as well if you are able to have a well designed site Nowadays people are attracted to colors and they can see if you have put effort into beautifying the site for the customers You can do so much more than just uploading some pictures onto Etsy on your own site you can always update your site design and your products to complement each other and therefore becoming more attractive
BLOG DIY BEADING MAGAZINE ISSUE 32
Should You Sell In The Marketplace
BLOG WWWHANDMADE-JEWELRY-CLUBCOM MEMBERSHIP WWWDIYBEADINGCLUBCOM
And herersquos the tough part when you want to have your own site
BLOG DIY BEADING MAGAZINE ISSUE 32
1 You need to have knowledge of what you want to do You have to learn to be involved in every aspect of your site so that you know what us going on at the front end of things and at the back end of things as well But if you have not any knowledge of designing a website it is usually a recipe for something to go wrong You have to remember that you need a user interface that is simple for customers to use an easy to use shopping cart you should know which third party platforms are trusted and one which will not keep changing their regulations If you still want to have your site hiring a designer may be your best option
2 You have to work towards promoting your store on your own You will need to find people to feature you in their social media sites because it will not just fall into your lap You need to have promotions or road shows if you need to Marketing your store is important whether or not you are using Etsy or other marketing platforms but if you are on your own it is even more important
3 You will still be competing with other sellers Though now you are now not only competing with Etsy sellers you are now competing with sellers and stores from the world wide web Etsy is already so well known so people tend to go there first so you need to up your methods of attracting customers
Should You Sell In The Marketplace
BLOG WWWHANDMADE-JEWELRY-CLUBCOM MEMBERSHIP WWWDIYBEADINGCLUBCOM
When we first started out we used Etsy as our platform to sell our works Other than that we also utilized blogs and we eventually built our own website as our main base
BLOG DIY BEADING MAGAZINE ISSUE 32
Things have changed over these 3 years It was easier to get sales without much effort but now with so many other shops also utilizing Etsy the competition has grown tremendously Now our main sales come from our own online store and has exceeded sales from Etsy
So what we recommend is that using an existing platform such as Etsy to start out is good and in time build up your website or webstore
It is not that hard to start your own webstore either these two companies offers the option to set up your webstore
1 Shopify
2 Bigcommerce
There are many things to take into consideration before starting a store online It is perfectly fine to start out using Etsy before branching out on your own But you can also
have both ndash have your own website and a store on Etsy There are many stores who operate like this They technically get customers from Etsy and the reroute them to their own websites As long as you are in control of what you are doing and not stressing and
confusing yourself you can opt for more exposure for your store
So do take some time and take a breather to really think through what will be the best for YOU and do remember that starting small does not mean you will not be able to be big
OFFER Get which can be downloaded by subscribing to
httpinternet-marketing-publishingcom
BLOG WWWHANDMADE-JEWELRY-CLUBCOM MEMBERSHIP WWWDIYBEADINGCLUBCOM
Materials - Copper wire diameter 08 mm - Copper wire diameter 04 mm - Small gemstone bead (~4 mm) (I used 3 mm beads in this tutorial because I didnrsquot have any other beads at the time but the beads in the earrings on the cover are 4 mm) Make sure that the beads you want to use are resistant against chemicals such as liver of sulfur or whichever oxidizing substance you want to use to give the metal patina The beads in the picture above are facetted garnet buttons in the tutorial itself I used black spinel facetted buttons Equipment - Round nose pliers - Flat nose pliers - Side-cutters - A small file - A cylindrical object of about 5mm diameter (eg a mandrel for jump rings) - Hammer amp anvil - Liver of sulfur or some other means to oxidize the metal (optional)
LOVE-ly Earrings
BLOG DIY BEADING MAGAZINE ISSUE 32
BLOG WWWHANDMADE-JEWELRY-CLUBCOM MEMBERSHIP WWWDIYBEADINGCLUBCOM
This tutorial teaches how to make 1 ear stud I recommend making both ear studs of the set simultaneously step-by-step so that symmetry is easier to achieve Between steps check for
symmetry in size and shape and adjust the construction if needed
LOVE-ly Earrings
BLOG DIY BEADING MAGAZINE ISSUE 32
Step 1 Straighten the end of the copper wire (+- 6cm) by rubbing along it with your fingers for a
few seconds
Step 2 Bend over the wire onto itself as illustrated below using flat nose pliers
Step 3 Grab the doubled-over wire with the flat nose pliers and push the two sides against each
other Use little force and do it bit by bit to avoid damaging or kinking the wire
Step 4 Push the two adjacent pieces of wire apart to create the bottom shape of the heart as shown
on the picture above
BLOG WWWHANDMADE-JEWELRY-CLUBCOM MEMBERSHIP WWWDIYBEADINGCLUBCOM
LOVE-ly Earrings
BLOG DIY BEADING MAGAZINE ISSUE 32
Step 5 Hammer down the angled wire (the part circled in red) This strengthens the construction
and looks more professional
Step 6 Wrap the two ends of wire tightly around a cylindrical object (+- 5 mm diameter)
Step 7 Push apart the loops you just made by wrapping the wire around the cylindrical object The wire should now be shaped like a heart as
illustrated above
Step 8 Use round nose pliers to bend around the wire for each side of the heart as illustrated above
BLOG WWWHANDMADE-JEWELRY-CLUBCOM MEMBERSHIP WWWDIYBEADINGCLUBCOM
LOVE-ly Earrings
BLOG DIY BEADING MAGAZINE ISSUE 32
Step 9 Use the flat nose pliers to bend one of the two wires (preferably the longer wire) in a 90deg angle at the place marked with a red dot In the picture accompanying the next step you can see
how it should look from the front
Step 10 Use the round nose pliers to bend the other piece of wire in a decorative coil You will cut off the rest of the wire of the coil at approximately the spot marked with a red dot so take that into account when coiling the wire into the shape that
you desire
Step 11 Cut of the wire at the spot indicated in the previous picture and file off any sharp edges
Step 12 Cut off the ear wire at the desired length (Between 1 and 2 cm If in doubt try the earring on
to see if it sits comfortably) and file off any sharp edges
BLOG WWWHANDMADE-JEWELRY-CLUBCOM MEMBERSHIP WWWDIYBEADINGCLUBCOM
LOVE-ly Earrings
BLOG DIY BEADING MAGAZINE ISSUE 32
Step 13 Hammer down the rest of the heart (bumps and coil) If you canrsquot reach certain parts because the ear wire is in the way bend that part of the heart shape away
(verticallyupward) and bend it back after you finish hammering
Congrats yoursquove now made a basic heart-shaped ear stud Next wersquore going to decorate it with a little gemstone and more copper wire
Step 14 Cut off a length of 04 mm copper wire (about 10-20 cm) and string the bead onto it
Step 15 Place the bead in the ldquonon-coilrdquo upper part of the heart shaped ear stud holding it between thumb and forefinger Let approximately 4 cm of the 04 mm wire stick out over the edge of the
heart as illustrated above
Step 16 Wrap the wire twice around the frame so that if you face the front of the ear stud the wire is
directed towards yourself
BLOG WWWHANDMADE-JEWELRY-CLUBCOM MEMBERSHIP WWWDIYBEADINGCLUBCOM
LOVE-ly Earrings
BLOG DIY BEADING MAGAZINE ISSUE 32
Step 17 Flip the wire over the wire with the bead (indicated by the red arrow) and pull tight whilst holding the bead (and its wire) tightly in place It
should look like the construction in the big picture above
Step 18 And make another loop around the wire with the bead The 04 mm wire is now coiled around
twice two times two coils around the frame and two coils around itself
Step 19 Repeat the wire-fastening procedure described in steps 16-18 with the other end of the
wire securing the gemstone in the heart frame Let the wire stick out at the back of the earstud
Step 20 Pull the wire through the lsquocoilrsquo part of the heart shape to the front The wire should lsquocross overrsquo to the other side of the heart at the back of the ear
stud
Step 21 Coil the wire around the frame until you are content with the design Optionally you can hammer down the coils a bit I often do this because I think it
looks somewhat more sophisticated and professional
BLOG WWWHANDMADE-JEWELRY-CLUBCOM MEMBERSHIP WWWDIYBEADINGCLUBCOM
LOVE-ly Earrings
BLOG DIY BEADING MAGAZINE ISSUE 32
Step 22 Cut off the spare bits of wire preferably at the backside of the ear stud and tuck in the ends
Congrats yoursquove now made a heart-shaped ear stud Next we are going to finish it off with a patina
Step 23 Oxidize the metal of the ear studs I always use liver of sulfur solved in warm water The metal
will turn a dark color and matte texture Afterwards rinse the ear studs thoroughly with water and pat
them dry
Step 24 Rub the oxidized ear stud all over with a rough polishing pad to bring back (a dark copper)
color to the surface
Yoursquove now finished making your own LOVE-ly ear studs
Secure them in your ear with plastic or copper stops These can be bought online or in jewelry-supply
stores
Variation ideas You can easily vary in size and shape (longer hearts smaller coils pointier bottoms etc) and
use different materials As you can see the earring I make in this tutorial has a slightly smaller bead than the
earrings on the cover which influences the overall appearance somewhat
The earrings underneath are made with sterling silver and gold wire (super-short coils) and contain small pink
rubies
LOVE-ly Earrings
BLOG WWWHANDMADE-JEWELRY-CLUBCOM MEMBERSHIP WWWDIYBEADINGCLUBCOM
About the Author
Jeske Hendriks
Hi there My name is Jeske and I love all things handmade Over the years Irsquove dabbled in countless different arts and crafts but nowadays I mainly focus on making jewellery and cutting stone cabochons As for jewellery
my preferred materials are silver wire and gemstonemineral beads Using wire-wrapping and basic silver smithing techniques I create both simple
and intricate pieces ndash each and every one of them unique a personal little artwork
You are welcome to follow me on facebook stop by at my personal
webpage andor to have a look at my Etsy shops httpswwwfacebookcomyeskecrafts
httpwwwyeskecraftscom httpwwwyourbeadsandfindingsetsycom
httpwwwyeskecraftsetsycom httpwwwyeskemiscetsycom
BLOG DIY BEADING MAGAZINE ISSUE 32
Flower Tale Earrings
BLOG WWWHANDMADE-JEWELRY-CLUBCOM MEMBERSHIP WWWDIYBEADINGCLUBCOM
Techniques Beadweaving
Project Level Beginner to Intermediate
Materials 12 bronze opaque 6mm Czech glass pearl round beads
2 gr gold lustered dark topaz Japanese 110 seed beads (Toho 459)
Size B gold beading thread
2 bronze earring hooks
Tools Size 10 beading needle
Scissors
Finished Size Diameter ndash 3 cm (118 inches) (without earring hooks)
BLOG DIY BEADING MAGAZINE ISSUE 32
Flower Tale Earrings
BLOG WWWHANDMADE-JEWELRY-CLUBCOM MEMBERSHIP WWWDIYBEADINGCLUBCOM
Step 1 Cut about 110 cm (43 inches) of thread and
pass it through the needle hole
Pick six groups of one 110 seed bead and one
6 mm round bead
BLOG DIY BEADING MAGAZINE ISSUE 32
Join the beads into a ring and secure with two
square knots
Leave a tail of about 15 cm (59 inches)
Step 2 The working thread should be right before the
6 mm round bead
Pick seven 110 seed beads skip the 6 mm
round bead and pass the needle through the
next 110 seed bead added in the previous
round
Repeat adding groups of seven 110 seed
beads five more times
When adding the last group take the needle
directly through the 110 seed bead from the
previous round and the next one added in the
beginning of current round
Flower Tale Earrings
BLOG WWWHANDMADE-JEWELRY-CLUBCOM MEMBERSHIP WWWDIYBEADINGCLUBCOM
Step 3 Pick three 110 seed beads skip one seed
bead from the chain of seven added in the
previous round and pass with the needle
directly through the next three 110 seed
beads
BLOG DIY BEADING MAGAZINE ISSUE 32
Pick three 110 seed beads skip one seed
bead from the chain of seven added in the
previous round and pass with the needle
through the last one and the first 110 seed
bead from the next chain of seven
Repeat the above directions from Step 3 five
more times
After completing this round make sure the
thread will be exiting from the middle 110
seed bead from the first group of three added
in the beginning of this round
Step 4 Pick one 110 seed bead and go through the
last seed bead of the group of three
Flower Tale Earrings
BLOG WWWHANDMADE-JEWELRY-CLUBCOM MEMBERSHIP WWWDIYBEADINGCLUBCOM
Pick three 110 seed beads and take the
needle through the first seed bead of the next
group of three added in the previous round
BLOG DIY BEADING MAGAZINE ISSUE 32
Pick one 110 seed bead and go with the
needle through the next three seed beads (the
last two of the group of three and the last one
from the chain of seven)
Then go up through three 110 seed beads
(the first from the next group of seven and the
first two from the next group of three)
Repeat the above directions from Step 4 to
complete the remaining petals
When working on the last petal perform the
operation from the image shown on the left
instead of picking the group of three 110 seed
beads string two 110 seed beads the earring
hook other two 110 seed beads and
continue beading as instructed above
When you are done hide the thread ends into the beadwork
Flower Tale Earrings
BLOG WWWHANDMADE-JEWELRY-CLUBCOM MEMBERSHIP WWWDIYBEADINGCLUBCOM
About the Author
Iulia Postică
I was born and live in Moldova Eastern Europe Ever since I remember myself
Ive been crocheting and knitting My grandmother has taught me that and I
loved it very much I always regarded crafts exclusively as a hobby and never
thought of making a career of it I traveled a lot to various historical sites
Actually Ive spent all my childhood summers in archaeological camps with
my father who is a professional archaeologist
I also enjoy metal hammering and wirework as it gives me possibility to
express myself in materials used by human communities since ancient times
copper brass glass seed beads and gemstones That is no surprise to anyone
given my family history and academic background
My shop ldquoBeadedTreasuryrdquo with beading tutorials and bead crochet patterns
httpswwwetsycomshopBeadedTreasury
My shop ldquoArchaeologicardquo with artisan jewelry
httpswwwetsycomshopArcheologica
My blog httpbeadedtreasuryblogspotcom
My facebook httpswwwfacebookcomBeadedTreasury
BLOG DIY BEADING MAGAZINE ISSUE 32
Liberty Earrings
BLOG WWWHANDMADE-JEWELRY-CLUBCOM MEMBERSHIP WWWDIYBEADINGCLUBCOM
Materials - Nr 2 cabochon Preciosa Ornela ovale 18x22 mm turchese
- Rocaille Toho 150 silver lined green emerald
- Nr 2 dagger beads
- Nr 20 pearl 4 mm
- Superduo opaque luster ceramic green
- Rocaille 80 color gold
- Rocaille 80 color ivory
- Delica Miyuki 110 aquagreen mix
- Rocaille Miyuki 110 galvanized silver
- Nr 2 monachelle (earwire)
-Fireline
- Beading Needle nr 12
BLOG DIY BEADING MAGAZINE ISSUE 32
Liberty Earrings
BLOG WWWHANDMADE-JEWELRY-CLUBCOM MEMBERSHIP WWWDIYBEADINGCLUBCOM
Make a circle of 20 delica beads and make a knot (a) Perform two rounds peyote with ivory 80 seed beads (b c) Exit from an ivory
bead
BLOG DIY BEADING MAGAZINE ISSUE 32
a b c
Jump from 80 to 80 with 110 80 gold 110 (a) Finish the round and come out of a 80 gold bead
Jump to the next 80 gold with a 4mm pearl (b) Finish the round and come out
of the first pearl Jump to the 2nd pearl and close with a 80 gold bead(c)
a b c
Position the cabochon and jump from one 80 to the other with two delica bead (a)
Continue with three delicas four times (b) At the bottom sew on two delicas then finish the round by sewing on three delicas for four times passing from one to another roc 80 Tighten the cabochon and exit from the
first two delica that you started with String together a 110 and 150 and enter the second of the three close delicas (c)
a b c
Liberty Earrings
BLOG WWWHANDMADE-JEWELRY-CLUBCOM MEMBERSHIP WWWDIYBEADINGCLUBCOM
Put together 150 110 150 and enter in the second of three next delica (a) Put the same beads for three times then put together 150 and 110 and enter
in the two delica of the bottom tip (b) Enter in the second of three next delica with 110 and 150 (c) Continue passing
in the 80 beads with three beads (150 110 150) for four times then at the top finish the round by putting together a 150 and 110 (d)
BLOG DIY BEADING MAGAZINE ISSUE 32
a b c
Exit from the first 150 sewn in the previous round and jump in the three next beads with a 150 (a)
Put a 150 at a time and exit from the first 110 beads of the bottom tip Jump in the
near 110 with a 150 (b) Finish round repeating steps a and b (c) Exit the roc 80 as shown in the photo (d)
a b c
d
a b c d
Enter in the 80 with four 150 (a b) Enter the 80 beads at the bottom of the pieces with two 110 one superduo one 80 ivory bead one superduo and two 110 (c)
d e f
Liberty Earrings
BLOG WWWHANDMADE-JEWELRY-CLUBCOM MEMBERSHIP WWWDIYBEADINGCLUBCOM
Exit from the bottom pearl (a) Put together 150 three 110 150 and enter in the superduorsquos second hole (b)
Put together three superduo and enter in the next superduorsquos second hole (c) Rethread 15 three 110 150 and return in the opposite direction in the pearl of departure (d)
BLOG DIY BEADING MAGAZINE ISSUE 32
a b
c
Exit from the second pearl indicated from (a) Put 150 four 110 and enter in the second of the three 110 (b) Go to the second superduorsquos hole with four 110 and a 150 (c)
Enter the second hole of the supeduo with a 150(d) Sew in the middle of the bottom of the superduo 150 two 110 150 dagger 150 two 110 150(e)
Enter the second hole of the thirs superduo with 150 (f)
a b c
d
d e f
Liberty Earrings
BLOG WWWHANDMADE-JEWELRY-CLUBCOM MEMBERSHIP WWWDIYBEADINGCLUBCOM BLOG DIY BEADING MAGAZINE ISSUE 32
Put 150 four 110 and enter in the second of three 110 of the base (a) Insert four 110 and 150 in the pearl opposite direction indicated in the picture (b) Go in all the beads
around the piece and exit from the pearl at the top (c) Put 150 three 110 150 and enter the superduo (d)
Enter the ivory bead 80 with two 150 (e) Enter the next superduo with two 150 (f)
a b c
d e f
Put together 150 three 110 and enter in opposite direction in the departurersquos pearl (a) Exit from the 150 beads indicated by photo (b) From this jump in the second of two near
150 with five 150 to created the hole for the earwire (c) Pass the thread in the beads make a few knots and cut the excess thread
a b c
Your earrings are finished
Liberty Earrings
BLOG WWWHANDMADE-JEWELRY-CLUBCOM MEMBERSHIP WWWDIYBEADINGCLUBCOM
About the Author
Mariella Martella
My name is Mariella Martella and I am the author and
designer of jewelry that I sign with the name of Mariel Bijoux
After changing city often for work and study I currently live
in northern Italy I am an art historian with a passion for travel
painting and jewelry design in weaving that project since
2010 In my beads and crystals are the colors of the
Mediterranean sea the atmosphere of summer evenings
and the lights of the places I visited
You can find me at
Etsy shop httpswwwetsycomitshopMarielBijoux
Facebook httpswwwfacebookcommari3lbijoux
Crafting blog httpmarielbijouxblogspotit
Twitter httpstwittercomMarielBijoux
BLOG DIY BEADING MAGAZINE ISSUE 32
Jade Necklace
BLOG WWWHANDMADE-JEWELRY-CLUBCOM MEMBERSHIP WWWDIYBEADINGCLUBCOM
Every time I wear a necklace I always make it a point that the
necklace will lay perfectly flat on my neck Using wire for a necklace
made it possible for me like what I did with Jade Necklace It may look
odd at first having bent wires for a necklace but once the jewelry is
finished youll be so happy how the necklace will perfectly lay on your
neck
The tutorial is catered for intermediate level One must know basic
wirework skills such as wire wrapping making loops wrapped loops
and linking to follow the tutorial It has clear instructions and ultra-clear
close-up photos at each step Additionally you can ask me question
you have on the tutorial No more getting stuck and frustrated on a
confusing or just plain inaccurate pattern
If you followed this tutorial and then sell the accessory or jewelry
please give credit to the author or DIY Beading Clubcom
Copyright 2015
wwwdiybeadingclubcom
wwwhandmade-jewelry-clubcom
BLOG DIY BEADING MAGAZINE ISSUE 32
Jade Necklace
BLOG WWWHANDMADE-JEWELRY-CLUBCOM MEMBERSHIP WWWDIYBEADINGCLUBCOM BLOG DIY BEADING MAGAZINE ISSUE 32
Materials Needed 18ga Craft wire 28ga Craft wire 15mm diameter Green Round Flat Back Sew On Gems 5mm Green pearls
8mm Green pearls 6mm x 11mm teardrop Crystal Treasures Mill Hill beads or any teardrop bead with holes on the side Hook for your clasp
Tools Needed Wire cutter Flat nose pliers Round nose pliers Mandrel A jar or any rounded object to shape your necklace
Skill Level Intermediate
Step 1 Cut 6 inches 18ga wire Make a loop on one end then measure approximately 125 inches and make another loop
Form a size 4 circle on your mandrel
Jade Necklace
BLOG WWWHANDMADE-JEWELRY-CLUBCOM MEMBERSHIP WWWDIYBEADINGCLUBCOM BLOG DIY BEADING MAGAZINE ISSUE 32
Then close the circle by wrapping the extended wire just below the loop Wrap the
wire 2x
This is how it looks like Lets call this circle frame Youll notice that the lower curve is
slightly bigger than the upper curve
Step 2 Cut 8 inches of 28ga wire Wrap one end of
the wire at least 3x on one side of the circle frame just below the loop
Bring up your gem Flat back sew on gems has 2 holes Insert the wire into one hole and then
wrap the wire once onto the circle frame
Jade Necklace
BLOG WWWHANDMADE-JEWELRY-CLUBCOM MEMBERSHIP WWWDIYBEADINGCLUBCOM BLOG DIY BEADING MAGAZINE ISSUE 32
Step 3 Insert a 5mm pearl on the wire and then pass
the wire under circle frame
Repeat previous step 2x and have 3 pearls wrapped
Continue wrapping with your teardrop crystal My crystal has 2 holes on the side
and then continue wrapping with your 5mm pearls then secure your wire
Repeat Step 3 and create as many as needed For 16-inch necklace Ive created 6 of these
components
Jade Necklace
BLOG WWWHANDMADE-JEWELRY-CLUBCOM MEMBERSHIP WWWDIYBEADINGCLUBCOM BLOG DIY BEADING MAGAZINE ISSUE 32
Step 4 Cut a 15-inch 18ga wire and make a loop on
one end Insert 8mm pearl and make a loop on the other end You then use these as connectors
and link the components
Step 5 The necklace is an 18ga wire with wrapped
loops on both ends First cut 7 inches 18ga wire and make a wrapped loop with your hook already inserted Side in 18pcs 5mm pearls
Then make a wrapped loop on the other end connecting the wrapped loop onto the component Do the same for the other
necklace but make the loop on the other end big enough so the hookclasp can pass thru
To have the necklace curve shaped use a jar to bend the wire Voila Now youre
ready to party
Jade Necklace
BLOG WWWHANDMADE-JEWELRY-CLUBCOM MEMBERSHIP WWWDIYBEADINGCLUBCOM
About the Author
Sky Aldovino
I consider myself a late bloomer when it comes to crafting Irsquom a self-taught jewelry maker Jewelry making wasnrsquot really a hobby of mine but unforeseen events lead me to learn jewellery making My family put up a craft store where we sell cross stitch beads and all sorts of crafting materials I fell in love with the beads and tried to create accessories only for myself Clients liked the pieces and I started customizing handmade jewelleries The craft store was a success for 6 years but like any other small businesses we had to close it down and I was confined to staying at home While at home I had all the time using the internet and now working as a home-based jewelry designer
BLOG DIY BEADING MAGAZINE ISSUE 32
Atomic Ring
BLOG WWWHANDMADE-JEWELRY-CLUBCOM MEMBERSHIP WWWDIYBEADINGCLUBCOM
Have fun making shapes using the wigjig Cyclops Make loops going in
circles to mimic the shape of a flower or in this tutorial mimic the
shape of an atom The tutorial will also teach you how to cage a
cabochon Whats nice about this piece is that with one long wire you
can create the ring from start to finish
The tutorial is catered for intermediate to advanced students One
must already know how to make spirals and use a wigjig tool It has
clear instructions and ultra-clear close-up photos at each step
Additionally you can ask me question you have on the tutorial No
more getting stuck and frustrated on a confusing or just plain
inaccurate pattern
If you followed this tutorial and then sell the accessory or jewelry
please give credit to the author or DIY Beading Clubcom
If you like to get a blank wigjig graph visit wigjigcom Shop and Jigs
section
Copyright 2015
wwwdiybeadingclubcom
wwwhandmade-jewelry-clubcom
BLOG DIY BEADING MAGAZINE ISSUE 32
Atomic Ring
BLOG WWWHANDMADE-JEWELRY-CLUBCOM MEMBERSHIP WWWDIYBEADINGCLUBCOM
Materials Needed 20ga Craft wire 28ga Craft wire 11mm Round Cabochon
Tools Needed Wigjig Cyclops 15mm pegs Wire cutter Flat nose pliers Mandrel
Skill Level Intermediate - Advanced
BLOG DIY BEADING MAGAZINE ISSUE 32
Step 1 Lets prepare your wigjig cyclops Position the pegs like so
Atomic Ring
BLOG WWWHANDMADE-JEWELRY-CLUBCOM MEMBERSHIP WWWDIYBEADINGCLUBCOM BLOG DIY BEADING MAGAZINE ISSUE 32
Lets work with longer wire so youll have enough wire to hold onto as you manipulate the wire so cut 36 inches of 20ga wire From
one end of the wire measure 10 inches
On the 10-inch measurement loop the wire at the center peg then continue to loop onto the side pegs going in circle going back to
the center peg after looping on the side peg
Now the wire at the center peg will start to build up as you go around the side pegs so
you need to constantly press the wire at the center peg to accommodate the build up of
wire
When youre done pull out the wire and this is
how it should look like
Atomic Ring
BLOG WWWHANDMADE-JEWELRY-CLUBCOM MEMBERSHIP WWWDIYBEADINGCLUBCOM BLOG DIY BEADING MAGAZINE ISSUE 32
You will notice that the frame opens wide Now to keep the atom frame from opening wide secure the center of the frame by wrapping a 28ga wire What you
need to do is simply pass the 28ga wire into the hole and wrap as many times as needed or until youre sure that the frame is secure
Step 2 Now youre finished with your atom frame Well now create the focal design With the longer wire make a spiral at the center big
enough to accommodate the size of your cabochon In this tutorial the spiral is about
11mm in diameter the same size as my cabochon
Pop in your cabochon and start to make spirals going around and over the cabochon as if you are caging the cabochon Create at
least 5 rounds and then cut off any excess
Step 3 Now lets make the ring and this with the other
end of the wire
Atomic Ring
BLOG WWWHANDMADE-JEWELRY-CLUBCOM MEMBERSHIP WWWDIYBEADINGCLUBCOM BLOG DIY BEADING MAGAZINE ISSUE 32
Bring up your mandrel and wrap the wire to the size of your finger Wrap at least 2 times
When youre sure you have the right size pull the ring out of the mandrel
With the extended wire wrap the wire the secure the ring
Cut off any excess and voila You have your atomic ring Create as many as you can with different colors of cabochon
Atomic Ring
BLOG WWWHANDMADE-JEWELRY-CLUBCOM MEMBERSHIP WWWDIYBEADINGCLUBCOM
About the Author
Sky Aldovino
I consider myself a late bloomer when it comes to crafting Irsquom a self-taught jewelry maker Jewelry making wasnrsquot really a hobby of mine but unforeseen events lead me to learn jewellery making My family put up a craft store where we sell cross stitch beads and all sorts of crafting materials I fell in love with the beads and tried to create accessories only for myself Clients liked the pieces and I started customizing handmade jewelleries The craft store was a success for 6 years but like any other small businesses we had to close it down and I was confined to staying at home While at home I had all the time using the internet and now working as a home-based jewelry designer
BLOG DIY BEADING MAGAZINE ISSUE 32
Featured Article Gemstones Used for Jewelry Making
BLOG WWWHANDMADE-JEWELRY-CLUBCOM MEMBERSHIP WWWDIYBEADINGCLUBCOM
Gemstones are stones which we hold quite highly in terms of value And
jewelry often consists of stones that add attractiveness to it so it is not
surprising when jewelry designers actually use gemstones in their designs In
fact there are different types of gemstones that can be used for making
jewelry There are the expensive and pure gemstones and there are also the
imitation ones The information below will provide some information about
the kinds of stones you can use to create jewelry and how these stones will
impact the jewelry you have created
The first kind of stone which I believe we are all quite familiar with are
birthstones These stones are associated with individualrsquos month of birth
by SunVDesigns by BeyhanAkman
For example Amethyst stone is connected with anybody who is born in
February which carries special significance in the area of emotions and also
spiritually This stone also signifies calm and peace as well
And then we have semi-precious stones which are also often used in jewelry
making They are not as valuable as compared to precious stones but still
valuable Best examples of these stones are aquamarine topaz tourmaline
opal and turquoise
BLOG DIY BEADING MAGAZINE ISSUE 32
Featured Article Gemstones Used for Jewelry Making
BLOG WWWHANDMADE-JEWELRY-CLUBCOM MEMBERSHIP WWWDIYBEADINGCLUBCOM
It is an ideal gift for someone who you deem special Aquamarine pendants
usually work well for anyone and is widely an accepted stone
by HyppieChic by joyeriamestiza
However precious stones are the most unusual
and precious jewels to us Examples of some of
them are emerald sapphire diamond and
ruby These stones are usually very expensive
and are prized for their exquisiteness These
stones are commonly used in high-quality
jewelry designs which costs quite a fortune to
obtain
BLOG DIY BEADING MAGAZINE ISSUE 32
by sarajewelrystu
Jewelry designs with precious stones are usually
given as exceptional gifts on special occasions A
perfect example is a diamond ring that is usually
given as an engagement gift
by ldiamondsforever
Featured Article Gemstones Used for Jewelry Making
BLOG WWWHANDMADE-JEWELRY-CLUBCOM MEMBERSHIP WWWDIYBEADINGCLUBCOM
There are also synthetic stones which are often used to create jewelry
Synthetic stones are artificial imitations of gemstones Synthetic Sapphire
jewelry costs less compare with the authentic ones Most of the time
imitation stones are used to save cost but at the same time have the similar
look of the real stone
BLOG DIY BEADING MAGAZINE ISSUE 32
by shininggems by thaimaker
by lapinduprintemps by PastimeArt
Gemstones are used like beads and you can use it in any designs whether
simple or elaborate
Swarovski crystal components are available in a rich multitude of rondelles Perfect as spacers in necklaces or as discs in earrings Rondelles can be used with many varieties of shapes or sizes Use Swarovski crystal rondelles between large gemstones as accents with precious metal findings Fire Mountain Gems and Beads Crystal Passionsreg brand presents Swarovski crystal in display-ready packaging for brilliant retail presentation Crystal Passionsreg is an assurance of genuine Swarovski crystal
BLOG DIY BEADING MAGAZINE ISSUE 32 BLOG WWWHANDMADE-JEWELRY-CLUBCOM MEMBERSHIP WWWDIYBEADINGCLUBCOM
Recommended Jewelry Making Supplies
Mz Unisex-adults 12pcs 25x18x6mm Turquoise Oval CAB Cabochon
BLOG DIY BEADING MAGAZINE ISSUE 32 BLOG WWWHANDMADE-JEWELRY-CLUBCOM MEMBERSHIP WWWDIYBEADINGCLUBCOM
Recommended Jewelry Making Supplies
For a little sparkle that goes a long way design with Swarovski 4mm faceted bicones Create glorious multi-strand necklaces with the dainty crystals or use as spacers to add a tiny flash to your designs Swarovski crystal components are made in Austria and are considered the finest products of their kind in the world
BLOG DIY BEADING MAGAZINE ISSUE 32 BLOG WWWHANDMADE-JEWELRY-CLUBCOM MEMBERSHIP WWWDIYBEADINGCLUBCOM
Recommended Jewelry Making Supplies
Imitation beads resist color change These beads have uniform quality with a good polish Some strands may have little to no matrix Sizes shapes and colors may vary with handcrafted items
BLOG DIY BEADING MAGAZINE ISSUE 32 BLOG WWWHANDMADE-JEWELRY-CLUBCOM MEMBERSHIP WWWDIYBEADINGCLUBCOM
Recommended Jewelry Making Supplies
Something Blue Necklace and Earrings
BLOG WWWHANDMADE-JEWELRY-CLUBCOM MEMBERSHIP WWWDIYBEADINGCLUBCOM
Skill level Beginner Intermediate Advanced
DIMENSIONS OF THE NECKLACE Inner Circumference 14 18 inch 35 cm
Focal Pendant Width 1 15 inch 35 cm Focal Pendant Height 1 15 inch 35 cm
DIMENSIONS OF THE EARRING Earring Width 716 inch 12 cm Earring Height 1516 inch 25 cm (Without the earring hook)
BLOG DIY BEADING MAGAZINE ISSUE 32
Materials
Note Before purchasing the supplies measure the length of your wished necklace If you decide to bead a longer necklace you should keep in mind that for every extra
frac34 inches 2 cm-s you will need 8 bicones and 8 pearls
Something Blue Necklace and Earrings
BLOG WWWHANDMADE-JEWELRY-CLUBCOM MEMBERSHIP WWWDIYBEADINGCLUBCOM BLOG DIY BEADING MAGAZINE ISSUE 32
Work RAW stitch into a beaded circle and embellish with Swarovski bicones
STEP 2 String 1A and 2 pearls Pass through the previous
second pearl and the freshly added 1A and the first pearl again
STEP 1 Use a comfortable length of thread to string 2
pearls 1A and 1 pearl again leaving a 2rdquo 5cm tail Pass through the first two pearls strung to form a
ring
STEP 3 String 2 pearls and 1A Pass through the previous first pearl and the freshly added two pearls
again
STEP 4 - 17 Repeat STEP 2 and STEP 3 again until you count 17 pearls in the inner circle
But be careful in the last step you only have to add 1 pearl then pass through the first pearls
added in STEP 1 and add another 1A Now pass through the first pearl added in STEP
1and 1A added in this round again to exit from this A
Something Blue Necklace and Earrings
BLOG WWWHANDMADE-JEWELRY-CLUBCOM MEMBERSHIP WWWDIYBEADINGCLUBCOM BLOG DIY BEADING MAGAZINE ISSUE 32
STEP 19 String 2A and pass through the next A added in round 4-17 and the A added in round 18 the 2A added in this round and finally the A added in round 4-17 to exit from the bead showed below
STEP 18 String 3A and pass through the 1A added in the previous round and the first A added in this
round
STEP 20 - 34 Repeat STEP 18 and STEP 19 again until you finish the circle
But be careful in the last step first you have to pass through 3A and then add 1A After this pass
through the 3A again and exit from the A bead
shown below (This is the first A added in STEP 18)
Something Blue Necklace and Earrings
BLOG WWWHANDMADE-JEWELRY-CLUBCOM MEMBERSHIP WWWDIYBEADINGCLUBCOM BLOG DIY BEADING MAGAZINE ISSUE 32
STEP 35 Step up to exit from the pearl shown below (Finishing the previous step in the A bead and then
stepping up from there makes the circle more secure)
Now string 3 bicones Pass through the pearl and the first bicone again
In the reality your circle will look more like this the A beads forming a strong row in the middle of the
pearls
STEP 36 Add 2 bicones Pass through the
neighboring pearl the first bicone added in the previous row and the 2 bicones added in this step
so you can exit from the next pearl
Something Blue Necklace and Earrings
BLOG WWWHANDMADE-JEWELRY-CLUBCOM MEMBERSHIP WWWDIYBEADINGCLUBCOM BLOG DIY BEADING MAGAZINE ISSUE 32
Now in the reality your circle will look more like this the A beads still forming a strong row in the middle of the pearls and the bicones slightly lying on top of
them
STEP 37 - 49 Repeat STEP 35 and STEP 36 again until you finish the circle with the bicones
But be careful in the last step first you have pass through the third bicone added then add 1 bicone
and pass through this little quartet to exit from the bicone shown below (The second one added in
STEP 35)
STEP 50 With these steps we finish the circle by adding 1 bicone to connect the A beads and the
bicone row So add 1 bicone pass through the nearest A bead and add 1 bicone again Pass
through the bicone already there and exit from the bicone you just added
Something Blue Necklace and Earrings
BLOG WWWHANDMADE-JEWELRY-CLUBCOM MEMBERSHIP WWWDIYBEADINGCLUBCOM BLOG DIY BEADING MAGAZINE ISSUE 32
STEP 66-83 Secure the circle by adding 1A between each bicone in the second row of Swarovski
bicones If you finished secure the thread and trim
STEP 51-65 Using the same technique as in STEP 37 - 49 add 1 bicone to finish the third bicone row The black line shows you the way (After STEP 50 pass through the next A bead add 1 bicone and pass through the bicone already there and the bicone added in the previous step Repeat these steps to
finish the inner bicone circle)
MIDDLE CIRCLE Work RAW stitch into a beaded circle and embellish with
Swarovski bicones Remember you need to bead two circles this time
STEP 1 Just like in the focal circle begin with 2 pearls 1A and 1 pearl again on a comfortable length of thread
leaving a 2rdquo 5cm tail Pass through the first two pearls strung to form a ring
Something Blue Necklace and Earrings
BLOG WWWHANDMADE-JEWELRY-CLUBCOM MEMBERSHIP WWWDIYBEADINGCLUBCOM BLOG DIY BEADING MAGAZINE ISSUE 32
STEP 15-28 Mimicing the FOCAL CIRCLElsquos STEP 18-34 bead A beads until you finish the inner part of the
circle Exit from a pearl in the second row This circle should look very similar to the first one but this is a bit
smaller
STEP 2-14 Mimicing the FOCAL CIRCLElsquos STEP 2-17 bead until you count 14 pearls in the inner circle Exit
from the last A added
STEP 29-42 Mimicing FOCAL CIRCLElsquos STEP 35-49 add 2 rows of bicones
STEP 43-56 Mimicing the FOCAL CIRCLElsquos STEP 50-65 bead the third row of bicones to finish the circle
Something Blue Necklace and Earrings
BLOG WWWHANDMADE-JEWELRY-CLUBCOM MEMBERSHIP WWWDIYBEADINGCLUBCOM BLOG DIY BEADING MAGAZINE ISSUE 32
SMALLEST CIRCLE Work RAW stitch into a beaded circle and embellish
with Swarovski bicones Remember you need to bead two circles again
STEP 1 Just like in the focal circle begin with 2 pearls
1A and 1 pearl again on a comfortable length of thread leaving a 2rdquo 5cm tail Pass through the first two
pearls strung to form a ring
STEP 57-70 Just like the FOCAL CIRCLElsquos STEP 66-83 secure the circle by adding 1A between every bicone
in the second row of bicones If you finished secure the thread and trim (Donrsquot forget to bead another
circle)
STEP 2-12 Mimicing the FOCAL CIRCLElsquos STEP 2-17 bead until you count 12 pearls in the inner circle Exit
from the last A added
STEP 13-24 Mimicing the FOCAL CIRCLElsquos STEP 18-34 bead A beads until you finish the inner part of the
circle Exit from a pearl in the second row This circle should look very similar to the first two but this is the
smallest of them all
Something Blue Necklace and Earrings
BLOG WWWHANDMADE-JEWELRY-CLUBCOM MEMBERSHIP WWWDIYBEADINGCLUBCOM BLOG DIY BEADING MAGAZINE ISSUE 32
STEP 37-48 Mimicing the FOCAL CIRCLElsquos STEP 50-65 bead the third row of bicones to finish this circle too
STEP 25-36 Mimicing FOCAL CIRCLElsquos STEP 35-49 add 2
rows of bicones The last step here is purple again
STEP 49-60 Just like the FOCAL CIRCLElsquos STEP 66-83 secure the circle by adding 1A between every bicone
in the second row of bicones If you finished secure the thread and trim (Donrsquot forget that you need two
small circles)
Something Blue Necklace and Earrings
BLOG WWWHANDMADE-JEWELRY-CLUBCOM MEMBERSHIP WWWDIYBEADINGCLUBCOM BLOG DIY BEADING MAGAZINE ISSUE 32
STEP 37-48 Mimicing the FOCAL CIRCLElsquos STEP 50-65 bead the third row of bicones to finish this circle too
STEP 25-36 Mimicing FOCAL CIRCLElsquos STEP 35-49 add 2
rows of bicones The last step here is purple again
STEP 49-60 Just like the FOCAL CIRCLElsquos STEP 66-83 secure the circle by adding 1A between every bicone
in the second row of bicones If you finished secure the thread and trim (Donrsquot forget that you need two
small circles)
Something Blue Necklace and Earrings
BLOG WWWHANDMADE-JEWELRY-CLUBCOM MEMBERSHIP WWWDIYBEADINGCLUBCOM BLOG DIY BEADING MAGAZINE ISSUE 32
STEP 2-6 Continue by adding 1A 1 bicone 1 pearl until you count 6 of each
STEP 1 Begin with 1 pearl 1 bicone 1A and 1 bicone again on a comfortable length of thread leaving a 2rdquo
5cm tail Pass through the pearl and the first bicone strung to form a ring
STEP 7-12 Pass through the A beads to make your
component more secure Also secure the thread and trim (Repeat these steps until you have six 6-BEAD
COMPONENTs)
6-BEAD COMPONENT Work RAW stitch into a beaded circle and embellish with Swarovski bicones
For the necklace we will need six from this component For the earring two
Something Blue Necklace and Earrings
BLOG WWWHANDMADE-JEWELRY-CLUBCOM MEMBERSHIP WWWDIYBEADINGCLUBCOM BLOG DIY BEADING MAGAZINE ISSUE 32
STEP 2-4 Continue by adding 1A 1 bicone 1 pearl
until you count 4 of each
STEP 1 Begin with 1 pearl 1 bicone 1A and 1 bicone again on a comfortable length of thread leaving a 2rdquo
5cm tail Pass through the pearl and the first bicone strung to form a ring
STEP 5-8 Pass through the A beads to make your component more secure Also secure the thread and
trim (Repeat these steps until you have the wished amount of 4-BEAD COMPONENTs)
4-BEAD COMPONENT Work RAW stitch into a beaded circle and embellish with Swarovski bicones
For the necklace-size that is given on the second page we will need 20 from this
component For the earring two
If you would like to make a longer necklace you need to make more (One 4-BEAD COMPONENT measures about 38 inch 1 cm To make the necklace symmetrical you have to have equal amounts on each side This means for every extra frac34 inches
2 cm-s you will need 1 4-BEAD COMPONENT on each side of the necklace)
Something Blue Necklace and Earrings
BLOG WWWHANDMADE-JEWELRY-CLUBCOM MEMBERSHIP WWWDIYBEADINGCLUBCOM BLOG DIY BEADING MAGAZINE ISSUE 32
STEP 2 Connect the MIDDLE CIRCLE to two 6-BEAD COMPONENTs by adding four-times 2As
between the pearls Choose a pearl on the MIDDLE CIRCLE and add
2A pass through a pearl in the 6-BEAD COMPONENT previously added and add 2A again Watch out this has to be symmetrical Repeat this at least two more times to make it
secure Now repeat this entire procedure but choose
the 8-th pearl on MIDDLE CIRCLE Repeat this on the other side of the necklace
too
Choose a pearl on the FOCAL CIRCLE and add 2A pass through a pearl in the 6-BEAD COMPONENT and add 2A again Repeat this at least two more times to make it secure
Now repeat this entire procedure but choose the 5-th pearl on FOCAL CIRCLE This will make the necklace nice on your neck
FINISHING THE NECKLACE Connects the parts with A beads
STEP 1 Connect the FOCAL CIRCLE to two 6-BEAD COMPONENTs by adding four-times 2As between the pearls To do this turn your parts upside down you need to
see the pearls We will work on this side from now on
Something Blue Necklace and Earrings
BLOG WWWHANDMADE-JEWELRY-CLUBCOM MEMBERSHIP WWWDIYBEADINGCLUBCOM BLOG DIY BEADING MAGAZINE ISSUE 32
FINISHING THE EARRING Connects the parts with A beads
STEP 1-2 Connect the 6-BEAD COMPONENT
to 4-BEAD COMPONENT and the 4-BEAD
COMPONENT to the earring hook
First connect the 4-BEAD COMPONENT to the 6-BEAD COMPONENT with 4A beads Mimic
the elongation steps of the necklace if needed
Secondly connect the 4-BEAD COMPONENT
to your earring hook with 4A beads again Leave from the last pearl bead 2A beads the hook (this is the orange oval form) and 2As again Pass through each of them to
secure this connection again
Finally get ready to prepare the other earring ndash since we need two of them
STEP 5 Connect the 4-BEAD COMPONENTs to the toggle clasp thus finishing the
necklace Leaving from the last pearl bead 2A the
clasp(this is the orange oval form) and 2A again Pass through all of them a couple more times to make this connection more
secure
Something Blue Necklace and Earrings
BLOG WWWHANDMADE-JEWELRY-CLUBCOM MEMBERSHIP WWWDIYBEADINGCLUBCOM BLOG DIY BEADING MAGAZINE ISSUE 32
If you finished it is time to try it on It was a great fun wasnrsquot it And how beautiful you look in your new necklace and the matching earrings
Something Blue Necklace and Earrings
BLOG WWWHANDMADE-JEWELRY-CLUBCOM MEMBERSHIP WWWDIYBEADINGCLUBCOM
About the Author
Margit Vogel
My name is Margit Vogel I live in Hungary Europe
By profession I am a biochemical engineer but I fell in love with
beads so much that I could not stop playing with them
I make one-of-a-kind beaded and bead embroidered art
jewelry made of the best quality materials such as Swarovski
stones gemstones Japanese beads (Miyuki and Toho) Czech
glass beads leather soutache and suede Each piece is unique
and individually crafted
Feel free to visit my blog for some eyecandy
httpiformjewelrywordpresscom
My shop httpwwwetsycomshopiformjewelry
Facebook httpwwwfacebookcomiformjewelry
BLOG DIY BEADING MAGAZINE ISSUE 32
Getting Down And Personal With Gianna
Getting Down And Personal With Gianna
Nowadays we see more and more jewelry stores opening up online and with these online jewelry stores it has made it easier for us to purchase and view their creations Have you ever wondered how they are able to manage and produce amazing jewelry pieces and tutorials So heres a little on the journey to open up an online shop We are excited to present to you Gianna aka Beading4perfectionists
Gianna Beader amp Youtuber
Unlike most jewelry makers and beadweavers Gianna did not start beading as a hobby but as a means to make ends meet With goals in trying to
fill the financial gap she did everything she could to expand her earnings ndash working as a security guard
and at the same time learning how to bead and selling her pieces at fair trades and flea markets
Since many were asking if she does home beading workshops she started on exploring how to teach people to bead She loves Scott Bakula and has always loved him till now and this served as her
inspiration to start making a beading video tutorial
Gianna started creating videos because she was at the point in her life where everything seemed to be falling apart And at that moment of time she had difficulties financially and selling jewelry was the only way for her to stay afloat financially She is a big Scott Bakula fan and when she went to the UK to see him on stage that was when it hit her that she is already able to edit videos and
taught herself Photoshop and done workshops at bead fairs so why not put these together and see what happens on Youtube She knew that if she gets enough subscribers and views ndash though no one knew what the exact numbers were you would be invited to become a Youtube partner This way she could monetize her videos with advertisements and hopefully she would be able to be a Youtube partner and be able to pay her bills
BLOG WWWHANDMADE-JEWELRY-CLUBCOM MEMBERSHIP WWWDIYBEADINGCLUBCOM BLOG DIY BEADING MAGAZINE ISSUE 32
Getting Down And Personal With Gianna
Her Youtube channel is popular and the reason why she chose Youtube is because Youtube is the biggest platform and reached almost to the whole world Everyone already knows about it and it was growing rapidly as compared to other platforms like Dailymotion so she figured that Youtube was the way to go Her advice to new designers is that when you start out go to the platforms on the top of your list first then work your way down your list if you do not get accepted by your first choice
After loyally putting up one video every week for about 8 months in a row she became a Youtube partner and monetized her videos She knew she needed at least $100 to get her first payout She managed to reach $100 after 3 months The process was not easy she worked hard lack sleep skipped meals and who knows what happened to Ridge in the Bold and the Beautiful because she stopped watching
On Youtube you can monetize your videos Google pays straight to your bank account and at other countries where they also have the option of getting checks among other options In order to get paid you have to reach the $100 mark and after 3 months For Gianna she thinks that you cannot say that Etsy is better than Youtube or Youtube is better than Etsy Her reasoning is because on Youtube she has many followers which will eventually check out her Etsy shop And to start an Etsy shop you need an audience
BLOG WWWHANDMADE-JEWELRY-CLUBCOM MEMBERSHIP WWWDIYBEADINGCLUBCOM BLOG DIY BEADING MAGAZINE ISSUE 32
television and dedicated her spare time (as she had another job) to Youtube She re-registered at the chamber of commerce after receiving her first payout Her work at Youtube now is not a full time job and things have changed on Youtube It is easier to become a parter but there are some countries that need to wait for an invitation to be a Youtube partner Take Italy for instance Italians would have to work just as hard as she did if they want to become a Youtube partner
Getting Down And Personal With Gianna
With her 60000 subscribers on her b4pbakup Youtube channel it is possible to sell at least 60 patterns on the first day on Etsy after promoting the PDF file on her Youtube channel Though you may think that 60 out of 60000 is not much you have to remember that not everyone has the means to purchase the PDF file and a lot of people still rather watch her carry out the tutorial(for free) on Youtube instead of reading the patterns or paying for the patterns even if the pattern is for a fundraiser and only cost $2 Her insights on Youtube is that Youtube is not what it used to be 6 years ago Instead of making more money every month she is making less and less because advertisers have more options of where they want to advertise their ads Ads do not pay as much as they used to Back in the days you could get 25 cents per ad Now you count yourself lucky if you could get 5 cents roll in after two hours
BLOG WWWHANDMADE-JEWELRY-CLUBCOM MEMBERSHIP WWWDIYBEADINGCLUBCOM BLOG DIY BEADING MAGAZINE ISSUE 32
And on top of that adblockers are destroying Youtube channel owners Youtube will start making changes to the channels where there will be ldquopaid subscriptionrdquo channels This has already been implemented in some countries but not in her country The Netherlands This means there will no longer be ads for her monthly paying subscribers She hopes that Youtube will add on a paid per video option feature The option to be a paid channel or free channel or to start a new channel for paying customers is yours to choose Gianna is not happy with Youtube because many others like her have worked so hard and for some years to become Youtube partners(which was something to be proud of) has lost their status
Getting Down And Personal With Gianna
Her advice for those who want to go on Youtube is 1 Do it because you want to teach
2 Do it because you want a career with beads
BLOG WWWHANDMADE-JEWELRY-CLUBCOM MEMBERSHIP WWWDIYBEADINGCLUBCOM BLOG DIY BEADING MAGAZINE ISSUE 32
After putting up about 20 videos and having at least 5000 subscribers add the PDF tutorials to Etsy and Craftsy She found out that her audience would like to have the PDF after watching her videos This is because they would rather print out the PDF and work while seated in a comfy chair technically somewhere else instead of having to pause the video time and time again
Gianna has also made a video for those who want to know the whole story of her journey up until the present day And to get updates on her you can check it out here She has also started a vlog where she tells of how she still works towards becoming a financial independent beader and explains her journey to get where she wants to be(or die trying) Gianna will be in the UK on October the 17th giving an all-day workshop with 4 different patterns
(2 beginners and 2 advanced) in Wotton-under-Edge
Gianna will be there Friday night as the workshop is on Saturday She will be leaving on Sunday Her
doors are open to all who wants to continue the party with her at the hotel across the street
For more information do contact Ann Tucker on Facebook
httpswwwfacebookcomanntucker501
Rec
omm
end
ed R
ead
ings
Making Jewelry with Gemstone
Beads
Combines the popular craft of beading with beautiful semi-precious stones which are collected by many Features a variety of versatile ideas which can be adapted for any type of gem or bead Readers will learn to reate beautiful gemstone jewelry with this dazzling collection of over 100 projects ranging from eyecatching earrings and accessories to exquisite necklaces and bracelets This beautiful book offers an impressive range of 28 beautiful semi-precious stones (including birthstones) and a glimpse into the fascinating history and mythical properties behind them
BLOG DIY BEADING MAGAZINE ISSUE 32 BLOG WWWHANDMADE-JEWELRY-CLUBCOM MEMBERSHIP WWWDIYBEADINGCLUBCOM
Rec
omm
end
ed R
ead
ings
Convertible Crystal Jewelry
Reverse it Twist it Wear it Many
Ways
Diane Whiting presents the idea that convertibility isnrsquot just about using pieces in multiple ways it is also about using skills and creativity in multiple ways Using ever-popular sparkling crystals Diane showcases design elements through various techniques for fun easy fashionable jewelry With 25 projects the reader can choose from bracelets necklaces and earrings that match any outfit or styleDiane Whiting presents the idea that convertibility isnrsquot just about using pieces in multiple ways it is also about using skills and creativity in multiple ways
BLOG DIY BEADING MAGAZINE ISSUE 32 BLOG WWWHANDMADE-JEWELRY-CLUBCOM MEMBERSHIP WWWDIYBEADINGCLUBCOM
Rec
omm
end
ed R
ead
ings
Wire Jewelry Masterclass
Wrapped Coiled and Woven Pieces
Using Fine Materials
Comprehensive and fabulous Wire Jewelry Masterclass takes an in-depth look at an intricate and rewarding craft The 24 projects which range from simple Dragons tear briolette earrings to a Poseidon-under-the-sea pendant will delight and inspire jewelers of all levels and tastes Divided into beginner intermediate and advanced sections this beautifully photographed step-by-step guide is the ticket to wire jewelry expertise
BLOG DIY BEADING MAGAZINE ISSUE 32 BLOG WWWHANDMADE-JEWELRY-CLUBCOM MEMBERSHIP WWWDIYBEADINGCLUBCOM
Rec
omm
end
ed R
ead
ings
Timeless Wire Weaving The
Complete Course
Timeless Wire Weaving focuses on developing wirework skills through 13 projects using three classic wire weaving techniques coiling wrapping and weaving The projects are built around a focal cabochon and incorporate seed beads and crystals in imaginative ways Designers learn to make the jewelry shown in the book and they also use the techniques learned to create innovative jewelry pieces of their own
BLOG DIY BEADING MAGAZINE ISSUE 32 BLOG WWWHANDMADE-JEWELRY-CLUBCOM MEMBERSHIP WWWDIYBEADINGCLUBCOM
Our digital magazine is available through
Apple Newsstand service available to millions of IPAD users
To advertise with us please email us at
diyjewelryclubgmailcom
Or visit our page at
httphandmade-jewelry-clubcomadvertising-diy-beading-magazine
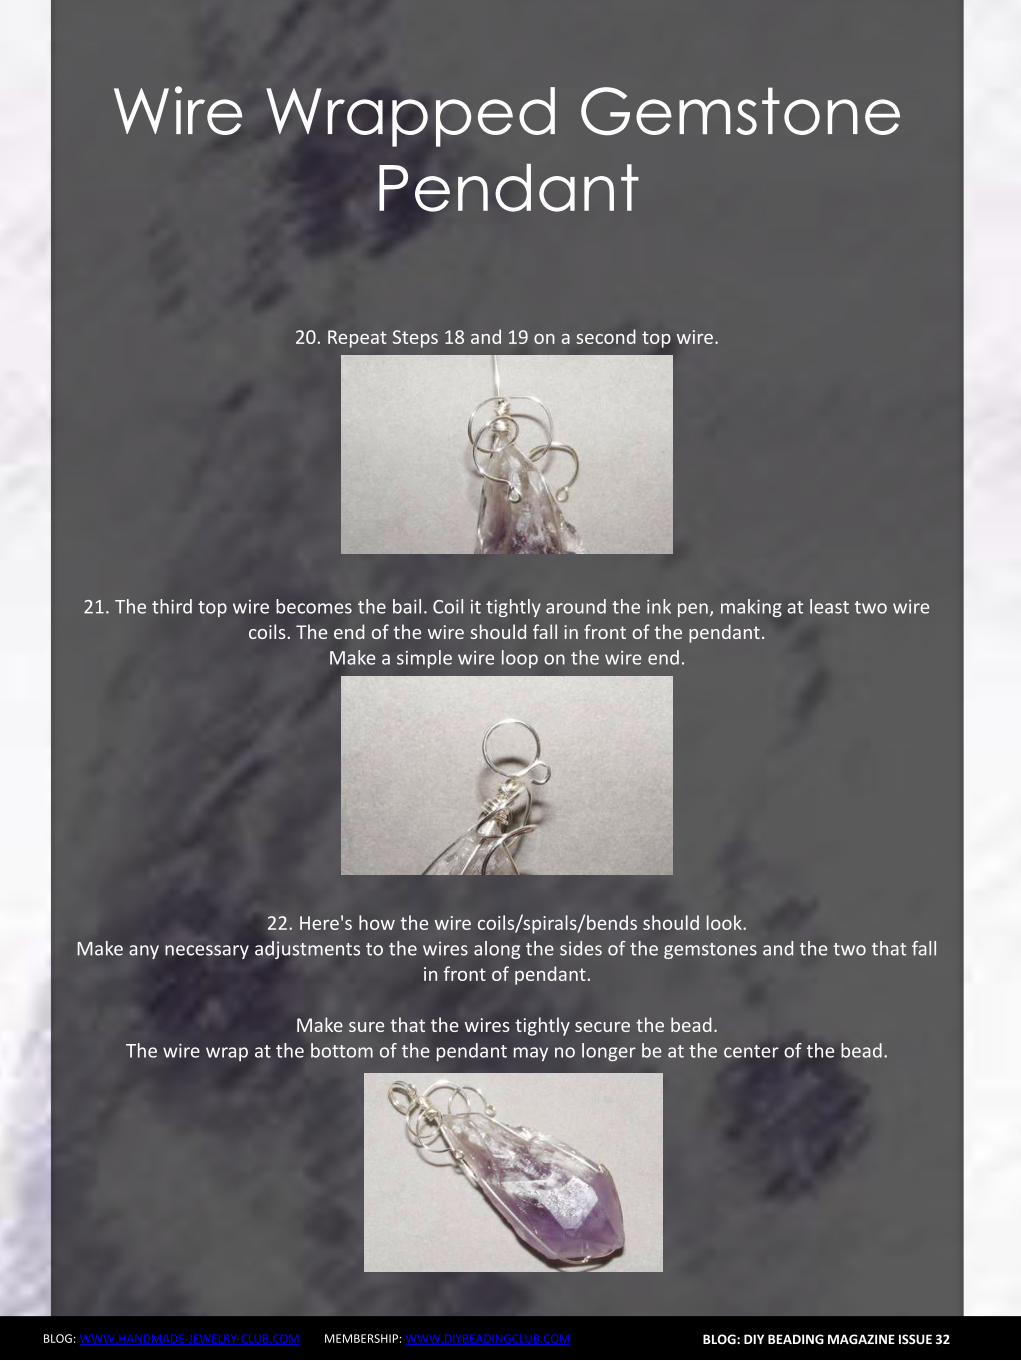
Should You Sell In The Marketplace
Should You Sell In The Marketplace
BLOG WWWHANDMADE-JEWELRY-CLUBCOM MEMBERSHIP WWWDIYBEADINGCLUBCOM
We are all able to create jewelry pieces and there will come a time where you want to share the joy with the rest of the world whether it is in the form of a tutorial or a finish
piece And this is when you will start to think about putting up your work for sale As someone who is new to the business world you may be confused on where you should start selling your work And the all famous site that is first on most peoplersquos minds is Etsy Etsy is popular and it is user friendly and that is why it is the choice of many designers and crafters But there are also some who wants to set up their own
shop with their logo and to put their works out as their own even at the very beginning Thatrsquos where you may be confused on which platform you should go for
So herersquos some explanation on how you will benefit from setting up shop at Etsy
BLOG DIY BEADING MAGAZINE ISSUE 32
1 Etsy has everything ready for you and all you have to do is to bring in your works and use the features that are already available for you to use ndash like the payment system web traffic design and layout are not an issue that you need to worry about
2 You also have the trust of customers almost immediately because Etsy has already established a name for itself and therefore there is already trust in brand in their site When you use Etsy your brand will automatically be exposed to many customers who visit Etsy to find what they need
3 For every site there is always the need to be able to interact with other sellers to help each other out Forums or community boards are very helpful as other passionate designers and crafters share their experience to help out the newer members of the community This is also where you will be able to form good relationships with other sellers and who knows you may even find a partnership over time
Should You Sell In The Marketplace
BLOG WWWHANDMADE-JEWELRY-CLUBCOM MEMBERSHIP WWWDIYBEADINGCLUBCOM
Though Etsy has itrsquos good points there are some things which you need to take into consideration as well
1 When you are using someone elsersquos facilities there is always the chance of having
being shut down due to unforeseen circumstances Be it violation of Etsyrsquos policy or decisions made by the administration department this will sometimes cost you a dent in your brand name and you may lose the trust of your followers and starting all over again may be the only way to start again
2 If you are a very creative person then you may feel limited as the design of shops at Etsy is standardized If you are new and do not worry so much about designs of websites this is perfectly fine But do remember that when you want to distinguish yourself from other sellers it will be tougher as you try to make your brand more well-known due to limitations of design of the site
3 Since Etsy has so many sellers all in one place the competition is of course going to be tighter and fiercer because even though customers are viewing your products there are also other options from other sellers listed on the page as well So customers may turn away if they see something of a better price
4 Each product that you list with Etsy costs you money Etsy also takes a 35 percent of the selling price of the item However if or when you start your business on your own website it will also cost you for web hosting and you would need PayPal and they have a fee of 29 percent +30cents So either way you will still need to pay to list your products on the web
BLOG DIY BEADING MAGAZINE ISSUE 32
Should You Sell In The Marketplace
BLOG WWWHANDMADE-JEWELRY-CLUBCOM MEMBERSHIP WWWDIYBEADINGCLUBCOM
If you are confident enough to have your own business site by all means go ahead and do it The benefits of it are as below
1 You get to be your own boss You get to control everything from the design of the
website layout and how you want to advertise your products You can also change your policies and not be affected by it because it is you who changes it Your shop will not be shut down suddenly without notice and you do not need to worry that you have to start all over again
2 Distractions of competitors products on your page will not be an issue It is your site and it is up to you whether or not you want to allow what kind of advertisements on your site So if you donrsquot want something on your page it is your call
3 You will be able to capture the attention of the media and customers as well if you are able to have a well designed site Nowadays people are attracted to colors and they can see if you have put effort into beautifying the site for the customers You can do so much more than just uploading some pictures onto Etsy on your own site you can always update your site design and your products to complement each other and therefore becoming more attractive
BLOG DIY BEADING MAGAZINE ISSUE 32
Should You Sell In The Marketplace
BLOG WWWHANDMADE-JEWELRY-CLUBCOM MEMBERSHIP WWWDIYBEADINGCLUBCOM
And herersquos the tough part when you want to have your own site
BLOG DIY BEADING MAGAZINE ISSUE 32
1 You need to have knowledge of what you want to do You have to learn to be involved in every aspect of your site so that you know what us going on at the front end of things and at the back end of things as well But if you have not any knowledge of designing a website it is usually a recipe for something to go wrong You have to remember that you need a user interface that is simple for customers to use an easy to use shopping cart you should know which third party platforms are trusted and one which will not keep changing their regulations If you still want to have your site hiring a designer may be your best option
2 You have to work towards promoting your store on your own You will need to find people to feature you in their social media sites because it will not just fall into your lap You need to have promotions or road shows if you need to Marketing your store is important whether or not you are using Etsy or other marketing platforms but if you are on your own it is even more important
3 You will still be competing with other sellers Though now you are now not only competing with Etsy sellers you are now competing with sellers and stores from the world wide web Etsy is already so well known so people tend to go there first so you need to up your methods of attracting customers
Should You Sell In The Marketplace
BLOG WWWHANDMADE-JEWELRY-CLUBCOM MEMBERSHIP WWWDIYBEADINGCLUBCOM
When we first started out we used Etsy as our platform to sell our works Other than that we also utilized blogs and we eventually built our own website as our main base
BLOG DIY BEADING MAGAZINE ISSUE 32
Things have changed over these 3 years It was easier to get sales without much effort but now with so many other shops also utilizing Etsy the competition has grown tremendously Now our main sales come from our own online store and has exceeded sales from Etsy
So what we recommend is that using an existing platform such as Etsy to start out is good and in time build up your website or webstore
It is not that hard to start your own webstore either these two companies offers the option to set up your webstore
1 Shopify
2 Bigcommerce
There are many things to take into consideration before starting a store online It is perfectly fine to start out using Etsy before branching out on your own But you can also
have both ndash have your own website and a store on Etsy There are many stores who operate like this They technically get customers from Etsy and the reroute them to their own websites As long as you are in control of what you are doing and not stressing and
confusing yourself you can opt for more exposure for your store
So do take some time and take a breather to really think through what will be the best for YOU and do remember that starting small does not mean you will not be able to be big
OFFER Get which can be downloaded by subscribing to
httpinternet-marketing-publishingcom
BLOG WWWHANDMADE-JEWELRY-CLUBCOM MEMBERSHIP WWWDIYBEADINGCLUBCOM
Materials - Copper wire diameter 08 mm - Copper wire diameter 04 mm - Small gemstone bead (~4 mm) (I used 3 mm beads in this tutorial because I didnrsquot have any other beads at the time but the beads in the earrings on the cover are 4 mm) Make sure that the beads you want to use are resistant against chemicals such as liver of sulfur or whichever oxidizing substance you want to use to give the metal patina The beads in the picture above are facetted garnet buttons in the tutorial itself I used black spinel facetted buttons Equipment - Round nose pliers - Flat nose pliers - Side-cutters - A small file - A cylindrical object of about 5mm diameter (eg a mandrel for jump rings) - Hammer amp anvil - Liver of sulfur or some other means to oxidize the metal (optional)
LOVE-ly Earrings
BLOG DIY BEADING MAGAZINE ISSUE 32
BLOG WWWHANDMADE-JEWELRY-CLUBCOM MEMBERSHIP WWWDIYBEADINGCLUBCOM
This tutorial teaches how to make 1 ear stud I recommend making both ear studs of the set simultaneously step-by-step so that symmetry is easier to achieve Between steps check for
symmetry in size and shape and adjust the construction if needed
LOVE-ly Earrings
BLOG DIY BEADING MAGAZINE ISSUE 32
Step 1 Straighten the end of the copper wire (+- 6cm) by rubbing along it with your fingers for a
few seconds
Step 2 Bend over the wire onto itself as illustrated below using flat nose pliers
Step 3 Grab the doubled-over wire with the flat nose pliers and push the two sides against each
other Use little force and do it bit by bit to avoid damaging or kinking the wire
Step 4 Push the two adjacent pieces of wire apart to create the bottom shape of the heart as shown
on the picture above
BLOG WWWHANDMADE-JEWELRY-CLUBCOM MEMBERSHIP WWWDIYBEADINGCLUBCOM
LOVE-ly Earrings
BLOG DIY BEADING MAGAZINE ISSUE 32
Step 5 Hammer down the angled wire (the part circled in red) This strengthens the construction
and looks more professional
Step 6 Wrap the two ends of wire tightly around a cylindrical object (+- 5 mm diameter)
Step 7 Push apart the loops you just made by wrapping the wire around the cylindrical object The wire should now be shaped like a heart as
illustrated above
Step 8 Use round nose pliers to bend around the wire for each side of the heart as illustrated above
BLOG WWWHANDMADE-JEWELRY-CLUBCOM MEMBERSHIP WWWDIYBEADINGCLUBCOM
LOVE-ly Earrings
BLOG DIY BEADING MAGAZINE ISSUE 32
Step 9 Use the flat nose pliers to bend one of the two wires (preferably the longer wire) in a 90deg angle at the place marked with a red dot In the picture accompanying the next step you can see
how it should look from the front
Step 10 Use the round nose pliers to bend the other piece of wire in a decorative coil You will cut off the rest of the wire of the coil at approximately the spot marked with a red dot so take that into account when coiling the wire into the shape that
you desire
Step 11 Cut of the wire at the spot indicated in the previous picture and file off any sharp edges
Step 12 Cut off the ear wire at the desired length (Between 1 and 2 cm If in doubt try the earring on
to see if it sits comfortably) and file off any sharp edges
BLOG WWWHANDMADE-JEWELRY-CLUBCOM MEMBERSHIP WWWDIYBEADINGCLUBCOM
LOVE-ly Earrings
BLOG DIY BEADING MAGAZINE ISSUE 32
Step 13 Hammer down the rest of the heart (bumps and coil) If you canrsquot reach certain parts because the ear wire is in the way bend that part of the heart shape away
(verticallyupward) and bend it back after you finish hammering
Congrats yoursquove now made a basic heart-shaped ear stud Next wersquore going to decorate it with a little gemstone and more copper wire
Step 14 Cut off a length of 04 mm copper wire (about 10-20 cm) and string the bead onto it
Step 15 Place the bead in the ldquonon-coilrdquo upper part of the heart shaped ear stud holding it between thumb and forefinger Let approximately 4 cm of the 04 mm wire stick out over the edge of the
heart as illustrated above
Step 16 Wrap the wire twice around the frame so that if you face the front of the ear stud the wire is
directed towards yourself
BLOG WWWHANDMADE-JEWELRY-CLUBCOM MEMBERSHIP WWWDIYBEADINGCLUBCOM
LOVE-ly Earrings
BLOG DIY BEADING MAGAZINE ISSUE 32
Step 17 Flip the wire over the wire with the bead (indicated by the red arrow) and pull tight whilst holding the bead (and its wire) tightly in place It
should look like the construction in the big picture above
Step 18 And make another loop around the wire with the bead The 04 mm wire is now coiled around
twice two times two coils around the frame and two coils around itself
Step 19 Repeat the wire-fastening procedure described in steps 16-18 with the other end of the
wire securing the gemstone in the heart frame Let the wire stick out at the back of the earstud
Step 20 Pull the wire through the lsquocoilrsquo part of the heart shape to the front The wire should lsquocross overrsquo to the other side of the heart at the back of the ear
stud
Step 21 Coil the wire around the frame until you are content with the design Optionally you can hammer down the coils a bit I often do this because I think it
looks somewhat more sophisticated and professional
BLOG WWWHANDMADE-JEWELRY-CLUBCOM MEMBERSHIP WWWDIYBEADINGCLUBCOM
LOVE-ly Earrings
BLOG DIY BEADING MAGAZINE ISSUE 32
Step 22 Cut off the spare bits of wire preferably at the backside of the ear stud and tuck in the ends
Congrats yoursquove now made a heart-shaped ear stud Next we are going to finish it off with a patina
Step 23 Oxidize the metal of the ear studs I always use liver of sulfur solved in warm water The metal
will turn a dark color and matte texture Afterwards rinse the ear studs thoroughly with water and pat
them dry
Step 24 Rub the oxidized ear stud all over with a rough polishing pad to bring back (a dark copper)
color to the surface
Yoursquove now finished making your own LOVE-ly ear studs
Secure them in your ear with plastic or copper stops These can be bought online or in jewelry-supply
stores
Variation ideas You can easily vary in size and shape (longer hearts smaller coils pointier bottoms etc) and
use different materials As you can see the earring I make in this tutorial has a slightly smaller bead than the
earrings on the cover which influences the overall appearance somewhat
The earrings underneath are made with sterling silver and gold wire (super-short coils) and contain small pink
rubies
LOVE-ly Earrings
BLOG WWWHANDMADE-JEWELRY-CLUBCOM MEMBERSHIP WWWDIYBEADINGCLUBCOM
About the Author
Jeske Hendriks
Hi there My name is Jeske and I love all things handmade Over the years Irsquove dabbled in countless different arts and crafts but nowadays I mainly focus on making jewellery and cutting stone cabochons As for jewellery
my preferred materials are silver wire and gemstonemineral beads Using wire-wrapping and basic silver smithing techniques I create both simple
and intricate pieces ndash each and every one of them unique a personal little artwork
You are welcome to follow me on facebook stop by at my personal
webpage andor to have a look at my Etsy shops httpswwwfacebookcomyeskecrafts
httpwwwyeskecraftscom httpwwwyourbeadsandfindingsetsycom
httpwwwyeskecraftsetsycom httpwwwyeskemiscetsycom
BLOG DIY BEADING MAGAZINE ISSUE 32
Flower Tale Earrings
BLOG WWWHANDMADE-JEWELRY-CLUBCOM MEMBERSHIP WWWDIYBEADINGCLUBCOM
Techniques Beadweaving
Project Level Beginner to Intermediate
Materials 12 bronze opaque 6mm Czech glass pearl round beads
2 gr gold lustered dark topaz Japanese 110 seed beads (Toho 459)
Size B gold beading thread
2 bronze earring hooks
Tools Size 10 beading needle
Scissors
Finished Size Diameter ndash 3 cm (118 inches) (without earring hooks)
BLOG DIY BEADING MAGAZINE ISSUE 32
Flower Tale Earrings
BLOG WWWHANDMADE-JEWELRY-CLUBCOM MEMBERSHIP WWWDIYBEADINGCLUBCOM
Step 1 Cut about 110 cm (43 inches) of thread and
pass it through the needle hole
Pick six groups of one 110 seed bead and one
6 mm round bead
BLOG DIY BEADING MAGAZINE ISSUE 32
Join the beads into a ring and secure with two
square knots
Leave a tail of about 15 cm (59 inches)
Step 2 The working thread should be right before the
6 mm round bead
Pick seven 110 seed beads skip the 6 mm
round bead and pass the needle through the
next 110 seed bead added in the previous
round
Repeat adding groups of seven 110 seed
beads five more times
When adding the last group take the needle
directly through the 110 seed bead from the
previous round and the next one added in the
beginning of current round
Flower Tale Earrings
BLOG WWWHANDMADE-JEWELRY-CLUBCOM MEMBERSHIP WWWDIYBEADINGCLUBCOM
Step 3 Pick three 110 seed beads skip one seed
bead from the chain of seven added in the
previous round and pass with the needle
directly through the next three 110 seed
beads
BLOG DIY BEADING MAGAZINE ISSUE 32
Pick three 110 seed beads skip one seed
bead from the chain of seven added in the
previous round and pass with the needle
through the last one and the first 110 seed
bead from the next chain of seven
Repeat the above directions from Step 3 five
more times
After completing this round make sure the
thread will be exiting from the middle 110
seed bead from the first group of three added
in the beginning of this round
Step 4 Pick one 110 seed bead and go through the
last seed bead of the group of three
Flower Tale Earrings
BLOG WWWHANDMADE-JEWELRY-CLUBCOM MEMBERSHIP WWWDIYBEADINGCLUBCOM
Pick three 110 seed beads and take the
needle through the first seed bead of the next
group of three added in the previous round
BLOG DIY BEADING MAGAZINE ISSUE 32
Pick one 110 seed bead and go with the
needle through the next three seed beads (the
last two of the group of three and the last one
from the chain of seven)
Then go up through three 110 seed beads
(the first from the next group of seven and the
first two from the next group of three)
Repeat the above directions from Step 4 to
complete the remaining petals
When working on the last petal perform the
operation from the image shown on the left
instead of picking the group of three 110 seed
beads string two 110 seed beads the earring
hook other two 110 seed beads and
continue beading as instructed above
When you are done hide the thread ends into the beadwork
Flower Tale Earrings
BLOG WWWHANDMADE-JEWELRY-CLUBCOM MEMBERSHIP WWWDIYBEADINGCLUBCOM
About the Author
Iulia Postică
I was born and live in Moldova Eastern Europe Ever since I remember myself
Ive been crocheting and knitting My grandmother has taught me that and I
loved it very much I always regarded crafts exclusively as a hobby and never
thought of making a career of it I traveled a lot to various historical sites
Actually Ive spent all my childhood summers in archaeological camps with
my father who is a professional archaeologist
I also enjoy metal hammering and wirework as it gives me possibility to
express myself in materials used by human communities since ancient times
copper brass glass seed beads and gemstones That is no surprise to anyone
given my family history and academic background
My shop ldquoBeadedTreasuryrdquo with beading tutorials and bead crochet patterns
httpswwwetsycomshopBeadedTreasury
My shop ldquoArchaeologicardquo with artisan jewelry
httpswwwetsycomshopArcheologica
My blog httpbeadedtreasuryblogspotcom
My facebook httpswwwfacebookcomBeadedTreasury
BLOG DIY BEADING MAGAZINE ISSUE 32
Liberty Earrings
BLOG WWWHANDMADE-JEWELRY-CLUBCOM MEMBERSHIP WWWDIYBEADINGCLUBCOM
Materials - Nr 2 cabochon Preciosa Ornela ovale 18x22 mm turchese
- Rocaille Toho 150 silver lined green emerald
- Nr 2 dagger beads
- Nr 20 pearl 4 mm
- Superduo opaque luster ceramic green
- Rocaille 80 color gold
- Rocaille 80 color ivory
- Delica Miyuki 110 aquagreen mix
- Rocaille Miyuki 110 galvanized silver
- Nr 2 monachelle (earwire)
-Fireline
- Beading Needle nr 12
BLOG DIY BEADING MAGAZINE ISSUE 32
Liberty Earrings
BLOG WWWHANDMADE-JEWELRY-CLUBCOM MEMBERSHIP WWWDIYBEADINGCLUBCOM
Make a circle of 20 delica beads and make a knot (a) Perform two rounds peyote with ivory 80 seed beads (b c) Exit from an ivory
bead
BLOG DIY BEADING MAGAZINE ISSUE 32
a b c
Jump from 80 to 80 with 110 80 gold 110 (a) Finish the round and come out of a 80 gold bead
Jump to the next 80 gold with a 4mm pearl (b) Finish the round and come out
of the first pearl Jump to the 2nd pearl and close with a 80 gold bead(c)
a b c
Position the cabochon and jump from one 80 to the other with two delica bead (a)
Continue with three delicas four times (b) At the bottom sew on two delicas then finish the round by sewing on three delicas for four times passing from one to another roc 80 Tighten the cabochon and exit from the
first two delica that you started with String together a 110 and 150 and enter the second of the three close delicas (c)
a b c
Liberty Earrings
BLOG WWWHANDMADE-JEWELRY-CLUBCOM MEMBERSHIP WWWDIYBEADINGCLUBCOM
Put together 150 110 150 and enter in the second of three next delica (a) Put the same beads for three times then put together 150 and 110 and enter
in the two delica of the bottom tip (b) Enter in the second of three next delica with 110 and 150 (c) Continue passing
in the 80 beads with three beads (150 110 150) for four times then at the top finish the round by putting together a 150 and 110 (d)
BLOG DIY BEADING MAGAZINE ISSUE 32
a b c
Exit from the first 150 sewn in the previous round and jump in the three next beads with a 150 (a)
Put a 150 at a time and exit from the first 110 beads of the bottom tip Jump in the
near 110 with a 150 (b) Finish round repeating steps a and b (c) Exit the roc 80 as shown in the photo (d)
a b c
d
a b c d
Enter in the 80 with four 150 (a b) Enter the 80 beads at the bottom of the pieces with two 110 one superduo one 80 ivory bead one superduo and two 110 (c)
d e f
Liberty Earrings
BLOG WWWHANDMADE-JEWELRY-CLUBCOM MEMBERSHIP WWWDIYBEADINGCLUBCOM
Exit from the bottom pearl (a) Put together 150 three 110 150 and enter in the superduorsquos second hole (b)
Put together three superduo and enter in the next superduorsquos second hole (c) Rethread 15 three 110 150 and return in the opposite direction in the pearl of departure (d)
BLOG DIY BEADING MAGAZINE ISSUE 32
a b
c
Exit from the second pearl indicated from (a) Put 150 four 110 and enter in the second of the three 110 (b) Go to the second superduorsquos hole with four 110 and a 150 (c)
Enter the second hole of the supeduo with a 150(d) Sew in the middle of the bottom of the superduo 150 two 110 150 dagger 150 two 110 150(e)
Enter the second hole of the thirs superduo with 150 (f)
a b c
d
d e f
Liberty Earrings
BLOG WWWHANDMADE-JEWELRY-CLUBCOM MEMBERSHIP WWWDIYBEADINGCLUBCOM BLOG DIY BEADING MAGAZINE ISSUE 32
Put 150 four 110 and enter in the second of three 110 of the base (a) Insert four 110 and 150 in the pearl opposite direction indicated in the picture (b) Go in all the beads
around the piece and exit from the pearl at the top (c) Put 150 three 110 150 and enter the superduo (d)
Enter the ivory bead 80 with two 150 (e) Enter the next superduo with two 150 (f)
a b c
d e f
Put together 150 three 110 and enter in opposite direction in the departurersquos pearl (a) Exit from the 150 beads indicated by photo (b) From this jump in the second of two near
150 with five 150 to created the hole for the earwire (c) Pass the thread in the beads make a few knots and cut the excess thread
a b c
Your earrings are finished
Liberty Earrings
BLOG WWWHANDMADE-JEWELRY-CLUBCOM MEMBERSHIP WWWDIYBEADINGCLUBCOM
About the Author
Mariella Martella
My name is Mariella Martella and I am the author and
designer of jewelry that I sign with the name of Mariel Bijoux
After changing city often for work and study I currently live
in northern Italy I am an art historian with a passion for travel
painting and jewelry design in weaving that project since
2010 In my beads and crystals are the colors of the
Mediterranean sea the atmosphere of summer evenings
and the lights of the places I visited
You can find me at
Etsy shop httpswwwetsycomitshopMarielBijoux
Facebook httpswwwfacebookcommari3lbijoux
Crafting blog httpmarielbijouxblogspotit
Twitter httpstwittercomMarielBijoux
BLOG DIY BEADING MAGAZINE ISSUE 32
Jade Necklace
BLOG WWWHANDMADE-JEWELRY-CLUBCOM MEMBERSHIP WWWDIYBEADINGCLUBCOM
Every time I wear a necklace I always make it a point that the
necklace will lay perfectly flat on my neck Using wire for a necklace
made it possible for me like what I did with Jade Necklace It may look
odd at first having bent wires for a necklace but once the jewelry is
finished youll be so happy how the necklace will perfectly lay on your
neck
The tutorial is catered for intermediate level One must know basic
wirework skills such as wire wrapping making loops wrapped loops
and linking to follow the tutorial It has clear instructions and ultra-clear
close-up photos at each step Additionally you can ask me question
you have on the tutorial No more getting stuck and frustrated on a
confusing or just plain inaccurate pattern
If you followed this tutorial and then sell the accessory or jewelry
please give credit to the author or DIY Beading Clubcom
Copyright 2015
wwwdiybeadingclubcom
wwwhandmade-jewelry-clubcom
BLOG DIY BEADING MAGAZINE ISSUE 32
Jade Necklace
BLOG WWWHANDMADE-JEWELRY-CLUBCOM MEMBERSHIP WWWDIYBEADINGCLUBCOM BLOG DIY BEADING MAGAZINE ISSUE 32
Materials Needed 18ga Craft wire 28ga Craft wire 15mm diameter Green Round Flat Back Sew On Gems 5mm Green pearls
8mm Green pearls 6mm x 11mm teardrop Crystal Treasures Mill Hill beads or any teardrop bead with holes on the side Hook for your clasp
Tools Needed Wire cutter Flat nose pliers Round nose pliers Mandrel A jar or any rounded object to shape your necklace
Skill Level Intermediate
Step 1 Cut 6 inches 18ga wire Make a loop on one end then measure approximately 125 inches and make another loop
Form a size 4 circle on your mandrel
Jade Necklace
BLOG WWWHANDMADE-JEWELRY-CLUBCOM MEMBERSHIP WWWDIYBEADINGCLUBCOM BLOG DIY BEADING MAGAZINE ISSUE 32
Then close the circle by wrapping the extended wire just below the loop Wrap the
wire 2x
This is how it looks like Lets call this circle frame Youll notice that the lower curve is
slightly bigger than the upper curve
Step 2 Cut 8 inches of 28ga wire Wrap one end of
the wire at least 3x on one side of the circle frame just below the loop
Bring up your gem Flat back sew on gems has 2 holes Insert the wire into one hole and then
wrap the wire once onto the circle frame
Jade Necklace
BLOG WWWHANDMADE-JEWELRY-CLUBCOM MEMBERSHIP WWWDIYBEADINGCLUBCOM BLOG DIY BEADING MAGAZINE ISSUE 32
Step 3 Insert a 5mm pearl on the wire and then pass
the wire under circle frame
Repeat previous step 2x and have 3 pearls wrapped
Continue wrapping with your teardrop crystal My crystal has 2 holes on the side
and then continue wrapping with your 5mm pearls then secure your wire
Repeat Step 3 and create as many as needed For 16-inch necklace Ive created 6 of these
components
Jade Necklace
BLOG WWWHANDMADE-JEWELRY-CLUBCOM MEMBERSHIP WWWDIYBEADINGCLUBCOM BLOG DIY BEADING MAGAZINE ISSUE 32
Step 4 Cut a 15-inch 18ga wire and make a loop on
one end Insert 8mm pearl and make a loop on the other end You then use these as connectors
and link the components
Step 5 The necklace is an 18ga wire with wrapped
loops on both ends First cut 7 inches 18ga wire and make a wrapped loop with your hook already inserted Side in 18pcs 5mm pearls
Then make a wrapped loop on the other end connecting the wrapped loop onto the component Do the same for the other
necklace but make the loop on the other end big enough so the hookclasp can pass thru
To have the necklace curve shaped use a jar to bend the wire Voila Now youre
ready to party
Jade Necklace
BLOG WWWHANDMADE-JEWELRY-CLUBCOM MEMBERSHIP WWWDIYBEADINGCLUBCOM
About the Author
Sky Aldovino
I consider myself a late bloomer when it comes to crafting Irsquom a self-taught jewelry maker Jewelry making wasnrsquot really a hobby of mine but unforeseen events lead me to learn jewellery making My family put up a craft store where we sell cross stitch beads and all sorts of crafting materials I fell in love with the beads and tried to create accessories only for myself Clients liked the pieces and I started customizing handmade jewelleries The craft store was a success for 6 years but like any other small businesses we had to close it down and I was confined to staying at home While at home I had all the time using the internet and now working as a home-based jewelry designer
BLOG DIY BEADING MAGAZINE ISSUE 32
Atomic Ring
BLOG WWWHANDMADE-JEWELRY-CLUBCOM MEMBERSHIP WWWDIYBEADINGCLUBCOM
Have fun making shapes using the wigjig Cyclops Make loops going in
circles to mimic the shape of a flower or in this tutorial mimic the
shape of an atom The tutorial will also teach you how to cage a
cabochon Whats nice about this piece is that with one long wire you
can create the ring from start to finish
The tutorial is catered for intermediate to advanced students One
must already know how to make spirals and use a wigjig tool It has
clear instructions and ultra-clear close-up photos at each step
Additionally you can ask me question you have on the tutorial No
more getting stuck and frustrated on a confusing or just plain
inaccurate pattern
If you followed this tutorial and then sell the accessory or jewelry
please give credit to the author or DIY Beading Clubcom
If you like to get a blank wigjig graph visit wigjigcom Shop and Jigs
section
Copyright 2015
wwwdiybeadingclubcom
wwwhandmade-jewelry-clubcom
BLOG DIY BEADING MAGAZINE ISSUE 32
Atomic Ring
BLOG WWWHANDMADE-JEWELRY-CLUBCOM MEMBERSHIP WWWDIYBEADINGCLUBCOM
Materials Needed 20ga Craft wire 28ga Craft wire 11mm Round Cabochon
Tools Needed Wigjig Cyclops 15mm pegs Wire cutter Flat nose pliers Mandrel
Skill Level Intermediate - Advanced
BLOG DIY BEADING MAGAZINE ISSUE 32
Step 1 Lets prepare your wigjig cyclops Position the pegs like so
Atomic Ring
BLOG WWWHANDMADE-JEWELRY-CLUBCOM MEMBERSHIP WWWDIYBEADINGCLUBCOM BLOG DIY BEADING MAGAZINE ISSUE 32
Lets work with longer wire so youll have enough wire to hold onto as you manipulate the wire so cut 36 inches of 20ga wire From
one end of the wire measure 10 inches
On the 10-inch measurement loop the wire at the center peg then continue to loop onto the side pegs going in circle going back to
the center peg after looping on the side peg
Now the wire at the center peg will start to build up as you go around the side pegs so
you need to constantly press the wire at the center peg to accommodate the build up of
wire
When youre done pull out the wire and this is
how it should look like
Atomic Ring
BLOG WWWHANDMADE-JEWELRY-CLUBCOM MEMBERSHIP WWWDIYBEADINGCLUBCOM BLOG DIY BEADING MAGAZINE ISSUE 32
You will notice that the frame opens wide Now to keep the atom frame from opening wide secure the center of the frame by wrapping a 28ga wire What you
need to do is simply pass the 28ga wire into the hole and wrap as many times as needed or until youre sure that the frame is secure
Step 2 Now youre finished with your atom frame Well now create the focal design With the longer wire make a spiral at the center big
enough to accommodate the size of your cabochon In this tutorial the spiral is about
11mm in diameter the same size as my cabochon
Pop in your cabochon and start to make spirals going around and over the cabochon as if you are caging the cabochon Create at
least 5 rounds and then cut off any excess
Step 3 Now lets make the ring and this with the other
end of the wire
Atomic Ring
BLOG WWWHANDMADE-JEWELRY-CLUBCOM MEMBERSHIP WWWDIYBEADINGCLUBCOM BLOG DIY BEADING MAGAZINE ISSUE 32
Bring up your mandrel and wrap the wire to the size of your finger Wrap at least 2 times
When youre sure you have the right size pull the ring out of the mandrel
With the extended wire wrap the wire the secure the ring
Cut off any excess and voila You have your atomic ring Create as many as you can with different colors of cabochon
Atomic Ring
BLOG WWWHANDMADE-JEWELRY-CLUBCOM MEMBERSHIP WWWDIYBEADINGCLUBCOM
About the Author
Sky Aldovino
I consider myself a late bloomer when it comes to crafting Irsquom a self-taught jewelry maker Jewelry making wasnrsquot really a hobby of mine but unforeseen events lead me to learn jewellery making My family put up a craft store where we sell cross stitch beads and all sorts of crafting materials I fell in love with the beads and tried to create accessories only for myself Clients liked the pieces and I started customizing handmade jewelleries The craft store was a success for 6 years but like any other small businesses we had to close it down and I was confined to staying at home While at home I had all the time using the internet and now working as a home-based jewelry designer
BLOG DIY BEADING MAGAZINE ISSUE 32
Featured Article Gemstones Used for Jewelry Making
BLOG WWWHANDMADE-JEWELRY-CLUBCOM MEMBERSHIP WWWDIYBEADINGCLUBCOM
Gemstones are stones which we hold quite highly in terms of value And
jewelry often consists of stones that add attractiveness to it so it is not
surprising when jewelry designers actually use gemstones in their designs In
fact there are different types of gemstones that can be used for making
jewelry There are the expensive and pure gemstones and there are also the
imitation ones The information below will provide some information about
the kinds of stones you can use to create jewelry and how these stones will
impact the jewelry you have created
The first kind of stone which I believe we are all quite familiar with are
birthstones These stones are associated with individualrsquos month of birth
by SunVDesigns by BeyhanAkman
For example Amethyst stone is connected with anybody who is born in
February which carries special significance in the area of emotions and also
spiritually This stone also signifies calm and peace as well
And then we have semi-precious stones which are also often used in jewelry
making They are not as valuable as compared to precious stones but still
valuable Best examples of these stones are aquamarine topaz tourmaline
opal and turquoise
BLOG DIY BEADING MAGAZINE ISSUE 32
Featured Article Gemstones Used for Jewelry Making
BLOG WWWHANDMADE-JEWELRY-CLUBCOM MEMBERSHIP WWWDIYBEADINGCLUBCOM
It is an ideal gift for someone who you deem special Aquamarine pendants
usually work well for anyone and is widely an accepted stone
by HyppieChic by joyeriamestiza
However precious stones are the most unusual
and precious jewels to us Examples of some of
them are emerald sapphire diamond and
ruby These stones are usually very expensive
and are prized for their exquisiteness These
stones are commonly used in high-quality
jewelry designs which costs quite a fortune to
obtain
BLOG DIY BEADING MAGAZINE ISSUE 32
by sarajewelrystu
Jewelry designs with precious stones are usually
given as exceptional gifts on special occasions A
perfect example is a diamond ring that is usually
given as an engagement gift
by ldiamondsforever
Featured Article Gemstones Used for Jewelry Making
BLOG WWWHANDMADE-JEWELRY-CLUBCOM MEMBERSHIP WWWDIYBEADINGCLUBCOM
There are also synthetic stones which are often used to create jewelry
Synthetic stones are artificial imitations of gemstones Synthetic Sapphire
jewelry costs less compare with the authentic ones Most of the time
imitation stones are used to save cost but at the same time have the similar
look of the real stone
BLOG DIY BEADING MAGAZINE ISSUE 32
by shininggems by thaimaker
by lapinduprintemps by PastimeArt
Gemstones are used like beads and you can use it in any designs whether
simple or elaborate
Swarovski crystal components are available in a rich multitude of rondelles Perfect as spacers in necklaces or as discs in earrings Rondelles can be used with many varieties of shapes or sizes Use Swarovski crystal rondelles between large gemstones as accents with precious metal findings Fire Mountain Gems and Beads Crystal Passionsreg brand presents Swarovski crystal in display-ready packaging for brilliant retail presentation Crystal Passionsreg is an assurance of genuine Swarovski crystal
BLOG DIY BEADING MAGAZINE ISSUE 32 BLOG WWWHANDMADE-JEWELRY-CLUBCOM MEMBERSHIP WWWDIYBEADINGCLUBCOM
Recommended Jewelry Making Supplies
Mz Unisex-adults 12pcs 25x18x6mm Turquoise Oval CAB Cabochon
BLOG DIY BEADING MAGAZINE ISSUE 32 BLOG WWWHANDMADE-JEWELRY-CLUBCOM MEMBERSHIP WWWDIYBEADINGCLUBCOM
Recommended Jewelry Making Supplies
For a little sparkle that goes a long way design with Swarovski 4mm faceted bicones Create glorious multi-strand necklaces with the dainty crystals or use as spacers to add a tiny flash to your designs Swarovski crystal components are made in Austria and are considered the finest products of their kind in the world
BLOG DIY BEADING MAGAZINE ISSUE 32 BLOG WWWHANDMADE-JEWELRY-CLUBCOM MEMBERSHIP WWWDIYBEADINGCLUBCOM
Recommended Jewelry Making Supplies
Imitation beads resist color change These beads have uniform quality with a good polish Some strands may have little to no matrix Sizes shapes and colors may vary with handcrafted items
BLOG DIY BEADING MAGAZINE ISSUE 32 BLOG WWWHANDMADE-JEWELRY-CLUBCOM MEMBERSHIP WWWDIYBEADINGCLUBCOM
Recommended Jewelry Making Supplies
Something Blue Necklace and Earrings
BLOG WWWHANDMADE-JEWELRY-CLUBCOM MEMBERSHIP WWWDIYBEADINGCLUBCOM
Skill level Beginner Intermediate Advanced
DIMENSIONS OF THE NECKLACE Inner Circumference 14 18 inch 35 cm
Focal Pendant Width 1 15 inch 35 cm Focal Pendant Height 1 15 inch 35 cm
DIMENSIONS OF THE EARRING Earring Width 716 inch 12 cm Earring Height 1516 inch 25 cm (Without the earring hook)
BLOG DIY BEADING MAGAZINE ISSUE 32
Materials
Note Before purchasing the supplies measure the length of your wished necklace If you decide to bead a longer necklace you should keep in mind that for every extra
frac34 inches 2 cm-s you will need 8 bicones and 8 pearls
Something Blue Necklace and Earrings
BLOG WWWHANDMADE-JEWELRY-CLUBCOM MEMBERSHIP WWWDIYBEADINGCLUBCOM BLOG DIY BEADING MAGAZINE ISSUE 32
Work RAW stitch into a beaded circle and embellish with Swarovski bicones
STEP 2 String 1A and 2 pearls Pass through the previous
second pearl and the freshly added 1A and the first pearl again
STEP 1 Use a comfortable length of thread to string 2
pearls 1A and 1 pearl again leaving a 2rdquo 5cm tail Pass through the first two pearls strung to form a
ring
STEP 3 String 2 pearls and 1A Pass through the previous first pearl and the freshly added two pearls
again
STEP 4 - 17 Repeat STEP 2 and STEP 3 again until you count 17 pearls in the inner circle
But be careful in the last step you only have to add 1 pearl then pass through the first pearls
added in STEP 1 and add another 1A Now pass through the first pearl added in STEP
1and 1A added in this round again to exit from this A
Something Blue Necklace and Earrings
BLOG WWWHANDMADE-JEWELRY-CLUBCOM MEMBERSHIP WWWDIYBEADINGCLUBCOM BLOG DIY BEADING MAGAZINE ISSUE 32
STEP 19 String 2A and pass through the next A added in round 4-17 and the A added in round 18 the 2A added in this round and finally the A added in round 4-17 to exit from the bead showed below
STEP 18 String 3A and pass through the 1A added in the previous round and the first A added in this
round
STEP 20 - 34 Repeat STEP 18 and STEP 19 again until you finish the circle
But be careful in the last step first you have to pass through 3A and then add 1A After this pass
through the 3A again and exit from the A bead
shown below (This is the first A added in STEP 18)
Something Blue Necklace and Earrings
BLOG WWWHANDMADE-JEWELRY-CLUBCOM MEMBERSHIP WWWDIYBEADINGCLUBCOM BLOG DIY BEADING MAGAZINE ISSUE 32
STEP 35 Step up to exit from the pearl shown below (Finishing the previous step in the A bead and then
stepping up from there makes the circle more secure)
Now string 3 bicones Pass through the pearl and the first bicone again
In the reality your circle will look more like this the A beads forming a strong row in the middle of the
pearls
STEP 36 Add 2 bicones Pass through the
neighboring pearl the first bicone added in the previous row and the 2 bicones added in this step
so you can exit from the next pearl
Something Blue Necklace and Earrings
BLOG WWWHANDMADE-JEWELRY-CLUBCOM MEMBERSHIP WWWDIYBEADINGCLUBCOM BLOG DIY BEADING MAGAZINE ISSUE 32
Now in the reality your circle will look more like this the A beads still forming a strong row in the middle of the pearls and the bicones slightly lying on top of
them
STEP 37 - 49 Repeat STEP 35 and STEP 36 again until you finish the circle with the bicones
But be careful in the last step first you have pass through the third bicone added then add 1 bicone
and pass through this little quartet to exit from the bicone shown below (The second one added in
STEP 35)
STEP 50 With these steps we finish the circle by adding 1 bicone to connect the A beads and the
bicone row So add 1 bicone pass through the nearest A bead and add 1 bicone again Pass
through the bicone already there and exit from the bicone you just added
Something Blue Necklace and Earrings
BLOG WWWHANDMADE-JEWELRY-CLUBCOM MEMBERSHIP WWWDIYBEADINGCLUBCOM BLOG DIY BEADING MAGAZINE ISSUE 32
STEP 66-83 Secure the circle by adding 1A between each bicone in the second row of Swarovski
bicones If you finished secure the thread and trim
STEP 51-65 Using the same technique as in STEP 37 - 49 add 1 bicone to finish the third bicone row The black line shows you the way (After STEP 50 pass through the next A bead add 1 bicone and pass through the bicone already there and the bicone added in the previous step Repeat these steps to
finish the inner bicone circle)
MIDDLE CIRCLE Work RAW stitch into a beaded circle and embellish with
Swarovski bicones Remember you need to bead two circles this time
STEP 1 Just like in the focal circle begin with 2 pearls 1A and 1 pearl again on a comfortable length of thread
leaving a 2rdquo 5cm tail Pass through the first two pearls strung to form a ring
Something Blue Necklace and Earrings
BLOG WWWHANDMADE-JEWELRY-CLUBCOM MEMBERSHIP WWWDIYBEADINGCLUBCOM BLOG DIY BEADING MAGAZINE ISSUE 32
STEP 15-28 Mimicing the FOCAL CIRCLElsquos STEP 18-34 bead A beads until you finish the inner part of the
circle Exit from a pearl in the second row This circle should look very similar to the first one but this is a bit
smaller
STEP 2-14 Mimicing the FOCAL CIRCLElsquos STEP 2-17 bead until you count 14 pearls in the inner circle Exit
from the last A added
STEP 29-42 Mimicing FOCAL CIRCLElsquos STEP 35-49 add 2 rows of bicones
STEP 43-56 Mimicing the FOCAL CIRCLElsquos STEP 50-65 bead the third row of bicones to finish the circle
Something Blue Necklace and Earrings
BLOG WWWHANDMADE-JEWELRY-CLUBCOM MEMBERSHIP WWWDIYBEADINGCLUBCOM BLOG DIY BEADING MAGAZINE ISSUE 32
SMALLEST CIRCLE Work RAW stitch into a beaded circle and embellish
with Swarovski bicones Remember you need to bead two circles again
STEP 1 Just like in the focal circle begin with 2 pearls
1A and 1 pearl again on a comfortable length of thread leaving a 2rdquo 5cm tail Pass through the first two
pearls strung to form a ring
STEP 57-70 Just like the FOCAL CIRCLElsquos STEP 66-83 secure the circle by adding 1A between every bicone
in the second row of bicones If you finished secure the thread and trim (Donrsquot forget to bead another
circle)
STEP 2-12 Mimicing the FOCAL CIRCLElsquos STEP 2-17 bead until you count 12 pearls in the inner circle Exit
from the last A added
STEP 13-24 Mimicing the FOCAL CIRCLElsquos STEP 18-34 bead A beads until you finish the inner part of the
circle Exit from a pearl in the second row This circle should look very similar to the first two but this is the
smallest of them all
Something Blue Necklace and Earrings
BLOG WWWHANDMADE-JEWELRY-CLUBCOM MEMBERSHIP WWWDIYBEADINGCLUBCOM BLOG DIY BEADING MAGAZINE ISSUE 32
STEP 37-48 Mimicing the FOCAL CIRCLElsquos STEP 50-65 bead the third row of bicones to finish this circle too
STEP 25-36 Mimicing FOCAL CIRCLElsquos STEP 35-49 add 2
rows of bicones The last step here is purple again
STEP 49-60 Just like the FOCAL CIRCLElsquos STEP 66-83 secure the circle by adding 1A between every bicone
in the second row of bicones If you finished secure the thread and trim (Donrsquot forget that you need two
small circles)
Something Blue Necklace and Earrings
BLOG WWWHANDMADE-JEWELRY-CLUBCOM MEMBERSHIP WWWDIYBEADINGCLUBCOM BLOG DIY BEADING MAGAZINE ISSUE 32
STEP 37-48 Mimicing the FOCAL CIRCLElsquos STEP 50-65 bead the third row of bicones to finish this circle too
STEP 25-36 Mimicing FOCAL CIRCLElsquos STEP 35-49 add 2
rows of bicones The last step here is purple again
STEP 49-60 Just like the FOCAL CIRCLElsquos STEP 66-83 secure the circle by adding 1A between every bicone
in the second row of bicones If you finished secure the thread and trim (Donrsquot forget that you need two
small circles)
Something Blue Necklace and Earrings
BLOG WWWHANDMADE-JEWELRY-CLUBCOM MEMBERSHIP WWWDIYBEADINGCLUBCOM BLOG DIY BEADING MAGAZINE ISSUE 32
STEP 2-6 Continue by adding 1A 1 bicone 1 pearl until you count 6 of each
STEP 1 Begin with 1 pearl 1 bicone 1A and 1 bicone again on a comfortable length of thread leaving a 2rdquo
5cm tail Pass through the pearl and the first bicone strung to form a ring
STEP 7-12 Pass through the A beads to make your
component more secure Also secure the thread and trim (Repeat these steps until you have six 6-BEAD
COMPONENTs)
6-BEAD COMPONENT Work RAW stitch into a beaded circle and embellish with Swarovski bicones
For the necklace we will need six from this component For the earring two
Something Blue Necklace and Earrings
BLOG WWWHANDMADE-JEWELRY-CLUBCOM MEMBERSHIP WWWDIYBEADINGCLUBCOM BLOG DIY BEADING MAGAZINE ISSUE 32
STEP 2-4 Continue by adding 1A 1 bicone 1 pearl
until you count 4 of each
STEP 1 Begin with 1 pearl 1 bicone 1A and 1 bicone again on a comfortable length of thread leaving a 2rdquo
5cm tail Pass through the pearl and the first bicone strung to form a ring
STEP 5-8 Pass through the A beads to make your component more secure Also secure the thread and
trim (Repeat these steps until you have the wished amount of 4-BEAD COMPONENTs)
4-BEAD COMPONENT Work RAW stitch into a beaded circle and embellish with Swarovski bicones
For the necklace-size that is given on the second page we will need 20 from this
component For the earring two
If you would like to make a longer necklace you need to make more (One 4-BEAD COMPONENT measures about 38 inch 1 cm To make the necklace symmetrical you have to have equal amounts on each side This means for every extra frac34 inches
2 cm-s you will need 1 4-BEAD COMPONENT on each side of the necklace)
Something Blue Necklace and Earrings
BLOG WWWHANDMADE-JEWELRY-CLUBCOM MEMBERSHIP WWWDIYBEADINGCLUBCOM BLOG DIY BEADING MAGAZINE ISSUE 32
STEP 2 Connect the MIDDLE CIRCLE to two 6-BEAD COMPONENTs by adding four-times 2As
between the pearls Choose a pearl on the MIDDLE CIRCLE and add
2A pass through a pearl in the 6-BEAD COMPONENT previously added and add 2A again Watch out this has to be symmetrical Repeat this at least two more times to make it
secure Now repeat this entire procedure but choose
the 8-th pearl on MIDDLE CIRCLE Repeat this on the other side of the necklace
too
Choose a pearl on the FOCAL CIRCLE and add 2A pass through a pearl in the 6-BEAD COMPONENT and add 2A again Repeat this at least two more times to make it secure
Now repeat this entire procedure but choose the 5-th pearl on FOCAL CIRCLE This will make the necklace nice on your neck
FINISHING THE NECKLACE Connects the parts with A beads
STEP 1 Connect the FOCAL CIRCLE to two 6-BEAD COMPONENTs by adding four-times 2As between the pearls To do this turn your parts upside down you need to
see the pearls We will work on this side from now on
Something Blue Necklace and Earrings
BLOG WWWHANDMADE-JEWELRY-CLUBCOM MEMBERSHIP WWWDIYBEADINGCLUBCOM BLOG DIY BEADING MAGAZINE ISSUE 32
FINISHING THE EARRING Connects the parts with A beads
STEP 1-2 Connect the 6-BEAD COMPONENT
to 4-BEAD COMPONENT and the 4-BEAD
COMPONENT to the earring hook
First connect the 4-BEAD COMPONENT to the 6-BEAD COMPONENT with 4A beads Mimic
the elongation steps of the necklace if needed
Secondly connect the 4-BEAD COMPONENT
to your earring hook with 4A beads again Leave from the last pearl bead 2A beads the hook (this is the orange oval form) and 2As again Pass through each of them to
secure this connection again
Finally get ready to prepare the other earring ndash since we need two of them
STEP 5 Connect the 4-BEAD COMPONENTs to the toggle clasp thus finishing the
necklace Leaving from the last pearl bead 2A the
clasp(this is the orange oval form) and 2A again Pass through all of them a couple more times to make this connection more
secure
Something Blue Necklace and Earrings
BLOG WWWHANDMADE-JEWELRY-CLUBCOM MEMBERSHIP WWWDIYBEADINGCLUBCOM BLOG DIY BEADING MAGAZINE ISSUE 32
If you finished it is time to try it on It was a great fun wasnrsquot it And how beautiful you look in your new necklace and the matching earrings
Something Blue Necklace and Earrings
BLOG WWWHANDMADE-JEWELRY-CLUBCOM MEMBERSHIP WWWDIYBEADINGCLUBCOM
About the Author
Margit Vogel
My name is Margit Vogel I live in Hungary Europe
By profession I am a biochemical engineer but I fell in love with
beads so much that I could not stop playing with them
I make one-of-a-kind beaded and bead embroidered art
jewelry made of the best quality materials such as Swarovski
stones gemstones Japanese beads (Miyuki and Toho) Czech
glass beads leather soutache and suede Each piece is unique
and individually crafted
Feel free to visit my blog for some eyecandy
httpiformjewelrywordpresscom
My shop httpwwwetsycomshopiformjewelry
Facebook httpwwwfacebookcomiformjewelry
BLOG DIY BEADING MAGAZINE ISSUE 32
Getting Down And Personal With Gianna
Getting Down And Personal With Gianna
Nowadays we see more and more jewelry stores opening up online and with these online jewelry stores it has made it easier for us to purchase and view their creations Have you ever wondered how they are able to manage and produce amazing jewelry pieces and tutorials So heres a little on the journey to open up an online shop We are excited to present to you Gianna aka Beading4perfectionists
Gianna Beader amp Youtuber
Unlike most jewelry makers and beadweavers Gianna did not start beading as a hobby but as a means to make ends meet With goals in trying to
fill the financial gap she did everything she could to expand her earnings ndash working as a security guard
and at the same time learning how to bead and selling her pieces at fair trades and flea markets
Since many were asking if she does home beading workshops she started on exploring how to teach people to bead She loves Scott Bakula and has always loved him till now and this served as her
inspiration to start making a beading video tutorial
Gianna started creating videos because she was at the point in her life where everything seemed to be falling apart And at that moment of time she had difficulties financially and selling jewelry was the only way for her to stay afloat financially She is a big Scott Bakula fan and when she went to the UK to see him on stage that was when it hit her that she is already able to edit videos and
taught herself Photoshop and done workshops at bead fairs so why not put these together and see what happens on Youtube She knew that if she gets enough subscribers and views ndash though no one knew what the exact numbers were you would be invited to become a Youtube partner This way she could monetize her videos with advertisements and hopefully she would be able to be a Youtube partner and be able to pay her bills
BLOG WWWHANDMADE-JEWELRY-CLUBCOM MEMBERSHIP WWWDIYBEADINGCLUBCOM BLOG DIY BEADING MAGAZINE ISSUE 32
Getting Down And Personal With Gianna
Her Youtube channel is popular and the reason why she chose Youtube is because Youtube is the biggest platform and reached almost to the whole world Everyone already knows about it and it was growing rapidly as compared to other platforms like Dailymotion so she figured that Youtube was the way to go Her advice to new designers is that when you start out go to the platforms on the top of your list first then work your way down your list if you do not get accepted by your first choice
After loyally putting up one video every week for about 8 months in a row she became a Youtube partner and monetized her videos She knew she needed at least $100 to get her first payout She managed to reach $100 after 3 months The process was not easy she worked hard lack sleep skipped meals and who knows what happened to Ridge in the Bold and the Beautiful because she stopped watching
On Youtube you can monetize your videos Google pays straight to your bank account and at other countries where they also have the option of getting checks among other options In order to get paid you have to reach the $100 mark and after 3 months For Gianna she thinks that you cannot say that Etsy is better than Youtube or Youtube is better than Etsy Her reasoning is because on Youtube she has many followers which will eventually check out her Etsy shop And to start an Etsy shop you need an audience
BLOG WWWHANDMADE-JEWELRY-CLUBCOM MEMBERSHIP WWWDIYBEADINGCLUBCOM BLOG DIY BEADING MAGAZINE ISSUE 32
television and dedicated her spare time (as she had another job) to Youtube She re-registered at the chamber of commerce after receiving her first payout Her work at Youtube now is not a full time job and things have changed on Youtube It is easier to become a parter but there are some countries that need to wait for an invitation to be a Youtube partner Take Italy for instance Italians would have to work just as hard as she did if they want to become a Youtube partner
Getting Down And Personal With Gianna
With her 60000 subscribers on her b4pbakup Youtube channel it is possible to sell at least 60 patterns on the first day on Etsy after promoting the PDF file on her Youtube channel Though you may think that 60 out of 60000 is not much you have to remember that not everyone has the means to purchase the PDF file and a lot of people still rather watch her carry out the tutorial(for free) on Youtube instead of reading the patterns or paying for the patterns even if the pattern is for a fundraiser and only cost $2 Her insights on Youtube is that Youtube is not what it used to be 6 years ago Instead of making more money every month she is making less and less because advertisers have more options of where they want to advertise their ads Ads do not pay as much as they used to Back in the days you could get 25 cents per ad Now you count yourself lucky if you could get 5 cents roll in after two hours
BLOG WWWHANDMADE-JEWELRY-CLUBCOM MEMBERSHIP WWWDIYBEADINGCLUBCOM BLOG DIY BEADING MAGAZINE ISSUE 32
And on top of that adblockers are destroying Youtube channel owners Youtube will start making changes to the channels where there will be ldquopaid subscriptionrdquo channels This has already been implemented in some countries but not in her country The Netherlands This means there will no longer be ads for her monthly paying subscribers She hopes that Youtube will add on a paid per video option feature The option to be a paid channel or free channel or to start a new channel for paying customers is yours to choose Gianna is not happy with Youtube because many others like her have worked so hard and for some years to become Youtube partners(which was something to be proud of) has lost their status
Getting Down And Personal With Gianna
Her advice for those who want to go on Youtube is 1 Do it because you want to teach
2 Do it because you want a career with beads
BLOG WWWHANDMADE-JEWELRY-CLUBCOM MEMBERSHIP WWWDIYBEADINGCLUBCOM BLOG DIY BEADING MAGAZINE ISSUE 32
After putting up about 20 videos and having at least 5000 subscribers add the PDF tutorials to Etsy and Craftsy She found out that her audience would like to have the PDF after watching her videos This is because they would rather print out the PDF and work while seated in a comfy chair technically somewhere else instead of having to pause the video time and time again
Gianna has also made a video for those who want to know the whole story of her journey up until the present day And to get updates on her you can check it out here She has also started a vlog where she tells of how she still works towards becoming a financial independent beader and explains her journey to get where she wants to be(or die trying) Gianna will be in the UK on October the 17th giving an all-day workshop with 4 different patterns
(2 beginners and 2 advanced) in Wotton-under-Edge
Gianna will be there Friday night as the workshop is on Saturday She will be leaving on Sunday Her
doors are open to all who wants to continue the party with her at the hotel across the street
For more information do contact Ann Tucker on Facebook
httpswwwfacebookcomanntucker501
Rec
omm
end
ed R
ead
ings
Making Jewelry with Gemstone
Beads
Combines the popular craft of beading with beautiful semi-precious stones which are collected by many Features a variety of versatile ideas which can be adapted for any type of gem or bead Readers will learn to reate beautiful gemstone jewelry with this dazzling collection of over 100 projects ranging from eyecatching earrings and accessories to exquisite necklaces and bracelets This beautiful book offers an impressive range of 28 beautiful semi-precious stones (including birthstones) and a glimpse into the fascinating history and mythical properties behind them
BLOG DIY BEADING MAGAZINE ISSUE 32 BLOG WWWHANDMADE-JEWELRY-CLUBCOM MEMBERSHIP WWWDIYBEADINGCLUBCOM
Rec
omm
end
ed R
ead
ings
Convertible Crystal Jewelry
Reverse it Twist it Wear it Many
Ways
Diane Whiting presents the idea that convertibility isnrsquot just about using pieces in multiple ways it is also about using skills and creativity in multiple ways Using ever-popular sparkling crystals Diane showcases design elements through various techniques for fun easy fashionable jewelry With 25 projects the reader can choose from bracelets necklaces and earrings that match any outfit or styleDiane Whiting presents the idea that convertibility isnrsquot just about using pieces in multiple ways it is also about using skills and creativity in multiple ways
BLOG DIY BEADING MAGAZINE ISSUE 32 BLOG WWWHANDMADE-JEWELRY-CLUBCOM MEMBERSHIP WWWDIYBEADINGCLUBCOM
Rec
omm
end
ed R
ead
ings
Wire Jewelry Masterclass
Wrapped Coiled and Woven Pieces
Using Fine Materials
Comprehensive and fabulous Wire Jewelry Masterclass takes an in-depth look at an intricate and rewarding craft The 24 projects which range from simple Dragons tear briolette earrings to a Poseidon-under-the-sea pendant will delight and inspire jewelers of all levels and tastes Divided into beginner intermediate and advanced sections this beautifully photographed step-by-step guide is the ticket to wire jewelry expertise
BLOG DIY BEADING MAGAZINE ISSUE 32 BLOG WWWHANDMADE-JEWELRY-CLUBCOM MEMBERSHIP WWWDIYBEADINGCLUBCOM
Rec
omm
end
ed R
ead
ings
Timeless Wire Weaving The
Complete Course
Timeless Wire Weaving focuses on developing wirework skills through 13 projects using three classic wire weaving techniques coiling wrapping and weaving The projects are built around a focal cabochon and incorporate seed beads and crystals in imaginative ways Designers learn to make the jewelry shown in the book and they also use the techniques learned to create innovative jewelry pieces of their own
BLOG DIY BEADING MAGAZINE ISSUE 32 BLOG WWWHANDMADE-JEWELRY-CLUBCOM MEMBERSHIP WWWDIYBEADINGCLUBCOM
Our digital magazine is available through
Apple Newsstand service available to millions of IPAD users
To advertise with us please email us at
diyjewelryclubgmailcom
Or visit our page at
httphandmade-jewelry-clubcomadvertising-diy-beading-magazine
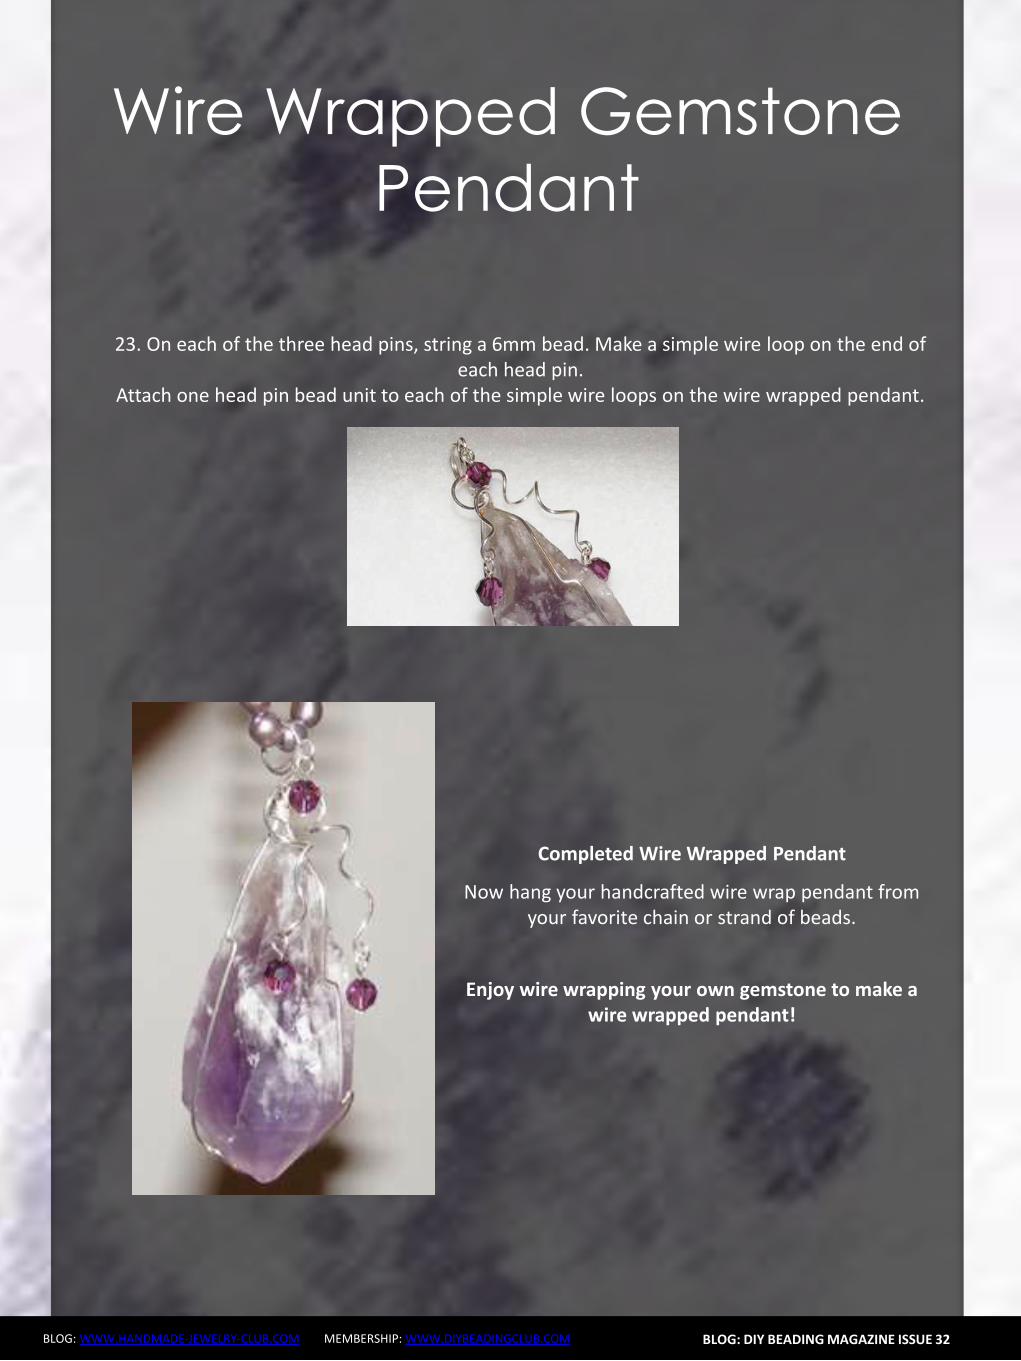
Should You Sell In The Marketplace
BLOG WWWHANDMADE-JEWELRY-CLUBCOM MEMBERSHIP WWWDIYBEADINGCLUBCOM
If you are confident enough to have your own business site by all means go ahead and do it The benefits of it are as below
1 You get to be your own boss You get to control everything from the design of the
website layout and how you want to advertise your products You can also change your policies and not be affected by it because it is you who changes it Your shop will not be shut down suddenly without notice and you do not need to worry that you have to start all over again
2 Distractions of competitors products on your page will not be an issue It is your site and it is up to you whether or not you want to allow what kind of advertisements on your site So if you donrsquot want something on your page it is your call
3 You will be able to capture the attention of the media and customers as well if you are able to have a well designed site Nowadays people are attracted to colors and they can see if you have put effort into beautifying the site for the customers You can do so much more than just uploading some pictures onto Etsy on your own site you can always update your site design and your products to complement each other and therefore becoming more attractive
BLOG DIY BEADING MAGAZINE ISSUE 32
Should You Sell In The Marketplace
BLOG WWWHANDMADE-JEWELRY-CLUBCOM MEMBERSHIP WWWDIYBEADINGCLUBCOM
And herersquos the tough part when you want to have your own site
BLOG DIY BEADING MAGAZINE ISSUE 32
1 You need to have knowledge of what you want to do You have to learn to be involved in every aspect of your site so that you know what us going on at the front end of things and at the back end of things as well But if you have not any knowledge of designing a website it is usually a recipe for something to go wrong You have to remember that you need a user interface that is simple for customers to use an easy to use shopping cart you should know which third party platforms are trusted and one which will not keep changing their regulations If you still want to have your site hiring a designer may be your best option
2 You have to work towards promoting your store on your own You will need to find people to feature you in their social media sites because it will not just fall into your lap You need to have promotions or road shows if you need to Marketing your store is important whether or not you are using Etsy or other marketing platforms but if you are on your own it is even more important
3 You will still be competing with other sellers Though now you are now not only competing with Etsy sellers you are now competing with sellers and stores from the world wide web Etsy is already so well known so people tend to go there first so you need to up your methods of attracting customers
Should You Sell In The Marketplace
BLOG WWWHANDMADE-JEWELRY-CLUBCOM MEMBERSHIP WWWDIYBEADINGCLUBCOM
When we first started out we used Etsy as our platform to sell our works Other than that we also utilized blogs and we eventually built our own website as our main base
BLOG DIY BEADING MAGAZINE ISSUE 32
Things have changed over these 3 years It was easier to get sales without much effort but now with so many other shops also utilizing Etsy the competition has grown tremendously Now our main sales come from our own online store and has exceeded sales from Etsy
So what we recommend is that using an existing platform such as Etsy to start out is good and in time build up your website or webstore
It is not that hard to start your own webstore either these two companies offers the option to set up your webstore
1 Shopify
2 Bigcommerce
There are many things to take into consideration before starting a store online It is perfectly fine to start out using Etsy before branching out on your own But you can also
have both ndash have your own website and a store on Etsy There are many stores who operate like this They technically get customers from Etsy and the reroute them to their own websites As long as you are in control of what you are doing and not stressing and
confusing yourself you can opt for more exposure for your store
So do take some time and take a breather to really think through what will be the best for YOU and do remember that starting small does not mean you will not be able to be big
OFFER Get which can be downloaded by subscribing to
httpinternet-marketing-publishingcom
BLOG WWWHANDMADE-JEWELRY-CLUBCOM MEMBERSHIP WWWDIYBEADINGCLUBCOM
Materials - Copper wire diameter 08 mm - Copper wire diameter 04 mm - Small gemstone bead (~4 mm) (I used 3 mm beads in this tutorial because I didnrsquot have any other beads at the time but the beads in the earrings on the cover are 4 mm) Make sure that the beads you want to use are resistant against chemicals such as liver of sulfur or whichever oxidizing substance you want to use to give the metal patina The beads in the picture above are facetted garnet buttons in the tutorial itself I used black spinel facetted buttons Equipment - Round nose pliers - Flat nose pliers - Side-cutters - A small file - A cylindrical object of about 5mm diameter (eg a mandrel for jump rings) - Hammer amp anvil - Liver of sulfur or some other means to oxidize the metal (optional)
LOVE-ly Earrings
BLOG DIY BEADING MAGAZINE ISSUE 32
BLOG WWWHANDMADE-JEWELRY-CLUBCOM MEMBERSHIP WWWDIYBEADINGCLUBCOM
This tutorial teaches how to make 1 ear stud I recommend making both ear studs of the set simultaneously step-by-step so that symmetry is easier to achieve Between steps check for
symmetry in size and shape and adjust the construction if needed
LOVE-ly Earrings
BLOG DIY BEADING MAGAZINE ISSUE 32
Step 1 Straighten the end of the copper wire (+- 6cm) by rubbing along it with your fingers for a
few seconds
Step 2 Bend over the wire onto itself as illustrated below using flat nose pliers
Step 3 Grab the doubled-over wire with the flat nose pliers and push the two sides against each
other Use little force and do it bit by bit to avoid damaging or kinking the wire
Step 4 Push the two adjacent pieces of wire apart to create the bottom shape of the heart as shown
on the picture above
BLOG WWWHANDMADE-JEWELRY-CLUBCOM MEMBERSHIP WWWDIYBEADINGCLUBCOM
LOVE-ly Earrings
BLOG DIY BEADING MAGAZINE ISSUE 32
Step 5 Hammer down the angled wire (the part circled in red) This strengthens the construction
and looks more professional
Step 6 Wrap the two ends of wire tightly around a cylindrical object (+- 5 mm diameter)
Step 7 Push apart the loops you just made by wrapping the wire around the cylindrical object The wire should now be shaped like a heart as
illustrated above
Step 8 Use round nose pliers to bend around the wire for each side of the heart as illustrated above
BLOG WWWHANDMADE-JEWELRY-CLUBCOM MEMBERSHIP WWWDIYBEADINGCLUBCOM
LOVE-ly Earrings
BLOG DIY BEADING MAGAZINE ISSUE 32
Step 9 Use the flat nose pliers to bend one of the two wires (preferably the longer wire) in a 90deg angle at the place marked with a red dot In the picture accompanying the next step you can see
how it should look from the front
Step 10 Use the round nose pliers to bend the other piece of wire in a decorative coil You will cut off the rest of the wire of the coil at approximately the spot marked with a red dot so take that into account when coiling the wire into the shape that
you desire
Step 11 Cut of the wire at the spot indicated in the previous picture and file off any sharp edges
Step 12 Cut off the ear wire at the desired length (Between 1 and 2 cm If in doubt try the earring on
to see if it sits comfortably) and file off any sharp edges
BLOG WWWHANDMADE-JEWELRY-CLUBCOM MEMBERSHIP WWWDIYBEADINGCLUBCOM
LOVE-ly Earrings
BLOG DIY BEADING MAGAZINE ISSUE 32
Step 13 Hammer down the rest of the heart (bumps and coil) If you canrsquot reach certain parts because the ear wire is in the way bend that part of the heart shape away
(verticallyupward) and bend it back after you finish hammering
Congrats yoursquove now made a basic heart-shaped ear stud Next wersquore going to decorate it with a little gemstone and more copper wire
Step 14 Cut off a length of 04 mm copper wire (about 10-20 cm) and string the bead onto it
Step 15 Place the bead in the ldquonon-coilrdquo upper part of the heart shaped ear stud holding it between thumb and forefinger Let approximately 4 cm of the 04 mm wire stick out over the edge of the
heart as illustrated above
Step 16 Wrap the wire twice around the frame so that if you face the front of the ear stud the wire is
directed towards yourself
BLOG WWWHANDMADE-JEWELRY-CLUBCOM MEMBERSHIP WWWDIYBEADINGCLUBCOM
LOVE-ly Earrings
BLOG DIY BEADING MAGAZINE ISSUE 32
Step 17 Flip the wire over the wire with the bead (indicated by the red arrow) and pull tight whilst holding the bead (and its wire) tightly in place It
should look like the construction in the big picture above
Step 18 And make another loop around the wire with the bead The 04 mm wire is now coiled around
twice two times two coils around the frame and two coils around itself
Step 19 Repeat the wire-fastening procedure described in steps 16-18 with the other end of the
wire securing the gemstone in the heart frame Let the wire stick out at the back of the earstud
Step 20 Pull the wire through the lsquocoilrsquo part of the heart shape to the front The wire should lsquocross overrsquo to the other side of the heart at the back of the ear
stud
Step 21 Coil the wire around the frame until you are content with the design Optionally you can hammer down the coils a bit I often do this because I think it
looks somewhat more sophisticated and professional
BLOG WWWHANDMADE-JEWELRY-CLUBCOM MEMBERSHIP WWWDIYBEADINGCLUBCOM
LOVE-ly Earrings
BLOG DIY BEADING MAGAZINE ISSUE 32
Step 22 Cut off the spare bits of wire preferably at the backside of the ear stud and tuck in the ends
Congrats yoursquove now made a heart-shaped ear stud Next we are going to finish it off with a patina
Step 23 Oxidize the metal of the ear studs I always use liver of sulfur solved in warm water The metal
will turn a dark color and matte texture Afterwards rinse the ear studs thoroughly with water and pat
them dry
Step 24 Rub the oxidized ear stud all over with a rough polishing pad to bring back (a dark copper)
color to the surface
Yoursquove now finished making your own LOVE-ly ear studs
Secure them in your ear with plastic or copper stops These can be bought online or in jewelry-supply
stores
Variation ideas You can easily vary in size and shape (longer hearts smaller coils pointier bottoms etc) and
use different materials As you can see the earring I make in this tutorial has a slightly smaller bead than the
earrings on the cover which influences the overall appearance somewhat
The earrings underneath are made with sterling silver and gold wire (super-short coils) and contain small pink
rubies
LOVE-ly Earrings
BLOG WWWHANDMADE-JEWELRY-CLUBCOM MEMBERSHIP WWWDIYBEADINGCLUBCOM
About the Author
Jeske Hendriks
Hi there My name is Jeske and I love all things handmade Over the years Irsquove dabbled in countless different arts and crafts but nowadays I mainly focus on making jewellery and cutting stone cabochons As for jewellery
my preferred materials are silver wire and gemstonemineral beads Using wire-wrapping and basic silver smithing techniques I create both simple
and intricate pieces ndash each and every one of them unique a personal little artwork
You are welcome to follow me on facebook stop by at my personal
webpage andor to have a look at my Etsy shops httpswwwfacebookcomyeskecrafts
httpwwwyeskecraftscom httpwwwyourbeadsandfindingsetsycom
httpwwwyeskecraftsetsycom httpwwwyeskemiscetsycom
BLOG DIY BEADING MAGAZINE ISSUE 32
Flower Tale Earrings
BLOG WWWHANDMADE-JEWELRY-CLUBCOM MEMBERSHIP WWWDIYBEADINGCLUBCOM
Techniques Beadweaving
Project Level Beginner to Intermediate
Materials 12 bronze opaque 6mm Czech glass pearl round beads
2 gr gold lustered dark topaz Japanese 110 seed beads (Toho 459)
Size B gold beading thread
2 bronze earring hooks
Tools Size 10 beading needle
Scissors
Finished Size Diameter ndash 3 cm (118 inches) (without earring hooks)
BLOG DIY BEADING MAGAZINE ISSUE 32
Flower Tale Earrings
BLOG WWWHANDMADE-JEWELRY-CLUBCOM MEMBERSHIP WWWDIYBEADINGCLUBCOM
Step 1 Cut about 110 cm (43 inches) of thread and
pass it through the needle hole
Pick six groups of one 110 seed bead and one
6 mm round bead
BLOG DIY BEADING MAGAZINE ISSUE 32
Join the beads into a ring and secure with two
square knots
Leave a tail of about 15 cm (59 inches)
Step 2 The working thread should be right before the
6 mm round bead
Pick seven 110 seed beads skip the 6 mm
round bead and pass the needle through the
next 110 seed bead added in the previous
round
Repeat adding groups of seven 110 seed
beads five more times
When adding the last group take the needle
directly through the 110 seed bead from the
previous round and the next one added in the
beginning of current round
Flower Tale Earrings
BLOG WWWHANDMADE-JEWELRY-CLUBCOM MEMBERSHIP WWWDIYBEADINGCLUBCOM
Step 3 Pick three 110 seed beads skip one seed
bead from the chain of seven added in the
previous round and pass with the needle
directly through the next three 110 seed
beads
BLOG DIY BEADING MAGAZINE ISSUE 32
Pick three 110 seed beads skip one seed
bead from the chain of seven added in the
previous round and pass with the needle
through the last one and the first 110 seed
bead from the next chain of seven
Repeat the above directions from Step 3 five
more times
After completing this round make sure the
thread will be exiting from the middle 110
seed bead from the first group of three added
in the beginning of this round
Step 4 Pick one 110 seed bead and go through the
last seed bead of the group of three
Flower Tale Earrings
BLOG WWWHANDMADE-JEWELRY-CLUBCOM MEMBERSHIP WWWDIYBEADINGCLUBCOM
Pick three 110 seed beads and take the
needle through the first seed bead of the next
group of three added in the previous round
BLOG DIY BEADING MAGAZINE ISSUE 32
Pick one 110 seed bead and go with the
needle through the next three seed beads (the
last two of the group of three and the last one
from the chain of seven)
Then go up through three 110 seed beads
(the first from the next group of seven and the
first two from the next group of three)
Repeat the above directions from Step 4 to
complete the remaining petals
When working on the last petal perform the
operation from the image shown on the left
instead of picking the group of three 110 seed
beads string two 110 seed beads the earring
hook other two 110 seed beads and
continue beading as instructed above
When you are done hide the thread ends into the beadwork
Flower Tale Earrings
BLOG WWWHANDMADE-JEWELRY-CLUBCOM MEMBERSHIP WWWDIYBEADINGCLUBCOM
About the Author
Iulia Postică
I was born and live in Moldova Eastern Europe Ever since I remember myself
Ive been crocheting and knitting My grandmother has taught me that and I
loved it very much I always regarded crafts exclusively as a hobby and never
thought of making a career of it I traveled a lot to various historical sites
Actually Ive spent all my childhood summers in archaeological camps with
my father who is a professional archaeologist
I also enjoy metal hammering and wirework as it gives me possibility to
express myself in materials used by human communities since ancient times
copper brass glass seed beads and gemstones That is no surprise to anyone
given my family history and academic background
My shop ldquoBeadedTreasuryrdquo with beading tutorials and bead crochet patterns
httpswwwetsycomshopBeadedTreasury
My shop ldquoArchaeologicardquo with artisan jewelry
httpswwwetsycomshopArcheologica
My blog httpbeadedtreasuryblogspotcom
My facebook httpswwwfacebookcomBeadedTreasury
BLOG DIY BEADING MAGAZINE ISSUE 32
Liberty Earrings
BLOG WWWHANDMADE-JEWELRY-CLUBCOM MEMBERSHIP WWWDIYBEADINGCLUBCOM
Materials - Nr 2 cabochon Preciosa Ornela ovale 18x22 mm turchese
- Rocaille Toho 150 silver lined green emerald
- Nr 2 dagger beads
- Nr 20 pearl 4 mm
- Superduo opaque luster ceramic green
- Rocaille 80 color gold
- Rocaille 80 color ivory
- Delica Miyuki 110 aquagreen mix
- Rocaille Miyuki 110 galvanized silver
- Nr 2 monachelle (earwire)
-Fireline
- Beading Needle nr 12
BLOG DIY BEADING MAGAZINE ISSUE 32
Liberty Earrings
BLOG WWWHANDMADE-JEWELRY-CLUBCOM MEMBERSHIP WWWDIYBEADINGCLUBCOM
Make a circle of 20 delica beads and make a knot (a) Perform two rounds peyote with ivory 80 seed beads (b c) Exit from an ivory
bead
BLOG DIY BEADING MAGAZINE ISSUE 32
a b c
Jump from 80 to 80 with 110 80 gold 110 (a) Finish the round and come out of a 80 gold bead
Jump to the next 80 gold with a 4mm pearl (b) Finish the round and come out
of the first pearl Jump to the 2nd pearl and close with a 80 gold bead(c)
a b c
Position the cabochon and jump from one 80 to the other with two delica bead (a)
Continue with three delicas four times (b) At the bottom sew on two delicas then finish the round by sewing on three delicas for four times passing from one to another roc 80 Tighten the cabochon and exit from the
first two delica that you started with String together a 110 and 150 and enter the second of the three close delicas (c)
a b c
Liberty Earrings
BLOG WWWHANDMADE-JEWELRY-CLUBCOM MEMBERSHIP WWWDIYBEADINGCLUBCOM
Put together 150 110 150 and enter in the second of three next delica (a) Put the same beads for three times then put together 150 and 110 and enter
in the two delica of the bottom tip (b) Enter in the second of three next delica with 110 and 150 (c) Continue passing
in the 80 beads with three beads (150 110 150) for four times then at the top finish the round by putting together a 150 and 110 (d)
BLOG DIY BEADING MAGAZINE ISSUE 32
a b c
Exit from the first 150 sewn in the previous round and jump in the three next beads with a 150 (a)
Put a 150 at a time and exit from the first 110 beads of the bottom tip Jump in the
near 110 with a 150 (b) Finish round repeating steps a and b (c) Exit the roc 80 as shown in the photo (d)
a b c
d
a b c d
Enter in the 80 with four 150 (a b) Enter the 80 beads at the bottom of the pieces with two 110 one superduo one 80 ivory bead one superduo and two 110 (c)
d e f
Liberty Earrings
BLOG WWWHANDMADE-JEWELRY-CLUBCOM MEMBERSHIP WWWDIYBEADINGCLUBCOM
Exit from the bottom pearl (a) Put together 150 three 110 150 and enter in the superduorsquos second hole (b)
Put together three superduo and enter in the next superduorsquos second hole (c) Rethread 15 three 110 150 and return in the opposite direction in the pearl of departure (d)
BLOG DIY BEADING MAGAZINE ISSUE 32
a b
c
Exit from the second pearl indicated from (a) Put 150 four 110 and enter in the second of the three 110 (b) Go to the second superduorsquos hole with four 110 and a 150 (c)
Enter the second hole of the supeduo with a 150(d) Sew in the middle of the bottom of the superduo 150 two 110 150 dagger 150 two 110 150(e)
Enter the second hole of the thirs superduo with 150 (f)
a b c
d
d e f
Liberty Earrings
BLOG WWWHANDMADE-JEWELRY-CLUBCOM MEMBERSHIP WWWDIYBEADINGCLUBCOM BLOG DIY BEADING MAGAZINE ISSUE 32
Put 150 four 110 and enter in the second of three 110 of the base (a) Insert four 110 and 150 in the pearl opposite direction indicated in the picture (b) Go in all the beads
around the piece and exit from the pearl at the top (c) Put 150 three 110 150 and enter the superduo (d)
Enter the ivory bead 80 with two 150 (e) Enter the next superduo with two 150 (f)
a b c
d e f
Put together 150 three 110 and enter in opposite direction in the departurersquos pearl (a) Exit from the 150 beads indicated by photo (b) From this jump in the second of two near
150 with five 150 to created the hole for the earwire (c) Pass the thread in the beads make a few knots and cut the excess thread
a b c
Your earrings are finished
Liberty Earrings
BLOG WWWHANDMADE-JEWELRY-CLUBCOM MEMBERSHIP WWWDIYBEADINGCLUBCOM
About the Author
Mariella Martella
My name is Mariella Martella and I am the author and
designer of jewelry that I sign with the name of Mariel Bijoux
After changing city often for work and study I currently live
in northern Italy I am an art historian with a passion for travel
painting and jewelry design in weaving that project since
2010 In my beads and crystals are the colors of the
Mediterranean sea the atmosphere of summer evenings
and the lights of the places I visited
You can find me at
Etsy shop httpswwwetsycomitshopMarielBijoux
Facebook httpswwwfacebookcommari3lbijoux
Crafting blog httpmarielbijouxblogspotit
Twitter httpstwittercomMarielBijoux
BLOG DIY BEADING MAGAZINE ISSUE 32
Jade Necklace
BLOG WWWHANDMADE-JEWELRY-CLUBCOM MEMBERSHIP WWWDIYBEADINGCLUBCOM
Every time I wear a necklace I always make it a point that the
necklace will lay perfectly flat on my neck Using wire for a necklace
made it possible for me like what I did with Jade Necklace It may look
odd at first having bent wires for a necklace but once the jewelry is
finished youll be so happy how the necklace will perfectly lay on your
neck
The tutorial is catered for intermediate level One must know basic
wirework skills such as wire wrapping making loops wrapped loops
and linking to follow the tutorial It has clear instructions and ultra-clear
close-up photos at each step Additionally you can ask me question
you have on the tutorial No more getting stuck and frustrated on a
confusing or just plain inaccurate pattern
If you followed this tutorial and then sell the accessory or jewelry
please give credit to the author or DIY Beading Clubcom
Copyright 2015
wwwdiybeadingclubcom
wwwhandmade-jewelry-clubcom
BLOG DIY BEADING MAGAZINE ISSUE 32
Jade Necklace
BLOG WWWHANDMADE-JEWELRY-CLUBCOM MEMBERSHIP WWWDIYBEADINGCLUBCOM BLOG DIY BEADING MAGAZINE ISSUE 32
Materials Needed 18ga Craft wire 28ga Craft wire 15mm diameter Green Round Flat Back Sew On Gems 5mm Green pearls
8mm Green pearls 6mm x 11mm teardrop Crystal Treasures Mill Hill beads or any teardrop bead with holes on the side Hook for your clasp
Tools Needed Wire cutter Flat nose pliers Round nose pliers Mandrel A jar or any rounded object to shape your necklace
Skill Level Intermediate
Step 1 Cut 6 inches 18ga wire Make a loop on one end then measure approximately 125 inches and make another loop
Form a size 4 circle on your mandrel
Jade Necklace
BLOG WWWHANDMADE-JEWELRY-CLUBCOM MEMBERSHIP WWWDIYBEADINGCLUBCOM BLOG DIY BEADING MAGAZINE ISSUE 32
Then close the circle by wrapping the extended wire just below the loop Wrap the
wire 2x
This is how it looks like Lets call this circle frame Youll notice that the lower curve is
slightly bigger than the upper curve
Step 2 Cut 8 inches of 28ga wire Wrap one end of
the wire at least 3x on one side of the circle frame just below the loop
Bring up your gem Flat back sew on gems has 2 holes Insert the wire into one hole and then
wrap the wire once onto the circle frame
Jade Necklace
BLOG WWWHANDMADE-JEWELRY-CLUBCOM MEMBERSHIP WWWDIYBEADINGCLUBCOM BLOG DIY BEADING MAGAZINE ISSUE 32
Step 3 Insert a 5mm pearl on the wire and then pass
the wire under circle frame
Repeat previous step 2x and have 3 pearls wrapped
Continue wrapping with your teardrop crystal My crystal has 2 holes on the side
and then continue wrapping with your 5mm pearls then secure your wire
Repeat Step 3 and create as many as needed For 16-inch necklace Ive created 6 of these
components
Jade Necklace
BLOG WWWHANDMADE-JEWELRY-CLUBCOM MEMBERSHIP WWWDIYBEADINGCLUBCOM BLOG DIY BEADING MAGAZINE ISSUE 32
Step 4 Cut a 15-inch 18ga wire and make a loop on
one end Insert 8mm pearl and make a loop on the other end You then use these as connectors
and link the components
Step 5 The necklace is an 18ga wire with wrapped
loops on both ends First cut 7 inches 18ga wire and make a wrapped loop with your hook already inserted Side in 18pcs 5mm pearls
Then make a wrapped loop on the other end connecting the wrapped loop onto the component Do the same for the other
necklace but make the loop on the other end big enough so the hookclasp can pass thru
To have the necklace curve shaped use a jar to bend the wire Voila Now youre
ready to party
Jade Necklace
BLOG WWWHANDMADE-JEWELRY-CLUBCOM MEMBERSHIP WWWDIYBEADINGCLUBCOM
About the Author
Sky Aldovino
I consider myself a late bloomer when it comes to crafting Irsquom a self-taught jewelry maker Jewelry making wasnrsquot really a hobby of mine but unforeseen events lead me to learn jewellery making My family put up a craft store where we sell cross stitch beads and all sorts of crafting materials I fell in love with the beads and tried to create accessories only for myself Clients liked the pieces and I started customizing handmade jewelleries The craft store was a success for 6 years but like any other small businesses we had to close it down and I was confined to staying at home While at home I had all the time using the internet and now working as a home-based jewelry designer
BLOG DIY BEADING MAGAZINE ISSUE 32
Atomic Ring
BLOG WWWHANDMADE-JEWELRY-CLUBCOM MEMBERSHIP WWWDIYBEADINGCLUBCOM
Have fun making shapes using the wigjig Cyclops Make loops going in
circles to mimic the shape of a flower or in this tutorial mimic the
shape of an atom The tutorial will also teach you how to cage a
cabochon Whats nice about this piece is that with one long wire you
can create the ring from start to finish
The tutorial is catered for intermediate to advanced students One
must already know how to make spirals and use a wigjig tool It has
clear instructions and ultra-clear close-up photos at each step
Additionally you can ask me question you have on the tutorial No
more getting stuck and frustrated on a confusing or just plain
inaccurate pattern
If you followed this tutorial and then sell the accessory or jewelry
please give credit to the author or DIY Beading Clubcom
If you like to get a blank wigjig graph visit wigjigcom Shop and Jigs
section
Copyright 2015
wwwdiybeadingclubcom
wwwhandmade-jewelry-clubcom
BLOG DIY BEADING MAGAZINE ISSUE 32
Atomic Ring
BLOG WWWHANDMADE-JEWELRY-CLUBCOM MEMBERSHIP WWWDIYBEADINGCLUBCOM
Materials Needed 20ga Craft wire 28ga Craft wire 11mm Round Cabochon
Tools Needed Wigjig Cyclops 15mm pegs Wire cutter Flat nose pliers Mandrel
Skill Level Intermediate - Advanced
BLOG DIY BEADING MAGAZINE ISSUE 32
Step 1 Lets prepare your wigjig cyclops Position the pegs like so
Atomic Ring
BLOG WWWHANDMADE-JEWELRY-CLUBCOM MEMBERSHIP WWWDIYBEADINGCLUBCOM BLOG DIY BEADING MAGAZINE ISSUE 32
Lets work with longer wire so youll have enough wire to hold onto as you manipulate the wire so cut 36 inches of 20ga wire From
one end of the wire measure 10 inches
On the 10-inch measurement loop the wire at the center peg then continue to loop onto the side pegs going in circle going back to
the center peg after looping on the side peg
Now the wire at the center peg will start to build up as you go around the side pegs so
you need to constantly press the wire at the center peg to accommodate the build up of
wire
When youre done pull out the wire and this is
how it should look like
Atomic Ring
BLOG WWWHANDMADE-JEWELRY-CLUBCOM MEMBERSHIP WWWDIYBEADINGCLUBCOM BLOG DIY BEADING MAGAZINE ISSUE 32
You will notice that the frame opens wide Now to keep the atom frame from opening wide secure the center of the frame by wrapping a 28ga wire What you
need to do is simply pass the 28ga wire into the hole and wrap as many times as needed or until youre sure that the frame is secure
Step 2 Now youre finished with your atom frame Well now create the focal design With the longer wire make a spiral at the center big
enough to accommodate the size of your cabochon In this tutorial the spiral is about
11mm in diameter the same size as my cabochon
Pop in your cabochon and start to make spirals going around and over the cabochon as if you are caging the cabochon Create at
least 5 rounds and then cut off any excess
Step 3 Now lets make the ring and this with the other
end of the wire
Atomic Ring
BLOG WWWHANDMADE-JEWELRY-CLUBCOM MEMBERSHIP WWWDIYBEADINGCLUBCOM BLOG DIY BEADING MAGAZINE ISSUE 32
Bring up your mandrel and wrap the wire to the size of your finger Wrap at least 2 times
When youre sure you have the right size pull the ring out of the mandrel
With the extended wire wrap the wire the secure the ring
Cut off any excess and voila You have your atomic ring Create as many as you can with different colors of cabochon
Atomic Ring
BLOG WWWHANDMADE-JEWELRY-CLUBCOM MEMBERSHIP WWWDIYBEADINGCLUBCOM
About the Author
Sky Aldovino
I consider myself a late bloomer when it comes to crafting Irsquom a self-taught jewelry maker Jewelry making wasnrsquot really a hobby of mine but unforeseen events lead me to learn jewellery making My family put up a craft store where we sell cross stitch beads and all sorts of crafting materials I fell in love with the beads and tried to create accessories only for myself Clients liked the pieces and I started customizing handmade jewelleries The craft store was a success for 6 years but like any other small businesses we had to close it down and I was confined to staying at home While at home I had all the time using the internet and now working as a home-based jewelry designer
BLOG DIY BEADING MAGAZINE ISSUE 32
Featured Article Gemstones Used for Jewelry Making
BLOG WWWHANDMADE-JEWELRY-CLUBCOM MEMBERSHIP WWWDIYBEADINGCLUBCOM
Gemstones are stones which we hold quite highly in terms of value And
jewelry often consists of stones that add attractiveness to it so it is not
surprising when jewelry designers actually use gemstones in their designs In
fact there are different types of gemstones that can be used for making
jewelry There are the expensive and pure gemstones and there are also the
imitation ones The information below will provide some information about
the kinds of stones you can use to create jewelry and how these stones will
impact the jewelry you have created
The first kind of stone which I believe we are all quite familiar with are
birthstones These stones are associated with individualrsquos month of birth
by SunVDesigns by BeyhanAkman
For example Amethyst stone is connected with anybody who is born in
February which carries special significance in the area of emotions and also
spiritually This stone also signifies calm and peace as well
And then we have semi-precious stones which are also often used in jewelry
making They are not as valuable as compared to precious stones but still
valuable Best examples of these stones are aquamarine topaz tourmaline
opal and turquoise
BLOG DIY BEADING MAGAZINE ISSUE 32
Featured Article Gemstones Used for Jewelry Making
BLOG WWWHANDMADE-JEWELRY-CLUBCOM MEMBERSHIP WWWDIYBEADINGCLUBCOM
It is an ideal gift for someone who you deem special Aquamarine pendants
usually work well for anyone and is widely an accepted stone
by HyppieChic by joyeriamestiza
However precious stones are the most unusual
and precious jewels to us Examples of some of
them are emerald sapphire diamond and
ruby These stones are usually very expensive
and are prized for their exquisiteness These
stones are commonly used in high-quality
jewelry designs which costs quite a fortune to
obtain
BLOG DIY BEADING MAGAZINE ISSUE 32
by sarajewelrystu
Jewelry designs with precious stones are usually
given as exceptional gifts on special occasions A
perfect example is a diamond ring that is usually
given as an engagement gift
by ldiamondsforever
Featured Article Gemstones Used for Jewelry Making
BLOG WWWHANDMADE-JEWELRY-CLUBCOM MEMBERSHIP WWWDIYBEADINGCLUBCOM
There are also synthetic stones which are often used to create jewelry
Synthetic stones are artificial imitations of gemstones Synthetic Sapphire
jewelry costs less compare with the authentic ones Most of the time
imitation stones are used to save cost but at the same time have the similar
look of the real stone
BLOG DIY BEADING MAGAZINE ISSUE 32
by shininggems by thaimaker
by lapinduprintemps by PastimeArt
Gemstones are used like beads and you can use it in any designs whether
simple or elaborate
Swarovski crystal components are available in a rich multitude of rondelles Perfect as spacers in necklaces or as discs in earrings Rondelles can be used with many varieties of shapes or sizes Use Swarovski crystal rondelles between large gemstones as accents with precious metal findings Fire Mountain Gems and Beads Crystal Passionsreg brand presents Swarovski crystal in display-ready packaging for brilliant retail presentation Crystal Passionsreg is an assurance of genuine Swarovski crystal
BLOG DIY BEADING MAGAZINE ISSUE 32 BLOG WWWHANDMADE-JEWELRY-CLUBCOM MEMBERSHIP WWWDIYBEADINGCLUBCOM
Recommended Jewelry Making Supplies
Mz Unisex-adults 12pcs 25x18x6mm Turquoise Oval CAB Cabochon
BLOG DIY BEADING MAGAZINE ISSUE 32 BLOG WWWHANDMADE-JEWELRY-CLUBCOM MEMBERSHIP WWWDIYBEADINGCLUBCOM
Recommended Jewelry Making Supplies
For a little sparkle that goes a long way design with Swarovski 4mm faceted bicones Create glorious multi-strand necklaces with the dainty crystals or use as spacers to add a tiny flash to your designs Swarovski crystal components are made in Austria and are considered the finest products of their kind in the world
BLOG DIY BEADING MAGAZINE ISSUE 32 BLOG WWWHANDMADE-JEWELRY-CLUBCOM MEMBERSHIP WWWDIYBEADINGCLUBCOM
Recommended Jewelry Making Supplies
Imitation beads resist color change These beads have uniform quality with a good polish Some strands may have little to no matrix Sizes shapes and colors may vary with handcrafted items
BLOG DIY BEADING MAGAZINE ISSUE 32 BLOG WWWHANDMADE-JEWELRY-CLUBCOM MEMBERSHIP WWWDIYBEADINGCLUBCOM
Recommended Jewelry Making Supplies
Something Blue Necklace and Earrings
BLOG WWWHANDMADE-JEWELRY-CLUBCOM MEMBERSHIP WWWDIYBEADINGCLUBCOM
Skill level Beginner Intermediate Advanced
DIMENSIONS OF THE NECKLACE Inner Circumference 14 18 inch 35 cm
Focal Pendant Width 1 15 inch 35 cm Focal Pendant Height 1 15 inch 35 cm
DIMENSIONS OF THE EARRING Earring Width 716 inch 12 cm Earring Height 1516 inch 25 cm (Without the earring hook)
BLOG DIY BEADING MAGAZINE ISSUE 32
Materials
Note Before purchasing the supplies measure the length of your wished necklace If you decide to bead a longer necklace you should keep in mind that for every extra
frac34 inches 2 cm-s you will need 8 bicones and 8 pearls
Something Blue Necklace and Earrings
BLOG WWWHANDMADE-JEWELRY-CLUBCOM MEMBERSHIP WWWDIYBEADINGCLUBCOM BLOG DIY BEADING MAGAZINE ISSUE 32
Work RAW stitch into a beaded circle and embellish with Swarovski bicones
STEP 2 String 1A and 2 pearls Pass through the previous
second pearl and the freshly added 1A and the first pearl again
STEP 1 Use a comfortable length of thread to string 2
pearls 1A and 1 pearl again leaving a 2rdquo 5cm tail Pass through the first two pearls strung to form a
ring
STEP 3 String 2 pearls and 1A Pass through the previous first pearl and the freshly added two pearls
again
STEP 4 - 17 Repeat STEP 2 and STEP 3 again until you count 17 pearls in the inner circle
But be careful in the last step you only have to add 1 pearl then pass through the first pearls
added in STEP 1 and add another 1A Now pass through the first pearl added in STEP
1and 1A added in this round again to exit from this A
Something Blue Necklace and Earrings
BLOG WWWHANDMADE-JEWELRY-CLUBCOM MEMBERSHIP WWWDIYBEADINGCLUBCOM BLOG DIY BEADING MAGAZINE ISSUE 32
STEP 19 String 2A and pass through the next A added in round 4-17 and the A added in round 18 the 2A added in this round and finally the A added in round 4-17 to exit from the bead showed below
STEP 18 String 3A and pass through the 1A added in the previous round and the first A added in this
round
STEP 20 - 34 Repeat STEP 18 and STEP 19 again until you finish the circle
But be careful in the last step first you have to pass through 3A and then add 1A After this pass
through the 3A again and exit from the A bead
shown below (This is the first A added in STEP 18)
Something Blue Necklace and Earrings
BLOG WWWHANDMADE-JEWELRY-CLUBCOM MEMBERSHIP WWWDIYBEADINGCLUBCOM BLOG DIY BEADING MAGAZINE ISSUE 32
STEP 35 Step up to exit from the pearl shown below (Finishing the previous step in the A bead and then
stepping up from there makes the circle more secure)
Now string 3 bicones Pass through the pearl and the first bicone again
In the reality your circle will look more like this the A beads forming a strong row in the middle of the
pearls
STEP 36 Add 2 bicones Pass through the
neighboring pearl the first bicone added in the previous row and the 2 bicones added in this step
so you can exit from the next pearl
Something Blue Necklace and Earrings
BLOG WWWHANDMADE-JEWELRY-CLUBCOM MEMBERSHIP WWWDIYBEADINGCLUBCOM BLOG DIY BEADING MAGAZINE ISSUE 32
Now in the reality your circle will look more like this the A beads still forming a strong row in the middle of the pearls and the bicones slightly lying on top of
them
STEP 37 - 49 Repeat STEP 35 and STEP 36 again until you finish the circle with the bicones
But be careful in the last step first you have pass through the third bicone added then add 1 bicone
and pass through this little quartet to exit from the bicone shown below (The second one added in
STEP 35)
STEP 50 With these steps we finish the circle by adding 1 bicone to connect the A beads and the
bicone row So add 1 bicone pass through the nearest A bead and add 1 bicone again Pass
through the bicone already there and exit from the bicone you just added
Something Blue Necklace and Earrings
BLOG WWWHANDMADE-JEWELRY-CLUBCOM MEMBERSHIP WWWDIYBEADINGCLUBCOM BLOG DIY BEADING MAGAZINE ISSUE 32
STEP 66-83 Secure the circle by adding 1A between each bicone in the second row of Swarovski
bicones If you finished secure the thread and trim
STEP 51-65 Using the same technique as in STEP 37 - 49 add 1 bicone to finish the third bicone row The black line shows you the way (After STEP 50 pass through the next A bead add 1 bicone and pass through the bicone already there and the bicone added in the previous step Repeat these steps to
finish the inner bicone circle)
MIDDLE CIRCLE Work RAW stitch into a beaded circle and embellish with
Swarovski bicones Remember you need to bead two circles this time
STEP 1 Just like in the focal circle begin with 2 pearls 1A and 1 pearl again on a comfortable length of thread
leaving a 2rdquo 5cm tail Pass through the first two pearls strung to form a ring
Something Blue Necklace and Earrings
BLOG WWWHANDMADE-JEWELRY-CLUBCOM MEMBERSHIP WWWDIYBEADINGCLUBCOM BLOG DIY BEADING MAGAZINE ISSUE 32
STEP 15-28 Mimicing the FOCAL CIRCLElsquos STEP 18-34 bead A beads until you finish the inner part of the
circle Exit from a pearl in the second row This circle should look very similar to the first one but this is a bit
smaller
STEP 2-14 Mimicing the FOCAL CIRCLElsquos STEP 2-17 bead until you count 14 pearls in the inner circle Exit
from the last A added
STEP 29-42 Mimicing FOCAL CIRCLElsquos STEP 35-49 add 2 rows of bicones
STEP 43-56 Mimicing the FOCAL CIRCLElsquos STEP 50-65 bead the third row of bicones to finish the circle
Something Blue Necklace and Earrings
BLOG WWWHANDMADE-JEWELRY-CLUBCOM MEMBERSHIP WWWDIYBEADINGCLUBCOM BLOG DIY BEADING MAGAZINE ISSUE 32
SMALLEST CIRCLE Work RAW stitch into a beaded circle and embellish
with Swarovski bicones Remember you need to bead two circles again
STEP 1 Just like in the focal circle begin with 2 pearls
1A and 1 pearl again on a comfortable length of thread leaving a 2rdquo 5cm tail Pass through the first two
pearls strung to form a ring
STEP 57-70 Just like the FOCAL CIRCLElsquos STEP 66-83 secure the circle by adding 1A between every bicone
in the second row of bicones If you finished secure the thread and trim (Donrsquot forget to bead another
circle)
STEP 2-12 Mimicing the FOCAL CIRCLElsquos STEP 2-17 bead until you count 12 pearls in the inner circle Exit
from the last A added
STEP 13-24 Mimicing the FOCAL CIRCLElsquos STEP 18-34 bead A beads until you finish the inner part of the
circle Exit from a pearl in the second row This circle should look very similar to the first two but this is the
smallest of them all
Something Blue Necklace and Earrings
BLOG WWWHANDMADE-JEWELRY-CLUBCOM MEMBERSHIP WWWDIYBEADINGCLUBCOM BLOG DIY BEADING MAGAZINE ISSUE 32
STEP 37-48 Mimicing the FOCAL CIRCLElsquos STEP 50-65 bead the third row of bicones to finish this circle too
STEP 25-36 Mimicing FOCAL CIRCLElsquos STEP 35-49 add 2
rows of bicones The last step here is purple again
STEP 49-60 Just like the FOCAL CIRCLElsquos STEP 66-83 secure the circle by adding 1A between every bicone
in the second row of bicones If you finished secure the thread and trim (Donrsquot forget that you need two
small circles)
Something Blue Necklace and Earrings
BLOG WWWHANDMADE-JEWELRY-CLUBCOM MEMBERSHIP WWWDIYBEADINGCLUBCOM BLOG DIY BEADING MAGAZINE ISSUE 32
STEP 37-48 Mimicing the FOCAL CIRCLElsquos STEP 50-65 bead the third row of bicones to finish this circle too
STEP 25-36 Mimicing FOCAL CIRCLElsquos STEP 35-49 add 2
rows of bicones The last step here is purple again
STEP 49-60 Just like the FOCAL CIRCLElsquos STEP 66-83 secure the circle by adding 1A between every bicone
in the second row of bicones If you finished secure the thread and trim (Donrsquot forget that you need two
small circles)
Something Blue Necklace and Earrings
BLOG WWWHANDMADE-JEWELRY-CLUBCOM MEMBERSHIP WWWDIYBEADINGCLUBCOM BLOG DIY BEADING MAGAZINE ISSUE 32
STEP 2-6 Continue by adding 1A 1 bicone 1 pearl until you count 6 of each
STEP 1 Begin with 1 pearl 1 bicone 1A and 1 bicone again on a comfortable length of thread leaving a 2rdquo
5cm tail Pass through the pearl and the first bicone strung to form a ring
STEP 7-12 Pass through the A beads to make your
component more secure Also secure the thread and trim (Repeat these steps until you have six 6-BEAD
COMPONENTs)
6-BEAD COMPONENT Work RAW stitch into a beaded circle and embellish with Swarovski bicones
For the necklace we will need six from this component For the earring two
Something Blue Necklace and Earrings
BLOG WWWHANDMADE-JEWELRY-CLUBCOM MEMBERSHIP WWWDIYBEADINGCLUBCOM BLOG DIY BEADING MAGAZINE ISSUE 32
STEP 2-4 Continue by adding 1A 1 bicone 1 pearl
until you count 4 of each
STEP 1 Begin with 1 pearl 1 bicone 1A and 1 bicone again on a comfortable length of thread leaving a 2rdquo
5cm tail Pass through the pearl and the first bicone strung to form a ring
STEP 5-8 Pass through the A beads to make your component more secure Also secure the thread and
trim (Repeat these steps until you have the wished amount of 4-BEAD COMPONENTs)
4-BEAD COMPONENT Work RAW stitch into a beaded circle and embellish with Swarovski bicones
For the necklace-size that is given on the second page we will need 20 from this
component For the earring two
If you would like to make a longer necklace you need to make more (One 4-BEAD COMPONENT measures about 38 inch 1 cm To make the necklace symmetrical you have to have equal amounts on each side This means for every extra frac34 inches
2 cm-s you will need 1 4-BEAD COMPONENT on each side of the necklace)
Something Blue Necklace and Earrings
BLOG WWWHANDMADE-JEWELRY-CLUBCOM MEMBERSHIP WWWDIYBEADINGCLUBCOM BLOG DIY BEADING MAGAZINE ISSUE 32
STEP 2 Connect the MIDDLE CIRCLE to two 6-BEAD COMPONENTs by adding four-times 2As
between the pearls Choose a pearl on the MIDDLE CIRCLE and add
2A pass through a pearl in the 6-BEAD COMPONENT previously added and add 2A again Watch out this has to be symmetrical Repeat this at least two more times to make it
secure Now repeat this entire procedure but choose
the 8-th pearl on MIDDLE CIRCLE Repeat this on the other side of the necklace
too
Choose a pearl on the FOCAL CIRCLE and add 2A pass through a pearl in the 6-BEAD COMPONENT and add 2A again Repeat this at least two more times to make it secure
Now repeat this entire procedure but choose the 5-th pearl on FOCAL CIRCLE This will make the necklace nice on your neck
FINISHING THE NECKLACE Connects the parts with A beads
STEP 1 Connect the FOCAL CIRCLE to two 6-BEAD COMPONENTs by adding four-times 2As between the pearls To do this turn your parts upside down you need to
see the pearls We will work on this side from now on
Something Blue Necklace and Earrings
BLOG WWWHANDMADE-JEWELRY-CLUBCOM MEMBERSHIP WWWDIYBEADINGCLUBCOM BLOG DIY BEADING MAGAZINE ISSUE 32
FINISHING THE EARRING Connects the parts with A beads
STEP 1-2 Connect the 6-BEAD COMPONENT
to 4-BEAD COMPONENT and the 4-BEAD
COMPONENT to the earring hook
First connect the 4-BEAD COMPONENT to the 6-BEAD COMPONENT with 4A beads Mimic
the elongation steps of the necklace if needed
Secondly connect the 4-BEAD COMPONENT
to your earring hook with 4A beads again Leave from the last pearl bead 2A beads the hook (this is the orange oval form) and 2As again Pass through each of them to
secure this connection again
Finally get ready to prepare the other earring ndash since we need two of them
STEP 5 Connect the 4-BEAD COMPONENTs to the toggle clasp thus finishing the
necklace Leaving from the last pearl bead 2A the
clasp(this is the orange oval form) and 2A again Pass through all of them a couple more times to make this connection more
secure
Something Blue Necklace and Earrings
BLOG WWWHANDMADE-JEWELRY-CLUBCOM MEMBERSHIP WWWDIYBEADINGCLUBCOM BLOG DIY BEADING MAGAZINE ISSUE 32
If you finished it is time to try it on It was a great fun wasnrsquot it And how beautiful you look in your new necklace and the matching earrings
Something Blue Necklace and Earrings
BLOG WWWHANDMADE-JEWELRY-CLUBCOM MEMBERSHIP WWWDIYBEADINGCLUBCOM
About the Author
Margit Vogel
My name is Margit Vogel I live in Hungary Europe
By profession I am a biochemical engineer but I fell in love with
beads so much that I could not stop playing with them
I make one-of-a-kind beaded and bead embroidered art
jewelry made of the best quality materials such as Swarovski
stones gemstones Japanese beads (Miyuki and Toho) Czech
glass beads leather soutache and suede Each piece is unique
and individually crafted
Feel free to visit my blog for some eyecandy
httpiformjewelrywordpresscom
My shop httpwwwetsycomshopiformjewelry
Facebook httpwwwfacebookcomiformjewelry
BLOG DIY BEADING MAGAZINE ISSUE 32
Getting Down And Personal With Gianna
Getting Down And Personal With Gianna
Nowadays we see more and more jewelry stores opening up online and with these online jewelry stores it has made it easier for us to purchase and view their creations Have you ever wondered how they are able to manage and produce amazing jewelry pieces and tutorials So heres a little on the journey to open up an online shop We are excited to present to you Gianna aka Beading4perfectionists
Gianna Beader amp Youtuber
Unlike most jewelry makers and beadweavers Gianna did not start beading as a hobby but as a means to make ends meet With goals in trying to
fill the financial gap she did everything she could to expand her earnings ndash working as a security guard
and at the same time learning how to bead and selling her pieces at fair trades and flea markets
Since many were asking if she does home beading workshops she started on exploring how to teach people to bead She loves Scott Bakula and has always loved him till now and this served as her
inspiration to start making a beading video tutorial
Gianna started creating videos because she was at the point in her life where everything seemed to be falling apart And at that moment of time she had difficulties financially and selling jewelry was the only way for her to stay afloat financially She is a big Scott Bakula fan and when she went to the UK to see him on stage that was when it hit her that she is already able to edit videos and
taught herself Photoshop and done workshops at bead fairs so why not put these together and see what happens on Youtube She knew that if she gets enough subscribers and views ndash though no one knew what the exact numbers were you would be invited to become a Youtube partner This way she could monetize her videos with advertisements and hopefully she would be able to be a Youtube partner and be able to pay her bills
BLOG WWWHANDMADE-JEWELRY-CLUBCOM MEMBERSHIP WWWDIYBEADINGCLUBCOM BLOG DIY BEADING MAGAZINE ISSUE 32
Getting Down And Personal With Gianna
Her Youtube channel is popular and the reason why she chose Youtube is because Youtube is the biggest platform and reached almost to the whole world Everyone already knows about it and it was growing rapidly as compared to other platforms like Dailymotion so she figured that Youtube was the way to go Her advice to new designers is that when you start out go to the platforms on the top of your list first then work your way down your list if you do not get accepted by your first choice
After loyally putting up one video every week for about 8 months in a row she became a Youtube partner and monetized her videos She knew she needed at least $100 to get her first payout She managed to reach $100 after 3 months The process was not easy she worked hard lack sleep skipped meals and who knows what happened to Ridge in the Bold and the Beautiful because she stopped watching
On Youtube you can monetize your videos Google pays straight to your bank account and at other countries where they also have the option of getting checks among other options In order to get paid you have to reach the $100 mark and after 3 months For Gianna she thinks that you cannot say that Etsy is better than Youtube or Youtube is better than Etsy Her reasoning is because on Youtube she has many followers which will eventually check out her Etsy shop And to start an Etsy shop you need an audience
BLOG WWWHANDMADE-JEWELRY-CLUBCOM MEMBERSHIP WWWDIYBEADINGCLUBCOM BLOG DIY BEADING MAGAZINE ISSUE 32
television and dedicated her spare time (as she had another job) to Youtube She re-registered at the chamber of commerce after receiving her first payout Her work at Youtube now is not a full time job and things have changed on Youtube It is easier to become a parter but there are some countries that need to wait for an invitation to be a Youtube partner Take Italy for instance Italians would have to work just as hard as she did if they want to become a Youtube partner
Getting Down And Personal With Gianna
With her 60000 subscribers on her b4pbakup Youtube channel it is possible to sell at least 60 patterns on the first day on Etsy after promoting the PDF file on her Youtube channel Though you may think that 60 out of 60000 is not much you have to remember that not everyone has the means to purchase the PDF file and a lot of people still rather watch her carry out the tutorial(for free) on Youtube instead of reading the patterns or paying for the patterns even if the pattern is for a fundraiser and only cost $2 Her insights on Youtube is that Youtube is not what it used to be 6 years ago Instead of making more money every month she is making less and less because advertisers have more options of where they want to advertise their ads Ads do not pay as much as they used to Back in the days you could get 25 cents per ad Now you count yourself lucky if you could get 5 cents roll in after two hours
BLOG WWWHANDMADE-JEWELRY-CLUBCOM MEMBERSHIP WWWDIYBEADINGCLUBCOM BLOG DIY BEADING MAGAZINE ISSUE 32
And on top of that adblockers are destroying Youtube channel owners Youtube will start making changes to the channels where there will be ldquopaid subscriptionrdquo channels This has already been implemented in some countries but not in her country The Netherlands This means there will no longer be ads for her monthly paying subscribers She hopes that Youtube will add on a paid per video option feature The option to be a paid channel or free channel or to start a new channel for paying customers is yours to choose Gianna is not happy with Youtube because many others like her have worked so hard and for some years to become Youtube partners(which was something to be proud of) has lost their status
Getting Down And Personal With Gianna
Her advice for those who want to go on Youtube is 1 Do it because you want to teach
2 Do it because you want a career with beads
BLOG WWWHANDMADE-JEWELRY-CLUBCOM MEMBERSHIP WWWDIYBEADINGCLUBCOM BLOG DIY BEADING MAGAZINE ISSUE 32
After putting up about 20 videos and having at least 5000 subscribers add the PDF tutorials to Etsy and Craftsy She found out that her audience would like to have the PDF after watching her videos This is because they would rather print out the PDF and work while seated in a comfy chair technically somewhere else instead of having to pause the video time and time again
Gianna has also made a video for those who want to know the whole story of her journey up until the present day And to get updates on her you can check it out here She has also started a vlog where she tells of how she still works towards becoming a financial independent beader and explains her journey to get where she wants to be(or die trying) Gianna will be in the UK on October the 17th giving an all-day workshop with 4 different patterns
(2 beginners and 2 advanced) in Wotton-under-Edge
Gianna will be there Friday night as the workshop is on Saturday She will be leaving on Sunday Her
doors are open to all who wants to continue the party with her at the hotel across the street
For more information do contact Ann Tucker on Facebook
httpswwwfacebookcomanntucker501
Rec
omm
end
ed R
ead
ings
Making Jewelry with Gemstone
Beads
Combines the popular craft of beading with beautiful semi-precious stones which are collected by many Features a variety of versatile ideas which can be adapted for any type of gem or bead Readers will learn to reate beautiful gemstone jewelry with this dazzling collection of over 100 projects ranging from eyecatching earrings and accessories to exquisite necklaces and bracelets This beautiful book offers an impressive range of 28 beautiful semi-precious stones (including birthstones) and a glimpse into the fascinating history and mythical properties behind them
BLOG DIY BEADING MAGAZINE ISSUE 32 BLOG WWWHANDMADE-JEWELRY-CLUBCOM MEMBERSHIP WWWDIYBEADINGCLUBCOM
Rec
omm
end
ed R
ead
ings
Convertible Crystal Jewelry
Reverse it Twist it Wear it Many
Ways
Diane Whiting presents the idea that convertibility isnrsquot just about using pieces in multiple ways it is also about using skills and creativity in multiple ways Using ever-popular sparkling crystals Diane showcases design elements through various techniques for fun easy fashionable jewelry With 25 projects the reader can choose from bracelets necklaces and earrings that match any outfit or styleDiane Whiting presents the idea that convertibility isnrsquot just about using pieces in multiple ways it is also about using skills and creativity in multiple ways
BLOG DIY BEADING MAGAZINE ISSUE 32 BLOG WWWHANDMADE-JEWELRY-CLUBCOM MEMBERSHIP WWWDIYBEADINGCLUBCOM
Rec
omm
end
ed R
ead
ings
Wire Jewelry Masterclass
Wrapped Coiled and Woven Pieces
Using Fine Materials
Comprehensive and fabulous Wire Jewelry Masterclass takes an in-depth look at an intricate and rewarding craft The 24 projects which range from simple Dragons tear briolette earrings to a Poseidon-under-the-sea pendant will delight and inspire jewelers of all levels and tastes Divided into beginner intermediate and advanced sections this beautifully photographed step-by-step guide is the ticket to wire jewelry expertise
BLOG DIY BEADING MAGAZINE ISSUE 32 BLOG WWWHANDMADE-JEWELRY-CLUBCOM MEMBERSHIP WWWDIYBEADINGCLUBCOM
Rec
omm
end
ed R
ead
ings
Timeless Wire Weaving The
Complete Course
Timeless Wire Weaving focuses on developing wirework skills through 13 projects using three classic wire weaving techniques coiling wrapping and weaving The projects are built around a focal cabochon and incorporate seed beads and crystals in imaginative ways Designers learn to make the jewelry shown in the book and they also use the techniques learned to create innovative jewelry pieces of their own
BLOG DIY BEADING MAGAZINE ISSUE 32 BLOG WWWHANDMADE-JEWELRY-CLUBCOM MEMBERSHIP WWWDIYBEADINGCLUBCOM
Our digital magazine is available through
Apple Newsstand service available to millions of IPAD users
To advertise with us please email us at
diyjewelryclubgmailcom
Or visit our page at
httphandmade-jewelry-clubcomadvertising-diy-beading-magazine
Should You Sell In The Marketplace
BLOG WWWHANDMADE-JEWELRY-CLUBCOM MEMBERSHIP WWWDIYBEADINGCLUBCOM
And herersquos the tough part when you want to have your own site
BLOG DIY BEADING MAGAZINE ISSUE 32
1 You need to have knowledge of what you want to do You have to learn to be involved in every aspect of your site so that you know what us going on at the front end of things and at the back end of things as well But if you have not any knowledge of designing a website it is usually a recipe for something to go wrong You have to remember that you need a user interface that is simple for customers to use an easy to use shopping cart you should know which third party platforms are trusted and one which will not keep changing their regulations If you still want to have your site hiring a designer may be your best option
2 You have to work towards promoting your store on your own You will need to find people to feature you in their social media sites because it will not just fall into your lap You need to have promotions or road shows if you need to Marketing your store is important whether or not you are using Etsy or other marketing platforms but if you are on your own it is even more important
3 You will still be competing with other sellers Though now you are now not only competing with Etsy sellers you are now competing with sellers and stores from the world wide web Etsy is already so well known so people tend to go there first so you need to up your methods of attracting customers
Should You Sell In The Marketplace
BLOG WWWHANDMADE-JEWELRY-CLUBCOM MEMBERSHIP WWWDIYBEADINGCLUBCOM
When we first started out we used Etsy as our platform to sell our works Other than that we also utilized blogs and we eventually built our own website as our main base
BLOG DIY BEADING MAGAZINE ISSUE 32
Things have changed over these 3 years It was easier to get sales without much effort but now with so many other shops also utilizing Etsy the competition has grown tremendously Now our main sales come from our own online store and has exceeded sales from Etsy
So what we recommend is that using an existing platform such as Etsy to start out is good and in time build up your website or webstore
It is not that hard to start your own webstore either these two companies offers the option to set up your webstore
1 Shopify
2 Bigcommerce
There are many things to take into consideration before starting a store online It is perfectly fine to start out using Etsy before branching out on your own But you can also
have both ndash have your own website and a store on Etsy There are many stores who operate like this They technically get customers from Etsy and the reroute them to their own websites As long as you are in control of what you are doing and not stressing and
confusing yourself you can opt for more exposure for your store
So do take some time and take a breather to really think through what will be the best for YOU and do remember that starting small does not mean you will not be able to be big
OFFER Get which can be downloaded by subscribing to
httpinternet-marketing-publishingcom
BLOG WWWHANDMADE-JEWELRY-CLUBCOM MEMBERSHIP WWWDIYBEADINGCLUBCOM
Materials - Copper wire diameter 08 mm - Copper wire diameter 04 mm - Small gemstone bead (~4 mm) (I used 3 mm beads in this tutorial because I didnrsquot have any other beads at the time but the beads in the earrings on the cover are 4 mm) Make sure that the beads you want to use are resistant against chemicals such as liver of sulfur or whichever oxidizing substance you want to use to give the metal patina The beads in the picture above are facetted garnet buttons in the tutorial itself I used black spinel facetted buttons Equipment - Round nose pliers - Flat nose pliers - Side-cutters - A small file - A cylindrical object of about 5mm diameter (eg a mandrel for jump rings) - Hammer amp anvil - Liver of sulfur or some other means to oxidize the metal (optional)
LOVE-ly Earrings
BLOG DIY BEADING MAGAZINE ISSUE 32
BLOG WWWHANDMADE-JEWELRY-CLUBCOM MEMBERSHIP WWWDIYBEADINGCLUBCOM
This tutorial teaches how to make 1 ear stud I recommend making both ear studs of the set simultaneously step-by-step so that symmetry is easier to achieve Between steps check for
symmetry in size and shape and adjust the construction if needed
LOVE-ly Earrings
BLOG DIY BEADING MAGAZINE ISSUE 32
Step 1 Straighten the end of the copper wire (+- 6cm) by rubbing along it with your fingers for a
few seconds
Step 2 Bend over the wire onto itself as illustrated below using flat nose pliers
Step 3 Grab the doubled-over wire with the flat nose pliers and push the two sides against each
other Use little force and do it bit by bit to avoid damaging or kinking the wire
Step 4 Push the two adjacent pieces of wire apart to create the bottom shape of the heart as shown
on the picture above
BLOG WWWHANDMADE-JEWELRY-CLUBCOM MEMBERSHIP WWWDIYBEADINGCLUBCOM
LOVE-ly Earrings
BLOG DIY BEADING MAGAZINE ISSUE 32
Step 5 Hammer down the angled wire (the part circled in red) This strengthens the construction
and looks more professional
Step 6 Wrap the two ends of wire tightly around a cylindrical object (+- 5 mm diameter)
Step 7 Push apart the loops you just made by wrapping the wire around the cylindrical object The wire should now be shaped like a heart as
illustrated above
Step 8 Use round nose pliers to bend around the wire for each side of the heart as illustrated above
BLOG WWWHANDMADE-JEWELRY-CLUBCOM MEMBERSHIP WWWDIYBEADINGCLUBCOM
LOVE-ly Earrings
BLOG DIY BEADING MAGAZINE ISSUE 32
Step 9 Use the flat nose pliers to bend one of the two wires (preferably the longer wire) in a 90deg angle at the place marked with a red dot In the picture accompanying the next step you can see
how it should look from the front
Step 10 Use the round nose pliers to bend the other piece of wire in a decorative coil You will cut off the rest of the wire of the coil at approximately the spot marked with a red dot so take that into account when coiling the wire into the shape that
you desire
Step 11 Cut of the wire at the spot indicated in the previous picture and file off any sharp edges
Step 12 Cut off the ear wire at the desired length (Between 1 and 2 cm If in doubt try the earring on
to see if it sits comfortably) and file off any sharp edges
BLOG WWWHANDMADE-JEWELRY-CLUBCOM MEMBERSHIP WWWDIYBEADINGCLUBCOM
LOVE-ly Earrings
BLOG DIY BEADING MAGAZINE ISSUE 32
Step 13 Hammer down the rest of the heart (bumps and coil) If you canrsquot reach certain parts because the ear wire is in the way bend that part of the heart shape away
(verticallyupward) and bend it back after you finish hammering
Congrats yoursquove now made a basic heart-shaped ear stud Next wersquore going to decorate it with a little gemstone and more copper wire
Step 14 Cut off a length of 04 mm copper wire (about 10-20 cm) and string the bead onto it
Step 15 Place the bead in the ldquonon-coilrdquo upper part of the heart shaped ear stud holding it between thumb and forefinger Let approximately 4 cm of the 04 mm wire stick out over the edge of the
heart as illustrated above
Step 16 Wrap the wire twice around the frame so that if you face the front of the ear stud the wire is
directed towards yourself
BLOG WWWHANDMADE-JEWELRY-CLUBCOM MEMBERSHIP WWWDIYBEADINGCLUBCOM
LOVE-ly Earrings
BLOG DIY BEADING MAGAZINE ISSUE 32
Step 17 Flip the wire over the wire with the bead (indicated by the red arrow) and pull tight whilst holding the bead (and its wire) tightly in place It
should look like the construction in the big picture above
Step 18 And make another loop around the wire with the bead The 04 mm wire is now coiled around
twice two times two coils around the frame and two coils around itself
Step 19 Repeat the wire-fastening procedure described in steps 16-18 with the other end of the
wire securing the gemstone in the heart frame Let the wire stick out at the back of the earstud
Step 20 Pull the wire through the lsquocoilrsquo part of the heart shape to the front The wire should lsquocross overrsquo to the other side of the heart at the back of the ear
stud
Step 21 Coil the wire around the frame until you are content with the design Optionally you can hammer down the coils a bit I often do this because I think it
looks somewhat more sophisticated and professional
BLOG WWWHANDMADE-JEWELRY-CLUBCOM MEMBERSHIP WWWDIYBEADINGCLUBCOM
LOVE-ly Earrings
BLOG DIY BEADING MAGAZINE ISSUE 32
Step 22 Cut off the spare bits of wire preferably at the backside of the ear stud and tuck in the ends
Congrats yoursquove now made a heart-shaped ear stud Next we are going to finish it off with a patina
Step 23 Oxidize the metal of the ear studs I always use liver of sulfur solved in warm water The metal
will turn a dark color and matte texture Afterwards rinse the ear studs thoroughly with water and pat
them dry
Step 24 Rub the oxidized ear stud all over with a rough polishing pad to bring back (a dark copper)
color to the surface
Yoursquove now finished making your own LOVE-ly ear studs
Secure them in your ear with plastic or copper stops These can be bought online or in jewelry-supply
stores
Variation ideas You can easily vary in size and shape (longer hearts smaller coils pointier bottoms etc) and
use different materials As you can see the earring I make in this tutorial has a slightly smaller bead than the
earrings on the cover which influences the overall appearance somewhat
The earrings underneath are made with sterling silver and gold wire (super-short coils) and contain small pink
rubies
LOVE-ly Earrings
BLOG WWWHANDMADE-JEWELRY-CLUBCOM MEMBERSHIP WWWDIYBEADINGCLUBCOM
About the Author
Jeske Hendriks
Hi there My name is Jeske and I love all things handmade Over the years Irsquove dabbled in countless different arts and crafts but nowadays I mainly focus on making jewellery and cutting stone cabochons As for jewellery
my preferred materials are silver wire and gemstonemineral beads Using wire-wrapping and basic silver smithing techniques I create both simple
and intricate pieces ndash each and every one of them unique a personal little artwork
You are welcome to follow me on facebook stop by at my personal
webpage andor to have a look at my Etsy shops httpswwwfacebookcomyeskecrafts
httpwwwyeskecraftscom httpwwwyourbeadsandfindingsetsycom
httpwwwyeskecraftsetsycom httpwwwyeskemiscetsycom
BLOG DIY BEADING MAGAZINE ISSUE 32
Flower Tale Earrings
BLOG WWWHANDMADE-JEWELRY-CLUBCOM MEMBERSHIP WWWDIYBEADINGCLUBCOM
Techniques Beadweaving
Project Level Beginner to Intermediate
Materials 12 bronze opaque 6mm Czech glass pearl round beads
2 gr gold lustered dark topaz Japanese 110 seed beads (Toho 459)
Size B gold beading thread
2 bronze earring hooks
Tools Size 10 beading needle
Scissors
Finished Size Diameter ndash 3 cm (118 inches) (without earring hooks)
BLOG DIY BEADING MAGAZINE ISSUE 32
Flower Tale Earrings
BLOG WWWHANDMADE-JEWELRY-CLUBCOM MEMBERSHIP WWWDIYBEADINGCLUBCOM
Step 1 Cut about 110 cm (43 inches) of thread and
pass it through the needle hole
Pick six groups of one 110 seed bead and one
6 mm round bead
BLOG DIY BEADING MAGAZINE ISSUE 32
Join the beads into a ring and secure with two
square knots
Leave a tail of about 15 cm (59 inches)
Step 2 The working thread should be right before the
6 mm round bead
Pick seven 110 seed beads skip the 6 mm
round bead and pass the needle through the
next 110 seed bead added in the previous
round
Repeat adding groups of seven 110 seed
beads five more times
When adding the last group take the needle
directly through the 110 seed bead from the
previous round and the next one added in the
beginning of current round
Flower Tale Earrings
BLOG WWWHANDMADE-JEWELRY-CLUBCOM MEMBERSHIP WWWDIYBEADINGCLUBCOM
Step 3 Pick three 110 seed beads skip one seed
bead from the chain of seven added in the
previous round and pass with the needle
directly through the next three 110 seed
beads
BLOG DIY BEADING MAGAZINE ISSUE 32
Pick three 110 seed beads skip one seed
bead from the chain of seven added in the
previous round and pass with the needle
through the last one and the first 110 seed
bead from the next chain of seven
Repeat the above directions from Step 3 five
more times
After completing this round make sure the
thread will be exiting from the middle 110
seed bead from the first group of three added
in the beginning of this round
Step 4 Pick one 110 seed bead and go through the
last seed bead of the group of three
Flower Tale Earrings
BLOG WWWHANDMADE-JEWELRY-CLUBCOM MEMBERSHIP WWWDIYBEADINGCLUBCOM
Pick three 110 seed beads and take the
needle through the first seed bead of the next
group of three added in the previous round
BLOG DIY BEADING MAGAZINE ISSUE 32
Pick one 110 seed bead and go with the
needle through the next three seed beads (the
last two of the group of three and the last one
from the chain of seven)
Then go up through three 110 seed beads
(the first from the next group of seven and the
first two from the next group of three)
Repeat the above directions from Step 4 to
complete the remaining petals
When working on the last petal perform the
operation from the image shown on the left
instead of picking the group of three 110 seed
beads string two 110 seed beads the earring
hook other two 110 seed beads and
continue beading as instructed above
When you are done hide the thread ends into the beadwork
Flower Tale Earrings
BLOG WWWHANDMADE-JEWELRY-CLUBCOM MEMBERSHIP WWWDIYBEADINGCLUBCOM
About the Author
Iulia Postică
I was born and live in Moldova Eastern Europe Ever since I remember myself
Ive been crocheting and knitting My grandmother has taught me that and I
loved it very much I always regarded crafts exclusively as a hobby and never
thought of making a career of it I traveled a lot to various historical sites
Actually Ive spent all my childhood summers in archaeological camps with
my father who is a professional archaeologist
I also enjoy metal hammering and wirework as it gives me possibility to
express myself in materials used by human communities since ancient times
copper brass glass seed beads and gemstones That is no surprise to anyone
given my family history and academic background
My shop ldquoBeadedTreasuryrdquo with beading tutorials and bead crochet patterns
httpswwwetsycomshopBeadedTreasury
My shop ldquoArchaeologicardquo with artisan jewelry
httpswwwetsycomshopArcheologica
My blog httpbeadedtreasuryblogspotcom
My facebook httpswwwfacebookcomBeadedTreasury
BLOG DIY BEADING MAGAZINE ISSUE 32
Liberty Earrings
BLOG WWWHANDMADE-JEWELRY-CLUBCOM MEMBERSHIP WWWDIYBEADINGCLUBCOM
Materials - Nr 2 cabochon Preciosa Ornela ovale 18x22 mm turchese
- Rocaille Toho 150 silver lined green emerald
- Nr 2 dagger beads
- Nr 20 pearl 4 mm
- Superduo opaque luster ceramic green
- Rocaille 80 color gold
- Rocaille 80 color ivory
- Delica Miyuki 110 aquagreen mix
- Rocaille Miyuki 110 galvanized silver
- Nr 2 monachelle (earwire)
-Fireline
- Beading Needle nr 12
BLOG DIY BEADING MAGAZINE ISSUE 32
Liberty Earrings
BLOG WWWHANDMADE-JEWELRY-CLUBCOM MEMBERSHIP WWWDIYBEADINGCLUBCOM
Make a circle of 20 delica beads and make a knot (a) Perform two rounds peyote with ivory 80 seed beads (b c) Exit from an ivory
bead
BLOG DIY BEADING MAGAZINE ISSUE 32
a b c
Jump from 80 to 80 with 110 80 gold 110 (a) Finish the round and come out of a 80 gold bead
Jump to the next 80 gold with a 4mm pearl (b) Finish the round and come out
of the first pearl Jump to the 2nd pearl and close with a 80 gold bead(c)
a b c
Position the cabochon and jump from one 80 to the other with two delica bead (a)
Continue with three delicas four times (b) At the bottom sew on two delicas then finish the round by sewing on three delicas for four times passing from one to another roc 80 Tighten the cabochon and exit from the
first two delica that you started with String together a 110 and 150 and enter the second of the three close delicas (c)
a b c
Liberty Earrings
BLOG WWWHANDMADE-JEWELRY-CLUBCOM MEMBERSHIP WWWDIYBEADINGCLUBCOM
Put together 150 110 150 and enter in the second of three next delica (a) Put the same beads for three times then put together 150 and 110 and enter
in the two delica of the bottom tip (b) Enter in the second of three next delica with 110 and 150 (c) Continue passing
in the 80 beads with three beads (150 110 150) for four times then at the top finish the round by putting together a 150 and 110 (d)
BLOG DIY BEADING MAGAZINE ISSUE 32
a b c
Exit from the first 150 sewn in the previous round and jump in the three next beads with a 150 (a)
Put a 150 at a time and exit from the first 110 beads of the bottom tip Jump in the
near 110 with a 150 (b) Finish round repeating steps a and b (c) Exit the roc 80 as shown in the photo (d)
a b c
d
a b c d
Enter in the 80 with four 150 (a b) Enter the 80 beads at the bottom of the pieces with two 110 one superduo one 80 ivory bead one superduo and two 110 (c)
d e f
Liberty Earrings
BLOG WWWHANDMADE-JEWELRY-CLUBCOM MEMBERSHIP WWWDIYBEADINGCLUBCOM
Exit from the bottom pearl (a) Put together 150 three 110 150 and enter in the superduorsquos second hole (b)
Put together three superduo and enter in the next superduorsquos second hole (c) Rethread 15 three 110 150 and return in the opposite direction in the pearl of departure (d)
BLOG DIY BEADING MAGAZINE ISSUE 32
a b
c
Exit from the second pearl indicated from (a) Put 150 four 110 and enter in the second of the three 110 (b) Go to the second superduorsquos hole with four 110 and a 150 (c)
Enter the second hole of the supeduo with a 150(d) Sew in the middle of the bottom of the superduo 150 two 110 150 dagger 150 two 110 150(e)
Enter the second hole of the thirs superduo with 150 (f)
a b c
d
d e f
Liberty Earrings
BLOG WWWHANDMADE-JEWELRY-CLUBCOM MEMBERSHIP WWWDIYBEADINGCLUBCOM BLOG DIY BEADING MAGAZINE ISSUE 32
Put 150 four 110 and enter in the second of three 110 of the base (a) Insert four 110 and 150 in the pearl opposite direction indicated in the picture (b) Go in all the beads
around the piece and exit from the pearl at the top (c) Put 150 three 110 150 and enter the superduo (d)
Enter the ivory bead 80 with two 150 (e) Enter the next superduo with two 150 (f)
a b c
d e f
Put together 150 three 110 and enter in opposite direction in the departurersquos pearl (a) Exit from the 150 beads indicated by photo (b) From this jump in the second of two near
150 with five 150 to created the hole for the earwire (c) Pass the thread in the beads make a few knots and cut the excess thread
a b c
Your earrings are finished
Liberty Earrings
BLOG WWWHANDMADE-JEWELRY-CLUBCOM MEMBERSHIP WWWDIYBEADINGCLUBCOM
About the Author
Mariella Martella
My name is Mariella Martella and I am the author and
designer of jewelry that I sign with the name of Mariel Bijoux
After changing city often for work and study I currently live
in northern Italy I am an art historian with a passion for travel
painting and jewelry design in weaving that project since
2010 In my beads and crystals are the colors of the
Mediterranean sea the atmosphere of summer evenings
and the lights of the places I visited
You can find me at
Etsy shop httpswwwetsycomitshopMarielBijoux
Facebook httpswwwfacebookcommari3lbijoux
Crafting blog httpmarielbijouxblogspotit
Twitter httpstwittercomMarielBijoux
BLOG DIY BEADING MAGAZINE ISSUE 32
Jade Necklace
BLOG WWWHANDMADE-JEWELRY-CLUBCOM MEMBERSHIP WWWDIYBEADINGCLUBCOM
Every time I wear a necklace I always make it a point that the
necklace will lay perfectly flat on my neck Using wire for a necklace
made it possible for me like what I did with Jade Necklace It may look
odd at first having bent wires for a necklace but once the jewelry is
finished youll be so happy how the necklace will perfectly lay on your
neck
The tutorial is catered for intermediate level One must know basic
wirework skills such as wire wrapping making loops wrapped loops
and linking to follow the tutorial It has clear instructions and ultra-clear
close-up photos at each step Additionally you can ask me question
you have on the tutorial No more getting stuck and frustrated on a
confusing or just plain inaccurate pattern
If you followed this tutorial and then sell the accessory or jewelry
please give credit to the author or DIY Beading Clubcom
Copyright 2015
wwwdiybeadingclubcom
wwwhandmade-jewelry-clubcom
BLOG DIY BEADING MAGAZINE ISSUE 32
Jade Necklace
BLOG WWWHANDMADE-JEWELRY-CLUBCOM MEMBERSHIP WWWDIYBEADINGCLUBCOM BLOG DIY BEADING MAGAZINE ISSUE 32
Materials Needed 18ga Craft wire 28ga Craft wire 15mm diameter Green Round Flat Back Sew On Gems 5mm Green pearls
8mm Green pearls 6mm x 11mm teardrop Crystal Treasures Mill Hill beads or any teardrop bead with holes on the side Hook for your clasp
Tools Needed Wire cutter Flat nose pliers Round nose pliers Mandrel A jar or any rounded object to shape your necklace
Skill Level Intermediate
Step 1 Cut 6 inches 18ga wire Make a loop on one end then measure approximately 125 inches and make another loop
Form a size 4 circle on your mandrel
Jade Necklace
BLOG WWWHANDMADE-JEWELRY-CLUBCOM MEMBERSHIP WWWDIYBEADINGCLUBCOM BLOG DIY BEADING MAGAZINE ISSUE 32
Then close the circle by wrapping the extended wire just below the loop Wrap the
wire 2x
This is how it looks like Lets call this circle frame Youll notice that the lower curve is
slightly bigger than the upper curve
Step 2 Cut 8 inches of 28ga wire Wrap one end of
the wire at least 3x on one side of the circle frame just below the loop
Bring up your gem Flat back sew on gems has 2 holes Insert the wire into one hole and then
wrap the wire once onto the circle frame
Jade Necklace
BLOG WWWHANDMADE-JEWELRY-CLUBCOM MEMBERSHIP WWWDIYBEADINGCLUBCOM BLOG DIY BEADING MAGAZINE ISSUE 32
Step 3 Insert a 5mm pearl on the wire and then pass
the wire under circle frame
Repeat previous step 2x and have 3 pearls wrapped
Continue wrapping with your teardrop crystal My crystal has 2 holes on the side
and then continue wrapping with your 5mm pearls then secure your wire
Repeat Step 3 and create as many as needed For 16-inch necklace Ive created 6 of these
components
Jade Necklace
BLOG WWWHANDMADE-JEWELRY-CLUBCOM MEMBERSHIP WWWDIYBEADINGCLUBCOM BLOG DIY BEADING MAGAZINE ISSUE 32
Step 4 Cut a 15-inch 18ga wire and make a loop on
one end Insert 8mm pearl and make a loop on the other end You then use these as connectors
and link the components
Step 5 The necklace is an 18ga wire with wrapped
loops on both ends First cut 7 inches 18ga wire and make a wrapped loop with your hook already inserted Side in 18pcs 5mm pearls
Then make a wrapped loop on the other end connecting the wrapped loop onto the component Do the same for the other
necklace but make the loop on the other end big enough so the hookclasp can pass thru
To have the necklace curve shaped use a jar to bend the wire Voila Now youre
ready to party
Jade Necklace
BLOG WWWHANDMADE-JEWELRY-CLUBCOM MEMBERSHIP WWWDIYBEADINGCLUBCOM
About the Author
Sky Aldovino
I consider myself a late bloomer when it comes to crafting Irsquom a self-taught jewelry maker Jewelry making wasnrsquot really a hobby of mine but unforeseen events lead me to learn jewellery making My family put up a craft store where we sell cross stitch beads and all sorts of crafting materials I fell in love with the beads and tried to create accessories only for myself Clients liked the pieces and I started customizing handmade jewelleries The craft store was a success for 6 years but like any other small businesses we had to close it down and I was confined to staying at home While at home I had all the time using the internet and now working as a home-based jewelry designer
BLOG DIY BEADING MAGAZINE ISSUE 32
Atomic Ring
BLOG WWWHANDMADE-JEWELRY-CLUBCOM MEMBERSHIP WWWDIYBEADINGCLUBCOM
Have fun making shapes using the wigjig Cyclops Make loops going in
circles to mimic the shape of a flower or in this tutorial mimic the
shape of an atom The tutorial will also teach you how to cage a
cabochon Whats nice about this piece is that with one long wire you
can create the ring from start to finish
The tutorial is catered for intermediate to advanced students One
must already know how to make spirals and use a wigjig tool It has
clear instructions and ultra-clear close-up photos at each step
Additionally you can ask me question you have on the tutorial No
more getting stuck and frustrated on a confusing or just plain
inaccurate pattern
If you followed this tutorial and then sell the accessory or jewelry
please give credit to the author or DIY Beading Clubcom
If you like to get a blank wigjig graph visit wigjigcom Shop and Jigs
section
Copyright 2015
wwwdiybeadingclubcom
wwwhandmade-jewelry-clubcom
BLOG DIY BEADING MAGAZINE ISSUE 32
Atomic Ring
BLOG WWWHANDMADE-JEWELRY-CLUBCOM MEMBERSHIP WWWDIYBEADINGCLUBCOM
Materials Needed 20ga Craft wire 28ga Craft wire 11mm Round Cabochon
Tools Needed Wigjig Cyclops 15mm pegs Wire cutter Flat nose pliers Mandrel
Skill Level Intermediate - Advanced
BLOG DIY BEADING MAGAZINE ISSUE 32
Step 1 Lets prepare your wigjig cyclops Position the pegs like so
Atomic Ring
BLOG WWWHANDMADE-JEWELRY-CLUBCOM MEMBERSHIP WWWDIYBEADINGCLUBCOM BLOG DIY BEADING MAGAZINE ISSUE 32
Lets work with longer wire so youll have enough wire to hold onto as you manipulate the wire so cut 36 inches of 20ga wire From
one end of the wire measure 10 inches
On the 10-inch measurement loop the wire at the center peg then continue to loop onto the side pegs going in circle going back to
the center peg after looping on the side peg
Now the wire at the center peg will start to build up as you go around the side pegs so
you need to constantly press the wire at the center peg to accommodate the build up of
wire
When youre done pull out the wire and this is
how it should look like
Atomic Ring
BLOG WWWHANDMADE-JEWELRY-CLUBCOM MEMBERSHIP WWWDIYBEADINGCLUBCOM BLOG DIY BEADING MAGAZINE ISSUE 32
You will notice that the frame opens wide Now to keep the atom frame from opening wide secure the center of the frame by wrapping a 28ga wire What you
need to do is simply pass the 28ga wire into the hole and wrap as many times as needed or until youre sure that the frame is secure
Step 2 Now youre finished with your atom frame Well now create the focal design With the longer wire make a spiral at the center big
enough to accommodate the size of your cabochon In this tutorial the spiral is about
11mm in diameter the same size as my cabochon
Pop in your cabochon and start to make spirals going around and over the cabochon as if you are caging the cabochon Create at
least 5 rounds and then cut off any excess
Step 3 Now lets make the ring and this with the other
end of the wire
Atomic Ring
BLOG WWWHANDMADE-JEWELRY-CLUBCOM MEMBERSHIP WWWDIYBEADINGCLUBCOM BLOG DIY BEADING MAGAZINE ISSUE 32
Bring up your mandrel and wrap the wire to the size of your finger Wrap at least 2 times
When youre sure you have the right size pull the ring out of the mandrel
With the extended wire wrap the wire the secure the ring
Cut off any excess and voila You have your atomic ring Create as many as you can with different colors of cabochon
Atomic Ring
BLOG WWWHANDMADE-JEWELRY-CLUBCOM MEMBERSHIP WWWDIYBEADINGCLUBCOM
About the Author
Sky Aldovino
I consider myself a late bloomer when it comes to crafting Irsquom a self-taught jewelry maker Jewelry making wasnrsquot really a hobby of mine but unforeseen events lead me to learn jewellery making My family put up a craft store where we sell cross stitch beads and all sorts of crafting materials I fell in love with the beads and tried to create accessories only for myself Clients liked the pieces and I started customizing handmade jewelleries The craft store was a success for 6 years but like any other small businesses we had to close it down and I was confined to staying at home While at home I had all the time using the internet and now working as a home-based jewelry designer
BLOG DIY BEADING MAGAZINE ISSUE 32
Featured Article Gemstones Used for Jewelry Making
BLOG WWWHANDMADE-JEWELRY-CLUBCOM MEMBERSHIP WWWDIYBEADINGCLUBCOM
Gemstones are stones which we hold quite highly in terms of value And
jewelry often consists of stones that add attractiveness to it so it is not
surprising when jewelry designers actually use gemstones in their designs In
fact there are different types of gemstones that can be used for making
jewelry There are the expensive and pure gemstones and there are also the
imitation ones The information below will provide some information about
the kinds of stones you can use to create jewelry and how these stones will
impact the jewelry you have created
The first kind of stone which I believe we are all quite familiar with are
birthstones These stones are associated with individualrsquos month of birth
by SunVDesigns by BeyhanAkman
For example Amethyst stone is connected with anybody who is born in
February which carries special significance in the area of emotions and also
spiritually This stone also signifies calm and peace as well
And then we have semi-precious stones which are also often used in jewelry
making They are not as valuable as compared to precious stones but still
valuable Best examples of these stones are aquamarine topaz tourmaline
opal and turquoise
BLOG DIY BEADING MAGAZINE ISSUE 32
Featured Article Gemstones Used for Jewelry Making
BLOG WWWHANDMADE-JEWELRY-CLUBCOM MEMBERSHIP WWWDIYBEADINGCLUBCOM
It is an ideal gift for someone who you deem special Aquamarine pendants
usually work well for anyone and is widely an accepted stone
by HyppieChic by joyeriamestiza
However precious stones are the most unusual
and precious jewels to us Examples of some of
them are emerald sapphire diamond and
ruby These stones are usually very expensive
and are prized for their exquisiteness These
stones are commonly used in high-quality
jewelry designs which costs quite a fortune to
obtain
BLOG DIY BEADING MAGAZINE ISSUE 32
by sarajewelrystu
Jewelry designs with precious stones are usually
given as exceptional gifts on special occasions A
perfect example is a diamond ring that is usually
given as an engagement gift
by ldiamondsforever
Featured Article Gemstones Used for Jewelry Making
BLOG WWWHANDMADE-JEWELRY-CLUBCOM MEMBERSHIP WWWDIYBEADINGCLUBCOM
There are also synthetic stones which are often used to create jewelry
Synthetic stones are artificial imitations of gemstones Synthetic Sapphire
jewelry costs less compare with the authentic ones Most of the time
imitation stones are used to save cost but at the same time have the similar
look of the real stone
BLOG DIY BEADING MAGAZINE ISSUE 32
by shininggems by thaimaker
by lapinduprintemps by PastimeArt
Gemstones are used like beads and you can use it in any designs whether
simple or elaborate
Swarovski crystal components are available in a rich multitude of rondelles Perfect as spacers in necklaces or as discs in earrings Rondelles can be used with many varieties of shapes or sizes Use Swarovski crystal rondelles between large gemstones as accents with precious metal findings Fire Mountain Gems and Beads Crystal Passionsreg brand presents Swarovski crystal in display-ready packaging for brilliant retail presentation Crystal Passionsreg is an assurance of genuine Swarovski crystal
BLOG DIY BEADING MAGAZINE ISSUE 32 BLOG WWWHANDMADE-JEWELRY-CLUBCOM MEMBERSHIP WWWDIYBEADINGCLUBCOM
Recommended Jewelry Making Supplies
Mz Unisex-adults 12pcs 25x18x6mm Turquoise Oval CAB Cabochon
BLOG DIY BEADING MAGAZINE ISSUE 32 BLOG WWWHANDMADE-JEWELRY-CLUBCOM MEMBERSHIP WWWDIYBEADINGCLUBCOM
Recommended Jewelry Making Supplies
For a little sparkle that goes a long way design with Swarovski 4mm faceted bicones Create glorious multi-strand necklaces with the dainty crystals or use as spacers to add a tiny flash to your designs Swarovski crystal components are made in Austria and are considered the finest products of their kind in the world
BLOG DIY BEADING MAGAZINE ISSUE 32 BLOG WWWHANDMADE-JEWELRY-CLUBCOM MEMBERSHIP WWWDIYBEADINGCLUBCOM
Recommended Jewelry Making Supplies
Imitation beads resist color change These beads have uniform quality with a good polish Some strands may have little to no matrix Sizes shapes and colors may vary with handcrafted items
BLOG DIY BEADING MAGAZINE ISSUE 32 BLOG WWWHANDMADE-JEWELRY-CLUBCOM MEMBERSHIP WWWDIYBEADINGCLUBCOM
Recommended Jewelry Making Supplies
Something Blue Necklace and Earrings
BLOG WWWHANDMADE-JEWELRY-CLUBCOM MEMBERSHIP WWWDIYBEADINGCLUBCOM
Skill level Beginner Intermediate Advanced
DIMENSIONS OF THE NECKLACE Inner Circumference 14 18 inch 35 cm
Focal Pendant Width 1 15 inch 35 cm Focal Pendant Height 1 15 inch 35 cm
DIMENSIONS OF THE EARRING Earring Width 716 inch 12 cm Earring Height 1516 inch 25 cm (Without the earring hook)
BLOG DIY BEADING MAGAZINE ISSUE 32
Materials
Note Before purchasing the supplies measure the length of your wished necklace If you decide to bead a longer necklace you should keep in mind that for every extra
frac34 inches 2 cm-s you will need 8 bicones and 8 pearls
Something Blue Necklace and Earrings
BLOG WWWHANDMADE-JEWELRY-CLUBCOM MEMBERSHIP WWWDIYBEADINGCLUBCOM BLOG DIY BEADING MAGAZINE ISSUE 32
Work RAW stitch into a beaded circle and embellish with Swarovski bicones
STEP 2 String 1A and 2 pearls Pass through the previous
second pearl and the freshly added 1A and the first pearl again
STEP 1 Use a comfortable length of thread to string 2
pearls 1A and 1 pearl again leaving a 2rdquo 5cm tail Pass through the first two pearls strung to form a
ring
STEP 3 String 2 pearls and 1A Pass through the previous first pearl and the freshly added two pearls
again
STEP 4 - 17 Repeat STEP 2 and STEP 3 again until you count 17 pearls in the inner circle
But be careful in the last step you only have to add 1 pearl then pass through the first pearls
added in STEP 1 and add another 1A Now pass through the first pearl added in STEP
1and 1A added in this round again to exit from this A
Something Blue Necklace and Earrings
BLOG WWWHANDMADE-JEWELRY-CLUBCOM MEMBERSHIP WWWDIYBEADINGCLUBCOM BLOG DIY BEADING MAGAZINE ISSUE 32
STEP 19 String 2A and pass through the next A added in round 4-17 and the A added in round 18 the 2A added in this round and finally the A added in round 4-17 to exit from the bead showed below
STEP 18 String 3A and pass through the 1A added in the previous round and the first A added in this
round
STEP 20 - 34 Repeat STEP 18 and STEP 19 again until you finish the circle
But be careful in the last step first you have to pass through 3A and then add 1A After this pass
through the 3A again and exit from the A bead
shown below (This is the first A added in STEP 18)
Something Blue Necklace and Earrings
BLOG WWWHANDMADE-JEWELRY-CLUBCOM MEMBERSHIP WWWDIYBEADINGCLUBCOM BLOG DIY BEADING MAGAZINE ISSUE 32
STEP 35 Step up to exit from the pearl shown below (Finishing the previous step in the A bead and then
stepping up from there makes the circle more secure)
Now string 3 bicones Pass through the pearl and the first bicone again
In the reality your circle will look more like this the A beads forming a strong row in the middle of the
pearls
STEP 36 Add 2 bicones Pass through the
neighboring pearl the first bicone added in the previous row and the 2 bicones added in this step
so you can exit from the next pearl
Something Blue Necklace and Earrings
BLOG WWWHANDMADE-JEWELRY-CLUBCOM MEMBERSHIP WWWDIYBEADINGCLUBCOM BLOG DIY BEADING MAGAZINE ISSUE 32
Now in the reality your circle will look more like this the A beads still forming a strong row in the middle of the pearls and the bicones slightly lying on top of
them
STEP 37 - 49 Repeat STEP 35 and STEP 36 again until you finish the circle with the bicones
But be careful in the last step first you have pass through the third bicone added then add 1 bicone
and pass through this little quartet to exit from the bicone shown below (The second one added in
STEP 35)
STEP 50 With these steps we finish the circle by adding 1 bicone to connect the A beads and the
bicone row So add 1 bicone pass through the nearest A bead and add 1 bicone again Pass
through the bicone already there and exit from the bicone you just added
Something Blue Necklace and Earrings
BLOG WWWHANDMADE-JEWELRY-CLUBCOM MEMBERSHIP WWWDIYBEADINGCLUBCOM BLOG DIY BEADING MAGAZINE ISSUE 32
STEP 66-83 Secure the circle by adding 1A between each bicone in the second row of Swarovski
bicones If you finished secure the thread and trim
STEP 51-65 Using the same technique as in STEP 37 - 49 add 1 bicone to finish the third bicone row The black line shows you the way (After STEP 50 pass through the next A bead add 1 bicone and pass through the bicone already there and the bicone added in the previous step Repeat these steps to
finish the inner bicone circle)
MIDDLE CIRCLE Work RAW stitch into a beaded circle and embellish with
Swarovski bicones Remember you need to bead two circles this time
STEP 1 Just like in the focal circle begin with 2 pearls 1A and 1 pearl again on a comfortable length of thread
leaving a 2rdquo 5cm tail Pass through the first two pearls strung to form a ring
Something Blue Necklace and Earrings
BLOG WWWHANDMADE-JEWELRY-CLUBCOM MEMBERSHIP WWWDIYBEADINGCLUBCOM BLOG DIY BEADING MAGAZINE ISSUE 32
STEP 15-28 Mimicing the FOCAL CIRCLElsquos STEP 18-34 bead A beads until you finish the inner part of the
circle Exit from a pearl in the second row This circle should look very similar to the first one but this is a bit
smaller
STEP 2-14 Mimicing the FOCAL CIRCLElsquos STEP 2-17 bead until you count 14 pearls in the inner circle Exit
from the last A added
STEP 29-42 Mimicing FOCAL CIRCLElsquos STEP 35-49 add 2 rows of bicones
STEP 43-56 Mimicing the FOCAL CIRCLElsquos STEP 50-65 bead the third row of bicones to finish the circle
Something Blue Necklace and Earrings
BLOG WWWHANDMADE-JEWELRY-CLUBCOM MEMBERSHIP WWWDIYBEADINGCLUBCOM BLOG DIY BEADING MAGAZINE ISSUE 32
SMALLEST CIRCLE Work RAW stitch into a beaded circle and embellish
with Swarovski bicones Remember you need to bead two circles again
STEP 1 Just like in the focal circle begin with 2 pearls
1A and 1 pearl again on a comfortable length of thread leaving a 2rdquo 5cm tail Pass through the first two
pearls strung to form a ring
STEP 57-70 Just like the FOCAL CIRCLElsquos STEP 66-83 secure the circle by adding 1A between every bicone
in the second row of bicones If you finished secure the thread and trim (Donrsquot forget to bead another
circle)
STEP 2-12 Mimicing the FOCAL CIRCLElsquos STEP 2-17 bead until you count 12 pearls in the inner circle Exit
from the last A added
STEP 13-24 Mimicing the FOCAL CIRCLElsquos STEP 18-34 bead A beads until you finish the inner part of the
circle Exit from a pearl in the second row This circle should look very similar to the first two but this is the
smallest of them all
Something Blue Necklace and Earrings
BLOG WWWHANDMADE-JEWELRY-CLUBCOM MEMBERSHIP WWWDIYBEADINGCLUBCOM BLOG DIY BEADING MAGAZINE ISSUE 32
STEP 37-48 Mimicing the FOCAL CIRCLElsquos STEP 50-65 bead the third row of bicones to finish this circle too
STEP 25-36 Mimicing FOCAL CIRCLElsquos STEP 35-49 add 2
rows of bicones The last step here is purple again
STEP 49-60 Just like the FOCAL CIRCLElsquos STEP 66-83 secure the circle by adding 1A between every bicone
in the second row of bicones If you finished secure the thread and trim (Donrsquot forget that you need two
small circles)
Something Blue Necklace and Earrings
BLOG WWWHANDMADE-JEWELRY-CLUBCOM MEMBERSHIP WWWDIYBEADINGCLUBCOM BLOG DIY BEADING MAGAZINE ISSUE 32
STEP 37-48 Mimicing the FOCAL CIRCLElsquos STEP 50-65 bead the third row of bicones to finish this circle too
STEP 25-36 Mimicing FOCAL CIRCLElsquos STEP 35-49 add 2
rows of bicones The last step here is purple again
STEP 49-60 Just like the FOCAL CIRCLElsquos STEP 66-83 secure the circle by adding 1A between every bicone
in the second row of bicones If you finished secure the thread and trim (Donrsquot forget that you need two
small circles)
Something Blue Necklace and Earrings
BLOG WWWHANDMADE-JEWELRY-CLUBCOM MEMBERSHIP WWWDIYBEADINGCLUBCOM BLOG DIY BEADING MAGAZINE ISSUE 32
STEP 2-6 Continue by adding 1A 1 bicone 1 pearl until you count 6 of each
STEP 1 Begin with 1 pearl 1 bicone 1A and 1 bicone again on a comfortable length of thread leaving a 2rdquo
5cm tail Pass through the pearl and the first bicone strung to form a ring
STEP 7-12 Pass through the A beads to make your
component more secure Also secure the thread and trim (Repeat these steps until you have six 6-BEAD
COMPONENTs)
6-BEAD COMPONENT Work RAW stitch into a beaded circle and embellish with Swarovski bicones
For the necklace we will need six from this component For the earring two
Something Blue Necklace and Earrings
BLOG WWWHANDMADE-JEWELRY-CLUBCOM MEMBERSHIP WWWDIYBEADINGCLUBCOM BLOG DIY BEADING MAGAZINE ISSUE 32
STEP 2-4 Continue by adding 1A 1 bicone 1 pearl
until you count 4 of each
STEP 1 Begin with 1 pearl 1 bicone 1A and 1 bicone again on a comfortable length of thread leaving a 2rdquo
5cm tail Pass through the pearl and the first bicone strung to form a ring
STEP 5-8 Pass through the A beads to make your component more secure Also secure the thread and
trim (Repeat these steps until you have the wished amount of 4-BEAD COMPONENTs)
4-BEAD COMPONENT Work RAW stitch into a beaded circle and embellish with Swarovski bicones
For the necklace-size that is given on the second page we will need 20 from this
component For the earring two
If you would like to make a longer necklace you need to make more (One 4-BEAD COMPONENT measures about 38 inch 1 cm To make the necklace symmetrical you have to have equal amounts on each side This means for every extra frac34 inches
2 cm-s you will need 1 4-BEAD COMPONENT on each side of the necklace)
Something Blue Necklace and Earrings
BLOG WWWHANDMADE-JEWELRY-CLUBCOM MEMBERSHIP WWWDIYBEADINGCLUBCOM BLOG DIY BEADING MAGAZINE ISSUE 32
STEP 2 Connect the MIDDLE CIRCLE to two 6-BEAD COMPONENTs by adding four-times 2As
between the pearls Choose a pearl on the MIDDLE CIRCLE and add
2A pass through a pearl in the 6-BEAD COMPONENT previously added and add 2A again Watch out this has to be symmetrical Repeat this at least two more times to make it
secure Now repeat this entire procedure but choose
the 8-th pearl on MIDDLE CIRCLE Repeat this on the other side of the necklace
too
Choose a pearl on the FOCAL CIRCLE and add 2A pass through a pearl in the 6-BEAD COMPONENT and add 2A again Repeat this at least two more times to make it secure
Now repeat this entire procedure but choose the 5-th pearl on FOCAL CIRCLE This will make the necklace nice on your neck
FINISHING THE NECKLACE Connects the parts with A beads
STEP 1 Connect the FOCAL CIRCLE to two 6-BEAD COMPONENTs by adding four-times 2As between the pearls To do this turn your parts upside down you need to
see the pearls We will work on this side from now on
Something Blue Necklace and Earrings
BLOG WWWHANDMADE-JEWELRY-CLUBCOM MEMBERSHIP WWWDIYBEADINGCLUBCOM BLOG DIY BEADING MAGAZINE ISSUE 32
FINISHING THE EARRING Connects the parts with A beads
STEP 1-2 Connect the 6-BEAD COMPONENT
to 4-BEAD COMPONENT and the 4-BEAD
COMPONENT to the earring hook
First connect the 4-BEAD COMPONENT to the 6-BEAD COMPONENT with 4A beads Mimic
the elongation steps of the necklace if needed
Secondly connect the 4-BEAD COMPONENT
to your earring hook with 4A beads again Leave from the last pearl bead 2A beads the hook (this is the orange oval form) and 2As again Pass through each of them to
secure this connection again
Finally get ready to prepare the other earring ndash since we need two of them
STEP 5 Connect the 4-BEAD COMPONENTs to the toggle clasp thus finishing the
necklace Leaving from the last pearl bead 2A the
clasp(this is the orange oval form) and 2A again Pass through all of them a couple more times to make this connection more
secure
Something Blue Necklace and Earrings
BLOG WWWHANDMADE-JEWELRY-CLUBCOM MEMBERSHIP WWWDIYBEADINGCLUBCOM BLOG DIY BEADING MAGAZINE ISSUE 32
If you finished it is time to try it on It was a great fun wasnrsquot it And how beautiful you look in your new necklace and the matching earrings
Something Blue Necklace and Earrings
BLOG WWWHANDMADE-JEWELRY-CLUBCOM MEMBERSHIP WWWDIYBEADINGCLUBCOM
About the Author
Margit Vogel
My name is Margit Vogel I live in Hungary Europe
By profession I am a biochemical engineer but I fell in love with
beads so much that I could not stop playing with them
I make one-of-a-kind beaded and bead embroidered art
jewelry made of the best quality materials such as Swarovski
stones gemstones Japanese beads (Miyuki and Toho) Czech
glass beads leather soutache and suede Each piece is unique
and individually crafted
Feel free to visit my blog for some eyecandy
httpiformjewelrywordpresscom
My shop httpwwwetsycomshopiformjewelry
Facebook httpwwwfacebookcomiformjewelry
BLOG DIY BEADING MAGAZINE ISSUE 32
Getting Down And Personal With Gianna
Getting Down And Personal With Gianna
Nowadays we see more and more jewelry stores opening up online and with these online jewelry stores it has made it easier for us to purchase and view their creations Have you ever wondered how they are able to manage and produce amazing jewelry pieces and tutorials So heres a little on the journey to open up an online shop We are excited to present to you Gianna aka Beading4perfectionists
Gianna Beader amp Youtuber
Unlike most jewelry makers and beadweavers Gianna did not start beading as a hobby but as a means to make ends meet With goals in trying to
fill the financial gap she did everything she could to expand her earnings ndash working as a security guard
and at the same time learning how to bead and selling her pieces at fair trades and flea markets
Since many were asking if she does home beading workshops she started on exploring how to teach people to bead She loves Scott Bakula and has always loved him till now and this served as her
inspiration to start making a beading video tutorial
Gianna started creating videos because she was at the point in her life where everything seemed to be falling apart And at that moment of time she had difficulties financially and selling jewelry was the only way for her to stay afloat financially She is a big Scott Bakula fan and when she went to the UK to see him on stage that was when it hit her that she is already able to edit videos and
taught herself Photoshop and done workshops at bead fairs so why not put these together and see what happens on Youtube She knew that if she gets enough subscribers and views ndash though no one knew what the exact numbers were you would be invited to become a Youtube partner This way she could monetize her videos with advertisements and hopefully she would be able to be a Youtube partner and be able to pay her bills
BLOG WWWHANDMADE-JEWELRY-CLUBCOM MEMBERSHIP WWWDIYBEADINGCLUBCOM BLOG DIY BEADING MAGAZINE ISSUE 32
Getting Down And Personal With Gianna
Her Youtube channel is popular and the reason why she chose Youtube is because Youtube is the biggest platform and reached almost to the whole world Everyone already knows about it and it was growing rapidly as compared to other platforms like Dailymotion so she figured that Youtube was the way to go Her advice to new designers is that when you start out go to the platforms on the top of your list first then work your way down your list if you do not get accepted by your first choice
After loyally putting up one video every week for about 8 months in a row she became a Youtube partner and monetized her videos She knew she needed at least $100 to get her first payout She managed to reach $100 after 3 months The process was not easy she worked hard lack sleep skipped meals and who knows what happened to Ridge in the Bold and the Beautiful because she stopped watching
On Youtube you can monetize your videos Google pays straight to your bank account and at other countries where they also have the option of getting checks among other options In order to get paid you have to reach the $100 mark and after 3 months For Gianna she thinks that you cannot say that Etsy is better than Youtube or Youtube is better than Etsy Her reasoning is because on Youtube she has many followers which will eventually check out her Etsy shop And to start an Etsy shop you need an audience
BLOG WWWHANDMADE-JEWELRY-CLUBCOM MEMBERSHIP WWWDIYBEADINGCLUBCOM BLOG DIY BEADING MAGAZINE ISSUE 32
television and dedicated her spare time (as she had another job) to Youtube She re-registered at the chamber of commerce after receiving her first payout Her work at Youtube now is not a full time job and things have changed on Youtube It is easier to become a parter but there are some countries that need to wait for an invitation to be a Youtube partner Take Italy for instance Italians would have to work just as hard as she did if they want to become a Youtube partner
Getting Down And Personal With Gianna
With her 60000 subscribers on her b4pbakup Youtube channel it is possible to sell at least 60 patterns on the first day on Etsy after promoting the PDF file on her Youtube channel Though you may think that 60 out of 60000 is not much you have to remember that not everyone has the means to purchase the PDF file and a lot of people still rather watch her carry out the tutorial(for free) on Youtube instead of reading the patterns or paying for the patterns even if the pattern is for a fundraiser and only cost $2 Her insights on Youtube is that Youtube is not what it used to be 6 years ago Instead of making more money every month she is making less and less because advertisers have more options of where they want to advertise their ads Ads do not pay as much as they used to Back in the days you could get 25 cents per ad Now you count yourself lucky if you could get 5 cents roll in after two hours
BLOG WWWHANDMADE-JEWELRY-CLUBCOM MEMBERSHIP WWWDIYBEADINGCLUBCOM BLOG DIY BEADING MAGAZINE ISSUE 32
And on top of that adblockers are destroying Youtube channel owners Youtube will start making changes to the channels where there will be ldquopaid subscriptionrdquo channels This has already been implemented in some countries but not in her country The Netherlands This means there will no longer be ads for her monthly paying subscribers She hopes that Youtube will add on a paid per video option feature The option to be a paid channel or free channel or to start a new channel for paying customers is yours to choose Gianna is not happy with Youtube because many others like her have worked so hard and for some years to become Youtube partners(which was something to be proud of) has lost their status
Getting Down And Personal With Gianna
Her advice for those who want to go on Youtube is 1 Do it because you want to teach
2 Do it because you want a career with beads
BLOG WWWHANDMADE-JEWELRY-CLUBCOM MEMBERSHIP WWWDIYBEADINGCLUBCOM BLOG DIY BEADING MAGAZINE ISSUE 32
After putting up about 20 videos and having at least 5000 subscribers add the PDF tutorials to Etsy and Craftsy She found out that her audience would like to have the PDF after watching her videos This is because they would rather print out the PDF and work while seated in a comfy chair technically somewhere else instead of having to pause the video time and time again
Gianna has also made a video for those who want to know the whole story of her journey up until the present day And to get updates on her you can check it out here She has also started a vlog where she tells of how she still works towards becoming a financial independent beader and explains her journey to get where she wants to be(or die trying) Gianna will be in the UK on October the 17th giving an all-day workshop with 4 different patterns
(2 beginners and 2 advanced) in Wotton-under-Edge
Gianna will be there Friday night as the workshop is on Saturday She will be leaving on Sunday Her
doors are open to all who wants to continue the party with her at the hotel across the street
For more information do contact Ann Tucker on Facebook
httpswwwfacebookcomanntucker501
Rec
omm
end
ed R
ead
ings
Making Jewelry with Gemstone
Beads
Combines the popular craft of beading with beautiful semi-precious stones which are collected by many Features a variety of versatile ideas which can be adapted for any type of gem or bead Readers will learn to reate beautiful gemstone jewelry with this dazzling collection of over 100 projects ranging from eyecatching earrings and accessories to exquisite necklaces and bracelets This beautiful book offers an impressive range of 28 beautiful semi-precious stones (including birthstones) and a glimpse into the fascinating history and mythical properties behind them
BLOG DIY BEADING MAGAZINE ISSUE 32 BLOG WWWHANDMADE-JEWELRY-CLUBCOM MEMBERSHIP WWWDIYBEADINGCLUBCOM
Rec
omm
end
ed R
ead
ings
Convertible Crystal Jewelry
Reverse it Twist it Wear it Many
Ways
Diane Whiting presents the idea that convertibility isnrsquot just about using pieces in multiple ways it is also about using skills and creativity in multiple ways Using ever-popular sparkling crystals Diane showcases design elements through various techniques for fun easy fashionable jewelry With 25 projects the reader can choose from bracelets necklaces and earrings that match any outfit or styleDiane Whiting presents the idea that convertibility isnrsquot just about using pieces in multiple ways it is also about using skills and creativity in multiple ways
BLOG DIY BEADING MAGAZINE ISSUE 32 BLOG WWWHANDMADE-JEWELRY-CLUBCOM MEMBERSHIP WWWDIYBEADINGCLUBCOM
Rec
omm
end
ed R
ead
ings
Wire Jewelry Masterclass
Wrapped Coiled and Woven Pieces
Using Fine Materials
Comprehensive and fabulous Wire Jewelry Masterclass takes an in-depth look at an intricate and rewarding craft The 24 projects which range from simple Dragons tear briolette earrings to a Poseidon-under-the-sea pendant will delight and inspire jewelers of all levels and tastes Divided into beginner intermediate and advanced sections this beautifully photographed step-by-step guide is the ticket to wire jewelry expertise
BLOG DIY BEADING MAGAZINE ISSUE 32 BLOG WWWHANDMADE-JEWELRY-CLUBCOM MEMBERSHIP WWWDIYBEADINGCLUBCOM
Rec
omm
end
ed R
ead
ings
Timeless Wire Weaving The
Complete Course
Timeless Wire Weaving focuses on developing wirework skills through 13 projects using three classic wire weaving techniques coiling wrapping and weaving The projects are built around a focal cabochon and incorporate seed beads and crystals in imaginative ways Designers learn to make the jewelry shown in the book and they also use the techniques learned to create innovative jewelry pieces of their own
BLOG DIY BEADING MAGAZINE ISSUE 32 BLOG WWWHANDMADE-JEWELRY-CLUBCOM MEMBERSHIP WWWDIYBEADINGCLUBCOM
Our digital magazine is available through
Apple Newsstand service available to millions of IPAD users
To advertise with us please email us at
diyjewelryclubgmailcom
Or visit our page at
httphandmade-jewelry-clubcomadvertising-diy-beading-magazine

BLOG WWWHANDMADE-JEWELRY-CLUBCOM MEMBERSHIP WWWDIYBEADINGCLUBCOM
LOVE-ly Earrings
BLOG DIY BEADING MAGAZINE ISSUE 32
Step 5 Hammer down the angled wire (the part circled in red) This strengthens the construction
and looks more professional
Step 6 Wrap the two ends of wire tightly around a cylindrical object (+- 5 mm diameter)
Step 7 Push apart the loops you just made by wrapping the wire around the cylindrical object The wire should now be shaped like a heart as
illustrated above
Step 8 Use round nose pliers to bend around the wire for each side of the heart as illustrated above
BLOG WWWHANDMADE-JEWELRY-CLUBCOM MEMBERSHIP WWWDIYBEADINGCLUBCOM
LOVE-ly Earrings
BLOG DIY BEADING MAGAZINE ISSUE 32
Step 9 Use the flat nose pliers to bend one of the two wires (preferably the longer wire) in a 90deg angle at the place marked with a red dot In the picture accompanying the next step you can see
how it should look from the front
Step 10 Use the round nose pliers to bend the other piece of wire in a decorative coil You will cut off the rest of the wire of the coil at approximately the spot marked with a red dot so take that into account when coiling the wire into the shape that
you desire
Step 11 Cut of the wire at the spot indicated in the previous picture and file off any sharp edges
Step 12 Cut off the ear wire at the desired length (Between 1 and 2 cm If in doubt try the earring on
to see if it sits comfortably) and file off any sharp edges
BLOG WWWHANDMADE-JEWELRY-CLUBCOM MEMBERSHIP WWWDIYBEADINGCLUBCOM
LOVE-ly Earrings
BLOG DIY BEADING MAGAZINE ISSUE 32
Step 13 Hammer down the rest of the heart (bumps and coil) If you canrsquot reach certain parts because the ear wire is in the way bend that part of the heart shape away
(verticallyupward) and bend it back after you finish hammering
Congrats yoursquove now made a basic heart-shaped ear stud Next wersquore going to decorate it with a little gemstone and more copper wire
Step 14 Cut off a length of 04 mm copper wire (about 10-20 cm) and string the bead onto it
Step 15 Place the bead in the ldquonon-coilrdquo upper part of the heart shaped ear stud holding it between thumb and forefinger Let approximately 4 cm of the 04 mm wire stick out over the edge of the
heart as illustrated above
Step 16 Wrap the wire twice around the frame so that if you face the front of the ear stud the wire is
directed towards yourself
BLOG WWWHANDMADE-JEWELRY-CLUBCOM MEMBERSHIP WWWDIYBEADINGCLUBCOM
LOVE-ly Earrings
BLOG DIY BEADING MAGAZINE ISSUE 32
Step 17 Flip the wire over the wire with the bead (indicated by the red arrow) and pull tight whilst holding the bead (and its wire) tightly in place It
should look like the construction in the big picture above
Step 18 And make another loop around the wire with the bead The 04 mm wire is now coiled around
twice two times two coils around the frame and two coils around itself
Step 19 Repeat the wire-fastening procedure described in steps 16-18 with the other end of the
wire securing the gemstone in the heart frame Let the wire stick out at the back of the earstud
Step 20 Pull the wire through the lsquocoilrsquo part of the heart shape to the front The wire should lsquocross overrsquo to the other side of the heart at the back of the ear
stud
Step 21 Coil the wire around the frame until you are content with the design Optionally you can hammer down the coils a bit I often do this because I think it
looks somewhat more sophisticated and professional
BLOG WWWHANDMADE-JEWELRY-CLUBCOM MEMBERSHIP WWWDIYBEADINGCLUBCOM
LOVE-ly Earrings
BLOG DIY BEADING MAGAZINE ISSUE 32
Step 22 Cut off the spare bits of wire preferably at the backside of the ear stud and tuck in the ends
Congrats yoursquove now made a heart-shaped ear stud Next we are going to finish it off with a patina
Step 23 Oxidize the metal of the ear studs I always use liver of sulfur solved in warm water The metal
will turn a dark color and matte texture Afterwards rinse the ear studs thoroughly with water and pat
them dry
Step 24 Rub the oxidized ear stud all over with a rough polishing pad to bring back (a dark copper)
color to the surface
Yoursquove now finished making your own LOVE-ly ear studs
Secure them in your ear with plastic or copper stops These can be bought online or in jewelry-supply
stores
Variation ideas You can easily vary in size and shape (longer hearts smaller coils pointier bottoms etc) and
use different materials As you can see the earring I make in this tutorial has a slightly smaller bead than the
earrings on the cover which influences the overall appearance somewhat
The earrings underneath are made with sterling silver and gold wire (super-short coils) and contain small pink
rubies
LOVE-ly Earrings
BLOG WWWHANDMADE-JEWELRY-CLUBCOM MEMBERSHIP WWWDIYBEADINGCLUBCOM
About the Author
Jeske Hendriks
Hi there My name is Jeske and I love all things handmade Over the years Irsquove dabbled in countless different arts and crafts but nowadays I mainly focus on making jewellery and cutting stone cabochons As for jewellery
my preferred materials are silver wire and gemstonemineral beads Using wire-wrapping and basic silver smithing techniques I create both simple
and intricate pieces ndash each and every one of them unique a personal little artwork
You are welcome to follow me on facebook stop by at my personal
webpage andor to have a look at my Etsy shops httpswwwfacebookcomyeskecrafts
httpwwwyeskecraftscom httpwwwyourbeadsandfindingsetsycom
httpwwwyeskecraftsetsycom httpwwwyeskemiscetsycom
BLOG DIY BEADING MAGAZINE ISSUE 32
Flower Tale Earrings
BLOG WWWHANDMADE-JEWELRY-CLUBCOM MEMBERSHIP WWWDIYBEADINGCLUBCOM
Techniques Beadweaving
Project Level Beginner to Intermediate
Materials 12 bronze opaque 6mm Czech glass pearl round beads
2 gr gold lustered dark topaz Japanese 110 seed beads (Toho 459)
Size B gold beading thread
2 bronze earring hooks
Tools Size 10 beading needle
Scissors
Finished Size Diameter ndash 3 cm (118 inches) (without earring hooks)
BLOG DIY BEADING MAGAZINE ISSUE 32
Flower Tale Earrings
BLOG WWWHANDMADE-JEWELRY-CLUBCOM MEMBERSHIP WWWDIYBEADINGCLUBCOM
Step 1 Cut about 110 cm (43 inches) of thread and
pass it through the needle hole
Pick six groups of one 110 seed bead and one
6 mm round bead
BLOG DIY BEADING MAGAZINE ISSUE 32
Join the beads into a ring and secure with two
square knots
Leave a tail of about 15 cm (59 inches)
Step 2 The working thread should be right before the
6 mm round bead
Pick seven 110 seed beads skip the 6 mm
round bead and pass the needle through the
next 110 seed bead added in the previous
round
Repeat adding groups of seven 110 seed
beads five more times
When adding the last group take the needle
directly through the 110 seed bead from the
previous round and the next one added in the
beginning of current round
Flower Tale Earrings
BLOG WWWHANDMADE-JEWELRY-CLUBCOM MEMBERSHIP WWWDIYBEADINGCLUBCOM
Step 3 Pick three 110 seed beads skip one seed
bead from the chain of seven added in the
previous round and pass with the needle
directly through the next three 110 seed
beads
BLOG DIY BEADING MAGAZINE ISSUE 32
Pick three 110 seed beads skip one seed
bead from the chain of seven added in the
previous round and pass with the needle
through the last one and the first 110 seed
bead from the next chain of seven
Repeat the above directions from Step 3 five
more times
After completing this round make sure the
thread will be exiting from the middle 110
seed bead from the first group of three added
in the beginning of this round
Step 4 Pick one 110 seed bead and go through the
last seed bead of the group of three
Flower Tale Earrings
BLOG WWWHANDMADE-JEWELRY-CLUBCOM MEMBERSHIP WWWDIYBEADINGCLUBCOM
Pick three 110 seed beads and take the
needle through the first seed bead of the next
group of three added in the previous round
BLOG DIY BEADING MAGAZINE ISSUE 32
Pick one 110 seed bead and go with the
needle through the next three seed beads (the
last two of the group of three and the last one
from the chain of seven)
Then go up through three 110 seed beads
(the first from the next group of seven and the
first two from the next group of three)
Repeat the above directions from Step 4 to
complete the remaining petals
When working on the last petal perform the
operation from the image shown on the left
instead of picking the group of three 110 seed
beads string two 110 seed beads the earring
hook other two 110 seed beads and
continue beading as instructed above
When you are done hide the thread ends into the beadwork
Flower Tale Earrings
BLOG WWWHANDMADE-JEWELRY-CLUBCOM MEMBERSHIP WWWDIYBEADINGCLUBCOM
About the Author
Iulia Postică
I was born and live in Moldova Eastern Europe Ever since I remember myself
Ive been crocheting and knitting My grandmother has taught me that and I
loved it very much I always regarded crafts exclusively as a hobby and never
thought of making a career of it I traveled a lot to various historical sites
Actually Ive spent all my childhood summers in archaeological camps with
my father who is a professional archaeologist
I also enjoy metal hammering and wirework as it gives me possibility to
express myself in materials used by human communities since ancient times
copper brass glass seed beads and gemstones That is no surprise to anyone
given my family history and academic background
My shop ldquoBeadedTreasuryrdquo with beading tutorials and bead crochet patterns
httpswwwetsycomshopBeadedTreasury
My shop ldquoArchaeologicardquo with artisan jewelry
httpswwwetsycomshopArcheologica
My blog httpbeadedtreasuryblogspotcom
My facebook httpswwwfacebookcomBeadedTreasury
BLOG DIY BEADING MAGAZINE ISSUE 32
Liberty Earrings
BLOG WWWHANDMADE-JEWELRY-CLUBCOM MEMBERSHIP WWWDIYBEADINGCLUBCOM
Materials - Nr 2 cabochon Preciosa Ornela ovale 18x22 mm turchese
- Rocaille Toho 150 silver lined green emerald
- Nr 2 dagger beads
- Nr 20 pearl 4 mm
- Superduo opaque luster ceramic green
- Rocaille 80 color gold
- Rocaille 80 color ivory
- Delica Miyuki 110 aquagreen mix
- Rocaille Miyuki 110 galvanized silver
- Nr 2 monachelle (earwire)
-Fireline
- Beading Needle nr 12
BLOG DIY BEADING MAGAZINE ISSUE 32
Liberty Earrings
BLOG WWWHANDMADE-JEWELRY-CLUBCOM MEMBERSHIP WWWDIYBEADINGCLUBCOM
Make a circle of 20 delica beads and make a knot (a) Perform two rounds peyote with ivory 80 seed beads (b c) Exit from an ivory
bead
BLOG DIY BEADING MAGAZINE ISSUE 32
a b c
Jump from 80 to 80 with 110 80 gold 110 (a) Finish the round and come out of a 80 gold bead
Jump to the next 80 gold with a 4mm pearl (b) Finish the round and come out
of the first pearl Jump to the 2nd pearl and close with a 80 gold bead(c)
a b c
Position the cabochon and jump from one 80 to the other with two delica bead (a)
Continue with three delicas four times (b) At the bottom sew on two delicas then finish the round by sewing on three delicas for four times passing from one to another roc 80 Tighten the cabochon and exit from the
first two delica that you started with String together a 110 and 150 and enter the second of the three close delicas (c)
a b c
Liberty Earrings
BLOG WWWHANDMADE-JEWELRY-CLUBCOM MEMBERSHIP WWWDIYBEADINGCLUBCOM
Put together 150 110 150 and enter in the second of three next delica (a) Put the same beads for three times then put together 150 and 110 and enter
in the two delica of the bottom tip (b) Enter in the second of three next delica with 110 and 150 (c) Continue passing
in the 80 beads with three beads (150 110 150) for four times then at the top finish the round by putting together a 150 and 110 (d)
BLOG DIY BEADING MAGAZINE ISSUE 32
a b c
Exit from the first 150 sewn in the previous round and jump in the three next beads with a 150 (a)
Put a 150 at a time and exit from the first 110 beads of the bottom tip Jump in the
near 110 with a 150 (b) Finish round repeating steps a and b (c) Exit the roc 80 as shown in the photo (d)
a b c
d
a b c d
Enter in the 80 with four 150 (a b) Enter the 80 beads at the bottom of the pieces with two 110 one superduo one 80 ivory bead one superduo and two 110 (c)
d e f
Liberty Earrings
BLOG WWWHANDMADE-JEWELRY-CLUBCOM MEMBERSHIP WWWDIYBEADINGCLUBCOM
Exit from the bottom pearl (a) Put together 150 three 110 150 and enter in the superduorsquos second hole (b)
Put together three superduo and enter in the next superduorsquos second hole (c) Rethread 15 three 110 150 and return in the opposite direction in the pearl of departure (d)
BLOG DIY BEADING MAGAZINE ISSUE 32
a b
c
Exit from the second pearl indicated from (a) Put 150 four 110 and enter in the second of the three 110 (b) Go to the second superduorsquos hole with four 110 and a 150 (c)
Enter the second hole of the supeduo with a 150(d) Sew in the middle of the bottom of the superduo 150 two 110 150 dagger 150 two 110 150(e)
Enter the second hole of the thirs superduo with 150 (f)
a b c
d
d e f
Liberty Earrings
BLOG WWWHANDMADE-JEWELRY-CLUBCOM MEMBERSHIP WWWDIYBEADINGCLUBCOM BLOG DIY BEADING MAGAZINE ISSUE 32
Put 150 four 110 and enter in the second of three 110 of the base (a) Insert four 110 and 150 in the pearl opposite direction indicated in the picture (b) Go in all the beads
around the piece and exit from the pearl at the top (c) Put 150 three 110 150 and enter the superduo (d)
Enter the ivory bead 80 with two 150 (e) Enter the next superduo with two 150 (f)
a b c
d e f
Put together 150 three 110 and enter in opposite direction in the departurersquos pearl (a) Exit from the 150 beads indicated by photo (b) From this jump in the second of two near
150 with five 150 to created the hole for the earwire (c) Pass the thread in the beads make a few knots and cut the excess thread
a b c
Your earrings are finished
Liberty Earrings
BLOG WWWHANDMADE-JEWELRY-CLUBCOM MEMBERSHIP WWWDIYBEADINGCLUBCOM
About the Author
Mariella Martella
My name is Mariella Martella and I am the author and
designer of jewelry that I sign with the name of Mariel Bijoux
After changing city often for work and study I currently live
in northern Italy I am an art historian with a passion for travel
painting and jewelry design in weaving that project since
2010 In my beads and crystals are the colors of the
Mediterranean sea the atmosphere of summer evenings
and the lights of the places I visited
You can find me at
Etsy shop httpswwwetsycomitshopMarielBijoux
Facebook httpswwwfacebookcommari3lbijoux
Crafting blog httpmarielbijouxblogspotit
Twitter httpstwittercomMarielBijoux
BLOG DIY BEADING MAGAZINE ISSUE 32
Jade Necklace
BLOG WWWHANDMADE-JEWELRY-CLUBCOM MEMBERSHIP WWWDIYBEADINGCLUBCOM
Every time I wear a necklace I always make it a point that the
necklace will lay perfectly flat on my neck Using wire for a necklace
made it possible for me like what I did with Jade Necklace It may look
odd at first having bent wires for a necklace but once the jewelry is
finished youll be so happy how the necklace will perfectly lay on your
neck
The tutorial is catered for intermediate level One must know basic
wirework skills such as wire wrapping making loops wrapped loops
and linking to follow the tutorial It has clear instructions and ultra-clear
close-up photos at each step Additionally you can ask me question
you have on the tutorial No more getting stuck and frustrated on a
confusing or just plain inaccurate pattern
If you followed this tutorial and then sell the accessory or jewelry
please give credit to the author or DIY Beading Clubcom
Copyright 2015
wwwdiybeadingclubcom
wwwhandmade-jewelry-clubcom
BLOG DIY BEADING MAGAZINE ISSUE 32
Jade Necklace
BLOG WWWHANDMADE-JEWELRY-CLUBCOM MEMBERSHIP WWWDIYBEADINGCLUBCOM BLOG DIY BEADING MAGAZINE ISSUE 32
Materials Needed 18ga Craft wire 28ga Craft wire 15mm diameter Green Round Flat Back Sew On Gems 5mm Green pearls
8mm Green pearls 6mm x 11mm teardrop Crystal Treasures Mill Hill beads or any teardrop bead with holes on the side Hook for your clasp
Tools Needed Wire cutter Flat nose pliers Round nose pliers Mandrel A jar or any rounded object to shape your necklace
Skill Level Intermediate
Step 1 Cut 6 inches 18ga wire Make a loop on one end then measure approximately 125 inches and make another loop
Form a size 4 circle on your mandrel
Jade Necklace
BLOG WWWHANDMADE-JEWELRY-CLUBCOM MEMBERSHIP WWWDIYBEADINGCLUBCOM BLOG DIY BEADING MAGAZINE ISSUE 32
Then close the circle by wrapping the extended wire just below the loop Wrap the
wire 2x
This is how it looks like Lets call this circle frame Youll notice that the lower curve is
slightly bigger than the upper curve
Step 2 Cut 8 inches of 28ga wire Wrap one end of
the wire at least 3x on one side of the circle frame just below the loop
Bring up your gem Flat back sew on gems has 2 holes Insert the wire into one hole and then
wrap the wire once onto the circle frame
Jade Necklace
BLOG WWWHANDMADE-JEWELRY-CLUBCOM MEMBERSHIP WWWDIYBEADINGCLUBCOM BLOG DIY BEADING MAGAZINE ISSUE 32
Step 3 Insert a 5mm pearl on the wire and then pass
the wire under circle frame
Repeat previous step 2x and have 3 pearls wrapped
Continue wrapping with your teardrop crystal My crystal has 2 holes on the side
and then continue wrapping with your 5mm pearls then secure your wire
Repeat Step 3 and create as many as needed For 16-inch necklace Ive created 6 of these
components
Jade Necklace
BLOG WWWHANDMADE-JEWELRY-CLUBCOM MEMBERSHIP WWWDIYBEADINGCLUBCOM BLOG DIY BEADING MAGAZINE ISSUE 32
Step 4 Cut a 15-inch 18ga wire and make a loop on
one end Insert 8mm pearl and make a loop on the other end You then use these as connectors
and link the components
Step 5 The necklace is an 18ga wire with wrapped
loops on both ends First cut 7 inches 18ga wire and make a wrapped loop with your hook already inserted Side in 18pcs 5mm pearls
Then make a wrapped loop on the other end connecting the wrapped loop onto the component Do the same for the other
necklace but make the loop on the other end big enough so the hookclasp can pass thru
To have the necklace curve shaped use a jar to bend the wire Voila Now youre
ready to party
Jade Necklace
BLOG WWWHANDMADE-JEWELRY-CLUBCOM MEMBERSHIP WWWDIYBEADINGCLUBCOM
About the Author
Sky Aldovino
I consider myself a late bloomer when it comes to crafting Irsquom a self-taught jewelry maker Jewelry making wasnrsquot really a hobby of mine but unforeseen events lead me to learn jewellery making My family put up a craft store where we sell cross stitch beads and all sorts of crafting materials I fell in love with the beads and tried to create accessories only for myself Clients liked the pieces and I started customizing handmade jewelleries The craft store was a success for 6 years but like any other small businesses we had to close it down and I was confined to staying at home While at home I had all the time using the internet and now working as a home-based jewelry designer
BLOG DIY BEADING MAGAZINE ISSUE 32
Atomic Ring
BLOG WWWHANDMADE-JEWELRY-CLUBCOM MEMBERSHIP WWWDIYBEADINGCLUBCOM
Have fun making shapes using the wigjig Cyclops Make loops going in
circles to mimic the shape of a flower or in this tutorial mimic the
shape of an atom The tutorial will also teach you how to cage a
cabochon Whats nice about this piece is that with one long wire you
can create the ring from start to finish
The tutorial is catered for intermediate to advanced students One
must already know how to make spirals and use a wigjig tool It has
clear instructions and ultra-clear close-up photos at each step
Additionally you can ask me question you have on the tutorial No
more getting stuck and frustrated on a confusing or just plain
inaccurate pattern
If you followed this tutorial and then sell the accessory or jewelry
please give credit to the author or DIY Beading Clubcom
If you like to get a blank wigjig graph visit wigjigcom Shop and Jigs
section
Copyright 2015
wwwdiybeadingclubcom
wwwhandmade-jewelry-clubcom
BLOG DIY BEADING MAGAZINE ISSUE 32
Atomic Ring
BLOG WWWHANDMADE-JEWELRY-CLUBCOM MEMBERSHIP WWWDIYBEADINGCLUBCOM
Materials Needed 20ga Craft wire 28ga Craft wire 11mm Round Cabochon
Tools Needed Wigjig Cyclops 15mm pegs Wire cutter Flat nose pliers Mandrel
Skill Level Intermediate - Advanced
BLOG DIY BEADING MAGAZINE ISSUE 32
Step 1 Lets prepare your wigjig cyclops Position the pegs like so
Atomic Ring
BLOG WWWHANDMADE-JEWELRY-CLUBCOM MEMBERSHIP WWWDIYBEADINGCLUBCOM BLOG DIY BEADING MAGAZINE ISSUE 32
Lets work with longer wire so youll have enough wire to hold onto as you manipulate the wire so cut 36 inches of 20ga wire From
one end of the wire measure 10 inches
On the 10-inch measurement loop the wire at the center peg then continue to loop onto the side pegs going in circle going back to
the center peg after looping on the side peg
Now the wire at the center peg will start to build up as you go around the side pegs so
you need to constantly press the wire at the center peg to accommodate the build up of
wire
When youre done pull out the wire and this is
how it should look like
Atomic Ring
BLOG WWWHANDMADE-JEWELRY-CLUBCOM MEMBERSHIP WWWDIYBEADINGCLUBCOM BLOG DIY BEADING MAGAZINE ISSUE 32
You will notice that the frame opens wide Now to keep the atom frame from opening wide secure the center of the frame by wrapping a 28ga wire What you
need to do is simply pass the 28ga wire into the hole and wrap as many times as needed or until youre sure that the frame is secure
Step 2 Now youre finished with your atom frame Well now create the focal design With the longer wire make a spiral at the center big
enough to accommodate the size of your cabochon In this tutorial the spiral is about
11mm in diameter the same size as my cabochon
Pop in your cabochon and start to make spirals going around and over the cabochon as if you are caging the cabochon Create at
least 5 rounds and then cut off any excess
Step 3 Now lets make the ring and this with the other
end of the wire
Atomic Ring
BLOG WWWHANDMADE-JEWELRY-CLUBCOM MEMBERSHIP WWWDIYBEADINGCLUBCOM BLOG DIY BEADING MAGAZINE ISSUE 32
Bring up your mandrel and wrap the wire to the size of your finger Wrap at least 2 times
When youre sure you have the right size pull the ring out of the mandrel
With the extended wire wrap the wire the secure the ring
Cut off any excess and voila You have your atomic ring Create as many as you can with different colors of cabochon
Atomic Ring
BLOG WWWHANDMADE-JEWELRY-CLUBCOM MEMBERSHIP WWWDIYBEADINGCLUBCOM
About the Author
Sky Aldovino
I consider myself a late bloomer when it comes to crafting Irsquom a self-taught jewelry maker Jewelry making wasnrsquot really a hobby of mine but unforeseen events lead me to learn jewellery making My family put up a craft store where we sell cross stitch beads and all sorts of crafting materials I fell in love with the beads and tried to create accessories only for myself Clients liked the pieces and I started customizing handmade jewelleries The craft store was a success for 6 years but like any other small businesses we had to close it down and I was confined to staying at home While at home I had all the time using the internet and now working as a home-based jewelry designer
BLOG DIY BEADING MAGAZINE ISSUE 32
Featured Article Gemstones Used for Jewelry Making
BLOG WWWHANDMADE-JEWELRY-CLUBCOM MEMBERSHIP WWWDIYBEADINGCLUBCOM
Gemstones are stones which we hold quite highly in terms of value And
jewelry often consists of stones that add attractiveness to it so it is not
surprising when jewelry designers actually use gemstones in their designs In
fact there are different types of gemstones that can be used for making
jewelry There are the expensive and pure gemstones and there are also the
imitation ones The information below will provide some information about
the kinds of stones you can use to create jewelry and how these stones will
impact the jewelry you have created
The first kind of stone which I believe we are all quite familiar with are
birthstones These stones are associated with individualrsquos month of birth
by SunVDesigns by BeyhanAkman
For example Amethyst stone is connected with anybody who is born in
February which carries special significance in the area of emotions and also
spiritually This stone also signifies calm and peace as well
And then we have semi-precious stones which are also often used in jewelry
making They are not as valuable as compared to precious stones but still
valuable Best examples of these stones are aquamarine topaz tourmaline
opal and turquoise
BLOG DIY BEADING MAGAZINE ISSUE 32
Featured Article Gemstones Used for Jewelry Making
BLOG WWWHANDMADE-JEWELRY-CLUBCOM MEMBERSHIP WWWDIYBEADINGCLUBCOM
It is an ideal gift for someone who you deem special Aquamarine pendants
usually work well for anyone and is widely an accepted stone
by HyppieChic by joyeriamestiza
However precious stones are the most unusual
and precious jewels to us Examples of some of
them are emerald sapphire diamond and
ruby These stones are usually very expensive
and are prized for their exquisiteness These
stones are commonly used in high-quality
jewelry designs which costs quite a fortune to
obtain
BLOG DIY BEADING MAGAZINE ISSUE 32
by sarajewelrystu
Jewelry designs with precious stones are usually
given as exceptional gifts on special occasions A
perfect example is a diamond ring that is usually
given as an engagement gift
by ldiamondsforever
Featured Article Gemstones Used for Jewelry Making
BLOG WWWHANDMADE-JEWELRY-CLUBCOM MEMBERSHIP WWWDIYBEADINGCLUBCOM
There are also synthetic stones which are often used to create jewelry
Synthetic stones are artificial imitations of gemstones Synthetic Sapphire
jewelry costs less compare with the authentic ones Most of the time
imitation stones are used to save cost but at the same time have the similar
look of the real stone
BLOG DIY BEADING MAGAZINE ISSUE 32
by shininggems by thaimaker
by lapinduprintemps by PastimeArt
Gemstones are used like beads and you can use it in any designs whether
simple or elaborate
Swarovski crystal components are available in a rich multitude of rondelles Perfect as spacers in necklaces or as discs in earrings Rondelles can be used with many varieties of shapes or sizes Use Swarovski crystal rondelles between large gemstones as accents with precious metal findings Fire Mountain Gems and Beads Crystal Passionsreg brand presents Swarovski crystal in display-ready packaging for brilliant retail presentation Crystal Passionsreg is an assurance of genuine Swarovski crystal
BLOG DIY BEADING MAGAZINE ISSUE 32 BLOG WWWHANDMADE-JEWELRY-CLUBCOM MEMBERSHIP WWWDIYBEADINGCLUBCOM
Recommended Jewelry Making Supplies
Mz Unisex-adults 12pcs 25x18x6mm Turquoise Oval CAB Cabochon
BLOG DIY BEADING MAGAZINE ISSUE 32 BLOG WWWHANDMADE-JEWELRY-CLUBCOM MEMBERSHIP WWWDIYBEADINGCLUBCOM
Recommended Jewelry Making Supplies
For a little sparkle that goes a long way design with Swarovski 4mm faceted bicones Create glorious multi-strand necklaces with the dainty crystals or use as spacers to add a tiny flash to your designs Swarovski crystal components are made in Austria and are considered the finest products of their kind in the world
BLOG DIY BEADING MAGAZINE ISSUE 32 BLOG WWWHANDMADE-JEWELRY-CLUBCOM MEMBERSHIP WWWDIYBEADINGCLUBCOM
Recommended Jewelry Making Supplies
Imitation beads resist color change These beads have uniform quality with a good polish Some strands may have little to no matrix Sizes shapes and colors may vary with handcrafted items
BLOG DIY BEADING MAGAZINE ISSUE 32 BLOG WWWHANDMADE-JEWELRY-CLUBCOM MEMBERSHIP WWWDIYBEADINGCLUBCOM
Recommended Jewelry Making Supplies
Something Blue Necklace and Earrings
BLOG WWWHANDMADE-JEWELRY-CLUBCOM MEMBERSHIP WWWDIYBEADINGCLUBCOM
Skill level Beginner Intermediate Advanced
DIMENSIONS OF THE NECKLACE Inner Circumference 14 18 inch 35 cm
Focal Pendant Width 1 15 inch 35 cm Focal Pendant Height 1 15 inch 35 cm
DIMENSIONS OF THE EARRING Earring Width 716 inch 12 cm Earring Height 1516 inch 25 cm (Without the earring hook)
BLOG DIY BEADING MAGAZINE ISSUE 32
Materials
Note Before purchasing the supplies measure the length of your wished necklace If you decide to bead a longer necklace you should keep in mind that for every extra
frac34 inches 2 cm-s you will need 8 bicones and 8 pearls
Something Blue Necklace and Earrings
BLOG WWWHANDMADE-JEWELRY-CLUBCOM MEMBERSHIP WWWDIYBEADINGCLUBCOM BLOG DIY BEADING MAGAZINE ISSUE 32
Work RAW stitch into a beaded circle and embellish with Swarovski bicones
STEP 2 String 1A and 2 pearls Pass through the previous
second pearl and the freshly added 1A and the first pearl again
STEP 1 Use a comfortable length of thread to string 2
pearls 1A and 1 pearl again leaving a 2rdquo 5cm tail Pass through the first two pearls strung to form a
ring
STEP 3 String 2 pearls and 1A Pass through the previous first pearl and the freshly added two pearls
again
STEP 4 - 17 Repeat STEP 2 and STEP 3 again until you count 17 pearls in the inner circle
But be careful in the last step you only have to add 1 pearl then pass through the first pearls
added in STEP 1 and add another 1A Now pass through the first pearl added in STEP
1and 1A added in this round again to exit from this A
Something Blue Necklace and Earrings
BLOG WWWHANDMADE-JEWELRY-CLUBCOM MEMBERSHIP WWWDIYBEADINGCLUBCOM BLOG DIY BEADING MAGAZINE ISSUE 32
STEP 19 String 2A and pass through the next A added in round 4-17 and the A added in round 18 the 2A added in this round and finally the A added in round 4-17 to exit from the bead showed below
STEP 18 String 3A and pass through the 1A added in the previous round and the first A added in this
round
STEP 20 - 34 Repeat STEP 18 and STEP 19 again until you finish the circle
But be careful in the last step first you have to pass through 3A and then add 1A After this pass
through the 3A again and exit from the A bead
shown below (This is the first A added in STEP 18)
Something Blue Necklace and Earrings
BLOG WWWHANDMADE-JEWELRY-CLUBCOM MEMBERSHIP WWWDIYBEADINGCLUBCOM BLOG DIY BEADING MAGAZINE ISSUE 32
STEP 35 Step up to exit from the pearl shown below (Finishing the previous step in the A bead and then
stepping up from there makes the circle more secure)
Now string 3 bicones Pass through the pearl and the first bicone again
In the reality your circle will look more like this the A beads forming a strong row in the middle of the
pearls
STEP 36 Add 2 bicones Pass through the
neighboring pearl the first bicone added in the previous row and the 2 bicones added in this step
so you can exit from the next pearl
Something Blue Necklace and Earrings
BLOG WWWHANDMADE-JEWELRY-CLUBCOM MEMBERSHIP WWWDIYBEADINGCLUBCOM BLOG DIY BEADING MAGAZINE ISSUE 32
Now in the reality your circle will look more like this the A beads still forming a strong row in the middle of the pearls and the bicones slightly lying on top of
them
STEP 37 - 49 Repeat STEP 35 and STEP 36 again until you finish the circle with the bicones
But be careful in the last step first you have pass through the third bicone added then add 1 bicone
and pass through this little quartet to exit from the bicone shown below (The second one added in
STEP 35)
STEP 50 With these steps we finish the circle by adding 1 bicone to connect the A beads and the
bicone row So add 1 bicone pass through the nearest A bead and add 1 bicone again Pass
through the bicone already there and exit from the bicone you just added
Something Blue Necklace and Earrings
BLOG WWWHANDMADE-JEWELRY-CLUBCOM MEMBERSHIP WWWDIYBEADINGCLUBCOM BLOG DIY BEADING MAGAZINE ISSUE 32
STEP 66-83 Secure the circle by adding 1A between each bicone in the second row of Swarovski
bicones If you finished secure the thread and trim
STEP 51-65 Using the same technique as in STEP 37 - 49 add 1 bicone to finish the third bicone row The black line shows you the way (After STEP 50 pass through the next A bead add 1 bicone and pass through the bicone already there and the bicone added in the previous step Repeat these steps to
finish the inner bicone circle)
MIDDLE CIRCLE Work RAW stitch into a beaded circle and embellish with
Swarovski bicones Remember you need to bead two circles this time
STEP 1 Just like in the focal circle begin with 2 pearls 1A and 1 pearl again on a comfortable length of thread
leaving a 2rdquo 5cm tail Pass through the first two pearls strung to form a ring
Something Blue Necklace and Earrings
BLOG WWWHANDMADE-JEWELRY-CLUBCOM MEMBERSHIP WWWDIYBEADINGCLUBCOM BLOG DIY BEADING MAGAZINE ISSUE 32
STEP 15-28 Mimicing the FOCAL CIRCLElsquos STEP 18-34 bead A beads until you finish the inner part of the
circle Exit from a pearl in the second row This circle should look very similar to the first one but this is a bit
smaller
STEP 2-14 Mimicing the FOCAL CIRCLElsquos STEP 2-17 bead until you count 14 pearls in the inner circle Exit
from the last A added
STEP 29-42 Mimicing FOCAL CIRCLElsquos STEP 35-49 add 2 rows of bicones
STEP 43-56 Mimicing the FOCAL CIRCLElsquos STEP 50-65 bead the third row of bicones to finish the circle
Something Blue Necklace and Earrings
BLOG WWWHANDMADE-JEWELRY-CLUBCOM MEMBERSHIP WWWDIYBEADINGCLUBCOM BLOG DIY BEADING MAGAZINE ISSUE 32
SMALLEST CIRCLE Work RAW stitch into a beaded circle and embellish
with Swarovski bicones Remember you need to bead two circles again
STEP 1 Just like in the focal circle begin with 2 pearls
1A and 1 pearl again on a comfortable length of thread leaving a 2rdquo 5cm tail Pass through the first two
pearls strung to form a ring
STEP 57-70 Just like the FOCAL CIRCLElsquos STEP 66-83 secure the circle by adding 1A between every bicone
in the second row of bicones If you finished secure the thread and trim (Donrsquot forget to bead another
circle)
STEP 2-12 Mimicing the FOCAL CIRCLElsquos STEP 2-17 bead until you count 12 pearls in the inner circle Exit
from the last A added
STEP 13-24 Mimicing the FOCAL CIRCLElsquos STEP 18-34 bead A beads until you finish the inner part of the
circle Exit from a pearl in the second row This circle should look very similar to the first two but this is the
smallest of them all
Something Blue Necklace and Earrings
BLOG WWWHANDMADE-JEWELRY-CLUBCOM MEMBERSHIP WWWDIYBEADINGCLUBCOM BLOG DIY BEADING MAGAZINE ISSUE 32
STEP 37-48 Mimicing the FOCAL CIRCLElsquos STEP 50-65 bead the third row of bicones to finish this circle too
STEP 25-36 Mimicing FOCAL CIRCLElsquos STEP 35-49 add 2
rows of bicones The last step here is purple again
STEP 49-60 Just like the FOCAL CIRCLElsquos STEP 66-83 secure the circle by adding 1A between every bicone
in the second row of bicones If you finished secure the thread and trim (Donrsquot forget that you need two
small circles)
Something Blue Necklace and Earrings
BLOG WWWHANDMADE-JEWELRY-CLUBCOM MEMBERSHIP WWWDIYBEADINGCLUBCOM BLOG DIY BEADING MAGAZINE ISSUE 32
STEP 37-48 Mimicing the FOCAL CIRCLElsquos STEP 50-65 bead the third row of bicones to finish this circle too
STEP 25-36 Mimicing FOCAL CIRCLElsquos STEP 35-49 add 2
rows of bicones The last step here is purple again
STEP 49-60 Just like the FOCAL CIRCLElsquos STEP 66-83 secure the circle by adding 1A between every bicone
in the second row of bicones If you finished secure the thread and trim (Donrsquot forget that you need two
small circles)
Something Blue Necklace and Earrings
BLOG WWWHANDMADE-JEWELRY-CLUBCOM MEMBERSHIP WWWDIYBEADINGCLUBCOM BLOG DIY BEADING MAGAZINE ISSUE 32
STEP 2-6 Continue by adding 1A 1 bicone 1 pearl until you count 6 of each
STEP 1 Begin with 1 pearl 1 bicone 1A and 1 bicone again on a comfortable length of thread leaving a 2rdquo
5cm tail Pass through the pearl and the first bicone strung to form a ring
STEP 7-12 Pass through the A beads to make your
component more secure Also secure the thread and trim (Repeat these steps until you have six 6-BEAD
COMPONENTs)
6-BEAD COMPONENT Work RAW stitch into a beaded circle and embellish with Swarovski bicones
For the necklace we will need six from this component For the earring two
Something Blue Necklace and Earrings
BLOG WWWHANDMADE-JEWELRY-CLUBCOM MEMBERSHIP WWWDIYBEADINGCLUBCOM BLOG DIY BEADING MAGAZINE ISSUE 32
STEP 2-4 Continue by adding 1A 1 bicone 1 pearl
until you count 4 of each
STEP 1 Begin with 1 pearl 1 bicone 1A and 1 bicone again on a comfortable length of thread leaving a 2rdquo
5cm tail Pass through the pearl and the first bicone strung to form a ring
STEP 5-8 Pass through the A beads to make your component more secure Also secure the thread and
trim (Repeat these steps until you have the wished amount of 4-BEAD COMPONENTs)
4-BEAD COMPONENT Work RAW stitch into a beaded circle and embellish with Swarovski bicones
For the necklace-size that is given on the second page we will need 20 from this
component For the earring two
If you would like to make a longer necklace you need to make more (One 4-BEAD COMPONENT measures about 38 inch 1 cm To make the necklace symmetrical you have to have equal amounts on each side This means for every extra frac34 inches
2 cm-s you will need 1 4-BEAD COMPONENT on each side of the necklace)
Something Blue Necklace and Earrings
BLOG WWWHANDMADE-JEWELRY-CLUBCOM MEMBERSHIP WWWDIYBEADINGCLUBCOM BLOG DIY BEADING MAGAZINE ISSUE 32
STEP 2 Connect the MIDDLE CIRCLE to two 6-BEAD COMPONENTs by adding four-times 2As
between the pearls Choose a pearl on the MIDDLE CIRCLE and add
2A pass through a pearl in the 6-BEAD COMPONENT previously added and add 2A again Watch out this has to be symmetrical Repeat this at least two more times to make it
secure Now repeat this entire procedure but choose
the 8-th pearl on MIDDLE CIRCLE Repeat this on the other side of the necklace
too
Choose a pearl on the FOCAL CIRCLE and add 2A pass through a pearl in the 6-BEAD COMPONENT and add 2A again Repeat this at least two more times to make it secure
Now repeat this entire procedure but choose the 5-th pearl on FOCAL CIRCLE This will make the necklace nice on your neck
FINISHING THE NECKLACE Connects the parts with A beads
STEP 1 Connect the FOCAL CIRCLE to two 6-BEAD COMPONENTs by adding four-times 2As between the pearls To do this turn your parts upside down you need to
see the pearls We will work on this side from now on
Something Blue Necklace and Earrings
BLOG WWWHANDMADE-JEWELRY-CLUBCOM MEMBERSHIP WWWDIYBEADINGCLUBCOM BLOG DIY BEADING MAGAZINE ISSUE 32
FINISHING THE EARRING Connects the parts with A beads
STEP 1-2 Connect the 6-BEAD COMPONENT
to 4-BEAD COMPONENT and the 4-BEAD
COMPONENT to the earring hook
First connect the 4-BEAD COMPONENT to the 6-BEAD COMPONENT with 4A beads Mimic
the elongation steps of the necklace if needed
Secondly connect the 4-BEAD COMPONENT
to your earring hook with 4A beads again Leave from the last pearl bead 2A beads the hook (this is the orange oval form) and 2As again Pass through each of them to
secure this connection again
Finally get ready to prepare the other earring ndash since we need two of them
STEP 5 Connect the 4-BEAD COMPONENTs to the toggle clasp thus finishing the
necklace Leaving from the last pearl bead 2A the
clasp(this is the orange oval form) and 2A again Pass through all of them a couple more times to make this connection more
secure
Something Blue Necklace and Earrings
BLOG WWWHANDMADE-JEWELRY-CLUBCOM MEMBERSHIP WWWDIYBEADINGCLUBCOM BLOG DIY BEADING MAGAZINE ISSUE 32
If you finished it is time to try it on It was a great fun wasnrsquot it And how beautiful you look in your new necklace and the matching earrings
Something Blue Necklace and Earrings
BLOG WWWHANDMADE-JEWELRY-CLUBCOM MEMBERSHIP WWWDIYBEADINGCLUBCOM
About the Author
Margit Vogel
My name is Margit Vogel I live in Hungary Europe
By profession I am a biochemical engineer but I fell in love with
beads so much that I could not stop playing with them
I make one-of-a-kind beaded and bead embroidered art
jewelry made of the best quality materials such as Swarovski
stones gemstones Japanese beads (Miyuki and Toho) Czech
glass beads leather soutache and suede Each piece is unique
and individually crafted
Feel free to visit my blog for some eyecandy
httpiformjewelrywordpresscom
My shop httpwwwetsycomshopiformjewelry
Facebook httpwwwfacebookcomiformjewelry
BLOG DIY BEADING MAGAZINE ISSUE 32
Getting Down And Personal With Gianna
Getting Down And Personal With Gianna
Nowadays we see more and more jewelry stores opening up online and with these online jewelry stores it has made it easier for us to purchase and view their creations Have you ever wondered how they are able to manage and produce amazing jewelry pieces and tutorials So heres a little on the journey to open up an online shop We are excited to present to you Gianna aka Beading4perfectionists
Gianna Beader amp Youtuber
Unlike most jewelry makers and beadweavers Gianna did not start beading as a hobby but as a means to make ends meet With goals in trying to
fill the financial gap she did everything she could to expand her earnings ndash working as a security guard
and at the same time learning how to bead and selling her pieces at fair trades and flea markets
Since many were asking if she does home beading workshops she started on exploring how to teach people to bead She loves Scott Bakula and has always loved him till now and this served as her
inspiration to start making a beading video tutorial
Gianna started creating videos because she was at the point in her life where everything seemed to be falling apart And at that moment of time she had difficulties financially and selling jewelry was the only way for her to stay afloat financially She is a big Scott Bakula fan and when she went to the UK to see him on stage that was when it hit her that she is already able to edit videos and
taught herself Photoshop and done workshops at bead fairs so why not put these together and see what happens on Youtube She knew that if she gets enough subscribers and views ndash though no one knew what the exact numbers were you would be invited to become a Youtube partner This way she could monetize her videos with advertisements and hopefully she would be able to be a Youtube partner and be able to pay her bills
BLOG WWWHANDMADE-JEWELRY-CLUBCOM MEMBERSHIP WWWDIYBEADINGCLUBCOM BLOG DIY BEADING MAGAZINE ISSUE 32
Getting Down And Personal With Gianna
Her Youtube channel is popular and the reason why she chose Youtube is because Youtube is the biggest platform and reached almost to the whole world Everyone already knows about it and it was growing rapidly as compared to other platforms like Dailymotion so she figured that Youtube was the way to go Her advice to new designers is that when you start out go to the platforms on the top of your list first then work your way down your list if you do not get accepted by your first choice
After loyally putting up one video every week for about 8 months in a row she became a Youtube partner and monetized her videos She knew she needed at least $100 to get her first payout She managed to reach $100 after 3 months The process was not easy she worked hard lack sleep skipped meals and who knows what happened to Ridge in the Bold and the Beautiful because she stopped watching
On Youtube you can monetize your videos Google pays straight to your bank account and at other countries where they also have the option of getting checks among other options In order to get paid you have to reach the $100 mark and after 3 months For Gianna she thinks that you cannot say that Etsy is better than Youtube or Youtube is better than Etsy Her reasoning is because on Youtube she has many followers which will eventually check out her Etsy shop And to start an Etsy shop you need an audience
BLOG WWWHANDMADE-JEWELRY-CLUBCOM MEMBERSHIP WWWDIYBEADINGCLUBCOM BLOG DIY BEADING MAGAZINE ISSUE 32
television and dedicated her spare time (as she had another job) to Youtube She re-registered at the chamber of commerce after receiving her first payout Her work at Youtube now is not a full time job and things have changed on Youtube It is easier to become a parter but there are some countries that need to wait for an invitation to be a Youtube partner Take Italy for instance Italians would have to work just as hard as she did if they want to become a Youtube partner
Getting Down And Personal With Gianna
With her 60000 subscribers on her b4pbakup Youtube channel it is possible to sell at least 60 patterns on the first day on Etsy after promoting the PDF file on her Youtube channel Though you may think that 60 out of 60000 is not much you have to remember that not everyone has the means to purchase the PDF file and a lot of people still rather watch her carry out the tutorial(for free) on Youtube instead of reading the patterns or paying for the patterns even if the pattern is for a fundraiser and only cost $2 Her insights on Youtube is that Youtube is not what it used to be 6 years ago Instead of making more money every month she is making less and less because advertisers have more options of where they want to advertise their ads Ads do not pay as much as they used to Back in the days you could get 25 cents per ad Now you count yourself lucky if you could get 5 cents roll in after two hours
BLOG WWWHANDMADE-JEWELRY-CLUBCOM MEMBERSHIP WWWDIYBEADINGCLUBCOM BLOG DIY BEADING MAGAZINE ISSUE 32
And on top of that adblockers are destroying Youtube channel owners Youtube will start making changes to the channels where there will be ldquopaid subscriptionrdquo channels This has already been implemented in some countries but not in her country The Netherlands This means there will no longer be ads for her monthly paying subscribers She hopes that Youtube will add on a paid per video option feature The option to be a paid channel or free channel or to start a new channel for paying customers is yours to choose Gianna is not happy with Youtube because many others like her have worked so hard and for some years to become Youtube partners(which was something to be proud of) has lost their status
Getting Down And Personal With Gianna
Her advice for those who want to go on Youtube is 1 Do it because you want to teach
2 Do it because you want a career with beads
BLOG WWWHANDMADE-JEWELRY-CLUBCOM MEMBERSHIP WWWDIYBEADINGCLUBCOM BLOG DIY BEADING MAGAZINE ISSUE 32
After putting up about 20 videos and having at least 5000 subscribers add the PDF tutorials to Etsy and Craftsy She found out that her audience would like to have the PDF after watching her videos This is because they would rather print out the PDF and work while seated in a comfy chair technically somewhere else instead of having to pause the video time and time again
Gianna has also made a video for those who want to know the whole story of her journey up until the present day And to get updates on her you can check it out here She has also started a vlog where she tells of how she still works towards becoming a financial independent beader and explains her journey to get where she wants to be(or die trying) Gianna will be in the UK on October the 17th giving an all-day workshop with 4 different patterns
(2 beginners and 2 advanced) in Wotton-under-Edge
Gianna will be there Friday night as the workshop is on Saturday She will be leaving on Sunday Her
doors are open to all who wants to continue the party with her at the hotel across the street
For more information do contact Ann Tucker on Facebook
httpswwwfacebookcomanntucker501
Rec
omm
end
ed R
ead
ings
Making Jewelry with Gemstone
Beads
Combines the popular craft of beading with beautiful semi-precious stones which are collected by many Features a variety of versatile ideas which can be adapted for any type of gem or bead Readers will learn to reate beautiful gemstone jewelry with this dazzling collection of over 100 projects ranging from eyecatching earrings and accessories to exquisite necklaces and bracelets This beautiful book offers an impressive range of 28 beautiful semi-precious stones (including birthstones) and a glimpse into the fascinating history and mythical properties behind them
BLOG DIY BEADING MAGAZINE ISSUE 32 BLOG WWWHANDMADE-JEWELRY-CLUBCOM MEMBERSHIP WWWDIYBEADINGCLUBCOM
Rec
omm
end
ed R
ead
ings
Convertible Crystal Jewelry
Reverse it Twist it Wear it Many
Ways
Diane Whiting presents the idea that convertibility isnrsquot just about using pieces in multiple ways it is also about using skills and creativity in multiple ways Using ever-popular sparkling crystals Diane showcases design elements through various techniques for fun easy fashionable jewelry With 25 projects the reader can choose from bracelets necklaces and earrings that match any outfit or styleDiane Whiting presents the idea that convertibility isnrsquot just about using pieces in multiple ways it is also about using skills and creativity in multiple ways
BLOG DIY BEADING MAGAZINE ISSUE 32 BLOG WWWHANDMADE-JEWELRY-CLUBCOM MEMBERSHIP WWWDIYBEADINGCLUBCOM
Rec
omm
end
ed R
ead
ings
Wire Jewelry Masterclass
Wrapped Coiled and Woven Pieces
Using Fine Materials
Comprehensive and fabulous Wire Jewelry Masterclass takes an in-depth look at an intricate and rewarding craft The 24 projects which range from simple Dragons tear briolette earrings to a Poseidon-under-the-sea pendant will delight and inspire jewelers of all levels and tastes Divided into beginner intermediate and advanced sections this beautifully photographed step-by-step guide is the ticket to wire jewelry expertise
BLOG DIY BEADING MAGAZINE ISSUE 32 BLOG WWWHANDMADE-JEWELRY-CLUBCOM MEMBERSHIP WWWDIYBEADINGCLUBCOM
Rec
omm
end
ed R
ead
ings
Timeless Wire Weaving The
Complete Course
Timeless Wire Weaving focuses on developing wirework skills through 13 projects using three classic wire weaving techniques coiling wrapping and weaving The projects are built around a focal cabochon and incorporate seed beads and crystals in imaginative ways Designers learn to make the jewelry shown in the book and they also use the techniques learned to create innovative jewelry pieces of their own
BLOG DIY BEADING MAGAZINE ISSUE 32 BLOG WWWHANDMADE-JEWELRY-CLUBCOM MEMBERSHIP WWWDIYBEADINGCLUBCOM
Our digital magazine is available through
Apple Newsstand service available to millions of IPAD users
To advertise with us please email us at
diyjewelryclubgmailcom
Or visit our page at
httphandmade-jewelry-clubcomadvertising-diy-beading-magazine
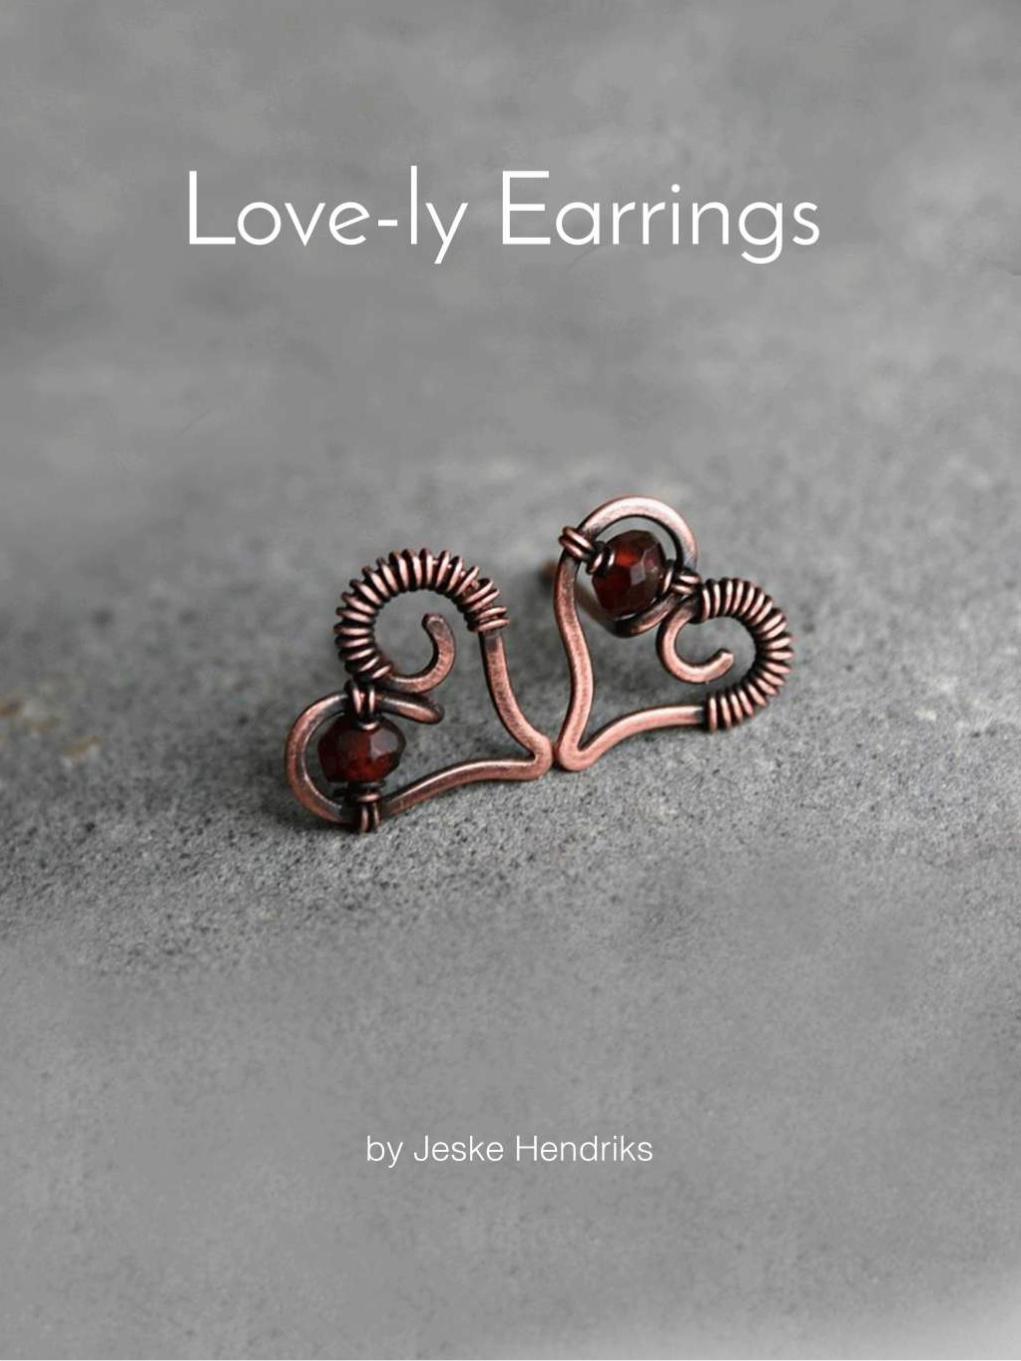
BLOG WWWHANDMADE-JEWELRY-CLUBCOM MEMBERSHIP WWWDIYBEADINGCLUBCOM
LOVE-ly Earrings
BLOG DIY BEADING MAGAZINE ISSUE 32
Step 9 Use the flat nose pliers to bend one of the two wires (preferably the longer wire) in a 90deg angle at the place marked with a red dot In the picture accompanying the next step you can see
how it should look from the front
Step 10 Use the round nose pliers to bend the other piece of wire in a decorative coil You will cut off the rest of the wire of the coil at approximately the spot marked with a red dot so take that into account when coiling the wire into the shape that
you desire
Step 11 Cut of the wire at the spot indicated in the previous picture and file off any sharp edges
Step 12 Cut off the ear wire at the desired length (Between 1 and 2 cm If in doubt try the earring on
to see if it sits comfortably) and file off any sharp edges
BLOG WWWHANDMADE-JEWELRY-CLUBCOM MEMBERSHIP WWWDIYBEADINGCLUBCOM
LOVE-ly Earrings
BLOG DIY BEADING MAGAZINE ISSUE 32
Step 13 Hammer down the rest of the heart (bumps and coil) If you canrsquot reach certain parts because the ear wire is in the way bend that part of the heart shape away
(verticallyupward) and bend it back after you finish hammering
Congrats yoursquove now made a basic heart-shaped ear stud Next wersquore going to decorate it with a little gemstone and more copper wire
Step 14 Cut off a length of 04 mm copper wire (about 10-20 cm) and string the bead onto it
Step 15 Place the bead in the ldquonon-coilrdquo upper part of the heart shaped ear stud holding it between thumb and forefinger Let approximately 4 cm of the 04 mm wire stick out over the edge of the
heart as illustrated above
Step 16 Wrap the wire twice around the frame so that if you face the front of the ear stud the wire is
directed towards yourself
BLOG WWWHANDMADE-JEWELRY-CLUBCOM MEMBERSHIP WWWDIYBEADINGCLUBCOM
LOVE-ly Earrings
BLOG DIY BEADING MAGAZINE ISSUE 32
Step 17 Flip the wire over the wire with the bead (indicated by the red arrow) and pull tight whilst holding the bead (and its wire) tightly in place It
should look like the construction in the big picture above
Step 18 And make another loop around the wire with the bead The 04 mm wire is now coiled around
twice two times two coils around the frame and two coils around itself
Step 19 Repeat the wire-fastening procedure described in steps 16-18 with the other end of the
wire securing the gemstone in the heart frame Let the wire stick out at the back of the earstud
Step 20 Pull the wire through the lsquocoilrsquo part of the heart shape to the front The wire should lsquocross overrsquo to the other side of the heart at the back of the ear
stud
Step 21 Coil the wire around the frame until you are content with the design Optionally you can hammer down the coils a bit I often do this because I think it
looks somewhat more sophisticated and professional
BLOG WWWHANDMADE-JEWELRY-CLUBCOM MEMBERSHIP WWWDIYBEADINGCLUBCOM
LOVE-ly Earrings
BLOG DIY BEADING MAGAZINE ISSUE 32
Step 22 Cut off the spare bits of wire preferably at the backside of the ear stud and tuck in the ends
Congrats yoursquove now made a heart-shaped ear stud Next we are going to finish it off with a patina
Step 23 Oxidize the metal of the ear studs I always use liver of sulfur solved in warm water The metal
will turn a dark color and matte texture Afterwards rinse the ear studs thoroughly with water and pat
them dry
Step 24 Rub the oxidized ear stud all over with a rough polishing pad to bring back (a dark copper)
color to the surface
Yoursquove now finished making your own LOVE-ly ear studs
Secure them in your ear with plastic or copper stops These can be bought online or in jewelry-supply
stores
Variation ideas You can easily vary in size and shape (longer hearts smaller coils pointier bottoms etc) and
use different materials As you can see the earring I make in this tutorial has a slightly smaller bead than the
earrings on the cover which influences the overall appearance somewhat
The earrings underneath are made with sterling silver and gold wire (super-short coils) and contain small pink
rubies
LOVE-ly Earrings
BLOG WWWHANDMADE-JEWELRY-CLUBCOM MEMBERSHIP WWWDIYBEADINGCLUBCOM
About the Author
Jeske Hendriks
Hi there My name is Jeske and I love all things handmade Over the years Irsquove dabbled in countless different arts and crafts but nowadays I mainly focus on making jewellery and cutting stone cabochons As for jewellery
my preferred materials are silver wire and gemstonemineral beads Using wire-wrapping and basic silver smithing techniques I create both simple
and intricate pieces ndash each and every one of them unique a personal little artwork
You are welcome to follow me on facebook stop by at my personal
webpage andor to have a look at my Etsy shops httpswwwfacebookcomyeskecrafts
httpwwwyeskecraftscom httpwwwyourbeadsandfindingsetsycom
httpwwwyeskecraftsetsycom httpwwwyeskemiscetsycom
BLOG DIY BEADING MAGAZINE ISSUE 32
Flower Tale Earrings
BLOG WWWHANDMADE-JEWELRY-CLUBCOM MEMBERSHIP WWWDIYBEADINGCLUBCOM
Techniques Beadweaving
Project Level Beginner to Intermediate
Materials 12 bronze opaque 6mm Czech glass pearl round beads
2 gr gold lustered dark topaz Japanese 110 seed beads (Toho 459)
Size B gold beading thread
2 bronze earring hooks
Tools Size 10 beading needle
Scissors
Finished Size Diameter ndash 3 cm (118 inches) (without earring hooks)
BLOG DIY BEADING MAGAZINE ISSUE 32
Flower Tale Earrings
BLOG WWWHANDMADE-JEWELRY-CLUBCOM MEMBERSHIP WWWDIYBEADINGCLUBCOM
Step 1 Cut about 110 cm (43 inches) of thread and
pass it through the needle hole
Pick six groups of one 110 seed bead and one
6 mm round bead
BLOG DIY BEADING MAGAZINE ISSUE 32
Join the beads into a ring and secure with two
square knots
Leave a tail of about 15 cm (59 inches)
Step 2 The working thread should be right before the
6 mm round bead
Pick seven 110 seed beads skip the 6 mm
round bead and pass the needle through the
next 110 seed bead added in the previous
round
Repeat adding groups of seven 110 seed
beads five more times
When adding the last group take the needle
directly through the 110 seed bead from the
previous round and the next one added in the
beginning of current round
Flower Tale Earrings
BLOG WWWHANDMADE-JEWELRY-CLUBCOM MEMBERSHIP WWWDIYBEADINGCLUBCOM
Step 3 Pick three 110 seed beads skip one seed
bead from the chain of seven added in the
previous round and pass with the needle
directly through the next three 110 seed
beads
BLOG DIY BEADING MAGAZINE ISSUE 32
Pick three 110 seed beads skip one seed
bead from the chain of seven added in the
previous round and pass with the needle
through the last one and the first 110 seed
bead from the next chain of seven
Repeat the above directions from Step 3 five
more times
After completing this round make sure the
thread will be exiting from the middle 110
seed bead from the first group of three added
in the beginning of this round
Step 4 Pick one 110 seed bead and go through the
last seed bead of the group of three
Flower Tale Earrings
BLOG WWWHANDMADE-JEWELRY-CLUBCOM MEMBERSHIP WWWDIYBEADINGCLUBCOM
Pick three 110 seed beads and take the
needle through the first seed bead of the next
group of three added in the previous round
BLOG DIY BEADING MAGAZINE ISSUE 32
Pick one 110 seed bead and go with the
needle through the next three seed beads (the
last two of the group of three and the last one
from the chain of seven)
Then go up through three 110 seed beads
(the first from the next group of seven and the
first two from the next group of three)
Repeat the above directions from Step 4 to
complete the remaining petals
When working on the last petal perform the
operation from the image shown on the left
instead of picking the group of three 110 seed
beads string two 110 seed beads the earring
hook other two 110 seed beads and
continue beading as instructed above
When you are done hide the thread ends into the beadwork
Flower Tale Earrings
BLOG WWWHANDMADE-JEWELRY-CLUBCOM MEMBERSHIP WWWDIYBEADINGCLUBCOM
About the Author
Iulia Postică
I was born and live in Moldova Eastern Europe Ever since I remember myself
Ive been crocheting and knitting My grandmother has taught me that and I
loved it very much I always regarded crafts exclusively as a hobby and never
thought of making a career of it I traveled a lot to various historical sites
Actually Ive spent all my childhood summers in archaeological camps with
my father who is a professional archaeologist
I also enjoy metal hammering and wirework as it gives me possibility to
express myself in materials used by human communities since ancient times
copper brass glass seed beads and gemstones That is no surprise to anyone
given my family history and academic background
My shop ldquoBeadedTreasuryrdquo with beading tutorials and bead crochet patterns
httpswwwetsycomshopBeadedTreasury
My shop ldquoArchaeologicardquo with artisan jewelry
httpswwwetsycomshopArcheologica
My blog httpbeadedtreasuryblogspotcom
My facebook httpswwwfacebookcomBeadedTreasury
BLOG DIY BEADING MAGAZINE ISSUE 32
Liberty Earrings
BLOG WWWHANDMADE-JEWELRY-CLUBCOM MEMBERSHIP WWWDIYBEADINGCLUBCOM
Materials - Nr 2 cabochon Preciosa Ornela ovale 18x22 mm turchese
- Rocaille Toho 150 silver lined green emerald
- Nr 2 dagger beads
- Nr 20 pearl 4 mm
- Superduo opaque luster ceramic green
- Rocaille 80 color gold
- Rocaille 80 color ivory
- Delica Miyuki 110 aquagreen mix
- Rocaille Miyuki 110 galvanized silver
- Nr 2 monachelle (earwire)
-Fireline
- Beading Needle nr 12
BLOG DIY BEADING MAGAZINE ISSUE 32
Liberty Earrings
BLOG WWWHANDMADE-JEWELRY-CLUBCOM MEMBERSHIP WWWDIYBEADINGCLUBCOM
Make a circle of 20 delica beads and make a knot (a) Perform two rounds peyote with ivory 80 seed beads (b c) Exit from an ivory
bead
BLOG DIY BEADING MAGAZINE ISSUE 32
a b c
Jump from 80 to 80 with 110 80 gold 110 (a) Finish the round and come out of a 80 gold bead
Jump to the next 80 gold with a 4mm pearl (b) Finish the round and come out
of the first pearl Jump to the 2nd pearl and close with a 80 gold bead(c)
a b c
Position the cabochon and jump from one 80 to the other with two delica bead (a)
Continue with three delicas four times (b) At the bottom sew on two delicas then finish the round by sewing on three delicas for four times passing from one to another roc 80 Tighten the cabochon and exit from the
first two delica that you started with String together a 110 and 150 and enter the second of the three close delicas (c)
a b c
Liberty Earrings
BLOG WWWHANDMADE-JEWELRY-CLUBCOM MEMBERSHIP WWWDIYBEADINGCLUBCOM
Put together 150 110 150 and enter in the second of three next delica (a) Put the same beads for three times then put together 150 and 110 and enter
in the two delica of the bottom tip (b) Enter in the second of three next delica with 110 and 150 (c) Continue passing
in the 80 beads with three beads (150 110 150) for four times then at the top finish the round by putting together a 150 and 110 (d)
BLOG DIY BEADING MAGAZINE ISSUE 32
a b c
Exit from the first 150 sewn in the previous round and jump in the three next beads with a 150 (a)
Put a 150 at a time and exit from the first 110 beads of the bottom tip Jump in the
near 110 with a 150 (b) Finish round repeating steps a and b (c) Exit the roc 80 as shown in the photo (d)
a b c
d
a b c d
Enter in the 80 with four 150 (a b) Enter the 80 beads at the bottom of the pieces with two 110 one superduo one 80 ivory bead one superduo and two 110 (c)
d e f
Liberty Earrings
BLOG WWWHANDMADE-JEWELRY-CLUBCOM MEMBERSHIP WWWDIYBEADINGCLUBCOM
Exit from the bottom pearl (a) Put together 150 three 110 150 and enter in the superduorsquos second hole (b)
Put together three superduo and enter in the next superduorsquos second hole (c) Rethread 15 three 110 150 and return in the opposite direction in the pearl of departure (d)
BLOG DIY BEADING MAGAZINE ISSUE 32
a b
c
Exit from the second pearl indicated from (a) Put 150 four 110 and enter in the second of the three 110 (b) Go to the second superduorsquos hole with four 110 and a 150 (c)
Enter the second hole of the supeduo with a 150(d) Sew in the middle of the bottom of the superduo 150 two 110 150 dagger 150 two 110 150(e)
Enter the second hole of the thirs superduo with 150 (f)
a b c
d
d e f
Liberty Earrings
BLOG WWWHANDMADE-JEWELRY-CLUBCOM MEMBERSHIP WWWDIYBEADINGCLUBCOM BLOG DIY BEADING MAGAZINE ISSUE 32
Put 150 four 110 and enter in the second of three 110 of the base (a) Insert four 110 and 150 in the pearl opposite direction indicated in the picture (b) Go in all the beads
around the piece and exit from the pearl at the top (c) Put 150 three 110 150 and enter the superduo (d)
Enter the ivory bead 80 with two 150 (e) Enter the next superduo with two 150 (f)
a b c
d e f
Put together 150 three 110 and enter in opposite direction in the departurersquos pearl (a) Exit from the 150 beads indicated by photo (b) From this jump in the second of two near
150 with five 150 to created the hole for the earwire (c) Pass the thread in the beads make a few knots and cut the excess thread
a b c
Your earrings are finished
Liberty Earrings
BLOG WWWHANDMADE-JEWELRY-CLUBCOM MEMBERSHIP WWWDIYBEADINGCLUBCOM
About the Author
Mariella Martella
My name is Mariella Martella and I am the author and
designer of jewelry that I sign with the name of Mariel Bijoux
After changing city often for work and study I currently live
in northern Italy I am an art historian with a passion for travel
painting and jewelry design in weaving that project since
2010 In my beads and crystals are the colors of the
Mediterranean sea the atmosphere of summer evenings
and the lights of the places I visited
You can find me at
Etsy shop httpswwwetsycomitshopMarielBijoux
Facebook httpswwwfacebookcommari3lbijoux
Crafting blog httpmarielbijouxblogspotit
Twitter httpstwittercomMarielBijoux
BLOG DIY BEADING MAGAZINE ISSUE 32
Jade Necklace
BLOG WWWHANDMADE-JEWELRY-CLUBCOM MEMBERSHIP WWWDIYBEADINGCLUBCOM
Every time I wear a necklace I always make it a point that the
necklace will lay perfectly flat on my neck Using wire for a necklace
made it possible for me like what I did with Jade Necklace It may look
odd at first having bent wires for a necklace but once the jewelry is
finished youll be so happy how the necklace will perfectly lay on your
neck
The tutorial is catered for intermediate level One must know basic
wirework skills such as wire wrapping making loops wrapped loops
and linking to follow the tutorial It has clear instructions and ultra-clear
close-up photos at each step Additionally you can ask me question
you have on the tutorial No more getting stuck and frustrated on a
confusing or just plain inaccurate pattern
If you followed this tutorial and then sell the accessory or jewelry
please give credit to the author or DIY Beading Clubcom
Copyright 2015
wwwdiybeadingclubcom
wwwhandmade-jewelry-clubcom
BLOG DIY BEADING MAGAZINE ISSUE 32
Jade Necklace
BLOG WWWHANDMADE-JEWELRY-CLUBCOM MEMBERSHIP WWWDIYBEADINGCLUBCOM BLOG DIY BEADING MAGAZINE ISSUE 32
Materials Needed 18ga Craft wire 28ga Craft wire 15mm diameter Green Round Flat Back Sew On Gems 5mm Green pearls
8mm Green pearls 6mm x 11mm teardrop Crystal Treasures Mill Hill beads or any teardrop bead with holes on the side Hook for your clasp
Tools Needed Wire cutter Flat nose pliers Round nose pliers Mandrel A jar or any rounded object to shape your necklace
Skill Level Intermediate
Step 1 Cut 6 inches 18ga wire Make a loop on one end then measure approximately 125 inches and make another loop
Form a size 4 circle on your mandrel
Jade Necklace
BLOG WWWHANDMADE-JEWELRY-CLUBCOM MEMBERSHIP WWWDIYBEADINGCLUBCOM BLOG DIY BEADING MAGAZINE ISSUE 32
Then close the circle by wrapping the extended wire just below the loop Wrap the
wire 2x
This is how it looks like Lets call this circle frame Youll notice that the lower curve is
slightly bigger than the upper curve
Step 2 Cut 8 inches of 28ga wire Wrap one end of
the wire at least 3x on one side of the circle frame just below the loop
Bring up your gem Flat back sew on gems has 2 holes Insert the wire into one hole and then
wrap the wire once onto the circle frame
Jade Necklace
BLOG WWWHANDMADE-JEWELRY-CLUBCOM MEMBERSHIP WWWDIYBEADINGCLUBCOM BLOG DIY BEADING MAGAZINE ISSUE 32
Step 3 Insert a 5mm pearl on the wire and then pass
the wire under circle frame
Repeat previous step 2x and have 3 pearls wrapped
Continue wrapping with your teardrop crystal My crystal has 2 holes on the side
and then continue wrapping with your 5mm pearls then secure your wire
Repeat Step 3 and create as many as needed For 16-inch necklace Ive created 6 of these
components
Jade Necklace
BLOG WWWHANDMADE-JEWELRY-CLUBCOM MEMBERSHIP WWWDIYBEADINGCLUBCOM BLOG DIY BEADING MAGAZINE ISSUE 32
Step 4 Cut a 15-inch 18ga wire and make a loop on
one end Insert 8mm pearl and make a loop on the other end You then use these as connectors
and link the components
Step 5 The necklace is an 18ga wire with wrapped
loops on both ends First cut 7 inches 18ga wire and make a wrapped loop with your hook already inserted Side in 18pcs 5mm pearls
Then make a wrapped loop on the other end connecting the wrapped loop onto the component Do the same for the other
necklace but make the loop on the other end big enough so the hookclasp can pass thru
To have the necklace curve shaped use a jar to bend the wire Voila Now youre
ready to party
Jade Necklace
BLOG WWWHANDMADE-JEWELRY-CLUBCOM MEMBERSHIP WWWDIYBEADINGCLUBCOM
About the Author
Sky Aldovino
I consider myself a late bloomer when it comes to crafting Irsquom a self-taught jewelry maker Jewelry making wasnrsquot really a hobby of mine but unforeseen events lead me to learn jewellery making My family put up a craft store where we sell cross stitch beads and all sorts of crafting materials I fell in love with the beads and tried to create accessories only for myself Clients liked the pieces and I started customizing handmade jewelleries The craft store was a success for 6 years but like any other small businesses we had to close it down and I was confined to staying at home While at home I had all the time using the internet and now working as a home-based jewelry designer
BLOG DIY BEADING MAGAZINE ISSUE 32
Atomic Ring
BLOG WWWHANDMADE-JEWELRY-CLUBCOM MEMBERSHIP WWWDIYBEADINGCLUBCOM
Have fun making shapes using the wigjig Cyclops Make loops going in
circles to mimic the shape of a flower or in this tutorial mimic the
shape of an atom The tutorial will also teach you how to cage a
cabochon Whats nice about this piece is that with one long wire you
can create the ring from start to finish
The tutorial is catered for intermediate to advanced students One
must already know how to make spirals and use a wigjig tool It has
clear instructions and ultra-clear close-up photos at each step
Additionally you can ask me question you have on the tutorial No
more getting stuck and frustrated on a confusing or just plain
inaccurate pattern
If you followed this tutorial and then sell the accessory or jewelry
please give credit to the author or DIY Beading Clubcom
If you like to get a blank wigjig graph visit wigjigcom Shop and Jigs
section
Copyright 2015
wwwdiybeadingclubcom
wwwhandmade-jewelry-clubcom
BLOG DIY BEADING MAGAZINE ISSUE 32
Atomic Ring
BLOG WWWHANDMADE-JEWELRY-CLUBCOM MEMBERSHIP WWWDIYBEADINGCLUBCOM
Materials Needed 20ga Craft wire 28ga Craft wire 11mm Round Cabochon
Tools Needed Wigjig Cyclops 15mm pegs Wire cutter Flat nose pliers Mandrel
Skill Level Intermediate - Advanced
BLOG DIY BEADING MAGAZINE ISSUE 32
Step 1 Lets prepare your wigjig cyclops Position the pegs like so
Atomic Ring
BLOG WWWHANDMADE-JEWELRY-CLUBCOM MEMBERSHIP WWWDIYBEADINGCLUBCOM BLOG DIY BEADING MAGAZINE ISSUE 32
Lets work with longer wire so youll have enough wire to hold onto as you manipulate the wire so cut 36 inches of 20ga wire From
one end of the wire measure 10 inches
On the 10-inch measurement loop the wire at the center peg then continue to loop onto the side pegs going in circle going back to
the center peg after looping on the side peg
Now the wire at the center peg will start to build up as you go around the side pegs so
you need to constantly press the wire at the center peg to accommodate the build up of
wire
When youre done pull out the wire and this is
how it should look like
Atomic Ring
BLOG WWWHANDMADE-JEWELRY-CLUBCOM MEMBERSHIP WWWDIYBEADINGCLUBCOM BLOG DIY BEADING MAGAZINE ISSUE 32
You will notice that the frame opens wide Now to keep the atom frame from opening wide secure the center of the frame by wrapping a 28ga wire What you
need to do is simply pass the 28ga wire into the hole and wrap as many times as needed or until youre sure that the frame is secure
Step 2 Now youre finished with your atom frame Well now create the focal design With the longer wire make a spiral at the center big
enough to accommodate the size of your cabochon In this tutorial the spiral is about
11mm in diameter the same size as my cabochon
Pop in your cabochon and start to make spirals going around and over the cabochon as if you are caging the cabochon Create at
least 5 rounds and then cut off any excess
Step 3 Now lets make the ring and this with the other
end of the wire
Atomic Ring
BLOG WWWHANDMADE-JEWELRY-CLUBCOM MEMBERSHIP WWWDIYBEADINGCLUBCOM BLOG DIY BEADING MAGAZINE ISSUE 32
Bring up your mandrel and wrap the wire to the size of your finger Wrap at least 2 times
When youre sure you have the right size pull the ring out of the mandrel
With the extended wire wrap the wire the secure the ring
Cut off any excess and voila You have your atomic ring Create as many as you can with different colors of cabochon
Atomic Ring
BLOG WWWHANDMADE-JEWELRY-CLUBCOM MEMBERSHIP WWWDIYBEADINGCLUBCOM
About the Author
Sky Aldovino
I consider myself a late bloomer when it comes to crafting Irsquom a self-taught jewelry maker Jewelry making wasnrsquot really a hobby of mine but unforeseen events lead me to learn jewellery making My family put up a craft store where we sell cross stitch beads and all sorts of crafting materials I fell in love with the beads and tried to create accessories only for myself Clients liked the pieces and I started customizing handmade jewelleries The craft store was a success for 6 years but like any other small businesses we had to close it down and I was confined to staying at home While at home I had all the time using the internet and now working as a home-based jewelry designer
BLOG DIY BEADING MAGAZINE ISSUE 32
Featured Article Gemstones Used for Jewelry Making
BLOG WWWHANDMADE-JEWELRY-CLUBCOM MEMBERSHIP WWWDIYBEADINGCLUBCOM
Gemstones are stones which we hold quite highly in terms of value And
jewelry often consists of stones that add attractiveness to it so it is not
surprising when jewelry designers actually use gemstones in their designs In
fact there are different types of gemstones that can be used for making
jewelry There are the expensive and pure gemstones and there are also the
imitation ones The information below will provide some information about
the kinds of stones you can use to create jewelry and how these stones will
impact the jewelry you have created
The first kind of stone which I believe we are all quite familiar with are
birthstones These stones are associated with individualrsquos month of birth
by SunVDesigns by BeyhanAkman
For example Amethyst stone is connected with anybody who is born in
February which carries special significance in the area of emotions and also
spiritually This stone also signifies calm and peace as well
And then we have semi-precious stones which are also often used in jewelry
making They are not as valuable as compared to precious stones but still
valuable Best examples of these stones are aquamarine topaz tourmaline
opal and turquoise
BLOG DIY BEADING MAGAZINE ISSUE 32
Featured Article Gemstones Used for Jewelry Making
BLOG WWWHANDMADE-JEWELRY-CLUBCOM MEMBERSHIP WWWDIYBEADINGCLUBCOM
It is an ideal gift for someone who you deem special Aquamarine pendants
usually work well for anyone and is widely an accepted stone
by HyppieChic by joyeriamestiza
However precious stones are the most unusual
and precious jewels to us Examples of some of
them are emerald sapphire diamond and
ruby These stones are usually very expensive
and are prized for their exquisiteness These
stones are commonly used in high-quality
jewelry designs which costs quite a fortune to
obtain
BLOG DIY BEADING MAGAZINE ISSUE 32
by sarajewelrystu
Jewelry designs with precious stones are usually
given as exceptional gifts on special occasions A
perfect example is a diamond ring that is usually
given as an engagement gift
by ldiamondsforever
Featured Article Gemstones Used for Jewelry Making
BLOG WWWHANDMADE-JEWELRY-CLUBCOM MEMBERSHIP WWWDIYBEADINGCLUBCOM
There are also synthetic stones which are often used to create jewelry
Synthetic stones are artificial imitations of gemstones Synthetic Sapphire
jewelry costs less compare with the authentic ones Most of the time
imitation stones are used to save cost but at the same time have the similar
look of the real stone
BLOG DIY BEADING MAGAZINE ISSUE 32
by shininggems by thaimaker
by lapinduprintemps by PastimeArt
Gemstones are used like beads and you can use it in any designs whether
simple or elaborate
Swarovski crystal components are available in a rich multitude of rondelles Perfect as spacers in necklaces or as discs in earrings Rondelles can be used with many varieties of shapes or sizes Use Swarovski crystal rondelles between large gemstones as accents with precious metal findings Fire Mountain Gems and Beads Crystal Passionsreg brand presents Swarovski crystal in display-ready packaging for brilliant retail presentation Crystal Passionsreg is an assurance of genuine Swarovski crystal
BLOG DIY BEADING MAGAZINE ISSUE 32 BLOG WWWHANDMADE-JEWELRY-CLUBCOM MEMBERSHIP WWWDIYBEADINGCLUBCOM
Recommended Jewelry Making Supplies
Mz Unisex-adults 12pcs 25x18x6mm Turquoise Oval CAB Cabochon
BLOG DIY BEADING MAGAZINE ISSUE 32 BLOG WWWHANDMADE-JEWELRY-CLUBCOM MEMBERSHIP WWWDIYBEADINGCLUBCOM
Recommended Jewelry Making Supplies
For a little sparkle that goes a long way design with Swarovski 4mm faceted bicones Create glorious multi-strand necklaces with the dainty crystals or use as spacers to add a tiny flash to your designs Swarovski crystal components are made in Austria and are considered the finest products of their kind in the world
BLOG DIY BEADING MAGAZINE ISSUE 32 BLOG WWWHANDMADE-JEWELRY-CLUBCOM MEMBERSHIP WWWDIYBEADINGCLUBCOM
Recommended Jewelry Making Supplies
Imitation beads resist color change These beads have uniform quality with a good polish Some strands may have little to no matrix Sizes shapes and colors may vary with handcrafted items
BLOG DIY BEADING MAGAZINE ISSUE 32 BLOG WWWHANDMADE-JEWELRY-CLUBCOM MEMBERSHIP WWWDIYBEADINGCLUBCOM
Recommended Jewelry Making Supplies
Something Blue Necklace and Earrings
BLOG WWWHANDMADE-JEWELRY-CLUBCOM MEMBERSHIP WWWDIYBEADINGCLUBCOM
Skill level Beginner Intermediate Advanced
DIMENSIONS OF THE NECKLACE Inner Circumference 14 18 inch 35 cm
Focal Pendant Width 1 15 inch 35 cm Focal Pendant Height 1 15 inch 35 cm
DIMENSIONS OF THE EARRING Earring Width 716 inch 12 cm Earring Height 1516 inch 25 cm (Without the earring hook)
BLOG DIY BEADING MAGAZINE ISSUE 32
Materials
Note Before purchasing the supplies measure the length of your wished necklace If you decide to bead a longer necklace you should keep in mind that for every extra
frac34 inches 2 cm-s you will need 8 bicones and 8 pearls
Something Blue Necklace and Earrings
BLOG WWWHANDMADE-JEWELRY-CLUBCOM MEMBERSHIP WWWDIYBEADINGCLUBCOM BLOG DIY BEADING MAGAZINE ISSUE 32
Work RAW stitch into a beaded circle and embellish with Swarovski bicones
STEP 2 String 1A and 2 pearls Pass through the previous
second pearl and the freshly added 1A and the first pearl again
STEP 1 Use a comfortable length of thread to string 2
pearls 1A and 1 pearl again leaving a 2rdquo 5cm tail Pass through the first two pearls strung to form a
ring
STEP 3 String 2 pearls and 1A Pass through the previous first pearl and the freshly added two pearls
again
STEP 4 - 17 Repeat STEP 2 and STEP 3 again until you count 17 pearls in the inner circle
But be careful in the last step you only have to add 1 pearl then pass through the first pearls
added in STEP 1 and add another 1A Now pass through the first pearl added in STEP
1and 1A added in this round again to exit from this A
Something Blue Necklace and Earrings
BLOG WWWHANDMADE-JEWELRY-CLUBCOM MEMBERSHIP WWWDIYBEADINGCLUBCOM BLOG DIY BEADING MAGAZINE ISSUE 32
STEP 19 String 2A and pass through the next A added in round 4-17 and the A added in round 18 the 2A added in this round and finally the A added in round 4-17 to exit from the bead showed below
STEP 18 String 3A and pass through the 1A added in the previous round and the first A added in this
round
STEP 20 - 34 Repeat STEP 18 and STEP 19 again until you finish the circle
But be careful in the last step first you have to pass through 3A and then add 1A After this pass
through the 3A again and exit from the A bead
shown below (This is the first A added in STEP 18)
Something Blue Necklace and Earrings
BLOG WWWHANDMADE-JEWELRY-CLUBCOM MEMBERSHIP WWWDIYBEADINGCLUBCOM BLOG DIY BEADING MAGAZINE ISSUE 32
STEP 35 Step up to exit from the pearl shown below (Finishing the previous step in the A bead and then
stepping up from there makes the circle more secure)
Now string 3 bicones Pass through the pearl and the first bicone again
In the reality your circle will look more like this the A beads forming a strong row in the middle of the
pearls
STEP 36 Add 2 bicones Pass through the
neighboring pearl the first bicone added in the previous row and the 2 bicones added in this step
so you can exit from the next pearl
Something Blue Necklace and Earrings
BLOG WWWHANDMADE-JEWELRY-CLUBCOM MEMBERSHIP WWWDIYBEADINGCLUBCOM BLOG DIY BEADING MAGAZINE ISSUE 32
Now in the reality your circle will look more like this the A beads still forming a strong row in the middle of the pearls and the bicones slightly lying on top of
them
STEP 37 - 49 Repeat STEP 35 and STEP 36 again until you finish the circle with the bicones
But be careful in the last step first you have pass through the third bicone added then add 1 bicone
and pass through this little quartet to exit from the bicone shown below (The second one added in
STEP 35)
STEP 50 With these steps we finish the circle by adding 1 bicone to connect the A beads and the
bicone row So add 1 bicone pass through the nearest A bead and add 1 bicone again Pass
through the bicone already there and exit from the bicone you just added
Something Blue Necklace and Earrings
BLOG WWWHANDMADE-JEWELRY-CLUBCOM MEMBERSHIP WWWDIYBEADINGCLUBCOM BLOG DIY BEADING MAGAZINE ISSUE 32
STEP 66-83 Secure the circle by adding 1A between each bicone in the second row of Swarovski
bicones If you finished secure the thread and trim
STEP 51-65 Using the same technique as in STEP 37 - 49 add 1 bicone to finish the third bicone row The black line shows you the way (After STEP 50 pass through the next A bead add 1 bicone and pass through the bicone already there and the bicone added in the previous step Repeat these steps to
finish the inner bicone circle)
MIDDLE CIRCLE Work RAW stitch into a beaded circle and embellish with
Swarovski bicones Remember you need to bead two circles this time
STEP 1 Just like in the focal circle begin with 2 pearls 1A and 1 pearl again on a comfortable length of thread
leaving a 2rdquo 5cm tail Pass through the first two pearls strung to form a ring
Something Blue Necklace and Earrings
BLOG WWWHANDMADE-JEWELRY-CLUBCOM MEMBERSHIP WWWDIYBEADINGCLUBCOM BLOG DIY BEADING MAGAZINE ISSUE 32
STEP 15-28 Mimicing the FOCAL CIRCLElsquos STEP 18-34 bead A beads until you finish the inner part of the
circle Exit from a pearl in the second row This circle should look very similar to the first one but this is a bit
smaller
STEP 2-14 Mimicing the FOCAL CIRCLElsquos STEP 2-17 bead until you count 14 pearls in the inner circle Exit
from the last A added
STEP 29-42 Mimicing FOCAL CIRCLElsquos STEP 35-49 add 2 rows of bicones
STEP 43-56 Mimicing the FOCAL CIRCLElsquos STEP 50-65 bead the third row of bicones to finish the circle
Something Blue Necklace and Earrings
BLOG WWWHANDMADE-JEWELRY-CLUBCOM MEMBERSHIP WWWDIYBEADINGCLUBCOM BLOG DIY BEADING MAGAZINE ISSUE 32
SMALLEST CIRCLE Work RAW stitch into a beaded circle and embellish
with Swarovski bicones Remember you need to bead two circles again
STEP 1 Just like in the focal circle begin with 2 pearls
1A and 1 pearl again on a comfortable length of thread leaving a 2rdquo 5cm tail Pass through the first two
pearls strung to form a ring
STEP 57-70 Just like the FOCAL CIRCLElsquos STEP 66-83 secure the circle by adding 1A between every bicone
in the second row of bicones If you finished secure the thread and trim (Donrsquot forget to bead another
circle)
STEP 2-12 Mimicing the FOCAL CIRCLElsquos STEP 2-17 bead until you count 12 pearls in the inner circle Exit
from the last A added
STEP 13-24 Mimicing the FOCAL CIRCLElsquos STEP 18-34 bead A beads until you finish the inner part of the
circle Exit from a pearl in the second row This circle should look very similar to the first two but this is the
smallest of them all
Something Blue Necklace and Earrings
BLOG WWWHANDMADE-JEWELRY-CLUBCOM MEMBERSHIP WWWDIYBEADINGCLUBCOM BLOG DIY BEADING MAGAZINE ISSUE 32
STEP 37-48 Mimicing the FOCAL CIRCLElsquos STEP 50-65 bead the third row of bicones to finish this circle too
STEP 25-36 Mimicing FOCAL CIRCLElsquos STEP 35-49 add 2
rows of bicones The last step here is purple again
STEP 49-60 Just like the FOCAL CIRCLElsquos STEP 66-83 secure the circle by adding 1A between every bicone
in the second row of bicones If you finished secure the thread and trim (Donrsquot forget that you need two
small circles)
Something Blue Necklace and Earrings
BLOG WWWHANDMADE-JEWELRY-CLUBCOM MEMBERSHIP WWWDIYBEADINGCLUBCOM BLOG DIY BEADING MAGAZINE ISSUE 32
STEP 37-48 Mimicing the FOCAL CIRCLElsquos STEP 50-65 bead the third row of bicones to finish this circle too
STEP 25-36 Mimicing FOCAL CIRCLElsquos STEP 35-49 add 2
rows of bicones The last step here is purple again
STEP 49-60 Just like the FOCAL CIRCLElsquos STEP 66-83 secure the circle by adding 1A between every bicone
in the second row of bicones If you finished secure the thread and trim (Donrsquot forget that you need two
small circles)
Something Blue Necklace and Earrings
BLOG WWWHANDMADE-JEWELRY-CLUBCOM MEMBERSHIP WWWDIYBEADINGCLUBCOM BLOG DIY BEADING MAGAZINE ISSUE 32
STEP 2-6 Continue by adding 1A 1 bicone 1 pearl until you count 6 of each
STEP 1 Begin with 1 pearl 1 bicone 1A and 1 bicone again on a comfortable length of thread leaving a 2rdquo
5cm tail Pass through the pearl and the first bicone strung to form a ring
STEP 7-12 Pass through the A beads to make your
component more secure Also secure the thread and trim (Repeat these steps until you have six 6-BEAD
COMPONENTs)
6-BEAD COMPONENT Work RAW stitch into a beaded circle and embellish with Swarovski bicones
For the necklace we will need six from this component For the earring two
Something Blue Necklace and Earrings
BLOG WWWHANDMADE-JEWELRY-CLUBCOM MEMBERSHIP WWWDIYBEADINGCLUBCOM BLOG DIY BEADING MAGAZINE ISSUE 32
STEP 2-4 Continue by adding 1A 1 bicone 1 pearl
until you count 4 of each
STEP 1 Begin with 1 pearl 1 bicone 1A and 1 bicone again on a comfortable length of thread leaving a 2rdquo
5cm tail Pass through the pearl and the first bicone strung to form a ring
STEP 5-8 Pass through the A beads to make your component more secure Also secure the thread and
trim (Repeat these steps until you have the wished amount of 4-BEAD COMPONENTs)
4-BEAD COMPONENT Work RAW stitch into a beaded circle and embellish with Swarovski bicones
For the necklace-size that is given on the second page we will need 20 from this
component For the earring two
If you would like to make a longer necklace you need to make more (One 4-BEAD COMPONENT measures about 38 inch 1 cm To make the necklace symmetrical you have to have equal amounts on each side This means for every extra frac34 inches
2 cm-s you will need 1 4-BEAD COMPONENT on each side of the necklace)
Something Blue Necklace and Earrings
BLOG WWWHANDMADE-JEWELRY-CLUBCOM MEMBERSHIP WWWDIYBEADINGCLUBCOM BLOG DIY BEADING MAGAZINE ISSUE 32
STEP 2 Connect the MIDDLE CIRCLE to two 6-BEAD COMPONENTs by adding four-times 2As
between the pearls Choose a pearl on the MIDDLE CIRCLE and add
2A pass through a pearl in the 6-BEAD COMPONENT previously added and add 2A again Watch out this has to be symmetrical Repeat this at least two more times to make it
secure Now repeat this entire procedure but choose
the 8-th pearl on MIDDLE CIRCLE Repeat this on the other side of the necklace
too
Choose a pearl on the FOCAL CIRCLE and add 2A pass through a pearl in the 6-BEAD COMPONENT and add 2A again Repeat this at least two more times to make it secure
Now repeat this entire procedure but choose the 5-th pearl on FOCAL CIRCLE This will make the necklace nice on your neck
FINISHING THE NECKLACE Connects the parts with A beads
STEP 1 Connect the FOCAL CIRCLE to two 6-BEAD COMPONENTs by adding four-times 2As between the pearls To do this turn your parts upside down you need to
see the pearls We will work on this side from now on
Something Blue Necklace and Earrings
BLOG WWWHANDMADE-JEWELRY-CLUBCOM MEMBERSHIP WWWDIYBEADINGCLUBCOM BLOG DIY BEADING MAGAZINE ISSUE 32
FINISHING THE EARRING Connects the parts with A beads
STEP 1-2 Connect the 6-BEAD COMPONENT
to 4-BEAD COMPONENT and the 4-BEAD
COMPONENT to the earring hook
First connect the 4-BEAD COMPONENT to the 6-BEAD COMPONENT with 4A beads Mimic
the elongation steps of the necklace if needed
Secondly connect the 4-BEAD COMPONENT
to your earring hook with 4A beads again Leave from the last pearl bead 2A beads the hook (this is the orange oval form) and 2As again Pass through each of them to
secure this connection again
Finally get ready to prepare the other earring ndash since we need two of them
STEP 5 Connect the 4-BEAD COMPONENTs to the toggle clasp thus finishing the
necklace Leaving from the last pearl bead 2A the
clasp(this is the orange oval form) and 2A again Pass through all of them a couple more times to make this connection more
secure
Something Blue Necklace and Earrings
BLOG WWWHANDMADE-JEWELRY-CLUBCOM MEMBERSHIP WWWDIYBEADINGCLUBCOM BLOG DIY BEADING MAGAZINE ISSUE 32
If you finished it is time to try it on It was a great fun wasnrsquot it And how beautiful you look in your new necklace and the matching earrings
Something Blue Necklace and Earrings
BLOG WWWHANDMADE-JEWELRY-CLUBCOM MEMBERSHIP WWWDIYBEADINGCLUBCOM
About the Author
Margit Vogel
My name is Margit Vogel I live in Hungary Europe
By profession I am a biochemical engineer but I fell in love with
beads so much that I could not stop playing with them
I make one-of-a-kind beaded and bead embroidered art
jewelry made of the best quality materials such as Swarovski
stones gemstones Japanese beads (Miyuki and Toho) Czech
glass beads leather soutache and suede Each piece is unique
and individually crafted
Feel free to visit my blog for some eyecandy
httpiformjewelrywordpresscom
My shop httpwwwetsycomshopiformjewelry
Facebook httpwwwfacebookcomiformjewelry
BLOG DIY BEADING MAGAZINE ISSUE 32
Getting Down And Personal With Gianna
Getting Down And Personal With Gianna
Nowadays we see more and more jewelry stores opening up online and with these online jewelry stores it has made it easier for us to purchase and view their creations Have you ever wondered how they are able to manage and produce amazing jewelry pieces and tutorials So heres a little on the journey to open up an online shop We are excited to present to you Gianna aka Beading4perfectionists
Gianna Beader amp Youtuber
Unlike most jewelry makers and beadweavers Gianna did not start beading as a hobby but as a means to make ends meet With goals in trying to
fill the financial gap she did everything she could to expand her earnings ndash working as a security guard
and at the same time learning how to bead and selling her pieces at fair trades and flea markets
Since many were asking if she does home beading workshops she started on exploring how to teach people to bead She loves Scott Bakula and has always loved him till now and this served as her
inspiration to start making a beading video tutorial
Gianna started creating videos because she was at the point in her life where everything seemed to be falling apart And at that moment of time she had difficulties financially and selling jewelry was the only way for her to stay afloat financially She is a big Scott Bakula fan and when she went to the UK to see him on stage that was when it hit her that she is already able to edit videos and
taught herself Photoshop and done workshops at bead fairs so why not put these together and see what happens on Youtube She knew that if she gets enough subscribers and views ndash though no one knew what the exact numbers were you would be invited to become a Youtube partner This way she could monetize her videos with advertisements and hopefully she would be able to be a Youtube partner and be able to pay her bills
BLOG WWWHANDMADE-JEWELRY-CLUBCOM MEMBERSHIP WWWDIYBEADINGCLUBCOM BLOG DIY BEADING MAGAZINE ISSUE 32
Getting Down And Personal With Gianna
Her Youtube channel is popular and the reason why she chose Youtube is because Youtube is the biggest platform and reached almost to the whole world Everyone already knows about it and it was growing rapidly as compared to other platforms like Dailymotion so she figured that Youtube was the way to go Her advice to new designers is that when you start out go to the platforms on the top of your list first then work your way down your list if you do not get accepted by your first choice
After loyally putting up one video every week for about 8 months in a row she became a Youtube partner and monetized her videos She knew she needed at least $100 to get her first payout She managed to reach $100 after 3 months The process was not easy she worked hard lack sleep skipped meals and who knows what happened to Ridge in the Bold and the Beautiful because she stopped watching
On Youtube you can monetize your videos Google pays straight to your bank account and at other countries where they also have the option of getting checks among other options In order to get paid you have to reach the $100 mark and after 3 months For Gianna she thinks that you cannot say that Etsy is better than Youtube or Youtube is better than Etsy Her reasoning is because on Youtube she has many followers which will eventually check out her Etsy shop And to start an Etsy shop you need an audience
BLOG WWWHANDMADE-JEWELRY-CLUBCOM MEMBERSHIP WWWDIYBEADINGCLUBCOM BLOG DIY BEADING MAGAZINE ISSUE 32
television and dedicated her spare time (as she had another job) to Youtube She re-registered at the chamber of commerce after receiving her first payout Her work at Youtube now is not a full time job and things have changed on Youtube It is easier to become a parter but there are some countries that need to wait for an invitation to be a Youtube partner Take Italy for instance Italians would have to work just as hard as she did if they want to become a Youtube partner
Getting Down And Personal With Gianna
With her 60000 subscribers on her b4pbakup Youtube channel it is possible to sell at least 60 patterns on the first day on Etsy after promoting the PDF file on her Youtube channel Though you may think that 60 out of 60000 is not much you have to remember that not everyone has the means to purchase the PDF file and a lot of people still rather watch her carry out the tutorial(for free) on Youtube instead of reading the patterns or paying for the patterns even if the pattern is for a fundraiser and only cost $2 Her insights on Youtube is that Youtube is not what it used to be 6 years ago Instead of making more money every month she is making less and less because advertisers have more options of where they want to advertise their ads Ads do not pay as much as they used to Back in the days you could get 25 cents per ad Now you count yourself lucky if you could get 5 cents roll in after two hours
BLOG WWWHANDMADE-JEWELRY-CLUBCOM MEMBERSHIP WWWDIYBEADINGCLUBCOM BLOG DIY BEADING MAGAZINE ISSUE 32
And on top of that adblockers are destroying Youtube channel owners Youtube will start making changes to the channels where there will be ldquopaid subscriptionrdquo channels This has already been implemented in some countries but not in her country The Netherlands This means there will no longer be ads for her monthly paying subscribers She hopes that Youtube will add on a paid per video option feature The option to be a paid channel or free channel or to start a new channel for paying customers is yours to choose Gianna is not happy with Youtube because many others like her have worked so hard and for some years to become Youtube partners(which was something to be proud of) has lost their status
Getting Down And Personal With Gianna
Her advice for those who want to go on Youtube is 1 Do it because you want to teach
2 Do it because you want a career with beads
BLOG WWWHANDMADE-JEWELRY-CLUBCOM MEMBERSHIP WWWDIYBEADINGCLUBCOM BLOG DIY BEADING MAGAZINE ISSUE 32
After putting up about 20 videos and having at least 5000 subscribers add the PDF tutorials to Etsy and Craftsy She found out that her audience would like to have the PDF after watching her videos This is because they would rather print out the PDF and work while seated in a comfy chair technically somewhere else instead of having to pause the video time and time again
Gianna has also made a video for those who want to know the whole story of her journey up until the present day And to get updates on her you can check it out here She has also started a vlog where she tells of how she still works towards becoming a financial independent beader and explains her journey to get where she wants to be(or die trying) Gianna will be in the UK on October the 17th giving an all-day workshop with 4 different patterns
(2 beginners and 2 advanced) in Wotton-under-Edge
Gianna will be there Friday night as the workshop is on Saturday She will be leaving on Sunday Her
doors are open to all who wants to continue the party with her at the hotel across the street
For more information do contact Ann Tucker on Facebook
httpswwwfacebookcomanntucker501
Rec
omm
end
ed R
ead
ings
Making Jewelry with Gemstone
Beads
Combines the popular craft of beading with beautiful semi-precious stones which are collected by many Features a variety of versatile ideas which can be adapted for any type of gem or bead Readers will learn to reate beautiful gemstone jewelry with this dazzling collection of over 100 projects ranging from eyecatching earrings and accessories to exquisite necklaces and bracelets This beautiful book offers an impressive range of 28 beautiful semi-precious stones (including birthstones) and a glimpse into the fascinating history and mythical properties behind them
BLOG DIY BEADING MAGAZINE ISSUE 32 BLOG WWWHANDMADE-JEWELRY-CLUBCOM MEMBERSHIP WWWDIYBEADINGCLUBCOM
Rec
omm
end
ed R
ead
ings
Convertible Crystal Jewelry
Reverse it Twist it Wear it Many
Ways
Diane Whiting presents the idea that convertibility isnrsquot just about using pieces in multiple ways it is also about using skills and creativity in multiple ways Using ever-popular sparkling crystals Diane showcases design elements through various techniques for fun easy fashionable jewelry With 25 projects the reader can choose from bracelets necklaces and earrings that match any outfit or styleDiane Whiting presents the idea that convertibility isnrsquot just about using pieces in multiple ways it is also about using skills and creativity in multiple ways
BLOG DIY BEADING MAGAZINE ISSUE 32 BLOG WWWHANDMADE-JEWELRY-CLUBCOM MEMBERSHIP WWWDIYBEADINGCLUBCOM
Rec
omm
end
ed R
ead
ings
Wire Jewelry Masterclass
Wrapped Coiled and Woven Pieces
Using Fine Materials
Comprehensive and fabulous Wire Jewelry Masterclass takes an in-depth look at an intricate and rewarding craft The 24 projects which range from simple Dragons tear briolette earrings to a Poseidon-under-the-sea pendant will delight and inspire jewelers of all levels and tastes Divided into beginner intermediate and advanced sections this beautifully photographed step-by-step guide is the ticket to wire jewelry expertise
BLOG DIY BEADING MAGAZINE ISSUE 32 BLOG WWWHANDMADE-JEWELRY-CLUBCOM MEMBERSHIP WWWDIYBEADINGCLUBCOM
Rec
omm
end
ed R
ead
ings
Timeless Wire Weaving The
Complete Course
Timeless Wire Weaving focuses on developing wirework skills through 13 projects using three classic wire weaving techniques coiling wrapping and weaving The projects are built around a focal cabochon and incorporate seed beads and crystals in imaginative ways Designers learn to make the jewelry shown in the book and they also use the techniques learned to create innovative jewelry pieces of their own
BLOG DIY BEADING MAGAZINE ISSUE 32 BLOG WWWHANDMADE-JEWELRY-CLUBCOM MEMBERSHIP WWWDIYBEADINGCLUBCOM
Our digital magazine is available through
Apple Newsstand service available to millions of IPAD users
To advertise with us please email us at
diyjewelryclubgmailcom
Or visit our page at
httphandmade-jewelry-clubcomadvertising-diy-beading-magazine
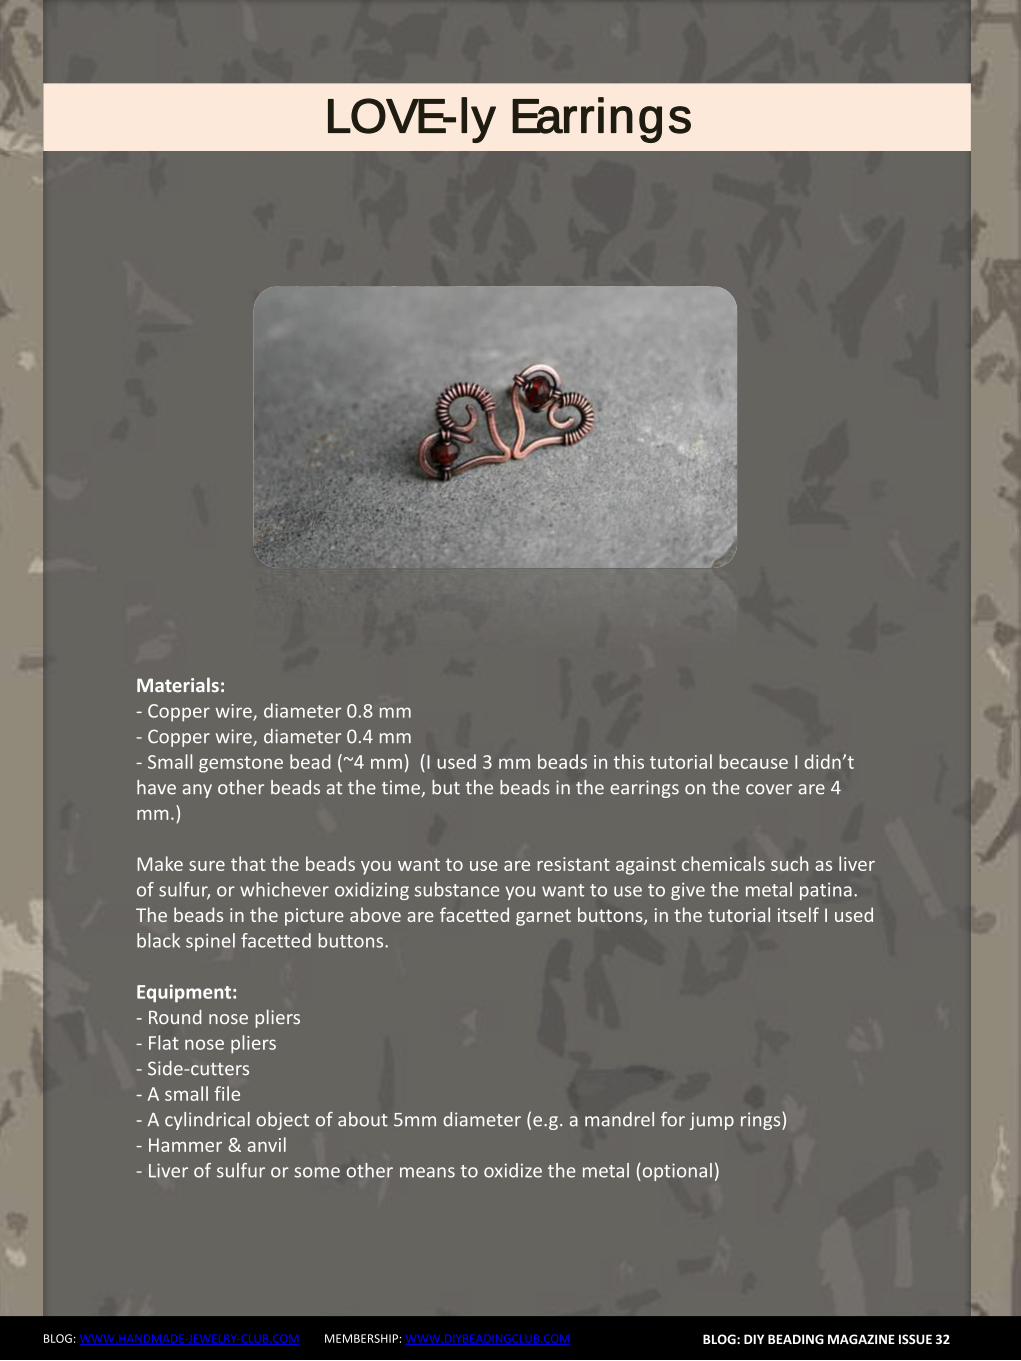
BLOG WWWHANDMADE-JEWELRY-CLUBCOM MEMBERSHIP WWWDIYBEADINGCLUBCOM
LOVE-ly Earrings
BLOG DIY BEADING MAGAZINE ISSUE 32
Step 13 Hammer down the rest of the heart (bumps and coil) If you canrsquot reach certain parts because the ear wire is in the way bend that part of the heart shape away
(verticallyupward) and bend it back after you finish hammering
Congrats yoursquove now made a basic heart-shaped ear stud Next wersquore going to decorate it with a little gemstone and more copper wire
Step 14 Cut off a length of 04 mm copper wire (about 10-20 cm) and string the bead onto it
Step 15 Place the bead in the ldquonon-coilrdquo upper part of the heart shaped ear stud holding it between thumb and forefinger Let approximately 4 cm of the 04 mm wire stick out over the edge of the
heart as illustrated above
Step 16 Wrap the wire twice around the frame so that if you face the front of the ear stud the wire is
directed towards yourself
BLOG WWWHANDMADE-JEWELRY-CLUBCOM MEMBERSHIP WWWDIYBEADINGCLUBCOM
LOVE-ly Earrings
BLOG DIY BEADING MAGAZINE ISSUE 32
Step 17 Flip the wire over the wire with the bead (indicated by the red arrow) and pull tight whilst holding the bead (and its wire) tightly in place It
should look like the construction in the big picture above
Step 18 And make another loop around the wire with the bead The 04 mm wire is now coiled around
twice two times two coils around the frame and two coils around itself
Step 19 Repeat the wire-fastening procedure described in steps 16-18 with the other end of the
wire securing the gemstone in the heart frame Let the wire stick out at the back of the earstud
Step 20 Pull the wire through the lsquocoilrsquo part of the heart shape to the front The wire should lsquocross overrsquo to the other side of the heart at the back of the ear
stud
Step 21 Coil the wire around the frame until you are content with the design Optionally you can hammer down the coils a bit I often do this because I think it
looks somewhat more sophisticated and professional
BLOG WWWHANDMADE-JEWELRY-CLUBCOM MEMBERSHIP WWWDIYBEADINGCLUBCOM
LOVE-ly Earrings
BLOG DIY BEADING MAGAZINE ISSUE 32
Step 22 Cut off the spare bits of wire preferably at the backside of the ear stud and tuck in the ends
Congrats yoursquove now made a heart-shaped ear stud Next we are going to finish it off with a patina
Step 23 Oxidize the metal of the ear studs I always use liver of sulfur solved in warm water The metal
will turn a dark color and matte texture Afterwards rinse the ear studs thoroughly with water and pat
them dry
Step 24 Rub the oxidized ear stud all over with a rough polishing pad to bring back (a dark copper)
color to the surface
Yoursquove now finished making your own LOVE-ly ear studs
Secure them in your ear with plastic or copper stops These can be bought online or in jewelry-supply
stores
Variation ideas You can easily vary in size and shape (longer hearts smaller coils pointier bottoms etc) and
use different materials As you can see the earring I make in this tutorial has a slightly smaller bead than the
earrings on the cover which influences the overall appearance somewhat
The earrings underneath are made with sterling silver and gold wire (super-short coils) and contain small pink
rubies
LOVE-ly Earrings
BLOG WWWHANDMADE-JEWELRY-CLUBCOM MEMBERSHIP WWWDIYBEADINGCLUBCOM
About the Author
Jeske Hendriks
Hi there My name is Jeske and I love all things handmade Over the years Irsquove dabbled in countless different arts and crafts but nowadays I mainly focus on making jewellery and cutting stone cabochons As for jewellery
my preferred materials are silver wire and gemstonemineral beads Using wire-wrapping and basic silver smithing techniques I create both simple
and intricate pieces ndash each and every one of them unique a personal little artwork
You are welcome to follow me on facebook stop by at my personal
webpage andor to have a look at my Etsy shops httpswwwfacebookcomyeskecrafts
httpwwwyeskecraftscom httpwwwyourbeadsandfindingsetsycom
httpwwwyeskecraftsetsycom httpwwwyeskemiscetsycom
BLOG DIY BEADING MAGAZINE ISSUE 32
Flower Tale Earrings
BLOG WWWHANDMADE-JEWELRY-CLUBCOM MEMBERSHIP WWWDIYBEADINGCLUBCOM
Techniques Beadweaving
Project Level Beginner to Intermediate
Materials 12 bronze opaque 6mm Czech glass pearl round beads
2 gr gold lustered dark topaz Japanese 110 seed beads (Toho 459)
Size B gold beading thread
2 bronze earring hooks
Tools Size 10 beading needle
Scissors
Finished Size Diameter ndash 3 cm (118 inches) (without earring hooks)
BLOG DIY BEADING MAGAZINE ISSUE 32
Flower Tale Earrings
BLOG WWWHANDMADE-JEWELRY-CLUBCOM MEMBERSHIP WWWDIYBEADINGCLUBCOM
Step 1 Cut about 110 cm (43 inches) of thread and
pass it through the needle hole
Pick six groups of one 110 seed bead and one
6 mm round bead
BLOG DIY BEADING MAGAZINE ISSUE 32
Join the beads into a ring and secure with two
square knots
Leave a tail of about 15 cm (59 inches)
Step 2 The working thread should be right before the
6 mm round bead
Pick seven 110 seed beads skip the 6 mm
round bead and pass the needle through the
next 110 seed bead added in the previous
round
Repeat adding groups of seven 110 seed
beads five more times
When adding the last group take the needle
directly through the 110 seed bead from the
previous round and the next one added in the
beginning of current round
Flower Tale Earrings
BLOG WWWHANDMADE-JEWELRY-CLUBCOM MEMBERSHIP WWWDIYBEADINGCLUBCOM
Step 3 Pick three 110 seed beads skip one seed
bead from the chain of seven added in the
previous round and pass with the needle
directly through the next three 110 seed
beads
BLOG DIY BEADING MAGAZINE ISSUE 32
Pick three 110 seed beads skip one seed
bead from the chain of seven added in the
previous round and pass with the needle
through the last one and the first 110 seed
bead from the next chain of seven
Repeat the above directions from Step 3 five
more times
After completing this round make sure the
thread will be exiting from the middle 110
seed bead from the first group of three added
in the beginning of this round
Step 4 Pick one 110 seed bead and go through the
last seed bead of the group of three
Flower Tale Earrings
BLOG WWWHANDMADE-JEWELRY-CLUBCOM MEMBERSHIP WWWDIYBEADINGCLUBCOM
Pick three 110 seed beads and take the
needle through the first seed bead of the next
group of three added in the previous round
BLOG DIY BEADING MAGAZINE ISSUE 32
Pick one 110 seed bead and go with the
needle through the next three seed beads (the
last two of the group of three and the last one
from the chain of seven)
Then go up through three 110 seed beads
(the first from the next group of seven and the
first two from the next group of three)
Repeat the above directions from Step 4 to
complete the remaining petals
When working on the last petal perform the
operation from the image shown on the left
instead of picking the group of three 110 seed
beads string two 110 seed beads the earring
hook other two 110 seed beads and
continue beading as instructed above
When you are done hide the thread ends into the beadwork
Flower Tale Earrings
BLOG WWWHANDMADE-JEWELRY-CLUBCOM MEMBERSHIP WWWDIYBEADINGCLUBCOM
About the Author
Iulia Postică
I was born and live in Moldova Eastern Europe Ever since I remember myself
Ive been crocheting and knitting My grandmother has taught me that and I
loved it very much I always regarded crafts exclusively as a hobby and never
thought of making a career of it I traveled a lot to various historical sites
Actually Ive spent all my childhood summers in archaeological camps with
my father who is a professional archaeologist
I also enjoy metal hammering and wirework as it gives me possibility to
express myself in materials used by human communities since ancient times
copper brass glass seed beads and gemstones That is no surprise to anyone
given my family history and academic background
My shop ldquoBeadedTreasuryrdquo with beading tutorials and bead crochet patterns
httpswwwetsycomshopBeadedTreasury
My shop ldquoArchaeologicardquo with artisan jewelry
httpswwwetsycomshopArcheologica
My blog httpbeadedtreasuryblogspotcom
My facebook httpswwwfacebookcomBeadedTreasury
BLOG DIY BEADING MAGAZINE ISSUE 32
Liberty Earrings
BLOG WWWHANDMADE-JEWELRY-CLUBCOM MEMBERSHIP WWWDIYBEADINGCLUBCOM
Materials - Nr 2 cabochon Preciosa Ornela ovale 18x22 mm turchese
- Rocaille Toho 150 silver lined green emerald
- Nr 2 dagger beads
- Nr 20 pearl 4 mm
- Superduo opaque luster ceramic green
- Rocaille 80 color gold
- Rocaille 80 color ivory
- Delica Miyuki 110 aquagreen mix
- Rocaille Miyuki 110 galvanized silver
- Nr 2 monachelle (earwire)
-Fireline
- Beading Needle nr 12
BLOG DIY BEADING MAGAZINE ISSUE 32
Liberty Earrings
BLOG WWWHANDMADE-JEWELRY-CLUBCOM MEMBERSHIP WWWDIYBEADINGCLUBCOM
Make a circle of 20 delica beads and make a knot (a) Perform two rounds peyote with ivory 80 seed beads (b c) Exit from an ivory
bead
BLOG DIY BEADING MAGAZINE ISSUE 32
a b c
Jump from 80 to 80 with 110 80 gold 110 (a) Finish the round and come out of a 80 gold bead
Jump to the next 80 gold with a 4mm pearl (b) Finish the round and come out
of the first pearl Jump to the 2nd pearl and close with a 80 gold bead(c)
a b c
Position the cabochon and jump from one 80 to the other with two delica bead (a)
Continue with three delicas four times (b) At the bottom sew on two delicas then finish the round by sewing on three delicas for four times passing from one to another roc 80 Tighten the cabochon and exit from the
first two delica that you started with String together a 110 and 150 and enter the second of the three close delicas (c)
a b c
Liberty Earrings
BLOG WWWHANDMADE-JEWELRY-CLUBCOM MEMBERSHIP WWWDIYBEADINGCLUBCOM
Put together 150 110 150 and enter in the second of three next delica (a) Put the same beads for three times then put together 150 and 110 and enter
in the two delica of the bottom tip (b) Enter in the second of three next delica with 110 and 150 (c) Continue passing
in the 80 beads with three beads (150 110 150) for four times then at the top finish the round by putting together a 150 and 110 (d)
BLOG DIY BEADING MAGAZINE ISSUE 32
a b c
Exit from the first 150 sewn in the previous round and jump in the three next beads with a 150 (a)
Put a 150 at a time and exit from the first 110 beads of the bottom tip Jump in the
near 110 with a 150 (b) Finish round repeating steps a and b (c) Exit the roc 80 as shown in the photo (d)
a b c
d
a b c d
Enter in the 80 with four 150 (a b) Enter the 80 beads at the bottom of the pieces with two 110 one superduo one 80 ivory bead one superduo and two 110 (c)
d e f
Liberty Earrings
BLOG WWWHANDMADE-JEWELRY-CLUBCOM MEMBERSHIP WWWDIYBEADINGCLUBCOM
Exit from the bottom pearl (a) Put together 150 three 110 150 and enter in the superduorsquos second hole (b)
Put together three superduo and enter in the next superduorsquos second hole (c) Rethread 15 three 110 150 and return in the opposite direction in the pearl of departure (d)
BLOG DIY BEADING MAGAZINE ISSUE 32
a b
c
Exit from the second pearl indicated from (a) Put 150 four 110 and enter in the second of the three 110 (b) Go to the second superduorsquos hole with four 110 and a 150 (c)
Enter the second hole of the supeduo with a 150(d) Sew in the middle of the bottom of the superduo 150 two 110 150 dagger 150 two 110 150(e)
Enter the second hole of the thirs superduo with 150 (f)
a b c
d
d e f
Liberty Earrings
BLOG WWWHANDMADE-JEWELRY-CLUBCOM MEMBERSHIP WWWDIYBEADINGCLUBCOM BLOG DIY BEADING MAGAZINE ISSUE 32
Put 150 four 110 and enter in the second of three 110 of the base (a) Insert four 110 and 150 in the pearl opposite direction indicated in the picture (b) Go in all the beads
around the piece and exit from the pearl at the top (c) Put 150 three 110 150 and enter the superduo (d)
Enter the ivory bead 80 with two 150 (e) Enter the next superduo with two 150 (f)
a b c
d e f
Put together 150 three 110 and enter in opposite direction in the departurersquos pearl (a) Exit from the 150 beads indicated by photo (b) From this jump in the second of two near
150 with five 150 to created the hole for the earwire (c) Pass the thread in the beads make a few knots and cut the excess thread
a b c
Your earrings are finished
Liberty Earrings
BLOG WWWHANDMADE-JEWELRY-CLUBCOM MEMBERSHIP WWWDIYBEADINGCLUBCOM
About the Author
Mariella Martella
My name is Mariella Martella and I am the author and
designer of jewelry that I sign with the name of Mariel Bijoux
After changing city often for work and study I currently live
in northern Italy I am an art historian with a passion for travel
painting and jewelry design in weaving that project since
2010 In my beads and crystals are the colors of the
Mediterranean sea the atmosphere of summer evenings
and the lights of the places I visited
You can find me at
Etsy shop httpswwwetsycomitshopMarielBijoux
Facebook httpswwwfacebookcommari3lbijoux
Crafting blog httpmarielbijouxblogspotit
Twitter httpstwittercomMarielBijoux
BLOG DIY BEADING MAGAZINE ISSUE 32
Jade Necklace
BLOG WWWHANDMADE-JEWELRY-CLUBCOM MEMBERSHIP WWWDIYBEADINGCLUBCOM
Every time I wear a necklace I always make it a point that the
necklace will lay perfectly flat on my neck Using wire for a necklace
made it possible for me like what I did with Jade Necklace It may look
odd at first having bent wires for a necklace but once the jewelry is
finished youll be so happy how the necklace will perfectly lay on your
neck
The tutorial is catered for intermediate level One must know basic
wirework skills such as wire wrapping making loops wrapped loops
and linking to follow the tutorial It has clear instructions and ultra-clear
close-up photos at each step Additionally you can ask me question
you have on the tutorial No more getting stuck and frustrated on a
confusing or just plain inaccurate pattern
If you followed this tutorial and then sell the accessory or jewelry
please give credit to the author or DIY Beading Clubcom
Copyright 2015
wwwdiybeadingclubcom
wwwhandmade-jewelry-clubcom
BLOG DIY BEADING MAGAZINE ISSUE 32
Jade Necklace
BLOG WWWHANDMADE-JEWELRY-CLUBCOM MEMBERSHIP WWWDIYBEADINGCLUBCOM BLOG DIY BEADING MAGAZINE ISSUE 32
Materials Needed 18ga Craft wire 28ga Craft wire 15mm diameter Green Round Flat Back Sew On Gems 5mm Green pearls
8mm Green pearls 6mm x 11mm teardrop Crystal Treasures Mill Hill beads or any teardrop bead with holes on the side Hook for your clasp
Tools Needed Wire cutter Flat nose pliers Round nose pliers Mandrel A jar or any rounded object to shape your necklace
Skill Level Intermediate
Step 1 Cut 6 inches 18ga wire Make a loop on one end then measure approximately 125 inches and make another loop
Form a size 4 circle on your mandrel
Jade Necklace
BLOG WWWHANDMADE-JEWELRY-CLUBCOM MEMBERSHIP WWWDIYBEADINGCLUBCOM BLOG DIY BEADING MAGAZINE ISSUE 32
Then close the circle by wrapping the extended wire just below the loop Wrap the
wire 2x
This is how it looks like Lets call this circle frame Youll notice that the lower curve is
slightly bigger than the upper curve
Step 2 Cut 8 inches of 28ga wire Wrap one end of
the wire at least 3x on one side of the circle frame just below the loop
Bring up your gem Flat back sew on gems has 2 holes Insert the wire into one hole and then
wrap the wire once onto the circle frame
Jade Necklace
BLOG WWWHANDMADE-JEWELRY-CLUBCOM MEMBERSHIP WWWDIYBEADINGCLUBCOM BLOG DIY BEADING MAGAZINE ISSUE 32
Step 3 Insert a 5mm pearl on the wire and then pass
the wire under circle frame
Repeat previous step 2x and have 3 pearls wrapped
Continue wrapping with your teardrop crystal My crystal has 2 holes on the side
and then continue wrapping with your 5mm pearls then secure your wire
Repeat Step 3 and create as many as needed For 16-inch necklace Ive created 6 of these
components
Jade Necklace
BLOG WWWHANDMADE-JEWELRY-CLUBCOM MEMBERSHIP WWWDIYBEADINGCLUBCOM BLOG DIY BEADING MAGAZINE ISSUE 32
Step 4 Cut a 15-inch 18ga wire and make a loop on
one end Insert 8mm pearl and make a loop on the other end You then use these as connectors
and link the components
Step 5 The necklace is an 18ga wire with wrapped
loops on both ends First cut 7 inches 18ga wire and make a wrapped loop with your hook already inserted Side in 18pcs 5mm pearls
Then make a wrapped loop on the other end connecting the wrapped loop onto the component Do the same for the other
necklace but make the loop on the other end big enough so the hookclasp can pass thru
To have the necklace curve shaped use a jar to bend the wire Voila Now youre
ready to party
Jade Necklace
BLOG WWWHANDMADE-JEWELRY-CLUBCOM MEMBERSHIP WWWDIYBEADINGCLUBCOM
About the Author
Sky Aldovino
I consider myself a late bloomer when it comes to crafting Irsquom a self-taught jewelry maker Jewelry making wasnrsquot really a hobby of mine but unforeseen events lead me to learn jewellery making My family put up a craft store where we sell cross stitch beads and all sorts of crafting materials I fell in love with the beads and tried to create accessories only for myself Clients liked the pieces and I started customizing handmade jewelleries The craft store was a success for 6 years but like any other small businesses we had to close it down and I was confined to staying at home While at home I had all the time using the internet and now working as a home-based jewelry designer
BLOG DIY BEADING MAGAZINE ISSUE 32
Atomic Ring
BLOG WWWHANDMADE-JEWELRY-CLUBCOM MEMBERSHIP WWWDIYBEADINGCLUBCOM
Have fun making shapes using the wigjig Cyclops Make loops going in
circles to mimic the shape of a flower or in this tutorial mimic the
shape of an atom The tutorial will also teach you how to cage a
cabochon Whats nice about this piece is that with one long wire you
can create the ring from start to finish
The tutorial is catered for intermediate to advanced students One
must already know how to make spirals and use a wigjig tool It has
clear instructions and ultra-clear close-up photos at each step
Additionally you can ask me question you have on the tutorial No
more getting stuck and frustrated on a confusing or just plain
inaccurate pattern
If you followed this tutorial and then sell the accessory or jewelry
please give credit to the author or DIY Beading Clubcom
If you like to get a blank wigjig graph visit wigjigcom Shop and Jigs
section
Copyright 2015
wwwdiybeadingclubcom
wwwhandmade-jewelry-clubcom
BLOG DIY BEADING MAGAZINE ISSUE 32
Atomic Ring
BLOG WWWHANDMADE-JEWELRY-CLUBCOM MEMBERSHIP WWWDIYBEADINGCLUBCOM
Materials Needed 20ga Craft wire 28ga Craft wire 11mm Round Cabochon
Tools Needed Wigjig Cyclops 15mm pegs Wire cutter Flat nose pliers Mandrel
Skill Level Intermediate - Advanced
BLOG DIY BEADING MAGAZINE ISSUE 32
Step 1 Lets prepare your wigjig cyclops Position the pegs like so
Atomic Ring
BLOG WWWHANDMADE-JEWELRY-CLUBCOM MEMBERSHIP WWWDIYBEADINGCLUBCOM BLOG DIY BEADING MAGAZINE ISSUE 32
Lets work with longer wire so youll have enough wire to hold onto as you manipulate the wire so cut 36 inches of 20ga wire From
one end of the wire measure 10 inches
On the 10-inch measurement loop the wire at the center peg then continue to loop onto the side pegs going in circle going back to
the center peg after looping on the side peg
Now the wire at the center peg will start to build up as you go around the side pegs so
you need to constantly press the wire at the center peg to accommodate the build up of
wire
When youre done pull out the wire and this is
how it should look like
Atomic Ring
BLOG WWWHANDMADE-JEWELRY-CLUBCOM MEMBERSHIP WWWDIYBEADINGCLUBCOM BLOG DIY BEADING MAGAZINE ISSUE 32
You will notice that the frame opens wide Now to keep the atom frame from opening wide secure the center of the frame by wrapping a 28ga wire What you
need to do is simply pass the 28ga wire into the hole and wrap as many times as needed or until youre sure that the frame is secure
Step 2 Now youre finished with your atom frame Well now create the focal design With the longer wire make a spiral at the center big
enough to accommodate the size of your cabochon In this tutorial the spiral is about
11mm in diameter the same size as my cabochon
Pop in your cabochon and start to make spirals going around and over the cabochon as if you are caging the cabochon Create at
least 5 rounds and then cut off any excess
Step 3 Now lets make the ring and this with the other
end of the wire
Atomic Ring
BLOG WWWHANDMADE-JEWELRY-CLUBCOM MEMBERSHIP WWWDIYBEADINGCLUBCOM BLOG DIY BEADING MAGAZINE ISSUE 32
Bring up your mandrel and wrap the wire to the size of your finger Wrap at least 2 times
When youre sure you have the right size pull the ring out of the mandrel
With the extended wire wrap the wire the secure the ring
Cut off any excess and voila You have your atomic ring Create as many as you can with different colors of cabochon
Atomic Ring
BLOG WWWHANDMADE-JEWELRY-CLUBCOM MEMBERSHIP WWWDIYBEADINGCLUBCOM
About the Author
Sky Aldovino
I consider myself a late bloomer when it comes to crafting Irsquom a self-taught jewelry maker Jewelry making wasnrsquot really a hobby of mine but unforeseen events lead me to learn jewellery making My family put up a craft store where we sell cross stitch beads and all sorts of crafting materials I fell in love with the beads and tried to create accessories only for myself Clients liked the pieces and I started customizing handmade jewelleries The craft store was a success for 6 years but like any other small businesses we had to close it down and I was confined to staying at home While at home I had all the time using the internet and now working as a home-based jewelry designer
BLOG DIY BEADING MAGAZINE ISSUE 32
Featured Article Gemstones Used for Jewelry Making
BLOG WWWHANDMADE-JEWELRY-CLUBCOM MEMBERSHIP WWWDIYBEADINGCLUBCOM
Gemstones are stones which we hold quite highly in terms of value And
jewelry often consists of stones that add attractiveness to it so it is not
surprising when jewelry designers actually use gemstones in their designs In
fact there are different types of gemstones that can be used for making
jewelry There are the expensive and pure gemstones and there are also the
imitation ones The information below will provide some information about
the kinds of stones you can use to create jewelry and how these stones will
impact the jewelry you have created
The first kind of stone which I believe we are all quite familiar with are
birthstones These stones are associated with individualrsquos month of birth
by SunVDesigns by BeyhanAkman
For example Amethyst stone is connected with anybody who is born in
February which carries special significance in the area of emotions and also
spiritually This stone also signifies calm and peace as well
And then we have semi-precious stones which are also often used in jewelry
making They are not as valuable as compared to precious stones but still
valuable Best examples of these stones are aquamarine topaz tourmaline
opal and turquoise
BLOG DIY BEADING MAGAZINE ISSUE 32
Featured Article Gemstones Used for Jewelry Making
BLOG WWWHANDMADE-JEWELRY-CLUBCOM MEMBERSHIP WWWDIYBEADINGCLUBCOM
It is an ideal gift for someone who you deem special Aquamarine pendants
usually work well for anyone and is widely an accepted stone
by HyppieChic by joyeriamestiza
However precious stones are the most unusual
and precious jewels to us Examples of some of
them are emerald sapphire diamond and
ruby These stones are usually very expensive
and are prized for their exquisiteness These
stones are commonly used in high-quality
jewelry designs which costs quite a fortune to
obtain
BLOG DIY BEADING MAGAZINE ISSUE 32
by sarajewelrystu
Jewelry designs with precious stones are usually
given as exceptional gifts on special occasions A
perfect example is a diamond ring that is usually
given as an engagement gift
by ldiamondsforever
Featured Article Gemstones Used for Jewelry Making
BLOG WWWHANDMADE-JEWELRY-CLUBCOM MEMBERSHIP WWWDIYBEADINGCLUBCOM
There are also synthetic stones which are often used to create jewelry
Synthetic stones are artificial imitations of gemstones Synthetic Sapphire
jewelry costs less compare with the authentic ones Most of the time
imitation stones are used to save cost but at the same time have the similar
look of the real stone
BLOG DIY BEADING MAGAZINE ISSUE 32
by shininggems by thaimaker
by lapinduprintemps by PastimeArt
Gemstones are used like beads and you can use it in any designs whether
simple or elaborate
Swarovski crystal components are available in a rich multitude of rondelles Perfect as spacers in necklaces or as discs in earrings Rondelles can be used with many varieties of shapes or sizes Use Swarovski crystal rondelles between large gemstones as accents with precious metal findings Fire Mountain Gems and Beads Crystal Passionsreg brand presents Swarovski crystal in display-ready packaging for brilliant retail presentation Crystal Passionsreg is an assurance of genuine Swarovski crystal
BLOG DIY BEADING MAGAZINE ISSUE 32 BLOG WWWHANDMADE-JEWELRY-CLUBCOM MEMBERSHIP WWWDIYBEADINGCLUBCOM
Recommended Jewelry Making Supplies
Mz Unisex-adults 12pcs 25x18x6mm Turquoise Oval CAB Cabochon
BLOG DIY BEADING MAGAZINE ISSUE 32 BLOG WWWHANDMADE-JEWELRY-CLUBCOM MEMBERSHIP WWWDIYBEADINGCLUBCOM
Recommended Jewelry Making Supplies
For a little sparkle that goes a long way design with Swarovski 4mm faceted bicones Create glorious multi-strand necklaces with the dainty crystals or use as spacers to add a tiny flash to your designs Swarovski crystal components are made in Austria and are considered the finest products of their kind in the world
BLOG DIY BEADING MAGAZINE ISSUE 32 BLOG WWWHANDMADE-JEWELRY-CLUBCOM MEMBERSHIP WWWDIYBEADINGCLUBCOM
Recommended Jewelry Making Supplies
Imitation beads resist color change These beads have uniform quality with a good polish Some strands may have little to no matrix Sizes shapes and colors may vary with handcrafted items
BLOG DIY BEADING MAGAZINE ISSUE 32 BLOG WWWHANDMADE-JEWELRY-CLUBCOM MEMBERSHIP WWWDIYBEADINGCLUBCOM
Recommended Jewelry Making Supplies
Something Blue Necklace and Earrings
BLOG WWWHANDMADE-JEWELRY-CLUBCOM MEMBERSHIP WWWDIYBEADINGCLUBCOM
Skill level Beginner Intermediate Advanced
DIMENSIONS OF THE NECKLACE Inner Circumference 14 18 inch 35 cm
Focal Pendant Width 1 15 inch 35 cm Focal Pendant Height 1 15 inch 35 cm
DIMENSIONS OF THE EARRING Earring Width 716 inch 12 cm Earring Height 1516 inch 25 cm (Without the earring hook)
BLOG DIY BEADING MAGAZINE ISSUE 32
Materials
Note Before purchasing the supplies measure the length of your wished necklace If you decide to bead a longer necklace you should keep in mind that for every extra
frac34 inches 2 cm-s you will need 8 bicones and 8 pearls
Something Blue Necklace and Earrings
BLOG WWWHANDMADE-JEWELRY-CLUBCOM MEMBERSHIP WWWDIYBEADINGCLUBCOM BLOG DIY BEADING MAGAZINE ISSUE 32
Work RAW stitch into a beaded circle and embellish with Swarovski bicones
STEP 2 String 1A and 2 pearls Pass through the previous
second pearl and the freshly added 1A and the first pearl again
STEP 1 Use a comfortable length of thread to string 2
pearls 1A and 1 pearl again leaving a 2rdquo 5cm tail Pass through the first two pearls strung to form a
ring
STEP 3 String 2 pearls and 1A Pass through the previous first pearl and the freshly added two pearls
again
STEP 4 - 17 Repeat STEP 2 and STEP 3 again until you count 17 pearls in the inner circle
But be careful in the last step you only have to add 1 pearl then pass through the first pearls
added in STEP 1 and add another 1A Now pass through the first pearl added in STEP
1and 1A added in this round again to exit from this A
Something Blue Necklace and Earrings
BLOG WWWHANDMADE-JEWELRY-CLUBCOM MEMBERSHIP WWWDIYBEADINGCLUBCOM BLOG DIY BEADING MAGAZINE ISSUE 32
STEP 19 String 2A and pass through the next A added in round 4-17 and the A added in round 18 the 2A added in this round and finally the A added in round 4-17 to exit from the bead showed below
STEP 18 String 3A and pass through the 1A added in the previous round and the first A added in this
round
STEP 20 - 34 Repeat STEP 18 and STEP 19 again until you finish the circle
But be careful in the last step first you have to pass through 3A and then add 1A After this pass
through the 3A again and exit from the A bead
shown below (This is the first A added in STEP 18)
Something Blue Necklace and Earrings
BLOG WWWHANDMADE-JEWELRY-CLUBCOM MEMBERSHIP WWWDIYBEADINGCLUBCOM BLOG DIY BEADING MAGAZINE ISSUE 32
STEP 35 Step up to exit from the pearl shown below (Finishing the previous step in the A bead and then
stepping up from there makes the circle more secure)
Now string 3 bicones Pass through the pearl and the first bicone again
In the reality your circle will look more like this the A beads forming a strong row in the middle of the
pearls
STEP 36 Add 2 bicones Pass through the
neighboring pearl the first bicone added in the previous row and the 2 bicones added in this step
so you can exit from the next pearl
Something Blue Necklace and Earrings
BLOG WWWHANDMADE-JEWELRY-CLUBCOM MEMBERSHIP WWWDIYBEADINGCLUBCOM BLOG DIY BEADING MAGAZINE ISSUE 32
Now in the reality your circle will look more like this the A beads still forming a strong row in the middle of the pearls and the bicones slightly lying on top of
them
STEP 37 - 49 Repeat STEP 35 and STEP 36 again until you finish the circle with the bicones
But be careful in the last step first you have pass through the third bicone added then add 1 bicone
and pass through this little quartet to exit from the bicone shown below (The second one added in
STEP 35)
STEP 50 With these steps we finish the circle by adding 1 bicone to connect the A beads and the
bicone row So add 1 bicone pass through the nearest A bead and add 1 bicone again Pass
through the bicone already there and exit from the bicone you just added
Something Blue Necklace and Earrings
BLOG WWWHANDMADE-JEWELRY-CLUBCOM MEMBERSHIP WWWDIYBEADINGCLUBCOM BLOG DIY BEADING MAGAZINE ISSUE 32
STEP 66-83 Secure the circle by adding 1A between each bicone in the second row of Swarovski
bicones If you finished secure the thread and trim
STEP 51-65 Using the same technique as in STEP 37 - 49 add 1 bicone to finish the third bicone row The black line shows you the way (After STEP 50 pass through the next A bead add 1 bicone and pass through the bicone already there and the bicone added in the previous step Repeat these steps to
finish the inner bicone circle)
MIDDLE CIRCLE Work RAW stitch into a beaded circle and embellish with
Swarovski bicones Remember you need to bead two circles this time
STEP 1 Just like in the focal circle begin with 2 pearls 1A and 1 pearl again on a comfortable length of thread
leaving a 2rdquo 5cm tail Pass through the first two pearls strung to form a ring
Something Blue Necklace and Earrings
BLOG WWWHANDMADE-JEWELRY-CLUBCOM MEMBERSHIP WWWDIYBEADINGCLUBCOM BLOG DIY BEADING MAGAZINE ISSUE 32
STEP 15-28 Mimicing the FOCAL CIRCLElsquos STEP 18-34 bead A beads until you finish the inner part of the
circle Exit from a pearl in the second row This circle should look very similar to the first one but this is a bit
smaller
STEP 2-14 Mimicing the FOCAL CIRCLElsquos STEP 2-17 bead until you count 14 pearls in the inner circle Exit
from the last A added
STEP 29-42 Mimicing FOCAL CIRCLElsquos STEP 35-49 add 2 rows of bicones
STEP 43-56 Mimicing the FOCAL CIRCLElsquos STEP 50-65 bead the third row of bicones to finish the circle
Something Blue Necklace and Earrings
BLOG WWWHANDMADE-JEWELRY-CLUBCOM MEMBERSHIP WWWDIYBEADINGCLUBCOM BLOG DIY BEADING MAGAZINE ISSUE 32
SMALLEST CIRCLE Work RAW stitch into a beaded circle and embellish
with Swarovski bicones Remember you need to bead two circles again
STEP 1 Just like in the focal circle begin with 2 pearls
1A and 1 pearl again on a comfortable length of thread leaving a 2rdquo 5cm tail Pass through the first two
pearls strung to form a ring
STEP 57-70 Just like the FOCAL CIRCLElsquos STEP 66-83 secure the circle by adding 1A between every bicone
in the second row of bicones If you finished secure the thread and trim (Donrsquot forget to bead another
circle)
STEP 2-12 Mimicing the FOCAL CIRCLElsquos STEP 2-17 bead until you count 12 pearls in the inner circle Exit
from the last A added
STEP 13-24 Mimicing the FOCAL CIRCLElsquos STEP 18-34 bead A beads until you finish the inner part of the
circle Exit from a pearl in the second row This circle should look very similar to the first two but this is the
smallest of them all
Something Blue Necklace and Earrings
BLOG WWWHANDMADE-JEWELRY-CLUBCOM MEMBERSHIP WWWDIYBEADINGCLUBCOM BLOG DIY BEADING MAGAZINE ISSUE 32
STEP 37-48 Mimicing the FOCAL CIRCLElsquos STEP 50-65 bead the third row of bicones to finish this circle too
STEP 25-36 Mimicing FOCAL CIRCLElsquos STEP 35-49 add 2
rows of bicones The last step here is purple again
STEP 49-60 Just like the FOCAL CIRCLElsquos STEP 66-83 secure the circle by adding 1A between every bicone
in the second row of bicones If you finished secure the thread and trim (Donrsquot forget that you need two
small circles)
Something Blue Necklace and Earrings
BLOG WWWHANDMADE-JEWELRY-CLUBCOM MEMBERSHIP WWWDIYBEADINGCLUBCOM BLOG DIY BEADING MAGAZINE ISSUE 32
STEP 37-48 Mimicing the FOCAL CIRCLElsquos STEP 50-65 bead the third row of bicones to finish this circle too
STEP 25-36 Mimicing FOCAL CIRCLElsquos STEP 35-49 add 2
rows of bicones The last step here is purple again
STEP 49-60 Just like the FOCAL CIRCLElsquos STEP 66-83 secure the circle by adding 1A between every bicone
in the second row of bicones If you finished secure the thread and trim (Donrsquot forget that you need two
small circles)
Something Blue Necklace and Earrings
BLOG WWWHANDMADE-JEWELRY-CLUBCOM MEMBERSHIP WWWDIYBEADINGCLUBCOM BLOG DIY BEADING MAGAZINE ISSUE 32
STEP 2-6 Continue by adding 1A 1 bicone 1 pearl until you count 6 of each
STEP 1 Begin with 1 pearl 1 bicone 1A and 1 bicone again on a comfortable length of thread leaving a 2rdquo
5cm tail Pass through the pearl and the first bicone strung to form a ring
STEP 7-12 Pass through the A beads to make your
component more secure Also secure the thread and trim (Repeat these steps until you have six 6-BEAD
COMPONENTs)
6-BEAD COMPONENT Work RAW stitch into a beaded circle and embellish with Swarovski bicones
For the necklace we will need six from this component For the earring two
Something Blue Necklace and Earrings
BLOG WWWHANDMADE-JEWELRY-CLUBCOM MEMBERSHIP WWWDIYBEADINGCLUBCOM BLOG DIY BEADING MAGAZINE ISSUE 32
STEP 2-4 Continue by adding 1A 1 bicone 1 pearl
until you count 4 of each
STEP 1 Begin with 1 pearl 1 bicone 1A and 1 bicone again on a comfortable length of thread leaving a 2rdquo
5cm tail Pass through the pearl and the first bicone strung to form a ring
STEP 5-8 Pass through the A beads to make your component more secure Also secure the thread and
trim (Repeat these steps until you have the wished amount of 4-BEAD COMPONENTs)
4-BEAD COMPONENT Work RAW stitch into a beaded circle and embellish with Swarovski bicones
For the necklace-size that is given on the second page we will need 20 from this
component For the earring two
If you would like to make a longer necklace you need to make more (One 4-BEAD COMPONENT measures about 38 inch 1 cm To make the necklace symmetrical you have to have equal amounts on each side This means for every extra frac34 inches
2 cm-s you will need 1 4-BEAD COMPONENT on each side of the necklace)
Something Blue Necklace and Earrings
BLOG WWWHANDMADE-JEWELRY-CLUBCOM MEMBERSHIP WWWDIYBEADINGCLUBCOM BLOG DIY BEADING MAGAZINE ISSUE 32
STEP 2 Connect the MIDDLE CIRCLE to two 6-BEAD COMPONENTs by adding four-times 2As
between the pearls Choose a pearl on the MIDDLE CIRCLE and add
2A pass through a pearl in the 6-BEAD COMPONENT previously added and add 2A again Watch out this has to be symmetrical Repeat this at least two more times to make it
secure Now repeat this entire procedure but choose
the 8-th pearl on MIDDLE CIRCLE Repeat this on the other side of the necklace
too
Choose a pearl on the FOCAL CIRCLE and add 2A pass through a pearl in the 6-BEAD COMPONENT and add 2A again Repeat this at least two more times to make it secure
Now repeat this entire procedure but choose the 5-th pearl on FOCAL CIRCLE This will make the necklace nice on your neck
FINISHING THE NECKLACE Connects the parts with A beads
STEP 1 Connect the FOCAL CIRCLE to two 6-BEAD COMPONENTs by adding four-times 2As between the pearls To do this turn your parts upside down you need to
see the pearls We will work on this side from now on
Something Blue Necklace and Earrings
BLOG WWWHANDMADE-JEWELRY-CLUBCOM MEMBERSHIP WWWDIYBEADINGCLUBCOM BLOG DIY BEADING MAGAZINE ISSUE 32
FINISHING THE EARRING Connects the parts with A beads
STEP 1-2 Connect the 6-BEAD COMPONENT
to 4-BEAD COMPONENT and the 4-BEAD
COMPONENT to the earring hook
First connect the 4-BEAD COMPONENT to the 6-BEAD COMPONENT with 4A beads Mimic
the elongation steps of the necklace if needed
Secondly connect the 4-BEAD COMPONENT
to your earring hook with 4A beads again Leave from the last pearl bead 2A beads the hook (this is the orange oval form) and 2As again Pass through each of them to
secure this connection again
Finally get ready to prepare the other earring ndash since we need two of them
STEP 5 Connect the 4-BEAD COMPONENTs to the toggle clasp thus finishing the
necklace Leaving from the last pearl bead 2A the
clasp(this is the orange oval form) and 2A again Pass through all of them a couple more times to make this connection more
secure
Something Blue Necklace and Earrings
BLOG WWWHANDMADE-JEWELRY-CLUBCOM MEMBERSHIP WWWDIYBEADINGCLUBCOM BLOG DIY BEADING MAGAZINE ISSUE 32
If you finished it is time to try it on It was a great fun wasnrsquot it And how beautiful you look in your new necklace and the matching earrings
Something Blue Necklace and Earrings
BLOG WWWHANDMADE-JEWELRY-CLUBCOM MEMBERSHIP WWWDIYBEADINGCLUBCOM
About the Author
Margit Vogel
My name is Margit Vogel I live in Hungary Europe
By profession I am a biochemical engineer but I fell in love with
beads so much that I could not stop playing with them
I make one-of-a-kind beaded and bead embroidered art
jewelry made of the best quality materials such as Swarovski
stones gemstones Japanese beads (Miyuki and Toho) Czech
glass beads leather soutache and suede Each piece is unique
and individually crafted
Feel free to visit my blog for some eyecandy
httpiformjewelrywordpresscom
My shop httpwwwetsycomshopiformjewelry
Facebook httpwwwfacebookcomiformjewelry
BLOG DIY BEADING MAGAZINE ISSUE 32
Getting Down And Personal With Gianna
Getting Down And Personal With Gianna
Nowadays we see more and more jewelry stores opening up online and with these online jewelry stores it has made it easier for us to purchase and view their creations Have you ever wondered how they are able to manage and produce amazing jewelry pieces and tutorials So heres a little on the journey to open up an online shop We are excited to present to you Gianna aka Beading4perfectionists
Gianna Beader amp Youtuber
Unlike most jewelry makers and beadweavers Gianna did not start beading as a hobby but as a means to make ends meet With goals in trying to
fill the financial gap she did everything she could to expand her earnings ndash working as a security guard
and at the same time learning how to bead and selling her pieces at fair trades and flea markets
Since many were asking if she does home beading workshops she started on exploring how to teach people to bead She loves Scott Bakula and has always loved him till now and this served as her
inspiration to start making a beading video tutorial
Gianna started creating videos because she was at the point in her life where everything seemed to be falling apart And at that moment of time she had difficulties financially and selling jewelry was the only way for her to stay afloat financially She is a big Scott Bakula fan and when she went to the UK to see him on stage that was when it hit her that she is already able to edit videos and
taught herself Photoshop and done workshops at bead fairs so why not put these together and see what happens on Youtube She knew that if she gets enough subscribers and views ndash though no one knew what the exact numbers were you would be invited to become a Youtube partner This way she could monetize her videos with advertisements and hopefully she would be able to be a Youtube partner and be able to pay her bills
BLOG WWWHANDMADE-JEWELRY-CLUBCOM MEMBERSHIP WWWDIYBEADINGCLUBCOM BLOG DIY BEADING MAGAZINE ISSUE 32
Getting Down And Personal With Gianna
Her Youtube channel is popular and the reason why she chose Youtube is because Youtube is the biggest platform and reached almost to the whole world Everyone already knows about it and it was growing rapidly as compared to other platforms like Dailymotion so she figured that Youtube was the way to go Her advice to new designers is that when you start out go to the platforms on the top of your list first then work your way down your list if you do not get accepted by your first choice
After loyally putting up one video every week for about 8 months in a row she became a Youtube partner and monetized her videos She knew she needed at least $100 to get her first payout She managed to reach $100 after 3 months The process was not easy she worked hard lack sleep skipped meals and who knows what happened to Ridge in the Bold and the Beautiful because she stopped watching
On Youtube you can monetize your videos Google pays straight to your bank account and at other countries where they also have the option of getting checks among other options In order to get paid you have to reach the $100 mark and after 3 months For Gianna she thinks that you cannot say that Etsy is better than Youtube or Youtube is better than Etsy Her reasoning is because on Youtube she has many followers which will eventually check out her Etsy shop And to start an Etsy shop you need an audience
BLOG WWWHANDMADE-JEWELRY-CLUBCOM MEMBERSHIP WWWDIYBEADINGCLUBCOM BLOG DIY BEADING MAGAZINE ISSUE 32
television and dedicated her spare time (as she had another job) to Youtube She re-registered at the chamber of commerce after receiving her first payout Her work at Youtube now is not a full time job and things have changed on Youtube It is easier to become a parter but there are some countries that need to wait for an invitation to be a Youtube partner Take Italy for instance Italians would have to work just as hard as she did if they want to become a Youtube partner
Getting Down And Personal With Gianna
With her 60000 subscribers on her b4pbakup Youtube channel it is possible to sell at least 60 patterns on the first day on Etsy after promoting the PDF file on her Youtube channel Though you may think that 60 out of 60000 is not much you have to remember that not everyone has the means to purchase the PDF file and a lot of people still rather watch her carry out the tutorial(for free) on Youtube instead of reading the patterns or paying for the patterns even if the pattern is for a fundraiser and only cost $2 Her insights on Youtube is that Youtube is not what it used to be 6 years ago Instead of making more money every month she is making less and less because advertisers have more options of where they want to advertise their ads Ads do not pay as much as they used to Back in the days you could get 25 cents per ad Now you count yourself lucky if you could get 5 cents roll in after two hours
BLOG WWWHANDMADE-JEWELRY-CLUBCOM MEMBERSHIP WWWDIYBEADINGCLUBCOM BLOG DIY BEADING MAGAZINE ISSUE 32
And on top of that adblockers are destroying Youtube channel owners Youtube will start making changes to the channels where there will be ldquopaid subscriptionrdquo channels This has already been implemented in some countries but not in her country The Netherlands This means there will no longer be ads for her monthly paying subscribers She hopes that Youtube will add on a paid per video option feature The option to be a paid channel or free channel or to start a new channel for paying customers is yours to choose Gianna is not happy with Youtube because many others like her have worked so hard and for some years to become Youtube partners(which was something to be proud of) has lost their status
Getting Down And Personal With Gianna
Her advice for those who want to go on Youtube is 1 Do it because you want to teach
2 Do it because you want a career with beads
BLOG WWWHANDMADE-JEWELRY-CLUBCOM MEMBERSHIP WWWDIYBEADINGCLUBCOM BLOG DIY BEADING MAGAZINE ISSUE 32
After putting up about 20 videos and having at least 5000 subscribers add the PDF tutorials to Etsy and Craftsy She found out that her audience would like to have the PDF after watching her videos This is because they would rather print out the PDF and work while seated in a comfy chair technically somewhere else instead of having to pause the video time and time again
Gianna has also made a video for those who want to know the whole story of her journey up until the present day And to get updates on her you can check it out here She has also started a vlog where she tells of how she still works towards becoming a financial independent beader and explains her journey to get where she wants to be(or die trying) Gianna will be in the UK on October the 17th giving an all-day workshop with 4 different patterns
(2 beginners and 2 advanced) in Wotton-under-Edge
Gianna will be there Friday night as the workshop is on Saturday She will be leaving on Sunday Her
doors are open to all who wants to continue the party with her at the hotel across the street
For more information do contact Ann Tucker on Facebook
httpswwwfacebookcomanntucker501
Rec
omm
end
ed R
ead
ings
Making Jewelry with Gemstone
Beads
Combines the popular craft of beading with beautiful semi-precious stones which are collected by many Features a variety of versatile ideas which can be adapted for any type of gem or bead Readers will learn to reate beautiful gemstone jewelry with this dazzling collection of over 100 projects ranging from eyecatching earrings and accessories to exquisite necklaces and bracelets This beautiful book offers an impressive range of 28 beautiful semi-precious stones (including birthstones) and a glimpse into the fascinating history and mythical properties behind them
BLOG DIY BEADING MAGAZINE ISSUE 32 BLOG WWWHANDMADE-JEWELRY-CLUBCOM MEMBERSHIP WWWDIYBEADINGCLUBCOM
Rec
omm
end
ed R
ead
ings
Convertible Crystal Jewelry
Reverse it Twist it Wear it Many
Ways
Diane Whiting presents the idea that convertibility isnrsquot just about using pieces in multiple ways it is also about using skills and creativity in multiple ways Using ever-popular sparkling crystals Diane showcases design elements through various techniques for fun easy fashionable jewelry With 25 projects the reader can choose from bracelets necklaces and earrings that match any outfit or styleDiane Whiting presents the idea that convertibility isnrsquot just about using pieces in multiple ways it is also about using skills and creativity in multiple ways
BLOG DIY BEADING MAGAZINE ISSUE 32 BLOG WWWHANDMADE-JEWELRY-CLUBCOM MEMBERSHIP WWWDIYBEADINGCLUBCOM
Rec
omm
end
ed R
ead
ings
Wire Jewelry Masterclass
Wrapped Coiled and Woven Pieces
Using Fine Materials
Comprehensive and fabulous Wire Jewelry Masterclass takes an in-depth look at an intricate and rewarding craft The 24 projects which range from simple Dragons tear briolette earrings to a Poseidon-under-the-sea pendant will delight and inspire jewelers of all levels and tastes Divided into beginner intermediate and advanced sections this beautifully photographed step-by-step guide is the ticket to wire jewelry expertise
BLOG DIY BEADING MAGAZINE ISSUE 32 BLOG WWWHANDMADE-JEWELRY-CLUBCOM MEMBERSHIP WWWDIYBEADINGCLUBCOM
Rec
omm
end
ed R
ead
ings
Timeless Wire Weaving The
Complete Course
Timeless Wire Weaving focuses on developing wirework skills through 13 projects using three classic wire weaving techniques coiling wrapping and weaving The projects are built around a focal cabochon and incorporate seed beads and crystals in imaginative ways Designers learn to make the jewelry shown in the book and they also use the techniques learned to create innovative jewelry pieces of their own
BLOG DIY BEADING MAGAZINE ISSUE 32 BLOG WWWHANDMADE-JEWELRY-CLUBCOM MEMBERSHIP WWWDIYBEADINGCLUBCOM
Our digital magazine is available through
Apple Newsstand service available to millions of IPAD users
To advertise with us please email us at
diyjewelryclubgmailcom
Or visit our page at
httphandmade-jewelry-clubcomadvertising-diy-beading-magazine
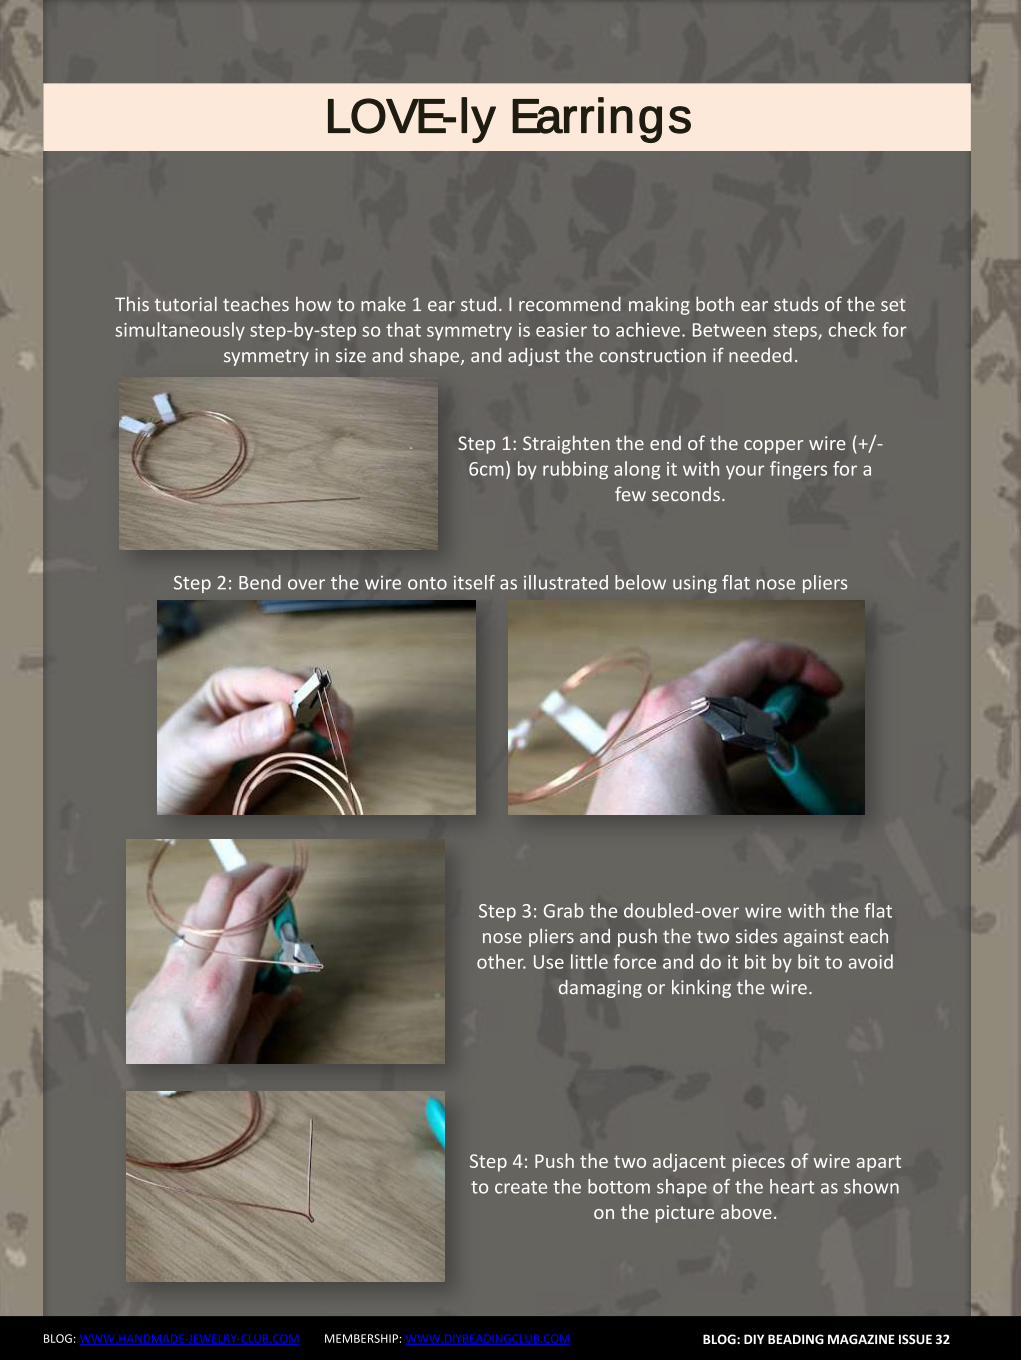
BLOG WWWHANDMADE-JEWELRY-CLUBCOM MEMBERSHIP WWWDIYBEADINGCLUBCOM
LOVE-ly Earrings
BLOG DIY BEADING MAGAZINE ISSUE 32
Step 17 Flip the wire over the wire with the bead (indicated by the red arrow) and pull tight whilst holding the bead (and its wire) tightly in place It
should look like the construction in the big picture above
Step 18 And make another loop around the wire with the bead The 04 mm wire is now coiled around
twice two times two coils around the frame and two coils around itself
Step 19 Repeat the wire-fastening procedure described in steps 16-18 with the other end of the
wire securing the gemstone in the heart frame Let the wire stick out at the back of the earstud
Step 20 Pull the wire through the lsquocoilrsquo part of the heart shape to the front The wire should lsquocross overrsquo to the other side of the heart at the back of the ear
stud
Step 21 Coil the wire around the frame until you are content with the design Optionally you can hammer down the coils a bit I often do this because I think it
looks somewhat more sophisticated and professional
BLOG WWWHANDMADE-JEWELRY-CLUBCOM MEMBERSHIP WWWDIYBEADINGCLUBCOM
LOVE-ly Earrings
BLOG DIY BEADING MAGAZINE ISSUE 32
Step 22 Cut off the spare bits of wire preferably at the backside of the ear stud and tuck in the ends
Congrats yoursquove now made a heart-shaped ear stud Next we are going to finish it off with a patina
Step 23 Oxidize the metal of the ear studs I always use liver of sulfur solved in warm water The metal
will turn a dark color and matte texture Afterwards rinse the ear studs thoroughly with water and pat
them dry
Step 24 Rub the oxidized ear stud all over with a rough polishing pad to bring back (a dark copper)
color to the surface
Yoursquove now finished making your own LOVE-ly ear studs
Secure them in your ear with plastic or copper stops These can be bought online or in jewelry-supply
stores
Variation ideas You can easily vary in size and shape (longer hearts smaller coils pointier bottoms etc) and
use different materials As you can see the earring I make in this tutorial has a slightly smaller bead than the
earrings on the cover which influences the overall appearance somewhat
The earrings underneath are made with sterling silver and gold wire (super-short coils) and contain small pink
rubies
LOVE-ly Earrings
BLOG WWWHANDMADE-JEWELRY-CLUBCOM MEMBERSHIP WWWDIYBEADINGCLUBCOM
About the Author
Jeske Hendriks
Hi there My name is Jeske and I love all things handmade Over the years Irsquove dabbled in countless different arts and crafts but nowadays I mainly focus on making jewellery and cutting stone cabochons As for jewellery
my preferred materials are silver wire and gemstonemineral beads Using wire-wrapping and basic silver smithing techniques I create both simple
and intricate pieces ndash each and every one of them unique a personal little artwork
You are welcome to follow me on facebook stop by at my personal
webpage andor to have a look at my Etsy shops httpswwwfacebookcomyeskecrafts
httpwwwyeskecraftscom httpwwwyourbeadsandfindingsetsycom
httpwwwyeskecraftsetsycom httpwwwyeskemiscetsycom
BLOG DIY BEADING MAGAZINE ISSUE 32
Flower Tale Earrings
BLOG WWWHANDMADE-JEWELRY-CLUBCOM MEMBERSHIP WWWDIYBEADINGCLUBCOM
Techniques Beadweaving
Project Level Beginner to Intermediate
Materials 12 bronze opaque 6mm Czech glass pearl round beads
2 gr gold lustered dark topaz Japanese 110 seed beads (Toho 459)
Size B gold beading thread
2 bronze earring hooks
Tools Size 10 beading needle
Scissors
Finished Size Diameter ndash 3 cm (118 inches) (without earring hooks)
BLOG DIY BEADING MAGAZINE ISSUE 32
Flower Tale Earrings
BLOG WWWHANDMADE-JEWELRY-CLUBCOM MEMBERSHIP WWWDIYBEADINGCLUBCOM
Step 1 Cut about 110 cm (43 inches) of thread and
pass it through the needle hole
Pick six groups of one 110 seed bead and one
6 mm round bead
BLOG DIY BEADING MAGAZINE ISSUE 32
Join the beads into a ring and secure with two
square knots
Leave a tail of about 15 cm (59 inches)
Step 2 The working thread should be right before the
6 mm round bead
Pick seven 110 seed beads skip the 6 mm
round bead and pass the needle through the
next 110 seed bead added in the previous
round
Repeat adding groups of seven 110 seed
beads five more times
When adding the last group take the needle
directly through the 110 seed bead from the
previous round and the next one added in the
beginning of current round
Flower Tale Earrings
BLOG WWWHANDMADE-JEWELRY-CLUBCOM MEMBERSHIP WWWDIYBEADINGCLUBCOM
Step 3 Pick three 110 seed beads skip one seed
bead from the chain of seven added in the
previous round and pass with the needle
directly through the next three 110 seed
beads
BLOG DIY BEADING MAGAZINE ISSUE 32
Pick three 110 seed beads skip one seed
bead from the chain of seven added in the
previous round and pass with the needle
through the last one and the first 110 seed
bead from the next chain of seven
Repeat the above directions from Step 3 five
more times
After completing this round make sure the
thread will be exiting from the middle 110
seed bead from the first group of three added
in the beginning of this round
Step 4 Pick one 110 seed bead and go through the
last seed bead of the group of three
Flower Tale Earrings
BLOG WWWHANDMADE-JEWELRY-CLUBCOM MEMBERSHIP WWWDIYBEADINGCLUBCOM
Pick three 110 seed beads and take the
needle through the first seed bead of the next
group of three added in the previous round
BLOG DIY BEADING MAGAZINE ISSUE 32
Pick one 110 seed bead and go with the
needle through the next three seed beads (the
last two of the group of three and the last one
from the chain of seven)
Then go up through three 110 seed beads
(the first from the next group of seven and the
first two from the next group of three)
Repeat the above directions from Step 4 to
complete the remaining petals
When working on the last petal perform the
operation from the image shown on the left
instead of picking the group of three 110 seed
beads string two 110 seed beads the earring
hook other two 110 seed beads and
continue beading as instructed above
When you are done hide the thread ends into the beadwork
Flower Tale Earrings
BLOG WWWHANDMADE-JEWELRY-CLUBCOM MEMBERSHIP WWWDIYBEADINGCLUBCOM
About the Author
Iulia Postică
I was born and live in Moldova Eastern Europe Ever since I remember myself
Ive been crocheting and knitting My grandmother has taught me that and I
loved it very much I always regarded crafts exclusively as a hobby and never
thought of making a career of it I traveled a lot to various historical sites
Actually Ive spent all my childhood summers in archaeological camps with
my father who is a professional archaeologist
I also enjoy metal hammering and wirework as it gives me possibility to
express myself in materials used by human communities since ancient times
copper brass glass seed beads and gemstones That is no surprise to anyone
given my family history and academic background
My shop ldquoBeadedTreasuryrdquo with beading tutorials and bead crochet patterns
httpswwwetsycomshopBeadedTreasury
My shop ldquoArchaeologicardquo with artisan jewelry
httpswwwetsycomshopArcheologica
My blog httpbeadedtreasuryblogspotcom
My facebook httpswwwfacebookcomBeadedTreasury
BLOG DIY BEADING MAGAZINE ISSUE 32
Liberty Earrings
BLOG WWWHANDMADE-JEWELRY-CLUBCOM MEMBERSHIP WWWDIYBEADINGCLUBCOM
Materials - Nr 2 cabochon Preciosa Ornela ovale 18x22 mm turchese
- Rocaille Toho 150 silver lined green emerald
- Nr 2 dagger beads
- Nr 20 pearl 4 mm
- Superduo opaque luster ceramic green
- Rocaille 80 color gold
- Rocaille 80 color ivory
- Delica Miyuki 110 aquagreen mix
- Rocaille Miyuki 110 galvanized silver
- Nr 2 monachelle (earwire)
-Fireline
- Beading Needle nr 12
BLOG DIY BEADING MAGAZINE ISSUE 32
Liberty Earrings
BLOG WWWHANDMADE-JEWELRY-CLUBCOM MEMBERSHIP WWWDIYBEADINGCLUBCOM
Make a circle of 20 delica beads and make a knot (a) Perform two rounds peyote with ivory 80 seed beads (b c) Exit from an ivory
bead
BLOG DIY BEADING MAGAZINE ISSUE 32
a b c
Jump from 80 to 80 with 110 80 gold 110 (a) Finish the round and come out of a 80 gold bead
Jump to the next 80 gold with a 4mm pearl (b) Finish the round and come out
of the first pearl Jump to the 2nd pearl and close with a 80 gold bead(c)
a b c
Position the cabochon and jump from one 80 to the other with two delica bead (a)
Continue with three delicas four times (b) At the bottom sew on two delicas then finish the round by sewing on three delicas for four times passing from one to another roc 80 Tighten the cabochon and exit from the
first two delica that you started with String together a 110 and 150 and enter the second of the three close delicas (c)
a b c
Liberty Earrings
BLOG WWWHANDMADE-JEWELRY-CLUBCOM MEMBERSHIP WWWDIYBEADINGCLUBCOM
Put together 150 110 150 and enter in the second of three next delica (a) Put the same beads for three times then put together 150 and 110 and enter
in the two delica of the bottom tip (b) Enter in the second of three next delica with 110 and 150 (c) Continue passing
in the 80 beads with three beads (150 110 150) for four times then at the top finish the round by putting together a 150 and 110 (d)
BLOG DIY BEADING MAGAZINE ISSUE 32
a b c
Exit from the first 150 sewn in the previous round and jump in the three next beads with a 150 (a)
Put a 150 at a time and exit from the first 110 beads of the bottom tip Jump in the
near 110 with a 150 (b) Finish round repeating steps a and b (c) Exit the roc 80 as shown in the photo (d)
a b c
d
a b c d
Enter in the 80 with four 150 (a b) Enter the 80 beads at the bottom of the pieces with two 110 one superduo one 80 ivory bead one superduo and two 110 (c)
d e f
Liberty Earrings
BLOG WWWHANDMADE-JEWELRY-CLUBCOM MEMBERSHIP WWWDIYBEADINGCLUBCOM
Exit from the bottom pearl (a) Put together 150 three 110 150 and enter in the superduorsquos second hole (b)
Put together three superduo and enter in the next superduorsquos second hole (c) Rethread 15 three 110 150 and return in the opposite direction in the pearl of departure (d)
BLOG DIY BEADING MAGAZINE ISSUE 32
a b
c
Exit from the second pearl indicated from (a) Put 150 four 110 and enter in the second of the three 110 (b) Go to the second superduorsquos hole with four 110 and a 150 (c)
Enter the second hole of the supeduo with a 150(d) Sew in the middle of the bottom of the superduo 150 two 110 150 dagger 150 two 110 150(e)
Enter the second hole of the thirs superduo with 150 (f)
a b c
d
d e f
Liberty Earrings
BLOG WWWHANDMADE-JEWELRY-CLUBCOM MEMBERSHIP WWWDIYBEADINGCLUBCOM BLOG DIY BEADING MAGAZINE ISSUE 32
Put 150 four 110 and enter in the second of three 110 of the base (a) Insert four 110 and 150 in the pearl opposite direction indicated in the picture (b) Go in all the beads
around the piece and exit from the pearl at the top (c) Put 150 three 110 150 and enter the superduo (d)
Enter the ivory bead 80 with two 150 (e) Enter the next superduo with two 150 (f)
a b c
d e f
Put together 150 three 110 and enter in opposite direction in the departurersquos pearl (a) Exit from the 150 beads indicated by photo (b) From this jump in the second of two near
150 with five 150 to created the hole for the earwire (c) Pass the thread in the beads make a few knots and cut the excess thread
a b c
Your earrings are finished
Liberty Earrings
BLOG WWWHANDMADE-JEWELRY-CLUBCOM MEMBERSHIP WWWDIYBEADINGCLUBCOM
About the Author
Mariella Martella
My name is Mariella Martella and I am the author and
designer of jewelry that I sign with the name of Mariel Bijoux
After changing city often for work and study I currently live
in northern Italy I am an art historian with a passion for travel
painting and jewelry design in weaving that project since
2010 In my beads and crystals are the colors of the
Mediterranean sea the atmosphere of summer evenings
and the lights of the places I visited
You can find me at
Etsy shop httpswwwetsycomitshopMarielBijoux
Facebook httpswwwfacebookcommari3lbijoux
Crafting blog httpmarielbijouxblogspotit
Twitter httpstwittercomMarielBijoux
BLOG DIY BEADING MAGAZINE ISSUE 32
Jade Necklace
BLOG WWWHANDMADE-JEWELRY-CLUBCOM MEMBERSHIP WWWDIYBEADINGCLUBCOM
Every time I wear a necklace I always make it a point that the
necklace will lay perfectly flat on my neck Using wire for a necklace
made it possible for me like what I did with Jade Necklace It may look
odd at first having bent wires for a necklace but once the jewelry is
finished youll be so happy how the necklace will perfectly lay on your
neck
The tutorial is catered for intermediate level One must know basic
wirework skills such as wire wrapping making loops wrapped loops
and linking to follow the tutorial It has clear instructions and ultra-clear
close-up photos at each step Additionally you can ask me question
you have on the tutorial No more getting stuck and frustrated on a
confusing or just plain inaccurate pattern
If you followed this tutorial and then sell the accessory or jewelry
please give credit to the author or DIY Beading Clubcom
Copyright 2015
wwwdiybeadingclubcom
wwwhandmade-jewelry-clubcom
BLOG DIY BEADING MAGAZINE ISSUE 32
Jade Necklace
BLOG WWWHANDMADE-JEWELRY-CLUBCOM MEMBERSHIP WWWDIYBEADINGCLUBCOM BLOG DIY BEADING MAGAZINE ISSUE 32
Materials Needed 18ga Craft wire 28ga Craft wire 15mm diameter Green Round Flat Back Sew On Gems 5mm Green pearls
8mm Green pearls 6mm x 11mm teardrop Crystal Treasures Mill Hill beads or any teardrop bead with holes on the side Hook for your clasp
Tools Needed Wire cutter Flat nose pliers Round nose pliers Mandrel A jar or any rounded object to shape your necklace
Skill Level Intermediate
Step 1 Cut 6 inches 18ga wire Make a loop on one end then measure approximately 125 inches and make another loop
Form a size 4 circle on your mandrel
Jade Necklace
BLOG WWWHANDMADE-JEWELRY-CLUBCOM MEMBERSHIP WWWDIYBEADINGCLUBCOM BLOG DIY BEADING MAGAZINE ISSUE 32
Then close the circle by wrapping the extended wire just below the loop Wrap the
wire 2x
This is how it looks like Lets call this circle frame Youll notice that the lower curve is
slightly bigger than the upper curve
Step 2 Cut 8 inches of 28ga wire Wrap one end of
the wire at least 3x on one side of the circle frame just below the loop
Bring up your gem Flat back sew on gems has 2 holes Insert the wire into one hole and then
wrap the wire once onto the circle frame
Jade Necklace
BLOG WWWHANDMADE-JEWELRY-CLUBCOM MEMBERSHIP WWWDIYBEADINGCLUBCOM BLOG DIY BEADING MAGAZINE ISSUE 32
Step 3 Insert a 5mm pearl on the wire and then pass
the wire under circle frame
Repeat previous step 2x and have 3 pearls wrapped
Continue wrapping with your teardrop crystal My crystal has 2 holes on the side
and then continue wrapping with your 5mm pearls then secure your wire
Repeat Step 3 and create as many as needed For 16-inch necklace Ive created 6 of these
components
Jade Necklace
BLOG WWWHANDMADE-JEWELRY-CLUBCOM MEMBERSHIP WWWDIYBEADINGCLUBCOM BLOG DIY BEADING MAGAZINE ISSUE 32
Step 4 Cut a 15-inch 18ga wire and make a loop on
one end Insert 8mm pearl and make a loop on the other end You then use these as connectors
and link the components
Step 5 The necklace is an 18ga wire with wrapped
loops on both ends First cut 7 inches 18ga wire and make a wrapped loop with your hook already inserted Side in 18pcs 5mm pearls
Then make a wrapped loop on the other end connecting the wrapped loop onto the component Do the same for the other
necklace but make the loop on the other end big enough so the hookclasp can pass thru
To have the necklace curve shaped use a jar to bend the wire Voila Now youre
ready to party
Jade Necklace
BLOG WWWHANDMADE-JEWELRY-CLUBCOM MEMBERSHIP WWWDIYBEADINGCLUBCOM
About the Author
Sky Aldovino
I consider myself a late bloomer when it comes to crafting Irsquom a self-taught jewelry maker Jewelry making wasnrsquot really a hobby of mine but unforeseen events lead me to learn jewellery making My family put up a craft store where we sell cross stitch beads and all sorts of crafting materials I fell in love with the beads and tried to create accessories only for myself Clients liked the pieces and I started customizing handmade jewelleries The craft store was a success for 6 years but like any other small businesses we had to close it down and I was confined to staying at home While at home I had all the time using the internet and now working as a home-based jewelry designer
BLOG DIY BEADING MAGAZINE ISSUE 32
Atomic Ring
BLOG WWWHANDMADE-JEWELRY-CLUBCOM MEMBERSHIP WWWDIYBEADINGCLUBCOM
Have fun making shapes using the wigjig Cyclops Make loops going in
circles to mimic the shape of a flower or in this tutorial mimic the
shape of an atom The tutorial will also teach you how to cage a
cabochon Whats nice about this piece is that with one long wire you
can create the ring from start to finish
The tutorial is catered for intermediate to advanced students One
must already know how to make spirals and use a wigjig tool It has
clear instructions and ultra-clear close-up photos at each step
Additionally you can ask me question you have on the tutorial No
more getting stuck and frustrated on a confusing or just plain
inaccurate pattern
If you followed this tutorial and then sell the accessory or jewelry
please give credit to the author or DIY Beading Clubcom
If you like to get a blank wigjig graph visit wigjigcom Shop and Jigs
section
Copyright 2015
wwwdiybeadingclubcom
wwwhandmade-jewelry-clubcom
BLOG DIY BEADING MAGAZINE ISSUE 32
Atomic Ring
BLOG WWWHANDMADE-JEWELRY-CLUBCOM MEMBERSHIP WWWDIYBEADINGCLUBCOM
Materials Needed 20ga Craft wire 28ga Craft wire 11mm Round Cabochon
Tools Needed Wigjig Cyclops 15mm pegs Wire cutter Flat nose pliers Mandrel
Skill Level Intermediate - Advanced
BLOG DIY BEADING MAGAZINE ISSUE 32
Step 1 Lets prepare your wigjig cyclops Position the pegs like so
Atomic Ring
BLOG WWWHANDMADE-JEWELRY-CLUBCOM MEMBERSHIP WWWDIYBEADINGCLUBCOM BLOG DIY BEADING MAGAZINE ISSUE 32
Lets work with longer wire so youll have enough wire to hold onto as you manipulate the wire so cut 36 inches of 20ga wire From
one end of the wire measure 10 inches
On the 10-inch measurement loop the wire at the center peg then continue to loop onto the side pegs going in circle going back to
the center peg after looping on the side peg
Now the wire at the center peg will start to build up as you go around the side pegs so
you need to constantly press the wire at the center peg to accommodate the build up of
wire
When youre done pull out the wire and this is
how it should look like
Atomic Ring
BLOG WWWHANDMADE-JEWELRY-CLUBCOM MEMBERSHIP WWWDIYBEADINGCLUBCOM BLOG DIY BEADING MAGAZINE ISSUE 32
You will notice that the frame opens wide Now to keep the atom frame from opening wide secure the center of the frame by wrapping a 28ga wire What you
need to do is simply pass the 28ga wire into the hole and wrap as many times as needed or until youre sure that the frame is secure
Step 2 Now youre finished with your atom frame Well now create the focal design With the longer wire make a spiral at the center big
enough to accommodate the size of your cabochon In this tutorial the spiral is about
11mm in diameter the same size as my cabochon
Pop in your cabochon and start to make spirals going around and over the cabochon as if you are caging the cabochon Create at
least 5 rounds and then cut off any excess
Step 3 Now lets make the ring and this with the other
end of the wire
Atomic Ring
BLOG WWWHANDMADE-JEWELRY-CLUBCOM MEMBERSHIP WWWDIYBEADINGCLUBCOM BLOG DIY BEADING MAGAZINE ISSUE 32
Bring up your mandrel and wrap the wire to the size of your finger Wrap at least 2 times
When youre sure you have the right size pull the ring out of the mandrel
With the extended wire wrap the wire the secure the ring
Cut off any excess and voila You have your atomic ring Create as many as you can with different colors of cabochon
Atomic Ring
BLOG WWWHANDMADE-JEWELRY-CLUBCOM MEMBERSHIP WWWDIYBEADINGCLUBCOM
About the Author
Sky Aldovino
I consider myself a late bloomer when it comes to crafting Irsquom a self-taught jewelry maker Jewelry making wasnrsquot really a hobby of mine but unforeseen events lead me to learn jewellery making My family put up a craft store where we sell cross stitch beads and all sorts of crafting materials I fell in love with the beads and tried to create accessories only for myself Clients liked the pieces and I started customizing handmade jewelleries The craft store was a success for 6 years but like any other small businesses we had to close it down and I was confined to staying at home While at home I had all the time using the internet and now working as a home-based jewelry designer
BLOG DIY BEADING MAGAZINE ISSUE 32
Featured Article Gemstones Used for Jewelry Making
BLOG WWWHANDMADE-JEWELRY-CLUBCOM MEMBERSHIP WWWDIYBEADINGCLUBCOM
Gemstones are stones which we hold quite highly in terms of value And
jewelry often consists of stones that add attractiveness to it so it is not
surprising when jewelry designers actually use gemstones in their designs In
fact there are different types of gemstones that can be used for making
jewelry There are the expensive and pure gemstones and there are also the
imitation ones The information below will provide some information about
the kinds of stones you can use to create jewelry and how these stones will
impact the jewelry you have created
The first kind of stone which I believe we are all quite familiar with are
birthstones These stones are associated with individualrsquos month of birth
by SunVDesigns by BeyhanAkman
For example Amethyst stone is connected with anybody who is born in
February which carries special significance in the area of emotions and also
spiritually This stone also signifies calm and peace as well
And then we have semi-precious stones which are also often used in jewelry
making They are not as valuable as compared to precious stones but still
valuable Best examples of these stones are aquamarine topaz tourmaline
opal and turquoise
BLOG DIY BEADING MAGAZINE ISSUE 32
Featured Article Gemstones Used for Jewelry Making
BLOG WWWHANDMADE-JEWELRY-CLUBCOM MEMBERSHIP WWWDIYBEADINGCLUBCOM
It is an ideal gift for someone who you deem special Aquamarine pendants
usually work well for anyone and is widely an accepted stone
by HyppieChic by joyeriamestiza
However precious stones are the most unusual
and precious jewels to us Examples of some of
them are emerald sapphire diamond and
ruby These stones are usually very expensive
and are prized for their exquisiteness These
stones are commonly used in high-quality
jewelry designs which costs quite a fortune to
obtain
BLOG DIY BEADING MAGAZINE ISSUE 32
by sarajewelrystu
Jewelry designs with precious stones are usually
given as exceptional gifts on special occasions A
perfect example is a diamond ring that is usually
given as an engagement gift
by ldiamondsforever
Featured Article Gemstones Used for Jewelry Making
BLOG WWWHANDMADE-JEWELRY-CLUBCOM MEMBERSHIP WWWDIYBEADINGCLUBCOM
There are also synthetic stones which are often used to create jewelry
Synthetic stones are artificial imitations of gemstones Synthetic Sapphire
jewelry costs less compare with the authentic ones Most of the time
imitation stones are used to save cost but at the same time have the similar
look of the real stone
BLOG DIY BEADING MAGAZINE ISSUE 32
by shininggems by thaimaker
by lapinduprintemps by PastimeArt
Gemstones are used like beads and you can use it in any designs whether
simple or elaborate
Swarovski crystal components are available in a rich multitude of rondelles Perfect as spacers in necklaces or as discs in earrings Rondelles can be used with many varieties of shapes or sizes Use Swarovski crystal rondelles between large gemstones as accents with precious metal findings Fire Mountain Gems and Beads Crystal Passionsreg brand presents Swarovski crystal in display-ready packaging for brilliant retail presentation Crystal Passionsreg is an assurance of genuine Swarovski crystal
BLOG DIY BEADING MAGAZINE ISSUE 32 BLOG WWWHANDMADE-JEWELRY-CLUBCOM MEMBERSHIP WWWDIYBEADINGCLUBCOM
Recommended Jewelry Making Supplies
Mz Unisex-adults 12pcs 25x18x6mm Turquoise Oval CAB Cabochon
BLOG DIY BEADING MAGAZINE ISSUE 32 BLOG WWWHANDMADE-JEWELRY-CLUBCOM MEMBERSHIP WWWDIYBEADINGCLUBCOM
Recommended Jewelry Making Supplies
For a little sparkle that goes a long way design with Swarovski 4mm faceted bicones Create glorious multi-strand necklaces with the dainty crystals or use as spacers to add a tiny flash to your designs Swarovski crystal components are made in Austria and are considered the finest products of their kind in the world
BLOG DIY BEADING MAGAZINE ISSUE 32 BLOG WWWHANDMADE-JEWELRY-CLUBCOM MEMBERSHIP WWWDIYBEADINGCLUBCOM
Recommended Jewelry Making Supplies
Imitation beads resist color change These beads have uniform quality with a good polish Some strands may have little to no matrix Sizes shapes and colors may vary with handcrafted items
BLOG DIY BEADING MAGAZINE ISSUE 32 BLOG WWWHANDMADE-JEWELRY-CLUBCOM MEMBERSHIP WWWDIYBEADINGCLUBCOM
Recommended Jewelry Making Supplies
Something Blue Necklace and Earrings
BLOG WWWHANDMADE-JEWELRY-CLUBCOM MEMBERSHIP WWWDIYBEADINGCLUBCOM
Skill level Beginner Intermediate Advanced
DIMENSIONS OF THE NECKLACE Inner Circumference 14 18 inch 35 cm
Focal Pendant Width 1 15 inch 35 cm Focal Pendant Height 1 15 inch 35 cm
DIMENSIONS OF THE EARRING Earring Width 716 inch 12 cm Earring Height 1516 inch 25 cm (Without the earring hook)
BLOG DIY BEADING MAGAZINE ISSUE 32
Materials
Note Before purchasing the supplies measure the length of your wished necklace If you decide to bead a longer necklace you should keep in mind that for every extra
frac34 inches 2 cm-s you will need 8 bicones and 8 pearls
Something Blue Necklace and Earrings
BLOG WWWHANDMADE-JEWELRY-CLUBCOM MEMBERSHIP WWWDIYBEADINGCLUBCOM BLOG DIY BEADING MAGAZINE ISSUE 32
Work RAW stitch into a beaded circle and embellish with Swarovski bicones
STEP 2 String 1A and 2 pearls Pass through the previous
second pearl and the freshly added 1A and the first pearl again
STEP 1 Use a comfortable length of thread to string 2
pearls 1A and 1 pearl again leaving a 2rdquo 5cm tail Pass through the first two pearls strung to form a
ring
STEP 3 String 2 pearls and 1A Pass through the previous first pearl and the freshly added two pearls
again
STEP 4 - 17 Repeat STEP 2 and STEP 3 again until you count 17 pearls in the inner circle
But be careful in the last step you only have to add 1 pearl then pass through the first pearls
added in STEP 1 and add another 1A Now pass through the first pearl added in STEP
1and 1A added in this round again to exit from this A
Something Blue Necklace and Earrings
BLOG WWWHANDMADE-JEWELRY-CLUBCOM MEMBERSHIP WWWDIYBEADINGCLUBCOM BLOG DIY BEADING MAGAZINE ISSUE 32
STEP 19 String 2A and pass through the next A added in round 4-17 and the A added in round 18 the 2A added in this round and finally the A added in round 4-17 to exit from the bead showed below
STEP 18 String 3A and pass through the 1A added in the previous round and the first A added in this
round
STEP 20 - 34 Repeat STEP 18 and STEP 19 again until you finish the circle
But be careful in the last step first you have to pass through 3A and then add 1A After this pass
through the 3A again and exit from the A bead
shown below (This is the first A added in STEP 18)
Something Blue Necklace and Earrings
BLOG WWWHANDMADE-JEWELRY-CLUBCOM MEMBERSHIP WWWDIYBEADINGCLUBCOM BLOG DIY BEADING MAGAZINE ISSUE 32
STEP 35 Step up to exit from the pearl shown below (Finishing the previous step in the A bead and then
stepping up from there makes the circle more secure)
Now string 3 bicones Pass through the pearl and the first bicone again
In the reality your circle will look more like this the A beads forming a strong row in the middle of the
pearls
STEP 36 Add 2 bicones Pass through the
neighboring pearl the first bicone added in the previous row and the 2 bicones added in this step
so you can exit from the next pearl
Something Blue Necklace and Earrings
BLOG WWWHANDMADE-JEWELRY-CLUBCOM MEMBERSHIP WWWDIYBEADINGCLUBCOM BLOG DIY BEADING MAGAZINE ISSUE 32
Now in the reality your circle will look more like this the A beads still forming a strong row in the middle of the pearls and the bicones slightly lying on top of
them
STEP 37 - 49 Repeat STEP 35 and STEP 36 again until you finish the circle with the bicones
But be careful in the last step first you have pass through the third bicone added then add 1 bicone
and pass through this little quartet to exit from the bicone shown below (The second one added in
STEP 35)
STEP 50 With these steps we finish the circle by adding 1 bicone to connect the A beads and the
bicone row So add 1 bicone pass through the nearest A bead and add 1 bicone again Pass
through the bicone already there and exit from the bicone you just added
Something Blue Necklace and Earrings
BLOG WWWHANDMADE-JEWELRY-CLUBCOM MEMBERSHIP WWWDIYBEADINGCLUBCOM BLOG DIY BEADING MAGAZINE ISSUE 32
STEP 66-83 Secure the circle by adding 1A between each bicone in the second row of Swarovski
bicones If you finished secure the thread and trim
STEP 51-65 Using the same technique as in STEP 37 - 49 add 1 bicone to finish the third bicone row The black line shows you the way (After STEP 50 pass through the next A bead add 1 bicone and pass through the bicone already there and the bicone added in the previous step Repeat these steps to
finish the inner bicone circle)
MIDDLE CIRCLE Work RAW stitch into a beaded circle and embellish with
Swarovski bicones Remember you need to bead two circles this time
STEP 1 Just like in the focal circle begin with 2 pearls 1A and 1 pearl again on a comfortable length of thread
leaving a 2rdquo 5cm tail Pass through the first two pearls strung to form a ring
Something Blue Necklace and Earrings
BLOG WWWHANDMADE-JEWELRY-CLUBCOM MEMBERSHIP WWWDIYBEADINGCLUBCOM BLOG DIY BEADING MAGAZINE ISSUE 32
STEP 15-28 Mimicing the FOCAL CIRCLElsquos STEP 18-34 bead A beads until you finish the inner part of the
circle Exit from a pearl in the second row This circle should look very similar to the first one but this is a bit
smaller
STEP 2-14 Mimicing the FOCAL CIRCLElsquos STEP 2-17 bead until you count 14 pearls in the inner circle Exit
from the last A added
STEP 29-42 Mimicing FOCAL CIRCLElsquos STEP 35-49 add 2 rows of bicones
STEP 43-56 Mimicing the FOCAL CIRCLElsquos STEP 50-65 bead the third row of bicones to finish the circle
Something Blue Necklace and Earrings
BLOG WWWHANDMADE-JEWELRY-CLUBCOM MEMBERSHIP WWWDIYBEADINGCLUBCOM BLOG DIY BEADING MAGAZINE ISSUE 32
SMALLEST CIRCLE Work RAW stitch into a beaded circle and embellish
with Swarovski bicones Remember you need to bead two circles again
STEP 1 Just like in the focal circle begin with 2 pearls
1A and 1 pearl again on a comfortable length of thread leaving a 2rdquo 5cm tail Pass through the first two
pearls strung to form a ring
STEP 57-70 Just like the FOCAL CIRCLElsquos STEP 66-83 secure the circle by adding 1A between every bicone
in the second row of bicones If you finished secure the thread and trim (Donrsquot forget to bead another
circle)
STEP 2-12 Mimicing the FOCAL CIRCLElsquos STEP 2-17 bead until you count 12 pearls in the inner circle Exit
from the last A added
STEP 13-24 Mimicing the FOCAL CIRCLElsquos STEP 18-34 bead A beads until you finish the inner part of the
circle Exit from a pearl in the second row This circle should look very similar to the first two but this is the
smallest of them all
Something Blue Necklace and Earrings
BLOG WWWHANDMADE-JEWELRY-CLUBCOM MEMBERSHIP WWWDIYBEADINGCLUBCOM BLOG DIY BEADING MAGAZINE ISSUE 32
STEP 37-48 Mimicing the FOCAL CIRCLElsquos STEP 50-65 bead the third row of bicones to finish this circle too
STEP 25-36 Mimicing FOCAL CIRCLElsquos STEP 35-49 add 2
rows of bicones The last step here is purple again
STEP 49-60 Just like the FOCAL CIRCLElsquos STEP 66-83 secure the circle by adding 1A between every bicone
in the second row of bicones If you finished secure the thread and trim (Donrsquot forget that you need two
small circles)
Something Blue Necklace and Earrings
BLOG WWWHANDMADE-JEWELRY-CLUBCOM MEMBERSHIP WWWDIYBEADINGCLUBCOM BLOG DIY BEADING MAGAZINE ISSUE 32
STEP 37-48 Mimicing the FOCAL CIRCLElsquos STEP 50-65 bead the third row of bicones to finish this circle too
STEP 25-36 Mimicing FOCAL CIRCLElsquos STEP 35-49 add 2
rows of bicones The last step here is purple again
STEP 49-60 Just like the FOCAL CIRCLElsquos STEP 66-83 secure the circle by adding 1A between every bicone
in the second row of bicones If you finished secure the thread and trim (Donrsquot forget that you need two
small circles)
Something Blue Necklace and Earrings
BLOG WWWHANDMADE-JEWELRY-CLUBCOM MEMBERSHIP WWWDIYBEADINGCLUBCOM BLOG DIY BEADING MAGAZINE ISSUE 32
STEP 2-6 Continue by adding 1A 1 bicone 1 pearl until you count 6 of each
STEP 1 Begin with 1 pearl 1 bicone 1A and 1 bicone again on a comfortable length of thread leaving a 2rdquo
5cm tail Pass through the pearl and the first bicone strung to form a ring
STEP 7-12 Pass through the A beads to make your
component more secure Also secure the thread and trim (Repeat these steps until you have six 6-BEAD
COMPONENTs)
6-BEAD COMPONENT Work RAW stitch into a beaded circle and embellish with Swarovski bicones
For the necklace we will need six from this component For the earring two
Something Blue Necklace and Earrings
BLOG WWWHANDMADE-JEWELRY-CLUBCOM MEMBERSHIP WWWDIYBEADINGCLUBCOM BLOG DIY BEADING MAGAZINE ISSUE 32
STEP 2-4 Continue by adding 1A 1 bicone 1 pearl
until you count 4 of each
STEP 1 Begin with 1 pearl 1 bicone 1A and 1 bicone again on a comfortable length of thread leaving a 2rdquo
5cm tail Pass through the pearl and the first bicone strung to form a ring
STEP 5-8 Pass through the A beads to make your component more secure Also secure the thread and
trim (Repeat these steps until you have the wished amount of 4-BEAD COMPONENTs)
4-BEAD COMPONENT Work RAW stitch into a beaded circle and embellish with Swarovski bicones
For the necklace-size that is given on the second page we will need 20 from this
component For the earring two
If you would like to make a longer necklace you need to make more (One 4-BEAD COMPONENT measures about 38 inch 1 cm To make the necklace symmetrical you have to have equal amounts on each side This means for every extra frac34 inches
2 cm-s you will need 1 4-BEAD COMPONENT on each side of the necklace)
Something Blue Necklace and Earrings
BLOG WWWHANDMADE-JEWELRY-CLUBCOM MEMBERSHIP WWWDIYBEADINGCLUBCOM BLOG DIY BEADING MAGAZINE ISSUE 32
STEP 2 Connect the MIDDLE CIRCLE to two 6-BEAD COMPONENTs by adding four-times 2As
between the pearls Choose a pearl on the MIDDLE CIRCLE and add
2A pass through a pearl in the 6-BEAD COMPONENT previously added and add 2A again Watch out this has to be symmetrical Repeat this at least two more times to make it
secure Now repeat this entire procedure but choose
the 8-th pearl on MIDDLE CIRCLE Repeat this on the other side of the necklace
too
Choose a pearl on the FOCAL CIRCLE and add 2A pass through a pearl in the 6-BEAD COMPONENT and add 2A again Repeat this at least two more times to make it secure
Now repeat this entire procedure but choose the 5-th pearl on FOCAL CIRCLE This will make the necklace nice on your neck
FINISHING THE NECKLACE Connects the parts with A beads
STEP 1 Connect the FOCAL CIRCLE to two 6-BEAD COMPONENTs by adding four-times 2As between the pearls To do this turn your parts upside down you need to
see the pearls We will work on this side from now on
Something Blue Necklace and Earrings
BLOG WWWHANDMADE-JEWELRY-CLUBCOM MEMBERSHIP WWWDIYBEADINGCLUBCOM BLOG DIY BEADING MAGAZINE ISSUE 32
FINISHING THE EARRING Connects the parts with A beads
STEP 1-2 Connect the 6-BEAD COMPONENT
to 4-BEAD COMPONENT and the 4-BEAD
COMPONENT to the earring hook
First connect the 4-BEAD COMPONENT to the 6-BEAD COMPONENT with 4A beads Mimic
the elongation steps of the necklace if needed
Secondly connect the 4-BEAD COMPONENT
to your earring hook with 4A beads again Leave from the last pearl bead 2A beads the hook (this is the orange oval form) and 2As again Pass through each of them to
secure this connection again
Finally get ready to prepare the other earring ndash since we need two of them
STEP 5 Connect the 4-BEAD COMPONENTs to the toggle clasp thus finishing the
necklace Leaving from the last pearl bead 2A the
clasp(this is the orange oval form) and 2A again Pass through all of them a couple more times to make this connection more
secure
Something Blue Necklace and Earrings
BLOG WWWHANDMADE-JEWELRY-CLUBCOM MEMBERSHIP WWWDIYBEADINGCLUBCOM BLOG DIY BEADING MAGAZINE ISSUE 32
If you finished it is time to try it on It was a great fun wasnrsquot it And how beautiful you look in your new necklace and the matching earrings
Something Blue Necklace and Earrings
BLOG WWWHANDMADE-JEWELRY-CLUBCOM MEMBERSHIP WWWDIYBEADINGCLUBCOM
About the Author
Margit Vogel
My name is Margit Vogel I live in Hungary Europe
By profession I am a biochemical engineer but I fell in love with
beads so much that I could not stop playing with them
I make one-of-a-kind beaded and bead embroidered art
jewelry made of the best quality materials such as Swarovski
stones gemstones Japanese beads (Miyuki and Toho) Czech
glass beads leather soutache and suede Each piece is unique
and individually crafted
Feel free to visit my blog for some eyecandy
httpiformjewelrywordpresscom
My shop httpwwwetsycomshopiformjewelry
Facebook httpwwwfacebookcomiformjewelry
BLOG DIY BEADING MAGAZINE ISSUE 32
Getting Down And Personal With Gianna
Getting Down And Personal With Gianna
Nowadays we see more and more jewelry stores opening up online and with these online jewelry stores it has made it easier for us to purchase and view their creations Have you ever wondered how they are able to manage and produce amazing jewelry pieces and tutorials So heres a little on the journey to open up an online shop We are excited to present to you Gianna aka Beading4perfectionists
Gianna Beader amp Youtuber
Unlike most jewelry makers and beadweavers Gianna did not start beading as a hobby but as a means to make ends meet With goals in trying to
fill the financial gap she did everything she could to expand her earnings ndash working as a security guard
and at the same time learning how to bead and selling her pieces at fair trades and flea markets
Since many were asking if she does home beading workshops she started on exploring how to teach people to bead She loves Scott Bakula and has always loved him till now and this served as her
inspiration to start making a beading video tutorial
Gianna started creating videos because she was at the point in her life where everything seemed to be falling apart And at that moment of time she had difficulties financially and selling jewelry was the only way for her to stay afloat financially She is a big Scott Bakula fan and when she went to the UK to see him on stage that was when it hit her that she is already able to edit videos and
taught herself Photoshop and done workshops at bead fairs so why not put these together and see what happens on Youtube She knew that if she gets enough subscribers and views ndash though no one knew what the exact numbers were you would be invited to become a Youtube partner This way she could monetize her videos with advertisements and hopefully she would be able to be a Youtube partner and be able to pay her bills
BLOG WWWHANDMADE-JEWELRY-CLUBCOM MEMBERSHIP WWWDIYBEADINGCLUBCOM BLOG DIY BEADING MAGAZINE ISSUE 32
Getting Down And Personal With Gianna
Her Youtube channel is popular and the reason why she chose Youtube is because Youtube is the biggest platform and reached almost to the whole world Everyone already knows about it and it was growing rapidly as compared to other platforms like Dailymotion so she figured that Youtube was the way to go Her advice to new designers is that when you start out go to the platforms on the top of your list first then work your way down your list if you do not get accepted by your first choice
After loyally putting up one video every week for about 8 months in a row she became a Youtube partner and monetized her videos She knew she needed at least $100 to get her first payout She managed to reach $100 after 3 months The process was not easy she worked hard lack sleep skipped meals and who knows what happened to Ridge in the Bold and the Beautiful because she stopped watching
On Youtube you can monetize your videos Google pays straight to your bank account and at other countries where they also have the option of getting checks among other options In order to get paid you have to reach the $100 mark and after 3 months For Gianna she thinks that you cannot say that Etsy is better than Youtube or Youtube is better than Etsy Her reasoning is because on Youtube she has many followers which will eventually check out her Etsy shop And to start an Etsy shop you need an audience
BLOG WWWHANDMADE-JEWELRY-CLUBCOM MEMBERSHIP WWWDIYBEADINGCLUBCOM BLOG DIY BEADING MAGAZINE ISSUE 32
television and dedicated her spare time (as she had another job) to Youtube She re-registered at the chamber of commerce after receiving her first payout Her work at Youtube now is not a full time job and things have changed on Youtube It is easier to become a parter but there are some countries that need to wait for an invitation to be a Youtube partner Take Italy for instance Italians would have to work just as hard as she did if they want to become a Youtube partner
Getting Down And Personal With Gianna
With her 60000 subscribers on her b4pbakup Youtube channel it is possible to sell at least 60 patterns on the first day on Etsy after promoting the PDF file on her Youtube channel Though you may think that 60 out of 60000 is not much you have to remember that not everyone has the means to purchase the PDF file and a lot of people still rather watch her carry out the tutorial(for free) on Youtube instead of reading the patterns or paying for the patterns even if the pattern is for a fundraiser and only cost $2 Her insights on Youtube is that Youtube is not what it used to be 6 years ago Instead of making more money every month she is making less and less because advertisers have more options of where they want to advertise their ads Ads do not pay as much as they used to Back in the days you could get 25 cents per ad Now you count yourself lucky if you could get 5 cents roll in after two hours
BLOG WWWHANDMADE-JEWELRY-CLUBCOM MEMBERSHIP WWWDIYBEADINGCLUBCOM BLOG DIY BEADING MAGAZINE ISSUE 32
And on top of that adblockers are destroying Youtube channel owners Youtube will start making changes to the channels where there will be ldquopaid subscriptionrdquo channels This has already been implemented in some countries but not in her country The Netherlands This means there will no longer be ads for her monthly paying subscribers She hopes that Youtube will add on a paid per video option feature The option to be a paid channel or free channel or to start a new channel for paying customers is yours to choose Gianna is not happy with Youtube because many others like her have worked so hard and for some years to become Youtube partners(which was something to be proud of) has lost their status
Getting Down And Personal With Gianna
Her advice for those who want to go on Youtube is 1 Do it because you want to teach
2 Do it because you want a career with beads
BLOG WWWHANDMADE-JEWELRY-CLUBCOM MEMBERSHIP WWWDIYBEADINGCLUBCOM BLOG DIY BEADING MAGAZINE ISSUE 32
After putting up about 20 videos and having at least 5000 subscribers add the PDF tutorials to Etsy and Craftsy She found out that her audience would like to have the PDF after watching her videos This is because they would rather print out the PDF and work while seated in a comfy chair technically somewhere else instead of having to pause the video time and time again
Gianna has also made a video for those who want to know the whole story of her journey up until the present day And to get updates on her you can check it out here She has also started a vlog where she tells of how she still works towards becoming a financial independent beader and explains her journey to get where she wants to be(or die trying) Gianna will be in the UK on October the 17th giving an all-day workshop with 4 different patterns
(2 beginners and 2 advanced) in Wotton-under-Edge
Gianna will be there Friday night as the workshop is on Saturday She will be leaving on Sunday Her
doors are open to all who wants to continue the party with her at the hotel across the street
For more information do contact Ann Tucker on Facebook
httpswwwfacebookcomanntucker501
Rec
omm
end
ed R
ead
ings
Making Jewelry with Gemstone
Beads
Combines the popular craft of beading with beautiful semi-precious stones which are collected by many Features a variety of versatile ideas which can be adapted for any type of gem or bead Readers will learn to reate beautiful gemstone jewelry with this dazzling collection of over 100 projects ranging from eyecatching earrings and accessories to exquisite necklaces and bracelets This beautiful book offers an impressive range of 28 beautiful semi-precious stones (including birthstones) and a glimpse into the fascinating history and mythical properties behind them
BLOG DIY BEADING MAGAZINE ISSUE 32 BLOG WWWHANDMADE-JEWELRY-CLUBCOM MEMBERSHIP WWWDIYBEADINGCLUBCOM
Rec
omm
end
ed R
ead
ings
Convertible Crystal Jewelry
Reverse it Twist it Wear it Many
Ways
Diane Whiting presents the idea that convertibility isnrsquot just about using pieces in multiple ways it is also about using skills and creativity in multiple ways Using ever-popular sparkling crystals Diane showcases design elements through various techniques for fun easy fashionable jewelry With 25 projects the reader can choose from bracelets necklaces and earrings that match any outfit or styleDiane Whiting presents the idea that convertibility isnrsquot just about using pieces in multiple ways it is also about using skills and creativity in multiple ways
BLOG DIY BEADING MAGAZINE ISSUE 32 BLOG WWWHANDMADE-JEWELRY-CLUBCOM MEMBERSHIP WWWDIYBEADINGCLUBCOM
Rec
omm
end
ed R
ead
ings
Wire Jewelry Masterclass
Wrapped Coiled and Woven Pieces
Using Fine Materials
Comprehensive and fabulous Wire Jewelry Masterclass takes an in-depth look at an intricate and rewarding craft The 24 projects which range from simple Dragons tear briolette earrings to a Poseidon-under-the-sea pendant will delight and inspire jewelers of all levels and tastes Divided into beginner intermediate and advanced sections this beautifully photographed step-by-step guide is the ticket to wire jewelry expertise
BLOG DIY BEADING MAGAZINE ISSUE 32 BLOG WWWHANDMADE-JEWELRY-CLUBCOM MEMBERSHIP WWWDIYBEADINGCLUBCOM
Rec
omm
end
ed R
ead
ings
Timeless Wire Weaving The
Complete Course
Timeless Wire Weaving focuses on developing wirework skills through 13 projects using three classic wire weaving techniques coiling wrapping and weaving The projects are built around a focal cabochon and incorporate seed beads and crystals in imaginative ways Designers learn to make the jewelry shown in the book and they also use the techniques learned to create innovative jewelry pieces of their own
BLOG DIY BEADING MAGAZINE ISSUE 32 BLOG WWWHANDMADE-JEWELRY-CLUBCOM MEMBERSHIP WWWDIYBEADINGCLUBCOM
Our digital magazine is available through
Apple Newsstand service available to millions of IPAD users
To advertise with us please email us at
diyjewelryclubgmailcom
Or visit our page at
httphandmade-jewelry-clubcomadvertising-diy-beading-magazine
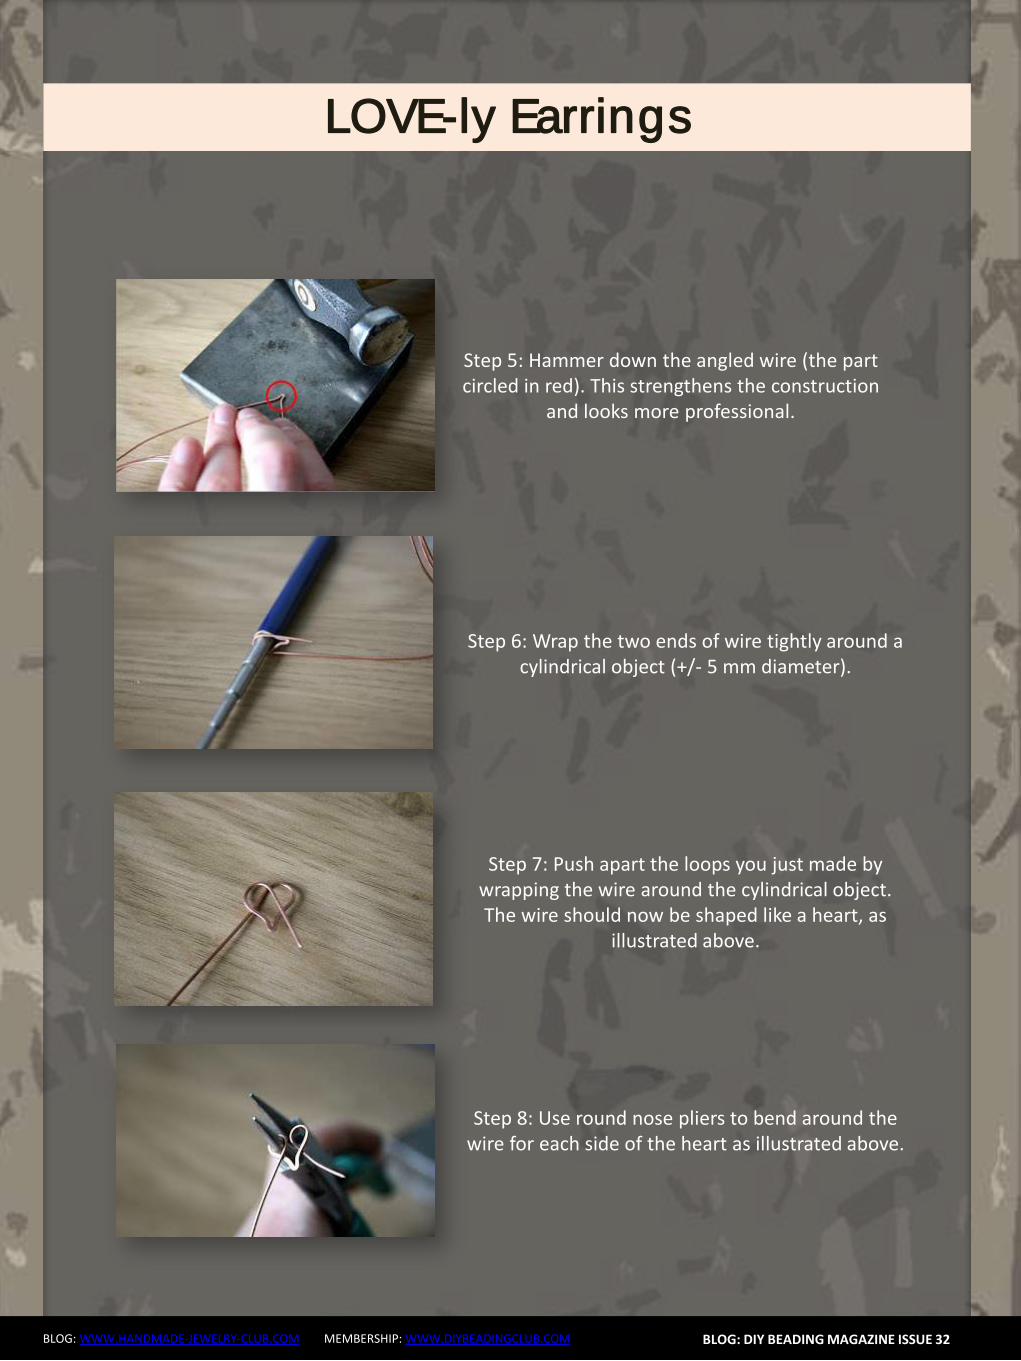
BLOG WWWHANDMADE-JEWELRY-CLUBCOM MEMBERSHIP WWWDIYBEADINGCLUBCOM
LOVE-ly Earrings
BLOG DIY BEADING MAGAZINE ISSUE 32
Step 22 Cut off the spare bits of wire preferably at the backside of the ear stud and tuck in the ends
Congrats yoursquove now made a heart-shaped ear stud Next we are going to finish it off with a patina
Step 23 Oxidize the metal of the ear studs I always use liver of sulfur solved in warm water The metal
will turn a dark color and matte texture Afterwards rinse the ear studs thoroughly with water and pat
them dry
Step 24 Rub the oxidized ear stud all over with a rough polishing pad to bring back (a dark copper)
color to the surface
Yoursquove now finished making your own LOVE-ly ear studs
Secure them in your ear with plastic or copper stops These can be bought online or in jewelry-supply
stores
Variation ideas You can easily vary in size and shape (longer hearts smaller coils pointier bottoms etc) and
use different materials As you can see the earring I make in this tutorial has a slightly smaller bead than the
earrings on the cover which influences the overall appearance somewhat
The earrings underneath are made with sterling silver and gold wire (super-short coils) and contain small pink
rubies
LOVE-ly Earrings
BLOG WWWHANDMADE-JEWELRY-CLUBCOM MEMBERSHIP WWWDIYBEADINGCLUBCOM
About the Author
Jeske Hendriks
Hi there My name is Jeske and I love all things handmade Over the years Irsquove dabbled in countless different arts and crafts but nowadays I mainly focus on making jewellery and cutting stone cabochons As for jewellery
my preferred materials are silver wire and gemstonemineral beads Using wire-wrapping and basic silver smithing techniques I create both simple
and intricate pieces ndash each and every one of them unique a personal little artwork
You are welcome to follow me on facebook stop by at my personal
webpage andor to have a look at my Etsy shops httpswwwfacebookcomyeskecrafts
httpwwwyeskecraftscom httpwwwyourbeadsandfindingsetsycom
httpwwwyeskecraftsetsycom httpwwwyeskemiscetsycom
BLOG DIY BEADING MAGAZINE ISSUE 32
Flower Tale Earrings
BLOG WWWHANDMADE-JEWELRY-CLUBCOM MEMBERSHIP WWWDIYBEADINGCLUBCOM
Techniques Beadweaving
Project Level Beginner to Intermediate
Materials 12 bronze opaque 6mm Czech glass pearl round beads
2 gr gold lustered dark topaz Japanese 110 seed beads (Toho 459)
Size B gold beading thread
2 bronze earring hooks
Tools Size 10 beading needle
Scissors
Finished Size Diameter ndash 3 cm (118 inches) (without earring hooks)
BLOG DIY BEADING MAGAZINE ISSUE 32
Flower Tale Earrings
BLOG WWWHANDMADE-JEWELRY-CLUBCOM MEMBERSHIP WWWDIYBEADINGCLUBCOM
Step 1 Cut about 110 cm (43 inches) of thread and
pass it through the needle hole
Pick six groups of one 110 seed bead and one
6 mm round bead
BLOG DIY BEADING MAGAZINE ISSUE 32
Join the beads into a ring and secure with two
square knots
Leave a tail of about 15 cm (59 inches)
Step 2 The working thread should be right before the
6 mm round bead
Pick seven 110 seed beads skip the 6 mm
round bead and pass the needle through the
next 110 seed bead added in the previous
round
Repeat adding groups of seven 110 seed
beads five more times
When adding the last group take the needle
directly through the 110 seed bead from the
previous round and the next one added in the
beginning of current round
Flower Tale Earrings
BLOG WWWHANDMADE-JEWELRY-CLUBCOM MEMBERSHIP WWWDIYBEADINGCLUBCOM
Step 3 Pick three 110 seed beads skip one seed
bead from the chain of seven added in the
previous round and pass with the needle
directly through the next three 110 seed
beads
BLOG DIY BEADING MAGAZINE ISSUE 32
Pick three 110 seed beads skip one seed
bead from the chain of seven added in the
previous round and pass with the needle
through the last one and the first 110 seed
bead from the next chain of seven
Repeat the above directions from Step 3 five
more times
After completing this round make sure the
thread will be exiting from the middle 110
seed bead from the first group of three added
in the beginning of this round
Step 4 Pick one 110 seed bead and go through the
last seed bead of the group of three
Flower Tale Earrings
BLOG WWWHANDMADE-JEWELRY-CLUBCOM MEMBERSHIP WWWDIYBEADINGCLUBCOM
Pick three 110 seed beads and take the
needle through the first seed bead of the next
group of three added in the previous round
BLOG DIY BEADING MAGAZINE ISSUE 32
Pick one 110 seed bead and go with the
needle through the next three seed beads (the
last two of the group of three and the last one
from the chain of seven)
Then go up through three 110 seed beads
(the first from the next group of seven and the
first two from the next group of three)
Repeat the above directions from Step 4 to
complete the remaining petals
When working on the last petal perform the
operation from the image shown on the left
instead of picking the group of three 110 seed
beads string two 110 seed beads the earring
hook other two 110 seed beads and
continue beading as instructed above
When you are done hide the thread ends into the beadwork
Flower Tale Earrings
BLOG WWWHANDMADE-JEWELRY-CLUBCOM MEMBERSHIP WWWDIYBEADINGCLUBCOM
About the Author
Iulia Postică
I was born and live in Moldova Eastern Europe Ever since I remember myself
Ive been crocheting and knitting My grandmother has taught me that and I
loved it very much I always regarded crafts exclusively as a hobby and never
thought of making a career of it I traveled a lot to various historical sites
Actually Ive spent all my childhood summers in archaeological camps with
my father who is a professional archaeologist
I also enjoy metal hammering and wirework as it gives me possibility to
express myself in materials used by human communities since ancient times
copper brass glass seed beads and gemstones That is no surprise to anyone
given my family history and academic background
My shop ldquoBeadedTreasuryrdquo with beading tutorials and bead crochet patterns
httpswwwetsycomshopBeadedTreasury
My shop ldquoArchaeologicardquo with artisan jewelry
httpswwwetsycomshopArcheologica
My blog httpbeadedtreasuryblogspotcom
My facebook httpswwwfacebookcomBeadedTreasury
BLOG DIY BEADING MAGAZINE ISSUE 32
Liberty Earrings
BLOG WWWHANDMADE-JEWELRY-CLUBCOM MEMBERSHIP WWWDIYBEADINGCLUBCOM
Materials - Nr 2 cabochon Preciosa Ornela ovale 18x22 mm turchese
- Rocaille Toho 150 silver lined green emerald
- Nr 2 dagger beads
- Nr 20 pearl 4 mm
- Superduo opaque luster ceramic green
- Rocaille 80 color gold
- Rocaille 80 color ivory
- Delica Miyuki 110 aquagreen mix
- Rocaille Miyuki 110 galvanized silver
- Nr 2 monachelle (earwire)
-Fireline
- Beading Needle nr 12
BLOG DIY BEADING MAGAZINE ISSUE 32
Liberty Earrings
BLOG WWWHANDMADE-JEWELRY-CLUBCOM MEMBERSHIP WWWDIYBEADINGCLUBCOM
Make a circle of 20 delica beads and make a knot (a) Perform two rounds peyote with ivory 80 seed beads (b c) Exit from an ivory
bead
BLOG DIY BEADING MAGAZINE ISSUE 32
a b c
Jump from 80 to 80 with 110 80 gold 110 (a) Finish the round and come out of a 80 gold bead
Jump to the next 80 gold with a 4mm pearl (b) Finish the round and come out
of the first pearl Jump to the 2nd pearl and close with a 80 gold bead(c)
a b c
Position the cabochon and jump from one 80 to the other with two delica bead (a)
Continue with three delicas four times (b) At the bottom sew on two delicas then finish the round by sewing on three delicas for four times passing from one to another roc 80 Tighten the cabochon and exit from the
first two delica that you started with String together a 110 and 150 and enter the second of the three close delicas (c)
a b c
Liberty Earrings
BLOG WWWHANDMADE-JEWELRY-CLUBCOM MEMBERSHIP WWWDIYBEADINGCLUBCOM
Put together 150 110 150 and enter in the second of three next delica (a) Put the same beads for three times then put together 150 and 110 and enter
in the two delica of the bottom tip (b) Enter in the second of three next delica with 110 and 150 (c) Continue passing
in the 80 beads with three beads (150 110 150) for four times then at the top finish the round by putting together a 150 and 110 (d)
BLOG DIY BEADING MAGAZINE ISSUE 32
a b c
Exit from the first 150 sewn in the previous round and jump in the three next beads with a 150 (a)
Put a 150 at a time and exit from the first 110 beads of the bottom tip Jump in the
near 110 with a 150 (b) Finish round repeating steps a and b (c) Exit the roc 80 as shown in the photo (d)
a b c
d
a b c d
Enter in the 80 with four 150 (a b) Enter the 80 beads at the bottom of the pieces with two 110 one superduo one 80 ivory bead one superduo and two 110 (c)
d e f
Liberty Earrings
BLOG WWWHANDMADE-JEWELRY-CLUBCOM MEMBERSHIP WWWDIYBEADINGCLUBCOM
Exit from the bottom pearl (a) Put together 150 three 110 150 and enter in the superduorsquos second hole (b)
Put together three superduo and enter in the next superduorsquos second hole (c) Rethread 15 three 110 150 and return in the opposite direction in the pearl of departure (d)
BLOG DIY BEADING MAGAZINE ISSUE 32
a b
c
Exit from the second pearl indicated from (a) Put 150 four 110 and enter in the second of the three 110 (b) Go to the second superduorsquos hole with four 110 and a 150 (c)
Enter the second hole of the supeduo with a 150(d) Sew in the middle of the bottom of the superduo 150 two 110 150 dagger 150 two 110 150(e)
Enter the second hole of the thirs superduo with 150 (f)
a b c
d
d e f
Liberty Earrings
BLOG WWWHANDMADE-JEWELRY-CLUBCOM MEMBERSHIP WWWDIYBEADINGCLUBCOM BLOG DIY BEADING MAGAZINE ISSUE 32
Put 150 four 110 and enter in the second of three 110 of the base (a) Insert four 110 and 150 in the pearl opposite direction indicated in the picture (b) Go in all the beads
around the piece and exit from the pearl at the top (c) Put 150 three 110 150 and enter the superduo (d)
Enter the ivory bead 80 with two 150 (e) Enter the next superduo with two 150 (f)
a b c
d e f
Put together 150 three 110 and enter in opposite direction in the departurersquos pearl (a) Exit from the 150 beads indicated by photo (b) From this jump in the second of two near
150 with five 150 to created the hole for the earwire (c) Pass the thread in the beads make a few knots and cut the excess thread
a b c
Your earrings are finished
Liberty Earrings
BLOG WWWHANDMADE-JEWELRY-CLUBCOM MEMBERSHIP WWWDIYBEADINGCLUBCOM
About the Author
Mariella Martella
My name is Mariella Martella and I am the author and
designer of jewelry that I sign with the name of Mariel Bijoux
After changing city often for work and study I currently live
in northern Italy I am an art historian with a passion for travel
painting and jewelry design in weaving that project since
2010 In my beads and crystals are the colors of the
Mediterranean sea the atmosphere of summer evenings
and the lights of the places I visited
You can find me at
Etsy shop httpswwwetsycomitshopMarielBijoux
Facebook httpswwwfacebookcommari3lbijoux
Crafting blog httpmarielbijouxblogspotit
Twitter httpstwittercomMarielBijoux
BLOG DIY BEADING MAGAZINE ISSUE 32
Jade Necklace
BLOG WWWHANDMADE-JEWELRY-CLUBCOM MEMBERSHIP WWWDIYBEADINGCLUBCOM
Every time I wear a necklace I always make it a point that the
necklace will lay perfectly flat on my neck Using wire for a necklace
made it possible for me like what I did with Jade Necklace It may look
odd at first having bent wires for a necklace but once the jewelry is
finished youll be so happy how the necklace will perfectly lay on your
neck
The tutorial is catered for intermediate level One must know basic
wirework skills such as wire wrapping making loops wrapped loops
and linking to follow the tutorial It has clear instructions and ultra-clear
close-up photos at each step Additionally you can ask me question
you have on the tutorial No more getting stuck and frustrated on a
confusing or just plain inaccurate pattern
If you followed this tutorial and then sell the accessory or jewelry
please give credit to the author or DIY Beading Clubcom
Copyright 2015
wwwdiybeadingclubcom
wwwhandmade-jewelry-clubcom
BLOG DIY BEADING MAGAZINE ISSUE 32
Jade Necklace
BLOG WWWHANDMADE-JEWELRY-CLUBCOM MEMBERSHIP WWWDIYBEADINGCLUBCOM BLOG DIY BEADING MAGAZINE ISSUE 32
Materials Needed 18ga Craft wire 28ga Craft wire 15mm diameter Green Round Flat Back Sew On Gems 5mm Green pearls
8mm Green pearls 6mm x 11mm teardrop Crystal Treasures Mill Hill beads or any teardrop bead with holes on the side Hook for your clasp
Tools Needed Wire cutter Flat nose pliers Round nose pliers Mandrel A jar or any rounded object to shape your necklace
Skill Level Intermediate
Step 1 Cut 6 inches 18ga wire Make a loop on one end then measure approximately 125 inches and make another loop
Form a size 4 circle on your mandrel
Jade Necklace
BLOG WWWHANDMADE-JEWELRY-CLUBCOM MEMBERSHIP WWWDIYBEADINGCLUBCOM BLOG DIY BEADING MAGAZINE ISSUE 32
Then close the circle by wrapping the extended wire just below the loop Wrap the
wire 2x
This is how it looks like Lets call this circle frame Youll notice that the lower curve is
slightly bigger than the upper curve
Step 2 Cut 8 inches of 28ga wire Wrap one end of
the wire at least 3x on one side of the circle frame just below the loop
Bring up your gem Flat back sew on gems has 2 holes Insert the wire into one hole and then
wrap the wire once onto the circle frame
Jade Necklace
BLOG WWWHANDMADE-JEWELRY-CLUBCOM MEMBERSHIP WWWDIYBEADINGCLUBCOM BLOG DIY BEADING MAGAZINE ISSUE 32
Step 3 Insert a 5mm pearl on the wire and then pass
the wire under circle frame
Repeat previous step 2x and have 3 pearls wrapped
Continue wrapping with your teardrop crystal My crystal has 2 holes on the side
and then continue wrapping with your 5mm pearls then secure your wire
Repeat Step 3 and create as many as needed For 16-inch necklace Ive created 6 of these
components
Jade Necklace
BLOG WWWHANDMADE-JEWELRY-CLUBCOM MEMBERSHIP WWWDIYBEADINGCLUBCOM BLOG DIY BEADING MAGAZINE ISSUE 32
Step 4 Cut a 15-inch 18ga wire and make a loop on
one end Insert 8mm pearl and make a loop on the other end You then use these as connectors
and link the components
Step 5 The necklace is an 18ga wire with wrapped
loops on both ends First cut 7 inches 18ga wire and make a wrapped loop with your hook already inserted Side in 18pcs 5mm pearls
Then make a wrapped loop on the other end connecting the wrapped loop onto the component Do the same for the other
necklace but make the loop on the other end big enough so the hookclasp can pass thru
To have the necklace curve shaped use a jar to bend the wire Voila Now youre
ready to party
Jade Necklace
BLOG WWWHANDMADE-JEWELRY-CLUBCOM MEMBERSHIP WWWDIYBEADINGCLUBCOM
About the Author
Sky Aldovino
I consider myself a late bloomer when it comes to crafting Irsquom a self-taught jewelry maker Jewelry making wasnrsquot really a hobby of mine but unforeseen events lead me to learn jewellery making My family put up a craft store where we sell cross stitch beads and all sorts of crafting materials I fell in love with the beads and tried to create accessories only for myself Clients liked the pieces and I started customizing handmade jewelleries The craft store was a success for 6 years but like any other small businesses we had to close it down and I was confined to staying at home While at home I had all the time using the internet and now working as a home-based jewelry designer
BLOG DIY BEADING MAGAZINE ISSUE 32
Atomic Ring
BLOG WWWHANDMADE-JEWELRY-CLUBCOM MEMBERSHIP WWWDIYBEADINGCLUBCOM
Have fun making shapes using the wigjig Cyclops Make loops going in
circles to mimic the shape of a flower or in this tutorial mimic the
shape of an atom The tutorial will also teach you how to cage a
cabochon Whats nice about this piece is that with one long wire you
can create the ring from start to finish
The tutorial is catered for intermediate to advanced students One
must already know how to make spirals and use a wigjig tool It has
clear instructions and ultra-clear close-up photos at each step
Additionally you can ask me question you have on the tutorial No
more getting stuck and frustrated on a confusing or just plain
inaccurate pattern
If you followed this tutorial and then sell the accessory or jewelry
please give credit to the author or DIY Beading Clubcom
If you like to get a blank wigjig graph visit wigjigcom Shop and Jigs
section
Copyright 2015
wwwdiybeadingclubcom
wwwhandmade-jewelry-clubcom
BLOG DIY BEADING MAGAZINE ISSUE 32
Atomic Ring
BLOG WWWHANDMADE-JEWELRY-CLUBCOM MEMBERSHIP WWWDIYBEADINGCLUBCOM
Materials Needed 20ga Craft wire 28ga Craft wire 11mm Round Cabochon
Tools Needed Wigjig Cyclops 15mm pegs Wire cutter Flat nose pliers Mandrel
Skill Level Intermediate - Advanced
BLOG DIY BEADING MAGAZINE ISSUE 32
Step 1 Lets prepare your wigjig cyclops Position the pegs like so
Atomic Ring
BLOG WWWHANDMADE-JEWELRY-CLUBCOM MEMBERSHIP WWWDIYBEADINGCLUBCOM BLOG DIY BEADING MAGAZINE ISSUE 32
Lets work with longer wire so youll have enough wire to hold onto as you manipulate the wire so cut 36 inches of 20ga wire From
one end of the wire measure 10 inches
On the 10-inch measurement loop the wire at the center peg then continue to loop onto the side pegs going in circle going back to
the center peg after looping on the side peg
Now the wire at the center peg will start to build up as you go around the side pegs so
you need to constantly press the wire at the center peg to accommodate the build up of
wire
When youre done pull out the wire and this is
how it should look like
Atomic Ring
BLOG WWWHANDMADE-JEWELRY-CLUBCOM MEMBERSHIP WWWDIYBEADINGCLUBCOM BLOG DIY BEADING MAGAZINE ISSUE 32
You will notice that the frame opens wide Now to keep the atom frame from opening wide secure the center of the frame by wrapping a 28ga wire What you
need to do is simply pass the 28ga wire into the hole and wrap as many times as needed or until youre sure that the frame is secure
Step 2 Now youre finished with your atom frame Well now create the focal design With the longer wire make a spiral at the center big
enough to accommodate the size of your cabochon In this tutorial the spiral is about
11mm in diameter the same size as my cabochon
Pop in your cabochon and start to make spirals going around and over the cabochon as if you are caging the cabochon Create at
least 5 rounds and then cut off any excess
Step 3 Now lets make the ring and this with the other
end of the wire
Atomic Ring
BLOG WWWHANDMADE-JEWELRY-CLUBCOM MEMBERSHIP WWWDIYBEADINGCLUBCOM BLOG DIY BEADING MAGAZINE ISSUE 32
Bring up your mandrel and wrap the wire to the size of your finger Wrap at least 2 times
When youre sure you have the right size pull the ring out of the mandrel
With the extended wire wrap the wire the secure the ring
Cut off any excess and voila You have your atomic ring Create as many as you can with different colors of cabochon
Atomic Ring
BLOG WWWHANDMADE-JEWELRY-CLUBCOM MEMBERSHIP WWWDIYBEADINGCLUBCOM
About the Author
Sky Aldovino
I consider myself a late bloomer when it comes to crafting Irsquom a self-taught jewelry maker Jewelry making wasnrsquot really a hobby of mine but unforeseen events lead me to learn jewellery making My family put up a craft store where we sell cross stitch beads and all sorts of crafting materials I fell in love with the beads and tried to create accessories only for myself Clients liked the pieces and I started customizing handmade jewelleries The craft store was a success for 6 years but like any other small businesses we had to close it down and I was confined to staying at home While at home I had all the time using the internet and now working as a home-based jewelry designer
BLOG DIY BEADING MAGAZINE ISSUE 32
Featured Article Gemstones Used for Jewelry Making
BLOG WWWHANDMADE-JEWELRY-CLUBCOM MEMBERSHIP WWWDIYBEADINGCLUBCOM
Gemstones are stones which we hold quite highly in terms of value And
jewelry often consists of stones that add attractiveness to it so it is not
surprising when jewelry designers actually use gemstones in their designs In
fact there are different types of gemstones that can be used for making
jewelry There are the expensive and pure gemstones and there are also the
imitation ones The information below will provide some information about
the kinds of stones you can use to create jewelry and how these stones will
impact the jewelry you have created
The first kind of stone which I believe we are all quite familiar with are
birthstones These stones are associated with individualrsquos month of birth
by SunVDesigns by BeyhanAkman
For example Amethyst stone is connected with anybody who is born in
February which carries special significance in the area of emotions and also
spiritually This stone also signifies calm and peace as well
And then we have semi-precious stones which are also often used in jewelry
making They are not as valuable as compared to precious stones but still
valuable Best examples of these stones are aquamarine topaz tourmaline
opal and turquoise
BLOG DIY BEADING MAGAZINE ISSUE 32
Featured Article Gemstones Used for Jewelry Making
BLOG WWWHANDMADE-JEWELRY-CLUBCOM MEMBERSHIP WWWDIYBEADINGCLUBCOM
It is an ideal gift for someone who you deem special Aquamarine pendants
usually work well for anyone and is widely an accepted stone
by HyppieChic by joyeriamestiza
However precious stones are the most unusual
and precious jewels to us Examples of some of
them are emerald sapphire diamond and
ruby These stones are usually very expensive
and are prized for their exquisiteness These
stones are commonly used in high-quality
jewelry designs which costs quite a fortune to
obtain
BLOG DIY BEADING MAGAZINE ISSUE 32
by sarajewelrystu
Jewelry designs with precious stones are usually
given as exceptional gifts on special occasions A
perfect example is a diamond ring that is usually
given as an engagement gift
by ldiamondsforever
Featured Article Gemstones Used for Jewelry Making
BLOG WWWHANDMADE-JEWELRY-CLUBCOM MEMBERSHIP WWWDIYBEADINGCLUBCOM
There are also synthetic stones which are often used to create jewelry
Synthetic stones are artificial imitations of gemstones Synthetic Sapphire
jewelry costs less compare with the authentic ones Most of the time
imitation stones are used to save cost but at the same time have the similar
look of the real stone
BLOG DIY BEADING MAGAZINE ISSUE 32
by shininggems by thaimaker
by lapinduprintemps by PastimeArt
Gemstones are used like beads and you can use it in any designs whether
simple or elaborate
Swarovski crystal components are available in a rich multitude of rondelles Perfect as spacers in necklaces or as discs in earrings Rondelles can be used with many varieties of shapes or sizes Use Swarovski crystal rondelles between large gemstones as accents with precious metal findings Fire Mountain Gems and Beads Crystal Passionsreg brand presents Swarovski crystal in display-ready packaging for brilliant retail presentation Crystal Passionsreg is an assurance of genuine Swarovski crystal
BLOG DIY BEADING MAGAZINE ISSUE 32 BLOG WWWHANDMADE-JEWELRY-CLUBCOM MEMBERSHIP WWWDIYBEADINGCLUBCOM
Recommended Jewelry Making Supplies
Mz Unisex-adults 12pcs 25x18x6mm Turquoise Oval CAB Cabochon
BLOG DIY BEADING MAGAZINE ISSUE 32 BLOG WWWHANDMADE-JEWELRY-CLUBCOM MEMBERSHIP WWWDIYBEADINGCLUBCOM
Recommended Jewelry Making Supplies
For a little sparkle that goes a long way design with Swarovski 4mm faceted bicones Create glorious multi-strand necklaces with the dainty crystals or use as spacers to add a tiny flash to your designs Swarovski crystal components are made in Austria and are considered the finest products of their kind in the world
BLOG DIY BEADING MAGAZINE ISSUE 32 BLOG WWWHANDMADE-JEWELRY-CLUBCOM MEMBERSHIP WWWDIYBEADINGCLUBCOM
Recommended Jewelry Making Supplies
Imitation beads resist color change These beads have uniform quality with a good polish Some strands may have little to no matrix Sizes shapes and colors may vary with handcrafted items
BLOG DIY BEADING MAGAZINE ISSUE 32 BLOG WWWHANDMADE-JEWELRY-CLUBCOM MEMBERSHIP WWWDIYBEADINGCLUBCOM
Recommended Jewelry Making Supplies
Something Blue Necklace and Earrings
BLOG WWWHANDMADE-JEWELRY-CLUBCOM MEMBERSHIP WWWDIYBEADINGCLUBCOM
Skill level Beginner Intermediate Advanced
DIMENSIONS OF THE NECKLACE Inner Circumference 14 18 inch 35 cm
Focal Pendant Width 1 15 inch 35 cm Focal Pendant Height 1 15 inch 35 cm
DIMENSIONS OF THE EARRING Earring Width 716 inch 12 cm Earring Height 1516 inch 25 cm (Without the earring hook)
BLOG DIY BEADING MAGAZINE ISSUE 32
Materials
Note Before purchasing the supplies measure the length of your wished necklace If you decide to bead a longer necklace you should keep in mind that for every extra
frac34 inches 2 cm-s you will need 8 bicones and 8 pearls
Something Blue Necklace and Earrings
BLOG WWWHANDMADE-JEWELRY-CLUBCOM MEMBERSHIP WWWDIYBEADINGCLUBCOM BLOG DIY BEADING MAGAZINE ISSUE 32
Work RAW stitch into a beaded circle and embellish with Swarovski bicones
STEP 2 String 1A and 2 pearls Pass through the previous
second pearl and the freshly added 1A and the first pearl again
STEP 1 Use a comfortable length of thread to string 2
pearls 1A and 1 pearl again leaving a 2rdquo 5cm tail Pass through the first two pearls strung to form a
ring
STEP 3 String 2 pearls and 1A Pass through the previous first pearl and the freshly added two pearls
again
STEP 4 - 17 Repeat STEP 2 and STEP 3 again until you count 17 pearls in the inner circle
But be careful in the last step you only have to add 1 pearl then pass through the first pearls
added in STEP 1 and add another 1A Now pass through the first pearl added in STEP
1and 1A added in this round again to exit from this A
Something Blue Necklace and Earrings
BLOG WWWHANDMADE-JEWELRY-CLUBCOM MEMBERSHIP WWWDIYBEADINGCLUBCOM BLOG DIY BEADING MAGAZINE ISSUE 32
STEP 19 String 2A and pass through the next A added in round 4-17 and the A added in round 18 the 2A added in this round and finally the A added in round 4-17 to exit from the bead showed below
STEP 18 String 3A and pass through the 1A added in the previous round and the first A added in this
round
STEP 20 - 34 Repeat STEP 18 and STEP 19 again until you finish the circle
But be careful in the last step first you have to pass through 3A and then add 1A After this pass
through the 3A again and exit from the A bead
shown below (This is the first A added in STEP 18)
Something Blue Necklace and Earrings
BLOG WWWHANDMADE-JEWELRY-CLUBCOM MEMBERSHIP WWWDIYBEADINGCLUBCOM BLOG DIY BEADING MAGAZINE ISSUE 32
STEP 35 Step up to exit from the pearl shown below (Finishing the previous step in the A bead and then
stepping up from there makes the circle more secure)
Now string 3 bicones Pass through the pearl and the first bicone again
In the reality your circle will look more like this the A beads forming a strong row in the middle of the
pearls
STEP 36 Add 2 bicones Pass through the
neighboring pearl the first bicone added in the previous row and the 2 bicones added in this step
so you can exit from the next pearl
Something Blue Necklace and Earrings
BLOG WWWHANDMADE-JEWELRY-CLUBCOM MEMBERSHIP WWWDIYBEADINGCLUBCOM BLOG DIY BEADING MAGAZINE ISSUE 32
Now in the reality your circle will look more like this the A beads still forming a strong row in the middle of the pearls and the bicones slightly lying on top of
them
STEP 37 - 49 Repeat STEP 35 and STEP 36 again until you finish the circle with the bicones
But be careful in the last step first you have pass through the third bicone added then add 1 bicone
and pass through this little quartet to exit from the bicone shown below (The second one added in
STEP 35)
STEP 50 With these steps we finish the circle by adding 1 bicone to connect the A beads and the
bicone row So add 1 bicone pass through the nearest A bead and add 1 bicone again Pass
through the bicone already there and exit from the bicone you just added
Something Blue Necklace and Earrings
BLOG WWWHANDMADE-JEWELRY-CLUBCOM MEMBERSHIP WWWDIYBEADINGCLUBCOM BLOG DIY BEADING MAGAZINE ISSUE 32
STEP 66-83 Secure the circle by adding 1A between each bicone in the second row of Swarovski
bicones If you finished secure the thread and trim
STEP 51-65 Using the same technique as in STEP 37 - 49 add 1 bicone to finish the third bicone row The black line shows you the way (After STEP 50 pass through the next A bead add 1 bicone and pass through the bicone already there and the bicone added in the previous step Repeat these steps to
finish the inner bicone circle)
MIDDLE CIRCLE Work RAW stitch into a beaded circle and embellish with
Swarovski bicones Remember you need to bead two circles this time
STEP 1 Just like in the focal circle begin with 2 pearls 1A and 1 pearl again on a comfortable length of thread
leaving a 2rdquo 5cm tail Pass through the first two pearls strung to form a ring
Something Blue Necklace and Earrings
BLOG WWWHANDMADE-JEWELRY-CLUBCOM MEMBERSHIP WWWDIYBEADINGCLUBCOM BLOG DIY BEADING MAGAZINE ISSUE 32
STEP 15-28 Mimicing the FOCAL CIRCLElsquos STEP 18-34 bead A beads until you finish the inner part of the
circle Exit from a pearl in the second row This circle should look very similar to the first one but this is a bit
smaller
STEP 2-14 Mimicing the FOCAL CIRCLElsquos STEP 2-17 bead until you count 14 pearls in the inner circle Exit
from the last A added
STEP 29-42 Mimicing FOCAL CIRCLElsquos STEP 35-49 add 2 rows of bicones
STEP 43-56 Mimicing the FOCAL CIRCLElsquos STEP 50-65 bead the third row of bicones to finish the circle
Something Blue Necklace and Earrings
BLOG WWWHANDMADE-JEWELRY-CLUBCOM MEMBERSHIP WWWDIYBEADINGCLUBCOM BLOG DIY BEADING MAGAZINE ISSUE 32
SMALLEST CIRCLE Work RAW stitch into a beaded circle and embellish
with Swarovski bicones Remember you need to bead two circles again
STEP 1 Just like in the focal circle begin with 2 pearls
1A and 1 pearl again on a comfortable length of thread leaving a 2rdquo 5cm tail Pass through the first two
pearls strung to form a ring
STEP 57-70 Just like the FOCAL CIRCLElsquos STEP 66-83 secure the circle by adding 1A between every bicone
in the second row of bicones If you finished secure the thread and trim (Donrsquot forget to bead another
circle)
STEP 2-12 Mimicing the FOCAL CIRCLElsquos STEP 2-17 bead until you count 12 pearls in the inner circle Exit
from the last A added
STEP 13-24 Mimicing the FOCAL CIRCLElsquos STEP 18-34 bead A beads until you finish the inner part of the
circle Exit from a pearl in the second row This circle should look very similar to the first two but this is the
smallest of them all
Something Blue Necklace and Earrings
BLOG WWWHANDMADE-JEWELRY-CLUBCOM MEMBERSHIP WWWDIYBEADINGCLUBCOM BLOG DIY BEADING MAGAZINE ISSUE 32
STEP 37-48 Mimicing the FOCAL CIRCLElsquos STEP 50-65 bead the third row of bicones to finish this circle too
STEP 25-36 Mimicing FOCAL CIRCLElsquos STEP 35-49 add 2
rows of bicones The last step here is purple again
STEP 49-60 Just like the FOCAL CIRCLElsquos STEP 66-83 secure the circle by adding 1A between every bicone
in the second row of bicones If you finished secure the thread and trim (Donrsquot forget that you need two
small circles)
Something Blue Necklace and Earrings
BLOG WWWHANDMADE-JEWELRY-CLUBCOM MEMBERSHIP WWWDIYBEADINGCLUBCOM BLOG DIY BEADING MAGAZINE ISSUE 32
STEP 37-48 Mimicing the FOCAL CIRCLElsquos STEP 50-65 bead the third row of bicones to finish this circle too
STEP 25-36 Mimicing FOCAL CIRCLElsquos STEP 35-49 add 2
rows of bicones The last step here is purple again
STEP 49-60 Just like the FOCAL CIRCLElsquos STEP 66-83 secure the circle by adding 1A between every bicone
in the second row of bicones If you finished secure the thread and trim (Donrsquot forget that you need two
small circles)
Something Blue Necklace and Earrings
BLOG WWWHANDMADE-JEWELRY-CLUBCOM MEMBERSHIP WWWDIYBEADINGCLUBCOM BLOG DIY BEADING MAGAZINE ISSUE 32
STEP 2-6 Continue by adding 1A 1 bicone 1 pearl until you count 6 of each
STEP 1 Begin with 1 pearl 1 bicone 1A and 1 bicone again on a comfortable length of thread leaving a 2rdquo
5cm tail Pass through the pearl and the first bicone strung to form a ring
STEP 7-12 Pass through the A beads to make your
component more secure Also secure the thread and trim (Repeat these steps until you have six 6-BEAD
COMPONENTs)
6-BEAD COMPONENT Work RAW stitch into a beaded circle and embellish with Swarovski bicones
For the necklace we will need six from this component For the earring two
Something Blue Necklace and Earrings
BLOG WWWHANDMADE-JEWELRY-CLUBCOM MEMBERSHIP WWWDIYBEADINGCLUBCOM BLOG DIY BEADING MAGAZINE ISSUE 32
STEP 2-4 Continue by adding 1A 1 bicone 1 pearl
until you count 4 of each
STEP 1 Begin with 1 pearl 1 bicone 1A and 1 bicone again on a comfortable length of thread leaving a 2rdquo
5cm tail Pass through the pearl and the first bicone strung to form a ring
STEP 5-8 Pass through the A beads to make your component more secure Also secure the thread and
trim (Repeat these steps until you have the wished amount of 4-BEAD COMPONENTs)
4-BEAD COMPONENT Work RAW stitch into a beaded circle and embellish with Swarovski bicones
For the necklace-size that is given on the second page we will need 20 from this
component For the earring two
If you would like to make a longer necklace you need to make more (One 4-BEAD COMPONENT measures about 38 inch 1 cm To make the necklace symmetrical you have to have equal amounts on each side This means for every extra frac34 inches
2 cm-s you will need 1 4-BEAD COMPONENT on each side of the necklace)
Something Blue Necklace and Earrings
BLOG WWWHANDMADE-JEWELRY-CLUBCOM MEMBERSHIP WWWDIYBEADINGCLUBCOM BLOG DIY BEADING MAGAZINE ISSUE 32
STEP 2 Connect the MIDDLE CIRCLE to two 6-BEAD COMPONENTs by adding four-times 2As
between the pearls Choose a pearl on the MIDDLE CIRCLE and add
2A pass through a pearl in the 6-BEAD COMPONENT previously added and add 2A again Watch out this has to be symmetrical Repeat this at least two more times to make it
secure Now repeat this entire procedure but choose
the 8-th pearl on MIDDLE CIRCLE Repeat this on the other side of the necklace
too
Choose a pearl on the FOCAL CIRCLE and add 2A pass through a pearl in the 6-BEAD COMPONENT and add 2A again Repeat this at least two more times to make it secure
Now repeat this entire procedure but choose the 5-th pearl on FOCAL CIRCLE This will make the necklace nice on your neck
FINISHING THE NECKLACE Connects the parts with A beads
STEP 1 Connect the FOCAL CIRCLE to two 6-BEAD COMPONENTs by adding four-times 2As between the pearls To do this turn your parts upside down you need to
see the pearls We will work on this side from now on
Something Blue Necklace and Earrings
BLOG WWWHANDMADE-JEWELRY-CLUBCOM MEMBERSHIP WWWDIYBEADINGCLUBCOM BLOG DIY BEADING MAGAZINE ISSUE 32
FINISHING THE EARRING Connects the parts with A beads
STEP 1-2 Connect the 6-BEAD COMPONENT
to 4-BEAD COMPONENT and the 4-BEAD
COMPONENT to the earring hook
First connect the 4-BEAD COMPONENT to the 6-BEAD COMPONENT with 4A beads Mimic
the elongation steps of the necklace if needed
Secondly connect the 4-BEAD COMPONENT
to your earring hook with 4A beads again Leave from the last pearl bead 2A beads the hook (this is the orange oval form) and 2As again Pass through each of them to
secure this connection again
Finally get ready to prepare the other earring ndash since we need two of them
STEP 5 Connect the 4-BEAD COMPONENTs to the toggle clasp thus finishing the
necklace Leaving from the last pearl bead 2A the
clasp(this is the orange oval form) and 2A again Pass through all of them a couple more times to make this connection more
secure
Something Blue Necklace and Earrings
BLOG WWWHANDMADE-JEWELRY-CLUBCOM MEMBERSHIP WWWDIYBEADINGCLUBCOM BLOG DIY BEADING MAGAZINE ISSUE 32
If you finished it is time to try it on It was a great fun wasnrsquot it And how beautiful you look in your new necklace and the matching earrings
Something Blue Necklace and Earrings
BLOG WWWHANDMADE-JEWELRY-CLUBCOM MEMBERSHIP WWWDIYBEADINGCLUBCOM
About the Author
Margit Vogel
My name is Margit Vogel I live in Hungary Europe
By profession I am a biochemical engineer but I fell in love with
beads so much that I could not stop playing with them
I make one-of-a-kind beaded and bead embroidered art
jewelry made of the best quality materials such as Swarovski
stones gemstones Japanese beads (Miyuki and Toho) Czech
glass beads leather soutache and suede Each piece is unique
and individually crafted
Feel free to visit my blog for some eyecandy
httpiformjewelrywordpresscom
My shop httpwwwetsycomshopiformjewelry
Facebook httpwwwfacebookcomiformjewelry
BLOG DIY BEADING MAGAZINE ISSUE 32
Getting Down And Personal With Gianna
Getting Down And Personal With Gianna
Nowadays we see more and more jewelry stores opening up online and with these online jewelry stores it has made it easier for us to purchase and view their creations Have you ever wondered how they are able to manage and produce amazing jewelry pieces and tutorials So heres a little on the journey to open up an online shop We are excited to present to you Gianna aka Beading4perfectionists
Gianna Beader amp Youtuber
Unlike most jewelry makers and beadweavers Gianna did not start beading as a hobby but as a means to make ends meet With goals in trying to
fill the financial gap she did everything she could to expand her earnings ndash working as a security guard
and at the same time learning how to bead and selling her pieces at fair trades and flea markets
Since many were asking if she does home beading workshops she started on exploring how to teach people to bead She loves Scott Bakula and has always loved him till now and this served as her
inspiration to start making a beading video tutorial
Gianna started creating videos because she was at the point in her life where everything seemed to be falling apart And at that moment of time she had difficulties financially and selling jewelry was the only way for her to stay afloat financially She is a big Scott Bakula fan and when she went to the UK to see him on stage that was when it hit her that she is already able to edit videos and
taught herself Photoshop and done workshops at bead fairs so why not put these together and see what happens on Youtube She knew that if she gets enough subscribers and views ndash though no one knew what the exact numbers were you would be invited to become a Youtube partner This way she could monetize her videos with advertisements and hopefully she would be able to be a Youtube partner and be able to pay her bills
BLOG WWWHANDMADE-JEWELRY-CLUBCOM MEMBERSHIP WWWDIYBEADINGCLUBCOM BLOG DIY BEADING MAGAZINE ISSUE 32
Getting Down And Personal With Gianna
Her Youtube channel is popular and the reason why she chose Youtube is because Youtube is the biggest platform and reached almost to the whole world Everyone already knows about it and it was growing rapidly as compared to other platforms like Dailymotion so she figured that Youtube was the way to go Her advice to new designers is that when you start out go to the platforms on the top of your list first then work your way down your list if you do not get accepted by your first choice
After loyally putting up one video every week for about 8 months in a row she became a Youtube partner and monetized her videos She knew she needed at least $100 to get her first payout She managed to reach $100 after 3 months The process was not easy she worked hard lack sleep skipped meals and who knows what happened to Ridge in the Bold and the Beautiful because she stopped watching
On Youtube you can monetize your videos Google pays straight to your bank account and at other countries where they also have the option of getting checks among other options In order to get paid you have to reach the $100 mark and after 3 months For Gianna she thinks that you cannot say that Etsy is better than Youtube or Youtube is better than Etsy Her reasoning is because on Youtube she has many followers which will eventually check out her Etsy shop And to start an Etsy shop you need an audience
BLOG WWWHANDMADE-JEWELRY-CLUBCOM MEMBERSHIP WWWDIYBEADINGCLUBCOM BLOG DIY BEADING MAGAZINE ISSUE 32
television and dedicated her spare time (as she had another job) to Youtube She re-registered at the chamber of commerce after receiving her first payout Her work at Youtube now is not a full time job and things have changed on Youtube It is easier to become a parter but there are some countries that need to wait for an invitation to be a Youtube partner Take Italy for instance Italians would have to work just as hard as she did if they want to become a Youtube partner
Getting Down And Personal With Gianna
With her 60000 subscribers on her b4pbakup Youtube channel it is possible to sell at least 60 patterns on the first day on Etsy after promoting the PDF file on her Youtube channel Though you may think that 60 out of 60000 is not much you have to remember that not everyone has the means to purchase the PDF file and a lot of people still rather watch her carry out the tutorial(for free) on Youtube instead of reading the patterns or paying for the patterns even if the pattern is for a fundraiser and only cost $2 Her insights on Youtube is that Youtube is not what it used to be 6 years ago Instead of making more money every month she is making less and less because advertisers have more options of where they want to advertise their ads Ads do not pay as much as they used to Back in the days you could get 25 cents per ad Now you count yourself lucky if you could get 5 cents roll in after two hours
BLOG WWWHANDMADE-JEWELRY-CLUBCOM MEMBERSHIP WWWDIYBEADINGCLUBCOM BLOG DIY BEADING MAGAZINE ISSUE 32
And on top of that adblockers are destroying Youtube channel owners Youtube will start making changes to the channels where there will be ldquopaid subscriptionrdquo channels This has already been implemented in some countries but not in her country The Netherlands This means there will no longer be ads for her monthly paying subscribers She hopes that Youtube will add on a paid per video option feature The option to be a paid channel or free channel or to start a new channel for paying customers is yours to choose Gianna is not happy with Youtube because many others like her have worked so hard and for some years to become Youtube partners(which was something to be proud of) has lost their status
Getting Down And Personal With Gianna
Her advice for those who want to go on Youtube is 1 Do it because you want to teach
2 Do it because you want a career with beads
BLOG WWWHANDMADE-JEWELRY-CLUBCOM MEMBERSHIP WWWDIYBEADINGCLUBCOM BLOG DIY BEADING MAGAZINE ISSUE 32
After putting up about 20 videos and having at least 5000 subscribers add the PDF tutorials to Etsy and Craftsy She found out that her audience would like to have the PDF after watching her videos This is because they would rather print out the PDF and work while seated in a comfy chair technically somewhere else instead of having to pause the video time and time again
Gianna has also made a video for those who want to know the whole story of her journey up until the present day And to get updates on her you can check it out here She has also started a vlog where she tells of how she still works towards becoming a financial independent beader and explains her journey to get where she wants to be(or die trying) Gianna will be in the UK on October the 17th giving an all-day workshop with 4 different patterns
(2 beginners and 2 advanced) in Wotton-under-Edge
Gianna will be there Friday night as the workshop is on Saturday She will be leaving on Sunday Her
doors are open to all who wants to continue the party with her at the hotel across the street
For more information do contact Ann Tucker on Facebook
httpswwwfacebookcomanntucker501
Rec
omm
end
ed R
ead
ings
Making Jewelry with Gemstone
Beads
Combines the popular craft of beading with beautiful semi-precious stones which are collected by many Features a variety of versatile ideas which can be adapted for any type of gem or bead Readers will learn to reate beautiful gemstone jewelry with this dazzling collection of over 100 projects ranging from eyecatching earrings and accessories to exquisite necklaces and bracelets This beautiful book offers an impressive range of 28 beautiful semi-precious stones (including birthstones) and a glimpse into the fascinating history and mythical properties behind them
BLOG DIY BEADING MAGAZINE ISSUE 32 BLOG WWWHANDMADE-JEWELRY-CLUBCOM MEMBERSHIP WWWDIYBEADINGCLUBCOM
Rec
omm
end
ed R
ead
ings
Convertible Crystal Jewelry
Reverse it Twist it Wear it Many
Ways
Diane Whiting presents the idea that convertibility isnrsquot just about using pieces in multiple ways it is also about using skills and creativity in multiple ways Using ever-popular sparkling crystals Diane showcases design elements through various techniques for fun easy fashionable jewelry With 25 projects the reader can choose from bracelets necklaces and earrings that match any outfit or styleDiane Whiting presents the idea that convertibility isnrsquot just about using pieces in multiple ways it is also about using skills and creativity in multiple ways
BLOG DIY BEADING MAGAZINE ISSUE 32 BLOG WWWHANDMADE-JEWELRY-CLUBCOM MEMBERSHIP WWWDIYBEADINGCLUBCOM
Rec
omm
end
ed R
ead
ings
Wire Jewelry Masterclass
Wrapped Coiled and Woven Pieces
Using Fine Materials
Comprehensive and fabulous Wire Jewelry Masterclass takes an in-depth look at an intricate and rewarding craft The 24 projects which range from simple Dragons tear briolette earrings to a Poseidon-under-the-sea pendant will delight and inspire jewelers of all levels and tastes Divided into beginner intermediate and advanced sections this beautifully photographed step-by-step guide is the ticket to wire jewelry expertise
BLOG DIY BEADING MAGAZINE ISSUE 32 BLOG WWWHANDMADE-JEWELRY-CLUBCOM MEMBERSHIP WWWDIYBEADINGCLUBCOM
Rec
omm
end
ed R
ead
ings
Timeless Wire Weaving The
Complete Course
Timeless Wire Weaving focuses on developing wirework skills through 13 projects using three classic wire weaving techniques coiling wrapping and weaving The projects are built around a focal cabochon and incorporate seed beads and crystals in imaginative ways Designers learn to make the jewelry shown in the book and they also use the techniques learned to create innovative jewelry pieces of their own
BLOG DIY BEADING MAGAZINE ISSUE 32 BLOG WWWHANDMADE-JEWELRY-CLUBCOM MEMBERSHIP WWWDIYBEADINGCLUBCOM
Our digital magazine is available through
Apple Newsstand service available to millions of IPAD users
To advertise with us please email us at
diyjewelryclubgmailcom
Or visit our page at
httphandmade-jewelry-clubcomadvertising-diy-beading-magazine
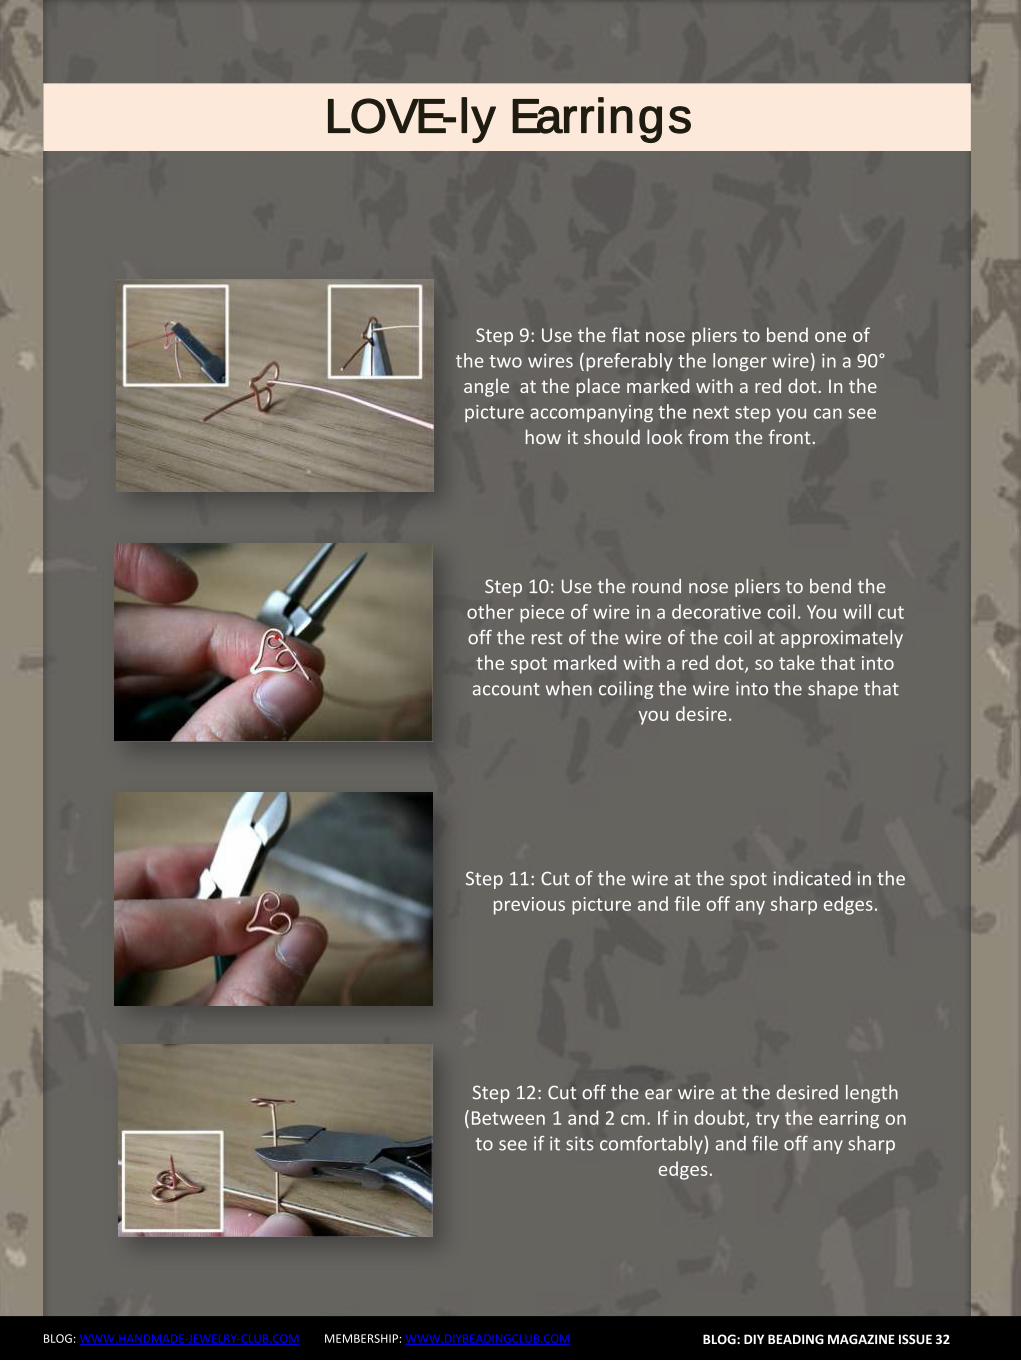
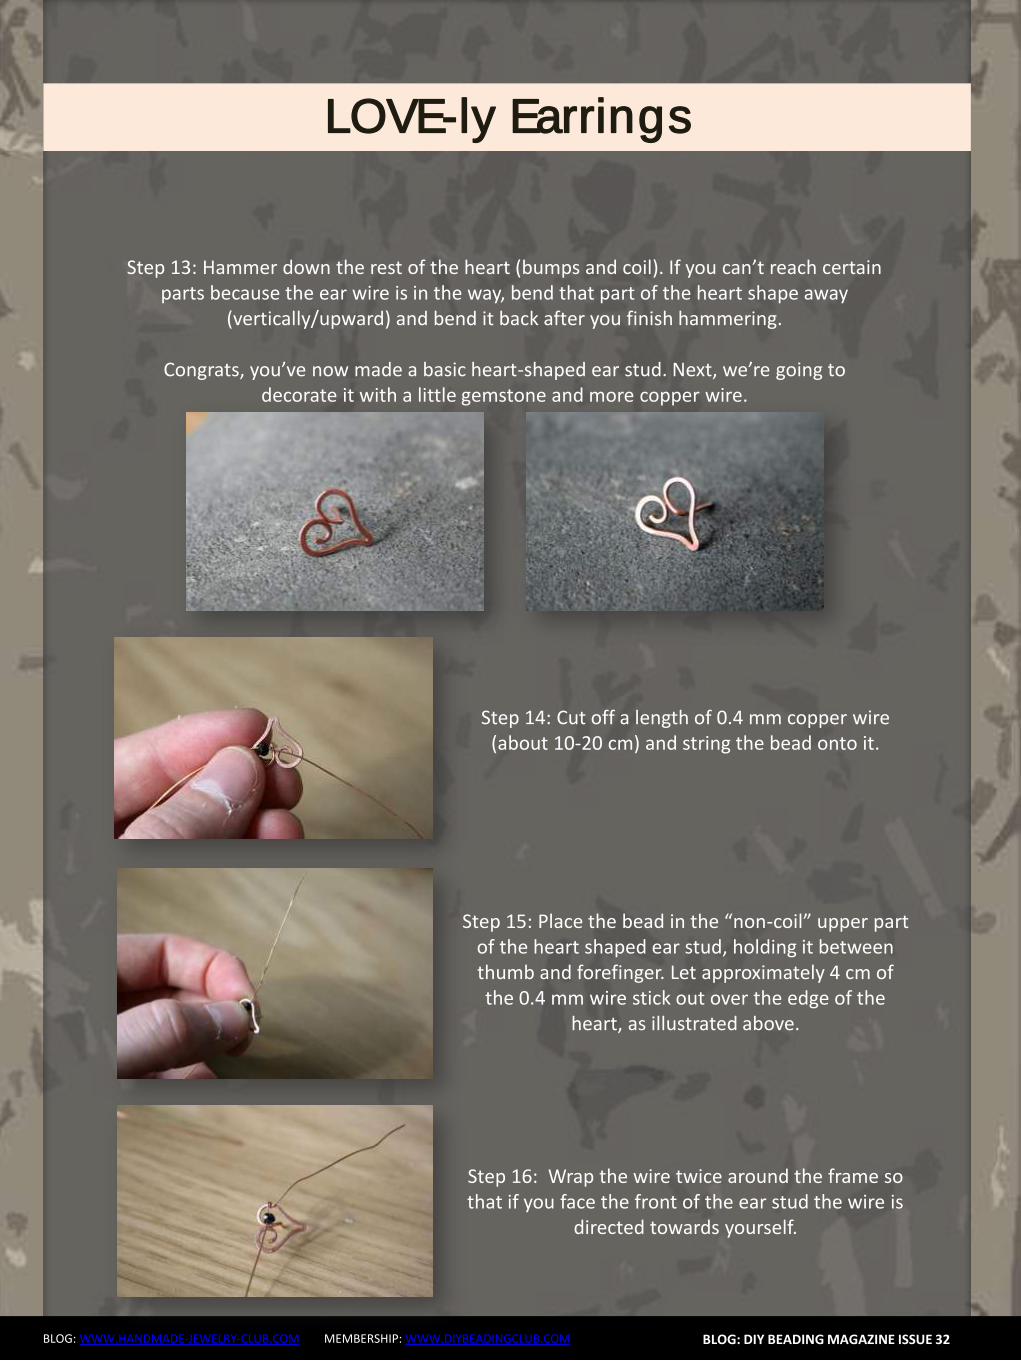
Flower Tale Earrings
BLOG WWWHANDMADE-JEWELRY-CLUBCOM MEMBERSHIP WWWDIYBEADINGCLUBCOM
Techniques Beadweaving
Project Level Beginner to Intermediate
Materials 12 bronze opaque 6mm Czech glass pearl round beads
2 gr gold lustered dark topaz Japanese 110 seed beads (Toho 459)
Size B gold beading thread
2 bronze earring hooks
Tools Size 10 beading needle
Scissors
Finished Size Diameter ndash 3 cm (118 inches) (without earring hooks)
BLOG DIY BEADING MAGAZINE ISSUE 32
Flower Tale Earrings
BLOG WWWHANDMADE-JEWELRY-CLUBCOM MEMBERSHIP WWWDIYBEADINGCLUBCOM
Step 1 Cut about 110 cm (43 inches) of thread and
pass it through the needle hole
Pick six groups of one 110 seed bead and one
6 mm round bead
BLOG DIY BEADING MAGAZINE ISSUE 32
Join the beads into a ring and secure with two
square knots
Leave a tail of about 15 cm (59 inches)
Step 2 The working thread should be right before the
6 mm round bead
Pick seven 110 seed beads skip the 6 mm
round bead and pass the needle through the
next 110 seed bead added in the previous
round
Repeat adding groups of seven 110 seed
beads five more times
When adding the last group take the needle
directly through the 110 seed bead from the
previous round and the next one added in the
beginning of current round
Flower Tale Earrings
BLOG WWWHANDMADE-JEWELRY-CLUBCOM MEMBERSHIP WWWDIYBEADINGCLUBCOM
Step 3 Pick three 110 seed beads skip one seed
bead from the chain of seven added in the
previous round and pass with the needle
directly through the next three 110 seed
beads
BLOG DIY BEADING MAGAZINE ISSUE 32
Pick three 110 seed beads skip one seed
bead from the chain of seven added in the
previous round and pass with the needle
through the last one and the first 110 seed
bead from the next chain of seven
Repeat the above directions from Step 3 five
more times
After completing this round make sure the
thread will be exiting from the middle 110
seed bead from the first group of three added
in the beginning of this round
Step 4 Pick one 110 seed bead and go through the
last seed bead of the group of three
Flower Tale Earrings
BLOG WWWHANDMADE-JEWELRY-CLUBCOM MEMBERSHIP WWWDIYBEADINGCLUBCOM
Pick three 110 seed beads and take the
needle through the first seed bead of the next
group of three added in the previous round
BLOG DIY BEADING MAGAZINE ISSUE 32
Pick one 110 seed bead and go with the
needle through the next three seed beads (the
last two of the group of three and the last one
from the chain of seven)
Then go up through three 110 seed beads
(the first from the next group of seven and the
first two from the next group of three)
Repeat the above directions from Step 4 to
complete the remaining petals
When working on the last petal perform the
operation from the image shown on the left
instead of picking the group of three 110 seed
beads string two 110 seed beads the earring
hook other two 110 seed beads and
continue beading as instructed above
When you are done hide the thread ends into the beadwork
Flower Tale Earrings
BLOG WWWHANDMADE-JEWELRY-CLUBCOM MEMBERSHIP WWWDIYBEADINGCLUBCOM
About the Author
Iulia Postică
I was born and live in Moldova Eastern Europe Ever since I remember myself
Ive been crocheting and knitting My grandmother has taught me that and I
loved it very much I always regarded crafts exclusively as a hobby and never
thought of making a career of it I traveled a lot to various historical sites
Actually Ive spent all my childhood summers in archaeological camps with
my father who is a professional archaeologist
I also enjoy metal hammering and wirework as it gives me possibility to
express myself in materials used by human communities since ancient times
copper brass glass seed beads and gemstones That is no surprise to anyone
given my family history and academic background
My shop ldquoBeadedTreasuryrdquo with beading tutorials and bead crochet patterns
httpswwwetsycomshopBeadedTreasury
My shop ldquoArchaeologicardquo with artisan jewelry
httpswwwetsycomshopArcheologica
My blog httpbeadedtreasuryblogspotcom
My facebook httpswwwfacebookcomBeadedTreasury
BLOG DIY BEADING MAGAZINE ISSUE 32
Liberty Earrings
BLOG WWWHANDMADE-JEWELRY-CLUBCOM MEMBERSHIP WWWDIYBEADINGCLUBCOM
Materials - Nr 2 cabochon Preciosa Ornela ovale 18x22 mm turchese
- Rocaille Toho 150 silver lined green emerald
- Nr 2 dagger beads
- Nr 20 pearl 4 mm
- Superduo opaque luster ceramic green
- Rocaille 80 color gold
- Rocaille 80 color ivory
- Delica Miyuki 110 aquagreen mix
- Rocaille Miyuki 110 galvanized silver
- Nr 2 monachelle (earwire)
-Fireline
- Beading Needle nr 12
BLOG DIY BEADING MAGAZINE ISSUE 32
Liberty Earrings
BLOG WWWHANDMADE-JEWELRY-CLUBCOM MEMBERSHIP WWWDIYBEADINGCLUBCOM
Make a circle of 20 delica beads and make a knot (a) Perform two rounds peyote with ivory 80 seed beads (b c) Exit from an ivory
bead
BLOG DIY BEADING MAGAZINE ISSUE 32
a b c
Jump from 80 to 80 with 110 80 gold 110 (a) Finish the round and come out of a 80 gold bead
Jump to the next 80 gold with a 4mm pearl (b) Finish the round and come out
of the first pearl Jump to the 2nd pearl and close with a 80 gold bead(c)
a b c
Position the cabochon and jump from one 80 to the other with two delica bead (a)
Continue with three delicas four times (b) At the bottom sew on two delicas then finish the round by sewing on three delicas for four times passing from one to another roc 80 Tighten the cabochon and exit from the
first two delica that you started with String together a 110 and 150 and enter the second of the three close delicas (c)
a b c
Liberty Earrings
BLOG WWWHANDMADE-JEWELRY-CLUBCOM MEMBERSHIP WWWDIYBEADINGCLUBCOM
Put together 150 110 150 and enter in the second of three next delica (a) Put the same beads for three times then put together 150 and 110 and enter
in the two delica of the bottom tip (b) Enter in the second of three next delica with 110 and 150 (c) Continue passing
in the 80 beads with three beads (150 110 150) for four times then at the top finish the round by putting together a 150 and 110 (d)
BLOG DIY BEADING MAGAZINE ISSUE 32
a b c
Exit from the first 150 sewn in the previous round and jump in the three next beads with a 150 (a)
Put a 150 at a time and exit from the first 110 beads of the bottom tip Jump in the
near 110 with a 150 (b) Finish round repeating steps a and b (c) Exit the roc 80 as shown in the photo (d)
a b c
d
a b c d
Enter in the 80 with four 150 (a b) Enter the 80 beads at the bottom of the pieces with two 110 one superduo one 80 ivory bead one superduo and two 110 (c)
d e f
Liberty Earrings
BLOG WWWHANDMADE-JEWELRY-CLUBCOM MEMBERSHIP WWWDIYBEADINGCLUBCOM
Exit from the bottom pearl (a) Put together 150 three 110 150 and enter in the superduorsquos second hole (b)
Put together three superduo and enter in the next superduorsquos second hole (c) Rethread 15 three 110 150 and return in the opposite direction in the pearl of departure (d)
BLOG DIY BEADING MAGAZINE ISSUE 32
a b
c
Exit from the second pearl indicated from (a) Put 150 four 110 and enter in the second of the three 110 (b) Go to the second superduorsquos hole with four 110 and a 150 (c)
Enter the second hole of the supeduo with a 150(d) Sew in the middle of the bottom of the superduo 150 two 110 150 dagger 150 two 110 150(e)
Enter the second hole of the thirs superduo with 150 (f)
a b c
d
d e f
Liberty Earrings
BLOG WWWHANDMADE-JEWELRY-CLUBCOM MEMBERSHIP WWWDIYBEADINGCLUBCOM BLOG DIY BEADING MAGAZINE ISSUE 32
Put 150 four 110 and enter in the second of three 110 of the base (a) Insert four 110 and 150 in the pearl opposite direction indicated in the picture (b) Go in all the beads
around the piece and exit from the pearl at the top (c) Put 150 three 110 150 and enter the superduo (d)
Enter the ivory bead 80 with two 150 (e) Enter the next superduo with two 150 (f)
a b c
d e f
Put together 150 three 110 and enter in opposite direction in the departurersquos pearl (a) Exit from the 150 beads indicated by photo (b) From this jump in the second of two near
150 with five 150 to created the hole for the earwire (c) Pass the thread in the beads make a few knots and cut the excess thread
a b c
Your earrings are finished
Liberty Earrings
BLOG WWWHANDMADE-JEWELRY-CLUBCOM MEMBERSHIP WWWDIYBEADINGCLUBCOM
About the Author
Mariella Martella
My name is Mariella Martella and I am the author and
designer of jewelry that I sign with the name of Mariel Bijoux
After changing city often for work and study I currently live
in northern Italy I am an art historian with a passion for travel
painting and jewelry design in weaving that project since
2010 In my beads and crystals are the colors of the
Mediterranean sea the atmosphere of summer evenings
and the lights of the places I visited
You can find me at
Etsy shop httpswwwetsycomitshopMarielBijoux
Facebook httpswwwfacebookcommari3lbijoux
Crafting blog httpmarielbijouxblogspotit
Twitter httpstwittercomMarielBijoux
BLOG DIY BEADING MAGAZINE ISSUE 32
Jade Necklace
BLOG WWWHANDMADE-JEWELRY-CLUBCOM MEMBERSHIP WWWDIYBEADINGCLUBCOM
Every time I wear a necklace I always make it a point that the
necklace will lay perfectly flat on my neck Using wire for a necklace
made it possible for me like what I did with Jade Necklace It may look
odd at first having bent wires for a necklace but once the jewelry is
finished youll be so happy how the necklace will perfectly lay on your
neck
The tutorial is catered for intermediate level One must know basic
wirework skills such as wire wrapping making loops wrapped loops
and linking to follow the tutorial It has clear instructions and ultra-clear
close-up photos at each step Additionally you can ask me question
you have on the tutorial No more getting stuck and frustrated on a
confusing or just plain inaccurate pattern
If you followed this tutorial and then sell the accessory or jewelry
please give credit to the author or DIY Beading Clubcom
Copyright 2015
wwwdiybeadingclubcom
wwwhandmade-jewelry-clubcom
BLOG DIY BEADING MAGAZINE ISSUE 32
Jade Necklace
BLOG WWWHANDMADE-JEWELRY-CLUBCOM MEMBERSHIP WWWDIYBEADINGCLUBCOM BLOG DIY BEADING MAGAZINE ISSUE 32
Materials Needed 18ga Craft wire 28ga Craft wire 15mm diameter Green Round Flat Back Sew On Gems 5mm Green pearls
8mm Green pearls 6mm x 11mm teardrop Crystal Treasures Mill Hill beads or any teardrop bead with holes on the side Hook for your clasp
Tools Needed Wire cutter Flat nose pliers Round nose pliers Mandrel A jar or any rounded object to shape your necklace
Skill Level Intermediate
Step 1 Cut 6 inches 18ga wire Make a loop on one end then measure approximately 125 inches and make another loop
Form a size 4 circle on your mandrel
Jade Necklace
BLOG WWWHANDMADE-JEWELRY-CLUBCOM MEMBERSHIP WWWDIYBEADINGCLUBCOM BLOG DIY BEADING MAGAZINE ISSUE 32
Then close the circle by wrapping the extended wire just below the loop Wrap the
wire 2x
This is how it looks like Lets call this circle frame Youll notice that the lower curve is
slightly bigger than the upper curve
Step 2 Cut 8 inches of 28ga wire Wrap one end of
the wire at least 3x on one side of the circle frame just below the loop
Bring up your gem Flat back sew on gems has 2 holes Insert the wire into one hole and then
wrap the wire once onto the circle frame
Jade Necklace
BLOG WWWHANDMADE-JEWELRY-CLUBCOM MEMBERSHIP WWWDIYBEADINGCLUBCOM BLOG DIY BEADING MAGAZINE ISSUE 32
Step 3 Insert a 5mm pearl on the wire and then pass
the wire under circle frame
Repeat previous step 2x and have 3 pearls wrapped
Continue wrapping with your teardrop crystal My crystal has 2 holes on the side
and then continue wrapping with your 5mm pearls then secure your wire
Repeat Step 3 and create as many as needed For 16-inch necklace Ive created 6 of these
components
Jade Necklace
BLOG WWWHANDMADE-JEWELRY-CLUBCOM MEMBERSHIP WWWDIYBEADINGCLUBCOM BLOG DIY BEADING MAGAZINE ISSUE 32
Step 4 Cut a 15-inch 18ga wire and make a loop on
one end Insert 8mm pearl and make a loop on the other end You then use these as connectors
and link the components
Step 5 The necklace is an 18ga wire with wrapped
loops on both ends First cut 7 inches 18ga wire and make a wrapped loop with your hook already inserted Side in 18pcs 5mm pearls
Then make a wrapped loop on the other end connecting the wrapped loop onto the component Do the same for the other
necklace but make the loop on the other end big enough so the hookclasp can pass thru
To have the necklace curve shaped use a jar to bend the wire Voila Now youre
ready to party
Jade Necklace
BLOG WWWHANDMADE-JEWELRY-CLUBCOM MEMBERSHIP WWWDIYBEADINGCLUBCOM
About the Author
Sky Aldovino
I consider myself a late bloomer when it comes to crafting Irsquom a self-taught jewelry maker Jewelry making wasnrsquot really a hobby of mine but unforeseen events lead me to learn jewellery making My family put up a craft store where we sell cross stitch beads and all sorts of crafting materials I fell in love with the beads and tried to create accessories only for myself Clients liked the pieces and I started customizing handmade jewelleries The craft store was a success for 6 years but like any other small businesses we had to close it down and I was confined to staying at home While at home I had all the time using the internet and now working as a home-based jewelry designer
BLOG DIY BEADING MAGAZINE ISSUE 32
Atomic Ring
BLOG WWWHANDMADE-JEWELRY-CLUBCOM MEMBERSHIP WWWDIYBEADINGCLUBCOM
Have fun making shapes using the wigjig Cyclops Make loops going in
circles to mimic the shape of a flower or in this tutorial mimic the
shape of an atom The tutorial will also teach you how to cage a
cabochon Whats nice about this piece is that with one long wire you
can create the ring from start to finish
The tutorial is catered for intermediate to advanced students One
must already know how to make spirals and use a wigjig tool It has
clear instructions and ultra-clear close-up photos at each step
Additionally you can ask me question you have on the tutorial No
more getting stuck and frustrated on a confusing or just plain
inaccurate pattern
If you followed this tutorial and then sell the accessory or jewelry
please give credit to the author or DIY Beading Clubcom
If you like to get a blank wigjig graph visit wigjigcom Shop and Jigs
section
Copyright 2015
wwwdiybeadingclubcom
wwwhandmade-jewelry-clubcom
BLOG DIY BEADING MAGAZINE ISSUE 32
Atomic Ring
BLOG WWWHANDMADE-JEWELRY-CLUBCOM MEMBERSHIP WWWDIYBEADINGCLUBCOM
Materials Needed 20ga Craft wire 28ga Craft wire 11mm Round Cabochon
Tools Needed Wigjig Cyclops 15mm pegs Wire cutter Flat nose pliers Mandrel
Skill Level Intermediate - Advanced
BLOG DIY BEADING MAGAZINE ISSUE 32
Step 1 Lets prepare your wigjig cyclops Position the pegs like so
Atomic Ring
BLOG WWWHANDMADE-JEWELRY-CLUBCOM MEMBERSHIP WWWDIYBEADINGCLUBCOM BLOG DIY BEADING MAGAZINE ISSUE 32
Lets work with longer wire so youll have enough wire to hold onto as you manipulate the wire so cut 36 inches of 20ga wire From
one end of the wire measure 10 inches
On the 10-inch measurement loop the wire at the center peg then continue to loop onto the side pegs going in circle going back to
the center peg after looping on the side peg
Now the wire at the center peg will start to build up as you go around the side pegs so
you need to constantly press the wire at the center peg to accommodate the build up of
wire
When youre done pull out the wire and this is
how it should look like
Atomic Ring
BLOG WWWHANDMADE-JEWELRY-CLUBCOM MEMBERSHIP WWWDIYBEADINGCLUBCOM BLOG DIY BEADING MAGAZINE ISSUE 32
You will notice that the frame opens wide Now to keep the atom frame from opening wide secure the center of the frame by wrapping a 28ga wire What you
need to do is simply pass the 28ga wire into the hole and wrap as many times as needed or until youre sure that the frame is secure
Step 2 Now youre finished with your atom frame Well now create the focal design With the longer wire make a spiral at the center big
enough to accommodate the size of your cabochon In this tutorial the spiral is about
11mm in diameter the same size as my cabochon
Pop in your cabochon and start to make spirals going around and over the cabochon as if you are caging the cabochon Create at
least 5 rounds and then cut off any excess
Step 3 Now lets make the ring and this with the other
end of the wire
Atomic Ring
BLOG WWWHANDMADE-JEWELRY-CLUBCOM MEMBERSHIP WWWDIYBEADINGCLUBCOM BLOG DIY BEADING MAGAZINE ISSUE 32
Bring up your mandrel and wrap the wire to the size of your finger Wrap at least 2 times
When youre sure you have the right size pull the ring out of the mandrel
With the extended wire wrap the wire the secure the ring
Cut off any excess and voila You have your atomic ring Create as many as you can with different colors of cabochon
Atomic Ring
BLOG WWWHANDMADE-JEWELRY-CLUBCOM MEMBERSHIP WWWDIYBEADINGCLUBCOM
About the Author
Sky Aldovino
I consider myself a late bloomer when it comes to crafting Irsquom a self-taught jewelry maker Jewelry making wasnrsquot really a hobby of mine but unforeseen events lead me to learn jewellery making My family put up a craft store where we sell cross stitch beads and all sorts of crafting materials I fell in love with the beads and tried to create accessories only for myself Clients liked the pieces and I started customizing handmade jewelleries The craft store was a success for 6 years but like any other small businesses we had to close it down and I was confined to staying at home While at home I had all the time using the internet and now working as a home-based jewelry designer
BLOG DIY BEADING MAGAZINE ISSUE 32
Featured Article Gemstones Used for Jewelry Making
BLOG WWWHANDMADE-JEWELRY-CLUBCOM MEMBERSHIP WWWDIYBEADINGCLUBCOM
Gemstones are stones which we hold quite highly in terms of value And
jewelry often consists of stones that add attractiveness to it so it is not
surprising when jewelry designers actually use gemstones in their designs In
fact there are different types of gemstones that can be used for making
jewelry There are the expensive and pure gemstones and there are also the
imitation ones The information below will provide some information about
the kinds of stones you can use to create jewelry and how these stones will
impact the jewelry you have created
The first kind of stone which I believe we are all quite familiar with are
birthstones These stones are associated with individualrsquos month of birth
by SunVDesigns by BeyhanAkman
For example Amethyst stone is connected with anybody who is born in
February which carries special significance in the area of emotions and also
spiritually This stone also signifies calm and peace as well
And then we have semi-precious stones which are also often used in jewelry
making They are not as valuable as compared to precious stones but still
valuable Best examples of these stones are aquamarine topaz tourmaline
opal and turquoise
BLOG DIY BEADING MAGAZINE ISSUE 32
Featured Article Gemstones Used for Jewelry Making
BLOG WWWHANDMADE-JEWELRY-CLUBCOM MEMBERSHIP WWWDIYBEADINGCLUBCOM
It is an ideal gift for someone who you deem special Aquamarine pendants
usually work well for anyone and is widely an accepted stone
by HyppieChic by joyeriamestiza
However precious stones are the most unusual
and precious jewels to us Examples of some of
them are emerald sapphire diamond and
ruby These stones are usually very expensive
and are prized for their exquisiteness These
stones are commonly used in high-quality
jewelry designs which costs quite a fortune to
obtain
BLOG DIY BEADING MAGAZINE ISSUE 32
by sarajewelrystu
Jewelry designs with precious stones are usually
given as exceptional gifts on special occasions A
perfect example is a diamond ring that is usually
given as an engagement gift
by ldiamondsforever
Featured Article Gemstones Used for Jewelry Making
BLOG WWWHANDMADE-JEWELRY-CLUBCOM MEMBERSHIP WWWDIYBEADINGCLUBCOM
There are also synthetic stones which are often used to create jewelry
Synthetic stones are artificial imitations of gemstones Synthetic Sapphire
jewelry costs less compare with the authentic ones Most of the time
imitation stones are used to save cost but at the same time have the similar
look of the real stone
BLOG DIY BEADING MAGAZINE ISSUE 32
by shininggems by thaimaker
by lapinduprintemps by PastimeArt
Gemstones are used like beads and you can use it in any designs whether
simple or elaborate
Swarovski crystal components are available in a rich multitude of rondelles Perfect as spacers in necklaces or as discs in earrings Rondelles can be used with many varieties of shapes or sizes Use Swarovski crystal rondelles between large gemstones as accents with precious metal findings Fire Mountain Gems and Beads Crystal Passionsreg brand presents Swarovski crystal in display-ready packaging for brilliant retail presentation Crystal Passionsreg is an assurance of genuine Swarovski crystal
BLOG DIY BEADING MAGAZINE ISSUE 32 BLOG WWWHANDMADE-JEWELRY-CLUBCOM MEMBERSHIP WWWDIYBEADINGCLUBCOM
Recommended Jewelry Making Supplies
Mz Unisex-adults 12pcs 25x18x6mm Turquoise Oval CAB Cabochon
BLOG DIY BEADING MAGAZINE ISSUE 32 BLOG WWWHANDMADE-JEWELRY-CLUBCOM MEMBERSHIP WWWDIYBEADINGCLUBCOM
Recommended Jewelry Making Supplies
For a little sparkle that goes a long way design with Swarovski 4mm faceted bicones Create glorious multi-strand necklaces with the dainty crystals or use as spacers to add a tiny flash to your designs Swarovski crystal components are made in Austria and are considered the finest products of their kind in the world
BLOG DIY BEADING MAGAZINE ISSUE 32 BLOG WWWHANDMADE-JEWELRY-CLUBCOM MEMBERSHIP WWWDIYBEADINGCLUBCOM
Recommended Jewelry Making Supplies
Imitation beads resist color change These beads have uniform quality with a good polish Some strands may have little to no matrix Sizes shapes and colors may vary with handcrafted items
BLOG DIY BEADING MAGAZINE ISSUE 32 BLOG WWWHANDMADE-JEWELRY-CLUBCOM MEMBERSHIP WWWDIYBEADINGCLUBCOM
Recommended Jewelry Making Supplies
Something Blue Necklace and Earrings
BLOG WWWHANDMADE-JEWELRY-CLUBCOM MEMBERSHIP WWWDIYBEADINGCLUBCOM
Skill level Beginner Intermediate Advanced
DIMENSIONS OF THE NECKLACE Inner Circumference 14 18 inch 35 cm
Focal Pendant Width 1 15 inch 35 cm Focal Pendant Height 1 15 inch 35 cm
DIMENSIONS OF THE EARRING Earring Width 716 inch 12 cm Earring Height 1516 inch 25 cm (Without the earring hook)
BLOG DIY BEADING MAGAZINE ISSUE 32
Materials
Note Before purchasing the supplies measure the length of your wished necklace If you decide to bead a longer necklace you should keep in mind that for every extra
frac34 inches 2 cm-s you will need 8 bicones and 8 pearls
Something Blue Necklace and Earrings
BLOG WWWHANDMADE-JEWELRY-CLUBCOM MEMBERSHIP WWWDIYBEADINGCLUBCOM BLOG DIY BEADING MAGAZINE ISSUE 32
Work RAW stitch into a beaded circle and embellish with Swarovski bicones
STEP 2 String 1A and 2 pearls Pass through the previous
second pearl and the freshly added 1A and the first pearl again
STEP 1 Use a comfortable length of thread to string 2
pearls 1A and 1 pearl again leaving a 2rdquo 5cm tail Pass through the first two pearls strung to form a
ring
STEP 3 String 2 pearls and 1A Pass through the previous first pearl and the freshly added two pearls
again
STEP 4 - 17 Repeat STEP 2 and STEP 3 again until you count 17 pearls in the inner circle
But be careful in the last step you only have to add 1 pearl then pass through the first pearls
added in STEP 1 and add another 1A Now pass through the first pearl added in STEP
1and 1A added in this round again to exit from this A
Something Blue Necklace and Earrings
BLOG WWWHANDMADE-JEWELRY-CLUBCOM MEMBERSHIP WWWDIYBEADINGCLUBCOM BLOG DIY BEADING MAGAZINE ISSUE 32
STEP 19 String 2A and pass through the next A added in round 4-17 and the A added in round 18 the 2A added in this round and finally the A added in round 4-17 to exit from the bead showed below
STEP 18 String 3A and pass through the 1A added in the previous round and the first A added in this
round
STEP 20 - 34 Repeat STEP 18 and STEP 19 again until you finish the circle
But be careful in the last step first you have to pass through 3A and then add 1A After this pass
through the 3A again and exit from the A bead
shown below (This is the first A added in STEP 18)
Something Blue Necklace and Earrings
BLOG WWWHANDMADE-JEWELRY-CLUBCOM MEMBERSHIP WWWDIYBEADINGCLUBCOM BLOG DIY BEADING MAGAZINE ISSUE 32
STEP 35 Step up to exit from the pearl shown below (Finishing the previous step in the A bead and then
stepping up from there makes the circle more secure)
Now string 3 bicones Pass through the pearl and the first bicone again
In the reality your circle will look more like this the A beads forming a strong row in the middle of the
pearls
STEP 36 Add 2 bicones Pass through the
neighboring pearl the first bicone added in the previous row and the 2 bicones added in this step
so you can exit from the next pearl
Something Blue Necklace and Earrings
BLOG WWWHANDMADE-JEWELRY-CLUBCOM MEMBERSHIP WWWDIYBEADINGCLUBCOM BLOG DIY BEADING MAGAZINE ISSUE 32
Now in the reality your circle will look more like this the A beads still forming a strong row in the middle of the pearls and the bicones slightly lying on top of
them
STEP 37 - 49 Repeat STEP 35 and STEP 36 again until you finish the circle with the bicones
But be careful in the last step first you have pass through the third bicone added then add 1 bicone
and pass through this little quartet to exit from the bicone shown below (The second one added in
STEP 35)
STEP 50 With these steps we finish the circle by adding 1 bicone to connect the A beads and the
bicone row So add 1 bicone pass through the nearest A bead and add 1 bicone again Pass
through the bicone already there and exit from the bicone you just added
Something Blue Necklace and Earrings
BLOG WWWHANDMADE-JEWELRY-CLUBCOM MEMBERSHIP WWWDIYBEADINGCLUBCOM BLOG DIY BEADING MAGAZINE ISSUE 32
STEP 66-83 Secure the circle by adding 1A between each bicone in the second row of Swarovski
bicones If you finished secure the thread and trim
STEP 51-65 Using the same technique as in STEP 37 - 49 add 1 bicone to finish the third bicone row The black line shows you the way (After STEP 50 pass through the next A bead add 1 bicone and pass through the bicone already there and the bicone added in the previous step Repeat these steps to
finish the inner bicone circle)
MIDDLE CIRCLE Work RAW stitch into a beaded circle and embellish with
Swarovski bicones Remember you need to bead two circles this time
STEP 1 Just like in the focal circle begin with 2 pearls 1A and 1 pearl again on a comfortable length of thread
leaving a 2rdquo 5cm tail Pass through the first two pearls strung to form a ring
Something Blue Necklace and Earrings
BLOG WWWHANDMADE-JEWELRY-CLUBCOM MEMBERSHIP WWWDIYBEADINGCLUBCOM BLOG DIY BEADING MAGAZINE ISSUE 32
STEP 15-28 Mimicing the FOCAL CIRCLElsquos STEP 18-34 bead A beads until you finish the inner part of the
circle Exit from a pearl in the second row This circle should look very similar to the first one but this is a bit
smaller
STEP 2-14 Mimicing the FOCAL CIRCLElsquos STEP 2-17 bead until you count 14 pearls in the inner circle Exit
from the last A added
STEP 29-42 Mimicing FOCAL CIRCLElsquos STEP 35-49 add 2 rows of bicones
STEP 43-56 Mimicing the FOCAL CIRCLElsquos STEP 50-65 bead the third row of bicones to finish the circle
Something Blue Necklace and Earrings
BLOG WWWHANDMADE-JEWELRY-CLUBCOM MEMBERSHIP WWWDIYBEADINGCLUBCOM BLOG DIY BEADING MAGAZINE ISSUE 32
SMALLEST CIRCLE Work RAW stitch into a beaded circle and embellish
with Swarovski bicones Remember you need to bead two circles again
STEP 1 Just like in the focal circle begin with 2 pearls
1A and 1 pearl again on a comfortable length of thread leaving a 2rdquo 5cm tail Pass through the first two
pearls strung to form a ring
STEP 57-70 Just like the FOCAL CIRCLElsquos STEP 66-83 secure the circle by adding 1A between every bicone
in the second row of bicones If you finished secure the thread and trim (Donrsquot forget to bead another
circle)
STEP 2-12 Mimicing the FOCAL CIRCLElsquos STEP 2-17 bead until you count 12 pearls in the inner circle Exit
from the last A added
STEP 13-24 Mimicing the FOCAL CIRCLElsquos STEP 18-34 bead A beads until you finish the inner part of the
circle Exit from a pearl in the second row This circle should look very similar to the first two but this is the
smallest of them all
Something Blue Necklace and Earrings
BLOG WWWHANDMADE-JEWELRY-CLUBCOM MEMBERSHIP WWWDIYBEADINGCLUBCOM BLOG DIY BEADING MAGAZINE ISSUE 32
STEP 37-48 Mimicing the FOCAL CIRCLElsquos STEP 50-65 bead the third row of bicones to finish this circle too
STEP 25-36 Mimicing FOCAL CIRCLElsquos STEP 35-49 add 2
rows of bicones The last step here is purple again
STEP 49-60 Just like the FOCAL CIRCLElsquos STEP 66-83 secure the circle by adding 1A between every bicone
in the second row of bicones If you finished secure the thread and trim (Donrsquot forget that you need two
small circles)
Something Blue Necklace and Earrings
BLOG WWWHANDMADE-JEWELRY-CLUBCOM MEMBERSHIP WWWDIYBEADINGCLUBCOM BLOG DIY BEADING MAGAZINE ISSUE 32
STEP 37-48 Mimicing the FOCAL CIRCLElsquos STEP 50-65 bead the third row of bicones to finish this circle too
STEP 25-36 Mimicing FOCAL CIRCLElsquos STEP 35-49 add 2
rows of bicones The last step here is purple again
STEP 49-60 Just like the FOCAL CIRCLElsquos STEP 66-83 secure the circle by adding 1A between every bicone
in the second row of bicones If you finished secure the thread and trim (Donrsquot forget that you need two
small circles)
Something Blue Necklace and Earrings
BLOG WWWHANDMADE-JEWELRY-CLUBCOM MEMBERSHIP WWWDIYBEADINGCLUBCOM BLOG DIY BEADING MAGAZINE ISSUE 32
STEP 2-6 Continue by adding 1A 1 bicone 1 pearl until you count 6 of each
STEP 1 Begin with 1 pearl 1 bicone 1A and 1 bicone again on a comfortable length of thread leaving a 2rdquo
5cm tail Pass through the pearl and the first bicone strung to form a ring
STEP 7-12 Pass through the A beads to make your
component more secure Also secure the thread and trim (Repeat these steps until you have six 6-BEAD
COMPONENTs)
6-BEAD COMPONENT Work RAW stitch into a beaded circle and embellish with Swarovski bicones
For the necklace we will need six from this component For the earring two
Something Blue Necklace and Earrings
BLOG WWWHANDMADE-JEWELRY-CLUBCOM MEMBERSHIP WWWDIYBEADINGCLUBCOM BLOG DIY BEADING MAGAZINE ISSUE 32
STEP 2-4 Continue by adding 1A 1 bicone 1 pearl
until you count 4 of each
STEP 1 Begin with 1 pearl 1 bicone 1A and 1 bicone again on a comfortable length of thread leaving a 2rdquo
5cm tail Pass through the pearl and the first bicone strung to form a ring
STEP 5-8 Pass through the A beads to make your component more secure Also secure the thread and
trim (Repeat these steps until you have the wished amount of 4-BEAD COMPONENTs)
4-BEAD COMPONENT Work RAW stitch into a beaded circle and embellish with Swarovski bicones
For the necklace-size that is given on the second page we will need 20 from this
component For the earring two
If you would like to make a longer necklace you need to make more (One 4-BEAD COMPONENT measures about 38 inch 1 cm To make the necklace symmetrical you have to have equal amounts on each side This means for every extra frac34 inches
2 cm-s you will need 1 4-BEAD COMPONENT on each side of the necklace)
Something Blue Necklace and Earrings
BLOG WWWHANDMADE-JEWELRY-CLUBCOM MEMBERSHIP WWWDIYBEADINGCLUBCOM BLOG DIY BEADING MAGAZINE ISSUE 32
STEP 2 Connect the MIDDLE CIRCLE to two 6-BEAD COMPONENTs by adding four-times 2As
between the pearls Choose a pearl on the MIDDLE CIRCLE and add
2A pass through a pearl in the 6-BEAD COMPONENT previously added and add 2A again Watch out this has to be symmetrical Repeat this at least two more times to make it
secure Now repeat this entire procedure but choose
the 8-th pearl on MIDDLE CIRCLE Repeat this on the other side of the necklace
too
Choose a pearl on the FOCAL CIRCLE and add 2A pass through a pearl in the 6-BEAD COMPONENT and add 2A again Repeat this at least two more times to make it secure
Now repeat this entire procedure but choose the 5-th pearl on FOCAL CIRCLE This will make the necklace nice on your neck
FINISHING THE NECKLACE Connects the parts with A beads
STEP 1 Connect the FOCAL CIRCLE to two 6-BEAD COMPONENTs by adding four-times 2As between the pearls To do this turn your parts upside down you need to
see the pearls We will work on this side from now on
Something Blue Necklace and Earrings
BLOG WWWHANDMADE-JEWELRY-CLUBCOM MEMBERSHIP WWWDIYBEADINGCLUBCOM BLOG DIY BEADING MAGAZINE ISSUE 32
FINISHING THE EARRING Connects the parts with A beads
STEP 1-2 Connect the 6-BEAD COMPONENT
to 4-BEAD COMPONENT and the 4-BEAD
COMPONENT to the earring hook
First connect the 4-BEAD COMPONENT to the 6-BEAD COMPONENT with 4A beads Mimic
the elongation steps of the necklace if needed
Secondly connect the 4-BEAD COMPONENT
to your earring hook with 4A beads again Leave from the last pearl bead 2A beads the hook (this is the orange oval form) and 2As again Pass through each of them to
secure this connection again
Finally get ready to prepare the other earring ndash since we need two of them
STEP 5 Connect the 4-BEAD COMPONENTs to the toggle clasp thus finishing the
necklace Leaving from the last pearl bead 2A the
clasp(this is the orange oval form) and 2A again Pass through all of them a couple more times to make this connection more
secure
Something Blue Necklace and Earrings
BLOG WWWHANDMADE-JEWELRY-CLUBCOM MEMBERSHIP WWWDIYBEADINGCLUBCOM BLOG DIY BEADING MAGAZINE ISSUE 32
If you finished it is time to try it on It was a great fun wasnrsquot it And how beautiful you look in your new necklace and the matching earrings
Something Blue Necklace and Earrings
BLOG WWWHANDMADE-JEWELRY-CLUBCOM MEMBERSHIP WWWDIYBEADINGCLUBCOM
About the Author
Margit Vogel
My name is Margit Vogel I live in Hungary Europe
By profession I am a biochemical engineer but I fell in love with
beads so much that I could not stop playing with them
I make one-of-a-kind beaded and bead embroidered art
jewelry made of the best quality materials such as Swarovski
stones gemstones Japanese beads (Miyuki and Toho) Czech
glass beads leather soutache and suede Each piece is unique
and individually crafted
Feel free to visit my blog for some eyecandy
httpiformjewelrywordpresscom
My shop httpwwwetsycomshopiformjewelry
Facebook httpwwwfacebookcomiformjewelry
BLOG DIY BEADING MAGAZINE ISSUE 32
Getting Down And Personal With Gianna
Getting Down And Personal With Gianna
Nowadays we see more and more jewelry stores opening up online and with these online jewelry stores it has made it easier for us to purchase and view their creations Have you ever wondered how they are able to manage and produce amazing jewelry pieces and tutorials So heres a little on the journey to open up an online shop We are excited to present to you Gianna aka Beading4perfectionists
Gianna Beader amp Youtuber
Unlike most jewelry makers and beadweavers Gianna did not start beading as a hobby but as a means to make ends meet With goals in trying to
fill the financial gap she did everything she could to expand her earnings ndash working as a security guard
and at the same time learning how to bead and selling her pieces at fair trades and flea markets
Since many were asking if she does home beading workshops she started on exploring how to teach people to bead She loves Scott Bakula and has always loved him till now and this served as her
inspiration to start making a beading video tutorial
Gianna started creating videos because she was at the point in her life where everything seemed to be falling apart And at that moment of time she had difficulties financially and selling jewelry was the only way for her to stay afloat financially She is a big Scott Bakula fan and when she went to the UK to see him on stage that was when it hit her that she is already able to edit videos and
taught herself Photoshop and done workshops at bead fairs so why not put these together and see what happens on Youtube She knew that if she gets enough subscribers and views ndash though no one knew what the exact numbers were you would be invited to become a Youtube partner This way she could monetize her videos with advertisements and hopefully she would be able to be a Youtube partner and be able to pay her bills
BLOG WWWHANDMADE-JEWELRY-CLUBCOM MEMBERSHIP WWWDIYBEADINGCLUBCOM BLOG DIY BEADING MAGAZINE ISSUE 32
Getting Down And Personal With Gianna
Her Youtube channel is popular and the reason why she chose Youtube is because Youtube is the biggest platform and reached almost to the whole world Everyone already knows about it and it was growing rapidly as compared to other platforms like Dailymotion so she figured that Youtube was the way to go Her advice to new designers is that when you start out go to the platforms on the top of your list first then work your way down your list if you do not get accepted by your first choice
After loyally putting up one video every week for about 8 months in a row she became a Youtube partner and monetized her videos She knew she needed at least $100 to get her first payout She managed to reach $100 after 3 months The process was not easy she worked hard lack sleep skipped meals and who knows what happened to Ridge in the Bold and the Beautiful because she stopped watching
On Youtube you can monetize your videos Google pays straight to your bank account and at other countries where they also have the option of getting checks among other options In order to get paid you have to reach the $100 mark and after 3 months For Gianna she thinks that you cannot say that Etsy is better than Youtube or Youtube is better than Etsy Her reasoning is because on Youtube she has many followers which will eventually check out her Etsy shop And to start an Etsy shop you need an audience
BLOG WWWHANDMADE-JEWELRY-CLUBCOM MEMBERSHIP WWWDIYBEADINGCLUBCOM BLOG DIY BEADING MAGAZINE ISSUE 32
television and dedicated her spare time (as she had another job) to Youtube She re-registered at the chamber of commerce after receiving her first payout Her work at Youtube now is not a full time job and things have changed on Youtube It is easier to become a parter but there are some countries that need to wait for an invitation to be a Youtube partner Take Italy for instance Italians would have to work just as hard as she did if they want to become a Youtube partner
Getting Down And Personal With Gianna
With her 60000 subscribers on her b4pbakup Youtube channel it is possible to sell at least 60 patterns on the first day on Etsy after promoting the PDF file on her Youtube channel Though you may think that 60 out of 60000 is not much you have to remember that not everyone has the means to purchase the PDF file and a lot of people still rather watch her carry out the tutorial(for free) on Youtube instead of reading the patterns or paying for the patterns even if the pattern is for a fundraiser and only cost $2 Her insights on Youtube is that Youtube is not what it used to be 6 years ago Instead of making more money every month she is making less and less because advertisers have more options of where they want to advertise their ads Ads do not pay as much as they used to Back in the days you could get 25 cents per ad Now you count yourself lucky if you could get 5 cents roll in after two hours
BLOG WWWHANDMADE-JEWELRY-CLUBCOM MEMBERSHIP WWWDIYBEADINGCLUBCOM BLOG DIY BEADING MAGAZINE ISSUE 32
And on top of that adblockers are destroying Youtube channel owners Youtube will start making changes to the channels where there will be ldquopaid subscriptionrdquo channels This has already been implemented in some countries but not in her country The Netherlands This means there will no longer be ads for her monthly paying subscribers She hopes that Youtube will add on a paid per video option feature The option to be a paid channel or free channel or to start a new channel for paying customers is yours to choose Gianna is not happy with Youtube because many others like her have worked so hard and for some years to become Youtube partners(which was something to be proud of) has lost their status
Getting Down And Personal With Gianna
Her advice for those who want to go on Youtube is 1 Do it because you want to teach
2 Do it because you want a career with beads
BLOG WWWHANDMADE-JEWELRY-CLUBCOM MEMBERSHIP WWWDIYBEADINGCLUBCOM BLOG DIY BEADING MAGAZINE ISSUE 32
After putting up about 20 videos and having at least 5000 subscribers add the PDF tutorials to Etsy and Craftsy She found out that her audience would like to have the PDF after watching her videos This is because they would rather print out the PDF and work while seated in a comfy chair technically somewhere else instead of having to pause the video time and time again
Gianna has also made a video for those who want to know the whole story of her journey up until the present day And to get updates on her you can check it out here She has also started a vlog where she tells of how she still works towards becoming a financial independent beader and explains her journey to get where she wants to be(or die trying) Gianna will be in the UK on October the 17th giving an all-day workshop with 4 different patterns
(2 beginners and 2 advanced) in Wotton-under-Edge
Gianna will be there Friday night as the workshop is on Saturday She will be leaving on Sunday Her
doors are open to all who wants to continue the party with her at the hotel across the street
For more information do contact Ann Tucker on Facebook
httpswwwfacebookcomanntucker501
Rec
omm
end
ed R
ead
ings
Making Jewelry with Gemstone
Beads
Combines the popular craft of beading with beautiful semi-precious stones which are collected by many Features a variety of versatile ideas which can be adapted for any type of gem or bead Readers will learn to reate beautiful gemstone jewelry with this dazzling collection of over 100 projects ranging from eyecatching earrings and accessories to exquisite necklaces and bracelets This beautiful book offers an impressive range of 28 beautiful semi-precious stones (including birthstones) and a glimpse into the fascinating history and mythical properties behind them
BLOG DIY BEADING MAGAZINE ISSUE 32 BLOG WWWHANDMADE-JEWELRY-CLUBCOM MEMBERSHIP WWWDIYBEADINGCLUBCOM
Rec
omm
end
ed R
ead
ings
Convertible Crystal Jewelry
Reverse it Twist it Wear it Many
Ways
Diane Whiting presents the idea that convertibility isnrsquot just about using pieces in multiple ways it is also about using skills and creativity in multiple ways Using ever-popular sparkling crystals Diane showcases design elements through various techniques for fun easy fashionable jewelry With 25 projects the reader can choose from bracelets necklaces and earrings that match any outfit or styleDiane Whiting presents the idea that convertibility isnrsquot just about using pieces in multiple ways it is also about using skills and creativity in multiple ways
BLOG DIY BEADING MAGAZINE ISSUE 32 BLOG WWWHANDMADE-JEWELRY-CLUBCOM MEMBERSHIP WWWDIYBEADINGCLUBCOM
Rec
omm
end
ed R
ead
ings
Wire Jewelry Masterclass
Wrapped Coiled and Woven Pieces
Using Fine Materials
Comprehensive and fabulous Wire Jewelry Masterclass takes an in-depth look at an intricate and rewarding craft The 24 projects which range from simple Dragons tear briolette earrings to a Poseidon-under-the-sea pendant will delight and inspire jewelers of all levels and tastes Divided into beginner intermediate and advanced sections this beautifully photographed step-by-step guide is the ticket to wire jewelry expertise
BLOG DIY BEADING MAGAZINE ISSUE 32 BLOG WWWHANDMADE-JEWELRY-CLUBCOM MEMBERSHIP WWWDIYBEADINGCLUBCOM
Rec
omm
end
ed R
ead
ings
Timeless Wire Weaving The
Complete Course
Timeless Wire Weaving focuses on developing wirework skills through 13 projects using three classic wire weaving techniques coiling wrapping and weaving The projects are built around a focal cabochon and incorporate seed beads and crystals in imaginative ways Designers learn to make the jewelry shown in the book and they also use the techniques learned to create innovative jewelry pieces of their own
BLOG DIY BEADING MAGAZINE ISSUE 32 BLOG WWWHANDMADE-JEWELRY-CLUBCOM MEMBERSHIP WWWDIYBEADINGCLUBCOM
Our digital magazine is available through
Apple Newsstand service available to millions of IPAD users
To advertise with us please email us at
diyjewelryclubgmailcom
Or visit our page at
httphandmade-jewelry-clubcomadvertising-diy-beading-magazine
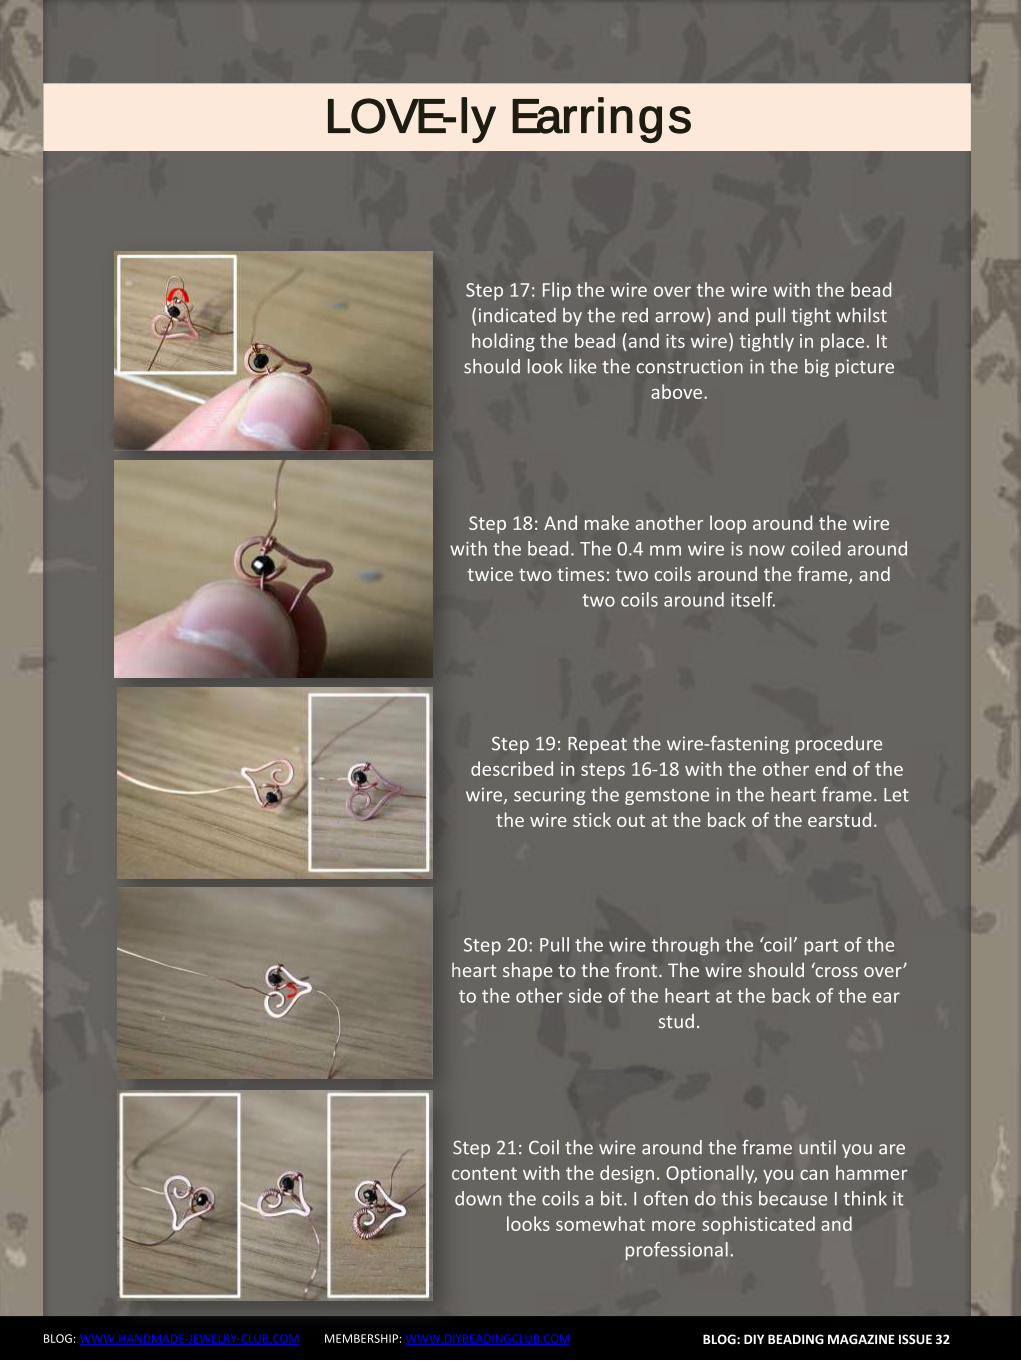
Flower Tale Earrings
BLOG WWWHANDMADE-JEWELRY-CLUBCOM MEMBERSHIP WWWDIYBEADINGCLUBCOM
Step 1 Cut about 110 cm (43 inches) of thread and
pass it through the needle hole
Pick six groups of one 110 seed bead and one
6 mm round bead
BLOG DIY BEADING MAGAZINE ISSUE 32
Join the beads into a ring and secure with two
square knots
Leave a tail of about 15 cm (59 inches)
Step 2 The working thread should be right before the
6 mm round bead
Pick seven 110 seed beads skip the 6 mm
round bead and pass the needle through the
next 110 seed bead added in the previous
round
Repeat adding groups of seven 110 seed
beads five more times
When adding the last group take the needle
directly through the 110 seed bead from the
previous round and the next one added in the
beginning of current round
Flower Tale Earrings
BLOG WWWHANDMADE-JEWELRY-CLUBCOM MEMBERSHIP WWWDIYBEADINGCLUBCOM
Step 3 Pick three 110 seed beads skip one seed
bead from the chain of seven added in the
previous round and pass with the needle
directly through the next three 110 seed
beads
BLOG DIY BEADING MAGAZINE ISSUE 32
Pick three 110 seed beads skip one seed
bead from the chain of seven added in the
previous round and pass with the needle
through the last one and the first 110 seed
bead from the next chain of seven
Repeat the above directions from Step 3 five
more times
After completing this round make sure the
thread will be exiting from the middle 110
seed bead from the first group of three added
in the beginning of this round
Step 4 Pick one 110 seed bead and go through the
last seed bead of the group of three
Flower Tale Earrings
BLOG WWWHANDMADE-JEWELRY-CLUBCOM MEMBERSHIP WWWDIYBEADINGCLUBCOM
Pick three 110 seed beads and take the
needle through the first seed bead of the next
group of three added in the previous round
BLOG DIY BEADING MAGAZINE ISSUE 32
Pick one 110 seed bead and go with the
needle through the next three seed beads (the
last two of the group of three and the last one
from the chain of seven)
Then go up through three 110 seed beads
(the first from the next group of seven and the
first two from the next group of three)
Repeat the above directions from Step 4 to
complete the remaining petals
When working on the last petal perform the
operation from the image shown on the left
instead of picking the group of three 110 seed
beads string two 110 seed beads the earring
hook other two 110 seed beads and
continue beading as instructed above
When you are done hide the thread ends into the beadwork
Flower Tale Earrings
BLOG WWWHANDMADE-JEWELRY-CLUBCOM MEMBERSHIP WWWDIYBEADINGCLUBCOM
About the Author
Iulia Postică
I was born and live in Moldova Eastern Europe Ever since I remember myself
Ive been crocheting and knitting My grandmother has taught me that and I
loved it very much I always regarded crafts exclusively as a hobby and never
thought of making a career of it I traveled a lot to various historical sites
Actually Ive spent all my childhood summers in archaeological camps with
my father who is a professional archaeologist
I also enjoy metal hammering and wirework as it gives me possibility to
express myself in materials used by human communities since ancient times
copper brass glass seed beads and gemstones That is no surprise to anyone
given my family history and academic background
My shop ldquoBeadedTreasuryrdquo with beading tutorials and bead crochet patterns
httpswwwetsycomshopBeadedTreasury
My shop ldquoArchaeologicardquo with artisan jewelry
httpswwwetsycomshopArcheologica
My blog httpbeadedtreasuryblogspotcom
My facebook httpswwwfacebookcomBeadedTreasury
BLOG DIY BEADING MAGAZINE ISSUE 32
Liberty Earrings
BLOG WWWHANDMADE-JEWELRY-CLUBCOM MEMBERSHIP WWWDIYBEADINGCLUBCOM
Materials - Nr 2 cabochon Preciosa Ornela ovale 18x22 mm turchese
- Rocaille Toho 150 silver lined green emerald
- Nr 2 dagger beads
- Nr 20 pearl 4 mm
- Superduo opaque luster ceramic green
- Rocaille 80 color gold
- Rocaille 80 color ivory
- Delica Miyuki 110 aquagreen mix
- Rocaille Miyuki 110 galvanized silver
- Nr 2 monachelle (earwire)
-Fireline
- Beading Needle nr 12
BLOG DIY BEADING MAGAZINE ISSUE 32
Liberty Earrings
BLOG WWWHANDMADE-JEWELRY-CLUBCOM MEMBERSHIP WWWDIYBEADINGCLUBCOM
Make a circle of 20 delica beads and make a knot (a) Perform two rounds peyote with ivory 80 seed beads (b c) Exit from an ivory
bead
BLOG DIY BEADING MAGAZINE ISSUE 32
a b c
Jump from 80 to 80 with 110 80 gold 110 (a) Finish the round and come out of a 80 gold bead
Jump to the next 80 gold with a 4mm pearl (b) Finish the round and come out
of the first pearl Jump to the 2nd pearl and close with a 80 gold bead(c)
a b c
Position the cabochon and jump from one 80 to the other with two delica bead (a)
Continue with three delicas four times (b) At the bottom sew on two delicas then finish the round by sewing on three delicas for four times passing from one to another roc 80 Tighten the cabochon and exit from the
first two delica that you started with String together a 110 and 150 and enter the second of the three close delicas (c)
a b c
Liberty Earrings
BLOG WWWHANDMADE-JEWELRY-CLUBCOM MEMBERSHIP WWWDIYBEADINGCLUBCOM
Put together 150 110 150 and enter in the second of three next delica (a) Put the same beads for three times then put together 150 and 110 and enter
in the two delica of the bottom tip (b) Enter in the second of three next delica with 110 and 150 (c) Continue passing
in the 80 beads with three beads (150 110 150) for four times then at the top finish the round by putting together a 150 and 110 (d)
BLOG DIY BEADING MAGAZINE ISSUE 32
a b c
Exit from the first 150 sewn in the previous round and jump in the three next beads with a 150 (a)
Put a 150 at a time and exit from the first 110 beads of the bottom tip Jump in the
near 110 with a 150 (b) Finish round repeating steps a and b (c) Exit the roc 80 as shown in the photo (d)
a b c
d
a b c d
Enter in the 80 with four 150 (a b) Enter the 80 beads at the bottom of the pieces with two 110 one superduo one 80 ivory bead one superduo and two 110 (c)
d e f
Liberty Earrings
BLOG WWWHANDMADE-JEWELRY-CLUBCOM MEMBERSHIP WWWDIYBEADINGCLUBCOM
Exit from the bottom pearl (a) Put together 150 three 110 150 and enter in the superduorsquos second hole (b)
Put together three superduo and enter in the next superduorsquos second hole (c) Rethread 15 three 110 150 and return in the opposite direction in the pearl of departure (d)
BLOG DIY BEADING MAGAZINE ISSUE 32
a b
c
Exit from the second pearl indicated from (a) Put 150 four 110 and enter in the second of the three 110 (b) Go to the second superduorsquos hole with four 110 and a 150 (c)
Enter the second hole of the supeduo with a 150(d) Sew in the middle of the bottom of the superduo 150 two 110 150 dagger 150 two 110 150(e)
Enter the second hole of the thirs superduo with 150 (f)
a b c
d
d e f
Liberty Earrings
BLOG WWWHANDMADE-JEWELRY-CLUBCOM MEMBERSHIP WWWDIYBEADINGCLUBCOM BLOG DIY BEADING MAGAZINE ISSUE 32
Put 150 four 110 and enter in the second of three 110 of the base (a) Insert four 110 and 150 in the pearl opposite direction indicated in the picture (b) Go in all the beads
around the piece and exit from the pearl at the top (c) Put 150 three 110 150 and enter the superduo (d)
Enter the ivory bead 80 with two 150 (e) Enter the next superduo with two 150 (f)
a b c
d e f
Put together 150 three 110 and enter in opposite direction in the departurersquos pearl (a) Exit from the 150 beads indicated by photo (b) From this jump in the second of two near
150 with five 150 to created the hole for the earwire (c) Pass the thread in the beads make a few knots and cut the excess thread
a b c
Your earrings are finished
Liberty Earrings
BLOG WWWHANDMADE-JEWELRY-CLUBCOM MEMBERSHIP WWWDIYBEADINGCLUBCOM
About the Author
Mariella Martella
My name is Mariella Martella and I am the author and
designer of jewelry that I sign with the name of Mariel Bijoux
After changing city often for work and study I currently live
in northern Italy I am an art historian with a passion for travel
painting and jewelry design in weaving that project since
2010 In my beads and crystals are the colors of the
Mediterranean sea the atmosphere of summer evenings
and the lights of the places I visited
You can find me at
Etsy shop httpswwwetsycomitshopMarielBijoux
Facebook httpswwwfacebookcommari3lbijoux
Crafting blog httpmarielbijouxblogspotit
Twitter httpstwittercomMarielBijoux
BLOG DIY BEADING MAGAZINE ISSUE 32
Jade Necklace
BLOG WWWHANDMADE-JEWELRY-CLUBCOM MEMBERSHIP WWWDIYBEADINGCLUBCOM
Every time I wear a necklace I always make it a point that the
necklace will lay perfectly flat on my neck Using wire for a necklace
made it possible for me like what I did with Jade Necklace It may look
odd at first having bent wires for a necklace but once the jewelry is
finished youll be so happy how the necklace will perfectly lay on your
neck
The tutorial is catered for intermediate level One must know basic
wirework skills such as wire wrapping making loops wrapped loops
and linking to follow the tutorial It has clear instructions and ultra-clear
close-up photos at each step Additionally you can ask me question
you have on the tutorial No more getting stuck and frustrated on a
confusing or just plain inaccurate pattern
If you followed this tutorial and then sell the accessory or jewelry
please give credit to the author or DIY Beading Clubcom
Copyright 2015
wwwdiybeadingclubcom
wwwhandmade-jewelry-clubcom
BLOG DIY BEADING MAGAZINE ISSUE 32
Jade Necklace
BLOG WWWHANDMADE-JEWELRY-CLUBCOM MEMBERSHIP WWWDIYBEADINGCLUBCOM BLOG DIY BEADING MAGAZINE ISSUE 32
Materials Needed 18ga Craft wire 28ga Craft wire 15mm diameter Green Round Flat Back Sew On Gems 5mm Green pearls
8mm Green pearls 6mm x 11mm teardrop Crystal Treasures Mill Hill beads or any teardrop bead with holes on the side Hook for your clasp
Tools Needed Wire cutter Flat nose pliers Round nose pliers Mandrel A jar or any rounded object to shape your necklace
Skill Level Intermediate
Step 1 Cut 6 inches 18ga wire Make a loop on one end then measure approximately 125 inches and make another loop
Form a size 4 circle on your mandrel
Jade Necklace
BLOG WWWHANDMADE-JEWELRY-CLUBCOM MEMBERSHIP WWWDIYBEADINGCLUBCOM BLOG DIY BEADING MAGAZINE ISSUE 32
Then close the circle by wrapping the extended wire just below the loop Wrap the
wire 2x
This is how it looks like Lets call this circle frame Youll notice that the lower curve is
slightly bigger than the upper curve
Step 2 Cut 8 inches of 28ga wire Wrap one end of
the wire at least 3x on one side of the circle frame just below the loop
Bring up your gem Flat back sew on gems has 2 holes Insert the wire into one hole and then
wrap the wire once onto the circle frame
Jade Necklace
BLOG WWWHANDMADE-JEWELRY-CLUBCOM MEMBERSHIP WWWDIYBEADINGCLUBCOM BLOG DIY BEADING MAGAZINE ISSUE 32
Step 3 Insert a 5mm pearl on the wire and then pass
the wire under circle frame
Repeat previous step 2x and have 3 pearls wrapped
Continue wrapping with your teardrop crystal My crystal has 2 holes on the side
and then continue wrapping with your 5mm pearls then secure your wire
Repeat Step 3 and create as many as needed For 16-inch necklace Ive created 6 of these
components
Jade Necklace
BLOG WWWHANDMADE-JEWELRY-CLUBCOM MEMBERSHIP WWWDIYBEADINGCLUBCOM BLOG DIY BEADING MAGAZINE ISSUE 32
Step 4 Cut a 15-inch 18ga wire and make a loop on
one end Insert 8mm pearl and make a loop on the other end You then use these as connectors
and link the components
Step 5 The necklace is an 18ga wire with wrapped
loops on both ends First cut 7 inches 18ga wire and make a wrapped loop with your hook already inserted Side in 18pcs 5mm pearls
Then make a wrapped loop on the other end connecting the wrapped loop onto the component Do the same for the other
necklace but make the loop on the other end big enough so the hookclasp can pass thru
To have the necklace curve shaped use a jar to bend the wire Voila Now youre
ready to party
Jade Necklace
BLOG WWWHANDMADE-JEWELRY-CLUBCOM MEMBERSHIP WWWDIYBEADINGCLUBCOM
About the Author
Sky Aldovino
I consider myself a late bloomer when it comes to crafting Irsquom a self-taught jewelry maker Jewelry making wasnrsquot really a hobby of mine but unforeseen events lead me to learn jewellery making My family put up a craft store where we sell cross stitch beads and all sorts of crafting materials I fell in love with the beads and tried to create accessories only for myself Clients liked the pieces and I started customizing handmade jewelleries The craft store was a success for 6 years but like any other small businesses we had to close it down and I was confined to staying at home While at home I had all the time using the internet and now working as a home-based jewelry designer
BLOG DIY BEADING MAGAZINE ISSUE 32
Atomic Ring
BLOG WWWHANDMADE-JEWELRY-CLUBCOM MEMBERSHIP WWWDIYBEADINGCLUBCOM
Have fun making shapes using the wigjig Cyclops Make loops going in
circles to mimic the shape of a flower or in this tutorial mimic the
shape of an atom The tutorial will also teach you how to cage a
cabochon Whats nice about this piece is that with one long wire you
can create the ring from start to finish
The tutorial is catered for intermediate to advanced students One
must already know how to make spirals and use a wigjig tool It has
clear instructions and ultra-clear close-up photos at each step
Additionally you can ask me question you have on the tutorial No
more getting stuck and frustrated on a confusing or just plain
inaccurate pattern
If you followed this tutorial and then sell the accessory or jewelry
please give credit to the author or DIY Beading Clubcom
If you like to get a blank wigjig graph visit wigjigcom Shop and Jigs
section
Copyright 2015
wwwdiybeadingclubcom
wwwhandmade-jewelry-clubcom
BLOG DIY BEADING MAGAZINE ISSUE 32
Atomic Ring
BLOG WWWHANDMADE-JEWELRY-CLUBCOM MEMBERSHIP WWWDIYBEADINGCLUBCOM
Materials Needed 20ga Craft wire 28ga Craft wire 11mm Round Cabochon
Tools Needed Wigjig Cyclops 15mm pegs Wire cutter Flat nose pliers Mandrel
Skill Level Intermediate - Advanced
BLOG DIY BEADING MAGAZINE ISSUE 32
Step 1 Lets prepare your wigjig cyclops Position the pegs like so
Atomic Ring
BLOG WWWHANDMADE-JEWELRY-CLUBCOM MEMBERSHIP WWWDIYBEADINGCLUBCOM BLOG DIY BEADING MAGAZINE ISSUE 32
Lets work with longer wire so youll have enough wire to hold onto as you manipulate the wire so cut 36 inches of 20ga wire From
one end of the wire measure 10 inches
On the 10-inch measurement loop the wire at the center peg then continue to loop onto the side pegs going in circle going back to
the center peg after looping on the side peg
Now the wire at the center peg will start to build up as you go around the side pegs so
you need to constantly press the wire at the center peg to accommodate the build up of
wire
When youre done pull out the wire and this is
how it should look like
Atomic Ring
BLOG WWWHANDMADE-JEWELRY-CLUBCOM MEMBERSHIP WWWDIYBEADINGCLUBCOM BLOG DIY BEADING MAGAZINE ISSUE 32
You will notice that the frame opens wide Now to keep the atom frame from opening wide secure the center of the frame by wrapping a 28ga wire What you
need to do is simply pass the 28ga wire into the hole and wrap as many times as needed or until youre sure that the frame is secure
Step 2 Now youre finished with your atom frame Well now create the focal design With the longer wire make a spiral at the center big
enough to accommodate the size of your cabochon In this tutorial the spiral is about
11mm in diameter the same size as my cabochon
Pop in your cabochon and start to make spirals going around and over the cabochon as if you are caging the cabochon Create at
least 5 rounds and then cut off any excess
Step 3 Now lets make the ring and this with the other
end of the wire
Atomic Ring
BLOG WWWHANDMADE-JEWELRY-CLUBCOM MEMBERSHIP WWWDIYBEADINGCLUBCOM BLOG DIY BEADING MAGAZINE ISSUE 32
Bring up your mandrel and wrap the wire to the size of your finger Wrap at least 2 times
When youre sure you have the right size pull the ring out of the mandrel
With the extended wire wrap the wire the secure the ring
Cut off any excess and voila You have your atomic ring Create as many as you can with different colors of cabochon
Atomic Ring
BLOG WWWHANDMADE-JEWELRY-CLUBCOM MEMBERSHIP WWWDIYBEADINGCLUBCOM
About the Author
Sky Aldovino
I consider myself a late bloomer when it comes to crafting Irsquom a self-taught jewelry maker Jewelry making wasnrsquot really a hobby of mine but unforeseen events lead me to learn jewellery making My family put up a craft store where we sell cross stitch beads and all sorts of crafting materials I fell in love with the beads and tried to create accessories only for myself Clients liked the pieces and I started customizing handmade jewelleries The craft store was a success for 6 years but like any other small businesses we had to close it down and I was confined to staying at home While at home I had all the time using the internet and now working as a home-based jewelry designer
BLOG DIY BEADING MAGAZINE ISSUE 32
Featured Article Gemstones Used for Jewelry Making
BLOG WWWHANDMADE-JEWELRY-CLUBCOM MEMBERSHIP WWWDIYBEADINGCLUBCOM
Gemstones are stones which we hold quite highly in terms of value And
jewelry often consists of stones that add attractiveness to it so it is not
surprising when jewelry designers actually use gemstones in their designs In
fact there are different types of gemstones that can be used for making
jewelry There are the expensive and pure gemstones and there are also the
imitation ones The information below will provide some information about
the kinds of stones you can use to create jewelry and how these stones will
impact the jewelry you have created
The first kind of stone which I believe we are all quite familiar with are
birthstones These stones are associated with individualrsquos month of birth
by SunVDesigns by BeyhanAkman
For example Amethyst stone is connected with anybody who is born in
February which carries special significance in the area of emotions and also
spiritually This stone also signifies calm and peace as well
And then we have semi-precious stones which are also often used in jewelry
making They are not as valuable as compared to precious stones but still
valuable Best examples of these stones are aquamarine topaz tourmaline
opal and turquoise
BLOG DIY BEADING MAGAZINE ISSUE 32
Featured Article Gemstones Used for Jewelry Making
BLOG WWWHANDMADE-JEWELRY-CLUBCOM MEMBERSHIP WWWDIYBEADINGCLUBCOM
It is an ideal gift for someone who you deem special Aquamarine pendants
usually work well for anyone and is widely an accepted stone
by HyppieChic by joyeriamestiza
However precious stones are the most unusual
and precious jewels to us Examples of some of
them are emerald sapphire diamond and
ruby These stones are usually very expensive
and are prized for their exquisiteness These
stones are commonly used in high-quality
jewelry designs which costs quite a fortune to
obtain
BLOG DIY BEADING MAGAZINE ISSUE 32
by sarajewelrystu
Jewelry designs with precious stones are usually
given as exceptional gifts on special occasions A
perfect example is a diamond ring that is usually
given as an engagement gift
by ldiamondsforever
Featured Article Gemstones Used for Jewelry Making
BLOG WWWHANDMADE-JEWELRY-CLUBCOM MEMBERSHIP WWWDIYBEADINGCLUBCOM
There are also synthetic stones which are often used to create jewelry
Synthetic stones are artificial imitations of gemstones Synthetic Sapphire
jewelry costs less compare with the authentic ones Most of the time
imitation stones are used to save cost but at the same time have the similar
look of the real stone
BLOG DIY BEADING MAGAZINE ISSUE 32
by shininggems by thaimaker
by lapinduprintemps by PastimeArt
Gemstones are used like beads and you can use it in any designs whether
simple or elaborate
Swarovski crystal components are available in a rich multitude of rondelles Perfect as spacers in necklaces or as discs in earrings Rondelles can be used with many varieties of shapes or sizes Use Swarovski crystal rondelles between large gemstones as accents with precious metal findings Fire Mountain Gems and Beads Crystal Passionsreg brand presents Swarovski crystal in display-ready packaging for brilliant retail presentation Crystal Passionsreg is an assurance of genuine Swarovski crystal
BLOG DIY BEADING MAGAZINE ISSUE 32 BLOG WWWHANDMADE-JEWELRY-CLUBCOM MEMBERSHIP WWWDIYBEADINGCLUBCOM
Recommended Jewelry Making Supplies
Mz Unisex-adults 12pcs 25x18x6mm Turquoise Oval CAB Cabochon
BLOG DIY BEADING MAGAZINE ISSUE 32 BLOG WWWHANDMADE-JEWELRY-CLUBCOM MEMBERSHIP WWWDIYBEADINGCLUBCOM
Recommended Jewelry Making Supplies
For a little sparkle that goes a long way design with Swarovski 4mm faceted bicones Create glorious multi-strand necklaces with the dainty crystals or use as spacers to add a tiny flash to your designs Swarovski crystal components are made in Austria and are considered the finest products of their kind in the world
BLOG DIY BEADING MAGAZINE ISSUE 32 BLOG WWWHANDMADE-JEWELRY-CLUBCOM MEMBERSHIP WWWDIYBEADINGCLUBCOM
Recommended Jewelry Making Supplies
Imitation beads resist color change These beads have uniform quality with a good polish Some strands may have little to no matrix Sizes shapes and colors may vary with handcrafted items
BLOG DIY BEADING MAGAZINE ISSUE 32 BLOG WWWHANDMADE-JEWELRY-CLUBCOM MEMBERSHIP WWWDIYBEADINGCLUBCOM
Recommended Jewelry Making Supplies
Something Blue Necklace and Earrings
BLOG WWWHANDMADE-JEWELRY-CLUBCOM MEMBERSHIP WWWDIYBEADINGCLUBCOM
Skill level Beginner Intermediate Advanced
DIMENSIONS OF THE NECKLACE Inner Circumference 14 18 inch 35 cm
Focal Pendant Width 1 15 inch 35 cm Focal Pendant Height 1 15 inch 35 cm
DIMENSIONS OF THE EARRING Earring Width 716 inch 12 cm Earring Height 1516 inch 25 cm (Without the earring hook)
BLOG DIY BEADING MAGAZINE ISSUE 32
Materials
Note Before purchasing the supplies measure the length of your wished necklace If you decide to bead a longer necklace you should keep in mind that for every extra
frac34 inches 2 cm-s you will need 8 bicones and 8 pearls
Something Blue Necklace and Earrings
BLOG WWWHANDMADE-JEWELRY-CLUBCOM MEMBERSHIP WWWDIYBEADINGCLUBCOM BLOG DIY BEADING MAGAZINE ISSUE 32
Work RAW stitch into a beaded circle and embellish with Swarovski bicones
STEP 2 String 1A and 2 pearls Pass through the previous
second pearl and the freshly added 1A and the first pearl again
STEP 1 Use a comfortable length of thread to string 2
pearls 1A and 1 pearl again leaving a 2rdquo 5cm tail Pass through the first two pearls strung to form a
ring
STEP 3 String 2 pearls and 1A Pass through the previous first pearl and the freshly added two pearls
again
STEP 4 - 17 Repeat STEP 2 and STEP 3 again until you count 17 pearls in the inner circle
But be careful in the last step you only have to add 1 pearl then pass through the first pearls
added in STEP 1 and add another 1A Now pass through the first pearl added in STEP
1and 1A added in this round again to exit from this A
Something Blue Necklace and Earrings
BLOG WWWHANDMADE-JEWELRY-CLUBCOM MEMBERSHIP WWWDIYBEADINGCLUBCOM BLOG DIY BEADING MAGAZINE ISSUE 32
STEP 19 String 2A and pass through the next A added in round 4-17 and the A added in round 18 the 2A added in this round and finally the A added in round 4-17 to exit from the bead showed below
STEP 18 String 3A and pass through the 1A added in the previous round and the first A added in this
round
STEP 20 - 34 Repeat STEP 18 and STEP 19 again until you finish the circle
But be careful in the last step first you have to pass through 3A and then add 1A After this pass
through the 3A again and exit from the A bead
shown below (This is the first A added in STEP 18)
Something Blue Necklace and Earrings
BLOG WWWHANDMADE-JEWELRY-CLUBCOM MEMBERSHIP WWWDIYBEADINGCLUBCOM BLOG DIY BEADING MAGAZINE ISSUE 32
STEP 35 Step up to exit from the pearl shown below (Finishing the previous step in the A bead and then
stepping up from there makes the circle more secure)
Now string 3 bicones Pass through the pearl and the first bicone again
In the reality your circle will look more like this the A beads forming a strong row in the middle of the
pearls
STEP 36 Add 2 bicones Pass through the
neighboring pearl the first bicone added in the previous row and the 2 bicones added in this step
so you can exit from the next pearl
Something Blue Necklace and Earrings
BLOG WWWHANDMADE-JEWELRY-CLUBCOM MEMBERSHIP WWWDIYBEADINGCLUBCOM BLOG DIY BEADING MAGAZINE ISSUE 32
Now in the reality your circle will look more like this the A beads still forming a strong row in the middle of the pearls and the bicones slightly lying on top of
them
STEP 37 - 49 Repeat STEP 35 and STEP 36 again until you finish the circle with the bicones
But be careful in the last step first you have pass through the third bicone added then add 1 bicone
and pass through this little quartet to exit from the bicone shown below (The second one added in
STEP 35)
STEP 50 With these steps we finish the circle by adding 1 bicone to connect the A beads and the
bicone row So add 1 bicone pass through the nearest A bead and add 1 bicone again Pass
through the bicone already there and exit from the bicone you just added
Something Blue Necklace and Earrings
BLOG WWWHANDMADE-JEWELRY-CLUBCOM MEMBERSHIP WWWDIYBEADINGCLUBCOM BLOG DIY BEADING MAGAZINE ISSUE 32
STEP 66-83 Secure the circle by adding 1A between each bicone in the second row of Swarovski
bicones If you finished secure the thread and trim
STEP 51-65 Using the same technique as in STEP 37 - 49 add 1 bicone to finish the third bicone row The black line shows you the way (After STEP 50 pass through the next A bead add 1 bicone and pass through the bicone already there and the bicone added in the previous step Repeat these steps to
finish the inner bicone circle)
MIDDLE CIRCLE Work RAW stitch into a beaded circle and embellish with
Swarovski bicones Remember you need to bead two circles this time
STEP 1 Just like in the focal circle begin with 2 pearls 1A and 1 pearl again on a comfortable length of thread
leaving a 2rdquo 5cm tail Pass through the first two pearls strung to form a ring
Something Blue Necklace and Earrings
BLOG WWWHANDMADE-JEWELRY-CLUBCOM MEMBERSHIP WWWDIYBEADINGCLUBCOM BLOG DIY BEADING MAGAZINE ISSUE 32
STEP 15-28 Mimicing the FOCAL CIRCLElsquos STEP 18-34 bead A beads until you finish the inner part of the
circle Exit from a pearl in the second row This circle should look very similar to the first one but this is a bit
smaller
STEP 2-14 Mimicing the FOCAL CIRCLElsquos STEP 2-17 bead until you count 14 pearls in the inner circle Exit
from the last A added
STEP 29-42 Mimicing FOCAL CIRCLElsquos STEP 35-49 add 2 rows of bicones
STEP 43-56 Mimicing the FOCAL CIRCLElsquos STEP 50-65 bead the third row of bicones to finish the circle
Something Blue Necklace and Earrings
BLOG WWWHANDMADE-JEWELRY-CLUBCOM MEMBERSHIP WWWDIYBEADINGCLUBCOM BLOG DIY BEADING MAGAZINE ISSUE 32
SMALLEST CIRCLE Work RAW stitch into a beaded circle and embellish
with Swarovski bicones Remember you need to bead two circles again
STEP 1 Just like in the focal circle begin with 2 pearls
1A and 1 pearl again on a comfortable length of thread leaving a 2rdquo 5cm tail Pass through the first two
pearls strung to form a ring
STEP 57-70 Just like the FOCAL CIRCLElsquos STEP 66-83 secure the circle by adding 1A between every bicone
in the second row of bicones If you finished secure the thread and trim (Donrsquot forget to bead another
circle)
STEP 2-12 Mimicing the FOCAL CIRCLElsquos STEP 2-17 bead until you count 12 pearls in the inner circle Exit
from the last A added
STEP 13-24 Mimicing the FOCAL CIRCLElsquos STEP 18-34 bead A beads until you finish the inner part of the
circle Exit from a pearl in the second row This circle should look very similar to the first two but this is the
smallest of them all
Something Blue Necklace and Earrings
BLOG WWWHANDMADE-JEWELRY-CLUBCOM MEMBERSHIP WWWDIYBEADINGCLUBCOM BLOG DIY BEADING MAGAZINE ISSUE 32
STEP 37-48 Mimicing the FOCAL CIRCLElsquos STEP 50-65 bead the third row of bicones to finish this circle too
STEP 25-36 Mimicing FOCAL CIRCLElsquos STEP 35-49 add 2
rows of bicones The last step here is purple again
STEP 49-60 Just like the FOCAL CIRCLElsquos STEP 66-83 secure the circle by adding 1A between every bicone
in the second row of bicones If you finished secure the thread and trim (Donrsquot forget that you need two
small circles)
Something Blue Necklace and Earrings
BLOG WWWHANDMADE-JEWELRY-CLUBCOM MEMBERSHIP WWWDIYBEADINGCLUBCOM BLOG DIY BEADING MAGAZINE ISSUE 32
STEP 37-48 Mimicing the FOCAL CIRCLElsquos STEP 50-65 bead the third row of bicones to finish this circle too
STEP 25-36 Mimicing FOCAL CIRCLElsquos STEP 35-49 add 2
rows of bicones The last step here is purple again
STEP 49-60 Just like the FOCAL CIRCLElsquos STEP 66-83 secure the circle by adding 1A between every bicone
in the second row of bicones If you finished secure the thread and trim (Donrsquot forget that you need two
small circles)
Something Blue Necklace and Earrings
BLOG WWWHANDMADE-JEWELRY-CLUBCOM MEMBERSHIP WWWDIYBEADINGCLUBCOM BLOG DIY BEADING MAGAZINE ISSUE 32
STEP 2-6 Continue by adding 1A 1 bicone 1 pearl until you count 6 of each
STEP 1 Begin with 1 pearl 1 bicone 1A and 1 bicone again on a comfortable length of thread leaving a 2rdquo
5cm tail Pass through the pearl and the first bicone strung to form a ring
STEP 7-12 Pass through the A beads to make your
component more secure Also secure the thread and trim (Repeat these steps until you have six 6-BEAD
COMPONENTs)
6-BEAD COMPONENT Work RAW stitch into a beaded circle and embellish with Swarovski bicones
For the necklace we will need six from this component For the earring two
Something Blue Necklace and Earrings
BLOG WWWHANDMADE-JEWELRY-CLUBCOM MEMBERSHIP WWWDIYBEADINGCLUBCOM BLOG DIY BEADING MAGAZINE ISSUE 32
STEP 2-4 Continue by adding 1A 1 bicone 1 pearl
until you count 4 of each
STEP 1 Begin with 1 pearl 1 bicone 1A and 1 bicone again on a comfortable length of thread leaving a 2rdquo
5cm tail Pass through the pearl and the first bicone strung to form a ring
STEP 5-8 Pass through the A beads to make your component more secure Also secure the thread and
trim (Repeat these steps until you have the wished amount of 4-BEAD COMPONENTs)
4-BEAD COMPONENT Work RAW stitch into a beaded circle and embellish with Swarovski bicones
For the necklace-size that is given on the second page we will need 20 from this
component For the earring two
If you would like to make a longer necklace you need to make more (One 4-BEAD COMPONENT measures about 38 inch 1 cm To make the necklace symmetrical you have to have equal amounts on each side This means for every extra frac34 inches
2 cm-s you will need 1 4-BEAD COMPONENT on each side of the necklace)
Something Blue Necklace and Earrings
BLOG WWWHANDMADE-JEWELRY-CLUBCOM MEMBERSHIP WWWDIYBEADINGCLUBCOM BLOG DIY BEADING MAGAZINE ISSUE 32
STEP 2 Connect the MIDDLE CIRCLE to two 6-BEAD COMPONENTs by adding four-times 2As
between the pearls Choose a pearl on the MIDDLE CIRCLE and add
2A pass through a pearl in the 6-BEAD COMPONENT previously added and add 2A again Watch out this has to be symmetrical Repeat this at least two more times to make it
secure Now repeat this entire procedure but choose
the 8-th pearl on MIDDLE CIRCLE Repeat this on the other side of the necklace
too
Choose a pearl on the FOCAL CIRCLE and add 2A pass through a pearl in the 6-BEAD COMPONENT and add 2A again Repeat this at least two more times to make it secure
Now repeat this entire procedure but choose the 5-th pearl on FOCAL CIRCLE This will make the necklace nice on your neck
FINISHING THE NECKLACE Connects the parts with A beads
STEP 1 Connect the FOCAL CIRCLE to two 6-BEAD COMPONENTs by adding four-times 2As between the pearls To do this turn your parts upside down you need to
see the pearls We will work on this side from now on
Something Blue Necklace and Earrings
BLOG WWWHANDMADE-JEWELRY-CLUBCOM MEMBERSHIP WWWDIYBEADINGCLUBCOM BLOG DIY BEADING MAGAZINE ISSUE 32
FINISHING THE EARRING Connects the parts with A beads
STEP 1-2 Connect the 6-BEAD COMPONENT
to 4-BEAD COMPONENT and the 4-BEAD
COMPONENT to the earring hook
First connect the 4-BEAD COMPONENT to the 6-BEAD COMPONENT with 4A beads Mimic
the elongation steps of the necklace if needed
Secondly connect the 4-BEAD COMPONENT
to your earring hook with 4A beads again Leave from the last pearl bead 2A beads the hook (this is the orange oval form) and 2As again Pass through each of them to
secure this connection again
Finally get ready to prepare the other earring ndash since we need two of them
STEP 5 Connect the 4-BEAD COMPONENTs to the toggle clasp thus finishing the
necklace Leaving from the last pearl bead 2A the
clasp(this is the orange oval form) and 2A again Pass through all of them a couple more times to make this connection more
secure
Something Blue Necklace and Earrings
BLOG WWWHANDMADE-JEWELRY-CLUBCOM MEMBERSHIP WWWDIYBEADINGCLUBCOM BLOG DIY BEADING MAGAZINE ISSUE 32
If you finished it is time to try it on It was a great fun wasnrsquot it And how beautiful you look in your new necklace and the matching earrings
Something Blue Necklace and Earrings
BLOG WWWHANDMADE-JEWELRY-CLUBCOM MEMBERSHIP WWWDIYBEADINGCLUBCOM
About the Author
Margit Vogel
My name is Margit Vogel I live in Hungary Europe
By profession I am a biochemical engineer but I fell in love with
beads so much that I could not stop playing with them
I make one-of-a-kind beaded and bead embroidered art
jewelry made of the best quality materials such as Swarovski
stones gemstones Japanese beads (Miyuki and Toho) Czech
glass beads leather soutache and suede Each piece is unique
and individually crafted
Feel free to visit my blog for some eyecandy
httpiformjewelrywordpresscom
My shop httpwwwetsycomshopiformjewelry
Facebook httpwwwfacebookcomiformjewelry
BLOG DIY BEADING MAGAZINE ISSUE 32
Getting Down And Personal With Gianna
Getting Down And Personal With Gianna
Nowadays we see more and more jewelry stores opening up online and with these online jewelry stores it has made it easier for us to purchase and view their creations Have you ever wondered how they are able to manage and produce amazing jewelry pieces and tutorials So heres a little on the journey to open up an online shop We are excited to present to you Gianna aka Beading4perfectionists
Gianna Beader amp Youtuber
Unlike most jewelry makers and beadweavers Gianna did not start beading as a hobby but as a means to make ends meet With goals in trying to
fill the financial gap she did everything she could to expand her earnings ndash working as a security guard
and at the same time learning how to bead and selling her pieces at fair trades and flea markets
Since many were asking if she does home beading workshops she started on exploring how to teach people to bead She loves Scott Bakula and has always loved him till now and this served as her
inspiration to start making a beading video tutorial
Gianna started creating videos because she was at the point in her life where everything seemed to be falling apart And at that moment of time she had difficulties financially and selling jewelry was the only way for her to stay afloat financially She is a big Scott Bakula fan and when she went to the UK to see him on stage that was when it hit her that she is already able to edit videos and
taught herself Photoshop and done workshops at bead fairs so why not put these together and see what happens on Youtube She knew that if she gets enough subscribers and views ndash though no one knew what the exact numbers were you would be invited to become a Youtube partner This way she could monetize her videos with advertisements and hopefully she would be able to be a Youtube partner and be able to pay her bills
BLOG WWWHANDMADE-JEWELRY-CLUBCOM MEMBERSHIP WWWDIYBEADINGCLUBCOM BLOG DIY BEADING MAGAZINE ISSUE 32
Getting Down And Personal With Gianna
Her Youtube channel is popular and the reason why she chose Youtube is because Youtube is the biggest platform and reached almost to the whole world Everyone already knows about it and it was growing rapidly as compared to other platforms like Dailymotion so she figured that Youtube was the way to go Her advice to new designers is that when you start out go to the platforms on the top of your list first then work your way down your list if you do not get accepted by your first choice
After loyally putting up one video every week for about 8 months in a row she became a Youtube partner and monetized her videos She knew she needed at least $100 to get her first payout She managed to reach $100 after 3 months The process was not easy she worked hard lack sleep skipped meals and who knows what happened to Ridge in the Bold and the Beautiful because she stopped watching
On Youtube you can monetize your videos Google pays straight to your bank account and at other countries where they also have the option of getting checks among other options In order to get paid you have to reach the $100 mark and after 3 months For Gianna she thinks that you cannot say that Etsy is better than Youtube or Youtube is better than Etsy Her reasoning is because on Youtube she has many followers which will eventually check out her Etsy shop And to start an Etsy shop you need an audience
BLOG WWWHANDMADE-JEWELRY-CLUBCOM MEMBERSHIP WWWDIYBEADINGCLUBCOM BLOG DIY BEADING MAGAZINE ISSUE 32
television and dedicated her spare time (as she had another job) to Youtube She re-registered at the chamber of commerce after receiving her first payout Her work at Youtube now is not a full time job and things have changed on Youtube It is easier to become a parter but there are some countries that need to wait for an invitation to be a Youtube partner Take Italy for instance Italians would have to work just as hard as she did if they want to become a Youtube partner
Getting Down And Personal With Gianna
With her 60000 subscribers on her b4pbakup Youtube channel it is possible to sell at least 60 patterns on the first day on Etsy after promoting the PDF file on her Youtube channel Though you may think that 60 out of 60000 is not much you have to remember that not everyone has the means to purchase the PDF file and a lot of people still rather watch her carry out the tutorial(for free) on Youtube instead of reading the patterns or paying for the patterns even if the pattern is for a fundraiser and only cost $2 Her insights on Youtube is that Youtube is not what it used to be 6 years ago Instead of making more money every month she is making less and less because advertisers have more options of where they want to advertise their ads Ads do not pay as much as they used to Back in the days you could get 25 cents per ad Now you count yourself lucky if you could get 5 cents roll in after two hours
BLOG WWWHANDMADE-JEWELRY-CLUBCOM MEMBERSHIP WWWDIYBEADINGCLUBCOM BLOG DIY BEADING MAGAZINE ISSUE 32
And on top of that adblockers are destroying Youtube channel owners Youtube will start making changes to the channels where there will be ldquopaid subscriptionrdquo channels This has already been implemented in some countries but not in her country The Netherlands This means there will no longer be ads for her monthly paying subscribers She hopes that Youtube will add on a paid per video option feature The option to be a paid channel or free channel or to start a new channel for paying customers is yours to choose Gianna is not happy with Youtube because many others like her have worked so hard and for some years to become Youtube partners(which was something to be proud of) has lost their status
Getting Down And Personal With Gianna
Her advice for those who want to go on Youtube is 1 Do it because you want to teach
2 Do it because you want a career with beads
BLOG WWWHANDMADE-JEWELRY-CLUBCOM MEMBERSHIP WWWDIYBEADINGCLUBCOM BLOG DIY BEADING MAGAZINE ISSUE 32
After putting up about 20 videos and having at least 5000 subscribers add the PDF tutorials to Etsy and Craftsy She found out that her audience would like to have the PDF after watching her videos This is because they would rather print out the PDF and work while seated in a comfy chair technically somewhere else instead of having to pause the video time and time again
Gianna has also made a video for those who want to know the whole story of her journey up until the present day And to get updates on her you can check it out here She has also started a vlog where she tells of how she still works towards becoming a financial independent beader and explains her journey to get where she wants to be(or die trying) Gianna will be in the UK on October the 17th giving an all-day workshop with 4 different patterns
(2 beginners and 2 advanced) in Wotton-under-Edge
Gianna will be there Friday night as the workshop is on Saturday She will be leaving on Sunday Her
doors are open to all who wants to continue the party with her at the hotel across the street
For more information do contact Ann Tucker on Facebook
httpswwwfacebookcomanntucker501
Rec
omm
end
ed R
ead
ings
Making Jewelry with Gemstone
Beads
Combines the popular craft of beading with beautiful semi-precious stones which are collected by many Features a variety of versatile ideas which can be adapted for any type of gem or bead Readers will learn to reate beautiful gemstone jewelry with this dazzling collection of over 100 projects ranging from eyecatching earrings and accessories to exquisite necklaces and bracelets This beautiful book offers an impressive range of 28 beautiful semi-precious stones (including birthstones) and a glimpse into the fascinating history and mythical properties behind them
BLOG DIY BEADING MAGAZINE ISSUE 32 BLOG WWWHANDMADE-JEWELRY-CLUBCOM MEMBERSHIP WWWDIYBEADINGCLUBCOM
Rec
omm
end
ed R
ead
ings
Convertible Crystal Jewelry
Reverse it Twist it Wear it Many
Ways
Diane Whiting presents the idea that convertibility isnrsquot just about using pieces in multiple ways it is also about using skills and creativity in multiple ways Using ever-popular sparkling crystals Diane showcases design elements through various techniques for fun easy fashionable jewelry With 25 projects the reader can choose from bracelets necklaces and earrings that match any outfit or styleDiane Whiting presents the idea that convertibility isnrsquot just about using pieces in multiple ways it is also about using skills and creativity in multiple ways
BLOG DIY BEADING MAGAZINE ISSUE 32 BLOG WWWHANDMADE-JEWELRY-CLUBCOM MEMBERSHIP WWWDIYBEADINGCLUBCOM
Rec
omm
end
ed R
ead
ings
Wire Jewelry Masterclass
Wrapped Coiled and Woven Pieces
Using Fine Materials
Comprehensive and fabulous Wire Jewelry Masterclass takes an in-depth look at an intricate and rewarding craft The 24 projects which range from simple Dragons tear briolette earrings to a Poseidon-under-the-sea pendant will delight and inspire jewelers of all levels and tastes Divided into beginner intermediate and advanced sections this beautifully photographed step-by-step guide is the ticket to wire jewelry expertise
BLOG DIY BEADING MAGAZINE ISSUE 32 BLOG WWWHANDMADE-JEWELRY-CLUBCOM MEMBERSHIP WWWDIYBEADINGCLUBCOM
Rec
omm
end
ed R
ead
ings
Timeless Wire Weaving The
Complete Course
Timeless Wire Weaving focuses on developing wirework skills through 13 projects using three classic wire weaving techniques coiling wrapping and weaving The projects are built around a focal cabochon and incorporate seed beads and crystals in imaginative ways Designers learn to make the jewelry shown in the book and they also use the techniques learned to create innovative jewelry pieces of their own
BLOG DIY BEADING MAGAZINE ISSUE 32 BLOG WWWHANDMADE-JEWELRY-CLUBCOM MEMBERSHIP WWWDIYBEADINGCLUBCOM
Our digital magazine is available through
Apple Newsstand service available to millions of IPAD users
To advertise with us please email us at
diyjewelryclubgmailcom
Or visit our page at
httphandmade-jewelry-clubcomadvertising-diy-beading-magazine
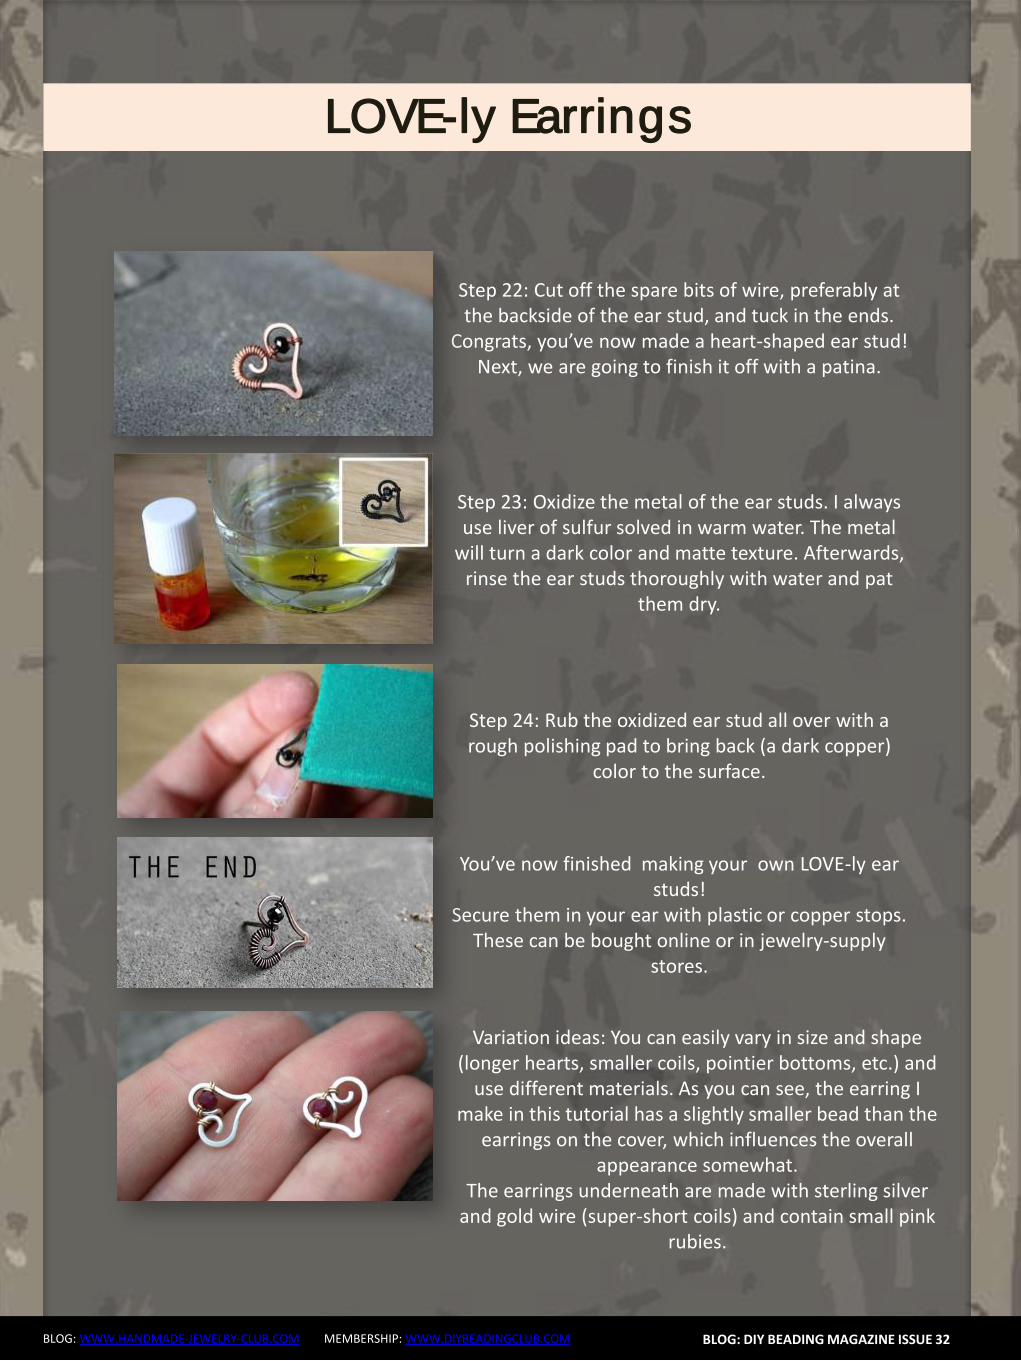
Flower Tale Earrings
BLOG WWWHANDMADE-JEWELRY-CLUBCOM MEMBERSHIP WWWDIYBEADINGCLUBCOM
About the Author
Iulia Postică
I was born and live in Moldova Eastern Europe Ever since I remember myself
Ive been crocheting and knitting My grandmother has taught me that and I
loved it very much I always regarded crafts exclusively as a hobby and never
thought of making a career of it I traveled a lot to various historical sites
Actually Ive spent all my childhood summers in archaeological camps with
my father who is a professional archaeologist
I also enjoy metal hammering and wirework as it gives me possibility to
express myself in materials used by human communities since ancient times
copper brass glass seed beads and gemstones That is no surprise to anyone
given my family history and academic background
My shop ldquoBeadedTreasuryrdquo with beading tutorials and bead crochet patterns
httpswwwetsycomshopBeadedTreasury
My shop ldquoArchaeologicardquo with artisan jewelry
httpswwwetsycomshopArcheologica
My blog httpbeadedtreasuryblogspotcom
My facebook httpswwwfacebookcomBeadedTreasury
BLOG DIY BEADING MAGAZINE ISSUE 32
Liberty Earrings
BLOG WWWHANDMADE-JEWELRY-CLUBCOM MEMBERSHIP WWWDIYBEADINGCLUBCOM
Materials - Nr 2 cabochon Preciosa Ornela ovale 18x22 mm turchese
- Rocaille Toho 150 silver lined green emerald
- Nr 2 dagger beads
- Nr 20 pearl 4 mm
- Superduo opaque luster ceramic green
- Rocaille 80 color gold
- Rocaille 80 color ivory
- Delica Miyuki 110 aquagreen mix
- Rocaille Miyuki 110 galvanized silver
- Nr 2 monachelle (earwire)
-Fireline
- Beading Needle nr 12
BLOG DIY BEADING MAGAZINE ISSUE 32
Liberty Earrings
BLOG WWWHANDMADE-JEWELRY-CLUBCOM MEMBERSHIP WWWDIYBEADINGCLUBCOM
Make a circle of 20 delica beads and make a knot (a) Perform two rounds peyote with ivory 80 seed beads (b c) Exit from an ivory
bead
BLOG DIY BEADING MAGAZINE ISSUE 32
a b c
Jump from 80 to 80 with 110 80 gold 110 (a) Finish the round and come out of a 80 gold bead
Jump to the next 80 gold with a 4mm pearl (b) Finish the round and come out
of the first pearl Jump to the 2nd pearl and close with a 80 gold bead(c)
a b c
Position the cabochon and jump from one 80 to the other with two delica bead (a)
Continue with three delicas four times (b) At the bottom sew on two delicas then finish the round by sewing on three delicas for four times passing from one to another roc 80 Tighten the cabochon and exit from the
first two delica that you started with String together a 110 and 150 and enter the second of the three close delicas (c)
a b c
Liberty Earrings
BLOG WWWHANDMADE-JEWELRY-CLUBCOM MEMBERSHIP WWWDIYBEADINGCLUBCOM
Put together 150 110 150 and enter in the second of three next delica (a) Put the same beads for three times then put together 150 and 110 and enter
in the two delica of the bottom tip (b) Enter in the second of three next delica with 110 and 150 (c) Continue passing
in the 80 beads with three beads (150 110 150) for four times then at the top finish the round by putting together a 150 and 110 (d)
BLOG DIY BEADING MAGAZINE ISSUE 32
a b c
Exit from the first 150 sewn in the previous round and jump in the three next beads with a 150 (a)
Put a 150 at a time and exit from the first 110 beads of the bottom tip Jump in the
near 110 with a 150 (b) Finish round repeating steps a and b (c) Exit the roc 80 as shown in the photo (d)
a b c
d
a b c d
Enter in the 80 with four 150 (a b) Enter the 80 beads at the bottom of the pieces with two 110 one superduo one 80 ivory bead one superduo and two 110 (c)
d e f
Liberty Earrings
BLOG WWWHANDMADE-JEWELRY-CLUBCOM MEMBERSHIP WWWDIYBEADINGCLUBCOM
Exit from the bottom pearl (a) Put together 150 three 110 150 and enter in the superduorsquos second hole (b)
Put together three superduo and enter in the next superduorsquos second hole (c) Rethread 15 three 110 150 and return in the opposite direction in the pearl of departure (d)
BLOG DIY BEADING MAGAZINE ISSUE 32
a b
c
Exit from the second pearl indicated from (a) Put 150 four 110 and enter in the second of the three 110 (b) Go to the second superduorsquos hole with four 110 and a 150 (c)
Enter the second hole of the supeduo with a 150(d) Sew in the middle of the bottom of the superduo 150 two 110 150 dagger 150 two 110 150(e)
Enter the second hole of the thirs superduo with 150 (f)
a b c
d
d e f
Liberty Earrings
BLOG WWWHANDMADE-JEWELRY-CLUBCOM MEMBERSHIP WWWDIYBEADINGCLUBCOM BLOG DIY BEADING MAGAZINE ISSUE 32
Put 150 four 110 and enter in the second of three 110 of the base (a) Insert four 110 and 150 in the pearl opposite direction indicated in the picture (b) Go in all the beads
around the piece and exit from the pearl at the top (c) Put 150 three 110 150 and enter the superduo (d)
Enter the ivory bead 80 with two 150 (e) Enter the next superduo with two 150 (f)
a b c
d e f
Put together 150 three 110 and enter in opposite direction in the departurersquos pearl (a) Exit from the 150 beads indicated by photo (b) From this jump in the second of two near
150 with five 150 to created the hole for the earwire (c) Pass the thread in the beads make a few knots and cut the excess thread
a b c
Your earrings are finished
Liberty Earrings
BLOG WWWHANDMADE-JEWELRY-CLUBCOM MEMBERSHIP WWWDIYBEADINGCLUBCOM
About the Author
Mariella Martella
My name is Mariella Martella and I am the author and
designer of jewelry that I sign with the name of Mariel Bijoux
After changing city often for work and study I currently live
in northern Italy I am an art historian with a passion for travel
painting and jewelry design in weaving that project since
2010 In my beads and crystals are the colors of the
Mediterranean sea the atmosphere of summer evenings
and the lights of the places I visited
You can find me at
Etsy shop httpswwwetsycomitshopMarielBijoux
Facebook httpswwwfacebookcommari3lbijoux
Crafting blog httpmarielbijouxblogspotit
Twitter httpstwittercomMarielBijoux
BLOG DIY BEADING MAGAZINE ISSUE 32
Jade Necklace
BLOG WWWHANDMADE-JEWELRY-CLUBCOM MEMBERSHIP WWWDIYBEADINGCLUBCOM
Every time I wear a necklace I always make it a point that the
necklace will lay perfectly flat on my neck Using wire for a necklace
made it possible for me like what I did with Jade Necklace It may look
odd at first having bent wires for a necklace but once the jewelry is
finished youll be so happy how the necklace will perfectly lay on your
neck
The tutorial is catered for intermediate level One must know basic
wirework skills such as wire wrapping making loops wrapped loops
and linking to follow the tutorial It has clear instructions and ultra-clear
close-up photos at each step Additionally you can ask me question
you have on the tutorial No more getting stuck and frustrated on a
confusing or just plain inaccurate pattern
If you followed this tutorial and then sell the accessory or jewelry
please give credit to the author or DIY Beading Clubcom
Copyright 2015
wwwdiybeadingclubcom
wwwhandmade-jewelry-clubcom
BLOG DIY BEADING MAGAZINE ISSUE 32
Jade Necklace
BLOG WWWHANDMADE-JEWELRY-CLUBCOM MEMBERSHIP WWWDIYBEADINGCLUBCOM BLOG DIY BEADING MAGAZINE ISSUE 32
Materials Needed 18ga Craft wire 28ga Craft wire 15mm diameter Green Round Flat Back Sew On Gems 5mm Green pearls
8mm Green pearls 6mm x 11mm teardrop Crystal Treasures Mill Hill beads or any teardrop bead with holes on the side Hook for your clasp
Tools Needed Wire cutter Flat nose pliers Round nose pliers Mandrel A jar or any rounded object to shape your necklace
Skill Level Intermediate
Step 1 Cut 6 inches 18ga wire Make a loop on one end then measure approximately 125 inches and make another loop
Form a size 4 circle on your mandrel
Jade Necklace
BLOG WWWHANDMADE-JEWELRY-CLUBCOM MEMBERSHIP WWWDIYBEADINGCLUBCOM BLOG DIY BEADING MAGAZINE ISSUE 32
Then close the circle by wrapping the extended wire just below the loop Wrap the
wire 2x
This is how it looks like Lets call this circle frame Youll notice that the lower curve is
slightly bigger than the upper curve
Step 2 Cut 8 inches of 28ga wire Wrap one end of
the wire at least 3x on one side of the circle frame just below the loop
Bring up your gem Flat back sew on gems has 2 holes Insert the wire into one hole and then
wrap the wire once onto the circle frame
Jade Necklace
BLOG WWWHANDMADE-JEWELRY-CLUBCOM MEMBERSHIP WWWDIYBEADINGCLUBCOM BLOG DIY BEADING MAGAZINE ISSUE 32
Step 3 Insert a 5mm pearl on the wire and then pass
the wire under circle frame
Repeat previous step 2x and have 3 pearls wrapped
Continue wrapping with your teardrop crystal My crystal has 2 holes on the side
and then continue wrapping with your 5mm pearls then secure your wire
Repeat Step 3 and create as many as needed For 16-inch necklace Ive created 6 of these
components
Jade Necklace
BLOG WWWHANDMADE-JEWELRY-CLUBCOM MEMBERSHIP WWWDIYBEADINGCLUBCOM BLOG DIY BEADING MAGAZINE ISSUE 32
Step 4 Cut a 15-inch 18ga wire and make a loop on
one end Insert 8mm pearl and make a loop on the other end You then use these as connectors
and link the components
Step 5 The necklace is an 18ga wire with wrapped
loops on both ends First cut 7 inches 18ga wire and make a wrapped loop with your hook already inserted Side in 18pcs 5mm pearls
Then make a wrapped loop on the other end connecting the wrapped loop onto the component Do the same for the other
necklace but make the loop on the other end big enough so the hookclasp can pass thru
To have the necklace curve shaped use a jar to bend the wire Voila Now youre
ready to party
Jade Necklace
BLOG WWWHANDMADE-JEWELRY-CLUBCOM MEMBERSHIP WWWDIYBEADINGCLUBCOM
About the Author
Sky Aldovino
I consider myself a late bloomer when it comes to crafting Irsquom a self-taught jewelry maker Jewelry making wasnrsquot really a hobby of mine but unforeseen events lead me to learn jewellery making My family put up a craft store where we sell cross stitch beads and all sorts of crafting materials I fell in love with the beads and tried to create accessories only for myself Clients liked the pieces and I started customizing handmade jewelleries The craft store was a success for 6 years but like any other small businesses we had to close it down and I was confined to staying at home While at home I had all the time using the internet and now working as a home-based jewelry designer
BLOG DIY BEADING MAGAZINE ISSUE 32
Atomic Ring
BLOG WWWHANDMADE-JEWELRY-CLUBCOM MEMBERSHIP WWWDIYBEADINGCLUBCOM
Have fun making shapes using the wigjig Cyclops Make loops going in
circles to mimic the shape of a flower or in this tutorial mimic the
shape of an atom The tutorial will also teach you how to cage a
cabochon Whats nice about this piece is that with one long wire you
can create the ring from start to finish
The tutorial is catered for intermediate to advanced students One
must already know how to make spirals and use a wigjig tool It has
clear instructions and ultra-clear close-up photos at each step
Additionally you can ask me question you have on the tutorial No
more getting stuck and frustrated on a confusing or just plain
inaccurate pattern
If you followed this tutorial and then sell the accessory or jewelry
please give credit to the author or DIY Beading Clubcom
If you like to get a blank wigjig graph visit wigjigcom Shop and Jigs
section
Copyright 2015
wwwdiybeadingclubcom
wwwhandmade-jewelry-clubcom
BLOG DIY BEADING MAGAZINE ISSUE 32
Atomic Ring
BLOG WWWHANDMADE-JEWELRY-CLUBCOM MEMBERSHIP WWWDIYBEADINGCLUBCOM
Materials Needed 20ga Craft wire 28ga Craft wire 11mm Round Cabochon
Tools Needed Wigjig Cyclops 15mm pegs Wire cutter Flat nose pliers Mandrel
Skill Level Intermediate - Advanced
BLOG DIY BEADING MAGAZINE ISSUE 32
Step 1 Lets prepare your wigjig cyclops Position the pegs like so
Atomic Ring
BLOG WWWHANDMADE-JEWELRY-CLUBCOM MEMBERSHIP WWWDIYBEADINGCLUBCOM BLOG DIY BEADING MAGAZINE ISSUE 32
Lets work with longer wire so youll have enough wire to hold onto as you manipulate the wire so cut 36 inches of 20ga wire From
one end of the wire measure 10 inches
On the 10-inch measurement loop the wire at the center peg then continue to loop onto the side pegs going in circle going back to
the center peg after looping on the side peg
Now the wire at the center peg will start to build up as you go around the side pegs so
you need to constantly press the wire at the center peg to accommodate the build up of
wire
When youre done pull out the wire and this is
how it should look like
Atomic Ring
BLOG WWWHANDMADE-JEWELRY-CLUBCOM MEMBERSHIP WWWDIYBEADINGCLUBCOM BLOG DIY BEADING MAGAZINE ISSUE 32
You will notice that the frame opens wide Now to keep the atom frame from opening wide secure the center of the frame by wrapping a 28ga wire What you
need to do is simply pass the 28ga wire into the hole and wrap as many times as needed or until youre sure that the frame is secure
Step 2 Now youre finished with your atom frame Well now create the focal design With the longer wire make a spiral at the center big
enough to accommodate the size of your cabochon In this tutorial the spiral is about
11mm in diameter the same size as my cabochon
Pop in your cabochon and start to make spirals going around and over the cabochon as if you are caging the cabochon Create at
least 5 rounds and then cut off any excess
Step 3 Now lets make the ring and this with the other
end of the wire
Atomic Ring
BLOG WWWHANDMADE-JEWELRY-CLUBCOM MEMBERSHIP WWWDIYBEADINGCLUBCOM BLOG DIY BEADING MAGAZINE ISSUE 32
Bring up your mandrel and wrap the wire to the size of your finger Wrap at least 2 times
When youre sure you have the right size pull the ring out of the mandrel
With the extended wire wrap the wire the secure the ring
Cut off any excess and voila You have your atomic ring Create as many as you can with different colors of cabochon
Atomic Ring
BLOG WWWHANDMADE-JEWELRY-CLUBCOM MEMBERSHIP WWWDIYBEADINGCLUBCOM
About the Author
Sky Aldovino
I consider myself a late bloomer when it comes to crafting Irsquom a self-taught jewelry maker Jewelry making wasnrsquot really a hobby of mine but unforeseen events lead me to learn jewellery making My family put up a craft store where we sell cross stitch beads and all sorts of crafting materials I fell in love with the beads and tried to create accessories only for myself Clients liked the pieces and I started customizing handmade jewelleries The craft store was a success for 6 years but like any other small businesses we had to close it down and I was confined to staying at home While at home I had all the time using the internet and now working as a home-based jewelry designer
BLOG DIY BEADING MAGAZINE ISSUE 32
Featured Article Gemstones Used for Jewelry Making
BLOG WWWHANDMADE-JEWELRY-CLUBCOM MEMBERSHIP WWWDIYBEADINGCLUBCOM
Gemstones are stones which we hold quite highly in terms of value And
jewelry often consists of stones that add attractiveness to it so it is not
surprising when jewelry designers actually use gemstones in their designs In
fact there are different types of gemstones that can be used for making
jewelry There are the expensive and pure gemstones and there are also the
imitation ones The information below will provide some information about
the kinds of stones you can use to create jewelry and how these stones will
impact the jewelry you have created
The first kind of stone which I believe we are all quite familiar with are
birthstones These stones are associated with individualrsquos month of birth
by SunVDesigns by BeyhanAkman
For example Amethyst stone is connected with anybody who is born in
February which carries special significance in the area of emotions and also
spiritually This stone also signifies calm and peace as well
And then we have semi-precious stones which are also often used in jewelry
making They are not as valuable as compared to precious stones but still
valuable Best examples of these stones are aquamarine topaz tourmaline
opal and turquoise
BLOG DIY BEADING MAGAZINE ISSUE 32
Featured Article Gemstones Used for Jewelry Making
BLOG WWWHANDMADE-JEWELRY-CLUBCOM MEMBERSHIP WWWDIYBEADINGCLUBCOM
It is an ideal gift for someone who you deem special Aquamarine pendants
usually work well for anyone and is widely an accepted stone
by HyppieChic by joyeriamestiza
However precious stones are the most unusual
and precious jewels to us Examples of some of
them are emerald sapphire diamond and
ruby These stones are usually very expensive
and are prized for their exquisiteness These
stones are commonly used in high-quality
jewelry designs which costs quite a fortune to
obtain
BLOG DIY BEADING MAGAZINE ISSUE 32
by sarajewelrystu
Jewelry designs with precious stones are usually
given as exceptional gifts on special occasions A
perfect example is a diamond ring that is usually
given as an engagement gift
by ldiamondsforever
Featured Article Gemstones Used for Jewelry Making
BLOG WWWHANDMADE-JEWELRY-CLUBCOM MEMBERSHIP WWWDIYBEADINGCLUBCOM
There are also synthetic stones which are often used to create jewelry
Synthetic stones are artificial imitations of gemstones Synthetic Sapphire
jewelry costs less compare with the authentic ones Most of the time
imitation stones are used to save cost but at the same time have the similar
look of the real stone
BLOG DIY BEADING MAGAZINE ISSUE 32
by shininggems by thaimaker
by lapinduprintemps by PastimeArt
Gemstones are used like beads and you can use it in any designs whether
simple or elaborate
Swarovski crystal components are available in a rich multitude of rondelles Perfect as spacers in necklaces or as discs in earrings Rondelles can be used with many varieties of shapes or sizes Use Swarovski crystal rondelles between large gemstones as accents with precious metal findings Fire Mountain Gems and Beads Crystal Passionsreg brand presents Swarovski crystal in display-ready packaging for brilliant retail presentation Crystal Passionsreg is an assurance of genuine Swarovski crystal
BLOG DIY BEADING MAGAZINE ISSUE 32 BLOG WWWHANDMADE-JEWELRY-CLUBCOM MEMBERSHIP WWWDIYBEADINGCLUBCOM
Recommended Jewelry Making Supplies
Mz Unisex-adults 12pcs 25x18x6mm Turquoise Oval CAB Cabochon
BLOG DIY BEADING MAGAZINE ISSUE 32 BLOG WWWHANDMADE-JEWELRY-CLUBCOM MEMBERSHIP WWWDIYBEADINGCLUBCOM
Recommended Jewelry Making Supplies
For a little sparkle that goes a long way design with Swarovski 4mm faceted bicones Create glorious multi-strand necklaces with the dainty crystals or use as spacers to add a tiny flash to your designs Swarovski crystal components are made in Austria and are considered the finest products of their kind in the world
BLOG DIY BEADING MAGAZINE ISSUE 32 BLOG WWWHANDMADE-JEWELRY-CLUBCOM MEMBERSHIP WWWDIYBEADINGCLUBCOM
Recommended Jewelry Making Supplies
Imitation beads resist color change These beads have uniform quality with a good polish Some strands may have little to no matrix Sizes shapes and colors may vary with handcrafted items
BLOG DIY BEADING MAGAZINE ISSUE 32 BLOG WWWHANDMADE-JEWELRY-CLUBCOM MEMBERSHIP WWWDIYBEADINGCLUBCOM
Recommended Jewelry Making Supplies
Something Blue Necklace and Earrings
BLOG WWWHANDMADE-JEWELRY-CLUBCOM MEMBERSHIP WWWDIYBEADINGCLUBCOM
Skill level Beginner Intermediate Advanced
DIMENSIONS OF THE NECKLACE Inner Circumference 14 18 inch 35 cm
Focal Pendant Width 1 15 inch 35 cm Focal Pendant Height 1 15 inch 35 cm
DIMENSIONS OF THE EARRING Earring Width 716 inch 12 cm Earring Height 1516 inch 25 cm (Without the earring hook)
BLOG DIY BEADING MAGAZINE ISSUE 32
Materials
Note Before purchasing the supplies measure the length of your wished necklace If you decide to bead a longer necklace you should keep in mind that for every extra
frac34 inches 2 cm-s you will need 8 bicones and 8 pearls
Something Blue Necklace and Earrings
BLOG WWWHANDMADE-JEWELRY-CLUBCOM MEMBERSHIP WWWDIYBEADINGCLUBCOM BLOG DIY BEADING MAGAZINE ISSUE 32
Work RAW stitch into a beaded circle and embellish with Swarovski bicones
STEP 2 String 1A and 2 pearls Pass through the previous
second pearl and the freshly added 1A and the first pearl again
STEP 1 Use a comfortable length of thread to string 2
pearls 1A and 1 pearl again leaving a 2rdquo 5cm tail Pass through the first two pearls strung to form a
ring
STEP 3 String 2 pearls and 1A Pass through the previous first pearl and the freshly added two pearls
again
STEP 4 - 17 Repeat STEP 2 and STEP 3 again until you count 17 pearls in the inner circle
But be careful in the last step you only have to add 1 pearl then pass through the first pearls
added in STEP 1 and add another 1A Now pass through the first pearl added in STEP
1and 1A added in this round again to exit from this A
Something Blue Necklace and Earrings
BLOG WWWHANDMADE-JEWELRY-CLUBCOM MEMBERSHIP WWWDIYBEADINGCLUBCOM BLOG DIY BEADING MAGAZINE ISSUE 32
STEP 19 String 2A and pass through the next A added in round 4-17 and the A added in round 18 the 2A added in this round and finally the A added in round 4-17 to exit from the bead showed below
STEP 18 String 3A and pass through the 1A added in the previous round and the first A added in this
round
STEP 20 - 34 Repeat STEP 18 and STEP 19 again until you finish the circle
But be careful in the last step first you have to pass through 3A and then add 1A After this pass
through the 3A again and exit from the A bead
shown below (This is the first A added in STEP 18)
Something Blue Necklace and Earrings
BLOG WWWHANDMADE-JEWELRY-CLUBCOM MEMBERSHIP WWWDIYBEADINGCLUBCOM BLOG DIY BEADING MAGAZINE ISSUE 32
STEP 35 Step up to exit from the pearl shown below (Finishing the previous step in the A bead and then
stepping up from there makes the circle more secure)
Now string 3 bicones Pass through the pearl and the first bicone again
In the reality your circle will look more like this the A beads forming a strong row in the middle of the
pearls
STEP 36 Add 2 bicones Pass through the
neighboring pearl the first bicone added in the previous row and the 2 bicones added in this step
so you can exit from the next pearl
Something Blue Necklace and Earrings
BLOG WWWHANDMADE-JEWELRY-CLUBCOM MEMBERSHIP WWWDIYBEADINGCLUBCOM BLOG DIY BEADING MAGAZINE ISSUE 32
Now in the reality your circle will look more like this the A beads still forming a strong row in the middle of the pearls and the bicones slightly lying on top of
them
STEP 37 - 49 Repeat STEP 35 and STEP 36 again until you finish the circle with the bicones
But be careful in the last step first you have pass through the third bicone added then add 1 bicone
and pass through this little quartet to exit from the bicone shown below (The second one added in
STEP 35)
STEP 50 With these steps we finish the circle by adding 1 bicone to connect the A beads and the
bicone row So add 1 bicone pass through the nearest A bead and add 1 bicone again Pass
through the bicone already there and exit from the bicone you just added
Something Blue Necklace and Earrings
BLOG WWWHANDMADE-JEWELRY-CLUBCOM MEMBERSHIP WWWDIYBEADINGCLUBCOM BLOG DIY BEADING MAGAZINE ISSUE 32
STEP 66-83 Secure the circle by adding 1A between each bicone in the second row of Swarovski
bicones If you finished secure the thread and trim
STEP 51-65 Using the same technique as in STEP 37 - 49 add 1 bicone to finish the third bicone row The black line shows you the way (After STEP 50 pass through the next A bead add 1 bicone and pass through the bicone already there and the bicone added in the previous step Repeat these steps to
finish the inner bicone circle)
MIDDLE CIRCLE Work RAW stitch into a beaded circle and embellish with
Swarovski bicones Remember you need to bead two circles this time
STEP 1 Just like in the focal circle begin with 2 pearls 1A and 1 pearl again on a comfortable length of thread
leaving a 2rdquo 5cm tail Pass through the first two pearls strung to form a ring
Something Blue Necklace and Earrings
BLOG WWWHANDMADE-JEWELRY-CLUBCOM MEMBERSHIP WWWDIYBEADINGCLUBCOM BLOG DIY BEADING MAGAZINE ISSUE 32
STEP 15-28 Mimicing the FOCAL CIRCLElsquos STEP 18-34 bead A beads until you finish the inner part of the
circle Exit from a pearl in the second row This circle should look very similar to the first one but this is a bit
smaller
STEP 2-14 Mimicing the FOCAL CIRCLElsquos STEP 2-17 bead until you count 14 pearls in the inner circle Exit
from the last A added
STEP 29-42 Mimicing FOCAL CIRCLElsquos STEP 35-49 add 2 rows of bicones
STEP 43-56 Mimicing the FOCAL CIRCLElsquos STEP 50-65 bead the third row of bicones to finish the circle
Something Blue Necklace and Earrings
BLOG WWWHANDMADE-JEWELRY-CLUBCOM MEMBERSHIP WWWDIYBEADINGCLUBCOM BLOG DIY BEADING MAGAZINE ISSUE 32
SMALLEST CIRCLE Work RAW stitch into a beaded circle and embellish
with Swarovski bicones Remember you need to bead two circles again
STEP 1 Just like in the focal circle begin with 2 pearls
1A and 1 pearl again on a comfortable length of thread leaving a 2rdquo 5cm tail Pass through the first two
pearls strung to form a ring
STEP 57-70 Just like the FOCAL CIRCLElsquos STEP 66-83 secure the circle by adding 1A between every bicone
in the second row of bicones If you finished secure the thread and trim (Donrsquot forget to bead another
circle)
STEP 2-12 Mimicing the FOCAL CIRCLElsquos STEP 2-17 bead until you count 12 pearls in the inner circle Exit
from the last A added
STEP 13-24 Mimicing the FOCAL CIRCLElsquos STEP 18-34 bead A beads until you finish the inner part of the
circle Exit from a pearl in the second row This circle should look very similar to the first two but this is the
smallest of them all
Something Blue Necklace and Earrings
BLOG WWWHANDMADE-JEWELRY-CLUBCOM MEMBERSHIP WWWDIYBEADINGCLUBCOM BLOG DIY BEADING MAGAZINE ISSUE 32
STEP 37-48 Mimicing the FOCAL CIRCLElsquos STEP 50-65 bead the third row of bicones to finish this circle too
STEP 25-36 Mimicing FOCAL CIRCLElsquos STEP 35-49 add 2
rows of bicones The last step here is purple again
STEP 49-60 Just like the FOCAL CIRCLElsquos STEP 66-83 secure the circle by adding 1A between every bicone
in the second row of bicones If you finished secure the thread and trim (Donrsquot forget that you need two
small circles)
Something Blue Necklace and Earrings
BLOG WWWHANDMADE-JEWELRY-CLUBCOM MEMBERSHIP WWWDIYBEADINGCLUBCOM BLOG DIY BEADING MAGAZINE ISSUE 32
STEP 37-48 Mimicing the FOCAL CIRCLElsquos STEP 50-65 bead the third row of bicones to finish this circle too
STEP 25-36 Mimicing FOCAL CIRCLElsquos STEP 35-49 add 2
rows of bicones The last step here is purple again
STEP 49-60 Just like the FOCAL CIRCLElsquos STEP 66-83 secure the circle by adding 1A between every bicone
in the second row of bicones If you finished secure the thread and trim (Donrsquot forget that you need two
small circles)
Something Blue Necklace and Earrings
BLOG WWWHANDMADE-JEWELRY-CLUBCOM MEMBERSHIP WWWDIYBEADINGCLUBCOM BLOG DIY BEADING MAGAZINE ISSUE 32
STEP 2-6 Continue by adding 1A 1 bicone 1 pearl until you count 6 of each
STEP 1 Begin with 1 pearl 1 bicone 1A and 1 bicone again on a comfortable length of thread leaving a 2rdquo
5cm tail Pass through the pearl and the first bicone strung to form a ring
STEP 7-12 Pass through the A beads to make your
component more secure Also secure the thread and trim (Repeat these steps until you have six 6-BEAD
COMPONENTs)
6-BEAD COMPONENT Work RAW stitch into a beaded circle and embellish with Swarovski bicones
For the necklace we will need six from this component For the earring two
Something Blue Necklace and Earrings
BLOG WWWHANDMADE-JEWELRY-CLUBCOM MEMBERSHIP WWWDIYBEADINGCLUBCOM BLOG DIY BEADING MAGAZINE ISSUE 32
STEP 2-4 Continue by adding 1A 1 bicone 1 pearl
until you count 4 of each
STEP 1 Begin with 1 pearl 1 bicone 1A and 1 bicone again on a comfortable length of thread leaving a 2rdquo
5cm tail Pass through the pearl and the first bicone strung to form a ring
STEP 5-8 Pass through the A beads to make your component more secure Also secure the thread and
trim (Repeat these steps until you have the wished amount of 4-BEAD COMPONENTs)
4-BEAD COMPONENT Work RAW stitch into a beaded circle and embellish with Swarovski bicones
For the necklace-size that is given on the second page we will need 20 from this
component For the earring two
If you would like to make a longer necklace you need to make more (One 4-BEAD COMPONENT measures about 38 inch 1 cm To make the necklace symmetrical you have to have equal amounts on each side This means for every extra frac34 inches
2 cm-s you will need 1 4-BEAD COMPONENT on each side of the necklace)
Something Blue Necklace and Earrings
BLOG WWWHANDMADE-JEWELRY-CLUBCOM MEMBERSHIP WWWDIYBEADINGCLUBCOM BLOG DIY BEADING MAGAZINE ISSUE 32
STEP 2 Connect the MIDDLE CIRCLE to two 6-BEAD COMPONENTs by adding four-times 2As
between the pearls Choose a pearl on the MIDDLE CIRCLE and add
2A pass through a pearl in the 6-BEAD COMPONENT previously added and add 2A again Watch out this has to be symmetrical Repeat this at least two more times to make it
secure Now repeat this entire procedure but choose
the 8-th pearl on MIDDLE CIRCLE Repeat this on the other side of the necklace
too
Choose a pearl on the FOCAL CIRCLE and add 2A pass through a pearl in the 6-BEAD COMPONENT and add 2A again Repeat this at least two more times to make it secure
Now repeat this entire procedure but choose the 5-th pearl on FOCAL CIRCLE This will make the necklace nice on your neck
FINISHING THE NECKLACE Connects the parts with A beads
STEP 1 Connect the FOCAL CIRCLE to two 6-BEAD COMPONENTs by adding four-times 2As between the pearls To do this turn your parts upside down you need to
see the pearls We will work on this side from now on
Something Blue Necklace and Earrings
BLOG WWWHANDMADE-JEWELRY-CLUBCOM MEMBERSHIP WWWDIYBEADINGCLUBCOM BLOG DIY BEADING MAGAZINE ISSUE 32
FINISHING THE EARRING Connects the parts with A beads
STEP 1-2 Connect the 6-BEAD COMPONENT
to 4-BEAD COMPONENT and the 4-BEAD
COMPONENT to the earring hook
First connect the 4-BEAD COMPONENT to the 6-BEAD COMPONENT with 4A beads Mimic
the elongation steps of the necklace if needed
Secondly connect the 4-BEAD COMPONENT
to your earring hook with 4A beads again Leave from the last pearl bead 2A beads the hook (this is the orange oval form) and 2As again Pass through each of them to
secure this connection again
Finally get ready to prepare the other earring ndash since we need two of them
STEP 5 Connect the 4-BEAD COMPONENTs to the toggle clasp thus finishing the
necklace Leaving from the last pearl bead 2A the
clasp(this is the orange oval form) and 2A again Pass through all of them a couple more times to make this connection more
secure
Something Blue Necklace and Earrings
BLOG WWWHANDMADE-JEWELRY-CLUBCOM MEMBERSHIP WWWDIYBEADINGCLUBCOM BLOG DIY BEADING MAGAZINE ISSUE 32
If you finished it is time to try it on It was a great fun wasnrsquot it And how beautiful you look in your new necklace and the matching earrings
Something Blue Necklace and Earrings
BLOG WWWHANDMADE-JEWELRY-CLUBCOM MEMBERSHIP WWWDIYBEADINGCLUBCOM
About the Author
Margit Vogel
My name is Margit Vogel I live in Hungary Europe
By profession I am a biochemical engineer but I fell in love with
beads so much that I could not stop playing with them
I make one-of-a-kind beaded and bead embroidered art
jewelry made of the best quality materials such as Swarovski
stones gemstones Japanese beads (Miyuki and Toho) Czech
glass beads leather soutache and suede Each piece is unique
and individually crafted
Feel free to visit my blog for some eyecandy
httpiformjewelrywordpresscom
My shop httpwwwetsycomshopiformjewelry
Facebook httpwwwfacebookcomiformjewelry
BLOG DIY BEADING MAGAZINE ISSUE 32
Getting Down And Personal With Gianna
Getting Down And Personal With Gianna
Nowadays we see more and more jewelry stores opening up online and with these online jewelry stores it has made it easier for us to purchase and view their creations Have you ever wondered how they are able to manage and produce amazing jewelry pieces and tutorials So heres a little on the journey to open up an online shop We are excited to present to you Gianna aka Beading4perfectionists
Gianna Beader amp Youtuber
Unlike most jewelry makers and beadweavers Gianna did not start beading as a hobby but as a means to make ends meet With goals in trying to
fill the financial gap she did everything she could to expand her earnings ndash working as a security guard
and at the same time learning how to bead and selling her pieces at fair trades and flea markets
Since many were asking if she does home beading workshops she started on exploring how to teach people to bead She loves Scott Bakula and has always loved him till now and this served as her
inspiration to start making a beading video tutorial
Gianna started creating videos because she was at the point in her life where everything seemed to be falling apart And at that moment of time she had difficulties financially and selling jewelry was the only way for her to stay afloat financially She is a big Scott Bakula fan and when she went to the UK to see him on stage that was when it hit her that she is already able to edit videos and
taught herself Photoshop and done workshops at bead fairs so why not put these together and see what happens on Youtube She knew that if she gets enough subscribers and views ndash though no one knew what the exact numbers were you would be invited to become a Youtube partner This way she could monetize her videos with advertisements and hopefully she would be able to be a Youtube partner and be able to pay her bills
BLOG WWWHANDMADE-JEWELRY-CLUBCOM MEMBERSHIP WWWDIYBEADINGCLUBCOM BLOG DIY BEADING MAGAZINE ISSUE 32
Getting Down And Personal With Gianna
Her Youtube channel is popular and the reason why she chose Youtube is because Youtube is the biggest platform and reached almost to the whole world Everyone already knows about it and it was growing rapidly as compared to other platforms like Dailymotion so she figured that Youtube was the way to go Her advice to new designers is that when you start out go to the platforms on the top of your list first then work your way down your list if you do not get accepted by your first choice
After loyally putting up one video every week for about 8 months in a row she became a Youtube partner and monetized her videos She knew she needed at least $100 to get her first payout She managed to reach $100 after 3 months The process was not easy she worked hard lack sleep skipped meals and who knows what happened to Ridge in the Bold and the Beautiful because she stopped watching
On Youtube you can monetize your videos Google pays straight to your bank account and at other countries where they also have the option of getting checks among other options In order to get paid you have to reach the $100 mark and after 3 months For Gianna she thinks that you cannot say that Etsy is better than Youtube or Youtube is better than Etsy Her reasoning is because on Youtube she has many followers which will eventually check out her Etsy shop And to start an Etsy shop you need an audience
BLOG WWWHANDMADE-JEWELRY-CLUBCOM MEMBERSHIP WWWDIYBEADINGCLUBCOM BLOG DIY BEADING MAGAZINE ISSUE 32
television and dedicated her spare time (as she had another job) to Youtube She re-registered at the chamber of commerce after receiving her first payout Her work at Youtube now is not a full time job and things have changed on Youtube It is easier to become a parter but there are some countries that need to wait for an invitation to be a Youtube partner Take Italy for instance Italians would have to work just as hard as she did if they want to become a Youtube partner
Getting Down And Personal With Gianna
With her 60000 subscribers on her b4pbakup Youtube channel it is possible to sell at least 60 patterns on the first day on Etsy after promoting the PDF file on her Youtube channel Though you may think that 60 out of 60000 is not much you have to remember that not everyone has the means to purchase the PDF file and a lot of people still rather watch her carry out the tutorial(for free) on Youtube instead of reading the patterns or paying for the patterns even if the pattern is for a fundraiser and only cost $2 Her insights on Youtube is that Youtube is not what it used to be 6 years ago Instead of making more money every month she is making less and less because advertisers have more options of where they want to advertise their ads Ads do not pay as much as they used to Back in the days you could get 25 cents per ad Now you count yourself lucky if you could get 5 cents roll in after two hours
BLOG WWWHANDMADE-JEWELRY-CLUBCOM MEMBERSHIP WWWDIYBEADINGCLUBCOM BLOG DIY BEADING MAGAZINE ISSUE 32
And on top of that adblockers are destroying Youtube channel owners Youtube will start making changes to the channels where there will be ldquopaid subscriptionrdquo channels This has already been implemented in some countries but not in her country The Netherlands This means there will no longer be ads for her monthly paying subscribers She hopes that Youtube will add on a paid per video option feature The option to be a paid channel or free channel or to start a new channel for paying customers is yours to choose Gianna is not happy with Youtube because many others like her have worked so hard and for some years to become Youtube partners(which was something to be proud of) has lost their status
Getting Down And Personal With Gianna
Her advice for those who want to go on Youtube is 1 Do it because you want to teach
2 Do it because you want a career with beads
BLOG WWWHANDMADE-JEWELRY-CLUBCOM MEMBERSHIP WWWDIYBEADINGCLUBCOM BLOG DIY BEADING MAGAZINE ISSUE 32
After putting up about 20 videos and having at least 5000 subscribers add the PDF tutorials to Etsy and Craftsy She found out that her audience would like to have the PDF after watching her videos This is because they would rather print out the PDF and work while seated in a comfy chair technically somewhere else instead of having to pause the video time and time again
Gianna has also made a video for those who want to know the whole story of her journey up until the present day And to get updates on her you can check it out here She has also started a vlog where she tells of how she still works towards becoming a financial independent beader and explains her journey to get where she wants to be(or die trying) Gianna will be in the UK on October the 17th giving an all-day workshop with 4 different patterns
(2 beginners and 2 advanced) in Wotton-under-Edge
Gianna will be there Friday night as the workshop is on Saturday She will be leaving on Sunday Her
doors are open to all who wants to continue the party with her at the hotel across the street
For more information do contact Ann Tucker on Facebook
httpswwwfacebookcomanntucker501
Rec
omm
end
ed R
ead
ings
Making Jewelry with Gemstone
Beads
Combines the popular craft of beading with beautiful semi-precious stones which are collected by many Features a variety of versatile ideas which can be adapted for any type of gem or bead Readers will learn to reate beautiful gemstone jewelry with this dazzling collection of over 100 projects ranging from eyecatching earrings and accessories to exquisite necklaces and bracelets This beautiful book offers an impressive range of 28 beautiful semi-precious stones (including birthstones) and a glimpse into the fascinating history and mythical properties behind them
BLOG DIY BEADING MAGAZINE ISSUE 32 BLOG WWWHANDMADE-JEWELRY-CLUBCOM MEMBERSHIP WWWDIYBEADINGCLUBCOM
Rec
omm
end
ed R
ead
ings
Convertible Crystal Jewelry
Reverse it Twist it Wear it Many
Ways
Diane Whiting presents the idea that convertibility isnrsquot just about using pieces in multiple ways it is also about using skills and creativity in multiple ways Using ever-popular sparkling crystals Diane showcases design elements through various techniques for fun easy fashionable jewelry With 25 projects the reader can choose from bracelets necklaces and earrings that match any outfit or styleDiane Whiting presents the idea that convertibility isnrsquot just about using pieces in multiple ways it is also about using skills and creativity in multiple ways
BLOG DIY BEADING MAGAZINE ISSUE 32 BLOG WWWHANDMADE-JEWELRY-CLUBCOM MEMBERSHIP WWWDIYBEADINGCLUBCOM
Rec
omm
end
ed R
ead
ings
Wire Jewelry Masterclass
Wrapped Coiled and Woven Pieces
Using Fine Materials
Comprehensive and fabulous Wire Jewelry Masterclass takes an in-depth look at an intricate and rewarding craft The 24 projects which range from simple Dragons tear briolette earrings to a Poseidon-under-the-sea pendant will delight and inspire jewelers of all levels and tastes Divided into beginner intermediate and advanced sections this beautifully photographed step-by-step guide is the ticket to wire jewelry expertise
BLOG DIY BEADING MAGAZINE ISSUE 32 BLOG WWWHANDMADE-JEWELRY-CLUBCOM MEMBERSHIP WWWDIYBEADINGCLUBCOM
Rec
omm
end
ed R
ead
ings
Timeless Wire Weaving The
Complete Course
Timeless Wire Weaving focuses on developing wirework skills through 13 projects using three classic wire weaving techniques coiling wrapping and weaving The projects are built around a focal cabochon and incorporate seed beads and crystals in imaginative ways Designers learn to make the jewelry shown in the book and they also use the techniques learned to create innovative jewelry pieces of their own
BLOG DIY BEADING MAGAZINE ISSUE 32 BLOG WWWHANDMADE-JEWELRY-CLUBCOM MEMBERSHIP WWWDIYBEADINGCLUBCOM
Our digital magazine is available through
Apple Newsstand service available to millions of IPAD users
To advertise with us please email us at
diyjewelryclubgmailcom
Or visit our page at
httphandmade-jewelry-clubcomadvertising-diy-beading-magazine
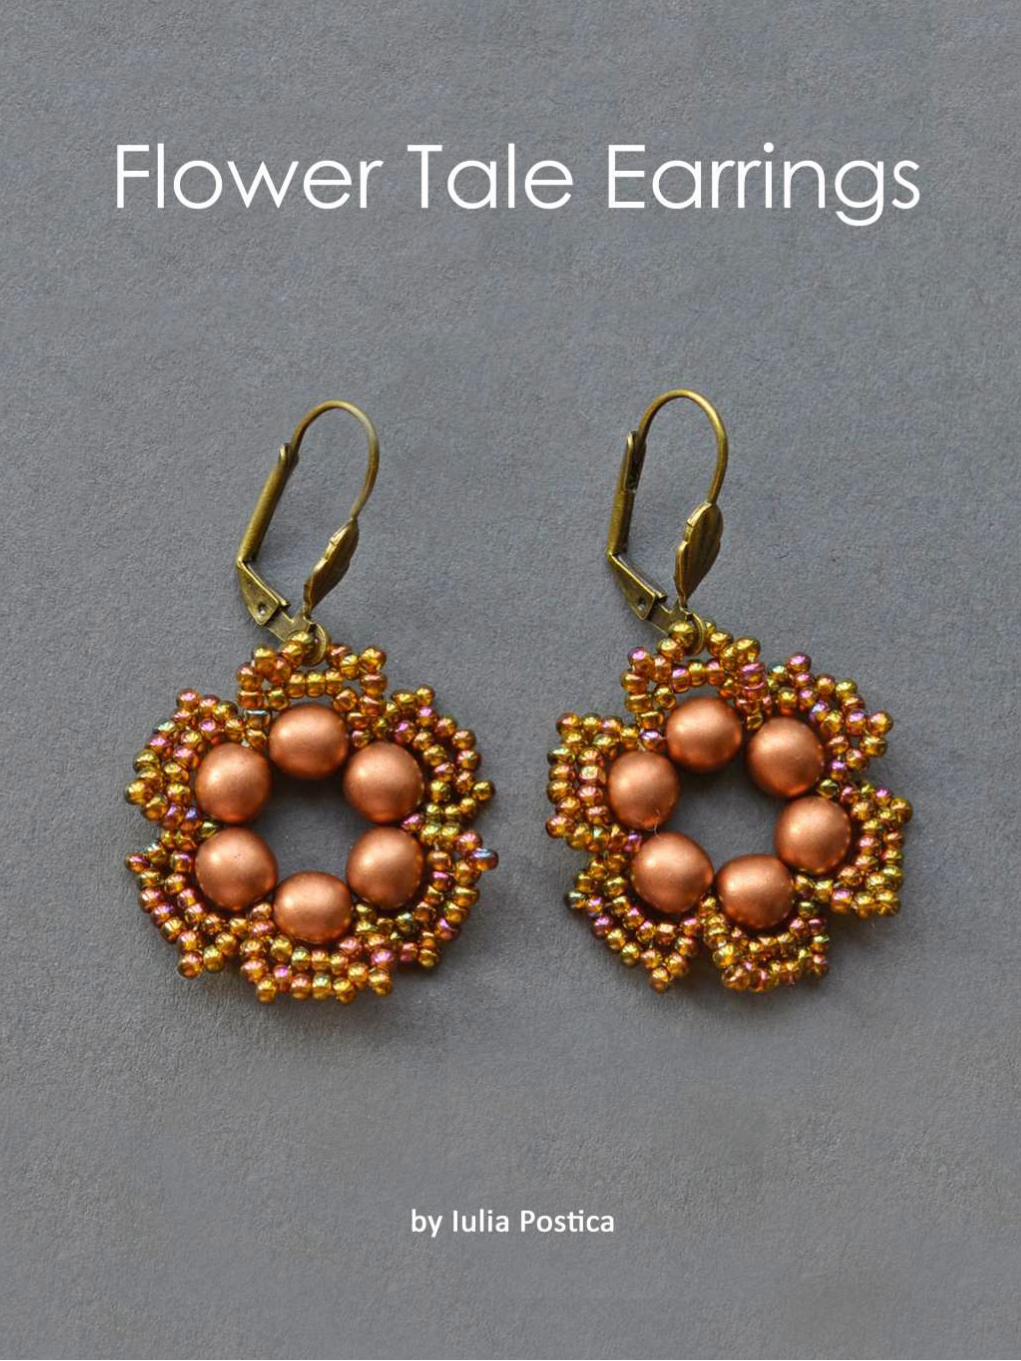
Liberty Earrings
BLOG WWWHANDMADE-JEWELRY-CLUBCOM MEMBERSHIP WWWDIYBEADINGCLUBCOM
Materials - Nr 2 cabochon Preciosa Ornela ovale 18x22 mm turchese
- Rocaille Toho 150 silver lined green emerald
- Nr 2 dagger beads
- Nr 20 pearl 4 mm
- Superduo opaque luster ceramic green
- Rocaille 80 color gold
- Rocaille 80 color ivory
- Delica Miyuki 110 aquagreen mix
- Rocaille Miyuki 110 galvanized silver
- Nr 2 monachelle (earwire)
-Fireline
- Beading Needle nr 12
BLOG DIY BEADING MAGAZINE ISSUE 32
Liberty Earrings
BLOG WWWHANDMADE-JEWELRY-CLUBCOM MEMBERSHIP WWWDIYBEADINGCLUBCOM
Make a circle of 20 delica beads and make a knot (a) Perform two rounds peyote with ivory 80 seed beads (b c) Exit from an ivory
bead
BLOG DIY BEADING MAGAZINE ISSUE 32
a b c
Jump from 80 to 80 with 110 80 gold 110 (a) Finish the round and come out of a 80 gold bead
Jump to the next 80 gold with a 4mm pearl (b) Finish the round and come out
of the first pearl Jump to the 2nd pearl and close with a 80 gold bead(c)
a b c
Position the cabochon and jump from one 80 to the other with two delica bead (a)
Continue with three delicas four times (b) At the bottom sew on two delicas then finish the round by sewing on three delicas for four times passing from one to another roc 80 Tighten the cabochon and exit from the
first two delica that you started with String together a 110 and 150 and enter the second of the three close delicas (c)
a b c
Liberty Earrings
BLOG WWWHANDMADE-JEWELRY-CLUBCOM MEMBERSHIP WWWDIYBEADINGCLUBCOM
Put together 150 110 150 and enter in the second of three next delica (a) Put the same beads for three times then put together 150 and 110 and enter
in the two delica of the bottom tip (b) Enter in the second of three next delica with 110 and 150 (c) Continue passing
in the 80 beads with three beads (150 110 150) for four times then at the top finish the round by putting together a 150 and 110 (d)
BLOG DIY BEADING MAGAZINE ISSUE 32
a b c
Exit from the first 150 sewn in the previous round and jump in the three next beads with a 150 (a)
Put a 150 at a time and exit from the first 110 beads of the bottom tip Jump in the
near 110 with a 150 (b) Finish round repeating steps a and b (c) Exit the roc 80 as shown in the photo (d)
a b c
d
a b c d
Enter in the 80 with four 150 (a b) Enter the 80 beads at the bottom of the pieces with two 110 one superduo one 80 ivory bead one superduo and two 110 (c)
d e f
Liberty Earrings
BLOG WWWHANDMADE-JEWELRY-CLUBCOM MEMBERSHIP WWWDIYBEADINGCLUBCOM
Exit from the bottom pearl (a) Put together 150 three 110 150 and enter in the superduorsquos second hole (b)
Put together three superduo and enter in the next superduorsquos second hole (c) Rethread 15 three 110 150 and return in the opposite direction in the pearl of departure (d)
BLOG DIY BEADING MAGAZINE ISSUE 32
a b
c
Exit from the second pearl indicated from (a) Put 150 four 110 and enter in the second of the three 110 (b) Go to the second superduorsquos hole with four 110 and a 150 (c)
Enter the second hole of the supeduo with a 150(d) Sew in the middle of the bottom of the superduo 150 two 110 150 dagger 150 two 110 150(e)
Enter the second hole of the thirs superduo with 150 (f)
a b c
d
d e f
Liberty Earrings
BLOG WWWHANDMADE-JEWELRY-CLUBCOM MEMBERSHIP WWWDIYBEADINGCLUBCOM BLOG DIY BEADING MAGAZINE ISSUE 32
Put 150 four 110 and enter in the second of three 110 of the base (a) Insert four 110 and 150 in the pearl opposite direction indicated in the picture (b) Go in all the beads
around the piece and exit from the pearl at the top (c) Put 150 three 110 150 and enter the superduo (d)
Enter the ivory bead 80 with two 150 (e) Enter the next superduo with two 150 (f)
a b c
d e f
Put together 150 three 110 and enter in opposite direction in the departurersquos pearl (a) Exit from the 150 beads indicated by photo (b) From this jump in the second of two near
150 with five 150 to created the hole for the earwire (c) Pass the thread in the beads make a few knots and cut the excess thread
a b c
Your earrings are finished
Liberty Earrings
BLOG WWWHANDMADE-JEWELRY-CLUBCOM MEMBERSHIP WWWDIYBEADINGCLUBCOM
About the Author
Mariella Martella
My name is Mariella Martella and I am the author and
designer of jewelry that I sign with the name of Mariel Bijoux
After changing city often for work and study I currently live
in northern Italy I am an art historian with a passion for travel
painting and jewelry design in weaving that project since
2010 In my beads and crystals are the colors of the
Mediterranean sea the atmosphere of summer evenings
and the lights of the places I visited
You can find me at
Etsy shop httpswwwetsycomitshopMarielBijoux
Facebook httpswwwfacebookcommari3lbijoux
Crafting blog httpmarielbijouxblogspotit
Twitter httpstwittercomMarielBijoux
BLOG DIY BEADING MAGAZINE ISSUE 32
Jade Necklace
BLOG WWWHANDMADE-JEWELRY-CLUBCOM MEMBERSHIP WWWDIYBEADINGCLUBCOM
Every time I wear a necklace I always make it a point that the
necklace will lay perfectly flat on my neck Using wire for a necklace
made it possible for me like what I did with Jade Necklace It may look
odd at first having bent wires for a necklace but once the jewelry is
finished youll be so happy how the necklace will perfectly lay on your
neck
The tutorial is catered for intermediate level One must know basic
wirework skills such as wire wrapping making loops wrapped loops
and linking to follow the tutorial It has clear instructions and ultra-clear
close-up photos at each step Additionally you can ask me question
you have on the tutorial No more getting stuck and frustrated on a
confusing or just plain inaccurate pattern
If you followed this tutorial and then sell the accessory or jewelry
please give credit to the author or DIY Beading Clubcom
Copyright 2015
wwwdiybeadingclubcom
wwwhandmade-jewelry-clubcom
BLOG DIY BEADING MAGAZINE ISSUE 32
Jade Necklace
BLOG WWWHANDMADE-JEWELRY-CLUBCOM MEMBERSHIP WWWDIYBEADINGCLUBCOM BLOG DIY BEADING MAGAZINE ISSUE 32
Materials Needed 18ga Craft wire 28ga Craft wire 15mm diameter Green Round Flat Back Sew On Gems 5mm Green pearls
8mm Green pearls 6mm x 11mm teardrop Crystal Treasures Mill Hill beads or any teardrop bead with holes on the side Hook for your clasp
Tools Needed Wire cutter Flat nose pliers Round nose pliers Mandrel A jar or any rounded object to shape your necklace
Skill Level Intermediate
Step 1 Cut 6 inches 18ga wire Make a loop on one end then measure approximately 125 inches and make another loop
Form a size 4 circle on your mandrel
Jade Necklace
BLOG WWWHANDMADE-JEWELRY-CLUBCOM MEMBERSHIP WWWDIYBEADINGCLUBCOM BLOG DIY BEADING MAGAZINE ISSUE 32
Then close the circle by wrapping the extended wire just below the loop Wrap the
wire 2x
This is how it looks like Lets call this circle frame Youll notice that the lower curve is
slightly bigger than the upper curve
Step 2 Cut 8 inches of 28ga wire Wrap one end of
the wire at least 3x on one side of the circle frame just below the loop
Bring up your gem Flat back sew on gems has 2 holes Insert the wire into one hole and then
wrap the wire once onto the circle frame
Jade Necklace
BLOG WWWHANDMADE-JEWELRY-CLUBCOM MEMBERSHIP WWWDIYBEADINGCLUBCOM BLOG DIY BEADING MAGAZINE ISSUE 32
Step 3 Insert a 5mm pearl on the wire and then pass
the wire under circle frame
Repeat previous step 2x and have 3 pearls wrapped
Continue wrapping with your teardrop crystal My crystal has 2 holes on the side
and then continue wrapping with your 5mm pearls then secure your wire
Repeat Step 3 and create as many as needed For 16-inch necklace Ive created 6 of these
components
Jade Necklace
BLOG WWWHANDMADE-JEWELRY-CLUBCOM MEMBERSHIP WWWDIYBEADINGCLUBCOM BLOG DIY BEADING MAGAZINE ISSUE 32
Step 4 Cut a 15-inch 18ga wire and make a loop on
one end Insert 8mm pearl and make a loop on the other end You then use these as connectors
and link the components
Step 5 The necklace is an 18ga wire with wrapped
loops on both ends First cut 7 inches 18ga wire and make a wrapped loop with your hook already inserted Side in 18pcs 5mm pearls
Then make a wrapped loop on the other end connecting the wrapped loop onto the component Do the same for the other
necklace but make the loop on the other end big enough so the hookclasp can pass thru
To have the necklace curve shaped use a jar to bend the wire Voila Now youre
ready to party
Jade Necklace
BLOG WWWHANDMADE-JEWELRY-CLUBCOM MEMBERSHIP WWWDIYBEADINGCLUBCOM
About the Author
Sky Aldovino
I consider myself a late bloomer when it comes to crafting Irsquom a self-taught jewelry maker Jewelry making wasnrsquot really a hobby of mine but unforeseen events lead me to learn jewellery making My family put up a craft store where we sell cross stitch beads and all sorts of crafting materials I fell in love with the beads and tried to create accessories only for myself Clients liked the pieces and I started customizing handmade jewelleries The craft store was a success for 6 years but like any other small businesses we had to close it down and I was confined to staying at home While at home I had all the time using the internet and now working as a home-based jewelry designer
BLOG DIY BEADING MAGAZINE ISSUE 32
Atomic Ring
BLOG WWWHANDMADE-JEWELRY-CLUBCOM MEMBERSHIP WWWDIYBEADINGCLUBCOM
Have fun making shapes using the wigjig Cyclops Make loops going in
circles to mimic the shape of a flower or in this tutorial mimic the
shape of an atom The tutorial will also teach you how to cage a
cabochon Whats nice about this piece is that with one long wire you
can create the ring from start to finish
The tutorial is catered for intermediate to advanced students One
must already know how to make spirals and use a wigjig tool It has
clear instructions and ultra-clear close-up photos at each step
Additionally you can ask me question you have on the tutorial No
more getting stuck and frustrated on a confusing or just plain
inaccurate pattern
If you followed this tutorial and then sell the accessory or jewelry
please give credit to the author or DIY Beading Clubcom
If you like to get a blank wigjig graph visit wigjigcom Shop and Jigs
section
Copyright 2015
wwwdiybeadingclubcom
wwwhandmade-jewelry-clubcom
BLOG DIY BEADING MAGAZINE ISSUE 32
Atomic Ring
BLOG WWWHANDMADE-JEWELRY-CLUBCOM MEMBERSHIP WWWDIYBEADINGCLUBCOM
Materials Needed 20ga Craft wire 28ga Craft wire 11mm Round Cabochon
Tools Needed Wigjig Cyclops 15mm pegs Wire cutter Flat nose pliers Mandrel
Skill Level Intermediate - Advanced
BLOG DIY BEADING MAGAZINE ISSUE 32
Step 1 Lets prepare your wigjig cyclops Position the pegs like so
Atomic Ring
BLOG WWWHANDMADE-JEWELRY-CLUBCOM MEMBERSHIP WWWDIYBEADINGCLUBCOM BLOG DIY BEADING MAGAZINE ISSUE 32
Lets work with longer wire so youll have enough wire to hold onto as you manipulate the wire so cut 36 inches of 20ga wire From
one end of the wire measure 10 inches
On the 10-inch measurement loop the wire at the center peg then continue to loop onto the side pegs going in circle going back to
the center peg after looping on the side peg
Now the wire at the center peg will start to build up as you go around the side pegs so
you need to constantly press the wire at the center peg to accommodate the build up of
wire
When youre done pull out the wire and this is
how it should look like
Atomic Ring
BLOG WWWHANDMADE-JEWELRY-CLUBCOM MEMBERSHIP WWWDIYBEADINGCLUBCOM BLOG DIY BEADING MAGAZINE ISSUE 32
You will notice that the frame opens wide Now to keep the atom frame from opening wide secure the center of the frame by wrapping a 28ga wire What you
need to do is simply pass the 28ga wire into the hole and wrap as many times as needed or until youre sure that the frame is secure
Step 2 Now youre finished with your atom frame Well now create the focal design With the longer wire make a spiral at the center big
enough to accommodate the size of your cabochon In this tutorial the spiral is about
11mm in diameter the same size as my cabochon
Pop in your cabochon and start to make spirals going around and over the cabochon as if you are caging the cabochon Create at
least 5 rounds and then cut off any excess
Step 3 Now lets make the ring and this with the other
end of the wire
Atomic Ring
BLOG WWWHANDMADE-JEWELRY-CLUBCOM MEMBERSHIP WWWDIYBEADINGCLUBCOM BLOG DIY BEADING MAGAZINE ISSUE 32
Bring up your mandrel and wrap the wire to the size of your finger Wrap at least 2 times
When youre sure you have the right size pull the ring out of the mandrel
With the extended wire wrap the wire the secure the ring
Cut off any excess and voila You have your atomic ring Create as many as you can with different colors of cabochon
Atomic Ring
BLOG WWWHANDMADE-JEWELRY-CLUBCOM MEMBERSHIP WWWDIYBEADINGCLUBCOM
About the Author
Sky Aldovino
I consider myself a late bloomer when it comes to crafting Irsquom a self-taught jewelry maker Jewelry making wasnrsquot really a hobby of mine but unforeseen events lead me to learn jewellery making My family put up a craft store where we sell cross stitch beads and all sorts of crafting materials I fell in love with the beads and tried to create accessories only for myself Clients liked the pieces and I started customizing handmade jewelleries The craft store was a success for 6 years but like any other small businesses we had to close it down and I was confined to staying at home While at home I had all the time using the internet and now working as a home-based jewelry designer
BLOG DIY BEADING MAGAZINE ISSUE 32
Featured Article Gemstones Used for Jewelry Making
BLOG WWWHANDMADE-JEWELRY-CLUBCOM MEMBERSHIP WWWDIYBEADINGCLUBCOM
Gemstones are stones which we hold quite highly in terms of value And
jewelry often consists of stones that add attractiveness to it so it is not
surprising when jewelry designers actually use gemstones in their designs In
fact there are different types of gemstones that can be used for making
jewelry There are the expensive and pure gemstones and there are also the
imitation ones The information below will provide some information about
the kinds of stones you can use to create jewelry and how these stones will
impact the jewelry you have created
The first kind of stone which I believe we are all quite familiar with are
birthstones These stones are associated with individualrsquos month of birth
by SunVDesigns by BeyhanAkman
For example Amethyst stone is connected with anybody who is born in
February which carries special significance in the area of emotions and also
spiritually This stone also signifies calm and peace as well
And then we have semi-precious stones which are also often used in jewelry
making They are not as valuable as compared to precious stones but still
valuable Best examples of these stones are aquamarine topaz tourmaline
opal and turquoise
BLOG DIY BEADING MAGAZINE ISSUE 32
Featured Article Gemstones Used for Jewelry Making
BLOG WWWHANDMADE-JEWELRY-CLUBCOM MEMBERSHIP WWWDIYBEADINGCLUBCOM
It is an ideal gift for someone who you deem special Aquamarine pendants
usually work well for anyone and is widely an accepted stone
by HyppieChic by joyeriamestiza
However precious stones are the most unusual
and precious jewels to us Examples of some of
them are emerald sapphire diamond and
ruby These stones are usually very expensive
and are prized for their exquisiteness These
stones are commonly used in high-quality
jewelry designs which costs quite a fortune to
obtain
BLOG DIY BEADING MAGAZINE ISSUE 32
by sarajewelrystu
Jewelry designs with precious stones are usually
given as exceptional gifts on special occasions A
perfect example is a diamond ring that is usually
given as an engagement gift
by ldiamondsforever
Featured Article Gemstones Used for Jewelry Making
BLOG WWWHANDMADE-JEWELRY-CLUBCOM MEMBERSHIP WWWDIYBEADINGCLUBCOM
There are also synthetic stones which are often used to create jewelry
Synthetic stones are artificial imitations of gemstones Synthetic Sapphire
jewelry costs less compare with the authentic ones Most of the time
imitation stones are used to save cost but at the same time have the similar
look of the real stone
BLOG DIY BEADING MAGAZINE ISSUE 32
by shininggems by thaimaker
by lapinduprintemps by PastimeArt
Gemstones are used like beads and you can use it in any designs whether
simple or elaborate
Swarovski crystal components are available in a rich multitude of rondelles Perfect as spacers in necklaces or as discs in earrings Rondelles can be used with many varieties of shapes or sizes Use Swarovski crystal rondelles between large gemstones as accents with precious metal findings Fire Mountain Gems and Beads Crystal Passionsreg brand presents Swarovski crystal in display-ready packaging for brilliant retail presentation Crystal Passionsreg is an assurance of genuine Swarovski crystal
BLOG DIY BEADING MAGAZINE ISSUE 32 BLOG WWWHANDMADE-JEWELRY-CLUBCOM MEMBERSHIP WWWDIYBEADINGCLUBCOM
Recommended Jewelry Making Supplies
Mz Unisex-adults 12pcs 25x18x6mm Turquoise Oval CAB Cabochon
BLOG DIY BEADING MAGAZINE ISSUE 32 BLOG WWWHANDMADE-JEWELRY-CLUBCOM MEMBERSHIP WWWDIYBEADINGCLUBCOM
Recommended Jewelry Making Supplies
For a little sparkle that goes a long way design with Swarovski 4mm faceted bicones Create glorious multi-strand necklaces with the dainty crystals or use as spacers to add a tiny flash to your designs Swarovski crystal components are made in Austria and are considered the finest products of their kind in the world
BLOG DIY BEADING MAGAZINE ISSUE 32 BLOG WWWHANDMADE-JEWELRY-CLUBCOM MEMBERSHIP WWWDIYBEADINGCLUBCOM
Recommended Jewelry Making Supplies
Imitation beads resist color change These beads have uniform quality with a good polish Some strands may have little to no matrix Sizes shapes and colors may vary with handcrafted items
BLOG DIY BEADING MAGAZINE ISSUE 32 BLOG WWWHANDMADE-JEWELRY-CLUBCOM MEMBERSHIP WWWDIYBEADINGCLUBCOM
Recommended Jewelry Making Supplies
Something Blue Necklace and Earrings
BLOG WWWHANDMADE-JEWELRY-CLUBCOM MEMBERSHIP WWWDIYBEADINGCLUBCOM
Skill level Beginner Intermediate Advanced
DIMENSIONS OF THE NECKLACE Inner Circumference 14 18 inch 35 cm
Focal Pendant Width 1 15 inch 35 cm Focal Pendant Height 1 15 inch 35 cm
DIMENSIONS OF THE EARRING Earring Width 716 inch 12 cm Earring Height 1516 inch 25 cm (Without the earring hook)
BLOG DIY BEADING MAGAZINE ISSUE 32
Materials
Note Before purchasing the supplies measure the length of your wished necklace If you decide to bead a longer necklace you should keep in mind that for every extra
frac34 inches 2 cm-s you will need 8 bicones and 8 pearls
Something Blue Necklace and Earrings
BLOG WWWHANDMADE-JEWELRY-CLUBCOM MEMBERSHIP WWWDIYBEADINGCLUBCOM BLOG DIY BEADING MAGAZINE ISSUE 32
Work RAW stitch into a beaded circle and embellish with Swarovski bicones
STEP 2 String 1A and 2 pearls Pass through the previous
second pearl and the freshly added 1A and the first pearl again
STEP 1 Use a comfortable length of thread to string 2
pearls 1A and 1 pearl again leaving a 2rdquo 5cm tail Pass through the first two pearls strung to form a
ring
STEP 3 String 2 pearls and 1A Pass through the previous first pearl and the freshly added two pearls
again
STEP 4 - 17 Repeat STEP 2 and STEP 3 again until you count 17 pearls in the inner circle
But be careful in the last step you only have to add 1 pearl then pass through the first pearls
added in STEP 1 and add another 1A Now pass through the first pearl added in STEP
1and 1A added in this round again to exit from this A
Something Blue Necklace and Earrings
BLOG WWWHANDMADE-JEWELRY-CLUBCOM MEMBERSHIP WWWDIYBEADINGCLUBCOM BLOG DIY BEADING MAGAZINE ISSUE 32
STEP 19 String 2A and pass through the next A added in round 4-17 and the A added in round 18 the 2A added in this round and finally the A added in round 4-17 to exit from the bead showed below
STEP 18 String 3A and pass through the 1A added in the previous round and the first A added in this
round
STEP 20 - 34 Repeat STEP 18 and STEP 19 again until you finish the circle
But be careful in the last step first you have to pass through 3A and then add 1A After this pass
through the 3A again and exit from the A bead
shown below (This is the first A added in STEP 18)
Something Blue Necklace and Earrings
BLOG WWWHANDMADE-JEWELRY-CLUBCOM MEMBERSHIP WWWDIYBEADINGCLUBCOM BLOG DIY BEADING MAGAZINE ISSUE 32
STEP 35 Step up to exit from the pearl shown below (Finishing the previous step in the A bead and then
stepping up from there makes the circle more secure)
Now string 3 bicones Pass through the pearl and the first bicone again
In the reality your circle will look more like this the A beads forming a strong row in the middle of the
pearls
STEP 36 Add 2 bicones Pass through the
neighboring pearl the first bicone added in the previous row and the 2 bicones added in this step
so you can exit from the next pearl
Something Blue Necklace and Earrings
BLOG WWWHANDMADE-JEWELRY-CLUBCOM MEMBERSHIP WWWDIYBEADINGCLUBCOM BLOG DIY BEADING MAGAZINE ISSUE 32
Now in the reality your circle will look more like this the A beads still forming a strong row in the middle of the pearls and the bicones slightly lying on top of
them
STEP 37 - 49 Repeat STEP 35 and STEP 36 again until you finish the circle with the bicones
But be careful in the last step first you have pass through the third bicone added then add 1 bicone
and pass through this little quartet to exit from the bicone shown below (The second one added in
STEP 35)
STEP 50 With these steps we finish the circle by adding 1 bicone to connect the A beads and the
bicone row So add 1 bicone pass through the nearest A bead and add 1 bicone again Pass
through the bicone already there and exit from the bicone you just added
Something Blue Necklace and Earrings
BLOG WWWHANDMADE-JEWELRY-CLUBCOM MEMBERSHIP WWWDIYBEADINGCLUBCOM BLOG DIY BEADING MAGAZINE ISSUE 32
STEP 66-83 Secure the circle by adding 1A between each bicone in the second row of Swarovski
bicones If you finished secure the thread and trim
STEP 51-65 Using the same technique as in STEP 37 - 49 add 1 bicone to finish the third bicone row The black line shows you the way (After STEP 50 pass through the next A bead add 1 bicone and pass through the bicone already there and the bicone added in the previous step Repeat these steps to
finish the inner bicone circle)
MIDDLE CIRCLE Work RAW stitch into a beaded circle and embellish with
Swarovski bicones Remember you need to bead two circles this time
STEP 1 Just like in the focal circle begin with 2 pearls 1A and 1 pearl again on a comfortable length of thread
leaving a 2rdquo 5cm tail Pass through the first two pearls strung to form a ring
Something Blue Necklace and Earrings
BLOG WWWHANDMADE-JEWELRY-CLUBCOM MEMBERSHIP WWWDIYBEADINGCLUBCOM BLOG DIY BEADING MAGAZINE ISSUE 32
STEP 15-28 Mimicing the FOCAL CIRCLElsquos STEP 18-34 bead A beads until you finish the inner part of the
circle Exit from a pearl in the second row This circle should look very similar to the first one but this is a bit
smaller
STEP 2-14 Mimicing the FOCAL CIRCLElsquos STEP 2-17 bead until you count 14 pearls in the inner circle Exit
from the last A added
STEP 29-42 Mimicing FOCAL CIRCLElsquos STEP 35-49 add 2 rows of bicones
STEP 43-56 Mimicing the FOCAL CIRCLElsquos STEP 50-65 bead the third row of bicones to finish the circle
Something Blue Necklace and Earrings
BLOG WWWHANDMADE-JEWELRY-CLUBCOM MEMBERSHIP WWWDIYBEADINGCLUBCOM BLOG DIY BEADING MAGAZINE ISSUE 32
SMALLEST CIRCLE Work RAW stitch into a beaded circle and embellish
with Swarovski bicones Remember you need to bead two circles again
STEP 1 Just like in the focal circle begin with 2 pearls
1A and 1 pearl again on a comfortable length of thread leaving a 2rdquo 5cm tail Pass through the first two
pearls strung to form a ring
STEP 57-70 Just like the FOCAL CIRCLElsquos STEP 66-83 secure the circle by adding 1A between every bicone
in the second row of bicones If you finished secure the thread and trim (Donrsquot forget to bead another
circle)
STEP 2-12 Mimicing the FOCAL CIRCLElsquos STEP 2-17 bead until you count 12 pearls in the inner circle Exit
from the last A added
STEP 13-24 Mimicing the FOCAL CIRCLElsquos STEP 18-34 bead A beads until you finish the inner part of the
circle Exit from a pearl in the second row This circle should look very similar to the first two but this is the
smallest of them all
Something Blue Necklace and Earrings
BLOG WWWHANDMADE-JEWELRY-CLUBCOM MEMBERSHIP WWWDIYBEADINGCLUBCOM BLOG DIY BEADING MAGAZINE ISSUE 32
STEP 37-48 Mimicing the FOCAL CIRCLElsquos STEP 50-65 bead the third row of bicones to finish this circle too
STEP 25-36 Mimicing FOCAL CIRCLElsquos STEP 35-49 add 2
rows of bicones The last step here is purple again
STEP 49-60 Just like the FOCAL CIRCLElsquos STEP 66-83 secure the circle by adding 1A between every bicone
in the second row of bicones If you finished secure the thread and trim (Donrsquot forget that you need two
small circles)
Something Blue Necklace and Earrings
BLOG WWWHANDMADE-JEWELRY-CLUBCOM MEMBERSHIP WWWDIYBEADINGCLUBCOM BLOG DIY BEADING MAGAZINE ISSUE 32
STEP 37-48 Mimicing the FOCAL CIRCLElsquos STEP 50-65 bead the third row of bicones to finish this circle too
STEP 25-36 Mimicing FOCAL CIRCLElsquos STEP 35-49 add 2
rows of bicones The last step here is purple again
STEP 49-60 Just like the FOCAL CIRCLElsquos STEP 66-83 secure the circle by adding 1A between every bicone
in the second row of bicones If you finished secure the thread and trim (Donrsquot forget that you need two
small circles)
Something Blue Necklace and Earrings
BLOG WWWHANDMADE-JEWELRY-CLUBCOM MEMBERSHIP WWWDIYBEADINGCLUBCOM BLOG DIY BEADING MAGAZINE ISSUE 32
STEP 2-6 Continue by adding 1A 1 bicone 1 pearl until you count 6 of each
STEP 1 Begin with 1 pearl 1 bicone 1A and 1 bicone again on a comfortable length of thread leaving a 2rdquo
5cm tail Pass through the pearl and the first bicone strung to form a ring
STEP 7-12 Pass through the A beads to make your
component more secure Also secure the thread and trim (Repeat these steps until you have six 6-BEAD
COMPONENTs)
6-BEAD COMPONENT Work RAW stitch into a beaded circle and embellish with Swarovski bicones
For the necklace we will need six from this component For the earring two
Something Blue Necklace and Earrings
BLOG WWWHANDMADE-JEWELRY-CLUBCOM MEMBERSHIP WWWDIYBEADINGCLUBCOM BLOG DIY BEADING MAGAZINE ISSUE 32
STEP 2-4 Continue by adding 1A 1 bicone 1 pearl
until you count 4 of each
STEP 1 Begin with 1 pearl 1 bicone 1A and 1 bicone again on a comfortable length of thread leaving a 2rdquo
5cm tail Pass through the pearl and the first bicone strung to form a ring
STEP 5-8 Pass through the A beads to make your component more secure Also secure the thread and
trim (Repeat these steps until you have the wished amount of 4-BEAD COMPONENTs)
4-BEAD COMPONENT Work RAW stitch into a beaded circle and embellish with Swarovski bicones
For the necklace-size that is given on the second page we will need 20 from this
component For the earring two
If you would like to make a longer necklace you need to make more (One 4-BEAD COMPONENT measures about 38 inch 1 cm To make the necklace symmetrical you have to have equal amounts on each side This means for every extra frac34 inches
2 cm-s you will need 1 4-BEAD COMPONENT on each side of the necklace)
Something Blue Necklace and Earrings
BLOG WWWHANDMADE-JEWELRY-CLUBCOM MEMBERSHIP WWWDIYBEADINGCLUBCOM BLOG DIY BEADING MAGAZINE ISSUE 32
STEP 2 Connect the MIDDLE CIRCLE to two 6-BEAD COMPONENTs by adding four-times 2As
between the pearls Choose a pearl on the MIDDLE CIRCLE and add
2A pass through a pearl in the 6-BEAD COMPONENT previously added and add 2A again Watch out this has to be symmetrical Repeat this at least two more times to make it
secure Now repeat this entire procedure but choose
the 8-th pearl on MIDDLE CIRCLE Repeat this on the other side of the necklace
too
Choose a pearl on the FOCAL CIRCLE and add 2A pass through a pearl in the 6-BEAD COMPONENT and add 2A again Repeat this at least two more times to make it secure
Now repeat this entire procedure but choose the 5-th pearl on FOCAL CIRCLE This will make the necklace nice on your neck
FINISHING THE NECKLACE Connects the parts with A beads
STEP 1 Connect the FOCAL CIRCLE to two 6-BEAD COMPONENTs by adding four-times 2As between the pearls To do this turn your parts upside down you need to
see the pearls We will work on this side from now on
Something Blue Necklace and Earrings
BLOG WWWHANDMADE-JEWELRY-CLUBCOM MEMBERSHIP WWWDIYBEADINGCLUBCOM BLOG DIY BEADING MAGAZINE ISSUE 32
FINISHING THE EARRING Connects the parts with A beads
STEP 1-2 Connect the 6-BEAD COMPONENT
to 4-BEAD COMPONENT and the 4-BEAD
COMPONENT to the earring hook
First connect the 4-BEAD COMPONENT to the 6-BEAD COMPONENT with 4A beads Mimic
the elongation steps of the necklace if needed
Secondly connect the 4-BEAD COMPONENT
to your earring hook with 4A beads again Leave from the last pearl bead 2A beads the hook (this is the orange oval form) and 2As again Pass through each of them to
secure this connection again
Finally get ready to prepare the other earring ndash since we need two of them
STEP 5 Connect the 4-BEAD COMPONENTs to the toggle clasp thus finishing the
necklace Leaving from the last pearl bead 2A the
clasp(this is the orange oval form) and 2A again Pass through all of them a couple more times to make this connection more
secure
Something Blue Necklace and Earrings
BLOG WWWHANDMADE-JEWELRY-CLUBCOM MEMBERSHIP WWWDIYBEADINGCLUBCOM BLOG DIY BEADING MAGAZINE ISSUE 32
If you finished it is time to try it on It was a great fun wasnrsquot it And how beautiful you look in your new necklace and the matching earrings
Something Blue Necklace and Earrings
BLOG WWWHANDMADE-JEWELRY-CLUBCOM MEMBERSHIP WWWDIYBEADINGCLUBCOM
About the Author
Margit Vogel
My name is Margit Vogel I live in Hungary Europe
By profession I am a biochemical engineer but I fell in love with
beads so much that I could not stop playing with them
I make one-of-a-kind beaded and bead embroidered art
jewelry made of the best quality materials such as Swarovski
stones gemstones Japanese beads (Miyuki and Toho) Czech
glass beads leather soutache and suede Each piece is unique
and individually crafted
Feel free to visit my blog for some eyecandy
httpiformjewelrywordpresscom
My shop httpwwwetsycomshopiformjewelry
Facebook httpwwwfacebookcomiformjewelry
BLOG DIY BEADING MAGAZINE ISSUE 32
Getting Down And Personal With Gianna
Getting Down And Personal With Gianna
Nowadays we see more and more jewelry stores opening up online and with these online jewelry stores it has made it easier for us to purchase and view their creations Have you ever wondered how they are able to manage and produce amazing jewelry pieces and tutorials So heres a little on the journey to open up an online shop We are excited to present to you Gianna aka Beading4perfectionists
Gianna Beader amp Youtuber
Unlike most jewelry makers and beadweavers Gianna did not start beading as a hobby but as a means to make ends meet With goals in trying to
fill the financial gap she did everything she could to expand her earnings ndash working as a security guard
and at the same time learning how to bead and selling her pieces at fair trades and flea markets
Since many were asking if she does home beading workshops she started on exploring how to teach people to bead She loves Scott Bakula and has always loved him till now and this served as her
inspiration to start making a beading video tutorial
Gianna started creating videos because she was at the point in her life where everything seemed to be falling apart And at that moment of time she had difficulties financially and selling jewelry was the only way for her to stay afloat financially She is a big Scott Bakula fan and when she went to the UK to see him on stage that was when it hit her that she is already able to edit videos and
taught herself Photoshop and done workshops at bead fairs so why not put these together and see what happens on Youtube She knew that if she gets enough subscribers and views ndash though no one knew what the exact numbers were you would be invited to become a Youtube partner This way she could monetize her videos with advertisements and hopefully she would be able to be a Youtube partner and be able to pay her bills
BLOG WWWHANDMADE-JEWELRY-CLUBCOM MEMBERSHIP WWWDIYBEADINGCLUBCOM BLOG DIY BEADING MAGAZINE ISSUE 32
Getting Down And Personal With Gianna
Her Youtube channel is popular and the reason why she chose Youtube is because Youtube is the biggest platform and reached almost to the whole world Everyone already knows about it and it was growing rapidly as compared to other platforms like Dailymotion so she figured that Youtube was the way to go Her advice to new designers is that when you start out go to the platforms on the top of your list first then work your way down your list if you do not get accepted by your first choice
After loyally putting up one video every week for about 8 months in a row she became a Youtube partner and monetized her videos She knew she needed at least $100 to get her first payout She managed to reach $100 after 3 months The process was not easy she worked hard lack sleep skipped meals and who knows what happened to Ridge in the Bold and the Beautiful because she stopped watching
On Youtube you can monetize your videos Google pays straight to your bank account and at other countries where they also have the option of getting checks among other options In order to get paid you have to reach the $100 mark and after 3 months For Gianna she thinks that you cannot say that Etsy is better than Youtube or Youtube is better than Etsy Her reasoning is because on Youtube she has many followers which will eventually check out her Etsy shop And to start an Etsy shop you need an audience
BLOG WWWHANDMADE-JEWELRY-CLUBCOM MEMBERSHIP WWWDIYBEADINGCLUBCOM BLOG DIY BEADING MAGAZINE ISSUE 32
television and dedicated her spare time (as she had another job) to Youtube She re-registered at the chamber of commerce after receiving her first payout Her work at Youtube now is not a full time job and things have changed on Youtube It is easier to become a parter but there are some countries that need to wait for an invitation to be a Youtube partner Take Italy for instance Italians would have to work just as hard as she did if they want to become a Youtube partner
Getting Down And Personal With Gianna
With her 60000 subscribers on her b4pbakup Youtube channel it is possible to sell at least 60 patterns on the first day on Etsy after promoting the PDF file on her Youtube channel Though you may think that 60 out of 60000 is not much you have to remember that not everyone has the means to purchase the PDF file and a lot of people still rather watch her carry out the tutorial(for free) on Youtube instead of reading the patterns or paying for the patterns even if the pattern is for a fundraiser and only cost $2 Her insights on Youtube is that Youtube is not what it used to be 6 years ago Instead of making more money every month she is making less and less because advertisers have more options of where they want to advertise their ads Ads do not pay as much as they used to Back in the days you could get 25 cents per ad Now you count yourself lucky if you could get 5 cents roll in after two hours
BLOG WWWHANDMADE-JEWELRY-CLUBCOM MEMBERSHIP WWWDIYBEADINGCLUBCOM BLOG DIY BEADING MAGAZINE ISSUE 32
And on top of that adblockers are destroying Youtube channel owners Youtube will start making changes to the channels where there will be ldquopaid subscriptionrdquo channels This has already been implemented in some countries but not in her country The Netherlands This means there will no longer be ads for her monthly paying subscribers She hopes that Youtube will add on a paid per video option feature The option to be a paid channel or free channel or to start a new channel for paying customers is yours to choose Gianna is not happy with Youtube because many others like her have worked so hard and for some years to become Youtube partners(which was something to be proud of) has lost their status
Getting Down And Personal With Gianna
Her advice for those who want to go on Youtube is 1 Do it because you want to teach
2 Do it because you want a career with beads
BLOG WWWHANDMADE-JEWELRY-CLUBCOM MEMBERSHIP WWWDIYBEADINGCLUBCOM BLOG DIY BEADING MAGAZINE ISSUE 32
After putting up about 20 videos and having at least 5000 subscribers add the PDF tutorials to Etsy and Craftsy She found out that her audience would like to have the PDF after watching her videos This is because they would rather print out the PDF and work while seated in a comfy chair technically somewhere else instead of having to pause the video time and time again
Gianna has also made a video for those who want to know the whole story of her journey up until the present day And to get updates on her you can check it out here She has also started a vlog where she tells of how she still works towards becoming a financial independent beader and explains her journey to get where she wants to be(or die trying) Gianna will be in the UK on October the 17th giving an all-day workshop with 4 different patterns
(2 beginners and 2 advanced) in Wotton-under-Edge
Gianna will be there Friday night as the workshop is on Saturday She will be leaving on Sunday Her
doors are open to all who wants to continue the party with her at the hotel across the street
For more information do contact Ann Tucker on Facebook
httpswwwfacebookcomanntucker501
Rec
omm
end
ed R
ead
ings
Making Jewelry with Gemstone
Beads
Combines the popular craft of beading with beautiful semi-precious stones which are collected by many Features a variety of versatile ideas which can be adapted for any type of gem or bead Readers will learn to reate beautiful gemstone jewelry with this dazzling collection of over 100 projects ranging from eyecatching earrings and accessories to exquisite necklaces and bracelets This beautiful book offers an impressive range of 28 beautiful semi-precious stones (including birthstones) and a glimpse into the fascinating history and mythical properties behind them
BLOG DIY BEADING MAGAZINE ISSUE 32 BLOG WWWHANDMADE-JEWELRY-CLUBCOM MEMBERSHIP WWWDIYBEADINGCLUBCOM
Rec
omm
end
ed R
ead
ings
Convertible Crystal Jewelry
Reverse it Twist it Wear it Many
Ways
Diane Whiting presents the idea that convertibility isnrsquot just about using pieces in multiple ways it is also about using skills and creativity in multiple ways Using ever-popular sparkling crystals Diane showcases design elements through various techniques for fun easy fashionable jewelry With 25 projects the reader can choose from bracelets necklaces and earrings that match any outfit or styleDiane Whiting presents the idea that convertibility isnrsquot just about using pieces in multiple ways it is also about using skills and creativity in multiple ways
BLOG DIY BEADING MAGAZINE ISSUE 32 BLOG WWWHANDMADE-JEWELRY-CLUBCOM MEMBERSHIP WWWDIYBEADINGCLUBCOM
Rec
omm
end
ed R
ead
ings
Wire Jewelry Masterclass
Wrapped Coiled and Woven Pieces
Using Fine Materials
Comprehensive and fabulous Wire Jewelry Masterclass takes an in-depth look at an intricate and rewarding craft The 24 projects which range from simple Dragons tear briolette earrings to a Poseidon-under-the-sea pendant will delight and inspire jewelers of all levels and tastes Divided into beginner intermediate and advanced sections this beautifully photographed step-by-step guide is the ticket to wire jewelry expertise
BLOG DIY BEADING MAGAZINE ISSUE 32 BLOG WWWHANDMADE-JEWELRY-CLUBCOM MEMBERSHIP WWWDIYBEADINGCLUBCOM
Rec
omm
end
ed R
ead
ings
Timeless Wire Weaving The
Complete Course
Timeless Wire Weaving focuses on developing wirework skills through 13 projects using three classic wire weaving techniques coiling wrapping and weaving The projects are built around a focal cabochon and incorporate seed beads and crystals in imaginative ways Designers learn to make the jewelry shown in the book and they also use the techniques learned to create innovative jewelry pieces of their own
BLOG DIY BEADING MAGAZINE ISSUE 32 BLOG WWWHANDMADE-JEWELRY-CLUBCOM MEMBERSHIP WWWDIYBEADINGCLUBCOM
Our digital magazine is available through
Apple Newsstand service available to millions of IPAD users
To advertise with us please email us at
diyjewelryclubgmailcom
Or visit our page at
httphandmade-jewelry-clubcomadvertising-diy-beading-magazine
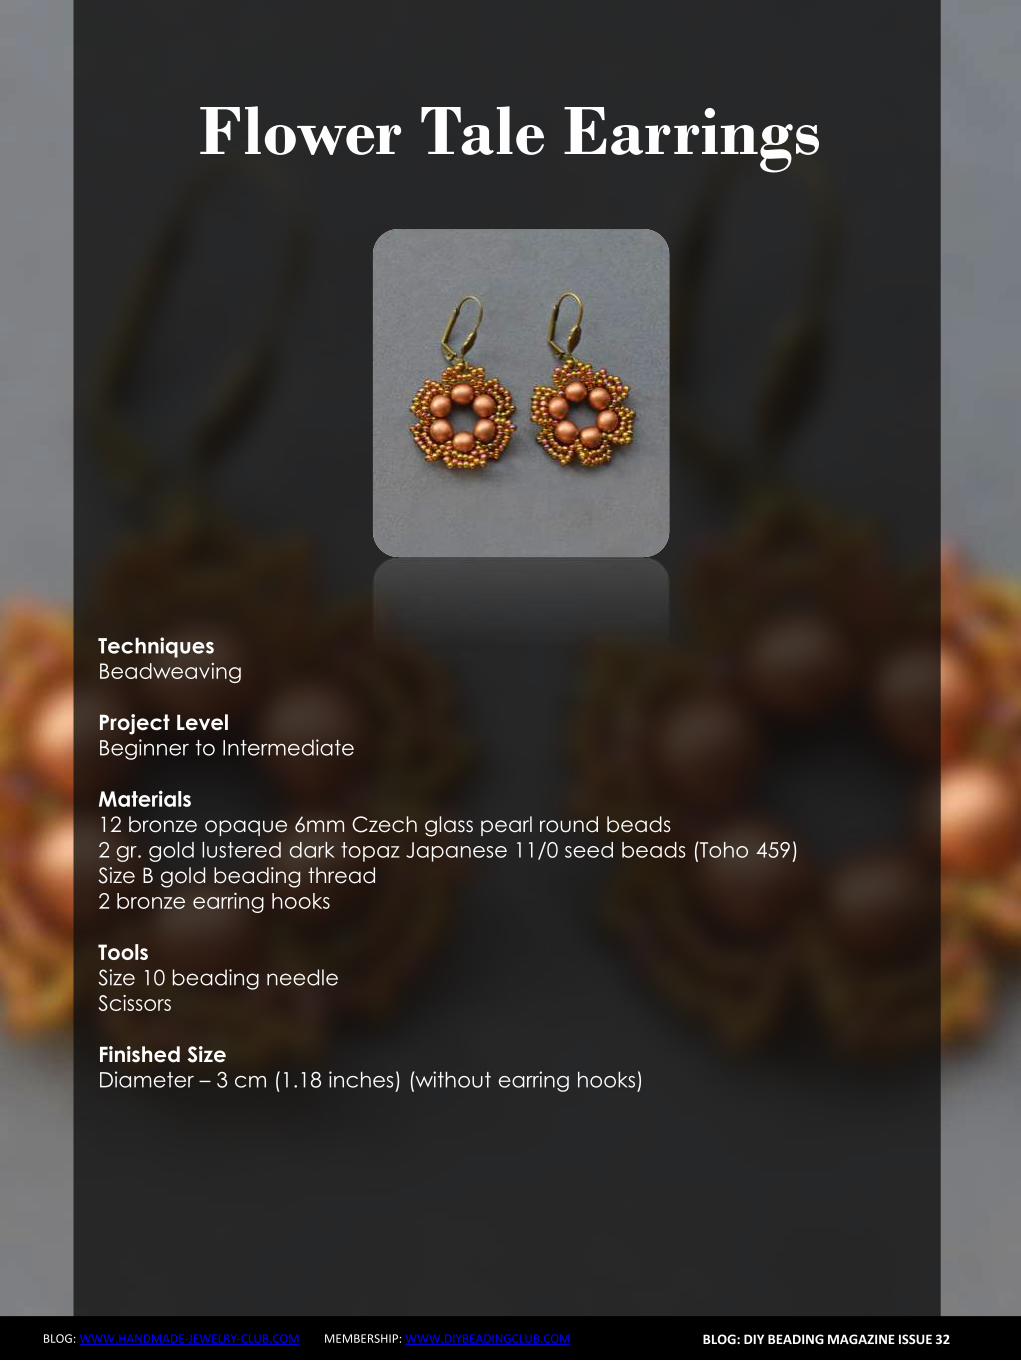
Liberty Earrings
BLOG WWWHANDMADE-JEWELRY-CLUBCOM MEMBERSHIP WWWDIYBEADINGCLUBCOM
Make a circle of 20 delica beads and make a knot (a) Perform two rounds peyote with ivory 80 seed beads (b c) Exit from an ivory
bead
BLOG DIY BEADING MAGAZINE ISSUE 32
a b c
Jump from 80 to 80 with 110 80 gold 110 (a) Finish the round and come out of a 80 gold bead
Jump to the next 80 gold with a 4mm pearl (b) Finish the round and come out
of the first pearl Jump to the 2nd pearl and close with a 80 gold bead(c)
a b c
Position the cabochon and jump from one 80 to the other with two delica bead (a)
Continue with three delicas four times (b) At the bottom sew on two delicas then finish the round by sewing on three delicas for four times passing from one to another roc 80 Tighten the cabochon and exit from the
first two delica that you started with String together a 110 and 150 and enter the second of the three close delicas (c)
a b c
Liberty Earrings
BLOG WWWHANDMADE-JEWELRY-CLUBCOM MEMBERSHIP WWWDIYBEADINGCLUBCOM
Put together 150 110 150 and enter in the second of three next delica (a) Put the same beads for three times then put together 150 and 110 and enter
in the two delica of the bottom tip (b) Enter in the second of three next delica with 110 and 150 (c) Continue passing
in the 80 beads with three beads (150 110 150) for four times then at the top finish the round by putting together a 150 and 110 (d)
BLOG DIY BEADING MAGAZINE ISSUE 32
a b c
Exit from the first 150 sewn in the previous round and jump in the three next beads with a 150 (a)
Put a 150 at a time and exit from the first 110 beads of the bottom tip Jump in the
near 110 with a 150 (b) Finish round repeating steps a and b (c) Exit the roc 80 as shown in the photo (d)
a b c
d
a b c d
Enter in the 80 with four 150 (a b) Enter the 80 beads at the bottom of the pieces with two 110 one superduo one 80 ivory bead one superduo and two 110 (c)
d e f
Liberty Earrings
BLOG WWWHANDMADE-JEWELRY-CLUBCOM MEMBERSHIP WWWDIYBEADINGCLUBCOM
Exit from the bottom pearl (a) Put together 150 three 110 150 and enter in the superduorsquos second hole (b)
Put together three superduo and enter in the next superduorsquos second hole (c) Rethread 15 three 110 150 and return in the opposite direction in the pearl of departure (d)
BLOG DIY BEADING MAGAZINE ISSUE 32
a b
c
Exit from the second pearl indicated from (a) Put 150 four 110 and enter in the second of the three 110 (b) Go to the second superduorsquos hole with four 110 and a 150 (c)
Enter the second hole of the supeduo with a 150(d) Sew in the middle of the bottom of the superduo 150 two 110 150 dagger 150 two 110 150(e)
Enter the second hole of the thirs superduo with 150 (f)
a b c
d
d e f
Liberty Earrings
BLOG WWWHANDMADE-JEWELRY-CLUBCOM MEMBERSHIP WWWDIYBEADINGCLUBCOM BLOG DIY BEADING MAGAZINE ISSUE 32
Put 150 four 110 and enter in the second of three 110 of the base (a) Insert four 110 and 150 in the pearl opposite direction indicated in the picture (b) Go in all the beads
around the piece and exit from the pearl at the top (c) Put 150 three 110 150 and enter the superduo (d)
Enter the ivory bead 80 with two 150 (e) Enter the next superduo with two 150 (f)
a b c
d e f
Put together 150 three 110 and enter in opposite direction in the departurersquos pearl (a) Exit from the 150 beads indicated by photo (b) From this jump in the second of two near
150 with five 150 to created the hole for the earwire (c) Pass the thread in the beads make a few knots and cut the excess thread
a b c
Your earrings are finished
Liberty Earrings
BLOG WWWHANDMADE-JEWELRY-CLUBCOM MEMBERSHIP WWWDIYBEADINGCLUBCOM
About the Author
Mariella Martella
My name is Mariella Martella and I am the author and
designer of jewelry that I sign with the name of Mariel Bijoux
After changing city often for work and study I currently live
in northern Italy I am an art historian with a passion for travel
painting and jewelry design in weaving that project since
2010 In my beads and crystals are the colors of the
Mediterranean sea the atmosphere of summer evenings
and the lights of the places I visited
You can find me at
Etsy shop httpswwwetsycomitshopMarielBijoux
Facebook httpswwwfacebookcommari3lbijoux
Crafting blog httpmarielbijouxblogspotit
Twitter httpstwittercomMarielBijoux
BLOG DIY BEADING MAGAZINE ISSUE 32
Jade Necklace
BLOG WWWHANDMADE-JEWELRY-CLUBCOM MEMBERSHIP WWWDIYBEADINGCLUBCOM
Every time I wear a necklace I always make it a point that the
necklace will lay perfectly flat on my neck Using wire for a necklace
made it possible for me like what I did with Jade Necklace It may look
odd at first having bent wires for a necklace but once the jewelry is
finished youll be so happy how the necklace will perfectly lay on your
neck
The tutorial is catered for intermediate level One must know basic
wirework skills such as wire wrapping making loops wrapped loops
and linking to follow the tutorial It has clear instructions and ultra-clear
close-up photos at each step Additionally you can ask me question
you have on the tutorial No more getting stuck and frustrated on a
confusing or just plain inaccurate pattern
If you followed this tutorial and then sell the accessory or jewelry
please give credit to the author or DIY Beading Clubcom
Copyright 2015
wwwdiybeadingclubcom
wwwhandmade-jewelry-clubcom
BLOG DIY BEADING MAGAZINE ISSUE 32
Jade Necklace
BLOG WWWHANDMADE-JEWELRY-CLUBCOM MEMBERSHIP WWWDIYBEADINGCLUBCOM BLOG DIY BEADING MAGAZINE ISSUE 32
Materials Needed 18ga Craft wire 28ga Craft wire 15mm diameter Green Round Flat Back Sew On Gems 5mm Green pearls
8mm Green pearls 6mm x 11mm teardrop Crystal Treasures Mill Hill beads or any teardrop bead with holes on the side Hook for your clasp
Tools Needed Wire cutter Flat nose pliers Round nose pliers Mandrel A jar or any rounded object to shape your necklace
Skill Level Intermediate
Step 1 Cut 6 inches 18ga wire Make a loop on one end then measure approximately 125 inches and make another loop
Form a size 4 circle on your mandrel
Jade Necklace
BLOG WWWHANDMADE-JEWELRY-CLUBCOM MEMBERSHIP WWWDIYBEADINGCLUBCOM BLOG DIY BEADING MAGAZINE ISSUE 32
Then close the circle by wrapping the extended wire just below the loop Wrap the
wire 2x
This is how it looks like Lets call this circle frame Youll notice that the lower curve is
slightly bigger than the upper curve
Step 2 Cut 8 inches of 28ga wire Wrap one end of
the wire at least 3x on one side of the circle frame just below the loop
Bring up your gem Flat back sew on gems has 2 holes Insert the wire into one hole and then
wrap the wire once onto the circle frame
Jade Necklace
BLOG WWWHANDMADE-JEWELRY-CLUBCOM MEMBERSHIP WWWDIYBEADINGCLUBCOM BLOG DIY BEADING MAGAZINE ISSUE 32
Step 3 Insert a 5mm pearl on the wire and then pass
the wire under circle frame
Repeat previous step 2x and have 3 pearls wrapped
Continue wrapping with your teardrop crystal My crystal has 2 holes on the side
and then continue wrapping with your 5mm pearls then secure your wire
Repeat Step 3 and create as many as needed For 16-inch necklace Ive created 6 of these
components
Jade Necklace
BLOG WWWHANDMADE-JEWELRY-CLUBCOM MEMBERSHIP WWWDIYBEADINGCLUBCOM BLOG DIY BEADING MAGAZINE ISSUE 32
Step 4 Cut a 15-inch 18ga wire and make a loop on
one end Insert 8mm pearl and make a loop on the other end You then use these as connectors
and link the components
Step 5 The necklace is an 18ga wire with wrapped
loops on both ends First cut 7 inches 18ga wire and make a wrapped loop with your hook already inserted Side in 18pcs 5mm pearls
Then make a wrapped loop on the other end connecting the wrapped loop onto the component Do the same for the other
necklace but make the loop on the other end big enough so the hookclasp can pass thru
To have the necklace curve shaped use a jar to bend the wire Voila Now youre
ready to party
Jade Necklace
BLOG WWWHANDMADE-JEWELRY-CLUBCOM MEMBERSHIP WWWDIYBEADINGCLUBCOM
About the Author
Sky Aldovino
I consider myself a late bloomer when it comes to crafting Irsquom a self-taught jewelry maker Jewelry making wasnrsquot really a hobby of mine but unforeseen events lead me to learn jewellery making My family put up a craft store where we sell cross stitch beads and all sorts of crafting materials I fell in love with the beads and tried to create accessories only for myself Clients liked the pieces and I started customizing handmade jewelleries The craft store was a success for 6 years but like any other small businesses we had to close it down and I was confined to staying at home While at home I had all the time using the internet and now working as a home-based jewelry designer
BLOG DIY BEADING MAGAZINE ISSUE 32
Atomic Ring
BLOG WWWHANDMADE-JEWELRY-CLUBCOM MEMBERSHIP WWWDIYBEADINGCLUBCOM
Have fun making shapes using the wigjig Cyclops Make loops going in
circles to mimic the shape of a flower or in this tutorial mimic the
shape of an atom The tutorial will also teach you how to cage a
cabochon Whats nice about this piece is that with one long wire you
can create the ring from start to finish
The tutorial is catered for intermediate to advanced students One
must already know how to make spirals and use a wigjig tool It has
clear instructions and ultra-clear close-up photos at each step
Additionally you can ask me question you have on the tutorial No
more getting stuck and frustrated on a confusing or just plain
inaccurate pattern
If you followed this tutorial and then sell the accessory or jewelry
please give credit to the author or DIY Beading Clubcom
If you like to get a blank wigjig graph visit wigjigcom Shop and Jigs
section
Copyright 2015
wwwdiybeadingclubcom
wwwhandmade-jewelry-clubcom
BLOG DIY BEADING MAGAZINE ISSUE 32
Atomic Ring
BLOG WWWHANDMADE-JEWELRY-CLUBCOM MEMBERSHIP WWWDIYBEADINGCLUBCOM
Materials Needed 20ga Craft wire 28ga Craft wire 11mm Round Cabochon
Tools Needed Wigjig Cyclops 15mm pegs Wire cutter Flat nose pliers Mandrel
Skill Level Intermediate - Advanced
BLOG DIY BEADING MAGAZINE ISSUE 32
Step 1 Lets prepare your wigjig cyclops Position the pegs like so
Atomic Ring
BLOG WWWHANDMADE-JEWELRY-CLUBCOM MEMBERSHIP WWWDIYBEADINGCLUBCOM BLOG DIY BEADING MAGAZINE ISSUE 32
Lets work with longer wire so youll have enough wire to hold onto as you manipulate the wire so cut 36 inches of 20ga wire From
one end of the wire measure 10 inches
On the 10-inch measurement loop the wire at the center peg then continue to loop onto the side pegs going in circle going back to
the center peg after looping on the side peg
Now the wire at the center peg will start to build up as you go around the side pegs so
you need to constantly press the wire at the center peg to accommodate the build up of
wire
When youre done pull out the wire and this is
how it should look like
Atomic Ring
BLOG WWWHANDMADE-JEWELRY-CLUBCOM MEMBERSHIP WWWDIYBEADINGCLUBCOM BLOG DIY BEADING MAGAZINE ISSUE 32
You will notice that the frame opens wide Now to keep the atom frame from opening wide secure the center of the frame by wrapping a 28ga wire What you
need to do is simply pass the 28ga wire into the hole and wrap as many times as needed or until youre sure that the frame is secure
Step 2 Now youre finished with your atom frame Well now create the focal design With the longer wire make a spiral at the center big
enough to accommodate the size of your cabochon In this tutorial the spiral is about
11mm in diameter the same size as my cabochon
Pop in your cabochon and start to make spirals going around and over the cabochon as if you are caging the cabochon Create at
least 5 rounds and then cut off any excess
Step 3 Now lets make the ring and this with the other
end of the wire
Atomic Ring
BLOG WWWHANDMADE-JEWELRY-CLUBCOM MEMBERSHIP WWWDIYBEADINGCLUBCOM BLOG DIY BEADING MAGAZINE ISSUE 32
Bring up your mandrel and wrap the wire to the size of your finger Wrap at least 2 times
When youre sure you have the right size pull the ring out of the mandrel
With the extended wire wrap the wire the secure the ring
Cut off any excess and voila You have your atomic ring Create as many as you can with different colors of cabochon
Atomic Ring
BLOG WWWHANDMADE-JEWELRY-CLUBCOM MEMBERSHIP WWWDIYBEADINGCLUBCOM
About the Author
Sky Aldovino
I consider myself a late bloomer when it comes to crafting Irsquom a self-taught jewelry maker Jewelry making wasnrsquot really a hobby of mine but unforeseen events lead me to learn jewellery making My family put up a craft store where we sell cross stitch beads and all sorts of crafting materials I fell in love with the beads and tried to create accessories only for myself Clients liked the pieces and I started customizing handmade jewelleries The craft store was a success for 6 years but like any other small businesses we had to close it down and I was confined to staying at home While at home I had all the time using the internet and now working as a home-based jewelry designer
BLOG DIY BEADING MAGAZINE ISSUE 32
Featured Article Gemstones Used for Jewelry Making
BLOG WWWHANDMADE-JEWELRY-CLUBCOM MEMBERSHIP WWWDIYBEADINGCLUBCOM
Gemstones are stones which we hold quite highly in terms of value And
jewelry often consists of stones that add attractiveness to it so it is not
surprising when jewelry designers actually use gemstones in their designs In
fact there are different types of gemstones that can be used for making
jewelry There are the expensive and pure gemstones and there are also the
imitation ones The information below will provide some information about
the kinds of stones you can use to create jewelry and how these stones will
impact the jewelry you have created
The first kind of stone which I believe we are all quite familiar with are
birthstones These stones are associated with individualrsquos month of birth
by SunVDesigns by BeyhanAkman
For example Amethyst stone is connected with anybody who is born in
February which carries special significance in the area of emotions and also
spiritually This stone also signifies calm and peace as well
And then we have semi-precious stones which are also often used in jewelry
making They are not as valuable as compared to precious stones but still
valuable Best examples of these stones are aquamarine topaz tourmaline
opal and turquoise
BLOG DIY BEADING MAGAZINE ISSUE 32
Featured Article Gemstones Used for Jewelry Making
BLOG WWWHANDMADE-JEWELRY-CLUBCOM MEMBERSHIP WWWDIYBEADINGCLUBCOM
It is an ideal gift for someone who you deem special Aquamarine pendants
usually work well for anyone and is widely an accepted stone
by HyppieChic by joyeriamestiza
However precious stones are the most unusual
and precious jewels to us Examples of some of
them are emerald sapphire diamond and
ruby These stones are usually very expensive
and are prized for their exquisiteness These
stones are commonly used in high-quality
jewelry designs which costs quite a fortune to
obtain
BLOG DIY BEADING MAGAZINE ISSUE 32
by sarajewelrystu
Jewelry designs with precious stones are usually
given as exceptional gifts on special occasions A
perfect example is a diamond ring that is usually
given as an engagement gift
by ldiamondsforever
Featured Article Gemstones Used for Jewelry Making
BLOG WWWHANDMADE-JEWELRY-CLUBCOM MEMBERSHIP WWWDIYBEADINGCLUBCOM
There are also synthetic stones which are often used to create jewelry
Synthetic stones are artificial imitations of gemstones Synthetic Sapphire
jewelry costs less compare with the authentic ones Most of the time
imitation stones are used to save cost but at the same time have the similar
look of the real stone
BLOG DIY BEADING MAGAZINE ISSUE 32
by shininggems by thaimaker
by lapinduprintemps by PastimeArt
Gemstones are used like beads and you can use it in any designs whether
simple or elaborate
Swarovski crystal components are available in a rich multitude of rondelles Perfect as spacers in necklaces or as discs in earrings Rondelles can be used with many varieties of shapes or sizes Use Swarovski crystal rondelles between large gemstones as accents with precious metal findings Fire Mountain Gems and Beads Crystal Passionsreg brand presents Swarovski crystal in display-ready packaging for brilliant retail presentation Crystal Passionsreg is an assurance of genuine Swarovski crystal
BLOG DIY BEADING MAGAZINE ISSUE 32 BLOG WWWHANDMADE-JEWELRY-CLUBCOM MEMBERSHIP WWWDIYBEADINGCLUBCOM
Recommended Jewelry Making Supplies
Mz Unisex-adults 12pcs 25x18x6mm Turquoise Oval CAB Cabochon
BLOG DIY BEADING MAGAZINE ISSUE 32 BLOG WWWHANDMADE-JEWELRY-CLUBCOM MEMBERSHIP WWWDIYBEADINGCLUBCOM
Recommended Jewelry Making Supplies
For a little sparkle that goes a long way design with Swarovski 4mm faceted bicones Create glorious multi-strand necklaces with the dainty crystals or use as spacers to add a tiny flash to your designs Swarovski crystal components are made in Austria and are considered the finest products of their kind in the world
BLOG DIY BEADING MAGAZINE ISSUE 32 BLOG WWWHANDMADE-JEWELRY-CLUBCOM MEMBERSHIP WWWDIYBEADINGCLUBCOM
Recommended Jewelry Making Supplies
Imitation beads resist color change These beads have uniform quality with a good polish Some strands may have little to no matrix Sizes shapes and colors may vary with handcrafted items
BLOG DIY BEADING MAGAZINE ISSUE 32 BLOG WWWHANDMADE-JEWELRY-CLUBCOM MEMBERSHIP WWWDIYBEADINGCLUBCOM
Recommended Jewelry Making Supplies
Something Blue Necklace and Earrings
BLOG WWWHANDMADE-JEWELRY-CLUBCOM MEMBERSHIP WWWDIYBEADINGCLUBCOM
Skill level Beginner Intermediate Advanced
DIMENSIONS OF THE NECKLACE Inner Circumference 14 18 inch 35 cm
Focal Pendant Width 1 15 inch 35 cm Focal Pendant Height 1 15 inch 35 cm
DIMENSIONS OF THE EARRING Earring Width 716 inch 12 cm Earring Height 1516 inch 25 cm (Without the earring hook)
BLOG DIY BEADING MAGAZINE ISSUE 32
Materials
Note Before purchasing the supplies measure the length of your wished necklace If you decide to bead a longer necklace you should keep in mind that for every extra
frac34 inches 2 cm-s you will need 8 bicones and 8 pearls
Something Blue Necklace and Earrings
BLOG WWWHANDMADE-JEWELRY-CLUBCOM MEMBERSHIP WWWDIYBEADINGCLUBCOM BLOG DIY BEADING MAGAZINE ISSUE 32
Work RAW stitch into a beaded circle and embellish with Swarovski bicones
STEP 2 String 1A and 2 pearls Pass through the previous
second pearl and the freshly added 1A and the first pearl again
STEP 1 Use a comfortable length of thread to string 2
pearls 1A and 1 pearl again leaving a 2rdquo 5cm tail Pass through the first two pearls strung to form a
ring
STEP 3 String 2 pearls and 1A Pass through the previous first pearl and the freshly added two pearls
again
STEP 4 - 17 Repeat STEP 2 and STEP 3 again until you count 17 pearls in the inner circle
But be careful in the last step you only have to add 1 pearl then pass through the first pearls
added in STEP 1 and add another 1A Now pass through the first pearl added in STEP
1and 1A added in this round again to exit from this A
Something Blue Necklace and Earrings
BLOG WWWHANDMADE-JEWELRY-CLUBCOM MEMBERSHIP WWWDIYBEADINGCLUBCOM BLOG DIY BEADING MAGAZINE ISSUE 32
STEP 19 String 2A and pass through the next A added in round 4-17 and the A added in round 18 the 2A added in this round and finally the A added in round 4-17 to exit from the bead showed below
STEP 18 String 3A and pass through the 1A added in the previous round and the first A added in this
round
STEP 20 - 34 Repeat STEP 18 and STEP 19 again until you finish the circle
But be careful in the last step first you have to pass through 3A and then add 1A After this pass
through the 3A again and exit from the A bead
shown below (This is the first A added in STEP 18)
Something Blue Necklace and Earrings
BLOG WWWHANDMADE-JEWELRY-CLUBCOM MEMBERSHIP WWWDIYBEADINGCLUBCOM BLOG DIY BEADING MAGAZINE ISSUE 32
STEP 35 Step up to exit from the pearl shown below (Finishing the previous step in the A bead and then
stepping up from there makes the circle more secure)
Now string 3 bicones Pass through the pearl and the first bicone again
In the reality your circle will look more like this the A beads forming a strong row in the middle of the
pearls
STEP 36 Add 2 bicones Pass through the
neighboring pearl the first bicone added in the previous row and the 2 bicones added in this step
so you can exit from the next pearl
Something Blue Necklace and Earrings
BLOG WWWHANDMADE-JEWELRY-CLUBCOM MEMBERSHIP WWWDIYBEADINGCLUBCOM BLOG DIY BEADING MAGAZINE ISSUE 32
Now in the reality your circle will look more like this the A beads still forming a strong row in the middle of the pearls and the bicones slightly lying on top of
them
STEP 37 - 49 Repeat STEP 35 and STEP 36 again until you finish the circle with the bicones
But be careful in the last step first you have pass through the third bicone added then add 1 bicone
and pass through this little quartet to exit from the bicone shown below (The second one added in
STEP 35)
STEP 50 With these steps we finish the circle by adding 1 bicone to connect the A beads and the
bicone row So add 1 bicone pass through the nearest A bead and add 1 bicone again Pass
through the bicone already there and exit from the bicone you just added
Something Blue Necklace and Earrings
BLOG WWWHANDMADE-JEWELRY-CLUBCOM MEMBERSHIP WWWDIYBEADINGCLUBCOM BLOG DIY BEADING MAGAZINE ISSUE 32
STEP 66-83 Secure the circle by adding 1A between each bicone in the second row of Swarovski
bicones If you finished secure the thread and trim
STEP 51-65 Using the same technique as in STEP 37 - 49 add 1 bicone to finish the third bicone row The black line shows you the way (After STEP 50 pass through the next A bead add 1 bicone and pass through the bicone already there and the bicone added in the previous step Repeat these steps to
finish the inner bicone circle)
MIDDLE CIRCLE Work RAW stitch into a beaded circle and embellish with
Swarovski bicones Remember you need to bead two circles this time
STEP 1 Just like in the focal circle begin with 2 pearls 1A and 1 pearl again on a comfortable length of thread
leaving a 2rdquo 5cm tail Pass through the first two pearls strung to form a ring
Something Blue Necklace and Earrings
BLOG WWWHANDMADE-JEWELRY-CLUBCOM MEMBERSHIP WWWDIYBEADINGCLUBCOM BLOG DIY BEADING MAGAZINE ISSUE 32
STEP 15-28 Mimicing the FOCAL CIRCLElsquos STEP 18-34 bead A beads until you finish the inner part of the
circle Exit from a pearl in the second row This circle should look very similar to the first one but this is a bit
smaller
STEP 2-14 Mimicing the FOCAL CIRCLElsquos STEP 2-17 bead until you count 14 pearls in the inner circle Exit
from the last A added
STEP 29-42 Mimicing FOCAL CIRCLElsquos STEP 35-49 add 2 rows of bicones
STEP 43-56 Mimicing the FOCAL CIRCLElsquos STEP 50-65 bead the third row of bicones to finish the circle
Something Blue Necklace and Earrings
BLOG WWWHANDMADE-JEWELRY-CLUBCOM MEMBERSHIP WWWDIYBEADINGCLUBCOM BLOG DIY BEADING MAGAZINE ISSUE 32
SMALLEST CIRCLE Work RAW stitch into a beaded circle and embellish
with Swarovski bicones Remember you need to bead two circles again
STEP 1 Just like in the focal circle begin with 2 pearls
1A and 1 pearl again on a comfortable length of thread leaving a 2rdquo 5cm tail Pass through the first two
pearls strung to form a ring
STEP 57-70 Just like the FOCAL CIRCLElsquos STEP 66-83 secure the circle by adding 1A between every bicone
in the second row of bicones If you finished secure the thread and trim (Donrsquot forget to bead another
circle)
STEP 2-12 Mimicing the FOCAL CIRCLElsquos STEP 2-17 bead until you count 12 pearls in the inner circle Exit
from the last A added
STEP 13-24 Mimicing the FOCAL CIRCLElsquos STEP 18-34 bead A beads until you finish the inner part of the
circle Exit from a pearl in the second row This circle should look very similar to the first two but this is the
smallest of them all
Something Blue Necklace and Earrings
BLOG WWWHANDMADE-JEWELRY-CLUBCOM MEMBERSHIP WWWDIYBEADINGCLUBCOM BLOG DIY BEADING MAGAZINE ISSUE 32
STEP 37-48 Mimicing the FOCAL CIRCLElsquos STEP 50-65 bead the third row of bicones to finish this circle too
STEP 25-36 Mimicing FOCAL CIRCLElsquos STEP 35-49 add 2
rows of bicones The last step here is purple again
STEP 49-60 Just like the FOCAL CIRCLElsquos STEP 66-83 secure the circle by adding 1A between every bicone
in the second row of bicones If you finished secure the thread and trim (Donrsquot forget that you need two
small circles)
Something Blue Necklace and Earrings
BLOG WWWHANDMADE-JEWELRY-CLUBCOM MEMBERSHIP WWWDIYBEADINGCLUBCOM BLOG DIY BEADING MAGAZINE ISSUE 32
STEP 37-48 Mimicing the FOCAL CIRCLElsquos STEP 50-65 bead the third row of bicones to finish this circle too
STEP 25-36 Mimicing FOCAL CIRCLElsquos STEP 35-49 add 2
rows of bicones The last step here is purple again
STEP 49-60 Just like the FOCAL CIRCLElsquos STEP 66-83 secure the circle by adding 1A between every bicone
in the second row of bicones If you finished secure the thread and trim (Donrsquot forget that you need two
small circles)
Something Blue Necklace and Earrings
BLOG WWWHANDMADE-JEWELRY-CLUBCOM MEMBERSHIP WWWDIYBEADINGCLUBCOM BLOG DIY BEADING MAGAZINE ISSUE 32
STEP 2-6 Continue by adding 1A 1 bicone 1 pearl until you count 6 of each
STEP 1 Begin with 1 pearl 1 bicone 1A and 1 bicone again on a comfortable length of thread leaving a 2rdquo
5cm tail Pass through the pearl and the first bicone strung to form a ring
STEP 7-12 Pass through the A beads to make your
component more secure Also secure the thread and trim (Repeat these steps until you have six 6-BEAD
COMPONENTs)
6-BEAD COMPONENT Work RAW stitch into a beaded circle and embellish with Swarovski bicones
For the necklace we will need six from this component For the earring two
Something Blue Necklace and Earrings
BLOG WWWHANDMADE-JEWELRY-CLUBCOM MEMBERSHIP WWWDIYBEADINGCLUBCOM BLOG DIY BEADING MAGAZINE ISSUE 32
STEP 2-4 Continue by adding 1A 1 bicone 1 pearl
until you count 4 of each
STEP 1 Begin with 1 pearl 1 bicone 1A and 1 bicone again on a comfortable length of thread leaving a 2rdquo
5cm tail Pass through the pearl and the first bicone strung to form a ring
STEP 5-8 Pass through the A beads to make your component more secure Also secure the thread and
trim (Repeat these steps until you have the wished amount of 4-BEAD COMPONENTs)
4-BEAD COMPONENT Work RAW stitch into a beaded circle and embellish with Swarovski bicones
For the necklace-size that is given on the second page we will need 20 from this
component For the earring two
If you would like to make a longer necklace you need to make more (One 4-BEAD COMPONENT measures about 38 inch 1 cm To make the necklace symmetrical you have to have equal amounts on each side This means for every extra frac34 inches
2 cm-s you will need 1 4-BEAD COMPONENT on each side of the necklace)
Something Blue Necklace and Earrings
BLOG WWWHANDMADE-JEWELRY-CLUBCOM MEMBERSHIP WWWDIYBEADINGCLUBCOM BLOG DIY BEADING MAGAZINE ISSUE 32
STEP 2 Connect the MIDDLE CIRCLE to two 6-BEAD COMPONENTs by adding four-times 2As
between the pearls Choose a pearl on the MIDDLE CIRCLE and add
2A pass through a pearl in the 6-BEAD COMPONENT previously added and add 2A again Watch out this has to be symmetrical Repeat this at least two more times to make it
secure Now repeat this entire procedure but choose
the 8-th pearl on MIDDLE CIRCLE Repeat this on the other side of the necklace
too
Choose a pearl on the FOCAL CIRCLE and add 2A pass through a pearl in the 6-BEAD COMPONENT and add 2A again Repeat this at least two more times to make it secure
Now repeat this entire procedure but choose the 5-th pearl on FOCAL CIRCLE This will make the necklace nice on your neck
FINISHING THE NECKLACE Connects the parts with A beads
STEP 1 Connect the FOCAL CIRCLE to two 6-BEAD COMPONENTs by adding four-times 2As between the pearls To do this turn your parts upside down you need to
see the pearls We will work on this side from now on
Something Blue Necklace and Earrings
BLOG WWWHANDMADE-JEWELRY-CLUBCOM MEMBERSHIP WWWDIYBEADINGCLUBCOM BLOG DIY BEADING MAGAZINE ISSUE 32
FINISHING THE EARRING Connects the parts with A beads
STEP 1-2 Connect the 6-BEAD COMPONENT
to 4-BEAD COMPONENT and the 4-BEAD
COMPONENT to the earring hook
First connect the 4-BEAD COMPONENT to the 6-BEAD COMPONENT with 4A beads Mimic
the elongation steps of the necklace if needed
Secondly connect the 4-BEAD COMPONENT
to your earring hook with 4A beads again Leave from the last pearl bead 2A beads the hook (this is the orange oval form) and 2As again Pass through each of them to
secure this connection again
Finally get ready to prepare the other earring ndash since we need two of them
STEP 5 Connect the 4-BEAD COMPONENTs to the toggle clasp thus finishing the
necklace Leaving from the last pearl bead 2A the
clasp(this is the orange oval form) and 2A again Pass through all of them a couple more times to make this connection more
secure
Something Blue Necklace and Earrings
BLOG WWWHANDMADE-JEWELRY-CLUBCOM MEMBERSHIP WWWDIYBEADINGCLUBCOM BLOG DIY BEADING MAGAZINE ISSUE 32
If you finished it is time to try it on It was a great fun wasnrsquot it And how beautiful you look in your new necklace and the matching earrings
Something Blue Necklace and Earrings
BLOG WWWHANDMADE-JEWELRY-CLUBCOM MEMBERSHIP WWWDIYBEADINGCLUBCOM
About the Author
Margit Vogel
My name is Margit Vogel I live in Hungary Europe
By profession I am a biochemical engineer but I fell in love with
beads so much that I could not stop playing with them
I make one-of-a-kind beaded and bead embroidered art
jewelry made of the best quality materials such as Swarovski
stones gemstones Japanese beads (Miyuki and Toho) Czech
glass beads leather soutache and suede Each piece is unique
and individually crafted
Feel free to visit my blog for some eyecandy
httpiformjewelrywordpresscom
My shop httpwwwetsycomshopiformjewelry
Facebook httpwwwfacebookcomiformjewelry
BLOG DIY BEADING MAGAZINE ISSUE 32
Getting Down And Personal With Gianna
Getting Down And Personal With Gianna
Nowadays we see more and more jewelry stores opening up online and with these online jewelry stores it has made it easier for us to purchase and view their creations Have you ever wondered how they are able to manage and produce amazing jewelry pieces and tutorials So heres a little on the journey to open up an online shop We are excited to present to you Gianna aka Beading4perfectionists
Gianna Beader amp Youtuber
Unlike most jewelry makers and beadweavers Gianna did not start beading as a hobby but as a means to make ends meet With goals in trying to
fill the financial gap she did everything she could to expand her earnings ndash working as a security guard
and at the same time learning how to bead and selling her pieces at fair trades and flea markets
Since many were asking if she does home beading workshops she started on exploring how to teach people to bead She loves Scott Bakula and has always loved him till now and this served as her
inspiration to start making a beading video tutorial
Gianna started creating videos because she was at the point in her life where everything seemed to be falling apart And at that moment of time she had difficulties financially and selling jewelry was the only way for her to stay afloat financially She is a big Scott Bakula fan and when she went to the UK to see him on stage that was when it hit her that she is already able to edit videos and
taught herself Photoshop and done workshops at bead fairs so why not put these together and see what happens on Youtube She knew that if she gets enough subscribers and views ndash though no one knew what the exact numbers were you would be invited to become a Youtube partner This way she could monetize her videos with advertisements and hopefully she would be able to be a Youtube partner and be able to pay her bills
BLOG WWWHANDMADE-JEWELRY-CLUBCOM MEMBERSHIP WWWDIYBEADINGCLUBCOM BLOG DIY BEADING MAGAZINE ISSUE 32
Getting Down And Personal With Gianna
Her Youtube channel is popular and the reason why she chose Youtube is because Youtube is the biggest platform and reached almost to the whole world Everyone already knows about it and it was growing rapidly as compared to other platforms like Dailymotion so she figured that Youtube was the way to go Her advice to new designers is that when you start out go to the platforms on the top of your list first then work your way down your list if you do not get accepted by your first choice
After loyally putting up one video every week for about 8 months in a row she became a Youtube partner and monetized her videos She knew she needed at least $100 to get her first payout She managed to reach $100 after 3 months The process was not easy she worked hard lack sleep skipped meals and who knows what happened to Ridge in the Bold and the Beautiful because she stopped watching
On Youtube you can monetize your videos Google pays straight to your bank account and at other countries where they also have the option of getting checks among other options In order to get paid you have to reach the $100 mark and after 3 months For Gianna she thinks that you cannot say that Etsy is better than Youtube or Youtube is better than Etsy Her reasoning is because on Youtube she has many followers which will eventually check out her Etsy shop And to start an Etsy shop you need an audience
BLOG WWWHANDMADE-JEWELRY-CLUBCOM MEMBERSHIP WWWDIYBEADINGCLUBCOM BLOG DIY BEADING MAGAZINE ISSUE 32
television and dedicated her spare time (as she had another job) to Youtube She re-registered at the chamber of commerce after receiving her first payout Her work at Youtube now is not a full time job and things have changed on Youtube It is easier to become a parter but there are some countries that need to wait for an invitation to be a Youtube partner Take Italy for instance Italians would have to work just as hard as she did if they want to become a Youtube partner
Getting Down And Personal With Gianna
With her 60000 subscribers on her b4pbakup Youtube channel it is possible to sell at least 60 patterns on the first day on Etsy after promoting the PDF file on her Youtube channel Though you may think that 60 out of 60000 is not much you have to remember that not everyone has the means to purchase the PDF file and a lot of people still rather watch her carry out the tutorial(for free) on Youtube instead of reading the patterns or paying for the patterns even if the pattern is for a fundraiser and only cost $2 Her insights on Youtube is that Youtube is not what it used to be 6 years ago Instead of making more money every month she is making less and less because advertisers have more options of where they want to advertise their ads Ads do not pay as much as they used to Back in the days you could get 25 cents per ad Now you count yourself lucky if you could get 5 cents roll in after two hours
BLOG WWWHANDMADE-JEWELRY-CLUBCOM MEMBERSHIP WWWDIYBEADINGCLUBCOM BLOG DIY BEADING MAGAZINE ISSUE 32
And on top of that adblockers are destroying Youtube channel owners Youtube will start making changes to the channels where there will be ldquopaid subscriptionrdquo channels This has already been implemented in some countries but not in her country The Netherlands This means there will no longer be ads for her monthly paying subscribers She hopes that Youtube will add on a paid per video option feature The option to be a paid channel or free channel or to start a new channel for paying customers is yours to choose Gianna is not happy with Youtube because many others like her have worked so hard and for some years to become Youtube partners(which was something to be proud of) has lost their status
Getting Down And Personal With Gianna
Her advice for those who want to go on Youtube is 1 Do it because you want to teach
2 Do it because you want a career with beads
BLOG WWWHANDMADE-JEWELRY-CLUBCOM MEMBERSHIP WWWDIYBEADINGCLUBCOM BLOG DIY BEADING MAGAZINE ISSUE 32
After putting up about 20 videos and having at least 5000 subscribers add the PDF tutorials to Etsy and Craftsy She found out that her audience would like to have the PDF after watching her videos This is because they would rather print out the PDF and work while seated in a comfy chair technically somewhere else instead of having to pause the video time and time again
Gianna has also made a video for those who want to know the whole story of her journey up until the present day And to get updates on her you can check it out here She has also started a vlog where she tells of how she still works towards becoming a financial independent beader and explains her journey to get where she wants to be(or die trying) Gianna will be in the UK on October the 17th giving an all-day workshop with 4 different patterns
(2 beginners and 2 advanced) in Wotton-under-Edge
Gianna will be there Friday night as the workshop is on Saturday She will be leaving on Sunday Her
doors are open to all who wants to continue the party with her at the hotel across the street
For more information do contact Ann Tucker on Facebook
httpswwwfacebookcomanntucker501
Rec
omm
end
ed R
ead
ings
Making Jewelry with Gemstone
Beads
Combines the popular craft of beading with beautiful semi-precious stones which are collected by many Features a variety of versatile ideas which can be adapted for any type of gem or bead Readers will learn to reate beautiful gemstone jewelry with this dazzling collection of over 100 projects ranging from eyecatching earrings and accessories to exquisite necklaces and bracelets This beautiful book offers an impressive range of 28 beautiful semi-precious stones (including birthstones) and a glimpse into the fascinating history and mythical properties behind them
BLOG DIY BEADING MAGAZINE ISSUE 32 BLOG WWWHANDMADE-JEWELRY-CLUBCOM MEMBERSHIP WWWDIYBEADINGCLUBCOM
Rec
omm
end
ed R
ead
ings
Convertible Crystal Jewelry
Reverse it Twist it Wear it Many
Ways
Diane Whiting presents the idea that convertibility isnrsquot just about using pieces in multiple ways it is also about using skills and creativity in multiple ways Using ever-popular sparkling crystals Diane showcases design elements through various techniques for fun easy fashionable jewelry With 25 projects the reader can choose from bracelets necklaces and earrings that match any outfit or styleDiane Whiting presents the idea that convertibility isnrsquot just about using pieces in multiple ways it is also about using skills and creativity in multiple ways
BLOG DIY BEADING MAGAZINE ISSUE 32 BLOG WWWHANDMADE-JEWELRY-CLUBCOM MEMBERSHIP WWWDIYBEADINGCLUBCOM
Rec
omm
end
ed R
ead
ings
Wire Jewelry Masterclass
Wrapped Coiled and Woven Pieces
Using Fine Materials
Comprehensive and fabulous Wire Jewelry Masterclass takes an in-depth look at an intricate and rewarding craft The 24 projects which range from simple Dragons tear briolette earrings to a Poseidon-under-the-sea pendant will delight and inspire jewelers of all levels and tastes Divided into beginner intermediate and advanced sections this beautifully photographed step-by-step guide is the ticket to wire jewelry expertise
BLOG DIY BEADING MAGAZINE ISSUE 32 BLOG WWWHANDMADE-JEWELRY-CLUBCOM MEMBERSHIP WWWDIYBEADINGCLUBCOM
Rec
omm
end
ed R
ead
ings
Timeless Wire Weaving The
Complete Course
Timeless Wire Weaving focuses on developing wirework skills through 13 projects using three classic wire weaving techniques coiling wrapping and weaving The projects are built around a focal cabochon and incorporate seed beads and crystals in imaginative ways Designers learn to make the jewelry shown in the book and they also use the techniques learned to create innovative jewelry pieces of their own
BLOG DIY BEADING MAGAZINE ISSUE 32 BLOG WWWHANDMADE-JEWELRY-CLUBCOM MEMBERSHIP WWWDIYBEADINGCLUBCOM
Our digital magazine is available through
Apple Newsstand service available to millions of IPAD users
To advertise with us please email us at
diyjewelryclubgmailcom
Or visit our page at
httphandmade-jewelry-clubcomadvertising-diy-beading-magazine
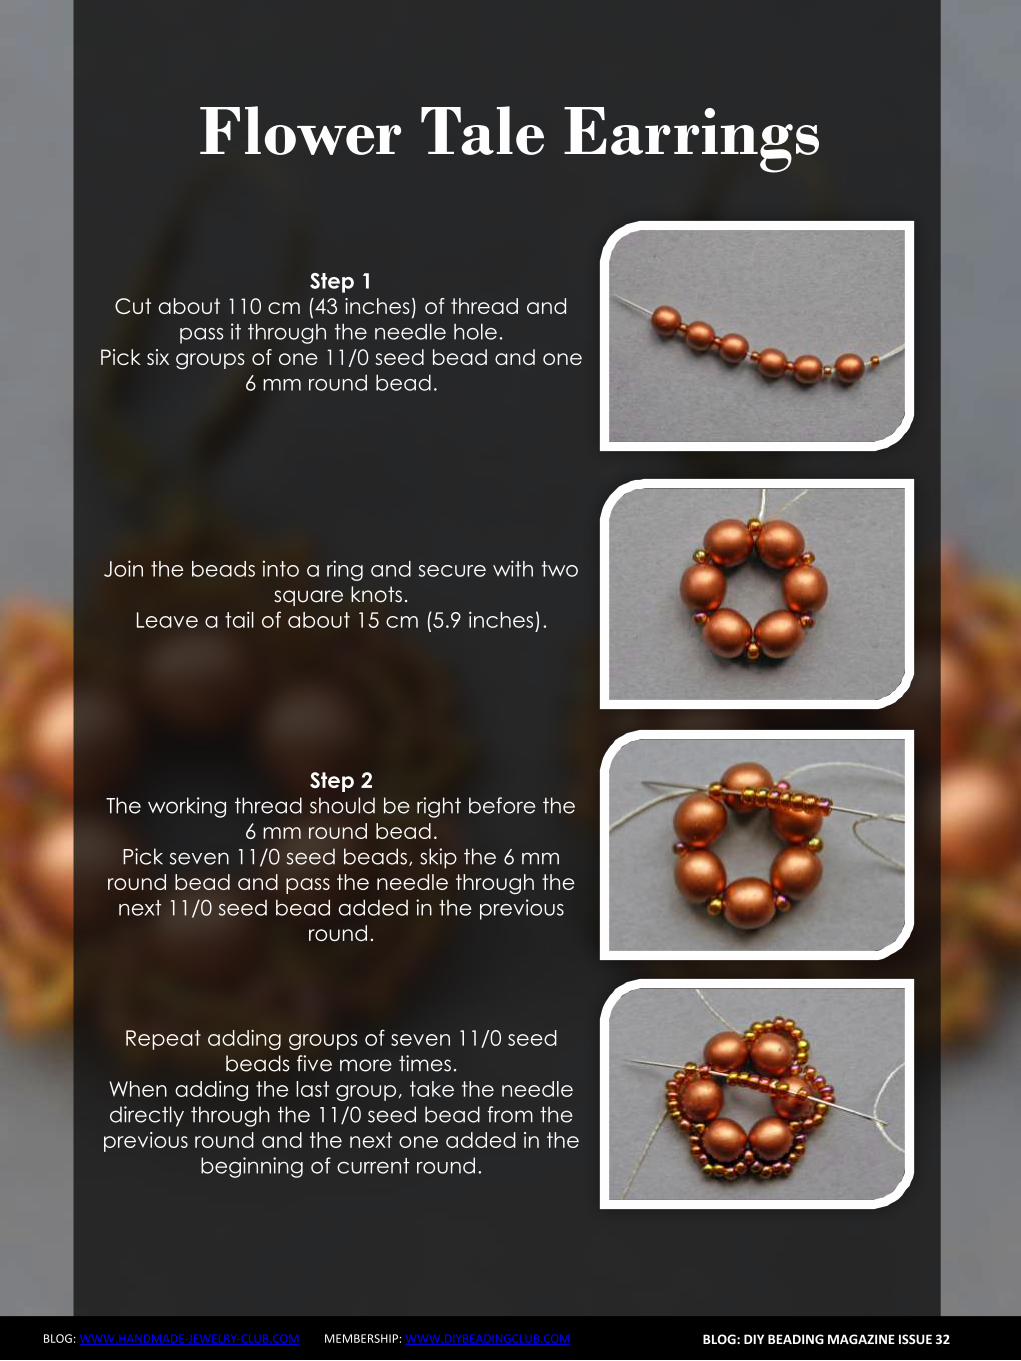
Liberty Earrings
BLOG WWWHANDMADE-JEWELRY-CLUBCOM MEMBERSHIP WWWDIYBEADINGCLUBCOM
Put together 150 110 150 and enter in the second of three next delica (a) Put the same beads for three times then put together 150 and 110 and enter
in the two delica of the bottom tip (b) Enter in the second of three next delica with 110 and 150 (c) Continue passing
in the 80 beads with three beads (150 110 150) for four times then at the top finish the round by putting together a 150 and 110 (d)
BLOG DIY BEADING MAGAZINE ISSUE 32
a b c
Exit from the first 150 sewn in the previous round and jump in the three next beads with a 150 (a)
Put a 150 at a time and exit from the first 110 beads of the bottom tip Jump in the
near 110 with a 150 (b) Finish round repeating steps a and b (c) Exit the roc 80 as shown in the photo (d)
a b c
d
a b c d
Enter in the 80 with four 150 (a b) Enter the 80 beads at the bottom of the pieces with two 110 one superduo one 80 ivory bead one superduo and two 110 (c)
d e f
Liberty Earrings
BLOG WWWHANDMADE-JEWELRY-CLUBCOM MEMBERSHIP WWWDIYBEADINGCLUBCOM
Exit from the bottom pearl (a) Put together 150 three 110 150 and enter in the superduorsquos second hole (b)
Put together three superduo and enter in the next superduorsquos second hole (c) Rethread 15 three 110 150 and return in the opposite direction in the pearl of departure (d)
BLOG DIY BEADING MAGAZINE ISSUE 32
a b
c
Exit from the second pearl indicated from (a) Put 150 four 110 and enter in the second of the three 110 (b) Go to the second superduorsquos hole with four 110 and a 150 (c)
Enter the second hole of the supeduo with a 150(d) Sew in the middle of the bottom of the superduo 150 two 110 150 dagger 150 two 110 150(e)
Enter the second hole of the thirs superduo with 150 (f)
a b c
d
d e f
Liberty Earrings
BLOG WWWHANDMADE-JEWELRY-CLUBCOM MEMBERSHIP WWWDIYBEADINGCLUBCOM BLOG DIY BEADING MAGAZINE ISSUE 32
Put 150 four 110 and enter in the second of three 110 of the base (a) Insert four 110 and 150 in the pearl opposite direction indicated in the picture (b) Go in all the beads
around the piece and exit from the pearl at the top (c) Put 150 three 110 150 and enter the superduo (d)
Enter the ivory bead 80 with two 150 (e) Enter the next superduo with two 150 (f)
a b c
d e f
Put together 150 three 110 and enter in opposite direction in the departurersquos pearl (a) Exit from the 150 beads indicated by photo (b) From this jump in the second of two near
150 with five 150 to created the hole for the earwire (c) Pass the thread in the beads make a few knots and cut the excess thread
a b c
Your earrings are finished
Liberty Earrings
BLOG WWWHANDMADE-JEWELRY-CLUBCOM MEMBERSHIP WWWDIYBEADINGCLUBCOM
About the Author
Mariella Martella
My name is Mariella Martella and I am the author and
designer of jewelry that I sign with the name of Mariel Bijoux
After changing city often for work and study I currently live
in northern Italy I am an art historian with a passion for travel
painting and jewelry design in weaving that project since
2010 In my beads and crystals are the colors of the
Mediterranean sea the atmosphere of summer evenings
and the lights of the places I visited
You can find me at
Etsy shop httpswwwetsycomitshopMarielBijoux
Facebook httpswwwfacebookcommari3lbijoux
Crafting blog httpmarielbijouxblogspotit
Twitter httpstwittercomMarielBijoux
BLOG DIY BEADING MAGAZINE ISSUE 32
Jade Necklace
BLOG WWWHANDMADE-JEWELRY-CLUBCOM MEMBERSHIP WWWDIYBEADINGCLUBCOM
Every time I wear a necklace I always make it a point that the
necklace will lay perfectly flat on my neck Using wire for a necklace
made it possible for me like what I did with Jade Necklace It may look
odd at first having bent wires for a necklace but once the jewelry is
finished youll be so happy how the necklace will perfectly lay on your
neck
The tutorial is catered for intermediate level One must know basic
wirework skills such as wire wrapping making loops wrapped loops
and linking to follow the tutorial It has clear instructions and ultra-clear
close-up photos at each step Additionally you can ask me question
you have on the tutorial No more getting stuck and frustrated on a
confusing or just plain inaccurate pattern
If you followed this tutorial and then sell the accessory or jewelry
please give credit to the author or DIY Beading Clubcom
Copyright 2015
wwwdiybeadingclubcom
wwwhandmade-jewelry-clubcom
BLOG DIY BEADING MAGAZINE ISSUE 32
Jade Necklace
BLOG WWWHANDMADE-JEWELRY-CLUBCOM MEMBERSHIP WWWDIYBEADINGCLUBCOM BLOG DIY BEADING MAGAZINE ISSUE 32
Materials Needed 18ga Craft wire 28ga Craft wire 15mm diameter Green Round Flat Back Sew On Gems 5mm Green pearls
8mm Green pearls 6mm x 11mm teardrop Crystal Treasures Mill Hill beads or any teardrop bead with holes on the side Hook for your clasp
Tools Needed Wire cutter Flat nose pliers Round nose pliers Mandrel A jar or any rounded object to shape your necklace
Skill Level Intermediate
Step 1 Cut 6 inches 18ga wire Make a loop on one end then measure approximately 125 inches and make another loop
Form a size 4 circle on your mandrel
Jade Necklace
BLOG WWWHANDMADE-JEWELRY-CLUBCOM MEMBERSHIP WWWDIYBEADINGCLUBCOM BLOG DIY BEADING MAGAZINE ISSUE 32
Then close the circle by wrapping the extended wire just below the loop Wrap the
wire 2x
This is how it looks like Lets call this circle frame Youll notice that the lower curve is
slightly bigger than the upper curve
Step 2 Cut 8 inches of 28ga wire Wrap one end of
the wire at least 3x on one side of the circle frame just below the loop
Bring up your gem Flat back sew on gems has 2 holes Insert the wire into one hole and then
wrap the wire once onto the circle frame
Jade Necklace
BLOG WWWHANDMADE-JEWELRY-CLUBCOM MEMBERSHIP WWWDIYBEADINGCLUBCOM BLOG DIY BEADING MAGAZINE ISSUE 32
Step 3 Insert a 5mm pearl on the wire and then pass
the wire under circle frame
Repeat previous step 2x and have 3 pearls wrapped
Continue wrapping with your teardrop crystal My crystal has 2 holes on the side
and then continue wrapping with your 5mm pearls then secure your wire
Repeat Step 3 and create as many as needed For 16-inch necklace Ive created 6 of these
components
Jade Necklace
BLOG WWWHANDMADE-JEWELRY-CLUBCOM MEMBERSHIP WWWDIYBEADINGCLUBCOM BLOG DIY BEADING MAGAZINE ISSUE 32
Step 4 Cut a 15-inch 18ga wire and make a loop on
one end Insert 8mm pearl and make a loop on the other end You then use these as connectors
and link the components
Step 5 The necklace is an 18ga wire with wrapped
loops on both ends First cut 7 inches 18ga wire and make a wrapped loop with your hook already inserted Side in 18pcs 5mm pearls
Then make a wrapped loop on the other end connecting the wrapped loop onto the component Do the same for the other
necklace but make the loop on the other end big enough so the hookclasp can pass thru
To have the necklace curve shaped use a jar to bend the wire Voila Now youre
ready to party
Jade Necklace
BLOG WWWHANDMADE-JEWELRY-CLUBCOM MEMBERSHIP WWWDIYBEADINGCLUBCOM
About the Author
Sky Aldovino
I consider myself a late bloomer when it comes to crafting Irsquom a self-taught jewelry maker Jewelry making wasnrsquot really a hobby of mine but unforeseen events lead me to learn jewellery making My family put up a craft store where we sell cross stitch beads and all sorts of crafting materials I fell in love with the beads and tried to create accessories only for myself Clients liked the pieces and I started customizing handmade jewelleries The craft store was a success for 6 years but like any other small businesses we had to close it down and I was confined to staying at home While at home I had all the time using the internet and now working as a home-based jewelry designer
BLOG DIY BEADING MAGAZINE ISSUE 32
Atomic Ring
BLOG WWWHANDMADE-JEWELRY-CLUBCOM MEMBERSHIP WWWDIYBEADINGCLUBCOM
Have fun making shapes using the wigjig Cyclops Make loops going in
circles to mimic the shape of a flower or in this tutorial mimic the
shape of an atom The tutorial will also teach you how to cage a
cabochon Whats nice about this piece is that with one long wire you
can create the ring from start to finish
The tutorial is catered for intermediate to advanced students One
must already know how to make spirals and use a wigjig tool It has
clear instructions and ultra-clear close-up photos at each step
Additionally you can ask me question you have on the tutorial No
more getting stuck and frustrated on a confusing or just plain
inaccurate pattern
If you followed this tutorial and then sell the accessory or jewelry
please give credit to the author or DIY Beading Clubcom
If you like to get a blank wigjig graph visit wigjigcom Shop and Jigs
section
Copyright 2015
wwwdiybeadingclubcom
wwwhandmade-jewelry-clubcom
BLOG DIY BEADING MAGAZINE ISSUE 32
Atomic Ring
BLOG WWWHANDMADE-JEWELRY-CLUBCOM MEMBERSHIP WWWDIYBEADINGCLUBCOM
Materials Needed 20ga Craft wire 28ga Craft wire 11mm Round Cabochon
Tools Needed Wigjig Cyclops 15mm pegs Wire cutter Flat nose pliers Mandrel
Skill Level Intermediate - Advanced
BLOG DIY BEADING MAGAZINE ISSUE 32
Step 1 Lets prepare your wigjig cyclops Position the pegs like so
Atomic Ring
BLOG WWWHANDMADE-JEWELRY-CLUBCOM MEMBERSHIP WWWDIYBEADINGCLUBCOM BLOG DIY BEADING MAGAZINE ISSUE 32
Lets work with longer wire so youll have enough wire to hold onto as you manipulate the wire so cut 36 inches of 20ga wire From
one end of the wire measure 10 inches
On the 10-inch measurement loop the wire at the center peg then continue to loop onto the side pegs going in circle going back to
the center peg after looping on the side peg
Now the wire at the center peg will start to build up as you go around the side pegs so
you need to constantly press the wire at the center peg to accommodate the build up of
wire
When youre done pull out the wire and this is
how it should look like
Atomic Ring
BLOG WWWHANDMADE-JEWELRY-CLUBCOM MEMBERSHIP WWWDIYBEADINGCLUBCOM BLOG DIY BEADING MAGAZINE ISSUE 32
You will notice that the frame opens wide Now to keep the atom frame from opening wide secure the center of the frame by wrapping a 28ga wire What you
need to do is simply pass the 28ga wire into the hole and wrap as many times as needed or until youre sure that the frame is secure
Step 2 Now youre finished with your atom frame Well now create the focal design With the longer wire make a spiral at the center big
enough to accommodate the size of your cabochon In this tutorial the spiral is about
11mm in diameter the same size as my cabochon
Pop in your cabochon and start to make spirals going around and over the cabochon as if you are caging the cabochon Create at
least 5 rounds and then cut off any excess
Step 3 Now lets make the ring and this with the other
end of the wire
Atomic Ring
BLOG WWWHANDMADE-JEWELRY-CLUBCOM MEMBERSHIP WWWDIYBEADINGCLUBCOM BLOG DIY BEADING MAGAZINE ISSUE 32
Bring up your mandrel and wrap the wire to the size of your finger Wrap at least 2 times
When youre sure you have the right size pull the ring out of the mandrel
With the extended wire wrap the wire the secure the ring
Cut off any excess and voila You have your atomic ring Create as many as you can with different colors of cabochon
Atomic Ring
BLOG WWWHANDMADE-JEWELRY-CLUBCOM MEMBERSHIP WWWDIYBEADINGCLUBCOM
About the Author
Sky Aldovino
I consider myself a late bloomer when it comes to crafting Irsquom a self-taught jewelry maker Jewelry making wasnrsquot really a hobby of mine but unforeseen events lead me to learn jewellery making My family put up a craft store where we sell cross stitch beads and all sorts of crafting materials I fell in love with the beads and tried to create accessories only for myself Clients liked the pieces and I started customizing handmade jewelleries The craft store was a success for 6 years but like any other small businesses we had to close it down and I was confined to staying at home While at home I had all the time using the internet and now working as a home-based jewelry designer
BLOG DIY BEADING MAGAZINE ISSUE 32
Featured Article Gemstones Used for Jewelry Making
BLOG WWWHANDMADE-JEWELRY-CLUBCOM MEMBERSHIP WWWDIYBEADINGCLUBCOM
Gemstones are stones which we hold quite highly in terms of value And
jewelry often consists of stones that add attractiveness to it so it is not
surprising when jewelry designers actually use gemstones in their designs In
fact there are different types of gemstones that can be used for making
jewelry There are the expensive and pure gemstones and there are also the
imitation ones The information below will provide some information about
the kinds of stones you can use to create jewelry and how these stones will
impact the jewelry you have created
The first kind of stone which I believe we are all quite familiar with are
birthstones These stones are associated with individualrsquos month of birth
by SunVDesigns by BeyhanAkman
For example Amethyst stone is connected with anybody who is born in
February which carries special significance in the area of emotions and also
spiritually This stone also signifies calm and peace as well
And then we have semi-precious stones which are also often used in jewelry
making They are not as valuable as compared to precious stones but still
valuable Best examples of these stones are aquamarine topaz tourmaline
opal and turquoise
BLOG DIY BEADING MAGAZINE ISSUE 32
Featured Article Gemstones Used for Jewelry Making
BLOG WWWHANDMADE-JEWELRY-CLUBCOM MEMBERSHIP WWWDIYBEADINGCLUBCOM
It is an ideal gift for someone who you deem special Aquamarine pendants
usually work well for anyone and is widely an accepted stone
by HyppieChic by joyeriamestiza
However precious stones are the most unusual
and precious jewels to us Examples of some of
them are emerald sapphire diamond and
ruby These stones are usually very expensive
and are prized for their exquisiteness These
stones are commonly used in high-quality
jewelry designs which costs quite a fortune to
obtain
BLOG DIY BEADING MAGAZINE ISSUE 32
by sarajewelrystu
Jewelry designs with precious stones are usually
given as exceptional gifts on special occasions A
perfect example is a diamond ring that is usually
given as an engagement gift
by ldiamondsforever
Featured Article Gemstones Used for Jewelry Making
BLOG WWWHANDMADE-JEWELRY-CLUBCOM MEMBERSHIP WWWDIYBEADINGCLUBCOM
There are also synthetic stones which are often used to create jewelry
Synthetic stones are artificial imitations of gemstones Synthetic Sapphire
jewelry costs less compare with the authentic ones Most of the time
imitation stones are used to save cost but at the same time have the similar
look of the real stone
BLOG DIY BEADING MAGAZINE ISSUE 32
by shininggems by thaimaker
by lapinduprintemps by PastimeArt
Gemstones are used like beads and you can use it in any designs whether
simple or elaborate
Swarovski crystal components are available in a rich multitude of rondelles Perfect as spacers in necklaces or as discs in earrings Rondelles can be used with many varieties of shapes or sizes Use Swarovski crystal rondelles between large gemstones as accents with precious metal findings Fire Mountain Gems and Beads Crystal Passionsreg brand presents Swarovski crystal in display-ready packaging for brilliant retail presentation Crystal Passionsreg is an assurance of genuine Swarovski crystal
BLOG DIY BEADING MAGAZINE ISSUE 32 BLOG WWWHANDMADE-JEWELRY-CLUBCOM MEMBERSHIP WWWDIYBEADINGCLUBCOM
Recommended Jewelry Making Supplies
Mz Unisex-adults 12pcs 25x18x6mm Turquoise Oval CAB Cabochon
BLOG DIY BEADING MAGAZINE ISSUE 32 BLOG WWWHANDMADE-JEWELRY-CLUBCOM MEMBERSHIP WWWDIYBEADINGCLUBCOM
Recommended Jewelry Making Supplies
For a little sparkle that goes a long way design with Swarovski 4mm faceted bicones Create glorious multi-strand necklaces with the dainty crystals or use as spacers to add a tiny flash to your designs Swarovski crystal components are made in Austria and are considered the finest products of their kind in the world
BLOG DIY BEADING MAGAZINE ISSUE 32 BLOG WWWHANDMADE-JEWELRY-CLUBCOM MEMBERSHIP WWWDIYBEADINGCLUBCOM
Recommended Jewelry Making Supplies
Imitation beads resist color change These beads have uniform quality with a good polish Some strands may have little to no matrix Sizes shapes and colors may vary with handcrafted items
BLOG DIY BEADING MAGAZINE ISSUE 32 BLOG WWWHANDMADE-JEWELRY-CLUBCOM MEMBERSHIP WWWDIYBEADINGCLUBCOM
Recommended Jewelry Making Supplies
Something Blue Necklace and Earrings
BLOG WWWHANDMADE-JEWELRY-CLUBCOM MEMBERSHIP WWWDIYBEADINGCLUBCOM
Skill level Beginner Intermediate Advanced
DIMENSIONS OF THE NECKLACE Inner Circumference 14 18 inch 35 cm
Focal Pendant Width 1 15 inch 35 cm Focal Pendant Height 1 15 inch 35 cm
DIMENSIONS OF THE EARRING Earring Width 716 inch 12 cm Earring Height 1516 inch 25 cm (Without the earring hook)
BLOG DIY BEADING MAGAZINE ISSUE 32
Materials
Note Before purchasing the supplies measure the length of your wished necklace If you decide to bead a longer necklace you should keep in mind that for every extra
frac34 inches 2 cm-s you will need 8 bicones and 8 pearls
Something Blue Necklace and Earrings
BLOG WWWHANDMADE-JEWELRY-CLUBCOM MEMBERSHIP WWWDIYBEADINGCLUBCOM BLOG DIY BEADING MAGAZINE ISSUE 32
Work RAW stitch into a beaded circle and embellish with Swarovski bicones
STEP 2 String 1A and 2 pearls Pass through the previous
second pearl and the freshly added 1A and the first pearl again
STEP 1 Use a comfortable length of thread to string 2
pearls 1A and 1 pearl again leaving a 2rdquo 5cm tail Pass through the first two pearls strung to form a
ring
STEP 3 String 2 pearls and 1A Pass through the previous first pearl and the freshly added two pearls
again
STEP 4 - 17 Repeat STEP 2 and STEP 3 again until you count 17 pearls in the inner circle
But be careful in the last step you only have to add 1 pearl then pass through the first pearls
added in STEP 1 and add another 1A Now pass through the first pearl added in STEP
1and 1A added in this round again to exit from this A
Something Blue Necklace and Earrings
BLOG WWWHANDMADE-JEWELRY-CLUBCOM MEMBERSHIP WWWDIYBEADINGCLUBCOM BLOG DIY BEADING MAGAZINE ISSUE 32
STEP 19 String 2A and pass through the next A added in round 4-17 and the A added in round 18 the 2A added in this round and finally the A added in round 4-17 to exit from the bead showed below
STEP 18 String 3A and pass through the 1A added in the previous round and the first A added in this
round
STEP 20 - 34 Repeat STEP 18 and STEP 19 again until you finish the circle
But be careful in the last step first you have to pass through 3A and then add 1A After this pass
through the 3A again and exit from the A bead
shown below (This is the first A added in STEP 18)
Something Blue Necklace and Earrings
BLOG WWWHANDMADE-JEWELRY-CLUBCOM MEMBERSHIP WWWDIYBEADINGCLUBCOM BLOG DIY BEADING MAGAZINE ISSUE 32
STEP 35 Step up to exit from the pearl shown below (Finishing the previous step in the A bead and then
stepping up from there makes the circle more secure)
Now string 3 bicones Pass through the pearl and the first bicone again
In the reality your circle will look more like this the A beads forming a strong row in the middle of the
pearls
STEP 36 Add 2 bicones Pass through the
neighboring pearl the first bicone added in the previous row and the 2 bicones added in this step
so you can exit from the next pearl
Something Blue Necklace and Earrings
BLOG WWWHANDMADE-JEWELRY-CLUBCOM MEMBERSHIP WWWDIYBEADINGCLUBCOM BLOG DIY BEADING MAGAZINE ISSUE 32
Now in the reality your circle will look more like this the A beads still forming a strong row in the middle of the pearls and the bicones slightly lying on top of
them
STEP 37 - 49 Repeat STEP 35 and STEP 36 again until you finish the circle with the bicones
But be careful in the last step first you have pass through the third bicone added then add 1 bicone
and pass through this little quartet to exit from the bicone shown below (The second one added in
STEP 35)
STEP 50 With these steps we finish the circle by adding 1 bicone to connect the A beads and the
bicone row So add 1 bicone pass through the nearest A bead and add 1 bicone again Pass
through the bicone already there and exit from the bicone you just added
Something Blue Necklace and Earrings
BLOG WWWHANDMADE-JEWELRY-CLUBCOM MEMBERSHIP WWWDIYBEADINGCLUBCOM BLOG DIY BEADING MAGAZINE ISSUE 32
STEP 66-83 Secure the circle by adding 1A between each bicone in the second row of Swarovski
bicones If you finished secure the thread and trim
STEP 51-65 Using the same technique as in STEP 37 - 49 add 1 bicone to finish the third bicone row The black line shows you the way (After STEP 50 pass through the next A bead add 1 bicone and pass through the bicone already there and the bicone added in the previous step Repeat these steps to
finish the inner bicone circle)
MIDDLE CIRCLE Work RAW stitch into a beaded circle and embellish with
Swarovski bicones Remember you need to bead two circles this time
STEP 1 Just like in the focal circle begin with 2 pearls 1A and 1 pearl again on a comfortable length of thread
leaving a 2rdquo 5cm tail Pass through the first two pearls strung to form a ring
Something Blue Necklace and Earrings
BLOG WWWHANDMADE-JEWELRY-CLUBCOM MEMBERSHIP WWWDIYBEADINGCLUBCOM BLOG DIY BEADING MAGAZINE ISSUE 32
STEP 15-28 Mimicing the FOCAL CIRCLElsquos STEP 18-34 bead A beads until you finish the inner part of the
circle Exit from a pearl in the second row This circle should look very similar to the first one but this is a bit
smaller
STEP 2-14 Mimicing the FOCAL CIRCLElsquos STEP 2-17 bead until you count 14 pearls in the inner circle Exit
from the last A added
STEP 29-42 Mimicing FOCAL CIRCLElsquos STEP 35-49 add 2 rows of bicones
STEP 43-56 Mimicing the FOCAL CIRCLElsquos STEP 50-65 bead the third row of bicones to finish the circle
Something Blue Necklace and Earrings
BLOG WWWHANDMADE-JEWELRY-CLUBCOM MEMBERSHIP WWWDIYBEADINGCLUBCOM BLOG DIY BEADING MAGAZINE ISSUE 32
SMALLEST CIRCLE Work RAW stitch into a beaded circle and embellish
with Swarovski bicones Remember you need to bead two circles again
STEP 1 Just like in the focal circle begin with 2 pearls
1A and 1 pearl again on a comfortable length of thread leaving a 2rdquo 5cm tail Pass through the first two
pearls strung to form a ring
STEP 57-70 Just like the FOCAL CIRCLElsquos STEP 66-83 secure the circle by adding 1A between every bicone
in the second row of bicones If you finished secure the thread and trim (Donrsquot forget to bead another
circle)
STEP 2-12 Mimicing the FOCAL CIRCLElsquos STEP 2-17 bead until you count 12 pearls in the inner circle Exit
from the last A added
STEP 13-24 Mimicing the FOCAL CIRCLElsquos STEP 18-34 bead A beads until you finish the inner part of the
circle Exit from a pearl in the second row This circle should look very similar to the first two but this is the
smallest of them all
Something Blue Necklace and Earrings
BLOG WWWHANDMADE-JEWELRY-CLUBCOM MEMBERSHIP WWWDIYBEADINGCLUBCOM BLOG DIY BEADING MAGAZINE ISSUE 32
STEP 37-48 Mimicing the FOCAL CIRCLElsquos STEP 50-65 bead the third row of bicones to finish this circle too
STEP 25-36 Mimicing FOCAL CIRCLElsquos STEP 35-49 add 2
rows of bicones The last step here is purple again
STEP 49-60 Just like the FOCAL CIRCLElsquos STEP 66-83 secure the circle by adding 1A between every bicone
in the second row of bicones If you finished secure the thread and trim (Donrsquot forget that you need two
small circles)
Something Blue Necklace and Earrings
BLOG WWWHANDMADE-JEWELRY-CLUBCOM MEMBERSHIP WWWDIYBEADINGCLUBCOM BLOG DIY BEADING MAGAZINE ISSUE 32
STEP 37-48 Mimicing the FOCAL CIRCLElsquos STEP 50-65 bead the third row of bicones to finish this circle too
STEP 25-36 Mimicing FOCAL CIRCLElsquos STEP 35-49 add 2
rows of bicones The last step here is purple again
STEP 49-60 Just like the FOCAL CIRCLElsquos STEP 66-83 secure the circle by adding 1A between every bicone
in the second row of bicones If you finished secure the thread and trim (Donrsquot forget that you need two
small circles)
Something Blue Necklace and Earrings
BLOG WWWHANDMADE-JEWELRY-CLUBCOM MEMBERSHIP WWWDIYBEADINGCLUBCOM BLOG DIY BEADING MAGAZINE ISSUE 32
STEP 2-6 Continue by adding 1A 1 bicone 1 pearl until you count 6 of each
STEP 1 Begin with 1 pearl 1 bicone 1A and 1 bicone again on a comfortable length of thread leaving a 2rdquo
5cm tail Pass through the pearl and the first bicone strung to form a ring
STEP 7-12 Pass through the A beads to make your
component more secure Also secure the thread and trim (Repeat these steps until you have six 6-BEAD
COMPONENTs)
6-BEAD COMPONENT Work RAW stitch into a beaded circle and embellish with Swarovski bicones
For the necklace we will need six from this component For the earring two
Something Blue Necklace and Earrings
BLOG WWWHANDMADE-JEWELRY-CLUBCOM MEMBERSHIP WWWDIYBEADINGCLUBCOM BLOG DIY BEADING MAGAZINE ISSUE 32
STEP 2-4 Continue by adding 1A 1 bicone 1 pearl
until you count 4 of each
STEP 1 Begin with 1 pearl 1 bicone 1A and 1 bicone again on a comfortable length of thread leaving a 2rdquo
5cm tail Pass through the pearl and the first bicone strung to form a ring
STEP 5-8 Pass through the A beads to make your component more secure Also secure the thread and
trim (Repeat these steps until you have the wished amount of 4-BEAD COMPONENTs)
4-BEAD COMPONENT Work RAW stitch into a beaded circle and embellish with Swarovski bicones
For the necklace-size that is given on the second page we will need 20 from this
component For the earring two
If you would like to make a longer necklace you need to make more (One 4-BEAD COMPONENT measures about 38 inch 1 cm To make the necklace symmetrical you have to have equal amounts on each side This means for every extra frac34 inches
2 cm-s you will need 1 4-BEAD COMPONENT on each side of the necklace)
Something Blue Necklace and Earrings
BLOG WWWHANDMADE-JEWELRY-CLUBCOM MEMBERSHIP WWWDIYBEADINGCLUBCOM BLOG DIY BEADING MAGAZINE ISSUE 32
STEP 2 Connect the MIDDLE CIRCLE to two 6-BEAD COMPONENTs by adding four-times 2As
between the pearls Choose a pearl on the MIDDLE CIRCLE and add
2A pass through a pearl in the 6-BEAD COMPONENT previously added and add 2A again Watch out this has to be symmetrical Repeat this at least two more times to make it
secure Now repeat this entire procedure but choose
the 8-th pearl on MIDDLE CIRCLE Repeat this on the other side of the necklace
too
Choose a pearl on the FOCAL CIRCLE and add 2A pass through a pearl in the 6-BEAD COMPONENT and add 2A again Repeat this at least two more times to make it secure
Now repeat this entire procedure but choose the 5-th pearl on FOCAL CIRCLE This will make the necklace nice on your neck
FINISHING THE NECKLACE Connects the parts with A beads
STEP 1 Connect the FOCAL CIRCLE to two 6-BEAD COMPONENTs by adding four-times 2As between the pearls To do this turn your parts upside down you need to
see the pearls We will work on this side from now on
Something Blue Necklace and Earrings
BLOG WWWHANDMADE-JEWELRY-CLUBCOM MEMBERSHIP WWWDIYBEADINGCLUBCOM BLOG DIY BEADING MAGAZINE ISSUE 32
FINISHING THE EARRING Connects the parts with A beads
STEP 1-2 Connect the 6-BEAD COMPONENT
to 4-BEAD COMPONENT and the 4-BEAD
COMPONENT to the earring hook
First connect the 4-BEAD COMPONENT to the 6-BEAD COMPONENT with 4A beads Mimic
the elongation steps of the necklace if needed
Secondly connect the 4-BEAD COMPONENT
to your earring hook with 4A beads again Leave from the last pearl bead 2A beads the hook (this is the orange oval form) and 2As again Pass through each of them to
secure this connection again
Finally get ready to prepare the other earring ndash since we need two of them
STEP 5 Connect the 4-BEAD COMPONENTs to the toggle clasp thus finishing the
necklace Leaving from the last pearl bead 2A the
clasp(this is the orange oval form) and 2A again Pass through all of them a couple more times to make this connection more
secure
Something Blue Necklace and Earrings
BLOG WWWHANDMADE-JEWELRY-CLUBCOM MEMBERSHIP WWWDIYBEADINGCLUBCOM BLOG DIY BEADING MAGAZINE ISSUE 32
If you finished it is time to try it on It was a great fun wasnrsquot it And how beautiful you look in your new necklace and the matching earrings
Something Blue Necklace and Earrings
BLOG WWWHANDMADE-JEWELRY-CLUBCOM MEMBERSHIP WWWDIYBEADINGCLUBCOM
About the Author
Margit Vogel
My name is Margit Vogel I live in Hungary Europe
By profession I am a biochemical engineer but I fell in love with
beads so much that I could not stop playing with them
I make one-of-a-kind beaded and bead embroidered art
jewelry made of the best quality materials such as Swarovski
stones gemstones Japanese beads (Miyuki and Toho) Czech
glass beads leather soutache and suede Each piece is unique
and individually crafted
Feel free to visit my blog for some eyecandy
httpiformjewelrywordpresscom
My shop httpwwwetsycomshopiformjewelry
Facebook httpwwwfacebookcomiformjewelry
BLOG DIY BEADING MAGAZINE ISSUE 32
Getting Down And Personal With Gianna
Getting Down And Personal With Gianna
Nowadays we see more and more jewelry stores opening up online and with these online jewelry stores it has made it easier for us to purchase and view their creations Have you ever wondered how they are able to manage and produce amazing jewelry pieces and tutorials So heres a little on the journey to open up an online shop We are excited to present to you Gianna aka Beading4perfectionists
Gianna Beader amp Youtuber
Unlike most jewelry makers and beadweavers Gianna did not start beading as a hobby but as a means to make ends meet With goals in trying to
fill the financial gap she did everything she could to expand her earnings ndash working as a security guard
and at the same time learning how to bead and selling her pieces at fair trades and flea markets
Since many were asking if she does home beading workshops she started on exploring how to teach people to bead She loves Scott Bakula and has always loved him till now and this served as her
inspiration to start making a beading video tutorial
Gianna started creating videos because she was at the point in her life where everything seemed to be falling apart And at that moment of time she had difficulties financially and selling jewelry was the only way for her to stay afloat financially She is a big Scott Bakula fan and when she went to the UK to see him on stage that was when it hit her that she is already able to edit videos and
taught herself Photoshop and done workshops at bead fairs so why not put these together and see what happens on Youtube She knew that if she gets enough subscribers and views ndash though no one knew what the exact numbers were you would be invited to become a Youtube partner This way she could monetize her videos with advertisements and hopefully she would be able to be a Youtube partner and be able to pay her bills
BLOG WWWHANDMADE-JEWELRY-CLUBCOM MEMBERSHIP WWWDIYBEADINGCLUBCOM BLOG DIY BEADING MAGAZINE ISSUE 32
Getting Down And Personal With Gianna
Her Youtube channel is popular and the reason why she chose Youtube is because Youtube is the biggest platform and reached almost to the whole world Everyone already knows about it and it was growing rapidly as compared to other platforms like Dailymotion so she figured that Youtube was the way to go Her advice to new designers is that when you start out go to the platforms on the top of your list first then work your way down your list if you do not get accepted by your first choice
After loyally putting up one video every week for about 8 months in a row she became a Youtube partner and monetized her videos She knew she needed at least $100 to get her first payout She managed to reach $100 after 3 months The process was not easy she worked hard lack sleep skipped meals and who knows what happened to Ridge in the Bold and the Beautiful because she stopped watching
On Youtube you can monetize your videos Google pays straight to your bank account and at other countries where they also have the option of getting checks among other options In order to get paid you have to reach the $100 mark and after 3 months For Gianna she thinks that you cannot say that Etsy is better than Youtube or Youtube is better than Etsy Her reasoning is because on Youtube she has many followers which will eventually check out her Etsy shop And to start an Etsy shop you need an audience
BLOG WWWHANDMADE-JEWELRY-CLUBCOM MEMBERSHIP WWWDIYBEADINGCLUBCOM BLOG DIY BEADING MAGAZINE ISSUE 32
television and dedicated her spare time (as she had another job) to Youtube She re-registered at the chamber of commerce after receiving her first payout Her work at Youtube now is not a full time job and things have changed on Youtube It is easier to become a parter but there are some countries that need to wait for an invitation to be a Youtube partner Take Italy for instance Italians would have to work just as hard as she did if they want to become a Youtube partner
Getting Down And Personal With Gianna
With her 60000 subscribers on her b4pbakup Youtube channel it is possible to sell at least 60 patterns on the first day on Etsy after promoting the PDF file on her Youtube channel Though you may think that 60 out of 60000 is not much you have to remember that not everyone has the means to purchase the PDF file and a lot of people still rather watch her carry out the tutorial(for free) on Youtube instead of reading the patterns or paying for the patterns even if the pattern is for a fundraiser and only cost $2 Her insights on Youtube is that Youtube is not what it used to be 6 years ago Instead of making more money every month she is making less and less because advertisers have more options of where they want to advertise their ads Ads do not pay as much as they used to Back in the days you could get 25 cents per ad Now you count yourself lucky if you could get 5 cents roll in after two hours
BLOG WWWHANDMADE-JEWELRY-CLUBCOM MEMBERSHIP WWWDIYBEADINGCLUBCOM BLOG DIY BEADING MAGAZINE ISSUE 32
And on top of that adblockers are destroying Youtube channel owners Youtube will start making changes to the channels where there will be ldquopaid subscriptionrdquo channels This has already been implemented in some countries but not in her country The Netherlands This means there will no longer be ads for her monthly paying subscribers She hopes that Youtube will add on a paid per video option feature The option to be a paid channel or free channel or to start a new channel for paying customers is yours to choose Gianna is not happy with Youtube because many others like her have worked so hard and for some years to become Youtube partners(which was something to be proud of) has lost their status
Getting Down And Personal With Gianna
Her advice for those who want to go on Youtube is 1 Do it because you want to teach
2 Do it because you want a career with beads
BLOG WWWHANDMADE-JEWELRY-CLUBCOM MEMBERSHIP WWWDIYBEADINGCLUBCOM BLOG DIY BEADING MAGAZINE ISSUE 32
After putting up about 20 videos and having at least 5000 subscribers add the PDF tutorials to Etsy and Craftsy She found out that her audience would like to have the PDF after watching her videos This is because they would rather print out the PDF and work while seated in a comfy chair technically somewhere else instead of having to pause the video time and time again
Gianna has also made a video for those who want to know the whole story of her journey up until the present day And to get updates on her you can check it out here She has also started a vlog where she tells of how she still works towards becoming a financial independent beader and explains her journey to get where she wants to be(or die trying) Gianna will be in the UK on October the 17th giving an all-day workshop with 4 different patterns
(2 beginners and 2 advanced) in Wotton-under-Edge
Gianna will be there Friday night as the workshop is on Saturday She will be leaving on Sunday Her
doors are open to all who wants to continue the party with her at the hotel across the street
For more information do contact Ann Tucker on Facebook
httpswwwfacebookcomanntucker501
Rec
omm
end
ed R
ead
ings
Making Jewelry with Gemstone
Beads
Combines the popular craft of beading with beautiful semi-precious stones which are collected by many Features a variety of versatile ideas which can be adapted for any type of gem or bead Readers will learn to reate beautiful gemstone jewelry with this dazzling collection of over 100 projects ranging from eyecatching earrings and accessories to exquisite necklaces and bracelets This beautiful book offers an impressive range of 28 beautiful semi-precious stones (including birthstones) and a glimpse into the fascinating history and mythical properties behind them
BLOG DIY BEADING MAGAZINE ISSUE 32 BLOG WWWHANDMADE-JEWELRY-CLUBCOM MEMBERSHIP WWWDIYBEADINGCLUBCOM
Rec
omm
end
ed R
ead
ings
Convertible Crystal Jewelry
Reverse it Twist it Wear it Many
Ways
Diane Whiting presents the idea that convertibility isnrsquot just about using pieces in multiple ways it is also about using skills and creativity in multiple ways Using ever-popular sparkling crystals Diane showcases design elements through various techniques for fun easy fashionable jewelry With 25 projects the reader can choose from bracelets necklaces and earrings that match any outfit or styleDiane Whiting presents the idea that convertibility isnrsquot just about using pieces in multiple ways it is also about using skills and creativity in multiple ways
BLOG DIY BEADING MAGAZINE ISSUE 32 BLOG WWWHANDMADE-JEWELRY-CLUBCOM MEMBERSHIP WWWDIYBEADINGCLUBCOM
Rec
omm
end
ed R
ead
ings
Wire Jewelry Masterclass
Wrapped Coiled and Woven Pieces
Using Fine Materials
Comprehensive and fabulous Wire Jewelry Masterclass takes an in-depth look at an intricate and rewarding craft The 24 projects which range from simple Dragons tear briolette earrings to a Poseidon-under-the-sea pendant will delight and inspire jewelers of all levels and tastes Divided into beginner intermediate and advanced sections this beautifully photographed step-by-step guide is the ticket to wire jewelry expertise
BLOG DIY BEADING MAGAZINE ISSUE 32 BLOG WWWHANDMADE-JEWELRY-CLUBCOM MEMBERSHIP WWWDIYBEADINGCLUBCOM
Rec
omm
end
ed R
ead
ings
Timeless Wire Weaving The
Complete Course
Timeless Wire Weaving focuses on developing wirework skills through 13 projects using three classic wire weaving techniques coiling wrapping and weaving The projects are built around a focal cabochon and incorporate seed beads and crystals in imaginative ways Designers learn to make the jewelry shown in the book and they also use the techniques learned to create innovative jewelry pieces of their own
BLOG DIY BEADING MAGAZINE ISSUE 32 BLOG WWWHANDMADE-JEWELRY-CLUBCOM MEMBERSHIP WWWDIYBEADINGCLUBCOM
Our digital magazine is available through
Apple Newsstand service available to millions of IPAD users
To advertise with us please email us at
diyjewelryclubgmailcom
Or visit our page at
httphandmade-jewelry-clubcomadvertising-diy-beading-magazine
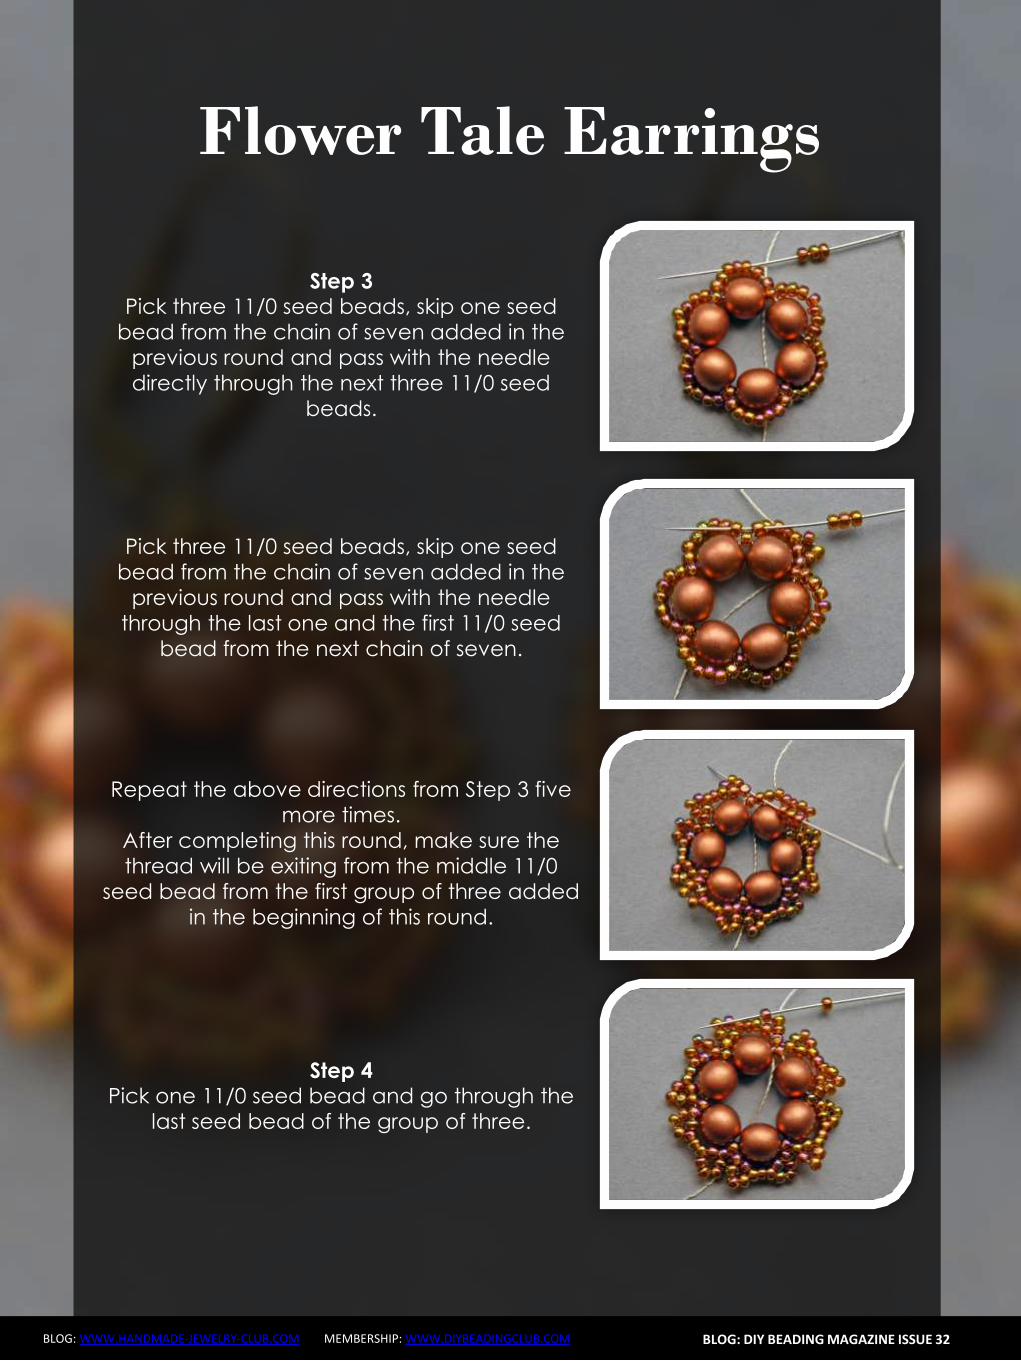
Liberty Earrings
BLOG WWWHANDMADE-JEWELRY-CLUBCOM MEMBERSHIP WWWDIYBEADINGCLUBCOM
Exit from the bottom pearl (a) Put together 150 three 110 150 and enter in the superduorsquos second hole (b)
Put together three superduo and enter in the next superduorsquos second hole (c) Rethread 15 three 110 150 and return in the opposite direction in the pearl of departure (d)
BLOG DIY BEADING MAGAZINE ISSUE 32
a b
c
Exit from the second pearl indicated from (a) Put 150 four 110 and enter in the second of the three 110 (b) Go to the second superduorsquos hole with four 110 and a 150 (c)
Enter the second hole of the supeduo with a 150(d) Sew in the middle of the bottom of the superduo 150 two 110 150 dagger 150 two 110 150(e)
Enter the second hole of the thirs superduo with 150 (f)
a b c
d
d e f
Liberty Earrings
BLOG WWWHANDMADE-JEWELRY-CLUBCOM MEMBERSHIP WWWDIYBEADINGCLUBCOM BLOG DIY BEADING MAGAZINE ISSUE 32
Put 150 four 110 and enter in the second of three 110 of the base (a) Insert four 110 and 150 in the pearl opposite direction indicated in the picture (b) Go in all the beads
around the piece and exit from the pearl at the top (c) Put 150 three 110 150 and enter the superduo (d)
Enter the ivory bead 80 with two 150 (e) Enter the next superduo with two 150 (f)
a b c
d e f
Put together 150 three 110 and enter in opposite direction in the departurersquos pearl (a) Exit from the 150 beads indicated by photo (b) From this jump in the second of two near
150 with five 150 to created the hole for the earwire (c) Pass the thread in the beads make a few knots and cut the excess thread
a b c
Your earrings are finished
Liberty Earrings
BLOG WWWHANDMADE-JEWELRY-CLUBCOM MEMBERSHIP WWWDIYBEADINGCLUBCOM
About the Author
Mariella Martella
My name is Mariella Martella and I am the author and
designer of jewelry that I sign with the name of Mariel Bijoux
After changing city often for work and study I currently live
in northern Italy I am an art historian with a passion for travel
painting and jewelry design in weaving that project since
2010 In my beads and crystals are the colors of the
Mediterranean sea the atmosphere of summer evenings
and the lights of the places I visited
You can find me at
Etsy shop httpswwwetsycomitshopMarielBijoux
Facebook httpswwwfacebookcommari3lbijoux
Crafting blog httpmarielbijouxblogspotit
Twitter httpstwittercomMarielBijoux
BLOG DIY BEADING MAGAZINE ISSUE 32
Jade Necklace
BLOG WWWHANDMADE-JEWELRY-CLUBCOM MEMBERSHIP WWWDIYBEADINGCLUBCOM
Every time I wear a necklace I always make it a point that the
necklace will lay perfectly flat on my neck Using wire for a necklace
made it possible for me like what I did with Jade Necklace It may look
odd at first having bent wires for a necklace but once the jewelry is
finished youll be so happy how the necklace will perfectly lay on your
neck
The tutorial is catered for intermediate level One must know basic
wirework skills such as wire wrapping making loops wrapped loops
and linking to follow the tutorial It has clear instructions and ultra-clear
close-up photos at each step Additionally you can ask me question
you have on the tutorial No more getting stuck and frustrated on a
confusing or just plain inaccurate pattern
If you followed this tutorial and then sell the accessory or jewelry
please give credit to the author or DIY Beading Clubcom
Copyright 2015
wwwdiybeadingclubcom
wwwhandmade-jewelry-clubcom
BLOG DIY BEADING MAGAZINE ISSUE 32
Jade Necklace
BLOG WWWHANDMADE-JEWELRY-CLUBCOM MEMBERSHIP WWWDIYBEADINGCLUBCOM BLOG DIY BEADING MAGAZINE ISSUE 32
Materials Needed 18ga Craft wire 28ga Craft wire 15mm diameter Green Round Flat Back Sew On Gems 5mm Green pearls
8mm Green pearls 6mm x 11mm teardrop Crystal Treasures Mill Hill beads or any teardrop bead with holes on the side Hook for your clasp
Tools Needed Wire cutter Flat nose pliers Round nose pliers Mandrel A jar or any rounded object to shape your necklace
Skill Level Intermediate
Step 1 Cut 6 inches 18ga wire Make a loop on one end then measure approximately 125 inches and make another loop
Form a size 4 circle on your mandrel
Jade Necklace
BLOG WWWHANDMADE-JEWELRY-CLUBCOM MEMBERSHIP WWWDIYBEADINGCLUBCOM BLOG DIY BEADING MAGAZINE ISSUE 32
Then close the circle by wrapping the extended wire just below the loop Wrap the
wire 2x
This is how it looks like Lets call this circle frame Youll notice that the lower curve is
slightly bigger than the upper curve
Step 2 Cut 8 inches of 28ga wire Wrap one end of
the wire at least 3x on one side of the circle frame just below the loop
Bring up your gem Flat back sew on gems has 2 holes Insert the wire into one hole and then
wrap the wire once onto the circle frame
Jade Necklace
BLOG WWWHANDMADE-JEWELRY-CLUBCOM MEMBERSHIP WWWDIYBEADINGCLUBCOM BLOG DIY BEADING MAGAZINE ISSUE 32
Step 3 Insert a 5mm pearl on the wire and then pass
the wire under circle frame
Repeat previous step 2x and have 3 pearls wrapped
Continue wrapping with your teardrop crystal My crystal has 2 holes on the side
and then continue wrapping with your 5mm pearls then secure your wire
Repeat Step 3 and create as many as needed For 16-inch necklace Ive created 6 of these
components
Jade Necklace
BLOG WWWHANDMADE-JEWELRY-CLUBCOM MEMBERSHIP WWWDIYBEADINGCLUBCOM BLOG DIY BEADING MAGAZINE ISSUE 32
Step 4 Cut a 15-inch 18ga wire and make a loop on
one end Insert 8mm pearl and make a loop on the other end You then use these as connectors
and link the components
Step 5 The necklace is an 18ga wire with wrapped
loops on both ends First cut 7 inches 18ga wire and make a wrapped loop with your hook already inserted Side in 18pcs 5mm pearls
Then make a wrapped loop on the other end connecting the wrapped loop onto the component Do the same for the other
necklace but make the loop on the other end big enough so the hookclasp can pass thru
To have the necklace curve shaped use a jar to bend the wire Voila Now youre
ready to party
Jade Necklace
BLOG WWWHANDMADE-JEWELRY-CLUBCOM MEMBERSHIP WWWDIYBEADINGCLUBCOM
About the Author
Sky Aldovino
I consider myself a late bloomer when it comes to crafting Irsquom a self-taught jewelry maker Jewelry making wasnrsquot really a hobby of mine but unforeseen events lead me to learn jewellery making My family put up a craft store where we sell cross stitch beads and all sorts of crafting materials I fell in love with the beads and tried to create accessories only for myself Clients liked the pieces and I started customizing handmade jewelleries The craft store was a success for 6 years but like any other small businesses we had to close it down and I was confined to staying at home While at home I had all the time using the internet and now working as a home-based jewelry designer
BLOG DIY BEADING MAGAZINE ISSUE 32
Atomic Ring
BLOG WWWHANDMADE-JEWELRY-CLUBCOM MEMBERSHIP WWWDIYBEADINGCLUBCOM
Have fun making shapes using the wigjig Cyclops Make loops going in
circles to mimic the shape of a flower or in this tutorial mimic the
shape of an atom The tutorial will also teach you how to cage a
cabochon Whats nice about this piece is that with one long wire you
can create the ring from start to finish
The tutorial is catered for intermediate to advanced students One
must already know how to make spirals and use a wigjig tool It has
clear instructions and ultra-clear close-up photos at each step
Additionally you can ask me question you have on the tutorial No
more getting stuck and frustrated on a confusing or just plain
inaccurate pattern
If you followed this tutorial and then sell the accessory or jewelry
please give credit to the author or DIY Beading Clubcom
If you like to get a blank wigjig graph visit wigjigcom Shop and Jigs
section
Copyright 2015
wwwdiybeadingclubcom
wwwhandmade-jewelry-clubcom
BLOG DIY BEADING MAGAZINE ISSUE 32
Atomic Ring
BLOG WWWHANDMADE-JEWELRY-CLUBCOM MEMBERSHIP WWWDIYBEADINGCLUBCOM
Materials Needed 20ga Craft wire 28ga Craft wire 11mm Round Cabochon
Tools Needed Wigjig Cyclops 15mm pegs Wire cutter Flat nose pliers Mandrel
Skill Level Intermediate - Advanced
BLOG DIY BEADING MAGAZINE ISSUE 32
Step 1 Lets prepare your wigjig cyclops Position the pegs like so
Atomic Ring
BLOG WWWHANDMADE-JEWELRY-CLUBCOM MEMBERSHIP WWWDIYBEADINGCLUBCOM BLOG DIY BEADING MAGAZINE ISSUE 32
Lets work with longer wire so youll have enough wire to hold onto as you manipulate the wire so cut 36 inches of 20ga wire From
one end of the wire measure 10 inches
On the 10-inch measurement loop the wire at the center peg then continue to loop onto the side pegs going in circle going back to
the center peg after looping on the side peg
Now the wire at the center peg will start to build up as you go around the side pegs so
you need to constantly press the wire at the center peg to accommodate the build up of
wire
When youre done pull out the wire and this is
how it should look like
Atomic Ring
BLOG WWWHANDMADE-JEWELRY-CLUBCOM MEMBERSHIP WWWDIYBEADINGCLUBCOM BLOG DIY BEADING MAGAZINE ISSUE 32
You will notice that the frame opens wide Now to keep the atom frame from opening wide secure the center of the frame by wrapping a 28ga wire What you
need to do is simply pass the 28ga wire into the hole and wrap as many times as needed or until youre sure that the frame is secure
Step 2 Now youre finished with your atom frame Well now create the focal design With the longer wire make a spiral at the center big
enough to accommodate the size of your cabochon In this tutorial the spiral is about
11mm in diameter the same size as my cabochon
Pop in your cabochon and start to make spirals going around and over the cabochon as if you are caging the cabochon Create at
least 5 rounds and then cut off any excess
Step 3 Now lets make the ring and this with the other
end of the wire
Atomic Ring
BLOG WWWHANDMADE-JEWELRY-CLUBCOM MEMBERSHIP WWWDIYBEADINGCLUBCOM BLOG DIY BEADING MAGAZINE ISSUE 32
Bring up your mandrel and wrap the wire to the size of your finger Wrap at least 2 times
When youre sure you have the right size pull the ring out of the mandrel
With the extended wire wrap the wire the secure the ring
Cut off any excess and voila You have your atomic ring Create as many as you can with different colors of cabochon
Atomic Ring
BLOG WWWHANDMADE-JEWELRY-CLUBCOM MEMBERSHIP WWWDIYBEADINGCLUBCOM
About the Author
Sky Aldovino
I consider myself a late bloomer when it comes to crafting Irsquom a self-taught jewelry maker Jewelry making wasnrsquot really a hobby of mine but unforeseen events lead me to learn jewellery making My family put up a craft store where we sell cross stitch beads and all sorts of crafting materials I fell in love with the beads and tried to create accessories only for myself Clients liked the pieces and I started customizing handmade jewelleries The craft store was a success for 6 years but like any other small businesses we had to close it down and I was confined to staying at home While at home I had all the time using the internet and now working as a home-based jewelry designer
BLOG DIY BEADING MAGAZINE ISSUE 32
Featured Article Gemstones Used for Jewelry Making
BLOG WWWHANDMADE-JEWELRY-CLUBCOM MEMBERSHIP WWWDIYBEADINGCLUBCOM
Gemstones are stones which we hold quite highly in terms of value And
jewelry often consists of stones that add attractiveness to it so it is not
surprising when jewelry designers actually use gemstones in their designs In
fact there are different types of gemstones that can be used for making
jewelry There are the expensive and pure gemstones and there are also the
imitation ones The information below will provide some information about
the kinds of stones you can use to create jewelry and how these stones will
impact the jewelry you have created
The first kind of stone which I believe we are all quite familiar with are
birthstones These stones are associated with individualrsquos month of birth
by SunVDesigns by BeyhanAkman
For example Amethyst stone is connected with anybody who is born in
February which carries special significance in the area of emotions and also
spiritually This stone also signifies calm and peace as well
And then we have semi-precious stones which are also often used in jewelry
making They are not as valuable as compared to precious stones but still
valuable Best examples of these stones are aquamarine topaz tourmaline
opal and turquoise
BLOG DIY BEADING MAGAZINE ISSUE 32
Featured Article Gemstones Used for Jewelry Making
BLOG WWWHANDMADE-JEWELRY-CLUBCOM MEMBERSHIP WWWDIYBEADINGCLUBCOM
It is an ideal gift for someone who you deem special Aquamarine pendants
usually work well for anyone and is widely an accepted stone
by HyppieChic by joyeriamestiza
However precious stones are the most unusual
and precious jewels to us Examples of some of
them are emerald sapphire diamond and
ruby These stones are usually very expensive
and are prized for their exquisiteness These
stones are commonly used in high-quality
jewelry designs which costs quite a fortune to
obtain
BLOG DIY BEADING MAGAZINE ISSUE 32
by sarajewelrystu
Jewelry designs with precious stones are usually
given as exceptional gifts on special occasions A
perfect example is a diamond ring that is usually
given as an engagement gift
by ldiamondsforever
Featured Article Gemstones Used for Jewelry Making
BLOG WWWHANDMADE-JEWELRY-CLUBCOM MEMBERSHIP WWWDIYBEADINGCLUBCOM
There are also synthetic stones which are often used to create jewelry
Synthetic stones are artificial imitations of gemstones Synthetic Sapphire
jewelry costs less compare with the authentic ones Most of the time
imitation stones are used to save cost but at the same time have the similar
look of the real stone
BLOG DIY BEADING MAGAZINE ISSUE 32
by shininggems by thaimaker
by lapinduprintemps by PastimeArt
Gemstones are used like beads and you can use it in any designs whether
simple or elaborate
Swarovski crystal components are available in a rich multitude of rondelles Perfect as spacers in necklaces or as discs in earrings Rondelles can be used with many varieties of shapes or sizes Use Swarovski crystal rondelles between large gemstones as accents with precious metal findings Fire Mountain Gems and Beads Crystal Passionsreg brand presents Swarovski crystal in display-ready packaging for brilliant retail presentation Crystal Passionsreg is an assurance of genuine Swarovski crystal
BLOG DIY BEADING MAGAZINE ISSUE 32 BLOG WWWHANDMADE-JEWELRY-CLUBCOM MEMBERSHIP WWWDIYBEADINGCLUBCOM
Recommended Jewelry Making Supplies
Mz Unisex-adults 12pcs 25x18x6mm Turquoise Oval CAB Cabochon
BLOG DIY BEADING MAGAZINE ISSUE 32 BLOG WWWHANDMADE-JEWELRY-CLUBCOM MEMBERSHIP WWWDIYBEADINGCLUBCOM
Recommended Jewelry Making Supplies
For a little sparkle that goes a long way design with Swarovski 4mm faceted bicones Create glorious multi-strand necklaces with the dainty crystals or use as spacers to add a tiny flash to your designs Swarovski crystal components are made in Austria and are considered the finest products of their kind in the world
BLOG DIY BEADING MAGAZINE ISSUE 32 BLOG WWWHANDMADE-JEWELRY-CLUBCOM MEMBERSHIP WWWDIYBEADINGCLUBCOM
Recommended Jewelry Making Supplies
Imitation beads resist color change These beads have uniform quality with a good polish Some strands may have little to no matrix Sizes shapes and colors may vary with handcrafted items
BLOG DIY BEADING MAGAZINE ISSUE 32 BLOG WWWHANDMADE-JEWELRY-CLUBCOM MEMBERSHIP WWWDIYBEADINGCLUBCOM
Recommended Jewelry Making Supplies
Something Blue Necklace and Earrings
BLOG WWWHANDMADE-JEWELRY-CLUBCOM MEMBERSHIP WWWDIYBEADINGCLUBCOM
Skill level Beginner Intermediate Advanced
DIMENSIONS OF THE NECKLACE Inner Circumference 14 18 inch 35 cm
Focal Pendant Width 1 15 inch 35 cm Focal Pendant Height 1 15 inch 35 cm
DIMENSIONS OF THE EARRING Earring Width 716 inch 12 cm Earring Height 1516 inch 25 cm (Without the earring hook)
BLOG DIY BEADING MAGAZINE ISSUE 32
Materials
Note Before purchasing the supplies measure the length of your wished necklace If you decide to bead a longer necklace you should keep in mind that for every extra
frac34 inches 2 cm-s you will need 8 bicones and 8 pearls
Something Blue Necklace and Earrings
BLOG WWWHANDMADE-JEWELRY-CLUBCOM MEMBERSHIP WWWDIYBEADINGCLUBCOM BLOG DIY BEADING MAGAZINE ISSUE 32
Work RAW stitch into a beaded circle and embellish with Swarovski bicones
STEP 2 String 1A and 2 pearls Pass through the previous
second pearl and the freshly added 1A and the first pearl again
STEP 1 Use a comfortable length of thread to string 2
pearls 1A and 1 pearl again leaving a 2rdquo 5cm tail Pass through the first two pearls strung to form a
ring
STEP 3 String 2 pearls and 1A Pass through the previous first pearl and the freshly added two pearls
again
STEP 4 - 17 Repeat STEP 2 and STEP 3 again until you count 17 pearls in the inner circle
But be careful in the last step you only have to add 1 pearl then pass through the first pearls
added in STEP 1 and add another 1A Now pass through the first pearl added in STEP
1and 1A added in this round again to exit from this A
Something Blue Necklace and Earrings
BLOG WWWHANDMADE-JEWELRY-CLUBCOM MEMBERSHIP WWWDIYBEADINGCLUBCOM BLOG DIY BEADING MAGAZINE ISSUE 32
STEP 19 String 2A and pass through the next A added in round 4-17 and the A added in round 18 the 2A added in this round and finally the A added in round 4-17 to exit from the bead showed below
STEP 18 String 3A and pass through the 1A added in the previous round and the first A added in this
round
STEP 20 - 34 Repeat STEP 18 and STEP 19 again until you finish the circle
But be careful in the last step first you have to pass through 3A and then add 1A After this pass
through the 3A again and exit from the A bead
shown below (This is the first A added in STEP 18)
Something Blue Necklace and Earrings
BLOG WWWHANDMADE-JEWELRY-CLUBCOM MEMBERSHIP WWWDIYBEADINGCLUBCOM BLOG DIY BEADING MAGAZINE ISSUE 32
STEP 35 Step up to exit from the pearl shown below (Finishing the previous step in the A bead and then
stepping up from there makes the circle more secure)
Now string 3 bicones Pass through the pearl and the first bicone again
In the reality your circle will look more like this the A beads forming a strong row in the middle of the
pearls
STEP 36 Add 2 bicones Pass through the
neighboring pearl the first bicone added in the previous row and the 2 bicones added in this step
so you can exit from the next pearl
Something Blue Necklace and Earrings
BLOG WWWHANDMADE-JEWELRY-CLUBCOM MEMBERSHIP WWWDIYBEADINGCLUBCOM BLOG DIY BEADING MAGAZINE ISSUE 32
Now in the reality your circle will look more like this the A beads still forming a strong row in the middle of the pearls and the bicones slightly lying on top of
them
STEP 37 - 49 Repeat STEP 35 and STEP 36 again until you finish the circle with the bicones
But be careful in the last step first you have pass through the third bicone added then add 1 bicone
and pass through this little quartet to exit from the bicone shown below (The second one added in
STEP 35)
STEP 50 With these steps we finish the circle by adding 1 bicone to connect the A beads and the
bicone row So add 1 bicone pass through the nearest A bead and add 1 bicone again Pass
through the bicone already there and exit from the bicone you just added
Something Blue Necklace and Earrings
BLOG WWWHANDMADE-JEWELRY-CLUBCOM MEMBERSHIP WWWDIYBEADINGCLUBCOM BLOG DIY BEADING MAGAZINE ISSUE 32
STEP 66-83 Secure the circle by adding 1A between each bicone in the second row of Swarovski
bicones If you finished secure the thread and trim
STEP 51-65 Using the same technique as in STEP 37 - 49 add 1 bicone to finish the third bicone row The black line shows you the way (After STEP 50 pass through the next A bead add 1 bicone and pass through the bicone already there and the bicone added in the previous step Repeat these steps to
finish the inner bicone circle)
MIDDLE CIRCLE Work RAW stitch into a beaded circle and embellish with
Swarovski bicones Remember you need to bead two circles this time
STEP 1 Just like in the focal circle begin with 2 pearls 1A and 1 pearl again on a comfortable length of thread
leaving a 2rdquo 5cm tail Pass through the first two pearls strung to form a ring
Something Blue Necklace and Earrings
BLOG WWWHANDMADE-JEWELRY-CLUBCOM MEMBERSHIP WWWDIYBEADINGCLUBCOM BLOG DIY BEADING MAGAZINE ISSUE 32
STEP 15-28 Mimicing the FOCAL CIRCLElsquos STEP 18-34 bead A beads until you finish the inner part of the
circle Exit from a pearl in the second row This circle should look very similar to the first one but this is a bit
smaller
STEP 2-14 Mimicing the FOCAL CIRCLElsquos STEP 2-17 bead until you count 14 pearls in the inner circle Exit
from the last A added
STEP 29-42 Mimicing FOCAL CIRCLElsquos STEP 35-49 add 2 rows of bicones
STEP 43-56 Mimicing the FOCAL CIRCLElsquos STEP 50-65 bead the third row of bicones to finish the circle
Something Blue Necklace and Earrings
BLOG WWWHANDMADE-JEWELRY-CLUBCOM MEMBERSHIP WWWDIYBEADINGCLUBCOM BLOG DIY BEADING MAGAZINE ISSUE 32
SMALLEST CIRCLE Work RAW stitch into a beaded circle and embellish
with Swarovski bicones Remember you need to bead two circles again
STEP 1 Just like in the focal circle begin with 2 pearls
1A and 1 pearl again on a comfortable length of thread leaving a 2rdquo 5cm tail Pass through the first two
pearls strung to form a ring
STEP 57-70 Just like the FOCAL CIRCLElsquos STEP 66-83 secure the circle by adding 1A between every bicone
in the second row of bicones If you finished secure the thread and trim (Donrsquot forget to bead another
circle)
STEP 2-12 Mimicing the FOCAL CIRCLElsquos STEP 2-17 bead until you count 12 pearls in the inner circle Exit
from the last A added
STEP 13-24 Mimicing the FOCAL CIRCLElsquos STEP 18-34 bead A beads until you finish the inner part of the
circle Exit from a pearl in the second row This circle should look very similar to the first two but this is the
smallest of them all
Something Blue Necklace and Earrings
BLOG WWWHANDMADE-JEWELRY-CLUBCOM MEMBERSHIP WWWDIYBEADINGCLUBCOM BLOG DIY BEADING MAGAZINE ISSUE 32
STEP 37-48 Mimicing the FOCAL CIRCLElsquos STEP 50-65 bead the third row of bicones to finish this circle too
STEP 25-36 Mimicing FOCAL CIRCLElsquos STEP 35-49 add 2
rows of bicones The last step here is purple again
STEP 49-60 Just like the FOCAL CIRCLElsquos STEP 66-83 secure the circle by adding 1A between every bicone
in the second row of bicones If you finished secure the thread and trim (Donrsquot forget that you need two
small circles)
Something Blue Necklace and Earrings
BLOG WWWHANDMADE-JEWELRY-CLUBCOM MEMBERSHIP WWWDIYBEADINGCLUBCOM BLOG DIY BEADING MAGAZINE ISSUE 32
STEP 37-48 Mimicing the FOCAL CIRCLElsquos STEP 50-65 bead the third row of bicones to finish this circle too
STEP 25-36 Mimicing FOCAL CIRCLElsquos STEP 35-49 add 2
rows of bicones The last step here is purple again
STEP 49-60 Just like the FOCAL CIRCLElsquos STEP 66-83 secure the circle by adding 1A between every bicone
in the second row of bicones If you finished secure the thread and trim (Donrsquot forget that you need two
small circles)
Something Blue Necklace and Earrings
BLOG WWWHANDMADE-JEWELRY-CLUBCOM MEMBERSHIP WWWDIYBEADINGCLUBCOM BLOG DIY BEADING MAGAZINE ISSUE 32
STEP 2-6 Continue by adding 1A 1 bicone 1 pearl until you count 6 of each
STEP 1 Begin with 1 pearl 1 bicone 1A and 1 bicone again on a comfortable length of thread leaving a 2rdquo
5cm tail Pass through the pearl and the first bicone strung to form a ring
STEP 7-12 Pass through the A beads to make your
component more secure Also secure the thread and trim (Repeat these steps until you have six 6-BEAD
COMPONENTs)
6-BEAD COMPONENT Work RAW stitch into a beaded circle and embellish with Swarovski bicones
For the necklace we will need six from this component For the earring two
Something Blue Necklace and Earrings
BLOG WWWHANDMADE-JEWELRY-CLUBCOM MEMBERSHIP WWWDIYBEADINGCLUBCOM BLOG DIY BEADING MAGAZINE ISSUE 32
STEP 2-4 Continue by adding 1A 1 bicone 1 pearl
until you count 4 of each
STEP 1 Begin with 1 pearl 1 bicone 1A and 1 bicone again on a comfortable length of thread leaving a 2rdquo
5cm tail Pass through the pearl and the first bicone strung to form a ring
STEP 5-8 Pass through the A beads to make your component more secure Also secure the thread and
trim (Repeat these steps until you have the wished amount of 4-BEAD COMPONENTs)
4-BEAD COMPONENT Work RAW stitch into a beaded circle and embellish with Swarovski bicones
For the necklace-size that is given on the second page we will need 20 from this
component For the earring two
If you would like to make a longer necklace you need to make more (One 4-BEAD COMPONENT measures about 38 inch 1 cm To make the necklace symmetrical you have to have equal amounts on each side This means for every extra frac34 inches
2 cm-s you will need 1 4-BEAD COMPONENT on each side of the necklace)
Something Blue Necklace and Earrings
BLOG WWWHANDMADE-JEWELRY-CLUBCOM MEMBERSHIP WWWDIYBEADINGCLUBCOM BLOG DIY BEADING MAGAZINE ISSUE 32
STEP 2 Connect the MIDDLE CIRCLE to two 6-BEAD COMPONENTs by adding four-times 2As
between the pearls Choose a pearl on the MIDDLE CIRCLE and add
2A pass through a pearl in the 6-BEAD COMPONENT previously added and add 2A again Watch out this has to be symmetrical Repeat this at least two more times to make it
secure Now repeat this entire procedure but choose
the 8-th pearl on MIDDLE CIRCLE Repeat this on the other side of the necklace
too
Choose a pearl on the FOCAL CIRCLE and add 2A pass through a pearl in the 6-BEAD COMPONENT and add 2A again Repeat this at least two more times to make it secure
Now repeat this entire procedure but choose the 5-th pearl on FOCAL CIRCLE This will make the necklace nice on your neck
FINISHING THE NECKLACE Connects the parts with A beads
STEP 1 Connect the FOCAL CIRCLE to two 6-BEAD COMPONENTs by adding four-times 2As between the pearls To do this turn your parts upside down you need to
see the pearls We will work on this side from now on
Something Blue Necklace and Earrings
BLOG WWWHANDMADE-JEWELRY-CLUBCOM MEMBERSHIP WWWDIYBEADINGCLUBCOM BLOG DIY BEADING MAGAZINE ISSUE 32
FINISHING THE EARRING Connects the parts with A beads
STEP 1-2 Connect the 6-BEAD COMPONENT
to 4-BEAD COMPONENT and the 4-BEAD
COMPONENT to the earring hook
First connect the 4-BEAD COMPONENT to the 6-BEAD COMPONENT with 4A beads Mimic
the elongation steps of the necklace if needed
Secondly connect the 4-BEAD COMPONENT
to your earring hook with 4A beads again Leave from the last pearl bead 2A beads the hook (this is the orange oval form) and 2As again Pass through each of them to
secure this connection again
Finally get ready to prepare the other earring ndash since we need two of them
STEP 5 Connect the 4-BEAD COMPONENTs to the toggle clasp thus finishing the
necklace Leaving from the last pearl bead 2A the
clasp(this is the orange oval form) and 2A again Pass through all of them a couple more times to make this connection more
secure
Something Blue Necklace and Earrings
BLOG WWWHANDMADE-JEWELRY-CLUBCOM MEMBERSHIP WWWDIYBEADINGCLUBCOM BLOG DIY BEADING MAGAZINE ISSUE 32
If you finished it is time to try it on It was a great fun wasnrsquot it And how beautiful you look in your new necklace and the matching earrings
Something Blue Necklace and Earrings
BLOG WWWHANDMADE-JEWELRY-CLUBCOM MEMBERSHIP WWWDIYBEADINGCLUBCOM
About the Author
Margit Vogel
My name is Margit Vogel I live in Hungary Europe
By profession I am a biochemical engineer but I fell in love with
beads so much that I could not stop playing with them
I make one-of-a-kind beaded and bead embroidered art
jewelry made of the best quality materials such as Swarovski
stones gemstones Japanese beads (Miyuki and Toho) Czech
glass beads leather soutache and suede Each piece is unique
and individually crafted
Feel free to visit my blog for some eyecandy
httpiformjewelrywordpresscom
My shop httpwwwetsycomshopiformjewelry
Facebook httpwwwfacebookcomiformjewelry
BLOG DIY BEADING MAGAZINE ISSUE 32
Getting Down And Personal With Gianna
Getting Down And Personal With Gianna
Nowadays we see more and more jewelry stores opening up online and with these online jewelry stores it has made it easier for us to purchase and view their creations Have you ever wondered how they are able to manage and produce amazing jewelry pieces and tutorials So heres a little on the journey to open up an online shop We are excited to present to you Gianna aka Beading4perfectionists
Gianna Beader amp Youtuber
Unlike most jewelry makers and beadweavers Gianna did not start beading as a hobby but as a means to make ends meet With goals in trying to
fill the financial gap she did everything she could to expand her earnings ndash working as a security guard
and at the same time learning how to bead and selling her pieces at fair trades and flea markets
Since many were asking if she does home beading workshops she started on exploring how to teach people to bead She loves Scott Bakula and has always loved him till now and this served as her
inspiration to start making a beading video tutorial
Gianna started creating videos because she was at the point in her life where everything seemed to be falling apart And at that moment of time she had difficulties financially and selling jewelry was the only way for her to stay afloat financially She is a big Scott Bakula fan and when she went to the UK to see him on stage that was when it hit her that she is already able to edit videos and
taught herself Photoshop and done workshops at bead fairs so why not put these together and see what happens on Youtube She knew that if she gets enough subscribers and views ndash though no one knew what the exact numbers were you would be invited to become a Youtube partner This way she could monetize her videos with advertisements and hopefully she would be able to be a Youtube partner and be able to pay her bills
BLOG WWWHANDMADE-JEWELRY-CLUBCOM MEMBERSHIP WWWDIYBEADINGCLUBCOM BLOG DIY BEADING MAGAZINE ISSUE 32
Getting Down And Personal With Gianna
Her Youtube channel is popular and the reason why she chose Youtube is because Youtube is the biggest platform and reached almost to the whole world Everyone already knows about it and it was growing rapidly as compared to other platforms like Dailymotion so she figured that Youtube was the way to go Her advice to new designers is that when you start out go to the platforms on the top of your list first then work your way down your list if you do not get accepted by your first choice
After loyally putting up one video every week for about 8 months in a row she became a Youtube partner and monetized her videos She knew she needed at least $100 to get her first payout She managed to reach $100 after 3 months The process was not easy she worked hard lack sleep skipped meals and who knows what happened to Ridge in the Bold and the Beautiful because she stopped watching
On Youtube you can monetize your videos Google pays straight to your bank account and at other countries where they also have the option of getting checks among other options In order to get paid you have to reach the $100 mark and after 3 months For Gianna she thinks that you cannot say that Etsy is better than Youtube or Youtube is better than Etsy Her reasoning is because on Youtube she has many followers which will eventually check out her Etsy shop And to start an Etsy shop you need an audience
BLOG WWWHANDMADE-JEWELRY-CLUBCOM MEMBERSHIP WWWDIYBEADINGCLUBCOM BLOG DIY BEADING MAGAZINE ISSUE 32
television and dedicated her spare time (as she had another job) to Youtube She re-registered at the chamber of commerce after receiving her first payout Her work at Youtube now is not a full time job and things have changed on Youtube It is easier to become a parter but there are some countries that need to wait for an invitation to be a Youtube partner Take Italy for instance Italians would have to work just as hard as she did if they want to become a Youtube partner
Getting Down And Personal With Gianna
With her 60000 subscribers on her b4pbakup Youtube channel it is possible to sell at least 60 patterns on the first day on Etsy after promoting the PDF file on her Youtube channel Though you may think that 60 out of 60000 is not much you have to remember that not everyone has the means to purchase the PDF file and a lot of people still rather watch her carry out the tutorial(for free) on Youtube instead of reading the patterns or paying for the patterns even if the pattern is for a fundraiser and only cost $2 Her insights on Youtube is that Youtube is not what it used to be 6 years ago Instead of making more money every month she is making less and less because advertisers have more options of where they want to advertise their ads Ads do not pay as much as they used to Back in the days you could get 25 cents per ad Now you count yourself lucky if you could get 5 cents roll in after two hours
BLOG WWWHANDMADE-JEWELRY-CLUBCOM MEMBERSHIP WWWDIYBEADINGCLUBCOM BLOG DIY BEADING MAGAZINE ISSUE 32
And on top of that adblockers are destroying Youtube channel owners Youtube will start making changes to the channels where there will be ldquopaid subscriptionrdquo channels This has already been implemented in some countries but not in her country The Netherlands This means there will no longer be ads for her monthly paying subscribers She hopes that Youtube will add on a paid per video option feature The option to be a paid channel or free channel or to start a new channel for paying customers is yours to choose Gianna is not happy with Youtube because many others like her have worked so hard and for some years to become Youtube partners(which was something to be proud of) has lost their status
Getting Down And Personal With Gianna
Her advice for those who want to go on Youtube is 1 Do it because you want to teach
2 Do it because you want a career with beads
BLOG WWWHANDMADE-JEWELRY-CLUBCOM MEMBERSHIP WWWDIYBEADINGCLUBCOM BLOG DIY BEADING MAGAZINE ISSUE 32
After putting up about 20 videos and having at least 5000 subscribers add the PDF tutorials to Etsy and Craftsy She found out that her audience would like to have the PDF after watching her videos This is because they would rather print out the PDF and work while seated in a comfy chair technically somewhere else instead of having to pause the video time and time again
Gianna has also made a video for those who want to know the whole story of her journey up until the present day And to get updates on her you can check it out here She has also started a vlog where she tells of how she still works towards becoming a financial independent beader and explains her journey to get where she wants to be(or die trying) Gianna will be in the UK on October the 17th giving an all-day workshop with 4 different patterns
(2 beginners and 2 advanced) in Wotton-under-Edge
Gianna will be there Friday night as the workshop is on Saturday She will be leaving on Sunday Her
doors are open to all who wants to continue the party with her at the hotel across the street
For more information do contact Ann Tucker on Facebook
httpswwwfacebookcomanntucker501
Rec
omm
end
ed R
ead
ings
Making Jewelry with Gemstone
Beads
Combines the popular craft of beading with beautiful semi-precious stones which are collected by many Features a variety of versatile ideas which can be adapted for any type of gem or bead Readers will learn to reate beautiful gemstone jewelry with this dazzling collection of over 100 projects ranging from eyecatching earrings and accessories to exquisite necklaces and bracelets This beautiful book offers an impressive range of 28 beautiful semi-precious stones (including birthstones) and a glimpse into the fascinating history and mythical properties behind them
BLOG DIY BEADING MAGAZINE ISSUE 32 BLOG WWWHANDMADE-JEWELRY-CLUBCOM MEMBERSHIP WWWDIYBEADINGCLUBCOM
Rec
omm
end
ed R
ead
ings
Convertible Crystal Jewelry
Reverse it Twist it Wear it Many
Ways
Diane Whiting presents the idea that convertibility isnrsquot just about using pieces in multiple ways it is also about using skills and creativity in multiple ways Using ever-popular sparkling crystals Diane showcases design elements through various techniques for fun easy fashionable jewelry With 25 projects the reader can choose from bracelets necklaces and earrings that match any outfit or styleDiane Whiting presents the idea that convertibility isnrsquot just about using pieces in multiple ways it is also about using skills and creativity in multiple ways
BLOG DIY BEADING MAGAZINE ISSUE 32 BLOG WWWHANDMADE-JEWELRY-CLUBCOM MEMBERSHIP WWWDIYBEADINGCLUBCOM
Rec
omm
end
ed R
ead
ings
Wire Jewelry Masterclass
Wrapped Coiled and Woven Pieces
Using Fine Materials
Comprehensive and fabulous Wire Jewelry Masterclass takes an in-depth look at an intricate and rewarding craft The 24 projects which range from simple Dragons tear briolette earrings to a Poseidon-under-the-sea pendant will delight and inspire jewelers of all levels and tastes Divided into beginner intermediate and advanced sections this beautifully photographed step-by-step guide is the ticket to wire jewelry expertise
BLOG DIY BEADING MAGAZINE ISSUE 32 BLOG WWWHANDMADE-JEWELRY-CLUBCOM MEMBERSHIP WWWDIYBEADINGCLUBCOM
Rec
omm
end
ed R
ead
ings
Timeless Wire Weaving The
Complete Course
Timeless Wire Weaving focuses on developing wirework skills through 13 projects using three classic wire weaving techniques coiling wrapping and weaving The projects are built around a focal cabochon and incorporate seed beads and crystals in imaginative ways Designers learn to make the jewelry shown in the book and they also use the techniques learned to create innovative jewelry pieces of their own
BLOG DIY BEADING MAGAZINE ISSUE 32 BLOG WWWHANDMADE-JEWELRY-CLUBCOM MEMBERSHIP WWWDIYBEADINGCLUBCOM
Our digital magazine is available through
Apple Newsstand service available to millions of IPAD users
To advertise with us please email us at
diyjewelryclubgmailcom
Or visit our page at
httphandmade-jewelry-clubcomadvertising-diy-beading-magazine
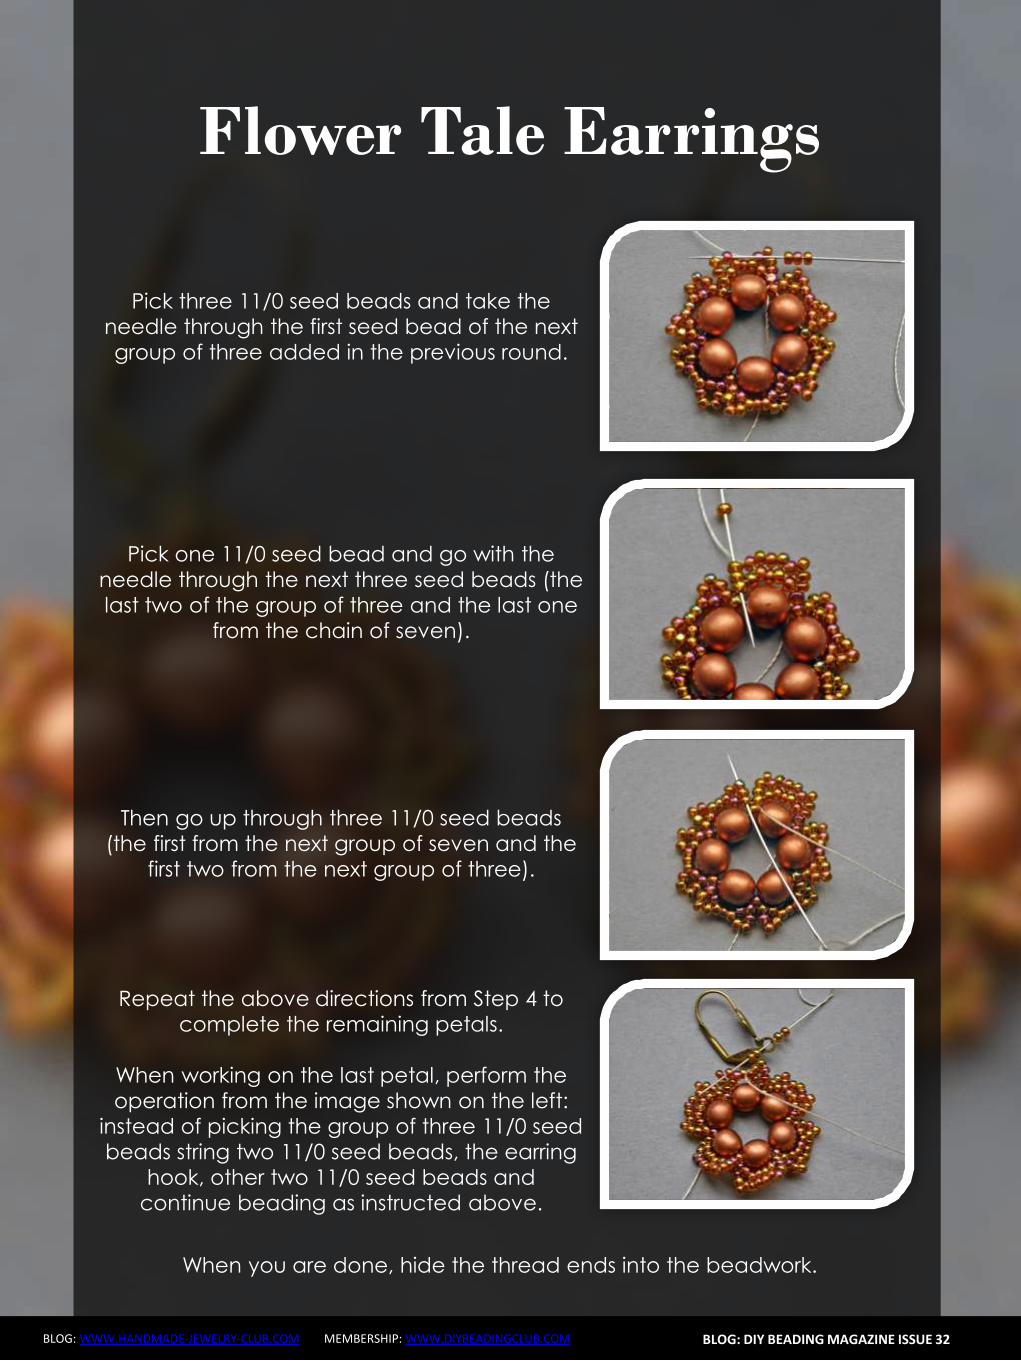
Liberty Earrings
BLOG WWWHANDMADE-JEWELRY-CLUBCOM MEMBERSHIP WWWDIYBEADINGCLUBCOM BLOG DIY BEADING MAGAZINE ISSUE 32
Put 150 four 110 and enter in the second of three 110 of the base (a) Insert four 110 and 150 in the pearl opposite direction indicated in the picture (b) Go in all the beads
around the piece and exit from the pearl at the top (c) Put 150 three 110 150 and enter the superduo (d)
Enter the ivory bead 80 with two 150 (e) Enter the next superduo with two 150 (f)
a b c
d e f
Put together 150 three 110 and enter in opposite direction in the departurersquos pearl (a) Exit from the 150 beads indicated by photo (b) From this jump in the second of two near
150 with five 150 to created the hole for the earwire (c) Pass the thread in the beads make a few knots and cut the excess thread
a b c
Your earrings are finished
Liberty Earrings
BLOG WWWHANDMADE-JEWELRY-CLUBCOM MEMBERSHIP WWWDIYBEADINGCLUBCOM
About the Author
Mariella Martella
My name is Mariella Martella and I am the author and
designer of jewelry that I sign with the name of Mariel Bijoux
After changing city often for work and study I currently live
in northern Italy I am an art historian with a passion for travel
painting and jewelry design in weaving that project since
2010 In my beads and crystals are the colors of the
Mediterranean sea the atmosphere of summer evenings
and the lights of the places I visited
You can find me at
Etsy shop httpswwwetsycomitshopMarielBijoux
Facebook httpswwwfacebookcommari3lbijoux
Crafting blog httpmarielbijouxblogspotit
Twitter httpstwittercomMarielBijoux
BLOG DIY BEADING MAGAZINE ISSUE 32
Jade Necklace
BLOG WWWHANDMADE-JEWELRY-CLUBCOM MEMBERSHIP WWWDIYBEADINGCLUBCOM
Every time I wear a necklace I always make it a point that the
necklace will lay perfectly flat on my neck Using wire for a necklace
made it possible for me like what I did with Jade Necklace It may look
odd at first having bent wires for a necklace but once the jewelry is
finished youll be so happy how the necklace will perfectly lay on your
neck
The tutorial is catered for intermediate level One must know basic
wirework skills such as wire wrapping making loops wrapped loops
and linking to follow the tutorial It has clear instructions and ultra-clear
close-up photos at each step Additionally you can ask me question
you have on the tutorial No more getting stuck and frustrated on a
confusing or just plain inaccurate pattern
If you followed this tutorial and then sell the accessory or jewelry
please give credit to the author or DIY Beading Clubcom
Copyright 2015
wwwdiybeadingclubcom
wwwhandmade-jewelry-clubcom
BLOG DIY BEADING MAGAZINE ISSUE 32
Jade Necklace
BLOG WWWHANDMADE-JEWELRY-CLUBCOM MEMBERSHIP WWWDIYBEADINGCLUBCOM BLOG DIY BEADING MAGAZINE ISSUE 32
Materials Needed 18ga Craft wire 28ga Craft wire 15mm diameter Green Round Flat Back Sew On Gems 5mm Green pearls
8mm Green pearls 6mm x 11mm teardrop Crystal Treasures Mill Hill beads or any teardrop bead with holes on the side Hook for your clasp
Tools Needed Wire cutter Flat nose pliers Round nose pliers Mandrel A jar or any rounded object to shape your necklace
Skill Level Intermediate
Step 1 Cut 6 inches 18ga wire Make a loop on one end then measure approximately 125 inches and make another loop
Form a size 4 circle on your mandrel
Jade Necklace
BLOG WWWHANDMADE-JEWELRY-CLUBCOM MEMBERSHIP WWWDIYBEADINGCLUBCOM BLOG DIY BEADING MAGAZINE ISSUE 32
Then close the circle by wrapping the extended wire just below the loop Wrap the
wire 2x
This is how it looks like Lets call this circle frame Youll notice that the lower curve is
slightly bigger than the upper curve
Step 2 Cut 8 inches of 28ga wire Wrap one end of
the wire at least 3x on one side of the circle frame just below the loop
Bring up your gem Flat back sew on gems has 2 holes Insert the wire into one hole and then
wrap the wire once onto the circle frame
Jade Necklace
BLOG WWWHANDMADE-JEWELRY-CLUBCOM MEMBERSHIP WWWDIYBEADINGCLUBCOM BLOG DIY BEADING MAGAZINE ISSUE 32
Step 3 Insert a 5mm pearl on the wire and then pass
the wire under circle frame
Repeat previous step 2x and have 3 pearls wrapped
Continue wrapping with your teardrop crystal My crystal has 2 holes on the side
and then continue wrapping with your 5mm pearls then secure your wire
Repeat Step 3 and create as many as needed For 16-inch necklace Ive created 6 of these
components
Jade Necklace
BLOG WWWHANDMADE-JEWELRY-CLUBCOM MEMBERSHIP WWWDIYBEADINGCLUBCOM BLOG DIY BEADING MAGAZINE ISSUE 32
Step 4 Cut a 15-inch 18ga wire and make a loop on
one end Insert 8mm pearl and make a loop on the other end You then use these as connectors
and link the components
Step 5 The necklace is an 18ga wire with wrapped
loops on both ends First cut 7 inches 18ga wire and make a wrapped loop with your hook already inserted Side in 18pcs 5mm pearls
Then make a wrapped loop on the other end connecting the wrapped loop onto the component Do the same for the other
necklace but make the loop on the other end big enough so the hookclasp can pass thru
To have the necklace curve shaped use a jar to bend the wire Voila Now youre
ready to party
Jade Necklace
BLOG WWWHANDMADE-JEWELRY-CLUBCOM MEMBERSHIP WWWDIYBEADINGCLUBCOM
About the Author
Sky Aldovino
I consider myself a late bloomer when it comes to crafting Irsquom a self-taught jewelry maker Jewelry making wasnrsquot really a hobby of mine but unforeseen events lead me to learn jewellery making My family put up a craft store where we sell cross stitch beads and all sorts of crafting materials I fell in love with the beads and tried to create accessories only for myself Clients liked the pieces and I started customizing handmade jewelleries The craft store was a success for 6 years but like any other small businesses we had to close it down and I was confined to staying at home While at home I had all the time using the internet and now working as a home-based jewelry designer
BLOG DIY BEADING MAGAZINE ISSUE 32
Atomic Ring
BLOG WWWHANDMADE-JEWELRY-CLUBCOM MEMBERSHIP WWWDIYBEADINGCLUBCOM
Have fun making shapes using the wigjig Cyclops Make loops going in
circles to mimic the shape of a flower or in this tutorial mimic the
shape of an atom The tutorial will also teach you how to cage a
cabochon Whats nice about this piece is that with one long wire you
can create the ring from start to finish
The tutorial is catered for intermediate to advanced students One
must already know how to make spirals and use a wigjig tool It has
clear instructions and ultra-clear close-up photos at each step
Additionally you can ask me question you have on the tutorial No
more getting stuck and frustrated on a confusing or just plain
inaccurate pattern
If you followed this tutorial and then sell the accessory or jewelry
please give credit to the author or DIY Beading Clubcom
If you like to get a blank wigjig graph visit wigjigcom Shop and Jigs
section
Copyright 2015
wwwdiybeadingclubcom
wwwhandmade-jewelry-clubcom
BLOG DIY BEADING MAGAZINE ISSUE 32
Atomic Ring
BLOG WWWHANDMADE-JEWELRY-CLUBCOM MEMBERSHIP WWWDIYBEADINGCLUBCOM
Materials Needed 20ga Craft wire 28ga Craft wire 11mm Round Cabochon
Tools Needed Wigjig Cyclops 15mm pegs Wire cutter Flat nose pliers Mandrel
Skill Level Intermediate - Advanced
BLOG DIY BEADING MAGAZINE ISSUE 32
Step 1 Lets prepare your wigjig cyclops Position the pegs like so
Atomic Ring
BLOG WWWHANDMADE-JEWELRY-CLUBCOM MEMBERSHIP WWWDIYBEADINGCLUBCOM BLOG DIY BEADING MAGAZINE ISSUE 32
Lets work with longer wire so youll have enough wire to hold onto as you manipulate the wire so cut 36 inches of 20ga wire From
one end of the wire measure 10 inches
On the 10-inch measurement loop the wire at the center peg then continue to loop onto the side pegs going in circle going back to
the center peg after looping on the side peg
Now the wire at the center peg will start to build up as you go around the side pegs so
you need to constantly press the wire at the center peg to accommodate the build up of
wire
When youre done pull out the wire and this is
how it should look like
Atomic Ring
BLOG WWWHANDMADE-JEWELRY-CLUBCOM MEMBERSHIP WWWDIYBEADINGCLUBCOM BLOG DIY BEADING MAGAZINE ISSUE 32
You will notice that the frame opens wide Now to keep the atom frame from opening wide secure the center of the frame by wrapping a 28ga wire What you
need to do is simply pass the 28ga wire into the hole and wrap as many times as needed or until youre sure that the frame is secure
Step 2 Now youre finished with your atom frame Well now create the focal design With the longer wire make a spiral at the center big
enough to accommodate the size of your cabochon In this tutorial the spiral is about
11mm in diameter the same size as my cabochon
Pop in your cabochon and start to make spirals going around and over the cabochon as if you are caging the cabochon Create at
least 5 rounds and then cut off any excess
Step 3 Now lets make the ring and this with the other
end of the wire
Atomic Ring
BLOG WWWHANDMADE-JEWELRY-CLUBCOM MEMBERSHIP WWWDIYBEADINGCLUBCOM BLOG DIY BEADING MAGAZINE ISSUE 32
Bring up your mandrel and wrap the wire to the size of your finger Wrap at least 2 times
When youre sure you have the right size pull the ring out of the mandrel
With the extended wire wrap the wire the secure the ring
Cut off any excess and voila You have your atomic ring Create as many as you can with different colors of cabochon
Atomic Ring
BLOG WWWHANDMADE-JEWELRY-CLUBCOM MEMBERSHIP WWWDIYBEADINGCLUBCOM
About the Author
Sky Aldovino
I consider myself a late bloomer when it comes to crafting Irsquom a self-taught jewelry maker Jewelry making wasnrsquot really a hobby of mine but unforeseen events lead me to learn jewellery making My family put up a craft store where we sell cross stitch beads and all sorts of crafting materials I fell in love with the beads and tried to create accessories only for myself Clients liked the pieces and I started customizing handmade jewelleries The craft store was a success for 6 years but like any other small businesses we had to close it down and I was confined to staying at home While at home I had all the time using the internet and now working as a home-based jewelry designer
BLOG DIY BEADING MAGAZINE ISSUE 32
Featured Article Gemstones Used for Jewelry Making
BLOG WWWHANDMADE-JEWELRY-CLUBCOM MEMBERSHIP WWWDIYBEADINGCLUBCOM
Gemstones are stones which we hold quite highly in terms of value And
jewelry often consists of stones that add attractiveness to it so it is not
surprising when jewelry designers actually use gemstones in their designs In
fact there are different types of gemstones that can be used for making
jewelry There are the expensive and pure gemstones and there are also the
imitation ones The information below will provide some information about
the kinds of stones you can use to create jewelry and how these stones will
impact the jewelry you have created
The first kind of stone which I believe we are all quite familiar with are
birthstones These stones are associated with individualrsquos month of birth
by SunVDesigns by BeyhanAkman
For example Amethyst stone is connected with anybody who is born in
February which carries special significance in the area of emotions and also
spiritually This stone also signifies calm and peace as well
And then we have semi-precious stones which are also often used in jewelry
making They are not as valuable as compared to precious stones but still
valuable Best examples of these stones are aquamarine topaz tourmaline
opal and turquoise
BLOG DIY BEADING MAGAZINE ISSUE 32
Featured Article Gemstones Used for Jewelry Making
BLOG WWWHANDMADE-JEWELRY-CLUBCOM MEMBERSHIP WWWDIYBEADINGCLUBCOM
It is an ideal gift for someone who you deem special Aquamarine pendants
usually work well for anyone and is widely an accepted stone
by HyppieChic by joyeriamestiza
However precious stones are the most unusual
and precious jewels to us Examples of some of
them are emerald sapphire diamond and
ruby These stones are usually very expensive
and are prized for their exquisiteness These
stones are commonly used in high-quality
jewelry designs which costs quite a fortune to
obtain
BLOG DIY BEADING MAGAZINE ISSUE 32
by sarajewelrystu
Jewelry designs with precious stones are usually
given as exceptional gifts on special occasions A
perfect example is a diamond ring that is usually
given as an engagement gift
by ldiamondsforever
Featured Article Gemstones Used for Jewelry Making
BLOG WWWHANDMADE-JEWELRY-CLUBCOM MEMBERSHIP WWWDIYBEADINGCLUBCOM
There are also synthetic stones which are often used to create jewelry
Synthetic stones are artificial imitations of gemstones Synthetic Sapphire
jewelry costs less compare with the authentic ones Most of the time
imitation stones are used to save cost but at the same time have the similar
look of the real stone
BLOG DIY BEADING MAGAZINE ISSUE 32
by shininggems by thaimaker
by lapinduprintemps by PastimeArt
Gemstones are used like beads and you can use it in any designs whether
simple or elaborate
Swarovski crystal components are available in a rich multitude of rondelles Perfect as spacers in necklaces or as discs in earrings Rondelles can be used with many varieties of shapes or sizes Use Swarovski crystal rondelles between large gemstones as accents with precious metal findings Fire Mountain Gems and Beads Crystal Passionsreg brand presents Swarovski crystal in display-ready packaging for brilliant retail presentation Crystal Passionsreg is an assurance of genuine Swarovski crystal
BLOG DIY BEADING MAGAZINE ISSUE 32 BLOG WWWHANDMADE-JEWELRY-CLUBCOM MEMBERSHIP WWWDIYBEADINGCLUBCOM
Recommended Jewelry Making Supplies
Mz Unisex-adults 12pcs 25x18x6mm Turquoise Oval CAB Cabochon
BLOG DIY BEADING MAGAZINE ISSUE 32 BLOG WWWHANDMADE-JEWELRY-CLUBCOM MEMBERSHIP WWWDIYBEADINGCLUBCOM
Recommended Jewelry Making Supplies
For a little sparkle that goes a long way design with Swarovski 4mm faceted bicones Create glorious multi-strand necklaces with the dainty crystals or use as spacers to add a tiny flash to your designs Swarovski crystal components are made in Austria and are considered the finest products of their kind in the world
BLOG DIY BEADING MAGAZINE ISSUE 32 BLOG WWWHANDMADE-JEWELRY-CLUBCOM MEMBERSHIP WWWDIYBEADINGCLUBCOM
Recommended Jewelry Making Supplies
Imitation beads resist color change These beads have uniform quality with a good polish Some strands may have little to no matrix Sizes shapes and colors may vary with handcrafted items
BLOG DIY BEADING MAGAZINE ISSUE 32 BLOG WWWHANDMADE-JEWELRY-CLUBCOM MEMBERSHIP WWWDIYBEADINGCLUBCOM
Recommended Jewelry Making Supplies
Something Blue Necklace and Earrings
BLOG WWWHANDMADE-JEWELRY-CLUBCOM MEMBERSHIP WWWDIYBEADINGCLUBCOM
Skill level Beginner Intermediate Advanced
DIMENSIONS OF THE NECKLACE Inner Circumference 14 18 inch 35 cm
Focal Pendant Width 1 15 inch 35 cm Focal Pendant Height 1 15 inch 35 cm
DIMENSIONS OF THE EARRING Earring Width 716 inch 12 cm Earring Height 1516 inch 25 cm (Without the earring hook)
BLOG DIY BEADING MAGAZINE ISSUE 32
Materials
Note Before purchasing the supplies measure the length of your wished necklace If you decide to bead a longer necklace you should keep in mind that for every extra
frac34 inches 2 cm-s you will need 8 bicones and 8 pearls
Something Blue Necklace and Earrings
BLOG WWWHANDMADE-JEWELRY-CLUBCOM MEMBERSHIP WWWDIYBEADINGCLUBCOM BLOG DIY BEADING MAGAZINE ISSUE 32
Work RAW stitch into a beaded circle and embellish with Swarovski bicones
STEP 2 String 1A and 2 pearls Pass through the previous
second pearl and the freshly added 1A and the first pearl again
STEP 1 Use a comfortable length of thread to string 2
pearls 1A and 1 pearl again leaving a 2rdquo 5cm tail Pass through the first two pearls strung to form a
ring
STEP 3 String 2 pearls and 1A Pass through the previous first pearl and the freshly added two pearls
again
STEP 4 - 17 Repeat STEP 2 and STEP 3 again until you count 17 pearls in the inner circle
But be careful in the last step you only have to add 1 pearl then pass through the first pearls
added in STEP 1 and add another 1A Now pass through the first pearl added in STEP
1and 1A added in this round again to exit from this A
Something Blue Necklace and Earrings
BLOG WWWHANDMADE-JEWELRY-CLUBCOM MEMBERSHIP WWWDIYBEADINGCLUBCOM BLOG DIY BEADING MAGAZINE ISSUE 32
STEP 19 String 2A and pass through the next A added in round 4-17 and the A added in round 18 the 2A added in this round and finally the A added in round 4-17 to exit from the bead showed below
STEP 18 String 3A and pass through the 1A added in the previous round and the first A added in this
round
STEP 20 - 34 Repeat STEP 18 and STEP 19 again until you finish the circle
But be careful in the last step first you have to pass through 3A and then add 1A After this pass
through the 3A again and exit from the A bead
shown below (This is the first A added in STEP 18)
Something Blue Necklace and Earrings
BLOG WWWHANDMADE-JEWELRY-CLUBCOM MEMBERSHIP WWWDIYBEADINGCLUBCOM BLOG DIY BEADING MAGAZINE ISSUE 32
STEP 35 Step up to exit from the pearl shown below (Finishing the previous step in the A bead and then
stepping up from there makes the circle more secure)
Now string 3 bicones Pass through the pearl and the first bicone again
In the reality your circle will look more like this the A beads forming a strong row in the middle of the
pearls
STEP 36 Add 2 bicones Pass through the
neighboring pearl the first bicone added in the previous row and the 2 bicones added in this step
so you can exit from the next pearl
Something Blue Necklace and Earrings
BLOG WWWHANDMADE-JEWELRY-CLUBCOM MEMBERSHIP WWWDIYBEADINGCLUBCOM BLOG DIY BEADING MAGAZINE ISSUE 32
Now in the reality your circle will look more like this the A beads still forming a strong row in the middle of the pearls and the bicones slightly lying on top of
them
STEP 37 - 49 Repeat STEP 35 and STEP 36 again until you finish the circle with the bicones
But be careful in the last step first you have pass through the third bicone added then add 1 bicone
and pass through this little quartet to exit from the bicone shown below (The second one added in
STEP 35)
STEP 50 With these steps we finish the circle by adding 1 bicone to connect the A beads and the
bicone row So add 1 bicone pass through the nearest A bead and add 1 bicone again Pass
through the bicone already there and exit from the bicone you just added
Something Blue Necklace and Earrings
BLOG WWWHANDMADE-JEWELRY-CLUBCOM MEMBERSHIP WWWDIYBEADINGCLUBCOM BLOG DIY BEADING MAGAZINE ISSUE 32
STEP 66-83 Secure the circle by adding 1A between each bicone in the second row of Swarovski
bicones If you finished secure the thread and trim
STEP 51-65 Using the same technique as in STEP 37 - 49 add 1 bicone to finish the third bicone row The black line shows you the way (After STEP 50 pass through the next A bead add 1 bicone and pass through the bicone already there and the bicone added in the previous step Repeat these steps to
finish the inner bicone circle)
MIDDLE CIRCLE Work RAW stitch into a beaded circle and embellish with
Swarovski bicones Remember you need to bead two circles this time
STEP 1 Just like in the focal circle begin with 2 pearls 1A and 1 pearl again on a comfortable length of thread
leaving a 2rdquo 5cm tail Pass through the first two pearls strung to form a ring
Something Blue Necklace and Earrings
BLOG WWWHANDMADE-JEWELRY-CLUBCOM MEMBERSHIP WWWDIYBEADINGCLUBCOM BLOG DIY BEADING MAGAZINE ISSUE 32
STEP 15-28 Mimicing the FOCAL CIRCLElsquos STEP 18-34 bead A beads until you finish the inner part of the
circle Exit from a pearl in the second row This circle should look very similar to the first one but this is a bit
smaller
STEP 2-14 Mimicing the FOCAL CIRCLElsquos STEP 2-17 bead until you count 14 pearls in the inner circle Exit
from the last A added
STEP 29-42 Mimicing FOCAL CIRCLElsquos STEP 35-49 add 2 rows of bicones
STEP 43-56 Mimicing the FOCAL CIRCLElsquos STEP 50-65 bead the third row of bicones to finish the circle
Something Blue Necklace and Earrings
BLOG WWWHANDMADE-JEWELRY-CLUBCOM MEMBERSHIP WWWDIYBEADINGCLUBCOM BLOG DIY BEADING MAGAZINE ISSUE 32
SMALLEST CIRCLE Work RAW stitch into a beaded circle and embellish
with Swarovski bicones Remember you need to bead two circles again
STEP 1 Just like in the focal circle begin with 2 pearls
1A and 1 pearl again on a comfortable length of thread leaving a 2rdquo 5cm tail Pass through the first two
pearls strung to form a ring
STEP 57-70 Just like the FOCAL CIRCLElsquos STEP 66-83 secure the circle by adding 1A between every bicone
in the second row of bicones If you finished secure the thread and trim (Donrsquot forget to bead another
circle)
STEP 2-12 Mimicing the FOCAL CIRCLElsquos STEP 2-17 bead until you count 12 pearls in the inner circle Exit
from the last A added
STEP 13-24 Mimicing the FOCAL CIRCLElsquos STEP 18-34 bead A beads until you finish the inner part of the
circle Exit from a pearl in the second row This circle should look very similar to the first two but this is the
smallest of them all
Something Blue Necklace and Earrings
BLOG WWWHANDMADE-JEWELRY-CLUBCOM MEMBERSHIP WWWDIYBEADINGCLUBCOM BLOG DIY BEADING MAGAZINE ISSUE 32
STEP 37-48 Mimicing the FOCAL CIRCLElsquos STEP 50-65 bead the third row of bicones to finish this circle too
STEP 25-36 Mimicing FOCAL CIRCLElsquos STEP 35-49 add 2
rows of bicones The last step here is purple again
STEP 49-60 Just like the FOCAL CIRCLElsquos STEP 66-83 secure the circle by adding 1A between every bicone
in the second row of bicones If you finished secure the thread and trim (Donrsquot forget that you need two
small circles)
Something Blue Necklace and Earrings
BLOG WWWHANDMADE-JEWELRY-CLUBCOM MEMBERSHIP WWWDIYBEADINGCLUBCOM BLOG DIY BEADING MAGAZINE ISSUE 32
STEP 37-48 Mimicing the FOCAL CIRCLElsquos STEP 50-65 bead the third row of bicones to finish this circle too
STEP 25-36 Mimicing FOCAL CIRCLElsquos STEP 35-49 add 2
rows of bicones The last step here is purple again
STEP 49-60 Just like the FOCAL CIRCLElsquos STEP 66-83 secure the circle by adding 1A between every bicone
in the second row of bicones If you finished secure the thread and trim (Donrsquot forget that you need two
small circles)
Something Blue Necklace and Earrings
BLOG WWWHANDMADE-JEWELRY-CLUBCOM MEMBERSHIP WWWDIYBEADINGCLUBCOM BLOG DIY BEADING MAGAZINE ISSUE 32
STEP 2-6 Continue by adding 1A 1 bicone 1 pearl until you count 6 of each
STEP 1 Begin with 1 pearl 1 bicone 1A and 1 bicone again on a comfortable length of thread leaving a 2rdquo
5cm tail Pass through the pearl and the first bicone strung to form a ring
STEP 7-12 Pass through the A beads to make your
component more secure Also secure the thread and trim (Repeat these steps until you have six 6-BEAD
COMPONENTs)
6-BEAD COMPONENT Work RAW stitch into a beaded circle and embellish with Swarovski bicones
For the necklace we will need six from this component For the earring two
Something Blue Necklace and Earrings
BLOG WWWHANDMADE-JEWELRY-CLUBCOM MEMBERSHIP WWWDIYBEADINGCLUBCOM BLOG DIY BEADING MAGAZINE ISSUE 32
STEP 2-4 Continue by adding 1A 1 bicone 1 pearl
until you count 4 of each
STEP 1 Begin with 1 pearl 1 bicone 1A and 1 bicone again on a comfortable length of thread leaving a 2rdquo
5cm tail Pass through the pearl and the first bicone strung to form a ring
STEP 5-8 Pass through the A beads to make your component more secure Also secure the thread and
trim (Repeat these steps until you have the wished amount of 4-BEAD COMPONENTs)
4-BEAD COMPONENT Work RAW stitch into a beaded circle and embellish with Swarovski bicones
For the necklace-size that is given on the second page we will need 20 from this
component For the earring two
If you would like to make a longer necklace you need to make more (One 4-BEAD COMPONENT measures about 38 inch 1 cm To make the necklace symmetrical you have to have equal amounts on each side This means for every extra frac34 inches
2 cm-s you will need 1 4-BEAD COMPONENT on each side of the necklace)
Something Blue Necklace and Earrings
BLOG WWWHANDMADE-JEWELRY-CLUBCOM MEMBERSHIP WWWDIYBEADINGCLUBCOM BLOG DIY BEADING MAGAZINE ISSUE 32
STEP 2 Connect the MIDDLE CIRCLE to two 6-BEAD COMPONENTs by adding four-times 2As
between the pearls Choose a pearl on the MIDDLE CIRCLE and add
2A pass through a pearl in the 6-BEAD COMPONENT previously added and add 2A again Watch out this has to be symmetrical Repeat this at least two more times to make it
secure Now repeat this entire procedure but choose
the 8-th pearl on MIDDLE CIRCLE Repeat this on the other side of the necklace
too
Choose a pearl on the FOCAL CIRCLE and add 2A pass through a pearl in the 6-BEAD COMPONENT and add 2A again Repeat this at least two more times to make it secure
Now repeat this entire procedure but choose the 5-th pearl on FOCAL CIRCLE This will make the necklace nice on your neck
FINISHING THE NECKLACE Connects the parts with A beads
STEP 1 Connect the FOCAL CIRCLE to two 6-BEAD COMPONENTs by adding four-times 2As between the pearls To do this turn your parts upside down you need to
see the pearls We will work on this side from now on
Something Blue Necklace and Earrings
BLOG WWWHANDMADE-JEWELRY-CLUBCOM MEMBERSHIP WWWDIYBEADINGCLUBCOM BLOG DIY BEADING MAGAZINE ISSUE 32
FINISHING THE EARRING Connects the parts with A beads
STEP 1-2 Connect the 6-BEAD COMPONENT
to 4-BEAD COMPONENT and the 4-BEAD
COMPONENT to the earring hook
First connect the 4-BEAD COMPONENT to the 6-BEAD COMPONENT with 4A beads Mimic
the elongation steps of the necklace if needed
Secondly connect the 4-BEAD COMPONENT
to your earring hook with 4A beads again Leave from the last pearl bead 2A beads the hook (this is the orange oval form) and 2As again Pass through each of them to
secure this connection again
Finally get ready to prepare the other earring ndash since we need two of them
STEP 5 Connect the 4-BEAD COMPONENTs to the toggle clasp thus finishing the
necklace Leaving from the last pearl bead 2A the
clasp(this is the orange oval form) and 2A again Pass through all of them a couple more times to make this connection more
secure
Something Blue Necklace and Earrings
BLOG WWWHANDMADE-JEWELRY-CLUBCOM MEMBERSHIP WWWDIYBEADINGCLUBCOM BLOG DIY BEADING MAGAZINE ISSUE 32
If you finished it is time to try it on It was a great fun wasnrsquot it And how beautiful you look in your new necklace and the matching earrings
Something Blue Necklace and Earrings
BLOG WWWHANDMADE-JEWELRY-CLUBCOM MEMBERSHIP WWWDIYBEADINGCLUBCOM
About the Author
Margit Vogel
My name is Margit Vogel I live in Hungary Europe
By profession I am a biochemical engineer but I fell in love with
beads so much that I could not stop playing with them
I make one-of-a-kind beaded and bead embroidered art
jewelry made of the best quality materials such as Swarovski
stones gemstones Japanese beads (Miyuki and Toho) Czech
glass beads leather soutache and suede Each piece is unique
and individually crafted
Feel free to visit my blog for some eyecandy
httpiformjewelrywordpresscom
My shop httpwwwetsycomshopiformjewelry
Facebook httpwwwfacebookcomiformjewelry
BLOG DIY BEADING MAGAZINE ISSUE 32
Getting Down And Personal With Gianna
Getting Down And Personal With Gianna
Nowadays we see more and more jewelry stores opening up online and with these online jewelry stores it has made it easier for us to purchase and view their creations Have you ever wondered how they are able to manage and produce amazing jewelry pieces and tutorials So heres a little on the journey to open up an online shop We are excited to present to you Gianna aka Beading4perfectionists
Gianna Beader amp Youtuber
Unlike most jewelry makers and beadweavers Gianna did not start beading as a hobby but as a means to make ends meet With goals in trying to
fill the financial gap she did everything she could to expand her earnings ndash working as a security guard
and at the same time learning how to bead and selling her pieces at fair trades and flea markets
Since many were asking if she does home beading workshops she started on exploring how to teach people to bead She loves Scott Bakula and has always loved him till now and this served as her
inspiration to start making a beading video tutorial
Gianna started creating videos because she was at the point in her life where everything seemed to be falling apart And at that moment of time she had difficulties financially and selling jewelry was the only way for her to stay afloat financially She is a big Scott Bakula fan and when she went to the UK to see him on stage that was when it hit her that she is already able to edit videos and
taught herself Photoshop and done workshops at bead fairs so why not put these together and see what happens on Youtube She knew that if she gets enough subscribers and views ndash though no one knew what the exact numbers were you would be invited to become a Youtube partner This way she could monetize her videos with advertisements and hopefully she would be able to be a Youtube partner and be able to pay her bills
BLOG WWWHANDMADE-JEWELRY-CLUBCOM MEMBERSHIP WWWDIYBEADINGCLUBCOM BLOG DIY BEADING MAGAZINE ISSUE 32
Getting Down And Personal With Gianna
Her Youtube channel is popular and the reason why she chose Youtube is because Youtube is the biggest platform and reached almost to the whole world Everyone already knows about it and it was growing rapidly as compared to other platforms like Dailymotion so she figured that Youtube was the way to go Her advice to new designers is that when you start out go to the platforms on the top of your list first then work your way down your list if you do not get accepted by your first choice
After loyally putting up one video every week for about 8 months in a row she became a Youtube partner and monetized her videos She knew she needed at least $100 to get her first payout She managed to reach $100 after 3 months The process was not easy she worked hard lack sleep skipped meals and who knows what happened to Ridge in the Bold and the Beautiful because she stopped watching
On Youtube you can monetize your videos Google pays straight to your bank account and at other countries where they also have the option of getting checks among other options In order to get paid you have to reach the $100 mark and after 3 months For Gianna she thinks that you cannot say that Etsy is better than Youtube or Youtube is better than Etsy Her reasoning is because on Youtube she has many followers which will eventually check out her Etsy shop And to start an Etsy shop you need an audience
BLOG WWWHANDMADE-JEWELRY-CLUBCOM MEMBERSHIP WWWDIYBEADINGCLUBCOM BLOG DIY BEADING MAGAZINE ISSUE 32
television and dedicated her spare time (as she had another job) to Youtube She re-registered at the chamber of commerce after receiving her first payout Her work at Youtube now is not a full time job and things have changed on Youtube It is easier to become a parter but there are some countries that need to wait for an invitation to be a Youtube partner Take Italy for instance Italians would have to work just as hard as she did if they want to become a Youtube partner
Getting Down And Personal With Gianna
With her 60000 subscribers on her b4pbakup Youtube channel it is possible to sell at least 60 patterns on the first day on Etsy after promoting the PDF file on her Youtube channel Though you may think that 60 out of 60000 is not much you have to remember that not everyone has the means to purchase the PDF file and a lot of people still rather watch her carry out the tutorial(for free) on Youtube instead of reading the patterns or paying for the patterns even if the pattern is for a fundraiser and only cost $2 Her insights on Youtube is that Youtube is not what it used to be 6 years ago Instead of making more money every month she is making less and less because advertisers have more options of where they want to advertise their ads Ads do not pay as much as they used to Back in the days you could get 25 cents per ad Now you count yourself lucky if you could get 5 cents roll in after two hours
BLOG WWWHANDMADE-JEWELRY-CLUBCOM MEMBERSHIP WWWDIYBEADINGCLUBCOM BLOG DIY BEADING MAGAZINE ISSUE 32
And on top of that adblockers are destroying Youtube channel owners Youtube will start making changes to the channels where there will be ldquopaid subscriptionrdquo channels This has already been implemented in some countries but not in her country The Netherlands This means there will no longer be ads for her monthly paying subscribers She hopes that Youtube will add on a paid per video option feature The option to be a paid channel or free channel or to start a new channel for paying customers is yours to choose Gianna is not happy with Youtube because many others like her have worked so hard and for some years to become Youtube partners(which was something to be proud of) has lost their status
Getting Down And Personal With Gianna
Her advice for those who want to go on Youtube is 1 Do it because you want to teach
2 Do it because you want a career with beads
BLOG WWWHANDMADE-JEWELRY-CLUBCOM MEMBERSHIP WWWDIYBEADINGCLUBCOM BLOG DIY BEADING MAGAZINE ISSUE 32
After putting up about 20 videos and having at least 5000 subscribers add the PDF tutorials to Etsy and Craftsy She found out that her audience would like to have the PDF after watching her videos This is because they would rather print out the PDF and work while seated in a comfy chair technically somewhere else instead of having to pause the video time and time again
Gianna has also made a video for those who want to know the whole story of her journey up until the present day And to get updates on her you can check it out here She has also started a vlog where she tells of how she still works towards becoming a financial independent beader and explains her journey to get where she wants to be(or die trying) Gianna will be in the UK on October the 17th giving an all-day workshop with 4 different patterns
(2 beginners and 2 advanced) in Wotton-under-Edge
Gianna will be there Friday night as the workshop is on Saturday She will be leaving on Sunday Her
doors are open to all who wants to continue the party with her at the hotel across the street
For more information do contact Ann Tucker on Facebook
httpswwwfacebookcomanntucker501
Rec
omm
end
ed R
ead
ings
Making Jewelry with Gemstone
Beads
Combines the popular craft of beading with beautiful semi-precious stones which are collected by many Features a variety of versatile ideas which can be adapted for any type of gem or bead Readers will learn to reate beautiful gemstone jewelry with this dazzling collection of over 100 projects ranging from eyecatching earrings and accessories to exquisite necklaces and bracelets This beautiful book offers an impressive range of 28 beautiful semi-precious stones (including birthstones) and a glimpse into the fascinating history and mythical properties behind them
BLOG DIY BEADING MAGAZINE ISSUE 32 BLOG WWWHANDMADE-JEWELRY-CLUBCOM MEMBERSHIP WWWDIYBEADINGCLUBCOM
Rec
omm
end
ed R
ead
ings
Convertible Crystal Jewelry
Reverse it Twist it Wear it Many
Ways
Diane Whiting presents the idea that convertibility isnrsquot just about using pieces in multiple ways it is also about using skills and creativity in multiple ways Using ever-popular sparkling crystals Diane showcases design elements through various techniques for fun easy fashionable jewelry With 25 projects the reader can choose from bracelets necklaces and earrings that match any outfit or styleDiane Whiting presents the idea that convertibility isnrsquot just about using pieces in multiple ways it is also about using skills and creativity in multiple ways
BLOG DIY BEADING MAGAZINE ISSUE 32 BLOG WWWHANDMADE-JEWELRY-CLUBCOM MEMBERSHIP WWWDIYBEADINGCLUBCOM
Rec
omm
end
ed R
ead
ings
Wire Jewelry Masterclass
Wrapped Coiled and Woven Pieces
Using Fine Materials
Comprehensive and fabulous Wire Jewelry Masterclass takes an in-depth look at an intricate and rewarding craft The 24 projects which range from simple Dragons tear briolette earrings to a Poseidon-under-the-sea pendant will delight and inspire jewelers of all levels and tastes Divided into beginner intermediate and advanced sections this beautifully photographed step-by-step guide is the ticket to wire jewelry expertise
BLOG DIY BEADING MAGAZINE ISSUE 32 BLOG WWWHANDMADE-JEWELRY-CLUBCOM MEMBERSHIP WWWDIYBEADINGCLUBCOM
Rec
omm
end
ed R
ead
ings
Timeless Wire Weaving The
Complete Course
Timeless Wire Weaving focuses on developing wirework skills through 13 projects using three classic wire weaving techniques coiling wrapping and weaving The projects are built around a focal cabochon and incorporate seed beads and crystals in imaginative ways Designers learn to make the jewelry shown in the book and they also use the techniques learned to create innovative jewelry pieces of their own
BLOG DIY BEADING MAGAZINE ISSUE 32 BLOG WWWHANDMADE-JEWELRY-CLUBCOM MEMBERSHIP WWWDIYBEADINGCLUBCOM
Our digital magazine is available through
Apple Newsstand service available to millions of IPAD users
To advertise with us please email us at
diyjewelryclubgmailcom
Or visit our page at
httphandmade-jewelry-clubcomadvertising-diy-beading-magazine

Liberty Earrings
BLOG WWWHANDMADE-JEWELRY-CLUBCOM MEMBERSHIP WWWDIYBEADINGCLUBCOM
About the Author
Mariella Martella
My name is Mariella Martella and I am the author and
designer of jewelry that I sign with the name of Mariel Bijoux
After changing city often for work and study I currently live
in northern Italy I am an art historian with a passion for travel
painting and jewelry design in weaving that project since
2010 In my beads and crystals are the colors of the
Mediterranean sea the atmosphere of summer evenings
and the lights of the places I visited
You can find me at
Etsy shop httpswwwetsycomitshopMarielBijoux
Facebook httpswwwfacebookcommari3lbijoux
Crafting blog httpmarielbijouxblogspotit
Twitter httpstwittercomMarielBijoux
BLOG DIY BEADING MAGAZINE ISSUE 32
Jade Necklace
BLOG WWWHANDMADE-JEWELRY-CLUBCOM MEMBERSHIP WWWDIYBEADINGCLUBCOM
Every time I wear a necklace I always make it a point that the
necklace will lay perfectly flat on my neck Using wire for a necklace
made it possible for me like what I did with Jade Necklace It may look
odd at first having bent wires for a necklace but once the jewelry is
finished youll be so happy how the necklace will perfectly lay on your
neck
The tutorial is catered for intermediate level One must know basic
wirework skills such as wire wrapping making loops wrapped loops
and linking to follow the tutorial It has clear instructions and ultra-clear
close-up photos at each step Additionally you can ask me question
you have on the tutorial No more getting stuck and frustrated on a
confusing or just plain inaccurate pattern
If you followed this tutorial and then sell the accessory or jewelry
please give credit to the author or DIY Beading Clubcom
Copyright 2015
wwwdiybeadingclubcom
wwwhandmade-jewelry-clubcom
BLOG DIY BEADING MAGAZINE ISSUE 32
Jade Necklace
BLOG WWWHANDMADE-JEWELRY-CLUBCOM MEMBERSHIP WWWDIYBEADINGCLUBCOM BLOG DIY BEADING MAGAZINE ISSUE 32
Materials Needed 18ga Craft wire 28ga Craft wire 15mm diameter Green Round Flat Back Sew On Gems 5mm Green pearls
8mm Green pearls 6mm x 11mm teardrop Crystal Treasures Mill Hill beads or any teardrop bead with holes on the side Hook for your clasp
Tools Needed Wire cutter Flat nose pliers Round nose pliers Mandrel A jar or any rounded object to shape your necklace
Skill Level Intermediate
Step 1 Cut 6 inches 18ga wire Make a loop on one end then measure approximately 125 inches and make another loop
Form a size 4 circle on your mandrel
Jade Necklace
BLOG WWWHANDMADE-JEWELRY-CLUBCOM MEMBERSHIP WWWDIYBEADINGCLUBCOM BLOG DIY BEADING MAGAZINE ISSUE 32
Then close the circle by wrapping the extended wire just below the loop Wrap the
wire 2x
This is how it looks like Lets call this circle frame Youll notice that the lower curve is
slightly bigger than the upper curve
Step 2 Cut 8 inches of 28ga wire Wrap one end of
the wire at least 3x on one side of the circle frame just below the loop
Bring up your gem Flat back sew on gems has 2 holes Insert the wire into one hole and then
wrap the wire once onto the circle frame
Jade Necklace
BLOG WWWHANDMADE-JEWELRY-CLUBCOM MEMBERSHIP WWWDIYBEADINGCLUBCOM BLOG DIY BEADING MAGAZINE ISSUE 32
Step 3 Insert a 5mm pearl on the wire and then pass
the wire under circle frame
Repeat previous step 2x and have 3 pearls wrapped
Continue wrapping with your teardrop crystal My crystal has 2 holes on the side
and then continue wrapping with your 5mm pearls then secure your wire
Repeat Step 3 and create as many as needed For 16-inch necklace Ive created 6 of these
components
Jade Necklace
BLOG WWWHANDMADE-JEWELRY-CLUBCOM MEMBERSHIP WWWDIYBEADINGCLUBCOM BLOG DIY BEADING MAGAZINE ISSUE 32
Step 4 Cut a 15-inch 18ga wire and make a loop on
one end Insert 8mm pearl and make a loop on the other end You then use these as connectors
and link the components
Step 5 The necklace is an 18ga wire with wrapped
loops on both ends First cut 7 inches 18ga wire and make a wrapped loop with your hook already inserted Side in 18pcs 5mm pearls
Then make a wrapped loop on the other end connecting the wrapped loop onto the component Do the same for the other
necklace but make the loop on the other end big enough so the hookclasp can pass thru
To have the necklace curve shaped use a jar to bend the wire Voila Now youre
ready to party
Jade Necklace
BLOG WWWHANDMADE-JEWELRY-CLUBCOM MEMBERSHIP WWWDIYBEADINGCLUBCOM
About the Author
Sky Aldovino
I consider myself a late bloomer when it comes to crafting Irsquom a self-taught jewelry maker Jewelry making wasnrsquot really a hobby of mine but unforeseen events lead me to learn jewellery making My family put up a craft store where we sell cross stitch beads and all sorts of crafting materials I fell in love with the beads and tried to create accessories only for myself Clients liked the pieces and I started customizing handmade jewelleries The craft store was a success for 6 years but like any other small businesses we had to close it down and I was confined to staying at home While at home I had all the time using the internet and now working as a home-based jewelry designer
BLOG DIY BEADING MAGAZINE ISSUE 32
Atomic Ring
BLOG WWWHANDMADE-JEWELRY-CLUBCOM MEMBERSHIP WWWDIYBEADINGCLUBCOM
Have fun making shapes using the wigjig Cyclops Make loops going in
circles to mimic the shape of a flower or in this tutorial mimic the
shape of an atom The tutorial will also teach you how to cage a
cabochon Whats nice about this piece is that with one long wire you
can create the ring from start to finish
The tutorial is catered for intermediate to advanced students One
must already know how to make spirals and use a wigjig tool It has
clear instructions and ultra-clear close-up photos at each step
Additionally you can ask me question you have on the tutorial No
more getting stuck and frustrated on a confusing or just plain
inaccurate pattern
If you followed this tutorial and then sell the accessory or jewelry
please give credit to the author or DIY Beading Clubcom
If you like to get a blank wigjig graph visit wigjigcom Shop and Jigs
section
Copyright 2015
wwwdiybeadingclubcom
wwwhandmade-jewelry-clubcom
BLOG DIY BEADING MAGAZINE ISSUE 32
Atomic Ring
BLOG WWWHANDMADE-JEWELRY-CLUBCOM MEMBERSHIP WWWDIYBEADINGCLUBCOM
Materials Needed 20ga Craft wire 28ga Craft wire 11mm Round Cabochon
Tools Needed Wigjig Cyclops 15mm pegs Wire cutter Flat nose pliers Mandrel
Skill Level Intermediate - Advanced
BLOG DIY BEADING MAGAZINE ISSUE 32
Step 1 Lets prepare your wigjig cyclops Position the pegs like so
Atomic Ring
BLOG WWWHANDMADE-JEWELRY-CLUBCOM MEMBERSHIP WWWDIYBEADINGCLUBCOM BLOG DIY BEADING MAGAZINE ISSUE 32
Lets work with longer wire so youll have enough wire to hold onto as you manipulate the wire so cut 36 inches of 20ga wire From
one end of the wire measure 10 inches
On the 10-inch measurement loop the wire at the center peg then continue to loop onto the side pegs going in circle going back to
the center peg after looping on the side peg
Now the wire at the center peg will start to build up as you go around the side pegs so
you need to constantly press the wire at the center peg to accommodate the build up of
wire
When youre done pull out the wire and this is
how it should look like
Atomic Ring
BLOG WWWHANDMADE-JEWELRY-CLUBCOM MEMBERSHIP WWWDIYBEADINGCLUBCOM BLOG DIY BEADING MAGAZINE ISSUE 32
You will notice that the frame opens wide Now to keep the atom frame from opening wide secure the center of the frame by wrapping a 28ga wire What you
need to do is simply pass the 28ga wire into the hole and wrap as many times as needed or until youre sure that the frame is secure
Step 2 Now youre finished with your atom frame Well now create the focal design With the longer wire make a spiral at the center big
enough to accommodate the size of your cabochon In this tutorial the spiral is about
11mm in diameter the same size as my cabochon
Pop in your cabochon and start to make spirals going around and over the cabochon as if you are caging the cabochon Create at
least 5 rounds and then cut off any excess
Step 3 Now lets make the ring and this with the other
end of the wire
Atomic Ring
BLOG WWWHANDMADE-JEWELRY-CLUBCOM MEMBERSHIP WWWDIYBEADINGCLUBCOM BLOG DIY BEADING MAGAZINE ISSUE 32
Bring up your mandrel and wrap the wire to the size of your finger Wrap at least 2 times
When youre sure you have the right size pull the ring out of the mandrel
With the extended wire wrap the wire the secure the ring
Cut off any excess and voila You have your atomic ring Create as many as you can with different colors of cabochon
Atomic Ring
BLOG WWWHANDMADE-JEWELRY-CLUBCOM MEMBERSHIP WWWDIYBEADINGCLUBCOM
About the Author
Sky Aldovino
I consider myself a late bloomer when it comes to crafting Irsquom a self-taught jewelry maker Jewelry making wasnrsquot really a hobby of mine but unforeseen events lead me to learn jewellery making My family put up a craft store where we sell cross stitch beads and all sorts of crafting materials I fell in love with the beads and tried to create accessories only for myself Clients liked the pieces and I started customizing handmade jewelleries The craft store was a success for 6 years but like any other small businesses we had to close it down and I was confined to staying at home While at home I had all the time using the internet and now working as a home-based jewelry designer
BLOG DIY BEADING MAGAZINE ISSUE 32
Featured Article Gemstones Used for Jewelry Making
BLOG WWWHANDMADE-JEWELRY-CLUBCOM MEMBERSHIP WWWDIYBEADINGCLUBCOM
Gemstones are stones which we hold quite highly in terms of value And
jewelry often consists of stones that add attractiveness to it so it is not
surprising when jewelry designers actually use gemstones in their designs In
fact there are different types of gemstones that can be used for making
jewelry There are the expensive and pure gemstones and there are also the
imitation ones The information below will provide some information about
the kinds of stones you can use to create jewelry and how these stones will
impact the jewelry you have created
The first kind of stone which I believe we are all quite familiar with are
birthstones These stones are associated with individualrsquos month of birth
by SunVDesigns by BeyhanAkman
For example Amethyst stone is connected with anybody who is born in
February which carries special significance in the area of emotions and also
spiritually This stone also signifies calm and peace as well
And then we have semi-precious stones which are also often used in jewelry
making They are not as valuable as compared to precious stones but still
valuable Best examples of these stones are aquamarine topaz tourmaline
opal and turquoise
BLOG DIY BEADING MAGAZINE ISSUE 32
Featured Article Gemstones Used for Jewelry Making
BLOG WWWHANDMADE-JEWELRY-CLUBCOM MEMBERSHIP WWWDIYBEADINGCLUBCOM
It is an ideal gift for someone who you deem special Aquamarine pendants
usually work well for anyone and is widely an accepted stone
by HyppieChic by joyeriamestiza
However precious stones are the most unusual
and precious jewels to us Examples of some of
them are emerald sapphire diamond and
ruby These stones are usually very expensive
and are prized for their exquisiteness These
stones are commonly used in high-quality
jewelry designs which costs quite a fortune to
obtain
BLOG DIY BEADING MAGAZINE ISSUE 32
by sarajewelrystu
Jewelry designs with precious stones are usually
given as exceptional gifts on special occasions A
perfect example is a diamond ring that is usually
given as an engagement gift
by ldiamondsforever
Featured Article Gemstones Used for Jewelry Making
BLOG WWWHANDMADE-JEWELRY-CLUBCOM MEMBERSHIP WWWDIYBEADINGCLUBCOM
There are also synthetic stones which are often used to create jewelry
Synthetic stones are artificial imitations of gemstones Synthetic Sapphire
jewelry costs less compare with the authentic ones Most of the time
imitation stones are used to save cost but at the same time have the similar
look of the real stone
BLOG DIY BEADING MAGAZINE ISSUE 32
by shininggems by thaimaker
by lapinduprintemps by PastimeArt
Gemstones are used like beads and you can use it in any designs whether
simple or elaborate
Swarovski crystal components are available in a rich multitude of rondelles Perfect as spacers in necklaces or as discs in earrings Rondelles can be used with many varieties of shapes or sizes Use Swarovski crystal rondelles between large gemstones as accents with precious metal findings Fire Mountain Gems and Beads Crystal Passionsreg brand presents Swarovski crystal in display-ready packaging for brilliant retail presentation Crystal Passionsreg is an assurance of genuine Swarovski crystal
BLOG DIY BEADING MAGAZINE ISSUE 32 BLOG WWWHANDMADE-JEWELRY-CLUBCOM MEMBERSHIP WWWDIYBEADINGCLUBCOM
Recommended Jewelry Making Supplies
Mz Unisex-adults 12pcs 25x18x6mm Turquoise Oval CAB Cabochon
BLOG DIY BEADING MAGAZINE ISSUE 32 BLOG WWWHANDMADE-JEWELRY-CLUBCOM MEMBERSHIP WWWDIYBEADINGCLUBCOM
Recommended Jewelry Making Supplies
For a little sparkle that goes a long way design with Swarovski 4mm faceted bicones Create glorious multi-strand necklaces with the dainty crystals or use as spacers to add a tiny flash to your designs Swarovski crystal components are made in Austria and are considered the finest products of their kind in the world
BLOG DIY BEADING MAGAZINE ISSUE 32 BLOG WWWHANDMADE-JEWELRY-CLUBCOM MEMBERSHIP WWWDIYBEADINGCLUBCOM
Recommended Jewelry Making Supplies
Imitation beads resist color change These beads have uniform quality with a good polish Some strands may have little to no matrix Sizes shapes and colors may vary with handcrafted items
BLOG DIY BEADING MAGAZINE ISSUE 32 BLOG WWWHANDMADE-JEWELRY-CLUBCOM MEMBERSHIP WWWDIYBEADINGCLUBCOM
Recommended Jewelry Making Supplies
Something Blue Necklace and Earrings
BLOG WWWHANDMADE-JEWELRY-CLUBCOM MEMBERSHIP WWWDIYBEADINGCLUBCOM
Skill level Beginner Intermediate Advanced
DIMENSIONS OF THE NECKLACE Inner Circumference 14 18 inch 35 cm
Focal Pendant Width 1 15 inch 35 cm Focal Pendant Height 1 15 inch 35 cm
DIMENSIONS OF THE EARRING Earring Width 716 inch 12 cm Earring Height 1516 inch 25 cm (Without the earring hook)
BLOG DIY BEADING MAGAZINE ISSUE 32
Materials
Note Before purchasing the supplies measure the length of your wished necklace If you decide to bead a longer necklace you should keep in mind that for every extra
frac34 inches 2 cm-s you will need 8 bicones and 8 pearls
Something Blue Necklace and Earrings
BLOG WWWHANDMADE-JEWELRY-CLUBCOM MEMBERSHIP WWWDIYBEADINGCLUBCOM BLOG DIY BEADING MAGAZINE ISSUE 32
Work RAW stitch into a beaded circle and embellish with Swarovski bicones
STEP 2 String 1A and 2 pearls Pass through the previous
second pearl and the freshly added 1A and the first pearl again
STEP 1 Use a comfortable length of thread to string 2
pearls 1A and 1 pearl again leaving a 2rdquo 5cm tail Pass through the first two pearls strung to form a
ring
STEP 3 String 2 pearls and 1A Pass through the previous first pearl and the freshly added two pearls
again
STEP 4 - 17 Repeat STEP 2 and STEP 3 again until you count 17 pearls in the inner circle
But be careful in the last step you only have to add 1 pearl then pass through the first pearls
added in STEP 1 and add another 1A Now pass through the first pearl added in STEP
1and 1A added in this round again to exit from this A
Something Blue Necklace and Earrings
BLOG WWWHANDMADE-JEWELRY-CLUBCOM MEMBERSHIP WWWDIYBEADINGCLUBCOM BLOG DIY BEADING MAGAZINE ISSUE 32
STEP 19 String 2A and pass through the next A added in round 4-17 and the A added in round 18 the 2A added in this round and finally the A added in round 4-17 to exit from the bead showed below
STEP 18 String 3A and pass through the 1A added in the previous round and the first A added in this
round
STEP 20 - 34 Repeat STEP 18 and STEP 19 again until you finish the circle
But be careful in the last step first you have to pass through 3A and then add 1A After this pass
through the 3A again and exit from the A bead
shown below (This is the first A added in STEP 18)
Something Blue Necklace and Earrings
BLOG WWWHANDMADE-JEWELRY-CLUBCOM MEMBERSHIP WWWDIYBEADINGCLUBCOM BLOG DIY BEADING MAGAZINE ISSUE 32
STEP 35 Step up to exit from the pearl shown below (Finishing the previous step in the A bead and then
stepping up from there makes the circle more secure)
Now string 3 bicones Pass through the pearl and the first bicone again
In the reality your circle will look more like this the A beads forming a strong row in the middle of the
pearls
STEP 36 Add 2 bicones Pass through the
neighboring pearl the first bicone added in the previous row and the 2 bicones added in this step
so you can exit from the next pearl
Something Blue Necklace and Earrings
BLOG WWWHANDMADE-JEWELRY-CLUBCOM MEMBERSHIP WWWDIYBEADINGCLUBCOM BLOG DIY BEADING MAGAZINE ISSUE 32
Now in the reality your circle will look more like this the A beads still forming a strong row in the middle of the pearls and the bicones slightly lying on top of
them
STEP 37 - 49 Repeat STEP 35 and STEP 36 again until you finish the circle with the bicones
But be careful in the last step first you have pass through the third bicone added then add 1 bicone
and pass through this little quartet to exit from the bicone shown below (The second one added in
STEP 35)
STEP 50 With these steps we finish the circle by adding 1 bicone to connect the A beads and the
bicone row So add 1 bicone pass through the nearest A bead and add 1 bicone again Pass
through the bicone already there and exit from the bicone you just added
Something Blue Necklace and Earrings
BLOG WWWHANDMADE-JEWELRY-CLUBCOM MEMBERSHIP WWWDIYBEADINGCLUBCOM BLOG DIY BEADING MAGAZINE ISSUE 32
STEP 66-83 Secure the circle by adding 1A between each bicone in the second row of Swarovski
bicones If you finished secure the thread and trim
STEP 51-65 Using the same technique as in STEP 37 - 49 add 1 bicone to finish the third bicone row The black line shows you the way (After STEP 50 pass through the next A bead add 1 bicone and pass through the bicone already there and the bicone added in the previous step Repeat these steps to
finish the inner bicone circle)
MIDDLE CIRCLE Work RAW stitch into a beaded circle and embellish with
Swarovski bicones Remember you need to bead two circles this time
STEP 1 Just like in the focal circle begin with 2 pearls 1A and 1 pearl again on a comfortable length of thread
leaving a 2rdquo 5cm tail Pass through the first two pearls strung to form a ring
Something Blue Necklace and Earrings
BLOG WWWHANDMADE-JEWELRY-CLUBCOM MEMBERSHIP WWWDIYBEADINGCLUBCOM BLOG DIY BEADING MAGAZINE ISSUE 32
STEP 15-28 Mimicing the FOCAL CIRCLElsquos STEP 18-34 bead A beads until you finish the inner part of the
circle Exit from a pearl in the second row This circle should look very similar to the first one but this is a bit
smaller
STEP 2-14 Mimicing the FOCAL CIRCLElsquos STEP 2-17 bead until you count 14 pearls in the inner circle Exit
from the last A added
STEP 29-42 Mimicing FOCAL CIRCLElsquos STEP 35-49 add 2 rows of bicones
STEP 43-56 Mimicing the FOCAL CIRCLElsquos STEP 50-65 bead the third row of bicones to finish the circle
Something Blue Necklace and Earrings
BLOG WWWHANDMADE-JEWELRY-CLUBCOM MEMBERSHIP WWWDIYBEADINGCLUBCOM BLOG DIY BEADING MAGAZINE ISSUE 32
SMALLEST CIRCLE Work RAW stitch into a beaded circle and embellish
with Swarovski bicones Remember you need to bead two circles again
STEP 1 Just like in the focal circle begin with 2 pearls
1A and 1 pearl again on a comfortable length of thread leaving a 2rdquo 5cm tail Pass through the first two
pearls strung to form a ring
STEP 57-70 Just like the FOCAL CIRCLElsquos STEP 66-83 secure the circle by adding 1A between every bicone
in the second row of bicones If you finished secure the thread and trim (Donrsquot forget to bead another
circle)
STEP 2-12 Mimicing the FOCAL CIRCLElsquos STEP 2-17 bead until you count 12 pearls in the inner circle Exit
from the last A added
STEP 13-24 Mimicing the FOCAL CIRCLElsquos STEP 18-34 bead A beads until you finish the inner part of the
circle Exit from a pearl in the second row This circle should look very similar to the first two but this is the
smallest of them all
Something Blue Necklace and Earrings
BLOG WWWHANDMADE-JEWELRY-CLUBCOM MEMBERSHIP WWWDIYBEADINGCLUBCOM BLOG DIY BEADING MAGAZINE ISSUE 32
STEP 37-48 Mimicing the FOCAL CIRCLElsquos STEP 50-65 bead the third row of bicones to finish this circle too
STEP 25-36 Mimicing FOCAL CIRCLElsquos STEP 35-49 add 2
rows of bicones The last step here is purple again
STEP 49-60 Just like the FOCAL CIRCLElsquos STEP 66-83 secure the circle by adding 1A between every bicone
in the second row of bicones If you finished secure the thread and trim (Donrsquot forget that you need two
small circles)
Something Blue Necklace and Earrings
BLOG WWWHANDMADE-JEWELRY-CLUBCOM MEMBERSHIP WWWDIYBEADINGCLUBCOM BLOG DIY BEADING MAGAZINE ISSUE 32
STEP 37-48 Mimicing the FOCAL CIRCLElsquos STEP 50-65 bead the third row of bicones to finish this circle too
STEP 25-36 Mimicing FOCAL CIRCLElsquos STEP 35-49 add 2
rows of bicones The last step here is purple again
STEP 49-60 Just like the FOCAL CIRCLElsquos STEP 66-83 secure the circle by adding 1A between every bicone
in the second row of bicones If you finished secure the thread and trim (Donrsquot forget that you need two
small circles)
Something Blue Necklace and Earrings
BLOG WWWHANDMADE-JEWELRY-CLUBCOM MEMBERSHIP WWWDIYBEADINGCLUBCOM BLOG DIY BEADING MAGAZINE ISSUE 32
STEP 2-6 Continue by adding 1A 1 bicone 1 pearl until you count 6 of each
STEP 1 Begin with 1 pearl 1 bicone 1A and 1 bicone again on a comfortable length of thread leaving a 2rdquo
5cm tail Pass through the pearl and the first bicone strung to form a ring
STEP 7-12 Pass through the A beads to make your
component more secure Also secure the thread and trim (Repeat these steps until you have six 6-BEAD
COMPONENTs)
6-BEAD COMPONENT Work RAW stitch into a beaded circle and embellish with Swarovski bicones
For the necklace we will need six from this component For the earring two
Something Blue Necklace and Earrings
BLOG WWWHANDMADE-JEWELRY-CLUBCOM MEMBERSHIP WWWDIYBEADINGCLUBCOM BLOG DIY BEADING MAGAZINE ISSUE 32
STEP 2-4 Continue by adding 1A 1 bicone 1 pearl
until you count 4 of each
STEP 1 Begin with 1 pearl 1 bicone 1A and 1 bicone again on a comfortable length of thread leaving a 2rdquo
5cm tail Pass through the pearl and the first bicone strung to form a ring
STEP 5-8 Pass through the A beads to make your component more secure Also secure the thread and
trim (Repeat these steps until you have the wished amount of 4-BEAD COMPONENTs)
4-BEAD COMPONENT Work RAW stitch into a beaded circle and embellish with Swarovski bicones
For the necklace-size that is given on the second page we will need 20 from this
component For the earring two
If you would like to make a longer necklace you need to make more (One 4-BEAD COMPONENT measures about 38 inch 1 cm To make the necklace symmetrical you have to have equal amounts on each side This means for every extra frac34 inches
2 cm-s you will need 1 4-BEAD COMPONENT on each side of the necklace)
Something Blue Necklace and Earrings
BLOG WWWHANDMADE-JEWELRY-CLUBCOM MEMBERSHIP WWWDIYBEADINGCLUBCOM BLOG DIY BEADING MAGAZINE ISSUE 32
STEP 2 Connect the MIDDLE CIRCLE to two 6-BEAD COMPONENTs by adding four-times 2As
between the pearls Choose a pearl on the MIDDLE CIRCLE and add
2A pass through a pearl in the 6-BEAD COMPONENT previously added and add 2A again Watch out this has to be symmetrical Repeat this at least two more times to make it
secure Now repeat this entire procedure but choose
the 8-th pearl on MIDDLE CIRCLE Repeat this on the other side of the necklace
too
Choose a pearl on the FOCAL CIRCLE and add 2A pass through a pearl in the 6-BEAD COMPONENT and add 2A again Repeat this at least two more times to make it secure
Now repeat this entire procedure but choose the 5-th pearl on FOCAL CIRCLE This will make the necklace nice on your neck
FINISHING THE NECKLACE Connects the parts with A beads
STEP 1 Connect the FOCAL CIRCLE to two 6-BEAD COMPONENTs by adding four-times 2As between the pearls To do this turn your parts upside down you need to
see the pearls We will work on this side from now on
Something Blue Necklace and Earrings
BLOG WWWHANDMADE-JEWELRY-CLUBCOM MEMBERSHIP WWWDIYBEADINGCLUBCOM BLOG DIY BEADING MAGAZINE ISSUE 32
FINISHING THE EARRING Connects the parts with A beads
STEP 1-2 Connect the 6-BEAD COMPONENT
to 4-BEAD COMPONENT and the 4-BEAD
COMPONENT to the earring hook
First connect the 4-BEAD COMPONENT to the 6-BEAD COMPONENT with 4A beads Mimic
the elongation steps of the necklace if needed
Secondly connect the 4-BEAD COMPONENT
to your earring hook with 4A beads again Leave from the last pearl bead 2A beads the hook (this is the orange oval form) and 2As again Pass through each of them to
secure this connection again
Finally get ready to prepare the other earring ndash since we need two of them
STEP 5 Connect the 4-BEAD COMPONENTs to the toggle clasp thus finishing the
necklace Leaving from the last pearl bead 2A the
clasp(this is the orange oval form) and 2A again Pass through all of them a couple more times to make this connection more
secure
Something Blue Necklace and Earrings
BLOG WWWHANDMADE-JEWELRY-CLUBCOM MEMBERSHIP WWWDIYBEADINGCLUBCOM BLOG DIY BEADING MAGAZINE ISSUE 32
If you finished it is time to try it on It was a great fun wasnrsquot it And how beautiful you look in your new necklace and the matching earrings
Something Blue Necklace and Earrings
BLOG WWWHANDMADE-JEWELRY-CLUBCOM MEMBERSHIP WWWDIYBEADINGCLUBCOM
About the Author
Margit Vogel
My name is Margit Vogel I live in Hungary Europe
By profession I am a biochemical engineer but I fell in love with
beads so much that I could not stop playing with them
I make one-of-a-kind beaded and bead embroidered art
jewelry made of the best quality materials such as Swarovski
stones gemstones Japanese beads (Miyuki and Toho) Czech
glass beads leather soutache and suede Each piece is unique
and individually crafted
Feel free to visit my blog for some eyecandy
httpiformjewelrywordpresscom
My shop httpwwwetsycomshopiformjewelry
Facebook httpwwwfacebookcomiformjewelry
BLOG DIY BEADING MAGAZINE ISSUE 32
Getting Down And Personal With Gianna
Getting Down And Personal With Gianna
Nowadays we see more and more jewelry stores opening up online and with these online jewelry stores it has made it easier for us to purchase and view their creations Have you ever wondered how they are able to manage and produce amazing jewelry pieces and tutorials So heres a little on the journey to open up an online shop We are excited to present to you Gianna aka Beading4perfectionists
Gianna Beader amp Youtuber
Unlike most jewelry makers and beadweavers Gianna did not start beading as a hobby but as a means to make ends meet With goals in trying to
fill the financial gap she did everything she could to expand her earnings ndash working as a security guard
and at the same time learning how to bead and selling her pieces at fair trades and flea markets
Since many were asking if she does home beading workshops she started on exploring how to teach people to bead She loves Scott Bakula and has always loved him till now and this served as her
inspiration to start making a beading video tutorial
Gianna started creating videos because she was at the point in her life where everything seemed to be falling apart And at that moment of time she had difficulties financially and selling jewelry was the only way for her to stay afloat financially She is a big Scott Bakula fan and when she went to the UK to see him on stage that was when it hit her that she is already able to edit videos and
taught herself Photoshop and done workshops at bead fairs so why not put these together and see what happens on Youtube She knew that if she gets enough subscribers and views ndash though no one knew what the exact numbers were you would be invited to become a Youtube partner This way she could monetize her videos with advertisements and hopefully she would be able to be a Youtube partner and be able to pay her bills
BLOG WWWHANDMADE-JEWELRY-CLUBCOM MEMBERSHIP WWWDIYBEADINGCLUBCOM BLOG DIY BEADING MAGAZINE ISSUE 32
Getting Down And Personal With Gianna
Her Youtube channel is popular and the reason why she chose Youtube is because Youtube is the biggest platform and reached almost to the whole world Everyone already knows about it and it was growing rapidly as compared to other platforms like Dailymotion so she figured that Youtube was the way to go Her advice to new designers is that when you start out go to the platforms on the top of your list first then work your way down your list if you do not get accepted by your first choice
After loyally putting up one video every week for about 8 months in a row she became a Youtube partner and monetized her videos She knew she needed at least $100 to get her first payout She managed to reach $100 after 3 months The process was not easy she worked hard lack sleep skipped meals and who knows what happened to Ridge in the Bold and the Beautiful because she stopped watching
On Youtube you can monetize your videos Google pays straight to your bank account and at other countries where they also have the option of getting checks among other options In order to get paid you have to reach the $100 mark and after 3 months For Gianna she thinks that you cannot say that Etsy is better than Youtube or Youtube is better than Etsy Her reasoning is because on Youtube she has many followers which will eventually check out her Etsy shop And to start an Etsy shop you need an audience
BLOG WWWHANDMADE-JEWELRY-CLUBCOM MEMBERSHIP WWWDIYBEADINGCLUBCOM BLOG DIY BEADING MAGAZINE ISSUE 32
television and dedicated her spare time (as she had another job) to Youtube She re-registered at the chamber of commerce after receiving her first payout Her work at Youtube now is not a full time job and things have changed on Youtube It is easier to become a parter but there are some countries that need to wait for an invitation to be a Youtube partner Take Italy for instance Italians would have to work just as hard as she did if they want to become a Youtube partner
Getting Down And Personal With Gianna
With her 60000 subscribers on her b4pbakup Youtube channel it is possible to sell at least 60 patterns on the first day on Etsy after promoting the PDF file on her Youtube channel Though you may think that 60 out of 60000 is not much you have to remember that not everyone has the means to purchase the PDF file and a lot of people still rather watch her carry out the tutorial(for free) on Youtube instead of reading the patterns or paying for the patterns even if the pattern is for a fundraiser and only cost $2 Her insights on Youtube is that Youtube is not what it used to be 6 years ago Instead of making more money every month she is making less and less because advertisers have more options of where they want to advertise their ads Ads do not pay as much as they used to Back in the days you could get 25 cents per ad Now you count yourself lucky if you could get 5 cents roll in after two hours
BLOG WWWHANDMADE-JEWELRY-CLUBCOM MEMBERSHIP WWWDIYBEADINGCLUBCOM BLOG DIY BEADING MAGAZINE ISSUE 32
And on top of that adblockers are destroying Youtube channel owners Youtube will start making changes to the channels where there will be ldquopaid subscriptionrdquo channels This has already been implemented in some countries but not in her country The Netherlands This means there will no longer be ads for her monthly paying subscribers She hopes that Youtube will add on a paid per video option feature The option to be a paid channel or free channel or to start a new channel for paying customers is yours to choose Gianna is not happy with Youtube because many others like her have worked so hard and for some years to become Youtube partners(which was something to be proud of) has lost their status
Getting Down And Personal With Gianna
Her advice for those who want to go on Youtube is 1 Do it because you want to teach
2 Do it because you want a career with beads
BLOG WWWHANDMADE-JEWELRY-CLUBCOM MEMBERSHIP WWWDIYBEADINGCLUBCOM BLOG DIY BEADING MAGAZINE ISSUE 32
After putting up about 20 videos and having at least 5000 subscribers add the PDF tutorials to Etsy and Craftsy She found out that her audience would like to have the PDF after watching her videos This is because they would rather print out the PDF and work while seated in a comfy chair technically somewhere else instead of having to pause the video time and time again
Gianna has also made a video for those who want to know the whole story of her journey up until the present day And to get updates on her you can check it out here She has also started a vlog where she tells of how she still works towards becoming a financial independent beader and explains her journey to get where she wants to be(or die trying) Gianna will be in the UK on October the 17th giving an all-day workshop with 4 different patterns
(2 beginners and 2 advanced) in Wotton-under-Edge
Gianna will be there Friday night as the workshop is on Saturday She will be leaving on Sunday Her
doors are open to all who wants to continue the party with her at the hotel across the street
For more information do contact Ann Tucker on Facebook
httpswwwfacebookcomanntucker501
Rec
omm
end
ed R
ead
ings
Making Jewelry with Gemstone
Beads
Combines the popular craft of beading with beautiful semi-precious stones which are collected by many Features a variety of versatile ideas which can be adapted for any type of gem or bead Readers will learn to reate beautiful gemstone jewelry with this dazzling collection of over 100 projects ranging from eyecatching earrings and accessories to exquisite necklaces and bracelets This beautiful book offers an impressive range of 28 beautiful semi-precious stones (including birthstones) and a glimpse into the fascinating history and mythical properties behind them
BLOG DIY BEADING MAGAZINE ISSUE 32 BLOG WWWHANDMADE-JEWELRY-CLUBCOM MEMBERSHIP WWWDIYBEADINGCLUBCOM
Rec
omm
end
ed R
ead
ings
Convertible Crystal Jewelry
Reverse it Twist it Wear it Many
Ways
Diane Whiting presents the idea that convertibility isnrsquot just about using pieces in multiple ways it is also about using skills and creativity in multiple ways Using ever-popular sparkling crystals Diane showcases design elements through various techniques for fun easy fashionable jewelry With 25 projects the reader can choose from bracelets necklaces and earrings that match any outfit or styleDiane Whiting presents the idea that convertibility isnrsquot just about using pieces in multiple ways it is also about using skills and creativity in multiple ways
BLOG DIY BEADING MAGAZINE ISSUE 32 BLOG WWWHANDMADE-JEWELRY-CLUBCOM MEMBERSHIP WWWDIYBEADINGCLUBCOM
Rec
omm
end
ed R
ead
ings
Wire Jewelry Masterclass
Wrapped Coiled and Woven Pieces
Using Fine Materials
Comprehensive and fabulous Wire Jewelry Masterclass takes an in-depth look at an intricate and rewarding craft The 24 projects which range from simple Dragons tear briolette earrings to a Poseidon-under-the-sea pendant will delight and inspire jewelers of all levels and tastes Divided into beginner intermediate and advanced sections this beautifully photographed step-by-step guide is the ticket to wire jewelry expertise
BLOG DIY BEADING MAGAZINE ISSUE 32 BLOG WWWHANDMADE-JEWELRY-CLUBCOM MEMBERSHIP WWWDIYBEADINGCLUBCOM
Rec
omm
end
ed R
ead
ings
Timeless Wire Weaving The
Complete Course
Timeless Wire Weaving focuses on developing wirework skills through 13 projects using three classic wire weaving techniques coiling wrapping and weaving The projects are built around a focal cabochon and incorporate seed beads and crystals in imaginative ways Designers learn to make the jewelry shown in the book and they also use the techniques learned to create innovative jewelry pieces of their own
BLOG DIY BEADING MAGAZINE ISSUE 32 BLOG WWWHANDMADE-JEWELRY-CLUBCOM MEMBERSHIP WWWDIYBEADINGCLUBCOM
Our digital magazine is available through
Apple Newsstand service available to millions of IPAD users
To advertise with us please email us at
diyjewelryclubgmailcom
Or visit our page at
httphandmade-jewelry-clubcomadvertising-diy-beading-magazine

Jade Necklace
BLOG WWWHANDMADE-JEWELRY-CLUBCOM MEMBERSHIP WWWDIYBEADINGCLUBCOM
Every time I wear a necklace I always make it a point that the
necklace will lay perfectly flat on my neck Using wire for a necklace
made it possible for me like what I did with Jade Necklace It may look
odd at first having bent wires for a necklace but once the jewelry is
finished youll be so happy how the necklace will perfectly lay on your
neck
The tutorial is catered for intermediate level One must know basic
wirework skills such as wire wrapping making loops wrapped loops
and linking to follow the tutorial It has clear instructions and ultra-clear
close-up photos at each step Additionally you can ask me question
you have on the tutorial No more getting stuck and frustrated on a
confusing or just plain inaccurate pattern
If you followed this tutorial and then sell the accessory or jewelry
please give credit to the author or DIY Beading Clubcom
Copyright 2015
wwwdiybeadingclubcom
wwwhandmade-jewelry-clubcom
BLOG DIY BEADING MAGAZINE ISSUE 32
Jade Necklace
BLOG WWWHANDMADE-JEWELRY-CLUBCOM MEMBERSHIP WWWDIYBEADINGCLUBCOM BLOG DIY BEADING MAGAZINE ISSUE 32
Materials Needed 18ga Craft wire 28ga Craft wire 15mm diameter Green Round Flat Back Sew On Gems 5mm Green pearls
8mm Green pearls 6mm x 11mm teardrop Crystal Treasures Mill Hill beads or any teardrop bead with holes on the side Hook for your clasp
Tools Needed Wire cutter Flat nose pliers Round nose pliers Mandrel A jar or any rounded object to shape your necklace
Skill Level Intermediate
Step 1 Cut 6 inches 18ga wire Make a loop on one end then measure approximately 125 inches and make another loop
Form a size 4 circle on your mandrel
Jade Necklace
BLOG WWWHANDMADE-JEWELRY-CLUBCOM MEMBERSHIP WWWDIYBEADINGCLUBCOM BLOG DIY BEADING MAGAZINE ISSUE 32
Then close the circle by wrapping the extended wire just below the loop Wrap the
wire 2x
This is how it looks like Lets call this circle frame Youll notice that the lower curve is
slightly bigger than the upper curve
Step 2 Cut 8 inches of 28ga wire Wrap one end of
the wire at least 3x on one side of the circle frame just below the loop
Bring up your gem Flat back sew on gems has 2 holes Insert the wire into one hole and then
wrap the wire once onto the circle frame
Jade Necklace
BLOG WWWHANDMADE-JEWELRY-CLUBCOM MEMBERSHIP WWWDIYBEADINGCLUBCOM BLOG DIY BEADING MAGAZINE ISSUE 32
Step 3 Insert a 5mm pearl on the wire and then pass
the wire under circle frame
Repeat previous step 2x and have 3 pearls wrapped
Continue wrapping with your teardrop crystal My crystal has 2 holes on the side
and then continue wrapping with your 5mm pearls then secure your wire
Repeat Step 3 and create as many as needed For 16-inch necklace Ive created 6 of these
components
Jade Necklace
BLOG WWWHANDMADE-JEWELRY-CLUBCOM MEMBERSHIP WWWDIYBEADINGCLUBCOM BLOG DIY BEADING MAGAZINE ISSUE 32
Step 4 Cut a 15-inch 18ga wire and make a loop on
one end Insert 8mm pearl and make a loop on the other end You then use these as connectors
and link the components
Step 5 The necklace is an 18ga wire with wrapped
loops on both ends First cut 7 inches 18ga wire and make a wrapped loop with your hook already inserted Side in 18pcs 5mm pearls
Then make a wrapped loop on the other end connecting the wrapped loop onto the component Do the same for the other
necklace but make the loop on the other end big enough so the hookclasp can pass thru
To have the necklace curve shaped use a jar to bend the wire Voila Now youre
ready to party
Jade Necklace
BLOG WWWHANDMADE-JEWELRY-CLUBCOM MEMBERSHIP WWWDIYBEADINGCLUBCOM
About the Author
Sky Aldovino
I consider myself a late bloomer when it comes to crafting Irsquom a self-taught jewelry maker Jewelry making wasnrsquot really a hobby of mine but unforeseen events lead me to learn jewellery making My family put up a craft store where we sell cross stitch beads and all sorts of crafting materials I fell in love with the beads and tried to create accessories only for myself Clients liked the pieces and I started customizing handmade jewelleries The craft store was a success for 6 years but like any other small businesses we had to close it down and I was confined to staying at home While at home I had all the time using the internet and now working as a home-based jewelry designer
BLOG DIY BEADING MAGAZINE ISSUE 32
Atomic Ring
BLOG WWWHANDMADE-JEWELRY-CLUBCOM MEMBERSHIP WWWDIYBEADINGCLUBCOM
Have fun making shapes using the wigjig Cyclops Make loops going in
circles to mimic the shape of a flower or in this tutorial mimic the
shape of an atom The tutorial will also teach you how to cage a
cabochon Whats nice about this piece is that with one long wire you
can create the ring from start to finish
The tutorial is catered for intermediate to advanced students One
must already know how to make spirals and use a wigjig tool It has
clear instructions and ultra-clear close-up photos at each step
Additionally you can ask me question you have on the tutorial No
more getting stuck and frustrated on a confusing or just plain
inaccurate pattern
If you followed this tutorial and then sell the accessory or jewelry
please give credit to the author or DIY Beading Clubcom
If you like to get a blank wigjig graph visit wigjigcom Shop and Jigs
section
Copyright 2015
wwwdiybeadingclubcom
wwwhandmade-jewelry-clubcom
BLOG DIY BEADING MAGAZINE ISSUE 32
Atomic Ring
BLOG WWWHANDMADE-JEWELRY-CLUBCOM MEMBERSHIP WWWDIYBEADINGCLUBCOM
Materials Needed 20ga Craft wire 28ga Craft wire 11mm Round Cabochon
Tools Needed Wigjig Cyclops 15mm pegs Wire cutter Flat nose pliers Mandrel
Skill Level Intermediate - Advanced
BLOG DIY BEADING MAGAZINE ISSUE 32
Step 1 Lets prepare your wigjig cyclops Position the pegs like so
Atomic Ring
BLOG WWWHANDMADE-JEWELRY-CLUBCOM MEMBERSHIP WWWDIYBEADINGCLUBCOM BLOG DIY BEADING MAGAZINE ISSUE 32
Lets work with longer wire so youll have enough wire to hold onto as you manipulate the wire so cut 36 inches of 20ga wire From
one end of the wire measure 10 inches
On the 10-inch measurement loop the wire at the center peg then continue to loop onto the side pegs going in circle going back to
the center peg after looping on the side peg
Now the wire at the center peg will start to build up as you go around the side pegs so
you need to constantly press the wire at the center peg to accommodate the build up of
wire
When youre done pull out the wire and this is
how it should look like
Atomic Ring
BLOG WWWHANDMADE-JEWELRY-CLUBCOM MEMBERSHIP WWWDIYBEADINGCLUBCOM BLOG DIY BEADING MAGAZINE ISSUE 32
You will notice that the frame opens wide Now to keep the atom frame from opening wide secure the center of the frame by wrapping a 28ga wire What you
need to do is simply pass the 28ga wire into the hole and wrap as many times as needed or until youre sure that the frame is secure
Step 2 Now youre finished with your atom frame Well now create the focal design With the longer wire make a spiral at the center big
enough to accommodate the size of your cabochon In this tutorial the spiral is about
11mm in diameter the same size as my cabochon
Pop in your cabochon and start to make spirals going around and over the cabochon as if you are caging the cabochon Create at
least 5 rounds and then cut off any excess
Step 3 Now lets make the ring and this with the other
end of the wire
Atomic Ring
BLOG WWWHANDMADE-JEWELRY-CLUBCOM MEMBERSHIP WWWDIYBEADINGCLUBCOM BLOG DIY BEADING MAGAZINE ISSUE 32
Bring up your mandrel and wrap the wire to the size of your finger Wrap at least 2 times
When youre sure you have the right size pull the ring out of the mandrel
With the extended wire wrap the wire the secure the ring
Cut off any excess and voila You have your atomic ring Create as many as you can with different colors of cabochon
Atomic Ring
BLOG WWWHANDMADE-JEWELRY-CLUBCOM MEMBERSHIP WWWDIYBEADINGCLUBCOM
About the Author
Sky Aldovino
I consider myself a late bloomer when it comes to crafting Irsquom a self-taught jewelry maker Jewelry making wasnrsquot really a hobby of mine but unforeseen events lead me to learn jewellery making My family put up a craft store where we sell cross stitch beads and all sorts of crafting materials I fell in love with the beads and tried to create accessories only for myself Clients liked the pieces and I started customizing handmade jewelleries The craft store was a success for 6 years but like any other small businesses we had to close it down and I was confined to staying at home While at home I had all the time using the internet and now working as a home-based jewelry designer
BLOG DIY BEADING MAGAZINE ISSUE 32
Featured Article Gemstones Used for Jewelry Making
BLOG WWWHANDMADE-JEWELRY-CLUBCOM MEMBERSHIP WWWDIYBEADINGCLUBCOM
Gemstones are stones which we hold quite highly in terms of value And
jewelry often consists of stones that add attractiveness to it so it is not
surprising when jewelry designers actually use gemstones in their designs In
fact there are different types of gemstones that can be used for making
jewelry There are the expensive and pure gemstones and there are also the
imitation ones The information below will provide some information about
the kinds of stones you can use to create jewelry and how these stones will
impact the jewelry you have created
The first kind of stone which I believe we are all quite familiar with are
birthstones These stones are associated with individualrsquos month of birth
by SunVDesigns by BeyhanAkman
For example Amethyst stone is connected with anybody who is born in
February which carries special significance in the area of emotions and also
spiritually This stone also signifies calm and peace as well
And then we have semi-precious stones which are also often used in jewelry
making They are not as valuable as compared to precious stones but still
valuable Best examples of these stones are aquamarine topaz tourmaline
opal and turquoise
BLOG DIY BEADING MAGAZINE ISSUE 32
Featured Article Gemstones Used for Jewelry Making
BLOG WWWHANDMADE-JEWELRY-CLUBCOM MEMBERSHIP WWWDIYBEADINGCLUBCOM
It is an ideal gift for someone who you deem special Aquamarine pendants
usually work well for anyone and is widely an accepted stone
by HyppieChic by joyeriamestiza
However precious stones are the most unusual
and precious jewels to us Examples of some of
them are emerald sapphire diamond and
ruby These stones are usually very expensive
and are prized for their exquisiteness These
stones are commonly used in high-quality
jewelry designs which costs quite a fortune to
obtain
BLOG DIY BEADING MAGAZINE ISSUE 32
by sarajewelrystu
Jewelry designs with precious stones are usually
given as exceptional gifts on special occasions A
perfect example is a diamond ring that is usually
given as an engagement gift
by ldiamondsforever
Featured Article Gemstones Used for Jewelry Making
BLOG WWWHANDMADE-JEWELRY-CLUBCOM MEMBERSHIP WWWDIYBEADINGCLUBCOM
There are also synthetic stones which are often used to create jewelry
Synthetic stones are artificial imitations of gemstones Synthetic Sapphire
jewelry costs less compare with the authentic ones Most of the time
imitation stones are used to save cost but at the same time have the similar
look of the real stone
BLOG DIY BEADING MAGAZINE ISSUE 32
by shininggems by thaimaker
by lapinduprintemps by PastimeArt
Gemstones are used like beads and you can use it in any designs whether
simple or elaborate
Swarovski crystal components are available in a rich multitude of rondelles Perfect as spacers in necklaces or as discs in earrings Rondelles can be used with many varieties of shapes or sizes Use Swarovski crystal rondelles between large gemstones as accents with precious metal findings Fire Mountain Gems and Beads Crystal Passionsreg brand presents Swarovski crystal in display-ready packaging for brilliant retail presentation Crystal Passionsreg is an assurance of genuine Swarovski crystal
BLOG DIY BEADING MAGAZINE ISSUE 32 BLOG WWWHANDMADE-JEWELRY-CLUBCOM MEMBERSHIP WWWDIYBEADINGCLUBCOM
Recommended Jewelry Making Supplies
Mz Unisex-adults 12pcs 25x18x6mm Turquoise Oval CAB Cabochon
BLOG DIY BEADING MAGAZINE ISSUE 32 BLOG WWWHANDMADE-JEWELRY-CLUBCOM MEMBERSHIP WWWDIYBEADINGCLUBCOM
Recommended Jewelry Making Supplies
For a little sparkle that goes a long way design with Swarovski 4mm faceted bicones Create glorious multi-strand necklaces with the dainty crystals or use as spacers to add a tiny flash to your designs Swarovski crystal components are made in Austria and are considered the finest products of their kind in the world
BLOG DIY BEADING MAGAZINE ISSUE 32 BLOG WWWHANDMADE-JEWELRY-CLUBCOM MEMBERSHIP WWWDIYBEADINGCLUBCOM
Recommended Jewelry Making Supplies
Imitation beads resist color change These beads have uniform quality with a good polish Some strands may have little to no matrix Sizes shapes and colors may vary with handcrafted items
BLOG DIY BEADING MAGAZINE ISSUE 32 BLOG WWWHANDMADE-JEWELRY-CLUBCOM MEMBERSHIP WWWDIYBEADINGCLUBCOM
Recommended Jewelry Making Supplies
Something Blue Necklace and Earrings
BLOG WWWHANDMADE-JEWELRY-CLUBCOM MEMBERSHIP WWWDIYBEADINGCLUBCOM
Skill level Beginner Intermediate Advanced
DIMENSIONS OF THE NECKLACE Inner Circumference 14 18 inch 35 cm
Focal Pendant Width 1 15 inch 35 cm Focal Pendant Height 1 15 inch 35 cm
DIMENSIONS OF THE EARRING Earring Width 716 inch 12 cm Earring Height 1516 inch 25 cm (Without the earring hook)
BLOG DIY BEADING MAGAZINE ISSUE 32
Materials
Note Before purchasing the supplies measure the length of your wished necklace If you decide to bead a longer necklace you should keep in mind that for every extra
frac34 inches 2 cm-s you will need 8 bicones and 8 pearls
Something Blue Necklace and Earrings
BLOG WWWHANDMADE-JEWELRY-CLUBCOM MEMBERSHIP WWWDIYBEADINGCLUBCOM BLOG DIY BEADING MAGAZINE ISSUE 32
Work RAW stitch into a beaded circle and embellish with Swarovski bicones
STEP 2 String 1A and 2 pearls Pass through the previous
second pearl and the freshly added 1A and the first pearl again
STEP 1 Use a comfortable length of thread to string 2
pearls 1A and 1 pearl again leaving a 2rdquo 5cm tail Pass through the first two pearls strung to form a
ring
STEP 3 String 2 pearls and 1A Pass through the previous first pearl and the freshly added two pearls
again
STEP 4 - 17 Repeat STEP 2 and STEP 3 again until you count 17 pearls in the inner circle
But be careful in the last step you only have to add 1 pearl then pass through the first pearls
added in STEP 1 and add another 1A Now pass through the first pearl added in STEP
1and 1A added in this round again to exit from this A
Something Blue Necklace and Earrings
BLOG WWWHANDMADE-JEWELRY-CLUBCOM MEMBERSHIP WWWDIYBEADINGCLUBCOM BLOG DIY BEADING MAGAZINE ISSUE 32
STEP 19 String 2A and pass through the next A added in round 4-17 and the A added in round 18 the 2A added in this round and finally the A added in round 4-17 to exit from the bead showed below
STEP 18 String 3A and pass through the 1A added in the previous round and the first A added in this
round
STEP 20 - 34 Repeat STEP 18 and STEP 19 again until you finish the circle
But be careful in the last step first you have to pass through 3A and then add 1A After this pass
through the 3A again and exit from the A bead
shown below (This is the first A added in STEP 18)
Something Blue Necklace and Earrings
BLOG WWWHANDMADE-JEWELRY-CLUBCOM MEMBERSHIP WWWDIYBEADINGCLUBCOM BLOG DIY BEADING MAGAZINE ISSUE 32
STEP 35 Step up to exit from the pearl shown below (Finishing the previous step in the A bead and then
stepping up from there makes the circle more secure)
Now string 3 bicones Pass through the pearl and the first bicone again
In the reality your circle will look more like this the A beads forming a strong row in the middle of the
pearls
STEP 36 Add 2 bicones Pass through the
neighboring pearl the first bicone added in the previous row and the 2 bicones added in this step
so you can exit from the next pearl
Something Blue Necklace and Earrings
BLOG WWWHANDMADE-JEWELRY-CLUBCOM MEMBERSHIP WWWDIYBEADINGCLUBCOM BLOG DIY BEADING MAGAZINE ISSUE 32
Now in the reality your circle will look more like this the A beads still forming a strong row in the middle of the pearls and the bicones slightly lying on top of
them
STEP 37 - 49 Repeat STEP 35 and STEP 36 again until you finish the circle with the bicones
But be careful in the last step first you have pass through the third bicone added then add 1 bicone
and pass through this little quartet to exit from the bicone shown below (The second one added in
STEP 35)
STEP 50 With these steps we finish the circle by adding 1 bicone to connect the A beads and the
bicone row So add 1 bicone pass through the nearest A bead and add 1 bicone again Pass
through the bicone already there and exit from the bicone you just added
Something Blue Necklace and Earrings
BLOG WWWHANDMADE-JEWELRY-CLUBCOM MEMBERSHIP WWWDIYBEADINGCLUBCOM BLOG DIY BEADING MAGAZINE ISSUE 32
STEP 66-83 Secure the circle by adding 1A between each bicone in the second row of Swarovski
bicones If you finished secure the thread and trim
STEP 51-65 Using the same technique as in STEP 37 - 49 add 1 bicone to finish the third bicone row The black line shows you the way (After STEP 50 pass through the next A bead add 1 bicone and pass through the bicone already there and the bicone added in the previous step Repeat these steps to
finish the inner bicone circle)
MIDDLE CIRCLE Work RAW stitch into a beaded circle and embellish with
Swarovski bicones Remember you need to bead two circles this time
STEP 1 Just like in the focal circle begin with 2 pearls 1A and 1 pearl again on a comfortable length of thread
leaving a 2rdquo 5cm tail Pass through the first two pearls strung to form a ring
Something Blue Necklace and Earrings
BLOG WWWHANDMADE-JEWELRY-CLUBCOM MEMBERSHIP WWWDIYBEADINGCLUBCOM BLOG DIY BEADING MAGAZINE ISSUE 32
STEP 15-28 Mimicing the FOCAL CIRCLElsquos STEP 18-34 bead A beads until you finish the inner part of the
circle Exit from a pearl in the second row This circle should look very similar to the first one but this is a bit
smaller
STEP 2-14 Mimicing the FOCAL CIRCLElsquos STEP 2-17 bead until you count 14 pearls in the inner circle Exit
from the last A added
STEP 29-42 Mimicing FOCAL CIRCLElsquos STEP 35-49 add 2 rows of bicones
STEP 43-56 Mimicing the FOCAL CIRCLElsquos STEP 50-65 bead the third row of bicones to finish the circle
Something Blue Necklace and Earrings
BLOG WWWHANDMADE-JEWELRY-CLUBCOM MEMBERSHIP WWWDIYBEADINGCLUBCOM BLOG DIY BEADING MAGAZINE ISSUE 32
SMALLEST CIRCLE Work RAW stitch into a beaded circle and embellish
with Swarovski bicones Remember you need to bead two circles again
STEP 1 Just like in the focal circle begin with 2 pearls
1A and 1 pearl again on a comfortable length of thread leaving a 2rdquo 5cm tail Pass through the first two
pearls strung to form a ring
STEP 57-70 Just like the FOCAL CIRCLElsquos STEP 66-83 secure the circle by adding 1A between every bicone
in the second row of bicones If you finished secure the thread and trim (Donrsquot forget to bead another
circle)
STEP 2-12 Mimicing the FOCAL CIRCLElsquos STEP 2-17 bead until you count 12 pearls in the inner circle Exit
from the last A added
STEP 13-24 Mimicing the FOCAL CIRCLElsquos STEP 18-34 bead A beads until you finish the inner part of the
circle Exit from a pearl in the second row This circle should look very similar to the first two but this is the
smallest of them all
Something Blue Necklace and Earrings
BLOG WWWHANDMADE-JEWELRY-CLUBCOM MEMBERSHIP WWWDIYBEADINGCLUBCOM BLOG DIY BEADING MAGAZINE ISSUE 32
STEP 37-48 Mimicing the FOCAL CIRCLElsquos STEP 50-65 bead the third row of bicones to finish this circle too
STEP 25-36 Mimicing FOCAL CIRCLElsquos STEP 35-49 add 2
rows of bicones The last step here is purple again
STEP 49-60 Just like the FOCAL CIRCLElsquos STEP 66-83 secure the circle by adding 1A between every bicone
in the second row of bicones If you finished secure the thread and trim (Donrsquot forget that you need two
small circles)
Something Blue Necklace and Earrings
BLOG WWWHANDMADE-JEWELRY-CLUBCOM MEMBERSHIP WWWDIYBEADINGCLUBCOM BLOG DIY BEADING MAGAZINE ISSUE 32
STEP 37-48 Mimicing the FOCAL CIRCLElsquos STEP 50-65 bead the third row of bicones to finish this circle too
STEP 25-36 Mimicing FOCAL CIRCLElsquos STEP 35-49 add 2
rows of bicones The last step here is purple again
STEP 49-60 Just like the FOCAL CIRCLElsquos STEP 66-83 secure the circle by adding 1A between every bicone
in the second row of bicones If you finished secure the thread and trim (Donrsquot forget that you need two
small circles)
Something Blue Necklace and Earrings
BLOG WWWHANDMADE-JEWELRY-CLUBCOM MEMBERSHIP WWWDIYBEADINGCLUBCOM BLOG DIY BEADING MAGAZINE ISSUE 32
STEP 2-6 Continue by adding 1A 1 bicone 1 pearl until you count 6 of each
STEP 1 Begin with 1 pearl 1 bicone 1A and 1 bicone again on a comfortable length of thread leaving a 2rdquo
5cm tail Pass through the pearl and the first bicone strung to form a ring
STEP 7-12 Pass through the A beads to make your
component more secure Also secure the thread and trim (Repeat these steps until you have six 6-BEAD
COMPONENTs)
6-BEAD COMPONENT Work RAW stitch into a beaded circle and embellish with Swarovski bicones
For the necklace we will need six from this component For the earring two
Something Blue Necklace and Earrings
BLOG WWWHANDMADE-JEWELRY-CLUBCOM MEMBERSHIP WWWDIYBEADINGCLUBCOM BLOG DIY BEADING MAGAZINE ISSUE 32
STEP 2-4 Continue by adding 1A 1 bicone 1 pearl
until you count 4 of each
STEP 1 Begin with 1 pearl 1 bicone 1A and 1 bicone again on a comfortable length of thread leaving a 2rdquo
5cm tail Pass through the pearl and the first bicone strung to form a ring
STEP 5-8 Pass through the A beads to make your component more secure Also secure the thread and
trim (Repeat these steps until you have the wished amount of 4-BEAD COMPONENTs)
4-BEAD COMPONENT Work RAW stitch into a beaded circle and embellish with Swarovski bicones
For the necklace-size that is given on the second page we will need 20 from this
component For the earring two
If you would like to make a longer necklace you need to make more (One 4-BEAD COMPONENT measures about 38 inch 1 cm To make the necklace symmetrical you have to have equal amounts on each side This means for every extra frac34 inches
2 cm-s you will need 1 4-BEAD COMPONENT on each side of the necklace)
Something Blue Necklace and Earrings
BLOG WWWHANDMADE-JEWELRY-CLUBCOM MEMBERSHIP WWWDIYBEADINGCLUBCOM BLOG DIY BEADING MAGAZINE ISSUE 32
STEP 2 Connect the MIDDLE CIRCLE to two 6-BEAD COMPONENTs by adding four-times 2As
between the pearls Choose a pearl on the MIDDLE CIRCLE and add
2A pass through a pearl in the 6-BEAD COMPONENT previously added and add 2A again Watch out this has to be symmetrical Repeat this at least two more times to make it
secure Now repeat this entire procedure but choose
the 8-th pearl on MIDDLE CIRCLE Repeat this on the other side of the necklace
too
Choose a pearl on the FOCAL CIRCLE and add 2A pass through a pearl in the 6-BEAD COMPONENT and add 2A again Repeat this at least two more times to make it secure
Now repeat this entire procedure but choose the 5-th pearl on FOCAL CIRCLE This will make the necklace nice on your neck
FINISHING THE NECKLACE Connects the parts with A beads
STEP 1 Connect the FOCAL CIRCLE to two 6-BEAD COMPONENTs by adding four-times 2As between the pearls To do this turn your parts upside down you need to
see the pearls We will work on this side from now on
Something Blue Necklace and Earrings
BLOG WWWHANDMADE-JEWELRY-CLUBCOM MEMBERSHIP WWWDIYBEADINGCLUBCOM BLOG DIY BEADING MAGAZINE ISSUE 32
FINISHING THE EARRING Connects the parts with A beads
STEP 1-2 Connect the 6-BEAD COMPONENT
to 4-BEAD COMPONENT and the 4-BEAD
COMPONENT to the earring hook
First connect the 4-BEAD COMPONENT to the 6-BEAD COMPONENT with 4A beads Mimic
the elongation steps of the necklace if needed
Secondly connect the 4-BEAD COMPONENT
to your earring hook with 4A beads again Leave from the last pearl bead 2A beads the hook (this is the orange oval form) and 2As again Pass through each of them to
secure this connection again
Finally get ready to prepare the other earring ndash since we need two of them
STEP 5 Connect the 4-BEAD COMPONENTs to the toggle clasp thus finishing the
necklace Leaving from the last pearl bead 2A the
clasp(this is the orange oval form) and 2A again Pass through all of them a couple more times to make this connection more
secure
Something Blue Necklace and Earrings
BLOG WWWHANDMADE-JEWELRY-CLUBCOM MEMBERSHIP WWWDIYBEADINGCLUBCOM BLOG DIY BEADING MAGAZINE ISSUE 32
If you finished it is time to try it on It was a great fun wasnrsquot it And how beautiful you look in your new necklace and the matching earrings
Something Blue Necklace and Earrings
BLOG WWWHANDMADE-JEWELRY-CLUBCOM MEMBERSHIP WWWDIYBEADINGCLUBCOM
About the Author
Margit Vogel
My name is Margit Vogel I live in Hungary Europe
By profession I am a biochemical engineer but I fell in love with
beads so much that I could not stop playing with them
I make one-of-a-kind beaded and bead embroidered art
jewelry made of the best quality materials such as Swarovski
stones gemstones Japanese beads (Miyuki and Toho) Czech
glass beads leather soutache and suede Each piece is unique
and individually crafted
Feel free to visit my blog for some eyecandy
httpiformjewelrywordpresscom
My shop httpwwwetsycomshopiformjewelry
Facebook httpwwwfacebookcomiformjewelry
BLOG DIY BEADING MAGAZINE ISSUE 32
Getting Down And Personal With Gianna
Getting Down And Personal With Gianna
Nowadays we see more and more jewelry stores opening up online and with these online jewelry stores it has made it easier for us to purchase and view their creations Have you ever wondered how they are able to manage and produce amazing jewelry pieces and tutorials So heres a little on the journey to open up an online shop We are excited to present to you Gianna aka Beading4perfectionists
Gianna Beader amp Youtuber
Unlike most jewelry makers and beadweavers Gianna did not start beading as a hobby but as a means to make ends meet With goals in trying to
fill the financial gap she did everything she could to expand her earnings ndash working as a security guard
and at the same time learning how to bead and selling her pieces at fair trades and flea markets
Since many were asking if she does home beading workshops she started on exploring how to teach people to bead She loves Scott Bakula and has always loved him till now and this served as her
inspiration to start making a beading video tutorial
Gianna started creating videos because she was at the point in her life where everything seemed to be falling apart And at that moment of time she had difficulties financially and selling jewelry was the only way for her to stay afloat financially She is a big Scott Bakula fan and when she went to the UK to see him on stage that was when it hit her that she is already able to edit videos and
taught herself Photoshop and done workshops at bead fairs so why not put these together and see what happens on Youtube She knew that if she gets enough subscribers and views ndash though no one knew what the exact numbers were you would be invited to become a Youtube partner This way she could monetize her videos with advertisements and hopefully she would be able to be a Youtube partner and be able to pay her bills
BLOG WWWHANDMADE-JEWELRY-CLUBCOM MEMBERSHIP WWWDIYBEADINGCLUBCOM BLOG DIY BEADING MAGAZINE ISSUE 32
Getting Down And Personal With Gianna
Her Youtube channel is popular and the reason why she chose Youtube is because Youtube is the biggest platform and reached almost to the whole world Everyone already knows about it and it was growing rapidly as compared to other platforms like Dailymotion so she figured that Youtube was the way to go Her advice to new designers is that when you start out go to the platforms on the top of your list first then work your way down your list if you do not get accepted by your first choice
After loyally putting up one video every week for about 8 months in a row she became a Youtube partner and monetized her videos She knew she needed at least $100 to get her first payout She managed to reach $100 after 3 months The process was not easy she worked hard lack sleep skipped meals and who knows what happened to Ridge in the Bold and the Beautiful because she stopped watching
On Youtube you can monetize your videos Google pays straight to your bank account and at other countries where they also have the option of getting checks among other options In order to get paid you have to reach the $100 mark and after 3 months For Gianna she thinks that you cannot say that Etsy is better than Youtube or Youtube is better than Etsy Her reasoning is because on Youtube she has many followers which will eventually check out her Etsy shop And to start an Etsy shop you need an audience
BLOG WWWHANDMADE-JEWELRY-CLUBCOM MEMBERSHIP WWWDIYBEADINGCLUBCOM BLOG DIY BEADING MAGAZINE ISSUE 32
television and dedicated her spare time (as she had another job) to Youtube She re-registered at the chamber of commerce after receiving her first payout Her work at Youtube now is not a full time job and things have changed on Youtube It is easier to become a parter but there are some countries that need to wait for an invitation to be a Youtube partner Take Italy for instance Italians would have to work just as hard as she did if they want to become a Youtube partner
Getting Down And Personal With Gianna
With her 60000 subscribers on her b4pbakup Youtube channel it is possible to sell at least 60 patterns on the first day on Etsy after promoting the PDF file on her Youtube channel Though you may think that 60 out of 60000 is not much you have to remember that not everyone has the means to purchase the PDF file and a lot of people still rather watch her carry out the tutorial(for free) on Youtube instead of reading the patterns or paying for the patterns even if the pattern is for a fundraiser and only cost $2 Her insights on Youtube is that Youtube is not what it used to be 6 years ago Instead of making more money every month she is making less and less because advertisers have more options of where they want to advertise their ads Ads do not pay as much as they used to Back in the days you could get 25 cents per ad Now you count yourself lucky if you could get 5 cents roll in after two hours
BLOG WWWHANDMADE-JEWELRY-CLUBCOM MEMBERSHIP WWWDIYBEADINGCLUBCOM BLOG DIY BEADING MAGAZINE ISSUE 32
And on top of that adblockers are destroying Youtube channel owners Youtube will start making changes to the channels where there will be ldquopaid subscriptionrdquo channels This has already been implemented in some countries but not in her country The Netherlands This means there will no longer be ads for her monthly paying subscribers She hopes that Youtube will add on a paid per video option feature The option to be a paid channel or free channel or to start a new channel for paying customers is yours to choose Gianna is not happy with Youtube because many others like her have worked so hard and for some years to become Youtube partners(which was something to be proud of) has lost their status
Getting Down And Personal With Gianna
Her advice for those who want to go on Youtube is 1 Do it because you want to teach
2 Do it because you want a career with beads
BLOG WWWHANDMADE-JEWELRY-CLUBCOM MEMBERSHIP WWWDIYBEADINGCLUBCOM BLOG DIY BEADING MAGAZINE ISSUE 32
After putting up about 20 videos and having at least 5000 subscribers add the PDF tutorials to Etsy and Craftsy She found out that her audience would like to have the PDF after watching her videos This is because they would rather print out the PDF and work while seated in a comfy chair technically somewhere else instead of having to pause the video time and time again
Gianna has also made a video for those who want to know the whole story of her journey up until the present day And to get updates on her you can check it out here She has also started a vlog where she tells of how she still works towards becoming a financial independent beader and explains her journey to get where she wants to be(or die trying) Gianna will be in the UK on October the 17th giving an all-day workshop with 4 different patterns
(2 beginners and 2 advanced) in Wotton-under-Edge
Gianna will be there Friday night as the workshop is on Saturday She will be leaving on Sunday Her
doors are open to all who wants to continue the party with her at the hotel across the street
For more information do contact Ann Tucker on Facebook
httpswwwfacebookcomanntucker501
Rec
omm
end
ed R
ead
ings
Making Jewelry with Gemstone
Beads
Combines the popular craft of beading with beautiful semi-precious stones which are collected by many Features a variety of versatile ideas which can be adapted for any type of gem or bead Readers will learn to reate beautiful gemstone jewelry with this dazzling collection of over 100 projects ranging from eyecatching earrings and accessories to exquisite necklaces and bracelets This beautiful book offers an impressive range of 28 beautiful semi-precious stones (including birthstones) and a glimpse into the fascinating history and mythical properties behind them
BLOG DIY BEADING MAGAZINE ISSUE 32 BLOG WWWHANDMADE-JEWELRY-CLUBCOM MEMBERSHIP WWWDIYBEADINGCLUBCOM
Rec
omm
end
ed R
ead
ings
Convertible Crystal Jewelry
Reverse it Twist it Wear it Many
Ways
Diane Whiting presents the idea that convertibility isnrsquot just about using pieces in multiple ways it is also about using skills and creativity in multiple ways Using ever-popular sparkling crystals Diane showcases design elements through various techniques for fun easy fashionable jewelry With 25 projects the reader can choose from bracelets necklaces and earrings that match any outfit or styleDiane Whiting presents the idea that convertibility isnrsquot just about using pieces in multiple ways it is also about using skills and creativity in multiple ways
BLOG DIY BEADING MAGAZINE ISSUE 32 BLOG WWWHANDMADE-JEWELRY-CLUBCOM MEMBERSHIP WWWDIYBEADINGCLUBCOM
Rec
omm
end
ed R
ead
ings
Wire Jewelry Masterclass
Wrapped Coiled and Woven Pieces
Using Fine Materials
Comprehensive and fabulous Wire Jewelry Masterclass takes an in-depth look at an intricate and rewarding craft The 24 projects which range from simple Dragons tear briolette earrings to a Poseidon-under-the-sea pendant will delight and inspire jewelers of all levels and tastes Divided into beginner intermediate and advanced sections this beautifully photographed step-by-step guide is the ticket to wire jewelry expertise
BLOG DIY BEADING MAGAZINE ISSUE 32 BLOG WWWHANDMADE-JEWELRY-CLUBCOM MEMBERSHIP WWWDIYBEADINGCLUBCOM
Rec
omm
end
ed R
ead
ings
Timeless Wire Weaving The
Complete Course
Timeless Wire Weaving focuses on developing wirework skills through 13 projects using three classic wire weaving techniques coiling wrapping and weaving The projects are built around a focal cabochon and incorporate seed beads and crystals in imaginative ways Designers learn to make the jewelry shown in the book and they also use the techniques learned to create innovative jewelry pieces of their own
BLOG DIY BEADING MAGAZINE ISSUE 32 BLOG WWWHANDMADE-JEWELRY-CLUBCOM MEMBERSHIP WWWDIYBEADINGCLUBCOM
Our digital magazine is available through
Apple Newsstand service available to millions of IPAD users
To advertise with us please email us at
diyjewelryclubgmailcom
Or visit our page at
httphandmade-jewelry-clubcomadvertising-diy-beading-magazine
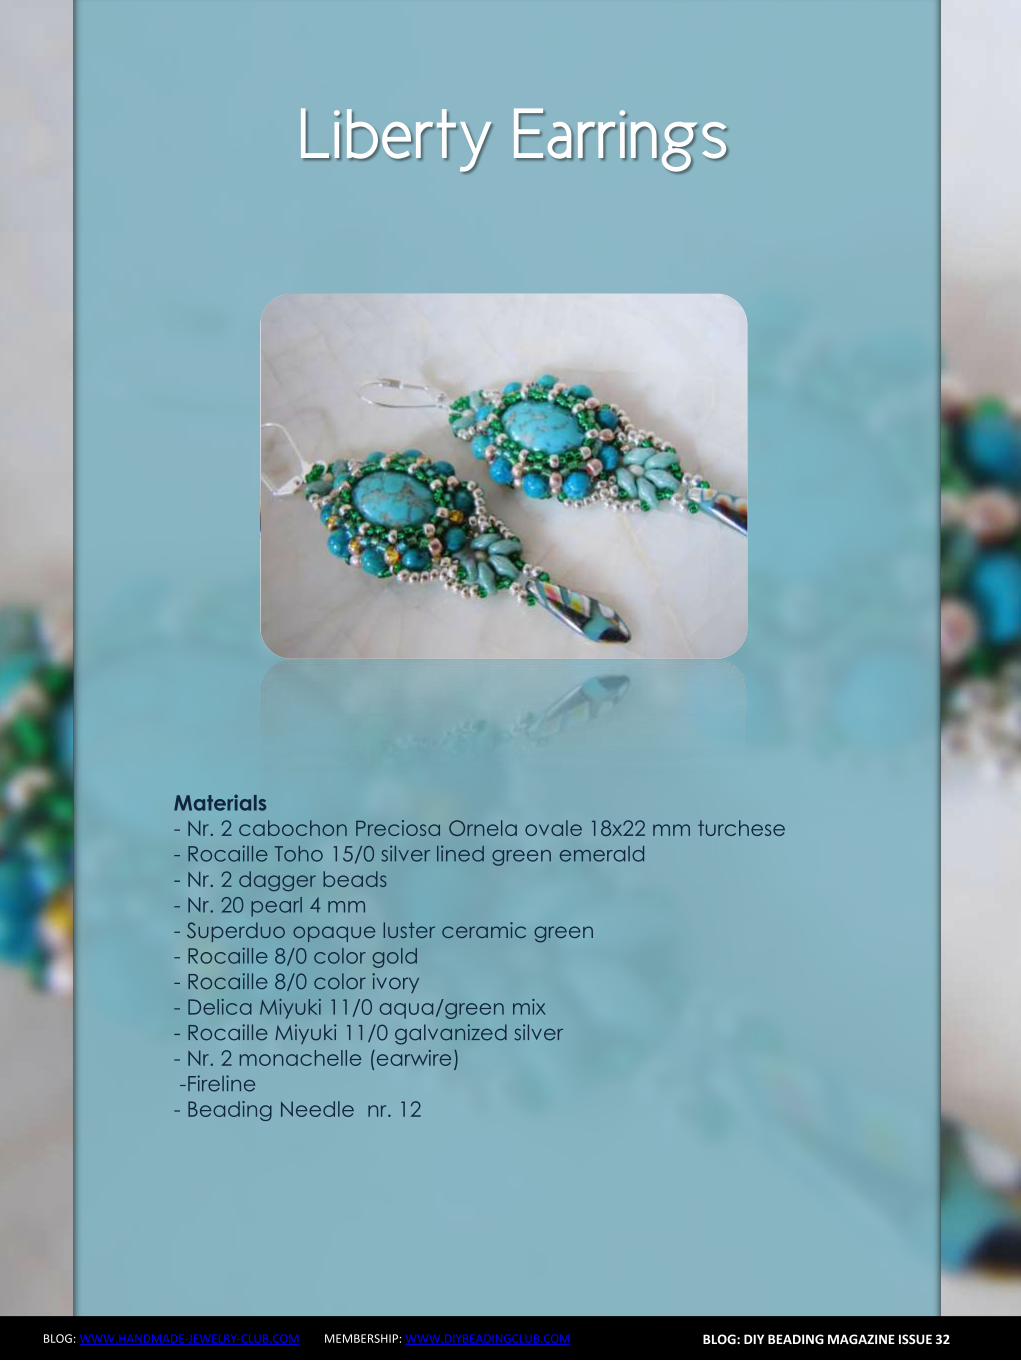
Jade Necklace
BLOG WWWHANDMADE-JEWELRY-CLUBCOM MEMBERSHIP WWWDIYBEADINGCLUBCOM BLOG DIY BEADING MAGAZINE ISSUE 32
Materials Needed 18ga Craft wire 28ga Craft wire 15mm diameter Green Round Flat Back Sew On Gems 5mm Green pearls
8mm Green pearls 6mm x 11mm teardrop Crystal Treasures Mill Hill beads or any teardrop bead with holes on the side Hook for your clasp
Tools Needed Wire cutter Flat nose pliers Round nose pliers Mandrel A jar or any rounded object to shape your necklace
Skill Level Intermediate
Step 1 Cut 6 inches 18ga wire Make a loop on one end then measure approximately 125 inches and make another loop
Form a size 4 circle on your mandrel
Jade Necklace
BLOG WWWHANDMADE-JEWELRY-CLUBCOM MEMBERSHIP WWWDIYBEADINGCLUBCOM BLOG DIY BEADING MAGAZINE ISSUE 32
Then close the circle by wrapping the extended wire just below the loop Wrap the
wire 2x
This is how it looks like Lets call this circle frame Youll notice that the lower curve is
slightly bigger than the upper curve
Step 2 Cut 8 inches of 28ga wire Wrap one end of
the wire at least 3x on one side of the circle frame just below the loop
Bring up your gem Flat back sew on gems has 2 holes Insert the wire into one hole and then
wrap the wire once onto the circle frame
Jade Necklace
BLOG WWWHANDMADE-JEWELRY-CLUBCOM MEMBERSHIP WWWDIYBEADINGCLUBCOM BLOG DIY BEADING MAGAZINE ISSUE 32
Step 3 Insert a 5mm pearl on the wire and then pass
the wire under circle frame
Repeat previous step 2x and have 3 pearls wrapped
Continue wrapping with your teardrop crystal My crystal has 2 holes on the side
and then continue wrapping with your 5mm pearls then secure your wire
Repeat Step 3 and create as many as needed For 16-inch necklace Ive created 6 of these
components
Jade Necklace
BLOG WWWHANDMADE-JEWELRY-CLUBCOM MEMBERSHIP WWWDIYBEADINGCLUBCOM BLOG DIY BEADING MAGAZINE ISSUE 32
Step 4 Cut a 15-inch 18ga wire and make a loop on
one end Insert 8mm pearl and make a loop on the other end You then use these as connectors
and link the components
Step 5 The necklace is an 18ga wire with wrapped
loops on both ends First cut 7 inches 18ga wire and make a wrapped loop with your hook already inserted Side in 18pcs 5mm pearls
Then make a wrapped loop on the other end connecting the wrapped loop onto the component Do the same for the other
necklace but make the loop on the other end big enough so the hookclasp can pass thru
To have the necklace curve shaped use a jar to bend the wire Voila Now youre
ready to party
Jade Necklace
BLOG WWWHANDMADE-JEWELRY-CLUBCOM MEMBERSHIP WWWDIYBEADINGCLUBCOM
About the Author
Sky Aldovino
I consider myself a late bloomer when it comes to crafting Irsquom a self-taught jewelry maker Jewelry making wasnrsquot really a hobby of mine but unforeseen events lead me to learn jewellery making My family put up a craft store where we sell cross stitch beads and all sorts of crafting materials I fell in love with the beads and tried to create accessories only for myself Clients liked the pieces and I started customizing handmade jewelleries The craft store was a success for 6 years but like any other small businesses we had to close it down and I was confined to staying at home While at home I had all the time using the internet and now working as a home-based jewelry designer
BLOG DIY BEADING MAGAZINE ISSUE 32
Atomic Ring
BLOG WWWHANDMADE-JEWELRY-CLUBCOM MEMBERSHIP WWWDIYBEADINGCLUBCOM
Have fun making shapes using the wigjig Cyclops Make loops going in
circles to mimic the shape of a flower or in this tutorial mimic the
shape of an atom The tutorial will also teach you how to cage a
cabochon Whats nice about this piece is that with one long wire you
can create the ring from start to finish
The tutorial is catered for intermediate to advanced students One
must already know how to make spirals and use a wigjig tool It has
clear instructions and ultra-clear close-up photos at each step
Additionally you can ask me question you have on the tutorial No
more getting stuck and frustrated on a confusing or just plain
inaccurate pattern
If you followed this tutorial and then sell the accessory or jewelry
please give credit to the author or DIY Beading Clubcom
If you like to get a blank wigjig graph visit wigjigcom Shop and Jigs
section
Copyright 2015
wwwdiybeadingclubcom
wwwhandmade-jewelry-clubcom
BLOG DIY BEADING MAGAZINE ISSUE 32
Atomic Ring
BLOG WWWHANDMADE-JEWELRY-CLUBCOM MEMBERSHIP WWWDIYBEADINGCLUBCOM
Materials Needed 20ga Craft wire 28ga Craft wire 11mm Round Cabochon
Tools Needed Wigjig Cyclops 15mm pegs Wire cutter Flat nose pliers Mandrel
Skill Level Intermediate - Advanced
BLOG DIY BEADING MAGAZINE ISSUE 32
Step 1 Lets prepare your wigjig cyclops Position the pegs like so
Atomic Ring
BLOG WWWHANDMADE-JEWELRY-CLUBCOM MEMBERSHIP WWWDIYBEADINGCLUBCOM BLOG DIY BEADING MAGAZINE ISSUE 32
Lets work with longer wire so youll have enough wire to hold onto as you manipulate the wire so cut 36 inches of 20ga wire From
one end of the wire measure 10 inches
On the 10-inch measurement loop the wire at the center peg then continue to loop onto the side pegs going in circle going back to
the center peg after looping on the side peg
Now the wire at the center peg will start to build up as you go around the side pegs so
you need to constantly press the wire at the center peg to accommodate the build up of
wire
When youre done pull out the wire and this is
how it should look like
Atomic Ring
BLOG WWWHANDMADE-JEWELRY-CLUBCOM MEMBERSHIP WWWDIYBEADINGCLUBCOM BLOG DIY BEADING MAGAZINE ISSUE 32
You will notice that the frame opens wide Now to keep the atom frame from opening wide secure the center of the frame by wrapping a 28ga wire What you
need to do is simply pass the 28ga wire into the hole and wrap as many times as needed or until youre sure that the frame is secure
Step 2 Now youre finished with your atom frame Well now create the focal design With the longer wire make a spiral at the center big
enough to accommodate the size of your cabochon In this tutorial the spiral is about
11mm in diameter the same size as my cabochon
Pop in your cabochon and start to make spirals going around and over the cabochon as if you are caging the cabochon Create at
least 5 rounds and then cut off any excess
Step 3 Now lets make the ring and this with the other
end of the wire
Atomic Ring
BLOG WWWHANDMADE-JEWELRY-CLUBCOM MEMBERSHIP WWWDIYBEADINGCLUBCOM BLOG DIY BEADING MAGAZINE ISSUE 32
Bring up your mandrel and wrap the wire to the size of your finger Wrap at least 2 times
When youre sure you have the right size pull the ring out of the mandrel
With the extended wire wrap the wire the secure the ring
Cut off any excess and voila You have your atomic ring Create as many as you can with different colors of cabochon
Atomic Ring
BLOG WWWHANDMADE-JEWELRY-CLUBCOM MEMBERSHIP WWWDIYBEADINGCLUBCOM
About the Author
Sky Aldovino
I consider myself a late bloomer when it comes to crafting Irsquom a self-taught jewelry maker Jewelry making wasnrsquot really a hobby of mine but unforeseen events lead me to learn jewellery making My family put up a craft store where we sell cross stitch beads and all sorts of crafting materials I fell in love with the beads and tried to create accessories only for myself Clients liked the pieces and I started customizing handmade jewelleries The craft store was a success for 6 years but like any other small businesses we had to close it down and I was confined to staying at home While at home I had all the time using the internet and now working as a home-based jewelry designer
BLOG DIY BEADING MAGAZINE ISSUE 32
Featured Article Gemstones Used for Jewelry Making
BLOG WWWHANDMADE-JEWELRY-CLUBCOM MEMBERSHIP WWWDIYBEADINGCLUBCOM
Gemstones are stones which we hold quite highly in terms of value And
jewelry often consists of stones that add attractiveness to it so it is not
surprising when jewelry designers actually use gemstones in their designs In
fact there are different types of gemstones that can be used for making
jewelry There are the expensive and pure gemstones and there are also the
imitation ones The information below will provide some information about
the kinds of stones you can use to create jewelry and how these stones will
impact the jewelry you have created
The first kind of stone which I believe we are all quite familiar with are
birthstones These stones are associated with individualrsquos month of birth
by SunVDesigns by BeyhanAkman
For example Amethyst stone is connected with anybody who is born in
February which carries special significance in the area of emotions and also
spiritually This stone also signifies calm and peace as well
And then we have semi-precious stones which are also often used in jewelry
making They are not as valuable as compared to precious stones but still
valuable Best examples of these stones are aquamarine topaz tourmaline
opal and turquoise
BLOG DIY BEADING MAGAZINE ISSUE 32
Featured Article Gemstones Used for Jewelry Making
BLOG WWWHANDMADE-JEWELRY-CLUBCOM MEMBERSHIP WWWDIYBEADINGCLUBCOM
It is an ideal gift for someone who you deem special Aquamarine pendants
usually work well for anyone and is widely an accepted stone
by HyppieChic by joyeriamestiza
However precious stones are the most unusual
and precious jewels to us Examples of some of
them are emerald sapphire diamond and
ruby These stones are usually very expensive
and are prized for their exquisiteness These
stones are commonly used in high-quality
jewelry designs which costs quite a fortune to
obtain
BLOG DIY BEADING MAGAZINE ISSUE 32
by sarajewelrystu
Jewelry designs with precious stones are usually
given as exceptional gifts on special occasions A
perfect example is a diamond ring that is usually
given as an engagement gift
by ldiamondsforever
Featured Article Gemstones Used for Jewelry Making
BLOG WWWHANDMADE-JEWELRY-CLUBCOM MEMBERSHIP WWWDIYBEADINGCLUBCOM
There are also synthetic stones which are often used to create jewelry
Synthetic stones are artificial imitations of gemstones Synthetic Sapphire
jewelry costs less compare with the authentic ones Most of the time
imitation stones are used to save cost but at the same time have the similar
look of the real stone
BLOG DIY BEADING MAGAZINE ISSUE 32
by shininggems by thaimaker
by lapinduprintemps by PastimeArt
Gemstones are used like beads and you can use it in any designs whether
simple or elaborate
Swarovski crystal components are available in a rich multitude of rondelles Perfect as spacers in necklaces or as discs in earrings Rondelles can be used with many varieties of shapes or sizes Use Swarovski crystal rondelles between large gemstones as accents with precious metal findings Fire Mountain Gems and Beads Crystal Passionsreg brand presents Swarovski crystal in display-ready packaging for brilliant retail presentation Crystal Passionsreg is an assurance of genuine Swarovski crystal
BLOG DIY BEADING MAGAZINE ISSUE 32 BLOG WWWHANDMADE-JEWELRY-CLUBCOM MEMBERSHIP WWWDIYBEADINGCLUBCOM
Recommended Jewelry Making Supplies
Mz Unisex-adults 12pcs 25x18x6mm Turquoise Oval CAB Cabochon
BLOG DIY BEADING MAGAZINE ISSUE 32 BLOG WWWHANDMADE-JEWELRY-CLUBCOM MEMBERSHIP WWWDIYBEADINGCLUBCOM
Recommended Jewelry Making Supplies
For a little sparkle that goes a long way design with Swarovski 4mm faceted bicones Create glorious multi-strand necklaces with the dainty crystals or use as spacers to add a tiny flash to your designs Swarovski crystal components are made in Austria and are considered the finest products of their kind in the world
BLOG DIY BEADING MAGAZINE ISSUE 32 BLOG WWWHANDMADE-JEWELRY-CLUBCOM MEMBERSHIP WWWDIYBEADINGCLUBCOM
Recommended Jewelry Making Supplies
Imitation beads resist color change These beads have uniform quality with a good polish Some strands may have little to no matrix Sizes shapes and colors may vary with handcrafted items
BLOG DIY BEADING MAGAZINE ISSUE 32 BLOG WWWHANDMADE-JEWELRY-CLUBCOM MEMBERSHIP WWWDIYBEADINGCLUBCOM
Recommended Jewelry Making Supplies
Something Blue Necklace and Earrings
BLOG WWWHANDMADE-JEWELRY-CLUBCOM MEMBERSHIP WWWDIYBEADINGCLUBCOM
Skill level Beginner Intermediate Advanced
DIMENSIONS OF THE NECKLACE Inner Circumference 14 18 inch 35 cm
Focal Pendant Width 1 15 inch 35 cm Focal Pendant Height 1 15 inch 35 cm
DIMENSIONS OF THE EARRING Earring Width 716 inch 12 cm Earring Height 1516 inch 25 cm (Without the earring hook)
BLOG DIY BEADING MAGAZINE ISSUE 32
Materials
Note Before purchasing the supplies measure the length of your wished necklace If you decide to bead a longer necklace you should keep in mind that for every extra
frac34 inches 2 cm-s you will need 8 bicones and 8 pearls
Something Blue Necklace and Earrings
BLOG WWWHANDMADE-JEWELRY-CLUBCOM MEMBERSHIP WWWDIYBEADINGCLUBCOM BLOG DIY BEADING MAGAZINE ISSUE 32
Work RAW stitch into a beaded circle and embellish with Swarovski bicones
STEP 2 String 1A and 2 pearls Pass through the previous
second pearl and the freshly added 1A and the first pearl again
STEP 1 Use a comfortable length of thread to string 2
pearls 1A and 1 pearl again leaving a 2rdquo 5cm tail Pass through the first two pearls strung to form a
ring
STEP 3 String 2 pearls and 1A Pass through the previous first pearl and the freshly added two pearls
again
STEP 4 - 17 Repeat STEP 2 and STEP 3 again until you count 17 pearls in the inner circle
But be careful in the last step you only have to add 1 pearl then pass through the first pearls
added in STEP 1 and add another 1A Now pass through the first pearl added in STEP
1and 1A added in this round again to exit from this A
Something Blue Necklace and Earrings
BLOG WWWHANDMADE-JEWELRY-CLUBCOM MEMBERSHIP WWWDIYBEADINGCLUBCOM BLOG DIY BEADING MAGAZINE ISSUE 32
STEP 19 String 2A and pass through the next A added in round 4-17 and the A added in round 18 the 2A added in this round and finally the A added in round 4-17 to exit from the bead showed below
STEP 18 String 3A and pass through the 1A added in the previous round and the first A added in this
round
STEP 20 - 34 Repeat STEP 18 and STEP 19 again until you finish the circle
But be careful in the last step first you have to pass through 3A and then add 1A After this pass
through the 3A again and exit from the A bead
shown below (This is the first A added in STEP 18)
Something Blue Necklace and Earrings
BLOG WWWHANDMADE-JEWELRY-CLUBCOM MEMBERSHIP WWWDIYBEADINGCLUBCOM BLOG DIY BEADING MAGAZINE ISSUE 32
STEP 35 Step up to exit from the pearl shown below (Finishing the previous step in the A bead and then
stepping up from there makes the circle more secure)
Now string 3 bicones Pass through the pearl and the first bicone again
In the reality your circle will look more like this the A beads forming a strong row in the middle of the
pearls
STEP 36 Add 2 bicones Pass through the
neighboring pearl the first bicone added in the previous row and the 2 bicones added in this step
so you can exit from the next pearl
Something Blue Necklace and Earrings
BLOG WWWHANDMADE-JEWELRY-CLUBCOM MEMBERSHIP WWWDIYBEADINGCLUBCOM BLOG DIY BEADING MAGAZINE ISSUE 32
Now in the reality your circle will look more like this the A beads still forming a strong row in the middle of the pearls and the bicones slightly lying on top of
them
STEP 37 - 49 Repeat STEP 35 and STEP 36 again until you finish the circle with the bicones
But be careful in the last step first you have pass through the third bicone added then add 1 bicone
and pass through this little quartet to exit from the bicone shown below (The second one added in
STEP 35)
STEP 50 With these steps we finish the circle by adding 1 bicone to connect the A beads and the
bicone row So add 1 bicone pass through the nearest A bead and add 1 bicone again Pass
through the bicone already there and exit from the bicone you just added
Something Blue Necklace and Earrings
BLOG WWWHANDMADE-JEWELRY-CLUBCOM MEMBERSHIP WWWDIYBEADINGCLUBCOM BLOG DIY BEADING MAGAZINE ISSUE 32
STEP 66-83 Secure the circle by adding 1A between each bicone in the second row of Swarovski
bicones If you finished secure the thread and trim
STEP 51-65 Using the same technique as in STEP 37 - 49 add 1 bicone to finish the third bicone row The black line shows you the way (After STEP 50 pass through the next A bead add 1 bicone and pass through the bicone already there and the bicone added in the previous step Repeat these steps to
finish the inner bicone circle)
MIDDLE CIRCLE Work RAW stitch into a beaded circle and embellish with
Swarovski bicones Remember you need to bead two circles this time
STEP 1 Just like in the focal circle begin with 2 pearls 1A and 1 pearl again on a comfortable length of thread
leaving a 2rdquo 5cm tail Pass through the first two pearls strung to form a ring
Something Blue Necklace and Earrings
BLOG WWWHANDMADE-JEWELRY-CLUBCOM MEMBERSHIP WWWDIYBEADINGCLUBCOM BLOG DIY BEADING MAGAZINE ISSUE 32
STEP 15-28 Mimicing the FOCAL CIRCLElsquos STEP 18-34 bead A beads until you finish the inner part of the
circle Exit from a pearl in the second row This circle should look very similar to the first one but this is a bit
smaller
STEP 2-14 Mimicing the FOCAL CIRCLElsquos STEP 2-17 bead until you count 14 pearls in the inner circle Exit
from the last A added
STEP 29-42 Mimicing FOCAL CIRCLElsquos STEP 35-49 add 2 rows of bicones
STEP 43-56 Mimicing the FOCAL CIRCLElsquos STEP 50-65 bead the third row of bicones to finish the circle
Something Blue Necklace and Earrings
BLOG WWWHANDMADE-JEWELRY-CLUBCOM MEMBERSHIP WWWDIYBEADINGCLUBCOM BLOG DIY BEADING MAGAZINE ISSUE 32
SMALLEST CIRCLE Work RAW stitch into a beaded circle and embellish
with Swarovski bicones Remember you need to bead two circles again
STEP 1 Just like in the focal circle begin with 2 pearls
1A and 1 pearl again on a comfortable length of thread leaving a 2rdquo 5cm tail Pass through the first two
pearls strung to form a ring
STEP 57-70 Just like the FOCAL CIRCLElsquos STEP 66-83 secure the circle by adding 1A between every bicone
in the second row of bicones If you finished secure the thread and trim (Donrsquot forget to bead another
circle)
STEP 2-12 Mimicing the FOCAL CIRCLElsquos STEP 2-17 bead until you count 12 pearls in the inner circle Exit
from the last A added
STEP 13-24 Mimicing the FOCAL CIRCLElsquos STEP 18-34 bead A beads until you finish the inner part of the
circle Exit from a pearl in the second row This circle should look very similar to the first two but this is the
smallest of them all
Something Blue Necklace and Earrings
BLOG WWWHANDMADE-JEWELRY-CLUBCOM MEMBERSHIP WWWDIYBEADINGCLUBCOM BLOG DIY BEADING MAGAZINE ISSUE 32
STEP 37-48 Mimicing the FOCAL CIRCLElsquos STEP 50-65 bead the third row of bicones to finish this circle too
STEP 25-36 Mimicing FOCAL CIRCLElsquos STEP 35-49 add 2
rows of bicones The last step here is purple again
STEP 49-60 Just like the FOCAL CIRCLElsquos STEP 66-83 secure the circle by adding 1A between every bicone
in the second row of bicones If you finished secure the thread and trim (Donrsquot forget that you need two
small circles)
Something Blue Necklace and Earrings
BLOG WWWHANDMADE-JEWELRY-CLUBCOM MEMBERSHIP WWWDIYBEADINGCLUBCOM BLOG DIY BEADING MAGAZINE ISSUE 32
STEP 37-48 Mimicing the FOCAL CIRCLElsquos STEP 50-65 bead the third row of bicones to finish this circle too
STEP 25-36 Mimicing FOCAL CIRCLElsquos STEP 35-49 add 2
rows of bicones The last step here is purple again
STEP 49-60 Just like the FOCAL CIRCLElsquos STEP 66-83 secure the circle by adding 1A between every bicone
in the second row of bicones If you finished secure the thread and trim (Donrsquot forget that you need two
small circles)
Something Blue Necklace and Earrings
BLOG WWWHANDMADE-JEWELRY-CLUBCOM MEMBERSHIP WWWDIYBEADINGCLUBCOM BLOG DIY BEADING MAGAZINE ISSUE 32
STEP 2-6 Continue by adding 1A 1 bicone 1 pearl until you count 6 of each
STEP 1 Begin with 1 pearl 1 bicone 1A and 1 bicone again on a comfortable length of thread leaving a 2rdquo
5cm tail Pass through the pearl and the first bicone strung to form a ring
STEP 7-12 Pass through the A beads to make your
component more secure Also secure the thread and trim (Repeat these steps until you have six 6-BEAD
COMPONENTs)
6-BEAD COMPONENT Work RAW stitch into a beaded circle and embellish with Swarovski bicones
For the necklace we will need six from this component For the earring two
Something Blue Necklace and Earrings
BLOG WWWHANDMADE-JEWELRY-CLUBCOM MEMBERSHIP WWWDIYBEADINGCLUBCOM BLOG DIY BEADING MAGAZINE ISSUE 32
STEP 2-4 Continue by adding 1A 1 bicone 1 pearl
until you count 4 of each
STEP 1 Begin with 1 pearl 1 bicone 1A and 1 bicone again on a comfortable length of thread leaving a 2rdquo
5cm tail Pass through the pearl and the first bicone strung to form a ring
STEP 5-8 Pass through the A beads to make your component more secure Also secure the thread and
trim (Repeat these steps until you have the wished amount of 4-BEAD COMPONENTs)
4-BEAD COMPONENT Work RAW stitch into a beaded circle and embellish with Swarovski bicones
For the necklace-size that is given on the second page we will need 20 from this
component For the earring two
If you would like to make a longer necklace you need to make more (One 4-BEAD COMPONENT measures about 38 inch 1 cm To make the necklace symmetrical you have to have equal amounts on each side This means for every extra frac34 inches
2 cm-s you will need 1 4-BEAD COMPONENT on each side of the necklace)
Something Blue Necklace and Earrings
BLOG WWWHANDMADE-JEWELRY-CLUBCOM MEMBERSHIP WWWDIYBEADINGCLUBCOM BLOG DIY BEADING MAGAZINE ISSUE 32
STEP 2 Connect the MIDDLE CIRCLE to two 6-BEAD COMPONENTs by adding four-times 2As
between the pearls Choose a pearl on the MIDDLE CIRCLE and add
2A pass through a pearl in the 6-BEAD COMPONENT previously added and add 2A again Watch out this has to be symmetrical Repeat this at least two more times to make it
secure Now repeat this entire procedure but choose
the 8-th pearl on MIDDLE CIRCLE Repeat this on the other side of the necklace
too
Choose a pearl on the FOCAL CIRCLE and add 2A pass through a pearl in the 6-BEAD COMPONENT and add 2A again Repeat this at least two more times to make it secure
Now repeat this entire procedure but choose the 5-th pearl on FOCAL CIRCLE This will make the necklace nice on your neck
FINISHING THE NECKLACE Connects the parts with A beads
STEP 1 Connect the FOCAL CIRCLE to two 6-BEAD COMPONENTs by adding four-times 2As between the pearls To do this turn your parts upside down you need to
see the pearls We will work on this side from now on
Something Blue Necklace and Earrings
BLOG WWWHANDMADE-JEWELRY-CLUBCOM MEMBERSHIP WWWDIYBEADINGCLUBCOM BLOG DIY BEADING MAGAZINE ISSUE 32
FINISHING THE EARRING Connects the parts with A beads
STEP 1-2 Connect the 6-BEAD COMPONENT
to 4-BEAD COMPONENT and the 4-BEAD
COMPONENT to the earring hook
First connect the 4-BEAD COMPONENT to the 6-BEAD COMPONENT with 4A beads Mimic
the elongation steps of the necklace if needed
Secondly connect the 4-BEAD COMPONENT
to your earring hook with 4A beads again Leave from the last pearl bead 2A beads the hook (this is the orange oval form) and 2As again Pass through each of them to
secure this connection again
Finally get ready to prepare the other earring ndash since we need two of them
STEP 5 Connect the 4-BEAD COMPONENTs to the toggle clasp thus finishing the
necklace Leaving from the last pearl bead 2A the
clasp(this is the orange oval form) and 2A again Pass through all of them a couple more times to make this connection more
secure
Something Blue Necklace and Earrings
BLOG WWWHANDMADE-JEWELRY-CLUBCOM MEMBERSHIP WWWDIYBEADINGCLUBCOM BLOG DIY BEADING MAGAZINE ISSUE 32
If you finished it is time to try it on It was a great fun wasnrsquot it And how beautiful you look in your new necklace and the matching earrings
Something Blue Necklace and Earrings
BLOG WWWHANDMADE-JEWELRY-CLUBCOM MEMBERSHIP WWWDIYBEADINGCLUBCOM
About the Author
Margit Vogel
My name is Margit Vogel I live in Hungary Europe
By profession I am a biochemical engineer but I fell in love with
beads so much that I could not stop playing with them
I make one-of-a-kind beaded and bead embroidered art
jewelry made of the best quality materials such as Swarovski
stones gemstones Japanese beads (Miyuki and Toho) Czech
glass beads leather soutache and suede Each piece is unique
and individually crafted
Feel free to visit my blog for some eyecandy
httpiformjewelrywordpresscom
My shop httpwwwetsycomshopiformjewelry
Facebook httpwwwfacebookcomiformjewelry
BLOG DIY BEADING MAGAZINE ISSUE 32
Getting Down And Personal With Gianna
Getting Down And Personal With Gianna
Nowadays we see more and more jewelry stores opening up online and with these online jewelry stores it has made it easier for us to purchase and view their creations Have you ever wondered how they are able to manage and produce amazing jewelry pieces and tutorials So heres a little on the journey to open up an online shop We are excited to present to you Gianna aka Beading4perfectionists
Gianna Beader amp Youtuber
Unlike most jewelry makers and beadweavers Gianna did not start beading as a hobby but as a means to make ends meet With goals in trying to
fill the financial gap she did everything she could to expand her earnings ndash working as a security guard
and at the same time learning how to bead and selling her pieces at fair trades and flea markets
Since many were asking if she does home beading workshops she started on exploring how to teach people to bead She loves Scott Bakula and has always loved him till now and this served as her
inspiration to start making a beading video tutorial
Gianna started creating videos because she was at the point in her life where everything seemed to be falling apart And at that moment of time she had difficulties financially and selling jewelry was the only way for her to stay afloat financially She is a big Scott Bakula fan and when she went to the UK to see him on stage that was when it hit her that she is already able to edit videos and
taught herself Photoshop and done workshops at bead fairs so why not put these together and see what happens on Youtube She knew that if she gets enough subscribers and views ndash though no one knew what the exact numbers were you would be invited to become a Youtube partner This way she could monetize her videos with advertisements and hopefully she would be able to be a Youtube partner and be able to pay her bills
BLOG WWWHANDMADE-JEWELRY-CLUBCOM MEMBERSHIP WWWDIYBEADINGCLUBCOM BLOG DIY BEADING MAGAZINE ISSUE 32
Getting Down And Personal With Gianna
Her Youtube channel is popular and the reason why she chose Youtube is because Youtube is the biggest platform and reached almost to the whole world Everyone already knows about it and it was growing rapidly as compared to other platforms like Dailymotion so she figured that Youtube was the way to go Her advice to new designers is that when you start out go to the platforms on the top of your list first then work your way down your list if you do not get accepted by your first choice
After loyally putting up one video every week for about 8 months in a row she became a Youtube partner and monetized her videos She knew she needed at least $100 to get her first payout She managed to reach $100 after 3 months The process was not easy she worked hard lack sleep skipped meals and who knows what happened to Ridge in the Bold and the Beautiful because she stopped watching
On Youtube you can monetize your videos Google pays straight to your bank account and at other countries where they also have the option of getting checks among other options In order to get paid you have to reach the $100 mark and after 3 months For Gianna she thinks that you cannot say that Etsy is better than Youtube or Youtube is better than Etsy Her reasoning is because on Youtube she has many followers which will eventually check out her Etsy shop And to start an Etsy shop you need an audience
BLOG WWWHANDMADE-JEWELRY-CLUBCOM MEMBERSHIP WWWDIYBEADINGCLUBCOM BLOG DIY BEADING MAGAZINE ISSUE 32
television and dedicated her spare time (as she had another job) to Youtube She re-registered at the chamber of commerce after receiving her first payout Her work at Youtube now is not a full time job and things have changed on Youtube It is easier to become a parter but there are some countries that need to wait for an invitation to be a Youtube partner Take Italy for instance Italians would have to work just as hard as she did if they want to become a Youtube partner
Getting Down And Personal With Gianna
With her 60000 subscribers on her b4pbakup Youtube channel it is possible to sell at least 60 patterns on the first day on Etsy after promoting the PDF file on her Youtube channel Though you may think that 60 out of 60000 is not much you have to remember that not everyone has the means to purchase the PDF file and a lot of people still rather watch her carry out the tutorial(for free) on Youtube instead of reading the patterns or paying for the patterns even if the pattern is for a fundraiser and only cost $2 Her insights on Youtube is that Youtube is not what it used to be 6 years ago Instead of making more money every month she is making less and less because advertisers have more options of where they want to advertise their ads Ads do not pay as much as they used to Back in the days you could get 25 cents per ad Now you count yourself lucky if you could get 5 cents roll in after two hours
BLOG WWWHANDMADE-JEWELRY-CLUBCOM MEMBERSHIP WWWDIYBEADINGCLUBCOM BLOG DIY BEADING MAGAZINE ISSUE 32
And on top of that adblockers are destroying Youtube channel owners Youtube will start making changes to the channels where there will be ldquopaid subscriptionrdquo channels This has already been implemented in some countries but not in her country The Netherlands This means there will no longer be ads for her monthly paying subscribers She hopes that Youtube will add on a paid per video option feature The option to be a paid channel or free channel or to start a new channel for paying customers is yours to choose Gianna is not happy with Youtube because many others like her have worked so hard and for some years to become Youtube partners(which was something to be proud of) has lost their status
Getting Down And Personal With Gianna
Her advice for those who want to go on Youtube is 1 Do it because you want to teach
2 Do it because you want a career with beads
BLOG WWWHANDMADE-JEWELRY-CLUBCOM MEMBERSHIP WWWDIYBEADINGCLUBCOM BLOG DIY BEADING MAGAZINE ISSUE 32
After putting up about 20 videos and having at least 5000 subscribers add the PDF tutorials to Etsy and Craftsy She found out that her audience would like to have the PDF after watching her videos This is because they would rather print out the PDF and work while seated in a comfy chair technically somewhere else instead of having to pause the video time and time again
Gianna has also made a video for those who want to know the whole story of her journey up until the present day And to get updates on her you can check it out here She has also started a vlog where she tells of how she still works towards becoming a financial independent beader and explains her journey to get where she wants to be(or die trying) Gianna will be in the UK on October the 17th giving an all-day workshop with 4 different patterns
(2 beginners and 2 advanced) in Wotton-under-Edge
Gianna will be there Friday night as the workshop is on Saturday She will be leaving on Sunday Her
doors are open to all who wants to continue the party with her at the hotel across the street
For more information do contact Ann Tucker on Facebook
httpswwwfacebookcomanntucker501
Rec
omm
end
ed R
ead
ings
Making Jewelry with Gemstone
Beads
Combines the popular craft of beading with beautiful semi-precious stones which are collected by many Features a variety of versatile ideas which can be adapted for any type of gem or bead Readers will learn to reate beautiful gemstone jewelry with this dazzling collection of over 100 projects ranging from eyecatching earrings and accessories to exquisite necklaces and bracelets This beautiful book offers an impressive range of 28 beautiful semi-precious stones (including birthstones) and a glimpse into the fascinating history and mythical properties behind them
BLOG DIY BEADING MAGAZINE ISSUE 32 BLOG WWWHANDMADE-JEWELRY-CLUBCOM MEMBERSHIP WWWDIYBEADINGCLUBCOM
Rec
omm
end
ed R
ead
ings
Convertible Crystal Jewelry
Reverse it Twist it Wear it Many
Ways
Diane Whiting presents the idea that convertibility isnrsquot just about using pieces in multiple ways it is also about using skills and creativity in multiple ways Using ever-popular sparkling crystals Diane showcases design elements through various techniques for fun easy fashionable jewelry With 25 projects the reader can choose from bracelets necklaces and earrings that match any outfit or styleDiane Whiting presents the idea that convertibility isnrsquot just about using pieces in multiple ways it is also about using skills and creativity in multiple ways
BLOG DIY BEADING MAGAZINE ISSUE 32 BLOG WWWHANDMADE-JEWELRY-CLUBCOM MEMBERSHIP WWWDIYBEADINGCLUBCOM
Rec
omm
end
ed R
ead
ings
Wire Jewelry Masterclass
Wrapped Coiled and Woven Pieces
Using Fine Materials
Comprehensive and fabulous Wire Jewelry Masterclass takes an in-depth look at an intricate and rewarding craft The 24 projects which range from simple Dragons tear briolette earrings to a Poseidon-under-the-sea pendant will delight and inspire jewelers of all levels and tastes Divided into beginner intermediate and advanced sections this beautifully photographed step-by-step guide is the ticket to wire jewelry expertise
BLOG DIY BEADING MAGAZINE ISSUE 32 BLOG WWWHANDMADE-JEWELRY-CLUBCOM MEMBERSHIP WWWDIYBEADINGCLUBCOM
Rec
omm
end
ed R
ead
ings
Timeless Wire Weaving The
Complete Course
Timeless Wire Weaving focuses on developing wirework skills through 13 projects using three classic wire weaving techniques coiling wrapping and weaving The projects are built around a focal cabochon and incorporate seed beads and crystals in imaginative ways Designers learn to make the jewelry shown in the book and they also use the techniques learned to create innovative jewelry pieces of their own
BLOG DIY BEADING MAGAZINE ISSUE 32 BLOG WWWHANDMADE-JEWELRY-CLUBCOM MEMBERSHIP WWWDIYBEADINGCLUBCOM
Our digital magazine is available through
Apple Newsstand service available to millions of IPAD users
To advertise with us please email us at
diyjewelryclubgmailcom
Or visit our page at
httphandmade-jewelry-clubcomadvertising-diy-beading-magazine
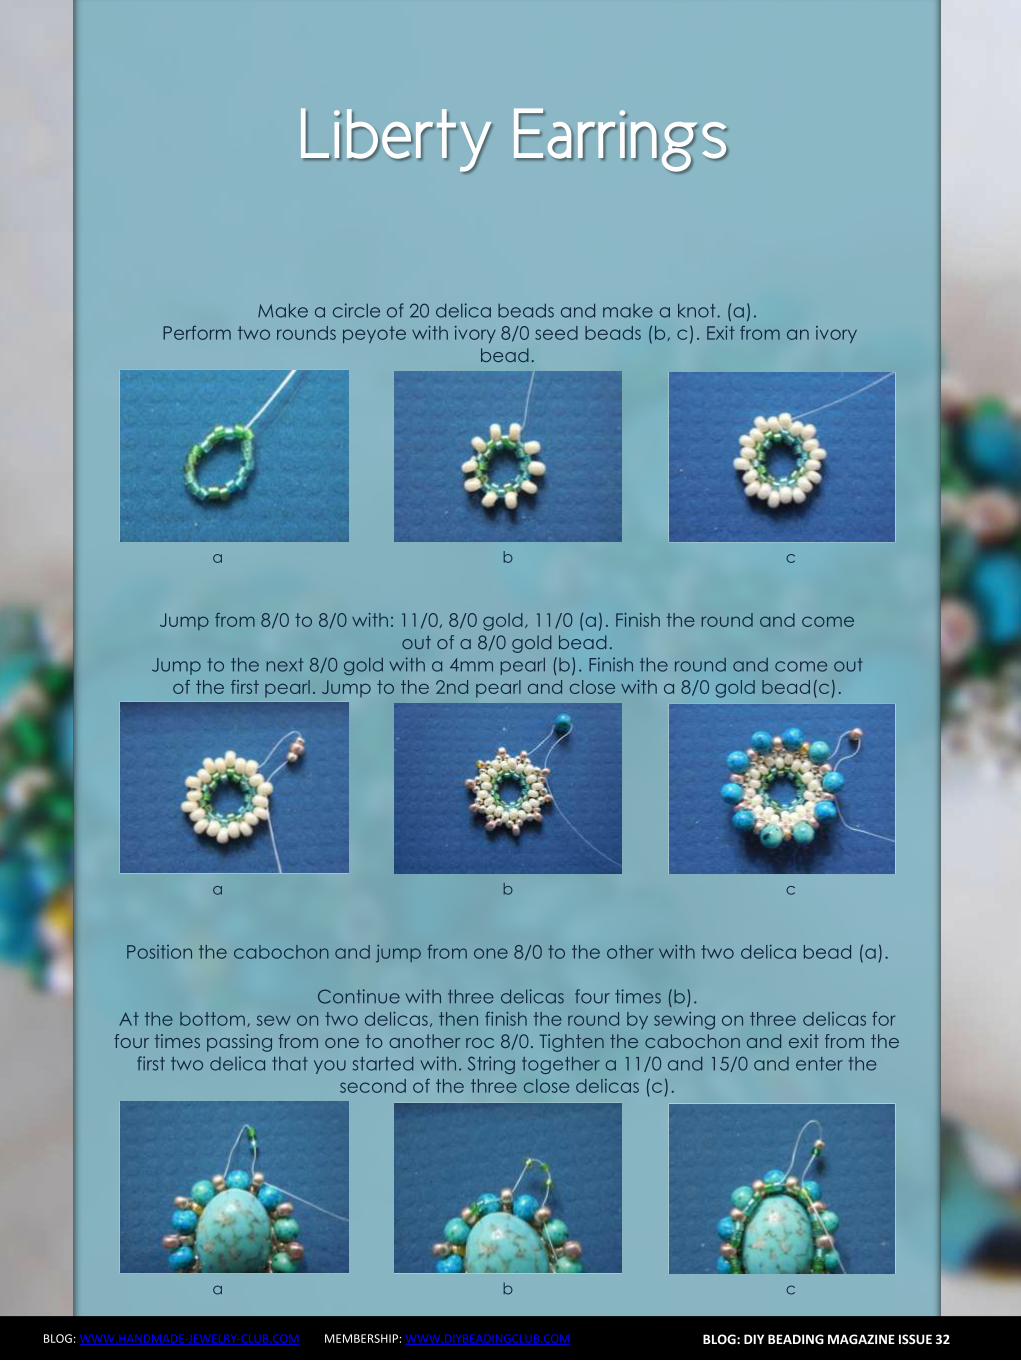
Jade Necklace
BLOG WWWHANDMADE-JEWELRY-CLUBCOM MEMBERSHIP WWWDIYBEADINGCLUBCOM BLOG DIY BEADING MAGAZINE ISSUE 32
Then close the circle by wrapping the extended wire just below the loop Wrap the
wire 2x
This is how it looks like Lets call this circle frame Youll notice that the lower curve is
slightly bigger than the upper curve
Step 2 Cut 8 inches of 28ga wire Wrap one end of
the wire at least 3x on one side of the circle frame just below the loop
Bring up your gem Flat back sew on gems has 2 holes Insert the wire into one hole and then
wrap the wire once onto the circle frame
Jade Necklace
BLOG WWWHANDMADE-JEWELRY-CLUBCOM MEMBERSHIP WWWDIYBEADINGCLUBCOM BLOG DIY BEADING MAGAZINE ISSUE 32
Step 3 Insert a 5mm pearl on the wire and then pass
the wire under circle frame
Repeat previous step 2x and have 3 pearls wrapped
Continue wrapping with your teardrop crystal My crystal has 2 holes on the side
and then continue wrapping with your 5mm pearls then secure your wire
Repeat Step 3 and create as many as needed For 16-inch necklace Ive created 6 of these
components
Jade Necklace
BLOG WWWHANDMADE-JEWELRY-CLUBCOM MEMBERSHIP WWWDIYBEADINGCLUBCOM BLOG DIY BEADING MAGAZINE ISSUE 32
Step 4 Cut a 15-inch 18ga wire and make a loop on
one end Insert 8mm pearl and make a loop on the other end You then use these as connectors
and link the components
Step 5 The necklace is an 18ga wire with wrapped
loops on both ends First cut 7 inches 18ga wire and make a wrapped loop with your hook already inserted Side in 18pcs 5mm pearls
Then make a wrapped loop on the other end connecting the wrapped loop onto the component Do the same for the other
necklace but make the loop on the other end big enough so the hookclasp can pass thru
To have the necklace curve shaped use a jar to bend the wire Voila Now youre
ready to party
Jade Necklace
BLOG WWWHANDMADE-JEWELRY-CLUBCOM MEMBERSHIP WWWDIYBEADINGCLUBCOM
About the Author
Sky Aldovino
I consider myself a late bloomer when it comes to crafting Irsquom a self-taught jewelry maker Jewelry making wasnrsquot really a hobby of mine but unforeseen events lead me to learn jewellery making My family put up a craft store where we sell cross stitch beads and all sorts of crafting materials I fell in love with the beads and tried to create accessories only for myself Clients liked the pieces and I started customizing handmade jewelleries The craft store was a success for 6 years but like any other small businesses we had to close it down and I was confined to staying at home While at home I had all the time using the internet and now working as a home-based jewelry designer
BLOG DIY BEADING MAGAZINE ISSUE 32
Atomic Ring
BLOG WWWHANDMADE-JEWELRY-CLUBCOM MEMBERSHIP WWWDIYBEADINGCLUBCOM
Have fun making shapes using the wigjig Cyclops Make loops going in
circles to mimic the shape of a flower or in this tutorial mimic the
shape of an atom The tutorial will also teach you how to cage a
cabochon Whats nice about this piece is that with one long wire you
can create the ring from start to finish
The tutorial is catered for intermediate to advanced students One
must already know how to make spirals and use a wigjig tool It has
clear instructions and ultra-clear close-up photos at each step
Additionally you can ask me question you have on the tutorial No
more getting stuck and frustrated on a confusing or just plain
inaccurate pattern
If you followed this tutorial and then sell the accessory or jewelry
please give credit to the author or DIY Beading Clubcom
If you like to get a blank wigjig graph visit wigjigcom Shop and Jigs
section
Copyright 2015
wwwdiybeadingclubcom
wwwhandmade-jewelry-clubcom
BLOG DIY BEADING MAGAZINE ISSUE 32
Atomic Ring
BLOG WWWHANDMADE-JEWELRY-CLUBCOM MEMBERSHIP WWWDIYBEADINGCLUBCOM
Materials Needed 20ga Craft wire 28ga Craft wire 11mm Round Cabochon
Tools Needed Wigjig Cyclops 15mm pegs Wire cutter Flat nose pliers Mandrel
Skill Level Intermediate - Advanced
BLOG DIY BEADING MAGAZINE ISSUE 32
Step 1 Lets prepare your wigjig cyclops Position the pegs like so
Atomic Ring
BLOG WWWHANDMADE-JEWELRY-CLUBCOM MEMBERSHIP WWWDIYBEADINGCLUBCOM BLOG DIY BEADING MAGAZINE ISSUE 32
Lets work with longer wire so youll have enough wire to hold onto as you manipulate the wire so cut 36 inches of 20ga wire From
one end of the wire measure 10 inches
On the 10-inch measurement loop the wire at the center peg then continue to loop onto the side pegs going in circle going back to
the center peg after looping on the side peg
Now the wire at the center peg will start to build up as you go around the side pegs so
you need to constantly press the wire at the center peg to accommodate the build up of
wire
When youre done pull out the wire and this is
how it should look like
Atomic Ring
BLOG WWWHANDMADE-JEWELRY-CLUBCOM MEMBERSHIP WWWDIYBEADINGCLUBCOM BLOG DIY BEADING MAGAZINE ISSUE 32
You will notice that the frame opens wide Now to keep the atom frame from opening wide secure the center of the frame by wrapping a 28ga wire What you
need to do is simply pass the 28ga wire into the hole and wrap as many times as needed or until youre sure that the frame is secure
Step 2 Now youre finished with your atom frame Well now create the focal design With the longer wire make a spiral at the center big
enough to accommodate the size of your cabochon In this tutorial the spiral is about
11mm in diameter the same size as my cabochon
Pop in your cabochon and start to make spirals going around and over the cabochon as if you are caging the cabochon Create at
least 5 rounds and then cut off any excess
Step 3 Now lets make the ring and this with the other
end of the wire
Atomic Ring
BLOG WWWHANDMADE-JEWELRY-CLUBCOM MEMBERSHIP WWWDIYBEADINGCLUBCOM BLOG DIY BEADING MAGAZINE ISSUE 32
Bring up your mandrel and wrap the wire to the size of your finger Wrap at least 2 times
When youre sure you have the right size pull the ring out of the mandrel
With the extended wire wrap the wire the secure the ring
Cut off any excess and voila You have your atomic ring Create as many as you can with different colors of cabochon
Atomic Ring
BLOG WWWHANDMADE-JEWELRY-CLUBCOM MEMBERSHIP WWWDIYBEADINGCLUBCOM
About the Author
Sky Aldovino
I consider myself a late bloomer when it comes to crafting Irsquom a self-taught jewelry maker Jewelry making wasnrsquot really a hobby of mine but unforeseen events lead me to learn jewellery making My family put up a craft store where we sell cross stitch beads and all sorts of crafting materials I fell in love with the beads and tried to create accessories only for myself Clients liked the pieces and I started customizing handmade jewelleries The craft store was a success for 6 years but like any other small businesses we had to close it down and I was confined to staying at home While at home I had all the time using the internet and now working as a home-based jewelry designer
BLOG DIY BEADING MAGAZINE ISSUE 32
Featured Article Gemstones Used for Jewelry Making
BLOG WWWHANDMADE-JEWELRY-CLUBCOM MEMBERSHIP WWWDIYBEADINGCLUBCOM
Gemstones are stones which we hold quite highly in terms of value And
jewelry often consists of stones that add attractiveness to it so it is not
surprising when jewelry designers actually use gemstones in their designs In
fact there are different types of gemstones that can be used for making
jewelry There are the expensive and pure gemstones and there are also the
imitation ones The information below will provide some information about
the kinds of stones you can use to create jewelry and how these stones will
impact the jewelry you have created
The first kind of stone which I believe we are all quite familiar with are
birthstones These stones are associated with individualrsquos month of birth
by SunVDesigns by BeyhanAkman
For example Amethyst stone is connected with anybody who is born in
February which carries special significance in the area of emotions and also
spiritually This stone also signifies calm and peace as well
And then we have semi-precious stones which are also often used in jewelry
making They are not as valuable as compared to precious stones but still
valuable Best examples of these stones are aquamarine topaz tourmaline
opal and turquoise
BLOG DIY BEADING MAGAZINE ISSUE 32
Featured Article Gemstones Used for Jewelry Making
BLOG WWWHANDMADE-JEWELRY-CLUBCOM MEMBERSHIP WWWDIYBEADINGCLUBCOM
It is an ideal gift for someone who you deem special Aquamarine pendants
usually work well for anyone and is widely an accepted stone
by HyppieChic by joyeriamestiza
However precious stones are the most unusual
and precious jewels to us Examples of some of
them are emerald sapphire diamond and
ruby These stones are usually very expensive
and are prized for their exquisiteness These
stones are commonly used in high-quality
jewelry designs which costs quite a fortune to
obtain
BLOG DIY BEADING MAGAZINE ISSUE 32
by sarajewelrystu
Jewelry designs with precious stones are usually
given as exceptional gifts on special occasions A
perfect example is a diamond ring that is usually
given as an engagement gift
by ldiamondsforever
Featured Article Gemstones Used for Jewelry Making
BLOG WWWHANDMADE-JEWELRY-CLUBCOM MEMBERSHIP WWWDIYBEADINGCLUBCOM
There are also synthetic stones which are often used to create jewelry
Synthetic stones are artificial imitations of gemstones Synthetic Sapphire
jewelry costs less compare with the authentic ones Most of the time
imitation stones are used to save cost but at the same time have the similar
look of the real stone
BLOG DIY BEADING MAGAZINE ISSUE 32
by shininggems by thaimaker
by lapinduprintemps by PastimeArt
Gemstones are used like beads and you can use it in any designs whether
simple or elaborate
Swarovski crystal components are available in a rich multitude of rondelles Perfect as spacers in necklaces or as discs in earrings Rondelles can be used with many varieties of shapes or sizes Use Swarovski crystal rondelles between large gemstones as accents with precious metal findings Fire Mountain Gems and Beads Crystal Passionsreg brand presents Swarovski crystal in display-ready packaging for brilliant retail presentation Crystal Passionsreg is an assurance of genuine Swarovski crystal
BLOG DIY BEADING MAGAZINE ISSUE 32 BLOG WWWHANDMADE-JEWELRY-CLUBCOM MEMBERSHIP WWWDIYBEADINGCLUBCOM
Recommended Jewelry Making Supplies
Mz Unisex-adults 12pcs 25x18x6mm Turquoise Oval CAB Cabochon
BLOG DIY BEADING MAGAZINE ISSUE 32 BLOG WWWHANDMADE-JEWELRY-CLUBCOM MEMBERSHIP WWWDIYBEADINGCLUBCOM
Recommended Jewelry Making Supplies
For a little sparkle that goes a long way design with Swarovski 4mm faceted bicones Create glorious multi-strand necklaces with the dainty crystals or use as spacers to add a tiny flash to your designs Swarovski crystal components are made in Austria and are considered the finest products of their kind in the world
BLOG DIY BEADING MAGAZINE ISSUE 32 BLOG WWWHANDMADE-JEWELRY-CLUBCOM MEMBERSHIP WWWDIYBEADINGCLUBCOM
Recommended Jewelry Making Supplies
Imitation beads resist color change These beads have uniform quality with a good polish Some strands may have little to no matrix Sizes shapes and colors may vary with handcrafted items
BLOG DIY BEADING MAGAZINE ISSUE 32 BLOG WWWHANDMADE-JEWELRY-CLUBCOM MEMBERSHIP WWWDIYBEADINGCLUBCOM
Recommended Jewelry Making Supplies
Something Blue Necklace and Earrings
BLOG WWWHANDMADE-JEWELRY-CLUBCOM MEMBERSHIP WWWDIYBEADINGCLUBCOM
Skill level Beginner Intermediate Advanced
DIMENSIONS OF THE NECKLACE Inner Circumference 14 18 inch 35 cm
Focal Pendant Width 1 15 inch 35 cm Focal Pendant Height 1 15 inch 35 cm
DIMENSIONS OF THE EARRING Earring Width 716 inch 12 cm Earring Height 1516 inch 25 cm (Without the earring hook)
BLOG DIY BEADING MAGAZINE ISSUE 32
Materials
Note Before purchasing the supplies measure the length of your wished necklace If you decide to bead a longer necklace you should keep in mind that for every extra
frac34 inches 2 cm-s you will need 8 bicones and 8 pearls
Something Blue Necklace and Earrings
BLOG WWWHANDMADE-JEWELRY-CLUBCOM MEMBERSHIP WWWDIYBEADINGCLUBCOM BLOG DIY BEADING MAGAZINE ISSUE 32
Work RAW stitch into a beaded circle and embellish with Swarovski bicones
STEP 2 String 1A and 2 pearls Pass through the previous
second pearl and the freshly added 1A and the first pearl again
STEP 1 Use a comfortable length of thread to string 2
pearls 1A and 1 pearl again leaving a 2rdquo 5cm tail Pass through the first two pearls strung to form a
ring
STEP 3 String 2 pearls and 1A Pass through the previous first pearl and the freshly added two pearls
again
STEP 4 - 17 Repeat STEP 2 and STEP 3 again until you count 17 pearls in the inner circle
But be careful in the last step you only have to add 1 pearl then pass through the first pearls
added in STEP 1 and add another 1A Now pass through the first pearl added in STEP
1and 1A added in this round again to exit from this A
Something Blue Necklace and Earrings
BLOG WWWHANDMADE-JEWELRY-CLUBCOM MEMBERSHIP WWWDIYBEADINGCLUBCOM BLOG DIY BEADING MAGAZINE ISSUE 32
STEP 19 String 2A and pass through the next A added in round 4-17 and the A added in round 18 the 2A added in this round and finally the A added in round 4-17 to exit from the bead showed below
STEP 18 String 3A and pass through the 1A added in the previous round and the first A added in this
round
STEP 20 - 34 Repeat STEP 18 and STEP 19 again until you finish the circle
But be careful in the last step first you have to pass through 3A and then add 1A After this pass
through the 3A again and exit from the A bead
shown below (This is the first A added in STEP 18)
Something Blue Necklace and Earrings
BLOG WWWHANDMADE-JEWELRY-CLUBCOM MEMBERSHIP WWWDIYBEADINGCLUBCOM BLOG DIY BEADING MAGAZINE ISSUE 32
STEP 35 Step up to exit from the pearl shown below (Finishing the previous step in the A bead and then
stepping up from there makes the circle more secure)
Now string 3 bicones Pass through the pearl and the first bicone again
In the reality your circle will look more like this the A beads forming a strong row in the middle of the
pearls
STEP 36 Add 2 bicones Pass through the
neighboring pearl the first bicone added in the previous row and the 2 bicones added in this step
so you can exit from the next pearl
Something Blue Necklace and Earrings
BLOG WWWHANDMADE-JEWELRY-CLUBCOM MEMBERSHIP WWWDIYBEADINGCLUBCOM BLOG DIY BEADING MAGAZINE ISSUE 32
Now in the reality your circle will look more like this the A beads still forming a strong row in the middle of the pearls and the bicones slightly lying on top of
them
STEP 37 - 49 Repeat STEP 35 and STEP 36 again until you finish the circle with the bicones
But be careful in the last step first you have pass through the third bicone added then add 1 bicone
and pass through this little quartet to exit from the bicone shown below (The second one added in
STEP 35)
STEP 50 With these steps we finish the circle by adding 1 bicone to connect the A beads and the
bicone row So add 1 bicone pass through the nearest A bead and add 1 bicone again Pass
through the bicone already there and exit from the bicone you just added
Something Blue Necklace and Earrings
BLOG WWWHANDMADE-JEWELRY-CLUBCOM MEMBERSHIP WWWDIYBEADINGCLUBCOM BLOG DIY BEADING MAGAZINE ISSUE 32
STEP 66-83 Secure the circle by adding 1A between each bicone in the second row of Swarovski
bicones If you finished secure the thread and trim
STEP 51-65 Using the same technique as in STEP 37 - 49 add 1 bicone to finish the third bicone row The black line shows you the way (After STEP 50 pass through the next A bead add 1 bicone and pass through the bicone already there and the bicone added in the previous step Repeat these steps to
finish the inner bicone circle)
MIDDLE CIRCLE Work RAW stitch into a beaded circle and embellish with
Swarovski bicones Remember you need to bead two circles this time
STEP 1 Just like in the focal circle begin with 2 pearls 1A and 1 pearl again on a comfortable length of thread
leaving a 2rdquo 5cm tail Pass through the first two pearls strung to form a ring
Something Blue Necklace and Earrings
BLOG WWWHANDMADE-JEWELRY-CLUBCOM MEMBERSHIP WWWDIYBEADINGCLUBCOM BLOG DIY BEADING MAGAZINE ISSUE 32
STEP 15-28 Mimicing the FOCAL CIRCLElsquos STEP 18-34 bead A beads until you finish the inner part of the
circle Exit from a pearl in the second row This circle should look very similar to the first one but this is a bit
smaller
STEP 2-14 Mimicing the FOCAL CIRCLElsquos STEP 2-17 bead until you count 14 pearls in the inner circle Exit
from the last A added
STEP 29-42 Mimicing FOCAL CIRCLElsquos STEP 35-49 add 2 rows of bicones
STEP 43-56 Mimicing the FOCAL CIRCLElsquos STEP 50-65 bead the third row of bicones to finish the circle
Something Blue Necklace and Earrings
BLOG WWWHANDMADE-JEWELRY-CLUBCOM MEMBERSHIP WWWDIYBEADINGCLUBCOM BLOG DIY BEADING MAGAZINE ISSUE 32
SMALLEST CIRCLE Work RAW stitch into a beaded circle and embellish
with Swarovski bicones Remember you need to bead two circles again
STEP 1 Just like in the focal circle begin with 2 pearls
1A and 1 pearl again on a comfortable length of thread leaving a 2rdquo 5cm tail Pass through the first two
pearls strung to form a ring
STEP 57-70 Just like the FOCAL CIRCLElsquos STEP 66-83 secure the circle by adding 1A between every bicone
in the second row of bicones If you finished secure the thread and trim (Donrsquot forget to bead another
circle)
STEP 2-12 Mimicing the FOCAL CIRCLElsquos STEP 2-17 bead until you count 12 pearls in the inner circle Exit
from the last A added
STEP 13-24 Mimicing the FOCAL CIRCLElsquos STEP 18-34 bead A beads until you finish the inner part of the
circle Exit from a pearl in the second row This circle should look very similar to the first two but this is the
smallest of them all
Something Blue Necklace and Earrings
BLOG WWWHANDMADE-JEWELRY-CLUBCOM MEMBERSHIP WWWDIYBEADINGCLUBCOM BLOG DIY BEADING MAGAZINE ISSUE 32
STEP 37-48 Mimicing the FOCAL CIRCLElsquos STEP 50-65 bead the third row of bicones to finish this circle too
STEP 25-36 Mimicing FOCAL CIRCLElsquos STEP 35-49 add 2
rows of bicones The last step here is purple again
STEP 49-60 Just like the FOCAL CIRCLElsquos STEP 66-83 secure the circle by adding 1A between every bicone
in the second row of bicones If you finished secure the thread and trim (Donrsquot forget that you need two
small circles)
Something Blue Necklace and Earrings
BLOG WWWHANDMADE-JEWELRY-CLUBCOM MEMBERSHIP WWWDIYBEADINGCLUBCOM BLOG DIY BEADING MAGAZINE ISSUE 32
STEP 37-48 Mimicing the FOCAL CIRCLElsquos STEP 50-65 bead the third row of bicones to finish this circle too
STEP 25-36 Mimicing FOCAL CIRCLElsquos STEP 35-49 add 2
rows of bicones The last step here is purple again
STEP 49-60 Just like the FOCAL CIRCLElsquos STEP 66-83 secure the circle by adding 1A between every bicone
in the second row of bicones If you finished secure the thread and trim (Donrsquot forget that you need two
small circles)
Something Blue Necklace and Earrings
BLOG WWWHANDMADE-JEWELRY-CLUBCOM MEMBERSHIP WWWDIYBEADINGCLUBCOM BLOG DIY BEADING MAGAZINE ISSUE 32
STEP 2-6 Continue by adding 1A 1 bicone 1 pearl until you count 6 of each
STEP 1 Begin with 1 pearl 1 bicone 1A and 1 bicone again on a comfortable length of thread leaving a 2rdquo
5cm tail Pass through the pearl and the first bicone strung to form a ring
STEP 7-12 Pass through the A beads to make your
component more secure Also secure the thread and trim (Repeat these steps until you have six 6-BEAD
COMPONENTs)
6-BEAD COMPONENT Work RAW stitch into a beaded circle and embellish with Swarovski bicones
For the necklace we will need six from this component For the earring two
Something Blue Necklace and Earrings
BLOG WWWHANDMADE-JEWELRY-CLUBCOM MEMBERSHIP WWWDIYBEADINGCLUBCOM BLOG DIY BEADING MAGAZINE ISSUE 32
STEP 2-4 Continue by adding 1A 1 bicone 1 pearl
until you count 4 of each
STEP 1 Begin with 1 pearl 1 bicone 1A and 1 bicone again on a comfortable length of thread leaving a 2rdquo
5cm tail Pass through the pearl and the first bicone strung to form a ring
STEP 5-8 Pass through the A beads to make your component more secure Also secure the thread and
trim (Repeat these steps until you have the wished amount of 4-BEAD COMPONENTs)
4-BEAD COMPONENT Work RAW stitch into a beaded circle and embellish with Swarovski bicones
For the necklace-size that is given on the second page we will need 20 from this
component For the earring two
If you would like to make a longer necklace you need to make more (One 4-BEAD COMPONENT measures about 38 inch 1 cm To make the necklace symmetrical you have to have equal amounts on each side This means for every extra frac34 inches
2 cm-s you will need 1 4-BEAD COMPONENT on each side of the necklace)
Something Blue Necklace and Earrings
BLOG WWWHANDMADE-JEWELRY-CLUBCOM MEMBERSHIP WWWDIYBEADINGCLUBCOM BLOG DIY BEADING MAGAZINE ISSUE 32
STEP 2 Connect the MIDDLE CIRCLE to two 6-BEAD COMPONENTs by adding four-times 2As
between the pearls Choose a pearl on the MIDDLE CIRCLE and add
2A pass through a pearl in the 6-BEAD COMPONENT previously added and add 2A again Watch out this has to be symmetrical Repeat this at least two more times to make it
secure Now repeat this entire procedure but choose
the 8-th pearl on MIDDLE CIRCLE Repeat this on the other side of the necklace
too
Choose a pearl on the FOCAL CIRCLE and add 2A pass through a pearl in the 6-BEAD COMPONENT and add 2A again Repeat this at least two more times to make it secure
Now repeat this entire procedure but choose the 5-th pearl on FOCAL CIRCLE This will make the necklace nice on your neck
FINISHING THE NECKLACE Connects the parts with A beads
STEP 1 Connect the FOCAL CIRCLE to two 6-BEAD COMPONENTs by adding four-times 2As between the pearls To do this turn your parts upside down you need to
see the pearls We will work on this side from now on
Something Blue Necklace and Earrings
BLOG WWWHANDMADE-JEWELRY-CLUBCOM MEMBERSHIP WWWDIYBEADINGCLUBCOM BLOG DIY BEADING MAGAZINE ISSUE 32
FINISHING THE EARRING Connects the parts with A beads
STEP 1-2 Connect the 6-BEAD COMPONENT
to 4-BEAD COMPONENT and the 4-BEAD
COMPONENT to the earring hook
First connect the 4-BEAD COMPONENT to the 6-BEAD COMPONENT with 4A beads Mimic
the elongation steps of the necklace if needed
Secondly connect the 4-BEAD COMPONENT
to your earring hook with 4A beads again Leave from the last pearl bead 2A beads the hook (this is the orange oval form) and 2As again Pass through each of them to
secure this connection again
Finally get ready to prepare the other earring ndash since we need two of them
STEP 5 Connect the 4-BEAD COMPONENTs to the toggle clasp thus finishing the
necklace Leaving from the last pearl bead 2A the
clasp(this is the orange oval form) and 2A again Pass through all of them a couple more times to make this connection more
secure
Something Blue Necklace and Earrings
BLOG WWWHANDMADE-JEWELRY-CLUBCOM MEMBERSHIP WWWDIYBEADINGCLUBCOM BLOG DIY BEADING MAGAZINE ISSUE 32
If you finished it is time to try it on It was a great fun wasnrsquot it And how beautiful you look in your new necklace and the matching earrings
Something Blue Necklace and Earrings
BLOG WWWHANDMADE-JEWELRY-CLUBCOM MEMBERSHIP WWWDIYBEADINGCLUBCOM
About the Author
Margit Vogel
My name is Margit Vogel I live in Hungary Europe
By profession I am a biochemical engineer but I fell in love with
beads so much that I could not stop playing with them
I make one-of-a-kind beaded and bead embroidered art
jewelry made of the best quality materials such as Swarovski
stones gemstones Japanese beads (Miyuki and Toho) Czech
glass beads leather soutache and suede Each piece is unique
and individually crafted
Feel free to visit my blog for some eyecandy
httpiformjewelrywordpresscom
My shop httpwwwetsycomshopiformjewelry
Facebook httpwwwfacebookcomiformjewelry
BLOG DIY BEADING MAGAZINE ISSUE 32
Getting Down And Personal With Gianna
Getting Down And Personal With Gianna
Nowadays we see more and more jewelry stores opening up online and with these online jewelry stores it has made it easier for us to purchase and view their creations Have you ever wondered how they are able to manage and produce amazing jewelry pieces and tutorials So heres a little on the journey to open up an online shop We are excited to present to you Gianna aka Beading4perfectionists
Gianna Beader amp Youtuber
Unlike most jewelry makers and beadweavers Gianna did not start beading as a hobby but as a means to make ends meet With goals in trying to
fill the financial gap she did everything she could to expand her earnings ndash working as a security guard
and at the same time learning how to bead and selling her pieces at fair trades and flea markets
Since many were asking if she does home beading workshops she started on exploring how to teach people to bead She loves Scott Bakula and has always loved him till now and this served as her
inspiration to start making a beading video tutorial
Gianna started creating videos because she was at the point in her life where everything seemed to be falling apart And at that moment of time she had difficulties financially and selling jewelry was the only way for her to stay afloat financially She is a big Scott Bakula fan and when she went to the UK to see him on stage that was when it hit her that she is already able to edit videos and
taught herself Photoshop and done workshops at bead fairs so why not put these together and see what happens on Youtube She knew that if she gets enough subscribers and views ndash though no one knew what the exact numbers were you would be invited to become a Youtube partner This way she could monetize her videos with advertisements and hopefully she would be able to be a Youtube partner and be able to pay her bills
BLOG WWWHANDMADE-JEWELRY-CLUBCOM MEMBERSHIP WWWDIYBEADINGCLUBCOM BLOG DIY BEADING MAGAZINE ISSUE 32
Getting Down And Personal With Gianna
Her Youtube channel is popular and the reason why she chose Youtube is because Youtube is the biggest platform and reached almost to the whole world Everyone already knows about it and it was growing rapidly as compared to other platforms like Dailymotion so she figured that Youtube was the way to go Her advice to new designers is that when you start out go to the platforms on the top of your list first then work your way down your list if you do not get accepted by your first choice
After loyally putting up one video every week for about 8 months in a row she became a Youtube partner and monetized her videos She knew she needed at least $100 to get her first payout She managed to reach $100 after 3 months The process was not easy she worked hard lack sleep skipped meals and who knows what happened to Ridge in the Bold and the Beautiful because she stopped watching
On Youtube you can monetize your videos Google pays straight to your bank account and at other countries where they also have the option of getting checks among other options In order to get paid you have to reach the $100 mark and after 3 months For Gianna she thinks that you cannot say that Etsy is better than Youtube or Youtube is better than Etsy Her reasoning is because on Youtube she has many followers which will eventually check out her Etsy shop And to start an Etsy shop you need an audience
BLOG WWWHANDMADE-JEWELRY-CLUBCOM MEMBERSHIP WWWDIYBEADINGCLUBCOM BLOG DIY BEADING MAGAZINE ISSUE 32
television and dedicated her spare time (as she had another job) to Youtube She re-registered at the chamber of commerce after receiving her first payout Her work at Youtube now is not a full time job and things have changed on Youtube It is easier to become a parter but there are some countries that need to wait for an invitation to be a Youtube partner Take Italy for instance Italians would have to work just as hard as she did if they want to become a Youtube partner
Getting Down And Personal With Gianna
With her 60000 subscribers on her b4pbakup Youtube channel it is possible to sell at least 60 patterns on the first day on Etsy after promoting the PDF file on her Youtube channel Though you may think that 60 out of 60000 is not much you have to remember that not everyone has the means to purchase the PDF file and a lot of people still rather watch her carry out the tutorial(for free) on Youtube instead of reading the patterns or paying for the patterns even if the pattern is for a fundraiser and only cost $2 Her insights on Youtube is that Youtube is not what it used to be 6 years ago Instead of making more money every month she is making less and less because advertisers have more options of where they want to advertise their ads Ads do not pay as much as they used to Back in the days you could get 25 cents per ad Now you count yourself lucky if you could get 5 cents roll in after two hours
BLOG WWWHANDMADE-JEWELRY-CLUBCOM MEMBERSHIP WWWDIYBEADINGCLUBCOM BLOG DIY BEADING MAGAZINE ISSUE 32
And on top of that adblockers are destroying Youtube channel owners Youtube will start making changes to the channels where there will be ldquopaid subscriptionrdquo channels This has already been implemented in some countries but not in her country The Netherlands This means there will no longer be ads for her monthly paying subscribers She hopes that Youtube will add on a paid per video option feature The option to be a paid channel or free channel or to start a new channel for paying customers is yours to choose Gianna is not happy with Youtube because many others like her have worked so hard and for some years to become Youtube partners(which was something to be proud of) has lost their status
Getting Down And Personal With Gianna
Her advice for those who want to go on Youtube is 1 Do it because you want to teach
2 Do it because you want a career with beads
BLOG WWWHANDMADE-JEWELRY-CLUBCOM MEMBERSHIP WWWDIYBEADINGCLUBCOM BLOG DIY BEADING MAGAZINE ISSUE 32
After putting up about 20 videos and having at least 5000 subscribers add the PDF tutorials to Etsy and Craftsy She found out that her audience would like to have the PDF after watching her videos This is because they would rather print out the PDF and work while seated in a comfy chair technically somewhere else instead of having to pause the video time and time again
Gianna has also made a video for those who want to know the whole story of her journey up until the present day And to get updates on her you can check it out here She has also started a vlog where she tells of how she still works towards becoming a financial independent beader and explains her journey to get where she wants to be(or die trying) Gianna will be in the UK on October the 17th giving an all-day workshop with 4 different patterns
(2 beginners and 2 advanced) in Wotton-under-Edge
Gianna will be there Friday night as the workshop is on Saturday She will be leaving on Sunday Her
doors are open to all who wants to continue the party with her at the hotel across the street
For more information do contact Ann Tucker on Facebook
httpswwwfacebookcomanntucker501
Rec
omm
end
ed R
ead
ings
Making Jewelry with Gemstone
Beads
Combines the popular craft of beading with beautiful semi-precious stones which are collected by many Features a variety of versatile ideas which can be adapted for any type of gem or bead Readers will learn to reate beautiful gemstone jewelry with this dazzling collection of over 100 projects ranging from eyecatching earrings and accessories to exquisite necklaces and bracelets This beautiful book offers an impressive range of 28 beautiful semi-precious stones (including birthstones) and a glimpse into the fascinating history and mythical properties behind them
BLOG DIY BEADING MAGAZINE ISSUE 32 BLOG WWWHANDMADE-JEWELRY-CLUBCOM MEMBERSHIP WWWDIYBEADINGCLUBCOM
Rec
omm
end
ed R
ead
ings
Convertible Crystal Jewelry
Reverse it Twist it Wear it Many
Ways
Diane Whiting presents the idea that convertibility isnrsquot just about using pieces in multiple ways it is also about using skills and creativity in multiple ways Using ever-popular sparkling crystals Diane showcases design elements through various techniques for fun easy fashionable jewelry With 25 projects the reader can choose from bracelets necklaces and earrings that match any outfit or styleDiane Whiting presents the idea that convertibility isnrsquot just about using pieces in multiple ways it is also about using skills and creativity in multiple ways
BLOG DIY BEADING MAGAZINE ISSUE 32 BLOG WWWHANDMADE-JEWELRY-CLUBCOM MEMBERSHIP WWWDIYBEADINGCLUBCOM
Rec
omm
end
ed R
ead
ings
Wire Jewelry Masterclass
Wrapped Coiled and Woven Pieces
Using Fine Materials
Comprehensive and fabulous Wire Jewelry Masterclass takes an in-depth look at an intricate and rewarding craft The 24 projects which range from simple Dragons tear briolette earrings to a Poseidon-under-the-sea pendant will delight and inspire jewelers of all levels and tastes Divided into beginner intermediate and advanced sections this beautifully photographed step-by-step guide is the ticket to wire jewelry expertise
BLOG DIY BEADING MAGAZINE ISSUE 32 BLOG WWWHANDMADE-JEWELRY-CLUBCOM MEMBERSHIP WWWDIYBEADINGCLUBCOM
Rec
omm
end
ed R
ead
ings
Timeless Wire Weaving The
Complete Course
Timeless Wire Weaving focuses on developing wirework skills through 13 projects using three classic wire weaving techniques coiling wrapping and weaving The projects are built around a focal cabochon and incorporate seed beads and crystals in imaginative ways Designers learn to make the jewelry shown in the book and they also use the techniques learned to create innovative jewelry pieces of their own
BLOG DIY BEADING MAGAZINE ISSUE 32 BLOG WWWHANDMADE-JEWELRY-CLUBCOM MEMBERSHIP WWWDIYBEADINGCLUBCOM
Our digital magazine is available through
Apple Newsstand service available to millions of IPAD users
To advertise with us please email us at
diyjewelryclubgmailcom
Or visit our page at
httphandmade-jewelry-clubcomadvertising-diy-beading-magazine
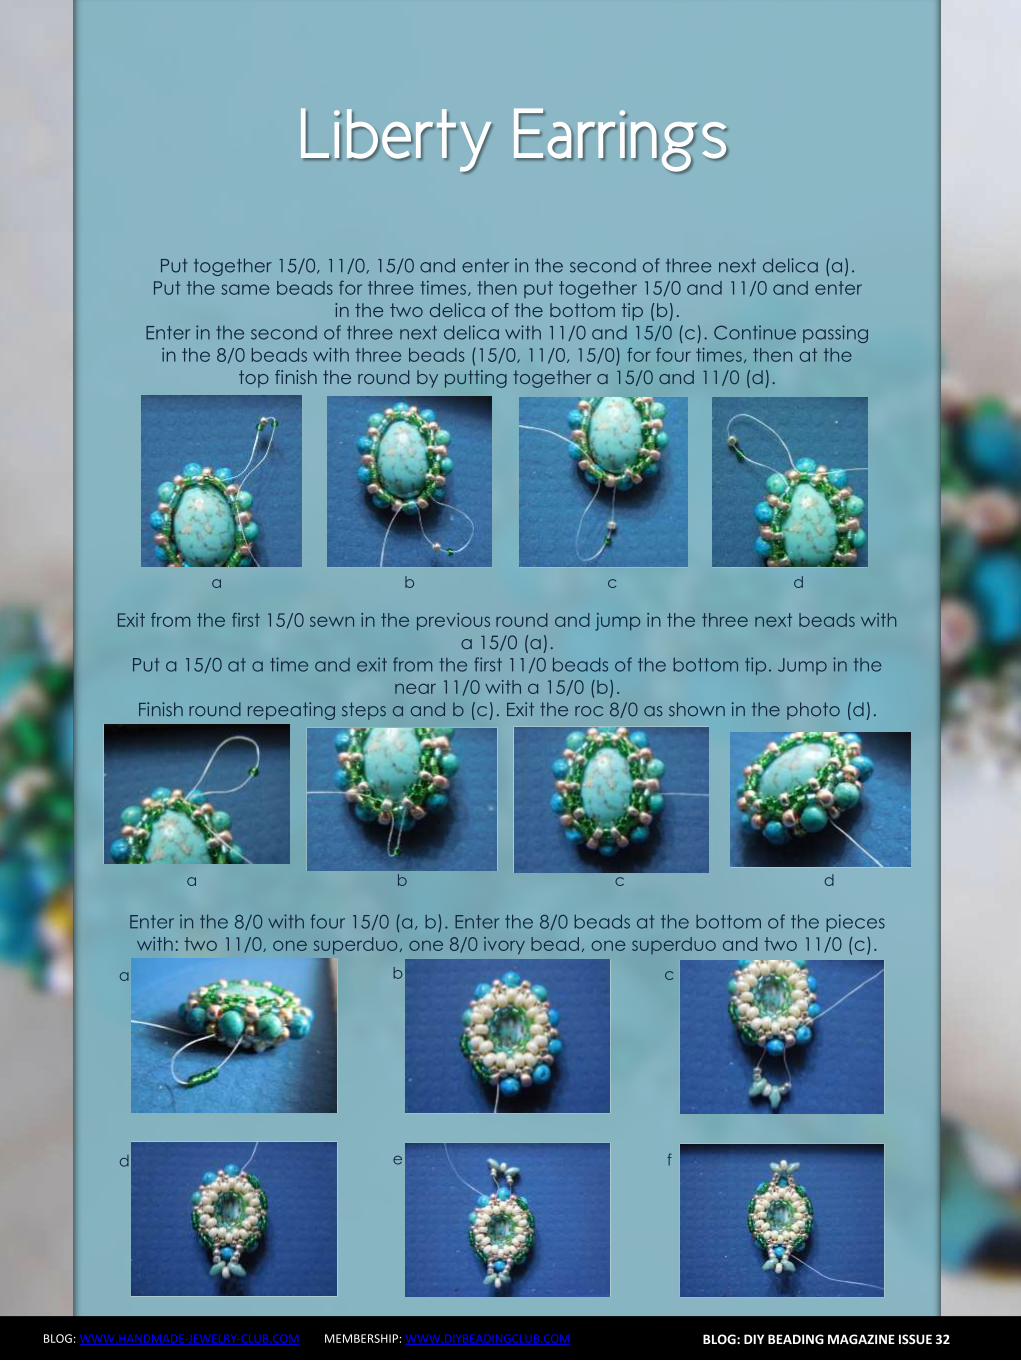
Jade Necklace
BLOG WWWHANDMADE-JEWELRY-CLUBCOM MEMBERSHIP WWWDIYBEADINGCLUBCOM BLOG DIY BEADING MAGAZINE ISSUE 32
Step 3 Insert a 5mm pearl on the wire and then pass
the wire under circle frame
Repeat previous step 2x and have 3 pearls wrapped
Continue wrapping with your teardrop crystal My crystal has 2 holes on the side
and then continue wrapping with your 5mm pearls then secure your wire
Repeat Step 3 and create as many as needed For 16-inch necklace Ive created 6 of these
components
Jade Necklace
BLOG WWWHANDMADE-JEWELRY-CLUBCOM MEMBERSHIP WWWDIYBEADINGCLUBCOM BLOG DIY BEADING MAGAZINE ISSUE 32
Step 4 Cut a 15-inch 18ga wire and make a loop on
one end Insert 8mm pearl and make a loop on the other end You then use these as connectors
and link the components
Step 5 The necklace is an 18ga wire with wrapped
loops on both ends First cut 7 inches 18ga wire and make a wrapped loop with your hook already inserted Side in 18pcs 5mm pearls
Then make a wrapped loop on the other end connecting the wrapped loop onto the component Do the same for the other
necklace but make the loop on the other end big enough so the hookclasp can pass thru
To have the necklace curve shaped use a jar to bend the wire Voila Now youre
ready to party
Jade Necklace
BLOG WWWHANDMADE-JEWELRY-CLUBCOM MEMBERSHIP WWWDIYBEADINGCLUBCOM
About the Author
Sky Aldovino
I consider myself a late bloomer when it comes to crafting Irsquom a self-taught jewelry maker Jewelry making wasnrsquot really a hobby of mine but unforeseen events lead me to learn jewellery making My family put up a craft store where we sell cross stitch beads and all sorts of crafting materials I fell in love with the beads and tried to create accessories only for myself Clients liked the pieces and I started customizing handmade jewelleries The craft store was a success for 6 years but like any other small businesses we had to close it down and I was confined to staying at home While at home I had all the time using the internet and now working as a home-based jewelry designer
BLOG DIY BEADING MAGAZINE ISSUE 32
Atomic Ring
BLOG WWWHANDMADE-JEWELRY-CLUBCOM MEMBERSHIP WWWDIYBEADINGCLUBCOM
Have fun making shapes using the wigjig Cyclops Make loops going in
circles to mimic the shape of a flower or in this tutorial mimic the
shape of an atom The tutorial will also teach you how to cage a
cabochon Whats nice about this piece is that with one long wire you
can create the ring from start to finish
The tutorial is catered for intermediate to advanced students One
must already know how to make spirals and use a wigjig tool It has
clear instructions and ultra-clear close-up photos at each step
Additionally you can ask me question you have on the tutorial No
more getting stuck and frustrated on a confusing or just plain
inaccurate pattern
If you followed this tutorial and then sell the accessory or jewelry
please give credit to the author or DIY Beading Clubcom
If you like to get a blank wigjig graph visit wigjigcom Shop and Jigs
section
Copyright 2015
wwwdiybeadingclubcom
wwwhandmade-jewelry-clubcom
BLOG DIY BEADING MAGAZINE ISSUE 32
Atomic Ring
BLOG WWWHANDMADE-JEWELRY-CLUBCOM MEMBERSHIP WWWDIYBEADINGCLUBCOM
Materials Needed 20ga Craft wire 28ga Craft wire 11mm Round Cabochon
Tools Needed Wigjig Cyclops 15mm pegs Wire cutter Flat nose pliers Mandrel
Skill Level Intermediate - Advanced
BLOG DIY BEADING MAGAZINE ISSUE 32
Step 1 Lets prepare your wigjig cyclops Position the pegs like so
Atomic Ring
BLOG WWWHANDMADE-JEWELRY-CLUBCOM MEMBERSHIP WWWDIYBEADINGCLUBCOM BLOG DIY BEADING MAGAZINE ISSUE 32
Lets work with longer wire so youll have enough wire to hold onto as you manipulate the wire so cut 36 inches of 20ga wire From
one end of the wire measure 10 inches
On the 10-inch measurement loop the wire at the center peg then continue to loop onto the side pegs going in circle going back to
the center peg after looping on the side peg
Now the wire at the center peg will start to build up as you go around the side pegs so
you need to constantly press the wire at the center peg to accommodate the build up of
wire
When youre done pull out the wire and this is
how it should look like
Atomic Ring
BLOG WWWHANDMADE-JEWELRY-CLUBCOM MEMBERSHIP WWWDIYBEADINGCLUBCOM BLOG DIY BEADING MAGAZINE ISSUE 32
You will notice that the frame opens wide Now to keep the atom frame from opening wide secure the center of the frame by wrapping a 28ga wire What you
need to do is simply pass the 28ga wire into the hole and wrap as many times as needed or until youre sure that the frame is secure
Step 2 Now youre finished with your atom frame Well now create the focal design With the longer wire make a spiral at the center big
enough to accommodate the size of your cabochon In this tutorial the spiral is about
11mm in diameter the same size as my cabochon
Pop in your cabochon and start to make spirals going around and over the cabochon as if you are caging the cabochon Create at
least 5 rounds and then cut off any excess
Step 3 Now lets make the ring and this with the other
end of the wire
Atomic Ring
BLOG WWWHANDMADE-JEWELRY-CLUBCOM MEMBERSHIP WWWDIYBEADINGCLUBCOM BLOG DIY BEADING MAGAZINE ISSUE 32
Bring up your mandrel and wrap the wire to the size of your finger Wrap at least 2 times
When youre sure you have the right size pull the ring out of the mandrel
With the extended wire wrap the wire the secure the ring
Cut off any excess and voila You have your atomic ring Create as many as you can with different colors of cabochon
Atomic Ring
BLOG WWWHANDMADE-JEWELRY-CLUBCOM MEMBERSHIP WWWDIYBEADINGCLUBCOM
About the Author
Sky Aldovino
I consider myself a late bloomer when it comes to crafting Irsquom a self-taught jewelry maker Jewelry making wasnrsquot really a hobby of mine but unforeseen events lead me to learn jewellery making My family put up a craft store where we sell cross stitch beads and all sorts of crafting materials I fell in love with the beads and tried to create accessories only for myself Clients liked the pieces and I started customizing handmade jewelleries The craft store was a success for 6 years but like any other small businesses we had to close it down and I was confined to staying at home While at home I had all the time using the internet and now working as a home-based jewelry designer
BLOG DIY BEADING MAGAZINE ISSUE 32
Featured Article Gemstones Used for Jewelry Making
BLOG WWWHANDMADE-JEWELRY-CLUBCOM MEMBERSHIP WWWDIYBEADINGCLUBCOM
Gemstones are stones which we hold quite highly in terms of value And
jewelry often consists of stones that add attractiveness to it so it is not
surprising when jewelry designers actually use gemstones in their designs In
fact there are different types of gemstones that can be used for making
jewelry There are the expensive and pure gemstones and there are also the
imitation ones The information below will provide some information about
the kinds of stones you can use to create jewelry and how these stones will
impact the jewelry you have created
The first kind of stone which I believe we are all quite familiar with are
birthstones These stones are associated with individualrsquos month of birth
by SunVDesigns by BeyhanAkman
For example Amethyst stone is connected with anybody who is born in
February which carries special significance in the area of emotions and also
spiritually This stone also signifies calm and peace as well
And then we have semi-precious stones which are also often used in jewelry
making They are not as valuable as compared to precious stones but still
valuable Best examples of these stones are aquamarine topaz tourmaline
opal and turquoise
BLOG DIY BEADING MAGAZINE ISSUE 32
Featured Article Gemstones Used for Jewelry Making
BLOG WWWHANDMADE-JEWELRY-CLUBCOM MEMBERSHIP WWWDIYBEADINGCLUBCOM
It is an ideal gift for someone who you deem special Aquamarine pendants
usually work well for anyone and is widely an accepted stone
by HyppieChic by joyeriamestiza
However precious stones are the most unusual
and precious jewels to us Examples of some of
them are emerald sapphire diamond and
ruby These stones are usually very expensive
and are prized for their exquisiteness These
stones are commonly used in high-quality
jewelry designs which costs quite a fortune to
obtain
BLOG DIY BEADING MAGAZINE ISSUE 32
by sarajewelrystu
Jewelry designs with precious stones are usually
given as exceptional gifts on special occasions A
perfect example is a diamond ring that is usually
given as an engagement gift
by ldiamondsforever
Featured Article Gemstones Used for Jewelry Making
BLOG WWWHANDMADE-JEWELRY-CLUBCOM MEMBERSHIP WWWDIYBEADINGCLUBCOM
There are also synthetic stones which are often used to create jewelry
Synthetic stones are artificial imitations of gemstones Synthetic Sapphire
jewelry costs less compare with the authentic ones Most of the time
imitation stones are used to save cost but at the same time have the similar
look of the real stone
BLOG DIY BEADING MAGAZINE ISSUE 32
by shininggems by thaimaker
by lapinduprintemps by PastimeArt
Gemstones are used like beads and you can use it in any designs whether
simple or elaborate
Swarovski crystal components are available in a rich multitude of rondelles Perfect as spacers in necklaces or as discs in earrings Rondelles can be used with many varieties of shapes or sizes Use Swarovski crystal rondelles between large gemstones as accents with precious metal findings Fire Mountain Gems and Beads Crystal Passionsreg brand presents Swarovski crystal in display-ready packaging for brilliant retail presentation Crystal Passionsreg is an assurance of genuine Swarovski crystal
BLOG DIY BEADING MAGAZINE ISSUE 32 BLOG WWWHANDMADE-JEWELRY-CLUBCOM MEMBERSHIP WWWDIYBEADINGCLUBCOM
Recommended Jewelry Making Supplies
Mz Unisex-adults 12pcs 25x18x6mm Turquoise Oval CAB Cabochon
BLOG DIY BEADING MAGAZINE ISSUE 32 BLOG WWWHANDMADE-JEWELRY-CLUBCOM MEMBERSHIP WWWDIYBEADINGCLUBCOM
Recommended Jewelry Making Supplies
For a little sparkle that goes a long way design with Swarovski 4mm faceted bicones Create glorious multi-strand necklaces with the dainty crystals or use as spacers to add a tiny flash to your designs Swarovski crystal components are made in Austria and are considered the finest products of their kind in the world
BLOG DIY BEADING MAGAZINE ISSUE 32 BLOG WWWHANDMADE-JEWELRY-CLUBCOM MEMBERSHIP WWWDIYBEADINGCLUBCOM
Recommended Jewelry Making Supplies
Imitation beads resist color change These beads have uniform quality with a good polish Some strands may have little to no matrix Sizes shapes and colors may vary with handcrafted items
BLOG DIY BEADING MAGAZINE ISSUE 32 BLOG WWWHANDMADE-JEWELRY-CLUBCOM MEMBERSHIP WWWDIYBEADINGCLUBCOM
Recommended Jewelry Making Supplies
Something Blue Necklace and Earrings
BLOG WWWHANDMADE-JEWELRY-CLUBCOM MEMBERSHIP WWWDIYBEADINGCLUBCOM
Skill level Beginner Intermediate Advanced
DIMENSIONS OF THE NECKLACE Inner Circumference 14 18 inch 35 cm
Focal Pendant Width 1 15 inch 35 cm Focal Pendant Height 1 15 inch 35 cm
DIMENSIONS OF THE EARRING Earring Width 716 inch 12 cm Earring Height 1516 inch 25 cm (Without the earring hook)
BLOG DIY BEADING MAGAZINE ISSUE 32
Materials
Note Before purchasing the supplies measure the length of your wished necklace If you decide to bead a longer necklace you should keep in mind that for every extra
frac34 inches 2 cm-s you will need 8 bicones and 8 pearls
Something Blue Necklace and Earrings
BLOG WWWHANDMADE-JEWELRY-CLUBCOM MEMBERSHIP WWWDIYBEADINGCLUBCOM BLOG DIY BEADING MAGAZINE ISSUE 32
Work RAW stitch into a beaded circle and embellish with Swarovski bicones
STEP 2 String 1A and 2 pearls Pass through the previous
second pearl and the freshly added 1A and the first pearl again
STEP 1 Use a comfortable length of thread to string 2
pearls 1A and 1 pearl again leaving a 2rdquo 5cm tail Pass through the first two pearls strung to form a
ring
STEP 3 String 2 pearls and 1A Pass through the previous first pearl and the freshly added two pearls
again
STEP 4 - 17 Repeat STEP 2 and STEP 3 again until you count 17 pearls in the inner circle
But be careful in the last step you only have to add 1 pearl then pass through the first pearls
added in STEP 1 and add another 1A Now pass through the first pearl added in STEP
1and 1A added in this round again to exit from this A
Something Blue Necklace and Earrings
BLOG WWWHANDMADE-JEWELRY-CLUBCOM MEMBERSHIP WWWDIYBEADINGCLUBCOM BLOG DIY BEADING MAGAZINE ISSUE 32
STEP 19 String 2A and pass through the next A added in round 4-17 and the A added in round 18 the 2A added in this round and finally the A added in round 4-17 to exit from the bead showed below
STEP 18 String 3A and pass through the 1A added in the previous round and the first A added in this
round
STEP 20 - 34 Repeat STEP 18 and STEP 19 again until you finish the circle
But be careful in the last step first you have to pass through 3A and then add 1A After this pass
through the 3A again and exit from the A bead
shown below (This is the first A added in STEP 18)
Something Blue Necklace and Earrings
BLOG WWWHANDMADE-JEWELRY-CLUBCOM MEMBERSHIP WWWDIYBEADINGCLUBCOM BLOG DIY BEADING MAGAZINE ISSUE 32
STEP 35 Step up to exit from the pearl shown below (Finishing the previous step in the A bead and then
stepping up from there makes the circle more secure)
Now string 3 bicones Pass through the pearl and the first bicone again
In the reality your circle will look more like this the A beads forming a strong row in the middle of the
pearls
STEP 36 Add 2 bicones Pass through the
neighboring pearl the first bicone added in the previous row and the 2 bicones added in this step
so you can exit from the next pearl
Something Blue Necklace and Earrings
BLOG WWWHANDMADE-JEWELRY-CLUBCOM MEMBERSHIP WWWDIYBEADINGCLUBCOM BLOG DIY BEADING MAGAZINE ISSUE 32
Now in the reality your circle will look more like this the A beads still forming a strong row in the middle of the pearls and the bicones slightly lying on top of
them
STEP 37 - 49 Repeat STEP 35 and STEP 36 again until you finish the circle with the bicones
But be careful in the last step first you have pass through the third bicone added then add 1 bicone
and pass through this little quartet to exit from the bicone shown below (The second one added in
STEP 35)
STEP 50 With these steps we finish the circle by adding 1 bicone to connect the A beads and the
bicone row So add 1 bicone pass through the nearest A bead and add 1 bicone again Pass
through the bicone already there and exit from the bicone you just added
Something Blue Necklace and Earrings
BLOG WWWHANDMADE-JEWELRY-CLUBCOM MEMBERSHIP WWWDIYBEADINGCLUBCOM BLOG DIY BEADING MAGAZINE ISSUE 32
STEP 66-83 Secure the circle by adding 1A between each bicone in the second row of Swarovski
bicones If you finished secure the thread and trim
STEP 51-65 Using the same technique as in STEP 37 - 49 add 1 bicone to finish the third bicone row The black line shows you the way (After STEP 50 pass through the next A bead add 1 bicone and pass through the bicone already there and the bicone added in the previous step Repeat these steps to
finish the inner bicone circle)
MIDDLE CIRCLE Work RAW stitch into a beaded circle and embellish with
Swarovski bicones Remember you need to bead two circles this time
STEP 1 Just like in the focal circle begin with 2 pearls 1A and 1 pearl again on a comfortable length of thread
leaving a 2rdquo 5cm tail Pass through the first two pearls strung to form a ring
Something Blue Necklace and Earrings
BLOG WWWHANDMADE-JEWELRY-CLUBCOM MEMBERSHIP WWWDIYBEADINGCLUBCOM BLOG DIY BEADING MAGAZINE ISSUE 32
STEP 15-28 Mimicing the FOCAL CIRCLElsquos STEP 18-34 bead A beads until you finish the inner part of the
circle Exit from a pearl in the second row This circle should look very similar to the first one but this is a bit
smaller
STEP 2-14 Mimicing the FOCAL CIRCLElsquos STEP 2-17 bead until you count 14 pearls in the inner circle Exit
from the last A added
STEP 29-42 Mimicing FOCAL CIRCLElsquos STEP 35-49 add 2 rows of bicones
STEP 43-56 Mimicing the FOCAL CIRCLElsquos STEP 50-65 bead the third row of bicones to finish the circle
Something Blue Necklace and Earrings
BLOG WWWHANDMADE-JEWELRY-CLUBCOM MEMBERSHIP WWWDIYBEADINGCLUBCOM BLOG DIY BEADING MAGAZINE ISSUE 32
SMALLEST CIRCLE Work RAW stitch into a beaded circle and embellish
with Swarovski bicones Remember you need to bead two circles again
STEP 1 Just like in the focal circle begin with 2 pearls
1A and 1 pearl again on a comfortable length of thread leaving a 2rdquo 5cm tail Pass through the first two
pearls strung to form a ring
STEP 57-70 Just like the FOCAL CIRCLElsquos STEP 66-83 secure the circle by adding 1A between every bicone
in the second row of bicones If you finished secure the thread and trim (Donrsquot forget to bead another
circle)
STEP 2-12 Mimicing the FOCAL CIRCLElsquos STEP 2-17 bead until you count 12 pearls in the inner circle Exit
from the last A added
STEP 13-24 Mimicing the FOCAL CIRCLElsquos STEP 18-34 bead A beads until you finish the inner part of the
circle Exit from a pearl in the second row This circle should look very similar to the first two but this is the
smallest of them all
Something Blue Necklace and Earrings
BLOG WWWHANDMADE-JEWELRY-CLUBCOM MEMBERSHIP WWWDIYBEADINGCLUBCOM BLOG DIY BEADING MAGAZINE ISSUE 32
STEP 37-48 Mimicing the FOCAL CIRCLElsquos STEP 50-65 bead the third row of bicones to finish this circle too
STEP 25-36 Mimicing FOCAL CIRCLElsquos STEP 35-49 add 2
rows of bicones The last step here is purple again
STEP 49-60 Just like the FOCAL CIRCLElsquos STEP 66-83 secure the circle by adding 1A between every bicone
in the second row of bicones If you finished secure the thread and trim (Donrsquot forget that you need two
small circles)
Something Blue Necklace and Earrings
BLOG WWWHANDMADE-JEWELRY-CLUBCOM MEMBERSHIP WWWDIYBEADINGCLUBCOM BLOG DIY BEADING MAGAZINE ISSUE 32
STEP 37-48 Mimicing the FOCAL CIRCLElsquos STEP 50-65 bead the third row of bicones to finish this circle too
STEP 25-36 Mimicing FOCAL CIRCLElsquos STEP 35-49 add 2
rows of bicones The last step here is purple again
STEP 49-60 Just like the FOCAL CIRCLElsquos STEP 66-83 secure the circle by adding 1A between every bicone
in the second row of bicones If you finished secure the thread and trim (Donrsquot forget that you need two
small circles)
Something Blue Necklace and Earrings
BLOG WWWHANDMADE-JEWELRY-CLUBCOM MEMBERSHIP WWWDIYBEADINGCLUBCOM BLOG DIY BEADING MAGAZINE ISSUE 32
STEP 2-6 Continue by adding 1A 1 bicone 1 pearl until you count 6 of each
STEP 1 Begin with 1 pearl 1 bicone 1A and 1 bicone again on a comfortable length of thread leaving a 2rdquo
5cm tail Pass through the pearl and the first bicone strung to form a ring
STEP 7-12 Pass through the A beads to make your
component more secure Also secure the thread and trim (Repeat these steps until you have six 6-BEAD
COMPONENTs)
6-BEAD COMPONENT Work RAW stitch into a beaded circle and embellish with Swarovski bicones
For the necklace we will need six from this component For the earring two
Something Blue Necklace and Earrings
BLOG WWWHANDMADE-JEWELRY-CLUBCOM MEMBERSHIP WWWDIYBEADINGCLUBCOM BLOG DIY BEADING MAGAZINE ISSUE 32
STEP 2-4 Continue by adding 1A 1 bicone 1 pearl
until you count 4 of each
STEP 1 Begin with 1 pearl 1 bicone 1A and 1 bicone again on a comfortable length of thread leaving a 2rdquo
5cm tail Pass through the pearl and the first bicone strung to form a ring
STEP 5-8 Pass through the A beads to make your component more secure Also secure the thread and
trim (Repeat these steps until you have the wished amount of 4-BEAD COMPONENTs)
4-BEAD COMPONENT Work RAW stitch into a beaded circle and embellish with Swarovski bicones
For the necklace-size that is given on the second page we will need 20 from this
component For the earring two
If you would like to make a longer necklace you need to make more (One 4-BEAD COMPONENT measures about 38 inch 1 cm To make the necklace symmetrical you have to have equal amounts on each side This means for every extra frac34 inches
2 cm-s you will need 1 4-BEAD COMPONENT on each side of the necklace)
Something Blue Necklace and Earrings
BLOG WWWHANDMADE-JEWELRY-CLUBCOM MEMBERSHIP WWWDIYBEADINGCLUBCOM BLOG DIY BEADING MAGAZINE ISSUE 32
STEP 2 Connect the MIDDLE CIRCLE to two 6-BEAD COMPONENTs by adding four-times 2As
between the pearls Choose a pearl on the MIDDLE CIRCLE and add
2A pass through a pearl in the 6-BEAD COMPONENT previously added and add 2A again Watch out this has to be symmetrical Repeat this at least two more times to make it
secure Now repeat this entire procedure but choose
the 8-th pearl on MIDDLE CIRCLE Repeat this on the other side of the necklace
too
Choose a pearl on the FOCAL CIRCLE and add 2A pass through a pearl in the 6-BEAD COMPONENT and add 2A again Repeat this at least two more times to make it secure
Now repeat this entire procedure but choose the 5-th pearl on FOCAL CIRCLE This will make the necklace nice on your neck
FINISHING THE NECKLACE Connects the parts with A beads
STEP 1 Connect the FOCAL CIRCLE to two 6-BEAD COMPONENTs by adding four-times 2As between the pearls To do this turn your parts upside down you need to
see the pearls We will work on this side from now on
Something Blue Necklace and Earrings
BLOG WWWHANDMADE-JEWELRY-CLUBCOM MEMBERSHIP WWWDIYBEADINGCLUBCOM BLOG DIY BEADING MAGAZINE ISSUE 32
FINISHING THE EARRING Connects the parts with A beads
STEP 1-2 Connect the 6-BEAD COMPONENT
to 4-BEAD COMPONENT and the 4-BEAD
COMPONENT to the earring hook
First connect the 4-BEAD COMPONENT to the 6-BEAD COMPONENT with 4A beads Mimic
the elongation steps of the necklace if needed
Secondly connect the 4-BEAD COMPONENT
to your earring hook with 4A beads again Leave from the last pearl bead 2A beads the hook (this is the orange oval form) and 2As again Pass through each of them to
secure this connection again
Finally get ready to prepare the other earring ndash since we need two of them
STEP 5 Connect the 4-BEAD COMPONENTs to the toggle clasp thus finishing the
necklace Leaving from the last pearl bead 2A the
clasp(this is the orange oval form) and 2A again Pass through all of them a couple more times to make this connection more
secure
Something Blue Necklace and Earrings
BLOG WWWHANDMADE-JEWELRY-CLUBCOM MEMBERSHIP WWWDIYBEADINGCLUBCOM BLOG DIY BEADING MAGAZINE ISSUE 32
If you finished it is time to try it on It was a great fun wasnrsquot it And how beautiful you look in your new necklace and the matching earrings
Something Blue Necklace and Earrings
BLOG WWWHANDMADE-JEWELRY-CLUBCOM MEMBERSHIP WWWDIYBEADINGCLUBCOM
About the Author
Margit Vogel
My name is Margit Vogel I live in Hungary Europe
By profession I am a biochemical engineer but I fell in love with
beads so much that I could not stop playing with them
I make one-of-a-kind beaded and bead embroidered art
jewelry made of the best quality materials such as Swarovski
stones gemstones Japanese beads (Miyuki and Toho) Czech
glass beads leather soutache and suede Each piece is unique
and individually crafted
Feel free to visit my blog for some eyecandy
httpiformjewelrywordpresscom
My shop httpwwwetsycomshopiformjewelry
Facebook httpwwwfacebookcomiformjewelry
BLOG DIY BEADING MAGAZINE ISSUE 32
Getting Down And Personal With Gianna
Getting Down And Personal With Gianna
Nowadays we see more and more jewelry stores opening up online and with these online jewelry stores it has made it easier for us to purchase and view their creations Have you ever wondered how they are able to manage and produce amazing jewelry pieces and tutorials So heres a little on the journey to open up an online shop We are excited to present to you Gianna aka Beading4perfectionists
Gianna Beader amp Youtuber
Unlike most jewelry makers and beadweavers Gianna did not start beading as a hobby but as a means to make ends meet With goals in trying to
fill the financial gap she did everything she could to expand her earnings ndash working as a security guard
and at the same time learning how to bead and selling her pieces at fair trades and flea markets
Since many were asking if she does home beading workshops she started on exploring how to teach people to bead She loves Scott Bakula and has always loved him till now and this served as her
inspiration to start making a beading video tutorial
Gianna started creating videos because she was at the point in her life where everything seemed to be falling apart And at that moment of time she had difficulties financially and selling jewelry was the only way for her to stay afloat financially She is a big Scott Bakula fan and when she went to the UK to see him on stage that was when it hit her that she is already able to edit videos and
taught herself Photoshop and done workshops at bead fairs so why not put these together and see what happens on Youtube She knew that if she gets enough subscribers and views ndash though no one knew what the exact numbers were you would be invited to become a Youtube partner This way she could monetize her videos with advertisements and hopefully she would be able to be a Youtube partner and be able to pay her bills
BLOG WWWHANDMADE-JEWELRY-CLUBCOM MEMBERSHIP WWWDIYBEADINGCLUBCOM BLOG DIY BEADING MAGAZINE ISSUE 32
Getting Down And Personal With Gianna
Her Youtube channel is popular and the reason why she chose Youtube is because Youtube is the biggest platform and reached almost to the whole world Everyone already knows about it and it was growing rapidly as compared to other platforms like Dailymotion so she figured that Youtube was the way to go Her advice to new designers is that when you start out go to the platforms on the top of your list first then work your way down your list if you do not get accepted by your first choice
After loyally putting up one video every week for about 8 months in a row she became a Youtube partner and monetized her videos She knew she needed at least $100 to get her first payout She managed to reach $100 after 3 months The process was not easy she worked hard lack sleep skipped meals and who knows what happened to Ridge in the Bold and the Beautiful because she stopped watching
On Youtube you can monetize your videos Google pays straight to your bank account and at other countries where they also have the option of getting checks among other options In order to get paid you have to reach the $100 mark and after 3 months For Gianna she thinks that you cannot say that Etsy is better than Youtube or Youtube is better than Etsy Her reasoning is because on Youtube she has many followers which will eventually check out her Etsy shop And to start an Etsy shop you need an audience
BLOG WWWHANDMADE-JEWELRY-CLUBCOM MEMBERSHIP WWWDIYBEADINGCLUBCOM BLOG DIY BEADING MAGAZINE ISSUE 32
television and dedicated her spare time (as she had another job) to Youtube She re-registered at the chamber of commerce after receiving her first payout Her work at Youtube now is not a full time job and things have changed on Youtube It is easier to become a parter but there are some countries that need to wait for an invitation to be a Youtube partner Take Italy for instance Italians would have to work just as hard as she did if they want to become a Youtube partner
Getting Down And Personal With Gianna
With her 60000 subscribers on her b4pbakup Youtube channel it is possible to sell at least 60 patterns on the first day on Etsy after promoting the PDF file on her Youtube channel Though you may think that 60 out of 60000 is not much you have to remember that not everyone has the means to purchase the PDF file and a lot of people still rather watch her carry out the tutorial(for free) on Youtube instead of reading the patterns or paying for the patterns even if the pattern is for a fundraiser and only cost $2 Her insights on Youtube is that Youtube is not what it used to be 6 years ago Instead of making more money every month she is making less and less because advertisers have more options of where they want to advertise their ads Ads do not pay as much as they used to Back in the days you could get 25 cents per ad Now you count yourself lucky if you could get 5 cents roll in after two hours
BLOG WWWHANDMADE-JEWELRY-CLUBCOM MEMBERSHIP WWWDIYBEADINGCLUBCOM BLOG DIY BEADING MAGAZINE ISSUE 32
And on top of that adblockers are destroying Youtube channel owners Youtube will start making changes to the channels where there will be ldquopaid subscriptionrdquo channels This has already been implemented in some countries but not in her country The Netherlands This means there will no longer be ads for her monthly paying subscribers She hopes that Youtube will add on a paid per video option feature The option to be a paid channel or free channel or to start a new channel for paying customers is yours to choose Gianna is not happy with Youtube because many others like her have worked so hard and for some years to become Youtube partners(which was something to be proud of) has lost their status
Getting Down And Personal With Gianna
Her advice for those who want to go on Youtube is 1 Do it because you want to teach
2 Do it because you want a career with beads
BLOG WWWHANDMADE-JEWELRY-CLUBCOM MEMBERSHIP WWWDIYBEADINGCLUBCOM BLOG DIY BEADING MAGAZINE ISSUE 32
After putting up about 20 videos and having at least 5000 subscribers add the PDF tutorials to Etsy and Craftsy She found out that her audience would like to have the PDF after watching her videos This is because they would rather print out the PDF and work while seated in a comfy chair technically somewhere else instead of having to pause the video time and time again
Gianna has also made a video for those who want to know the whole story of her journey up until the present day And to get updates on her you can check it out here She has also started a vlog where she tells of how she still works towards becoming a financial independent beader and explains her journey to get where she wants to be(or die trying) Gianna will be in the UK on October the 17th giving an all-day workshop with 4 different patterns
(2 beginners and 2 advanced) in Wotton-under-Edge
Gianna will be there Friday night as the workshop is on Saturday She will be leaving on Sunday Her
doors are open to all who wants to continue the party with her at the hotel across the street
For more information do contact Ann Tucker on Facebook
httpswwwfacebookcomanntucker501
Rec
omm
end
ed R
ead
ings
Making Jewelry with Gemstone
Beads
Combines the popular craft of beading with beautiful semi-precious stones which are collected by many Features a variety of versatile ideas which can be adapted for any type of gem or bead Readers will learn to reate beautiful gemstone jewelry with this dazzling collection of over 100 projects ranging from eyecatching earrings and accessories to exquisite necklaces and bracelets This beautiful book offers an impressive range of 28 beautiful semi-precious stones (including birthstones) and a glimpse into the fascinating history and mythical properties behind them
BLOG DIY BEADING MAGAZINE ISSUE 32 BLOG WWWHANDMADE-JEWELRY-CLUBCOM MEMBERSHIP WWWDIYBEADINGCLUBCOM
Rec
omm
end
ed R
ead
ings
Convertible Crystal Jewelry
Reverse it Twist it Wear it Many
Ways
Diane Whiting presents the idea that convertibility isnrsquot just about using pieces in multiple ways it is also about using skills and creativity in multiple ways Using ever-popular sparkling crystals Diane showcases design elements through various techniques for fun easy fashionable jewelry With 25 projects the reader can choose from bracelets necklaces and earrings that match any outfit or styleDiane Whiting presents the idea that convertibility isnrsquot just about using pieces in multiple ways it is also about using skills and creativity in multiple ways
BLOG DIY BEADING MAGAZINE ISSUE 32 BLOG WWWHANDMADE-JEWELRY-CLUBCOM MEMBERSHIP WWWDIYBEADINGCLUBCOM
Rec
omm
end
ed R
ead
ings
Wire Jewelry Masterclass
Wrapped Coiled and Woven Pieces
Using Fine Materials
Comprehensive and fabulous Wire Jewelry Masterclass takes an in-depth look at an intricate and rewarding craft The 24 projects which range from simple Dragons tear briolette earrings to a Poseidon-under-the-sea pendant will delight and inspire jewelers of all levels and tastes Divided into beginner intermediate and advanced sections this beautifully photographed step-by-step guide is the ticket to wire jewelry expertise
BLOG DIY BEADING MAGAZINE ISSUE 32 BLOG WWWHANDMADE-JEWELRY-CLUBCOM MEMBERSHIP WWWDIYBEADINGCLUBCOM
Rec
omm
end
ed R
ead
ings
Timeless Wire Weaving The
Complete Course
Timeless Wire Weaving focuses on developing wirework skills through 13 projects using three classic wire weaving techniques coiling wrapping and weaving The projects are built around a focal cabochon and incorporate seed beads and crystals in imaginative ways Designers learn to make the jewelry shown in the book and they also use the techniques learned to create innovative jewelry pieces of their own
BLOG DIY BEADING MAGAZINE ISSUE 32 BLOG WWWHANDMADE-JEWELRY-CLUBCOM MEMBERSHIP WWWDIYBEADINGCLUBCOM
Our digital magazine is available through
Apple Newsstand service available to millions of IPAD users
To advertise with us please email us at
diyjewelryclubgmailcom
Or visit our page at
httphandmade-jewelry-clubcomadvertising-diy-beading-magazine
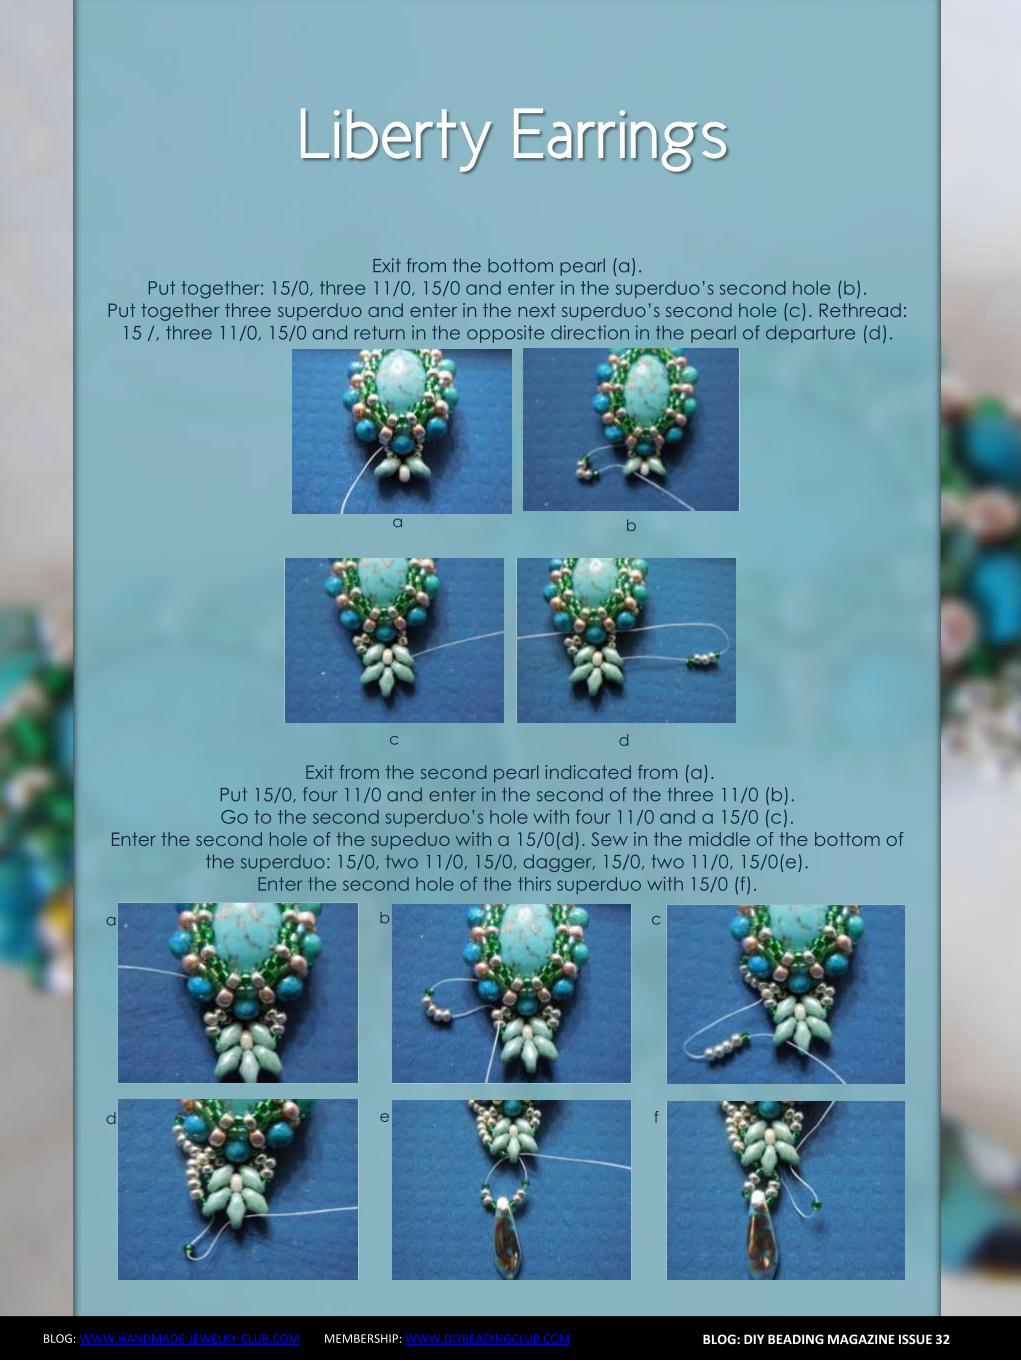
Jade Necklace
BLOG WWWHANDMADE-JEWELRY-CLUBCOM MEMBERSHIP WWWDIYBEADINGCLUBCOM BLOG DIY BEADING MAGAZINE ISSUE 32
Step 4 Cut a 15-inch 18ga wire and make a loop on
one end Insert 8mm pearl and make a loop on the other end You then use these as connectors
and link the components
Step 5 The necklace is an 18ga wire with wrapped
loops on both ends First cut 7 inches 18ga wire and make a wrapped loop with your hook already inserted Side in 18pcs 5mm pearls
Then make a wrapped loop on the other end connecting the wrapped loop onto the component Do the same for the other
necklace but make the loop on the other end big enough so the hookclasp can pass thru
To have the necklace curve shaped use a jar to bend the wire Voila Now youre
ready to party
Jade Necklace
BLOG WWWHANDMADE-JEWELRY-CLUBCOM MEMBERSHIP WWWDIYBEADINGCLUBCOM
About the Author
Sky Aldovino
I consider myself a late bloomer when it comes to crafting Irsquom a self-taught jewelry maker Jewelry making wasnrsquot really a hobby of mine but unforeseen events lead me to learn jewellery making My family put up a craft store where we sell cross stitch beads and all sorts of crafting materials I fell in love with the beads and tried to create accessories only for myself Clients liked the pieces and I started customizing handmade jewelleries The craft store was a success for 6 years but like any other small businesses we had to close it down and I was confined to staying at home While at home I had all the time using the internet and now working as a home-based jewelry designer
BLOG DIY BEADING MAGAZINE ISSUE 32
Atomic Ring
BLOG WWWHANDMADE-JEWELRY-CLUBCOM MEMBERSHIP WWWDIYBEADINGCLUBCOM
Have fun making shapes using the wigjig Cyclops Make loops going in
circles to mimic the shape of a flower or in this tutorial mimic the
shape of an atom The tutorial will also teach you how to cage a
cabochon Whats nice about this piece is that with one long wire you
can create the ring from start to finish
The tutorial is catered for intermediate to advanced students One
must already know how to make spirals and use a wigjig tool It has
clear instructions and ultra-clear close-up photos at each step
Additionally you can ask me question you have on the tutorial No
more getting stuck and frustrated on a confusing or just plain
inaccurate pattern
If you followed this tutorial and then sell the accessory or jewelry
please give credit to the author or DIY Beading Clubcom
If you like to get a blank wigjig graph visit wigjigcom Shop and Jigs
section
Copyright 2015
wwwdiybeadingclubcom
wwwhandmade-jewelry-clubcom
BLOG DIY BEADING MAGAZINE ISSUE 32
Atomic Ring
BLOG WWWHANDMADE-JEWELRY-CLUBCOM MEMBERSHIP WWWDIYBEADINGCLUBCOM
Materials Needed 20ga Craft wire 28ga Craft wire 11mm Round Cabochon
Tools Needed Wigjig Cyclops 15mm pegs Wire cutter Flat nose pliers Mandrel
Skill Level Intermediate - Advanced
BLOG DIY BEADING MAGAZINE ISSUE 32
Step 1 Lets prepare your wigjig cyclops Position the pegs like so
Atomic Ring
BLOG WWWHANDMADE-JEWELRY-CLUBCOM MEMBERSHIP WWWDIYBEADINGCLUBCOM BLOG DIY BEADING MAGAZINE ISSUE 32
Lets work with longer wire so youll have enough wire to hold onto as you manipulate the wire so cut 36 inches of 20ga wire From
one end of the wire measure 10 inches
On the 10-inch measurement loop the wire at the center peg then continue to loop onto the side pegs going in circle going back to
the center peg after looping on the side peg
Now the wire at the center peg will start to build up as you go around the side pegs so
you need to constantly press the wire at the center peg to accommodate the build up of
wire
When youre done pull out the wire and this is
how it should look like
Atomic Ring
BLOG WWWHANDMADE-JEWELRY-CLUBCOM MEMBERSHIP WWWDIYBEADINGCLUBCOM BLOG DIY BEADING MAGAZINE ISSUE 32
You will notice that the frame opens wide Now to keep the atom frame from opening wide secure the center of the frame by wrapping a 28ga wire What you
need to do is simply pass the 28ga wire into the hole and wrap as many times as needed or until youre sure that the frame is secure
Step 2 Now youre finished with your atom frame Well now create the focal design With the longer wire make a spiral at the center big
enough to accommodate the size of your cabochon In this tutorial the spiral is about
11mm in diameter the same size as my cabochon
Pop in your cabochon and start to make spirals going around and over the cabochon as if you are caging the cabochon Create at
least 5 rounds and then cut off any excess
Step 3 Now lets make the ring and this with the other
end of the wire
Atomic Ring
BLOG WWWHANDMADE-JEWELRY-CLUBCOM MEMBERSHIP WWWDIYBEADINGCLUBCOM BLOG DIY BEADING MAGAZINE ISSUE 32
Bring up your mandrel and wrap the wire to the size of your finger Wrap at least 2 times
When youre sure you have the right size pull the ring out of the mandrel
With the extended wire wrap the wire the secure the ring
Cut off any excess and voila You have your atomic ring Create as many as you can with different colors of cabochon
Atomic Ring
BLOG WWWHANDMADE-JEWELRY-CLUBCOM MEMBERSHIP WWWDIYBEADINGCLUBCOM
About the Author
Sky Aldovino
I consider myself a late bloomer when it comes to crafting Irsquom a self-taught jewelry maker Jewelry making wasnrsquot really a hobby of mine but unforeseen events lead me to learn jewellery making My family put up a craft store where we sell cross stitch beads and all sorts of crafting materials I fell in love with the beads and tried to create accessories only for myself Clients liked the pieces and I started customizing handmade jewelleries The craft store was a success for 6 years but like any other small businesses we had to close it down and I was confined to staying at home While at home I had all the time using the internet and now working as a home-based jewelry designer
BLOG DIY BEADING MAGAZINE ISSUE 32
Featured Article Gemstones Used for Jewelry Making
BLOG WWWHANDMADE-JEWELRY-CLUBCOM MEMBERSHIP WWWDIYBEADINGCLUBCOM
Gemstones are stones which we hold quite highly in terms of value And
jewelry often consists of stones that add attractiveness to it so it is not
surprising when jewelry designers actually use gemstones in their designs In
fact there are different types of gemstones that can be used for making
jewelry There are the expensive and pure gemstones and there are also the
imitation ones The information below will provide some information about
the kinds of stones you can use to create jewelry and how these stones will
impact the jewelry you have created
The first kind of stone which I believe we are all quite familiar with are
birthstones These stones are associated with individualrsquos month of birth
by SunVDesigns by BeyhanAkman
For example Amethyst stone is connected with anybody who is born in
February which carries special significance in the area of emotions and also
spiritually This stone also signifies calm and peace as well
And then we have semi-precious stones which are also often used in jewelry
making They are not as valuable as compared to precious stones but still
valuable Best examples of these stones are aquamarine topaz tourmaline
opal and turquoise
BLOG DIY BEADING MAGAZINE ISSUE 32
Featured Article Gemstones Used for Jewelry Making
BLOG WWWHANDMADE-JEWELRY-CLUBCOM MEMBERSHIP WWWDIYBEADINGCLUBCOM
It is an ideal gift for someone who you deem special Aquamarine pendants
usually work well for anyone and is widely an accepted stone
by HyppieChic by joyeriamestiza
However precious stones are the most unusual
and precious jewels to us Examples of some of
them are emerald sapphire diamond and
ruby These stones are usually very expensive
and are prized for their exquisiteness These
stones are commonly used in high-quality
jewelry designs which costs quite a fortune to
obtain
BLOG DIY BEADING MAGAZINE ISSUE 32
by sarajewelrystu
Jewelry designs with precious stones are usually
given as exceptional gifts on special occasions A
perfect example is a diamond ring that is usually
given as an engagement gift
by ldiamondsforever
Featured Article Gemstones Used for Jewelry Making
BLOG WWWHANDMADE-JEWELRY-CLUBCOM MEMBERSHIP WWWDIYBEADINGCLUBCOM
There are also synthetic stones which are often used to create jewelry
Synthetic stones are artificial imitations of gemstones Synthetic Sapphire
jewelry costs less compare with the authentic ones Most of the time
imitation stones are used to save cost but at the same time have the similar
look of the real stone
BLOG DIY BEADING MAGAZINE ISSUE 32
by shininggems by thaimaker
by lapinduprintemps by PastimeArt
Gemstones are used like beads and you can use it in any designs whether
simple or elaborate
Swarovski crystal components are available in a rich multitude of rondelles Perfect as spacers in necklaces or as discs in earrings Rondelles can be used with many varieties of shapes or sizes Use Swarovski crystal rondelles between large gemstones as accents with precious metal findings Fire Mountain Gems and Beads Crystal Passionsreg brand presents Swarovski crystal in display-ready packaging for brilliant retail presentation Crystal Passionsreg is an assurance of genuine Swarovski crystal
BLOG DIY BEADING MAGAZINE ISSUE 32 BLOG WWWHANDMADE-JEWELRY-CLUBCOM MEMBERSHIP WWWDIYBEADINGCLUBCOM
Recommended Jewelry Making Supplies
Mz Unisex-adults 12pcs 25x18x6mm Turquoise Oval CAB Cabochon
BLOG DIY BEADING MAGAZINE ISSUE 32 BLOG WWWHANDMADE-JEWELRY-CLUBCOM MEMBERSHIP WWWDIYBEADINGCLUBCOM
Recommended Jewelry Making Supplies
For a little sparkle that goes a long way design with Swarovski 4mm faceted bicones Create glorious multi-strand necklaces with the dainty crystals or use as spacers to add a tiny flash to your designs Swarovski crystal components are made in Austria and are considered the finest products of their kind in the world
BLOG DIY BEADING MAGAZINE ISSUE 32 BLOG WWWHANDMADE-JEWELRY-CLUBCOM MEMBERSHIP WWWDIYBEADINGCLUBCOM
Recommended Jewelry Making Supplies
Imitation beads resist color change These beads have uniform quality with a good polish Some strands may have little to no matrix Sizes shapes and colors may vary with handcrafted items
BLOG DIY BEADING MAGAZINE ISSUE 32 BLOG WWWHANDMADE-JEWELRY-CLUBCOM MEMBERSHIP WWWDIYBEADINGCLUBCOM
Recommended Jewelry Making Supplies
Something Blue Necklace and Earrings
BLOG WWWHANDMADE-JEWELRY-CLUBCOM MEMBERSHIP WWWDIYBEADINGCLUBCOM
Skill level Beginner Intermediate Advanced
DIMENSIONS OF THE NECKLACE Inner Circumference 14 18 inch 35 cm
Focal Pendant Width 1 15 inch 35 cm Focal Pendant Height 1 15 inch 35 cm
DIMENSIONS OF THE EARRING Earring Width 716 inch 12 cm Earring Height 1516 inch 25 cm (Without the earring hook)
BLOG DIY BEADING MAGAZINE ISSUE 32
Materials
Note Before purchasing the supplies measure the length of your wished necklace If you decide to bead a longer necklace you should keep in mind that for every extra
frac34 inches 2 cm-s you will need 8 bicones and 8 pearls
Something Blue Necklace and Earrings
BLOG WWWHANDMADE-JEWELRY-CLUBCOM MEMBERSHIP WWWDIYBEADINGCLUBCOM BLOG DIY BEADING MAGAZINE ISSUE 32
Work RAW stitch into a beaded circle and embellish with Swarovski bicones
STEP 2 String 1A and 2 pearls Pass through the previous
second pearl and the freshly added 1A and the first pearl again
STEP 1 Use a comfortable length of thread to string 2
pearls 1A and 1 pearl again leaving a 2rdquo 5cm tail Pass through the first two pearls strung to form a
ring
STEP 3 String 2 pearls and 1A Pass through the previous first pearl and the freshly added two pearls
again
STEP 4 - 17 Repeat STEP 2 and STEP 3 again until you count 17 pearls in the inner circle
But be careful in the last step you only have to add 1 pearl then pass through the first pearls
added in STEP 1 and add another 1A Now pass through the first pearl added in STEP
1and 1A added in this round again to exit from this A
Something Blue Necklace and Earrings
BLOG WWWHANDMADE-JEWELRY-CLUBCOM MEMBERSHIP WWWDIYBEADINGCLUBCOM BLOG DIY BEADING MAGAZINE ISSUE 32
STEP 19 String 2A and pass through the next A added in round 4-17 and the A added in round 18 the 2A added in this round and finally the A added in round 4-17 to exit from the bead showed below
STEP 18 String 3A and pass through the 1A added in the previous round and the first A added in this
round
STEP 20 - 34 Repeat STEP 18 and STEP 19 again until you finish the circle
But be careful in the last step first you have to pass through 3A and then add 1A After this pass
through the 3A again and exit from the A bead
shown below (This is the first A added in STEP 18)
Something Blue Necklace and Earrings
BLOG WWWHANDMADE-JEWELRY-CLUBCOM MEMBERSHIP WWWDIYBEADINGCLUBCOM BLOG DIY BEADING MAGAZINE ISSUE 32
STEP 35 Step up to exit from the pearl shown below (Finishing the previous step in the A bead and then
stepping up from there makes the circle more secure)
Now string 3 bicones Pass through the pearl and the first bicone again
In the reality your circle will look more like this the A beads forming a strong row in the middle of the
pearls
STEP 36 Add 2 bicones Pass through the
neighboring pearl the first bicone added in the previous row and the 2 bicones added in this step
so you can exit from the next pearl
Something Blue Necklace and Earrings
BLOG WWWHANDMADE-JEWELRY-CLUBCOM MEMBERSHIP WWWDIYBEADINGCLUBCOM BLOG DIY BEADING MAGAZINE ISSUE 32
Now in the reality your circle will look more like this the A beads still forming a strong row in the middle of the pearls and the bicones slightly lying on top of
them
STEP 37 - 49 Repeat STEP 35 and STEP 36 again until you finish the circle with the bicones
But be careful in the last step first you have pass through the third bicone added then add 1 bicone
and pass through this little quartet to exit from the bicone shown below (The second one added in
STEP 35)
STEP 50 With these steps we finish the circle by adding 1 bicone to connect the A beads and the
bicone row So add 1 bicone pass through the nearest A bead and add 1 bicone again Pass
through the bicone already there and exit from the bicone you just added
Something Blue Necklace and Earrings
BLOG WWWHANDMADE-JEWELRY-CLUBCOM MEMBERSHIP WWWDIYBEADINGCLUBCOM BLOG DIY BEADING MAGAZINE ISSUE 32
STEP 66-83 Secure the circle by adding 1A between each bicone in the second row of Swarovski
bicones If you finished secure the thread and trim
STEP 51-65 Using the same technique as in STEP 37 - 49 add 1 bicone to finish the third bicone row The black line shows you the way (After STEP 50 pass through the next A bead add 1 bicone and pass through the bicone already there and the bicone added in the previous step Repeat these steps to
finish the inner bicone circle)
MIDDLE CIRCLE Work RAW stitch into a beaded circle and embellish with
Swarovski bicones Remember you need to bead two circles this time
STEP 1 Just like in the focal circle begin with 2 pearls 1A and 1 pearl again on a comfortable length of thread
leaving a 2rdquo 5cm tail Pass through the first two pearls strung to form a ring
Something Blue Necklace and Earrings
BLOG WWWHANDMADE-JEWELRY-CLUBCOM MEMBERSHIP WWWDIYBEADINGCLUBCOM BLOG DIY BEADING MAGAZINE ISSUE 32
STEP 15-28 Mimicing the FOCAL CIRCLElsquos STEP 18-34 bead A beads until you finish the inner part of the
circle Exit from a pearl in the second row This circle should look very similar to the first one but this is a bit
smaller
STEP 2-14 Mimicing the FOCAL CIRCLElsquos STEP 2-17 bead until you count 14 pearls in the inner circle Exit
from the last A added
STEP 29-42 Mimicing FOCAL CIRCLElsquos STEP 35-49 add 2 rows of bicones
STEP 43-56 Mimicing the FOCAL CIRCLElsquos STEP 50-65 bead the third row of bicones to finish the circle
Something Blue Necklace and Earrings
BLOG WWWHANDMADE-JEWELRY-CLUBCOM MEMBERSHIP WWWDIYBEADINGCLUBCOM BLOG DIY BEADING MAGAZINE ISSUE 32
SMALLEST CIRCLE Work RAW stitch into a beaded circle and embellish
with Swarovski bicones Remember you need to bead two circles again
STEP 1 Just like in the focal circle begin with 2 pearls
1A and 1 pearl again on a comfortable length of thread leaving a 2rdquo 5cm tail Pass through the first two
pearls strung to form a ring
STEP 57-70 Just like the FOCAL CIRCLElsquos STEP 66-83 secure the circle by adding 1A between every bicone
in the second row of bicones If you finished secure the thread and trim (Donrsquot forget to bead another
circle)
STEP 2-12 Mimicing the FOCAL CIRCLElsquos STEP 2-17 bead until you count 12 pearls in the inner circle Exit
from the last A added
STEP 13-24 Mimicing the FOCAL CIRCLElsquos STEP 18-34 bead A beads until you finish the inner part of the
circle Exit from a pearl in the second row This circle should look very similar to the first two but this is the
smallest of them all
Something Blue Necklace and Earrings
BLOG WWWHANDMADE-JEWELRY-CLUBCOM MEMBERSHIP WWWDIYBEADINGCLUBCOM BLOG DIY BEADING MAGAZINE ISSUE 32
STEP 37-48 Mimicing the FOCAL CIRCLElsquos STEP 50-65 bead the third row of bicones to finish this circle too
STEP 25-36 Mimicing FOCAL CIRCLElsquos STEP 35-49 add 2
rows of bicones The last step here is purple again
STEP 49-60 Just like the FOCAL CIRCLElsquos STEP 66-83 secure the circle by adding 1A between every bicone
in the second row of bicones If you finished secure the thread and trim (Donrsquot forget that you need two
small circles)
Something Blue Necklace and Earrings
BLOG WWWHANDMADE-JEWELRY-CLUBCOM MEMBERSHIP WWWDIYBEADINGCLUBCOM BLOG DIY BEADING MAGAZINE ISSUE 32
STEP 37-48 Mimicing the FOCAL CIRCLElsquos STEP 50-65 bead the third row of bicones to finish this circle too
STEP 25-36 Mimicing FOCAL CIRCLElsquos STEP 35-49 add 2
rows of bicones The last step here is purple again
STEP 49-60 Just like the FOCAL CIRCLElsquos STEP 66-83 secure the circle by adding 1A between every bicone
in the second row of bicones If you finished secure the thread and trim (Donrsquot forget that you need two
small circles)
Something Blue Necklace and Earrings
BLOG WWWHANDMADE-JEWELRY-CLUBCOM MEMBERSHIP WWWDIYBEADINGCLUBCOM BLOG DIY BEADING MAGAZINE ISSUE 32
STEP 2-6 Continue by adding 1A 1 bicone 1 pearl until you count 6 of each
STEP 1 Begin with 1 pearl 1 bicone 1A and 1 bicone again on a comfortable length of thread leaving a 2rdquo
5cm tail Pass through the pearl and the first bicone strung to form a ring
STEP 7-12 Pass through the A beads to make your
component more secure Also secure the thread and trim (Repeat these steps until you have six 6-BEAD
COMPONENTs)
6-BEAD COMPONENT Work RAW stitch into a beaded circle and embellish with Swarovski bicones
For the necklace we will need six from this component For the earring two
Something Blue Necklace and Earrings
BLOG WWWHANDMADE-JEWELRY-CLUBCOM MEMBERSHIP WWWDIYBEADINGCLUBCOM BLOG DIY BEADING MAGAZINE ISSUE 32
STEP 2-4 Continue by adding 1A 1 bicone 1 pearl
until you count 4 of each
STEP 1 Begin with 1 pearl 1 bicone 1A and 1 bicone again on a comfortable length of thread leaving a 2rdquo
5cm tail Pass through the pearl and the first bicone strung to form a ring
STEP 5-8 Pass through the A beads to make your component more secure Also secure the thread and
trim (Repeat these steps until you have the wished amount of 4-BEAD COMPONENTs)
4-BEAD COMPONENT Work RAW stitch into a beaded circle and embellish with Swarovski bicones
For the necklace-size that is given on the second page we will need 20 from this
component For the earring two
If you would like to make a longer necklace you need to make more (One 4-BEAD COMPONENT measures about 38 inch 1 cm To make the necklace symmetrical you have to have equal amounts on each side This means for every extra frac34 inches
2 cm-s you will need 1 4-BEAD COMPONENT on each side of the necklace)
Something Blue Necklace and Earrings
BLOG WWWHANDMADE-JEWELRY-CLUBCOM MEMBERSHIP WWWDIYBEADINGCLUBCOM BLOG DIY BEADING MAGAZINE ISSUE 32
STEP 2 Connect the MIDDLE CIRCLE to two 6-BEAD COMPONENTs by adding four-times 2As
between the pearls Choose a pearl on the MIDDLE CIRCLE and add
2A pass through a pearl in the 6-BEAD COMPONENT previously added and add 2A again Watch out this has to be symmetrical Repeat this at least two more times to make it
secure Now repeat this entire procedure but choose
the 8-th pearl on MIDDLE CIRCLE Repeat this on the other side of the necklace
too
Choose a pearl on the FOCAL CIRCLE and add 2A pass through a pearl in the 6-BEAD COMPONENT and add 2A again Repeat this at least two more times to make it secure
Now repeat this entire procedure but choose the 5-th pearl on FOCAL CIRCLE This will make the necklace nice on your neck
FINISHING THE NECKLACE Connects the parts with A beads
STEP 1 Connect the FOCAL CIRCLE to two 6-BEAD COMPONENTs by adding four-times 2As between the pearls To do this turn your parts upside down you need to
see the pearls We will work on this side from now on
Something Blue Necklace and Earrings
BLOG WWWHANDMADE-JEWELRY-CLUBCOM MEMBERSHIP WWWDIYBEADINGCLUBCOM BLOG DIY BEADING MAGAZINE ISSUE 32
FINISHING THE EARRING Connects the parts with A beads
STEP 1-2 Connect the 6-BEAD COMPONENT
to 4-BEAD COMPONENT and the 4-BEAD
COMPONENT to the earring hook
First connect the 4-BEAD COMPONENT to the 6-BEAD COMPONENT with 4A beads Mimic
the elongation steps of the necklace if needed
Secondly connect the 4-BEAD COMPONENT
to your earring hook with 4A beads again Leave from the last pearl bead 2A beads the hook (this is the orange oval form) and 2As again Pass through each of them to
secure this connection again
Finally get ready to prepare the other earring ndash since we need two of them
STEP 5 Connect the 4-BEAD COMPONENTs to the toggle clasp thus finishing the
necklace Leaving from the last pearl bead 2A the
clasp(this is the orange oval form) and 2A again Pass through all of them a couple more times to make this connection more
secure
Something Blue Necklace and Earrings
BLOG WWWHANDMADE-JEWELRY-CLUBCOM MEMBERSHIP WWWDIYBEADINGCLUBCOM BLOG DIY BEADING MAGAZINE ISSUE 32
If you finished it is time to try it on It was a great fun wasnrsquot it And how beautiful you look in your new necklace and the matching earrings
Something Blue Necklace and Earrings
BLOG WWWHANDMADE-JEWELRY-CLUBCOM MEMBERSHIP WWWDIYBEADINGCLUBCOM
About the Author
Margit Vogel
My name is Margit Vogel I live in Hungary Europe
By profession I am a biochemical engineer but I fell in love with
beads so much that I could not stop playing with them
I make one-of-a-kind beaded and bead embroidered art
jewelry made of the best quality materials such as Swarovski
stones gemstones Japanese beads (Miyuki and Toho) Czech
glass beads leather soutache and suede Each piece is unique
and individually crafted
Feel free to visit my blog for some eyecandy
httpiformjewelrywordpresscom
My shop httpwwwetsycomshopiformjewelry
Facebook httpwwwfacebookcomiformjewelry
BLOG DIY BEADING MAGAZINE ISSUE 32
Getting Down And Personal With Gianna
Getting Down And Personal With Gianna
Nowadays we see more and more jewelry stores opening up online and with these online jewelry stores it has made it easier for us to purchase and view their creations Have you ever wondered how they are able to manage and produce amazing jewelry pieces and tutorials So heres a little on the journey to open up an online shop We are excited to present to you Gianna aka Beading4perfectionists
Gianna Beader amp Youtuber
Unlike most jewelry makers and beadweavers Gianna did not start beading as a hobby but as a means to make ends meet With goals in trying to
fill the financial gap she did everything she could to expand her earnings ndash working as a security guard
and at the same time learning how to bead and selling her pieces at fair trades and flea markets
Since many were asking if she does home beading workshops she started on exploring how to teach people to bead She loves Scott Bakula and has always loved him till now and this served as her
inspiration to start making a beading video tutorial
Gianna started creating videos because she was at the point in her life where everything seemed to be falling apart And at that moment of time she had difficulties financially and selling jewelry was the only way for her to stay afloat financially She is a big Scott Bakula fan and when she went to the UK to see him on stage that was when it hit her that she is already able to edit videos and
taught herself Photoshop and done workshops at bead fairs so why not put these together and see what happens on Youtube She knew that if she gets enough subscribers and views ndash though no one knew what the exact numbers were you would be invited to become a Youtube partner This way she could monetize her videos with advertisements and hopefully she would be able to be a Youtube partner and be able to pay her bills
BLOG WWWHANDMADE-JEWELRY-CLUBCOM MEMBERSHIP WWWDIYBEADINGCLUBCOM BLOG DIY BEADING MAGAZINE ISSUE 32
Getting Down And Personal With Gianna
Her Youtube channel is popular and the reason why she chose Youtube is because Youtube is the biggest platform and reached almost to the whole world Everyone already knows about it and it was growing rapidly as compared to other platforms like Dailymotion so she figured that Youtube was the way to go Her advice to new designers is that when you start out go to the platforms on the top of your list first then work your way down your list if you do not get accepted by your first choice
After loyally putting up one video every week for about 8 months in a row she became a Youtube partner and monetized her videos She knew she needed at least $100 to get her first payout She managed to reach $100 after 3 months The process was not easy she worked hard lack sleep skipped meals and who knows what happened to Ridge in the Bold and the Beautiful because she stopped watching
On Youtube you can monetize your videos Google pays straight to your bank account and at other countries where they also have the option of getting checks among other options In order to get paid you have to reach the $100 mark and after 3 months For Gianna she thinks that you cannot say that Etsy is better than Youtube or Youtube is better than Etsy Her reasoning is because on Youtube she has many followers which will eventually check out her Etsy shop And to start an Etsy shop you need an audience
BLOG WWWHANDMADE-JEWELRY-CLUBCOM MEMBERSHIP WWWDIYBEADINGCLUBCOM BLOG DIY BEADING MAGAZINE ISSUE 32
television and dedicated her spare time (as she had another job) to Youtube She re-registered at the chamber of commerce after receiving her first payout Her work at Youtube now is not a full time job and things have changed on Youtube It is easier to become a parter but there are some countries that need to wait for an invitation to be a Youtube partner Take Italy for instance Italians would have to work just as hard as she did if they want to become a Youtube partner
Getting Down And Personal With Gianna
With her 60000 subscribers on her b4pbakup Youtube channel it is possible to sell at least 60 patterns on the first day on Etsy after promoting the PDF file on her Youtube channel Though you may think that 60 out of 60000 is not much you have to remember that not everyone has the means to purchase the PDF file and a lot of people still rather watch her carry out the tutorial(for free) on Youtube instead of reading the patterns or paying for the patterns even if the pattern is for a fundraiser and only cost $2 Her insights on Youtube is that Youtube is not what it used to be 6 years ago Instead of making more money every month she is making less and less because advertisers have more options of where they want to advertise their ads Ads do not pay as much as they used to Back in the days you could get 25 cents per ad Now you count yourself lucky if you could get 5 cents roll in after two hours
BLOG WWWHANDMADE-JEWELRY-CLUBCOM MEMBERSHIP WWWDIYBEADINGCLUBCOM BLOG DIY BEADING MAGAZINE ISSUE 32
And on top of that adblockers are destroying Youtube channel owners Youtube will start making changes to the channels where there will be ldquopaid subscriptionrdquo channels This has already been implemented in some countries but not in her country The Netherlands This means there will no longer be ads for her monthly paying subscribers She hopes that Youtube will add on a paid per video option feature The option to be a paid channel or free channel or to start a new channel for paying customers is yours to choose Gianna is not happy with Youtube because many others like her have worked so hard and for some years to become Youtube partners(which was something to be proud of) has lost their status
Getting Down And Personal With Gianna
Her advice for those who want to go on Youtube is 1 Do it because you want to teach
2 Do it because you want a career with beads
BLOG WWWHANDMADE-JEWELRY-CLUBCOM MEMBERSHIP WWWDIYBEADINGCLUBCOM BLOG DIY BEADING MAGAZINE ISSUE 32
After putting up about 20 videos and having at least 5000 subscribers add the PDF tutorials to Etsy and Craftsy She found out that her audience would like to have the PDF after watching her videos This is because they would rather print out the PDF and work while seated in a comfy chair technically somewhere else instead of having to pause the video time and time again
Gianna has also made a video for those who want to know the whole story of her journey up until the present day And to get updates on her you can check it out here She has also started a vlog where she tells of how she still works towards becoming a financial independent beader and explains her journey to get where she wants to be(or die trying) Gianna will be in the UK on October the 17th giving an all-day workshop with 4 different patterns
(2 beginners and 2 advanced) in Wotton-under-Edge
Gianna will be there Friday night as the workshop is on Saturday She will be leaving on Sunday Her
doors are open to all who wants to continue the party with her at the hotel across the street
For more information do contact Ann Tucker on Facebook
httpswwwfacebookcomanntucker501
Rec
omm
end
ed R
ead
ings
Making Jewelry with Gemstone
Beads
Combines the popular craft of beading with beautiful semi-precious stones which are collected by many Features a variety of versatile ideas which can be adapted for any type of gem or bead Readers will learn to reate beautiful gemstone jewelry with this dazzling collection of over 100 projects ranging from eyecatching earrings and accessories to exquisite necklaces and bracelets This beautiful book offers an impressive range of 28 beautiful semi-precious stones (including birthstones) and a glimpse into the fascinating history and mythical properties behind them
BLOG DIY BEADING MAGAZINE ISSUE 32 BLOG WWWHANDMADE-JEWELRY-CLUBCOM MEMBERSHIP WWWDIYBEADINGCLUBCOM
Rec
omm
end
ed R
ead
ings
Convertible Crystal Jewelry
Reverse it Twist it Wear it Many
Ways
Diane Whiting presents the idea that convertibility isnrsquot just about using pieces in multiple ways it is also about using skills and creativity in multiple ways Using ever-popular sparkling crystals Diane showcases design elements through various techniques for fun easy fashionable jewelry With 25 projects the reader can choose from bracelets necklaces and earrings that match any outfit or styleDiane Whiting presents the idea that convertibility isnrsquot just about using pieces in multiple ways it is also about using skills and creativity in multiple ways
BLOG DIY BEADING MAGAZINE ISSUE 32 BLOG WWWHANDMADE-JEWELRY-CLUBCOM MEMBERSHIP WWWDIYBEADINGCLUBCOM
Rec
omm
end
ed R
ead
ings
Wire Jewelry Masterclass
Wrapped Coiled and Woven Pieces
Using Fine Materials
Comprehensive and fabulous Wire Jewelry Masterclass takes an in-depth look at an intricate and rewarding craft The 24 projects which range from simple Dragons tear briolette earrings to a Poseidon-under-the-sea pendant will delight and inspire jewelers of all levels and tastes Divided into beginner intermediate and advanced sections this beautifully photographed step-by-step guide is the ticket to wire jewelry expertise
BLOG DIY BEADING MAGAZINE ISSUE 32 BLOG WWWHANDMADE-JEWELRY-CLUBCOM MEMBERSHIP WWWDIYBEADINGCLUBCOM
Rec
omm
end
ed R
ead
ings
Timeless Wire Weaving The
Complete Course
Timeless Wire Weaving focuses on developing wirework skills through 13 projects using three classic wire weaving techniques coiling wrapping and weaving The projects are built around a focal cabochon and incorporate seed beads and crystals in imaginative ways Designers learn to make the jewelry shown in the book and they also use the techniques learned to create innovative jewelry pieces of their own
BLOG DIY BEADING MAGAZINE ISSUE 32 BLOG WWWHANDMADE-JEWELRY-CLUBCOM MEMBERSHIP WWWDIYBEADINGCLUBCOM
Our digital magazine is available through
Apple Newsstand service available to millions of IPAD users
To advertise with us please email us at
diyjewelryclubgmailcom
Or visit our page at
httphandmade-jewelry-clubcomadvertising-diy-beading-magazine
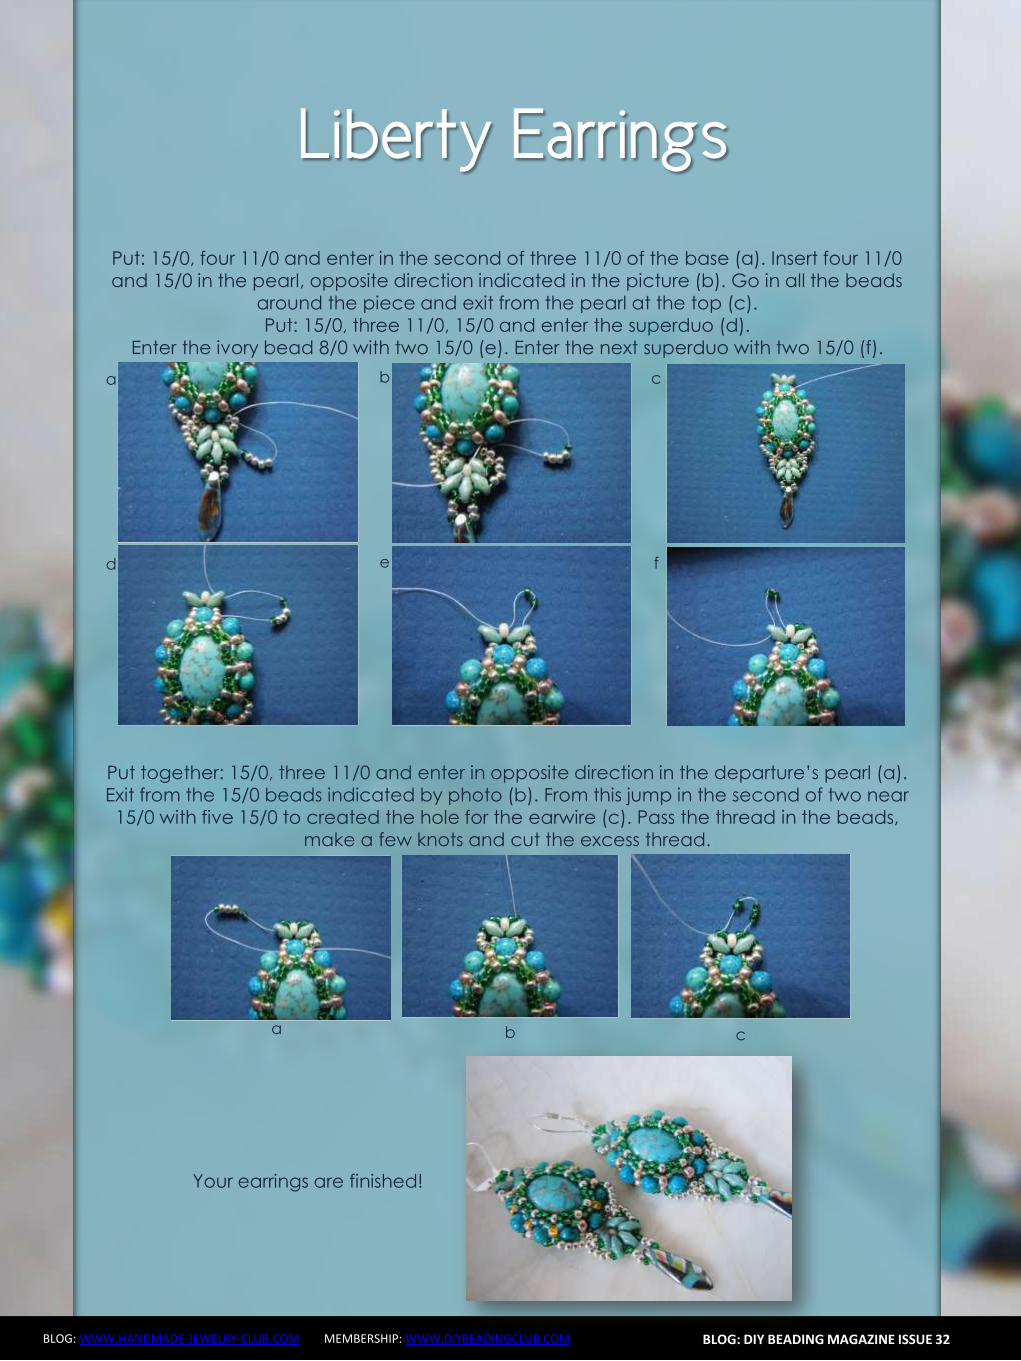
Jade Necklace
BLOG WWWHANDMADE-JEWELRY-CLUBCOM MEMBERSHIP WWWDIYBEADINGCLUBCOM
About the Author
Sky Aldovino
I consider myself a late bloomer when it comes to crafting Irsquom a self-taught jewelry maker Jewelry making wasnrsquot really a hobby of mine but unforeseen events lead me to learn jewellery making My family put up a craft store where we sell cross stitch beads and all sorts of crafting materials I fell in love with the beads and tried to create accessories only for myself Clients liked the pieces and I started customizing handmade jewelleries The craft store was a success for 6 years but like any other small businesses we had to close it down and I was confined to staying at home While at home I had all the time using the internet and now working as a home-based jewelry designer
BLOG DIY BEADING MAGAZINE ISSUE 32
Atomic Ring
BLOG WWWHANDMADE-JEWELRY-CLUBCOM MEMBERSHIP WWWDIYBEADINGCLUBCOM
Have fun making shapes using the wigjig Cyclops Make loops going in
circles to mimic the shape of a flower or in this tutorial mimic the
shape of an atom The tutorial will also teach you how to cage a
cabochon Whats nice about this piece is that with one long wire you
can create the ring from start to finish
The tutorial is catered for intermediate to advanced students One
must already know how to make spirals and use a wigjig tool It has
clear instructions and ultra-clear close-up photos at each step
Additionally you can ask me question you have on the tutorial No
more getting stuck and frustrated on a confusing or just plain
inaccurate pattern
If you followed this tutorial and then sell the accessory or jewelry
please give credit to the author or DIY Beading Clubcom
If you like to get a blank wigjig graph visit wigjigcom Shop and Jigs
section
Copyright 2015
wwwdiybeadingclubcom
wwwhandmade-jewelry-clubcom
BLOG DIY BEADING MAGAZINE ISSUE 32
Atomic Ring
BLOG WWWHANDMADE-JEWELRY-CLUBCOM MEMBERSHIP WWWDIYBEADINGCLUBCOM
Materials Needed 20ga Craft wire 28ga Craft wire 11mm Round Cabochon
Tools Needed Wigjig Cyclops 15mm pegs Wire cutter Flat nose pliers Mandrel
Skill Level Intermediate - Advanced
BLOG DIY BEADING MAGAZINE ISSUE 32
Step 1 Lets prepare your wigjig cyclops Position the pegs like so
Atomic Ring
BLOG WWWHANDMADE-JEWELRY-CLUBCOM MEMBERSHIP WWWDIYBEADINGCLUBCOM BLOG DIY BEADING MAGAZINE ISSUE 32
Lets work with longer wire so youll have enough wire to hold onto as you manipulate the wire so cut 36 inches of 20ga wire From
one end of the wire measure 10 inches
On the 10-inch measurement loop the wire at the center peg then continue to loop onto the side pegs going in circle going back to
the center peg after looping on the side peg
Now the wire at the center peg will start to build up as you go around the side pegs so
you need to constantly press the wire at the center peg to accommodate the build up of
wire
When youre done pull out the wire and this is
how it should look like
Atomic Ring
BLOG WWWHANDMADE-JEWELRY-CLUBCOM MEMBERSHIP WWWDIYBEADINGCLUBCOM BLOG DIY BEADING MAGAZINE ISSUE 32
You will notice that the frame opens wide Now to keep the atom frame from opening wide secure the center of the frame by wrapping a 28ga wire What you
need to do is simply pass the 28ga wire into the hole and wrap as many times as needed or until youre sure that the frame is secure
Step 2 Now youre finished with your atom frame Well now create the focal design With the longer wire make a spiral at the center big
enough to accommodate the size of your cabochon In this tutorial the spiral is about
11mm in diameter the same size as my cabochon
Pop in your cabochon and start to make spirals going around and over the cabochon as if you are caging the cabochon Create at
least 5 rounds and then cut off any excess
Step 3 Now lets make the ring and this with the other
end of the wire
Atomic Ring
BLOG WWWHANDMADE-JEWELRY-CLUBCOM MEMBERSHIP WWWDIYBEADINGCLUBCOM BLOG DIY BEADING MAGAZINE ISSUE 32
Bring up your mandrel and wrap the wire to the size of your finger Wrap at least 2 times
When youre sure you have the right size pull the ring out of the mandrel
With the extended wire wrap the wire the secure the ring
Cut off any excess and voila You have your atomic ring Create as many as you can with different colors of cabochon
Atomic Ring
BLOG WWWHANDMADE-JEWELRY-CLUBCOM MEMBERSHIP WWWDIYBEADINGCLUBCOM
About the Author
Sky Aldovino
I consider myself a late bloomer when it comes to crafting Irsquom a self-taught jewelry maker Jewelry making wasnrsquot really a hobby of mine but unforeseen events lead me to learn jewellery making My family put up a craft store where we sell cross stitch beads and all sorts of crafting materials I fell in love with the beads and tried to create accessories only for myself Clients liked the pieces and I started customizing handmade jewelleries The craft store was a success for 6 years but like any other small businesses we had to close it down and I was confined to staying at home While at home I had all the time using the internet and now working as a home-based jewelry designer
BLOG DIY BEADING MAGAZINE ISSUE 32
Featured Article Gemstones Used for Jewelry Making
BLOG WWWHANDMADE-JEWELRY-CLUBCOM MEMBERSHIP WWWDIYBEADINGCLUBCOM
Gemstones are stones which we hold quite highly in terms of value And
jewelry often consists of stones that add attractiveness to it so it is not
surprising when jewelry designers actually use gemstones in their designs In
fact there are different types of gemstones that can be used for making
jewelry There are the expensive and pure gemstones and there are also the
imitation ones The information below will provide some information about
the kinds of stones you can use to create jewelry and how these stones will
impact the jewelry you have created
The first kind of stone which I believe we are all quite familiar with are
birthstones These stones are associated with individualrsquos month of birth
by SunVDesigns by BeyhanAkman
For example Amethyst stone is connected with anybody who is born in
February which carries special significance in the area of emotions and also
spiritually This stone also signifies calm and peace as well
And then we have semi-precious stones which are also often used in jewelry
making They are not as valuable as compared to precious stones but still
valuable Best examples of these stones are aquamarine topaz tourmaline
opal and turquoise
BLOG DIY BEADING MAGAZINE ISSUE 32
Featured Article Gemstones Used for Jewelry Making
BLOG WWWHANDMADE-JEWELRY-CLUBCOM MEMBERSHIP WWWDIYBEADINGCLUBCOM
It is an ideal gift for someone who you deem special Aquamarine pendants
usually work well for anyone and is widely an accepted stone
by HyppieChic by joyeriamestiza
However precious stones are the most unusual
and precious jewels to us Examples of some of
them are emerald sapphire diamond and
ruby These stones are usually very expensive
and are prized for their exquisiteness These
stones are commonly used in high-quality
jewelry designs which costs quite a fortune to
obtain
BLOG DIY BEADING MAGAZINE ISSUE 32
by sarajewelrystu
Jewelry designs with precious stones are usually
given as exceptional gifts on special occasions A
perfect example is a diamond ring that is usually
given as an engagement gift
by ldiamondsforever
Featured Article Gemstones Used for Jewelry Making
BLOG WWWHANDMADE-JEWELRY-CLUBCOM MEMBERSHIP WWWDIYBEADINGCLUBCOM
There are also synthetic stones which are often used to create jewelry
Synthetic stones are artificial imitations of gemstones Synthetic Sapphire
jewelry costs less compare with the authentic ones Most of the time
imitation stones are used to save cost but at the same time have the similar
look of the real stone
BLOG DIY BEADING MAGAZINE ISSUE 32
by shininggems by thaimaker
by lapinduprintemps by PastimeArt
Gemstones are used like beads and you can use it in any designs whether
simple or elaborate
Swarovski crystal components are available in a rich multitude of rondelles Perfect as spacers in necklaces or as discs in earrings Rondelles can be used with many varieties of shapes or sizes Use Swarovski crystal rondelles between large gemstones as accents with precious metal findings Fire Mountain Gems and Beads Crystal Passionsreg brand presents Swarovski crystal in display-ready packaging for brilliant retail presentation Crystal Passionsreg is an assurance of genuine Swarovski crystal
BLOG DIY BEADING MAGAZINE ISSUE 32 BLOG WWWHANDMADE-JEWELRY-CLUBCOM MEMBERSHIP WWWDIYBEADINGCLUBCOM
Recommended Jewelry Making Supplies
Mz Unisex-adults 12pcs 25x18x6mm Turquoise Oval CAB Cabochon
BLOG DIY BEADING MAGAZINE ISSUE 32 BLOG WWWHANDMADE-JEWELRY-CLUBCOM MEMBERSHIP WWWDIYBEADINGCLUBCOM
Recommended Jewelry Making Supplies
For a little sparkle that goes a long way design with Swarovski 4mm faceted bicones Create glorious multi-strand necklaces with the dainty crystals or use as spacers to add a tiny flash to your designs Swarovski crystal components are made in Austria and are considered the finest products of their kind in the world
BLOG DIY BEADING MAGAZINE ISSUE 32 BLOG WWWHANDMADE-JEWELRY-CLUBCOM MEMBERSHIP WWWDIYBEADINGCLUBCOM
Recommended Jewelry Making Supplies
Imitation beads resist color change These beads have uniform quality with a good polish Some strands may have little to no matrix Sizes shapes and colors may vary with handcrafted items
BLOG DIY BEADING MAGAZINE ISSUE 32 BLOG WWWHANDMADE-JEWELRY-CLUBCOM MEMBERSHIP WWWDIYBEADINGCLUBCOM
Recommended Jewelry Making Supplies
Something Blue Necklace and Earrings
BLOG WWWHANDMADE-JEWELRY-CLUBCOM MEMBERSHIP WWWDIYBEADINGCLUBCOM
Skill level Beginner Intermediate Advanced
DIMENSIONS OF THE NECKLACE Inner Circumference 14 18 inch 35 cm
Focal Pendant Width 1 15 inch 35 cm Focal Pendant Height 1 15 inch 35 cm
DIMENSIONS OF THE EARRING Earring Width 716 inch 12 cm Earring Height 1516 inch 25 cm (Without the earring hook)
BLOG DIY BEADING MAGAZINE ISSUE 32
Materials
Note Before purchasing the supplies measure the length of your wished necklace If you decide to bead a longer necklace you should keep in mind that for every extra
frac34 inches 2 cm-s you will need 8 bicones and 8 pearls
Something Blue Necklace and Earrings
BLOG WWWHANDMADE-JEWELRY-CLUBCOM MEMBERSHIP WWWDIYBEADINGCLUBCOM BLOG DIY BEADING MAGAZINE ISSUE 32
Work RAW stitch into a beaded circle and embellish with Swarovski bicones
STEP 2 String 1A and 2 pearls Pass through the previous
second pearl and the freshly added 1A and the first pearl again
STEP 1 Use a comfortable length of thread to string 2
pearls 1A and 1 pearl again leaving a 2rdquo 5cm tail Pass through the first two pearls strung to form a
ring
STEP 3 String 2 pearls and 1A Pass through the previous first pearl and the freshly added two pearls
again
STEP 4 - 17 Repeat STEP 2 and STEP 3 again until you count 17 pearls in the inner circle
But be careful in the last step you only have to add 1 pearl then pass through the first pearls
added in STEP 1 and add another 1A Now pass through the first pearl added in STEP
1and 1A added in this round again to exit from this A
Something Blue Necklace and Earrings
BLOG WWWHANDMADE-JEWELRY-CLUBCOM MEMBERSHIP WWWDIYBEADINGCLUBCOM BLOG DIY BEADING MAGAZINE ISSUE 32
STEP 19 String 2A and pass through the next A added in round 4-17 and the A added in round 18 the 2A added in this round and finally the A added in round 4-17 to exit from the bead showed below
STEP 18 String 3A and pass through the 1A added in the previous round and the first A added in this
round
STEP 20 - 34 Repeat STEP 18 and STEP 19 again until you finish the circle
But be careful in the last step first you have to pass through 3A and then add 1A After this pass
through the 3A again and exit from the A bead
shown below (This is the first A added in STEP 18)
Something Blue Necklace and Earrings
BLOG WWWHANDMADE-JEWELRY-CLUBCOM MEMBERSHIP WWWDIYBEADINGCLUBCOM BLOG DIY BEADING MAGAZINE ISSUE 32
STEP 35 Step up to exit from the pearl shown below (Finishing the previous step in the A bead and then
stepping up from there makes the circle more secure)
Now string 3 bicones Pass through the pearl and the first bicone again
In the reality your circle will look more like this the A beads forming a strong row in the middle of the
pearls
STEP 36 Add 2 bicones Pass through the
neighboring pearl the first bicone added in the previous row and the 2 bicones added in this step
so you can exit from the next pearl
Something Blue Necklace and Earrings
BLOG WWWHANDMADE-JEWELRY-CLUBCOM MEMBERSHIP WWWDIYBEADINGCLUBCOM BLOG DIY BEADING MAGAZINE ISSUE 32
Now in the reality your circle will look more like this the A beads still forming a strong row in the middle of the pearls and the bicones slightly lying on top of
them
STEP 37 - 49 Repeat STEP 35 and STEP 36 again until you finish the circle with the bicones
But be careful in the last step first you have pass through the third bicone added then add 1 bicone
and pass through this little quartet to exit from the bicone shown below (The second one added in
STEP 35)
STEP 50 With these steps we finish the circle by adding 1 bicone to connect the A beads and the
bicone row So add 1 bicone pass through the nearest A bead and add 1 bicone again Pass
through the bicone already there and exit from the bicone you just added
Something Blue Necklace and Earrings
BLOG WWWHANDMADE-JEWELRY-CLUBCOM MEMBERSHIP WWWDIYBEADINGCLUBCOM BLOG DIY BEADING MAGAZINE ISSUE 32
STEP 66-83 Secure the circle by adding 1A between each bicone in the second row of Swarovski
bicones If you finished secure the thread and trim
STEP 51-65 Using the same technique as in STEP 37 - 49 add 1 bicone to finish the third bicone row The black line shows you the way (After STEP 50 pass through the next A bead add 1 bicone and pass through the bicone already there and the bicone added in the previous step Repeat these steps to
finish the inner bicone circle)
MIDDLE CIRCLE Work RAW stitch into a beaded circle and embellish with
Swarovski bicones Remember you need to bead two circles this time
STEP 1 Just like in the focal circle begin with 2 pearls 1A and 1 pearl again on a comfortable length of thread
leaving a 2rdquo 5cm tail Pass through the first two pearls strung to form a ring
Something Blue Necklace and Earrings
BLOG WWWHANDMADE-JEWELRY-CLUBCOM MEMBERSHIP WWWDIYBEADINGCLUBCOM BLOG DIY BEADING MAGAZINE ISSUE 32
STEP 15-28 Mimicing the FOCAL CIRCLElsquos STEP 18-34 bead A beads until you finish the inner part of the
circle Exit from a pearl in the second row This circle should look very similar to the first one but this is a bit
smaller
STEP 2-14 Mimicing the FOCAL CIRCLElsquos STEP 2-17 bead until you count 14 pearls in the inner circle Exit
from the last A added
STEP 29-42 Mimicing FOCAL CIRCLElsquos STEP 35-49 add 2 rows of bicones
STEP 43-56 Mimicing the FOCAL CIRCLElsquos STEP 50-65 bead the third row of bicones to finish the circle
Something Blue Necklace and Earrings
BLOG WWWHANDMADE-JEWELRY-CLUBCOM MEMBERSHIP WWWDIYBEADINGCLUBCOM BLOG DIY BEADING MAGAZINE ISSUE 32
SMALLEST CIRCLE Work RAW stitch into a beaded circle and embellish
with Swarovski bicones Remember you need to bead two circles again
STEP 1 Just like in the focal circle begin with 2 pearls
1A and 1 pearl again on a comfortable length of thread leaving a 2rdquo 5cm tail Pass through the first two
pearls strung to form a ring
STEP 57-70 Just like the FOCAL CIRCLElsquos STEP 66-83 secure the circle by adding 1A between every bicone
in the second row of bicones If you finished secure the thread and trim (Donrsquot forget to bead another
circle)
STEP 2-12 Mimicing the FOCAL CIRCLElsquos STEP 2-17 bead until you count 12 pearls in the inner circle Exit
from the last A added
STEP 13-24 Mimicing the FOCAL CIRCLElsquos STEP 18-34 bead A beads until you finish the inner part of the
circle Exit from a pearl in the second row This circle should look very similar to the first two but this is the
smallest of them all
Something Blue Necklace and Earrings
BLOG WWWHANDMADE-JEWELRY-CLUBCOM MEMBERSHIP WWWDIYBEADINGCLUBCOM BLOG DIY BEADING MAGAZINE ISSUE 32
STEP 37-48 Mimicing the FOCAL CIRCLElsquos STEP 50-65 bead the third row of bicones to finish this circle too
STEP 25-36 Mimicing FOCAL CIRCLElsquos STEP 35-49 add 2
rows of bicones The last step here is purple again
STEP 49-60 Just like the FOCAL CIRCLElsquos STEP 66-83 secure the circle by adding 1A between every bicone
in the second row of bicones If you finished secure the thread and trim (Donrsquot forget that you need two
small circles)
Something Blue Necklace and Earrings
BLOG WWWHANDMADE-JEWELRY-CLUBCOM MEMBERSHIP WWWDIYBEADINGCLUBCOM BLOG DIY BEADING MAGAZINE ISSUE 32
STEP 37-48 Mimicing the FOCAL CIRCLElsquos STEP 50-65 bead the third row of bicones to finish this circle too
STEP 25-36 Mimicing FOCAL CIRCLElsquos STEP 35-49 add 2
rows of bicones The last step here is purple again
STEP 49-60 Just like the FOCAL CIRCLElsquos STEP 66-83 secure the circle by adding 1A between every bicone
in the second row of bicones If you finished secure the thread and trim (Donrsquot forget that you need two
small circles)
Something Blue Necklace and Earrings
BLOG WWWHANDMADE-JEWELRY-CLUBCOM MEMBERSHIP WWWDIYBEADINGCLUBCOM BLOG DIY BEADING MAGAZINE ISSUE 32
STEP 2-6 Continue by adding 1A 1 bicone 1 pearl until you count 6 of each
STEP 1 Begin with 1 pearl 1 bicone 1A and 1 bicone again on a comfortable length of thread leaving a 2rdquo
5cm tail Pass through the pearl and the first bicone strung to form a ring
STEP 7-12 Pass through the A beads to make your
component more secure Also secure the thread and trim (Repeat these steps until you have six 6-BEAD
COMPONENTs)
6-BEAD COMPONENT Work RAW stitch into a beaded circle and embellish with Swarovski bicones
For the necklace we will need six from this component For the earring two
Something Blue Necklace and Earrings
BLOG WWWHANDMADE-JEWELRY-CLUBCOM MEMBERSHIP WWWDIYBEADINGCLUBCOM BLOG DIY BEADING MAGAZINE ISSUE 32
STEP 2-4 Continue by adding 1A 1 bicone 1 pearl
until you count 4 of each
STEP 1 Begin with 1 pearl 1 bicone 1A and 1 bicone again on a comfortable length of thread leaving a 2rdquo
5cm tail Pass through the pearl and the first bicone strung to form a ring
STEP 5-8 Pass through the A beads to make your component more secure Also secure the thread and
trim (Repeat these steps until you have the wished amount of 4-BEAD COMPONENTs)
4-BEAD COMPONENT Work RAW stitch into a beaded circle and embellish with Swarovski bicones
For the necklace-size that is given on the second page we will need 20 from this
component For the earring two
If you would like to make a longer necklace you need to make more (One 4-BEAD COMPONENT measures about 38 inch 1 cm To make the necklace symmetrical you have to have equal amounts on each side This means for every extra frac34 inches
2 cm-s you will need 1 4-BEAD COMPONENT on each side of the necklace)
Something Blue Necklace and Earrings
BLOG WWWHANDMADE-JEWELRY-CLUBCOM MEMBERSHIP WWWDIYBEADINGCLUBCOM BLOG DIY BEADING MAGAZINE ISSUE 32
STEP 2 Connect the MIDDLE CIRCLE to two 6-BEAD COMPONENTs by adding four-times 2As
between the pearls Choose a pearl on the MIDDLE CIRCLE and add
2A pass through a pearl in the 6-BEAD COMPONENT previously added and add 2A again Watch out this has to be symmetrical Repeat this at least two more times to make it
secure Now repeat this entire procedure but choose
the 8-th pearl on MIDDLE CIRCLE Repeat this on the other side of the necklace
too
Choose a pearl on the FOCAL CIRCLE and add 2A pass through a pearl in the 6-BEAD COMPONENT and add 2A again Repeat this at least two more times to make it secure
Now repeat this entire procedure but choose the 5-th pearl on FOCAL CIRCLE This will make the necklace nice on your neck
FINISHING THE NECKLACE Connects the parts with A beads
STEP 1 Connect the FOCAL CIRCLE to two 6-BEAD COMPONENTs by adding four-times 2As between the pearls To do this turn your parts upside down you need to
see the pearls We will work on this side from now on
Something Blue Necklace and Earrings
BLOG WWWHANDMADE-JEWELRY-CLUBCOM MEMBERSHIP WWWDIYBEADINGCLUBCOM BLOG DIY BEADING MAGAZINE ISSUE 32
FINISHING THE EARRING Connects the parts with A beads
STEP 1-2 Connect the 6-BEAD COMPONENT
to 4-BEAD COMPONENT and the 4-BEAD
COMPONENT to the earring hook
First connect the 4-BEAD COMPONENT to the 6-BEAD COMPONENT with 4A beads Mimic
the elongation steps of the necklace if needed
Secondly connect the 4-BEAD COMPONENT
to your earring hook with 4A beads again Leave from the last pearl bead 2A beads the hook (this is the orange oval form) and 2As again Pass through each of them to
secure this connection again
Finally get ready to prepare the other earring ndash since we need two of them
STEP 5 Connect the 4-BEAD COMPONENTs to the toggle clasp thus finishing the
necklace Leaving from the last pearl bead 2A the
clasp(this is the orange oval form) and 2A again Pass through all of them a couple more times to make this connection more
secure
Something Blue Necklace and Earrings
BLOG WWWHANDMADE-JEWELRY-CLUBCOM MEMBERSHIP WWWDIYBEADINGCLUBCOM BLOG DIY BEADING MAGAZINE ISSUE 32
If you finished it is time to try it on It was a great fun wasnrsquot it And how beautiful you look in your new necklace and the matching earrings
Something Blue Necklace and Earrings
BLOG WWWHANDMADE-JEWELRY-CLUBCOM MEMBERSHIP WWWDIYBEADINGCLUBCOM
About the Author
Margit Vogel
My name is Margit Vogel I live in Hungary Europe
By profession I am a biochemical engineer but I fell in love with
beads so much that I could not stop playing with them
I make one-of-a-kind beaded and bead embroidered art
jewelry made of the best quality materials such as Swarovski
stones gemstones Japanese beads (Miyuki and Toho) Czech
glass beads leather soutache and suede Each piece is unique
and individually crafted
Feel free to visit my blog for some eyecandy
httpiformjewelrywordpresscom
My shop httpwwwetsycomshopiformjewelry
Facebook httpwwwfacebookcomiformjewelry
BLOG DIY BEADING MAGAZINE ISSUE 32
Getting Down And Personal With Gianna
Getting Down And Personal With Gianna
Nowadays we see more and more jewelry stores opening up online and with these online jewelry stores it has made it easier for us to purchase and view their creations Have you ever wondered how they are able to manage and produce amazing jewelry pieces and tutorials So heres a little on the journey to open up an online shop We are excited to present to you Gianna aka Beading4perfectionists
Gianna Beader amp Youtuber
Unlike most jewelry makers and beadweavers Gianna did not start beading as a hobby but as a means to make ends meet With goals in trying to
fill the financial gap she did everything she could to expand her earnings ndash working as a security guard
and at the same time learning how to bead and selling her pieces at fair trades and flea markets
Since many were asking if she does home beading workshops she started on exploring how to teach people to bead She loves Scott Bakula and has always loved him till now and this served as her
inspiration to start making a beading video tutorial
Gianna started creating videos because she was at the point in her life where everything seemed to be falling apart And at that moment of time she had difficulties financially and selling jewelry was the only way for her to stay afloat financially She is a big Scott Bakula fan and when she went to the UK to see him on stage that was when it hit her that she is already able to edit videos and
taught herself Photoshop and done workshops at bead fairs so why not put these together and see what happens on Youtube She knew that if she gets enough subscribers and views ndash though no one knew what the exact numbers were you would be invited to become a Youtube partner This way she could monetize her videos with advertisements and hopefully she would be able to be a Youtube partner and be able to pay her bills
BLOG WWWHANDMADE-JEWELRY-CLUBCOM MEMBERSHIP WWWDIYBEADINGCLUBCOM BLOG DIY BEADING MAGAZINE ISSUE 32
Getting Down And Personal With Gianna
Her Youtube channel is popular and the reason why she chose Youtube is because Youtube is the biggest platform and reached almost to the whole world Everyone already knows about it and it was growing rapidly as compared to other platforms like Dailymotion so she figured that Youtube was the way to go Her advice to new designers is that when you start out go to the platforms on the top of your list first then work your way down your list if you do not get accepted by your first choice
After loyally putting up one video every week for about 8 months in a row she became a Youtube partner and monetized her videos She knew she needed at least $100 to get her first payout She managed to reach $100 after 3 months The process was not easy she worked hard lack sleep skipped meals and who knows what happened to Ridge in the Bold and the Beautiful because she stopped watching
On Youtube you can monetize your videos Google pays straight to your bank account and at other countries where they also have the option of getting checks among other options In order to get paid you have to reach the $100 mark and after 3 months For Gianna she thinks that you cannot say that Etsy is better than Youtube or Youtube is better than Etsy Her reasoning is because on Youtube she has many followers which will eventually check out her Etsy shop And to start an Etsy shop you need an audience
BLOG WWWHANDMADE-JEWELRY-CLUBCOM MEMBERSHIP WWWDIYBEADINGCLUBCOM BLOG DIY BEADING MAGAZINE ISSUE 32
television and dedicated her spare time (as she had another job) to Youtube She re-registered at the chamber of commerce after receiving her first payout Her work at Youtube now is not a full time job and things have changed on Youtube It is easier to become a parter but there are some countries that need to wait for an invitation to be a Youtube partner Take Italy for instance Italians would have to work just as hard as she did if they want to become a Youtube partner
Getting Down And Personal With Gianna
With her 60000 subscribers on her b4pbakup Youtube channel it is possible to sell at least 60 patterns on the first day on Etsy after promoting the PDF file on her Youtube channel Though you may think that 60 out of 60000 is not much you have to remember that not everyone has the means to purchase the PDF file and a lot of people still rather watch her carry out the tutorial(for free) on Youtube instead of reading the patterns or paying for the patterns even if the pattern is for a fundraiser and only cost $2 Her insights on Youtube is that Youtube is not what it used to be 6 years ago Instead of making more money every month she is making less and less because advertisers have more options of where they want to advertise their ads Ads do not pay as much as they used to Back in the days you could get 25 cents per ad Now you count yourself lucky if you could get 5 cents roll in after two hours
BLOG WWWHANDMADE-JEWELRY-CLUBCOM MEMBERSHIP WWWDIYBEADINGCLUBCOM BLOG DIY BEADING MAGAZINE ISSUE 32
And on top of that adblockers are destroying Youtube channel owners Youtube will start making changes to the channels where there will be ldquopaid subscriptionrdquo channels This has already been implemented in some countries but not in her country The Netherlands This means there will no longer be ads for her monthly paying subscribers She hopes that Youtube will add on a paid per video option feature The option to be a paid channel or free channel or to start a new channel for paying customers is yours to choose Gianna is not happy with Youtube because many others like her have worked so hard and for some years to become Youtube partners(which was something to be proud of) has lost their status
Getting Down And Personal With Gianna
Her advice for those who want to go on Youtube is 1 Do it because you want to teach
2 Do it because you want a career with beads
BLOG WWWHANDMADE-JEWELRY-CLUBCOM MEMBERSHIP WWWDIYBEADINGCLUBCOM BLOG DIY BEADING MAGAZINE ISSUE 32
After putting up about 20 videos and having at least 5000 subscribers add the PDF tutorials to Etsy and Craftsy She found out that her audience would like to have the PDF after watching her videos This is because they would rather print out the PDF and work while seated in a comfy chair technically somewhere else instead of having to pause the video time and time again
Gianna has also made a video for those who want to know the whole story of her journey up until the present day And to get updates on her you can check it out here She has also started a vlog where she tells of how she still works towards becoming a financial independent beader and explains her journey to get where she wants to be(or die trying) Gianna will be in the UK on October the 17th giving an all-day workshop with 4 different patterns
(2 beginners and 2 advanced) in Wotton-under-Edge
Gianna will be there Friday night as the workshop is on Saturday She will be leaving on Sunday Her
doors are open to all who wants to continue the party with her at the hotel across the street
For more information do contact Ann Tucker on Facebook
httpswwwfacebookcomanntucker501
Rec
omm
end
ed R
ead
ings
Making Jewelry with Gemstone
Beads
Combines the popular craft of beading with beautiful semi-precious stones which are collected by many Features a variety of versatile ideas which can be adapted for any type of gem or bead Readers will learn to reate beautiful gemstone jewelry with this dazzling collection of over 100 projects ranging from eyecatching earrings and accessories to exquisite necklaces and bracelets This beautiful book offers an impressive range of 28 beautiful semi-precious stones (including birthstones) and a glimpse into the fascinating history and mythical properties behind them
BLOG DIY BEADING MAGAZINE ISSUE 32 BLOG WWWHANDMADE-JEWELRY-CLUBCOM MEMBERSHIP WWWDIYBEADINGCLUBCOM
Rec
omm
end
ed R
ead
ings
Convertible Crystal Jewelry
Reverse it Twist it Wear it Many
Ways
Diane Whiting presents the idea that convertibility isnrsquot just about using pieces in multiple ways it is also about using skills and creativity in multiple ways Using ever-popular sparkling crystals Diane showcases design elements through various techniques for fun easy fashionable jewelry With 25 projects the reader can choose from bracelets necklaces and earrings that match any outfit or styleDiane Whiting presents the idea that convertibility isnrsquot just about using pieces in multiple ways it is also about using skills and creativity in multiple ways
BLOG DIY BEADING MAGAZINE ISSUE 32 BLOG WWWHANDMADE-JEWELRY-CLUBCOM MEMBERSHIP WWWDIYBEADINGCLUBCOM
Rec
omm
end
ed R
ead
ings
Wire Jewelry Masterclass
Wrapped Coiled and Woven Pieces
Using Fine Materials
Comprehensive and fabulous Wire Jewelry Masterclass takes an in-depth look at an intricate and rewarding craft The 24 projects which range from simple Dragons tear briolette earrings to a Poseidon-under-the-sea pendant will delight and inspire jewelers of all levels and tastes Divided into beginner intermediate and advanced sections this beautifully photographed step-by-step guide is the ticket to wire jewelry expertise
BLOG DIY BEADING MAGAZINE ISSUE 32 BLOG WWWHANDMADE-JEWELRY-CLUBCOM MEMBERSHIP WWWDIYBEADINGCLUBCOM
Rec
omm
end
ed R
ead
ings
Timeless Wire Weaving The
Complete Course
Timeless Wire Weaving focuses on developing wirework skills through 13 projects using three classic wire weaving techniques coiling wrapping and weaving The projects are built around a focal cabochon and incorporate seed beads and crystals in imaginative ways Designers learn to make the jewelry shown in the book and they also use the techniques learned to create innovative jewelry pieces of their own
BLOG DIY BEADING MAGAZINE ISSUE 32 BLOG WWWHANDMADE-JEWELRY-CLUBCOM MEMBERSHIP WWWDIYBEADINGCLUBCOM
Our digital magazine is available through
Apple Newsstand service available to millions of IPAD users
To advertise with us please email us at
diyjewelryclubgmailcom
Or visit our page at
httphandmade-jewelry-clubcomadvertising-diy-beading-magazine

Atomic Ring
BLOG WWWHANDMADE-JEWELRY-CLUBCOM MEMBERSHIP WWWDIYBEADINGCLUBCOM
Materials Needed 20ga Craft wire 28ga Craft wire 11mm Round Cabochon
Tools Needed Wigjig Cyclops 15mm pegs Wire cutter Flat nose pliers Mandrel
Skill Level Intermediate - Advanced
BLOG DIY BEADING MAGAZINE ISSUE 32
Step 1 Lets prepare your wigjig cyclops Position the pegs like so
Atomic Ring
BLOG WWWHANDMADE-JEWELRY-CLUBCOM MEMBERSHIP WWWDIYBEADINGCLUBCOM BLOG DIY BEADING MAGAZINE ISSUE 32
Lets work with longer wire so youll have enough wire to hold onto as you manipulate the wire so cut 36 inches of 20ga wire From
one end of the wire measure 10 inches
On the 10-inch measurement loop the wire at the center peg then continue to loop onto the side pegs going in circle going back to
the center peg after looping on the side peg
Now the wire at the center peg will start to build up as you go around the side pegs so
you need to constantly press the wire at the center peg to accommodate the build up of
wire
When youre done pull out the wire and this is
how it should look like
Atomic Ring
BLOG WWWHANDMADE-JEWELRY-CLUBCOM MEMBERSHIP WWWDIYBEADINGCLUBCOM BLOG DIY BEADING MAGAZINE ISSUE 32
You will notice that the frame opens wide Now to keep the atom frame from opening wide secure the center of the frame by wrapping a 28ga wire What you
need to do is simply pass the 28ga wire into the hole and wrap as many times as needed or until youre sure that the frame is secure
Step 2 Now youre finished with your atom frame Well now create the focal design With the longer wire make a spiral at the center big
enough to accommodate the size of your cabochon In this tutorial the spiral is about
11mm in diameter the same size as my cabochon
Pop in your cabochon and start to make spirals going around and over the cabochon as if you are caging the cabochon Create at
least 5 rounds and then cut off any excess
Step 3 Now lets make the ring and this with the other
end of the wire
Atomic Ring
BLOG WWWHANDMADE-JEWELRY-CLUBCOM MEMBERSHIP WWWDIYBEADINGCLUBCOM BLOG DIY BEADING MAGAZINE ISSUE 32
Bring up your mandrel and wrap the wire to the size of your finger Wrap at least 2 times
When youre sure you have the right size pull the ring out of the mandrel
With the extended wire wrap the wire the secure the ring
Cut off any excess and voila You have your atomic ring Create as many as you can with different colors of cabochon
Atomic Ring
BLOG WWWHANDMADE-JEWELRY-CLUBCOM MEMBERSHIP WWWDIYBEADINGCLUBCOM
About the Author
Sky Aldovino
I consider myself a late bloomer when it comes to crafting Irsquom a self-taught jewelry maker Jewelry making wasnrsquot really a hobby of mine but unforeseen events lead me to learn jewellery making My family put up a craft store where we sell cross stitch beads and all sorts of crafting materials I fell in love with the beads and tried to create accessories only for myself Clients liked the pieces and I started customizing handmade jewelleries The craft store was a success for 6 years but like any other small businesses we had to close it down and I was confined to staying at home While at home I had all the time using the internet and now working as a home-based jewelry designer
BLOG DIY BEADING MAGAZINE ISSUE 32
Featured Article Gemstones Used for Jewelry Making
BLOG WWWHANDMADE-JEWELRY-CLUBCOM MEMBERSHIP WWWDIYBEADINGCLUBCOM
Gemstones are stones which we hold quite highly in terms of value And
jewelry often consists of stones that add attractiveness to it so it is not
surprising when jewelry designers actually use gemstones in their designs In
fact there are different types of gemstones that can be used for making
jewelry There are the expensive and pure gemstones and there are also the
imitation ones The information below will provide some information about
the kinds of stones you can use to create jewelry and how these stones will
impact the jewelry you have created
The first kind of stone which I believe we are all quite familiar with are
birthstones These stones are associated with individualrsquos month of birth
by SunVDesigns by BeyhanAkman
For example Amethyst stone is connected with anybody who is born in
February which carries special significance in the area of emotions and also
spiritually This stone also signifies calm and peace as well
And then we have semi-precious stones which are also often used in jewelry
making They are not as valuable as compared to precious stones but still
valuable Best examples of these stones are aquamarine topaz tourmaline
opal and turquoise
BLOG DIY BEADING MAGAZINE ISSUE 32
Featured Article Gemstones Used for Jewelry Making
BLOG WWWHANDMADE-JEWELRY-CLUBCOM MEMBERSHIP WWWDIYBEADINGCLUBCOM
It is an ideal gift for someone who you deem special Aquamarine pendants
usually work well for anyone and is widely an accepted stone
by HyppieChic by joyeriamestiza
However precious stones are the most unusual
and precious jewels to us Examples of some of
them are emerald sapphire diamond and
ruby These stones are usually very expensive
and are prized for their exquisiteness These
stones are commonly used in high-quality
jewelry designs which costs quite a fortune to
obtain
BLOG DIY BEADING MAGAZINE ISSUE 32
by sarajewelrystu
Jewelry designs with precious stones are usually
given as exceptional gifts on special occasions A
perfect example is a diamond ring that is usually
given as an engagement gift
by ldiamondsforever
Featured Article Gemstones Used for Jewelry Making
BLOG WWWHANDMADE-JEWELRY-CLUBCOM MEMBERSHIP WWWDIYBEADINGCLUBCOM
There are also synthetic stones which are often used to create jewelry
Synthetic stones are artificial imitations of gemstones Synthetic Sapphire
jewelry costs less compare with the authentic ones Most of the time
imitation stones are used to save cost but at the same time have the similar
look of the real stone
BLOG DIY BEADING MAGAZINE ISSUE 32
by shininggems by thaimaker
by lapinduprintemps by PastimeArt
Gemstones are used like beads and you can use it in any designs whether
simple or elaborate
Swarovski crystal components are available in a rich multitude of rondelles Perfect as spacers in necklaces or as discs in earrings Rondelles can be used with many varieties of shapes or sizes Use Swarovski crystal rondelles between large gemstones as accents with precious metal findings Fire Mountain Gems and Beads Crystal Passionsreg brand presents Swarovski crystal in display-ready packaging for brilliant retail presentation Crystal Passionsreg is an assurance of genuine Swarovski crystal
BLOG DIY BEADING MAGAZINE ISSUE 32 BLOG WWWHANDMADE-JEWELRY-CLUBCOM MEMBERSHIP WWWDIYBEADINGCLUBCOM
Recommended Jewelry Making Supplies
Mz Unisex-adults 12pcs 25x18x6mm Turquoise Oval CAB Cabochon
BLOG DIY BEADING MAGAZINE ISSUE 32 BLOG WWWHANDMADE-JEWELRY-CLUBCOM MEMBERSHIP WWWDIYBEADINGCLUBCOM
Recommended Jewelry Making Supplies
For a little sparkle that goes a long way design with Swarovski 4mm faceted bicones Create glorious multi-strand necklaces with the dainty crystals or use as spacers to add a tiny flash to your designs Swarovski crystal components are made in Austria and are considered the finest products of their kind in the world
BLOG DIY BEADING MAGAZINE ISSUE 32 BLOG WWWHANDMADE-JEWELRY-CLUBCOM MEMBERSHIP WWWDIYBEADINGCLUBCOM
Recommended Jewelry Making Supplies
Imitation beads resist color change These beads have uniform quality with a good polish Some strands may have little to no matrix Sizes shapes and colors may vary with handcrafted items
BLOG DIY BEADING MAGAZINE ISSUE 32 BLOG WWWHANDMADE-JEWELRY-CLUBCOM MEMBERSHIP WWWDIYBEADINGCLUBCOM
Recommended Jewelry Making Supplies
Something Blue Necklace and Earrings
BLOG WWWHANDMADE-JEWELRY-CLUBCOM MEMBERSHIP WWWDIYBEADINGCLUBCOM
Skill level Beginner Intermediate Advanced
DIMENSIONS OF THE NECKLACE Inner Circumference 14 18 inch 35 cm
Focal Pendant Width 1 15 inch 35 cm Focal Pendant Height 1 15 inch 35 cm
DIMENSIONS OF THE EARRING Earring Width 716 inch 12 cm Earring Height 1516 inch 25 cm (Without the earring hook)
BLOG DIY BEADING MAGAZINE ISSUE 32
Materials
Note Before purchasing the supplies measure the length of your wished necklace If you decide to bead a longer necklace you should keep in mind that for every extra
frac34 inches 2 cm-s you will need 8 bicones and 8 pearls
Something Blue Necklace and Earrings
BLOG WWWHANDMADE-JEWELRY-CLUBCOM MEMBERSHIP WWWDIYBEADINGCLUBCOM BLOG DIY BEADING MAGAZINE ISSUE 32
Work RAW stitch into a beaded circle and embellish with Swarovski bicones
STEP 2 String 1A and 2 pearls Pass through the previous
second pearl and the freshly added 1A and the first pearl again
STEP 1 Use a comfortable length of thread to string 2
pearls 1A and 1 pearl again leaving a 2rdquo 5cm tail Pass through the first two pearls strung to form a
ring
STEP 3 String 2 pearls and 1A Pass through the previous first pearl and the freshly added two pearls
again
STEP 4 - 17 Repeat STEP 2 and STEP 3 again until you count 17 pearls in the inner circle
But be careful in the last step you only have to add 1 pearl then pass through the first pearls
added in STEP 1 and add another 1A Now pass through the first pearl added in STEP
1and 1A added in this round again to exit from this A
Something Blue Necklace and Earrings
BLOG WWWHANDMADE-JEWELRY-CLUBCOM MEMBERSHIP WWWDIYBEADINGCLUBCOM BLOG DIY BEADING MAGAZINE ISSUE 32
STEP 19 String 2A and pass through the next A added in round 4-17 and the A added in round 18 the 2A added in this round and finally the A added in round 4-17 to exit from the bead showed below
STEP 18 String 3A and pass through the 1A added in the previous round and the first A added in this
round
STEP 20 - 34 Repeat STEP 18 and STEP 19 again until you finish the circle
But be careful in the last step first you have to pass through 3A and then add 1A After this pass
through the 3A again and exit from the A bead
shown below (This is the first A added in STEP 18)
Something Blue Necklace and Earrings
BLOG WWWHANDMADE-JEWELRY-CLUBCOM MEMBERSHIP WWWDIYBEADINGCLUBCOM BLOG DIY BEADING MAGAZINE ISSUE 32
STEP 35 Step up to exit from the pearl shown below (Finishing the previous step in the A bead and then
stepping up from there makes the circle more secure)
Now string 3 bicones Pass through the pearl and the first bicone again
In the reality your circle will look more like this the A beads forming a strong row in the middle of the
pearls
STEP 36 Add 2 bicones Pass through the
neighboring pearl the first bicone added in the previous row and the 2 bicones added in this step
so you can exit from the next pearl
Something Blue Necklace and Earrings
BLOG WWWHANDMADE-JEWELRY-CLUBCOM MEMBERSHIP WWWDIYBEADINGCLUBCOM BLOG DIY BEADING MAGAZINE ISSUE 32
Now in the reality your circle will look more like this the A beads still forming a strong row in the middle of the pearls and the bicones slightly lying on top of
them
STEP 37 - 49 Repeat STEP 35 and STEP 36 again until you finish the circle with the bicones
But be careful in the last step first you have pass through the third bicone added then add 1 bicone
and pass through this little quartet to exit from the bicone shown below (The second one added in
STEP 35)
STEP 50 With these steps we finish the circle by adding 1 bicone to connect the A beads and the
bicone row So add 1 bicone pass through the nearest A bead and add 1 bicone again Pass
through the bicone already there and exit from the bicone you just added
Something Blue Necklace and Earrings
BLOG WWWHANDMADE-JEWELRY-CLUBCOM MEMBERSHIP WWWDIYBEADINGCLUBCOM BLOG DIY BEADING MAGAZINE ISSUE 32
STEP 66-83 Secure the circle by adding 1A between each bicone in the second row of Swarovski
bicones If you finished secure the thread and trim
STEP 51-65 Using the same technique as in STEP 37 - 49 add 1 bicone to finish the third bicone row The black line shows you the way (After STEP 50 pass through the next A bead add 1 bicone and pass through the bicone already there and the bicone added in the previous step Repeat these steps to
finish the inner bicone circle)
MIDDLE CIRCLE Work RAW stitch into a beaded circle and embellish with
Swarovski bicones Remember you need to bead two circles this time
STEP 1 Just like in the focal circle begin with 2 pearls 1A and 1 pearl again on a comfortable length of thread
leaving a 2rdquo 5cm tail Pass through the first two pearls strung to form a ring
Something Blue Necklace and Earrings
BLOG WWWHANDMADE-JEWELRY-CLUBCOM MEMBERSHIP WWWDIYBEADINGCLUBCOM BLOG DIY BEADING MAGAZINE ISSUE 32
STEP 15-28 Mimicing the FOCAL CIRCLElsquos STEP 18-34 bead A beads until you finish the inner part of the
circle Exit from a pearl in the second row This circle should look very similar to the first one but this is a bit
smaller
STEP 2-14 Mimicing the FOCAL CIRCLElsquos STEP 2-17 bead until you count 14 pearls in the inner circle Exit
from the last A added
STEP 29-42 Mimicing FOCAL CIRCLElsquos STEP 35-49 add 2 rows of bicones
STEP 43-56 Mimicing the FOCAL CIRCLElsquos STEP 50-65 bead the third row of bicones to finish the circle
Something Blue Necklace and Earrings
BLOG WWWHANDMADE-JEWELRY-CLUBCOM MEMBERSHIP WWWDIYBEADINGCLUBCOM BLOG DIY BEADING MAGAZINE ISSUE 32
SMALLEST CIRCLE Work RAW stitch into a beaded circle and embellish
with Swarovski bicones Remember you need to bead two circles again
STEP 1 Just like in the focal circle begin with 2 pearls
1A and 1 pearl again on a comfortable length of thread leaving a 2rdquo 5cm tail Pass through the first two
pearls strung to form a ring
STEP 57-70 Just like the FOCAL CIRCLElsquos STEP 66-83 secure the circle by adding 1A between every bicone
in the second row of bicones If you finished secure the thread and trim (Donrsquot forget to bead another
circle)
STEP 2-12 Mimicing the FOCAL CIRCLElsquos STEP 2-17 bead until you count 12 pearls in the inner circle Exit
from the last A added
STEP 13-24 Mimicing the FOCAL CIRCLElsquos STEP 18-34 bead A beads until you finish the inner part of the
circle Exit from a pearl in the second row This circle should look very similar to the first two but this is the
smallest of them all
Something Blue Necklace and Earrings
BLOG WWWHANDMADE-JEWELRY-CLUBCOM MEMBERSHIP WWWDIYBEADINGCLUBCOM BLOG DIY BEADING MAGAZINE ISSUE 32
STEP 37-48 Mimicing the FOCAL CIRCLElsquos STEP 50-65 bead the third row of bicones to finish this circle too
STEP 25-36 Mimicing FOCAL CIRCLElsquos STEP 35-49 add 2
rows of bicones The last step here is purple again
STEP 49-60 Just like the FOCAL CIRCLElsquos STEP 66-83 secure the circle by adding 1A between every bicone
in the second row of bicones If you finished secure the thread and trim (Donrsquot forget that you need two
small circles)
Something Blue Necklace and Earrings
BLOG WWWHANDMADE-JEWELRY-CLUBCOM MEMBERSHIP WWWDIYBEADINGCLUBCOM BLOG DIY BEADING MAGAZINE ISSUE 32
STEP 37-48 Mimicing the FOCAL CIRCLElsquos STEP 50-65 bead the third row of bicones to finish this circle too
STEP 25-36 Mimicing FOCAL CIRCLElsquos STEP 35-49 add 2
rows of bicones The last step here is purple again
STEP 49-60 Just like the FOCAL CIRCLElsquos STEP 66-83 secure the circle by adding 1A between every bicone
in the second row of bicones If you finished secure the thread and trim (Donrsquot forget that you need two
small circles)
Something Blue Necklace and Earrings
BLOG WWWHANDMADE-JEWELRY-CLUBCOM MEMBERSHIP WWWDIYBEADINGCLUBCOM BLOG DIY BEADING MAGAZINE ISSUE 32
STEP 2-6 Continue by adding 1A 1 bicone 1 pearl until you count 6 of each
STEP 1 Begin with 1 pearl 1 bicone 1A and 1 bicone again on a comfortable length of thread leaving a 2rdquo
5cm tail Pass through the pearl and the first bicone strung to form a ring
STEP 7-12 Pass through the A beads to make your
component more secure Also secure the thread and trim (Repeat these steps until you have six 6-BEAD
COMPONENTs)
6-BEAD COMPONENT Work RAW stitch into a beaded circle and embellish with Swarovski bicones
For the necklace we will need six from this component For the earring two
Something Blue Necklace and Earrings
BLOG WWWHANDMADE-JEWELRY-CLUBCOM MEMBERSHIP WWWDIYBEADINGCLUBCOM BLOG DIY BEADING MAGAZINE ISSUE 32
STEP 2-4 Continue by adding 1A 1 bicone 1 pearl
until you count 4 of each
STEP 1 Begin with 1 pearl 1 bicone 1A and 1 bicone again on a comfortable length of thread leaving a 2rdquo
5cm tail Pass through the pearl and the first bicone strung to form a ring
STEP 5-8 Pass through the A beads to make your component more secure Also secure the thread and
trim (Repeat these steps until you have the wished amount of 4-BEAD COMPONENTs)
4-BEAD COMPONENT Work RAW stitch into a beaded circle and embellish with Swarovski bicones
For the necklace-size that is given on the second page we will need 20 from this
component For the earring two
If you would like to make a longer necklace you need to make more (One 4-BEAD COMPONENT measures about 38 inch 1 cm To make the necklace symmetrical you have to have equal amounts on each side This means for every extra frac34 inches
2 cm-s you will need 1 4-BEAD COMPONENT on each side of the necklace)
Something Blue Necklace and Earrings
BLOG WWWHANDMADE-JEWELRY-CLUBCOM MEMBERSHIP WWWDIYBEADINGCLUBCOM BLOG DIY BEADING MAGAZINE ISSUE 32
STEP 2 Connect the MIDDLE CIRCLE to two 6-BEAD COMPONENTs by adding four-times 2As
between the pearls Choose a pearl on the MIDDLE CIRCLE and add
2A pass through a pearl in the 6-BEAD COMPONENT previously added and add 2A again Watch out this has to be symmetrical Repeat this at least two more times to make it
secure Now repeat this entire procedure but choose
the 8-th pearl on MIDDLE CIRCLE Repeat this on the other side of the necklace
too
Choose a pearl on the FOCAL CIRCLE and add 2A pass through a pearl in the 6-BEAD COMPONENT and add 2A again Repeat this at least two more times to make it secure
Now repeat this entire procedure but choose the 5-th pearl on FOCAL CIRCLE This will make the necklace nice on your neck
FINISHING THE NECKLACE Connects the parts with A beads
STEP 1 Connect the FOCAL CIRCLE to two 6-BEAD COMPONENTs by adding four-times 2As between the pearls To do this turn your parts upside down you need to
see the pearls We will work on this side from now on
Something Blue Necklace and Earrings
BLOG WWWHANDMADE-JEWELRY-CLUBCOM MEMBERSHIP WWWDIYBEADINGCLUBCOM BLOG DIY BEADING MAGAZINE ISSUE 32
FINISHING THE EARRING Connects the parts with A beads
STEP 1-2 Connect the 6-BEAD COMPONENT
to 4-BEAD COMPONENT and the 4-BEAD
COMPONENT to the earring hook
First connect the 4-BEAD COMPONENT to the 6-BEAD COMPONENT with 4A beads Mimic
the elongation steps of the necklace if needed
Secondly connect the 4-BEAD COMPONENT
to your earring hook with 4A beads again Leave from the last pearl bead 2A beads the hook (this is the orange oval form) and 2As again Pass through each of them to
secure this connection again
Finally get ready to prepare the other earring ndash since we need two of them
STEP 5 Connect the 4-BEAD COMPONENTs to the toggle clasp thus finishing the
necklace Leaving from the last pearl bead 2A the
clasp(this is the orange oval form) and 2A again Pass through all of them a couple more times to make this connection more
secure
Something Blue Necklace and Earrings
BLOG WWWHANDMADE-JEWELRY-CLUBCOM MEMBERSHIP WWWDIYBEADINGCLUBCOM BLOG DIY BEADING MAGAZINE ISSUE 32
If you finished it is time to try it on It was a great fun wasnrsquot it And how beautiful you look in your new necklace and the matching earrings
Something Blue Necklace and Earrings
BLOG WWWHANDMADE-JEWELRY-CLUBCOM MEMBERSHIP WWWDIYBEADINGCLUBCOM
About the Author
Margit Vogel
My name is Margit Vogel I live in Hungary Europe
By profession I am a biochemical engineer but I fell in love with
beads so much that I could not stop playing with them
I make one-of-a-kind beaded and bead embroidered art
jewelry made of the best quality materials such as Swarovski
stones gemstones Japanese beads (Miyuki and Toho) Czech
glass beads leather soutache and suede Each piece is unique
and individually crafted
Feel free to visit my blog for some eyecandy
httpiformjewelrywordpresscom
My shop httpwwwetsycomshopiformjewelry
Facebook httpwwwfacebookcomiformjewelry
BLOG DIY BEADING MAGAZINE ISSUE 32
Getting Down And Personal With Gianna
Getting Down And Personal With Gianna
Nowadays we see more and more jewelry stores opening up online and with these online jewelry stores it has made it easier for us to purchase and view their creations Have you ever wondered how they are able to manage and produce amazing jewelry pieces and tutorials So heres a little on the journey to open up an online shop We are excited to present to you Gianna aka Beading4perfectionists
Gianna Beader amp Youtuber
Unlike most jewelry makers and beadweavers Gianna did not start beading as a hobby but as a means to make ends meet With goals in trying to
fill the financial gap she did everything she could to expand her earnings ndash working as a security guard
and at the same time learning how to bead and selling her pieces at fair trades and flea markets
Since many were asking if she does home beading workshops she started on exploring how to teach people to bead She loves Scott Bakula and has always loved him till now and this served as her
inspiration to start making a beading video tutorial
Gianna started creating videos because she was at the point in her life where everything seemed to be falling apart And at that moment of time she had difficulties financially and selling jewelry was the only way for her to stay afloat financially She is a big Scott Bakula fan and when she went to the UK to see him on stage that was when it hit her that she is already able to edit videos and
taught herself Photoshop and done workshops at bead fairs so why not put these together and see what happens on Youtube She knew that if she gets enough subscribers and views ndash though no one knew what the exact numbers were you would be invited to become a Youtube partner This way she could monetize her videos with advertisements and hopefully she would be able to be a Youtube partner and be able to pay her bills
BLOG WWWHANDMADE-JEWELRY-CLUBCOM MEMBERSHIP WWWDIYBEADINGCLUBCOM BLOG DIY BEADING MAGAZINE ISSUE 32
Getting Down And Personal With Gianna
Her Youtube channel is popular and the reason why she chose Youtube is because Youtube is the biggest platform and reached almost to the whole world Everyone already knows about it and it was growing rapidly as compared to other platforms like Dailymotion so she figured that Youtube was the way to go Her advice to new designers is that when you start out go to the platforms on the top of your list first then work your way down your list if you do not get accepted by your first choice
After loyally putting up one video every week for about 8 months in a row she became a Youtube partner and monetized her videos She knew she needed at least $100 to get her first payout She managed to reach $100 after 3 months The process was not easy she worked hard lack sleep skipped meals and who knows what happened to Ridge in the Bold and the Beautiful because she stopped watching
On Youtube you can monetize your videos Google pays straight to your bank account and at other countries where they also have the option of getting checks among other options In order to get paid you have to reach the $100 mark and after 3 months For Gianna she thinks that you cannot say that Etsy is better than Youtube or Youtube is better than Etsy Her reasoning is because on Youtube she has many followers which will eventually check out her Etsy shop And to start an Etsy shop you need an audience
BLOG WWWHANDMADE-JEWELRY-CLUBCOM MEMBERSHIP WWWDIYBEADINGCLUBCOM BLOG DIY BEADING MAGAZINE ISSUE 32
television and dedicated her spare time (as she had another job) to Youtube She re-registered at the chamber of commerce after receiving her first payout Her work at Youtube now is not a full time job and things have changed on Youtube It is easier to become a parter but there are some countries that need to wait for an invitation to be a Youtube partner Take Italy for instance Italians would have to work just as hard as she did if they want to become a Youtube partner
Getting Down And Personal With Gianna
With her 60000 subscribers on her b4pbakup Youtube channel it is possible to sell at least 60 patterns on the first day on Etsy after promoting the PDF file on her Youtube channel Though you may think that 60 out of 60000 is not much you have to remember that not everyone has the means to purchase the PDF file and a lot of people still rather watch her carry out the tutorial(for free) on Youtube instead of reading the patterns or paying for the patterns even if the pattern is for a fundraiser and only cost $2 Her insights on Youtube is that Youtube is not what it used to be 6 years ago Instead of making more money every month she is making less and less because advertisers have more options of where they want to advertise their ads Ads do not pay as much as they used to Back in the days you could get 25 cents per ad Now you count yourself lucky if you could get 5 cents roll in after two hours
BLOG WWWHANDMADE-JEWELRY-CLUBCOM MEMBERSHIP WWWDIYBEADINGCLUBCOM BLOG DIY BEADING MAGAZINE ISSUE 32
And on top of that adblockers are destroying Youtube channel owners Youtube will start making changes to the channels where there will be ldquopaid subscriptionrdquo channels This has already been implemented in some countries but not in her country The Netherlands This means there will no longer be ads for her monthly paying subscribers She hopes that Youtube will add on a paid per video option feature The option to be a paid channel or free channel or to start a new channel for paying customers is yours to choose Gianna is not happy with Youtube because many others like her have worked so hard and for some years to become Youtube partners(which was something to be proud of) has lost their status
Getting Down And Personal With Gianna
Her advice for those who want to go on Youtube is 1 Do it because you want to teach
2 Do it because you want a career with beads
BLOG WWWHANDMADE-JEWELRY-CLUBCOM MEMBERSHIP WWWDIYBEADINGCLUBCOM BLOG DIY BEADING MAGAZINE ISSUE 32
After putting up about 20 videos and having at least 5000 subscribers add the PDF tutorials to Etsy and Craftsy She found out that her audience would like to have the PDF after watching her videos This is because they would rather print out the PDF and work while seated in a comfy chair technically somewhere else instead of having to pause the video time and time again
Gianna has also made a video for those who want to know the whole story of her journey up until the present day And to get updates on her you can check it out here She has also started a vlog where she tells of how she still works towards becoming a financial independent beader and explains her journey to get where she wants to be(or die trying) Gianna will be in the UK on October the 17th giving an all-day workshop with 4 different patterns
(2 beginners and 2 advanced) in Wotton-under-Edge
Gianna will be there Friday night as the workshop is on Saturday She will be leaving on Sunday Her
doors are open to all who wants to continue the party with her at the hotel across the street
For more information do contact Ann Tucker on Facebook
httpswwwfacebookcomanntucker501
Rec
omm
end
ed R
ead
ings
Making Jewelry with Gemstone
Beads
Combines the popular craft of beading with beautiful semi-precious stones which are collected by many Features a variety of versatile ideas which can be adapted for any type of gem or bead Readers will learn to reate beautiful gemstone jewelry with this dazzling collection of over 100 projects ranging from eyecatching earrings and accessories to exquisite necklaces and bracelets This beautiful book offers an impressive range of 28 beautiful semi-precious stones (including birthstones) and a glimpse into the fascinating history and mythical properties behind them
BLOG DIY BEADING MAGAZINE ISSUE 32 BLOG WWWHANDMADE-JEWELRY-CLUBCOM MEMBERSHIP WWWDIYBEADINGCLUBCOM
Rec
omm
end
ed R
ead
ings
Convertible Crystal Jewelry
Reverse it Twist it Wear it Many
Ways
Diane Whiting presents the idea that convertibility isnrsquot just about using pieces in multiple ways it is also about using skills and creativity in multiple ways Using ever-popular sparkling crystals Diane showcases design elements through various techniques for fun easy fashionable jewelry With 25 projects the reader can choose from bracelets necklaces and earrings that match any outfit or styleDiane Whiting presents the idea that convertibility isnrsquot just about using pieces in multiple ways it is also about using skills and creativity in multiple ways
BLOG DIY BEADING MAGAZINE ISSUE 32 BLOG WWWHANDMADE-JEWELRY-CLUBCOM MEMBERSHIP WWWDIYBEADINGCLUBCOM
Rec
omm
end
ed R
ead
ings
Wire Jewelry Masterclass
Wrapped Coiled and Woven Pieces
Using Fine Materials
Comprehensive and fabulous Wire Jewelry Masterclass takes an in-depth look at an intricate and rewarding craft The 24 projects which range from simple Dragons tear briolette earrings to a Poseidon-under-the-sea pendant will delight and inspire jewelers of all levels and tastes Divided into beginner intermediate and advanced sections this beautifully photographed step-by-step guide is the ticket to wire jewelry expertise
BLOG DIY BEADING MAGAZINE ISSUE 32 BLOG WWWHANDMADE-JEWELRY-CLUBCOM MEMBERSHIP WWWDIYBEADINGCLUBCOM
Rec
omm
end
ed R
ead
ings
Timeless Wire Weaving The
Complete Course
Timeless Wire Weaving focuses on developing wirework skills through 13 projects using three classic wire weaving techniques coiling wrapping and weaving The projects are built around a focal cabochon and incorporate seed beads and crystals in imaginative ways Designers learn to make the jewelry shown in the book and they also use the techniques learned to create innovative jewelry pieces of their own
BLOG DIY BEADING MAGAZINE ISSUE 32 BLOG WWWHANDMADE-JEWELRY-CLUBCOM MEMBERSHIP WWWDIYBEADINGCLUBCOM
Our digital magazine is available through
Apple Newsstand service available to millions of IPAD users
To advertise with us please email us at
diyjewelryclubgmailcom
Or visit our page at
httphandmade-jewelry-clubcomadvertising-diy-beading-magazine
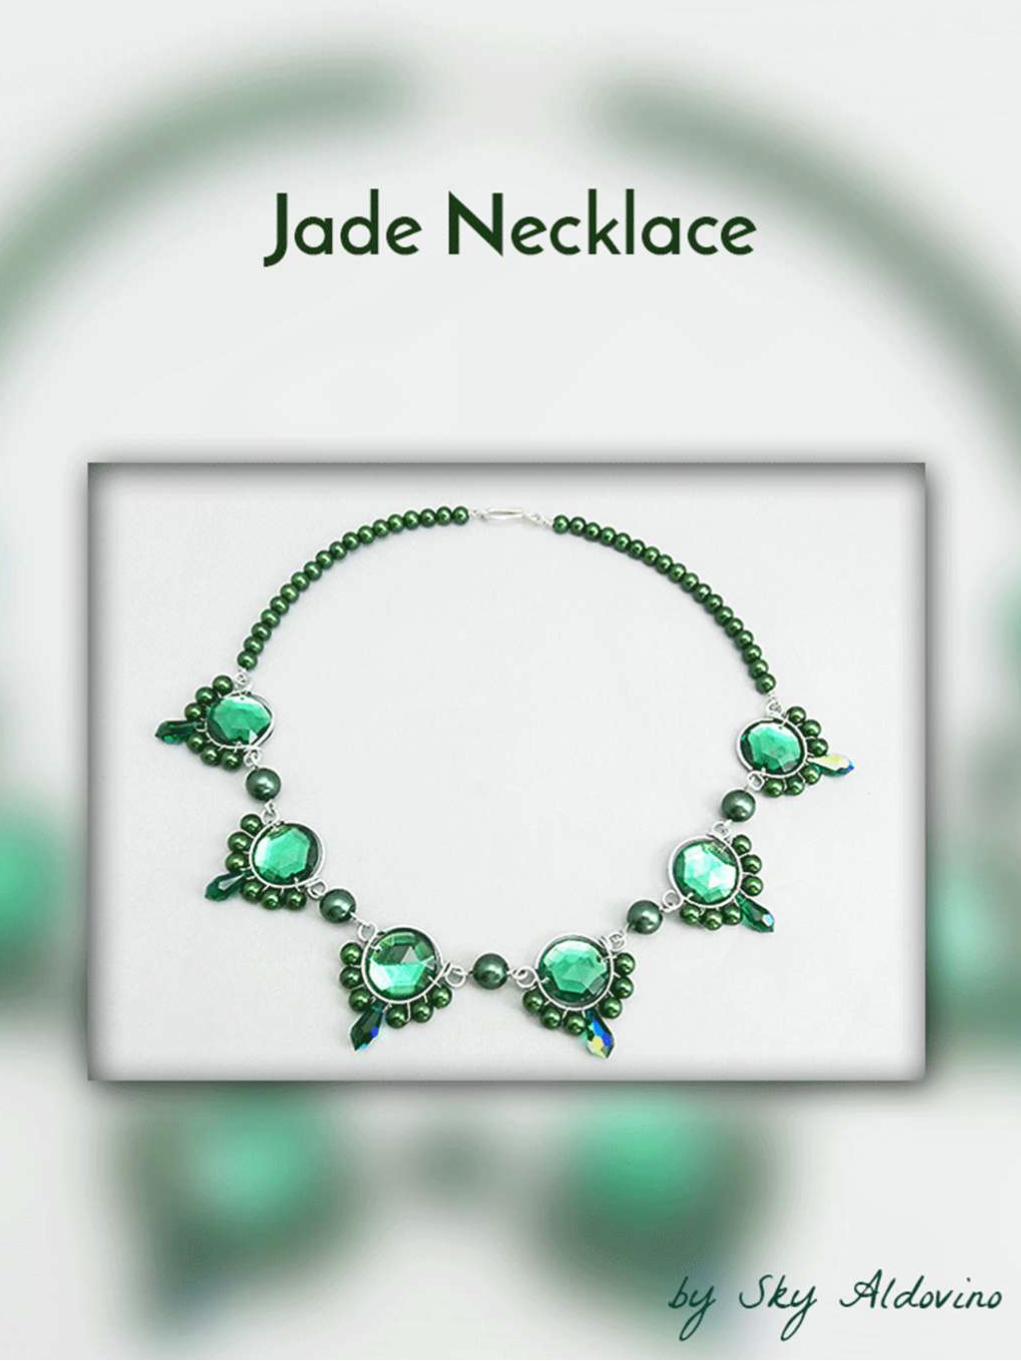
Atomic Ring
BLOG WWWHANDMADE-JEWELRY-CLUBCOM MEMBERSHIP WWWDIYBEADINGCLUBCOM BLOG DIY BEADING MAGAZINE ISSUE 32
You will notice that the frame opens wide Now to keep the atom frame from opening wide secure the center of the frame by wrapping a 28ga wire What you
need to do is simply pass the 28ga wire into the hole and wrap as many times as needed or until youre sure that the frame is secure
Step 2 Now youre finished with your atom frame Well now create the focal design With the longer wire make a spiral at the center big
enough to accommodate the size of your cabochon In this tutorial the spiral is about
11mm in diameter the same size as my cabochon
Pop in your cabochon and start to make spirals going around and over the cabochon as if you are caging the cabochon Create at
least 5 rounds and then cut off any excess
Step 3 Now lets make the ring and this with the other
end of the wire
Atomic Ring
BLOG WWWHANDMADE-JEWELRY-CLUBCOM MEMBERSHIP WWWDIYBEADINGCLUBCOM BLOG DIY BEADING MAGAZINE ISSUE 32
Bring up your mandrel and wrap the wire to the size of your finger Wrap at least 2 times
When youre sure you have the right size pull the ring out of the mandrel
With the extended wire wrap the wire the secure the ring
Cut off any excess and voila You have your atomic ring Create as many as you can with different colors of cabochon
Atomic Ring
BLOG WWWHANDMADE-JEWELRY-CLUBCOM MEMBERSHIP WWWDIYBEADINGCLUBCOM
About the Author
Sky Aldovino
I consider myself a late bloomer when it comes to crafting Irsquom a self-taught jewelry maker Jewelry making wasnrsquot really a hobby of mine but unforeseen events lead me to learn jewellery making My family put up a craft store where we sell cross stitch beads and all sorts of crafting materials I fell in love with the beads and tried to create accessories only for myself Clients liked the pieces and I started customizing handmade jewelleries The craft store was a success for 6 years but like any other small businesses we had to close it down and I was confined to staying at home While at home I had all the time using the internet and now working as a home-based jewelry designer
BLOG DIY BEADING MAGAZINE ISSUE 32
Featured Article Gemstones Used for Jewelry Making
BLOG WWWHANDMADE-JEWELRY-CLUBCOM MEMBERSHIP WWWDIYBEADINGCLUBCOM
Gemstones are stones which we hold quite highly in terms of value And
jewelry often consists of stones that add attractiveness to it so it is not
surprising when jewelry designers actually use gemstones in their designs In
fact there are different types of gemstones that can be used for making
jewelry There are the expensive and pure gemstones and there are also the
imitation ones The information below will provide some information about
the kinds of stones you can use to create jewelry and how these stones will
impact the jewelry you have created
The first kind of stone which I believe we are all quite familiar with are
birthstones These stones are associated with individualrsquos month of birth
by SunVDesigns by BeyhanAkman
For example Amethyst stone is connected with anybody who is born in
February which carries special significance in the area of emotions and also
spiritually This stone also signifies calm and peace as well
And then we have semi-precious stones which are also often used in jewelry
making They are not as valuable as compared to precious stones but still
valuable Best examples of these stones are aquamarine topaz tourmaline
opal and turquoise
BLOG DIY BEADING MAGAZINE ISSUE 32
Featured Article Gemstones Used for Jewelry Making
BLOG WWWHANDMADE-JEWELRY-CLUBCOM MEMBERSHIP WWWDIYBEADINGCLUBCOM
It is an ideal gift for someone who you deem special Aquamarine pendants
usually work well for anyone and is widely an accepted stone
by HyppieChic by joyeriamestiza
However precious stones are the most unusual
and precious jewels to us Examples of some of
them are emerald sapphire diamond and
ruby These stones are usually very expensive
and are prized for their exquisiteness These
stones are commonly used in high-quality
jewelry designs which costs quite a fortune to
obtain
BLOG DIY BEADING MAGAZINE ISSUE 32
by sarajewelrystu
Jewelry designs with precious stones are usually
given as exceptional gifts on special occasions A
perfect example is a diamond ring that is usually
given as an engagement gift
by ldiamondsforever
Featured Article Gemstones Used for Jewelry Making
BLOG WWWHANDMADE-JEWELRY-CLUBCOM MEMBERSHIP WWWDIYBEADINGCLUBCOM
There are also synthetic stones which are often used to create jewelry
Synthetic stones are artificial imitations of gemstones Synthetic Sapphire
jewelry costs less compare with the authentic ones Most of the time
imitation stones are used to save cost but at the same time have the similar
look of the real stone
BLOG DIY BEADING MAGAZINE ISSUE 32
by shininggems by thaimaker
by lapinduprintemps by PastimeArt
Gemstones are used like beads and you can use it in any designs whether
simple or elaborate
Swarovski crystal components are available in a rich multitude of rondelles Perfect as spacers in necklaces or as discs in earrings Rondelles can be used with many varieties of shapes or sizes Use Swarovski crystal rondelles between large gemstones as accents with precious metal findings Fire Mountain Gems and Beads Crystal Passionsreg brand presents Swarovski crystal in display-ready packaging for brilliant retail presentation Crystal Passionsreg is an assurance of genuine Swarovski crystal
BLOG DIY BEADING MAGAZINE ISSUE 32 BLOG WWWHANDMADE-JEWELRY-CLUBCOM MEMBERSHIP WWWDIYBEADINGCLUBCOM
Recommended Jewelry Making Supplies
Mz Unisex-adults 12pcs 25x18x6mm Turquoise Oval CAB Cabochon
BLOG DIY BEADING MAGAZINE ISSUE 32 BLOG WWWHANDMADE-JEWELRY-CLUBCOM MEMBERSHIP WWWDIYBEADINGCLUBCOM
Recommended Jewelry Making Supplies
For a little sparkle that goes a long way design with Swarovski 4mm faceted bicones Create glorious multi-strand necklaces with the dainty crystals or use as spacers to add a tiny flash to your designs Swarovski crystal components are made in Austria and are considered the finest products of their kind in the world
BLOG DIY BEADING MAGAZINE ISSUE 32 BLOG WWWHANDMADE-JEWELRY-CLUBCOM MEMBERSHIP WWWDIYBEADINGCLUBCOM
Recommended Jewelry Making Supplies
Imitation beads resist color change These beads have uniform quality with a good polish Some strands may have little to no matrix Sizes shapes and colors may vary with handcrafted items
BLOG DIY BEADING MAGAZINE ISSUE 32 BLOG WWWHANDMADE-JEWELRY-CLUBCOM MEMBERSHIP WWWDIYBEADINGCLUBCOM
Recommended Jewelry Making Supplies
Something Blue Necklace and Earrings
BLOG WWWHANDMADE-JEWELRY-CLUBCOM MEMBERSHIP WWWDIYBEADINGCLUBCOM
Skill level Beginner Intermediate Advanced
DIMENSIONS OF THE NECKLACE Inner Circumference 14 18 inch 35 cm
Focal Pendant Width 1 15 inch 35 cm Focal Pendant Height 1 15 inch 35 cm
DIMENSIONS OF THE EARRING Earring Width 716 inch 12 cm Earring Height 1516 inch 25 cm (Without the earring hook)
BLOG DIY BEADING MAGAZINE ISSUE 32
Materials
Note Before purchasing the supplies measure the length of your wished necklace If you decide to bead a longer necklace you should keep in mind that for every extra
frac34 inches 2 cm-s you will need 8 bicones and 8 pearls
Something Blue Necklace and Earrings
BLOG WWWHANDMADE-JEWELRY-CLUBCOM MEMBERSHIP WWWDIYBEADINGCLUBCOM BLOG DIY BEADING MAGAZINE ISSUE 32
Work RAW stitch into a beaded circle and embellish with Swarovski bicones
STEP 2 String 1A and 2 pearls Pass through the previous
second pearl and the freshly added 1A and the first pearl again
STEP 1 Use a comfortable length of thread to string 2
pearls 1A and 1 pearl again leaving a 2rdquo 5cm tail Pass through the first two pearls strung to form a
ring
STEP 3 String 2 pearls and 1A Pass through the previous first pearl and the freshly added two pearls
again
STEP 4 - 17 Repeat STEP 2 and STEP 3 again until you count 17 pearls in the inner circle
But be careful in the last step you only have to add 1 pearl then pass through the first pearls
added in STEP 1 and add another 1A Now pass through the first pearl added in STEP
1and 1A added in this round again to exit from this A
Something Blue Necklace and Earrings
BLOG WWWHANDMADE-JEWELRY-CLUBCOM MEMBERSHIP WWWDIYBEADINGCLUBCOM BLOG DIY BEADING MAGAZINE ISSUE 32
STEP 19 String 2A and pass through the next A added in round 4-17 and the A added in round 18 the 2A added in this round and finally the A added in round 4-17 to exit from the bead showed below
STEP 18 String 3A and pass through the 1A added in the previous round and the first A added in this
round
STEP 20 - 34 Repeat STEP 18 and STEP 19 again until you finish the circle
But be careful in the last step first you have to pass through 3A and then add 1A After this pass
through the 3A again and exit from the A bead
shown below (This is the first A added in STEP 18)
Something Blue Necklace and Earrings
BLOG WWWHANDMADE-JEWELRY-CLUBCOM MEMBERSHIP WWWDIYBEADINGCLUBCOM BLOG DIY BEADING MAGAZINE ISSUE 32
STEP 35 Step up to exit from the pearl shown below (Finishing the previous step in the A bead and then
stepping up from there makes the circle more secure)
Now string 3 bicones Pass through the pearl and the first bicone again
In the reality your circle will look more like this the A beads forming a strong row in the middle of the
pearls
STEP 36 Add 2 bicones Pass through the
neighboring pearl the first bicone added in the previous row and the 2 bicones added in this step
so you can exit from the next pearl
Something Blue Necklace and Earrings
BLOG WWWHANDMADE-JEWELRY-CLUBCOM MEMBERSHIP WWWDIYBEADINGCLUBCOM BLOG DIY BEADING MAGAZINE ISSUE 32
Now in the reality your circle will look more like this the A beads still forming a strong row in the middle of the pearls and the bicones slightly lying on top of
them
STEP 37 - 49 Repeat STEP 35 and STEP 36 again until you finish the circle with the bicones
But be careful in the last step first you have pass through the third bicone added then add 1 bicone
and pass through this little quartet to exit from the bicone shown below (The second one added in
STEP 35)
STEP 50 With these steps we finish the circle by adding 1 bicone to connect the A beads and the
bicone row So add 1 bicone pass through the nearest A bead and add 1 bicone again Pass
through the bicone already there and exit from the bicone you just added
Something Blue Necklace and Earrings
BLOG WWWHANDMADE-JEWELRY-CLUBCOM MEMBERSHIP WWWDIYBEADINGCLUBCOM BLOG DIY BEADING MAGAZINE ISSUE 32
STEP 66-83 Secure the circle by adding 1A between each bicone in the second row of Swarovski
bicones If you finished secure the thread and trim
STEP 51-65 Using the same technique as in STEP 37 - 49 add 1 bicone to finish the third bicone row The black line shows you the way (After STEP 50 pass through the next A bead add 1 bicone and pass through the bicone already there and the bicone added in the previous step Repeat these steps to
finish the inner bicone circle)
MIDDLE CIRCLE Work RAW stitch into a beaded circle and embellish with
Swarovski bicones Remember you need to bead two circles this time
STEP 1 Just like in the focal circle begin with 2 pearls 1A and 1 pearl again on a comfortable length of thread
leaving a 2rdquo 5cm tail Pass through the first two pearls strung to form a ring
Something Blue Necklace and Earrings
BLOG WWWHANDMADE-JEWELRY-CLUBCOM MEMBERSHIP WWWDIYBEADINGCLUBCOM BLOG DIY BEADING MAGAZINE ISSUE 32
STEP 15-28 Mimicing the FOCAL CIRCLElsquos STEP 18-34 bead A beads until you finish the inner part of the
circle Exit from a pearl in the second row This circle should look very similar to the first one but this is a bit
smaller
STEP 2-14 Mimicing the FOCAL CIRCLElsquos STEP 2-17 bead until you count 14 pearls in the inner circle Exit
from the last A added
STEP 29-42 Mimicing FOCAL CIRCLElsquos STEP 35-49 add 2 rows of bicones
STEP 43-56 Mimicing the FOCAL CIRCLElsquos STEP 50-65 bead the third row of bicones to finish the circle
Something Blue Necklace and Earrings
BLOG WWWHANDMADE-JEWELRY-CLUBCOM MEMBERSHIP WWWDIYBEADINGCLUBCOM BLOG DIY BEADING MAGAZINE ISSUE 32
SMALLEST CIRCLE Work RAW stitch into a beaded circle and embellish
with Swarovski bicones Remember you need to bead two circles again
STEP 1 Just like in the focal circle begin with 2 pearls
1A and 1 pearl again on a comfortable length of thread leaving a 2rdquo 5cm tail Pass through the first two
pearls strung to form a ring
STEP 57-70 Just like the FOCAL CIRCLElsquos STEP 66-83 secure the circle by adding 1A between every bicone
in the second row of bicones If you finished secure the thread and trim (Donrsquot forget to bead another
circle)
STEP 2-12 Mimicing the FOCAL CIRCLElsquos STEP 2-17 bead until you count 12 pearls in the inner circle Exit
from the last A added
STEP 13-24 Mimicing the FOCAL CIRCLElsquos STEP 18-34 bead A beads until you finish the inner part of the
circle Exit from a pearl in the second row This circle should look very similar to the first two but this is the
smallest of them all
Something Blue Necklace and Earrings
BLOG WWWHANDMADE-JEWELRY-CLUBCOM MEMBERSHIP WWWDIYBEADINGCLUBCOM BLOG DIY BEADING MAGAZINE ISSUE 32
STEP 37-48 Mimicing the FOCAL CIRCLElsquos STEP 50-65 bead the third row of bicones to finish this circle too
STEP 25-36 Mimicing FOCAL CIRCLElsquos STEP 35-49 add 2
rows of bicones The last step here is purple again
STEP 49-60 Just like the FOCAL CIRCLElsquos STEP 66-83 secure the circle by adding 1A between every bicone
in the second row of bicones If you finished secure the thread and trim (Donrsquot forget that you need two
small circles)
Something Blue Necklace and Earrings
BLOG WWWHANDMADE-JEWELRY-CLUBCOM MEMBERSHIP WWWDIYBEADINGCLUBCOM BLOG DIY BEADING MAGAZINE ISSUE 32
STEP 37-48 Mimicing the FOCAL CIRCLElsquos STEP 50-65 bead the third row of bicones to finish this circle too
STEP 25-36 Mimicing FOCAL CIRCLElsquos STEP 35-49 add 2
rows of bicones The last step here is purple again
STEP 49-60 Just like the FOCAL CIRCLElsquos STEP 66-83 secure the circle by adding 1A between every bicone
in the second row of bicones If you finished secure the thread and trim (Donrsquot forget that you need two
small circles)
Something Blue Necklace and Earrings
BLOG WWWHANDMADE-JEWELRY-CLUBCOM MEMBERSHIP WWWDIYBEADINGCLUBCOM BLOG DIY BEADING MAGAZINE ISSUE 32
STEP 2-6 Continue by adding 1A 1 bicone 1 pearl until you count 6 of each
STEP 1 Begin with 1 pearl 1 bicone 1A and 1 bicone again on a comfortable length of thread leaving a 2rdquo
5cm tail Pass through the pearl and the first bicone strung to form a ring
STEP 7-12 Pass through the A beads to make your
component more secure Also secure the thread and trim (Repeat these steps until you have six 6-BEAD
COMPONENTs)
6-BEAD COMPONENT Work RAW stitch into a beaded circle and embellish with Swarovski bicones
For the necklace we will need six from this component For the earring two
Something Blue Necklace and Earrings
BLOG WWWHANDMADE-JEWELRY-CLUBCOM MEMBERSHIP WWWDIYBEADINGCLUBCOM BLOG DIY BEADING MAGAZINE ISSUE 32
STEP 2-4 Continue by adding 1A 1 bicone 1 pearl
until you count 4 of each
STEP 1 Begin with 1 pearl 1 bicone 1A and 1 bicone again on a comfortable length of thread leaving a 2rdquo
5cm tail Pass through the pearl and the first bicone strung to form a ring
STEP 5-8 Pass through the A beads to make your component more secure Also secure the thread and
trim (Repeat these steps until you have the wished amount of 4-BEAD COMPONENTs)
4-BEAD COMPONENT Work RAW stitch into a beaded circle and embellish with Swarovski bicones
For the necklace-size that is given on the second page we will need 20 from this
component For the earring two
If you would like to make a longer necklace you need to make more (One 4-BEAD COMPONENT measures about 38 inch 1 cm To make the necklace symmetrical you have to have equal amounts on each side This means for every extra frac34 inches
2 cm-s you will need 1 4-BEAD COMPONENT on each side of the necklace)
Something Blue Necklace and Earrings
BLOG WWWHANDMADE-JEWELRY-CLUBCOM MEMBERSHIP WWWDIYBEADINGCLUBCOM BLOG DIY BEADING MAGAZINE ISSUE 32
STEP 2 Connect the MIDDLE CIRCLE to two 6-BEAD COMPONENTs by adding four-times 2As
between the pearls Choose a pearl on the MIDDLE CIRCLE and add
2A pass through a pearl in the 6-BEAD COMPONENT previously added and add 2A again Watch out this has to be symmetrical Repeat this at least two more times to make it
secure Now repeat this entire procedure but choose
the 8-th pearl on MIDDLE CIRCLE Repeat this on the other side of the necklace
too
Choose a pearl on the FOCAL CIRCLE and add 2A pass through a pearl in the 6-BEAD COMPONENT and add 2A again Repeat this at least two more times to make it secure
Now repeat this entire procedure but choose the 5-th pearl on FOCAL CIRCLE This will make the necklace nice on your neck
FINISHING THE NECKLACE Connects the parts with A beads
STEP 1 Connect the FOCAL CIRCLE to two 6-BEAD COMPONENTs by adding four-times 2As between the pearls To do this turn your parts upside down you need to
see the pearls We will work on this side from now on
Something Blue Necklace and Earrings
BLOG WWWHANDMADE-JEWELRY-CLUBCOM MEMBERSHIP WWWDIYBEADINGCLUBCOM BLOG DIY BEADING MAGAZINE ISSUE 32
FINISHING THE EARRING Connects the parts with A beads
STEP 1-2 Connect the 6-BEAD COMPONENT
to 4-BEAD COMPONENT and the 4-BEAD
COMPONENT to the earring hook
First connect the 4-BEAD COMPONENT to the 6-BEAD COMPONENT with 4A beads Mimic
the elongation steps of the necklace if needed
Secondly connect the 4-BEAD COMPONENT
to your earring hook with 4A beads again Leave from the last pearl bead 2A beads the hook (this is the orange oval form) and 2As again Pass through each of them to
secure this connection again
Finally get ready to prepare the other earring ndash since we need two of them
STEP 5 Connect the 4-BEAD COMPONENTs to the toggle clasp thus finishing the
necklace Leaving from the last pearl bead 2A the
clasp(this is the orange oval form) and 2A again Pass through all of them a couple more times to make this connection more
secure
Something Blue Necklace and Earrings
BLOG WWWHANDMADE-JEWELRY-CLUBCOM MEMBERSHIP WWWDIYBEADINGCLUBCOM BLOG DIY BEADING MAGAZINE ISSUE 32
If you finished it is time to try it on It was a great fun wasnrsquot it And how beautiful you look in your new necklace and the matching earrings
Something Blue Necklace and Earrings
BLOG WWWHANDMADE-JEWELRY-CLUBCOM MEMBERSHIP WWWDIYBEADINGCLUBCOM
About the Author
Margit Vogel
My name is Margit Vogel I live in Hungary Europe
By profession I am a biochemical engineer but I fell in love with
beads so much that I could not stop playing with them
I make one-of-a-kind beaded and bead embroidered art
jewelry made of the best quality materials such as Swarovski
stones gemstones Japanese beads (Miyuki and Toho) Czech
glass beads leather soutache and suede Each piece is unique
and individually crafted
Feel free to visit my blog for some eyecandy
httpiformjewelrywordpresscom
My shop httpwwwetsycomshopiformjewelry
Facebook httpwwwfacebookcomiformjewelry
BLOG DIY BEADING MAGAZINE ISSUE 32
Getting Down And Personal With Gianna
Getting Down And Personal With Gianna
Nowadays we see more and more jewelry stores opening up online and with these online jewelry stores it has made it easier for us to purchase and view their creations Have you ever wondered how they are able to manage and produce amazing jewelry pieces and tutorials So heres a little on the journey to open up an online shop We are excited to present to you Gianna aka Beading4perfectionists
Gianna Beader amp Youtuber
Unlike most jewelry makers and beadweavers Gianna did not start beading as a hobby but as a means to make ends meet With goals in trying to
fill the financial gap she did everything she could to expand her earnings ndash working as a security guard
and at the same time learning how to bead and selling her pieces at fair trades and flea markets
Since many were asking if she does home beading workshops she started on exploring how to teach people to bead She loves Scott Bakula and has always loved him till now and this served as her
inspiration to start making a beading video tutorial
Gianna started creating videos because she was at the point in her life where everything seemed to be falling apart And at that moment of time she had difficulties financially and selling jewelry was the only way for her to stay afloat financially She is a big Scott Bakula fan and when she went to the UK to see him on stage that was when it hit her that she is already able to edit videos and
taught herself Photoshop and done workshops at bead fairs so why not put these together and see what happens on Youtube She knew that if she gets enough subscribers and views ndash though no one knew what the exact numbers were you would be invited to become a Youtube partner This way she could monetize her videos with advertisements and hopefully she would be able to be a Youtube partner and be able to pay her bills
BLOG WWWHANDMADE-JEWELRY-CLUBCOM MEMBERSHIP WWWDIYBEADINGCLUBCOM BLOG DIY BEADING MAGAZINE ISSUE 32
Getting Down And Personal With Gianna
Her Youtube channel is popular and the reason why she chose Youtube is because Youtube is the biggest platform and reached almost to the whole world Everyone already knows about it and it was growing rapidly as compared to other platforms like Dailymotion so she figured that Youtube was the way to go Her advice to new designers is that when you start out go to the platforms on the top of your list first then work your way down your list if you do not get accepted by your first choice
After loyally putting up one video every week for about 8 months in a row she became a Youtube partner and monetized her videos She knew she needed at least $100 to get her first payout She managed to reach $100 after 3 months The process was not easy she worked hard lack sleep skipped meals and who knows what happened to Ridge in the Bold and the Beautiful because she stopped watching
On Youtube you can monetize your videos Google pays straight to your bank account and at other countries where they also have the option of getting checks among other options In order to get paid you have to reach the $100 mark and after 3 months For Gianna she thinks that you cannot say that Etsy is better than Youtube or Youtube is better than Etsy Her reasoning is because on Youtube she has many followers which will eventually check out her Etsy shop And to start an Etsy shop you need an audience
BLOG WWWHANDMADE-JEWELRY-CLUBCOM MEMBERSHIP WWWDIYBEADINGCLUBCOM BLOG DIY BEADING MAGAZINE ISSUE 32
television and dedicated her spare time (as she had another job) to Youtube She re-registered at the chamber of commerce after receiving her first payout Her work at Youtube now is not a full time job and things have changed on Youtube It is easier to become a parter but there are some countries that need to wait for an invitation to be a Youtube partner Take Italy for instance Italians would have to work just as hard as she did if they want to become a Youtube partner
Getting Down And Personal With Gianna
With her 60000 subscribers on her b4pbakup Youtube channel it is possible to sell at least 60 patterns on the first day on Etsy after promoting the PDF file on her Youtube channel Though you may think that 60 out of 60000 is not much you have to remember that not everyone has the means to purchase the PDF file and a lot of people still rather watch her carry out the tutorial(for free) on Youtube instead of reading the patterns or paying for the patterns even if the pattern is for a fundraiser and only cost $2 Her insights on Youtube is that Youtube is not what it used to be 6 years ago Instead of making more money every month she is making less and less because advertisers have more options of where they want to advertise their ads Ads do not pay as much as they used to Back in the days you could get 25 cents per ad Now you count yourself lucky if you could get 5 cents roll in after two hours
BLOG WWWHANDMADE-JEWELRY-CLUBCOM MEMBERSHIP WWWDIYBEADINGCLUBCOM BLOG DIY BEADING MAGAZINE ISSUE 32
And on top of that adblockers are destroying Youtube channel owners Youtube will start making changes to the channels where there will be ldquopaid subscriptionrdquo channels This has already been implemented in some countries but not in her country The Netherlands This means there will no longer be ads for her monthly paying subscribers She hopes that Youtube will add on a paid per video option feature The option to be a paid channel or free channel or to start a new channel for paying customers is yours to choose Gianna is not happy with Youtube because many others like her have worked so hard and for some years to become Youtube partners(which was something to be proud of) has lost their status
Getting Down And Personal With Gianna
Her advice for those who want to go on Youtube is 1 Do it because you want to teach
2 Do it because you want a career with beads
BLOG WWWHANDMADE-JEWELRY-CLUBCOM MEMBERSHIP WWWDIYBEADINGCLUBCOM BLOG DIY BEADING MAGAZINE ISSUE 32
After putting up about 20 videos and having at least 5000 subscribers add the PDF tutorials to Etsy and Craftsy She found out that her audience would like to have the PDF after watching her videos This is because they would rather print out the PDF and work while seated in a comfy chair technically somewhere else instead of having to pause the video time and time again
Gianna has also made a video for those who want to know the whole story of her journey up until the present day And to get updates on her you can check it out here She has also started a vlog where she tells of how she still works towards becoming a financial independent beader and explains her journey to get where she wants to be(or die trying) Gianna will be in the UK on October the 17th giving an all-day workshop with 4 different patterns
(2 beginners and 2 advanced) in Wotton-under-Edge
Gianna will be there Friday night as the workshop is on Saturday She will be leaving on Sunday Her
doors are open to all who wants to continue the party with her at the hotel across the street
For more information do contact Ann Tucker on Facebook
httpswwwfacebookcomanntucker501
Rec
omm
end
ed R
ead
ings
Making Jewelry with Gemstone
Beads
Combines the popular craft of beading with beautiful semi-precious stones which are collected by many Features a variety of versatile ideas which can be adapted for any type of gem or bead Readers will learn to reate beautiful gemstone jewelry with this dazzling collection of over 100 projects ranging from eyecatching earrings and accessories to exquisite necklaces and bracelets This beautiful book offers an impressive range of 28 beautiful semi-precious stones (including birthstones) and a glimpse into the fascinating history and mythical properties behind them
BLOG DIY BEADING MAGAZINE ISSUE 32 BLOG WWWHANDMADE-JEWELRY-CLUBCOM MEMBERSHIP WWWDIYBEADINGCLUBCOM
Rec
omm
end
ed R
ead
ings
Convertible Crystal Jewelry
Reverse it Twist it Wear it Many
Ways
Diane Whiting presents the idea that convertibility isnrsquot just about using pieces in multiple ways it is also about using skills and creativity in multiple ways Using ever-popular sparkling crystals Diane showcases design elements through various techniques for fun easy fashionable jewelry With 25 projects the reader can choose from bracelets necklaces and earrings that match any outfit or styleDiane Whiting presents the idea that convertibility isnrsquot just about using pieces in multiple ways it is also about using skills and creativity in multiple ways
BLOG DIY BEADING MAGAZINE ISSUE 32 BLOG WWWHANDMADE-JEWELRY-CLUBCOM MEMBERSHIP WWWDIYBEADINGCLUBCOM
Rec
omm
end
ed R
ead
ings
Wire Jewelry Masterclass
Wrapped Coiled and Woven Pieces
Using Fine Materials
Comprehensive and fabulous Wire Jewelry Masterclass takes an in-depth look at an intricate and rewarding craft The 24 projects which range from simple Dragons tear briolette earrings to a Poseidon-under-the-sea pendant will delight and inspire jewelers of all levels and tastes Divided into beginner intermediate and advanced sections this beautifully photographed step-by-step guide is the ticket to wire jewelry expertise
BLOG DIY BEADING MAGAZINE ISSUE 32 BLOG WWWHANDMADE-JEWELRY-CLUBCOM MEMBERSHIP WWWDIYBEADINGCLUBCOM
Rec
omm
end
ed R
ead
ings
Timeless Wire Weaving The
Complete Course
Timeless Wire Weaving focuses on developing wirework skills through 13 projects using three classic wire weaving techniques coiling wrapping and weaving The projects are built around a focal cabochon and incorporate seed beads and crystals in imaginative ways Designers learn to make the jewelry shown in the book and they also use the techniques learned to create innovative jewelry pieces of their own
BLOG DIY BEADING MAGAZINE ISSUE 32 BLOG WWWHANDMADE-JEWELRY-CLUBCOM MEMBERSHIP WWWDIYBEADINGCLUBCOM
Our digital magazine is available through
Apple Newsstand service available to millions of IPAD users
To advertise with us please email us at
diyjewelryclubgmailcom
Or visit our page at
httphandmade-jewelry-clubcomadvertising-diy-beading-magazine
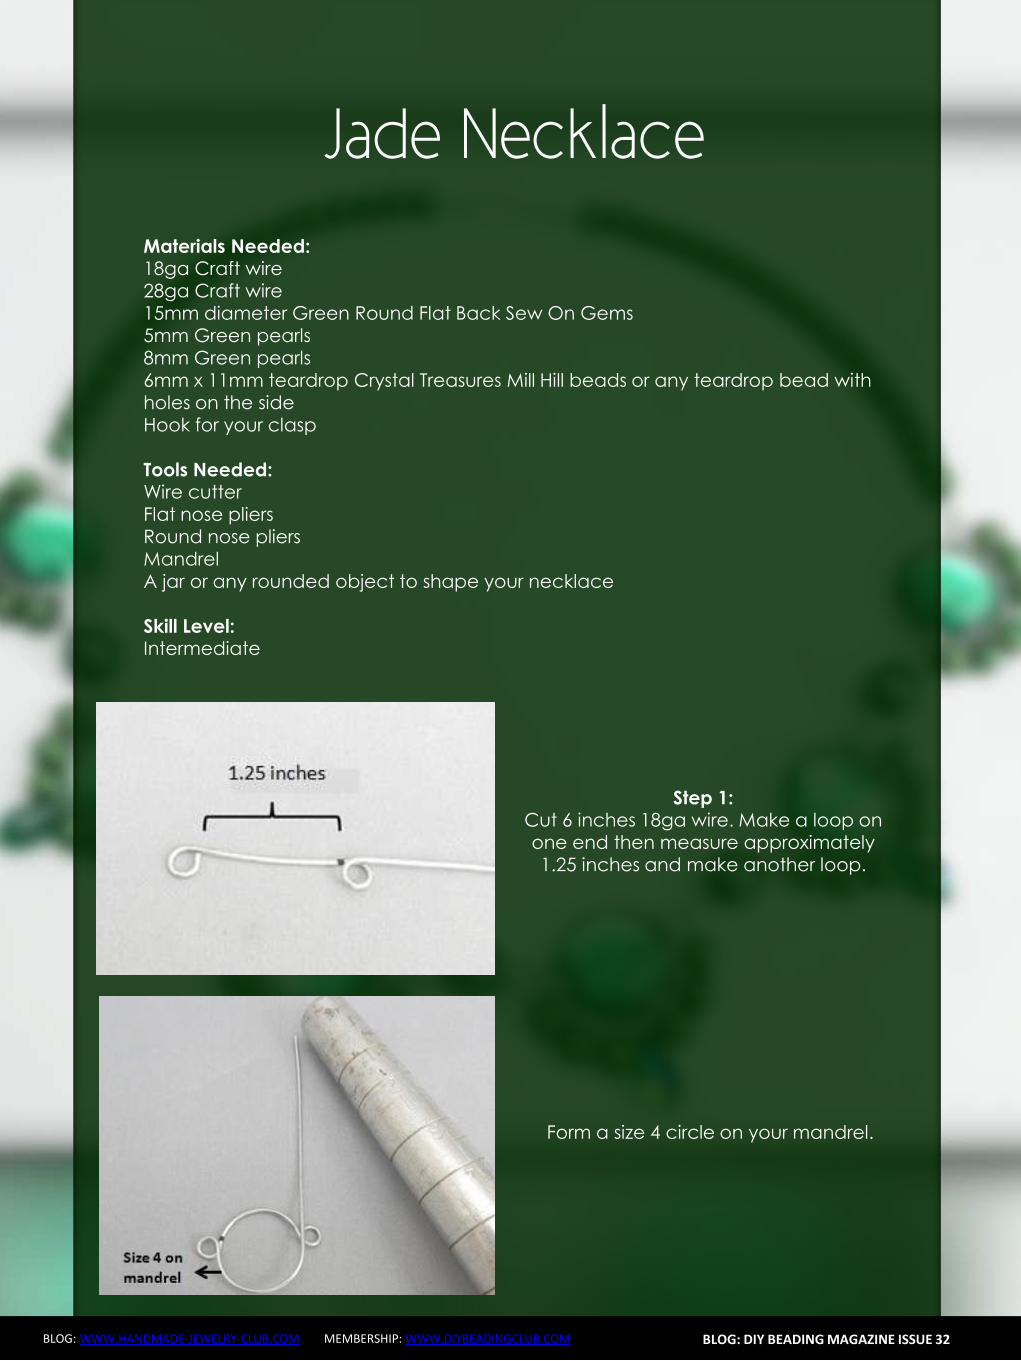
Atomic Ring
BLOG WWWHANDMADE-JEWELRY-CLUBCOM MEMBERSHIP WWWDIYBEADINGCLUBCOM BLOG DIY BEADING MAGAZINE ISSUE 32
Bring up your mandrel and wrap the wire to the size of your finger Wrap at least 2 times
When youre sure you have the right size pull the ring out of the mandrel
With the extended wire wrap the wire the secure the ring
Cut off any excess and voila You have your atomic ring Create as many as you can with different colors of cabochon
Atomic Ring
BLOG WWWHANDMADE-JEWELRY-CLUBCOM MEMBERSHIP WWWDIYBEADINGCLUBCOM
About the Author
Sky Aldovino
I consider myself a late bloomer when it comes to crafting Irsquom a self-taught jewelry maker Jewelry making wasnrsquot really a hobby of mine but unforeseen events lead me to learn jewellery making My family put up a craft store where we sell cross stitch beads and all sorts of crafting materials I fell in love with the beads and tried to create accessories only for myself Clients liked the pieces and I started customizing handmade jewelleries The craft store was a success for 6 years but like any other small businesses we had to close it down and I was confined to staying at home While at home I had all the time using the internet and now working as a home-based jewelry designer
BLOG DIY BEADING MAGAZINE ISSUE 32
Featured Article Gemstones Used for Jewelry Making
BLOG WWWHANDMADE-JEWELRY-CLUBCOM MEMBERSHIP WWWDIYBEADINGCLUBCOM
Gemstones are stones which we hold quite highly in terms of value And
jewelry often consists of stones that add attractiveness to it so it is not
surprising when jewelry designers actually use gemstones in their designs In
fact there are different types of gemstones that can be used for making
jewelry There are the expensive and pure gemstones and there are also the
imitation ones The information below will provide some information about
the kinds of stones you can use to create jewelry and how these stones will
impact the jewelry you have created
The first kind of stone which I believe we are all quite familiar with are
birthstones These stones are associated with individualrsquos month of birth
by SunVDesigns by BeyhanAkman
For example Amethyst stone is connected with anybody who is born in
February which carries special significance in the area of emotions and also
spiritually This stone also signifies calm and peace as well
And then we have semi-precious stones which are also often used in jewelry
making They are not as valuable as compared to precious stones but still
valuable Best examples of these stones are aquamarine topaz tourmaline
opal and turquoise
BLOG DIY BEADING MAGAZINE ISSUE 32
Featured Article Gemstones Used for Jewelry Making
BLOG WWWHANDMADE-JEWELRY-CLUBCOM MEMBERSHIP WWWDIYBEADINGCLUBCOM
It is an ideal gift for someone who you deem special Aquamarine pendants
usually work well for anyone and is widely an accepted stone
by HyppieChic by joyeriamestiza
However precious stones are the most unusual
and precious jewels to us Examples of some of
them are emerald sapphire diamond and
ruby These stones are usually very expensive
and are prized for their exquisiteness These
stones are commonly used in high-quality
jewelry designs which costs quite a fortune to
obtain
BLOG DIY BEADING MAGAZINE ISSUE 32
by sarajewelrystu
Jewelry designs with precious stones are usually
given as exceptional gifts on special occasions A
perfect example is a diamond ring that is usually
given as an engagement gift
by ldiamondsforever
Featured Article Gemstones Used for Jewelry Making
BLOG WWWHANDMADE-JEWELRY-CLUBCOM MEMBERSHIP WWWDIYBEADINGCLUBCOM
There are also synthetic stones which are often used to create jewelry
Synthetic stones are artificial imitations of gemstones Synthetic Sapphire
jewelry costs less compare with the authentic ones Most of the time
imitation stones are used to save cost but at the same time have the similar
look of the real stone
BLOG DIY BEADING MAGAZINE ISSUE 32
by shininggems by thaimaker
by lapinduprintemps by PastimeArt
Gemstones are used like beads and you can use it in any designs whether
simple or elaborate
Swarovski crystal components are available in a rich multitude of rondelles Perfect as spacers in necklaces or as discs in earrings Rondelles can be used with many varieties of shapes or sizes Use Swarovski crystal rondelles between large gemstones as accents with precious metal findings Fire Mountain Gems and Beads Crystal Passionsreg brand presents Swarovski crystal in display-ready packaging for brilliant retail presentation Crystal Passionsreg is an assurance of genuine Swarovski crystal
BLOG DIY BEADING MAGAZINE ISSUE 32 BLOG WWWHANDMADE-JEWELRY-CLUBCOM MEMBERSHIP WWWDIYBEADINGCLUBCOM
Recommended Jewelry Making Supplies
Mz Unisex-adults 12pcs 25x18x6mm Turquoise Oval CAB Cabochon
BLOG DIY BEADING MAGAZINE ISSUE 32 BLOG WWWHANDMADE-JEWELRY-CLUBCOM MEMBERSHIP WWWDIYBEADINGCLUBCOM
Recommended Jewelry Making Supplies
For a little sparkle that goes a long way design with Swarovski 4mm faceted bicones Create glorious multi-strand necklaces with the dainty crystals or use as spacers to add a tiny flash to your designs Swarovski crystal components are made in Austria and are considered the finest products of their kind in the world
BLOG DIY BEADING MAGAZINE ISSUE 32 BLOG WWWHANDMADE-JEWELRY-CLUBCOM MEMBERSHIP WWWDIYBEADINGCLUBCOM
Recommended Jewelry Making Supplies
Imitation beads resist color change These beads have uniform quality with a good polish Some strands may have little to no matrix Sizes shapes and colors may vary with handcrafted items
BLOG DIY BEADING MAGAZINE ISSUE 32 BLOG WWWHANDMADE-JEWELRY-CLUBCOM MEMBERSHIP WWWDIYBEADINGCLUBCOM
Recommended Jewelry Making Supplies
Something Blue Necklace and Earrings
BLOG WWWHANDMADE-JEWELRY-CLUBCOM MEMBERSHIP WWWDIYBEADINGCLUBCOM
Skill level Beginner Intermediate Advanced
DIMENSIONS OF THE NECKLACE Inner Circumference 14 18 inch 35 cm
Focal Pendant Width 1 15 inch 35 cm Focal Pendant Height 1 15 inch 35 cm
DIMENSIONS OF THE EARRING Earring Width 716 inch 12 cm Earring Height 1516 inch 25 cm (Without the earring hook)
BLOG DIY BEADING MAGAZINE ISSUE 32
Materials
Note Before purchasing the supplies measure the length of your wished necklace If you decide to bead a longer necklace you should keep in mind that for every extra
frac34 inches 2 cm-s you will need 8 bicones and 8 pearls
Something Blue Necklace and Earrings
BLOG WWWHANDMADE-JEWELRY-CLUBCOM MEMBERSHIP WWWDIYBEADINGCLUBCOM BLOG DIY BEADING MAGAZINE ISSUE 32
Work RAW stitch into a beaded circle and embellish with Swarovski bicones
STEP 2 String 1A and 2 pearls Pass through the previous
second pearl and the freshly added 1A and the first pearl again
STEP 1 Use a comfortable length of thread to string 2
pearls 1A and 1 pearl again leaving a 2rdquo 5cm tail Pass through the first two pearls strung to form a
ring
STEP 3 String 2 pearls and 1A Pass through the previous first pearl and the freshly added two pearls
again
STEP 4 - 17 Repeat STEP 2 and STEP 3 again until you count 17 pearls in the inner circle
But be careful in the last step you only have to add 1 pearl then pass through the first pearls
added in STEP 1 and add another 1A Now pass through the first pearl added in STEP
1and 1A added in this round again to exit from this A
Something Blue Necklace and Earrings
BLOG WWWHANDMADE-JEWELRY-CLUBCOM MEMBERSHIP WWWDIYBEADINGCLUBCOM BLOG DIY BEADING MAGAZINE ISSUE 32
STEP 19 String 2A and pass through the next A added in round 4-17 and the A added in round 18 the 2A added in this round and finally the A added in round 4-17 to exit from the bead showed below
STEP 18 String 3A and pass through the 1A added in the previous round and the first A added in this
round
STEP 20 - 34 Repeat STEP 18 and STEP 19 again until you finish the circle
But be careful in the last step first you have to pass through 3A and then add 1A After this pass
through the 3A again and exit from the A bead
shown below (This is the first A added in STEP 18)
Something Blue Necklace and Earrings
BLOG WWWHANDMADE-JEWELRY-CLUBCOM MEMBERSHIP WWWDIYBEADINGCLUBCOM BLOG DIY BEADING MAGAZINE ISSUE 32
STEP 35 Step up to exit from the pearl shown below (Finishing the previous step in the A bead and then
stepping up from there makes the circle more secure)
Now string 3 bicones Pass through the pearl and the first bicone again
In the reality your circle will look more like this the A beads forming a strong row in the middle of the
pearls
STEP 36 Add 2 bicones Pass through the
neighboring pearl the first bicone added in the previous row and the 2 bicones added in this step
so you can exit from the next pearl
Something Blue Necklace and Earrings
BLOG WWWHANDMADE-JEWELRY-CLUBCOM MEMBERSHIP WWWDIYBEADINGCLUBCOM BLOG DIY BEADING MAGAZINE ISSUE 32
Now in the reality your circle will look more like this the A beads still forming a strong row in the middle of the pearls and the bicones slightly lying on top of
them
STEP 37 - 49 Repeat STEP 35 and STEP 36 again until you finish the circle with the bicones
But be careful in the last step first you have pass through the third bicone added then add 1 bicone
and pass through this little quartet to exit from the bicone shown below (The second one added in
STEP 35)
STEP 50 With these steps we finish the circle by adding 1 bicone to connect the A beads and the
bicone row So add 1 bicone pass through the nearest A bead and add 1 bicone again Pass
through the bicone already there and exit from the bicone you just added
Something Blue Necklace and Earrings
BLOG WWWHANDMADE-JEWELRY-CLUBCOM MEMBERSHIP WWWDIYBEADINGCLUBCOM BLOG DIY BEADING MAGAZINE ISSUE 32
STEP 66-83 Secure the circle by adding 1A between each bicone in the second row of Swarovski
bicones If you finished secure the thread and trim
STEP 51-65 Using the same technique as in STEP 37 - 49 add 1 bicone to finish the third bicone row The black line shows you the way (After STEP 50 pass through the next A bead add 1 bicone and pass through the bicone already there and the bicone added in the previous step Repeat these steps to
finish the inner bicone circle)
MIDDLE CIRCLE Work RAW stitch into a beaded circle and embellish with
Swarovski bicones Remember you need to bead two circles this time
STEP 1 Just like in the focal circle begin with 2 pearls 1A and 1 pearl again on a comfortable length of thread
leaving a 2rdquo 5cm tail Pass through the first two pearls strung to form a ring
Something Blue Necklace and Earrings
BLOG WWWHANDMADE-JEWELRY-CLUBCOM MEMBERSHIP WWWDIYBEADINGCLUBCOM BLOG DIY BEADING MAGAZINE ISSUE 32
STEP 15-28 Mimicing the FOCAL CIRCLElsquos STEP 18-34 bead A beads until you finish the inner part of the
circle Exit from a pearl in the second row This circle should look very similar to the first one but this is a bit
smaller
STEP 2-14 Mimicing the FOCAL CIRCLElsquos STEP 2-17 bead until you count 14 pearls in the inner circle Exit
from the last A added
STEP 29-42 Mimicing FOCAL CIRCLElsquos STEP 35-49 add 2 rows of bicones
STEP 43-56 Mimicing the FOCAL CIRCLElsquos STEP 50-65 bead the third row of bicones to finish the circle
Something Blue Necklace and Earrings
BLOG WWWHANDMADE-JEWELRY-CLUBCOM MEMBERSHIP WWWDIYBEADINGCLUBCOM BLOG DIY BEADING MAGAZINE ISSUE 32
SMALLEST CIRCLE Work RAW stitch into a beaded circle and embellish
with Swarovski bicones Remember you need to bead two circles again
STEP 1 Just like in the focal circle begin with 2 pearls
1A and 1 pearl again on a comfortable length of thread leaving a 2rdquo 5cm tail Pass through the first two
pearls strung to form a ring
STEP 57-70 Just like the FOCAL CIRCLElsquos STEP 66-83 secure the circle by adding 1A between every bicone
in the second row of bicones If you finished secure the thread and trim (Donrsquot forget to bead another
circle)
STEP 2-12 Mimicing the FOCAL CIRCLElsquos STEP 2-17 bead until you count 12 pearls in the inner circle Exit
from the last A added
STEP 13-24 Mimicing the FOCAL CIRCLElsquos STEP 18-34 bead A beads until you finish the inner part of the
circle Exit from a pearl in the second row This circle should look very similar to the first two but this is the
smallest of them all
Something Blue Necklace and Earrings
BLOG WWWHANDMADE-JEWELRY-CLUBCOM MEMBERSHIP WWWDIYBEADINGCLUBCOM BLOG DIY BEADING MAGAZINE ISSUE 32
STEP 37-48 Mimicing the FOCAL CIRCLElsquos STEP 50-65 bead the third row of bicones to finish this circle too
STEP 25-36 Mimicing FOCAL CIRCLElsquos STEP 35-49 add 2
rows of bicones The last step here is purple again
STEP 49-60 Just like the FOCAL CIRCLElsquos STEP 66-83 secure the circle by adding 1A between every bicone
in the second row of bicones If you finished secure the thread and trim (Donrsquot forget that you need two
small circles)
Something Blue Necklace and Earrings
BLOG WWWHANDMADE-JEWELRY-CLUBCOM MEMBERSHIP WWWDIYBEADINGCLUBCOM BLOG DIY BEADING MAGAZINE ISSUE 32
STEP 37-48 Mimicing the FOCAL CIRCLElsquos STEP 50-65 bead the third row of bicones to finish this circle too
STEP 25-36 Mimicing FOCAL CIRCLElsquos STEP 35-49 add 2
rows of bicones The last step here is purple again
STEP 49-60 Just like the FOCAL CIRCLElsquos STEP 66-83 secure the circle by adding 1A between every bicone
in the second row of bicones If you finished secure the thread and trim (Donrsquot forget that you need two
small circles)
Something Blue Necklace and Earrings
BLOG WWWHANDMADE-JEWELRY-CLUBCOM MEMBERSHIP WWWDIYBEADINGCLUBCOM BLOG DIY BEADING MAGAZINE ISSUE 32
STEP 2-6 Continue by adding 1A 1 bicone 1 pearl until you count 6 of each
STEP 1 Begin with 1 pearl 1 bicone 1A and 1 bicone again on a comfortable length of thread leaving a 2rdquo
5cm tail Pass through the pearl and the first bicone strung to form a ring
STEP 7-12 Pass through the A beads to make your
component more secure Also secure the thread and trim (Repeat these steps until you have six 6-BEAD
COMPONENTs)
6-BEAD COMPONENT Work RAW stitch into a beaded circle and embellish with Swarovski bicones
For the necklace we will need six from this component For the earring two
Something Blue Necklace and Earrings
BLOG WWWHANDMADE-JEWELRY-CLUBCOM MEMBERSHIP WWWDIYBEADINGCLUBCOM BLOG DIY BEADING MAGAZINE ISSUE 32
STEP 2-4 Continue by adding 1A 1 bicone 1 pearl
until you count 4 of each
STEP 1 Begin with 1 pearl 1 bicone 1A and 1 bicone again on a comfortable length of thread leaving a 2rdquo
5cm tail Pass through the pearl and the first bicone strung to form a ring
STEP 5-8 Pass through the A beads to make your component more secure Also secure the thread and
trim (Repeat these steps until you have the wished amount of 4-BEAD COMPONENTs)
4-BEAD COMPONENT Work RAW stitch into a beaded circle and embellish with Swarovski bicones
For the necklace-size that is given on the second page we will need 20 from this
component For the earring two
If you would like to make a longer necklace you need to make more (One 4-BEAD COMPONENT measures about 38 inch 1 cm To make the necklace symmetrical you have to have equal amounts on each side This means for every extra frac34 inches
2 cm-s you will need 1 4-BEAD COMPONENT on each side of the necklace)
Something Blue Necklace and Earrings
BLOG WWWHANDMADE-JEWELRY-CLUBCOM MEMBERSHIP WWWDIYBEADINGCLUBCOM BLOG DIY BEADING MAGAZINE ISSUE 32
STEP 2 Connect the MIDDLE CIRCLE to two 6-BEAD COMPONENTs by adding four-times 2As
between the pearls Choose a pearl on the MIDDLE CIRCLE and add
2A pass through a pearl in the 6-BEAD COMPONENT previously added and add 2A again Watch out this has to be symmetrical Repeat this at least two more times to make it
secure Now repeat this entire procedure but choose
the 8-th pearl on MIDDLE CIRCLE Repeat this on the other side of the necklace
too
Choose a pearl on the FOCAL CIRCLE and add 2A pass through a pearl in the 6-BEAD COMPONENT and add 2A again Repeat this at least two more times to make it secure
Now repeat this entire procedure but choose the 5-th pearl on FOCAL CIRCLE This will make the necklace nice on your neck
FINISHING THE NECKLACE Connects the parts with A beads
STEP 1 Connect the FOCAL CIRCLE to two 6-BEAD COMPONENTs by adding four-times 2As between the pearls To do this turn your parts upside down you need to
see the pearls We will work on this side from now on
Something Blue Necklace and Earrings
BLOG WWWHANDMADE-JEWELRY-CLUBCOM MEMBERSHIP WWWDIYBEADINGCLUBCOM BLOG DIY BEADING MAGAZINE ISSUE 32
FINISHING THE EARRING Connects the parts with A beads
STEP 1-2 Connect the 6-BEAD COMPONENT
to 4-BEAD COMPONENT and the 4-BEAD
COMPONENT to the earring hook
First connect the 4-BEAD COMPONENT to the 6-BEAD COMPONENT with 4A beads Mimic
the elongation steps of the necklace if needed
Secondly connect the 4-BEAD COMPONENT
to your earring hook with 4A beads again Leave from the last pearl bead 2A beads the hook (this is the orange oval form) and 2As again Pass through each of them to
secure this connection again
Finally get ready to prepare the other earring ndash since we need two of them
STEP 5 Connect the 4-BEAD COMPONENTs to the toggle clasp thus finishing the
necklace Leaving from the last pearl bead 2A the
clasp(this is the orange oval form) and 2A again Pass through all of them a couple more times to make this connection more
secure
Something Blue Necklace and Earrings
BLOG WWWHANDMADE-JEWELRY-CLUBCOM MEMBERSHIP WWWDIYBEADINGCLUBCOM BLOG DIY BEADING MAGAZINE ISSUE 32
If you finished it is time to try it on It was a great fun wasnrsquot it And how beautiful you look in your new necklace and the matching earrings
Something Blue Necklace and Earrings
BLOG WWWHANDMADE-JEWELRY-CLUBCOM MEMBERSHIP WWWDIYBEADINGCLUBCOM
About the Author
Margit Vogel
My name is Margit Vogel I live in Hungary Europe
By profession I am a biochemical engineer but I fell in love with
beads so much that I could not stop playing with them
I make one-of-a-kind beaded and bead embroidered art
jewelry made of the best quality materials such as Swarovski
stones gemstones Japanese beads (Miyuki and Toho) Czech
glass beads leather soutache and suede Each piece is unique
and individually crafted
Feel free to visit my blog for some eyecandy
httpiformjewelrywordpresscom
My shop httpwwwetsycomshopiformjewelry
Facebook httpwwwfacebookcomiformjewelry
BLOG DIY BEADING MAGAZINE ISSUE 32
Getting Down And Personal With Gianna
Getting Down And Personal With Gianna
Nowadays we see more and more jewelry stores opening up online and with these online jewelry stores it has made it easier for us to purchase and view their creations Have you ever wondered how they are able to manage and produce amazing jewelry pieces and tutorials So heres a little on the journey to open up an online shop We are excited to present to you Gianna aka Beading4perfectionists
Gianna Beader amp Youtuber
Unlike most jewelry makers and beadweavers Gianna did not start beading as a hobby but as a means to make ends meet With goals in trying to
fill the financial gap she did everything she could to expand her earnings ndash working as a security guard
and at the same time learning how to bead and selling her pieces at fair trades and flea markets
Since many were asking if she does home beading workshops she started on exploring how to teach people to bead She loves Scott Bakula and has always loved him till now and this served as her
inspiration to start making a beading video tutorial
Gianna started creating videos because she was at the point in her life where everything seemed to be falling apart And at that moment of time she had difficulties financially and selling jewelry was the only way for her to stay afloat financially She is a big Scott Bakula fan and when she went to the UK to see him on stage that was when it hit her that she is already able to edit videos and
taught herself Photoshop and done workshops at bead fairs so why not put these together and see what happens on Youtube She knew that if she gets enough subscribers and views ndash though no one knew what the exact numbers were you would be invited to become a Youtube partner This way she could monetize her videos with advertisements and hopefully she would be able to be a Youtube partner and be able to pay her bills
BLOG WWWHANDMADE-JEWELRY-CLUBCOM MEMBERSHIP WWWDIYBEADINGCLUBCOM BLOG DIY BEADING MAGAZINE ISSUE 32
Getting Down And Personal With Gianna
Her Youtube channel is popular and the reason why she chose Youtube is because Youtube is the biggest platform and reached almost to the whole world Everyone already knows about it and it was growing rapidly as compared to other platforms like Dailymotion so she figured that Youtube was the way to go Her advice to new designers is that when you start out go to the platforms on the top of your list first then work your way down your list if you do not get accepted by your first choice
After loyally putting up one video every week for about 8 months in a row she became a Youtube partner and monetized her videos She knew she needed at least $100 to get her first payout She managed to reach $100 after 3 months The process was not easy she worked hard lack sleep skipped meals and who knows what happened to Ridge in the Bold and the Beautiful because she stopped watching
On Youtube you can monetize your videos Google pays straight to your bank account and at other countries where they also have the option of getting checks among other options In order to get paid you have to reach the $100 mark and after 3 months For Gianna she thinks that you cannot say that Etsy is better than Youtube or Youtube is better than Etsy Her reasoning is because on Youtube she has many followers which will eventually check out her Etsy shop And to start an Etsy shop you need an audience
BLOG WWWHANDMADE-JEWELRY-CLUBCOM MEMBERSHIP WWWDIYBEADINGCLUBCOM BLOG DIY BEADING MAGAZINE ISSUE 32
television and dedicated her spare time (as she had another job) to Youtube She re-registered at the chamber of commerce after receiving her first payout Her work at Youtube now is not a full time job and things have changed on Youtube It is easier to become a parter but there are some countries that need to wait for an invitation to be a Youtube partner Take Italy for instance Italians would have to work just as hard as she did if they want to become a Youtube partner
Getting Down And Personal With Gianna
With her 60000 subscribers on her b4pbakup Youtube channel it is possible to sell at least 60 patterns on the first day on Etsy after promoting the PDF file on her Youtube channel Though you may think that 60 out of 60000 is not much you have to remember that not everyone has the means to purchase the PDF file and a lot of people still rather watch her carry out the tutorial(for free) on Youtube instead of reading the patterns or paying for the patterns even if the pattern is for a fundraiser and only cost $2 Her insights on Youtube is that Youtube is not what it used to be 6 years ago Instead of making more money every month she is making less and less because advertisers have more options of where they want to advertise their ads Ads do not pay as much as they used to Back in the days you could get 25 cents per ad Now you count yourself lucky if you could get 5 cents roll in after two hours
BLOG WWWHANDMADE-JEWELRY-CLUBCOM MEMBERSHIP WWWDIYBEADINGCLUBCOM BLOG DIY BEADING MAGAZINE ISSUE 32
And on top of that adblockers are destroying Youtube channel owners Youtube will start making changes to the channels where there will be ldquopaid subscriptionrdquo channels This has already been implemented in some countries but not in her country The Netherlands This means there will no longer be ads for her monthly paying subscribers She hopes that Youtube will add on a paid per video option feature The option to be a paid channel or free channel or to start a new channel for paying customers is yours to choose Gianna is not happy with Youtube because many others like her have worked so hard and for some years to become Youtube partners(which was something to be proud of) has lost their status
Getting Down And Personal With Gianna
Her advice for those who want to go on Youtube is 1 Do it because you want to teach
2 Do it because you want a career with beads
BLOG WWWHANDMADE-JEWELRY-CLUBCOM MEMBERSHIP WWWDIYBEADINGCLUBCOM BLOG DIY BEADING MAGAZINE ISSUE 32
After putting up about 20 videos and having at least 5000 subscribers add the PDF tutorials to Etsy and Craftsy She found out that her audience would like to have the PDF after watching her videos This is because they would rather print out the PDF and work while seated in a comfy chair technically somewhere else instead of having to pause the video time and time again
Gianna has also made a video for those who want to know the whole story of her journey up until the present day And to get updates on her you can check it out here She has also started a vlog where she tells of how she still works towards becoming a financial independent beader and explains her journey to get where she wants to be(or die trying) Gianna will be in the UK on October the 17th giving an all-day workshop with 4 different patterns
(2 beginners and 2 advanced) in Wotton-under-Edge
Gianna will be there Friday night as the workshop is on Saturday She will be leaving on Sunday Her
doors are open to all who wants to continue the party with her at the hotel across the street
For more information do contact Ann Tucker on Facebook
httpswwwfacebookcomanntucker501
Rec
omm
end
ed R
ead
ings
Making Jewelry with Gemstone
Beads
Combines the popular craft of beading with beautiful semi-precious stones which are collected by many Features a variety of versatile ideas which can be adapted for any type of gem or bead Readers will learn to reate beautiful gemstone jewelry with this dazzling collection of over 100 projects ranging from eyecatching earrings and accessories to exquisite necklaces and bracelets This beautiful book offers an impressive range of 28 beautiful semi-precious stones (including birthstones) and a glimpse into the fascinating history and mythical properties behind them
BLOG DIY BEADING MAGAZINE ISSUE 32 BLOG WWWHANDMADE-JEWELRY-CLUBCOM MEMBERSHIP WWWDIYBEADINGCLUBCOM
Rec
omm
end
ed R
ead
ings
Convertible Crystal Jewelry
Reverse it Twist it Wear it Many
Ways
Diane Whiting presents the idea that convertibility isnrsquot just about using pieces in multiple ways it is also about using skills and creativity in multiple ways Using ever-popular sparkling crystals Diane showcases design elements through various techniques for fun easy fashionable jewelry With 25 projects the reader can choose from bracelets necklaces and earrings that match any outfit or styleDiane Whiting presents the idea that convertibility isnrsquot just about using pieces in multiple ways it is also about using skills and creativity in multiple ways
BLOG DIY BEADING MAGAZINE ISSUE 32 BLOG WWWHANDMADE-JEWELRY-CLUBCOM MEMBERSHIP WWWDIYBEADINGCLUBCOM
Rec
omm
end
ed R
ead
ings
Wire Jewelry Masterclass
Wrapped Coiled and Woven Pieces
Using Fine Materials
Comprehensive and fabulous Wire Jewelry Masterclass takes an in-depth look at an intricate and rewarding craft The 24 projects which range from simple Dragons tear briolette earrings to a Poseidon-under-the-sea pendant will delight and inspire jewelers of all levels and tastes Divided into beginner intermediate and advanced sections this beautifully photographed step-by-step guide is the ticket to wire jewelry expertise
BLOG DIY BEADING MAGAZINE ISSUE 32 BLOG WWWHANDMADE-JEWELRY-CLUBCOM MEMBERSHIP WWWDIYBEADINGCLUBCOM
Rec
omm
end
ed R
ead
ings
Timeless Wire Weaving The
Complete Course
Timeless Wire Weaving focuses on developing wirework skills through 13 projects using three classic wire weaving techniques coiling wrapping and weaving The projects are built around a focal cabochon and incorporate seed beads and crystals in imaginative ways Designers learn to make the jewelry shown in the book and they also use the techniques learned to create innovative jewelry pieces of their own
BLOG DIY BEADING MAGAZINE ISSUE 32 BLOG WWWHANDMADE-JEWELRY-CLUBCOM MEMBERSHIP WWWDIYBEADINGCLUBCOM
Our digital magazine is available through
Apple Newsstand service available to millions of IPAD users
To advertise with us please email us at
diyjewelryclubgmailcom
Or visit our page at
httphandmade-jewelry-clubcomadvertising-diy-beading-magazine

Atomic Ring
BLOG WWWHANDMADE-JEWELRY-CLUBCOM MEMBERSHIP WWWDIYBEADINGCLUBCOM
About the Author
Sky Aldovino
I consider myself a late bloomer when it comes to crafting Irsquom a self-taught jewelry maker Jewelry making wasnrsquot really a hobby of mine but unforeseen events lead me to learn jewellery making My family put up a craft store where we sell cross stitch beads and all sorts of crafting materials I fell in love with the beads and tried to create accessories only for myself Clients liked the pieces and I started customizing handmade jewelleries The craft store was a success for 6 years but like any other small businesses we had to close it down and I was confined to staying at home While at home I had all the time using the internet and now working as a home-based jewelry designer
BLOG DIY BEADING MAGAZINE ISSUE 32
Featured Article Gemstones Used for Jewelry Making
BLOG WWWHANDMADE-JEWELRY-CLUBCOM MEMBERSHIP WWWDIYBEADINGCLUBCOM
Gemstones are stones which we hold quite highly in terms of value And
jewelry often consists of stones that add attractiveness to it so it is not
surprising when jewelry designers actually use gemstones in their designs In
fact there are different types of gemstones that can be used for making
jewelry There are the expensive and pure gemstones and there are also the
imitation ones The information below will provide some information about
the kinds of stones you can use to create jewelry and how these stones will
impact the jewelry you have created
The first kind of stone which I believe we are all quite familiar with are
birthstones These stones are associated with individualrsquos month of birth
by SunVDesigns by BeyhanAkman
For example Amethyst stone is connected with anybody who is born in
February which carries special significance in the area of emotions and also
spiritually This stone also signifies calm and peace as well
And then we have semi-precious stones which are also often used in jewelry
making They are not as valuable as compared to precious stones but still
valuable Best examples of these stones are aquamarine topaz tourmaline
opal and turquoise
BLOG DIY BEADING MAGAZINE ISSUE 32
Featured Article Gemstones Used for Jewelry Making
BLOG WWWHANDMADE-JEWELRY-CLUBCOM MEMBERSHIP WWWDIYBEADINGCLUBCOM
It is an ideal gift for someone who you deem special Aquamarine pendants
usually work well for anyone and is widely an accepted stone
by HyppieChic by joyeriamestiza
However precious stones are the most unusual
and precious jewels to us Examples of some of
them are emerald sapphire diamond and
ruby These stones are usually very expensive
and are prized for their exquisiteness These
stones are commonly used in high-quality
jewelry designs which costs quite a fortune to
obtain
BLOG DIY BEADING MAGAZINE ISSUE 32
by sarajewelrystu
Jewelry designs with precious stones are usually
given as exceptional gifts on special occasions A
perfect example is a diamond ring that is usually
given as an engagement gift
by ldiamondsforever
Featured Article Gemstones Used for Jewelry Making
BLOG WWWHANDMADE-JEWELRY-CLUBCOM MEMBERSHIP WWWDIYBEADINGCLUBCOM
There are also synthetic stones which are often used to create jewelry
Synthetic stones are artificial imitations of gemstones Synthetic Sapphire
jewelry costs less compare with the authentic ones Most of the time
imitation stones are used to save cost but at the same time have the similar
look of the real stone
BLOG DIY BEADING MAGAZINE ISSUE 32
by shininggems by thaimaker
by lapinduprintemps by PastimeArt
Gemstones are used like beads and you can use it in any designs whether
simple or elaborate
Swarovski crystal components are available in a rich multitude of rondelles Perfect as spacers in necklaces or as discs in earrings Rondelles can be used with many varieties of shapes or sizes Use Swarovski crystal rondelles between large gemstones as accents with precious metal findings Fire Mountain Gems and Beads Crystal Passionsreg brand presents Swarovski crystal in display-ready packaging for brilliant retail presentation Crystal Passionsreg is an assurance of genuine Swarovski crystal
BLOG DIY BEADING MAGAZINE ISSUE 32 BLOG WWWHANDMADE-JEWELRY-CLUBCOM MEMBERSHIP WWWDIYBEADINGCLUBCOM
Recommended Jewelry Making Supplies
Mz Unisex-adults 12pcs 25x18x6mm Turquoise Oval CAB Cabochon
BLOG DIY BEADING MAGAZINE ISSUE 32 BLOG WWWHANDMADE-JEWELRY-CLUBCOM MEMBERSHIP WWWDIYBEADINGCLUBCOM
Recommended Jewelry Making Supplies
For a little sparkle that goes a long way design with Swarovski 4mm faceted bicones Create glorious multi-strand necklaces with the dainty crystals or use as spacers to add a tiny flash to your designs Swarovski crystal components are made in Austria and are considered the finest products of their kind in the world
BLOG DIY BEADING MAGAZINE ISSUE 32 BLOG WWWHANDMADE-JEWELRY-CLUBCOM MEMBERSHIP WWWDIYBEADINGCLUBCOM
Recommended Jewelry Making Supplies
Imitation beads resist color change These beads have uniform quality with a good polish Some strands may have little to no matrix Sizes shapes and colors may vary with handcrafted items
BLOG DIY BEADING MAGAZINE ISSUE 32 BLOG WWWHANDMADE-JEWELRY-CLUBCOM MEMBERSHIP WWWDIYBEADINGCLUBCOM
Recommended Jewelry Making Supplies
Something Blue Necklace and Earrings
BLOG WWWHANDMADE-JEWELRY-CLUBCOM MEMBERSHIP WWWDIYBEADINGCLUBCOM
Skill level Beginner Intermediate Advanced
DIMENSIONS OF THE NECKLACE Inner Circumference 14 18 inch 35 cm
Focal Pendant Width 1 15 inch 35 cm Focal Pendant Height 1 15 inch 35 cm
DIMENSIONS OF THE EARRING Earring Width 716 inch 12 cm Earring Height 1516 inch 25 cm (Without the earring hook)
BLOG DIY BEADING MAGAZINE ISSUE 32
Materials
Note Before purchasing the supplies measure the length of your wished necklace If you decide to bead a longer necklace you should keep in mind that for every extra
frac34 inches 2 cm-s you will need 8 bicones and 8 pearls
Something Blue Necklace and Earrings
BLOG WWWHANDMADE-JEWELRY-CLUBCOM MEMBERSHIP WWWDIYBEADINGCLUBCOM BLOG DIY BEADING MAGAZINE ISSUE 32
Work RAW stitch into a beaded circle and embellish with Swarovski bicones
STEP 2 String 1A and 2 pearls Pass through the previous
second pearl and the freshly added 1A and the first pearl again
STEP 1 Use a comfortable length of thread to string 2
pearls 1A and 1 pearl again leaving a 2rdquo 5cm tail Pass through the first two pearls strung to form a
ring
STEP 3 String 2 pearls and 1A Pass through the previous first pearl and the freshly added two pearls
again
STEP 4 - 17 Repeat STEP 2 and STEP 3 again until you count 17 pearls in the inner circle
But be careful in the last step you only have to add 1 pearl then pass through the first pearls
added in STEP 1 and add another 1A Now pass through the first pearl added in STEP
1and 1A added in this round again to exit from this A
Something Blue Necklace and Earrings
BLOG WWWHANDMADE-JEWELRY-CLUBCOM MEMBERSHIP WWWDIYBEADINGCLUBCOM BLOG DIY BEADING MAGAZINE ISSUE 32
STEP 19 String 2A and pass through the next A added in round 4-17 and the A added in round 18 the 2A added in this round and finally the A added in round 4-17 to exit from the bead showed below
STEP 18 String 3A and pass through the 1A added in the previous round and the first A added in this
round
STEP 20 - 34 Repeat STEP 18 and STEP 19 again until you finish the circle
But be careful in the last step first you have to pass through 3A and then add 1A After this pass
through the 3A again and exit from the A bead
shown below (This is the first A added in STEP 18)
Something Blue Necklace and Earrings
BLOG WWWHANDMADE-JEWELRY-CLUBCOM MEMBERSHIP WWWDIYBEADINGCLUBCOM BLOG DIY BEADING MAGAZINE ISSUE 32
STEP 35 Step up to exit from the pearl shown below (Finishing the previous step in the A bead and then
stepping up from there makes the circle more secure)
Now string 3 bicones Pass through the pearl and the first bicone again
In the reality your circle will look more like this the A beads forming a strong row in the middle of the
pearls
STEP 36 Add 2 bicones Pass through the
neighboring pearl the first bicone added in the previous row and the 2 bicones added in this step
so you can exit from the next pearl
Something Blue Necklace and Earrings
BLOG WWWHANDMADE-JEWELRY-CLUBCOM MEMBERSHIP WWWDIYBEADINGCLUBCOM BLOG DIY BEADING MAGAZINE ISSUE 32
Now in the reality your circle will look more like this the A beads still forming a strong row in the middle of the pearls and the bicones slightly lying on top of
them
STEP 37 - 49 Repeat STEP 35 and STEP 36 again until you finish the circle with the bicones
But be careful in the last step first you have pass through the third bicone added then add 1 bicone
and pass through this little quartet to exit from the bicone shown below (The second one added in
STEP 35)
STEP 50 With these steps we finish the circle by adding 1 bicone to connect the A beads and the
bicone row So add 1 bicone pass through the nearest A bead and add 1 bicone again Pass
through the bicone already there and exit from the bicone you just added
Something Blue Necklace and Earrings
BLOG WWWHANDMADE-JEWELRY-CLUBCOM MEMBERSHIP WWWDIYBEADINGCLUBCOM BLOG DIY BEADING MAGAZINE ISSUE 32
STEP 66-83 Secure the circle by adding 1A between each bicone in the second row of Swarovski
bicones If you finished secure the thread and trim
STEP 51-65 Using the same technique as in STEP 37 - 49 add 1 bicone to finish the third bicone row The black line shows you the way (After STEP 50 pass through the next A bead add 1 bicone and pass through the bicone already there and the bicone added in the previous step Repeat these steps to
finish the inner bicone circle)
MIDDLE CIRCLE Work RAW stitch into a beaded circle and embellish with
Swarovski bicones Remember you need to bead two circles this time
STEP 1 Just like in the focal circle begin with 2 pearls 1A and 1 pearl again on a comfortable length of thread
leaving a 2rdquo 5cm tail Pass through the first two pearls strung to form a ring
Something Blue Necklace and Earrings
BLOG WWWHANDMADE-JEWELRY-CLUBCOM MEMBERSHIP WWWDIYBEADINGCLUBCOM BLOG DIY BEADING MAGAZINE ISSUE 32
STEP 15-28 Mimicing the FOCAL CIRCLElsquos STEP 18-34 bead A beads until you finish the inner part of the
circle Exit from a pearl in the second row This circle should look very similar to the first one but this is a bit
smaller
STEP 2-14 Mimicing the FOCAL CIRCLElsquos STEP 2-17 bead until you count 14 pearls in the inner circle Exit
from the last A added
STEP 29-42 Mimicing FOCAL CIRCLElsquos STEP 35-49 add 2 rows of bicones
STEP 43-56 Mimicing the FOCAL CIRCLElsquos STEP 50-65 bead the third row of bicones to finish the circle
Something Blue Necklace and Earrings
BLOG WWWHANDMADE-JEWELRY-CLUBCOM MEMBERSHIP WWWDIYBEADINGCLUBCOM BLOG DIY BEADING MAGAZINE ISSUE 32
SMALLEST CIRCLE Work RAW stitch into a beaded circle and embellish
with Swarovski bicones Remember you need to bead two circles again
STEP 1 Just like in the focal circle begin with 2 pearls
1A and 1 pearl again on a comfortable length of thread leaving a 2rdquo 5cm tail Pass through the first two
pearls strung to form a ring
STEP 57-70 Just like the FOCAL CIRCLElsquos STEP 66-83 secure the circle by adding 1A between every bicone
in the second row of bicones If you finished secure the thread and trim (Donrsquot forget to bead another
circle)
STEP 2-12 Mimicing the FOCAL CIRCLElsquos STEP 2-17 bead until you count 12 pearls in the inner circle Exit
from the last A added
STEP 13-24 Mimicing the FOCAL CIRCLElsquos STEP 18-34 bead A beads until you finish the inner part of the
circle Exit from a pearl in the second row This circle should look very similar to the first two but this is the
smallest of them all
Something Blue Necklace and Earrings
BLOG WWWHANDMADE-JEWELRY-CLUBCOM MEMBERSHIP WWWDIYBEADINGCLUBCOM BLOG DIY BEADING MAGAZINE ISSUE 32
STEP 37-48 Mimicing the FOCAL CIRCLElsquos STEP 50-65 bead the third row of bicones to finish this circle too
STEP 25-36 Mimicing FOCAL CIRCLElsquos STEP 35-49 add 2
rows of bicones The last step here is purple again
STEP 49-60 Just like the FOCAL CIRCLElsquos STEP 66-83 secure the circle by adding 1A between every bicone
in the second row of bicones If you finished secure the thread and trim (Donrsquot forget that you need two
small circles)
Something Blue Necklace and Earrings
BLOG WWWHANDMADE-JEWELRY-CLUBCOM MEMBERSHIP WWWDIYBEADINGCLUBCOM BLOG DIY BEADING MAGAZINE ISSUE 32
STEP 37-48 Mimicing the FOCAL CIRCLElsquos STEP 50-65 bead the third row of bicones to finish this circle too
STEP 25-36 Mimicing FOCAL CIRCLElsquos STEP 35-49 add 2
rows of bicones The last step here is purple again
STEP 49-60 Just like the FOCAL CIRCLElsquos STEP 66-83 secure the circle by adding 1A between every bicone
in the second row of bicones If you finished secure the thread and trim (Donrsquot forget that you need two
small circles)
Something Blue Necklace and Earrings
BLOG WWWHANDMADE-JEWELRY-CLUBCOM MEMBERSHIP WWWDIYBEADINGCLUBCOM BLOG DIY BEADING MAGAZINE ISSUE 32
STEP 2-6 Continue by adding 1A 1 bicone 1 pearl until you count 6 of each
STEP 1 Begin with 1 pearl 1 bicone 1A and 1 bicone again on a comfortable length of thread leaving a 2rdquo
5cm tail Pass through the pearl and the first bicone strung to form a ring
STEP 7-12 Pass through the A beads to make your
component more secure Also secure the thread and trim (Repeat these steps until you have six 6-BEAD
COMPONENTs)
6-BEAD COMPONENT Work RAW stitch into a beaded circle and embellish with Swarovski bicones
For the necklace we will need six from this component For the earring two
Something Blue Necklace and Earrings
BLOG WWWHANDMADE-JEWELRY-CLUBCOM MEMBERSHIP WWWDIYBEADINGCLUBCOM BLOG DIY BEADING MAGAZINE ISSUE 32
STEP 2-4 Continue by adding 1A 1 bicone 1 pearl
until you count 4 of each
STEP 1 Begin with 1 pearl 1 bicone 1A and 1 bicone again on a comfortable length of thread leaving a 2rdquo
5cm tail Pass through the pearl and the first bicone strung to form a ring
STEP 5-8 Pass through the A beads to make your component more secure Also secure the thread and
trim (Repeat these steps until you have the wished amount of 4-BEAD COMPONENTs)
4-BEAD COMPONENT Work RAW stitch into a beaded circle and embellish with Swarovski bicones
For the necklace-size that is given on the second page we will need 20 from this
component For the earring two
If you would like to make a longer necklace you need to make more (One 4-BEAD COMPONENT measures about 38 inch 1 cm To make the necklace symmetrical you have to have equal amounts on each side This means for every extra frac34 inches
2 cm-s you will need 1 4-BEAD COMPONENT on each side of the necklace)
Something Blue Necklace and Earrings
BLOG WWWHANDMADE-JEWELRY-CLUBCOM MEMBERSHIP WWWDIYBEADINGCLUBCOM BLOG DIY BEADING MAGAZINE ISSUE 32
STEP 2 Connect the MIDDLE CIRCLE to two 6-BEAD COMPONENTs by adding four-times 2As
between the pearls Choose a pearl on the MIDDLE CIRCLE and add
2A pass through a pearl in the 6-BEAD COMPONENT previously added and add 2A again Watch out this has to be symmetrical Repeat this at least two more times to make it
secure Now repeat this entire procedure but choose
the 8-th pearl on MIDDLE CIRCLE Repeat this on the other side of the necklace
too
Choose a pearl on the FOCAL CIRCLE and add 2A pass through a pearl in the 6-BEAD COMPONENT and add 2A again Repeat this at least two more times to make it secure
Now repeat this entire procedure but choose the 5-th pearl on FOCAL CIRCLE This will make the necklace nice on your neck
FINISHING THE NECKLACE Connects the parts with A beads
STEP 1 Connect the FOCAL CIRCLE to two 6-BEAD COMPONENTs by adding four-times 2As between the pearls To do this turn your parts upside down you need to
see the pearls We will work on this side from now on
Something Blue Necklace and Earrings
BLOG WWWHANDMADE-JEWELRY-CLUBCOM MEMBERSHIP WWWDIYBEADINGCLUBCOM BLOG DIY BEADING MAGAZINE ISSUE 32
FINISHING THE EARRING Connects the parts with A beads
STEP 1-2 Connect the 6-BEAD COMPONENT
to 4-BEAD COMPONENT and the 4-BEAD
COMPONENT to the earring hook
First connect the 4-BEAD COMPONENT to the 6-BEAD COMPONENT with 4A beads Mimic
the elongation steps of the necklace if needed
Secondly connect the 4-BEAD COMPONENT
to your earring hook with 4A beads again Leave from the last pearl bead 2A beads the hook (this is the orange oval form) and 2As again Pass through each of them to
secure this connection again
Finally get ready to prepare the other earring ndash since we need two of them
STEP 5 Connect the 4-BEAD COMPONENTs to the toggle clasp thus finishing the
necklace Leaving from the last pearl bead 2A the
clasp(this is the orange oval form) and 2A again Pass through all of them a couple more times to make this connection more
secure
Something Blue Necklace and Earrings
BLOG WWWHANDMADE-JEWELRY-CLUBCOM MEMBERSHIP WWWDIYBEADINGCLUBCOM BLOG DIY BEADING MAGAZINE ISSUE 32
If you finished it is time to try it on It was a great fun wasnrsquot it And how beautiful you look in your new necklace and the matching earrings
Something Blue Necklace and Earrings
BLOG WWWHANDMADE-JEWELRY-CLUBCOM MEMBERSHIP WWWDIYBEADINGCLUBCOM
About the Author
Margit Vogel
My name is Margit Vogel I live in Hungary Europe
By profession I am a biochemical engineer but I fell in love with
beads so much that I could not stop playing with them
I make one-of-a-kind beaded and bead embroidered art
jewelry made of the best quality materials such as Swarovski
stones gemstones Japanese beads (Miyuki and Toho) Czech
glass beads leather soutache and suede Each piece is unique
and individually crafted
Feel free to visit my blog for some eyecandy
httpiformjewelrywordpresscom
My shop httpwwwetsycomshopiformjewelry
Facebook httpwwwfacebookcomiformjewelry
BLOG DIY BEADING MAGAZINE ISSUE 32
Getting Down And Personal With Gianna
Getting Down And Personal With Gianna
Nowadays we see more and more jewelry stores opening up online and with these online jewelry stores it has made it easier for us to purchase and view their creations Have you ever wondered how they are able to manage and produce amazing jewelry pieces and tutorials So heres a little on the journey to open up an online shop We are excited to present to you Gianna aka Beading4perfectionists
Gianna Beader amp Youtuber
Unlike most jewelry makers and beadweavers Gianna did not start beading as a hobby but as a means to make ends meet With goals in trying to
fill the financial gap she did everything she could to expand her earnings ndash working as a security guard
and at the same time learning how to bead and selling her pieces at fair trades and flea markets
Since many were asking if she does home beading workshops she started on exploring how to teach people to bead She loves Scott Bakula and has always loved him till now and this served as her
inspiration to start making a beading video tutorial
Gianna started creating videos because she was at the point in her life where everything seemed to be falling apart And at that moment of time she had difficulties financially and selling jewelry was the only way for her to stay afloat financially She is a big Scott Bakula fan and when she went to the UK to see him on stage that was when it hit her that she is already able to edit videos and
taught herself Photoshop and done workshops at bead fairs so why not put these together and see what happens on Youtube She knew that if she gets enough subscribers and views ndash though no one knew what the exact numbers were you would be invited to become a Youtube partner This way she could monetize her videos with advertisements and hopefully she would be able to be a Youtube partner and be able to pay her bills
BLOG WWWHANDMADE-JEWELRY-CLUBCOM MEMBERSHIP WWWDIYBEADINGCLUBCOM BLOG DIY BEADING MAGAZINE ISSUE 32
Getting Down And Personal With Gianna
Her Youtube channel is popular and the reason why she chose Youtube is because Youtube is the biggest platform and reached almost to the whole world Everyone already knows about it and it was growing rapidly as compared to other platforms like Dailymotion so she figured that Youtube was the way to go Her advice to new designers is that when you start out go to the platforms on the top of your list first then work your way down your list if you do not get accepted by your first choice
After loyally putting up one video every week for about 8 months in a row she became a Youtube partner and monetized her videos She knew she needed at least $100 to get her first payout She managed to reach $100 after 3 months The process was not easy she worked hard lack sleep skipped meals and who knows what happened to Ridge in the Bold and the Beautiful because she stopped watching
On Youtube you can monetize your videos Google pays straight to your bank account and at other countries where they also have the option of getting checks among other options In order to get paid you have to reach the $100 mark and after 3 months For Gianna she thinks that you cannot say that Etsy is better than Youtube or Youtube is better than Etsy Her reasoning is because on Youtube she has many followers which will eventually check out her Etsy shop And to start an Etsy shop you need an audience
BLOG WWWHANDMADE-JEWELRY-CLUBCOM MEMBERSHIP WWWDIYBEADINGCLUBCOM BLOG DIY BEADING MAGAZINE ISSUE 32
television and dedicated her spare time (as she had another job) to Youtube She re-registered at the chamber of commerce after receiving her first payout Her work at Youtube now is not a full time job and things have changed on Youtube It is easier to become a parter but there are some countries that need to wait for an invitation to be a Youtube partner Take Italy for instance Italians would have to work just as hard as she did if they want to become a Youtube partner
Getting Down And Personal With Gianna
With her 60000 subscribers on her b4pbakup Youtube channel it is possible to sell at least 60 patterns on the first day on Etsy after promoting the PDF file on her Youtube channel Though you may think that 60 out of 60000 is not much you have to remember that not everyone has the means to purchase the PDF file and a lot of people still rather watch her carry out the tutorial(for free) on Youtube instead of reading the patterns or paying for the patterns even if the pattern is for a fundraiser and only cost $2 Her insights on Youtube is that Youtube is not what it used to be 6 years ago Instead of making more money every month she is making less and less because advertisers have more options of where they want to advertise their ads Ads do not pay as much as they used to Back in the days you could get 25 cents per ad Now you count yourself lucky if you could get 5 cents roll in after two hours
BLOG WWWHANDMADE-JEWELRY-CLUBCOM MEMBERSHIP WWWDIYBEADINGCLUBCOM BLOG DIY BEADING MAGAZINE ISSUE 32
And on top of that adblockers are destroying Youtube channel owners Youtube will start making changes to the channels where there will be ldquopaid subscriptionrdquo channels This has already been implemented in some countries but not in her country The Netherlands This means there will no longer be ads for her monthly paying subscribers She hopes that Youtube will add on a paid per video option feature The option to be a paid channel or free channel or to start a new channel for paying customers is yours to choose Gianna is not happy with Youtube because many others like her have worked so hard and for some years to become Youtube partners(which was something to be proud of) has lost their status
Getting Down And Personal With Gianna
Her advice for those who want to go on Youtube is 1 Do it because you want to teach
2 Do it because you want a career with beads
BLOG WWWHANDMADE-JEWELRY-CLUBCOM MEMBERSHIP WWWDIYBEADINGCLUBCOM BLOG DIY BEADING MAGAZINE ISSUE 32
After putting up about 20 videos and having at least 5000 subscribers add the PDF tutorials to Etsy and Craftsy She found out that her audience would like to have the PDF after watching her videos This is because they would rather print out the PDF and work while seated in a comfy chair technically somewhere else instead of having to pause the video time and time again
Gianna has also made a video for those who want to know the whole story of her journey up until the present day And to get updates on her you can check it out here She has also started a vlog where she tells of how she still works towards becoming a financial independent beader and explains her journey to get where she wants to be(or die trying) Gianna will be in the UK on October the 17th giving an all-day workshop with 4 different patterns
(2 beginners and 2 advanced) in Wotton-under-Edge
Gianna will be there Friday night as the workshop is on Saturday She will be leaving on Sunday Her
doors are open to all who wants to continue the party with her at the hotel across the street
For more information do contact Ann Tucker on Facebook
httpswwwfacebookcomanntucker501
Rec
omm
end
ed R
ead
ings
Making Jewelry with Gemstone
Beads
Combines the popular craft of beading with beautiful semi-precious stones which are collected by many Features a variety of versatile ideas which can be adapted for any type of gem or bead Readers will learn to reate beautiful gemstone jewelry with this dazzling collection of over 100 projects ranging from eyecatching earrings and accessories to exquisite necklaces and bracelets This beautiful book offers an impressive range of 28 beautiful semi-precious stones (including birthstones) and a glimpse into the fascinating history and mythical properties behind them
BLOG DIY BEADING MAGAZINE ISSUE 32 BLOG WWWHANDMADE-JEWELRY-CLUBCOM MEMBERSHIP WWWDIYBEADINGCLUBCOM
Rec
omm
end
ed R
ead
ings
Convertible Crystal Jewelry
Reverse it Twist it Wear it Many
Ways
Diane Whiting presents the idea that convertibility isnrsquot just about using pieces in multiple ways it is also about using skills and creativity in multiple ways Using ever-popular sparkling crystals Diane showcases design elements through various techniques for fun easy fashionable jewelry With 25 projects the reader can choose from bracelets necklaces and earrings that match any outfit or styleDiane Whiting presents the idea that convertibility isnrsquot just about using pieces in multiple ways it is also about using skills and creativity in multiple ways
BLOG DIY BEADING MAGAZINE ISSUE 32 BLOG WWWHANDMADE-JEWELRY-CLUBCOM MEMBERSHIP WWWDIYBEADINGCLUBCOM
Rec
omm
end
ed R
ead
ings
Wire Jewelry Masterclass
Wrapped Coiled and Woven Pieces
Using Fine Materials
Comprehensive and fabulous Wire Jewelry Masterclass takes an in-depth look at an intricate and rewarding craft The 24 projects which range from simple Dragons tear briolette earrings to a Poseidon-under-the-sea pendant will delight and inspire jewelers of all levels and tastes Divided into beginner intermediate and advanced sections this beautifully photographed step-by-step guide is the ticket to wire jewelry expertise
BLOG DIY BEADING MAGAZINE ISSUE 32 BLOG WWWHANDMADE-JEWELRY-CLUBCOM MEMBERSHIP WWWDIYBEADINGCLUBCOM
Rec
omm
end
ed R
ead
ings
Timeless Wire Weaving The
Complete Course
Timeless Wire Weaving focuses on developing wirework skills through 13 projects using three classic wire weaving techniques coiling wrapping and weaving The projects are built around a focal cabochon and incorporate seed beads and crystals in imaginative ways Designers learn to make the jewelry shown in the book and they also use the techniques learned to create innovative jewelry pieces of their own
BLOG DIY BEADING MAGAZINE ISSUE 32 BLOG WWWHANDMADE-JEWELRY-CLUBCOM MEMBERSHIP WWWDIYBEADINGCLUBCOM
Our digital magazine is available through
Apple Newsstand service available to millions of IPAD users
To advertise with us please email us at
diyjewelryclubgmailcom
Or visit our page at
httphandmade-jewelry-clubcomadvertising-diy-beading-magazine
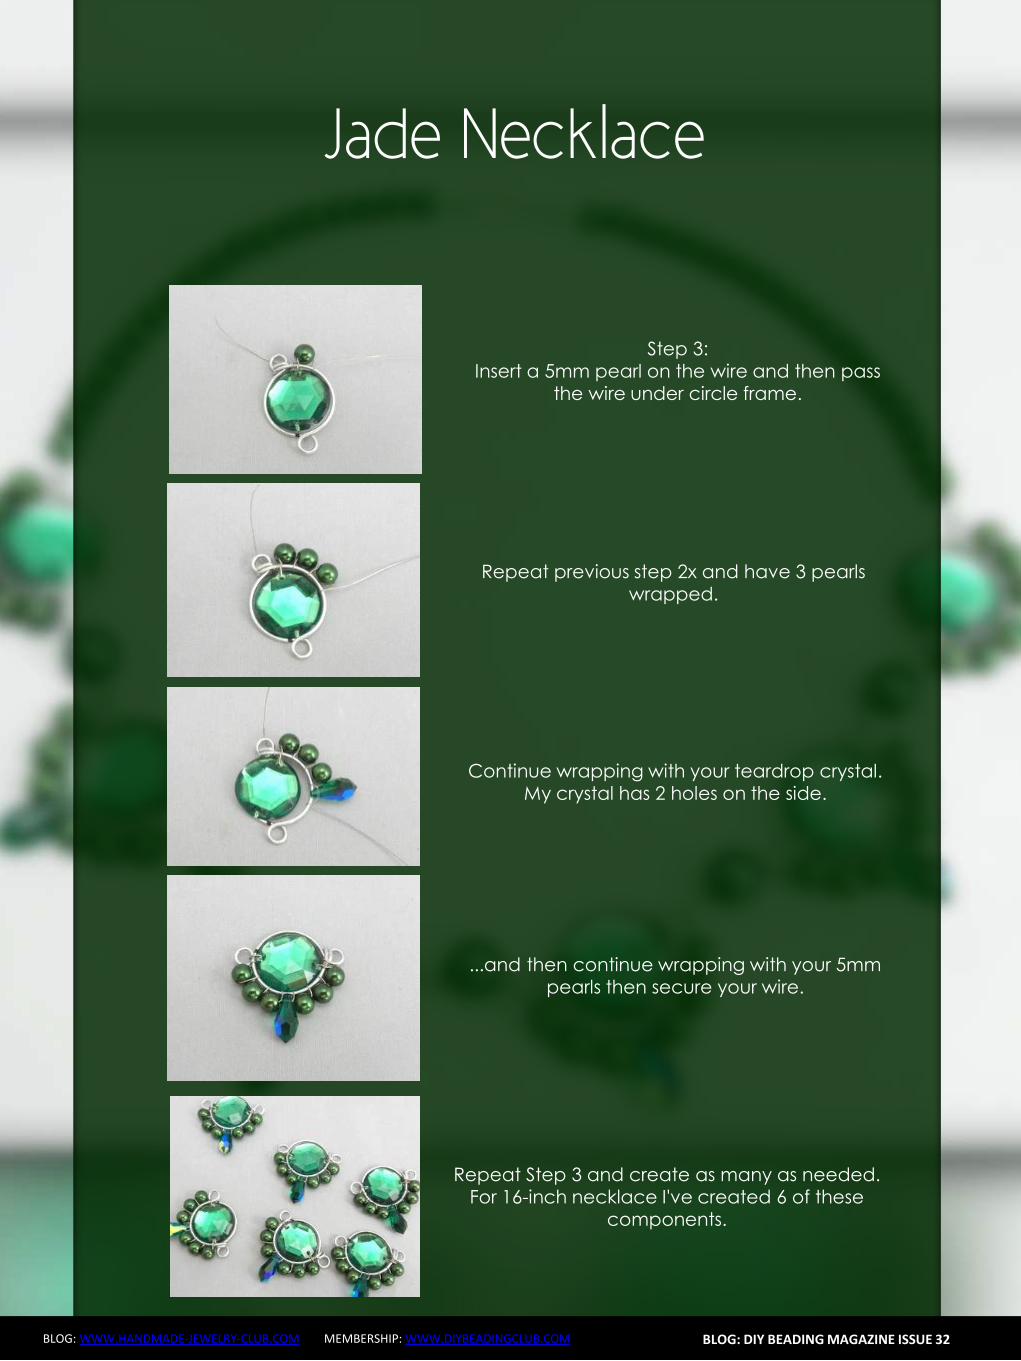
Featured Article Gemstones Used for Jewelry Making
BLOG WWWHANDMADE-JEWELRY-CLUBCOM MEMBERSHIP WWWDIYBEADINGCLUBCOM
Gemstones are stones which we hold quite highly in terms of value And
jewelry often consists of stones that add attractiveness to it so it is not
surprising when jewelry designers actually use gemstones in their designs In
fact there are different types of gemstones that can be used for making
jewelry There are the expensive and pure gemstones and there are also the
imitation ones The information below will provide some information about
the kinds of stones you can use to create jewelry and how these stones will
impact the jewelry you have created
The first kind of stone which I believe we are all quite familiar with are
birthstones These stones are associated with individualrsquos month of birth
by SunVDesigns by BeyhanAkman
For example Amethyst stone is connected with anybody who is born in
February which carries special significance in the area of emotions and also
spiritually This stone also signifies calm and peace as well
And then we have semi-precious stones which are also often used in jewelry
making They are not as valuable as compared to precious stones but still
valuable Best examples of these stones are aquamarine topaz tourmaline
opal and turquoise
BLOG DIY BEADING MAGAZINE ISSUE 32
Featured Article Gemstones Used for Jewelry Making
BLOG WWWHANDMADE-JEWELRY-CLUBCOM MEMBERSHIP WWWDIYBEADINGCLUBCOM
It is an ideal gift for someone who you deem special Aquamarine pendants
usually work well for anyone and is widely an accepted stone
by HyppieChic by joyeriamestiza
However precious stones are the most unusual
and precious jewels to us Examples of some of
them are emerald sapphire diamond and
ruby These stones are usually very expensive
and are prized for their exquisiteness These
stones are commonly used in high-quality
jewelry designs which costs quite a fortune to
obtain
BLOG DIY BEADING MAGAZINE ISSUE 32
by sarajewelrystu
Jewelry designs with precious stones are usually
given as exceptional gifts on special occasions A
perfect example is a diamond ring that is usually
given as an engagement gift
by ldiamondsforever
Featured Article Gemstones Used for Jewelry Making
BLOG WWWHANDMADE-JEWELRY-CLUBCOM MEMBERSHIP WWWDIYBEADINGCLUBCOM
There are also synthetic stones which are often used to create jewelry
Synthetic stones are artificial imitations of gemstones Synthetic Sapphire
jewelry costs less compare with the authentic ones Most of the time
imitation stones are used to save cost but at the same time have the similar
look of the real stone
BLOG DIY BEADING MAGAZINE ISSUE 32
by shininggems by thaimaker
by lapinduprintemps by PastimeArt
Gemstones are used like beads and you can use it in any designs whether
simple or elaborate
Swarovski crystal components are available in a rich multitude of rondelles Perfect as spacers in necklaces or as discs in earrings Rondelles can be used with many varieties of shapes or sizes Use Swarovski crystal rondelles between large gemstones as accents with precious metal findings Fire Mountain Gems and Beads Crystal Passionsreg brand presents Swarovski crystal in display-ready packaging for brilliant retail presentation Crystal Passionsreg is an assurance of genuine Swarovski crystal
BLOG DIY BEADING MAGAZINE ISSUE 32 BLOG WWWHANDMADE-JEWELRY-CLUBCOM MEMBERSHIP WWWDIYBEADINGCLUBCOM
Recommended Jewelry Making Supplies
Mz Unisex-adults 12pcs 25x18x6mm Turquoise Oval CAB Cabochon
BLOG DIY BEADING MAGAZINE ISSUE 32 BLOG WWWHANDMADE-JEWELRY-CLUBCOM MEMBERSHIP WWWDIYBEADINGCLUBCOM
Recommended Jewelry Making Supplies
For a little sparkle that goes a long way design with Swarovski 4mm faceted bicones Create glorious multi-strand necklaces with the dainty crystals or use as spacers to add a tiny flash to your designs Swarovski crystal components are made in Austria and are considered the finest products of their kind in the world
BLOG DIY BEADING MAGAZINE ISSUE 32 BLOG WWWHANDMADE-JEWELRY-CLUBCOM MEMBERSHIP WWWDIYBEADINGCLUBCOM
Recommended Jewelry Making Supplies
Imitation beads resist color change These beads have uniform quality with a good polish Some strands may have little to no matrix Sizes shapes and colors may vary with handcrafted items
BLOG DIY BEADING MAGAZINE ISSUE 32 BLOG WWWHANDMADE-JEWELRY-CLUBCOM MEMBERSHIP WWWDIYBEADINGCLUBCOM
Recommended Jewelry Making Supplies
Something Blue Necklace and Earrings
BLOG WWWHANDMADE-JEWELRY-CLUBCOM MEMBERSHIP WWWDIYBEADINGCLUBCOM
Skill level Beginner Intermediate Advanced
DIMENSIONS OF THE NECKLACE Inner Circumference 14 18 inch 35 cm
Focal Pendant Width 1 15 inch 35 cm Focal Pendant Height 1 15 inch 35 cm
DIMENSIONS OF THE EARRING Earring Width 716 inch 12 cm Earring Height 1516 inch 25 cm (Without the earring hook)
BLOG DIY BEADING MAGAZINE ISSUE 32
Materials
Note Before purchasing the supplies measure the length of your wished necklace If you decide to bead a longer necklace you should keep in mind that for every extra
frac34 inches 2 cm-s you will need 8 bicones and 8 pearls
Something Blue Necklace and Earrings
BLOG WWWHANDMADE-JEWELRY-CLUBCOM MEMBERSHIP WWWDIYBEADINGCLUBCOM BLOG DIY BEADING MAGAZINE ISSUE 32
Work RAW stitch into a beaded circle and embellish with Swarovski bicones
STEP 2 String 1A and 2 pearls Pass through the previous
second pearl and the freshly added 1A and the first pearl again
STEP 1 Use a comfortable length of thread to string 2
pearls 1A and 1 pearl again leaving a 2rdquo 5cm tail Pass through the first two pearls strung to form a
ring
STEP 3 String 2 pearls and 1A Pass through the previous first pearl and the freshly added two pearls
again
STEP 4 - 17 Repeat STEP 2 and STEP 3 again until you count 17 pearls in the inner circle
But be careful in the last step you only have to add 1 pearl then pass through the first pearls
added in STEP 1 and add another 1A Now pass through the first pearl added in STEP
1and 1A added in this round again to exit from this A
Something Blue Necklace and Earrings
BLOG WWWHANDMADE-JEWELRY-CLUBCOM MEMBERSHIP WWWDIYBEADINGCLUBCOM BLOG DIY BEADING MAGAZINE ISSUE 32
STEP 19 String 2A and pass through the next A added in round 4-17 and the A added in round 18 the 2A added in this round and finally the A added in round 4-17 to exit from the bead showed below
STEP 18 String 3A and pass through the 1A added in the previous round and the first A added in this
round
STEP 20 - 34 Repeat STEP 18 and STEP 19 again until you finish the circle
But be careful in the last step first you have to pass through 3A and then add 1A After this pass
through the 3A again and exit from the A bead
shown below (This is the first A added in STEP 18)
Something Blue Necklace and Earrings
BLOG WWWHANDMADE-JEWELRY-CLUBCOM MEMBERSHIP WWWDIYBEADINGCLUBCOM BLOG DIY BEADING MAGAZINE ISSUE 32
STEP 35 Step up to exit from the pearl shown below (Finishing the previous step in the A bead and then
stepping up from there makes the circle more secure)
Now string 3 bicones Pass through the pearl and the first bicone again
In the reality your circle will look more like this the A beads forming a strong row in the middle of the
pearls
STEP 36 Add 2 bicones Pass through the
neighboring pearl the first bicone added in the previous row and the 2 bicones added in this step
so you can exit from the next pearl
Something Blue Necklace and Earrings
BLOG WWWHANDMADE-JEWELRY-CLUBCOM MEMBERSHIP WWWDIYBEADINGCLUBCOM BLOG DIY BEADING MAGAZINE ISSUE 32
Now in the reality your circle will look more like this the A beads still forming a strong row in the middle of the pearls and the bicones slightly lying on top of
them
STEP 37 - 49 Repeat STEP 35 and STEP 36 again until you finish the circle with the bicones
But be careful in the last step first you have pass through the third bicone added then add 1 bicone
and pass through this little quartet to exit from the bicone shown below (The second one added in
STEP 35)
STEP 50 With these steps we finish the circle by adding 1 bicone to connect the A beads and the
bicone row So add 1 bicone pass through the nearest A bead and add 1 bicone again Pass
through the bicone already there and exit from the bicone you just added
Something Blue Necklace and Earrings
BLOG WWWHANDMADE-JEWELRY-CLUBCOM MEMBERSHIP WWWDIYBEADINGCLUBCOM BLOG DIY BEADING MAGAZINE ISSUE 32
STEP 66-83 Secure the circle by adding 1A between each bicone in the second row of Swarovski
bicones If you finished secure the thread and trim
STEP 51-65 Using the same technique as in STEP 37 - 49 add 1 bicone to finish the third bicone row The black line shows you the way (After STEP 50 pass through the next A bead add 1 bicone and pass through the bicone already there and the bicone added in the previous step Repeat these steps to
finish the inner bicone circle)
MIDDLE CIRCLE Work RAW stitch into a beaded circle and embellish with
Swarovski bicones Remember you need to bead two circles this time
STEP 1 Just like in the focal circle begin with 2 pearls 1A and 1 pearl again on a comfortable length of thread
leaving a 2rdquo 5cm tail Pass through the first two pearls strung to form a ring
Something Blue Necklace and Earrings
BLOG WWWHANDMADE-JEWELRY-CLUBCOM MEMBERSHIP WWWDIYBEADINGCLUBCOM BLOG DIY BEADING MAGAZINE ISSUE 32
STEP 15-28 Mimicing the FOCAL CIRCLElsquos STEP 18-34 bead A beads until you finish the inner part of the
circle Exit from a pearl in the second row This circle should look very similar to the first one but this is a bit
smaller
STEP 2-14 Mimicing the FOCAL CIRCLElsquos STEP 2-17 bead until you count 14 pearls in the inner circle Exit
from the last A added
STEP 29-42 Mimicing FOCAL CIRCLElsquos STEP 35-49 add 2 rows of bicones
STEP 43-56 Mimicing the FOCAL CIRCLElsquos STEP 50-65 bead the third row of bicones to finish the circle
Something Blue Necklace and Earrings
BLOG WWWHANDMADE-JEWELRY-CLUBCOM MEMBERSHIP WWWDIYBEADINGCLUBCOM BLOG DIY BEADING MAGAZINE ISSUE 32
SMALLEST CIRCLE Work RAW stitch into a beaded circle and embellish
with Swarovski bicones Remember you need to bead two circles again
STEP 1 Just like in the focal circle begin with 2 pearls
1A and 1 pearl again on a comfortable length of thread leaving a 2rdquo 5cm tail Pass through the first two
pearls strung to form a ring
STEP 57-70 Just like the FOCAL CIRCLElsquos STEP 66-83 secure the circle by adding 1A between every bicone
in the second row of bicones If you finished secure the thread and trim (Donrsquot forget to bead another
circle)
STEP 2-12 Mimicing the FOCAL CIRCLElsquos STEP 2-17 bead until you count 12 pearls in the inner circle Exit
from the last A added
STEP 13-24 Mimicing the FOCAL CIRCLElsquos STEP 18-34 bead A beads until you finish the inner part of the
circle Exit from a pearl in the second row This circle should look very similar to the first two but this is the
smallest of them all
Something Blue Necklace and Earrings
BLOG WWWHANDMADE-JEWELRY-CLUBCOM MEMBERSHIP WWWDIYBEADINGCLUBCOM BLOG DIY BEADING MAGAZINE ISSUE 32
STEP 37-48 Mimicing the FOCAL CIRCLElsquos STEP 50-65 bead the third row of bicones to finish this circle too
STEP 25-36 Mimicing FOCAL CIRCLElsquos STEP 35-49 add 2
rows of bicones The last step here is purple again
STEP 49-60 Just like the FOCAL CIRCLElsquos STEP 66-83 secure the circle by adding 1A between every bicone
in the second row of bicones If you finished secure the thread and trim (Donrsquot forget that you need two
small circles)
Something Blue Necklace and Earrings
BLOG WWWHANDMADE-JEWELRY-CLUBCOM MEMBERSHIP WWWDIYBEADINGCLUBCOM BLOG DIY BEADING MAGAZINE ISSUE 32
STEP 37-48 Mimicing the FOCAL CIRCLElsquos STEP 50-65 bead the third row of bicones to finish this circle too
STEP 25-36 Mimicing FOCAL CIRCLElsquos STEP 35-49 add 2
rows of bicones The last step here is purple again
STEP 49-60 Just like the FOCAL CIRCLElsquos STEP 66-83 secure the circle by adding 1A between every bicone
in the second row of bicones If you finished secure the thread and trim (Donrsquot forget that you need two
small circles)
Something Blue Necklace and Earrings
BLOG WWWHANDMADE-JEWELRY-CLUBCOM MEMBERSHIP WWWDIYBEADINGCLUBCOM BLOG DIY BEADING MAGAZINE ISSUE 32
STEP 2-6 Continue by adding 1A 1 bicone 1 pearl until you count 6 of each
STEP 1 Begin with 1 pearl 1 bicone 1A and 1 bicone again on a comfortable length of thread leaving a 2rdquo
5cm tail Pass through the pearl and the first bicone strung to form a ring
STEP 7-12 Pass through the A beads to make your
component more secure Also secure the thread and trim (Repeat these steps until you have six 6-BEAD
COMPONENTs)
6-BEAD COMPONENT Work RAW stitch into a beaded circle and embellish with Swarovski bicones
For the necklace we will need six from this component For the earring two
Something Blue Necklace and Earrings
BLOG WWWHANDMADE-JEWELRY-CLUBCOM MEMBERSHIP WWWDIYBEADINGCLUBCOM BLOG DIY BEADING MAGAZINE ISSUE 32
STEP 2-4 Continue by adding 1A 1 bicone 1 pearl
until you count 4 of each
STEP 1 Begin with 1 pearl 1 bicone 1A and 1 bicone again on a comfortable length of thread leaving a 2rdquo
5cm tail Pass through the pearl and the first bicone strung to form a ring
STEP 5-8 Pass through the A beads to make your component more secure Also secure the thread and
trim (Repeat these steps until you have the wished amount of 4-BEAD COMPONENTs)
4-BEAD COMPONENT Work RAW stitch into a beaded circle and embellish with Swarovski bicones
For the necklace-size that is given on the second page we will need 20 from this
component For the earring two
If you would like to make a longer necklace you need to make more (One 4-BEAD COMPONENT measures about 38 inch 1 cm To make the necklace symmetrical you have to have equal amounts on each side This means for every extra frac34 inches
2 cm-s you will need 1 4-BEAD COMPONENT on each side of the necklace)
Something Blue Necklace and Earrings
BLOG WWWHANDMADE-JEWELRY-CLUBCOM MEMBERSHIP WWWDIYBEADINGCLUBCOM BLOG DIY BEADING MAGAZINE ISSUE 32
STEP 2 Connect the MIDDLE CIRCLE to two 6-BEAD COMPONENTs by adding four-times 2As
between the pearls Choose a pearl on the MIDDLE CIRCLE and add
2A pass through a pearl in the 6-BEAD COMPONENT previously added and add 2A again Watch out this has to be symmetrical Repeat this at least two more times to make it
secure Now repeat this entire procedure but choose
the 8-th pearl on MIDDLE CIRCLE Repeat this on the other side of the necklace
too
Choose a pearl on the FOCAL CIRCLE and add 2A pass through a pearl in the 6-BEAD COMPONENT and add 2A again Repeat this at least two more times to make it secure
Now repeat this entire procedure but choose the 5-th pearl on FOCAL CIRCLE This will make the necklace nice on your neck
FINISHING THE NECKLACE Connects the parts with A beads
STEP 1 Connect the FOCAL CIRCLE to two 6-BEAD COMPONENTs by adding four-times 2As between the pearls To do this turn your parts upside down you need to
see the pearls We will work on this side from now on
Something Blue Necklace and Earrings
BLOG WWWHANDMADE-JEWELRY-CLUBCOM MEMBERSHIP WWWDIYBEADINGCLUBCOM BLOG DIY BEADING MAGAZINE ISSUE 32
FINISHING THE EARRING Connects the parts with A beads
STEP 1-2 Connect the 6-BEAD COMPONENT
to 4-BEAD COMPONENT and the 4-BEAD
COMPONENT to the earring hook
First connect the 4-BEAD COMPONENT to the 6-BEAD COMPONENT with 4A beads Mimic
the elongation steps of the necklace if needed
Secondly connect the 4-BEAD COMPONENT
to your earring hook with 4A beads again Leave from the last pearl bead 2A beads the hook (this is the orange oval form) and 2As again Pass through each of them to
secure this connection again
Finally get ready to prepare the other earring ndash since we need two of them
STEP 5 Connect the 4-BEAD COMPONENTs to the toggle clasp thus finishing the
necklace Leaving from the last pearl bead 2A the
clasp(this is the orange oval form) and 2A again Pass through all of them a couple more times to make this connection more
secure
Something Blue Necklace and Earrings
BLOG WWWHANDMADE-JEWELRY-CLUBCOM MEMBERSHIP WWWDIYBEADINGCLUBCOM BLOG DIY BEADING MAGAZINE ISSUE 32
If you finished it is time to try it on It was a great fun wasnrsquot it And how beautiful you look in your new necklace and the matching earrings
Something Blue Necklace and Earrings
BLOG WWWHANDMADE-JEWELRY-CLUBCOM MEMBERSHIP WWWDIYBEADINGCLUBCOM
About the Author
Margit Vogel
My name is Margit Vogel I live in Hungary Europe
By profession I am a biochemical engineer but I fell in love with
beads so much that I could not stop playing with them
I make one-of-a-kind beaded and bead embroidered art
jewelry made of the best quality materials such as Swarovski
stones gemstones Japanese beads (Miyuki and Toho) Czech
glass beads leather soutache and suede Each piece is unique
and individually crafted
Feel free to visit my blog for some eyecandy
httpiformjewelrywordpresscom
My shop httpwwwetsycomshopiformjewelry
Facebook httpwwwfacebookcomiformjewelry
BLOG DIY BEADING MAGAZINE ISSUE 32
Getting Down And Personal With Gianna
Getting Down And Personal With Gianna
Nowadays we see more and more jewelry stores opening up online and with these online jewelry stores it has made it easier for us to purchase and view their creations Have you ever wondered how they are able to manage and produce amazing jewelry pieces and tutorials So heres a little on the journey to open up an online shop We are excited to present to you Gianna aka Beading4perfectionists
Gianna Beader amp Youtuber
Unlike most jewelry makers and beadweavers Gianna did not start beading as a hobby but as a means to make ends meet With goals in trying to
fill the financial gap she did everything she could to expand her earnings ndash working as a security guard
and at the same time learning how to bead and selling her pieces at fair trades and flea markets
Since many were asking if she does home beading workshops she started on exploring how to teach people to bead She loves Scott Bakula and has always loved him till now and this served as her
inspiration to start making a beading video tutorial
Gianna started creating videos because she was at the point in her life where everything seemed to be falling apart And at that moment of time she had difficulties financially and selling jewelry was the only way for her to stay afloat financially She is a big Scott Bakula fan and when she went to the UK to see him on stage that was when it hit her that she is already able to edit videos and
taught herself Photoshop and done workshops at bead fairs so why not put these together and see what happens on Youtube She knew that if she gets enough subscribers and views ndash though no one knew what the exact numbers were you would be invited to become a Youtube partner This way she could monetize her videos with advertisements and hopefully she would be able to be a Youtube partner and be able to pay her bills
BLOG WWWHANDMADE-JEWELRY-CLUBCOM MEMBERSHIP WWWDIYBEADINGCLUBCOM BLOG DIY BEADING MAGAZINE ISSUE 32
Getting Down And Personal With Gianna
Her Youtube channel is popular and the reason why she chose Youtube is because Youtube is the biggest platform and reached almost to the whole world Everyone already knows about it and it was growing rapidly as compared to other platforms like Dailymotion so she figured that Youtube was the way to go Her advice to new designers is that when you start out go to the platforms on the top of your list first then work your way down your list if you do not get accepted by your first choice
After loyally putting up one video every week for about 8 months in a row she became a Youtube partner and monetized her videos She knew she needed at least $100 to get her first payout She managed to reach $100 after 3 months The process was not easy she worked hard lack sleep skipped meals and who knows what happened to Ridge in the Bold and the Beautiful because she stopped watching
On Youtube you can monetize your videos Google pays straight to your bank account and at other countries where they also have the option of getting checks among other options In order to get paid you have to reach the $100 mark and after 3 months For Gianna she thinks that you cannot say that Etsy is better than Youtube or Youtube is better than Etsy Her reasoning is because on Youtube she has many followers which will eventually check out her Etsy shop And to start an Etsy shop you need an audience
BLOG WWWHANDMADE-JEWELRY-CLUBCOM MEMBERSHIP WWWDIYBEADINGCLUBCOM BLOG DIY BEADING MAGAZINE ISSUE 32
television and dedicated her spare time (as she had another job) to Youtube She re-registered at the chamber of commerce after receiving her first payout Her work at Youtube now is not a full time job and things have changed on Youtube It is easier to become a parter but there are some countries that need to wait for an invitation to be a Youtube partner Take Italy for instance Italians would have to work just as hard as she did if they want to become a Youtube partner
Getting Down And Personal With Gianna
With her 60000 subscribers on her b4pbakup Youtube channel it is possible to sell at least 60 patterns on the first day on Etsy after promoting the PDF file on her Youtube channel Though you may think that 60 out of 60000 is not much you have to remember that not everyone has the means to purchase the PDF file and a lot of people still rather watch her carry out the tutorial(for free) on Youtube instead of reading the patterns or paying for the patterns even if the pattern is for a fundraiser and only cost $2 Her insights on Youtube is that Youtube is not what it used to be 6 years ago Instead of making more money every month she is making less and less because advertisers have more options of where they want to advertise their ads Ads do not pay as much as they used to Back in the days you could get 25 cents per ad Now you count yourself lucky if you could get 5 cents roll in after two hours
BLOG WWWHANDMADE-JEWELRY-CLUBCOM MEMBERSHIP WWWDIYBEADINGCLUBCOM BLOG DIY BEADING MAGAZINE ISSUE 32
And on top of that adblockers are destroying Youtube channel owners Youtube will start making changes to the channels where there will be ldquopaid subscriptionrdquo channels This has already been implemented in some countries but not in her country The Netherlands This means there will no longer be ads for her monthly paying subscribers She hopes that Youtube will add on a paid per video option feature The option to be a paid channel or free channel or to start a new channel for paying customers is yours to choose Gianna is not happy with Youtube because many others like her have worked so hard and for some years to become Youtube partners(which was something to be proud of) has lost their status
Getting Down And Personal With Gianna
Her advice for those who want to go on Youtube is 1 Do it because you want to teach
2 Do it because you want a career with beads
BLOG WWWHANDMADE-JEWELRY-CLUBCOM MEMBERSHIP WWWDIYBEADINGCLUBCOM BLOG DIY BEADING MAGAZINE ISSUE 32
After putting up about 20 videos and having at least 5000 subscribers add the PDF tutorials to Etsy and Craftsy She found out that her audience would like to have the PDF after watching her videos This is because they would rather print out the PDF and work while seated in a comfy chair technically somewhere else instead of having to pause the video time and time again
Gianna has also made a video for those who want to know the whole story of her journey up until the present day And to get updates on her you can check it out here She has also started a vlog where she tells of how she still works towards becoming a financial independent beader and explains her journey to get where she wants to be(or die trying) Gianna will be in the UK on October the 17th giving an all-day workshop with 4 different patterns
(2 beginners and 2 advanced) in Wotton-under-Edge
Gianna will be there Friday night as the workshop is on Saturday She will be leaving on Sunday Her
doors are open to all who wants to continue the party with her at the hotel across the street
For more information do contact Ann Tucker on Facebook
httpswwwfacebookcomanntucker501
Rec
omm
end
ed R
ead
ings
Making Jewelry with Gemstone
Beads
Combines the popular craft of beading with beautiful semi-precious stones which are collected by many Features a variety of versatile ideas which can be adapted for any type of gem or bead Readers will learn to reate beautiful gemstone jewelry with this dazzling collection of over 100 projects ranging from eyecatching earrings and accessories to exquisite necklaces and bracelets This beautiful book offers an impressive range of 28 beautiful semi-precious stones (including birthstones) and a glimpse into the fascinating history and mythical properties behind them
BLOG DIY BEADING MAGAZINE ISSUE 32 BLOG WWWHANDMADE-JEWELRY-CLUBCOM MEMBERSHIP WWWDIYBEADINGCLUBCOM
Rec
omm
end
ed R
ead
ings
Convertible Crystal Jewelry
Reverse it Twist it Wear it Many
Ways
Diane Whiting presents the idea that convertibility isnrsquot just about using pieces in multiple ways it is also about using skills and creativity in multiple ways Using ever-popular sparkling crystals Diane showcases design elements through various techniques for fun easy fashionable jewelry With 25 projects the reader can choose from bracelets necklaces and earrings that match any outfit or styleDiane Whiting presents the idea that convertibility isnrsquot just about using pieces in multiple ways it is also about using skills and creativity in multiple ways
BLOG DIY BEADING MAGAZINE ISSUE 32 BLOG WWWHANDMADE-JEWELRY-CLUBCOM MEMBERSHIP WWWDIYBEADINGCLUBCOM
Rec
omm
end
ed R
ead
ings
Wire Jewelry Masterclass
Wrapped Coiled and Woven Pieces
Using Fine Materials
Comprehensive and fabulous Wire Jewelry Masterclass takes an in-depth look at an intricate and rewarding craft The 24 projects which range from simple Dragons tear briolette earrings to a Poseidon-under-the-sea pendant will delight and inspire jewelers of all levels and tastes Divided into beginner intermediate and advanced sections this beautifully photographed step-by-step guide is the ticket to wire jewelry expertise
BLOG DIY BEADING MAGAZINE ISSUE 32 BLOG WWWHANDMADE-JEWELRY-CLUBCOM MEMBERSHIP WWWDIYBEADINGCLUBCOM
Rec
omm
end
ed R
ead
ings
Timeless Wire Weaving The
Complete Course
Timeless Wire Weaving focuses on developing wirework skills through 13 projects using three classic wire weaving techniques coiling wrapping and weaving The projects are built around a focal cabochon and incorporate seed beads and crystals in imaginative ways Designers learn to make the jewelry shown in the book and they also use the techniques learned to create innovative jewelry pieces of their own
BLOG DIY BEADING MAGAZINE ISSUE 32 BLOG WWWHANDMADE-JEWELRY-CLUBCOM MEMBERSHIP WWWDIYBEADINGCLUBCOM
Our digital magazine is available through
Apple Newsstand service available to millions of IPAD users
To advertise with us please email us at
diyjewelryclubgmailcom
Or visit our page at
httphandmade-jewelry-clubcomadvertising-diy-beading-magazine
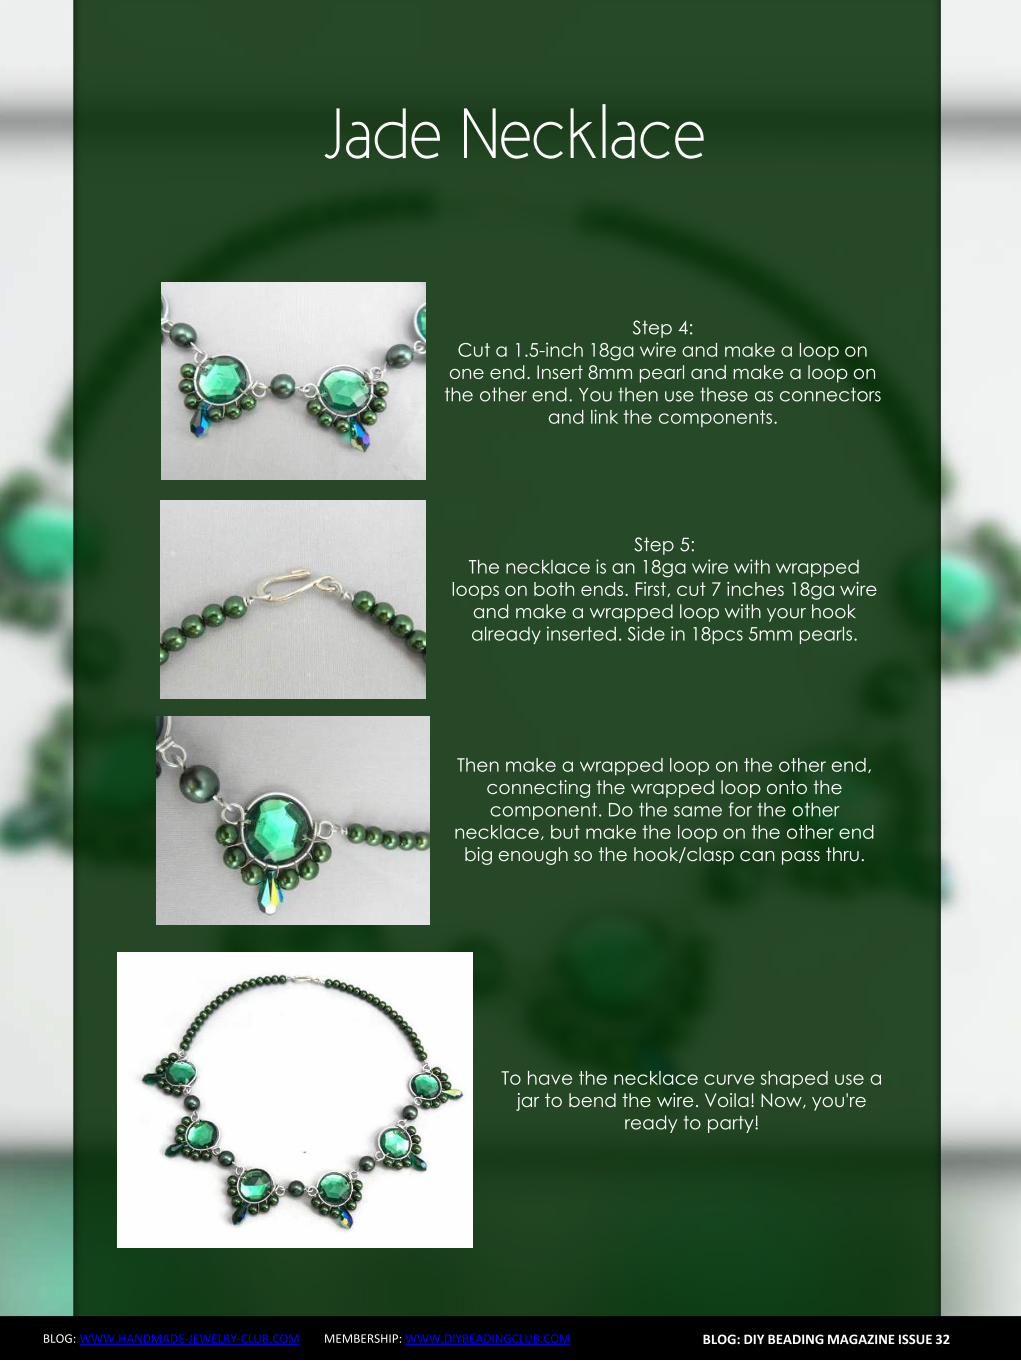
Featured Article Gemstones Used for Jewelry Making
BLOG WWWHANDMADE-JEWELRY-CLUBCOM MEMBERSHIP WWWDIYBEADINGCLUBCOM
It is an ideal gift for someone who you deem special Aquamarine pendants
usually work well for anyone and is widely an accepted stone
by HyppieChic by joyeriamestiza
However precious stones are the most unusual
and precious jewels to us Examples of some of
them are emerald sapphire diamond and
ruby These stones are usually very expensive
and are prized for their exquisiteness These
stones are commonly used in high-quality
jewelry designs which costs quite a fortune to
obtain
BLOG DIY BEADING MAGAZINE ISSUE 32
by sarajewelrystu
Jewelry designs with precious stones are usually
given as exceptional gifts on special occasions A
perfect example is a diamond ring that is usually
given as an engagement gift
by ldiamondsforever
Featured Article Gemstones Used for Jewelry Making
BLOG WWWHANDMADE-JEWELRY-CLUBCOM MEMBERSHIP WWWDIYBEADINGCLUBCOM
There are also synthetic stones which are often used to create jewelry
Synthetic stones are artificial imitations of gemstones Synthetic Sapphire
jewelry costs less compare with the authentic ones Most of the time
imitation stones are used to save cost but at the same time have the similar
look of the real stone
BLOG DIY BEADING MAGAZINE ISSUE 32
by shininggems by thaimaker
by lapinduprintemps by PastimeArt
Gemstones are used like beads and you can use it in any designs whether
simple or elaborate
Swarovski crystal components are available in a rich multitude of rondelles Perfect as spacers in necklaces or as discs in earrings Rondelles can be used with many varieties of shapes or sizes Use Swarovski crystal rondelles between large gemstones as accents with precious metal findings Fire Mountain Gems and Beads Crystal Passionsreg brand presents Swarovski crystal in display-ready packaging for brilliant retail presentation Crystal Passionsreg is an assurance of genuine Swarovski crystal
BLOG DIY BEADING MAGAZINE ISSUE 32 BLOG WWWHANDMADE-JEWELRY-CLUBCOM MEMBERSHIP WWWDIYBEADINGCLUBCOM
Recommended Jewelry Making Supplies
Mz Unisex-adults 12pcs 25x18x6mm Turquoise Oval CAB Cabochon
BLOG DIY BEADING MAGAZINE ISSUE 32 BLOG WWWHANDMADE-JEWELRY-CLUBCOM MEMBERSHIP WWWDIYBEADINGCLUBCOM
Recommended Jewelry Making Supplies
For a little sparkle that goes a long way design with Swarovski 4mm faceted bicones Create glorious multi-strand necklaces with the dainty crystals or use as spacers to add a tiny flash to your designs Swarovski crystal components are made in Austria and are considered the finest products of their kind in the world
BLOG DIY BEADING MAGAZINE ISSUE 32 BLOG WWWHANDMADE-JEWELRY-CLUBCOM MEMBERSHIP WWWDIYBEADINGCLUBCOM
Recommended Jewelry Making Supplies
Imitation beads resist color change These beads have uniform quality with a good polish Some strands may have little to no matrix Sizes shapes and colors may vary with handcrafted items
BLOG DIY BEADING MAGAZINE ISSUE 32 BLOG WWWHANDMADE-JEWELRY-CLUBCOM MEMBERSHIP WWWDIYBEADINGCLUBCOM
Recommended Jewelry Making Supplies
Something Blue Necklace and Earrings
BLOG WWWHANDMADE-JEWELRY-CLUBCOM MEMBERSHIP WWWDIYBEADINGCLUBCOM
Skill level Beginner Intermediate Advanced
DIMENSIONS OF THE NECKLACE Inner Circumference 14 18 inch 35 cm
Focal Pendant Width 1 15 inch 35 cm Focal Pendant Height 1 15 inch 35 cm
DIMENSIONS OF THE EARRING Earring Width 716 inch 12 cm Earring Height 1516 inch 25 cm (Without the earring hook)
BLOG DIY BEADING MAGAZINE ISSUE 32
Materials
Note Before purchasing the supplies measure the length of your wished necklace If you decide to bead a longer necklace you should keep in mind that for every extra
frac34 inches 2 cm-s you will need 8 bicones and 8 pearls
Something Blue Necklace and Earrings
BLOG WWWHANDMADE-JEWELRY-CLUBCOM MEMBERSHIP WWWDIYBEADINGCLUBCOM BLOG DIY BEADING MAGAZINE ISSUE 32
Work RAW stitch into a beaded circle and embellish with Swarovski bicones
STEP 2 String 1A and 2 pearls Pass through the previous
second pearl and the freshly added 1A and the first pearl again
STEP 1 Use a comfortable length of thread to string 2
pearls 1A and 1 pearl again leaving a 2rdquo 5cm tail Pass through the first two pearls strung to form a
ring
STEP 3 String 2 pearls and 1A Pass through the previous first pearl and the freshly added two pearls
again
STEP 4 - 17 Repeat STEP 2 and STEP 3 again until you count 17 pearls in the inner circle
But be careful in the last step you only have to add 1 pearl then pass through the first pearls
added in STEP 1 and add another 1A Now pass through the first pearl added in STEP
1and 1A added in this round again to exit from this A
Something Blue Necklace and Earrings
BLOG WWWHANDMADE-JEWELRY-CLUBCOM MEMBERSHIP WWWDIYBEADINGCLUBCOM BLOG DIY BEADING MAGAZINE ISSUE 32
STEP 19 String 2A and pass through the next A added in round 4-17 and the A added in round 18 the 2A added in this round and finally the A added in round 4-17 to exit from the bead showed below
STEP 18 String 3A and pass through the 1A added in the previous round and the first A added in this
round
STEP 20 - 34 Repeat STEP 18 and STEP 19 again until you finish the circle
But be careful in the last step first you have to pass through 3A and then add 1A After this pass
through the 3A again and exit from the A bead
shown below (This is the first A added in STEP 18)
Something Blue Necklace and Earrings
BLOG WWWHANDMADE-JEWELRY-CLUBCOM MEMBERSHIP WWWDIYBEADINGCLUBCOM BLOG DIY BEADING MAGAZINE ISSUE 32
STEP 35 Step up to exit from the pearl shown below (Finishing the previous step in the A bead and then
stepping up from there makes the circle more secure)
Now string 3 bicones Pass through the pearl and the first bicone again
In the reality your circle will look more like this the A beads forming a strong row in the middle of the
pearls
STEP 36 Add 2 bicones Pass through the
neighboring pearl the first bicone added in the previous row and the 2 bicones added in this step
so you can exit from the next pearl
Something Blue Necklace and Earrings
BLOG WWWHANDMADE-JEWELRY-CLUBCOM MEMBERSHIP WWWDIYBEADINGCLUBCOM BLOG DIY BEADING MAGAZINE ISSUE 32
Now in the reality your circle will look more like this the A beads still forming a strong row in the middle of the pearls and the bicones slightly lying on top of
them
STEP 37 - 49 Repeat STEP 35 and STEP 36 again until you finish the circle with the bicones
But be careful in the last step first you have pass through the third bicone added then add 1 bicone
and pass through this little quartet to exit from the bicone shown below (The second one added in
STEP 35)
STEP 50 With these steps we finish the circle by adding 1 bicone to connect the A beads and the
bicone row So add 1 bicone pass through the nearest A bead and add 1 bicone again Pass
through the bicone already there and exit from the bicone you just added
Something Blue Necklace and Earrings
BLOG WWWHANDMADE-JEWELRY-CLUBCOM MEMBERSHIP WWWDIYBEADINGCLUBCOM BLOG DIY BEADING MAGAZINE ISSUE 32
STEP 66-83 Secure the circle by adding 1A between each bicone in the second row of Swarovski
bicones If you finished secure the thread and trim
STEP 51-65 Using the same technique as in STEP 37 - 49 add 1 bicone to finish the third bicone row The black line shows you the way (After STEP 50 pass through the next A bead add 1 bicone and pass through the bicone already there and the bicone added in the previous step Repeat these steps to
finish the inner bicone circle)
MIDDLE CIRCLE Work RAW stitch into a beaded circle and embellish with
Swarovski bicones Remember you need to bead two circles this time
STEP 1 Just like in the focal circle begin with 2 pearls 1A and 1 pearl again on a comfortable length of thread
leaving a 2rdquo 5cm tail Pass through the first two pearls strung to form a ring
Something Blue Necklace and Earrings
BLOG WWWHANDMADE-JEWELRY-CLUBCOM MEMBERSHIP WWWDIYBEADINGCLUBCOM BLOG DIY BEADING MAGAZINE ISSUE 32
STEP 15-28 Mimicing the FOCAL CIRCLElsquos STEP 18-34 bead A beads until you finish the inner part of the
circle Exit from a pearl in the second row This circle should look very similar to the first one but this is a bit
smaller
STEP 2-14 Mimicing the FOCAL CIRCLElsquos STEP 2-17 bead until you count 14 pearls in the inner circle Exit
from the last A added
STEP 29-42 Mimicing FOCAL CIRCLElsquos STEP 35-49 add 2 rows of bicones
STEP 43-56 Mimicing the FOCAL CIRCLElsquos STEP 50-65 bead the third row of bicones to finish the circle
Something Blue Necklace and Earrings
BLOG WWWHANDMADE-JEWELRY-CLUBCOM MEMBERSHIP WWWDIYBEADINGCLUBCOM BLOG DIY BEADING MAGAZINE ISSUE 32
SMALLEST CIRCLE Work RAW stitch into a beaded circle and embellish
with Swarovski bicones Remember you need to bead two circles again
STEP 1 Just like in the focal circle begin with 2 pearls
1A and 1 pearl again on a comfortable length of thread leaving a 2rdquo 5cm tail Pass through the first two
pearls strung to form a ring
STEP 57-70 Just like the FOCAL CIRCLElsquos STEP 66-83 secure the circle by adding 1A between every bicone
in the second row of bicones If you finished secure the thread and trim (Donrsquot forget to bead another
circle)
STEP 2-12 Mimicing the FOCAL CIRCLElsquos STEP 2-17 bead until you count 12 pearls in the inner circle Exit
from the last A added
STEP 13-24 Mimicing the FOCAL CIRCLElsquos STEP 18-34 bead A beads until you finish the inner part of the
circle Exit from a pearl in the second row This circle should look very similar to the first two but this is the
smallest of them all
Something Blue Necklace and Earrings
BLOG WWWHANDMADE-JEWELRY-CLUBCOM MEMBERSHIP WWWDIYBEADINGCLUBCOM BLOG DIY BEADING MAGAZINE ISSUE 32
STEP 37-48 Mimicing the FOCAL CIRCLElsquos STEP 50-65 bead the third row of bicones to finish this circle too
STEP 25-36 Mimicing FOCAL CIRCLElsquos STEP 35-49 add 2
rows of bicones The last step here is purple again
STEP 49-60 Just like the FOCAL CIRCLElsquos STEP 66-83 secure the circle by adding 1A between every bicone
in the second row of bicones If you finished secure the thread and trim (Donrsquot forget that you need two
small circles)
Something Blue Necklace and Earrings
BLOG WWWHANDMADE-JEWELRY-CLUBCOM MEMBERSHIP WWWDIYBEADINGCLUBCOM BLOG DIY BEADING MAGAZINE ISSUE 32
STEP 37-48 Mimicing the FOCAL CIRCLElsquos STEP 50-65 bead the third row of bicones to finish this circle too
STEP 25-36 Mimicing FOCAL CIRCLElsquos STEP 35-49 add 2
rows of bicones The last step here is purple again
STEP 49-60 Just like the FOCAL CIRCLElsquos STEP 66-83 secure the circle by adding 1A between every bicone
in the second row of bicones If you finished secure the thread and trim (Donrsquot forget that you need two
small circles)
Something Blue Necklace and Earrings
BLOG WWWHANDMADE-JEWELRY-CLUBCOM MEMBERSHIP WWWDIYBEADINGCLUBCOM BLOG DIY BEADING MAGAZINE ISSUE 32
STEP 2-6 Continue by adding 1A 1 bicone 1 pearl until you count 6 of each
STEP 1 Begin with 1 pearl 1 bicone 1A and 1 bicone again on a comfortable length of thread leaving a 2rdquo
5cm tail Pass through the pearl and the first bicone strung to form a ring
STEP 7-12 Pass through the A beads to make your
component more secure Also secure the thread and trim (Repeat these steps until you have six 6-BEAD
COMPONENTs)
6-BEAD COMPONENT Work RAW stitch into a beaded circle and embellish with Swarovski bicones
For the necklace we will need six from this component For the earring two
Something Blue Necklace and Earrings
BLOG WWWHANDMADE-JEWELRY-CLUBCOM MEMBERSHIP WWWDIYBEADINGCLUBCOM BLOG DIY BEADING MAGAZINE ISSUE 32
STEP 2-4 Continue by adding 1A 1 bicone 1 pearl
until you count 4 of each
STEP 1 Begin with 1 pearl 1 bicone 1A and 1 bicone again on a comfortable length of thread leaving a 2rdquo
5cm tail Pass through the pearl and the first bicone strung to form a ring
STEP 5-8 Pass through the A beads to make your component more secure Also secure the thread and
trim (Repeat these steps until you have the wished amount of 4-BEAD COMPONENTs)
4-BEAD COMPONENT Work RAW stitch into a beaded circle and embellish with Swarovski bicones
For the necklace-size that is given on the second page we will need 20 from this
component For the earring two
If you would like to make a longer necklace you need to make more (One 4-BEAD COMPONENT measures about 38 inch 1 cm To make the necklace symmetrical you have to have equal amounts on each side This means for every extra frac34 inches
2 cm-s you will need 1 4-BEAD COMPONENT on each side of the necklace)
Something Blue Necklace and Earrings
BLOG WWWHANDMADE-JEWELRY-CLUBCOM MEMBERSHIP WWWDIYBEADINGCLUBCOM BLOG DIY BEADING MAGAZINE ISSUE 32
STEP 2 Connect the MIDDLE CIRCLE to two 6-BEAD COMPONENTs by adding four-times 2As
between the pearls Choose a pearl on the MIDDLE CIRCLE and add
2A pass through a pearl in the 6-BEAD COMPONENT previously added and add 2A again Watch out this has to be symmetrical Repeat this at least two more times to make it
secure Now repeat this entire procedure but choose
the 8-th pearl on MIDDLE CIRCLE Repeat this on the other side of the necklace
too
Choose a pearl on the FOCAL CIRCLE and add 2A pass through a pearl in the 6-BEAD COMPONENT and add 2A again Repeat this at least two more times to make it secure
Now repeat this entire procedure but choose the 5-th pearl on FOCAL CIRCLE This will make the necklace nice on your neck
FINISHING THE NECKLACE Connects the parts with A beads
STEP 1 Connect the FOCAL CIRCLE to two 6-BEAD COMPONENTs by adding four-times 2As between the pearls To do this turn your parts upside down you need to
see the pearls We will work on this side from now on
Something Blue Necklace and Earrings
BLOG WWWHANDMADE-JEWELRY-CLUBCOM MEMBERSHIP WWWDIYBEADINGCLUBCOM BLOG DIY BEADING MAGAZINE ISSUE 32
FINISHING THE EARRING Connects the parts with A beads
STEP 1-2 Connect the 6-BEAD COMPONENT
to 4-BEAD COMPONENT and the 4-BEAD
COMPONENT to the earring hook
First connect the 4-BEAD COMPONENT to the 6-BEAD COMPONENT with 4A beads Mimic
the elongation steps of the necklace if needed
Secondly connect the 4-BEAD COMPONENT
to your earring hook with 4A beads again Leave from the last pearl bead 2A beads the hook (this is the orange oval form) and 2As again Pass through each of them to
secure this connection again
Finally get ready to prepare the other earring ndash since we need two of them
STEP 5 Connect the 4-BEAD COMPONENTs to the toggle clasp thus finishing the
necklace Leaving from the last pearl bead 2A the
clasp(this is the orange oval form) and 2A again Pass through all of them a couple more times to make this connection more
secure
Something Blue Necklace and Earrings
BLOG WWWHANDMADE-JEWELRY-CLUBCOM MEMBERSHIP WWWDIYBEADINGCLUBCOM BLOG DIY BEADING MAGAZINE ISSUE 32
If you finished it is time to try it on It was a great fun wasnrsquot it And how beautiful you look in your new necklace and the matching earrings
Something Blue Necklace and Earrings
BLOG WWWHANDMADE-JEWELRY-CLUBCOM MEMBERSHIP WWWDIYBEADINGCLUBCOM
About the Author
Margit Vogel
My name is Margit Vogel I live in Hungary Europe
By profession I am a biochemical engineer but I fell in love with
beads so much that I could not stop playing with them
I make one-of-a-kind beaded and bead embroidered art
jewelry made of the best quality materials such as Swarovski
stones gemstones Japanese beads (Miyuki and Toho) Czech
glass beads leather soutache and suede Each piece is unique
and individually crafted
Feel free to visit my blog for some eyecandy
httpiformjewelrywordpresscom
My shop httpwwwetsycomshopiformjewelry
Facebook httpwwwfacebookcomiformjewelry
BLOG DIY BEADING MAGAZINE ISSUE 32
Getting Down And Personal With Gianna
Getting Down And Personal With Gianna
Nowadays we see more and more jewelry stores opening up online and with these online jewelry stores it has made it easier for us to purchase and view their creations Have you ever wondered how they are able to manage and produce amazing jewelry pieces and tutorials So heres a little on the journey to open up an online shop We are excited to present to you Gianna aka Beading4perfectionists
Gianna Beader amp Youtuber
Unlike most jewelry makers and beadweavers Gianna did not start beading as a hobby but as a means to make ends meet With goals in trying to
fill the financial gap she did everything she could to expand her earnings ndash working as a security guard
and at the same time learning how to bead and selling her pieces at fair trades and flea markets
Since many were asking if she does home beading workshops she started on exploring how to teach people to bead She loves Scott Bakula and has always loved him till now and this served as her
inspiration to start making a beading video tutorial
Gianna started creating videos because she was at the point in her life where everything seemed to be falling apart And at that moment of time she had difficulties financially and selling jewelry was the only way for her to stay afloat financially She is a big Scott Bakula fan and when she went to the UK to see him on stage that was when it hit her that she is already able to edit videos and
taught herself Photoshop and done workshops at bead fairs so why not put these together and see what happens on Youtube She knew that if she gets enough subscribers and views ndash though no one knew what the exact numbers were you would be invited to become a Youtube partner This way she could monetize her videos with advertisements and hopefully she would be able to be a Youtube partner and be able to pay her bills
BLOG WWWHANDMADE-JEWELRY-CLUBCOM MEMBERSHIP WWWDIYBEADINGCLUBCOM BLOG DIY BEADING MAGAZINE ISSUE 32
Getting Down And Personal With Gianna
Her Youtube channel is popular and the reason why she chose Youtube is because Youtube is the biggest platform and reached almost to the whole world Everyone already knows about it and it was growing rapidly as compared to other platforms like Dailymotion so she figured that Youtube was the way to go Her advice to new designers is that when you start out go to the platforms on the top of your list first then work your way down your list if you do not get accepted by your first choice
After loyally putting up one video every week for about 8 months in a row she became a Youtube partner and monetized her videos She knew she needed at least $100 to get her first payout She managed to reach $100 after 3 months The process was not easy she worked hard lack sleep skipped meals and who knows what happened to Ridge in the Bold and the Beautiful because she stopped watching
On Youtube you can monetize your videos Google pays straight to your bank account and at other countries where they also have the option of getting checks among other options In order to get paid you have to reach the $100 mark and after 3 months For Gianna she thinks that you cannot say that Etsy is better than Youtube or Youtube is better than Etsy Her reasoning is because on Youtube she has many followers which will eventually check out her Etsy shop And to start an Etsy shop you need an audience
BLOG WWWHANDMADE-JEWELRY-CLUBCOM MEMBERSHIP WWWDIYBEADINGCLUBCOM BLOG DIY BEADING MAGAZINE ISSUE 32
television and dedicated her spare time (as she had another job) to Youtube She re-registered at the chamber of commerce after receiving her first payout Her work at Youtube now is not a full time job and things have changed on Youtube It is easier to become a parter but there are some countries that need to wait for an invitation to be a Youtube partner Take Italy for instance Italians would have to work just as hard as she did if they want to become a Youtube partner
Getting Down And Personal With Gianna
With her 60000 subscribers on her b4pbakup Youtube channel it is possible to sell at least 60 patterns on the first day on Etsy after promoting the PDF file on her Youtube channel Though you may think that 60 out of 60000 is not much you have to remember that not everyone has the means to purchase the PDF file and a lot of people still rather watch her carry out the tutorial(for free) on Youtube instead of reading the patterns or paying for the patterns even if the pattern is for a fundraiser and only cost $2 Her insights on Youtube is that Youtube is not what it used to be 6 years ago Instead of making more money every month she is making less and less because advertisers have more options of where they want to advertise their ads Ads do not pay as much as they used to Back in the days you could get 25 cents per ad Now you count yourself lucky if you could get 5 cents roll in after two hours
BLOG WWWHANDMADE-JEWELRY-CLUBCOM MEMBERSHIP WWWDIYBEADINGCLUBCOM BLOG DIY BEADING MAGAZINE ISSUE 32
And on top of that adblockers are destroying Youtube channel owners Youtube will start making changes to the channels where there will be ldquopaid subscriptionrdquo channels This has already been implemented in some countries but not in her country The Netherlands This means there will no longer be ads for her monthly paying subscribers She hopes that Youtube will add on a paid per video option feature The option to be a paid channel or free channel or to start a new channel for paying customers is yours to choose Gianna is not happy with Youtube because many others like her have worked so hard and for some years to become Youtube partners(which was something to be proud of) has lost their status
Getting Down And Personal With Gianna
Her advice for those who want to go on Youtube is 1 Do it because you want to teach
2 Do it because you want a career with beads
BLOG WWWHANDMADE-JEWELRY-CLUBCOM MEMBERSHIP WWWDIYBEADINGCLUBCOM BLOG DIY BEADING MAGAZINE ISSUE 32
After putting up about 20 videos and having at least 5000 subscribers add the PDF tutorials to Etsy and Craftsy She found out that her audience would like to have the PDF after watching her videos This is because they would rather print out the PDF and work while seated in a comfy chair technically somewhere else instead of having to pause the video time and time again
Gianna has also made a video for those who want to know the whole story of her journey up until the present day And to get updates on her you can check it out here She has also started a vlog where she tells of how she still works towards becoming a financial independent beader and explains her journey to get where she wants to be(or die trying) Gianna will be in the UK on October the 17th giving an all-day workshop with 4 different patterns
(2 beginners and 2 advanced) in Wotton-under-Edge
Gianna will be there Friday night as the workshop is on Saturday She will be leaving on Sunday Her
doors are open to all who wants to continue the party with her at the hotel across the street
For more information do contact Ann Tucker on Facebook
httpswwwfacebookcomanntucker501
Rec
omm
end
ed R
ead
ings
Making Jewelry with Gemstone
Beads
Combines the popular craft of beading with beautiful semi-precious stones which are collected by many Features a variety of versatile ideas which can be adapted for any type of gem or bead Readers will learn to reate beautiful gemstone jewelry with this dazzling collection of over 100 projects ranging from eyecatching earrings and accessories to exquisite necklaces and bracelets This beautiful book offers an impressive range of 28 beautiful semi-precious stones (including birthstones) and a glimpse into the fascinating history and mythical properties behind them
BLOG DIY BEADING MAGAZINE ISSUE 32 BLOG WWWHANDMADE-JEWELRY-CLUBCOM MEMBERSHIP WWWDIYBEADINGCLUBCOM
Rec
omm
end
ed R
ead
ings
Convertible Crystal Jewelry
Reverse it Twist it Wear it Many
Ways
Diane Whiting presents the idea that convertibility isnrsquot just about using pieces in multiple ways it is also about using skills and creativity in multiple ways Using ever-popular sparkling crystals Diane showcases design elements through various techniques for fun easy fashionable jewelry With 25 projects the reader can choose from bracelets necklaces and earrings that match any outfit or styleDiane Whiting presents the idea that convertibility isnrsquot just about using pieces in multiple ways it is also about using skills and creativity in multiple ways
BLOG DIY BEADING MAGAZINE ISSUE 32 BLOG WWWHANDMADE-JEWELRY-CLUBCOM MEMBERSHIP WWWDIYBEADINGCLUBCOM
Rec
omm
end
ed R
ead
ings
Wire Jewelry Masterclass
Wrapped Coiled and Woven Pieces
Using Fine Materials
Comprehensive and fabulous Wire Jewelry Masterclass takes an in-depth look at an intricate and rewarding craft The 24 projects which range from simple Dragons tear briolette earrings to a Poseidon-under-the-sea pendant will delight and inspire jewelers of all levels and tastes Divided into beginner intermediate and advanced sections this beautifully photographed step-by-step guide is the ticket to wire jewelry expertise
BLOG DIY BEADING MAGAZINE ISSUE 32 BLOG WWWHANDMADE-JEWELRY-CLUBCOM MEMBERSHIP WWWDIYBEADINGCLUBCOM
Rec
omm
end
ed R
ead
ings
Timeless Wire Weaving The
Complete Course
Timeless Wire Weaving focuses on developing wirework skills through 13 projects using three classic wire weaving techniques coiling wrapping and weaving The projects are built around a focal cabochon and incorporate seed beads and crystals in imaginative ways Designers learn to make the jewelry shown in the book and they also use the techniques learned to create innovative jewelry pieces of their own
BLOG DIY BEADING MAGAZINE ISSUE 32 BLOG WWWHANDMADE-JEWELRY-CLUBCOM MEMBERSHIP WWWDIYBEADINGCLUBCOM
Our digital magazine is available through
Apple Newsstand service available to millions of IPAD users
To advertise with us please email us at
diyjewelryclubgmailcom
Or visit our page at
httphandmade-jewelry-clubcomadvertising-diy-beading-magazine
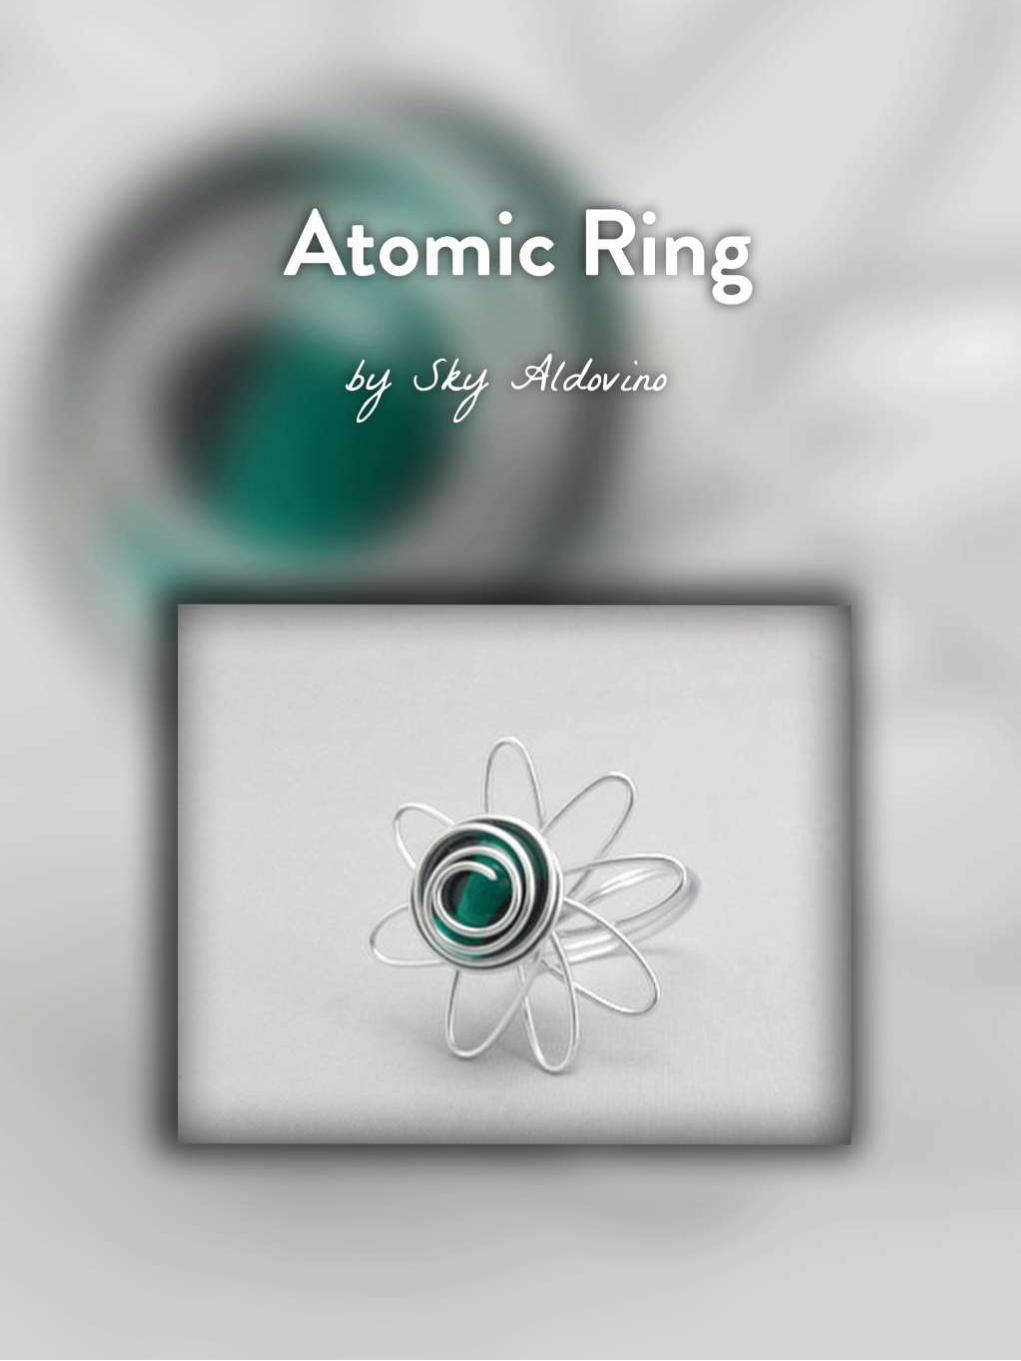
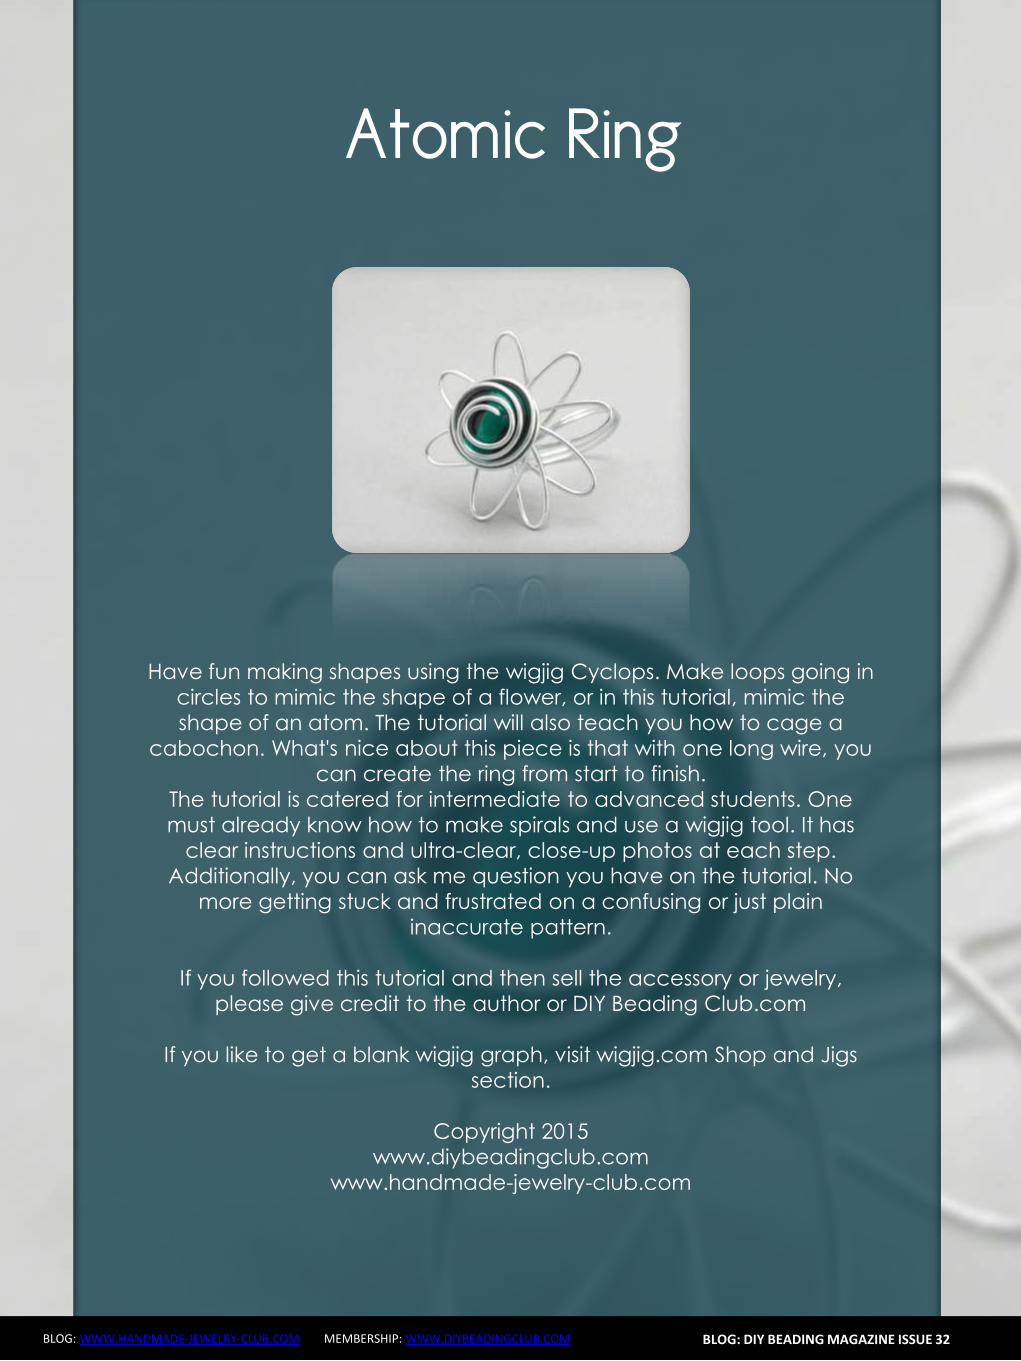
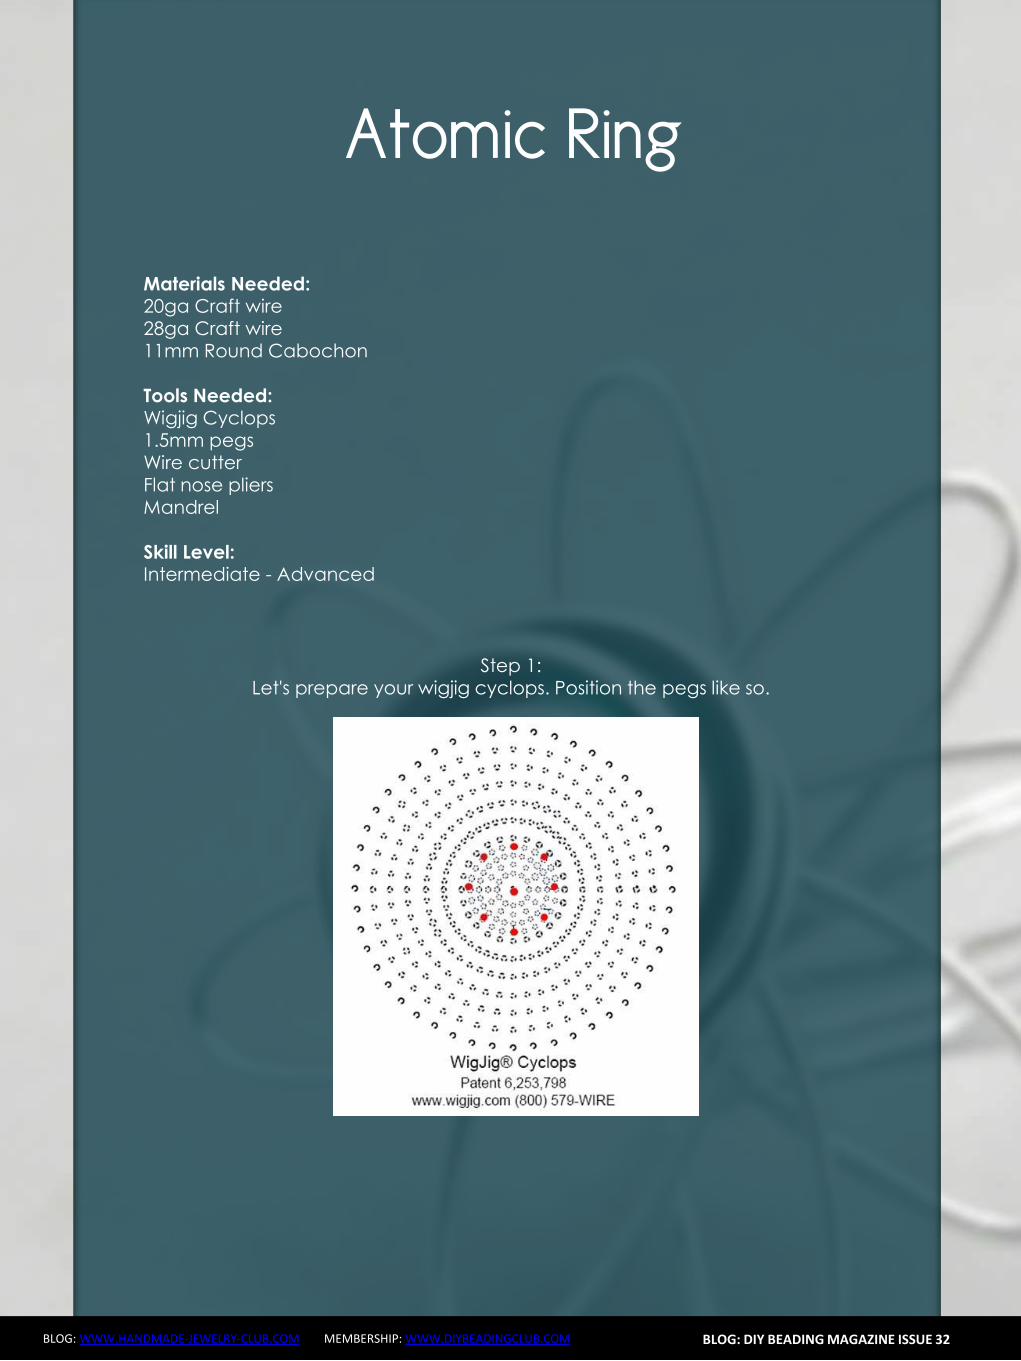
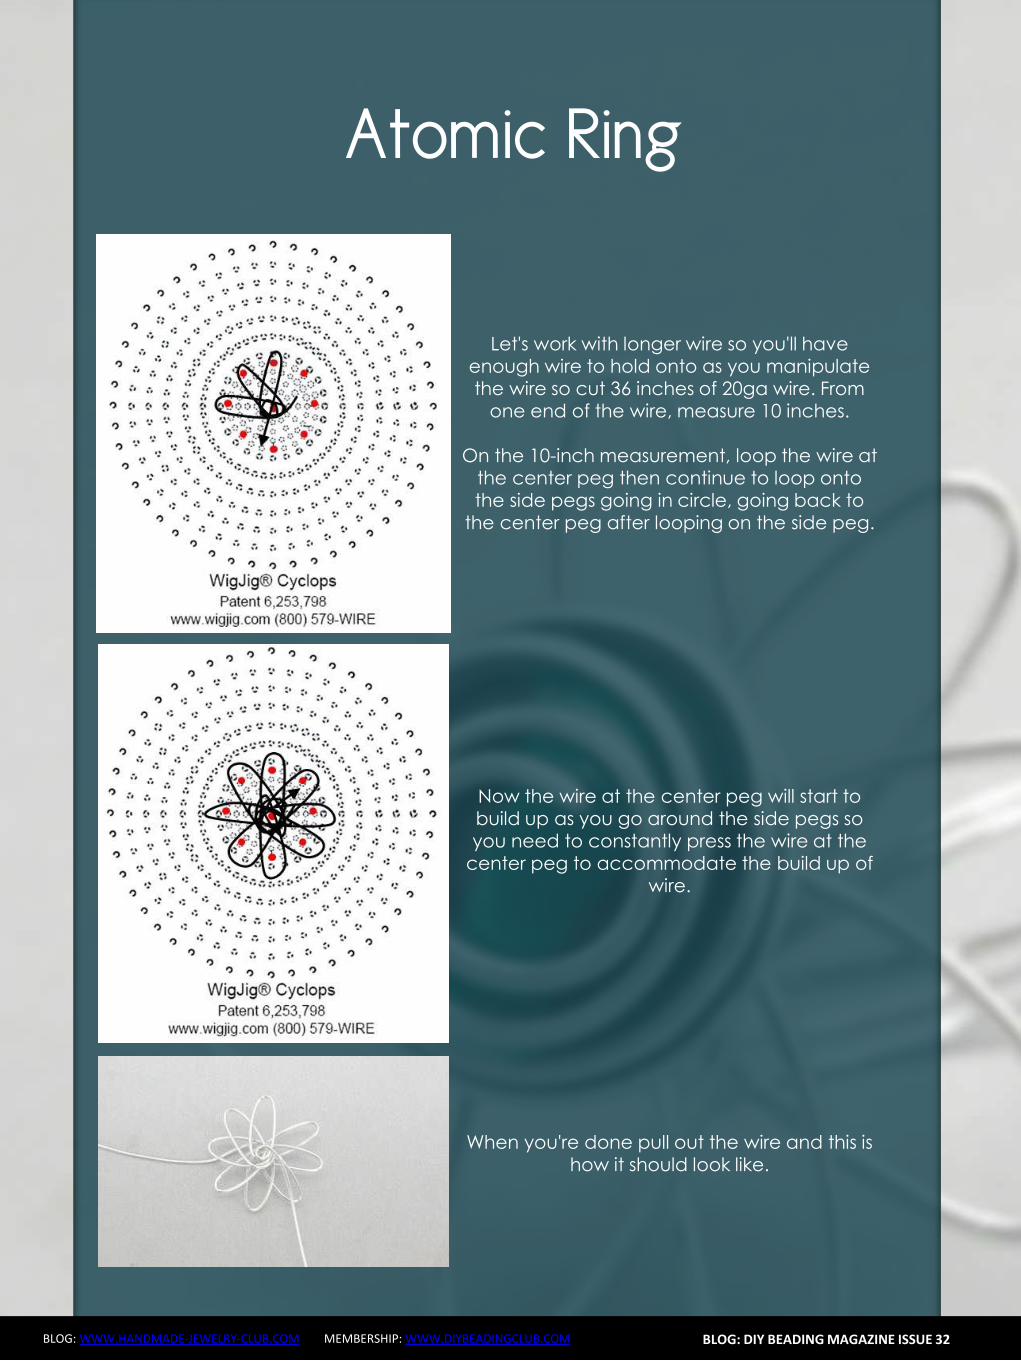
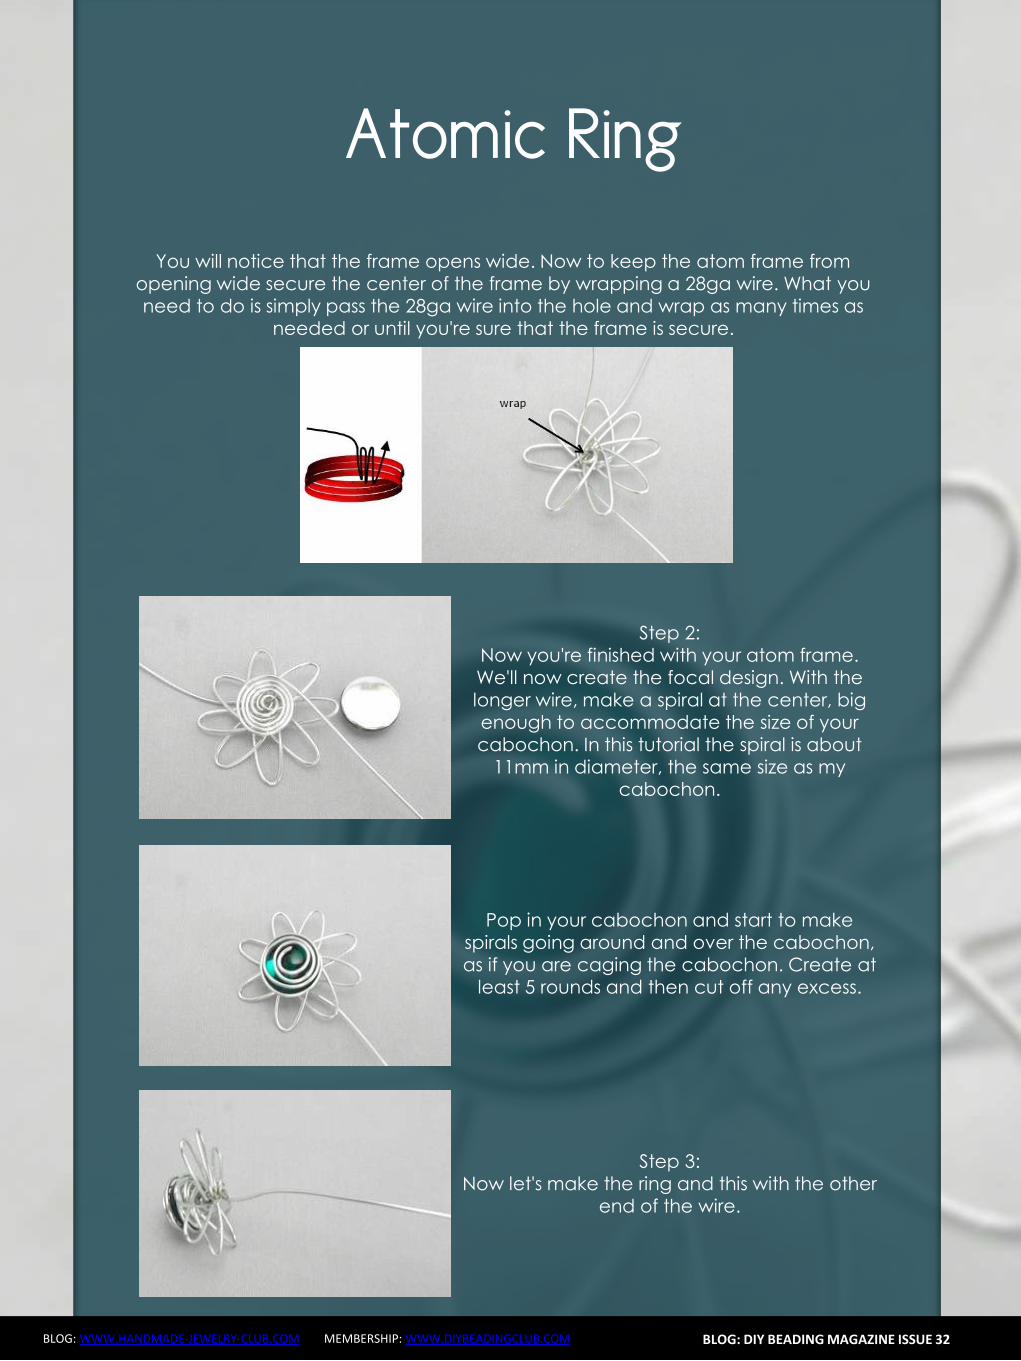
Something Blue Necklace and Earrings
BLOG WWWHANDMADE-JEWELRY-CLUBCOM MEMBERSHIP WWWDIYBEADINGCLUBCOM
Skill level Beginner Intermediate Advanced
DIMENSIONS OF THE NECKLACE Inner Circumference 14 18 inch 35 cm
Focal Pendant Width 1 15 inch 35 cm Focal Pendant Height 1 15 inch 35 cm
DIMENSIONS OF THE EARRING Earring Width 716 inch 12 cm Earring Height 1516 inch 25 cm (Without the earring hook)
BLOG DIY BEADING MAGAZINE ISSUE 32
Materials
Note Before purchasing the supplies measure the length of your wished necklace If you decide to bead a longer necklace you should keep in mind that for every extra
frac34 inches 2 cm-s you will need 8 bicones and 8 pearls
Something Blue Necklace and Earrings
BLOG WWWHANDMADE-JEWELRY-CLUBCOM MEMBERSHIP WWWDIYBEADINGCLUBCOM BLOG DIY BEADING MAGAZINE ISSUE 32
Work RAW stitch into a beaded circle and embellish with Swarovski bicones
STEP 2 String 1A and 2 pearls Pass through the previous
second pearl and the freshly added 1A and the first pearl again
STEP 1 Use a comfortable length of thread to string 2
pearls 1A and 1 pearl again leaving a 2rdquo 5cm tail Pass through the first two pearls strung to form a
ring
STEP 3 String 2 pearls and 1A Pass through the previous first pearl and the freshly added two pearls
again
STEP 4 - 17 Repeat STEP 2 and STEP 3 again until you count 17 pearls in the inner circle
But be careful in the last step you only have to add 1 pearl then pass through the first pearls
added in STEP 1 and add another 1A Now pass through the first pearl added in STEP
1and 1A added in this round again to exit from this A
Something Blue Necklace and Earrings
BLOG WWWHANDMADE-JEWELRY-CLUBCOM MEMBERSHIP WWWDIYBEADINGCLUBCOM BLOG DIY BEADING MAGAZINE ISSUE 32
STEP 19 String 2A and pass through the next A added in round 4-17 and the A added in round 18 the 2A added in this round and finally the A added in round 4-17 to exit from the bead showed below
STEP 18 String 3A and pass through the 1A added in the previous round and the first A added in this
round
STEP 20 - 34 Repeat STEP 18 and STEP 19 again until you finish the circle
But be careful in the last step first you have to pass through 3A and then add 1A After this pass
through the 3A again and exit from the A bead
shown below (This is the first A added in STEP 18)
Something Blue Necklace and Earrings
BLOG WWWHANDMADE-JEWELRY-CLUBCOM MEMBERSHIP WWWDIYBEADINGCLUBCOM BLOG DIY BEADING MAGAZINE ISSUE 32
STEP 35 Step up to exit from the pearl shown below (Finishing the previous step in the A bead and then
stepping up from there makes the circle more secure)
Now string 3 bicones Pass through the pearl and the first bicone again
In the reality your circle will look more like this the A beads forming a strong row in the middle of the
pearls
STEP 36 Add 2 bicones Pass through the
neighboring pearl the first bicone added in the previous row and the 2 bicones added in this step
so you can exit from the next pearl
Something Blue Necklace and Earrings
BLOG WWWHANDMADE-JEWELRY-CLUBCOM MEMBERSHIP WWWDIYBEADINGCLUBCOM BLOG DIY BEADING MAGAZINE ISSUE 32
Now in the reality your circle will look more like this the A beads still forming a strong row in the middle of the pearls and the bicones slightly lying on top of
them
STEP 37 - 49 Repeat STEP 35 and STEP 36 again until you finish the circle with the bicones
But be careful in the last step first you have pass through the third bicone added then add 1 bicone
and pass through this little quartet to exit from the bicone shown below (The second one added in
STEP 35)
STEP 50 With these steps we finish the circle by adding 1 bicone to connect the A beads and the
bicone row So add 1 bicone pass through the nearest A bead and add 1 bicone again Pass
through the bicone already there and exit from the bicone you just added
Something Blue Necklace and Earrings
BLOG WWWHANDMADE-JEWELRY-CLUBCOM MEMBERSHIP WWWDIYBEADINGCLUBCOM BLOG DIY BEADING MAGAZINE ISSUE 32
STEP 66-83 Secure the circle by adding 1A between each bicone in the second row of Swarovski
bicones If you finished secure the thread and trim
STEP 51-65 Using the same technique as in STEP 37 - 49 add 1 bicone to finish the third bicone row The black line shows you the way (After STEP 50 pass through the next A bead add 1 bicone and pass through the bicone already there and the bicone added in the previous step Repeat these steps to
finish the inner bicone circle)
MIDDLE CIRCLE Work RAW stitch into a beaded circle and embellish with
Swarovski bicones Remember you need to bead two circles this time
STEP 1 Just like in the focal circle begin with 2 pearls 1A and 1 pearl again on a comfortable length of thread
leaving a 2rdquo 5cm tail Pass through the first two pearls strung to form a ring
Something Blue Necklace and Earrings
BLOG WWWHANDMADE-JEWELRY-CLUBCOM MEMBERSHIP WWWDIYBEADINGCLUBCOM BLOG DIY BEADING MAGAZINE ISSUE 32
STEP 15-28 Mimicing the FOCAL CIRCLElsquos STEP 18-34 bead A beads until you finish the inner part of the
circle Exit from a pearl in the second row This circle should look very similar to the first one but this is a bit
smaller
STEP 2-14 Mimicing the FOCAL CIRCLElsquos STEP 2-17 bead until you count 14 pearls in the inner circle Exit
from the last A added
STEP 29-42 Mimicing FOCAL CIRCLElsquos STEP 35-49 add 2 rows of bicones
STEP 43-56 Mimicing the FOCAL CIRCLElsquos STEP 50-65 bead the third row of bicones to finish the circle
Something Blue Necklace and Earrings
BLOG WWWHANDMADE-JEWELRY-CLUBCOM MEMBERSHIP WWWDIYBEADINGCLUBCOM BLOG DIY BEADING MAGAZINE ISSUE 32
SMALLEST CIRCLE Work RAW stitch into a beaded circle and embellish
with Swarovski bicones Remember you need to bead two circles again
STEP 1 Just like in the focal circle begin with 2 pearls
1A and 1 pearl again on a comfortable length of thread leaving a 2rdquo 5cm tail Pass through the first two
pearls strung to form a ring
STEP 57-70 Just like the FOCAL CIRCLElsquos STEP 66-83 secure the circle by adding 1A between every bicone
in the second row of bicones If you finished secure the thread and trim (Donrsquot forget to bead another
circle)
STEP 2-12 Mimicing the FOCAL CIRCLElsquos STEP 2-17 bead until you count 12 pearls in the inner circle Exit
from the last A added
STEP 13-24 Mimicing the FOCAL CIRCLElsquos STEP 18-34 bead A beads until you finish the inner part of the
circle Exit from a pearl in the second row This circle should look very similar to the first two but this is the
smallest of them all
Something Blue Necklace and Earrings
BLOG WWWHANDMADE-JEWELRY-CLUBCOM MEMBERSHIP WWWDIYBEADINGCLUBCOM BLOG DIY BEADING MAGAZINE ISSUE 32
STEP 37-48 Mimicing the FOCAL CIRCLElsquos STEP 50-65 bead the third row of bicones to finish this circle too
STEP 25-36 Mimicing FOCAL CIRCLElsquos STEP 35-49 add 2
rows of bicones The last step here is purple again
STEP 49-60 Just like the FOCAL CIRCLElsquos STEP 66-83 secure the circle by adding 1A between every bicone
in the second row of bicones If you finished secure the thread and trim (Donrsquot forget that you need two
small circles)
Something Blue Necklace and Earrings
BLOG WWWHANDMADE-JEWELRY-CLUBCOM MEMBERSHIP WWWDIYBEADINGCLUBCOM BLOG DIY BEADING MAGAZINE ISSUE 32
STEP 37-48 Mimicing the FOCAL CIRCLElsquos STEP 50-65 bead the third row of bicones to finish this circle too
STEP 25-36 Mimicing FOCAL CIRCLElsquos STEP 35-49 add 2
rows of bicones The last step here is purple again
STEP 49-60 Just like the FOCAL CIRCLElsquos STEP 66-83 secure the circle by adding 1A between every bicone
in the second row of bicones If you finished secure the thread and trim (Donrsquot forget that you need two
small circles)
Something Blue Necklace and Earrings
BLOG WWWHANDMADE-JEWELRY-CLUBCOM MEMBERSHIP WWWDIYBEADINGCLUBCOM BLOG DIY BEADING MAGAZINE ISSUE 32
STEP 2-6 Continue by adding 1A 1 bicone 1 pearl until you count 6 of each
STEP 1 Begin with 1 pearl 1 bicone 1A and 1 bicone again on a comfortable length of thread leaving a 2rdquo
5cm tail Pass through the pearl and the first bicone strung to form a ring
STEP 7-12 Pass through the A beads to make your
component more secure Also secure the thread and trim (Repeat these steps until you have six 6-BEAD
COMPONENTs)
6-BEAD COMPONENT Work RAW stitch into a beaded circle and embellish with Swarovski bicones
For the necklace we will need six from this component For the earring two
Something Blue Necklace and Earrings
BLOG WWWHANDMADE-JEWELRY-CLUBCOM MEMBERSHIP WWWDIYBEADINGCLUBCOM BLOG DIY BEADING MAGAZINE ISSUE 32
STEP 2-4 Continue by adding 1A 1 bicone 1 pearl
until you count 4 of each
STEP 1 Begin with 1 pearl 1 bicone 1A and 1 bicone again on a comfortable length of thread leaving a 2rdquo
5cm tail Pass through the pearl and the first bicone strung to form a ring
STEP 5-8 Pass through the A beads to make your component more secure Also secure the thread and
trim (Repeat these steps until you have the wished amount of 4-BEAD COMPONENTs)
4-BEAD COMPONENT Work RAW stitch into a beaded circle and embellish with Swarovski bicones
For the necklace-size that is given on the second page we will need 20 from this
component For the earring two
If you would like to make a longer necklace you need to make more (One 4-BEAD COMPONENT measures about 38 inch 1 cm To make the necklace symmetrical you have to have equal amounts on each side This means for every extra frac34 inches
2 cm-s you will need 1 4-BEAD COMPONENT on each side of the necklace)
Something Blue Necklace and Earrings
BLOG WWWHANDMADE-JEWELRY-CLUBCOM MEMBERSHIP WWWDIYBEADINGCLUBCOM BLOG DIY BEADING MAGAZINE ISSUE 32
STEP 2 Connect the MIDDLE CIRCLE to two 6-BEAD COMPONENTs by adding four-times 2As
between the pearls Choose a pearl on the MIDDLE CIRCLE and add
2A pass through a pearl in the 6-BEAD COMPONENT previously added and add 2A again Watch out this has to be symmetrical Repeat this at least two more times to make it
secure Now repeat this entire procedure but choose
the 8-th pearl on MIDDLE CIRCLE Repeat this on the other side of the necklace
too
Choose a pearl on the FOCAL CIRCLE and add 2A pass through a pearl in the 6-BEAD COMPONENT and add 2A again Repeat this at least two more times to make it secure
Now repeat this entire procedure but choose the 5-th pearl on FOCAL CIRCLE This will make the necklace nice on your neck
FINISHING THE NECKLACE Connects the parts with A beads
STEP 1 Connect the FOCAL CIRCLE to two 6-BEAD COMPONENTs by adding four-times 2As between the pearls To do this turn your parts upside down you need to
see the pearls We will work on this side from now on
Something Blue Necklace and Earrings
BLOG WWWHANDMADE-JEWELRY-CLUBCOM MEMBERSHIP WWWDIYBEADINGCLUBCOM BLOG DIY BEADING MAGAZINE ISSUE 32
FINISHING THE EARRING Connects the parts with A beads
STEP 1-2 Connect the 6-BEAD COMPONENT
to 4-BEAD COMPONENT and the 4-BEAD
COMPONENT to the earring hook
First connect the 4-BEAD COMPONENT to the 6-BEAD COMPONENT with 4A beads Mimic
the elongation steps of the necklace if needed
Secondly connect the 4-BEAD COMPONENT
to your earring hook with 4A beads again Leave from the last pearl bead 2A beads the hook (this is the orange oval form) and 2As again Pass through each of them to
secure this connection again
Finally get ready to prepare the other earring ndash since we need two of them
STEP 5 Connect the 4-BEAD COMPONENTs to the toggle clasp thus finishing the
necklace Leaving from the last pearl bead 2A the
clasp(this is the orange oval form) and 2A again Pass through all of them a couple more times to make this connection more
secure
Something Blue Necklace and Earrings
BLOG WWWHANDMADE-JEWELRY-CLUBCOM MEMBERSHIP WWWDIYBEADINGCLUBCOM BLOG DIY BEADING MAGAZINE ISSUE 32
If you finished it is time to try it on It was a great fun wasnrsquot it And how beautiful you look in your new necklace and the matching earrings
Something Blue Necklace and Earrings
BLOG WWWHANDMADE-JEWELRY-CLUBCOM MEMBERSHIP WWWDIYBEADINGCLUBCOM
About the Author
Margit Vogel
My name is Margit Vogel I live in Hungary Europe
By profession I am a biochemical engineer but I fell in love with
beads so much that I could not stop playing with them
I make one-of-a-kind beaded and bead embroidered art
jewelry made of the best quality materials such as Swarovski
stones gemstones Japanese beads (Miyuki and Toho) Czech
glass beads leather soutache and suede Each piece is unique
and individually crafted
Feel free to visit my blog for some eyecandy
httpiformjewelrywordpresscom
My shop httpwwwetsycomshopiformjewelry
Facebook httpwwwfacebookcomiformjewelry
BLOG DIY BEADING MAGAZINE ISSUE 32
Getting Down And Personal With Gianna
Getting Down And Personal With Gianna
Nowadays we see more and more jewelry stores opening up online and with these online jewelry stores it has made it easier for us to purchase and view their creations Have you ever wondered how they are able to manage and produce amazing jewelry pieces and tutorials So heres a little on the journey to open up an online shop We are excited to present to you Gianna aka Beading4perfectionists
Gianna Beader amp Youtuber
Unlike most jewelry makers and beadweavers Gianna did not start beading as a hobby but as a means to make ends meet With goals in trying to
fill the financial gap she did everything she could to expand her earnings ndash working as a security guard
and at the same time learning how to bead and selling her pieces at fair trades and flea markets
Since many were asking if she does home beading workshops she started on exploring how to teach people to bead She loves Scott Bakula and has always loved him till now and this served as her
inspiration to start making a beading video tutorial
Gianna started creating videos because she was at the point in her life where everything seemed to be falling apart And at that moment of time she had difficulties financially and selling jewelry was the only way for her to stay afloat financially She is a big Scott Bakula fan and when she went to the UK to see him on stage that was when it hit her that she is already able to edit videos and
taught herself Photoshop and done workshops at bead fairs so why not put these together and see what happens on Youtube She knew that if she gets enough subscribers and views ndash though no one knew what the exact numbers were you would be invited to become a Youtube partner This way she could monetize her videos with advertisements and hopefully she would be able to be a Youtube partner and be able to pay her bills
BLOG WWWHANDMADE-JEWELRY-CLUBCOM MEMBERSHIP WWWDIYBEADINGCLUBCOM BLOG DIY BEADING MAGAZINE ISSUE 32
Getting Down And Personal With Gianna
Her Youtube channel is popular and the reason why she chose Youtube is because Youtube is the biggest platform and reached almost to the whole world Everyone already knows about it and it was growing rapidly as compared to other platforms like Dailymotion so she figured that Youtube was the way to go Her advice to new designers is that when you start out go to the platforms on the top of your list first then work your way down your list if you do not get accepted by your first choice
After loyally putting up one video every week for about 8 months in a row she became a Youtube partner and monetized her videos She knew she needed at least $100 to get her first payout She managed to reach $100 after 3 months The process was not easy she worked hard lack sleep skipped meals and who knows what happened to Ridge in the Bold and the Beautiful because she stopped watching
On Youtube you can monetize your videos Google pays straight to your bank account and at other countries where they also have the option of getting checks among other options In order to get paid you have to reach the $100 mark and after 3 months For Gianna she thinks that you cannot say that Etsy is better than Youtube or Youtube is better than Etsy Her reasoning is because on Youtube she has many followers which will eventually check out her Etsy shop And to start an Etsy shop you need an audience
BLOG WWWHANDMADE-JEWELRY-CLUBCOM MEMBERSHIP WWWDIYBEADINGCLUBCOM BLOG DIY BEADING MAGAZINE ISSUE 32
television and dedicated her spare time (as she had another job) to Youtube She re-registered at the chamber of commerce after receiving her first payout Her work at Youtube now is not a full time job and things have changed on Youtube It is easier to become a parter but there are some countries that need to wait for an invitation to be a Youtube partner Take Italy for instance Italians would have to work just as hard as she did if they want to become a Youtube partner
Getting Down And Personal With Gianna
With her 60000 subscribers on her b4pbakup Youtube channel it is possible to sell at least 60 patterns on the first day on Etsy after promoting the PDF file on her Youtube channel Though you may think that 60 out of 60000 is not much you have to remember that not everyone has the means to purchase the PDF file and a lot of people still rather watch her carry out the tutorial(for free) on Youtube instead of reading the patterns or paying for the patterns even if the pattern is for a fundraiser and only cost $2 Her insights on Youtube is that Youtube is not what it used to be 6 years ago Instead of making more money every month she is making less and less because advertisers have more options of where they want to advertise their ads Ads do not pay as much as they used to Back in the days you could get 25 cents per ad Now you count yourself lucky if you could get 5 cents roll in after two hours
BLOG WWWHANDMADE-JEWELRY-CLUBCOM MEMBERSHIP WWWDIYBEADINGCLUBCOM BLOG DIY BEADING MAGAZINE ISSUE 32
And on top of that adblockers are destroying Youtube channel owners Youtube will start making changes to the channels where there will be ldquopaid subscriptionrdquo channels This has already been implemented in some countries but not in her country The Netherlands This means there will no longer be ads for her monthly paying subscribers She hopes that Youtube will add on a paid per video option feature The option to be a paid channel or free channel or to start a new channel for paying customers is yours to choose Gianna is not happy with Youtube because many others like her have worked so hard and for some years to become Youtube partners(which was something to be proud of) has lost their status
Getting Down And Personal With Gianna
Her advice for those who want to go on Youtube is 1 Do it because you want to teach
2 Do it because you want a career with beads
BLOG WWWHANDMADE-JEWELRY-CLUBCOM MEMBERSHIP WWWDIYBEADINGCLUBCOM BLOG DIY BEADING MAGAZINE ISSUE 32
After putting up about 20 videos and having at least 5000 subscribers add the PDF tutorials to Etsy and Craftsy She found out that her audience would like to have the PDF after watching her videos This is because they would rather print out the PDF and work while seated in a comfy chair technically somewhere else instead of having to pause the video time and time again
Gianna has also made a video for those who want to know the whole story of her journey up until the present day And to get updates on her you can check it out here She has also started a vlog where she tells of how she still works towards becoming a financial independent beader and explains her journey to get where she wants to be(or die trying) Gianna will be in the UK on October the 17th giving an all-day workshop with 4 different patterns
(2 beginners and 2 advanced) in Wotton-under-Edge
Gianna will be there Friday night as the workshop is on Saturday She will be leaving on Sunday Her
doors are open to all who wants to continue the party with her at the hotel across the street
For more information do contact Ann Tucker on Facebook
httpswwwfacebookcomanntucker501
Rec
omm
end
ed R
ead
ings
Making Jewelry with Gemstone
Beads
Combines the popular craft of beading with beautiful semi-precious stones which are collected by many Features a variety of versatile ideas which can be adapted for any type of gem or bead Readers will learn to reate beautiful gemstone jewelry with this dazzling collection of over 100 projects ranging from eyecatching earrings and accessories to exquisite necklaces and bracelets This beautiful book offers an impressive range of 28 beautiful semi-precious stones (including birthstones) and a glimpse into the fascinating history and mythical properties behind them
BLOG DIY BEADING MAGAZINE ISSUE 32 BLOG WWWHANDMADE-JEWELRY-CLUBCOM MEMBERSHIP WWWDIYBEADINGCLUBCOM
Rec
omm
end
ed R
ead
ings
Convertible Crystal Jewelry
Reverse it Twist it Wear it Many
Ways
Diane Whiting presents the idea that convertibility isnrsquot just about using pieces in multiple ways it is also about using skills and creativity in multiple ways Using ever-popular sparkling crystals Diane showcases design elements through various techniques for fun easy fashionable jewelry With 25 projects the reader can choose from bracelets necklaces and earrings that match any outfit or styleDiane Whiting presents the idea that convertibility isnrsquot just about using pieces in multiple ways it is also about using skills and creativity in multiple ways
BLOG DIY BEADING MAGAZINE ISSUE 32 BLOG WWWHANDMADE-JEWELRY-CLUBCOM MEMBERSHIP WWWDIYBEADINGCLUBCOM
Rec
omm
end
ed R
ead
ings
Wire Jewelry Masterclass
Wrapped Coiled and Woven Pieces
Using Fine Materials
Comprehensive and fabulous Wire Jewelry Masterclass takes an in-depth look at an intricate and rewarding craft The 24 projects which range from simple Dragons tear briolette earrings to a Poseidon-under-the-sea pendant will delight and inspire jewelers of all levels and tastes Divided into beginner intermediate and advanced sections this beautifully photographed step-by-step guide is the ticket to wire jewelry expertise
BLOG DIY BEADING MAGAZINE ISSUE 32 BLOG WWWHANDMADE-JEWELRY-CLUBCOM MEMBERSHIP WWWDIYBEADINGCLUBCOM
Rec
omm
end
ed R
ead
ings
Timeless Wire Weaving The
Complete Course
Timeless Wire Weaving focuses on developing wirework skills through 13 projects using three classic wire weaving techniques coiling wrapping and weaving The projects are built around a focal cabochon and incorporate seed beads and crystals in imaginative ways Designers learn to make the jewelry shown in the book and they also use the techniques learned to create innovative jewelry pieces of their own
BLOG DIY BEADING MAGAZINE ISSUE 32 BLOG WWWHANDMADE-JEWELRY-CLUBCOM MEMBERSHIP WWWDIYBEADINGCLUBCOM
Our digital magazine is available through
Apple Newsstand service available to millions of IPAD users
To advertise with us please email us at
diyjewelryclubgmailcom
Or visit our page at
httphandmade-jewelry-clubcomadvertising-diy-beading-magazine
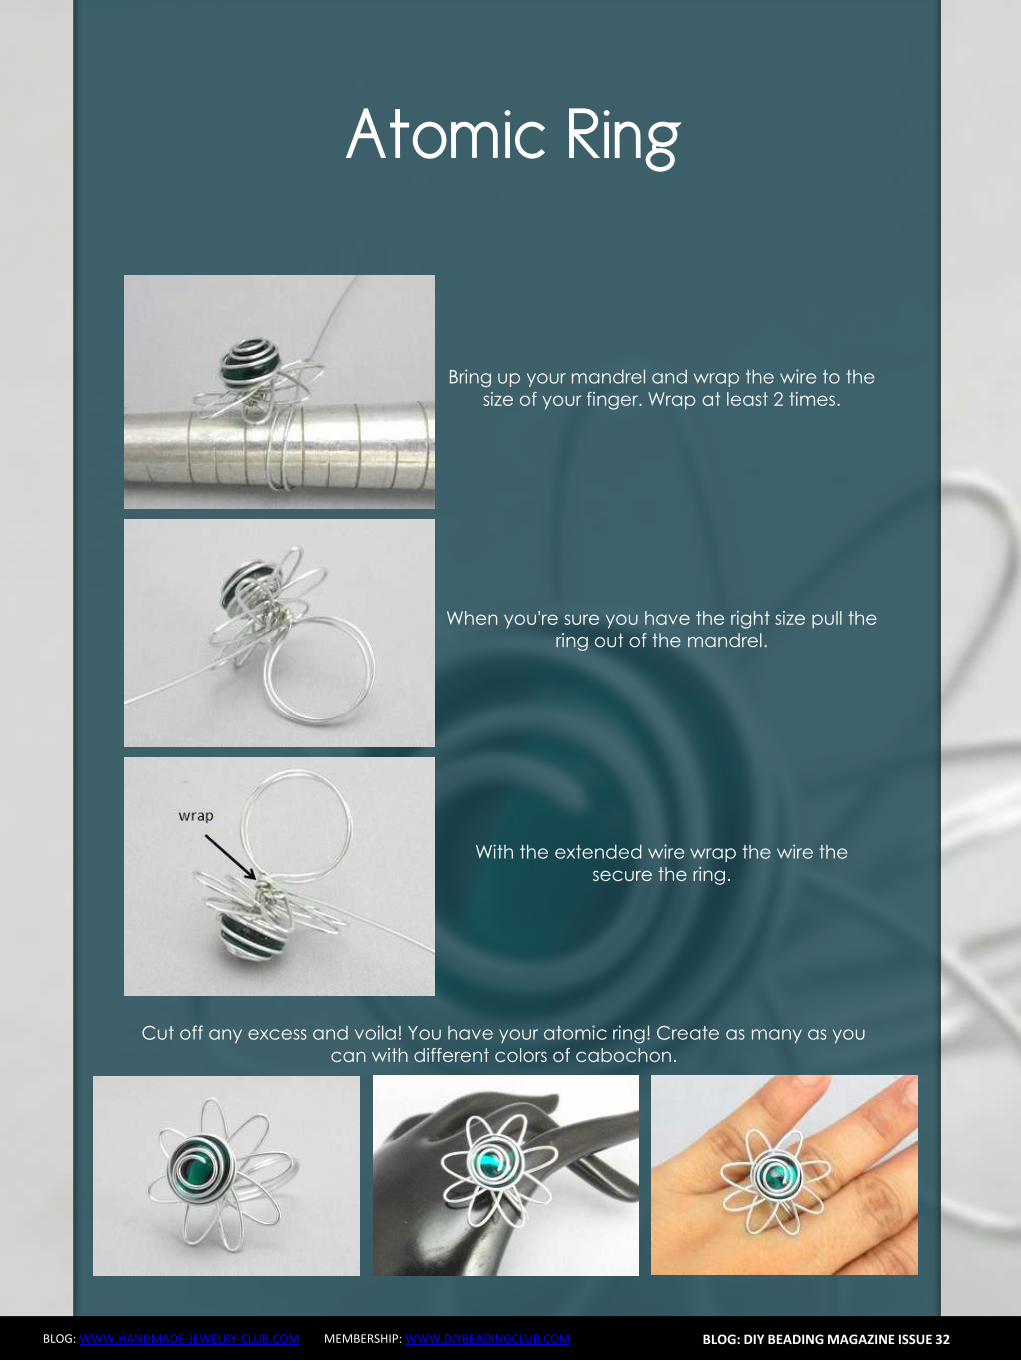
Something Blue Necklace and Earrings
BLOG WWWHANDMADE-JEWELRY-CLUBCOM MEMBERSHIP WWWDIYBEADINGCLUBCOM BLOG DIY BEADING MAGAZINE ISSUE 32
Now in the reality your circle will look more like this the A beads still forming a strong row in the middle of the pearls and the bicones slightly lying on top of
them
STEP 37 - 49 Repeat STEP 35 and STEP 36 again until you finish the circle with the bicones
But be careful in the last step first you have pass through the third bicone added then add 1 bicone
and pass through this little quartet to exit from the bicone shown below (The second one added in
STEP 35)
STEP 50 With these steps we finish the circle by adding 1 bicone to connect the A beads and the
bicone row So add 1 bicone pass through the nearest A bead and add 1 bicone again Pass
through the bicone already there and exit from the bicone you just added
Something Blue Necklace and Earrings
BLOG WWWHANDMADE-JEWELRY-CLUBCOM MEMBERSHIP WWWDIYBEADINGCLUBCOM BLOG DIY BEADING MAGAZINE ISSUE 32
STEP 66-83 Secure the circle by adding 1A between each bicone in the second row of Swarovski
bicones If you finished secure the thread and trim
STEP 51-65 Using the same technique as in STEP 37 - 49 add 1 bicone to finish the third bicone row The black line shows you the way (After STEP 50 pass through the next A bead add 1 bicone and pass through the bicone already there and the bicone added in the previous step Repeat these steps to
finish the inner bicone circle)
MIDDLE CIRCLE Work RAW stitch into a beaded circle and embellish with
Swarovski bicones Remember you need to bead two circles this time
STEP 1 Just like in the focal circle begin with 2 pearls 1A and 1 pearl again on a comfortable length of thread
leaving a 2rdquo 5cm tail Pass through the first two pearls strung to form a ring
Something Blue Necklace and Earrings
BLOG WWWHANDMADE-JEWELRY-CLUBCOM MEMBERSHIP WWWDIYBEADINGCLUBCOM BLOG DIY BEADING MAGAZINE ISSUE 32
STEP 15-28 Mimicing the FOCAL CIRCLElsquos STEP 18-34 bead A beads until you finish the inner part of the
circle Exit from a pearl in the second row This circle should look very similar to the first one but this is a bit
smaller
STEP 2-14 Mimicing the FOCAL CIRCLElsquos STEP 2-17 bead until you count 14 pearls in the inner circle Exit
from the last A added
STEP 29-42 Mimicing FOCAL CIRCLElsquos STEP 35-49 add 2 rows of bicones
STEP 43-56 Mimicing the FOCAL CIRCLElsquos STEP 50-65 bead the third row of bicones to finish the circle
Something Blue Necklace and Earrings
BLOG WWWHANDMADE-JEWELRY-CLUBCOM MEMBERSHIP WWWDIYBEADINGCLUBCOM BLOG DIY BEADING MAGAZINE ISSUE 32
SMALLEST CIRCLE Work RAW stitch into a beaded circle and embellish
with Swarovski bicones Remember you need to bead two circles again
STEP 1 Just like in the focal circle begin with 2 pearls
1A and 1 pearl again on a comfortable length of thread leaving a 2rdquo 5cm tail Pass through the first two
pearls strung to form a ring
STEP 57-70 Just like the FOCAL CIRCLElsquos STEP 66-83 secure the circle by adding 1A between every bicone
in the second row of bicones If you finished secure the thread and trim (Donrsquot forget to bead another
circle)
STEP 2-12 Mimicing the FOCAL CIRCLElsquos STEP 2-17 bead until you count 12 pearls in the inner circle Exit
from the last A added
STEP 13-24 Mimicing the FOCAL CIRCLElsquos STEP 18-34 bead A beads until you finish the inner part of the
circle Exit from a pearl in the second row This circle should look very similar to the first two but this is the
smallest of them all
Something Blue Necklace and Earrings
BLOG WWWHANDMADE-JEWELRY-CLUBCOM MEMBERSHIP WWWDIYBEADINGCLUBCOM BLOG DIY BEADING MAGAZINE ISSUE 32
STEP 37-48 Mimicing the FOCAL CIRCLElsquos STEP 50-65 bead the third row of bicones to finish this circle too
STEP 25-36 Mimicing FOCAL CIRCLElsquos STEP 35-49 add 2
rows of bicones The last step here is purple again
STEP 49-60 Just like the FOCAL CIRCLElsquos STEP 66-83 secure the circle by adding 1A between every bicone
in the second row of bicones If you finished secure the thread and trim (Donrsquot forget that you need two
small circles)
Something Blue Necklace and Earrings
BLOG WWWHANDMADE-JEWELRY-CLUBCOM MEMBERSHIP WWWDIYBEADINGCLUBCOM BLOG DIY BEADING MAGAZINE ISSUE 32
STEP 37-48 Mimicing the FOCAL CIRCLElsquos STEP 50-65 bead the third row of bicones to finish this circle too
STEP 25-36 Mimicing FOCAL CIRCLElsquos STEP 35-49 add 2
rows of bicones The last step here is purple again
STEP 49-60 Just like the FOCAL CIRCLElsquos STEP 66-83 secure the circle by adding 1A between every bicone
in the second row of bicones If you finished secure the thread and trim (Donrsquot forget that you need two
small circles)
Something Blue Necklace and Earrings
BLOG WWWHANDMADE-JEWELRY-CLUBCOM MEMBERSHIP WWWDIYBEADINGCLUBCOM BLOG DIY BEADING MAGAZINE ISSUE 32
STEP 2-6 Continue by adding 1A 1 bicone 1 pearl until you count 6 of each
STEP 1 Begin with 1 pearl 1 bicone 1A and 1 bicone again on a comfortable length of thread leaving a 2rdquo
5cm tail Pass through the pearl and the first bicone strung to form a ring
STEP 7-12 Pass through the A beads to make your
component more secure Also secure the thread and trim (Repeat these steps until you have six 6-BEAD
COMPONENTs)
6-BEAD COMPONENT Work RAW stitch into a beaded circle and embellish with Swarovski bicones
For the necklace we will need six from this component For the earring two
Something Blue Necklace and Earrings
BLOG WWWHANDMADE-JEWELRY-CLUBCOM MEMBERSHIP WWWDIYBEADINGCLUBCOM BLOG DIY BEADING MAGAZINE ISSUE 32
STEP 2-4 Continue by adding 1A 1 bicone 1 pearl
until you count 4 of each
STEP 1 Begin with 1 pearl 1 bicone 1A and 1 bicone again on a comfortable length of thread leaving a 2rdquo
5cm tail Pass through the pearl and the first bicone strung to form a ring
STEP 5-8 Pass through the A beads to make your component more secure Also secure the thread and
trim (Repeat these steps until you have the wished amount of 4-BEAD COMPONENTs)
4-BEAD COMPONENT Work RAW stitch into a beaded circle and embellish with Swarovski bicones
For the necklace-size that is given on the second page we will need 20 from this
component For the earring two
If you would like to make a longer necklace you need to make more (One 4-BEAD COMPONENT measures about 38 inch 1 cm To make the necklace symmetrical you have to have equal amounts on each side This means for every extra frac34 inches
2 cm-s you will need 1 4-BEAD COMPONENT on each side of the necklace)
Something Blue Necklace and Earrings
BLOG WWWHANDMADE-JEWELRY-CLUBCOM MEMBERSHIP WWWDIYBEADINGCLUBCOM BLOG DIY BEADING MAGAZINE ISSUE 32
STEP 2 Connect the MIDDLE CIRCLE to two 6-BEAD COMPONENTs by adding four-times 2As
between the pearls Choose a pearl on the MIDDLE CIRCLE and add
2A pass through a pearl in the 6-BEAD COMPONENT previously added and add 2A again Watch out this has to be symmetrical Repeat this at least two more times to make it
secure Now repeat this entire procedure but choose
the 8-th pearl on MIDDLE CIRCLE Repeat this on the other side of the necklace
too
Choose a pearl on the FOCAL CIRCLE and add 2A pass through a pearl in the 6-BEAD COMPONENT and add 2A again Repeat this at least two more times to make it secure
Now repeat this entire procedure but choose the 5-th pearl on FOCAL CIRCLE This will make the necklace nice on your neck
FINISHING THE NECKLACE Connects the parts with A beads
STEP 1 Connect the FOCAL CIRCLE to two 6-BEAD COMPONENTs by adding four-times 2As between the pearls To do this turn your parts upside down you need to
see the pearls We will work on this side from now on
Something Blue Necklace and Earrings
BLOG WWWHANDMADE-JEWELRY-CLUBCOM MEMBERSHIP WWWDIYBEADINGCLUBCOM BLOG DIY BEADING MAGAZINE ISSUE 32
FINISHING THE EARRING Connects the parts with A beads
STEP 1-2 Connect the 6-BEAD COMPONENT
to 4-BEAD COMPONENT and the 4-BEAD
COMPONENT to the earring hook
First connect the 4-BEAD COMPONENT to the 6-BEAD COMPONENT with 4A beads Mimic
the elongation steps of the necklace if needed
Secondly connect the 4-BEAD COMPONENT
to your earring hook with 4A beads again Leave from the last pearl bead 2A beads the hook (this is the orange oval form) and 2As again Pass through each of them to
secure this connection again
Finally get ready to prepare the other earring ndash since we need two of them
STEP 5 Connect the 4-BEAD COMPONENTs to the toggle clasp thus finishing the
necklace Leaving from the last pearl bead 2A the
clasp(this is the orange oval form) and 2A again Pass through all of them a couple more times to make this connection more
secure
Something Blue Necklace and Earrings
BLOG WWWHANDMADE-JEWELRY-CLUBCOM MEMBERSHIP WWWDIYBEADINGCLUBCOM BLOG DIY BEADING MAGAZINE ISSUE 32
If you finished it is time to try it on It was a great fun wasnrsquot it And how beautiful you look in your new necklace and the matching earrings
Something Blue Necklace and Earrings
BLOG WWWHANDMADE-JEWELRY-CLUBCOM MEMBERSHIP WWWDIYBEADINGCLUBCOM
About the Author
Margit Vogel
My name is Margit Vogel I live in Hungary Europe
By profession I am a biochemical engineer but I fell in love with
beads so much that I could not stop playing with them
I make one-of-a-kind beaded and bead embroidered art
jewelry made of the best quality materials such as Swarovski
stones gemstones Japanese beads (Miyuki and Toho) Czech
glass beads leather soutache and suede Each piece is unique
and individually crafted
Feel free to visit my blog for some eyecandy
httpiformjewelrywordpresscom
My shop httpwwwetsycomshopiformjewelry
Facebook httpwwwfacebookcomiformjewelry
BLOG DIY BEADING MAGAZINE ISSUE 32
Getting Down And Personal With Gianna
Getting Down And Personal With Gianna
Nowadays we see more and more jewelry stores opening up online and with these online jewelry stores it has made it easier for us to purchase and view their creations Have you ever wondered how they are able to manage and produce amazing jewelry pieces and tutorials So heres a little on the journey to open up an online shop We are excited to present to you Gianna aka Beading4perfectionists
Gianna Beader amp Youtuber
Unlike most jewelry makers and beadweavers Gianna did not start beading as a hobby but as a means to make ends meet With goals in trying to
fill the financial gap she did everything she could to expand her earnings ndash working as a security guard
and at the same time learning how to bead and selling her pieces at fair trades and flea markets
Since many were asking if she does home beading workshops she started on exploring how to teach people to bead She loves Scott Bakula and has always loved him till now and this served as her
inspiration to start making a beading video tutorial
Gianna started creating videos because she was at the point in her life where everything seemed to be falling apart And at that moment of time she had difficulties financially and selling jewelry was the only way for her to stay afloat financially She is a big Scott Bakula fan and when she went to the UK to see him on stage that was when it hit her that she is already able to edit videos and
taught herself Photoshop and done workshops at bead fairs so why not put these together and see what happens on Youtube She knew that if she gets enough subscribers and views ndash though no one knew what the exact numbers were you would be invited to become a Youtube partner This way she could monetize her videos with advertisements and hopefully she would be able to be a Youtube partner and be able to pay her bills
BLOG WWWHANDMADE-JEWELRY-CLUBCOM MEMBERSHIP WWWDIYBEADINGCLUBCOM BLOG DIY BEADING MAGAZINE ISSUE 32
Getting Down And Personal With Gianna
Her Youtube channel is popular and the reason why she chose Youtube is because Youtube is the biggest platform and reached almost to the whole world Everyone already knows about it and it was growing rapidly as compared to other platforms like Dailymotion so she figured that Youtube was the way to go Her advice to new designers is that when you start out go to the platforms on the top of your list first then work your way down your list if you do not get accepted by your first choice
After loyally putting up one video every week for about 8 months in a row she became a Youtube partner and monetized her videos She knew she needed at least $100 to get her first payout She managed to reach $100 after 3 months The process was not easy she worked hard lack sleep skipped meals and who knows what happened to Ridge in the Bold and the Beautiful because she stopped watching
On Youtube you can monetize your videos Google pays straight to your bank account and at other countries where they also have the option of getting checks among other options In order to get paid you have to reach the $100 mark and after 3 months For Gianna she thinks that you cannot say that Etsy is better than Youtube or Youtube is better than Etsy Her reasoning is because on Youtube she has many followers which will eventually check out her Etsy shop And to start an Etsy shop you need an audience
BLOG WWWHANDMADE-JEWELRY-CLUBCOM MEMBERSHIP WWWDIYBEADINGCLUBCOM BLOG DIY BEADING MAGAZINE ISSUE 32
television and dedicated her spare time (as she had another job) to Youtube She re-registered at the chamber of commerce after receiving her first payout Her work at Youtube now is not a full time job and things have changed on Youtube It is easier to become a parter but there are some countries that need to wait for an invitation to be a Youtube partner Take Italy for instance Italians would have to work just as hard as she did if they want to become a Youtube partner
Getting Down And Personal With Gianna
With her 60000 subscribers on her b4pbakup Youtube channel it is possible to sell at least 60 patterns on the first day on Etsy after promoting the PDF file on her Youtube channel Though you may think that 60 out of 60000 is not much you have to remember that not everyone has the means to purchase the PDF file and a lot of people still rather watch her carry out the tutorial(for free) on Youtube instead of reading the patterns or paying for the patterns even if the pattern is for a fundraiser and only cost $2 Her insights on Youtube is that Youtube is not what it used to be 6 years ago Instead of making more money every month she is making less and less because advertisers have more options of where they want to advertise their ads Ads do not pay as much as they used to Back in the days you could get 25 cents per ad Now you count yourself lucky if you could get 5 cents roll in after two hours
BLOG WWWHANDMADE-JEWELRY-CLUBCOM MEMBERSHIP WWWDIYBEADINGCLUBCOM BLOG DIY BEADING MAGAZINE ISSUE 32
And on top of that adblockers are destroying Youtube channel owners Youtube will start making changes to the channels where there will be ldquopaid subscriptionrdquo channels This has already been implemented in some countries but not in her country The Netherlands This means there will no longer be ads for her monthly paying subscribers She hopes that Youtube will add on a paid per video option feature The option to be a paid channel or free channel or to start a new channel for paying customers is yours to choose Gianna is not happy with Youtube because many others like her have worked so hard and for some years to become Youtube partners(which was something to be proud of) has lost their status
Getting Down And Personal With Gianna
Her advice for those who want to go on Youtube is 1 Do it because you want to teach
2 Do it because you want a career with beads
BLOG WWWHANDMADE-JEWELRY-CLUBCOM MEMBERSHIP WWWDIYBEADINGCLUBCOM BLOG DIY BEADING MAGAZINE ISSUE 32
After putting up about 20 videos and having at least 5000 subscribers add the PDF tutorials to Etsy and Craftsy She found out that her audience would like to have the PDF after watching her videos This is because they would rather print out the PDF and work while seated in a comfy chair technically somewhere else instead of having to pause the video time and time again
Gianna has also made a video for those who want to know the whole story of her journey up until the present day And to get updates on her you can check it out here She has also started a vlog where she tells of how she still works towards becoming a financial independent beader and explains her journey to get where she wants to be(or die trying) Gianna will be in the UK on October the 17th giving an all-day workshop with 4 different patterns
(2 beginners and 2 advanced) in Wotton-under-Edge
Gianna will be there Friday night as the workshop is on Saturday She will be leaving on Sunday Her
doors are open to all who wants to continue the party with her at the hotel across the street
For more information do contact Ann Tucker on Facebook
httpswwwfacebookcomanntucker501
Rec
omm
end
ed R
ead
ings
Making Jewelry with Gemstone
Beads
Combines the popular craft of beading with beautiful semi-precious stones which are collected by many Features a variety of versatile ideas which can be adapted for any type of gem or bead Readers will learn to reate beautiful gemstone jewelry with this dazzling collection of over 100 projects ranging from eyecatching earrings and accessories to exquisite necklaces and bracelets This beautiful book offers an impressive range of 28 beautiful semi-precious stones (including birthstones) and a glimpse into the fascinating history and mythical properties behind them
BLOG DIY BEADING MAGAZINE ISSUE 32 BLOG WWWHANDMADE-JEWELRY-CLUBCOM MEMBERSHIP WWWDIYBEADINGCLUBCOM
Rec
omm
end
ed R
ead
ings
Convertible Crystal Jewelry
Reverse it Twist it Wear it Many
Ways
Diane Whiting presents the idea that convertibility isnrsquot just about using pieces in multiple ways it is also about using skills and creativity in multiple ways Using ever-popular sparkling crystals Diane showcases design elements through various techniques for fun easy fashionable jewelry With 25 projects the reader can choose from bracelets necklaces and earrings that match any outfit or styleDiane Whiting presents the idea that convertibility isnrsquot just about using pieces in multiple ways it is also about using skills and creativity in multiple ways
BLOG DIY BEADING MAGAZINE ISSUE 32 BLOG WWWHANDMADE-JEWELRY-CLUBCOM MEMBERSHIP WWWDIYBEADINGCLUBCOM
Rec
omm
end
ed R
ead
ings
Wire Jewelry Masterclass
Wrapped Coiled and Woven Pieces
Using Fine Materials
Comprehensive and fabulous Wire Jewelry Masterclass takes an in-depth look at an intricate and rewarding craft The 24 projects which range from simple Dragons tear briolette earrings to a Poseidon-under-the-sea pendant will delight and inspire jewelers of all levels and tastes Divided into beginner intermediate and advanced sections this beautifully photographed step-by-step guide is the ticket to wire jewelry expertise
BLOG DIY BEADING MAGAZINE ISSUE 32 BLOG WWWHANDMADE-JEWELRY-CLUBCOM MEMBERSHIP WWWDIYBEADINGCLUBCOM
Rec
omm
end
ed R
ead
ings
Timeless Wire Weaving The
Complete Course
Timeless Wire Weaving focuses on developing wirework skills through 13 projects using three classic wire weaving techniques coiling wrapping and weaving The projects are built around a focal cabochon and incorporate seed beads and crystals in imaginative ways Designers learn to make the jewelry shown in the book and they also use the techniques learned to create innovative jewelry pieces of their own
BLOG DIY BEADING MAGAZINE ISSUE 32 BLOG WWWHANDMADE-JEWELRY-CLUBCOM MEMBERSHIP WWWDIYBEADINGCLUBCOM
Our digital magazine is available through
Apple Newsstand service available to millions of IPAD users
To advertise with us please email us at
diyjewelryclubgmailcom
Or visit our page at
httphandmade-jewelry-clubcomadvertising-diy-beading-magazine
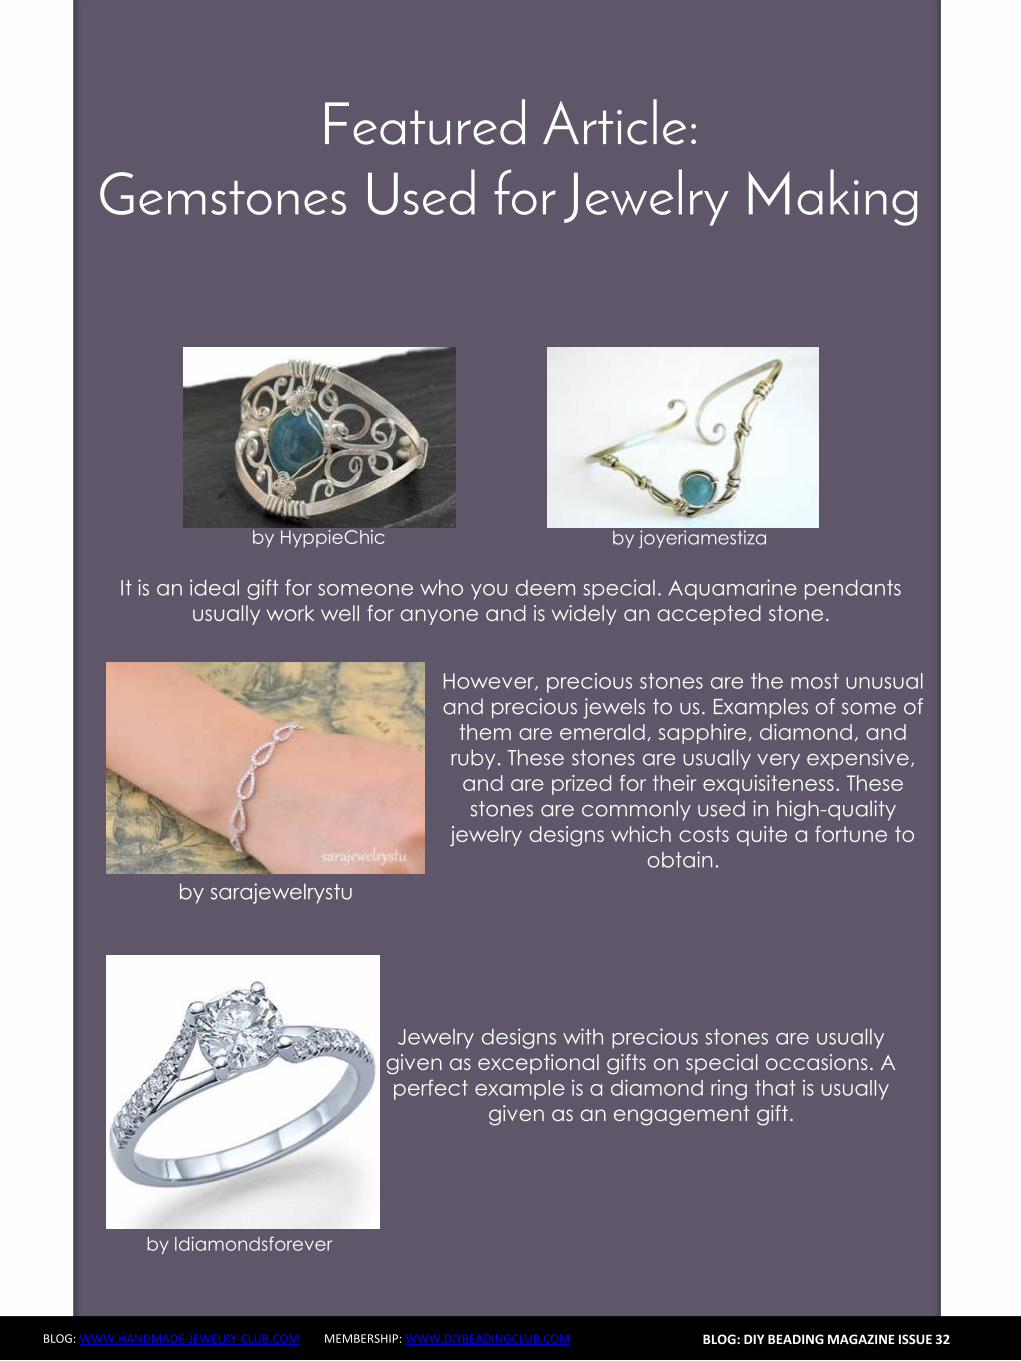
Something Blue Necklace and Earrings
BLOG WWWHANDMADE-JEWELRY-CLUBCOM MEMBERSHIP WWWDIYBEADINGCLUBCOM BLOG DIY BEADING MAGAZINE ISSUE 32
STEP 66-83 Secure the circle by adding 1A between each bicone in the second row of Swarovski
bicones If you finished secure the thread and trim
STEP 51-65 Using the same technique as in STEP 37 - 49 add 1 bicone to finish the third bicone row The black line shows you the way (After STEP 50 pass through the next A bead add 1 bicone and pass through the bicone already there and the bicone added in the previous step Repeat these steps to
finish the inner bicone circle)
MIDDLE CIRCLE Work RAW stitch into a beaded circle and embellish with
Swarovski bicones Remember you need to bead two circles this time
STEP 1 Just like in the focal circle begin with 2 pearls 1A and 1 pearl again on a comfortable length of thread
leaving a 2rdquo 5cm tail Pass through the first two pearls strung to form a ring
Something Blue Necklace and Earrings
BLOG WWWHANDMADE-JEWELRY-CLUBCOM MEMBERSHIP WWWDIYBEADINGCLUBCOM BLOG DIY BEADING MAGAZINE ISSUE 32
STEP 15-28 Mimicing the FOCAL CIRCLElsquos STEP 18-34 bead A beads until you finish the inner part of the
circle Exit from a pearl in the second row This circle should look very similar to the first one but this is a bit
smaller
STEP 2-14 Mimicing the FOCAL CIRCLElsquos STEP 2-17 bead until you count 14 pearls in the inner circle Exit
from the last A added
STEP 29-42 Mimicing FOCAL CIRCLElsquos STEP 35-49 add 2 rows of bicones
STEP 43-56 Mimicing the FOCAL CIRCLElsquos STEP 50-65 bead the third row of bicones to finish the circle
Something Blue Necklace and Earrings
BLOG WWWHANDMADE-JEWELRY-CLUBCOM MEMBERSHIP WWWDIYBEADINGCLUBCOM BLOG DIY BEADING MAGAZINE ISSUE 32
SMALLEST CIRCLE Work RAW stitch into a beaded circle and embellish
with Swarovski bicones Remember you need to bead two circles again
STEP 1 Just like in the focal circle begin with 2 pearls
1A and 1 pearl again on a comfortable length of thread leaving a 2rdquo 5cm tail Pass through the first two
pearls strung to form a ring
STEP 57-70 Just like the FOCAL CIRCLElsquos STEP 66-83 secure the circle by adding 1A between every bicone
in the second row of bicones If you finished secure the thread and trim (Donrsquot forget to bead another
circle)
STEP 2-12 Mimicing the FOCAL CIRCLElsquos STEP 2-17 bead until you count 12 pearls in the inner circle Exit
from the last A added
STEP 13-24 Mimicing the FOCAL CIRCLElsquos STEP 18-34 bead A beads until you finish the inner part of the
circle Exit from a pearl in the second row This circle should look very similar to the first two but this is the
smallest of them all
Something Blue Necklace and Earrings
BLOG WWWHANDMADE-JEWELRY-CLUBCOM MEMBERSHIP WWWDIYBEADINGCLUBCOM BLOG DIY BEADING MAGAZINE ISSUE 32
STEP 37-48 Mimicing the FOCAL CIRCLElsquos STEP 50-65 bead the third row of bicones to finish this circle too
STEP 25-36 Mimicing FOCAL CIRCLElsquos STEP 35-49 add 2
rows of bicones The last step here is purple again
STEP 49-60 Just like the FOCAL CIRCLElsquos STEP 66-83 secure the circle by adding 1A between every bicone
in the second row of bicones If you finished secure the thread and trim (Donrsquot forget that you need two
small circles)
Something Blue Necklace and Earrings
BLOG WWWHANDMADE-JEWELRY-CLUBCOM MEMBERSHIP WWWDIYBEADINGCLUBCOM BLOG DIY BEADING MAGAZINE ISSUE 32
STEP 37-48 Mimicing the FOCAL CIRCLElsquos STEP 50-65 bead the third row of bicones to finish this circle too
STEP 25-36 Mimicing FOCAL CIRCLElsquos STEP 35-49 add 2
rows of bicones The last step here is purple again
STEP 49-60 Just like the FOCAL CIRCLElsquos STEP 66-83 secure the circle by adding 1A between every bicone
in the second row of bicones If you finished secure the thread and trim (Donrsquot forget that you need two
small circles)
Something Blue Necklace and Earrings
BLOG WWWHANDMADE-JEWELRY-CLUBCOM MEMBERSHIP WWWDIYBEADINGCLUBCOM BLOG DIY BEADING MAGAZINE ISSUE 32
STEP 2-6 Continue by adding 1A 1 bicone 1 pearl until you count 6 of each
STEP 1 Begin with 1 pearl 1 bicone 1A and 1 bicone again on a comfortable length of thread leaving a 2rdquo
5cm tail Pass through the pearl and the first bicone strung to form a ring
STEP 7-12 Pass through the A beads to make your
component more secure Also secure the thread and trim (Repeat these steps until you have six 6-BEAD
COMPONENTs)
6-BEAD COMPONENT Work RAW stitch into a beaded circle and embellish with Swarovski bicones
For the necklace we will need six from this component For the earring two
Something Blue Necklace and Earrings
BLOG WWWHANDMADE-JEWELRY-CLUBCOM MEMBERSHIP WWWDIYBEADINGCLUBCOM BLOG DIY BEADING MAGAZINE ISSUE 32
STEP 2-4 Continue by adding 1A 1 bicone 1 pearl
until you count 4 of each
STEP 1 Begin with 1 pearl 1 bicone 1A and 1 bicone again on a comfortable length of thread leaving a 2rdquo
5cm tail Pass through the pearl and the first bicone strung to form a ring
STEP 5-8 Pass through the A beads to make your component more secure Also secure the thread and
trim (Repeat these steps until you have the wished amount of 4-BEAD COMPONENTs)
4-BEAD COMPONENT Work RAW stitch into a beaded circle and embellish with Swarovski bicones
For the necklace-size that is given on the second page we will need 20 from this
component For the earring two
If you would like to make a longer necklace you need to make more (One 4-BEAD COMPONENT measures about 38 inch 1 cm To make the necklace symmetrical you have to have equal amounts on each side This means for every extra frac34 inches
2 cm-s you will need 1 4-BEAD COMPONENT on each side of the necklace)
Something Blue Necklace and Earrings
BLOG WWWHANDMADE-JEWELRY-CLUBCOM MEMBERSHIP WWWDIYBEADINGCLUBCOM BLOG DIY BEADING MAGAZINE ISSUE 32
STEP 2 Connect the MIDDLE CIRCLE to two 6-BEAD COMPONENTs by adding four-times 2As
between the pearls Choose a pearl on the MIDDLE CIRCLE and add
2A pass through a pearl in the 6-BEAD COMPONENT previously added and add 2A again Watch out this has to be symmetrical Repeat this at least two more times to make it
secure Now repeat this entire procedure but choose
the 8-th pearl on MIDDLE CIRCLE Repeat this on the other side of the necklace
too
Choose a pearl on the FOCAL CIRCLE and add 2A pass through a pearl in the 6-BEAD COMPONENT and add 2A again Repeat this at least two more times to make it secure
Now repeat this entire procedure but choose the 5-th pearl on FOCAL CIRCLE This will make the necklace nice on your neck
FINISHING THE NECKLACE Connects the parts with A beads
STEP 1 Connect the FOCAL CIRCLE to two 6-BEAD COMPONENTs by adding four-times 2As between the pearls To do this turn your parts upside down you need to
see the pearls We will work on this side from now on
Something Blue Necklace and Earrings
BLOG WWWHANDMADE-JEWELRY-CLUBCOM MEMBERSHIP WWWDIYBEADINGCLUBCOM BLOG DIY BEADING MAGAZINE ISSUE 32
FINISHING THE EARRING Connects the parts with A beads
STEP 1-2 Connect the 6-BEAD COMPONENT
to 4-BEAD COMPONENT and the 4-BEAD
COMPONENT to the earring hook
First connect the 4-BEAD COMPONENT to the 6-BEAD COMPONENT with 4A beads Mimic
the elongation steps of the necklace if needed
Secondly connect the 4-BEAD COMPONENT
to your earring hook with 4A beads again Leave from the last pearl bead 2A beads the hook (this is the orange oval form) and 2As again Pass through each of them to
secure this connection again
Finally get ready to prepare the other earring ndash since we need two of them
STEP 5 Connect the 4-BEAD COMPONENTs to the toggle clasp thus finishing the
necklace Leaving from the last pearl bead 2A the
clasp(this is the orange oval form) and 2A again Pass through all of them a couple more times to make this connection more
secure
Something Blue Necklace and Earrings
BLOG WWWHANDMADE-JEWELRY-CLUBCOM MEMBERSHIP WWWDIYBEADINGCLUBCOM BLOG DIY BEADING MAGAZINE ISSUE 32
If you finished it is time to try it on It was a great fun wasnrsquot it And how beautiful you look in your new necklace and the matching earrings
Something Blue Necklace and Earrings
BLOG WWWHANDMADE-JEWELRY-CLUBCOM MEMBERSHIP WWWDIYBEADINGCLUBCOM
About the Author
Margit Vogel
My name is Margit Vogel I live in Hungary Europe
By profession I am a biochemical engineer but I fell in love with
beads so much that I could not stop playing with them
I make one-of-a-kind beaded and bead embroidered art
jewelry made of the best quality materials such as Swarovski
stones gemstones Japanese beads (Miyuki and Toho) Czech
glass beads leather soutache and suede Each piece is unique
and individually crafted
Feel free to visit my blog for some eyecandy
httpiformjewelrywordpresscom
My shop httpwwwetsycomshopiformjewelry
Facebook httpwwwfacebookcomiformjewelry
BLOG DIY BEADING MAGAZINE ISSUE 32
Getting Down And Personal With Gianna
Getting Down And Personal With Gianna
Nowadays we see more and more jewelry stores opening up online and with these online jewelry stores it has made it easier for us to purchase and view their creations Have you ever wondered how they are able to manage and produce amazing jewelry pieces and tutorials So heres a little on the journey to open up an online shop We are excited to present to you Gianna aka Beading4perfectionists
Gianna Beader amp Youtuber
Unlike most jewelry makers and beadweavers Gianna did not start beading as a hobby but as a means to make ends meet With goals in trying to
fill the financial gap she did everything she could to expand her earnings ndash working as a security guard
and at the same time learning how to bead and selling her pieces at fair trades and flea markets
Since many were asking if she does home beading workshops she started on exploring how to teach people to bead She loves Scott Bakula and has always loved him till now and this served as her
inspiration to start making a beading video tutorial
Gianna started creating videos because she was at the point in her life where everything seemed to be falling apart And at that moment of time she had difficulties financially and selling jewelry was the only way for her to stay afloat financially She is a big Scott Bakula fan and when she went to the UK to see him on stage that was when it hit her that she is already able to edit videos and
taught herself Photoshop and done workshops at bead fairs so why not put these together and see what happens on Youtube She knew that if she gets enough subscribers and views ndash though no one knew what the exact numbers were you would be invited to become a Youtube partner This way she could monetize her videos with advertisements and hopefully she would be able to be a Youtube partner and be able to pay her bills
BLOG WWWHANDMADE-JEWELRY-CLUBCOM MEMBERSHIP WWWDIYBEADINGCLUBCOM BLOG DIY BEADING MAGAZINE ISSUE 32
Getting Down And Personal With Gianna
Her Youtube channel is popular and the reason why she chose Youtube is because Youtube is the biggest platform and reached almost to the whole world Everyone already knows about it and it was growing rapidly as compared to other platforms like Dailymotion so she figured that Youtube was the way to go Her advice to new designers is that when you start out go to the platforms on the top of your list first then work your way down your list if you do not get accepted by your first choice
After loyally putting up one video every week for about 8 months in a row she became a Youtube partner and monetized her videos She knew she needed at least $100 to get her first payout She managed to reach $100 after 3 months The process was not easy she worked hard lack sleep skipped meals and who knows what happened to Ridge in the Bold and the Beautiful because she stopped watching
On Youtube you can monetize your videos Google pays straight to your bank account and at other countries where they also have the option of getting checks among other options In order to get paid you have to reach the $100 mark and after 3 months For Gianna she thinks that you cannot say that Etsy is better than Youtube or Youtube is better than Etsy Her reasoning is because on Youtube she has many followers which will eventually check out her Etsy shop And to start an Etsy shop you need an audience
BLOG WWWHANDMADE-JEWELRY-CLUBCOM MEMBERSHIP WWWDIYBEADINGCLUBCOM BLOG DIY BEADING MAGAZINE ISSUE 32
television and dedicated her spare time (as she had another job) to Youtube She re-registered at the chamber of commerce after receiving her first payout Her work at Youtube now is not a full time job and things have changed on Youtube It is easier to become a parter but there are some countries that need to wait for an invitation to be a Youtube partner Take Italy for instance Italians would have to work just as hard as she did if they want to become a Youtube partner
Getting Down And Personal With Gianna
With her 60000 subscribers on her b4pbakup Youtube channel it is possible to sell at least 60 patterns on the first day on Etsy after promoting the PDF file on her Youtube channel Though you may think that 60 out of 60000 is not much you have to remember that not everyone has the means to purchase the PDF file and a lot of people still rather watch her carry out the tutorial(for free) on Youtube instead of reading the patterns or paying for the patterns even if the pattern is for a fundraiser and only cost $2 Her insights on Youtube is that Youtube is not what it used to be 6 years ago Instead of making more money every month she is making less and less because advertisers have more options of where they want to advertise their ads Ads do not pay as much as they used to Back in the days you could get 25 cents per ad Now you count yourself lucky if you could get 5 cents roll in after two hours
BLOG WWWHANDMADE-JEWELRY-CLUBCOM MEMBERSHIP WWWDIYBEADINGCLUBCOM BLOG DIY BEADING MAGAZINE ISSUE 32
And on top of that adblockers are destroying Youtube channel owners Youtube will start making changes to the channels where there will be ldquopaid subscriptionrdquo channels This has already been implemented in some countries but not in her country The Netherlands This means there will no longer be ads for her monthly paying subscribers She hopes that Youtube will add on a paid per video option feature The option to be a paid channel or free channel or to start a new channel for paying customers is yours to choose Gianna is not happy with Youtube because many others like her have worked so hard and for some years to become Youtube partners(which was something to be proud of) has lost their status
Getting Down And Personal With Gianna
Her advice for those who want to go on Youtube is 1 Do it because you want to teach
2 Do it because you want a career with beads
BLOG WWWHANDMADE-JEWELRY-CLUBCOM MEMBERSHIP WWWDIYBEADINGCLUBCOM BLOG DIY BEADING MAGAZINE ISSUE 32
After putting up about 20 videos and having at least 5000 subscribers add the PDF tutorials to Etsy and Craftsy She found out that her audience would like to have the PDF after watching her videos This is because they would rather print out the PDF and work while seated in a comfy chair technically somewhere else instead of having to pause the video time and time again
Gianna has also made a video for those who want to know the whole story of her journey up until the present day And to get updates on her you can check it out here She has also started a vlog where she tells of how she still works towards becoming a financial independent beader and explains her journey to get where she wants to be(or die trying) Gianna will be in the UK on October the 17th giving an all-day workshop with 4 different patterns
(2 beginners and 2 advanced) in Wotton-under-Edge
Gianna will be there Friday night as the workshop is on Saturday She will be leaving on Sunday Her
doors are open to all who wants to continue the party with her at the hotel across the street
For more information do contact Ann Tucker on Facebook
httpswwwfacebookcomanntucker501
Rec
omm
end
ed R
ead
ings
Making Jewelry with Gemstone
Beads
Combines the popular craft of beading with beautiful semi-precious stones which are collected by many Features a variety of versatile ideas which can be adapted for any type of gem or bead Readers will learn to reate beautiful gemstone jewelry with this dazzling collection of over 100 projects ranging from eyecatching earrings and accessories to exquisite necklaces and bracelets This beautiful book offers an impressive range of 28 beautiful semi-precious stones (including birthstones) and a glimpse into the fascinating history and mythical properties behind them
BLOG DIY BEADING MAGAZINE ISSUE 32 BLOG WWWHANDMADE-JEWELRY-CLUBCOM MEMBERSHIP WWWDIYBEADINGCLUBCOM
Rec
omm
end
ed R
ead
ings
Convertible Crystal Jewelry
Reverse it Twist it Wear it Many
Ways
Diane Whiting presents the idea that convertibility isnrsquot just about using pieces in multiple ways it is also about using skills and creativity in multiple ways Using ever-popular sparkling crystals Diane showcases design elements through various techniques for fun easy fashionable jewelry With 25 projects the reader can choose from bracelets necklaces and earrings that match any outfit or styleDiane Whiting presents the idea that convertibility isnrsquot just about using pieces in multiple ways it is also about using skills and creativity in multiple ways
BLOG DIY BEADING MAGAZINE ISSUE 32 BLOG WWWHANDMADE-JEWELRY-CLUBCOM MEMBERSHIP WWWDIYBEADINGCLUBCOM
Rec
omm
end
ed R
ead
ings
Wire Jewelry Masterclass
Wrapped Coiled and Woven Pieces
Using Fine Materials
Comprehensive and fabulous Wire Jewelry Masterclass takes an in-depth look at an intricate and rewarding craft The 24 projects which range from simple Dragons tear briolette earrings to a Poseidon-under-the-sea pendant will delight and inspire jewelers of all levels and tastes Divided into beginner intermediate and advanced sections this beautifully photographed step-by-step guide is the ticket to wire jewelry expertise
BLOG DIY BEADING MAGAZINE ISSUE 32 BLOG WWWHANDMADE-JEWELRY-CLUBCOM MEMBERSHIP WWWDIYBEADINGCLUBCOM
Rec
omm
end
ed R
ead
ings
Timeless Wire Weaving The
Complete Course
Timeless Wire Weaving focuses on developing wirework skills through 13 projects using three classic wire weaving techniques coiling wrapping and weaving The projects are built around a focal cabochon and incorporate seed beads and crystals in imaginative ways Designers learn to make the jewelry shown in the book and they also use the techniques learned to create innovative jewelry pieces of their own
BLOG DIY BEADING MAGAZINE ISSUE 32 BLOG WWWHANDMADE-JEWELRY-CLUBCOM MEMBERSHIP WWWDIYBEADINGCLUBCOM
Our digital magazine is available through
Apple Newsstand service available to millions of IPAD users
To advertise with us please email us at
diyjewelryclubgmailcom
Or visit our page at
httphandmade-jewelry-clubcomadvertising-diy-beading-magazine
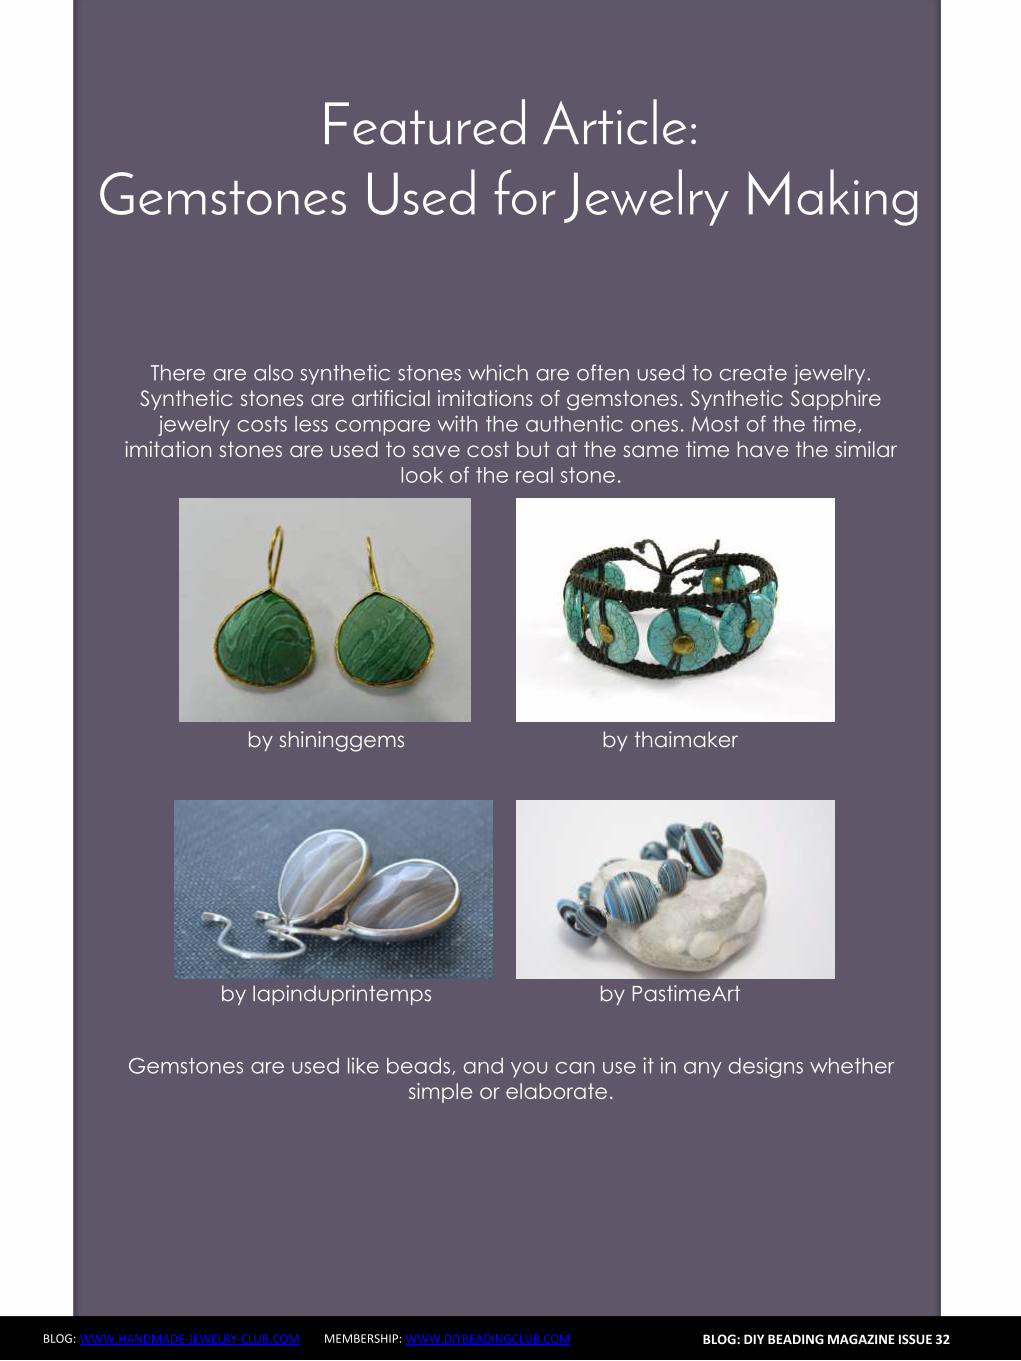
Something Blue Necklace and Earrings
BLOG WWWHANDMADE-JEWELRY-CLUBCOM MEMBERSHIP WWWDIYBEADINGCLUBCOM BLOG DIY BEADING MAGAZINE ISSUE 32
STEP 15-28 Mimicing the FOCAL CIRCLElsquos STEP 18-34 bead A beads until you finish the inner part of the
circle Exit from a pearl in the second row This circle should look very similar to the first one but this is a bit
smaller
STEP 2-14 Mimicing the FOCAL CIRCLElsquos STEP 2-17 bead until you count 14 pearls in the inner circle Exit
from the last A added
STEP 29-42 Mimicing FOCAL CIRCLElsquos STEP 35-49 add 2 rows of bicones
STEP 43-56 Mimicing the FOCAL CIRCLElsquos STEP 50-65 bead the third row of bicones to finish the circle
Something Blue Necklace and Earrings
BLOG WWWHANDMADE-JEWELRY-CLUBCOM MEMBERSHIP WWWDIYBEADINGCLUBCOM BLOG DIY BEADING MAGAZINE ISSUE 32
SMALLEST CIRCLE Work RAW stitch into a beaded circle and embellish
with Swarovski bicones Remember you need to bead two circles again
STEP 1 Just like in the focal circle begin with 2 pearls
1A and 1 pearl again on a comfortable length of thread leaving a 2rdquo 5cm tail Pass through the first two
pearls strung to form a ring
STEP 57-70 Just like the FOCAL CIRCLElsquos STEP 66-83 secure the circle by adding 1A between every bicone
in the second row of bicones If you finished secure the thread and trim (Donrsquot forget to bead another
circle)
STEP 2-12 Mimicing the FOCAL CIRCLElsquos STEP 2-17 bead until you count 12 pearls in the inner circle Exit
from the last A added
STEP 13-24 Mimicing the FOCAL CIRCLElsquos STEP 18-34 bead A beads until you finish the inner part of the
circle Exit from a pearl in the second row This circle should look very similar to the first two but this is the
smallest of them all
Something Blue Necklace and Earrings
BLOG WWWHANDMADE-JEWELRY-CLUBCOM MEMBERSHIP WWWDIYBEADINGCLUBCOM BLOG DIY BEADING MAGAZINE ISSUE 32
STEP 37-48 Mimicing the FOCAL CIRCLElsquos STEP 50-65 bead the third row of bicones to finish this circle too
STEP 25-36 Mimicing FOCAL CIRCLElsquos STEP 35-49 add 2
rows of bicones The last step here is purple again
STEP 49-60 Just like the FOCAL CIRCLElsquos STEP 66-83 secure the circle by adding 1A between every bicone
in the second row of bicones If you finished secure the thread and trim (Donrsquot forget that you need two
small circles)
Something Blue Necklace and Earrings
BLOG WWWHANDMADE-JEWELRY-CLUBCOM MEMBERSHIP WWWDIYBEADINGCLUBCOM BLOG DIY BEADING MAGAZINE ISSUE 32
STEP 37-48 Mimicing the FOCAL CIRCLElsquos STEP 50-65 bead the third row of bicones to finish this circle too
STEP 25-36 Mimicing FOCAL CIRCLElsquos STEP 35-49 add 2
rows of bicones The last step here is purple again
STEP 49-60 Just like the FOCAL CIRCLElsquos STEP 66-83 secure the circle by adding 1A between every bicone
in the second row of bicones If you finished secure the thread and trim (Donrsquot forget that you need two
small circles)
Something Blue Necklace and Earrings
BLOG WWWHANDMADE-JEWELRY-CLUBCOM MEMBERSHIP WWWDIYBEADINGCLUBCOM BLOG DIY BEADING MAGAZINE ISSUE 32
STEP 2-6 Continue by adding 1A 1 bicone 1 pearl until you count 6 of each
STEP 1 Begin with 1 pearl 1 bicone 1A and 1 bicone again on a comfortable length of thread leaving a 2rdquo
5cm tail Pass through the pearl and the first bicone strung to form a ring
STEP 7-12 Pass through the A beads to make your
component more secure Also secure the thread and trim (Repeat these steps until you have six 6-BEAD
COMPONENTs)
6-BEAD COMPONENT Work RAW stitch into a beaded circle and embellish with Swarovski bicones
For the necklace we will need six from this component For the earring two
Something Blue Necklace and Earrings
BLOG WWWHANDMADE-JEWELRY-CLUBCOM MEMBERSHIP WWWDIYBEADINGCLUBCOM BLOG DIY BEADING MAGAZINE ISSUE 32
STEP 2-4 Continue by adding 1A 1 bicone 1 pearl
until you count 4 of each
STEP 1 Begin with 1 pearl 1 bicone 1A and 1 bicone again on a comfortable length of thread leaving a 2rdquo
5cm tail Pass through the pearl and the first bicone strung to form a ring
STEP 5-8 Pass through the A beads to make your component more secure Also secure the thread and
trim (Repeat these steps until you have the wished amount of 4-BEAD COMPONENTs)
4-BEAD COMPONENT Work RAW stitch into a beaded circle and embellish with Swarovski bicones
For the necklace-size that is given on the second page we will need 20 from this
component For the earring two
If you would like to make a longer necklace you need to make more (One 4-BEAD COMPONENT measures about 38 inch 1 cm To make the necklace symmetrical you have to have equal amounts on each side This means for every extra frac34 inches
2 cm-s you will need 1 4-BEAD COMPONENT on each side of the necklace)
Something Blue Necklace and Earrings
BLOG WWWHANDMADE-JEWELRY-CLUBCOM MEMBERSHIP WWWDIYBEADINGCLUBCOM BLOG DIY BEADING MAGAZINE ISSUE 32
STEP 2 Connect the MIDDLE CIRCLE to two 6-BEAD COMPONENTs by adding four-times 2As
between the pearls Choose a pearl on the MIDDLE CIRCLE and add
2A pass through a pearl in the 6-BEAD COMPONENT previously added and add 2A again Watch out this has to be symmetrical Repeat this at least two more times to make it
secure Now repeat this entire procedure but choose
the 8-th pearl on MIDDLE CIRCLE Repeat this on the other side of the necklace
too
Choose a pearl on the FOCAL CIRCLE and add 2A pass through a pearl in the 6-BEAD COMPONENT and add 2A again Repeat this at least two more times to make it secure
Now repeat this entire procedure but choose the 5-th pearl on FOCAL CIRCLE This will make the necklace nice on your neck
FINISHING THE NECKLACE Connects the parts with A beads
STEP 1 Connect the FOCAL CIRCLE to two 6-BEAD COMPONENTs by adding four-times 2As between the pearls To do this turn your parts upside down you need to
see the pearls We will work on this side from now on
Something Blue Necklace and Earrings
BLOG WWWHANDMADE-JEWELRY-CLUBCOM MEMBERSHIP WWWDIYBEADINGCLUBCOM BLOG DIY BEADING MAGAZINE ISSUE 32
FINISHING THE EARRING Connects the parts with A beads
STEP 1-2 Connect the 6-BEAD COMPONENT
to 4-BEAD COMPONENT and the 4-BEAD
COMPONENT to the earring hook
First connect the 4-BEAD COMPONENT to the 6-BEAD COMPONENT with 4A beads Mimic
the elongation steps of the necklace if needed
Secondly connect the 4-BEAD COMPONENT
to your earring hook with 4A beads again Leave from the last pearl bead 2A beads the hook (this is the orange oval form) and 2As again Pass through each of them to
secure this connection again
Finally get ready to prepare the other earring ndash since we need two of them
STEP 5 Connect the 4-BEAD COMPONENTs to the toggle clasp thus finishing the
necklace Leaving from the last pearl bead 2A the
clasp(this is the orange oval form) and 2A again Pass through all of them a couple more times to make this connection more
secure
Something Blue Necklace and Earrings
BLOG WWWHANDMADE-JEWELRY-CLUBCOM MEMBERSHIP WWWDIYBEADINGCLUBCOM BLOG DIY BEADING MAGAZINE ISSUE 32
If you finished it is time to try it on It was a great fun wasnrsquot it And how beautiful you look in your new necklace and the matching earrings
Something Blue Necklace and Earrings
BLOG WWWHANDMADE-JEWELRY-CLUBCOM MEMBERSHIP WWWDIYBEADINGCLUBCOM
About the Author
Margit Vogel
My name is Margit Vogel I live in Hungary Europe
By profession I am a biochemical engineer but I fell in love with
beads so much that I could not stop playing with them
I make one-of-a-kind beaded and bead embroidered art
jewelry made of the best quality materials such as Swarovski
stones gemstones Japanese beads (Miyuki and Toho) Czech
glass beads leather soutache and suede Each piece is unique
and individually crafted
Feel free to visit my blog for some eyecandy
httpiformjewelrywordpresscom
My shop httpwwwetsycomshopiformjewelry
Facebook httpwwwfacebookcomiformjewelry
BLOG DIY BEADING MAGAZINE ISSUE 32
Getting Down And Personal With Gianna
Getting Down And Personal With Gianna
Nowadays we see more and more jewelry stores opening up online and with these online jewelry stores it has made it easier for us to purchase and view their creations Have you ever wondered how they are able to manage and produce amazing jewelry pieces and tutorials So heres a little on the journey to open up an online shop We are excited to present to you Gianna aka Beading4perfectionists
Gianna Beader amp Youtuber
Unlike most jewelry makers and beadweavers Gianna did not start beading as a hobby but as a means to make ends meet With goals in trying to
fill the financial gap she did everything she could to expand her earnings ndash working as a security guard
and at the same time learning how to bead and selling her pieces at fair trades and flea markets
Since many were asking if she does home beading workshops she started on exploring how to teach people to bead She loves Scott Bakula and has always loved him till now and this served as her
inspiration to start making a beading video tutorial
Gianna started creating videos because she was at the point in her life where everything seemed to be falling apart And at that moment of time she had difficulties financially and selling jewelry was the only way for her to stay afloat financially She is a big Scott Bakula fan and when she went to the UK to see him on stage that was when it hit her that she is already able to edit videos and
taught herself Photoshop and done workshops at bead fairs so why not put these together and see what happens on Youtube She knew that if she gets enough subscribers and views ndash though no one knew what the exact numbers were you would be invited to become a Youtube partner This way she could monetize her videos with advertisements and hopefully she would be able to be a Youtube partner and be able to pay her bills
BLOG WWWHANDMADE-JEWELRY-CLUBCOM MEMBERSHIP WWWDIYBEADINGCLUBCOM BLOG DIY BEADING MAGAZINE ISSUE 32
Getting Down And Personal With Gianna
Her Youtube channel is popular and the reason why she chose Youtube is because Youtube is the biggest platform and reached almost to the whole world Everyone already knows about it and it was growing rapidly as compared to other platforms like Dailymotion so she figured that Youtube was the way to go Her advice to new designers is that when you start out go to the platforms on the top of your list first then work your way down your list if you do not get accepted by your first choice
After loyally putting up one video every week for about 8 months in a row she became a Youtube partner and monetized her videos She knew she needed at least $100 to get her first payout She managed to reach $100 after 3 months The process was not easy she worked hard lack sleep skipped meals and who knows what happened to Ridge in the Bold and the Beautiful because she stopped watching
On Youtube you can monetize your videos Google pays straight to your bank account and at other countries where they also have the option of getting checks among other options In order to get paid you have to reach the $100 mark and after 3 months For Gianna she thinks that you cannot say that Etsy is better than Youtube or Youtube is better than Etsy Her reasoning is because on Youtube she has many followers which will eventually check out her Etsy shop And to start an Etsy shop you need an audience
BLOG WWWHANDMADE-JEWELRY-CLUBCOM MEMBERSHIP WWWDIYBEADINGCLUBCOM BLOG DIY BEADING MAGAZINE ISSUE 32
television and dedicated her spare time (as she had another job) to Youtube She re-registered at the chamber of commerce after receiving her first payout Her work at Youtube now is not a full time job and things have changed on Youtube It is easier to become a parter but there are some countries that need to wait for an invitation to be a Youtube partner Take Italy for instance Italians would have to work just as hard as she did if they want to become a Youtube partner
Getting Down And Personal With Gianna
With her 60000 subscribers on her b4pbakup Youtube channel it is possible to sell at least 60 patterns on the first day on Etsy after promoting the PDF file on her Youtube channel Though you may think that 60 out of 60000 is not much you have to remember that not everyone has the means to purchase the PDF file and a lot of people still rather watch her carry out the tutorial(for free) on Youtube instead of reading the patterns or paying for the patterns even if the pattern is for a fundraiser and only cost $2 Her insights on Youtube is that Youtube is not what it used to be 6 years ago Instead of making more money every month she is making less and less because advertisers have more options of where they want to advertise their ads Ads do not pay as much as they used to Back in the days you could get 25 cents per ad Now you count yourself lucky if you could get 5 cents roll in after two hours
BLOG WWWHANDMADE-JEWELRY-CLUBCOM MEMBERSHIP WWWDIYBEADINGCLUBCOM BLOG DIY BEADING MAGAZINE ISSUE 32
And on top of that adblockers are destroying Youtube channel owners Youtube will start making changes to the channels where there will be ldquopaid subscriptionrdquo channels This has already been implemented in some countries but not in her country The Netherlands This means there will no longer be ads for her monthly paying subscribers She hopes that Youtube will add on a paid per video option feature The option to be a paid channel or free channel or to start a new channel for paying customers is yours to choose Gianna is not happy with Youtube because many others like her have worked so hard and for some years to become Youtube partners(which was something to be proud of) has lost their status
Getting Down And Personal With Gianna
Her advice for those who want to go on Youtube is 1 Do it because you want to teach
2 Do it because you want a career with beads
BLOG WWWHANDMADE-JEWELRY-CLUBCOM MEMBERSHIP WWWDIYBEADINGCLUBCOM BLOG DIY BEADING MAGAZINE ISSUE 32
After putting up about 20 videos and having at least 5000 subscribers add the PDF tutorials to Etsy and Craftsy She found out that her audience would like to have the PDF after watching her videos This is because they would rather print out the PDF and work while seated in a comfy chair technically somewhere else instead of having to pause the video time and time again
Gianna has also made a video for those who want to know the whole story of her journey up until the present day And to get updates on her you can check it out here She has also started a vlog where she tells of how she still works towards becoming a financial independent beader and explains her journey to get where she wants to be(or die trying) Gianna will be in the UK on October the 17th giving an all-day workshop with 4 different patterns
(2 beginners and 2 advanced) in Wotton-under-Edge
Gianna will be there Friday night as the workshop is on Saturday She will be leaving on Sunday Her
doors are open to all who wants to continue the party with her at the hotel across the street
For more information do contact Ann Tucker on Facebook
httpswwwfacebookcomanntucker501
Rec
omm
end
ed R
ead
ings
Making Jewelry with Gemstone
Beads
Combines the popular craft of beading with beautiful semi-precious stones which are collected by many Features a variety of versatile ideas which can be adapted for any type of gem or bead Readers will learn to reate beautiful gemstone jewelry with this dazzling collection of over 100 projects ranging from eyecatching earrings and accessories to exquisite necklaces and bracelets This beautiful book offers an impressive range of 28 beautiful semi-precious stones (including birthstones) and a glimpse into the fascinating history and mythical properties behind them
BLOG DIY BEADING MAGAZINE ISSUE 32 BLOG WWWHANDMADE-JEWELRY-CLUBCOM MEMBERSHIP WWWDIYBEADINGCLUBCOM
Rec
omm
end
ed R
ead
ings
Convertible Crystal Jewelry
Reverse it Twist it Wear it Many
Ways
Diane Whiting presents the idea that convertibility isnrsquot just about using pieces in multiple ways it is also about using skills and creativity in multiple ways Using ever-popular sparkling crystals Diane showcases design elements through various techniques for fun easy fashionable jewelry With 25 projects the reader can choose from bracelets necklaces and earrings that match any outfit or styleDiane Whiting presents the idea that convertibility isnrsquot just about using pieces in multiple ways it is also about using skills and creativity in multiple ways
BLOG DIY BEADING MAGAZINE ISSUE 32 BLOG WWWHANDMADE-JEWELRY-CLUBCOM MEMBERSHIP WWWDIYBEADINGCLUBCOM
Rec
omm
end
ed R
ead
ings
Wire Jewelry Masterclass
Wrapped Coiled and Woven Pieces
Using Fine Materials
Comprehensive and fabulous Wire Jewelry Masterclass takes an in-depth look at an intricate and rewarding craft The 24 projects which range from simple Dragons tear briolette earrings to a Poseidon-under-the-sea pendant will delight and inspire jewelers of all levels and tastes Divided into beginner intermediate and advanced sections this beautifully photographed step-by-step guide is the ticket to wire jewelry expertise
BLOG DIY BEADING MAGAZINE ISSUE 32 BLOG WWWHANDMADE-JEWELRY-CLUBCOM MEMBERSHIP WWWDIYBEADINGCLUBCOM
Rec
omm
end
ed R
ead
ings
Timeless Wire Weaving The
Complete Course
Timeless Wire Weaving focuses on developing wirework skills through 13 projects using three classic wire weaving techniques coiling wrapping and weaving The projects are built around a focal cabochon and incorporate seed beads and crystals in imaginative ways Designers learn to make the jewelry shown in the book and they also use the techniques learned to create innovative jewelry pieces of their own
BLOG DIY BEADING MAGAZINE ISSUE 32 BLOG WWWHANDMADE-JEWELRY-CLUBCOM MEMBERSHIP WWWDIYBEADINGCLUBCOM
Our digital magazine is available through
Apple Newsstand service available to millions of IPAD users
To advertise with us please email us at
diyjewelryclubgmailcom
Or visit our page at
httphandmade-jewelry-clubcomadvertising-diy-beading-magazine
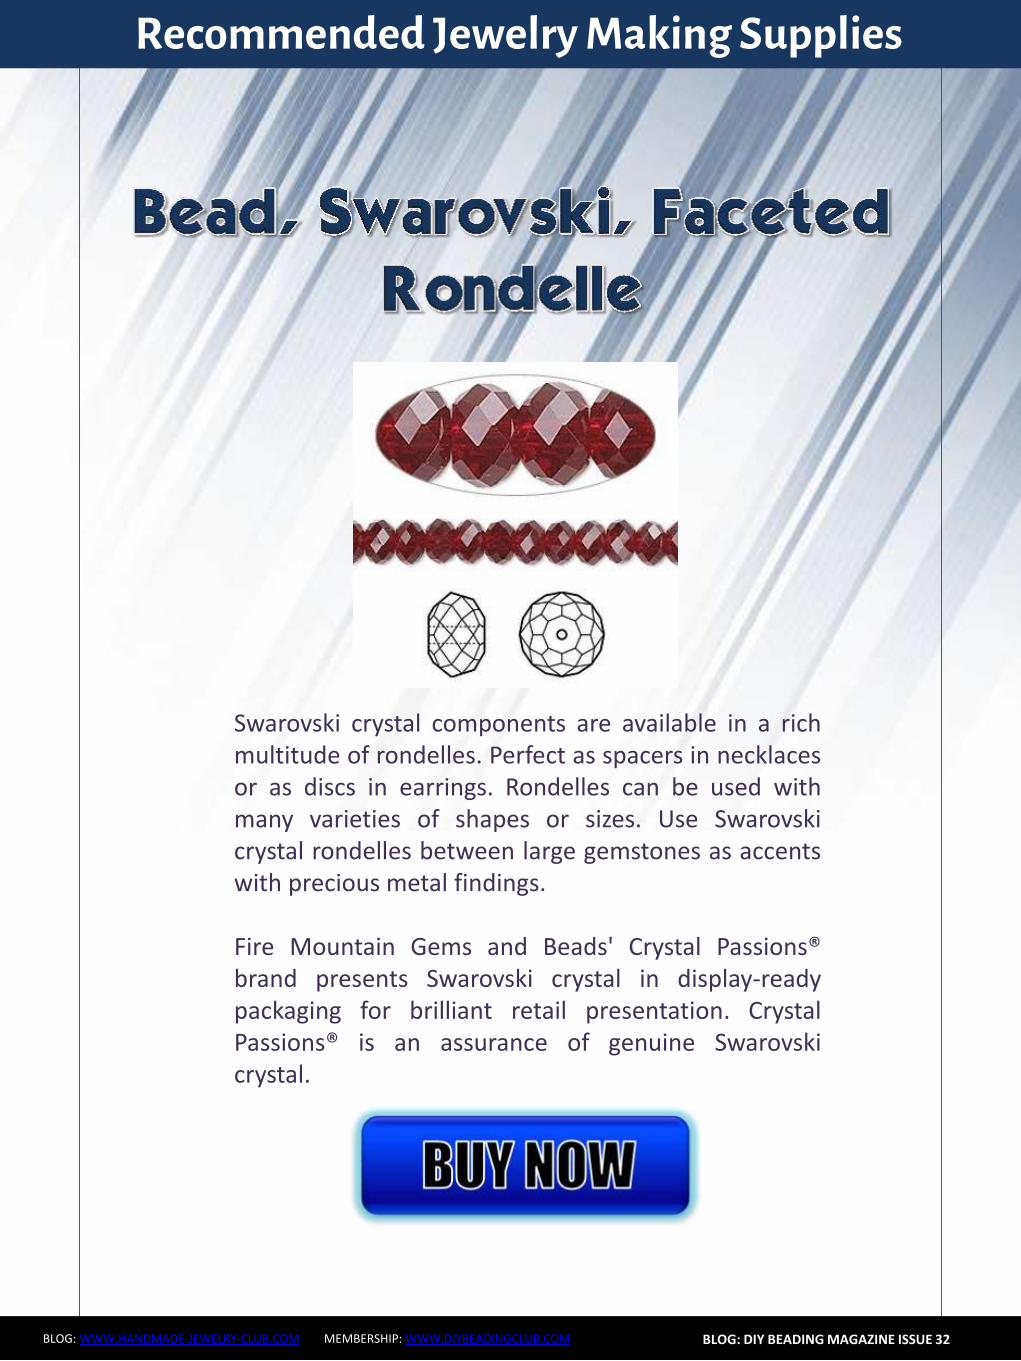
Something Blue Necklace and Earrings
BLOG WWWHANDMADE-JEWELRY-CLUBCOM MEMBERSHIP WWWDIYBEADINGCLUBCOM BLOG DIY BEADING MAGAZINE ISSUE 32
STEP 37-48 Mimicing the FOCAL CIRCLElsquos STEP 50-65 bead the third row of bicones to finish this circle too
STEP 25-36 Mimicing FOCAL CIRCLElsquos STEP 35-49 add 2
rows of bicones The last step here is purple again
STEP 49-60 Just like the FOCAL CIRCLElsquos STEP 66-83 secure the circle by adding 1A between every bicone
in the second row of bicones If you finished secure the thread and trim (Donrsquot forget that you need two
small circles)
Something Blue Necklace and Earrings
BLOG WWWHANDMADE-JEWELRY-CLUBCOM MEMBERSHIP WWWDIYBEADINGCLUBCOM BLOG DIY BEADING MAGAZINE ISSUE 32
STEP 2-6 Continue by adding 1A 1 bicone 1 pearl until you count 6 of each
STEP 1 Begin with 1 pearl 1 bicone 1A and 1 bicone again on a comfortable length of thread leaving a 2rdquo
5cm tail Pass through the pearl and the first bicone strung to form a ring
STEP 7-12 Pass through the A beads to make your
component more secure Also secure the thread and trim (Repeat these steps until you have six 6-BEAD
COMPONENTs)
6-BEAD COMPONENT Work RAW stitch into a beaded circle and embellish with Swarovski bicones
For the necklace we will need six from this component For the earring two
Something Blue Necklace and Earrings
BLOG WWWHANDMADE-JEWELRY-CLUBCOM MEMBERSHIP WWWDIYBEADINGCLUBCOM BLOG DIY BEADING MAGAZINE ISSUE 32
STEP 2-4 Continue by adding 1A 1 bicone 1 pearl
until you count 4 of each
STEP 1 Begin with 1 pearl 1 bicone 1A and 1 bicone again on a comfortable length of thread leaving a 2rdquo
5cm tail Pass through the pearl and the first bicone strung to form a ring
STEP 5-8 Pass through the A beads to make your component more secure Also secure the thread and
trim (Repeat these steps until you have the wished amount of 4-BEAD COMPONENTs)
4-BEAD COMPONENT Work RAW stitch into a beaded circle and embellish with Swarovski bicones
For the necklace-size that is given on the second page we will need 20 from this
component For the earring two
If you would like to make a longer necklace you need to make more (One 4-BEAD COMPONENT measures about 38 inch 1 cm To make the necklace symmetrical you have to have equal amounts on each side This means for every extra frac34 inches
2 cm-s you will need 1 4-BEAD COMPONENT on each side of the necklace)
Something Blue Necklace and Earrings
BLOG WWWHANDMADE-JEWELRY-CLUBCOM MEMBERSHIP WWWDIYBEADINGCLUBCOM BLOG DIY BEADING MAGAZINE ISSUE 32
STEP 2 Connect the MIDDLE CIRCLE to two 6-BEAD COMPONENTs by adding four-times 2As
between the pearls Choose a pearl on the MIDDLE CIRCLE and add
2A pass through a pearl in the 6-BEAD COMPONENT previously added and add 2A again Watch out this has to be symmetrical Repeat this at least two more times to make it
secure Now repeat this entire procedure but choose
the 8-th pearl on MIDDLE CIRCLE Repeat this on the other side of the necklace
too
Choose a pearl on the FOCAL CIRCLE and add 2A pass through a pearl in the 6-BEAD COMPONENT and add 2A again Repeat this at least two more times to make it secure
Now repeat this entire procedure but choose the 5-th pearl on FOCAL CIRCLE This will make the necklace nice on your neck
FINISHING THE NECKLACE Connects the parts with A beads
STEP 1 Connect the FOCAL CIRCLE to two 6-BEAD COMPONENTs by adding four-times 2As between the pearls To do this turn your parts upside down you need to
see the pearls We will work on this side from now on
Something Blue Necklace and Earrings
BLOG WWWHANDMADE-JEWELRY-CLUBCOM MEMBERSHIP WWWDIYBEADINGCLUBCOM BLOG DIY BEADING MAGAZINE ISSUE 32
FINISHING THE EARRING Connects the parts with A beads
STEP 1-2 Connect the 6-BEAD COMPONENT
to 4-BEAD COMPONENT and the 4-BEAD
COMPONENT to the earring hook
First connect the 4-BEAD COMPONENT to the 6-BEAD COMPONENT with 4A beads Mimic
the elongation steps of the necklace if needed
Secondly connect the 4-BEAD COMPONENT
to your earring hook with 4A beads again Leave from the last pearl bead 2A beads the hook (this is the orange oval form) and 2As again Pass through each of them to
secure this connection again
Finally get ready to prepare the other earring ndash since we need two of them
STEP 5 Connect the 4-BEAD COMPONENTs to the toggle clasp thus finishing the
necklace Leaving from the last pearl bead 2A the
clasp(this is the orange oval form) and 2A again Pass through all of them a couple more times to make this connection more
secure
Something Blue Necklace and Earrings
BLOG WWWHANDMADE-JEWELRY-CLUBCOM MEMBERSHIP WWWDIYBEADINGCLUBCOM BLOG DIY BEADING MAGAZINE ISSUE 32
If you finished it is time to try it on It was a great fun wasnrsquot it And how beautiful you look in your new necklace and the matching earrings
Something Blue Necklace and Earrings
BLOG WWWHANDMADE-JEWELRY-CLUBCOM MEMBERSHIP WWWDIYBEADINGCLUBCOM
About the Author
Margit Vogel
My name is Margit Vogel I live in Hungary Europe
By profession I am a biochemical engineer but I fell in love with
beads so much that I could not stop playing with them
I make one-of-a-kind beaded and bead embroidered art
jewelry made of the best quality materials such as Swarovski
stones gemstones Japanese beads (Miyuki and Toho) Czech
glass beads leather soutache and suede Each piece is unique
and individually crafted
Feel free to visit my blog for some eyecandy
httpiformjewelrywordpresscom
My shop httpwwwetsycomshopiformjewelry
Facebook httpwwwfacebookcomiformjewelry
BLOG DIY BEADING MAGAZINE ISSUE 32
Getting Down And Personal With Gianna
Getting Down And Personal With Gianna
Nowadays we see more and more jewelry stores opening up online and with these online jewelry stores it has made it easier for us to purchase and view their creations Have you ever wondered how they are able to manage and produce amazing jewelry pieces and tutorials So heres a little on the journey to open up an online shop We are excited to present to you Gianna aka Beading4perfectionists
Gianna Beader amp Youtuber
Unlike most jewelry makers and beadweavers Gianna did not start beading as a hobby but as a means to make ends meet With goals in trying to
fill the financial gap she did everything she could to expand her earnings ndash working as a security guard
and at the same time learning how to bead and selling her pieces at fair trades and flea markets
Since many were asking if she does home beading workshops she started on exploring how to teach people to bead She loves Scott Bakula and has always loved him till now and this served as her
inspiration to start making a beading video tutorial
Gianna started creating videos because she was at the point in her life where everything seemed to be falling apart And at that moment of time she had difficulties financially and selling jewelry was the only way for her to stay afloat financially She is a big Scott Bakula fan and when she went to the UK to see him on stage that was when it hit her that she is already able to edit videos and
taught herself Photoshop and done workshops at bead fairs so why not put these together and see what happens on Youtube She knew that if she gets enough subscribers and views ndash though no one knew what the exact numbers were you would be invited to become a Youtube partner This way she could monetize her videos with advertisements and hopefully she would be able to be a Youtube partner and be able to pay her bills
BLOG WWWHANDMADE-JEWELRY-CLUBCOM MEMBERSHIP WWWDIYBEADINGCLUBCOM BLOG DIY BEADING MAGAZINE ISSUE 32
Getting Down And Personal With Gianna
Her Youtube channel is popular and the reason why she chose Youtube is because Youtube is the biggest platform and reached almost to the whole world Everyone already knows about it and it was growing rapidly as compared to other platforms like Dailymotion so she figured that Youtube was the way to go Her advice to new designers is that when you start out go to the platforms on the top of your list first then work your way down your list if you do not get accepted by your first choice
After loyally putting up one video every week for about 8 months in a row she became a Youtube partner and monetized her videos She knew she needed at least $100 to get her first payout She managed to reach $100 after 3 months The process was not easy she worked hard lack sleep skipped meals and who knows what happened to Ridge in the Bold and the Beautiful because she stopped watching
On Youtube you can monetize your videos Google pays straight to your bank account and at other countries where they also have the option of getting checks among other options In order to get paid you have to reach the $100 mark and after 3 months For Gianna she thinks that you cannot say that Etsy is better than Youtube or Youtube is better than Etsy Her reasoning is because on Youtube she has many followers which will eventually check out her Etsy shop And to start an Etsy shop you need an audience
BLOG WWWHANDMADE-JEWELRY-CLUBCOM MEMBERSHIP WWWDIYBEADINGCLUBCOM BLOG DIY BEADING MAGAZINE ISSUE 32
television and dedicated her spare time (as she had another job) to Youtube She re-registered at the chamber of commerce after receiving her first payout Her work at Youtube now is not a full time job and things have changed on Youtube It is easier to become a parter but there are some countries that need to wait for an invitation to be a Youtube partner Take Italy for instance Italians would have to work just as hard as she did if they want to become a Youtube partner
Getting Down And Personal With Gianna
With her 60000 subscribers on her b4pbakup Youtube channel it is possible to sell at least 60 patterns on the first day on Etsy after promoting the PDF file on her Youtube channel Though you may think that 60 out of 60000 is not much you have to remember that not everyone has the means to purchase the PDF file and a lot of people still rather watch her carry out the tutorial(for free) on Youtube instead of reading the patterns or paying for the patterns even if the pattern is for a fundraiser and only cost $2 Her insights on Youtube is that Youtube is not what it used to be 6 years ago Instead of making more money every month she is making less and less because advertisers have more options of where they want to advertise their ads Ads do not pay as much as they used to Back in the days you could get 25 cents per ad Now you count yourself lucky if you could get 5 cents roll in after two hours
BLOG WWWHANDMADE-JEWELRY-CLUBCOM MEMBERSHIP WWWDIYBEADINGCLUBCOM BLOG DIY BEADING MAGAZINE ISSUE 32
And on top of that adblockers are destroying Youtube channel owners Youtube will start making changes to the channels where there will be ldquopaid subscriptionrdquo channels This has already been implemented in some countries but not in her country The Netherlands This means there will no longer be ads for her monthly paying subscribers She hopes that Youtube will add on a paid per video option feature The option to be a paid channel or free channel or to start a new channel for paying customers is yours to choose Gianna is not happy with Youtube because many others like her have worked so hard and for some years to become Youtube partners(which was something to be proud of) has lost their status
Getting Down And Personal With Gianna
Her advice for those who want to go on Youtube is 1 Do it because you want to teach
2 Do it because you want a career with beads
BLOG WWWHANDMADE-JEWELRY-CLUBCOM MEMBERSHIP WWWDIYBEADINGCLUBCOM BLOG DIY BEADING MAGAZINE ISSUE 32
After putting up about 20 videos and having at least 5000 subscribers add the PDF tutorials to Etsy and Craftsy She found out that her audience would like to have the PDF after watching her videos This is because they would rather print out the PDF and work while seated in a comfy chair technically somewhere else instead of having to pause the video time and time again
Gianna has also made a video for those who want to know the whole story of her journey up until the present day And to get updates on her you can check it out here She has also started a vlog where she tells of how she still works towards becoming a financial independent beader and explains her journey to get where she wants to be(or die trying) Gianna will be in the UK on October the 17th giving an all-day workshop with 4 different patterns
(2 beginners and 2 advanced) in Wotton-under-Edge
Gianna will be there Friday night as the workshop is on Saturday She will be leaving on Sunday Her
doors are open to all who wants to continue the party with her at the hotel across the street
For more information do contact Ann Tucker on Facebook
httpswwwfacebookcomanntucker501
Rec
omm
end
ed R
ead
ings
Making Jewelry with Gemstone
Beads
Combines the popular craft of beading with beautiful semi-precious stones which are collected by many Features a variety of versatile ideas which can be adapted for any type of gem or bead Readers will learn to reate beautiful gemstone jewelry with this dazzling collection of over 100 projects ranging from eyecatching earrings and accessories to exquisite necklaces and bracelets This beautiful book offers an impressive range of 28 beautiful semi-precious stones (including birthstones) and a glimpse into the fascinating history and mythical properties behind them
BLOG DIY BEADING MAGAZINE ISSUE 32 BLOG WWWHANDMADE-JEWELRY-CLUBCOM MEMBERSHIP WWWDIYBEADINGCLUBCOM
Rec
omm
end
ed R
ead
ings
Convertible Crystal Jewelry
Reverse it Twist it Wear it Many
Ways
Diane Whiting presents the idea that convertibility isnrsquot just about using pieces in multiple ways it is also about using skills and creativity in multiple ways Using ever-popular sparkling crystals Diane showcases design elements through various techniques for fun easy fashionable jewelry With 25 projects the reader can choose from bracelets necklaces and earrings that match any outfit or styleDiane Whiting presents the idea that convertibility isnrsquot just about using pieces in multiple ways it is also about using skills and creativity in multiple ways
BLOG DIY BEADING MAGAZINE ISSUE 32 BLOG WWWHANDMADE-JEWELRY-CLUBCOM MEMBERSHIP WWWDIYBEADINGCLUBCOM
Rec
omm
end
ed R
ead
ings
Wire Jewelry Masterclass
Wrapped Coiled and Woven Pieces
Using Fine Materials
Comprehensive and fabulous Wire Jewelry Masterclass takes an in-depth look at an intricate and rewarding craft The 24 projects which range from simple Dragons tear briolette earrings to a Poseidon-under-the-sea pendant will delight and inspire jewelers of all levels and tastes Divided into beginner intermediate and advanced sections this beautifully photographed step-by-step guide is the ticket to wire jewelry expertise
BLOG DIY BEADING MAGAZINE ISSUE 32 BLOG WWWHANDMADE-JEWELRY-CLUBCOM MEMBERSHIP WWWDIYBEADINGCLUBCOM
Rec
omm
end
ed R
ead
ings
Timeless Wire Weaving The
Complete Course
Timeless Wire Weaving focuses on developing wirework skills through 13 projects using three classic wire weaving techniques coiling wrapping and weaving The projects are built around a focal cabochon and incorporate seed beads and crystals in imaginative ways Designers learn to make the jewelry shown in the book and they also use the techniques learned to create innovative jewelry pieces of their own
BLOG DIY BEADING MAGAZINE ISSUE 32 BLOG WWWHANDMADE-JEWELRY-CLUBCOM MEMBERSHIP WWWDIYBEADINGCLUBCOM
Our digital magazine is available through
Apple Newsstand service available to millions of IPAD users
To advertise with us please email us at
diyjewelryclubgmailcom
Or visit our page at
httphandmade-jewelry-clubcomadvertising-diy-beading-magazine
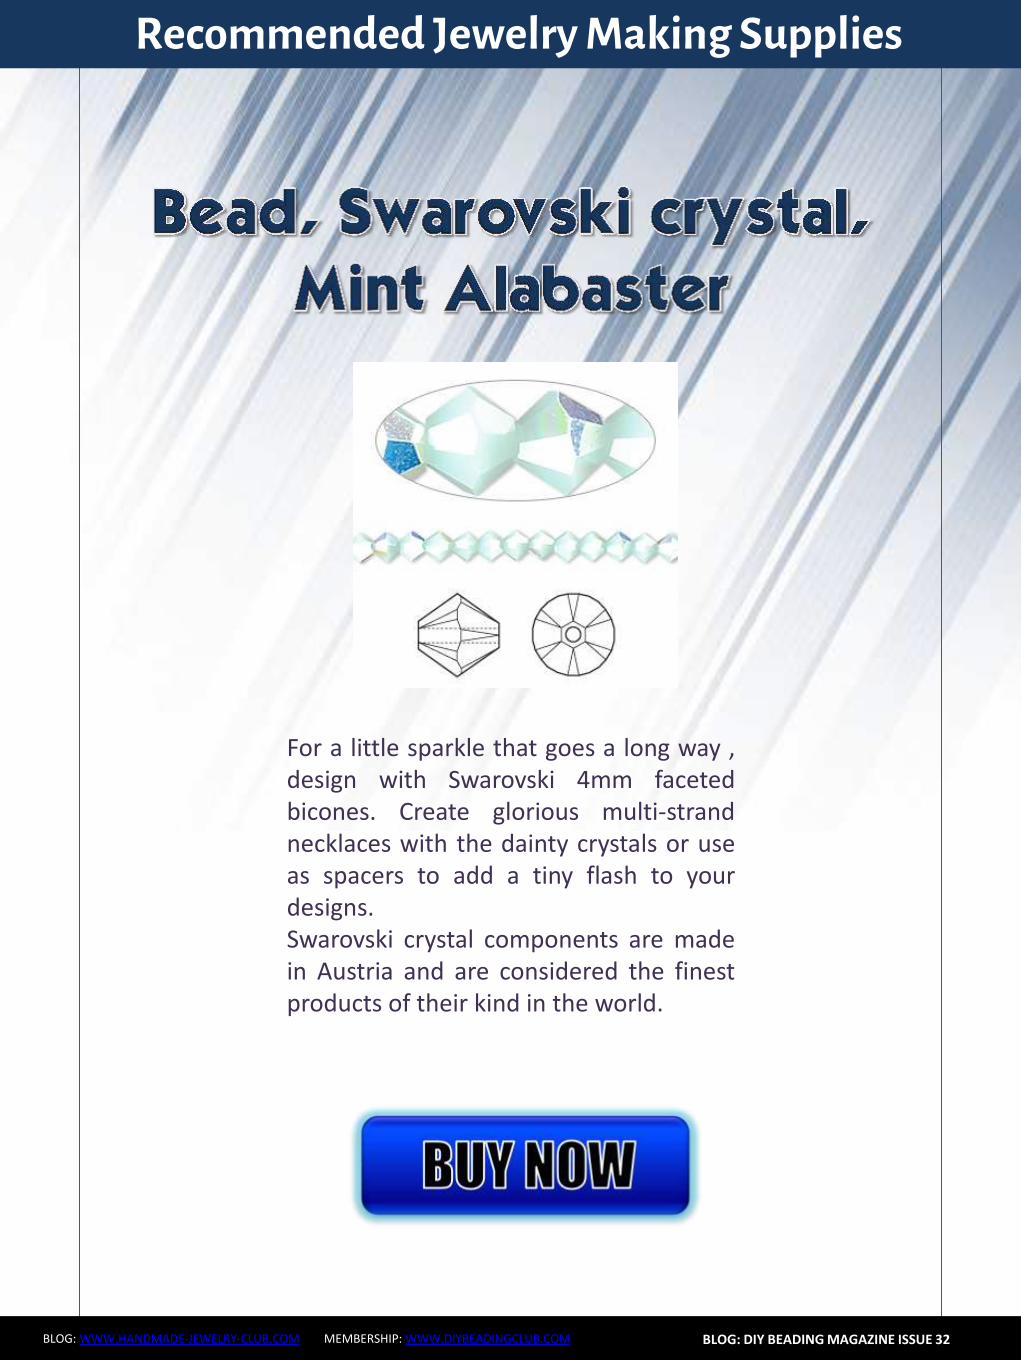
Something Blue Necklace and Earrings
BLOG WWWHANDMADE-JEWELRY-CLUBCOM MEMBERSHIP WWWDIYBEADINGCLUBCOM BLOG DIY BEADING MAGAZINE ISSUE 32
STEP 37-48 Mimicing the FOCAL CIRCLElsquos STEP 50-65 bead the third row of bicones to finish this circle too
STEP 25-36 Mimicing FOCAL CIRCLElsquos STEP 35-49 add 2
rows of bicones The last step here is purple again
STEP 49-60 Just like the FOCAL CIRCLElsquos STEP 66-83 secure the circle by adding 1A between every bicone
in the second row of bicones If you finished secure the thread and trim (Donrsquot forget that you need two
small circles)
Something Blue Necklace and Earrings
BLOG WWWHANDMADE-JEWELRY-CLUBCOM MEMBERSHIP WWWDIYBEADINGCLUBCOM BLOG DIY BEADING MAGAZINE ISSUE 32
STEP 2-6 Continue by adding 1A 1 bicone 1 pearl until you count 6 of each
STEP 1 Begin with 1 pearl 1 bicone 1A and 1 bicone again on a comfortable length of thread leaving a 2rdquo
5cm tail Pass through the pearl and the first bicone strung to form a ring
STEP 7-12 Pass through the A beads to make your
component more secure Also secure the thread and trim (Repeat these steps until you have six 6-BEAD
COMPONENTs)
6-BEAD COMPONENT Work RAW stitch into a beaded circle and embellish with Swarovski bicones
For the necklace we will need six from this component For the earring two
Something Blue Necklace and Earrings
BLOG WWWHANDMADE-JEWELRY-CLUBCOM MEMBERSHIP WWWDIYBEADINGCLUBCOM BLOG DIY BEADING MAGAZINE ISSUE 32
STEP 2-4 Continue by adding 1A 1 bicone 1 pearl
until you count 4 of each
STEP 1 Begin with 1 pearl 1 bicone 1A and 1 bicone again on a comfortable length of thread leaving a 2rdquo
5cm tail Pass through the pearl and the first bicone strung to form a ring
STEP 5-8 Pass through the A beads to make your component more secure Also secure the thread and
trim (Repeat these steps until you have the wished amount of 4-BEAD COMPONENTs)
4-BEAD COMPONENT Work RAW stitch into a beaded circle and embellish with Swarovski bicones
For the necklace-size that is given on the second page we will need 20 from this
component For the earring two
If you would like to make a longer necklace you need to make more (One 4-BEAD COMPONENT measures about 38 inch 1 cm To make the necklace symmetrical you have to have equal amounts on each side This means for every extra frac34 inches
2 cm-s you will need 1 4-BEAD COMPONENT on each side of the necklace)
Something Blue Necklace and Earrings
BLOG WWWHANDMADE-JEWELRY-CLUBCOM MEMBERSHIP WWWDIYBEADINGCLUBCOM BLOG DIY BEADING MAGAZINE ISSUE 32
STEP 2 Connect the MIDDLE CIRCLE to two 6-BEAD COMPONENTs by adding four-times 2As
between the pearls Choose a pearl on the MIDDLE CIRCLE and add
2A pass through a pearl in the 6-BEAD COMPONENT previously added and add 2A again Watch out this has to be symmetrical Repeat this at least two more times to make it
secure Now repeat this entire procedure but choose
the 8-th pearl on MIDDLE CIRCLE Repeat this on the other side of the necklace
too
Choose a pearl on the FOCAL CIRCLE and add 2A pass through a pearl in the 6-BEAD COMPONENT and add 2A again Repeat this at least two more times to make it secure
Now repeat this entire procedure but choose the 5-th pearl on FOCAL CIRCLE This will make the necklace nice on your neck
FINISHING THE NECKLACE Connects the parts with A beads
STEP 1 Connect the FOCAL CIRCLE to two 6-BEAD COMPONENTs by adding four-times 2As between the pearls To do this turn your parts upside down you need to
see the pearls We will work on this side from now on
Something Blue Necklace and Earrings
BLOG WWWHANDMADE-JEWELRY-CLUBCOM MEMBERSHIP WWWDIYBEADINGCLUBCOM BLOG DIY BEADING MAGAZINE ISSUE 32
FINISHING THE EARRING Connects the parts with A beads
STEP 1-2 Connect the 6-BEAD COMPONENT
to 4-BEAD COMPONENT and the 4-BEAD
COMPONENT to the earring hook
First connect the 4-BEAD COMPONENT to the 6-BEAD COMPONENT with 4A beads Mimic
the elongation steps of the necklace if needed
Secondly connect the 4-BEAD COMPONENT
to your earring hook with 4A beads again Leave from the last pearl bead 2A beads the hook (this is the orange oval form) and 2As again Pass through each of them to
secure this connection again
Finally get ready to prepare the other earring ndash since we need two of them
STEP 5 Connect the 4-BEAD COMPONENTs to the toggle clasp thus finishing the
necklace Leaving from the last pearl bead 2A the
clasp(this is the orange oval form) and 2A again Pass through all of them a couple more times to make this connection more
secure
Something Blue Necklace and Earrings
BLOG WWWHANDMADE-JEWELRY-CLUBCOM MEMBERSHIP WWWDIYBEADINGCLUBCOM BLOG DIY BEADING MAGAZINE ISSUE 32
If you finished it is time to try it on It was a great fun wasnrsquot it And how beautiful you look in your new necklace and the matching earrings
Something Blue Necklace and Earrings
BLOG WWWHANDMADE-JEWELRY-CLUBCOM MEMBERSHIP WWWDIYBEADINGCLUBCOM
About the Author
Margit Vogel
My name is Margit Vogel I live in Hungary Europe
By profession I am a biochemical engineer but I fell in love with
beads so much that I could not stop playing with them
I make one-of-a-kind beaded and bead embroidered art
jewelry made of the best quality materials such as Swarovski
stones gemstones Japanese beads (Miyuki and Toho) Czech
glass beads leather soutache and suede Each piece is unique
and individually crafted
Feel free to visit my blog for some eyecandy
httpiformjewelrywordpresscom
My shop httpwwwetsycomshopiformjewelry
Facebook httpwwwfacebookcomiformjewelry
BLOG DIY BEADING MAGAZINE ISSUE 32
Getting Down And Personal With Gianna
Getting Down And Personal With Gianna
Nowadays we see more and more jewelry stores opening up online and with these online jewelry stores it has made it easier for us to purchase and view their creations Have you ever wondered how they are able to manage and produce amazing jewelry pieces and tutorials So heres a little on the journey to open up an online shop We are excited to present to you Gianna aka Beading4perfectionists
Gianna Beader amp Youtuber
Unlike most jewelry makers and beadweavers Gianna did not start beading as a hobby but as a means to make ends meet With goals in trying to
fill the financial gap she did everything she could to expand her earnings ndash working as a security guard
and at the same time learning how to bead and selling her pieces at fair trades and flea markets
Since many were asking if she does home beading workshops she started on exploring how to teach people to bead She loves Scott Bakula and has always loved him till now and this served as her
inspiration to start making a beading video tutorial
Gianna started creating videos because she was at the point in her life where everything seemed to be falling apart And at that moment of time she had difficulties financially and selling jewelry was the only way for her to stay afloat financially She is a big Scott Bakula fan and when she went to the UK to see him on stage that was when it hit her that she is already able to edit videos and
taught herself Photoshop and done workshops at bead fairs so why not put these together and see what happens on Youtube She knew that if she gets enough subscribers and views ndash though no one knew what the exact numbers were you would be invited to become a Youtube partner This way she could monetize her videos with advertisements and hopefully she would be able to be a Youtube partner and be able to pay her bills
BLOG WWWHANDMADE-JEWELRY-CLUBCOM MEMBERSHIP WWWDIYBEADINGCLUBCOM BLOG DIY BEADING MAGAZINE ISSUE 32
Getting Down And Personal With Gianna
Her Youtube channel is popular and the reason why she chose Youtube is because Youtube is the biggest platform and reached almost to the whole world Everyone already knows about it and it was growing rapidly as compared to other platforms like Dailymotion so she figured that Youtube was the way to go Her advice to new designers is that when you start out go to the platforms on the top of your list first then work your way down your list if you do not get accepted by your first choice
After loyally putting up one video every week for about 8 months in a row she became a Youtube partner and monetized her videos She knew she needed at least $100 to get her first payout She managed to reach $100 after 3 months The process was not easy she worked hard lack sleep skipped meals and who knows what happened to Ridge in the Bold and the Beautiful because she stopped watching
On Youtube you can monetize your videos Google pays straight to your bank account and at other countries where they also have the option of getting checks among other options In order to get paid you have to reach the $100 mark and after 3 months For Gianna she thinks that you cannot say that Etsy is better than Youtube or Youtube is better than Etsy Her reasoning is because on Youtube she has many followers which will eventually check out her Etsy shop And to start an Etsy shop you need an audience
BLOG WWWHANDMADE-JEWELRY-CLUBCOM MEMBERSHIP WWWDIYBEADINGCLUBCOM BLOG DIY BEADING MAGAZINE ISSUE 32
television and dedicated her spare time (as she had another job) to Youtube She re-registered at the chamber of commerce after receiving her first payout Her work at Youtube now is not a full time job and things have changed on Youtube It is easier to become a parter but there are some countries that need to wait for an invitation to be a Youtube partner Take Italy for instance Italians would have to work just as hard as she did if they want to become a Youtube partner
Getting Down And Personal With Gianna
With her 60000 subscribers on her b4pbakup Youtube channel it is possible to sell at least 60 patterns on the first day on Etsy after promoting the PDF file on her Youtube channel Though you may think that 60 out of 60000 is not much you have to remember that not everyone has the means to purchase the PDF file and a lot of people still rather watch her carry out the tutorial(for free) on Youtube instead of reading the patterns or paying for the patterns even if the pattern is for a fundraiser and only cost $2 Her insights on Youtube is that Youtube is not what it used to be 6 years ago Instead of making more money every month she is making less and less because advertisers have more options of where they want to advertise their ads Ads do not pay as much as they used to Back in the days you could get 25 cents per ad Now you count yourself lucky if you could get 5 cents roll in after two hours
BLOG WWWHANDMADE-JEWELRY-CLUBCOM MEMBERSHIP WWWDIYBEADINGCLUBCOM BLOG DIY BEADING MAGAZINE ISSUE 32
And on top of that adblockers are destroying Youtube channel owners Youtube will start making changes to the channels where there will be ldquopaid subscriptionrdquo channels This has already been implemented in some countries but not in her country The Netherlands This means there will no longer be ads for her monthly paying subscribers She hopes that Youtube will add on a paid per video option feature The option to be a paid channel or free channel or to start a new channel for paying customers is yours to choose Gianna is not happy with Youtube because many others like her have worked so hard and for some years to become Youtube partners(which was something to be proud of) has lost their status
Getting Down And Personal With Gianna
Her advice for those who want to go on Youtube is 1 Do it because you want to teach
2 Do it because you want a career with beads
BLOG WWWHANDMADE-JEWELRY-CLUBCOM MEMBERSHIP WWWDIYBEADINGCLUBCOM BLOG DIY BEADING MAGAZINE ISSUE 32
After putting up about 20 videos and having at least 5000 subscribers add the PDF tutorials to Etsy and Craftsy She found out that her audience would like to have the PDF after watching her videos This is because they would rather print out the PDF and work while seated in a comfy chair technically somewhere else instead of having to pause the video time and time again
Gianna has also made a video for those who want to know the whole story of her journey up until the present day And to get updates on her you can check it out here She has also started a vlog where she tells of how she still works towards becoming a financial independent beader and explains her journey to get where she wants to be(or die trying) Gianna will be in the UK on October the 17th giving an all-day workshop with 4 different patterns
(2 beginners and 2 advanced) in Wotton-under-Edge
Gianna will be there Friday night as the workshop is on Saturday She will be leaving on Sunday Her
doors are open to all who wants to continue the party with her at the hotel across the street
For more information do contact Ann Tucker on Facebook
httpswwwfacebookcomanntucker501
Rec
omm
end
ed R
ead
ings
Making Jewelry with Gemstone
Beads
Combines the popular craft of beading with beautiful semi-precious stones which are collected by many Features a variety of versatile ideas which can be adapted for any type of gem or bead Readers will learn to reate beautiful gemstone jewelry with this dazzling collection of over 100 projects ranging from eyecatching earrings and accessories to exquisite necklaces and bracelets This beautiful book offers an impressive range of 28 beautiful semi-precious stones (including birthstones) and a glimpse into the fascinating history and mythical properties behind them
BLOG DIY BEADING MAGAZINE ISSUE 32 BLOG WWWHANDMADE-JEWELRY-CLUBCOM MEMBERSHIP WWWDIYBEADINGCLUBCOM
Rec
omm
end
ed R
ead
ings
Convertible Crystal Jewelry
Reverse it Twist it Wear it Many
Ways
Diane Whiting presents the idea that convertibility isnrsquot just about using pieces in multiple ways it is also about using skills and creativity in multiple ways Using ever-popular sparkling crystals Diane showcases design elements through various techniques for fun easy fashionable jewelry With 25 projects the reader can choose from bracelets necklaces and earrings that match any outfit or styleDiane Whiting presents the idea that convertibility isnrsquot just about using pieces in multiple ways it is also about using skills and creativity in multiple ways
BLOG DIY BEADING MAGAZINE ISSUE 32 BLOG WWWHANDMADE-JEWELRY-CLUBCOM MEMBERSHIP WWWDIYBEADINGCLUBCOM
Rec
omm
end
ed R
ead
ings
Wire Jewelry Masterclass
Wrapped Coiled and Woven Pieces
Using Fine Materials
Comprehensive and fabulous Wire Jewelry Masterclass takes an in-depth look at an intricate and rewarding craft The 24 projects which range from simple Dragons tear briolette earrings to a Poseidon-under-the-sea pendant will delight and inspire jewelers of all levels and tastes Divided into beginner intermediate and advanced sections this beautifully photographed step-by-step guide is the ticket to wire jewelry expertise
BLOG DIY BEADING MAGAZINE ISSUE 32 BLOG WWWHANDMADE-JEWELRY-CLUBCOM MEMBERSHIP WWWDIYBEADINGCLUBCOM
Rec
omm
end
ed R
ead
ings
Timeless Wire Weaving The
Complete Course
Timeless Wire Weaving focuses on developing wirework skills through 13 projects using three classic wire weaving techniques coiling wrapping and weaving The projects are built around a focal cabochon and incorporate seed beads and crystals in imaginative ways Designers learn to make the jewelry shown in the book and they also use the techniques learned to create innovative jewelry pieces of their own
BLOG DIY BEADING MAGAZINE ISSUE 32 BLOG WWWHANDMADE-JEWELRY-CLUBCOM MEMBERSHIP WWWDIYBEADINGCLUBCOM
Our digital magazine is available through
Apple Newsstand service available to millions of IPAD users
To advertise with us please email us at
diyjewelryclubgmailcom
Or visit our page at
httphandmade-jewelry-clubcomadvertising-diy-beading-magazine

Something Blue Necklace and Earrings
BLOG WWWHANDMADE-JEWELRY-CLUBCOM MEMBERSHIP WWWDIYBEADINGCLUBCOM BLOG DIY BEADING MAGAZINE ISSUE 32
STEP 2-6 Continue by adding 1A 1 bicone 1 pearl until you count 6 of each
STEP 1 Begin with 1 pearl 1 bicone 1A and 1 bicone again on a comfortable length of thread leaving a 2rdquo
5cm tail Pass through the pearl and the first bicone strung to form a ring
STEP 7-12 Pass through the A beads to make your
component more secure Also secure the thread and trim (Repeat these steps until you have six 6-BEAD
COMPONENTs)
6-BEAD COMPONENT Work RAW stitch into a beaded circle and embellish with Swarovski bicones
For the necklace we will need six from this component For the earring two
Something Blue Necklace and Earrings
BLOG WWWHANDMADE-JEWELRY-CLUBCOM MEMBERSHIP WWWDIYBEADINGCLUBCOM BLOG DIY BEADING MAGAZINE ISSUE 32
STEP 2-4 Continue by adding 1A 1 bicone 1 pearl
until you count 4 of each
STEP 1 Begin with 1 pearl 1 bicone 1A and 1 bicone again on a comfortable length of thread leaving a 2rdquo
5cm tail Pass through the pearl and the first bicone strung to form a ring
STEP 5-8 Pass through the A beads to make your component more secure Also secure the thread and
trim (Repeat these steps until you have the wished amount of 4-BEAD COMPONENTs)
4-BEAD COMPONENT Work RAW stitch into a beaded circle and embellish with Swarovski bicones
For the necklace-size that is given on the second page we will need 20 from this
component For the earring two
If you would like to make a longer necklace you need to make more (One 4-BEAD COMPONENT measures about 38 inch 1 cm To make the necklace symmetrical you have to have equal amounts on each side This means for every extra frac34 inches
2 cm-s you will need 1 4-BEAD COMPONENT on each side of the necklace)
Something Blue Necklace and Earrings
BLOG WWWHANDMADE-JEWELRY-CLUBCOM MEMBERSHIP WWWDIYBEADINGCLUBCOM BLOG DIY BEADING MAGAZINE ISSUE 32
STEP 2 Connect the MIDDLE CIRCLE to two 6-BEAD COMPONENTs by adding four-times 2As
between the pearls Choose a pearl on the MIDDLE CIRCLE and add
2A pass through a pearl in the 6-BEAD COMPONENT previously added and add 2A again Watch out this has to be symmetrical Repeat this at least two more times to make it
secure Now repeat this entire procedure but choose
the 8-th pearl on MIDDLE CIRCLE Repeat this on the other side of the necklace
too
Choose a pearl on the FOCAL CIRCLE and add 2A pass through a pearl in the 6-BEAD COMPONENT and add 2A again Repeat this at least two more times to make it secure
Now repeat this entire procedure but choose the 5-th pearl on FOCAL CIRCLE This will make the necklace nice on your neck
FINISHING THE NECKLACE Connects the parts with A beads
STEP 1 Connect the FOCAL CIRCLE to two 6-BEAD COMPONENTs by adding four-times 2As between the pearls To do this turn your parts upside down you need to
see the pearls We will work on this side from now on
Something Blue Necklace and Earrings
BLOG WWWHANDMADE-JEWELRY-CLUBCOM MEMBERSHIP WWWDIYBEADINGCLUBCOM BLOG DIY BEADING MAGAZINE ISSUE 32
FINISHING THE EARRING Connects the parts with A beads
STEP 1-2 Connect the 6-BEAD COMPONENT
to 4-BEAD COMPONENT and the 4-BEAD
COMPONENT to the earring hook
First connect the 4-BEAD COMPONENT to the 6-BEAD COMPONENT with 4A beads Mimic
the elongation steps of the necklace if needed
Secondly connect the 4-BEAD COMPONENT
to your earring hook with 4A beads again Leave from the last pearl bead 2A beads the hook (this is the orange oval form) and 2As again Pass through each of them to
secure this connection again
Finally get ready to prepare the other earring ndash since we need two of them
STEP 5 Connect the 4-BEAD COMPONENTs to the toggle clasp thus finishing the
necklace Leaving from the last pearl bead 2A the
clasp(this is the orange oval form) and 2A again Pass through all of them a couple more times to make this connection more
secure
Something Blue Necklace and Earrings
BLOG WWWHANDMADE-JEWELRY-CLUBCOM MEMBERSHIP WWWDIYBEADINGCLUBCOM BLOG DIY BEADING MAGAZINE ISSUE 32
If you finished it is time to try it on It was a great fun wasnrsquot it And how beautiful you look in your new necklace and the matching earrings
Something Blue Necklace and Earrings
BLOG WWWHANDMADE-JEWELRY-CLUBCOM MEMBERSHIP WWWDIYBEADINGCLUBCOM
About the Author
Margit Vogel
My name is Margit Vogel I live in Hungary Europe
By profession I am a biochemical engineer but I fell in love with
beads so much that I could not stop playing with them
I make one-of-a-kind beaded and bead embroidered art
jewelry made of the best quality materials such as Swarovski
stones gemstones Japanese beads (Miyuki and Toho) Czech
glass beads leather soutache and suede Each piece is unique
and individually crafted
Feel free to visit my blog for some eyecandy
httpiformjewelrywordpresscom
My shop httpwwwetsycomshopiformjewelry
Facebook httpwwwfacebookcomiformjewelry
BLOG DIY BEADING MAGAZINE ISSUE 32
Getting Down And Personal With Gianna
Getting Down And Personal With Gianna
Nowadays we see more and more jewelry stores opening up online and with these online jewelry stores it has made it easier for us to purchase and view their creations Have you ever wondered how they are able to manage and produce amazing jewelry pieces and tutorials So heres a little on the journey to open up an online shop We are excited to present to you Gianna aka Beading4perfectionists
Gianna Beader amp Youtuber
Unlike most jewelry makers and beadweavers Gianna did not start beading as a hobby but as a means to make ends meet With goals in trying to
fill the financial gap she did everything she could to expand her earnings ndash working as a security guard
and at the same time learning how to bead and selling her pieces at fair trades and flea markets
Since many were asking if she does home beading workshops she started on exploring how to teach people to bead She loves Scott Bakula and has always loved him till now and this served as her
inspiration to start making a beading video tutorial
Gianna started creating videos because she was at the point in her life where everything seemed to be falling apart And at that moment of time she had difficulties financially and selling jewelry was the only way for her to stay afloat financially She is a big Scott Bakula fan and when she went to the UK to see him on stage that was when it hit her that she is already able to edit videos and
taught herself Photoshop and done workshops at bead fairs so why not put these together and see what happens on Youtube She knew that if she gets enough subscribers and views ndash though no one knew what the exact numbers were you would be invited to become a Youtube partner This way she could monetize her videos with advertisements and hopefully she would be able to be a Youtube partner and be able to pay her bills
BLOG WWWHANDMADE-JEWELRY-CLUBCOM MEMBERSHIP WWWDIYBEADINGCLUBCOM BLOG DIY BEADING MAGAZINE ISSUE 32
Getting Down And Personal With Gianna
Her Youtube channel is popular and the reason why she chose Youtube is because Youtube is the biggest platform and reached almost to the whole world Everyone already knows about it and it was growing rapidly as compared to other platforms like Dailymotion so she figured that Youtube was the way to go Her advice to new designers is that when you start out go to the platforms on the top of your list first then work your way down your list if you do not get accepted by your first choice
After loyally putting up one video every week for about 8 months in a row she became a Youtube partner and monetized her videos She knew she needed at least $100 to get her first payout She managed to reach $100 after 3 months The process was not easy she worked hard lack sleep skipped meals and who knows what happened to Ridge in the Bold and the Beautiful because she stopped watching
On Youtube you can monetize your videos Google pays straight to your bank account and at other countries where they also have the option of getting checks among other options In order to get paid you have to reach the $100 mark and after 3 months For Gianna she thinks that you cannot say that Etsy is better than Youtube or Youtube is better than Etsy Her reasoning is because on Youtube she has many followers which will eventually check out her Etsy shop And to start an Etsy shop you need an audience
BLOG WWWHANDMADE-JEWELRY-CLUBCOM MEMBERSHIP WWWDIYBEADINGCLUBCOM BLOG DIY BEADING MAGAZINE ISSUE 32
television and dedicated her spare time (as she had another job) to Youtube She re-registered at the chamber of commerce after receiving her first payout Her work at Youtube now is not a full time job and things have changed on Youtube It is easier to become a parter but there are some countries that need to wait for an invitation to be a Youtube partner Take Italy for instance Italians would have to work just as hard as she did if they want to become a Youtube partner
Getting Down And Personal With Gianna
With her 60000 subscribers on her b4pbakup Youtube channel it is possible to sell at least 60 patterns on the first day on Etsy after promoting the PDF file on her Youtube channel Though you may think that 60 out of 60000 is not much you have to remember that not everyone has the means to purchase the PDF file and a lot of people still rather watch her carry out the tutorial(for free) on Youtube instead of reading the patterns or paying for the patterns even if the pattern is for a fundraiser and only cost $2 Her insights on Youtube is that Youtube is not what it used to be 6 years ago Instead of making more money every month she is making less and less because advertisers have more options of where they want to advertise their ads Ads do not pay as much as they used to Back in the days you could get 25 cents per ad Now you count yourself lucky if you could get 5 cents roll in after two hours
BLOG WWWHANDMADE-JEWELRY-CLUBCOM MEMBERSHIP WWWDIYBEADINGCLUBCOM BLOG DIY BEADING MAGAZINE ISSUE 32
And on top of that adblockers are destroying Youtube channel owners Youtube will start making changes to the channels where there will be ldquopaid subscriptionrdquo channels This has already been implemented in some countries but not in her country The Netherlands This means there will no longer be ads for her monthly paying subscribers She hopes that Youtube will add on a paid per video option feature The option to be a paid channel or free channel or to start a new channel for paying customers is yours to choose Gianna is not happy with Youtube because many others like her have worked so hard and for some years to become Youtube partners(which was something to be proud of) has lost their status
Getting Down And Personal With Gianna
Her advice for those who want to go on Youtube is 1 Do it because you want to teach
2 Do it because you want a career with beads
BLOG WWWHANDMADE-JEWELRY-CLUBCOM MEMBERSHIP WWWDIYBEADINGCLUBCOM BLOG DIY BEADING MAGAZINE ISSUE 32
After putting up about 20 videos and having at least 5000 subscribers add the PDF tutorials to Etsy and Craftsy She found out that her audience would like to have the PDF after watching her videos This is because they would rather print out the PDF and work while seated in a comfy chair technically somewhere else instead of having to pause the video time and time again
Gianna has also made a video for those who want to know the whole story of her journey up until the present day And to get updates on her you can check it out here She has also started a vlog where she tells of how she still works towards becoming a financial independent beader and explains her journey to get where she wants to be(or die trying) Gianna will be in the UK on October the 17th giving an all-day workshop with 4 different patterns
(2 beginners and 2 advanced) in Wotton-under-Edge
Gianna will be there Friday night as the workshop is on Saturday She will be leaving on Sunday Her
doors are open to all who wants to continue the party with her at the hotel across the street
For more information do contact Ann Tucker on Facebook
httpswwwfacebookcomanntucker501
Rec
omm
end
ed R
ead
ings
Making Jewelry with Gemstone
Beads
Combines the popular craft of beading with beautiful semi-precious stones which are collected by many Features a variety of versatile ideas which can be adapted for any type of gem or bead Readers will learn to reate beautiful gemstone jewelry with this dazzling collection of over 100 projects ranging from eyecatching earrings and accessories to exquisite necklaces and bracelets This beautiful book offers an impressive range of 28 beautiful semi-precious stones (including birthstones) and a glimpse into the fascinating history and mythical properties behind them
BLOG DIY BEADING MAGAZINE ISSUE 32 BLOG WWWHANDMADE-JEWELRY-CLUBCOM MEMBERSHIP WWWDIYBEADINGCLUBCOM
Rec
omm
end
ed R
ead
ings
Convertible Crystal Jewelry
Reverse it Twist it Wear it Many
Ways
Diane Whiting presents the idea that convertibility isnrsquot just about using pieces in multiple ways it is also about using skills and creativity in multiple ways Using ever-popular sparkling crystals Diane showcases design elements through various techniques for fun easy fashionable jewelry With 25 projects the reader can choose from bracelets necklaces and earrings that match any outfit or styleDiane Whiting presents the idea that convertibility isnrsquot just about using pieces in multiple ways it is also about using skills and creativity in multiple ways
BLOG DIY BEADING MAGAZINE ISSUE 32 BLOG WWWHANDMADE-JEWELRY-CLUBCOM MEMBERSHIP WWWDIYBEADINGCLUBCOM
Rec
omm
end
ed R
ead
ings
Wire Jewelry Masterclass
Wrapped Coiled and Woven Pieces
Using Fine Materials
Comprehensive and fabulous Wire Jewelry Masterclass takes an in-depth look at an intricate and rewarding craft The 24 projects which range from simple Dragons tear briolette earrings to a Poseidon-under-the-sea pendant will delight and inspire jewelers of all levels and tastes Divided into beginner intermediate and advanced sections this beautifully photographed step-by-step guide is the ticket to wire jewelry expertise
BLOG DIY BEADING MAGAZINE ISSUE 32 BLOG WWWHANDMADE-JEWELRY-CLUBCOM MEMBERSHIP WWWDIYBEADINGCLUBCOM
Rec
omm
end
ed R
ead
ings
Timeless Wire Weaving The
Complete Course
Timeless Wire Weaving focuses on developing wirework skills through 13 projects using three classic wire weaving techniques coiling wrapping and weaving The projects are built around a focal cabochon and incorporate seed beads and crystals in imaginative ways Designers learn to make the jewelry shown in the book and they also use the techniques learned to create innovative jewelry pieces of their own
BLOG DIY BEADING MAGAZINE ISSUE 32 BLOG WWWHANDMADE-JEWELRY-CLUBCOM MEMBERSHIP WWWDIYBEADINGCLUBCOM
Our digital magazine is available through
Apple Newsstand service available to millions of IPAD users
To advertise with us please email us at
diyjewelryclubgmailcom
Or visit our page at
httphandmade-jewelry-clubcomadvertising-diy-beading-magazine
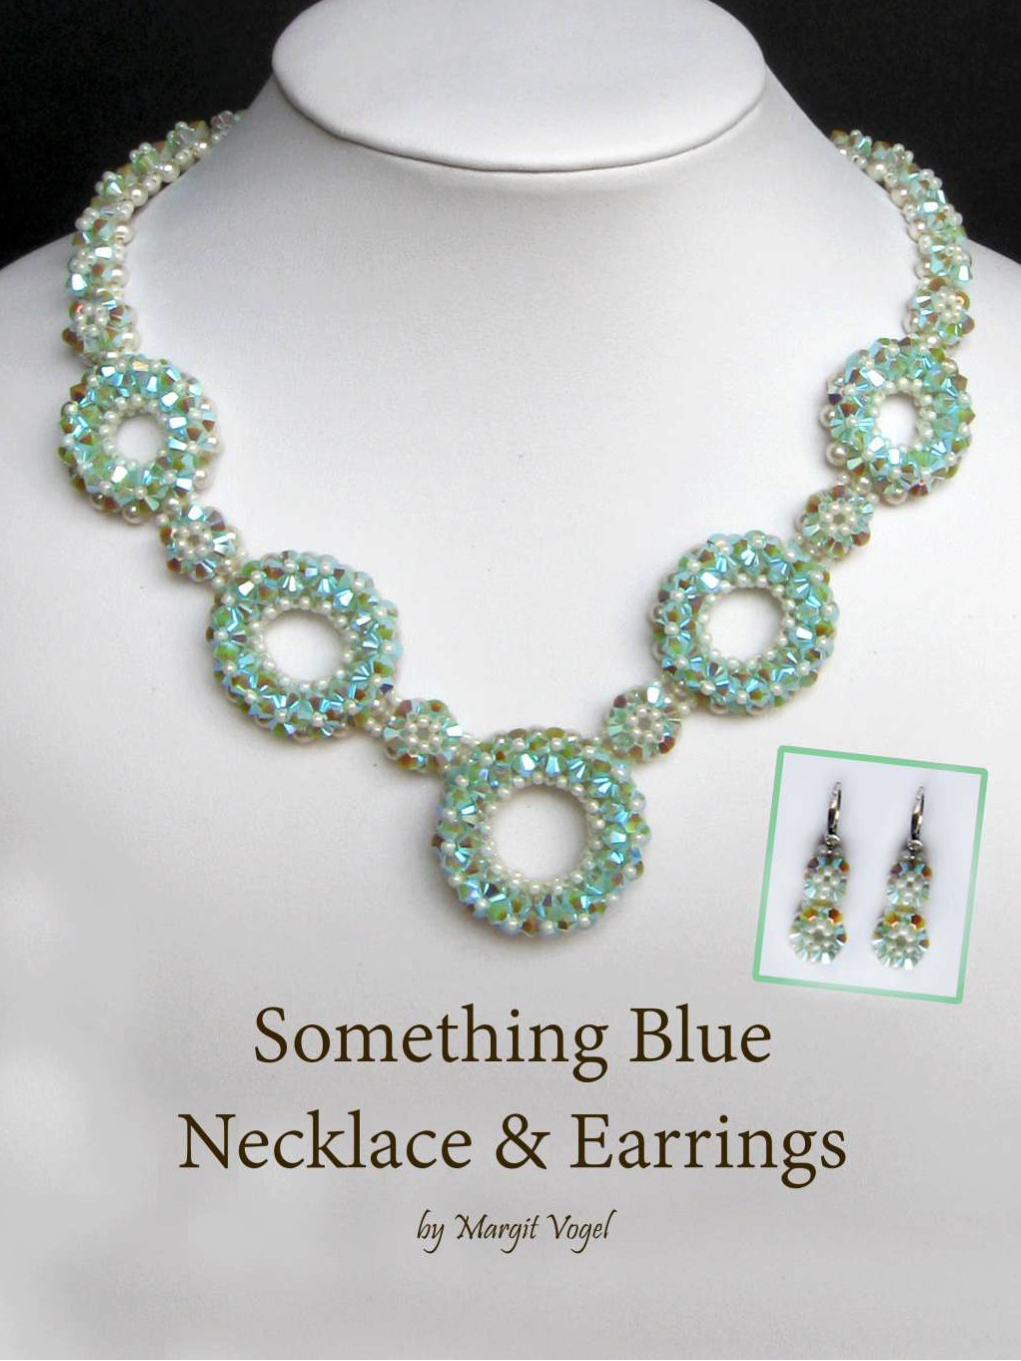
Something Blue Necklace and Earrings
BLOG WWWHANDMADE-JEWELRY-CLUBCOM MEMBERSHIP WWWDIYBEADINGCLUBCOM BLOG DIY BEADING MAGAZINE ISSUE 32
STEP 2 Connect the MIDDLE CIRCLE to two 6-BEAD COMPONENTs by adding four-times 2As
between the pearls Choose a pearl on the MIDDLE CIRCLE and add
2A pass through a pearl in the 6-BEAD COMPONENT previously added and add 2A again Watch out this has to be symmetrical Repeat this at least two more times to make it
secure Now repeat this entire procedure but choose
the 8-th pearl on MIDDLE CIRCLE Repeat this on the other side of the necklace
too
Choose a pearl on the FOCAL CIRCLE and add 2A pass through a pearl in the 6-BEAD COMPONENT and add 2A again Repeat this at least two more times to make it secure
Now repeat this entire procedure but choose the 5-th pearl on FOCAL CIRCLE This will make the necklace nice on your neck
FINISHING THE NECKLACE Connects the parts with A beads
STEP 1 Connect the FOCAL CIRCLE to two 6-BEAD COMPONENTs by adding four-times 2As between the pearls To do this turn your parts upside down you need to
see the pearls We will work on this side from now on
Something Blue Necklace and Earrings
BLOG WWWHANDMADE-JEWELRY-CLUBCOM MEMBERSHIP WWWDIYBEADINGCLUBCOM BLOG DIY BEADING MAGAZINE ISSUE 32
FINISHING THE EARRING Connects the parts with A beads
STEP 1-2 Connect the 6-BEAD COMPONENT
to 4-BEAD COMPONENT and the 4-BEAD
COMPONENT to the earring hook
First connect the 4-BEAD COMPONENT to the 6-BEAD COMPONENT with 4A beads Mimic
the elongation steps of the necklace if needed
Secondly connect the 4-BEAD COMPONENT
to your earring hook with 4A beads again Leave from the last pearl bead 2A beads the hook (this is the orange oval form) and 2As again Pass through each of them to
secure this connection again
Finally get ready to prepare the other earring ndash since we need two of them
STEP 5 Connect the 4-BEAD COMPONENTs to the toggle clasp thus finishing the
necklace Leaving from the last pearl bead 2A the
clasp(this is the orange oval form) and 2A again Pass through all of them a couple more times to make this connection more
secure
Something Blue Necklace and Earrings
BLOG WWWHANDMADE-JEWELRY-CLUBCOM MEMBERSHIP WWWDIYBEADINGCLUBCOM BLOG DIY BEADING MAGAZINE ISSUE 32
If you finished it is time to try it on It was a great fun wasnrsquot it And how beautiful you look in your new necklace and the matching earrings
Something Blue Necklace and Earrings
BLOG WWWHANDMADE-JEWELRY-CLUBCOM MEMBERSHIP WWWDIYBEADINGCLUBCOM
About the Author
Margit Vogel
My name is Margit Vogel I live in Hungary Europe
By profession I am a biochemical engineer but I fell in love with
beads so much that I could not stop playing with them
I make one-of-a-kind beaded and bead embroidered art
jewelry made of the best quality materials such as Swarovski
stones gemstones Japanese beads (Miyuki and Toho) Czech
glass beads leather soutache and suede Each piece is unique
and individually crafted
Feel free to visit my blog for some eyecandy
httpiformjewelrywordpresscom
My shop httpwwwetsycomshopiformjewelry
Facebook httpwwwfacebookcomiformjewelry
BLOG DIY BEADING MAGAZINE ISSUE 32
Getting Down And Personal With Gianna
Getting Down And Personal With Gianna
Nowadays we see more and more jewelry stores opening up online and with these online jewelry stores it has made it easier for us to purchase and view their creations Have you ever wondered how they are able to manage and produce amazing jewelry pieces and tutorials So heres a little on the journey to open up an online shop We are excited to present to you Gianna aka Beading4perfectionists
Gianna Beader amp Youtuber
Unlike most jewelry makers and beadweavers Gianna did not start beading as a hobby but as a means to make ends meet With goals in trying to
fill the financial gap she did everything she could to expand her earnings ndash working as a security guard
and at the same time learning how to bead and selling her pieces at fair trades and flea markets
Since many were asking if she does home beading workshops she started on exploring how to teach people to bead She loves Scott Bakula and has always loved him till now and this served as her
inspiration to start making a beading video tutorial
Gianna started creating videos because she was at the point in her life where everything seemed to be falling apart And at that moment of time she had difficulties financially and selling jewelry was the only way for her to stay afloat financially She is a big Scott Bakula fan and when she went to the UK to see him on stage that was when it hit her that she is already able to edit videos and
taught herself Photoshop and done workshops at bead fairs so why not put these together and see what happens on Youtube She knew that if she gets enough subscribers and views ndash though no one knew what the exact numbers were you would be invited to become a Youtube partner This way she could monetize her videos with advertisements and hopefully she would be able to be a Youtube partner and be able to pay her bills
BLOG WWWHANDMADE-JEWELRY-CLUBCOM MEMBERSHIP WWWDIYBEADINGCLUBCOM BLOG DIY BEADING MAGAZINE ISSUE 32
Getting Down And Personal With Gianna
Her Youtube channel is popular and the reason why she chose Youtube is because Youtube is the biggest platform and reached almost to the whole world Everyone already knows about it and it was growing rapidly as compared to other platforms like Dailymotion so she figured that Youtube was the way to go Her advice to new designers is that when you start out go to the platforms on the top of your list first then work your way down your list if you do not get accepted by your first choice
After loyally putting up one video every week for about 8 months in a row she became a Youtube partner and monetized her videos She knew she needed at least $100 to get her first payout She managed to reach $100 after 3 months The process was not easy she worked hard lack sleep skipped meals and who knows what happened to Ridge in the Bold and the Beautiful because she stopped watching
On Youtube you can monetize your videos Google pays straight to your bank account and at other countries where they also have the option of getting checks among other options In order to get paid you have to reach the $100 mark and after 3 months For Gianna she thinks that you cannot say that Etsy is better than Youtube or Youtube is better than Etsy Her reasoning is because on Youtube she has many followers which will eventually check out her Etsy shop And to start an Etsy shop you need an audience
BLOG WWWHANDMADE-JEWELRY-CLUBCOM MEMBERSHIP WWWDIYBEADINGCLUBCOM BLOG DIY BEADING MAGAZINE ISSUE 32
television and dedicated her spare time (as she had another job) to Youtube She re-registered at the chamber of commerce after receiving her first payout Her work at Youtube now is not a full time job and things have changed on Youtube It is easier to become a parter but there are some countries that need to wait for an invitation to be a Youtube partner Take Italy for instance Italians would have to work just as hard as she did if they want to become a Youtube partner
Getting Down And Personal With Gianna
With her 60000 subscribers on her b4pbakup Youtube channel it is possible to sell at least 60 patterns on the first day on Etsy after promoting the PDF file on her Youtube channel Though you may think that 60 out of 60000 is not much you have to remember that not everyone has the means to purchase the PDF file and a lot of people still rather watch her carry out the tutorial(for free) on Youtube instead of reading the patterns or paying for the patterns even if the pattern is for a fundraiser and only cost $2 Her insights on Youtube is that Youtube is not what it used to be 6 years ago Instead of making more money every month she is making less and less because advertisers have more options of where they want to advertise their ads Ads do not pay as much as they used to Back in the days you could get 25 cents per ad Now you count yourself lucky if you could get 5 cents roll in after two hours
BLOG WWWHANDMADE-JEWELRY-CLUBCOM MEMBERSHIP WWWDIYBEADINGCLUBCOM BLOG DIY BEADING MAGAZINE ISSUE 32
And on top of that adblockers are destroying Youtube channel owners Youtube will start making changes to the channels where there will be ldquopaid subscriptionrdquo channels This has already been implemented in some countries but not in her country The Netherlands This means there will no longer be ads for her monthly paying subscribers She hopes that Youtube will add on a paid per video option feature The option to be a paid channel or free channel or to start a new channel for paying customers is yours to choose Gianna is not happy with Youtube because many others like her have worked so hard and for some years to become Youtube partners(which was something to be proud of) has lost their status
Getting Down And Personal With Gianna
Her advice for those who want to go on Youtube is 1 Do it because you want to teach
2 Do it because you want a career with beads
BLOG WWWHANDMADE-JEWELRY-CLUBCOM MEMBERSHIP WWWDIYBEADINGCLUBCOM BLOG DIY BEADING MAGAZINE ISSUE 32
After putting up about 20 videos and having at least 5000 subscribers add the PDF tutorials to Etsy and Craftsy She found out that her audience would like to have the PDF after watching her videos This is because they would rather print out the PDF and work while seated in a comfy chair technically somewhere else instead of having to pause the video time and time again
Gianna has also made a video for those who want to know the whole story of her journey up until the present day And to get updates on her you can check it out here She has also started a vlog where she tells of how she still works towards becoming a financial independent beader and explains her journey to get where she wants to be(or die trying) Gianna will be in the UK on October the 17th giving an all-day workshop with 4 different patterns
(2 beginners and 2 advanced) in Wotton-under-Edge
Gianna will be there Friday night as the workshop is on Saturday She will be leaving on Sunday Her
doors are open to all who wants to continue the party with her at the hotel across the street
For more information do contact Ann Tucker on Facebook
httpswwwfacebookcomanntucker501
Rec
omm
end
ed R
ead
ings
Making Jewelry with Gemstone
Beads
Combines the popular craft of beading with beautiful semi-precious stones which are collected by many Features a variety of versatile ideas which can be adapted for any type of gem or bead Readers will learn to reate beautiful gemstone jewelry with this dazzling collection of over 100 projects ranging from eyecatching earrings and accessories to exquisite necklaces and bracelets This beautiful book offers an impressive range of 28 beautiful semi-precious stones (including birthstones) and a glimpse into the fascinating history and mythical properties behind them
BLOG DIY BEADING MAGAZINE ISSUE 32 BLOG WWWHANDMADE-JEWELRY-CLUBCOM MEMBERSHIP WWWDIYBEADINGCLUBCOM
Rec
omm
end
ed R
ead
ings
Convertible Crystal Jewelry
Reverse it Twist it Wear it Many
Ways
Diane Whiting presents the idea that convertibility isnrsquot just about using pieces in multiple ways it is also about using skills and creativity in multiple ways Using ever-popular sparkling crystals Diane showcases design elements through various techniques for fun easy fashionable jewelry With 25 projects the reader can choose from bracelets necklaces and earrings that match any outfit or styleDiane Whiting presents the idea that convertibility isnrsquot just about using pieces in multiple ways it is also about using skills and creativity in multiple ways
BLOG DIY BEADING MAGAZINE ISSUE 32 BLOG WWWHANDMADE-JEWELRY-CLUBCOM MEMBERSHIP WWWDIYBEADINGCLUBCOM
Rec
omm
end
ed R
ead
ings
Wire Jewelry Masterclass
Wrapped Coiled and Woven Pieces
Using Fine Materials
Comprehensive and fabulous Wire Jewelry Masterclass takes an in-depth look at an intricate and rewarding craft The 24 projects which range from simple Dragons tear briolette earrings to a Poseidon-under-the-sea pendant will delight and inspire jewelers of all levels and tastes Divided into beginner intermediate and advanced sections this beautifully photographed step-by-step guide is the ticket to wire jewelry expertise
BLOG DIY BEADING MAGAZINE ISSUE 32 BLOG WWWHANDMADE-JEWELRY-CLUBCOM MEMBERSHIP WWWDIYBEADINGCLUBCOM
Rec
omm
end
ed R
ead
ings
Timeless Wire Weaving The
Complete Course
Timeless Wire Weaving focuses on developing wirework skills through 13 projects using three classic wire weaving techniques coiling wrapping and weaving The projects are built around a focal cabochon and incorporate seed beads and crystals in imaginative ways Designers learn to make the jewelry shown in the book and they also use the techniques learned to create innovative jewelry pieces of their own
BLOG DIY BEADING MAGAZINE ISSUE 32 BLOG WWWHANDMADE-JEWELRY-CLUBCOM MEMBERSHIP WWWDIYBEADINGCLUBCOM
Our digital magazine is available through
Apple Newsstand service available to millions of IPAD users
To advertise with us please email us at
diyjewelryclubgmailcom
Or visit our page at
httphandmade-jewelry-clubcomadvertising-diy-beading-magazine
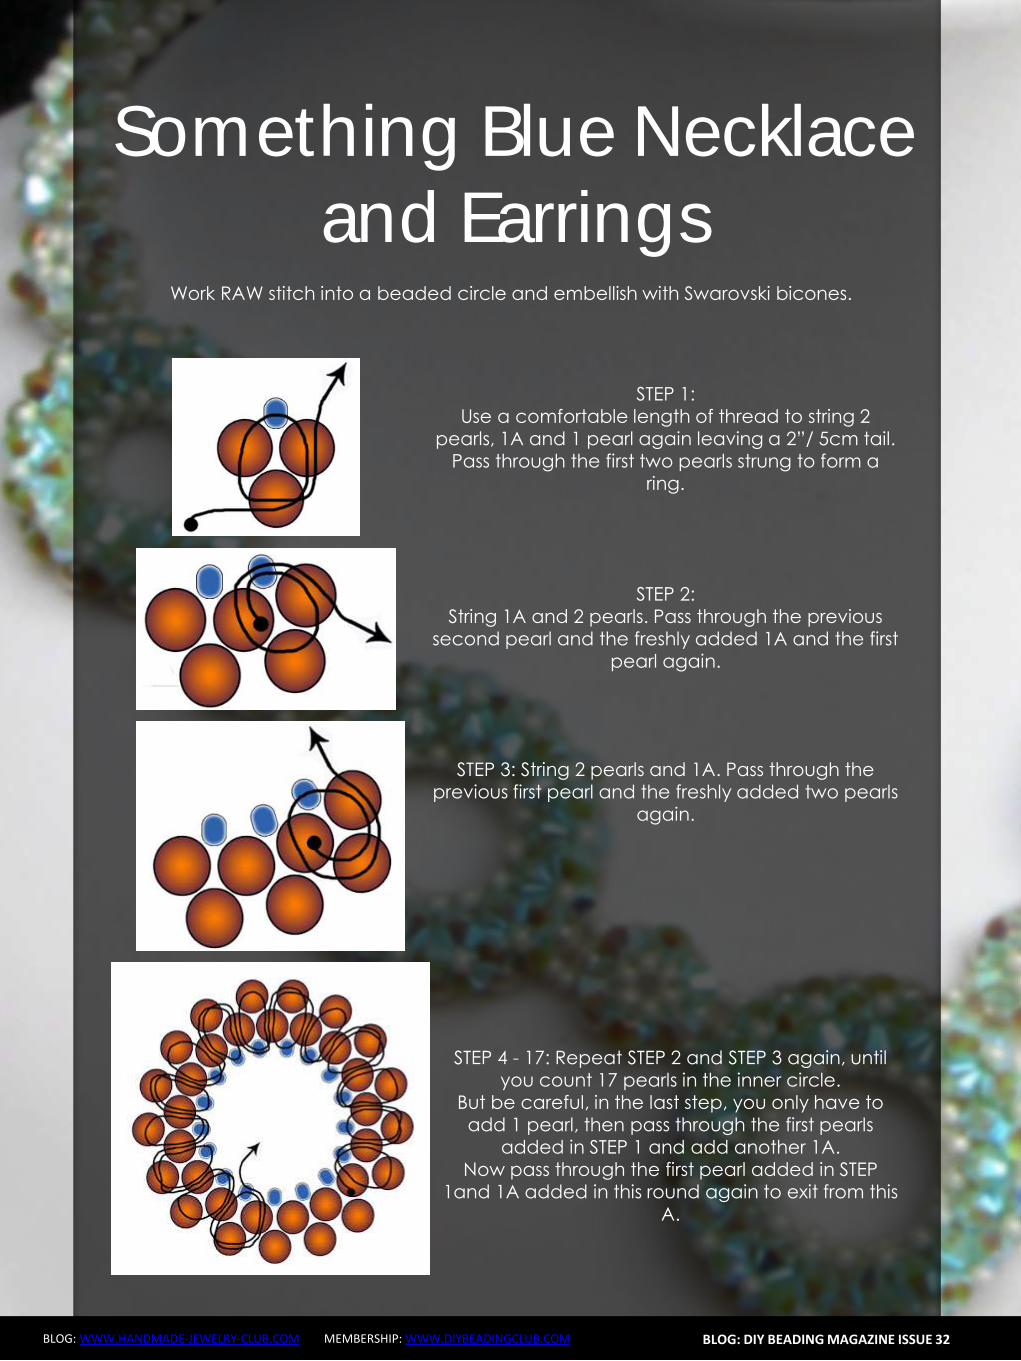
Something Blue Necklace and Earrings
BLOG WWWHANDMADE-JEWELRY-CLUBCOM MEMBERSHIP WWWDIYBEADINGCLUBCOM BLOG DIY BEADING MAGAZINE ISSUE 32
FINISHING THE EARRING Connects the parts with A beads
STEP 1-2 Connect the 6-BEAD COMPONENT
to 4-BEAD COMPONENT and the 4-BEAD
COMPONENT to the earring hook
First connect the 4-BEAD COMPONENT to the 6-BEAD COMPONENT with 4A beads Mimic
the elongation steps of the necklace if needed
Secondly connect the 4-BEAD COMPONENT
to your earring hook with 4A beads again Leave from the last pearl bead 2A beads the hook (this is the orange oval form) and 2As again Pass through each of them to
secure this connection again
Finally get ready to prepare the other earring ndash since we need two of them
STEP 5 Connect the 4-BEAD COMPONENTs to the toggle clasp thus finishing the
necklace Leaving from the last pearl bead 2A the
clasp(this is the orange oval form) and 2A again Pass through all of them a couple more times to make this connection more
secure
Something Blue Necklace and Earrings
BLOG WWWHANDMADE-JEWELRY-CLUBCOM MEMBERSHIP WWWDIYBEADINGCLUBCOM BLOG DIY BEADING MAGAZINE ISSUE 32
If you finished it is time to try it on It was a great fun wasnrsquot it And how beautiful you look in your new necklace and the matching earrings
Something Blue Necklace and Earrings
BLOG WWWHANDMADE-JEWELRY-CLUBCOM MEMBERSHIP WWWDIYBEADINGCLUBCOM
About the Author
Margit Vogel
My name is Margit Vogel I live in Hungary Europe
By profession I am a biochemical engineer but I fell in love with
beads so much that I could not stop playing with them
I make one-of-a-kind beaded and bead embroidered art
jewelry made of the best quality materials such as Swarovski
stones gemstones Japanese beads (Miyuki and Toho) Czech
glass beads leather soutache and suede Each piece is unique
and individually crafted
Feel free to visit my blog for some eyecandy
httpiformjewelrywordpresscom
My shop httpwwwetsycomshopiformjewelry
Facebook httpwwwfacebookcomiformjewelry
BLOG DIY BEADING MAGAZINE ISSUE 32
Getting Down And Personal With Gianna
Getting Down And Personal With Gianna
Nowadays we see more and more jewelry stores opening up online and with these online jewelry stores it has made it easier for us to purchase and view their creations Have you ever wondered how they are able to manage and produce amazing jewelry pieces and tutorials So heres a little on the journey to open up an online shop We are excited to present to you Gianna aka Beading4perfectionists
Gianna Beader amp Youtuber
Unlike most jewelry makers and beadweavers Gianna did not start beading as a hobby but as a means to make ends meet With goals in trying to
fill the financial gap she did everything she could to expand her earnings ndash working as a security guard
and at the same time learning how to bead and selling her pieces at fair trades and flea markets
Since many were asking if she does home beading workshops she started on exploring how to teach people to bead She loves Scott Bakula and has always loved him till now and this served as her
inspiration to start making a beading video tutorial
Gianna started creating videos because she was at the point in her life where everything seemed to be falling apart And at that moment of time she had difficulties financially and selling jewelry was the only way for her to stay afloat financially She is a big Scott Bakula fan and when she went to the UK to see him on stage that was when it hit her that she is already able to edit videos and
taught herself Photoshop and done workshops at bead fairs so why not put these together and see what happens on Youtube She knew that if she gets enough subscribers and views ndash though no one knew what the exact numbers were you would be invited to become a Youtube partner This way she could monetize her videos with advertisements and hopefully she would be able to be a Youtube partner and be able to pay her bills
BLOG WWWHANDMADE-JEWELRY-CLUBCOM MEMBERSHIP WWWDIYBEADINGCLUBCOM BLOG DIY BEADING MAGAZINE ISSUE 32
Getting Down And Personal With Gianna
Her Youtube channel is popular and the reason why she chose Youtube is because Youtube is the biggest platform and reached almost to the whole world Everyone already knows about it and it was growing rapidly as compared to other platforms like Dailymotion so she figured that Youtube was the way to go Her advice to new designers is that when you start out go to the platforms on the top of your list first then work your way down your list if you do not get accepted by your first choice
After loyally putting up one video every week for about 8 months in a row she became a Youtube partner and monetized her videos She knew she needed at least $100 to get her first payout She managed to reach $100 after 3 months The process was not easy she worked hard lack sleep skipped meals and who knows what happened to Ridge in the Bold and the Beautiful because she stopped watching
On Youtube you can monetize your videos Google pays straight to your bank account and at other countries where they also have the option of getting checks among other options In order to get paid you have to reach the $100 mark and after 3 months For Gianna she thinks that you cannot say that Etsy is better than Youtube or Youtube is better than Etsy Her reasoning is because on Youtube she has many followers which will eventually check out her Etsy shop And to start an Etsy shop you need an audience
BLOG WWWHANDMADE-JEWELRY-CLUBCOM MEMBERSHIP WWWDIYBEADINGCLUBCOM BLOG DIY BEADING MAGAZINE ISSUE 32
television and dedicated her spare time (as she had another job) to Youtube She re-registered at the chamber of commerce after receiving her first payout Her work at Youtube now is not a full time job and things have changed on Youtube It is easier to become a parter but there are some countries that need to wait for an invitation to be a Youtube partner Take Italy for instance Italians would have to work just as hard as she did if they want to become a Youtube partner
Getting Down And Personal With Gianna
With her 60000 subscribers on her b4pbakup Youtube channel it is possible to sell at least 60 patterns on the first day on Etsy after promoting the PDF file on her Youtube channel Though you may think that 60 out of 60000 is not much you have to remember that not everyone has the means to purchase the PDF file and a lot of people still rather watch her carry out the tutorial(for free) on Youtube instead of reading the patterns or paying for the patterns even if the pattern is for a fundraiser and only cost $2 Her insights on Youtube is that Youtube is not what it used to be 6 years ago Instead of making more money every month she is making less and less because advertisers have more options of where they want to advertise their ads Ads do not pay as much as they used to Back in the days you could get 25 cents per ad Now you count yourself lucky if you could get 5 cents roll in after two hours
BLOG WWWHANDMADE-JEWELRY-CLUBCOM MEMBERSHIP WWWDIYBEADINGCLUBCOM BLOG DIY BEADING MAGAZINE ISSUE 32
And on top of that adblockers are destroying Youtube channel owners Youtube will start making changes to the channels where there will be ldquopaid subscriptionrdquo channels This has already been implemented in some countries but not in her country The Netherlands This means there will no longer be ads for her monthly paying subscribers She hopes that Youtube will add on a paid per video option feature The option to be a paid channel or free channel or to start a new channel for paying customers is yours to choose Gianna is not happy with Youtube because many others like her have worked so hard and for some years to become Youtube partners(which was something to be proud of) has lost their status
Getting Down And Personal With Gianna
Her advice for those who want to go on Youtube is 1 Do it because you want to teach
2 Do it because you want a career with beads
BLOG WWWHANDMADE-JEWELRY-CLUBCOM MEMBERSHIP WWWDIYBEADINGCLUBCOM BLOG DIY BEADING MAGAZINE ISSUE 32
After putting up about 20 videos and having at least 5000 subscribers add the PDF tutorials to Etsy and Craftsy She found out that her audience would like to have the PDF after watching her videos This is because they would rather print out the PDF and work while seated in a comfy chair technically somewhere else instead of having to pause the video time and time again
Gianna has also made a video for those who want to know the whole story of her journey up until the present day And to get updates on her you can check it out here She has also started a vlog where she tells of how she still works towards becoming a financial independent beader and explains her journey to get where she wants to be(or die trying) Gianna will be in the UK on October the 17th giving an all-day workshop with 4 different patterns
(2 beginners and 2 advanced) in Wotton-under-Edge
Gianna will be there Friday night as the workshop is on Saturday She will be leaving on Sunday Her
doors are open to all who wants to continue the party with her at the hotel across the street
For more information do contact Ann Tucker on Facebook
httpswwwfacebookcomanntucker501
Rec
omm
end
ed R
ead
ings
Making Jewelry with Gemstone
Beads
Combines the popular craft of beading with beautiful semi-precious stones which are collected by many Features a variety of versatile ideas which can be adapted for any type of gem or bead Readers will learn to reate beautiful gemstone jewelry with this dazzling collection of over 100 projects ranging from eyecatching earrings and accessories to exquisite necklaces and bracelets This beautiful book offers an impressive range of 28 beautiful semi-precious stones (including birthstones) and a glimpse into the fascinating history and mythical properties behind them
BLOG DIY BEADING MAGAZINE ISSUE 32 BLOG WWWHANDMADE-JEWELRY-CLUBCOM MEMBERSHIP WWWDIYBEADINGCLUBCOM
Rec
omm
end
ed R
ead
ings
Convertible Crystal Jewelry
Reverse it Twist it Wear it Many
Ways
Diane Whiting presents the idea that convertibility isnrsquot just about using pieces in multiple ways it is also about using skills and creativity in multiple ways Using ever-popular sparkling crystals Diane showcases design elements through various techniques for fun easy fashionable jewelry With 25 projects the reader can choose from bracelets necklaces and earrings that match any outfit or styleDiane Whiting presents the idea that convertibility isnrsquot just about using pieces in multiple ways it is also about using skills and creativity in multiple ways
BLOG DIY BEADING MAGAZINE ISSUE 32 BLOG WWWHANDMADE-JEWELRY-CLUBCOM MEMBERSHIP WWWDIYBEADINGCLUBCOM
Rec
omm
end
ed R
ead
ings
Wire Jewelry Masterclass
Wrapped Coiled and Woven Pieces
Using Fine Materials
Comprehensive and fabulous Wire Jewelry Masterclass takes an in-depth look at an intricate and rewarding craft The 24 projects which range from simple Dragons tear briolette earrings to a Poseidon-under-the-sea pendant will delight and inspire jewelers of all levels and tastes Divided into beginner intermediate and advanced sections this beautifully photographed step-by-step guide is the ticket to wire jewelry expertise
BLOG DIY BEADING MAGAZINE ISSUE 32 BLOG WWWHANDMADE-JEWELRY-CLUBCOM MEMBERSHIP WWWDIYBEADINGCLUBCOM
Rec
omm
end
ed R
ead
ings
Timeless Wire Weaving The
Complete Course
Timeless Wire Weaving focuses on developing wirework skills through 13 projects using three classic wire weaving techniques coiling wrapping and weaving The projects are built around a focal cabochon and incorporate seed beads and crystals in imaginative ways Designers learn to make the jewelry shown in the book and they also use the techniques learned to create innovative jewelry pieces of their own
BLOG DIY BEADING MAGAZINE ISSUE 32 BLOG WWWHANDMADE-JEWELRY-CLUBCOM MEMBERSHIP WWWDIYBEADINGCLUBCOM
Our digital magazine is available through
Apple Newsstand service available to millions of IPAD users
To advertise with us please email us at
diyjewelryclubgmailcom
Or visit our page at
httphandmade-jewelry-clubcomadvertising-diy-beading-magazine
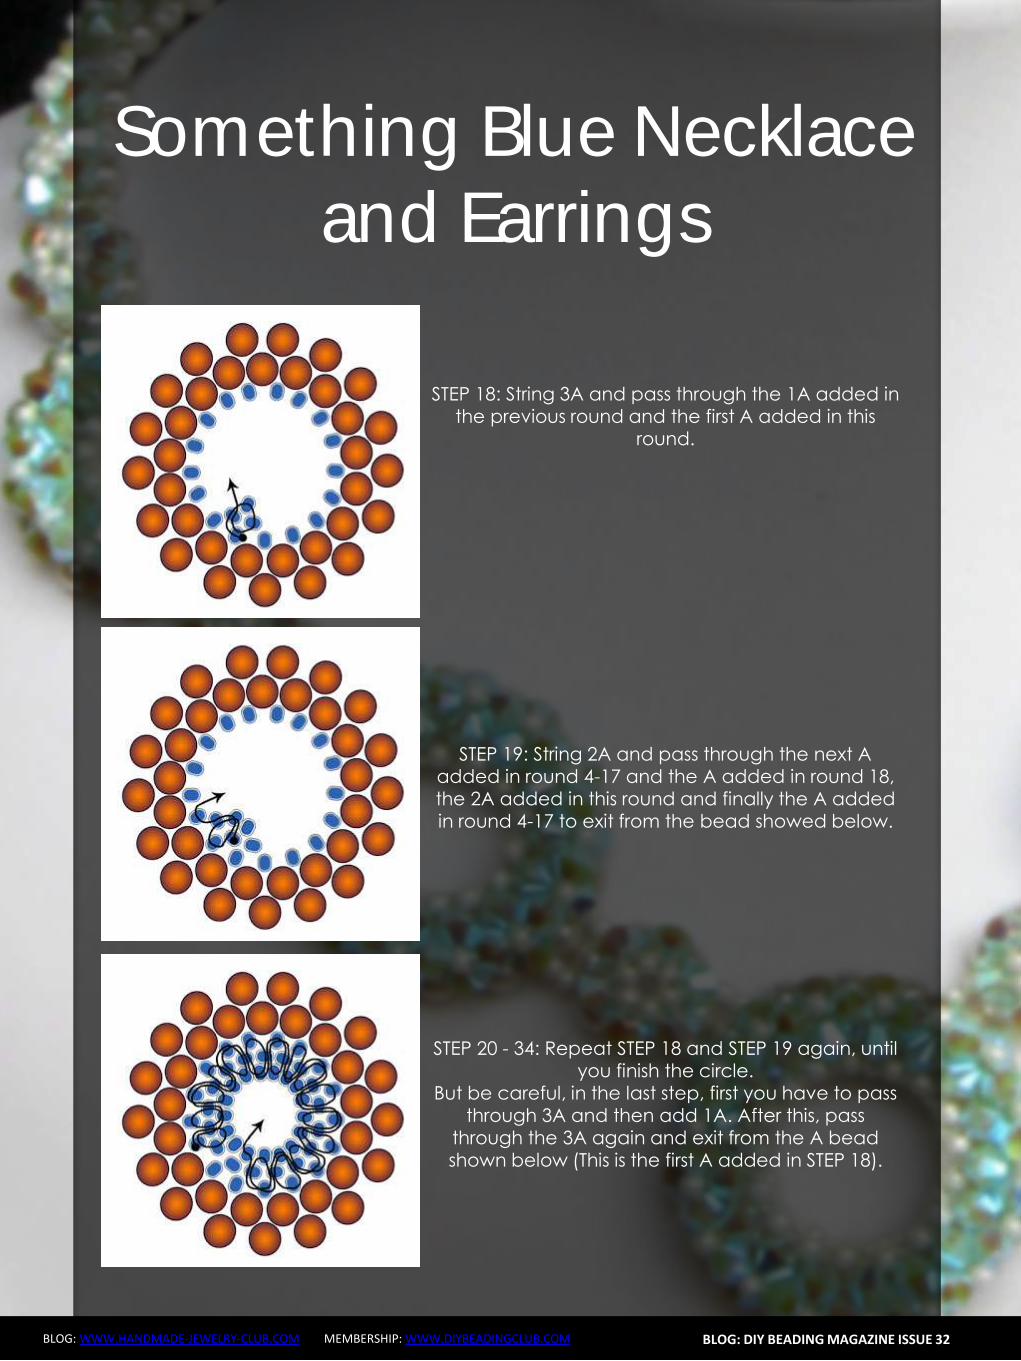
Something Blue Necklace and Earrings
BLOG WWWHANDMADE-JEWELRY-CLUBCOM MEMBERSHIP WWWDIYBEADINGCLUBCOM BLOG DIY BEADING MAGAZINE ISSUE 32
If you finished it is time to try it on It was a great fun wasnrsquot it And how beautiful you look in your new necklace and the matching earrings
Something Blue Necklace and Earrings
BLOG WWWHANDMADE-JEWELRY-CLUBCOM MEMBERSHIP WWWDIYBEADINGCLUBCOM
About the Author
Margit Vogel
My name is Margit Vogel I live in Hungary Europe
By profession I am a biochemical engineer but I fell in love with
beads so much that I could not stop playing with them
I make one-of-a-kind beaded and bead embroidered art
jewelry made of the best quality materials such as Swarovski
stones gemstones Japanese beads (Miyuki and Toho) Czech
glass beads leather soutache and suede Each piece is unique
and individually crafted
Feel free to visit my blog for some eyecandy
httpiformjewelrywordpresscom
My shop httpwwwetsycomshopiformjewelry
Facebook httpwwwfacebookcomiformjewelry
BLOG DIY BEADING MAGAZINE ISSUE 32
Getting Down And Personal With Gianna
Getting Down And Personal With Gianna
Nowadays we see more and more jewelry stores opening up online and with these online jewelry stores it has made it easier for us to purchase and view their creations Have you ever wondered how they are able to manage and produce amazing jewelry pieces and tutorials So heres a little on the journey to open up an online shop We are excited to present to you Gianna aka Beading4perfectionists
Gianna Beader amp Youtuber
Unlike most jewelry makers and beadweavers Gianna did not start beading as a hobby but as a means to make ends meet With goals in trying to
fill the financial gap she did everything she could to expand her earnings ndash working as a security guard
and at the same time learning how to bead and selling her pieces at fair trades and flea markets
Since many were asking if she does home beading workshops she started on exploring how to teach people to bead She loves Scott Bakula and has always loved him till now and this served as her
inspiration to start making a beading video tutorial
Gianna started creating videos because she was at the point in her life where everything seemed to be falling apart And at that moment of time she had difficulties financially and selling jewelry was the only way for her to stay afloat financially She is a big Scott Bakula fan and when she went to the UK to see him on stage that was when it hit her that she is already able to edit videos and
taught herself Photoshop and done workshops at bead fairs so why not put these together and see what happens on Youtube She knew that if she gets enough subscribers and views ndash though no one knew what the exact numbers were you would be invited to become a Youtube partner This way she could monetize her videos with advertisements and hopefully she would be able to be a Youtube partner and be able to pay her bills
BLOG WWWHANDMADE-JEWELRY-CLUBCOM MEMBERSHIP WWWDIYBEADINGCLUBCOM BLOG DIY BEADING MAGAZINE ISSUE 32
Getting Down And Personal With Gianna
Her Youtube channel is popular and the reason why she chose Youtube is because Youtube is the biggest platform and reached almost to the whole world Everyone already knows about it and it was growing rapidly as compared to other platforms like Dailymotion so she figured that Youtube was the way to go Her advice to new designers is that when you start out go to the platforms on the top of your list first then work your way down your list if you do not get accepted by your first choice
After loyally putting up one video every week for about 8 months in a row she became a Youtube partner and monetized her videos She knew she needed at least $100 to get her first payout She managed to reach $100 after 3 months The process was not easy she worked hard lack sleep skipped meals and who knows what happened to Ridge in the Bold and the Beautiful because she stopped watching
On Youtube you can monetize your videos Google pays straight to your bank account and at other countries where they also have the option of getting checks among other options In order to get paid you have to reach the $100 mark and after 3 months For Gianna she thinks that you cannot say that Etsy is better than Youtube or Youtube is better than Etsy Her reasoning is because on Youtube she has many followers which will eventually check out her Etsy shop And to start an Etsy shop you need an audience
BLOG WWWHANDMADE-JEWELRY-CLUBCOM MEMBERSHIP WWWDIYBEADINGCLUBCOM BLOG DIY BEADING MAGAZINE ISSUE 32
television and dedicated her spare time (as she had another job) to Youtube She re-registered at the chamber of commerce after receiving her first payout Her work at Youtube now is not a full time job and things have changed on Youtube It is easier to become a parter but there are some countries that need to wait for an invitation to be a Youtube partner Take Italy for instance Italians would have to work just as hard as she did if they want to become a Youtube partner
Getting Down And Personal With Gianna
With her 60000 subscribers on her b4pbakup Youtube channel it is possible to sell at least 60 patterns on the first day on Etsy after promoting the PDF file on her Youtube channel Though you may think that 60 out of 60000 is not much you have to remember that not everyone has the means to purchase the PDF file and a lot of people still rather watch her carry out the tutorial(for free) on Youtube instead of reading the patterns or paying for the patterns even if the pattern is for a fundraiser and only cost $2 Her insights on Youtube is that Youtube is not what it used to be 6 years ago Instead of making more money every month she is making less and less because advertisers have more options of where they want to advertise their ads Ads do not pay as much as they used to Back in the days you could get 25 cents per ad Now you count yourself lucky if you could get 5 cents roll in after two hours
BLOG WWWHANDMADE-JEWELRY-CLUBCOM MEMBERSHIP WWWDIYBEADINGCLUBCOM BLOG DIY BEADING MAGAZINE ISSUE 32
And on top of that adblockers are destroying Youtube channel owners Youtube will start making changes to the channels where there will be ldquopaid subscriptionrdquo channels This has already been implemented in some countries but not in her country The Netherlands This means there will no longer be ads for her monthly paying subscribers She hopes that Youtube will add on a paid per video option feature The option to be a paid channel or free channel or to start a new channel for paying customers is yours to choose Gianna is not happy with Youtube because many others like her have worked so hard and for some years to become Youtube partners(which was something to be proud of) has lost their status
Getting Down And Personal With Gianna
Her advice for those who want to go on Youtube is 1 Do it because you want to teach
2 Do it because you want a career with beads
BLOG WWWHANDMADE-JEWELRY-CLUBCOM MEMBERSHIP WWWDIYBEADINGCLUBCOM BLOG DIY BEADING MAGAZINE ISSUE 32
After putting up about 20 videos and having at least 5000 subscribers add the PDF tutorials to Etsy and Craftsy She found out that her audience would like to have the PDF after watching her videos This is because they would rather print out the PDF and work while seated in a comfy chair technically somewhere else instead of having to pause the video time and time again
Gianna has also made a video for those who want to know the whole story of her journey up until the present day And to get updates on her you can check it out here She has also started a vlog where she tells of how she still works towards becoming a financial independent beader and explains her journey to get where she wants to be(or die trying) Gianna will be in the UK on October the 17th giving an all-day workshop with 4 different patterns
(2 beginners and 2 advanced) in Wotton-under-Edge
Gianna will be there Friday night as the workshop is on Saturday She will be leaving on Sunday Her
doors are open to all who wants to continue the party with her at the hotel across the street
For more information do contact Ann Tucker on Facebook
httpswwwfacebookcomanntucker501
Rec
omm
end
ed R
ead
ings
Making Jewelry with Gemstone
Beads
Combines the popular craft of beading with beautiful semi-precious stones which are collected by many Features a variety of versatile ideas which can be adapted for any type of gem or bead Readers will learn to reate beautiful gemstone jewelry with this dazzling collection of over 100 projects ranging from eyecatching earrings and accessories to exquisite necklaces and bracelets This beautiful book offers an impressive range of 28 beautiful semi-precious stones (including birthstones) and a glimpse into the fascinating history and mythical properties behind them
BLOG DIY BEADING MAGAZINE ISSUE 32 BLOG WWWHANDMADE-JEWELRY-CLUBCOM MEMBERSHIP WWWDIYBEADINGCLUBCOM
Rec
omm
end
ed R
ead
ings
Convertible Crystal Jewelry
Reverse it Twist it Wear it Many
Ways
Diane Whiting presents the idea that convertibility isnrsquot just about using pieces in multiple ways it is also about using skills and creativity in multiple ways Using ever-popular sparkling crystals Diane showcases design elements through various techniques for fun easy fashionable jewelry With 25 projects the reader can choose from bracelets necklaces and earrings that match any outfit or styleDiane Whiting presents the idea that convertibility isnrsquot just about using pieces in multiple ways it is also about using skills and creativity in multiple ways
BLOG DIY BEADING MAGAZINE ISSUE 32 BLOG WWWHANDMADE-JEWELRY-CLUBCOM MEMBERSHIP WWWDIYBEADINGCLUBCOM
Rec
omm
end
ed R
ead
ings
Wire Jewelry Masterclass
Wrapped Coiled and Woven Pieces
Using Fine Materials
Comprehensive and fabulous Wire Jewelry Masterclass takes an in-depth look at an intricate and rewarding craft The 24 projects which range from simple Dragons tear briolette earrings to a Poseidon-under-the-sea pendant will delight and inspire jewelers of all levels and tastes Divided into beginner intermediate and advanced sections this beautifully photographed step-by-step guide is the ticket to wire jewelry expertise
BLOG DIY BEADING MAGAZINE ISSUE 32 BLOG WWWHANDMADE-JEWELRY-CLUBCOM MEMBERSHIP WWWDIYBEADINGCLUBCOM
Rec
omm
end
ed R
ead
ings
Timeless Wire Weaving The
Complete Course
Timeless Wire Weaving focuses on developing wirework skills through 13 projects using three classic wire weaving techniques coiling wrapping and weaving The projects are built around a focal cabochon and incorporate seed beads and crystals in imaginative ways Designers learn to make the jewelry shown in the book and they also use the techniques learned to create innovative jewelry pieces of their own
BLOG DIY BEADING MAGAZINE ISSUE 32 BLOG WWWHANDMADE-JEWELRY-CLUBCOM MEMBERSHIP WWWDIYBEADINGCLUBCOM
Our digital magazine is available through
Apple Newsstand service available to millions of IPAD users
To advertise with us please email us at
diyjewelryclubgmailcom
Or visit our page at
httphandmade-jewelry-clubcomadvertising-diy-beading-magazine
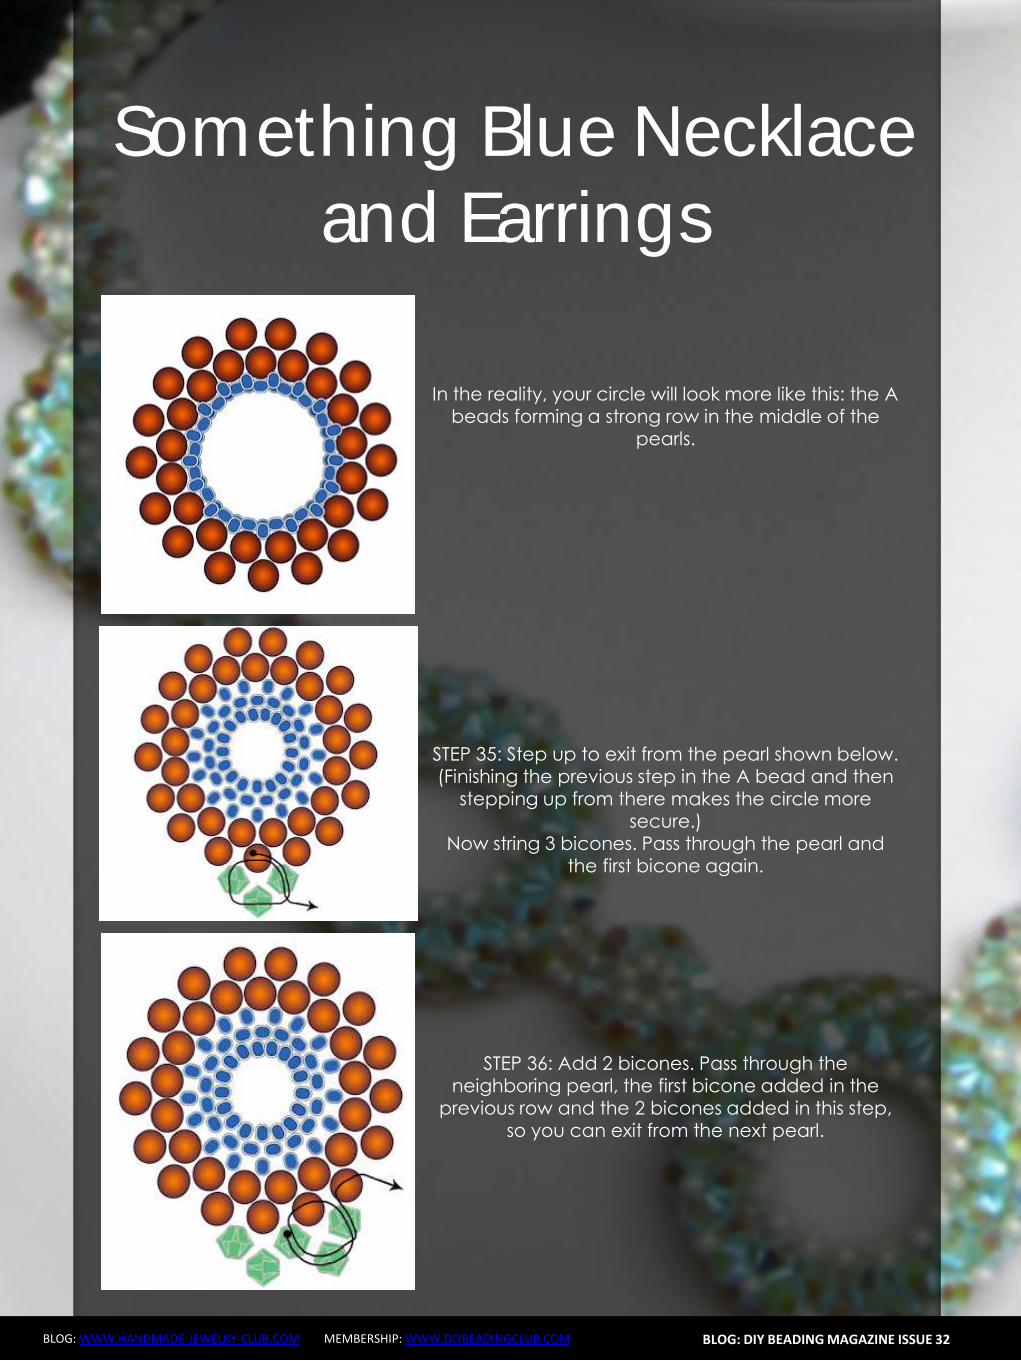
Something Blue Necklace and Earrings
BLOG WWWHANDMADE-JEWELRY-CLUBCOM MEMBERSHIP WWWDIYBEADINGCLUBCOM
About the Author
Margit Vogel
My name is Margit Vogel I live in Hungary Europe
By profession I am a biochemical engineer but I fell in love with
beads so much that I could not stop playing with them
I make one-of-a-kind beaded and bead embroidered art
jewelry made of the best quality materials such as Swarovski
stones gemstones Japanese beads (Miyuki and Toho) Czech
glass beads leather soutache and suede Each piece is unique
and individually crafted
Feel free to visit my blog for some eyecandy
httpiformjewelrywordpresscom
My shop httpwwwetsycomshopiformjewelry
Facebook httpwwwfacebookcomiformjewelry
BLOG DIY BEADING MAGAZINE ISSUE 32
Getting Down And Personal With Gianna
Getting Down And Personal With Gianna
Nowadays we see more and more jewelry stores opening up online and with these online jewelry stores it has made it easier for us to purchase and view their creations Have you ever wondered how they are able to manage and produce amazing jewelry pieces and tutorials So heres a little on the journey to open up an online shop We are excited to present to you Gianna aka Beading4perfectionists
Gianna Beader amp Youtuber
Unlike most jewelry makers and beadweavers Gianna did not start beading as a hobby but as a means to make ends meet With goals in trying to
fill the financial gap she did everything she could to expand her earnings ndash working as a security guard
and at the same time learning how to bead and selling her pieces at fair trades and flea markets
Since many were asking if she does home beading workshops she started on exploring how to teach people to bead She loves Scott Bakula and has always loved him till now and this served as her
inspiration to start making a beading video tutorial
Gianna started creating videos because she was at the point in her life where everything seemed to be falling apart And at that moment of time she had difficulties financially and selling jewelry was the only way for her to stay afloat financially She is a big Scott Bakula fan and when she went to the UK to see him on stage that was when it hit her that she is already able to edit videos and
taught herself Photoshop and done workshops at bead fairs so why not put these together and see what happens on Youtube She knew that if she gets enough subscribers and views ndash though no one knew what the exact numbers were you would be invited to become a Youtube partner This way she could monetize her videos with advertisements and hopefully she would be able to be a Youtube partner and be able to pay her bills
BLOG WWWHANDMADE-JEWELRY-CLUBCOM MEMBERSHIP WWWDIYBEADINGCLUBCOM BLOG DIY BEADING MAGAZINE ISSUE 32
Getting Down And Personal With Gianna
Her Youtube channel is popular and the reason why she chose Youtube is because Youtube is the biggest platform and reached almost to the whole world Everyone already knows about it and it was growing rapidly as compared to other platforms like Dailymotion so she figured that Youtube was the way to go Her advice to new designers is that when you start out go to the platforms on the top of your list first then work your way down your list if you do not get accepted by your first choice
After loyally putting up one video every week for about 8 months in a row she became a Youtube partner and monetized her videos She knew she needed at least $100 to get her first payout She managed to reach $100 after 3 months The process was not easy she worked hard lack sleep skipped meals and who knows what happened to Ridge in the Bold and the Beautiful because she stopped watching
On Youtube you can monetize your videos Google pays straight to your bank account and at other countries where they also have the option of getting checks among other options In order to get paid you have to reach the $100 mark and after 3 months For Gianna she thinks that you cannot say that Etsy is better than Youtube or Youtube is better than Etsy Her reasoning is because on Youtube she has many followers which will eventually check out her Etsy shop And to start an Etsy shop you need an audience
BLOG WWWHANDMADE-JEWELRY-CLUBCOM MEMBERSHIP WWWDIYBEADINGCLUBCOM BLOG DIY BEADING MAGAZINE ISSUE 32
television and dedicated her spare time (as she had another job) to Youtube She re-registered at the chamber of commerce after receiving her first payout Her work at Youtube now is not a full time job and things have changed on Youtube It is easier to become a parter but there are some countries that need to wait for an invitation to be a Youtube partner Take Italy for instance Italians would have to work just as hard as she did if they want to become a Youtube partner
Getting Down And Personal With Gianna
With her 60000 subscribers on her b4pbakup Youtube channel it is possible to sell at least 60 patterns on the first day on Etsy after promoting the PDF file on her Youtube channel Though you may think that 60 out of 60000 is not much you have to remember that not everyone has the means to purchase the PDF file and a lot of people still rather watch her carry out the tutorial(for free) on Youtube instead of reading the patterns or paying for the patterns even if the pattern is for a fundraiser and only cost $2 Her insights on Youtube is that Youtube is not what it used to be 6 years ago Instead of making more money every month she is making less and less because advertisers have more options of where they want to advertise their ads Ads do not pay as much as they used to Back in the days you could get 25 cents per ad Now you count yourself lucky if you could get 5 cents roll in after two hours
BLOG WWWHANDMADE-JEWELRY-CLUBCOM MEMBERSHIP WWWDIYBEADINGCLUBCOM BLOG DIY BEADING MAGAZINE ISSUE 32
And on top of that adblockers are destroying Youtube channel owners Youtube will start making changes to the channels where there will be ldquopaid subscriptionrdquo channels This has already been implemented in some countries but not in her country The Netherlands This means there will no longer be ads for her monthly paying subscribers She hopes that Youtube will add on a paid per video option feature The option to be a paid channel or free channel or to start a new channel for paying customers is yours to choose Gianna is not happy with Youtube because many others like her have worked so hard and for some years to become Youtube partners(which was something to be proud of) has lost their status
Getting Down And Personal With Gianna
Her advice for those who want to go on Youtube is 1 Do it because you want to teach
2 Do it because you want a career with beads
BLOG WWWHANDMADE-JEWELRY-CLUBCOM MEMBERSHIP WWWDIYBEADINGCLUBCOM BLOG DIY BEADING MAGAZINE ISSUE 32
After putting up about 20 videos and having at least 5000 subscribers add the PDF tutorials to Etsy and Craftsy She found out that her audience would like to have the PDF after watching her videos This is because they would rather print out the PDF and work while seated in a comfy chair technically somewhere else instead of having to pause the video time and time again
Gianna has also made a video for those who want to know the whole story of her journey up until the present day And to get updates on her you can check it out here She has also started a vlog where she tells of how she still works towards becoming a financial independent beader and explains her journey to get where she wants to be(or die trying) Gianna will be in the UK on October the 17th giving an all-day workshop with 4 different patterns
(2 beginners and 2 advanced) in Wotton-under-Edge
Gianna will be there Friday night as the workshop is on Saturday She will be leaving on Sunday Her
doors are open to all who wants to continue the party with her at the hotel across the street
For more information do contact Ann Tucker on Facebook
httpswwwfacebookcomanntucker501
Rec
omm
end
ed R
ead
ings
Making Jewelry with Gemstone
Beads
Combines the popular craft of beading with beautiful semi-precious stones which are collected by many Features a variety of versatile ideas which can be adapted for any type of gem or bead Readers will learn to reate beautiful gemstone jewelry with this dazzling collection of over 100 projects ranging from eyecatching earrings and accessories to exquisite necklaces and bracelets This beautiful book offers an impressive range of 28 beautiful semi-precious stones (including birthstones) and a glimpse into the fascinating history and mythical properties behind them
BLOG DIY BEADING MAGAZINE ISSUE 32 BLOG WWWHANDMADE-JEWELRY-CLUBCOM MEMBERSHIP WWWDIYBEADINGCLUBCOM
Rec
omm
end
ed R
ead
ings
Convertible Crystal Jewelry
Reverse it Twist it Wear it Many
Ways
Diane Whiting presents the idea that convertibility isnrsquot just about using pieces in multiple ways it is also about using skills and creativity in multiple ways Using ever-popular sparkling crystals Diane showcases design elements through various techniques for fun easy fashionable jewelry With 25 projects the reader can choose from bracelets necklaces and earrings that match any outfit or styleDiane Whiting presents the idea that convertibility isnrsquot just about using pieces in multiple ways it is also about using skills and creativity in multiple ways
BLOG DIY BEADING MAGAZINE ISSUE 32 BLOG WWWHANDMADE-JEWELRY-CLUBCOM MEMBERSHIP WWWDIYBEADINGCLUBCOM
Rec
omm
end
ed R
ead
ings
Wire Jewelry Masterclass
Wrapped Coiled and Woven Pieces
Using Fine Materials
Comprehensive and fabulous Wire Jewelry Masterclass takes an in-depth look at an intricate and rewarding craft The 24 projects which range from simple Dragons tear briolette earrings to a Poseidon-under-the-sea pendant will delight and inspire jewelers of all levels and tastes Divided into beginner intermediate and advanced sections this beautifully photographed step-by-step guide is the ticket to wire jewelry expertise
BLOG DIY BEADING MAGAZINE ISSUE 32 BLOG WWWHANDMADE-JEWELRY-CLUBCOM MEMBERSHIP WWWDIYBEADINGCLUBCOM
Rec
omm
end
ed R
ead
ings
Timeless Wire Weaving The
Complete Course
Timeless Wire Weaving focuses on developing wirework skills through 13 projects using three classic wire weaving techniques coiling wrapping and weaving The projects are built around a focal cabochon and incorporate seed beads and crystals in imaginative ways Designers learn to make the jewelry shown in the book and they also use the techniques learned to create innovative jewelry pieces of their own
BLOG DIY BEADING MAGAZINE ISSUE 32 BLOG WWWHANDMADE-JEWELRY-CLUBCOM MEMBERSHIP WWWDIYBEADINGCLUBCOM
Our digital magazine is available through
Apple Newsstand service available to millions of IPAD users
To advertise with us please email us at
diyjewelryclubgmailcom
Or visit our page at
httphandmade-jewelry-clubcomadvertising-diy-beading-magazine
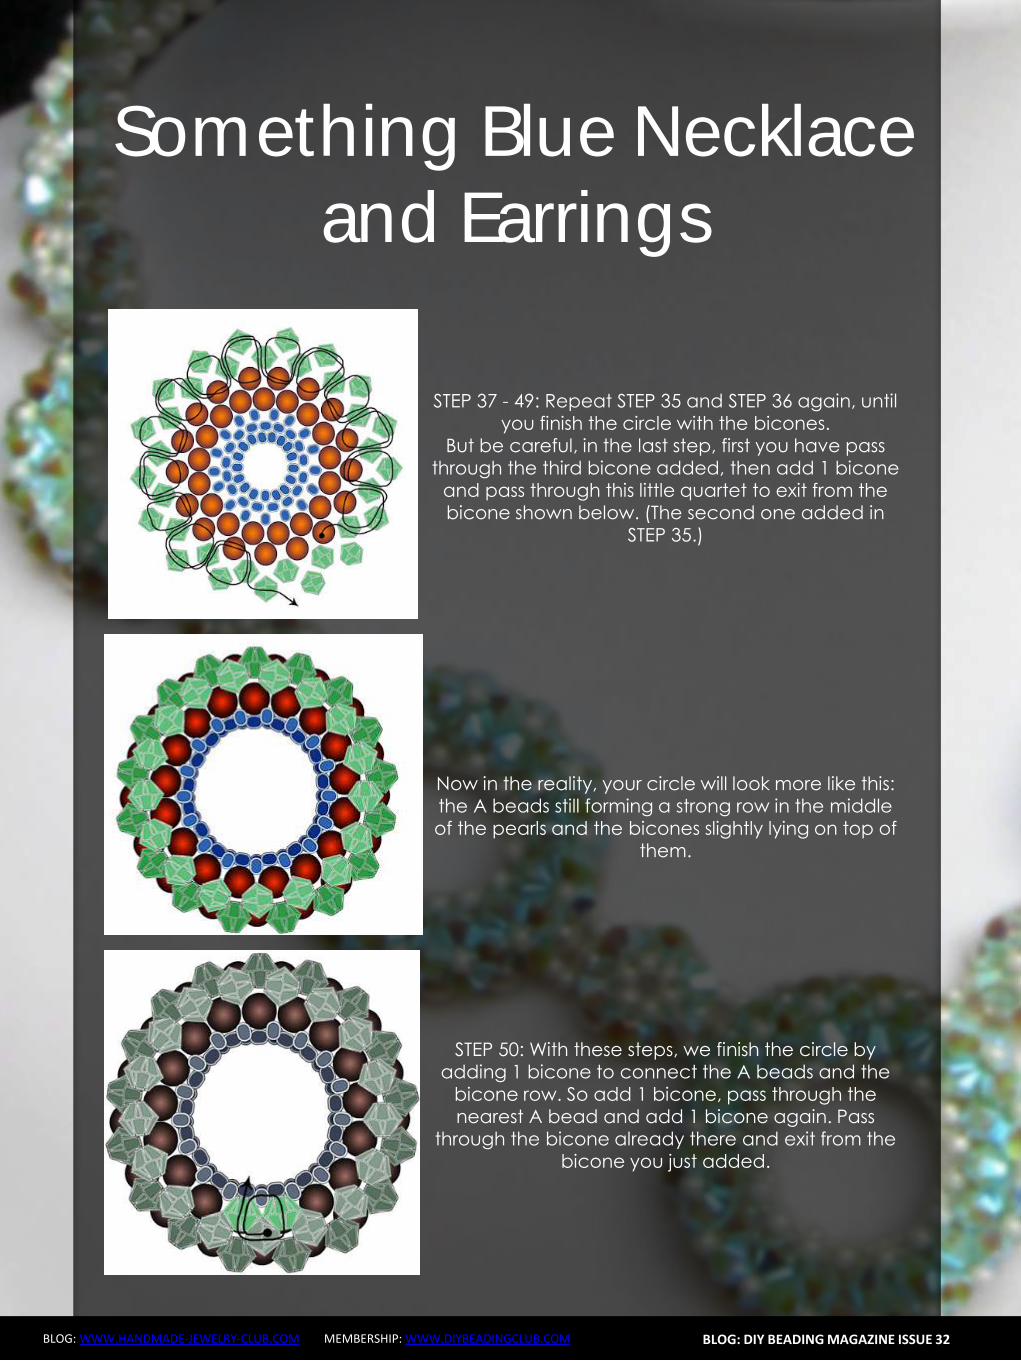
Getting Down And Personal With Gianna
Getting Down And Personal With Gianna
Nowadays we see more and more jewelry stores opening up online and with these online jewelry stores it has made it easier for us to purchase and view their creations Have you ever wondered how they are able to manage and produce amazing jewelry pieces and tutorials So heres a little on the journey to open up an online shop We are excited to present to you Gianna aka Beading4perfectionists
Gianna Beader amp Youtuber
Unlike most jewelry makers and beadweavers Gianna did not start beading as a hobby but as a means to make ends meet With goals in trying to
fill the financial gap she did everything she could to expand her earnings ndash working as a security guard
and at the same time learning how to bead and selling her pieces at fair trades and flea markets
Since many were asking if she does home beading workshops she started on exploring how to teach people to bead She loves Scott Bakula and has always loved him till now and this served as her
inspiration to start making a beading video tutorial
Gianna started creating videos because she was at the point in her life where everything seemed to be falling apart And at that moment of time she had difficulties financially and selling jewelry was the only way for her to stay afloat financially She is a big Scott Bakula fan and when she went to the UK to see him on stage that was when it hit her that she is already able to edit videos and
taught herself Photoshop and done workshops at bead fairs so why not put these together and see what happens on Youtube She knew that if she gets enough subscribers and views ndash though no one knew what the exact numbers were you would be invited to become a Youtube partner This way she could monetize her videos with advertisements and hopefully she would be able to be a Youtube partner and be able to pay her bills
BLOG WWWHANDMADE-JEWELRY-CLUBCOM MEMBERSHIP WWWDIYBEADINGCLUBCOM BLOG DIY BEADING MAGAZINE ISSUE 32
Getting Down And Personal With Gianna
Her Youtube channel is popular and the reason why she chose Youtube is because Youtube is the biggest platform and reached almost to the whole world Everyone already knows about it and it was growing rapidly as compared to other platforms like Dailymotion so she figured that Youtube was the way to go Her advice to new designers is that when you start out go to the platforms on the top of your list first then work your way down your list if you do not get accepted by your first choice
After loyally putting up one video every week for about 8 months in a row she became a Youtube partner and monetized her videos She knew she needed at least $100 to get her first payout She managed to reach $100 after 3 months The process was not easy she worked hard lack sleep skipped meals and who knows what happened to Ridge in the Bold and the Beautiful because she stopped watching
On Youtube you can monetize your videos Google pays straight to your bank account and at other countries where they also have the option of getting checks among other options In order to get paid you have to reach the $100 mark and after 3 months For Gianna she thinks that you cannot say that Etsy is better than Youtube or Youtube is better than Etsy Her reasoning is because on Youtube she has many followers which will eventually check out her Etsy shop And to start an Etsy shop you need an audience
BLOG WWWHANDMADE-JEWELRY-CLUBCOM MEMBERSHIP WWWDIYBEADINGCLUBCOM BLOG DIY BEADING MAGAZINE ISSUE 32
television and dedicated her spare time (as she had another job) to Youtube She re-registered at the chamber of commerce after receiving her first payout Her work at Youtube now is not a full time job and things have changed on Youtube It is easier to become a parter but there are some countries that need to wait for an invitation to be a Youtube partner Take Italy for instance Italians would have to work just as hard as she did if they want to become a Youtube partner
Getting Down And Personal With Gianna
With her 60000 subscribers on her b4pbakup Youtube channel it is possible to sell at least 60 patterns on the first day on Etsy after promoting the PDF file on her Youtube channel Though you may think that 60 out of 60000 is not much you have to remember that not everyone has the means to purchase the PDF file and a lot of people still rather watch her carry out the tutorial(for free) on Youtube instead of reading the patterns or paying for the patterns even if the pattern is for a fundraiser and only cost $2 Her insights on Youtube is that Youtube is not what it used to be 6 years ago Instead of making more money every month she is making less and less because advertisers have more options of where they want to advertise their ads Ads do not pay as much as they used to Back in the days you could get 25 cents per ad Now you count yourself lucky if you could get 5 cents roll in after two hours
BLOG WWWHANDMADE-JEWELRY-CLUBCOM MEMBERSHIP WWWDIYBEADINGCLUBCOM BLOG DIY BEADING MAGAZINE ISSUE 32
And on top of that adblockers are destroying Youtube channel owners Youtube will start making changes to the channels where there will be ldquopaid subscriptionrdquo channels This has already been implemented in some countries but not in her country The Netherlands This means there will no longer be ads for her monthly paying subscribers She hopes that Youtube will add on a paid per video option feature The option to be a paid channel or free channel or to start a new channel for paying customers is yours to choose Gianna is not happy with Youtube because many others like her have worked so hard and for some years to become Youtube partners(which was something to be proud of) has lost their status
Getting Down And Personal With Gianna
Her advice for those who want to go on Youtube is 1 Do it because you want to teach
2 Do it because you want a career with beads
BLOG WWWHANDMADE-JEWELRY-CLUBCOM MEMBERSHIP WWWDIYBEADINGCLUBCOM BLOG DIY BEADING MAGAZINE ISSUE 32
After putting up about 20 videos and having at least 5000 subscribers add the PDF tutorials to Etsy and Craftsy She found out that her audience would like to have the PDF after watching her videos This is because they would rather print out the PDF and work while seated in a comfy chair technically somewhere else instead of having to pause the video time and time again
Gianna has also made a video for those who want to know the whole story of her journey up until the present day And to get updates on her you can check it out here She has also started a vlog where she tells of how she still works towards becoming a financial independent beader and explains her journey to get where she wants to be(or die trying) Gianna will be in the UK on October the 17th giving an all-day workshop with 4 different patterns
(2 beginners and 2 advanced) in Wotton-under-Edge
Gianna will be there Friday night as the workshop is on Saturday She will be leaving on Sunday Her
doors are open to all who wants to continue the party with her at the hotel across the street
For more information do contact Ann Tucker on Facebook
httpswwwfacebookcomanntucker501
Rec
omm
end
ed R
ead
ings
Making Jewelry with Gemstone
Beads
Combines the popular craft of beading with beautiful semi-precious stones which are collected by many Features a variety of versatile ideas which can be adapted for any type of gem or bead Readers will learn to reate beautiful gemstone jewelry with this dazzling collection of over 100 projects ranging from eyecatching earrings and accessories to exquisite necklaces and bracelets This beautiful book offers an impressive range of 28 beautiful semi-precious stones (including birthstones) and a glimpse into the fascinating history and mythical properties behind them
BLOG DIY BEADING MAGAZINE ISSUE 32 BLOG WWWHANDMADE-JEWELRY-CLUBCOM MEMBERSHIP WWWDIYBEADINGCLUBCOM
Rec
omm
end
ed R
ead
ings
Convertible Crystal Jewelry
Reverse it Twist it Wear it Many
Ways
Diane Whiting presents the idea that convertibility isnrsquot just about using pieces in multiple ways it is also about using skills and creativity in multiple ways Using ever-popular sparkling crystals Diane showcases design elements through various techniques for fun easy fashionable jewelry With 25 projects the reader can choose from bracelets necklaces and earrings that match any outfit or styleDiane Whiting presents the idea that convertibility isnrsquot just about using pieces in multiple ways it is also about using skills and creativity in multiple ways
BLOG DIY BEADING MAGAZINE ISSUE 32 BLOG WWWHANDMADE-JEWELRY-CLUBCOM MEMBERSHIP WWWDIYBEADINGCLUBCOM
Rec
omm
end
ed R
ead
ings
Wire Jewelry Masterclass
Wrapped Coiled and Woven Pieces
Using Fine Materials
Comprehensive and fabulous Wire Jewelry Masterclass takes an in-depth look at an intricate and rewarding craft The 24 projects which range from simple Dragons tear briolette earrings to a Poseidon-under-the-sea pendant will delight and inspire jewelers of all levels and tastes Divided into beginner intermediate and advanced sections this beautifully photographed step-by-step guide is the ticket to wire jewelry expertise
BLOG DIY BEADING MAGAZINE ISSUE 32 BLOG WWWHANDMADE-JEWELRY-CLUBCOM MEMBERSHIP WWWDIYBEADINGCLUBCOM
Rec
omm
end
ed R
ead
ings
Timeless Wire Weaving The
Complete Course
Timeless Wire Weaving focuses on developing wirework skills through 13 projects using three classic wire weaving techniques coiling wrapping and weaving The projects are built around a focal cabochon and incorporate seed beads and crystals in imaginative ways Designers learn to make the jewelry shown in the book and they also use the techniques learned to create innovative jewelry pieces of their own
BLOG DIY BEADING MAGAZINE ISSUE 32 BLOG WWWHANDMADE-JEWELRY-CLUBCOM MEMBERSHIP WWWDIYBEADINGCLUBCOM
Our digital magazine is available through
Apple Newsstand service available to millions of IPAD users
To advertise with us please email us at
diyjewelryclubgmailcom
Or visit our page at
httphandmade-jewelry-clubcomadvertising-diy-beading-magazine
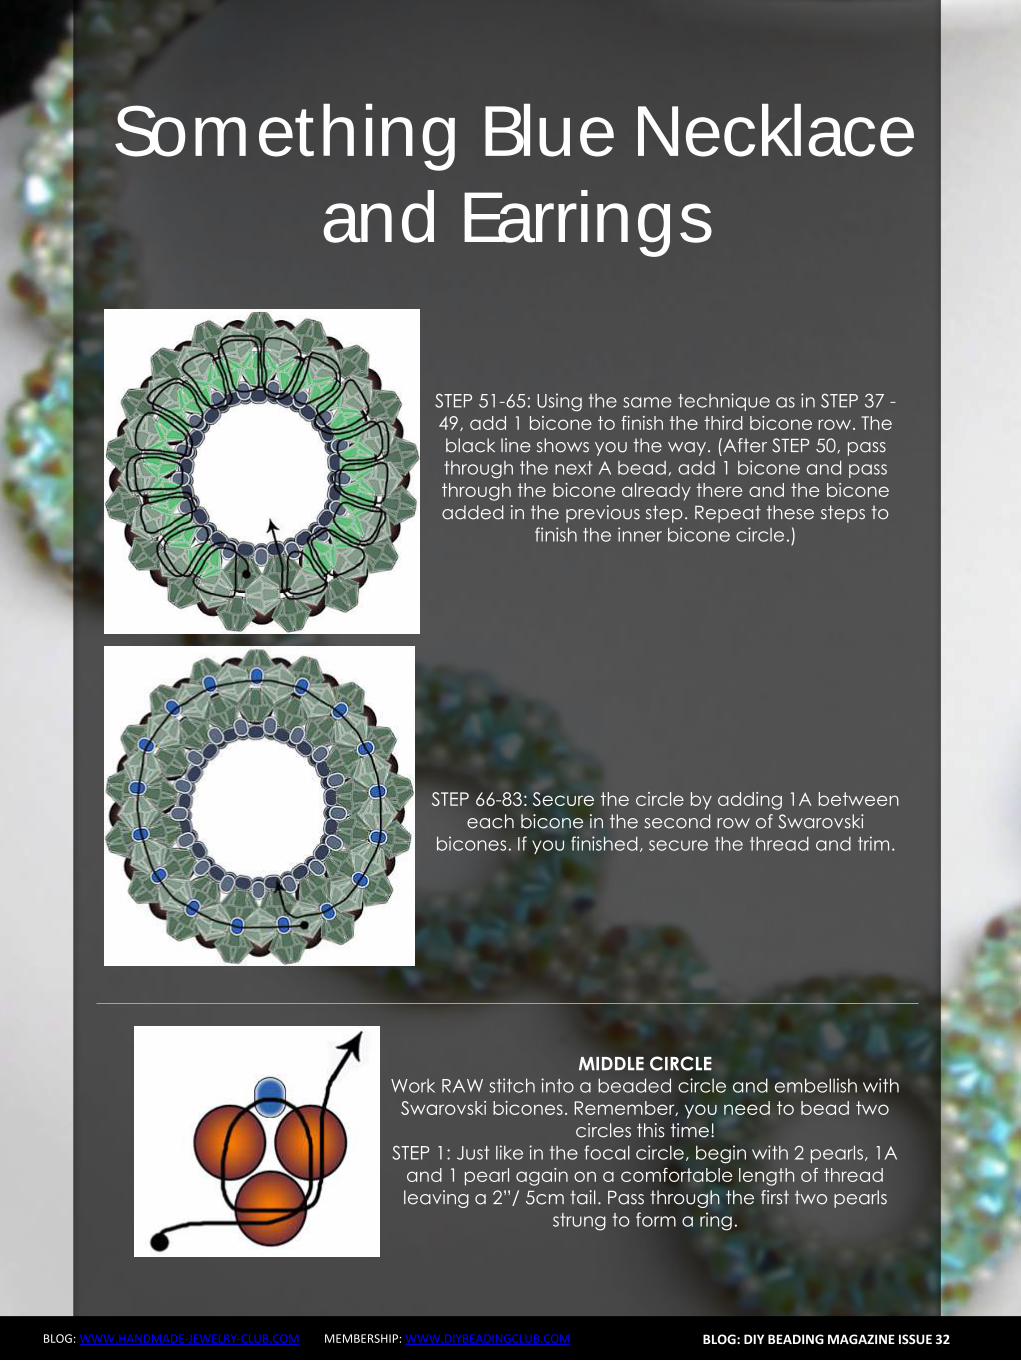
Getting Down And Personal With Gianna
Her Youtube channel is popular and the reason why she chose Youtube is because Youtube is the biggest platform and reached almost to the whole world Everyone already knows about it and it was growing rapidly as compared to other platforms like Dailymotion so she figured that Youtube was the way to go Her advice to new designers is that when you start out go to the platforms on the top of your list first then work your way down your list if you do not get accepted by your first choice
After loyally putting up one video every week for about 8 months in a row she became a Youtube partner and monetized her videos She knew she needed at least $100 to get her first payout She managed to reach $100 after 3 months The process was not easy she worked hard lack sleep skipped meals and who knows what happened to Ridge in the Bold and the Beautiful because she stopped watching
On Youtube you can monetize your videos Google pays straight to your bank account and at other countries where they also have the option of getting checks among other options In order to get paid you have to reach the $100 mark and after 3 months For Gianna she thinks that you cannot say that Etsy is better than Youtube or Youtube is better than Etsy Her reasoning is because on Youtube she has many followers which will eventually check out her Etsy shop And to start an Etsy shop you need an audience
BLOG WWWHANDMADE-JEWELRY-CLUBCOM MEMBERSHIP WWWDIYBEADINGCLUBCOM BLOG DIY BEADING MAGAZINE ISSUE 32
television and dedicated her spare time (as she had another job) to Youtube She re-registered at the chamber of commerce after receiving her first payout Her work at Youtube now is not a full time job and things have changed on Youtube It is easier to become a parter but there are some countries that need to wait for an invitation to be a Youtube partner Take Italy for instance Italians would have to work just as hard as she did if they want to become a Youtube partner
Getting Down And Personal With Gianna
With her 60000 subscribers on her b4pbakup Youtube channel it is possible to sell at least 60 patterns on the first day on Etsy after promoting the PDF file on her Youtube channel Though you may think that 60 out of 60000 is not much you have to remember that not everyone has the means to purchase the PDF file and a lot of people still rather watch her carry out the tutorial(for free) on Youtube instead of reading the patterns or paying for the patterns even if the pattern is for a fundraiser and only cost $2 Her insights on Youtube is that Youtube is not what it used to be 6 years ago Instead of making more money every month she is making less and less because advertisers have more options of where they want to advertise their ads Ads do not pay as much as they used to Back in the days you could get 25 cents per ad Now you count yourself lucky if you could get 5 cents roll in after two hours
BLOG WWWHANDMADE-JEWELRY-CLUBCOM MEMBERSHIP WWWDIYBEADINGCLUBCOM BLOG DIY BEADING MAGAZINE ISSUE 32
And on top of that adblockers are destroying Youtube channel owners Youtube will start making changes to the channels where there will be ldquopaid subscriptionrdquo channels This has already been implemented in some countries but not in her country The Netherlands This means there will no longer be ads for her monthly paying subscribers She hopes that Youtube will add on a paid per video option feature The option to be a paid channel or free channel or to start a new channel for paying customers is yours to choose Gianna is not happy with Youtube because many others like her have worked so hard and for some years to become Youtube partners(which was something to be proud of) has lost their status
Getting Down And Personal With Gianna
Her advice for those who want to go on Youtube is 1 Do it because you want to teach
2 Do it because you want a career with beads
BLOG WWWHANDMADE-JEWELRY-CLUBCOM MEMBERSHIP WWWDIYBEADINGCLUBCOM BLOG DIY BEADING MAGAZINE ISSUE 32
After putting up about 20 videos and having at least 5000 subscribers add the PDF tutorials to Etsy and Craftsy She found out that her audience would like to have the PDF after watching her videos This is because they would rather print out the PDF and work while seated in a comfy chair technically somewhere else instead of having to pause the video time and time again
Gianna has also made a video for those who want to know the whole story of her journey up until the present day And to get updates on her you can check it out here She has also started a vlog where she tells of how she still works towards becoming a financial independent beader and explains her journey to get where she wants to be(or die trying) Gianna will be in the UK on October the 17th giving an all-day workshop with 4 different patterns
(2 beginners and 2 advanced) in Wotton-under-Edge
Gianna will be there Friday night as the workshop is on Saturday She will be leaving on Sunday Her
doors are open to all who wants to continue the party with her at the hotel across the street
For more information do contact Ann Tucker on Facebook
httpswwwfacebookcomanntucker501
Rec
omm
end
ed R
ead
ings
Making Jewelry with Gemstone
Beads
Combines the popular craft of beading with beautiful semi-precious stones which are collected by many Features a variety of versatile ideas which can be adapted for any type of gem or bead Readers will learn to reate beautiful gemstone jewelry with this dazzling collection of over 100 projects ranging from eyecatching earrings and accessories to exquisite necklaces and bracelets This beautiful book offers an impressive range of 28 beautiful semi-precious stones (including birthstones) and a glimpse into the fascinating history and mythical properties behind them
BLOG DIY BEADING MAGAZINE ISSUE 32 BLOG WWWHANDMADE-JEWELRY-CLUBCOM MEMBERSHIP WWWDIYBEADINGCLUBCOM
Rec
omm
end
ed R
ead
ings
Convertible Crystal Jewelry
Reverse it Twist it Wear it Many
Ways
Diane Whiting presents the idea that convertibility isnrsquot just about using pieces in multiple ways it is also about using skills and creativity in multiple ways Using ever-popular sparkling crystals Diane showcases design elements through various techniques for fun easy fashionable jewelry With 25 projects the reader can choose from bracelets necklaces and earrings that match any outfit or styleDiane Whiting presents the idea that convertibility isnrsquot just about using pieces in multiple ways it is also about using skills and creativity in multiple ways
BLOG DIY BEADING MAGAZINE ISSUE 32 BLOG WWWHANDMADE-JEWELRY-CLUBCOM MEMBERSHIP WWWDIYBEADINGCLUBCOM
Rec
omm
end
ed R
ead
ings
Wire Jewelry Masterclass
Wrapped Coiled and Woven Pieces
Using Fine Materials
Comprehensive and fabulous Wire Jewelry Masterclass takes an in-depth look at an intricate and rewarding craft The 24 projects which range from simple Dragons tear briolette earrings to a Poseidon-under-the-sea pendant will delight and inspire jewelers of all levels and tastes Divided into beginner intermediate and advanced sections this beautifully photographed step-by-step guide is the ticket to wire jewelry expertise
BLOG DIY BEADING MAGAZINE ISSUE 32 BLOG WWWHANDMADE-JEWELRY-CLUBCOM MEMBERSHIP WWWDIYBEADINGCLUBCOM
Rec
omm
end
ed R
ead
ings
Timeless Wire Weaving The
Complete Course
Timeless Wire Weaving focuses on developing wirework skills through 13 projects using three classic wire weaving techniques coiling wrapping and weaving The projects are built around a focal cabochon and incorporate seed beads and crystals in imaginative ways Designers learn to make the jewelry shown in the book and they also use the techniques learned to create innovative jewelry pieces of their own
BLOG DIY BEADING MAGAZINE ISSUE 32 BLOG WWWHANDMADE-JEWELRY-CLUBCOM MEMBERSHIP WWWDIYBEADINGCLUBCOM
Our digital magazine is available through
Apple Newsstand service available to millions of IPAD users
To advertise with us please email us at
diyjewelryclubgmailcom
Or visit our page at
httphandmade-jewelry-clubcomadvertising-diy-beading-magazine
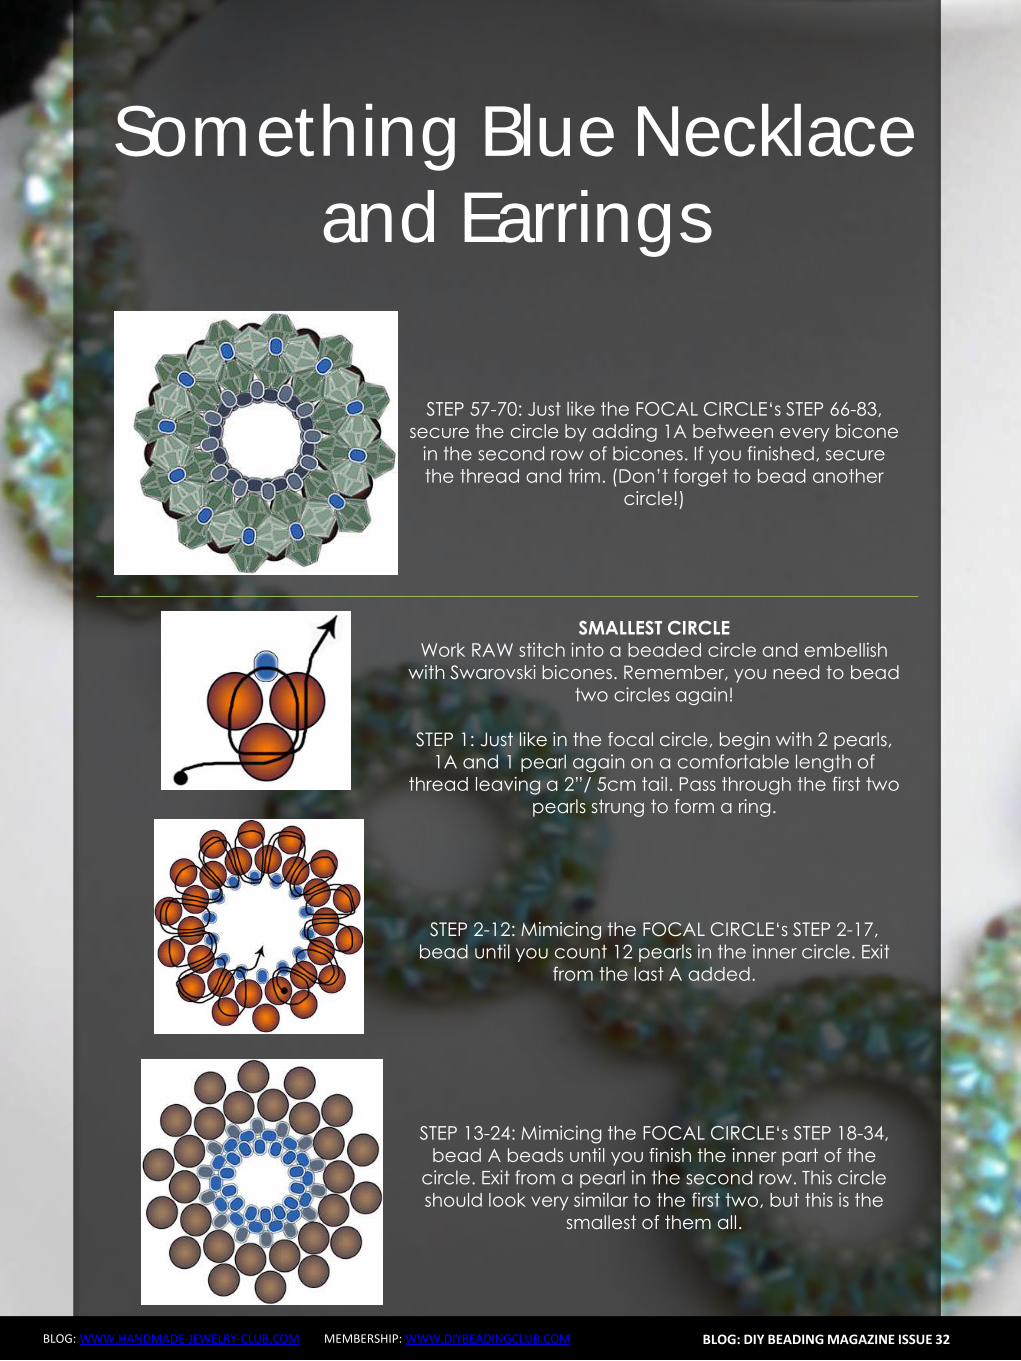
Getting Down And Personal With Gianna
With her 60000 subscribers on her b4pbakup Youtube channel it is possible to sell at least 60 patterns on the first day on Etsy after promoting the PDF file on her Youtube channel Though you may think that 60 out of 60000 is not much you have to remember that not everyone has the means to purchase the PDF file and a lot of people still rather watch her carry out the tutorial(for free) on Youtube instead of reading the patterns or paying for the patterns even if the pattern is for a fundraiser and only cost $2 Her insights on Youtube is that Youtube is not what it used to be 6 years ago Instead of making more money every month she is making less and less because advertisers have more options of where they want to advertise their ads Ads do not pay as much as they used to Back in the days you could get 25 cents per ad Now you count yourself lucky if you could get 5 cents roll in after two hours
BLOG WWWHANDMADE-JEWELRY-CLUBCOM MEMBERSHIP WWWDIYBEADINGCLUBCOM BLOG DIY BEADING MAGAZINE ISSUE 32
And on top of that adblockers are destroying Youtube channel owners Youtube will start making changes to the channels where there will be ldquopaid subscriptionrdquo channels This has already been implemented in some countries but not in her country The Netherlands This means there will no longer be ads for her monthly paying subscribers She hopes that Youtube will add on a paid per video option feature The option to be a paid channel or free channel or to start a new channel for paying customers is yours to choose Gianna is not happy with Youtube because many others like her have worked so hard and for some years to become Youtube partners(which was something to be proud of) has lost their status
Getting Down And Personal With Gianna
Her advice for those who want to go on Youtube is 1 Do it because you want to teach
2 Do it because you want a career with beads
BLOG WWWHANDMADE-JEWELRY-CLUBCOM MEMBERSHIP WWWDIYBEADINGCLUBCOM BLOG DIY BEADING MAGAZINE ISSUE 32
After putting up about 20 videos and having at least 5000 subscribers add the PDF tutorials to Etsy and Craftsy She found out that her audience would like to have the PDF after watching her videos This is because they would rather print out the PDF and work while seated in a comfy chair technically somewhere else instead of having to pause the video time and time again
Gianna has also made a video for those who want to know the whole story of her journey up until the present day And to get updates on her you can check it out here She has also started a vlog where she tells of how she still works towards becoming a financial independent beader and explains her journey to get where she wants to be(or die trying) Gianna will be in the UK on October the 17th giving an all-day workshop with 4 different patterns
(2 beginners and 2 advanced) in Wotton-under-Edge
Gianna will be there Friday night as the workshop is on Saturday She will be leaving on Sunday Her
doors are open to all who wants to continue the party with her at the hotel across the street
For more information do contact Ann Tucker on Facebook
httpswwwfacebookcomanntucker501
Rec
omm
end
ed R
ead
ings
Making Jewelry with Gemstone
Beads
Combines the popular craft of beading with beautiful semi-precious stones which are collected by many Features a variety of versatile ideas which can be adapted for any type of gem or bead Readers will learn to reate beautiful gemstone jewelry with this dazzling collection of over 100 projects ranging from eyecatching earrings and accessories to exquisite necklaces and bracelets This beautiful book offers an impressive range of 28 beautiful semi-precious stones (including birthstones) and a glimpse into the fascinating history and mythical properties behind them
BLOG DIY BEADING MAGAZINE ISSUE 32 BLOG WWWHANDMADE-JEWELRY-CLUBCOM MEMBERSHIP WWWDIYBEADINGCLUBCOM
Rec
omm
end
ed R
ead
ings
Convertible Crystal Jewelry
Reverse it Twist it Wear it Many
Ways
Diane Whiting presents the idea that convertibility isnrsquot just about using pieces in multiple ways it is also about using skills and creativity in multiple ways Using ever-popular sparkling crystals Diane showcases design elements through various techniques for fun easy fashionable jewelry With 25 projects the reader can choose from bracelets necklaces and earrings that match any outfit or styleDiane Whiting presents the idea that convertibility isnrsquot just about using pieces in multiple ways it is also about using skills and creativity in multiple ways
BLOG DIY BEADING MAGAZINE ISSUE 32 BLOG WWWHANDMADE-JEWELRY-CLUBCOM MEMBERSHIP WWWDIYBEADINGCLUBCOM
Rec
omm
end
ed R
ead
ings
Wire Jewelry Masterclass
Wrapped Coiled and Woven Pieces
Using Fine Materials
Comprehensive and fabulous Wire Jewelry Masterclass takes an in-depth look at an intricate and rewarding craft The 24 projects which range from simple Dragons tear briolette earrings to a Poseidon-under-the-sea pendant will delight and inspire jewelers of all levels and tastes Divided into beginner intermediate and advanced sections this beautifully photographed step-by-step guide is the ticket to wire jewelry expertise
BLOG DIY BEADING MAGAZINE ISSUE 32 BLOG WWWHANDMADE-JEWELRY-CLUBCOM MEMBERSHIP WWWDIYBEADINGCLUBCOM
Rec
omm
end
ed R
ead
ings
Timeless Wire Weaving The
Complete Course
Timeless Wire Weaving focuses on developing wirework skills through 13 projects using three classic wire weaving techniques coiling wrapping and weaving The projects are built around a focal cabochon and incorporate seed beads and crystals in imaginative ways Designers learn to make the jewelry shown in the book and they also use the techniques learned to create innovative jewelry pieces of their own
BLOG DIY BEADING MAGAZINE ISSUE 32 BLOG WWWHANDMADE-JEWELRY-CLUBCOM MEMBERSHIP WWWDIYBEADINGCLUBCOM
Our digital magazine is available through
Apple Newsstand service available to millions of IPAD users
To advertise with us please email us at
diyjewelryclubgmailcom
Or visit our page at
httphandmade-jewelry-clubcomadvertising-diy-beading-magazine
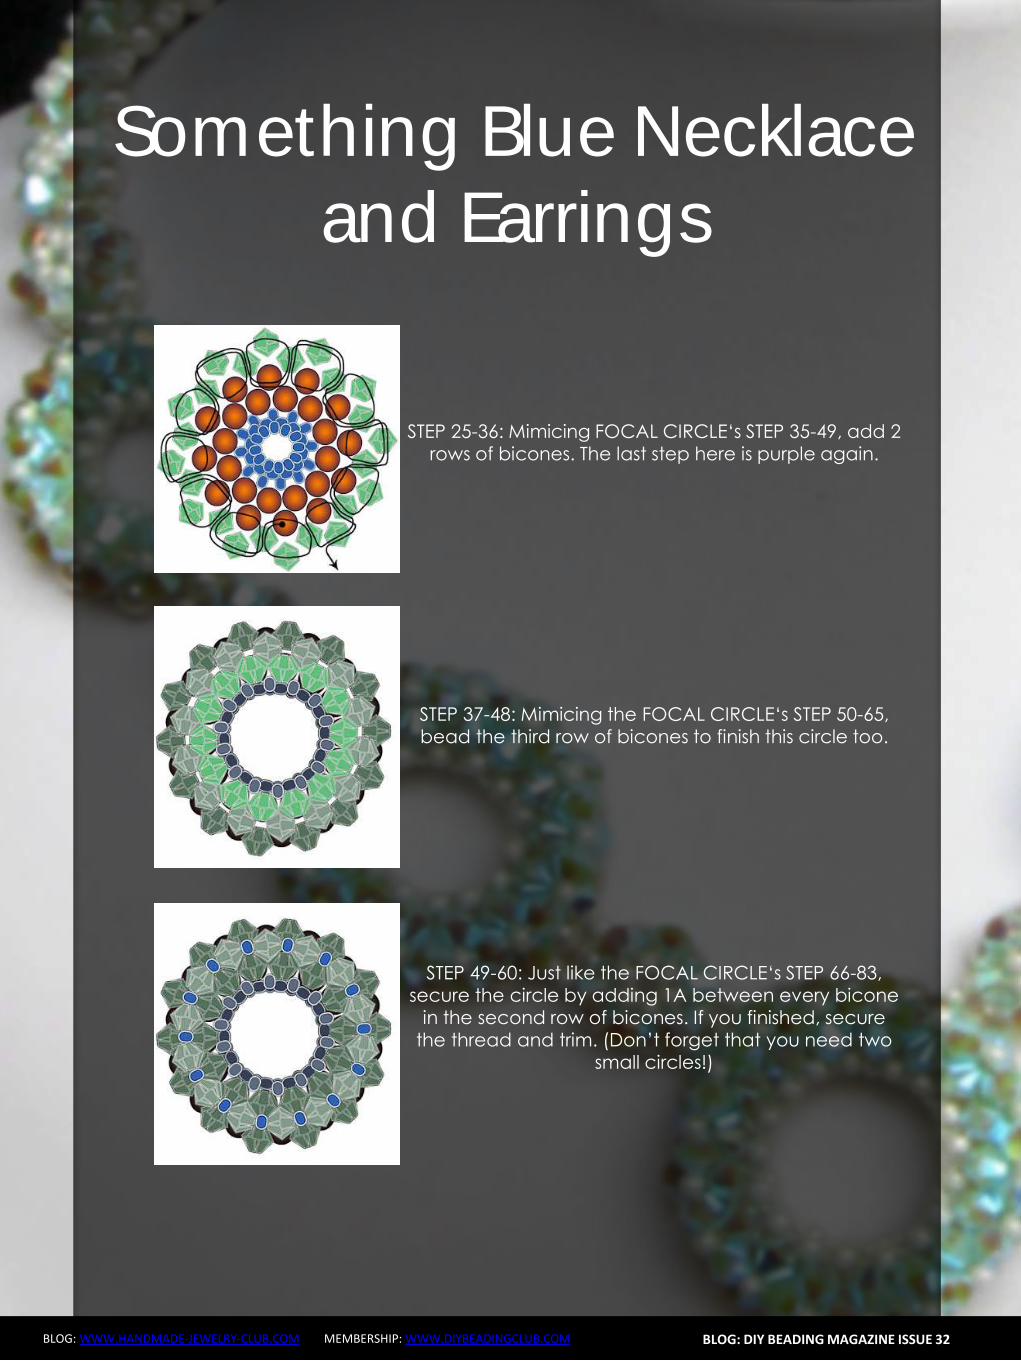
Getting Down And Personal With Gianna
Her advice for those who want to go on Youtube is 1 Do it because you want to teach
2 Do it because you want a career with beads
BLOG WWWHANDMADE-JEWELRY-CLUBCOM MEMBERSHIP WWWDIYBEADINGCLUBCOM BLOG DIY BEADING MAGAZINE ISSUE 32
After putting up about 20 videos and having at least 5000 subscribers add the PDF tutorials to Etsy and Craftsy She found out that her audience would like to have the PDF after watching her videos This is because they would rather print out the PDF and work while seated in a comfy chair technically somewhere else instead of having to pause the video time and time again
Gianna has also made a video for those who want to know the whole story of her journey up until the present day And to get updates on her you can check it out here She has also started a vlog where she tells of how she still works towards becoming a financial independent beader and explains her journey to get where she wants to be(or die trying) Gianna will be in the UK on October the 17th giving an all-day workshop with 4 different patterns
(2 beginners and 2 advanced) in Wotton-under-Edge
Gianna will be there Friday night as the workshop is on Saturday She will be leaving on Sunday Her
doors are open to all who wants to continue the party with her at the hotel across the street
For more information do contact Ann Tucker on Facebook
httpswwwfacebookcomanntucker501
Rec
omm
end
ed R
ead
ings
Making Jewelry with Gemstone
Beads
Combines the popular craft of beading with beautiful semi-precious stones which are collected by many Features a variety of versatile ideas which can be adapted for any type of gem or bead Readers will learn to reate beautiful gemstone jewelry with this dazzling collection of over 100 projects ranging from eyecatching earrings and accessories to exquisite necklaces and bracelets This beautiful book offers an impressive range of 28 beautiful semi-precious stones (including birthstones) and a glimpse into the fascinating history and mythical properties behind them
BLOG DIY BEADING MAGAZINE ISSUE 32 BLOG WWWHANDMADE-JEWELRY-CLUBCOM MEMBERSHIP WWWDIYBEADINGCLUBCOM
Rec
omm
end
ed R
ead
ings
Convertible Crystal Jewelry
Reverse it Twist it Wear it Many
Ways
Diane Whiting presents the idea that convertibility isnrsquot just about using pieces in multiple ways it is also about using skills and creativity in multiple ways Using ever-popular sparkling crystals Diane showcases design elements through various techniques for fun easy fashionable jewelry With 25 projects the reader can choose from bracelets necklaces and earrings that match any outfit or styleDiane Whiting presents the idea that convertibility isnrsquot just about using pieces in multiple ways it is also about using skills and creativity in multiple ways
BLOG DIY BEADING MAGAZINE ISSUE 32 BLOG WWWHANDMADE-JEWELRY-CLUBCOM MEMBERSHIP WWWDIYBEADINGCLUBCOM
Rec
omm
end
ed R
ead
ings
Wire Jewelry Masterclass
Wrapped Coiled and Woven Pieces
Using Fine Materials
Comprehensive and fabulous Wire Jewelry Masterclass takes an in-depth look at an intricate and rewarding craft The 24 projects which range from simple Dragons tear briolette earrings to a Poseidon-under-the-sea pendant will delight and inspire jewelers of all levels and tastes Divided into beginner intermediate and advanced sections this beautifully photographed step-by-step guide is the ticket to wire jewelry expertise
BLOG DIY BEADING MAGAZINE ISSUE 32 BLOG WWWHANDMADE-JEWELRY-CLUBCOM MEMBERSHIP WWWDIYBEADINGCLUBCOM
Rec
omm
end
ed R
ead
ings
Timeless Wire Weaving The
Complete Course
Timeless Wire Weaving focuses on developing wirework skills through 13 projects using three classic wire weaving techniques coiling wrapping and weaving The projects are built around a focal cabochon and incorporate seed beads and crystals in imaginative ways Designers learn to make the jewelry shown in the book and they also use the techniques learned to create innovative jewelry pieces of their own
BLOG DIY BEADING MAGAZINE ISSUE 32 BLOG WWWHANDMADE-JEWELRY-CLUBCOM MEMBERSHIP WWWDIYBEADINGCLUBCOM
Our digital magazine is available through
Apple Newsstand service available to millions of IPAD users
To advertise with us please email us at
diyjewelryclubgmailcom
Or visit our page at
httphandmade-jewelry-clubcomadvertising-diy-beading-magazine

Rec
omm
end
ed R
ead
ings
Making Jewelry with Gemstone
Beads
Combines the popular craft of beading with beautiful semi-precious stones which are collected by many Features a variety of versatile ideas which can be adapted for any type of gem or bead Readers will learn to reate beautiful gemstone jewelry with this dazzling collection of over 100 projects ranging from eyecatching earrings and accessories to exquisite necklaces and bracelets This beautiful book offers an impressive range of 28 beautiful semi-precious stones (including birthstones) and a glimpse into the fascinating history and mythical properties behind them
BLOG DIY BEADING MAGAZINE ISSUE 32 BLOG WWWHANDMADE-JEWELRY-CLUBCOM MEMBERSHIP WWWDIYBEADINGCLUBCOM
Rec
omm
end
ed R
ead
ings
Convertible Crystal Jewelry
Reverse it Twist it Wear it Many
Ways
Diane Whiting presents the idea that convertibility isnrsquot just about using pieces in multiple ways it is also about using skills and creativity in multiple ways Using ever-popular sparkling crystals Diane showcases design elements through various techniques for fun easy fashionable jewelry With 25 projects the reader can choose from bracelets necklaces and earrings that match any outfit or styleDiane Whiting presents the idea that convertibility isnrsquot just about using pieces in multiple ways it is also about using skills and creativity in multiple ways
BLOG DIY BEADING MAGAZINE ISSUE 32 BLOG WWWHANDMADE-JEWELRY-CLUBCOM MEMBERSHIP WWWDIYBEADINGCLUBCOM
Rec
omm
end
ed R
ead
ings
Wire Jewelry Masterclass
Wrapped Coiled and Woven Pieces
Using Fine Materials
Comprehensive and fabulous Wire Jewelry Masterclass takes an in-depth look at an intricate and rewarding craft The 24 projects which range from simple Dragons tear briolette earrings to a Poseidon-under-the-sea pendant will delight and inspire jewelers of all levels and tastes Divided into beginner intermediate and advanced sections this beautifully photographed step-by-step guide is the ticket to wire jewelry expertise
BLOG DIY BEADING MAGAZINE ISSUE 32 BLOG WWWHANDMADE-JEWELRY-CLUBCOM MEMBERSHIP WWWDIYBEADINGCLUBCOM
Rec
omm
end
ed R
ead
ings
Timeless Wire Weaving The
Complete Course
Timeless Wire Weaving focuses on developing wirework skills through 13 projects using three classic wire weaving techniques coiling wrapping and weaving The projects are built around a focal cabochon and incorporate seed beads and crystals in imaginative ways Designers learn to make the jewelry shown in the book and they also use the techniques learned to create innovative jewelry pieces of their own
BLOG DIY BEADING MAGAZINE ISSUE 32 BLOG WWWHANDMADE-JEWELRY-CLUBCOM MEMBERSHIP WWWDIYBEADINGCLUBCOM
Our digital magazine is available through
Apple Newsstand service available to millions of IPAD users
To advertise with us please email us at
diyjewelryclubgmailcom
Or visit our page at
httphandmade-jewelry-clubcomadvertising-diy-beading-magazine
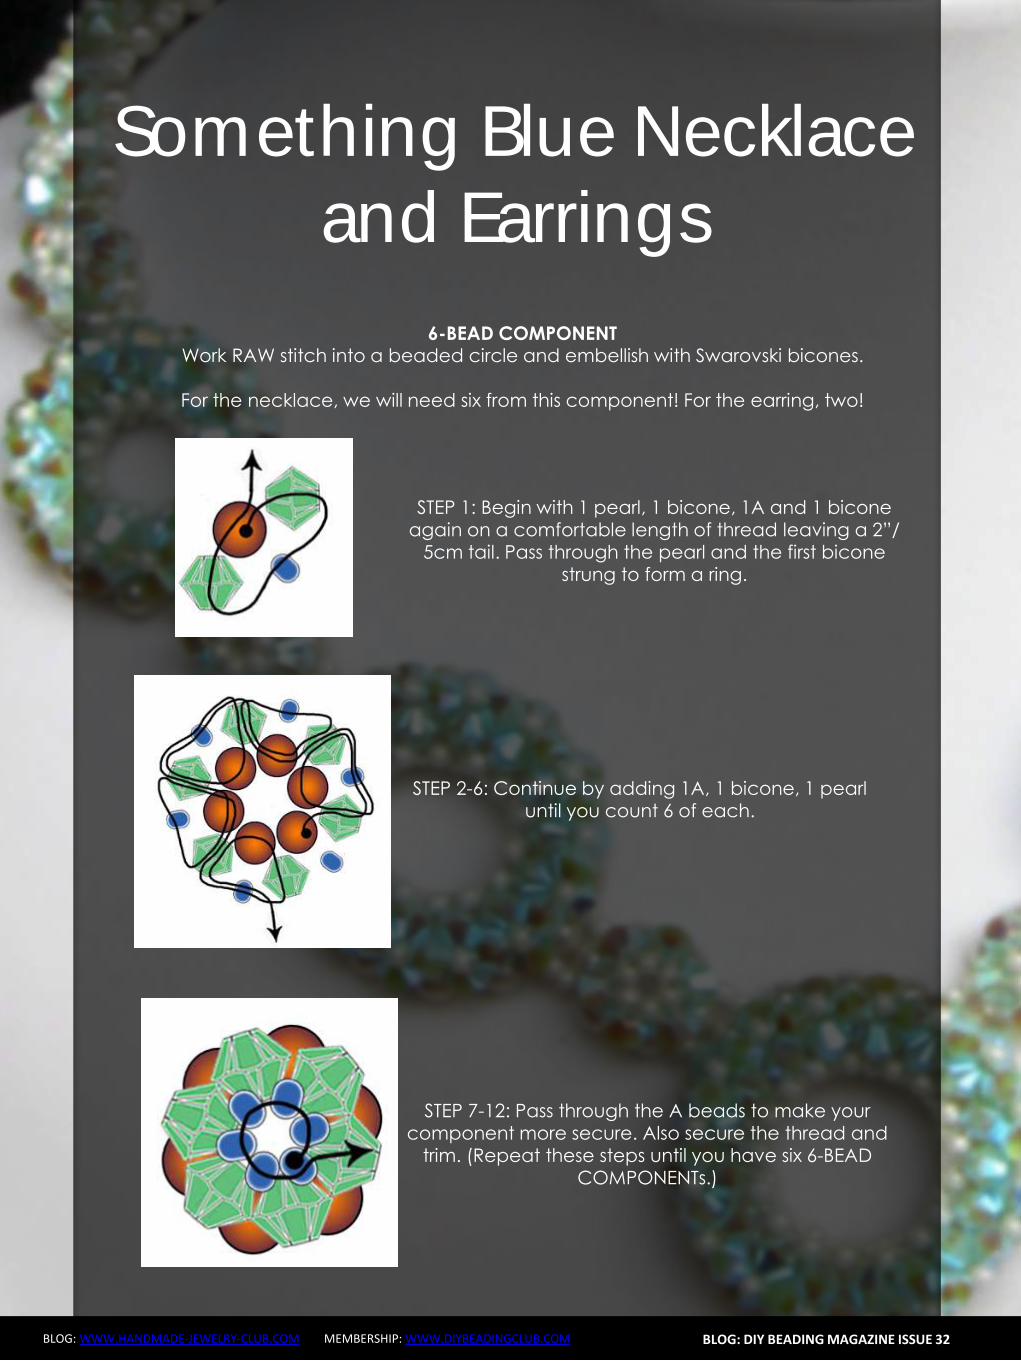
Rec
omm
end
ed R
ead
ings
Convertible Crystal Jewelry
Reverse it Twist it Wear it Many
Ways
Diane Whiting presents the idea that convertibility isnrsquot just about using pieces in multiple ways it is also about using skills and creativity in multiple ways Using ever-popular sparkling crystals Diane showcases design elements through various techniques for fun easy fashionable jewelry With 25 projects the reader can choose from bracelets necklaces and earrings that match any outfit or styleDiane Whiting presents the idea that convertibility isnrsquot just about using pieces in multiple ways it is also about using skills and creativity in multiple ways
BLOG DIY BEADING MAGAZINE ISSUE 32 BLOG WWWHANDMADE-JEWELRY-CLUBCOM MEMBERSHIP WWWDIYBEADINGCLUBCOM
Rec
omm
end
ed R
ead
ings
Wire Jewelry Masterclass
Wrapped Coiled and Woven Pieces
Using Fine Materials
Comprehensive and fabulous Wire Jewelry Masterclass takes an in-depth look at an intricate and rewarding craft The 24 projects which range from simple Dragons tear briolette earrings to a Poseidon-under-the-sea pendant will delight and inspire jewelers of all levels and tastes Divided into beginner intermediate and advanced sections this beautifully photographed step-by-step guide is the ticket to wire jewelry expertise
BLOG DIY BEADING MAGAZINE ISSUE 32 BLOG WWWHANDMADE-JEWELRY-CLUBCOM MEMBERSHIP WWWDIYBEADINGCLUBCOM
Rec
omm
end
ed R
ead
ings
Timeless Wire Weaving The
Complete Course
Timeless Wire Weaving focuses on developing wirework skills through 13 projects using three classic wire weaving techniques coiling wrapping and weaving The projects are built around a focal cabochon and incorporate seed beads and crystals in imaginative ways Designers learn to make the jewelry shown in the book and they also use the techniques learned to create innovative jewelry pieces of their own
BLOG DIY BEADING MAGAZINE ISSUE 32 BLOG WWWHANDMADE-JEWELRY-CLUBCOM MEMBERSHIP WWWDIYBEADINGCLUBCOM
Our digital magazine is available through
Apple Newsstand service available to millions of IPAD users
To advertise with us please email us at
diyjewelryclubgmailcom
Or visit our page at
httphandmade-jewelry-clubcomadvertising-diy-beading-magazine
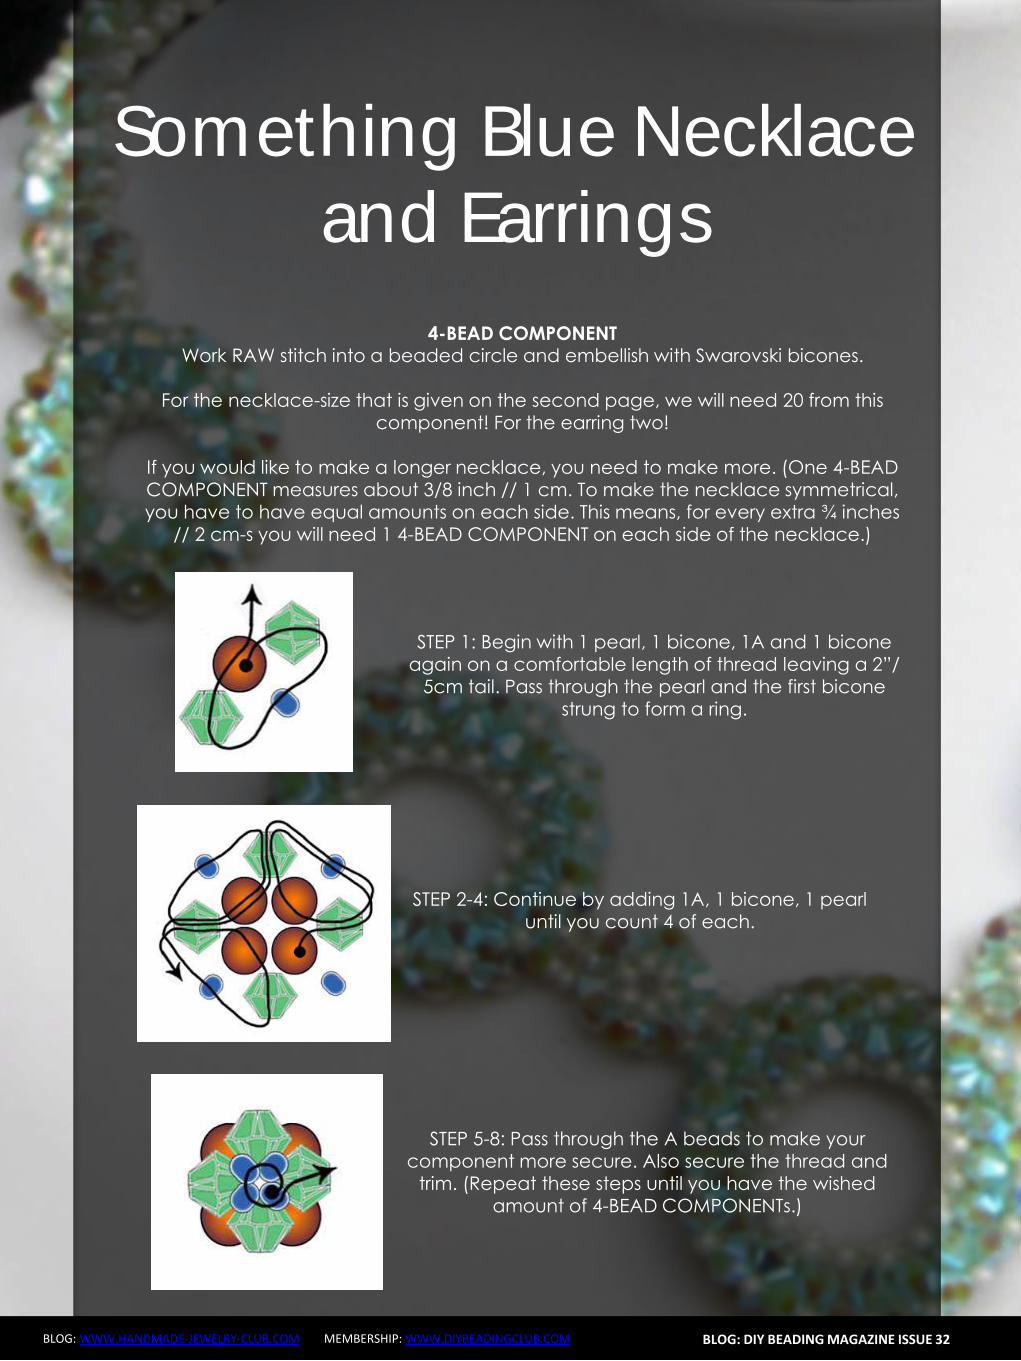
Rec
omm
end
ed R
ead
ings
Wire Jewelry Masterclass
Wrapped Coiled and Woven Pieces
Using Fine Materials
Comprehensive and fabulous Wire Jewelry Masterclass takes an in-depth look at an intricate and rewarding craft The 24 projects which range from simple Dragons tear briolette earrings to a Poseidon-under-the-sea pendant will delight and inspire jewelers of all levels and tastes Divided into beginner intermediate and advanced sections this beautifully photographed step-by-step guide is the ticket to wire jewelry expertise
BLOG DIY BEADING MAGAZINE ISSUE 32 BLOG WWWHANDMADE-JEWELRY-CLUBCOM MEMBERSHIP WWWDIYBEADINGCLUBCOM
Rec
omm
end
ed R
ead
ings
Timeless Wire Weaving The
Complete Course
Timeless Wire Weaving focuses on developing wirework skills through 13 projects using three classic wire weaving techniques coiling wrapping and weaving The projects are built around a focal cabochon and incorporate seed beads and crystals in imaginative ways Designers learn to make the jewelry shown in the book and they also use the techniques learned to create innovative jewelry pieces of their own
BLOG DIY BEADING MAGAZINE ISSUE 32 BLOG WWWHANDMADE-JEWELRY-CLUBCOM MEMBERSHIP WWWDIYBEADINGCLUBCOM
Our digital magazine is available through
Apple Newsstand service available to millions of IPAD users
To advertise with us please email us at
diyjewelryclubgmailcom
Or visit our page at
httphandmade-jewelry-clubcomadvertising-diy-beading-magazine
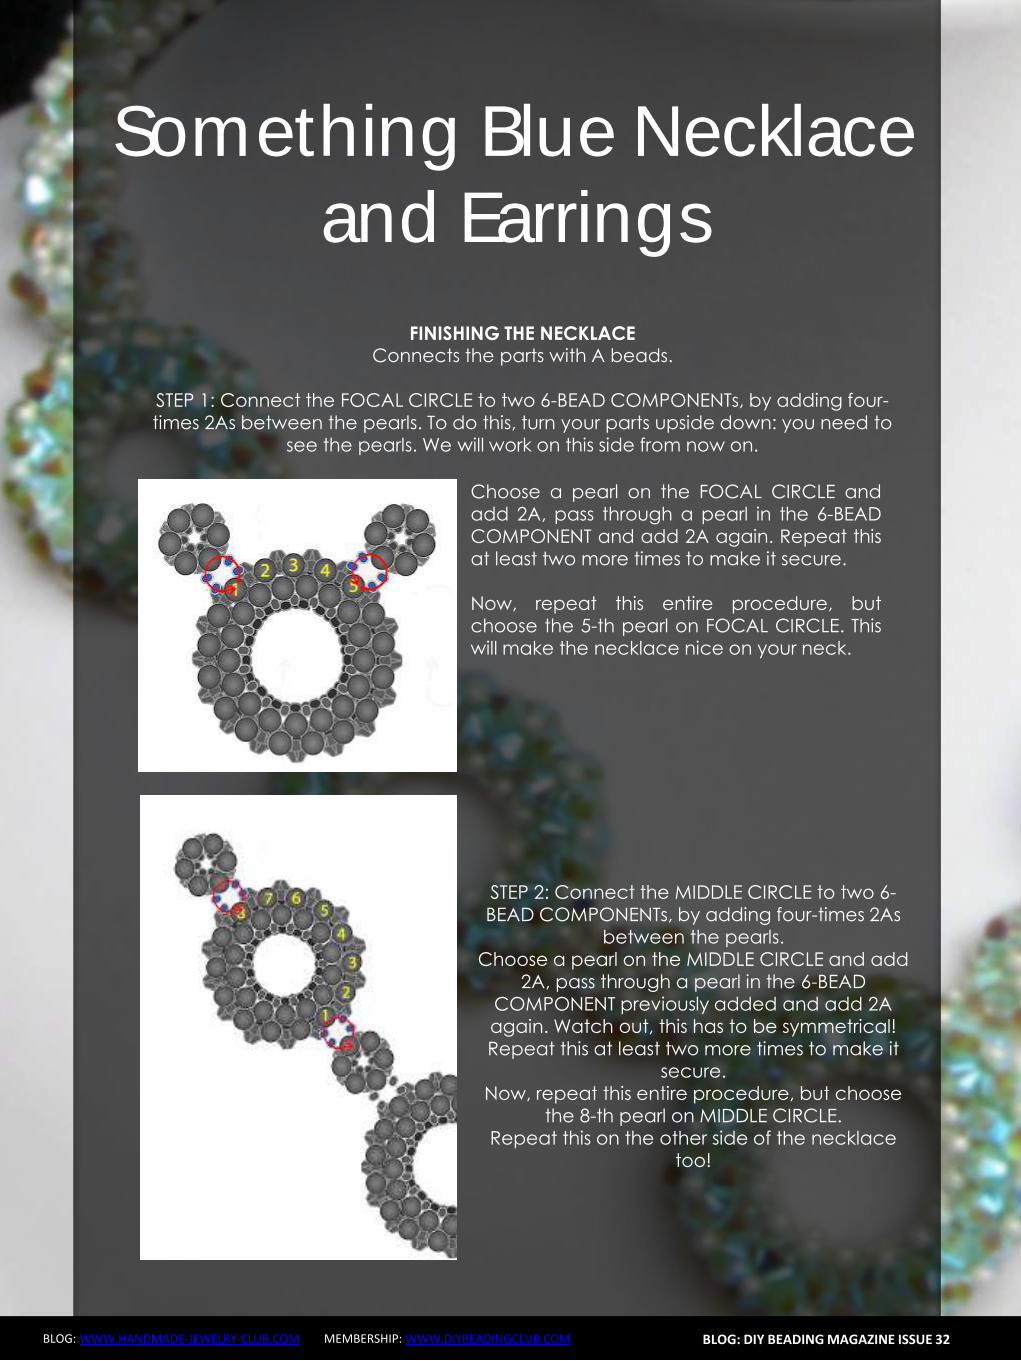
Rec
omm
end
ed R
ead
ings
Timeless Wire Weaving The
Complete Course
Timeless Wire Weaving focuses on developing wirework skills through 13 projects using three classic wire weaving techniques coiling wrapping and weaving The projects are built around a focal cabochon and incorporate seed beads and crystals in imaginative ways Designers learn to make the jewelry shown in the book and they also use the techniques learned to create innovative jewelry pieces of their own
BLOG DIY BEADING MAGAZINE ISSUE 32 BLOG WWWHANDMADE-JEWELRY-CLUBCOM MEMBERSHIP WWWDIYBEADINGCLUBCOM
Our digital magazine is available through
Apple Newsstand service available to millions of IPAD users
To advertise with us please email us at
diyjewelryclubgmailcom
Or visit our page at
httphandmade-jewelry-clubcomadvertising-diy-beading-magazine
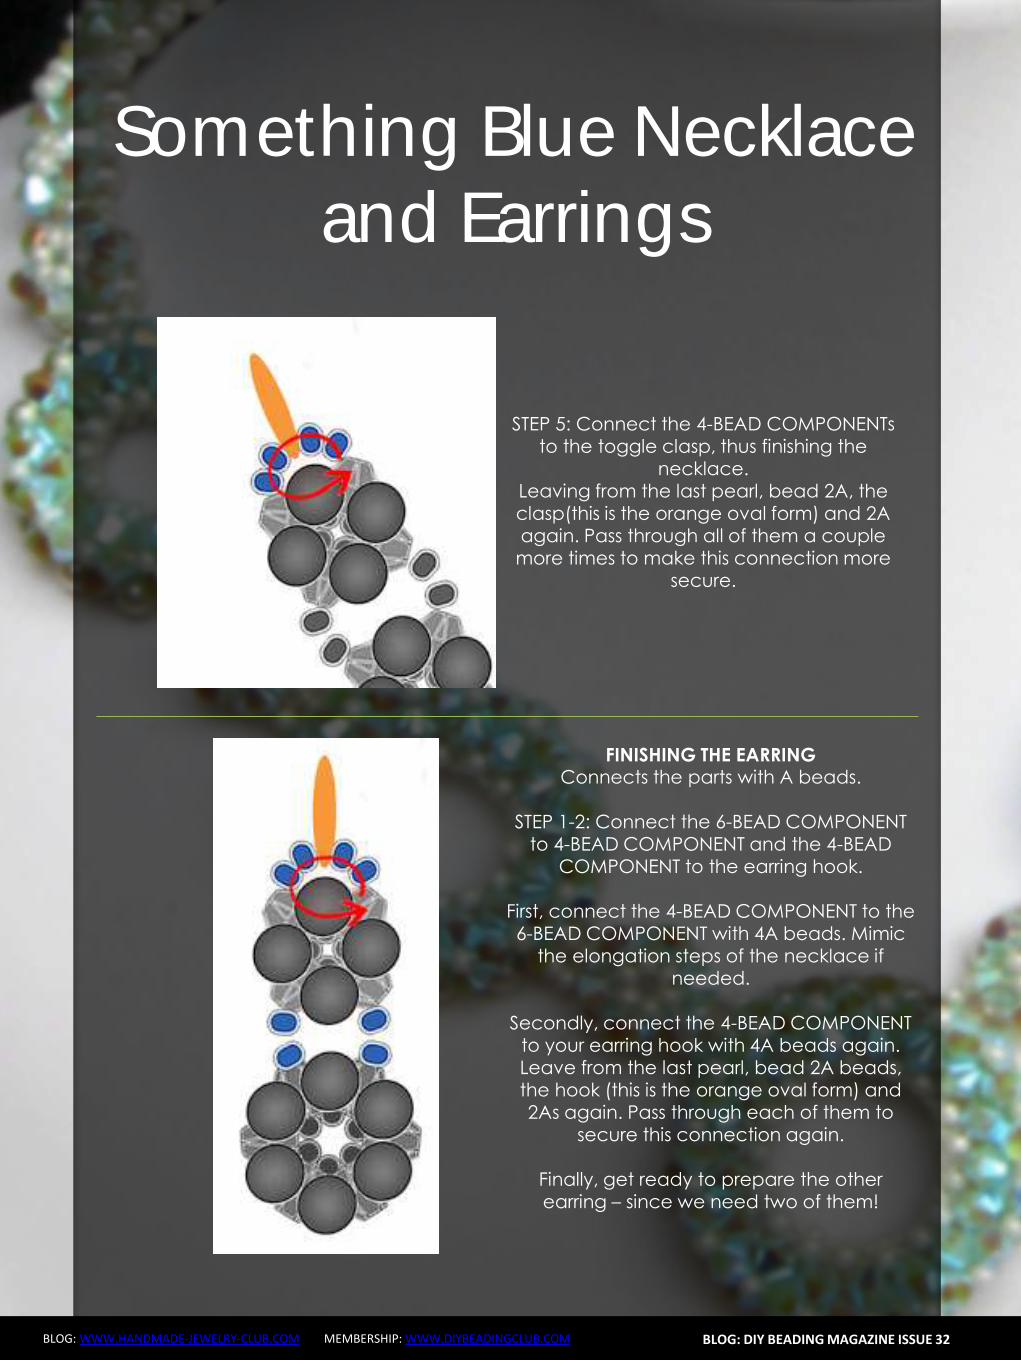
Our digital magazine is available through
Apple Newsstand service available to millions of IPAD users
To advertise with us please email us at
diyjewelryclubgmailcom
Or visit our page at
httphandmade-jewelry-clubcomadvertising-diy-beading-magazine