Embed Size (px)
Citation preview

Umoja Foundation Training FI-AA Job Aid 3-1: AuC Set Up of the AuC Cost Collector v1.5 1/36
Job Aid
Table of Contents Overview ......................................................................................................................................... 2 Section 1: Set up an AuC as a Project with WBS Elements ............................................................. 4
Creating a Project from a Standard Project Definition template: .......................................... 4 Creating a Project from scratch: ........................................................................................... 14 Updating the Project/WBSE Status: ...................................................................................... 20 Updating the Budget Control WBSE field for FM/GM Users: ............................................... 24 Ensure that higher-level WBS elements cannot incur expenses: ......................................... 25 Review that budget has been assigned to the project: ........................................................ 26 Create Settlement Rules for Non-Capitalisable WBS Elements: .......................................... 27 Define Investment Profile and Create AuC Asset after Project is already released: ............ 29
Section 2: Set up an AuC as an Internal Order .............................................................................. 31 Creating an Internal Order: ................................................................................................... 31
FI-AA 3-1: AuC set up of the AuC cost collector (WBSE/IO)

Umoja Foundation Training FI-AA Job Aid 3-1: AuC Set Up of the AuC Cost Collector v1.5 2/36
Job Aid
Overview Under IPSAS the UN is required to capitalise costs related to Assets under Construction that are expected to exceed the $100,000 USD capitalisation threshold. The use of a cost collector in Umoja allows the UN to easily capture costs related to AuC and also ensure these costs are capitalised monthly. For information regarding IPSAS requirements related to AuC, please refer to www.ipsas.un.org/ This job aid is to be used for the set up of the cost collector for an Asset under Construction, either as project or as an internal order. The review and monthly settlement of the AuC and final settlement are in other job aids, AuC JA 3-2 and JA-3-3, respectively. Before creating an Asset under Construction, ask the following questions:
• What type of funding? Assessed funds or grants? How many? • At what level of detail do you need to record costs? How many cost centers / functional areas? • What type of asset will this be? New Building, Leasehold Improvement, Major Alteration,
Infrastructure, or Intangible Asset? • Do you want to collect costs on an Project with WBS Elements or on an Internal Order? • How will services and materials be procured? Is a Service Order going to be used for services?
Should you create a project or an internal order?
Users of this guide may have some of the following roles: PP.01 Programme_Project: Project_Management_Approver PP.02 Programme_Project: Project_Management_User FA.15 Financial_Accounting: Asset_Accounting_User FA.16 Financial_Accounting: Asset_Accounting_Senior_User
• Complex set of activities that need to be tracked individually
• Implemented by multiple Resp. Cost Centers
• Funded by multiple Grants
• Addressing multiple Functional Areas
• Need to capitalise to multiple assets or components
• Is an Intangible Asset with non-capitalisable research costs
• Group of activities, no need to track individually
• Implemented by one Resp. Cost Center
• Funded by one Grant • Addressing one
Functional Area • To be capitalised to
one asset only

Umoja Foundation Training FI-AA Job Aid 3-1: AuC Set Up of the AuC Cost Collector v1.5 3/36
Job Aid
IPSAS requires that for an internally developed intangible assets, both non-capitalizable (research) and capitalizable (development) costs should be collected and reported. This can be achieved by creating a cost collector in the form of Work Breakdown Structure (WBS) in Umoja as shown below.
Assets under Construction can be used to create Final Assets within the following Asset Classes. The tables below show which AuC Asset Class is associated with each Final Asset Class.
Umoja Foundation Training FI-AA Job Aid 3-1: AuC Set Up of the AuC Cost Collector v1.5 4/36
Job Aid
Section 1: Set up an AuC as a Project with WBS Elements A standard project template which follows the typical componentization of a Building AuC (where the final assets are the sub-components) exists in the system. To use this as a starting point for your AuC, follow the instructions directly below, otherwise look at the section on creating a project from scratch.
Componentisation of a building in Umoja is in accordance with UN IPSAS Corporate Guidance (please refer to UN Policy Frame work for IPSAS and also UN Corporate Guidance for IPSAS #10, PPE) at www.ipsas.un.org
Creating a Project from a Standard Project Definition template: The steps to create a new Project and its WBSEs for an AuC are as follows:
1. Login to Umoja ECC. ** You must have the FA.16, PP.01, or PP.02 security authorizations to create a project.
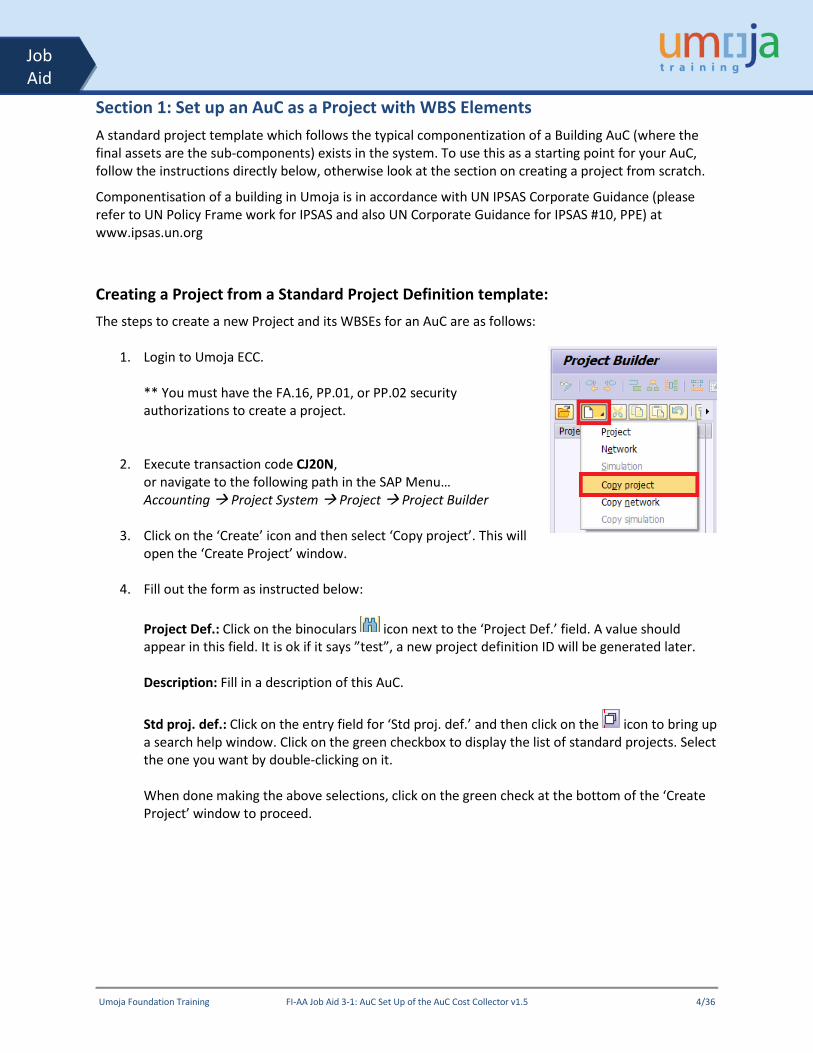
2. Execute transaction code CJ20N, or navigate to the following path in the SAP Menu… Accounting Project System Project Project Builder
3. Click on the ‘Create’ icon and then select ‘Copy project’. This will open the ‘Create Project’ window.
4. Fill out the form as instructed below: Project Def.: Click on the binoculars icon next to the ‘Project Def.’ field. A value should appear in this field. It is ok if it says ”test”, a new project definition ID will be generated later. Description: Fill in a description of this AuC.
Std proj. def.: Click on the entry field for ‘Std proj. def.’ and then click on the icon to bring up a search help window. Click on the green checkbox to display the list of standard projects. Select the one you want by double-clicking on it. When done making the above selections, click on the green check at the bottom of the ‘Create Project’ window to proceed.

Umoja Foundation Training FI-AA Job Aid 3-1: AuC Set Up of the AuC Cost Collector v1.5 5/36
Job Aid
5. You will see an Error message. Ignore it and click on the green check to continue.
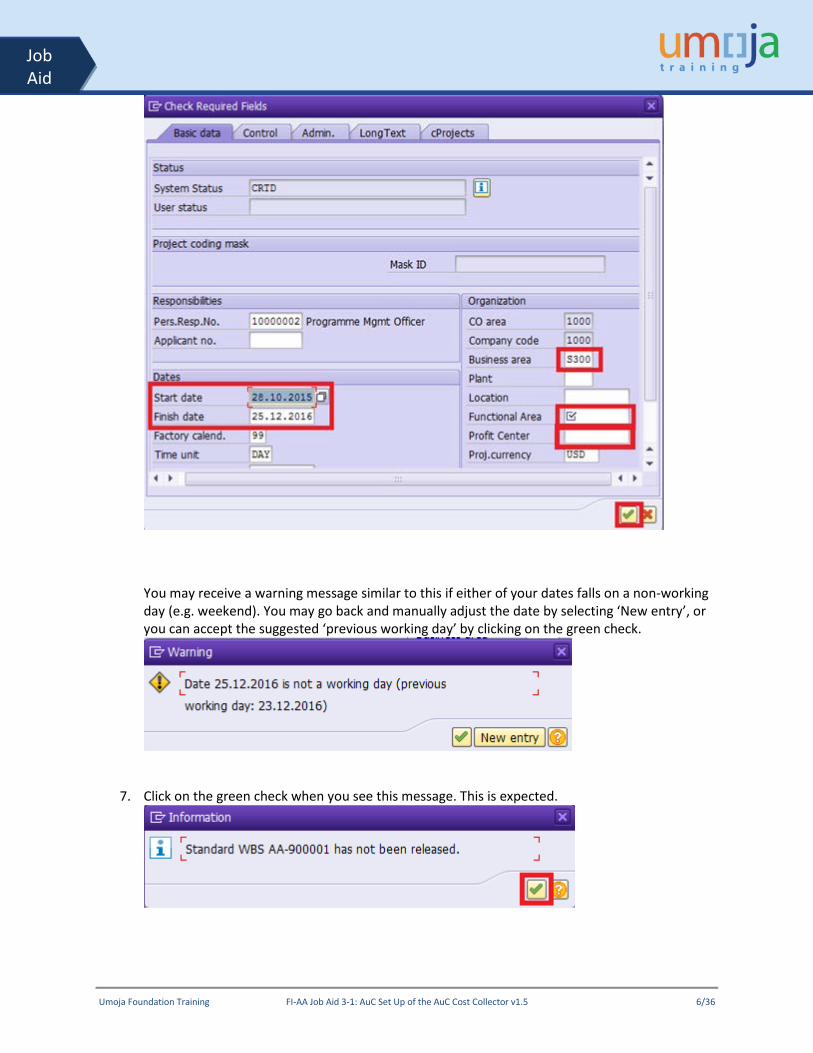
6. In the ‘Check Required Fields’ screen, fill out the following fields: Start date and Finish date: Fill in planned dates here. These can be changed later, if necessary. Business Area: This should be changed to your local business area code. Functional Area: Select an appropriate functional area for this project. This field is mandatory at this time and will be defaulted into each WBS Element, though it is the WBS Element’s functional area that is ultimately responsible for budget and postings. Note that this default value may not apply to all WBS Elements, so care should be taken to review when later defining each WBS Element. Profit Center: Enter the default profit center ‘9999’ Click on the green check at the bottom when ready to continue. The other tabs at the top ‘Control’, ‘Admin’, ‘LongText’, and ‘cProjects’ do not need to be filled out at this time.
Umoja Foundation Training FI-AA Job Aid 3-1: AuC Set Up of the AuC Cost Collector v1.5 6/36
Job Aid
You may receive a warning message similar to this if either of your dates falls on a non-working day (e.g. weekend). You may go back and manually adjust the date by selecting ‘New entry’, or you can accept the suggested ‘previous working day’ by clicking on the green check.
7. Click on the green check when you see this message. This is expected.

Umoja Foundation Training FI-AA Job Aid 3-1: AuC Set Up of the AuC Cost Collector v1.5 7/36
Job Aid
8. You will now be greeted with the Project Builder interface.
The Worklist and Templates area contains recently viewed projects in the ‘Worklist’ section and various elements that can be added to the project in the Templates section. The Project Structure Tree contains the Project Definition and all of the WBS Elements beneath it. Click on any of them will open them in the Work Area for display or editing.
9. The Project Definition has been prepared already from the standard project definition and any values entered during Step 6. Now the WBS Elements need to be customized for this project. Select the top (Level 1) WBS Element by clicking on it in the project tree.

Umoja Foundation Training FI-AA Job Aid 3-1: AuC Set Up of the AuC Cost Collector v1.5 8/36
Job Aid
10. First, update the Level 1 WBS Element. Start by updating the WBS Element Description to match the description you gave to the Project Definition. This is a standard convention that the Project Definition and Level 1 WBS Element share the same description.
Basic Data tab: Responsible Cost Center: Enter company code 1000 and the Cost Center for this WBSE. For all WBSE elements that should not be used to charge costs the box “Acct asst elem.” should be unchecked. This will mean that users of the shopping carts etc cannot use these lines to charge costs to. This will be the case for all level 1 WBSE.
*Reminder: only leave the account assignment element checked where you want to collect costs at this level. ‘Assignments’ tab: Functional Area: Enter the Functional Area associated with the Responsible Cost Center defined on the ‘Basic Data’ tab. This will NOT be automatically derived from the cost center, so it is important that care is taken to make sure they align. Use transaction KS03 to confirm that the functional area relates to the cost center entered.
Umoja Foundation Training FI-AA Job Aid 3-1: AuC Set Up of the AuC Cost Collector v1.5 9/36
Job Aid
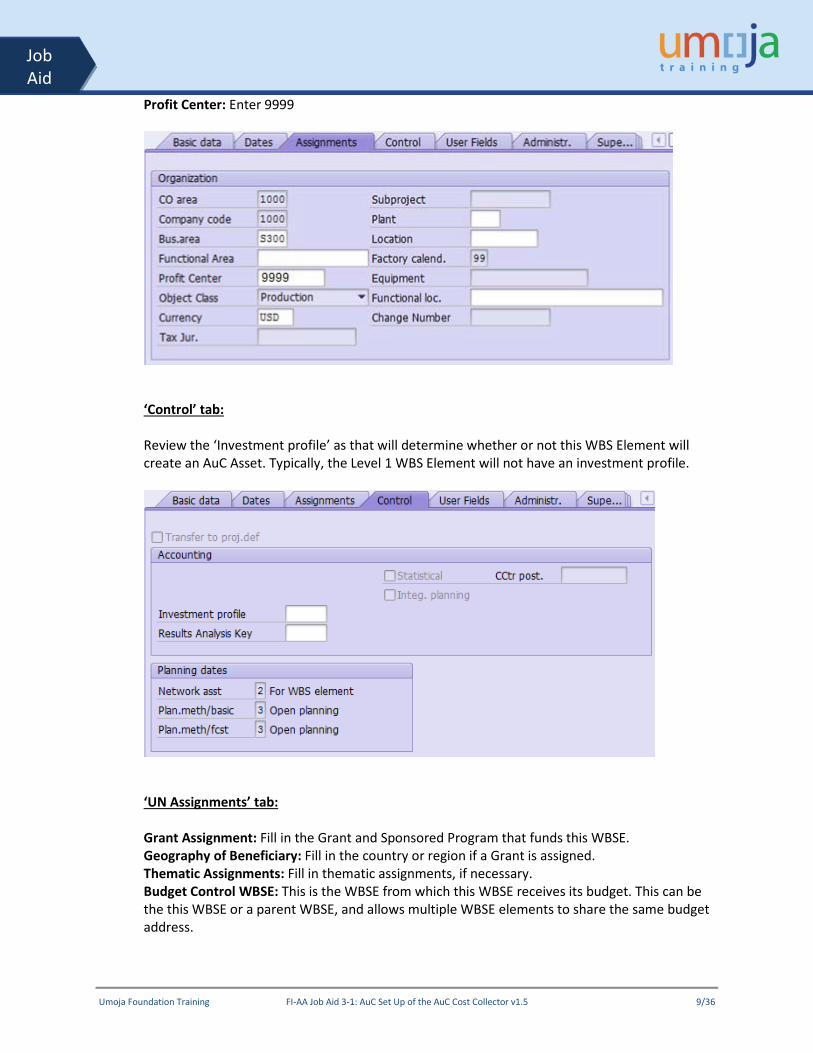
Profit Center: Enter 9999
‘Control’ tab: Review the ‘Investment profile’ as that will determine whether or not this WBS Element will create an AuC Asset. Typically, the Level 1 WBS Element will not have an investment profile.
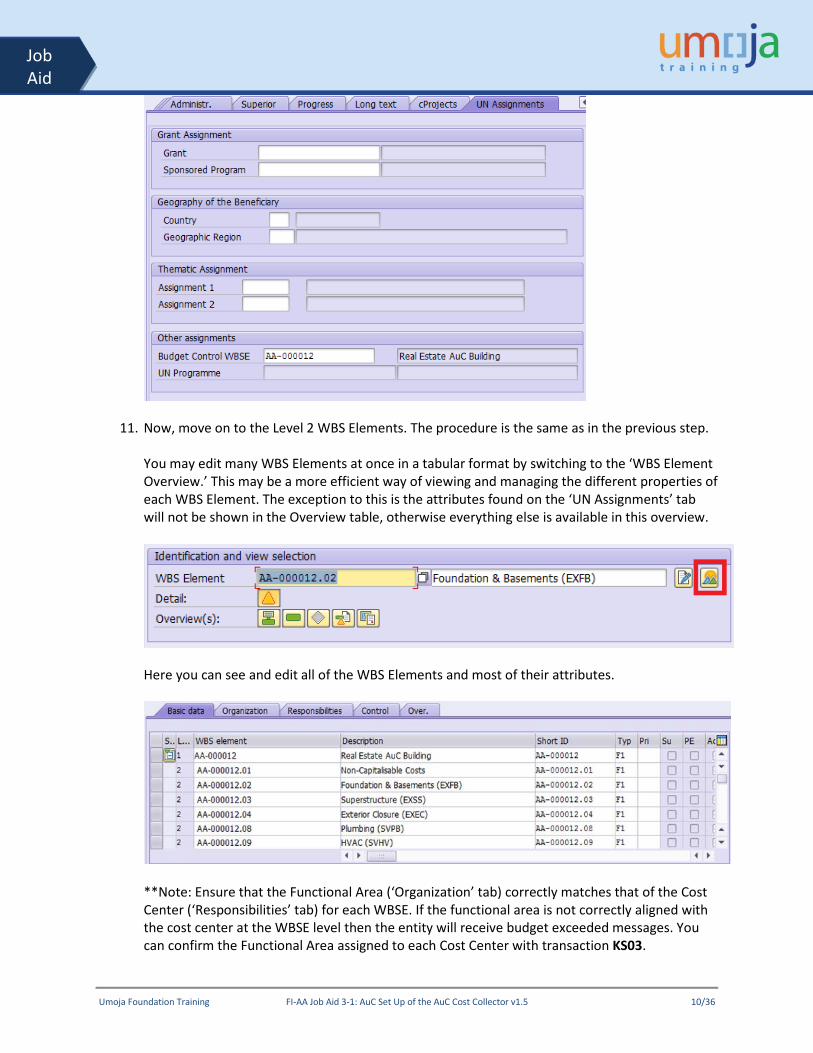
‘UN Assignments’ tab: Grant Assignment: Fill in the Grant and Sponsored Program that funds this WBSE. Geography of Beneficiary: Fill in the country or region if a Grant is assigned. Thematic Assignments: Fill in thematic assignments, if necessary. Budget Control WBSE: This is the WBSE from which this WBSE receives its budget. This can be the this WBSE or a parent WBSE, and allows multiple WBSE elements to share the same budget address.
Umoja Foundation Training FI-AA Job Aid 3-1: AuC Set Up of the AuC Cost Collector v1.5 10/36
Job Aid
11. Now, move on to the Level 2 WBS Elements. The procedure is the same as in the previous step. You may edit many WBS Elements at once in a tabular format by switching to the ‘WBS Element Overview.’ This may be a more efficient way of viewing and managing the different properties of each WBS Element. The exception to this is the attributes found on the ‘UN Assignments’ tab will not be shown in the Overview table, otherwise everything else is available in this overview.
Here you can see and edit all of the WBS Elements and most of their attributes.
**Note: Ensure that the Functional Area (‘Organization’ tab) correctly matches that of the Cost Center (‘Responsibilities’ tab) for each WBSE. If the functional area is not correctly aligned with the cost center at the WBSE level then the entity will receive budget exceeded messages. You can confirm the Functional Area assigned to each Cost Center with transaction KS03.

Umoja Foundation Training FI-AA Job Aid 3-1: AuC Set Up of the AuC Cost Collector v1.5 11/36
Job Aid
12. Fill out the necessary fields for all remaining WBS Elements. ** Only bottom-level WBS Elements should collect expenses, and therefore all ‘parent’ WBS Elements should have their Acct assn elem. Indicator unchecked on the ‘Basic Data’ tab.
13. If you need to add a new WBS Element… Determine which WBS Element you’d like to insert the new one beneath. If you want to add a Level 2 WBSE, choose the Level 1 WBSE. In the example screenshot below, we are creating a Level 3 WBSE beneath the “Non-Capitalisable Costs” Level 2 WBSE. Create a new WBS Element by right-clicking on an existing WBS Element and selecting Create WBS element.
Fill in a description for this WBS Element and any other necessary fields as with any other WBSE.
The new WBSE should be visible in the tree view after pressing enter.

Umoja Foundation Training FI-AA Job Aid 3-1: AuC Set Up of the AuC Cost Collector v1.5 12/36
Job Aid
14. If you expect to have capitalisable charges that will be distributed across multiple final assets (i.e. building subcomponents) when the project is completed, AND you cannot define a % split when the shopping cart/Purchase order is set up, you can add an extra WBS Element to collect these costs during construction/development, calling this WBSE “Other Capitalisable Costs”. At final project settlement, you settle these charges to multiple final assets on a percentage basis (this will be covered in Job Aid JA3-3). It is recommended that you keep charges to this WBSE to a minimum to avoid a lengthly review process of expenses charged to this WBSE when the AuC is finalised. Note: non-capitalisable costs should NOT be charged to this WBSE, if part of the costs are capitalisable and part not capitalisable this split must be done at the time of the financial commitment. Follow the instructions in the previous step to add the WBS Element. Be sure to give it a description that communicates its intended use, such as “Other Capitalisable Costs”. For example: If your project will have service charges that will be capitalised across many of the building’s subcomponents (Foundation, Superstructure, Roof, Interior construction, etc), you could charge the “Other Capitalisable Costs” WBS Element. At final settlement, the entity would need to review the charges to this WBSE and define multiple settlement rules (on a percentage basis) for this WBS Element to the final assets of each of the subcomponents.

Umoja Foundation Training FI-AA Job Aid 3-1: AuC Set Up of the AuC Cost Collector v1.5 13/36
Job Aid
15. If you want to remove an existing WBS Element, select it in the tree view and then click on the
‘Delete’ button.
Confirm that you want to delete the WBS Element.
16. When you have added, removed, and updated all of the WBS Elements, save the project by clicking on the ‘Save’ icon at the top of the screen. You should see a message in the status bar similar to this, and the project will be closed.
17. After initiation creation, you will want to update the status of your project. In order to release the project, you will have to take 3 steps: First step: Update the User Status of each WBS Element from ‘10: IPP’ to ’20: UBR’ Second step: Update the User Status of each WBS Element from ’20: UBR’ to ’30: RFR’ Third step: Update the System Status of the Project Definition to Released. Instructions on changing the User Status and System Status are covered the section “Updating the Project/WBSE Status”.
Umoja Foundation Training FI-AA Job Aid 3-1: AuC Set Up of the AuC Cost Collector v1.5 14/36
Job Aid
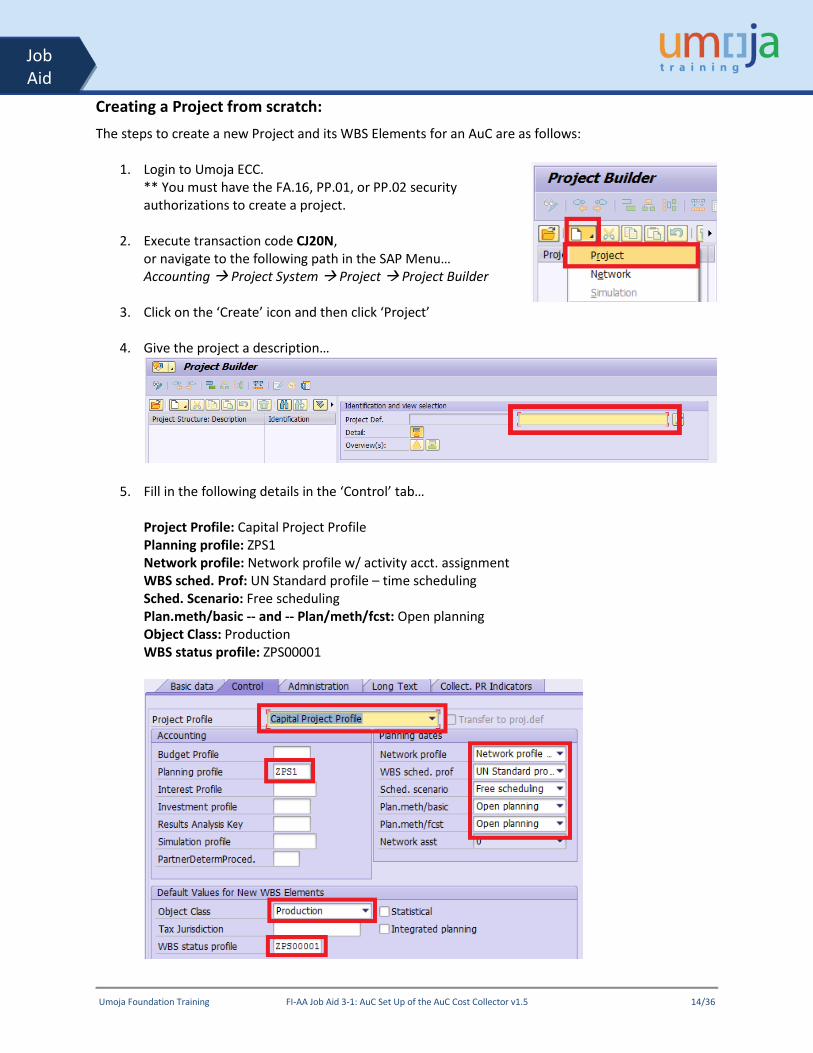
Creating a Project from scratch: The steps to create a new Project and its WBS Elements for an AuC are as follows:
1. Login to Umoja ECC. ** You must have the FA.16, PP.01, or PP.02 security authorizations to create a project.
2. Execute transaction code CJ20N, or navigate to the following path in the SAP Menu… Accounting Project System Project Project Builder
3. Click on the ‘Create’ icon and then click ‘Project’
4. Give the project a description…
5. Fill in the following details in the ‘Control’ tab… Project Profile: Capital Project Profile Planning profile: ZPS1 Network profile: Network profile w/ activity acct. assignment WBS sched. Prof: UN Standard profile – time scheduling Sched. Scenario: Free scheduling Plan.meth/basic -- and -- Plan/meth/fcst: Open planning Object Class: Production WBS status profile: ZPS00001

Umoja Foundation Training FI-AA Job Aid 3-1: AuC Set Up of the AuC Cost Collector v1.5 15/36
Job Aid
6. Fill out the following details on the ‘Basic’ tab, and then press Enter. Pers.Resp.No.: The role responsible for this project. This will usually be 10000002 - Programme Mgmt Officer. Start date and Finish date: Estimated (and adjustable) dates for projects start/finish. Factory calend.: Most should use calendar 99 Business area and Functional Area: Select as appropriate for this project. Profit Center: Enter the default profit center ‘9999’
7. Now, create the first WBS Element. Right-click on the Project Definition from the Project Structure Tree and then select ‘Create WBS element’.
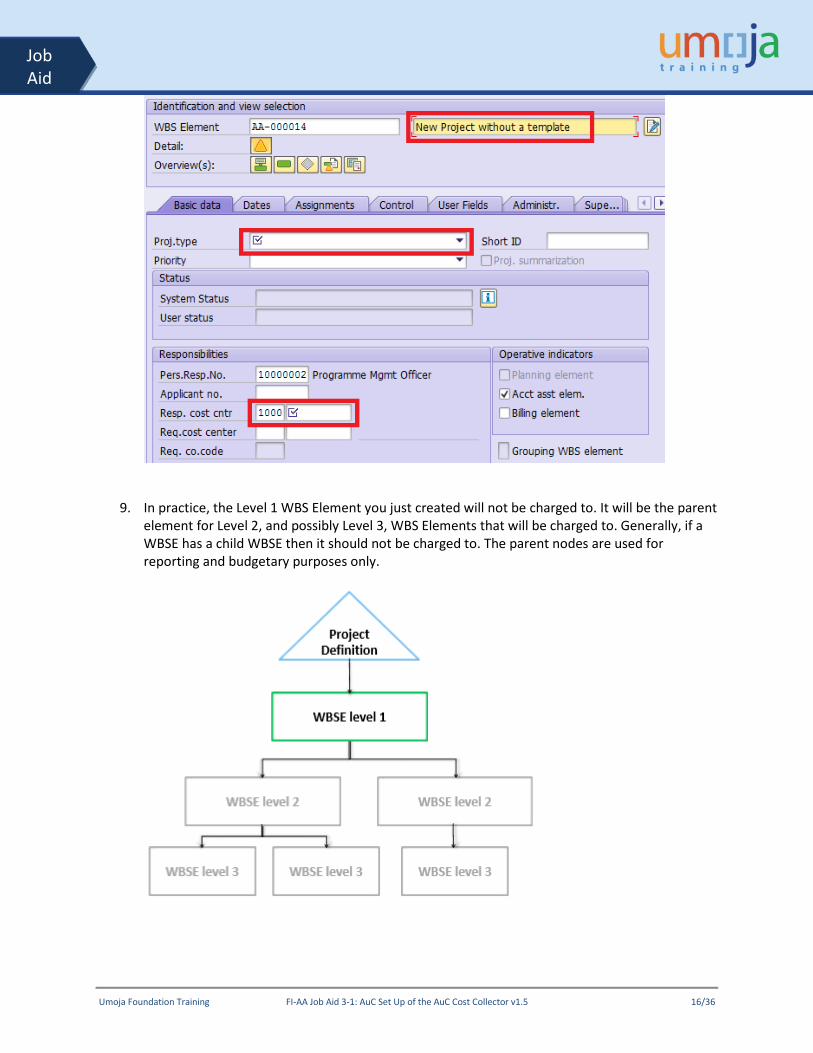
8. First, enter the description of the WBS Element. It should have the same description as the Project Definition that you created in steps 4 through 6. Next, fill out the following fields on the ‘Basic’ tab. Proj.type: Select either Facilities, ICT, or Substantive Capital Projects. Resp. cost cntr: Enter the company code (1000) and Cost Center for this WBS Element.
Umoja Foundation Training FI-AA Job Aid 3-1: AuC Set Up of the AuC Cost Collector v1.5 16/36
Job Aid
9. In practice, the Level 1 WBS Element you just created will not be charged to. It will be the parent element for Level 2, and possibly Level 3, WBS Elements that will be charged to. Generally, if a WBSE has a child WBSE then it should not be charged to. The parent nodes are used for reporting and budgetary purposes only.
Umoja Foundation Training FI-AA Job Aid 3-1: AuC Set Up of the AuC Cost Collector v1.5 17/36
Job Aid
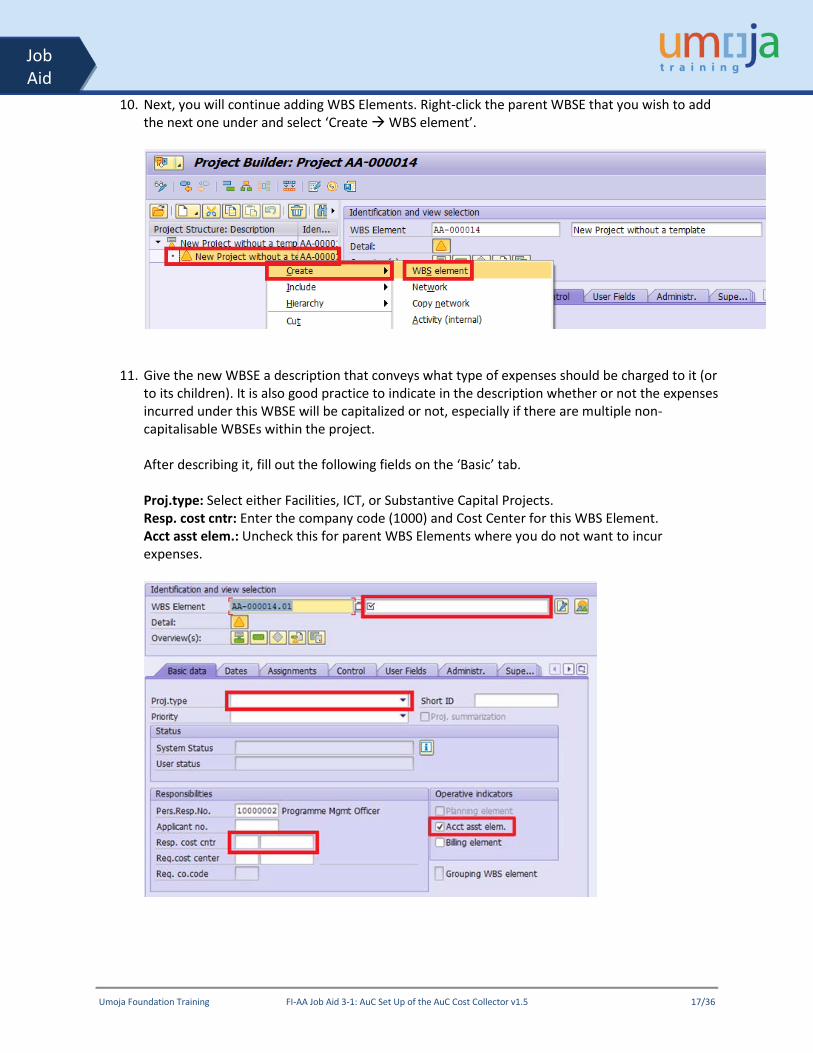
10. Next, you will continue adding WBS Elements. Right-click the parent WBSE that you wish to add the next one under and select ‘Create WBS element’.
11. Give the new WBSE a description that conveys what type of expenses should be charged to it (or to its children). It is also good practice to indicate in the description whether or not the expenses incurred under this WBSE will be capitalized or not, especially if there are multiple non-capitalisable WBSEs within the project. After describing it, fill out the following fields on the ‘Basic’ tab. Proj.type: Select either Facilities, ICT, or Substantive Capital Projects. Resp. cost cntr: Enter the company code (1000) and Cost Center for this WBS Element. Acct asst elem.: Uncheck this for parent WBS Elements where you do not want to incur expenses.
Umoja Foundation Training FI-AA Job Aid 3-1: AuC Set Up of the AuC Cost Collector v1.5 18/36
Job Aid
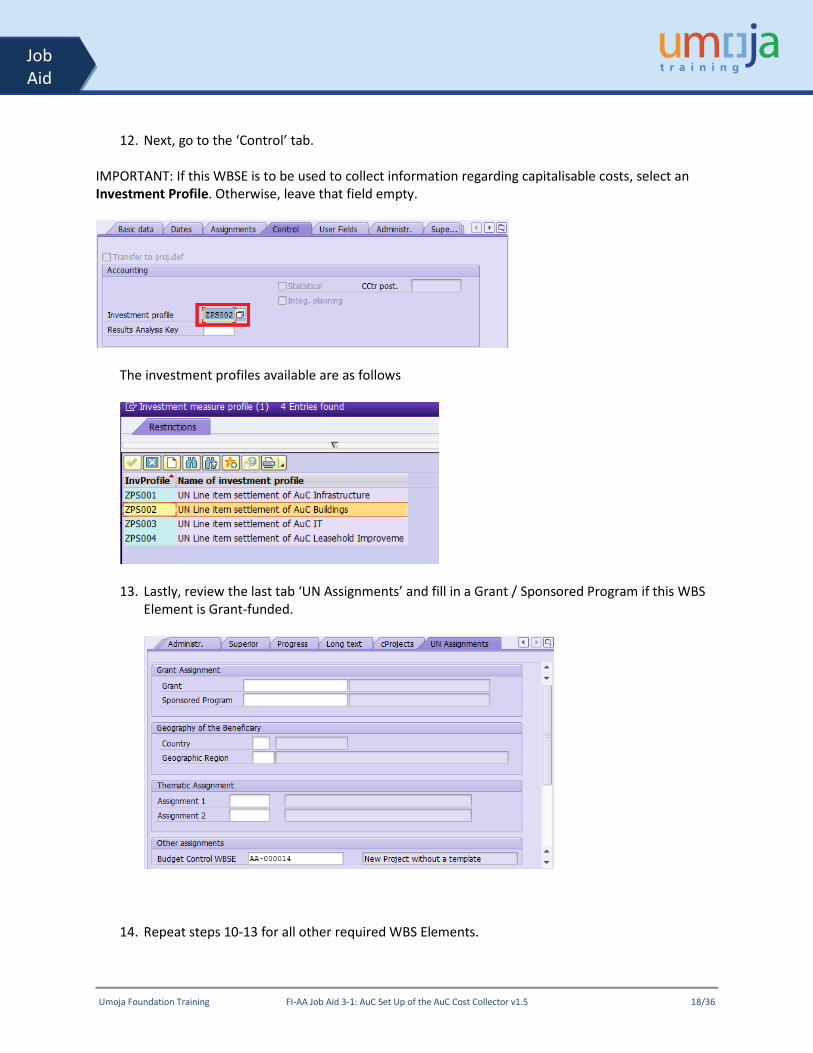
12. Next, go to the ‘Control’ tab.
IMPORTANT: If this WBSE is to be used to collect information regarding capitalisable costs, select an Investment Profile. Otherwise, leave that field empty.
The investment profiles available are as follows
13. Lastly, review the last tab ‘UN Assignments’ and fill in a Grant / Sponsored Program if this WBS
Element is Grant-funded.
14. Repeat steps 10-13 for all other required WBS Elements.

Umoja Foundation Training FI-AA Job Aid 3-1: AuC Set Up of the AuC Cost Collector v1.5 19/36
Job Aid
15. As mentioned in the earlier section, if you expect to have capitalisable charges that will be distributed across multiple final assets or subcomponents when the project is completed and you cannot define a % split when the shopping cart/Purchase order is set up, you can add an extra WBS Element to collect these costs during construction/development, calling this WBSE “Other Capitalisable Costs”. At final project settlement, you settle these charges to multiple final assets on a percentage basis (this will be covered in Job Aid JA3-3). It is recommended that you keep charges to this WBSE to a minimum to avoid a lengthly review process of expenses charged to this WBSE when the AuC is finalised.
16. When you have added all required WBS Elements, save the project by clicking on the ‘Save’ icon at the top of the screen. You should see a message in the status bar similar to this, and the project will be closed.
17. After initiation creation, you will want to update the status of your project. In order to release the project, you will have to take 3 steps: First step: Update the User Status of each WBS Element from ‘10: IPP’ to ’20: UBR’ Second step: Update the User Status of each WBS Element from ’20: UBR’ to ’30: RFR’ Third step: Update the System Status of the Project Definition to Released. Instructions on changing the User Status and System Status are covered in the next section.
Umoja Foundation Training FI-AA Job Aid 3-1: AuC Set Up of the AuC Cost Collector v1.5 20/36
Job Aid
Updating the Project/WBSE Status: A project goes through several statuses before it can be used. There are actually two types of status in Umoja, ‘System Status’ and ‘User Status’. Each WBS Element, and the Project Definition, has its own status.
System Status User Status State of the Project / Actions
CRTD - Created
IPP – Initial Project Planning
Initial Status of Project / WBS Elements.
CRTD - Created
UBR – Under Budget Review
All WBS Elements have been defined and the project is ready to have budget allotted.
CRTD - Created
RFR – Ready for Release
Budget has been allotted. It is ready to be released. **Note: Only users assigned the FA.16 – Asset Accounting Senior User or PP.01 – Project Management Approver can set this status.
REL - Released RFR – Ready for Release
The project has been released. Individual WBS Elements can now have their User Status set to Ready for Release.
REL - Released RAB – Released and Budgeted
The project is Released and Budgeted. Goods and services can now be procured against these WBS Elements.
The steps to update a project’s User Status are as follows
1. Execute transaction code CJ20N,
or navigate to the following path in the SAP Menu… Accounting Project System Project Project Builder
2. Reopen the project you created earlier by either clicking on the ‘Open’ icon and entering the project definition number, or by clicking on the dropdown arrow ( ) next to ‘Last Projects Processed’ and double-clicking your new project.
User Status: IPP
• Initial Status. Work Breakdown Structure is being defined.
User Status: UBR
• Project and Work Breakdown Structure are finalized. Budget is being allocated and approved.
User Status: RFR
• Budget has been approved. Ready to be Released.
System Status: REL
• Project is released.
User Status: RAB
• Project is released, budgeted, and can be charged to.

Umoja Foundation Training FI-AA Job Aid 3-1: AuC Set Up of the AuC Cost Collector v1.5 21/36
Job Aid
3. To change the User Status for all WBS Elements, select the Level 1 WBS Element in the Project Tree and then select ‘Edit Status User Status Set & Pass On’ from the top menu bar.
4. Doubleclick on the new User Status you want to change to. Review the messages that are displayed in a new window and click on the green check to continue. Save the project.

Umoja Foundation Training FI-AA Job Aid 3-1: AuC Set Up of the AuC Cost Collector v1.5 22/36
Job Aid
The steps to update a project’s System Status to Released are as follows:
1. Execute transaction code CJ20N, or navigate to the following path in the SAP Menu… Accounting Project System Project Project Builder
2. Reopen the project you created earlier. All WBS Elements should be in status RFR (Ready for Release) in order to release the project.
3. Select the Project Definition (the top line in the Project Structure Tree) and then select ‘Edit Status Release’ from the top menu bar.

Umoja Foundation Training FI-AA Job Aid 3-1: AuC Set Up of the AuC Cost Collector v1.5 23/36
Job Aid
4. Save the Project.
5. Before posting to any of the WBS Elements, the User Status must be updated once again to RAB (Released and Budgeted). This should not be done, however, until budget has been allocated by FM or GM colleagues.
Umoja Foundation Training FI-AA Job Aid 3-1: AuC Set Up of the AuC Cost Collector v1.5 24/36
Job Aid
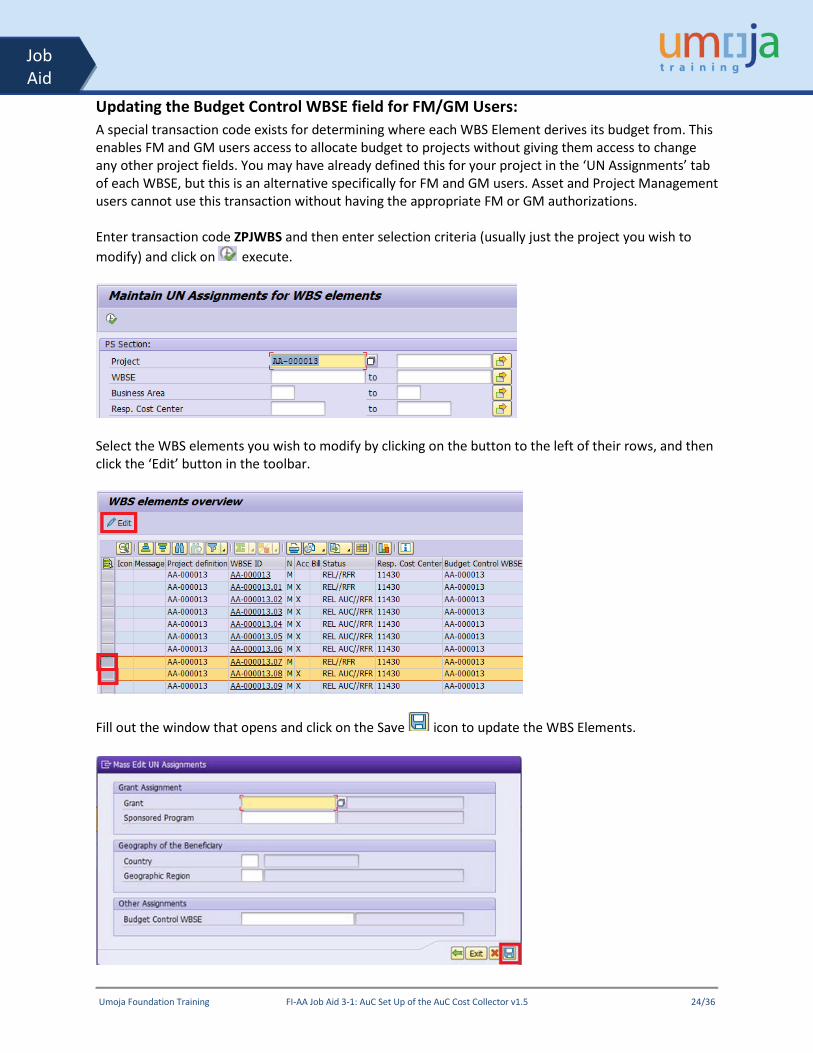
Updating the Budget Control WBSE field for FM/GM Users: A special transaction code exists for determining where each WBS Element derives its budget from. This enables FM and GM users access to allocate budget to projects without giving them access to change any other project fields. You may have already defined this for your project in the ‘UN Assignments’ tab of each WBSE, but this is an alternative specifically for FM and GM users. Asset and Project Management users cannot use this transaction without having the appropriate FM or GM authorizations. Enter transaction code ZPJWBS and then enter selection criteria (usually just the project you wish to modify) and click on execute.
Select the WBS elements you wish to modify by clicking on the button to the left of their rows, and then click the ‘Edit’ button in the toolbar.
Fill out the window that opens and click on the Save icon to update the WBS Elements.
Umoja Foundation Training FI-AA Job Aid 3-1: AuC Set Up of the AuC Cost Collector v1.5 25/36
Job Aid
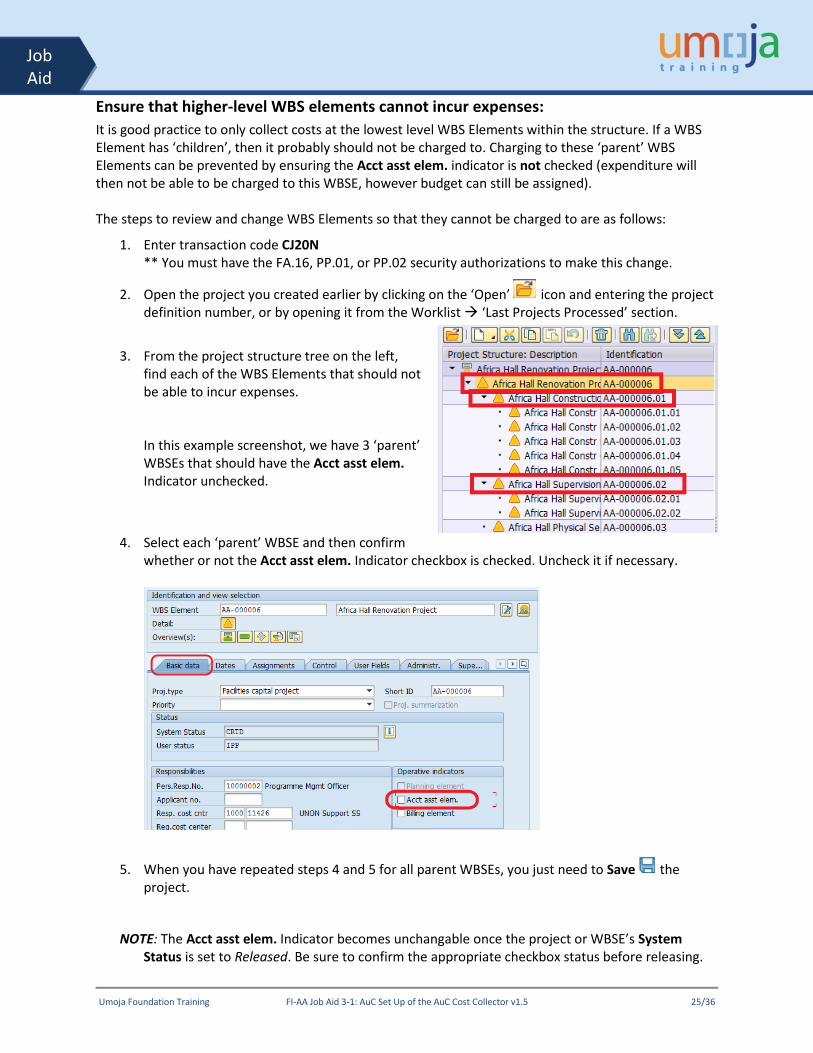
Ensure that higher-level WBS elements cannot incur expenses: It is good practice to only collect costs at the lowest level WBS Elements within the structure. If a WBS Element has ‘children’, then it probably should not be charged to. Charging to these ‘parent’ WBS Elements can be prevented by ensuring the Acct asst elem. indicator is not checked (expenditure will then not be able to be charged to this WBSE, however budget can still be assigned). The steps to review and change WBS Elements so that they cannot be charged to are as follows:
1. Enter transaction code CJ20N ** You must have the FA.16, PP.01, or PP.02 security authorizations to make this change.
2. Open the project you created earlier by clicking on the ‘Open’ icon and entering the project definition number, or by opening it from the Worklist ‘Last Projects Processed’ section.
3. From the project structure tree on the left, find each of the WBS Elements that should not be able to incur expenses. In this example screenshot, we have 3 ‘parent’ WBSEs that should have the Acct asst elem. Indicator unchecked.
4. Select each ‘parent’ WBSE and then confirm whether or not the Acct asst elem. Indicator checkbox is checked. Uncheck it if necessary.
5. When you have repeated steps 4 and 5 for all parent WBSEs, you just need to Save the project.
NOTE: The Acct asst elem. Indicator becomes unchangable once the project or WBSE’s System Status is set to Released. Be sure to confirm the appropriate checkbox status before releasing.

Umoja Foundation Training FI-AA Job Aid 3-1: AuC Set Up of the AuC Cost Collector v1.5 26/36
Job Aid
Review that budget has been assigned to the project: All projects will have one or more ‘Budget Control WBSEs’. These are WBSEs within the project that receive budget allocations. The other WBSEs on the project will reference these Budget Control WBSEs in the ‘UN Assignments’ tab and derive/share their budget from it. The following instructions detail how to review the status of budget for each Budget Control WBSE.
The steps to review the budget for a project are as follows:
1. Enter transaction code ZPJPRJBUDBAL ** Any Fixed Asset or Project Management users can access this transaction.
2. Enter the project or WBSEs that you wish to review and click on Execute.
3. You will see a report similar to the below summarizing the status of each Budget Control WBSE.
**Note: Take care to ensure that the Functional Area aligns correctly with the Cost Center. WBS Elements inherit the Functional Area from that of the Project Definition, so if the Cost Center has a different Functional Area then the Functional Area would need to be manually corrected. Use KS03 to review which Functional Area belongs to which Cost Center.
Umoja Foundation Training FI-AA Job Aid 3-1: AuC Set Up of the AuC Cost Collector v1.5 27/36
Job Aid
Create Settlement Rules for Non-Capitalisable WBS Elements: Settlement rules must be created for each WBS element that will be settled to a cost center (non-capitalisable AuC costs). This is not required forWBS elements that are settling to an AuC asset because those settlement rules are automatically generated during settlement (it will need to be done later however when you are settling to the final asset).
Notes:
• Settlement Rules must be maintained for the lowest level WBS elements where the expenditures have been incurred.
• If a service order is used, the expenditures incurred for the service order must first be settled to the project and then to the AuC.
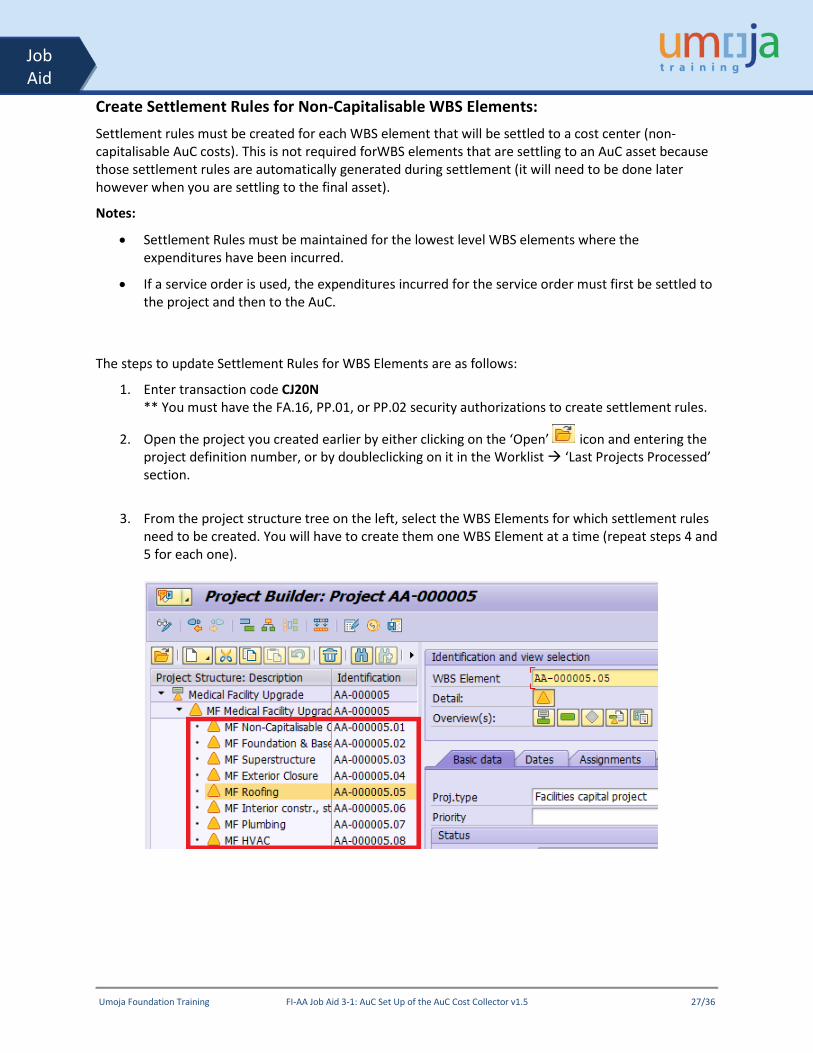
The steps to update Settlement Rules for WBS Elements are as follows:
1. Enter transaction code CJ20N ** You must have the FA.16, PP.01, or PP.02 security authorizations to create settlement rules.
2. Open the project you created earlier by either clicking on the ‘Open’ icon and entering the project definition number, or by doubleclicking on it in the Worklist ‘Last Projects Processed’ section.
3. From the project structure tree on the left, select the WBS Elements for which settlement rules need to be created. You will have to create them one WBS Element at a time (repeat steps 4 and 5 for each one).

Umoja Foundation Training FI-AA Job Aid 3-1: AuC Set Up of the AuC Cost Collector v1.5 28/36
Job Aid
4. Select the WBS Element and go to Edit > Costs > Settlement Rule from the top menu bar.
The Maintain Settlement Rule: Overview screen opens up for the selected WBS Element
5. Populate the following fields in the Maintain Settlement Rule: Overview screen:
• Category: CTR - This defines the settlement receiver type to be a cost center.
• Settlement Receiver: Enter the appropriate Cost Center (this is often the Responsible Cost Center of the WBSe)
• Settlement Percentage: 100%
If there is split settlement you may adjust the percentage here by adding multiple lines that sum to 100%.
• Settlement Type: PER (periodic settlement, the rule used for month end).
6. Press the Enter key on your keyboard, and then click the Save icon in the initial screen (the project builder).
Again note, for all WBS Elements with a selected Investment Profile, a Settlement Rule to the corresponding AuC will be generated automatically.

Umoja Foundation Training FI-AA Job Aid 3-1: AuC Set Up of the AuC Cost Collector v1.5 29/36
Job Aid
Define Investment Profile and Create AuC Asset after Project is already released: If your AuC project has already been released, but you need to add an Investment profile to it, there are a few additional steps to complete compared to adding an Investment profile to an unreleased project. 1. Execute Transaction code CJ20N and open the project.
2. Select the WBS Element you wish to create an Investment profile for. Go to the ‘Control’ tab.
3. From the Control tab, select the appropriate Investment profile for this WBS Element.
4. After selecting the investment profile, press the Enter key on your keyboard.
You should receive a warning message similar to the following… Press the Enter key again to dismiss this message.
5. On the next prompt, click ‘Yes’ to create an asset under construction for this WBS element.

Umoja Foundation Training FI-AA Job Aid 3-1: AuC Set Up of the AuC Cost Collector v1.5 30/36
Job Aid
6. On the next screen (‘Create Asset: Initial screen’), just click on the back button before going any further. If you instead hit enter at this screen or go further into to ‘Master data’, then you will be forced to enter a Fund and Budget Period for this AuC Asset before clicking the back button (adding a fund at this stage is not necessary).
7. After this the asset has been created in the background and the system has accepted the investment profile you entered. Don’t forget to save the project after this!
Umoja Foundation Training FI-AA Job Aid 3-1: AuC Set Up of the AuC Cost Collector v1.5 31/36
Job Aid
Section 2: Set up an AuC as an Internal Order
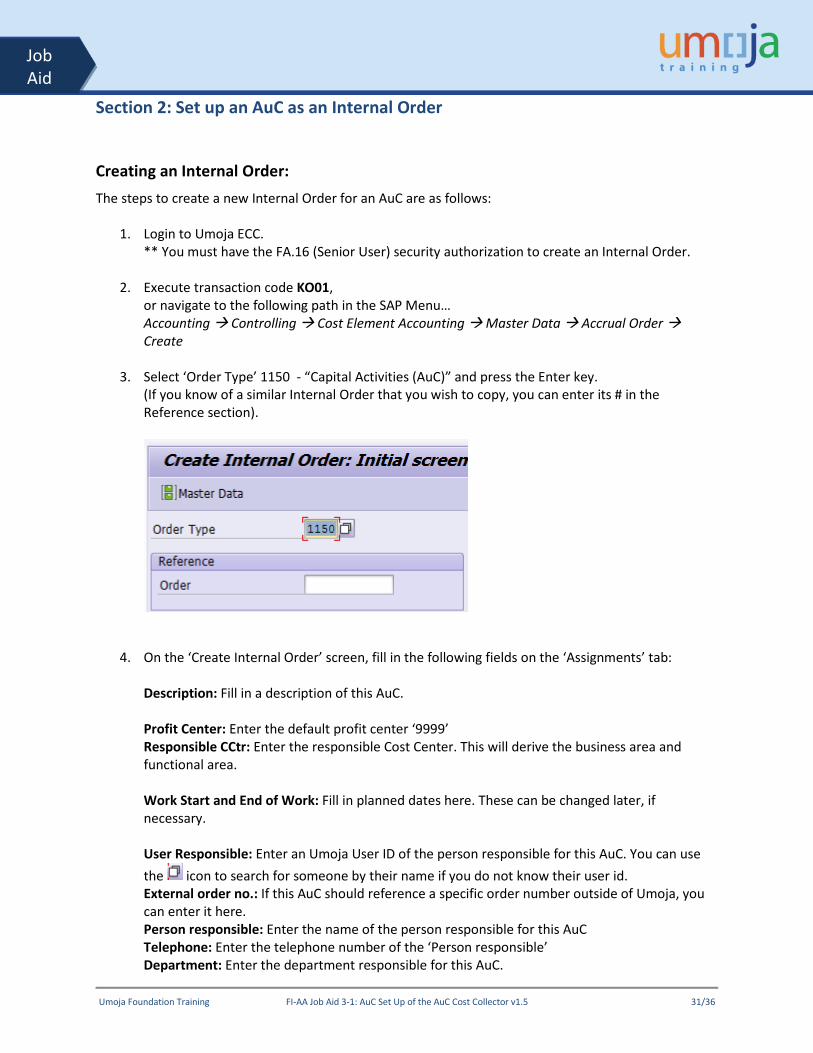
Creating an Internal Order: The steps to create a new Internal Order for an AuC are as follows:
1. Login to Umoja ECC. ** You must have the FA.16 (Senior User) security authorization to create an Internal Order.
2. Execute transaction code KO01, or navigate to the following path in the SAP Menu… Accounting Controlling Cost Element Accounting Master Data Accrual Order Create
3. Select ‘Order Type’ 1150 - “Capital Activities (AuC)” and press the Enter key. (If you know of a similar Internal Order that you wish to copy, you can enter its # in the Reference section).
4. On the ‘Create Internal Order’ screen, fill in the following fields on the ‘Assignments’ tab: Description: Fill in a description of this AuC. Profit Center: Enter the default profit center ‘9999’ Responsible CCtr: Enter the responsible Cost Center. This will derive the business area and functional area. Work Start and End of Work: Fill in planned dates here. These can be changed later, if necessary. User Responsible: Enter an Umoja User ID of the person responsible for this AuC. You can use the icon to search for someone by their name if you do not know their user id. External order no.: If this AuC should reference a specific order number outside of Umoja, you can enter it here. Person responsible: Enter the name of the person responsible for this AuC Telephone: Enter the telephone number of the ‘Person responsible’ Department: Enter the department responsible for this AuC.

Umoja Foundation Training FI-AA Job Aid 3-1: AuC Set Up of the AuC Cost Collector v1.5 32/36
Job Aid
5. You can skip the ‘Control data’ and ‘Prd-end closing’ tabs.
6. On the ‘UN Assignments’ tab, fill in Grant and Sponsored Program if this AuC is grant-funded.

Umoja Foundation Training FI-AA Job Aid 3-1: AuC Set Up of the AuC Cost Collector v1.5 33/36
Job Aid
7. On the ‘Investments’ tab, select an appropriate Investment Profile from the list depending on if the Asset under Construction is an Infrastructure, a Building, an IT / Intangible asset, or a Leasehold Improvement.
8. When you’re done, click on the Save icon. You should see the following informational message… Press the Enter key to proceed.
You will then see this prompt… Choose ‘Yes’ to create the AuC asset master now.
Umoja Foundation Training FI-AA Job Aid 3-1: AuC Set Up of the AuC Cost Collector v1.5 34/36
Job Aid
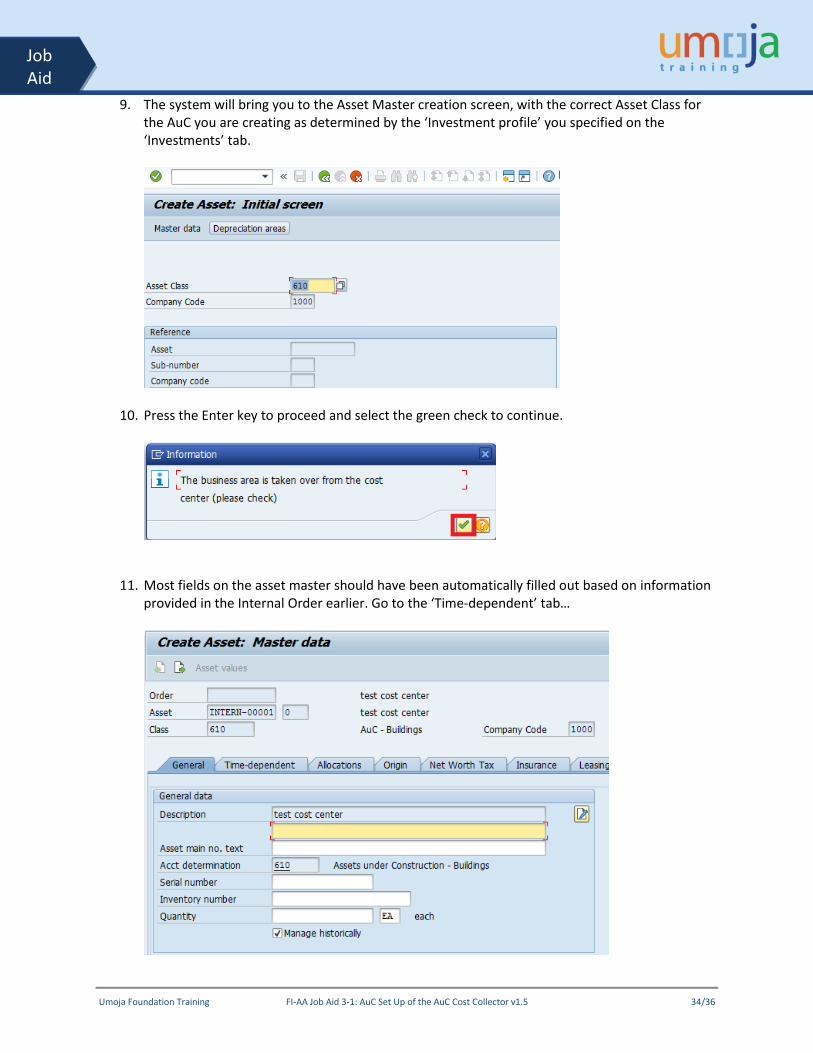
9. The system will bring you to the Asset Master creation screen, with the correct Asset Class for the AuC you are creating as determined by the ‘Investment profile’ you specified on the ‘Investments’ tab.
10. Press the Enter key to proceed and select the green check to continue.
11. Most fields on the asset master should have been automatically filled out based on information provided in the Internal Order earlier. Go to the ‘Time-dependent’ tab…

Umoja Foundation Training FI-AA Job Aid 3-1: AuC Set Up of the AuC Cost Collector v1.5 35/36
Job Aid
12. On the ‘Time-dependent’ tab, enter the Fund and the other fields should derive from the Cost Center & Fund. Note that the Cost Center came from the responsible cost center on the Internal Order.
13. On the ‘Net Worth Tax’ tab, fill in the Property indicator, this will often be ‘2 – Owned Constructed‘.
Umoja Foundation Training FI-AA Job Aid 3-1: AuC Set Up of the AuC Cost Collector v1.5 36/36
Job Aid
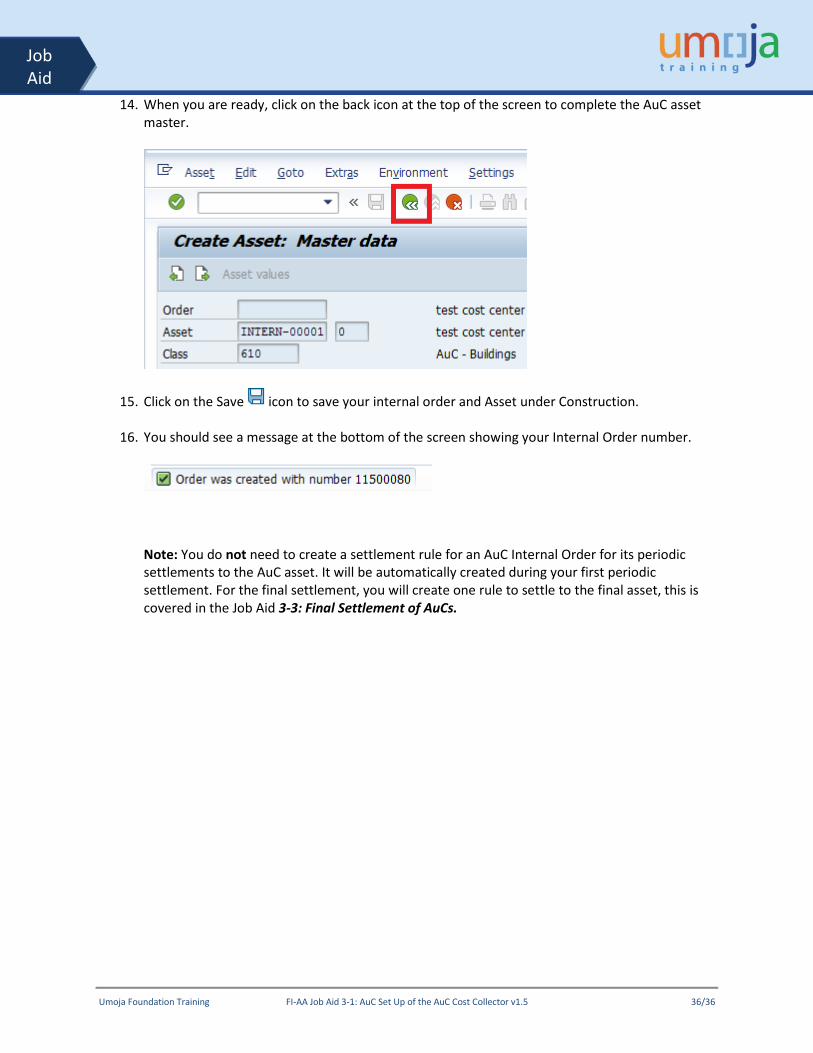
14. When you are ready, click on the back icon at the top of the screen to complete the AuC asset master.
15. Click on the Save icon to save your internal order and Asset under Construction.
16. You should see a message at the bottom of the screen showing your Internal Order number.
Note: You do not need to create a settlement rule for an AuC Internal Order for its periodic settlements to the AuC asset. It will be automatically created during your first periodic settlement. For the final settlement, you will create one rule to settle to the final asset, this is covered in the Job Aid 3-3: Final Settlement of AuCs.