Embed Size (px)
Citation preview

608: Advanced Configuration of XenApp and XenDesktop 7.6 using the PowerShell SDK
Hands-on Lab Exercise Guide
Kimberly Ferrie
May 2015
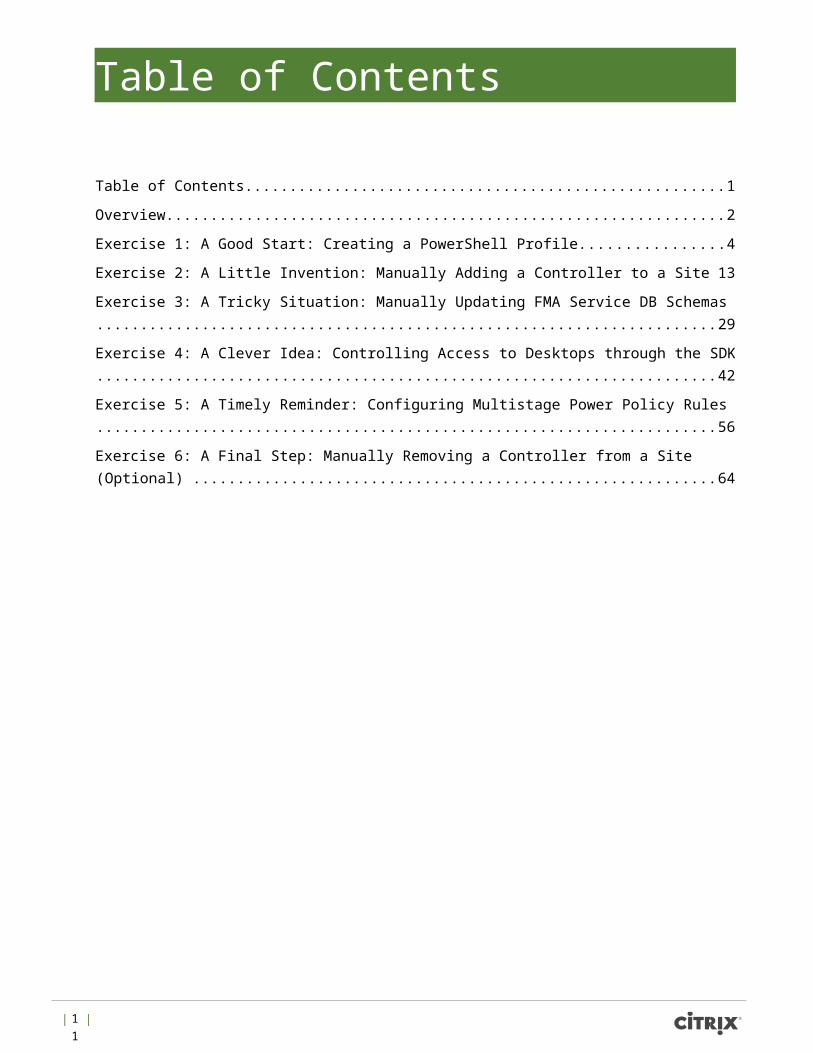
Table of Contents
Table of Contents...............................................................................................................................1
Overview............................................................................................................................................2
Exercise 1: A Good Start: Creating a PowerShell Profile...................................................................4
Exercise 2: A Little Invention: Manually Adding a Controller to a Site.............................................13
Exercise 3: A Tricky Situation: Manually Updating FMA Service DB Schemas...............................29
Exercise 4: A Clever Idea: Controlling Access to Desktops through the SDK.................................42
Exercise 5: A Timely Reminder: Configuring Multistage Power Policy Rules .................................56
Exercise 6: A Final Step: Manually Removing a Controller from a Site (Optional) .........................64
| 1 |

Overview Hands-on Training Module
Objective This training will provide hands-on experience with carrying out XenApp and XenDesktop 7.6 advanced administration & configuration tasks.
Prerequisites Basic XenDesktop 5.x/7.x and or XenApp 7.x administration and configuration knowledge would be beneficial but not essential.
Audience Citrix Partners, Customers, Sales Engineers, Consultants, Technical Support.
Lab Environment Details
The Student Desktop is accessed remotely using Citrix Receiver running on your laptop. All windows applications such as XenCenter, (the XenServer GUI management tool) and Remote Desktop Manager are accessed from shortcuts on the Student Desktop.
For convenience, two methods can be used to access the lab VM’s:
1. XenCenter
2. Remote Desktop Manager
Note: If you encounter the following message at any point during the lab exercises, click Restart Later:
| 2 |
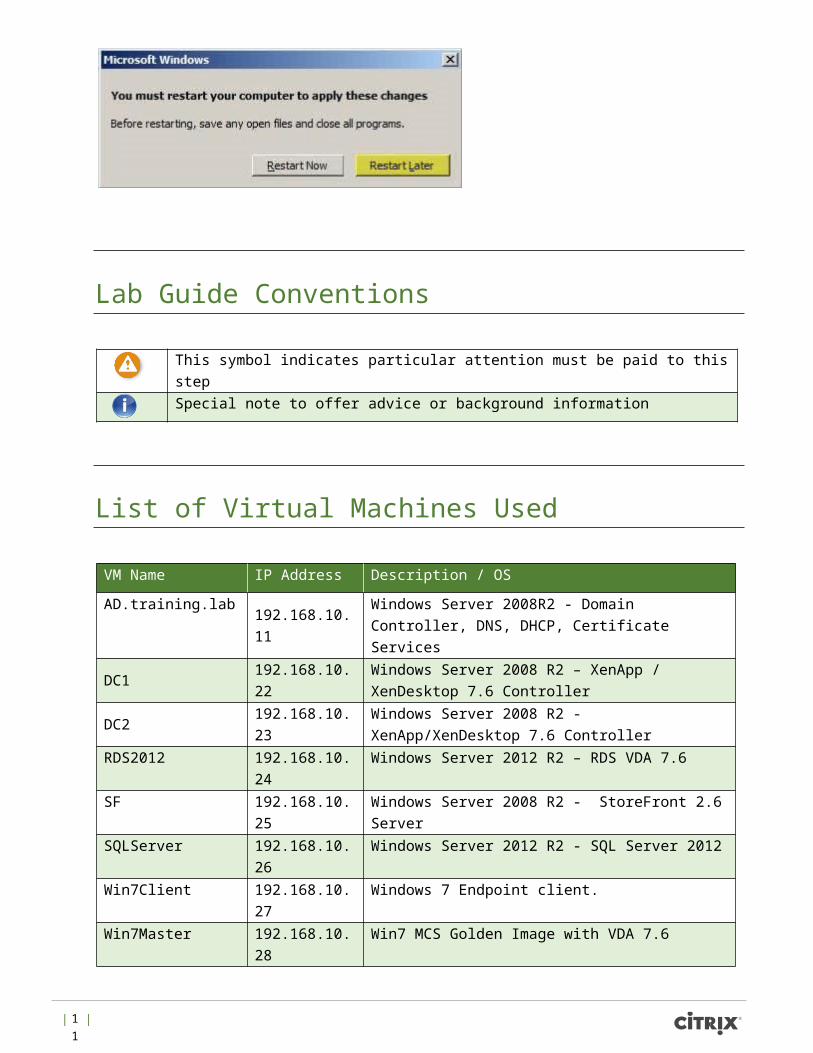
Lab Guide Conventions
This symbol indicates particular attention must be paid to this step
Special note to offer advice or background information
List of Virtual Machines Used
VM Name IP Address Description / OS
AD.training.lab 192.168.10.11
Windows Server 2008R2 - Domain Controller, DNS, DHCP, Certificate Services
DC1 192.168.10.22 Windows Server 2008 R2 – XenApp / XenDesktop 7.6 Controller
DC2 192.168.10.23 Windows Server 2008 R2 - XenApp/XenDesktop 7.6 Controller
RDS2012 192.168.10.24 Windows Server 2012 R2 – RDS VDA 7.6 SF 192.168.10.25 Windows Server 2008 R2 - StoreFront 2.6 Server SQLServer 192.168.10.26 Windows Server 2012 R2 - SQL Server 2012 Win7Client 192.168.10.27 Windows 7 Endpoint client. Win7Master 192.168.10.28 Win7 MCS Golden Image with VDA 7.6 Win7VDA75 192.168.10.29 Win7 VDA 7.5 with Hotfixes Win7VM 192.168.10.30 Win7 VDA v7.6 Win8VM 192.168.10.31 Win 8.1 VDA v7.6
Required Lab Credentials
The credentials required to connect to the environment and complete the lab exercises. VM Name Username Password
AD.training.lab training\administrator Citrix123 DC1 training\administrator Citrix123 DC2 training\administrator Citrix123 RDS2012 training\administrator Citrix123 SF2 training\administrator Citrix123
| 3 |
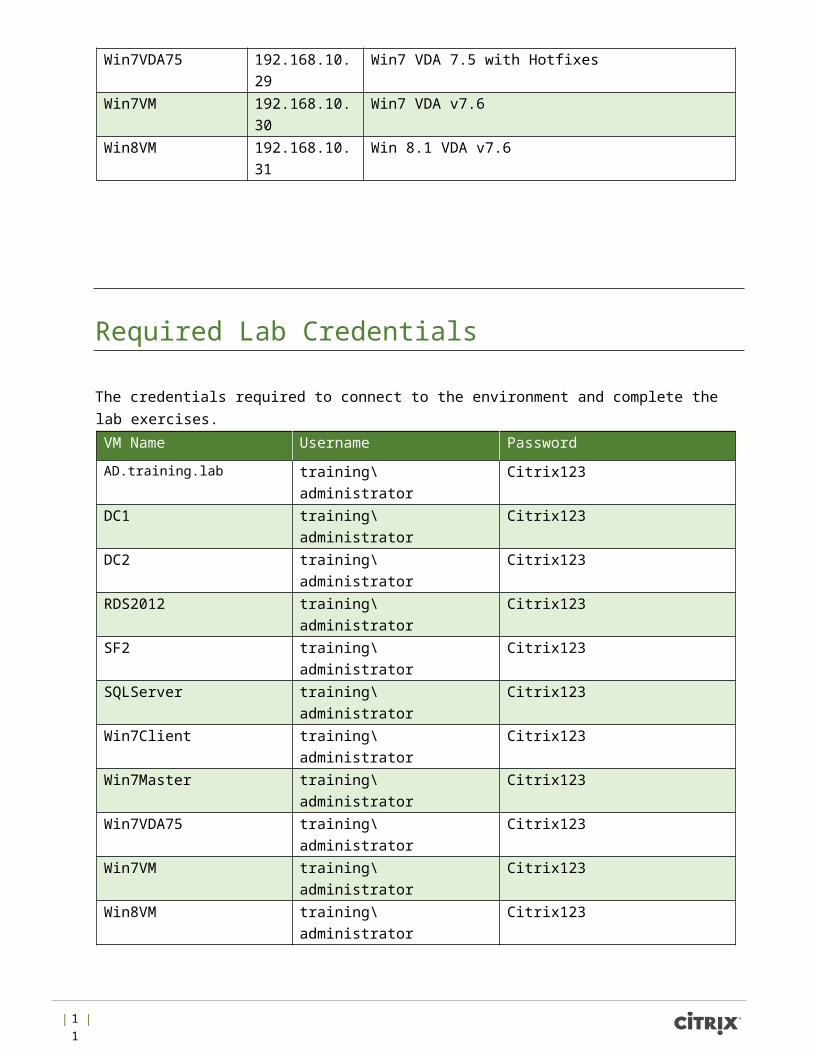
SQLServer training\administrator Citrix123 Win7Client training\administrator Citrix123 Win7Master training\administrator Citrix123 Win7VDA75 training\administrator Citrix123 Win7VM training\administrator Citrix123 Win8VM training\administrator Citrix123
Exercise 1 A Good Start: Creating a PowerShell Profile
Overview In this exercise we will create a customized PowerShell (PoSH) Profile so that the required functionality to interact with our XenDesktop Site is available each time we start a PoSH instance.
Step by step guidance Estimated time to complete this lab: 20 minutes.
Step
1. Login to DC1 as training\administrator with password Citrix123 and launch a PowerShell window by clicking on the PoSH icon on the taskbar:
2. Type Test-Path $PROFILE to check for the existence of a previously configured Profile on DC1:
Note: A return value of False indicates that a PoSH Profile does not exist and therefore must be created. This is the expected behavior.
| 4 |

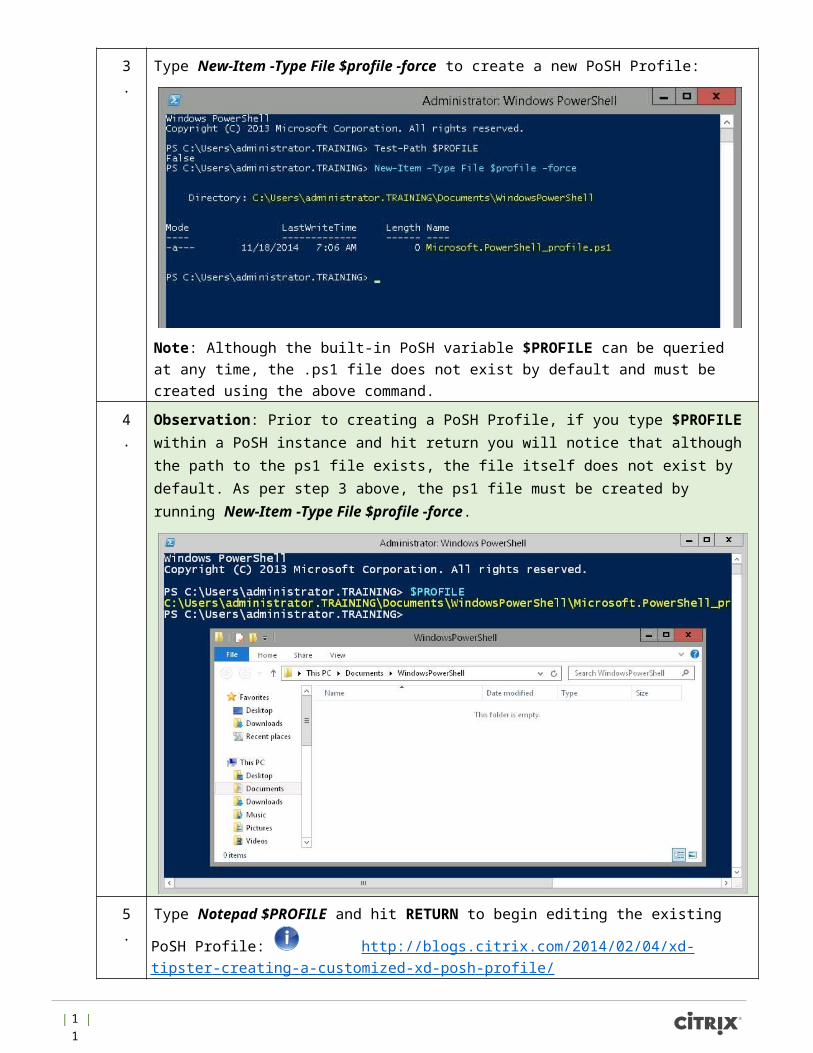
3. Type New-Item -Type File $profile -force to create a new PoSH Profile:
Note: Although the built-in PoSH variable $PROFILE can be queried at any time, the .ps1 file does not exist by default and must be created using the above command.
4. Observation: Prior to creating a PoSH Profile, if you type $PROFILE within a PoSH instance and hit return you will notice that although the path to the ps1 file exists, the file itself does not exist by default. As per step 3 above, the ps1 file must be created by running New-Item -Type File $profile -force.
5. Type Notepad $PROFILE and hit RETURN to begin editing the existing PoSH Profile: http://blogs.citrix.com/2014/02/04/xd - tipster - creating - a - customized - xd - posh - profile/
| 5 |
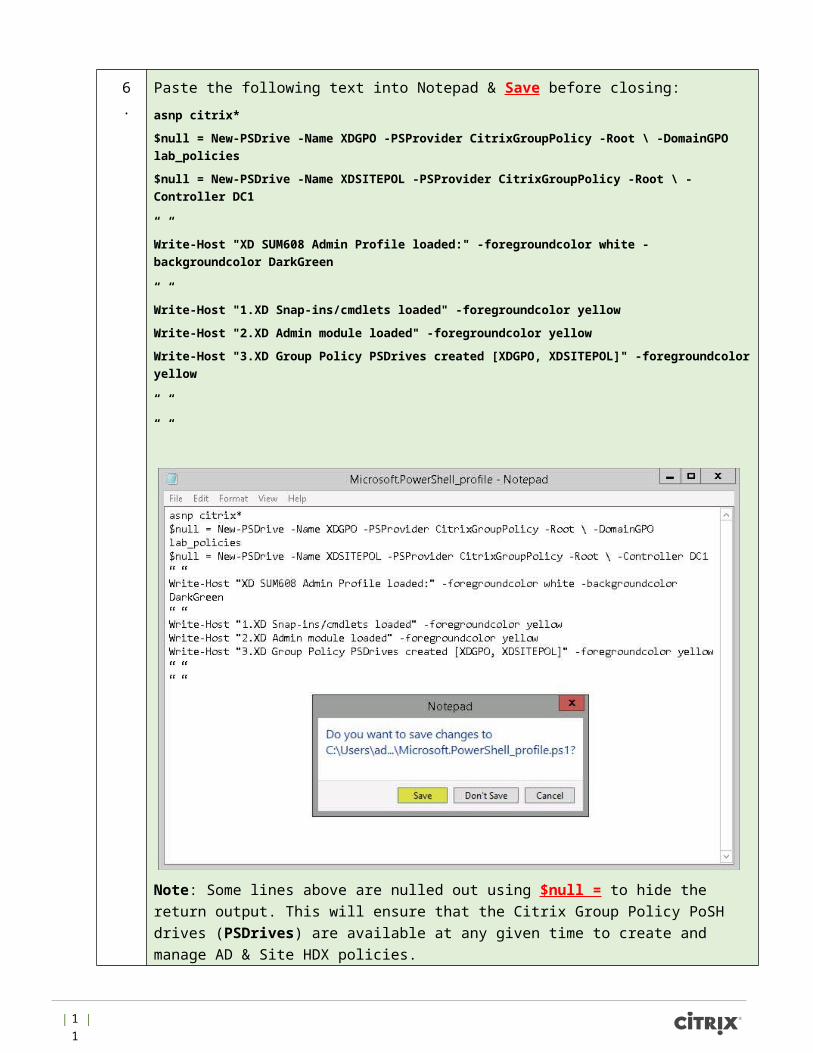
6. Paste the following text into Notepad & Save before closing: asnp citrix* $null = New-PSDrive -Name XDGPO -PSProvider CitrixGroupPolicy -Root \ -DomainGPO lab_policies $null = New-PSDrive -Name XDSITEPOL -PSProvider CitrixGroupPolicy -Root \ -Controller DC1
“ “ Write-Host "XD SUM608 Admin Profile loaded:" -foregroundcolor white -backgroundcolor DarkGreen
“ “ Write-Host "1.XD Snap-ins/cmdlets loaded" -foregroundcolor yellow Write-Host "2.XD Admin module loaded" -foregroundcolor yellow Write-Host "3.XD Group Policy PSDrives created [XDGPO, XDSITEPOL]" -foregroundcolor yellow
“ “
“ “
Note: Some lines above are nulled out using $null = to hide the return output. This will ensure that the Citrix Group Policy PoSH drives (PSDrives) are available at any given time to create and manage AD & Site HDX policies.
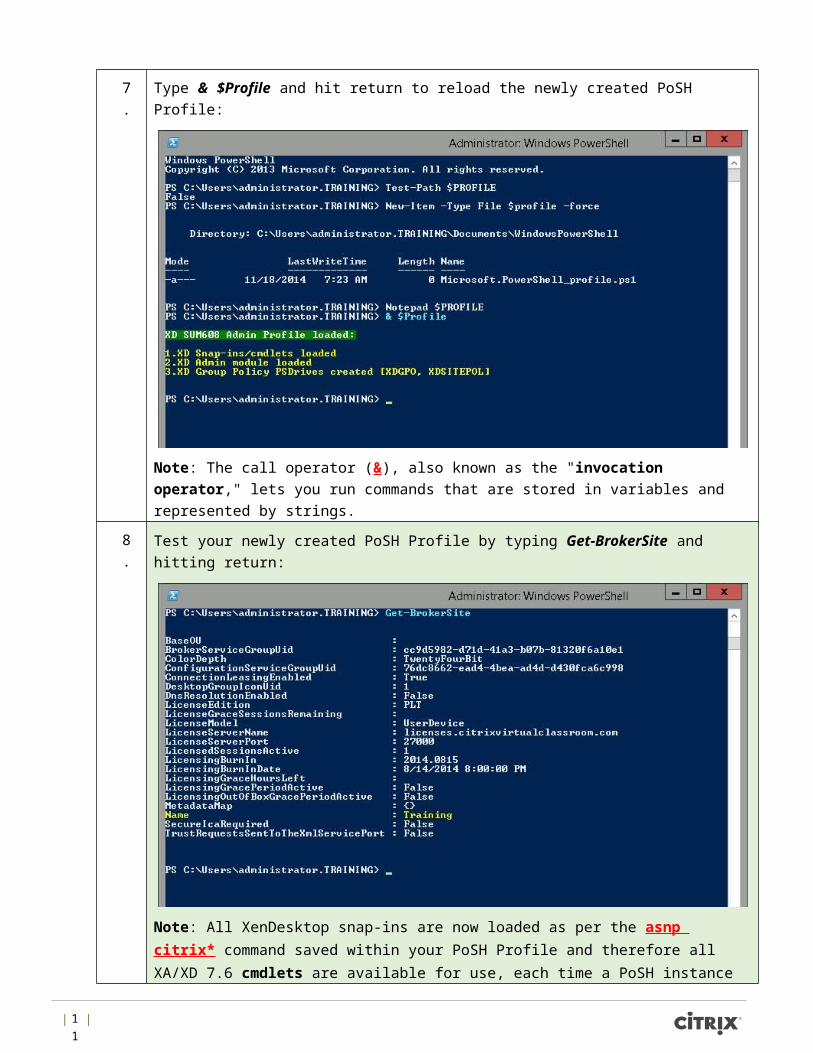
7. Type & $Profile and hit return to reload the newly created PoSH Profile:
| 6 |
Note: The call operator (&), also known as the "invocation operator," lets you run commands that are stored in variables and represented by strings.
8. Test your newly created PoSH Profile by typing Get-BrokerSite and hitting return:
Note: All XenDesktop snap-ins are now loaded as per the asnp citrix* command saved within your PoSH Profile and therefore all XA/XD 7.6 cmdlets are available for use, each time a PoSH instance is launched.
Get-BrokerSite returns a number of key details about the Training site.
| 7 |
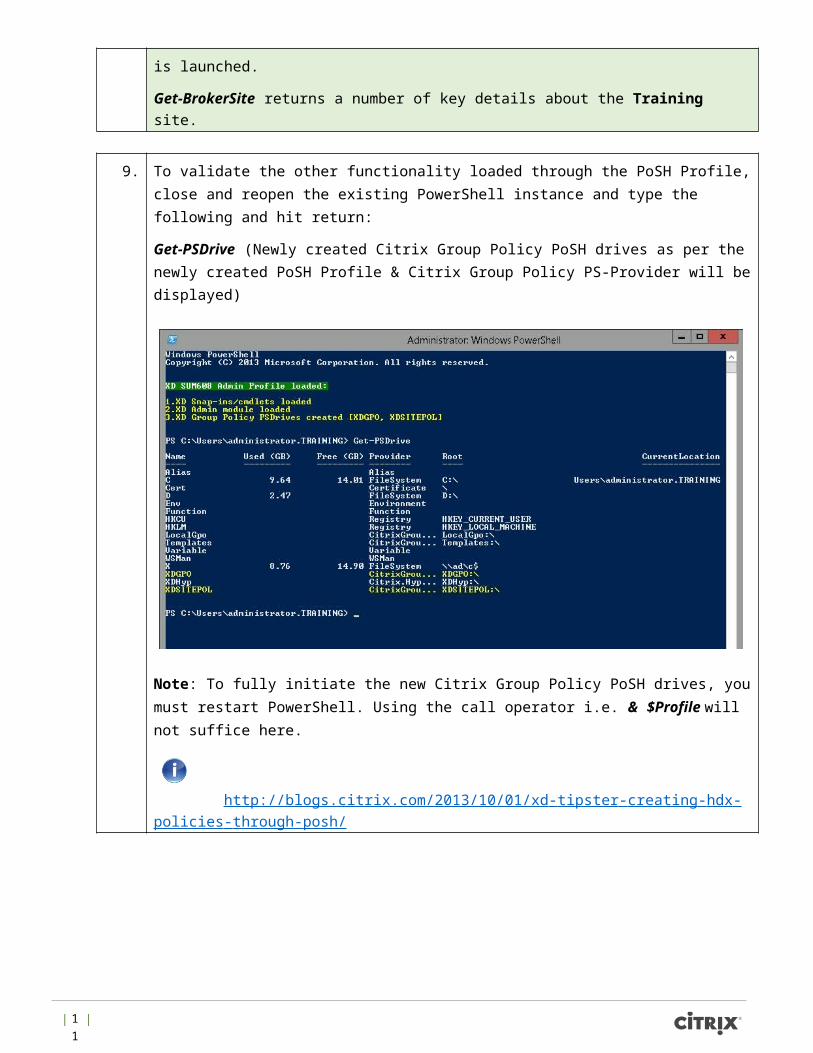
9. To validate the other functionality loaded through the PoSH Profile, close and reopen the existing PowerShell instance and type the following and hit return:
Get-PSDrive (Newly created Citrix Group Policy PoSH drives as per the newly created PoSH Profile & Citrix Group Policy PS-Provider will be displayed)
Note: To fully initiate the new Citrix Group Policy PoSH drives, you must restart PowerShell. Using the call operator i.e. & $Profile will not suffice here.
http://blogs.citrix.com/2013/10/01/xd - tipster - creating - hdx - policies - through - posh/
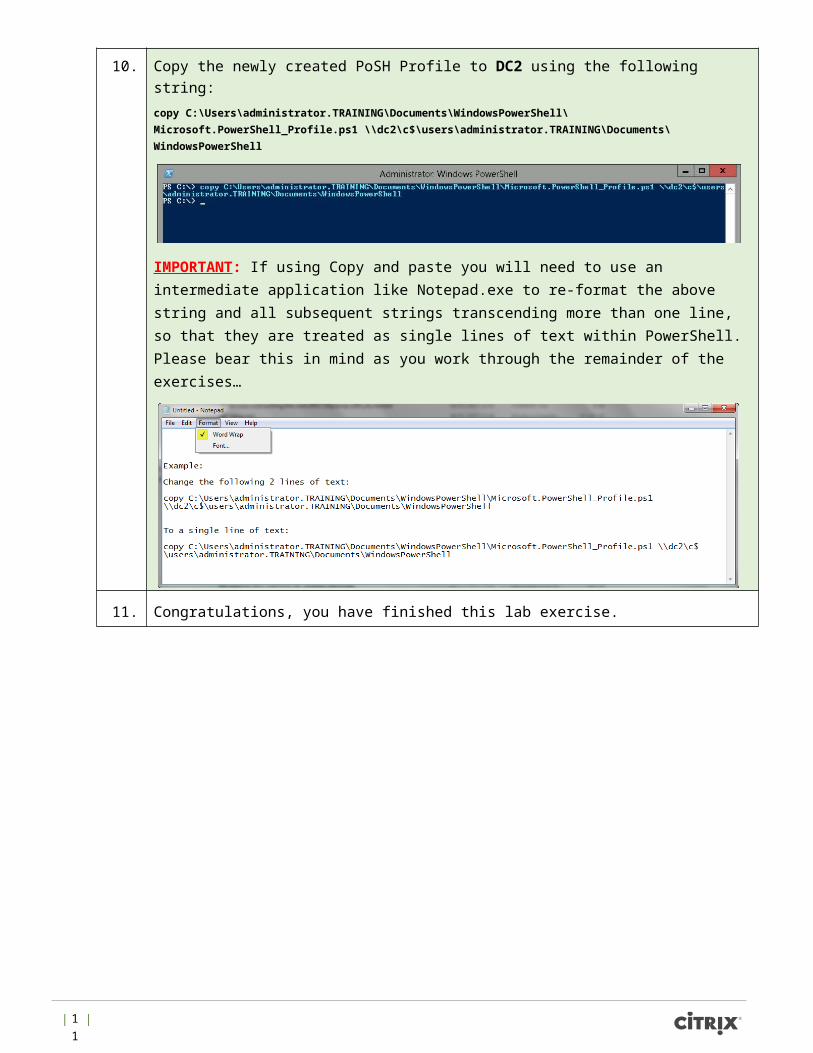
10. Copy the newly created PoSH Profile to DC2 using the following string: copy C:\Users\administrator.TRAINING\Documents\WindowsPowerShell\Microsoft.PowerShell_Profile.ps1 \\dc2\c$\users\administrator.TRAINING\Documents\WindowsPowerShell
IMPORTANT: If using Copy and paste you will need to use an intermediate application like Notepad.exe to re-format the above string and all subsequent strings transcending more than one line, so that they are treated as single lines of text within PowerShell. Please bear this in mind as you work through the remainder of the exercises…
| 8 |
11. Congratulations, you have finished this lab exercise.
| 9 |
Exercise Summary
Takeaways from this exercise:
• During this first exercise we learned how to customize a working XenDesktop PoSH environment through the use of a PoSH Profile. Similar to a User Profile, a PoSH Profile loads each time an instance of PoSH is launched and configures the PoSH env as per the user’s unique needs.
• For more information about creating a customized XD PoSH Profile see the following XD
Tipster blog post: http://blogs.citrix.com/2014/02/04/xd - tipster - creating - a - customized - xd -
posh - profile/
• For more cool info & tips on XenDesktop follow @XDtipster and @XDInformer on twitter.
| 10 |
Exercise 2 A Little Invention: Manually Adding a Controller to a Site
Overview In this exercise you will learn how to manually add a controller to a site DB; simulating a situation where you do not have an existing Controller to facilitate the process. In the real world, this may be required when restoring a customer’s DB in house or in Disaster Recovery situations.
Step by step guidance Estimated time to complete this lab: 45 minutes.
Step Action
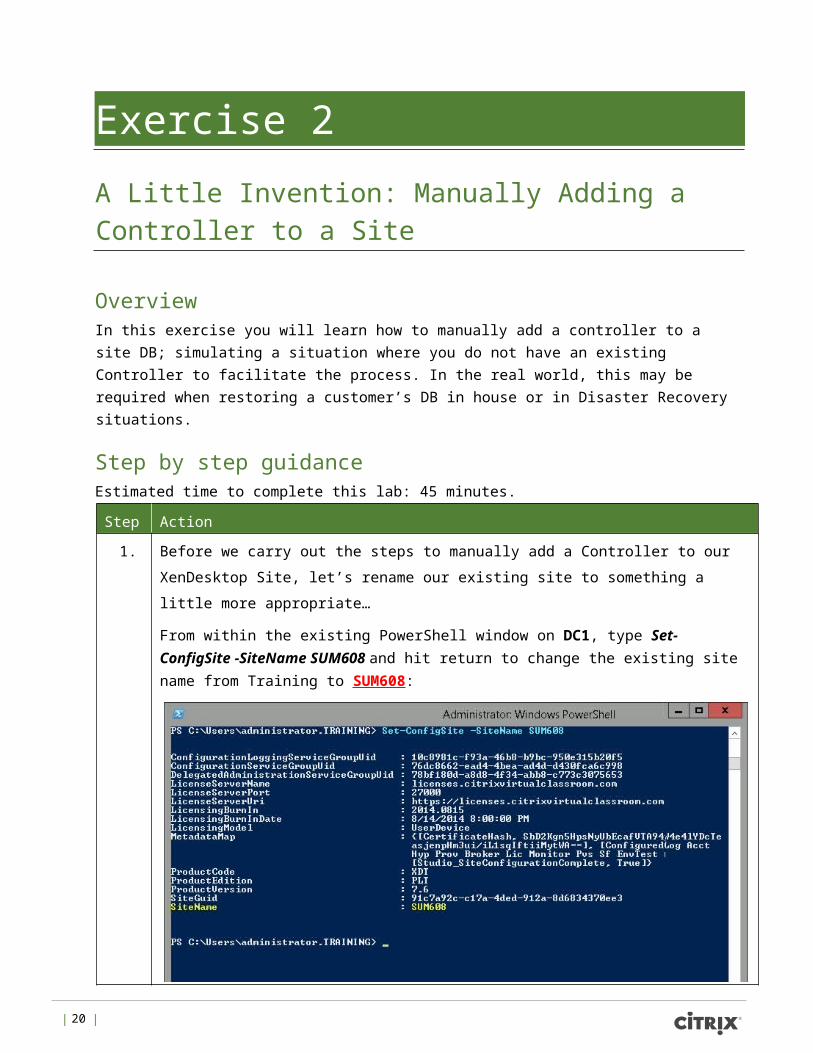
1. Before we carry out the steps to manually add a Controller to our XenDesktop Site, let’s rename our existing site to something a little more appropriate…
From within the existing PowerShell window on DC1, type Set-ConfigSite -SiteName SUM608 and hit return to change the existing site name from Training to SUM608:
| 11 |
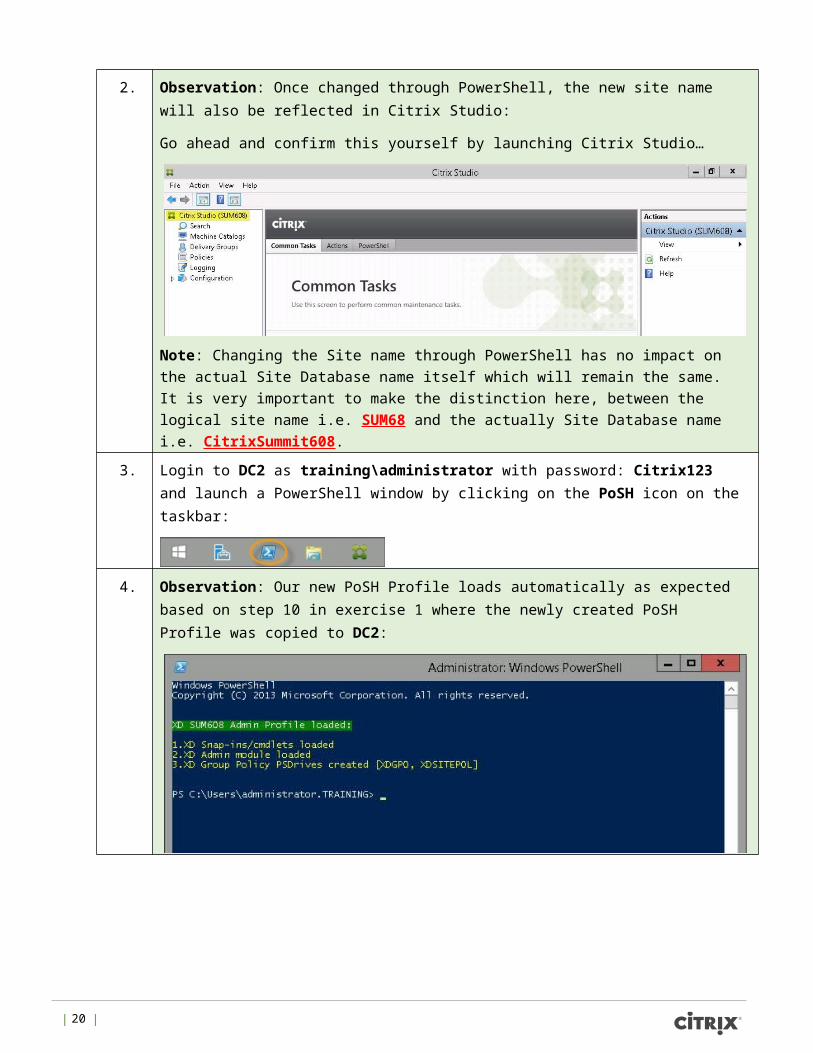
2. Observation: Once changed through PowerShell, the new site name will also be reflected in Citrix Studio:
Go ahead and confirm this yourself by launching Citrix Studio…
Note: Changing the Site name through PowerShell has no impact on the actual Site Database name itself which will remain the same. It is very important to make the distinction here, between the logical site name i.e. SUM68 and the actually Site Database name i.e. CitrixSummit608.
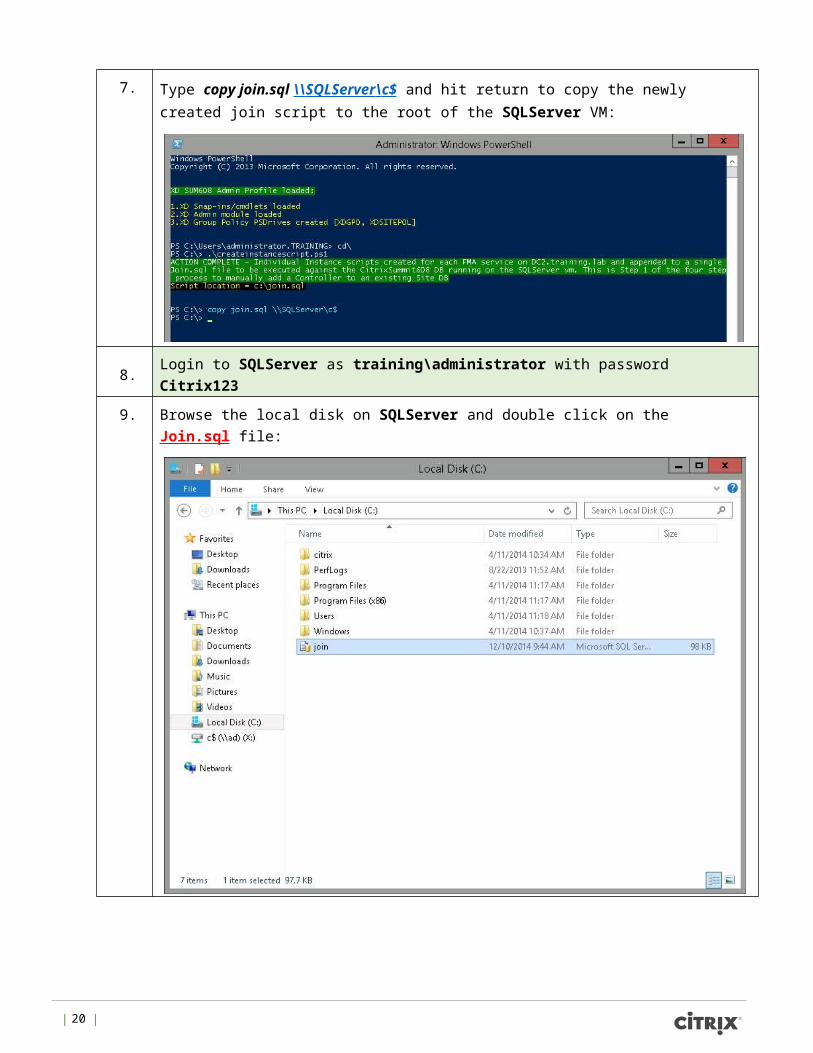
3. Login to DC2 as training\administrator with password: Citrix123 and launch a PowerShell window by clicking on the PoSH icon on the taskbar:
4. Observation: Our new PoSH Profile loads automatically as expected based on step 10 in exercise 1 where the newly created PoSH Profile was copied to DC2:
| 12 |
5. Run the following simple script from the root of PoSH: (To get to the root just type cd\ & hit return)
C:\> .\createinstancescript.ps1
Reminder: You should be running this script from DC2
6. Browse to the root of DC2 and open createinstancescript.ps1 with notepad to view the contents and script structure:
Note: The Get-<serviceALIAS>DBSchema cmdlet can be used to generate an instance script to add each service instance running on DC2 to the site DB (CitrixSummit608)
To optimize the process, you can see that we are using the | out-file –append switch so all service instance scripts are merged into a single .sql file. (Makes sense…)
| 13 |

7. Type copy join.sql \\ SQLServer \ c$ and hit return to copy the newly created join script to the root of the SQLServer VM:
8. Login to SQLServer as training\administrator with password Citrix123
9. Browse the local disk on SQLServer and double click on the Join.sql file:
| 14 |
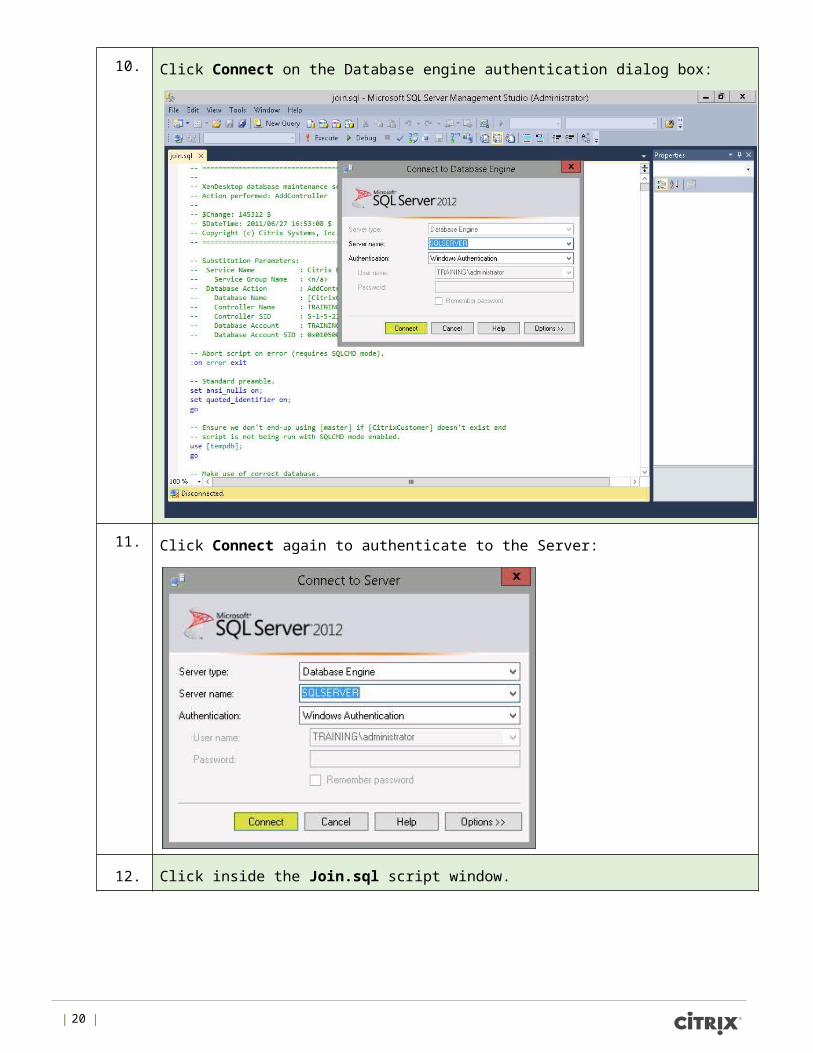
10. Click Connect on the Database engine authentication dialog box:
11. Click Connect again to authenticate to the Server:
12. Click inside the Join.sql script window.
| 15 |
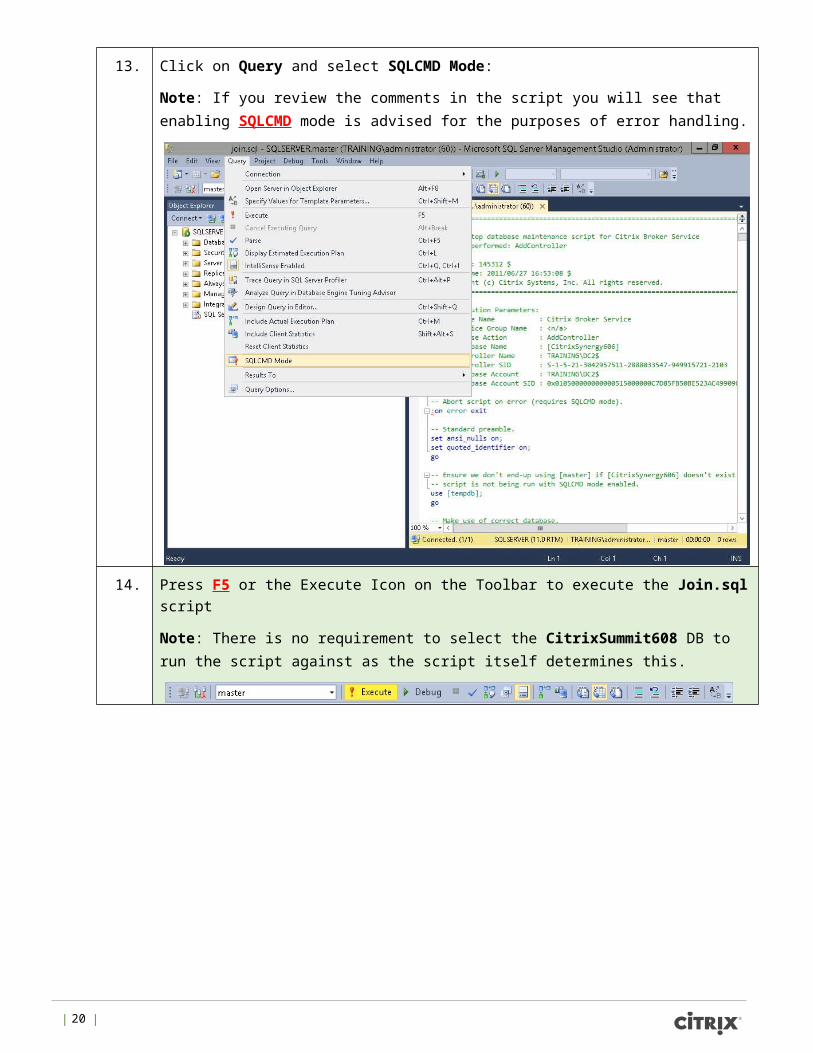
13. Click on Query and select SQLCMD Mode:
Note: If you review the comments in the script you will see that enabling SQLCMD mode is advised for the purposes of error handling.
14. Press F5 or the Execute Icon on the Toolbar to execute the Join.sql script
Note: There is no requirement to select the CitrixSummit608 DB to run the script against as the script itself determines this.
| 16 |
15. Observation: The Script runs without errors and does the following:
1. Creates DB login for new Controller (Training\DC2$)
2. Adds all FMA services to the SUM608 site
16. Close SQL management Studio.
17. Now that all the FMA services on DC2 have been successfully added to the SUM608 site DB, we need to set the DBConnection string for each so they point to the correct Database.
To do this, switch back to DC2 and run the following simple script from the root of PoSH: (To get to the root just type cd\ & hit return)
C:\> .\set.ps1
Reminder: You should be running this script from DC2
| 17 |

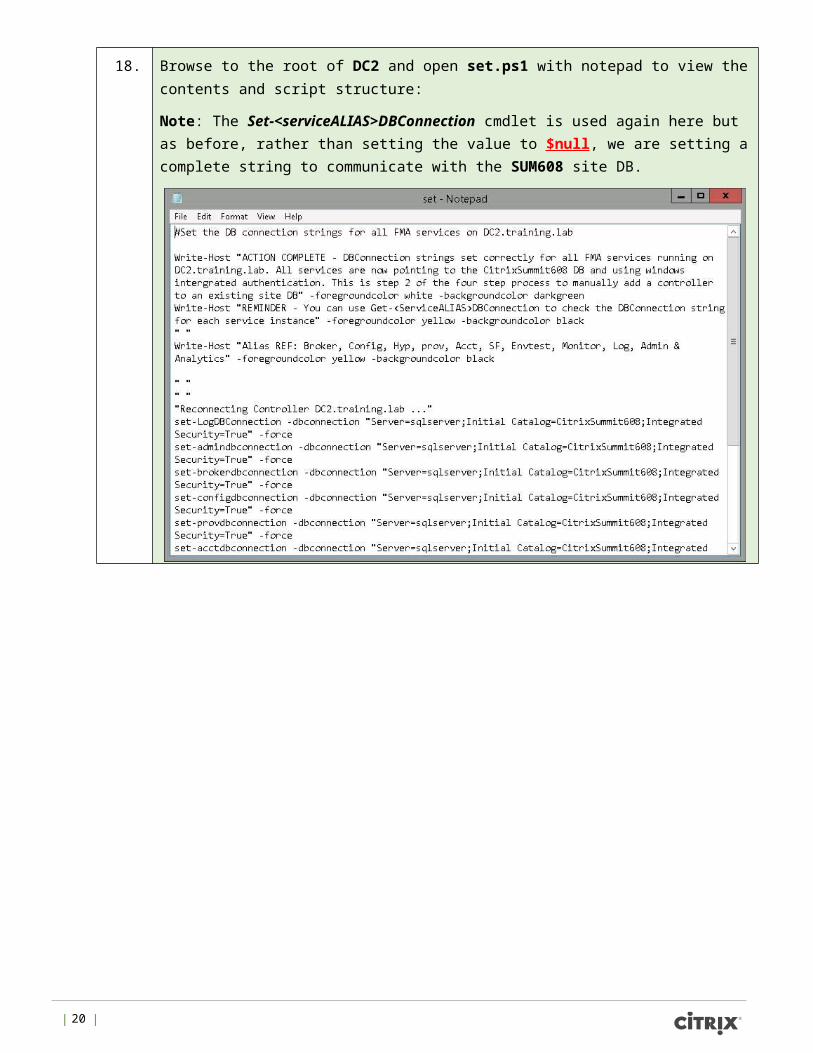
18. Browse to the root of DC2 and open set.ps1 with notepad to view the contents and script structure:
Note: The Set-<serviceALIAS>DBConnection cmdlet is used again here but as before, rather than setting the value to $null, we are setting a complete string to communicate with the SUM608 site DB.
| 18 |
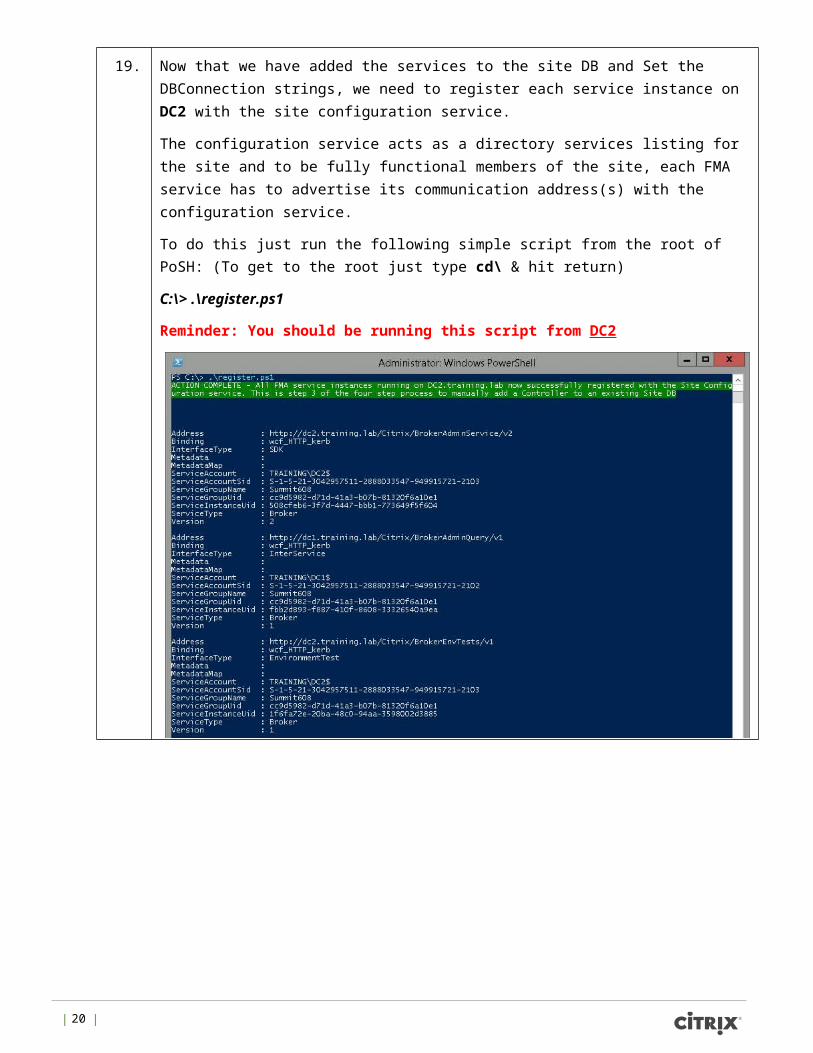
19. Now that we have added the services to the site DB and Set the DBConnection strings, we need to register each service instance on DC2 with the site configuration service.
The configuration service acts as a directory services listing for the site and to be fully functional members of the site, each FMA service has to advertise its communication address(s) with the configuration service.
To do this just run the following simple script from the root of PoSH: (To get to the root just type cd\ & hit return)
C:\> .\register.ps1
Reminder: You should be running this script from DC2
| 19 |
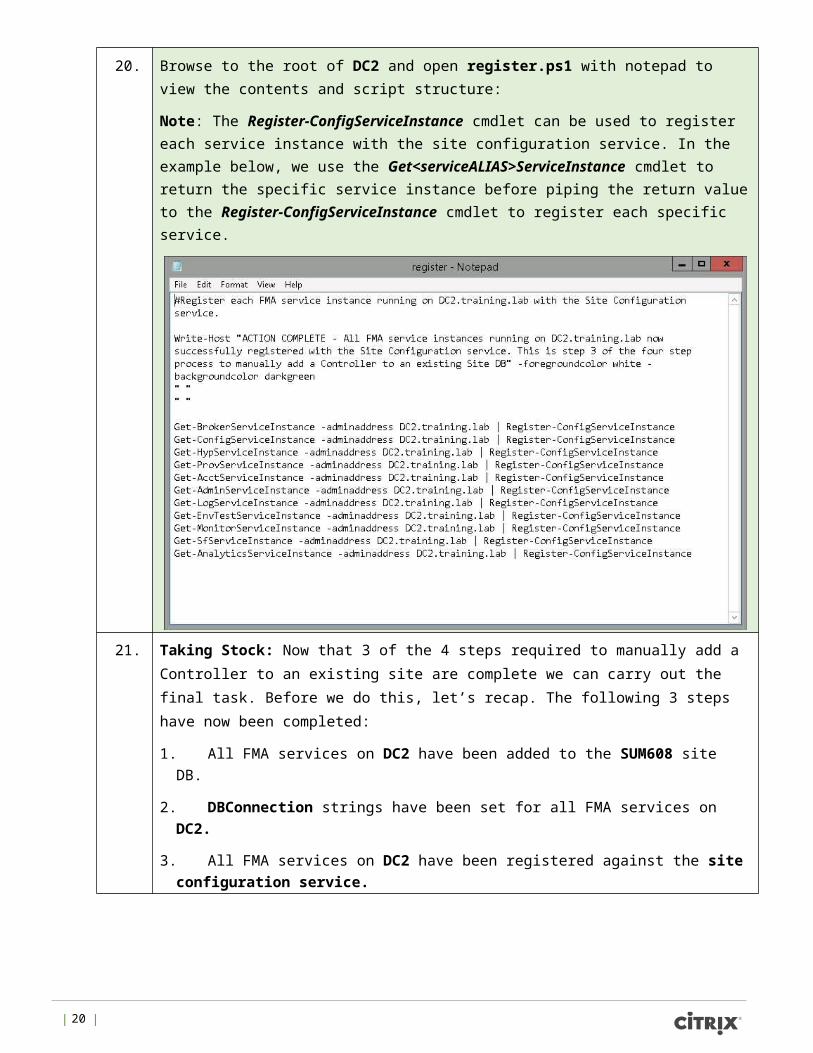
20. Browse to the root of DC2 and open register.ps1 with notepad to view the contents and script structure:
Note: The Register-ConfigServiceInstance cmdlet can be used to register each service instance with the site configuration service. In the example below, we use the Get<serviceALIAS>ServiceInstance cmdlet to return the specific service instance before piping the return value to the Register-ConfigServiceInstance cmdlet to register each specific service.
21. Taking Stock: Now that 3 of the 4 steps required to manually add a Controller to an existing site are complete we can carry out the final task. Before we do this, let’s recap. The following 3 steps have now been completed:
1. All FMA services on DC2 have been added to the SUM608 site DB.
2. DBConnection strings have been set for all FMA services on DC2.
3. All FMA services on DC2 have been registered against the site configuration service.
| 20 |
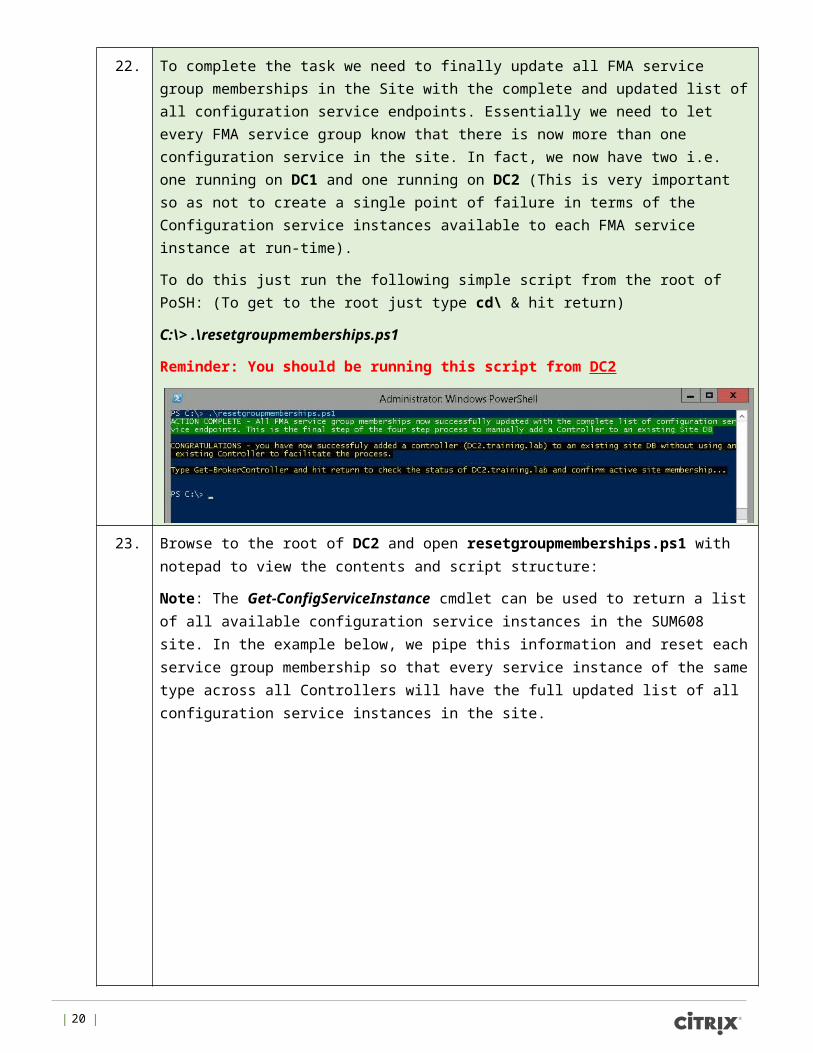
22. To complete the task we need to finally update all FMA service group memberships in the Site with the complete and updated list of all configuration service endpoints. Essentially we need to let every FMA service group know that there is now more than one configuration service in the site. In fact, we now have two i.e. one running on DC1 and one running on DC2 (This is very important so as not to create a single point of failure in terms of the Configuration service instances available to each FMA service instance at run-time).
To do this just run the following simple script from the root of PoSH: (To get to the root just type cd\ & hit return)
C:\> .\resetgroupmemberships.ps1
Reminder: You should be running this script from DC2
23. Browse to the root of DC2 and open resetgroupmemberships.ps1 with notepad to view the contents and script structure:
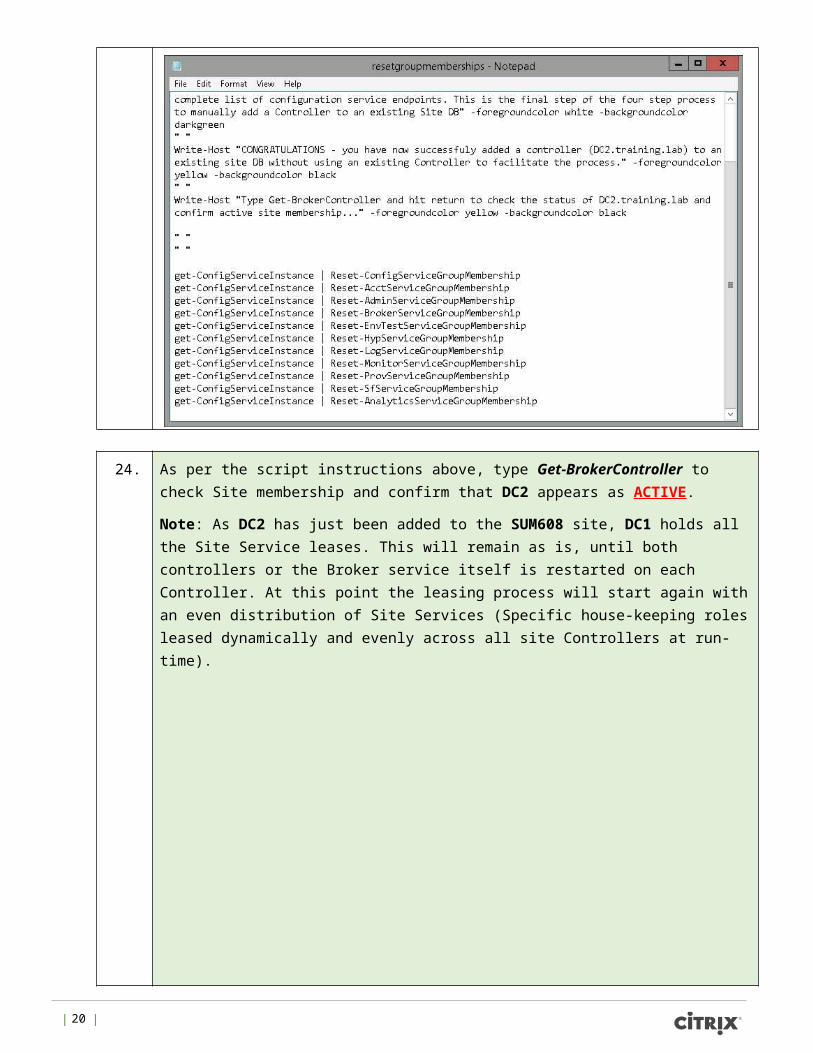
Note: The Get-ConfigServiceInstance cmdlet can be used to return a list of all available configuration service instances in the SUM608 site. In the example below, we pipe this information and reset each service group membership so that every service instance of the same type across all Controllers will have the full updated list of all configuration service instances in the site.
| 21 |
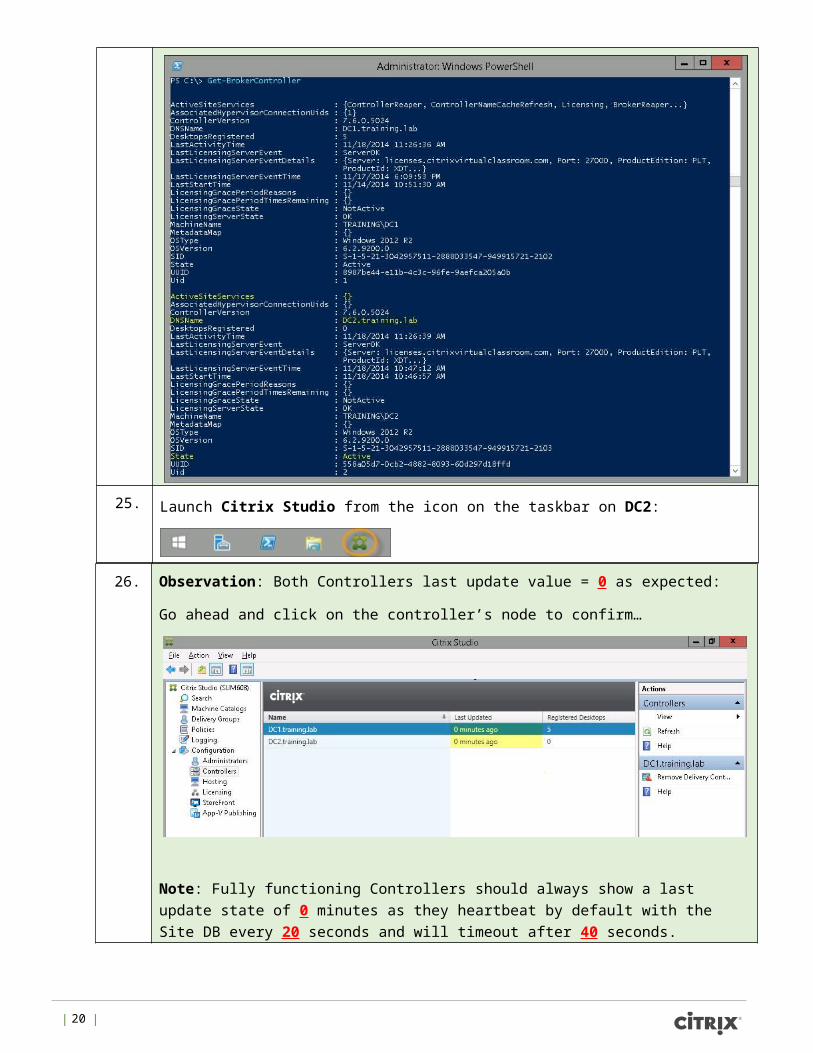
24. As per the script instructions above, type Get-BrokerController to check Site membership and confirm that DC2 appears as ACTIVE.
Note: As DC2 has just been added to the SUM608 site, DC1 holds all the Site Service leases. This will remain as is, until both controllers or the Broker service itself is restarted on each Controller. At this point the leasing process will start again with an even distribution of Site Services (Specific house-keeping roles leased dynamically and evenly across all site Controllers at run-time).
25. Launch Citrix Studio from the icon on the taskbar on DC2:
| 22 |
26. Observation: Both Controllers last update value = 0 as expected:
Go ahead and click on the controller’s node to confirm…
Note: Fully functioning Controllers should always show a last update state of 0 minutes as they heartbeat by default with the Site DB every 20 seconds and will timeout after 40 seconds.
27. Observation: How many registered desktops are appearing against the DC1 Controller? Haven’t we only published 3 desktops as per the three Delivery Groups? If so, then why do you see 5 Registered desktops? See next step for explanation…
| 23 |
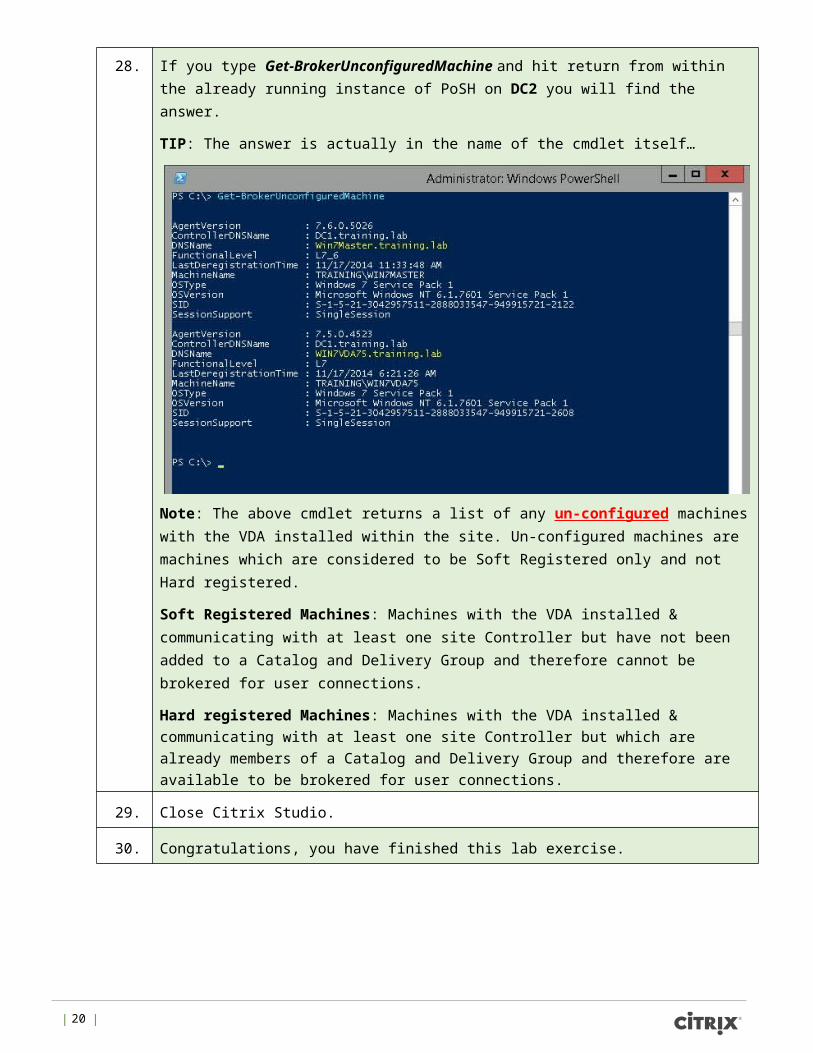
28. If you type Get-BrokerUnconfiguredMachine and hit return from within the already running instance of PoSH on DC2 you will find the answer.
TIP: The answer is actually in the name of the cmdlet itself…
Note: The above cmdlet returns a list of any un-configured machines with the VDA installed within the site. Un-configured machines are machines which are considered to be Soft Registered only and not Hard registered.
Soft Registered Machines: Machines with the VDA installed & communicating with at least one site Controller but have not been added to a Catalog and Delivery Group and therefore cannot be brokered for user connections.
Hard registered Machines: Machines with the VDA installed & communicating with at least one site Controller but which are already members of a Catalog and Delivery Group and therefore are available to be brokered for user connections.
29. Close Citrix Studio.
30. Congratulations, you have finished this lab exercise.
| 24 |

Exercise Summary
Takeaways from this exercise:
• To reduce the administration burden when carrying out complex repetitive tasks, simple PoSH scripts can and should be used.
• There are 4 key steps when manually adding a Controller to an existing Site DB which can essentially be broken as follows:
1. Create Instance script for each FMA service on the controller to join the existing DB.
2. Set DBConnection string for each of the FMA services on the controller to join the existing DB.
3. Register all new FMA services on the controller to join the existing DB with the site configuration service.
4. Reset all existing FMA service Group memberships so that they are aware of the new configuration service endpoint running on the new controller.
• For more cool info & tips on XenDesktop follow @XDtipster and @XDInformer on twitter.
| 25 |
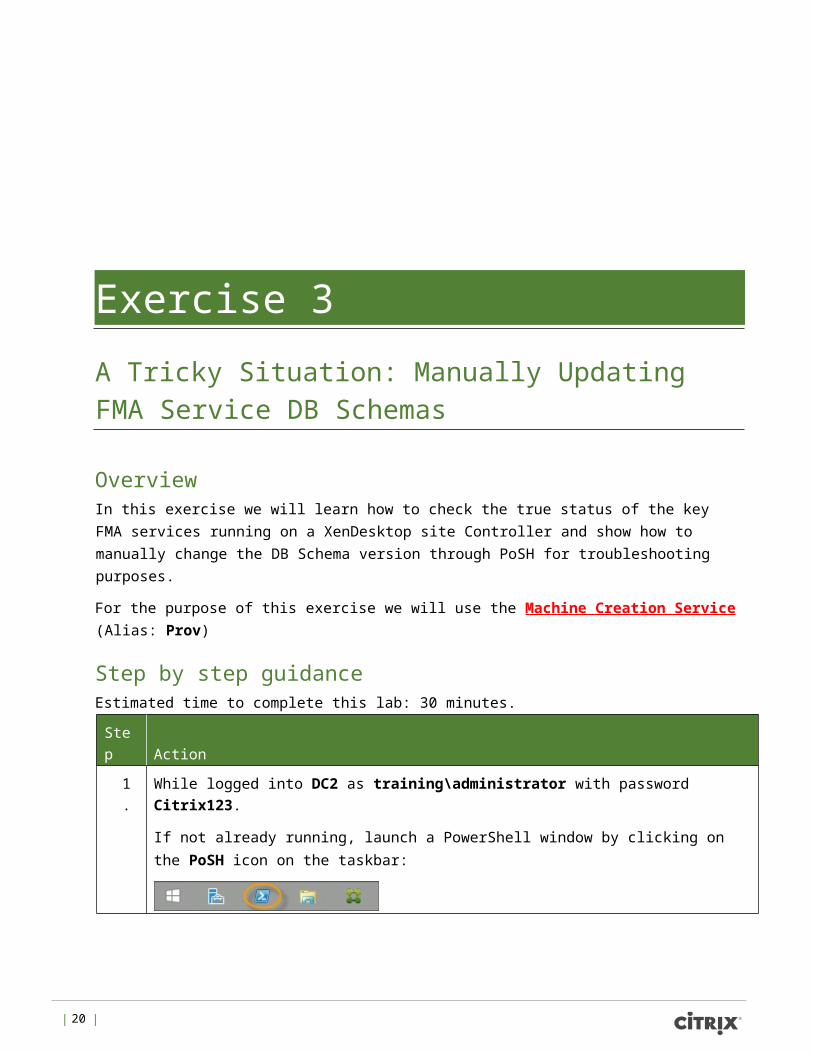
Exercise 3 A Tricky Situation: Manually Updating FMA Service DB Schemas
Overview In this exercise we will learn how to check the true status of the key FMA services running on a XenDesktop site Controller and show how to manually change the DB Schema version through PoSH for troubleshooting purposes.
For the purpose of this exercise we will use the Machine Creation Service (Alias: Prov)
Step by step guidance Estimated time to complete this lab: 30 minutes.
Step Action
1. While logged into DC2 as training\administrator with password Citrix123.
If not already running, launch a PowerShell window by clicking on the PoSH icon on the taskbar:
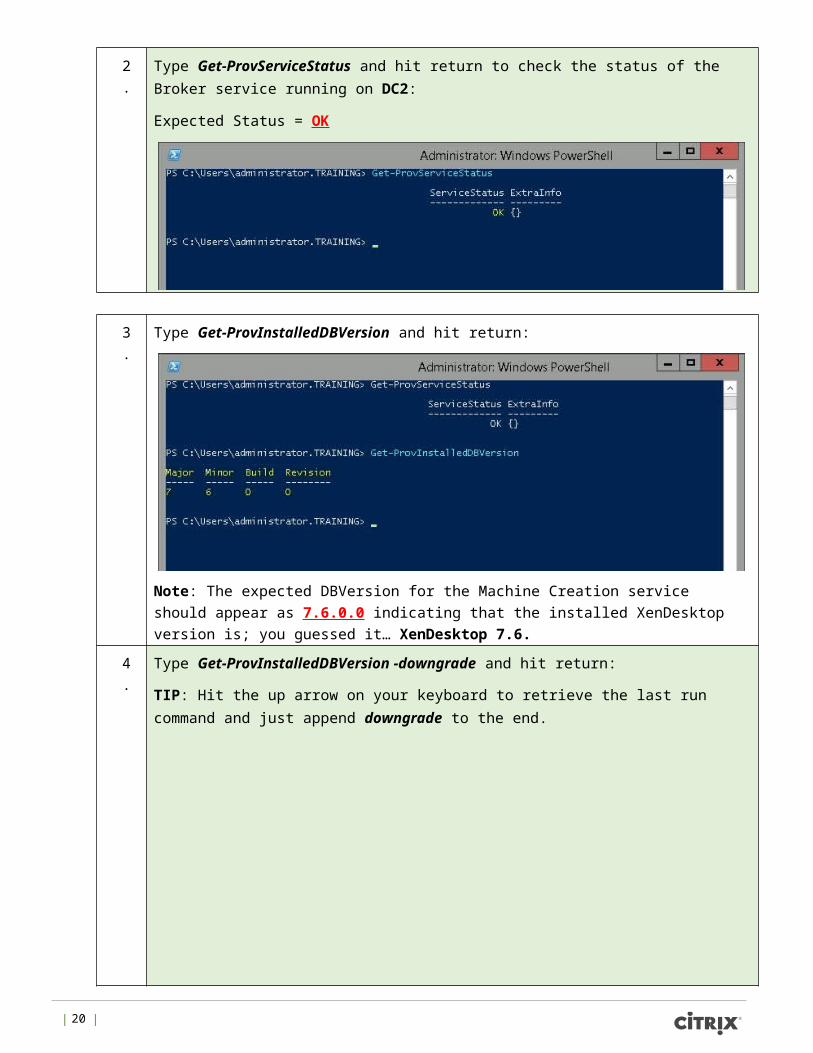
2. Type Get-ProvServiceStatus and hit return to check the status of the Broker service running on DC2:
Expected Status = OK
| 26 |
3. Type Get-ProvInstalledDBVersion and hit return:
Note: The expected DBVersion for the Machine Creation service should appear as 7.6.0.0 indicating that the installed XenDesktop version is; you guessed it… XenDesktop 7.6.
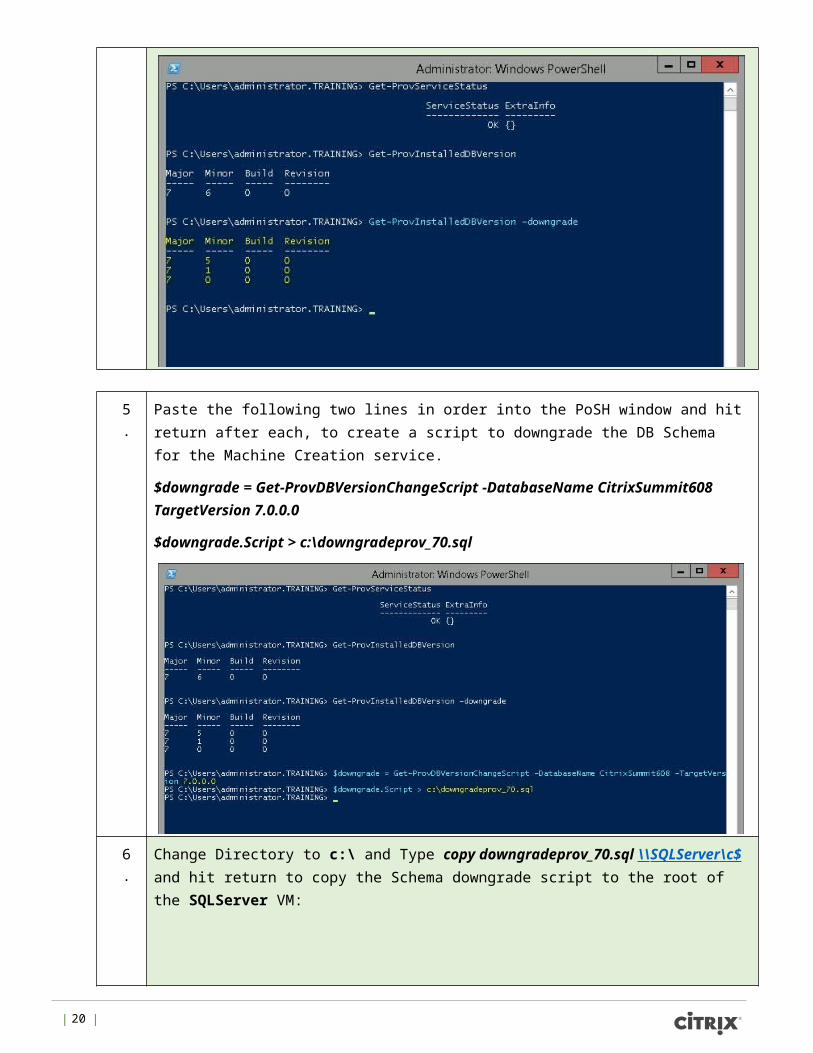
4. Type Get-ProvInstalledDBVersion -downgrade and hit return:
TIP: Hit the up arrow on your keyboard to retrieve the last run command and just append downgrade to the end.
| 27 |
5. Paste the following two lines in order into the PoSH window and hit return after each, to create a script to downgrade the DB Schema for the Machine Creation service.
$downgrade = Get-ProvDBVersionChangeScript -DatabaseName CitrixSummit608 TargetVersion 7.0.0.0
$downgrade.Script > c:\downgradeprov_70.sql
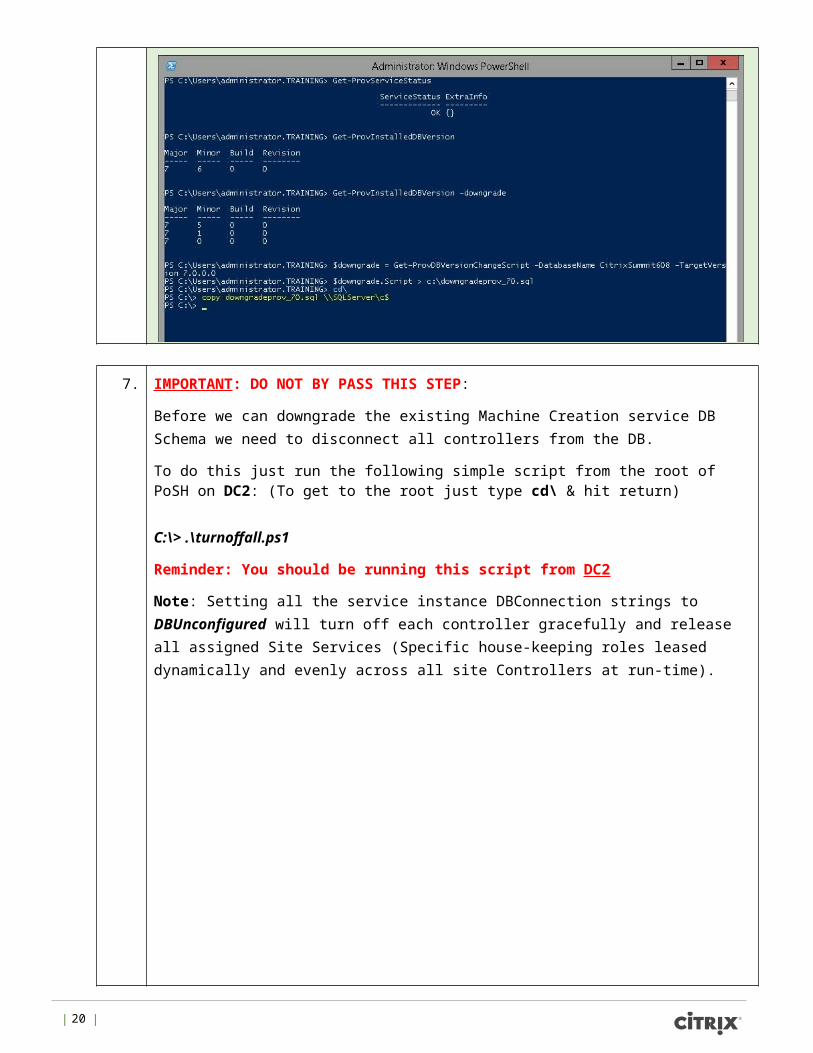
6. Change Directory to c:\ and Type copy downgradeprov_70.sql \\ SQLServer \ c$ and hit return to copy the Schema downgrade script to the root of the SQLServer VM:
| 28 |
7. IMPORTANT: DO NOT BY PASS THIS STEP:
Before we can downgrade the existing Machine Creation service DB Schema we need to disconnect all controllers from the DB.
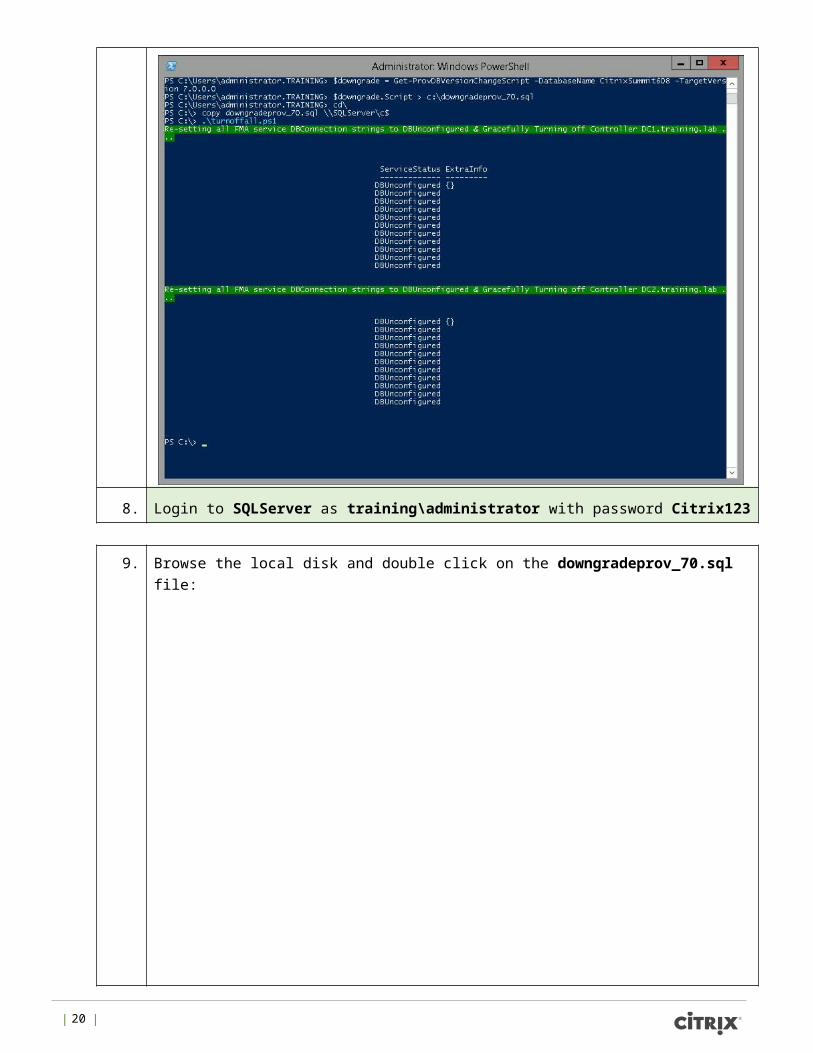
To do this just run the following simple script from the root of PoSH on DC2: (To get to the root just type cd\ & hit return) C:\> .\turnoffall.ps1
Reminder: You should be running this script from DC2
Note: Setting all the service instance DBConnection strings to DBUnconfigured will turn off each controller gracefully and release all assigned Site Services (Specific house-keeping roles leased dynamically and evenly across all site Controllers at run-time).
8. Login to SQLServer as training\administrator with password Citrix123
| 29 |
9. Browse the local disk and double click on the downgradeprov_70.sql file:
10. Click Connect on the Database engine authentication dialog box:
| 30 |
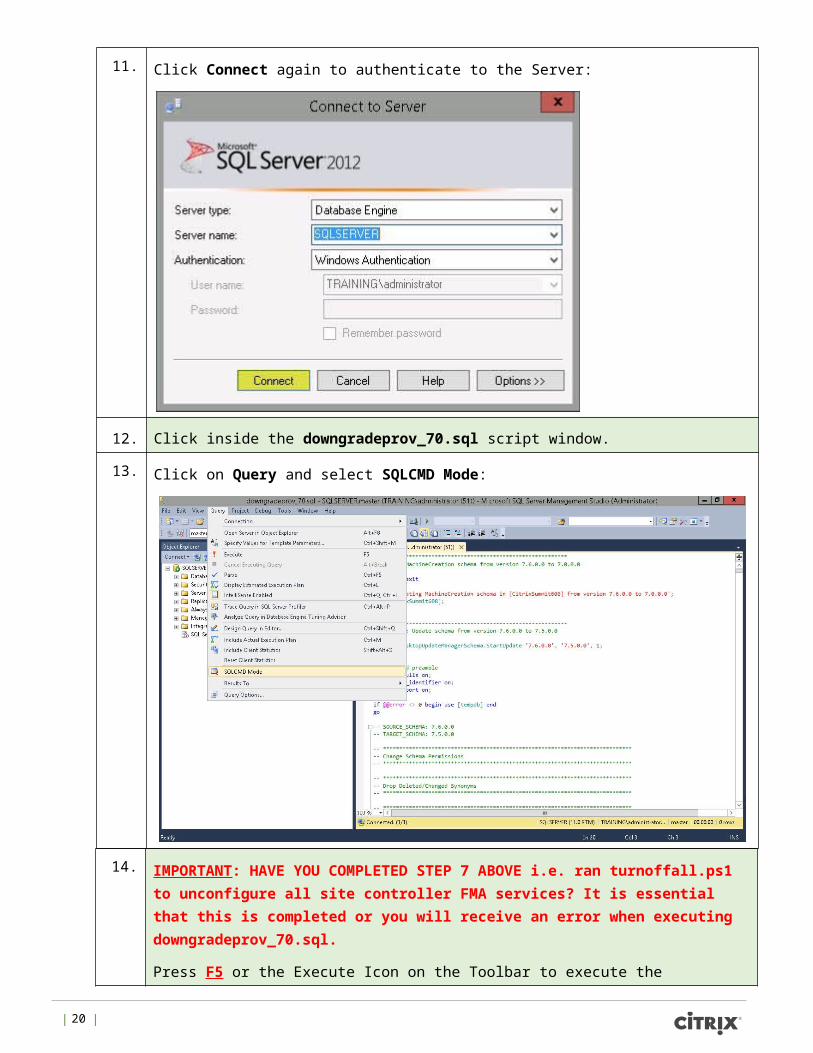
11. Click Connect again to authenticate to the Server:
12. Click inside the downgradeprov_70.sql script window.
13. Click on Query and select SQLCMD Mode:
| 31 |
14. IMPORTANT: HAVE YOU COMPLETED STEP 7 ABOVE i.e. ran turnoffall.ps1 to unconfigure all site controller FMA services? It is essential that this is completed or you will receive an error when executing downgradeprov_70.sql.
Press F5 or the Execute Icon on the Toolbar to execute the downgradeprov_70.sql script
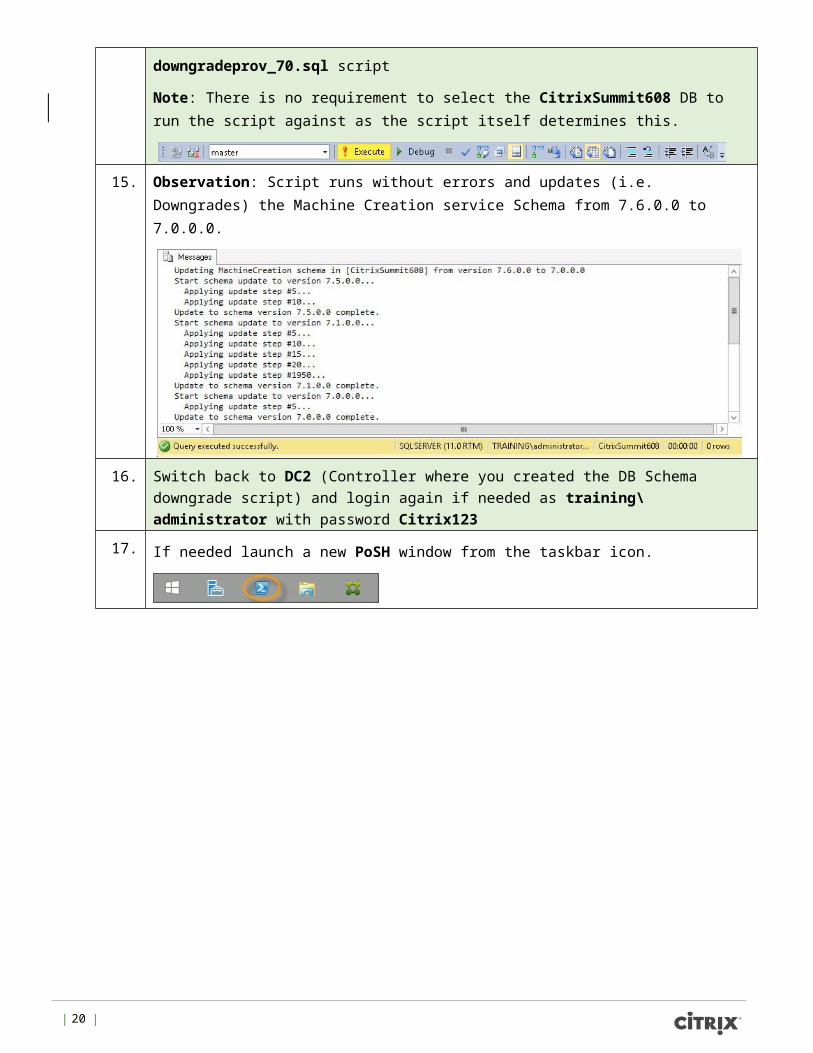
Note: There is no requirement to select the CitrixSummit608 DB to run the script against as the script itself determines this.
15. Observation: Script runs without errors and updates (i.e. Downgrades) the Machine Creation service Schema from 7.6.0.0 to 7.0.0.0.
16. Switch back to DC2 (Controller where you created the DB Schema downgrade script) and login again if needed as training\administrator with password Citrix123
17. If needed launch a new PoSH window from the taskbar icon.
| 32 |

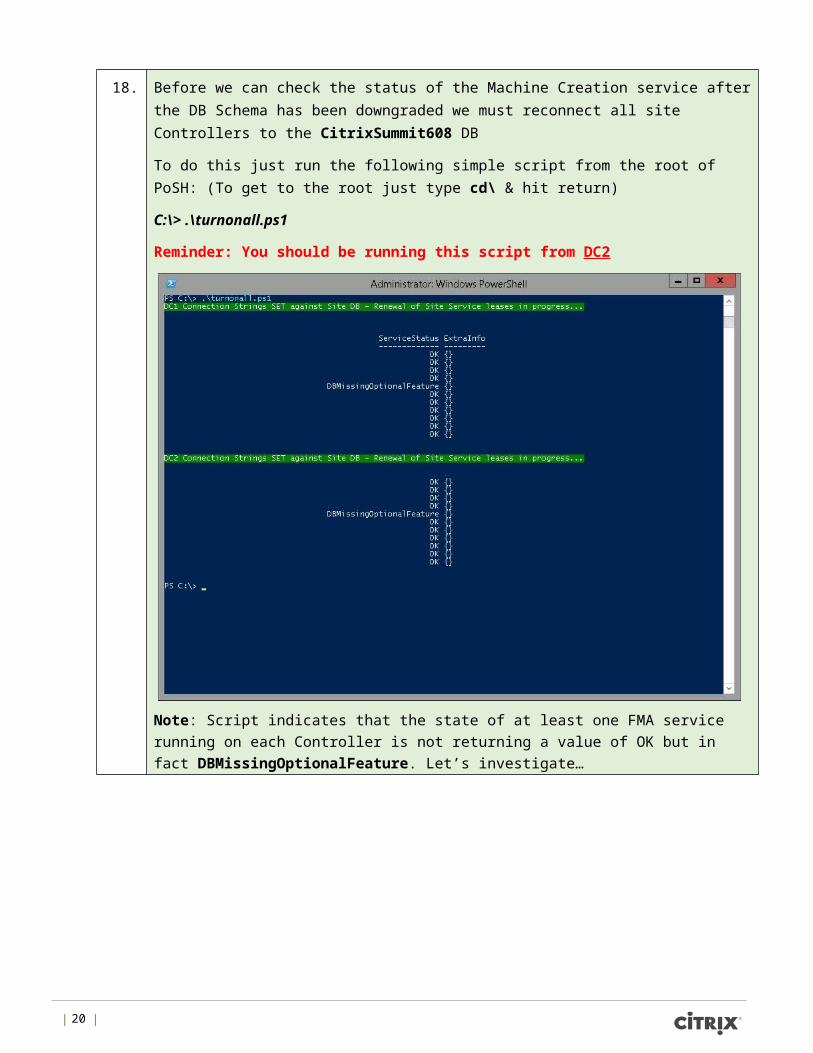
18. Before we can check the status of the Machine Creation service after the DB Schema has been downgraded we must reconnect all site Controllers to the CitrixSummit608 DB
To do this just run the following simple script from the root of PoSH: (To get to the root just type cd\ & hit return)
C:\> .\turnonall.ps1
Reminder: You should be running this script from DC2
Note: Script indicates that the state of at least one FMA service running on each Controller is not returning a value of OK but in fact DBMissingOptionalFeature. Let’s investigate…
| 33 |
19. Type Get-ProvInstalledDBVersion and hit return:
Note: After downgrading the Machine Creation service DB Schema the above cmdlet reports the installed DB version as 7.0.0.0 and not 7.6.0.0. As you may have already guessed. This is the reason for the above script to report a value of DBMissingOptionalFeature for a service instance on each controller. Based on the steps above and what we have seen so far, we can say with authority now that the affected service is the Machine Creation Service.
TIP: You can confirm this by simply running Get-ProvServiceStatus from within the same PoSH window.
Note: The DBMissingOptionalFeature return value in fact, indicates that the Machine Creation Service is connected to a database that is valid, but one that does not have the full functionality required for optimal performance. Upgrading the database is advisable. (See Next Step...)
20. Type Get-ProvInstalledDBVersion –upgrade to view the available upgrade options:
Note: At this point, you could (But DON’T) repeat Step 5-14 with a few little tweaks to manually upgrade the Machine Creation service Schema to target version 7.6.0.0. Let’s take the easy option this time however…
| 34 |
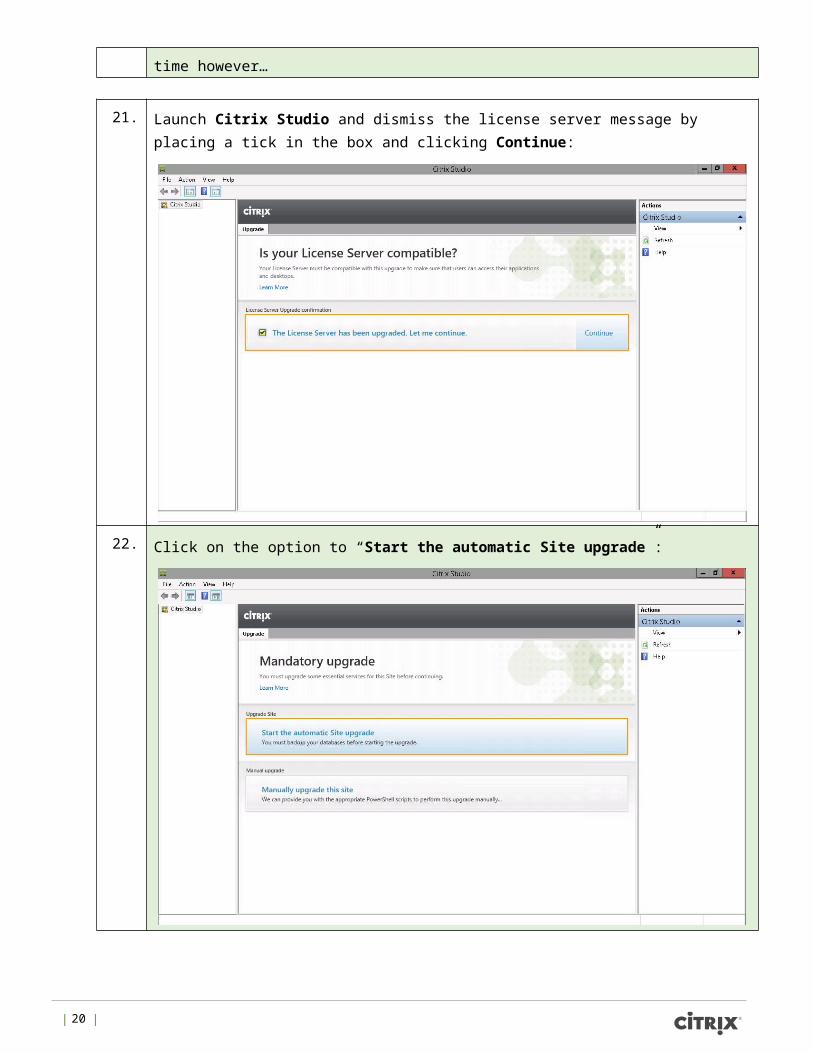
21. Launch Citrix Studio and dismiss the license server message by placing a tick in the box and clicking Continue:
22. Click on the option to “Start the automatic Site upgrade”:
| 35 |
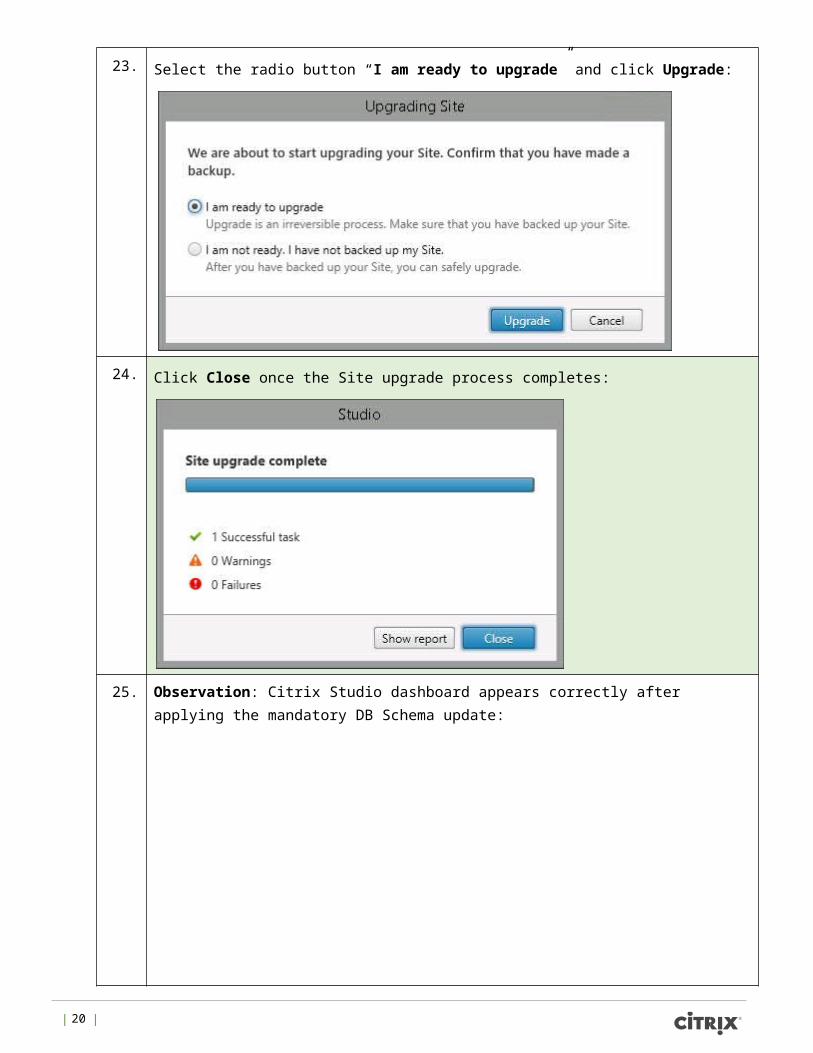
23. Select the radio button “I am ready to upgrade” and click Upgrade:
24. Click Close once the Site upgrade process completes:
25. Observation: Citrix Studio dashboard appears correctly after applying the mandatory DB Schema update:
| 36 |

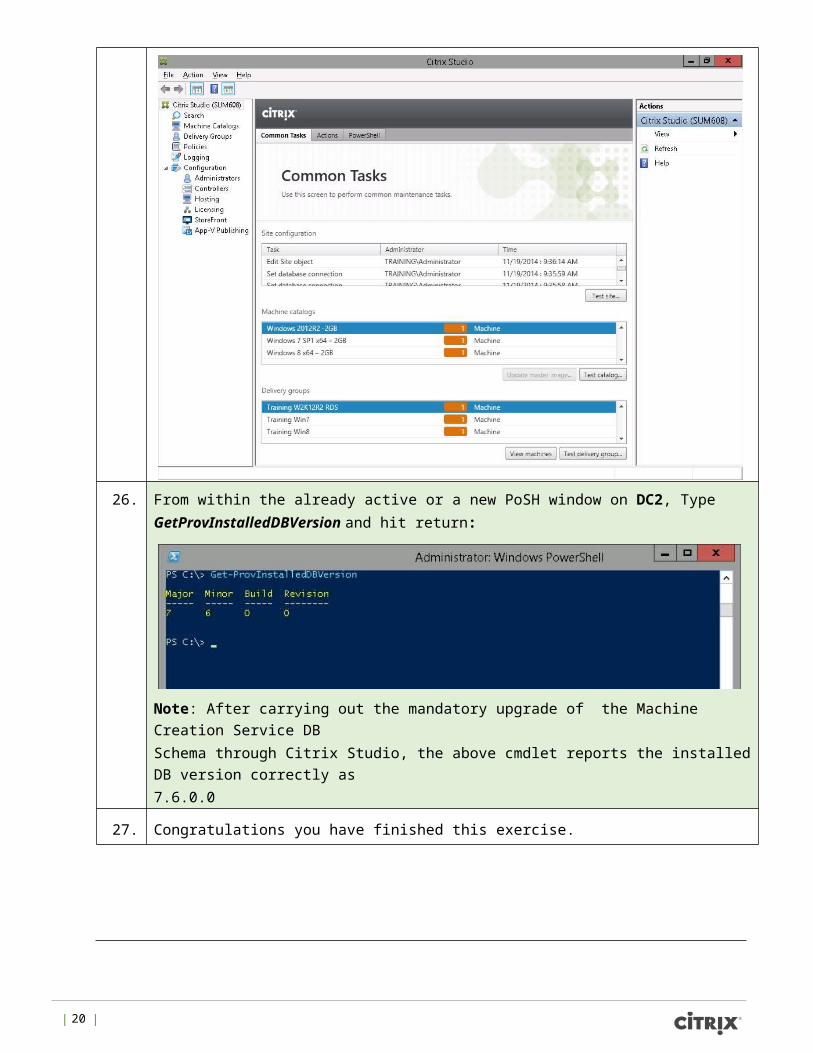
26. From within the already active or a new PoSH window on DC2, Type GetProvInstalledDBVersion and hit return:
Note: After carrying out the mandatory upgrade of the Machine Creation Service DB Schema through Citrix Studio, the above cmdlet reports the installed DB version correctly as 7.6.0.0
27. Congratulations you have finished this exercise.
Exercise Summary
Takeaways from this exercise:
| 37 |
• FMA services should be running against the latest DB Schema versions to avoid possible inconsistent behavior.
• Citrix Studio will inform you if a mandatory DB upgrade is required and will also complete the task if instructed through helpful wizards o PoSH can be used to check for upgrade and downgrade Schema target versions and also generate an SQL script to apply directly against the site DB. This is an alternative method which can be used if Citrix Studio encounters issues.
• It is important to look beyond the windows services applet and check the true state of the FMA services using the PoSH SDK o E.G. Get-<ServiceAlias>ServiceStatus
• For more cool info & tips on XenDesktop follow @XDtipster and @XDInformer on twitter.
Exercise 4
| 38 |
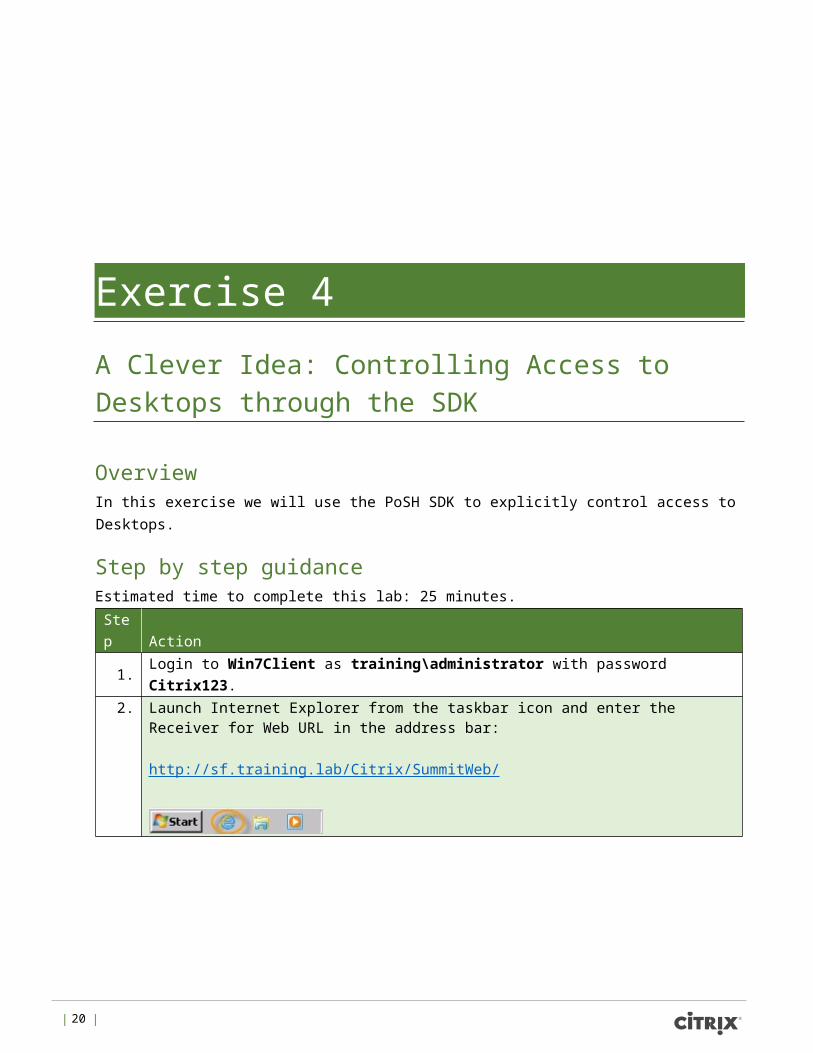
A Clever Idea: Controlling Access to Desktops through the SDK
Overview In this exercise we will use the PoSH SDK to explicitly control access to Desktops.
Step by step guidance Estimated time to complete this lab: 25 minutes.
Step Action
1. Login to Win7Client as training\administrator with password Citrix123.
2. Launch Internet Explorer from the taskbar icon and enter the Receiver for Web URL in the address bar: http://sf.training.lab/Citrix/SummitWeb/
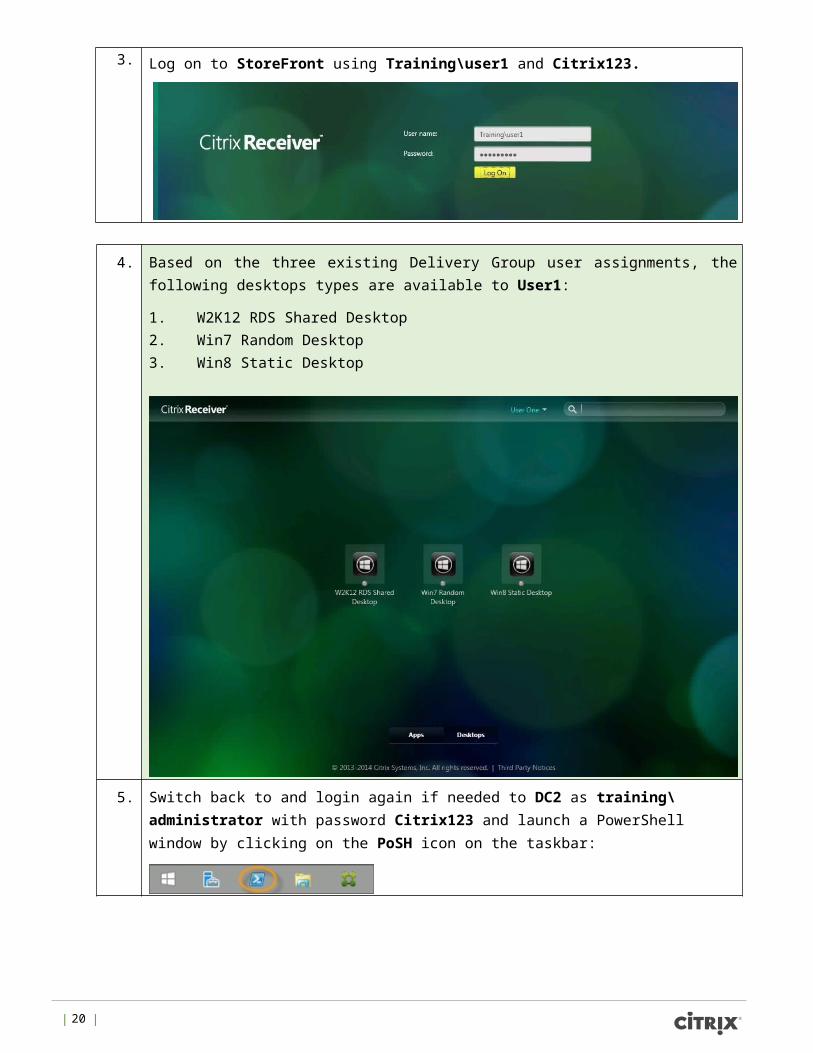
3. Log on to StoreFront using Training\user1 and Citrix123.
4. Based on the three existing Delivery Group user assignments, the following desktops types are available to User1:
1. W2K12 RDS Shared Desktop 2. Win7 Random Desktop 3. Win8 Static Desktop
| 39 |
5. Switch back to and login again if needed to DC2 as training\administrator with password Citrix123 and launch a PowerShell window by clicking on the PoSH icon on the taskbar:
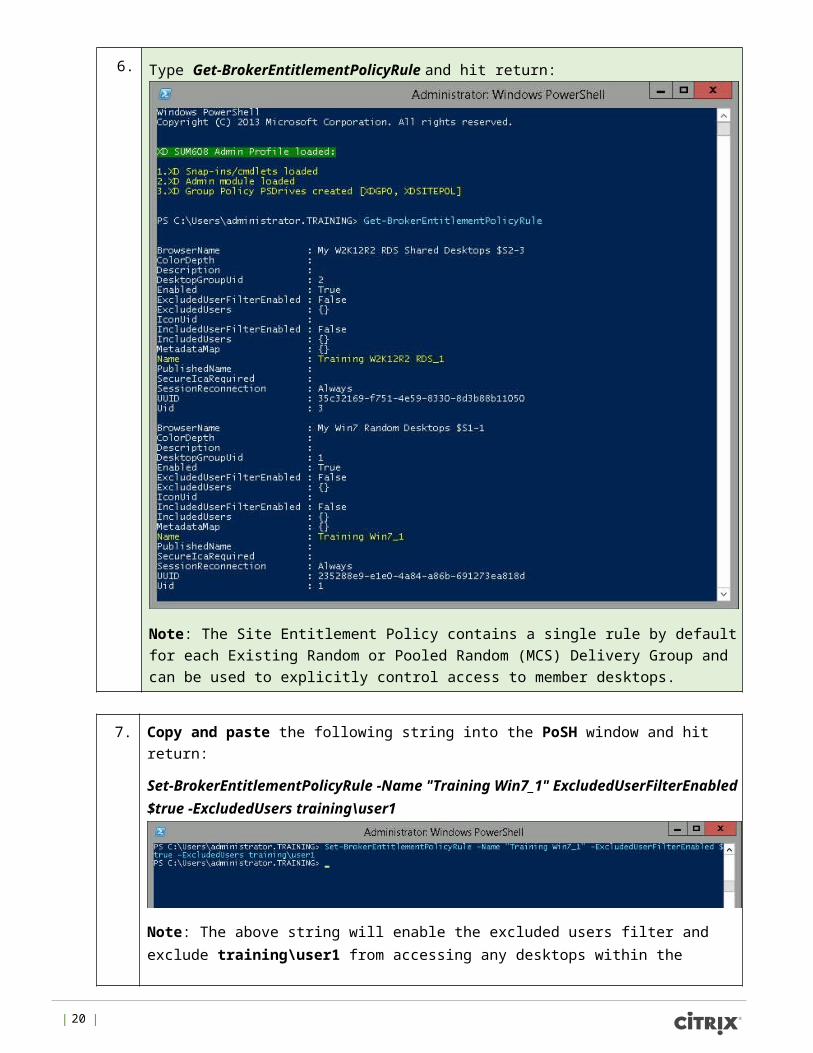
6. Type Get-BrokerEntitlementPolicyRule and hit return:
| 40 |
Note: The Site Entitlement Policy contains a single rule by default for each Existing Random or Pooled Random (MCS) Delivery Group and can be used to explicitly control access to member desktops.
7. Copy and paste the following string into the PoSH window and hit return:
Set-BrokerEntitlementPolicyRule -Name "Training Win7_1" ExcludedUserFilterEnabled $true -ExcludedUsers training\user1
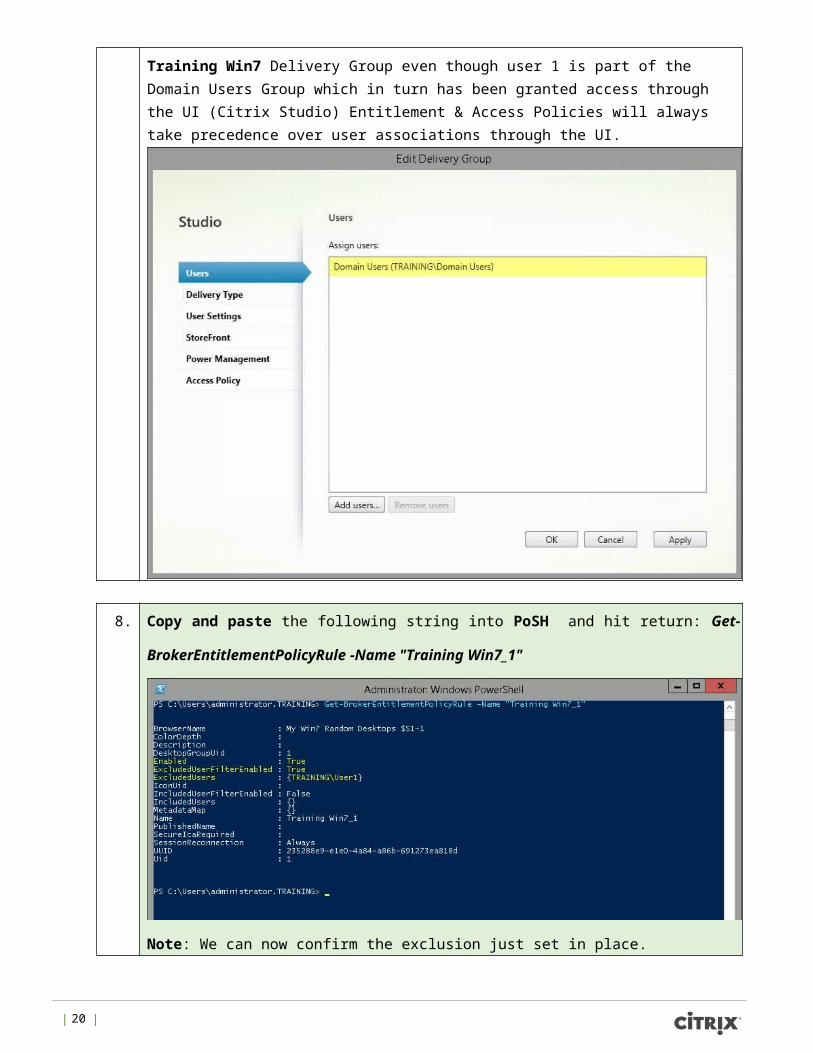
Note: The above string will enable the excluded users filter and exclude training\user1 from accessing any desktops within the Training Win7 Delivery Group even though user 1 is part of the Domain Users Group which in turn has been granted access through the UI (Citrix Studio) Entitlement & Access Policies will always take precedence over user associations through the UI.
| 41 |
8. Copy and paste the following string into PoSH and hit return: Get-
BrokerEntitlementPolicyRule -Name "Training Win7_1"
Note: We can now confirm the exclusion just set in place.
| 42 |
9. Switch back to Win7Client and press F5 or hit return to refresh StoreFront console. If your session has timed out, just log in again as Training\user1 and Citrix123.
Based on the three existing Delivery Group user assignments and the explicit entitlement policy exclusion on the Training Win7 Delivery Group, only the following two desktops types are available to User1:
1. W2K12 RDS Shared Desktop 2. Win8 Static Desktop
Note: The Win7 Random Desktop is no longer available based on the entitlement policy exclusion which we just set in Step 7 above.
10. Switch back to DC2 and remove the exclusion by copying one of the following strings into the open PoSH window and hitting return:
Set-BrokerEntitlementPolicyRule -Name "Training Win7_1" -RemoveExcludedUsers training\user1 -ExcludedUserFilterEnabled $false
Or
Set-BrokerEntitlementPolicyRule -Name "Training Win7_1" -ExcludedUserFilterEnabled $false -ExcludedUsers @()
| 43 |
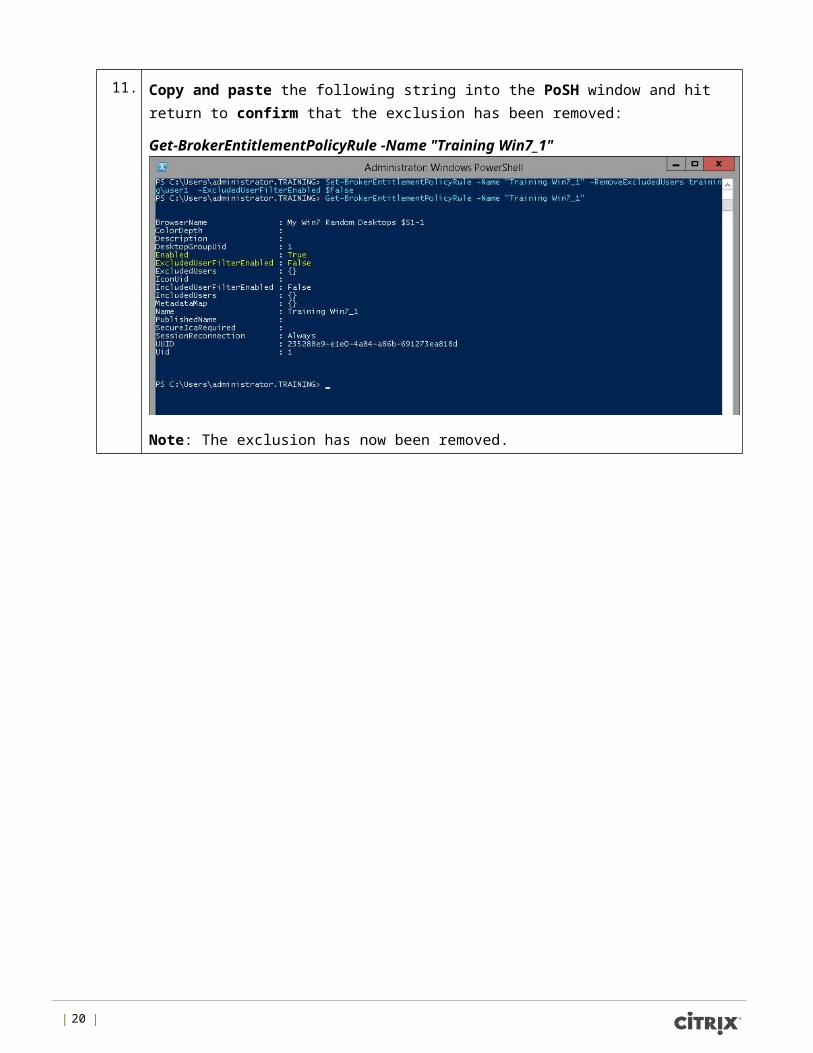
11. Copy and paste the following string into the PoSH window and hit return to confirm that the exclusion has been removed:
Get-BrokerEntitlementPolicyRule -Name "Training Win7_1"
Note: The exclusion has now been removed.
| 44 |
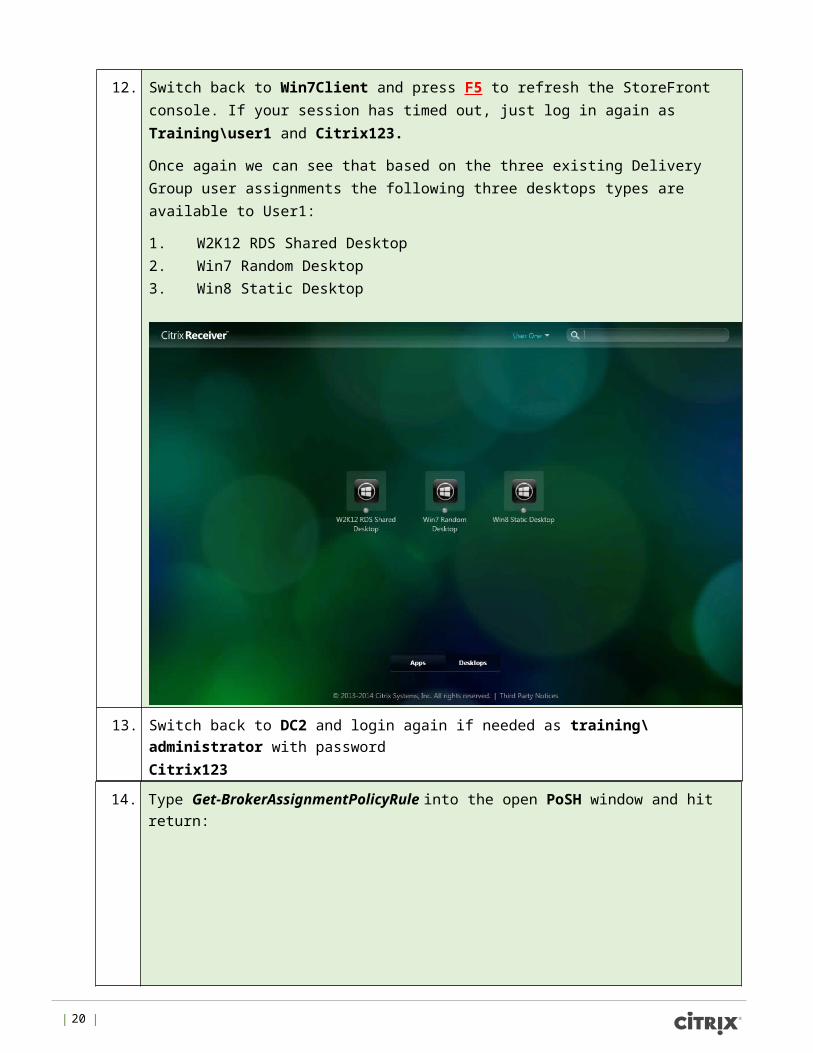
12. Switch back to Win7Client and press F5 to refresh the StoreFront console. If your session has timed out, just log in again as Training\user1 and Citrix123.
Once again we can see that based on the three existing Delivery Group user assignments the following three desktops types are available to User1:
1. W2K12 RDS Shared Desktop 2. Win7 Random Desktop 3. Win8 Static Desktop
13. Switch back to DC2 and login again if needed as training\administrator with password Citrix123
| 45 |

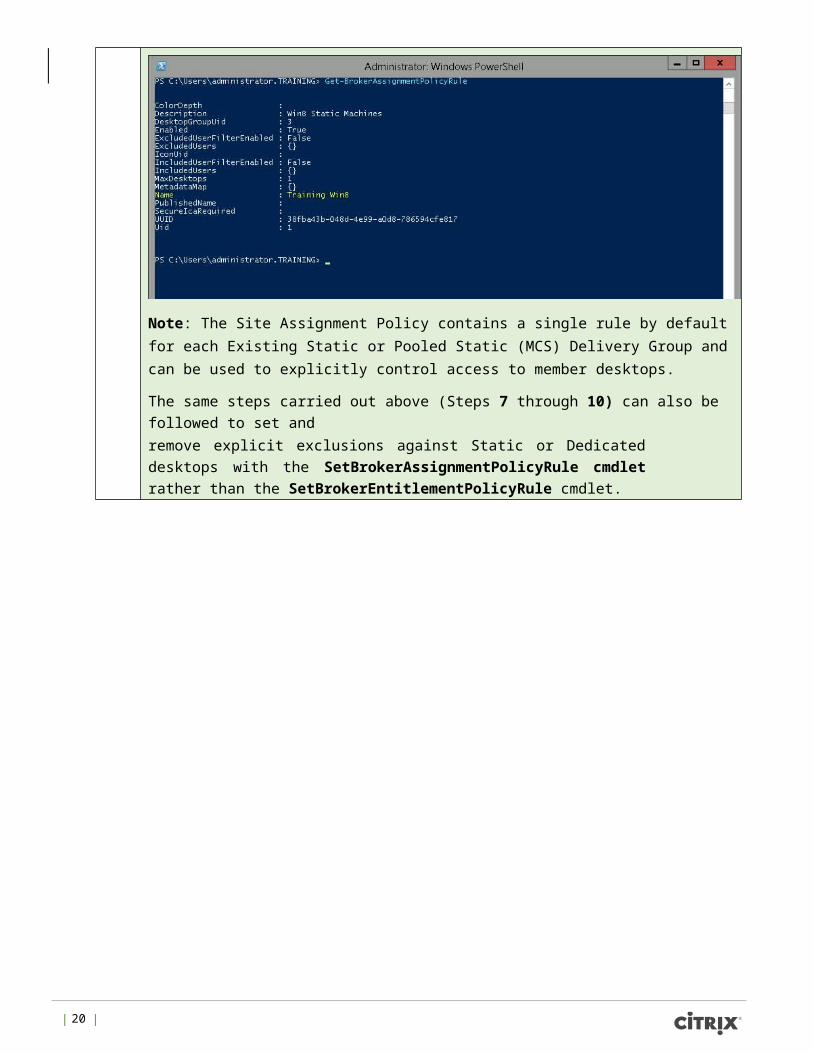
14. Type Get-BrokerAssignmentPolicyRule into the open PoSH window and hit return:
Note: The Site Assignment Policy contains a single rule by default for each Existing Static or Pooled Static (MCS) Delivery Group and can be used to explicitly control access to member desktops.
The same steps carried out above (Steps 7 through 10) can also be followed to set and remove explicit exclusions against Static or Dedicated desktops with the SetBrokerAssignmentPolicyRule cmdlet rather than the SetBrokerEntitlementPolicyRule cmdlet.
| 46 |
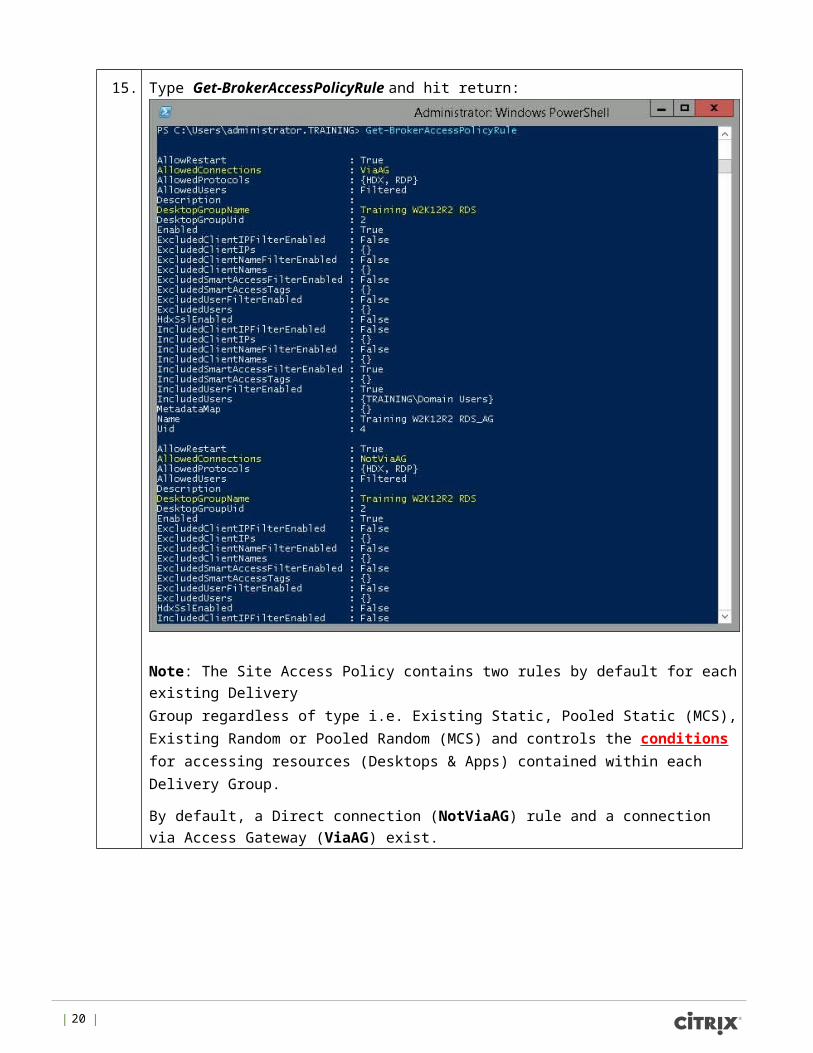
15. Type Get-BrokerAccessPolicyRule and hit return:
Note: The Site Access Policy contains two rules by default for each existing Delivery Group regardless of type i.e. Existing Static, Pooled Static (MCS), Existing Random or Pooled Random (MCS) and controls the conditions for accessing resources (Desktops & Apps) contained within each Delivery Group.
By default, a Direct connection (NotViaAG) rule and a connection via Access Gateway (ViaAG) exist.
| 47 |
16. Copy and paste the following string into the PoSH window and hit return:
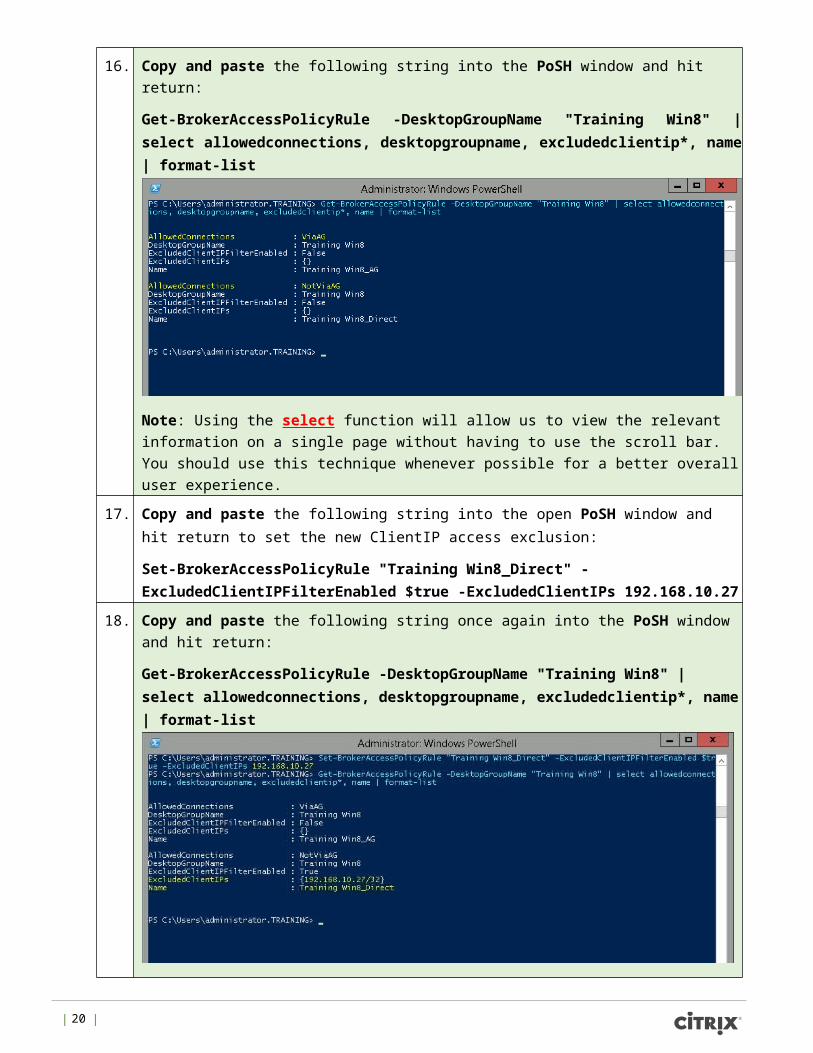
Get-BrokerAccessPolicyRule -DesktopGroupName "Training Win8" | select allowedconnections, desktopgroupname, excludedclientip*, name | format-list
Note: Using the select function will allow us to view the relevant information on a single page without having to use the scroll bar. You should use this technique whenever possible for a better overall user experience.
17. Copy and paste the following string into the open PoSH window and hit return to set the new ClientIP access exclusion:
Set-BrokerAccessPolicyRule "Training Win8_Direct" -ExcludedClientIPFilterEnabled $true -ExcludedClientIPs 192.168.10.27
18. Copy and paste the following string once again into the PoSH window and hit return:
Get-BrokerAccessPolicyRule -DesktopGroupName "Training Win8" | select allowedconnections, desktopgroupname, excludedclientip*, name | format-list
Note: The new ClientIP exclusion can be clearly seen and verified.
| 48 |
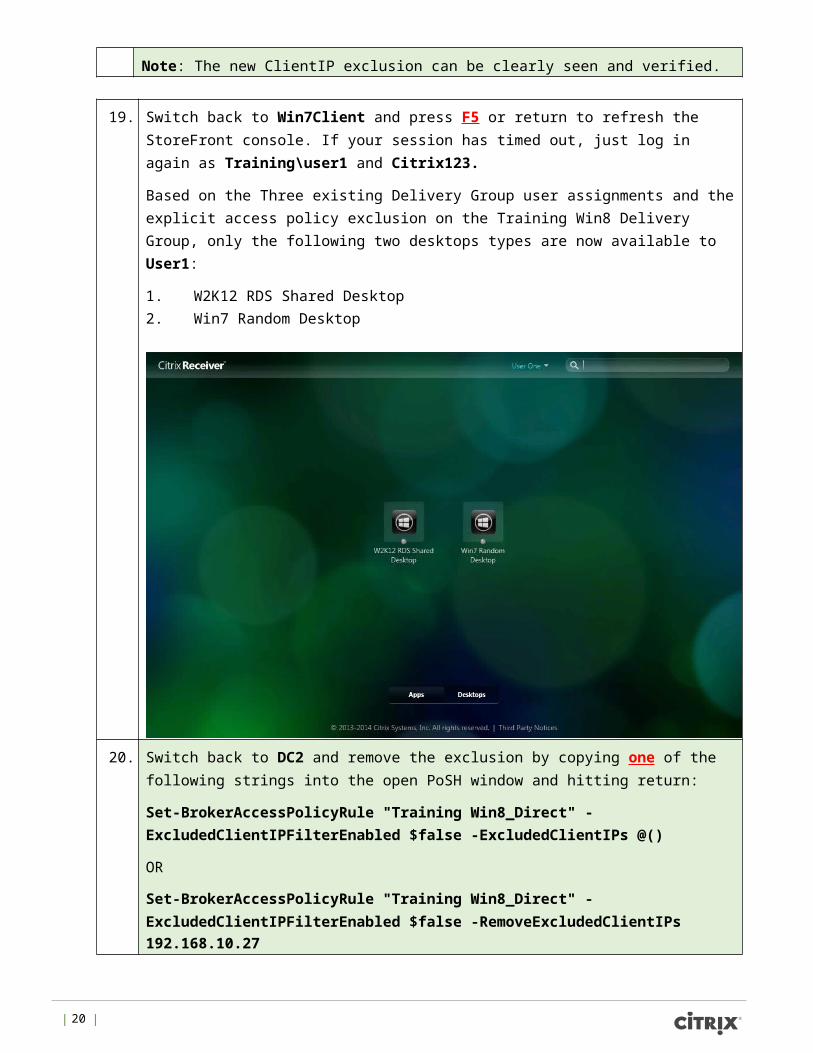
19. Switch back to Win7Client and press F5 or return to refresh the StoreFront console. If your session has timed out, just log in again as Training\user1 and Citrix123.
Based on the Three existing Delivery Group user assignments and the explicit access policy exclusion on the Training Win8 Delivery Group, only the following two desktops types are now available to User1:
1. W2K12 RDS Shared Desktop 2. Win7 Random Desktop
20. Switch back to DC2 and remove the exclusion by copying one of the following strings into the open PoSH window and hitting return:
Set-BrokerAccessPolicyRule "Training Win8_Direct" -ExcludedClientIPFilterEnabled $false -ExcludedClientIPs @()
OR
Set-BrokerAccessPolicyRule "Training Win8_Direct" -ExcludedClientIPFilterEnabled $false -RemoveExcludedClientIPs 192.168.10.27
21. Copy and paste the following string once again into the PoSH window and hit return:
Get-BrokerAccessPolicyRule -DesktopGroupName "Training Win8" | select allowedconnections, desktopgroupname, excludedclientip*, name | format-list
Note: The previously set ClientIP exclusions have been removed.
22. Switch back to Win7Client and press F5 or return to refresh StoreFront console. If your session has timed out, just log in again as Training\user1 and Citrix123.
Once again we can see that based on the three existing Delivery Group user assignments the following three desktops types are available to User1:
1. W2K12 RDS Shared Desktop 2. Win7 Random Desktop 3. Win8 Static Desktop
| 49 |
23. Logout of StoreFront and close IE.
24. Congratulations you have finished this exercise.
Exercise Summary
Takeaways from this exercise:
• XenDesktop includes a number of Site wide policies which can be used to explicitly control access to Desktops and the conditions under which Desktops are accessed. Some of those discussed during the above exercise include:
o Broker Entitlement Policy (Get-BrokerEntitlementPolicyRule)
Controls access to Existing Random or Pooled Random (MCS) machines o
Broker Assignment Policy (Get-BrokerAssignmentPolicyRule)
Controls access to Existing Static or Pooled Static (MCS) machines o
Broker Access Policy (Get-BrokerAccessPolicyRule)
Controls the conditions for accessing resources contained within each Delivery Group
• XenDesktop also includes a number of site wide policies for controlling access to Applications and the conditions under which Applications are accessed. These include: o
Broker Application Entitlement Policy (Get-BrokerAppEntitlementPolicyRule)
Controls access to applications on Existing Random or Pooled Random (MCS) machines
o Broker Application Assignment Policy (Get-BrokerAppAssignmentPolicyRule)
Controls access to applications on Existing Static or Pooled Static (MCS) machines
• For complete granular control of access to site resources through site policies, the PoSH SDK must be used.
• For more cool info & tips on XenDesktop follow @XDtipster and @XDInformer on twitter.
| 50 |
Exercise 5 A Timely Reminder: Configuring Multistage Power Policy Rules
Overview In this exercise we will take a look at the Extended Disconnect Power Policy Rules hidden within the SDK. Designed to control the actions to be performed after a second extended & configurable period of a user session disconnecting in peak and off-peak hours, extended disconnect policy rules along with the standard disconnect policy rules, allow administrators to apply multistage power policies settings such as initially suspending a machine shortly after a session disconnect occurs, and then later powering-off the machine if the session has not been reconnected.
Step by step guidance Estimated time to complete this lab: 25 minutes.
Step
1. IMPORTANT: As a pre-req for this exercise, please ensure that you are running XenCenter and have connected to your assigned host as per the portal details.
Note: XenCenter is required to monitor power state of VMs (namely Win8VM)
2. Switch back to and login again if needed to DC2 as training\administrator with password: Citrix123.
3. If not already running. Launch Citrix Studio from the taskbar icon:
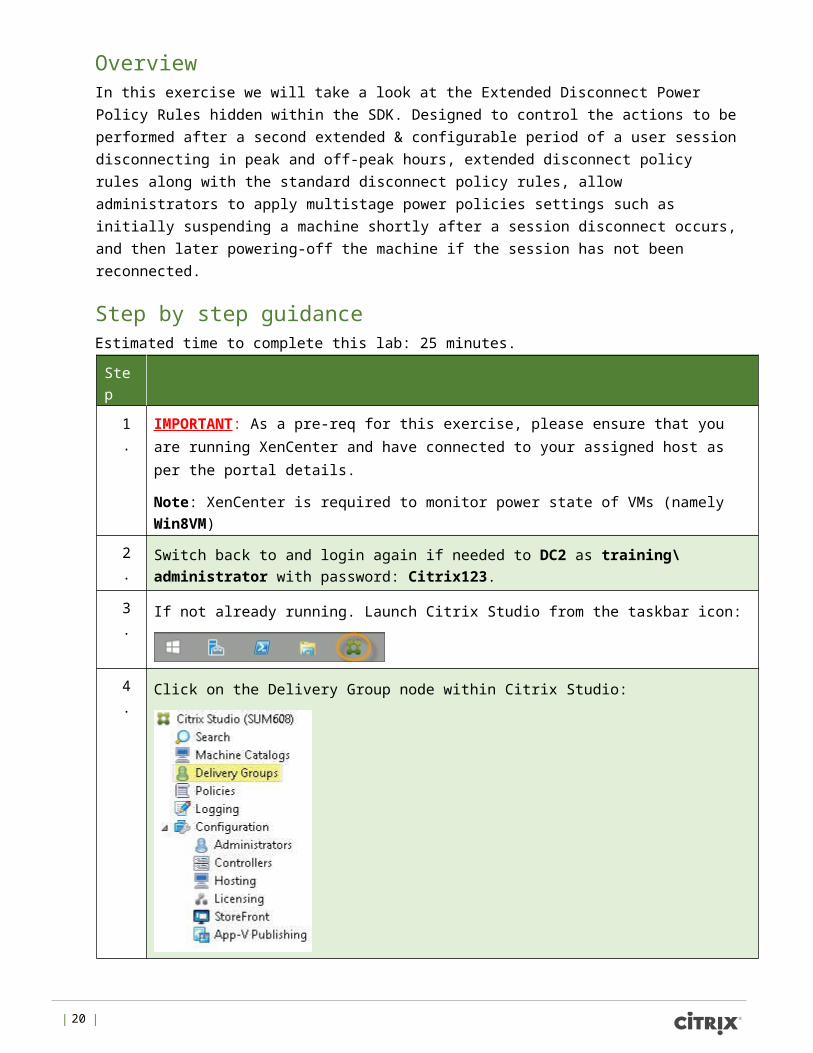
4. Click on the Delivery Group node within Citrix Studio:
| 51 |
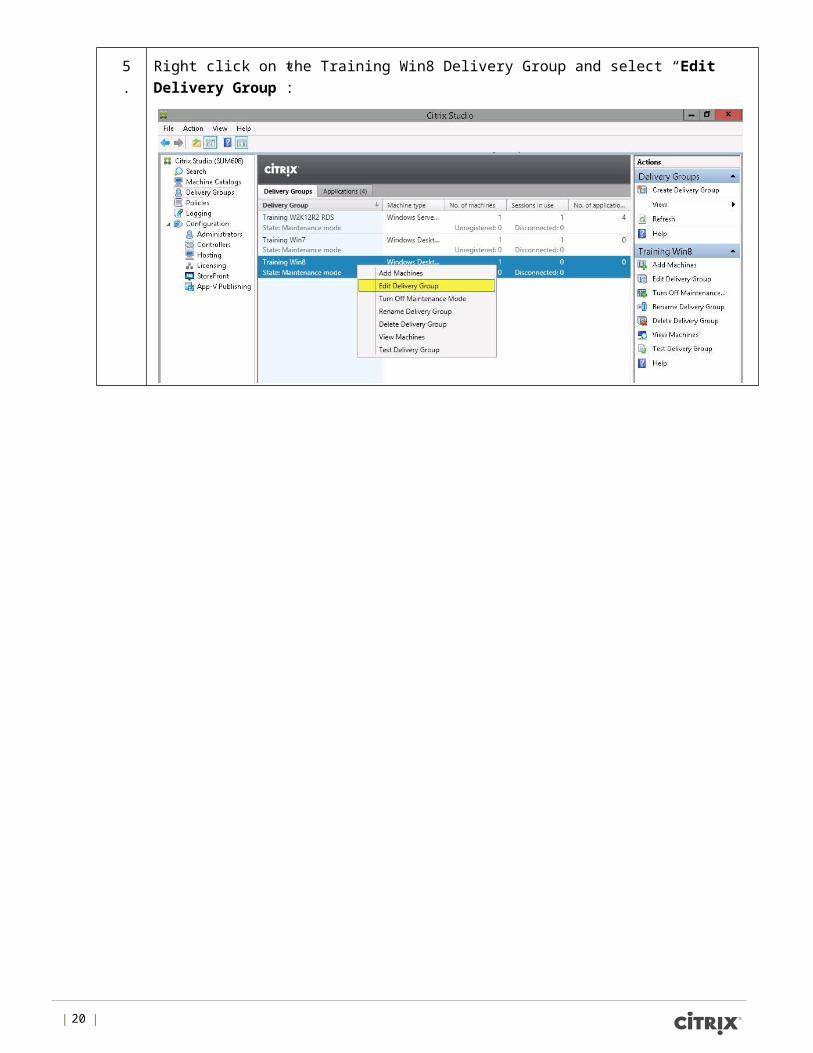
5. Right click on the Training Win8 Delivery Group and select “Edit Delivery Group”:
| 52 |

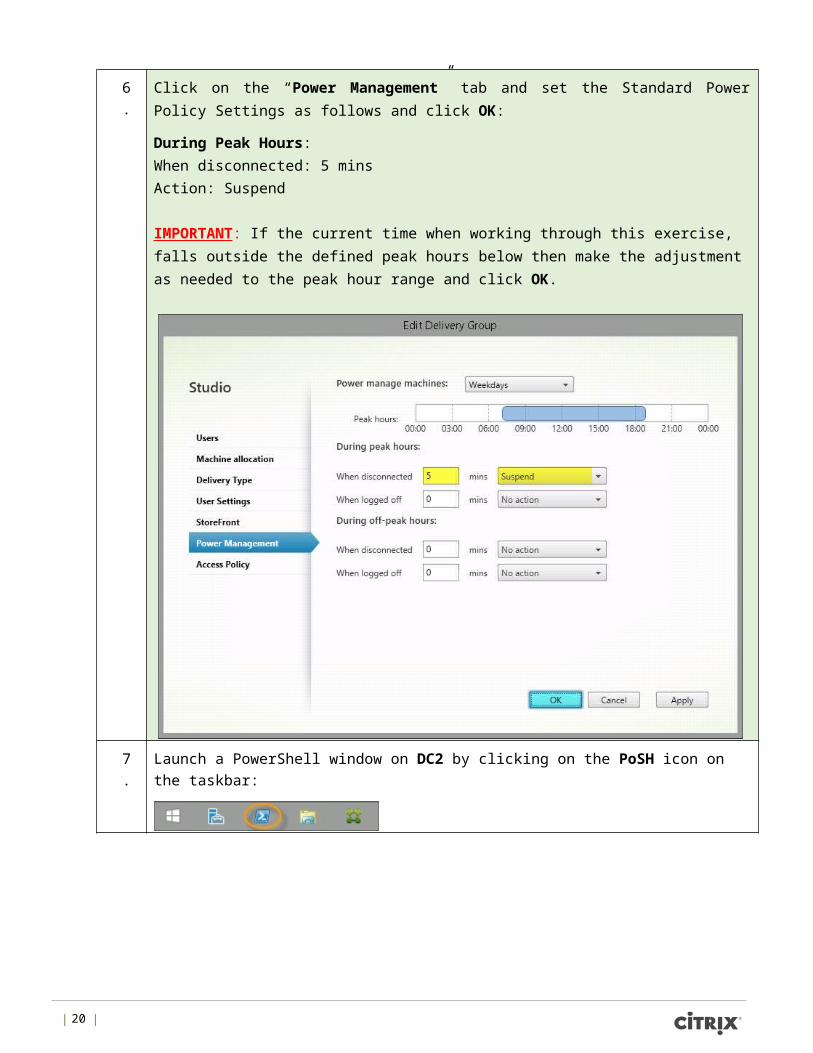
6. Click on the “Power Management” tab and set the Standard Power Policy Settings as follows and click OK:
During Peak Hours: When disconnected: 5 mins Action: Suspend IMPORTANT: If the current time when working through this exercise, falls outside the defined peak hours below then make the adjustment as needed to the peak hour range and click OK.
7. Launch a PowerShell window on DC2 by clicking on the PoSH icon on the taskbar:
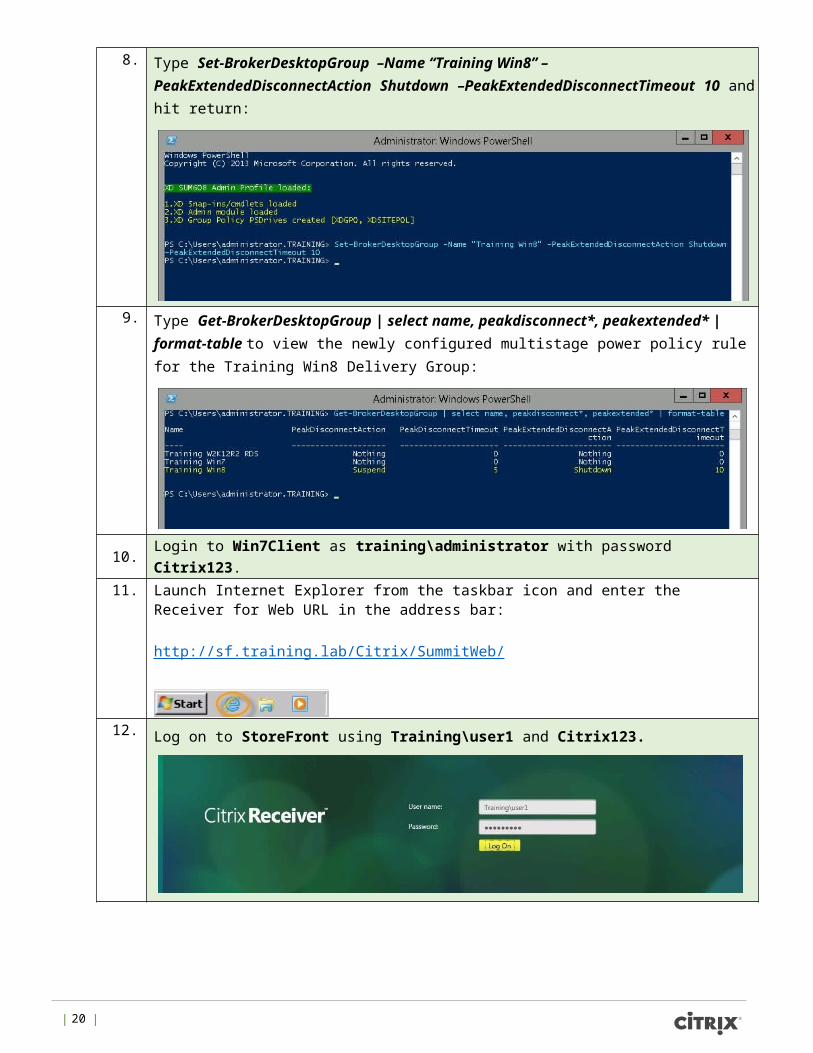
8. Type Set-BrokerDesktopGroup –Name “Training Win8” –PeakExtendedDisconnectAction Shutdown –PeakExtendedDisconnectTimeout 10 and hit return:
| 53 |

9. Type Get-BrokerDesktopGroup | select name, peakdisconnect*, peakextended* | format-table to view the newly configured multistage power policy rule for the Training Win8 Delivery Group:
10. Login to Win7Client as training\administrator with password Citrix123.
11. Launch Internet Explorer from the taskbar icon and enter the Receiver for Web URL in the address bar: http://sf.training.lab/Citrix/SummitWeb/
12. Log on to StoreFront using Training\user1 and Citrix123.
| 54 |
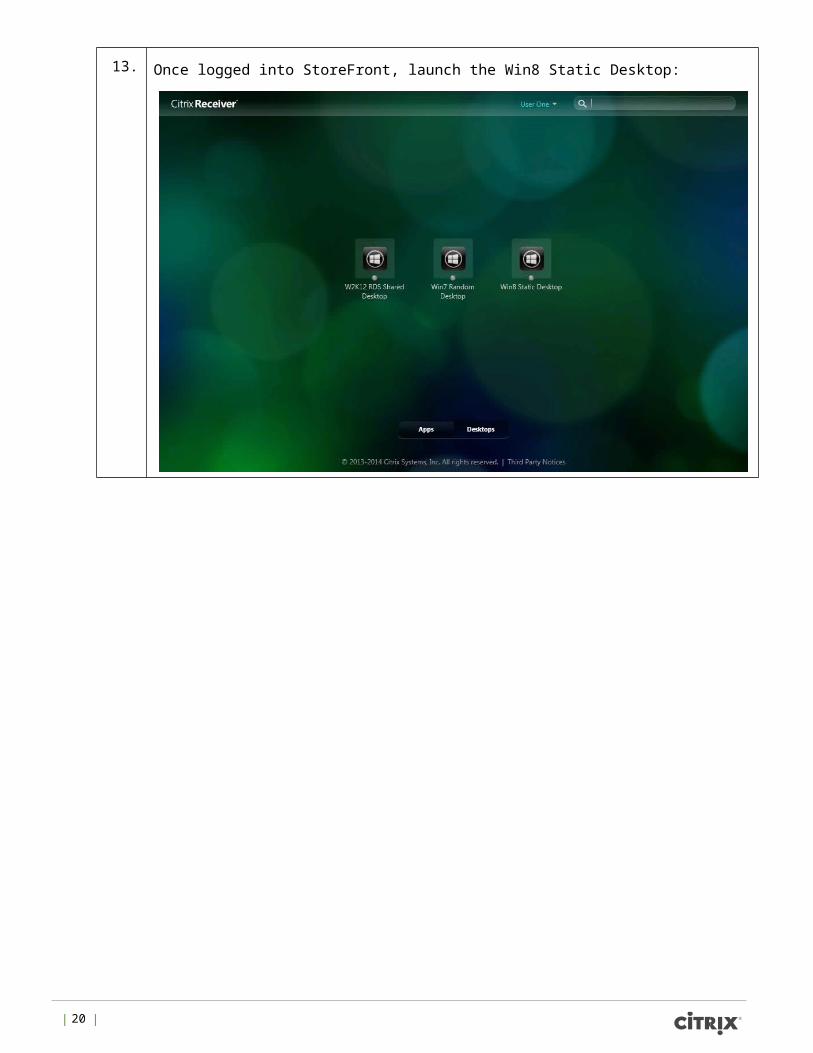
13. Once logged into StoreFront, launch the Win8 Static Desktop:
| 55 |
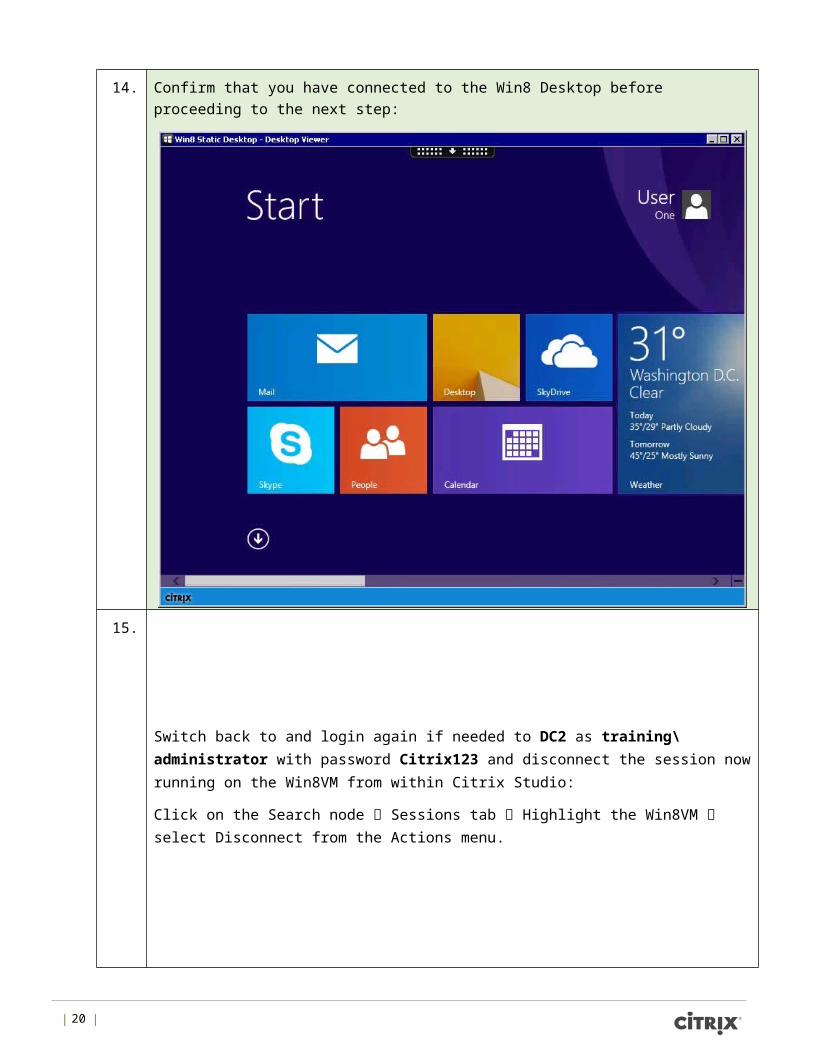
14. Confirm that you have connected to the Win8 Desktop before proceeding to the next step:
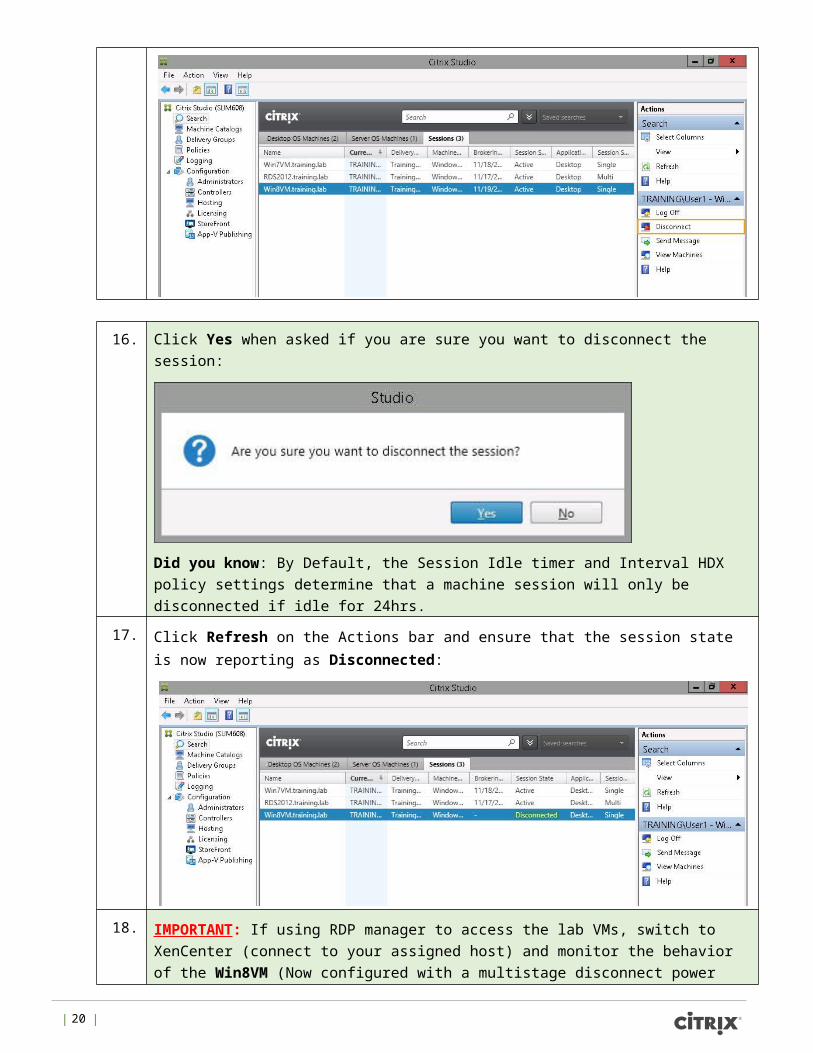
15. Switch back to and login again if needed to DC2 as training\administrator with password Citrix123 and disconnect the session now running on the Win8VM from within Citrix Studio:
Click on the Search node Sessions tab Highlight the Win8VM select Disconnect from the Actions menu.
| 56 |
16. Click Yes when asked if you are sure you want to disconnect the session:
Did you know: By Default, the Session Idle timer and Interval HDX policy settings determine that a machine session will only be disconnected if idle for 24hrs.
17. Click Refresh on the Actions bar and ensure that the session state is now reporting as Disconnected:
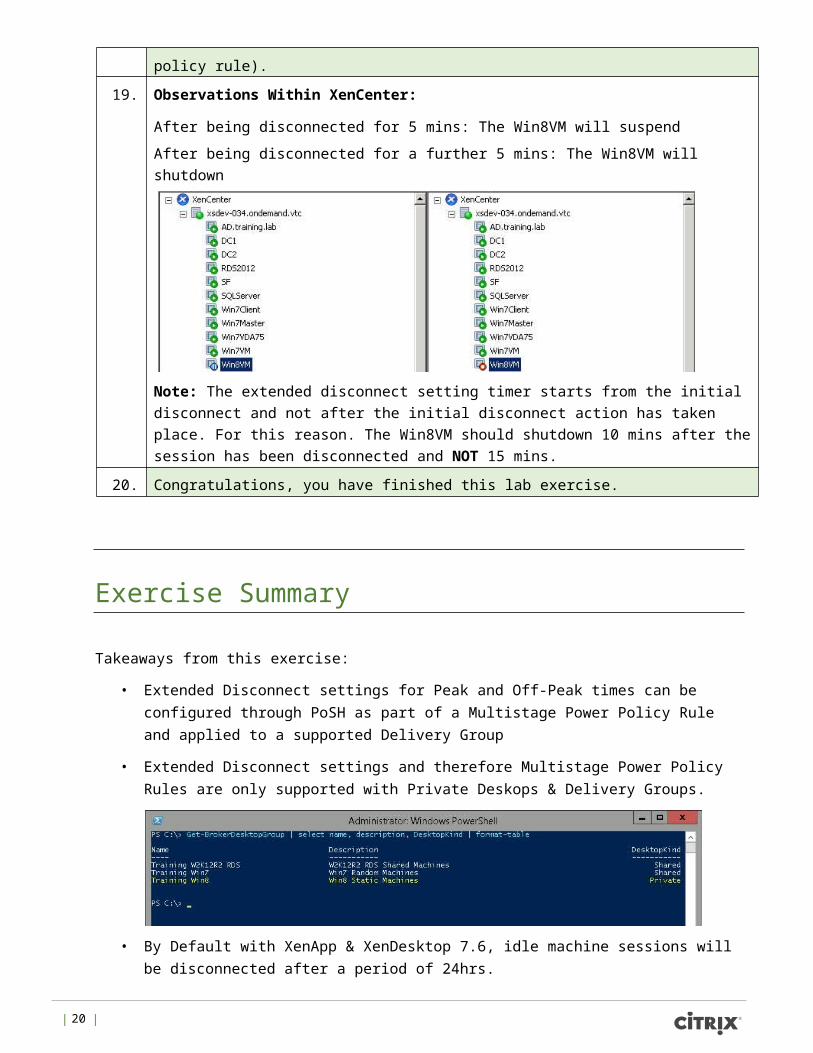
18. IMPORTANT: If using RDP manager to access the lab VMs, switch to XenCenter (connect to your assigned host) and monitor the behavior of the Win8VM (Now configured with a multistage disconnect power policy rule).
19. Observations Within XenCenter:
After being disconnected for 5 mins: The Win8VM will suspend
After being disconnected for a further 5 mins: The Win8VM will shutdown
Note: The extended disconnect setting timer starts from the initial disconnect and not after the initial disconnect action has taken place. For this reason. The Win8VM should shutdown
| 57 |
10 mins after the session has been disconnected and NOT 15 mins.
20. Congratulations, you have finished this lab exercise.
Exercise Summary
Takeaways from this exercise:
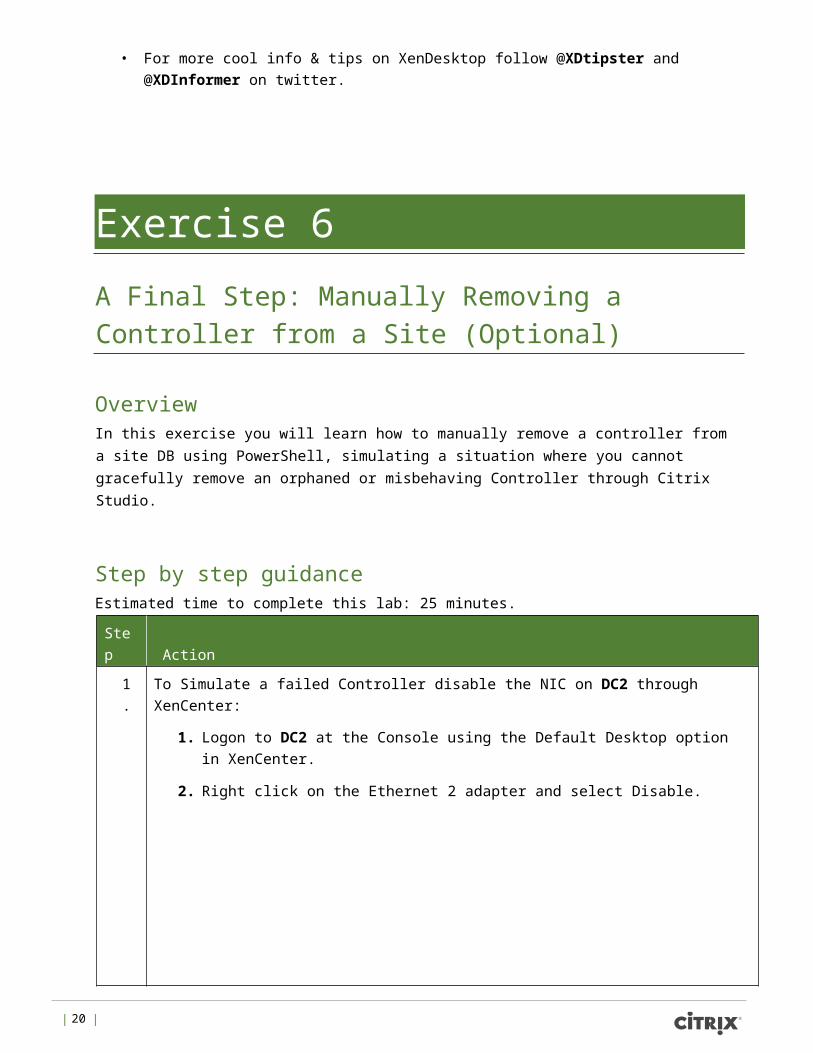
• Extended Disconnect settings for Peak and Off-Peak times can be configured through PoSH as part of a Multistage Power Policy Rule and applied to a supported Delivery Group
• Extended Disconnect settings and therefore Multistage Power Policy Rules are only supported with Private Deskops & Delivery Groups.
• By Default with XenApp & XenDesktop 7.6, idle machine sessions will be disconnected after a period of 24hrs.
• For more cool info & tips on XenDesktop follow @XDtipster and @XDInformer on twitter.
Exercise 6 A Final Step: Manually Removing a Controller from a Site (Optional)
Overview In this exercise you will learn how to manually remove a controller from a site DB using PowerShell, simulating a situation where you cannot gracefully remove an orphaned or misbehaving Controller through Citrix Studio.
| 58 |
Step by step guidance Estimated time to complete this lab: 25 minutes.
Step Action
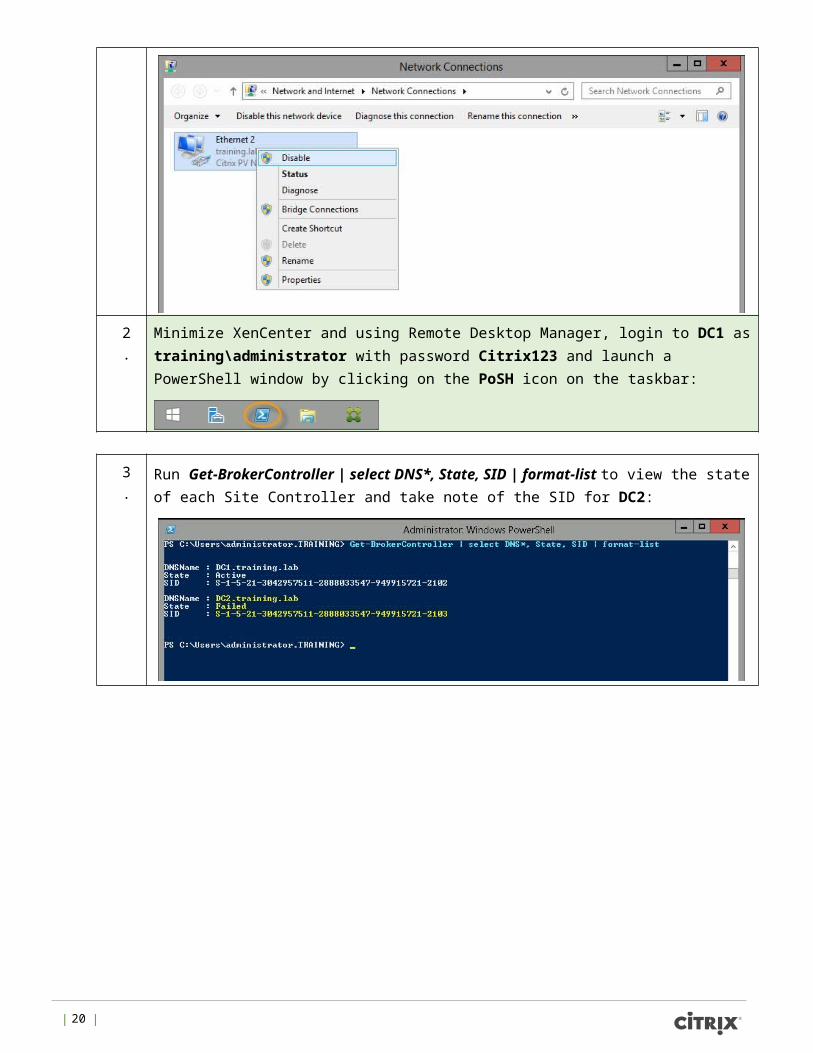
1. To Simulate a failed Controller disable the NIC on DC2 through XenCenter:
1. Logon to DC2 at the Console using the Default Desktop option in XenCenter.
2. Right click on the Ethernet 2 adapter and select Disable.
2. Minimize XenCenter and using Remote Desktop Manager, login to DC1 as training\administrator with password Citrix123 and launch a PowerShell window by clicking on the PoSH icon on the taskbar:
3. Run Get-BrokerController | select DNS*, State, SID | format-list to view the state of each Site Controller and take note of the SID for DC2:
| 59 |
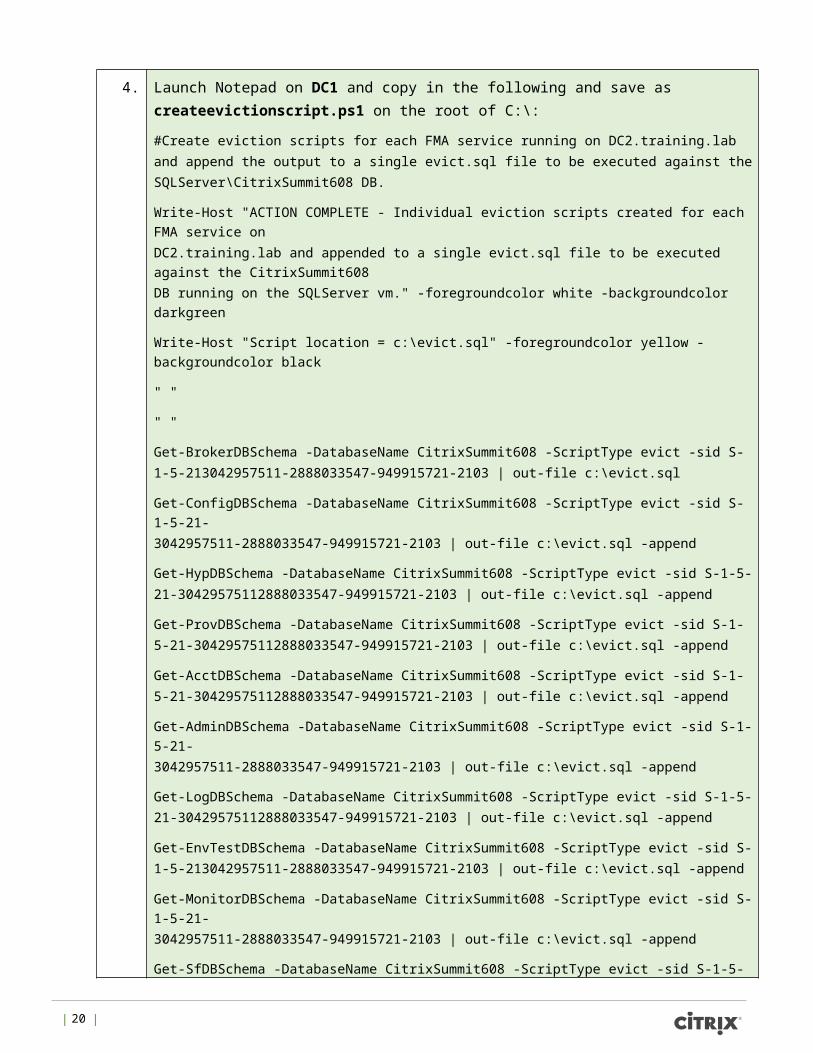
4. Launch Notepad on DC1 and copy in the following and save as createevictionscript.ps1 on the root of C:\:
#Create eviction scripts for each FMA service running on DC2.training.lab and append the output to a single evict.sql file to be executed against the SQLServer\CitrixSummit608 DB.
Write-Host "ACTION COMPLETE - Individual eviction scripts created for each FMA service on DC2.training.lab and appended to a single evict.sql file to be executed against the CitrixSummit608 DB running on the SQLServer vm." -foregroundcolor white -backgroundcolor darkgreen
Write-Host "Script location = c:\evict.sql" -foregroundcolor yellow -backgroundcolor black
" "
" "
Get-BrokerDBSchema -DatabaseName CitrixSummit608 -ScriptType evict -sid S-1-5-213042957511-2888033547-949915721-2103 | out-file c:\evict.sql
Get-ConfigDBSchema -DatabaseName CitrixSummit608 -ScriptType evict -sid S-1-5-21-3042957511-2888033547-949915721-2103 | out-file c:\evict.sql -append
Get-HypDBSchema -DatabaseName CitrixSummit608 -ScriptType evict -sid S-1-5-21-30429575112888033547-949915721-2103 | out-file c:\evict.sql -append
Get-ProvDBSchema -DatabaseName CitrixSummit608 -ScriptType evict -sid S-1-5-21-30429575112888033547-949915721-2103 | out-file c:\evict.sql -append
Get-AcctDBSchema -DatabaseName CitrixSummit608 -ScriptType evict -sid S-1-5-21-30429575112888033547-949915721-2103 | out-file c:\evict.sql -append
Get-AdminDBSchema -DatabaseName CitrixSummit608 -ScriptType evict -sid S-1-5-21-3042957511-2888033547-949915721-2103 | out-file c:\evict.sql -append
Get-LogDBSchema -DatabaseName CitrixSummit608 -ScriptType evict -sid S-1-5-21-30429575112888033547-949915721-2103 | out-file c:\evict.sql -append
Get-EnvTestDBSchema -DatabaseName CitrixSummit608 -ScriptType evict -sid S-1-5-213042957511-2888033547-949915721-2103 | out-file c:\evict.sql -append
Get-MonitorDBSchema -DatabaseName CitrixSummit608 -ScriptType evict -sid S-1-5-21-3042957511-2888033547-949915721-2103 | out-file c:\evict.sql -append
Get-SfDBSchema -DatabaseName CitrixSummit608 -ScriptType evict -sid S-1-5-21-3042957511-2888033547-949915721-2103 | out-file c:\evict.sql -append
Get-AnalyticsDBSchema -DatabaseName CitrixSummit608 -ScriptType evict -sid S-1-5-213042957511-2888033547-949915721-2103 | out-file c:\evict.sql –append
Note: A previously created version of this script can also be found at \\AD\Software\Scripts
| 60 |
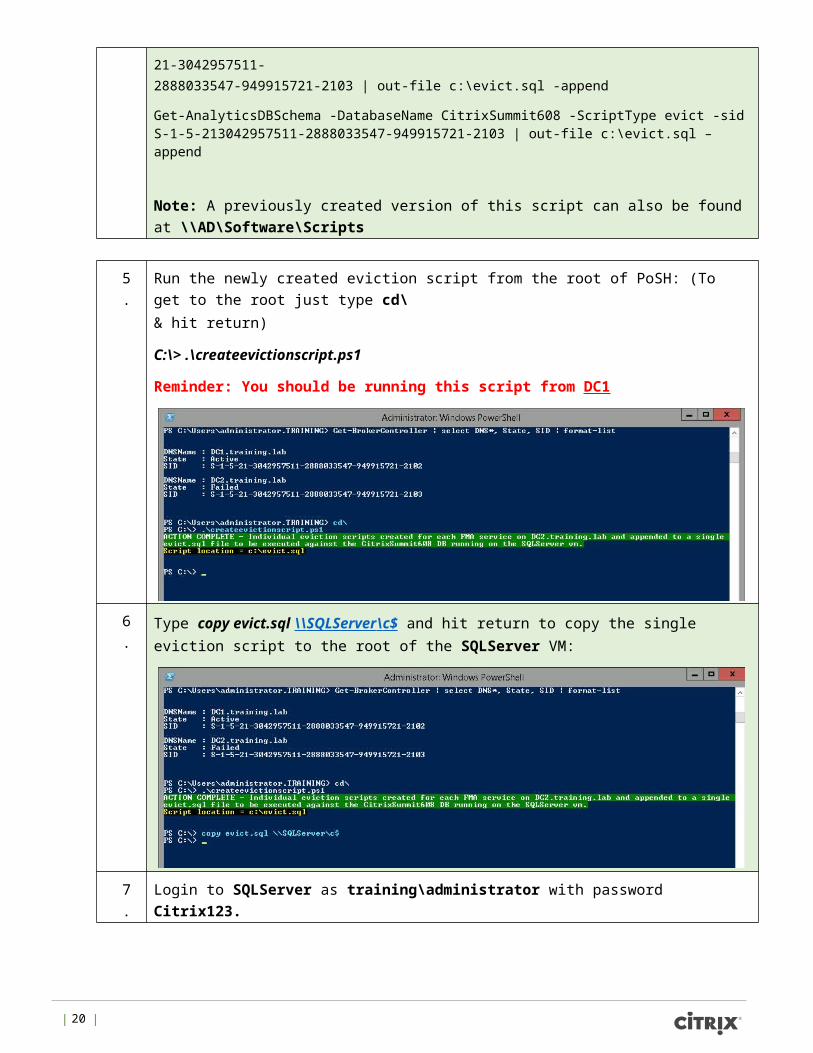
5. Run the newly created eviction script from the root of PoSH: (To get to the root just type cd\ & hit return)
C:\> .\createevictionscript.ps1
Reminder: You should be running this script from DC1
6. Type copy evict.sql \\ SQLServer \ c$ and hit return to copy the single eviction script to the root of the SQLServer VM:
7. Login to SQLServer as training\administrator with password Citrix123.
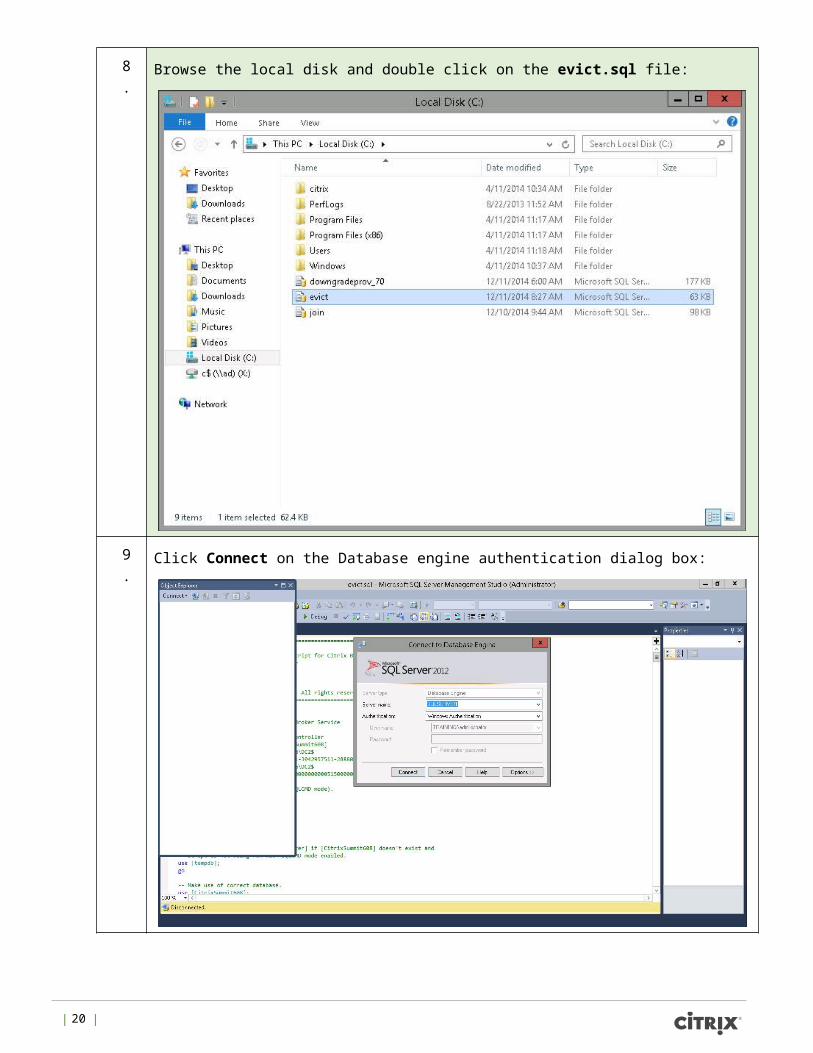
8. Browse the local disk and double click on the evict.sql file:
| 61 |
9. Click Connect on the Database engine authentication dialog box:
| 62 |
10. Click Connect again to authenticate to the Server:
11. Click inside the evict.sql script window.
12. Click on Query and select SQLCMD Mode:
13. Press F5 or the Execute Icon on the Toolbar to execute the evict.sql script
Note: There is no requirement to select the CitrixSummit608 DB to run the script against as the script itself determines this.
| 63 |
14. Observation: Script runs without errors and removes the Broker Service and Database user for a/c for DC2 from the Site DB:
15. Switch back to DC1 (Controller where you created the eviction script) and login again if needed as training\administrator with password Citrix123.
16. Type Get-BrokerController and verify that DC2.training.lab is no longer listed as a Site Controller:
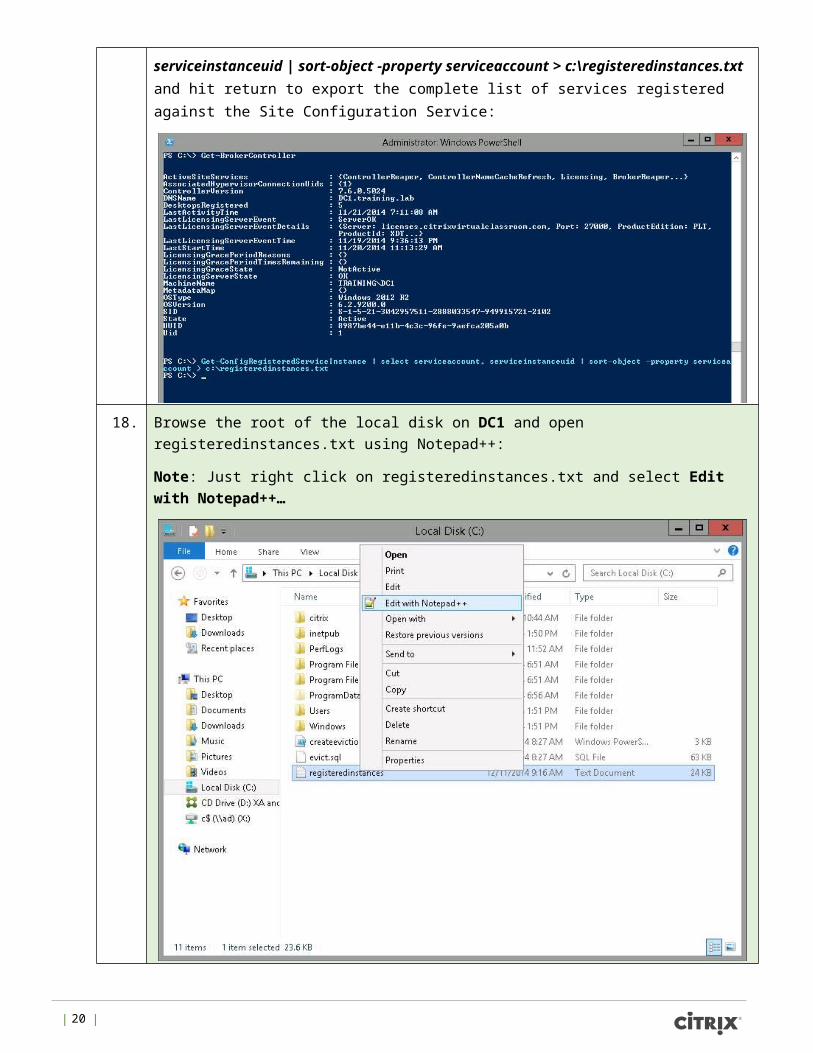
17. Type Get-ConfigRegisteredServiceInstance | select serviceaccount, serviceinstanceuid | sort-object -property serviceaccount > c:\registeredinstances.txt and hit return to export the complete list of services registered against the Site Configuration
| 64 |
Service:
18. Browse the root of the local disk on DC1 and open registeredinstances.txt using Notepad++:
Note: Just right click on registeredinstances.txt and select Edit with Notepad++…
| 65 |
19. Manually delete all reference to the service instances running on DC1:
Note: Make sure to also delete the column headings…
| 66 |
20. Using the Alt key (Hold down and highlight text) delete all Training\DC2$ entries leaving just the service instance UID’s behind:
Note: Notepad++ allows developers to manipulate text in a way that standard text editors like Notepad.exe can’t and is very useful in this situation.
| 67 |
21. Continue editing the registeredinstances.txt file placing Unregister-ConfigRegisteredServiceInstance –serviceinstanceuid before each service instance UID:
Once formatted correctly jump to the next step below.
22. Click File Save and save the text as Unregisterdc2.ps1 on the root of C:\ on DC1:
Note: Ensure “All Types (*.*)” is selected under “Save as Type”
| 68 |

Note: A previously created and tested Unregisterdc2.ps1 script can also be found at \\ad\software\scripts\Exercise 6 for convenience and validation.
23. Close Notepad++ and switch back to the open instance of PoSH (on DC1).
24. Run the newly created unregisterdc2.ps1 script from the root of PoSH: (To get to the root just type cd\ & hit return)
C:\> .\unregisterdc2.ps1
Reminder: You should be running this script from DC1
| 69 |

25. Type Get-ConfigRegisteredServiceInstance | select serviceaccount, serviceinstanceuid | sort-object -property serviceaccount and hit return to verify that only service instances running on DC1 remain registered with the Site Configuration service:
26. If not already running, launch Citrix Studio from the taskbar icon on DC1:
27. Click on the Controllers node:
Observation: Only DC1.training.lab is now listed as an active Site Controller.
Note: As mentioned previously, fully functioning Controllers should always show a last update state of 0 minutes as they heartbeat by default with the Site DB every 20 seconds and will timeout after 40 seconds.
28. Congratulations, you have finished this lab exercise.
| 70 |
Exercise Summary
Takeaways from this exercise:
• Although Citrix Studio provides the ability to gracefully remove Site Controllers this may not always be possible especially if the Controller state is returning as failed or unknown (Orphaned Controller, misbehaving Controller). In this situation it is important to understand how to approach this task manually using the SQL Service evict scripts.
• For more information re: How to manually remove Controllers from an XD site using PoSH take a look at the following XD Tipster blog:
o http://blogs.citrix.com/2013/10/22/xd-tipster-removing-controllers-from-an-xd-siteusing-posh/
• For more information and XenDesktop related tips follow @XDtipster and @XDInformer
Revision Change Descriptions Updated By Date
1.0 Original Version Kimberly Ferrie May 2015
| 71 |

About Citrix
Citrix (NASDAQ:CTXS) is a cloud company that enables mobile workstyles—empowering people to work and collaborate from anywhere, securely accessing apps and data on any of the latest devices, as easily as they would in their own office. Citrix solutions help IT and service providers build clouds, leveraging virtualization and networking technologies to deliver high-performance, elastic and cost-effective cloud services. With market-leading cloud solutions for mobility, desktop virtualization, networking, cloud platforms, collaboration and data sharing, Citrix helps organizations of all sizes achieve the speed and agility necessary to succeed in a mobile and dynamic world. Citrix products are in use at more than 330,000 organizations and by over 100 million users globally. Annual revenue in 2012 was $2.59 billion. Learn more at www.citrix.com.
| 72 |