Embed Size (px)
Citation preview

Postural Care Positioning & Re-Positioning System . . .
. . . . Taking the strain out of patient handling
User Instructions
Using your Symmslyde system can protect your
back, enhance user comfort and reduce the
need to constantly reposition. Please read these
instructions carefully.
Please use the system in accordance with
local moving and handling guidelines. Use
bed rails as instructed.
If you are not familiar with Symmetrisleep
positioning, use the positioning elements as
agreed with a competent individual.
Ensure that a risk analysis has been carried
out.
You do not need to use a bed sheet with
this system.
The Helping Hand Company
Bromyard Road
Ledbury
HR8 1NS
UK
Tel: 01531 635388
Fax: 01531 638059
www.symmetrikit.com
Www.position2relax.com SA9050_3
Patent Pending
CoolOver® , Symmetrisleep®, Omnitherm® and Symmslyde®
are all registered trademarks belonging to The Helping Hand Company (Ledbury) Ltd.
Patent Pending
Page 15
Getting Started
Identifying typical components:
SA9010
Symmslyde Airmantle
Airmantle Core to aid temperature regulation
with wipe clean removable cover. Straps sewn
to underside. Retaining strap on underside
towards head end.
CoolOver® Airmantle Top Sheet
Embroidered logo is top surface. Press
studs at top end, zip fixings down sides.
SA9060
Receptor Sheet & Slide Tube
A Velcro like sheet with a tubular panel of
slide material attached together with Velcro.
SA8000S & SA9020
Cleaning and caring for your Symmslyde
Receptor Sheet
Red Slide Tube &
Retainer Strap
CoolOver® Top
Sheet
Airmantle Cover
Airmantle
Padded Core
Press studs
Wipe
clean
surface
Retaining Strap
Supplied with SA9010 Symmslyde
Airmantle.
SA9030
Page 2
WASH SEPARATELY. Detach from Receptor Sheet.
Wash with mild detergents at 75°C (165°F).
Tumble Dry or Air dry.
DO NOT Iron.
DO NOT Dry Clean.
Wipe Clean with a soft cloth moistened with
water and mild detergent or no more than
1,000ppm bleach solution.
Can be machine washed.
DO NOT TUMBLE DRY
Can be machine washed .
DO NOT Dry Clean
DO NOT Spin.
DO NOT TUMBLE DRY.
Wash at 75°C (165°F)
DO NOT Tumble Dry
Do Not use Bleach
DO NOT Iron
DO NOT wash with strong colours
Detach from Airmantle.
Wash with mild detergents at 75°C (165°F).
Tumble Dry or Air dry.
DO NOT Wash with Dark colours.
DO NOT Iron.
DO NOT Dry Clean.
Clip fixing adaptor straps
To work on hoists with fixed pin
attachment points. Supplied as a pair.
SA9070
Page 14 Page 3
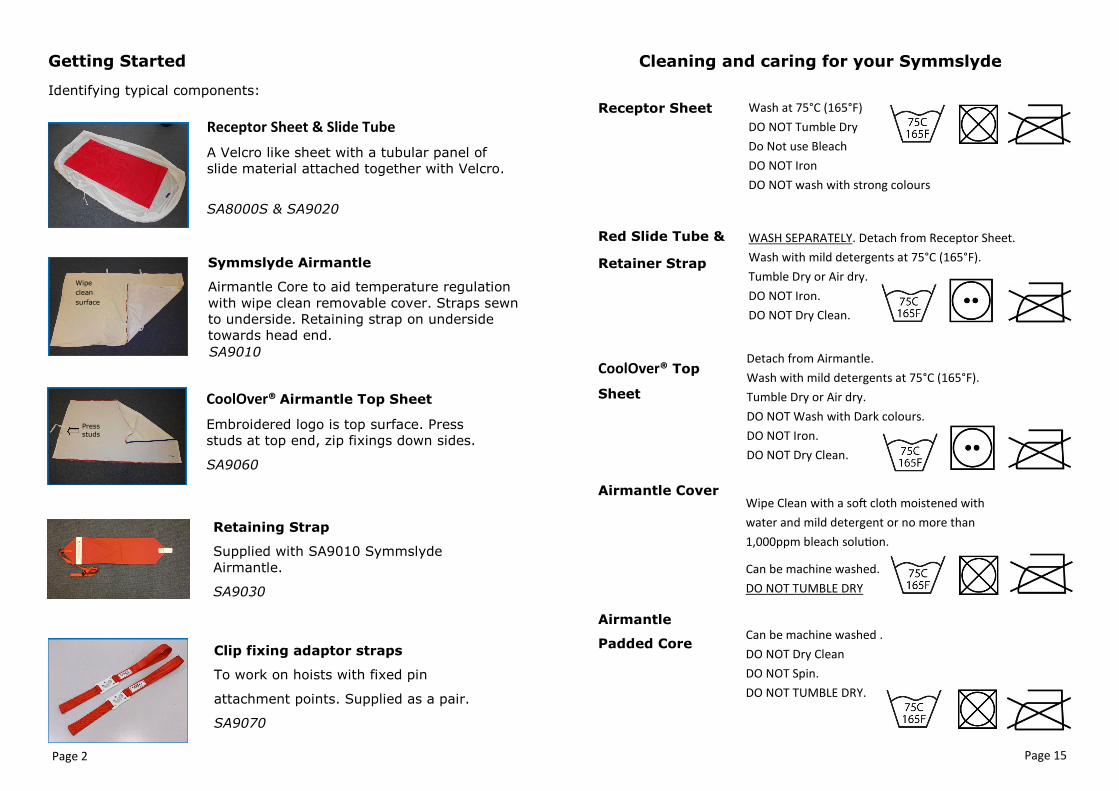
Positioning aids—ordered separately
Symmetrisleep brackets, pads and
cushions.
Part codes on request
Please Note:
It is not necessary to use a separate sheet with the Symmslyde
system. The CoolOver® Airmantle Topsheet is attached with zips,
enabling it to be easily removed for washing.
Blue markers indicate the foot end of the bed on the main
components for quick changeover identification.
Colours may vary from those illustrated.
The head end is indicated by a label ‘ HEAD’.
Whilst the client is still supported,
add brackets as required.
Raise bed rails to ensure safety.
Working from the hoist side, add
further supports as required.
Lower and disconnect the hoist
and tuck the Airmantle over the
brackets.
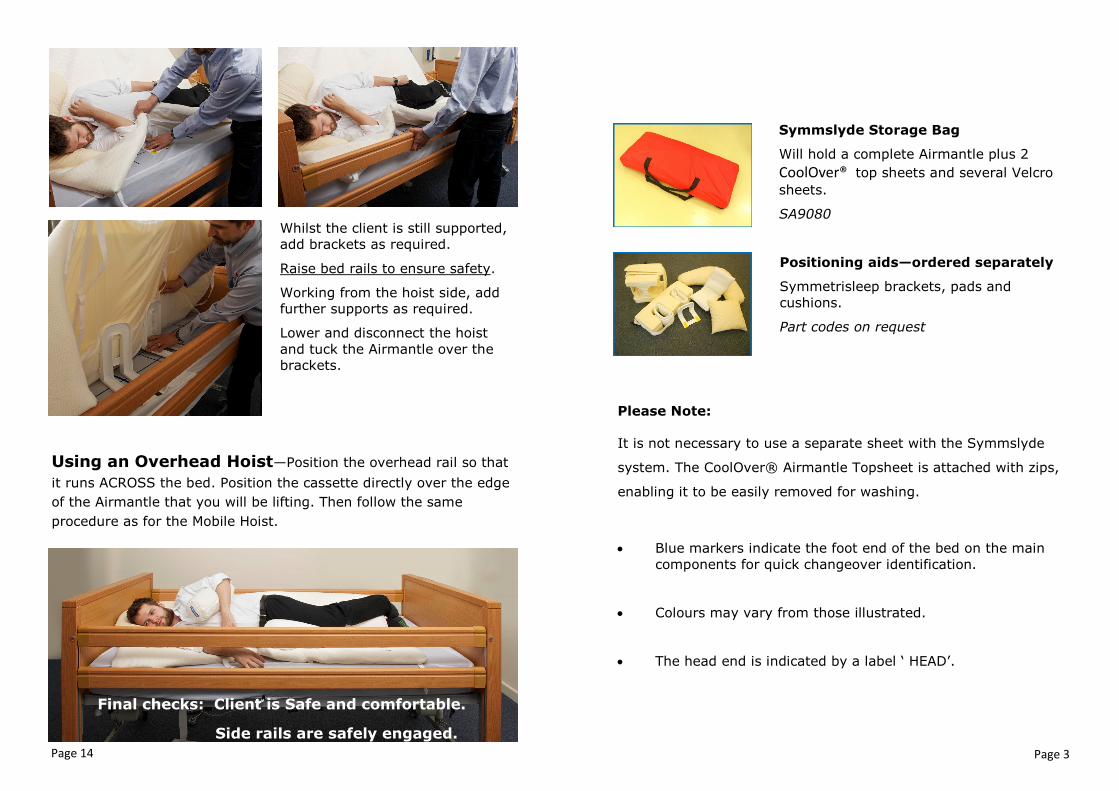
Using an Overhead Hoist—Position the overhead rail so that
it runs ACROSS the bed. Position the cassette directly over the edge
of the Airmantle that you will be lifting. Then follow the same
procedure as for the Mobile Hoist.
Final checks: Client is Safe and comfortable.
Side rails are safely engaged.
Symmslyde Storage Bag
Will hold a complete Airmantle plus 2
CoolOver® top sheets and several Velcro
sheets.
SA9080
Page 4 Page 13
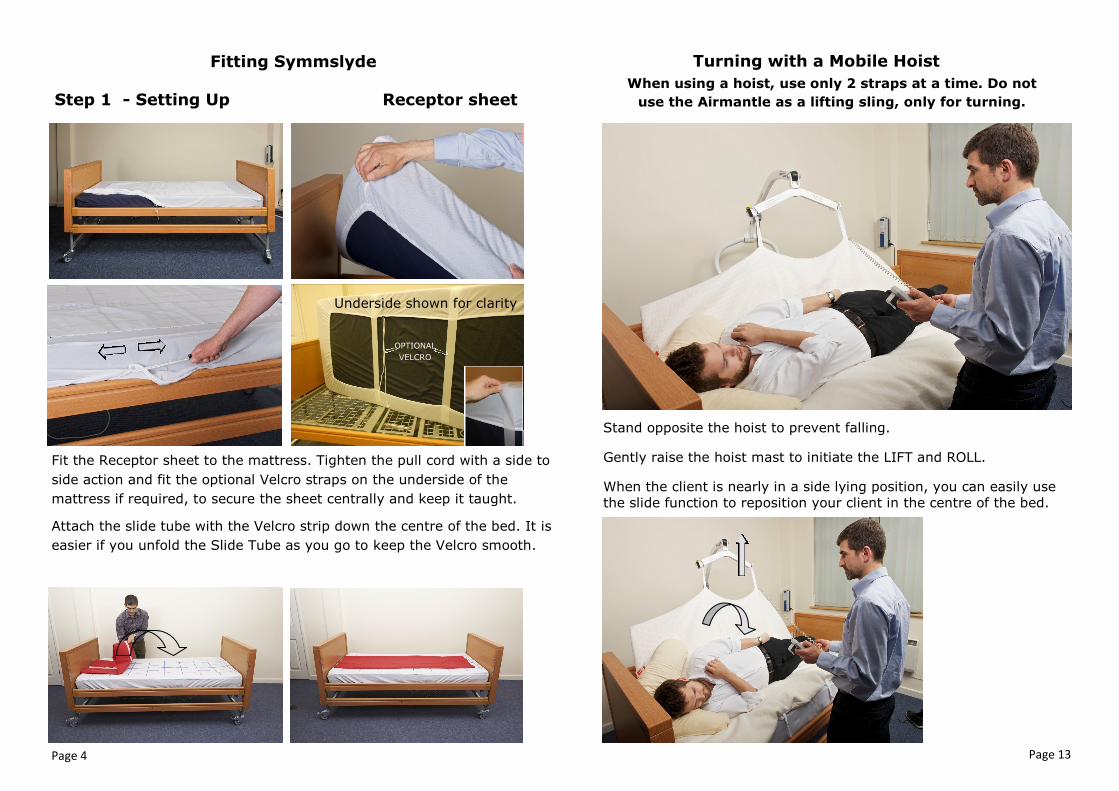
Step 1 - Setting Up Receptor sheet
Fit the Receptor sheet to the mattress. Tighten the pull cord with a side to
side action and fit the optional Velcro straps on the underside of the
mattress if required, to secure the sheet centrally and keep it taught.
Attach the slide tube with the Velcro strip down the centre of the bed. It is
easier if you unfold the Slide Tube as you go to keep the Velcro smooth.
Turning with a Mobile Hoist
Stand opposite the hoist to prevent falling.
Gently raise the hoist mast to initiate the LIFT and ROLL.
When the client is nearly in a side lying position, you can easily use
the slide function to reposition your client in the centre of the bed.
When using a hoist, use only 2 straps at a time. Do not
use the Airmantle as a lifting sling, only for turning.
Fitting Symmslyde
OPTIONAL
VELCRO
Underside shown for clarity
Page 12 Page 5
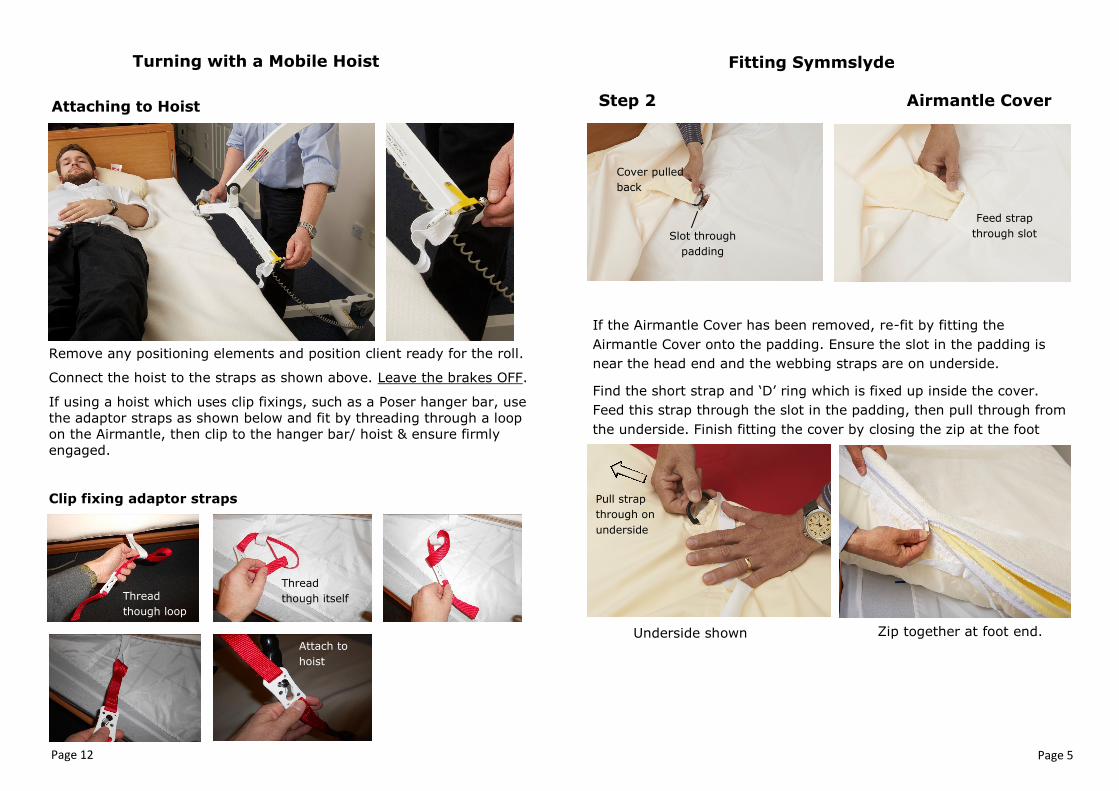
Step 2 Airmantle Cover
Slot through
padding
If the Airmantle Cover has been removed, re-fit by fitting the
Airmantle Cover onto the padding. Ensure the slot in the padding is
near the head end and the webbing straps are on underside.
Find the short strap and ‘D’ ring which is fixed up inside the cover.
Feed this strap through the slot in the padding, then pull through from
the underside. Finish fitting the cover by closing the zip at the foot
Turning with a Mobile Hoist
Remove any positioning elements and position client ready for the roll.
Connect the hoist to the straps as shown above. Leave the brakes OFF.
If using a hoist which uses clip fixings, such as a Poser hanger bar, use
the adaptor straps as shown below and fit by threading through a loop
on the Airmantle, then clip to the hanger bar/ hoist & ensure firmly
engaged.
Clip fixing adaptor straps
Cover pulled
back
Feed strap
through slot
Pull strap
through on
underside
Attach to
hoist
Thread
though loop
Thread
though itself
Zip together at foot end.
Fitting Symmslyde
Underside shown
Attaching to Hoist
Feed strap
through slot
Page 6 Page 11
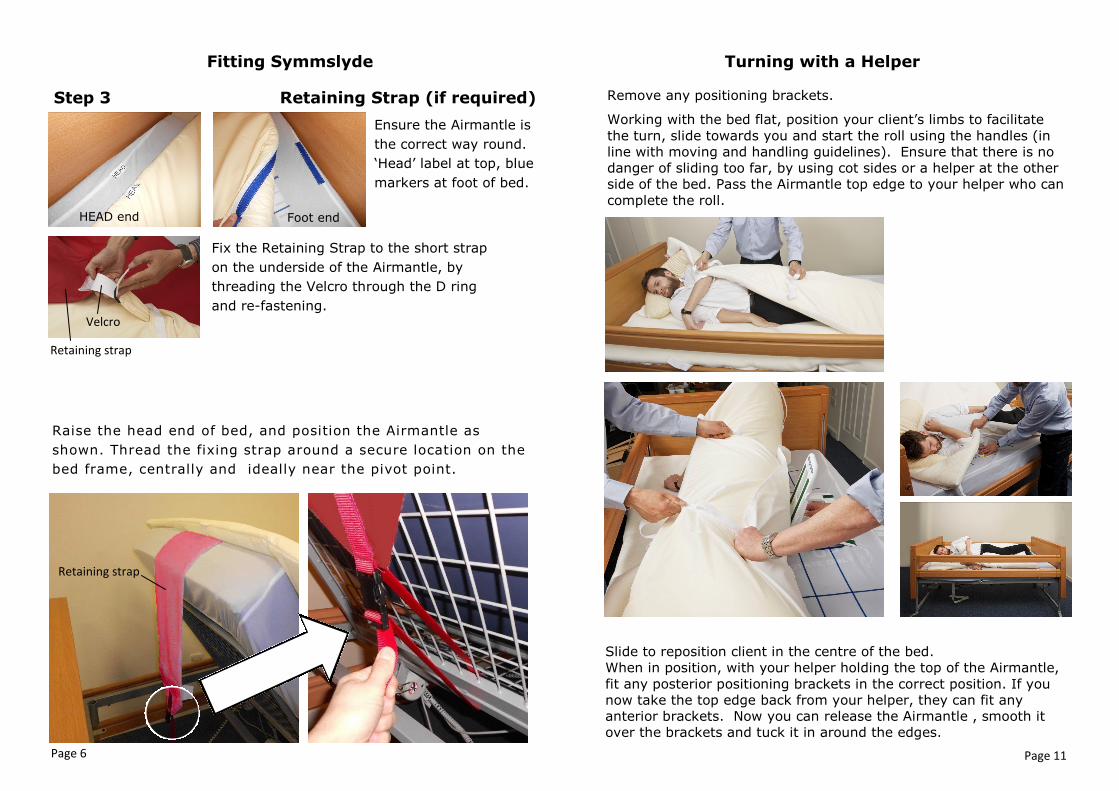
Ensure the Airmantle is
the correct way round.
‘Head’ label at top, blue
markers at foot of bed.
Fix the Retaining Strap to the short strap
on the underside of the Airmantle, by
threading the Velcro through the D ring
and re-fastening.
Raise the head end of bed, and position the Airmantle as
shown. Thread the fixing strap around a secure location on the
bed frame, centrally and ideally near the pivot point.
HEAD end Foot end
D ring
Step 3 Retaining Strap (if required)
Turning with a Helper
Remove any positioning brackets.
Working with the bed flat, position your client’s limbs to facilitate
the turn, slide towards you and start the roll using the handles (in
line with moving and handling guidelines). Ensure that there is no
danger of sliding too far, by using cot sides or a helper at the other
side of the bed. Pass the Airmantle top edge to your helper who can
complete the roll.
Slide to reposition client in the centre of the bed.
When in position, with your helper holding the top of the Airmantle,
fit any posterior positioning brackets in the correct position. If you
now take the top edge back from your helper, they can fit any
anterior brackets. Now you can release the Airmantle , smooth it
over the brackets and tuck it in around the edges.
Fitting Symmslyde
Retaining strap
Retaining strap
Velcro
Page 10 Page 7
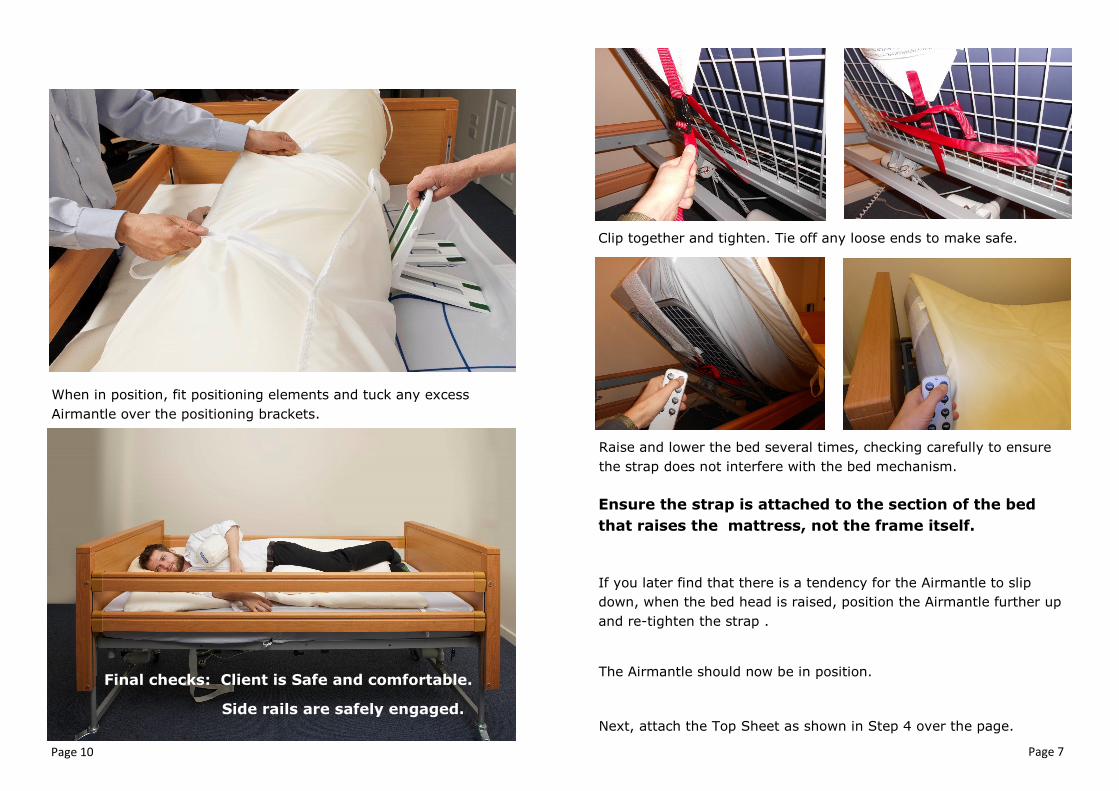
Raise and lower the bed several times, checking carefully to ensure
the strap does not interfere with the bed mechanism.
The Airmantle should now be in position.
Next, attach the Top Sheet as shown in Step 4 over the page.
Ensure the strap is attached to the section of the bed
that raises the mattress, not the frame itself.
If you later find that there is a tendency for the Airmantle to slip
down, when the bed head is raised, position the Airmantle further up
and re-tighten the strap .
When in position, fit positioning elements and tuck any excess
Airmantle over the positioning brackets.
Final checks: Client is Safe and comfortable.
Side rails are safely engaged.
Clip together and tighten. Tie off any loose ends to make safe.

Page 8 Page 9
Step 4 CoolOver® Top sheet
Lay the CoolOver® Top Sheet onto the Airmantle with the ‘HEAD’
label at the head end of the bed. Attach all the press studs to the
corresponding studs on the underside of the Airmantle Cover.
Zip both sides of the CoolOver® Top Sheet to the sides of the
Airmantle.
Working with Symmslyde
Slide Sheet Function
Make sure there are no positioning brackets in place. Working with
the bed flat and the user lying on top of the Airmantle, you can now
slide the user as required. Simply grip hold of the Airmantle and pull
towards you.
Ensure that there is no danger of sliding too far — use cot sides
or a helper at the other side of the bed.
Fitting Symmslyde
Press studs