Embed Size (px)
Citation preview
Syllabus
Name of the Practical : DBMS LAB
Code : CS 2258
1. Data Definition, Table Creation, Constraints,
2. Insert, Select Commands, Update & Delete Commands.
3. Nested Queries & Join Queries
4. Views
5. High level programming language extensions (Control structures, Procedures and Functions).
6. Front end tools
7. Forms
8. Triggers
9. Menu Design
10. Reports.
11. Database Design and implementation (Mini Project).
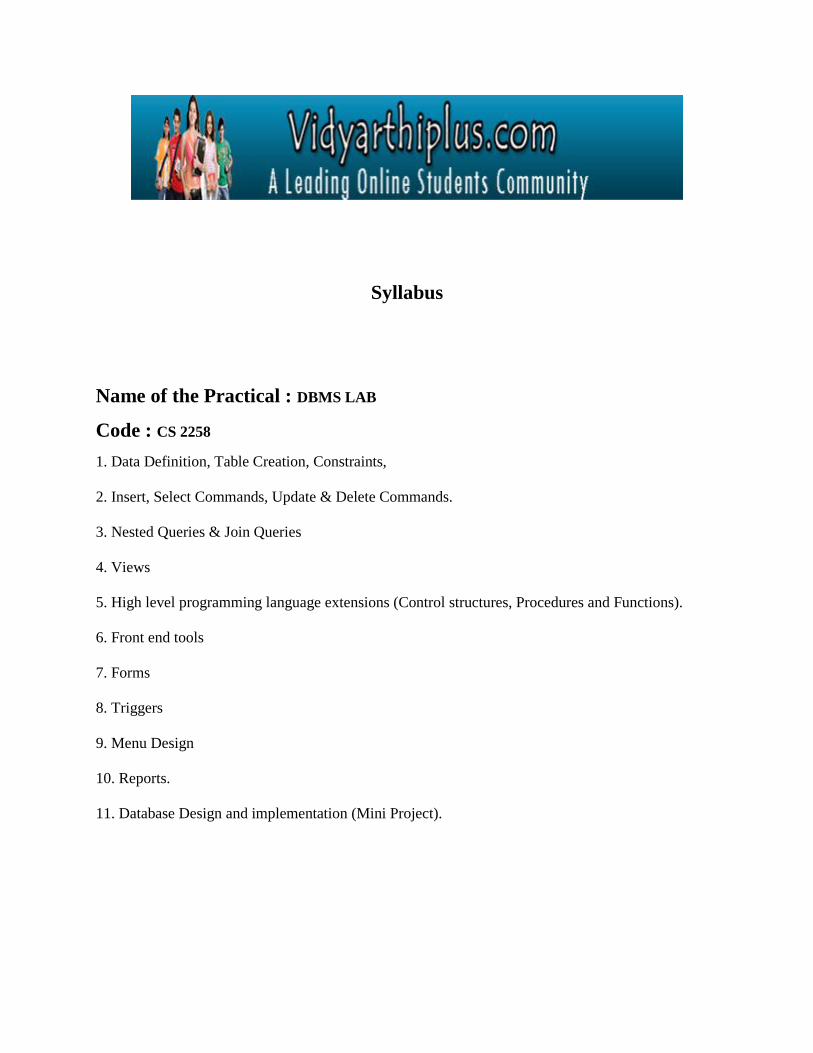
Ex. No: 1 INDEXDate :
Data Definition Language : Table Creation, Constraints.
Aim
To write SQL Statements using Data Definition Language (DDL) to Create Table with Constraints.
Theory
Data Definition Language
The Data Definition Language (DDL) is used to Creating a table Altering table structure by adding, deleting or modifying columns Destroy databases and database objects.
These commands will primarily be used by database administrators during the setup and removal phases of adatabase project.
CREATE COMMAND
CREATE command is used to Create tables that will contain data.
Syntax
CREATE TABLE [table name] ( [column definitions] );
CREATE TABLE student (studname varchar2(20) not null, studid number not null) ;
establishes a table titled "student" in the current database. In our example, the table contains two attributes:studname and studid.
ALTEROnce table created within a database, one may wish to modify the definition of it. The ALTER
command allows you to make changes to the structure of a table without deleting and recreating it. Forexample, the command to add a column named branch to an existing table named student would be:
ALTER TABLE student ADD branch varchar2(3);
The above command adds a new attribute branch to the student table.
DROPThe final command of the Data Definition Language, DROP, allows us to remove entire database
objects from DBMS. For example, if we want to permanently remove the student table that we created,following command is used:
DROP TABLE student;
Practice Exercise
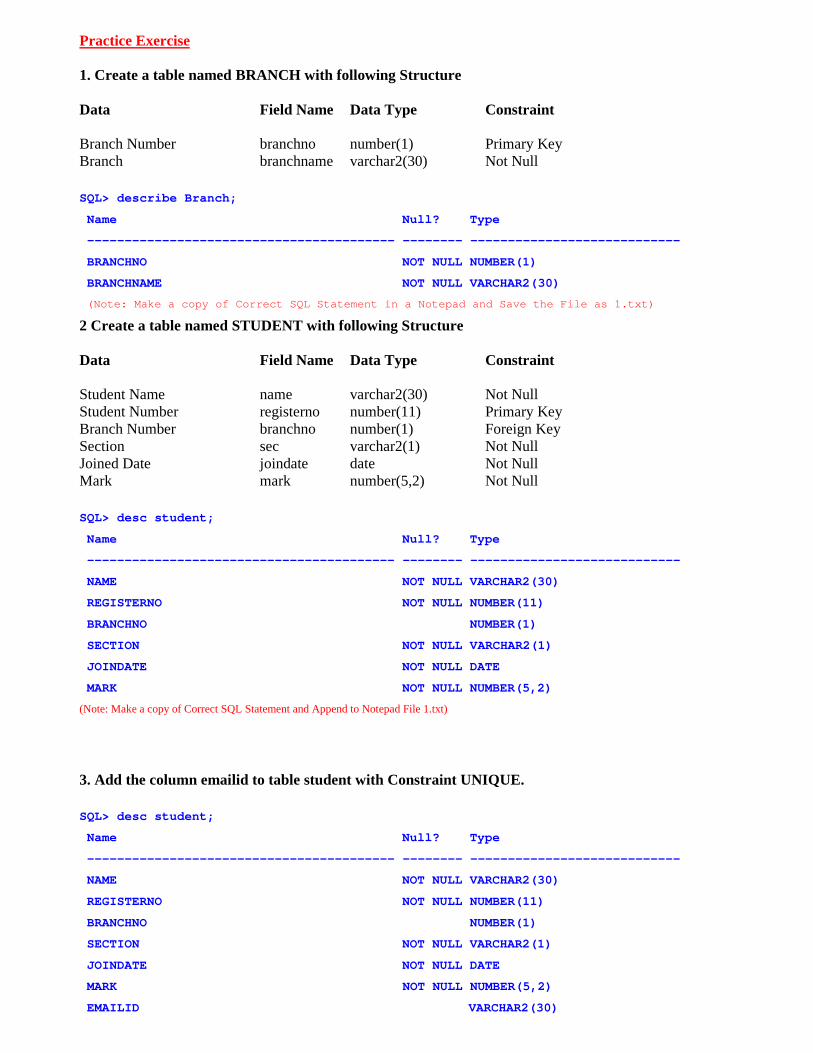
1. Create a table named BRANCH with following Structure
Data Field Name Data Type Constraint
Branch Number branchno number(1) Primary KeyBranch branchname varchar2(30) Not Null
SQL> describe Branch;
Name Null? Type
----------------------------------------- -------- ----------------------------
BRANCHNO NOT NULL NUMBER(1)
BRANCHNAME NOT NULL VARCHAR2(30)
(Note: Make a copy of Correct SQL Statement in a Notepad and Save the File as 1.txt)
2 Create a table named STUDENT with following Structure
Data Field Name Data Type Constraint
Student Name name varchar2(30) Not NullStudent Number registerno number(11) Primary KeyBranch Number branchno number(1) Foreign KeySection sec varchar2(1) Not NullJoined Date joindate date Not NullMark mark number(5,2) Not Null
SQL> desc student;
Name Null? Type
----------------------------------------- -------- ----------------------------
NAME NOT NULL VARCHAR2(30)
REGISTERNO NOT NULL NUMBER(11)
BRANCHNO NUMBER(1)
SECTION NOT NULL VARCHAR2(1)
JOINDATE NOT NULL DATE
MARK NOT NULL NUMBER(5,2)
(Note: Make a copy of Correct SQL Statement and Append to Notepad File 1.txt)
3. Add the column emailid to table student with Constraint UNIQUE.
SQL> desc student;
Name Null? Type
----------------------------------------- -------- ----------------------------
NAME NOT NULL VARCHAR2(30)
REGISTERNO NOT NULL NUMBER(11)
BRANCHNO NUMBER(1)
SECTION NOT NULL VARCHAR2(1)
JOINDATE NOT NULL DATE
MARK NOT NULL NUMBER(5,2)
EMAILID VARCHAR2(30)
(Note: Make a copy of Correct SQL Statement and Append to Notepad File 1.txt)
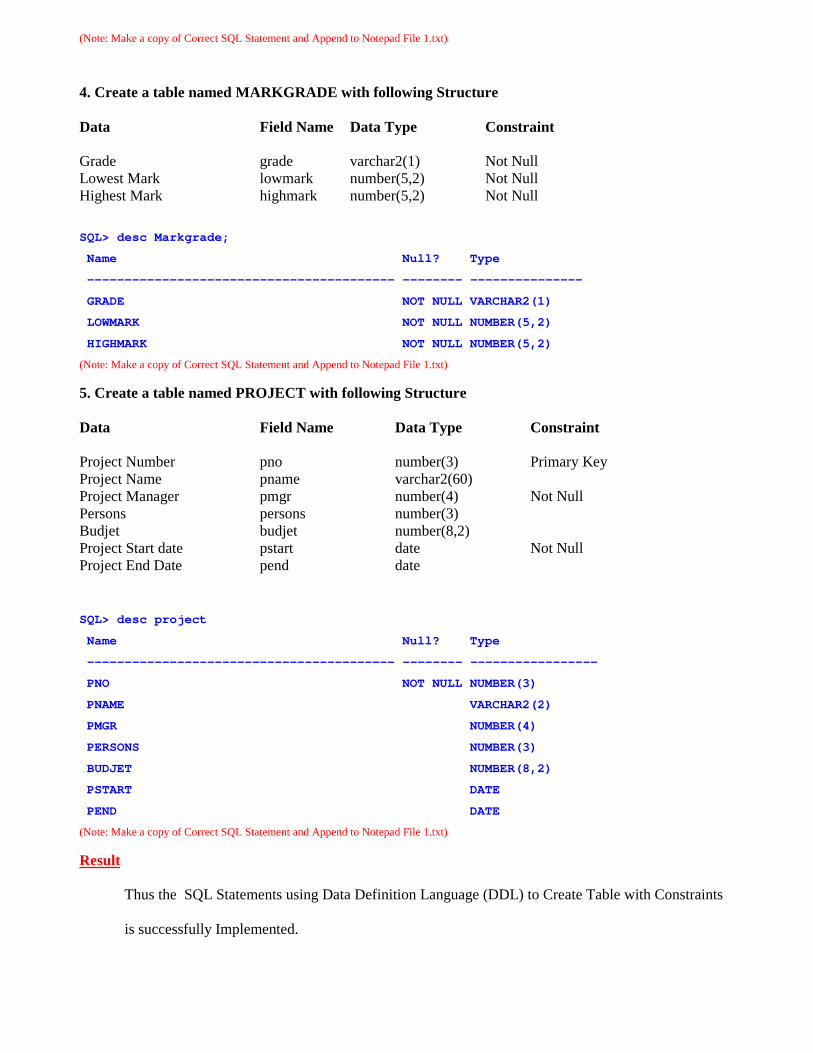
4. Create a table named MARKGRADE with following Structure
Data Field Name Data Type Constraint
Grade grade varchar2(1) Not NullLowest Mark lowmark number(5,2) Not NullHighest Mark highmark number(5,2) Not Null
SQL> desc Markgrade;
Name Null? Type
----------------------------------------- -------- ---------------
GRADE NOT NULL VARCHAR2(1)
LOWMARK NOT NULL NUMBER(5,2)
HIGHMARK NOT NULL NUMBER(5,2)
(Note: Make a copy of Correct SQL Statement and Append to Notepad File 1.txt)
5. Create a table named PROJECT with following Structure
Data Field Name Data Type Constraint
Project Number pno number(3) Primary KeyProject Name pname varchar2(60)Project Manager pmgr number(4) Not NullPersons persons number(3)Budjet budjet number(8,2)Project Start date pstart date Not NullProject End Date pend date
SQL> desc project
Name Null? Type
----------------------------------------- -------- -----------------
PNO NOT NULL NUMBER(3)
PNAME VARCHAR2(2)
PMGR NUMBER(4)
PERSONS NUMBER(3)
BUDJET NUMBER(8,2)
PSTART DATE
PEND DATE
(Note: Make a copy of Correct SQL Statement and Append to Notepad File 1.txt)
Result
Thus the SQL Statements using Data Definition Language (DDL) to Create Table with Constraints
is successfully Implemented.
Ex. No: 2 INDEXDate :
Insert, Select , Update and Delete Commands.
Aim
To write queries using Insert, Select, Update, and Delete Commands in Data Manipulation Language
(DML).
Theory
Data Retrieval: Select
Data Manipulation Language (DML): Insert, Delete, Update
Data Manipulation Language (Insert, Delete, Update)
Data Manipulation Language (DML) is used by computer programs or database users to retrieve, insert,delete and update data in a database. Currently, the most popular data manipulation language is that of SQL,which is used to retrieve and manipulate data in a Relational database
Data Manipulation Languages have their functional capability organized by the initial word in astatement, which is almost always a verb. In the case of SQL, these verbs are:
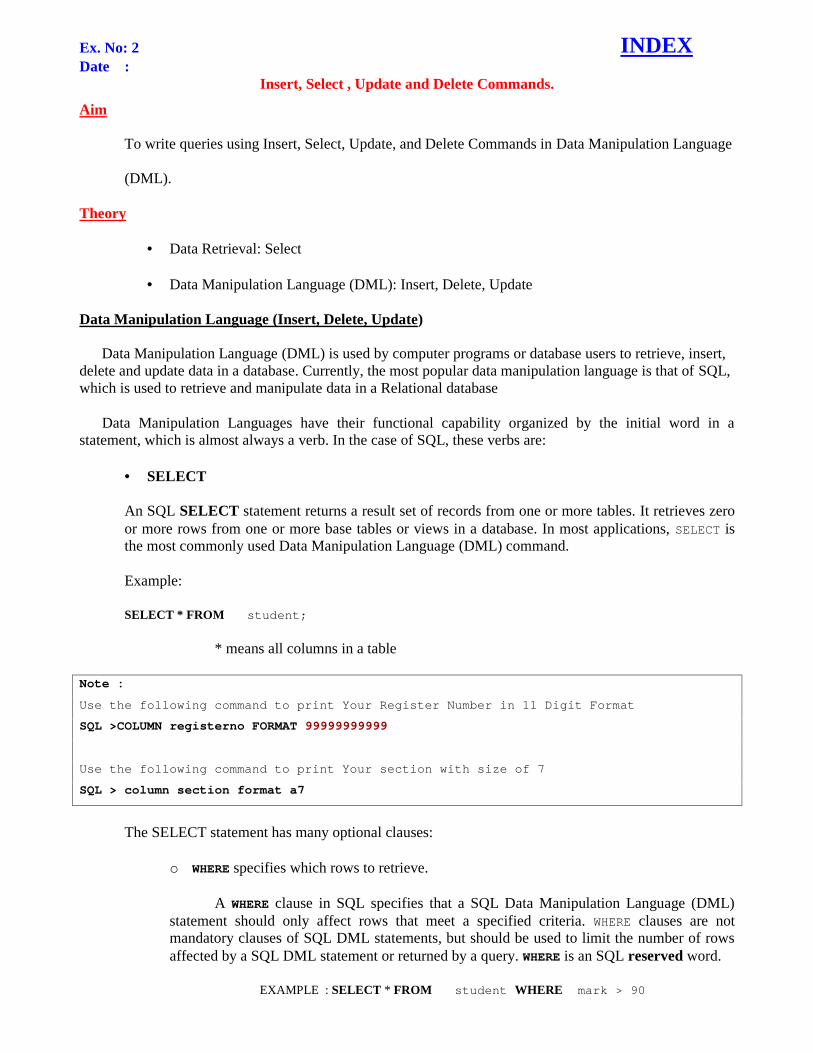
SELECT
An SQL SELECT statement returns a result set of records from one or more tables. It retrieves zeroor more rows from one or more base tables or views in a database. In most applications, SELECT isthe most commonly used Data Manipulation Language (DML) command.
Example:
SELECT * FROM student;
* means all columns in a table
Note :
Use the following command to print Your Register Number in 11 Digit Format
SQL >COLUMN registerno FORMAT 99999999999
Use the following command to print Your section with size of 7
SQL > column section format a7
The SELECT statement has many optional clauses:
o WHERE specifies which rows to retrieve.
A WHERE clause in SQL specifies that a SQL Data Manipulation Language (DML)statement should only affect rows that meet a specified criteria. WHERE clauses are notmandatory clauses of SQL DML statements, but should be used to limit the number of rowsaffected by a SQL DML statement or returned by a query. WHERE is an SQL reserved word.
EXAMPLE : SELECT * FROM student WHERE mark > 90
o GROUP BY groups rows sharing a property so that an aggregate function can be applied toeach group.
A GROUP BY statement in SQL specifies that a SQL SELECT statement returns a list that isgrouped by one or more columns, usually in order to apply some sort of aggregatefunction to certain columns.
Common grouping (aggregation) functions include: Count(expression) - Quantity of matching records (per group) Sum(expression) - Summation of given value (per group)1. Min(expression) - Minimum of given value (per group) Max(expression) - Maximum of given value (per group) Avg(expression) - Average of given value (per group)
SELECT branchno, AVG(mark) FROM studentGROUP BY branchno;
o HAVING selects among the groups defined by the GROUP BY clause.
A HAVING statement in SQL specifies that a SQL SELECT statement should only returnrows where aggregate values meet the specified conditions.
Example:
SELECT branchno, AVG(mark) FROM studentGROUP BY branchnoHAVING AVG(mark) > 80;
o ORDER BY specifies an order in which to return the rows.
An ORDER BY clause in SQL specifies that a SQL SELECT statement returns a result setwith the rows being sorted by the values of one or more columns. ORDER BY is the only way tosort the rows in the result set. Without this clause, the relational database system may return therows in any order. If an ordering is required, the ORDER BY must be provided in the SELECT
statement sent by the application.
Example:
SELECT * FROM student ORDER BY registerno;
SELECT * FROM student ORDER BY mark;
INSERT
The number of columns and values must be the same. The values specified (or implied) by theINSERT statement must satisfy all the applicable constraints (such as primary keys, CHECK constraints,and NOT NULL constraints). If a syntax error occurs or if any constraints are violated, the new row is notadded to the table and an error returned instead.
Syntax:
INSERT INTO table (column1, [column2, ... ]) VALUES (value1, [value2, ...])
INSERT INTO table VALUES (value1, [value2, ...])
Example:
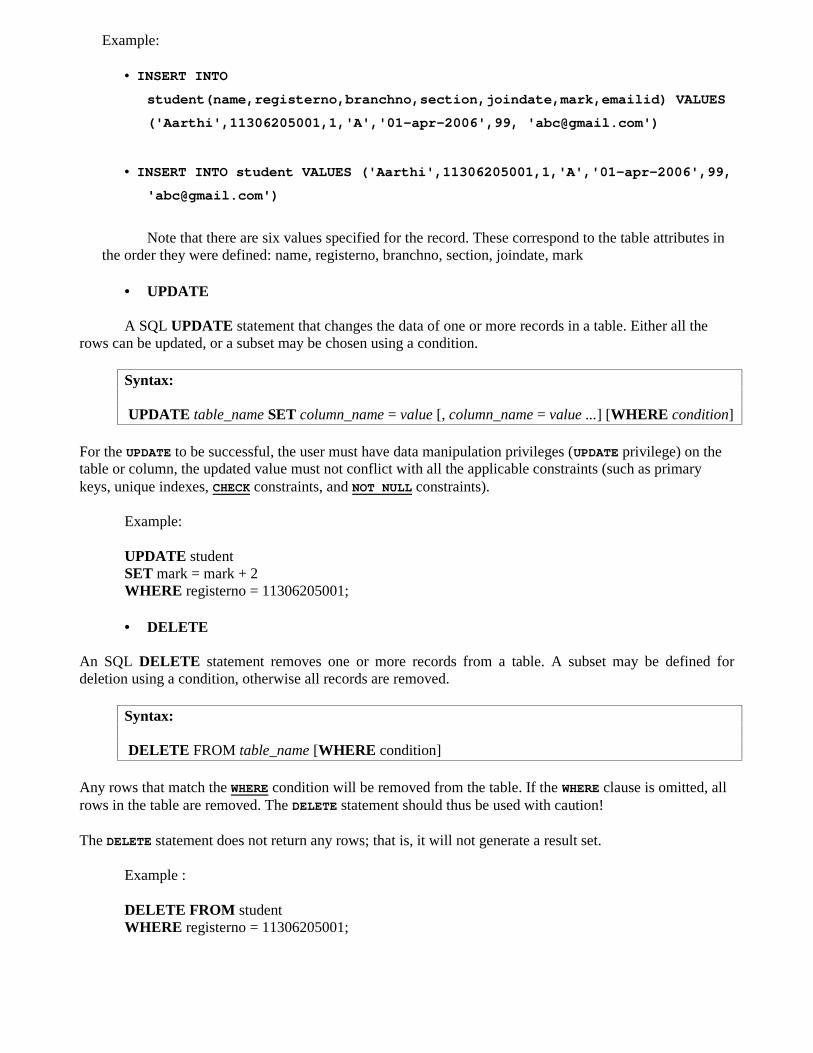
INSERT INTO
student(name,registerno,branchno,section,joindate,mark,emailid) VALUES
('Aarthi',11306205001,1,'A','01-apr-2006',99, '[email protected]')
INSERT INTO student VALUES ('Aarthi',11306205001,1,'A','01-apr-2006',99,
Note that there are six values specified for the record. These correspond to the table attributes inthe order they were defined: name, registerno, branchno, section, joindate, mark
UPDATE
A SQL UPDATE statement that changes the data of one or more records in a table. Either all therows can be updated, or a subset may be chosen using a condition.
Syntax:
UPDATE table_name SET column_name = value [, column_name = value ...] [WHERE condition]
For the UPDATE to be successful, the user must have data manipulation privileges (UPDATE privilege) on thetable or column, the updated value must not conflict with all the applicable constraints (such as primarykeys, unique indexes, CHECK constraints, and NOT NULL constraints).
Example:
UPDATE studentSET mark = mark + 2WHERE registerno = 11306205001;
DELETE
An SQL DELETE statement removes one or more records from a table. A subset may be defined fordeletion using a condition, otherwise all records are removed.
Syntax:
DELETE FROM table_name [WHERE condition]
Any rows that match the WHERE condition will be removed from the table. If the WHERE clause is omitted, allrows in the table are removed. The DELETE statement should thus be used with caution!
The DELETE statement does not return any rows; that is, it will not generate a result set.
Example :
DELETE FROM studentWHERE registerno = 11306205001;
Practice Exercise
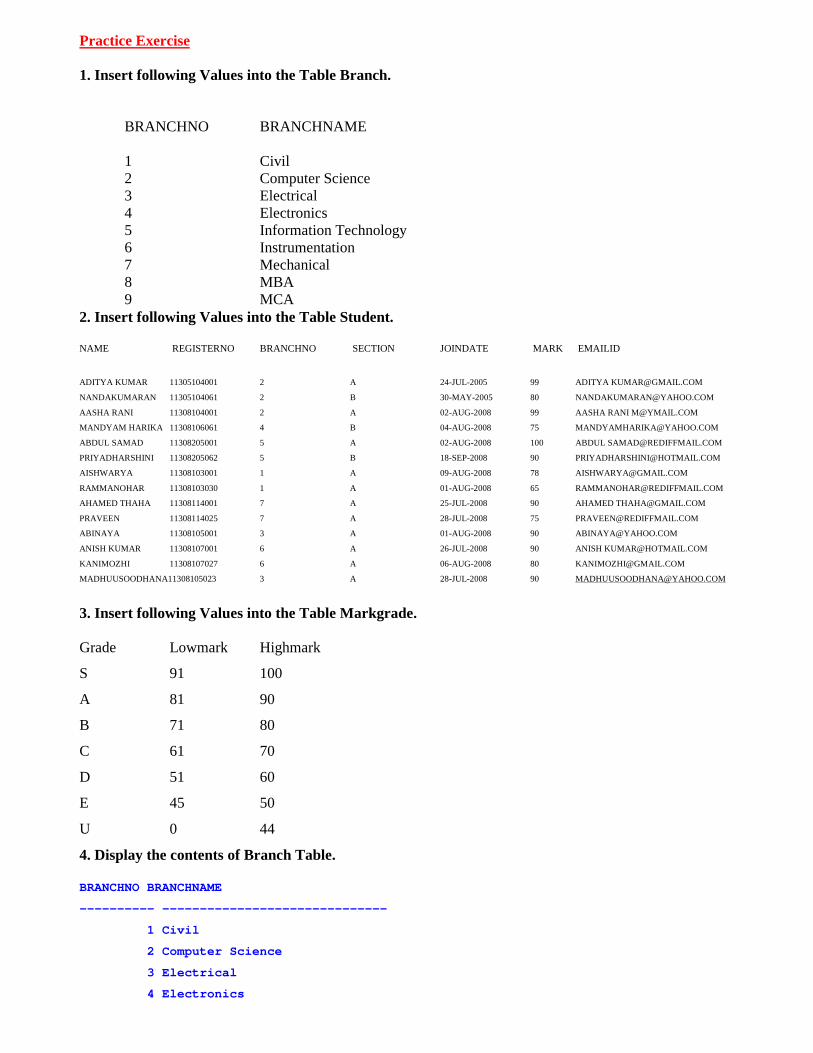
1. Insert following Values into the Table Branch.
BRANCHNO BRANCHNAME
1 Civil2 Computer Science3 Electrical4 Electronics5 Information Technology6 Instrumentation7 Mechanical8 MBA9 MCA
2. Insert following Values into the Table Student.
NAME REGISTERNO BRANCHNO SECTION JOINDATE MARK EMAILID
ADITYA KUMAR 11305104001 2 A 24-JUL-2005 99 ADITYA [email protected]
NANDAKUMARAN 11305104061 2 B 30-MAY-2005 80 [email protected]
AASHA RANI 11308104001 2 A 02-AUG-2008 99 AASHA RANI [email protected]
MANDYAM HARIKA 11308106061 4 B 04-AUG-2008 75 [email protected]
ABDUL SAMAD 11308205001 5 A 02-AUG-2008 100 ABDUL [email protected]
PRIYADHARSHINI 11308205062 5 B 18-SEP-2008 90 [email protected]
AISHWARYA 11308103001 1 A 09-AUG-2008 78 [email protected]
RAMMANOHAR 11308103030 1 A 01-AUG-2008 65 [email protected]
AHAMED THAHA 11308114001 7 A 25-JUL-2008 90 AHAMED [email protected]
PRAVEEN 11308114025 7 A 28-JUL-2008 75 [email protected]
ABINAYA 11308105001 3 A 01-AUG-2008 90 [email protected]
ANISH KUMAR 11308107001 6 A 26-JUL-2008 90 ANISH [email protected]
KANIMOZHI 11308107027 6 A 06-AUG-2008 80 [email protected]
MADHUUSOODHANA11308105023 3 A 28-JUL-2008 90 [email protected]
3. Insert following Values into the Table Markgrade.
Grade Lowmark Highmark
S 91 100
A 81 90
B 71 80
C 61 70
D 51 60
E 45 50
U 0 44
4. Display the contents of Branch Table.
BRANCHNO BRANCHNAME
---------- ------------------------------
1 Civil
2 Computer Science
3 Electrical
4 Electronics
5 Information Technology
6 Instrumentation
7 Mechanical
8 MBA
9 MCA
9 rows selected.
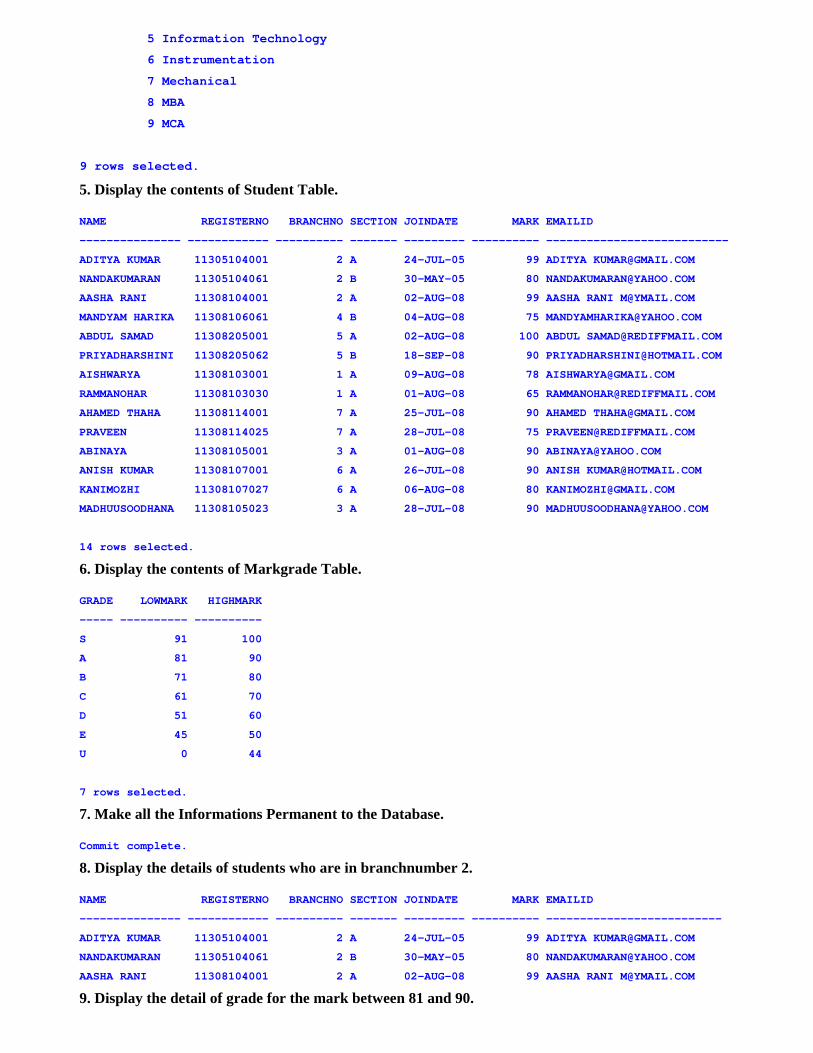
5. Display the contents of Student Table.
NAME REGISTERNO BRANCHNO SECTION JOINDATE MARK EMAILID
--------------- ------------ ---------- ------- --------- ---------- ---------------------------
ADITYA KUMAR 11305104001 2 A 24-JUL-05 99 ADITYA [email protected]
NANDAKUMARAN 11305104061 2 B 30-MAY-05 80 [email protected]
AASHA RANI 11308104001 2 A 02-AUG-08 99 AASHA RANI [email protected]
MANDYAM HARIKA 11308106061 4 B 04-AUG-08 75 [email protected]
ABDUL SAMAD 11308205001 5 A 02-AUG-08 100 ABDUL [email protected]
PRIYADHARSHINI 11308205062 5 B 18-SEP-08 90 [email protected]
AISHWARYA 11308103001 1 A 09-AUG-08 78 [email protected]
RAMMANOHAR 11308103030 1 A 01-AUG-08 65 [email protected]
AHAMED THAHA 11308114001 7 A 25-JUL-08 90 AHAMED [email protected]
PRAVEEN 11308114025 7 A 28-JUL-08 75 [email protected]
ABINAYA 11308105001 3 A 01-AUG-08 90 [email protected]
ANISH KUMAR 11308107001 6 A 26-JUL-08 90 ANISH [email protected]
KANIMOZHI 11308107027 6 A 06-AUG-08 80 [email protected]
MADHUUSOODHANA 11308105023 3 A 28-JUL-08 90 [email protected]
14 rows selected.
6. Display the contents of Markgrade Table.
GRADE LOWMARK HIGHMARK
----- ---------- ----------
S 91 100
A 81 90
B 71 80
C 61 70
D 51 60
E 45 50
U 0 44
7 rows selected.
7. Make all the Informations Permanent to the Database.
Commit complete.
8. Display the details of students who are in branchnumber 2.
NAME REGISTERNO BRANCHNO SECTION JOINDATE MARK EMAILID
--------------- ------------ ---------- ------- --------- ---------- --------------------------
ADITYA KUMAR 11305104001 2 A 24-JUL-05 99 ADITYA [email protected]
NANDAKUMARAN 11305104061 2 B 30-MAY-05 80 [email protected]
AASHA RANI 11308104001 2 A 02-AUG-08 99 AASHA RANI [email protected]
9. Display the detail of grade for the mark between 81 and 90.
GRADE LOWMARK HIGHMARK
----- ---------- ----------
A 81 90
10. Display the name of the branch with branch number 5.
BRANCHNO BRANCHNAME
---------- ------------------------------
5 Information Technology
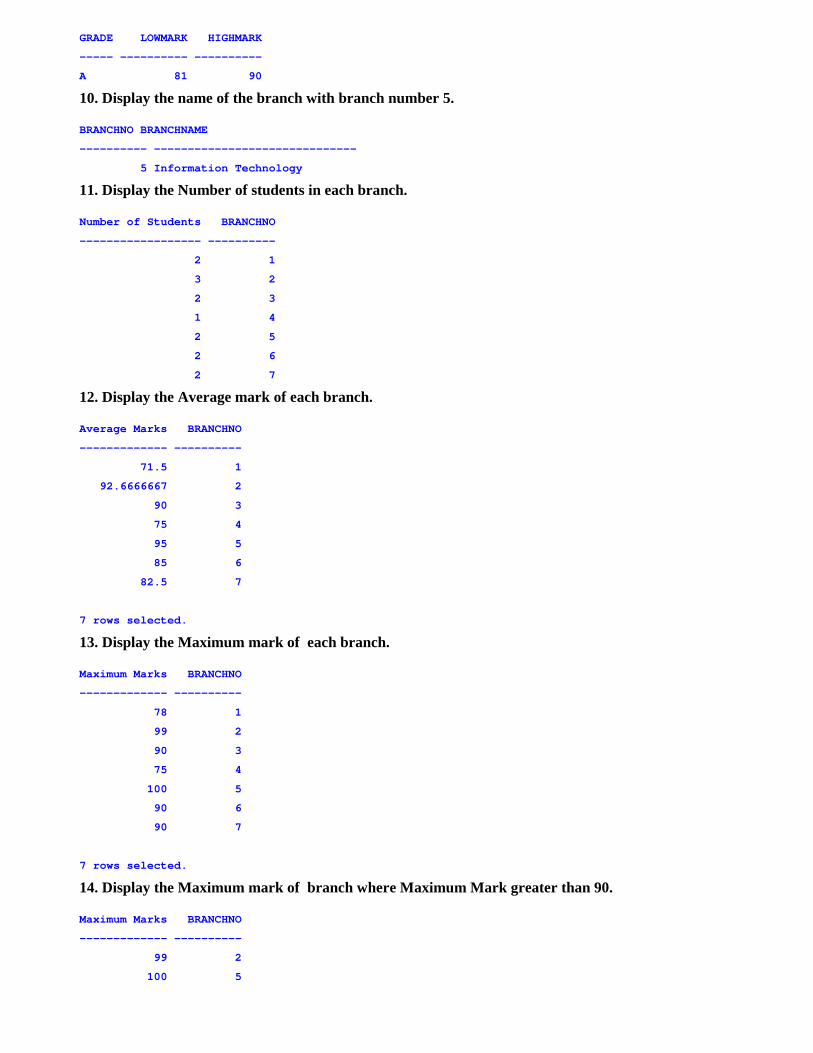
11. Display the Number of students in each branch.
Number of Students BRANCHNO
------------------ ----------
2 1
3 2
2 3
1 4
2 5
2 6
2 7
12. Display the Average mark of each branch.
Average Marks BRANCHNO
------------- ----------
71.5 1
92.6666667 2
90 3
75 4
95 5
85 6
82.5 7
7 rows selected.
13. Display the Maximum mark of each branch.
Maximum Marks BRANCHNO
------------- ----------
78 1
99 2
90 3
75 4
100 5
90 6
90 7
7 rows selected.
14. Display the Maximum mark of branch where Maximum Mark greater than 90.
Maximum Marks BRANCHNO
------------- ----------
99 2
100 5
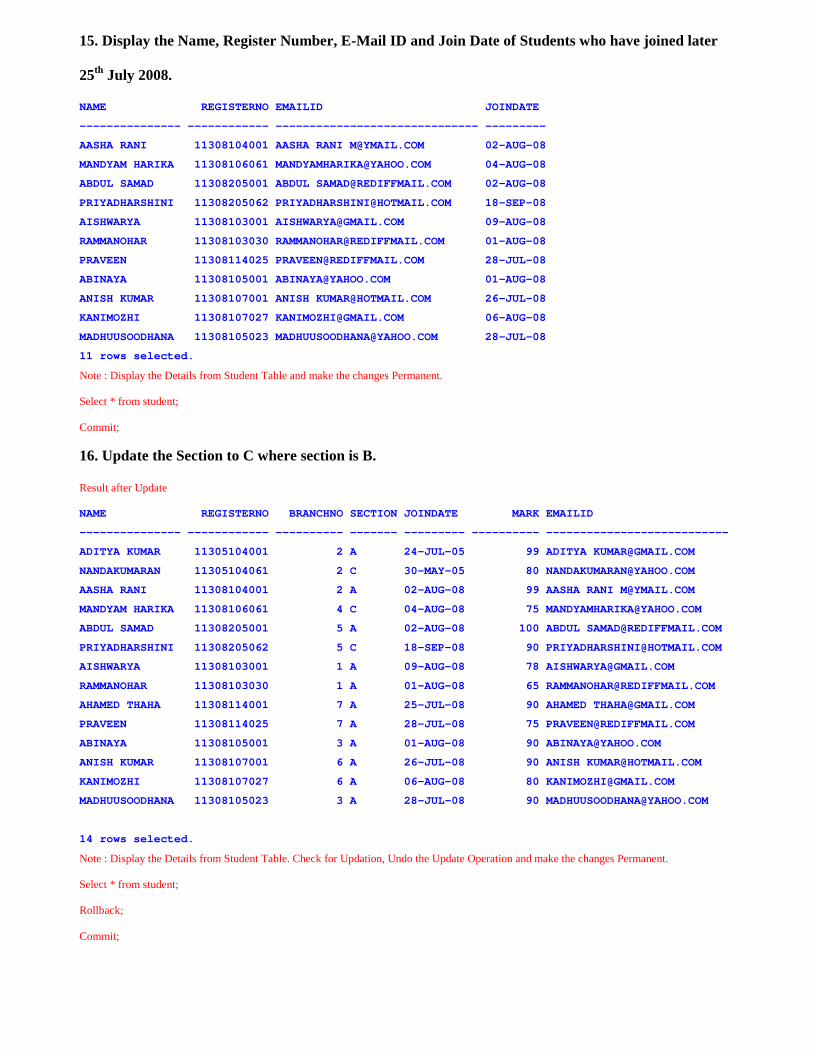
15. Display the Name, Register Number, E-Mail ID and Join Date of Students who have joined later
25th July 2008.
NAME REGISTERNO EMAILID JOINDATE
--------------- ------------ ------------------------------ ---------
AASHA RANI 11308104001 AASHA RANI [email protected] 02-AUG-08
MANDYAM HARIKA 11308106061 [email protected] 04-AUG-08
ABDUL SAMAD 11308205001 ABDUL [email protected] 02-AUG-08
PRIYADHARSHINI 11308205062 [email protected] 18-SEP-08
AISHWARYA 11308103001 [email protected] 09-AUG-08
RAMMANOHAR 11308103030 [email protected] 01-AUG-08
PRAVEEN 11308114025 [email protected] 28-JUL-08
ABINAYA 11308105001 [email protected] 01-AUG-08
ANISH KUMAR 11308107001 ANISH [email protected] 26-JUL-08
KANIMOZHI 11308107027 [email protected] 06-AUG-08
MADHUUSOODHANA 11308105023 [email protected] 28-JUL-08
11 rows selected.
Note : Display the Details from Student Table and make the changes Permanent.
Select * from student;
Commit;
16. Update the Section to C where section is B.
Result after Update
NAME REGISTERNO BRANCHNO SECTION JOINDATE MARK EMAILID
--------------- ------------ ---------- ------- --------- ---------- ---------------------------
ADITYA KUMAR 11305104001 2 A 24-JUL-05 99 ADITYA [email protected]
NANDAKUMARAN 11305104061 2 C 30-MAY-05 80 [email protected]
AASHA RANI 11308104001 2 A 02-AUG-08 99 AASHA RANI [email protected]
MANDYAM HARIKA 11308106061 4 C 04-AUG-08 75 [email protected]
ABDUL SAMAD 11308205001 5 A 02-AUG-08 100 ABDUL [email protected]
PRIYADHARSHINI 11308205062 5 C 18-SEP-08 90 [email protected]
AISHWARYA 11308103001 1 A 09-AUG-08 78 [email protected]
RAMMANOHAR 11308103030 1 A 01-AUG-08 65 [email protected]
AHAMED THAHA 11308114001 7 A 25-JUL-08 90 AHAMED [email protected]
PRAVEEN 11308114025 7 A 28-JUL-08 75 [email protected]
ABINAYA 11308105001 3 A 01-AUG-08 90 [email protected]
ANISH KUMAR 11308107001 6 A 26-JUL-08 90 ANISH [email protected]
KANIMOZHI 11308107027 6 A 06-AUG-08 80 [email protected]
MADHUUSOODHANA 11308105023 3 A 28-JUL-08 90 [email protected]
14 rows selected.
Note : Display the Details from Student Table. Check for Updation, Undo the Update Operation and make the changes Permanent.
Select * from student;
Rollback;
Commit;
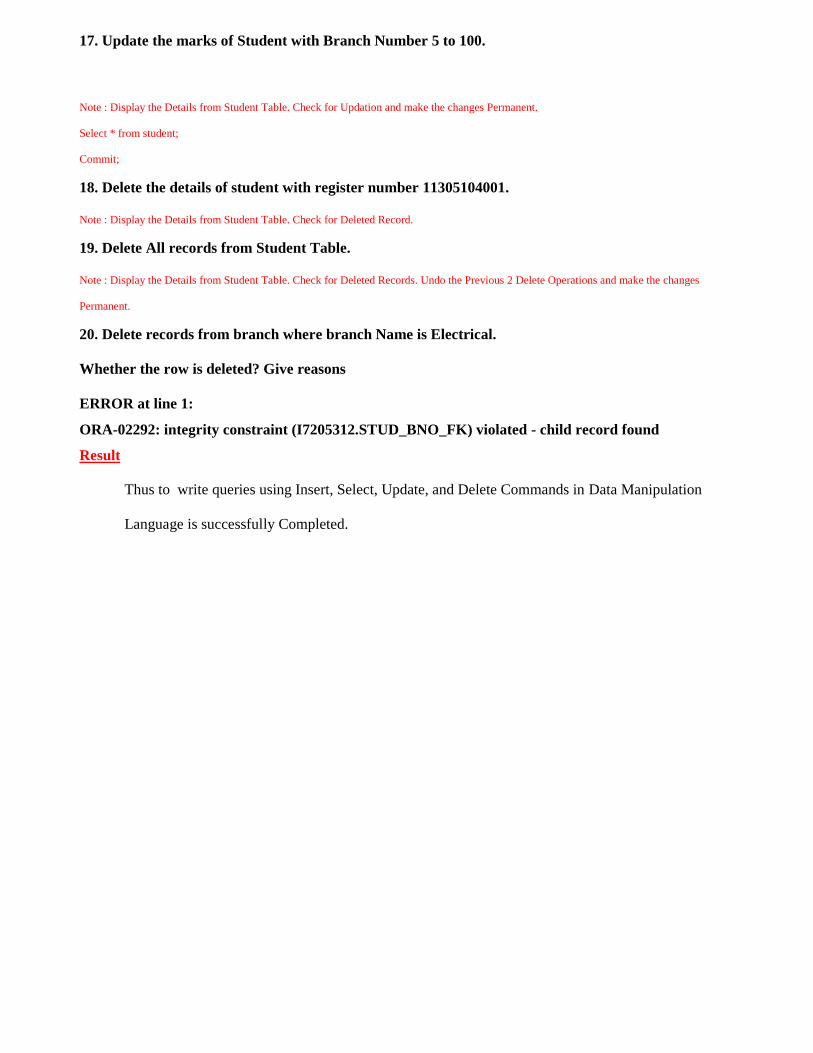
17. Update the marks of Student with Branch Number 5 to 100.
Note : Display the Details from Student Table. Check for Updation and make the changes Permanent.
Select * from student;
Commit;
18. Delete the details of student with register number 11305104001.
Note : Display the Details from Student Table. Check for Deleted Record.
19. Delete All records from Student Table.
Note : Display the Details from Student Table. Check for Deleted Records. Undo the Previous 2 Delete Operations and make the changes
Permanent.
20. Delete records from branch where branch Name is Electrical.
Whether the row is deleted? Give reasons
ERROR at line 1:
ORA-02292: integrity constraint (I7205312.STUD_BNO_FK) violated - child record found
Result
Thus to write queries using Insert, Select, Update, and Delete Commands in Data Manipulation
Language is successfully Completed.
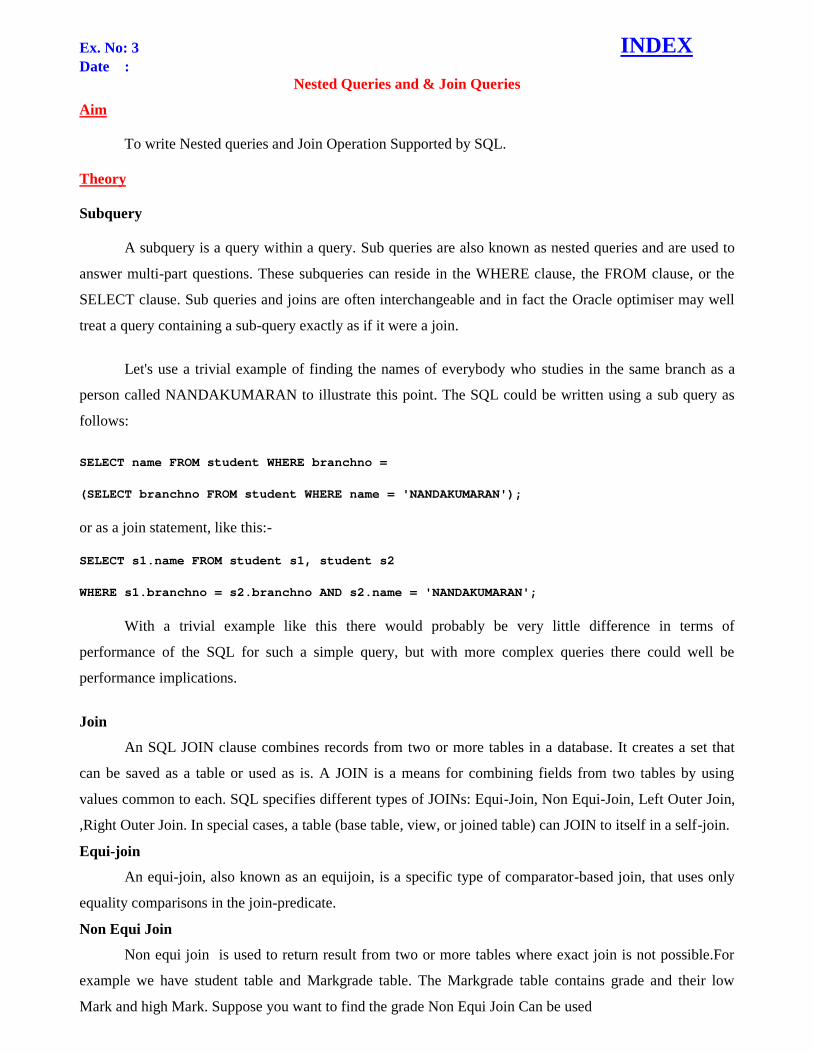
Ex. No: 3 INDEXDate :
Nested Queries and & Join Queries
Aim
To write Nested queries and Join Operation Supported by SQL.
Theory
Subquery
A subquery is a query within a query. Sub queries are also known as nested queries and are used to
answer multi-part questions. These subqueries can reside in the WHERE clause, the FROM clause, or the
SELECT clause. Sub queries and joins are often interchangeable and in fact the Oracle optimiser may well
treat a query containing a sub-query exactly as if it were a join.
Let's use a trivial example of finding the names of everybody who studies in the same branch as a
person called NANDAKUMARAN to illustrate this point. The SQL could be written using a sub query as
follows:
SELECT name FROM student WHERE branchno =
(SELECT branchno FROM student WHERE name = 'NANDAKUMARAN');
or as a join statement, like this:-
SELECT s1.name FROM student s1, student s2
WHERE s1.branchno = s2.branchno AND s2.name = 'NANDAKUMARAN';
With a trivial example like this there would probably be very little difference in terms of
performance of the SQL for such a simple query, but with more complex queries there could well be
performance implications.
Join
An SQL JOIN clause combines records from two or more tables in a database. It creates a set that
can be saved as a table or used as is. A JOIN is a means for combining fields from two tables by using
values common to each. SQL specifies different types of JOINs: Equi-Join, Non Equi-Join, Left Outer Join,
,Right Outer Join. In special cases, a table (base table, view, or joined table) can JOIN to itself in a self-join.
Equi-join
An equi-join, also known as an equijoin, is a specific type of comparator-based join, that uses only
equality comparisons in the join-predicate.
Non Equi Join
Non equi join is used to return result from two or more tables where exact join is not possible.For
example we have student table and Markgrade table. The Markgrade table contains grade and their low
Mark and high Mark. Suppose you want to find the grade Non Equi Join Can be used
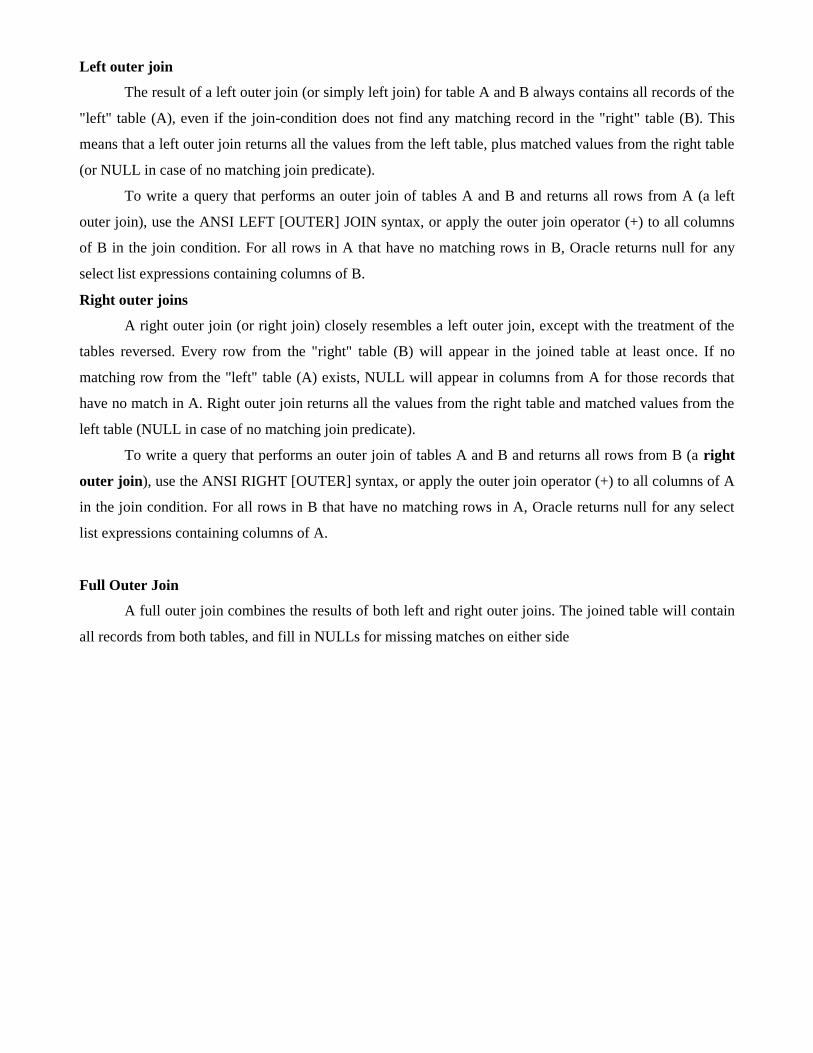
Left outer join
The result of a left outer join (or simply left join) for table A and B always contains all records of the
"left" table (A), even if the join-condition does not find any matching record in the "right" table (B). This
means that a left outer join returns all the values from the left table, plus matched values from the right table
(or NULL in case of no matching join predicate).
To write a query that performs an outer join of tables A and B and returns all rows from A (a left
outer join), use the ANSI LEFT [OUTER] JOIN syntax, or apply the outer join operator (+) to all columns
of B in the join condition. For all rows in A that have no matching rows in B, Oracle returns null for any
select list expressions containing columns of B.
Right outer joins
A right outer join (or right join) closely resembles a left outer join, except with the treatment of the
tables reversed. Every row from the "right" table (B) will appear in the joined table at least once. If no
matching row from the "left" table (A) exists, NULL will appear in columns from A for those records that
have no match in A. Right outer join returns all the values from the right table and matched values from the
left table (NULL in case of no matching join predicate).
To write a query that performs an outer join of tables A and B and returns all rows from B (a right
outer join), use the ANSI RIGHT [OUTER] syntax, or apply the outer join operator (+) to all columns of A
in the join condition. For all rows in B that have no matching rows in A, Oracle returns null for any select
list expressions containing columns of A.
Full Outer Join
A full outer join combines the results of both left and right outer joins. The joined table will contain
all records from both tables, and fill in NULLs for missing matches on either side
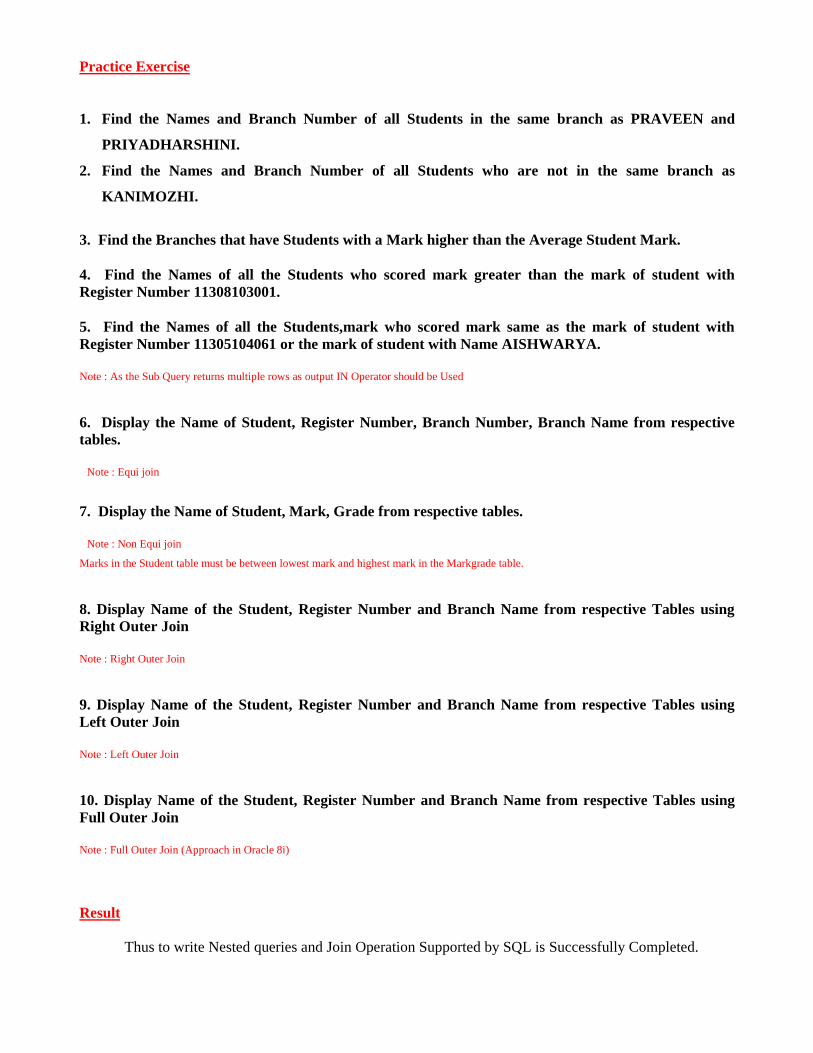
Practice Exercise
1. Find the Names and Branch Number of all Students in the same branch as PRAVEEN and
PRIYADHARSHINI.
2. Find the Names and Branch Number of all Students who are not in the same branch as
KANIMOZHI.
3. Find the Branches that have Students with a Mark higher than the Average Student Mark.
4. Find the Names of all the Students who scored mark greater than the mark of student withRegister Number 11308103001.
5. Find the Names of all the Students,mark who scored mark same as the mark of student withRegister Number 11305104061 or the mark of student with Name AISHWARYA.
Note : As the Sub Query returns multiple rows as output IN Operator should be Used
6. Display the Name of Student, Register Number, Branch Number, Branch Name from respectivetables.
Note : Equi join
7. Display the Name of Student, Mark, Grade from respective tables.
Note : Non Equi join
Marks in the Student table must be between lowest mark and highest mark in the Markgrade table.
8. Display Name of the Student, Register Number and Branch Name from respective Tables usingRight Outer Join
Note : Right Outer Join
9. Display Name of the Student, Register Number and Branch Name from respective Tables usingLeft Outer Join
Note : Left Outer Join
10. Display Name of the Student, Register Number and Branch Name from respective Tables usingFull Outer Join
Note : Full Outer Join (Approach in Oracle 8i)
Result
Thus to write Nested queries and Join Operation Supported by SQL is Successfully Completed.
Ex. No: 4 INDEXDate :
ViewsAim
To Implement Simple Views and Complex Views.
Theory
1. A view is a predefined query on one or more tables.
2. Retrieving information from a view is done in the same manner as retrieving from a table.
3. With some views you can also perform DML operations (delete, insert, update) on the base tables.
4. Views don't store data, they only access rows in the base tables.
5. user_tables, user_sequences, and user_indexes are all views.
6. View Only allows a user to retrieve data.
7. View can hide the underlying base tables.
8. By writing complex queries as a view, we can hide complexity from an end user.
9. View only allows a user to access certain rows in the base tables.
Syntax
CREATE [OR REPLACE] VIEW view_nameAS subquery
OR REPLACE specifies the view is to replace an existing view if present.
subquery specifies the subquery that retrieves from the base tables.
There are two basic types of views:
Simple views, which contain a subquery that retrieves from one base table
Complex views, which contain a subquery that:
o Retrieves from multiple base tables
o Groups rows using a GROUP BY or DISTINCT clause
o Contains a function call
A view is simply the representation of a SQL statement that is stored in memory so that it can easily
be re-used. For example, if we frequently issue the following query
SELECT registerno FROM student;
To create a view use the create view command as seen in this example
CREATE VIEW view_studASSELECT registerno FROM student;
This command creates a new view called VIEW_STUD. Note that this command does not result in
anything being actually stored in the database at all except for a data dictionary entry that defines this view.
This means that every time you query this view, Oracle has to go out and execute the view and query the
database data. We can query the view like this:
SELECT * FROM view_stud WHERE registerno BETWEEN 11305205001 AND 11305205060;
And Oracle will transform the query into this:
SELECT * FROM (select registerno from student) WHERE registerno BETWEEN 11305205001 AND
11305205060;
Practice Exercise
Simple Views
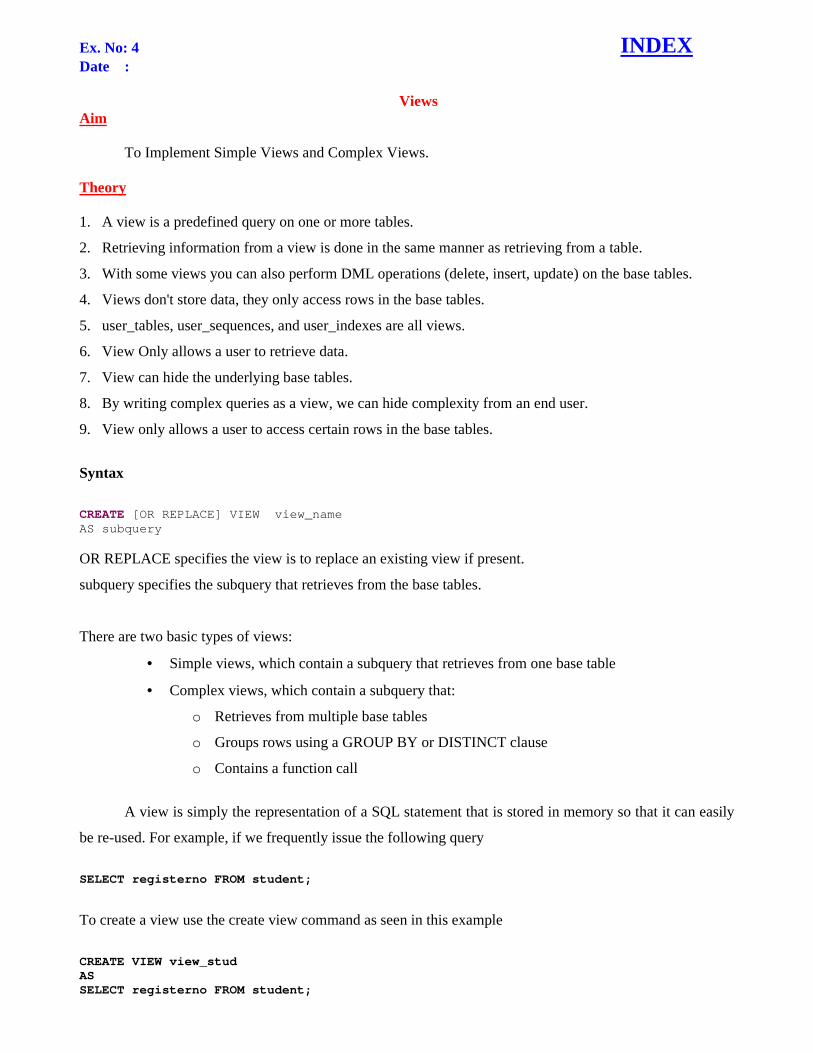
1. Create a View that holds only the Branch Name. Name the View as BranchNameView
SQL> select * from BranchNameView;
BRANCHNAME------------------------------CivilComputer ScienceElectricalElectronicsInformation TechnologyInstrumentationMechanicalMBAMCA9 rows selected.
2. Create a View that holds Student Name, Register Number of student who are in branchnumber 2. Name the View as StudentView.
Give alias name for columns as follow
Column Alias Name
Name - Student Name
Registerno - Register Number
SQL> select * from StudentView;Student Name Register Number------------------------------ ---------------ABDUL SAMAD 11308205001PRIYADHARSHINI 11308205062
Note : Use the following command to print Your Register Number in 11 Digit Format
COLUMN "Register Number" format 99999999999
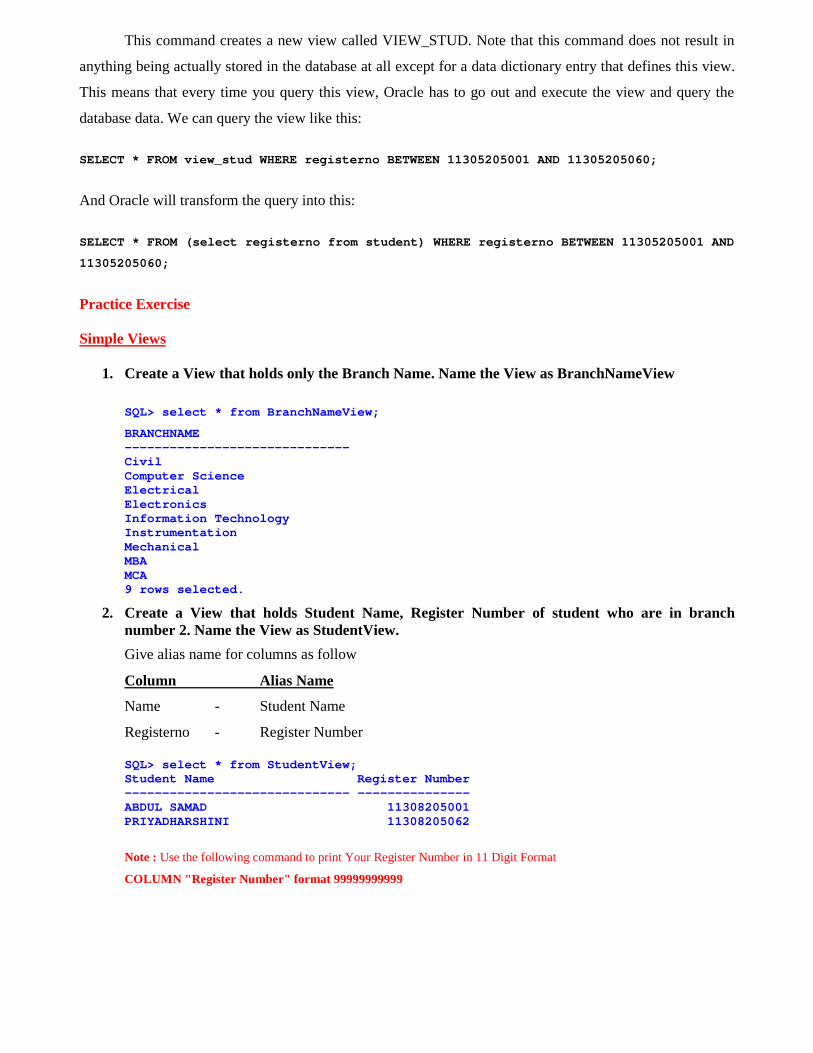
Complex Views
3. Create a View that holds Branch Number and Average Mark of Each Branch. Name the view
as AverageMarkView.
Give alias name for columns as follow
Column Alias Name
Avg(Mark) - Average Mark
SQL> select * from AverageMarkView;
BRANCHNO Average Mark
---------- ------------
1 71.52 92.66666673 904 755 1006 857 82.5
7 rows selected.
4. Create a View that holds Branch Number Branch Name and Average Mark of Each Branch.
Name the view as AverageBranchMarkView.
Give alias name for columns as follow
Column Alias Name
Avg(Mark) - Average Mark
SQL> select * from AverageBranchMarkView;
BRANCHNO BRANCHNAME Average Mark---------- ------------------------------ ------------
1 Civil 71.52 Computer Science 92.66666673 Electrical 904 Electronics 755 Information Technology 1006 Instrumentation 857 Mechanical 82.5
7 rows selected.
5. Create a View that holds Branch Number, Branch Name and Number of Students in each
branch. Name the view as NOSBranchView.
SQL> select * from NOSBranchView;
BRANCHNO BRANCHNAME Number of Students
---------- ------------------------------ ------------------
1 Civil 2
2 Computer Science 3
3 Electrical 2
4 Electronics 1
5 Information Technology 2
6 Instrumentation 2
7 Mechanical 2
7 rows selected.
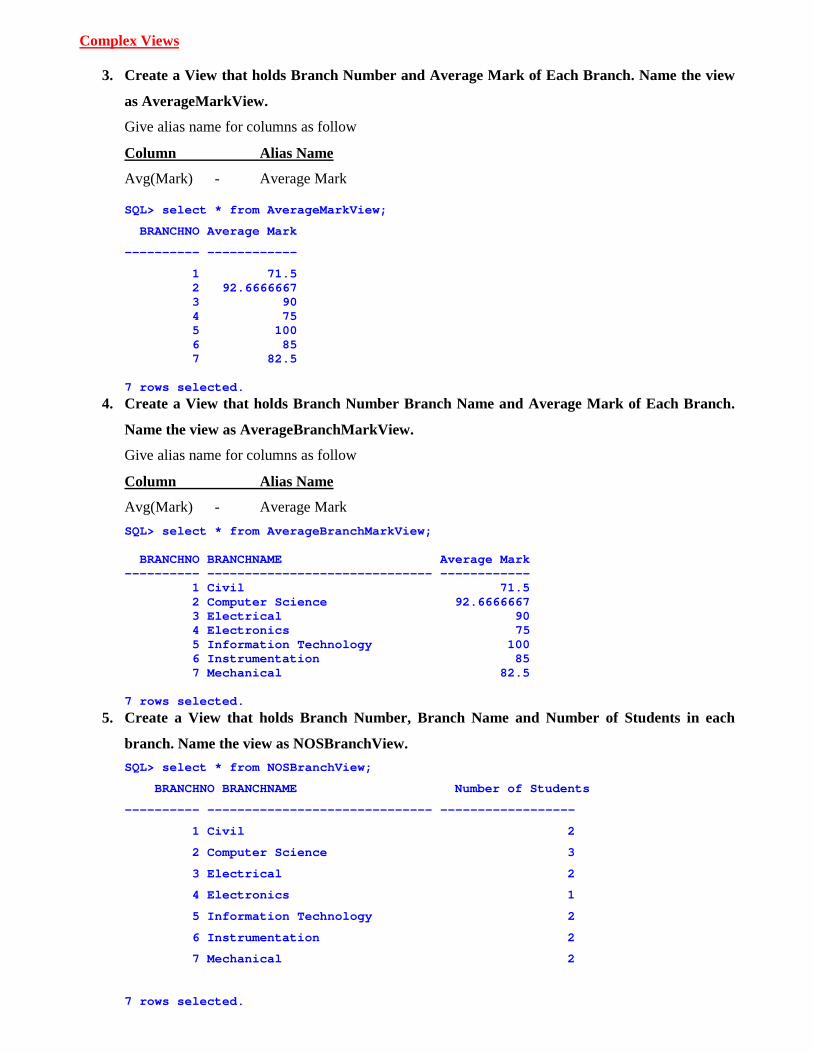
6. Create a View that holds Student Name, Register Number, Mark and Grade. Name the view as
StudentGradeView
Give alias name for columns as follow
Column Alias Name
Name - Student NameRegisterno - Register NumberMark - MarkGrade - Grade
SQL> select * from StudentGradeView;
Student Name Register Number Mark Grade
------------------------------ --------------- ---------- -----
ADITYA KUMAR 11305104001 99 S
AASHA RANI 11308104001 99 S
ABDUL SAMAD 11308205001 100 S
PRIYADHARSHINI 11308205062 100 S
AHAMED THAHA 11308114001 90 A
ABINAYA 11308105001 90 A
ANISH KUMAR 11308107001 90 A
MADHUUSOODHANA 11308105023 90 A
NANDAKUMARAN 11305104061 80 B
MANDYAM HARIKA 11308106061 75 B
AISHWARYA 11308103001 78 B
PRAVEEN 11308114025 75 B
KANIMOZHI 11308107027 80 B
RAMMANOHAR 11308103030 65 C
14 rows selected.
Result
Thus to Create View on tables are successfully completed.
Ex. No: 5 INDEXDate :
High Level Programming Language Extensions
(Control Structures, Procedures and Functions).
Aim
To write Procedures, Functions to retrieve or manipulate data from the table and to use Control
Structures.
Theory
PL/SQL subprograms
A subprogram is a named block of PL/SQL. There are two types of subprograms in PL/SQL namely
Procedures and Functions. Every subprogram will have a declarative part, an executable part or body, and an
exception handling part, which is optional.
Declarative part contains variable declarations. Body of a subprogram contains executable statements
of SQL and PL/SQL. Statements to handle exceptions are written in exception part.
When client executes a procedure are function, the processing is done in the server. This reduces
network traffic. The subprograms are compiled and stored in the Oracle database as stored programs and can
be invoked whenever required. As they are stored in compiled form when called they only need to be
executed. Hence they save time needed for compilation.
Subprograms provide the following advantages
1. They allow you to write PL/SQL program that meet our need
2. They allow you to break the program into manageable modules.
3. They provide reusability and maintainability for the code.
Procedures
Procedure is a subprogram used to perform a specific action. A procedure contains two parts
specification and the body. Procedure specification begins with CREATE and ends with procedure name or
parameters list. Procedures that do not take parameters are written without a parenthesis. The body of the
procedure starts after the keyword IS or AS and ends with keyword END.
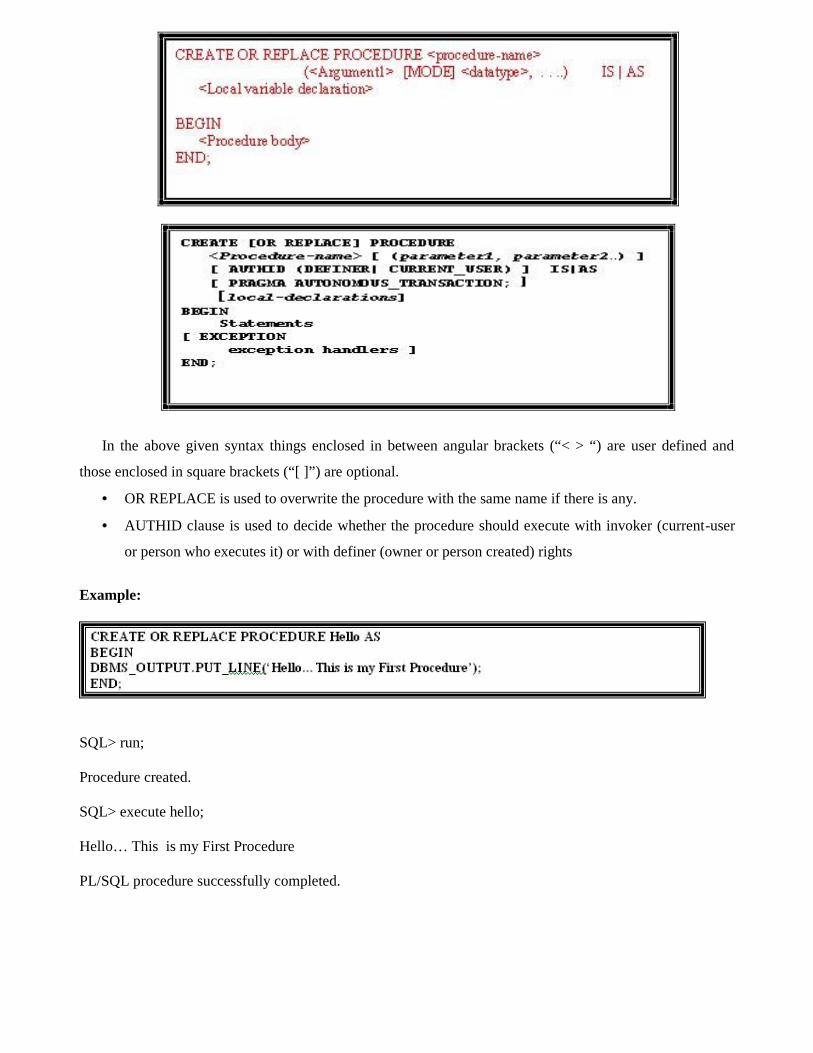
In the above given syntax things enclosed in between angular brackets (“< > “) are user defined and
those enclosed in square brackets (“[ ]”) are optional.
OR REPLACE is used to overwrite the procedure with the same name if there is any.
AUTHID clause is used to decide whether the procedure should execute with invoker (current-user
or person who executes it) or with definer (owner or person created) rights
Example:
SQL> run;
Procedure created.
SQL> execute hello;
Hello… This is my First Procedure
PL/SQL procedure successfully completed.
Practice Exercise (Procedures):
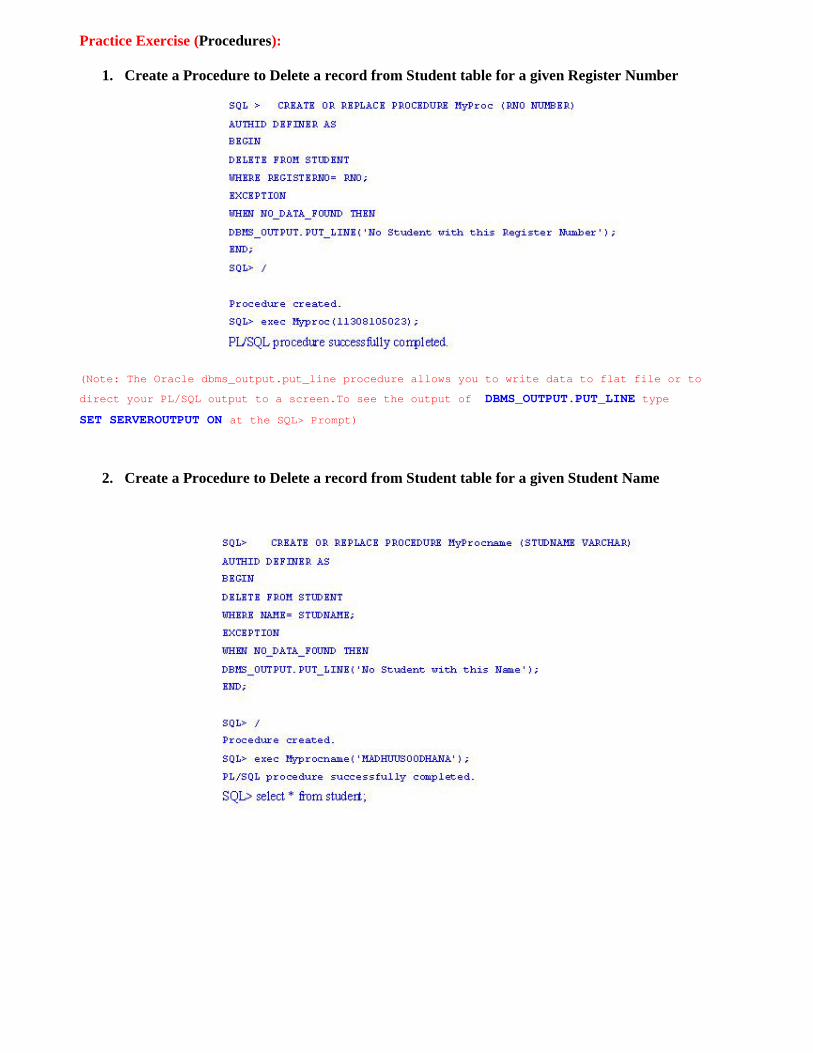
1. Create a Procedure to Delete a record from Student table for a given Register Number
(Note: The Oracle dbms_output.put_line procedure allows you to write data to flat file or to
direct your PL/SQL output to a screen.To see the output of DBMS_OUTPUT.PUT_LINE type
SET SERVEROUTPUT ON at the SQL> Prompt)
2. Create a Procedure to Delete a record from Student table for a given Student Name
Functions:
A function is a PL/SQL subprogram, which is used to compute a value. Function is same like a procedure
except for the difference that it have RETURN clause.
The syntax for a function is:
CREATE [OR REPLACE] FUNCTION function_name[ (parameter [,parameter]) ]RETURN return_datatype
IS | AS[declaration_section]
BEGINexecutable_section
[EXCEPTIONexception_section]
END [function_name];
When you create a procedure or function, you may define parameters. There are three types of parametersthat can be declared:
1. IN - The parameter can be referenced by the procedure or function. The value of the parameter can
not be overwritten by the procedure or function.
2. OUT - The parameter can not be referenced by the procedure or function, but the value of the
parameter can be overwritten by the procedure or function.
3. IN OUT - The parameter can be referenced by the procedure or function and the value of the
parameter can be overwritten by the procedure or function.
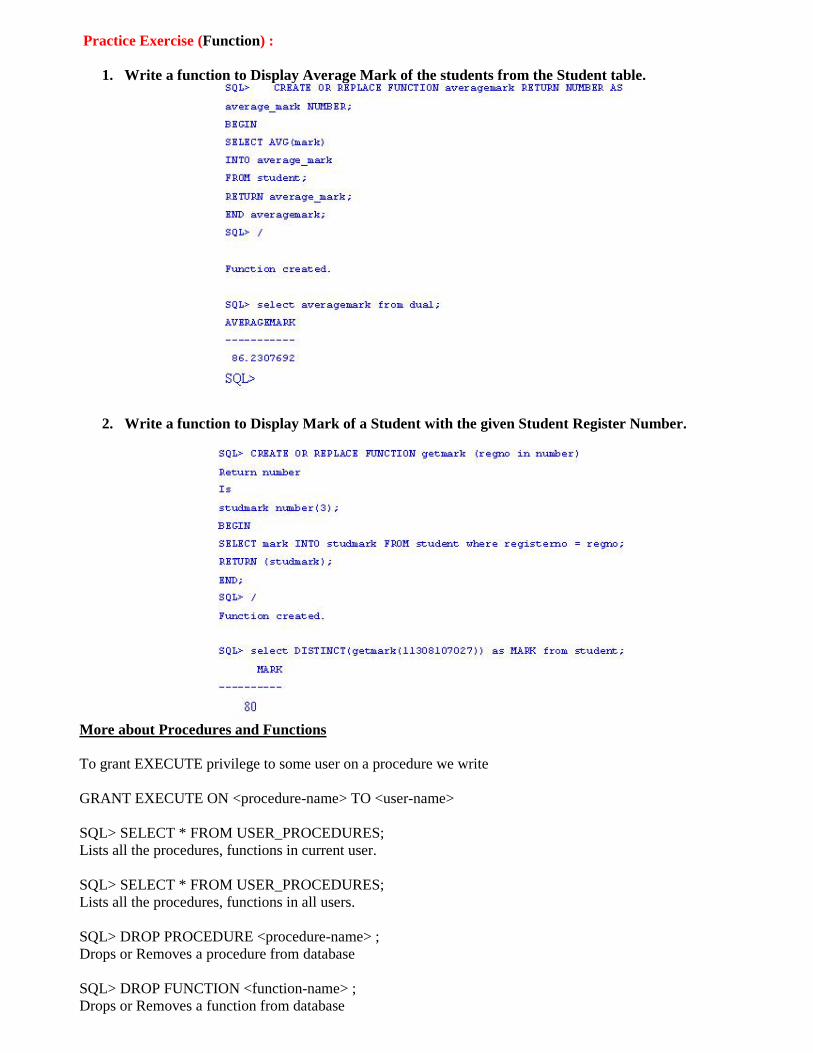
Practice Exercise (Function) :
1. Write a function to Display Average Mark of the students from the Student table.
2. Write a function to Display Mark of a Student with the given Student Register Number.
More about Procedures and Functions
To grant EXECUTE privilege to some user on a procedure we write
GRANT EXECUTE ON <procedure-name> TO <user-name>
SQL> SELECT * FROM USER_PROCEDURES;Lists all the procedures, functions in current user.
SQL> SELECT * FROM USER_PROCEDURES;Lists all the procedures, functions in all users.
SQL> DROP PROCEDURE <procedure-name> ;Drops or Removes a procedure from database
SQL> DROP FUNCTION <function-name> ;Drops or Removes a function from database
Practice Exercise (Oracle SQL Functions)
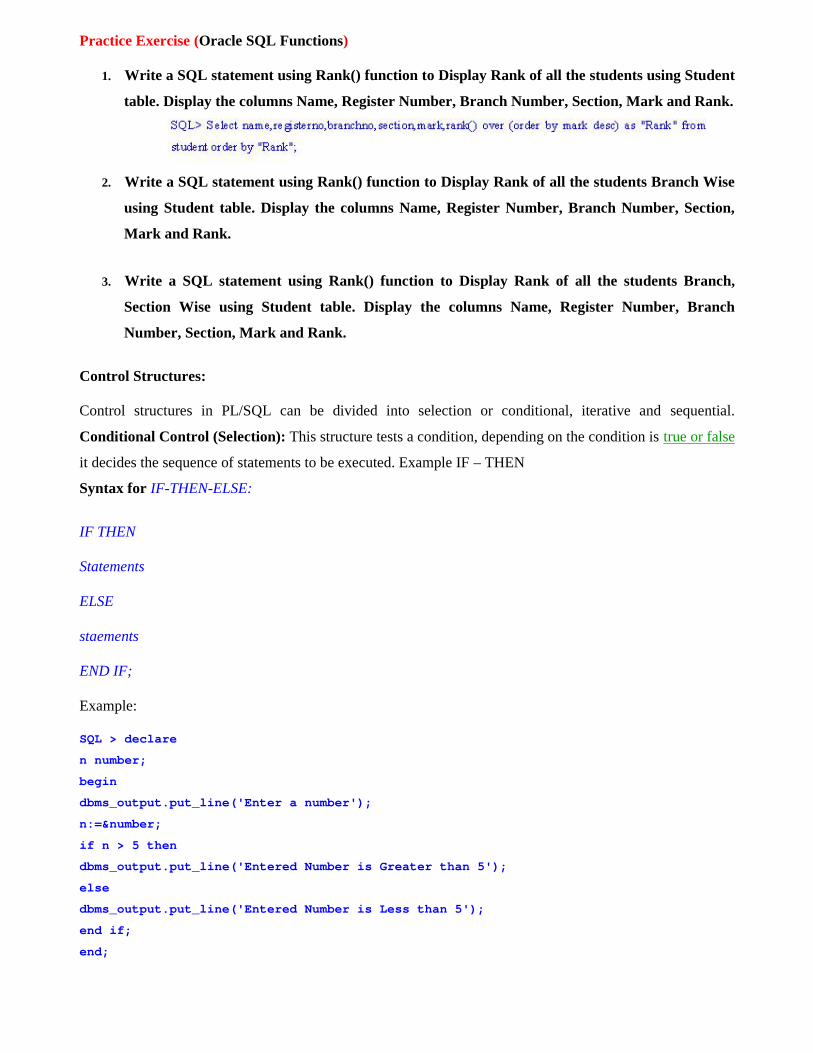
1. Write a SQL statement using Rank() function to Display Rank of all the students using Student
table. Display the columns Name, Register Number, Branch Number, Section, Mark and Rank.
2. Write a SQL statement using Rank() function to Display Rank of all the students Branch Wise
using Student table. Display the columns Name, Register Number, Branch Number, Section,
Mark and Rank.
3. Write a SQL statement using Rank() function to Display Rank of all the students Branch,
Section Wise using Student table. Display the columns Name, Register Number, Branch
Number, Section, Mark and Rank.
Control Structures:
Control structures in PL/SQL can be divided into selection or conditional, iterative and sequential.
Conditional Control (Selection): This structure tests a condition, depending on the condition is true or false
it decides the sequence of statements to be executed. Example IF – THEN
Syntax for IF-THEN-ELSE:
IF THEN
Statements
ELSE
staements
END IF;
Example:
SQL > declare
n number;
begin
dbms_output.put_line('Enter a number');
n:=&number;
if n > 5 then
dbms_output.put_line('Entered Number is Greater than 5');
else
dbms_output.put_line('Entered Number is Less than 5');
end if;
end;
Practice Exercise (Control Structures)
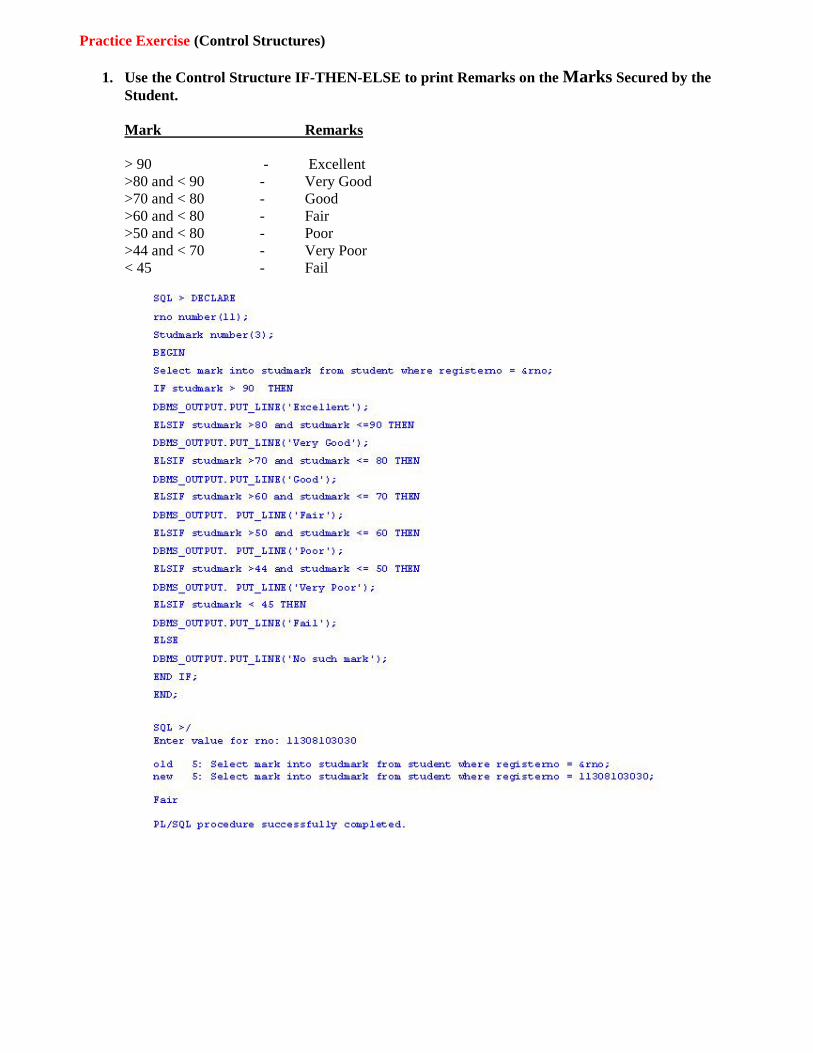
1. Use the Control Structure IF-THEN-ELSE to print Remarks on the Marks Secured by theStudent.
Mark Remarks
> 90 - Excellent>80 and < 90 - Very Good>70 and < 80 - Good>60 and < 80 - Fair>50 and < 80 - Poor>44 and < 70 - Very Poor< 45 - Fail

2. Use the Control Structure IF-THEN-ELSE to print Remarks on the Grade Secured by theStudent.
Grade Remarks
S ExcellentA Very GoodB GoodC FairD PoorE Very PoorU Fail

Result
Thus to write Procedures, Functions to retrieve or manipulate data from the table and to use Control
Structures are successfully completed.

Ex. No: 6 INDEXDate :
TriggersAim
To write triggers using Oracle PL/SQL.
Theory
In a DBMS, a trigger is a SQL procedure that initiates an action (i.e., fires an action) when an event
(INSERT, DELETE or UPDATE) occurs. Since triggers are event-driven specialized procedures, they are
stored in and managed by the DBMS. A trigger cannot be called or executed; the DBMS automatically fires
the trigger as a result of a data modification to the associated table.
A trigger can also contain INSERT, UPDATE and DELETE logic within itself, so when the trigger
is fired because of data modification it can also cause another data modification, thereby firing another
trigger. A trigger that contains data modification logic within itself is called a nested trigger.
Syntax
The CREATE TRIGGER command defines and names a trigger that will be stored in the database.
CREATE [ OR REPLACE ] TRIGGER name
{ BEFORE | AFTER } { INSERT | UPDATE | DELETE } [ OR { INSERT | UPDATE | DELETE }
]... ON
table
[ FOR EACH ROW ]
[DECLARE
declarations ]
BEGIN
statements
END;
name is the name of the trigger. If [ OR REPLACE ] is specified and a trigger with the same name already
exists in the schema, the new trigger replaces the existing one. If [ OR REPLACE ] is not specified, the new
trigger will not be allowed to replace an existing one with the same name in the same schema. If BEFORE is
specified, the trigger is defined as a before trigger. If AFTER is specified, the trigger is defined as an after
trigger. One of INSERT, UPDATE, or DELETE must be specified defining the triggering event as an insert,
update, or deletion, respectively. One or both of the remaining triggering event keywords may also be
specified separated by the keyword, OR, in which case these are also defined as triggering events. table is the
name of the table on which a triggering event will cause the trigger to fire. If [ FOR EACH ROW ] is specified,
the trigger is defined as a row-level trigger. If [ FOR EACH ROW ] is omitted, the trigger is defined as a
statement-level trigger. declarations are variable, cursor, or type declarations. statements are SPL program
statements. The BEGIN - END block may contain an EXCEPTION section.
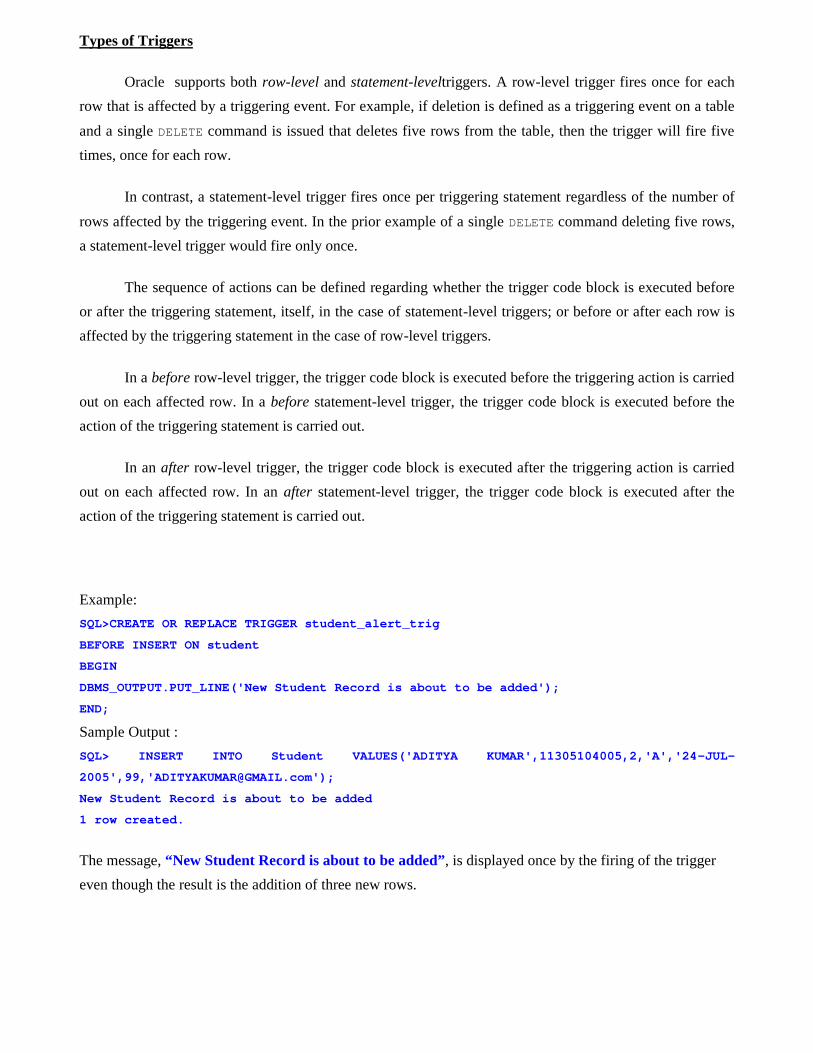
Types of Triggers
Oracle supports both row-level and statement-leveltriggers. A row-level trigger fires once for each
row that is affected by a triggering event. For example, if deletion is defined as a triggering event on a table
and a single DELETE command is issued that deletes five rows from the table, then the trigger will fire five
times, once for each row.
In contrast, a statement-level trigger fires once per triggering statement regardless of the number of
rows affected by the triggering event. In the prior example of a single DELETE command deleting five rows,
a statement-level trigger would fire only once.
The sequence of actions can be defined regarding whether the trigger code block is executed before
or after the triggering statement, itself, in the case of statement-level triggers; or before or after each row is
affected by the triggering statement in the case of row-level triggers.
In a before row-level trigger, the trigger code block is executed before the triggering action is carried
out on each affected row. In a before statement-level trigger, the trigger code block is executed before the
action of the triggering statement is carried out.
In an after row-level trigger, the trigger code block is executed after the triggering action is carried
out on each affected row. In an after statement-level trigger, the trigger code block is executed after the
action of the triggering statement is carried out.
Example:
SQL>CREATE OR REPLACE TRIGGER student_alert_trig
BEFORE INSERT ON student
BEGIN
DBMS_OUTPUT.PUT_LINE('New Student Record is about to be added');
END;
Sample Output :
SQL> INSERT INTO Student VALUES('ADITYA KUMAR',11305104005,2,'A','24-JUL-
2005',99,'[email protected]');
New Student Record is about to be added
1 row created.
The message, “New Student Record is about to be added”, is displayed once by the firing of the trigger
even though the result is the addition of three new rows.
Practice Exercise
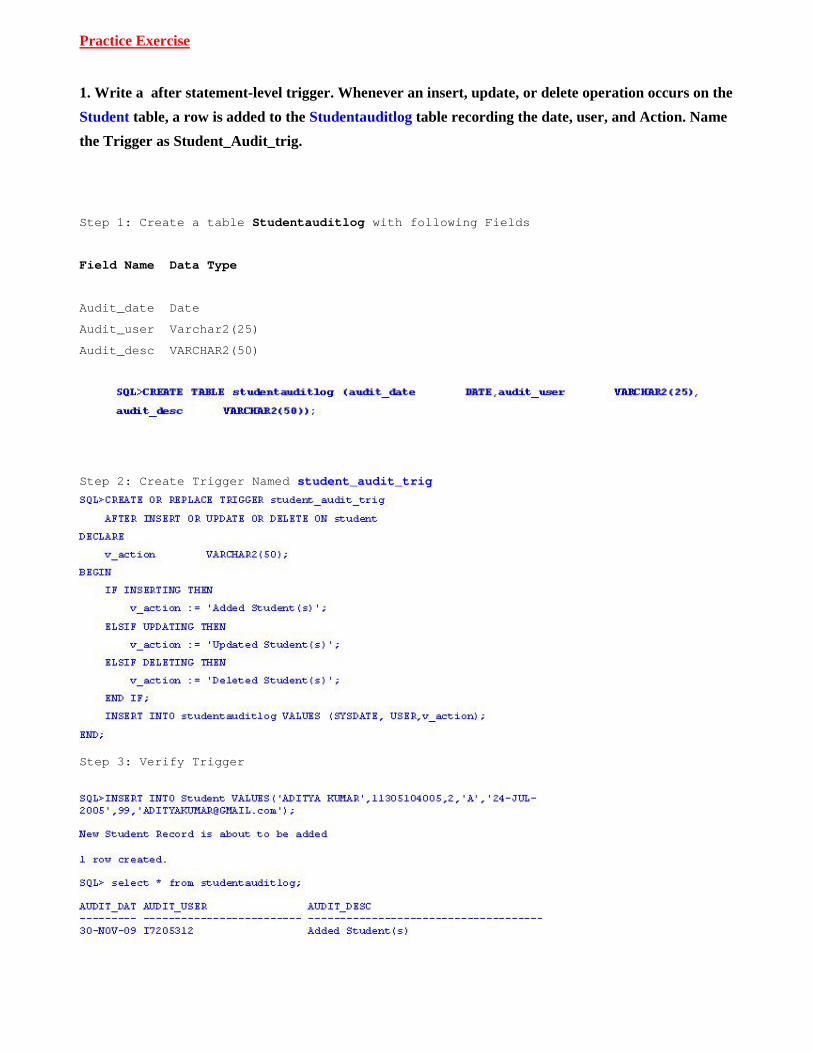
1. Write a after statement-level trigger. Whenever an insert, update, or delete operation occurs on the
Student table, a row is added to the Studentauditlog table recording the date, user, and Action. Name
the Trigger as Student_Audit_trig.
Step 1: Create a table Studentauditlog with following Fields
Field Name Data Type
Audit_date Date
Audit_user Varchar2(25)
Audit_desc VARCHAR2(50)
Step 2: Create Trigger Named student_audit_trig
Step 3: Verify Trigger
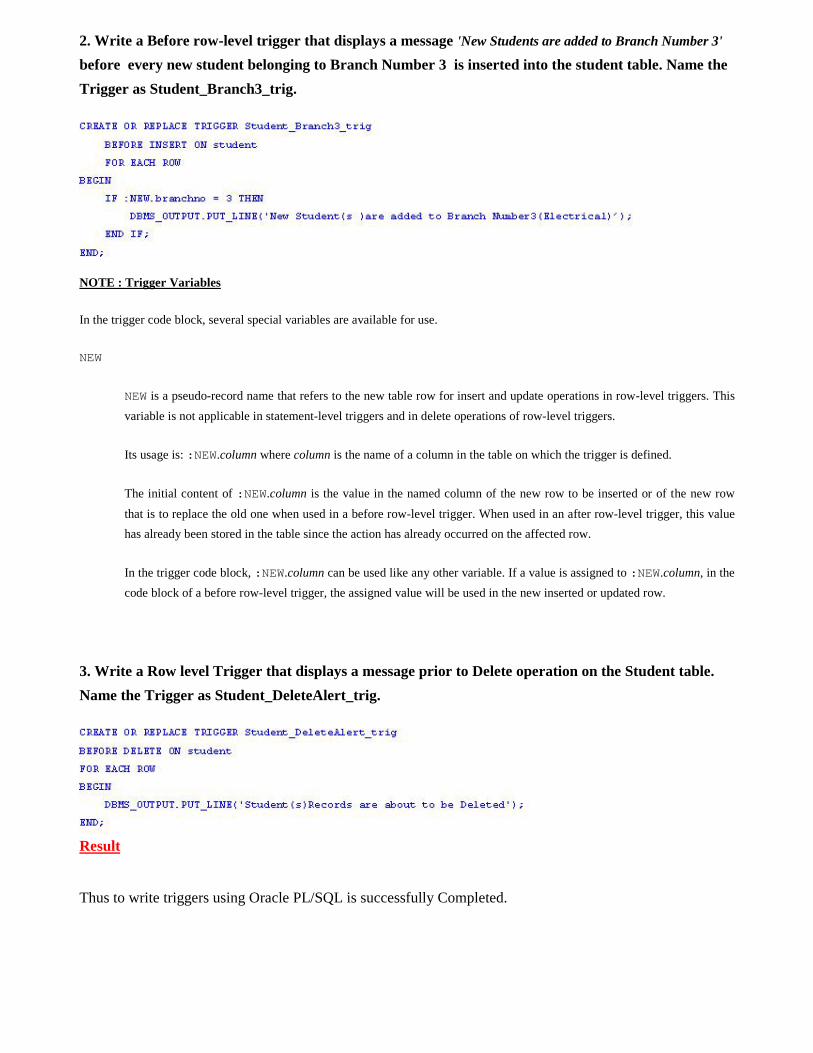
2. Write a Before row-level trigger that displays a message 'New Students are added to Branch Number 3'
before every new student belonging to Branch Number 3 is inserted into the student table. Name the
Trigger as Student_Branch3_trig.
NOTE : Trigger Variables
In the trigger code block, several special variables are available for use.
NEW
NEW is a pseudo-record name that refers to the new table row for insert and update operations in row-level triggers. This
variable is not applicable in statement-level triggers and in delete operations of row-level triggers.
Its usage is: :NEW.column where column is the name of a column in the table on which the trigger is defined.
The initial content of :NEW.column is the value in the named column of the new row to be inserted or of the new row
that is to replace the old one when used in a before row-level trigger. When used in an after row-level trigger, this value
has already been stored in the table since the action has already occurred on the affected row.
In the trigger code block, :NEW.column can be used like any other variable. If a value is assigned to :NEW.column, in the
code block of a before row-level trigger, the assigned value will be used in the new inserted or updated row.
3. Write a Row level Trigger that displays a message prior to Delete operation on the Student table.
Name the Trigger as Student_DeleteAlert_trig.
Result
Thus to write triggers using Oracle PL/SQL is successfully Completed.
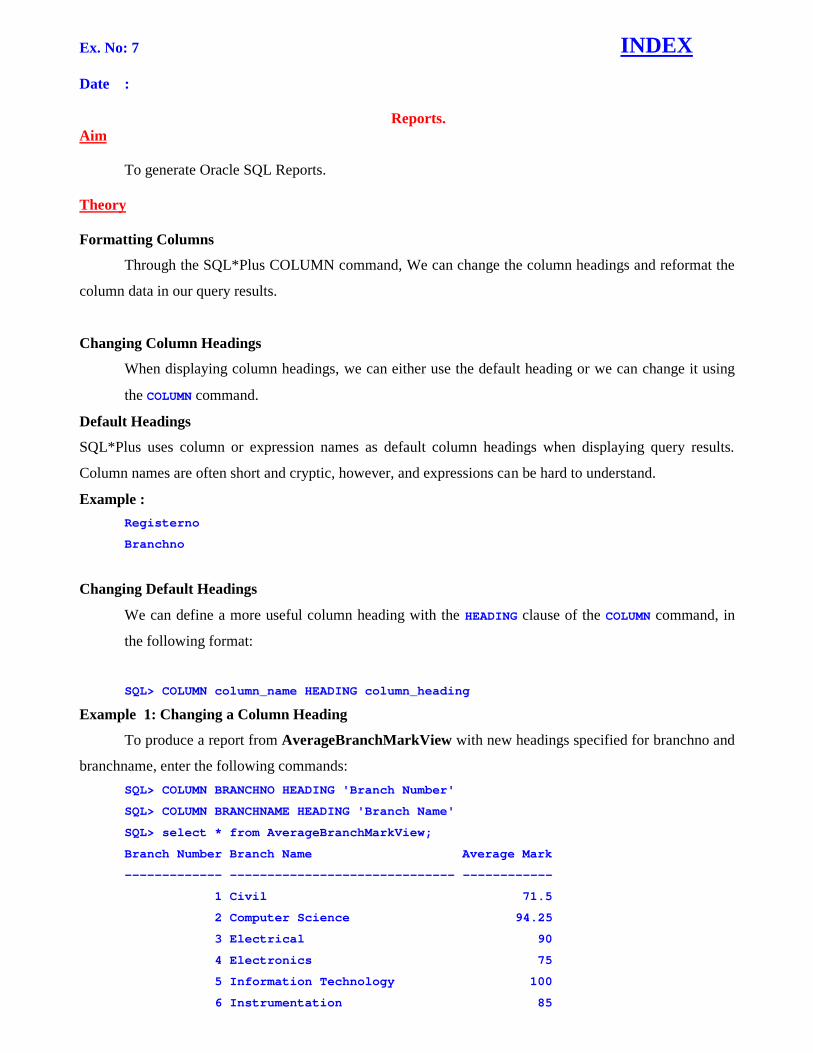
Ex. No: 7 INDEX
Date :
Reports.Aim
To generate Oracle SQL Reports.
Theory
Formatting Columns
Through the SQL*Plus COLUMN command, We can change the column headings and reformat the
column data in our query results.
Changing Column Headings
When displaying column headings, we can either use the default heading or we can change it using
the COLUMN command.
Default Headings
SQL*Plus uses column or expression names as default column headings when displaying query results.
Column names are often short and cryptic, however, and expressions can be hard to understand.
Example :
Registerno
Branchno
Changing Default Headings
We can define a more useful column heading with the HEADING clause of the COLUMN command, in
the following format:
SQL> COLUMN column_name HEADING column_heading
Example 1: Changing a Column Heading
To produce a report from AverageBranchMarkView with new headings specified for branchno and
branchname, enter the following commands:
SQL> COLUMN BRANCHNO HEADING 'Branch Number'
SQL> COLUMN BRANCHNAME HEADING 'Branch Name'
SQL> select * from AverageBranchMarkView;
Branch Number Branch Name Average Mark
------------- ------------------------------ ------------
1 Civil 71.5
2 Computer Science 94.25
3 Electrical 90
4 Electronics 75
5 Information Technology 100
6 Instrumentation 85
7 Mechanical 82.5
Example 2: Splitting a Column Heading
To give the columns BRANCHNO ,BRANCHNAME, Average Mark the headings BRANCH
NUMBER, BRANCH NAME, AVERAGEMARK respectively, and to split the new headings onto two
lines, enter
SQL> COLUMN BRANCHNO HEADING 'Branch|Number'
SQL> COLUMN BRANCHNAME HEADING 'Branch|Name'
SQL> COLUMN "Average Mark" HEADING 'Average|Mark'
Now rerun the query with the slash (/) command:
Branch Branch Average
Number Name Mark
---------- ------------------------------ ----------
1 Civil 71.5
2 Computer Science 94.25
3 Electrical 90
4 Electronics 75
5 Information Technology 100
6 Instrumentation 85
7 Mechanical 82.5
Example 3: Setting the Underline Character
To change the character used to underline headings to an equal sign and rerun the query, enter the
following commands:
SQL> SET UNDERLINE =
SQL> /
Now change the underline character back to a dash:
SQL> SET UNDERLINE '-'
Example 4: Formatting a Character Column
To set the width of the column SECTION to 24 characters and rerun the current query, enter
SQL> COLUMN BRANCHNAME FORMAT A24
SQL> select * from AverageBranchMarkView;
Formatting NUMBER Columns
Example 5: Changing the Default Display
The COLUMN command identifies the column you want to format and the model you want to use, as
shown:
SQL> COLUMN column_name FORMAT model
To display registerno with 11 digit Number , enter the following command:
SQL> COLUMN registerno FORMAT 99999999999
SQL> select registerno from student;
REGISTERNO

------------
11305104001
11305104061
.
.
.
To display “Average Mark with 2 Decimal Places , enter the following command:
SQL> COLUMN "Average Mark"FORMAT 999.99
Listing and Resetting Column Display Attributes
To list the current display attributes for a given column, use the COLUMN command followed by the
column name only, as shown:
SQL> COLUMN column_name
To list the current display attributes for all columns, enter the COLUMN command with no column
names or clauses after it:
SQL> COLUMN
To reset the display attributes for a column to their default values, use the CLEAR clause of the
COLUMN command as shown:
SQL> COLUMN column_name CLEAR
Example 5:Resetting Column Display Attributes to their Defaults
To reset all column display attributes to their default values, enter:
SQL> CLEAR COLUMNS
columns cleared
Setting the Top and Bottom Titles and Headers and Footers
We can set a title to display at the top of each page of a report. We can also set a title to display at the
bottom of each page. The TTITLE command defines the top title; the BTITLE command defines the bottom
title. We can also set a header and footer for each report. The REPHEADER command defines the report
header; the REPFOOTER command defines the report footer.
A TTITLE, BTITLE, REPHEADER or REPFOOTER command consists of the command name followed
by one or more clauses specifying a position or format and a CHAR value you wish to place in that position
or give that format.
Example 6: Placing a Top and Bottom Title on a Page
To put titles at the top and bottom of each page of a report, enter
TTITLE CENTER "Branch Wise Average Mark"
BTITLE CENTER "Institution Confidential"
Now run the current query:
SQL> select * from AverageBranchMarkView;
Example 7: Placing a Header on a Report
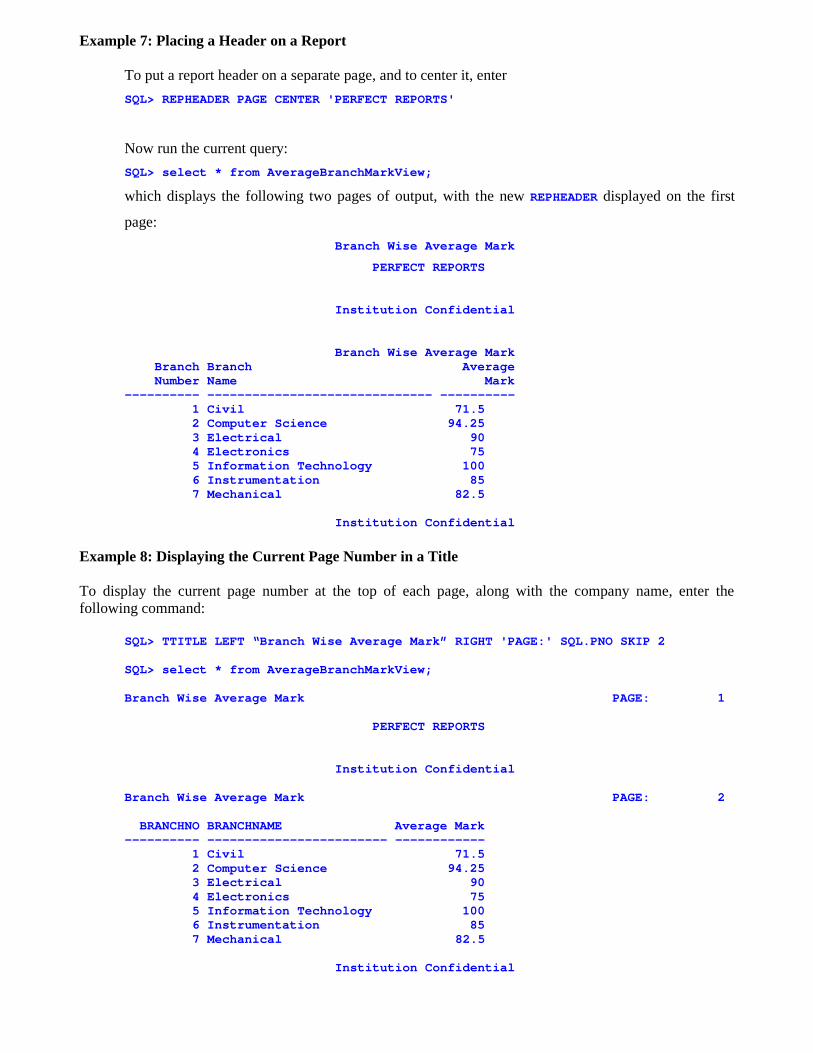
To put a report header on a separate page, and to center it, enter
SQL> REPHEADER PAGE CENTER 'PERFECT REPORTS'
Now run the current query:
SQL> select * from AverageBranchMarkView;
which displays the following two pages of output, with the new REPHEADER displayed on the first
page:
Branch Wise Average Mark
PERFECT REPORTS
Institution Confidential
Branch Wise Average MarkBranch Branch AverageNumber Name Mark
---------- ------------------------------ ----------1 Civil 71.52 Computer Science 94.253 Electrical 904 Electronics 755 Information Technology 1006 Instrumentation 857 Mechanical 82.5
Institution Confidential
Example 8: Displaying the Current Page Number in a Title
To display the current page number at the top of each page, along with the company name, enter thefollowing command:
SQL> TTITLE LEFT “Branch Wise Average Mark” RIGHT 'PAGE:' SQL.PNO SKIP 2
SQL> select * from AverageBranchMarkView;
Branch Wise Average Mark PAGE: 1
PERFECT REPORTS
Institution Confidential
Branch Wise Average Mark PAGE: 2
BRANCHNO BRANCHNAME Average Mark---------- ------------------------ ------------
1 Civil 71.52 Computer Science 94.253 Electrical 904 Electronics 755 Information Technology 1006 Instrumentation 857 Mechanical 82.5
Institution Confidential
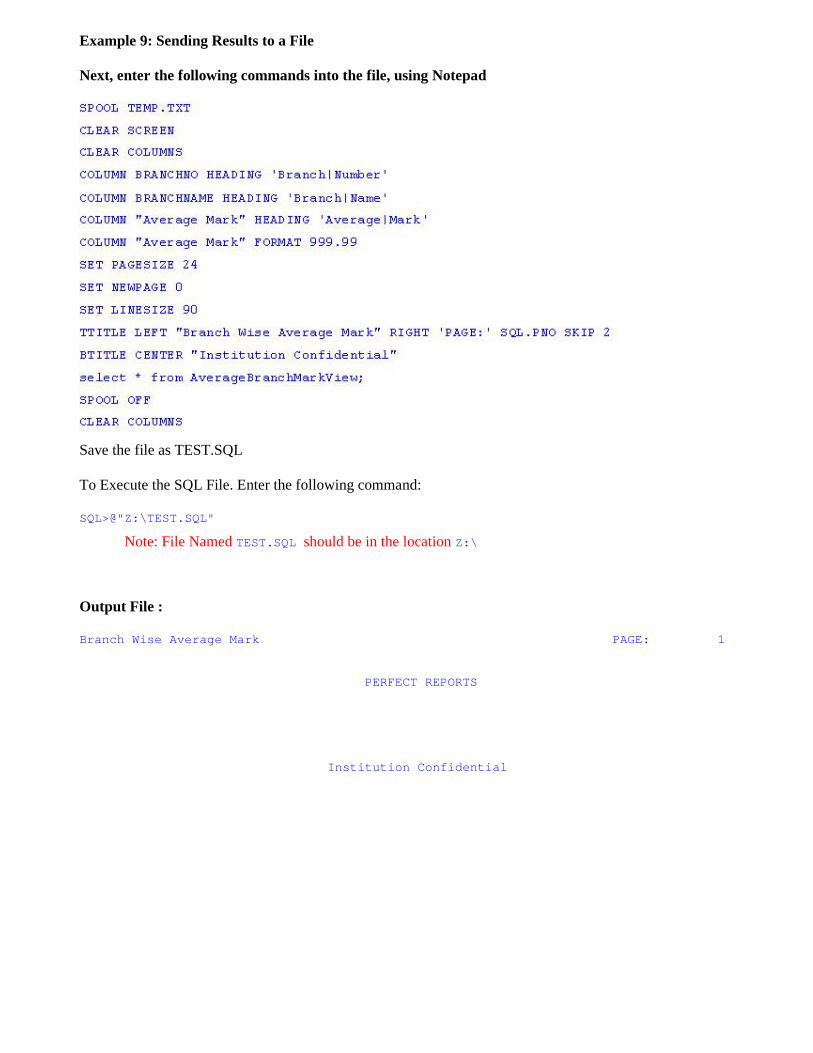
Example 9: Sending Results to a File
Next, enter the following commands into the file, using Notepad
Save the file as TEST.SQL
To Execute the SQL File. Enter the following command:
SQL>@"Z:\TEST.SQL"
Note: File Named TEST.SQL should be in the location Z:\
Output File :
Branch Wise Average Mark PAGE: 1
PERFECT REPORTS
Institution Confidential
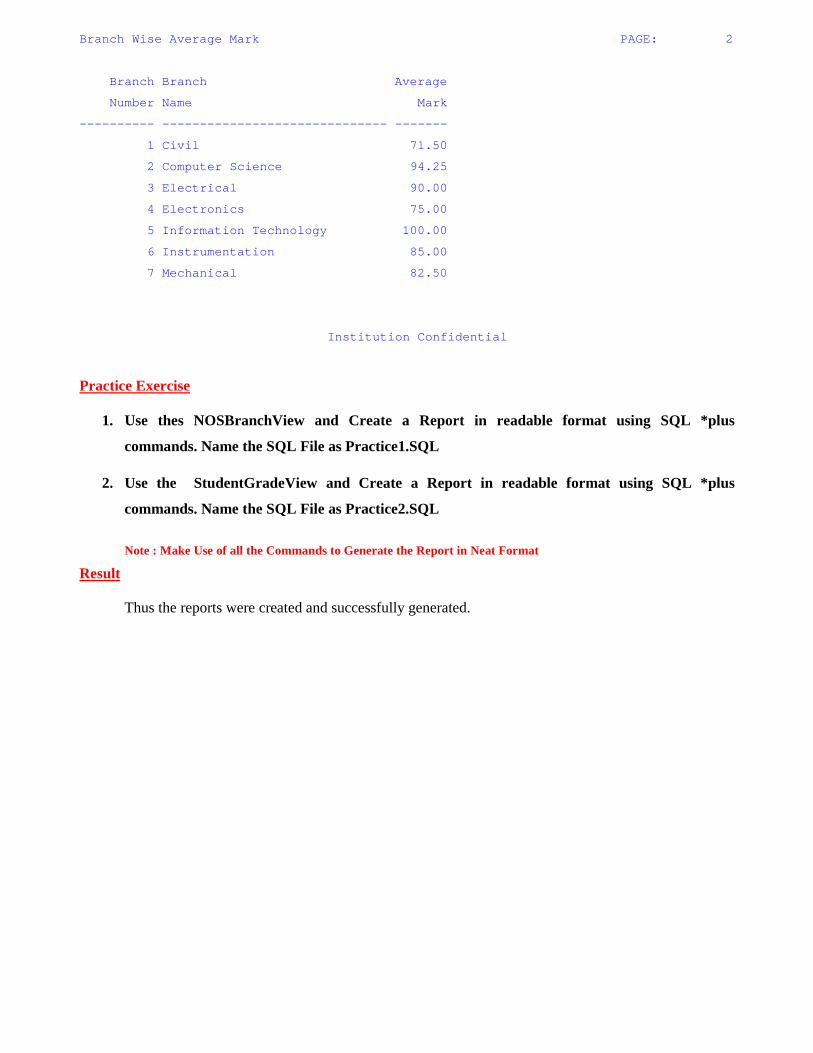
Branch Wise Average Mark PAGE: 2
Branch Branch Average
Number Name Mark
---------- ------------------------------ -------
1 Civil 71.50
2 Computer Science 94.25
3 Electrical 90.00
4 Electronics 75.00
5 Information Technology 100.00
6 Instrumentation 85.00
7 Mechanical 82.50
Institution Confidential
Practice Exercise
1. Use thes NOSBranchView and Create a Report in readable format using SQL *plus
commands. Name the SQL File as Practice1.SQL
2. Use the StudentGradeView and Create a Report in readable format using SQL *plus
commands. Name the SQL File as Practice2.SQL
Note : Make Use of all the Commands to Generate the Report in Neat Format
Result
Thus the reports were created and successfully generated.
Ex. No: 8 INDEX
Date :
Front End ToolAim
To Study about Visual Basic 6.
Theory
Visual Basic 6.0 is a robust, object-oriented, sophisticated and powerful development platform,
ideally suited for producing impressive Windows applications.
The major advantages of VB are:
It is a powerful and complete Windows application development system that enables us to use
built-in functions and subroutines for dozens of different tasks.
It also provides capability to produce custom libraries and objects that can be loaded at runtime
or bound into the distributed application.
It is a hugely successful product preferred by millions of developers at virtually all skill levels.
It is well supported by third party products
It supports the principle of object driven design
It is very flexible and user-friendly as it is a GUI (Graphic User Interface)
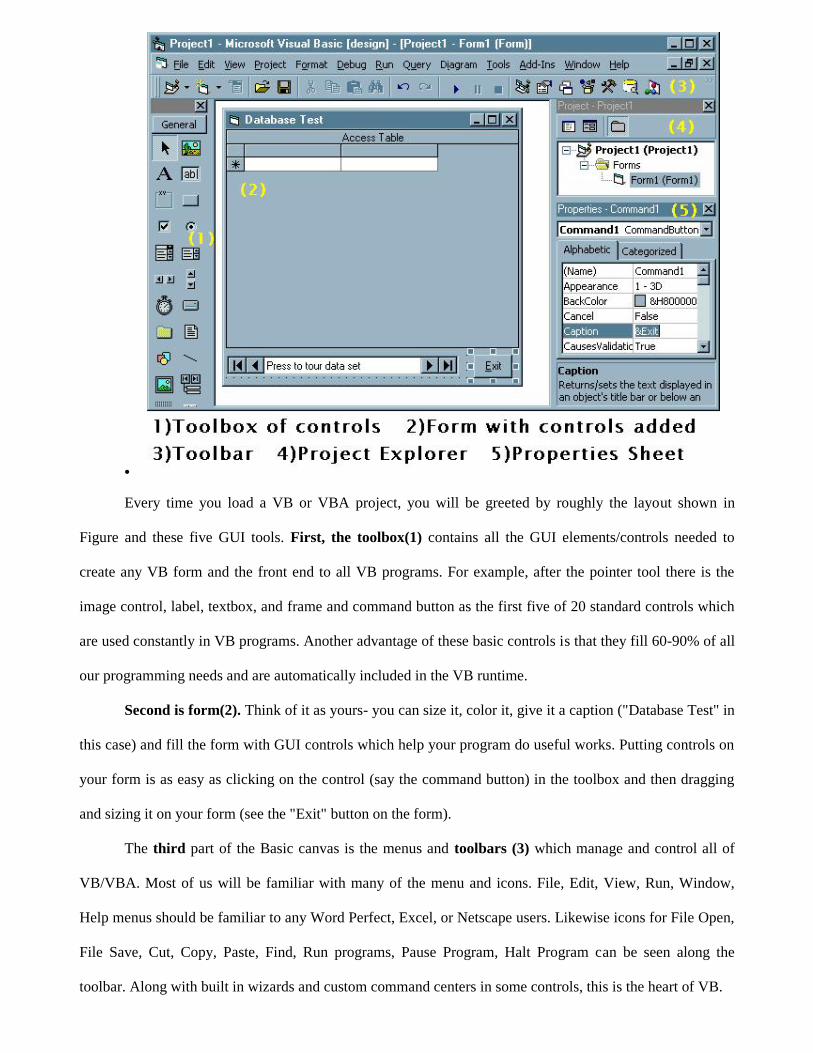
Every time you load a VB or VBA project, you will be greeted by roughly the layout shown in
Figure and these five GUI tools. First, the toolbox(1) contains all the GUI elements/controls needed to
create any VB form and the front end to all VB programs. For example, after the pointer tool there is the
image control, label, textbox, and frame and command button as the first five of 20 standard controls which
are used constantly in VB programs. Another advantage of these basic controls is that they fill 60-90% of all
our programming needs and are automatically included in the VB runtime.
Second is form(2). Think of it as yours- you can size it, color it, give it a caption ("Database Test" in
this case) and fill the form with GUI controls which help your program do useful works. Putting controls on
your form is as easy as clicking on the control (say the command button) in the toolbox and then dragging
and sizing it on your form (see the "Exit" button on the form).
The third part of the Basic canvas is the menus and toolbars (3) which manage and control all of
VB/VBA. Most of us will be familiar with many of the menu and icons. File, Edit, View, Run, Window,
Help menus should be familiar to any Word Perfect, Excel, or Netscape users. Likewise icons for File Open,
File Save, Cut, Copy, Paste, Find, Run programs, Pause Program, Halt Program can be seen along the
toolbar. Along with built in wizards and custom command centers in some controls, this is the heart of VB.
Fourth is the Project Explorer (4) which you use to access all the forms and coding files in your
VB program. The PE-Project Explorer is such a handy navigation device you will find yourself using it all
the time to switch among different forms and code.
Fifth and even more frequently used than the Project Explorer is the Properties sheet (5). Note that
the "Exit" command button is highlighted in the form and is also the control listed in the Properties sheet.
The Properties sheet is both the elegance and the swamp of VB. If you want to change the property of any
control like its color, shape, caption, or whatever - the Property sheet is the place to go. But a command
button has 32 properties - and some controls have hundreds, hence the swamp.
You will find in developing in Visual Basic that you spend a large percentage of time using the
Project Explorer and Property sheet. It is worthwhile to get to know them well. Project Explorer is your
means of navigating around the various parts of VB; while Property sheets allow you to set the very basic
look and feel plus behavior of all your forms in Visual Basic.
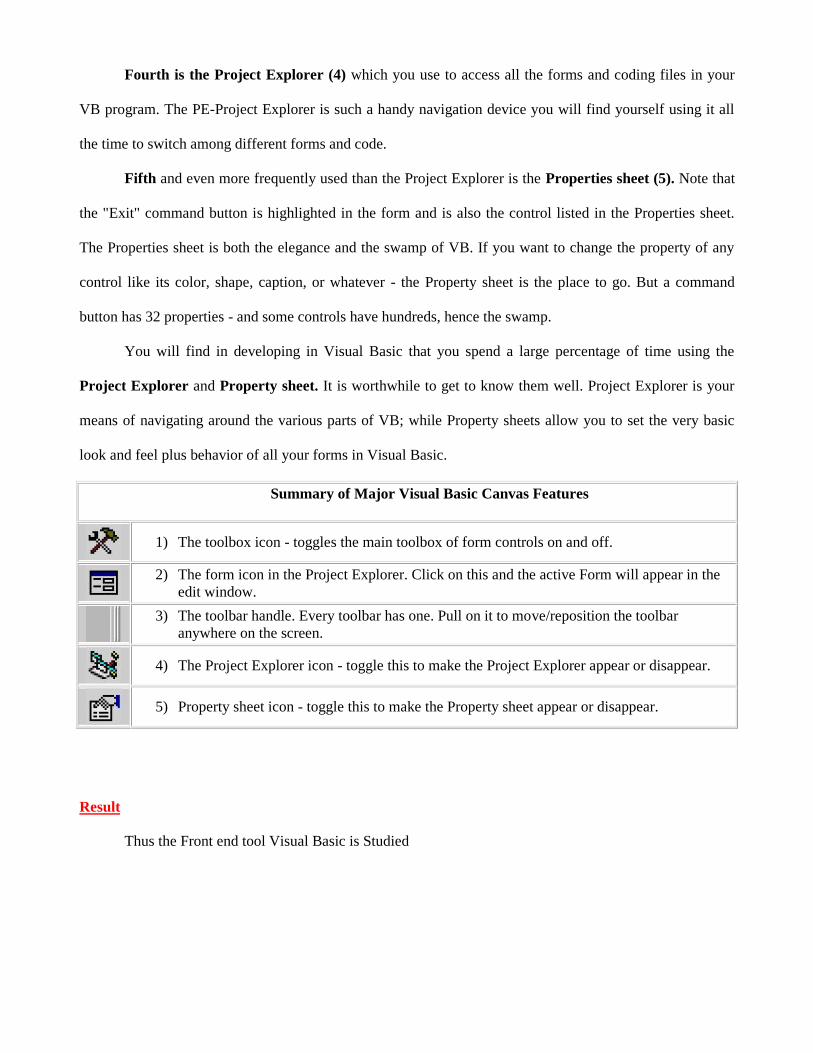
Summary of Major Visual Basic Canvas Features
1) The toolbox icon - toggles the main toolbox of form controls on and off.
2) The form icon in the Project Explorer. Click on this and the active Form will appear in theedit window.
3) The toolbar handle. Every toolbar has one. Pull on it to move/reposition the toolbaranywhere on the screen.
4) The Project Explorer icon - toggle this to make the Project Explorer appear or disappear.
5) Property sheet icon - toggle this to make the Property sheet appear or disappear.
Result
Thus the Front end tool Visual Basic is Studied
Ex. No: 9 INDEX
Date :
Form Design
Aim
To Design an Application with Visual Basic Form.
Theory
Develop proper forms
Forms don’t usually get much attention from code-level developers. We add a form and off we go,plugging in various controls and using them as containers for information. But setting up forms’ propertiesis important for creating visually pleasant, consistent, and intuitive interfaces.
You should specify the proper border style of a form. Your options are:
None Fixed Single Sizable Fixed Dialog Fixed ToolWindow Sizable ToolWindow
Using None is rarely a good idea, since such forms don’t have a title bar or the control menu box, sousers can’t close or resize them. The default form value is Sizable (allowing users to resize the form), butthis is a good choice only in cases where all the form elements are designed to resize along with the formitself.
The Fixed Dialog style offers a border and doesn’t allow a form to be resized, but it lacks Minimize andMaximize buttons in the top-right corner. To include those buttons, use the Fixed Single style. SizableToolWindow and Fixed ToolWindow styles are generally used for forms that need to float over andallow changes to be made to the main forms.
You should also address the form’s start position. The available start position styles are:
Manual Windows Default CenterScreen CenterOwner
The default style is Manual, which means that the form will appear in the same location at both runtime anddesign time. Windows Default puts a form in the upper-left corner on the screen. CenterScreen places a formin the center of the user’s screen regardless of the screen resolution. CenterOwner places a form in the centerof the owner form. An owner is a form on top of which the current form is to appear. When no owner isspecified, the form shows up in the center of the desktop.
Keep controls consistent and appropriate
Before simply dropping controls on a form, consider what kind of data the control will oversee and howyour users will interact with that data. The guidelines provided below will help you choose the best controlsfor a particular type of data.
The first rule of form controls is that they should have consistent characteristics, such as look, feel, andsize. Users shouldn't need to learn specific visual cues and usage parameters for each control.
Your text box controls should be the same height as the combo boxes. By default, the height property oftext boxes is different from that of the combo boxes. You should change the height value of the text boxes tomatch that of the combo boxes (since the height property is read-only in combo boxes). Obviously, this ruleapplies only to single-line text boxes.
You should use the proper controls for the data you need to display. If you're displaying read-only data,you should not use a text box and modify its properties so that users can’t make changes to its text. Instead,use a label. Text box controls should be used only for editable data.
When you need to display fewer than five options in a list and you want the user to choose only oneitem, option buttons are your best choice. Many applications use combo boxes to display such information,but from the user's standpoint, it’s much better to see all options at once rather than having to scroll throughthe listings in a combo box.
Keep in mind that when you want your users to be able to select more than one item from a small list ofselections, using check boxes is a good idea. As with option buttons, check boxes let users see all optionsavailable at the same time, but check boxes also allow the selection of multiple items from the list.
When you need to display a larger number of items for users to choose from, it’s not feasible to useoption buttons or check boxes because of the amount of real estate they would take up on the form. In suchcases, you should display data either in combo boxes or list boxes to save space. You can use multiple-selection list boxes to let users select more than one item at a time; combo boxes allow only one item to beselected.
Developers sometimes use combo boxes and list boxes to display more than one column of data;however, grid controls may be easier for users to understand (and easier for you to code).
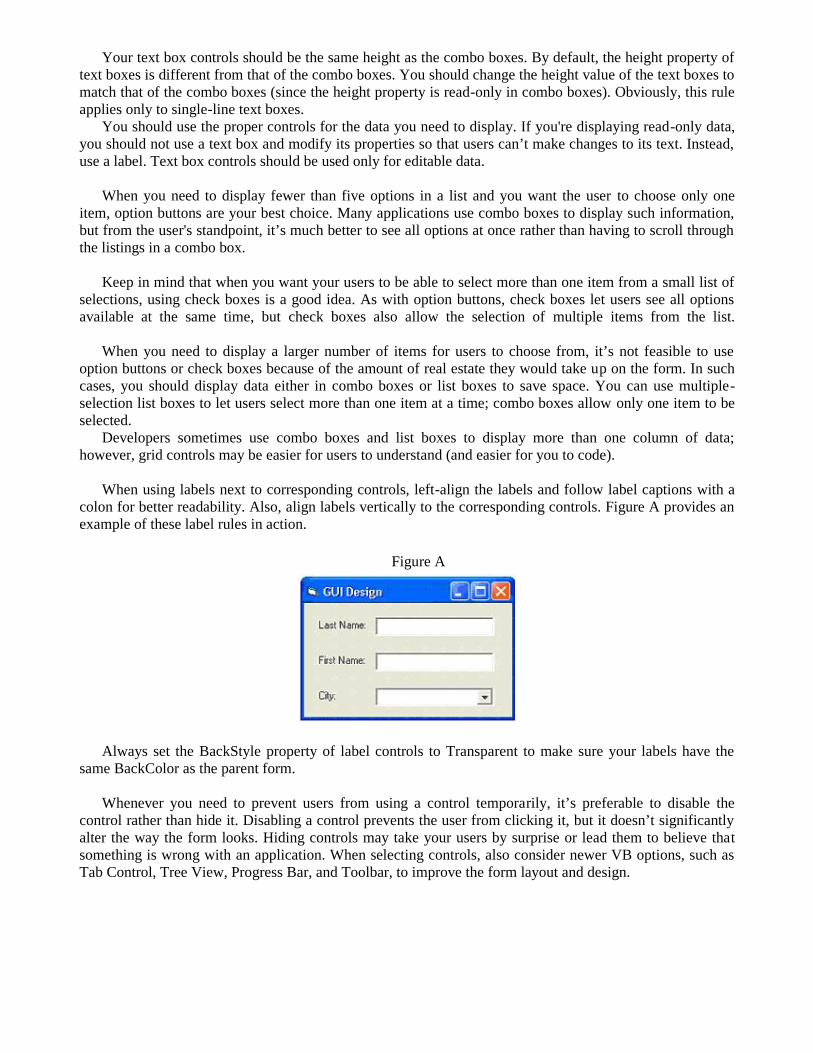
When using labels next to corresponding controls, left-align the labels and follow label captions with acolon for better readability. Also, align labels vertically to the corresponding controls. Figure A provides anexample of these label rules in action.
Figure A
Always set the BackStyle property of label controls to Transparent to make sure your labels have thesame BackColor as the parent form.
Whenever you need to prevent users from using a control temporarily, it’s preferable to disable thecontrol rather than hide it. Disabling a control prevents the user from clicking it, but it doesn’t significantlyalter the way the form looks. Hiding controls may take your users by surprise or lead them to believe thatsomething is wrong with an application. When selecting controls, also consider newer VB options, such asTab Control, Tree View, Progress Bar, and Toolbar, to improve the form layout and design.
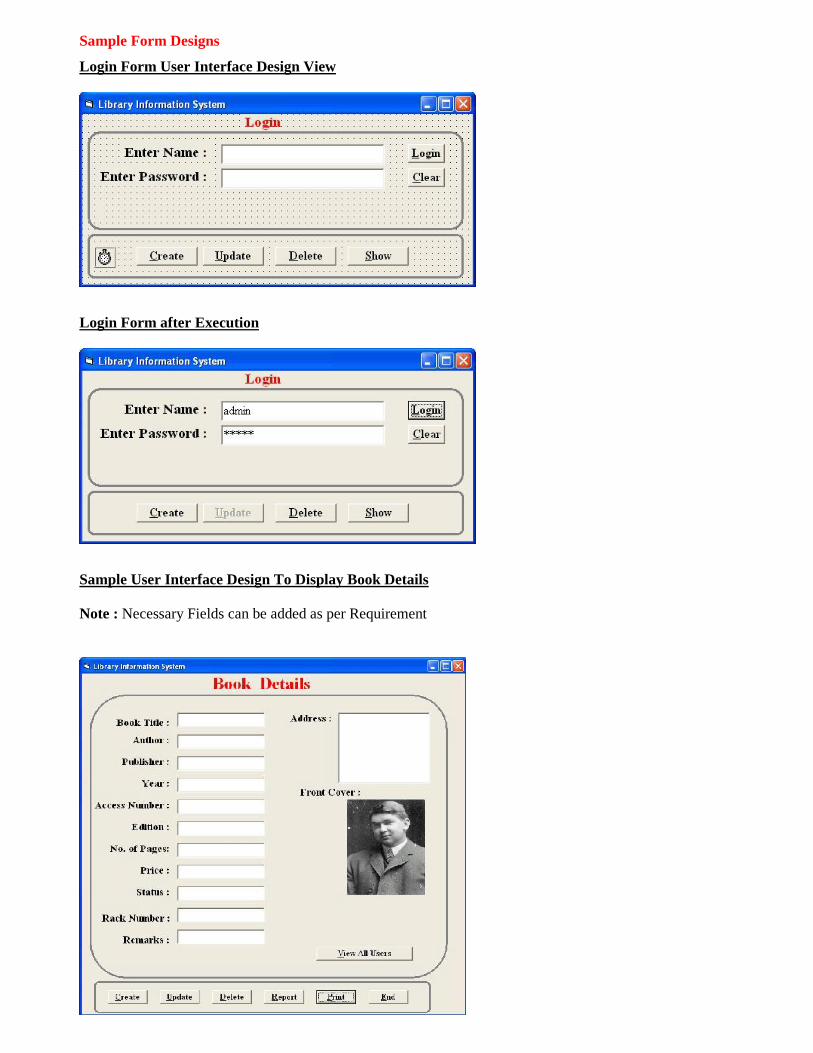
Sample Form Designs
Login Form User Interface Design View
Login Form after Execution
Sample User Interface Design To Display Book Details
Note : Necessary Fields can be added as per Requirement
Ex. No: 10 INDEX
Date :
Menu Design
Aim
To Design an Application with Menu.
Theory
Adding Menu Bar Using Menu Editor
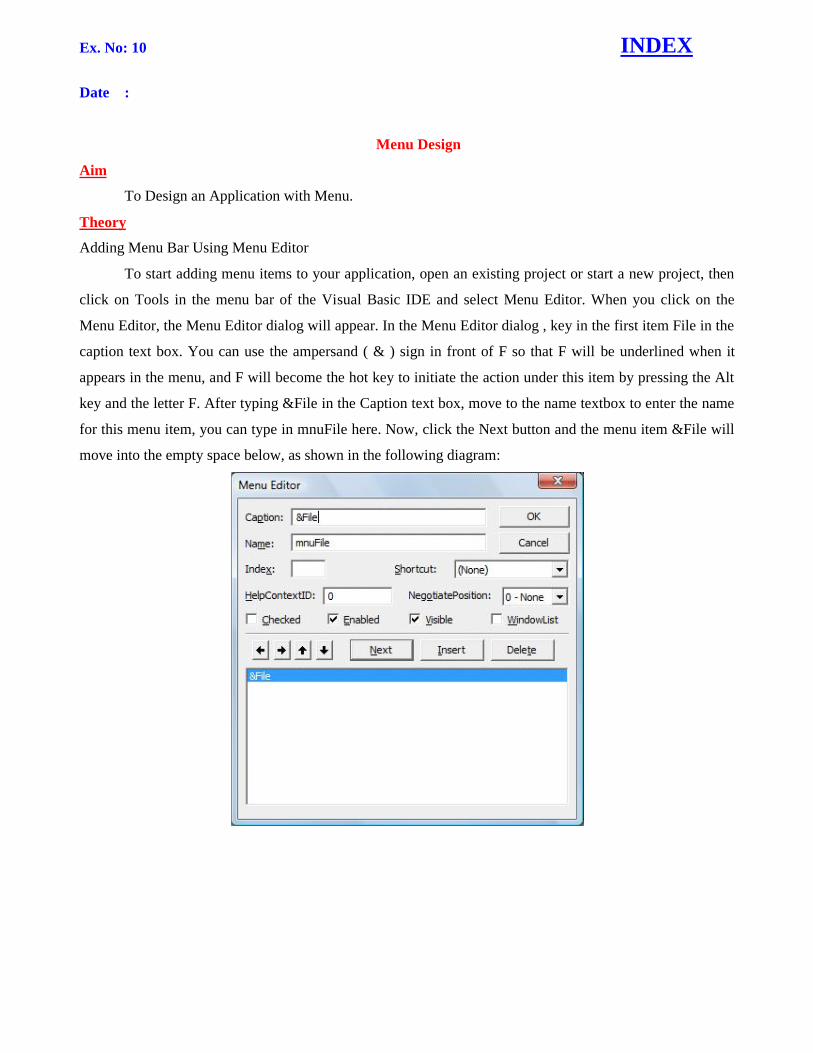
To start adding menu items to your application, open an existing project or start a new project, then
click on Tools in the menu bar of the Visual Basic IDE and select Menu Editor. When you click on the
Menu Editor, the Menu Editor dialog will appear. In the Menu Editor dialog , key in the first item File in the
caption text box. You can use the ampersand ( & ) sign in front of F so that F will be underlined when it
appears in the menu, and F will become the hot key to initiate the action under this item by pressing the Alt
key and the letter F. After typing &File in the Caption text box, move to the name textbox to enter the name
for this menu item, you can type in mnuFile here. Now, click the Next button and the menu item &File will
move into the empty space below, as shown in the following diagram:

You can then add in other menu items on the menu bar by following the same procedure, as shown in the
diagram below:
when you click Ok, the menu items will be shown on the menu bar of the form.
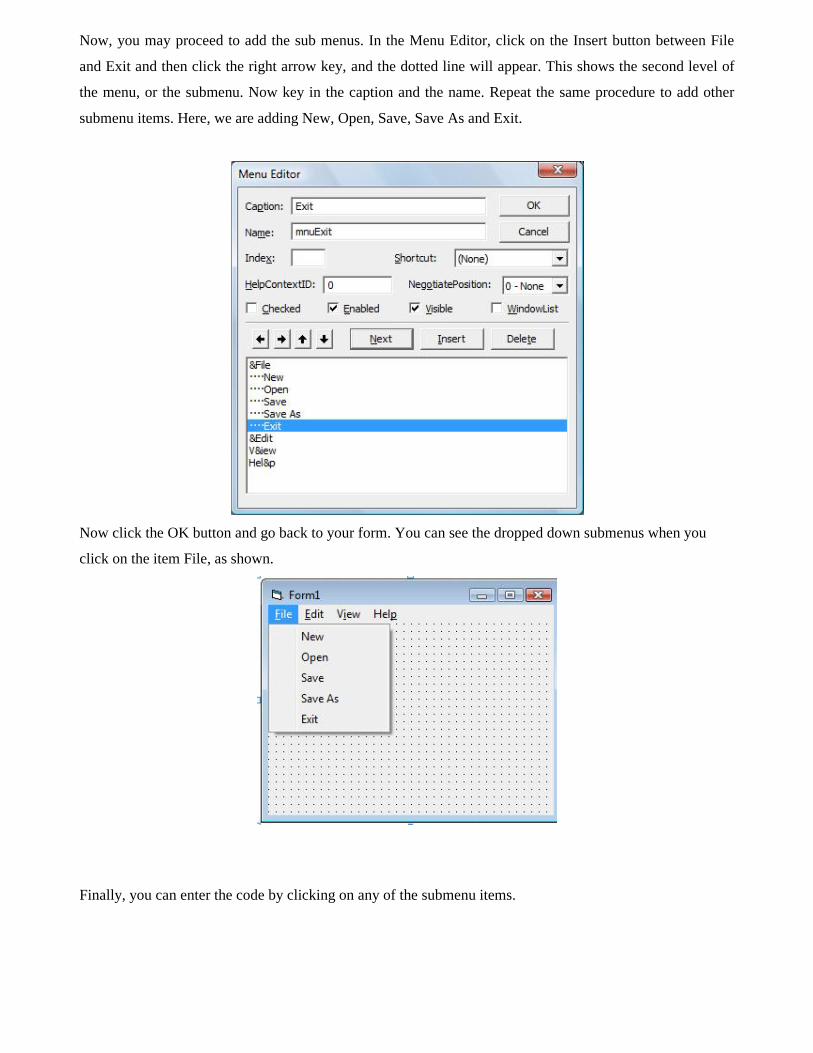
Now, you may proceed to add the sub menus. In the Menu Editor, click on the Insert button between File
and Exit and then click the right arrow key, and the dotted line will appear. This shows the second level of
the menu, or the submenu. Now key in the caption and the name. Repeat the same procedure to add other
submenu items. Here, we are adding New, Open, Save, Save As and Exit.
Now click the OK button and go back to your form. You can see the dropped down submenus when you
click on the item File, as shown.
Finally, you can enter the code by clicking on any of the submenu items.
Ex. No: 11 INDEX
Date :
Mini Project
Aim
Aim:To develop a project to automate Student Information System
Phases of Project Development:
1. Requirment Analysis (collect client requirements and analyze it.)
2. Design phase (prepare design according to the requirements)
2.1 Database Design:
A good database design is, therefore, one that:
Divides your information into subject-based tables to reduce redundant data.
Provides Access with the information it requires to join the information in the tables together asneeded.
Helps support and ensure the accuracy and integrity of your information.
Accommodates your data processing and reporting needs.
2.1.1 The Design process: The design process consists of the following steps:
Determine the purpose of your database: This helps prepare you for the remaining steps.
2.1.2 Find and organize the information required: Gather all of the types of information you might want
to record in the database, such as product name and order number.
2.1.3 Divide the information into tables: Divide your information items into major entities or subjects,
such as Products or Orders. Each subject then becomes a table.
2.1.4 Turn information items into columns: Decide what information you want to store in each table.
Each item becomes a field, and is displayed as a column in the table. For example, an Employees table
might include fields such as Last Name and Hire Date.
2.1.5 Specify primary keys: Choose each table’s primary key. The primary key is a column that is used touniquely identify each row. An example might be Product ID or Order ID.
2.1.6 Set up the table relationships: Look at each table and decide how the data in one table is related to
the data in other tables. Add fields to tables or create new tables to clarify the relationships, as necessary.
2.1.7 Refine your design: Analyze your design for errors. Create the tables and add a few records of
sample data. See if you can get the results you want from your tables. Make adjustments to the design, as
needed.
2.1.8. Apply the Normalization rules:
2.1.9. Draw Entity Relationship Diagram:
2.2 User Interface Design
These are ten general principles for user interface design. They are called "heuristics" because they are morein the nature of rules of thumb than specific usability guidelines.
By Jakob Nielsen2.2.1 Visibility of system status
The system should always keep users informed about what is going on, through appropriatefeedback within reasonable time.
2.2.2 Match between system and the real worldThe system should speak the users' language, with words, phrases and concepts familiar to
the user, rather than system-oriented terms. Follow real-world conventions, making informationappear in a natural and logical order.
2.2.3 User control and freedomUsers often choose system functions by mistake and will need a clearly marked "emergency
exit" to leave the unwanted state without having to go through an extended dialogue. Support undoand redo.
2.2.4 Consistency and standardsUsers should not have to wonder whether different words, situations, or actions mean the
same thing. Follow platform conventions.
2.2.5 Error preventionEven better than good error messages is a careful design which prevents a problem from
occurring in the first place. Either eliminate error-prone conditions or check for them and presentusers with a confirmation option before they commit to the action.
2.2.6 Recognition rather than recallMinimize the user's memory load by making objects, actions, and options visible. The user
should not have to remember information from one part of the dialogue to another. Instructions foruse of the system should be visible or easily retrievable whenever appropriate.
2.2.7 Flexibility and efficiency of useAccelerators -- unseen by the novice user -- may often speed up the interaction for the expert
user such that the system can cater to both inexperienced and experienced users. Allow users to tailorfrequent actions.
2.2.8 Aesthetic and minimalist designDialogues should not contain information which is irrelevant or rarely needed. Every extra
unit of information in a dialogue competes with the relevant units of information and diminishestheir relative visibility.
2.2.9 Help users recognize, diagnose, and recover from errorsError messages should be expressed in plain language (no codes), precisely indicate the
problem, and constructively suggest a solution.
2.2.10 Help and documentationEven though it is better if the system can be used without documentation, it may be necessary
to provide help and documentation. Any such information should be easy to search, focused on theuser's task, list concrete steps to be carried out, and not be too large.


![Practical Password Cracking - OWASP · Practical Password Cracking ... [List.Rules: SillyAppJTR] Az ... [INFO] the back-end DBMS is MySQL web server operating system: Linux Ubuntu](https://img.pdfslide.us/doc/110x75/5b282c6f7f8b9a9f0a8b474f/practical-password-cracking-owasp-practical-password-cracking-listrules.jpg)