Embed Size (px)
Citation preview
Hentzenwerke Whitepaper Series
SuSE 10.1 SetupBy Whil Hentzen
The recent news that Lenovo (the folks who bought IBM's Thinkpad business) will be actively supporting SuSE on their T60s came as very good news to many folks, including me, as I just picked up a T60 myself. I immediately ran out and grabbed a copy of 10.1. I've installed it on several boxes; here's my cheat sheet for all the tips and tweaks I use. I suspect this will be helpful to many of you as well. Note that this is the process I use; some steps (such as static setup for a network card) may not be applicable to your situation.
Hentzenwerke Publishing, Inc. • [email protected] • www.hentzenwerke.com
SuSE 10.1 Setup Page 2
1. Preface
1.1 CopyrightCopyright 2006 Whil Hentzen. Some rights reserved. This work is licensed under the Creative Commons Attribution-NonCommercial-NoDerivs License, which basically means that you can copy, distribute, and display only unaltered copies of this work, but in return, you must give the original author credit, you may not distribute the work for commercial gain, nor create derivative works based on it without first licensing those rights from the author. To view a copy of this license, visit http://creativecommons.org/licenses/by-nc-nd/2.0/.
1.2 Revisions
1.2.1 HistoryVersion Date Synopsis Author1.0.0 2006/8/26 Original WH
1.2.2 New versionThe newest version of this document will be found at www.hentzenwerke.com.
1.2.3 Feedback and correctionsIf you have questions, comments, or corrections about this document, please feel free to email me at '[email protected]'. I also welcome suggestions for passages you find unclear.
1.3 References and acknowledgmentsThanks to the many folks on the IBM Thinkpad mailing list (http://mailman.linux-thinkpad.org/mailman/listinfo/linux-thinkpad), the folks on the Milwaukee Linux User Group list (www.milwaukeelug.org), in particular Glenn Holmer, a long-time SuSE supporter, who gave me the ZMD emasculation details, and Justin Purdy, and, natch, the SuSE and Novell teams.
1.4 DisclaimerNo warranty! This material is provided as is, with no warranty of fitness for any particular purpose. Use the concepts, examples and other content at your own risk. There may be errors and inaccuracies that in some configurations may be damaging to your system. The author(s) disavows all liability for the contents of this document.
Before making any changes to your system, ensure that you have backups and other resources to restore the system to its state before making those changes.
All copyrights are held by their respective owners, unless specifically noted otherwise. Use of a term in this document should not be regarded as affecting the validity of any trademark or service mark. Naming of particular products or brands should not be seen as endorsements.
1.5 PrerequisitesThis document was written using SuSE 10.1 on a brand-spanking new 2 GHz Thinkpad T60 with a gigabyte of RAM and on an old, creaky Dell Inspiron 700, 700 Mhz, with 512MB of RAM. The Thinkpad supports the DVD while the Dell requires swapping in and out the 6 CDs.
2. Basic InstallThrow the DVD (or CD #1) into the drive and reboot. You'll be given several choices from which to boot, including DVD/CD or from hard disk. Choose DVD/CD.
By the way, screen shots can be taken during installation by pressing the Prt-Scrn button on the keyboard; a dialog will display asking "Save screen shot to..." and the default location is /root/yast2-screen-shots/, with each image taken being named yast2-nnn.png, where 'nnn' ranges from '000' through whatever number of screen shots you take.
2.1. Select language screenChange the language if necessary, then go to next screen.
Hentzenwerke Publishing, Inc. • [email protected] • www.hentzenwerke.com
SuSE 10.1 Setup Page 3
2.2. License agreement screenAccept, then go to next screen.
2.3. Installation Mode screenSelect "New Installation" unless you're specifically doing an update. Generally, you won't pick the "Include Add-On Products from Separate Media" since everything for the installation described here is on the DVD/CD sets. If you have non-SuSE media that has other software that you want to install now, you'd use the "Include Add-ons" function.
In either case, when done, go to the next screen.
2.4. Time Zone selection screenSelect the Region (the US version of SuSE defaults to "USA") and the Time Zone (default is Eastern). Then change the Time and Date using the Change button in the lower right if necessary. Then go to the next screen.
2.5. Desktop Selection screenChoose the KDE option button, then go to the next screen.
2.6. Installation Settings screenClick the Partitioning link to change the partitioning if necessary. Recommended for disks > 20 GB:
swap twice amount of RAM/boot 100 MB/ 10 GB/home remainder of space
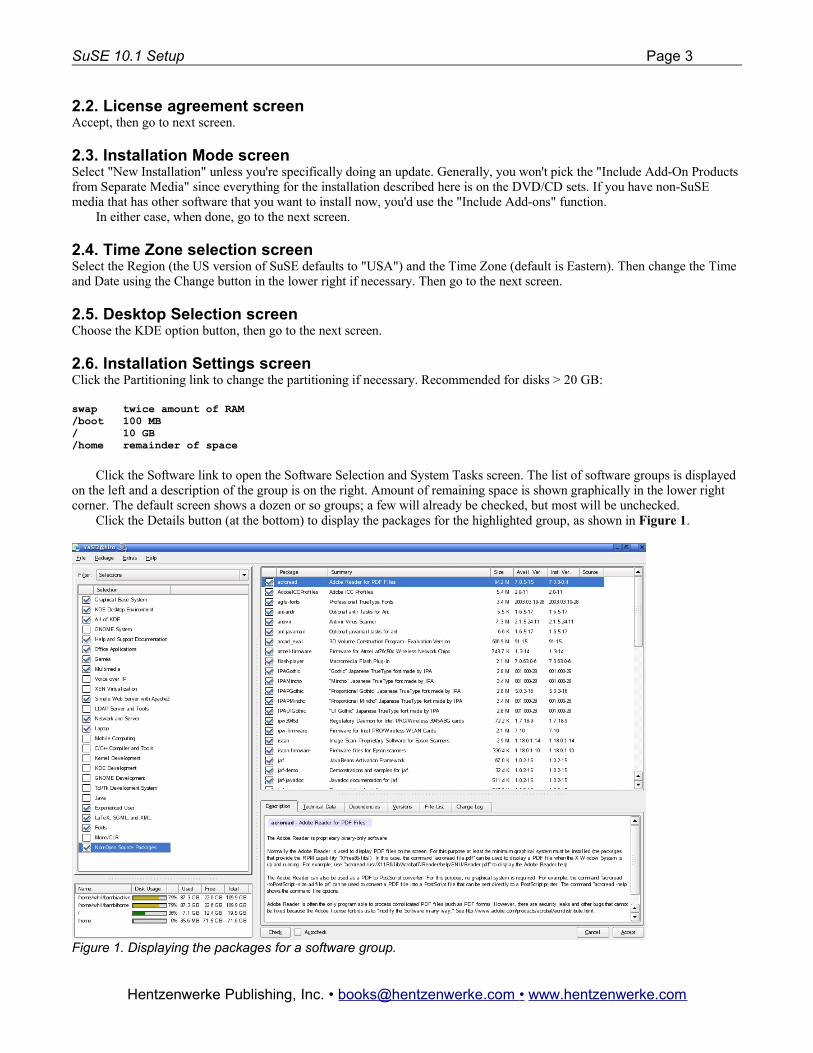
Click the Software link to open the Software Selection and System Tasks screen. The list of software groups is displayed on the left and a description of the group is on the right. Amount of remaining space is shown graphically in the lower right corner. The default screen shows a dozen or so groups; a few will already be checked, but most will be unchecked.
Click the Details button (at the bottom) to display the packages for the highlighted group, as shown in Figure 1.
Figure 1. Displaying the packages for a software group.
Hentzenwerke Publishing, Inc. • [email protected] • www.hentzenwerke.com
SuSE 10.1 Setup Page 4
For a desktop (end-user or software developer) system, choose the following groups. Those for a development workstation have a note in parens after the group name. Note that I do not pick and choose individual packages inside a group; disk space is cheap and even a robust install doesn't take much room, so I just select the whole group.
• All of KDE• Office• Games• Multimedia• Simple Web Server (development only)• Network/Server (development only)• Experienced User• Latex (development only)• Fonts• Non-Open Source packages
Under Mobile Computing, add two more:
• tpb – ThinkPad buttons• usbview – USB Topology
Then change the Filter from "Selections" to "Search", look for "thunderbird", and select it. Also choose any others that are germane to your needs (such as Laptop or Mobile Computing).Finally, click "Accept" to go to the next screen.The system will display a "Checking dependencies" dialog, then one or more License Agreements, depending on if you
picked Non-Open Source Packages. The system will display a "Evaluating package selection" dialog and then send you back to the "Installation Settings" page.
2.6.1. Booting processThe default behavior during bootup is for a series of dots to circle the SuSE "gecko" icon on the screen. I prefer the old-fashioned behavior where messages about the progress of bootup display on the screen. If you want the same behavior, following these steps:
1. Click on "Booting" link.2. In Boot Loader Settings page, click on Edit button (very bottom).3. In Boot Loader Settings page, remove "splash=silent" from "Other Kernel Parameters".4. Back at Boot Loader Settings page, click "Finish".
2.6.2. Finish installationClick "Accept". You'll be asked to confirm installation. When you click acceptance, the installation will commence. A blue thermometer bar will display on the right side, showing your progress. The bar will be broken up into segments if you're installing off of CDs, or just one big bar if you're using the DVD.
Depending on how much software you chose, the installation may take anywhere from 20 minutes to an hour and a half. When complete, the system will warn you that it's going to reboot automatically, counting backwards from 10.
2.7. Perform Installation screenAfter the basic kernel is installed, the machine will automatically reboot. You'll again be given a choice to boot from DVD/CD or hard disk. This time, pick "Hard disk" since the core software has been now installed.
2.8. Hostname and Domain screenHostname is the name of the machine (e.g. frodo or zanzibar or galactica).
Domain is the URL of the site you're on (e.g. example.com).Enter both, then go to the next screen.
2.9. Root password screenMake this one difficult to guess, then go to the next screen.
Hentzenwerke Publishing, Inc. • [email protected] • www.hentzenwerke.com
SuSE 10.1 Setup Page 5
2.10. Network Configuration screenThe network screen will display a list of all network cards found in the machine.
2.10.1. Wireless cardIf there's a wireless card found, select it and turn wireless to encrypted by changing the Authentication Mode to Shared Key (or other, if you have a preference) and then entering an Encryption Key.
2.10.2. Network Card Configuration Overview screenSelect the Ethernet card in the list, and click on the Edit button in the bottom of the screen. Select the "Address tab, the "Static Address Setup" option button, then enter the following settings (change the values to those on your own network as appropriate):
- IP address: 192.168.1.nn- Mask: 255.255.255.0Click on the Hostname and Name Server button.- Hostname should already be entered- Name servers. Uncheck the "Update Name Servers and Search List via DHCP" checkbox at the bottom of the screen,
then enter the name servers you use for your own network. Note that on one box, I had to uncheck the checkbox at the bottom in order to type in my own name server IP addresses but on another, the textboxes were enabled even though checkbox was checked (it was disabled, though, weird.)
Then click OK.Click on the "Routing" button.- Gateway: 192.168.1.1 Click on "OK" a couple of times until you get to the main Network Configuration screen. Click the Next button; a
messagebox will display temporarily saying "Saving network configuration."
2.11. Test Internet Connection screenSelect the "No, Skip This Test" option button. Even though it seems like we'd want to test the connection to the Internet, we don't want to download updates. We'll do a complete update with after replacing the existing (broken) update mechanism with an older, but more reliable, tool in section 3.
2.12. User Authentication screenThe Users screen allows you to set attributes for a day-to-day user as well as create additional users if needed.
2.12.1. AuthenticationSelect Local authentication method.
2.12.2. New Local UserEnter the user attributes, such as name, username and password. Check "Receive system mail" and uncheck "Auto login".
2.12.3. Set up a groupThis step is for my particular network configuration, as each user has their own group in order to limit access to their own shares on the file server. Select "User Management" and create a group with same name as user, add the user to the group. For example, if the day-to-day user is named 'bob', create a group named 'bob', and then add the user 'bob' to the 'bob' group.
2.12.4. Additional usersIf you have more users to add for this box, here's where to add them.
Finally, go to the next screen.
2.13. Clean Up screenThe title to this screen says "Writing the system configuration" – it'll take a couple of minutes. Just wait until this screen displays the release notes.
2.14. Release Notes screenRead if you're so inclined, then go to the next screen.
Hentzenwerke Publishing, Inc. • [email protected] • www.hentzenwerke.com
SuSE 10.1 Setup Page 6
2.15. Hardware configuration screenYou'll need to wait a bit here as well, depending on how much stuff there is on your machine and the speed of your processor.
Change the resolution of the Monitor from 10x7 to 12x10; for some reason, SuSE isn't recognizing the monitor itself. (I have a ViewSonic VX900 but it only sees VX800.)
When it's finished, go to the next screen.
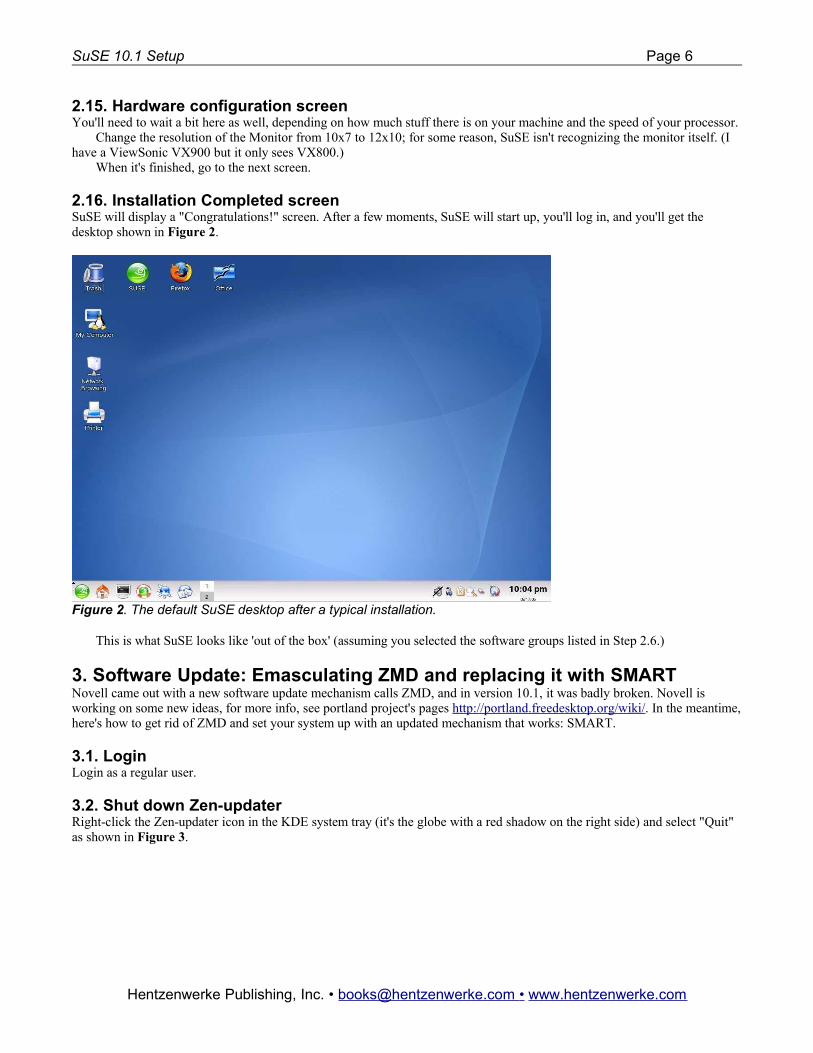
2.16. Installation Completed screenSuSE will display a "Congratulations!" screen. After a few moments, SuSE will start up, you'll log in, and you'll get the desktop shown in Figure 2.
Figure 2. The default SuSE desktop after a typical installation.
This is what SuSE looks like 'out of the box' (assuming you selected the software groups listed in Step 2.6.)
3. Software Update: Emasculating ZMD and replacing it with SMARTNovell came out with a new software update mechanism calls ZMD, and in version 10.1, it was badly broken. Novell is working on some new ideas, for more info, see portland project's pages http://portland.freedesktop.org/wiki/. In the meantime, here's how to get rid of ZMD and set your system up with an updated mechanism that works: SMART.
3.1. LoginLogin as a regular user.
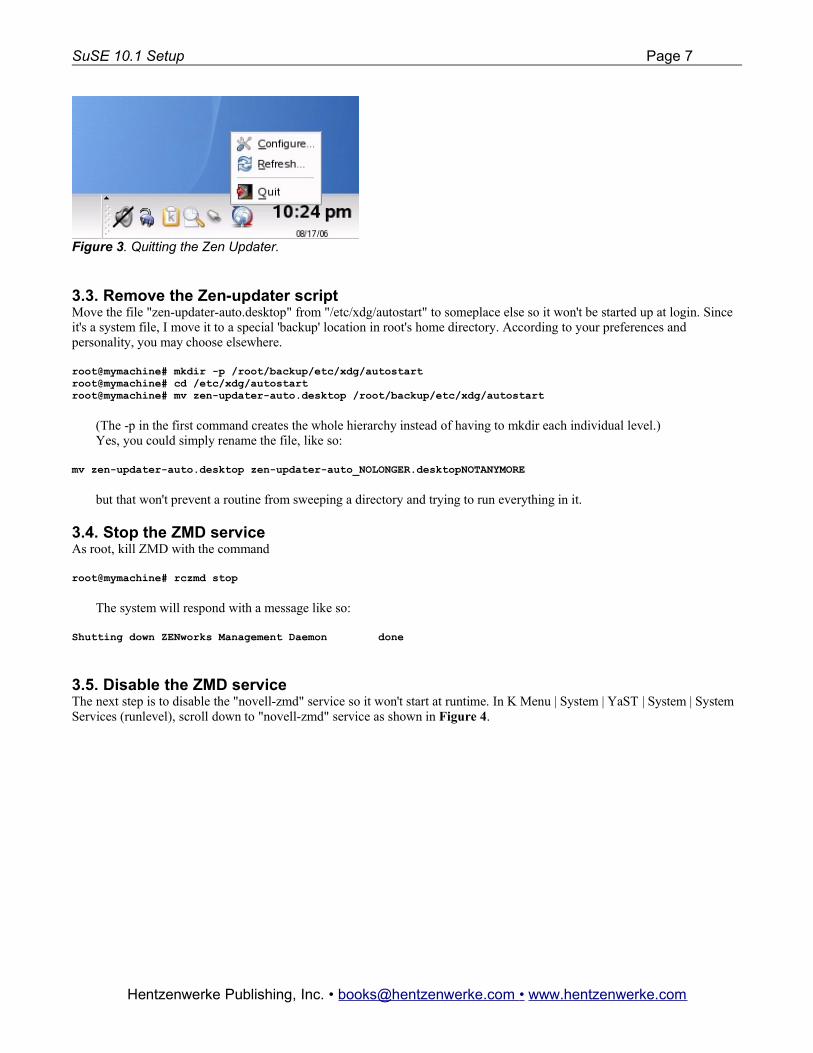
3.2. Shut down Zen-updaterRight-click the Zen-updater icon in the KDE system tray (it's the globe with a red shadow on the right side) and select "Quit" as shown in Figure 3.
Hentzenwerke Publishing, Inc. • [email protected] • www.hentzenwerke.com
SuSE 10.1 Setup Page 7
Figure 3. Quitting the Zen Updater.
3.3. Remove the Zen-updater scriptMove the file "zen-updater-auto.desktop" from "/etc/xdg/autostart" to someplace else so it won't be started up at login. Since it's a system file, I move it to a special 'backup' location in root's home directory. According to your preferences and personality, you may choose elsewhere.
root@mymachine# mkdir -p /root/backup/etc/xdg/autostartroot@mymachine# cd /etc/xdg/autostartroot@mymachine# mv zen-updater-auto.desktop /root/backup/etc/xdg/autostart
(The -p in the first command creates the whole hierarchy instead of having to mkdir each individual level.)Yes, you could simply rename the file, like so:
mv zen-updater-auto.desktop zen-updater-auto_NOLONGER.desktopNOTANYMORE
but that won't prevent a routine from sweeping a directory and trying to run everything in it.
3.4. Stop the ZMD serviceAs root, kill ZMD with the command
root@mymachine# rczmd stop
The system will respond with a message like so:
Shutting down ZENworks Management Daemon done
3.5. Disable the ZMD serviceThe next step is to disable the "novell-zmd" service so it won't start at runtime. In K Menu | System | YaST | System | System Services (runlevel), scroll down to "novell-zmd" service as shown in Figure 4.
Hentzenwerke Publishing, Inc. • [email protected] • www.hentzenwerke.com
SuSE 10.1 Setup Page 8
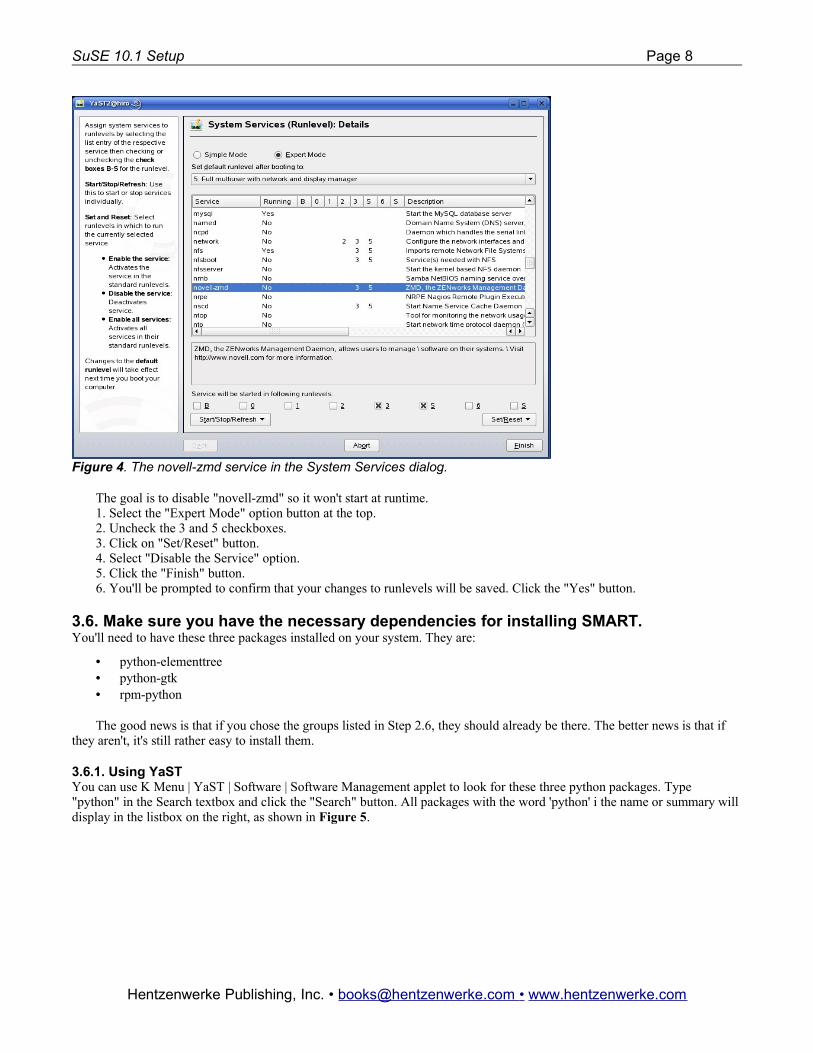
Figure 4. The novell-zmd service in the System Services dialog.
The goal is to disable "novell-zmd" so it won't start at runtime.1. Select the "Expert Mode" option button at the top.2. Uncheck the 3 and 5 checkboxes.3. Click on "Set/Reset" button.4. Select "Disable the Service" option.5. Click the "Finish" button.6. You'll be prompted to confirm that your changes to runlevels will be saved. Click the "Yes" button.
3.6. Make sure you have the necessary dependencies for installing SMART.You'll need to have these three packages installed on your system. They are:
• python-elementtree• python-gtk• rpm-python
The good news is that if you chose the groups listed in Step 2.6, they should already be there. The better news is that if they aren't, it's still rather easy to install them.
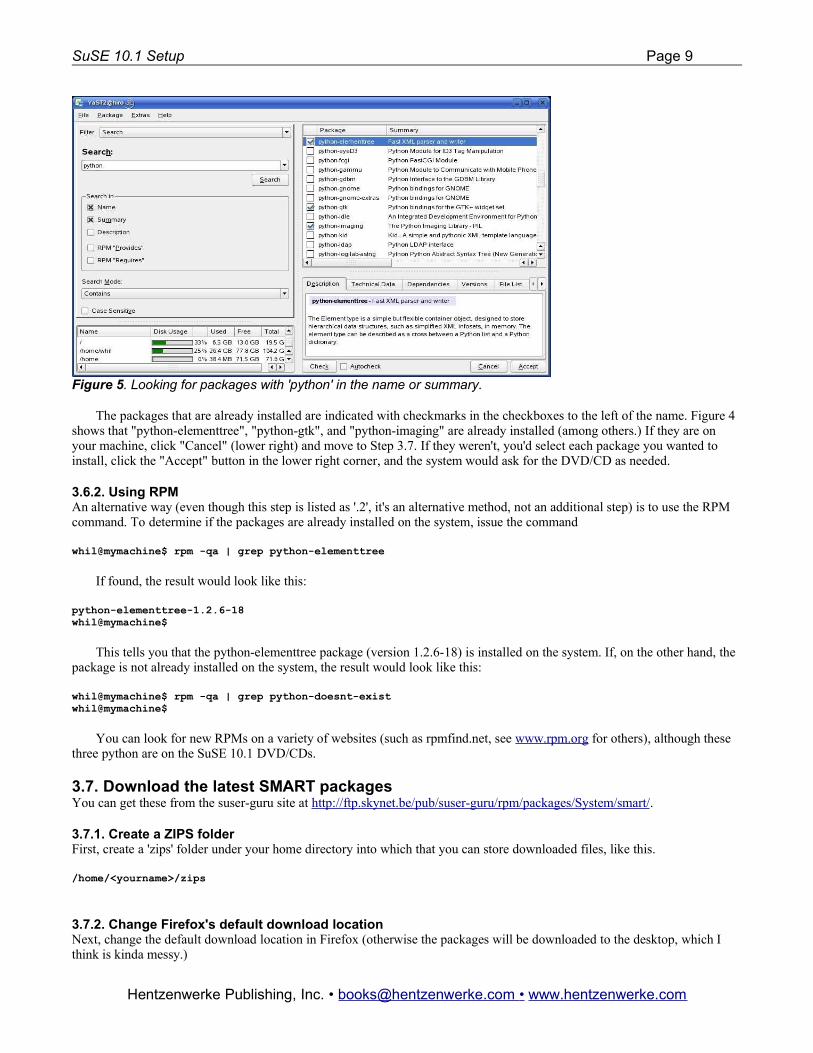
3.6.1. Using YaSTYou can use K Menu | YaST | Software | Software Management applet to look for these three python packages. Type "python" in the Search textbox and click the "Search" button. All packages with the word 'python' i the name or summary will display in the listbox on the right, as shown in Figure 5.
Hentzenwerke Publishing, Inc. • [email protected] • www.hentzenwerke.com
SuSE 10.1 Setup Page 9
Figure 5. Looking for packages with 'python' in the name or summary.
The packages that are already installed are indicated with checkmarks in the checkboxes to the left of the name. Figure 4 shows that "python-elementtree", "python-gtk", and "python-imaging" are already installed (among others.) If they are on your machine, click "Cancel" (lower right) and move to Step 3.7. If they weren't, you'd select each package you wanted to install, click the "Accept" button in the lower right corner, and the system would ask for the DVD/CD as needed.
3.6.2. Using RPMAn alternative way (even though this step is listed as '.2', it's an alternative method, not an additional step) is to use the RPM command. To determine if the packages are already installed on the system, issue the command
whil@mymachine$ rpm -qa | grep python-elementtree
If found, the result would look like this:
python-elementtree-1.2.6-18whil@mymachine$
This tells you that the python-elementtree package (version 1.2.6-18) is installed on the system. If, on the other hand, the package is not already installed on the system, the result would look like this:
whil@mymachine$ rpm -qa | grep python-doesnt-existwhil@mymachine$
You can look for new RPMs on a variety of websites (such as rpmfind.net, see www.rpm.org for others), although these three python are on the SuSE 10.1 DVD/CDs.
3.7. Download the latest SMART packagesYou can get these from the suser-guru site at http://ftp.skynet.be/pub/suser-guru/rpm/packages/System/smart/.
3.7.1. Create a ZIPS folderFirst, create a 'zips' folder under your home directory into which that you can store downloaded files, like this.
/home/<yourname>/zips
3.7.2. Change Firefox's default download locationNext, change the default download location in Firefox (otherwise the packages will be downloaded to the desktop, which I think is kinda messy.)
Hentzenwerke Publishing, Inc. • [email protected] • www.hentzenwerke.com
SuSE 10.1 Setup Page 10
1. Load Firefox and select the Edit | Preferences | Downloads menu option.2. Change "Save all files to this folder" from “Desktop” to the "/home/<yourname>/zips" directory you just created in
3.7.1.
3.7.3. Download packagesGo to the suser-guru site and download the following packages:
• smart-0.42-7.guru.suse101.i686.rpm (453K)• smart-addons-0.42-7.guru.suse101.i686.rpm (10K)• smart-gui-0.42-7.guru.suse101.i686.rpm (76K)• smart-ksmarttray-0.42-7.guru.suse101.i686.rpm (30K)
The list of files on the suser-guru is long and can be difficult to parse at first. The four filenames are "smart", "smart-addons", "smart-gui", and "smart-ksmarttray". The rest of the filename for each of these determines various attributes. The "42-7" strings are version numbers. The 42-7 version was as of 2006/8/16; before that date, the latest was 42-5. The 'suse101 means SuSE 10.1, and the i686 indicates the file as being appropriate for my non-64bit box.
Put all four of these files in the same directory (without anything else). While you can install them one by one yourself (via rpm -ivh <rpm name>, you would need to do it in the right order (smart, smart-gui, smart-addons, smart-ksmarttray), there's a faster way. Run the command:
root@mymachine# rpm -Uvh *
and the RPM command will figure out the right order and install them all himself, as shown in the following listing:
root@mymachine# rpm -Uvh *Preparing... ############################## [100%]1.smart ############################## [ 25%]2:smart-gui ############################## [ 50%]3:smart-addons ############################## [ 75%]4:smart-ksmarttray ############################## [100%]root@mymachine#
3.8. Add potential channelsAs root, add potential channels (called "seeding the cache") with the "smart" command:
root@mymachine# smart update
You'll be prompted to add a half dozen or so channels (a channel is a location on the Web that contains updates), like so:
"New channel 'Current KDE applications (suse-kde-backports)' detected. Include it? (Y/n):"
The following channels will be listed:
• SUSE 10.1 OpenSource Repository (suse)• SUSE 10.1 Add-On Repository with non OpenSource Packages (suse-non-oss)• Latest mozilla.org packages (suse-mozilla)
• SUSE Linux Online Updates (suse-update)• Guru 3rd party package repository (guru)• Packman 3rd Party Package Repository (packman)• Current KDE applications (suse-kde-backports)• Latest KDE packages (suse-kde)
This list is in two groups. The second batch of five contain "cutting edge" packages, and thus may not be for the faint of heart. I always select the first three channels myself.
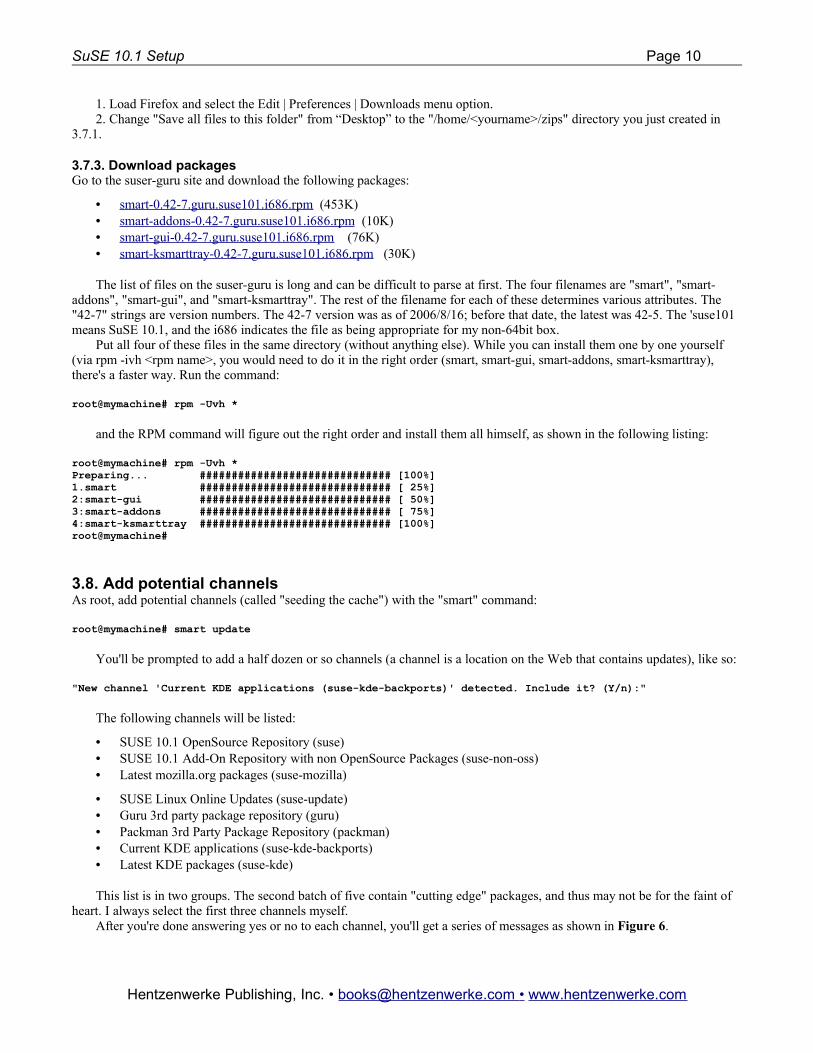
After you're done answering yes or no to each channel, you'll get a series of messages as shown in Figure 6.
Hentzenwerke Publishing, Inc. • [email protected] • www.hentzenwerke.com
SuSE 10.1 Setup Page 11
Figure 6. The results of a smart update command.
This will take 5 minutes or so, depending on the speed of your machine. When complete, you'll be informed that
Channels have NNNN new packages.Saving cache...
Then you'll be returned to the shell prompt.
3.9. Menu items installedThe result of this is a pair of new items in the K Menu | System | Configuration menu:
• Smart Package Manager• Smart Package Update Checker
I'll discuss the first in section 4, and the second in section 3.11 shortly.
3.10. Update the keyserverAlso as root, run
root@mymachine# smart config --set keyserver=pgp.mit.edu
so Smart will be able to apply signed packages. Nothing interesting happens – you'll just be returned to the shell prompt.
3.11. Starting the Smart Tray
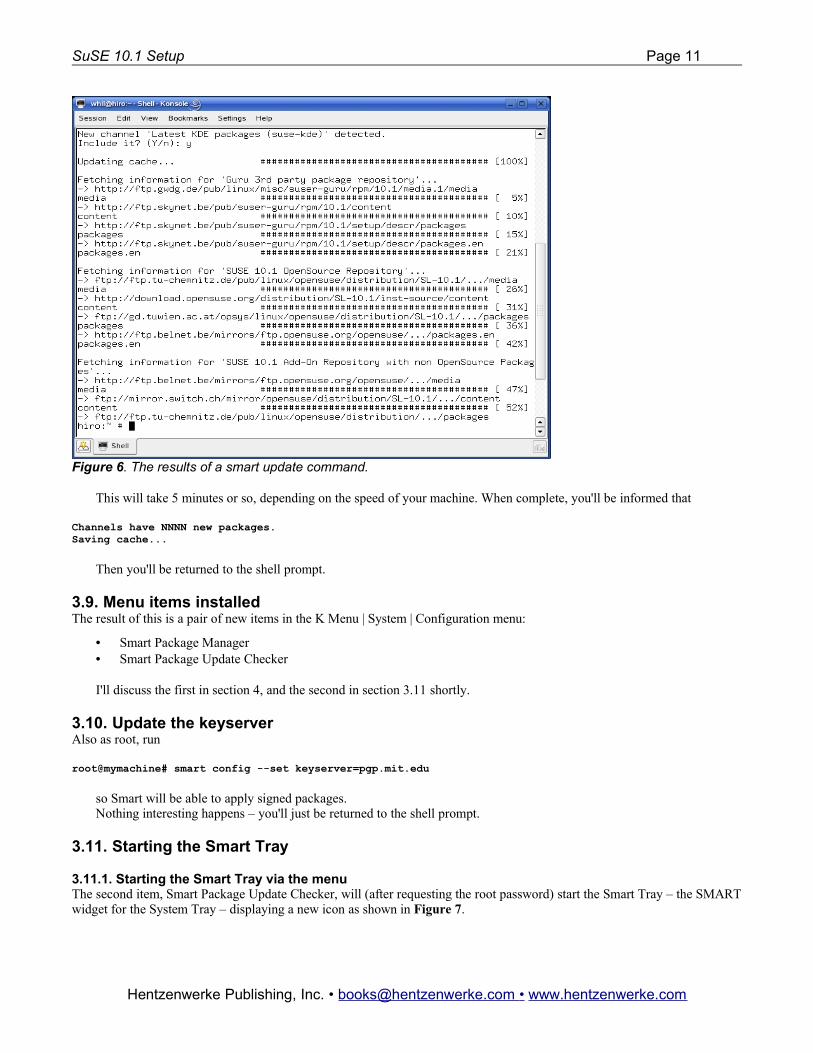
3.11.1. Starting the Smart Tray via the menuThe second item, Smart Package Update Checker, will (after requesting the root password) start the Smart Tray – the SMART widget for the System Tray – displaying a new icon as shown in Figure 7.
Hentzenwerke Publishing, Inc. • [email protected] • www.hentzenwerke.com
SuSE 10.1 Setup Page 12
Figure 7. The Smart Tray icon.
(Note that it may take 15 to 30 seconds for it to appear.) The icon that shows the CD overlaid on the open blue box (immediately to the left of the clock) is the Smart Tray icon. The first time you load the Smart Tray icon, you'll see a tool tip that says "Updating channels" for a minute or two. Then it'll start to flash, and the tool tip changes to "There are new upgrades available!"
Having the Smart Tray icon in your System Tray will ensure that you'll get security updates automatically - the tray icon flashes when new ones are available. After you've done this once, KDE is smart enough to run this every time you log in.
3.11.2. Starting the Smart Tray manuallyYou can also load the Smart Tray icon manually. As a regular user, execute:
whil@mymachine$ ksmarttray
And the icon will show up.Note that each user has to run this themselves – that way, one user's choices won't affect another user's preferences. As a
result, each user can choose to have the Smart Tray icon displayed or not.
4. Software Update: Update/Install with SMART
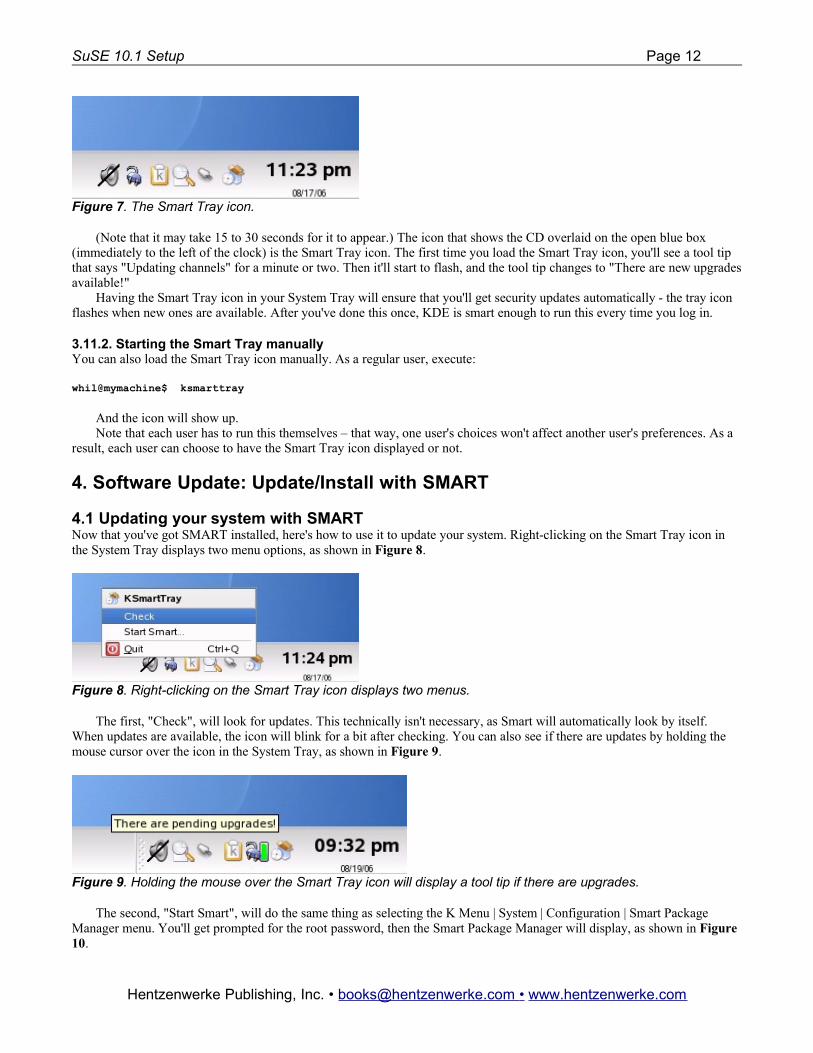
4.1 Updating your system with SMARTNow that you've got SMART installed, here's how to use it to update your system. Right-clicking on the Smart Tray icon in the System Tray displays two menu options, as shown in Figure 8.
Figure 8. Right-clicking on the Smart Tray icon displays two menus.
The first, "Check", will look for updates. This technically isn't necessary, as Smart will automatically look by itself. When updates are available, the icon will blink for a bit after checking. You can also see if there are updates by holding the mouse cursor over the icon in the System Tray, as shown in Figure 9.
Figure 9. Holding the mouse over the Smart Tray icon will display a tool tip if there are upgrades.
The second, "Start Smart", will do the same thing as selecting the K Menu | System | Configuration | Smart Package Manager menu. You'll get prompted for the root password, then the Smart Package Manager will display, as shown in Figure 10.
Hentzenwerke Publishing, Inc. • [email protected] • www.hentzenwerke.com
SuSE 10.1 Setup Page 13
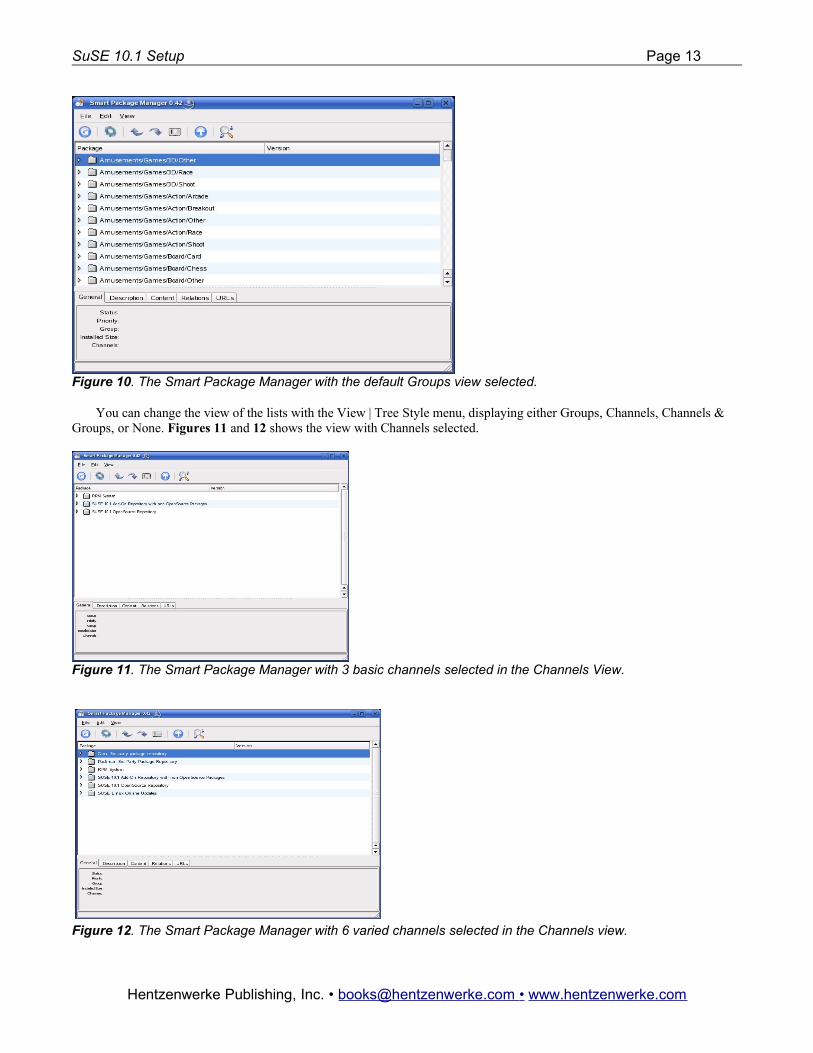
Figure 10. The Smart Package Manager with the default Groups view selected.
You can change the view of the lists with the View | Tree Style menu, displaying either Groups, Channels, Channels & Groups, or None. Figures 11 and 12 shows the view with Channels selected.
Figure 11. The Smart Package Manager with 3 basic channels selected in the Channels View.
Figure 12. The Smart Package Manager with 6 varied channels selected in the Channels view.
Hentzenwerke Publishing, Inc. • [email protected] • www.hentzenwerke.com
SuSE 10.1 Setup Page 14
Figure 11 shows the 3 'basic' channels described earlier in section 3.8 while Figure 12 shows all six channels. Click the Update channels button (blue button with counter-clockwise arrow, below "File" menu). SMART will update the package lists incorporating new updates. Then, to perform the updates, either select the Edit | Upgrade All menu item or click the "Upgrade all packages" button (the upward pointing arrow to the left of the magnifying glass icon).
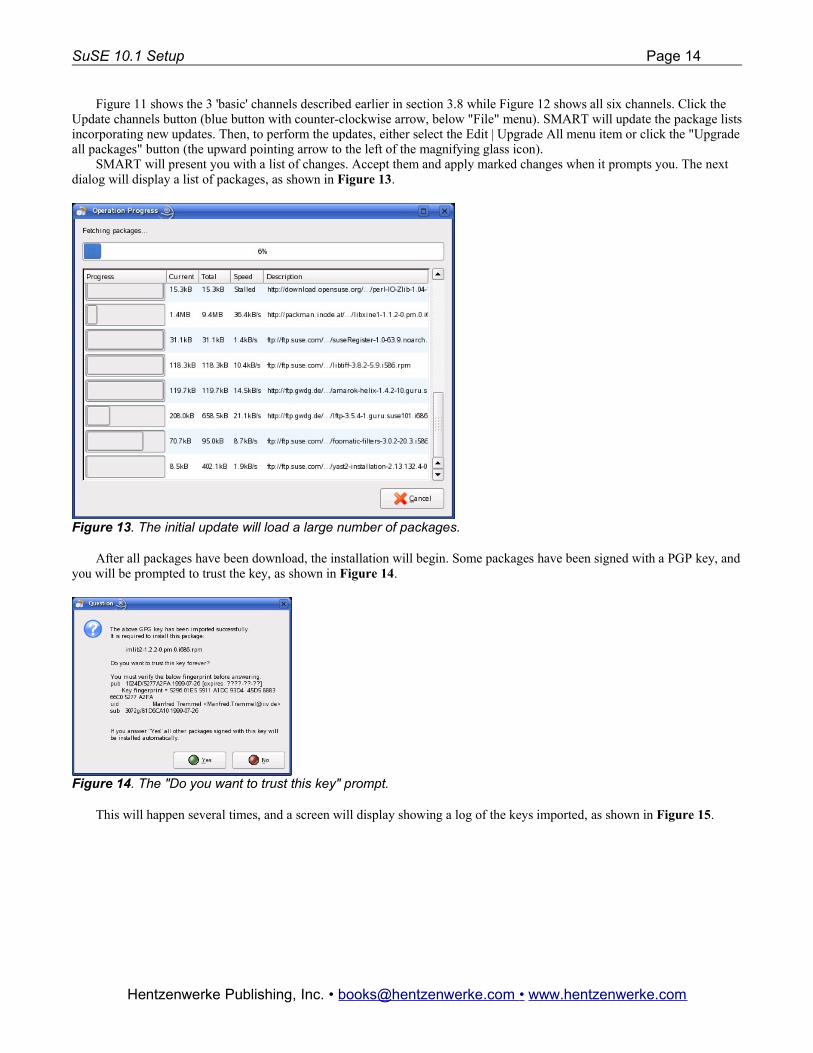
SMART will present you with a list of changes. Accept them and apply marked changes when it prompts you. The next dialog will display a list of packages, as shown in Figure 13.
Figure 13. The initial update will load a large number of packages.
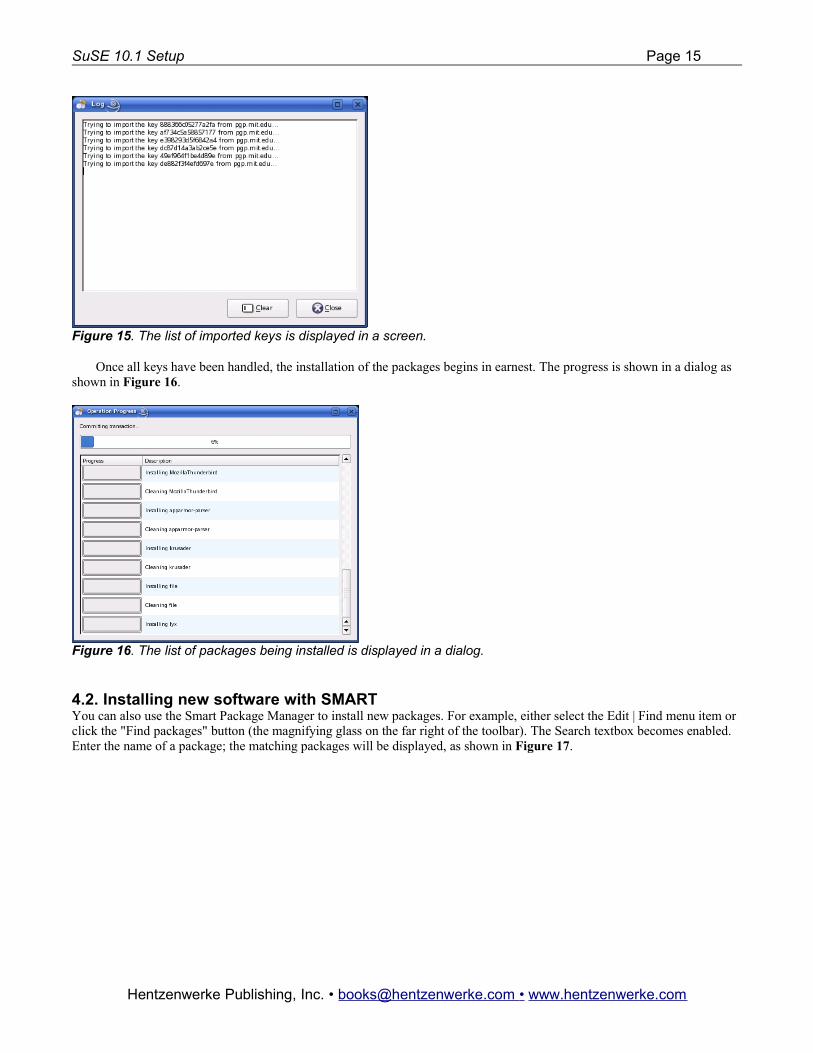
After all packages have been download, the installation will begin. Some packages have been signed with a PGP key, and you will be prompted to trust the key, as shown in Figure 14.
Figure 14. The "Do you want to trust this key" prompt.
This will happen several times, and a screen will display showing a log of the keys imported, as shown in Figure 15.
Hentzenwerke Publishing, Inc. • [email protected] • www.hentzenwerke.com
SuSE 10.1 Setup Page 15
Figure 15. The list of imported keys is displayed in a screen.
Once all keys have been handled, the installation of the packages begins in earnest. The progress is shown in a dialog as shown in Figure 16.
Figure 16. The list of packages being installed is displayed in a dialog.
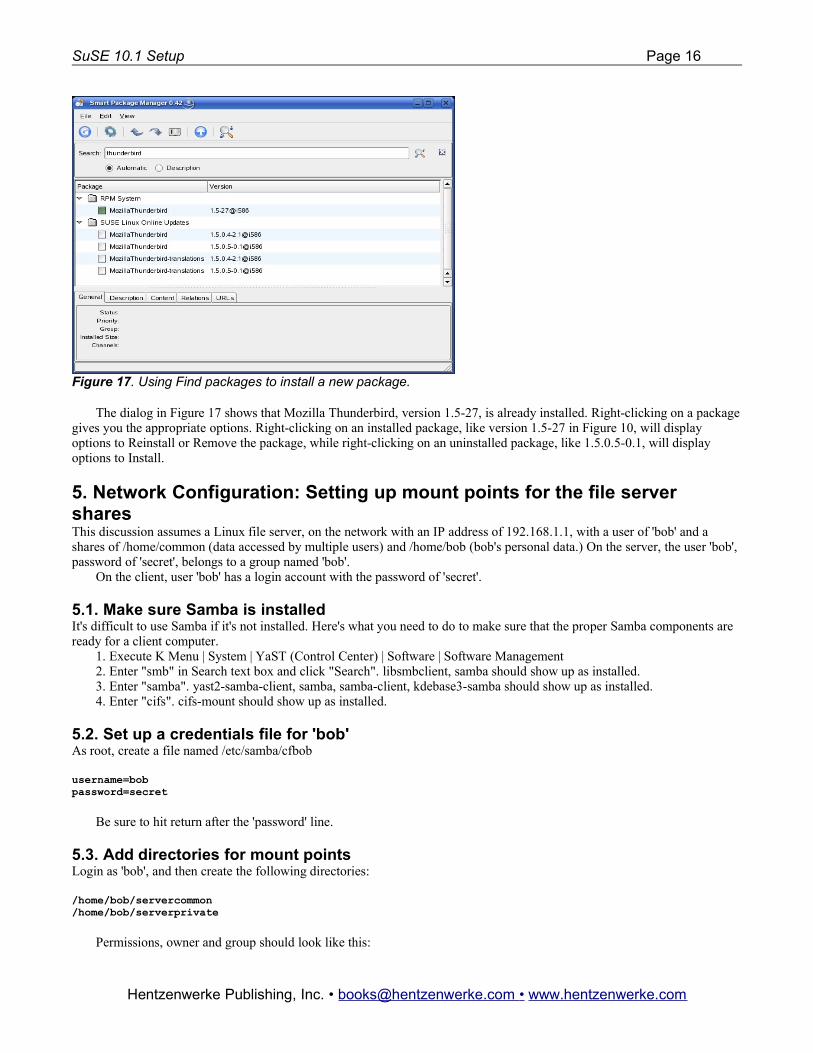
4.2. Installing new software with SMARTYou can also use the Smart Package Manager to install new packages. For example, either select the Edit | Find menu item or click the "Find packages" button (the magnifying glass on the far right of the toolbar). The Search textbox becomes enabled. Enter the name of a package; the matching packages will be displayed, as shown in Figure 17.
Hentzenwerke Publishing, Inc. • [email protected] • www.hentzenwerke.com
SuSE 10.1 Setup Page 16
Figure 17. Using Find packages to install a new package.
The dialog in Figure 17 shows that Mozilla Thunderbird, version 1.5-27, is already installed. Right-clicking on a package gives you the appropriate options. Right-clicking on an installed package, like version 1.5-27 in Figure 10, will display options to Reinstall or Remove the package, while right-clicking on an uninstalled package, like 1.5.0.5-0.1, will display options to Install.
5. Network Configuration: Setting up mount points for the file server sharesThis discussion assumes a Linux file server, on the network with an IP address of 192.168.1.1, with a user of 'bob' and a shares of /home/common (data accessed by multiple users) and /home/bob (bob's personal data.) On the server, the user 'bob', password of 'secret', belongs to a group named 'bob'.
On the client, user 'bob' has a login account with the password of 'secret'.
5.1. Make sure Samba is installedIt's difficult to use Samba if it's not installed. Here's what you need to do to make sure that the proper Samba components are ready for a client computer.
1. Execute K Menu | System | YaST (Control Center) | Software | Software Management 2. Enter "smb" in Search text box and click "Search". libsmbclient, samba should show up as installed.3. Enter "samba". yast2-samba-client, samba, samba-client, kdebase3-samba should show up as installed.4. Enter "cifs". cifs-mount should show up as installed.
5.2. Set up a credentials file for 'bob'As root, create a file named /etc/samba/cfbob
username=bobpassword=secret
Be sure to hit return after the 'password' line.
5.3. Add directories for mount pointsLogin as 'bob', and then create the following directories:
/home/bob/servercommon/home/bob/serverprivate
Permissions, owner and group should look like this:
Hentzenwerke Publishing, Inc. • [email protected] • www.hentzenwerke.com

SuSE 10.1 Setup Page 17
drwxrwxrwx bob bob
5.4. Set up entries in fstabIn /etc/fstab, at the end of the file (so that other mount points have already been created), add the following line for each mount point. You'll need to be root to edit fstab.
//192.168.1.1/bob /home/bob/servercommon cifs auto,credentials=/etc/samba/cfbob,uid=bob,gid=bob 0 0
You will probably get a dialog that informs you that a new media has been detected, and asks you what to do about it. Click "do nothing" unless you want to open it in a window and take a looky-loo or something.
5.5. Make sure users and groups matchThere should be a user and a group both named 'bob. The user should belong to the group and the group should contain the user as a member.
5.6. Make sure the smbfs is running:Open the services dialog, via K Menu | System | YaST | System | System Services. Then make sure that the service is running and that runlevels 3 and 5 are checked.
Various systems that I've worked on needed different tweaks to accomplish this. The most straightforward way is to click "Enable" in the Simple mode tab.
On one machine, smbfs still starts up as Enabled but not running upon reboot. Clicking "Enable" or turning the service on doesn't 'stick' upon reboot – running the two following commands in a Shell window as root
chkconfig smb onchkconfig nmb on
however, did the trick.
6. Improving Security and Performance: Shutting down unneeded servicesUnneeded services that are left running are potential security risks and can potentially use up processor cycles.
Typical services that are automatically started during installation, but are often not needed (particularly on a desktop box) are postfix (mail server), mysql (database server), and pcscd (smart card reader daemon).
7. Having It My Way: Customizing the InterfaceThis section describes what I do to customize the interface. The following description uses the 'configure' items in each component. I'll cover advanced preferences (via K Menu | Personal Settings) next.
7.1. DesktopRight-click on the desktop and select "Configure Desktop". Change the following settings.
In the Background node, change picture to the classic "Flyguins" by Heather Schumacher. Note that I point to a copy of this file on my file server; when I boot, if the image doesn't display, it tells me immediately that my connection tot he server isn't working.
In the Behavior node, turn "Show icons on desktop" off. Clean, uncluttered.In the Screen Saver node, select the "Blank screen" screen saver.The end results looks like Figure 18. You'll note that there's no panel or other icons; I cover those changes next.
Hentzenwerke Publishing, Inc. • [email protected] • www.hentzenwerke.com
SuSE 10.1 Setup Page 18
Figure 18. My desktop with Heather's Flyguins background.
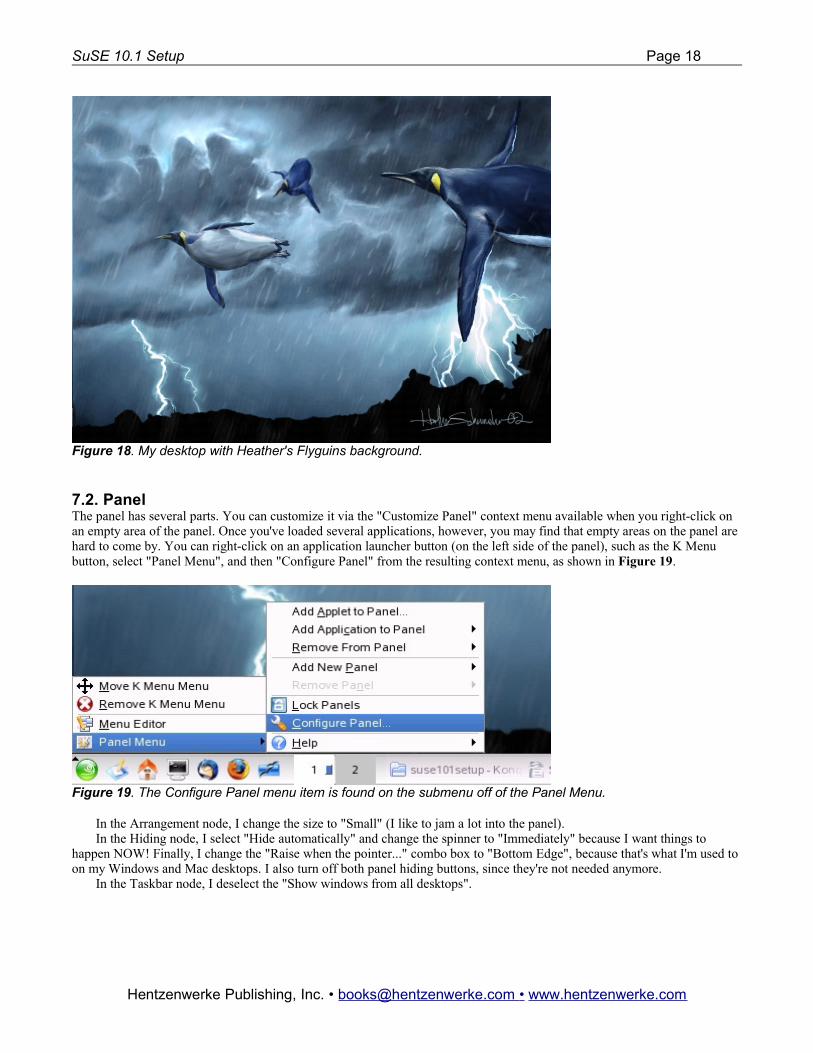
7.2. PanelThe panel has several parts. You can customize it via the "Customize Panel" context menu available when you right-click on an empty area of the panel. Once you've loaded several applications, however, you may find that empty areas on the panel are hard to come by. You can right-click on an application launcher button (on the left side of the panel), such as the K Menu button, select "Panel Menu", and then "Configure Panel" from the resulting context menu, as shown in Figure 19.
Figure 19. The Configure Panel menu item is found on the submenu off of the Panel Menu.
In the Arrangement node, I change the size to "Small" (I like to jam a lot into the panel).In the Hiding node, I select "Hide automatically" and change the spinner to "Immediately" because I want things to
happen NOW! Finally, I change the "Raise when the pointer..." combo box to "Bottom Edge", because that's what I'm used to on my Windows and Mac desktops. I also turn off both panel hiding buttons, since they're not needed anymore.
In the Taskbar node, I deselect the "Show windows from all desktops".
Hentzenwerke Publishing, Inc. • [email protected] • www.hentzenwerke.com
SuSE 10.1 Setup Page 19
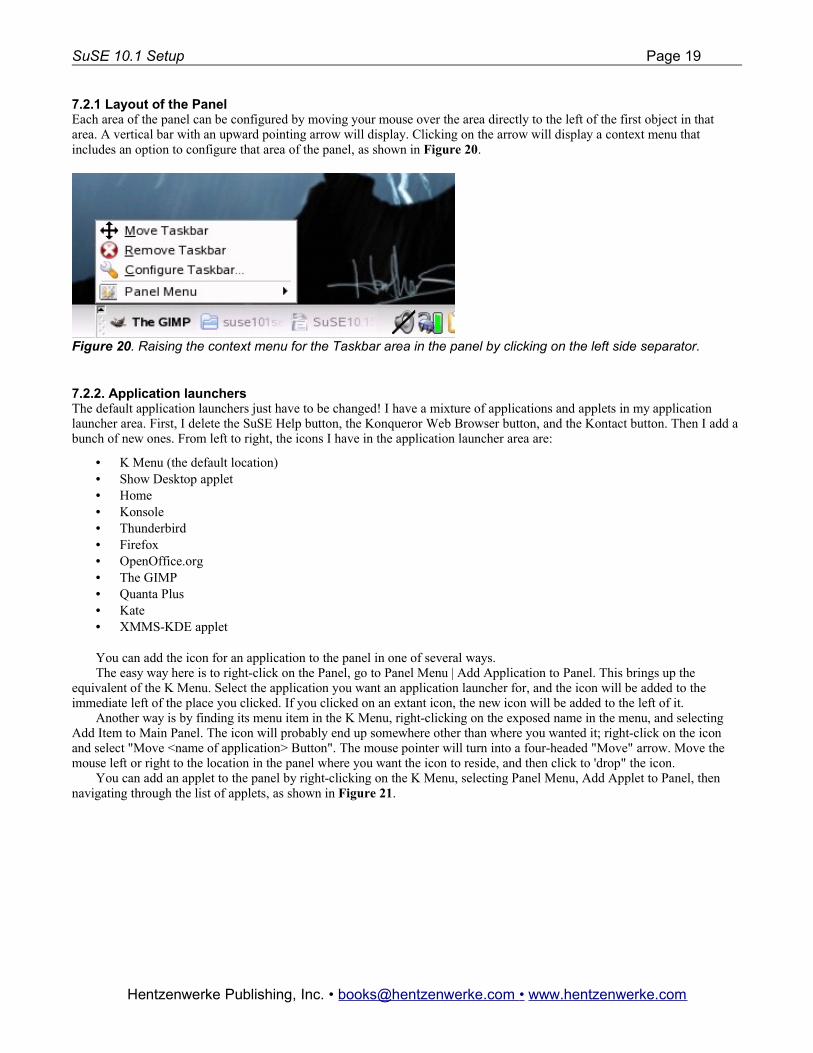
7.2.1 Layout of the PanelEach area of the panel can be configured by moving your mouse over the area directly to the left of the first object in that area. A vertical bar with an upward pointing arrow will display. Clicking on the arrow will display a context menu that includes an option to configure that area of the panel, as shown in Figure 20.
Figure 20. Raising the context menu for the Taskbar area in the panel by clicking on the left side separator.
7.2.2. Application launchersThe default application launchers just have to be changed! I have a mixture of applications and applets in my application launcher area. First, I delete the SuSE Help button, the Konqueror Web Browser button, and the Kontact button. Then I add a bunch of new ones. From left to right, the icons I have in the application launcher area are:
• K Menu (the default location)• Show Desktop applet• Home• Konsole• Thunderbird• Firefox• OpenOffice.org• The GIMP• Quanta Plus• Kate• XMMS-KDE applet
You can add the icon for an application to the panel in one of several ways.The easy way here is to right-click on the Panel, go to Panel Menu | Add Application to Panel. This brings up the
equivalent of the K Menu. Select the application you want an application launcher for, and the icon will be added to the immediate left of the place you clicked. If you clicked on an extant icon, the new icon will be added to the left of it.
Another way is by finding its menu item in the K Menu, right-clicking on the exposed name in the menu, and selecting Add Item to Main Panel. The icon will probably end up somewhere other than where you wanted it; right-click on the icon and select "Move <name of application> Button". The mouse pointer will turn into a four-headed "Move" arrow. Move the mouse left or right to the location in the panel where you want the icon to reside, and then click to 'drop" the icon.
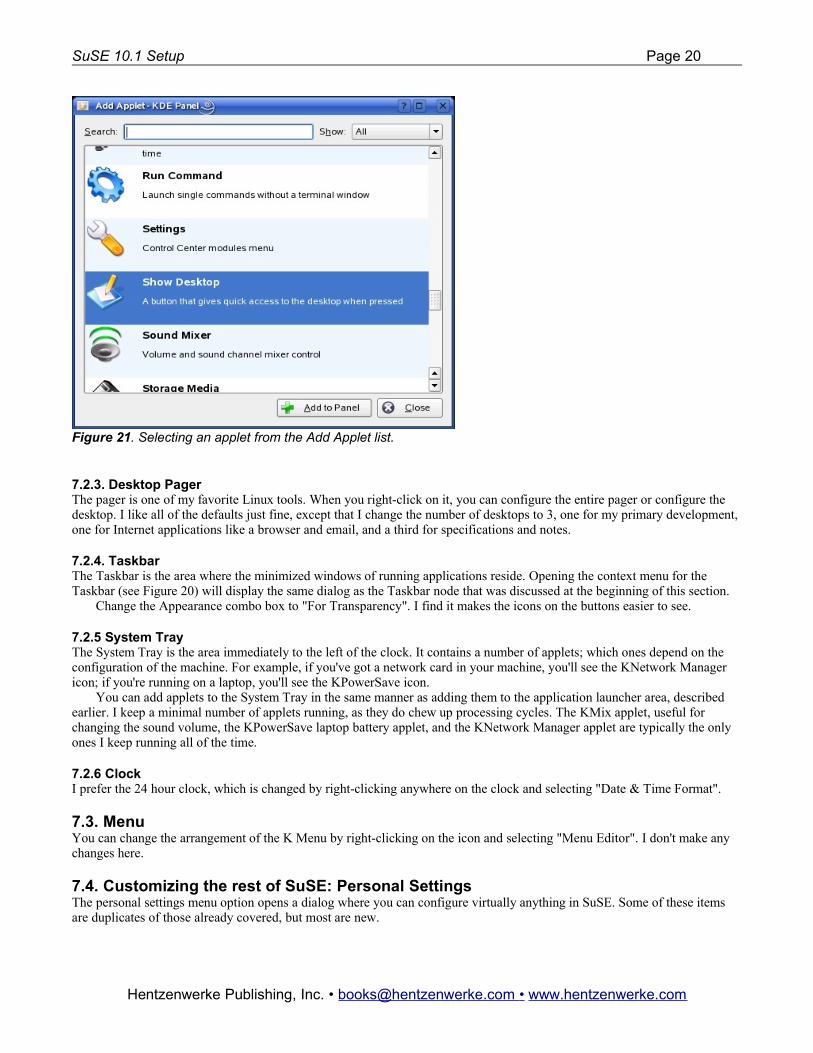
You can add an applet to the panel by right-clicking on the K Menu, selecting Panel Menu, Add Applet to Panel, then navigating through the list of applets, as shown in Figure 21.
Hentzenwerke Publishing, Inc. • [email protected] • www.hentzenwerke.com
SuSE 10.1 Setup Page 20
Figure 21. Selecting an applet from the Add Applet list.
7.2.3. Desktop PagerThe pager is one of my favorite Linux tools. When you right-click on it, you can configure the entire pager or configure the desktop. I like all of the defaults just fine, except that I change the number of desktops to 3, one for my primary development, one for Internet applications like a browser and email, and a third for specifications and notes.
7.2.4. TaskbarThe Taskbar is the area where the minimized windows of running applications reside. Opening the context menu for the Taskbar (see Figure 20) will display the same dialog as the Taskbar node that was discussed at the beginning of this section.
Change the Appearance combo box to "For Transparency". I find it makes the icons on the buttons easier to see.
7.2.5 System TrayThe System Tray is the area immediately to the left of the clock. It contains a number of applets; which ones depend on the configuration of the machine. For example, if you've got a network card in your machine, you'll see the KNetwork Manager icon; if you're running on a laptop, you'll see the KPowerSave icon.
You can add applets to the System Tray in the same manner as adding them to the application launcher area, described earlier. I keep a minimal number of applets running, as they do chew up processing cycles. The KMix applet, useful for changing the sound volume, the KPowerSave laptop battery applet, and the KNetwork Manager applet are typically the only ones I keep running all of the time.
7.2.6 ClockI prefer the 24 hour clock, which is changed by right-clicking anywhere on the clock and selecting "Date & Time Format".
7.3. Menu You can change the arrangement of the K Menu by right-clicking on the icon and selecting "Menu Editor". I don't make any changes here.
7.4. Customizing the rest of SuSE: Personal SettingsThe personal settings menu option opens a dialog where you can configure virtually anything in SuSE. Some of these items are duplicates of those already covered, but most are new.
Hentzenwerke Publishing, Inc. • [email protected] • www.hentzenwerke.com

SuSE 10.1 Setup Page 21
The one thing here that I do immediately is KDE Components | File Associations. Search for "text" or scroll down to the "Text" node. Find the "plain" sub-node; you'll see that "Kate" is well down in the Application Preference Order list box. I move it up to the top so that it shows up as the first (and default) text editor. See Figure 22.
Figure 22. Changing the order of programs to edit text files.
8. Customization of installed softwareOnce SuSE is installedTurn and customized, it's time to customize the software applications I use as well.
8.1. ThunderbirdI keep my Thunderbird mail files on the file server so I can access them from multiple computers. (Yeah, I know, why not just use IMAP... well, that's a discussion for another place and time.)
Thunderbird stores mail files in a directory named with a set of random characters, like so:
rkw31bwyx.default
This directory is identified in a text file named "profiles.ini" which is located in ~/.thunderbird. (Important tip: You must first start Thunderbird and advance at least through the setup wizard through the "Do you want to use Thunderbird as your default email client" dialog first. If you don't, the .thunderbird directory won't exist.)
The profiles.ini file contains lines similar to the following:
[Profile0]Name=defaultIsRelative=0Path=/home/whil/serverhome/mail/thunderbird/rkw31bwyz.default
The '0' for IsRelative means that the path in the next line is a fully qualified path, in other words, no, it is NOT relative. The string in the Path line is, in this example, the fully qualified path to the location for the Thunderbird mail files. The rkw31bwyx.default directory contains files like
Hentzenwerke Publishing, Inc. • [email protected] • www.hentzenwerke.com
SuSE 10.1 Setup Page 22
abook.mabdefaults.inihistory.mabpanacea.datprefs.js
as well as directories like
chromeUSextensionsMail
and so on. If you point Thunderbird to an existing data set by altering the profiles.ini file manually, you'll gain all of the settings of that data set, including accounts, sub-folders, and junk mail filtering data.
8.2. FirefoxSeveral customizations for Firefox!
8.2.1. Add EnginesAdd ask.com, Dictionary.com, WeatherChannel.com, Wikipedia, and IMDB to the Search control in the Navigation toolbar. Note: If you later want to remove one of these, you can navigate to ~/.mozilla/firefox/gotyotye.default/searchplugins. (the text string before the word 'default' will be different on your machine). You'll see a pair of files for each plugin; one with a .src extension and a second with an image file extension (such as .gif or .png.) Just delete those two files and the engine will no longer display. But there's a better way through the Search Engine Ordering add-on described next.
8.2.2. Install Add-onThe Search Engine Ordering add-on is a handy add-on, available via the "Add Engines" link at the bottom of the Search Engine drop-down. It allows you to manipulate the engines in the Search Engine drop-down in the Firefox toolbar. It's better than manually deleting files in the .mozilla/../searchplugins directory because it works on all engines, not just user-added engines, and it allows you to change the order of the items in the drop-down as well.
1. Open Firefox. 2. Select the "Add Engines..." link in the Search Engine drop-down.3. The Firefox Add-ons page opens.4. Enter "Search Engine Order" in the search text box in the upper right corner.5. Two results will probably be displayed. You want the one named "Search Engine Ordering 0.9.6" (or something
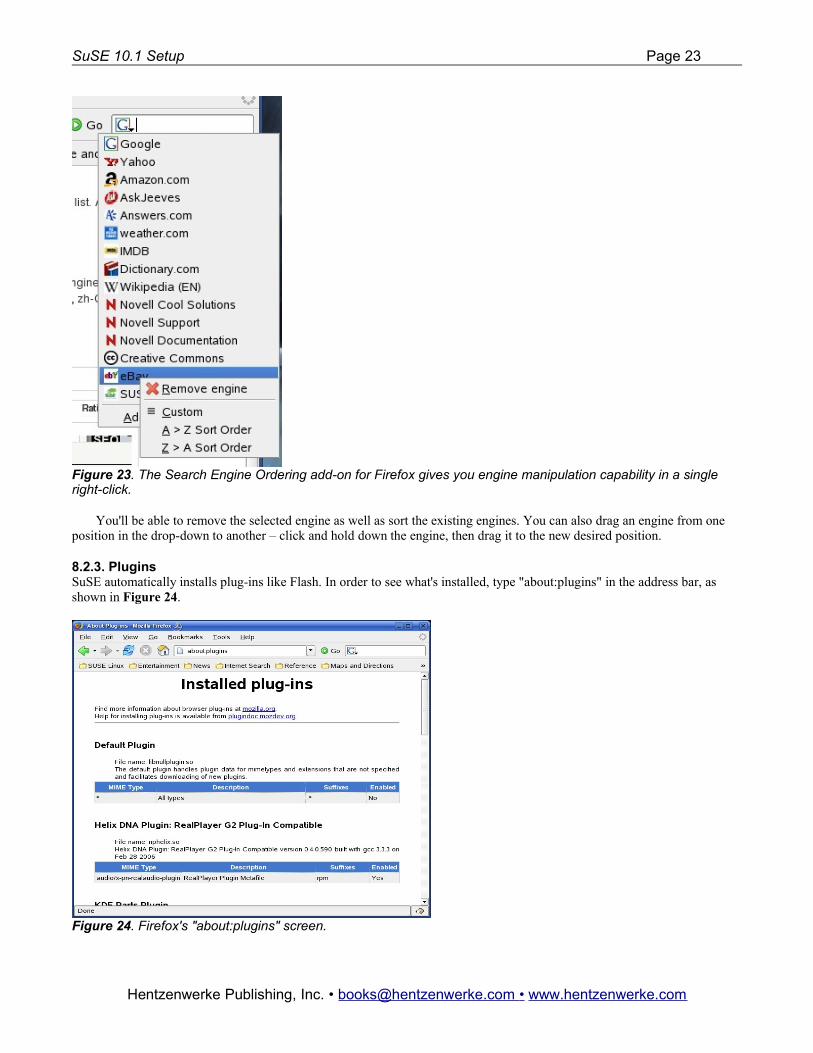
similar.)After you install, close Firefox and restart. The engine manipulation functionality is now "built-in" to the drop-down. To
use it, open the Search Engine drop-down and right-click on an engine icon, as shown in Figure 23.
Hentzenwerke Publishing, Inc. • [email protected] • www.hentzenwerke.com
SuSE 10.1 Setup Page 23
Figure 23. The Search Engine Ordering add-on for Firefox gives you engine manipulation capability in a single right-click.
You'll be able to remove the selected engine as well as sort the existing engines. You can also drag an engine from one position in the drop-down to another – click and hold down the engine, then drag it to the new desired position.
8.2.3. PluginsSuSE automatically installs plug-ins like Flash. In order to see what's installed, type "about:plugins" in the address bar, as shown in Figure 24.
Figure 24. Firefox's "about:plugins" screen.
Hentzenwerke Publishing, Inc. • [email protected] • www.hentzenwerke.com
SuSE 10.1 Setup Page 24
(By the way, "about:config" displays a huge amount of configuration information about the browser, including much that is not accessible via the various GUI options.)
8.2.4. PreferencesChanges I make in the Edit | Preferences dialog include:
General node: Point to "file:///home/whil/serverhome/misc/`MyLinks.htm" page on my server for Home Page Location.Tabs node: Uncheck "Hide the tab bar when only one web site is open".Downloads node:: Already mentioned to save all files to ~/zips
8.2.5. ToolbarsChanges I make in the View | Toolbars menu:
Turn Bookmarks toolbar OFF.Add a "New Tab" icon to the Navigation toolbar by clicking on Customize, then drag "New Tab" icon from the dialog to
the Navigation toolbar.
8.3. OpenOffice.orgI spend a lot of time in OpenOffice.org. Thus, the list of things I customize is longer than in other programs.
8.3.1. Turn paragraph markings ONUse View | Nonprinting characters, or the toolbar button or Ctrl-F10.
8.3.2. Turn help agent offTools | Options | OpenOffice.Org node | General Subnode, Uncheck Help Agent.
8.3.3. Set up outline numbering for NavigatorThis assumes that there's a document created with a stylesheet with styles of "subhead1", "subhead2", etc
8.3.3.1 Set the numbering levelSelect Tools | Outline numbering, Numbering tab.Select Level 1.Select "_subhead1" in the Paragraph Style combo box.Repeat for Levels 2 through 4.When done, click OK.
8.3.3.2 Set the Navigator viewOpen navigator (edit | navigator) or toolbar button (compass) or F5.Right click in navigator window.Select outline level | 10 (to show all 10 levels, if desired).Open the Navigator.Click on the Headings node.All headings in the document marked with "_subhead1", etc. should display under the headings node.
8.3.4. Remove unused buttons from toolbarsSelect "Customize Toolbar" menu item (which is also available under Tools | Customize, Toolbars tab.). Don't click on shaded box with down arrow at far right of toolbar (menu optiosn are "Visible Buttons" and "Customize Toolbar", and select Visible Buttons, because each time you check or uncheck a button, the menu goes away.
Select Standard toolbar Uncheck Send document as email, Edit file, next separator, Format paintbrush, Hyperlink, Table, Show drawing, next
separator, Gallery, Data sources, OpenOffice.org Help.
8.3.5. Add a "repeat" button to the standard toolbar:Use the Tools | Customize menu option and click on the Customize Toolbars tab.
Select StandardClick AddHighlight "Edit" in the left listboxHighlight "Repeat" in the right listbox
Hentzenwerke Publishing, Inc. • [email protected] • www.hentzenwerke.com
SuSE 10.1 Setup Page 25
Click AddThe icon shows up in toolbar on the far leftMove it to far right of the toolbar by highlighting it in the list, then using the up/down arrows.
8.3.6. Add an "insert graphics" button to the standard toolbarSame process as 8.3.5. Highlight "Insert" in the left listbox and "From file" in the right listbox.
8.3.7. Add a keystroke shortcut for repeatUse the Tools | Customize menu option and click on the Customize Keyboard tab.
Click on F12 in top listbox (note that there's a description already there).Click on "Edit" in Category listbox.Click on "Repeat" in Function listbox.Click the "Modify" button.Click on OK.
8.3.8. Get rid of word completion and smart quotesUse the Tools | Auto Correct menu item.
Select the Word Completion tab.Uncheck "Enable Word Completion".Select the Custom Quotes tab.Uncheck "Replace" for both single and double quotes.
9. Where to go for more informationThis free whitepaper is published and distributed by Hentzenwerke Publishing, Inc. We have the largest lists of “Moving to Linux”, OpenOffice.org, and Visual FoxPro books on the planet.
We also have oodles of free whitepapers on our website and more are being added regularly. Our Preferred Customer mailing list gets bi-monthly announcements of new whitepapers (and gets discounts on our books, first crack at special deals, and other stuff as we think of it.)
Click on “Your Account” at www.hentzenwerke.com to get on our Preferred Customer list.
If you found this whitepaper helpful, check out these Hentzenwerke Publishing books as well:
Linux Transfer for Windows® Network Admins:A roadmap for building a Linux file and print server
Michael Jang
Linux Transfer for Windows® Power Users:Getting started with Linux for the desktop
Whil Hentzen
Hentzenwerke Publishing, Inc. • [email protected] • www.hentzenwerke.com