Embed Size (px)
Citation preview

Submitting a Non-Catalog Request

What’s different in UD Exchange?
Commodity Codes
Previously, UD employees would manually select an account code and category code for their purchases
In UD Exchange, employees will select a commodity code which will automatically generate the correct account code for the purchase.
Allocation
Previously, UD employees would allocate their Procurement Card purchases after the fact.
In UD Exchange, all purchases are allocated prior to ordering.
1

Submitting a Non-Catalog Requisition
• Catalog shopping in UD Exchange uses hosted or punch-out catalogs where UD-specific items and prices are offered by UD-contracted suppliers. “Non-catalog” shopping refers to purchases where hosted or punch-out catalogs are not used.
• A non-catalog requisition can be initiated by a Shopper or initiated and submitted by a Requester in UD Exchange.
• A non-catalog requisition usually begins with a quote from a supplier.• A supplier must be registered in UD Exchange prior to completing a non-catalog
form.
2

3
Review the quote you have received from the supplier.
Take note of which items/services will need to be listed as separate line items on the non-catalog form
While it’s not as important to list out ALL
items if they are the same commodity (e.g., building materials), it IS important to separate goods from services.

4
In UD Exchange, go to Shopping > Non-Catalog Item

5
1. The Non-Catalog Item window will appear.
2. Enter the name of the supplier into the Enter Supplier field.
3. Select the correct supplier from the list of results
1
23
6
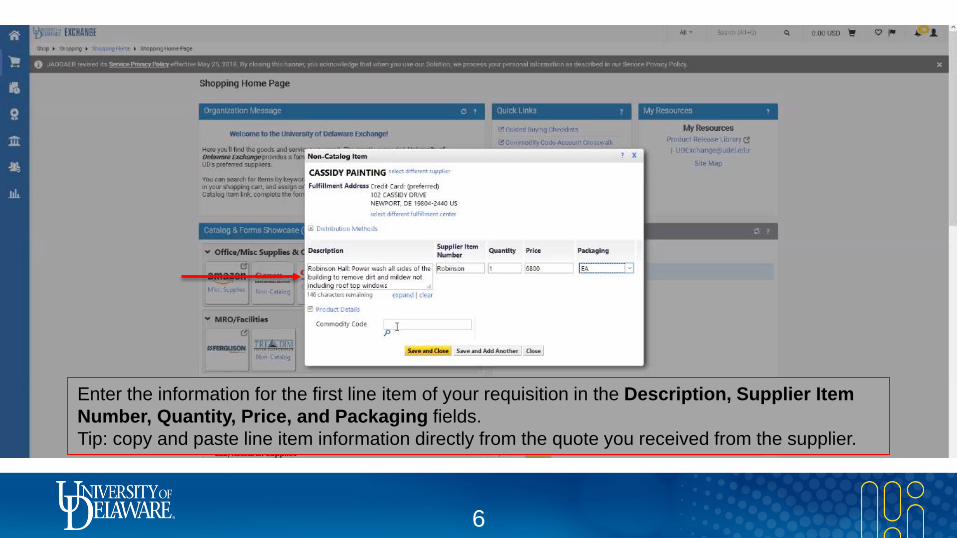
Enter the information for the first line item of your requisition in the Description, Supplier Item Number, Quantity, Price, and Packaging fields.Tip: copy and paste line item information directly from the quote you received from the supplier.

7
You will be required to enter a Commodity Code for each line item.
Click the magnifying glass next to the Commodity Code field to search for codes.
8
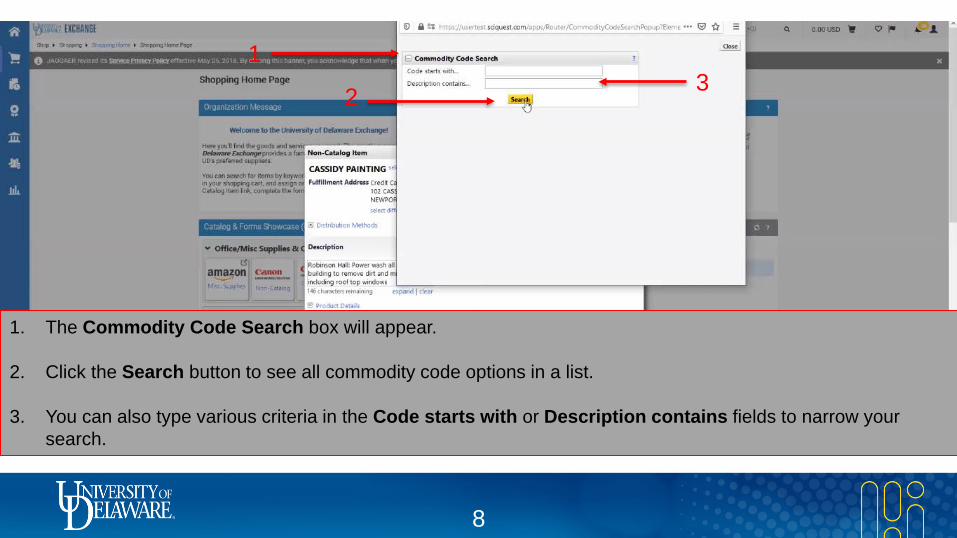
1. The Commodity Code Search box will appear.
2. Click the Search button to see all commodity code options in a list.
3. You can also type various criteria in the Code starts with or Description contains fields to narrow your search.
1
2 3
9
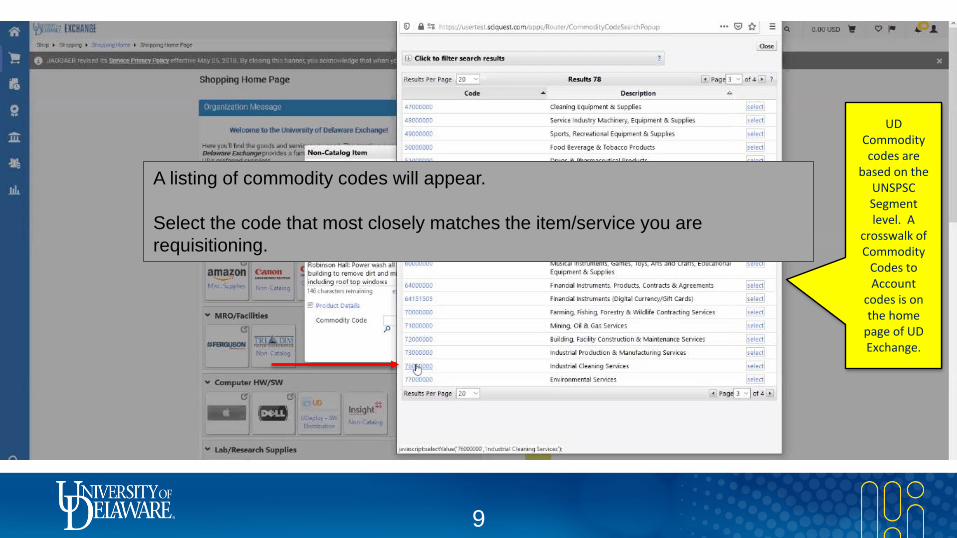
A listing of commodity codes will appear.
Select the code that most closely matches the item/service you are requisitioning.
UD Commodity codes are
based on the UNSPSC Segment level. A
crosswalk of Commodity
Codes to Account
codes is on the home
page of UD Exchange.
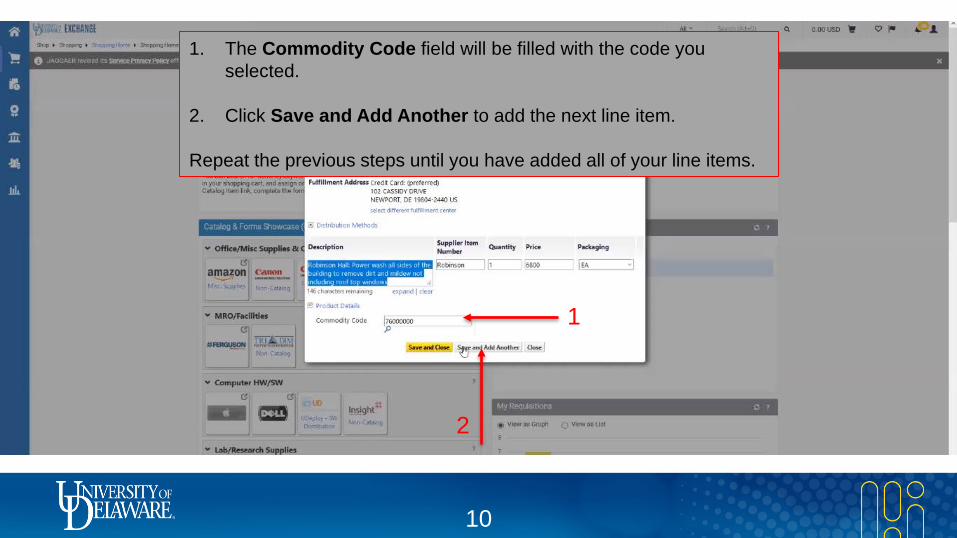
10
1. The Commodity Code field will be filled with the code you selected.
2. Click Save and Add Another to add the next line item.
Repeat the previous steps until you have added all of your line items.
1
2

11
Once you have added all of your line items, click Save and Close.
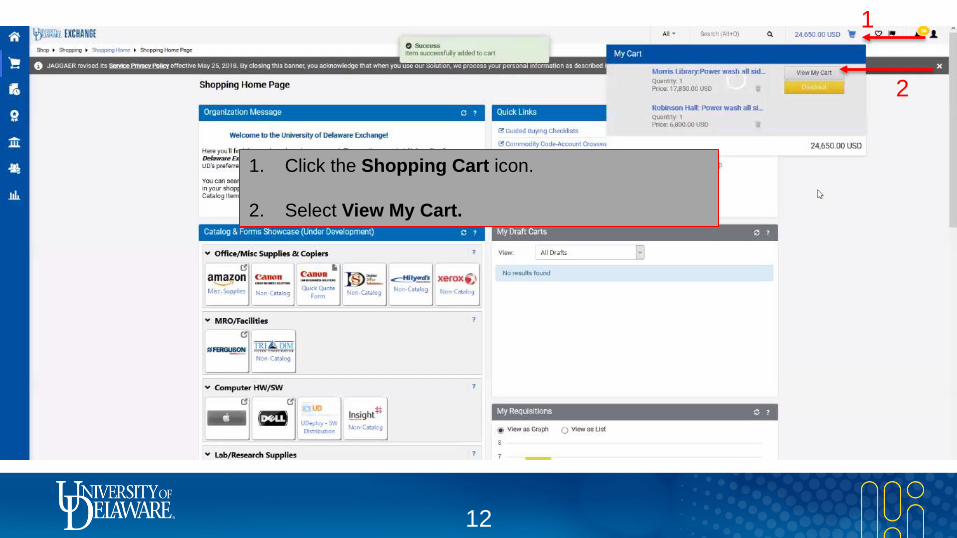
12
1. Click the Shopping Cart icon.
2. Select View My Cart.
1
2
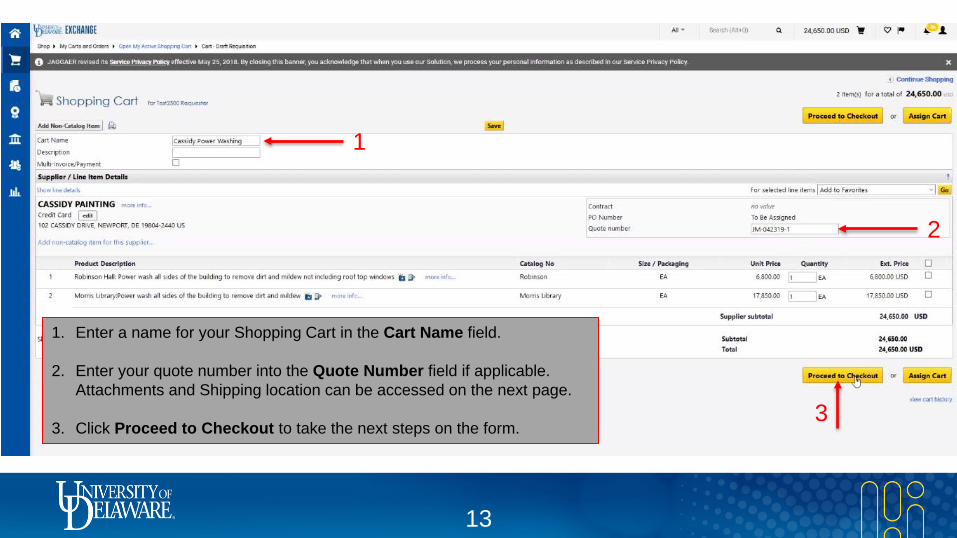
13
1. Enter a name for your Shopping Cart in the Cart Name field.
2. Enter your quote number into the Quote Number field if applicable. Attachments and Shipping location can be accessed on the next page.
3. Click Proceed to Checkout to take the next steps on the form.
1
2
3

14
Choosing Proceed to Checkout turns the cart into a requisition.
There are a list of checkmarks on the left side of the page that must be completed before submission.
Once all required sections of the form have been completed, the checkmarks will turn green.
Shoppers may complete some or all of this
information as desired – it is the Requester’s job to
confirm accuracy and completeness.
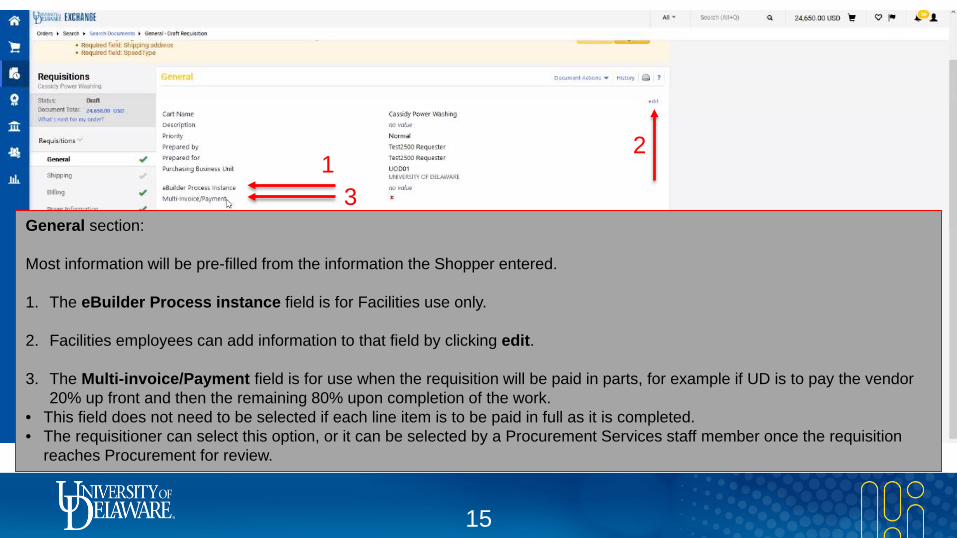
15
General section:
Most information will be pre-filled from the information the Shopper entered.
1. The eBuilder Process instance field is for Facilities use only.
2. Facilities employees can add information to that field by clicking edit.
3. The Multi-invoice/Payment field is for use when the requisition will be paid in parts, for example if UD is to pay the vendor 20% up front and then the remaining 80% upon completion of the work.
• This field does not need to be selected if each line item is to be paid in full as it is completed. • The requisitioner can select this option, or it can be selected by a Procurement Services staff member once the requisition
reaches Procurement for review.
13
2

16
Shipping section:
Review the shipping address. If you have already saved a default shipping address to your profile, it will be pre-filled.
If you need to search for a campus address, you can click edit, and a search box will appear for you.

17
Billing section:
There is only one central billing address for UD. It will be pre-filled.

18
Buyer Information section:
Only Buyers in Procurement Services will see details of the requisition in this section.
The requisitioner will always see this section as complete with a green check mark.

19
Accounting Codes section:
Any accounting fields that need to be completed will be marked as a required field.
You will notice that there is not a field to manually enter a UD account code or category code. This information is all tied into the commodity code that the Shopper selected.
Click on the blue Required field link to complete the required SpeedType information

20
1. The Accounting Codes window will appear.
2. You can select the SpeedType you need from the Select from all values list.
3. If there is a Work Order Number associated with the requisition, you can select it from the Select from all values list.
1
23

21
If you click the Select from all values link under Work Order Number, a search box will appear.
1. Enter the Work Order Number
2. Click Search.
For Non-Facilities users, this functionality works the same with SpeedType.
1
2

22
When you have found your Work Order Number, click select.
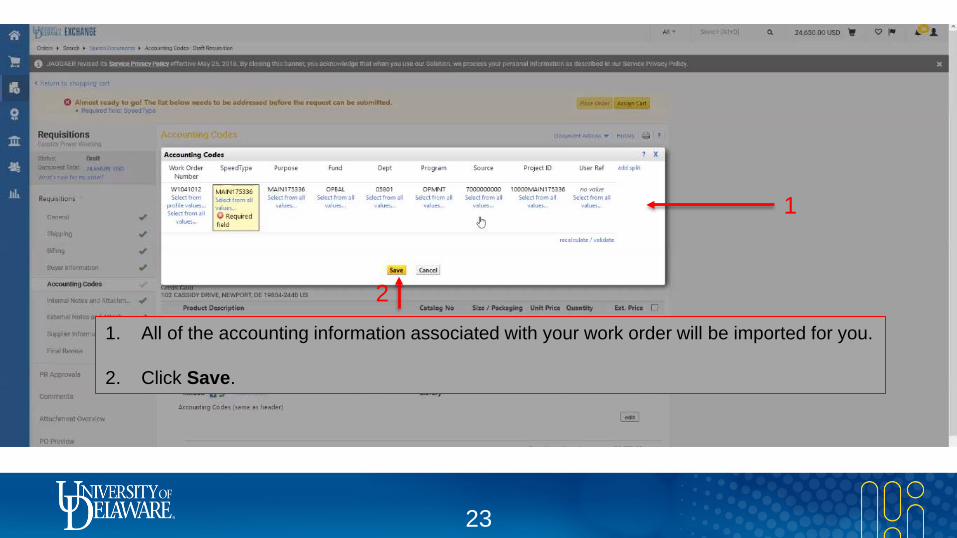
23
1. All of the accounting information associated with your work order will be imported for you.
2. Click Save.
2
1

24
1. If you need to add a split, click add split and you can select from percentage of price, percentage of quantity, or amount of price.
2. Click Save.
1
2
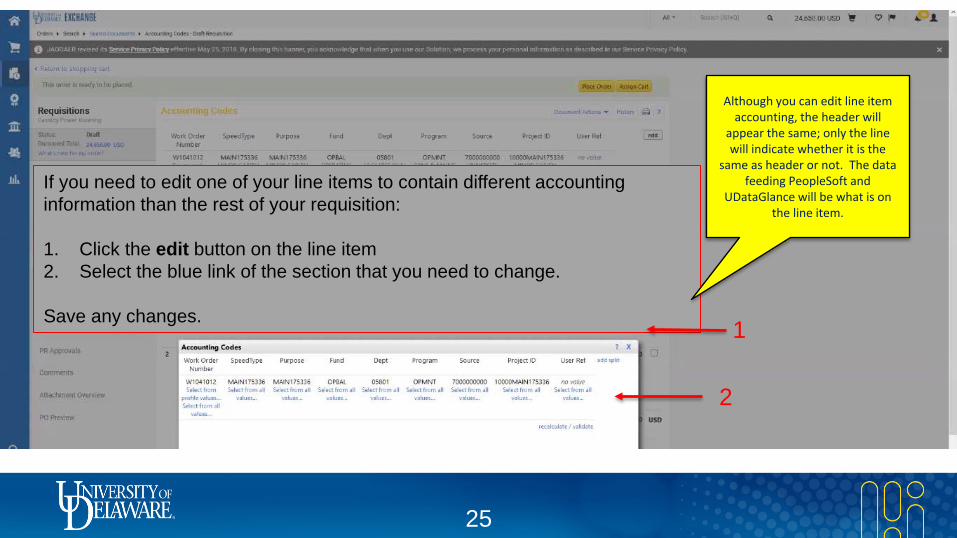
25
If you need to edit one of your line items to contain different accounting information than the rest of your requisition:
1. Click the edit button on the line item2. Select the blue link of the section that you need to change.
Save any changes.
Although you can edit line item accounting, the header will
appear the same; only the line will indicate whether it is the
same as header or not. The data feeding PeopleSoft and
UDataGlance will be what is on the line item.
1
2
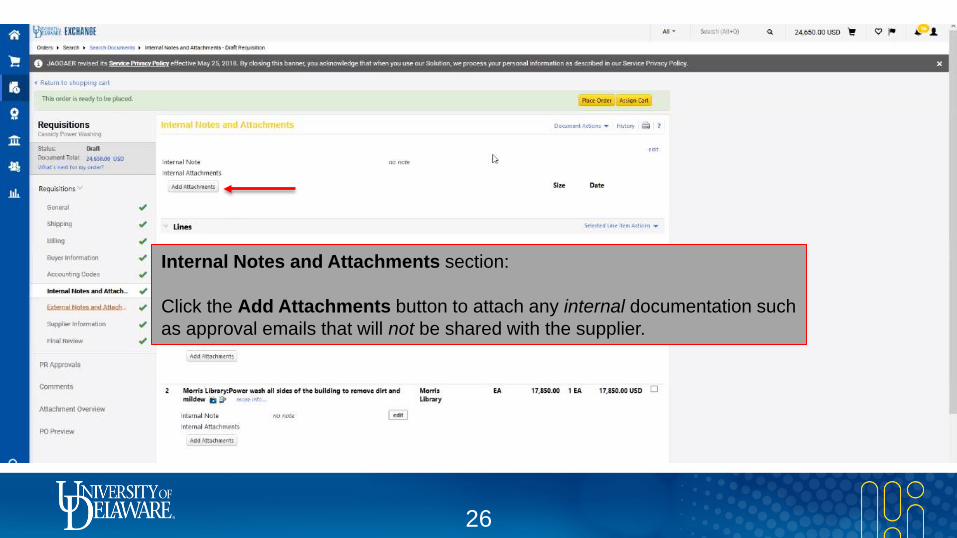
26
Internal Notes and Attachments section:
Click the Add Attachments button to attach any internal documentation such as approval emails that will not be shared with the supplier.

27
External Notes and Attachments section:
Click the Add Attachments button to attach any documentation such as the quote that needs to be shared with the supplier.

28
Supplier Information section:
Click the edit button if any changes need to be made to the supplier information, such as the fulfillment address.

29
Final Review section:
The Final Review allows you to scroll and review all sections of the requisition. In the Final Review, you can make any changes, including to accounting information, prior to submitting the requisition.
Each section of the Final Review has an edit button that you can click to make changes. You can also add attachments or specific notes to individual line items.

30
Once all of the checkmarks are green, the requisition is ready to submit.

31
1. Prior to submitting the requisition, you can click PR Approvals to see all of the approval steps that the requisition will go through.
2. Some approval steps offer the option to click View approvers to see the name of the specific Approver that the requisition will route to after it is submitted.
3. When you are ready, click Place Order.
12
3
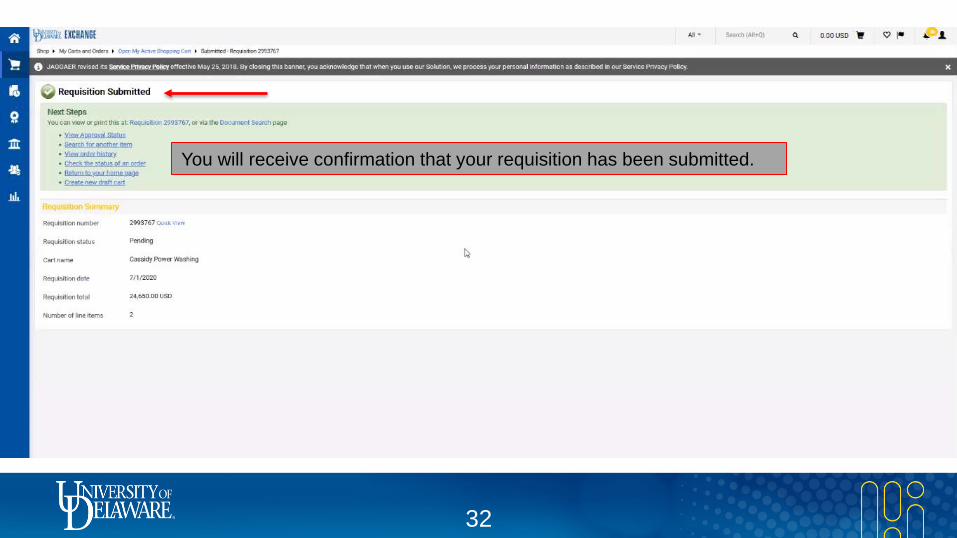
32
You will receive confirmation that your requisition has been submitted.