Embed Size (px)
Citation preview

Jordi BATLLE PORTO
PROMO 2008
SUPÉLEC ‐ ACS STUDIES TERMINATION REPORT
STUDY AND IMPLEMENTATION OF CONTROL STRATEGIES FOR FLEXIBLE STRUCTURES: APPLICATION TO A MEDICAL IMAGING ROBOT
283, rue de la Minière 78533 BUC FRANCE
GE tutor: Carlos Martínez Ferreira.Supélec tutor: Emmanuel Godoy.
2
Table of Contents
Table of Contents ................................................................................................................ 2 Table of Figures ................................................................................................................... 4 List of Tables: ....................................................................................................................... 5 Remerciement ..................................................................................................................... 6 Résumé ................................................................................................................................ 7 1. Introduction .................................................................................................................. 9
1.1. Présentation de General Electric ..................................................................... 9 1.2. Présentation de GE Healthcare (GEHC) ........................................................ 10 1.3. La division Clinical Systems ............................................................................ 11 1.4. Presentation of the internship ...................................................................... 13
2. Model Definition: ....................................................................................................... 14 2.1. Electrical Model ............................................................................................. 14 2.2. Mass Spring Transfer Function: ..................................................................... 15 2.3. State‐space representation: .......................................................................... 18 2.4. Observability Analysis: ................................................................................... 19 2.5. Controllability Analysis: ................................................................................. 20 2.6. Block diagram representation: ...................................................................... 21
3. Control Strategies ....................................................................................................... 22 3.1. Cascade control using the pivot measures: ................................................... 23 3.2. Cascade control with Δdθ/dt as a state feedback: ........................................ 23 3.3. Optimal control: ............................................................................................ 25 3.4. Comparative of the control strategies .......................................................... 27 3.5. State Observer: .............................................................................................. 28 3.6. Notch Filter: ................................................................................................... 30
4. Simulation Results ...................................................................................................... 32 4.1. Specifications for reference generation ........................................................ 32 4.2. Simulation results with the reference: .......................................................... 33
4.2.1. Acceleration values: .............................................................................. 34 4.3. Robustness study ........................................................................................... 34 4.4. Conclusions: ................................................................................................... 39
5. Accelerometer Model: ............................................................................................... 40 5.1. Introduction: .................................................................................................. 40 5.2. Principle of operation: ................................................................................... 40 5.3. Types of accelerometers: .............................................................................. 41 5.4. Basic Performances: ...................................................................................... 44 5.5. Sensor error types ......................................................................................... 45 5.6. Matlab model: ............................................................................................... 47
6. Experimentation with the accelerometer: ................................................................. 48 6.1. Accelerometer data transmission protocol: .................................................. 48

3
6.2. Cantilever beam measures: ........................................................................... 49 6.3. Experimental measures in Innova ................................................................. 50
7. Analysis of the experimental measures: .................................................................... 53 7.1. Model Identification: ..................................................................................... 53 7.2. Calibration ..................................................................................................... 54 7.3. Data Filtering: ................................................................................................ 59
8. On‐Board DSP implementation: ................................................................................. 61 8.1. Communication Bus Issues: ........................................................................... 61
8.1.1. Interpolation: ......................................................................................... 62 8.1.2. Hardware acceptance filter: .................................................................. 62
8.2. Implementation considerations: ................................................................... 63 8.2.1. Accelerometer gain considerations: ...................................................... 63 8.2.2. Trigonometric function implementation: .............................................. 64 8.2.3. Rotation Matrix implementation .......................................................... 64
8.3. Calibration: .................................................................................................... 65 8.4. Data Filtering: ................................................................................................ 67 8.5. Results: .......................................................................................................... 69
9. Perspectives: .............................................................................................................. 70 9.1. Speed and Position estimation ...................................................................... 70 9.2. Optimal control implementation: ................................................................. 70
9.2.1. Gain considerations: .............................................................................. 70 9.2.2. Experimental essays of optimal control ................................................ 71
10. Conclusions ............................................................................................................ 72 11. Bibliography ........................................................................................................... 73 12. Annex: .................................................................................................................... 74

4
Table of Figures Figure 1 Innova X‐Ray imaging robot ................................................................................ 13 Figure 2 Mass‐Spring model: Flexible pivot modeling ...................................................... 14 Figure 3 Motor transfer function....................................................................................... 14 Figure 4 Bode Diagram of TF θm /Torque .......................................................................... 17 Figure 5 Bode Diagram of TF d/dt(θm) /Torque ............................................................... 17 Figure 6 Bode Diagram of TF θpvt /Torque ....................................................................... 17 Figure 7 Bode Diagram of TF d/dt(θpvt) /Torque ............................................................. 17 Figure 8 SVD of Observability matrix ................................................................................. 19 Figure 9 SVD of Controllability Matrix ............................................................................... 20 Figure 10 Mass‐Spring Block diagram representation ...................................................... 21 Figure 11 Actual Control Block diagram ............................................................................ 22 Figure 12 (A) Control Block diagram .................................................................................. 23 Figure 13 (B) Control Block diagram .................................................................................. 23 Figure 14 Bode diagram of velocity open loop ................................................................. 24 Figure 15 Position step response ...................................................................................... 24 Figure 16 (C.1) Control Block diagram ............................................................................... 25 Figure 17 (C.2) Control Block diagram ............................................................................... 26 Figure 18 Close loop pole evolution depending on Q values ............................................ 26 Figure 19 Close loop bode diagram comparative .............................................................. 27 Figure 20 State observer for the pivot measures .............................................................. 28 Figure 21 Notch Filter in the global schema ...................................................................... 30 Figure 22 Close loop bode diagram with(out) notch filter ................................................ 31 Figure 23 Specifications for reference generation ............................................................ 32 Figure 24 Simulation results with a real reference ........................................................... 33 Figure 25 Performance comparative ................................................................................. 33 Figure 26 Tube acceleration values in simulation ............................................................. 34 Figure 27 Mass‐Spring Model with uncertainties ............................................................. 36 Figure 28 Notch robustness analysis ................................................................................. 38 Figure 29 Open loop accelerometer. ................................................................................. 40 Figure 30 Close loop accelerometer. ................................................................................. 41 Figure 31 Schema of a Piezoelectric Accelerometer. ........................................................ 41 Figure 32 Example of Piezoresistive Accelerometer: ........................................................ 42 Figure 33 Strain gauge based Accelerometer. .................................................................. 42 Figure 34 Variable‐Capacitance Accelerometer. ............................................................... 42 Figure 35 Schema of a Force Balanced Accelerometer ..................................................... 43 Figure 36 MEMS Accelerometer photography. ................................................................. 43 Figure 37 Matlab model of the accelerometer ................................................................. 47 Figure 38 Experimental setup for accelerometer measures ............................................. 48 Figure 39 Data transmission frame ................................................................................... 48 Figure 40 Cantilever beam experimental setup ................................................................ 49 Figure 41 Cantilever beam acceleration and direct velocity and position ........................ 49

5
Figure 42 Cantilever beam acceleration and filtered velocity and position ..................... 50 Figure 43 Experimental setup for Innova measures ......................................................... 50 Figure 44 Innova measures with enable release ............................................................... 51 Figure 45 Innova measures with emergency stop ............................................................ 51 Figure 46 Accelerometer Frame ........................................................................................ 52 Figure 47 Accelerometer Frames in the experimental setup ............................................ 52 Figure 48 Resonance frequency identification .................................................................. 53 Figure 49 Accelerometer axis model ................................................................................. 54 Figure 50 Calibration process example ............................................................................. 55 Figure 51 Movement for calibration data acquisition ....................................................... 56 Figure 52 Plan fitting of the calibration measures ............................................................ 56 Figure 53 Measure result of a (+/‐) 90° of the pivot ......................................................... 57 Figure 54 (+/‐) 90° of the pivot once rotated .................................................................... 57 Figure 55 Ellipse fitting and resultant ellipse once scaled and centered .......................... 57 Figure 56 Simulink blocks of measures calibration / Verification ..................................... 58 Figure 57 Encoder position vs.Gravity estimated position (and XY decomposition) ........ 58 Figure 58 Example of fdatool use for LPF design. ............................................................. 59 Figure 59 Raw calibrated measures / HPF measures. / HPF+LPF Measures. .................... 60 Figure 60 Send data and received interpolated data / Detail of interpolation ................. 62 Figure 61 Register of the CAN acceptance filter register .................................................. 62 Figure 62 Schema extract for accelerometer gain deduction ........................................... 63 Figure 63 Look‐Up Table implementation of sin(x) / cos(x) .............................................. 64 Figure 64 Simulink representation of the DSP implemented calibration algorithm ......... 65 Figure 65 DPS calibration verification ............................................................................... 66 Figure 66 Calibrated acceleration measure in the pivot axis ............................................ 66 Figure 67 Frequency response of the Moving Average Filter ........................................... 67 Figure 68 LFP via 32 points Moving Average results ......................................................... 68 Figure 69 DC estimation (left) and resultant signal after extraction (right)...................... 68 Figure 70 Raw / Calibrated / Filtered Accelerometer measure ........................................ 69 Figure 71 Speed and position estimation from acceleration ............................................ 70 Figure 72 Motor state feedback results ............................................................................ 71 Figure 74 Zigbee Accelerometer card schematics ............................................................. 74
List of Tables: Table 1 Accelerometer types comparative Ref. 13 ........................................................... 44 Table 2 Specification table for the X‐AXIS and Y‐AXIS accelerometer .............................. 45 Table 3 Specification table for the Z‐AXIS accelerometer ................................................. 45

6
Remerciement Je suis honoré d'être accepté à faire des études dans l’École supérieure d'électricité Supélec. Je tiens pour cela, à remercier vivement toute l'administration et en particulier le responsable de mon stage, Emmanuel Godoy. Je tiens ici à adresser vivement mes remerciements à toute l’équipe Hardware et en particulier mon maître de stage, Monsieur Carlos Martinez Ferreira. Il a eu confiance en moi et m'a soutenu et encouragé pendant toute la durée de mon stage. Je remercie tout particulièrement Monsieur Omar Al Assad, thésard de l’équipe Hardware qui m'a aidée dans l'aboutissement du projet et a toujours eu du temps pour répondre à mes différentes questions. Mes remerciements s'adressent aussi à tous les stagiaires, prestataires, et autres qui m'ont prêté main forte durant ce stage. Merci enfin, pour toutes les choses apprises, toutes les expériences vécues et tous les bons moments auxquels n’a pas manqué un sourire en chacun de vous.

7
Résumé L’imagerie médicale regroupe l’ensemble des techniques utilisées par la médecine pour le diagnostic mais aussi le traitement d’un grand nombre de pathologies. Elle a révolutionné la médecine en donnant un accès à des informations jusqu’alors «invisibles». En particulière, l´imagerie vasculaire est réservée à l´observation des vaisseaux sanguins. Les techniques d´imagerie (échographie, scanner) permettent de repérer les organes de manière très précise et de guider le geste du médecin. L´artériographie, par exemple, combine la mise au point (l´observation) et le traitement des lésions des artères. Dans le cadre de l´imagerie vasculaire, GE a développé le système Innova qui permet de positionner la chaine d’image. Le robot est formé d’une structure constituée par un «L‐arm » un «Pivot » et un « C‐Arc». Cette structure présente une souplesse causant de modes vibratoires gênants au niveau de la chaîne image. Le but de ce stage était de présenter de nouvelles techniques de contrôle commande de façon à diminuer les effets négatifs des vibrations. L’idée générale était d’intégrer au robot un capteur qui fournissait à la boucle de contrôle l’information correspondant au comportement de cette souplesse ; Pour ça, l’addition d’un accéléromètre était proposée. La première étape de la démarche de mon stage était donc, de faire une étude théorique des différentes solutions possibles en ajoutant la nouvelle mesure dans la boucle de contrôle. Plusieurs structures ont été considérées, comme ajouter directement l’accélération à travers d’un gain, la régulation en cascade en utilisant les mesures au niveau de la chaîne d’image ou le retour d’état par placement de pôles et par optimisation LQ. Cette dernière a été sélectionnée en raison de la facilité d’implémentation (bas coût de calcul) et la qualité des résultats. En parallèle à l’étude de l’intégration des mesures de l’accéléromètre, nous avons considéré des solutions complémentaires, comme la mis en place au niveau de la consigne d’un filtre coupe‐bande ou d’un observateur de façon à estimer l’état complet sans avoir besoin de ces nouvelles mesures. Les conclusions ont été que si on peut disposer de bonnes mesures à niveau de la chaine d’image, ces solutions complémentaires n’avaient pas d’intérêt à cause de leur manque de robustesse vis‐à‐vis des variations paramétriques. Une fois l’étude théorique complétée, la deuxième étape a consisté à faire une étude de l’état de l’art des accéléromètres, l’identification de leurs problématiques et leurs limitations. Enfin, la proposition de solutions pour les contourner.

8
Parmi les limitations des accéléromètres, il y avait la bande passante du capteur mais celle‐ci ne nous affectait pas dû à la basse fréquence des vibrations observées dans le système. Comme problématique, il y avait l’effet de la dérive. Ce composant presque continu (légèrement variant dans le temps), faisait que la double intégration pour obtenir la vitesse et position, donné des valeurs erronées très rapidement. Pour le même besoin d’avoir une mesure précise, une phase d’étalonnage était aussi à déterminer. La troisième et dernière étape de mon stage était l’implémentation sur la carte numérique de la nouvelle stratégie de commande, le traitement et l’intégration des mesures des accéléromètres. Cette‐étape‐là s’est déroulée en deux phases : Premièrement des essais seulement avec le nouveau capteur. Ces derniers ont permis de valider les paramètres du modèle du robot, aussi bien que vérifier les caractéristiques du signal fournis par l’accéléromètre. Cette information nous a permis de valider les traitements de signal à réaliser (Filtrage, Calibrage ) au niveau de simulation logiciel. Ultérieurement, une adaptation (en considérant les limitations numériques) a était implémentée. Les mesures obtenus avec le capteur ont été utilisées pour vérifier le bon fonctionnement des traitements implémentés. Il reste encore à vérifier que les bons résultats obtenus au niveau théorique de la nouvelle stratégie de commande. Néanmoins, un premier essai avec un retour d’état seulement avec seulement les mesures au niveau moteur a été réalisé. Comme conclusions, la commande par retour d’état complet ( donc avec un état qui contient information aussi sur la vitesse et position de la chaine d’image ) a présenté en simulation une amélioration considérable des performances de l’asservissement de position. Cependant, bien que les accéléromètres soient des capteurs bien adaptés pour donner information sur l’accélération, ils ne sont pas très bien appropriés pour fournir la position et la vitesse. Ceci est dû principalement au grand nombre d’opérations de traitements de signal à réaliser (filtrage, calibrage etc.). Les performances attendues par un retour d’état dan ce cas, sont inférieures à cause du retard ajouté dans la boucle.

9
1. Introduction 1.1. Présentation de General Electric
Genèse de GE General Electric est l’un des premiers groupes mondiaux, aux activités diversifiées dans le domaine de l’industrie, de la technologie et des services. L’aventure GE a commencé en 1876, quand Thomas Edison ouvre un laboratoire à Menlo Park dans le New Jersey. À partir de 1890, Edison avait concentré ses activités et fonda une entreprise sous le nom de « Edison General Electric Company ». En 1892, EGEC a fusionné avec la compagnie rivale « Thomson‐Houston Company » pour donner naissance à «General Electric Company ». Cette fusion a mis les deux compagnies en position dominante dans l'industrie électrique. En 1896, la « General Electric Company» fut l'une des douze compagnies qui ont formé le Dow Jones Industrial Average (GE est aujourd'hui la seule à y être encore). En 1917, Le gouvernement des Etats Unis a engagé un partenariat avec GE pour la fabrication des moteurs d’avion. L’activité de GE s’est, ensuite, largement diversifiée avec des performances financières et managériales remarquables. GE est composé de quatre branches d’activité : Technology Infrastructure: Partout dans le monde, ils aident à renforcer les soins de santé, le transport et l'infrastructure technologique du nouveau siècle. Beaucoup de GE la croissance la plus rapide dans les entreprises de GE segment de l'infrastructure de la technologie.
• Aviation • Enterprise Solutions • Healthcare • Transportation
Energy Infrastructure: GE Energy secteur Infrastructure dirige le domaine du développement, la mise en œuvre et l'amélioration des produits et des technologies qui mobilisent nos ressources comme le vent, pétrole, gaz et eau.
• Energy • Oil & Gas • Water & Process Technologies
GE Capital: GE Capital offre une gamme étonnante de produits et de services visant à permettre aux entreprises commerciales et les consommateurs du monde entier à réaliser leurs rêves. Les services comprennent des prêts commerciaux, de location‐exploitation, gestion de flotte, des programmes financiers, les prêts au logement, assurance, cartes de crédit, prêts personnels et autres services financiers.

10
• Aviation Financial Services • Commercial Finance • Energy Financial Services • GE Money • Treasury
NBC Universal: NBC Universal est un des leaders mondiaux du spectacle et des médias, développement, la production et la commercialisation de films, la télévision, des nouvelles, des sports et des événements spéciaux pour un grand public du monde entier.
• Cable • Film • International • Network • Sports & Olympics
En 2007, GE a généré une croissance à deux chiffres du profit et des revenus (173 milliards de dollars de revenus et 22.5 milliards de dollars de profits). En moyenne, la croissance des revenus sur les quatre dernières années est de 14% par an.
1.2. Présentation de GE Healthcare (GEHC)
L’objectif de GEHC est d’aider les médecins à prédire, diagnostiquer, informer et traiter les pathologies le plus tôt possible afin d’améliorer la qualité de vie du patient. GEHC pèse 17 milliards de dollars et emploie à travers le monde plus de 46 000 personnes. Les différentes branches d’activité de GE Healthcare sont : • Diagnostic Imaging (DI) qui offre aux médecins des moyens rapides et non‐invasifs
pour visualiser des fractures, diagnostiquer des traumatismes dans les services d’urgences, visualiser le cœur et sa fonction ou identifier les stades précoces des cancers et autres maladies cérébrales. En ce concentrant sur les systèmes d’acquisition d’images médicales : radiographie, mammographie numérique, scanner X (CT), imagerie par résonance magnétique (IRM) et imagerie moléculaire, GE DI crée des produits innovants permettant aux cliniciens d’explorer l’intérieur du corps humain avec une précision accrue.
• Global Services qui collabore avec les prestataires de soins médicaux du monde
entier pour assurer une maintenance de qualité d’une vaste gamme de systèmes et d’appareils médicaux.
• Clinical Systems qui offre tout un éventail de technologies et services destinés aux
cliniciens et aux administrateurs d’établissements hospitaliers et permettant aux personnels soignants d’améliorer chaque jour la qualité et l’efficacité des soins prodigués. L’accent est mis sur l’échographie, l’électrocardiogramme (ECG), la densitométrie osseuse, le monitoring patient, les incubateurs et autres couveuses,

11
l’anesthésie et les soins respiratoires avec des soins qui vont du simple dépistage au diagnostic avancé en passant par la thérapeutique salvatrice. Cette branche inclut aujourd’hui la division Interventionnal qui offre des outils et des technologies pour des soins interventionnels.
• Life Science qui innove par la recherche de nouveaux médicaments, la fabrication
de produits biopharmaceutiques et des technologies cellulaires. Cette branche conçoit également des systèmes et des équipements destinés à la purification des produits biopharmaceutiques.
• Medical Diagnostics qui développe des produits pharmaceutiques d’imagerie
médicale utilisés sur les systèmes de radiographie, d’IRM et de médecine nucléaire, par exemple pour faire ressortir certains organes, tissus ou fonctions à l’intérieur du corps humain pour aider les médecins dans la détection, le diagnostic et la prise en charge des pathologies.
• Integrated IT Solutions qui propose des solutions IT cliniques et financières
complètes comprenant des produits IT d’entreprises et de départements, des applications de gestion de cycle de chiffre d’affaires et de pratiques.
• Surgery qui offre des outils et des technologies mobiles pour des soins chirurgicaux
parfaitement intégrés : systèmes de radioscopie mobiles, instruments de navigation et de visualisation 3D, etc.
1.3. La division Clinical Systems La branche Clinical Systems offre des produits et des services qui permettent d’améliorer la qualité des soins. Les systèmes conçus analysent des données pertinentes afin d’aider le personnel clinique au quotidien. On peut citer les stations d’anesthésie telle que Carestation qui présente des fonctions novatrices et avancées de ventilation et d’anesthésie, les systèmes ECG accompagnés de logiciels de mesure d’analyse de toutes les fonctions nécessaires à un examen complet ou encore le système Densitométrie Lunar dédié à l’analyse de la densité osseuse, etc. Quant à la sous‐division Interventionnal, elle fusionne aux avis et idées des meilleurs médecins de l’imagerie cardiovasculaire les technologies de pointe de GEHC pour développer des systèmes d’imagerie radiographique à la pointe du progrès. Un des produits phare est le système Innova qui permet de réaliser des procédures d’angiographie et d’angioplastie cardiaques et vasculaires sur un seul et même système, sans compromis. Il existe aussi l’Innova Biplan qui offre une couverture anatomique idéale sans multiplier les injections de produits de contraste et les expositions au rayonnement. Ces salles sont accompagnées de systèmes d’imagerie de performance. Le logiciel Innova 3D par exemple permet une imagerie 3D vasculaire.

12
GEMS emploie plus de 20000 personnes, dont la moitié aux Etats‐Unis, où se trouve le siège de l’entreprise à Milwaukee. Pour couvrir l’ensemble de la planète, la société s’appuie sur trois pôles :
GE Healthcare America GE Healthcare Europe GE Healthcare Asia Siège Milwaukee, USA Buc, France Tokyo, Japon
Activités
Principales
IRM Scanner
Médecine nucléaire Radiologie conventionnelle
Imagerie cardio-vasculaire Radiologie
Mammographie
IRM Scanner
Echographie
La division européenne de GEMS est née en 1987 de la fusion entre GE et Thomson CGR. Elle emploie 1700 personnes. Elle est basé à Buc (78) en France. Sur ce site sont produits les systèmes d’imagerie cardiovasculaires conventionnels ou télécommandés, les unités de mammographie, les tubes à rayons X et les générateurs haute tension les alimentant. Parmi les départements des Etudes et Recherches, se trouve le département Hardware, au sein duquel s'est déroulé mon stage.

13
1.4. Presentation of the internship Innova is a system developed by GE. This robot used in medical X‐ray imaging. The positioned team takes care of the correct positioning of the image chain composed of the X‐Ray tube and the Detector. The structure that holds this image chain contains an L‐arm, a pivot and a C‐arc (see Figure 1) and a table for the patient positioning.
Figure 1 Innova X‐Ray imaging robot
• Problematic
The C‐arc is a flexible structure, so the image chain supported by the robot has associated vibration modes, which reduces de quality of the acquired images. To make sure that this quality goes beyond a certain threshold, there are some constraints in form of specifications of the vibrations amplitudes. The objective of this internship is studying a new control strategy to achieve a reduction of the vibration level by an active reaction. This is going to be done using additional sensors, which will allow the robot to go faster keeping the vibration specifications satisfied. The main interest of this velocity increase is because being faster means less injected contrast1 into the patient. The addition of an accelerometer will give to the control loop important information on the system dynamics that can be translated in an improvement of this control.
1 "Contrast" is a term describing the substances used to help improve the visualization of internal body structures, in this case the vascular system.

14
2. Model Definition:
Any robot is an electromechanical system where the electrical part is contained in the drive chain and the mechanical part by the robot structure. A mass‐spring model is used to model the flexibility of the structure.
For simplification, only one axis is considered (concretely the pivot axis), and afterwards the results are going to be generalized in the multi‐axis system. All the load inertia is placed at the pivot point (Jpvt) , the flexibility is represented by the stiffness and the frictions by the damping.
In a first time, it is considered that the flexibility appears in the transmission, so it can be considered in the axis. This consideration permits studying only the vibration modes who are in the sense of the movement of the axis.
Drive chaine
Jm JPVT
Stiffness k
mθ PVTθ
Damping d
rN
Figure 2 Mass‐Spring model: Flexible pivot modeling
This model has been adopted following the study lines of Ref. 3. All the experimental values were extracted from it as well.
2.1. Electrical Model Given the hypothesis that the current loop is correctly controlled, and that it has a faster dynamics than that of interest, the electrical transfer can be seen as a simple static gain:
LoopCurrentu
E Ke
Kc mΓrΓ
pJf m+1
LoopCurrentu
E Ke
Kc mΓrΓ
pJf m+1
KcG
JKcKeGp
pKcGpup
CLp
m
CL
CLm ≅⎯→⎯+
⋅≅
Γ ↑
)()(
Figure 3 Motor transfer function

15
2.2. Mass Spring Transfer Function: The mechanical equations can be obtained using a method derived of the stiffness method of structural analysis [1]:
⎥⎦
⎤⎢⎣
⎡ΓΓ
=⎥⎦
⎤⎢⎣
⎡⋅⎥
⎦
⎤⎢⎣
⎡−
−+
⎥⎥⎦
⎤
⎢⎢⎣
⎡⋅⎥
⎦
⎤⎢⎣
⎡+
⎥⎥⎦
⎤
⎢⎢⎣
⎡⋅⎥
⎦
⎤⎢⎣
⎡
pvt
m
pvt
m
pvt
m
pvt
m
pvt
m
kkkk
dd
JJ
θθ
θθ
θθ
&
&
&&
&&
00
00
(1)
Applying the Laplace transform:
⎥⎦
⎤⎢⎣
⎡ΓΓ
=⎥⎦
⎤⎢⎣
⎡⋅⎥⎦
⎤⎢⎣
⎡−
−+⎥
⎦
⎤⎢⎣
⎡⋅⎥⎦
⎤⎢⎣
⎡+
⎥⎥⎦
⎤
⎢⎢⎣
⎡⋅⎥⎦
⎤⎢⎣
⎡
pvt
m
pvt
m
pvt
m
pvt
m
pvt
m
kkkk
pp
dd
pp
JJ
θθ
θθ
θθ
00
00
2
2
⎥⎦
⎤⎢⎣
⎡ΓΓ
=⎥⎦
⎤⎢⎣
⎡⋅
⎥⎥⎦
⎤
⎢⎢⎣
⎡
++−−++
)()(
)()(
2
2
pp
pp
kdppJkkkdppJ
pvt
m
pvt
m
pvt
m
θθ
Taking row by row, we get the next transfer functions:
⎟⎠⎞
⎜⎝⎛ +Γ⋅
+⋅+= pvtm
mm
mm p
kJkpJdpJkp θθ )(1)( 2
⎟⎠⎞
⎜⎝⎛ +Γ⋅
+⋅+= mpvt
PVTPVT
PVTpvt p
kJkpJdpJkp θθ )(1)( 2
(2)
Identifying the transfers with a second order transfer function:
pvt
pvt
m
mm
JkJd
JkJd
/2/
/2/
0 =
=
ξ
ξ
pvt
mm
Jkw
Jkw
=
=
20
2
⎟⎠⎞
⎜⎝⎛ +Γ⋅
+⋅+=
⎟⎠⎞
⎜⎝⎛ +Γ⋅
+⋅+=
mpvtpvt
pvtmmmm
mm
pkwpwp
wp
pkwpwp
wp
θξ
θ
θξ
θ
)(12
)(
)(12
)(
2000
2
20
22
2
In the case of an irreversible transmission chain (actually the case of Innova), the last expression is decomposed in two parts. Each case is adopted depending if the torque and the movement has the same sings or opposite signs (when the transmission suffers the effect of the pivot inertia) :
( )
( ) ⎟⎠⎞
⎜⎝⎛ Γ⋅
+⋅+=→≤Γ⋅Δ+
⎟⎠⎞
⎜⎝⎛ +Γ⋅
+⋅+=→≥Γ⋅Δ+
)(12
)(0
)(12
)(0
22
2
22
2
pkwpwp
wpkd
pkwpwp
wpkd
mmmm
mmmm
pvtmmmm
mmmm
ξθθθ
θξ
θθθ
&
&
(3)

16
Hypothesis: In a first time, and for simplicity, it is always considered the reversible case. It is predicted to implement a feed forward in the current loop who will compensate the )(spvtΓ . Also, the variation of the load torque is slower than the studied frequency,
so it can be seen as a constant. For both reasons, it can be neglected for the further analysis. With both hypotheses, the next transfer functions are obtained:
( )( )( )222222
222
22
2
)()(
mmmooomo
ooom
m
m
wpwpwpwpww
pwpwpkw
pp
+⋅++⋅+−
+⋅+=
Γ ξξ
ξθ&
( )( )( )222222
222
22
2
)()(
mmmooomo
ooom
m
m
wpwpwpwpww
wpwpkw
pp
+⋅++⋅+−
+⋅+=
Γ ξξ
ξθ
( )( )222222
22
22)()(
mmmooomo
mo
m
pvt
wpwpwpwpwwk
ww
pp
+⋅++⋅+−=
Γ ξξθ
( )( )222222
22
22)()(
mmmooomo
mo
m
pvt
wpwpwpwpww
pkww
pp
+⋅++⋅+−
⎟⎠⎞
⎜⎝⎛
=Γ ξξθ&
(4)
Getting the values experimentally obtained in the tests of Ref. 3, all considered from the pivot side (so applying to the motor inertia the transmission rate):
Stiffness k = 5.9770e+004 ow = 24.3159 (rad/s)
Damping d = 98.3231 mw = 17.8868 (rad/s)
Motor rotor inertia Jm = 186.8184 (kg.m^2) oξ = 0.02
Pivot Inertia = 101.0892 (kg.m^2) mξ = 0.0147

17
Transfer functions:
Figure 4 Bode Diagram of TF θm /Torque
( )( )( )2.9118159.06831.0
3.5919726.09869.2)()(
2
2
+++++
=pppp
pppupmθ
Figure 5 Bode Diagram of TF d/dt(θm) /Torque
( )( )( )2.9118159.06831.0
3.5919726.09869.2)()(
2
2
+++++
=pppp
ppppupmθ&
Figure 6 Bode Diagram of TF θpvt /Torque
( )( )2.9118159.06831.01649.3
)()(
2 +++=
pppppuppvtθ
Figure 7 Bode Diagram of TF d/dt(θpvt) /Torque
( )( )2.9118159.06831.01649.3
)()(
2 +++=
ppppp
puppvtθ&

18
System Poles:
Studying the system poles shows that the transfers )()(
sp
m
i
Γθ
are not stable (pole at 0)
for the both positions, being compensated by a zero in the velocity transfers.
⎪⎭
⎪⎬
⎫
⎪⎩
⎪⎨
⎧
==→==→==→±
= /68.0 ;1 0.6831- / 0 ;1- 0
/2.30 0.0135;30.1826i 0.4079-
sradsradsrad
Polesωξωξωξ
2.3. State‐space representation: Given a linear invariant system, like the one under study, the general definition of a state‐space representation is:
( ) ( ) ( )( ) ( ) ( )tDutCxty
tButAxtx+=+=&
Name Description u(t) System input signal, p × 1 vector
y(t) System output signal, m × 1 vector
x(t) System state vector, n × 1 vector
A System matrix, n × n matrix
B Input matrix, n × p matrix
C Output Matrix, m × n matrix
D Direct through matrix, m × p matrix
Using the equation (1), the mass‐spring model can be represented by:
⎥⎥⎥⎥⎥
⎦
⎤
⎢⎢⎢⎢⎢
⎣
⎡
⋅
⎥⎥⎥⎥
⎦
⎤
⎢⎢⎢⎢
⎣
⎡
=
Γ
⎥⎥⎥⎥
⎦
⎤
⎢⎢⎢⎢
⎣
⎡
+
⎥⎥⎥⎥⎥
⎦
⎤
⎢⎢⎢⎢⎢
⎣
⎡
⋅
⎥⎥⎥⎥⎥
⎦
⎤
⎢⎢⎢⎢⎢
⎣
⎡
−−
−−=
⎥⎥⎥⎥⎥
⎦
⎤
⎢⎢⎢⎢⎢
⎣
⎡
pvt
pvt
m
m
mm
pvt
pvt
m
m
pvtpvtpvt
mmm
pvt
m
m
m
NrNr
Y
J
JdJkJk
JkJdJk
θθθθ
θθθθ
θθθθ
&
&
&
&
&&
&
&&
&
10000100000000
00
/10
//0/10000///0010
(5)
In the C matrix, the Nr value is the transmission rate, which is applied to the position/speed of the motor rotor, so the outputs are the real values of the state.

19
2.4. Observability Analysis: Observability is a measure for how well internal states of a system can be inferred by knowledge of its external outputs. A system is said to be observable if, for any possible sequence of state and control vectors, the current state can be determined in finite time using only the outputs. Symbolic analysis: For a system with n states, the system is completely observable if the rank of the following observability matrix is n:
Observability Matrix:
⎥⎦
⎤⎢⎣
⎡=
000000
1 NrNr
C
Rank = 4;
⎥⎥⎥⎥
⎦
⎤
⎢⎢⎢⎢
⎣
⎡
=
10000100000000
2
NrNr
C
Rank = 4 Numerical Analysis: A useful tool to determine the degree of Observability of each mode is the Observability gramian. Unhappily, our system is not stable so it is not possible to calculate the gramian here. However we can use the singular value decomposition of the Observability matrix to have a good idea of the Observability of the modes:
⎥⎦
⎤⎢⎣
⎡=
000000
1 NrNr
C
⎥⎥⎥⎥
⎦
⎤
⎢⎢⎢⎢
⎣
⎡
=
10000100000000
2
NrNr
C
Singular Values:
( )
0.00000.00000.00362.2999
10
),(
8
⎪⎪⎭
⎪⎪⎬
⎫
⎪⎪⎩
⎪⎪⎨
⎧
⋅
=ACObssvd
( )
0.00000.00000.00362.2999
10
),(
8
2
⎪⎪⎭
⎪⎪⎬
⎫
⎪⎪⎩
⎪⎪⎨
⎧
⋅
=ACObssvd
Figure 8 SVD of Observability matrix
⎥⎥⎥⎥⎥⎥⎥⎥⎥⎥
⎦
⎤
⎢⎢⎢⎢⎢⎢⎢⎢⎢⎢
⎣
⎡
⋅−⎟⎠⎞⎜
⎝⎛
⎭⎬⎫
⎩⎨⎧
+⎟⎠⎞⎜
⎝⎛⎟
⎠⎞⎜
⎝⎛
⋅−⋅−⋅
⋅−⋅−⋅=
⎥⎥⎥⎥⎥⎥
⎦
⎤
⎢⎢⎢⎢⎢⎢
⎣
⎡
=
−
mmmmm
mmm
mmm
n
JdNr
JkNrJ
kJ
dNrJkNr
JkNr
JdNr
JkNr
JkNr
JdNr
JkNr
NrNr
Nr
CA
CACAC
ACObs
2221
21
0
0000000000
),(M

20
In all the configurations, the first 2 modes of the system are more observable. For an identification of which one is the most and the less observable, it is used the PBH (Popov‐Belevitch‐Hautus) Rank test (Ref. 9):
( ) [ ] nBApIpRcRankwAwBw
d
TTT
=−−=⇔=≠⇔
= )( where0 pole eCommandabl
mode(i)pmode(i)
λ
It was established that the first poles that lost numerically (increasing the tolerance) their rank are the pair of complex poles.
2.5. Controllability Analysis: Controllability denotes the ability to move a system around in its entire configuration space using only certain admissible manipulations.
[ ]
⎥⎥⎥⎥⎥⎥⎥⎥⎥⎥⎥⎥⎥⎥
⎦
⎤
⎢⎢⎢⎢⎢⎢⎢⎢⎢⎢⎢⎢⎢⎢
⎣
⎡
⎟⎟⎠
⎞⎜⎜⎝
⎛+
−
−
⎟⎟⎟⎟⎟
⎠
⎞
⎜⎜⎜⎜⎜
⎝
⎛⎟⎟⎠
⎞⎜⎜⎝
⎛+
−−
⎟⎟⎠
⎞⎜⎜⎝
⎛+
−
⎟⎟⎠
⎞⎜⎜⎝
⎛+
−
== −
2
2
2
22
2
2
2
12
00
000
0
),(
Jpvtdk
JmJpvtkd
JpvtkGu
JpvtkGu
GuJm
Jmd
Jmkd
JmdkGu
Jmd
Jmk
JmdGuGu
GuJmd
Jmk
JmdGuGu
BABAABBBACrtl nL
( ) 4),(),( 224
=→= BACrtlrankJkGuBACrtl
pvt
Numerical Analysis: Using the singular value decomposition of the controllability matrix:
⎥⎥⎥⎥
⎦
⎤
⎢⎢⎢⎢
⎣
⎡
=
00
/10
mJB
Singular Values:
( )
⎪⎪⎭
⎪⎪⎬
⎫
⎪⎪⎩
⎪⎪⎨
⎧
=
0.00340.00631.90106.9302
),( BACrtlsvd
Figure 9 SVD of Controllability Matrix

21
It is showed that the 3rd and 4th modes are hard to control. . For an identification of which one is the most and the less observable, it is used the PBH (Popov‐Belevitch‐Hautus) Rank test (Ref. 9):
( ) [ ] nBApIpRcRankwAwBw
d
TTT
=−−=⇔=≠⇔
= )( where0 pole eCommandabl
mode(i)pmode(i)
λ
So the first poles that lost numerically (increasing the tolerance) their rank are the pair of complex poles.
2.6. Block diagram representation: The next diagram block represents also the same transfer: (Having the advantage that the acceleration is accessible, useful later with the accelerometer model).
m θ & & PVT θ &&mθ
k PVT θ & PVTθ m Γ
d
+ + − −
− + m θ &
d
p1
p 1 p
1 p
1pvtJ
1m J
1 m θ & & PVT θ &&mθ
k PVT θ & PVTθ m Γ
d d
+ + − −
− + m θ &
d d
p1
p 1 p
1 p
1pvtJ
1m J
1
Figure 10 Mass‐Spring Block diagram representation

22
3. Control Strategies Just until now, the motion control architecture proposed by GE was a classical cascade control with 3 control loops of current, velocity and position and a feed forward at the velocity loop. The control loops uses the measures from the encoders placed in the motor rotor, as seen in the next schema:
J JPVT
Stiffness k
mθ
Damping
PVTθ&&
θR driveI
+ −
− + u
mΓ+
−
mθ&
θPI θ&PI currPI
currM
)(pM Kc
Nr
θ&R
J JPVT
Stiffness k
mθ
Damping
PVTθ&&
θR driveI
+ −
− + u
mΓ+
−
mθ&
θPI θ&PI currPI
currM
)(pM Kc
Nr
θ&R
Figure 11 Actual Control Block diagram
Four new control architectures were proposed using the dynamical information of the system given by the accelerometer:
• Using cascade control with the measures of the pivot [ ]mm θθ & .
• Adding accelerometer measures to the current loop • Using cascade control with θ&Δ as a perturbation
• Optimal control with the state vector of [ ]pvtpvtm θθθθ &&Δ .
The first two propositions where ruled out from the information acquired in the simulation results. Additionally, two complements for the control strategies were also proposed:
• Using a State observer instead the accelerometer measurements. • Using a Notch filter to avoid the resonance frequency.
A comparative of the close loop from the reference to the pivot position will be done. In all the cases it is needed to take care what if the reference is for the motor rotor position or the pivot position (Transmission rate considerations)

23
3.1. Cascade control using the pivot measures: The first logical approach is to consider the possibility of acting directly to the pivot dynamics. This means keeping the structure of cascade control, but using it with the measures from the pivot.
J
m
JPVT
Stiffness k
mθ
Damping d
PVTθ&&
θR driveI+ −
− + − mΓ+
−
mθ&
θControl θ&Contol currPI
currM
)( pM Kc
NrAccelerometer
PVTθ& PVTθ
J
m
JPVT
Stiffness k
mθ
Damping d
PVTθ&&
θR driveI+ −
− + − mΓ+
−
mθ&
θControl θ&Contol currPI
currM
)( pM Kc
NrAccelerometer
PVTθ& PVTθ
Figure 12 (A) Control Block diagram
The problem is that the transfer from the torque to the pivot velocity drops the phase down to –270° after the resonance (Figure 7). Because the resonance frequency is at 30.2 rad/s, the cutoff frequency must be placed after it, so the controller needs at least two derivative actions to make the looped system stable, which is not physically implementable. The strategy was ruled out.
3.2. Cascade control with Δdθ/dt as a state feedback: The problem until now was that the control was applied to the dynamics of the motor rotor, without any reaction about the pivot behavior, except the given to the rotor through the stiffness. A reasonable way of taking it into account is to add a state feedback of the difference of dynamics. Then, the system is, in fact, forcing the pivot to have the same velocity like the motor.
Stiffness k
mθ
Damping d
PVTθ&&
θR driveI+ u
mPVTθθθ &&& −=Δ
mθ& u mΓ−
mθ&
θPI θ&PI currPI
currM
)( pM Kc
NrAccelerometer
PVTθ&
mJ pvtJ
optK
−
mPVT θθθ &&& −=Δ
θ&R
Stiffness k
mθ
Damping d
PVTθ&&
θR driveI+ u
mPVTθθθ &&& −=Δ
mθ& u mΓ−
mθ&
θPI θ&PI currPI
currM
)( pM Kc
NrAccelerometer
PVTθ&
mJ pvtJ
optK
−
mPVT θθθ &&& −=Δ
θ&R
Stiffness k
mθ
Damping d
PVTθ&&
θR driveI+ u
mPVTθθθ &&& −=Δ
mθ& u mΓ−
mθ&
θPI θ&PI currPI
currM
)( pM Kc
NrAccelerometer
PVTθ&
mJ pvtJ
optK
−
mPVT θθθ &&& −=Δ
θ&R
Figure 13 (B) Control Block diagram

24
The benefits can be seen in the velocity loop of the MCB, where increasing the Proportion of state feedback applied means decreasing the Q‐factor of the resonance:
↑K ↑K
Figure 14 Bode diagram of velocity open loop
This is translated in an improvement in the position step response (more damped):
⎟⎟⎠
⎞⎜⎜⎝
⎛
)()(
pp
stepref
pvt
θθ&
&
Figure 15 Position step response

25
3.3. Optimal control: A second approach of the vibration control is trying to place the poles of the looped system so the dynamics of the pivot has better performances. The optimal control theory finds a matrix gain for a given system such that a certain optimality criterion is achieved. The cost functional is defined as:
( )∫∞
⋅⋅+⋅⋅=0
)()()()( dttuRtutxQtxJ TT
⎥⎥⎥⎥
⎦
⎤
⎢⎢⎢⎢
⎣
⎡
==
4
3
2
1
000000000000
HHQ T λ=R
Where the Q an R are weighting matrix and they are positive defined. If (A, B) is stabilizable and (H, A) is detectable, then the solution is given by:
⎪⎪⎩
⎪⎪⎨
⎧
−−=
=+−+=
=⋅+⋅−=
−−
−
−
11
1
1
))((0
)(
BBLACMQPBPBRPAPAP
PBRLyMxLtu
TT
Tref
The looped system, is given by :
⎟⎟⎟⎟⎟
⎠
⎞
⎜⎜⎜⎜⎜
⎝
⎛
⎥⎥⎥⎥⎥
⎦
⎤
⎢⎢⎢⎢⎢
⎣
⎡
−Γ
⎥⎥⎥⎥
⎦
⎤
⎢⎢⎢⎢
⎣
⎡
+
⎥⎥⎥⎥⎥
⎦
⎤
⎢⎢⎢⎢⎢
⎣
⎡
⋅
⎥⎥⎥⎥⎥
⎦
⎤
⎢⎢⎢⎢⎢
⎣
⎡
−−
−−=
⎥⎥⎥⎥⎥
⎦
⎤
⎢⎢⎢⎢⎢
⎣
⎡
pvt
m
pvt
m
kmm
pvt
pvt
m
m
pvtpvtpvt
mmm
pvt
m
m
m
LJ
JdJkJk
JkJdJk
θθθθ
θθθθ
θθθθ
&&
&
&&
&
&
&
&&
&
&&
&
00
/10
//0/10000///0010
(6)
To make the controller follow the reference, the feedback is fed with the difference between the reference and the actual state (instead of the M matrix defined before):
Stiffness k
mθ
Damping d
PVTθ&&
driveI−
u mΓ
mθ&
currPI
currM
)( pM Kc
NrAccelerometer
PVTθ& PVTθ
mJ pvtJ
optK
−
θ&R
θR
−−
−−
++
++
∫
Stiffness k
mθ
Damping d
PVTθ&&
driveI−
u mΓ
mθ&
currPI
currM
)( pM Kc
NrAccelerometer
PVTθ& PVTθ
mJ pvtJ
optK
−
θ&R
θR
−−
−−
++
++
∫∫
Figure 16 (C.1) Control Block diagram

26
After the simulations, it was shown that even the reference was well followed in the steady state; there was a delay in the position evolution. The problem was that there is no integral action in the position error, so it was added as a new state:
⎟⎟⎟⎟⎟⎟⎟
⎠
⎞
⎜⎜⎜⎜⎜⎜⎜
⎝
⎛
⎥⎥⎥⎥⎥⎥
⎦
⎤
⎢⎢⎢⎢⎢⎢
⎣
⎡
−Γ
⎥⎥⎥⎥⎥⎥
⎦
⎤
⎢⎢⎢⎢⎢⎢
⎣
⎡
+
⎥⎥⎥⎥⎥⎥
⎦
⎤
⎢⎢⎢⎢⎢⎢
⎣
⎡
⋅
⎥⎥⎥⎥⎥⎥
⎦
⎤
⎢⎢⎢⎢⎢⎢
⎣
⎡
−−
−−=
⎥⎥⎥⎥⎥⎥⎥
⎦
⎤
⎢⎢⎢⎢⎢⎢⎢
⎣
⎡
pvtpvtpvtI
LJ
IJdJkJk
JkJdJk
Ipvt
pvt
m
m
km
m
pvt
pvt
m
m
pvtpvtpvt
mmm
pvt
pvt
m
m
θθθ
θθθθ
θθθθ
θθθθ
&
&
&
&
&
&&
&
&&
&
000
/10
001000//0/0100000///00010
(7)
Another idea was to rewrite the state‐space so the new state variables made easier to find the weighting matrix. Instead of having the both dynamics, it was used the pivot dynamics plus the difference between dynamics.
θ&R
A ccelerom eter
Stiffness k
mθ
D am ping d
PVTθ&&
θR motorI
−u mΓ
mθ&
currPI
currM
)( pM Kc
Nr
PVTθ& PVTθ
mJ pvtJ
optK
−
mPVT θθθ −=Δ
mPVT θθθ &&& −=Δ
−−++∫
θ&R
A ccelerom eter
Stiffness k
mθ
D am ping d
PVTθ&&
θR motorI
−u mΓ
mθ&
currPI
currM
)( pM Kc
Nr
PVTθ& PVTθ
mJ pvtJ
optK
−
mPVT θθθ −=Δ
mPVT θθθ &&& −=Δ
−−++
θ&R
A ccelerom eter
Stiffness k
mθ
D am ping d
PVTθ&&
θR motorI
−u mΓ
mθ&
currPI
currM
)( pM Kc
Nr
PVTθ& PVTθ
mJ pvtJ
optK
−
mPVT θθθ −=Δ
mPVT θθθ &&& −=Δ
−−++∫∫∫
Figure 17 (C.2) Control Block diagram
The final state space of the looped system (where pvtm θθθ −=Δ ):
⎟⎟⎟⎟⎟⎟⎟
⎠
⎞
⎜⎜⎜⎜⎜⎜⎜
⎝
⎛
⎥⎥⎥⎥⎥⎥
⎦
⎤
⎢⎢⎢⎢⎢⎢
⎣
⎡
Δ
Δ
−Γ
⎥⎥⎥⎥⎥⎥
⎦
⎤
⎢⎢⎢⎢⎢⎢
⎣
⎡
+
⎥⎥⎥⎥⎥⎥
⎦
⎤
⎢⎢⎢⎢⎢⎢
⎣
⎡
Δ
Δ
⋅
⎥⎥⎥⎥⎥⎥⎥⎥
⎦
⎤
⎢⎢⎢⎢⎢⎢⎢⎢
⎣
⎡
+−⎥⎥⎦
⎤
⎢⎢⎣
⎡−−−
−
=
⎥⎥⎥⎥⎥⎥
⎦
⎤
⎢⎢⎢⎢⎢⎢
⎣
⎡
Δ
Δ
pvtpvtpvtI
LJ
IJJd
Jd
JJk
Jd
Jk
I
pvt
pvt
km
m
pvt
pvt
pvtmmpvtm
pvtpvtpvt
pvt
θθθ
θθθ
θ
θθθ
θ
θθθ
θ
&
&
&
&
&
&&
&&
&
&
0/1000
00001
00)11()11(0
0000100000100
(8)
The Figure 18 shows the close‐loop pole evolution, where the complex pair of poles needs a big numbers on the weighting matrix to be moved:
Low Q values High Q values
Figure 18 Close loop pole evolution depending on Q values

27
3.4. Comparative of the control strategies To compare the different control strategies proposed, it is shown the bode diagram of the transfer function of the close‐loop from the reference to the pivot position. For this, it is used the linear analysis tool of matlab and there has been added a derivation from the position reference to the velocity reference.
Bode diagram of the closed loop of pivot position
⎟⎟⎠
⎞⎜⎜⎝
⎛
)()(
pp
Boderef
pvt
θθ
sradDi
sradDi
540%3.10%587.0309.066.0
3.24%94%0197.0024.0999.0
===±
===±
ωξ
ωξ
sradDi
sradDi
503%57%176.0435.0805.0
22%71%108.0021.0997.0
===±
===±
ωξ
ωξ
sradDi
sradDi
6.71%4.5%67.005.0951.0
1.22%2.11%57.0017.0987.0
===±
===±
ωξ
ωξ
MCB
Optimal ControlMCB + Δvel
Bode diagram of the closed loop of pivot position
⎟⎟⎠
⎞⎜⎜⎝
⎛
)()(
pp
Boderef
pvt
θθ
sradDi
sradDi
540%3.10%587.0309.066.0
3.24%94%0197.0024.0999.0
===±
===±
ωξ
ωξ
sradDi
sradDi
503%57%176.0435.0805.0
22%71%108.0021.0997.0
===±
===±
ωξ
ωξ
sradDi
sradDi
6.71%4.5%67.005.0951.0
1.22%2.11%57.0017.0987.0
===±
===±
ωξ
ωξ
MCB
Optimal ControlMCB + ΔvelMCB
Optimal ControlMCB + Δvel
Figure 19 Close loop bode diagram comparative
What can be seen in the Bode is that the frequency resonance of the actual MCB is less damped than that of the first control strategy proposed. However, this one adds a disturbing high frequency resonance. Finally, the optimal control gives a more damped response.

28
3.5. State Observer: Before adding supplementary sensors, it must be studied the possibility of implementing a state observer. A state observer is a system that gives an estimation of the state vector, given measurements of the input and output of the real system.
Controller MassSpringmθ
Observermθ&
mθ
mθ&
Jpvtθ
Jpvtθ&Controller MassSpring
mθ
Observermθ&
mθ
mθ&
Jpvtθ
Jpvtθ&
Figure 20 State observer for the pivot measures
Here is interesting an estimation of the position and velocity of the pivot from the motor position and velocity information is done:
( )( )⎪⎩
⎪⎨⎧
−=
−++⋅=
XKCAX
XCYKBuXAX
ˆˆ
ˆˆˆ
&
&
⎟⎟⎟⎟⎟⎟
⎠
⎞
⎜⎜⎜⎜⎜⎜
⎝
⎛
⎥⎥⎥⎥⎥
⎦
⎤
⎢⎢⎢⎢⎢
⎣
⎡
⋅⎥⎦
⎤⎢⎣
⎡−+Γ
⎥⎥⎥⎥
⎦
⎤
⎢⎢⎢⎢
⎣
⎡
+
⎥⎥⎥⎥⎥
⎦
⎤
⎢⎢⎢⎢⎢
⎣
⎡
⋅
⎥⎥⎥⎥⎥
⎦
⎤
⎢⎢⎢⎢⎢
⎣
⎡
−−
−=
⎥⎥⎥⎥⎥
⎦
⎤
⎢⎢⎢⎢⎢
⎣
⎡
pvt
pvt
m
m
m
pvt
pvt
m
m
pvtpvtpvt
mm
pvt
m
m
m
NrNr
YKJ
JdJkJk
JkJk
θ
θθθ
θ
θθθ
θθθθ
ˆˆ
ˆˆ
000000
00
/10
ˆˆ
ˆˆ
//0/10000/0/0010
ˆˆˆˆ
&
&
&
&
&&
&
&&
&
Determining the poles of (A‐KC), it is possible to force the dynamics of reconstruction of the observer, which normally has to be ~2/3 times faster than the controlled system dynamics. Taking the poles of (Figure 19), and choosing them 3 times faster, you can determine:
( ) [ ]( )∏ −⋅++=−− 21)(deti
ipKCApI iid ξξω
=
⎪⎪
⎭
⎪⎪
⎬
⎫
⎪⎪
⎩
⎪⎪
⎨
⎧
⎟⎟⎟⎟⎟
⎠
⎞
⎜⎜⎜⎜⎜
⎝
⎛
⎥⎦
⎤⎢⎣
⎡
⎥⎥⎥⎥
⎦
⎤
⎢⎢⎢⎢
⎣
⎡
−
⎥⎥⎥⎥⎥
⎦
⎤
⎢⎢⎢⎢⎢
⎣
⎡
−−
−−−
000000
//0/10000///0010
det
0100
1110
2120
3130
NrNr
KKKKKKKK
JdJkJk
JkJdJkpId
pvtpvtpvt
mmm

29
0.06025.33310.00100.04800.00140.02330.00000.0009
10
///1
0///001
det 3
0100
1110
2120
3130
Bpvtpvtpvt
mmm K
JdpJkNrKJkNrKpNrKNrK
JkJdNrKpJkNrKNrKNrKp
⎥⎥⎥⎥
⎦
⎤
⎢⎢⎢⎢
⎣
⎡
⋅=→
⎪⎪⎭
⎪⎪⎬
⎫
⎪⎪⎩
⎪⎪⎨
⎧
+−+−
+++−−+
The state observer can be also used to integrate directly the measures from the accelerometer, which should give more robustness as it adds information of the system dynamics. The new schema is:
Controller MassSpring
mθ
Observermθ&
mθ
mθ&
Jpvtθ
Jpvtθ&Accelero
pvtθ&&Controller Mass
Spring
mθ
Observermθ&
mθ
mθ&
Jpvtθ
Jpvtθ&Accelero
pvtθ&&
So now there are 3 inputs in the observer given by:
⎟⎟⎟⎟⎟⎟
⎠
⎞
⎜⎜⎜⎜⎜⎜
⎝
⎛
⎥⎥⎥⎥⎥
⎦
⎤
⎢⎢⎢⎢⎢
⎣
⎡
⋅
⎥⎥⎥⎥⎥
⎦
⎤
⎢⎢⎢⎢⎢
⎣
⎡
−−−+Γ
⎥⎥⎥⎥
⎦
⎤
⎢⎢⎢⎢
⎣
⎡
+
⎥⎥⎥⎥⎥
⎦
⎤
⎢⎢⎢⎢⎢
⎣
⎡
⋅
⎥⎥⎥⎥⎥
⎦
⎤
⎢⎢⎢⎢⎢
⎣
⎡
−−
−−=
⎥⎥⎥⎥⎥
⎦
⎤
⎢⎢⎢⎢⎢
⎣
⎡
pvt
pvt
m
m
pvtpvtpvt
m
pvt
pvt
m
m
pvtpvtpvt
mmm
pvt
m
m
m
Jd
Jk
Jk
NrNr
YKJ
JdJkJk
JkJdJk
θ
θθθ
θ
θθθ
θθθθ
ˆˆ
ˆˆ
0000000
00
/10
ˆˆ
ˆˆ
//0/10000///0010
ˆˆˆˆ
&
&
&
&
&&
&
&&
&
As well as before, determining the K gain is determining the reconstruction dynamics. They can be chosen determining the roots of :
=
⎪⎪
⎭
⎪⎪
⎬
⎫
⎪⎪
⎩
⎪⎪
⎨
⎧
⎟⎟⎟⎟⎟
⎠
⎞
⎜⎜⎜⎜⎜
⎝
⎛
⎥⎥⎥⎥⎥
⎦
⎤
⎢⎢⎢⎢⎢
⎣
⎡
−−⋅
⎥⎥⎥⎥
⎦
⎤
⎢⎢⎢⎢
⎣
⎡
−
⎥⎥⎥⎥⎥
⎦
⎤
⎢⎢⎢⎢⎢
⎣
⎡
−−
−−−
pvtpvtpvtpvtpvtpvt
mmm
Jd
Jk
Jk
NrNr
KKKK
KKKKKKKK
JdJkJk
JkJdJkpId
0000000
//0/10000///0010
det
32
32
32
32
0100
1110
2120
3130
Now, the poles are not chosen directly 3 times faster those of the controller, because there is a new measure that is not used at the state feedback. Instead, there are chosen so the acceleration measure really makes an impact over the observer behavior. This point needs a deeper study to find the optimal pole placement if finally this observer is seen as interesting to implement.

30
3.6. Notch Filter: A notch filter is a filter that eliminated a selected frequency. If it is placed after the reference it will be modified so the system is not excited at this frequency, so placing it at the resonance frequency means avoiding the system to vibrate.
mθ PVTθ&&
θR driveI+ u
mθ&
mθ& u mΓ−
mθ&
θPI θ&PI currPI
currM
)( pM Kc
Nr
PVTθ&
mJ pvtJ
optK
−
mPVT θθθ &&& −=Δ
)()(
pp
ref
notch
θθ
pvtR θ&
mθPVTθ&&
motorI−
u mΓ
mθ&
currPI
currM
)( pM Kc
Nr
PVTθ& PVTθ
mJ pvtJ
optK
−
mPVT θθθ −=Δ
mPVT θθθ &&& −=Δ
−−++∫
pvtRθ
)()(
pp
ref
notch
θθ
mθ PVTθ&&
θR driveI+ u
mθ& u mΓ−
mθ&
θPI θ&PI currPI
currM
)( pM Kc
Nr
PVTθ&
mJ pvtJ−
)()(
pp
ref
notch
θθ
mθ PVTθ&&
θR driveI+ u
mθ&
mθ& u mΓ−
mθ&
θPI θ&PI currPI
currM
)( pM Kc
Nr
PVTθ&
mJ pvtJ
optK
−
mPVT θθθ &&& −=Δ
)()(
pp
ref
notch
θθ
pvtR θ&
mθPVTθ&&
motorI−
u mΓ
mθ&
currPI
currM
)( pM Kc
Nr
PVTθ& PVTθ
mJ pvtJ
optK
−
mPVT θθθ −=Δ
mPVT θθθ &&& −=Δ
−−++∫∫∫
pvtRθ
)()(
pp
ref
notch
θθ
mθ PVTθ&&
θR driveI+ u
mθ& u mΓ−
mθ&
θPI θ&PI currPI
currM
)( pM Kc
Nr
PVTθ&
mJ pvtJ−
)()(
pp
ref
notch
θθ
Figure 21 Notch Filter in the global schema
The general transfer function of a notch filter is:
wpw2 p
wp)()(
20
2
2
+++
=o
o
ref
notch
pp
ξθθ

31
The transfer function of this filter is calculated to place the attenuation band centered at the resonance frequency of each controller:
⎪⎪⎪
⎩
⎪⎪⎪
⎨
⎧
+++
→
+++
→Δ+
+++
→
→++
+=
488.41p 8.84 p 488.41p )/1.22(
484p 8.84 p 484p )/22(
3.591p 9.727 p 591.3p )/3.24(
wpw2 p
wp)()(
2
2
2
2
2
2
20
2
2
sradtrolOptimalCon
sradMCB
sradMCB
pp
o
o
ref
notch θξθ
θ &
The close‐loop bode comparative of the 3 control strategies with and without the notch filter shows than mainly it is interesting in the actual strategy and in the MCB+ State Feedback (reducing K gain?), but it has no interest in Optimal Control:
MCB
Optimal ControlMCB + ΔvelMCB
Optimal ControlMCB + Δvel
Figure 22 Close loop bode diagram with(out) notch filter

32
4. Simulation Results To give a coherent comparison from the different control strategies, it is required to have some specifications that give from one side what kind of movement reference has to follow the system; and from the other side how to evaluate the results. Both are given by the braking distance analysis and the vibration analysis respectively.
4.1. Specifications for reference generation The braking distance specifies that the distance realized from the tube since it is stopped until it stops must be less than 10 mm (“breaking distance”). This constraint is translated in an acceleration profile. In the vibration specifications, 2 Vibration peak values are considered and specified:
• First Peak:(< 1mm) is defined as the max peak amplitude value of the tube position after at least one signal inversion;
• Second Peak:(< 0.1mm) is defined as the max peak amplitude value of the tube
position a second after the first peak (Instant when the picture from the tube is taken)
Figure 23 Specifications for reference generation

33
4.2. Simulation results with the reference: Giving a motion reference from initial velocity of 20 m/s and respecting the first approach of the distance break at 10mm, the response of the different controllers is:
Figure 24 Simulation results with a real reference
To compare the performances of vibration level and the current exigencies of each controller see the next bar chart who shows the maximal current (A), the mean current (A), the value of the first peak amplitude (mm in Tube) and the value:
Much Less Vibration
More Current Peak!
Figure 25 Performance comparative

34
4.2.1. Acceleration values:
Other results that have to be analyzed are the acceleration values range and his frequency, for the ulterior choice of the accelerometer sensor. Taking the values from the diagram block and applying the gains to obtain the acceleration in the Tube in g’s units it is obtained:
A c c M CBA c c Re f
A c c M CB+ SFA c c Re f
A c c O CA c c Re f
Figure 26 Tube acceleration values in simulation
In all the cases the value is smaller than 0.5g and looking to the signal period, there are all less than 5Hz.
4.3. Robustness study A Stability Robustness study is performed in front of the model parameters Stiffness (k) and Pivot inertia (Jpvt). They are the most unknown and variable parameters; remark that the pivot inertia depends on the position of the robot structure. For the robustness study it is used the structured singular value theory, which says [Ref. 2]:
( ) ( ) ( ){ }
αδαϖμ
εδεεδδ
1 then ,))((
;;,,,,,,,, 11 11q1
≤↔≤
ℑ∈ℜ∈ΔΔ=Δ
Δ StabilityjHand
IIIIppDiagpGiven iicccrrr crKKK
)( pΔ
)( pHe z
)( pΔ
)( pHe z
So it is enough to extract the parameter uncertainties in this form to use it. This can be done analytically (next it is given the example for the case of the Optimal Control for both parameters).

35
For the stiffness uncertainty:
( )
( ) ( ) ( )44444 344444 21
444 3444 21&&&&
&
&
&&
&
&&
&
&
1
11
0000
1o
4321
1///
111
//0/1000
///0010
;
e
z
pvtpvtmJpvtpvt
pvtpvtpvtpvtmpvtm
Jpvtpvtpvt
pvt
pvt
m
m
pvtpvtpvt
mmm
pvt
pvt
m
m
iccl
i
dkkJ
JdJkJk
JJJ
JdJkJk
llJklJdlJk
LJmKGlXBLAX
pvt
⎟⎟⎟
⎠
⎞
⎜⎜⎜
⎝
⎛−+−+−++−=
⎯→⎯⎥⎥⎦
⎤
⎢⎢⎣
⎡+=
⎥⎥⎥⎥⎥
⎦
⎤
⎢⎢⎢⎢⎢
⎣
⎡
⋅
⎥⎥⎥⎥⎥
⎦
⎤
⎢⎢⎢⎢⎢
⎣
⎡
−−
−−−−−−=
⎥⎥⎥⎥⎥
⎦
⎤
⎢⎢⎢⎢⎢
⎣
⎡
⎟⎠⎞⎜
⎝⎛=−=
θθθδθθθθ
δ
θθθθ
θθθθ
[ ] [ ]
⎪⎪⎪⎪⎪⎪
⎩
⎪⎪⎪⎪⎪⎪
⎨
⎧
+
⎥⎥⎥⎥⎥
⎦
⎤
⎢⎢⎢⎢⎢
⎣
⎡
−−=
⎥⎥⎥⎥⎥
⎦
⎤
⎢⎢⎢⎢⎢
⎣
⎡
−+
⎥⎥⎥⎥⎥
⎦
⎤
⎢⎢⎢⎢⎢
⎣
⎡
⋅
⎥⎥⎥⎥⎥
⎦
⎤
⎢⎢⎢⎢⎢
⎣
⎡
−−
−−−−−−=
⎥⎥⎥⎥⎥
⎦
⎤
⎢⎢⎢⎢⎢
⎣
⎡
11
1
1000
4321
00
1000
//0/1000
///0010
)(
edkkz
e
JJdJkJk
llJklJdlJk
jH
pvt
pvt
m
m
pvtpvt
pvt
m
m
pvtpvtpvt
mmm
pvt
pvt
m
m
θθθθ
θθθθ
θθθθ
ω
&
&
&
&
&&
&
&&
&
Having the transfer of H(jw), it only rests to calculate the singular values and conclude about de uncertainty margin you have with assured stability. Another example is given for the pivot inertia:

36
( )
[ ]
( ) ( ) ( ) ( )
( ) ( ) ( ) ( )
[ ] [ ]⎪⎪⎪⎪⎪⎪
⎩
⎪⎪⎪⎪⎪⎪
⎨
⎧
+
⎥⎥⎥⎥⎥
⎦
⎤
⎢⎢⎢⎢⎢
⎣
⎡
−=
⎥⎥⎥⎥⎥⎥
⎦
⎤
⎢⎢⎢⎢⎢⎢
⎣
⎡
−+
⎥⎥⎥⎥⎥
⎦
⎤
⎢⎢⎢⎢⎢
⎣
⎡
⋅
⎥⎥⎥⎥⎥
⎦
⎤
⎢⎢⎢⎢⎢
⎣
⎡
−−
−−−−−−=
⎥⎥⎥⎥⎥
⎦
⎤
⎢⎢⎢⎢⎢
⎣
⎡
−−
+−++−=
⎟⎟⎟
⎠
⎞
⎜⎜⎜
⎝
⎛−+−+−−+−−+−=
⎯→⎯+=
⎥⎥⎥⎥⎥
⎦
⎤
⎢⎢⎢⎢⎢
⎣
⎡
⋅
⎥⎥⎥⎥⎥
⎦
⎤
⎢⎢⎢⎢⎢
⎣
⎡
−−
−−−−−−=
⎥⎥⎥⎥⎥
⎦
⎤
⎢⎢⎢⎢⎢
⎣
⎡
⎟⎠⎞⎜
⎝⎛=−=
11
1
1
1
00
430210
100
1430210
1o
4321
00101
0
0
//0/1000
///0010
)(
///
///
//0/1000
///0010
;
1
1
ez
e
Jk
Jk
JdJkJk
llJklJdlJk
jH
Jk
JdJkJk
Jk
llJklJdlJk
kkk
JdJkJk
llJklJdlJk
LJmKGlXBLAX
pvt
pvt
m
m
pvt
m
pvt
pvt
m
m
pvtpvtpvt
mmm
pvt
pvt
m
m
pvtmkpvt
pvtpvtpvtpvtmpvtpvt
e
z
pvtmkm
pvtpvtmmmmmm
k
pvt
pvt
m
m
pvtpvtpvt
mmm
pvt
pvt
m
m
iccl
i
θθθθ
θθθθ
θθθθ
ω
θθδθθθθ
θθδθθθθθ
δ
θθθθ
θθθθ
&
&
&
&
&&
&
&&
&
&&&
4434421
43421&&&&
&
&
&&
&
&&
&
&
However, it can also be used Matlab Linear Analysis tool with the modification on the block diagram as:
m θ & & 1/ J m
1/ p
m θ 0k 1/p 1/pm Γ
d
+ + − −
− + 1/
p
m θ &
d
1 k kδ 1
1Jpvt Jpvtδ
− +
0
1Jpvt
PVTθ & PVTθ PVT θ & & m θ & & 1/ J m
1/ p
m θ 0k 1/p 1/pm Γ
d d
+ + − −
− + 1/
p
m θ &
d d
1 k kδ 1
1Jpvt Jpvtδ
− +
0
1Jpvt
PVTθ & PVTθ PVT θ & &
Figure 27 Mass‐Spring Model with uncertainties

37
The results for the stiffness and the pivot inertia uncertainty are:
))(( ϖμ jHΔ
Accelerometer Measures
))(( ϖμ jHΔ
Accelerometer Measures
( ) 11)( zep kδ=→Δ
))(( ϖμ jHΔ
Accelerometer Measures
))(( ϖμ jHΔ
Accelerometer Measures
( ) 11)( zep Jpvtδ=→Δ
Now, the same robustness study is done comparing the Optimal Control robustness if using ideal accelerometer measures, the state observer using only motor encoder measures and the state observer using also the accelerometer measures: Using state observer measures:
))(( ϖμ jHΔ
Obs+AccObsIdealM
))(( ϖμ jHΔ
Obs+AccObsIdealM
( ) 11)( zep kδ=→Δ
( )( )( )
⎪⎩
⎪⎨
⎧
≤≤Δ+
≤↔
− =
=
=
Δ
Δ+Δ
Δ
31. 1445.0
078. 0
41 . 2)(02 . 7)(
1 . 22 )(
max
max
max
Optimal MCBMCB
Stability
dBjHdBjH
dB jH
k
Optimal
MCB
MCB
θ δ
ϖμ
ϖμϖμ
θ
&
&
( )( )( )
⎪ ⎩
⎪ ⎨
⎧
≤ ≤ Δ+
≤ ↔
− =
=
=
Δ
Δ+Δ
Δ
27. 1441.0
078. 0
11 . 2)(1. 7)(
1 . 22 )(
max
max
max
OptimalMCBMCB
Stability
dBjHdBjH
dB jH
Jpvt
Optimal
MCB
MCB
θδ
ϖμϖμϖμ
θ
&
&
( ) ( ) ( )
⎪ ⎩
⎪ ⎨
⎧
≤ ≤≤
↔
=
−=
− =
Δ
Δ
Δ
973.0263.1
258.1
23. 0)(03. 2 )(
2)(
max
max
max
OldObs NewObsIdealM
Stability
dBjHdBjH
dBjH
k
OldObs
NewObs
IdealM
δ
ϖμϖμϖμ

38
))(( ϖμ jHΔObs+AccObsIdealM))(( ϖμ jHΔObs+AccObsIdealM
Remarks:
• Adding the accelerometer measures improves the robustness of the control. • It shows better results in the pivot inertia parameter, due to the strength
relationship of inertia and acceleration. • To compare in equality, the observer robustness should be compared in front
of an optimal control with the acceleration as a state. • It still must be done a study of the noise sensibility
The next two bode diagrams shows the effects of the pivot inertia uncertainty ( if used in the Actual control strategy and if used with the state feedback of the speeds). They allow concluding about the notch filter robustness:
MCB
MCB – 50% JpvtMCB + 50%JpvtMCB
MCB – 50% JpvtMCB + 50%Jpvt
MCBΔVel
MCBΔVel – 50% JpvtMCBΔVel + 50%JpvtMCBΔVel
MCBΔVel – 50% JpvtMCBΔVel + 50%Jpvt
Figure 28 Notch robustness analysis
It is shown that once the system is not exactly as expected, the resonance frequency is no longer avoided, appearing one next to the filtered frequency.
( )( )( )
⎪ ⎩
⎪ ⎨
⎧
≤≤≤
↔
−=
− =
− =
Δ
Δ
Δ
168.1401.1
216.1
35. 1 )(93. 2 )(7. 1 )(
max
max
max
OldObs NewObs IdealM
Stability
dBjHdBjH
dBjH
Jpvt
OldObs
NewObs
IdealM
δ
ϖμϖμϖμ
( ) 11)( zep Jpvtδ=→Δ

39
4.4. Conclusions:
See the next table that shows the main conclusions of the studied control strategies:
•Need of full state knowledge
•Best vibration results
•Robustness
•Easy Implementation
•Current Max Peak
•Generally less performing (Vibration specifications)
•No need of Pivot position
-
+
Optimal control
-+
MCB + Δdθ/dt
•Need of full state knowledge
•Best vibration results
•Robustness
•Easy Implementation
•Current Max Peak
•Generally less performing (Vibration specifications)
•No need of Pivot position
-
+
Optimal control
-+
MCB + Δdθ/dt
•Robustness
•Added delay
•Observability in Non-reversible transmission
•No accelerometer needed
•Robustness
•Added delay (Reference modification)
• Interesting if very noisy accelerometer measures
-+
StateObserver
-+
Notch Filter
•Robustness
•Added delay
•Observability in Non-reversible transmission
•No accelerometer needed
•Robustness
•Added delay (Reference modification)
• Interesting if very noisy accelerometer measures
-+
StateObserver
-+
Notch Filter

40
5. Accelerometer Model:
5.1. Introduction:
An accelerometer is a device, either mechanical or electromechanical, for measuring acceleration, which converts an input signal of acceleration in an electrical output signal. Accelerometers can be used to measure vibration on machines, cars, buildings, seismic activity, inclination etc. They can also be used to determine the tilt of a body. The massive apparition of the Micromachined Accelerometers has caused that they are increasingly being incorporated into personal electronic devices.
5.2. Principle of operation: The measurement of acceleration always relies on classical Newton’s mechanics. Generally there are two major families of accelerometers:
Open loop: A mass is inside of case connected via springs (and damping), null position means zero acceleration and when acceleration happens the displacement is proportional to the applied force:
Figure 29 Open loop accelerometer.
Using Newton’s second law of motion:
0=Δ+Δ+→⋅= xcxkxmamF &&&
Applying Laplace transformation, it gives a second order transfer function, with a natural frequency w, and the damping ζ depending on the parameters k, m, c:
p w2 p p mc p
1)()(
22
2
2
2 ww
ckpF
px
kmcmkw ++⎯⎯⎯ →⎯
++=
=
= ξξ
Closed loop: Here, the springs are replaced by electromagnetic devices (coils). When mass tries to displace (acceleration), the electric current is fed to coils for keeping the

41
mass at its”null” place. The force‐feedback method is more accurate than the open‐loop one and it is the most commonly used method. The electric current fed to coils is proportional to the acceleration.
Figure 30 Close loop accelerometer.
5.3. Types of accelerometers: There are a lot of different types of accelerometers, basically because of the different natures of the applications where they will be used. All of them are based in the Newton’s law of motion and the difference comes from the different way of measuring the proof‐mass movement. A fast overview of the most common types is given (See Ref. 10, Ref. 11, Ref. 12): Piezoelectric Accelerometer: Piezoelectric crystals are man‐made or naturally occurring crystals that produce a charge output when they are compressed, flexed or subjected to shear forces. The piezoelectric (PE) accelerometer uses a simple spring‐mass principle in which a force is generated that relates to amplitude and frequency. This force is applied to the PE element, which develops an electrical charge proportional to the mechanical motion. Because a PE device generates a charge output when actively stressed, it does not require an external power supply for operation.
Figure 31 Schema of a Piezoelectric Accelerometer.
Piezoresistive Accelerometer: The Piezoresistive Accelerometer is an accelerometer that uses a piezoresistive substrate in place of the piezoelectric crystal and the force exerted by the seismic mass changes the resistance of the etched bridge network and a whetstone bridge network detects this. Piézorésistive accelerometers have the advantage over piezoelectric accelerometers in that they can measure accelerations down to zero Hertz.

42
Figure 32 Example of Piezoresistive Accelerometer:
Strain gauge based Accelerometer: Strain gauge based Accelerometer uses the propriety of resistance variation of a strain gauge with the motion, which with the help of a Wheatstone‐bridge configuration produces an electrical signal proportional to motion. They have the same typical characteristics as Piézorésistive Accelerometers.
Figure 33 Strain gauge based Accelerometer.
Variable‐Capacitance Accelerometer: In the Variable‐Capacitance Accelerometer the sensor element is sandwiched between a lid and a base and electrostatically bonded to form a parallel‐plate capacitor. Changes in capacitance of the VC elements due to acceleration are sensed by a pair of current detectors that convert the changes into output voltage. Output voltage is proportional to capacitance changes, and, therefore, to acceleration. The variable‐capacitance sensors require a dynamic excitation and all capacitive designs contain an internal oscillator and signal demodulator to provide static capable outputs.
Figure 34 Variable‐Capacitance Accelerometer.

43
Force Balance (Servo) Accelerometer: A Force Balance (Servo) measures the electrical energy required to balance inertial forces caused by acceleration of a mass. If acceleration is applied to this assembly, a force is exerted on the mass and it will attempt to move from the null position. The coil current provides the restoring force required maintaining the null position and this current is in direct proportion to the applied acceleration.
Figure 35 Schema of a Force Balanced Accelerometer
Micromachined Accelerometer (MEMS): The same technology used to manufacture highly complex integrated circuits, can also be used with relatively slight modifications, to fabricate miniature mechanical devices. Silicon, also of his electronic properties, has some outstanding mechanical characteristics, so it is well suited for producing precision microstructures. The two most commonly used methods for detecting the position of the seismic mass are piezoresistive or capacitive signal pick‐off.
Figure 36 MEMS Accelerometer photography.

44
Measure down to 0 Hz (DC response)Wide dynamic range (>120 dB)Extremely stable over time and temperature Limited high frequency range (<1 kHz)Poor overload survivability (<100 g’s)Force balance may exhibit large magnetic sensitivityVery expensive
Measure down to 0 Hz (DC response)Limited dynamic range (<80 dB )Limited high frequency range (<10 kHz)Often a damped frequency response (0.7% of critical)Sensitivity may vary with input (mV/g/V)Traditionally fragile (limited shock protection)Operates multi-conductor cable (at least 3 wires)Micro-machined versions are small and lightweight Performance matches cost
Dynamic events only (>0.2 Hz)Wide dynamic range (>100dB)Wide frequency bandwidth (<1 Hz to >10 kHz)Solid-state (No moving parts)Self-generating piezoelectric elements require no powerOperates over two conductorsRugged (5,000 g’s)High temperature
Force Balance (Servo)Piezoresistive, Strain gauge based , Variable-Capacitance
Piezoelectric
*Extracted from "Lecture Notes from Remote Sensing and Space Sciences at UIUC"
Table 1 Accelerometer types comparative Ref. 13
5.4. Basic Performances: To be able to classify the quality of the accelerometer, as long as to decide if it is adequate for our interests, it is necessary first of all to define the most remarkable characteristics [Ref. 5]:
Bias: the zero acceleration output is normally kept at a bias, which normally is half of the supply voltage of the device. Scale Factor: Ratio of the change in output voltage in response to a change in the measured input acceleration, expressed as (mV/±/g). Resolution (or Sensitivity): Minimum acceleration signal variation that the accelerometer can detect. Dynamic Range: The dynamic range specifies the range of acceleration that the sensor is able to detect. Bandwidth: It is the term that defines how an accelerometer behaves when the acceleration is not a steady state value, but it is something that varies with time. If the acceleration changes faster than the response of the rate sensor, then there will be errors in the measurement of the angular rate. Noise: Noise can be defined as a function of frequency using a power spectral density (PSD).

45
The prototype boards used for experimentation had these specifications:
CHARACTERISTIC MIN TYPE MAX SYMBOL Bias 2.7 3.3 3.6 V Scale factor 740 800 860 mV/g Bandwidth 300 Hz Dynamic range +‐1.5 g Noise density 300 μg/√HZ
Table 2 Specification table for the X‐AXIS and Y‐AXIS accelerometer
CHARACTERISTIC MIN TYPE MAX SYMBOL Bias 2.25 2.5 2.75 V Scale factor 1140 1200 1290 mV/g Bandwidth 40 50 60 Hz Dynamic range +‐1.5 g Noise density 500 μg/√HZ
Table 3 Specification table for the Z‐AXIS accelerometer
5.5. Sensor error types There are different sources of error in the accelerometer measure that can be regrouped basically in (Ref. 14): Fixed bias (Bf): Bias or displacement from zero on the measurement. Sources of fixed bias:
• Switch‐on errors • Temperature dependent errors • Stochastic errors
Scale‐factor errors (Sx): Errors in ratio of change in the output signal to a change in the input acceleration, same sources than fixed bias. Cross‐axis coupling errors (My, Mz): Errors caused by accelerometer sensitivity to accelerations applied normal to the input axis Sources:
• Imperfect perpendicular alignment of sensors in triad of accelerometers • Electronic noise due common electronic components
Vibro‐pendulous errors (Bv): Errors caused by dynamic cross‐coupling of pendulous movement, angular displacement, and phasing between accelerometer pendulum and displacement. Can be expressed in units of g/g2 Noise (Nx) : Errors caused from the existing additive noise.

46
So finally the estimation of the acceleration measurement is:
( ) ( ) xaxisyaxisxvfaxiszzaxisyyaxisxxaxisx NAccAccBBAccMAccMAccSccA ++++++= −−−−−− 1~(8)
Noise considerations:
Three different noise sources are found in an electromechanical system like the accelerometer (Ref. 7) :
• Mechanical noise due to Brownian motion.
• Electronic noise introduced by the interface circuit due to thermal noise sources in the electronic devices.
• Quantization noise due to the analog to digital conversion process. Here it is only considered the electronic and the quantification noise. The standard deviation of the electronic noise introduced in the simulations was derived from the power spectral noise density and its closed loop bandwidth given in the accelerometer datasheet. X,Y Axis ‐> (standard deviation)
yx,σ = BWPSD *2 = HzHzg 300*300
2
⎟⎟⎠
⎞⎜⎜⎝
⎛ μ= 0.0052g due to the electronic noise
Z Axis ‐> ‐> (standard deviation)
yx,σ = BWPSD *2 = HzHzg 50*500
2
⎟⎟⎠
⎞⎜⎜⎝
⎛ μ= 0.0035g due to the electronic noise
The quantification noise is defined as a uniform distributed random signal when the original signal is much larger than one LSB. Its RMS (Root Mean Square) value is the standard deviation of this distribution, so 1/√12*LSB. X,Y Axis ‐> 1/√12* ΔV/ 2Nbits (LSB) * 0. 8 V/g (Sensibility) =
1/√12*3/28*0.8 = 0.0027g RMS due to the quantification
Z Axis ‐> 1/√12* ΔV/ 2Nbits (LSB) * 1.2 V/g (Sensibility) = 1/√12*3/28*0.8 = 0.0041 g RMS due to the quantification

47
5.6. Matlab model: An ulterior validation of the simulations has to be done using the next matlab model of the accelerometer, extracted from the described analysis of the accelerometers, and the specific values of the ones used in experimentation:
Figure 37 Matlab model of the accelerometer
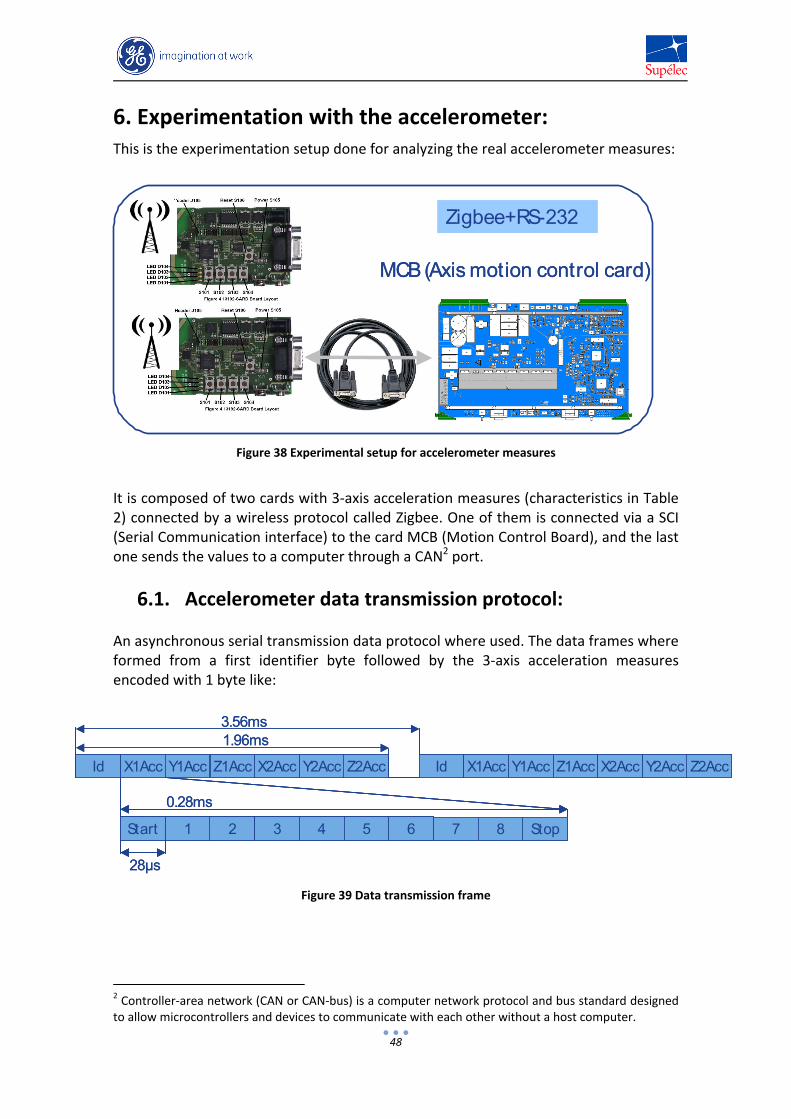
48
6. Experimentation with the accelerometer: This is the experimentation setup done for analyzing the real accelerometer measures:
Zigbee+RS-232
MCB (Axis motion control card)
Zigbee+RS-232
MCB (Axis motion control card)
Figure 38 Experimental setup for accelerometer measures
It is composed of two cards with 3‐axis acceleration measures (characteristics in Table 2) connected by a wireless protocol called Zigbee. One of them is connected via a SCI (Serial Communication interface) to the card MCB (Motion Control Board), and the last one sends the values to a computer through a CAN2 port.
6.1. Accelerometer data transmission protocol: An asynchronous serial transmission data protocol where used. The data frames where formed from a first identifier byte followed by the 3‐axis acceleration measures encoded with 1 byte like:
Id X1Acc Y1Acc Z1Acc X2Acc Y2Acc Z2Acc
3.56ms
Id X1Acc Y1Acc Z1Acc X2Acc Y2Acc Z2Acc
Id 1 2 3 4 5 6Start Stop7 8
0.28ms
28μs
Id X1Acc Y1Acc Z1Acc X2Acc Y2Acc Z2Acc Id X1Acc Y1Acc Z1Acc X2Acc Y2Acc Z2Acc
Id 1 2 3 4 5 6Start Stop7 8
1.96ms
Id X1Acc Y1Acc Z1Acc X2Acc Y2Acc Z2AccId X1Acc Y1Acc Z1Acc X2Acc Y2Acc Z2Acc
3.56ms
Id X1Acc Y1Acc Z1Acc X2Acc Y2Acc Z2AccId X1Acc Y1Acc Z1Acc X2Acc Y2Acc Z2Acc
Id 1 2 3 4 5 6Start Stop7 8Id 1 2 3 4 5 6Id 1 2 3 4 5 6Start Stop7 8
0.28ms
28μs
Id X1Acc Y1Acc Z1Acc X2Acc Y2Acc Z2Acc Id X1Acc Y1Acc Z1Acc X2Acc Y2Acc Z2Acc
Id 1 2 3 4 5 6Id 1 2 3 4 5 6Start Stop7 8
1.96ms
Figure 39 Data transmission frame
2 Controller‐area network (CAN or CAN‐bus) is a computer network protocol and bus standard designed to allow microcontrollers and devices to communicate with each other without a host computer.

49
6.2. Cantilever beam measures: To analysis the sensor signals proprieties, a first essay was done using a cantilever beam. One accelerometer where attached at the end of a cantilever beam for the firs acceleration measures. It had the interest to show how the accelerometer to a damped vibration reacted:
Figure 40 Cantilever beam experimental setup
It was shown, as expected from the model, that it is not possible to obtain directly the velocity and position from the acceleration measures:
Figure 41 Cantilever beam acceleration and direct velocity and position
Shown problems: • The integration of a white Gaussian noise is a Brownian movement.
• Bias: Position depends on acceleration by a t2 factor so a small acceleration error means fast position uncertainty.
• Need to know the gravity vector for absolute acceleration knowledge. Proposed solutions: • Use the direct geometry model for gravity vector estimation.
• Perform a calibration to reject the constant error sources
• Use a High‐Pass filter to eliminate the almost constant bias error.
• Use a Low‐Pass filter to reject the electrical noise.

50
Implementing a first simple calibration method (extracting the mean of constant acceleration measures), and filtering to respect the vibration frequency shows a clear improvement:
Figure 42 Cantilever beam acceleration and filtered velocity and position
Even if this shows proper results, the reality is much harder because the constant error bias varies with time and the frequency of resonance of the robot is slower making it more difficult to implement an effective high‐pass filtering without deforming the measured signal.
6.3. Experimental measures in Innova The same experimental setup where used for taking acceleration measures from the Innova robot. One accelerometer was attached to the x‐ray tube generator and the other one was attached to the detector like shown in the figure.
Figure 43 Experimental setup for Innova measures

51
Two situations were acquired. The first one consisted in movements of the pivot from 0º to 90º stopping in what is called “ Enable Release”. To enable a movement from the joystick, the user has to push firstly. An enable release is what happens when the user releases from pushing the joystick. It shows that the amplitude of vibration is very low, but it has been moved at 10º/s:
Figure 44 Innova measures with enable release
The second acquisition was an “Emergency stop”. This is a hardware stop that can be triggered either manually or for a system failure. It can be seen as a test of what happens in a faster breaking in open loop (there is no motion control if emergency stop), so it shows the apparition on a considerable vibration:
Figure 45 Innova measures with emergency stop

52
For a further analysis, it is necessary firstly to determine exactly the accelerometer measure frame used in the experimental measures. The sense of the axis in the accelerometer card is like:
Z
Y
X
Figure 46 Accelerometer Frame
So, as seen from the photo of the experimental setup, it is possible to obtain the measure axis frame of the accelerometer in each case (tube and detector) in front of the one of the positioning robot:
Z
Y
XZ
Y
X
Z
Y
X Z
Y
X Y
ZX
Y
Z
X
Y
ZX
Y
Z
X
Y
ZX
Y
ZX
Y
Z
X Y
Z
X
Figure 47 Accelerometer Frames in the experimental setup

53
7. Analysis of the experimental measures: Firstly, numerical analysis software like matlab is used to extract conclusions from the experimental measures. It is used for tasks like model parameter identification, calibration parameter estimation or filtering data. Most of the methods will have to be adapted for a further on‐board DSP implementation given the powerful limitation of it in relation to Matlab. However, these ones will be useful as a guideline for the final implemented ones.
7.1. Model Identification: To verify the used model, a piece of the acceleration measures from Innova were used in the case of the ‘emergency stop’ (Emergency stop is a hardware stop without any kind of regulation so it can be seen as an open loop response). From his FFT, it is shown two vibration modes: A first one, the one of interest, at a frequency of 4.67Hz, and a second one that is much more damped, which appears in all the axis (unconsidered since it is used a mono‐axis model).
PSD: Power Spectral Density
4.67Hz
Figure 48 Resonance frequency identification
The damping can be extracted from the temporal signal, looking for the amplitude attenuation in a time interval (using the known solution of a free response mass‐spring). Two measures were considered to give a variation range of the value.

54
( )0100
ln where10
ttBA
eCBeCA tt
−
⎟⎠⎞
⎜⎝⎛
=⎯→⎯=⋅=⋅= −−
ϖξξϖλλλ
67.420 ⋅⋅= πω A B t0 t1 ξ
Worst case 0.266 0.1205 7.905 11.88 0.0068 Best case 0.677 0.235 7.05 8.12 0.0337
These model parameter results are closed with those used in simulation, so the model parameters has been verified experimentally.
7.2. Calibration For a reliable measure acquisition, calibration is an important issue in sensor‐based systems. It is the only way to ensure a predictable quality of delivered information. Calibration is normally done during the production process, but it is very costly and sometimes requires manual steps, which increases considerably the cost. The first model of the accelerometer measures is shown in the figure. It is a 3‐axis accelerometer with non‐orthogonal axis. From this model there, three mathematical conversions has to be done to have three perfectly aligned accelerometer measures: Convert the tilted axis to a virtual orthogonal axis measures, estimating the scaling factor parameter and finally extracting the axis offsets.
x
y
z
xaccyacc
zacc
90°
•Tilted•Offset•Scaled
Figure 49 Accelerometer axis model
For simplification and shown that the results are enough satisfying, it is supposed having a perfectly aligned 3‐axis accelerometer. Consequently, there are only the scaling and the offset parameters to be found. For this, two proposed methods are found in the literature [Ref. 8]: Rotational Calibration: The method determines the offset and the scale factor for each axis separately. The method places the acceleration sensor to be oriented to the earth’s gravity centre and kept stationary. It is exposed to 1g and rotated and exposed to ‐1g. (Giving umax and umin) . Solving the equation gives the offset ox and scale factor sx
for this axis:
22minmaxminmax uusuuo xx
−=
+=

55
In order to find umax and umin the rotation has to be carried out very slowly to minimize the effect of dynamic acceleration components. This method presents 2 problems: The first one is than the precision of the calibration depends on the accuracy of the alignment, and the second one, and the limiting factor, is that the robot can’t be placed to (+/‐)g perfectly in all the accelerometer axis. For this reason the second calibration method is used. Automatic Calibration: Here, the idea is to use the earth’s gravity force as a known static acceleration on a 3‐axis accelerometer when a sensor has no dynamic component applied on it. Is this state of being stationary (no external acceleration) the following equation is valid:
1222 =++= zyxxr .
With the according offsets and scale errors of the accelerometers, the equation extends to:
( )wvuxs
ows
ovs
ou
z
z
y
y
x
x ,, where1222
==⎟⎟⎠
⎞⎜⎜⎝
⎛ −+⎟
⎟⎠
⎞⎜⎜⎝
⎛ −+⎟⎟
⎠
⎞⎜⎜⎝
⎛ − r
With this equation all the unknown calibration parameters (ox; oy; oz; sx; sy; sz) can be solved creating a six lined equation system using six earth’s gravity vectors measured in different orientations of the accelerometer. A variation of this last method id used for the numerical estimation of the calibration parameters. To minimize the effect of the noise in the parameter estimation, the calibration is done using the measures all along one trajectory. Moving the pivot from (+/‐)90°, the gravity follows a semicircle in the plane of the movement, where the eccentricity of the ellipse is the scaling factor of the y/z axis and the origin displacement is the offset. For the x‐axis, the principle is the same, but this time the trajectory is the pivot from (+/‐)90° and the C‐arc at 45°:
y-axis
z-axis
oz
oy
sz
sy
Measured g
Real g
1g
xacc
yacc
zacc
Pivot:(+/-)90°
xy
z
xacc
yacc
zacc
xacc
yacc
zacc
Pivot:(+/-)90°
xy
z
Figure 50 Calibration process example
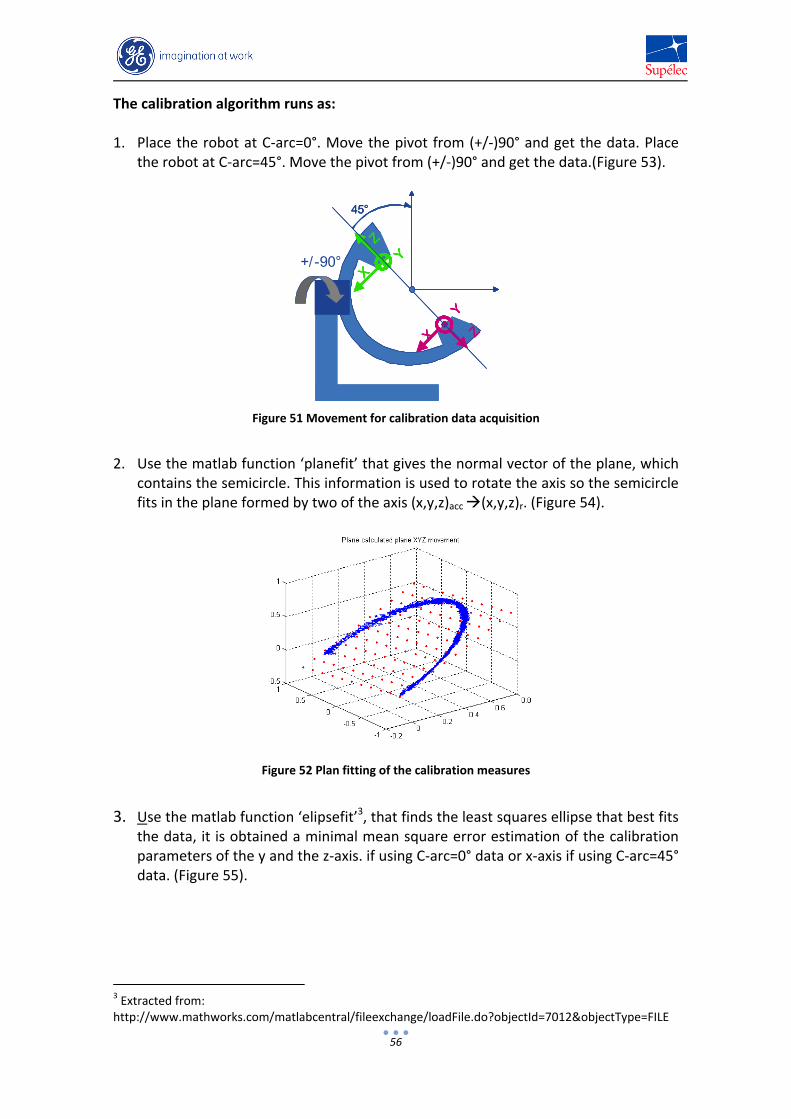
56
The calibration algorithm runs as: 1. Place the robot at C‐arc=0°. Move the pivot from (+/‐)90° and get the data. Place
the robot at C‐arc=45°. Move the pivot from (+/‐)90° and get the data.(Figure 53).
YZ
X
Y
ZX
45°
YZ
X
Y
ZX
YZ
XY
Z
X
Y
ZX
Y
ZX
45°45°
+/-90°
Figure 51 Movement for calibration data acquisition
2. Use the matlab function ‘planefit’ that gives the normal vector of the plane, which
contains the semicircle. This information is used to rotate the axis so the semicircle fits in the plane formed by two of the axis (x,y,z)acc (x,y,z)r. (Figure 54).
Figure 52 Plan fitting of the calibration measures
3. Use the matlab function ‘elipsefit’3, that finds the least squares ellipse that best fits
the data, it is obtained a minimal mean square error estimation of the calibration parameters of the y and the z‐axis. if using C‐arc=0° data or x‐axis if using C‐arc=45° data. (Figure 55).
3 Extracted from: http://www.mathworks.com/matlabcentral/fileexchange/loadFile.do?objectId=7012&objectType=FILE

57
Figure 53 Measure result of a (+/‐) 90° of the pivot
Figure 54 (+/‐) 90° of the pivot once rotated
Figure 55 Ellipse fitting and resultant ellipse once scaled and centered
4. To acquire a reliable measure, it is necessary to extract from the measures the
gravity component. It is attached to the real acceleration measure. This can be easily done now because the measures have been rotated to the plane of movement, so it is as simple as decompose 1g to sinus and cosines of the pivot angle (given by the pivot motor encoder).
5. Finally, the last stage is to divide the measure by the effective rayon, which
depends on the cosines of the C‐arc position: 1/(R_Carc*cos(CarcPos))

58
Figure 56 Simulink blocks of measures calibration / Verification
To verify that the calibration parameters where well estimated, it can be used the comparison of the motor encoder angle position measures with the angle given by the gravity vector. It can be done if assuming than the acceleration is much smaller than the 1g. The angle of the gravity vector is given by atan[x/y] where x is the x‐axis calibrated measure and y is the y‐axis calibrated measure):
Figure 57 Encoder position vs.Gravity estimated position (and XY decomposition)

59
7.3. Data Filtering: Once find out the calibration parameters, the next step before the measure can be used to feed the control loop is filtering the data for two main reasons: The first one is to reduce the electric noise, and the second one is to extract any offset component that can be lasted from the calibration process (with is translated in a drift in a eventual integration for the velocity and position estimation from the accelerometer measures). To reduce the electrical noise, it can be used a digital low pass band filter. This one is calculated using the Matlab Tool Filter Design & Analysis Tool. To be realistic, it was used a Butterworth filter of order 4.
Figure 58 Example of fdatool use for LPF design.
It is known from the model validation that the frequency of interest is ~4Hz so the frequency cut‐off of the filter was chosen as 10Hz (Also with the interest of avoiding the second vibration mode). The selected frequency sampling were 1000Hz, being the same as in the MCB card.
4-3-2-1-
-4-3-2-1-51
0.8486z3.5305z-5.5208z3.8358z-1)0.0898z0.3594zz5391.00.3594z (0.0898*10)(
++++++
=−zH LPF
To reject the offset component, it was used a digital high pass band filter. For the same reasons as in the LPF, the cut‐off frequency was chosen at 1Hz this time.
4-3-2-1-
-4-3-2-11
0.9837z3.9510z-5.9509z3.9836z-10.9918z3.9673z-5.9509z3.9673z- 0.9918)(
++++
=−zH HPF

60
Figure 59 Raw calibrated measures / HPF measures. / HPF+LPF Measures.

61
8. On‐Board DSP implementation: In the implementation of any algorithm in a DSP4 microprocessor, some issues have to be handled. The first one is the “real time” constraint, which is solved making special attention to the computational cost of the operations being done. A second one is the fact that all the previous calculus where done considering a double precision floating point data format. The used dsp (DSP56F805 from Freescale), does not have capability to perform real time operations in floating point. One way to attack this problem is to express each coefficient as a fraction. For example, 0.15 becomes 19/128. Instead of multiplying by 0.15, you first multiply by 19 and then divide by 128 (which is equivalent to a 7bit right shifting). Another problem is not having mathematical functions like the trigonometric ones. It has been solved replacing the required functions with look‐up tables. For example, there is a 8bit look‐up table that is 256 entries long, which contains the 256sampling points of the cosines all along 2*PI rad/s. So instead of doing cos(PI/4), it is taken the value of cosLUT[0x64]. This method is very fast, but it does require extra memory; a separate look‐up table is needed for each coefficient. In general, another embedded implementation techniques used were scaling values for a fully use of the register range, and doing intermediate operations in software emulated 32bits.
8.1. Communication Bus Issues: A MCB card controls each axis of the positioning robot of Innova, however all of them are communicated to a central CPU who calculates the desired trajectory and decomposes it in a trajectory of each axis that is send SCI. For the tests, instead of doing this, the trajectory is send by us through the CAN bus. This implies taking care of the “Bus load rate”, to avoid overloading it and then sending error frames to the card. To achieve this, two techniques are utilized: A hardware acceptance filter and interpolation to reduce the number of points send. 4 A digital signal processor (DSP or DSP micro) is a specialized microprocessor designed specifically for digital signal processing, generally in real‐time computing.

62
8.1.1. Interpolation: The first thing that was implemented was a linear interpolation algorithm. This was done because the final intention of the hardware department was to use a centralized multi‐variable control that send to each axe the trajectory each 4ms instead of 1ms to avoid bus saturation.
Figure 60 Send data and received interpolated data / Detail of interpolation
8.1.2. Hardware acceptance filter:
The DSP56F805 dispose of a hardware acceptance filter to filter the received data in the CAN bus. Taking advantage of the fact that each axis has an identifier, each card was programmed to filter all received data but those with the identifier of his axis.
Figure 61 Register of the CAN acceptance filter register

63
8.2. Implementation considerations: As already said in the introduction of the chapter, passing from the computer‐aided numerical and process analysis to the real hardware implementation, implies taking into account things like the gain equivalence of the real values to the 16 or 32‐bit register values, trigonometric functions, etc.
8.2.1. Accelerometer gain considerations: From the 802.15.4/ZigBee Evaluation Kit (13193EVK) schema (see Figure 73) it can be extracted the theoretical relationship between measure and g's acceleration: X,Y Axis: 3V*(1.0/1.0)(Resistance divisor) ‐> 3V/2^8 ‐‐> 1Bit = 11.7mV Sensibitity3.3V=800mV/g; Sensibitity3V = 800mV/g*(3/3.3)= 727.27 mV/g
‐>1bit = 16.1mg
Z Axis: 5V*(1.5/2.5)(Resistance divisor) ‐> 3V/2^8 ‐‐> 1Bit = 11.7mV Sensibitity5V=1200mV/g; Sensibitity3V = 1200mV/g*(3/5)= 720 mV/g
‐>1bit = 16.3mg
Scaling is applied in the DSP to use these measures in a 16‐bit register for a better resolution. The values are multiplied by 120. It not fills completely 16‐bits but this gives some surety margin to avoid overflow in further calculations.
Figure 62 Schema extract for accelerometer gain deduction

64
8.2.2. Trigonometric function implementation: Look‐up tables are commonly used for generating all sorts of functions, which are expensive to calculate on‐line. The general idea is that values are pre‐calculated and stored in an array so they can be "looked up" later. In this case we are concerned with storing values of sin(x) in a lookup table. (It will be used in the calibration algorithm, for the gravity component extraction and the rotation matrix). Taking advantage of the symmetry in the values of the trigonometric functions all along the four quarters of the unit circle, it is only stored the first quarter of the sinus function in a 8bit LUT (Look‐Up Table). From that, it is possible to obtain the cosines and sinus values of any angle.
Figure 63 Look‐Up Table implementation of sin(x) / cos(x)
8.2.3. Rotation Matrix implementation
In the calibration process, there is a rotation of the Y‐axis accelerometer frame to move it to the plane of movement, depending on the C‐arc position. This implies multiplying the tri‐axis measure by:
( ) ( )
( ) ( )ArcPosC
YRot
−=⎥⎥⎥
⎦
⎤
⎢⎢⎢
⎣
⎡
−=
θθθ
θθθ
cos0sin010
sin0cos)(
Here it is used the emulated 32‐bit internal multiplier, to multiply the 16‐bits measure to the LUT (also 16‐bits) which gives a 32‐bit size result; and then shifting by 15 to scale the trigonometric function to 1 so it can be saved in a 16‐bits value.

65
8.3. Calibration: The proposed calibration method exposed in the simulation chapter, implies multiple rotations and a plane and elliptic fitting algorithms, which cannot be implemented easily in a DSP. For this reason, a simplified algorithm is implemented, considering at this stage negligible the placement incorrections of the accelerometer in respect to the C‐Arc reference frame. So finally the implemented calibration method is composed of:
• One axis rotation depending on the C‐Arc position to move the 3‐axis measures to the plane of the pivot movement (remember that until now is the only axis of interest).
• Adding the off‐line calculated calibration parameters of scaling factors and
offsets. All parameters have been recalculated considering the 16 bits scale instead of using directly g’s unit.
Tube Accelerometer
cal.ox: ‐37.196 ~ ‐37 cal.oy: ‐2943.280 ~ ‐2943 cal.sx: 1.1085 cal.sy: 0.9878
Detector Accelerometer
cal.ox: 1806.5 ~ 1806 cal.oy: ‐2241.2 ~ ‐2241 cal.sx: 1.2497 cal.sy: 0.9962
• Extracting the gravity component to the measures. The gravity is decomposed
in sin/cos according to the pivot angle measure. • Once rotated to the plane of movement, y‐axis directly corresponds to the
acceleration in the moving sense of the pivot. To obtain the acceleration in the axis point, it must be divided by the rayon, which depends also of the C‐Arc position.
Figure 64 Simulink representation of the DSP implemented calibration algorithm
To verify than the calibration parameters where well estimated, it can be done the same comparative as in the analysis chapter: The angle of the motor encoder to the angle given by the gravity vector (to avoid implementing atan[x/y] in the DSP, the comparison is done with the x‐axis and y‐axis decomposition).

66
If it is looked carefully, it shows that there is a remaining error in the calibration. The main sources of this error are: the fact that it has been omitted the position incorrections of the accelerometers, and the existing acceleration into the measure (so the measure is not only gravity component).
X-Axis Position Component
Y-Axis Position Component
Tube Accelerometer
Figure 65 DPS calibration verification
So finally, once applied the scaling, the offset, deleting the gravity component and dividing by the rayon, the calibrated acceleration measure existing in the pivot axis is:
Detector
Tube
Figure 66 Calibrated acceleration measure in the pivot axis

67
It shows a remaining offset, due to the calibration errors. However this does not suppose a problem, because it will be rejected in the filtering stage. The gain errors, which cannot be seen directly in the graphics, do not suppose a problem either, because they will be included as a consideration in the gain tuning. Another interesting remark is the evidence that the vibration at the pivot point is different if taken from the tube and from the detector. The justification is that because C‐arc was placed at 45° when taking the measures, the inertia of each segment, pivot <‐> tube and pivot <‐> detector, were different consequently causing different responses. At C‐arc=45°, the pivot <‐> tube segment is larger and it corresponds to the larger vibrations acquired by the accelerometer.
8.4. Data Filtering: First essays of implementing a low and high pass frequencies as an IIR filter showed up the limitations of the hardware implementation. Round‐off errors due to the fact of working in a limited number of bits and the problem of using the outputs as an input for the next output calculation (which feedbacks the error), made the IIR filters not the best choice for digital implementation. As found in the literature [Ref. 15] “Single precision floating point is ideal to implement these simple recursive filters. The use of integers is possible, but it is much more difficult. There are two main problems. First, the round‐off error from the limited number of bits can degrade the response of the filter, or even make it unstable. Second, the fractional values of the recursion coefficients must be handled with integer math. […] Before you try either of these integer methods, make sure the recursive algorithm for the moving average filter will not suit your needs. It loves integers.” So instead of the used IIR filters, it were used the moving average filter (MA). In spite of its simplicity, the moving average filter is optimal for a common task: reducing random noise while retaining a sharp step response. This makes it the premier filter for time domain encoded signals. Basically, the MA filter is an averaging of a number of past inputs. His frequency response is given by:
[ ]∑=
−=M
i
ikxM
ky0
1)(
( )
→=)sin(
sin)(fM
fMfHπ
π
Figure 67 Frequency response of the Moving Average Filter
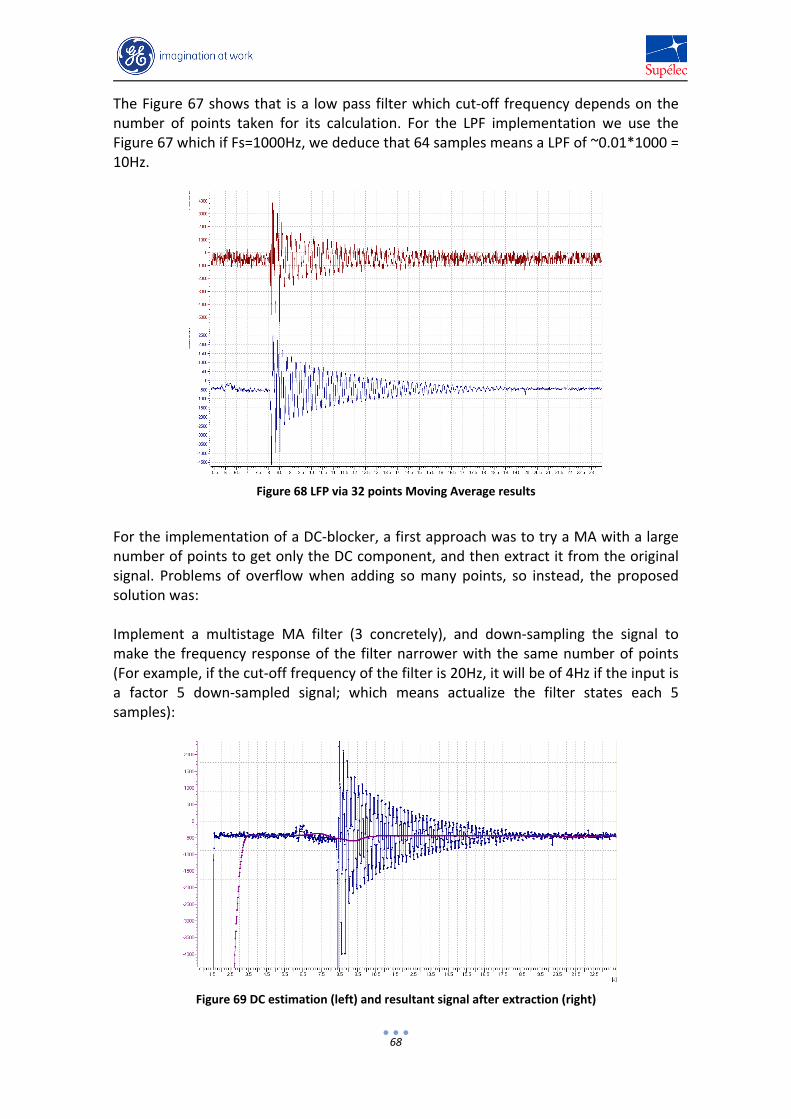
68
The Figure 67 shows that is a low pass filter which cut‐off frequency depends on the number of points taken for its calculation. For the LPF implementation we use the Figure 67 which if Fs=1000Hz, we deduce that 64 samples means a LPF of ~0.01*1000 = 10Hz.
Figure 68 LFP via 32 points Moving Average results
For the implementation of a DC‐blocker, a first approach was to try a MA with a large number of points to get only the DC component, and then extract it from the original signal. Problems of overflow when adding so many points, so instead, the proposed solution was: Implement a multistage MA filter (3 concretely), and down‐sampling the signal to make the frequency response of the filter narrower with the same number of points (For example, if the cut‐off frequency of the filter is 20Hz, it will be of 4Hz if the input is a factor 5 down‐sampled signal; which means actualize the filter states each 5 samples):
Figure 69 DC estimation (left) and resultant signal after extraction (right)

69
These results show that the HPF has a large delay, but as long as his function is to eliminate the calibration parameter errors and the sensor bias errors, this is not a problem because both of them are supposed to vary very slowly. Remark: If it is only taken the continuous component, no delay is added in the high pass filter because the signal himself is not filtered, it is only subtracted of his DC component. However, the low pass filter adds a delay to the signal proportional to the number of samples taken to filter it. Here, once again, exists a give and take between the signal quality and the delay added. Moreover there is the time taken by the processor to run the calibration algorithm. The total delay determined experimentally was approximately of 16ms.
8.5. Results:
After doing the calibration algorithm and the filtering process, it is finally obtained a clean signal in 16‐bits that represents the acceleration in the pivot axis with the next gain equivalences: 7453bits/1g for X‐Y axis and 7362bits/1g for Z‐axis.
Raw Measure
Cal Measure
Cal+Filt Measure
Figure 70 Raw / Calibrated / Filtered Accelerometer measure
At this point, the accelerometer still cannot be used to feed the optimal control state feedback, but at least it can be used as a calibrated sensor to do, for example, a vibration comparative analysis when breaking, depending on the different positions of the robot axis.

70
9. Perspectives: At this point, the accelerometer can be used as a vibration sensor of the image chain. It can be useful for example to compare later control strategies implementations. However, it still requires some work to be able to use this sensor for the return of state. Some ones have already been started like:
9.1. Speed and Position estimation First essays to get the speed and the position measures from the acceleration by integration, showed again the numerical limitation of the hardware implementation. As it can be seen in (Figure 71), the speed (and even harder in position) follows a random tendency that comes from the round‐off error of the DC component estimation.
Figure 71 Speed and position estimation from acceleration
9.2. Optimal control implementation:
The DSP was already programmed to control the axis using a state feedback using only, for now, the measures of the motor encoder position and speed, and also the error position integral. For this firstly it was carefully seen the equivalence of the gains founded in simulation and those to be used in the DSP:
9.2.1. Gain considerations:
To obtain the gains that have to be implemented in the MCB card, it has to be considered the internal gains of the card and the side from the where the gains were obtained in theory:

71
→
−=→
−=Γ→−=Γ
norm degresin Measures
/// sradmsradmsradfromload KxNrKcIx
NrKKx
⎥⎥⎥⎥
⎦
⎤
⎢⎢⎢⎢
⎣
⎡
⎥⎥⎥⎥⎥⎥⎥⎥
⎦
⎤
⎢⎢⎢⎢⎢⎢⎢⎢
⎣
⎡
⎥⎥⎥⎥⎥⎥⎥⎥
⎦
⎤
⎢⎢⎢⎢⎢⎢⎢⎢
⎣
⎡
=
⎥⎥⎥⎥
⎦
⎤
⎢⎢⎢⎢
⎣
⎡
snpvt
npvt
snm
nm
TOradMCBgains
sradpvt
radpvt
sradm
radm
/deg
deg
/deg
deg
deg
/
/
180000
0180
00
00180
0
000180
2001000
0100
100
0020010
000100
1
θθθθ
π
π
π
π
θθθθ
&
&
4444 34444 214444 34444 21
&
&
KNrKcKmcb
⎥⎥⎥⎥⎥⎥⎥⎥
⎦
⎤
⎢⎢⎢⎢⎢⎢⎢⎢
⎣
⎡
−=
36000000
018000
00
0036000
0
00018000
π
π
π
π
9.2.2. Experimental essays of optimal control Experimental essays were done with a state feedback from the motor encoder measures. They were realized sending through the CAN bus a sinusoidal trajectory to the pivot and the C‐arc axis. Even if it is in a early stage of implementation, it demonstrated good results in trajectory tracking.
Figure 72 Motor state feedback results

72
10. Conclusions In theory, the addition of an accelerometer has been shown as a powerful sensor for the vibration reduction, as long as it can give useful information about the velocity and the position. The optimal control strategy has exposed to add robustness and performances to the system so it is interesting to follow this research line for the future. However, it has been revealed that it is hard to use the measures of the accelerometer for a useful speed and position measurement, so it rests a deeper study for achieving it. Additionally, it has to be taken into account that here it has been used a simplified one axis model, so it still rests an extrapolation in the multi‐axis case to be closer to reality. Doing a study of the state of art of the accelerometers, it was found that the gyroscopes had better drift performances and that they give directly the angular velocity (only need to integrate once to get the position) so it is interesting to see if they are a better possibility of measuring the entire state vector. Additionally, the state observers are something to work on. In this internship where finally not tested because they are being numerically hard to implement in a DSP. Nevertheless, it is also an interesting line of work for future studies. It is interesting to mention that even the final objective is still not obtained, a lot of intermediate benefits where achieved. Among them, the validations of the model parameters from the accelerometer measures, the definition of an automatic calibration method and the first stages of the implementation of the new control strategy in the MCB card. The pass from the simulation world to the real hardware implementation has demonstrated to be a hard task, where even the most common tasks ended to be a real challenge. Also notable is the fact of working in a large complex system. This implied solving problems of unknown origin. Finally, I would like to express the benefits of participating on a so interesting internship, where I have had the opportunity to learn a large amount of things of very varied domains, going from system modeling to the digital hardware implementation.

73
11. Bibliography
Books : Ref. 1 M.R.Hatch "Vibration Simulation Using MATLAB and ANSYS", Chapman & Hall/CRC, 2001
Ref. 2 Duc,Gilles: “Commande robuste multivariable”, Supélec.
Papers : Ref. 3 Al Assad, Omar « Etude d’une methodologie de modelisation et de commande d’un robot multiaxes pour une application en radiologie medicale »
Ref. 4 N.Patil, "Design and Analysis of MEMS Angular Rate Sensors", Department of Mechanical Engineering Indian Institute of Science Bangalore, June 2006.
Ref. 5 M.Kraft, C.P.Lewis, Thomas G. Hesketh, "Control system design study for a micromachined accelerometer",Coventry University
Ref. 6 M.Kraft*, C.P.Lewis**, "System Level Simulation of a Digital Accelerometer", *University of California,**Coventry University.
Ref. 7 Noise Considerations for Closed Loop Digital Accelerometers Elena Gaura*, Michael Kraft** *Coventry University, **University of Southampton
Ref. 8 “Inexpensive and Automatic Calibration for Acceleration Sensors”,Albert Krohn, Michael Beigl, Christian Decker, Uwe Kochendörfer, Philip Robinson and Tobias Zimmer, Universität Karlsruhe.
Internet: Ref. 9 http://www.stanford.edu/class/ee363/ Lecture Notes of Linear Dynamical Systems, Stanford University,2005‐06.
Ref. 10 http://www.me.uvic.ca/~mech466/MECH466‐Lecture‐1.pdf Microelectromechanical Systems Lectures University of Victoria
Ref. 11 http://archives.sensorsmag.com/articles/0299/prac0299/main.shtml A Practical Approach to Vibration Detection and Measurement
Ref. 12 http://archive.evaluationengineering.com/archive/articles/0501data.htm Selecting the Optimum Accelerometer for Your Application
Ref. 13 http://airglow.csl.uiuc.edu/Teaching/ECE437/FA2007/ECE437_Lecture10.pdf Lecture Notes from Remote Sensing and Space Sciences at UIUC
Ref. 14 http://www.tkt.cs.tut.fi/kurssit/9628/121107_Accelerometers.pdf Tampere University of Technology , Inertial Navigation Seminar: Accelerometers.
Ref. 15 http://www.dspguide.com/ The Scientist and Engineer's Guide to Digital Signal Processing

74
12. Annex: A. 802.15.4/ZigBee Evaluation Kit (13193EVK) schema
Figure 73 Zigbee Accelerometer card schematics

75
B. X&Y-Axis Accelerometer Datasheet:

76

77
C. Z-Axis Accelerometer Datasheet
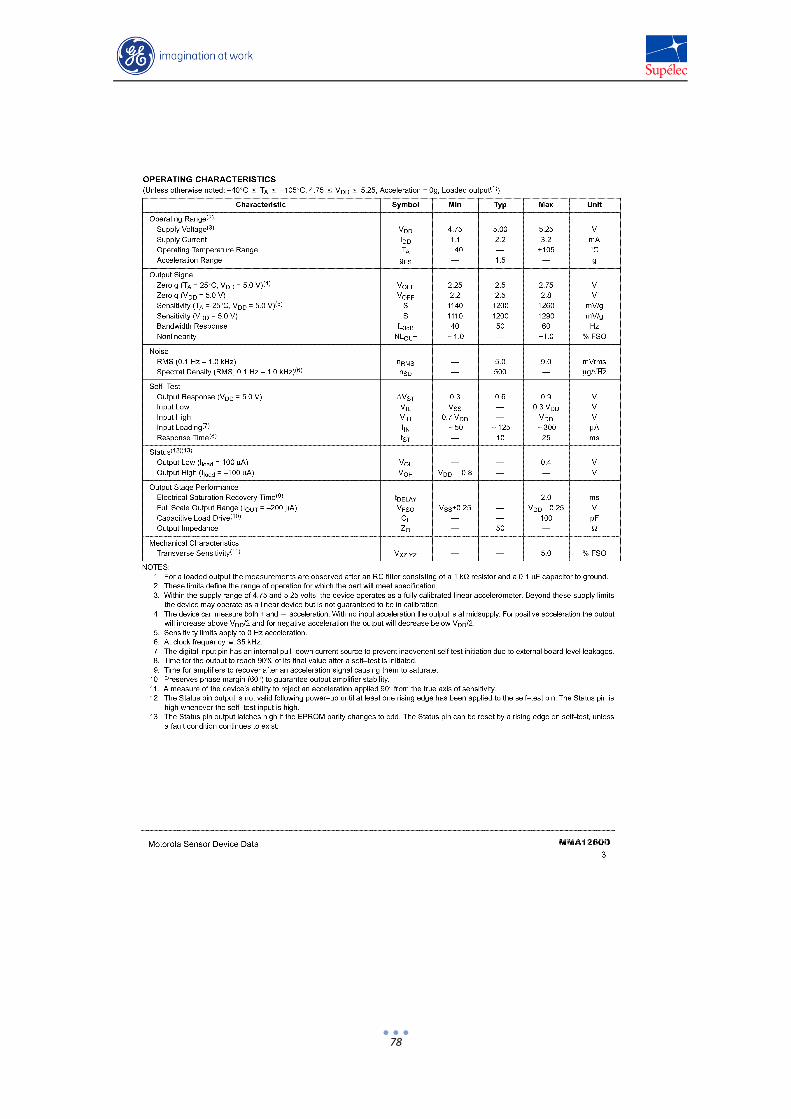
78


![Chapter [6] Strategy Implementation and Control Strategy Implementation and Control](https://img.pdfslide.us/doc/110x75/56649cdb5503460f949a5895/chapter-6-strategy-implementation-and-control-strategy-implementation-and.jpg)