Embed Size (px)
Citation preview

Training Guide PeopleSoft CMS - Self Service
Page i
STUDENT SELF ENROLLMENT
1. Please type the URL in Explorer, provided to you in the letter. Following screen
will show up:
2. Login to PeopleSoft using the User Id and Password provide to you in the letter.

Training Guide PeopleSoft CMS - Self Service
Page ii
Table of Contents Student ............................................................................................................................... 1
Student Center ............................................................................................................................. 1 Student - Biographic & Demographic Info ................................................................................. 4 Student - My Weekly Schedule ................................................................................................... 9 View My Assignments .............................................................................................................. 15 View My Grades ........................................................................................................................ 18 My Course History .................................................................................................................... 21 Online Enrollment - Add Classes .............................................................................................. 27 Online Enrollment - Add Classes with Labs ............................................................................. 42 Online Enrollment - Drop Classes ............................................................................................. 48 Online Enrollment - No More Capacity .................................................................................... 54 Online Enrollment - Pre Requisite Not Met .............................................................................. 60 Online Enrollment - With Negative Holds Applied .................................................................. 69 View Unofficial Transcript ........................................................................................................ 81 View Degree Progress Report ................................................................................................... 88 Account Inquiry ......................................................................................................................... 92 Print Invoice .............................................................................................................................. 98

Training Guide PeopleSoft CMS - Self Service
Page 1
Student
Student Center
Procedure
PeopleSoft Student Ceter feature provides students flexibility to view his academic
information on one page. This feature also provides students access to various links to
view/edit their academic information, etc.
Step Action
1. Click the Sign In button.

Training Guide PeopleSoft CMS - Self Service
Page 2
Step Action
2. Click the Self Service link.

Training Guide PeopleSoft CMS - Self Service
Page 3
Step Action
3. Click the Student Center link.

Training Guide PeopleSoft CMS - Self Service
Page 4
Step Action
4. Point to the Academic Information object.
5. Point to the Student's Finances Information object.
6. Point to the Student Biographic and Demographic Information object.
7. Point to the Search for Classes object.
8. Point to the Student's Advisor object.
9. Point to the Links to External Web Pages object.
10. End of Procedure.
Student - Biographic & Demographic Info
Procedure
Using Personal Campus Information, student can view/edit their biographic, and
demohraphic data.

Training Guide PeopleSoft CMS - Self Service
Page 5
Step Action
1. Click the Sign In button.
Training Guide PeopleSoft CMS - Self Service
Page 6
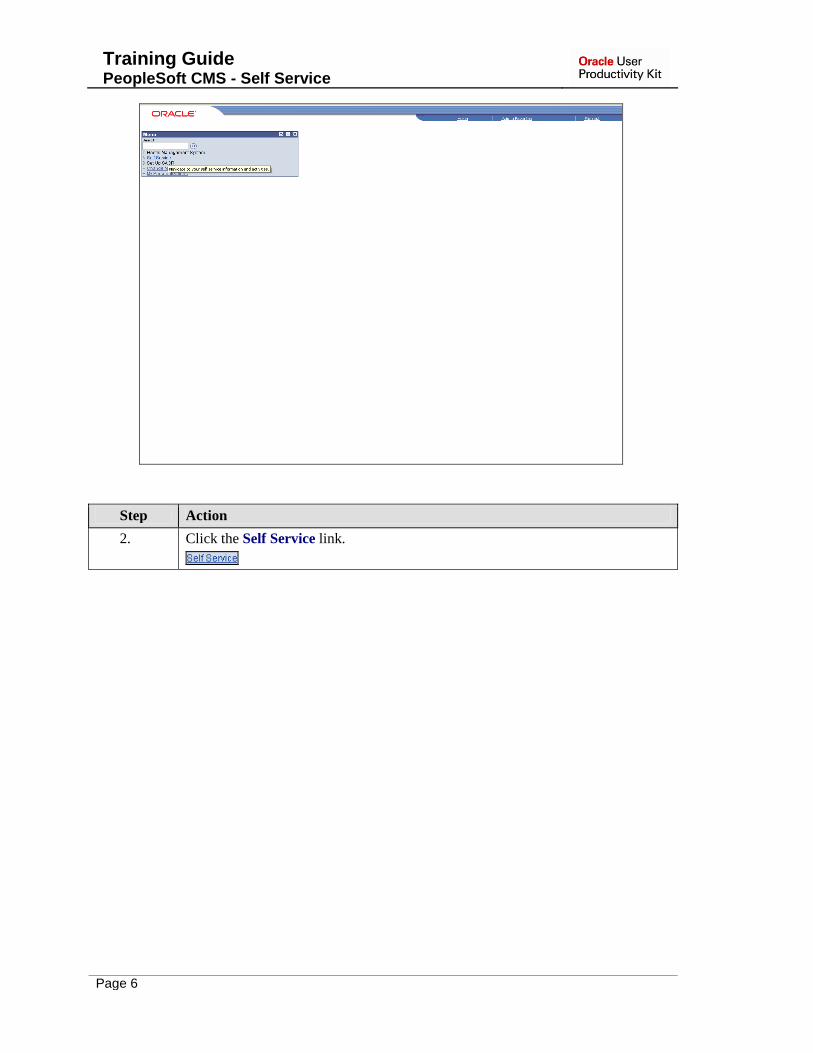
Step Action
2. Click the Self Service link.
Training Guide PeopleSoft CMS - Self Service
Page 7
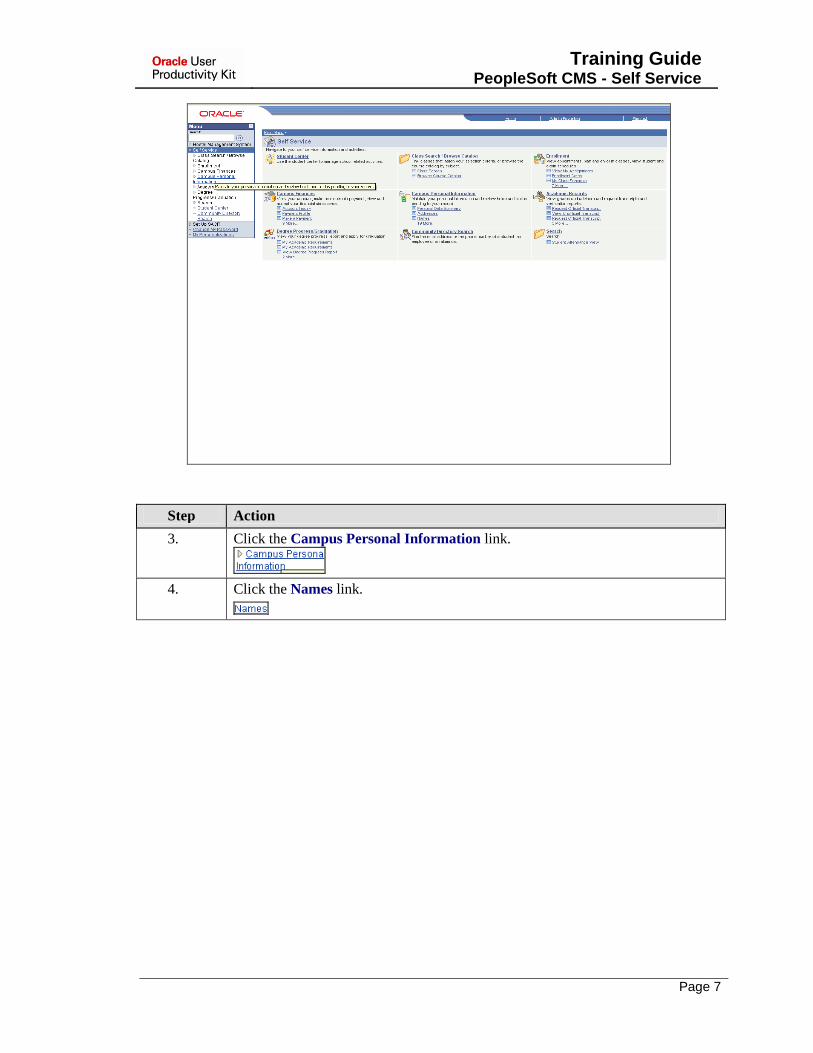
Step Action
3. Click the Campus Personal Information link.
4. Click the Names link.
Training Guide PeopleSoft CMS - Self Service
Page 8
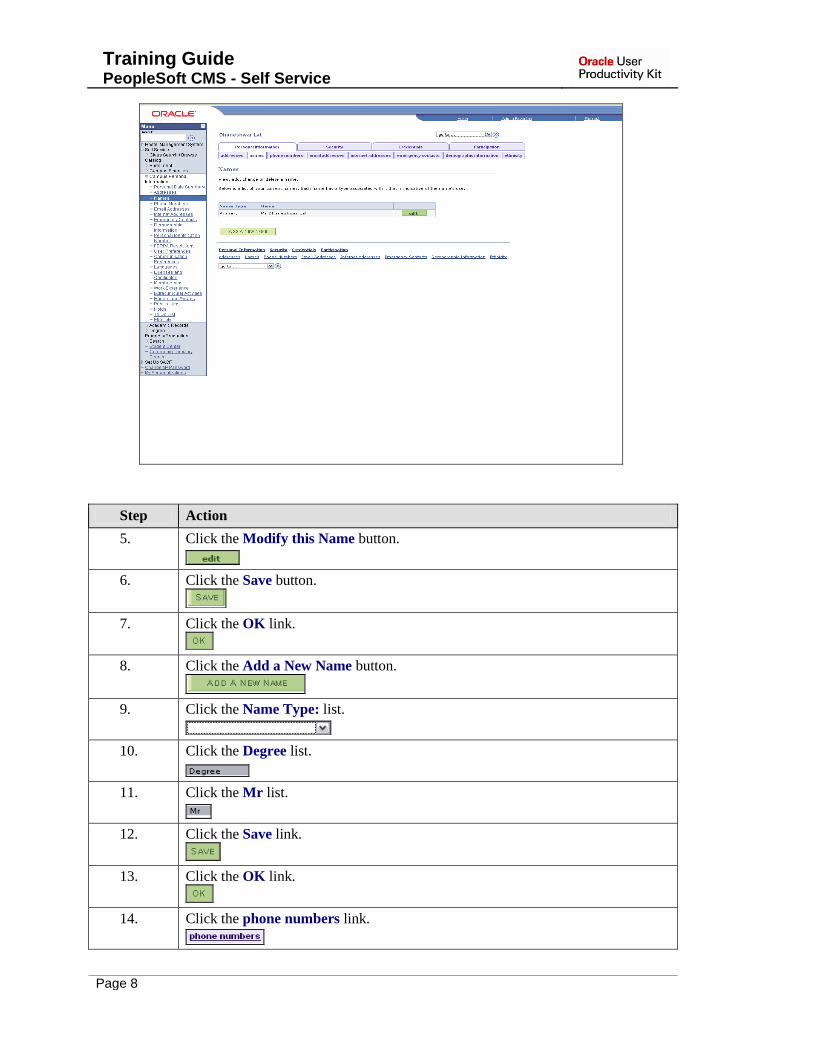
Step Action
5. Click the Modify this Name button.
6. Click the Save button.
7. Click the OK link.
8. Click the Add a New Name button.
9. Click the Name Type: list.
10. Click the Degree list.
11. Click the Mr list.
12. Click the Save link.
13. Click the OK link.
14. Click the phone numbers link.

Training Guide PeopleSoft CMS - Self Service
Page 9
Step Action
15. Enter the desired information into the field. Enter "92033467414253".
16. Click the Save link.
17. Click the OK link.
18. Point to the Peronsal Information object.
Under Personal Information Tab, Student can view/edit their's email
address, internet addresses, etc.
19. Click the Credentials link.
20. Point to the Credentials object.
Under Credentials Tab, student can view/edit their licenses, certificates, etc.
21. Click the Participation link.
22. Point to the Participation object.
Under Participation Tab, student can view/edit their publication,
extracurricular activities, etc.
23. End of Procedure.
Student - My Weekly Schedule
Procedure
Student can view weekly schedule of their classes.

Training Guide PeopleSoft CMS - Self Service
Page 10
Step Action
1. Click the Sign In button.

Training Guide PeopleSoft CMS - Self Service
Page 11
Step Action
2. Click the Self Service link.

Training Guide PeopleSoft CMS - Self Service
Page 12
Step Action
3. Click the Enrollment link.

Training Guide PeopleSoft CMS - Self Service
Page 13
Step Action
4. Click the My Weekly Schedule link.

Training Guide PeopleSoft CMS - Self Service
Page 14
Step Action
5. Point to the My Class Schedule object.
6. Enter the desired information into the Show Week of field. Enter "08/01/2008".
7. Click the refresh calendar link.
8. Click the Show Instructors option.
9. Click the refresh calendar link.
10. Click the Show Class Title option.
11. Click the refresh calendar link.
12. Enter the desired information into the End Time field. Enter "12:00PM".
13. Click the refresh calendar link.
14. End of Procedure.

Training Guide PeopleSoft CMS - Self Service
Page 15
View My Assignments
Procedure
Student can view assignments, marks and equivalent grade for a class of current term.
Step Action
1. Click the Sign In button.

Training Guide PeopleSoft CMS - Self Service
Page 16
Step Action
2. Click the Self Service link.

Training Guide PeopleSoft CMS - Self Service
Page 17
Step Action
3. Click the Enrollment link.
4. Click the View My Assignments link.

Training Guide PeopleSoft CMS - Self Service
Page 18
Step Action
5. Click the Managerial Accounting link.
6. Point to the Expand Assignment Categories section object.
7. Click the Expand Grade Scale section graphic.
8. Press the left mouse button and drag the mouse to the desired location.
9. Click the Expand Instructor Comments section graphic.
10. Press the left mouse button and drag the mouse to the desired location.
11. Press the left mouse button and drag the mouse to the desired location.
12. End of Procedure.
View My Grades
Procedure
Student can view grades of courses of current term.

Training Guide PeopleSoft CMS - Self Service
Page 19
Step Action
1. Click the Sign In button.
2. Click the Self Service link.

Training Guide PeopleSoft CMS - Self Service
Page 20
Step Action
3. Click the Enrollment link.
4. Click the View My Grades link.

Training Guide PeopleSoft CMS - Self Service
Page 21
Step Action
5. Point to the Fall 2008 Stats object.
6. End of Procedure.
My Course History
Procedure
Student can view history of their attempted courses.

Training Guide PeopleSoft CMS - Self Service
Page 22
Step Action
1. Click the Sign In button.

Training Guide PeopleSoft CMS - Self Service
Page 23
Step Action
2. Click the Self Service link.

Training Guide PeopleSoft CMS - Self Service
Page 24
Step Action
3. Click the Academic Records link.
4. Click the My Course History link.

Training Guide PeopleSoft CMS - Self Service
Page 25
Step Action
5. Click the Sort results by list.
6. Click the Term list.

Training Guide PeopleSoft CMS - Self Service
Page 26
Step Action
7. Click the Course list.

Training Guide PeopleSoft CMS - Self Service
Page 27
Step Action
8. Click the sort link.
9. Point to the Course Status object.
10. End of Procedure.
Online Enrollment - Add Classes
Procedure
To Enroll into a class without lab follow the steps given in this lesson.

Training Guide PeopleSoft CMS - Self Service
Page 28
Step Action
1. Please enter the User ID and Password provided to you in your letters instead of
"Model_Student".
Enter the desired information into the User ID: field. Enter "Model_Student".
2. Enter the desired information into the Password field. Enter .
"Model_Student"
3. Click the Sign In button.

Training Guide PeopleSoft CMS - Self Service
Page 29
Step Action
4. Click the Self Service link.

Training Guide PeopleSoft CMS - Self Service
Page 30
Step Action
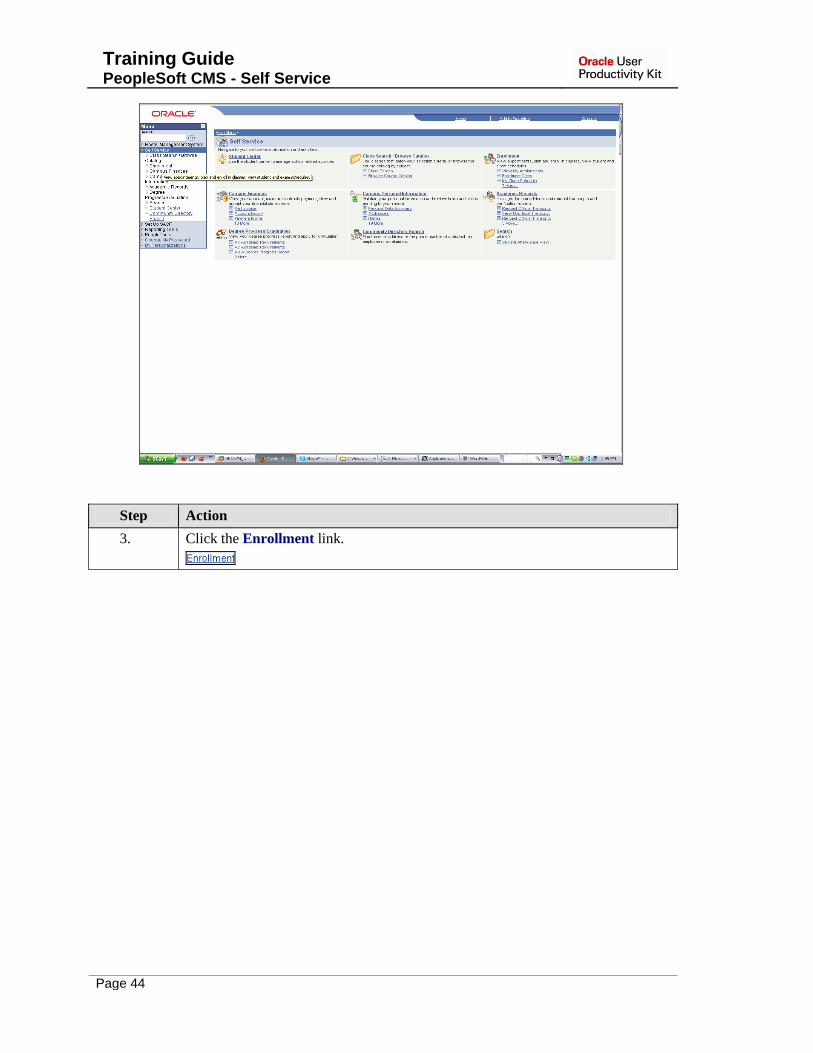
5. Click the Enrollment link.
6. Click the Enrollment Add Classes link.

Training Guide PeopleSoft CMS - Self Service
Page 31
Step Action
7. Select the term for which you want to enroll into a course.
Click the Summer 2010 option.
8. Click the Continue button.

Training Guide PeopleSoft CMS - Self Service
Page 32
Step Action
9. Click the Search button.

Training Guide PeopleSoft CMS - Self Service
Page 33
Step Action
10. Click the Course Subject list.

Training Guide PeopleSoft CMS - Self Service
Page 34
Step Action
11. Select the Course Subject of the class in which you want to enroll.
Click an entry in the list.

Training Guide PeopleSoft CMS - Self Service
Page 35
Step Action
12. If you know the Coruse Number/Catalog Number then enter it here else, click on
the search button.
Click in the Course Number field.
13. Click the Search button.

Training Guide PeopleSoft CMS - Self Service
Page 36
Step Action
14. To select a course
Click the Select Class button.

Training Guide PeopleSoft CMS - Self Service
Page 37
Step Action
15. Check details of the Course that you selected and to continue
Click the Next button.

Training Guide PeopleSoft CMS - Self Service
Page 38
Step Action
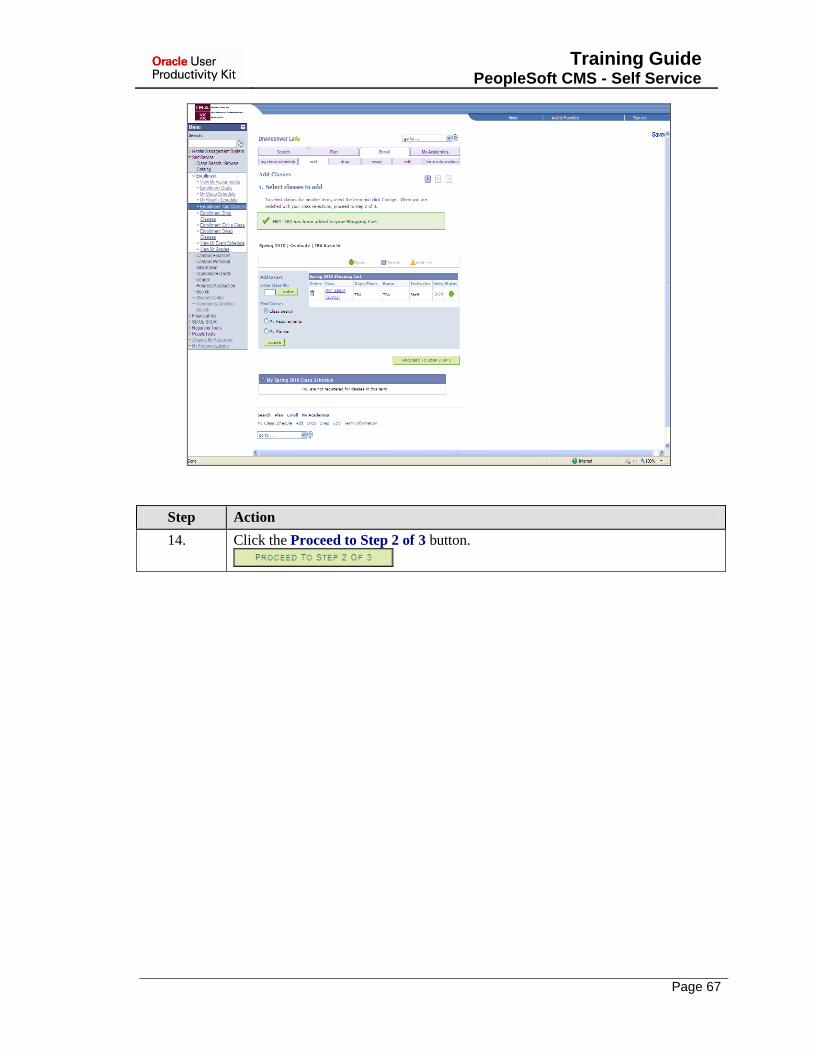
16. The course that you selected has been added to your cart.
Click the Proceed to Step 2 of 3 button.
Training Guide PeopleSoft CMS - Self Service
Page 39
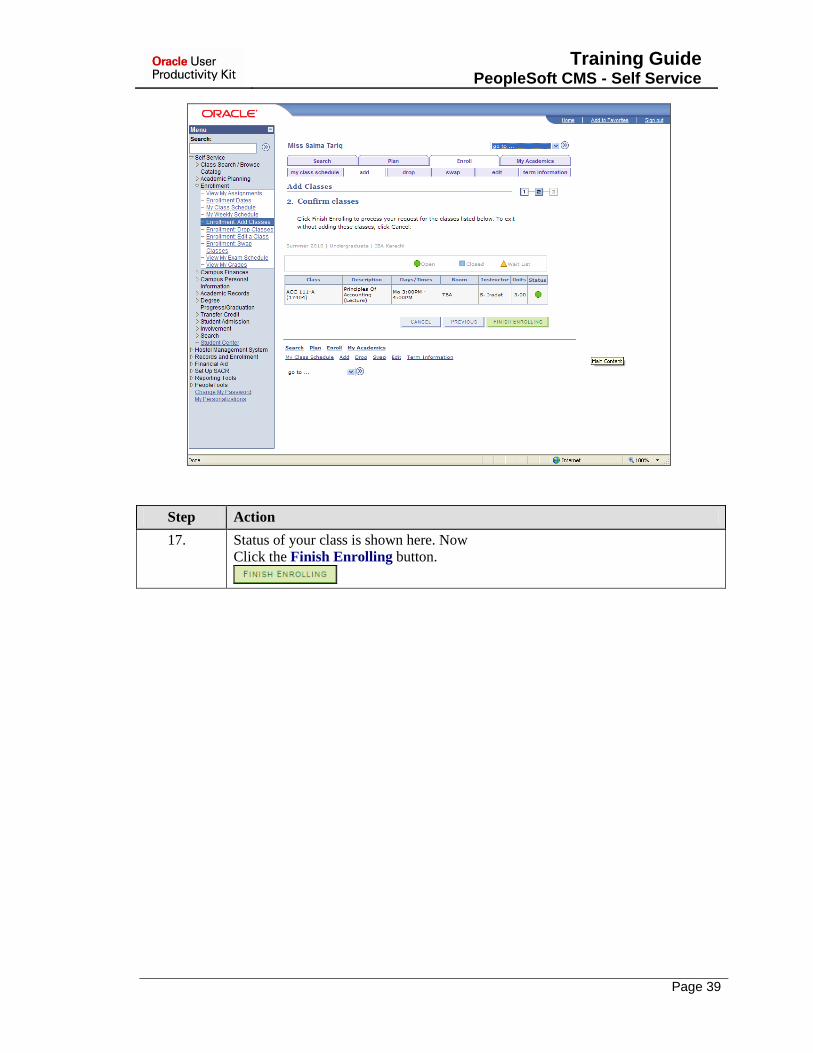
Step Action
17. Status of your class is shown here. Now
Click the Finish Enrolling button.

Training Guide PeopleSoft CMS - Self Service
Page 40
Step Action
18. If Status of the class is Success that means you are successfully enrolled in the
class.
If Status of the class is Error that means you are unable to enroll in this class.
Please see the message against the class for details.
To enroll into another course click 'Add Another Class' button.
To see the schedule of your classes,
Click the My Class Schedule button.

Training Guide PeopleSoft CMS - Self Service
Page 41
Step Action
19. Your Class Schedule is shown here. If enrollment is successfull, you could see the
selected course here.
To see only the Enrolled courses uncheck Show Dropped Classes and Show
Waitlisted Classes option.
Click the Show Dropped Classes option.
20. To unchek Show Waitlisted Classes,
Click the Show Waitlisted Classes option.

Training Guide PeopleSoft CMS - Self Service
Page 42
Step Action
21. Click the filter button.
22. Now you could only see the classes in which you are enrolled. Filter can also be
applied in a similar way to show the dropped classes.
End of Procedure.
Online Enrollment - Add Classes with Labs
Procedure
Online Enrollment - Add Classes lesson shows the steps to Enroll in Classes without Labs. To
enroll into classes with which labs are associated follow steps given in this lesson.

Training Guide PeopleSoft CMS - Self Service
Page 43
Step Action
1. Please enter the User ID and Password provided to you in your letters instead of
using " Model_Student".
Click the Sign In button.
2. Click the Self Service link.
Training Guide PeopleSoft CMS - Self Service
Page 44
Step Action
3. Click the Enrollment link.

Training Guide PeopleSoft CMS - Self Service
Page 45
Step Action
4. Click the Enrollment: Add Class link.
5. Click the Class Search option.
6. Click the search button.
To enroll into....

Training Guide PeopleSoft CMS - Self Service
Page 46
Step Action
7. Select the Course Subject of the class in which you want to enroll.
Click an entry in the list.

Training Guide PeopleSoft CMS - Self Service
Page 47
Step Action
8. Click the Search link.
9. View the list of classes by scrolling down.
Scroll the object with the mouse wheel.
10. Select the class in which you want to enroll. The lab associated with this class will
be automatically added.
Click the select class link.
11. Select your required Laboratory section.
Click the Select this row option.
12. Click the Next link.
13. You can see that both lecture and Labortary have been added in your shopping
cart.
Click the Next link.
14. Click the Proceed to Step 2 of 3 link.
Added classes in shopping Cart will be registered!

Training Guide PeopleSoft CMS - Self Service
Page 48
Step Action
15. Status of your class and Lab are shown here.
Click the Finish Enrolling link.
16. If status of the class is Success that means you are successfully enrolled in the
class.
If Status of the class is Error that means you are unable to enroll in this class.
Please see the message against the class for details.
To add another class click on 'Add Another Class' button and to view your class
Schedule click on ' My Class Schedule' button.
Click the Add Another Class button.
17. End of Procedure.
Online Enrollment - Drop Classes
Procedure
You can Drop a class only if you are already enrolled into a class.

Training Guide PeopleSoft CMS - Self Service
Page 49
Step Action
1. Please enter the User ID and Password provided to you in your letters instead of
"Model_Student".
Enter the desired information into the User ID: field. Enter "Model_Student".
2. Enter the desired information into the Password: field. Enter "Model_Student".
3. Click the Sign In button.
Step Action
4. Click the Self Service link.

Training Guide PeopleSoft CMS - Self Service
Page 50
Step Action
5. Click the Enrollment link.
6. Click the Enrollment: Drop Classes link.

Training Guide PeopleSoft CMS - Self Service
Page 51
Step Action
7. Select your current term here for which you want to drop a class.
Click the Summer 2010 option.
8. Click the Continue button.

Training Guide PeopleSoft CMS - Self Service
Page 52
Step Action
9. Click the Select option.
This will select the course to be dropped.
10. Click the Drop Selected Classes button.

Training Guide PeopleSoft CMS - Self Service
Page 53
Step Action
11. Click the Finish Dropping button.

Training Guide PeopleSoft CMS - Self Service
Page 54
Step Action
12. If Status against the class is Success, that means you have successfully dropped
the class.
If Status against the class is Error, that means you are unable to drop the class.
Please see the message against the class for further details.
Point to the object.
13. You can also view the status of the course by clicking on 'My Class Schedule'
button.
End of Procedure.
Online Enrollment - No More Capacity
Procedure
Student trying to enroll in a class, which doesn't belong to their program.

Training Guide PeopleSoft CMS - Self Service
Page 55
Step Action
1. Click the Sign In button.
2. Click the Self Service link.

Training Guide PeopleSoft CMS - Self Service
Page 56
Step Action
3. Click the Enrollment link.
4. Click the Enrollment: Add Classes link.

Training Guide PeopleSoft CMS - Self Service
Page 57
Step Action
5. Click the search link.

Training Guide PeopleSoft CMS - Self Service
Page 58
Step Action
6. Click the Course Subject: list.

Training Guide PeopleSoft CMS - Self Service
Page 59
Step Action
7. Click the Search link.
8. Scroll the object with the mouse wheel.
9. Click the select class link.
10. Click the Select this row option.
11. Click the Next link.
12. Click the Next link.
13. Click the Proceed to Step 2 of 3 link.
Proceed to enrolling in classes added in the Shopping Cart
14. Click the Finish Enrolling link.
15. System stopped student from enrolling in the class by indicating reason that
Available seats are reserved, and student doesn't meet the reserve capacity
requirement.
End of Procedure.

Training Guide PeopleSoft CMS - Self Service
Page 60
Online Enrollment - Pre Requisite Not Met
Procedure
Step Action
1. Press [Ctrl+V].
2. Click the Sign In button.
3. Click the Self Service link.
4. Click the Enrollment link.
5. Click the Enrollment: Add Classes link.

Training Guide PeopleSoft CMS - Self Service
Page 61
Step Action
6. Click the Class Search option.
7. Click the Search button.

Training Guide PeopleSoft CMS - Self Service
Page 62
Step Action
8. Click the Course Subject list.

Training Guide PeopleSoft CMS - Self Service
Page 63
Step Action
9. Point to the Management Info. Sys object.
10. Click the Marketing list item.

Training Guide PeopleSoft CMS - Self Service
Page 64
Step Action
11. Click the Search button.

Training Guide PeopleSoft CMS - Self Service
Page 65
Step Action
12. Click the Select Class button.

Training Guide PeopleSoft CMS - Self Service
Page 66
Step Action
13. Click the Next button.
Training Guide PeopleSoft CMS - Self Service
Page 67
Step Action
14. Click the Proceed to Step 2 of 3 button.

Training Guide PeopleSoft CMS - Self Service
Page 68
Step Action
15. Click the Finish Enrolling button.
16.

Training Guide PeopleSoft CMS - Self Service
Page 69
Step Action
17. Release the mouse button.
18. End of Procedure.
Online Enrollment - With Negative Holds Applied
Procedure
Training Guide PeopleSoft CMS - Self Service
Page 70
Step Action
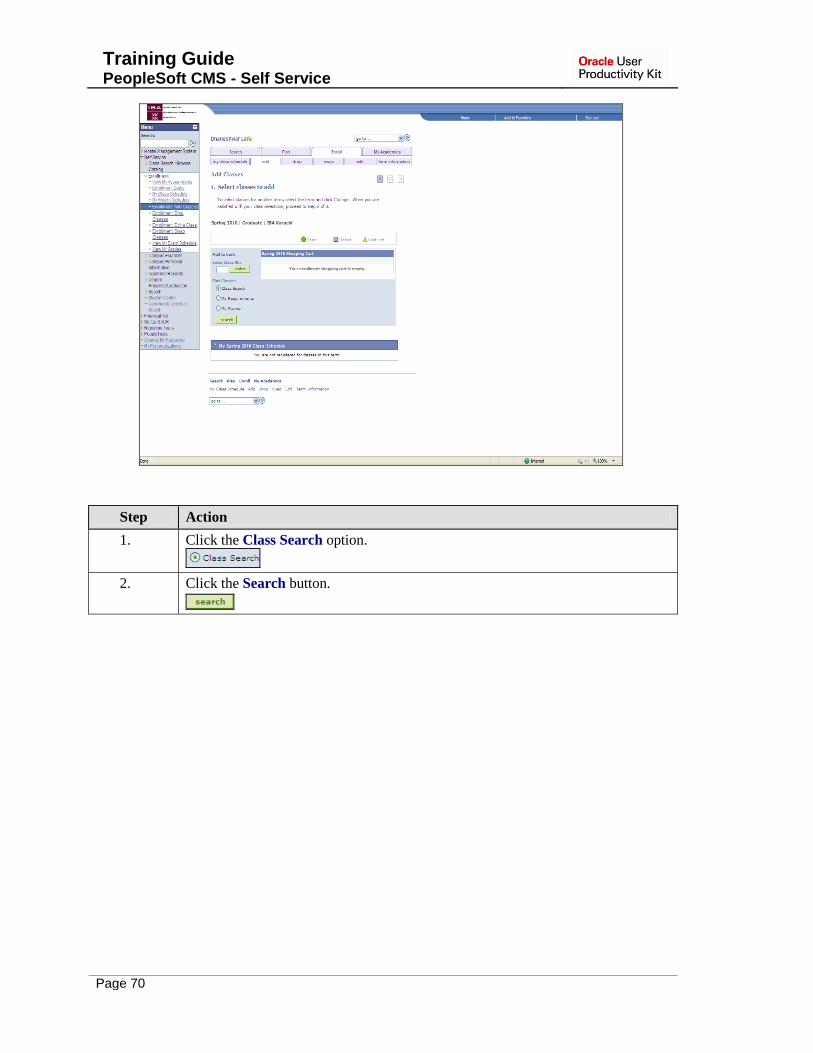
1. Click the Class Search option.
2. Click the Search button.

Training Guide PeopleSoft CMS - Self Service
Page 71
Step Action
3. Click the Course Subject list.

Training Guide PeopleSoft CMS - Self Service
Page 72
Step Action
4. Point to the Marketing object.
5. Click the Marketing list item.

Training Guide PeopleSoft CMS - Self Service
Page 73
Step Action
6. Click the Search button.

Training Guide PeopleSoft CMS - Self Service
Page 74
Step Action
7. Click the Select Class button.

Training Guide PeopleSoft CMS - Self Service
Page 75
Step Action
8. Click the Next button.

Training Guide PeopleSoft CMS - Self Service
Page 76
Step Action
9. Click the Proceed to Step 2 of 3 button.

Training Guide PeopleSoft CMS - Self Service
Page 77
Step Action
10. Click the Finish Enrolling button.
11. Click the object.

Training Guide PeopleSoft CMS - Self Service
Page 78
Step Action
12. Click the object.

Training Guide PeopleSoft CMS - Self Service
Page 79
Step Action
13. Point to the Details object.
14. Click the Details link.

Training Guide PeopleSoft CMS - Self Service
Page 80
Step Action
15. Click an entry in the Hold Item column.

Training Guide PeopleSoft CMS - Self Service
Page 81
Step Action
16. Click the Return button.
17. End of Procedure.
View Unofficial Transcript
Procedure
Student can view their provisional (unofficial) transcript.

Training Guide PeopleSoft CMS - Self Service
Page 82
Step Action
1. Click the Sign In button.

Training Guide PeopleSoft CMS - Self Service
Page 83
Step Action
2. Click the Self Service link.

Training Guide PeopleSoft CMS - Self Service
Page 84
Step Action
3. Click the Academic Records link.

Training Guide PeopleSoft CMS - Self Service
Page 85
Step Action
4. Click the View Unofficial Transcript link.

Training Guide PeopleSoft CMS - Self Service
Page 86
Step Action
5. Click the Unofficial Transcript list.
Training Guide PeopleSoft CMS - Self Service
Page 87
Step Action
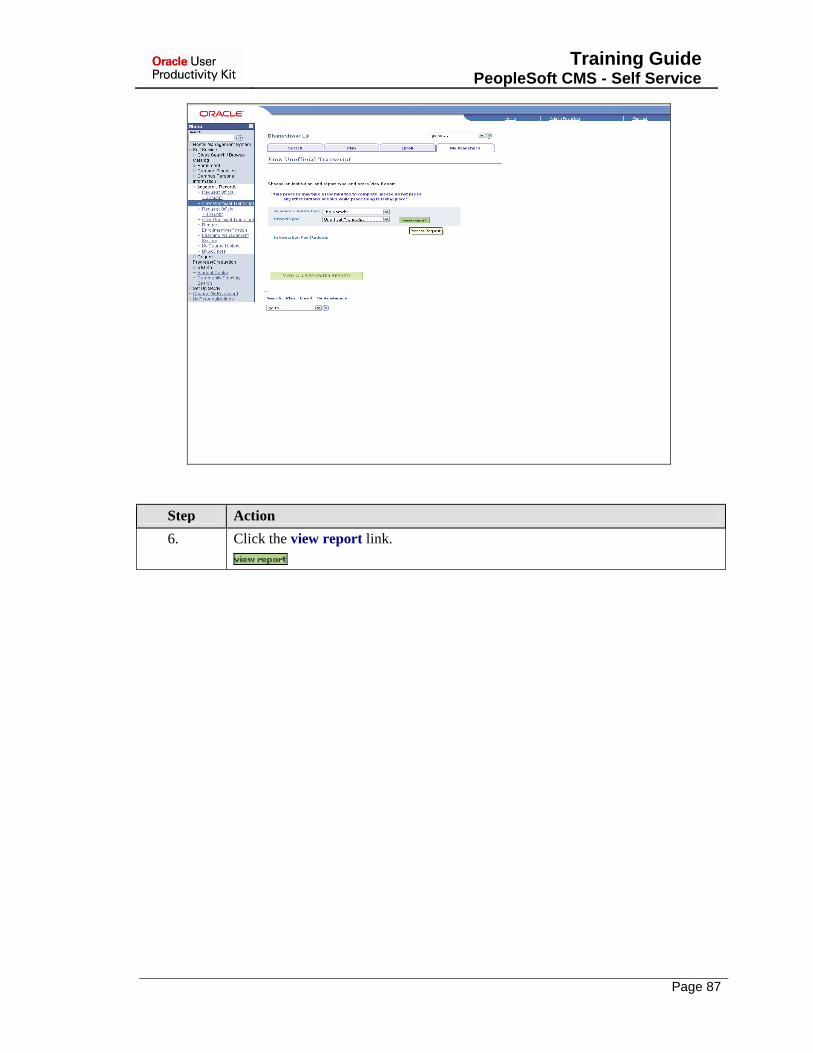
6. Click the view report link.

Training Guide PeopleSoft CMS - Self Service
Page 88
Step Action
7. Click the view report link.
8. End of Procedure.
View Degree Progress Report
Procedure
Student can view their progress towards degree.

Training Guide PeopleSoft CMS - Self Service
Page 89
Step Action
1. Click the Sign In button.

Training Guide PeopleSoft CMS - Self Service
Page 90
Step Action
2. Double-click the Self Service object.

Training Guide PeopleSoft CMS - Self Service
Page 91
Step Action
3. Click the Degree Progress/Graduation link.
4. Click the My Academic Requirements link.
Training Guide PeopleSoft CMS - Self Service
Page 92
Step Action
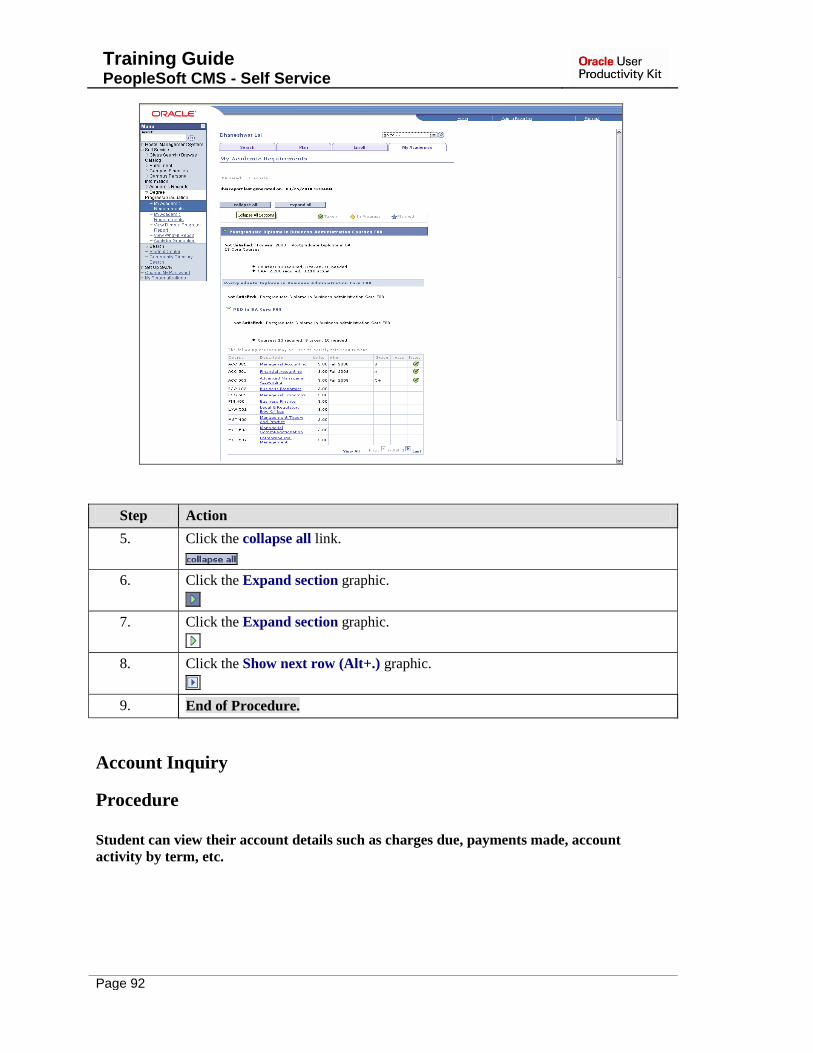
5. Click the collapse all link.
6. Click the Expand section graphic.
7. Click the Expand section graphic.
8. Click the Show next row (Alt+.) graphic.
9. End of Procedure.
Account Inquiry
Procedure
Student can view their account details such as charges due, payments made, account
activity by term, etc.

Training Guide PeopleSoft CMS - Self Service
Page 93
Step Action
1. Click the Sign In button.

Training Guide PeopleSoft CMS - Self Service
Page 94
Step Action
2. Click the Self Service link.

Training Guide PeopleSoft CMS - Self Service
Page 95
Step Action
3. Click the Campus Finances link.
4. Click the Account Inquiry link.

Training Guide PeopleSoft CMS - Self Service
Page 96
Step Action
5. Click the Activity link.

Training Guide PeopleSoft CMS - Self Service
Page 97
Step Action
6. Click the Fall 2008 list.
Training Guide PeopleSoft CMS - Self Service
Page 98
Step Action
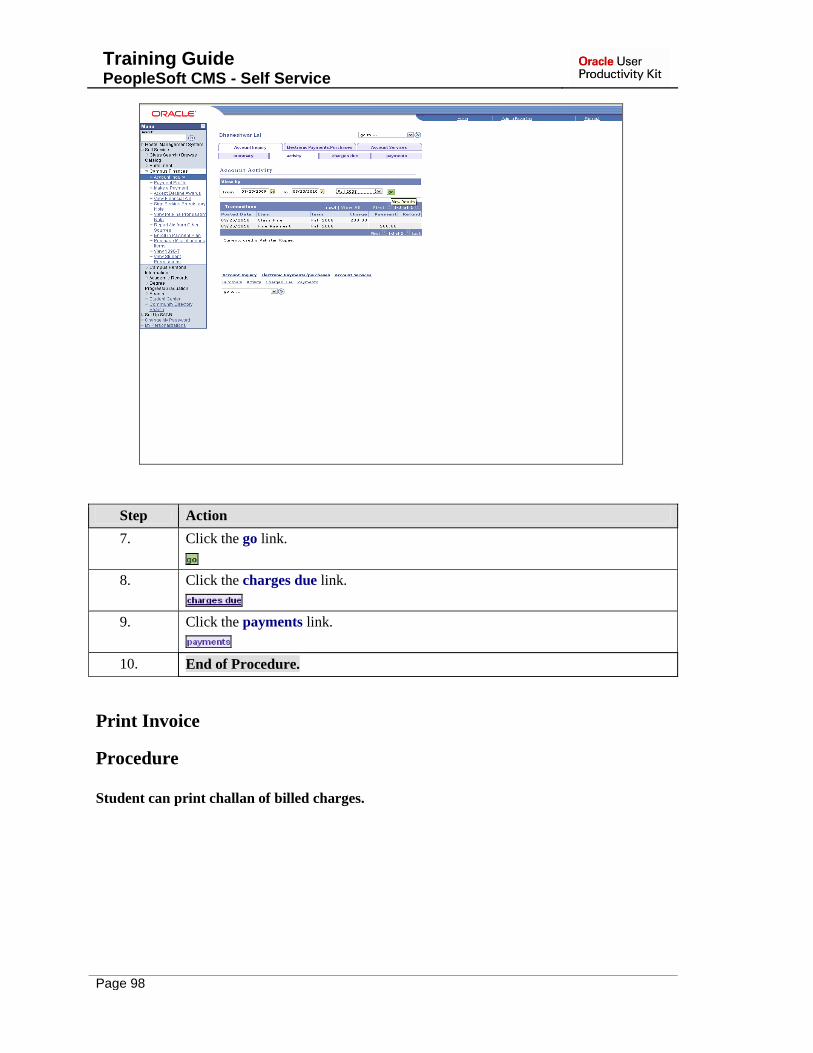
7. Click the go link.
8. Click the charges due link.
9. Click the payments link.
10. End of Procedure.
Print Invoice
Procedure
Student can print challan of billed charges.

Training Guide PeopleSoft CMS - Self Service
Page 99
Step Action
1. Click the Sign In button.

Training Guide PeopleSoft CMS - Self Service
Page 100
Step Action
2. Click the Self Service link.

Training Guide PeopleSoft CMS - Self Service
Page 101
Step Action
3. Click the Campus Finances link.
4. Click the Print Invoice link.

Training Guide PeopleSoft CMS - Self Service
Page 102
Step Action
5. Click the dd a New Value link.
6. Enter the desired information into the Run Control ID: field. Enter
"print_challan".
7. Click the Add (Alt+1) button.
8. Click the Look up Invoice Number (Alt+5) graphic.
9. Click the IBA-000000000000000009 link.
10. Click the Save (Alt+1) button.
11. Click the Run button.
12. Click the Server Name: list.
13. Click the Ok (Enter) button.
14. Click the Process Monitor link.

Training Guide PeopleSoft CMS - Self Service
Page 103
Step Action
15. Click the Refresh button.
16. Point to the Report Stats object.
Run Status: Should be Success
Distribution Status: Should be Posted
17. Click the Go back to Print Invoice link.
18. Click the Report Manager link.
19. Click the Administration link.
20. Click the Details link.
21. Click the SSF_PRNT_INV.pdf link.
Training Guide PeopleSoft CMS - Self Service
Page 104
Step Action
22. Click the zoom graphic.
23. End of Procedure.