Embed Size (px)
Citation preview

Stryker Studio3 iPad App
User Manual
November 2012 P22611 REV B www.stryker.com
This manual contains confidential information that shall not be disclosed or duplicated for any reason other than to use and main-tain the STRYKER STUDIO3 IPAD APP. This restriction does not limit the right to use information contained in this manual if it is obtained from another source without restriction. The information subject to this restriction is contained in all pages of this manual.
© November 2012 Stryker Communications. All Rights Reserved. Information in this document is subject to change without notice. Stryker and Stryker logo are registered trademarks of Stryker.Endosuite® OR and iSuite® are registered trademarks of Stryker.All Rights Reserved
Stryker Studio3 iPad App User Manual
P22611A Rev B
Stryker Studio3 iPad AppUser Manual

S
1
Contents
1. Indications for Use ..................................................................................3
1.1 System Requirements.......................................................... 3
2. General Warnings and Cautions ..............................................................4
2.1 Warnings ............................................................................ 4
2.2 Notes ................................................................................. 4
2.3 Product Symbol Definition ................................................... 4
3. Installing the Studio3 App ......................................................................5
4. Setting up the App .................................................................................6
4.1 Connecting to a Server......................................................... 6
4.2 Cache Settings .................................................................... 8
4.3 Profile Image ...................................................................... 9
4.4 Setting a Passcode .............................................................. 9
4.5 Creating Notes .................................................................. 10
4.5.1 Creating a New Note ......................................... 114.5.2 Editing an Existing Note .................................... 12
5. Navigating Studio3 and My Studio .......................................................13
5.1 Home Page Overview ........................................................ 13
5.2 Sorting Studies by Date ..................................................... 14
5.3 Searching for a Case .......................................................... 14
5.4 Viewing a Case .................................................................. 14
5.4.1 Viewing Images ................................................ 165.4.2 Viewing Videos ................................................. 16
5.5 Downloading Cases from Studio3 ....................................... 17
S
2
5.5.1 Checking Download Status ................................ 18
5.6 Emailing Case Images ........................................................ 19
6. Troubleshooting ...................................................................................22
7. Maintenance ........................................................................................23
8. Stryker Limited Warranty......................................................................24
9. Contact Information .............................................................................25

S
3
1. Indications for Use
The intended use of Studio3 is to provide for the storage of surgi-cal videos, images and related documents and allow physicians the capability to search and retrieve these assets for viewing. The Stu-dio3 product is indicated for use with the Stryker Endoscopy SDC™ (Stryker Digital Capture) product line. The users of the Studio3 product are surgeons who would like to access stored videos or im-ages that were previously recorded. The intended life of Studio3 is three years in duration. There is no technical limitation that dictates the product life for Studio3 but rather it is dictated by the need to enhance functionality or implement technology improvements.
1.1 System Requirements• The iPad device must have version iOS 5.0.1 or higher.• Studio3 must be version 1.2 or higher.

S
4
2. General Warnings and Cautions
Please read this manual and follow its instructions carefully. The words WARNING and Note carry special meanings and should be carefully reviewed:
WARNING The personal safety of the patient or user may be involved. Disregarding this information could result in injury to the patient.
Note Special information to make maintenance easier or important information more clear.
To avoid potential serious injury to the patient, the user must ad-here to the following warnings.
2.1 Warnings1. Read this manual thoroughly, and be familiar with its con-
tents prior to using this software.2. Be qualified medical personnel, having complete knowledge
of the use of this software.
2.2 Notes1. Video being streamed is not HD quality.
2.3 Product Symbol Definition
Indicates the device is intended as a digital storage device.

S
5
3. Installing the Studio3 App
To install the Studio3 iPad App, download it from the iTunes store, and install as you would any other App.

S
6
4. Setting up the App
4.1 Connecting to a ServerTo connect to a server, follow the steps below:
1. Press the Settings icon in the upper right corner of the screen.
2. From the Settings menu, press the Connections button.3. Press the New Connection button.
4. Enter the following information in the Add Connection popup dialog box:

S
7
• Display Name - The name associated with the server.• Server - The IP address of the server.• User Name - The User Name of the user associated with
the connection being created.• Password - A password for the server connection• Remember Password - To have the password for the
connection automatically remembered, slide the button to the On position.
• To save the settings, press the Save button. To cancel the new connection, press the Connections button or any-where outside of the Connection window.
5. To return to the Settings menu, press the Settings button in the upper left corner of the dialog box. To close out of Set-tings, touch anywhere on the screen.
6. To connect to a server, press and hold the Studio3 button.
S
8
7. Select a server from the dialog box that appears.
Note If a server has been previously selected, Stu-dio3 will automatically connect to it each time the application is opened.
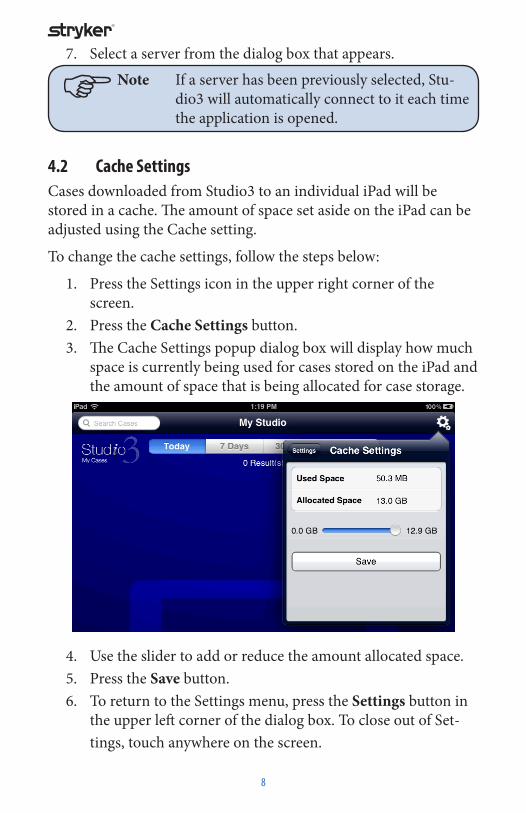
4.2 Cache SettingsCases downloaded from Studio3 to an individual iPad will be stored in a cache. The amount of space set aside on the iPad can be adjusted using the Cache setting.
To change the cache settings, follow the steps below:
1. Press the Settings icon in the upper right corner of the screen.
2. Press the Cache Settings button. 3. The Cache Settings popup dialog box will display how much
space is currently being used for cases stored on the iPad and the amount of space that is being allocated for case storage.
4. Use the slider to add or reduce the amount allocated space.5. Press the Save button.6. To return to the Settings menu, press the Settings button in
the upper left corner of the dialog box. To close out of Set-tings, touch anywhere on the screen.

S
9
4.3 Profile ImageTo add or change a profile image, follow the steps below:
1. Press the Settings icon in the upper right corner of the screen.
2. Press the Profile Image button.3. Press the Choose button and navigate to the desired picture
on the iPad. The image will then be set.
4. To return to the Settings menu, press the Settings button in the upper left corner of the dialog box. To close out of Set-tings, touch anywhere on the screen.
4.4 Setting a PasscodeStudio3 provides the ability to set a passcode that is required upon launching the application.
To set or change a passcode, follow the steps below:
1. Press the Settings icon in the upper right corner of the screen.
2. Press the Passcode button.3. Press the Turn Passocode On button. If a passcode is already
set, and you wish to change it, press the Change Passcode button.

S
10
4. Enter a 4-digit passcode in the Enter Passcode dialog box.
5. Press the Enter or Cancel button when done.6. To return to the Settings menu, press the Settings button in
the upper left corner of the dialog box. To close out of Set-tings, touch anywhere on the screen.
4.5 Creating NotesGeneral notes can be created as templates placed in the body of an email when emailing a case from the application (see Section 5.6).
Note Notes are limited to 300 characters.

S
11
4.5.1 Creating a New NoteTo create a note, follow the steps below:
1. Press the Settings icon in the upper right corner of the screen.
2. Press the Notes button.3. Press the New Note button.
4. In the New Note dialog box that appears, enter a display name for the note.
5. Enter a description.6. Press the Save button.

S
12
4.5.2 Editing an Existing NoteTo edit a note, follow the steps below:
1. Press the Settings icon in the upper right corner of the screen.
2. Press the Notes button.3. Select the note to be modified.4. Modify the current information and press Save.
To delete a note, press the Delete button.

S
13
5. Navigating Studio3 and My Studio
5.1 Home Page OverviewThe interface for both the My Studio and Studio3 desktops are the same with only a few minor differences. The Studio3 home page will appear similar to the following figure.
All of the features on the home page are described in greater detail in the sections that follow.
6 5
4
321
1 Search Term Box2 Date Range Filter Buttons

S
14
3 Settings Button4 Asset Finder5 Studio 3 Button6 My Studio Button
5.2 Sorting Studies by DateCases can be filtered by specifying a date range anywhere from the current date, past 7 days, or past 30 days using the Date Range Filter buttons. You can view all cases, regardless of date by selecting the All filter button.
The application will automatically open to show cases that are new as of the current date (i.e., today).
To sort the studies, press the desired date range or All button.
5.3 Searching for a CaseA basic search can be performed using one general search criteria, such as a patient’s first or last name or procedure type.
To perform a basic search, enter your criteria into the Search Term box and press the Search button. The cases appearing in the Asset Finder will be reduced to those matching any part of the search criteria. A date range filter may also be applied.
To clear the search criteria, click on the “X” button located within the search box, and then refresh the page.
5.4 Viewing a CaseTo view a case, press the thumbnail image. This will open the case in the Viewer.

S
15
6
5
8
7
4
3
21
1 Back to Home Page Button2 Case Information3 Email/Download Case Button4 Case Viewer Window5 Image Navigation Buttons6 Case Navigation Buttons7 Case Thumbnails8 Indicates Thumbnail is a Video
The Viewer automatically opens to show thumbnails for all images and videos.

S
16
5.4.1 Viewing ImagesTo view a specific image, press on the thumbnail. Images will ap-pear in the Viewer.
To navigate between images, either press the respective thumbnail, or use the Image Navigation buttons located directly beneath the viewing window.
Note The Image Navigation buttons will only be available if there are two ore more images.
To view the images only in the case, press the Images button.
5.4.2 Viewing VideosTo view a video, press on the thumbnail. Videos will expand to full-screen mode and automatically begin playing.
To access the playback options, touch anywhere on the screen dur-ing video playback.
1 32
5
4
S
17
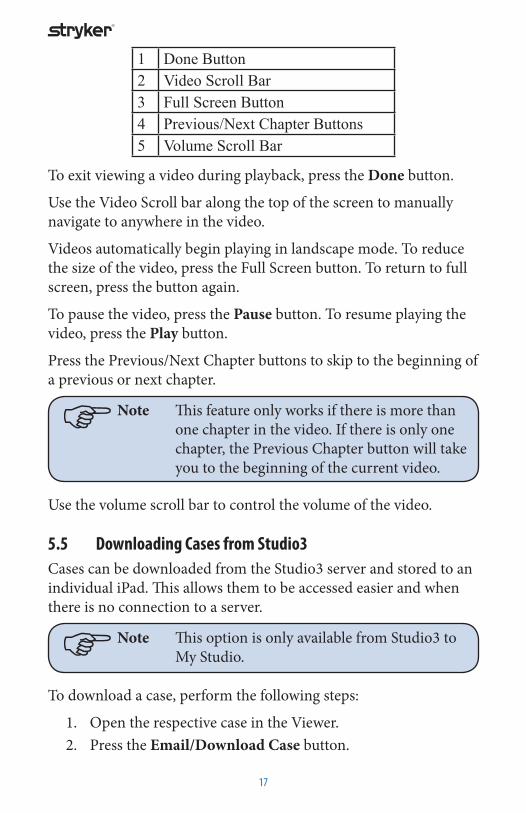
1 Done Button2 Video Scroll Bar3 Full Screen Button4 Previous/Next Chapter Buttons5 Volume Scroll Bar
To exit viewing a video during playback, press the Done button.
Use the Video Scroll bar along the top of the screen to manually navigate to anywhere in the video.
Videos automatically begin playing in landscape mode. To reduce the size of the video, press the Full Screen button. To return to full screen, press the button again.
To pause the video, press the Pause button. To resume playing the video, press the Play button.
Press the Previous/Next Chapter buttons to skip to the beginning of a previous or next chapter.
Note This feature only works if there is more than one chapter in the video. If there is only one chapter, the Previous Chapter button will take you to the beginning of the current video.
Use the volume scroll bar to control the volume of the video.
5.5 Downloading Cases from Studio3Cases can be downloaded from the Studio3 server and stored to an individual iPad. This allows them to be accessed easier and when there is no connection to a server.
Note This option is only available from Studio3 to My Studio.
To download a case, perform the following steps:
1. Open the respective case in the Viewer.2. Press the Email/Download Case button.

S
18
3. Select either the Download or Download All option. 4. To download specific case items, skip to the next step. To
download an entire case, press the Download All button.5. Select the thumbnails to download. A selected item will be
indicated by a green check mark in the upper left hand cor-ner of the thumbnail.
21
3
1 Cancel Download Button2 Download Button3 Selected Item Confirmation
6. Once all of the desired items have been selected, press the Download button. The case will be sent to the My Studio desktop.
Note Cases downloaded from the Studio3 server will still be sorted by the date of the case in My Studio, rather than the date of the down-load.
5.5.1 Checking Download StatusWhen a case is being downloaded, the status can be checked by do-ing the following:
1. Press the Settings icon in the upper right corner of the screen.

S
19
2. Press the Downloads button. The status of any current downloads will appear in the dialog box.
Note If there is nothing currently being down-loaded, this dialog box will display “No Active Downloads.”
To cancel the download, press the red “X” button.
Once a case has been downloaded, it will appear in My Studio.
5.6 Emailing Case ImagesImages from a can be emailed from both Studio3 and My Studio and will use the email account associated with the iPad.
Note Videos and reports cannot be emailed.
To email a case, perform the following steps:
1. Open the respective case in the Viewer.2. Press the Email/Download Case button.3. Press the Email button.4. Select the thumbnails to email. A selected item will be indi-
cated by a green check mark in the upper left hand corner of the thumbnail.

S
20
3
21
5. Once all of the desired items have been selected, press the Email button.
6. A dialog box will open. To include patient information, ensure the slider is set to the ON position. To anonymize the case, set the slider to the OFF position.
7. If desired, select a pre-created note (see Section 4.5). 8. Press the Email button. A new message will be created using
the email account associated with the iPad.

S
21
9. Enter the email information to the recipients and a subject. If a note was selected in Step 7, it will appear in the body of the email, along with the selected images.
10. Once all information has been entered, press the Send but-ton.

S
22
6. Troubleshooting
Error SolutionEnd-Users are unable to share a case with external users via email address.
The SMTP server settings may be configured incorrectly, or they may not be an SMTP server configured in the Ad-ministration settings. Check the SMTP settings and configure correctly.
The email option is not work-ing.
Make sure there is an account set up in the mail application, as the email operation uses the default email account.
Receiving error message “Me-dia not connected” or “Error saving data.”
Disconnect and reconnect the device. Retry the operation after approximately 5 seconds.
Videos are not transferring to the iPad.
Videos are missing from a saved case.
Make sure the video format is set to MPEG4 (AVC) on the SDC3.
Receiving error message for insufficient memory.
Check and adjust the Cache settings to allocate more space. Otherwise, removed old files to free up space.
S
23
7. Maintenance
Make sure that the device has version iOS 5.0.1 or greater, and the SDC3 is version 1.2 or greater.
The user should use the Cache Settings page to check how much space is allotted to the App and how much is being used.

S
24
8. Stryker Limited Warranty
Stryker warrants that the Software will operate in substantial conformance with its then-current Documentation for a period of ninety (90) days after the Software is installed by Stryker. Stryker agrees to correct or replace, at no charge, any nonconformity of which it receives notice during the warranty period.

S
25
9. Contact Information
Contact Stryker Customer Service with questions or concerns.
Stryker Communications 1410 Lakeside Parkway #100 Flower, Mound, TX 75028 Toll Free: (866) 841-5663 1-972-410-7100
For international service locations, refer to the Stryker website at the following URL: www.stryker.com.

S
26
Stryker Communications
1410 Lakeside Parkway #100,
Flower Mound, TX 75028
Tel: 866-841-5663
www.stryker.com