Embed Size (px)
Citation preview

National Aeronautics and Space Administration
GRADES
stru
ctur
es a
nd m
ater
ials
5-8
Space Shuttle Tiles
Aeronautics ResearchMission Directorate
Museumin a
BOXMuseum
in a
BOXSeries
www.nasa.gov

structures and materials
MU
SE
UM
IN A
BO
X
(Photo courtesy of NASA - www.nasaimages.org)
Img. 1 The Space Shuttle Atlantis in orbit.
Space Shuttle TilesLesson Overview
This activity is divided into 2 parts—Activity1 Shuttle Tile Density and Activity 2 Thermal Properties. During the first task the students will determine the density of the shuttle tile included in the MIB. The students will then do Activity 2 to demonstrate the thermal properties of a shuttle tile. Use the background material as a lead into the activity.
SAFETY NOTE FOR SHUTTLE TILE: The silica material in shuttle tiles is not classified as hazardous
either by Federal SARA or CERCLA standards. However, material from the silica fiber layer can cause temporary irritation of the
throat and/or itching of the eyes and skin so that touching a bare tile should be avoided. For your convenience, the tile is sealed in a
protective plastic wrapping. The plastic wrap should not be removed. Never touch the shuttle tile. More information is
available through MSDS (www.MSDS.gov).
Objectives
1. Determine density of a shuttle tile and compare its density with those of other materials
2. Students will determine the thermal properties of 2 different cups of hot water.
Materials:Included in MIB
Space Shuttle tile Food scale
Provided by User
Foam cups (1 per group)
Paper cups (1 per group)
Hot water
Thermometers (1 per group)
Two balls of approximately the same size, but different
weights, such as a baseball and a tennis ball
GRADES 5-8 Time Requirements: 1 hour
2

structures and materials
MU
SE
UM
IN
A B
OX
Background
Shuttle Tiles
A key to a successful thermal protection system
for the Space Shuttle depends on two things—
light weight and the ability to withstand the
high temperatures of reentry.
When the space shuttle de-orbits and begins to
return to Earth, it faces a serious problem due
to frictional heating. Protecting the shuttle and the crew from such heat is very important. When the shuttle
reenters Earth’s atmosphere at about 400,000 feet or about 122 km, it is traveling at about 25 times the speed of
sound (Mach 25). It uses the friction of reentry to slow the shuttle down, but in doing so it pays a price in the form
of frictional heating. Temperatures on the shuttle reach several thousand degrees. If the shuttle had a metal exterior
like an airplane, it would be burn up due to the heat produced by the friction.
The tiles on the shuttle provide a means for thermal protection.
There are some 24,300 tiles that measure about six inches long on each side (15.25cm) and vary in thickness from
1 to 5 inches (2.54 to 12.7 cm) depending on where they are attached. They are made up of what is called a porous
silicon material that is very light and extremely heat resistant. There are two main types of tiles, one a black-coated
tile called HRSI for High-Temperature Reusable Surface Insulation tile. These tiles can withstand up to 2,300 degrees
F (1,260 degrees C). They cover the bottom of the shuttle, areas around the forward windows, and several other key
areas. The densities of these tiles range from 9-22 pounds per cubic foot.
caption
Img. 2 A close-up of the underside of the orbiter.
(Photo courtesy of NASA - www.nasaimages.org)
(Photo courtesy of NASA - www.nasaimages.org)
The second type are white-coated tiles and are
LowTemperature Reusable Surface Insulation
(LRSI). They are made to insulate the shuttle up
to 1,200 degrees F (650 degrees C). These tiles
are usually larger and thinner, 8 inches long on
each side (20.3cm) and from less than a half
inch (1 cm) thick up to 1 inch (2.54 cm) in thick-
ness. The densities range from 9 to 12 pounds
per cubic foot.
The making of tiles begins with pure silica
that comes from refined sand. This material is
formed in fibers and mixed with pure water
and other chemicals and then poured into a
mold where the excess water is squeezed
3

structures and materials
MU
SE
UM
IN A
BO
X
A close-up of the tile numbering system.
(Photo courtesy of NASA - www.nasaimages.org)
out. This is then taken to the largest
microwave oven in America located at
the Lockheed Space Operations plant
in Sunnyvale, California. After this they
are treated in an oven at a temperature
of 2,350 F (1,288 C). This process fuses
the fibers without actually melting
them.
The two types of tiles are essentially
the same except for the coatings
and cut. No two tiles are exactly alike.
They fit by being trimmed to an exact
size depending on its location on the
shuttle. The tiles form the ultimate
“jigsaw puzzle”, only in this case, each
piece is numbered so its location is
easy to find.
4

structures and materials
MU
SE
UM
IN
A B
OX
Activity 1 Shuttle Tile Density
GRADES 5-8
(Photo courtesy of NASA - www.nasaimages.org)
Time Requirement: 30 minutes
Materials:
In the Box
Space Shuttle tile Food scale
Supplied by user
A Baseball A Tennis ball
Worksheets
Shuttle Tile Volume (Worksheet 1)
Reference Materials
None
Img. 8 An artist’s rendering of the Space Shuttle.
Objective:
Discover how material densities affect a Space Shuttle launch.
Activity:
1. Toss the baseball and tennis ball in your hands. Ask the students to describe
what is different about the balls. Infer how the difference in weight (and thus the
densities of the balls) would affect how the balls are thrown. Students may say
that you need more force to throw the baseball than to throw the tennis ball the
same distance. Lead the students to discuss how the force exerted on the balls
is proportional to the work done in throwing the balls and thus, the amount of
energy. They should arrive at the conclusion that it takes more energy to move
a heavier ball than one of less weight.
2. Discuss how you would find the densities of the balls (mass/volume). They both
have the same approximate volume, but because the baseball has more mass
(and thus more weight), it is more dense.
3. Explain that engineers must consider many factors when designing and
choosing materials for various purposes. Show the students the picture of
the space shuttle orbiter. Point out the tiles and ask the students to infer the
function of the tiles. (To protect the shuttle (and thus the shuttle occupants)
5

structures and materials
MU
SE
UM
IN A
BO
X
from heat that is produced (from friction) as the shuttle moves through the atmosphere.)
Show the students the space shuttle tile. What would be some characteristics of materials that
engineers would find desirable for a shuttle tile? As students name characteristics, write these
on the board or on chart paper. (Low cost, safe, durable, high thermal insulating
ability, low density.) Now, go back to the analogy with the tennis ball and baseball – why would
good material for a space shuttle tile be low density? (Less weight takes less energy (and less
cost) to launch into space.) Pass the shuttle tile around. The tile is very fragile and students should
be instructed on how to handle the tile carefully. ** CAUTION – The tile must stay in the plastic
bag! ** Now we will determine the density of the space shuttle tile and compare it to the density
of other objects.
4. P erform the following density calculations.
*Note: Numbers in the following calculations are for example only. Class calculation will vary by
individual tile.
a. D etermine the volume of the shuttle tile. Measure its length, width and height then
multiply these numbers to determine the volume in cubic inches.
length • width • height = volume 6 in • 6 in • 3 in = 108 in3
b. W eigh the shuttle tile.
Tile weight: 0.8 lb
c. Determine the density of the shuttle tile
Weight = Density (lbs/in3 .08 lb) Volume = 0.0074 lbs/in3 108 in3
d. C ompare the density of a shuttle tile with the density of other materials. The density of
several common materials are listed below. Convert the density measurement for each
of these materials to pounds/cubic inch. To do this, divide the measurement by the
number of cubic inches in a cubic foot, which is 1,728 in3.
Aluminum
165 lb/ft3
= 0.0955 lbs/in3 1,728 in3/ft3
Iron
495 lb/ft3
= 0.2865 lbs/in3 1,728 in3/ft3
Material Density lbs/ft3 Density lbs/in3
Metal
Aluminum 165 lbs/ft3 0.0955 lb/in3
Iron 495 lbs/ft3 0.2865 lb/in3
Gold 1204 lbs/ft3 0.6968 lb/in3
Woods
Pine 26 lbs/ft3 0.0150 lb/in3
Oak 59lbs/ft3 0.0341 lb/in3
Shuttle Tile -- 0.0074 lb/in3
f. Arrange the items above including the shuttle tile from least density per cubic inch to
highest density.
Answer: 1. Tile 2. Pine 3. Oak 4. Aluminum 5. Iron 6. Gold
6

structures and materials
MU
SE
UM
IN
A B
OX
NATIONAL SCIENCE STANDARDS 5-8 SCIENCE AS INQUIRY• Abilities necessary to do scientific inquiry
• Understandings about scientific inquiry
SCIENCE IN PERSONAL AND SOCIAL PERSPECTIVES• Science and technology in society
NATIONAL MATH STANDARDS K-12 NUMBER AND OPERATIONS• Understand numbers, ways of representing numbers, relationships among numbers, and number systems
• Understand meanings of operations and how they relate to one another
• Compute fluently and make reasonable estimates
ALGEBRA• Represent and analyze mathematical situations and structures using algebraic symbols
• Use mathematical models to represent and understand quantitative relationships
MEASUREMENT• Understand measurable attributes of objects and the units, systems, and processes of measurement
• Apply appropriate techniques, tools, and formulas to determine measurements.
DATA ANALYSIS AND PROBABILITY• Formulate questions that can be addressed with data and collect, organize, and display relevant data to answer them
PROCESS• Problem Solving
• Communication
• Connections
• Representation
7

structures and materials
MU
SE
UM
IN A
BO
X
Activity 2 Thermal Properties
GRADES 5-8 Time Requirement: 30 minutes
Materials:
In the Box
Space Shuttle tile
Supplied by user
Foam cups (1 per group)
Paper cups (1 per group)
Hot water
Thermometers (1 per group)
Worksheets
Thermal Properties of a Paper and Styrofoam Cup (Worksheet 2)
Reference Materials
Figure 1
Activity:
1. Explain t o the students that heat is a form of energy that we refer to as thermal
energy, while conduction is the flow of energy from one object to another.
Emphasize that heat energy always moves from a warmer object or area to a
cooler object or area. An example is an ice cube that you hold in your hand.The
heat energy moves from your hand to the ice cube causing it to melt. Many stu-
dents think that the cold is leaving the ice cube and entering their hand. (That
is certainly what it feels like!) However, what is really happening is that thermal
energy is leaving your warm hand and going to ice cube.
Some objects have high thermal conductivity, meaning thermal energy transfers
more quickly between the objects. Other objects have a lower thermal conduc-
tivity and do not transfer thermal energy as well. Many students believe that ob-
jects such as blankets and sweaters actually generate heat. They do not. Sweat-
ers and blankets are good insulators. They do not allow heat to easily leave your
body. They keep you warm by restricting heat flow between your body and the
environment, not by generating heat.
2. Refer to the list of desirable shuttle tile characteristics that was generated earlier.
We have already discussed that the tiles need to have a low density. Another
characteristic of the tile is that it must be a good thermal insulator. Thermal
insulators do not allow heat to flow easily from one material to another. The
friction between the shuttle and the atmosphere generates an enormous
amount of heat. The tiles are good insulators and they protect the shuttle from
the heat. Compare and contrast the terms “insulator” and “conductor.” Draw a
chart on the board or on chart paper and list materials known to students as
good insulators of heat and good conductors of heat. Record all answers –
even those that are incorrect.
3. Explain to the students that they will be working in groups to determine
the thermal properties of paper and Styrofoam cups. First ask the students
to discuss with their partners what they already know about paper and
Styrofoam cups.
8

structures and materials
MU
SE
UM
IN
A B
OX
Thermal Properties
4. Ask the students to use their background knowledge of the cups to create a hypothesis regarding
which cup will keep water warm the longest – paper or Styrofoam? Students should record their
hypothesis on their Thermal Properties of a Paper and Styrofoam Cup worksheet.
5. A sk the students to design an experiment to test their hypothesis. Explain that they will be
given a paper cup and a Styrofoam cup and a thermometer. What will the variables be?
What will the procedure be? Students should discuss their experimental design with their
partners and record the variables and procedure on their worksheet. Go over their procedures.
The recommended procedure is as follows:
a. P our an equal amount of hot (not boiling) water into each cup.
b. Measure and record the temperature of the water in each cup.
c. After 1 minute, measure and record the temperature of the water in the cups.
Each team member should also feel the outside of the cup.
d. Repeat Step 3 every minute for ten minutes.
e. If possible, have the students determine how long it will take for the temperature
of the water in both cups to reach the same temperature.
6. S tudents should begin the experiment. **CAUTION: Students should be instructed to use care
when working with hot water.** Students should record their data in the data chart provided in
the handout, or they can create their own data chart. Students should also answer the analysis
questions and write a conclusion summarizing their findings.
7. R efer back to the chart the class created comparing insulators and conductors. Are there any
corrections to be made? Be sure that Styrofoam and Shuttle Tiles are listed as insulators.
Discussion Points:
1. Explain why you would choose a Styrofoam cup to keep your cold drink cold during the summer?
2. Explain how the space shuttle tile is able to protect the shuttle from the heat when re-entering
the earth’s atmosphere. Have them use the terms: thermal energy, conductivity, and heat transfer.
A possible answer might be that thermal energy is transferred to the shuttle tile due to air friction in
reentry. The shuttle tile has a very low conductivity and therefore does not allow the thermal energy
to be transferred through it to the shuttle. Refer to the conductivity rate in the Some Specifics of Shuttle
Tile chart Fig. 1.
3. What is meant by the term density?
4. What are characteristics of low density materials?
5. Have students identify and classify materials in their homes as either conductors or insulators.
Are there any common characteristics among the materials in either group? What makes a
material a good conductor or insulator?
9

structures and materials
MU
SE
UM
IN A
BO
X
NATIONAL SCIENCE STANDARDS 5-8 SCIENCE AS INQUIRY• Abilities necessary to do scientific inquiry
• Understandings about scientific inquiry
SCIENCE IN PERSONAL AND SOCIAL PERSPECTIVES• Science and technology in society
NATIONAL MATH STANDARDS K-12 NUMBER AND OPERATIONS• Understand numbers, ways of representing numbers, relationships among numbers, and number systems
• Understand meanings of operations and how they relate to one another
• Compute fluently and make reasonable estimates
ALGEBRA• Represent and analyze mathematical situations and structures using algebraic symbols
• Use mathematical models to represent and understand quantitative relationships
MEASUREMENT• Understand measurable attributes of objects and the units, systems, and processes of measurement
• Apply appropriate techniques, tools, and formulas to determine measurements.
DATA ANALYSIS AND PROBABILITY• Formulate questions that can be addressed with data and collect, organize, and display relevant data to answer them
PROCESS• Problem Solving
• Communication
• Connections
• Representation
1 0

structures and materials
MU
SE
UM
IN
A B
OX
Glossary
Acceleration:
is the rate of change of velocity. An object is accelerating if it is changing its velocity.
Energy:
is the capacity for doing work. You must have energy to accomplish work - it is like the “currency” for performing
work. To do 1000 Joules of work, you must expend 1000 Joules of energy.
Friction:
is the surface resistance to relative motion, as of a body sliding or rolling.
Joule:
is the unit of energy equal to the energy exerted by a force of one Newton acting to move an object through a
distance of one meter.
Kinetic Energy:
is the energy of motion
Mass:
is a measurement of how much matter there is in a body.
Newton:
is the unit of force equal to the force required to cause a mass of one kilogram to accelerate at a rate of one meter
per second squared.
Power:
is the rate of doing work or the rate of using energy, which are numerically the same. If you do 100 Joules of work
in one second (using 100 Joules of energy), the power is 100 Watts.
Work:
refers to an activity involving a force and movement in the direction of the force. A force of 20 Newtons pushing
an object 5 meters in the direction of the force does 100 Joules of work.
1 1

1 2
MU
SE
UM
IN A
BO
X -
RE
FE
RE
NC
E M
AT
ER
IAL
SReference Materials

MU
SE
UM
IN
A B
OX
-
R
EF
ER
EN
CE
MA
TE
RIA
LS
Reference Materials
Fig. 1 Some Specifics of Shuttle Tile
Some of the specifics of the shuttle tile:
Density 9 lb/ft3
Specific heat .15 BTU/lb-ºF
Thermal conductivity .028 BTU/ft-hr-ºF at 70ºF and 1 atm
.073 BTU/ft-hr-ºF at 2000ºF and 10-4 atm
Maximum reuse temperature >2300ºF
Maximum single use temperature 2800ºF
Reusability at 2300ºF >100 missions
1 3

1 4
MU
SE
UM
IN A
BO
X
Student Worksheets
structures and materials
MU
SE
UM
IN
A B
OX
Student Worksheets
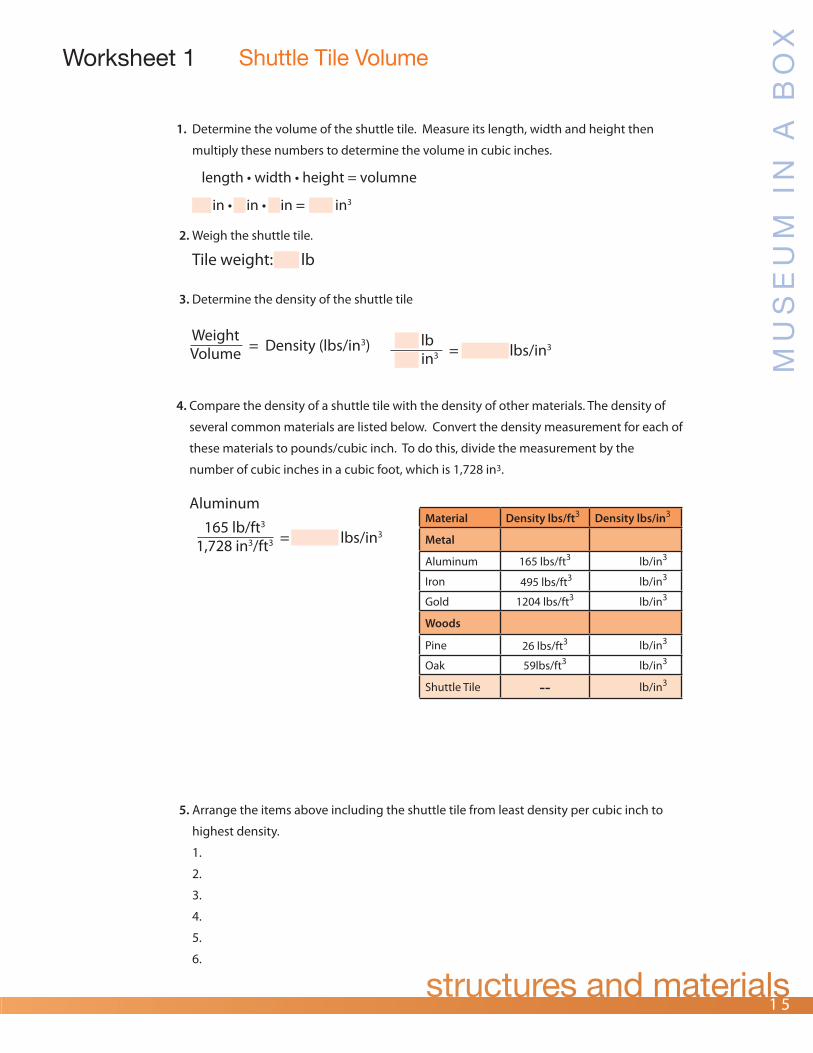
Worksheet 1 Shuttle Tile Volume
1. D etermine the volume of the shuttle tile. Measure its length, width and height then
multiply these numbers to determine the volume in cubic inches.
length • width • height = volumne
6 in • 6 in • 3 in = 108 in3
2. W eigh the shuttle tile.
Tile weight: 0.8 lb
3. Determine the density of the shuttle tile
Weight = Density (lbs/in3 .08 lb) Volume = 0.0074 lbs/in3 108 in3
4. C ompare the density of a shuttle tile with the density of other materials. The density of
several common materials are listed below. Convert the density measurement for each of
these materials to pounds/cubic inch. To do this, divide the measurement by the
number of cubic inches in a cubic foot, which is 1,728 in3.
Aluminum
165 lb/ft3
= 0.0955 lbs/in3 1,728 in3/ft3
Material Density lbs/ft3 Density lbs/in3
Metal
Aluminum 165 lbs/ft3 0.0955 lb/in3
Iron 495 lbs/ft3 0.2865 lb/in3
Gold 1204 lbs/ft3 0.6968 lb/in3
Woods
Pine 26 lbs/ft3 0.0150 lb/in3
Oak 59lbs/ft3 0.0341 lb/in3
Shuttle Tile -- 0.0074 lb/in3
5. Arrange the items above including the shuttle tile from least density per cubic inch to
highest density.
1.
2.
3.
4.
5.
6.
1 5

MU
SE
UM
IN A
BO
X
Worksheet 2 Thermal Properties of a Paper and Styrofoam Cup
Hypothesis: If hot water is placed into paper and Styrofoam cups, then...
Independent Variable:
Dependent Variable:
Procedure:
Thermal Properties of a Paper and Styrofoam Cup
Paper Cup Styrofoam Cup
Time in Minutes Temperature Time in Minutes Temperature
Starting Temperature
1 minute 1 minute
2 minutes 2 minutes
3 minutes 3 minutes
4 minutes 4 minutes
5 minutes 5 minutes
6 minutes 6 minutes
7 minutes 7 minutes
8 minutes 8 minutes
9 minutes 9 minutes
10 minutes 10 minutes
Average Average
1 6

MU
SE
UM
IN
A B
OX
Worksheet 2 Continued
Analysis: 1. Which cup loses heat more quickly?
2. What might account for the differences between the cups?
3. What was the percent of the original temperature in each cup? As an example, if the original temperature was 100º and at the end of 10 minutes it was still 100º it would be 100 percent; however if it was only 90º , it would only be 90 percent of the original temperature. What is the percent of the original temperature in the paper cup ____________ and Styrofoam cup___________?
4. What might be some ways to reduce the thermal conductivity even more?
5. If you put cold water in the cups instead of hot water would the temperature change be the same?
Conclusion:
1 7

1 8structures and materials
MU
SE
UM
IN A
BO
X

1 9structures and materials
MU
SE
UM
IN
A B
OX
Images

MU
SE
UM
IN A
BO
X -
IMA
GE
S
Img. 1 The Space Shuttle A
tlantis in orbit.
(Photo courtesy of NA
SA - w
ww
.nasaimages.org)
2 0

MU
SE
UM
IN
A B
OX
-
IM
AG
ES
Img.
2 A
clo
se-u
p of
the
unde
rsid
e of
the
orbi
ter.
(Pho
to c
ourt
esy
of N
ASA
- w
ww
.nas
aim
ages
.org
)
2 1

MU
SE
UM
IN A
BO
X -
IMA
GE
S
Img. 3 Replacing a shuttle tile.
(Photo courtesy of NA
SA - w
ww
.nasaimages.org)
2 2

MU
SE
UM
IN
A B
OX
-
IM
AG
ES
Img.
4 S
hutt
le ti
le s
how
ing
sign
s of
dam
age.
(Pho
to c
ourt
esy
of N
ASA
- w
ww
.nas
aim
ages
.org
)
2 3

MU
SE
UM
IN A
BO
X -
IMA
GE
S
Img. 5 A close-up of the tile numbering system.
(Photo courtesy of NASA - www.nasaimages.org)
2 4

MU
SE
UM
IN
A B
OX
-
IM
AG
ES
Img.
6 T
he u
nder
side
of t
he S
pace
Shu
ttle
in o
rbit.
(Pho
to c
ourt
esy
of N
ASA
- w
ww
.nas
aim
ages
.org
)
2 5

MU
SE
UM
IN A
BO
X -
IMA
GE
S
Img. 7 The underside of the Space Shuttle during re-entry.
(Photo courtesy of NA
SA - w
ww
.nasaimages.org)
2 6

Img.
8 A
n ar
tist’s
rend
erin
g of
the
Spac
e Sh
uttle
.
(Pho
to c
ourt
esy
of N
ASA
- w
ww
.nas
aim
ages
.org
)
2 7
MU
SE
UM
IN
A B
OX
-
IM
AG
ES

Aeronautics ResearchMission Directorate
Museumin a
BOXMuseum
in a
BOXSeries
2 8www.nasa.gov EP-2010-12-482-HQ
structures and materials