Embed Size (px)
Citation preview
Page 1
Paul Waite
Technology Integration Center
Davis School District, Farmington, Utah 84025 Revised 9/14/2009
PowerPoint 2007
Storyboarding
This is not an official training handout of the
Technology Integration Center, Davis School District
Opening an Existing Presentation ............... 1
Understanding the PowerPoint Window ..... 2 Changing the Layout of a Slide .................. 3
Adding More Slides ................................... 3 Deleting a Slide .......................................... 3
Saving the Slide Show................................ 3 Applying and Customizing a Theme .......... 4
Changing the Background of a Slide .......... 4 Text Boxes ................................................. 6
Identification Text Box .............................. 6 Text Appearance ........................................ 7
Mini toolbar ...............................................7
Scene Notes ................................................7 Pictures ......................................................8
Animating an Object (Text or Pictures) .... 10 Changing the Order Objects Play .............. 11
Speech Balloons ....................................... 11 Sounds ..................................................... 12
Narrating the Cartoon ............................... 13 Printing .................................................... 14
Rehearse Timings ..................................... 14
Opening an Existing Presentation
Click on the Microsoft Office Button and then click on Open.
Navigate to the location of the presentation.
Click on the name of the presentation.
The preview window shows the first slide in the presentation.
Click on the Open button.
Page 2
Paul Waite
Technology Integration Center
Davis School District, Farmington, Utah 84025 Revised 9/14/2009
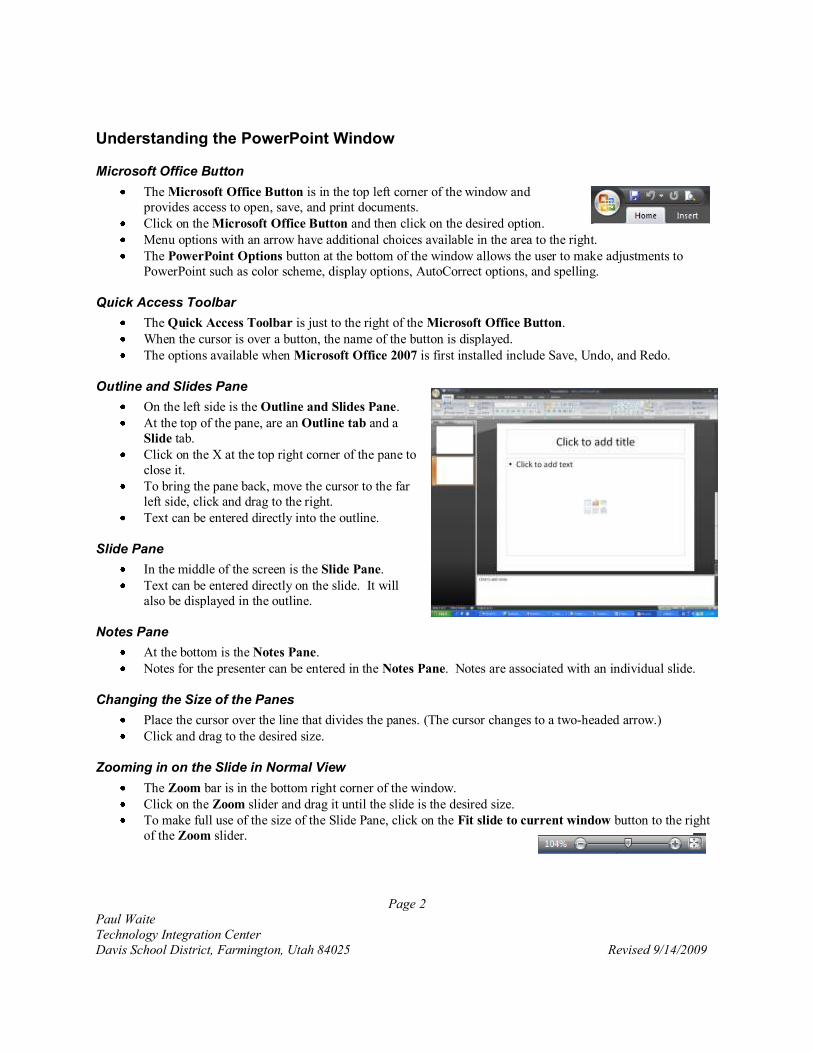
Understanding the PowerPoint Window
Microsoft Office Button
The Microsoft Office Button is in the top left corner of the window and
provides access to open, save, and print documents.
Click on the Microsoft Office Button and then click on the desired option.
Menu options with an arrow have additional choices available in the area to the right.
The PowerPoint Options button at the bottom of the window allows the user to make adjustments to
PowerPoint such as color scheme, display options, AutoCorrect options, and spelling.
Quick Access Toolbar
The Quick Access Toolbar is just to the right of the Microsoft Office Button.
When the cursor is over a button, the name of the button is displayed.
The options available when Microsoft Office 2007 is first installed include Save, Undo, and Redo.
Outline and Slides Pane
On the left side is the Outline and Slides Pane. At the top of the pane, are an Outline tab and a
Slide tab.
Click on the X at the top right corner of the pane to
close it.
To bring the pane back, move the cursor to the far
left side, click and drag to the right.
Text can be entered directly into the outline.
Slide Pane
In the middle of the screen is the Slide Pane.
Text can be entered directly on the slide. It will
also be displayed in the outline.
Notes Pane
At the bottom is the Notes Pane.
Notes for the presenter can be entered in the Notes Pane. Notes are associated with an individual slide.
Changing the Size of the Panes
Place the cursor over the line that divides the panes. (The cursor changes to a two-headed arrow.)
Click and drag to the desired size.
Zooming in on the Slide in Normal View
The Zoom bar is in the bottom right corner of the window.
Click on the Zoom slider and drag it until the slide is the desired size.
To make full use of the size of the Slide Pane, click on the Fit slide to current window button to the right
of the Zoom slider.
Page 3
Paul Waite
Technology Integration Center
Davis School District, Farmington, Utah 84025 Revised 9/14/2009
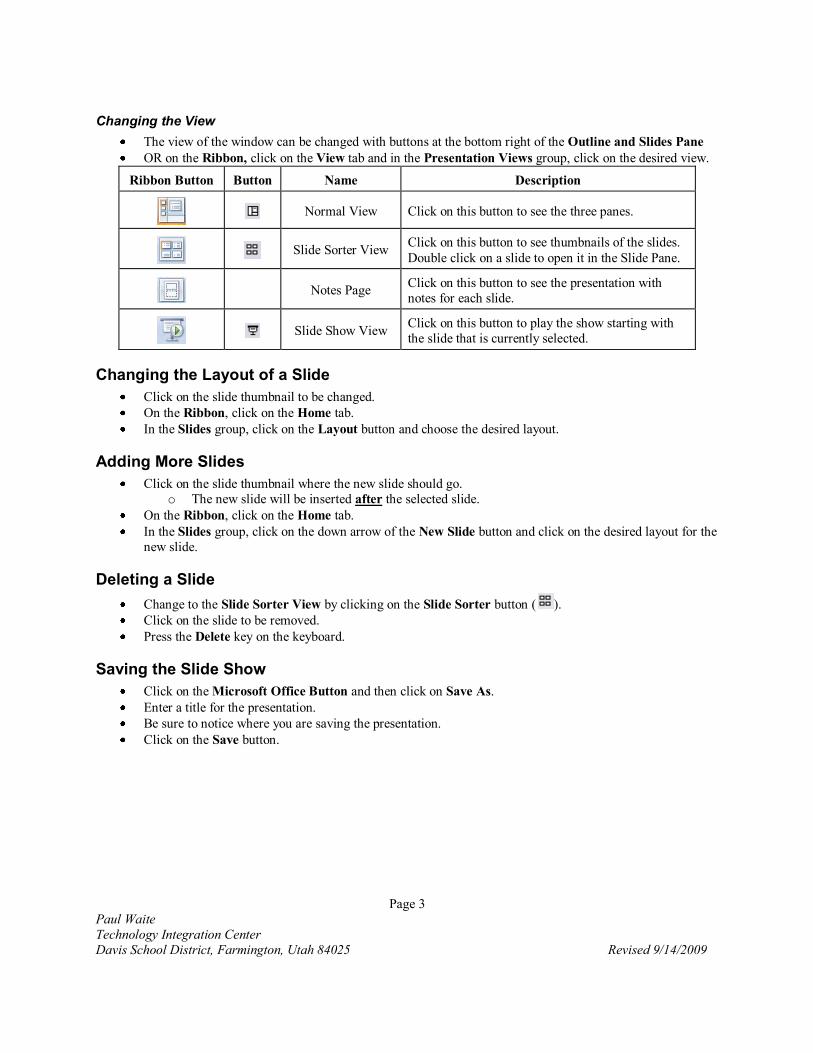
Changing the View
The view of the window can be changed with buttons at the bottom right of the Outline and Slides Pane
OR on the Ribbon, click on the View tab and in the Presentation Views group, click on the desired view.
Ribbon Button Button Name Description
Normal View Click on this button to see the three panes.
Slide Sorter View Click on this button to see thumbnails of the slides.
Double click on a slide to open it in the Slide Pane.
Notes Page
Click on this button to see the presentation with
notes for each slide.
Slide Show View
Click on this button to play the show starting with
the slide that is currently selected.
Changing the Layout of a Slide
Click on the slide thumbnail to be changed.
On the Ribbon, click on the Home tab.
In the Slides group, click on the Layout button and choose the desired layout.
Adding More Slides
Click on the slide thumbnail where the new slide should go.
o The new slide will be inserted after the selected slide.
On the Ribbon, click on the Home tab.
In the Slides group, click on the down arrow of the New Slide button and click on the desired layout for the
new slide.
Deleting a Slide
Change to the Slide Sorter View by clicking on the Slide Sorter button ( ).
Click on the slide to be removed.
Press the Delete key on the keyboard.
Saving the Slide Show
Click on the Microsoft Office Button and then click on Save As.
Enter a title for the presentation.
Be sure to notice where you are saving the presentation.
Click on the Save button.
Page 4
Paul Waite
Technology Integration Center
Davis School District, Farmington, Utah 84025 Revised 9/14/2009
Applying and Customizing a Theme
On the Ribbon, click on the Design tab.
In the Themes group, click on the More button located to the far right of the thumbnails.
Click on the desired theme.
o Note – Holding the cursor over a theme without clicking displays the slide with the theme. This
also applies to each of the choices mentioned below.
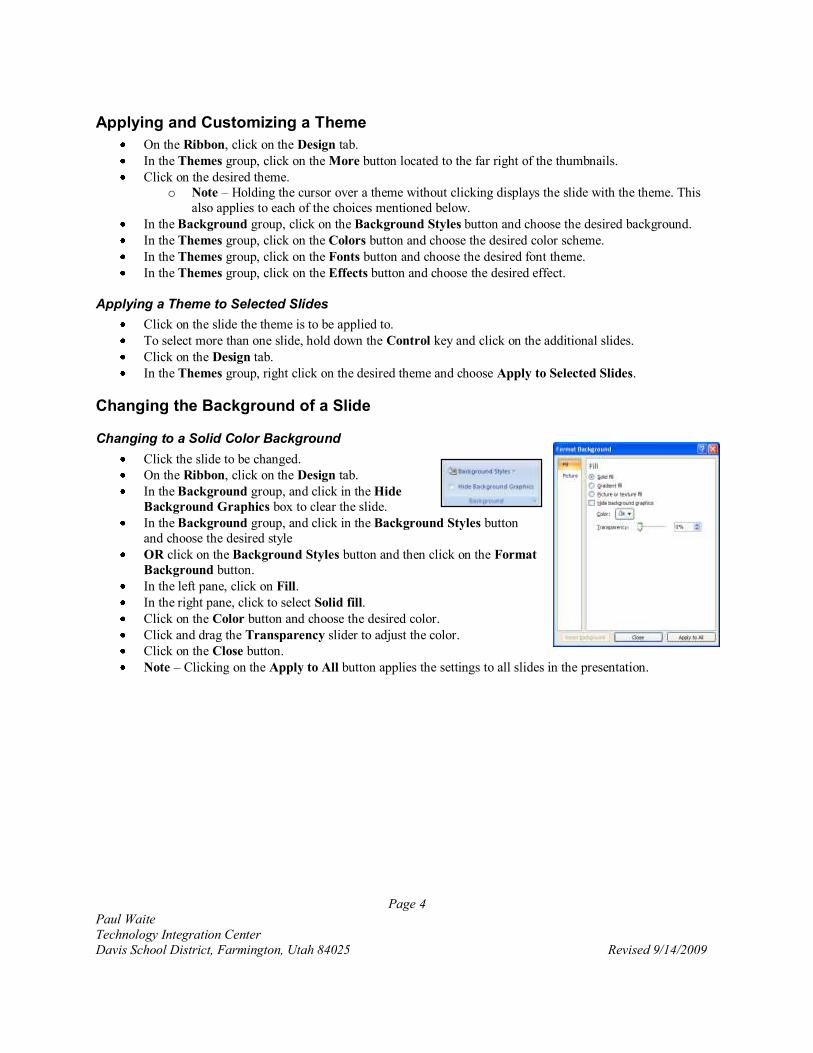
In the Background group, click on the Background Styles button and choose the desired background.
In the Themes group, click on the Colors button and choose the desired color scheme.
In the Themes group, click on the Fonts button and choose the desired font theme.
In the Themes group, click on the Effects button and choose the desired effect.
Applying a Theme to Selected Slides
Click on the slide the theme is to be applied to.
To select more than one slide, hold down the Control key and click on the additional slides.
Click on the Design tab.
In the Themes group, right click on the desired theme and choose Apply to Selected Slides.
Changing the Background of a Slide
Changing to a Solid Color Background
Click the slide to be changed.
On the Ribbon, click on the Design tab.
In the Background group, and click in the Hide
Background Graphics box to clear the slide.
In the Background group, and click in the Background Styles button
and choose the desired style
OR click on the Background Styles button and then click on the Format
Background button.
In the left pane, click on Fill.
In the right pane, click to select Solid fill.
Click on the Color button and choose the desired color.
Click and drag the Transparency slider to adjust the color.
Click on the Close button.
Note – Clicking on the Apply to All button applies the settings to all slides in the presentation.
Page 5
Paul Waite
Technology Integration Center
Davis School District, Farmington, Utah 84025 Revised 9/14/2009
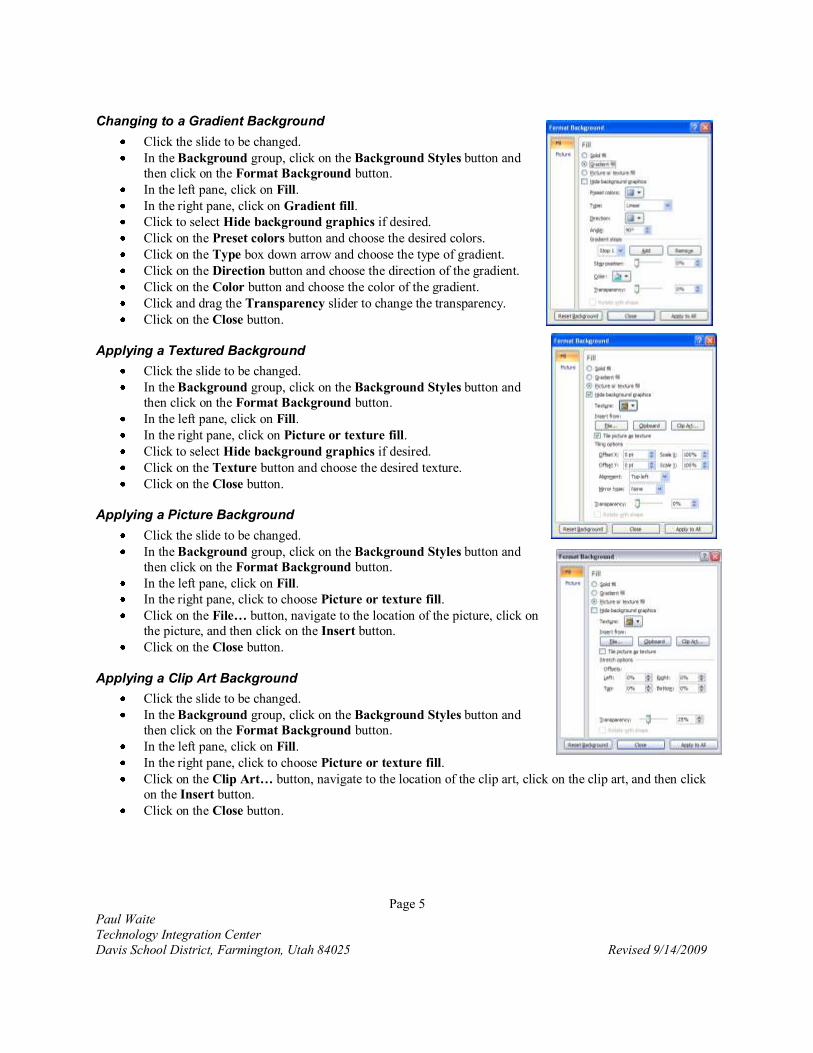
Changing to a Gradient Background
Click the slide to be changed.
In the Background group, click on the Background Styles button and
then click on the Format Background button.
In the left pane, click on Fill.
In the right pane, click on Gradient fill.
Click to select Hide background graphics if desired.
Click on the Preset colors button and choose the desired colors. Click on the Type box down arrow and choose the type of gradient.
Click on the Direction button and choose the direction of the gradient.
Click on the Color button and choose the color of the gradient.
Click and drag the Transparency slider to change the transparency.
Click on the Close button.
Applying a Textured Background
Click the slide to be changed.
In the Background group, click on the Background Styles button and
then click on the Format Background button.
In the left pane, click on Fill.
In the right pane, click on Picture or texture fill.
Click to select Hide background graphics if desired.
Click on the Texture button and choose the desired texture. Click on the Close button.
Applying a Picture Background
Click the slide to be changed.
In the Background group, click on the Background Styles button and
then click on the Format Background button.
In the left pane, click on Fill.
In the right pane, click to choose Picture or texture fill.
Click on the File… button, navigate to the location of the picture, click on
the picture, and then click on the Insert button. Click on the Close button.
Applying a Clip Art Background
Click the slide to be changed.
In the Background group, click on the Background Styles button and
then click on the Format Background button.
In the left pane, click on Fill.
In the right pane, click to choose Picture or texture fill.
Click on the Clip Art… button, navigate to the location of the clip art, click on the clip art, and then click
on the Insert button. Click on the Close button.
Page 6
Paul Waite
Technology Integration Center
Davis School District, Farmington, Utah 84025 Revised 9/14/2009
Text Boxes
Text boxes are areas that hold text.
Creating a Text Box
On the Ribbon, click on the Insert tab.
In the Text group, click on the Text Box button.
Click and drag on the slide to create the text box.
Note – A text box cannot be created within another text box.
Moving a Text Box
Click in the text box.
Move the cursor to the edge of the box.
Note - The cursor changes to a four-headed arrow.
Click and drag the box to the desired location.
Resizing a Text Box
Click in the text box.
Move the cursor to a corner of the box. (The box at the corner is called a handle.)
Note - The cursor changes to a two-headed arrow.
Click and drag to change the size of the box.
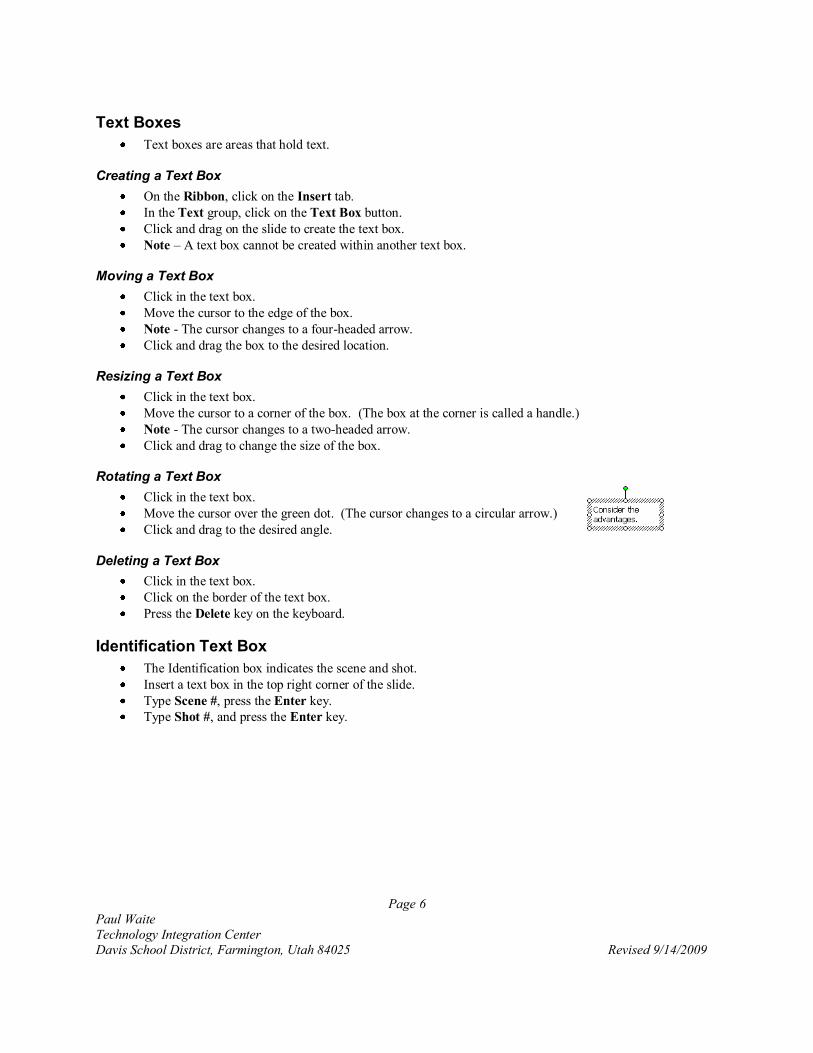
Rotating a Text Box
Click in the text box.
Move the cursor over the green dot. (The cursor changes to a circular arrow.)
Click and drag to the desired angle.
Deleting a Text Box
Click in the text box.
Click on the border of the text box.
Press the Delete key on the keyboard.
Identification Text Box
The Identification box indicates the scene and shot.
Insert a text box in the top right corner of the slide.
Type Scene #, press the Enter key.
Type Shot #, and press the Enter key.
Page 7
Paul Waite
Technology Integration Center
Davis School District, Farmington, Utah 84025 Revised 9/14/2009
Text Appearance
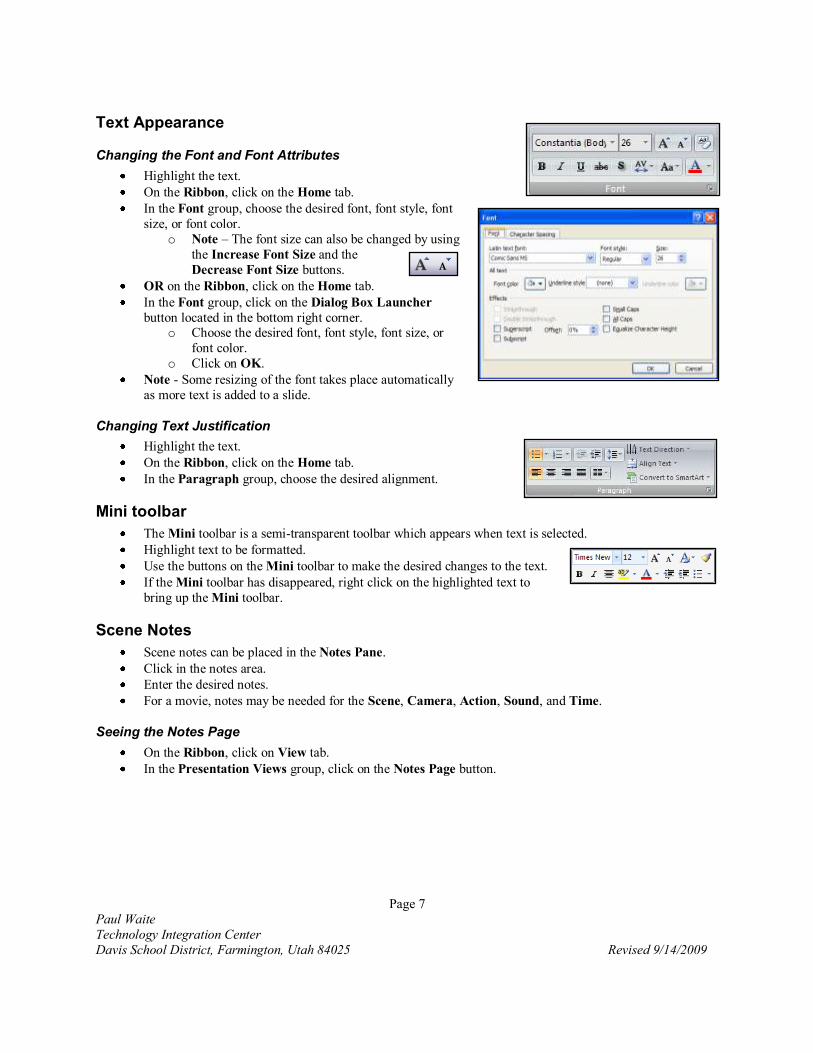
Changing the Font and Font Attributes
Highlight the text.
On the Ribbon, click on the Home tab.
In the Font group, choose the desired font, font style, font
size, or font color.
o Note – The font size can also be changed by using
the Increase Font Size and the
Decrease Font Size buttons.
OR on the Ribbon, click on the Home tab.
In the Font group, click on the Dialog Box Launcher
button located in the bottom right corner. o Choose the desired font, font style, font size, or
font color.
o Click on OK.
Note - Some resizing of the font takes place automatically
as more text is added to a slide.
Changing Text Justification
Highlight the text.
On the Ribbon, click on the Home tab.
In the Paragraph group, choose the desired alignment.
Mini toolbar
The Mini toolbar is a semi-transparent toolbar which appears when text is selected.
Highlight text to be formatted.
Use the buttons on the Mini toolbar to make the desired changes to the text.
If the Mini toolbar has disappeared, right click on the highlighted text to
bring up the Mini toolbar.
Scene Notes
Scene notes can be placed in the Notes Pane.
Click in the notes area.
Enter the desired notes.
For a movie, notes may be needed for the Scene, Camera, Action, Sound, and Time.
Seeing the Notes Page
On the Ribbon, click on View tab.
In the Presentation Views group, click on the Notes Page button.
Page 8
Paul Waite
Technology Integration Center
Davis School District, Farmington, Utah 84025 Revised 9/14/2009
Pictures
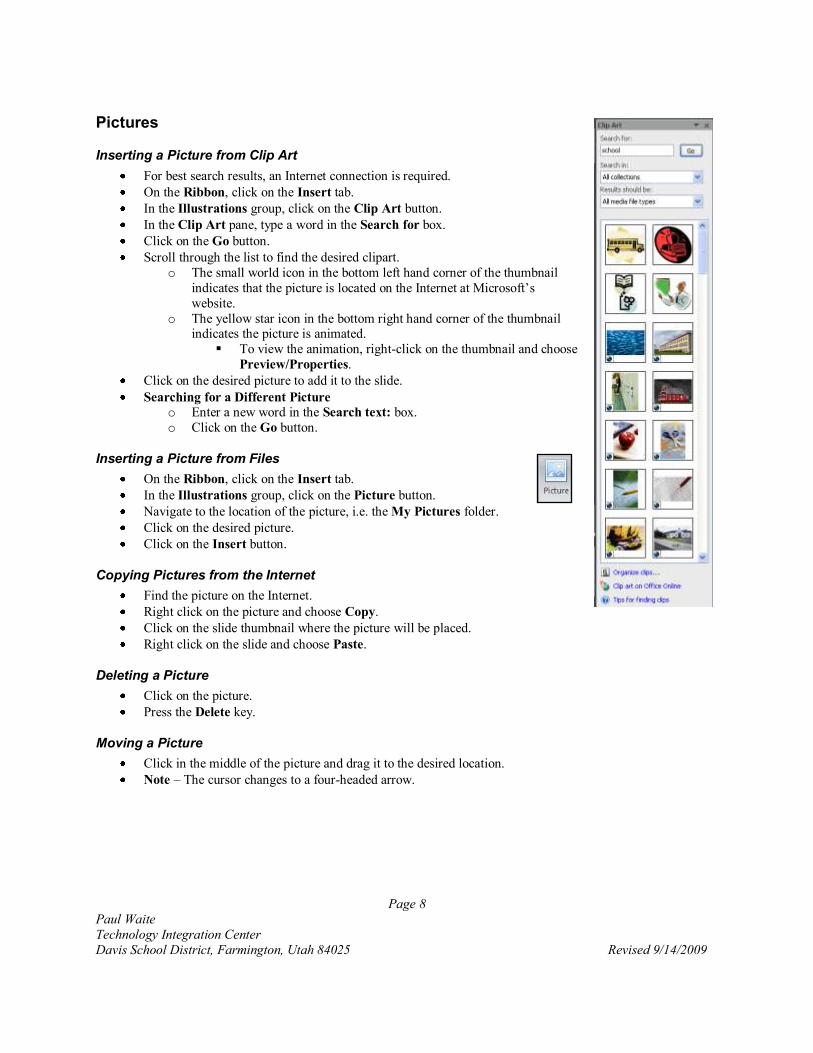
Inserting a Picture from Clip Art
For best search results, an Internet connection is required.
On the Ribbon, click on the Insert tab.
In the Illustrations group, click on the Clip Art button.
In the Clip Art pane, type a word in the Search for box.
Click on the Go button.
Scroll through the list to find the desired clipart.
o The small world icon in the bottom left hand corner of the thumbnail
indicates that the picture is located on the Internet at Microsoft’s
website.
o The yellow star icon in the bottom right hand corner of the thumbnail indicates the picture is animated.
To view the animation, right-click on the thumbnail and choose
Preview/Properties.
Click on the desired picture to add it to the slide.
Searching for a Different Picture o Enter a new word in the Search text: box.
o Click on the Go button.
Inserting a Picture from Files
On the Ribbon, click on the Insert tab.
In the Illustrations group, click on the Picture button.
Navigate to the location of the picture, i.e. the My Pictures folder.
Click on the desired picture.
Click on the Insert button.
Copying Pictures from the Internet
Find the picture on the Internet.
Right click on the picture and choose Copy.
Click on the slide thumbnail where the picture will be placed.
Right click on the slide and choose Paste.
Deleting a Picture
Click on the picture.
Press the Delete key.
Moving a Picture
Click in the middle of the picture and drag it to the desired location.
Note – The cursor changes to a four-headed arrow.
Page 9
Paul Waite
Technology Integration Center
Davis School District, Farmington, Utah 84025 Revised 9/14/2009
Resizing a Picture
Click on the picture to select it.
Move the cursor to a handle (circle) at the corner.
Note – The cursor changes to a double-headed arrow.
Click and drag towards the center of the picture to make it smaller OR away from the picture to make it
larger.
Rotating a Picture
Double click on the picture.
The Format tab of Picture Tools comes up on the Ribbon.
In the Arrange group, click on the Rotate button and choose the desired rotation.
OR click on the green dot above the picture and drag the picture to the desired angle.
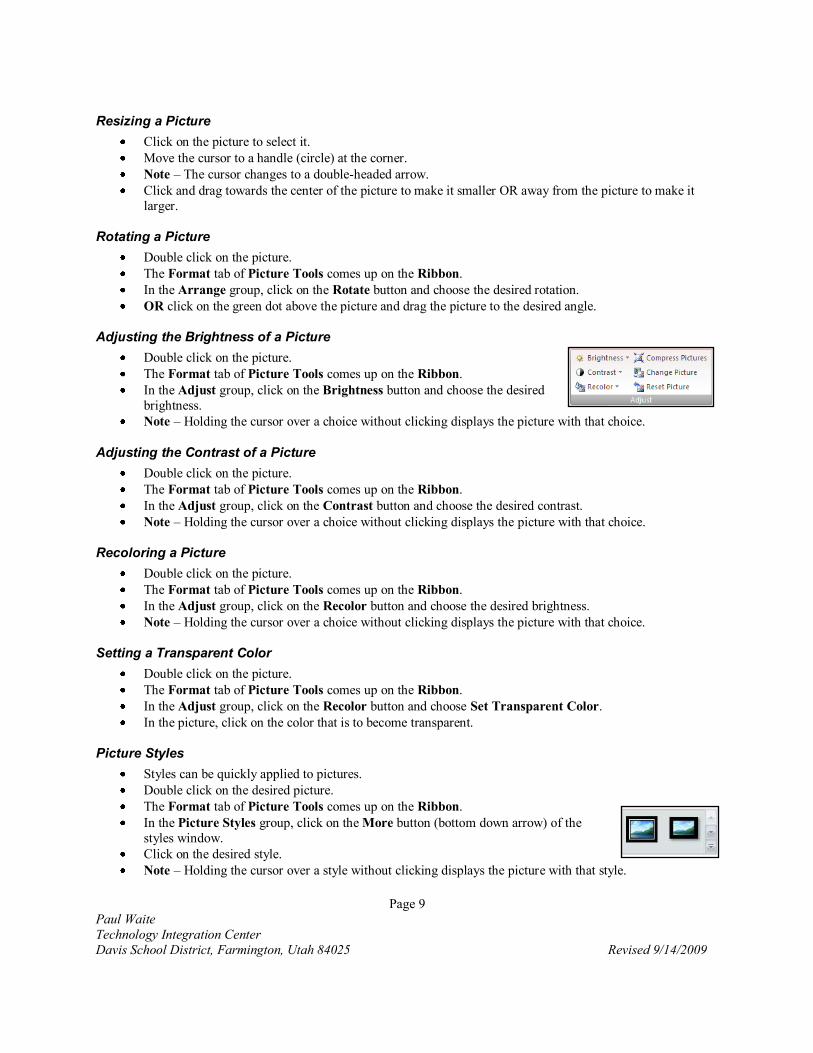
Adjusting the Brightness of a Picture
Double click on the picture.
The Format tab of Picture Tools comes up on the Ribbon.
In the Adjust group, click on the Brightness button and choose the desired
brightness.
Note – Holding the cursor over a choice without clicking displays the picture with that choice.
Adjusting the Contrast of a Picture
Double click on the picture.
The Format tab of Picture Tools comes up on the Ribbon.
In the Adjust group, click on the Contrast button and choose the desired contrast.
Note – Holding the cursor over a choice without clicking displays the picture with that choice.
Recoloring a Picture
Double click on the picture.
The Format tab of Picture Tools comes up on the Ribbon.
In the Adjust group, click on the Recolor button and choose the desired brightness.
Note – Holding the cursor over a choice without clicking displays the picture with that choice.
Setting a Transparent Color
Double click on the picture.
The Format tab of Picture Tools comes up on the Ribbon.
In the Adjust group, click on the Recolor button and choose Set Transparent Color.
In the picture, click on the color that is to become transparent.
Picture Styles
Styles can be quickly applied to pictures.
Double click on the desired picture.
The Format tab of Picture Tools comes up on the Ribbon.
In the Picture Styles group, click on the More button (bottom down arrow) of the
styles window.
Click on the desired style.
Note – Holding the cursor over a style without clicking displays the picture with that style.
Page 10
Paul Waite
Technology Integration Center
Davis School District, Farmington, Utah 84025 Revised 9/14/2009
Changing the Picture Shape
Double click on the desired picture.
The Format tab of Picture Tools comes up on the Ribbon.
In the Picture Styles group, click on the Picture Shape button and choose the desired shape.
Note – Holding the cursor over a shape without clicking displays the picture with that shape.
Changing the Picture Border
Double click on the desired shape or object.
The Format tab of Picture Tools comes up on the Ribbon.
In the Picture Styles group, click on the Picture Border button and choose the desired border.
Note – Holding the cursor over a border without clicking displays the picture with that border.
Changing the Picture Effects
Double click on the desired shape or object.
The Format tab of Picture Tools comes up on the Ribbon.
In the Picture Styles group, click on the Picture Effects button and choose the desired effect.
Note – Holding the cursor over an effect without clicking displays the picture with that effect.
Changing the Order of Layered Pictures
Right click on the picture and choose Bring to Front or Send to Back and the desired option.
o Bring to Front puts the picture on top of all other pictures.
o Bring Forward puts the picture above another picture.
o Send to Back puts the picture behind all other pictures.
o Send Backward puts the picture behind another picture.
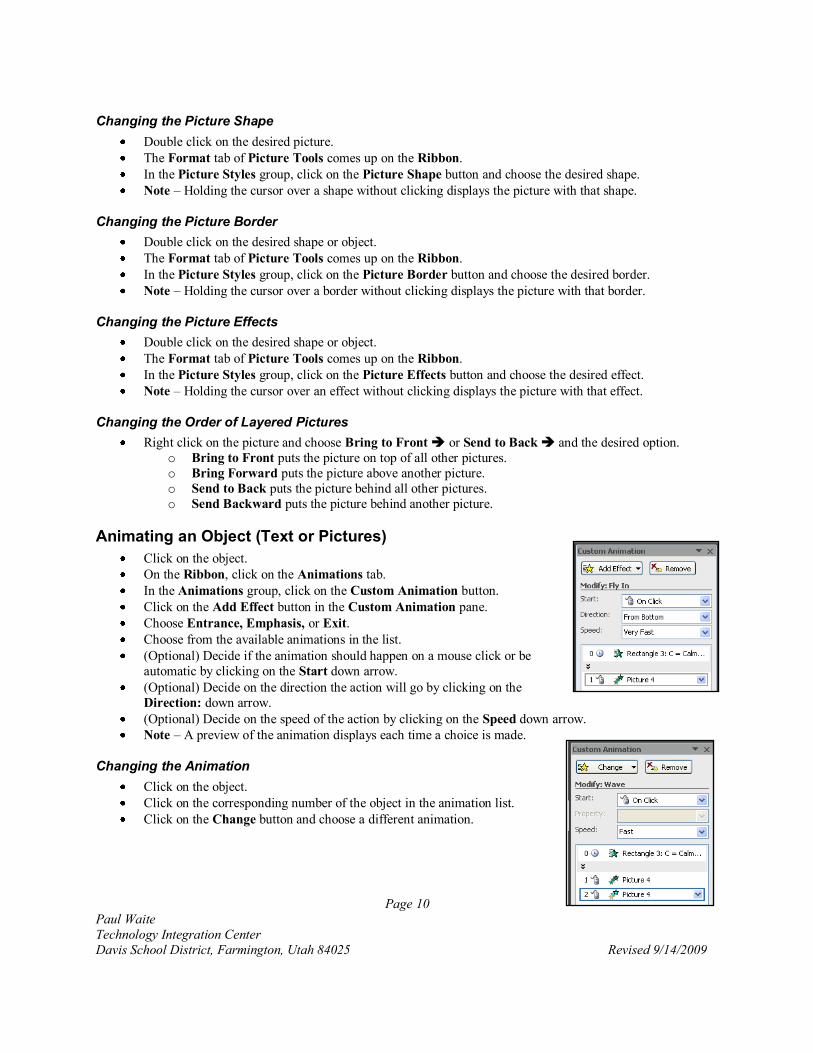
Animating an Object (Text or Pictures)
Click on the object.
On the Ribbon, click on the Animations tab.
In the Animations group, click on the Custom Animation button.
Click on the Add Effect button in the Custom Animation pane.
Choose Entrance, Emphasis, or Exit.
Choose from the available animations in the list.
(Optional) Decide if the animation should happen on a mouse click or be
automatic by clicking on the Start down arrow.
(Optional) Decide on the direction the action will go by clicking on the
Direction: down arrow.
(Optional) Decide on the speed of the action by clicking on the Speed down arrow.
Note – A preview of the animation displays each time a choice is made.
Changing the Animation
Click on the object.
Click on the corresponding number of the object in the animation list.
Click on the Change button and choose a different animation.
Page 11
Paul Waite
Technology Integration Center
Davis School District, Farmington, Utah 84025 Revised 9/14/2009
Removing the Animation
Click on the object.
Click on the corresponding number of the object in the animation list.
Click on the Remove button in the Custom Animation pane to remove the previous choice
Adding a Delay to an Automatic Animation
Click on the object.
Click on the down arrow next to the corresponding number of the
object in the animation list.
Click on Timing.
Change the Delay to the desired number of seconds.
Click OK.
Adding Multiple Animations to the Same Object
Click on the object.
Click on the Add Effect button in the Custom Animation pane.
Choose Entrance, Emphasis, or Exit.
Choose from the available animations in the list.
Changing the Order Objects Play
If the Custom Animations screen is not showing:
o On the Ribbon, click on the Animations tab.
o In the Animations group, click on the Custom Animation button.
Look at the list in the Custom Animations pane showing the order in which
objects play.
Click on the object on the slide to be changed. (The animation in the list is
highlighted.)
Click and drag the animation in the list to the desired playing position.
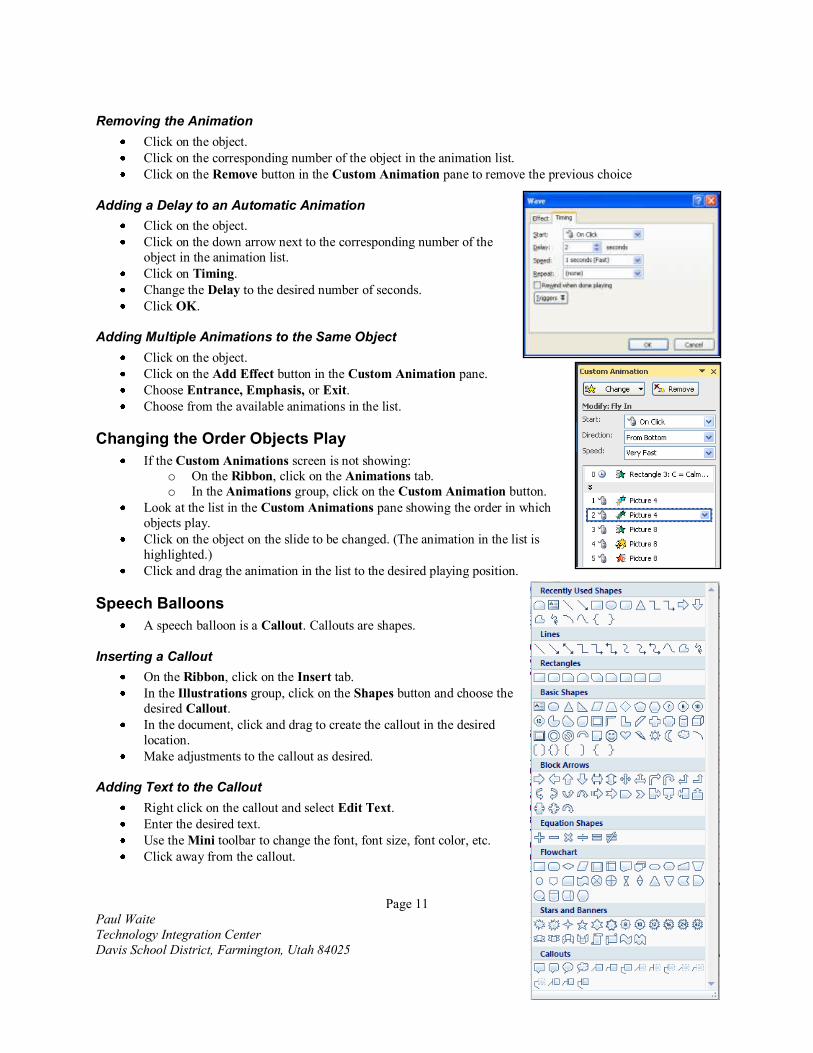
Speech Balloons
A speech balloon is a Callout. Callouts are shapes.
Inserting a Callout
On the Ribbon, click on the Insert tab.
In the Illustrations group, click on the Shapes button and choose the
desired Callout.
In the document, click and drag to create the callout in the desired
location.
Make adjustments to the callout as desired.
Adding Text to the Callout
Right click on the callout and select Edit Text.
Enter the desired text.
Use the Mini toolbar to change the font, font size, font color, etc.
Click away from the callout.
Page 12
Paul Waite
Technology Integration Center
Davis School District, Farmington, Utah 84025 Revised 9/14/2009
Moving the Callout
Click on the callout and move the cursor to the edge.
Click and drag the callout to the desired location.
Resizing a Shape
Click on the callout.
Move the cursor over one of the handles. (The open circles at the corners and the middle of each edge.)
The cursor will change to a two-headed arrow.
Click and drag to the desired size.
Connecting the Tail of the Callout
Click on the callout.
Notice the yellow diamond at the end of the tail of the callout.
Click and drag it to the desired location.
Deleting a Callout
Click on the callout.
Press the Delete key on the keyboard.
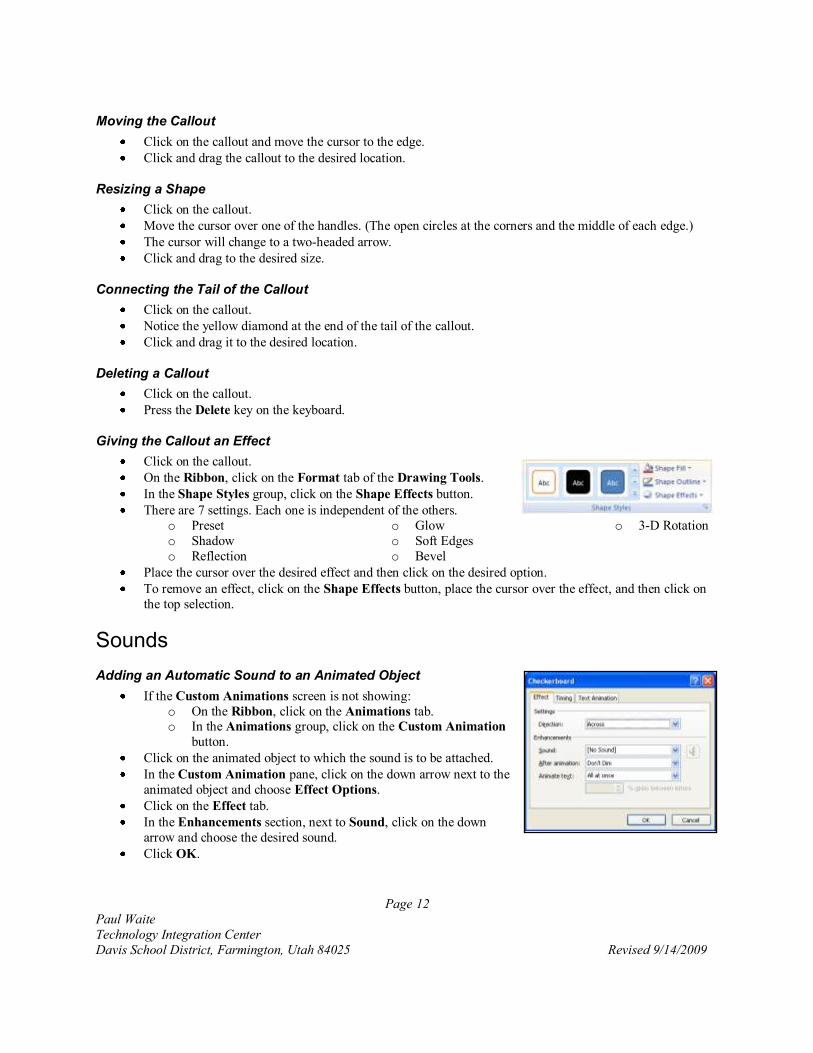
Giving the Callout an Effect
Click on the callout.
On the Ribbon, click on the Format tab of the Drawing Tools.
In the Shape Styles group, click on the Shape Effects button.
There are 7 settings. Each one is independent of the others.
o Preset
o Shadow
o Reflection
o Glow
o Soft Edges
o Bevel
o 3-D Rotation
Place the cursor over the desired effect and then click on the desired option.
To remove an effect, click on the Shape Effects button, place the cursor over the effect, and then click on
the top selection.
Sounds
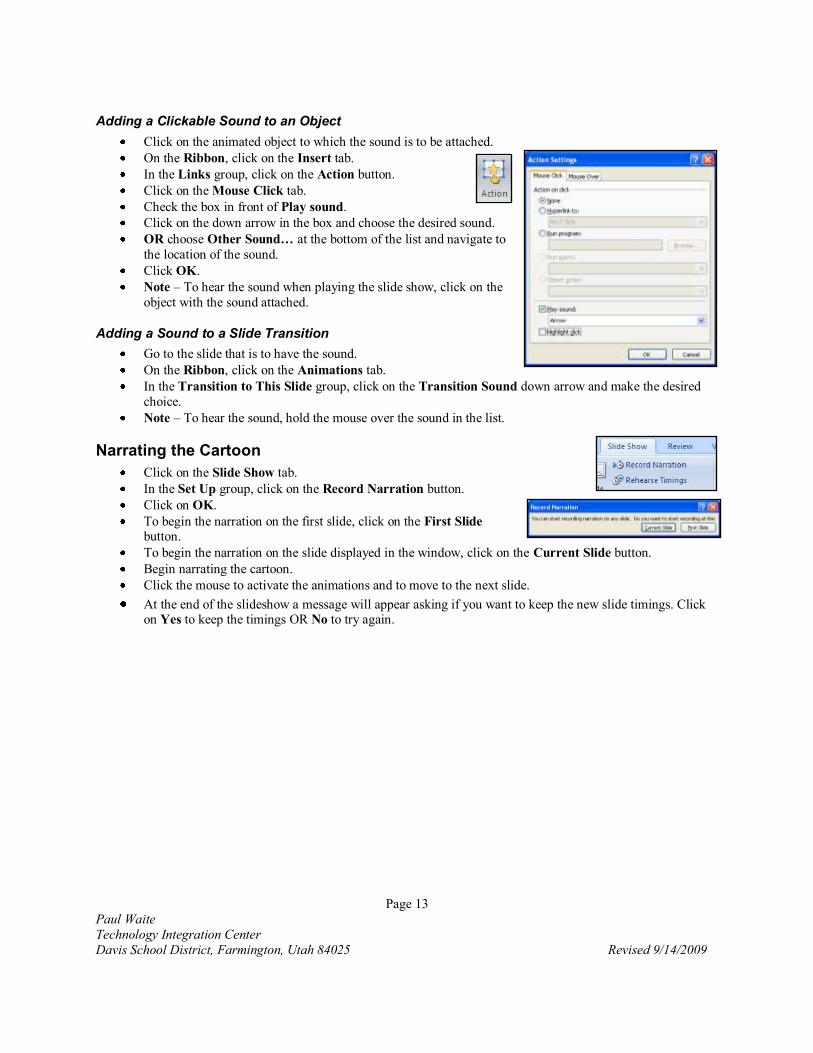
Adding an Automatic Sound to an Animated Object
If the Custom Animations screen is not showing:
o On the Ribbon, click on the Animations tab. o In the Animations group, click on the Custom Animation
button.
Click on the animated object to which the sound is to be attached.
In the Custom Animation pane, click on the down arrow next to the
animated object and choose Effect Options.
Click on the Effect tab.
In the Enhancements section, next to Sound, click on the down
arrow and choose the desired sound.
Click OK.
Page 13
Paul Waite
Technology Integration Center
Davis School District, Farmington, Utah 84025 Revised 9/14/2009
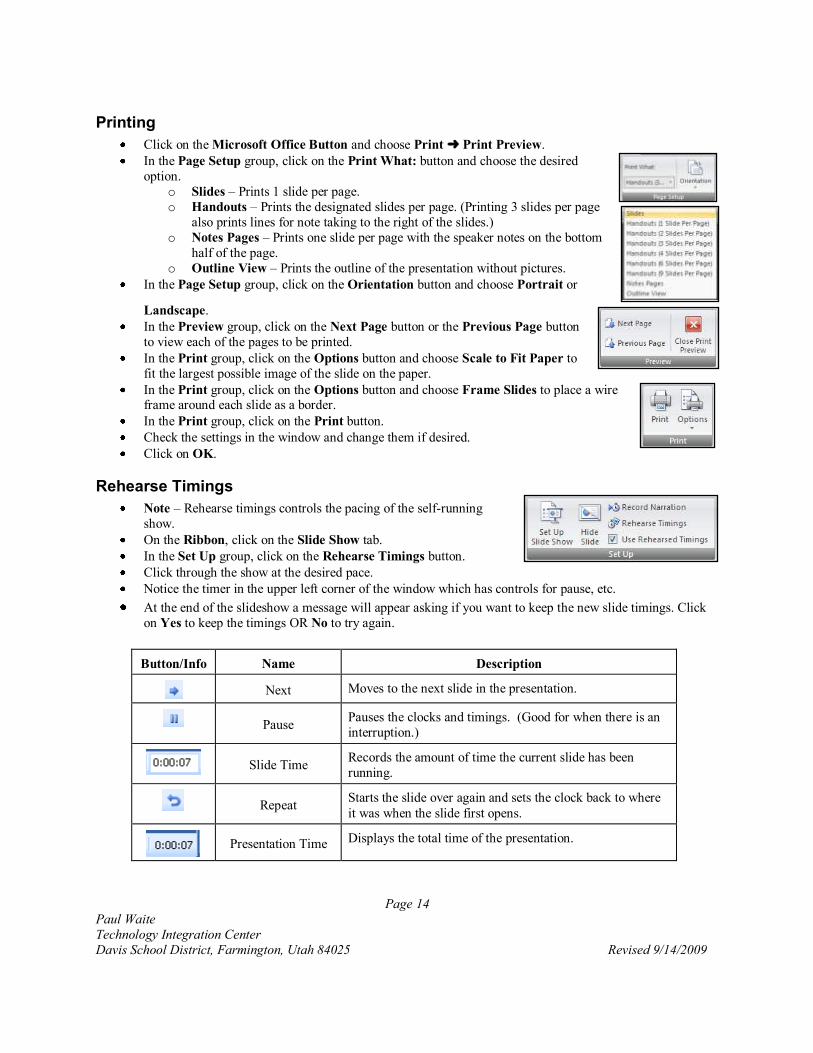
Adding a Clickable Sound to an Object
Click on the animated object to which the sound is to be attached.
On the Ribbon, click on the Insert tab.
In the Links group, click on the Action button.
Click on the Mouse Click tab.
Check the box in front of Play sound.
Click on the down arrow in the box and choose the desired sound.
OR choose Other Sound… at the bottom of the list and navigate to
the location of the sound.
Click OK.
Note – To hear the sound when playing the slide show, click on the
object with the sound attached.
Adding a Sound to a Slide Transition
Go to the slide that is to have the sound.
On the Ribbon, click on the Animations tab.
In the Transition to This Slide group, click on the Transition Sound down arrow and make the desired
choice.
Note – To hear the sound, hold the mouse over the sound in the list.
Narrating the Cartoon
Click on the Slide Show tab.
In the Set Up group, click on the Record Narration button.
Click on OK.
To begin the narration on the first slide, click on the First Slide
button.
To begin the narration on the slide displayed in the window, click on the Current Slide button.
Begin narrating the cartoon.
Click the mouse to activate the animations and to move to the next slide.
At the end of the slideshow a message will appear asking if you want to keep the new slide timings. Click on Yes to keep the timings OR No to try again.
Page 14
Paul Waite
Technology Integration Center
Davis School District, Farmington, Utah 84025 Revised 9/14/2009
Printing
Click on the Microsoft Office Button and choose Print Print Preview.
In the Page Setup group, click on the Print What: button and choose the desired
option.
o Slides – Prints 1 slide per page.
o Handouts – Prints the designated slides per page. (Printing 3 slides per page
also prints lines for note taking to the right of the slides.)
o Notes Pages – Prints one slide per page with the speaker notes on the bottom
half of the page.
o Outline View – Prints the outline of the presentation without pictures.
In the Page Setup group, click on the Orientation button and choose Portrait or
Landscape.
In the Preview group, click on the Next Page button or the Previous Page button
to view each of the pages to be printed.
In the Print group, click on the Options button and choose Scale to Fit Paper to
fit the largest possible image of the slide on the paper.
In the Print group, click on the Options button and choose Frame Slides to place a wire frame around each slide as a border.
In the Print group, click on the Print button.
Check the settings in the window and change them if desired.
Click on OK.
Rehearse Timings
Note – Rehearse timings controls the pacing of the self-running
show.
On the Ribbon, click on the Slide Show tab.
In the Set Up group, click on the Rehearse Timings button.
Click through the show at the desired pace.
Notice the timer in the upper left corner of the window which has controls for pause, etc.
At the end of the slideshow a message will appear asking if you want to keep the new slide timings. Click
on Yes to keep the timings OR No to try again.
Button/Info Name Description
Next Moves to the next slide in the presentation.
Pause Pauses the clocks and timings. (Good for when there is an
interruption.)
Slide Time
Records the amount of time the current slide has been
running.
Repeat Starts the slide over again and sets the clock back to where
it was when the slide first opens.
Presentation Time Displays the total time of the presentation.