Embed Size (px)
Citation preview
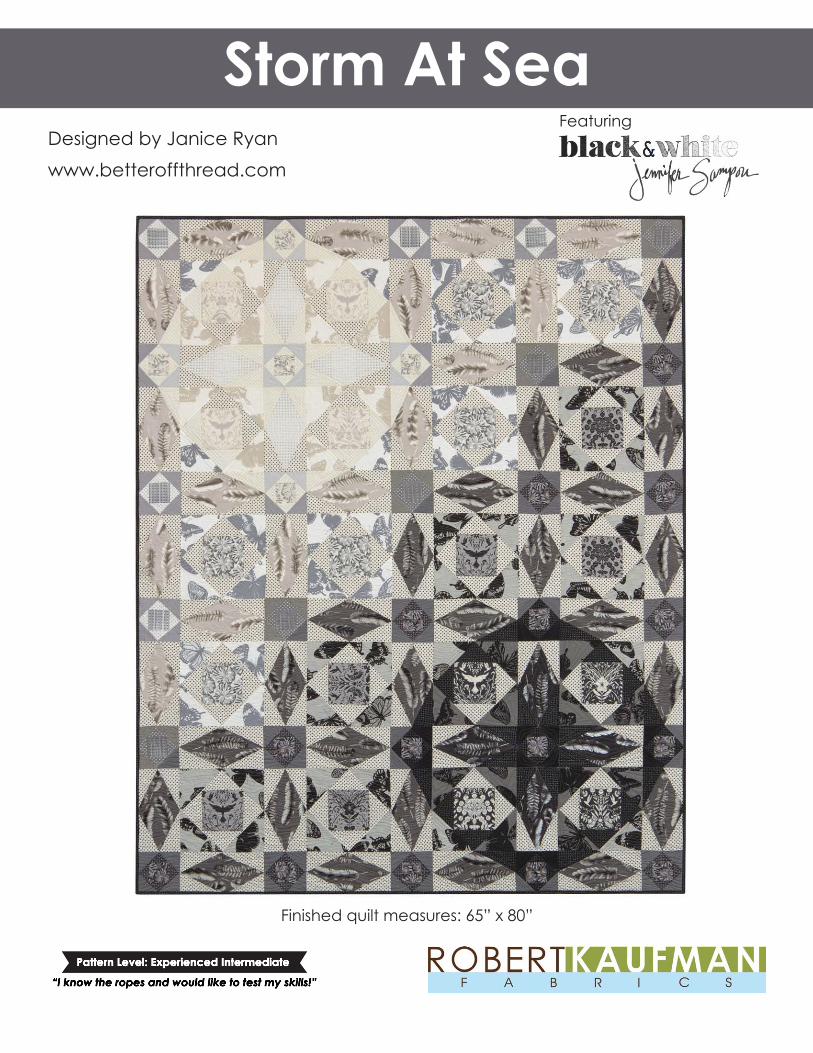
Storm At SeaDesigned by Janice Ryanwww.betteroffthread.com
Finished quilt measures: 65” x 80”
Pattern Level: Experienced Intermediate
“I know the ropes and would like to test my skills!”
Featuring
page 2
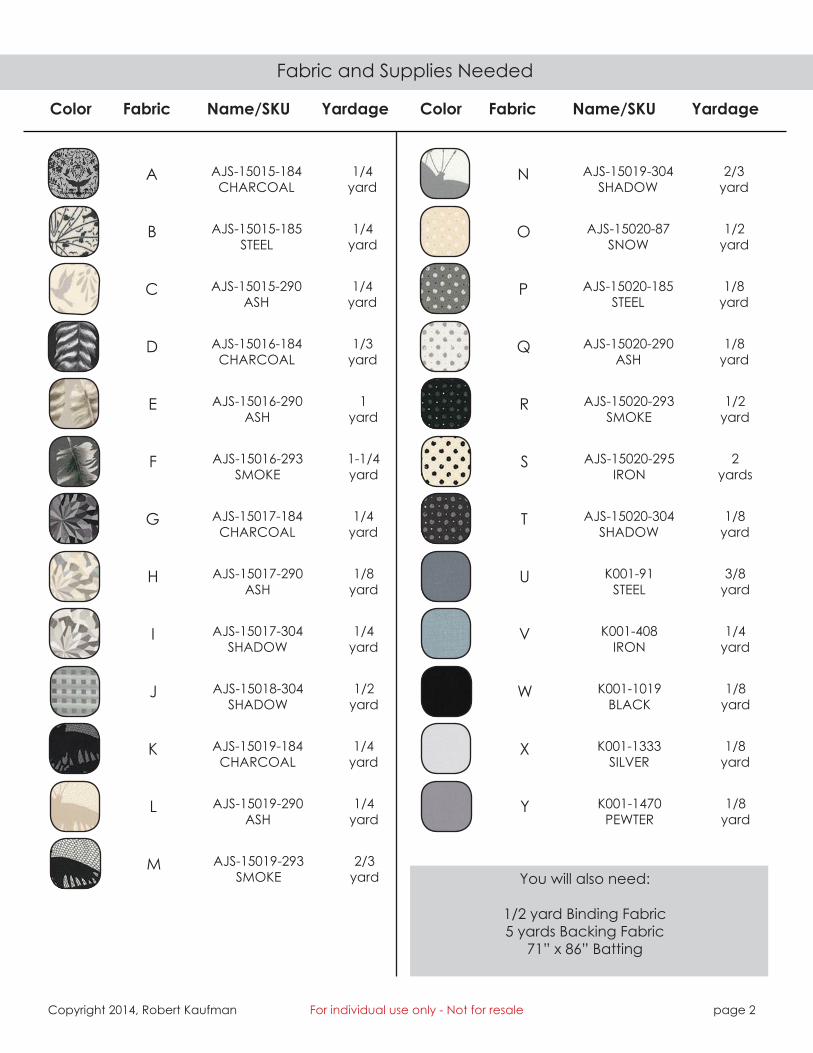
Color Fabric Name/SKU Yardage Color Fabric Name/SKU Yardage
Copyright 2014, Robert Kaufman For individual use only - Not for resale
A AJS-15015-184 CHARCOAL
1/4yard
B AJS-15015-185 STEEL
1/4yard
C AJS-15015-290 ASH
1/4yard
D AJS-15016-184 CHARCOAL
1/3yard
E AJS-15016-290 ASH
1yard
F AJS-15016-293 SMOKE
1-1/4yard
G AJS-15017-184 CHARCOAL
1/4yard
H AJS-15017-290 ASH
1/8yard
I AJS-15017-304 SHADOW
1/4yard
J AJS-15018-304 SHADOW
1/2yard
K AJS-15019-184 CHARCOAL
1/4yard
L AJS-15019-290 ASH
1/4yard
M AJS-15019-293 SMOKE
2/3 yard
N AJS-15019-304 SHADOW
2/3yard
O AJS-15020-87 SNOW
1/2yard
P AJS-15020-185 STEEL
1/8yard
Q AJS-15020-290 ASH
1/8yard
R AJS-15020-293 SMOKE
1/2yard
S AJS-15020-295 IRON
2yards
T AJS-15020-304 SHADOW
1/8yard
U K001-91 STEEL
3/8yard
V K001-408 IRON
1/4yard
W K001-1019 BLACK
1/8yard
X K001-1333 SILVER
1/8yard
Y K001-1470 PEWTER
1/8yard
You will also need:
1/2 yard Binding Fabric5 yards Backing Fabric
71” x 86” Batting
Fabric and Supplies Needed
page 3
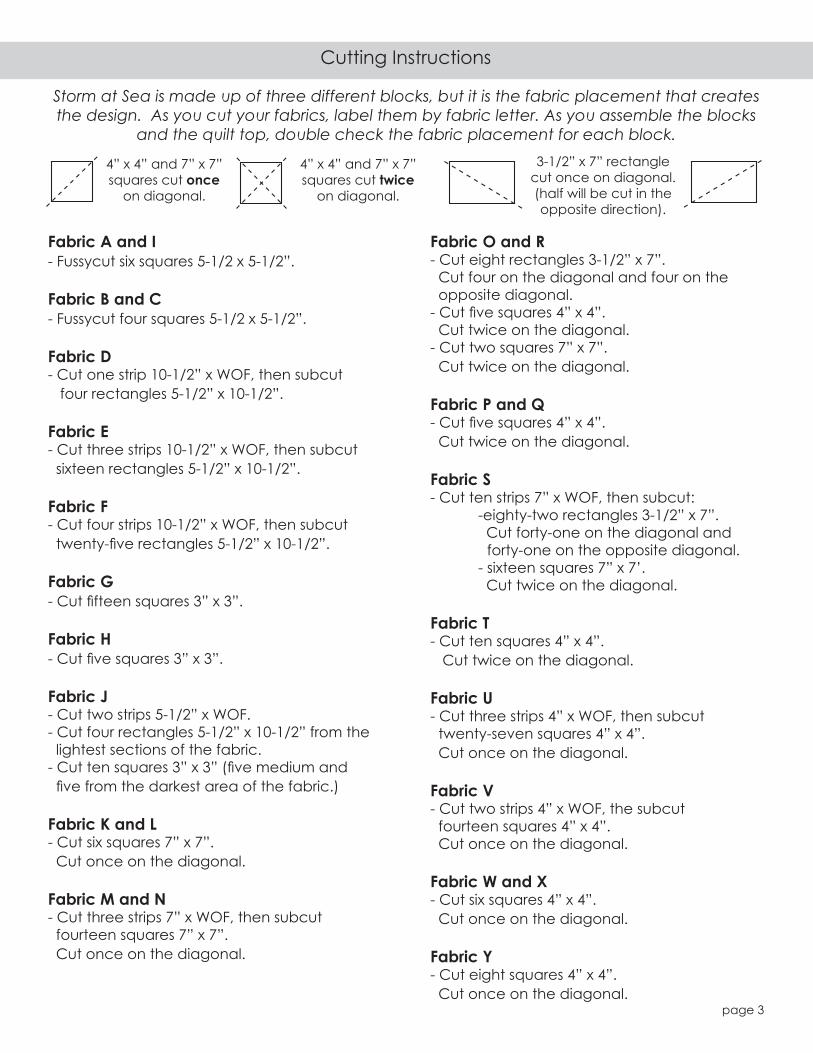
Cutting Instructions
Fabric A and I- Fussycut six squares 5-1/2 x 5-1/2”.
Fabric B and C- Fussycut four squares 5-1/2 x 5-1/2”.
Fabric D- Cut one strip 10-1/2” x WOF, then subcut four rectangles 5-1/2” x 10-1/2”.
Fabric E- Cut three strips 10-1/2” x WOF, then subcut sixteen rectangles 5-1/2” x 10-1/2”.
Fabric F- Cut four strips 10-1/2” x WOF, then subcut��WZHQW\�ÀYH�UHFWDQJOHV������µ�[�������µ�
Fabric G��&XW�ÀIWHHQ�VTXDUHV��µ�[��µ�
Fabric H��&XW�ÀYH�VTXDUHV��µ�[��µ�
Fabric J- Cut two strips 5-1/2” x WOF. - Cut four rectangles 5-1/2” x 10-1/2” from the lightest sections of the fabric.��&XW�WHQ�VTXDUHV��µ�[��µ��ÀYH�PHGLXP�DQG��ÀYH�IURP�WKH�GDUNHVW�DUHD�RI�WKH�IDEULF��
Fabric K and L- Cut six squares 7” x 7”. Cut once on the diagonal.
Fabric M and N- Cut three strips 7” x WOF, then subcut fourteen squares 7” x 7”. Cut once on the diagonal.
Fabric O and R- Cut eight rectangles 3-1/2” x 7”. Cut four on the diagonal and four on the opposite diagonal.��&XW�ÀYH�VTXDUHV��µ�[��µ� Cut twice on the diagonal.- Cut two squares 7” x 7”. Cut twice on the diagonal.
Fabric P and Q��&XW�ÀYH�VTXDUHV��µ�[��µ� Cut twice on the diagonal.
Fabric S- Cut ten strips 7” x WOF, then subcut: -eighty-two rectangles 3-1/2” x 7”. Cut forty-one on the diagonal and forty-one on the opposite diagonal. - sixteen squares 7” x 7’. Cut twice on the diagonal.
Fabric T- Cut ten squares 4” x 4”. Cut twice on the diagonal.
Fabric U- Cut three strips 4” x WOF, then subcut twenty-seven squares 4” x 4”. Cut once on the diagonal.
Fabric V- Cut two strips 4” x WOF, the subcut fourteen squares 4” x 4”. Cut once on the diagonal.
Fabric W and X- Cut six squares 4” x 4”. Cut once on the diagonal.
Fabric Y- Cut eight squares 4” x 4”. Cut once on the diagonal.
Storm at Sea is made up of three different blocks, but it is the fabric placement that creates the design. As you cut your fabrics, label them by fabric letter. As you assemble the blocks
and the quilt top, double check the fabric placement for each block.
4” x 4” and 7” x 7” squares cut once
on diagonal.
4” x 4” and 7” x 7” squares cut twice
on diagonal.
3-1/2” x 7” rectangle cut once on diagonal.(half will be cut in the RSSRVLWH�GLUHFWLRQ��
page 4
Assembly Instructions
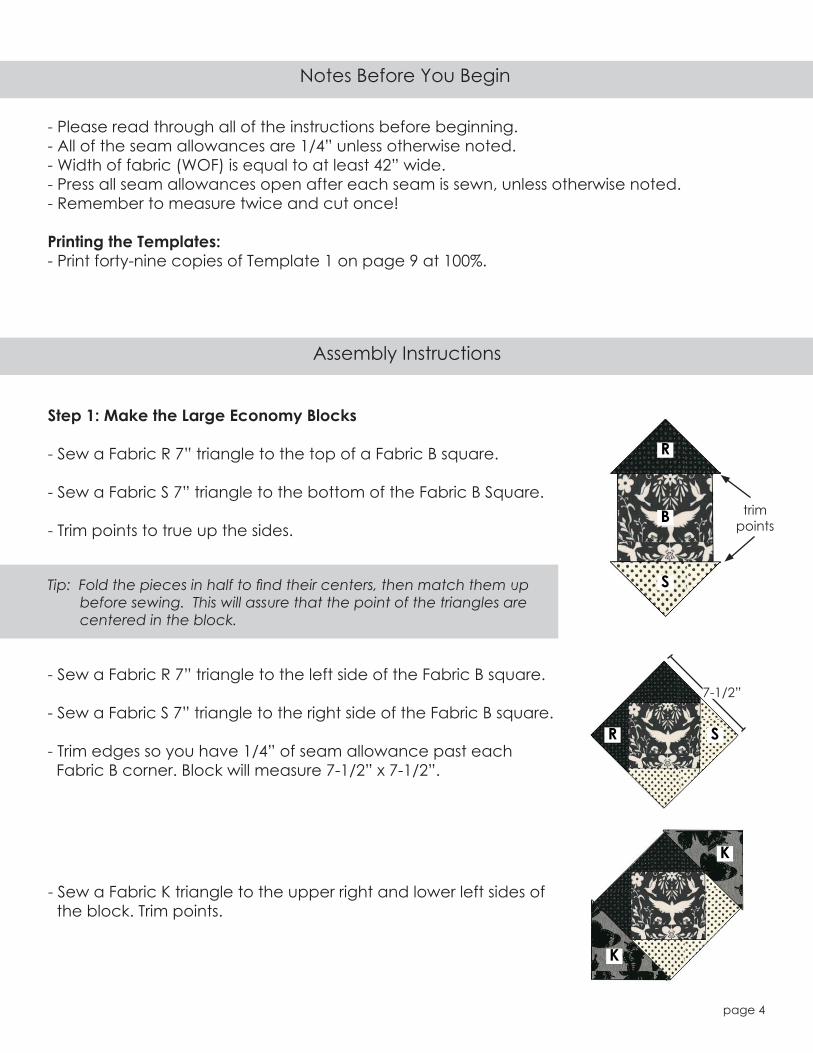
Notes Before You Begin
- Please read through all of the instructions before beginning.- All of the seam allowances are 1/4” unless otherwise noted. ��:LGWK�RI�IDEULF��:2)��LV�HTXDO�WR�DW�OHDVW���µ�ZLGH�- Press all seam allowances open after each seam is sewn, unless otherwise noted.- Remember to measure twice and cut once!
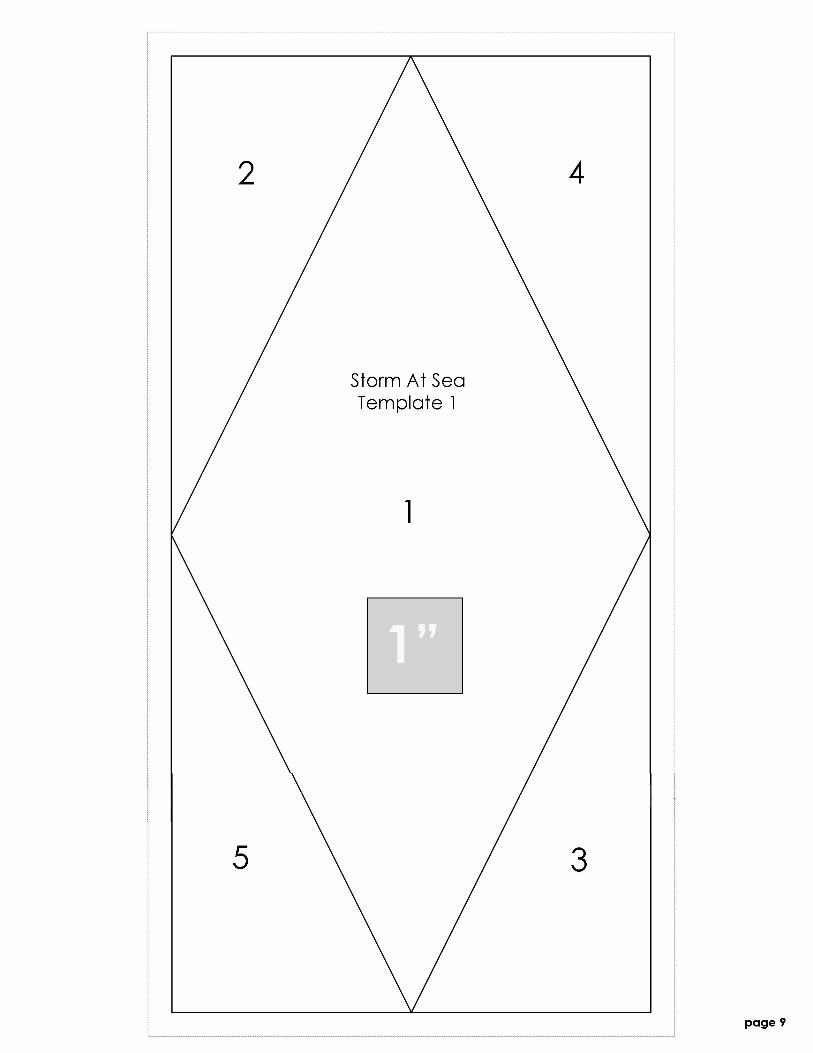
Printing the Templates:- Print forty-nine copies of Template 1 on page 9 at 100%.
Step 1: Make the Large Economy Blocks
- Sew a Fabric R 7” triangle to the top of a Fabric B square.
- Sew a Fabric S 7” triangle to the bottom of the Fabric B Square.
- Trim points to true up the sides.
7LS���)ROG�WKH�SLHFHV�LQ�KDOI�WR�ÀQG�WKHLU�FHQWHUV��WKHQ�PDWFK�WKHP�XS� before sewing. This will assure that the point of the triangles are centered in the block.
- Sew a Fabric R 7” triangle to the left side of the Fabric B square.
- Sew a Fabric S 7” triangle to the right side of the Fabric B square.
- Trim edges so you have 1/4” of seam allowance past each Fabric B corner. Block will measure 7-1/2” x 7-1/2”.
- Sew a Fabric K triangle to the upper right and lower left sides of the block. Trim points.
R
S
B
R S
K
K
7-1/2”
trim points
page 5
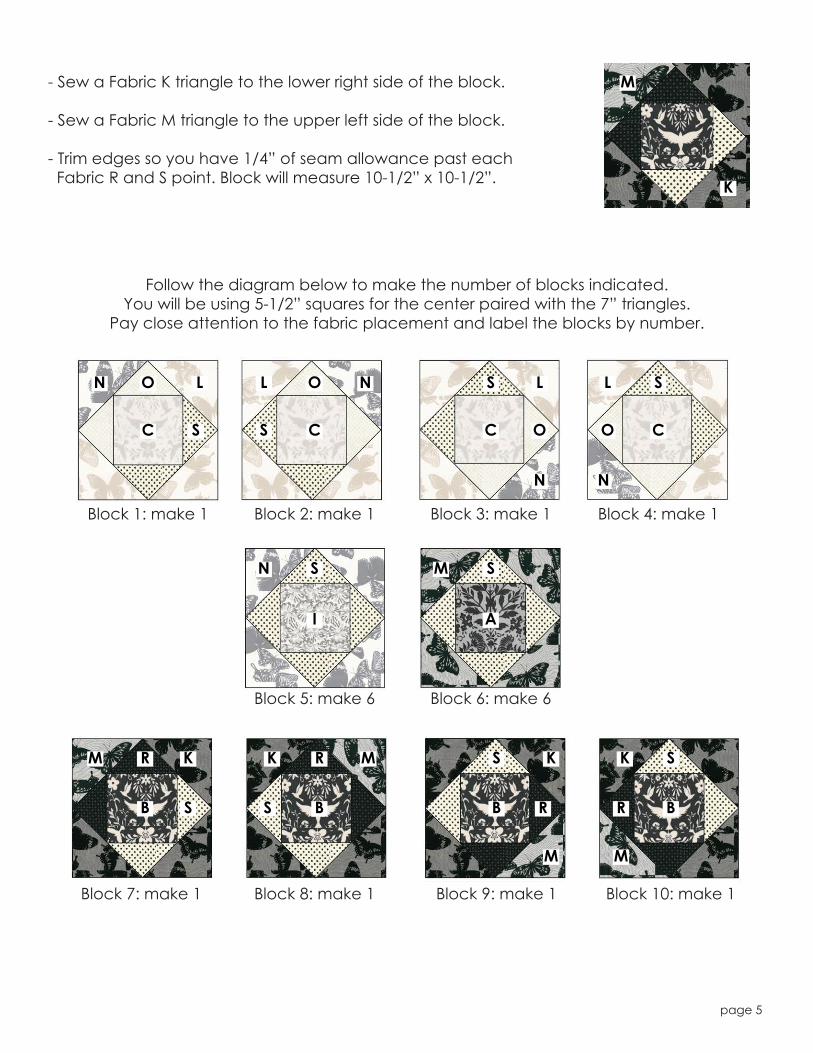
- Sew a Fabric K triangle to the lower right side of the block.
- Sew a Fabric M triangle to the upper left side of the block.
- Trim edges so you have 1/4” of seam allowance past each Fabric R and S point. Block will measure 10-1/2” x 10-1/2”.
Follow the diagram below to make the number of blocks indicated. You will be using 5-1/2” squares for the center paired with the 7” triangles.
Pay close attention to the fabric placement and label the blocks by number.
Block 5: make 6 Block 6: make 6
Block 1: make 1 Block 2: make 1 Block 3: make 1 Block 4: make 1
Block 7: make 1 Block 8: make 1 Block 9: make 1 Block 10: make 1
M
K
N L
C
O
S CS
OL N
C C
L
N
S
O
L
N
S
O
I
SN
A
SM
B
M KR
S
K M
B
R
S
K
M
B R
S
B
K
M
R
S
page 6
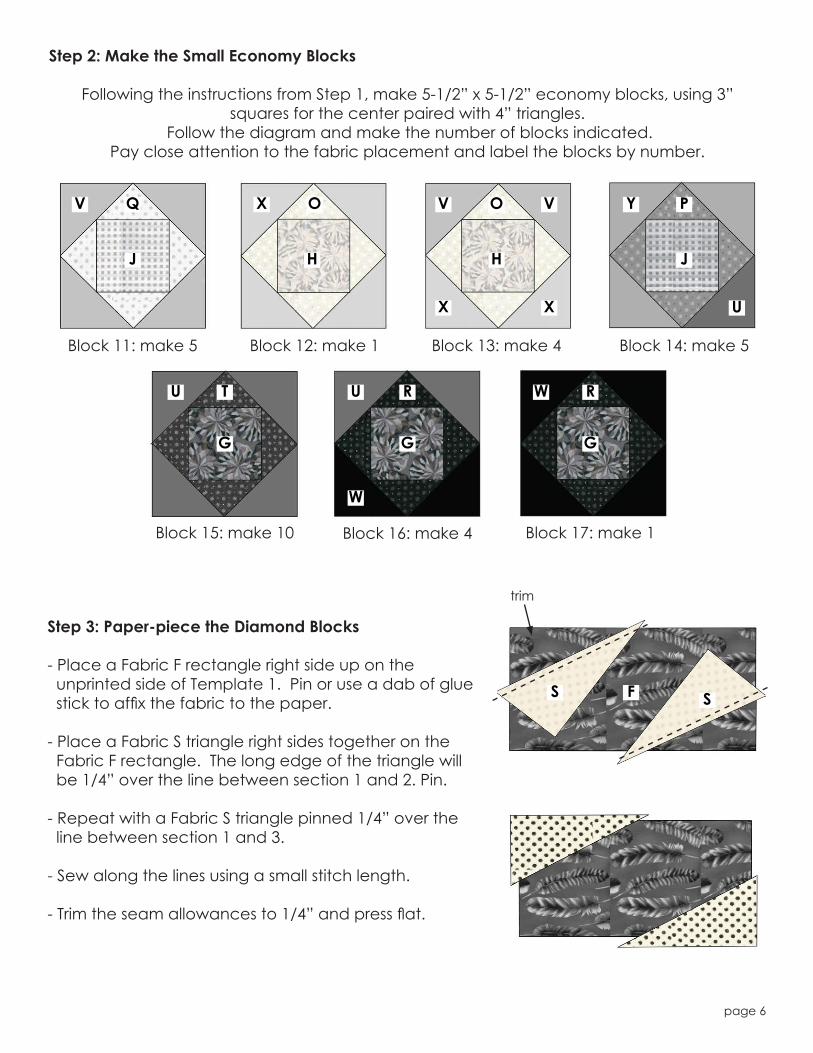
Step 2: Make the Small Economy Blocks
Following the instructions from Step 1, make 5-1/2” x 5-1/2” economy blocks, using 3” squares for the center paired with 4” triangles.
Follow the diagram and make the number of blocks indicated.Pay close attention to the fabric placement and label the blocks by number.
Block 11: make 5 Block 12: make 1 Block 13: make 4 Block 14: make 5
Block 15: make 10 Block 16: make 4 Block 17: make 1
Step 3: Paper-piece the Diamond Blocks
- Place a Fabric F rectangle right side up on the unprinted side of Template 1. Pin or use a dab of glue ��VWLFN�WR�DIÀ[�WKH�IDEULF�WR�WKH�SDSHU�
- Place a Fabric S triangle right sides together on the Fabric F rectangle. The long edge of the triangle will be 1/4” over the line between section 1 and 2. Pin.
- Repeat with a Fabric S triangle pinned 1/4” over the line between section 1 and 3.
- Sew along the lines using a small stitch length.
��7ULP�WKH�VHDP�DOORZDQFHV�WR����µ�DQG�SUHVV�ÁDW�
J H H J
G G G
V Q X O V V
X X
PY
U
TU RU
W
W R
O
S F S
trim
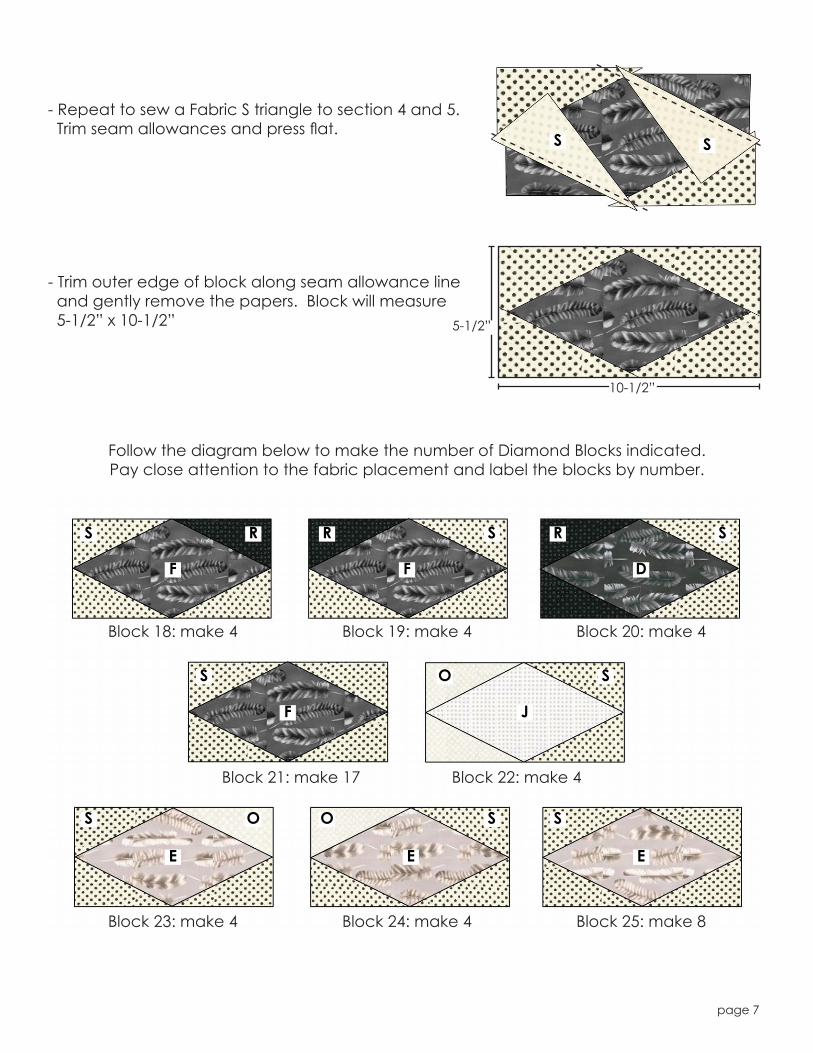
- Repeat to sew a Fabric S triangle to section 4 and 5.��7ULP�VHDP�DOORZDQFHV�DQG�SUHVV�ÁDW�
- Trim outer edge of block along seam allowance line and gently remove the papers. Block will measure 5-1/2” x 10-1/2”
Follow the diagram below to make the number of Diamond Blocks indicated.Pay close attention to the fabric placement and label the blocks by number.
Block 18: make 4 Block 19: make 4 Block 20: make 4
Block 21: make 17 Block 22: make 4
Block 23: make 4 Block 24: make 4 Block 25: make 8
page 7
S S
5-1/2”
10-1/2”
F F D
F J
E E E
RS R S R S
S O S
OS O S S

Your quilt top is complete! Baste, quilt, bind & enjoy.page 8
Step 4: Assemble the Quilt
Sew the blocks into rows and sew the rows together, matching the seams, to complete the quilt top. The numbers on the diagram indicate the block number.
11
1 2 5 5
4 3 5 6
5 5 6 6
5 7 8
6 6 9
11 11
11
11
12
13
13 13
13 14
14
14
14
14
15
15
15 15 15 15
15 15
15
16
16
16
1617
10
24
24
23
24
24
23
23
23
25
25 25
25
2525
25
22
22 22
22
21 21
21 21
21 21
21
21
21 21 21
21 21
19
19
19
19
18
18
18
18
20
20 20
20
15
25 6
21 21
21
21