Embed Size (px)
Citation preview

INSTRUCTION GUIDE
• Step-By-Step Illustrated Installation Instructions• Jet Cleaning Instructions• Proper Finish Care• Limited Warranty
Read these instructions carefully before installing your new shower system
INSTRUCTION GUIDE
For Model: 317-8749
CALL FOR A
FREE CATALOG
FEATURING OUR
COMPLETE LINE OF
OVER 450 FAUCETS
& ACCESSORIES
CALL FOR A
FREE CATALOG
FEATURING OUR
COMPLETE LINE OF
OVER 450 FAUCETS
& ACCESSORIES
Shower SystemDual HeadShower SystemDual Head
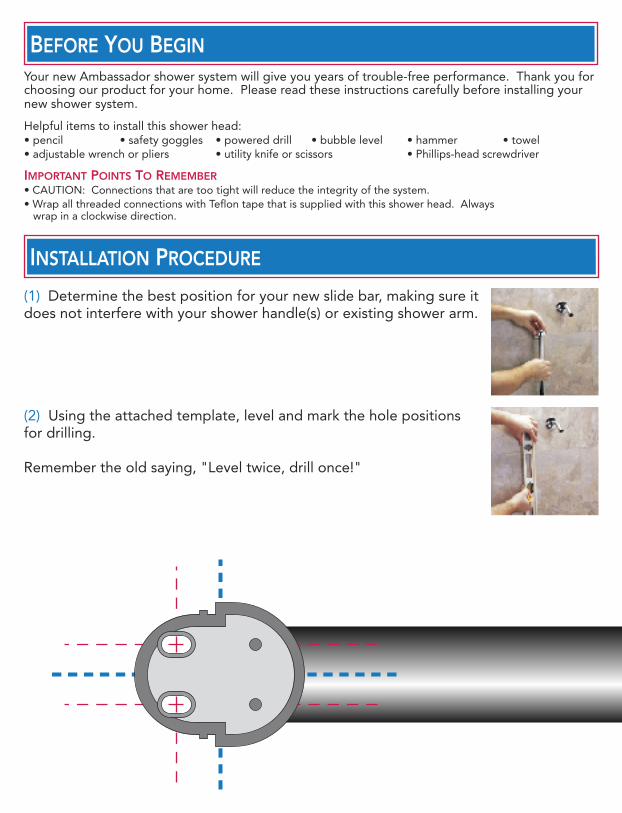
Your new Ambassador shower system will give you years of trouble-free performance. Thank you for choosing our product for your home. Please read these instructions carefully before installing your new shower system.
Helpful items to install this shower head:• pencil • safety goggles • powered drill • bubble level • hammer • towel• adjustable wrench or pliers • utility knife or scissors • Phillips-head screwdriver
IMPORTANT POINTS TO REMEMBER• CAUTION: Connections that are too tight will reduce the integrity of the system.• Wrap all threaded connections with Teflon tape that is supplied with this shower head. Always wrap in a clockwise direction.
INSTALLATION PROCEDURE
BEFORE YOU BEGIN
(1) Determine the best position for your new slide bar, making sure it does not interfere with your shower handle(s) or existing shower arm.
(2) Using the attached template, level and mark the hole positions for drilling.
Remember the old saying, "Level twice, drill once!"
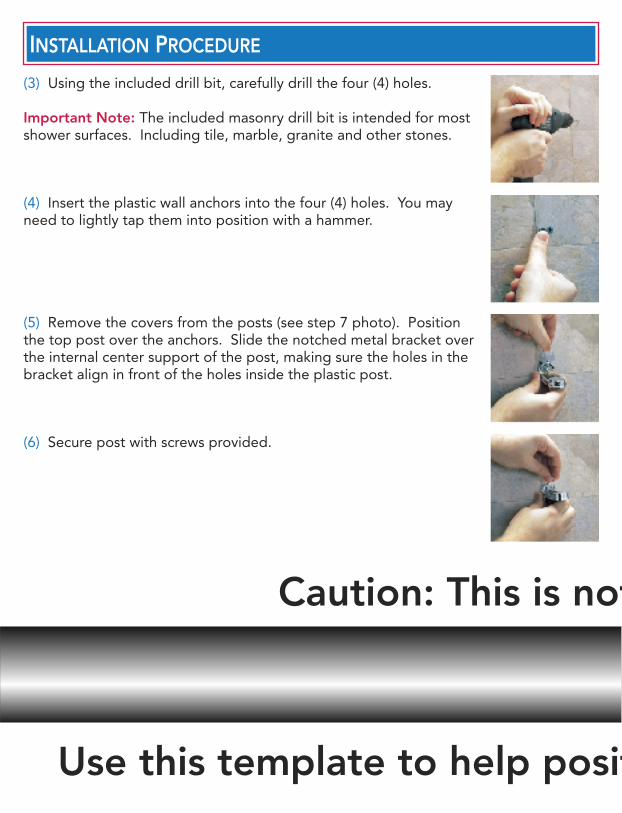
(3) Using the included drill bit, carefully drill the four (4) holes.
Important Note: The included masonry drill bit is intended for most shower surfaces. Including tile, marble, granite and other stones.
(4) Insert the plastic wall anchors into the four (4) holes. You may need to lightly tap them into position with a hammer.
(5) Remove the covers from the posts (see step 7 photo). Position the top post over the anchors. Slide the notched metal bracket over the internal center support of the post, making sure the holes in the bracket align in front of the holes inside the plastic post.
(6) Secure post with screws provided.
INSTALLATION PROCEDURE
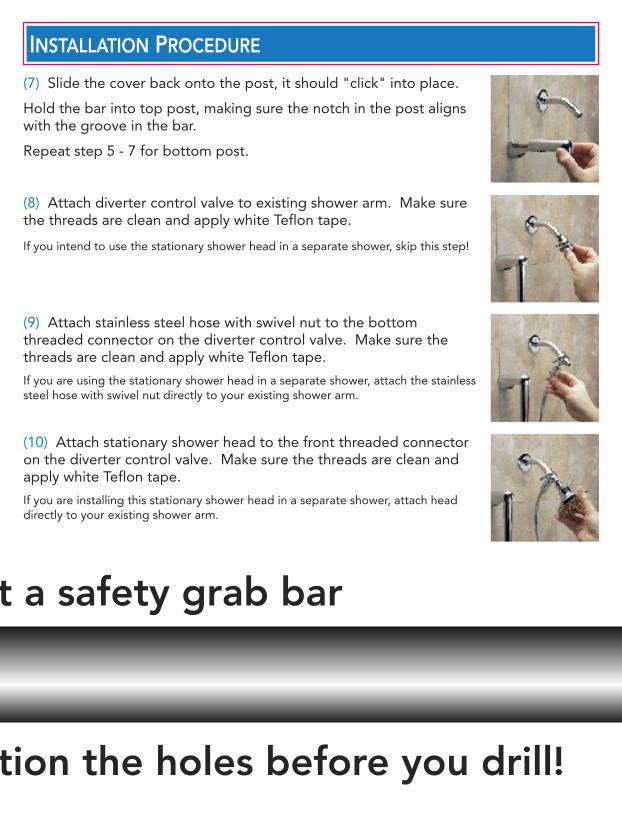
(7) Slide the cover back onto the post, it should "click" into place.
Hold the bar into top post, making sure the notch in the post aligns with the groove in the bar.
Repeat step 5 - 7 for bottom post.
(8) Attach diverter control valve to existing shower arm. Make sure the threads are clean and apply white Teflon tape.
If you intend to use the stationary shower head in a separate shower, skip this step!
(9) Attach stainless steel hose with swivel nut to the bottom threaded connector on the diverter control valve. Make sure the threads are clean and apply white Teflon tape.
If you are using the stationary shower head in a separate shower, attach the stainless steel hose with swivel nut directly to your existing shower arm.
(10) Attach stationary shower head to the front threaded connector on the diverter control valve. Make sure the threads are clean and apply white Teflon tape.
If you are installing this stationary shower head in a separate shower, attach head directly to your existing shower arm.
INSTALLATION PROCEDURE
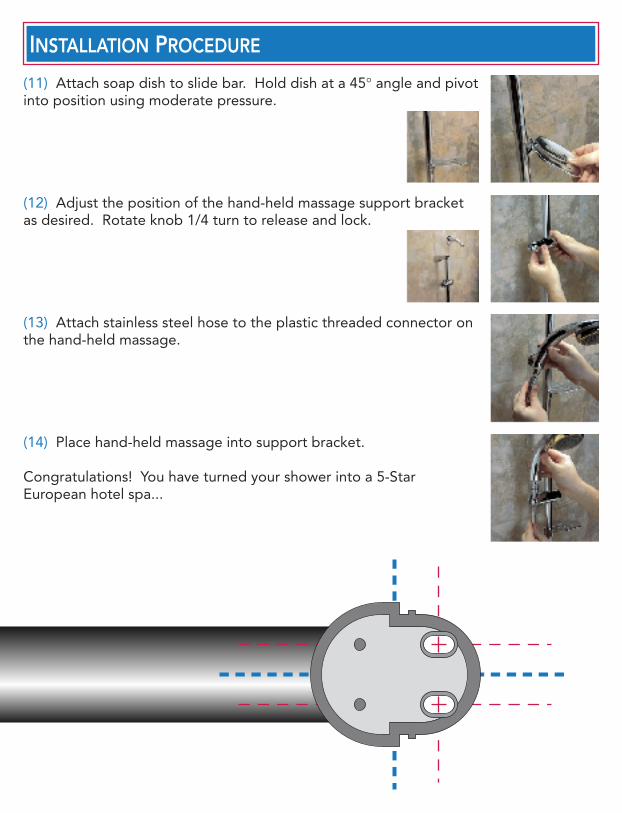
(11) Attach soap dish to slide bar. Hold dish at a 45° angle and pivot into position using moderate pressure.
(12) Adjust the position of the hand-held massage support bracket as desired. Rotate knob 1/4 turn to release and lock.
(13) Attach stainless steel hose to the plastic threaded connector on the hand-held massage.
INSTALLATION PROCEDURE
(14) Place hand-held massage into support bracket.
Congratulations! You have turned your shower into a 5-Star European hotel spa...
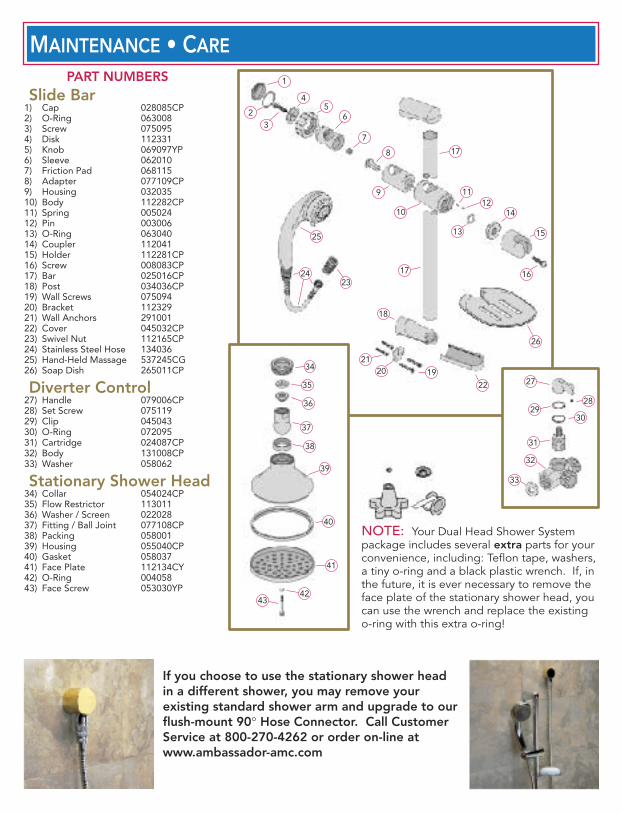
NOTE: Your Dual Head Shower System package includes several extra parts for your convenience, including: Teflon tape, washers, a tiny o-ring and a black plastic wrench. If, in the future, it is ever necessary to remove the face plate of the stationary shower head, you can use the wrench and replace the existing o-ring with this extra o-ring!
MAINTENANCE • CAREPART NUMBERS
Slide Bar1) Cap 028085CP2) O-Ring 0630083) Screw 0750954) Disk 1123315) Knob 069097YP6) Sleeve 0620107) Friction Pad 0681158) Adapter 077109CP9) Housing 03203510) Body 112282CP11) Spring 00502412) Pin 00300613) O-Ring 06304014) Coupler 11204115) Holder 112281CP16) Screw 008083CP17) Bar 025016CP18) Post 034036CP19) Wall Screws 07509420) Bracket 11232921) Wall Anchors 29100122) Cover 045032CP23) Swivel Nut 112165CP24) Stainless Steel Hose 13403625) Hand-Held Massage 537245CG26) Soap Dish 265011CP
Diverter Control27) Handle 079006CP28) Set Screw 07511929) Clip 04504330) O-Ring 07209531) Cartridge 024087CP32) Body 131008CP33) Washer 058062
Stationary Shower Head34) Collar 054024CP35) Flow Restrictor 11301136) Washer / Screen 02202837) Fitting / Ball Joint 077108CP38) Packing 05800139) Housing 055040CP40) Gasket 05803741) Face Plate 112134CY42) O-Ring 00405843) Face Screw 053030YP�
If you choose to use the stationary shower head in a different shower, you may remove your existing standard shower arm and upgrade to our flush-mount 90° Hose Connector. Call Customer Service at 800-270-4262 or order on-line at www.ambassador-amc.com
4
1
65
7
21
2
13
8
9
15
17 16
14
24
11
18
12
1920
22
25
23
10
3
17
26
27
2928
32
31
30
33
36
37
34
39
38
35
40
41
4243
DISCOLORED OR CLOGGED JETSHAND-HELD MASSAGE: After time, mineral deposits may build up on the silicone rubber jets, these will clean off easily. Simply rub the jet with your fingers! If the jet continues to have an improper flow after rubbing, use a straightened paper clip or pin to open the clogged jet.
STATIONARY SHOWER HEAD: After time, green or white mineral deposits may build up on the metal jets. Build-up is NOT a discoloration of the metal. It is a mineral build-up and chemical reaction to the metal jets that will clean off easily. It is usually not necessary to open your shower head. Cleaning from the outside is advised.
A mild soap and water solution should be sufficient, however, a stronger vinegar and water solution (approx. 50/50) or gentle cleaning product (such as “Lime-Away” or “Soft-Scrub”) may also be used. In serious cases, soak the entire face plate in the vinegar solution overnight.
In severe cases, it may be necessary to open the shower head and clean the jets from the inside. Remove the face plate with the plastic wrench (included). Unscrew only the center nut of your shower head. Using a wire brush or a small piece of wire, poke through each jet to break away the minerals. NOTE: Always unclog jets from the inside to avoid finish damage. Replace face plate taking care to properly align the large black gasket with the edge of the housing and o-ring with the front of the face plate. Do not over tighten center nut.
WATER-SAVING FLOW RESTRICTORFederal law requires we install a water-saving flow restrictor (2.5 gallons per minute at 85 psi maximum) in your shower heads. If your water flow is below 2.5 GPM or does not perform to your satisfaction, you can easily remove the restrictors.
HAND-HELD MASSAGE: Unscrew your hand-held massage from the stainless steel hose. Located in the plastic threaded connector of the hand-held massage is a black rubber plug with small holes. Simply pull the plug out of the connector and discard.
STATIONARY SHOWER HEAD: Remove your stationary shower head from the diverter control valve (or standard shower arm). With a Phillips-head screwdriver, simply unscrew the small white disk in the shower head fitting. Discard flow restrictor disk.
DIVERTER CONTROL VALVEDue to Federal regulations, a small amount of water will continue to flow through the diverter control valve, to the unselected setting, while the shower is in use.
PROPER FINISH CAREYour new Dual Head Shower System is protected by a clear-coat. To clean the surface, you only need to wipe it with a damp, soft cloth. NEVER use any abrasive cleaners, steel wool or chemicals, as they will harm the finish and void your warranty. For additional cleaning help, call our Customer Service Center at 1-800-270-4262.
MAINTENANCE • CARE
1 YEAR LIMITED WARRANTYThe manufacturer warrants this product to the original purchaser to be free from defects in material or workmanship for a period of one year from the date of purchase found on the retail sales receipt, a copy of which is required for any warranty claims. The warranty on the finish of this product is also for one year from the date of purchase. However, the manufacturer will not be responsible for mineral build-up, within that year, due to hard water (please see, "Discolored or Clogged Jets" above). Do not attempt to clean your shower system with any kind of chemical or abrasive cleaner. Any abrasive will mar the finish and void this warranty (please see, "Proper Finish Care" above). �
IF YOU NEED MORE INFORMATION CONCERNING PARTS OR SERVICEDO NOT CONTACT YOUR RETAILER, PLEASE CONTACT:
CUSTOMER SERVICE CENTER1-800-270-4262�
Please be advised that this warranty does not cover labor, or other costs of installation, removal, repair, freight to or from the manufacturer, or reinstallation of any parts or surfaces. Further, this warranty is void when a defect or failure results from misuse, neglect, accident, improper installation, or modification of the product, or as a result of work performed by other than the manufacturer.
This warranty is in lieu of all other expressed warranties. The sole and exclusive remedy against the maker hereunder shall be for repair or replacement of the parts, exclusively at the option of the manufacturer. Further, the manufacturer cannot issue refunds for products not purchased directly from the manufacturer. In no event will the maker or its agents be liable for incidental or consequential damages arising out of the purchase or use of this product.
If your state does not allow the exclusion or limitation of incidental or consequential damages the above limitations may not apply to you. This warranty gives you certain legal rights which may vary from State to State.
If You Have Any Problems,DO NOT CONTACT YOUR RETAILERFOR SERVICE OR PARTS.Call Our Customer Service Center.For Questions, Service,Or Replacement Parts Call:1-800-270-4AMC9:00 AM - 5:00 PM Pacific TimeMonday - Friday
Associated Marketing ConceptsCustomer Service Warehouse
21624 Marilla StreetChatsworth, CA 91311-4123www.ambassador-amc.com
© 2002, Associated Marketing Concepts© 2002, Associated Marketing Concepts SC8749USv1SC8749USv1
Associated Marketing ConceptsCustomer Service Warehouse
21624 Marilla StreetChatsworth, CA 91311-4123www.ambassador-amc.com
CALL FOR A
FREE CATALOG
FEATURING OUR
COMPLETE LINE OF
OVER 450 FAUCETS
& ACCESSORIES
CALL FOR A
FREE CATALOG
FEATURING OUR
COMPLETE LINE OF
OVER 450 FAUCETS
& ACCESSORIES