Embed Size (px)
Citation preview
8/6/2019 Step-By-Step Guide for Secure Wireless Deployment for Small Office Home Office or Small Organization Networks
http://slidepdf.com/reader/full/step-by-step-guide-for-secure-wireless-deployment-for-small-office-home-office 1/113
8/6/2019 Step-By-Step Guide for Secure Wireless Deployment for Small Office Home Office or Small Organization Networks
http://slidepdf.com/reader/full/step-by-step-guide-for-secure-wireless-deployment-for-small-office-home-office 2/113
Information in this document, including URL and other Internet Web site references, is
subject to change without notice. Unless otherwise noted, the example companies,
organizations, products, domain names, e-mail addresses, logos, people, places, and
events depicted herein are fictitious, and no association with any real company,
organization, product, domain name, e-mail address, logo, person, place, or event is
intended or should be inferred. Complying with all applicable copyright laws is the
responsibility of the user. Without limiting the rights under copyright, no part of this
document may be reproduced, stored in or introduced into a retrieval system, or
transmitted in any form or by any means (electronic, mechanical, photocopying,
recording, or otherwise), or for any purpose, without the express written permission of
Microsoft Corporation.
Microsoft may have patents, patent applications, trademarks, copyrights, or other
intellectual property rights covering subject matter in this document. Except as expressly
provided in any written license agreement from Microsoft, the furnishing of this document
does not give you any license to these patents, trademarks, copyrights, or other
intellectual property.
© 2005 Microsoft Corporation. All rights reserved.
Microsoft, Active Directory, MS-DOS, Windows, Windows NT, and Windows Server are
either registered trademarks or trademarks of Microsoft Corporation in the United States
and/or other countries.
All other trademarks are property of their respective owners.
8/6/2019 Step-By-Step Guide for Secure Wireless Deployment for Small Office Home Office or Small Organization Networks
http://slidepdf.com/reader/full/step-by-step-guide-for-secure-wireless-deployment-for-small-office-home-office 3/113
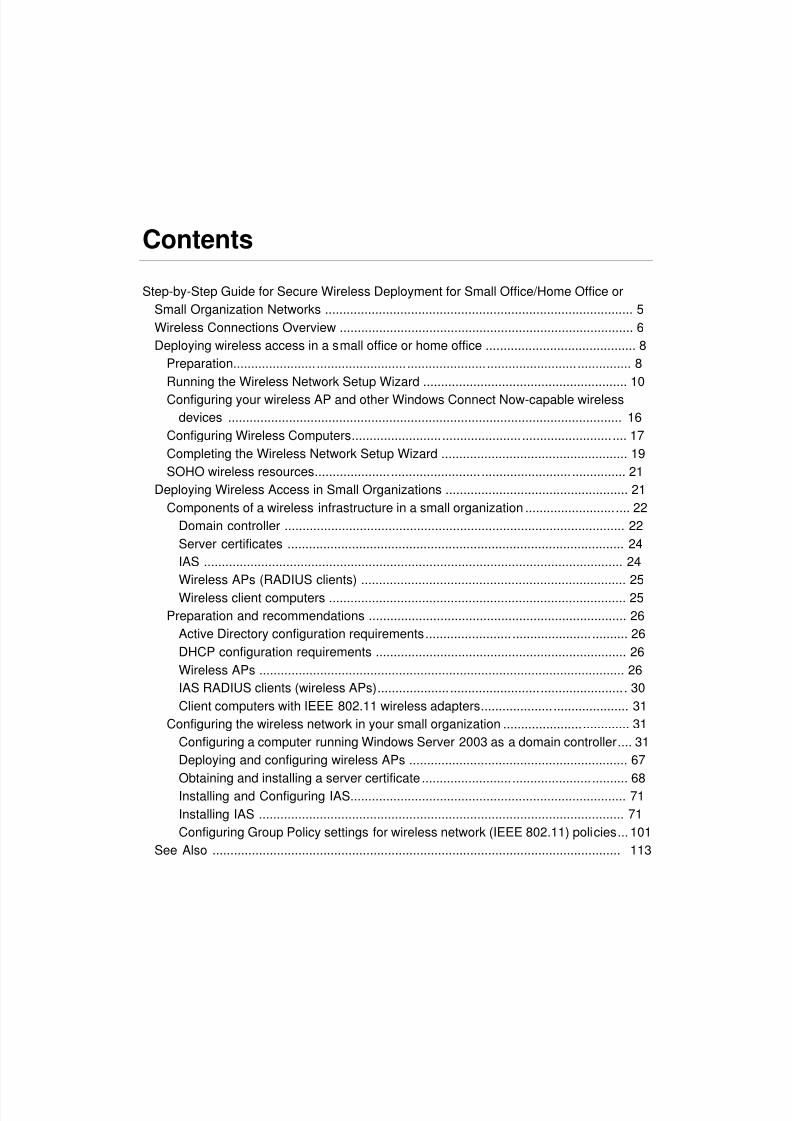
Contents
Step-by-Step Guide for Secure Wireless Deployment for Small Office/Home Office or
Small Organization Networks ...................................................................................... 5 Wireless Connections Overview .................................................................................. 6 Deploying wireless access in a small office or home office .......................................... 8
Preparation ....................... ......................... ...................... ......................... ............... 8 Running the Wireless Network Setup Wizard ......................................................... 10 Configuring your wireless AP and other Windows Connect Now-capable wireless
devices .............................................................................................................. 16 Configuring Wireless Computers ......................... ...................... ......................... .... 17 Completing the Wireless Network Setup Wizard .................................................... 19 SOHO wireless resources ..................... ......................... ......................... ............... 21
Deploying Wireless Access in Small Organizations ................................................... 21 Components of a wireless infrastructure in a small organization ......................... .... 22
Domain controller ............................................................................................... 22 Server certificates .............................................................................................. 24 IAS ..................................................................................................................... 24 Wireless APs (RADIUS clients) .......................................................................... 25 Wireless client computers ................................................................................... 25
Preparation and recommendations ........................................................................ 26 Active Directory configuration requirements ........................ ...................... .......... 26 DHCP configuration requirements ...................................................................... 26 Wireless APs ...................................................................................................... 26 IAS RADIUS clients (wireless APs) .................... ......................... ....................... . 30 Client computers with IEEE 802.11 wireless adapters .................... ..................... 31
Configuring the wireless network in your small organization ...................... ............. 31 Configuring a computer running Windows Server 2003 as a domain controller .... 31 Deploying and configuring wireless APs ............................................................. 67 Obtaining and installing a server certificate ......................... ...................... .......... 68 Installing and Configuring IAS............................................................................. 71 Installing IAS ...................................................................................................... 71 Configuring Group Policy settings for wireless network (IEEE 802.11) policies ...101
See Also ..................................................................................................................113

8/6/2019 Step-By-Step Guide for Secure Wireless Deployment for Small Office Home Office or Small Organization Networks
http://slidepdf.com/reader/full/step-by-step-guide-for-secure-wireless-deployment-for-small-office-home-office 4/113
8/6/2019 Step-By-Step Guide for Secure Wireless Deployment for Small Office Home Office or Small Organization Networks
http://slidepdf.com/reader/full/step-by-step-guide-for-secure-wireless-deployment-for-small-office-home-office 5/113
5
Step-by-Step Guide for Secure WirelessDeployment for Small Office/Home Officeor Small Organization Networks
This white paper presents two deployment methods for secure wireless access: one for
small office/home office (SOHO) networks and one for small organizations whosedomain-based networks are built using Microsoft® Windows Server™ 2003 technologies.
If you are planning a new network with wireless access or if you are considering a
change to a different type of network with wireless access, this paper provides
information that can assist you in determining which type of deployment suits your needs.
In this paper, "IEEE 802.11 wireless" is referred to as "wireless."
Note
Although the instructions in this paper are written to help you create strong
wireless security for your network, the concept of a "secure" network is relative
and should be weighed with the confidentiality requirements of your home, small
office, or small organization in mind.
Portable wireless devices are often used in multiple locations and they connect to
multiple wireless fidelity (Wi-Fi) networks. In addition to securing your wireless
network, you should also secure the data on portable devices when those
devices are used on other, potentially less secure, networks. For information
about how to protect your computers and data, see Securing Remote Clients and
Portable Computers on the Microsoft Web site
(http://go.microsoft.com/fwlink/?LinkId=55254).
If highly sensitive information, such as customer banking data, is regularly sent or
stored on your network, you should consider hiring a specialist to configure your
wireless network or reconsider the deployment of wireless devices on yournetwork.
This paper is divided into three sections:
• Wireless Connections Overview
This section identifies the differences between SOHO networks and small
organization networks. You can use this information to help you determine the more
appropriate wireless solution for your needs.
8/6/2019 Step-By-Step Guide for Secure Wireless Deployment for Small Office Home Office or Small Organization Networks
http://slidepdf.com/reader/full/step-by-step-guide-for-secure-wireless-deployment-for-small-office-home-office 6/113
6
• Deploying Wireless Access in the Small Office/Home Office
This section provides preparation information and step-by-step instructions for
deploying wireless access on a SOHO network that uses computers running
Windows XP with Service Pack 2 (SP2).
• Deploying Wireless Access in Small Organizations
This section provides a brief component overview, preparation information,
recommendations, and step-by-step instructions for deploying secure IEEE 802.1X
authenticated wireless access in small organizations that use Windows Server 2003,
Standard Edition.
Note
This deployment is not intended for networks that use Microsoft Windows
Small Business Server 2003. For information about deploying wireless
access in small organizations that use Windows 2003 Small Business
Server, see Providing Secure Wireless Services on the Microsoft Web site
(http://go.microsoft.com/fwlink/?LinkId=49453).
Wireless Connections OverviewFor the purposes of this paper, SOHO networks are workgroup-based networks. Small
organization networks are domain networks that use Active Directory® and other
Windows Server 2003 technologies.
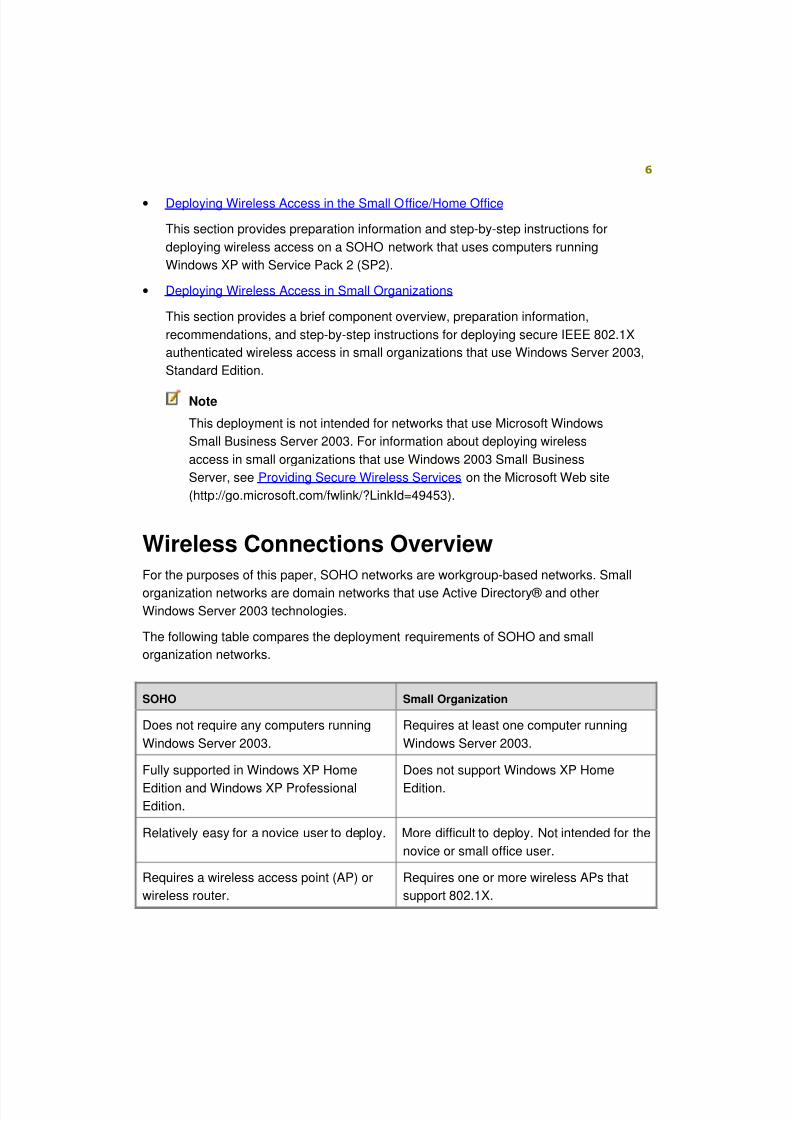
The following table compares the deployment requirements of SOHO and small
organization networks.
SOHO Small Organization
Does not require any computers running
Windows Server 2003.
Requires at least one computer running
Windows Server 2003.
Fully supported in Windows XP Home
Edition and Windows XP ProfessionalEdition.
Does not support Windows XP Home
Edition.
Relatively easy for a novice user to deploy. More difficult to deploy. Not intended for the
novice or small office user.
Requires a wireless access point (AP) or
wireless router.
Requires one or more wireless APs that
support 802.1X.
8/6/2019 Step-By-Step Guide for Secure Wireless Deployment for Small Office Home Office or Small Organization Networks
http://slidepdf.com/reader/full/step-by-step-guide-for-secure-wireless-deployment-for-small-office-home-office 7/113
7
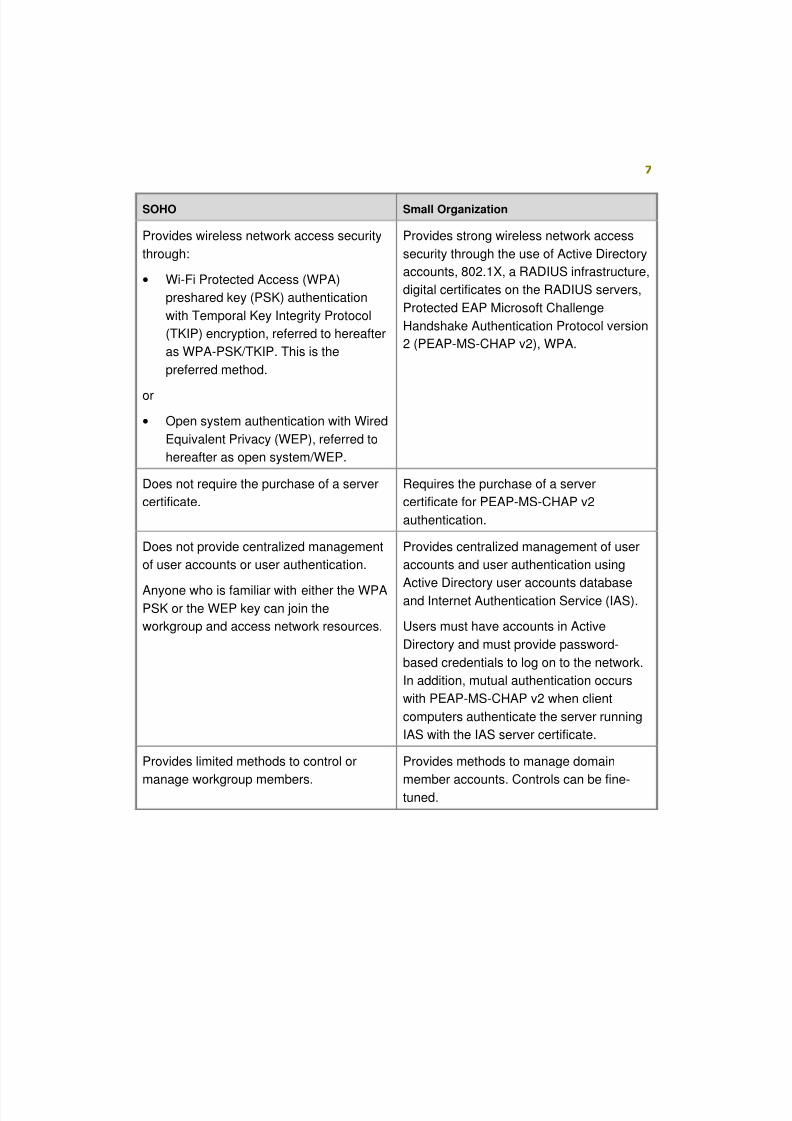
SOHO Small Organization
Provides wireless network access security
through:
• Wi-Fi Protected Access (WPA)
preshared key (PSK) authentication
with Temporal Key Integrity Protocol
(TKIP) encryption, referred to hereafter
as WPA-PSK/TKIP. This is the
preferred method.
or
• Open system authentication with Wired
Equivalent Privacy (WEP), referred to
hereafter as open system/WEP.
Provides strong wireless network access
security through the use of Active Directory
accounts, 802.1X, a RADIUS infrastructure,
digital certificates on the RADIUS servers,
Protected EAP Microsoft Challenge
Handshake Authentication Protocol version
2 (PEAP-MS-CHAP v2), WPA.
Does not require the purchase of a server
certificate.
Requires the purchase of a server
certificate for PEAP-MS-CHAP v2
authentication.
Does not provide centralized management
of user accounts or user authentication.
Anyone who is familiar with either the WPAPSK or the WEP key can join the
workgroup and access network resources.
Provides centralized management of user
accounts and user authentication using
Active Directory user accounts databaseand Internet Authentication Service (IAS).
Users must have accounts in Active
Directory and must provide password-
based credentials to log on to the network.
In addition, mutual authentication occurs
with PEAP-MS-CHAP v2 when client
computers authenticate the server running
IAS with the IAS server certificate.
Provides limited methods to control or
manage workgroup members.
Provides methods to manage domain
member accounts. Controls can be fine-tuned.

8/6/2019 Step-By-Step Guide for Secure Wireless Deployment for Small Office Home Office or Small Organization Networks
http://slidepdf.com/reader/full/step-by-step-guide-for-secure-wireless-deployment-for-small-office-home-office 8/113
8
Deploying wireless access in a small office orhome officeTo deploy wireless access on a SOHO network, each wireless device must be configured
with the same wireless settings. The Windows Connect Now technology in Windows XP
with SP2 can be used to configure wireless computers and devices. Windows Connect
Now technology is built into many newer wireless devices, such as printers and wireless
APs.
The wireless deployment for small offices or home offices is presented in three parts:
•
Preparation
Lists the tasks that you need to complete before deploying your wireless network.
• Running the Wireless Network Setup Wizard
Windows Connect Now technology is incorporated into the Wireless Network Setup
Wizard. Wireless devices that support Windows Connect Now are configured using
the Wireless Network Setup Wizard and a Universal Serial Bus (USB) flash drive
(UFD).
• SOHO Wireless Resources
Provides links to information about SOHO wireless networking.
Preparation
To set up your wireless network, you will first need to perform these tasks:
1. If you do not already have one, obtain a USB flash drive with a minimum capacity of
2 megabytes (MB).
2. If you have not already done so, purchase a wireless AP and use the manufacturer's
documentation to physically connect it to your network.
Note
Do not configure any wireless settings on the wireless AP at this t ime.
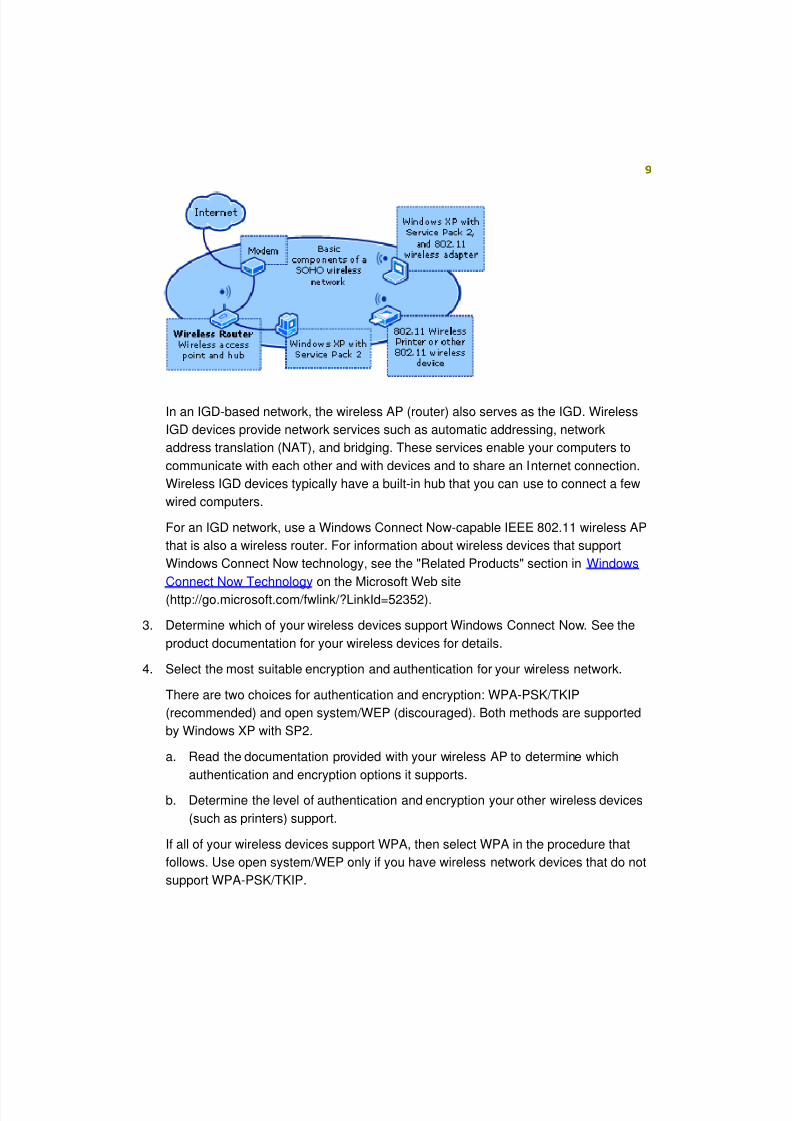
The following figure shows the components of an Internet Gateway Device (IGD)-
based network.
8/6/2019 Step-By-Step Guide for Secure Wireless Deployment for Small Office Home Office or Small Organization Networks
http://slidepdf.com/reader/full/step-by-step-guide-for-secure-wireless-deployment-for-small-office-home-office 9/113
9
In an IGD-based network, the wireless AP (router) also serves as the IGD. Wireless
IGD devices provide network services such as automatic addressing, network
address translation (NAT), and bridging. These services enable your computers to
communicate with each other and with devices and to share an Internet connection.
Wireless IGD devices typically have a built-in hub that you can use to connect a few
wired computers.
For an IGD network, use a Windows Connect Now-capable IEEE 802.11 wireless AP
that is also a wireless router. For information about wireless devices that support
Windows Connect Now technology, see the "Related Products" section in Windows
Connect Now Technology on the Microsoft Web site
(http://go.microsoft.com/fwlink/?LinkId=52352).
3. Determine which of your wireless devices support Windows Connect Now. See the
product documentation for your wireless devices for details.
4. Select the most suitable encryption and authentication for your wireless network.
There are two choices for authentication and encryption: WPA-PSK/TKIP
(recommended) and open system/WEP (discouraged). Both methods are supported
by Windows XP with SP2.
a. Read the documentation provided with your wireless AP to determine which
authentication and encryption options it supports.
b. Determine the level of authentication and encryption your other wireless devices
(such as printers) support.
If all of your wireless devices support WPA, then select WPA in the procedure that
follows. Use open system/WEP only if you have wireless network devices that do not
support WPA-PSK/TKIP.
8/6/2019 Step-By-Step Guide for Secure Wireless Deployment for Small Office Home Office or Small Organization Networks
http://slidepdf.com/reader/full/step-by-step-guide-for-secure-wireless-deployment-for-small-office-home-office 10/113
10
5. Laptop computers frequently have an external switch to turn the wireless adapter on
or off. If any of your wireless computers are equipped with an external switch, make
sure the switch is turned on.
6. Use Windows Update to upgrade all of your computers running Windows XP to
Windows XP with SP2.
7. Ensure that wireless client computers are configured for automatic addressing, and
that automatic wireless network configuration is enabled.
To configure computers for automatic addressing
1. To open Network Connections, click Start, click Connect to, and then clickShow all connections.
2. Right-click your wireless network connection, and then click Properties.
3. On the General tab, in This connection uses the following items, click
Internet Protocol (TCP/IP), and then click Properties.
4. On the Internet Protocol (TCP/IP) Properties dialog box, on the General
tab, select Obtain an IP address automatically. Click OK twice, and then
close Network Connections.
To enable automatic wireless network configuration
1. Click Start, click Control Panel, and then double-click Network
Connections.
2. Right-click Wireless Network Connection, and then click Properties.
3. On the Wireless Networks tab, make sure the Use Windows to configure
my wireless network settings check box is selected.
Running the Wireless Network Setup Wizard
Use the following procedures to set up your wireless network.
Note
If possible, you should launch the Wireless Network Setup Wizard on a computer
that is already connected to a printer so that you can print the configuration
information that is generated in the final steps of the Wireless Network Setup
Wizard. Use this information to manually configure wireless devices that do not
support Windows Connect Now.
8/6/2019 Step-By-Step Guide for Secure Wireless Deployment for Small Office Home Office or Small Organization Networks
http://slidepdf.com/reader/full/step-by-step-guide-for-secure-wireless-deployment-for-small-office-home-office 11/113
11
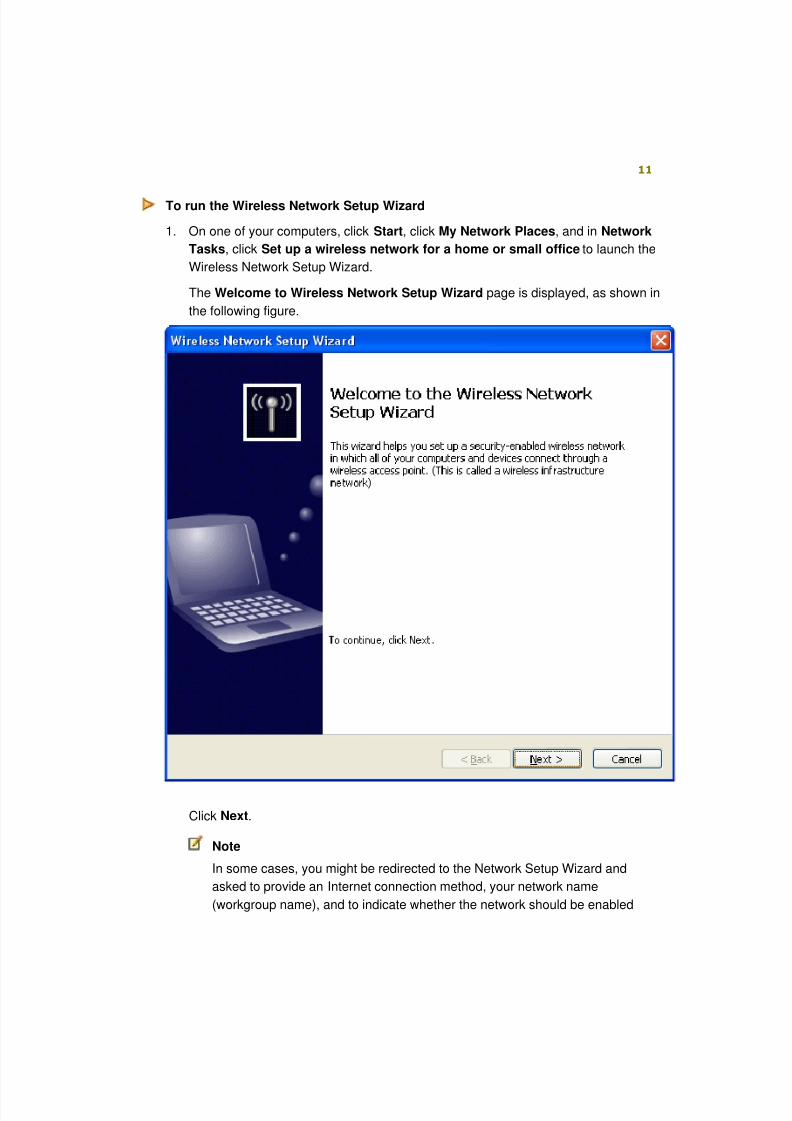
To run the Wireless Network Setup Wizard
1. On one of your computers, click Start, click My Network Places, and in Network
Tasks, click Set up a wireless network for a home or small office to launch the
Wireless Network Setup Wizard.
The Welcome to Wireless Network Setup Wizard page is displayed, as shown in
the following figure.
Click Next.
Note
In some cases, you might be redirected to the Network Setup Wizard and
asked to provide an Internet connection method, your network name
(workgroup name), and to indicate whether the network should be enabled

8/6/2019 Step-By-Step Guide for Secure Wireless Deployment for Small Office Home Office or Small Organization Networks
http://slidepdf.com/reader/full/step-by-step-guide-for-secure-wireless-deployment-for-small-office-home-office 12/113
12
for file and printer sharing. You must complete these tasks before you
resume wireless setup.
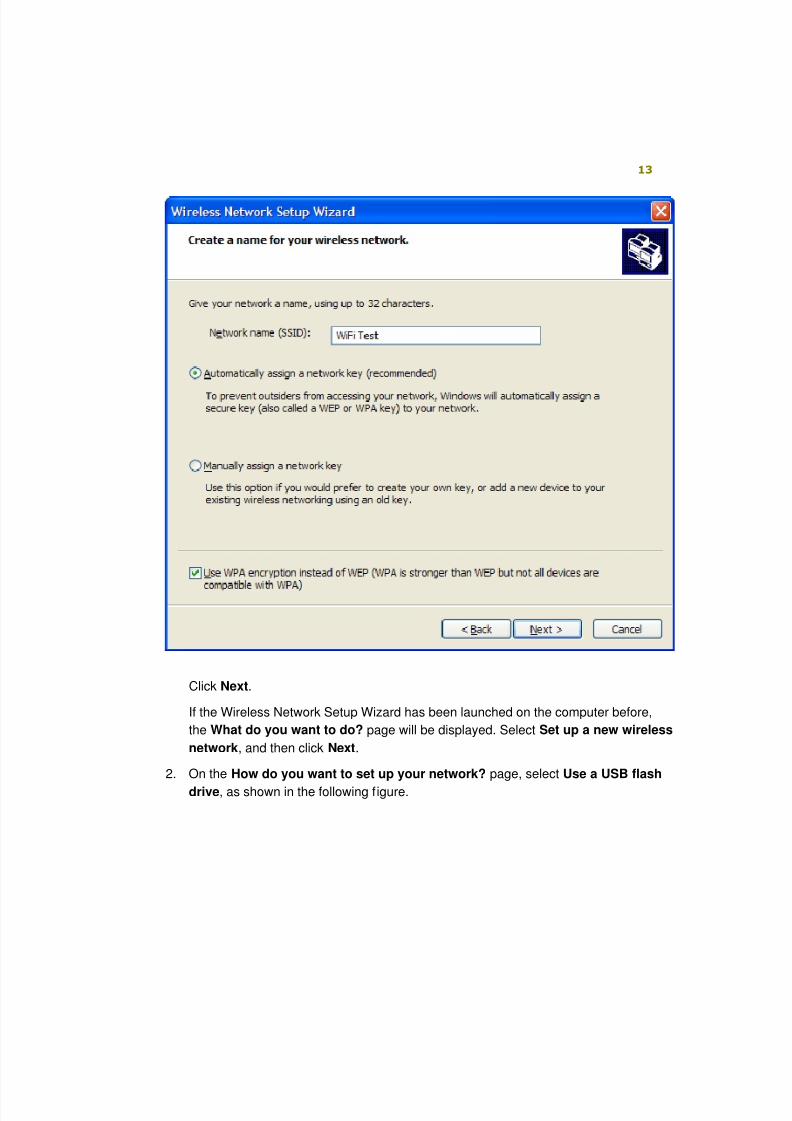
If this is the first time the Wireless Network Setup Wizard has been launched on the
computer, the Create a name for your wireless network page is displayed.
Specify the following:
a. In Network name (SSID), type a name for your wireless network. In the following
example, the wireless network is named WiFi Test.
b. Select Automatically assign a network key.
c. Select the wireless encryption for your network.
Note
WPA is much stronger than WEP, but not all wireless devices are compatible
with WPA.
If all of your wireless devices support WPA (recommended), select Use WPA
encryption instead of WEP.
8/6/2019 Step-By-Step Guide for Secure Wireless Deployment for Small Office Home Office or Small Organization Networks
http://slidepdf.com/reader/full/step-by-step-guide-for-secure-wireless-deployment-for-small-office-home-office 13/113
13
Click Next.
If the Wireless Network Setup Wizard has been launched on the computer before,
the What do you want to do? page will be displayed. Select Set up a new wireless
network, and then click Next.
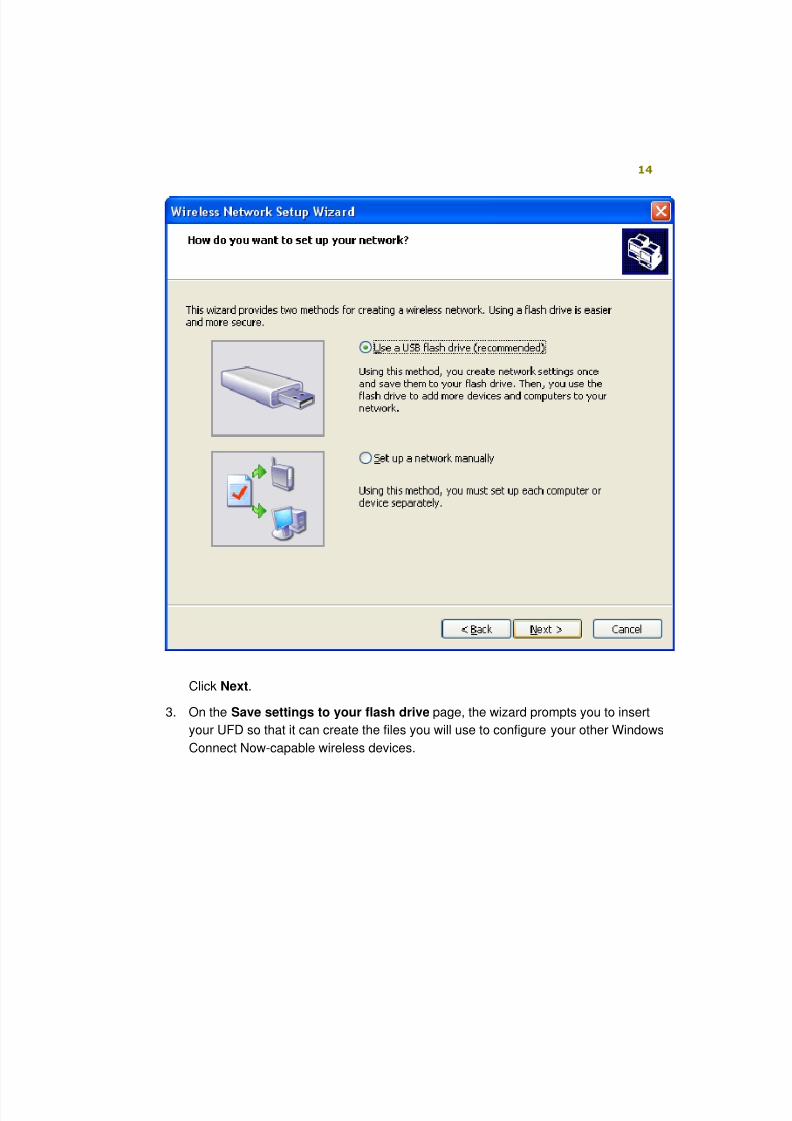
2. On the How do you want to set up your network? page, select Use a USB flash
drive, as shown in the following f igure.
8/6/2019 Step-By-Step Guide for Secure Wireless Deployment for Small Office Home Office or Small Organization Networks
http://slidepdf.com/reader/full/step-by-step-guide-for-secure-wireless-deployment-for-small-office-home-office 14/113
14
Click Next.
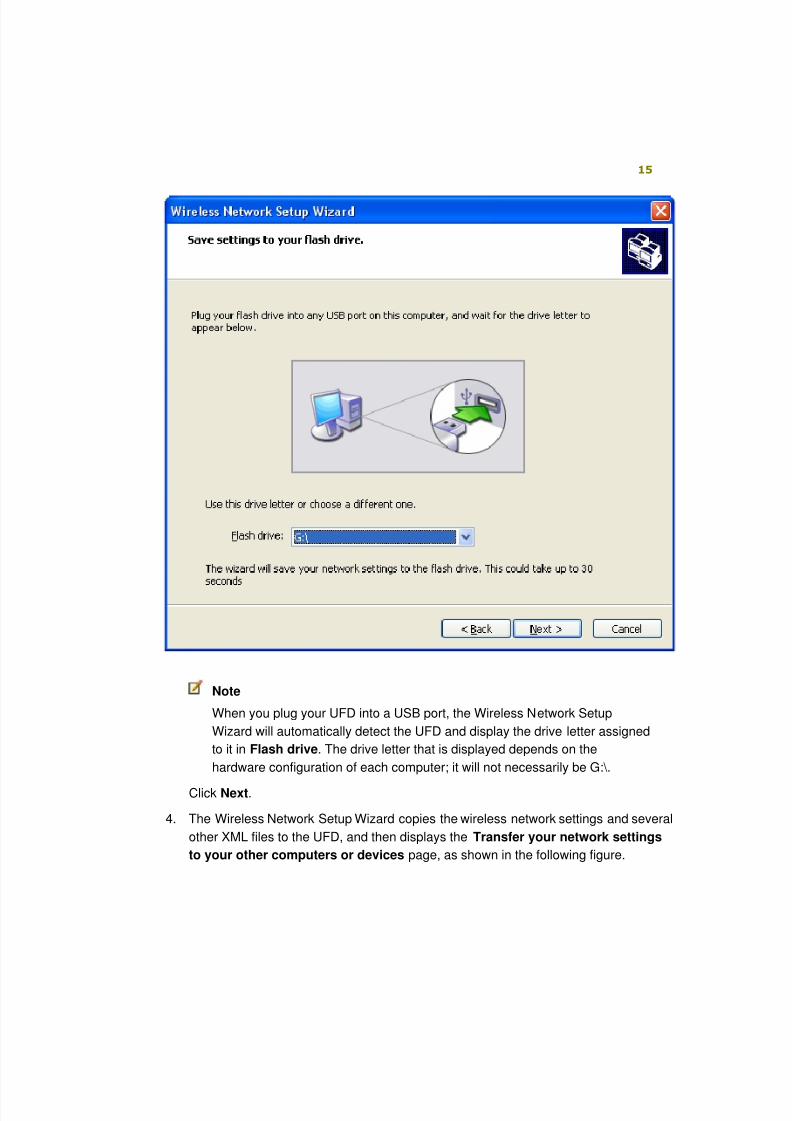
3. On the Save settings to your flash drive page, the wizard prompts you to insert
your UFD so that it can create the files you will use to configure your other Windows
Connect Now-capable wireless devices.
8/6/2019 Step-By-Step Guide for Secure Wireless Deployment for Small Office Home Office or Small Organization Networks
http://slidepdf.com/reader/full/step-by-step-guide-for-secure-wireless-deployment-for-small-office-home-office 15/113
15
Note
When you plug your UFD into a USB port, the Wireless Network Setup
Wizard will automatically detect the UFD and display the drive letter assigned
to it in Flash drive. The drive letter that is displayed depends on the
hardware configuration of each computer; it will not necessarily be G:\.
Click Next.
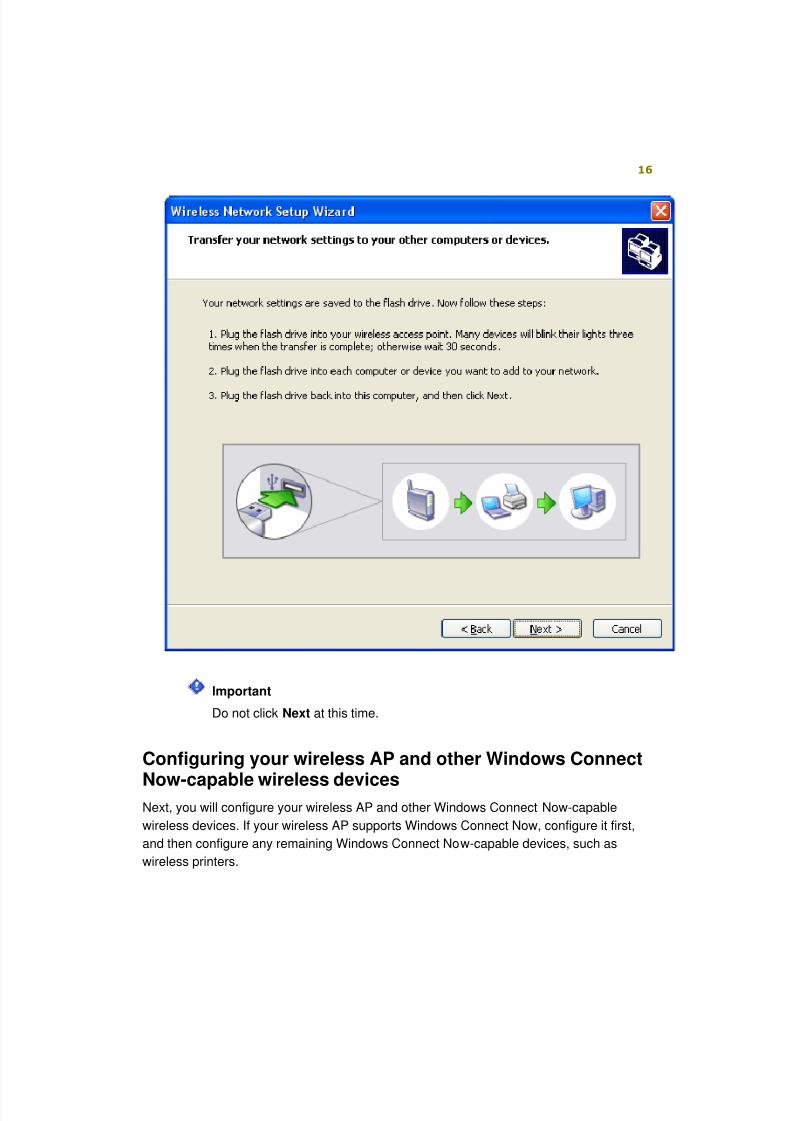
4. The Wireless Network Setup Wizard copies the wireless network settings and several
other XML files to the UFD, and then displays the Transfer your network settings
to your other computers or devices page, as shown in the following figure.
8/6/2019 Step-By-Step Guide for Secure Wireless Deployment for Small Office Home Office or Small Organization Networks
http://slidepdf.com/reader/full/step-by-step-guide-for-secure-wireless-deployment-for-small-office-home-office 16/113
16
Important
Do not click Next at this time.
Configuring your wireless AP and other Windows Connect
Now-capable wireless devicesNext, you will configure your wireless AP and other Windows Connect Now-capable
wireless devices. If your wireless AP supports Windows Connect Now, configure it first,
and then configure any remaining Windows Connect Now-capable devices, such as
wireless printers.

8/6/2019 Step-By-Step Guide for Secure Wireless Deployment for Small Office Home Office or Small Organization Networks
http://slidepdf.com/reader/full/step-by-step-guide-for-secure-wireless-deployment-for-small-office-home-office 17/113
17
Note
If none of your wireless devices support Windows Connect Now, go to the next
procedure, Configuring wireless computers.
To configure your wireless AP and Windows Connect Now-capable wirelessdevices
1. Plug the UFD into your Windows Connect Now-capable wireless device.
For Windows Connect Now-capable wireless devices that have a monitor or
readout display, select from the options provided by the wireless device.
For Windows Connect Now-capable wireless devices that do not have a monitoror readout display, watch the WLAN or USB LED on the indication panel of the
wireless device. The LED will flash three times to indicate the configuration is
complete for that wireless device.
Important
Some manufacturers use the WLAN or USB LED for other purposes,
which may cause it to flash for reasons other than Windows Connect
Now configuration. It is recommended that you leave the UFD in each
wireless device for 30 seconds to ensure configuration is complete.
2. Remove the UFD from the device.
3. Configure your remaining Windows Connect Now-capable wireless devices using
steps 1 and 2 in this procedure.
Configuring Wireless Computers
To configure wireless computers
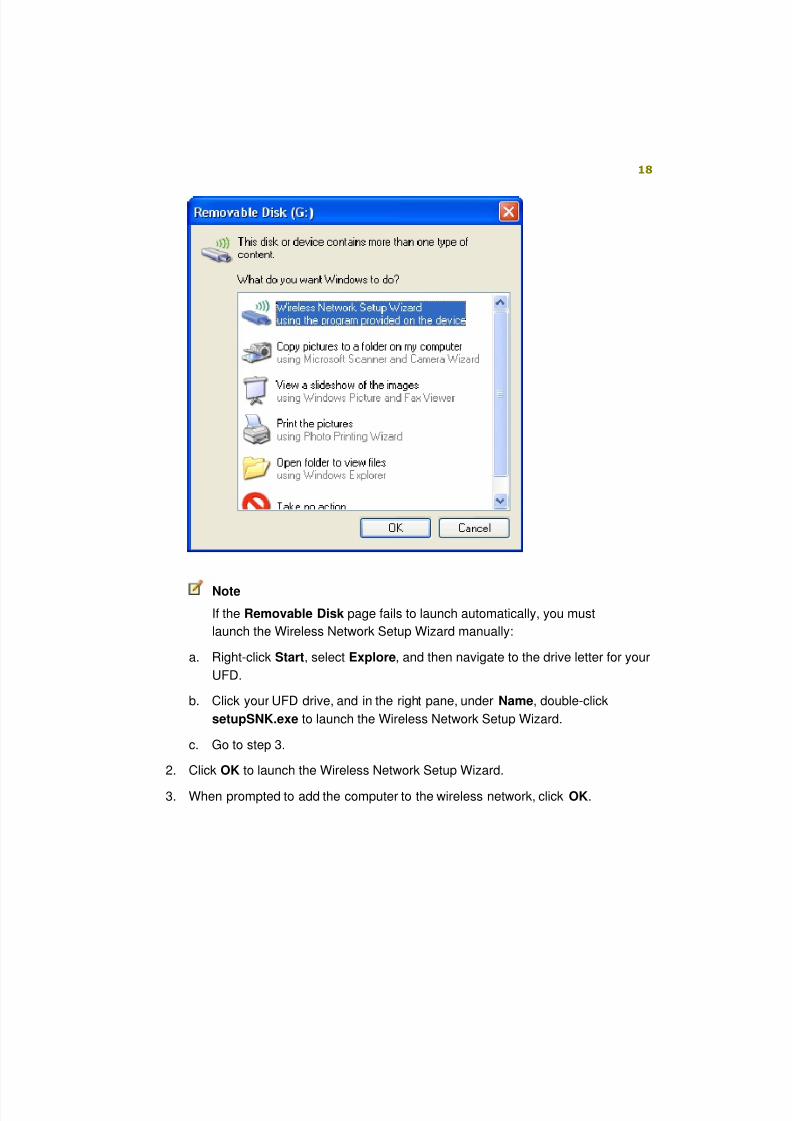
1. When you plug the UFD into a computer running Windows XP with SP2, the
Removable Disk page opens, and the following message is displayed:
This disk or device contains more than one type of content. What do youwant Windows to do?
Select Wireless Network Setup Wizard using the program provided on the
device.
8/6/2019 Step-By-Step Guide for Secure Wireless Deployment for Small Office Home Office or Small Organization Networks
http://slidepdf.com/reader/full/step-by-step-guide-for-secure-wireless-deployment-for-small-office-home-office 18/113
18
Note
If the Removable Disk page fails to launch automatically, you must
launch the Wireless Network Setup Wizard manually:
a. Right-click Start, select Explore, and then navigate to the drive letter for your
UFD.
b. Click your UFD drive, and in the right pane, under Name, double-click
setupSNK.exe to launch the Wireless Network Setup Wizard.
c. Go to step 3.
2. Click OK to launch the Wireless Network Setup Wizard.
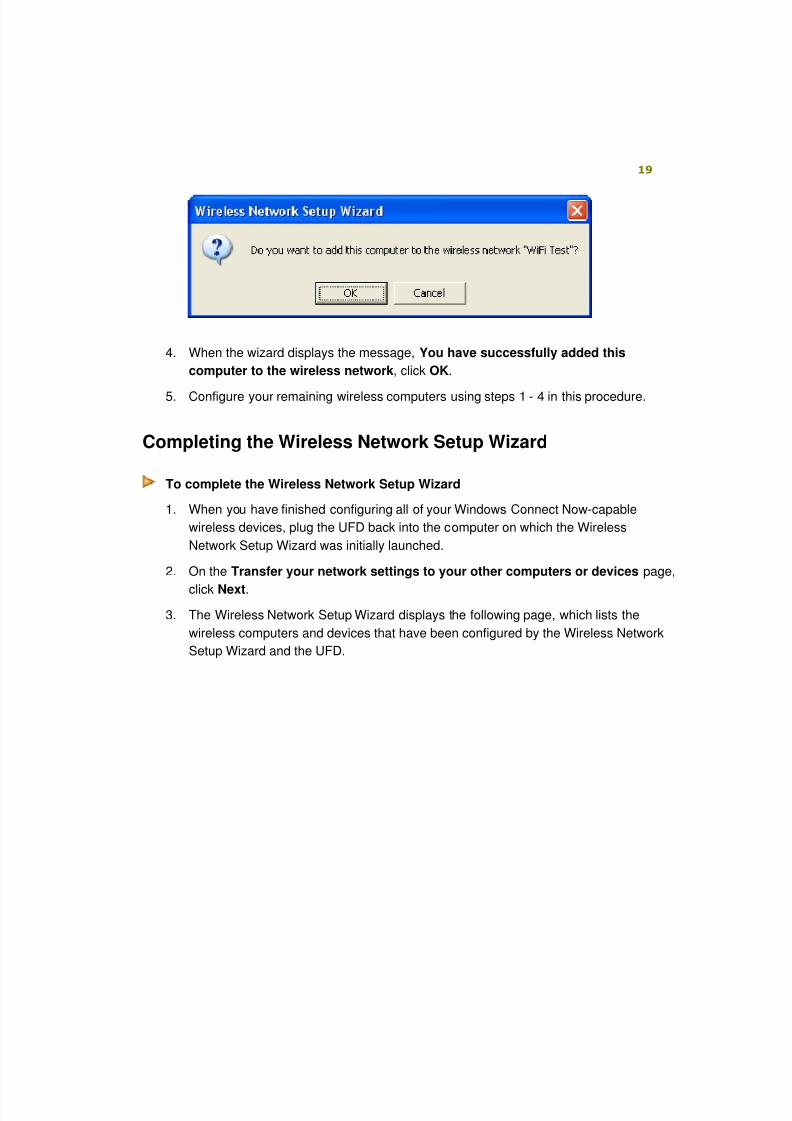
3. When prompted to add the computer to the wireless network, click OK.
8/6/2019 Step-By-Step Guide for Secure Wireless Deployment for Small Office Home Office or Small Organization Networks
http://slidepdf.com/reader/full/step-by-step-guide-for-secure-wireless-deployment-for-small-office-home-office 19/113
8/6/2019 Step-By-Step Guide for Secure Wireless Deployment for Small Office Home Office or Small Organization Networks
http://slidepdf.com/reader/full/step-by-step-guide-for-secure-wireless-deployment-for-small-office-home-office 20/113
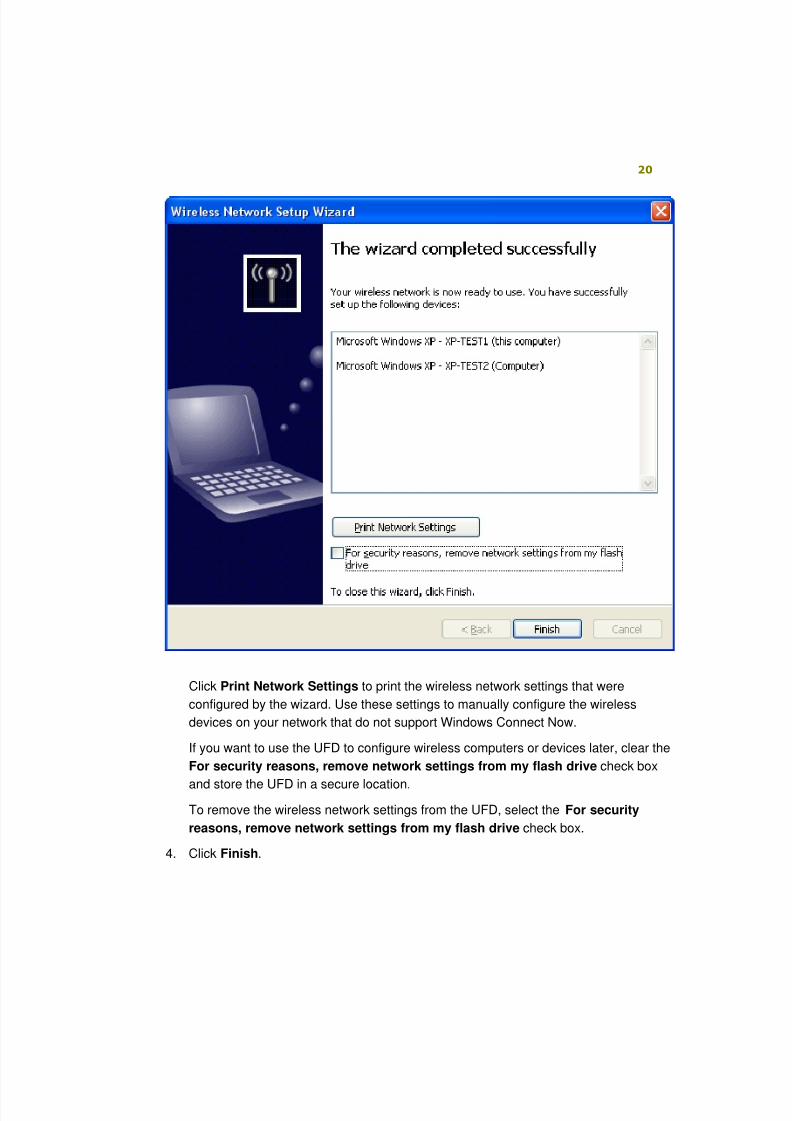
20
Click Print Network Settings to print the wireless network settings that were
configured by the wizard. Use these settings to manually configure the wireless
devices on your network that do not support Windows Connect Now.
If you want to use the UFD to configure wireless computers or devices later, clear the
For security reasons, remove network settings from my flash drive check box
and store the UFD in a secure location.
To remove the wireless network settings from the UFD, select the For security
reasons, remove network settings from my flash drive check box.
4. Click Finish.
8/6/2019 Step-By-Step Guide for Secure Wireless Deployment for Small Office Home Office or Small Organization Networks
http://slidepdf.com/reader/full/step-by-step-guide-for-secure-wireless-deployment-for-small-office-home-office 21/113
21
SOHO wireless resources
For information about wireless adapter and wireless access point support for WPA and
WEP, see Certified product listing on the Wi-Fi Alliance Web site
(http://go.microsoft.com/fwlink/?LinkId=49773).
For other information about wireless networking, see:
• Wireless Networking on the Microsoft Web site
(http://go.microsoft.com/fwlink/?LinkId=49751)
• WPA Wireless Security for Home Networks on the Microsoft Web site
(http://go.microsoft.com/fwlink/?LinkId=54434)
• The Cable Guy, November 2004 - Wi-Fi Protected Access Data Encryption and
Integrity on the Microsoft Web site (http://go.microsoft.com/fwlink/?LinkId=49763)
• Troubleshooting Microsoft Windows XP-based Wireless Networks in the Small Office
or Home Office at the Microsoft Web Site
(http://go.microsoft.com/fwlink/?LinkId=55033)
Deploying Wireless Access in SmallOrganizations
This deployment scenario provides steps for implementing 802.1X authenticated wireless
network access in a small organization on a single-subnet network of 250 or fewer
network devices.
The deployment relies on one computer running Windows Server 2003 with SP1 to
provide the following wireless authentication infrastructure:
• Active Directory domain controller.
• Internet Authentication Service (IAS).
• A server certificate obtained from VeriSign.
• PEAP-MS-CHAP v2 configured as the authentication method in the IAS remote
access policy and on client computers running Windows XP with SP2.
• Client computers with IEEE 802.11 wireless adapters.
• One or more wireless APs.
The wireless deployment for small organizations is presented in three parts:
• Components of a wireless infrastructure in a small organization
8/6/2019 Step-By-Step Guide for Secure Wireless Deployment for Small Office Home Office or Small Organization Networks
http://slidepdf.com/reader/full/step-by-step-guide-for-secure-wireless-deployment-for-small-office-home-office 22/113
22
• Preparation and recommendations
• Configuring your small organization wireless network
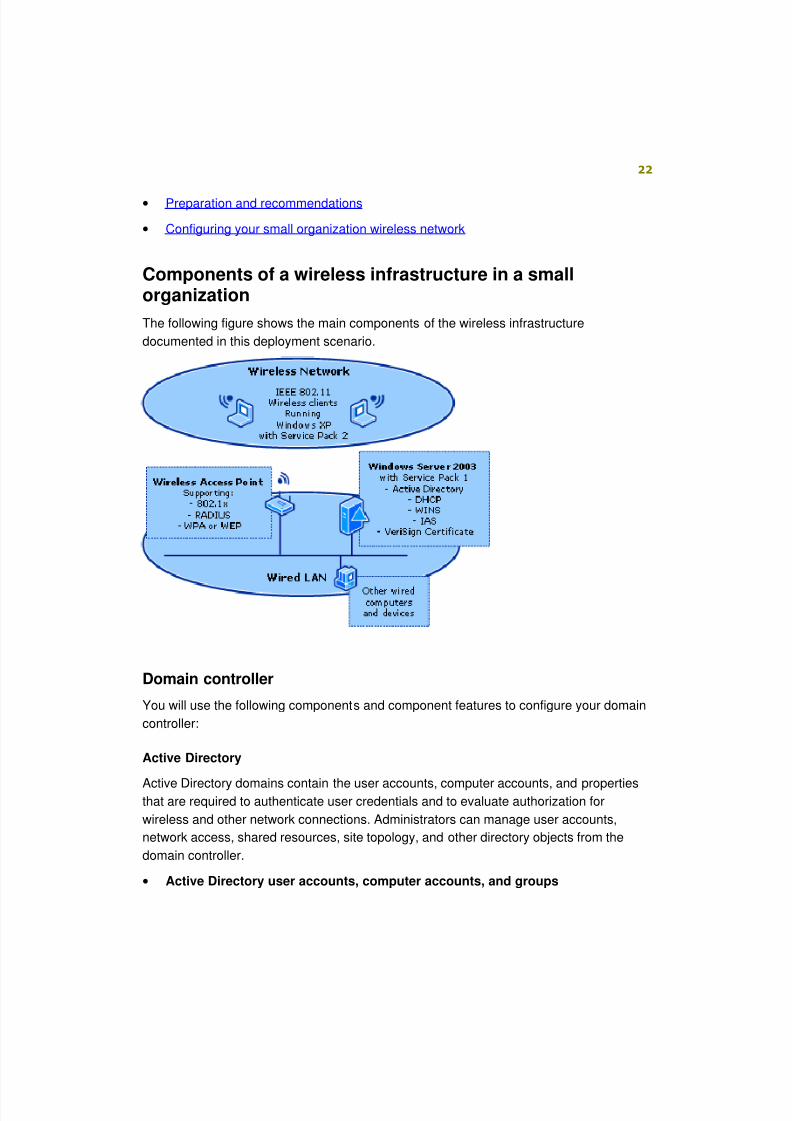
Components of a wireless infrastructure in a smallorganization
The following figure shows the main components of the wireless infrastructure
documented in this deployment scenario.
Domain controller
You will use the following components and component features to configure your domain
controller:
Active Directory
Active Directory domains contain the user accounts, computer accounts, and propertiesthat are required to authenticate user credentials and to evaluate authorization for
wireless and other network connections. Administrators can manage user accounts,
network access, shared resources, site topology, and other directory objects from the
domain controller.
• Active Directory user accounts, computer accounts, and groups
8/6/2019 Step-By-Step Guide for Secure Wireless Deployment for Small Office Home Office or Small Organization Networks
http://slidepdf.com/reader/full/step-by-step-guide-for-secure-wireless-deployment-for-small-office-home-office 23/113
23
Active Directory user and computer accounts represent physical entities, such as a
computer or person. User and computer accounts that belong to a particular group
are referred to as group members. A group is a collection of user and computer
accounts that can be managed as a single unit.
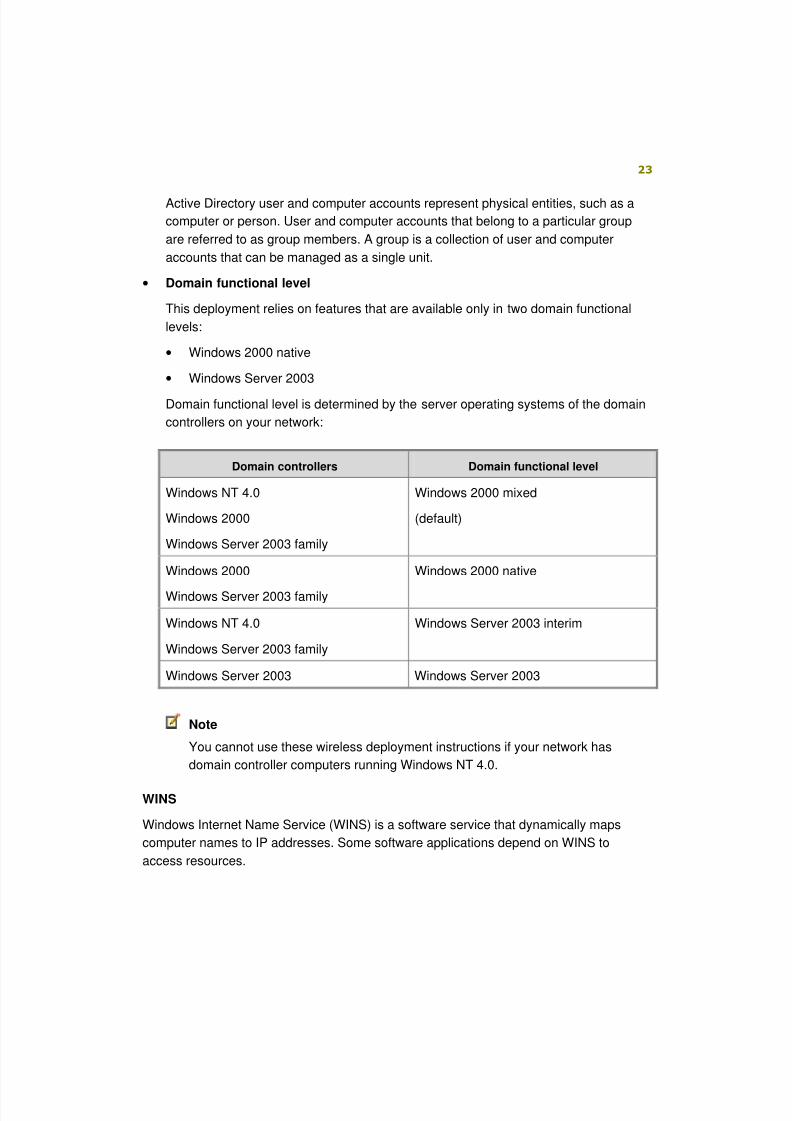
• Domain functional level
This deployment relies on features that are available only in two domain functional
levels:
• Windows 2000 native
• Windows Server 2003
Domain functional level is determined by the server operating systems of the domain
controllers on your network:
Domain controllers Domain functional level
Windows NT 4.0
Windows 2000
Windows Server 2003 family
Windows 2000 mixed
(default)
Windows 2000
Windows Server 2003 family
Windows 2000 native
Windows NT 4.0
Windows Server 2003 family
Windows Server 2003 interim
Windows Server 2003 Windows Server 2003
Note
You cannot use these wireless deployment instructions if your network has
domain controller computers running Windows NT 4.0.
WINS
Windows Internet Name Service (WINS) is a software service that dynamically maps
computer names to IP addresses. Some software applications depend on WINS to
access resources.
8/6/2019 Step-By-Step Guide for Secure Wireless Deployment for Small Office Home Office or Small Organization Networks
http://slidepdf.com/reader/full/step-by-step-guide-for-secure-wireless-deployment-for-small-office-home-office 24/113
24
DHCP
DHCP servers lease IP addresses to network client computers and distribute other
configuration parameters to network clients.
• DHCP scopes
DHCP scopes define a single physical subnet on your network and are used by the
DHCP server to manage network client IP address assignment and any related
configuration parameters.
• DHCP leases
DHCP servers lease IP addresses to network client computers from a finite pool of
addresses called an IP address range. Each lease has an expiration period.
• DHCP Server authorization
To lease addresses to network clients, DHCP servers must be authorized in Active
Directory. This behavior is designed to prevent unauthorized DHCP servers running
Windows operating systems from leasing incorrect IP addresses to network clients or
denying DHCP clients that are attempting to renew current address leases.
Server certificates
This deployment scenario relies on:
• PEAP-MS-CHAP v2 to provide secure wireless user authentication with password-
based credentials.
• Server certificate installed on the server running IAS, so that the server can
authenticate itself to wireless clients. To use PEAP-MS-CHAP v2, this server must
have a server certificate that is issued by a certification authority (CA) that is trusted
by your wireless clients.
VeriSign, Inc. has partnered with Microsoft to allow customers to easily obtain and
install a VeriSign WLAN server certificate for servers running IAS that perform PEAP-
MS-CHAP v2 authentication. Client computers running Windows operating systems
trust the VeriSign server certificates by default.
IAS
IAS is the Microsoft implementation of a RADIUS server or proxy. IAS manages
authentication, authorization, and accounting for virtual private network (VPN), dial-up,
802.1X wireless, and Ethernet switch connection attempts that are compatible with the
IETF RADIUS protocol.
8/6/2019 Step-By-Step Guide for Secure Wireless Deployment for Small Office Home Office or Small Organization Networks
http://slidepdf.com/reader/full/step-by-step-guide-for-secure-wireless-deployment-for-small-office-home-office 25/113
25
In this scenario, IAS is used to authenticate and authorize wireless connection requests.
Each wireless AP is configured in IAS as a RADIUS client. By creating an IAS remote
access policy, you define who can connect to your network through wireless APs.
• IAS wireless remote access policy
A remote access policy is configured for wireless connections so that employees can
access the organization's intranet.
• Wireless APs as IAS RADIUS clients
Wireless APs must be configured as IAS RADIUS clients to communicate with
the server running IAS.
• Vendor-specific attributes
Some wireless APs require vendor-specific attributes (VSAs). These attributes
provide functionality that is not supported in the standard RADIUS attributes. IAS
includes VSAs from a number of vendors in its dictionary; however, not all VSAs
for all vendors are included. For required VSAs that are not in the IAS VSA
dictionary, you can create a VSA in the profile settings of each remote access
policy.
• Logging
Enable logging to store authentication and accounting information for connection
analysis and security investigation. IAS can log information to either a local file or to aStructured Query Language (SQL) file in a Microsoft SQL Server™ 2000 database.
Wireless APs (RADIUS clients)
This deployment scenario requires one or more wireless APs compatible with the
RADIUS protocol and 802.1X connected to your wired network.
Wireless client computers
Because Windows XP with SP2 has built-in support for IEEE 802.1X authentication using
the Extensible Authentication Protocol (EAP), built-in VeriSign trusted root CAcertificates, Wireless Auto Configuration, as well as support for WPA and WEP, Windows
XP with SP2 requires the least amount of manual configuration. For ease of
configuration, and enhanced security, this paper documents configuration to support
client computers running Windows XP with SP2.
8/6/2019 Step-By-Step Guide for Secure Wireless Deployment for Small Office Home Office or Small Organization Networks
http://slidepdf.com/reader/full/step-by-step-guide-for-secure-wireless-deployment-for-small-office-home-office 26/113
26
Note
Wireless Auto Configuration is the feature in Windows XP and Windows Server
2003 that allows Windows to detect available wireless networks and
automatically attempt to connect to them in the order in which they are listed in
Preferred networks.
Preparation and recommendations
This section provides preparation information and recommendations that will help you
deploy your wireless network.
Active Directory configuration requirements
• To install Active Directory, you will need to know the registered name of your domain
(for example, microsoft.example.com).
DHCP configuration requirements
• To configure DHCP, you must know the IP address range for your network. If your
network does not already have one, you must determine a suitable IP address range
for your network.
• To configure a DHCP scope, you must know the IP address of your router (default
gateway).
• As part of the DHCP scope configuration, configure a DCHP exclusion range for
network devices that require a static IP address. To define your exclusion range,
determine how many network devices (routers, wireless APs, printers, and servers)
require a static IP address. It is recommended that you configure a scope that is
slightly larger than your current needs.
Wireless APs
The wireless APs that you deploy must support the following:• 802.1X authentication.
• WPA. To deploy WPA, use wireless network adapters and wireless APs that also
support WPA.
• RADIUS authentication and RADIUS accounting.
In addition, to provide enhanced security for the network, the wireless APs must support
the following filtering options:
8/6/2019 Step-By-Step Guide for Secure Wireless Deployment for Small Office Home Office or Small Organization Networks
http://slidepdf.com/reader/full/step-by-step-guide-for-secure-wireless-deployment-for-small-office-home-office 27/113
8/6/2019 Step-By-Step Guide for Secure Wireless Deployment for Small Office Home Office or Small Organization Networks
http://slidepdf.com/reader/full/step-by-step-guide-for-secure-wireless-deployment-for-small-office-home-office 28/113
28
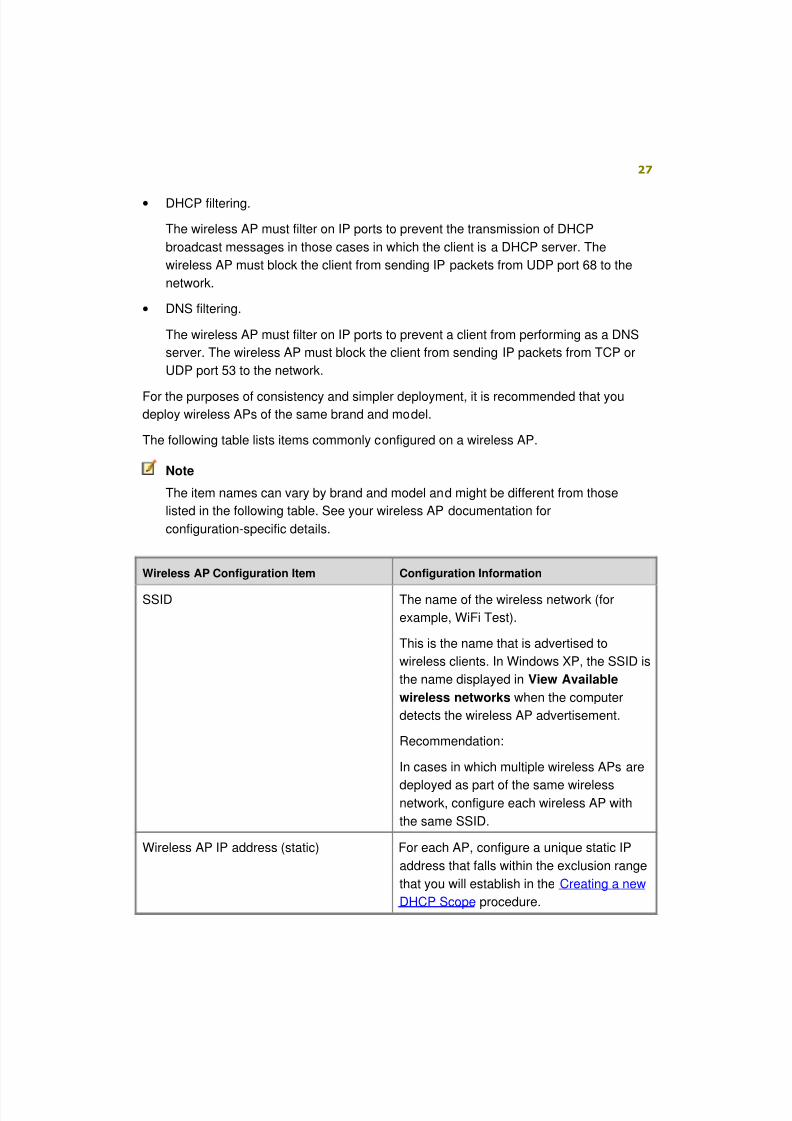
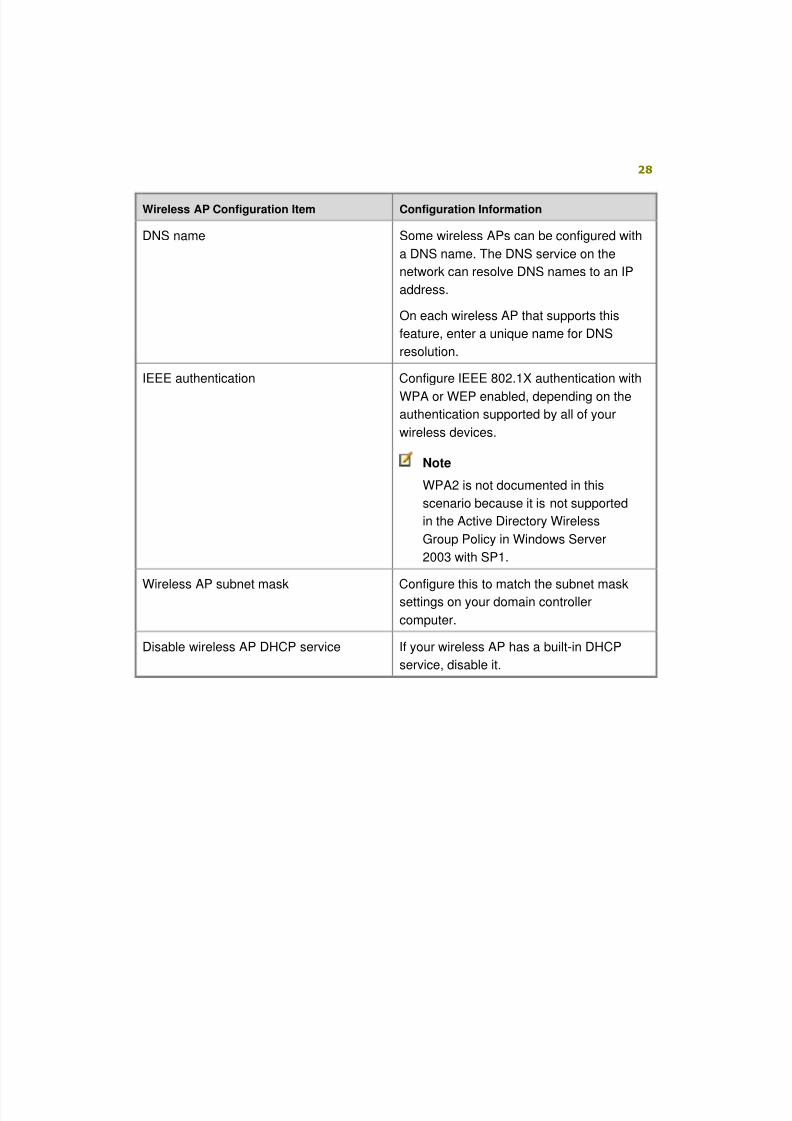
Wireless AP Configuration Item Configuration Information
DNS name Some wireless APs can be configured with
a DNS name. The DNS service on the
network can resolve DNS names to an IP
address.
On each wireless AP that supports this
feature, enter a unique name for DNS
resolution.
IEEE authentication Configure IEEE 802.1X authentication with
WPA or WEP enabled, depending on the
authentication supported by all of your
wireless devices.
Note
WPA2 is not documented in this
scenario because it is not supported
in the Active Directory Wireless
Group Policy in Windows Server
2003 with SP1.
Wireless AP subnet mask Configure this to match the subnet masksettings on your domain controller
computer.
Disable wireless AP DHCP service If your wireless AP has a built-in DHCP
service, disable it.
8/6/2019 Step-By-Step Guide for Secure Wireless Deployment for Small Office Home Office or Small Organization Networks
http://slidepdf.com/reader/full/step-by-step-guide-for-secure-wireless-deployment-for-small-office-home-office 29/113
29
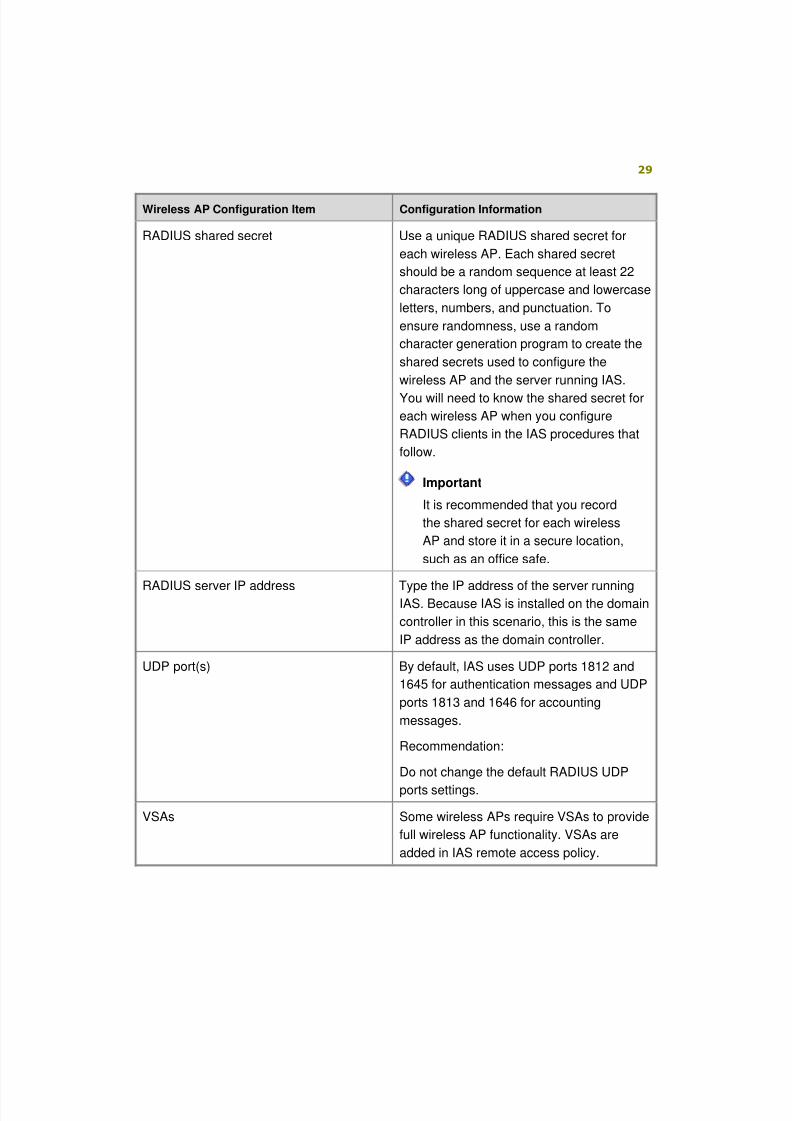
Wireless AP Configuration Item Configuration Information
RADIUS shared secret Use a unique RADIUS shared secret for
each wireless AP. Each shared secret
should be a random sequence at least 22
characters long of uppercase and lowercase
letters, numbers, and punctuation. To
ensure randomness, use a random
character generation program to create the
shared secrets used to configure the
wireless AP and the server running IAS.
You will need to know the shared secret for
each wireless AP when you configure
RADIUS clients in the IAS procedures that
follow.
Important
It is recommended that you record
the shared secret for each wireless
AP and store it in a secure location,
such as an office safe.
RADIUS server IP address Type the IP address of the server runningIAS. Because IAS is installed on the domain
controller in this scenario, this is the same
IP address as the domain controller.
UDP port(s) By default, IAS uses UDP ports 1812 and
1645 for authentication messages and UDP
ports 1813 and 1646 for accounting
messages.
Recommendation:
Do not change the default RADIUS UDP
ports settings.
VSAs Some wireless APs require VSAs to provide
full wireless AP functionality. VSAs are
added in IAS remote access policy.
8/6/2019 Step-By-Step Guide for Secure Wireless Deployment for Small Office Home Office or Small Organization Networks
http://slidepdf.com/reader/full/step-by-step-guide-for-secure-wireless-deployment-for-small-office-home-office 30/113
30
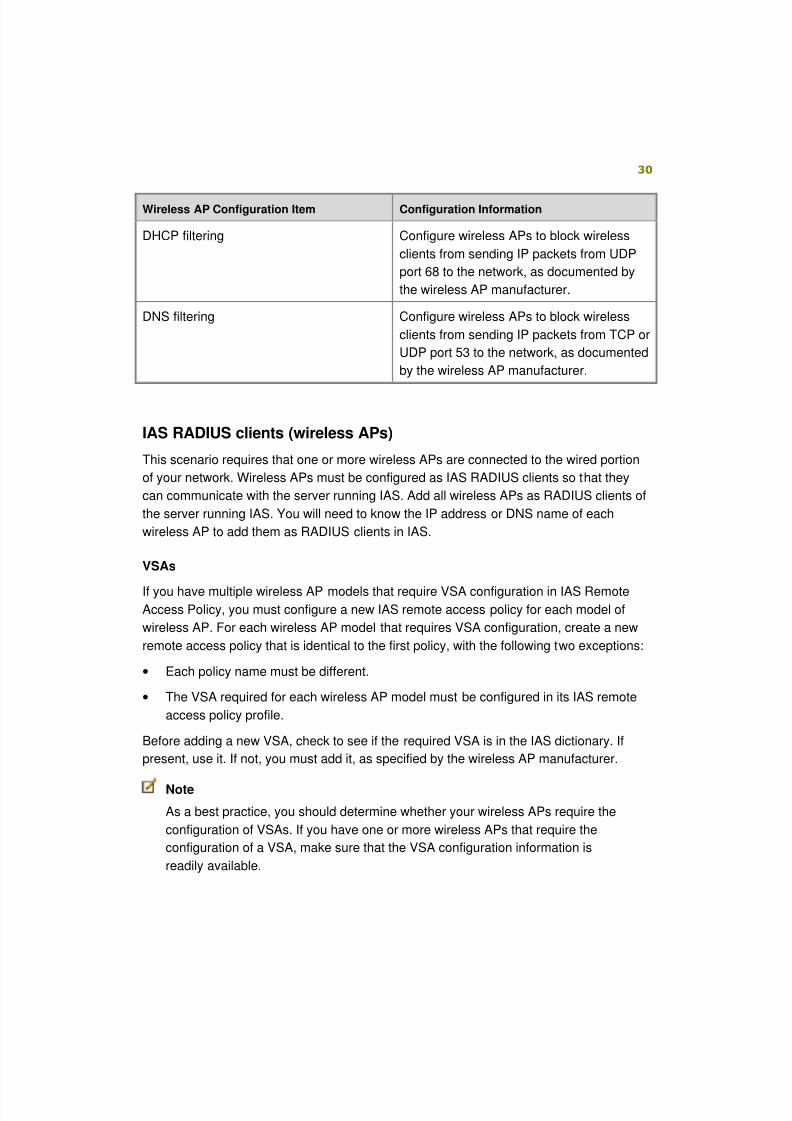
Wireless AP Configuration Item Configuration Information
DHCP filtering Configure wireless APs to block wireless
clients from sending IP packets from UDP
port 68 to the network, as documented by
the wireless AP manufacturer.
DNS filtering Configure wireless APs to block wireless
clients from sending IP packets from TCP or
UDP port 53 to the network, as documented
by the wireless AP manufacturer.
IAS RADIUS clients (wireless APs)
This scenario requires that one or more wireless APs are connected to the wired portion
of your network. Wireless APs must be configured as IAS RADIUS clients so that they
can communicate with the server running IAS. Add all wireless APs as RADIUS clients of
the server running IAS. You will need to know the IP address or DNS name of each
wireless AP to add them as RADIUS clients in IAS.
VSAs
If you have multiple wireless AP models that require VSA configuration in IAS RemoteAccess Policy, you must configure a new IAS remote access policy for each model of
wireless AP. For each wireless AP model that requires VSA configuration, create a new
remote access policy that is identical to the first policy, with the following two exceptions:
• Each policy name must be different.
• The VSA required for each wireless AP model must be configured in its IAS remote
access policy profile.
Before adding a new VSA, check to see if the required VSA is in the IAS dictionary. If
present, use it. If not, you must add it, as specified by the wireless AP manufacturer.
Note
As a best practice, you should determine whether your wireless APs require the
configuration of VSAs. If you have one or more wireless APs that require the
configuration of a VSA, make sure that the VSA configuration information is
readily available.
8/6/2019 Step-By-Step Guide for Secure Wireless Deployment for Small Office Home Office or Small Organization Networks
http://slidepdf.com/reader/full/step-by-step-guide-for-secure-wireless-deployment-for-small-office-home-office 31/113
31
Client computers with IEEE 802.11 wireless adapters
• If any of your wireless laptop computers are equipped with a switch to turn the
wireless adapter on or off, make sure the switch is turned on.
• Make sure wireless adapters for all of your wireless computers are configured for
automatic addressing.
To configure TCP/IP for automatic addressing
1. Click Start, click Connect to, and then click Show all connections to open
Network Connections.
2. Right-click your wireless network connection, and then click Properties.
3. On the General tab, in This connection uses the following items, click
Internet Protocol (TCP/IP), and then click Properties.
4. On the Internet Protocol (TCP/IP) Properties dialog box, on the General tab,
select Obtain an IP address automatically. Click OK twice, and then close
Network Connections.
Configuring the wireless network in your smallorganization
This section provides the steps required to install and configure a secure wireless
network as an extension to an existing wired network infrastructure.
The configuration steps in this scenario document how to add wireless services to a
newly constructed wired network that has limited or no services configured. If you are
adding wireless services to an existing network, you might already have installed some
services or components that are described in this paper. In that case, it is recommended
that you review the information and then modify your services or components as
required.
Configuring a computer running Windows Server 2003 as a domaincontroller
The following configuration steps assume you have:
• Physically set up the wired portion of your network.
• Already performed a basic installation of Windows Server 2003, with TCP/IP
configured on the private interface for static IP addressing.
• Installed SP1 on the computer running Windows Server 2003.
8/6/2019 Step-By-Step Guide for Secure Wireless Deployment for Small Office Home Office or Small Organization Networks
http://slidepdf.com/reader/full/step-by-step-guide-for-secure-wireless-deployment-for-small-office-home-office 32/113
8/6/2019 Step-By-Step Guide for Secure Wireless Deployment for Small Office Home Office or Small Organization Networks
http://slidepdf.com/reader/full/step-by-step-guide-for-secure-wireless-deployment-for-small-office-home-office 33/113
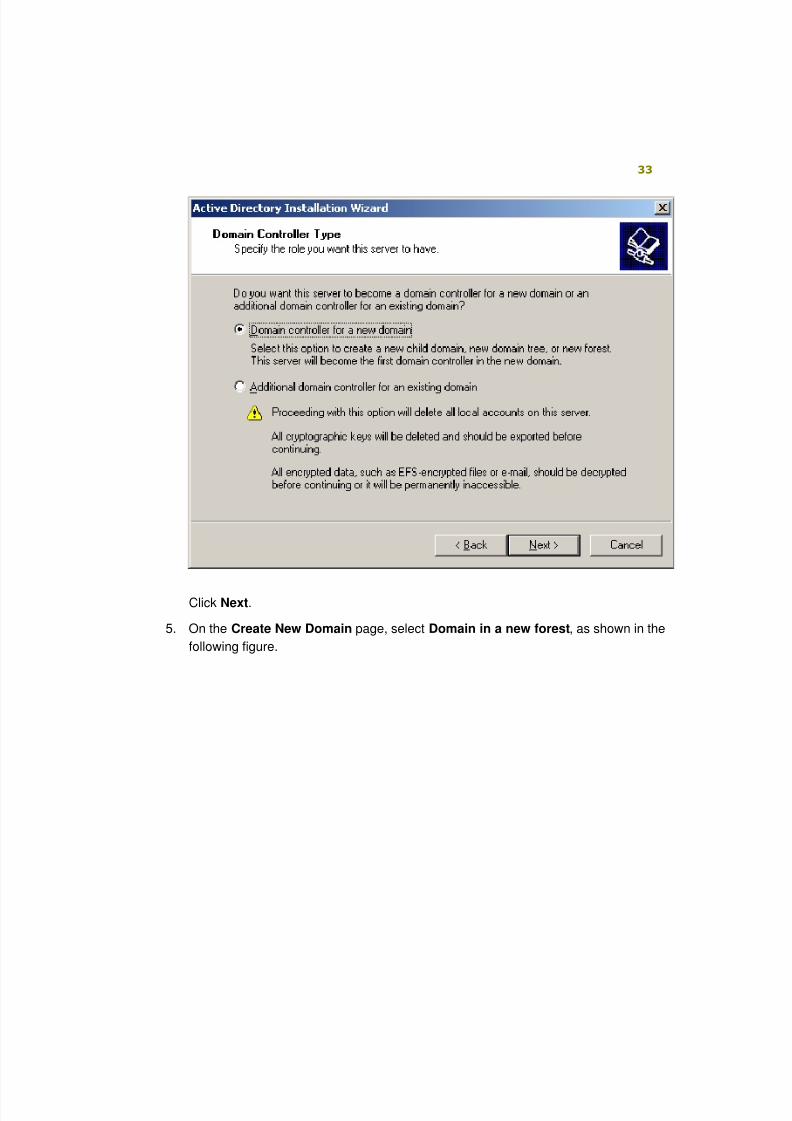
33
Click Next.
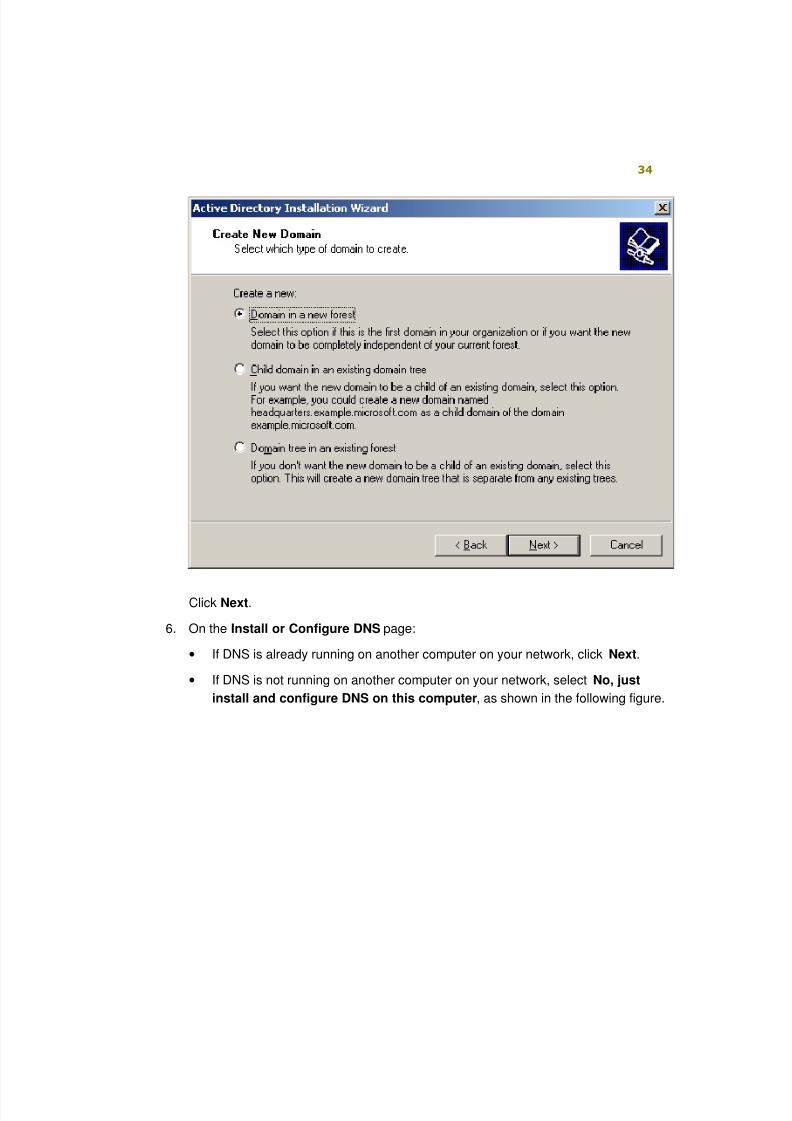
5. On the Create New Domain page, select Domain in a new forest, as shown in the
following figure.
8/6/2019 Step-By-Step Guide for Secure Wireless Deployment for Small Office Home Office or Small Organization Networks
http://slidepdf.com/reader/full/step-by-step-guide-for-secure-wireless-deployment-for-small-office-home-office 34/113
34
Click Next.
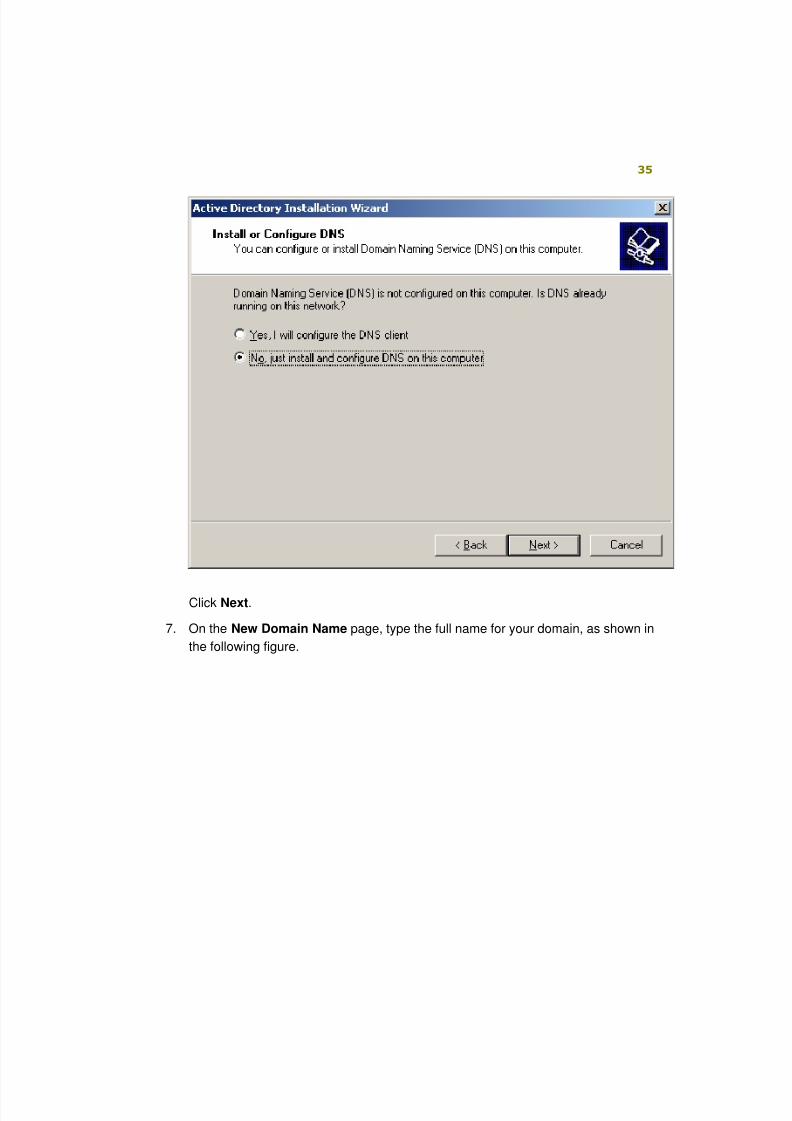
6. On the Install or Configure DNS page:
• If DNS is already running on another computer on your network, click Next.
• If DNS is not running on another computer on your network, select No, just
install and configure DNS on this computer, as shown in the following figure.
8/6/2019 Step-By-Step Guide for Secure Wireless Deployment for Small Office Home Office or Small Organization Networks
http://slidepdf.com/reader/full/step-by-step-guide-for-secure-wireless-deployment-for-small-office-home-office 35/113
35
Click Next.
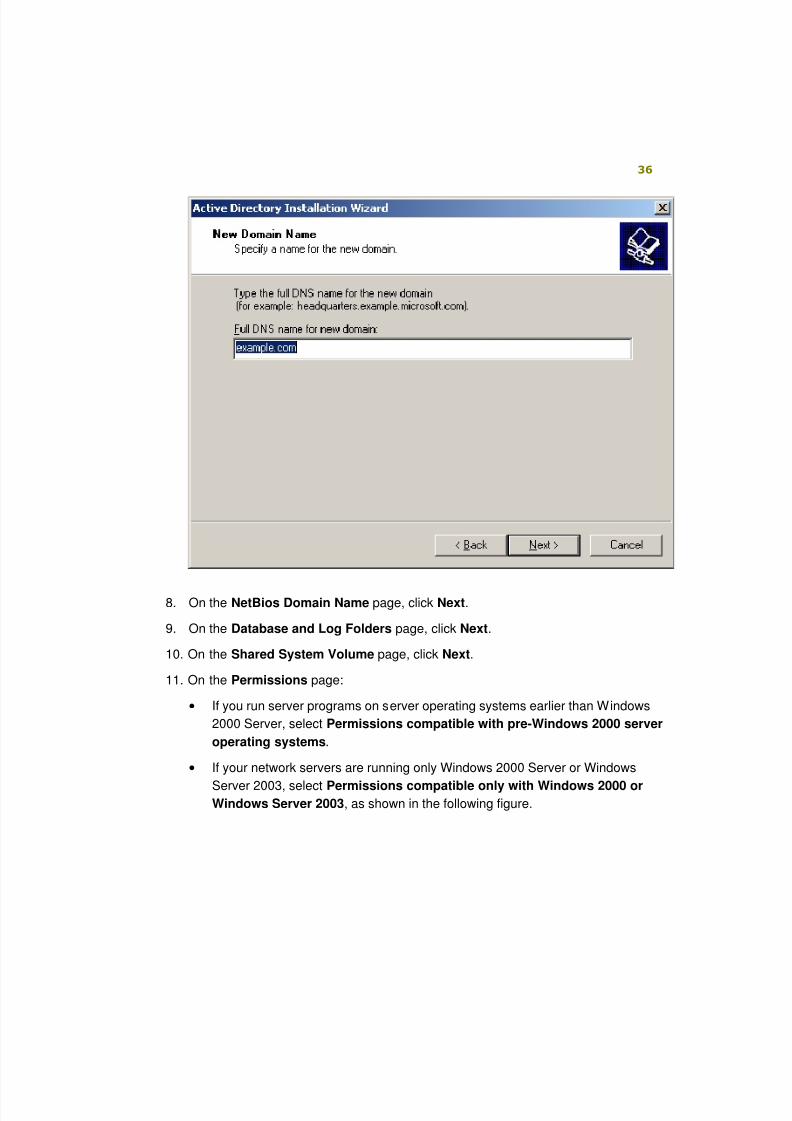
7. On the New Domain Name page, type the full name for your domain, as shown in
the following figure.
8/6/2019 Step-By-Step Guide for Secure Wireless Deployment for Small Office Home Office or Small Organization Networks
http://slidepdf.com/reader/full/step-by-step-guide-for-secure-wireless-deployment-for-small-office-home-office 36/113
8/6/2019 Step-By-Step Guide for Secure Wireless Deployment for Small Office Home Office or Small Organization Networks
http://slidepdf.com/reader/full/step-by-step-guide-for-secure-wireless-deployment-for-small-office-home-office 37/113
37
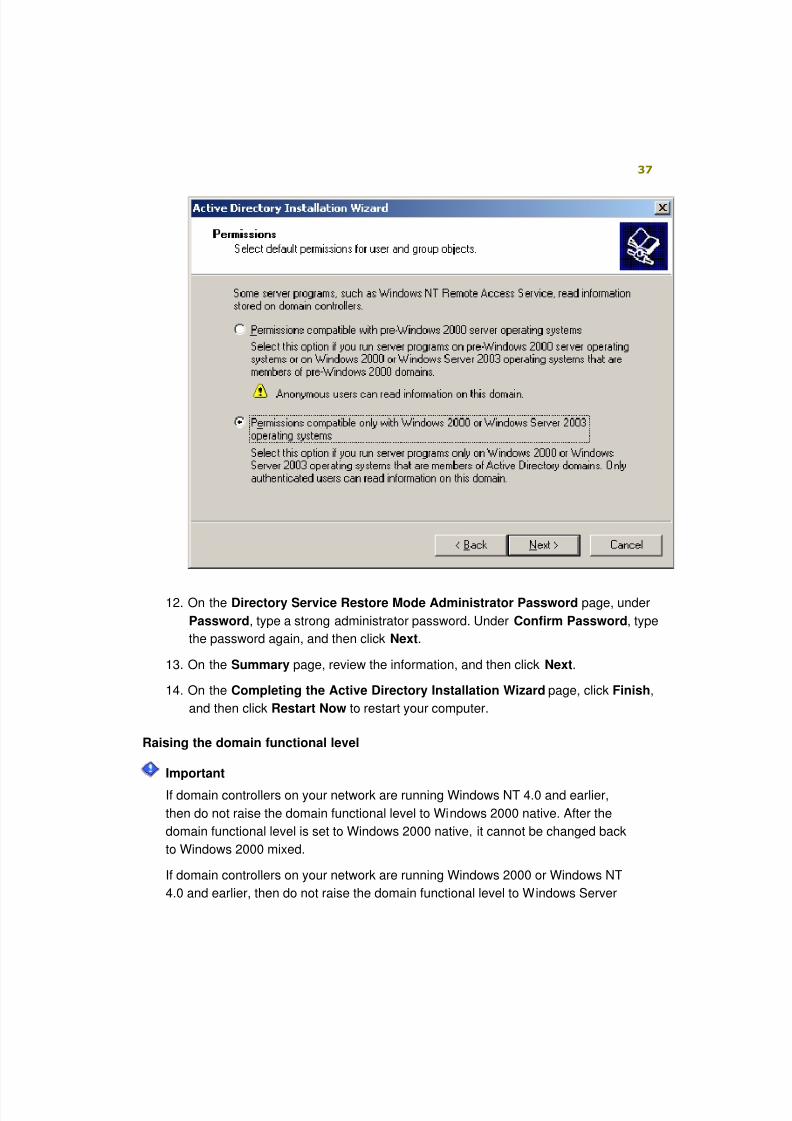
12. On the Directory Service Restore Mode Administrator Password page, under
Password, type a strong administrator password. Under Confirm Password, type
the password again, and then click Next.
13. On the Summary page, review the information, and then click Next.
14. On the Completing the Active Directory Installation Wizard page, click Finish,
and then click Restart Now to restart your computer.
Raising the domain functional level
Important
If domain controllers on your network are running Windows NT 4.0 and earlier,
then do not raise the domain functional level to Windows 2000 native. After the
domain functional level is set to Windows 2000 native, it cannot be changed back
to Windows 2000 mixed.
If domain controllers on your network are running Windows 2000 or Windows NT
4.0 and earlier, then do not raise the domain functional level to Windows Server
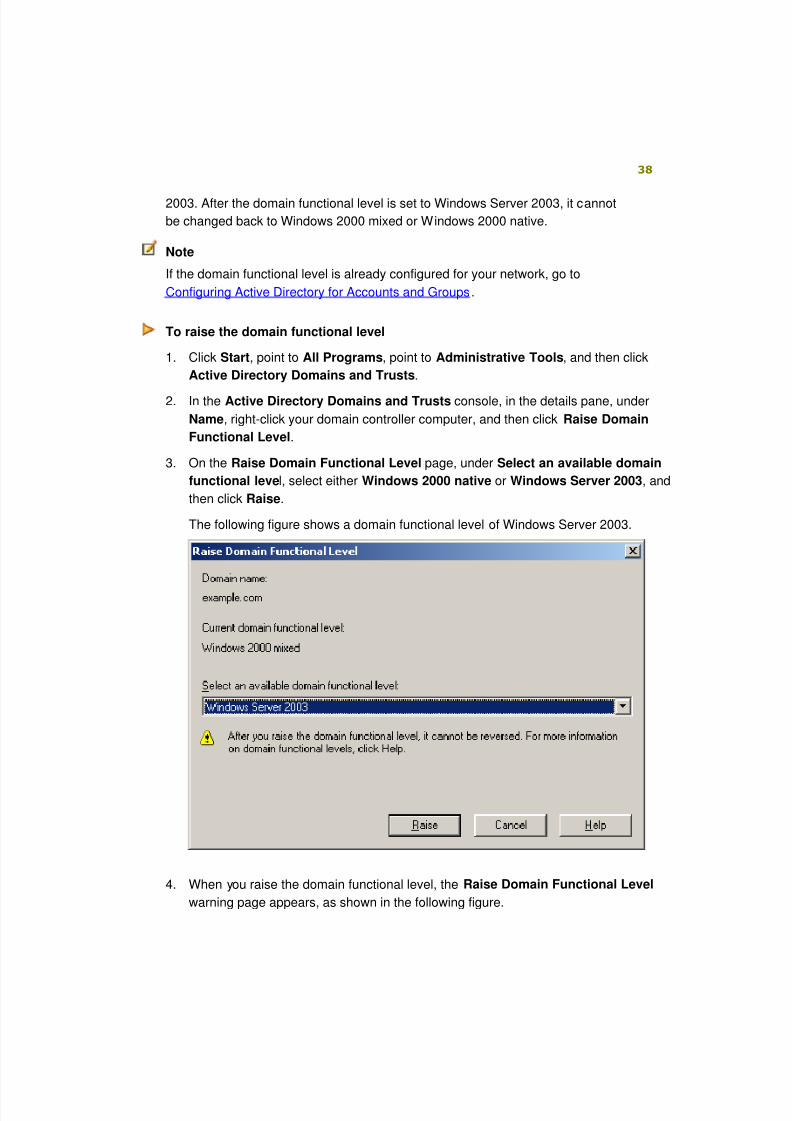
8/6/2019 Step-By-Step Guide for Secure Wireless Deployment for Small Office Home Office or Small Organization Networks
http://slidepdf.com/reader/full/step-by-step-guide-for-secure-wireless-deployment-for-small-office-home-office 38/113
8/6/2019 Step-By-Step Guide for Secure Wireless Deployment for Small Office Home Office or Small Organization Networks
http://slidepdf.com/reader/full/step-by-step-guide-for-secure-wireless-deployment-for-small-office-home-office 39/113
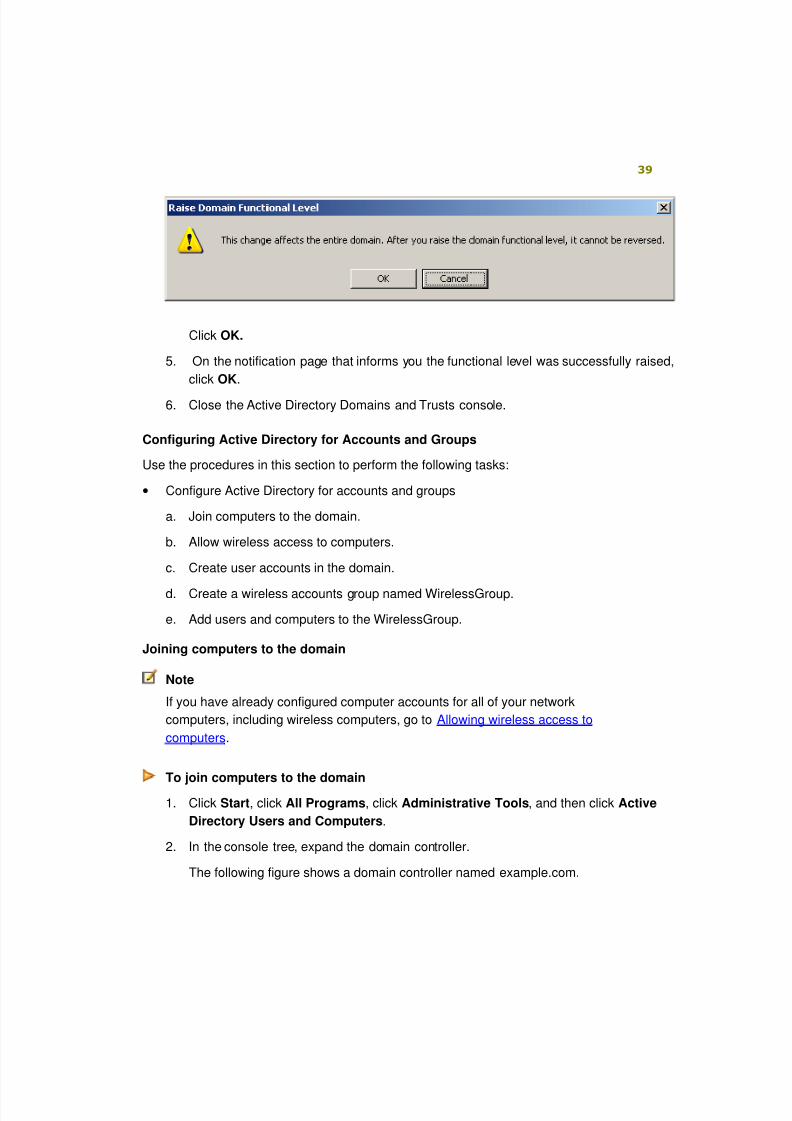
39
Click OK.
5. On the notification page that informs you the functional level was successfully raised,
click OK.
6. Close the Active Directory Domains and Trusts console.
Configuring Active Directory for Accounts and Groups
Use the procedures in this section to perform the following tasks:
• Configure Active Directory for accounts and groups
a. Join computers to the domain.
b. Allow wireless access to computers.
c. Create user accounts in the domain.
d. Create a wireless accounts group named WirelessGroup.
e. Add users and computers to the WirelessGroup.
Joining computers to the domain
Note
If you have already configured computer accounts for all of your network
computers, including wireless computers, go to Allowing wireless access to
computers.
To join computers to the domain
1. Click Start, click All Programs, click Administrative Tools, and then click Active
Directory Users and Computers.
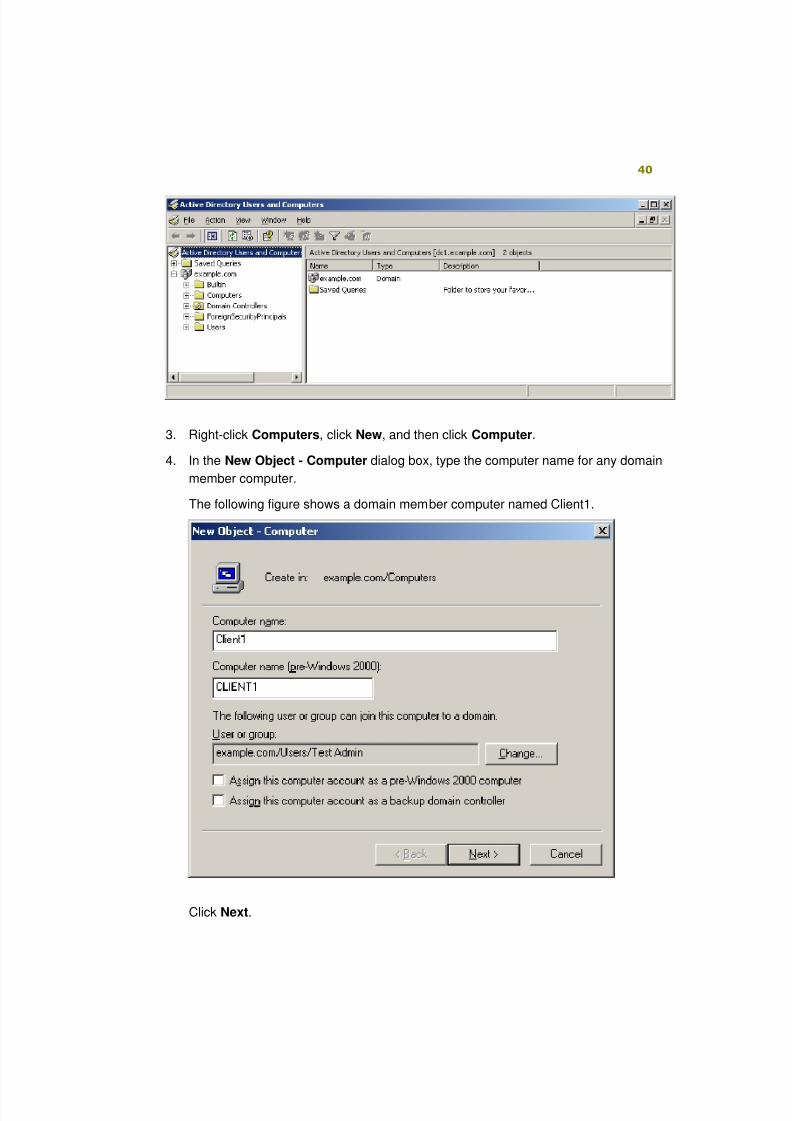
2. In the console tree, expand the domain controller.
The following figure shows a domain controller named example.com.
8/6/2019 Step-By-Step Guide for Secure Wireless Deployment for Small Office Home Office or Small Organization Networks
http://slidepdf.com/reader/full/step-by-step-guide-for-secure-wireless-deployment-for-small-office-home-office 40/113
40
3. Right-click Computers, click New, and then click Computer.
4. In the New Object - Computer dialog box, type the computer name for any domain
member computer.
The following figure shows a domain member computer named Client1.
Click Next.
8/6/2019 Step-By-Step Guide for Secure Wireless Deployment for Small Office Home Office or Small Organization Networks
http://slidepdf.com/reader/full/step-by-step-guide-for-secure-wireless-deployment-for-small-office-home-office 41/113
41
5. In the Managed dialog box, click Next.
6. In the New Object - Computer dialog box, click Finish.
7. Repeat steps 1 - 6 of this procedure to create computer accounts for all the
computers on your network.
Allowing wireless access to computers
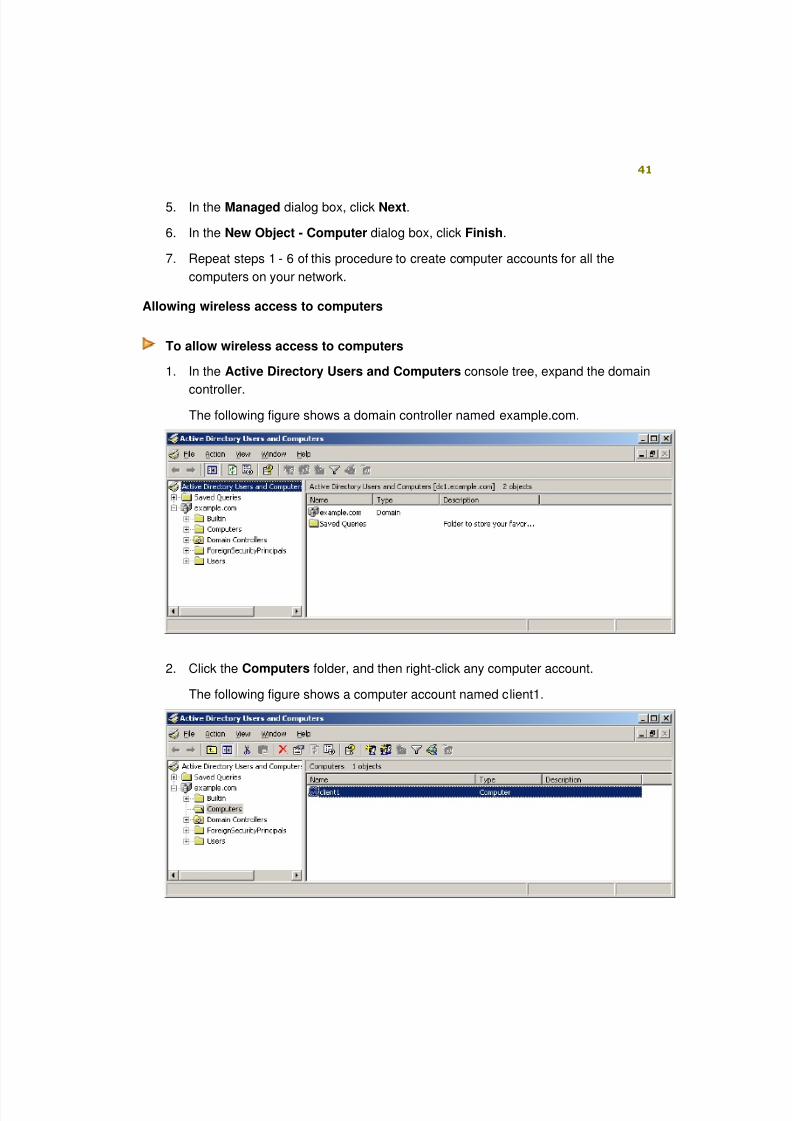
To allow wireless access to computers
1. In the Active Directory Users and Computers console tree, expand the domain
controller.
The following figure shows a domain controller named example.com.
2. Click the Computers folder, and then right-click any computer account.
The following figure shows a computer account named client1.
8/6/2019 Step-By-Step Guide for Secure Wireless Deployment for Small Office Home Office or Small Organization Networks
http://slidepdf.com/reader/full/step-by-step-guide-for-secure-wireless-deployment-for-small-office-home-office 42/113
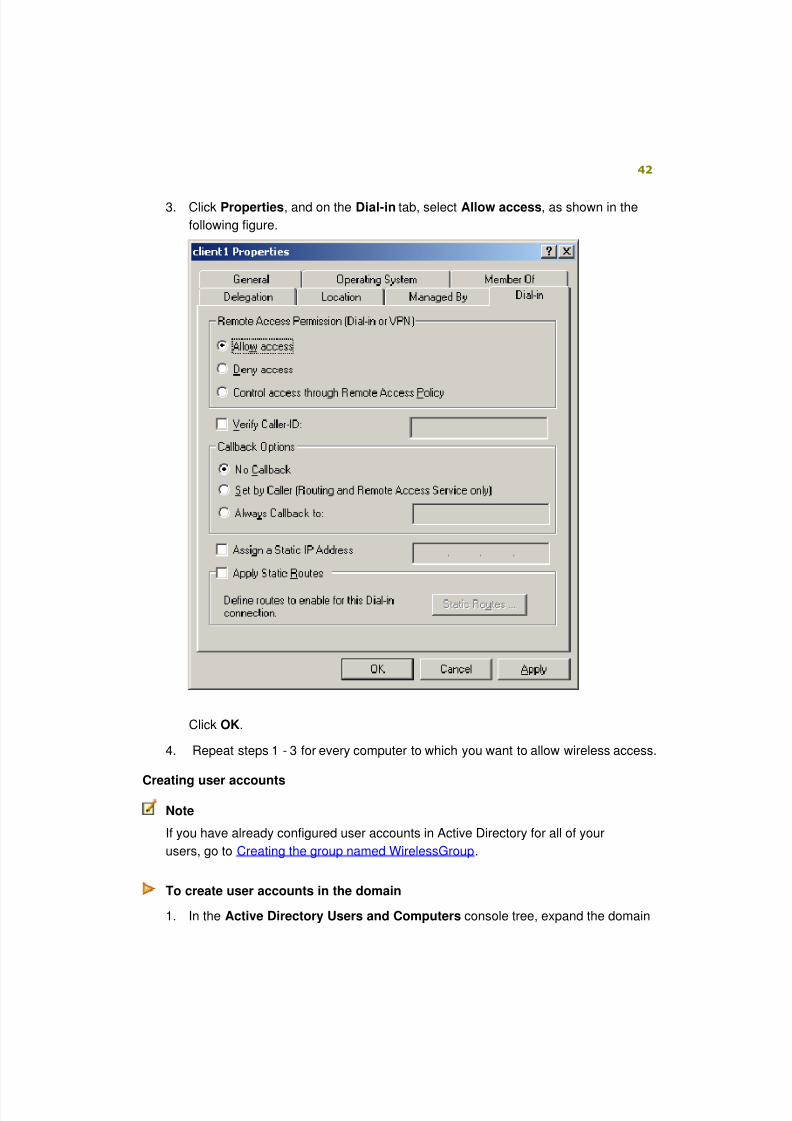
8/6/2019 Step-By-Step Guide for Secure Wireless Deployment for Small Office Home Office or Small Organization Networks
http://slidepdf.com/reader/full/step-by-step-guide-for-secure-wireless-deployment-for-small-office-home-office 43/113
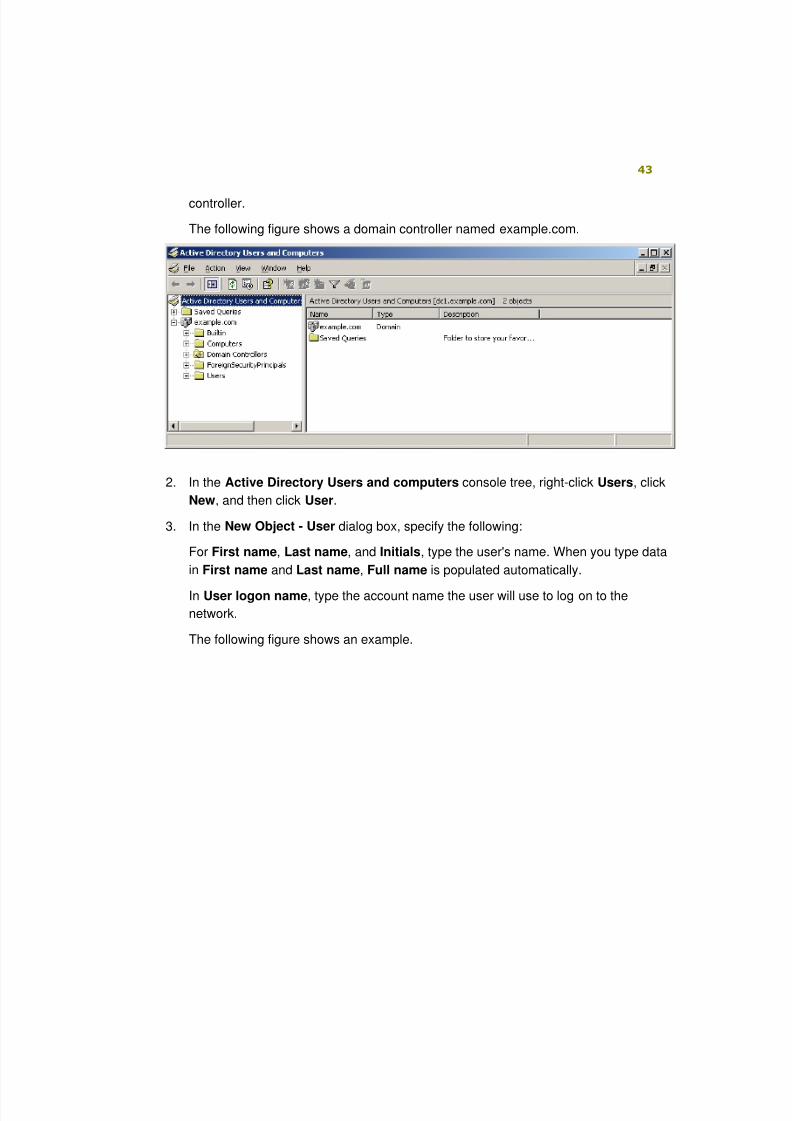
43
controller.
The following figure shows a domain controller named example.com.
2. In the Active Directory Users and computers console tree, right-click Users, click
New, and then click User.
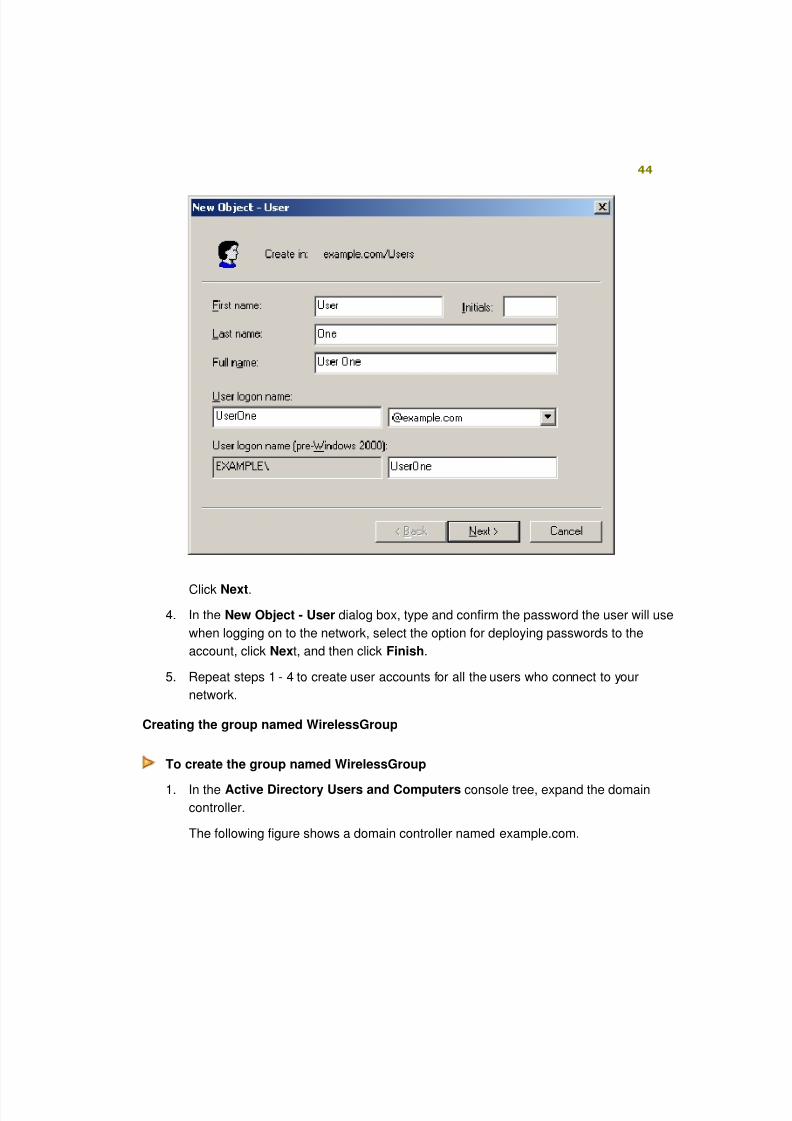
3. In the New Object - User dialog box, specify the following:
For First name, Last name, and Initials, type the user's name. When you type data
in First name and Last name, Full name is populated automatically.
In User logon name, type the account name the user will use to log on to the
network.
The following figure shows an example.
8/6/2019 Step-By-Step Guide for Secure Wireless Deployment for Small Office Home Office or Small Organization Networks
http://slidepdf.com/reader/full/step-by-step-guide-for-secure-wireless-deployment-for-small-office-home-office 44/113
44
Click Next.
4. In the New Object - User dialog box, type and confirm the password the user will use
when logging on to the network, select the option for deploying passwords to the
account, click Next, and then click Finish.
5. Repeat steps 1 - 4 to create user accounts for all the users who connect to your
network.
Creating the group named WirelessGroup
To create the group named WirelessGroup
1. In the Active Directory Users and Computers console tree, expand the domain
controller.
The following figure shows a domain controller named example.com.
8/6/2019 Step-By-Step Guide for Secure Wireless Deployment for Small Office Home Office or Small Organization Networks
http://slidepdf.com/reader/full/step-by-step-guide-for-secure-wireless-deployment-for-small-office-home-office 45/113
45
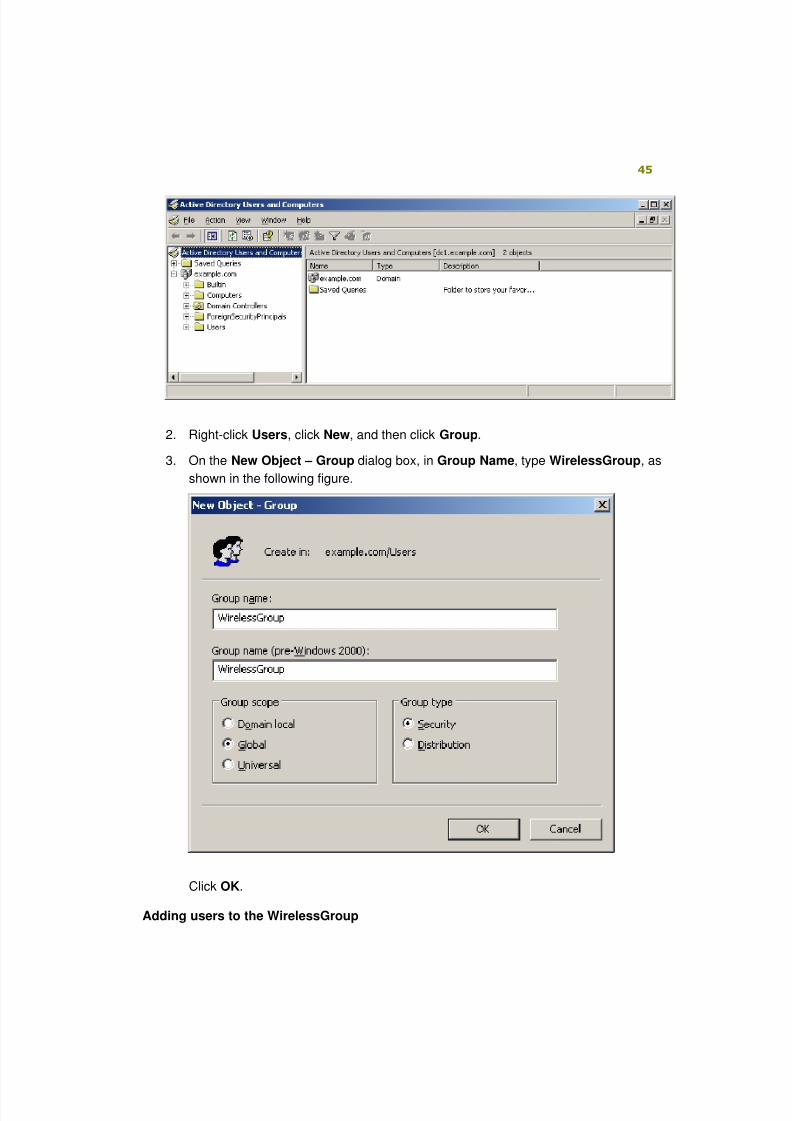
2. Right-click Users, click New, and then click Group.
3. On the New Object – Group dialog box, in Group Name, type WirelessGroup, as
shown in the following figure.
Click OK.
Adding users to the WirelessGroup
8/6/2019 Step-By-Step Guide for Secure Wireless Deployment for Small Office Home Office or Small Organization Networks
http://slidepdf.com/reader/full/step-by-step-guide-for-secure-wireless-deployment-for-small-office-home-office 46/113
46
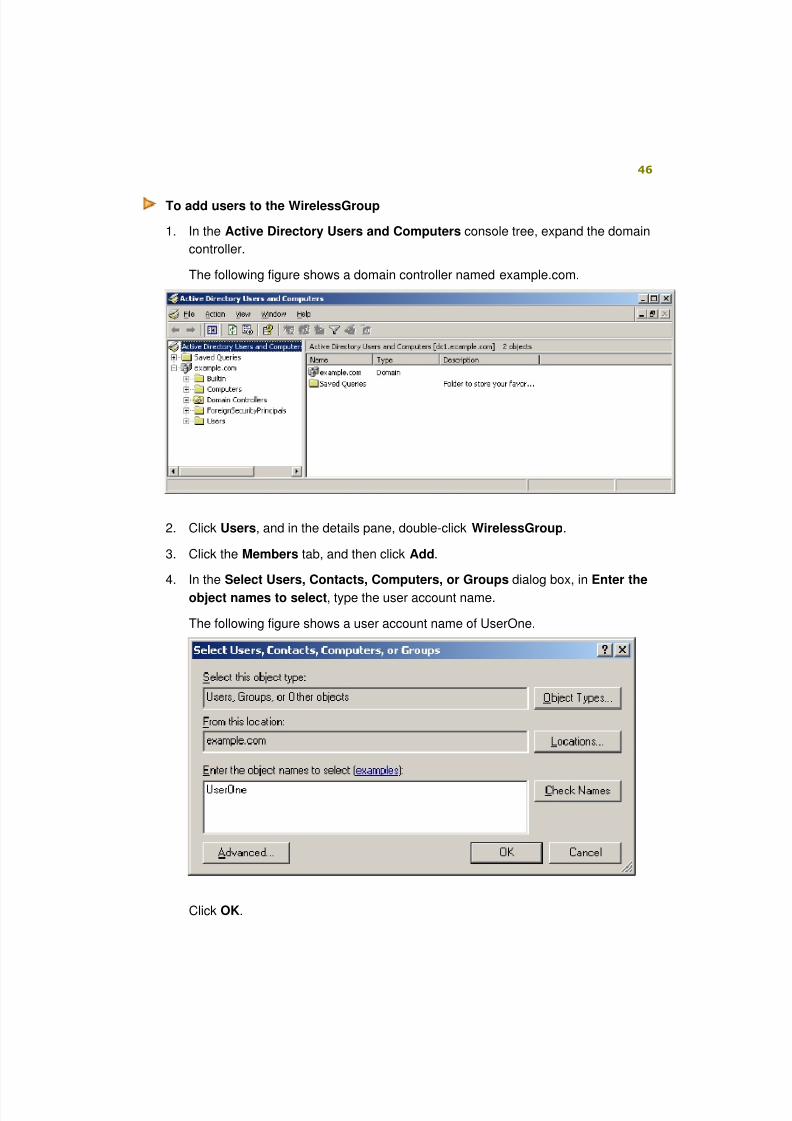
To add users to the WirelessGroup
1. In the Active Directory Users and Computers console tree, expand the domain
controller.
The following figure shows a domain controller named example.com.
2. Click Users, and in the details pane, double-click WirelessGroup.
3. Click the Members tab, and then click Add.
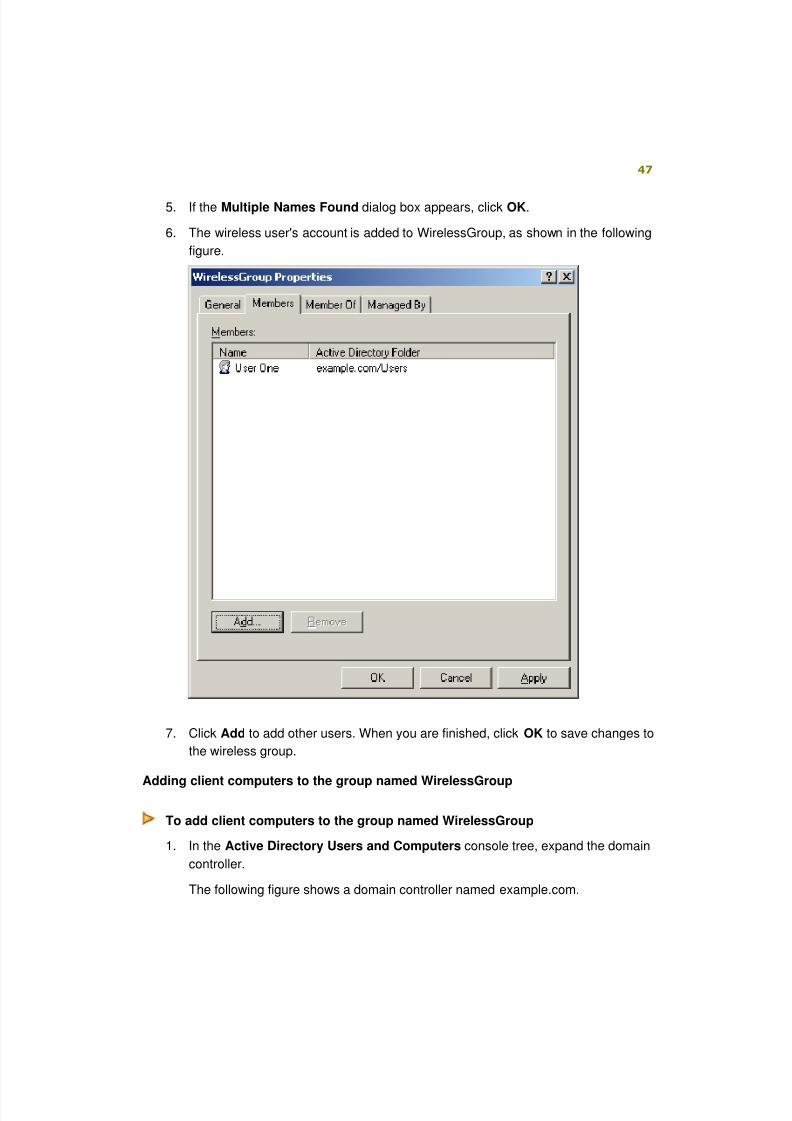
4. In the Select Users, Contacts, Computers, or Groups dialog box, in Enter the
object names to select, type the user account name.
The following figure shows a user account name of UserOne.
Click OK.
8/6/2019 Step-By-Step Guide for Secure Wireless Deployment for Small Office Home Office or Small Organization Networks
http://slidepdf.com/reader/full/step-by-step-guide-for-secure-wireless-deployment-for-small-office-home-office 47/113
47
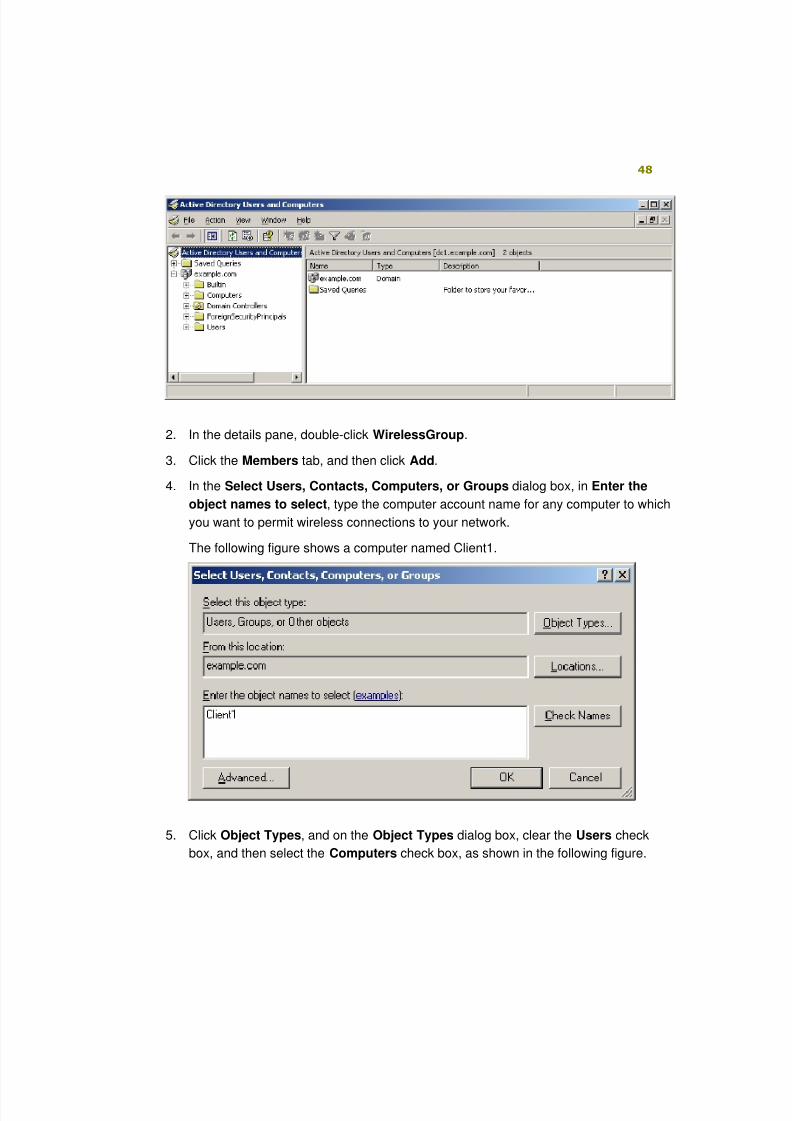
5. If the Multiple Names Found dialog box appears, click OK.
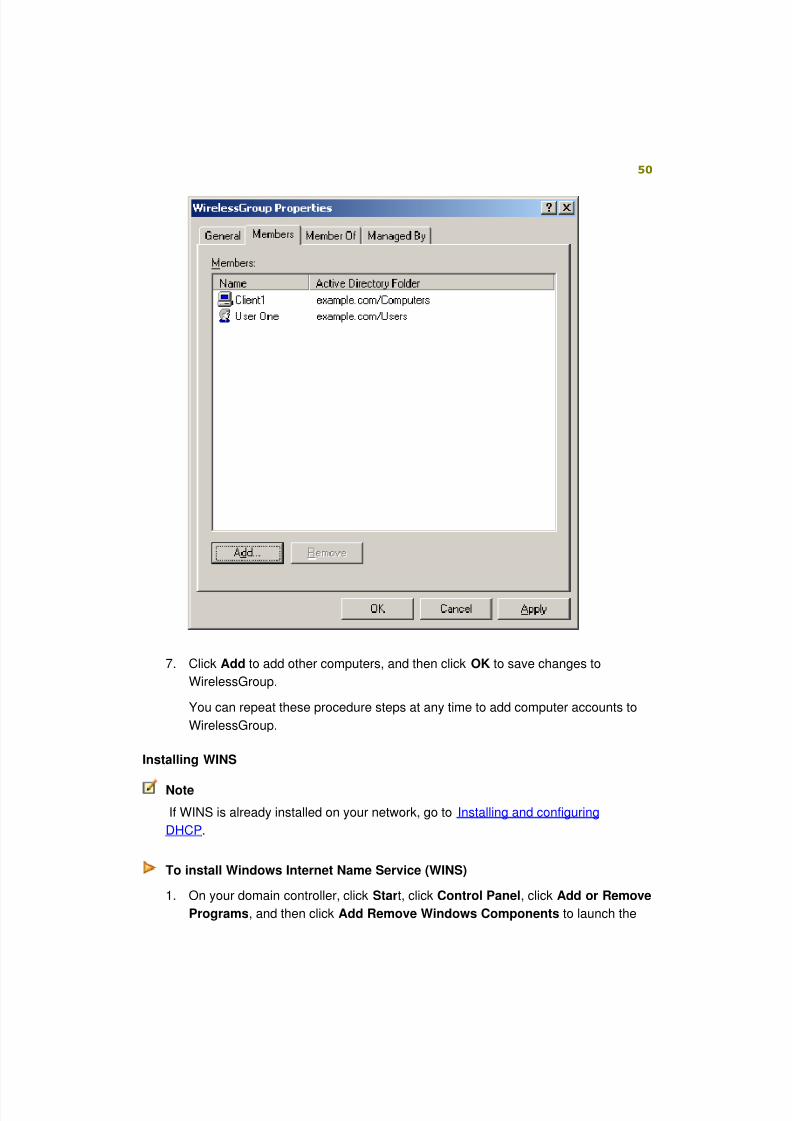
6. The wireless user's account is added to WirelessGroup, as shown in the following
figure.
7. Click Add to add other users. When you are finished, click OK to save changes to
the wireless group.
Adding client computers to the group named WirelessGroup
To add client computers to the group named WirelessGroup
1. In the Active Directory Users and Computers console tree, expand the domain
controller.
The following figure shows a domain controller named example.com.
8/6/2019 Step-By-Step Guide for Secure Wireless Deployment for Small Office Home Office or Small Organization Networks
http://slidepdf.com/reader/full/step-by-step-guide-for-secure-wireless-deployment-for-small-office-home-office 48/113
8/6/2019 Step-By-Step Guide for Secure Wireless Deployment for Small Office Home Office or Small Organization Networks
http://slidepdf.com/reader/full/step-by-step-guide-for-secure-wireless-deployment-for-small-office-home-office 49/113
49
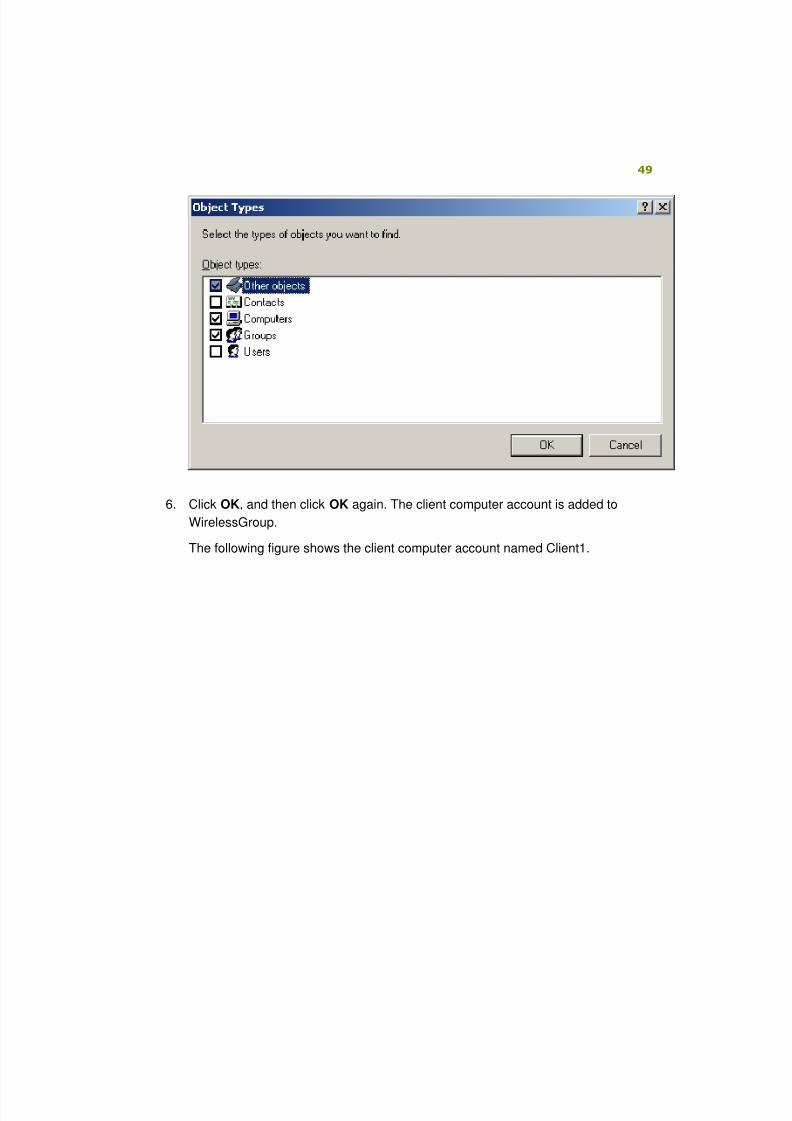
6. Click OK, and then click OK again. The client computer account is added to
WirelessGroup.
The following figure shows the client computer account named Client1.
8/6/2019 Step-By-Step Guide for Secure Wireless Deployment for Small Office Home Office or Small Organization Networks
http://slidepdf.com/reader/full/step-by-step-guide-for-secure-wireless-deployment-for-small-office-home-office 50/113
8/6/2019 Step-By-Step Guide for Secure Wireless Deployment for Small Office Home Office or Small Organization Networks
http://slidepdf.com/reader/full/step-by-step-guide-for-secure-wireless-deployment-for-small-office-home-office 51/113
8/6/2019 Step-By-Step Guide for Secure Wireless Deployment for Small Office Home Office or Small Organization Networks
http://slidepdf.com/reader/full/step-by-step-guide-for-secure-wireless-deployment-for-small-office-home-office 52/113
52
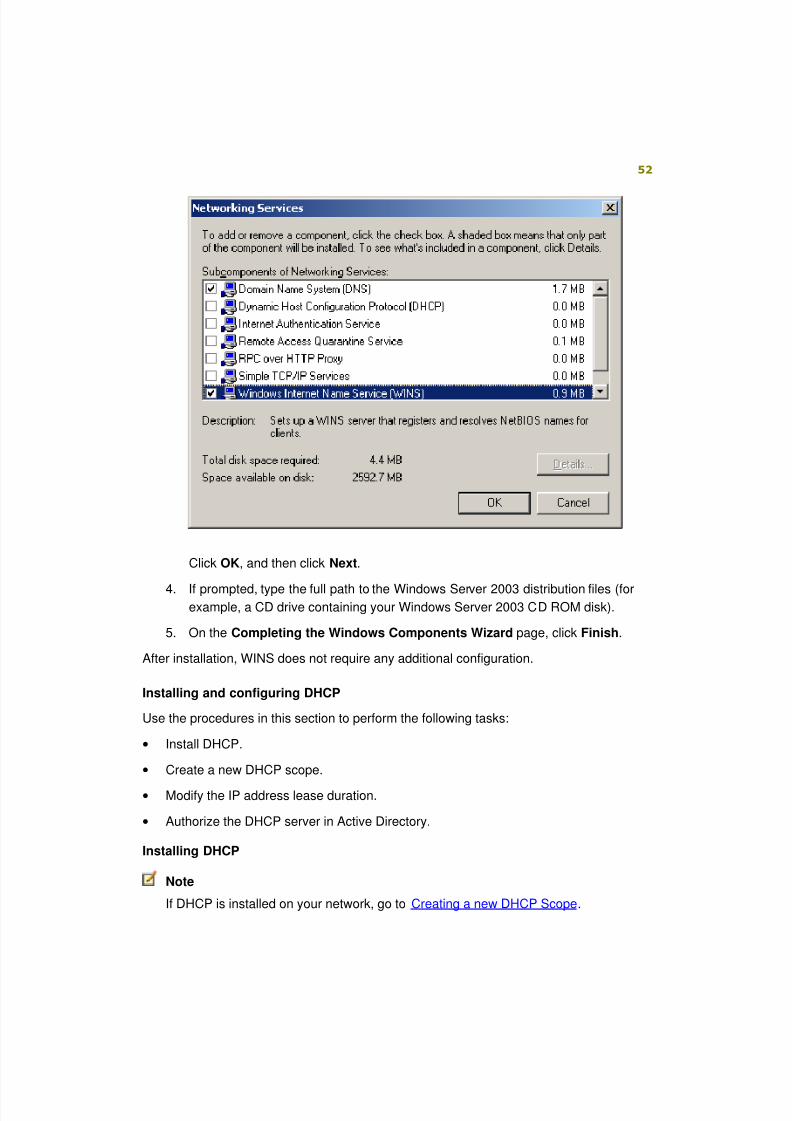
Click OK, and then click Next.
4. If prompted, type the full path to the Windows Server 2003 distribution files (forexample, a CD drive containing your Windows Server 2003 CD ROM disk).
5. On the Completing the Windows Components Wizard page, click Finish.
After installation, WINS does not require any additional configuration.
Installing and configuring DHCP
Use the procedures in this section to perform the following tasks:
• Install DHCP.
• Create a new DHCP scope.
• Modify the IP address lease duration.
• Authorize the DHCP server in Active Directory.
Installing DHCP
Note
If DHCP is installed on your network, go to Creating a new DHCP Scope.
8/6/2019 Step-By-Step Guide for Secure Wireless Deployment for Small Office Home Office or Small Organization Networks
http://slidepdf.com/reader/full/step-by-step-guide-for-secure-wireless-deployment-for-small-office-home-office 53/113
53
To install DHCP
1. On your domain controller, click Start, click Control Panel, click Add or Remove
Programs, and then click Add Remove Windows Components to launch the
Windows Components Wizard.
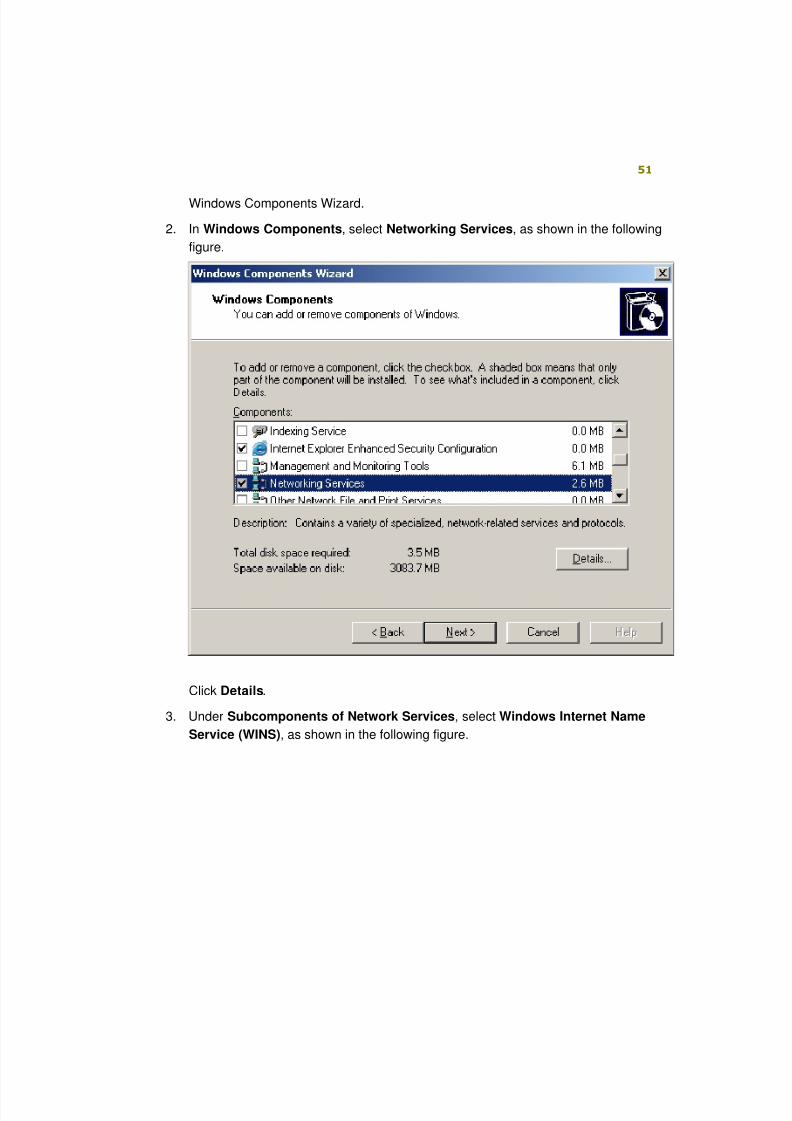
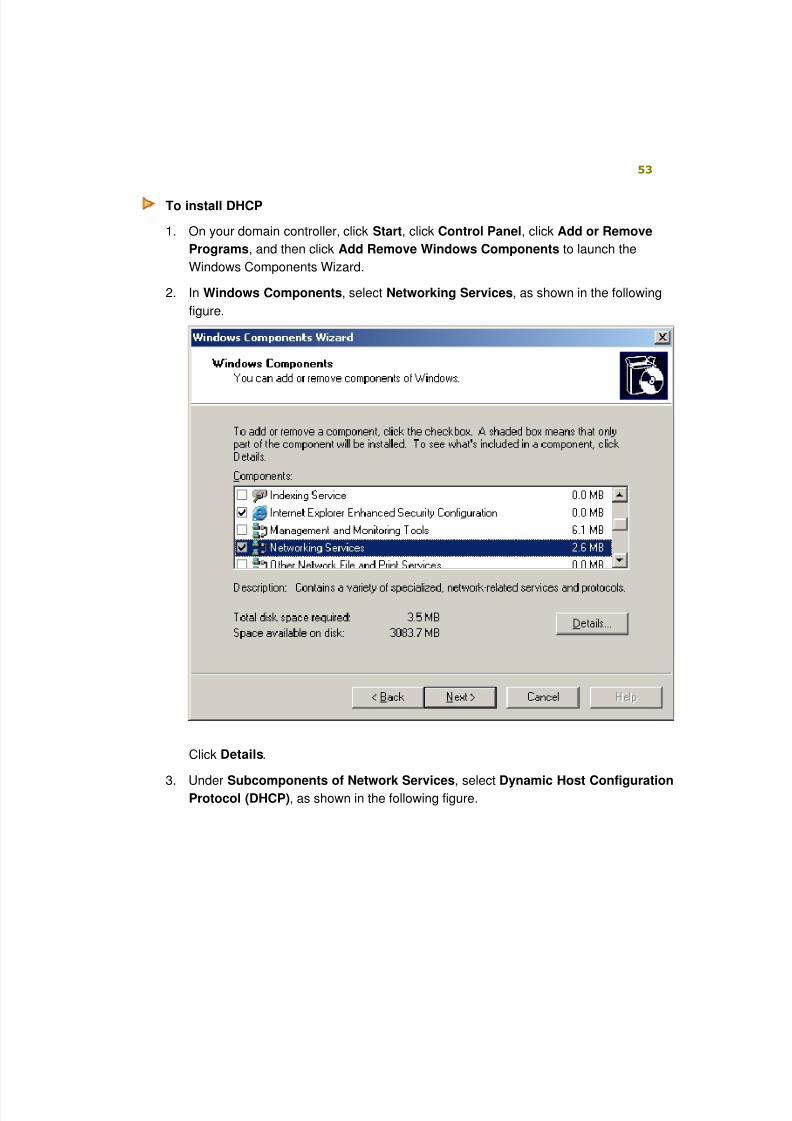
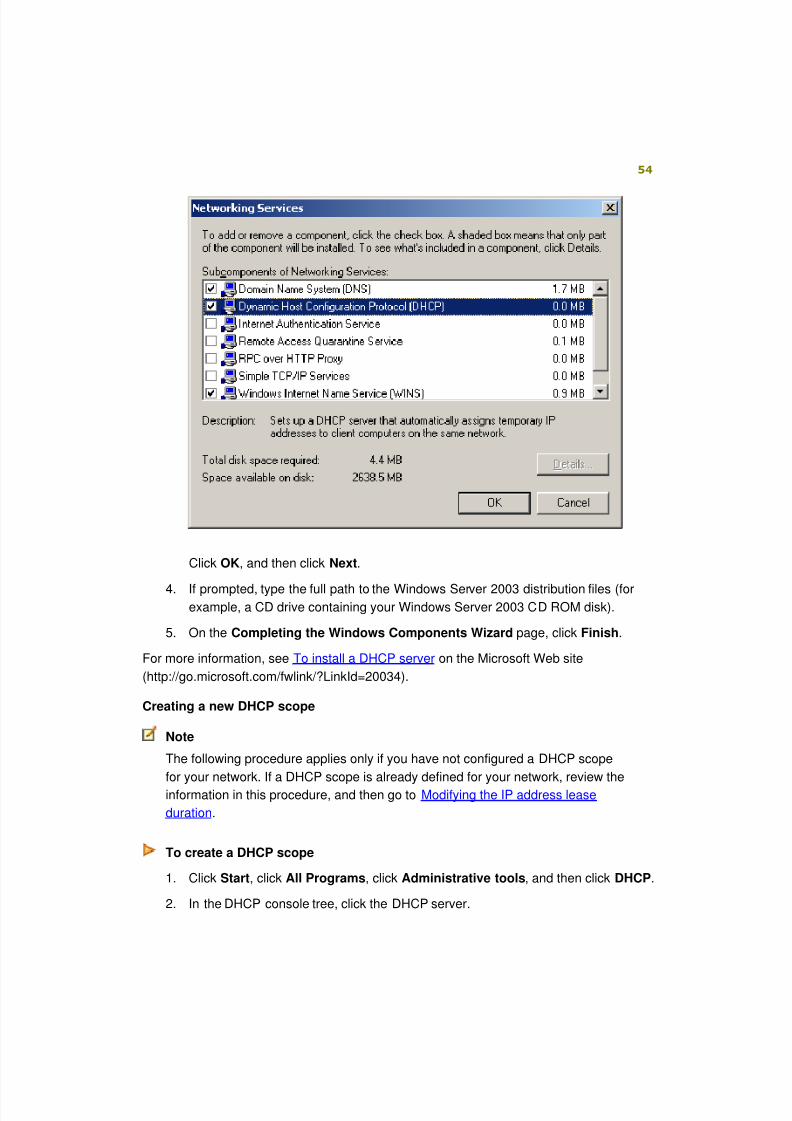
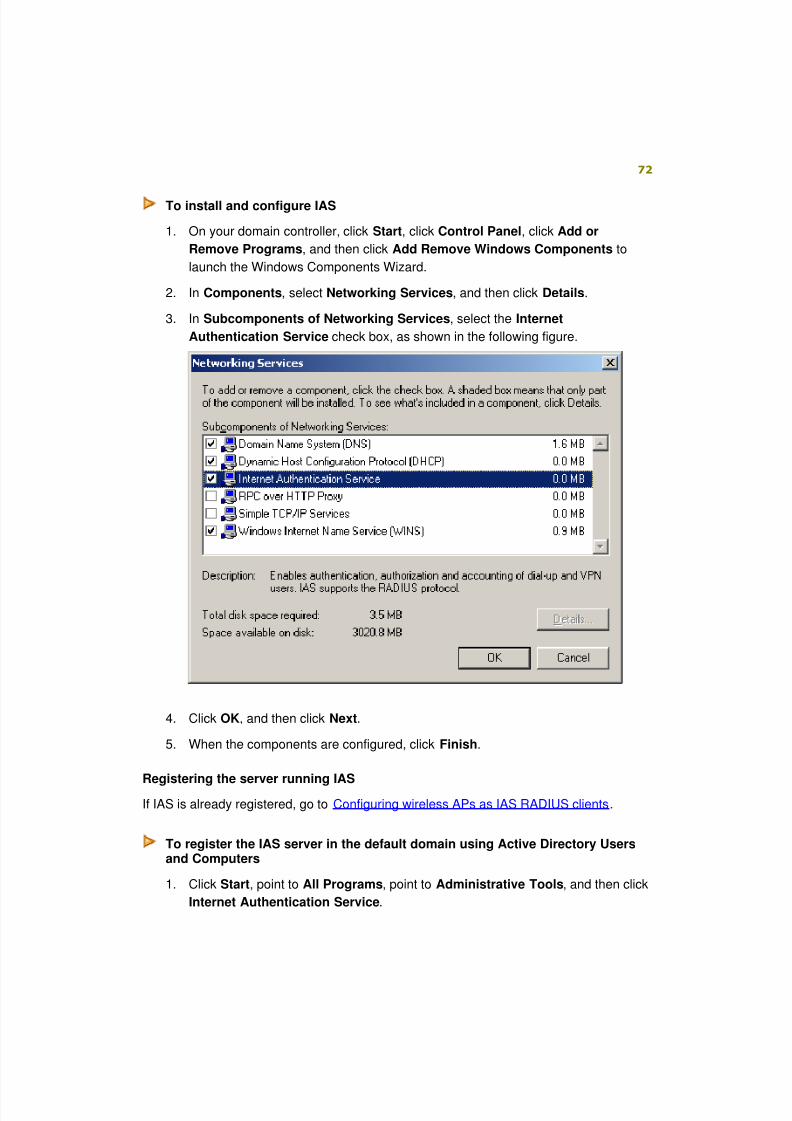
2. In Windows Components, select Networking Services, as shown in the following
figure.
Click Details.
3. Under Subcomponents of Network Services, select Dynamic Host ConfigurationProtocol (DHCP), as shown in the following figure.
8/6/2019 Step-By-Step Guide for Secure Wireless Deployment for Small Office Home Office or Small Organization Networks
http://slidepdf.com/reader/full/step-by-step-guide-for-secure-wireless-deployment-for-small-office-home-office 54/113
54
Click OK, and then click Next.
4. If prompted, type the full path to the Windows Server 2003 distribution files (forexample, a CD drive containing your Windows Server 2003 CD ROM disk).
5. On the Completing the Windows Components Wizard page, click Finish.
For more information, see To install a DHCP server on the Microsoft Web site
(http://go.microsoft.com/fwlink/?LinkId=20034).
Creating a new DHCP scope
Note
The following procedure applies only if you have not configured a DHCP scope
for your network. If a DHCP scope is already defined for your network, review the
information in this procedure, and then go to Modifying the IP address lease
duration.
To create a DHCP scope
1. Click Start, click All Programs, click Administrative tools, and then click DHCP.
2. In the DHCP console tree, click the DHCP server.
8/6/2019 Step-By-Step Guide for Secure Wireless Deployment for Small Office Home Office or Small Organization Networks
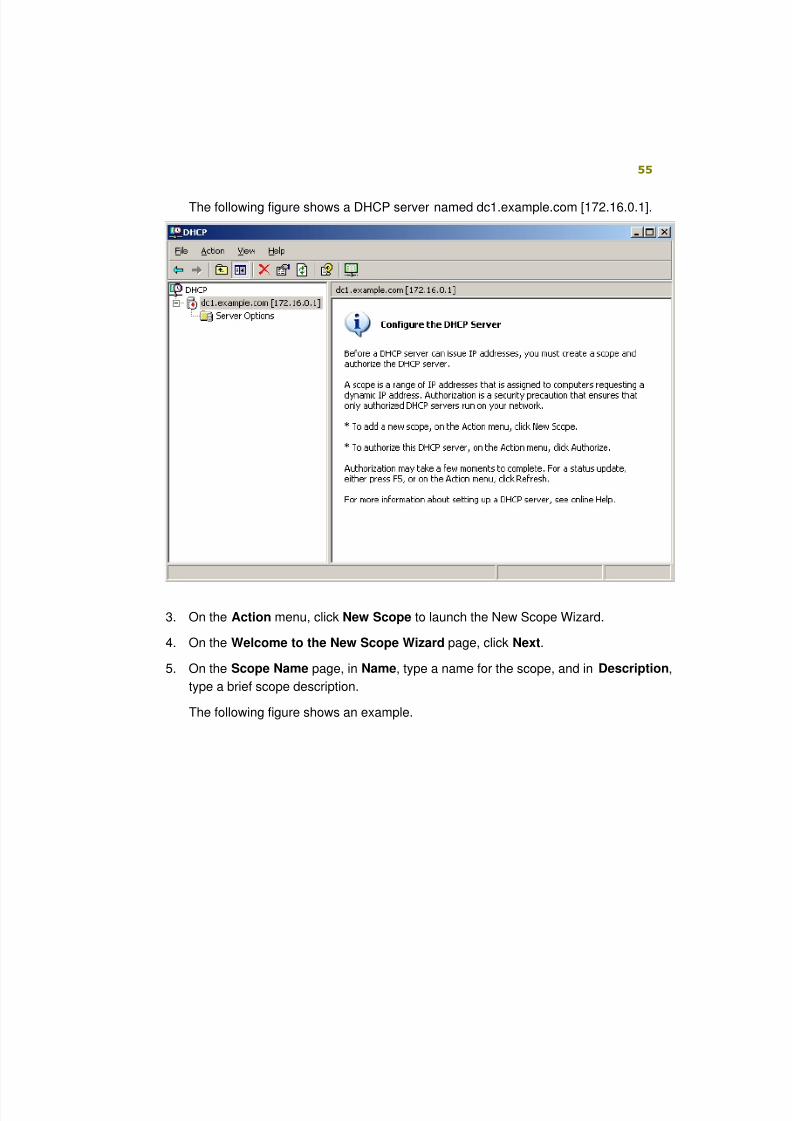
http://slidepdf.com/reader/full/step-by-step-guide-for-secure-wireless-deployment-for-small-office-home-office 55/113
8/6/2019 Step-By-Step Guide for Secure Wireless Deployment for Small Office Home Office or Small Organization Networks
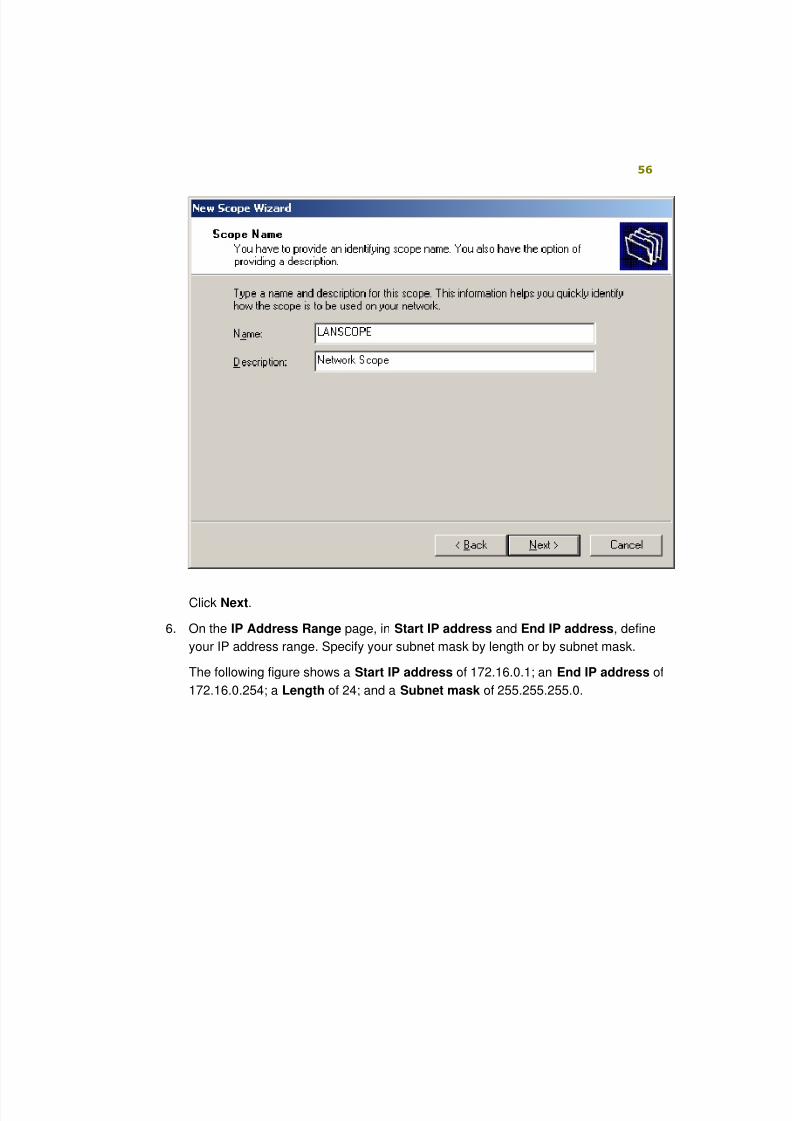
http://slidepdf.com/reader/full/step-by-step-guide-for-secure-wireless-deployment-for-small-office-home-office 56/113
56
Click Next.
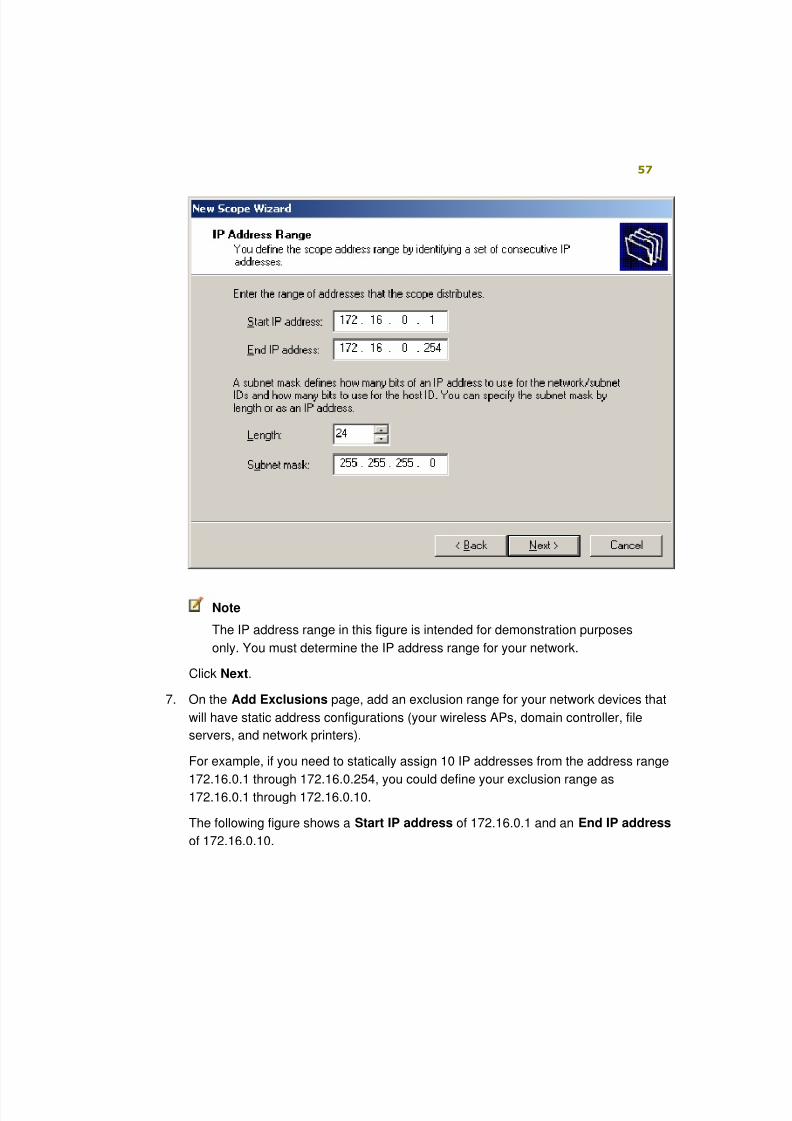
6. On the IP Address Range page, in Start IP address and End IP address, define
your IP address range. Specify your subnet mask by length or by subnet mask.
The following figure shows a Start IP address of 172.16.0.1; an End IP address of
172.16.0.254; a Length of 24; and a Subnet mask of 255.255.255.0.
8/6/2019 Step-By-Step Guide for Secure Wireless Deployment for Small Office Home Office or Small Organization Networks
http://slidepdf.com/reader/full/step-by-step-guide-for-secure-wireless-deployment-for-small-office-home-office 57/113
57
Note
The IP address range in this figure is intended for demonstration purposes
only. You must determine the IP address range for your network.
Click Next.
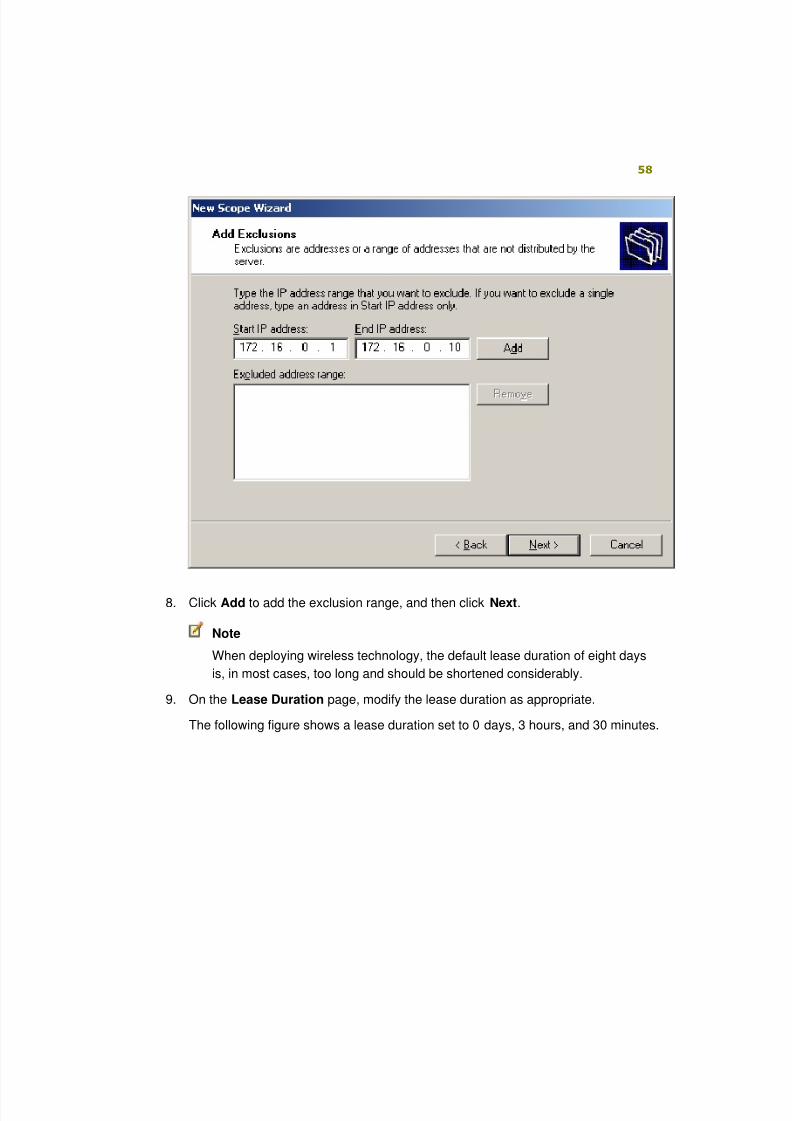
7. On the Add Exclusions page, add an exclusion range for your network devices that
will have static address configurations (your wireless APs, domain controller, file
servers, and network printers).
For example, if you need to statically assign 10 IP addresses from the address range
172.16.0.1 through 172.16.0.254, you could define your exclusion range as172.16.0.1 through 172.16.0.10.
The following figure shows a Start IP address of 172.16.0.1 and an End IP address
of 172.16.0.10.
8/6/2019 Step-By-Step Guide for Secure Wireless Deployment for Small Office Home Office or Small Organization Networks
http://slidepdf.com/reader/full/step-by-step-guide-for-secure-wireless-deployment-for-small-office-home-office 58/113
58
8. Click Add to add the exclusion range, and then click Next.
Note
When deploying wireless technology, the default lease duration of eight days
is, in most cases, too long and should be shortened considerably.
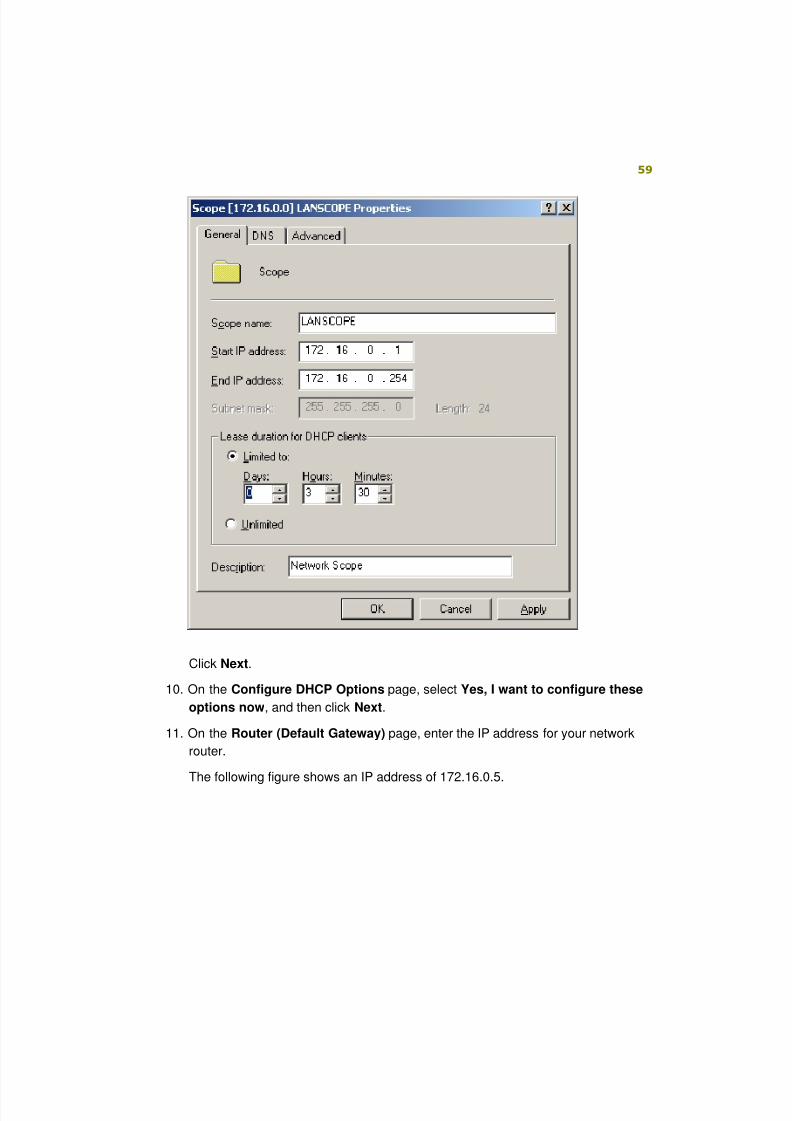
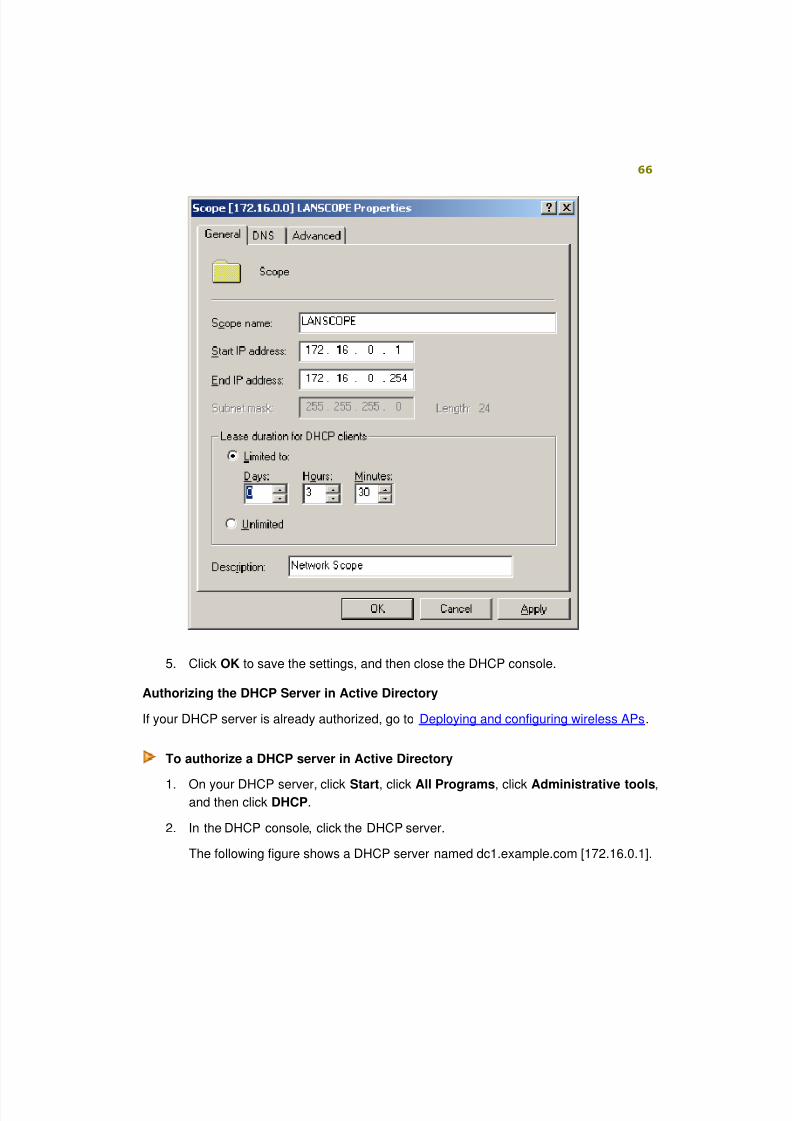
9. On the Lease Duration page, modify the lease duration as appropriate.
The following figure shows a lease duration set to 0 days, 3 hours, and 30 minutes.
8/6/2019 Step-By-Step Guide for Secure Wireless Deployment for Small Office Home Office or Small Organization Networks
http://slidepdf.com/reader/full/step-by-step-guide-for-secure-wireless-deployment-for-small-office-home-office 59/113
59
Click Next.
10. On the Configure DHCP Options page, select Yes, I want to configure these
options now, and then click Next.
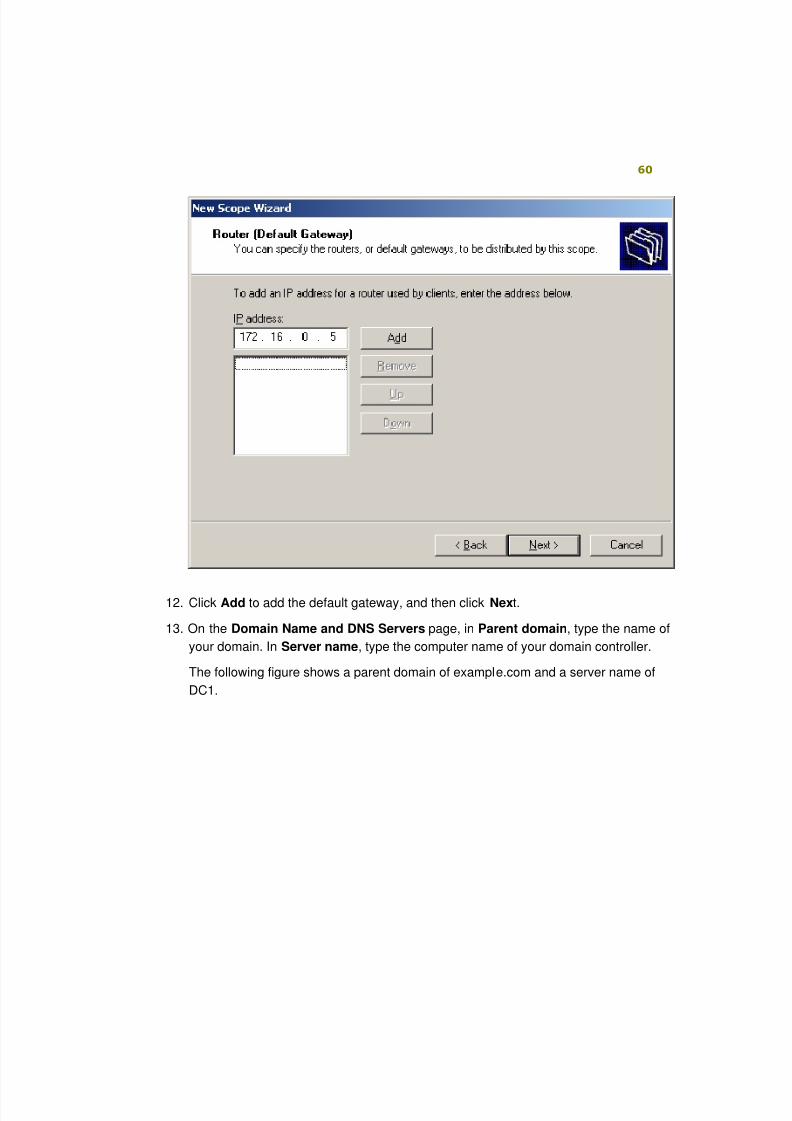
11. On the Router (Default Gateway) page, enter the IP address for your network
router.
The following figure shows an IP address of 172.16.0.5.
8/6/2019 Step-By-Step Guide for Secure Wireless Deployment for Small Office Home Office or Small Organization Networks
http://slidepdf.com/reader/full/step-by-step-guide-for-secure-wireless-deployment-for-small-office-home-office 60/113
60
12. Click Add to add the default gateway, and then click Next.
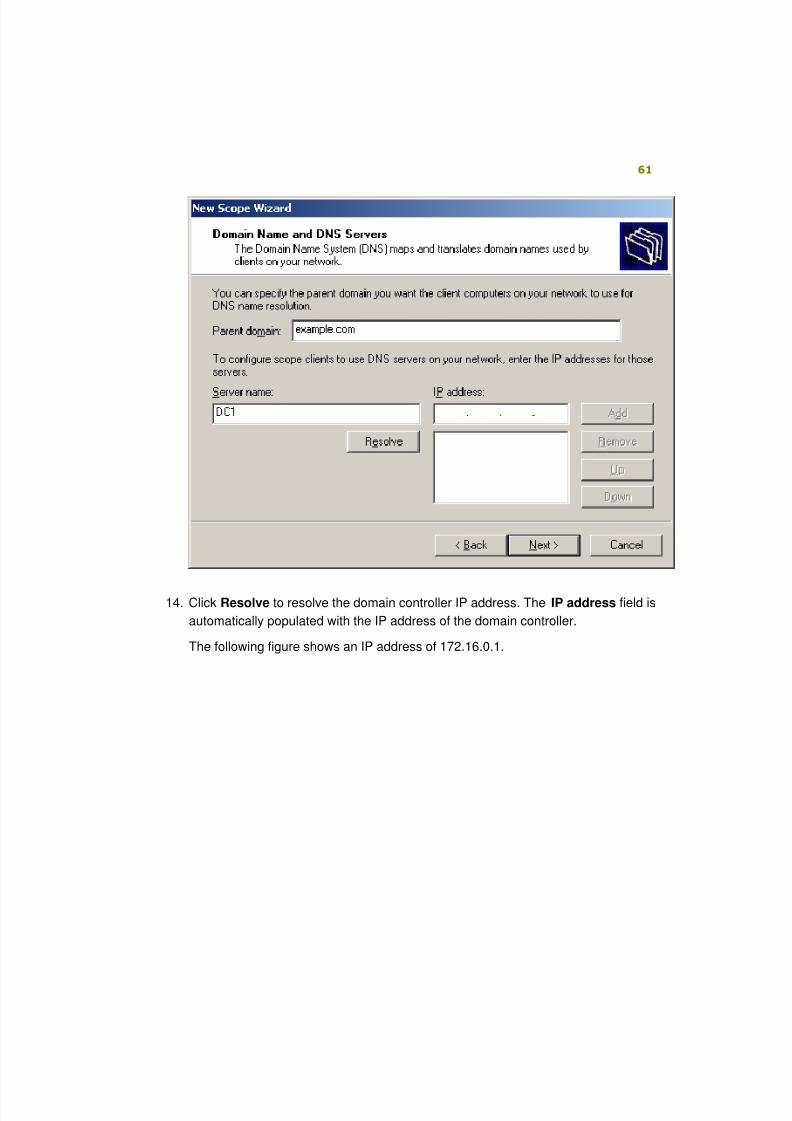
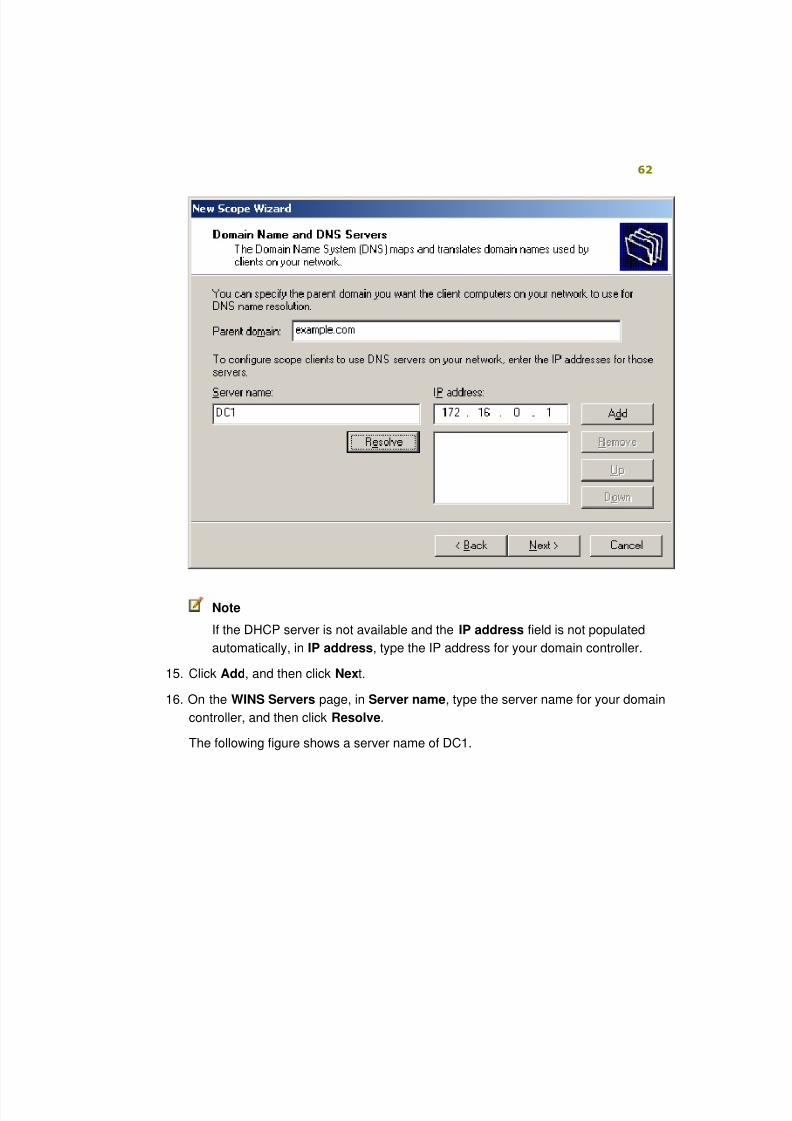
13. On the Domain Name and DNS Servers page, in Parent domain, type the name of
your domain. In Server name, type the computer name of your domain controller.
The following figure shows a parent domain of example.com and a server name of
DC1.
8/6/2019 Step-By-Step Guide for Secure Wireless Deployment for Small Office Home Office or Small Organization Networks
http://slidepdf.com/reader/full/step-by-step-guide-for-secure-wireless-deployment-for-small-office-home-office 61/113
8/6/2019 Step-By-Step Guide for Secure Wireless Deployment for Small Office Home Office or Small Organization Networks
http://slidepdf.com/reader/full/step-by-step-guide-for-secure-wireless-deployment-for-small-office-home-office 62/113
62
Note
If the DHCP server is not available and the IP address field is not populated
automatically, in IP address, type the IP address for your domain controller.
15. Click Add, and then click Next.
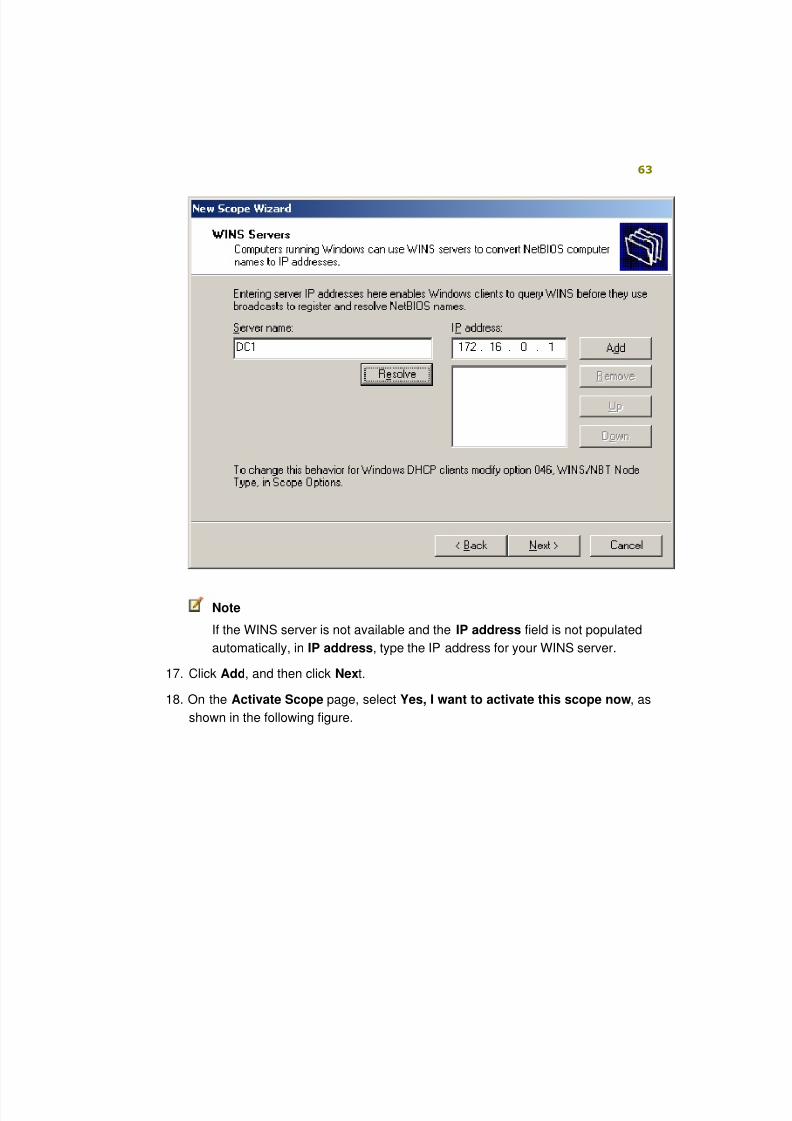
16. On the WINS Servers page, in Server name, type the server name for your domain
controller, and then click Resolve.
The following figure shows a server name of DC1.
8/6/2019 Step-By-Step Guide for Secure Wireless Deployment for Small Office Home Office or Small Organization Networks
http://slidepdf.com/reader/full/step-by-step-guide-for-secure-wireless-deployment-for-small-office-home-office 63/113
63
Note
If the WINS server is not available and the IP address field is not populated
automatically, in IP address, type the IP address for your WINS server.
17. Click Add, and then click Next.
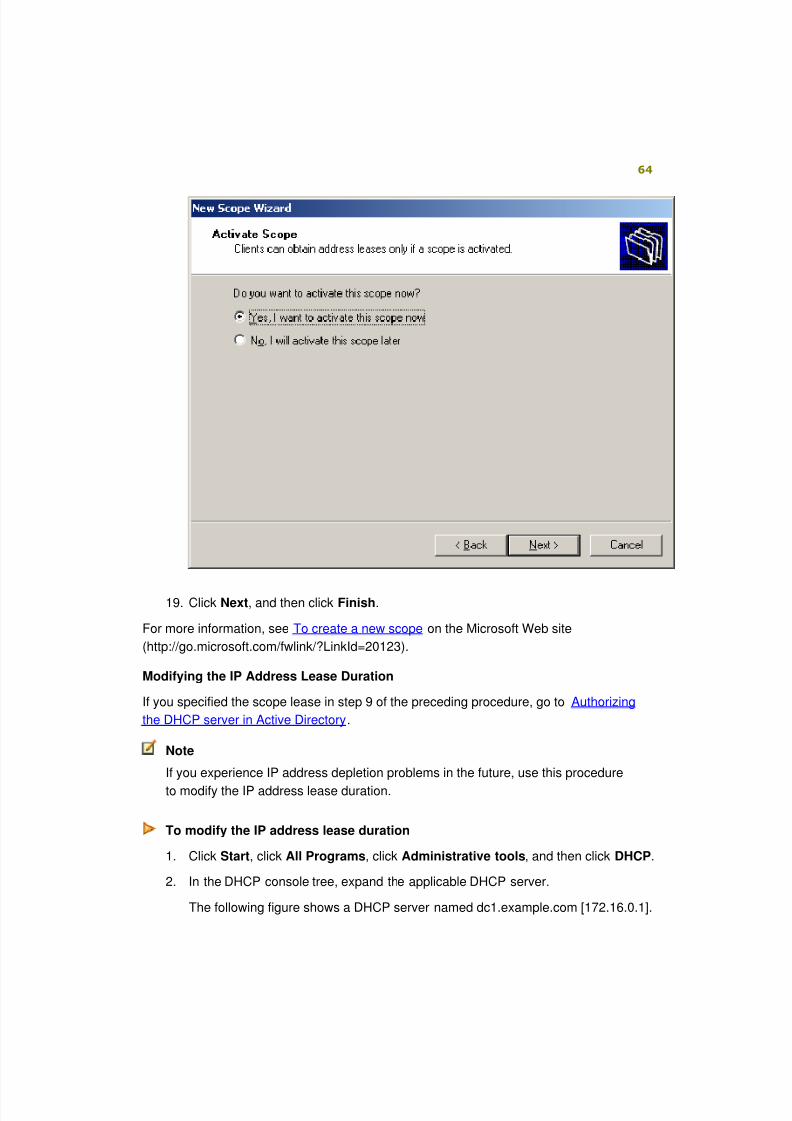
18. On the Activate Scope page, select Yes, I want to activate this scope now, as
shown in the following figure.
8/6/2019 Step-By-Step Guide for Secure Wireless Deployment for Small Office Home Office or Small Organization Networks
http://slidepdf.com/reader/full/step-by-step-guide-for-secure-wireless-deployment-for-small-office-home-office 64/113
64
19. Click Next, and then click Finish.
For more information, see To create a new scope on the Microsoft Web site
(http://go.microsoft.com/fwlink/?LinkId=20123).
Modifying the IP Address Lease Duration
If you specified the scope lease in step 9 of the preceding procedure, go to Authorizing
the DHCP server in Active Directory.
Note
If you experience IP address depletion problems in the future, use this procedure
to modify the IP address lease duration.
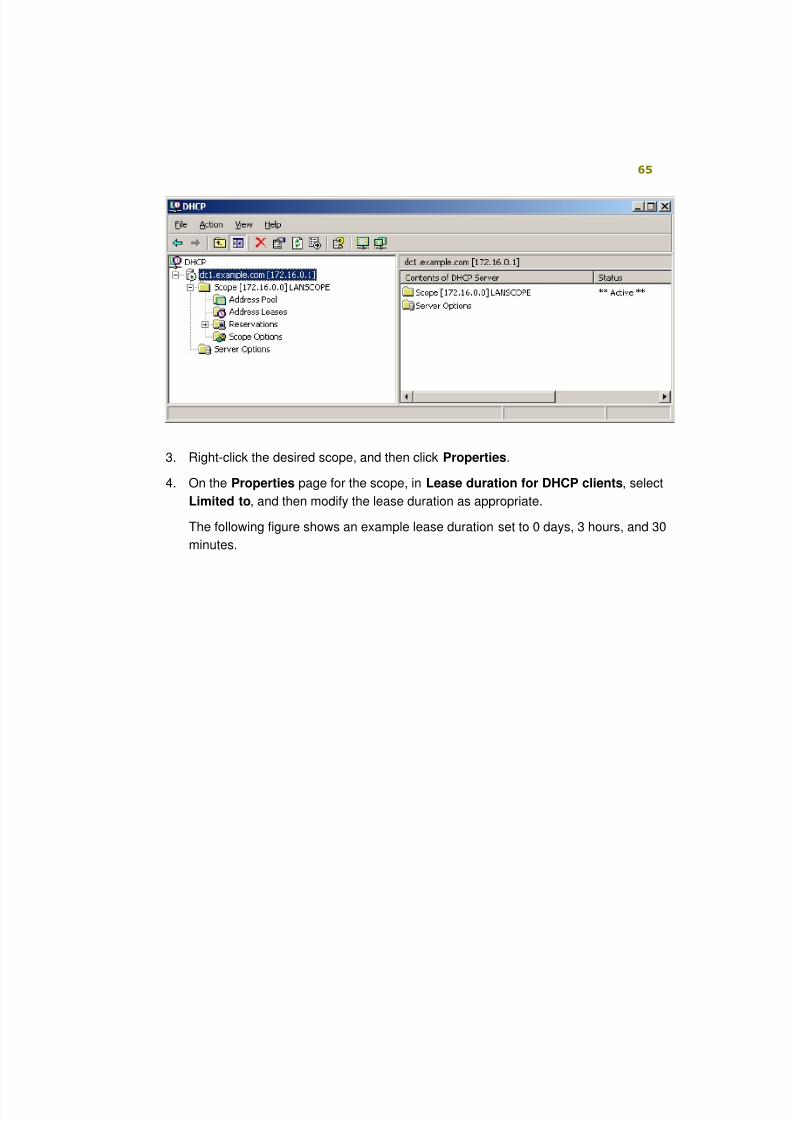
To modify the IP address lease duration
1. Click Start, click All Programs, click Administrative tools, and then click DHCP.
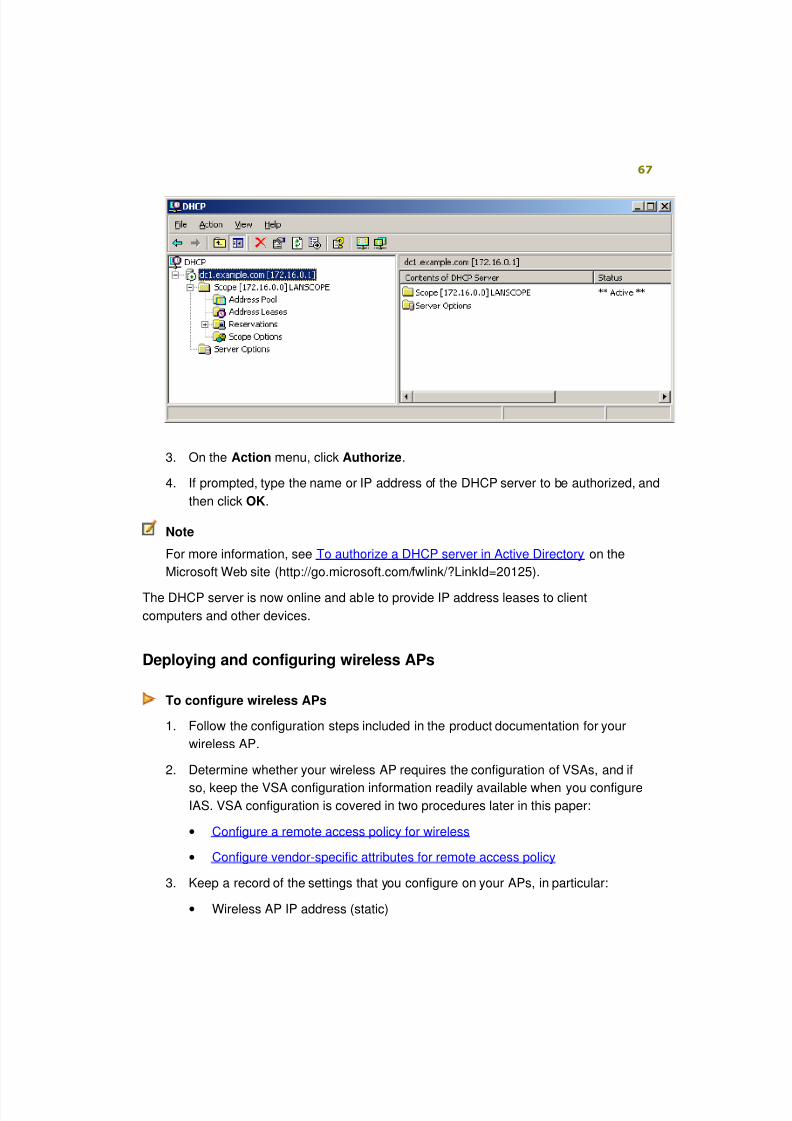
2. In the DHCP console tree, expand the applicable DHCP server.
The following figure shows a DHCP server named dc1.example.com [172.16.0.1].
8/6/2019 Step-By-Step Guide for Secure Wireless Deployment for Small Office Home Office or Small Organization Networks
http://slidepdf.com/reader/full/step-by-step-guide-for-secure-wireless-deployment-for-small-office-home-office 65/113
8/6/2019 Step-By-Step Guide for Secure Wireless Deployment for Small Office Home Office or Small Organization Networks
http://slidepdf.com/reader/full/step-by-step-guide-for-secure-wireless-deployment-for-small-office-home-office 66/113
8/6/2019 Step-By-Step Guide for Secure Wireless Deployment for Small Office Home Office or Small Organization Networks
http://slidepdf.com/reader/full/step-by-step-guide-for-secure-wireless-deployment-for-small-office-home-office 67/113
8/6/2019 Step-By-Step Guide for Secure Wireless Deployment for Small Office Home Office or Small Organization Networks
http://slidepdf.com/reader/full/step-by-step-guide-for-secure-wireless-deployment-for-small-office-home-office 68/113
68
• DNS name, wireless AP name
• Wireless AP subnet mask
• RADIUS shared secret for each wireless AP
You will need to have this information available when you configure wireless APs
as RADIUS clients in the IAS console.
Obtaining and installing a server certificate
This section of the paper will guide you through the following configurations:
• Obtain and install a certificate in the Trusted Root Certification Authority Store.
a. Complete the VeriSign enrollment form.
b. Retrieve your VeriSign wireless local area network (WLAN) server certificate.
c. Install the certificate in the Trusted Root Certification Authority Store.
Completing the VeriSign enrollment form
To complete the VeriSign enrollment form
1. Using an administrator account, log on to your domain controller computer.
2. Use your Internet browser to navigate to the VeriSign Wireless LAN Server
Certificates Web page at http://www.verisign.com/products-services/security-
services/ssl/wireless-lan-security/index.html.
3. On the Wireless LAN Server Certificates page, click Buy Now to begin the
enrollment and payment process.
4. In Select Options, under Validity Period, select either One Year or TwoYear.
Note
After you select the validity period, you can check certificate pricing by
clicking Recalculate.
Click Continue.
5. Review the information that you will need to supply to VeriSign to complete the
certificate purchase, and then click Continue.
6. Under Technical Contact Information, type your contact information. When you
have completed the form, click Continue.
7. On Wireless LAN Server Certificate Information, under Common Name, type
8/6/2019 Step-By-Step Guide for Secure Wireless Deployment for Small Office Home Office or Small Organization Networks
http://slidepdf.com/reader/full/step-by-step-guide-for-secure-wireless-deployment-for-small-office-home-office 69/113
69
the fully-qualified domain name of your domain server.
For example, for a domain server named DC1 in the test.com domain, the fully-
qualified domain name is DC1.test.com.
Note
VeriSign server certificates are issued specifically for your server; they
will not work on another computer.
8. Type the following information:
• Company
• Division
• City
• State
• Country
Note
All of the fields on this page are required; however, if a particular field
does not apply, you can type Not applicable.
9. At this point, you might receive a Potential Scripting Violation warning that
informs you that the VeriSign Web site is requesting a new certificate on yourbehalf. Click Yes to request a certificate.
10. Under Creating a new RSA exchange key, click OK.
11. On the following Web page, under Certificate Information, verify the certificate
information. Under Challenge Phrase, type a password phrase, and then
confirm the password. Under Reminder Question, enter a short description to
remind you of your challenge phrase. Click Continue.
12. Under Organizational Contact Information, type the contact information, and
then click Continue.
13. Under Payment Type, select the payment method you will use to purchase thecertificate.
• If the billing contact is the same as the technical contact information entered
in step 7 of this procedure, select Copy the Technical Contactinformation.
• If the billing contact is the same as the organizational contact information
entered in step 12 of this procedure, select Copy the Organizational
Contact information.

8/6/2019 Step-By-Step Guide for Secure Wireless Deployment for Small Office Home Office or Small Organization Networks
http://slidepdf.com/reader/full/step-by-step-guide-for-secure-wireless-deployment-for-small-office-home-office 70/113
70
• If the billing contact differs from either the technical or organizational contact
information, select New Contact, and then type the contact information.
14. Click Continue to submit and finish the certificate purchase.
Retrieving the VeriSign server certificate
You will receive an e-mail message from VeriSign that contains a URL to a Web page
and a personal identification number that you must use to retrieve your WLAN server
certificate.
To retrieve your VeriSign WLAN server certificate1. Print a copy of the e-mail message that contains the URL and PIN needed to
retrieve your certificate.
2. Using an account that has local administrator permissions, log on to the domain
controller computer that you used to complete the VeriSign enrollment.
Note
In the next procedure, the VeriSign WLAN server certificate is
automatically installed in the Local Computer certificate store. For this
reason, you must use a Local Administrator account.
3. Use the Internet browser to access the Web location specified in the e-mailmessage.
4. When prompted, type and submit the PIN.
Installing the server certificate
To install the server certificate
1. When prompted, click the button to install the certificate.
2. You should see a Potential Scripting Violation warning message that indicates
that the Web site is adding certificates to the computer. Click Yes to proceed with
the installation.
You now have a WLAN Server Certificate installed in your Certificates (Local
Computer)\Personal\Certificates folder.
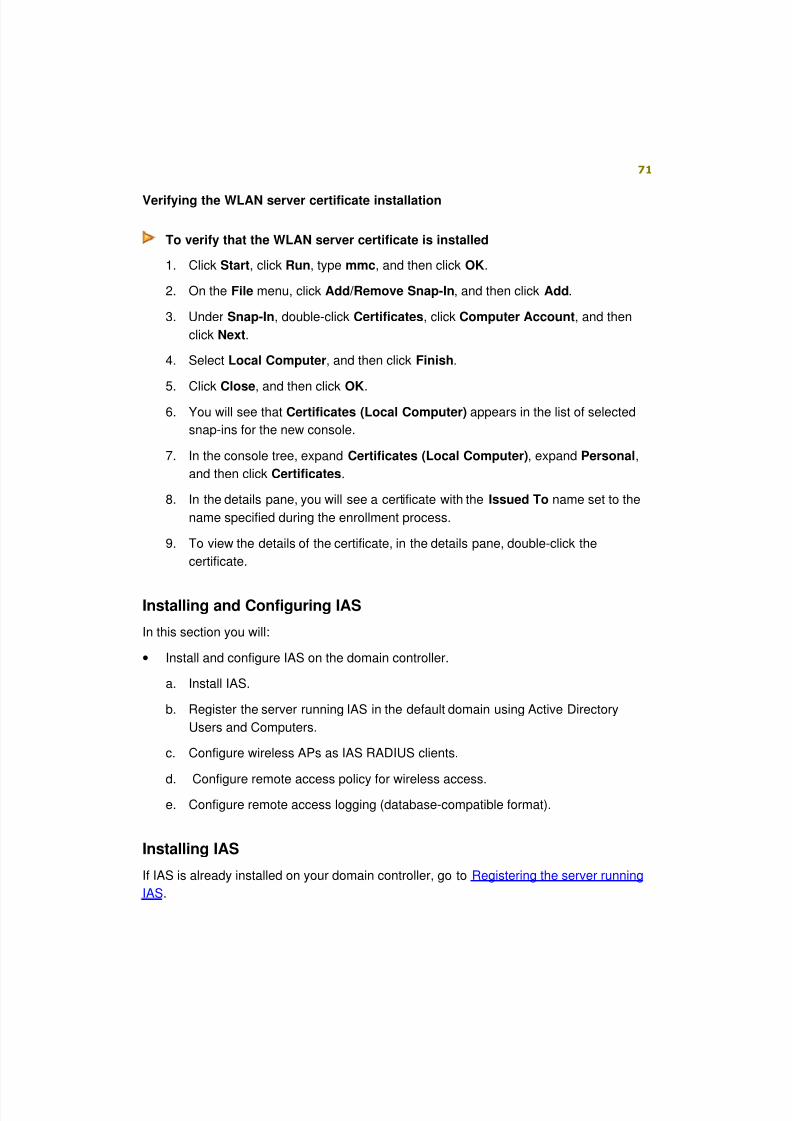
3.
8/6/2019 Step-By-Step Guide for Secure Wireless Deployment for Small Office Home Office or Small Organization Networks
http://slidepdf.com/reader/full/step-by-step-guide-for-secure-wireless-deployment-for-small-office-home-office 71/113
8/6/2019 Step-By-Step Guide for Secure Wireless Deployment for Small Office Home Office or Small Organization Networks
http://slidepdf.com/reader/full/step-by-step-guide-for-secure-wireless-deployment-for-small-office-home-office 72/113
8/6/2019 Step-By-Step Guide for Secure Wireless Deployment for Small Office Home Office or Small Organization Networks
http://slidepdf.com/reader/full/step-by-step-guide-for-secure-wireless-deployment-for-small-office-home-office 73/113

8/6/2019 Step-By-Step Guide for Secure Wireless Deployment for Small Office Home Office or Small Organization Networks
http://slidepdf.com/reader/full/step-by-step-guide-for-secure-wireless-deployment-for-small-office-home-office 74/113
8/6/2019 Step-By-Step Guide for Secure Wireless Deployment for Small Office Home Office or Small Organization Networks
http://slidepdf.com/reader/full/step-by-step-guide-for-secure-wireless-deployment-for-small-office-home-office 75/113
75
Click Next.
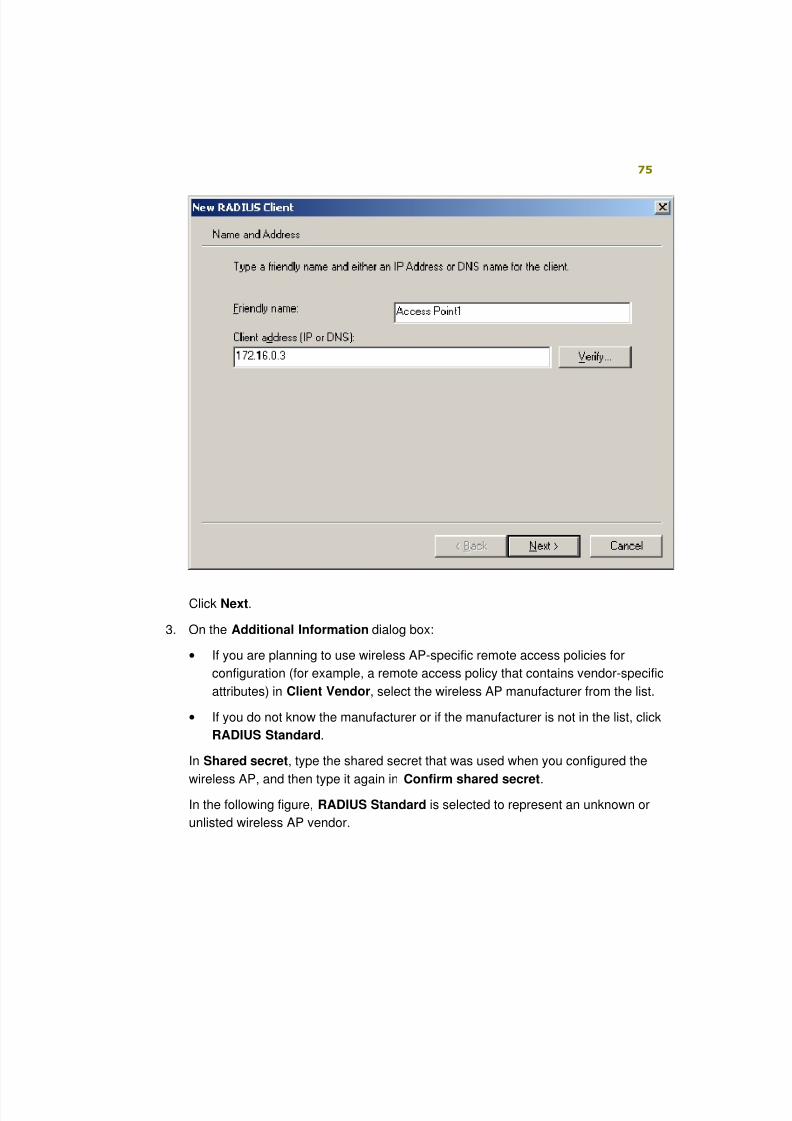
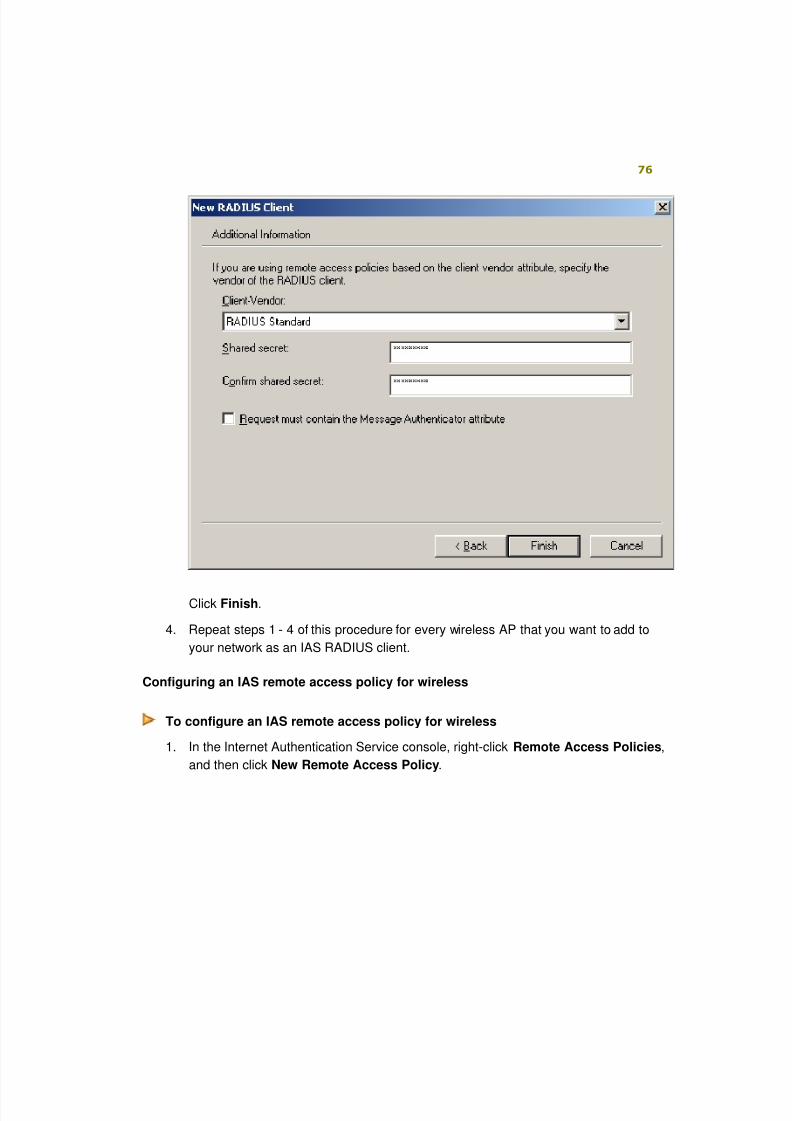
3. On the Additional Information dialog box:
• If you are planning to use wireless AP-specific remote access policies for
configuration (for example, a remote access policy that contains vendor-specific
attributes) in Client Vendor, select the wireless AP manufacturer from the list.
• If you do not know the manufacturer or if the manufacturer is not in the list, click
RADIUS Standard.
In Shared secret, type the shared secret that was used when you configured the
wireless AP, and then type it again in Confirm shared secret.In the following figure, RADIUS Standard is selected to represent an unknown or
unlisted wireless AP vendor.
8/6/2019 Step-By-Step Guide for Secure Wireless Deployment for Small Office Home Office or Small Organization Networks
http://slidepdf.com/reader/full/step-by-step-guide-for-secure-wireless-deployment-for-small-office-home-office 76/113
76
Click Finish.
4. Repeat steps 1 - 4 of this procedure for every wireless AP that you want to add to
your network as an IAS RADIUS client.
Configuring an IAS remote access policy for wireless
To configure an IAS remote access policy for wireless
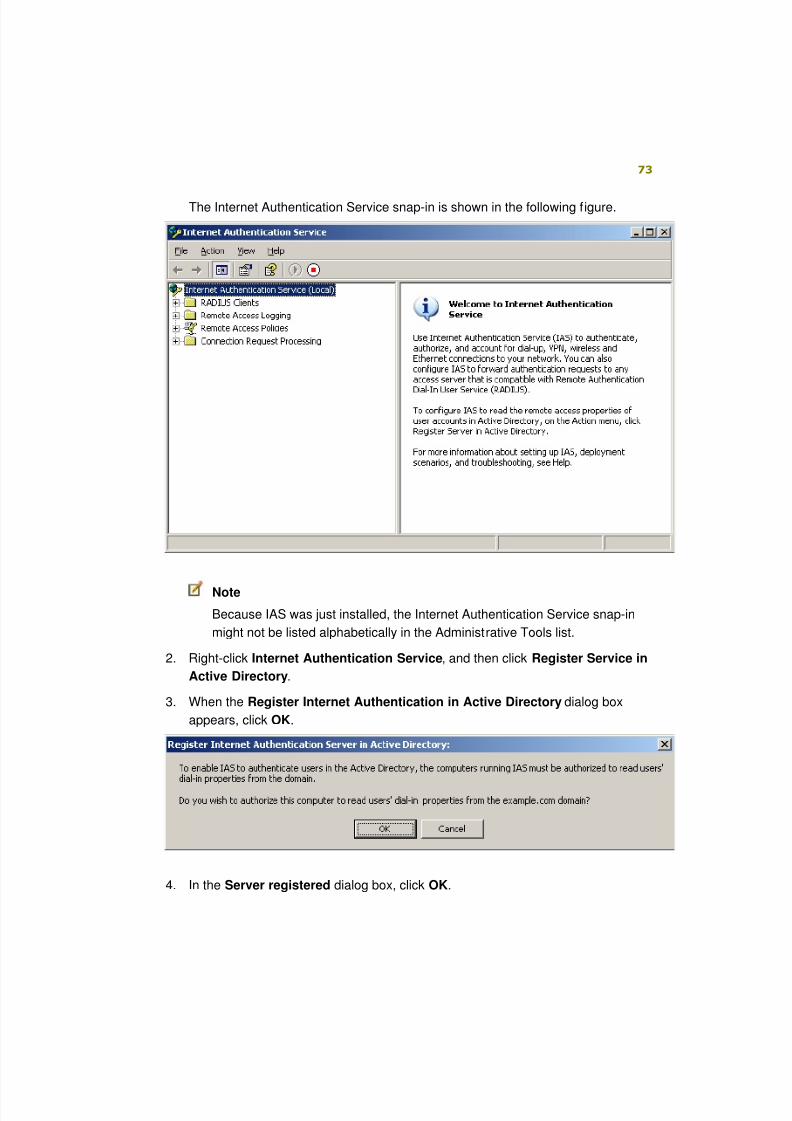
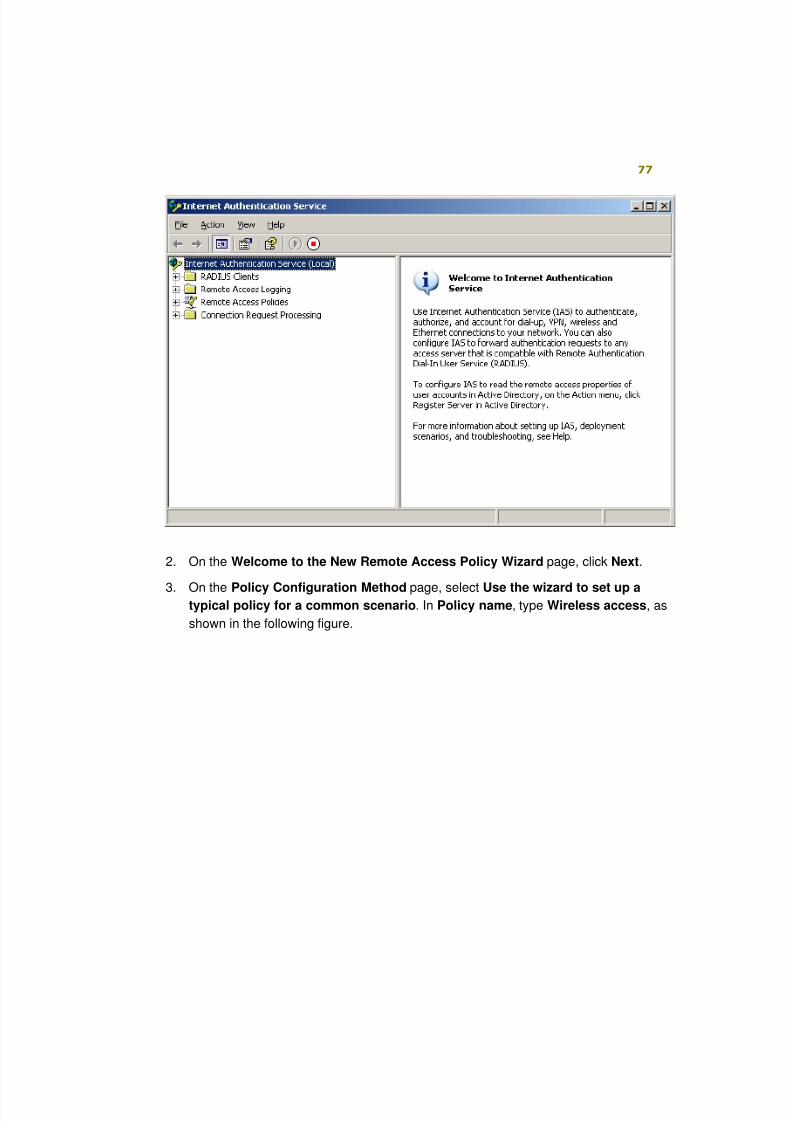
1. In the Internet Authentication Service console, right-click Remote Access Policies,
and then click New Remote Access Policy.
8/6/2019 Step-By-Step Guide for Secure Wireless Deployment for Small Office Home Office or Small Organization Networks
http://slidepdf.com/reader/full/step-by-step-guide-for-secure-wireless-deployment-for-small-office-home-office 77/113
77
2. On the Welcome to the New Remote Access Policy Wizard page, click Next.
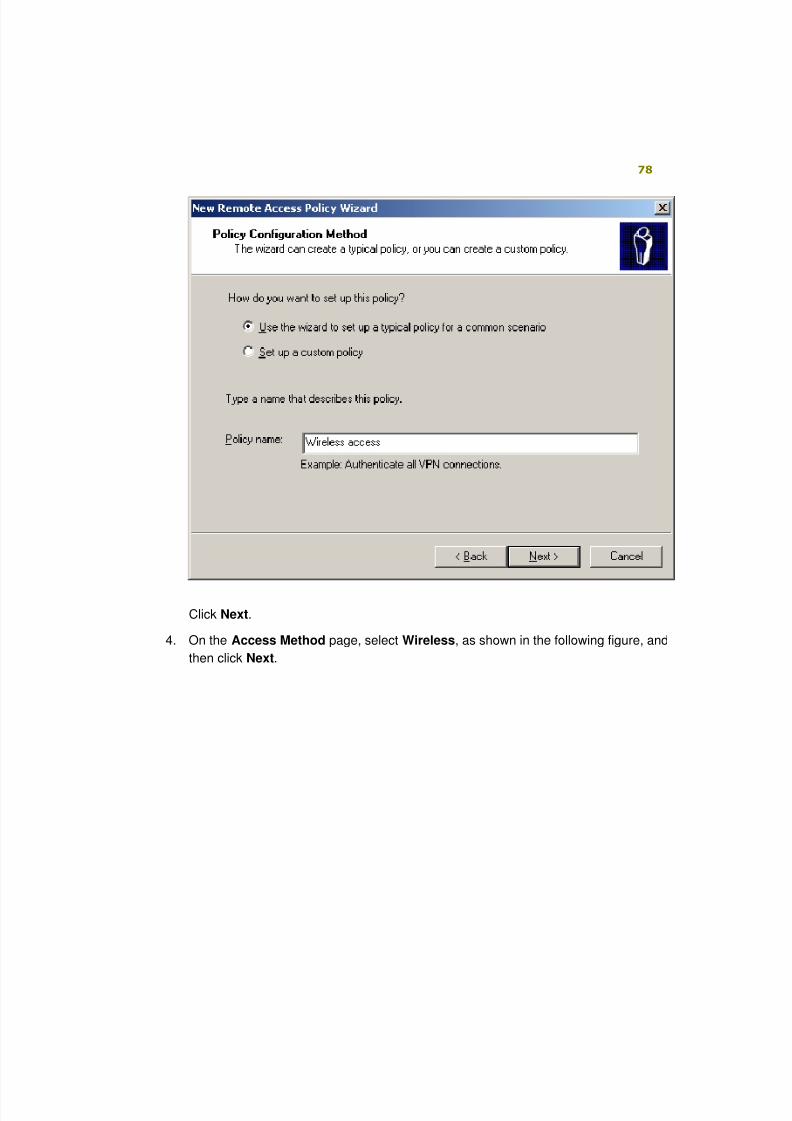
3. On the Policy Configuration Method page, select Use the wizard to set up atypical policy for a common scenario. In Policy name, type Wireless access, as
shown in the following figure.
8/6/2019 Step-By-Step Guide for Secure Wireless Deployment for Small Office Home Office or Small Organization Networks
http://slidepdf.com/reader/full/step-by-step-guide-for-secure-wireless-deployment-for-small-office-home-office 78/113
78
Click Next.
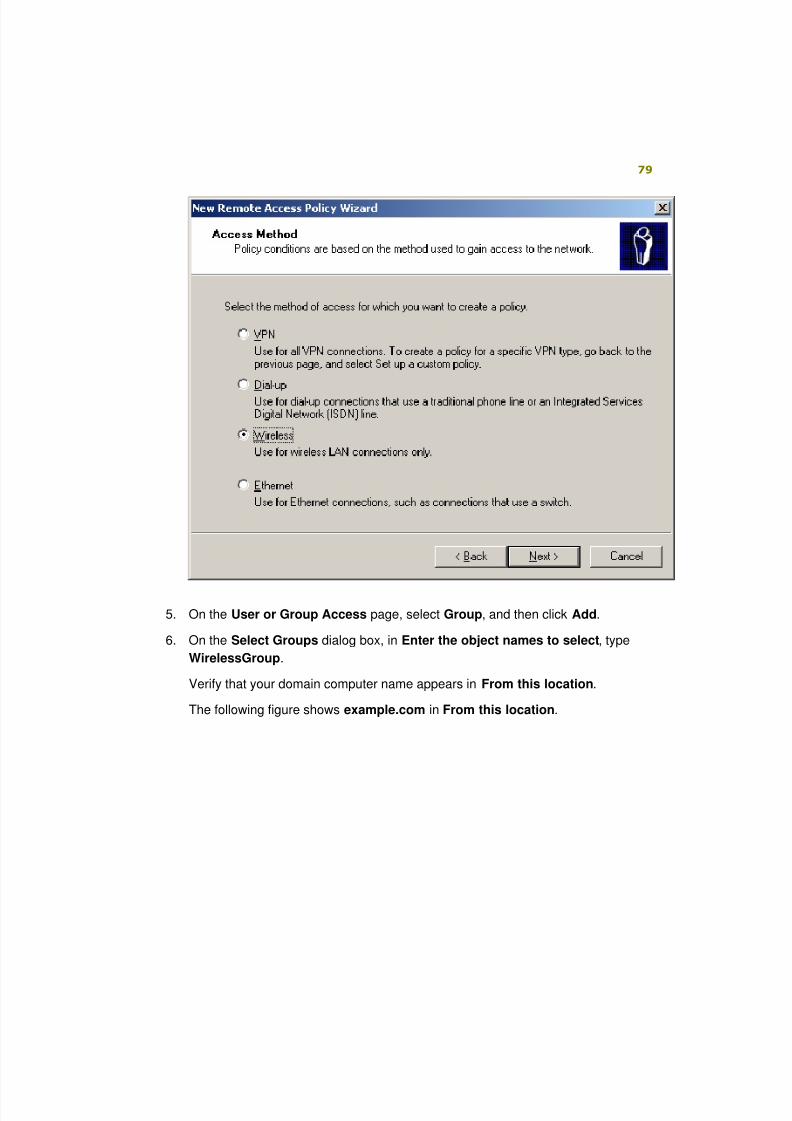
4. On the Access Method page, select Wireless, as shown in the following figure, and
then click Next.
8/6/2019 Step-By-Step Guide for Secure Wireless Deployment for Small Office Home Office or Small Organization Networks
http://slidepdf.com/reader/full/step-by-step-guide-for-secure-wireless-deployment-for-small-office-home-office 79/113
79
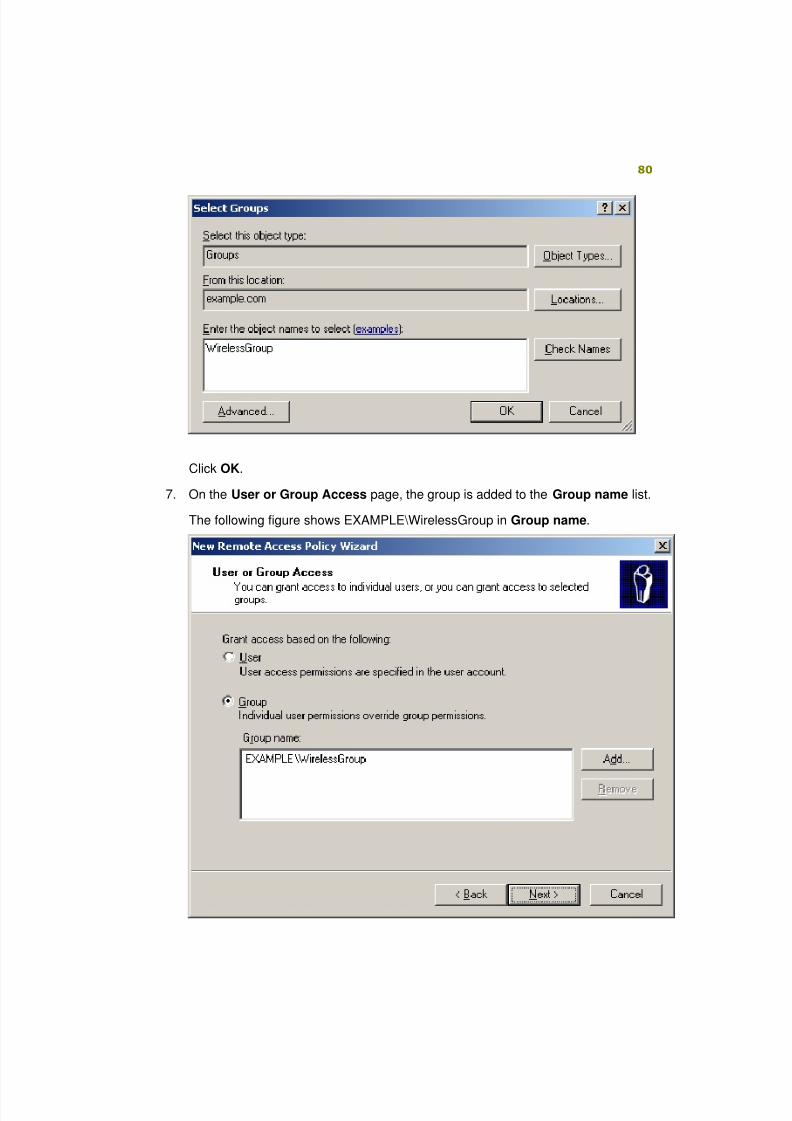
5. On the User or Group Access page, select Group, and then click Add.
6. On the Select Groups dialog box, in Enter the object names to select, type
WirelessGroup.
Verify that your domain computer name appears in From this location.
The following figure shows example.com in From this location.
8/6/2019 Step-By-Step Guide for Secure Wireless Deployment for Small Office Home Office or Small Organization Networks
http://slidepdf.com/reader/full/step-by-step-guide-for-secure-wireless-deployment-for-small-office-home-office 80/113
80
Click OK.
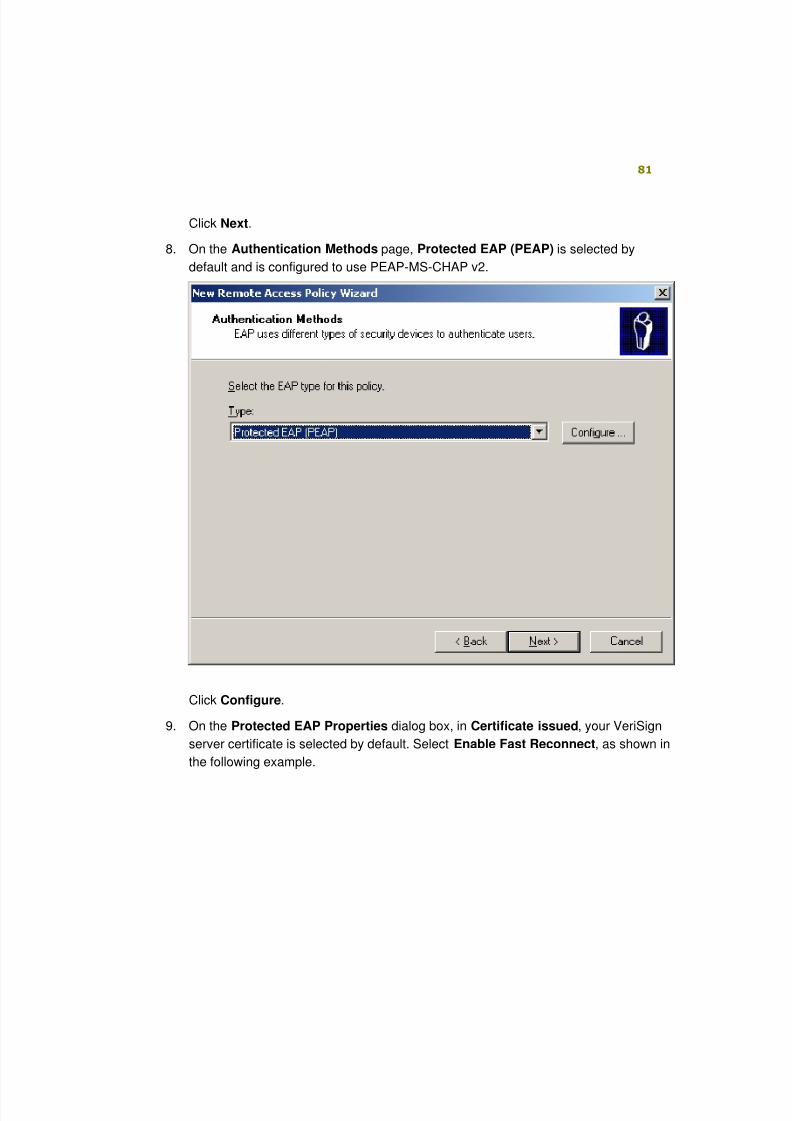
7. On the User or Group Access page, the group is added to the Group name list.
The following figure shows EXAMPLE\WirelessGroup in Group name.
8/6/2019 Step-By-Step Guide for Secure Wireless Deployment for Small Office Home Office or Small Organization Networks
http://slidepdf.com/reader/full/step-by-step-guide-for-secure-wireless-deployment-for-small-office-home-office 81/113
81
Click Next.
8. On the Authentication Methods page, Protected EAP (PEAP) is selected by
default and is configured to use PEAP-MS-CHAP v2.
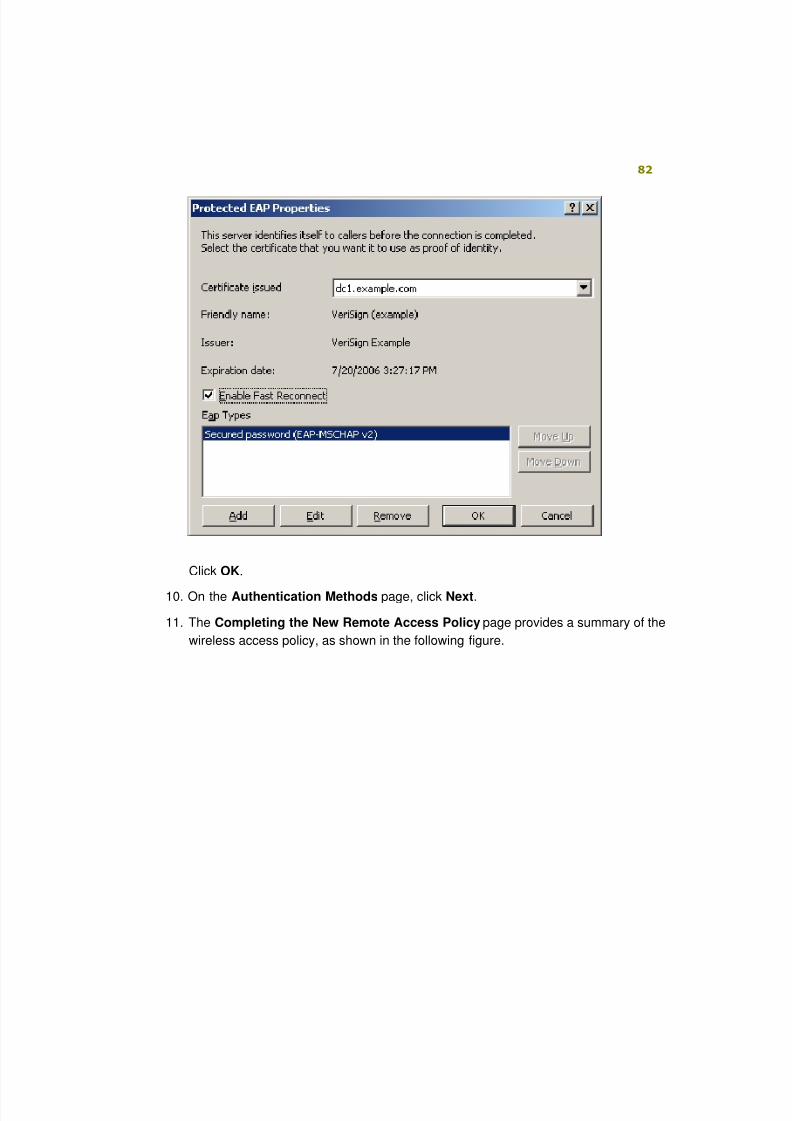
Click Configure.
9. On the Protected EAP Properties dialog box, in Certificate issued, your VeriSign
server certificate is selected by default. Select Enable Fast Reconnect, as shown in
the following example.
8/6/2019 Step-By-Step Guide for Secure Wireless Deployment for Small Office Home Office or Small Organization Networks
http://slidepdf.com/reader/full/step-by-step-guide-for-secure-wireless-deployment-for-small-office-home-office 82/113
82
Click OK.
10. On the Authentication Methods page, click Next.
11. The Completing the New Remote Access Policy page provides a summary of the
wireless access policy, as shown in the following figure.

8/6/2019 Step-By-Step Guide for Secure Wireless Deployment for Small Office Home Office or Small Organization Networks
http://slidepdf.com/reader/full/step-by-step-guide-for-secure-wireless-deployment-for-small-office-home-office 83/113
83
12. Click Finish to close the wizard.
13. In the Internet Authentication Service console tree, click Remote Access Policies,
and in the details pane, identify your new wireless access policy and the two default
remote access policies:
• Connections to Microsoft Routing and Remote Access server
• Connections to other access servers
The following figure shows an example.
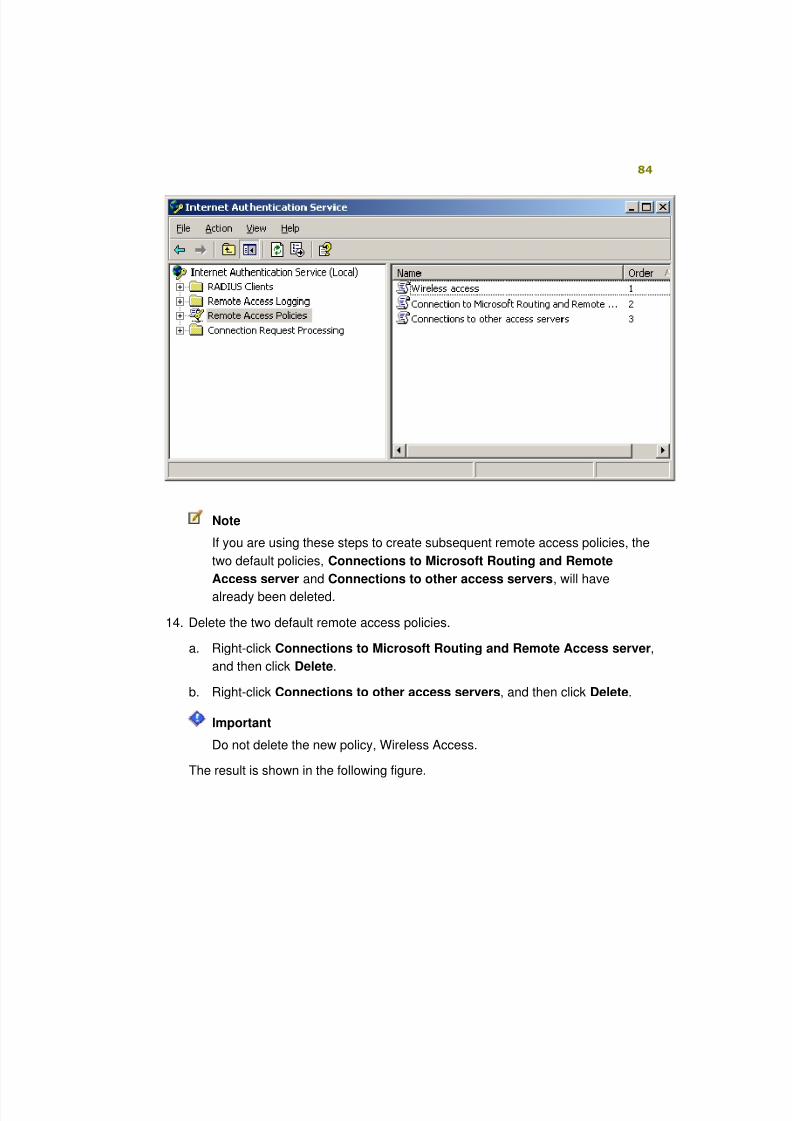
8/6/2019 Step-By-Step Guide for Secure Wireless Deployment for Small Office Home Office or Small Organization Networks
http://slidepdf.com/reader/full/step-by-step-guide-for-secure-wireless-deployment-for-small-office-home-office 84/113
84
Note
If you are using these steps to create subsequent remote access policies, the
two default policies, Connections to Microsoft Routing and Remote
Access server and Connections to other access servers, will have
already been deleted.
14. Delete the two default remote access policies.
a. Right-click Connections to Microsoft Routing and Remote Access server,
and then click Delete.
b. Right-click Connections to other access servers, and then click Delete.
Important
Do not delete the new policy, Wireless Access.
The result is shown in the following figure.
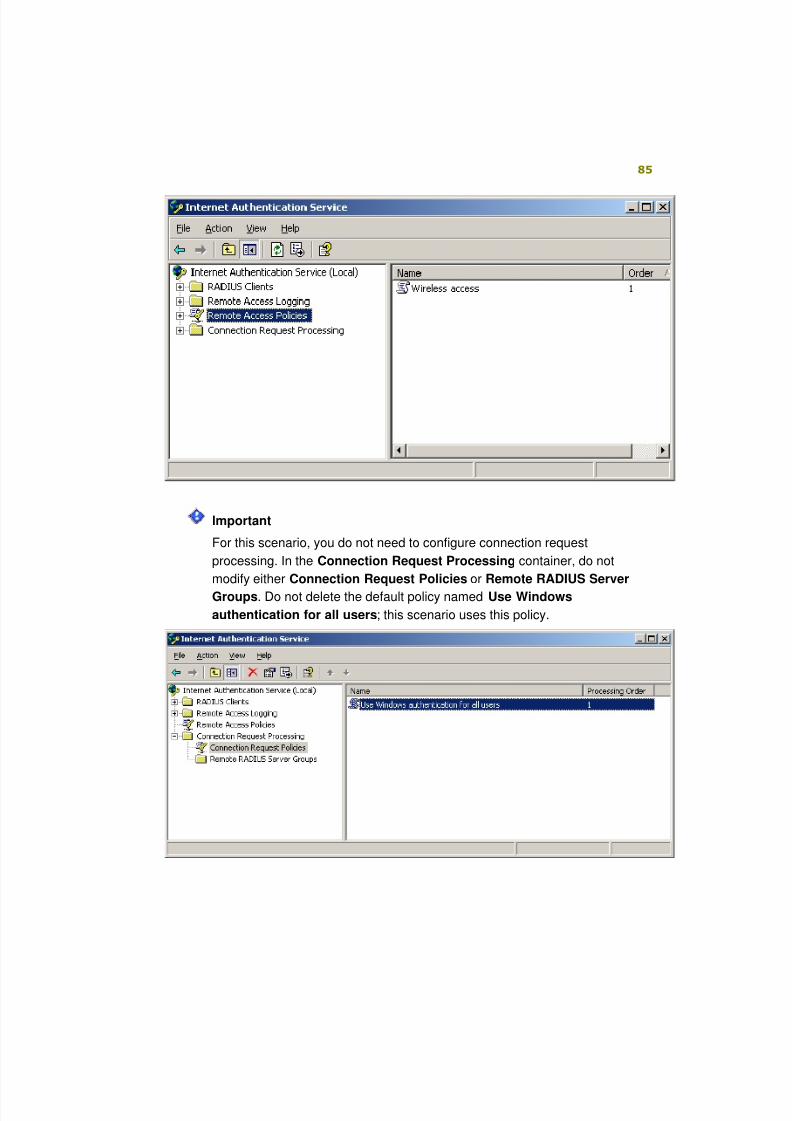
8/6/2019 Step-By-Step Guide for Secure Wireless Deployment for Small Office Home Office or Small Organization Networks
http://slidepdf.com/reader/full/step-by-step-guide-for-secure-wireless-deployment-for-small-office-home-office 85/113
85
Important
For this scenario, you do not need to configure connection request
processing. In the Connection Request Processing container, do not
modify either Connection Request Policies or Remote RADIUS Server
Groups. Do not delete the default policy named Use Windows
authentication for all users; this scenario uses this policy.
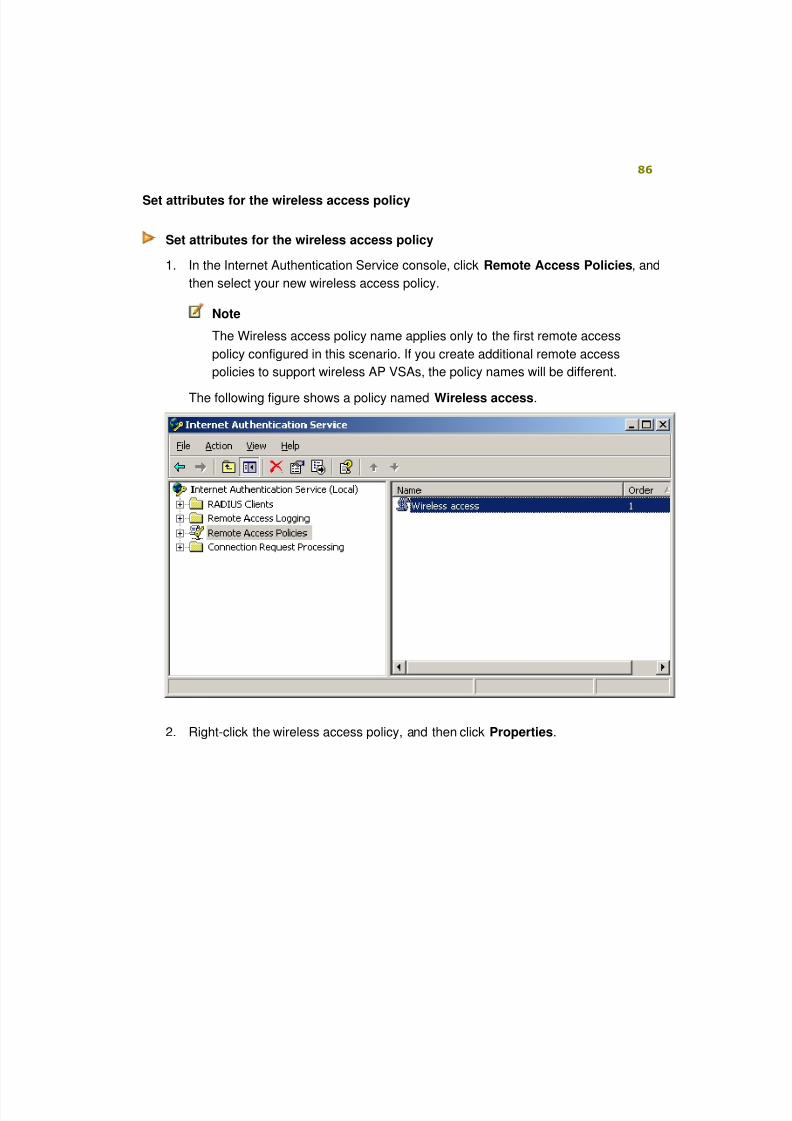
8/6/2019 Step-By-Step Guide for Secure Wireless Deployment for Small Office Home Office or Small Organization Networks
http://slidepdf.com/reader/full/step-by-step-guide-for-secure-wireless-deployment-for-small-office-home-office 86/113
86
Set attributes for the wireless access policy
Set attributes for the wireless access policy
1. In the Internet Authentication Service console, click Remote Access Policies, and
then select your new wireless access policy.
Note
The Wireless access policy name applies only to the first remote access
policy configured in this scenario. If you create additional remote access
policies to support wireless AP VSAs, the policy names will be different.
The following figure shows a policy named Wireless access.
2. Right-click the wireless access policy, and then click Properties.
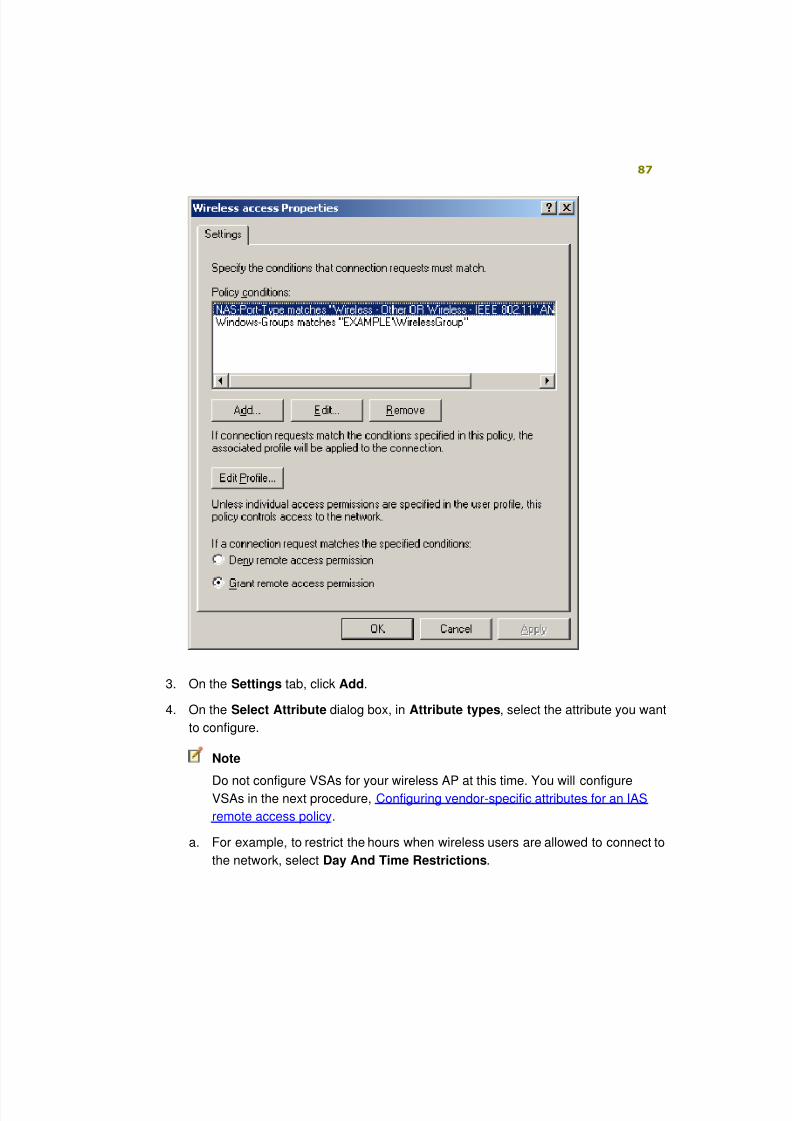
8/6/2019 Step-By-Step Guide for Secure Wireless Deployment for Small Office Home Office or Small Organization Networks
http://slidepdf.com/reader/full/step-by-step-guide-for-secure-wireless-deployment-for-small-office-home-office 87/113
87
3. On the Settings tab, click Add.
4. On the Select Attribute dialog box, in Attribute types, select the attribute you want
to configure.
Note
Do not configure VSAs for your wireless AP at this time. You will configureVSAs in the next procedure, Configuring vendor-specific attributes for an IAS
remote access policy.
a. For example, to restrict the hours when wireless users are allowed to connect to
the network, select Day And Time Restrictions.
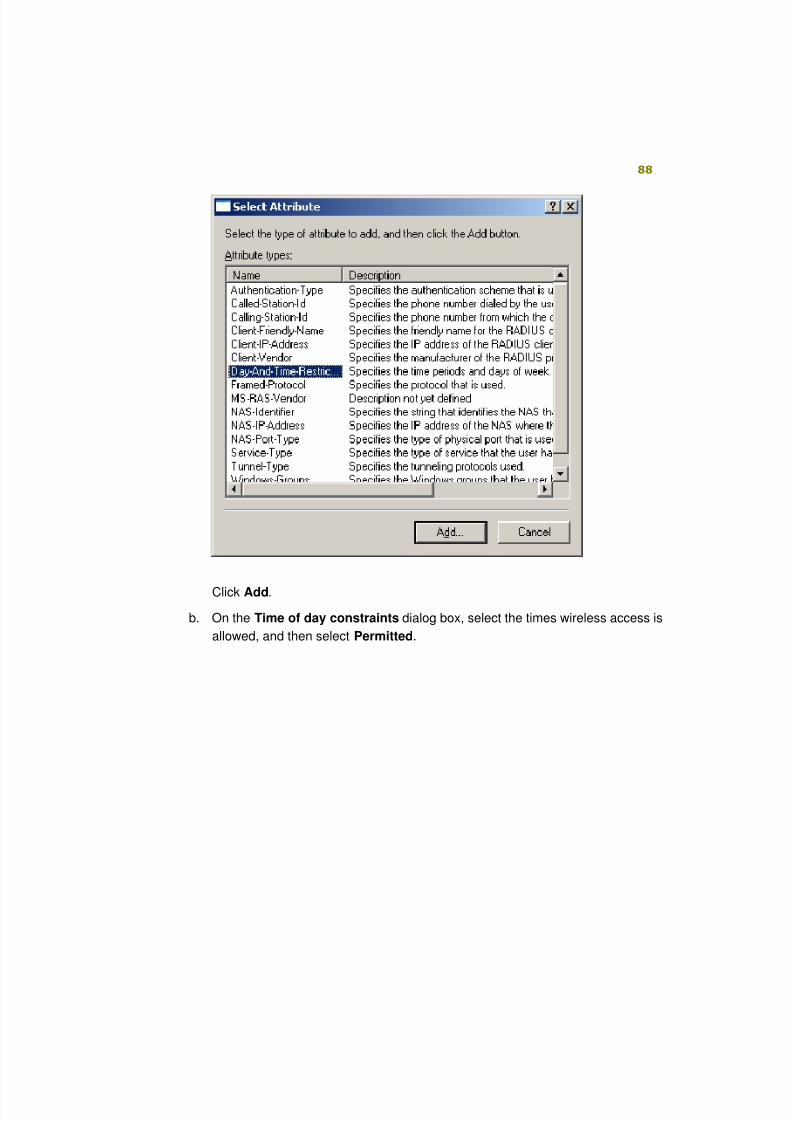
8/6/2019 Step-By-Step Guide for Secure Wireless Deployment for Small Office Home Office or Small Organization Networks
http://slidepdf.com/reader/full/step-by-step-guide-for-secure-wireless-deployment-for-small-office-home-office 88/113
88
Click Add.
b. On the Time of day constraints dialog box, select the times wireless access is
allowed, and then select Permitted.
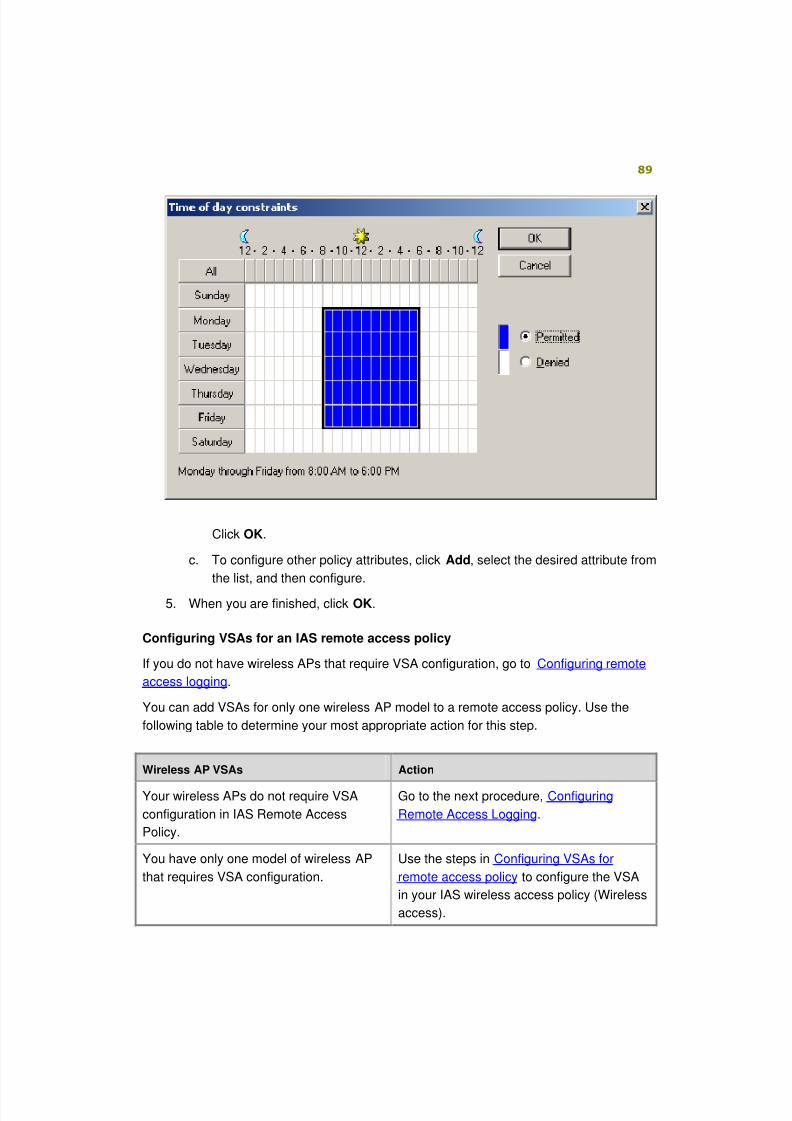
8/6/2019 Step-By-Step Guide for Secure Wireless Deployment for Small Office Home Office or Small Organization Networks
http://slidepdf.com/reader/full/step-by-step-guide-for-secure-wireless-deployment-for-small-office-home-office 89/113
89
Click OK.
c. To configure other policy attributes, click Add, select the desired attribute from
the list, and then configure.
5. When you are finished, click OK.
Configuring VSAs for an IAS remote access policy
If you do not have wireless APs that require VSA configuration, go to Configuring remote
access logging.
You can add VSAs for only one wireless AP model to a remote access policy. Use the
following table to determine your most appropriate action for this step.
Wireless AP VSAs Action
Your wireless APs do not require VSA
configuration in IAS Remote Access
Policy.
Go to the next procedure, Configuring
Remote Access Logging.
You have only one model of wireless AP
that requires VSA configuration.
Use the steps in Configuring VSAs for
remote access policy to configure the VSA
in your IAS wireless access policy (Wireless
access).
8/6/2019 Step-By-Step Guide for Secure Wireless Deployment for Small Office Home Office or Small Organization Networks
http://slidepdf.com/reader/full/step-by-step-guide-for-secure-wireless-deployment-for-small-office-home-office 90/113
90
Wireless AP VSAs Action
You have multiple wireless AP models that
require VSA configuration and you must
configure a new IAS remote access policy
for each model of wireless AP.
For each wireless AP model that requires
VSA configuration:
Configure a new IAS remote access policy
that is identical to the policy you created in
Configuring an IAS remote access policy for
wireless, with the following two exceptions:
• Each policy name must be different.
• The VSA required for each wireless AP
model is configured in the IAS remote
access policy profile according to the
steps described in .
Note
For better organization, when
you name the IAS remote
access policy in step 3 of the To
configure an IAS remote access
policy for wireless procedure, in
Policy name, type the model
name of the wireless AP.
To configure VSAs for an IAS remote access policy
1. In the Internet Authentication Service console, click Remote Access Policies, and
then select the policy for the wireless AP that requires VSA configuration.
The following figure shows a policy named Wireless access.
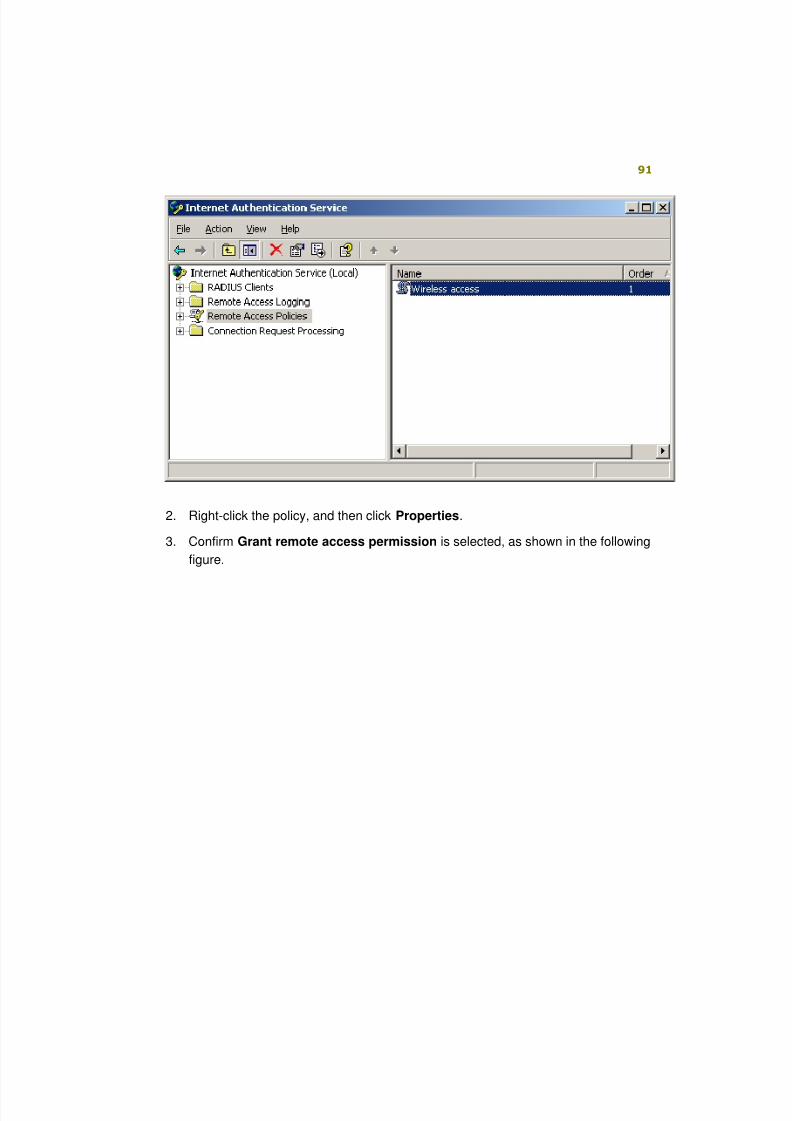
8/6/2019 Step-By-Step Guide for Secure Wireless Deployment for Small Office Home Office or Small Organization Networks
http://slidepdf.com/reader/full/step-by-step-guide-for-secure-wireless-deployment-for-small-office-home-office 91/113
91
2. Right-click the policy, and then click Properties.
3. Confirm Grant remote access permission is selected, as shown in the following
figure.

8/6/2019 Step-By-Step Guide for Secure Wireless Deployment for Small Office Home Office or Small Organization Networks
http://slidepdf.com/reader/full/step-by-step-guide-for-secure-wireless-deployment-for-small-office-home-office 92/113
92
4. Click Edit Profile, and on the Edit Dial-in Profile dialog box, click the Advanced
tab, as shown in the following figure.
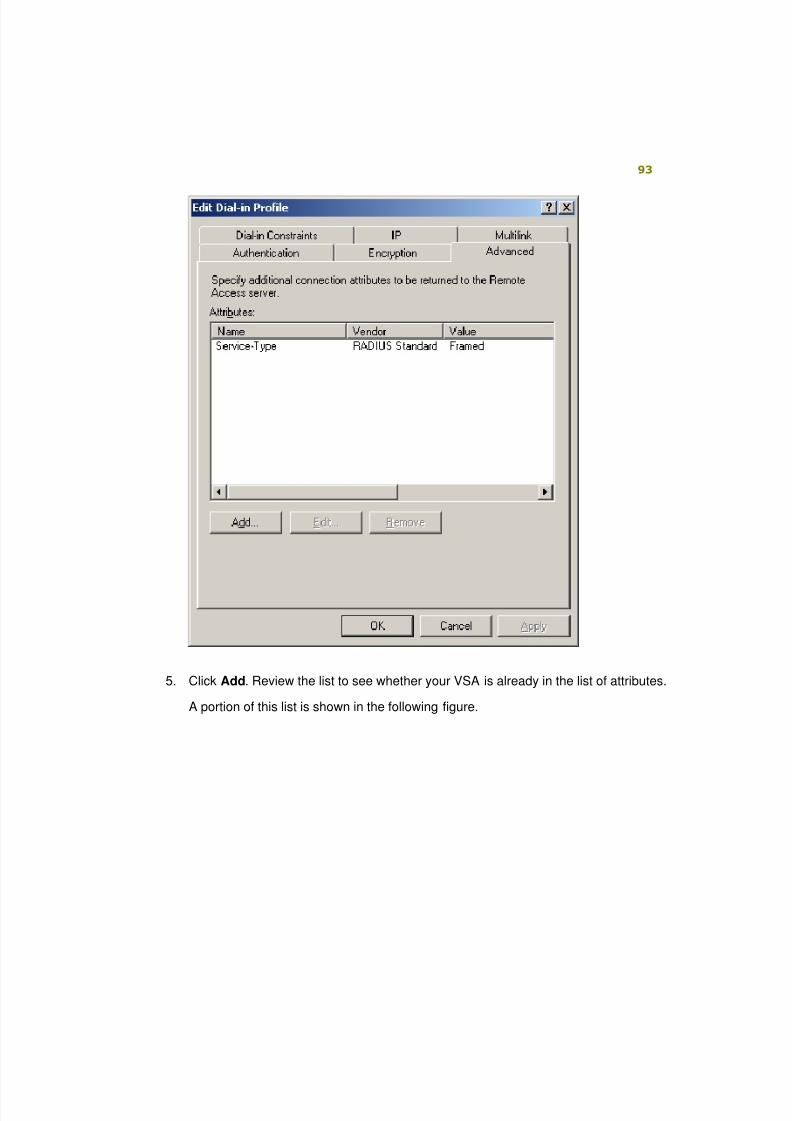
8/6/2019 Step-By-Step Guide for Secure Wireless Deployment for Small Office Home Office or Small Organization Networks
http://slidepdf.com/reader/full/step-by-step-guide-for-secure-wireless-deployment-for-small-office-home-office 93/113
93
5. Click Add. Review the list to see whether your VSA is already in the list of attributes.
A portion of this list is shown in the following figure.

8/6/2019 Step-By-Step Guide for Secure Wireless Deployment for Small Office Home Office or Small Organization Networks
http://slidepdf.com/reader/full/step-by-step-guide-for-secure-wireless-deployment-for-small-office-home-office 94/113
94
If the VSA is in the list
a. Select the attribute, click Add, and on the Multivalued Attribute Information
dialog box, click Add.
b. Configure the attribute as described in your wireless AP documentation.
c. Go to step 6 of this procedure.
If the VSA is not in the list
a. From the list, select Vendor-Specific, as shown in the following figure.
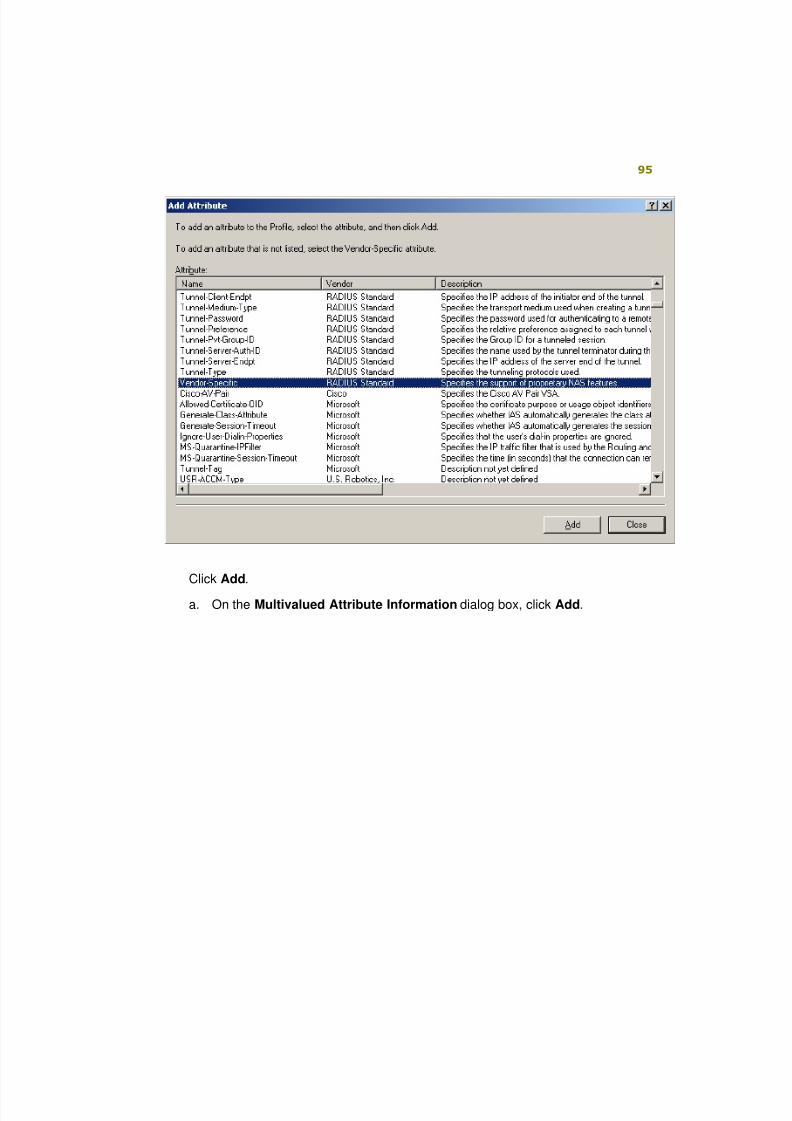
8/6/2019 Step-By-Step Guide for Secure Wireless Deployment for Small Office Home Office or Small Organization Networks
http://slidepdf.com/reader/full/step-by-step-guide-for-secure-wireless-deployment-for-small-office-home-office 95/113
95
Click Add.
a. On the Multivalued Attribute Information dialog box, click Add.
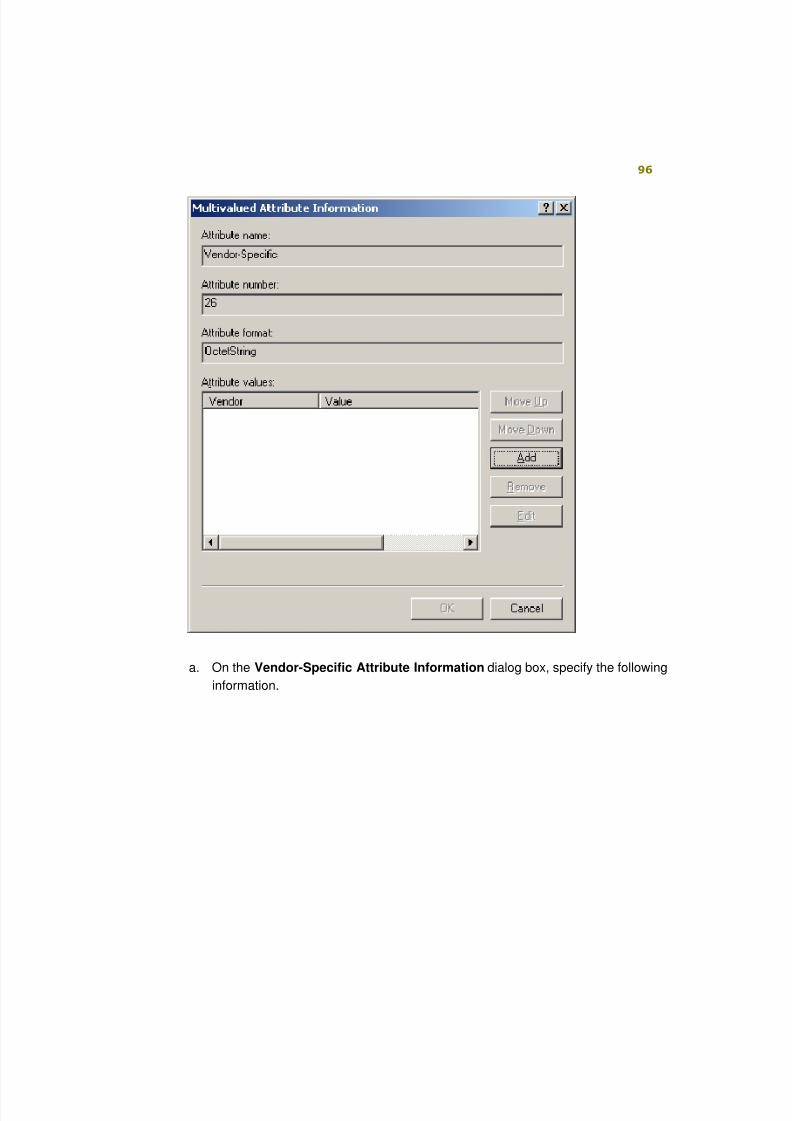
8/6/2019 Step-By-Step Guide for Secure Wireless Deployment for Small Office Home Office or Small Organization Networks
http://slidepdf.com/reader/full/step-by-step-guide-for-secure-wireless-deployment-for-small-office-home-office 96/113
96
a. On the Vendor-Specific Attribute Information dialog box, specify the following
information.
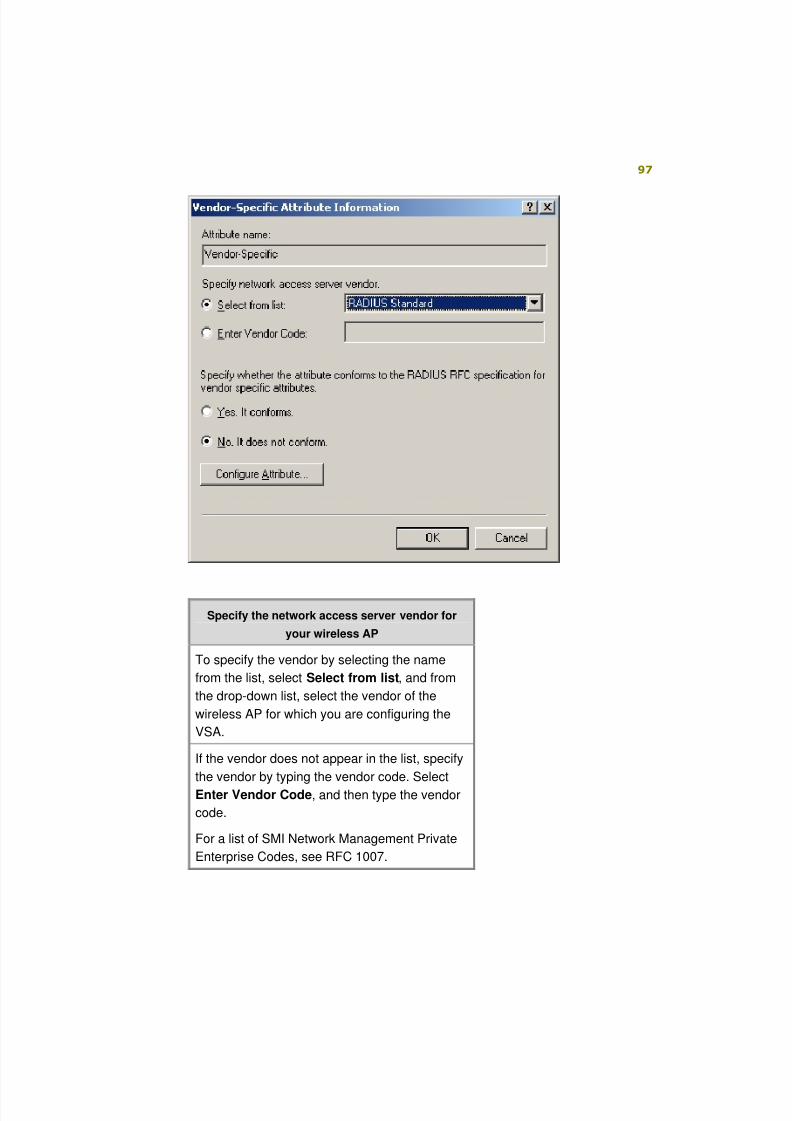
8/6/2019 Step-By-Step Guide for Secure Wireless Deployment for Small Office Home Office or Small Organization Networks
http://slidepdf.com/reader/full/step-by-step-guide-for-secure-wireless-deployment-for-small-office-home-office 97/113
97
Specify the network access server vendor for
your wireless AP
To specify the vendor by selecting the name
from the list, select Select from list, and from
the drop-down list, select the vendor of the
wireless AP for which you are configuring the
VSA.
If the vendor does not appear in the list, specify
the vendor by typing the vendor code. Select
Enter Vendor Code, and then type the vendor
code.
For a list of SMI Network Management Private
Enterprise Codes, see RFC 1007.
8/6/2019 Step-By-Step Guide for Secure Wireless Deployment for Small Office Home Office or Small Organization Networks
http://slidepdf.com/reader/full/step-by-step-guide-for-secure-wireless-deployment-for-small-office-home-office 98/113
98
Specify whether the attribute conforms to the
RADIUS RFC specification for VSAs
If your attribute conforms to the RADIUS RFC
specification, select Yes. It conforms, and then
click Configure Attribute.
On the Configure VSA (RFC compliant)
dialog box, in Vendor-assigned attribute
number, type the number assigned to the
attribute. (This should be an integer from 0 to
255.)In Attribute format, specify the format for the
attribute.
In Attribute value, type the value you are
assigning to the attribute.
If the attribute does not conform, click No. It
does not conform, and then click Configure
Attribute.
In Hexadecimal attribute value, type the value
for the attribute, as specified in your wireless
AP documentation.
6. Click OK or Close to close all open dialog boxes.
Configuring remote access logging
To configure remote access logging
1. In the Internet Authentication Service console, right-click Internet Authentication
Service, and then click Properties.
2. On the General tab, verify that Rejected authentication requests and Successfulauthentication requests are selected, and then click OK.
3. Click Remote Access Logging, as shown in the following figure.
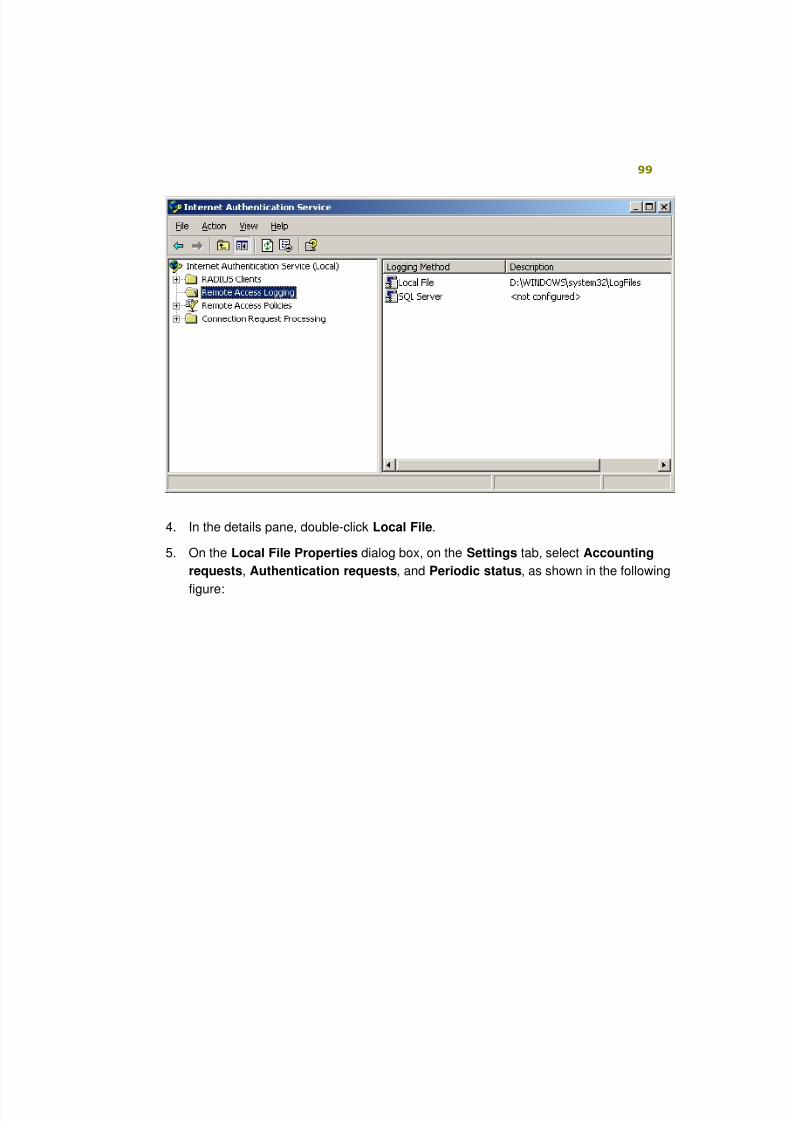
8/6/2019 Step-By-Step Guide for Secure Wireless Deployment for Small Office Home Office or Small Organization Networks
http://slidepdf.com/reader/full/step-by-step-guide-for-secure-wireless-deployment-for-small-office-home-office 99/113
99
4. In the details pane, double-click Local File.
5. On the Local File Properties dialog box, on the Settings tab, select Accounting
requests, Authentication requests, and Periodic status, as shown in the following
figure:
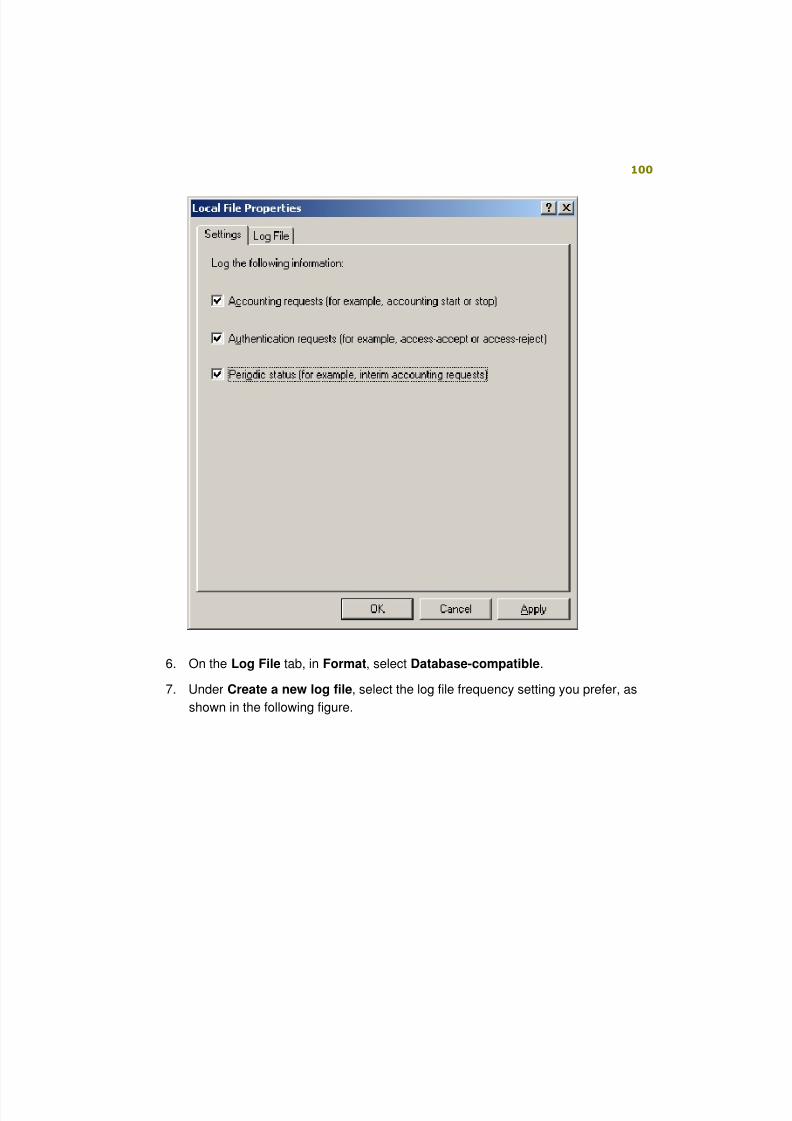
8/6/2019 Step-By-Step Guide for Secure Wireless Deployment for Small Office Home Office or Small Organization Networks
http://slidepdf.com/reader/full/step-by-step-guide-for-secure-wireless-deployment-for-small-office-home-office 100/113
100
6. On the Log File tab, in Format, select Database-compatible.
7. Under Create a new log file, select the log file frequency setting you prefer, as
shown in the following figure.
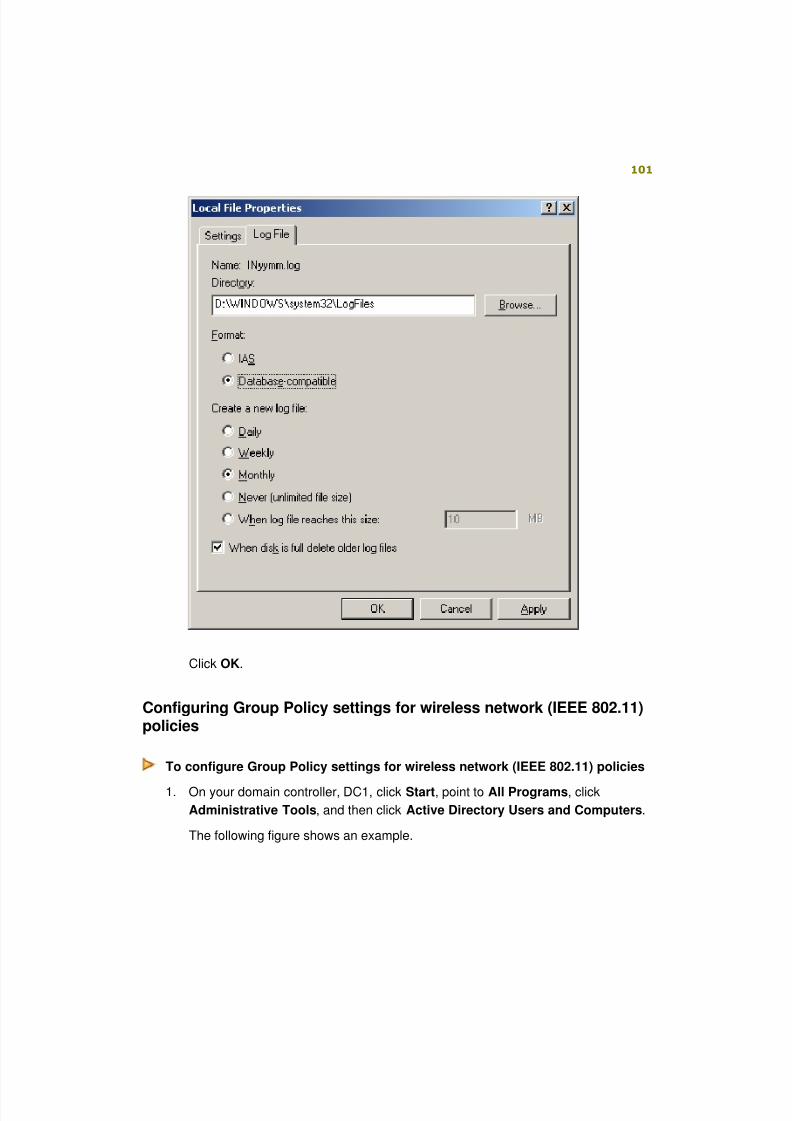
8/6/2019 Step-By-Step Guide for Secure Wireless Deployment for Small Office Home Office or Small Organization Networks
http://slidepdf.com/reader/full/step-by-step-guide-for-secure-wireless-deployment-for-small-office-home-office 101/113
101
Click OK.
Configuring Group Policy settings for wireless network (IEEE 802.11)policies
To configure Group Policy settings for wireless network (IEEE 802.11) policies
1. On your domain controller, DC1, click Start, point to All Programs, click
Administrative Tools, and then click Active Directory Users and Computers.
The following figure shows an example.
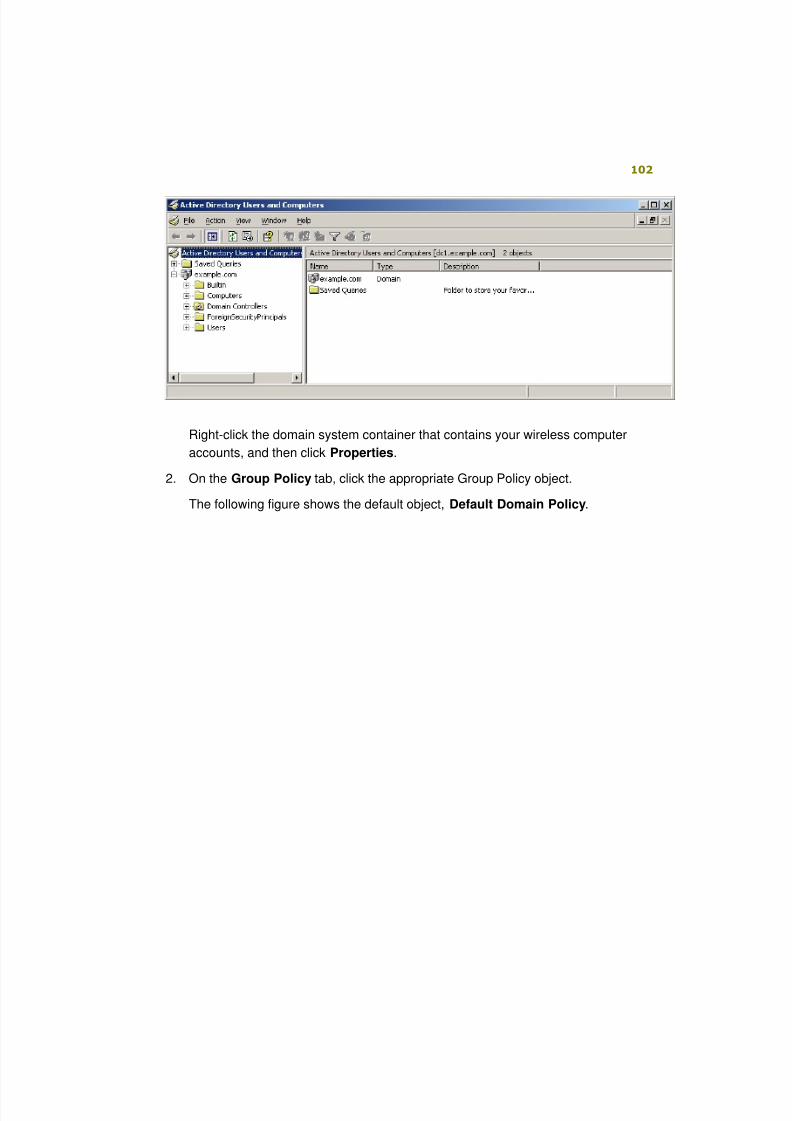
8/6/2019 Step-By-Step Guide for Secure Wireless Deployment for Small Office Home Office or Small Organization Networks
http://slidepdf.com/reader/full/step-by-step-guide-for-secure-wireless-deployment-for-small-office-home-office 102/113
102
Right-click the domain system container that contains your wireless computer
accounts, and then click Properties.
2. On the Group Policy tab, click the appropriate Group Policy object.
The following figure shows the default object, Default Domain Policy.
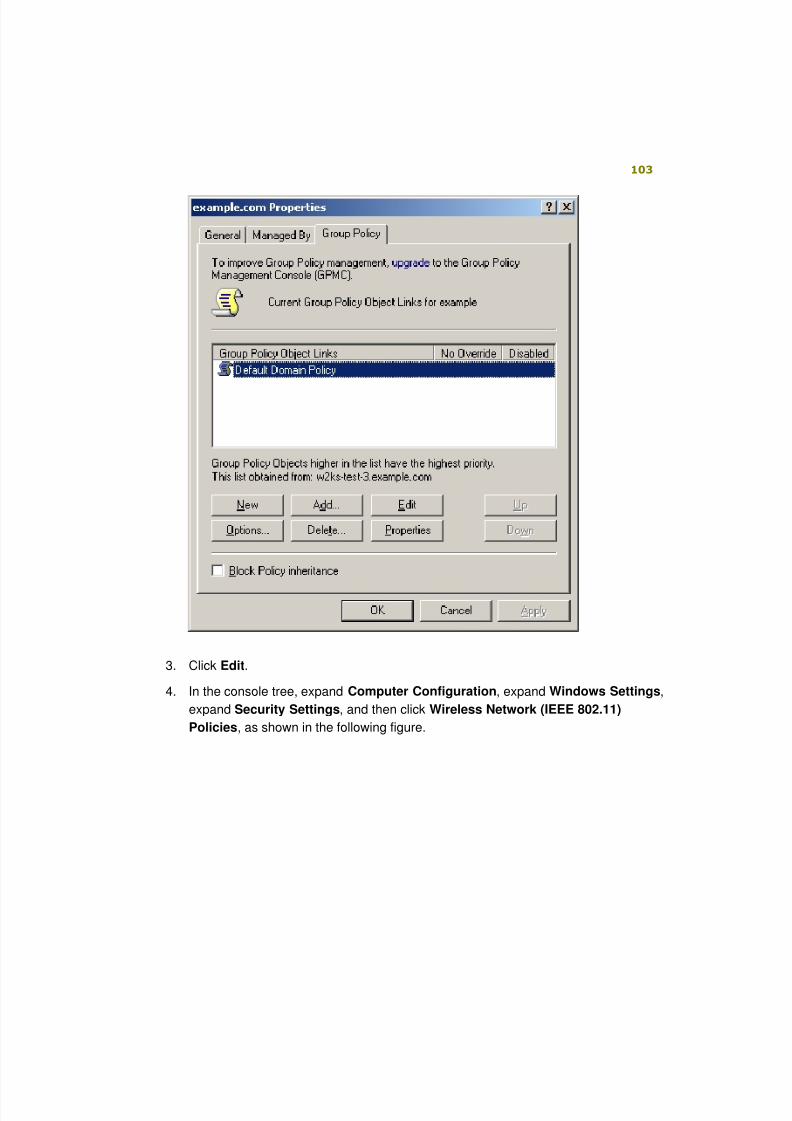
8/6/2019 Step-By-Step Guide for Secure Wireless Deployment for Small Office Home Office or Small Organization Networks
http://slidepdf.com/reader/full/step-by-step-guide-for-secure-wireless-deployment-for-small-office-home-office 103/113
103
3. Click Edit.
4. In the console tree, expand Computer Configuration, expand Windows Settings,
expand Security Settings, and then click Wireless Network (IEEE 802.11)
Policies, as shown in the following figure.
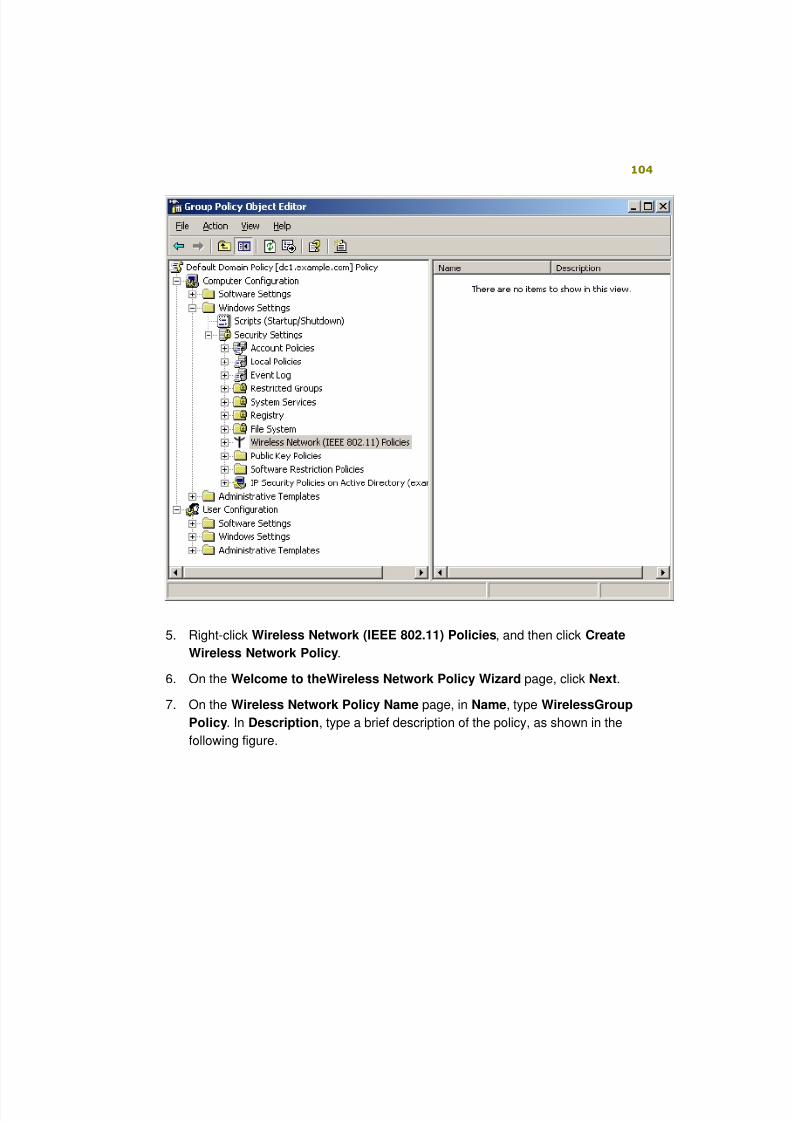
8/6/2019 Step-By-Step Guide for Secure Wireless Deployment for Small Office Home Office or Small Organization Networks
http://slidepdf.com/reader/full/step-by-step-guide-for-secure-wireless-deployment-for-small-office-home-office 104/113
104
5. Right-click Wireless Network (IEEE 802.11) Policies, and then click Create
Wireless Network Policy.
6. On the Welcome to theWireless Network Policy Wizard page, click Next.
7. On the Wireless Network Policy Name page, in Name, type WirelessGroup
Policy. In Description, type a brief description of the policy, as shown in the
following figure.
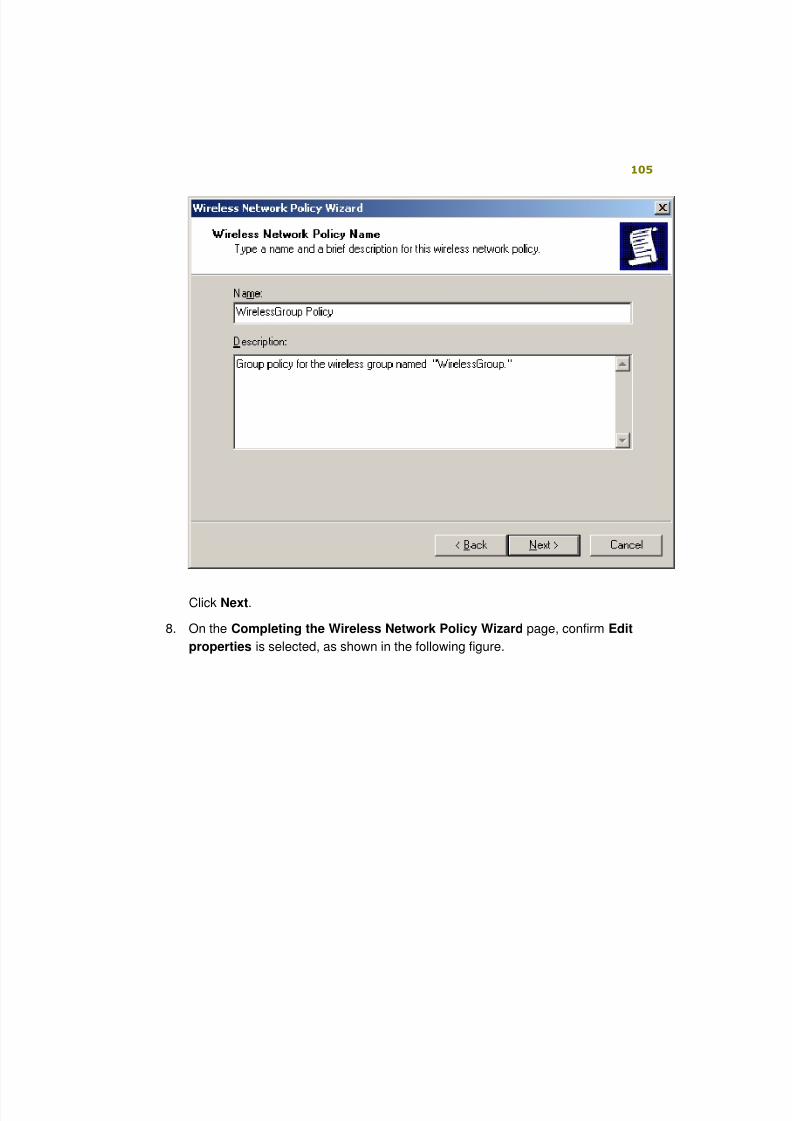
8/6/2019 Step-By-Step Guide for Secure Wireless Deployment for Small Office Home Office or Small Organization Networks
http://slidepdf.com/reader/full/step-by-step-guide-for-secure-wireless-deployment-for-small-office-home-office 105/113
105
Click Next.
8. On the Completing the Wireless Network Policy Wizard page, confirm Edit
properties is selected, as shown in the following figure.
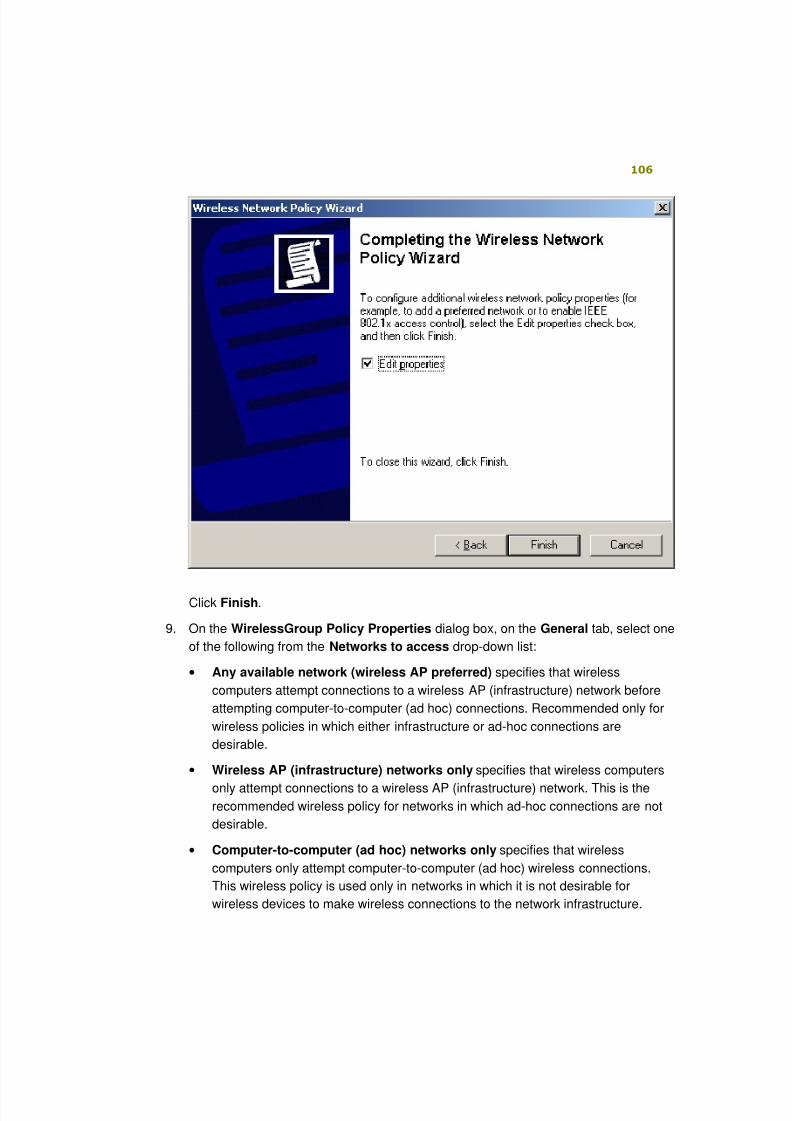
8/6/2019 Step-By-Step Guide for Secure Wireless Deployment for Small Office Home Office or Small Organization Networks
http://slidepdf.com/reader/full/step-by-step-guide-for-secure-wireless-deployment-for-small-office-home-office 106/113
106
Click Finish.
9. On the WirelessGroup Policy Properties dialog box, on the General tab, select one
of the following from the Networks to access drop-down list:
• Any available network (wireless AP preferred) specifies that wireless
computers attempt connections to a wireless AP (infrastructure) network before
attempting computer-to-computer (ad hoc) connections. Recommended only for
wireless policies in which either infrastructure or ad-hoc connections are
desirable.
• Wireless AP (infrastructure) networks only specifies that wireless computers
only attempt connections to a wireless AP (infrastructure) network. This is therecommended wireless policy for networks in which ad-hoc connections are not
desirable.
• Computer-to-computer (ad hoc) networks only specifies that wireless
computers only attempt computer-to-computer (ad hoc) wireless connections.
This wireless policy is used only in networks in which it is not desirable for
wireless devices to make wireless connections to the network infrastructure.
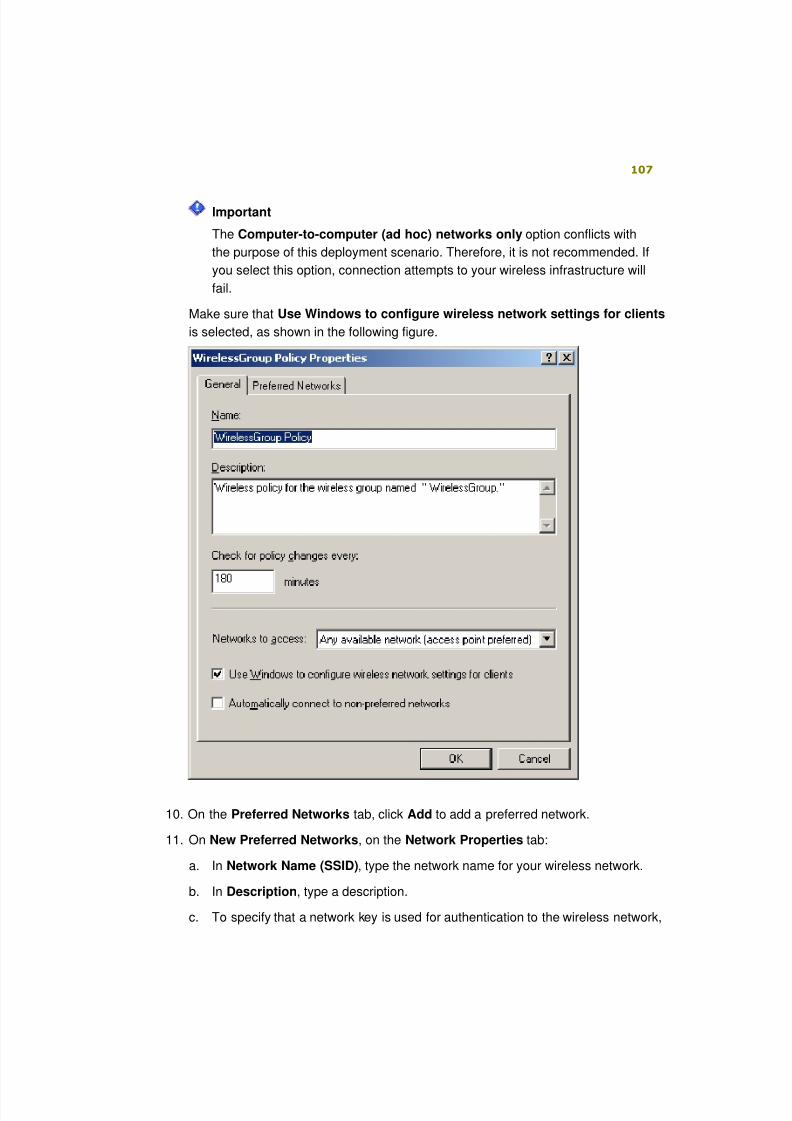
8/6/2019 Step-By-Step Guide for Secure Wireless Deployment for Small Office Home Office or Small Organization Networks
http://slidepdf.com/reader/full/step-by-step-guide-for-secure-wireless-deployment-for-small-office-home-office 107/113
107
Important
The Computer-to-computer (ad hoc) networks only option conflicts with
the purpose of this deployment scenario. Therefore, it is not recommended. If
you select this option, connection attempts to your wireless infrastructure will
fail.
Make sure that Use Windows to configure wireless network settings for clients
is selected, as shown in the following figure.
10. On the Preferred Networks tab, click Add to add a preferred network.
11. On New Preferred Networks, on the Network Properties tab:
a. In Network Name (SSID), type the network name for your wireless network.
b. In Description, type a description.
c. To specify that a network key is used for authentication to the wireless network,
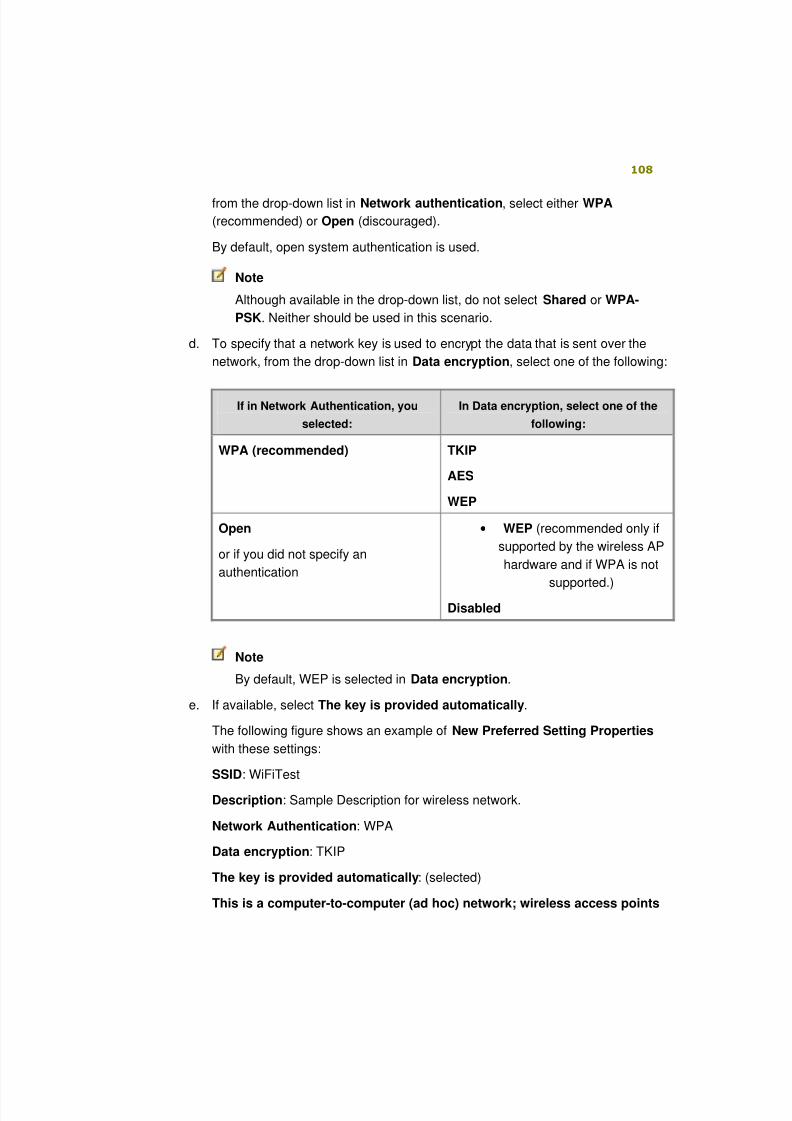
8/6/2019 Step-By-Step Guide for Secure Wireless Deployment for Small Office Home Office or Small Organization Networks
http://slidepdf.com/reader/full/step-by-step-guide-for-secure-wireless-deployment-for-small-office-home-office 108/113
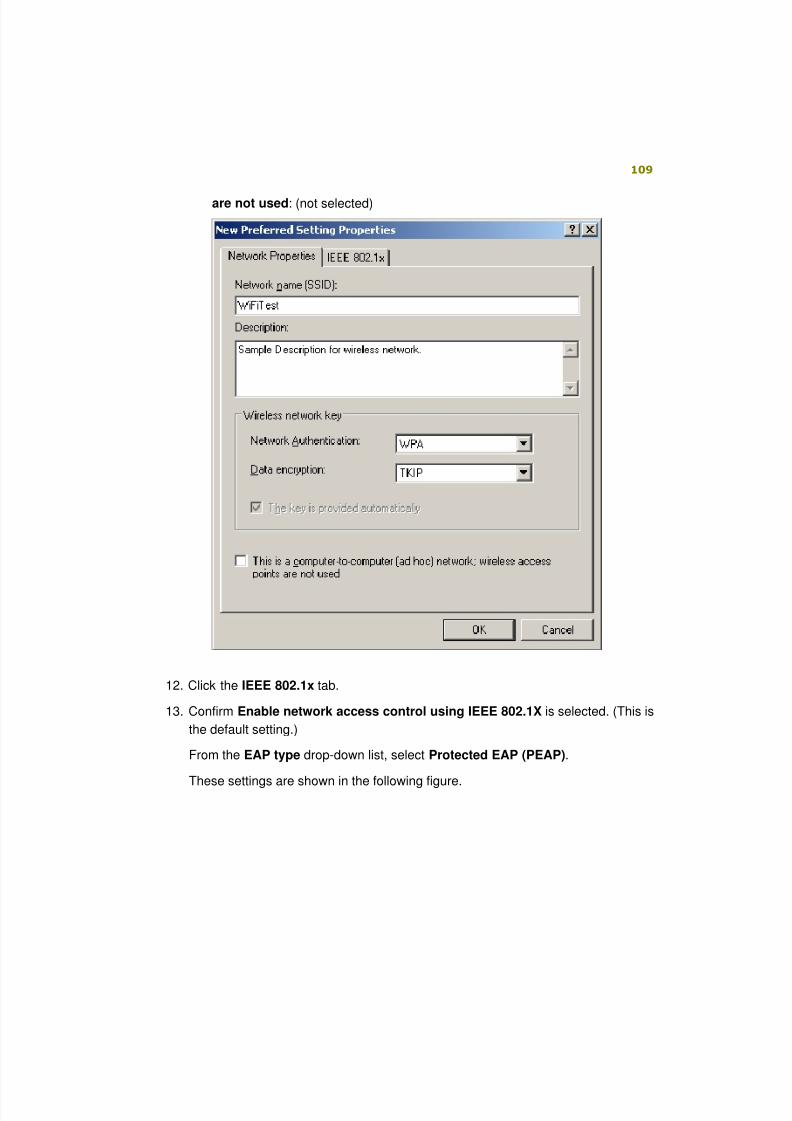
8/6/2019 Step-By-Step Guide for Secure Wireless Deployment for Small Office Home Office or Small Organization Networks
http://slidepdf.com/reader/full/step-by-step-guide-for-secure-wireless-deployment-for-small-office-home-office 109/113
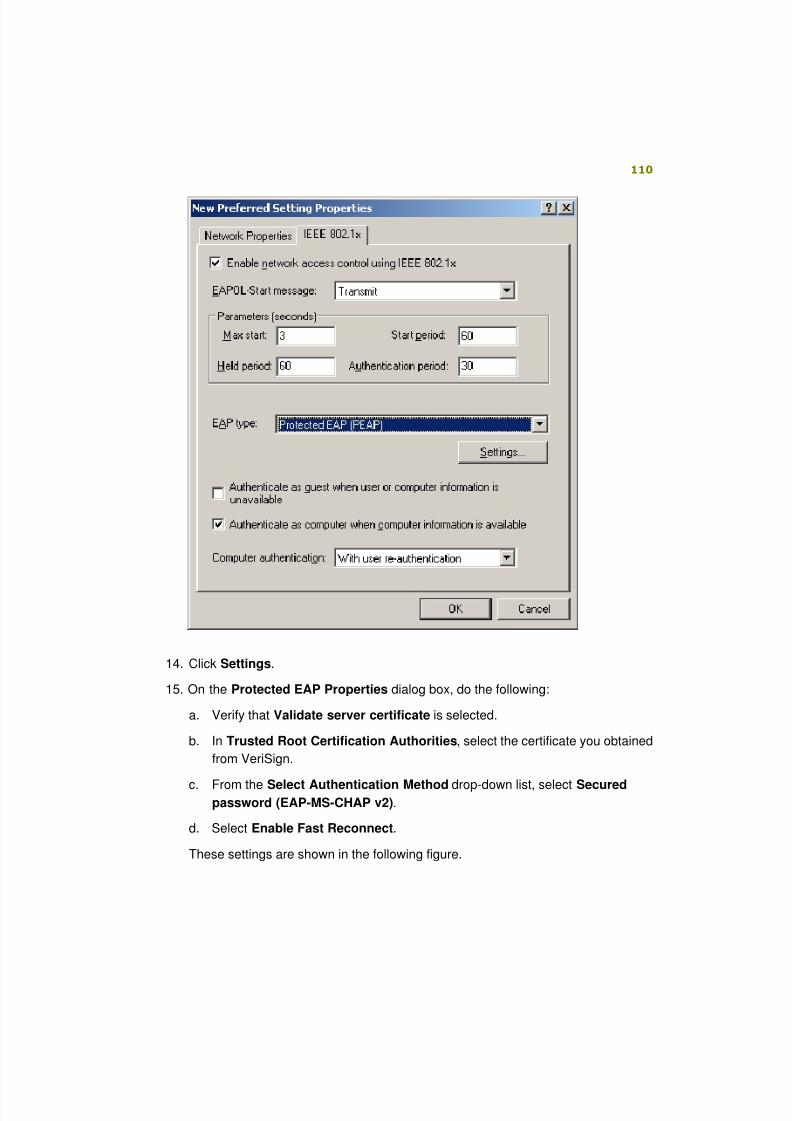
8/6/2019 Step-By-Step Guide for Secure Wireless Deployment for Small Office Home Office or Small Organization Networks
http://slidepdf.com/reader/full/step-by-step-guide-for-secure-wireless-deployment-for-small-office-home-office 110/113
110
14. Click Settings.
15. On the Protected EAP Properties dialog box, do the following:
a. Verify that Validate server certificate is selected.
b. In Trusted Root Certification Authorities, select the certificate you obtained
from VeriSign.
c. From the Select Authentication Method drop-down list, select Securedpassword (EAP-MS-CHAP v2).
d. Select Enable Fast Reconnect.
These settings are shown in the following figure.
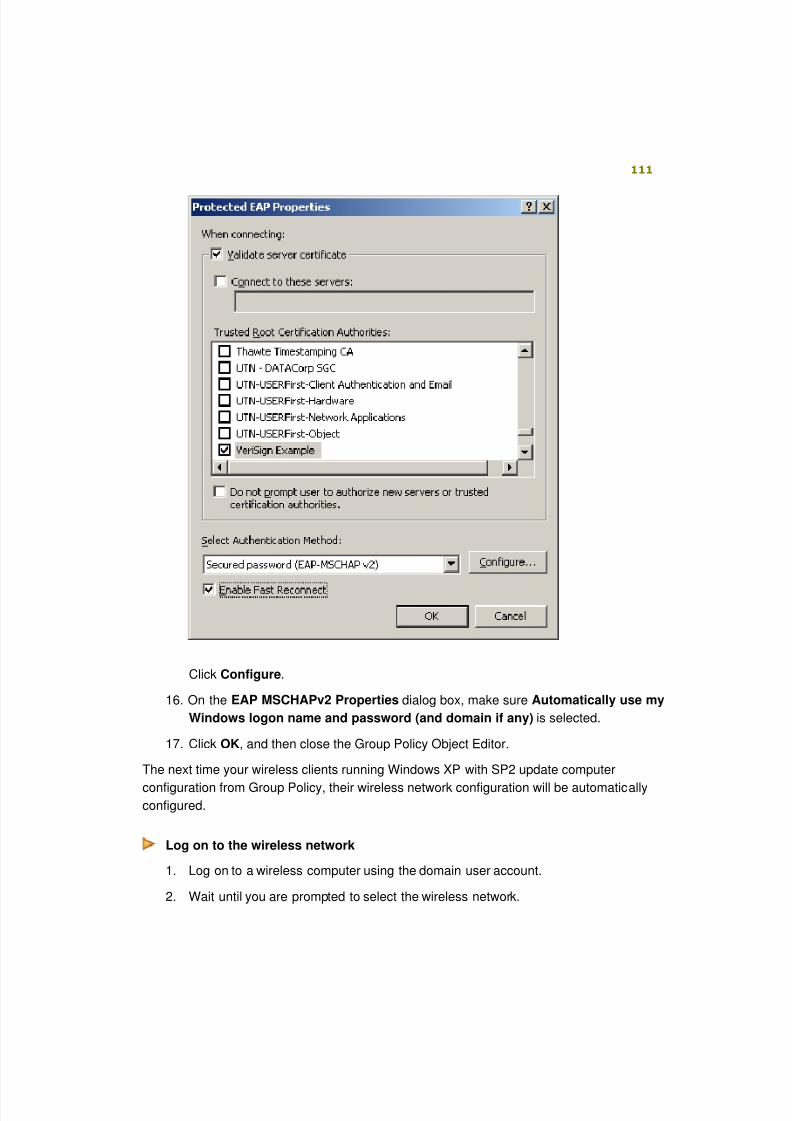
8/6/2019 Step-By-Step Guide for Secure Wireless Deployment for Small Office Home Office or Small Organization Networks
http://slidepdf.com/reader/full/step-by-step-guide-for-secure-wireless-deployment-for-small-office-home-office 111/113
111
Click Configure.
16. On the EAP MSCHAPv2 Properties dialog box, make sure Automatically use my
Windows logon name and password (and domain if any) is selected.
17. Click OK, and then close the Group Policy Object Editor.
The next time your wireless clients running Windows XP with SP2 update computer
configuration from Group Policy, their wireless network configuration will be automaticallyconfigured.
Log on to the wireless network
1. Log on to a wireless computer using the domain user account.
2. Wait until you are prompted to select the wireless network.
8/6/2019 Step-By-Step Guide for Secure Wireless Deployment for Small Office Home Office or Small Organization Networks
http://slidepdf.com/reader/full/step-by-step-guide-for-secure-wireless-deployment-for-small-office-home-office 112/113
112
3. In the notification area, right-click the wireless network connection icon, and then
click View Available Wireless Networks.
Note
You can right-click the icon for the wireless adapter in either the
notification area or in Network Connections.
4. On the Choose a wireless network page, select your network, and then click
Connect.
When connected, the Choose a wireless network page will display the status of
the connection as Connected.
If you experience difficulty connecting to the wireless LAN, you should first physically
connect the computer to the wired LAN and then log on with the domain user account to
update Group Policy configuration.
If you continue to experience difficulty connecting, use the following procedure to check
the Group Policy-provided wireless configurations.
Troubleshooting wireless connections on client computers
1. Right-click the wireless network connection icon in either the notification area or
in Network Connections, and then click View Available Wireless Networks.
2. Under Related Tasks, click Change advanced settings.
3. On the Wireless Network Connection Properties dialog box, click the
Wireless Networks tab.
4. In Preferred Networks, select the appropriate wireless network, and then click
Properties.
5. On the Association tab, verify that both Network Authentication and Data
encryption are set correctly, and confirm that the correct network key is being
used.
6. On the Authentication tab, confirm the following settings:
Enable IEEE 802.1x authentication for this network is selected.
EAP type is set to Protected EAP (PEAP).
Authenticate as computer when computer information is available is
selected.
7. On the Connection tab, make sure that Connect when this network is in
range is selected.
8/6/2019 Step-By-Step Guide for Secure Wireless Deployment for Small Office Home Office or Small Organization Networks
http://slidepdf.com/reader/full/step-by-step-guide-for-secure-wireless-deployment-for-small-office-home-office 113/113
113
8. After authentication is successful, use Network Connections to check the TCP/IP
configuration for the wireless adapter. It should have an address within the range
of the DHCP scope.
See AlsoActive Directory
User and Group Accounts
DHCP
DNS
IAS
WINS
Wireless Networking
Cable Guy, November 2004 - Wi-Fi Protected Access Data Encryption and Integrity
Windows XP Wireless Deployment Technology and Component Overview
Windows Server 2003 Security Services
Encrypting File System
Public Key Infrastructure
Providing Secure Wireless Services