Embed Size (px)
Citation preview
StarShip Installation

ii
Table Of Contents StarShip 10.1 vs. previous versions of StarShip 1 Where to install 1
System Requirements______________________________________________________________________________ 3
StarShip Server Installation__________________________________________________________________________ 4
Prerequisite Software ______________________________________________________________________________ 4
Getting Started 2 Installing Microsoft Data Access Components 10 Installing .NET Framework 11 Web Server 15 Installing SQL Server 2005 Express SP2 with Advanced Services or SQL Native Client 16 Installing SQL Server 2005 Express SP2 with Advanced Services 18
StarShip Server : 1st Time Installation ________________________________________________________________ 48
StarShip Server : Update Existing Installation __________________________________________________________ 64
StarShip Server : Install Over Existing Installation _______________________________________________________ 71
Installing the SQL Native Client 39 Notes about errors 82 Known Issue 83
StarShip Client : 1st Time Installation _________________________________________________________________ 84
StarShip Client : Update Existing Installation ___________________________________________________________ 94
StarShip Client : Install Over Existing Installation _______________________________________________________ 102
Dashboard Installation ___________________________________________________________________________ 113
S Who is V-Technologies? 123
tarShip Server/Client Web Updates ________________________________________________________________ 117

StarShip 10.1 is the latest addition to our family of shipping products. With a redesigned Ship screen, StarShip provides a graphic representation of your packages and contents. It automates small parcel and freight (LTL) shipping from one user interface and offers a great improvement in the speed, accuracy, and ease of shipping.
StarShip 10.1 vs. previous versions of StarShip What are the main differences in StarShip 10.1? In addition to supporting both parcel and freight (LTL) carriers, StarShip also includes:
MS SQL 2005 database
Seat licensing (eliminates per site license)
A Dashboard, which is a web-based tool for users to access and analyze shipment information
Enhanced reporting using Crystal Reports
Access to line item detail, to automate international documentation, customs filing and generate the Bill of Lading (BOL)
AES Direct integration
Address Validation
Rate shopping between all licensed carrier modules
The information in this document guides you through the steps to install the StarShip Server and StarShip Client. It also includes the information you need to know before you begin the installation. Please review the System Requirements section and close down any other programs that might be running.
Where to install
The StarShip Server must be installed on one computer. The StarShip Client may be installed on the same computer as the StarShip Server. You can also choose to install the client on multiple, different PCs that are used for shipping, depending upon your number of seat licenses. The StarShip Server computer must be accessible by each StarShip Client PC.
1
Getting Started
Before installing the StarShip Server, some prerequisite software might need to be installed. The installation program will check the computer and let you know which, if any, programs need to be installed. After installing the prerequisite software, you will continue with the StarShip Server installation or update. Finally, you will install or update the StarShip Client. You can also run Web Updates to make sure you have the latest files.
1. Prerequisite Software
2. StarShip Server Installation:
1. 1st Time Installation
2. Update Existing Installation
3. Install Over Existing Installation
3. StarShip Client Installation:
1st Time Installation
Update Existing Installation
Install Over Existing Installation
4. Dashboard Installation
2
System Requirements
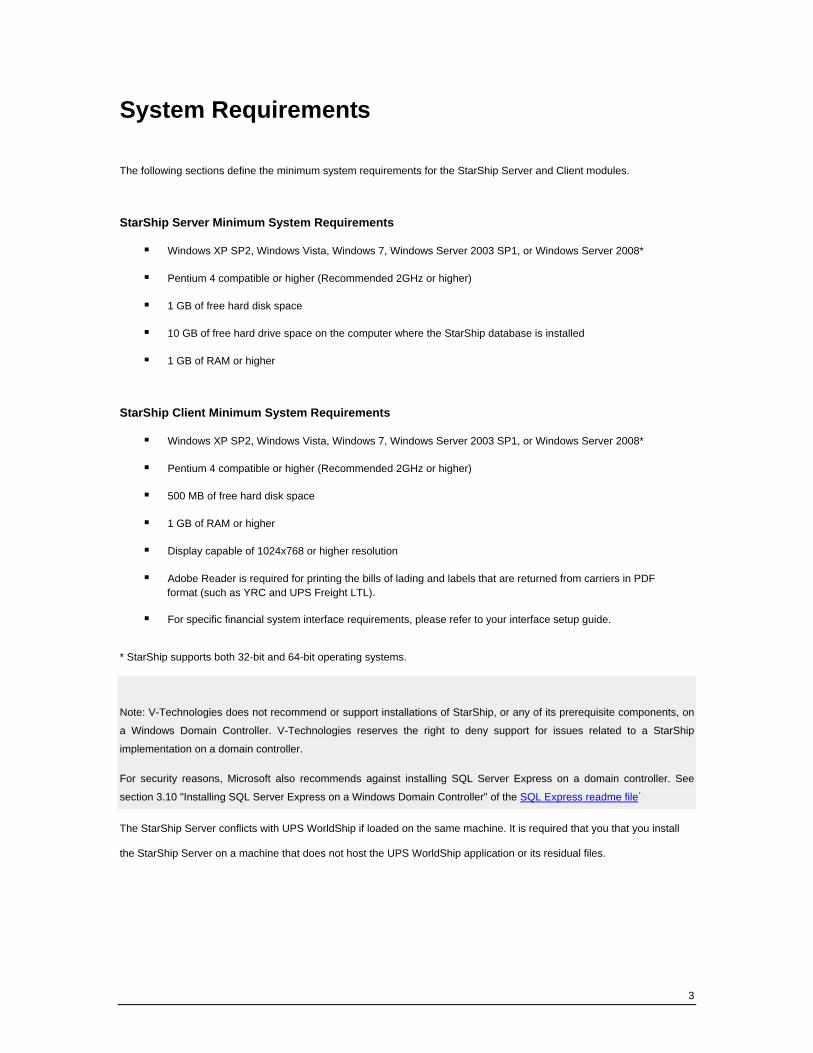
The following sections define the minimum system requirements for the StarShip Server and Client modules.
StarShip Server Minimum System Requirements
Windows XP SP2, Windows Vista, Windows 7, Windows Server 2003 SP1, or Windows Server 2008*
Pentium 4 compatible or higher (Recommended 2GHz or higher)
1 GB of free hard disk space
10 GB of free hard drive space on the computer where the StarShip database is installed
1 GB of RAM or higher
StarShip Client Minimum System Requirements
Windows XP SP2, Windows Vista, Windows 7, Windows Server 2003 SP1, or Windows Server 2008*
Pentium 4 compatible or higher (Recommended 2GHz or higher)
500 MB of free hard disk space
1 GB of RAM or higher
Display capable of 1024x768 or higher resolution
Adobe Reader is required for printing the bills of lading and labels that are returned from carriers in PDF format (such as YRC and UPS Freight LTL). For specific financial system interface requirements, please refer to your interface setup guide.
* StarShip supports both 32-bit and 64-bit operating systems.
Note: V-Technologies does not recommend or support installations of StarShip, or any of its prerequisite components, on
a Windows Domain Controller. V-Technologies reserves the right to deny support for issues related to a StarShip
implementation on a domain controller.
For security reasons, Microsoft also recommends against installing SQL Server Express on a domain controller. See
section 3.10 "Installing SQL Server Express on a Windows Domain Controller" of the SQL Express readme file. The StarShip Server conflicts with UPS WorldShip if loaded on the same machine. It is required that you that you install the StarShip Server on a machine that does not host the UPS WorldShip application or its residual files.
3

StarShip Server Installation
Prerequisite Software
Before installing the StarShip Server, the following programs must be installed. The StarShip Server installation program will detect any of these programs that are already installed. Starship Server must be installed before installing the StarShip clients.
Microsoft Data Access Components (MDAC) 2.8 SP1*
IE 6 SP1 or higher
.NET Framework 3.5*
Cassini Web Server*
SQL Server 2005 Express SP2*, or an existing SQL Server 2005 SP2 or SQL Server 2008 installation**
SQL Native Client* required when using an existing SQL Server
Crystal Reports Runtime*
* Included on the StarShip Installation CD
**StarShip supports both 32-bit and 64-bit versions of SQL Server 2005 and 2008.
Launch StarShip Server installation
To begin the StarShip Server installation, continue with these steps:
4

StarShip Server Installation
1. Place the StarShip CD into the appropriate drive. The Welcome to StarShip dialog appears automatically. Select Install StarShip Server.
The installer checks the system to find any prerequisite components that are already installed. The "Checking System" information dialog appears briefly.
5

StarShip Installation
2. Be sure to close any programs you may have running before clicking Next to start the installation process.
3. Read the License Agreement and select I Agree.
6

StarShip Server Installation
4. Server installation requires the installation of Microsoft Windows Installer (MSI) 3.1 or higher. Click OK.
5. Read the Windows Installer information and click Next to continue.
7

StarShip Installation
6. Read the license agreement and select I Agree. Then, click Next.
8
StarShip Server Installation
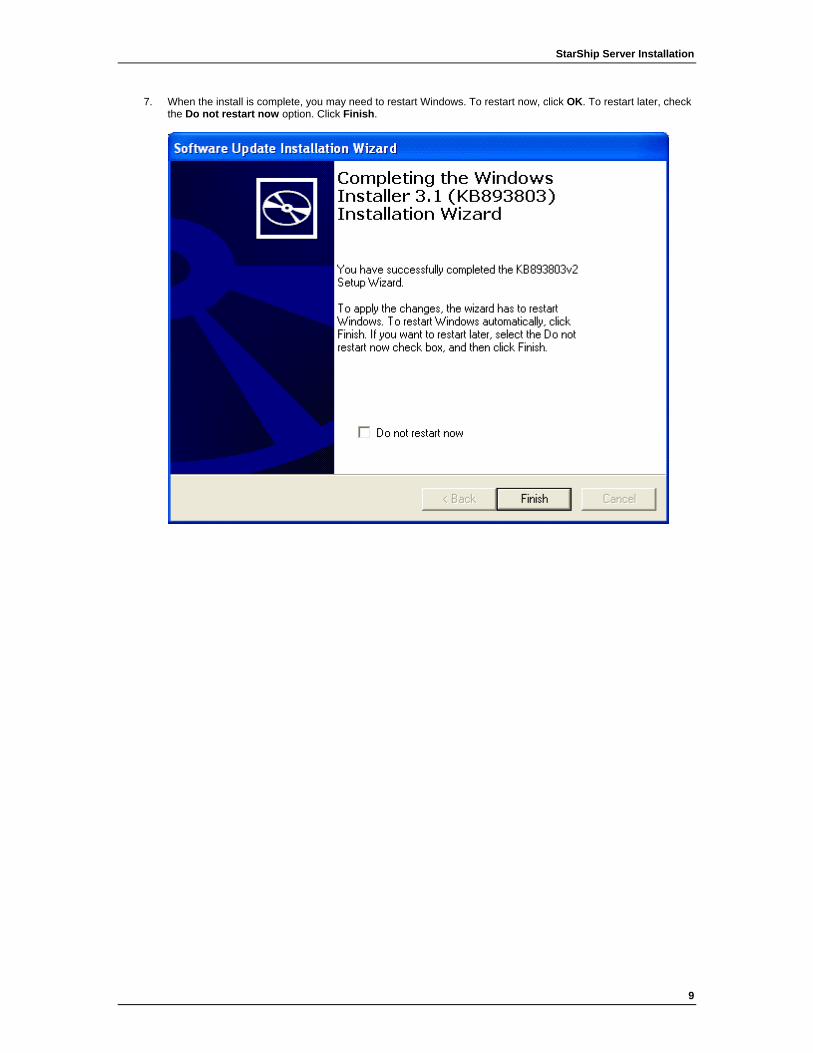
7. When the install is complete, you may need to restart Windows. To restart now, click OK. To restart later, check the Do not restart now option. Click Finish.
9

StarShip Installation
8. On the Component Installation dialog, any previously installed components are noted with a check mark. When no prerequisite components are found, no components are checked.
Installing Microsoft Data Access Components Click the MDAC 2.81 link to install Microsoft Data Access Components 2.81, if required.
After the setup files are extracted, follow the remaining installation prompts.
10

11
Installing .NET Framework 1. On the StarShip Server Installation dialog, click the .NET Framework 3.5 link to install it.
2. Click Install on the Welcome dialog to continue.

StarShip Installation
3. Enable the I accept the terms of the License Agreement check box and click the Install button.
12

13
4. The Download and Install Progress dialog appears.

StarShip Installation
5. Click Exit when the installation is complete.
6. You may need to restart your computer to complete the installation. Click Restart Now or Restart Later when prompted.
14

StarShip Server Installation
Web Server StarShip requires Cassini Web Server to be installed. There are no installation options to configure during the Web Server installation. On the StarShip Server Installation dialog, click on the Web Server link to install it.
15

16
Installing SQL Server 2005 Express SP2 with Advanced Services or SQL Native Client StarShip requires an SQL 2005 Server installation for its database. You have the option of installing SQL Server 2005 Express, or of using an existing installation of SQL Server 2005. Note: Reporting Services, which is installed as part of SQL Server Express with Advanced Services, will not install on operating systems that do not include Internet Information Services (IIS).
1. On the StarShip Server Installation dialog, click the SQL Server 2005 link to install it.
StarShip Server Installation
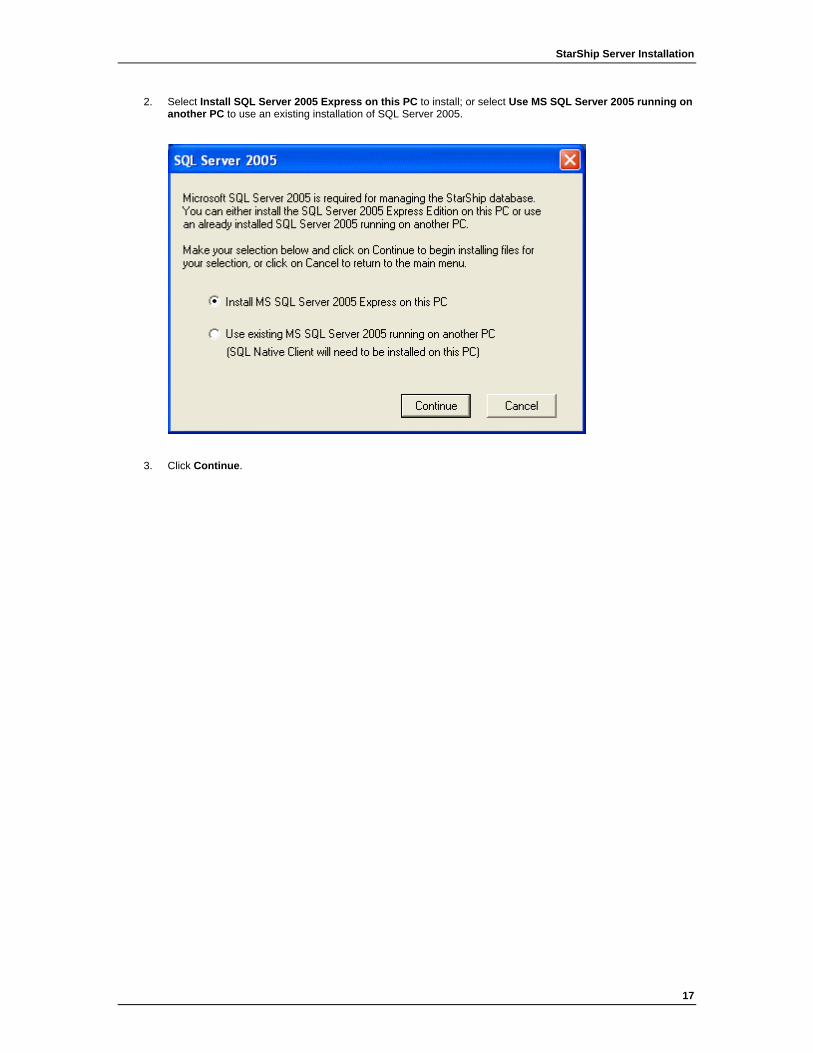
2. Select Install SQL Server 2005 Express on this PC to install; or select Use MS SQL Server 2005 running on another PC to use an existing installation of SQL Server 2005.
3. Click Continue.
17

18
Installing SQL Server 2005 Express SP2 with Advanced Services This installation will run if you selected Install MS SQL Server 2005 Express on this PC. Note: Reporting Services, which is installed as part of SQL Server Express with Advanced Services, will not install on operating systems that do not include Internet Information Services (IIS).
1. The installation files are extracted. Enable the I accept the licensing terms and conditions check box and click Next.

StarShip Server Installation
2. Click Install to continue. After the required components are installed, click Next.
19
StarShip Installation
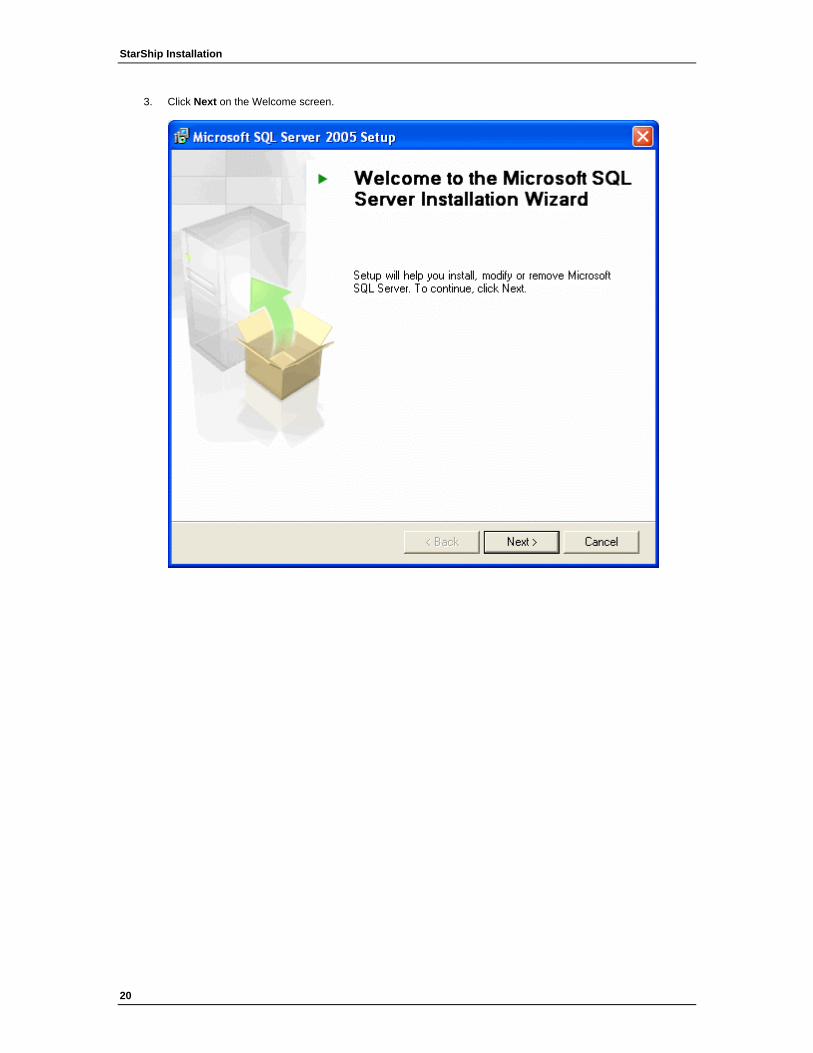
3. Click Next on the Welcome screen.
20

StarShip Server Installation
4. SQL Setup checks the system configuration and displays any warnings or error messages. Please review any messages that appear. If there are no errors/warnings, click Next.
21
StarShip Installation
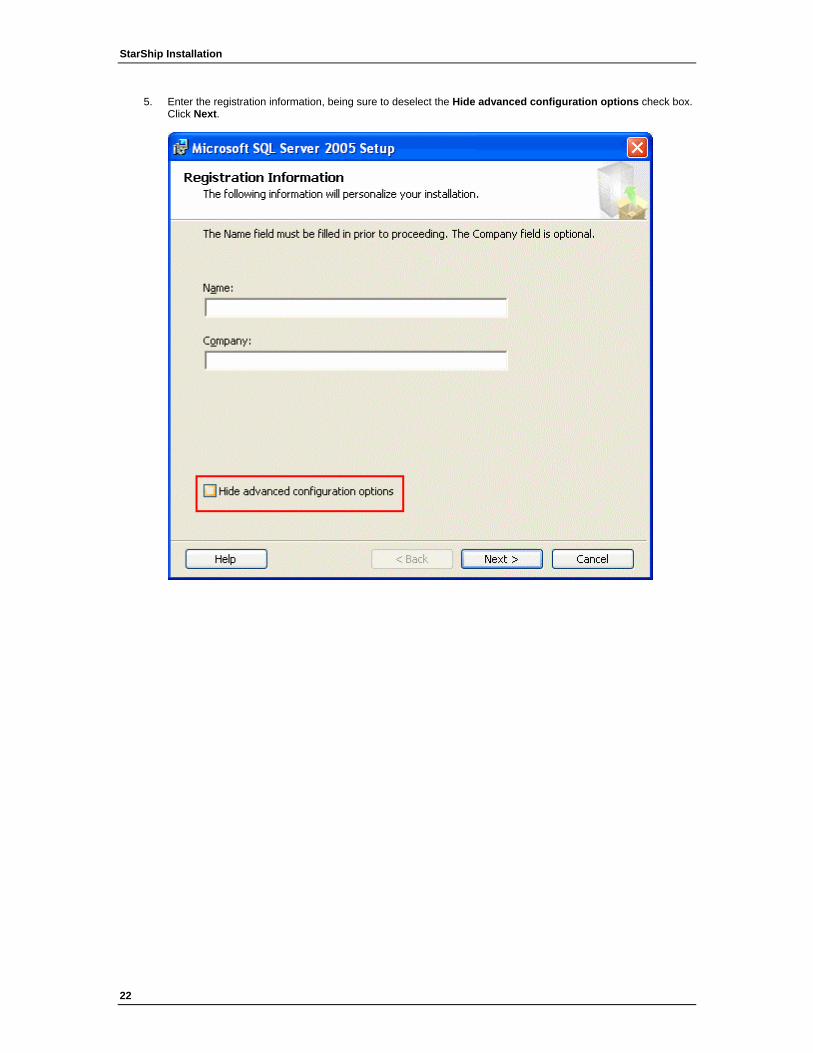
5. Enter the registration information, being sure to deselect the Hide advanced configuration options check box. Click Next.
22

StarShip Server Installation
6. Under Client Components, choose the option Will be installed on local hard drive for Management Studio Express. Click Next.
23

StarShip Installation
7. Follow the instructions on the Instance Name dialog to select an Instance Name. Microsoft recommends accepting the default of Named instance. Click Next.
24

StarShip Server Installation
8. For Service Account, accept the default settings but make sure the SQL Browser check box is enabled. Click Next.
25

StarShip Installation
9. Select an authentication mode for connecting to SQL Server. V-Technologies recommends using Mixed Mode. If you choose Mixed Mode, type in and confirm a password for the SQL sa (System Administrator) logon. Click Next.
26

StarShip Server Installation
10. Accept the default Collation Settings and click Next.
27

StarShip Installation
11. Select the Add user to the SQL Server Administrator role. This ensures that the user performing the installation can access the SQL server to create users, manage databases, etc. Click Next.
28

StarShip Server Installation
12. Choose whether or not you want to participate in Microsoft error reporting. Errors are automatically sent to Microsoft if this computer has Internet access. Click Next.
29

StarShip Installation
13. The SQL Server is now ready to be installed. If you need to make any changes, you may click Back to revisit previous dialogs. To continue, click Install.
30
StarShip Server Installation
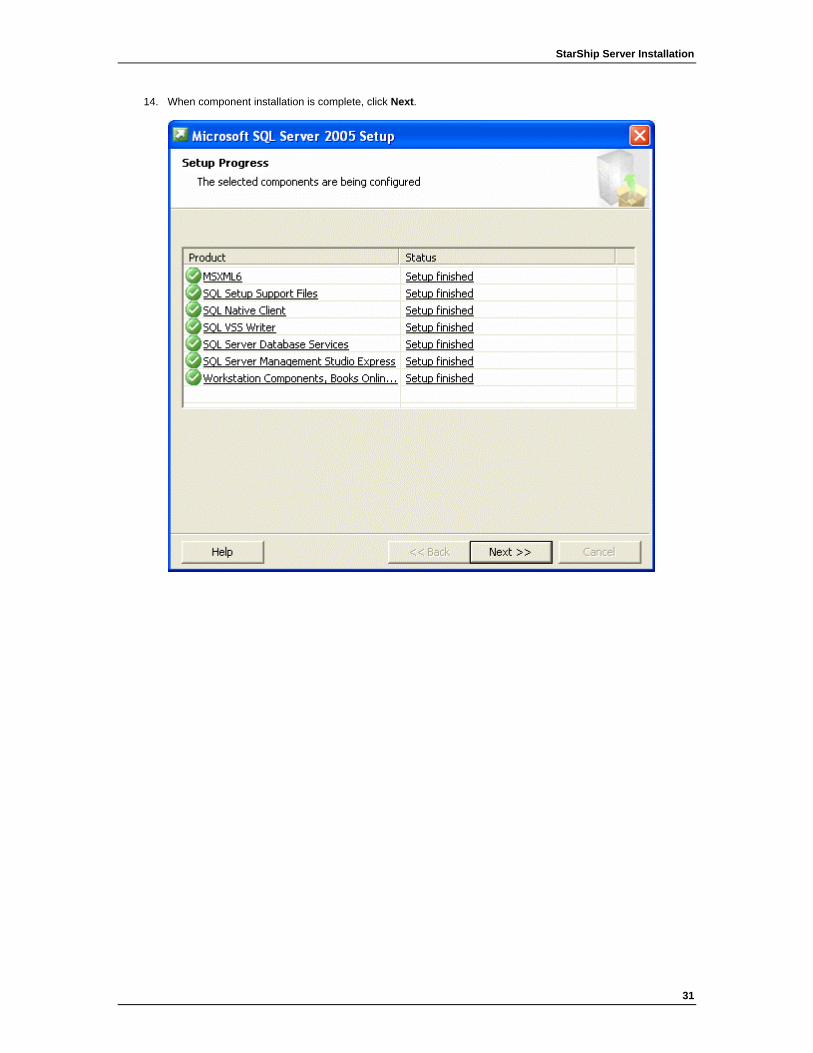
14. When component installation is complete, click Next.
31

StarShip Installation
15. By default, several SQL Server features are disabled. If a different computer (other than the local computer) needs access to SQL Server, you need to enable remote connections. Additionally, the xp_cmdshell feature must be enabled in order for the database backup that is built into the StarShip Server component to run. To do this, click the Surface Area Configuration tool link.
32

StarShip Server Installation
16. In the Surface Area Configuration dialog, select Surface Area Configuration for Services and Connections.
33
StarShip Installation
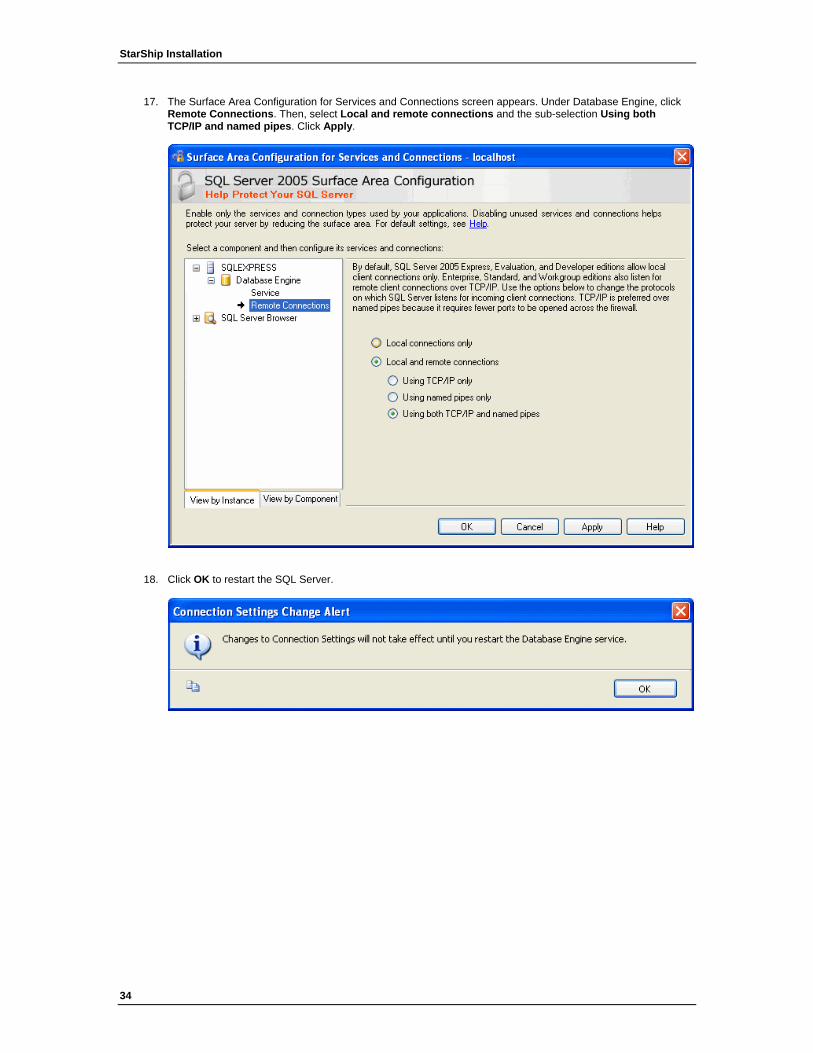
17. The Surface Area Configuration for Services and Connections screen appears. Under Database Engine, click Remote Connections. Then, select Local and remote connections and the sub-selection Using both TCP/IP and named pipes. Click Apply.
18. Click OK to restart the SQL Server.
34

StarShip Server Installation
19. Click OK to close the Surface Area Configuration for Services and Connections dialog.
35

StarShip Installation
20. Click Surface Area Configuration for Features.
36

StarShip Server Installation
21. Select xp_cmdshell and check the Enable xp_cmdshell check box.
22. Click Apply, then OK to exit.
23. Click the X in the top right-hand corner of the window to close the Surface Area Configuration tool.
37

StarShip Installation
24. Click Finish to complete the installation.
38
39
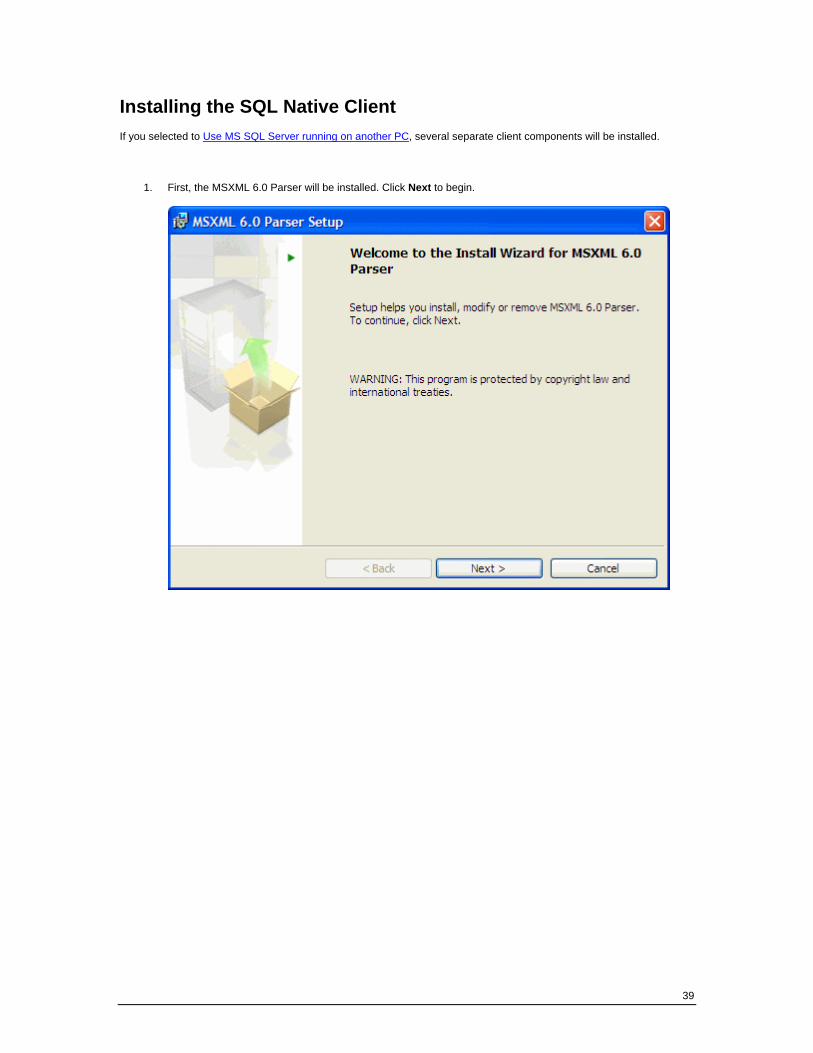
Installing the SQL Native Client If you selected to Use MS SQL Server running on another PC, several separate client components will be installed.
1. First, the MSXML 6.0 Parser will be installed. Click Next to begin.
StarShip Installation
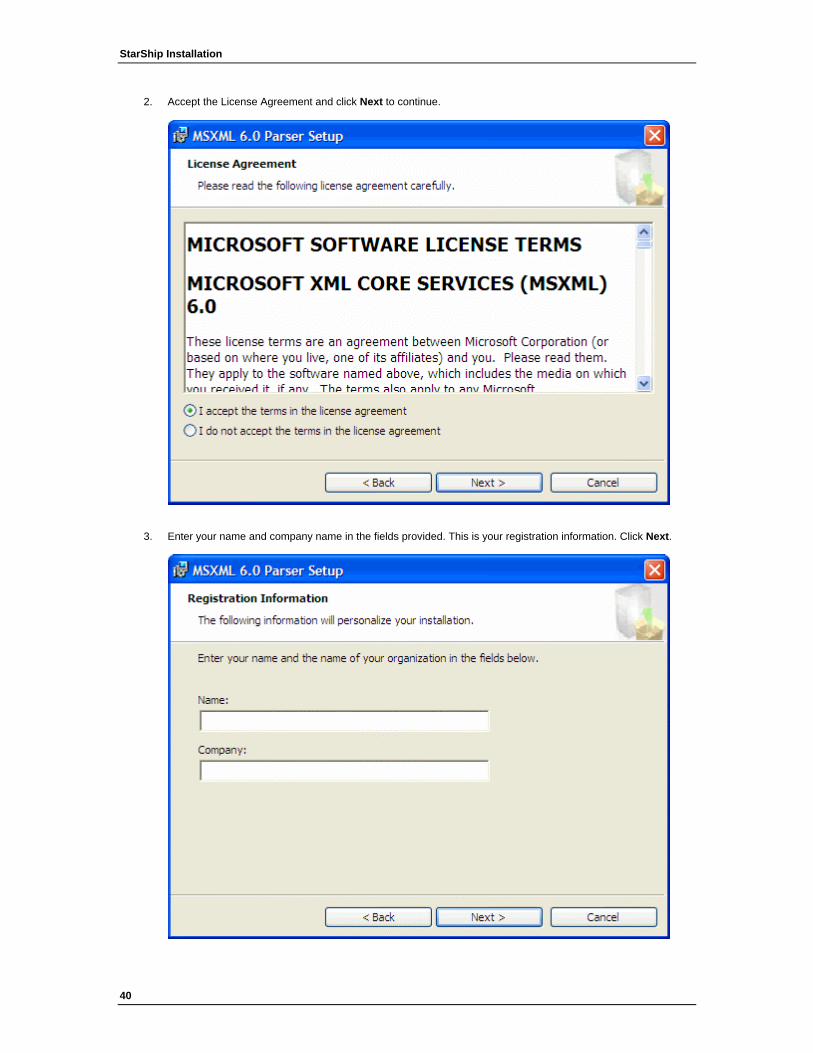
2. Accept the License Agreement and click Next to continue.
3. Enter your name and company name in the fields provided. This is your registration information. Click Next.
40

StarShip Server Installation
4. Click Install.
5. Click Finish when the install is complete.
41

StarShip Installation
6. Next, the SQL Server Native Client is installed. Click Next to begin the installation.
7. Accept the License Agreement and click Next to continue.
42
StarShip Server Installation
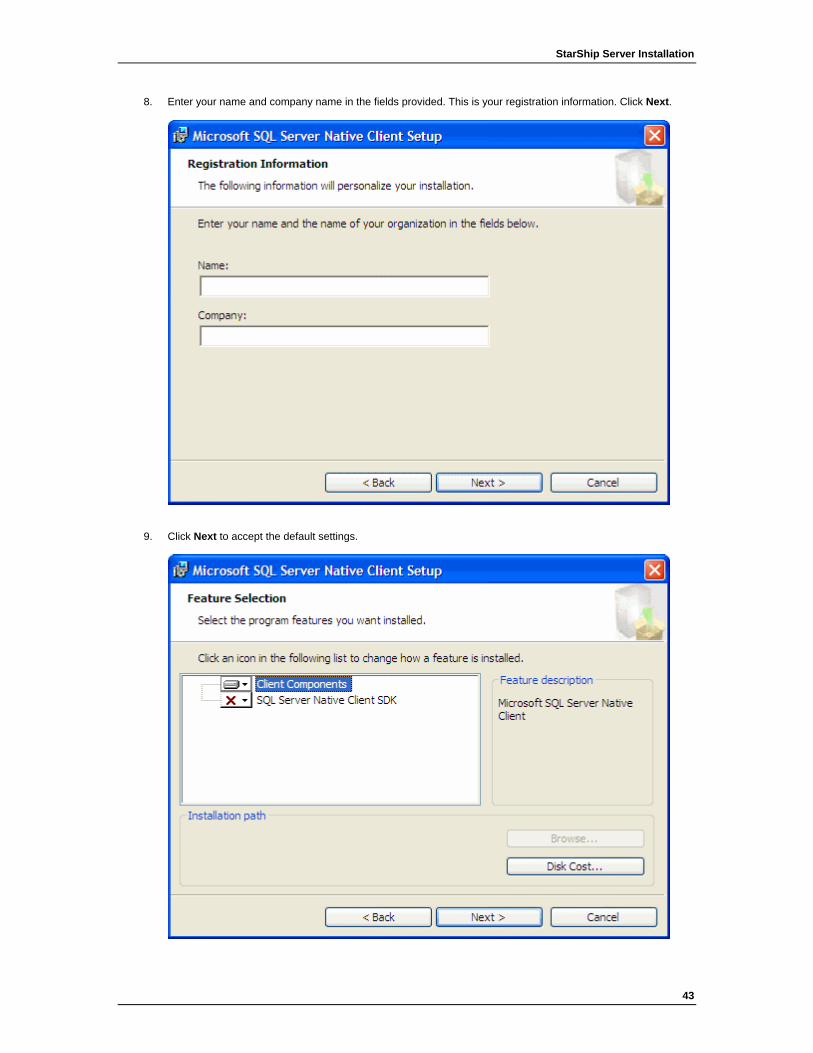
8. Enter your name and company name in the fields provided. This is your registration information. Click Next.
9. Click Next to accept the default settings.
43
StarShip Installation
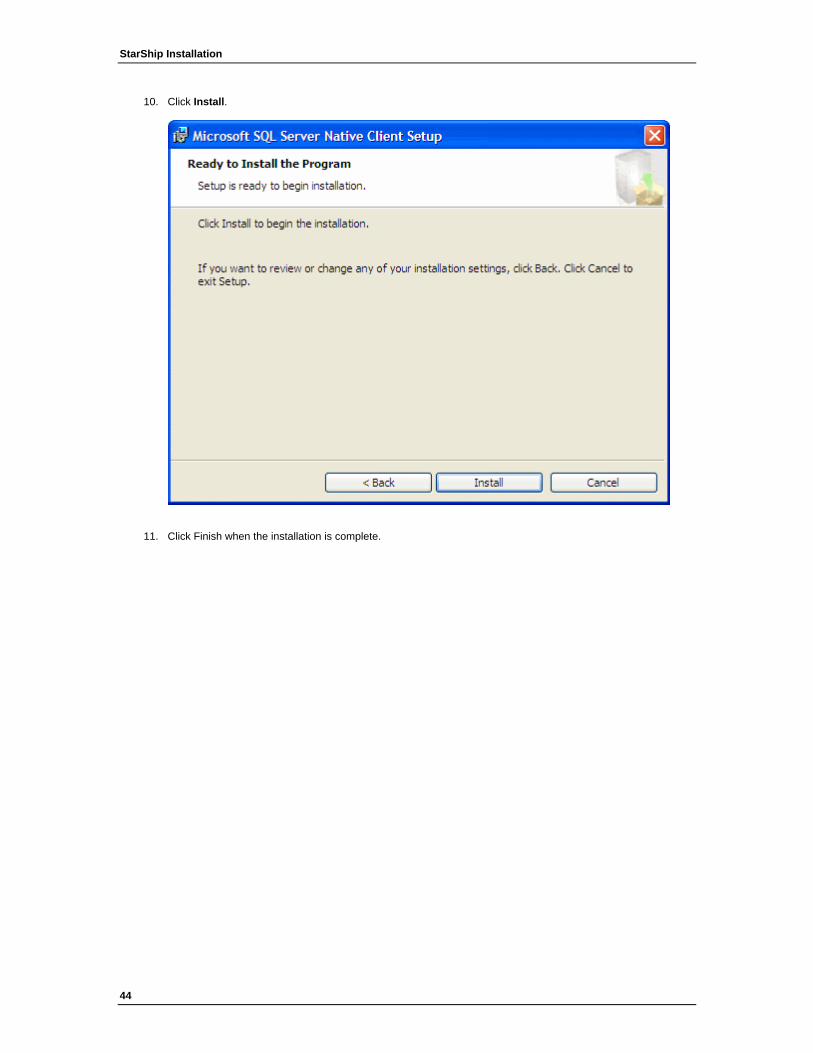
10. Click Install.
11. Click Finish when the installation is complete.
44
StarShip Server Installation
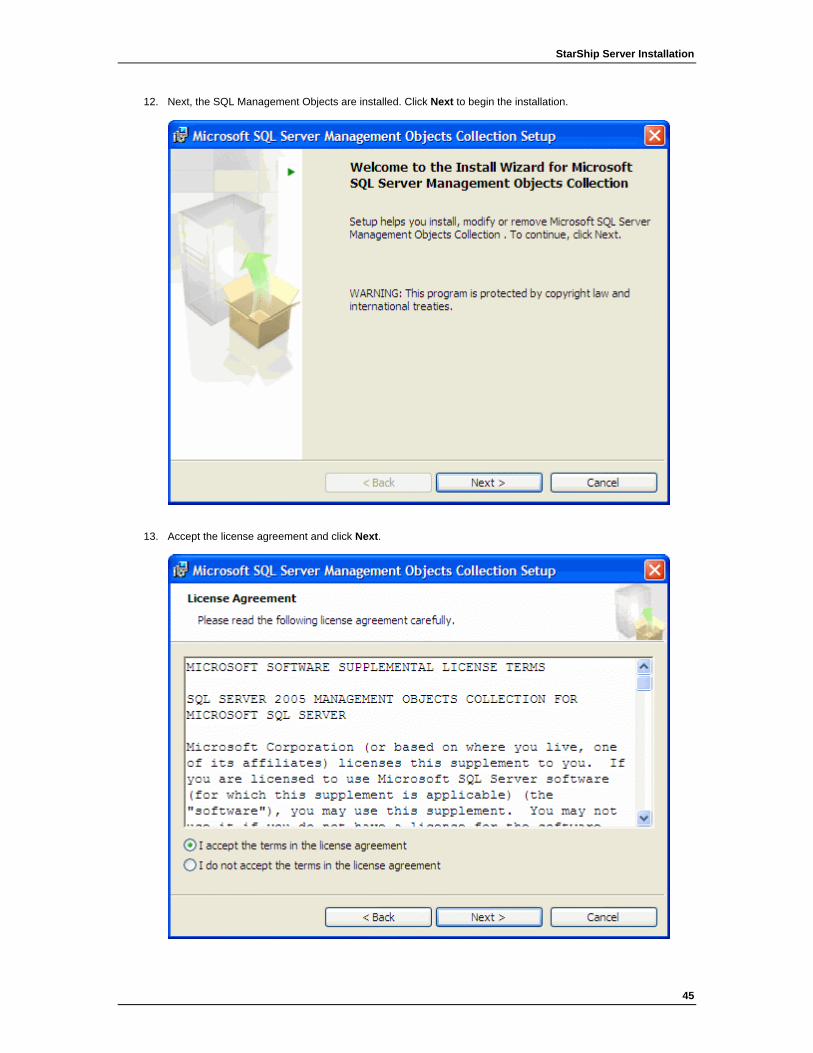
12. Next, the SQL Management Objects are installed. Click Next to begin the installation.
13. Accept the license agreement and click Next.
45

StarShip Installation
14. Enter your name and company name in the fields provided. This is your registration information. Click Next.
15. Click Install.
46

StarShip Server Installation
16. Click Finish when the installation is complete.
17. Next, choose the Crystal Reports Runtime 2008 link.
18. Crystal Reports installation runs.
Now that the prerequisite software is installed, continue with the StarShip Server Installation.
47
StarShip Installation
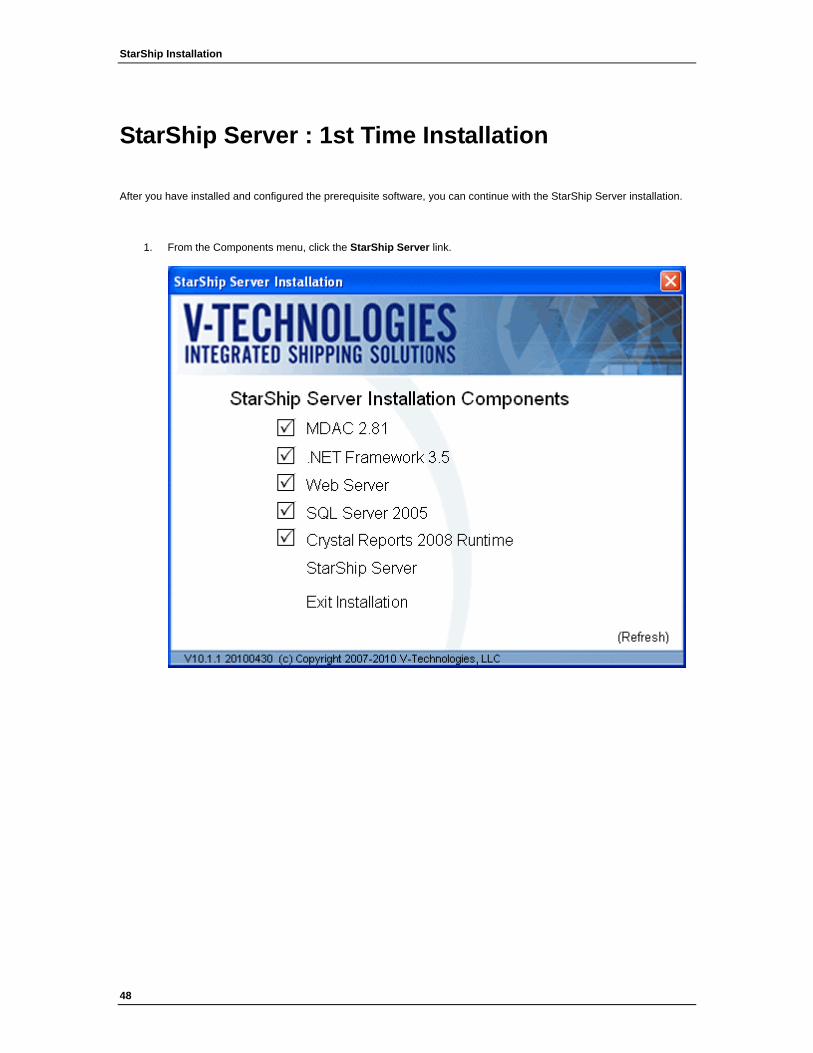
StarShip Server : 1st Time Installation
After you have installed and configured the prerequisite software, you can continue with the StarShip Server installation.
1. From the Components menu, click the StarShip Server link.
48
StarShip Server Installation
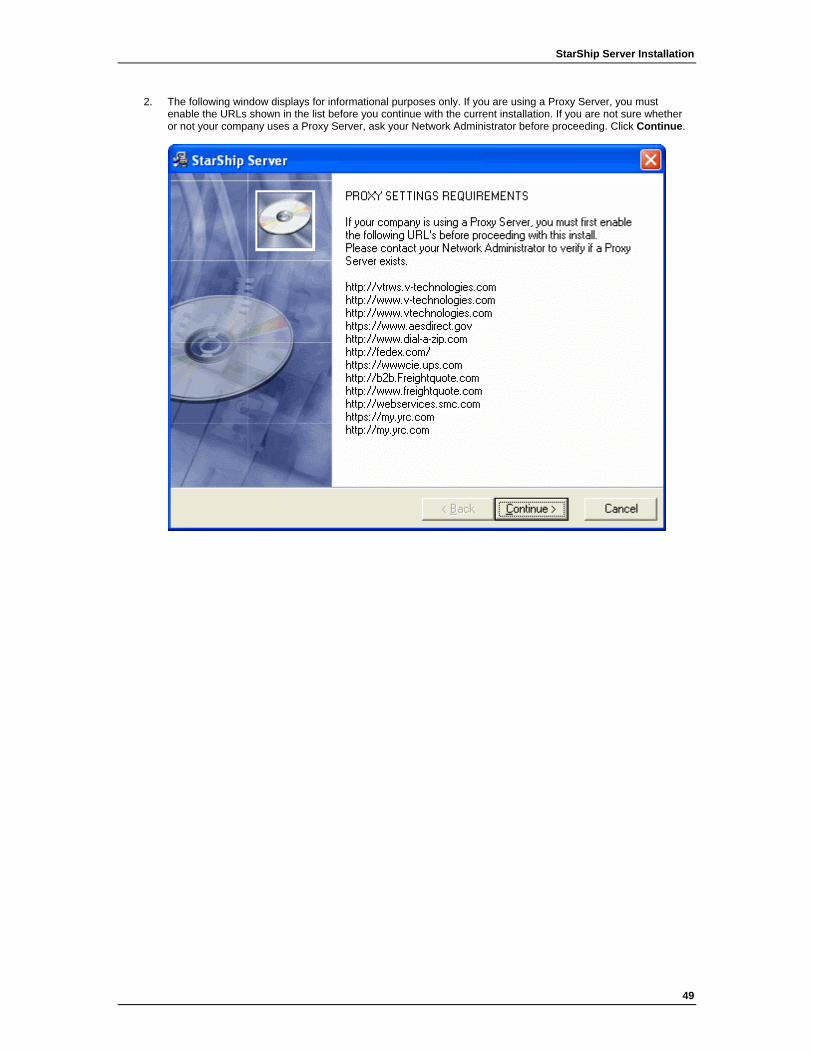
2. The following window displays for informational purposes only. If you are using a Proxy Server, you must enable the URLs shown in the list before you continue with the current installation. If you are not sure whether or not your company uses a Proxy Server, ask your Network Administrator before proceeding. Click Continue.
49

StarShip Installation
3. Enter the Registration Information and Product Serial Number provided to you by V-Technologies. If you did not receive a serial number, please contact the V-Technologies Sales Department by calling 1.800.462.4016. Click Next.
50
StarShip Server Installation
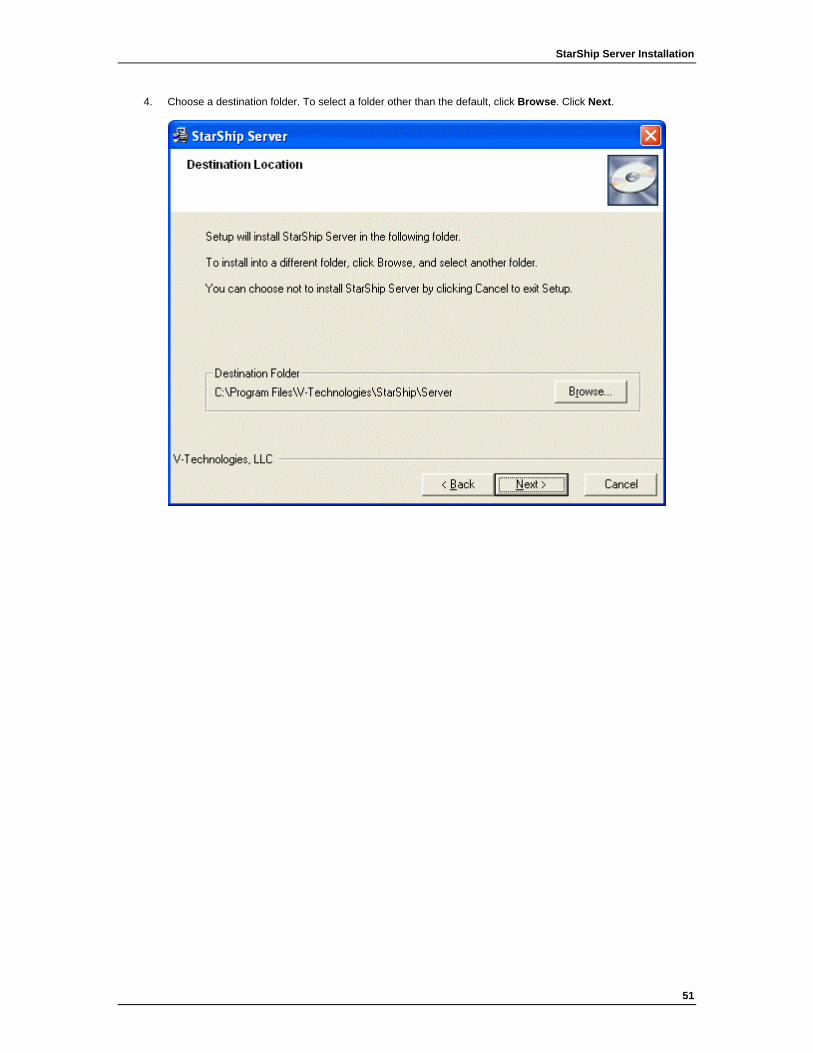
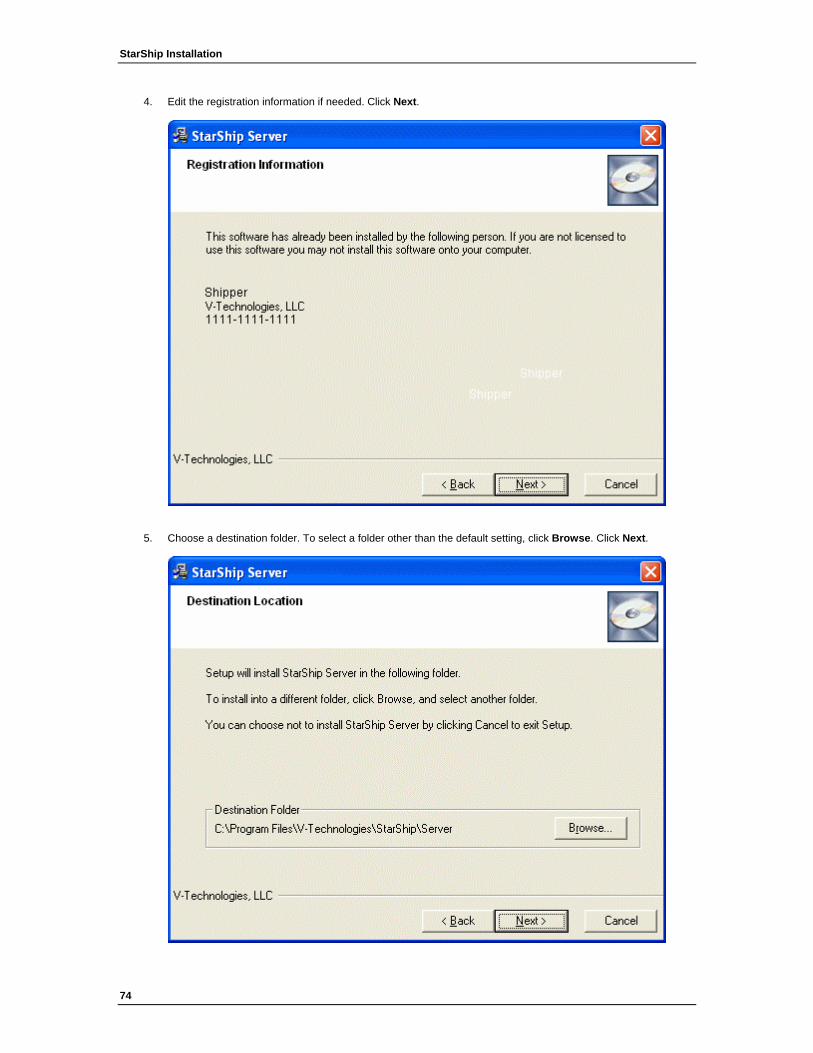
4. Choose a destination folder. To select a folder other than the default, click Browse. Click Next.
51

StarShip Installation
5. Select the SQL Server 2005 Instance where the Starship database should be installed. If it does not appear in the list, click the My SQL Server 2005 Instance... check box and then enter the computer name where SQL 2005 is running. Click Next.
52
StarShip Server Installation
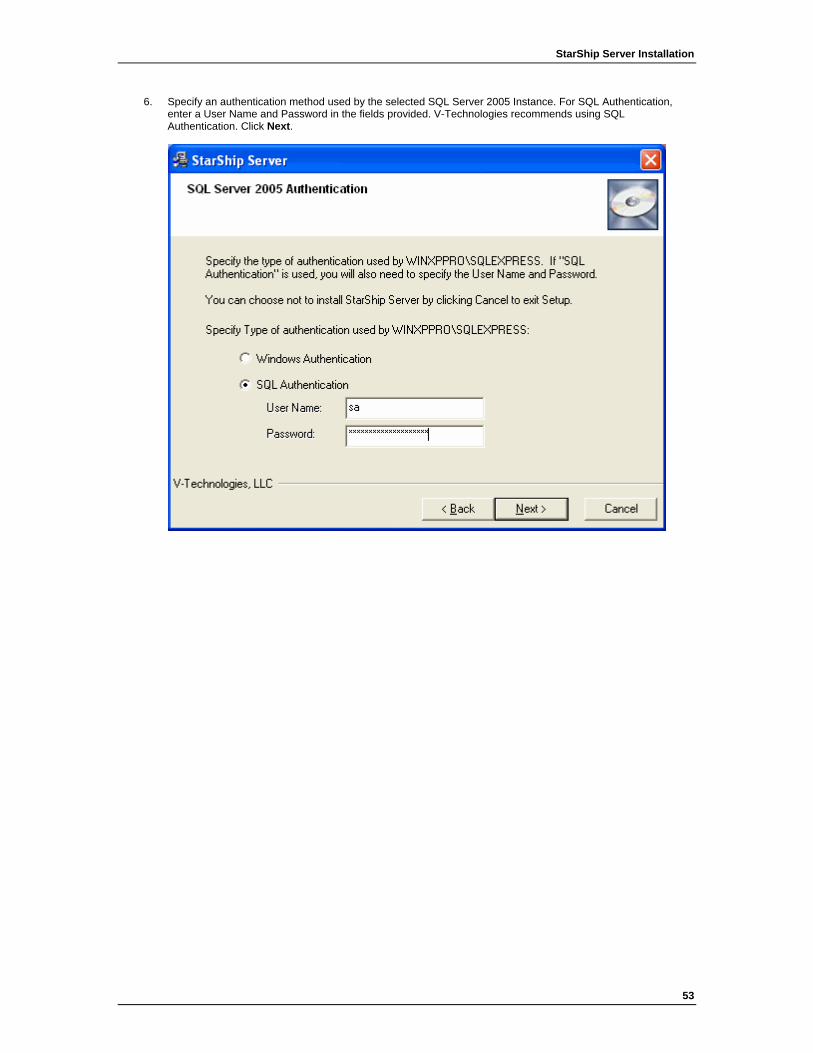
6. Specify an authentication method used by the selected SQL Server 2005 Instance. For SQL Authentication, enter a User Name and Password in the fields provided. V-Technologies recommends using SQL Authentication. Click Next.
53

StarShip Installation
7. You can choose whether or not to create backup copies of any files that are replaced during the installation process. When you select Yes, you can also provide a directory for the backup files. Click Next.
54

StarShip Server Installation
8. Select the Program Manager group where you would like to add shortcut icons for StarShip Server. You may accept the default setting of StarShip Server or type in a new group. Click Next.
55

StarShip Installation
9. Click Next to begin the installation.
56

StarShip Server Installation
10. Set up your UPS connection: Select the type of access based upon the descriptions provided. Click Next.
57

StarShip Installation
11. If you are using a proxy server, enter the proxy information and click Test.
58

59
12. If you are not using a proxy server, leave this dialog blank and click Next.

StarShip Installation
13. The connection is tested and if successful, you receive an informational message that the connection was made. Click OK to continue.
60
StarShip Server Installation
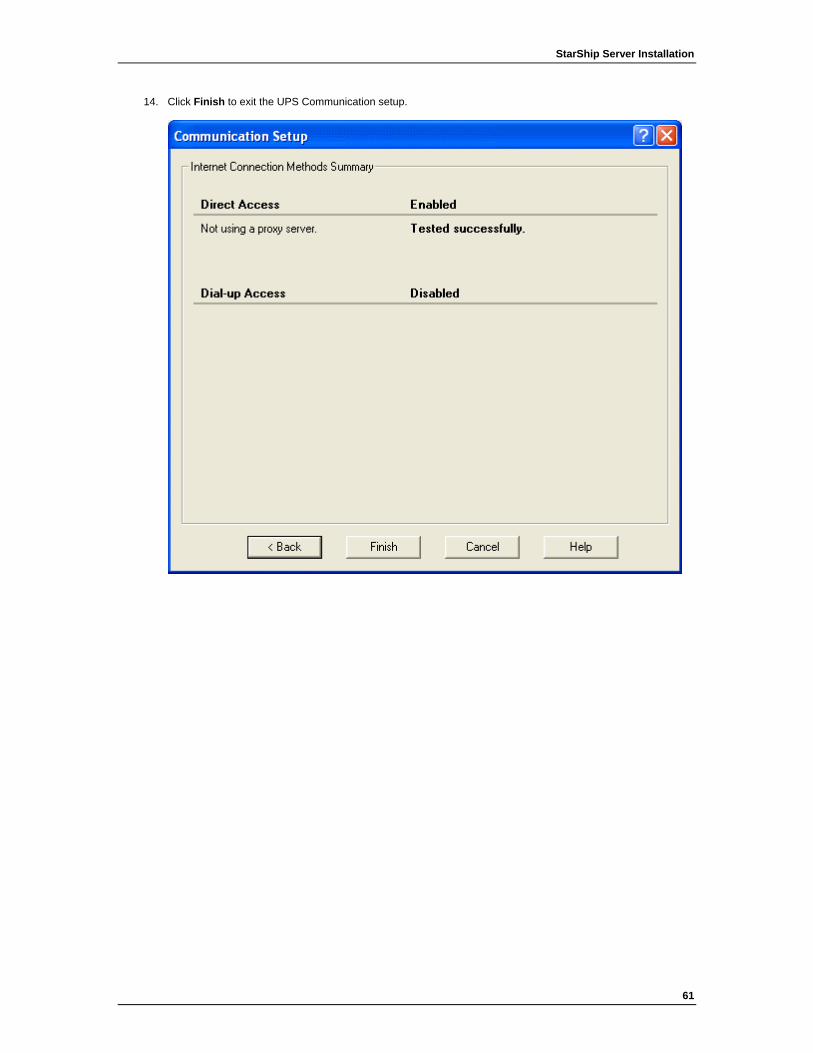
14. Click Finish to exit the UPS Communication setup.
61

StarShip Installation
15. If you ran the installation program from a CD, enable the Check for updates on the web check box. If you used a web installer, there is no need to check for updates. Click Finish to complete the installation.
62
StarShip Server Installation
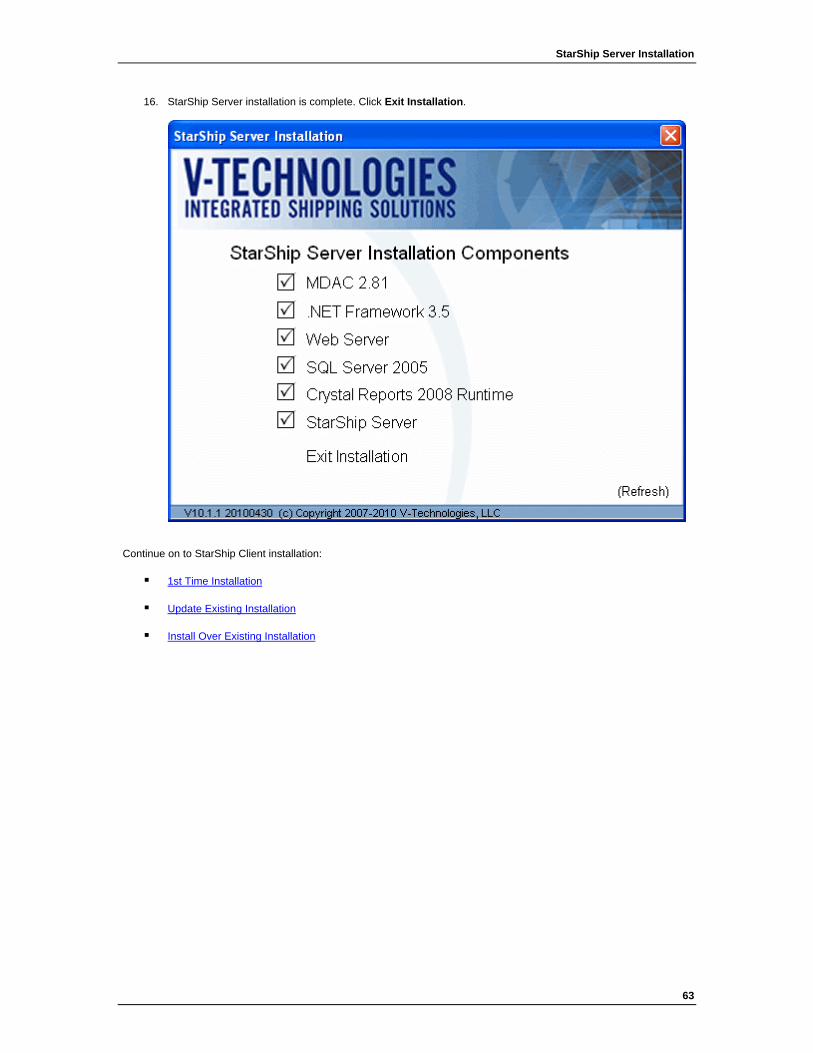
16. StarShip Server installation is complete. Click Exit Installation.
Continue on to StarShip Client installation:
1st Time Installation
Update Existing Installation
Install Over Existing Installation
63

StarShip Installation
StarShip Server : Update Existing Installation
Follow these instructions to update your existing StarShip Server installation. We suggest that you create a backup of your database before continuing with these steps.
1. From the Components menu, select StarShip Server.
64

StarShip Server Installation
2. The following window displays for informational purposes only. If you are using a Proxy Server, you must enable the URLs shown in the list before you continue with the current installation. If you are not sure whether or not your company uses a Proxy Server, ask your Network Administrator before proceeding. Click Continue.
65

StarShip Installation
3. StarShip detects that you already have the Server installed. Click Update existing installation to reinstall current files and update the database. Then press Next.
66

StarShip Server Installation
4. Click Next to confirm the Registration Information.
5. StarShip validates the registration information.
67

StarShip Installation
6. Choose if you would like to back up the replaced files. You may click Browse to change the default location of the files. Press Next.
68

StarShip Server Installation
7. Click Next to start the update.
8. Click Finish to exit the installation.
69

StarShip Installation
Client installation
Continue on to StarShip Client installation:
1st Time Installation
Update Existing Installation
Install Over Existing Installation
70

StarShip Server Installation
StarShip Server : Install Over Existing Installation
Follow this procedure to install a clean copy of StarShip Server over your existing installation. A new default database named StarShip will be created.
1. From the Components menu, select StarShip Server.
71

StarShip Installation
2. The following window displays for informational purposes only. If you are using a Proxy Server, you must enable the URLs shown in the list before you continue with the current installation. If you are not sure whether or not your company uses a Proxy Server, ask your Network Administrator before proceeding. Click Continue.
72

StarShip Server Installation
3. StarShip detects that you already have the Server installed. Select Install over existing installation. Then click Next.
73
StarShip Installation
4. Edit the registration information if needed. Click Next.
5. Choose a destination folder. To select a folder other than the default setting, click Browse. Click Next.
74

StarShip Server Installation
6. Select the SQL Server 2005 Instance where the Starship database should be installed. If it does not appear in the list, click the My SQL Server 2005 Instance... check box and then enter the computer name where SQL 2005 is running. Click Next.
75

StarShip Installation
7. Specify an authentication method to use for the selected SQL Server 2005 Instance. For SQL Authentication, enter a User Name and Password in the fields provided. V-Technologies recommends using SQL Authentication. Click Next.
76
StarShip Server Installation
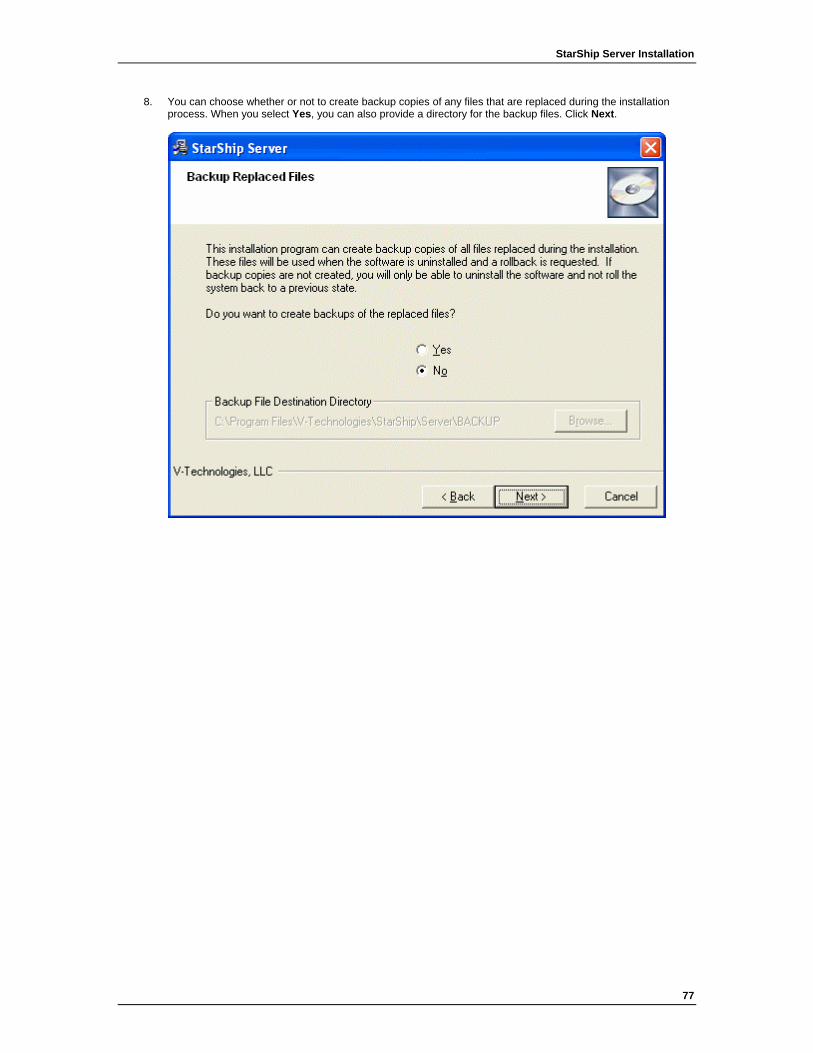
8. You can choose whether or not to create backup copies of any files that are replaced during the installation process. When you select Yes, you can also provide a directory for the backup files. Click Next.
77

StarShip Installation
9. Select the Program Manager group where you would like to add shortcut icons for StarShip Server. You may accept the default setting of StarShip Server or type in a new group. Click Next.
78

StarShip Server Installation
10. Click Next to begin the installation.
79

StarShip Installation
11. If you ran the installation program from a CD, enable the Check for updates on the web check box. If you used a web installer, there is no need to check for updates. Click Finish to complete the installation.
80
StarShip Server Installation
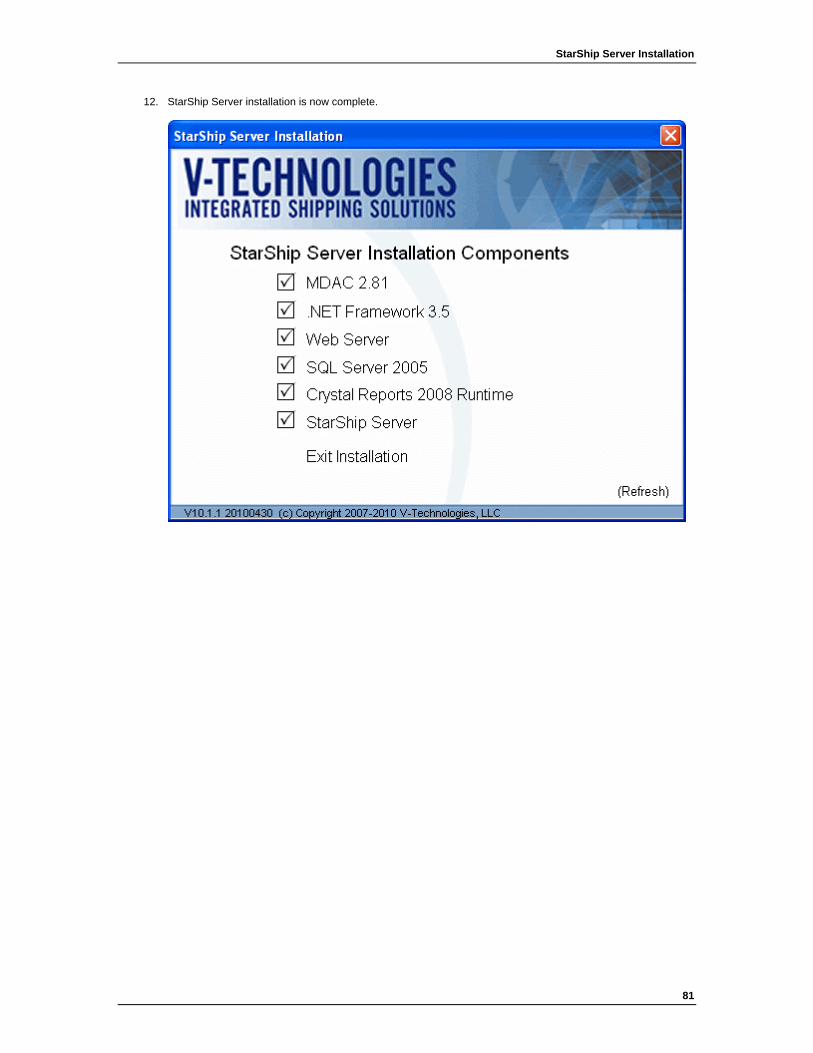
12. StarShip Server installation is now complete.
81

82
Notes about errors If there is already a database named StarShip the installer requires you to enter a new database name and retry. If the name does not conflict with an existing name, the database is created and set as the current database.
You may also receive this error if you are trying to upgrade an installation that is lower than version 10.0.2. In this case, you will need to install over the existing installation or first upgrade to 10.0.2 before upgrading your installation.
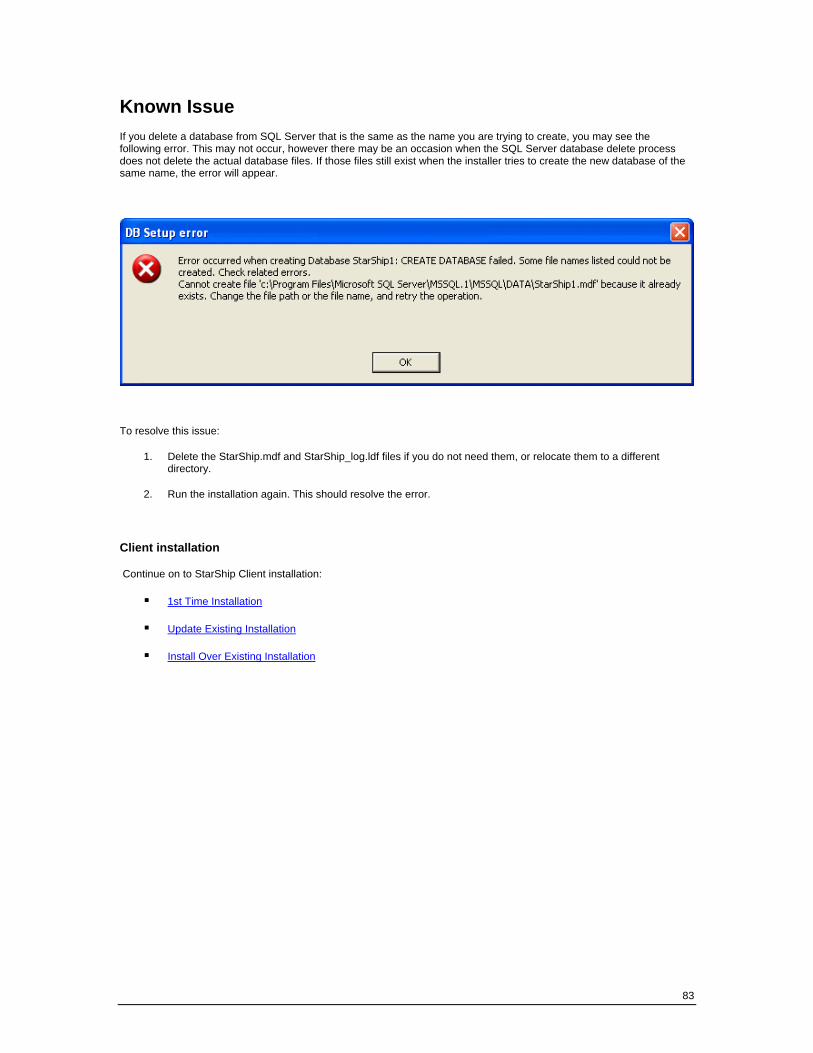
Known Issue If you delete a database from SQL Server that is the same as the name you are trying to create, you may see the following error. This may not occur, however there may be an occasion when the SQL Server database delete process does not delete the actual database files. If those files still exist when the installer tries to create the new database of the same name, the error will appear.
To resolve this issue:
1. Delete the StarShip.mdf and StarShip_log.ldf files if you do not need them, or relocate them to a different directory.
2. Run the installation again. This should resolve the error.
Client installation
Continue on to StarShip Client installation:
1st Time Installation
Update Existing Installation
Install Over Existing Installation
83
StarShip Client : 1st Time Installation
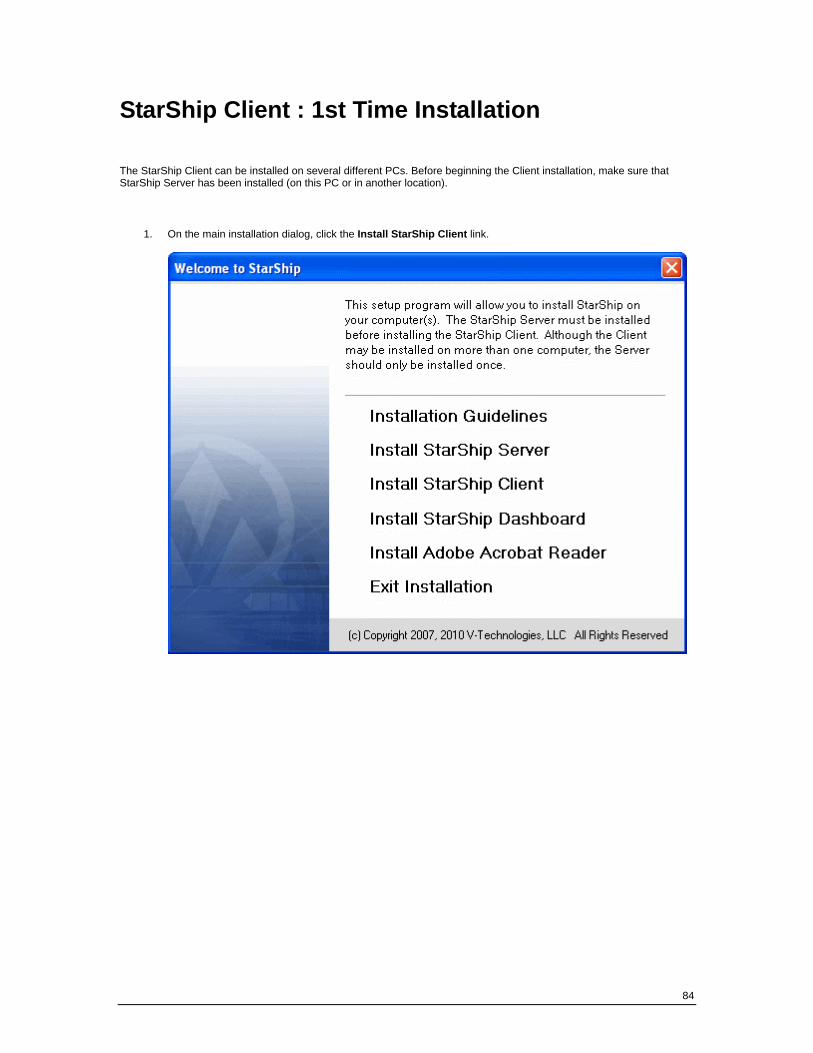
The StarShip Client can be installed on several different PCs. Before beginning the Client installation, make sure that StarShip Server has been installed (on this PC or in another location).
1. On the main installation dialog, click the Install StarShip Client link.
84

StarShip Client Installation
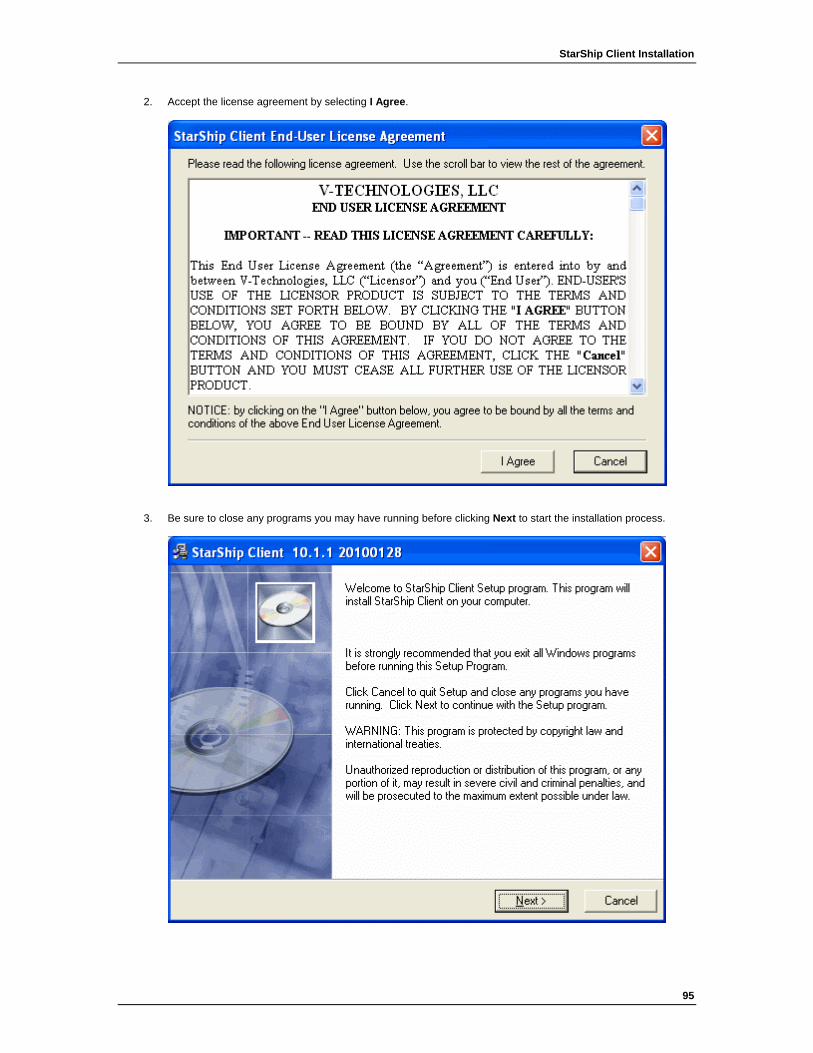
2. Accept the license agreement by selecting I Agree.
3. Click Next to start the installation.
85

StarShip Installation
4. Select where to install the StarShip Client. You can accept the default directory or select a different directory by clicking Browse. Click Next.
86

StarShip Client Installation
5. You can choose whether or not to create backup copies of any files that are replaced during the installation process. When you select Yes, you can also provide a directory for the backup files. Click Next.
87

StarShip Installation
6. In the StarShip Server Location field, type in the computer name or IP address of the computer where StarShip Server is installed and running. "Local" indicates that the server is running on the local machine; in this case, you do not need to enter the computer name or IP address. Click Next.
88

StarShip Client Installation
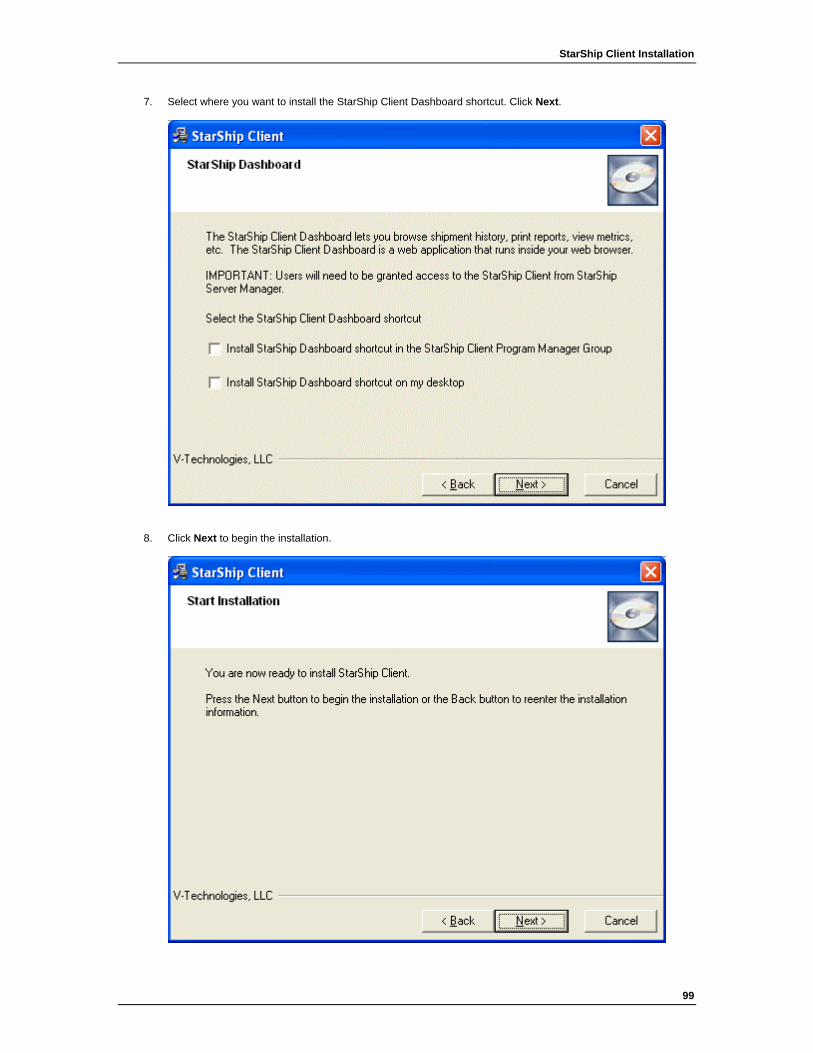
7. Select where you want to install the StarShip Client Dashboard shortcut. Click Next.
89

StarShip Installation
8. Select the Program Manager group where you would like to add shortcut icons for the StarShip Client. You may accept the default setting of StarShip Client or type in a new group. Click Next.
90

StarShip Client Installation
9. Click Next to begin the installation.
91
StarShip Installation
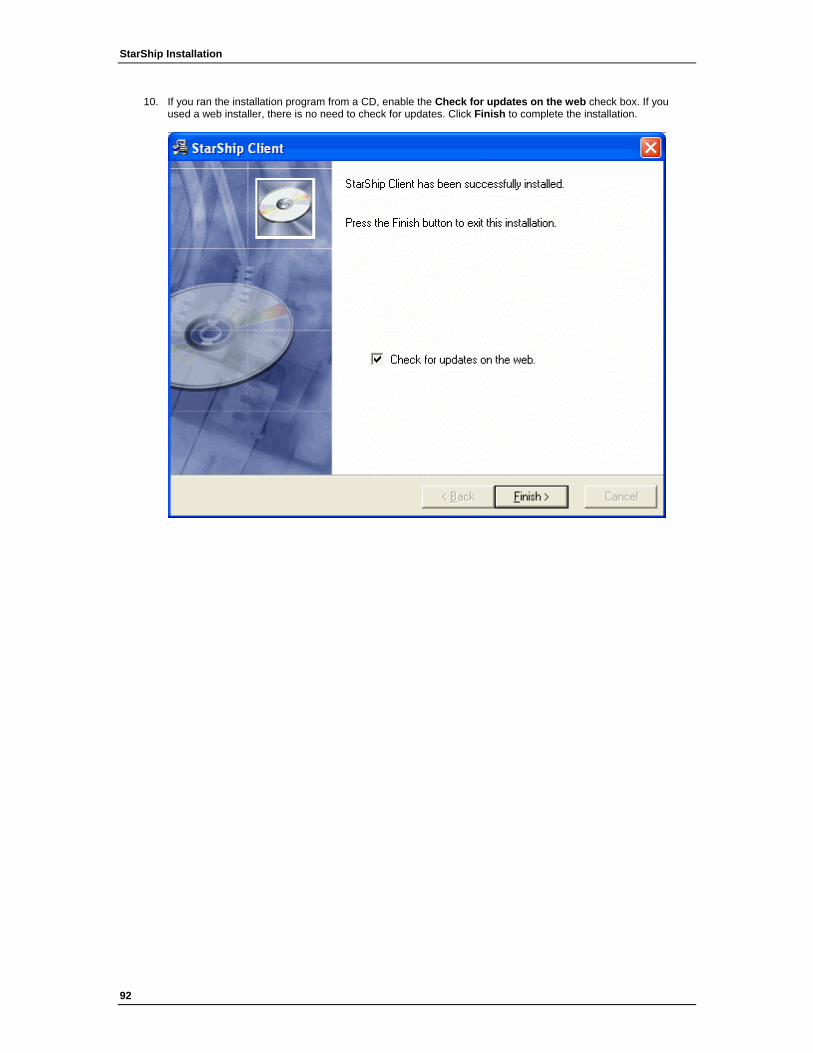
10. If you ran the installation program from a CD, enable the Check for updates on the web check box. If you used a web installer, there is no need to check for updates. Click Finish to complete the installation.
92

StarShip Client Installation
11. Click Exit Installation to close the installer.
93

StarShip Installation
StarShip Client : Update Existing Installation
Updating a StarShip Client installation means that only new and updated files are copied to the existing installation(s).
1. On the main installation dialog, click the Install StarShip Client link.
94
StarShip Client Installation
2. Accept the license agreement by selecting I Agree.
3. Be sure to close any programs you may have running before clicking Next to start the installation process.
95

StarShip Installation
4. StarShip detects the existing installation. Select Update existing installation and click Next.
96

StarShip Client Installation
5. Choose if you would like to back up the replaced files. You may press Browse to change the default location of the files. Press Next.
97

StarShip Installation
6. In the StarShip Server Location field, type in the computer name or IP address of the computer where StarShip Server is installed and running. "Local" indicates that the server is running on the local machine; in this case, you do not need to enter the computer name or IP address. Click Next.
98
StarShip Client Installation
7. Select where you want to install the StarShip Client Dashboard shortcut. Click Next.
8. Click Next to begin the installation.
99

StarShip Installation
9. If you ran the installation program from a CD, enable the Check for updates on the web check box. If you used a web installer, there is no need to check for updates. Click Finish to complete the installation.
100

StarShip Client Installation
10. Click Exit Installation to close the installer.
101

StarShip Installation
StarShip Client : Install Over Existing Installation
Follow this procedure to install a clean copy of the StarShip Client over existing installations. All files will be newly installed except for data and settings.
1. On the main installation dialog, click the Install StarShip Client link.
102

StarShip Client Installation
2. Accept the license agreement by selecting I Agree.
3. Be sure to close any programs you may have running before clicking Next to start the installation process.
103

StarShip Installation
4. StarShip detects that you already have the Client installed. Click Install over existing installation. Then press Next.
104

StarShip Client Installation
5. Select where to install the StarShip Client. You can accept the default directory or select a different directory by clicking Browse. Click Next.
105

StarShip Installation
6. Choose if you would like to back up the replaced files. You may press Browse to change the default location of the files. Press Next.
106

StarShip Client Installation
7. In the StarShip Server Location field, type in the computer name or IP address of the computer where StarShip Server is installed and running. "Local" indicates that the server is running on the local machine; in this case, you do not need to enter the computer name or IP address. Click Next.
107

StarShip Installation
8. Select where you want to install the StarShip Client Dashboard shortcut. Click Next.
108
StarShip Client Installation
9. Select the Program Manager group where you would like to add shortcut icons for the StarShip Client. You may accept the default setting or type in a new group. Click Next.
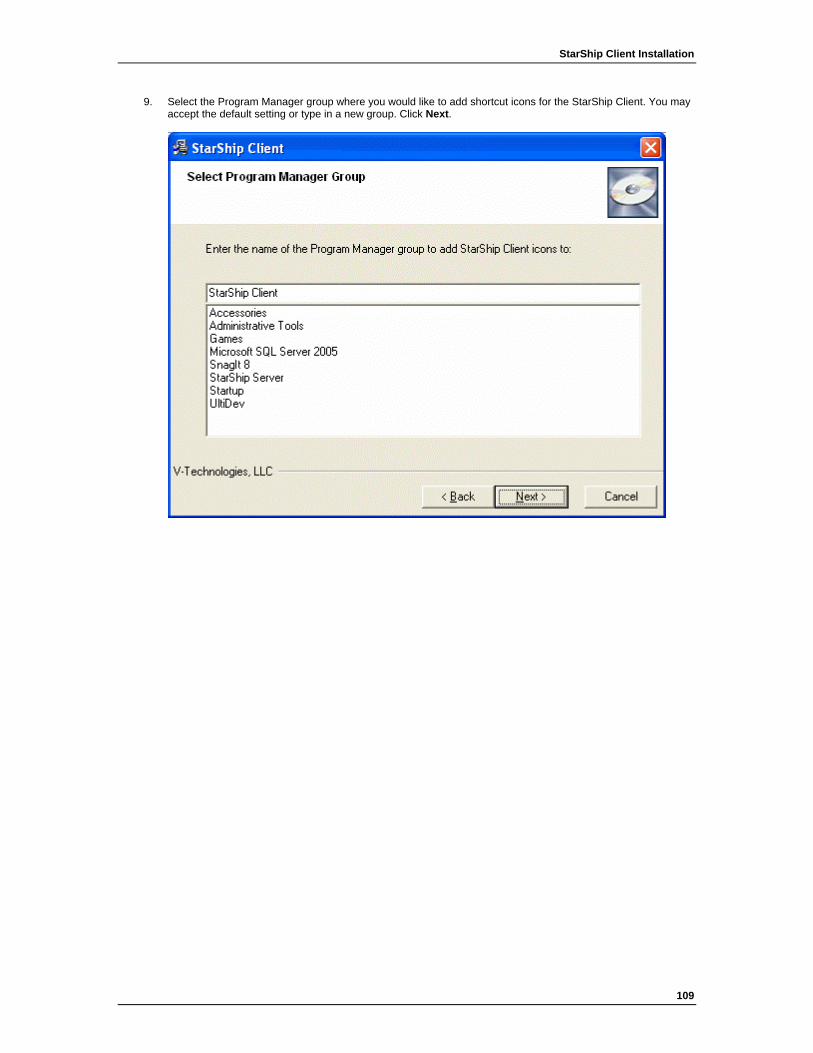
109

StarShip Installation
10. Click Next to begin the installation.
110

StarShip Client Installation
11. If you ran the installation program from a CD, enable the Check for updates on the web check box. If you used a web installer, there is no need to check for updates. Click Finish to complete the installation.
111
StarShip Installation
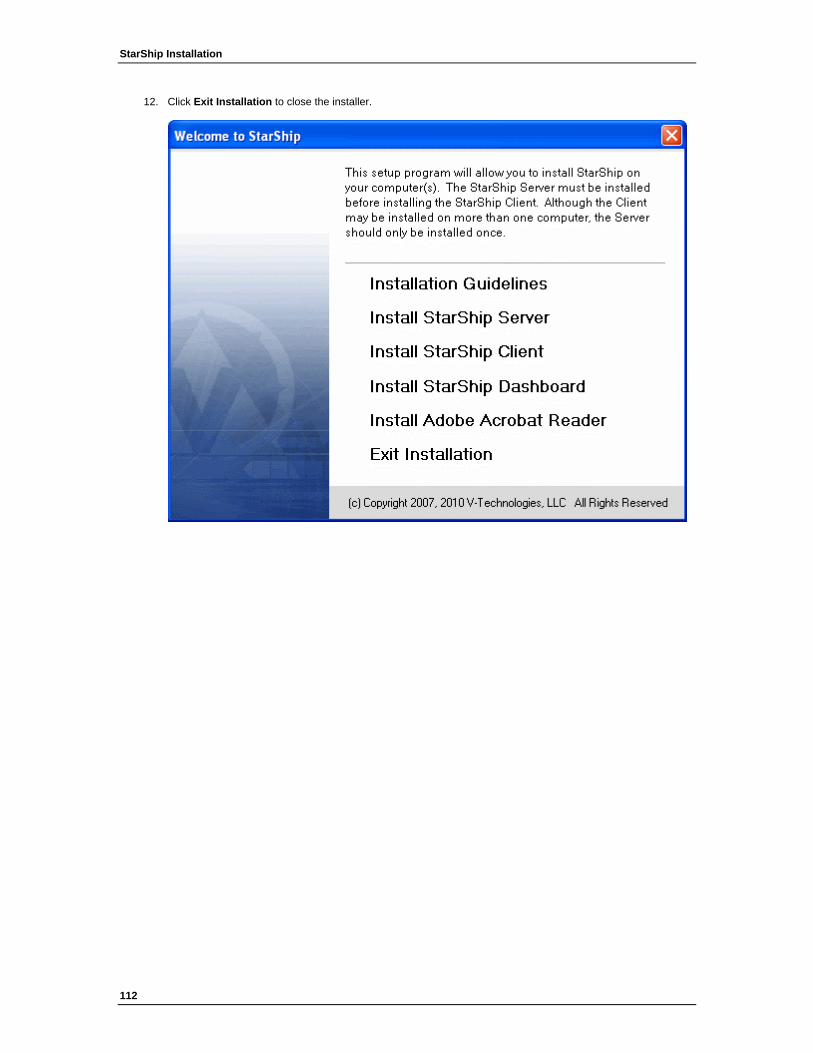
12. Click Exit Installation to close the installer.
112
113
Dashboard Installation
The Dashboard is a new feature in StarShip that gives users a unified view to analyze and monitor all freight and parcel activity and identify future trends.
To give users access to StarShip Dashboard, you will need to enable the Dashboard Login option for each user. You can access this option in Server Manager under Tools > Users.
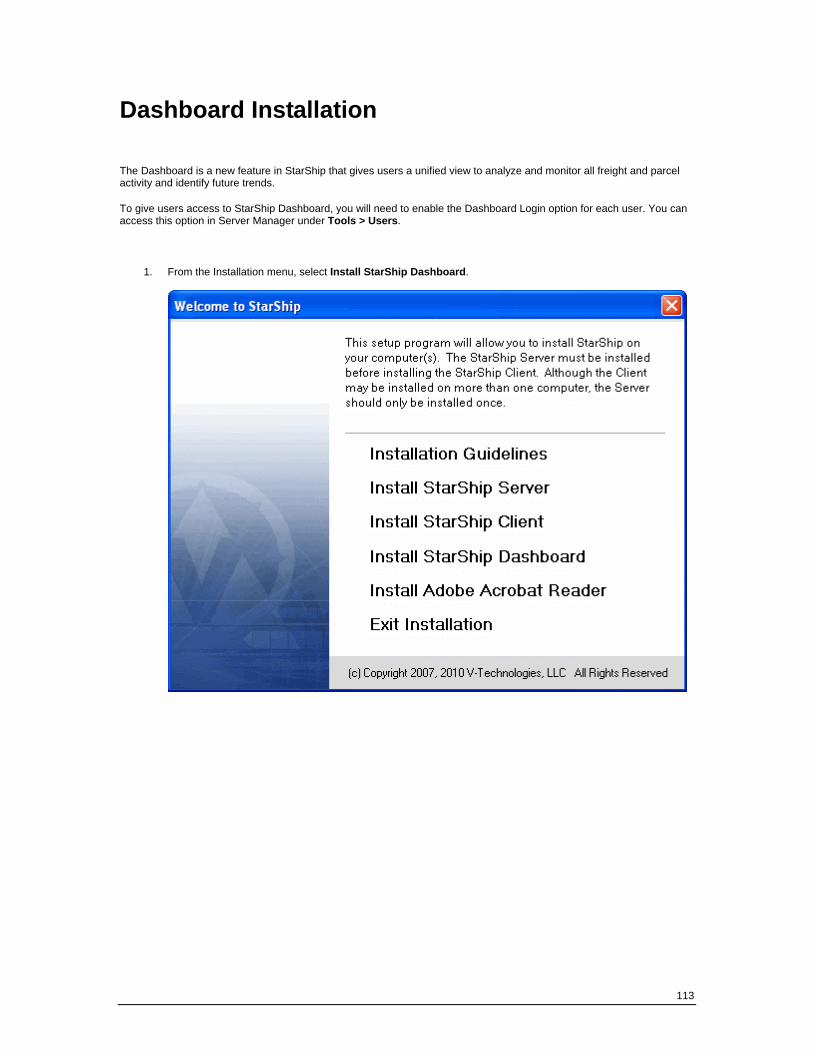
1. From the Installation menu, select Install StarShip Dashboard.

StarShip Installation
2. Click Install Microsoft Silverlight.
3. When the File Download warning appears, click Run.
114

Dashboard Installation
4. Verify that you want to run this software by clicking Run.
5. Click the link to read the License Agreement. There is also information regarding automatic updates available by clicking the learn more link. Click Install Now.
6. Enable Microsoft Update by clicking the check box, if desired. Click Next.
115
StarShip Installation
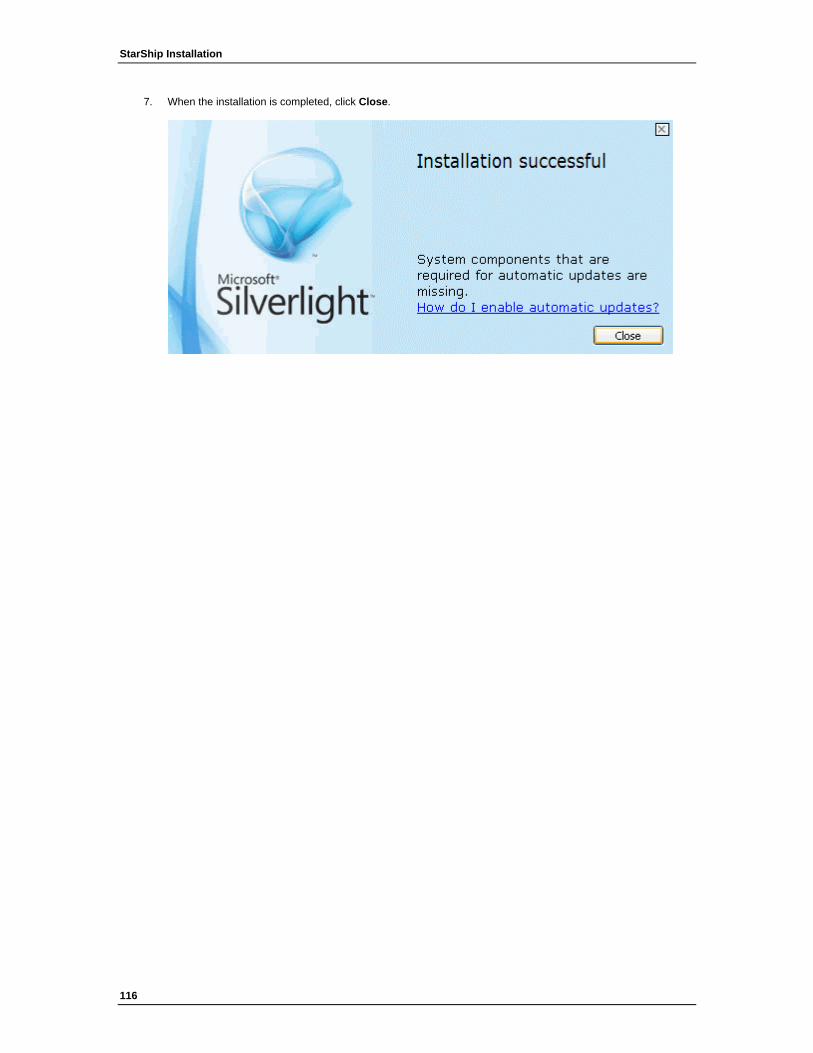
7. When the installation is completed, click Close.
116

117
StarShip Server/Client Web Updates
The Web Update will run if Check for updates on the web was selected at the end of StarShip Server or Client installation. You may also run Web Update at any time from the StarShip Server or StarShip Client program menu.
When the Web Update is launched:
1. The Check for Updates to StarShip Server or Client screen appears. If a Proxy Server exists, the Web Update program adopts the default Proxy Server settings from Internet Explorer.

StarShip Installation
2. If you need to enter specific Proxy Server information, click Advanced and configure Proxy settings. Click Next to continue the web update.
More information about Advanced Settings: Enter the Proxy Server Name or IP address, and Port Number used for HTTP communication.
118

V-Technologies Headquarters
3. StarShip checks the currently installed version. If you are running the latest version of the StarShip Client or Server, click OK. The Web Update is complete.
However, if updates exist, the Readme screen displays the list of changes. Click Next.
119

StarShip Installation
4. Choose a location for the update by clicking Browse or accepting the default setting. You can also choose if you want to delete the update file after installing it by enabling the Erase ... check box. Click Next.
5. When the download is complete, click Finish to begin the installation.
120

V-Technologies Headquarters
6. Accept the license agreement by selecting I Agree.
7. Click Next.
121

StarShip Installation
8. Click Next to begin the Client Web Update.
9. Click Finish to close the installer.
122

V-Technologies Headquarters
Who is V-Technologies?
V-Technologies, LLC is a software company specializing in shipping automation software. We've been in business since 1987, and have been developing shipping software since 1989. Our StarShip products are used by thousands of companies to integrate the shipping department to the front office.
V-Technologies is best known for offering sophisticated shipping solutions at very affordable prices. The cost of our basic system is comparable to what most of our competitors charge for rate changes each year.
V-Technologies is a reseller of Transcell and Mettler Toledo electronic scales, Zebra label printers, Symbol Cobra scanners and supplies providing a single source to meet all of your shipping needs.
CONTACT V-TECHNOLOGIES
V-Technologies, LLC 675 W. Johnson Ave Cheshire, CT 06410
V-Technologies Sales Department Contact the Sales Department to request product information, place an order, schedule an online demo or find out about upcoming product releases. Let us know if you would like to receive our latest Newsletter.
800.462.4016 (9 am - 5 pm EST) 203.439.9060 Fax: 203.439.9062 [email protected] or request information using our online form: Request Product Information
V-Technologies Technical Support Contact the Support Department for help with a new installation or to log a help desk ticket. Technical Support incidents may be purchased online at: shop.vtechnologies.com or through the Sales Department.
STARSHIP Hours: 9:00 AM - 6:30 PM EST Phone: 800.462.4016 Fax: 203.439.9062 E-mail: [email protected] Purchase: StarShip Support
Want to expedite your technical support request? Send us a detailed description of the problem using one of our online forms: Online Product Support
For answers to your Frequently Asked Questions, visit one of the following pages: Sales FAQs
SHIPGEAR Hours: 9:00 AM - 6:30 PM EST Phone: 800.462.4016 Fax: 203.439.9062 E-mail: [email protected] Purchase: ShipGear Support
Want to expedite your technical support request? Send us a detailed description of the problem using one of our online forms: Online Product Support
For answers to your Frequently Asked Questions, visit one of the following pages: Sales FAQs
123

StarShip Installation
124
125
Index C Client Installation
1st Time Installation ............................................... 93 Install Over Existing.............................................. 114 Update Existing .................................................... 104
D Dashboard Installation .............................................. 126
R Requirements................................................................ 3
S Server Installation
.NET ....................................................................... 12 Install Over Existing................................................ 79 Launch Server Installation........................................ 5 MDAC..................................................................... 12 Prerequisite Software ............................................... 5 SQL Express .......................................................... 17 SQL Native Client................................................... 17 SQL Server Express............................................... 19 Update Existing ...................................................... 72 Web Server ............................................................ 16
W Web Updates ............................................................ 131