Embed Size (px)
Citation preview
A Collection of Curricula for the STARLAB®
Plate Tectonics Cylinder
Including:
The Changing Earth by Gerald L. Mallon, Ed.D.
v. 616 - ©2008 by Science First®/STARLAB®, 86475 Gene Lasserre Blvd., Yulee, FL. 32097 - www.starlab.com. All rights reserved.
Curriculum Guide Contents
The Changing Earth ................................................3The Changing Earth: STARLAB Activity 1 ..............6The Changing Earth: STARLAB Activity 2 ..............7The Changing Earth: STARLAB Activity 3 ..............8
Pre-visit Activity .......................................................9
Post-visit Activity....................................................11The Changing Earth: Background ...........................12
The Changing Earth: Activity 1 .........................12The Changing Earth: Activity 2 .........................13
Research Project ...................................................14
• Plate Tectonics D-3 • Cylinder Guides
Materials• STARLAB Portable
Planetarium
• Plate Tectonics Cylinder
• earth maps
• earth maps with positions of earthquake zones
• worksheets
• pencils
• arrow pointers (preferably five)
Optional
• Slide projector with slides to accompany the open-ing section of the lesson. [Example: slide of the earth from space, slides of the sky, storms, volcanoes, earthquakes, etc.]
The Changing Earth
Note
In this planetarium activity, text that is in italics is suggested script for the teacher to use, but not necessarily intended to be read word for word.
Purpose
To examine the Theory of Plate Tectonics, making special note of the relationship between volcanoes, earthquakes and plate boundaries.
Objectives
By the end of this unit, students should be able to:
1. Summarize the theory of “plate tectonics” making reference to crustal plates and to their movement over time.
2. Describe the three types of plate boundaries, (constructive boundaries — ridges; destructive boundaries — ocean trenches; and transform boundaries — fault zones).
3. Using a map of the earth and the STARLAB dome with the Plate Tectonics Cylinder), locate the following areas and mark them on a map: volcanoes, earthquakes, ridge, plate boundaries.
4. Explain why earthquakes and volcanoes might occur in the same area.
Preparation
Set up the STARLAB dome and projector. Attach the Plate Tectonics Cylinder to the projector. Set the cylinder at an angle of approximately 50º. Turn the cylinder until the “Mid-Atlantic Ridge” is seen high on the dome. The continents should now be prominently displayed in the dome. (If this is not the case, adjust the cylinder until they are.) [Optional: if you are using the slide projector and slides, set up the equipment so that the images are projected over the opening of the inflation tube. Since no one should be sitting in front of the opening, it will make it easier for all of the students to see the slides.]
Procedure
Welcome the class and explain the purpose of today’s lesson.
The earth seems to be a peaceful planet most of the time. Day and night follow each other, the air temperature rises and falls, storms come and go. Such changes usually do not upset people’s lives very much. At times, however, violent changes occur. An earthquake may rumble across the earth, changing the shape of the land. A volcano may erupt, burying the ground for kilometers with ash and lava. Events like these affect both people and the earth itself. In today’s lesson you will have the opportunity to investigate how movements of the top layers of the earth can cause earthquakes, volcanoes, and the formation of mountains, as we explore “The Changing Earth” and the theory of “Plate Tectonics.”
To begin our exploration of plate tectonics, we are going to gather some facts about the earth using a special projection on the dome overhead. Rather than the dome representing the sky, today it will represent a huge globe with us in the middle. This globe has been carefully labeled to show the location of different features of the earth. Your job will be to find certain features on the dome and mark their location on
Cylinder Guides • Plate Tectonics D-4 •
the maps of the earth that you will be getting. You will be doing this in small groups with each group working on a different feature. Once all of the information has been gathered, we will spend time comparing the maps from the different groups.
• Divide the class into four groups of approximately 6 students each. Assign each group a different feature to locate and mark on their maps: volcanoes, active ridges, faults, plate boundaries.
• Distribute the earth maps and pencils to the students. Bring down the lights. Turn on the projector. Give the students a moment to look at the projection on the dome, and then explain the legend (volcanoes are represented by dots, faults by lines, etc.) Turn on the reading lights and/or side lights. If possible, give each group an arrow pointer to assist them in their work.
• Circulate among the groups as they work, offering help as needed. After ap-proximately 10-15 minutes, turn on the room lights and ask the students to stop working. Explain that in order to evaluate the information that was collected, each student will need to compare their group’s map with the maps that were completed by the other groups. While they are doing this, they will also have to complete a worksheet that will ask various questions about their data.
• Distribute the worksheets to the students. Ask the students in group 1 to work with a partner from group 2, and the students in group 3 to work with a partner from group 4. After a few minutes, ask the students to switch partners. Students from group 1 should work with students from group 3, and group 2 with those group 4. After a short work period, ask the students to switch one last time. Group 1 students should work with group 4 and group 2 students with group 3 students.
• After the students have had time to compare their data with those from the other groups, distribute the earth map showing the location of earthquakes and ask the students to complete the last two questions on the worksheet. They should do this individually and not as a group. When the students have finished this last task, engage them in a discussion on their findings.
Ask: “Which features seemed to coincide with each other? Which features did not?” (Student responses may vary but the following points should be made: the plate boundaries and the location of volcanoes match; the location of volcanoes and the location of earthquakes match; the location of fault zones and plate boundaries match.)
To demonstrate to the class how plates rubbing together can cause an earthquake, conduct the following activity. Ask the students to press their two palms tightly together. As they press their palms together, instruct them to try to rub one palm over the other. Their palms will suddenly slip past each other. This action would be similar to an earthquake at a fault zone. After the above points have been noted, summarize the lesson as follows.
The Theory of Plate Tectonics helps to explain the formation of the earth’s crust and its movements, collisions, and destruction. This theory suggests that the crust of the earth is made of a number of large rigid plates and a number of smaller ones. The layer of the earth under the crust is the mantle. The upper mantle is made of hot rock. The plates of the crust float on this hot rock. The whole system of plates is like a jigsaw puzzle. One plate cannot move without affecting all the others. The plates collide in some places. In other places, one plate slips over or under another plate. Many of the features that you noted in today’s lesson — volcanoes, earthquakes, etc. — are to be found at the boundaries of the plates, where the plates are spreading, colliding or rubbing against one another. Although much has been discovered about the changing earth, there is still a great deal to be learned. In particular, the force causing the earth’s plates to move is not yet fully understood. Many scientists believe that differences in heat and density in the mantle cause material there to flow, thus
• Plate Tectonics D-5 • Cylinder Guides
moving parts of the crust. Others think that convection in the mantle produces up-currents under ocean ridges and down-currents under trenches. Other ideas have been suggested, but as of yet we just don’t know the answer.
Conclude the lesson by explaining how scientists are continuing to gather data today about the changing earth. Point out that in 1976 a satellite was placed in orbit above the earth. This particular satellite looked a lot like a giant brass golf ball covered with 425 small reflectors. The reflectors bounced back high-powered pulses of laser light that were aimed at the satellite. The time that it takes for the light to be reflected back was measured, and in this way scientists could calculate the exact distance to the satellite. By placing laser guns around the world, on the various plates, scientists are able to track the exact rate and direction of the plates as they move about on the changing earth.
Cylinder Guides • Plate Tectonics D-6 •
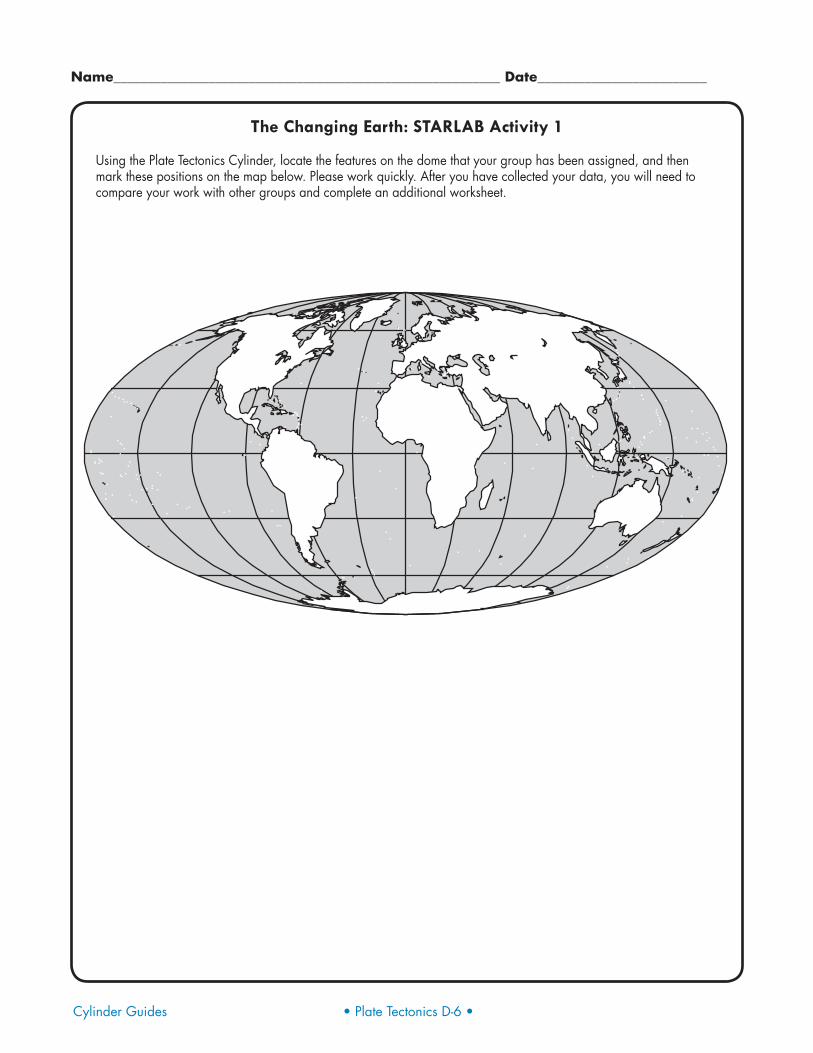
The Changing Earth: STARLAB Activity 1
Using the Plate Tectonics Cylinder, locate the features on the dome that your group has been assigned, and then mark these positions on the map below. Please work quickly. After you have collected your data, you will need to compare your work with other groups and complete an additional worksheet.
• Plate Tectonics D-7 • Cylinder Guides
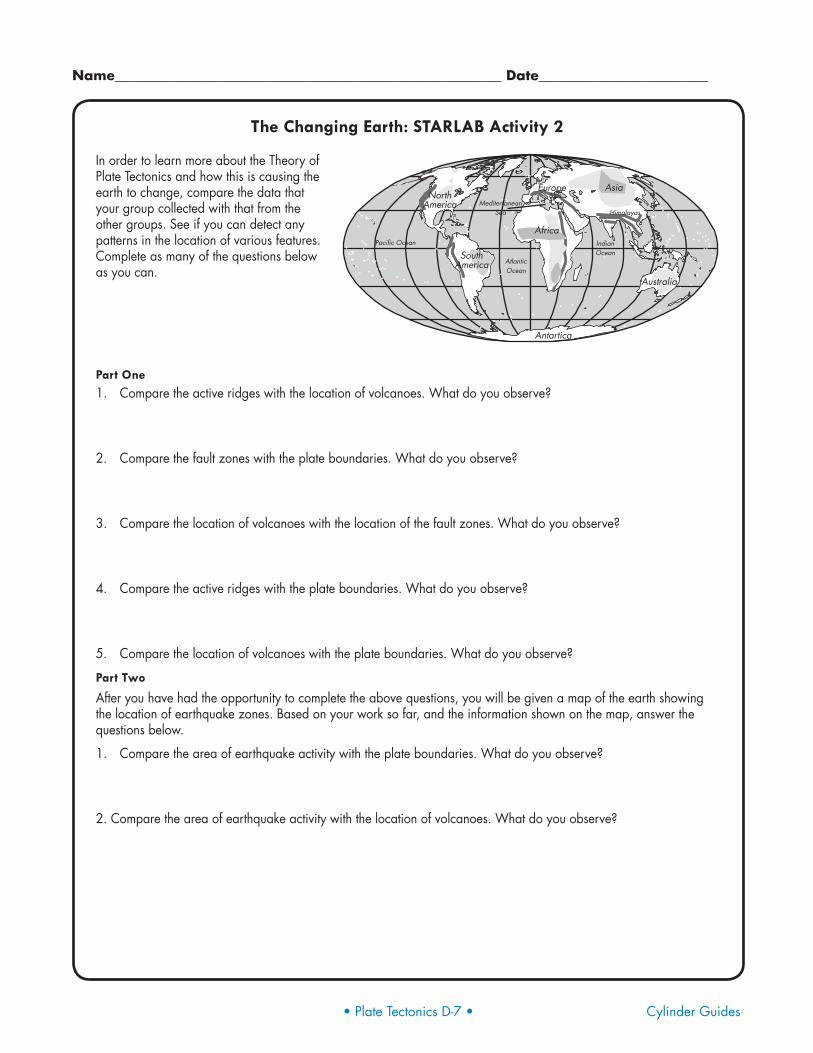
The Changing Earth: STARLAB Activity 2
In order to learn more about the Theory of Plate Tectonics and how this is causing the earth to change, compare the data that your group collected with that from the other groups. See if you can detect any patterns in the location of various features. Complete as many of the questions below as you can.
Part One1. Compare the active ridges with the location of volcanoes. What do you observe?
2. Compare the fault zones with the plate boundaries. What do you observe?
3. Compare the location of volcanoes with the location of the fault zones. What do you observe?
4. Compare the active ridges with the plate boundaries. What do you observe?
5. Compare the location of volcanoes with the plate boundaries. What do you observe?
Part Two
After you have had the opportunity to complete the above questions, you will be given a map of the earth showing the location of earthquake zones. Based on your work so far, and the information shown on the map, answer the questions below.
1. Compare the area of earthquake activity with the plate boundaries. What do you observe?
2. Compare the area of earthquake activity with the location of volcanoes. What do you observe?
Cylinder Guides • Plate Tectonics D-8 •
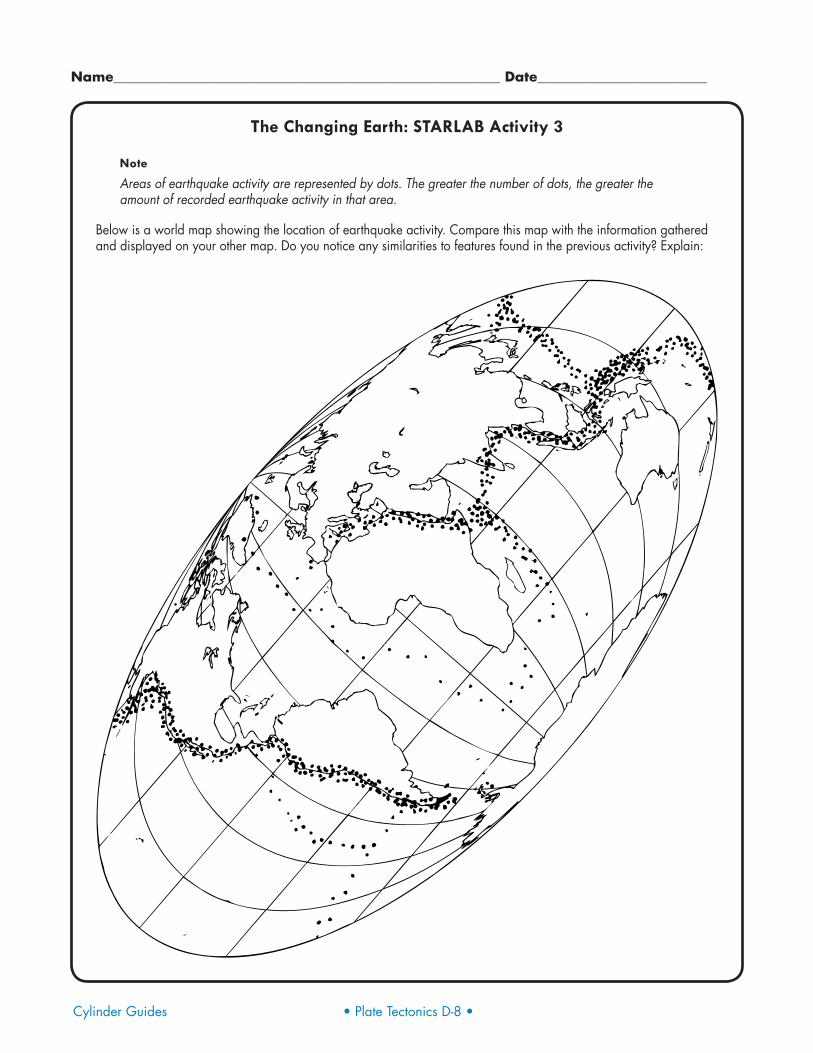
The Changing Earth: STARLAB Activity 3
Note
Areas of earthquake activity are represented by dots. The greater the number of dots, the greater the amount of recorded earthquake activity in that area.
Below is a world map showing the location of earthquake activity. Compare this map with the information gathered and displayed on your other map. Do you notice any similarities to features found in the previous activity? Explain:
• Plate Tectonics D-9 • Cylinder Guides
Pre-visit Activity
Note
In this planetarium activity, text that is in italics is suggested script for the teacher to use, but not necessarily intended to be read word for word.
Purpose
To examine how physical evidence can support the theory of plate tectonics.
Objectives
By the end of this unit, students should be able to:
1. List at least two types of “clues” or data that can be used to support the Theory of Plate Tectonics.
2. Identify the person largely responsible for the origin of the Theory of Plate Tectonics — Alfred Wegener.
3. Define the term “Pangaea” as the name for the large “supercontinent” that ex-isted approximately 160 million years ago.
Preparation
Note
In constructing these “puzzles,” all of the sets should be identical. The only difference should be the color of the construction paper used for the puzzle.
Using eight or nine pieces of different colored construction paper, draw identical lines on each sheet. The lines should be random and at least 10 cm long. Next, draw a large irregular shape on one of the sheets of construction paper and cut this shape out on all of the sheets. Put one of these shapes aside to use as a key to check student work. Finally, cut up the remaining large shapes into ten smaller irregular shapes. Put all of the pieces for each individual puzzle into an envelope. [Optional: If possible, laminate each of the large shapes before they are cut into the smaller shapes. This will help preserve the puzzles for future use.]
Procedure
Welcome the class and explain the purpose of today’s lesson. Next, present the following background information.
Alfred Wegener was trained as an astronomer and meteorologist but was interested in many areas of science. One day while reading in the library, he came across a paper that tried to explain the similarities between fossils in South America and Africa by suggesting that a land bridge had once existed between the two continents. Wegener disagreed. After several months of intense research into the available evidence, he presented his own explanation. He proposed that at one time all of the continents were joined into one “supercontinent” called “Pangaea.” The term “Pangaea” was created from two Greek words: pan meaning “all” and Gaea, the name of the earth goddess. Pangaea took up half the globe, Wegener said. The rest was covered by water. About 160 million years ago, Pangaea started to break up. The pieces of the original supercontinent started to drift apart. According to Wegener’s theory, the continents are still drifting today. Wegener’s theory is called the “Theory of Continental Drift.” At first many scientists did not accept Wegener’s theory of continental drift. They could not understand how the continents could have
Materials• construction paper (various
colors)
• scissors
• pencils
Cylinder Guides • Plate Tectonics D-10 •
moved. In fact, it took more than 50 years and some very important discoveries before Wegener’s theory was finally accepted by most scientists.
Ask: “How did Wegener get the idea that the continents of today had been one huge continent?” (Accept student responses.)
The first clue was the shapes of the continents. Wegener looked at the map of the world and saw the continents as pieces of a jigsaw puzzle that had come apart. There were other clues to support this idea, including fossils, and one that you are going to find out about now, by participating in a group activity.
• Divide the class into groups of four students each. Give each group one of the envelopes and explain to them that they must arrange the pieces into one “supercontinent.” As they work, they should look for clues that support the way that they are constructing their shape. When they are finished they will compare their completed shape with those from other groups. They should be prepared to defend their arrangement, if it differs from other groups. Give the students approximately ten minutes to work and then a few minutes to look at the other groups’ shapes.
• Examine the shapes that were created by each of the groups. (You can use the large uncut shape to check each of the groups.) If there are differences (or even if there are not), have the students from the various groups explain why they arranged the pieces the way they did. Ask the class if they can point out any clues that support their arrangement. (Accept student responses but emphasize the following two points.) The first major clue would be the shapes of each of the pieces. The edges of the pieces match the edges of other pieces. The second clue would be the match of the various “lines” that appear on the shapes. If the shapes are arranged correctly, the lines continue from one shape to another.
• Explain that the same clues were used to support the Theory of Plate Tectonics.
The German scientist Alfred Wegener noticed that the continents of the earth seemed to fit together like a giant jigsaw puzzle. He also noted that certain rock structures appeared on widely separated continents. The Cape Mountains of South Africa are folded mountains. Folded mountains are formed from rocks in the earth’s crust that have been crumpled by forces within the earth. The Cape Mountains end suddenly at the Atlantic Ocean. Across the ocean near Buenos Aires, Argentina, are mountains made of folded rock of the same age and type. If South America and Africa were put together, the two mountain ranges would line up. It appears then that the two mountain ranges were once part of the same belt but broke in two when the continents separated.
Your activity today has shown you how different types of clues or data can be used to support a theory. Unfortunately for Alfred Wegener, he did not live long enough to see his theory finally supported. As mentioned previously, it took over 50 years and some very important discoveries before Wegener’s theory was finally accepted by most scientists.
• Plate Tectonics D-11 • Cylinder Guides
Post-visit Activity
Purpose
To examine some of the evidence for the Theory of Plate Tectonics, in particular the shape of the continents and their ability to “fit together.”
Objectives
By the end of this unit, students should be able to:
1. Explain how the continents can be pieced together to make one large “supercontinent.”
2. Describe the three types of plate boundaries. (Constructive boundaries — ridges; Destructive boundaries — ocean trenches; and Transform boundaries — fault zones)
Note
This exercise may either be done in class or as a homework assignment. If it is to be administered in class then the following procedure applies.
Procedure
Explain to the class the purpose of the activity.
The Theory of Plate Tectonics explains that the earth’s crust is divided into several moving plates. Since these plates have been moving for millions of years, their positions today are very different from their positions long ago. In this activity, you will try to reconstruct the positions of the continents as they may have been millions of years ago. You will be working as individuals, although you will have the chance to compare your work with other students before the class is over.
Distribute the worksheets. Point out where the scissors and glue and/or tape are located. Give the students time to work. When the students have finished, provide a few minutes for them to view the work of others and then ask them to complete the questions at the bottom of the worksheet.
Cylinder Guides • Plate Tectonics D-12 •
The Changing Earth: Background
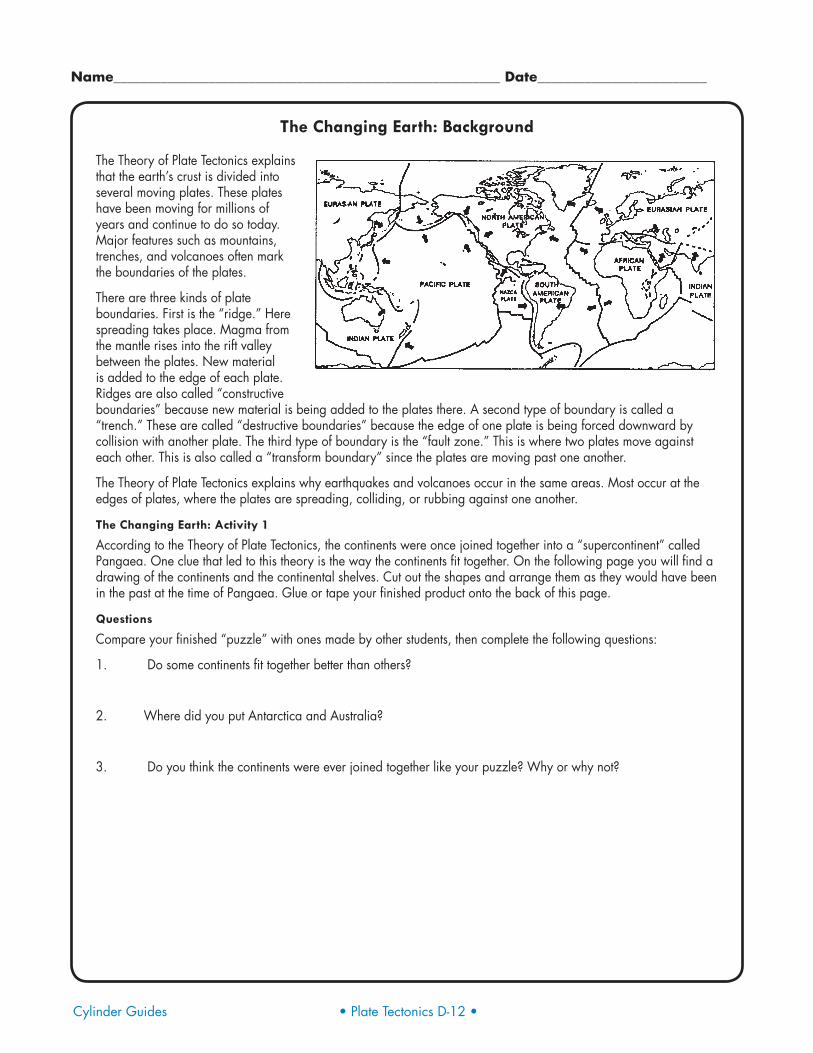
The Theory of Plate Tectonics explains that the earth’s crust is divided into several moving plates. These plates have been moving for millions of years and continue to do so today. Major features such as mountains, trenches, and volcanoes often mark the boundaries of the plates.
There are three kinds of plate boundaries. First is the “ridge.” Here spreading takes place. Magma from the mantle rises into the rift valley between the plates. New material is added to the edge of each plate. Ridges are also called “constructive boundaries” because new material is being added to the plates there. A second type of boundary is called a “trench.” These are called “destructive boundaries” because the edge of one plate is being forced downward by collision with another plate. The third type of boundary is the “fault zone.” This is where two plates move against each other. This is also called a “transform boundary” since the plates are moving past one another.
The Theory of Plate Tectonics explains why earthquakes and volcanoes occur in the same areas. Most occur at the edges of plates, where the plates are spreading, colliding, or rubbing against one another.
The Changing Earth: Activity 1
According to the Theory of Plate Tectonics, the continents were once joined together into a “supercontinent” called Pangaea. One clue that led to this theory is the way the continents fit together. On the following page you will find a drawing of the continents and the continental shelves. Cut out the shapes and arrange them as they would have been in the past at the time of Pangaea. Glue or tape your finished product onto the back of this page.
Questions
Compare your finished “puzzle” with ones made by other students, then complete the following questions:
1. Do some continents fit together better than others?
2. Where did you put Antarctica and Australia?
3. Do you think the continents were ever joined together like your puzzle? Why or why not?
• Plate Tectonics D-13 • Cylinder Guides
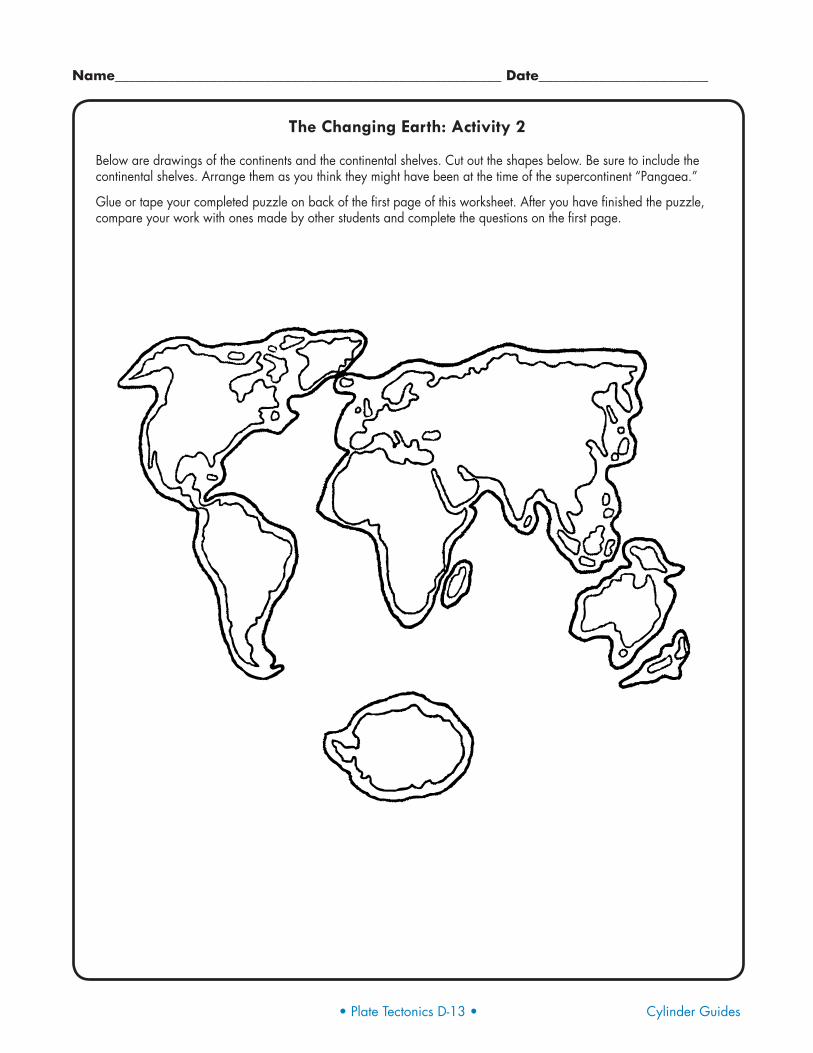
The Changing Earth: Activity 2
Below are drawings of the continents and the continental shelves. Cut out the shapes below. Be sure to include the continental shelves. Arrange them as you think they might have been at the time of the supercontinent “Pangaea.”
Glue or tape your completed puzzle on back of the first page of this worksheet. After you have finished the puzzle, compare your work with ones made by other students and complete the questions on the first page.
Cylinder Guides • Plate Tectonics D-14 •
Research Project
Scientists are continually uncovering fossil evidence that supports the idea of plate tectonics. Use the library to do research about scientists who discovered such evidence. Use indexes to magazines and periodicals to find recent articles that may be helpful. Look up and write a report about one of the scientists listed below or another scientist.
David Harwood Bruce Heezen
John H. Mercer Sara L. Samson
Peter N. Webb Dr. J. Tuzo Wilson