Embed Size (px)
Citation preview
STALIN’s WORLD WAR III: OPERATION PINCHER in EUROPE Rules of Play 1©) 2019 Compass Games, LLC
SWWIII Rules 09 columns.indd 1 11/16/2018 1:59:41 PM
2 STALIN’s WORLD WAR III: OPERATION PINCHER in EUROPE Rules of Play ©) 2019 Compass Games, LLC
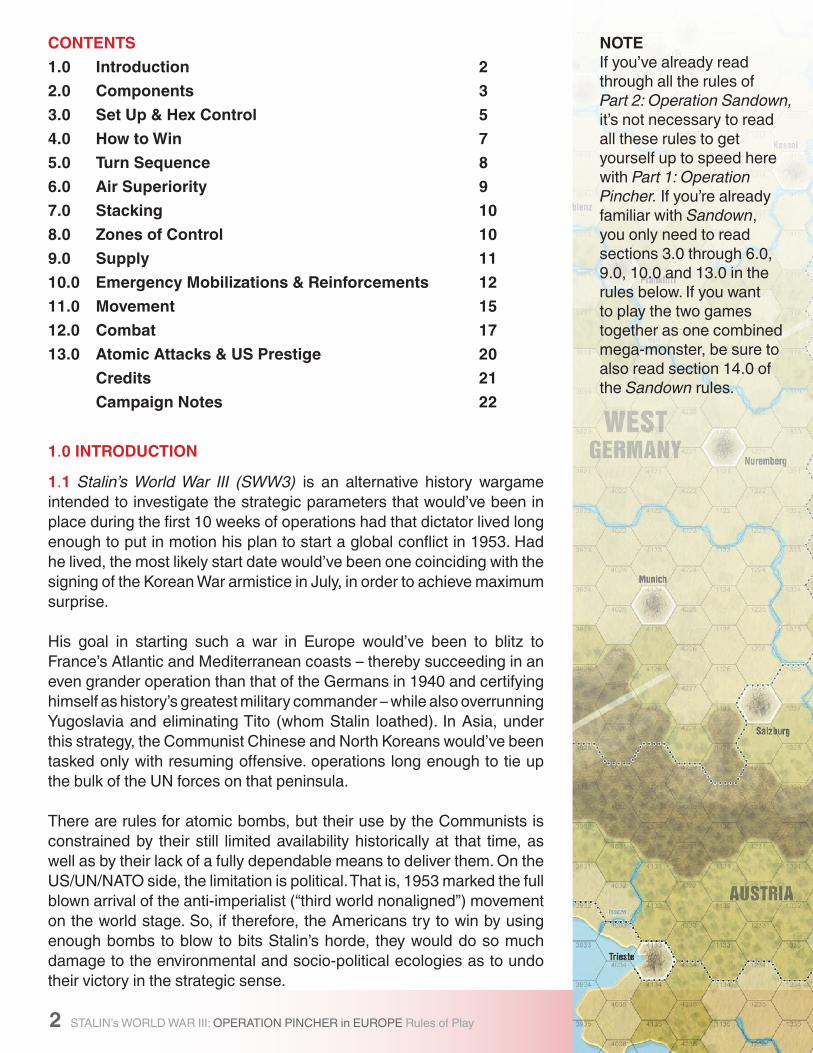
Contents1.0 Introduction 22.0 Components 33.0 set Up & Hex Control 54.0 How to Win 75.0 turn sequence 86.0 Air superiority 97.0 stacking 108.0 Zones of Control 109.0 supply 1110.0 emergency Mobilizations & Reinforcements 1211.0 Movement 1512.0 Combat 1713.0 Atomic Attacks & Us Prestige 20 Credits 21 Campaign notes 22
1.0 IntRodUCtIon
1.1 Stalin’s World War III (SWW3) is an alternative history wargame intended to investigate the strategic parameters that would’ve been in place during the first 10 weeks of operations had that dictator lived long enough to put in motion his plan to start a global conflict in 1953. Had he lived, the most likely start date would’ve been one coinciding with the signing of the Korean War armistice in July, in order to achieve maximum surprise.
His goal in starting such a war in Europe would’ve been to blitz to France’s Atlantic and Mediterranean coasts – thereby succeeding in an even grander operation than that of the Germans in 1940 and certifying himself as history’s greatest military commander – while also overrunning Yugoslavia and eliminating Tito (whom Stalin loathed). In Asia, under this strategy, the Communist Chinese and North Koreans would’ve been tasked only with resuming offensive. operations long enough to tie up the bulk of the UN forces on that peninsula.
There are rules for atomic bombs, but their use by the Communists is constrained by their still limited availability historically at that time, as well as by their lack of a fully dependable means to deliver them. On the US/UN/NATO side, the limitation is political. That is, 1953 marked the full blown arrival of the anti-imperialist (“third world nonaligned”) movement on the world stage. So, if therefore, the Americans try to win by using enough bombs to blow to bits Stalin’s horde, they would do so much damage to the environmental and socio-political ecologies as to undo their victory in the strategic sense.
noteIf you’ve already read through all the rules of Part 2: Operation Sandown, it’s not necessary to read all these rules to get yourself up to speed here with Part 1: Operation Pincher. If you’re already familiar with Sandown, you only need to read sections 3.0 through 6.0, 9.0, 10.0 and 13.0 in the rules below. If you want to play the two games together as one combined mega-monster, be sure to also read section 14.0 of the Sandown rules.
SWWIII Rules 09 columns.indd 2 11/16/2018 1:59:44 PM
STALIN’s WORLD WAR III: OPERATION PINCHER in EUROPE Rules of Play 3©) 2019 Compass Games, LLC
1.2 scales. Each hexagon on the map represents 20 miles (32.4 kilometers) from side to opposite side. The Communist units of maneuver mostly Soviet divisions along with satellite-nation armies and corps, while those on the NATO side are mostly divisions along with a few corps. Air power is represented abstractly, with counters and rules showing the effects of one side or the other gaining temporary air superiority over sub-areas within the theater of operations. Each full game turn represents one week of ‘real time’ from late July to early October 1953.
1.3 Counter Colors. Note that the counters for Part 1: Operation Pincher in Europe are slightly darker in color than their Part 2 counterparts to aid in distinguishing the two.
1.4 Definitions. If a rule is said to apply to “Communist units,” that means it applies to all the units of that side (see 2.5). If a rule is said to apply only to “Soviet” units, it applies to all the units bearing the “SU” (for “Soviet Union”) abbreviation. If a rule is said to apply to “Allied (or UN) units,” that means it applies to all the units of that side, regardless of their nationalities (see 2.6). If a rule applies only to some national or unit-type subset of Communist or Allied units, that will be specifically stated. The name “East Germany” is used synonymously with “German Democratic Republic,” while “West Germany” is used synonymously with “Federal Republic of Germany.”
Historical Note. The organizationally semi-autonomous Warsaw Pact satellite nation armies were creations of the post-Stalin era. Here those nations’ units are functionally part of the Soviet Army, just as they were historically at this time. They were uniformed and supplied solely through Soviet sources; their officers were Russian, and they had no national command chains or communications channels of their own.
2.0 CoMPonents
2.1 the components to a complete game of SWW3 Part 1: Operation Pincher in Europe include these rules, the two mapsheets and two sheets of die-cut counters (totaling 456 counters altogether, which are also referred to as “units” and “unit-counters”). Also included are the player aid cards and dice.
2.2 the Game Maps illustrate the militarily significant terrain found in and around Western Europe in 1953 when portrayed at this scale. A hexagonal (“hex”) grid is printed over the map to regulate the placement and movement of units across it. A unit is considered to be in only one hex at any one time. Every hex on the map has a unique four-digit identification number printed within it. They’re provided to help find exact locations more quickly and to allow for the recording of unit positions if a game has to be taken down before it can be completed.
2.3 Unit-Counters. Most of the unit-counters represent combat formations; others are provided as informational markers and memory aids. After reading through these rules at least once, carefully punch out the counters. Using a nail clipper (or an emery board or purpose-designed counter-clipping device) to remove the nub-like “dog ears” from their corners will facilitate the units’ easy handling and stacking during play, and it will also demonstrate to your opponents your samurai-like determination and discipline.
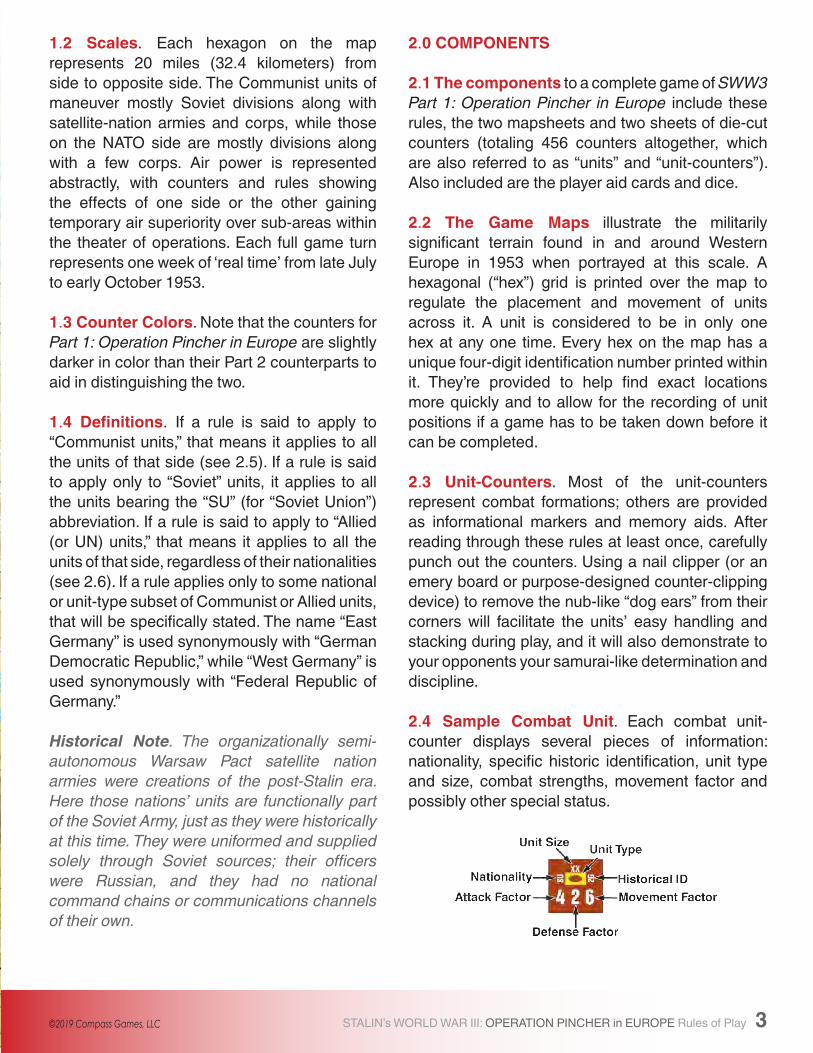
2.4 sample Combat Unit. Each combat unit-counter displays several pieces of information: nationality, specific historic identification, unit type and size, combat strengths, movement factor and possibly other special status.
SWWIII Rules 09 columns.indd 3 11/16/2018 1:59:45 PM
4 STALIN’s WORLD WAR III: OPERATION PINCHER in EUROPE Rules of Play ©) 2019 Compass Games, LLC
2.5 nationality. A unit’s nationality, and therefore the side it’s on, is shown by its color scheme and an abbreviation.
Communist sideSoviets – yellow and white on redSoviet Satellite Nation Allies – yellow and black on red
Un sideBelgian – red and black on yellowFrench – white and black on blue Italian – white and black on greenNetherlands – blue and black on orangeSwiss – red on whiteUnited Kingdom – white and black on tanUnited States – white and black on olive drabWest German – red and black on white Yugoslavian – yellow and black on gray
2.6 Historical Identification & Abbreviations. All units are given their specific identities by the numbers or names used to designate those formations during this period. Those abbreviations are defined as follows.
Ar – Ariete Armored BrigadeBCB – British Command BerlinBe – BelgianBFA – British Forces AustriaBGS – Bundesgrenschutz (Border Guards)CdF – Cividale del Friuli Alpine BrigadeEG – East GermanFCB – French Command Berlin FFA – French Forces AustriaFol – Folgore Motorized Infantry DivisionFr – FrenchG – GuardsHPA – Hungarian People’s ArmyIt – ItalianJ – JavelinJul – Julia Alpine BrigadeKVP – Barracked (Kasernierte ) People’s PoliceMan – Mantova Infantry DivisionNL – NetherlandishPPA – Polish People’s Army
RPA – Romanian People’s Army SU – Soviet UnionSw – SwissTrd – Tridentia Alpine BrigadeTri – Trieste Motorized Infantry DivisionUK – United KingdomUS – United StatesUSBC – United States Berlin CommandUSFA – United States Forces AustriaWG – West GermanYg – Yugoslavian
2.7 Unit sizes. Units’ organizational sizes, from largest down to smallest, are shown using the following symbols. If a unit’s size symbol is bracketed, that means its an ad hoc formation, put together solely for this campaign, rather than being one regularly carried on the table of organization of its army.
XXXX – armyXXX – corpsXX – division [or “groupement” if bracketed]X – brigade groupIII – regiment [or “regimental combat team” if bracketed]
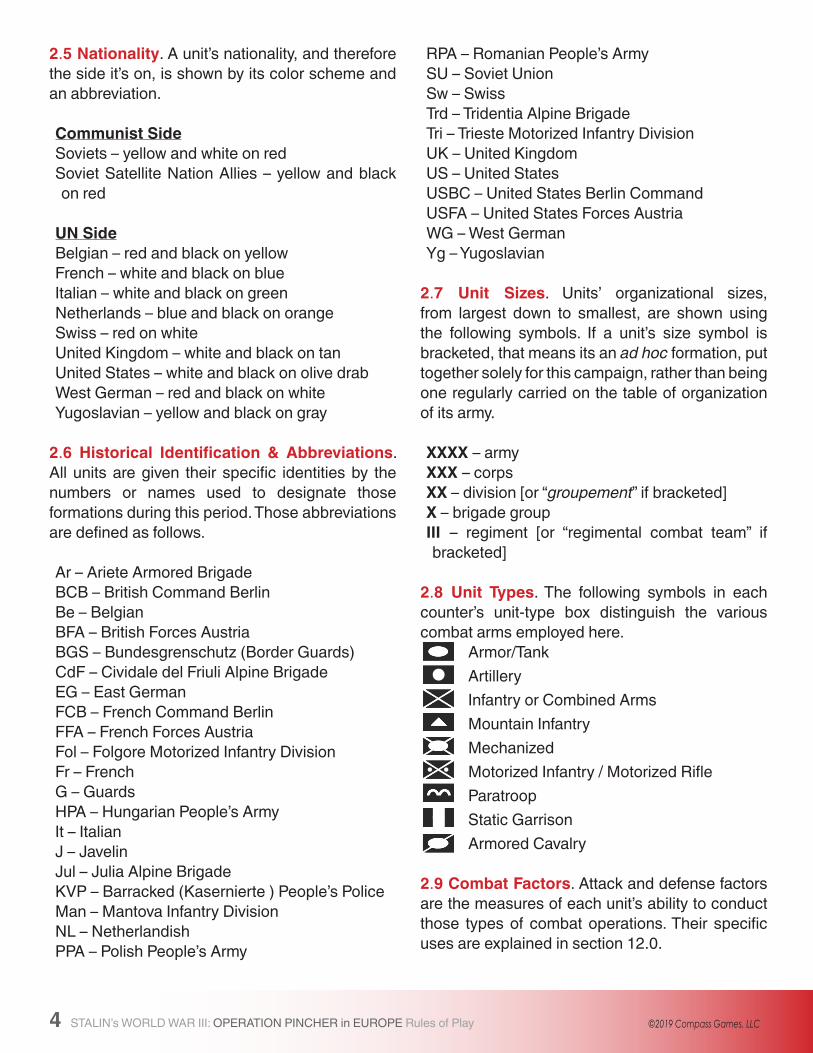
2.8 Unit types. The following symbols in each counter’s unit-type box distinguish the various combat arms employed here. Armor/Tank Artillery Infantry or Combined Arms Mountain Infantry Mechanized Motorized Infantry / Motorized Rifle Paratroop Static Garrison Armored Cavalry
2.9 Combat Factors. Attack and defense factors are the measures of each unit’s ability to conduct those types of combat operations. Their specific uses are explained in section 12.0.
SWWIII Rules 09 columns.indd 4 11/16/2018 1:59:45 PM
STALIN’s WORLD WAR III: OPERATION PINCHER in EUROPE Rules of Play 5©) 2019 Compass Games, LLC
2.10 Movement Factor. This number is a measure of a unit’s ability to move across the hex grid printed over the map. Units pay varied movement costs to enter different hexes, depending on the terrain in each and, in some cases, the moving unit’s type. See section 12.0 for details.
2.11 step strength. All ground units in the game have one or two “strength steps,” which are also simply called “steps.” That’s an arbitrary term used to express the ability of a unit to absorb a certain amount of combat losses before ceasing to be an effective formation (a measure of its “robustness” in current US Army jargon). Those units with combat factors printed on only one side of their counters are “one-step” units; those with printing on both sides of their counters are “two-step” units. (Note: two-step units also show an asterisk between their combat factors.) If a two-step unit suffers a one-step loss, it’s flipped over so its one-step side (with the lower combat factors) shows. If a one-step unit, or a two-stepper that’s already been “reduced,” suffers a step loss, it’s removed from the map (“eliminated”) and placed into a “dead pile” off to the side. No fully eliminated unit is ever returned to play, at any level of step strength, for the remainder of the game. It is possible for a reduced unit to be brought back to full strength (see 10.6). 2.12 Reinforcement & starting Units. Units that enter play after the game has begun, rather than starting play already set up on the map, are called “reinforcements.” See section 10.0 for details on them.
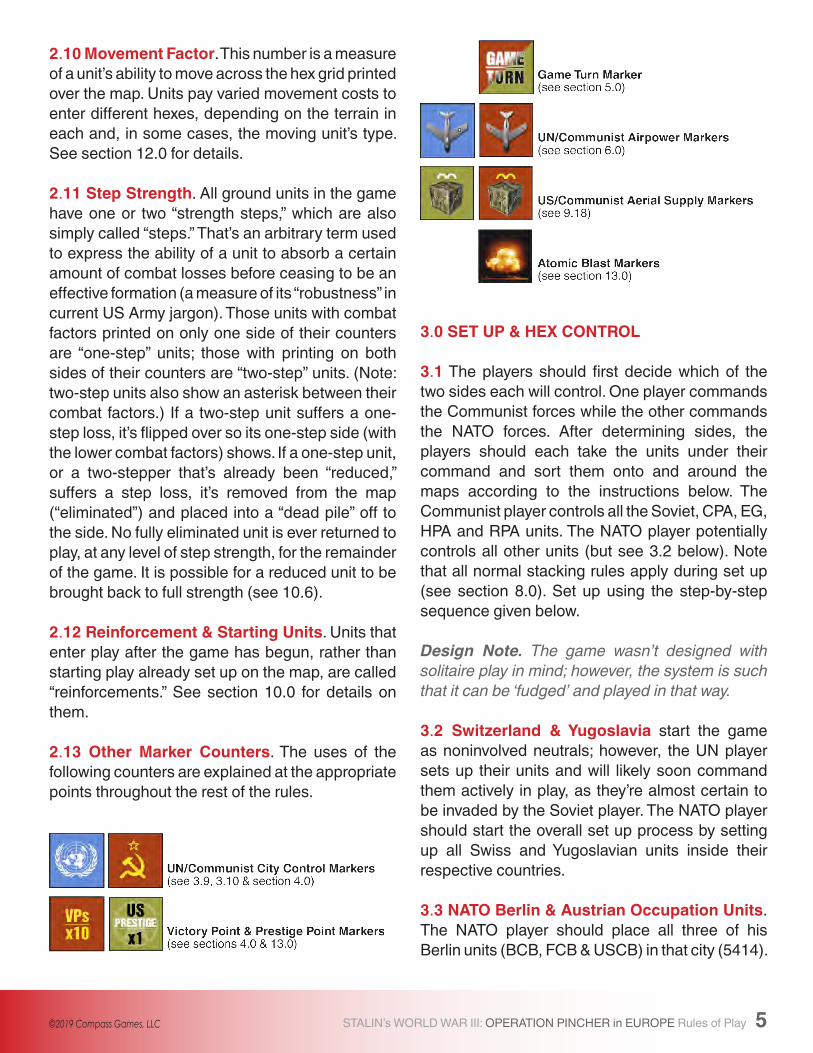
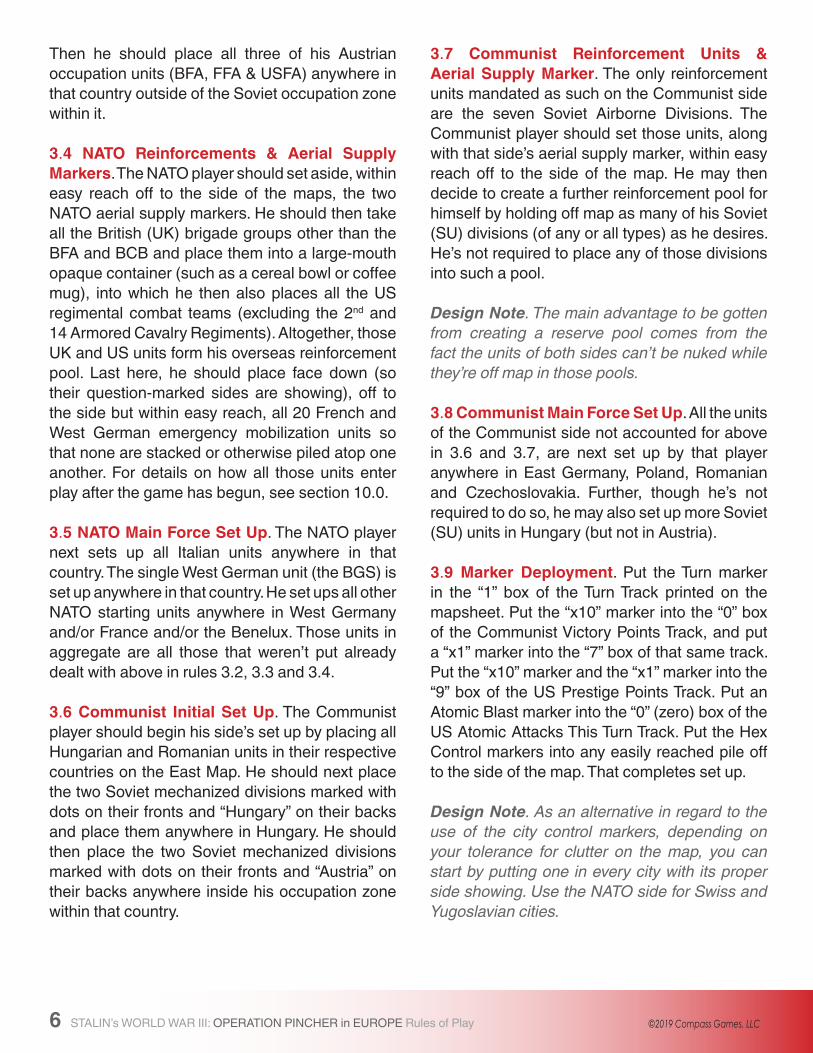
2.13 other Marker Counters. The uses of the following counters are explained at the appropriate points throughout the rest of the rules.
3.0 set UP & HeX ContRol
3.1 The players should first decide which of the two sides each will control. One player commands the Communist forces while the other commands the NATO forces. After determining sides, the players should each take the units under their command and sort them onto and around the maps according to the instructions below. The Communist player controls all the Soviet, CPA, EG, HPA and RPA units. The NATO player potentially controls all other units (but see 3.2 below). Note that all normal stacking rules apply during set up (see section 8.0). Set up using the step-by-step sequence given below.
Design Note. The game wasn’t designed with solitaire play in mind; however, the system is such that it can be ‘fudged’ and played in that way.
3.2 switzerland & Yugoslavia start the game as noninvolved neutrals; however, the UN player sets up their units and will likely soon command them actively in play, as they’re almost certain to be invaded by the Soviet player. The NATO player should start the overall set up process by setting up all Swiss and Yugoslavian units inside their respective countries.
3.3 nAto Berlin & Austrian occupation Units. The NATO player should place all three of his Berlin units (BCB, FCB & USCB) in that city (5414).
SWWIII Rules 09 columns.indd 5 11/16/2018 1:59:45 PM
6 STALIN’s WORLD WAR III: OPERATION PINCHER in EUROPE Rules of Play ©) 2019 Compass Games, LLC
Then he should place all three of his Austrian occupation units (BFA, FFA & USFA) anywhere in that country outside of the Soviet occupation zone within it.
3.4 nAto Reinforcements & Aerial supply Markers. The NATO player should set aside, within easy reach off to the side of the maps, the two NATO aerial supply markers. He should then take all the British (UK) brigade groups other than the BFA and BCB and place them into a large-mouth opaque container (such as a cereal bowl or coffee mug), into which he then also places all the US regimental combat teams (excluding the 2nd and 14 Armored Cavalry Regiments). Altogether, those UK and US units form his overseas reinforcement pool. Last here, he should place face down (so their question-marked sides are showing), off to the side but within easy reach, all 20 French and West German emergency mobilization units so that none are stacked or otherwise piled atop one another. For details on how all those units enter play after the game has begun, see section 10.0.
3.5 nAto Main Force set Up. The NATO player next sets up all Italian units anywhere in that country. The single West German unit (the BGS) is set up anywhere in that country. He set ups all other NATO starting units anywhere in West Germany and/or France and/or the Benelux. Those units in aggregate are all those that weren’t put already dealt with above in rules 3.2, 3.3 and 3.4.
3.6 Communist Initial set Up. The Communist player should begin his side’s set up by placing all Hungarian and Romanian units in their respective countries on the East Map. He should next place the two Soviet mechanized divisions marked with dots on their fronts and “Hungary” on their backs and place them anywhere in Hungary. He should then place the two Soviet mechanized divisions marked with dots on their fronts and “Austria” on their backs anywhere inside his occupation zone within that country.
3.7 Communist Reinforcement Units & Aerial supply Marker. The only reinforcement units mandated as such on the Communist side are the seven Soviet Airborne Divisions. The Communist player should set those units, along with that side’s aerial supply marker, within easy reach off to the side of the map. He may then decide to create a further reinforcement pool for himself by holding off map as many of his Soviet (SU) divisions (of any or all types) as he desires. He’s not required to place any of those divisions into such a pool.
Design Note. The main advantage to be gotten from creating a reserve pool comes from the fact the units of both sides can’t be nuked while they’re off map in those pools.
3.8 Communist Main Force set Up. All the units of the Communist side not accounted for above in 3.6 and 3.7, are next set up by that player anywhere in East Germany, Poland, Romanian and Czechoslovakia. Further, though he’s not required to do so, he may also set up more Soviet (SU) units in Hungary (but not in Austria).
3.9 Marker deployment. Put the Turn marker in the “1” box of the Turn Track printed on the mapsheet. Put the “x10” marker into the “0” box of the Communist Victory Points Track, and put a “x1” marker into the “7” box of that same track. Put the “x10” marker and the “x1” marker into the “9” box of the US Prestige Points Track. Put an Atomic Blast marker into the “0” (zero) box of the US Atomic Attacks This Turn Track. Put the Hex Control markers into any easily reached pile off to the side of the map. That completes set up.
Design Note. As an alternative in regard to the use of the city control markers, depending on your tolerance for clutter on the map, you can start by putting one in every city with its proper side showing. Use the NATO side for Swiss and Yugoslavian cities.
SWWIII Rules 09 columns.indd 6 11/16/2018 1:59:45 PM
STALIN’s WORLD WAR III: OPERATION PINCHER in EUROPE Rules of Play 7©) 2019 Compass Games, LLC
3.10 Hex Control. The idea of “hex control” — which side “owns” which hexes at any given instant — is important for purposes of column movement (see 11.16) judging victory (see section 4.0) and tracing supply (see section 10.0). At the start of play the Communist side controls all hexes in East Germany, Poland, Czechoslovakia, Hungary and the Soviet occupation in Austria; the NATO side controls all others. The control status of a hex switches from one side to the other whenever a ground unit from the other side enters it. Control switching is immediate, and may occur and reoccur in the same hexes any number of times during play. Hex control markers are provided for use on the board to help keep track of which hexes are controlled by which side in areas where the deployment of actual units doesn’t make that clear.
3.11 Hex Control & Zones of Control. Don’t confuse the idea of “hex control,” explained above, with that of “zones of control”(a.k.a. “ZOC”), which is explained in section 8.0. For now, all you need understand in regard to the latter is the fact the mere projection of a ZOC into an enemy-controlled hex isn’t enough by itself to cause the control status of that hex to switch from one side to the other.
4.0 HoW to WIn
4.1 In General, the Communist player is generally on the offensive, trying to win by driving into NATO territory as fast as possible and in such a way as to bring about the conquest or neutralization of as much of Western Europe as possible. The NATO player generally wins by preventing the Communist player from having fulfilled that side’s victory conditions as judged at the conclusion of Turn 10; however, see 4.9 below for a “Sudden Death” exception that allows for a Communist victory earlier than that.
4.2 When to Check for Victory. The various kinds of victory are generally only checked during Phase
IV of every game turn. Of course, the game may also end at any time if either player assesses the situation to be hopeless and therefore capitulates unconditionally to the other player.
4.3 Victory on Points. Every city and capital in East Germany, West Germany, Czechoslovakia, Hungary and Yugoslavia is worth one victory point (“V.P.”). Every city and capital city in the Benelux nations is worth two VP. Every city and capital city in France, Switzerland, Italy is worth three VP. Note that supply and nuked status of the various kinds of city have no bearing on their VP. Within that framework, if the Communist VP total is found to be greater than 60 during Game Turn 10’s Phase IV, that player is generally declared to have won the game at that time. See 4.4 below for the exception.
4.4 Yugoslavian Victory Precondition. For the Communist player to win the game via rule 4.3 above, the Yugoslavian city of Belgrade must be among those under his control during the Turn 10 victory check (no matter what the point tally is otherwise). Note that the supply status and nuked status of that city has no bearing on whether this precondition is judged to have been fulfilled by the Soviet player.
4.5 Communist sudden death Political Victory. If, at any time during play, all the capital cities on the map are all under Communist control during any turn’s Phase IV, play stops and that player is declared to have won the game at that time. If Switzerland hasn’t been brought into the war, don’t count Bern in when judging if this victory condition has been fulfilled.
4.6 Communist sudden death Victory via Us Prestige Collapse. If, at any time during play of any turn, the total of US Prestige Points falls to zero (see section 13.9) play stops and the Communist player is declared to have won the game.
SWWIII Rules 09 columns.indd 7 11/16/2018 1:59:46 PM
8 STALIN’s WORLD WAR III: OPERATION PINCHER in EUROPE Rules of Play ©) 2019 Compass Games, LLC
5.0 tURn seqUenCe
5.1 In General. Every game turn of SWW3 is divided into two “player turns,” one Soviet (a.k.a. “Communist”) and one UN (a.k.a. “US”). That full sequence makes up one “game turn,” of which there are a maximum of 10 in an entire match. The Soviet Player Turn is the first player turn in every game turn. Every action taken by a player must be carried out during the appropriate part of the sequence outlined below. Once a player has finished a particular phase, or a specific activity within a phase, he may not go back to perform some forgotten action or redo a poorly executed one unless his opponent graciously permits it.
5.2 turn sequence. The game turn sequence is given below in outline. The rest of the rules are organized, as much as possible, to explain things in the order they’re encountered as you go through this sequence in each game turn.
turn sequence outline I. Air superiority Phase
II. soviet Player turn A. soviet Movement or Combat Phase B. soviet Combat or Movement Phase
III. nAto Player turn A. nAto Movement or Combat Phase B. nAto Combat or Movement Phase C. nAto Franco-German emergency Mobilization Phase d. nAto overseas Reinforcement Phase
IV. Victory Check Phase
V. Administrative Phase
5.3 Move/Fight or Fight/Move. At the start of every one of his player turns, the player about to take that turn must declare in what order he will carry out his movement and combat phases that turn. That is, he may choose to have his units move first and attack after that, or he may make take his combat phase first and movement phase second. That decision is always up to each commander. No
matter what phase order a player chooses, all his units are allowed to participate to the limit of their normal capabilities in both of them. The players only make one phase order declaration per game turn, at the start of his own player turns, which is then applied to all his units throughout that player turn. It’s prohibited to choose one phase order for some of your units and the other phase order for others.
5.4 ending a Game turn. Game Turns 1 through 9 are completed when each one’s Phase V is concluded. At those times move forward by one box the Game Turn marker on the Game Turn Track printed on the mapsheet. Game Turn 10, and the overall game itself, is concluded at the end of its Phase IV.
5.5 Game turn 1 special Rules. The following special rules are applied during Game Turn 1 on both maps:
• All units of both sides are automatically in supply throughout the turn.
• The Communist player adds one to his air superiority die roll.
5.6 Fight/Move Prepared Attack Bonus. During player turns in which either player chooses the fight/move phase sequence, all his attacks are considered “prepared attacks,” and they therefore gain a one-column-right odds shift in conjunction to all other applicable bonus and penalty shifts. See section 12.0 for more details.
5.7 nAto Franco-German emergency Mobilization Phases. See 10.3 for details on this phase.
5.8 nAto overseas Reinforcement Phases. See 10.5 for details on this phase. It is the method by which UK and US reinforcements enter play on the map after having come from overseas.
5.9 Communist Reinforcements. The only Communist reinforcements available are the Soviet airborne divisions, along with any units that player deliberately held back during set up (see
SWWIII Rules 09 columns.indd 8 11/16/2018 1:59:46 PM
STALIN’s WORLD WAR III: OPERATION PINCHER in EUROPE Rules of Play 9©) 2019 Compass Games, LLC
3.7), both of which categories of reinforcement are entered into play during any of that side’s movement phases.
5.10 Victory Check Phases. At this time during every turn, check to see if the soviet player has achieved victory based on rule 4.3.
5.11 Administrative Phases. During these phases, during Turns 1 through 10, the players should cooperate to clean up around the map, moving and adjusting markers as necessary to prepare for the start of the new turn.
6.0 AIR sUPeRIoRItY
6.1 In General. At the start of every the Air Superiority Phases of Turns 1 through 10, both players openly a die. The side getting the higher total has “air superiority” for that turn all across map (reroll ties). If you had air superiority the turn prior, add one to your roll this turn; however, that addition may never be greater than one no matter how on many previous turns you may have had air superiority. Subtract the lower rolled total from higher roll total: the winning player gets that many airpower markers (one through five). He immediately places all those markers as described below. Note there will never be a turn in which both players have airpower markers deployed on the map at the same time.
6.2 Placement. Available airpower markers may be placed in any hexes on the map. Friendly and enemy ground unit presence and/or ZOC have no bearing on this. Note, though, no more than one marker may be placed in any one hex. All available markers must be deployed.
6.3 Range. Every airpower marker on the map effects the hex in which it’s placed and all six of the immediately surrounding hexes. That’s termed its “range.” If the ranges of two or more friendly airpower markers overlap, there are no additive effects because of it.
6.4 Violating neutrality. If a NATO airpower marker’s position or range lies in the territory of a still neutral country, that positioning or projection is simply ignored and that nation continues in its neutrality. If a Soviet airpower marker’s position or range lies in the territory of a still neutral country, that immediately brings the country into the war on the NATO side.
6.5 Airpower’s Effect on Enemy Movement. For an enemy unit or stack to make a regular move into a hex that’s in range of one or more of your airpower markers, it must pay an extra movement point (MP) to do so for each such hex entered, for both in-hex and hexside costs. Further, no column movement may take place in the range of an enemy airpower marker. Your own airpower markers have no effect on the movement of your own forces. Note that enemy airpower presence in a hex doesn’t absolutely prohibit your units making regular moves into and/or through such hexes; it merely makes it more expensive in terms of movement point expenditures. Also note you may only make paratroop airdrops on turns during which your side has air superiority.
6.6 Airpower & Combat. If you make an attack into a hex that’s in range of one or more of your airpower markers, your attack gains a one-column rightward shift (cumulative with all other applicable bonus and penalty shifts). Conversely, if an enemy attack is launched against one of your forces, and that defending force is in range of one or more of your airpower markers, that defense benefits from a one-column leftward shift (cumulative with all other applicable bonus and shifts). Those shifts never amount to more than one column per battle, no matter how many markers are in range.
6.7 Marker Retrieval. Deployed airpower markers remain on the map until the Administrative Phase of each turn, at which time they’re retrieved for use again in the next turn. Airpower markers are never subject to elimination; all the markers are always available for use as described above.
SWWIII Rules 09 columns.indd 9 11/16/2018 1:59:46 PM
10 STALIN’s WORLD WAR III: OPERATION PINCHER in EUROPE Rules of Play ©) 2019 Compass Games, LLC
7.0 stACkInG
7.1 In General. Stacking is the term used to describe the piling of more than one friendly unit in the same hex at the same time. Opposing grounds units will never stack together; only friendly units stack together.
7.2 The stacking rules are in effect for both sides during set up and all through every phase of every turn. You therefore need to be careful in regard to the order in which you move your units; otherwise, moves made carelessly early in your movement phases may work to jam you up later in those phases. If, at the end of any phase, any hexes are found to be over-stacked, the player owning the units in those hexes must eliminate enough excess units there, of his choice, so as to bring the hexes into compliance with the stacking rules.
7.3 stacking limit. The stacking limit for both sides is determined by counting steps (see 2.11), rather than the more typical counting of units. The per-hex stacking limit for both sides is 10 steps.
7.4 None of the markers pictured in rule 2.13 have any stacking value, and they may be placed in any hexes according to the rules for their respective uses.
7.5 Both players are always free to examine all stacks on the map and the map sheets, both friendly and enemy.
7.6 stacking order. The top-down/bottom-up order in which units in a hex are piled together has no significance.
8.0 Zones oF ContRol
8.1 In General. The six hexes immediately surrounding a hex containing one or more ground units constitute the “zone of control” (ZOC) of the units in that hex. Zones of control extend across all hexsides and into and out of types of terrain. All ground units of both sides project their ZOC at all times in all supply states. There’s no difference in effect between ZOC
projected by units of different sides into the same hex. Opposing units may simultaneously project their ZOC into the same hexes.
8.2 terrain & ZoC. ZOC project into, out of, and across all types of terrain and water barriers. ZOC don’t extend into or out of neutral countries.
8.3 enemy Zones of Control & Movement. A moving unit must pay one additional MP to enter a hex containing an enemy zone of control (EZOC). A moving unit must pay an additional MP to leave a hex containing an EZOC. A unit may therefore move from EZOC hex to EZOC hex for a total cost of two additional movement points. “Additional” means in addition to all the normal terrain costs otherwise involved in the move. See section 11.0 for further details. The presence of one or more of your units in a hex containing an EZOC doesn’t negate that EZOC for purposes of counting the movement costs of units you want to move there.
8.4 eZoC & supply. Your units are always able to trace their supply lines into one EZOC hex without penalty. In order to trace supply both into and through one or more EZOC hexes, a friendly ground unit must be in each such hex in order to “negate” the effect of the EZOC. See section 19.0 for details.
8.5 eZoC & Retreat After Combat. For purposes of defender retreat (DR) combat results, EZOC are negated by the presence of friendly units. See 12.20 for details.
8.6 eZoC & Advance After Combat. EZOC don’t in any way inhibit or stop or block the ability of victorious units advancing-after-combat. See 12.22 for details.
8.7 Probing Attacks. EZOC hexes that are otherwise empty of enemy and friendly units may be the subject of “probing attacks.” See 12.23 for details.
SWWIII Rules 09 columns.indd 10 11/16/2018 1:59:46 PM
STALIN’s WORLD WAR III: OPERATION PINCHER in EUROPE Rules of Play 11©) 2019 Compass Games, LLC
8.8 eZoC & Paradrops. EZOC by themselves don’t prohibit an otherwise allowably paratroop drop into those hexes. See 3.7, 5.9, 6.5, 8.8, 9.18, 10.2 and 10.7 for details.
8.9 eZoC, ZoC & Atomic Attack disruption. See rule 13.6.
9.0 sUPPlY
9.1 In General, in order for a unit to be able to move and fight at its full potential, it must be in supply. Supply for movement is determined at the moment a given unit begins to move and, once determined, that status lasts all during a unit’s move. Supply for combat is determined at the start of each individual battle for all the units of both sides involved in that battle.
9.2 tracing supply lines. No counters are provided to represent the materiel consumed by the combat units. Instead, that’s abstracted into the process of supply line tracing (“tracing supply”). A unit has supply (“is in supply”) if it can trace a path of contiguous hexes of any length from a friendly “supply source hex” to its own location. A unit without a valid supply line is said to be “out of supply” or “OOS.”
9.3 enemy Units & supply lines. Supply paths may never be traced into enemy occupied hexes. 9.4 eZoC & supply lines. A supply line may be traced into any one EZOC hex; however, no supply line may ever be traced through an EZOC hex into any other hex unless there are one or more friendly units in each such EZOC hex. That friendly unit presence works to negate EZOC for purposes of supply line tracing.
9.5 enemy Controlled City Hexes & supply lines. Neither side may trace its supply lines into or through an enemy-controlled city hex even if that hex is empty of actual enemy units and/or EZOC.
9.6 terrain & supply. Within the strictures given above, the supply lines of both sides may be traced into and through all kinds of terrain except for all-sea hexes and hexsides, which is prohibited. 9.7 oos Movement. If a unit or stack is found to be OOS at the start of its move, the movement factor of that force is halved for that phase. That halving remains in effect throughout that movement phase even if the moving force moves into a location where it would’ve been judged to have had supply had it started its move there.
9.8 oos Combat. If an attack contains one or more units that are found to be OOS at the start of that battle’s resolution, those OOS units have their attack factor halved when that battle’s odds are calculated. Exception: Soviet artillery divisions (see 2.8) may not attack at all when OOS. When halving, round up all remainders. If a defending force is OOS at the start of that battle’s resolution, those units have their defense factor halved when that battle’s odds are calculated. When halving, round up all remainders. If more than one unit in a given battle is to be halved, add together the combat factors of all such units and them perform just one halving and rounding.
9.9 Indefinite OOS. No unit is ever reduced in step strength or fully eliminated simply for being OOS. Units of both sides may remain OOS indefinitely.
9.10 Willful oos. It’s permitted for both players to move units into hexes in which they may or will become OOS.
9.11 Appropriate supply sources. Units may only use supply sources appropriate to their own side as described in the rules below.
9.12 International supply line tracing is allowed. That is, the supply lines of units of the various nationalities, both friendly and enemy, may freely cross each another and may even run through same hex paths.
SWWIII Rules 09 columns.indd 11 11/16/2018 1:59:46 PM
12 STALIN’s WORLD WAR III: OPERATION PINCHER in EUROPE Rules of Play ©) 2019 Compass Games, LLC
9.13 “nuked” Hexes. On both maps, hexes containing an atomic attack marker may still have supply lines traced into and out of them (but also see 9.15 below).
9.14 Home Country supply. All units are always in supply for all purposes when in hexes of their own country.
9.15 nAto Main supply sources, which are potentially available for use as needed by all the alliance nationalities in the game, are all the friendly-controlled port (coastal city) hexes on the map. Note, however, that once a port is nuked (by either side), it loses its supply providing capacity for the rest of the game. NATO units outside their home country, but that also aren’t in Italy, must use these supply sources.
Design Note. The geographers among you will note there are several inland river ports on the map. For game purposes, though, we’re assuming those rivers are too quickly jammed up with debris, or are otherwise blocked, for those locales to function as supply sources.
9.16 nAto Italy & denmark supply. NATO units in Italy must trace supply to the south map edge hexes in that country (3044-3644). Those hexes lose their supply-providing capacity while occupied by enemy units, but they regain that capacity as soon as that condition is overturned. Similarly, NATO units north of the Kiel Canal must trace their supply to 5103, 5204 or 5303. Note, though, that Danish supply source is only available to NATO units north of that waterway.
9.17 Communist supply sources, which are potentially available for use as needed by all the nationalities on that side in the game, are all the friendly-controlled hexes on the east map edge (5712-5743). Those hexes lose their supply-providing capacity while occupied by enemy units, but they regain that capacity as soon as that condition is overturned.
9.18 Aerial supply. A one- or two-hex hex aerial supply capacity is available to the side that has air superiority on a map (one hex for the Communists, two hexes for NATO). The advantaged player may place his side’s aerial supply marker(s) atop any one (or two) of his side’s stacks anywhere on the map anytime during the turn. Friendly units in that hex, regardless of specific nationalities, are considered fully supplied while the marker remains in place. The marker remains in the chosen hex(es) throughout the remainder of that turn or until it becomes enemy controlled, whichever comes first. An aerially supplied unit or stack moving away from the chosen hex might therefore still run into supply difficulties later in the turn, depending on the phase sequence (see 9.7 and 9.8 above).
9.19 nAto Berlin Garrison supply. The three static units (see 11.20) of the NATO Berlin garrison are always in supply; however, that benefit isn’t extended to any other units that might make their way into that city.
9.20 nAto Coastal supply. NATO units in coastal hexes anywhere on the map are always in supply while in those hexes. That remains true regardless of whether a coastal hex has been nuked, and it is equally true in the coastal hexes of all the various oceans and seas on the map.
10.0 eMeRGenCY MoBIlIZAtIons & ReInFoRCeMents
10.1 In General. Reinforcements are units of both sides that don’t start the game already in play on the map; rather, they enter play after the war has already begun.
10.2 Communist Airborne Reinforcements. The seven guards airborne divisions constitute the only reinforcements likely to be available to the Soviet side during the game (the only others being whatever units that player set aside via
SWWIII Rules 09 columns.indd 12 11/16/2018 1:59:46 PM
STALIN’s WORLD WAR III: OPERATION PINCHER in EUROPE Rules of Play 13©) 2019 Compass Games, LLC
rule 3.6). During any turn during which he has air superiority, the Soviet player may decide to enter one, some or all of those divisions during any portion of his movement phase. He may pick as their entry location any enemy-unoccupied (EZOC and nuclear detonations OK) clear or city or oil city or capital city hex on the map. On any given turn, there may not be more than one drop hex selected. That selection made, he places the divisions he’s selected into the chosen hex. They/It remain there throughout the rest of the game turn unless eliminated or forced to retreat by UN attack. During their turn of entry they may not move, and they may only attack (and potentially advance after combat) if the phase sequence chosen for that Soviet player turn is move/fight. They are automatically in supply during their drop turn no matter the phase sequence. If forced to retreat-after-combat they may do so normally. After their turn of entry, they trace supply like normal units. On subsequent turns they may be assigned aerial supply under the provisions of rule 9.18 and, further, during their turn(s) of entry the divisions are considered to be using up the Soviet side’s aerial supply capacity for that that turn.
10.3 other Communist Reinforcements. If, during set up, the Communist player held back any of his units under the provision of rule 3.7, he may enter one, some or all of those units at the start of any of his movement phases throughout the game. They enter via any east edge Communist supply source hexes (see 9.17), paying to all regular movement costs involved starting with their hex of entry. Unlike the paratroopers, these units may potentially enter via any number of eligible hexes during every Soviet movement phase. Note, though, that no Communist units, once in play on the map, may ever be withdrawn from it (except when eliminated in combat). Also note that, if the Communist player decides to do so, he may enter one some or all of his paratroop divisions using this method; however, divisions entered in that way lose their airdrop capacity for the rest of the game.
10.4 Franco-German emergency Mobilization. At the start of this phase in every turn, the NATO player should openly roll one die for the French and one die for the West Germans. Those rolls are separately halved and rounded down, for final results for both of zero through three. He then blindly chooses the corresponding number of “groupements” from the flat piles of those units he set up according to rule 3.4. “Blindly” means looking only at the groupements’ untried (question-marked) sides, and operating the units that way until the first time they go into combat. Each groupement may be entered into play, at no more than one per hex, via any friendly controlled and un-nuked city hexes in their own countries. Once on the map they operate as any other unit of their side and nationality. Once their combat strengths are revealed, they are never flipped back to their other (“untried”) side and they are always each only one-step units.
Both nationalities have “0-0” units in their groupement orders of battle. When/if those units are revealed, they are immediately removed from play and that removal in no way goes toward satisfying any part of the combat result of the combat that caused it/them to be revealed. Further, in being revealed and removed, the 0-0 units also generate a one-column odds shift if favor of the Communist side in whatever combat it/they were taking part. That’s a maximum of one shift even if more than one 0-0 unit is revealed during the same combat.
Historical Note. At this time there were negotiations going on in regard to the formation of what later became know as the Bundeswehr, the official army of the Federal Republic of Germany. The original suggestion was to create a dozen German divisions; however, the whole thing was held up because the French objected to the very idea of that nation’s rearmament. The government in Paris then indicated they would agree to such a move only when they had the time to mobilize a corresponding number of new units in their own army. Further, they couldn’t
SWWIII Rules 09 columns.indd 13 11/16/2018 1:59:46 PM
14 STALIN’s WORLD WAR III: OPERATION PINCHER in EUROPE Rules of Play ©) 2019 Compass Games, LLC
even bring themselves to tolerate the use of the term “division” in regard to the proposed German mobilization, so “groupement” was to have been substituted, and there were also to be no corps or army levels of command allowed to the Germans. All that taken into account, rule 10.4 represents my best estimate of how all this would’ve played out in this kind of emergency situation.
10.5 nAto overseas Reinforcement Arrivals. During each game turn’s Phase III.D, the NATO player should openly roll two dice and subtract two from that number to get a final result of from zero through 10. That final result is the number of units he then pulls blindly (without first looking) from the reinforcement pool created during set up according to rule 3.4. The arriving units are generally immediately placed in any functioning NATO supply source hex on the appropriate map (and see 10.7 below for an option). Reinforcement arrivals may not be delayed. Also note that, since NATO reinforcement don’t enter during a movement phase, it costs them nothing to be placed onto the map.
Design Note. There are no “amphibious invasions” of non-port or enemy controlled coastal hexes allowed in the game. This is the start of a war; those kinds of operation take a degree of planning and preparation that’s not yet available here.
10.6 Augmenting Reduced nAto divisions. If a NATO division has been reduced to one step, it may potentially be augmented back to full two-step strength. To be able to do so, it must begin or end a NATO Movement Phase stacked in a hex with one or more RCT or brigade groups or groupements of its own nationality. With that nationality qualification met, it doesn’t matter the exact type of augmenting unit, even the three ad hoc brigades that begin in Austria could be used. The NATO player may then decide, regardless of supply state, to remove one of the smaller units and immediately flip to its full strength side the reduced division. This may be done any number of times during any NATO Movement Phase in which appropriate units are collocated. The smaller unit
used for the augmentation is permanently removed from play, and such augmentations may never be undone. For purposes of this rule, the West German BGS unit is considered a two-step division.
10.7 Uk & Us Paratroop (a.k.a. Airborne) Arrivals may, at the NATO player’s option, enter a nationally appropriate map via airdrop. That is, when they arrive, and provided the NATO side has air superiority on that turn, that player may enter them in the same way the Soviet airborne are entered. That is, as soon they become available, he may select any enemy-unoccupied (EZOC OK) clear or city hex on the map and paradrop the units into it. Note, however, these units would still be entering during the Phase III.D, not during the NATO Movement Phase. Such units will afterward need to trace supply normally or be provided aerial supply. If this kind of entry isn’t made on their turn of arrival, the NATO player must enter them as regular ground reinforcements.
Historical Note. The restrictions on NATO paratroop entry given above are meant to model the historic fact that, despite the Anglo-Allies having been the first powers to ever organize a whole “Allied Airborne Army” in WW2, that combat arm had afterward been allowed to wither away in the years after 1945. On the Soviet side, their high command had intensely studied the airborne operations of WW2 that had been conducted on all sides, and they would therefore have been much better prepared in regard to deployment timing and flexibility.
10.8 No NATO reinforcement of any kind may have its arrival delayed to a later turn. Any arriving units not entered during their turn of arrival are simply put back into the reinforcement pool. All reinforcements have their full combat and movement capabilities immediately available upon arrival (within normal turn and phase sequence strictures).
Design Note. Also see rules 10.9 and 14.10 in the Sandown game’s rules. Those “Soviet Second Formation Divisions” may also be introduced into the Pincher-only-play this game.
SWWIII Rules 09 columns.indd 14 11/16/2018 1:59:46 PM
STALIN’s WORLD WAR III: OPERATION PINCHER in EUROPE Rules of Play 15©) 2019 Compass Games, LLC
11.0 MoVeMent
11.1 Every ground unit in the game has a movement factor printed in its lower-right corner. That factor is the number of “movement points” (also called “MP,” “movement factors” and “MF”) available to the unit to use to move across the hex grid during its side’s movement phases in each game turn. Units move from hex to adjacent hex – no “skipping” of hexes is allowed – paying varied costs to do so depending on the terrain in, and barriers along the sides of, the hexes being entered. In general, the movement of each player’s ground units takes place only during his own player turn’s movement phase; no enemy movement takes place during your own player turn. For the exception, see 12.20 “DR.”
11.2 limits. MP may not be accumulated from turn to turn or phase to phase, nor may they be loaned or given from one unit or stack to another. A player may potentially move all, some, or none of his units in each of his movement phases throughout the game Moving units aren’t required to expend all their MP before stopping. The movement of each unit or stack must be completed before that of another is begun. A player may only change the position of an already moved unit or stack if his opponent agrees to allow it.
11.3 no Minimum Movement Ability. There’s no guaranteed ability for any unit to be able to move at least one hex during a friendly movement phase. To enter any hex, a moving unit must have sufficient MP available to pay all the involved cost or the move may not be made. Also note your units never enter hexes containing enemy units.
11.4 stack Movement. To move together as a stack, units must begin a friendly movement phase already stacked together in the same hex. Units aren’t, however, required to move together simply because they started a friendly movement phase in the same hex; such units might be moved together, individually or in sub-stacks.
11.5 splitting stacks. When moving a stack, you may halt it temporarily to allow a unit or sub-stack to split off and move away on a separate course. The units left behind in the original (or “parent”) stack may then resume their own movement, even splitting off other units if desired. Once you begin moving an entirely different parent stack, or an individual unit that began in a different hex than the currently moving parent stack, you may no longer resume the movement of the earlier stack without your opponent’s permission.
11.6 terrain & Movement. All terrain features on the map are classified into two broad categories: natural and manmade. Both those categories are further divided into different types (see below). There is never more than one type of natural terrain in any one hex, but more than one type of manmade terrain may exist in the same hex.
11.7 natural terrain & Water Barriers. There are the following types of natural terrain and hydrographic features on the map: clear, rough, mountain, polder, river hexsides and all-sea/lake hexes and hexsides. The effects those various features have on the movement of units are described below and are also summarized on the Terrain Effects Chart (TEC) printed on the mapsheet for quick reference during play.
11.8 Clear terrain is the “base” terrain of the game; it’s devoid of any natural features that would enhance defense or slow movement at this level of operations. Each clear hex costs all ground units one MP to enter. All city and capital city hexes are considered to otherwise be clear terrain (until they’re nuked; see section 13.0).
11.9 Rough. Each rough hex costs most units two MP to enter, except for mountain infantry, which pay only one MP. Also see 11.10 below concerning passes through some rough terrain areas.
SWWIII Rules 09 columns.indd 15 11/16/2018 1:59:46 PM
16 STALIN’s WORLD WAR III: OPERATION PINCHER in EUROPE Rules of Play ©) 2019 Compass Games, LLC
11.10 Mountains & Passes. Each mountain hex costs most units three MP to enter, except for mountain infantry, which pay only one MP. Note that the passes shown on the map effectively function as highways through their hexes (both rough and mountain). That is, as long as a moving unit moves from one pass hex to another pass hex by crossing a pass hexside, that move only costs that unit one MP. Also note, though, a nuked pass hex ceases to function as such for the rest of the game.
11.11 Polder hexes generally cost only one MP to enter; however, either player may announce he’s “blowing the dikes” (but the Soviet player may only make that announcement on a turn during which he has air superiority). Once that announcement is made, all polder hexes are permanently flooded, and they thereafter cost all units of both sides 3 MP to enter. The flooding can’t be undone.
11.12 River Hexsides. Rivers run between hexes, along the hexsides, rather than existing in-hex. Every river hex side may generally be crossed by units by paying one extra MP for that crossing. “Extra” means in addition to whatever normal movement cost is involved for the hex being moved into. Exception: if a river hexside is being crossed into or from an un-nuked city or capital city hexside, that crossing carries no extra MP cost.
11.13 All-sea/lake Hexes & Hexsides. No movement or combat is generally allowed across or into them, but see 11.19 below for the exception.
11.14 Manmade terrain & Movement. Manmade terrain exists in the following types: cities, capital cities and passes. The latter have already been explained above in 11.10.
11.15 Cities & Capital Cities. The cost for entering un-nuked city and capital city hexes is one MP for all units. Except for purposes of adjudicating victory (see section 4.0) there are no functional differences between city and capital city hexes.
11.16 Column Movement. Overland (but not aerially) supplied units may double their movement factor whenever they conduct a move such that they don’t start in an EZOC, don’t enter one anywhere along it, or end their move it in a hex containing one. The presence of friendly units in EZOC hexes doesn’t serve to negate those EZOC for purposes of determining column movement eligibility. Further, column movement may never be used to enter an enemy controlled and un-nuked city or capital city hex even if no actual enemy units or EZOC are present there.
11.17 Cumulative Costs. The total movement cost for entering any hex is always the sum of all the applicable in-hex and hexside costs.
11.18 Multi-national stack Movement. On the NATO side, if one or more stacks begin their Movement Phase containing units of more than one nationality, all the units in that stack lose one MP that phase on that account. That penalty doesn’t increase beyond one no matter how many nationalities are in a given stack. There is no such penalty on the Communist side.
11.19 nAto sea Moves. During each of that side’s movement phases, the NATO may move-by-sea up to one full stack of units. Each such move must begin and end in a friendly controlled and un-nuked port. Units that make sea moves may not move in any other way or attack that turn. That latter condition remain in place no matter the phase sequence being used that turn.
11.20 nAto Berlin Garrison. The three units of the NATO Berlin garrison are “static.” That is, they never move once placed on the map except possibly to go into the dead pile when eliminated in combat.
11.21 Geographic Restrictions. Hungarian, Romanian and Yugoslavian units may only move and fight in hexes in and/or immediately adjacent to Hungary, Romania and Yugoslavia. Swiss units,
SWWIII Rules 09 columns.indd 16 11/16/2018 1:59:46 PM
STALIN’s WORLD WAR III: OPERATION PINCHER in EUROPE Rules of Play 17©) 2019 Compass Games, LLC
while that country is still neutral may only move inside Switzerland (and, of course, they may not fight at all). Once (if) Switzerland has been brought into play by Soviet invasion, Swiss units may move and fight in Switzerland and all hexes immediately adjacent to Switzerland. Italian units may only move and fight in hexes in and immediately adjacent to Italy (that would exclude Switzerland, though, while that country is still neutral).
Design Note. The restrictions on Italian movement and combat given above don’t reflect any kind of neutrality on that nation’s part. Rather, it reflects the fact that in 1953 their more recently reorganized armed forces – though part of NATO – weren’t logistically prepared to move beyond those limits.
11.22 Paratroop Airdrops. See rules 3.7, 5.9, 6.5, 8.8, 9.18, 10.2 and 10.7.
12.0 CoMBAt
12.1 Attacks take place between adjacent opposing units during the combat phases in every player turn. Attacking is always voluntary; the mere fact of enemy unit adjacency doesn’t necessitate your units launch attacks against those adjacent enemy units. Both players are always free to attack or not, as each chooses on a case by case basis, during both of his own combat phases in each turn throughout the game. The player whose combat phase it is, is considered the “attacker,” and the other player is considered the “defender,” no matter the general situation across the map.
12.2 Multiple defenders in one Hex. If there are two or more enemy units in a hex being attacked by your units, you may only attack that stack as if it were one combined defending unit.
12.3 Multi-Hex Attacks. An enemy occupied hex may be attacked in one battle by as many of your units as you can bring to bear from one, some or all the surrounding hexes; however, no more than one hex may ever be the object of any one attack.
12.4 Indivisibility of Individual Units. No single attacking unit may have its attack factor divided and applied to more than one battle. Likewise, no defending unit may have part of its defense factor attacked by one or a few attackers while another part is attacked by others. No attacking unit may attack more than once per combat phase, and no defending unit may be attacked more than once per combat phase.
12.5 Attack sequencing. There’s no arbitrary limit on the number of attacks each player may resolve during his combat phases. The attacker need not declare all his attacks beforehand, and he may resolve them in any order he wishes, as long as the resolution of one is completed before that of the next is begun.
12.6 stacks Attacking & defending. It’s not necessary for all the units you have stacked in a given hex to participate in the same attack. Some of the units in a stack might attack into one hex while others attacked into some other hex or simply didn’t attack at all. No defending unit may ever refuse combat; all units in an attacked hex must participate in its defense.
12.7 Combat Procedure. Normally the attacking player should strive to have several times more attack factors involved in a battle than the defender has defense factors. Such battles are called “high odds” attacks. To resolve such fights, the attacking player begins by calculating his “odds.” Do that by adding together the attack factors of all the attacking units involved in the battle; then add up the defense factors of the enemy units defending in the battle. Divide the defender-total into the attacker-total and round down any remainder. For example, if 26 attack factors attack 7 defense factors, the situation yields an odds ratio of 3:1 (“three to one”). That is, 27÷7=3.71, which rounds down to 3. To turn that “3” into a ratio, you must set a “1” next to it on the right. Thus “3” becomes “3:1,” which corresponds to a column-heading on the Combat Results Table (CRT) printed on the mapsheet.
SWWIII Rules 09 columns.indd 17 11/16/2018 1:59:46 PM
18 STALIN’s WORLD WAR III: OPERATION PINCHER in EUROPE Rules of Play ©) 2019 Compass Games, LLC
12.8 Poor odds Attacks. Battles in which the attacking force has fewer combat factors than the defender are called “poor odds attacks.” Procedures in such situations are modified from what’s described above in that here you divide the defender’s total by the attacker’s, round up all remainders, and set the “1” on the left side of that result. For example, if a force with 5 attack factors is attacking a force with 11 defense factors, it’s a poor odds attack. In that case, divide 11 by 5 (11÷5=2.2), and round up (2.2 becomes 3); then set a “1” on the left of that “3,” yielding odds of 1:3 (“one to three”).
12.9 CRt odds limits. Note the column headings on the CRT range from 1:2 to 6:1. Final odds greater than 6:1 always receive automatic “DE” results. Odds less than 1:2 always receive automatic “AL1” results.
12.10 odds shifters. Combat odds may be modified by the terrain in the defender’s hex and around its perimeter, as well as by other factors described below. All applicable odds shifters are cumulative in their effects. That is, in every battle, all applicable shifts are applied to get one final left or right shift. Leftward shifts favor the defender; rightward shifts favor the attacker. 12.11 Clear terrain. Units defending in clear terrain hexes devoid of all other terrain features derive no benefit to their defense.
12.12 Rough. Units defending in rough hexes receive a one-column-left (1L) odds shift on that account.
12.13 Mountains. Units defending in mountain hexes receive a two-column-left benefit on that account.
12.14 Polder. Units defending in polder hexes derive no benefit to their defense, no matter if they’re flooded or not.
12.15 River Hexsides. Unit attacking across a river hexside have their attack factors halved on that account. When halving, round up all remainders. If more than one unit is to be halved, add together those attack factors and make just one division.
12.16 Cities & Capital Cities. Shift the odds two columns leftward (2L), and no concentric attack bonus (see 12.18) is ever possible when attacking any defenders in a city or Ruhr city. Further, convert DR combat results to BB (see 13.23).
12.17 Combat Air support. If your side has air superiority (see section 6.0) and you conduct one or more attacks and/or defenses within one or more of those airpower marker’s ranges, those combats get a one-column odds shift in your side’s favor. That bonus is never increased beyond one odds shift per battle, however, even if a particular combat is in range of more than one marker.
12.18 Concentric Attack. If a defending hex is attacked by units in opposite hexes, or by units from three surrounding hexes with one hex between each and the next attacker-occupied hex, or by units from more than three hexes, that attack may be eligible to receive the “concentric attack” one-column right odds shift bonus. The concentric shift is never awarded for attacks into un-nuked city or capital city hexes, but is otherwise always available when the attacking units are positioned as described above.
12.19 Final Combat Resolution. After all applicable odds shifts have been applied, the attacker rolls a die and cross-indexes that result beneath that proper odds ratio column to get a “combat result.” For example, a result of “6” rolled for an attack made at 3:1 odds yields a combat result of “EX.”
12.20 Combat Results are defined and applied as follows.
SWWIII Rules 09 columns.indd 18 11/16/2018 1:59:46 PM
STALIN’s WORLD WAR III: OPERATION PINCHER in EUROPE Rules of Play 19©) 2019 Compass Games, LLC
de = defender eliminated. Remove to the dead pile all involved one-step defending units; then reduce to one-step strength all involved two-step defending units. Survivors hold their position.
BB = Bloodbath. Both sides lose one step (grand total) from among their involved units. Each player chooses which among his own involved units he’ll reduce or eliminate. That ends the battle unless the attacker player immediately and openly decides to eliminate a second step from among his involved units. If he does so, the defending player must remove another step from his involved force or take a DR result. That escalatory process may go on, at the attacker’s option, until such time as he’s down to his last step. He may not choose to entirely wipe out his involved force.
Al1 = Attacker loses 1 step. The attacking player must eliminate one step (total) from among his involved units. The choice of which step to lose is always up to the attacking player.
dR = defender Retreat. The player owning the defending force must move it from its present hex to any adjacent hex into which it can move while still observing the stacking limit. If no such hex is available, the defending force remains in place and suffers a DE result instead. If more than one hex is available to receive the retreating force, the owning player generally has his choice; however, if retreat hexes are available and some contain EZOC and others don’t, a non-EZOC hex must be chosen. If an EZOC hex has to be retreated into, the retreating force must lose one step (total) on that account (owning player’s choice as to which unit in it to reduce or eliminate). The presence of a friendly unit in an EZOC hex negates that EZOC for retreat purposes, but stacking limits must still be taken into account. In that regard, a retreating force must be considered in a unitary fashion; that is, all the units in it go or stay together.
12.21 Apportioning losses. Within the strictures given above, both players are always free to apportion his own side’s step losses among his involved attacking or defending units as he sees fit.
12.22 Advance-After-Combat. At the end of every attack, whenever the defender’s hex is left empty of all units (no matter the reason), the victorious attacking units may advance-after-combat into that hex. Stacking limitations must be observed. Such advances aren’t part of normal movement; they don’t cost any MP, but advancing units must still observe normal terrain prohibitions. EZOC don’t block advances after combat. Advancing-after-combat is an option; it’s never mandatory; however, the decision to advance must be made immediately after the battle is resolved and before that of another is begun. It’s not necessary for advancing attackers to stack-full the newly won hex; the victorious player may send just one or a few units. There’s never any defender advance-after-combat; victorious defenders and simply hold in place.
12.23 Probing Attacks. If you have units located such that they’re adjacent to one or more hexes containing enemy units, and those same units of yours are also adjacent to one or more hexes that contain only EZOC, you may decide to attack into the empty-but-EZOC-containing hex(es) in a procedure known as a “probing attack.” Probing attacks are conducted using the same general procedures as regular attacks, with the important exceptions no odds calculation process is undertaken and neither side can in anyway suffer any step losses. Instead, just announce the probing attack and then make an advance-after-combat into the probed hex. Probing attacks count as “attacks” in regard to one-attack-per-unit-per-combat-phase stricture.
Design Note. Please carefully read the rule above. Its skillful application during play is essential to maximize both sides’ chances of battlefield success. On the offensive, in an otherwise deadlocked situation, probing attacks can be used to open up new operational opportunities. While on the strategic defense, in in an otherwise disastrous situation, probing attacks can provide a means of rescue and escape.
SWWIII Rules 09 columns.indd 19 11/16/2018 1:59:46 PM
20 STALIN’s WORLD WAR III: OPERATION PINCHER in EUROPE Rules of Play ©) 2019 Compass Games, LLC
12.24 Multi-national Attacks & defenses. Whenever an attack by the NATO side contains units of more than one nationality, that generates a one-column odds shift in favor of the Communist side. Both sides may conduct multi-national defenses without penalty, and there are never any penalties involved with multi-national Communist attacks.
12.25 soviet Artillery Attack Restriction. In general, Soviet artillery divisions attack in the same way as all other units; however, there is an exception. That is, in any given attack there may never be any more artillery attack factors involved than there are non-artillery attack factors. Any excess amount is ignored during the odds calculation process. (Of course, that means artillery units may never attack by themselves.)
13.0 AtoMIC AttACks & Us PRestIGe 13.1 First Use. On Turn 1, the NATO player may not make any atomic attacks until after the Communist player has made an atomic attack. On subsequent turns that stricture is no longer in effect.
13.2 limits. The Communist player may never make more than one atomic attack per turn. Except within the stricture given above in 13.1, the NATO player may potentially make any number of atomic attacks per turn. Neither player is ever required to make any atomic attacks.
13.3 targeting eligibility. Any hex on the map may be attacked atomically (“nuked”) by either player. Enemy unit presence isn’t needed in order to allow for an attack to be made into a hex.
13.4 Atomic Attack timing. Within the strictures given above, at any time during any friendly or enemy movement or combat phases, either player may simply say “Halt! I will now conduct an atomic attack!” With that announcement, the other player should complete whatever operation (movement or a battle’s combat resolution) he was conducting
at the time his opponent made that declaration. If both players declare they want to make an atomic attack at the same time, the NATO player decides which attack will be resolved first. Note that no single non-atomic action may be interrupted while it’s actually in process. Also note the NATO player may never make more than one atomic attack declaration at a time. The Communist player is always allowed to carry out at least one discreet activity (movement or battle resolution) before another interrupting declaration may be made by the NATO commander.
13.5 Attack Resolution. The player making an atomic attack should openly roll two dice (or one die twice) and then consult the Atomic Attack Terrain DRM (Dice Roll Modifiers) Table to get a final numeric result. The dice roll result is reduced by the modifier given for the terrain type in the hex where the attack is taking place.
13.6 Atomic Attack Results. The numeric result obtained using the process above is the number of steps the attacked player must immediately eliminate within the attacked hex. He’s generally free to eliminate and reduce his involved units in any way he sees fit in order to satisfy the overall step-loss requirement. The only exception is on the NATO side: if one or more French Javelin units are in a targeted hex, they may not be reduced or eliminated until all other involved units have first been eliminated.
It’s possible no step losses will be required. Even so, all atomic attacks result in the disruption of all the surviving units in the target hex. Show that by placing the mushroom cloud marker atop such units, keeping it there until that turn’s Administrative Phase, when it would be moved to a position below the units and their disruption is ended. Disrupted units may not move or attack and, if attacked, their status grants their opponent a 1R column shift. Further disrupted units exert no ZOC while in that state.
SWWIII Rules 09 columns.indd 20 11/16/2018 1:59:47 PM
STALIN’s WORLD WAR III: OPERATION PINCHER in EUROPE Rules of Play 21©) 2019 Compass Games, LLC
Design Note. Javelin units were specifically organized and trained so as to maximize their survivability on the “atomic battlefield.” In that regard, they anticipated the later development of US “pentomic divisions.”
13.7 nuked Cities & Capital Cities. If a city or capital city hex is once nuked (no matter the final step loss result in that attack) the hex is thereafter considered a rough terrain hex rather than a city or capital city hex (also see 9.15). For Communist VP purposes, though, continue to count nuked city and capital city hexes as such.
13.8 Atomic detonation Markers. Within the strictures given above, there’s no limit on the number of times any given hex may be nuked per turn or over the course of an entire game. Each time a strike is made into a hex, no matter the operational result, place a mushroom cloud detonation (a.k.a. “blast”) marker there (see 2.11). If there are one or more blast markers in a city hex, the normal entry costs for the in-hex terrain there are increased by one (total, no matter how many markers are present. If one more hexes become multiply nuked, feel free to remove all the markers but one, since the effects of each blast aren’t cumulative.
13.9 Us Prestige. Every turn, if/when the NATO player makes that side’s first atomic attack, he must, immediately after resolving the attack itself, openly roll another die. He halves that result, rounding down any remainder to get a final result of zero through three (which procedure is abbreviated as “1d6/2rd”). He then deducts that amount from his total of Prestige Points.
A second attack during the same turn on either map requires another such roll, but that time the halved result is rounded up if there’s any remainder (“1d6/2ru”).
A third attack in every turn gets that same second-attack procedure, but then a one is also added to it (“1d6/2ru+1).
A fourth and any subsequent attacks get that same third-attack treatment, but then a two is added to it (“1d6/2ru+2”) .
Also note, in all attacks, if the target hex was until then an un-nuked city in West Germany, France, the Benelux or Italy, the NATO player must then increase his rolled up prestige point debit by another one point, or by two in the case of capital cities.
A track is printed on the map to keep track of the number of US atomic attacks made each turn. Note that US prestige only goes down over the course of a game; no debited points may ever be regained. Also note Communist atomic attacks have no effect on any of this, and see 4.6 for the ultimate significance of all of it.
Fin.
CRedItsGame design & development: Ty Bomba
Project Manager: Ken Dingley Graphic design: Mark Mahaffey
Playtesting: Ty Bomba, Grant Cardwell, Christopher Perello & Sherman Tutweiler
Box design: Mark Mahaffey and Brien Miller Produced by: Ken Dingley and Bill Thomas
for Compass Games, LLC.
SWWIII Rules 09 columns.indd 21 11/16/2018 1:59:47 PM
22 STALIN’s WORLD WAR III: OPERATION PINCHER in EUROPE Rules of Play ©) 2019 Compass Games, LLC
CAMPAIGn notes by ty Bomba
stalin’s Plan.At the end of World War II the Soviet Union had some 12.7 million personnel under arms, with the Red Army forming the largest single component with approximately 477 division-equivalents supported by about 35,500 combat aircraft. The labor requirements for postwar reconstruction allowed for only 4.4 million personnel to be kept in service along with about 24,000 aircraft. That demobilization had taken place by the start of 1948.
Meanwhile, however, the US military went from a wartime high of some 14 million personnel down to 1.4 million. The military aircraft inventory shrank from 68,400 to 20,800. Further, the draft ended in March 1947 and all the services thereafter began complaining of a severe lack of trained manpower. In comparison, all men and women in the USSR remained eligible for call up, or call back, from the ages of 17 through 50.
Despite that numeric advantage, Stalin was initially concerned in the postwar period merely with holding and consolidating the territorial gains made in 1945. Stalin’s thinking at the time was officially expressed as doctrine in the 1947 promulgation (within the Kremlin) of a document titled The Plan for the Active Defense of the Territory of the Soviet Union.
It predicted the next war would begin with a US-led attack into the Central European lands occupied by the Soviets. In turn, the Red Army’s initial mission would be to defeat that aggression at the border before it could reach the Motherland proper. The goal was to be “securing the invulnerability of the boundaries established by international agreement after World War II.”
Since the USSR still didn’t have the atomic bomb, the overarching idea was to defeat the nuclear monopoly of America with conventional numerical superiority on the ground and in the air.
At the same time, the smaller postwar Red Army was to be made more combat efficient via full motorization. (During the war, the Red Army had employed 3.5 million horses to meet its transport needs.) The mechanization program was mostly completed by the end of the 1940s.
Despite the greater access to Kremlin records from the early Cold War era granted to historians since the dissolution of the USSR, no document has as yet emerged delineating when Stalin moved from his doctrine of strategic defense to one of strategic offense. Even so, though it remains impossible to distinguish exactly when he crossed that line, we know that by 1950 he had indeed moved past it in his thinking. Early in that year he carried on a dialogue with Mao Tse-tung as to the feasibility of overrunning South Korea without bringing on US intervention. Stalin encouraged the initially reluctant Chinese dictator to go ahead in preparing and supporting the North Koreans for that effort. He admitted the US might be drawn into the fighting, but asked: “Should we fear this?”
He answered his own question by saying: “In my opinion, we should not, because together we will be stronger than the USA and England, while the other European capitalist states…do not present serious military forces. If a war is inevitable, then let it be waged now, and not in a few years when Japanese militarism will be restored as an ally of the USA and when the USA and Japan will have a ready made bridgehead on the continent in the form of…Korea.”
SWWIII Rules 09 columns.indd 22 11/16/2018 1:59:48 PM
STALIN’s WORLD WAR III: OPERATION PINCHER in EUROPE Rules of Play 23©) 2019 Compass Games, LLC
After the war was begun, and he was next trying to encourage direct Chinese intervention to bring it to a victorious end, Stalin further assured the Chinese by saying: “Americans don’t know how to fight….They are pinning their hopes on the atomic bomb and air power. But one cannot win a war with that. One needs infantry, and they don’t have much infantry; the infantry they do have is weak.”
In January 1951 he summoned to the Kremlin the leaders and defense ministers of all the east European satellites. He told them he intended to overrun all of Europe, explaining the ongoing and indecisive fighting in Korea clearly proved the West was weak. His further analysis was the current communist bloc conventional military superiority would only last another three or four years, after which growing nuclear stockpiles would likely render it irrelevant. Those pronouncements were followed, throughout 1951 and 1952, with increasing arms expenditures.
In March 1953, as those programs and preparations were nearing their fulfillment, Stalin died. The official version said it was due to a combination of stroke and stomach hemorrhage. He was 74, and had been a smoker and drinker throughout his life, so the official explanation is plausible on the face of it. Even so, there are reasons to believe the alternative explanation – broadly accepted in Russian popular culture – that the dictator was actually assassinated (by poisoned wine) in a plot fostered by those around him in the Central Committee.
The rationale was, those on the Central Committee had been feeding Stalin inflated reports in regard to the progress of the Soviet Union’s military and economic recovery since the end of World War II. They knew, if the acid test of a new war came about, they would be revealed in their lies. That would mean bullets in the backs of their skulls. Since the new world war’s launch date had finally been set by Stalin (according to this theory) for sometime that summer, they had to act. One way or another, then, Stain’s death likely aborted a new world war at that time.
Us Plans.“Operation Dropshot” was completed by the US Joint Chiefs of Staff on 31 January 1949. Intended for use from then through 1957, it contained within it the earlier promulgated “Operation Pincher,” but it differed from all the earlier plans in three significant ways and, in effect, closed out the period today referred to as the “early Cold War.”
First, it included the idea the Soviets would, sometime during the period in which the plan was to be kept in place, acquire atomic bombs of their own. It then further predicted, even if a new world war began with only conventional means, the fighting would soon escalate to the use of nuclear weapons by both sides.
Second, it rejected the idea (which had been part of all the other plans drawn up since 1945, of simply abandoning Western Europe to the opening Soviet offensive. That change was necessitated by larger political developments, namely the founding of the North Atlantic Treaty Organization (NATO, signed 4 April 1949).
That is, US diplomats and generals knew they couldn’t expect any Western European government to agree to join an alliance in which, if war came, the first strategic measure taken would be to abandon their territory to the aggressor. The new intention was therefore to increase US and allied ground forces in western Germany to the point they would be strong enough to make a fighting withdrawal – while wearing down the invading Red Army – to a line along the Rhine/Ijssel Rivers-Alps-Piave River.
If that line couldn’t be held, further stands would be made at the base of the Brittany and Normandy peninsulas in France, the Pyrenees, and the Apennines. In a codicil added to the larger plan in February 1950, first-time provision was made for the use of small-yield “tactical” nuclear weapons on the battlefield to aid that defense.
SWWIII Rules 09 columns.indd 23 11/16/2018 1:59:48 PM
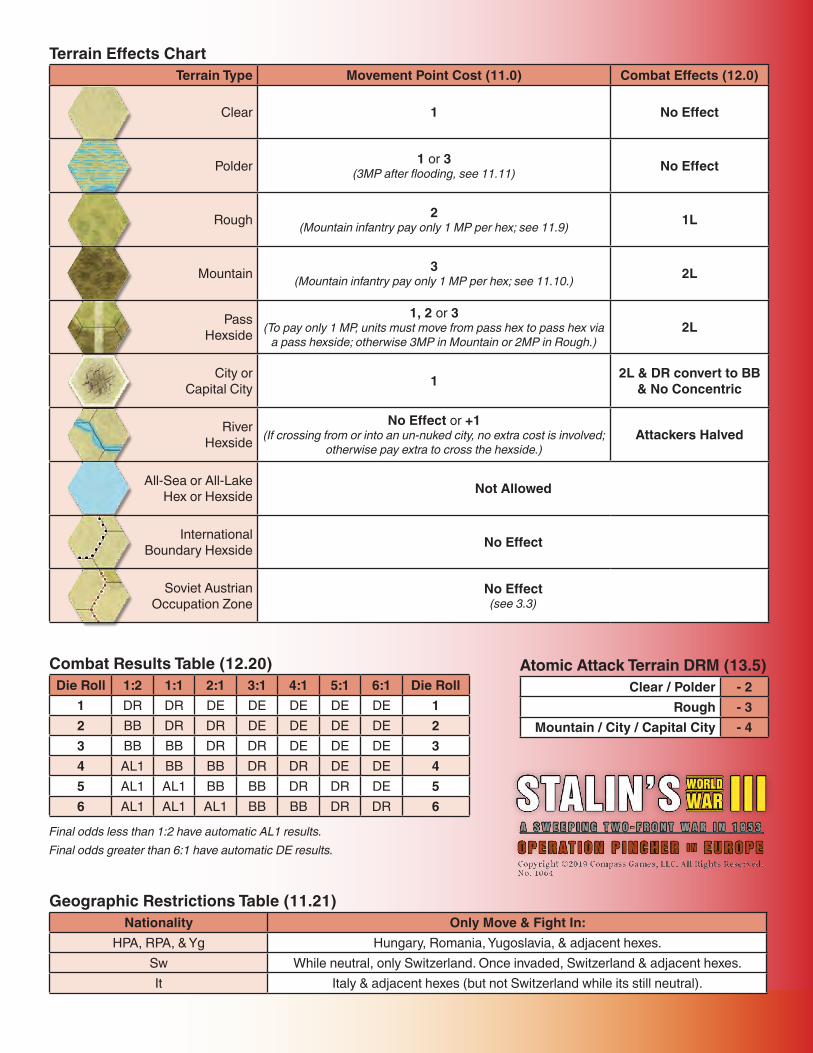
Terrain Effects Chartterrain type Movement Point Cost (11.0) Combat Effects (12.0)
Clear 1 No Effect
Polder 1 or 3(3MP after flooding, see 11.11) No Effect
Rough 2(Mountain infantry pay only 1 MP per hex; see 11.9) 1l
Mountain 3(Mountain infantry pay only 1 MP per hex; see 11.10.) 2l
PassHexside
1, 2 or 3(To pay only 1 MP, units must move from pass hex to pass hex via
a pass hexside; otherwise 3MP in Mountain or 2MP in Rough.)2l
City or Capital City 1 2l & dR convert to BB
& no Concentric
River Hexside
No Effect or +1(If crossing from or into an un-nuked city, no extra cost is involved;
otherwise pay extra to cross the hexside.)Attackers Halved
All-Sea or All-Lake Hex or Hexside not Allowed
International Boundary Hexside No Effect
Soviet Austrian Occupation Zone
No Effect(see 3.3)
Combat Results table (12.20)die Roll 1:2 1:1 2:1 3:1 4:1 5:1 6:1 die Roll
1 DR DR DE DE DE DE DE 12 BB DR DR DE DE DE DE 23 BB BB DR DR DE DE DE 34 AL1 BB BB DR DR DE DE 45 AL1 AL1 BB BB DR DR DE 56 AL1 AL1 AL1 BB BB DR DR 6
Final odds less than 1:2 have automatic AL1 results.Final odds greater than 6:1 have automatic DE results.
Geographic Restrictions table (11.21)nationality only Move & Fight In:
HPA, RPA, & Yg Hungary, Romania, Yugoslavia, & adjacent hexes.Sw While neutral, only Switzerland. Once invaded, Switzerland & adjacent hexes. It Italy & adjacent hexes (but not Switzerland while its still neutral).
Atomic Attack terrain dRM (13.5)Clear / Polder - 2
Rough - 3Mountain / City / Capital City - 4
SWWIII Rules 09 columns.indd 24 11/16/2018 1:59:51 PM