Embed Size (px)
Citation preview

EMC® ViPR SRMVersion 3.7.2
Installation and Configuration GuideP/N 302-003-111
REV 01

Copyright © 2016 EMC Corporation. All rights reserved. Published in the USA.
Published August 2016
EMC believes the information in this publication is accurate as of its publication date. The information is subject to changewithout notice.
The information in this publication is provided as is. EMC Corporation makes no representations or warranties of any kind withrespect to the information in this publication, and specifically disclaims implied warranties of merchantability or fitness for aparticular purpose. Use, copying, and distribution of any EMC software described in this publication requires an applicablesoftware license.
EMC², EMC, and the EMC logo are registered trademarks or trademarks of EMC Corporation in the United States and othercountries. All other trademarks used herein are the property of their respective owners.
For the most up-to-date regulatory document for your product line, go to EMC Online Support (https://support.emc.com).
EMC CorporationHopkinton, Massachusetts 01748-91031-508-435-1000 In North America 1-866-464-7381www.EMC.com
2 EMC ViPR SRM 3.7.2 Installation and Configuration Guide

7
9
Installing the Virtual Appliance 11
Virtual appliance installation overview.......................................................... 12Installing the 4 VM vApp................................................................................12Starting the vApp.......................................................................................... 14Logging in to the user interface..................................................................... 14
Passwords....................................................................................... 14Verifying if the EMC M&R platform services are running.................... 15
Adding disk space.........................................................................................16Configuring the user process limits for a Linux installation............................ 16
Installing Using the Binary Installer 19
Options for standard installation...................................................................20Installing EMC M&R platform on UNIX............................................................20Installing EMC M&R platform on Windows Server...........................................21
Configuring virus-scanning software.................................................22Configuring the hosts.................................................................................... 22Configuring the backend hosts......................................................................23Configuring the additional backend...............................................................23Configuring the frontend............................................................................... 25Starting the collector..................................................................................... 27Configuring the load balancer arbiter on the primary backend....................... 28Configuring Load Balancer Connectors, generic-snmp, and generic-rsc..........29Installing the health collectors...................................................................... 30Editing new actions scripts............................................................................31Verifying if the EMC M&R platform services are running................................. 32
Troubleshooting service start-up problems on UNIX......................... 32Troubleshooting service start-up problems on Windows...................33
Logging in to the user interface..................................................................... 33Connecting to Centralized Management........................................................ 33Confirming settings for the first time..............................................................34Configuring the user process limits for a Linux installation............................ 34
Using the Binary Installer to Scaleout the Environment 37
Overview....................................................................................................... 38General requirements....................................................................................38Linux requirements....................................................................................... 38Server requirements......................................................................................39Installing the basic binary deployment with four hosts.................................. 39Configuring the hosts.................................................................................... 39Configuring the backend hosts......................................................................40Configuring the additional backend...............................................................41Configuring the frontend............................................................................... 43
Figures
Tables
Chapter 1
Chapter 2
Chapter 3
CONTENTS
EMC ViPR SRM 3.7.2 Installation and Configuration Guide 3

Starting the collector..................................................................................... 45Configuring the load balancer arbiter on the primary backend....................... 45Configuring Load Balancer Connectors, generic-snmp, and generic-rsc..........46Installing the health collectors...................................................................... 47
Using the 1VM vApp to Scaleout the Environment 49
Deploy Scaleout VMs in Existing vApp........................................................... 50Deploy Scaleout VMs outside of a vApp Folder.............................................. 51Add disk space..............................................................................................51Modify start order of vApps in SRM................................................................52Scaleout scripts............................................................................................ 52
Automating the Download of Updates 55
Online Update overview................................................................................ 56Configuring server settings for online updates..................................56Enabling the online update task.......................................................56Running the online update task manually.........................................57Online Update Status....................................................................... 57Online Update History...................................................................... 58Disabling the online update task......................................................58
Licensing 61
Licensing concepts........................................................................................62After installation: Licenses and SolutionPacks................................. 62EMC M&R feature names and ELMS licenses.................................... 62Trial licenses....................................................................................62License duration.............................................................................. 63License purchase............................................................................. 63
Licensing operations..................................................................................... 63Log in with admin credentials...........................................................63View license information.................................................................. 64Upload a new license file................................................................. 66Delete licenses................................................................................ 67Synchronize licenses on multiple hosts............................................67
Troubleshooting licensing ............................................................................ 68Permanent license stops working after host reconfiguration.............68Users are locked out of ViPR SRM..................................................... 68Module does not start or has no license .......................................... 70
ELMS license entitlements............................................................................ 71
Uninstallation 75
Overview....................................................................................................... 76Stopping EMC M&R platform services on a UNIX server..................................76Uninstalling EMC M&R platform from a UNIX server....................................... 76Stopping EMC M&R platform services on a Windows server........................... 76Uninstalling EMC M&R platform from a Windows server.................................77Uninstalling a SolutionPack...........................................................................77
Telnet and Socket Interface Ports 79
Telnet and socket interface ports for each backend....................................... 80
Chapter 4
Chapter 5
Chapter 6
Chapter 7
Appendix A
CONTENTS
4 EMC ViPR SRM 3.7.2 Installation and Configuration Guide

SolutionPack Reconfiguration Fields 81
SolutionPack Reconfiguration Fields..............................................................82
Appendix B
CONTENTS
EMC ViPR SRM 3.7.2 Installation and Configuration Guide 5

CONTENTS
6 EMC ViPR SRM 3.7.2 Installation and Configuration Guide

Online Update Status.................................................................................................... 57Online Update Status with a major version update detected.......................................... 58
12
FIGURES
EMC ViPR SRM 3.7.2 Installation and Configuration Guide 7

FIGURES
8 EMC ViPR SRM 3.7.2 Installation and Configuration Guide

Default usernames and passwords ............................................................................... 14Required Server Resources............................................................................................ 39Features in ELMS SRMSUITE_GENERAL...........................................................................71Features in ELMS Add-On Licenses................................................................................ 73SolutionPack Reconfiguration Fields.............................................................................. 82
12345
TABLES
EMC ViPR SRM 3.7.2 Installation and Configuration Guide 9

TABLES
10 EMC ViPR SRM 3.7.2 Installation and Configuration Guide

CHAPTER 1
Installing the Virtual Appliance
This chapter includes the following topics:
l Virtual appliance installation overview.................................................................. 12l Installing the 4 VM vApp........................................................................................12l Starting the vApp.................................................................................................. 14l Logging in to the user interface..............................................................................14l Adding disk space.................................................................................................16l Configuring the user process limits for a Linux installation.................................... 16
Installing the Virtual Appliance 11

Virtual appliance installation overviewLearn how to install ViPR SRM as an appliance in a supported VMware environment.
Any new vApp (4VM or 1VM) installations require VMware vSphere 5.x or 6.0. Thisincludes adding a vApp VM to an existing installation.
The vApp is based on SuSE Enterprise Linux 11 SP3.
The MySQL version included with the product is 5.5.36 MySQL Community Server (GPL).
Do not add any VMs into the vApp other than the vApp VMs provided by EMC.
The procedures enable you to install two types of software:
Core software
A reporting solution built on a scalable architecture of distributed backends,frontends, collectors, and databases. When you install the core software, youestablish the foundation for the product, which provides common capabilities,functions, and user interfaces.
SolutionPacks
Software components that support EMC and third-party storage infrastructurecomponents. Each SolutionPack enables you to select a specific report in the UI. Tolearn more about the SolutionPacks that ViPR SRM supports, see the followingdocuments:
l EMC ViPR SRM Support Matrix
l EMC ViPR SRM Release Notes
ViPR SRM vApps are distributed using Open Virtualization Format (OVF) files. Dependingon your environment's requirements, you can use two types of OVF installations:
Four VM installation procedure
Enables you to install four VMs that are preconfigured to communicate with eachother (Frontend, Primary Backend, Additional Backend, and Collector).
One VM installation option
Enables you to install an appliance (Frontend, Primary Backend, Additional Backend,and Collector) as a single VM. You can use this option to install a single,consolidated VM for evaluation purposes or to add additional Backend and Collectorappliances to scale out the environment.
Installing the 4 VM vAppYou can deploy the ViPR SRM 4 VM appliance from an OVF template using a vSphereClient.
Before you begin
l Download the OVF template from support.emc.com.
l Gather the following information:
n vCenter location where you plan to deploy the appliance
n Data store that you can use for deployment
n Static IP address to assign to your appliance
Installing the Virtual Appliance
12 EMC ViPR SRM 3.7.2 Installation and Configuration Guide

n Gateway
n Netmask
n DNS Servers
l Ensure that DRS is enabled
Procedure
1. Open vSphere Client and connect to the vCenter Server that manages your VMwareenvironment.
2. Select the resource pool where you want to deploy the VMs for ViPR SRM.
3. Select File > Deploy OVF Template.
4. In the Source step, locate the OVF template file.
5. Click Next.
To save time, deploy the appliance in the same local area network (LAN) that yourVMware ESX/ESXi servers share. Deployment across a WAN can take much longerthan a local deployment.
6. In the OVF Template Details step, review the details of the loaded OVF file, and thenclick Next.
7. In the End User License Agreement step, review the license agreement. Click Accept,and then click Next.
8. In the Name and Location step:
a. Accept the default name or type a new name for the appliance.
b. Specify an inventory location for the appliance in your VMware environment.
c. Click Next.
9. Select the host or cluster where you want to run the deployed template, and then clickNext.
10. Select the destination storage for the virtual machine files, and then click Next.
11. In the Disk Format step, select the storage space provisioning method, and then clickNext.
Option Description
Thin-provisioned format On-demand expansion of available storage, used fornewer data store file systems.
Thick-provisioned format Appliance storage that is allocated immediately andreserved as a block.
Note
EMC recommends the Thin provisioned format option when the vApp is deployed in ahigh performance environment.
12. In the Network Mapping step, select a destination network that has an IP Poolassociated with it for each of the VMs, and then click Next.
13. In the IP Address Allocation step, choose the IP allocation policy and IP protocol touse, and then click Next.
14. In the Properties step, provide the values for each of the VMs, and then click Next.
Installing the Virtual Appliance
Installing the 4 VM vApp 13

15. In the Ready to Complete step, review the list of properties for the appliance, and thenclick Finish.
A status bar opens in vSphere Client showing the deployment progress.
16. After you finish deployment, in the Deployment Completed Successfully dialog box,click Close.
Starting the vAppUse the vSphere client to start the vApp.
Procedure
1. In the vSphere client, navigate to the Host and Cluster view.
2. From the configured resource pool, find the resource pool that you selected for theappliance.
The new appliance is listed under the resource pool.
3. Right-click each VM, and then select Open Console.
4. Right-click the vApp, and then select Power On.
Each VM in the vApp is powered on. After the initial startup and module installationsare complete, the login prompt displays.
Logging in to the user interfaceLog in to view reports or test user access.
Procedure
1. Open a browser, and then type the URL.
Example: http://<Frontend-hostname>:58080/APG2. Log in.
a. Type the login credentials.
The default username is admin. The default password is changeme.
b. Click Sign In.
After you finish
You are automatically logged off after four hours.
PasswordsUse passwords to control access to the appliance.
Table 1 Default usernames and passwords
Environment Username and password
Web-based console accessed in a browser admin/changeme Ensure that you change
this password.
Linux guest OS appliance console accessedthrough SSH or vSphere
root/Changeme1!
Installing the Virtual Appliance
14 EMC ViPR SRM 3.7.2 Installation and Configuration Guide

If you set the appliance console password while you deployed the OVF, the password thatyou entered is the default password.
Passwords must conform to the following requirements.:
l Be at least eight characters and no more than 40 characters
l Contain at least one numeric character
l Contain at least one uppercase and one lowercase character
l Contain at least one non-alphanumeric character such as # or !
l Cannot contain the single quote character (') because it is a delimiter for thepassword string
Note
These requirements do not apply to the Linux passwords.
Verifying if the EMC M&R platform services are runningVerify the EMC M&R platform services are running on each host by obtaining the status.
Before you begin
Ensure that you have a login with root, APG, or system administrator privileges. The userapg is the account that the EMC M&R platform application uses instead of root.Procedure
1. Type the command for your operating system from the bin directory of the EMC M&Rplatform installation:
Operating system Command
UNIX ./manage-modules.sh service status allWindows manage-modules.cmd service status all
2. Verify that each service has a status of running in the output.
Results
Note
The list of available services will vary depending upon choices (Collector, Backend,Frontend, Default, or Minimal) made during installation.
Example:
* Checking 'topology-mapping-service Default'... [ running ]* Checking 'webservice-gateway Default'... [ running ]* Checking 'mysql Default'... [ running ]* Checking 'alerting-backend Default'... [ running ]* Checking 'backend Default'... [ running ]* Checking 'collector-manager Default'... [ running ]* Checking 'collector-manager Generic-SNMP'... [ running ]* Checking 'collector-manager Load-Balancer'... [ running ]* Checking 'collector-manager emc smarts'... [ running ]* Checking 'event-processing-manager emc smarts'... [ running ]* Checking 'tomcat Default'... [ running ]* Checking 'task-scheduler Default'... [ running ]
Installing the Virtual Appliance
Verifying if the EMC M&R platform services are running 15

Troubleshooting service start-up problems on UNIXCheck the log files when services do not start.
Before you begin
Ensure that you have logged in with root or APG privileges to check the log files.
Procedure
l Look for log files in these /opt/APG/ directory paths.
The list of available log files will vary depending upon choices made duringinstallation. (Collector, Backend, Frontend, Default, or Minimal installations willgenerate different sets of log files.)
Databases/MySQL/Default/data/[SERVER NAME].errBackends/Alerting-Backend/Default/logs/alerting-0-0.logBackends/APG-Backend/Default/logs/cache-0-0.logCollecting/Collector-Manager/Default/logs/collecting-0-0.logWeb-Servers/Tomcat/Default/logs/service.logTools/Task-Scheduler/Default/logs/scheduler-0-0.logTools/Webservice-Gateway/Default/logs/gateway-0-0.log
Adding disk spaceAdd a virtual machine disk to a running system for use by suite virtual machines.
Procedure
1. From the vSphere Console, add a new disk to a virtual machine.
2. Select Edit Settings on the virtual machine.
3. Click Add.
4. Select Hard Disk, then click Next.
5. Select Create a new virtual disk, then click Next.
6. Specify the disk size, the provisioning type, and the location of the disk, then clickNext.
7. Specify the virtual device node (the default value should be OK), then click Next.
8. Review the options, and then click Finish.
9. Access a Linux login prompt. You can access a login prompt through the vSphereConsole or using an SSH tool such as PuTTY.
10. Log in to Linux.
11. At the system prompt, type the command expand_disk.pl.
Configuring the user process limits for a Linux installationIncrease the user process limits for the user account to a maximum of 65534. Thismodification enables services to open 65534 files and 65534 processes when needed.
Before you begin
l Make sure you have a login with root privileges.
l The installed on a server running Red Hat Enterprise Linux 6, CentOS Linux 6, or SUSELinux Enterprise Server (SLES) 11.
Installing the Virtual Appliance
16 EMC ViPR SRM 3.7.2 Installation and Configuration Guide

l The name specified for the user account during the installation.
Procedure
1. Open the /etc/security/limits.conf file.
2. Add the following lines for the user.
In this example, the user is apg.
apg hard nofile 65534apg soft nofile 65534apg hard nproc 65534apg soft nproc 65534
3. Save the file.
4. To restart the services, type the following commands from the bin directory of theinstallation:
./manage-modules.sh service stop all
./manage-modules.sh service start all
5. To verify the changes, type su apg -c 'ulimit -n -u'
Installing the Virtual Appliance
Configuring the user process limits for a Linux installation 17

Installing the Virtual Appliance
18 EMC ViPR SRM 3.7.2 Installation and Configuration Guide

CHAPTER 2
Installing Using the Binary Installer
This chapter includes the following topics:
l Options for standard installation...........................................................................20l Installing EMC M&R platform on UNIX....................................................................20l Installing EMC M&R platform on Windows Server...................................................21l Configuring the hosts............................................................................................ 22l Configuring the backend hosts..............................................................................23l Configuring the additional backend.......................................................................23l Configuring the frontend....................................................................................... 25l Starting the collector............................................................................................. 27l Configuring the load balancer arbiter on the primary backend............................... 28l Configuring Load Balancer Connectors, generic-snmp, and generic-rsc..................29l Installing the health collectors.............................................................................. 30l Editing new actions scripts....................................................................................31l Verifying if the EMC M&R platform services are running......................................... 32l Logging in to the user interface..............................................................................33l Connecting to Centralized Management................................................................ 33l Confirming settings for the first time......................................................................34l Configuring the user process limits for a Linux installation.................................... 34
Installing Using the Binary Installer 19

Options for standard installationLearn how to install the EMC M&R platform using a binary installation package.
The EMC M&R platform infrastructure consists of three types of hosts:
l Frontend host
l Backend host (Primary and Additional)
l Collector host
You can have only one Primary Backend host. You can add Additional Backend hosts toscale out a deployment.
The Topology-Mapping-Service module, by default, is configured with 2GB max heap. Forthose installed on the Frontend and Backend hosts, actual maximum consumption isunder 128MB. The additional memory need not be considered for sizing calculations. TheTopology-Mapping-Service installed on the Collector host should have its full 2GB maxheap considered.
The MySQL version included with the product is 5.5.36 MySQL Community Server (GPL).
The EMC M&R platform binary installation package supports the following installationoptions.
Default (UNIX) or Recommended Modules (Windows) installationTo install all of the modules in the EMC M&R platform binary installation package, usethis option.
You can use this option on a single host and enable it to serve as a Frontend, Backend,and Collector host. You can customize this host further by manually adding or removingspecific modules.
Host-specific installationsTo install software only on a specific host (Frontend, Backend or Collector host), use thesame EMC M&R platform binary installation package and select the type of host to install.
Minimal (UNIX) or Base Installation (Windows)To install the minimum modules required for any host type, use this option. You cancustomize this host by manually adding specific modules.
Installing EMC M&R platform on UNIXYou can install the EMC M&R platform on supported UNIX hosts. This procedurespecifically uses the Linux installation procedure as an example.
Before you begin
l When you install EMC M&R platform on a UNIX server, assign executable permissionsto the installation script.
l Ensure that you have a login with root privileges to run the installer.
l Download the installation file from support.emc.com, and place it in a temporarylocation on the server.
Procedure
1. Log in to the server as root.
2. Change the permissions of the installer.
Installing Using the Binary Installer
20 EMC ViPR SRM 3.7.2 Installation and Configuration Guide

For example:
chmod +x <file_name>.sh3. Run the installer from the directory.
For example:
./<file_name>.sh4. Read and accept the End User License Agreement.
5. Accept the default installation directory of /opt/APG or type another location.
6. Accept the default user account name of apg or type another name.
7. Accept the default location of service scripts of /etc/init.d or type anotherlocation.
8. Accept the default base directory of/etc for runlevel scripts or type another basedirectory.
9. Depending on the host purpose, select one of the following options:
Option Description
Default Installs recommended modules available in the binary installationpackage. You can use this option on a single host, which enables it toserve as a Frontend, Backend and Collector host. To customize this hostfurther, manually add or remove specific modules.
Frontend Installs web services and front end applications.
Backend Installs the database and backend services.
Collector Installs base modules to perform data collection and enrichment.
Minimal Installs the minimal modules required for any host type. To customize thishost further, manually add specific modules.
Installing EMC M&R platform on Windows ServerYou can install the EMC M&R platform on supported Windows Server hosts.
Before you begin
l Ensure that you have a login with system administrator privileges to run the installer.
l Download the installation file from support.emc.com, and place it in a temporarylocation on the server.
Procedure
1. Double-click the .exe file.
2. Click Next on the Welcome screen.
3. Read and accept the End User License Agreement. Click I Agree.
4. Select the Destination Folder:
a. Change the drive to a Windows non-root drive.
b. Maintain the default folder structure (Program Files\APG).
c. Click Next.
Installing Using the Binary Installer
Installing EMC M&R platform on Windows Server 21

5. Depending on the host purpose, select one of the following options:
Option Description
RecommendedModules
Installs all recommended modules available in the binaryinstallation package. You can use this option on a singlehost, which enables it to serve as a Frontend, Backend andCollector host. To customize this host further, manually addor remove specific modules.
Frontend Modules Installs web services and front end applications.
Backend Modules Installs the database and backend services.
Collector Modules Installs base modules to perform data collection andenrichment.
Base Installation Installs the minimal modules required for any host type. Tocustomize this host further, manually add specific modules.
6. Click Install.
7. When the installation is complete, click Next.
8. To close the installer, click Finish.
Configuring virus-scanning softwareRunning virus-scanning software on directories containing MySQL data and temporarytables can cause issues, both in terms of the performance of MySQL and the virus-scanning software misidentifying the contents of the files as containing spam.
After installing MySQL Server, it is recommended that you disable virus scanning on thedirectory used to store your MySQL table data (such as C:\Program Files\APG\Databases\MySQL\Default\data). In addition, by default, MySQL createstemporary files in the standard Windows temporary directory. To prevent scanning thetemporary files, configure a separate temporary directory for MySQL temporary files andadd this directory to the virus scanning exclusion list. To do this, add a configurationoption for the tmpdir parameter to your my.ini configuration file.
Configuring the hostsYou must configure the hosts in a particular order.
Configure the four hosts in the following order:
Procedure
1. Select one of the backend hosts to be the primary backend.
2. Select the other backend host to be the additional backend.
3. Select a host to be the frontend.
4. Select a host to be the collector.
Installing Using the Binary Installer
22 EMC ViPR SRM 3.7.2 Installation and Configuration Guide

Configuring the backend hostsLearn how to configure the backend hosts.
Procedure
1. Set the Maximum Java Heap Size in the /opt/APG/Backends/Topology-Service/Default/conf/unix-service.properties file to 6144 MB.
2. Reconfigure the topology service to commit the change:
/opt/APG/bin/manage-modules.sh service update topology-service/opt/APG/bin/manage-modules.sh service start topology-service
3. Start the MySQL process:
/opt/APG/bin/manage-modules.sh service start mysql Default
4. Allow remote access to the databases.Each database must be configured to beaccessible from the collectors, frontends, backend hosts, and localhost:
/opt/APG/bin/mysql-command-runner.sh -c /opt/APG/Tools/MySQL-Maintenance-Tool/Default/conf/mysql-root-mysql.xml -Q "GRANT ALLPRIVILEGES ON *.* TO 'apg'@<HOST NAME> IDENTIFIED BY PASSWORD'*FA71926E39A02D4DA4843003DF34BEADE3920AF3'"
The <HOST NAME> must be the DNS name resolved from the nslookup <CLIENT IP>command executed from the operating system where the backend is installed.
5. Start the backend services:
Option Description
Linux manage-module.sh service start all
Windows manage-module.cmd service start all
6. Check that all of the services are running:
Option Description
Linux manage-module.sh service status all
Windows manage-module.cmd service status all
Configuring the additional backendLearn how to configure the additional backend. This step is optional. The minimal setupdoes not require an additional backend.
Procedure
1. Start the MySQL process:
/opt/APG/bin/manage-modules.sh service start mysql
2. Create four new databases with the names apg1, apg2, ap3, and apg4 by running thefollowing command four times (replacing the [1..n] with a number):
Installing Using the Binary Installer
Configuring the backend hosts 23

/opt/APG/bin/mysql-command-runner.sh -c /opt/APG/Tools/MySQL-Maintenance-Tool/Default/conf/mysql-root-mysql.xml -Q "createdatabase apg[1..n]";
Note
EMC recommends keeping the default APG timeseries database.
3. Register the apg databases to the APG Backend server by running the followingcommand for each apg database. Answer yes to each question.
/opt/APG/bin/manage-modules.sh install backend apg[1..n]
Note
The MySQL Storage Adapter uses in-memory temporary tables. You should set themax_heap_table_size in …/APG/Databases/MySQL/Default/my.cnf (Unix) or
my.ini (Windows) to at least 128M (depending on your installation size) to avoid
errors.
4. Install the maintenance tool for each new backend by running the following commandfor each apg database. Answer yes to each question.
/opt/APG/bin/manage-modules.sh install mysql-maintenance-toolapg[1..n]
5. Allow remote access to the new databases. Each database must be configured to beaccessible from the collectors, frontends, primary backend and localhost:
/opt/APG/bin/mysql-command-runner.sh -c /opt/APG/Tools/MySQL-Maintenance-Tool/Default/conf/mysql-root-mysql.xml -Q "GRANT ALLPRIVILEGES ON *.* TO 'apg'@'<HostName>' IDENTIFIED BYPASSWORD'*FA71926E39A02D4DA4843003DF34BEADE3920AF3'"
The <HOST NAME> must be the DNS name resolved from the nslookup <CLIENT IP>command executed from the Additional Backend host.
6. Find all of the XML files in the /opt/APG/Backends/APG-Backend/apg[1..n]folders that contains JDBS connection URLs.
For example: …localhost:53306/apg7. Update the URLs to include the correct APG database numbers.
For example: …localhost:53306/apg[1..n]
To complete this step with a script (for Linux), run the following command:
find /opt/APG/Backends/APG-Backend/apg[1..n] -name '*.xml' | xargssed -i "s|jdbc:mysql://localhost:53306/apg|\\0[1..n]|"
8. The Telnet interface port for each new apg database must be different. The defaultport is 2001. To change the port numbers, edit the following files and set the portnumbers to 2[1..n]01:
/opt/APG/Backends/APG-Backend/apg[1..n]/conf/telnetinterface.xmlTelnet and socket interface ports for each backend on page 80 lists the portnumbers.
Installing Using the Binary Installer
24 EMC ViPR SRM 3.7.2 Installation and Configuration Guide

9. The socket interface port for each new apg database must be different. The defaultport is 2000. To change the port numbers, edit the following files and set the portnumbers to 2[1..n]00:
/opt/APG/Backends/APG-Backend/apg[1..n]/conf/socketinterface.xmlTelnet and socket interface ports for each backend on page 80 lists the portnumbers.
10. Point the MySQL maintenance tools to the new local databases by editing thefollowing files and replacing "apg" with the correct names (like apg1):
l /opt/APG/Tools/MySQL-Maintenance-Tool/apg[1..n]/conf/mysql.xml
l /opt/APG/Tools/MySQL-Maintenance-Tool/apg[1..n]/conf/mysql-root-apg.xml
For example:
<url>jdbc:mysql://localhost:53306/apg1?autoReconnect=true</url> <!-- The username for database access. --> <username>apg</username> <!-- The password for database access. --> <password>watch4net</password>
To complete this step with a script (for Linux), run the following command:
find /opt/APG/Tools/MySQL-Maintenance-Tool/apg[1..n] -name '*.xml'| xargs sed -i "s|jdbc:mysql://localhost:53306/apg|\\0[1..n]|"
11. Start the backend services:
Option Description
Linux manage-modules.sh service start all
Windows manage-modules.cmd service start all
12. Verify that all the services are running:
Option Description
Linux manage-modules.sh service status all
Windows manage-modules.cmd service status all
manage-modules service status all
Configuring the frontendLearn how to configure the frontend.
Procedure
1. Install the frontend as described in Installing Using the Binary Installer on page 19.
2. Set the connections that point to a local MySQL server to point to the new primarybackend. In the following files, locate all of the strings like localhost:53306, andreplace the string hostname with the primary backend DNS name (it must beresolvable):
Installing Using the Binary Installer
Configuring the frontend 25

l /opt/APG/Web-Servers/Tomcat/Default/conf/server.xmll /opt/APG/Tools/Frontend-Report-Generator/Default/conf/
report-generation-config.xmll /opt/APG/Tools/Administration-Tool/Default/conf/master-
accessor-service-conf.xmll /opt/APG/Tools/WhatIf-Scenario-CLI/Default/conf/whatif-
scenario-cli-conf.xml
3. Set non-MySQL localhost connections to point to the new primary backend:
a. Locate and replace the hostname in the strings localhost:48443 in thefollowing file:
/opt/APG/Web-Servers/Tomcat/Default/conf/Catalina/localhost/APG.xml
b. Locate and replace the hostname in the strings localhost:52569 in thefollowing file:
/opt/APG/Web-Servers/Tomcat/Default/conf/Catalina/localhost/alerting-frontend.xml
c. Locate and replace the hostname in the strings localhost:52569 in thefollowing file:
/opt/APG/Tools/Frontend-Report-Generator/Default/conf/report-generation-config.xml
4. Increase the maximum memory that the Tomcat server can use by locatingmemory.max= in the /opt/APG/Web-Servers/Tomcat/Default/conf/unix-service.properties file and setting it to memory.max=8192.
5. Update the Tomcat service to apply the new memory settings:
#/opt/APG/bin/manage-modules service update tomcat Default#/opt/APG/bin/manage-modules service start tomcat Default
6. Restart the Tomcat service and the webservice-gateway:
#/opt/APG/bin/manage-modules service start tomcat Default#/opt/APG/bin/manage-modules service restart webservice-gateway Default
7. On the frontend, go to Centralized Management > Configuration, and then clickRegister a Server. Register all of the APG servers that are up and running. Use thefollowing settings:
l Server HostName = the DNS name of the server
l Gateway URL = https://<server DNS name>:48443/
l User Name = admin
l Password = changeme
8. Click Save.
9. Once you have registered all of the servers, verify that they display in CentralizedManagement > Physical Overview without any error messages.
Installing Using the Binary Installer
26 EMC ViPR SRM 3.7.2 Installation and Configuration Guide

10. ResourceLinks for the timeseries database are now stored in the master database. Togive access to the timeseries database on the primary backend, update the resourcesusing the manage-resources.sh command:
#/opt/APG/bin/manage-resource.sh list(this will list all the resources)#/opt/APG/bin/manage-resources.sh get "dba/APG-DB"
a. Check the details of dba/APG-DB and update the connection URL to point to theprimary backend host:
#/opt/APG/bin/manage-resources.sh update dba/APG-DB "{'datasource':{'url': 'jdbc:mysql://<PRIMARY BACKEND HOST>:53306/apg?autoReconnect=true&connectTimeout=20000&maxReconnects=2'}}"
b. Update the management resource for the data management tool to communicatewith the backend:
#/opt/APG/bin/manage-resources.sh get "mgmt/APG-DB"# /opt/APG/bin/manage-resources.sh update "mgmt/APG-DB" "{'connection': {'url': 'https://<PRIMARY BACKEND HOST>:48443/Backends/APG-Backend/Default'}}"
c. Update all of the remaining resources in the same way.
11. Create resources for each of the newly added APG databases on the AdditionalBackend:
For example, to create a Database resource:
# manage-resources.sh create "dba/APG-DB1" "{'datasource': {'driverClassName': 'com.mysql.jdbc.Driver','username': 'apg','password': '{6230FED930DD59BEB1095D6801AA74E2FC23B2C8B76AFF6447D5C49B84C4001FDF5B6441DF7CD5CB2B19D4A927C63934}','url': 'jdbc:mysql://<ADDITIONAL BACKEND>:53306/apg1?autoReconnect=true&connectTimeout=20000&maxReconnects=2' },'settings': {'cachegrp': 'DB'}}"
To create a Management Resource:
# manage-resources.sh create mgmt/APG-DB1 "{'connection': {'url': 'https://<ADDITIONAL BACKEND HOST>:48443/Backends/APG-Backend/apg1','user': 'admin', 'password': '{68951D237EABAFD17BD2F90B2029E51B9078C3968D27791E745EB38C2F8E4B7B6351D632200618220667E25792D7E8894330B34886D638E3C3B93856C94998B9}'}}"
Starting the collectorLearn how to start the collector.
Procedure
1. Install the collector as described in Installing Using the Binary Installer on page 19.
2. Start the collector service:
Installing Using the Binary Installer
Starting the collector 27

manage-modules service start all
Configuring the load balancer arbiter on the primary backendLearn how to configure the load balancer on the primary backend.
Before you begin
l The connection must point to the FQDN of the backend host.
l The listening port must be 2020.
Procedure
1. Create a list of apg (timeseries) databases and their management services for thearbiter by reconfiguring the load-balancer-arbiter on the primary backend.
For example:
SolutionPack Reconfiguration Fields on page 81 describes the values that youshould enter for each field on the SolutionPack Reconfiguration page.
2. Click the + button and add an entry for each of the backend instances (apg1, apg2,apg3 and apg4) created on the additional backend host.
3. Provide the appropriate backend data port, web-service gateway, backend instancename, and DB connection details for each of the instances.
4. After you have setup the arbiter, check the logs under /opt/APG/Collecting/Collector-Manager/Load-Balancer/logs to see if all of the APG backendinstances were correctly installed.
For example:
# cat /opt/APG/Collecting/Collector-Manager/Load-Balancer/logscollecting-0-0.log | grep "LoadFactorDecision::isReady"INFO -- [2014-06-05 12:28:44 EDT] -- LoadFactorDecision::isReady(): Starting decision with current load
Installing Using the Binary Installer
28 EMC ViPR SRM 3.7.2 Installation and Configuration Guide

factor of:INFO -- [2014-06-05 12:28:44 EDT] -- LoadFactorDecision::isReady(): Backend1 0.0/750000.0 (0.0)INFO -- [2014-06-05 12:28:44 EDT] -- LoadFactorDecision::isReady(): Backend2 0.0/750000.0 (0.0)INFO -- [2014-06-05 12:28:44 EDT] -- LoadFactorDecision::isReady(): Backend3 0.0/750000.0 (0.0)INFO -- [2014-06-05 12:28:44 EDT] -- LoadFactorDecision::isReady(): Backend4 0.0/750000.0 (0.0)INFO -- [2014-06-05 12:28:44 EDT] -- LoadFactorDecision::isReady(): Backend0 595.0/750000.0 (7.933333333333333E-4)
Configuring Load Balancer Connectors, generic-snmp, andgeneric-rsc
Learn how to configure Load Balancer Connectors (LBCs).
Before you begin
l The Load Balancer Arbiter is installed on the primary backend with the listener port of2020.
l The LBCs are installed on all of the collector hosts.
l The LBC listens on port 2020 local on that collector server and communicates withthe Load Balancer Arbiter on the primary backend also using port 2020.
Procedure
1. During the installation of the LBC, when the script asks for the Web-Servicegateway hostname or IP address [localhost], enter the DNS of theprimary backend server where the arbiter is installed.
2. The collector server has the LBC installed by default, but you must reconfigured it topoint it to the primary backend and its arbiter:
a. In Centralized Management > SolutionPacks > Other Components, filter on thecollector name, and click the Reconfigure button for the load-balancer-connector.
b. Update all of the host names and gateway URLs so they point to the primarybackend.
c. Update the Alerting Backend hostname to Primary Backend host and 2010 port.
d. Update the Frontend Web Service to point to the Frontend host.
For example:
Installing Using the Binary Installer
Configuring Load Balancer Connectors, generic-snmp, and generic-rsc 29

e. generic-rsc is installed by default on the collector host. Click the Reconfigurebutton and update the Frontend Web Service to point to frontend host. Update theTopology service question by changing the host name and gateway to point to theprimary backend host.
f. Click the Reconfigure button for generic-snmp. Update the Frontend Web service topoint to frontend host. Update the Topology service question by changing the hostname and gateway to point to primary backend host
Installing the health collectorsLearn how to install the health collectors.
Before you begin
The Health Collector on the primary backend must point to the local LBC and its port. Inthis installation, the port is 2020.
The first installation of the SolutionPack will install the Health Reports on the frontendserver.
Procedure
1. On the Select the Components to Install window:
a. Install Pre-configured alerts where the primary backend is located.
b. Install Data collection on every host by repeating the installation procedure foreach host.
c. Install Reports on the frontend.
Installing Using the Binary Installer
30 EMC ViPR SRM 3.7.2 Installation and Configuration Guide

2. On the Data Collection window:
a. Data collection is the local LBC on port 2020.
b. Alerting is on the primary backend.
c. Topology host and gateway is on the primary backend
Editing new actions scriptsEdit actions on the frontend host to send events to the machine on which the event-processing-manager of the alerting-consolidation module is configured.
Procedure
1. In the following file, replace 127.0.0.1 with the primary backend IP address:
Option Description
Linux /opt/APG/Custom/WebApps-Resources/Default/actions/event-mgmt/linux/conf
Windows Program Files\APG\Custom\WebApps-Resources\Default\actions\event-mgmt\windows\conf.cmd
Installing Using the Binary Installer
Editing new actions scripts 31

Verifying if the EMC M&R platform services are runningVerify the EMC M&R platform services are running on each host by obtaining the status.
Before you begin
Ensure that you have a login with root, APG, or system administrator privileges. The userapg is the account that the EMC M&R platform application uses instead of root.Procedure
1. Type the command for your operating system from the bin directory of the EMC M&Rplatform installation:
Operating system Command
UNIX ./manage-modules.sh service status allWindows manage-modules.cmd service status all
2. Verify that each service has a status of running in the output.
Results
Note
The list of available services will vary depending upon choices (Collector, Backend,Frontend, Default, or Minimal) made during installation.
Example:
* Checking 'topology-mapping-service Default'... [ running ]* Checking 'webservice-gateway Default'... [ running ]* Checking 'mysql Default'... [ running ]* Checking 'alerting-backend Default'... [ running ]* Checking 'backend Default'... [ running ]* Checking 'collector-manager Default'... [ running ]* Checking 'collector-manager Generic-SNMP'... [ running ]* Checking 'collector-manager Load-Balancer'... [ running ]* Checking 'collector-manager emc smarts'... [ running ]* Checking 'event-processing-manager emc smarts'... [ running ]* Checking 'tomcat Default'... [ running ]* Checking 'task-scheduler Default'... [ running ]
Troubleshooting service start-up problems on UNIXCheck the log files when services do not start.
Before you begin
Ensure that you have logged in with root or APG privileges to check the log files.
Procedure
l Look for log files in these /opt/APG/ directory paths.
The list of available log files will vary depending upon choices made duringinstallation. (Collector, Backend, Frontend, Default, or Minimal installations willgenerate different sets of log files.)
Databases/MySQL/Default/data/[SERVER NAME].errBackends/Alerting-Backend/Default/logs/alerting-0-0.logBackends/APG-Backend/Default/logs/cache-0-0.log
Installing Using the Binary Installer
32 EMC ViPR SRM 3.7.2 Installation and Configuration Guide

Collecting/Collector-Manager/Default/logs/collecting-0-0.logWeb-Servers/Tomcat/Default/logs/service.logTools/Task-Scheduler/Default/logs/scheduler-0-0.logTools/Webservice-Gateway/Default/logs/gateway-0-0.log
Troubleshooting service start-up problems on WindowsCheck the log files when services do not start.
Before you begin
Ensure that you have logged in with system administrator credentials to check the logfiles.
Procedure
l Look for log files in these C:\Program Files\APG directory paths.
The list of available log files will vary depending upon choices made duringinstallation. (Collector, Backend, Frontend, Default, or Minimal installations willgenerate different sets of log files.)
Databases\MySQL\Default\data\[SERVER NAME].err.Backends\Alerting-Backend\Default\logs\alerting-0-0.logBackends\APG-Backend\Default\logs\cache-0-0.logCollecting\Collector-Manager\Default\logs\collecting-0-0.logWeb-Servers\Tomcat\Default\logs\service.logTools\Task-Scheduler\Default\logs\scheduler-0-0.logTools\Webservice-Gateway\Default\logs\gateway-0-0.log
Logging in to the user interfaceLog in to view reports or test user access.
Procedure
1. Open a browser, and then type the URL.
Example: http://<Frontend-hostname>:58080/APG2. Log in.
a. Type the login credentials.
The default username is admin. The default password is changeme.
b. Click Sign In.
After you finish
You are automatically logged off after four hours.
Connecting to Centralized ManagementConnect to the server so that you can access Centralized Management to install andadminister SolutionPacks.
Centralized Management is one of the multiple web applications available in EMC M&Rplatform.
Procedure
1. Open a browser.
2. Type http://<serverIP:port>/centralized-management.
Installing Using the Binary Installer
Troubleshooting service start-up problems on Windows 33

The serverIP is the fully qualified hostname or IP address of the server where EMC M&Rplatform runs.
The port is the port number of the server.
Example:
http://myHost.emc.com:58080/centralized-management3. Log in.
a. Default username is admin.
b. Default password is changeme.
c. Click Sign In.
After you finish
You are automatically logged off after four hours.
Confirming settings for the first timeAfter you first log in with administrator credentials for EMC M&R platform, you mustconfirm the configuration settings for the server.
Procedure
l To accept the predefined values for the server, click Save.
Blank fields must remain blank.
Configuring the user process limits for a Linux installationIncrease the user process limits for the user account to a maximum of 65534. Thismodification enables services to open 65534 files and 65534 processes when needed.
Before you begin
l Make sure you have a login with root privileges.
l The installed on a server running Red Hat Enterprise Linux 6, CentOS Linux 6, or SUSELinux Enterprise Server (SLES) 11.
l The name specified for the user account during the installation.
Procedure
1. Open the /etc/security/limits.conf file.
2. Add the following lines for the user.
In this example, the user is apg.
apg hard nofile 65534apg soft nofile 65534apg hard nproc 65534apg soft nproc 65534
3. Save the file.
4. To restart the services, type the following commands from the bin directory of theinstallation:
./manage-modules.sh service stop all
Installing Using the Binary Installer
34 EMC ViPR SRM 3.7.2 Installation and Configuration Guide

./manage-modules.sh service start all
5. To verify the changes, type su apg -c 'ulimit -n -u'
Installing Using the Binary Installer
Configuring the user process limits for a Linux installation 35

Installing Using the Binary Installer
36 EMC ViPR SRM 3.7.2 Installation and Configuration Guide

CHAPTER 3
Using the Binary Installer to Scaleout theEnvironment
This chapter includes the following topics:
l Overview............................................................................................................... 38l General requirements............................................................................................38l Linux requirements............................................................................................... 38l Server requirements..............................................................................................39l Installing the basic binary deployment with four hosts.......................................... 39l Configuring the hosts............................................................................................ 39l Configuring the backend hosts..............................................................................40l Configuring the additional backend.......................................................................41l Configuring the frontend....................................................................................... 43l Starting the collector............................................................................................. 45l Configuring the load balancer arbiter on the primary backend............................... 45l Configuring Load Balancer Connectors, generic-snmp, and generic-rsc..................46l Installing the health collectors.............................................................................. 47
Using the Binary Installer to Scaleout the Environment 37

OverviewLearn how to manually scale out a binary deployment.
This deployment includes the following components:
l Frontend server
l Primary backend server with one backend instance named "Default" attached to aMySQL table named "apg"
l Additional backend server with four instances (apg1, apg2, apg3 and apg4). Eachinstance includes a database (apg1, apg2, apg3, and apg4)
l Collector server
In addition, this solution includes a properly configured Load Balancer Arbiter and a LoadBalancer Connector (LBC) installed and configured on each server. The end result is adistributed solution capable of handling five million metrics using the load balancer.
Note
Use the Fully Qualified Domain Name (FQDN) instead oflocalhost when configuring theservers.
General requirementsThe environment must meet certain general requirements.
These requirements are for a minimal deployment. In a production environment, therequirements will vary depending on the provisioned load, and you must include carefulplanning and sizing before beginning the deployment.
The ViPR SRM Planner and the EMC ViPR SRM Performance and Scalability Guidelinesdocument associated with your specific release will provide guidance for SolutionPacksand object discovery.
The environment must meet the following requirements:
l 64 bit operating system (Linux or Windows)
l 8 to 24 GB RAM for each host
l Frontend – 16 GB RAM
l Backends – 24 GB RAM
l Collectors – 8 to 16 GB RAM
l 150 GB disk storage
l 4 CPUs per host
l Forward and Reverse IP and DNS lookups must work on each server
Linux requirementsThe environment must meet certain requirements for Linux distributions.
The environment must meet the following requirements:
l /tmp folder larger than 2.5 GB
Using the Binary Installer to Scaleout the Environment
38 EMC ViPR SRM 3.7.2 Installation and Configuration Guide
l SWAP file should be at least equal to the RAM size
l On CentOs or RedHat-like Linux, the SELinux should be disabled or reconfigured
l The graphical desktop environment is not required
l On some Linux distributions:
n MySQL server requires libaio1 libaio-dev or libaio to start
n The installation process requires unzip
n On system restart the apg services will not start
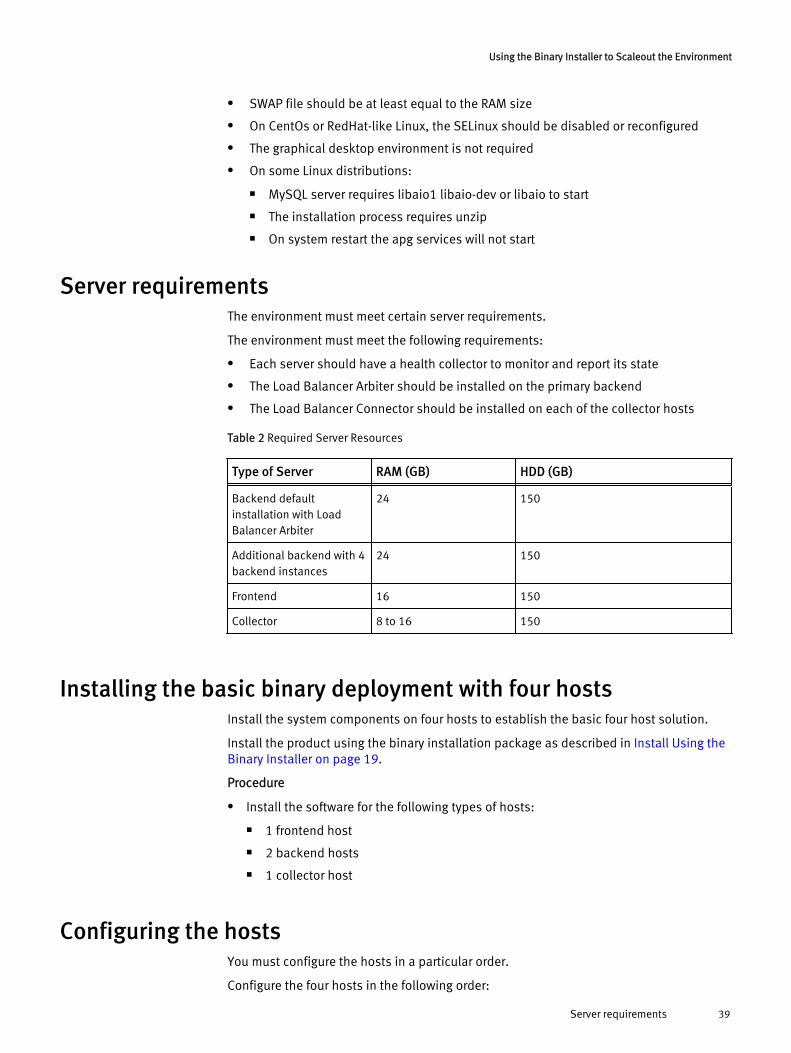
Server requirementsThe environment must meet certain server requirements.
The environment must meet the following requirements:
l Each server should have a health collector to monitor and report its state
l The Load Balancer Arbiter should be installed on the primary backend
l The Load Balancer Connector should be installed on each of the collector hosts
Table 2 Required Server Resources
Type of Server RAM (GB) HDD (GB)
Backend defaultinstallation with LoadBalancer Arbiter
24 150
Additional backend with 4backend instances
24 150
Frontend 16 150
Collector 8 to 16 150
Installing the basic binary deployment with four hostsInstall the system components on four hosts to establish the basic four host solution.
Install the product using the binary installation package as described in Install Using theBinary Installer on page 19.
Procedure
l Install the software for the following types of hosts:
n 1 frontend host
n 2 backend hosts
n 1 collector host
Configuring the hostsYou must configure the hosts in a particular order.
Configure the four hosts in the following order:
Using the Binary Installer to Scaleout the Environment
Server requirements 39

Procedure
1. Select one of the backend hosts to be the primary backend.
2. Select the other backend host to be the additional backend.
3. Select a host to be the frontend.
4. Select a host to be the collector.
Configuring the backend hostsLearn how to configure the backend hosts.
Procedure
1. Set the Maximum Java Heap Size in the /opt/APG/Backends/Topology-Service/Default/conf/unix-service.properties file to 6144 MB.
2. Reconfigure the topology service to commit the change:
/opt/APG/bin/manage-modules.sh service update topology-service/opt/APG/bin/manage-modules.sh service start topology-service
3. Start the MySQL process:
/opt/APG/bin/manage-modules.sh service start mysql Default
4. Allow remote access to the databases.Each database must be configured to beaccessible from the collectors, frontends, backend hosts, and localhost:
/opt/APG/bin/mysql-command-runner.sh -c /opt/APG/Tools/MySQL-Maintenance-Tool/Default/conf/mysql-root-mysql.xml -Q "GRANT ALLPRIVILEGES ON *.* TO 'apg'@<HOST NAME> IDENTIFIED BY PASSWORD'*FA71926E39A02D4DA4843003DF34BEADE3920AF3'"
The <HOST NAME> must be the DNS name resolved from the nslookup <CLIENT IP>command executed from the operating system where the backend is installed.
5. Start the backend services:
Option Description
Linux manage-module.sh service start all
Windows manage-module.cmd service start all
6. Check that all of the services are running:
Option Description
Linux manage-module.sh service status all
Windows manage-module.cmd service status all
Using the Binary Installer to Scaleout the Environment
40 EMC ViPR SRM 3.7.2 Installation and Configuration Guide

Configuring the additional backendLearn how to configure the additional backend. This step is optional. The minimal setupdoes not require an additional backend.
Procedure
1. Start the MySQL process:
/opt/APG/bin/manage-modules.sh service start mysql
2. Create four new databases with the names apg1, apg2, ap3, and apg4 by running thefollowing command four times (replacing the [1..n] with a number):
/opt/APG/bin/mysql-command-runner.sh -c /opt/APG/Tools/MySQL-Maintenance-Tool/Default/conf/mysql-root-mysql.xml -Q "createdatabase apg[1..n]";
Note
EMC recommends keeping the default APG timeseries database.
3. Register the apg databases to the APG Backend server by running the followingcommand for each apg database. Answer yes to each question.
/opt/APG/bin/manage-modules.sh install backend apg[1..n]
Note
The MySQL Storage Adapter uses in-memory temporary tables. You should set themax_heap_table_size in …/APG/Databases/MySQL/Default/my.cnf (Unix) or
my.ini (Windows) to at least 128M (depending on your installation size) to avoid
errors.
4. Install the maintenance tool for each new backend by running the following commandfor each apg database. Answer yes to each question.
/opt/APG/bin/manage-modules.sh install mysql-maintenance-toolapg[1..n]
5. Allow remote access to the new databases. Each database must be configured to beaccessible from the collectors, frontends, primary backend and localhost:
/opt/APG/bin/mysql-command-runner.sh -c /opt/APG/Tools/MySQL-Maintenance-Tool/Default/conf/mysql-root-mysql.xml -Q "GRANT ALLPRIVILEGES ON *.* TO 'apg'@'<HostName>' IDENTIFIED BYPASSWORD'*FA71926E39A02D4DA4843003DF34BEADE3920AF3'"
The <HOST NAME> must be the DNS name resolved from the nslookup <CLIENT IP>command executed from the Additional Backend host.
6. Find all of the XML files in the /opt/APG/Backends/APG-Backend/apg[1..n]folders that contains JDBS connection URLs.
For example: …localhost:53306/apg7. Update the URLs to include the correct APG database numbers.
For example: …localhost:53306/apg[1..n]
Using the Binary Installer to Scaleout the Environment
Configuring the additional backend 41

To complete this step with a script (for Linux), run the following command:
find /opt/APG/Backends/APG-Backend/apg[1..n] -name '*.xml' | xargssed -i "s|jdbc:mysql://localhost:53306/apg|\\0[1..n]|"
8. The Telnet interface port for each new apg database must be different. The defaultport is 2001. To change the port numbers, edit the following files and set the portnumbers to 2[1..n]01:
/opt/APG/Backends/APG-Backend/apg[1..n]/conf/telnetinterface.xml
Telnet and socket interface ports for each backend on page 80 lists the portnumbers.
9. The socket interface port for each new apg database must be different. The defaultport is 2000. To change the port numbers, edit the following files and set the portnumbers to 2[1..n]00:
/opt/APG/Backends/APG-Backend/apg[1..n]/conf/socketinterface.xml
Telnet and socket interface ports for each backend on page 80 lists the portnumbers.
10. Point the MySQL maintenance tools to the new local databases by editing thefollowing files and replacing "apg" with the correct names (like apg1):
l /opt/APG/Tools/MySQL-Maintenance-Tool/apg[1..n]/conf/mysql.xml
l /opt/APG/Tools/MySQL-Maintenance-Tool/apg[1..n]/conf/mysql-root-apg.xml
For example:
<url>jdbc:mysql://localhost:53306/apg1?autoReconnect=true</url> <!-- The username for database access. --> <username>apg</username> <!-- The password for database access. --> <password>watch4net</password>
To complete this step with a script (for Linux), run the following command:
find /opt/APG/Tools/MySQL-Maintenance-Tool/apg[1..n] -name '*.xml'| xargs sed -i "s|jdbc:mysql://localhost:53306/apg|\\0[1..n]|"
11. Start the backend services:
Option Description
Linux manage-modules.sh service start all
Windows manage-modules.cmd service start all
12. Verify that all the services are running:
Option Description
Linux manage-modules.sh service status all
Windows manage-modules.cmd service status all
Using the Binary Installer to Scaleout the Environment
42 EMC ViPR SRM 3.7.2 Installation and Configuration Guide

manage-modules service status all
Configuring the frontendLearn how to configure the frontend.
Procedure
1. Install the frontend as described in Installing Using the Binary Installer on page 19.
2. Set the connections that point to a local MySQL server to point to the new primarybackend. In the following files, locate all of the strings like localhost:53306, andreplace the string hostname with the primary backend DNS name (it must beresolvable):
l /opt/APG/Web-Servers/Tomcat/Default/conf/server.xmll /opt/APG/Tools/Frontend-Report-Generator/Default/conf/
report-generation-config.xmll /opt/APG/Tools/Administration-Tool/Default/conf/master-
accessor-service-conf.xmll /opt/APG/Tools/WhatIf-Scenario-CLI/Default/conf/whatif-
scenario-cli-conf.xml
3. Set non-MySQL localhost connections to point to the new primary backend:
a. Locate and replace the hostname in the strings localhost:48443 in thefollowing file:
/opt/APG/Web-Servers/Tomcat/Default/conf/Catalina/localhost/APG.xml
b. Locate and replace the hostname in the strings localhost:52569 in thefollowing file:
/opt/APG/Web-Servers/Tomcat/Default/conf/Catalina/localhost/alerting-frontend.xml
c. Locate and replace the hostname in the strings localhost:52569 in thefollowing file:
/opt/APG/Tools/Frontend-Report-Generator/Default/conf/report-generation-config.xml
4. Increase the maximum memory that the Tomcat server can use by locatingmemory.max= in the /opt/APG/Web-Servers/Tomcat/Default/conf/unix-service.properties file and setting it to memory.max=8192.
5. Update the Tomcat service to apply the new memory settings:
#/opt/APG/bin/manage-modules service update tomcat Default#/opt/APG/bin/manage-modules service start tomcat Default
6. Restart the Tomcat service and the webservice-gateway:
#/opt/APG/bin/manage-modules service start tomcat Default#/opt/APG/bin/manage-modules service restart webservice-gateway Default
Using the Binary Installer to Scaleout the Environment
Configuring the frontend 43

7. On the frontend, go to Centralized Management > Configuration, and then clickRegister a Server. Register all of the APG servers that are up and running. Use thefollowing settings:
l Server HostName = the DNS name of the server
l Gateway URL = https://<server DNS name>:48443/
l User Name = admin
l Password = changeme
8. Click Save.
9. Once you have registered all of the servers, verify that they display in CentralizedManagement > Physical Overview without any error messages.
10. ResourceLinks for the timeseries database are now stored in the master database. Togive access to the timeseries database on the primary backend, update the resourcesusing the manage-resources.sh command:
#/opt/APG/bin/manage-resource.sh list(this will list all the resources)#/opt/APG/bin/manage-resources.sh get "dba/APG-DB"
a. Check the details of dba/APG-DB and update the connection URL to point to theprimary backend host:
#/opt/APG/bin/manage-resources.sh update dba/APG-DB "{'datasource':{'url': 'jdbc:mysql://<PRIMARY BACKEND HOST>:53306/apg?autoReconnect=true&connectTimeout=20000&maxReconnects=2'}}"
b. Update the management resource for the data management tool to communicatewith the backend:
#/opt/APG/bin/manage-resources.sh get "mgmt/APG-DB"# /opt/APG/bin/manage-resources.sh update "mgmt/APG-DB" "{'connection': {'url': 'https://<PRIMARY BACKEND HOST>:48443/Backends/APG-Backend/Default'}}"
c. Update all of the remaining resources in the same way.
11. Create resources for each of the newly added APG databases on the AdditionalBackend:
For example, to create a Database resource:
# manage-resources.sh create "dba/APG-DB1" "{'datasource': {'driverClassName': 'com.mysql.jdbc.Driver','username': 'apg','password': '{6230FED930DD59BEB1095D6801AA74E2FC23B2C8B76AFF6447D5C49B84C4001FDF5B6441DF7CD5CB2B19D4A927C63934}','url': 'jdbc:mysql://<ADDITIONAL BACKEND>:53306/apg1?autoReconnect=true&connectTimeout=20000&maxReconnects=2' },'settings': {'cachegrp': 'DB'}}"
To create a Management Resource:
# manage-resources.sh create mgmt/APG-DB1 "{'connection': {'url': 'https://<ADDITIONAL BACKEND HOST>:48443/Backends/APG-
Using the Binary Installer to Scaleout the Environment
44 EMC ViPR SRM 3.7.2 Installation and Configuration Guide

Backend/apg1','user': 'admin', 'password': '{68951D237EABAFD17BD2F90B2029E51B9078C3968D27791E745EB38C2F8E4B7B6351D632200618220667E25792D7E8894330B34886D638E3C3B93856C94998B9}'}}"
Starting the collectorLearn how to start the collector.
Procedure
1. Install the collector as described in Installing Using the Binary Installer on page 19.
2. Start the collector service:
manage-modules service start all
Configuring the load balancer arbiter on the primary backendLearn how to configure the load balancer on the primary backend.
Before you begin
l The connection must point to the FQDN of the backend host.
l The listening port must be 2020.
Procedure
1. Create a list of apg (timeseries) databases and their management services for thearbiter by reconfiguring the load-balancer-arbiter on the primary backend.
For example:
SolutionPack Reconfiguration Fields on page 81 describes the values that youshould enter for each field on the SolutionPack Reconfiguration page.
Using the Binary Installer to Scaleout the Environment
Starting the collector 45

2. Click the + button and add an entry for each of the backend instances (apg1, apg2,apg3 and apg4) created on the additional backend host.
3. Provide the appropriate backend data port, web-service gateway, backend instancename, and DB connection details for each of the instances.
4. After you have setup the arbiter, check the logs under /opt/APG/Collecting/Collector-Manager/Load-Balancer/logs to see if all of the APG backendinstances were correctly installed.
For example:
# cat /opt/APG/Collecting/Collector-Manager/Load-Balancer/logscollecting-0-0.log | grep "LoadFactorDecision::isReady"INFO -- [2014-06-05 12:28:44 EDT] -- LoadFactorDecision::isReady(): Starting decision with current load factor of:INFO -- [2014-06-05 12:28:44 EDT] -- LoadFactorDecision::isReady(): Backend1 0.0/750000.0 (0.0)INFO -- [2014-06-05 12:28:44 EDT] -- LoadFactorDecision::isReady(): Backend2 0.0/750000.0 (0.0)INFO -- [2014-06-05 12:28:44 EDT] -- LoadFactorDecision::isReady(): Backend3 0.0/750000.0 (0.0)INFO -- [2014-06-05 12:28:44 EDT] -- LoadFactorDecision::isReady(): Backend4 0.0/750000.0 (0.0)INFO -- [2014-06-05 12:28:44 EDT] -- LoadFactorDecision::isReady(): Backend0 595.0/750000.0 (7.933333333333333E-4)
Configuring Load Balancer Connectors, generic-snmp, andgeneric-rsc
Learn how to configure Load Balancer Connectors (LBCs).
Before you begin
l The Load Balancer Arbiter is installed on the primary backend with the listener port of2020.
l The LBCs are installed on all of the collector hosts.
l The LBC listens on port 2020 local on that collector server and communicates withthe Load Balancer Arbiter on the primary backend also using port 2020.
Procedure
1. During the installation of the LBC, when the script asks for the Web-Servicegateway hostname or IP address [localhost], enter the DNS of theprimary backend server where the arbiter is installed.
2. The collector server has the LBC installed by default, but you must reconfigured it topoint it to the primary backend and its arbiter:
a. In Centralized Management > SolutionPacks > Other Components, filter on thecollector name, and click the Reconfigure button for the load-balancer-connector.
b. Update all of the host names and gateway URLs so they point to the primarybackend.
c. Update the Alerting Backend hostname to Primary Backend host and 2010 port.
d. Update the Frontend Web Service to point to the Frontend host.
For example:
Using the Binary Installer to Scaleout the Environment
46 EMC ViPR SRM 3.7.2 Installation and Configuration Guide

e. generic-rsc is installed by default on the collector host. Click the Reconfigurebutton and update the Frontend Web Service to point to frontend host. Update theTopology service question by changing the host name and gateway to point to theprimary backend host.
f. Click the Reconfigure button for generic-snmp. Update the Frontend Web service topoint to frontend host. Update the Topology service question by changing the hostname and gateway to point to primary backend host
Installing the health collectorsLearn how to install the health collectors.
Before you begin
The Health Collector on the primary backend must point to the local LBC and its port. Inthis installation, the port is 2020.
The first installation of the SolutionPack will install the Health Reports on the frontendserver.
Procedure
1. On the Select the Components to Install window:
a. Install Pre-configured alerts where the primary backend is located.
b. Install Data collection on every host by repeating the installation procedure foreach host.
c. Install Reports on the frontend.
Using the Binary Installer to Scaleout the Environment
Installing the health collectors 47

2. On the Data Collection window:
a. Data collection is the local LBC on port 2020.
b. Alerting is on the primary backend.
c. Topology host and gateway is on the primary backend
Using the Binary Installer to Scaleout the Environment
48 EMC ViPR SRM 3.7.2 Installation and Configuration Guide

CHAPTER 4
Using the 1VM vApp to Scaleout the Environment
This chapter includes the following topics:
l Deploy Scaleout VMs in Existing vApp................................................................... 50l Deploy Scaleout VMs outside of a vApp Folder...................................................... 51l Add disk space......................................................................................................51l Modify start order of vApps in SRM........................................................................52l Scaleout scripts.................................................................................................... 52
Using the 1VM vApp to Scaleout the Environment 49

Deploy Scaleout VMs in Existing vAppViPR SRM supports adding additional backends and collectors either inside or outside ofthe SRM vApp. Use this procedure to deploy scaleout VMs inside of the SRM vApp.
Before you begin
1. Login to the Virtual Center managing the vApp you want to scale out.
2. Right click the vApp and select Shut Down. Wait for all VMs in the vApp to shut downcompletely.
Procedure
1. Open the vSphere Client and connect to the vCenter Server that manages yourVMware environment.
2. Select the resource pool where you want to deploy the VMs for ViPR SRM.
3. Select File > Deploy OVF Template.
4. In the Source step, locate the ViPR_SRM_3.7.2_1VM_vApp.ovf file.
l Sample file path: /opt/ovf/ViPR_SRM_3.7.2_1VM_vApp.ovfl Sample URL: http://myHost.emc.com/ovf/snapshot/92/
ViPR_SRM_3.7.2_1VM_vApp.ovf
5. Click Next.
To save time, deploy the appliance in the same local area network (LAN) that yourVMware ESX/ESXi servers share. Deployment takes approximately 5 to 15 minutes.Deployment across a WAN can take 2 hours or more.
6. In the OVF Template Details step, review the details of the loaded .ovf file and clickNext.
7. In the End User License Agreement step, review the license agreement, click Accept,and then click Next.
8. In the Name and Location step, accept the default name (ViPR SRM) or type a Namefor the appliance. Specify an Inventory Location for the appliance in your VMwareenvironment. Click Next.
9. Select the host or cluster where you want to run the deployed template and click Next.
10. Select the destination storage for the virtual machine files and click Next.
11. In the Disk Format step, select the storage space provisioning method and click Next.
Option Description
Thin-provisioned format On-demand expansion of available storage, used fornewer data store file systems.
Thick-provisioned format Appliance storage that is allocated immediately andreserved as a block.
Note
EMC recommends the thin-provisioned format option when the vApp is deployed in ahigh-performance environment.
Using the 1VM vApp to Scaleout the Environment
50 EMC ViPR SRM 3.7.2 Installation and Configuration Guide

12. In the Network Mapping step, select a destination network that has an IP Poolassociated with it for each of the VMs and click Next.
13. In the IP Address Allocation step, choose the IP allocation policy, the IP protocol touse, and click Next.
14. In the Properties step, provide the values for each of the VMs, and click Next.
15. In the Ready to Complete step, review the list of properties for the appliance and clickFinish.
A status bar opens in the vSphere Client showing the deployment progress.
16. Click Close in the Deployment Completed Successfully dialog.
After you finish
1. Wait for all VMs to complete deployment.
2. Modify the start order of the vApp entities as described in Modify start order ofvApps on page 52.
3. Power on vApp after all deployments are completed. Right click the vApp and selectPower On.
A built-in service detects the new VMs and performs the needed configurations.
Deploy Scaleout VMs outside of a vApp FolderUse this procedure to deploy scaleout VMs outside of the vApp folder.
Procedure
1. Login to the Virtual Center in which you want to deploy your new scaleout VM.
2. Deploy the new scaleout VMs using the 1VM-vApp.ovf file.
3. Select the type of VM to be deployed from the drop list.
4. Complete the deployment and power on the VMs.
5. Run the scaleout scripts on each VM in your system.
6. When the scaleout scripts are complete, log in to Centralized Management andconfigure the new VM.
7. If a collector is powered on outside of the vApp, you must make configuration changesto the Load Balancer Connectors, generic-rsc, and generic-snmp. These changes aredescribed in the Adding a new Collector Appliance section of Scaleout Scripts on page52.
Add disk spaceAdd a virtual machine disk to a running system for use by SRM virtual machines.
Procedure
1. From the vSphere Console, add a new disk to a virtual machine.
2. Select Edit Settings on the virtual machine and click Add.
3. Select Hard Disk and click Next .
4. Select Create a new virtual disk and click Next.
5. Specify the disk size, the provisioning type, the location of the disk and click Next.
6. Specify the virtual device node (the default value should be OK) and click Next.
Using the 1VM vApp to Scaleout the Environment
Deploy Scaleout VMs outside of a vApp Folder 51

7. Review the options and click Finish.
8. Access a Linux login prompt and log in to Linux. You can access a login promptthrough the vSphere Console or using an SSH tool such as PuTTY.
9. At the system prompt, type the command expand_disk.pl.
Modify start order of vApps in SRMModify the start order of the vApps in an SRM installation.
Procedure
1. Right click the vApp and select Edit Settings.
2. Navigate to the Start Order tab.
3. Move the new VMs into the proper group based on the following:
l Group 1: Additional backends
l Group 2: Primary backend
l Group 3: Frontends and collectors
4. In the Shutdown Action section, select Guest Shutdown from the Operation list.
5. Click OK.
Scaleout scriptsUse scaleout scripts to add Additional Backend appliances and Collector appliances toan SRM installation.
Scaleout scriptsThe scaleout script name includes the type of the new VM and the VM that you are scalingout.
l Each script is located in the /usr/APG_Source/conf directory.
l Each script restarts the needed services at the end of each execution.
l With this method, you do not need to reboot the vApp.
The scaleout script name follows this pattern:
<server-type>-scale-<scale-server-type>.sh [args] frontend-scale-additionalbackend.sh frontend-scale-collector.sh
where:
server-type Appliance type from which you execute the script.
scale-server-type Flavor of the VM being added.
Adding a new Additional Backend applianceWhen scaling a new Additional Backend appliance, run the corresponding scaleout scripton each appliance type.
Using the 1VM vApp to Scaleout the Environment
52 EMC ViPR SRM 3.7.2 Installation and Configuration Guide

Frontend appliance
frontend-scale-additionalbackend.sh -H <additionalbackend-fqdn> -o <os-type> -p <primarybackend-fqdn>
where:
additionalbackend-fqdn Must be a fully qualified hostname
os-type Must be the operating system of the new Additional Backendserver: windows-x64,linux-x64
Note
If you are deploying from the 1VM OVF, the os-type shouldalways be linux-x64.
Primary Backend appliance
primarybackend-scale-additionalbackend.sh -H <additionalbackend-fqdn>
where additionalbackend-fqdn must be a fully qualified hostname.
Additional Backend appliance
additionalbackend-scale-additionalbackend.sh -H <additionalbackend-fqdn>
where additionalbackend-fqdn must be a fully qualified hostname.
Collector appliance
collector-scale-additionalbackend.sh -H <additionalbackend-fqdn>
where additionalbackend-fqdn must be a fully qualified hostname.
Adding a new Collector ApplianceWhen adding a new collector VM, run the corresponding scaleout script on eachappliance type.
Frontend appliance
frontend-scale-collector.sh -H <collector-fqdn> -o <os-type>
where:
colllector-fqdn Must be a fully qualified hostname.
os-type Must be the operating system of the new Additional Backend server:windows-x64,linux-x64
Note
If you are deploying from the 1VM OVF, the os-type should always belinux-x64.
If a collector is powered on outside of the vApp, you must reconfigure the Load BalancerConnector, generic-snmp, and generic-rsc.
Using the 1VM vApp to Scaleout the Environment
Scaleout scripts 53

1. From Centralized Management, click SolutionPacks.
2. Under Other Components, click the Reconfigure icon for a Load Balancer Connector.
3. From the Arbiter configuration drop-down menu, select Add a new Arbiterconfiguration.
4. In the Arbiter hostname or IP address field, enter the hostname or IP address of theprimary backend.
5. From the Alerting on data collection drop-down menu, select Add a new alerting ondata collection.
6. In the Alerting Backend hostname or IP address field, enter the hostname or IPaddress of the primary backend.
7. Repeat the steps for each Load Balancer Connector.
8. Under Other Components, click the Reconfigure icon for a generic-snmp or generic-rsc instance.
9. From the Frontend Web Service drop-down menu, select Add a new Frontend Webservice.
10. In the Tomcat hostname or IP address field, enter the hostname or IP address of thefrontend host.
11. From the Topology Service drop-down menu, select Add a new Topology Service.
12. In the Topology Service hostname or IP address field, enter the hostname or IPaddress of the primary backend.
13. In the SNMP Collector Name field, enter the FQDN of the collector host.
14. Repeat the steps for each instance of generic-snmp and generic-rsc.
Primary Backend appliance
1. primarybackend-scale-collector.sh -H <collector -fqdn>
where collector -fqdn must be a fully qualified hostname.
2. Run the mysql-client.sh command with user root and database mysql.
3. Run the mysql command to view the privileges of the collector host just added:
SELECT user,host, select_priv, insert_priv, update_priv, delete_priv, grant_priv FROM mysql.user;
Additional Backend appliance
1. additionalbackend-scale- collector.sh -H <collector -fqdn>
where: collector -fqdn must be a fully qualified hostname.
2. Run the mysql-client.sh command with user root and database mysql.
3. Run the mysql command to view the privileges of the collector host just added:
SELECT user,host, select_priv, insert_priv, update_priv, delete_priv, grant_priv FROM mysql.user;
Using the 1VM vApp to Scaleout the Environment
54 EMC ViPR SRM 3.7.2 Installation and Configuration Guide

CHAPTER 5
Automating the Download of Updates
This chapter includes the following topics:
l Online Update overview........................................................................................ 56
Automating the Download of Updates 55

Online Update overviewOnline Update automatically downloads the latest versions of the SolutionPacks andEMC M&R components from the EMC Update server to the Module Repository on theCentralized Management (CM) server.
In a multi-server environment, the downloaded modules are distributed to all of theremote servers managed by the CM server.
Configuring server settings for online updatesProcedure
1. Click Administration .
2. Click Centralized Management.
3. Click Configuration > Online Update .
4. Ensure that you are on the Settings tab.
5. By default, online update uses the EMC Online Support username and passwordspecified under Configuration > EMC Support. If you want to use different credentials,click Override Support Credentials. These credentials are used only for online update.
6. Click the icon to test connectivity to the update server.
The icon indicates that connectivity to the server has been established.
The icon indicates that connectivity to the server failed.
7. Click Save.
Enabling the online update taskEnable the Online Update task to download the latest updates from the EMC Updateserver automatically.
Procedure
1. Click Administration .
2. Click Centralized Management.
3. On the Physical Overview page, click the <host_name> - Front End where the OnlineUpdate task needs to run.
4. Click Tasks.
5. Type OnlineUpdate in the Search bar.
6. Click the OnlineUpdate scheduled task.
7. Click Enable.
Note
By default, this task is set to run once everyday at 12AM. You can customize the taskschedule by editing the configuration file.
Automating the Download of Updates
56 EMC ViPR SRM 3.7.2 Installation and Configuration Guide
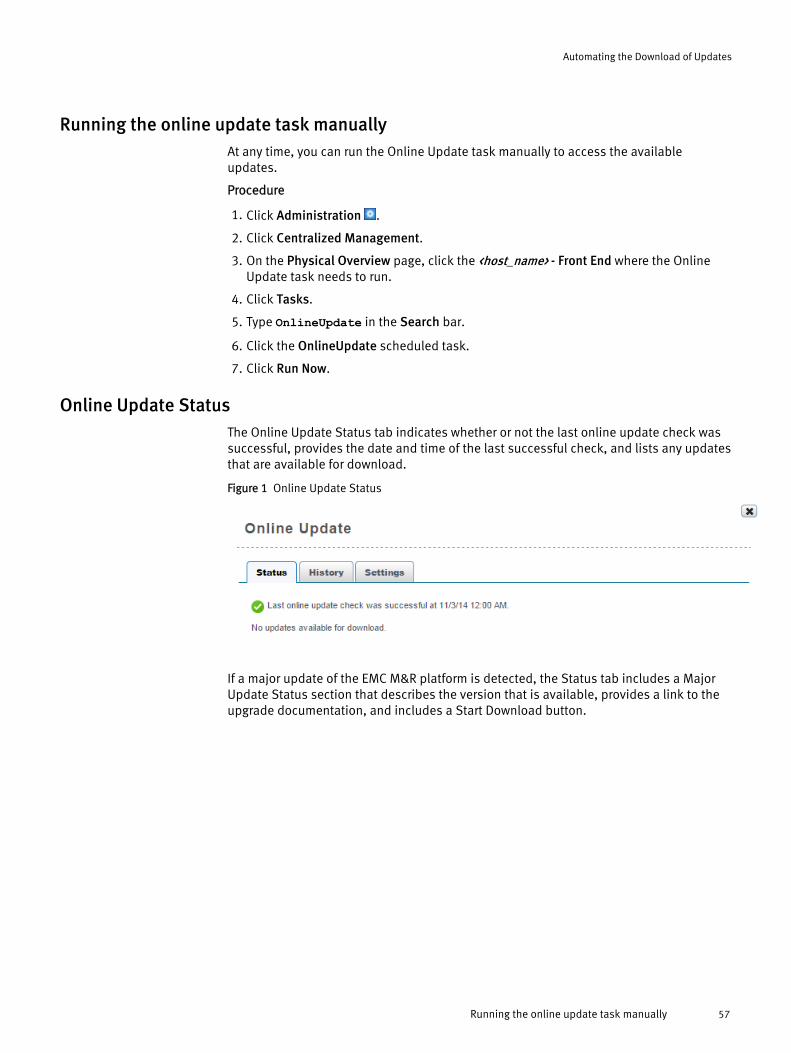
Running the online update task manuallyAt any time, you can run the Online Update task manually to access the availableupdates.
Procedure
1. Click Administration .
2. Click Centralized Management.
3. On the Physical Overview page, click the <host_name> - Front End where the OnlineUpdate task needs to run.
4. Click Tasks.
5. Type OnlineUpdate in the Search bar.
6. Click the OnlineUpdate scheduled task.
7. Click Run Now.
Online Update StatusThe Online Update Status tab indicates whether or not the last online update check wassuccessful, provides the date and time of the last successful check, and lists any updatesthat are available for download.
Figure 1 Online Update Status
If a major update of the EMC M&R platform is detected, the Status tab includes a MajorUpdate Status section that describes the version that is available, provides a link to theupgrade documentation, and includes a Start Download button.
Automating the Download of Updates
Running the online update task manually 57

Figure 2 Online Update Status with a major version update detected
Downloading a major updateYou can use Online Update to download a major version of the EMC M&R platform. Youshould only download a major version if you intend to immediately complete the fullupgrade process.
Procedure
1. Click Administration .
2. Click Centralized Management.
3. Click Configuration > Online Update.
4. Click the Status tab.
5. Click Start Download. When the download is finished, the Download State will changefrom "Not Downloaded" to "Complete."
6. Complete the upgrade process as described in the upgrade documentation.
Online Update HistoryThe Online Update History tab provides a download history with the names of thecomponents, the version numbers, and the date and time of the downloads.
The History tab also allows you to search the download history for a particular componentname or version number.
Disabling the online update taskYou can disable the Online Update task if you prefer to manually download the updatesfrom the EMC Update server.
Procedure
1. Click Administration .
2. Click Centralized Management.
Automating the Download of Updates
58 EMC ViPR SRM 3.7.2 Installation and Configuration Guide

3. On the Physical Overview page, click the <host_name> - Front End where the OnlineUpdate task needs to run.
4. Click Tasks.
5. Type OnlineUpdate in the Search bar.
6. Click the OnlineUpdate scheduled task.
7. Click Disable.
Automating the Download of Updates
Disabling the online update task 59

Automating the Download of Updates
60 EMC ViPR SRM 3.7.2 Installation and Configuration Guide

CHAPTER 6
Licensing
This chapter includes the following topics:
l Licensing concepts................................................................................................62l Licensing operations............................................................................................. 63l Troubleshooting licensing .................................................................................... 68l ELMS license entitlements.................................................................................... 71
Licensing 61

Licensing conceptsLearn how to manage and troubleshoot ViPR SRM ELMS licensing. Learn how to uploadlicense files, delete trial licenses, verify available licenses, and synchronize licenses onmultiple hosts.
Starting with ViPR SRM 3.0, ViPR SRM uses ViPR SRM the Electronic LicensingManagement System (ELMS) for licensing. ViPR SRM runs on the EMC M&R platform,which uses a different licensing system. Various other products that also run on EMCM&R, such as Software Assurance Suite (SAS) and ViPR, continue to use the legacylicense system, which is also referred to as EMC M&R licenses.
To manage ViPR SRM licensing, you need to understand permanent and trial licensingand the relationship between EMC M&R features and the ViPR SRM ELMS licenses.
After installation: Licenses and SolutionPacksA ViPR SRM installation includes the software for the core system features and allSolutionPacks. Although the installation includes the software for all SolutionPacks, yoursite might not have permanent licenses for all of them.
The ViPR SRM licensing method divides product content into the following threecategories:
1. ViPR SRM core software, which is a bundling of core features and selectedSolutionPacks.
2. ViPR SRM add-on SolutionPacks.
3. SolutionPacks that are not part of ViPR SRM.
See ELMS license entitlements on page 71 for the list of features included in the coresuite and a list of available ViPR SRM add-on licenses.
EMC M&R feature names and ELMS licensesEMC M&R is the underlying platform for ViPR SRM. EMC M&R identifies functionality usingstrings known as EMC M&R feature names. ELMS licenses use a different set of strings torefer to sets of features.
Feature names are formal references to SolutionPack names, collectors, and componentsthat work within the product. For example, XML Collector is the feature namecorresponding to the collector component that collects XML data. As another example,the SolutionPack that collects VNX data uses the feature name SolutionPack for EMCVNX. Services and components typically require multiple sets of features to run properly.
An ELMS license maps to a set of EMC M&R features.
For a list of ELMS license names and the features that they enable, see ELMS LicenseEntitlements at the end of this article.
Trial licensesYour ViPR SRM software can include all trial licenses or a combination of permanent andtrial licenses.
Licenses that you purchase are permanent. Other software comes with trial licenses.
Trial licenses let you test features in the UI and perform some initial configurations beforefull purchase. Trial licenses typically last for 30 days after the installation time. Youcannot copy or regenerate a trial license in the product.
Licensing
62 EMC ViPR SRM 3.7.2 Installation and Configuration Guide

If all of your licenses are trial licenses, including the core software license that includesthe Web Portal feature, the software can lock out all users from accessing the UI when thetrial expires.
License durationPermanent licenses do not expire. Trial licenses have expiration dates, typically 30 daysafter the installation date.
When trial licenses expire, module license checks fail and the modules stop working. Ifthe Web Portal module fails, you cannot access the product.
Because the License Management UI operates behind the Web Portal module, you mustupload your permanent license file or extended trials before the 30-day license for thecore features expires. Otherwise, the UI locks and you cannot upload the license file. Ifthis happens, see Troubleshooting licensing on page 68.
License purchaseTo convert a feature from a trial license into a permanently licensed feature, you need topurchase a license.
To initiate the purchase of a license for a SolutionPack or ReportPack, visit EMC OnlineSupport using the following URL:
https://support.emc.com/servicecenter/createSR/
On the page that appears, submit a service request to EMC. Include the SolutionPack orReportPack name that you want to purchase.
When all purchasing transactions are complete, EMC sends you instructions fordownloading a regenerated license file for your site that includes the newly purchasedsoftware license. Download the file to a local server, and then follow instructions in Upload a new license file on page 66 to upload the new license file into ViPR SRM.
Note
Until the license is purchased and the new license file is obtained and uploaded intoViPR SRM, the SolutionPack is inoperable, unless the 30-day trial license is still in effect.
Licensing operationsUse the ViPR SRM Centralized Management UI to perform licensing managementoperations, such as uploading, verifying, deleting, and synchronizing licenses.
Log in with admin credentialsYou must have administrator credentials to perform license management operations.
Procedure
1. Access ViPR SRM by typing the following URL in a web browser:
http://frontend-hostname:58080/centralized-management
where frontend-hostname is the server where the ViPR SRM frontend module isinstalled.
The ViPR SRM login page opens.
Licensing
License duration 63
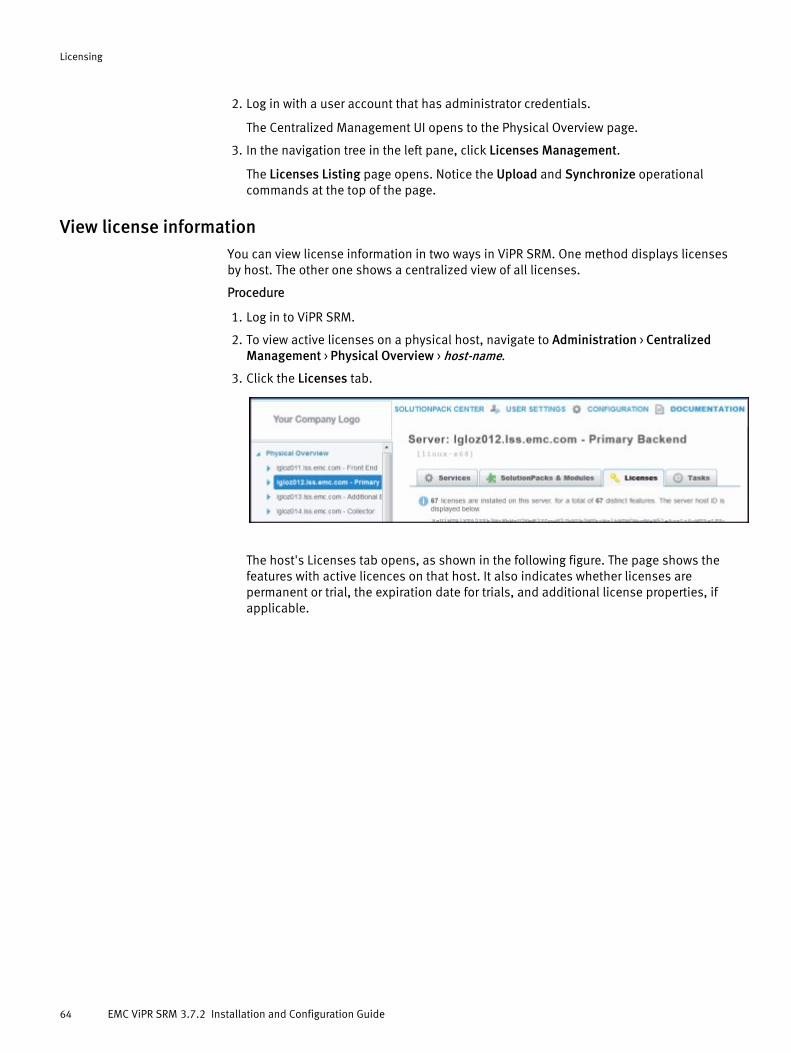
2. Log in with a user account that has administrator credentials.
The Centralized Management UI opens to the Physical Overview page.
3. In the navigation tree in the left pane, click Licenses Management.
The Licenses Listing page opens. Notice the Upload and Synchronize operationalcommands at the top of the page.
View license informationYou can view license information in two ways in ViPR SRM. One method displays licensesby host. The other one shows a centralized view of all licenses.
Procedure
1. Log in to ViPR SRM.
2. To view active licenses on a physical host, navigate to Administration > CentralizedManagement > Physical Overview > host-name.
3. Click the Licenses tab.
The host's Licenses tab opens, as shown in the following figure. The page shows thefeatures with active licences on that host. It also indicates whether licenses arepermanent or trial, the expiration date for trials, and additional license properties, ifapplicable.
Licensing
64 EMC ViPR SRM 3.7.2 Installation and Configuration Guide

4. To view a consolidated list of licenses for all hosts, and to perform licensemanagement operations, in the navigation tree in the left pane, click LicensesManagement.
The Licenses Listing page opens showing all licenses on all servers.The following figure shows this page. Notice the ELMS permanent license, showing allfeatures included in the license and the license serial number. Also notice the Uploadand Synchronize commands at the top of the page.
Licensing
View license information 65

This table displays Information for ELMS licenses related to product name for thelicense, SWID, and serial numbers.
Upload a new license fileTo add a new license to your system, such as a newly purchased SolutionPack orReportPack license, you upload a new license file.
Before you begin
1. Purchase the required licenses.
2. Download the new license file to a local server, as directed by EMC during thepurchase process.
When you upload a license file, the new file affects all servers capable of using thelicenses.
Procedure
1. Log in to the Centralized Management UI in ViPR SRM using the following URL:
http://frontend-hostname:58080/centralized-management
2. In the navigation pane, select Licenses Management.
3. Click Upload at the top of the page.
The License Upload dialog appears.
Licensing
66 EMC ViPR SRM 3.7.2 Installation and Configuration Guide

4. Click Browse and locate the new license file that you downloaded.
5. Click OK.
The system extracts the licenses and displays them in the table on the LicensesListing pane.
6. When the License Upload Complete dialog appears, click OK, and then click Continue.
The new license automatically affects all servers capable of using the license.
7. Delete the trial licenses that correspond to newly licensed features, if any.
To delete a trial license, see Delete licenses on page 67.
Delete licensesYou can select and delete specific licenses or delete all licenses. A delete action affectsall servers that use the license.
After you install a permanent license, delete the trial licenses that are covered by thepermanent license.
Procedure
1. Log in to the Centralized Management UI in ViPR SRM using the following URL:
http://frontend-hostname:58080/centralized-management
2. In the navigation pane, select Licenses Management.
3. In the Licenses Listing table, select one or more license check boxes.
4. Click Delete.
The Delete command appears below the table. It is dimmed until you select at leastone license.
The system deletes the selected license from all available servers.
Synchronize licenses on multiple hostsThe Synchronize action ensures that all remote hosts have licenses based on thoseavailable on the Centralized Management host.
Certain situations might cause licenses to become out of sync. For example, if a remotehost is unavailable when you perform an upload or a delete operation, those operationswould not be propagated to the offline server. Another example is if you add a new serverto your configuration, the new server would need licensing information.
Procedure
1. Log in to the Centralized Management UI in ViPR SRM using the following URL:
http://frontend-hostname:58080/centralized-management
2. In the navigation pane, select Licenses Management.
3. Click Synchronize at the top of the page.
The system synchronizes the licenses on all remote hosts.
Licensing
Delete licenses 67

Troubleshooting licensingYou can resolve common licensing problems.
Permanent license stops working after host reconfigurationIf you change the configuration of a host, for example, by adding interfaces, removinginterfaces, or changing the operating system, your permanent license might stop working.If your license does not work, obtain a new host ID and request a new permanent license.
Before you begin
Ensure that you have a login with root, EMC M&R, or system administrator privileges toperform this task. The user apg is the account that the application uses instead of root.
Procedure
1. Log in to the operating system command line on the EMC M&R host server.
2. To obtain the new host ID, run one of the following operating system commands:
Operating system Command
UNIX /opt/APG/bin/manage-licenses.sh host-id
Windows C:\Program Files\APG\bin\manage-licenses.cmd host-id
The command output is the new EMC M&R host ID.
3. Copy the host ID information to the clipboard or to a text file.
4. To obtain the new license, go to the EMC support site using the following URL:
https://support.emc.com/servicecenter/createSR/
The Create a Service Request page opens.
5. Submit a service request to EMC, asking for a new permanent license file for a newhost. Paste the new host ID into the request.
6. When EMC sends you the new license file, follow the procedure in Upload a newlicense file on page 66.
Users are locked out of ViPR SRMIf the license for the core ViPR SRM features expires, the system locks users out of the UI.
To recover from this scenario:
1. Obtain a license file with permanent licenses. See License purchase on page 63.
2. Install the new license file from the command line. See Install license file from thecommand line on page 69.
3. Restart the Tomcat service. See Restart Tomcat service on page 69.
4. Log in to ViPR SRM and perform the following tasks:
a. Reinstall the new license file from the Centralized Management UI.
Licensing
68 EMC ViPR SRM 3.7.2 Installation and Configuration Guide
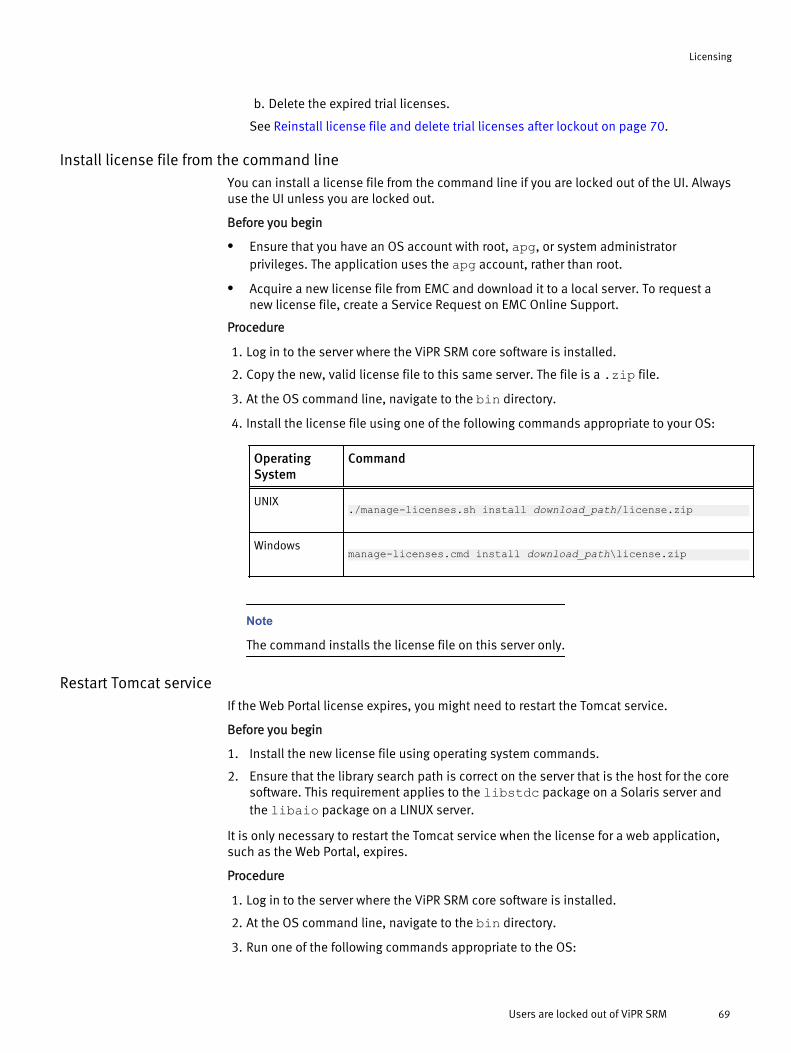
b. Delete the expired trial licenses.
See Reinstall license file and delete trial licenses after lockout on page 70.
Install license file from the command lineYou can install a license file from the command line if you are locked out of the UI. Alwaysuse the UI unless you are locked out.
Before you begin
l Ensure that you have an OS account with root, apg, or system administratorprivileges. The application uses the apg account, rather than root.
l Acquire a new license file from EMC and download it to a local server. To request anew license file, create a Service Request on EMC Online Support.
Procedure
1. Log in to the server where the ViPR SRM core software is installed.
2. Copy the new, valid license file to this same server. The file is a .zip file.
3. At the OS command line, navigate to the bin directory.
4. Install the license file using one of the following commands appropriate to your OS:
OperatingSystem
Command
UNIX ./manage-licenses.sh install download_path/license.zip
Windows manage-licenses.cmd install download_path\license.zip
Note
The command installs the license file on this server only.
Restart Tomcat serviceIf the Web Portal license expires, you might need to restart the Tomcat service.
Before you begin
1. Install the new license file using operating system commands.
2. Ensure that the library search path is correct on the server that is the host for the coresoftware. This requirement applies to the libstdc package on a Solaris server andthe libaio package on a LINUX server.
It is only necessary to restart the Tomcat service when the license for a web application,such as the Web Portal, expires.
Procedure
1. Log in to the server where the ViPR SRM core software is installed.
2. At the OS command line, navigate to the bin directory.
3. Run one of the following commands appropriate to the OS:
Licensing
Users are locked out of ViPR SRM 69

Operating System Command
UNIX ./manage-modules.sh service restart tomcat
Windows manage-modules.cmd service restart tomcat
The command output starts like this:
* Starting 'tomcat Default'... [ OK ]
Reinstall license file and delete trial licenses after lockoutAfter you install a permanent license file on the command line, you need to reinstall thatfile using the Centralized Management UI to make the license visible in the UI andavailable for distribution to other remote servers. You also need to delete the expired triallicenses.
Procedure
1. Open a browser and log in to the Centralized Management UI in ViPR SRM using thefollowing URL:
http://frontend-hostname:58080/centralized-management
2. In the navigation pane, select Licenses Management.
3. Click Upload at the top of the page.
The License Upload dialog appears.
4. Click Browse and locate the new license file.
5. Click OK.
The system extracts the licenses and displays them in the table on the LicensesListing pane.
6. When the License Upload Complete dialog appears, click OK, and then click Continue.
The new license automatically affects all servers capable of using the license.
7. In the License Listing table, select all expired trial licenses by clicking the appropriatecheck boxes.
8. Click Delete.
The Delete command appears at the bottom of the page, below the table of licenses.
The delete action automatically affects all available servers.
Module does not start or has no licenseIf a component reports that it has no license or does not start, verify the licenses on thephysical host.
Procedure
1. Log in to the Centralized Management UI in ViPR SRM using the following URL:
http://frontend-hostname:58080/centralized-management
2. Navigate to Physical hosts > host-name > Licenses.
The page shows all licenses active on this local host.
Licensing
70 EMC ViPR SRM 3.7.2 Installation and Configuration Guide

3. Inspect the Expiration column for the termination date of each license.
ELMS license entitlementsThis section describes the features associated with the core ViPR SRM license as well asthe additional licenses that you can purchase.
The ELMS SRMSUITE_GENERAL feature bundles all of the basic features andSolutionPacks that you receive as part of any ViPR SRM purchase. This bundle enablesmost of the EMC M&R functionality. The first table below lists the features included inSRMSUITE_GENERAL.
When you purchase an add-on license, you receive additional ELMS features. The add-onlicenses enable sets of features that ViPR SRM verifies during runtime. The second tablebelow lists ELMS add-on license names and the features enabled by each one.
Table 3 Features in ELMS SRMSUITE_GENERAL
EMC M&R Features Included in SRMSUITE_GENERAL
ViPR SRMVersionAdded
EMC M&RVersionAdded
ReportPack for Fibre Channel Fabrics 3.0 6.3
ReportPack for Oracle 3.0 6.3
SolutionPack for Brocade FC Switch 3.0 6.3
SolutionPack for Cisco MDS Nexus 3.0 6.3
SolutionPack for Cisco UCS 3.0 6.3
SolutionPack for EMC AppSync 3.5.1 6.4u1
SolutionPack for EMC Data Protection Advisor 3.0 6.3
SolutionPack for EMC ProSphere-SCA 3.0 6.3
SolutionPack for EMC RecoverPoint 3.0 6.3
SolutionPack for EMC ViPR 3.0 6.3
SolutionPack for EMC VPLEX 3.0 6.3
SolutionPack for EMC Watch4net Health 3.0 6.3
SolutionPack for IBM LPAR 3.0.1 6.3u1
SolutionPack for IBM SVC V7000 3.0 6.3
SolutionPack for Impact Analysis 3.0 6.3
SolutionPack for Microsoft Hyper-V 3.0 6.3
SolutionPack for Microsoft SQL Server 3.5 6.4
SolutionPack for Oracle Database 3.0 6.3
SolutionPack for Oracle MySQL Database 3.5.1 6.4u1
SolutionPack for Physical Hosts 3.0 6.3
SolutionPack for Storage Compliance 3.0 6.3
SolutionPack for VMware vCenter 3.0 6.3
Licensing
ELMS license entitlements 71

Table 3 Features in ELMS SRMSUITE_GENERAL (continued)
EMC M&R Features Included in SRMSUITE_GENERAL
ViPR SRMVersionAdded
EMC M&RVersionAdded
SolutionPack for VI VirtualWisdom 3.0 6.3
APG Self-Monitoring Collector 3.0 6.3
Alerting Engine 3.0 6.3
Backend AdapterProperties:
limit.device.value=100000limit.device.property=devicelimit.device.ratio=4000000limit.device.tolerance=10
3.0 6.3
DatabaseAccessor Web Service 3.0 6.3
Device Discovery 3.0 6.3
Event Adapter 3.0 6.3
Event Log Processor 3.0 6.3
Formula Editor 3.0 6.3
Formula Engine 3.0 6.3
Generic Text Collector 3.0 6.3
Geomap Integration Module 3.0 6.3
iPhone Integration Module 3.0 6.3
Mib Browser 3.0 6.3
Remote Shell Collector (SSH) 3.0 6.3
Remote Shell Collector (Windows) 3.0 6.3
Report Refiner 3.6.3 6.5u3
ReportManager Web Service 3.0 6.3
SNMP Poller 3.0 6.3
SQL Collector 3.0 6.3
SSH Telnet Collector 3.0 6.3
Trap Receiver 3.0 6.3
VMWare Listener 3.0 6.3
VMware Collector 3.0 6.3
WMI Collector 3.0 6.3
Web Portal 3.0 6.3
XML Collector 3.0 6.3
Licensing
72 EMC ViPR SRM 3.7.2 Installation and Configuration Guide

Table 4 Features in ELMS Add-On Licenses
ELMS Feature Name Enabled EMC M&R Features
ViPR SRMVersionAdded
EMC M&RVersionAdded
SRMSUITE_3PAR_TB SolutionPack for HP 3PAR StoreServ 3.0 6.3
SRMSUITE_CENTERA SolutionPack for EMC Centera 3.0 6.3
SRMSUITE_DATADOM SolutionPack for EMC Data Domain 3.0 6.3
SRMSUITE_HDS_TB SolutionPack for Hitachi Device Manager 3.0 6.3
SRMSUITE_HPEVA_TB Report Pack for HP EVA; SolutionPack forHP EVA
3.0 6.3
SRMSUITE_HPXP_P9500_TB
SolutionPack for HP StorageWorks P9000 3.0 6.3
SRMSUITE_IBM_DS_TB
Report Pack for IBM DS Series;SolutionPack for IBM DS
3.0 6.3
SRMSUITE_ISILON SolutionPack for EMC Isilon 3.0 6.3
SRMSUITE_NTAP_TB ReportPack for NetApp Filers;SolutionPack for NetApp Filer
3.0 6.3
SRMSUITE_VBLOCK SolutionPack for Converged Infrastructure 3.0 6.3
SRMSUITE_VMAX_ENABLER
ReportPack for Symmetrix; SolutionPackfor EMC VMAX
3.0 6.3
SRMSUITE_VNX ReportPack for CLARiiON; SolutionPackfor EMC VNX
3.0 6.3
SRMSUITE_XIV_TB SolutionPack for IBM XIV 3.0 6.3
SRMSUITE_XTREMIO SolutionPack for EMC XtremIO 3.0 6.3
SRMSUITE_VMAXCE SolutionPack for EMC VMAX Cloud Edition 3.0 6.3
SRMSUITE_ATMOS_TB SolutionPack for EMC Atmos 3.0.1 6.3u1
VIPRSRM_SCALEIO_TB SolutionPack for EMC ScaleIO 3.5.1 6.4u1
VIPRSRM_ECS_TB ECS Add-on for EMC ViPR SolutionPack 3.5.1 6.4u1
ViPR SRM ELA LicenseStarting with EMC M&R 6.4u1, a ViPR SRM ELA license is available under the ELMSfeature name ViPRSRM_ELA. This license grants all of the functionality and SolutionPacksfor ViPR SRM. It is equivalent to a license for SRMSUITE_GENERAL plus all of the availableELMS features listed in the previous table.
Note
The Backend Adapter for this license allows for 1 million devices and 4 million metricsper device.
Licensing
ELMS license entitlements 73

Licensing
74 EMC ViPR SRM 3.7.2 Installation and Configuration Guide

CHAPTER 7
Uninstallation
This chapter includes the following topics:
l Overview............................................................................................................... 76l Stopping EMC M&R platform services on a UNIX server..........................................76l Uninstalling EMC M&R platform from a UNIX server............................................... 76l Stopping EMC M&R platform services on a Windows server................................... 76l Uninstalling EMC M&R platform from a Windows server.........................................77l Uninstalling a SolutionPack...................................................................................77
Uninstallation 75
OverviewYou can uninstall a SolutionPack and uninstall EMC M&R platform from a UNIX orWindows server.
Stop the EMC M&R platform services before uninstalling EMC M&R platform.
Stopping EMC M&R platform services on a UNIX serverUse the manage-modules.sh service stop command to stop a specific EMC M&Rplatform service or to stop all EMC M&R platform services on a UNIX server.
Before you begin
Make sure you have logged in with root or APG privileges.
Note
The list of services varies depending upon which type of installation was performed, forexample, vApp, collector, backend, frontend, and so forth.
Procedure
l Type manage-modules.sh service stop <service_name> from the bin directoryof the installation to stop a specific EMC M&R platform service.
This example shows how to stop all EMC M&R platform services:
./manage-modules.sh service stop all
Uninstalling EMC M&R platform from a UNIX serverUse the manage-modules.sh service remove all command to uninstall all EMCM&R platform services.
Before you begin
Make sure you have a login with root privileges.
Procedure
1. Type manage-modules.sh service remove all from the /opt/APG/bindirectory to uninstall all EMC M&R platform services.
2. Type rm -rf /opt/APG to remove the installation directory.
Stopping EMC M&R platform services on a Windows serverUse this procedure to stop EMC M&R platform services from the Windows desktop.
Before you begin
Make sure you have logged in with system administrator credentials to manage services.
Uninstallation
76 EMC ViPR SRM 3.7.2 Installation and Configuration Guide

Note
The list of services varies depending upon which type of installation was performed, forexample, vApp, collector, backend, frontend, and so forth.
Procedure
1. Type manage-modules.cmd service stop <service_name> from the bindirectory of the installation to stop a specific EMC M&R platform service.
This example shows how to stop all EMC M&R platform services:
./manage-modules.cmd service stop all
Uninstalling EMC M&R platform from a Windows serverUse the manage-modules.cmd service remove all command to remove all EMCM&R platform services from a Windows server.
Before you begin
Make sure you have logged in with system administrator credentials.
Procedure
1. Type manage-modules.cmd service remove all from the C:\Program Files\APG\bin folder to uninstall all EMC M&R platform services.
2. Use the Windows Control Panel to uninstall EMC M&R platform.
a. Click Start > Control Panel > Programs.
b. Click Uninstall a program.
c. Select the Watch4net Solutions APG and click Uninstall.
Uninstalling a SolutionPackIf you no longer want to view the reports of a certain SolutionPack, you can uninstall thatSolutionPack from the server.
Procedure
1. Log in with administrator credentials for EMC M&R platform and select Administration.
2. Select Centralized Management in the Administration tree.
3. Select SolutionPacks in the tree.
4. Select the SolutionPack that you want to uninstall in the Installed SolutionPacksscreen.
5. In the Properties area, click Trashcan icon for each instance of the SolutionPackBlockand click Remove.
Uninstallation
Uninstalling EMC M&R platform from a Windows server 77

Uninstallation
78 EMC ViPR SRM 3.7.2 Installation and Configuration Guide

APPENDIX A
Telnet and Socket Interface Ports
This appendix includes the following topics:
l Telnet and socket interface ports for each backend............................................... 80
Telnet and Socket Interface Ports 79

Telnet and socket interface ports for each backendThe telnet and socket interface ports for each backend must be different on the samehost. Make sure these ports are opened in the firewall.
Backend Host Backend socket interface telnet interface
Primary backend Default 2000 2001
Additional backend #1 New backend (apg1) 2100 2101
New backend (apg2) 2200 2201
New backend (apg2) 2300 2301
New backend (apg4) 2400 2401
Additional backend #2 New backend (apg1) 2500 2501
New backend (apg2) 2600 2601
New backend (apg2) 2700 2701
New backend (apg4) 2800 2801
Additional backend #3 New backend (apg1) 2900 2901
New backend (apg2) 3000 3001
New backend (apg2) 3100 3101
New backend (apg4) 3200 3201
Additional backend #4 New backend (apg1) 3300 3301
New backend (apg2) 3400 3401
New backend (apg2) 3500 3501
New backend (apg4) 3600 3601
Additional backend #5 New backend (apg1) 3700 3701
New backend (apg2) 3800 3801
New backend (apg2) 3900 3901
New backend (apg4) 4000 4001
Additional backend #6 New backend (apg1) 4100 4101
New backend (apg2) 4200 4201
New backend (apg2) 4300 4301
New backend (apg4) 4400 4401
Telnet and Socket Interface Ports
80 EMC ViPR SRM 3.7.2 Installation and Configuration Guide

APPENDIX B
SolutionPack Reconfiguration Fields
This appendix includes the following topics:
l SolutionPack Reconfiguration Fields......................................................................82
SolutionPack Reconfiguration Fields 81

SolutionPack Reconfiguration FieldsYou can change the settings for the SolutionPack from the SolutionPack Reconfigurationpage.
Table 5 SolutionPack Reconfiguration Fields
Field Description
Socket Collector port On this TCP port on the Primary Backend, the Arbiter is accepting theremote connections from all LBCs.
APG Backendhostname or IPaddress
The hostname of the server where the apg database and its backendservice are running. In this deployment, the possible options arebackend and backend2. Do not use "localhost" for the default apg onthe primary backend.
APG Backend data port Each apg has a backend and each backend has its own TCP port toreceive raw data. The port must be unique only inside the server. Refer to Configuring the Additional Backend on page 23.
In this installation, the ports are 2000, 2100, 2200, 2300 and 2400.
Web-Service Gateway Each APG server has a Web-Service Gateway. This hostname must pointto the APG server with the backend service.
Backend Web-ServiceInstance
The backend instance name. In this deployment, the possible valuesare:
l Default (the default backend instance name from primary backend)
l apg1
l apg2
l apg3
l apg4
Backend databasetype
MySQL by default.
Backend databasehostname or IPaddress
The hostname where the MySQL database is running. By default, it issame as the APG Backend hostname.
Backend databaseport number
The port on which MySQL is accepting remote TCP connections. Bydefault, it is 53306 .
Backend Databasename
The database name used in MySQL. For example, apg, apg1, apg2.
Backend databaseusername
The user configured in MySQL. The default is "apg"
Backend databasepassword
The default password for the MySQL user is "watch4net"
SolutionPack Reconfiguration Fields
82 EMC ViPR SRM 3.7.2 Installation and Configuration Guide