Embed Size (px)
Citation preview
SQL Data Many readers of the second tutorial have written asking how they can use DataBinding to bind to data in their SQL Database. This tutorial will walk through accessing SQL Data by creating a Web Service and then using LINQ to create a data source you can bind to. The control we will bind to will be the DataGrid. The DataGrid deserves and will receive its own (upcoming) tutorial as it has quite a lot to offer.
New Skills
The application we'll build will combine a number of different new skills:
• Connecting to a WCF Web Service • Using LINQ to query and retrieve data that our Silverlight Application can use • Using the DataGrid control to display data
From a strictly Silverlight perspective, building the Web Service and using LINQ are related skills but beyond the scope of these tutorials. That said, we'll examine how they intersect with Silverlight.
Getting Started
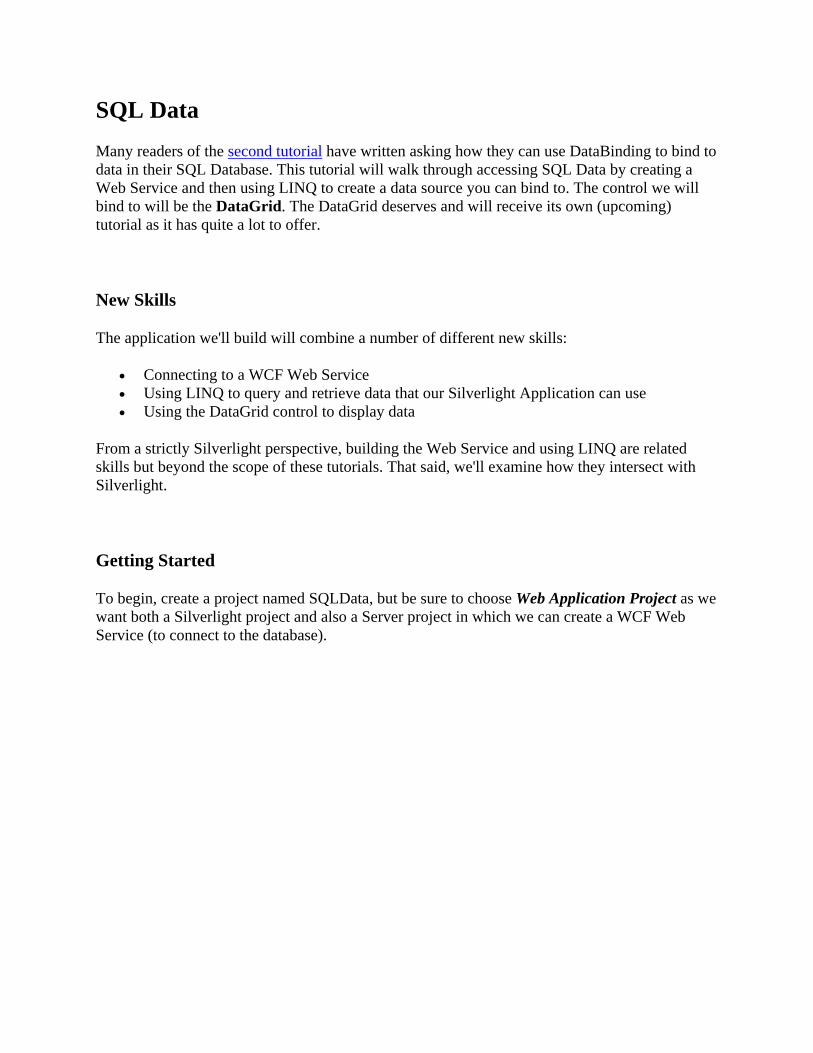
To begin, create a project named SQLData, but be sure to choose Web Application Project as we want both a Silverlight project and also a Server project in which we can create a WCF Web Service (to connect to the database).
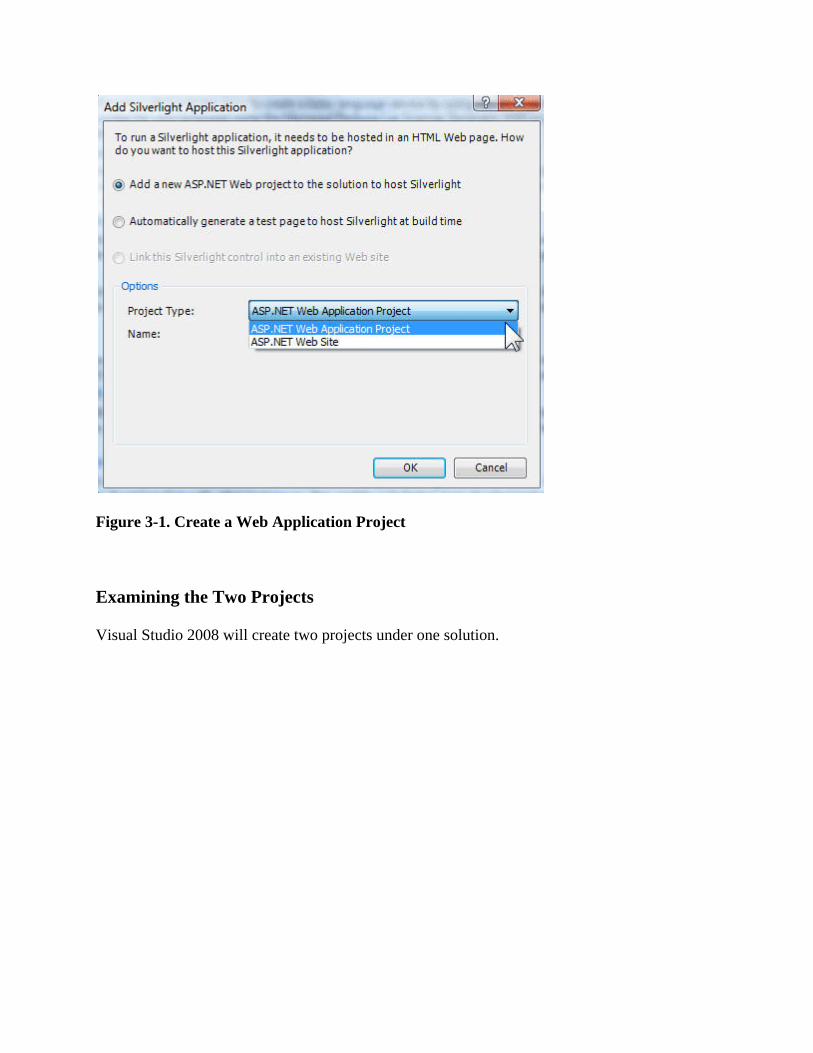
Figure 3-1. Create a Web Application Project
Examining the Two Projects
Visual Studio 2008 will create two projects under one solution.
Figure 3-2. Two projects in one solution
The solution and first project are named SQLData. That first project is the Silverlight application and has the same files that you've seen in previous tutorials.
The second project, SQLData_Web is created for you as a test environment for the Silverlight project and it has four potential entry points,
• Default.aspx • Silverlight.js • SQLDataTestPage.aspx • SQLDataTestPage.html
SQLDataTestPage.aspx is specifically designed to test the Silverlight controls and quick examination shows that it includes an AJAX ScriptManager and an ASP:Silverlight control whose source is the .xap file (pronounced zap file) that will be produced by the Silverlight project,
<form id="form1" runat="server" style="height:100%;"> <asp:ScriptManager ID="ScriptManager1" runat="server"/> </form>
Linq To Sql
LINQ is a very powerful addition to CSharp and is likely to be a central technique for data retrieval for Silverlight and other .NET technology going forward.
The trick to learning LINQ is to find Anders and have him explain it to you. No one does it better. Failing that, I recommend ScottGu's tutorial followed by one of the numerous books on LINQ (anything from our single chapter in Programming .NET 3.5 to one of the excellent dedicated books such as Pro LINQ in CSharp by Raatz or the forthcoming required reading Essential LINQ by Calvert & Kulkarni
In this tutorial we'll be writing a simple LINQ query that I'll parse for you.
Adding Linq Classes
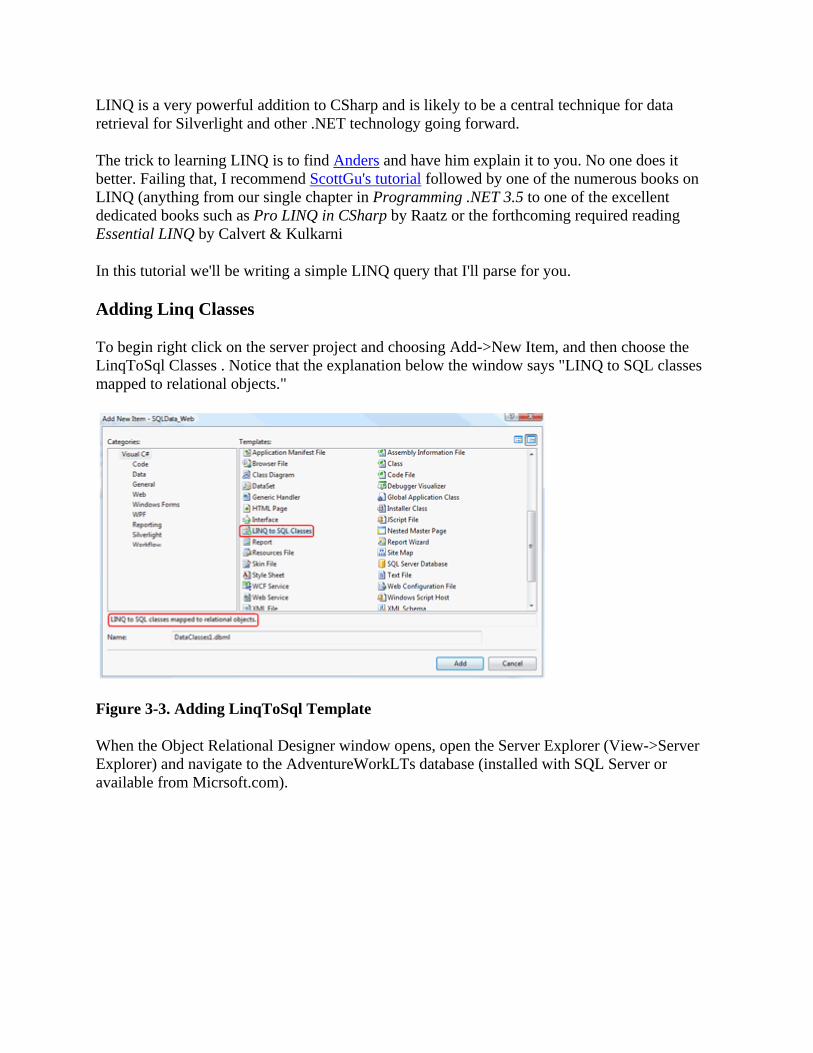
To begin right click on the server project and choosing Add->New Item, and then choose the LinqToSql Classes . Notice that the explanation below the window says "LINQ to SQL classes mapped to relational objects."
Figure 3-3. Adding LinqToSql Template
When the Object Relational Designer window opens, open the Server Explorer (View->Server Explorer) and navigate to the AdventureWorkLTs database (installed with SQL Server or available from Micrsoft.com).
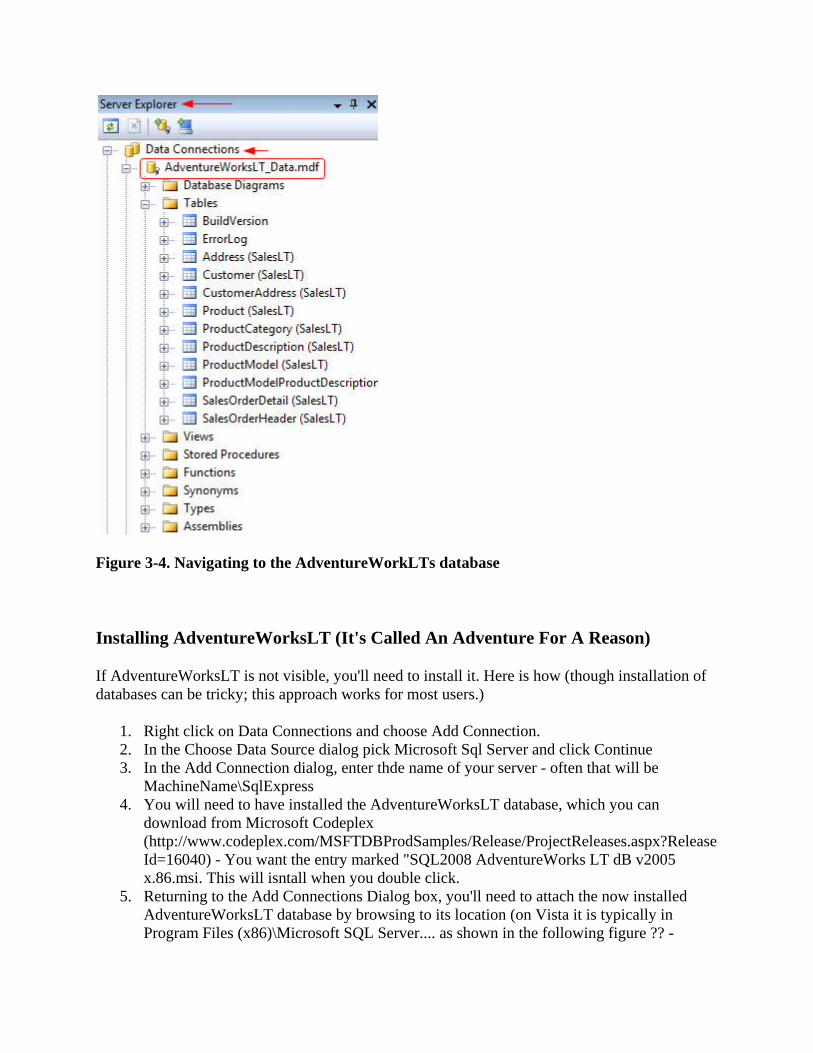
Figure 3-4. Navigating to the AdventureWorkLTs database
Installing AdventureWorksLT (It's Called An Adventure For A Reason)
If AdventureWorksLT is not visible, you'll need to install it. Here is how (though installation of databases can be tricky; this approach works for most users.)
1. Right click on Data Connections and choose Add Connection. 2. In the Choose Data Source dialog pick Microsoft Sql Server and click Continue 3. In the Add Connection dialog, enter thde name of your server - often that will be
MachineName\SqlExpress 4. You will need to have installed the AdventureWorksLT database, which you can
download from Microsoft Codeplex (http://www.codeplex.com/MSFTDBProdSamples/Release/ProjectReleases.aspx?ReleaseId=16040) - You want the entry marked "SQL2008 AdventureWorks LT dB v2005 x.86.msi. This will isntall when you double click.
5. Returning to the Add Connections Dialog box, you'll need to attach the now installed AdventureWorksLT database by browsing to its location (on Vista it is typically in Program Files (x86)\Microsoft SQL Server.... as shown in the following figure ?? -

6. Click on Test Connection to ensure that your connection to the Adventure Works database is working properly; if it is click OK, if it is not, keep tinkering until it works or you break down and repave your machine.
Figure 3-5. Connecting to the Adventure Works database
Expand to reveal the tables and drag the Customer table onto the DataClasses1.dbml Designer workspace.

Note that this may mean right clicking on the Data Connections and choosing Add Connection. In the Choose Data Source dialog you'll choose Microsoft Sql Server , leave the other options as is, and click Continue That will open the Add Connection dialog, where you will enter the name of the server on which you loaded the AdventureworksLT database (if you didn't load that database, you can pause here, download the file from Microsoft and load it to your local machine). If you loaded it to your local machine, type in localhost and choose Windows Authentication or Sql Server Authentication (if you are not sure, choose the former).
Figure 3-6. Dragging a table onto the Designer
When you do this, you may receive the warning shown in figure 3-7. Click OK
Figure 3-7. Connection Warning
Make the resulting LINQ class Serializable
While a LINQ class will be generated for you corresponding to the Customer table the default is for that class not to be serializable, but for it to usable in a web service we need to change that.. Click on the design surface to bring up the properties of the entire class, and set the Serilaization mode from None to Unidirectional
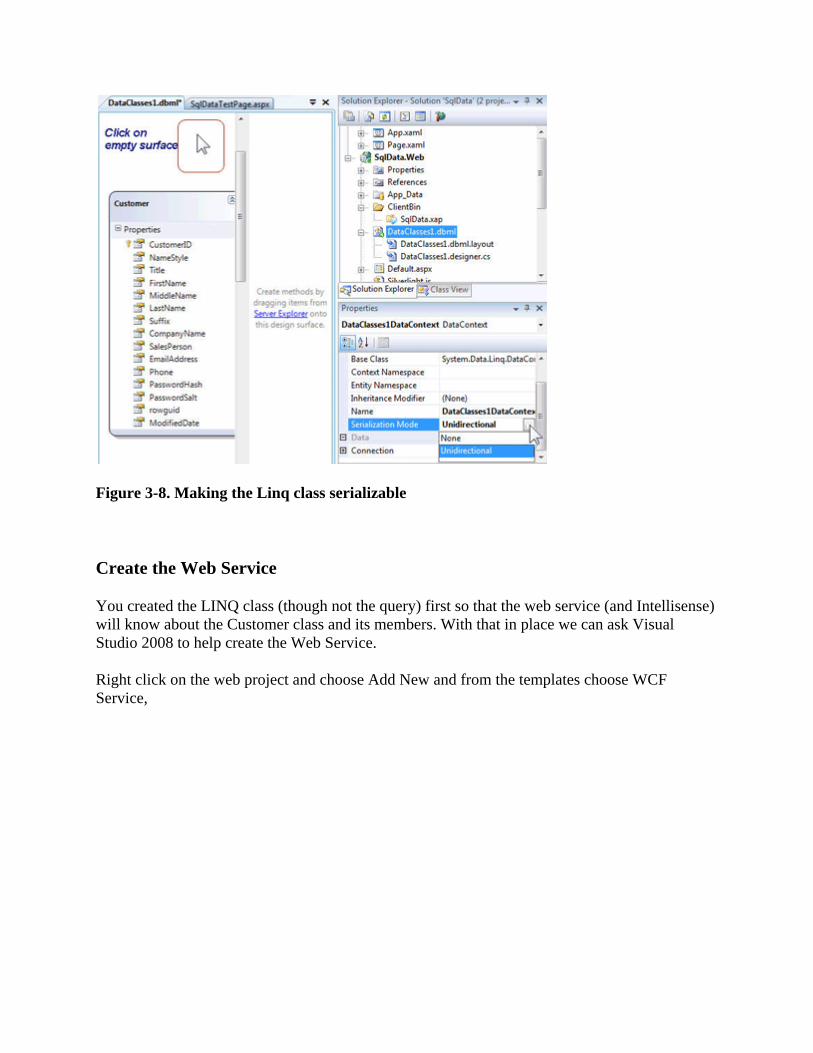
Figure 3-8. Making the Linq class serializable
Create the Web Service
You created the LINQ class (though not the query) first so that the web service (and Intellisense) will know about the Customer class and its members. With that in place we can ask Visual Studio 2008 to help create the Web Service.
Right click on the web project and choose Add New and from the templates choose WCF Service,
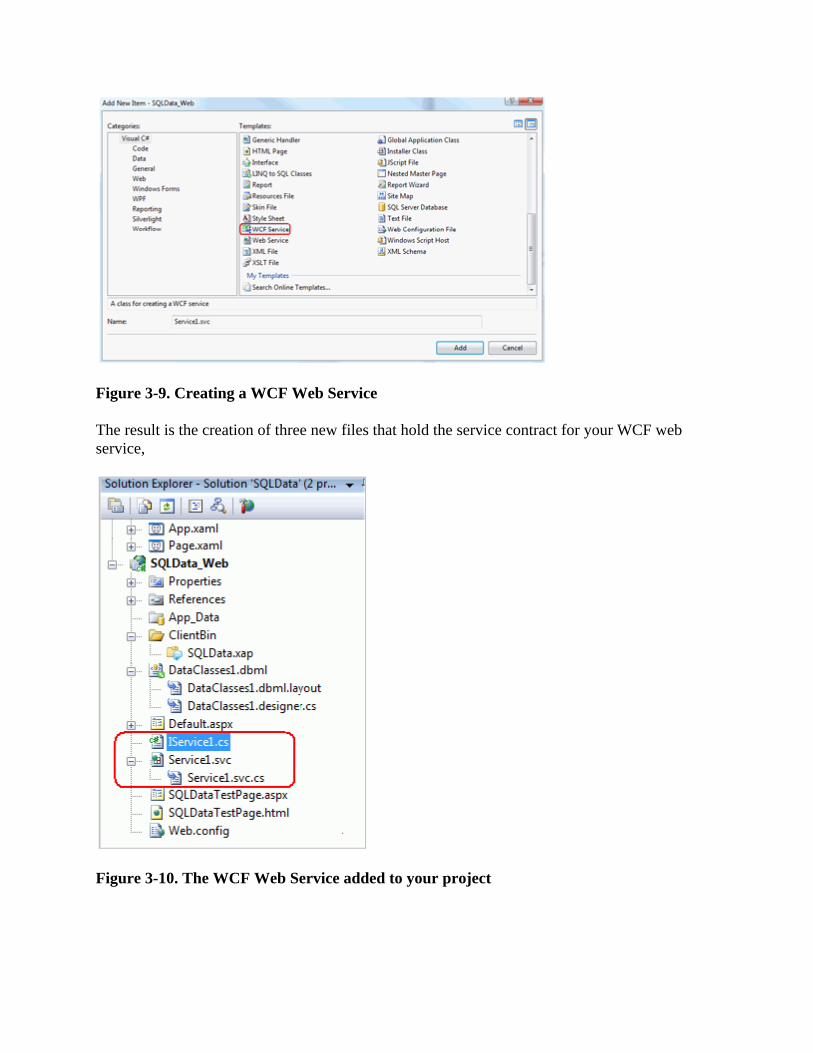
Figure 3-9. Creating a WCF Web Service
The result is the creation of three new files that hold the service contract for your WCF web service,
Figure 3-10. The WCF Web Service added to your project

Note that if you are more familiar with .NET 2 proxy based web services, you are in for a bit of an adjustment. WCF exposes more of the underlying XML and provides more of a contract-based programming model. You can find out more about WCF here.
Open the first file, IService1.cs which contains the contract that was created by Visual Studio 2008.
public interface IService1 { [OperationContract] void DoWork(); }
We can replace this "dummy" contract with whatever contract we want our web service to provide. For the purposes of this tutorial we want to contract that our web service will return a list of Customer objects given a string that represents the beginning of a customer's last name.
Thus, we'll modify the method from returning void to returning List<Customer>.. However, as soon as you start to change the return type Intellisense is able to pop up to help you, specifically because we created this type in the LINQ class we defined earlier.
Figure 3-11. Intellisense is now aware of your Customer
The convention for a method that returns a set of foo given a bar is to name it GetFoosByBar. Thus, we'll name this GetCustomersByLastName.
public interface IService1 { [OperationContract] List<Customer> GetCustomersByLastName(string lastName); }
Having changed the contract in the interface, you must be sure to change the implementation in the .cs file. But why work so hard? When you get to the cs file, just click on the interface and a

smart tag will appear. Open the tag and it will offer to create the implementation skeleton for you!
Figure 3-12. Intellisense can help implement the Interface
Throw away the DoWork method and fill in the GetCustomersByLastName with the LINQ query,
public class Service1 : IService1 { #region IService1 Members public List<Customer> GetCustomersByLastName(string lastName) { DataClasses1DataContext db = new DataClasses1DataContext(); var matchingCustomers = from cust in db.Customers where cust.LastName.StartsWith(lastName) select cust; return matchingCustomers.ToList(); } #endregion }
(The region comments were put in when I asked the smart tag to create the implementation skeleton)
LINQ Syntax
Let's take this one LINQ statement apart. First, we use the new var inference variable which, surprisingly is type safe (it infers the type, but it is not without type!). We assign to it the result of the LINQ query, which will be an object of type IEnumerable.
The query syntax is much like SQL except that the Select statement comes at the end. So, in English, "Give me a connection to the database I told you about earlier and name that connection db. Go into that database and find the table named customers and look for each record where the LastName field begins with the letters held in the string lastName. Give me all the matching records. Assign all those records to the object matchingCustomers, which is smart enough to (a)
know that it has to be of type IEnumerable and (b) know that when I call ToList() on it it should return a List<Customer>.
Watch Out for the Binding!
WCF uses wsHttpBinding as its default binding, in the Web.config file,
<services> <service behaviorConfiguration="SQLData_Web.Service1Behavior" name="SQLData_Web.Service1"> <endpoint address="" binding="wsHttpBinding" contract="SQLData_Web.IService1"> <identity> <dns value="localhost"/> </identity> </endpoint> </service> </services>
Silverlight, however, supports only basic binding (SOAP 1.1, etc.), so you will need to change the binding accordingly,
<endpoint address="" binding="basicHttpBinding" contract="SQLData_Web.IService1">
That's it. Your service is ready to go.
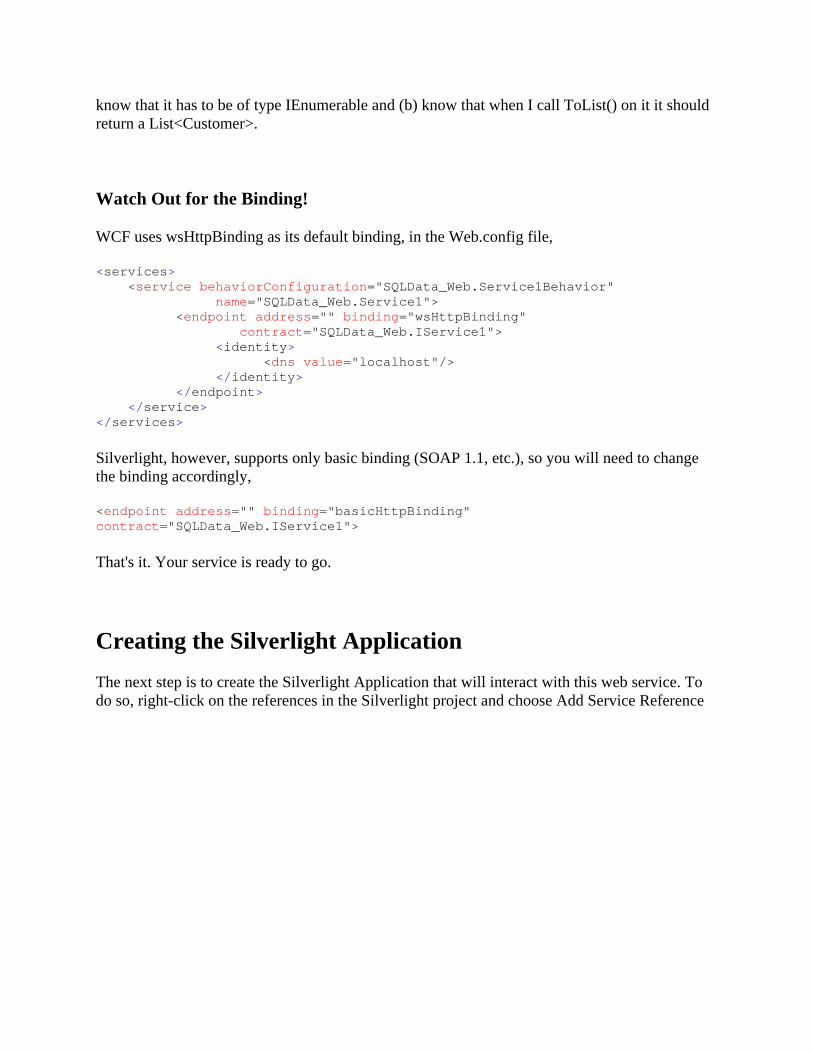
Creating the Silverlight Application The next step is to create the Silverlight Application that will interact with this web service. To do so, right-click on the references in the Silverlight project and choose Add Service Reference
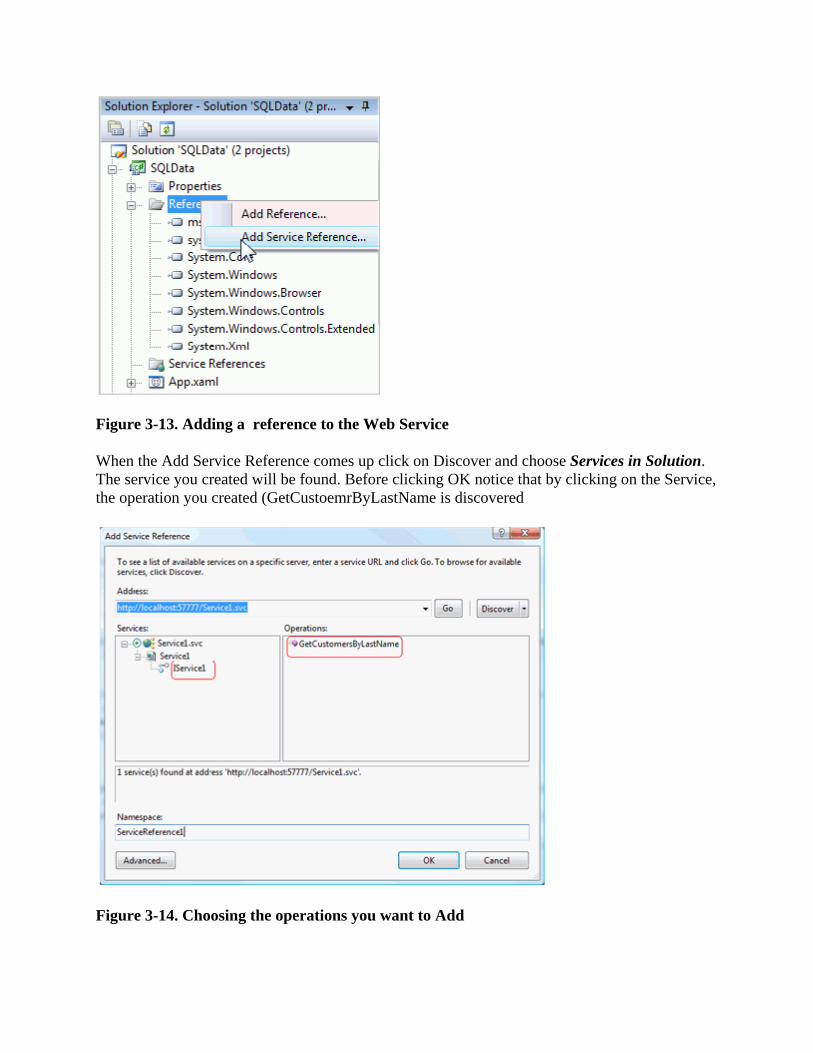
Figure 3-13. Adding a reference to the Web Service
When the Add Service Reference comes up click on Discover and choose Services in Solution. The service you created will be found. Before clicking OK notice that by clicking on the Service, the operation you created (GetCustoemrByLastName is discovered
Figure 3-14. Choosing the operations you want to Add
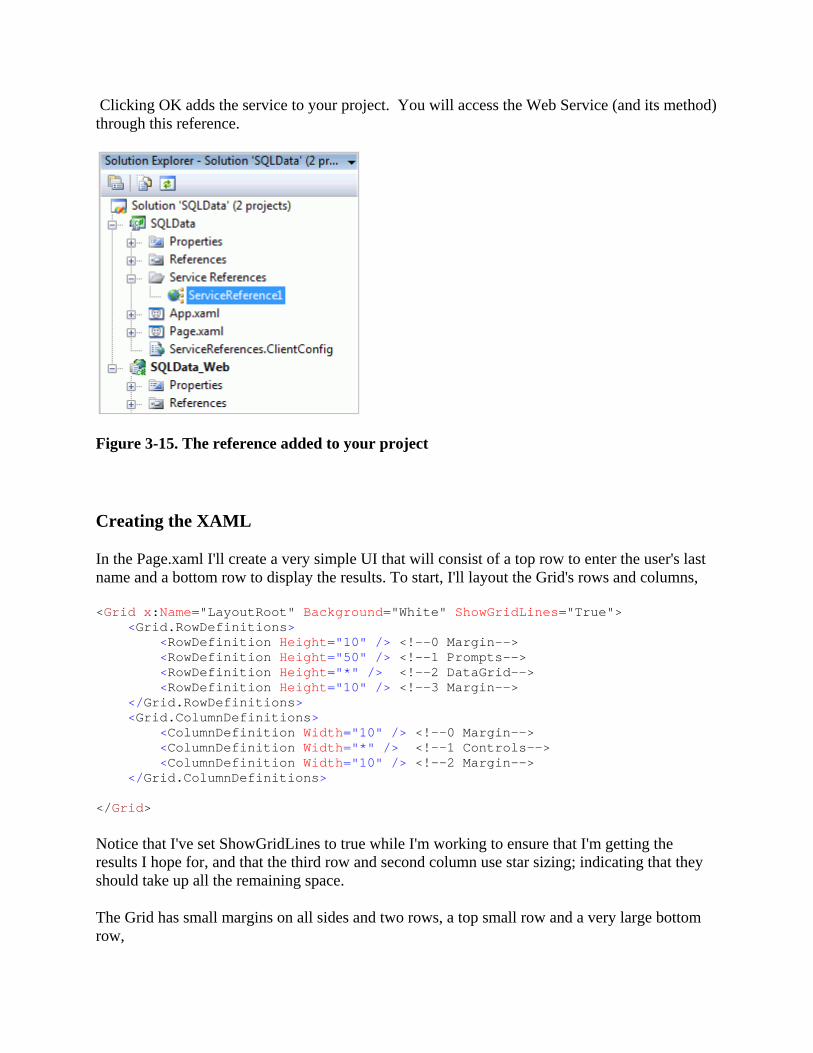
Clicking OK adds the service to your project. You will access the Web Service (and its method) through this reference.
Figure 3-15. The reference added to your project
Creating the XAML
In the Page.xaml I'll create a very simple UI that will consist of a top row to enter the user's last name and a bottom row to display the results. To start, I'll layout the Grid's rows and columns,
<Grid x:Name="LayoutRoot" Background="White" ShowGridLines="True"> <Grid.RowDefinitions> <RowDefinition Height="10" /> <!--0 Margin--> <RowDefinition Height="50" /> <!--1 Prompts--> <RowDefinition Height="*" /> <!--2 DataGrid--> <RowDefinition Height="10" /> <!--3 Margin--> </Grid.RowDefinitions> <Grid.ColumnDefinitions> <ColumnDefinition Width="10" /> <!--0 Margin--> <ColumnDefinition Width="*" /> <!--1 Controls--> <ColumnDefinition Width="10" /> <!--2 Margin--> </Grid.ColumnDefinitions> </Grid>
Notice that I've set ShowGridLines to true while I'm working to ensure that I'm getting the results I hope for, and that the third row and second column use star sizing; indicating that they should take up all the remaining space.
The Grid has small margins on all sides and two rows, a top small row and a very large bottom row,

Figure 3-16. The grid in design mode
Placing controls in the top row
I want to place a Textblock (for the prompt) and TextBox (for input) and a button in the top row. The easiest way to do so is with a stack panel, and I'll surround it all with a border to set it off from the results.
<Border BorderBrush="Black" BorderThickness="2" Grid.Row="1" Grid.Column="1"/> <StackPanel Grid.Row="1" Grid.Column="1" Orientation="Horizontal"> <TextBlock Text="Last name to search for: " VerticalAlignment="Bottom" FontSize="18" Margin="15,0,0,0" /> <TextBox x:Name="LastName" Width="250" Height="30" Margin="2,0,0,4" VerticalAlignment="Bottom"/> <Button x:Name="Search" Width="75" Height="30" Margin="20,0,0,4" Content="Search" VerticalAlignment="Bottom" Background="Blue" FontWeight="Bold" FontSize="14" /> </StackPanel>
Finally, drag a DataGrid from the Toolbox onto the XAML.
<my:DataGrid x:Name="theDataGrid" AlternatingRowBackground="Beige" AutoGenerateColumns="True" Width="700" Height="500" Grid.Row="2" Grid.Column="1" CanUserResizeColumns="True" />
You'll notice that it is given the prefix my and that a new namespace is declared to support it,

xmlns:my="clr-namespace:System.Windows.Controls;assembly=System.Windows.Controls.Data"
Write the Event Handler for the Search Button
When the user clicks the search button we want to pick up the text in the Text box and give it to the web service, and get back a collection of customers. Let's set up the boilerplate event handling code in page.xaml.cs,
public Page() { InitializeComponent(); Loaded += new RoutedEventHandler(Page_Loaded); } void Page_Loaded(object sender, RoutedEventArgs e) { Search.Click += new RoutedEventHandler(Search_Click); } void Search_Click(object sender, RoutedEventArgs e) { }
Call the Service Asynchronously
The only way to call a web service from Silverlight is asynchronously (which is fair as it is running in a browser and can't afford to block!)
The first task is to get a reference to the Web Service's Service1Client member. You can examine this in the object browser to see that it is this object that has the Asynchronous methods we'll need,
Figure 3-17. The Web Service client seen in the object browser
(image slightly abridged to save space)
We assign the Service1Client to the local object webService,
void Search_Click(object sender, RoutedEventArgs e) { ServiceReference1.Service1Client webService = new SQLData.ServiceReference1.Service1Client();
We then use webService to set up an event handler for the method that will be called when the GetCustomersByLastNameCompleted event is called
webService.GetCustomersByLastNameCompleted += new EventHandler<SQLData.ServiceReference1. GetCustomersByLastNameCompletedEventArgs> (webService_GetCustomersByLastNameCompleted);
Finally, we make the asynchronous call
webService.GetCustomersByLastNameAsync(LastName.Text); }
When the service completes, the GetCustomersByLastNameCompleted event is raised, and our method is invoked. The carefully constructed list of Customers is stashed in e.Result which we assign to the DataGrid's ItemSource property and all the bindings now have a source to bind to.
void webService_GetCustomersByLastNameCompleted( object sender, SQLData.ServiceReference1.GetCustomersByLastNameCompletedEventArgs e) { theDataGrid.ItemsSource = e.Result; }

Figure 3-18. The Running Program
Hey presto!
Once you know how, the effort to make this kind of application, even using Styles and more to make it look just the way you want, is measured in hours, at most.