Embed Size (px)
Citation preview
817
Appendix B
Spring Caching
When a heavy computation is done in a program, retrieval of data is slow, or the retrieved data hardly ever changes it can be useful to apply caching. Caching is the ability to store and retrieve data, transparently, so that data can be served quicker to the client.
In the Java eco system there are multiple cache implementations, ranging from the use of a simple Map implementation to a fully distributed cache solution (Coherence for instance). However there is also the proven and trusted EhCache.
As of JEE7 there is also a general caching API (JSR-107) named JCache, for this specification several implementations exists (like Apache JCS, Hazelcast but also Oracle Coherence is JCache compliant).
Spring provides a cache abstract to make it easier to work with any of these implementations which makes it quite easy to add caching to your application. For testing you could use a simple Map-based implementation whereas your real system would use an Oracle Coherence cluster for caching.
In this chapter you will explore Spring’s caching abstraction and will take a look at different strategies of applying caching to your application.
B-1. Caching with EhCacheProblemYou have an application with some heavy computation tasks you would like to cache the result and reuse it.
SolutionUse EhCache to store the result of your computation. For each computation check if a result is already present. If it is return the cached value, or calculate and put it in the cache.
How It WorksFirst let’s create the CalculationService which simulates a heavy computation by doing a Thread.sleep().
Appendix B ■ Spring CAChing
818
package com.apress.springrecipes.caching; import java.math.BigDecimal; public class PlainCalculationService implements CalculationService { @Override public BigDecimal heavyCalculation(BigDecimal base, int power) { try { Thread.sleep(500); } catch (InterruptedException e) {} return base.pow(power); }}
As one can see, calculating the power of is a very heavy computation to do. Create a Main class to run this program in a couple of iterations. package com.apress.springrecipes.caching; import java.math.BigDecimal; public class Main { public static final void main(String[] args) throws Exception { CalculationService calculationService = new PlainCalculationService(); for (int i = 0; i < 10 ;i++) { long start = System.currentTimeMillis(); System.out.println(calculationService.heavyCalculation(BigDecimal.valueOf(2L), 16)); long duration = System.currentTimeMillis() - start; System.out.println("Took: " + duration); } }}
The main class will run the computation 10 times and output the result as well as the time it took to calculate the results. When running you will see that the time for each computation is around 500 milliseconds, mainly due to the Thread.sleep().
Using EhCache without SpringLet’s improve our system by introducing caching. For this you are going to use plain EhCache. The modified service looks like the following package com.apress.springrecipes.caching; import net.sf.ehcache.Ehcache;import net.sf.ehcache.Element; import java.math.BigDecimal;
Appendix B ■ Spring CAChing
819
public class PlainCachingCalculationService implements CalculationService { private final Ehcache cache; public PlainCachingCalculationService(Ehcache cache) { this.cache = cache; } @Override public BigDecimal heavyCalculation(BigDecimal base, int power) { String key = base +"^"+power; Element result = cache.get(key); if (result != null) { return (BigDecimal) result.getObjectValue(); } try { Thread.sleep(500); } catch (InterruptedException e) {} BigDecimal calculatedResult = base.pow(power); cache.putIfAbsent(new Element(key, calculatedResult)); return calculatedResult; }}
First notice the addition of a cache variable in the service. This cache is injected through the constructor. Let’s take a look at the updated heavyCalculation method. First it generates a unique key based on the method arguments, this key is used to lookup a result from the cache, if found it is returned. If there is no cached result the calculation proceeds as normal and after the calculation the result is added to the cache and finally the value is returned.
Due to the need for an EhCache cache the Main class needs to be modified to bootstrap EhCache and lookup a cache before constructing our service. The updated Main class looks like the following: package com.apress.springrecipes.caching; import net.sf.ehcache.CacheManager;import net.sf.ehcache.Ehcache;...public class Main { public static final void main(String[] args) throws Exception { CacheManager cacheManager = CacheManager.getInstance(); Ehcache cache = cacheManager.getEhcache("calculations"); CalculationService calculationService = new PlainCachingCalculationService(cache); ... cacheManager.shutdown(); }}
First there needs to be a CacheManager constructed. For this, use the getInstance method on the CacheManager class. It will try to read a file called ehcache.xml from the root of the classpath to configure the caches. Next a cache instance is requested with the name calculations, the resulting cache is injected into the PlainCachingCalculationService.
Appendix B ■ Spring CAChing
820
The ehcache.xml file is configuration file for ehcache and it contains the following: <ehcache> <diskStore path="java.io.tmpdir"/>
<defaultCache maxElementsInMemory="1000" eternal="false" timeToIdleSeconds="120" timeToLiveSeconds="120" overflowToDisk="true" />
<cache name="calculations" maxElementsInMemory="100" eternal="false" timeToIdleSeconds="600" timeToLiveSeconds="3600" overflowToDisk="true" />
</ehcache>
This configures ehcache and the specific cache we want to use. It keeps 100 results in memory (maxElementsInMemory) for 1 hour (timeToLiveSeconds), when there are more elements it will store those on disk (overflowToDisk).
When running the main class the first computation takes around 500 milliseconds whereas the next computations take a lot less around 0 to 1 milliseconds.
Using EhCache with Spring for ConfigurationThe application is integrated with Spring and Spring will be leveraged for configuration of the CacheManager and constructing the service. To make this work you need to do some spring configuration and use an ApplicationContext to load everything. The configuration is the following: package com.apress.springrecipes.caching.config; import com.apress.springrecipes.caching.CalculationService;import com.apress.springrecipes.caching.PlainCachingCalculationService;import net.sf.ehcache.CacheManager;import net.sf.ehcache.Ehcache;import org.springframework.context.annotation.Bean;import org.springframework.context.annotation.Configuration; @Configurationpublic class CalculationConfiguration { @Bean public CacheManager cacheManager() { return CacheManager.getInstance(); }
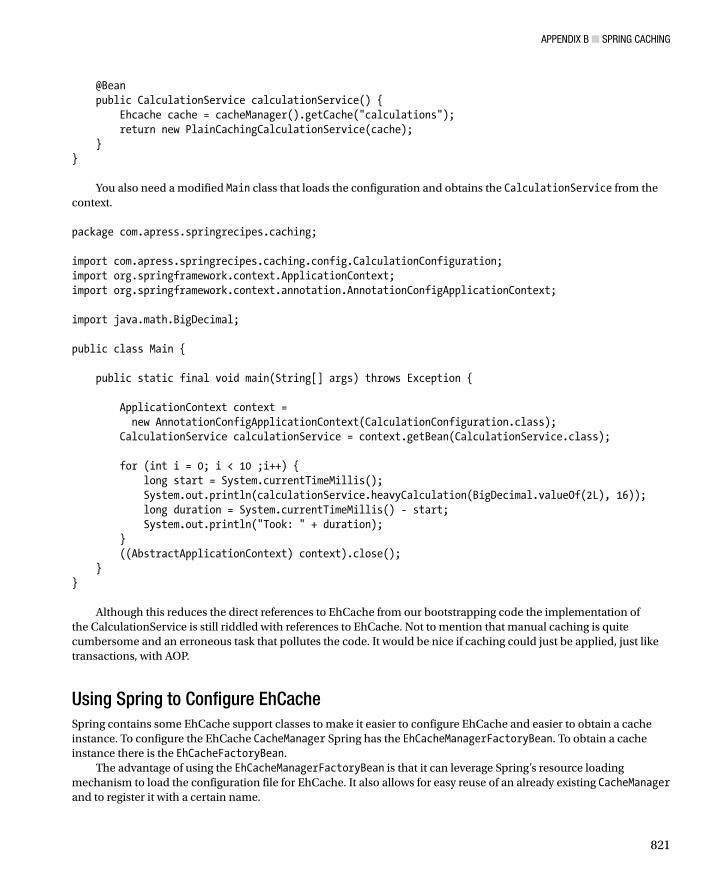
Appendix B ■ Spring CAChing
821
@Bean public CalculationService calculationService() { Ehcache cache = cacheManager().getCache("calculations"); return new PlainCachingCalculationService(cache); }}
You also need a modified Main class that loads the configuration and obtains the CalculationService from the context. package com.apress.springrecipes.caching; import com.apress.springrecipes.caching.config.CalculationConfiguration;import org.springframework.context.ApplicationContext;import org.springframework.context.annotation.AnnotationConfigApplicationContext; import java.math.BigDecimal; public class Main { public static final void main(String[] args) throws Exception { ApplicationContext context = new AnnotationConfigApplicationContext(CalculationConfiguration.class); CalculationService calculationService = context.getBean(CalculationService.class); for (int i = 0; i < 10 ;i++) { long start = System.currentTimeMillis(); System.out.println(calculationService.heavyCalculation(BigDecimal.valueOf(2L), 16)); long duration = System.currentTimeMillis() - start; System.out.println("Took: " + duration); } ((AbstractApplicationContext) context).close(); }}
Although this reduces the direct references to EhCache from our bootstrapping code the implementation of the CalculationService is still riddled with references to EhCache. Not to mention that manual caching is quite cumbersome and an erroneous task that pollutes the code. It would be nice if caching could just be applied, just like transactions, with AOP.
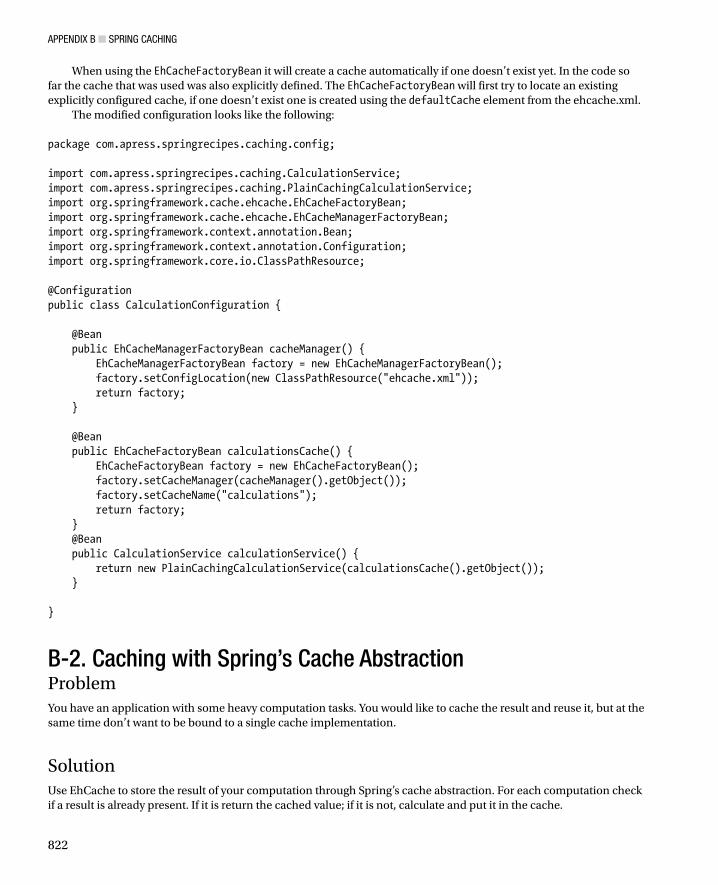
Using Spring to Configure EhCacheSpring contains some EhCache support classes to make it easier to configure EhCache and easier to obtain a cache instance. To configure the EhCache CacheManager Spring has the EhCacheManagerFactoryBean. To obtain a cache instance there is the EhCacheFactoryBean.
The advantage of using the EhCacheManagerFactoryBean is that it can leverage Spring’s resource loading mechanism to load the configuration file for EhCache. It also allows for easy reuse of an already existing CacheManager and to register it with a certain name.
Appendix B ■ Spring CAChing
822
When using the EhCacheFactoryBean it will create a cache automatically if one doesn’t exist yet. In the code so far the cache that was used was also explicitly defined. The EhCacheFactoryBean will first try to locate an existing explicitly configured cache, if one doesn’t exist one is created using the defaultCache element from the ehcache.xml.
The modified configuration looks like the following: package com.apress.springrecipes.caching.config; import com.apress.springrecipes.caching.CalculationService;import com.apress.springrecipes.caching.PlainCachingCalculationService;import org.springframework.cache.ehcache.EhCacheFactoryBean;import org.springframework.cache.ehcache.EhCacheManagerFactoryBean;import org.springframework.context.annotation.Bean;import org.springframework.context.annotation.Configuration;import org.springframework.core.io.ClassPathResource; @Configurationpublic class CalculationConfiguration { @Bean public EhCacheManagerFactoryBean cacheManager() { EhCacheManagerFactoryBean factory = new EhCacheManagerFactoryBean(); factory.setConfigLocation(new ClassPathResource("ehcache.xml")); return factory; } @Bean public EhCacheFactoryBean calculationsCache() { EhCacheFactoryBean factory = new EhCacheFactoryBean(); factory.setCacheManager(cacheManager().getObject()); factory.setCacheName("calculations"); return factory; } @Bean public CalculationService calculationService() { return new PlainCachingCalculationService(calculationsCache().getObject()); } }
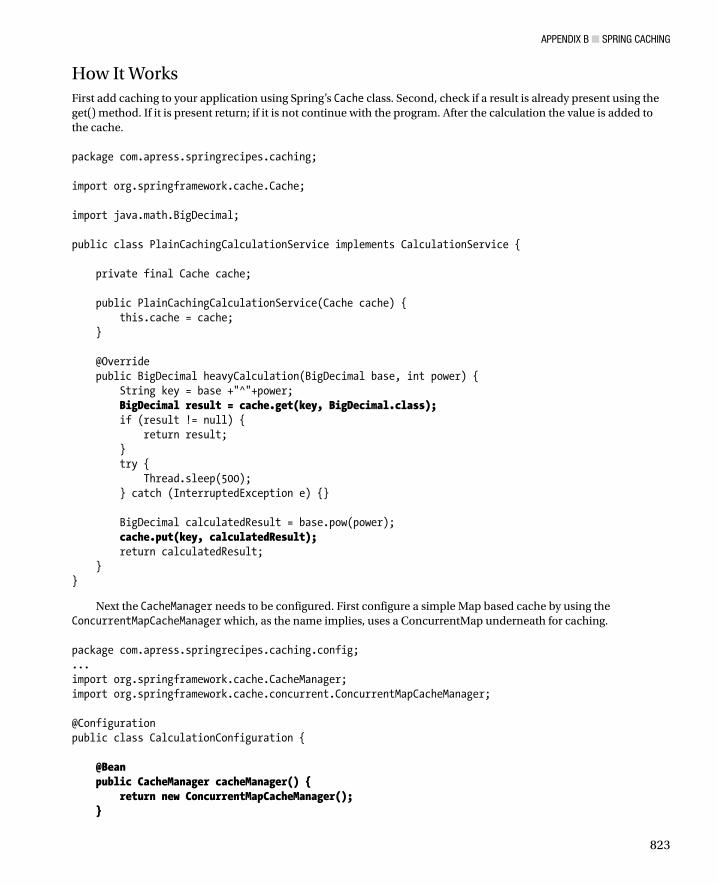
B-2. Caching with Spring’s Cache AbstractionProblemYou have an application with some heavy computation tasks. You would like to cache the result and reuse it, but at the same time don’t want to be bound to a single cache implementation.
SolutionUse EhCache to store the result of your computation through Spring’s cache abstraction. For each computation check if a result is already present. If it is return the cached value; if it is not, calculate and put it in the cache.
Appendix B ■ Spring CAChing
823
How It WorksFirst add caching to your application using Spring’s Cache class. Second, check if a result is already present using the get() method. If it is present return; if it is not continue with the program. After the calculation the value is added to the cache. package com.apress.springrecipes.caching; import org.springframework.cache.Cache; import java.math.BigDecimal; public class PlainCachingCalculationService implements CalculationService { private final Cache cache; public PlainCachingCalculationService(Cache cache) { this.cache = cache; } @Override public BigDecimal heavyCalculation(BigDecimal base, int power) { String key = base +"^"+power; BigDecimal result = cache.get(key, BigDecimal.class); if (result != null) { return result; } try { Thread.sleep(500); } catch (InterruptedException e) {} BigDecimal calculatedResult = base.pow(power); cache.put(key, calculatedResult); return calculatedResult; }}
Next the CacheManager needs to be configured. First configure a simple Map based cache by using the ConcurrentMapCacheManager which, as the name implies, uses a ConcurrentMap underneath for caching. package com.apress.springrecipes.caching.config;...import org.springframework.cache.CacheManager;import org.springframework.cache.concurrent.ConcurrentMapCacheManager; @Configurationpublic class CalculationConfiguration { @Bean public CacheManager cacheManager() { return new ConcurrentMapCacheManager(); }
Appendix B ■ Spring CAChing
824
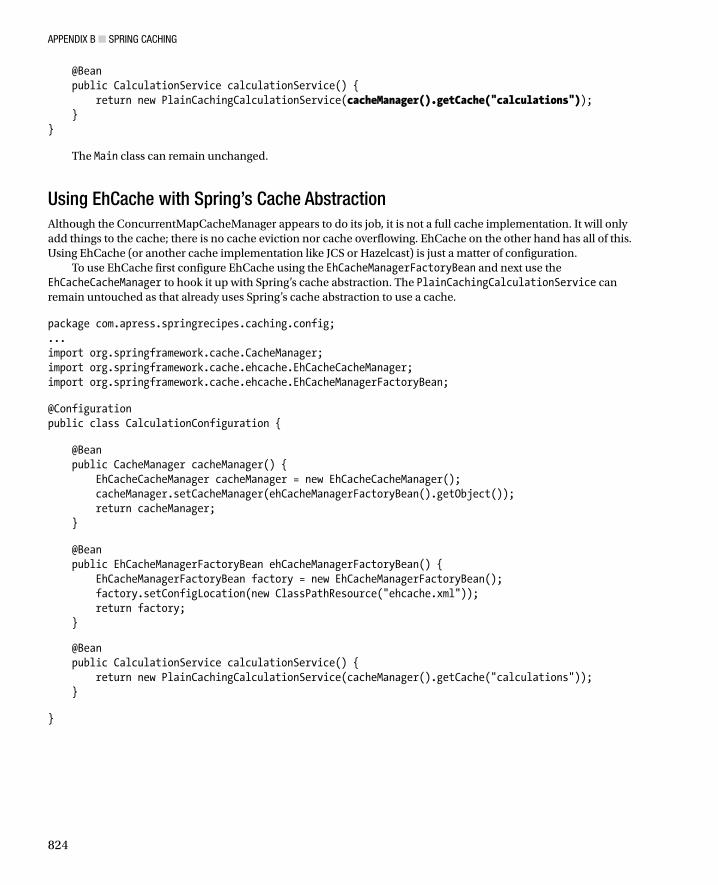
@Bean public CalculationService calculationService() { return new PlainCachingCalculationService(cacheManager().getCache("calculations")); }}
The Main class can remain unchanged.
Using EhCache with Spring’s Cache AbstractionAlthough the ConcurrentMapCacheManager appears to do its job, it is not a full cache implementation. It will only add things to the cache; there is no cache eviction nor cache overflowing. EhCache on the other hand has all of this. Using EhCache (or another cache implementation like JCS or Hazelcast) is just a matter of configuration.
To use EhCache first configure EhCache using the EhCacheManagerFactoryBean and next use the EhCacheCacheManager to hook it up with Spring’s cache abstraction. The PlainCachingCalculationService can remain untouched as that already uses Spring’s cache abstraction to use a cache. package com.apress.springrecipes.caching.config;...import org.springframework.cache.CacheManager;import org.springframework.cache.ehcache.EhCacheCacheManager;import org.springframework.cache.ehcache.EhCacheManagerFactoryBean; @Configurationpublic class CalculationConfiguration { @Bean public CacheManager cacheManager() { EhCacheCacheManager cacheManager = new EhCacheCacheManager(); cacheManager.setCacheManager(ehCacheManagerFactoryBean().getObject()); return cacheManager; } @Bean public EhCacheManagerFactoryBean ehCacheManagerFactoryBean() { EhCacheManagerFactoryBean factory = new EhCacheManagerFactoryBean(); factory.setConfigLocation(new ClassPathResource("ehcache.xml")); return factory; }
@Bean public CalculationService calculationService() { return new PlainCachingCalculationService(cacheManager().getCache("calculations")); } }
Appendix B ■ Spring CAChing
825
B-3. Declarative Caching with AOPProblemCaching is a kind of crosscutting concern. Applying caching manually can be tedious and error prone. It is simpler to specify, declaratively, what behavior you are expecting and to not prescribe how that behavior is to be achieved.
SolutionSpring (since version 3.1) offers a cache advice that can be enabled by <cache:annotation-driven/>or @EnableCaching.
How It WorksTo enable declarative caching you have to add @EnableCaching to the configuration class. This will register a CacheInterceptor or AnnotationCacheAspect (depending on the mode) which will detect, among others, the @Cacheable annotation. public BigDecimal heavyCalculation(BigDecimal base, int power) { String key = base +"^"+power; Element result = cache.get(key); if (result != null) { return (BigDecimal) result.getObjectValue(); } try { Thread.sleep(500); } catch (InterruptedException e) {} BigDecimal calculatedResult = base.pow(power); cache.putIfAbsent(new Element(key, calculatedResult)); return calculatedResult;}
The registered advice replaces the code in bold, as that is mainly boilerplate and would need to be duplicated in each method in which we want to introduce caching. When the boilerplate code is removed the following code is what would remain @Overridepublic BigDecimal heavyCalculation(BigDecimal base, int power) { try { Thread.sleep(500); } catch (InterruptedException e) {} return base.pow(power);}
To enable caching for this method you need to place a @Cacheable annotation on the method. This annotation requires the name of the cache to use to be specified (by using the value attribute of the annotation). @Override@Cacheable("calculations")public BigDecimal heavyCalculation(BigDecimal base, int power) { ... }

Appendix B ■ Spring CAChing
826
This annotation has three other attributes: key, condition, and unless. Each of these attributes takes a SpEL expression which is evaluated at runtime. The key attribute specifies which method arguments to use to calculate the key used for caching, the default is to use all method arguments. The condition attribute can be used to define the condition for which the cache is applied, the default is to always cache and is invoked before the actual method is invoked. The unless attribute works similar to the condition attribute however this is invoked after the actual method invocation.
Using Spring AOPThe default operation mode for the @EnableCaching annotation is to use plain Spring AOP. This means a proxy will be created for the CalculationService. The configuration looks like the following. package com.apress.springrecipes.caching.config; import com.apress.springrecipes.caching.CalculationService;import com.apress.springrecipes.caching.PlainCalculationService;import org.springframework.cache.CacheManager;import org.springframework.cache.annotation.EnableCaching;import org.springframework.cache.ehcache.EhCacheCacheManager;import org.springframework.cache.ehcache.EhCacheManagerFactoryBean;import org.springframework.context.annotation.Bean;import org.springframework.context.annotation.Configuration;import org.springframework.core.io.ClassPathResource; @Configuration@EnableCachingpublic class CalculationConfiguration { @Bean public CacheManager cacheManager() { EhCacheCacheManager cacheManager = new EhCacheCacheManager(); cacheManager.setCacheManager(ehCacheManagerFactoryBean().getObject()); return cacheManager; } @Bean public EhCacheManagerFactoryBean ehCacheManagerFactoryBean() { EhCacheManagerFactoryBean factory = new EhCacheManagerFactoryBean(); factory.setConfigLocation(new ClassPathResource("ehcache.xml")); return factory; }
@Bean public CalculationService calculationService() { return new PlainCalculationService(); }}
The configuration now has a @EnableCaching annotation and the CalculationService used only has the @Cacheable annotation, no dependency on the caching framework.
Appendix B ■ Spring CAChing
827
Using AspectJUsing the AspectJ mode for caching is as easy as setting the mode attribute of the @EnableCaching annotation to ASPECTJ. Depending on whether one uses compile or loadtime weaving it might be necessary to add @EnableLoadTimeWeaving. For the sample it is assumed that the code uses loadtime weaving. For this add the aforementioned annotation to the configuration class. package com.apress.springrecipes.caching.config;...import org.springframework.cache.annotation.EnableCaching;import org.springframework.context.annotation.EnableLoadTimeWeaving; @Configuration@EnableLoadTimeWeaving@EnableCaching(mode = AdviceMode.ASPECTJ)public class CalculationConfiguration { ... }
More information on loadtime weaving can be found in Recipe 3-19. To run the main application you have to start it with a so-called java agent. To run the program with loadtime weaving use java -javaagent:./lib/spring-instrument-4.0.6.RELEASE.jar -jar Recipe_19_3_ii-3.0.0.jar (from the build/libs directory of this Recipe).
B-4. Configure a Custom KeyGeneratorProblemThe default KeyGenerator generates a key based on the method parameters. You want to modify this behavior.
SolutionImplement a custom KeyGenerator with the desired strategy and configure the caching support to use this custom KeyGenerator.
How It WorksThe caching abstraction uses a KeyGenerator interface as a callback mechanism for the key generation. By default it uses the SimpleKeyGenerator class for key generation. This class takes all method arguments and calculates a hashCode for this. This hash is used as a key.
It is possible to implement your own generation strategy and use that to generate the keys. To do this create a class that implements the KeyGenerator interface and implements the generate method. package com.apress.springrecipes.caching; import org.springframework.cache.interceptor.KeyGenerator; import java.lang.reflect.Method; public class CustomKeyGenerator implements KeyGenerator { @Override public Object generate(Object target, Method method, Object... params) { return params[0] + "^" + params[1]; }}
Appendix B ■ Spring CAChing
828
The CustomKeyGenerator takes the first and second parameter and appends them with a ^ in between (the same as was done in the samples when you generated your own key for the cache).
Next wire up the custom implementation with the caching support in Spring. For this use the CachingConfigurer interface, which is used to further configure the caching support in Spring. package com.apress.springrecipes.caching.config; import com.apress.springrecipes.caching.CustomKeyGenerator;import org.springframework.cache.annotation.CachingConfigurer;import org.springframework.cache.annotation.EnableCaching;import org.springframework.cache.interceptor.KeyGenerator;... @Configuration@EnableCachingpublic class CalculationConfiguration { @Bean public CacheManager cacheManager() { ... } @Bean public KeyGenerator keyGenerator() { return new CustomKeyGenerator(); }
@Bean public CachingConfigurer cachingConfigurer() { return new CachingConfigurer() { @Override public CacheManager cacheManager() { return CalculationConfiguration.this.cacheManager(); } @Override public KeyGenerator keyGenerator() { return CalculationConfiguration.this.keyGenerator(); } }; }...}
First notice the addition of the CustomKeyGenerator as a bean so that it is available for use. Next the inner class for the CachingConfigurer (you can also create a normal class as long as it implements the CachingConfigurer interface). The implementation for the CachingConfigurer returns the already configured CacheManager as well as the KeyGenerator. When using a CachingConfigurer the CacheManager is no longer autodetected and must be configured through the CachingConfigurer.
Appendix B ■ Spring CAChing
829
B-5. Adding and Removing Objects from the CacheProblemYou want to use cache eviction and cache puts when objects get created, updated, or removed.
SolutionUse the @CachePut and @CacheEvict annotations on methods that you want to update or invalidate objects in the cache.
How It WorksNext to @Cacheable Spring also has the @CachePut and @CacheEvict annotations which respectively add or remove objects (or invalidate the whole cache) to/from a cache.
When using caches you don’t only want your cache to fill up you also want it to keep in sync with what is happening inside your application, including object updates and removal. For methods whose results update the cache add a @CachePut annotation; for methods that invalidate objects inside the cache use the @CacheEvict annotation.
There is a CustomerRepository and obtaining the customers from the underlying data source is very time consuming. It is decided that caching is being added to the repository. First create the CustomerRepository interface package com.apress.springrecipes.caching; public interface CustomerRepository { Customer find(long customerId); Customer create(String name); void update(Customer customer); void remove(long customerId);}
There is also a need for a Customer class. package com.apress.springrecipes.caching; import java.io.Serializable; public class Customer implements Serializable { private final long id; private String name; public Customer(long id) { this.id = id; } public long getId() { return id; }
Appendix B ■ Spring CAChing
830
public String getName() { return name; } public void setName(String name) { this.name = name; }}
Finally the implementation of the CustomerRepository interface, it is based on a HashMap as it is just for testing purposes. The slow retrieval is faked with a call to Thread.sleep(). package com.apress.springrecipes.caching; import org.springframework.cache.annotation.Cacheable; import java.util.HashMap;import java.util.Map;import java.util.UUID; public class MapBasedCustomerRepository implements CustomerRepository { private final Map<Long, Customer> repository = new HashMap<>(); @Override @Cacheable(value = "customers") public Customer find(long customerId) { try { Thread.sleep(500); } catch (InterruptedException e) {} return repository.get(customerId); } @Override public Customer create(String name) { long id = UUID.randomUUID().getMostSignificantBits(); Customer customer = new Customer(id); customer.setName(name); repository.put(id, customer); return customer; } @Override public void update(Customer customer) { repository.put(customer.getId(), customer); }
@Override public void remove(long customerId) { repository.remove(customerId); }}

Appendix B ■ Spring CAChing
831
Next everything needs to be configured with a configuration class. package com.apress.springrecipes.caching.config; import com.apress.springrecipes.caching.CustomerRepository;import com.apress.springrecipes.caching.MapBasedCustomerRepository;import org.springframework.cache.CacheManager;import org.springframework.cache.annotation.EnableCaching;import org.springframework.cache.ehcache.EhCacheCacheManager;import org.springframework.cache.ehcache.EhCacheManagerFactoryBean;import org.springframework.context.annotation.Bean;import org.springframework.context.annotation.Configuration;import org.springframework.core.io.ClassPathResource; @Configuration@EnableCachingpublic class CustomerConfiguration { @Bean public CacheManager cacheManager() { EhCacheCacheManager cacheManager = new EhCacheCacheManager(); cacheManager.setCacheManager(ehCacheManagerFactoryBean().getObject()); return cacheManager; } @Bean public EhCacheManagerFactoryBean ehCacheManagerFactoryBean() { EhCacheManagerFactoryBean factory = new EhCacheManagerFactoryBean(); factory.setConfigLocation(new ClassPathResource("ehcache.xml")); return factory; } @Bean public CustomerRepository customerRepository() { return new MapBasedCustomerRepository(); }}
Last but not least to be able to run this program a Main class is needed. package com.apress.springrecipes.caching; import com.apress.springrecipes.caching.config.CustomerConfiguration; import org.apache.commons.lang3.builder.ToStringBuilder;import org.apache.commons.lang3.builder.ToStringStyle;import org.springframework.context.ApplicationContext;import org.springframework.context.annotation.AnnotationConfigApplicationContext;import org.springframework.context.support.AbstractApplicationContext;import org.springframework.util.StopWatch;
Appendix B ■ Spring CAChing
832
public class Main { public static final void main(String[] args) throws Exception { ApplicationContext context = new AnnotationConfigApplicationContext(CustomerConfiguration.class); CustomerRepository customerRepository = context.getBean(CustomerRepository.class); StopWatch sw = new StopWatch("Cache Evict and Put"); sw.start("Get 'Unknown Customer'"); Customer customer = customerRepository.find(1L); System.out.println("Get 'Unknown Customer' (result) : " + ToStringBuilder.reflectionToString(customer, ToStringStyle.SHORT_PREFIX_STYLE)); sw.stop(); sw.start("Create New Customer"); customer = customerRepository.create("Marten Deinum"); System.out.println("Create new Customer (result) : " + ToStringBuilder.reflectionToString(customer, ToStringStyle.SHORT_PREFIX_STYLE)); sw.stop(); long customerId = customer.getId(); sw.start("Get 'New Customer 1'"); customer = customerRepository.find(customerId); System.out.println("Get 'New Customer 1' (result) : " + ToStringBuilder.reflectionToString(customer, ToStringStyle.SHORT_PREFIX_STYLE)); sw.stop(); sw.start("Get 'New Customer 2'"); customer = customerRepository.find(customerId); System.out.println("Get 'New Customer 2' (result) : " + ToStringBuilder.reflectionToString(customer, ToStringStyle.SHORT_PREFIX_STYLE)); sw.stop(); sw.start("Update Customer"); customer.setName("Josh Long"); customerRepository.update(customer); sw.stop(); sw.start("Get 'Updated Customer 1'"); customer = customerRepository.find(customerId); System.out.println("Get 'Updated Customer 1' (result) : " + ToStringBuilder.reflectionToString(customer, ToStringStyle.SHORT_PREFIX_STYLE)); sw.stop(); sw.start("Get 'Updated Customer 2'"); customer = customerRepository.find(customerId); System.out.println("Get 'Updated Customer 2' (result) : " + ToStringBuilder.reflectionToString(customer, ToStringStyle.SHORT_PREFIX_STYLE)); sw.stop();
Appendix B ■ Spring CAChing
833
sw.start("Remove Customer"); customerRepository.remove(customer.getId()); sw.stop(); sw.start("Get 'Deleted Customer 1'"); customer = customerRepository.find(customerId); System.out.println("Get 'Deleted Customer 1' (result) : " + ToStringBuilder.reflectionToString(customer, ToStringStyle.SHORT_PREFIX_STYLE)); sw.stop(); sw.start("Get 'Deleted Customer 2'"); customer = customerRepository.find(customerId); System.out.println("Get 'Deleted Customer 2' (result) : " + ToStringBuilder.reflectionToString(customer, ToStringStyle.SHORT_PREFIX_STYLE)); sw.stop(); System.out.println(); System.out.println(sw.prettyPrint()); ((AbstractApplicationContext) context).close(); }}
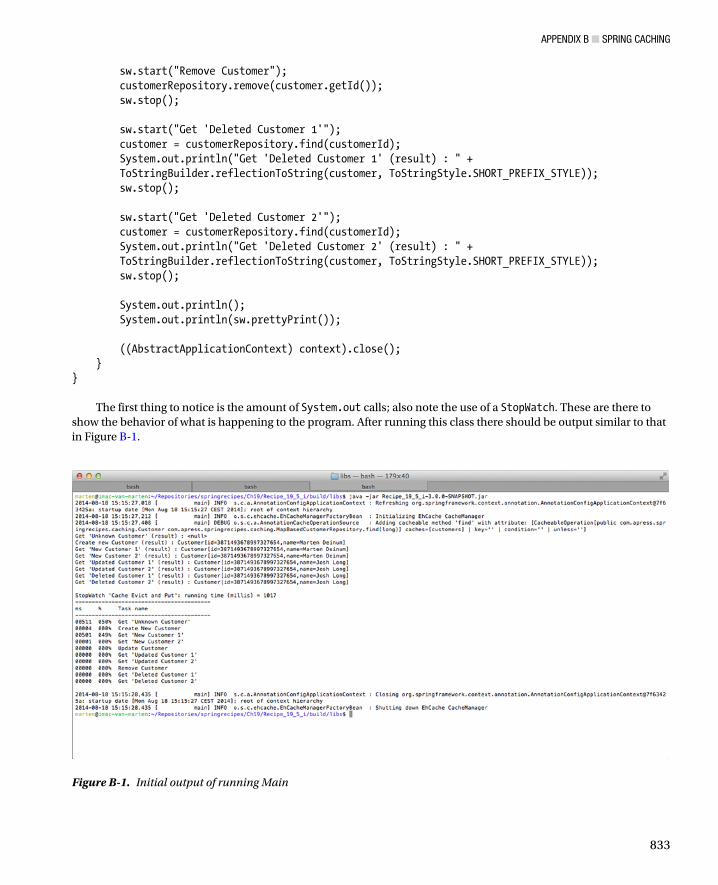
The first thing to notice is the amount of System.out calls; also note the use of a StopWatch. These are there to show the behavior of what is happening to the program. After running this class there should be output similar to that in Figure B-1.
Figure B-1. Initial output of running Main
Appendix B ■ Spring CAChing
834
There are a couple of things to notice in the output of running the program. First after removing the customer we still get a result when trying to find the deleted customer. This is due to the fact that the object is only removed from the repository if it still is in the cache that is being used. Second the first get after creating the customer is taking a long time, it would be more efficient to have the created customer cached immediately. Third, although not directly apparent from the output, is the fact that the first get after the update of the object is really fast. After updating the object the cached instance should be removed.
Note ■ The update only appears to be working but that is due to the fact that we are updating the same Customer instance as is in the cache. if the update were a real JdBC update the cache wouldn’t reflect the update!
Using @CacheEvict to Remove Invalid ObjectsWhen an object is removed from the underlying repository it has to be removed from the cache (or maybe the whole cache needs to be invalidated). To do this, add the @CacheEvict annotation to the remove method. Now when this method is called the object with the same key will be removed from the cache. package com.apress.springrecipes.caching; import org.springframework.cache.annotation.CacheEvict;... public class MapBasedCustomerRepository implements CustomerRepository {... @Override @CacheEvict(value="customers") public void remove(long customerId) { repository.remove(customerId); }}
Notice the @CacheEvict annotation on the remove method needs the name of the cache from which to remove the item. In this case the cache name is customers. It has a few other attributes that can be used (see Table B-1).
Table B-1. @CacheEvict attributes
Attribute Description
key SpEL expression for computing the key. Default is to use all method arguments.
condition The condition on which the cache will or will not be invalidated.
allEntries Should the whole cache be evicted, default is false.
beforeInvocation Should the cache be invalidated before or after (the default) method invocation. When invoked before the method the cache will invalidate regardless of the method outcome.
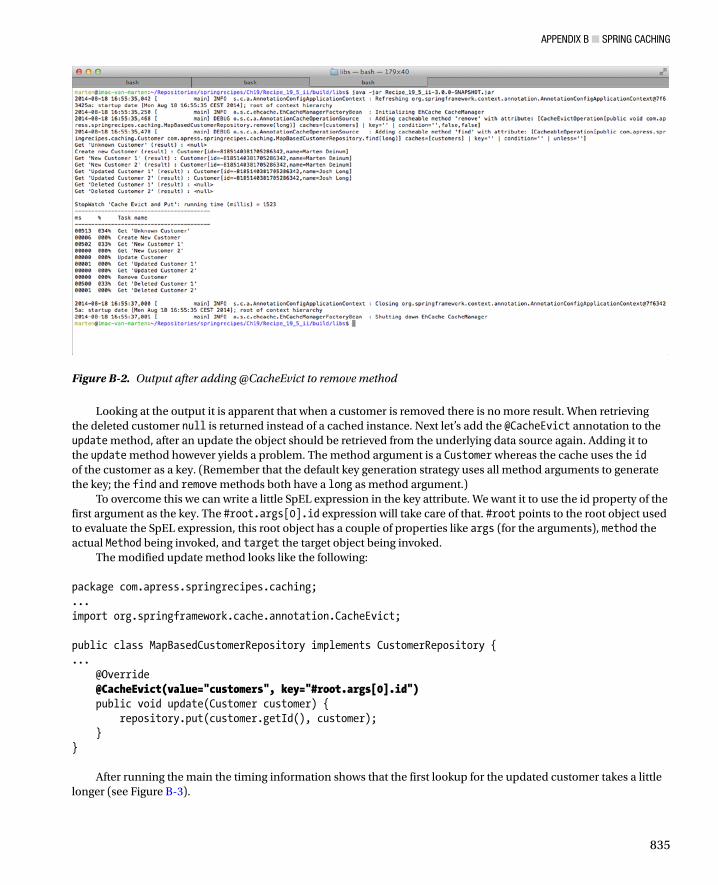
When running the Main program again the output has changed a little (see Figure B-2).
Appendix B ■ Spring CAChing
835
Looking at the output it is apparent that when a customer is removed there is no more result. When retrieving the deleted customer null is returned instead of a cached instance. Next let’s add the @CacheEvict annotation to the update method, after an update the object should be retrieved from the underlying data source again. Adding it to the update method however yields a problem. The method argument is a Customer whereas the cache uses the id of the customer as a key. (Remember that the default key generation strategy uses all method arguments to generate the key; the find and remove methods both have a long as method argument.)
To overcome this we can write a little SpEL expression in the key attribute. We want it to use the id property of the first argument as the key. The #root.args[0].id expression will take care of that. #root points to the root object used to evaluate the SpEL expression, this root object has a couple of properties like args (for the arguments), method the actual Method being invoked, and target the target object being invoked.
The modified update method looks like the following: package com.apress.springrecipes.caching;...import org.springframework.cache.annotation.CacheEvict; public class MapBasedCustomerRepository implements CustomerRepository {... @Override @CacheEvict(value="customers", key="#root.args[0].id") public void update(Customer customer) { repository.put(customer.getId(), customer); }}
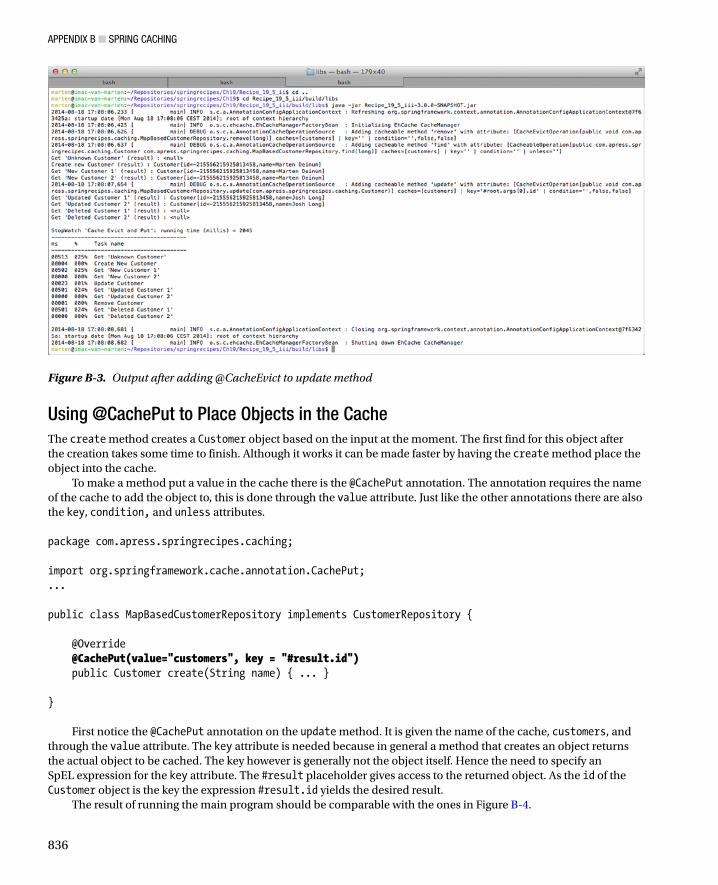
After running the main the timing information shows that the first lookup for the updated customer takes a little longer (see Figure B-3).
Figure B-2. Output after adding @CacheEvict to remove method
Appendix B ■ Spring CAChing
836
Using @CachePut to Place Objects in the CacheThe create method creates a Customer object based on the input at the moment. The first find for this object after the creation takes some time to finish. Although it works it can be made faster by having the create method place the object into the cache.
To make a method put a value in the cache there is the @CachePut annotation. The annotation requires the name of the cache to add the object to, this is done through the value attribute. Just like the other annotations there are also the key, condition, and unless attributes. package com.apress.springrecipes.caching; import org.springframework.cache.annotation.CachePut;... public class MapBasedCustomerRepository implements CustomerRepository { @Override @CachePut(value="customers", key = "#result.id") public Customer create(String name) { ... } }
First notice the @CachePut annotation on the update method. It is given the name of the cache, customers, and through the value attribute. The key attribute is needed because in general a method that creates an object returns the actual object to be cached. The key however is generally not the object itself. Hence the need to specify an SpEL expression for the key attribute. The #result placeholder gives access to the returned object. As the id of the Customer object is the key the expression #result.id yields the desired result.
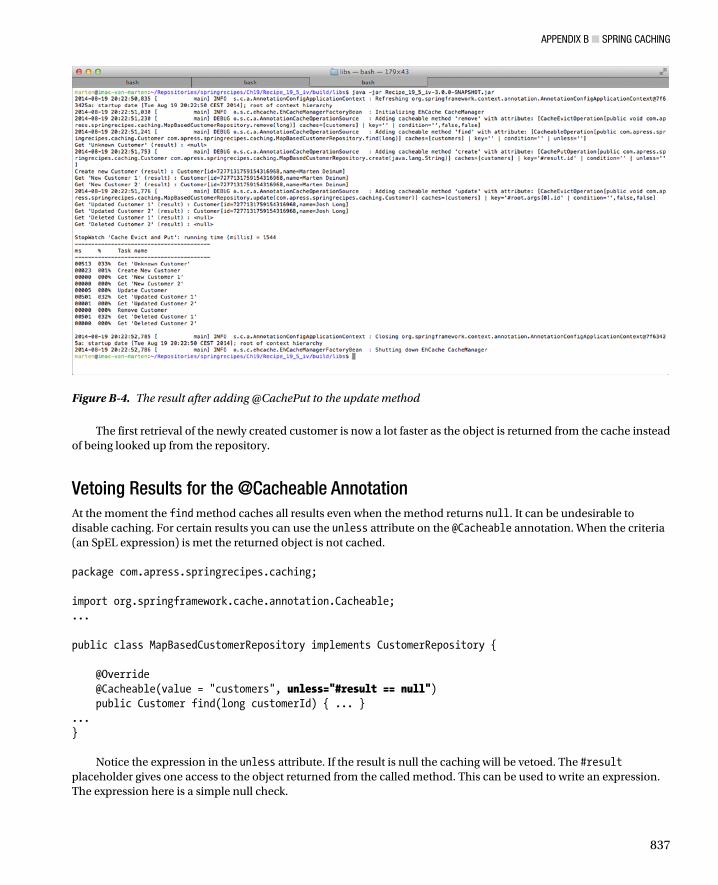
The result of running the main program should be comparable with the ones in Figure B-4.
Figure B-3. Output after adding @CacheEvict to update method
Appendix B ■ Spring CAChing
837
The first retrieval of the newly created customer is now a lot faster as the object is returned from the cache instead of being looked up from the repository.
Vetoing Results for the @Cacheable AnnotationAt the moment the find method caches all results even when the method returns null. It can be undesirable to disable caching. For certain results you can use the unless attribute on the @Cacheable annotation. When the criteria (an SpEL expression) is met the returned object is not cached. package com.apress.springrecipes.caching; import org.springframework.cache.annotation.Cacheable;... public class MapBasedCustomerRepository implements CustomerRepository { @Override @Cacheable(value = "customers", unless="#result == null") public Customer find(long customerId) { ... }...}
Notice the expression in the unless attribute. If the result is null the caching will be vetoed. The #result placeholder gives one access to the object returned from the called method. This can be used to write an expression. The expression here is a simple null check.
Figure B-4. The result after adding @CachePut to the update method
Appendix B ■ Spring CAChing
838
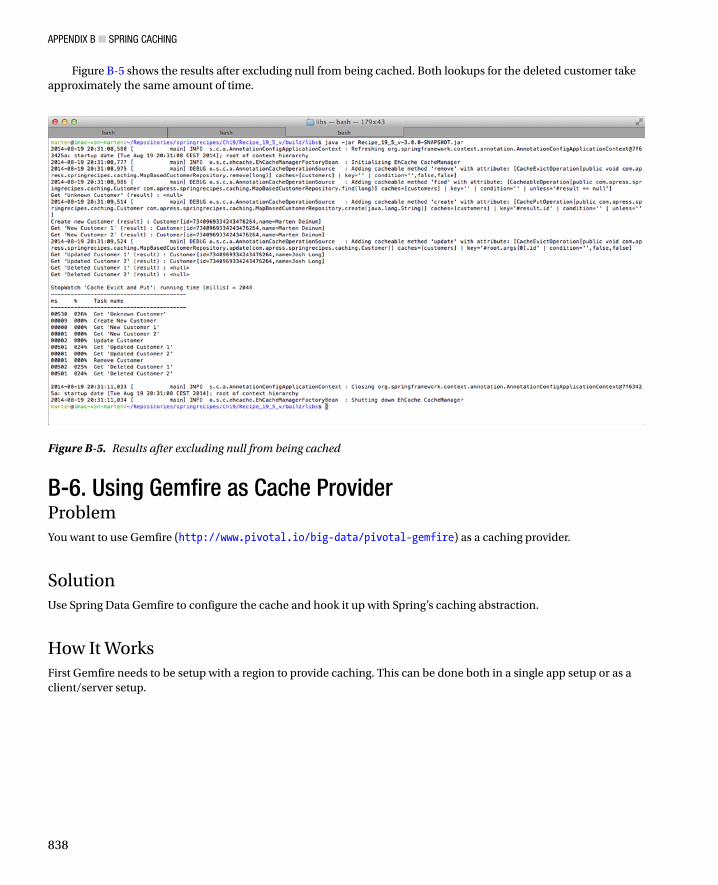
Figure B-5 shows the results after excluding null from being cached. Both lookups for the deleted customer take approximately the same amount of time.
Figure B-5. Results after excluding null from being cached
B-6. Using Gemfire as Cache ProviderProblemYou want to use Gemfire (http://www.pivotal.io/big-data/pivotal-gemfire) as a caching provider.
SolutionUse Spring Data Gemfire to configure the cache and hook it up with Spring’s caching abstraction.
How It WorksFirst Gemfire needs to be setup with a region to provide caching. This can be done both in a single app setup or as a client/server setup.

Appendix B ■ Spring CAChing
839
Note ■ To compile and run test cases created for Testng, you have to add Testng to your CLASSpATh. if you are using Maven, add the following dependency to your project.
<dependency> <groupId>com.gemstone.gemfire</groupId> <artifactId>gemfire</artifactId> <version>8.0.0</version></dependency> <dependency> <groupId>org.springframework.data</groupId> <artifactId>spring-data-gemfire</artifactId> <version>1.4.4.RELEASE</version></dependency>
You will be using the spring-data-gemfire project which allows for easier configuration of Gemfire.
Using Gemfire as Local Cache ProviderTo start using Gemfire you first need to configure a Gemfire cache and wire it up with Spring’s cache abstraction. To make it easier to configure a Gemfire spring-data-gemfire provides xml namespace support. Create a file cache-client.xml which is a Spring context file. <?xml version="1.0" encoding="UTF-8"?><beans xmlns="http://www.springframework.org/schema/beans" xmlns:xsi="http://www.w3.org/2001/XMLSchema-instance" xmlns:gfe="http://www.springframework.org/schema/gemfire" xmlns:util="http://www.springframework.org/schema/util" xsi:schemaLocation=" http://www.springframework.org/schema/gemfire http://www.springframework.org/schema/gemfire/spring-gemfire.xsd http://www.springframework.org/schema/beans http://www.springframework.org/schema/beans/spring-beans.xsd http://www.springframework.org/schema/util http://www.springframework.org/schema/util/spring-util.xsd"> <util:properties id="gemfire-props"> <prop key="log-level">warning</prop> </util:properties> <gfe:cache properties-ref="gemfire-props"/>
<gfe:local-region id="customers"> <gfe:cache-listener> <bean class="com.apress.springrecipes.caching.LoggingCacheListener"/> </gfe:cache-listener> </gfe:local-region> </beans>
Appendix B ■ Spring CAChing
840
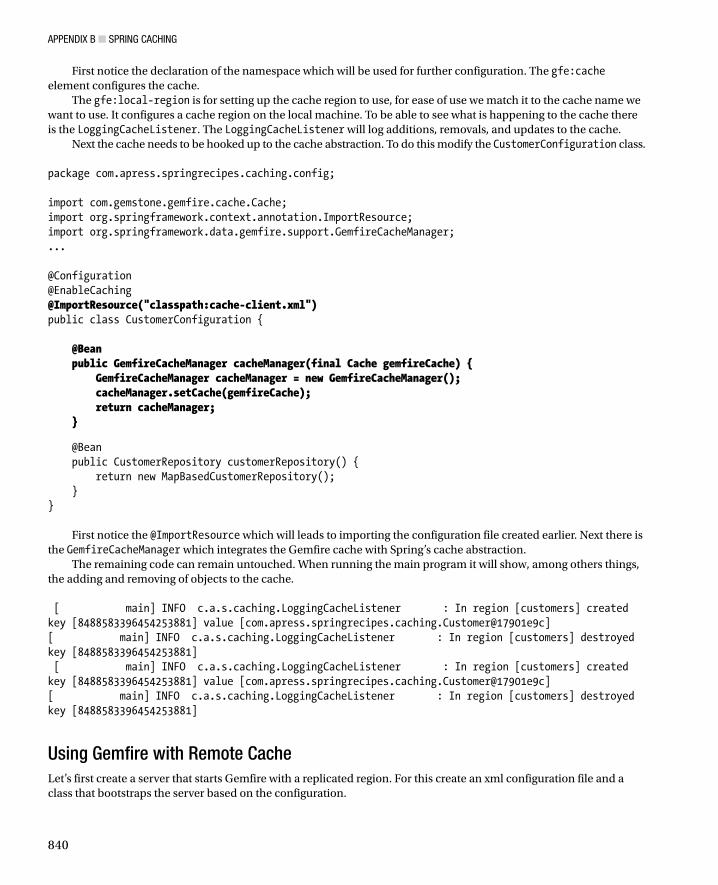
First notice the declaration of the namespace which will be used for further configuration. The gfe:cache element configures the cache.
The gfe:local-region is for setting up the cache region to use, for ease of use we match it to the cache name we want to use. It configures a cache region on the local machine. To be able to see what is happening to the cache there is the LoggingCacheListener. The LoggingCacheListener will log additions, removals, and updates to the cache.
Next the cache needs to be hooked up to the cache abstraction. To do this modify the CustomerConfiguration class. package com.apress.springrecipes.caching.config; import com.gemstone.gemfire.cache.Cache;import org.springframework.context.annotation.ImportResource;import org.springframework.data.gemfire.support.GemfireCacheManager;... @Configuration@EnableCaching@ImportResource("classpath:cache-client.xml")public class CustomerConfiguration { @Bean public GemfireCacheManager cacheManager(final Cache gemfireCache) { GemfireCacheManager cacheManager = new GemfireCacheManager(); cacheManager.setCache(gemfireCache); return cacheManager; }
@Bean public CustomerRepository customerRepository() { return new MapBasedCustomerRepository(); }}
First notice the @ImportResource which will leads to importing the configuration file created earlier. Next there is the GemfireCacheManager which integrates the Gemfire cache with Spring’s cache abstraction.
The remaining code can remain untouched. When running the main program it will show, among others things, the adding and removing of objects to the cache. [ main] INFO c.a.s.caching.LoggingCacheListener : In region [customers] created key [8488583396454253881] value [com.apress.springrecipes.caching.Customer@17901e9c][ main] INFO c.a.s.caching.LoggingCacheListener : In region [customers] destroyed key [8488583396454253881] [ main] INFO c.a.s.caching.LoggingCacheListener : In region [customers] created key [8488583396454253881] value [com.apress.springrecipes.caching.Customer@17901e9c][ main] INFO c.a.s.caching.LoggingCacheListener : In region [customers] destroyed key [8488583396454253881]
Using Gemfire with Remote CacheLet’s first create a server that starts Gemfire with a replicated region. For this create an xml configuration file and a class that bootstraps the server based on the configuration.
Appendix B ■ Spring CAChing
841
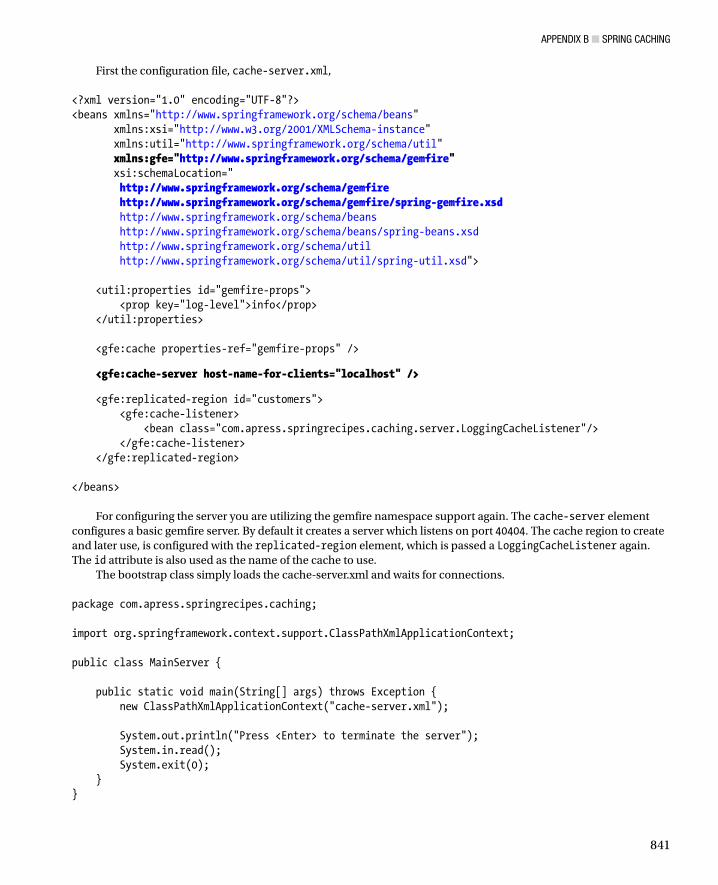
First the configuration file, cache-server.xml, <?xml version="1.0" encoding="UTF-8"?><beans xmlns="http://www.springframework.org/schema/beans" xmlns:xsi="http://www.w3.org/2001/XMLSchema-instance" xmlns:util="http://www.springframework.org/schema/util" xmlns:gfe="http://www.springframework.org/schema/gemfire" xsi:schemaLocation=" http://www.springframework.org/schema/gemfire http://www.springframework.org/schema/gemfire/spring-gemfire.xsd http://www.springframework.org/schema/beans http://www.springframework.org/schema/beans/spring-beans.xsd http://www.springframework.org/schema/util http://www.springframework.org/schema/util/spring-util.xsd"> <util:properties id="gemfire-props"> <prop key="log-level">info</prop> </util:properties> <gfe:cache properties-ref="gemfire-props" />
<gfe:cache-server host-name-for-clients="localhost" />
<gfe:replicated-region id="customers"> <gfe:cache-listener> <bean class="com.apress.springrecipes.caching.server.LoggingCacheListener"/> </gfe:cache-listener> </gfe:replicated-region> </beans>
For configuring the server you are utilizing the gemfire namespace support again. The cache-server element configures a basic gemfire server. By default it creates a server which listens on port 40404. The cache region to create and later use, is configured with the replicated-region element, which is passed a LoggingCacheListener again. The id attribute is also used as the name of the cache to use.
The bootstrap class simply loads the cache-server.xml and waits for connections. package com.apress.springrecipes.caching; import org.springframework.context.support.ClassPathXmlApplicationContext; public class MainServer { public static void main(String[] args) throws Exception { new ClassPathXmlApplicationContext("cache-server.xml"); System.out.println("Press <Enter> to terminate the server"); System.in.read(); System.exit(0); }}
Appendix B ■ Spring CAChing
842
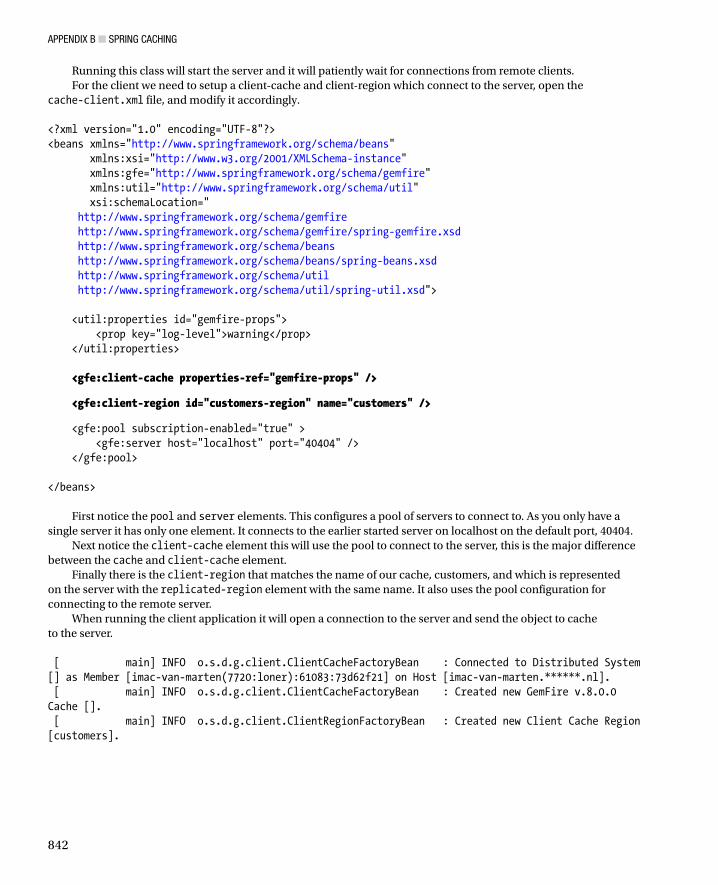
Running this class will start the server and it will patiently wait for connections from remote clients.For the client we need to setup a client-cache and client-region which connect to the server, open the
cache-client.xml file, and modify it accordingly. <?xml version="1.0" encoding="UTF-8"?><beans xmlns="http://www.springframework.org/schema/beans" xmlns:xsi="http://www.w3.org/2001/XMLSchema-instance" xmlns:gfe="http://www.springframework.org/schema/gemfire" xmlns:util="http://www.springframework.org/schema/util" xsi:schemaLocation=" http://www.springframework.org/schema/gemfire http://www.springframework.org/schema/gemfire/spring-gemfire.xsd http://www.springframework.org/schema/beans http://www.springframework.org/schema/beans/spring-beans.xsd http://www.springframework.org/schema/util http://www.springframework.org/schema/util/spring-util.xsd"> <util:properties id="gemfire-props"> <prop key="log-level">warning</prop> </util:properties> <gfe:client-cache properties-ref="gemfire-props" />
<gfe:client-region id="customers-region" name="customers" />
<gfe:pool subscription-enabled="true" > <gfe:server host="localhost" port="40404" /> </gfe:pool> </beans>
First notice the pool and server elements. This configures a pool of servers to connect to. As you only have a single server it has only one element. It connects to the earlier started server on localhost on the default port, 40404.
Next notice the client-cache element this will use the pool to connect to the server, this is the major difference between the cache and client-cache element.
Finally there is the client-region that matches the name of our cache, customers, and which is represented on the server with the replicated-region element with the same name. It also uses the pool configuration for connecting to the remote server.
When running the client application it will open a connection to the server and send the object to cache to the server. [ main] INFO o.s.d.g.client.ClientCacheFactoryBean : Connected to Distributed System [] as Member [imac-van-marten(7720:loner):61083:73d62f21] on Host [imac-van-marten.******.nl]. [ main] INFO o.s.d.g.client.ClientCacheFactoryBean : Created new GemFire v.8.0.0 Cache []. [ main] INFO o.s.d.g.client.ClientRegionFactoryBean : Created new Client Cache Region [customers].
Appendix B ■ Spring CAChing
843
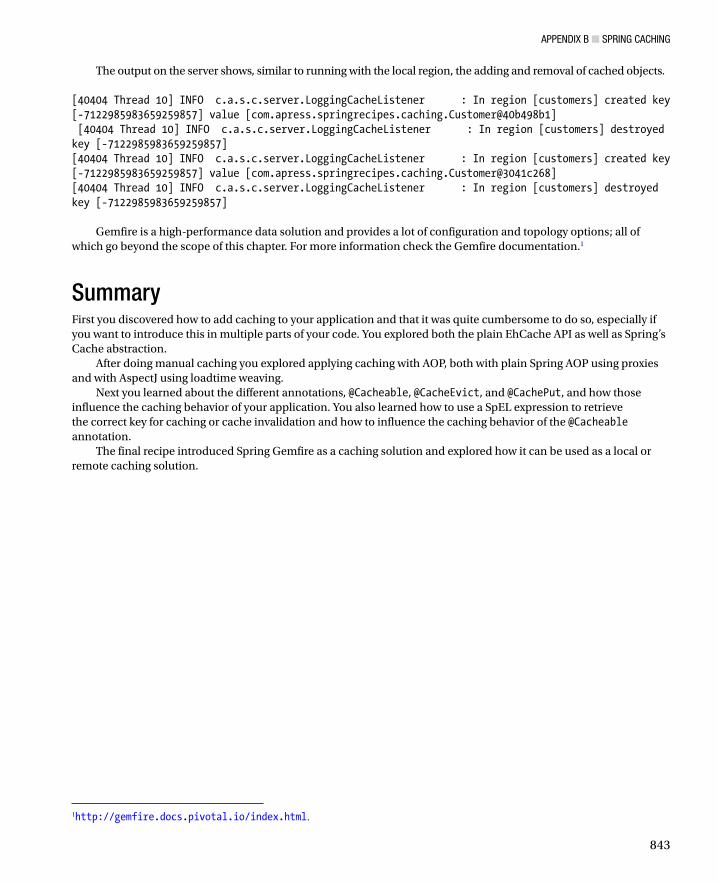
The output on the server shows, similar to running with the local region, the adding and removal of cached objects. [40404 Thread 10] INFO c.a.s.c.server.LoggingCacheListener : In region [customers] created key [-7122985983659259857] value [com.apress.springrecipes.caching.Customer@40b498b1] [40404 Thread 10] INFO c.a.s.c.server.LoggingCacheListener : In region [customers] destroyed key [-7122985983659259857][40404 Thread 10] INFO c.a.s.c.server.LoggingCacheListener : In region [customers] created key [-7122985983659259857] value [com.apress.springrecipes.caching.Customer@3041c268][40404 Thread 10] INFO c.a.s.c.server.LoggingCacheListener : In region [customers] destroyed key [-7122985983659259857]
Gemfire is a high-performance data solution and provides a lot of configuration and topology options; all of which go beyond the scope of this chapter. For more information check the Gemfire documentation.1
SummaryFirst you discovered how to add caching to your application and that it was quite cumbersome to do so, especially if you want to introduce this in multiple parts of your code. You explored both the plain EhCache API as well as Spring’s Cache abstraction.
After doing manual caching you explored applying caching with AOP, both with plain Spring AOP using proxies and with AspectJ using loadtime weaving.
Next you learned about the different annotations, @Cacheable, @CacheEvict, and @CachePut, and how those influence the caching behavior of your application. You also learned how to use a SpEL expression to retrieve the correct key for caching or cache invalidation and how to influence the caching behavior of the @Cacheable annotation.
The final recipe introduced Spring Gemfire as a caching solution and explored how it can be used as a local or remote caching solution.
1http://gemfire.docs.pivotal.io/index.html.