Embed Size (px)
Citation preview
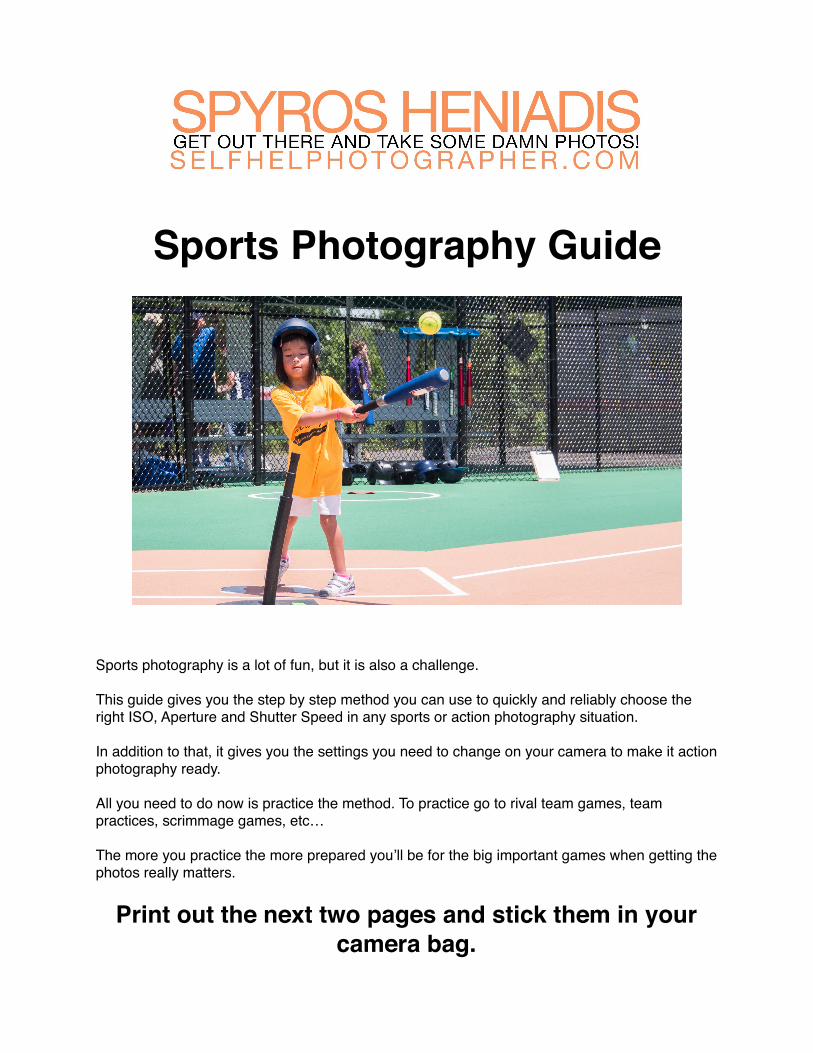
Sports Photography Guide
Sports photography is a lot of fun, but it is also a challenge.
This guide gives you the step by step method you can use to quickly and reliably choose the right ISO, Aperture and Shutter Speed in any sports or action photography situation.
In addition to that, it gives you the settings you need to change on your camera to make it action photography ready.
All you need to do now is practice the method. To practice go to rival team games, team practices, scrimmage games, etc…
The more you practice the more prepared you’ll be for the big important games when getting the photos really matters.
Print out the next two pages and stick them in your camera bag.
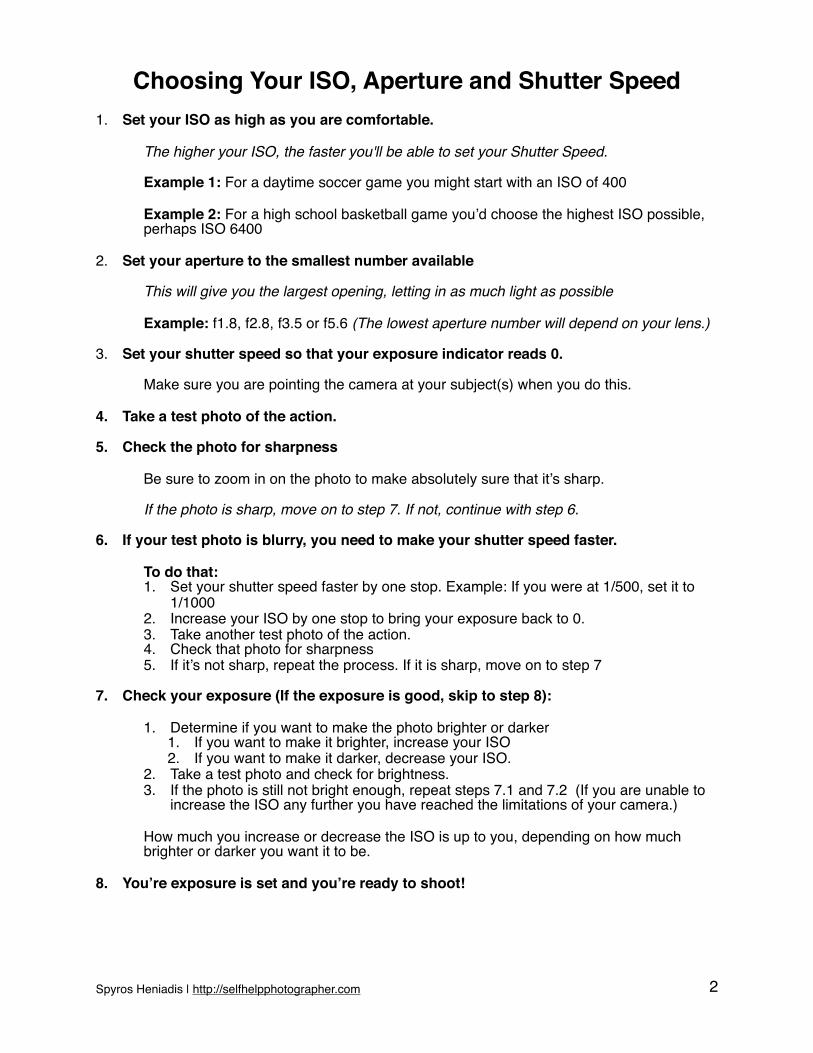
Choosing Your ISO, Aperture and Shutter Speed1. Set your ISO as high as you are comfortable.
The higher your ISO, the faster you'll be able to set your Shutter Speed.
Example 1: For a daytime soccer game you might start with an ISO of 400
Example 2: For a high school basketball game you’d choose the highest ISO possible, perhaps ISO 6400
2. Set your aperture to the smallest number available
This will give you the largest opening, letting in as much light as possible
Example: f1.8, f2.8, f3.5 or f5.6 (The lowest aperture number will depend on your lens.)
3. Set your shutter speed so that your exposure indicator reads 0.
Make sure you are pointing the camera at your subject(s) when you do this.
4. Take a test photo of the action.
5. Check the photo for sharpness
Be sure to zoom in on the photo to make absolutely sure that it’s sharp.
If the photo is sharp, move on to step 7. If not, continue with step 6.
6. If your test photo is blurry, you need to make your shutter speed faster.
To do that:1. Set your shutter speed faster by one stop. Example: If you were at 1/500, set it to
1/10002. Increase your ISO by one stop to bring your exposure back to 0.3. Take another test photo of the action.4. Check that photo for sharpness5. If it’s not sharp, repeat the process. If it is sharp, move on to step 7
7. Check your exposure (If the exposure is good, skip to step 8):
1. Determine if you want to make the photo brighter or darker1. If you want to make it brighter, increase your ISO2. If you want to make it darker, decrease your ISO.
2. Take a test photo and check for brightness.3. If the photo is still not bright enough, repeat steps 7.1 and 7.2 (If you are unable to
increase the ISO any further you have reached the limitations of your camera.)
How much you increase or decrease the ISO is up to you, depending on how much brighter or darker you want it to be.
8. You’re exposure is set and you’re ready to shoot!
Spyros Heniadis | http://selfhelpphotographer.com �2
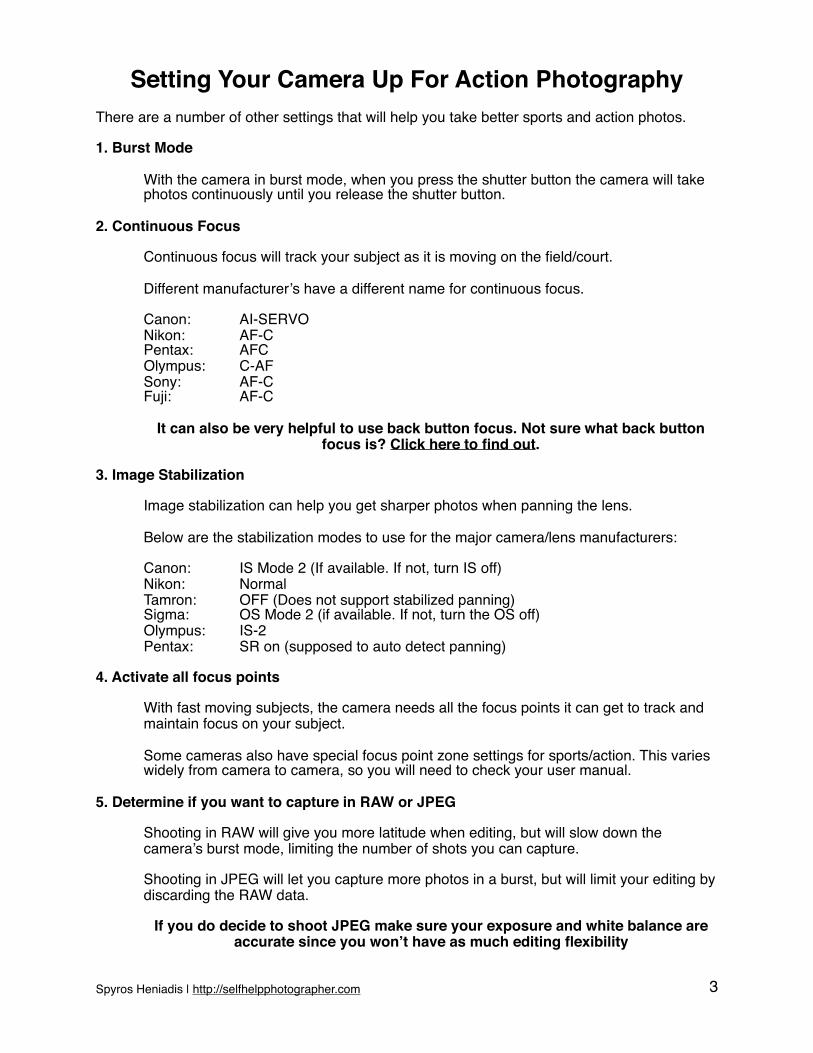
Setting Your Camera Up For Action PhotographyThere are a number of other settings that will help you take better sports and action photos.
1. Burst Mode
With the camera in burst mode, when you press the shutter button the camera will take photos continuously until you release the shutter button.
2. Continuous Focus
Continuous focus will track your subject as it is moving on the field/court.
Different manufacturer’s have a different name for continuous focus.
Canon: AI-SERVONikon: AF-CPentax: AFCOlympus: C-AFSony: AF-CFuji: AF-C
It can also be very helpful to use back button focus. Not sure what back button focus is? Click here to find out.
3. Image Stabilization
Image stabilization can help you get sharper photos when panning the lens.
Below are the stabilization modes to use for the major camera/lens manufacturers:
Canon: IS Mode 2 (If available. If not, turn IS off)Nikon: NormalTamron: OFF (Does not support stabilized panning)Sigma: OS Mode 2 (if available. If not, turn the OS off)Olympus: IS-2Pentax: SR on (supposed to auto detect panning)
4. Activate all focus points
With fast moving subjects, the camera needs all the focus points it can get to track and maintain focus on your subject.
Some cameras also have special focus point zone settings for sports/action. This varies widely from camera to camera, so you will need to check your user manual.
5. Determine if you want to capture in RAW or JPEG
Shooting in RAW will give you more latitude when editing, but will slow down the camera’s burst mode, limiting the number of shots you can capture.
Shooting in JPEG will let you capture more photos in a burst, but will limit your editing by discarding the RAW data.
If you do decide to shoot JPEG make sure your exposure and white balance are accurate since you won’t have as much editing flexibility
Spyros Heniadis | http://selfhelpphotographer.com �3

The Limitations Of Your GearThe method and settings covered in pages two and three will work, but even with practice you will find there are times that you just cannot get the shot.
Sometimes it will be human error. To err is human and that’s just what we do.
But sometimes it will be your gear. All cameras and lenses have limitations, and shooting sports and action, especially in low light, tends to highlight those limitations.
You’ll notice these limitations when you’re going through the steps on page two and finding that you can’t adjust your shutter speed because you can’t set your ISO any higher, or because the maximum aperture on your lens isn’t very large (or both).
When this happens, don’t get frustrated. You haven’t failed. Just do the best you can and start saving your money, because this is a situation where upgrading your gear is appropriate.
If you’d like some guidance in what gear to get, click here, otherwise…
Spyros Heniadis | http://selfhelpphotographer.com �4