Embed Size (px)
Citation preview
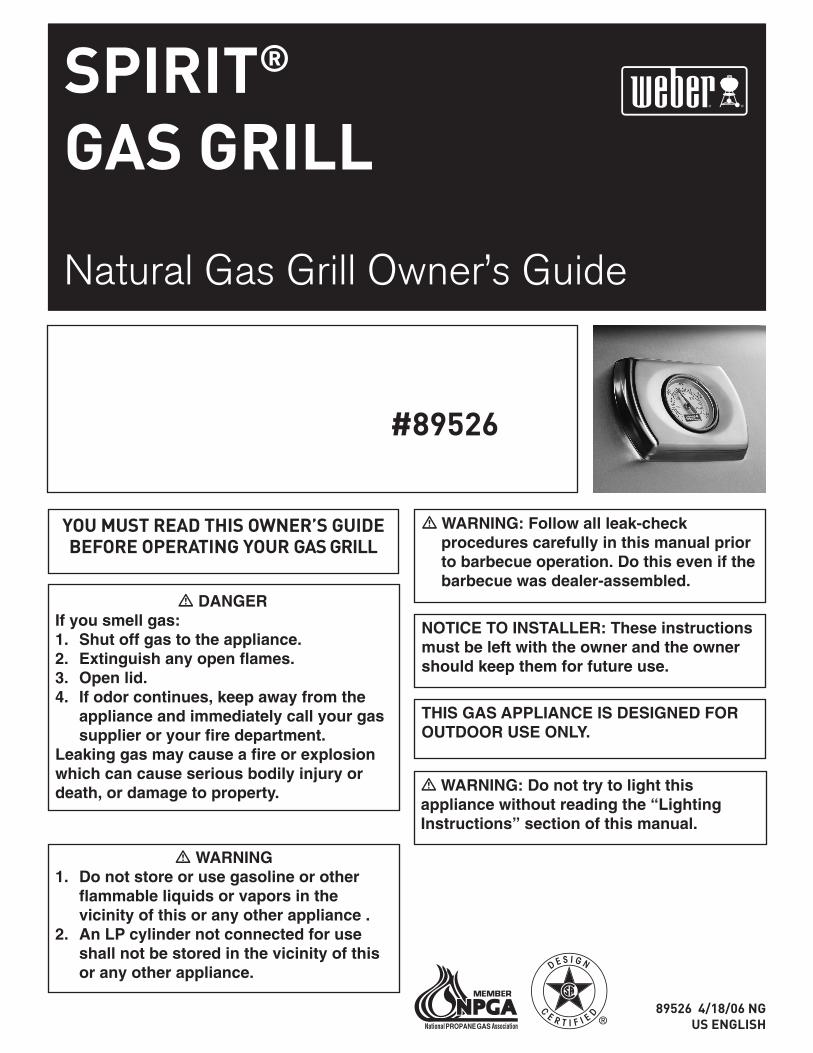
You must read this owner’s Guide before operatinG Your Gas Grill
m DANGERIf you smell gas: 1. Shut off gas to the appliance.2. Extinguish any open flames.3. Open lid.4. If odor continues, keep away from the
appliance and immediately call your gas supplier or your fire department.
Leaking gas may cause a fire or explosion which can cause serious bodily injury or death, or damage to property.
m WARNING1. Do not store or use gasoline or other
flammable liquids or vapors in the vicinity of this or any other appliance .
2. An LP cylinder not connected for use shall not be stored in the vicinity of this or any other appliance.
m WARNING: Follow all leak-check procedures carefully in this manual prior to barbecue operation. Do this even if the barbecue was dealer-assembled.
NOTICE TO INSTALLER: These instructions must be left with the owner and the owner should keep them for future use.
THIS GAS APPLIANCE IS DESIGNED FOR OUTDOOR USE ONLY.
89526 4/18/06 nGus enGlish
spirit®
Gas Grill
#00000#89526
m WARNING: Do not try to light this appliance without reading the “Lighting Instructions” section of this manual.
Natural Gas Grill Owner’s Guide
2
www.weber.com®
mDANGERFailure to follow the Dangers, Warnings and Cautions contained in this Owner’s Manual may result in serious bodily injury or
death, or in a fire or an explosion causing damage to property.
mWARNINGS
m Do not store a spare or disconnected liquid propane cylinder under or near this barbecue.m Improper assembly may be dangerous. Please carefully follow the assembly instructions in this manual. m After a period of storage, and/or nonuse, the Weber® gas barbecue should be checked for gas leaks and burner obstructions
before use. See instructions in this manual for correct procedures. m Do not operate the Weber® gas barbecue if there is a gas leak present.m Do not use a flame to check for gas leaks.m Combustible materials should never be within 24 inches of the back or sides of your Weber® gas barbecue.m Do not put a barbecue cover or anything flammable on, or in the storage area under the barbecue.m Your Weber® gas barbecue should never be used by children. Accessible parts of the barbecue may be very hot. Keep young
children away while it is in use.m You should exercise reasonable care when operating your Weber® gas barbecue. It will be hot during cooking or cleaning and
should never be left unattended, or moved while in operation.m Should the burners go out while in operation, turn all gas valves off. Open the lid and wait five minutes before attempting to
relight, using the lighting instructions.m Do not use charcoal or lava rock in your Weber® gas barbecue.m Never lean over open grill or place hands or fingers on the front edge of the cooking box.m Should a grease fire occur, turn off all burners and leave lid closed until fire is out.m Do not enlarge valve orifices or burner ports when cleaning the valves or burners.m The Weber® gas barbecue should be thoroughly cleaned on a regular basis.m Liquid propane gas is not natural gas. The conversion or attempted use of natural gas in a liquid propane unit or liquid
propane gas in a natural gas unit is dangerous and will void your warranty.m Do not attempt to disconnect any gas fitting while your barbecue is in operation.m Use heat-resistant barbecue mitts or gloves when operating barbecue.m Keep any electrical supply cord and the fuel supply hose away from any heated surfaces.m Combustion byproducts produced when using this product contain chemicals known to the state of California to cause cancer,
birth defects, or other reproductive harm.m Do not use this barbecue unless all parts are in place. The unit must be properly assembled according to the instructions
outlined in the “Assembly Instructions”.
LIQUID PROPANE GAS UNITS ONLY:m Use the regulator that is supplied with your Weber® gas barbecue.m Do not attempt to disconnect the gas regulator or any gas fitting while your barbecue is in operation. m A dented or rusty liquid propane cylinder may be hazardous and should be checked by your liquid propane supplier. Do not
use a liquid propane cylinder with a damaged valve.m Although your liquid propane cylinder may appear to be empty, gas may still be present, and the cylinder should be
transported and stored accordingly.m If you see, smell or hear the hiss of escaping gas from the liquid propane cylinder:
1. Move away from liquid propane cylinder. 2. Do not attempt to correct the problem yourself. 3. Call your fire department.
danGers and warninGs
�
www.weber.com®
�
Weber-StephenProductsCo.(Weber)herebywarrantstotheORIGINALPURCHASERofthisWeber®gasgrillthatitwillbefreeofdefectsinmaterialandworkmanshipfromthedateofpurchaseasfollows:
AluminumCastings, 2yearpaintExcludingfading StainlessSteelHoodSection, 10years PorcelainHoodSection, 10years StainlessSteelBurners, 10years Igniter, 3years PorcelainEnameledCookingGrates, 3yearsnorustthrough PorcelainEnameledCastIron CookingGrates, 5yearsnorustthrough PorcelainEnameledCastIronGriddle, 5yearsnorustthrough StainlessSteelCookingGrates, 5years PorcelainEnameledFlavorizer®Bars, 1yearnorustthrough StainlessSteelFlavorizer®Bars, 5years Thermoplastic/ThermosetParts, 10yearsExcludingfading Rotisserieandallrelatedcomponents, 1year AllRemainingParts, 2years
whenassembledandoperatedinaccordancewiththeprintedinstructionsaccompanyingit.Webermayrequirereasonableproofofyourdateofpurchase.THEREFORE,YOUSHOULDRETAINYOURSALESSLIPORINVOICE.ThisLimitedWarrantyshallbelimitedtotherepairorreplacementofpartsthatprovedefectiveundernormaluseandserviceandwhichonexaminationshallindicate,toWeber’ssatisfaction,theyaredefective.Beforereturninganyparts,contacttheCustomerServiceRepresentativeinyourareausingthecontactinformationonourwebsite.IfWeberconfirmsthedefectandapprovestheclaim,Weberwillelecttoreplacesuchpartswithoutcharge.Ifyouarerequiredtoreturndefectiveparts,transportationchargesmustbeprepaid.Weberwillreturnpartstothepurchaser,freightorpostageprepaid.ThisLimitedWarrantydoesnotcoveranyfailuresoroperatingdifficultiesduetoaccident,abuse,misuse,alteration,misapplication,vandalism,improperinstallationorimpropermaintenanceor
service,orfailuretoperformnormalandroutinemaintenance,includingbutnotlimitedtodamagecausedbyinsectswithintheburnertubes,assetoutinthisowner’smanual.Deteriorationordamageduetosevereweatherconditionssuchashail,hurricanes,earthquakesortornadoes,discolorationduetoexposuretochemicalseitherdirectlyorintheatmosphere,isnotcoveredbythisLimitedWarranty.
TherearenootherexpresswarrantsexceptassetforthhereinandanyapplicableimpliedwarrantiesofmerchantabilityandfitnessarelimitedindurationtotheperiodofcoverageofthisexpresswrittenLimitedWarranty.Someregionsdonotallowlimitationonhowlonganimpliedwarrantylasts,sothislimitationmaynotapplytoyou.Weberisnotliableforanyspecial,indirectorconsequentialdamages.Someregionsdonotallowtheexclusionorlimitationofincidentalorconsequentialdamages,sothislimitationorexclusionmaynotapplytoyou.Weberdoesnotauthorizeanypersonorcompanytoassumeforitanyotherobligationorliabilityinconnectionwiththesale,installation,use,removal,return,orreplacementofitsequipment;andnosuchrepresentationsarebindingonWeber.ThisWarrantyappliesonlytoproductssoldatretail.
WEBER-STEPHEN PRODUCTS CO.Customer Service Center1890 Roselle Road, Suite 308Schaumburg, IL 60195USA
For replacement parts call:
1-800-446-1071www.weber.com®
Weber-StephenProductsCo.,(Weber)medianteelpresentedocumentolegarantizaalCOMPRADORORIGINALdeestabarbacoadegasWeber®quelamismaestarálibredefectosencuantoamaterialesyamanodeobraapartirdelafechadecomprasegúnlosiguiente:
Fundicionesdealuminio, 2añosparalapinturaexceptuandoladecoloración Seccióndeaceroinoxidabledelacampana, 10años Seccióndeporcelanadelacampana, 10años Quemadoresdeaceroinoxidable, 10años Encendedor, 3años Parrillasdecocciónconrevestimientodeporcelana, 3añossinoxidarse Rejillasdecoccióndehierrocolado conrevestimientodeporcelana, 5añossinoxidarsePlanchadehierrocoladoconrevestimientodeporcelana,5añossinoxidarse Parrillasdecoccióndeaceroinoxidable. 5años BarrasFlavorizer®revestidasdeporcelana, 1añossinoxidarse BarrasFlavorizer®deaceroinoxidable, 5años Partestermoplásticasytermofijas, 10añosexcluyendoladecoloración Asadorytodosloscomponentesrelacionados, 1año Todaslasdemáspartes 2años
cuandoseensamblayoperadeacuerdoalasinstruccionesimpresasqueloacompañan.Weberpudieserequerirpruebarazonabledelafechadecompra.PORLOTANTO,DEBERÁGUARDARSURECIBOOFACTURADEVENTA.Estagarantíalimitadaestálimitadaalareparaciónoreemplazodepiezasqueseresultasendefectuosasbajousoyservicionormalylascualesalexaminarseindiquen,alaplenasatisfaccióndeWeber,dequeefectivamentesondefectuosas.Antesdedevolvercualquierparte,contactealRepresentantedeAtenciónalClienteensuárea,cuyainformacióndecontactolaencontraráennuestrositioweb.SiWeberconfirmaeldefectoyapruebaelreclamo,éstaelegirárepararoreemplazartalpiezasincargoalguno.Siustedtienequeretornarnoslaspartesdefectuosas,losgastosdetransportedebenserprepagados.Weberretornarálaspartesalcompradorcontransporte
ofranqueoprepagado.EstaGarantíaLimitadanocubreningunafallaoproblemadeoperaciónacausadeaccidentes,abuso,maluso,alteración,usoenaplicacionesindebidas,vandalismo,instalacióninapropiadaomantenimientooservicioinapropiados,opornollevaracaboelmantenimientonormalyrutinario,entrelosqueseincluyen,perosinlimitación,losdañoscausadosporinsectosdentrodelostubosquemadores,segúnsedetallaenestemanualdelpropietario.EstaGarantíaLimitadanocubreeldeterioroodañosacausadecondicionesdetiempoinclementestalescomogranizo,huracanes,terremotosotornadosnitampocoladecoloraciónporexposiciónasustanciasquímicasbienseaporcontactodirectooporlasmismascontenidasenlaatmósfera.
NoexisteningunaotragarantíaexpresaquenoseanlaslasacáindicadasycualesquiergarantíasimplícitasdecomerciabilidadyaptituddeusoestánlimitadasenduraciónaltiempodecoberturadeestaexpresaGarantíaLimitadaporescrito.Algunasregionesnopermitenlimitaciónalgunaeneltiempoqueunagarantíaimplícitapuedadurar,porloqueestalimitaciónpudieranoaplicarleausted.Webernosehaceresponsabledecualesquierdañosespeciales,indirectosoemergentes.Algunasregionesnopermitenlaexclusiónolimitacióndedañosincidentalesoemergentes,porloqueestalimitaciónoexclusiónpudierannoaplicarleausted.Webernoautorizaapersonaoempresaalgunaaasumirensunombreningunaobligaciónoresponsabilidadenrelaciónconlaventa,instalación,uso,retiro,devoluciónoreemplazodesusequipos,yningunatalrepresentaciónserávinculanteparaWeber.EstaGarantíaaplicasoloaaquellosproductosvendidosalpormenor.
WEBER-STEPHEN PRODUCTS CO.Customer Service Center1890 Roselle Road, Suite 308Schaumburg, IL 60195USA
Para partes de repuesto llame a:
1-800-446-1071www.weber.com®
warrantY
Weber-StephenProductsCo.(Weber)garantitparlaprésenteàL”ACHETEURD”ORIGINEquecegrilàgazWeber®serasansdéfautdematériauoudefabricationàpartirdeladated’achatselonlesmodalitéssuivantes:
Fonted’aluminium, 2anspourlapeintureàl’exception dublanchiment Partieducouvercleenacierinoxydable, 10ans Partieémailléeducouvercle, 10ans Brûleursenacierinoxydable, 10ans Allumeur, 3ans Grillesdecuissonémaillées, 3ansanticorrosion Fonteémaillée, Grillesdecuisson, 5ansanticorrosion Plaquedecuissonenfonteémaillée, 5ansanticorrosion Plaquesdecuissonenacierinoxydable, 5ans BarresFlavorizer®émaillées, 1ananticorrosion BarresFlavorizer®enacierinoxydable, 5ans Piècesthermoplastiques/thermodurcies, 10ansàl’exceptiondublanchiment Rôtisserieetpiècesconnexes, 1an Touteslesautrespièces, 2ans
quandl’appareilestassembléetutiliséensuivantlesinstructionsimpriméesquil’accompagnent.
Weberpeutdemanderunepreuveraisonnabledeladated’achat.PARCONSÉQUENT,ILFAUTGARDERLEREÇUOULAFACTURE.Cettegarantielimitéenecouvrequelaréparationouleremplacementdespiècesquis’avèrentdéfectueusesenconditionnormalesd’utilisationetdeserviceetquiprésententundéfautselonWeber.Avantderenvoyerdespièces,veuillezcontacterleReprésentantduserviceàlaclientèledevotrerégionàl’aidedescoordonnéesdisponiblessurnotresiteInternet.SiWeberconfirmeledéfautetapprouvelaréclamation,Weberchoisiraderemplacercespiècesgratuitement.S’ilvousfautrenvoyerdespiècesdéfectueuses,lesfraisd’expéditiondoiventêtrepayésd’avance.Weberrenverralespiècesàl’acheteurenportpayé.
Cettegarantielimitéenecouvrepaslesdéfautsoudifficultésdefonctionnementcausésparunaccident,parunusageabusif,parunmauvaisusage,unemodification,uneutilisation,installationoumaintenanceouunentretiennonconforme,parvandalismeouparlemanquedemaintenancenormaleetroutinière,ycomprismaisnonlimitéeauxdégâtsprovoquéspardesinsectesdanslestubesdesbrûleurs,commeindiquédanslemanueldupropriétaire.Lesdétériorationsoudommagescauséspardesintempériestellesquegrêle,ouragan,tremblementdeterre,tornadesetlesdécolorationscauséespardesproduitschimiquessoitencontactdirectsoitdansl’atmosphèrenesontpascouvertsparcettegarantie.
Iln’existeaucunegarantieexpressehormiscellesindiquéesiciettoutegarantieimplicitedequalitémarchandeetd’adaptationàl’usageestlimitéedansletempsàladuréedelacouverturedecettegarantieexpresselimitée.Certainesprovincesnepermettantpasderestrictionsurladuréed’unegarantieimplicite,ilestpossiblequecetterestrictionnes’appliquepasdansvotrecas.Webern’estpasresponsablepourlesdommagesparticuliers,indirectsouconsécutifs.Certainesprovincesinterdisentl’exclusionoulalimitationdesdommagesfortuitsouconsécutifs,parconséquentcettelimitationoucetteexclusionpeuventnepass’appliqueràvotresituation.Webern’autoriseaucunepersonneoucompagnieàprendreenchargepourWebertouteautreobligationouresponsabilitéenrapportaveclavente,l’installation,l’utilisation,l’enlèvement,lerenvoiouleremplacementdesonmatérieletlaresponsabilitédeWeberneseraenaucunefaçonengagéeparunereprésentationdecegenre.Cettegarantienes’appliquequ’auxproduitsvendusaudétail.
WEBER-STEPHEN PRODUCTS CO.
Service à la clientèle1890 Roselle Road, Suite 308Schaumburg, IL 60195
États-Unis
Pour les pièces de rechange, appelez :1-800-446-1071www.weber.com®
4
www.weber.com®
spirit®
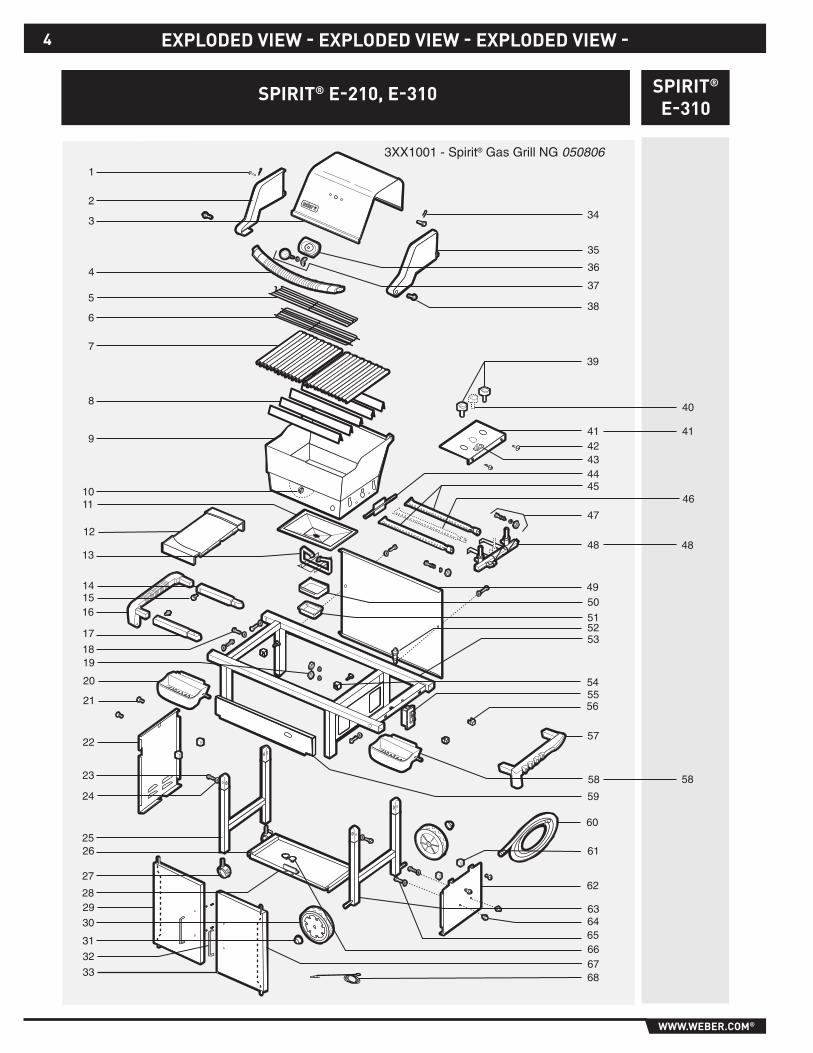
e-�10 spirit® e-210, e-�10
46
56
12
3XX1001-Spirit®GasGrillNG050806
5
6
7
8
9
1011
13
16
17
23
24
25
27
28
30
31
4142434445
47
48
50
515253
57
59
63
1819
1514
65
1
2
3
4
34
35
37
38
36
39
55
58
66
21
22
29
32
49
62
64
6768
26
54
33
41
48
40
58
20
61
60
exploded View - exploded View - exploded View -
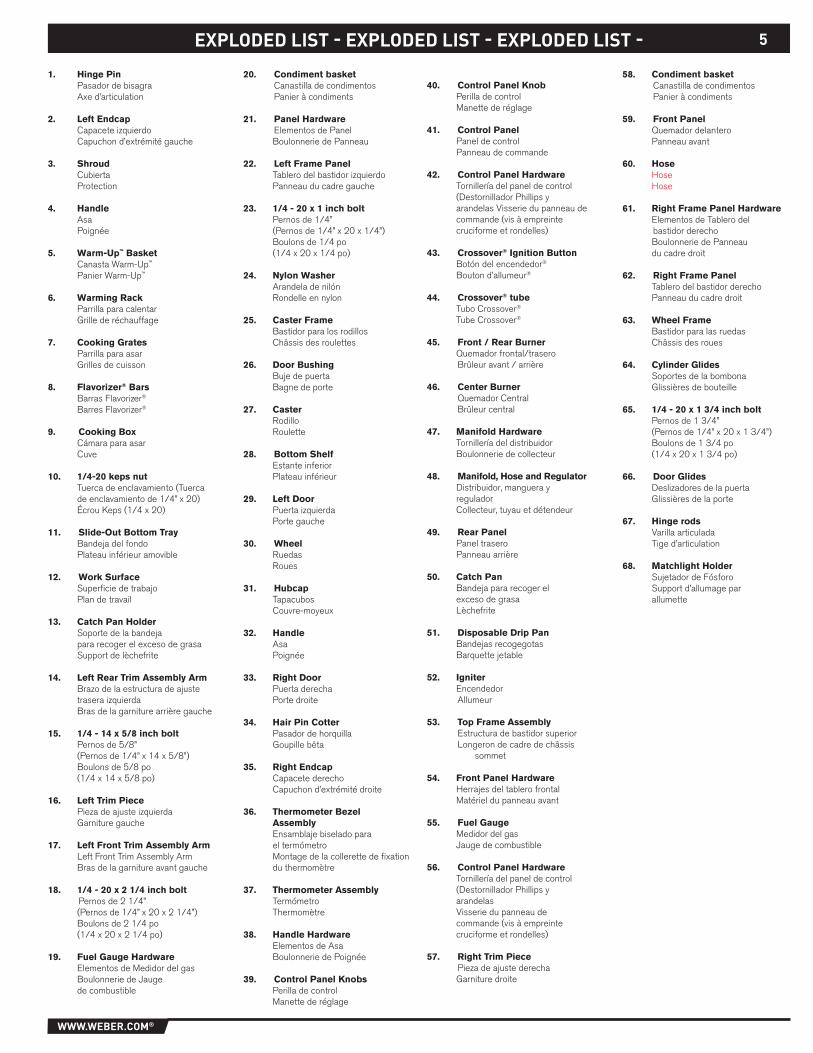
5
www.weber.com®
5
1. Hinge Pin Pasador de bisagra Axe d’articulation
2. Left Endcap Capacete izquierdo Capuchon d’extrémité gauche
3. Shroud Cubierta Protection
4. Handle Asa Poignée
5. Warm-Up™ Basket Canasta Warm-Up™
Panier Warm-Up™
6. Warming Rack Parrilla para calentar Grille de réchauffage
7. Cooking Grates Parrilla para asar Grilles de cuisson
8. Flavorizer® Bars Barras Flavorizer®
Barres Flavorizer®
9. Cooking Box Cámara para asar Cuve
10. 1/4-20 keps nut Tuerca de enclavamiento (Tuerca
de enclavamiento de 1/4” x 20) Écrou Keps (1/4 x 20)
11. Slide-Out Bottom Tray Bandeja del fondo Plateau inférieur amovible
12. Work Surface Superficie de trabajo Plan de travail
13. Catch Pan Holder Soporte de la bandeja para recoger el exceso de grasa Support de lèchefrite
14. Left Rear Trim Assembly Arm Brazo de la estructura de ajuste
trasera izquierda Bras de la garniture arrière gauche
15. 1/4 - 14 x 5/8 inch bolt Pernos de 5/8” (Pernos de 1/4” x 14 x 5/8”) Boulons de 5/8 po (1/4 x 14 x 5/8 po)
16. Left Trim Piece Pieza de ajuste izquierda Garniture gauche
17. Left Front Trim Assembly Arm Left Front Trim Assembly Arm Bras de la garniture avant gauche
18. 1/4 - 20 x 2 1/4 inch bolt Pernos de 2 1/4” (Pernos de 1/4” x 20 x 2 1/4”) Boulons de 2 1/4 po (1/4 x 20 x 2 1/4 po)
19. Fuel Gauge Hardware Elementos de Medidor del gas Boulonnerie de Jauge de combustible
20. Condiment basket Canastilla de condimentos Panier à condiments
21. Panel Hardware Elementos de Panel Boulonnerie de Panneau
22. Left Frame Panel Tablero del bastidor izquierdo Panneau du cadre gauche
23. 1/4 - 20 x 1 inch bolt Pernos de 1/4” (Pernos de 1/4” x 20 x 1/4”) Boulons de 1/4 po (1/4 x 20 x 1/4 po)
24. Nylon Washer Arandela de nilón Rondelle en nylon
25. Caster Frame Bastidor para los rodillos Châssis des roulettes
26. Door Bushing Buje de puerta Bagne de porte
27. Caster Rodillo Roulette
28. Bottom Shelf Estante inferior Plateau inférieur
29. Left Door Puerta izquierda Porte gauche
30. Wheel Ruedas Roues
31. Hubcap Tapacubos Couvre-moyeux
32. Handle Asa Poignée
33. Right Door Puerta derecha Porte droite
34. Hair Pin Cotter Pasador de horquilla Goupille bêta
35. Right Endcap Capacete derecho Capuchon d’extrémité droite
36. Thermometer Bezel Assembly Ensamblaje biselado para el termómetro Montage de la collerette de fixation
du thermomètre
37. Thermometer Assembly Termómetro Thermomètre
38. Handle Hardware Elementos de Asa Boulonnerie de Poignée
39. Control Panel Knobs Perilla de control Manette de réglage
40. Control Panel Knob Perilla de control Manette de réglage
41. Control Panel Panel de control Panneau de commande
42. Control Panel Hardware Tornillería del panel de control
(Destornillador Phillips y arandelas Visserie du panneau de commande (vis à empreinte cruciforme et rondelles)
43. Crossover® Ignition Button Botón del encendedor®
Bouton d’allumeur®
44. Crossover® tube Tubo Crossover®
Tube Crossover®
45. Front / Rear Burner Quemador frontal/trasero Brûleur avant / arrière
46. Center Burner Quemador Central Brûleur central
47. Manifold Hardware Tornillería del distribuidor Boulonnerie de collecteur
48. Manifold, Hose and Regulator Distribuidor, manguera y regulador Collecteur, tuyau et détendeur
49. Rear Panel Panel trasero Panneau arrière
50. Catch Pan Bandeja para recoger el exceso de grasa Lèchefrite
51. Disposable Drip Pan Bandejas recogegotas Barquette jetable
52. Igniter Encendedor Allumeur
53. Top Frame Assembly Estructura de bastidor superior Longeron de cadre de châssis
sommet
54. Front Panel Hardware Herrajes del tablero frontal Matériel du panneau avant
55. Fuel Gauge Medidor del gas Jauge de combustible
56. Control Panel Hardware Tornillería del panel de control
(Destornillador Phillips y arandelas Visserie du panneau de commande (vis à empreinte cruciforme et rondelles)
57. Right Trim Piece Pieza de ajuste derecha Garniture droite
58. Condiment basket Canastilla de condimentos Panier à condiments
59. Front Panel Quemador delantero Panneau avant
60. Hose Hose Hose
61. Right Frame Panel Hardware Elementos de Tablero del bastidor derecho Boulonnerie de Panneau du cadre droit
62. Right Frame Panel Tablero del bastidor derecho Panneau du cadre droit
63. Wheel Frame Bastidor para las ruedas Châssis des roues
64. Cylinder Glides Soportes de la bombona Glissières de bouteille
65. 1/4 - 20 x 1 3/4 inch bolt Pernos de 1 3/4” (Pernos de 1/4” x 20 x 1 3/4”) Boulons de 1 3/4 po (1/4 x 20 x 1 3/4 po)
66. Door Glides Deslizadores de la puerta Glissières de la porte 67. Hinge rods Varilla articulada Tige d’articulation
68. Matchlight Holder Sujetador de Fósforo Support d’allumage par allumette
exploded list - exploded list - exploded list -
6
www.weber.com®
YourWeber®gasbarbecueisaportableoutdoorcookingappliance.WiththeWeber®gasbarbecueyoucangrill,barbecue,roastandbakewithresultsthataredifficulttoduplicatewithindoorkitchenappliances.TheclosedlidandFlavorizer®barsproducethat“outdoor”flavorinthefood.TheWeber®gasbarbecueisportablesoyoucaneasilychangeitslocationinyouryardoronyourpatio.PortabilitymeansyoucantakeyourWeber®gasbarbecuewithyouifyoumove.Thenaturalgassupplyiseasytouseandgivesyoumorecookingcontrolthancharcoalfuel.• Theseinstructionswillgiveyoutheminimumrequirementsforassemblingyour
Weber®gasbarbecue.PleasereadtheinstructionscarefullybeforeusingyourWeber®gasbarbecue.Improperassemblycanbedangerous.
• Notforusebychildren.• Iftherearelocalcodesthatapplytoportablegasgrills,youwillhavetoconform
tothem.Iftherearenolocalcodes,youmustconformtothelatesteditionoftheNationalFuelGasCode:ANSIZ223.1/NFPA54,orCAN/CGA-B149.1,NaturalGasandPropaneInstallationCode.
• ThisWeber®gasbarbecueisdesignedfornatural(pipedincity)gasonly.Donotuseliquidpropane(LP)bottledgas.Thevalves,orificesandhosearefornaturalgasonly.
• Donotusewithcharcoalfuel.• Checkthattheareaunderthecontrolpanelandthebottomtrayarefreefrom
debristhatmightobstructtheflowofcombustionorventilationair.
for installation in canadaTheseinstructions,whilegenerallyacceptable,donotnecessarilycomplywiththeCanadianInstallationcodes,particularlywithpipingaboveandbelowground.InCanadatheinstallationofthisappliancemustcomplywithlocalcodesand/orStandardsCAN/CGA-B149.1(InstallationCodeforNaturalGasBurningAppliancesandEquipment).
storaGe• ThegasmustbeturnedOFFatthenaturalgassupplywhentheWeber®gas
barbecueisnotinuse.• WhentheWeber®gasbarbecueisstoredindoors,thegassupplymustbe
disconnected.• TheWeber®gasbarbecueshouldbecheckedforgasleaksandanyobstructions
intheburnertubesbeforeusing.(SeeSections:“GeneralMaintenanceandAnnualMaintenance.”)
• Checkthattheareasunderthecontrolpanelandtheslideoutbottomtrayarefreefromdebristhatmightobstructtheflowofcombustionorventilationair.
• TheSpider/InsectScreensshouldalsobecheckedforanyobstructions.(SeeSection:"AnnualMaintenance.")
cookinGm WARNING: Do not move the Weber® gas barbecue when
operating or while barbecue is hot.YoucanadjusttheFRONTandBACKburnersasdesired.Thecontrolsettings:High(H),Medium(M),Low(L),orOff(O)aredescribedinyourWeber®cookbook.ThecookbookusesthesenotationstodescribethesettingsoftheFRONTandBACKburners.Forexample,tosearsteaks,youwouldsetallburnersatH(high).Thentocompletecooking,youwouldsetFRONTandBACKatM(medium).RefertoyourWeber®cookbookfordetailedcookinginstructions.
Note: The temperature inside your cooking box for the first few uses, while surfaces are still very reflective, may be hotter than those shown in your cookbook. Cooking condi-tions. Such as wind and weather, may require the adjustment of the burner controls to obtain the correct cooking temperatures.
Preheating - YourWeber®gasbarbecueisanenergy-efficientappliance.ItoperatesataneconomicallowBTUrate.Topreheat:afterlighting,closelidandturnallburnerstohigh(HH).Preheatingtobetween500°and550°F(260°and290°C)willtake10to15minutesdependingonconditionssuchasairtemperatureandwind.Drippings and grease - TheFlavorizer®barsaredesignedto“smoke”thecorrectamountofdrippingsforflavorfulcooking.Excessdrippingsandgreasewillaccumulateinthecatchpanundertheslideoutbottomtray.Disposablefoildrippansareavailablethatfitthecatchpan.
cleaninGm WARNING: Turn your Weber® gas barbecue OFF and wait for
it to cool before cleaning.
Outside surfaces-Useawarmsoapywatersolutiontoclean,thenrinsewithwater.
m CAUTION: Do not use oven cleaner, abrasive cleansers (kitchen cleansers) cleaners that contain citrus products, or abrasive cleaning pads on barbecue or cart surfaces.
Flavorizer® bars and Cooking grates -Cleanwithasuitablebrassbristlebrush.Asneeded,removefromgrillandwashwithwarmsoapywater,thenrinsewithwater.
operatinGm WARNING: Only use this barbecue outdoors in a well-
ventilated area. Do not use in a garage, building, breezeway or any other enclosed area.
m WARNING: Your Weber® gas barbecue shall not be used under overhead combustible construction.
m WARNING: Your Weber® gas barbecue is not intended to be installed in or on recreational vehicles and/or boats.
m WARNING: Do not use the barbecue within 24 inches of combustible materials, top, bottom, back or sides of the grill.
m WARNING: The entire cooking box gets hot when in use. Do not leave unattended.
m WARNING: Keep any electrical supply cord and the fuel supply hose away from any heated surface.
m WARNING: Keep the cooking area clear of flammable vapors and liquids, such as gasoline, alcohol, etc., and combustible materials.
Gas supplY testinG• DisconnectyourWeber®gasbarbecuewhenthegassupplyisbeingtestedathigh
pressures.Thisapplianceanditsindividualshutoffvalvemustbedisconnectedfromthegassupplypipingsystemduringanypressuretestingofthatsystemattestpressuresinexcessof1/2psig(3.5kPa).
• TurnOFFyourWeber®gasbarbecuewhenthegassupplyisbeingtestedatlowpressures.Thisappliancemustbeisolatedfromthegassupplypipingsystembyclosingitsindividualmanualshutoffvalveduringanypressuretestingofthegassupplypipingsystematthepressureequaltoorlessthan1/2psig(3.5kPa).
m WARNING: Check the bottom tray for grease build-up before each use. Remove excess grease to avoid a grease fire in the slide out bottom tray.
General instructions
�
www.weber.com®
�
m CAUTION: Do not clean your Flavorizer® bars or cooking grates in a self-cleaning oven.
For availability of replacement cooking grates and Flavorizer® bars Contact the Customer Service Representative in your area using the contact information on our web site. Log onto www.weber.com®.
Slide out Bottom tray-Removeexcessgrease,thenwashwithwarmsoapywater,thenrinse.
Catch pan-Disposablefoiltraysareavailable,oryoucanlinethecatchpanwithalumi-numfoil.Tocleanthecatchpan,washwithwarmsoapywater,thenrinse.
Thermometer-Wipewithwarmsoapywater;cleanwithplasticscrubball.
Inside cooking module-Brushanydebrisoffofburnertubes.DO NOT ENLARGE BURNER PORTS (OPENINGS).Washinsideofcookingboxwithwarmsoapywaterandawaterrinse.
Inside Lid-Whilelidiswarm,wipeinsidewithpapertoweltopreventgreasebuild-up.Flakingbuilt-upgreaseresemblespaintflakes.
Stainless steel surfaces -Preserve Your Stainless Steel - Yourgrilloritscabinet,lid,controlpanelandshelvesmaybemadefromstainlesssteel.Inordertokeepthestain-lesssteellookingitsbestiseasy.Simplycleanitwithsoapandwater,rinsewithcleanwaterandwipedry.Anon-metallicbrushcanbeusedforstubbornstains.
m IMPORTANT: Do not use wire brushes or abrasive cleaners on the stainless steel surfaces of your grill, as this will leave scratches.
m IMPORTANT: Do no use cleaners that contain chlorine bleach on the stainless steel surface of your grill.
m IMPORTANT: When cleaning surfaces, be sure to rub/wipe in the direction of the grain to preserve the look of your stain-less steel.
Thermoset surfaces -Washwithasoftclothandasoapandwatersolution.
Do not use cleaners that contain acid, mineral spirits or xylene. Rinse well after cleaning.
Thermoset work surfaces are not to be used as cutting boards.
General instructions
Gas instructions
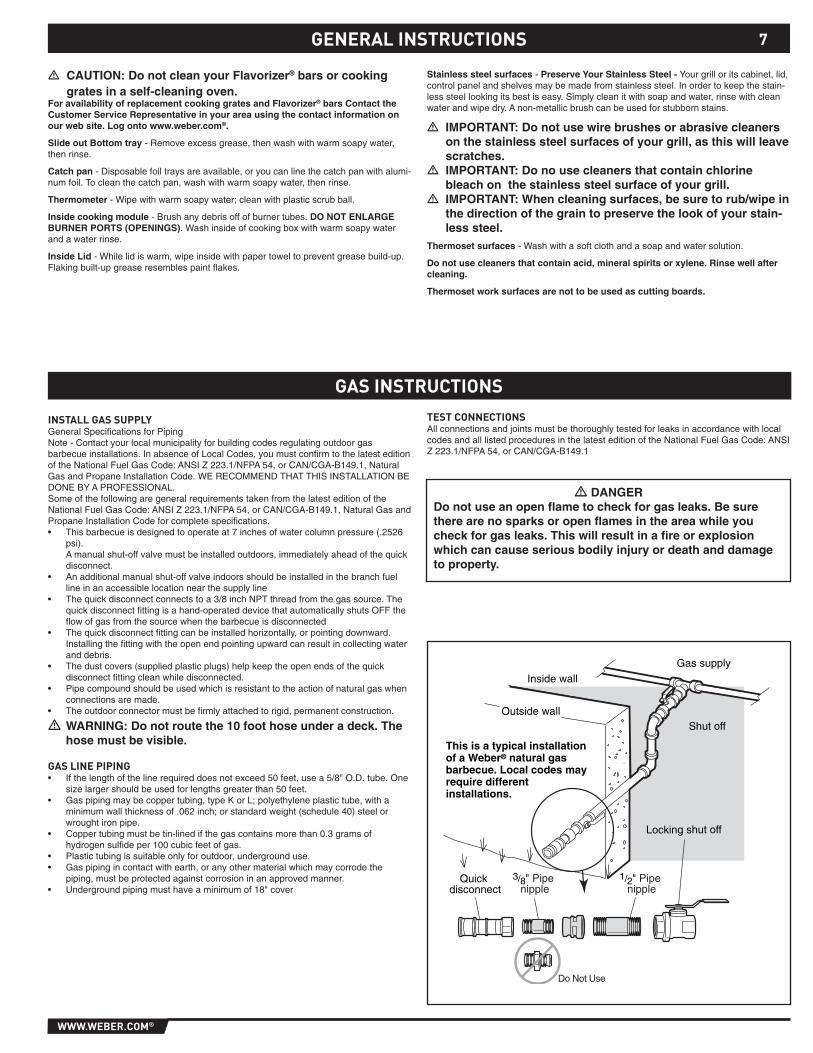
install Gas supplYGeneralSpecificationsforPipingNote-Contactyourlocalmunicipalityforbuildingcodesregulatingoutdoorgasbarbecueinstallations.InabsenceofLocalCodes,youmustconfirmtothelatesteditionoftheNationalFuelGasCode:ANSIZ223.1/NFPA54,orCAN/CGA-B149.1,NaturalGasandPropaneInstallationCode.WERECOMMENDTHATTHISINSTALLATIONBEDONEBYAPROFESSIONAL.SomeofthefollowingaregeneralrequirementstakenfromthelatesteditionoftheNationalFuelGasCode:ANSIZ223.1/NFPA54,orCAN/CGA-B149.1,NaturalGasandPropaneInstallationCodeforcompletespecifications.• Thisbarbecueisdesignedtooperateat7inchesofwatercolumnpressure(.2526
psi). Amanualshut-offvalvemustbeinstalledoutdoors,immediatelyaheadofthequick
disconnect.• Anadditionalmanualshut-offvalveindoorsshouldbeinstalledinthebranchfuel
lineinanaccessiblelocationnearthesupplyline• Thequickdisconnectconnectstoa3/8inchNPTthreadfromthegassource.The
quickdisconnectfittingisahand-operateddevicethatautomaticallyshutsOFFtheflowofgasfromthesourcewhenthebarbecueisdisconnected
• Thequickdisconnectfittingcanbeinstalledhorizontally,orpointingdownward.Installingthefittingwiththeopenendpointingupwardcanresultincollectingwateranddebris.
• Thedustcovers(suppliedplasticplugs)helpkeeptheopenendsofthequickdisconnectfittingcleanwhiledisconnected.
• Pipecompoundshouldbeusedwhichisresistanttotheactionofnaturalgaswhenconnectionsaremade.
• Theoutdoorconnectormustbefirmlyattachedtorigid,permanentconstruction.
m WARNING: Do not route the 10 foot hose under a deck. The hose must be visible.
Gas line pipinG• Ifthelengthofthelinerequireddoesnotexceed50feet,usea5/8"O.D.tube.One
sizelargershouldbeusedforlengthsgreaterthan50feet.• Gaspipingmaybecoppertubing,typeKorL;polyethyleneplastictube,witha
minimumwallthicknessof.062inch;orstandardweight(schedule40)steelorwroughtironpipe.
• Coppertubingmustbetin-linedifthegascontainsmorethan0.3gramsofhydrogensulfideper100cubicfeetofgas.
• Plastictubingissuitableonlyforoutdoor,undergrounduse.• Gaspipingincontactwithearth,oranyothermaterialwhichmaycorrodethe
piping,mustbeprotectedagainstcorrosioninanapprovedmanner.• Undergroundpipingmusthaveaminimumof18"cover
test connectionsAllconnectionsandjointsmustbethoroughlytestedforleaksinaccordancewithlocalcodesandalllistedproceduresinthelatesteditionoftheNationalFuelGasCode:ANSIZ223.1/NFPA54,orCAN/CGA-B149.1
m DANGERDo not use an open flame to check for gas leaks. Be sure there are no sparks or open flames in the area while you check for gas leaks. This will result in a fire or explosion which can cause serious bodily injury or death and damage to property.
Gas supply
Shut off
Locking shut off
Inside wall
Outside wall
Quick disconnect
3/8" Pipe nipple
1/2" Pipe nipple
Do Not Use
This is a typical installation of a Weber® natural gas barbecue. Local codes may require differentinstallations.
8
www.weber.com®
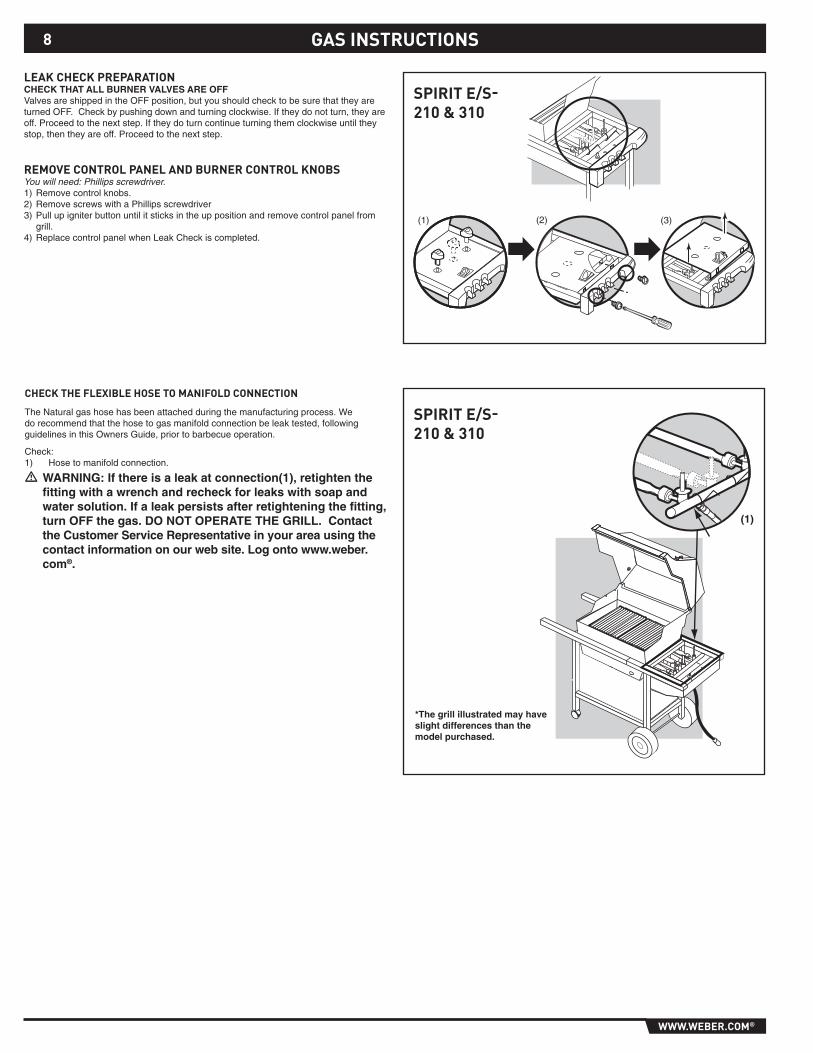
(1) (2) (3)
remoVe control panel and burner control knobsYou will need: Phillips screwdriver.1)Removecontrolknobs.2)RemovescrewswithaPhillipsscrewdriver3)Pullupigniterbuttonuntilitsticksintheuppositionandremovecontrolpanelfrom
grill.4)ReplacecontrolpanelwhenLeakCheckiscompleted.
check the flexible hose to manifold connection
TheNaturalgashosehasbeenattachedduringthemanufacturingprocess.Wedorecommendthatthehosetogasmanifoldconnectionbeleaktested,followingguidelinesinthisOwnersGuide,priortobarbecueoperation.
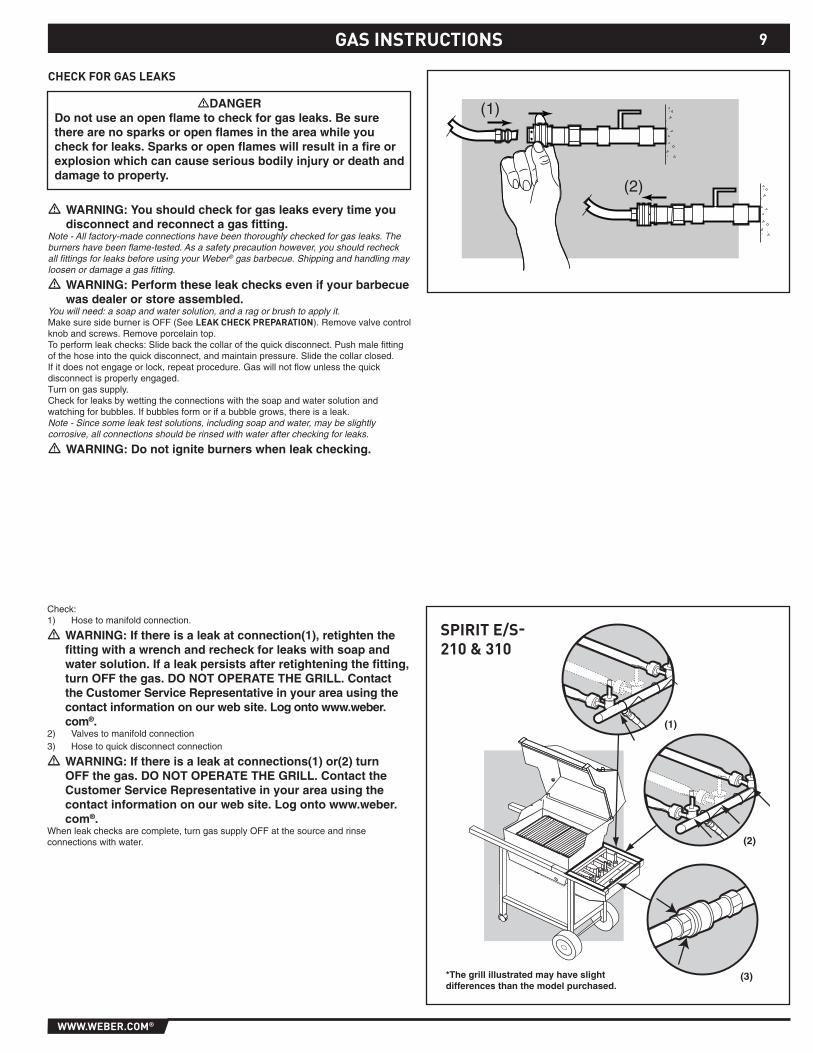
Check:1) Hosetomanifoldconnection.
m WARNING: If there is a leak at connection(1), retighten the fitting with a wrench and recheck for leaks with soap and water solution. If a leak persists after retightening the fitting, turn OFF the gas. DO NOT OPERATE THE GRILL. Contact the Customer Service Representative in your area using the contact information on our web site. Log onto www.weber.com®.
Gas instructions
leak check preparationCHECK THAT ALL BURNER vALvES ARE OFFValvesareshippedintheOFFposition,butyoushouldchecktobesurethattheyareturnedOFF.Checkbypushingdownandturningclockwise.Iftheydonotturn,theyareoff.Proceedtothenextstep.Iftheydoturncontinueturningthemclockwiseuntiltheystop,thentheyareoff.Proceedtothenextstep.
spirit e/s- 210 & �10
(1)
*The grill illustrated may have slight differences than the model purchased.
spirit e/s- 210 & �10
9
www.weber.com®
9Gas instructions
check for Gas leaks
(1)
(2)
Check:1) Hosetomanifoldconnection.
m WARNING: If there is a leak at connection(1), retighten the fitting with a wrench and recheck for leaks with soap and water solution. If a leak persists after retightening the fitting, turn OFF the gas. DO NOT OPERATE THE GRILL. Contact the Customer Service Representative in your area using the contact information on our web site. Log onto www.weber.com®.
2) Valvestomanifoldconnection3) Hosetoquickdisconnectconnection
m WARNING: If there is a leak at connections(1) or(2) turn OFF the gas. DO NOT OPERATE THE GRILL. Contact the Customer Service Representative in your area using the contact information on our web site. Log onto www.weber.com®.
Whenleakchecksarecomplete,turngassupplyOFFatthesourceandrinseconnectionswithwater. (2)
(3)
(1)
*The grill illustrated may have slight differences than the model purchased.
spirit e/s- 210 & �10
mDANGERDo not use an open flame to check for gas leaks. Be sure there are no sparks or open flames in the area while you check for leaks. Sparks or open flames will result in a fire or explosion which can cause serious bodily injury or death and damage to property.
m WARNING: You should check for gas leaks every time you disconnect and reconnect a gas fitting.
Note - All factory-made connections have been thoroughly checked for gas leaks. The burners have been flame-tested. As a safety precaution however, you should recheck all fittings for leaks before using your Weber® gas barbecue. Shipping and handling may loosen or damage a gas fitting.
m WARNING: Perform these leak checks even if your barbecue was dealer or store assembled.
You will need: a soap and water solution, and a rag or brush to apply it.MakesuresideburnerisOFF(Seeleak check preparation).Removevalvecontrolknobandscrews.Removeporcelaintop.Toperformleakchecks:Slidebackthecollarofthequickdisconnect.Pushmalefittingofthehoseintothequickdisconnect,andmaintainpressure.Slidethecollarclosed.Ifitdoesnotengageorlock,repeatprocedure.Gaswillnotflowunlessthequickdisconnectisproperlyengaged.Turnongassupply.Checkforleaksbywettingtheconnectionswiththesoapandwatersolutionandwatchingforbubbles.Ifbubblesformorifabubblegrows,thereisaleak.Note - Since some leak test solutions, including soap and water, may be slightly corrosive, all connections should be rinsed with water after checking for leaks.
m WARNING: Do not ignite burners when leak checking.
10
www.weber.com®
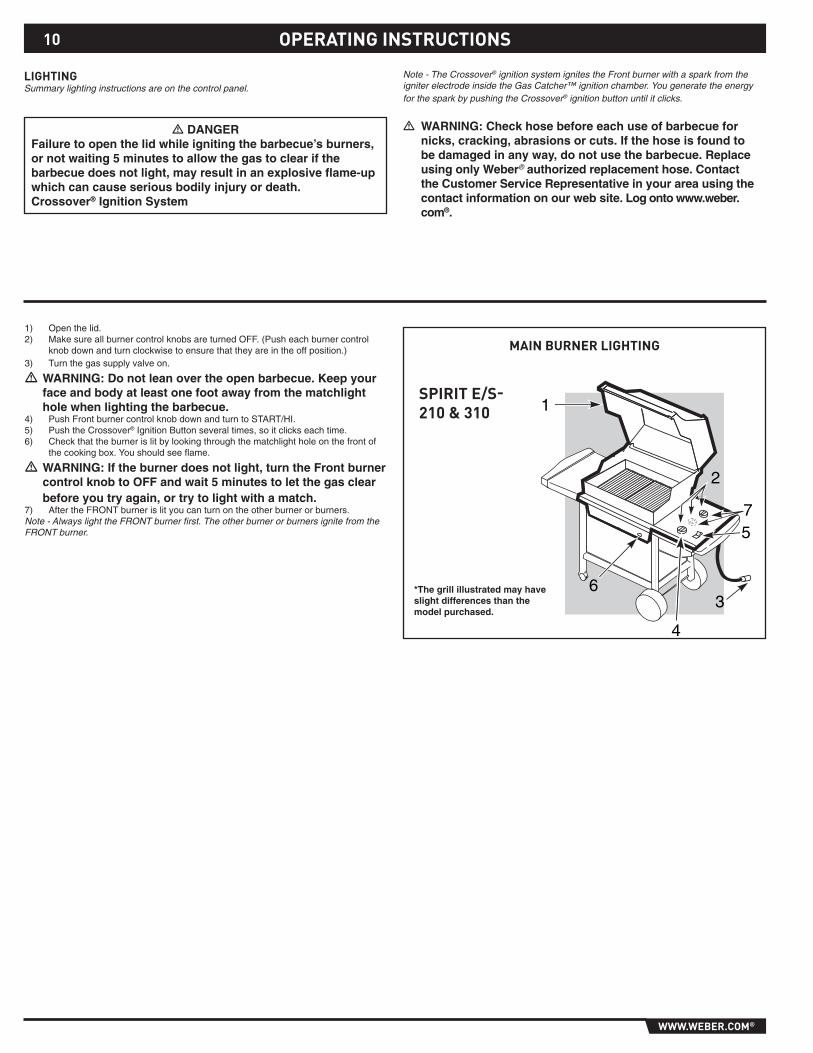
1) Openthelid.2) MakesureallburnercontrolknobsareturnedOFF.(Pusheachburnercontrol
knobdownandturnclockwisetoensurethattheyareintheoffposition.)3) Turnthegassupplyvalveon.
m WARNING: Do not lean over the open barbecue. Keep your face and body at least one foot away from the matchlight hole when lighting the barbecue.
4) PushFrontburnercontrolknobdownandturntoSTART/HI.5) PushtheCrossover®IgnitionButtonseveraltimes,soitclickseachtime.6) Checkthattheburnerislitbylookingthroughthematchlightholeonthefrontof
thecookingbox.Youshouldseeflame.
m WARNING: If the burner does not light, turn the Front burner control knob to OFF and wait 5 minutes to let the gas clear before you try again, or try to light with a match.
7) AftertheFRONTburnerislityoucanturnontheotherburnerorburners.Note - Always light the FRONT burner first. The other burner or burners ignite from the FRONT burner.
liGhtinGSummary lighting instructions are on the control panel.
m DANGERFailure to open the lid while igniting the barbecue’s burners, or not waiting 5 minutes to allow the gas to clear if the barbecue does not light, may result in an explosive flame-up which can cause serious bodily injury or death.Crossover® Ignition System
Note - The Crossover® ignition system ignites the Front burner with a spark from the igniter electrode inside the Gas Catcher™ ignition chamber. You generate the energy for the spark by pushing the Crossover® ignition button until it clicks.
m WARNING: Check hose before each use of barbecue for nicks, cracking, abrasions or cuts. If the hose is found to be damaged in any way, do not use the barbecue. Replace using only Weber® authorized replacement hose. Contact the Customer Service Representative in your area using the contact information on our web site. Log onto www.weber.com®.
operatinG instructions
spirit e/s- 210 & �10
*The grill illustrated may have slight differences than the model purchased.
main burner liGhtinG
11
www.weber.com®
11
manual liGhtinG
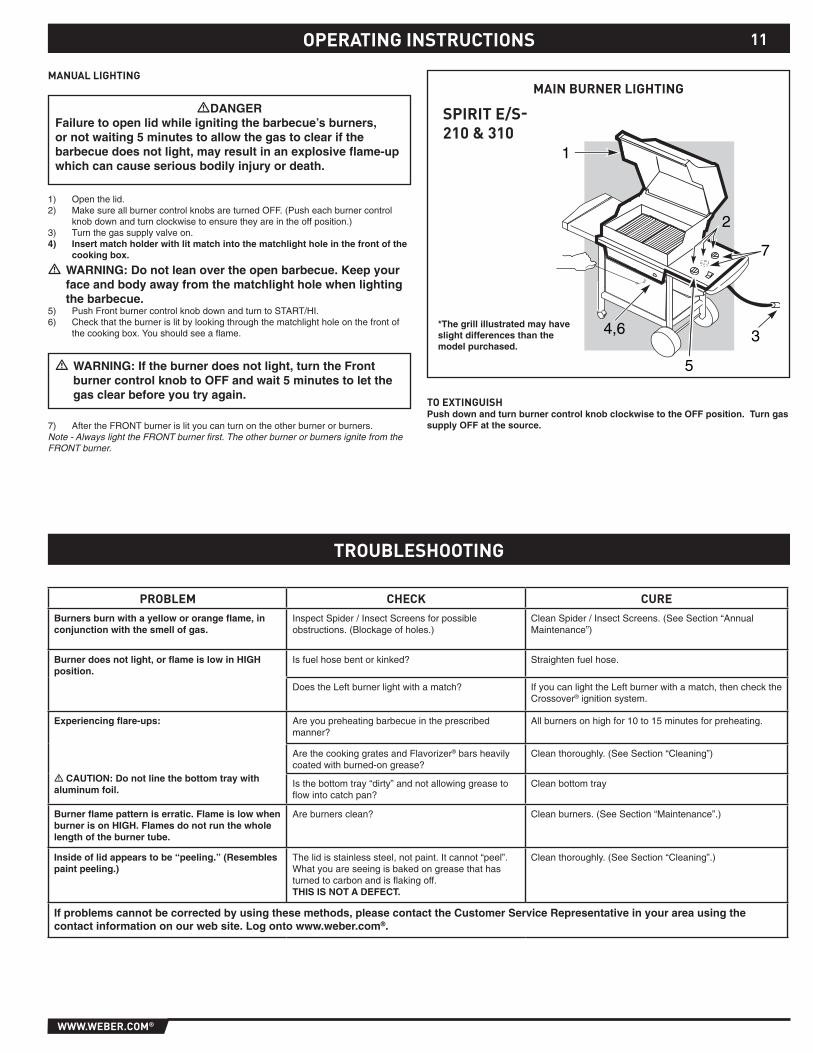
mDANGERFailure to open lid while igniting the barbecue’s burners, or not waiting 5 minutes to allow the gas to clear if the barbecue does not light, may result in an explosive flame-up which can cause serious bodily injury or death.
1) Openthelid.2) MakesureallburnercontrolknobsareturnedOFF.(Pusheachburnercontrol
knobdownandturnclockwisetoensuretheyareintheoffposition.)3) Turnthegassupplyvalveon.4) Insert match holder with lit match into the matchlight hole in the front of the
cooking box.
m WARNING: Do not lean over the open barbecue. Keep your face and body away from the matchlight hole when lighting the barbecue.
5) PushFrontburnercontrolknobdownandturntoSTART/HI.6) Checkthattheburnerislitbylookingthroughthematchlightholeonthefrontof
thecookingbox.Youshouldseeaflame.
m WARNING: If the burner does not light, turn the Front burner control knob to OFF and wait 5 minutes to let the gas clear before you try again.
operatinG instructions
7) AftertheFRONTburnerislityoucanturnontheotherburnerorburners.Note - Always light the FRONT burner first. The other burner or burners ignite from the FRONT burner.
to extinGuishPush down and turn burner control knob clockwise to the OFF position. Turn gas supply OFF at the source.
problem check cureBurners burn with a yellow or orange flame, in conjunction with the smell of gas.
InspectSpider/InsectScreensforpossibleobstructions.(Blockageofholes.)
CleanSpider/InsectScreens.(SeeSection“AnnualMaintenance”)
Burner does not light, or flame is low in HIGH position.
Isfuelhosebentorkinked? Straightenfuelhose.
DoestheLeftburnerlightwithamatch? IfyoucanlighttheLeftburnerwithamatch,thenchecktheCrossover®ignitionsystem.
Experiencing flare-ups:
m CAUTION: Do not line the bottom tray with aluminum foil.
Areyoupreheatingbarbecueintheprescribedmanner?
Allburnersonhighfor10to15minutesforpreheating.
ArethecookinggratesandFlavorizer®barsheavilycoatedwithburned-ongrease?
Cleanthoroughly.(SeeSection“Cleaning”)
Isthebottomtray“dirty”andnotallowinggreasetoflowintocatchpan?
Cleanbottomtray
Burner flame pattern is erratic. Flame is low when burner is on HIGH. Flames do not run the whole length of the burner tube.
Areburnersclean? Cleanburners.(SeeSection“Maintenance”.)
Inside of lid appears to be “peeling.” (Resembles paint peeling.)
Thelidisstainlesssteel,notpaint.Itcannot“peel”.Whatyouareseeingisbakedongreasethathasturnedtocarbonandisflakingoff.THIS IS NOT A DEFECT.
Cleanthoroughly.(SeeSection“Cleaning”.)
If problems cannot be corrected by using these methods, please contact the Customer Service Representative in your area using the contact information on our web site. Log onto www.weber.com®.
troubleshootinG
*The grill illustrated may have slight differences than the model purchased.
main burner liGhtinG
7
5
4,6
2
1
3
spirit e/s- 210 & �10
12
www.weber.com®
(1)
(2)
annnnnual maintenanceInspection and cleaning of the Spider/Insect screensToinspectthespider/insectscreens,removethecontrolpanel.Ifthereisdustordirtonthescreens,removetheburnersforcleaningthescreens.
Brushthespider/inspectscreens,lightly,withasoftbristlebrush(i.e.anoldtoothbrush).
m CAUTION: Do not clean the spider/insect screens with hard or sharp tools. Do not dislodge the spider/insect screens or enlarge the screen openings.
Lightlytaptheburnertogetdebrisanddirtoutoftheburnertube.Oncethespider/insectscreensandburnersarecleanreplacetheburners.Ifthespider/insectscreenbecomesdamagedorcannotbecleaned,pleasecontacttheCustomerServiceRepresentativeinyourareausingthecontactinformationonourwebsite.Logontowww.weber.com®.
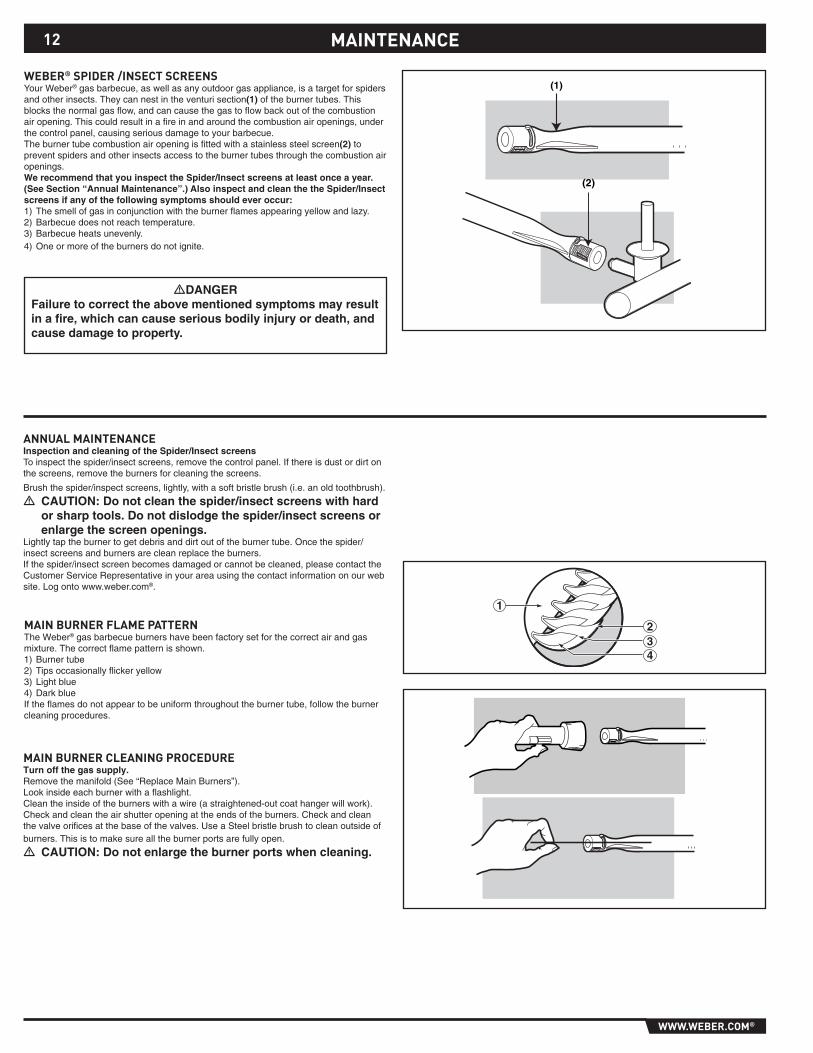
weber® spider /insect screensYourWeber®gasbarbecue,aswellasanyoutdoorgasappliance,isatargetforspidersandotherinsects.Theycannestintheventurisection(1)oftheburnertubes.Thisblocksthenormalgasflow,andcancausethegastoflowbackoutofthecombustionairopening.Thiscouldresultinafireinandaroundthecombustionairopenings,underthecontrolpanel,causingseriousdamagetoyourbarbecue.Theburnertubecombustionairopeningisfittedwithastainlesssteelscreen(2)topreventspidersandotherinsectsaccesstotheburnertubesthroughthecombustionairopenings.We recommend that you inspect the Spider/Insect screens at least once a year. (See Section “Annual Maintenance”.) Also inspect and clean the the Spider/Insect screens if any of the following symptoms should ever occur:1)Thesmellofgasinconjunctionwiththeburnerflamesappearingyellowandlazy.2)Barbecuedoesnotreachtemperature.3)Barbecueheatsunevenly.4)Oneormoreoftheburnersdonotignite.
mDANGERFailure to correct the above mentioned symptoms may result in a fire, which can cause serious bodily injury or death, and cause damage to property.
main burner cleaninG procedureTurn off the gas supply.Removethemanifold(See“ReplaceMainBurners”).Lookinsideeachburnerwithaflashlight.Cleantheinsideoftheburnerswithawire(astraightened-outcoathangerwillwork).Checkandcleantheairshutteropeningattheendsoftheburners.Checkandcleanthevalveorificesatthebaseofthevalves.UseaSteelbristlebrushtocleanoutsideofburners.Thisistomakesurealltheburnerportsarefullyopen.
m CAUTION: Do not enlarge the burner ports when cleaning.
main burner flame patternTheWeber®gasbarbecueburnershavebeenfactorysetforthecorrectairandgasmixture.Thecorrectflamepatternisshown.1)Burnertube2)Tipsoccasionallyflickeryellow3)Lightblue4)DarkblueIftheflamesdonotappeartobeuniformthroughouttheburnertube,followtheburnercleaningprocedures.
1
234
maintenance
1�
www.weber.com®
1�
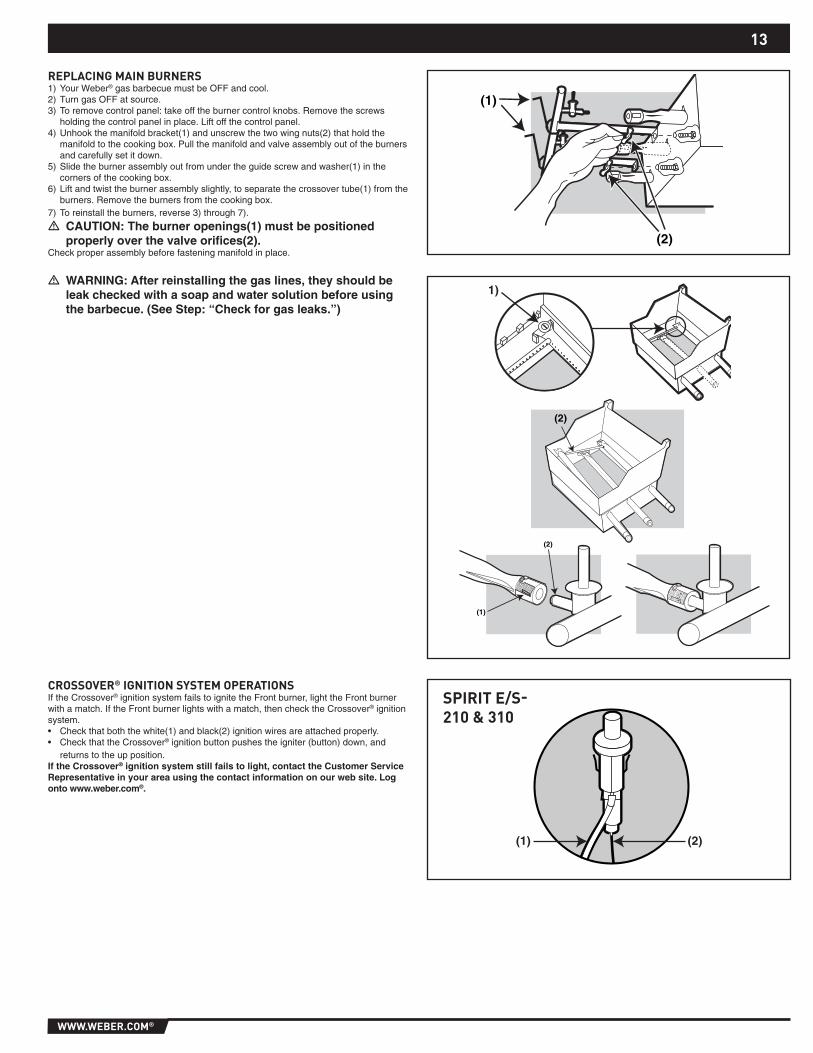
crossoVer® iGnition sYstem operationsIftheCrossover®ignitionsystemfailstoignitetheFrontburner,lighttheFrontburnerwithamatch.IftheFrontburnerlightswithamatch,thenchecktheCrossover®ignitionsystem.• Checkthatboththewhite(1)andblack(2)ignitionwiresareattachedproperly.• CheckthattheCrossover®ignitionbuttonpushestheigniter(button)down,and
returnstotheupposition.If the Crossover® ignition system still fails to light, contact the Customer Service Representative in your area using the contact information on our web site. Log onto www.weber.com®.
(1) (2)
replacinG main burners1)YourWeber®gasbarbecuemustbeOFFandcool.2)TurngasOFFatsource.3)Toremovecontrolpanel:takeofftheburnercontrolknobs.Removethescrews
holdingthecontrolpanelinplace.Liftoffthecontrolpanel.4)Unhookthemanifoldbracket(1)andunscrewthetwowingnuts(2)thatholdthe
manifoldtothecookingbox.Pullthemanifoldandvalveassemblyoutoftheburnersandcarefullysetitdown.
5)Slidetheburnerassemblyoutfromundertheguidescrewandwasher(1)inthecornersofthecookingbox.
6)Liftandtwisttheburnerassemblyslightly,toseparatethecrossovertube(1)fromtheburners.Removetheburnersfromthecookingbox.
7)Toreinstalltheburners,reverse3)through7).
m CAUTION: The burner openings(1) must be positioned properly over the valve orifices(2).
Checkproperassemblybeforefasteningmanifoldinplace.
m WARNING: After reinstalling the gas lines, they should be leak checked with a soap and water solution before using the barbecue. (See Step: “Check for gas leaks.”)
(2)
(1)
(1)
(2)
(2)
(1)
spirit e/s- 210 & �10
©2003ThefollowingtrademarksareregisteredinthenameofWeber-StephenProductsCo.,anIllinoiscorporation,locatedat200EastDanielsRoad,Palatine,Illinois60067U.S.A.Australia;SmokeyJoe,Weber,KettleSilhouette ®,Genesis,Austria;KettleSilhouette ®,SmokeyJoe,Weber,Benelux;KettleSilhouette ®,SmokeyJoe,Weber,CompactGrillConfigu-ration,Botswana;Weber,Canada;SmokeyJoe,Genesis,China;KettleSilhouette ®,Denmark;KettleSilhouette ®,SmokeyJoe,Weber,Finland;SmokeyJoe,France;KettleSilhouette
®,SmokeyJoe,Weber,One-Touch,Germany;SmokeyJoe,Weber,One-Touch,Greece;SmokeyJoe,Ireland;KettleSilhouette ®,SmokeyJoe,Italy;SmokeyJoe,Weber,Japan;SmokeyJoe,Weber,Korea;SmokeyJoe,Weber,NewZealand;Weber,SmokeyJoe,Nigeria;Weber,Norway;SmokeyJoe,Weber,Portugal;Weber,SouthAfrica:SmokeyJoe,Weber,KettleConfiguration,Spain;SmokeyJoe,Weber,Sweden;KettleSilhouette ®,SmokeyJoe,Switzerland;KettleSilhouette ®,SmokeyJoe,Weber,UnitedKingdom;SmokeyJoe,Weber,WeberOne-Touch,U.S.A..;KettleConfiguration,KettleSilhouette ®,SmokeyJoe,Weber,One-Touch,Firespice,Go-Anywhere,U.S.A.;KettleConfiguration,KettleSilhou-ette,Genesis,Flavorizer,Crossover,Flamgo,Performer,Rapidfire,Tuck‘NCarry,JumboJoe,Bar-B-Kettle,Master-Touch,Spirit,GrillOut,Summit,Platinum,1-800-Grill-Out,Ranch,MatchlessFlame,Zimbabwe;Weber,KettleConfiguration,KettleSilhouette ®.
WEBER-STEPHENPRODUCTSCO.www.weber.com®
m ATTENTION: This product has been safety tested and is only certified for use in a specific country. Refer to country designation located on outer carton.
These parts may be gas carrying or gas burning components. Please contact Weber-Stephen Products Co., Customer Service Department for genuine Weber-Stephen Products Co. replacement part(s) information.
m WARNING: Do not attempt to make any repair to gas carrying or gas burning components without contacting Weber-Stephen Products Co., Customer Service Department. Your actions, if you fail to follow this product Warning, may cause a fire or an explosion resulting in serious personal injury or death and damage to property.
m ATENCIÓN: A este producto se le han realizado pruebas de seguridad y ha sido certificado para usarse en un país específico. Refiérase al país indicado en la parte externa del cartón de empaque.
Estas partes pueden ser componentes que transporten gas o lo quemen. Por favor póngase en contacto con el Departamento de Atención al Cliente de Weber-Stephen Products Co. para obtener información sobre las partes de repuesto Weber-Stephen Products Co. genuinas.
m ADvERTENCIA: No trate de realizar reparación alguna a los componentes que transporten o quemen gas sin antes ponerse en contacto con el Departamento de Atención al Cliente de Weber-Stephen Products Co. Si no llegase a acatar esta advertencia, sus acciones podrían causar un fuego o una explosión que resulte en lesiones personales serias o la muerte o daños a la propiedad.
m ATTENTION : Ce produit a fait l’objet de tests de sécurité et est certifié pour une utilisation dans un pays particulier unique-ment. vérifiez la désignation de pays située sur le carton d’emballage.
Cespiècespeuventcontenirdugazouêtredesélémentsdontlacombustionproduitdugaz.VeuillezconsulterleServiceclientèledeWeber-StephenProductsCo.pourdesrenseignementssurlespiècesderechangeoriginalesdeWeber-StephenProductsCo..
m MISE EN GARDE : Ne tentez pas d’effectuer des réparations sur des éléments contenant du gaz ou sur des éléments dont la combustion produit du gaz sans contacter le service clientèle de Weber-Stephen Products Co.. Si vous ne suivez pas la présente Mise en garde relative au produit, vos actions risquent de provoquer un incendie ou une explosion entraînant des blessures physiques graves voire un décès ainsi que des dégâts matériels.