Embed Size (px)
Citation preview
CHAPTER 2
SPECIAL CLOTHING AND EQUIPMENT
This chapter is intended as a guide for the individualSeabee on the proper use and care of special clothingand equipment issued to him while serving with theNaval Construction Force (NCF).
The utility uniform is known as special clothing.Special equipment is needed by an individual under fieldconditions whether in combat or in training. This specialequipment is commonly called 782 gear, the number ofthe custody card originated in the Marine Corps SupplySystem years ago. This gear is also known as field orbivouac equipment.
General instructions for wearing, cleaning,pressing, storing, and mending items of the uniform areincluded in this chapter. Uses of the poncho, sleepingbag, and other bivouac equipment are discussed as wellas methods of assembling, packing, and using load-carrying equipment. Instructions for the display ofindividual clothing and equipment are given whereapplicable.
You are responsible for the use and care of clothingand equipment issued to you. It is your duty to ensurethese items are available and in a serviceable conditionwhen they are needed. A torn sleeping bag cannotprovide the protection required on cold nights. Neithercan your cold weather coat if it does not have buttons ora zipper. Under certain circumstances, you may becharged for the replacement or repair of items lost ordamaged through carelessness. Under othercircumstances, neglect may cost you your life.
SPECIAL CLOTHING (STANDARDISSUE)
The initial allowance of utility uniforms will beissued to you when you check into your unit. Theseitems remain the property of the government; however,you are responsible for their proper upkeep. When anitem wears out through normal use, it will be replacedat no cost to you by the supply section of the unit. Alwaysensure that your clothing is in good condition beforedeploying to an overseas destination where the supplyof these items maybe limited.
Current instructions recommend that the standardMINIMUM OUTFIT issued to each person consist ofthe following:
1. Six utility shirts
2. Six pairs of utility trousers
3. Three caps
4. A cold weather coat (field jacket)
5. Two pairs of combination combat/safety boots
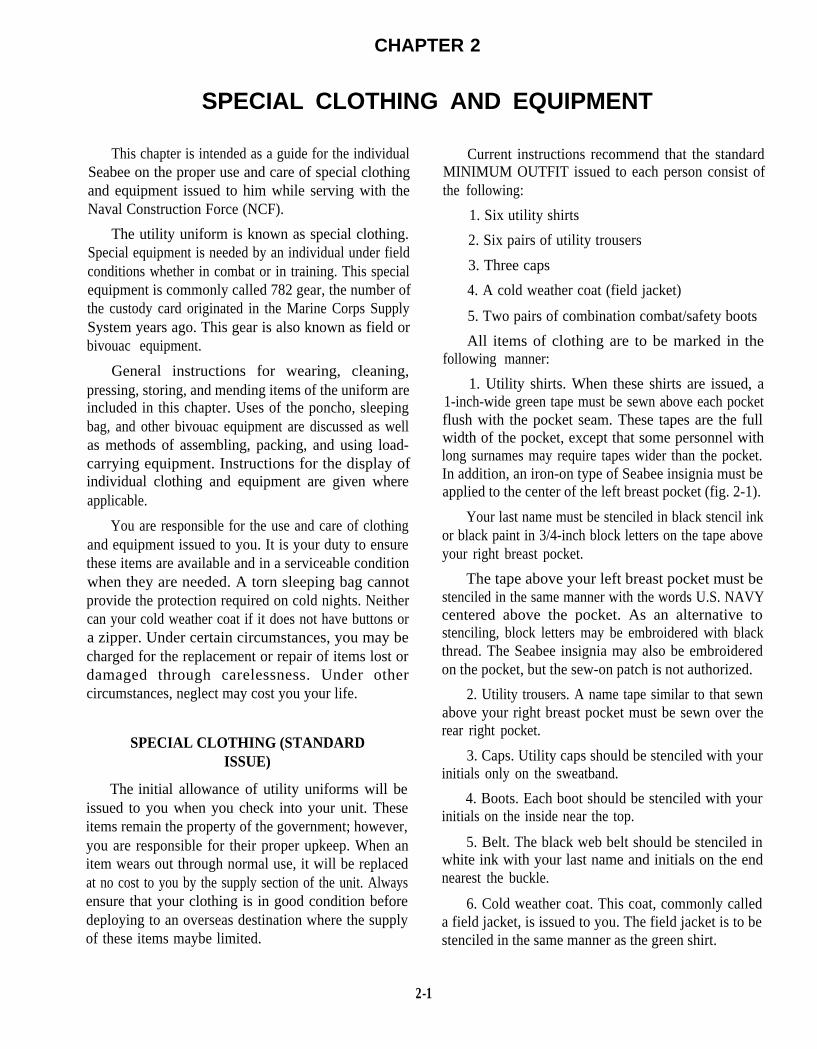
All items of clothing are to be marked in thefollowing manner:
1. Utility shirts. When these shirts are issued, a1-inch-wide green tape must be sewn above each pocketflush with the pocket seam. These tapes are the fullwidth of the pocket, except that some personnel withlong surnames may require tapes wider than the pocket.In addition, an iron-on type of Seabee insignia must beapplied to the center of the left breast pocket (fig. 2-1).
Your last name must be stenciled in black stencil inkor black paint in 3/4-inch block letters on the tape aboveyour right breast pocket.
The tape above your left breast pocket must bestenciled in the same manner with the words U.S. NAVYcentered above the pocket. As an alternative tostenciling, block letters may be embroidered with blackthread. The Seabee insignia may also be embroideredon the pocket, but the sew-on patch is not authorized.
2. Utility trousers. A name tape similar to that sewnabove your right breast pocket must be sewn over therear right pocket.
3. Caps. Utility caps should be stenciled with yourinitials only on the sweatband.
4. Boots. Each boot should be stenciled with yourinitials on the inside near the top.
5. Belt. The black web belt should be stenciled inwhite ink with your last name and initials on the endnearest the buckle.
6. Cold weather coat. This coat, commonly calleda field jacket, is issued to you. The field jacket is to bestenciled in the same manner as the green shirt.
2-1
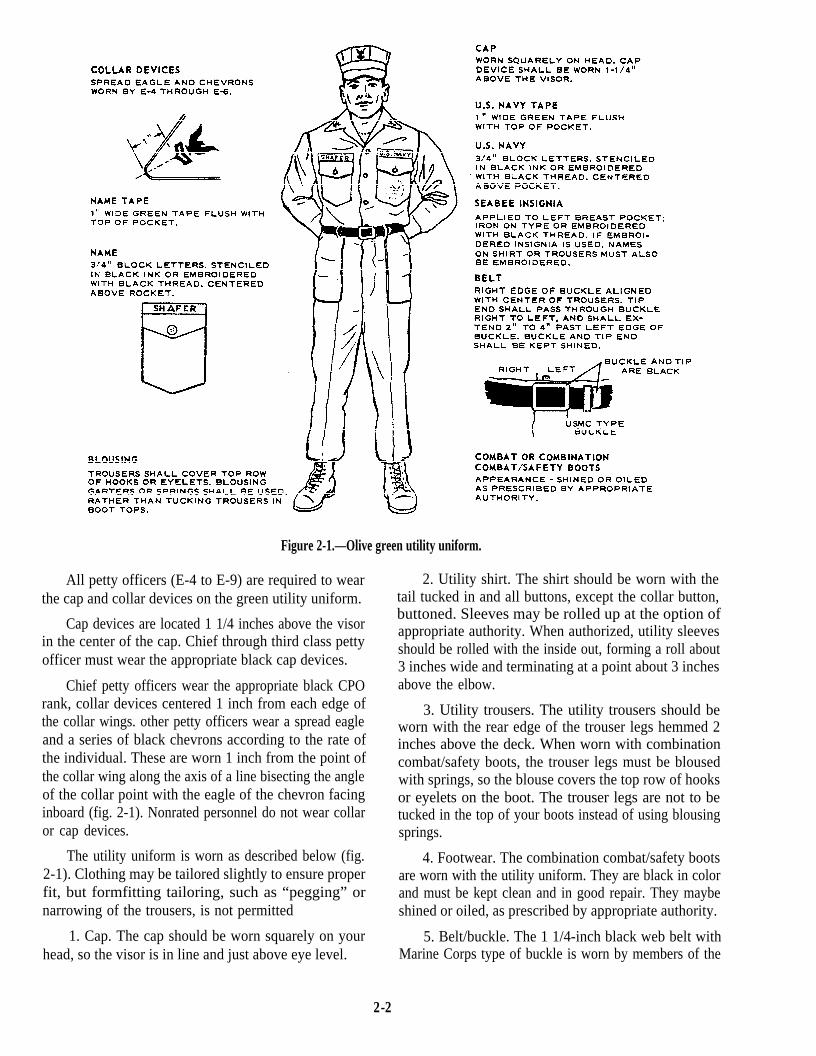
Figure 2-1.—Olive green utility uniform.
All petty officers (E-4 to E-9) are required to wearthe cap and collar devices on the green utility uniform.
Cap devices are located 1 1/4 inches above the visorin the center of the cap. Chief through third class pettyofficer must wear the appropriate black cap devices.
Chief petty officers wear the appropriate black CPOrank, collar devices centered 1 inch from each edge ofthe collar wings. other petty officers wear a spread eagleand a series of black chevrons according to the rate ofthe individual. These are worn 1 inch from the point ofthe collar wing along the axis of a line bisecting the angleof the collar point with the eagle of the chevron facinginboard (fig. 2-1). Nonrated personnel do not wear collaror cap devices.
The utility uniform is worn as described below (fig.2-1). Clothing may be tailored slightly to ensure properfit, but formfitting tailoring, such as “pegging” ornarrowing of the trousers, is not permitted
1. Cap. The cap should be worn squarely on yourhead, so the visor is in line and just above eye level.
2. Utility shirt. The shirt should be worn with thetail tucked in and all buttons, except the collar button,buttoned. Sleeves may be rolled up at the option ofappropriate authority. When authorized, utility sleevesshould be rolled with the inside out, forming a roll about3 inches wide and terminating at a point about 3 inchesabove the elbow.
3. Utility trousers. The utility trousers should beworn with the rear edge of the trouser legs hemmed 2inches above the deck. When worn with combinationcombat/safety boots, the trouser legs must be blousedwith springs, so the blouse covers the top row of hooksor eyelets on the boot. The trouser legs are not to betucked in the top of your boots instead of using blousingsprings.
4. Footwear. The combination combat/safety bootsare worn with the utility uniform. They are black in colorand must be kept clean and in good repair. They maybeshined or oiled, as prescribed by appropriate authority.
5. Belt/buckle. The 1 1/4-inch black web belt withMarine Corps type of buckle is worn by members of the
2-2
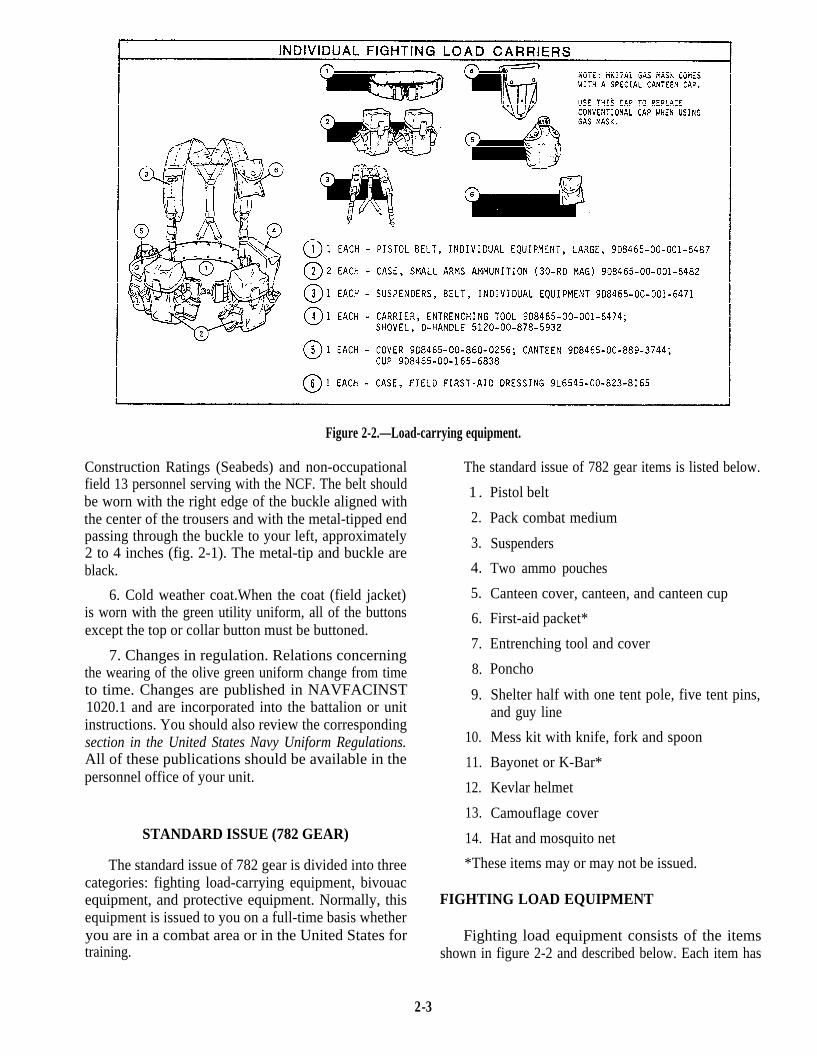
Figure 2-2.—Load-carrying equipment.
Construction Ratings (Seabeds) and non-occupational The standard issue of 782 gear items is listed below.field 13 personnel serving with the NCF. The belt shouldbe worn with the right edge of the buckle aligned withthe center of the trousers and with the metal-tipped endpassing through the buckle to your left, approximately2 to 4 inches (fig. 2-1). The metal-tip and buckle areblack.
6. Cold weather coat.When the coat (field jacket)is worn with the green utility uniform, all of the buttonsexcept the top or collar button must be buttoned.
7. Changes in regulation. Relations concerningthe wearing of the olive green uniform change from timeto time. Changes are published in NAVFACINST1020.1 and are incorporated into the battalion or unitinstructions. You should also review the correspondingsection in the United States Navy Uniform Regulations.All of these publications should be available in thepersonnel office of your unit.
STANDARD ISSUE (782 GEAR)
The standard issue of 782 gear is divided into threecategories: fighting load-carrying equipment, bivouacequipment, and protective equipment. Normally, thisequipment is issued to you on a full-time basis whetheryou are in a combat area or in the United States fortraining.
1 .
2.
3.
4.
5.
6.
7.
8.
9.
10.
11.
12.
13.
14.
Pistol belt
Pack combat medium
Suspenders
Two ammo pouches
Canteen cover, canteen, and canteen cup
First-aid packet*
Entrenching tool and cover
Poncho
Shelter half with one tent pole, five tent pins,and guy line
Mess kit with knife, fork and spoon
Bayonet or K-Bar*
Kevlar helmet
Camouflage cover
Hat and mosquito net
*These items may or may not be issued.
FIGHTING LOAD EQUIPMENT
Fighting load equipment consists of the itemsshown in figure 2-2 and described below. Each item has
2-3
been designed to make the job of carrying theequipment you need easier and more comfortable.There are certain rules, however, that must befollowed when the equipment is to do the job forwhich it is intended. When the rules listed below arefollowed, individual loads can be carried with moreease and comfort.
Rules for carrying equipment.
l
l
l
l
Keep your load as light as possible.
Know your equipment.
Assemble the equipment correctly.
Keep every item in its proper place.
1. Pistol belt (item 1 of fig. 2-2). The olive drabwebbed pistol belt, M-1956, has a special ball type offastener that makes the belt easier to put on and takeoff. The belt uses eyelets for attachment purposes andhas sliding keepers to prevent the belt hooks frombecoming unfastened after adjustment to the waist ofthe wearer. The pistol belt helps to carry theentrenching tool and carrier, the ammunition pouches,the canteen and cover, and the first-aid or compasscase. It is issued in two sizes: medium and large.Medium is the size for waist measurements under 30inches; large is the size for waist measurements of 30inches or more. The proper-size belt can be adjustedto fit over all layers of outer clothing, including thearmored vest.
2. Ammunition pouches (item 2 of fig. 2-2). Eachsmall-arms ammunition pouch is 4 1/4 inches wide,6 1/4 inches high, and 2 1/2 inches deep. Plasticstiffeners are provided in the back of each pouch,so the clips of ammunition can be easily insertedand removed. There are two attaching clips andsupporting straps on the back of the pouch, so theycan be fastened to the pistol belt and to thesuspenders. (See fig. 2-5.) Both sides of eachammunition pouch have attachments for carryinghand grenades. The pouches are designed to carryany of the basic loads of ammunition; however,with special weapons it may be necessary to carrymore ammunition than the pouches can hold. Whenextra ammunition is needed, bandoleers of ammomay be carried in a cross-chest manner. To placebandoleers in pouches, make a neat bundle byfolding the bandoleers accordion fashion andplacing them in the pouches with the bandoleerstrap on the top. This method permits the bandoleerto be inserted and removed easily.
3. Suspenders (item 3 of fig. 2-2). The olive drabwebbed suspenders, with the pistol belt, make upthe basic individual fighting load equipment, as theremaining components are suspended from them.The suspenders can be adjusted by means of theclamp type of buckle. Suspenders are issued inthree sizes: regular, long, and extra long. If you areunder 68 inches tall without shoes, wear the regularsize. If over 68 inches, wear the large size. If youare tall or broad chested or intend wearing themover outer garments or the armored vest or both,wear the extra large size. When you have the time,you should try them on first.
4. Entrenching tool carrier (item 4 of fig. 2-2). Theentrenching tool carrier is olive drab in color and isattached to the pistol belt by means of two clipslocated on the back.
5. Canteen cover (item 5 of fig. 2-2). The olivedrab canteen cover has either a pile or felt lining andis attached to the pistol belt by means of two clipslocated on the back of the cover. The canteen coveraccommodates the canteen and canteen cup. Duringwarm weather, the lining should be kept wet to helpkeep the water cool. The cover should be kept dryduring cold weather, as the lining helps to protect thewater inside from freezing.
6. First-aid case (item 6 of fig. 2-2). The olivedrab first-aid case is attached to the pistol belt bymeans of a clip located on the back The case is closedby means of a flap that is secured by a glove type offastener. The first-aid case is used either to carry afield dressing or an unmounted magnetic compass.
The method for assembling the individualfighting load equipment is described below in thesequence normally followed.
Adjusting the Pistol Belt
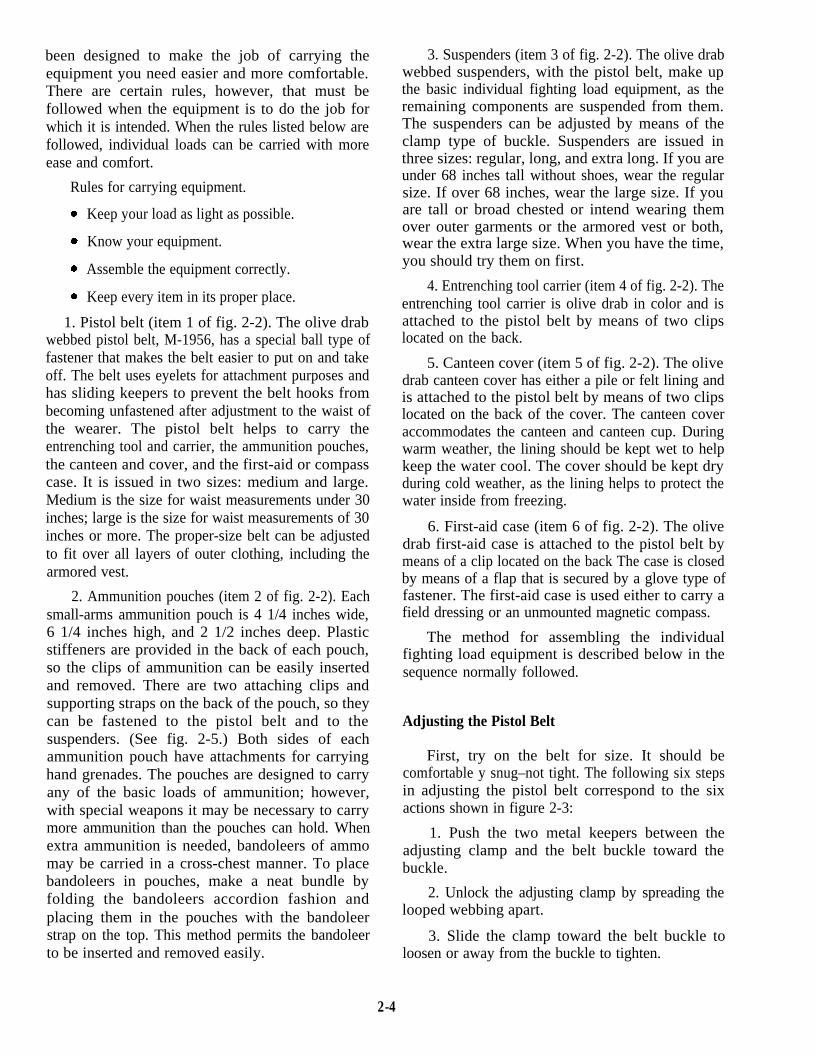
First, try on the belt for size. It should becomfortable y snug–not tight. The following six stepsin adjusting the pistol belt correspond to the sixactions shown in figure 2-3:
1. Push the two metal keepers between theadjusting clamp and the belt buckle toward thebuckle.
2. Unlock the adjusting clamp by spreading thelooped webbing apart.
3. Slide the clamp toward the belt buckle toloosen or away from the buckle to tighten.
2-4
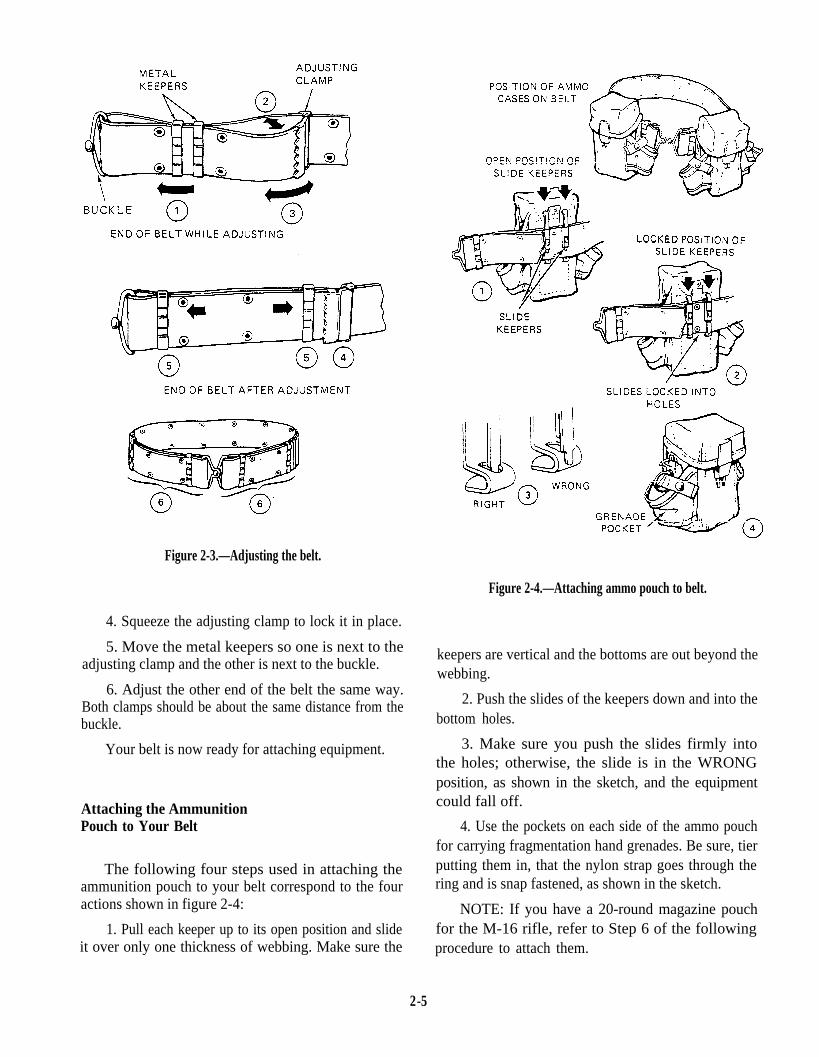
Figure 2-3.—Adjusting the belt.
Figure 2-4.—Attaching ammo pouch to belt.
4. Squeeze the adjusting clamp to lock it in place.
5. Move the metal keepers so one is next to theadjusting clamp and the other is next to the buckle.
6. Adjust the other end of the belt the same way.Both clamps should be about the same distance from thebuckle.
Your belt is now ready for attaching equipment.
Attaching the AmmunitionPouch to Your Belt
The following four steps used in attaching theammunition pouch to your belt correspond to the fouractions shown in figure 2-4:
1. Pull each keeper up to its open position and slideit over only one thickness of webbing. Make sure the
keepers are vertical and the bottoms are out beyond thewebbing.
2. Push the slides of the keepers down and into thebottom holes.
3. Make sure you push the slides firmly intothe holes; otherwise, the slide is in the WRONGposition, as shown in the sketch, and the equipmentcould fall off.
4. Use the pockets on each side of the ammo pouchfor carrying fragmentation hand grenades. Be sure, tierputting them in, that the nylon strap goes through thering and is snap fastened, as shown in the sketch.
NOTE: If you have a 20-round magazine pouchfor the M-16 rifle, refer to Step 6 of the followingprocedure to attach them.
2-5
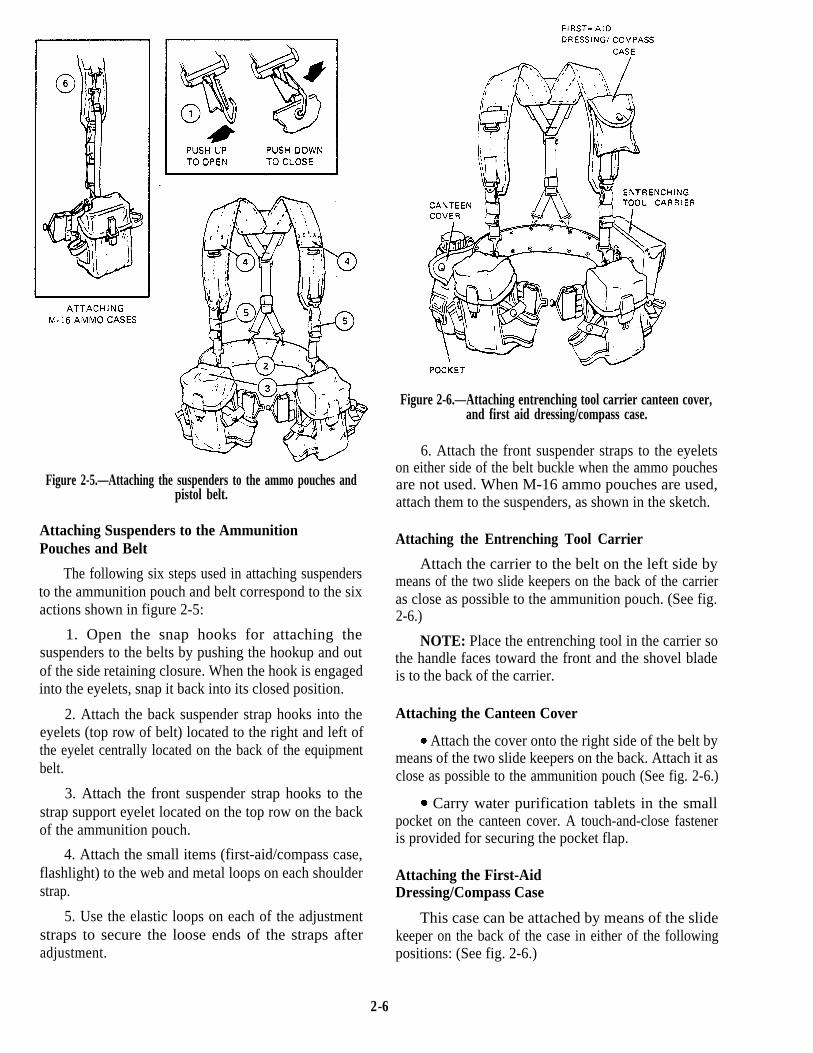
Figure 2-5.—Attaching the suspenders to the ammo pouches andpistol belt.
Attaching Suspenders to the AmmunitionPouches and Belt
The following six steps used in attaching suspendersto the ammunition pouch and belt correspond to the sixactions shown in figure 2-5:
1. Open the snap hooks for attaching thesuspenders to the belts by pushing the hookup and outof the side retaining closure. When the hook is engagedinto the eyelets, snap it back into its closed position.
2. Attach the back suspender strap hooks into theeyelets (top row of belt) located to the right and left ofthe eyelet centrally located on the back of the equipmentbelt.
3. Attach the front suspender strap hooks to thestrap support eyelet located on the top row on the backof the ammunition pouch.
4. Attach the small items (first-aid/compass case,flashlight) to the web and metal loops on each shoulderstrap.
5. Use the elastic loops on each of the adjustmentstraps to secure the loose ends of the straps afteradjustment.
Figure 2-6.—Attaching entrenching tool carrier canteen cover,and first aid dressing/compass case.
6. Attach the front suspender straps to the eyeletson either side of the belt buckle when the ammo pouchesare not used. When M-16 ammo pouches are used,attach them to the suspenders, as shown in the sketch.
Attaching the Entrenching Tool Carrier
Attach the carrier to the belt on the left side bymeans of the two slide keepers on the back of the carrieras close as possible to the ammunition pouch. (See fig.2-6.)
NOTE: Place the entrenching tool in the carrier sothe handle faces toward the front and the shovel bladeis to the back of the carrier.
Attaching the Canteen Cover
. Attach the cover onto the right side of the belt bymeans of the two slide keepers on the back. Attach it asclose as possible to the ammunition pouch (See fig. 2-6.)
l Carry water purification tablets in the smallpocket on the canteen cover. A touch-and-close fasteneris provided for securing the pocket flap.
Attaching the First-AidDressing/Compass Case
This case can be attached by means of the slidekeeper on the back of the case in either of the followingpositions: (See fig. 2-6.)
2-6
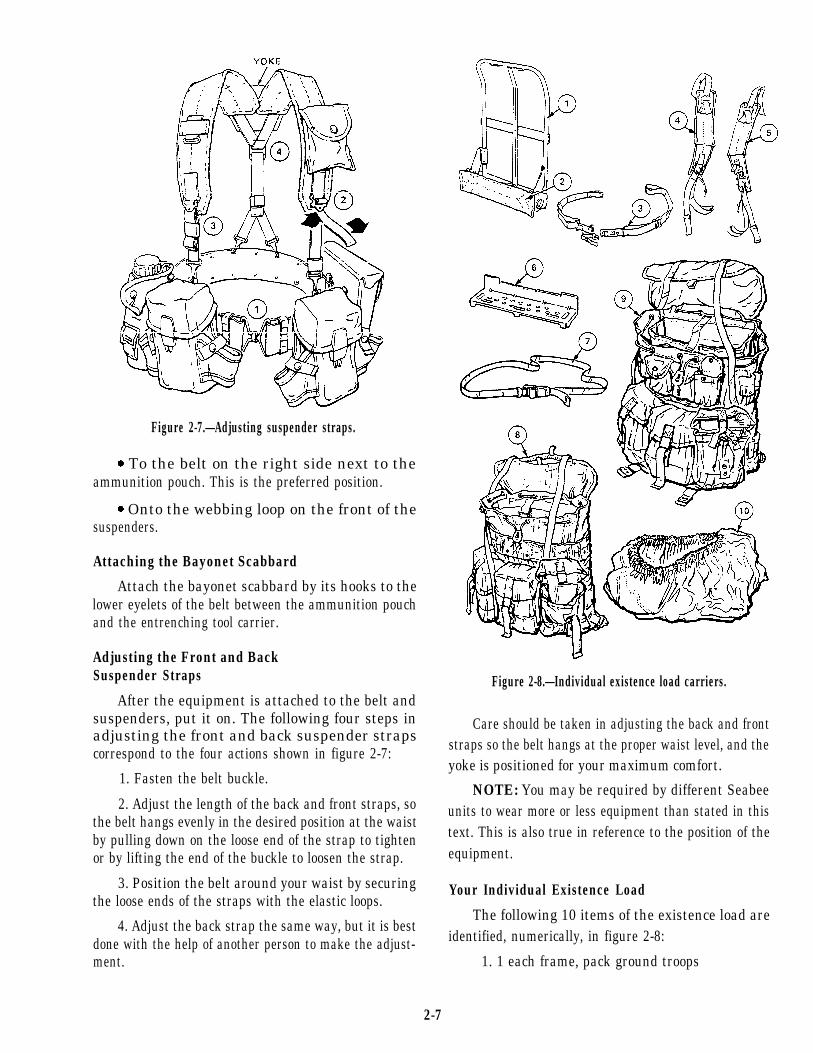
Figure 2-7.—Adjusting suspender straps.
l To the belt on the right side next to theammunition pouch. This is the preferred position.
. Onto the webbing loop on the front of thesuspenders.
Attaching the Bayonet Scabbard
Attach the bayonet scabbard by its hooks to thelower eyelets of the belt between the ammunition pouchand the entrenching tool carrier.
Adjusting the Front and BackSuspender Straps
After the equipment is attached to the belt andsuspenders, put it on. The following four steps inadjusting the front and back suspender strapscorrespond to the four actions shown in figure 2-7:
1. Fasten the belt buckle.
2. Adjust the length of the back and front straps, sothe belt hangs evenly in the desired position at the waistby pulling down on the loose end of the strap to tightenor by lifting the end of the buckle to loosen the strap.
3. Position the belt around your waist by securingthe loose ends of the straps with the elastic loops.
4. Adjust the back strap the same way, but it is bestdone with the help of another person to make the adjust-ment.
Figure 2-8.—Individual existence load carriers.
Care should be taken in adjusting the back and frontstraps so the belt hangs at the proper waist level, and theyoke is positioned for your maximum comfort.
NOTE: You may be required by different Seabeeunits to wear more or less equipment than stated in thistext. This is also true in reference to the position of theequipment.
Your Individual Existence Load
The following 10 items of the existence load areidentified, numerically, in figure 2-8:
1. 1 each frame, pack ground troops
2-7
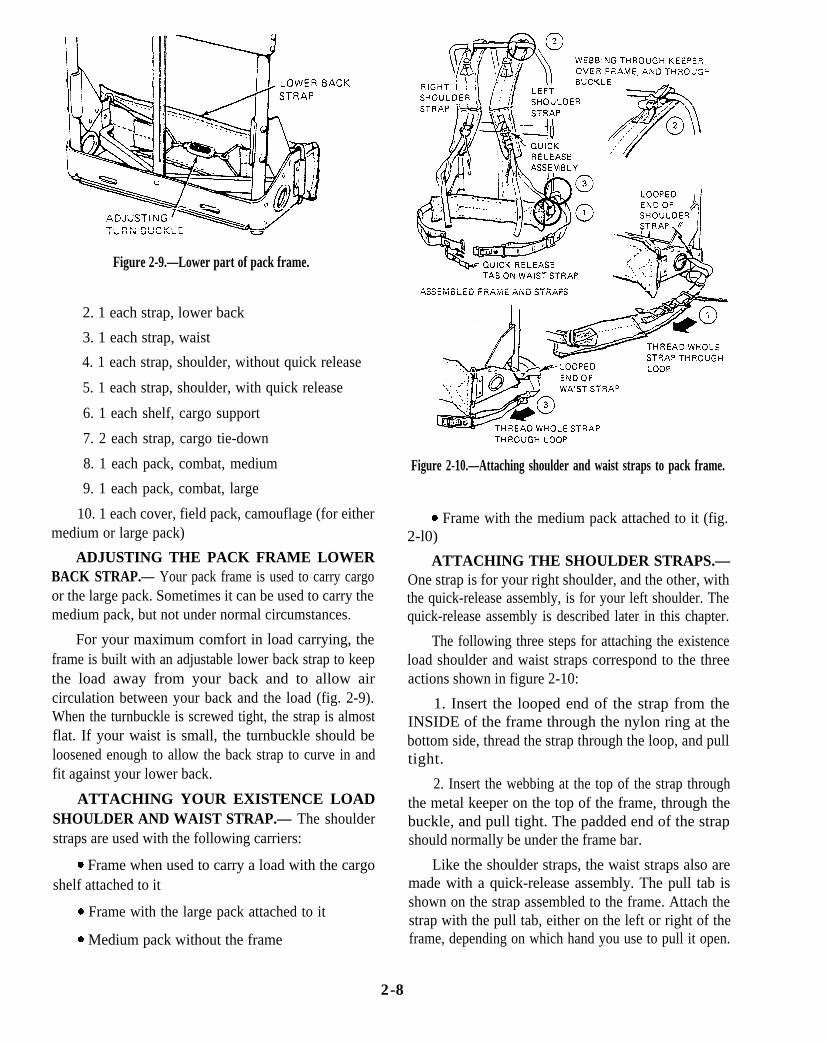
Figure 2-9.—Lower part of pack frame.
2. 1 each strap, lower back
3. 1 each strap, waist
4. 1 each strap, shoulder, without quick release
5. 1 each strap, shoulder, with quick release
6. 1 each shelf, cargo support
7. 2 each strap, cargo tie-down
8. 1 each pack, combat, medium
9. 1 each pack, combat, large
10. 1 each cover, field pack, camouflage (for eithermedium or large pack)
ADJUSTING THE PACK FRAME LOWERBACK STRAP.— Your pack frame is used to carry cargoor the large pack. Sometimes it can be used to carry themedium pack, but not under normal circumstances.
For your maximum comfort in load carrying, theframe is built with an adjustable lower back strap to keepthe load away from your back and to allow aircirculation between your back and the load (fig. 2-9).When the turnbuckle is screwed tight, the strap is almostflat. If your waist is small, the turnbuckle should beloosened enough to allow the back strap to curve in andfit against your lower back.
ATTACHING YOUR EXISTENCE LOADSHOULDER AND WAIST STRAP.— The shoulderstraps are used with the following carriers:
s Frame when used to carry a load with the cargoshelf attached to it
l Frame with the large pack attached to it
l Medium pack without the frame
Figure 2-10.—Attaching shoulder and waist straps to pack frame.
l Frame with the medium pack attached to it (fig.2-l0)
ATTACHING THE SHOULDER STRAPS.—One strap is for your right shoulder, and the other, withthe quick-release assembly, is for your left shoulder. Thequick-release assembly is described later in this chapter.
The following three steps for attaching the existenceload shoulder and waist straps correspond to the threeactions shown in figure 2-10:
1. Insert the looped end of the strap from theINSIDE of the frame through the nylon ring at thebottom side, thread the strap through the loop, and pulltight.
2. Insert the webbing at the top of the strap throughthe metal keeper on the top of the frame, through thebuckle, and pull tight. The padded end of the strapshould normally be under the frame bar.
Like the shoulder straps, the waist straps also aremade with a quick-release assembly. The pull tab isshown on the strap assembled to the frame. Attach thestrap with the pull tab, either on the left or right of theframe, depending on which hand you use to pull it open.
2-8
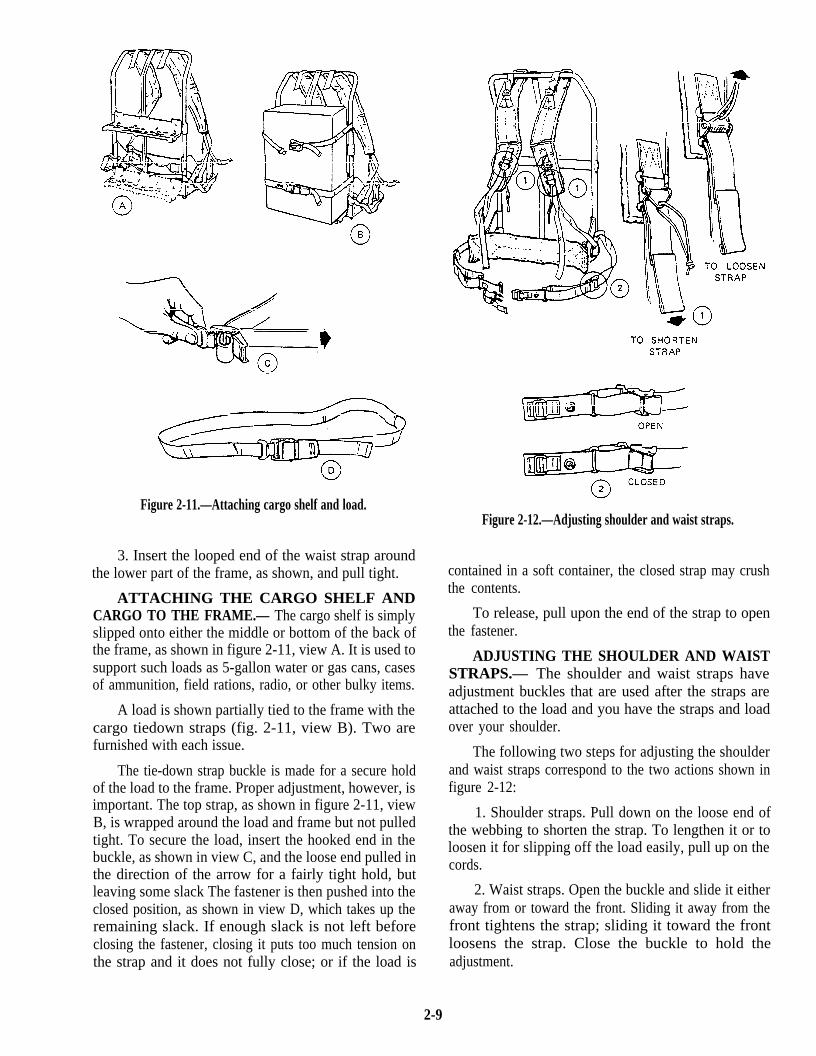
Figure 2-11.—Attaching cargo shelf and load.
3. Insert the looped end of the waist strap aroundthe lower part of the frame, as shown, and pull tight.
ATTACHING THE CARGO SHELF ANDCARGO TO THE FRAME.— The cargo shelf is simplyslipped onto either the middle or bottom of the back ofthe frame, as shown in figure 2-11, view A. It is used tosupport such loads as 5-gallon water or gas cans, casesof ammunition, field rations, radio, or other bulky items.
A load is shown partially tied to the frame with thecargo tiedown straps (fig. 2-11, view B). Two arefurnished with each issue.
The tie-down strap buckle is made for a secure holdof the load to the frame. Proper adjustment, however, isimportant. The top strap, as shown in figure 2-11, viewB, is wrapped around the load and frame but not pulledtight. To secure the load, insert the hooked end in thebuckle, as shown in view C, and the loose end pulled inthe direction of the arrow for a fairly tight hold, butleaving some slack The fastener is then pushed into theclosed position, as shown in view D, which takes up theremaining slack. If enough slack is not left beforeclosing the fastener, closing it puts too much tension onthe strap and it does not fully close; or if the load is
Figure 2-12.—Adjusting shoulder and waist straps.
contained in a soft container, the closed strap may crushthe contents.
To release, pull upon the end of the strap to openthe fastener.
ADJUSTING THE SHOULDER AND WAISTSTRAPS.— The shoulder and waist straps haveadjustment buckles that are used after the straps areattached to the load and you have the straps and loadover your shoulder.
The following two steps for adjusting the shoulderand waist straps correspond to the two actions shown infigure 2-12:
1. Shoulder straps. Pull down on the loose end ofthe webbing to shorten the strap. To lengthen it or toloosen it for slipping off the load easily, pull up on thecords.
2. Waist straps. Open the buckle and slide it eitheraway from or toward the front. Sliding it away from thefront tightens the strap; sliding it toward the frontloosens the strap. Close the buckle to hold theadjustment.
2-9
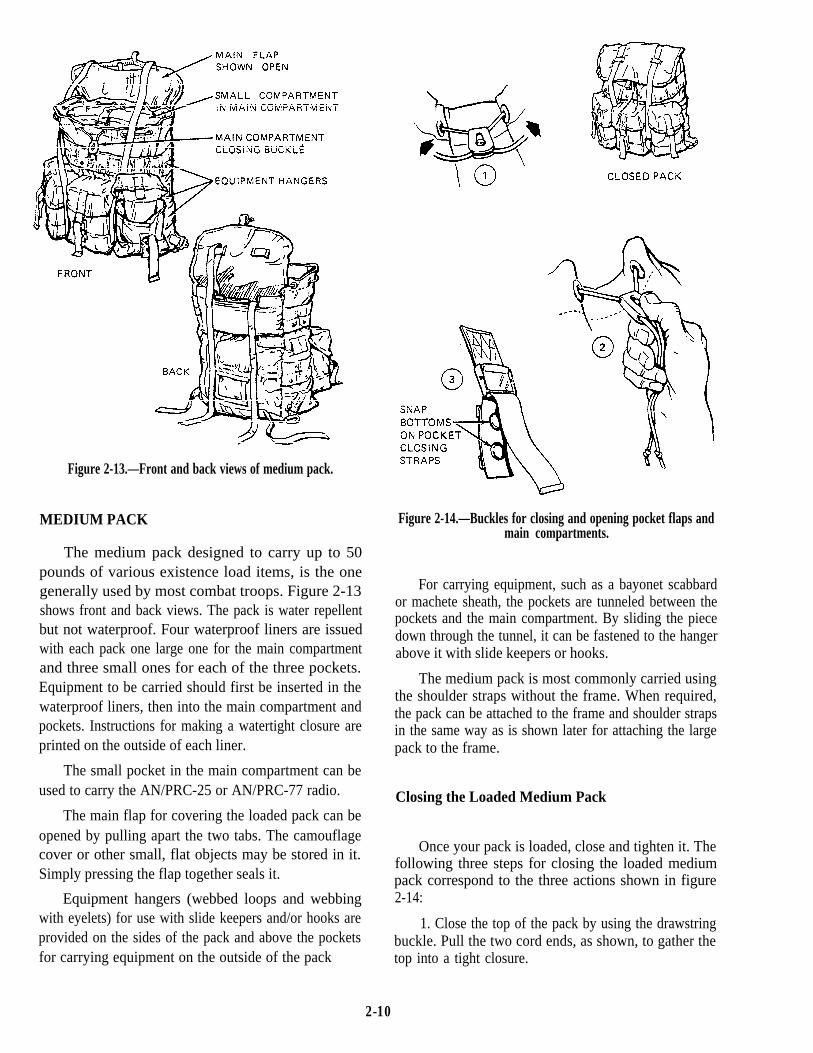
Figure 2-13.—Front and back views of medium pack.
MEDIUM PACK
The medium pack designed to carry up to 50pounds of various existence load items, is the onegenerally used by most combat troops. Figure 2-13shows front and back views. The pack is water repellentbut not waterproof. Four waterproof liners are issuedwith each pack one large one for the main compartmentand three small ones for each of the three pockets.Equipment to be carried should first be inserted in thewaterproof liners, then into the main compartment andpockets. Instructions for making a watertight closure areprinted on the outside of each liner.
The small pocket in the main compartment can beused to carry the AN/PRC-25 or AN/PRC-77 radio.
The main flap for covering the loaded pack can beopened by pulling apart the two tabs. The camouflagecover or other small, flat objects may be stored in it.Simply pressing the flap together seals it.
Equipment hangers (webbed loops and webbingwith eyelets) for use with slide keepers and/or hooks areprovided on the sides of the pack and above the pocketsfor carrying equipment on the outside of the pack
Figure 2-14.—Buckles for closing and opening pocket flaps andmain compartments.
For carrying equipment, such as a bayonet scabbardor machete sheath, the pockets are tunneled between thepockets and the main compartment. By sliding the piecedown through the tunnel, it can be fastened to the hangerabove it with slide keepers or hooks.
The medium pack is most commonly carried usingthe shoulder straps without the frame. When required,the pack can be attached to the frame and shoulder strapsin the same way as is shown later for attaching the largepack to the frame.
Closing the Loaded Medium Pack
Once your pack is loaded, close and tighten it. Thefollowing three steps for closing the loaded mediumpack correspond to the three actions shown in figure2-14:
1. Close the top of the pack by using the drawstringbuckle. Pull the two cord ends, as shown, to gather thetop into a tight closure.
2-10
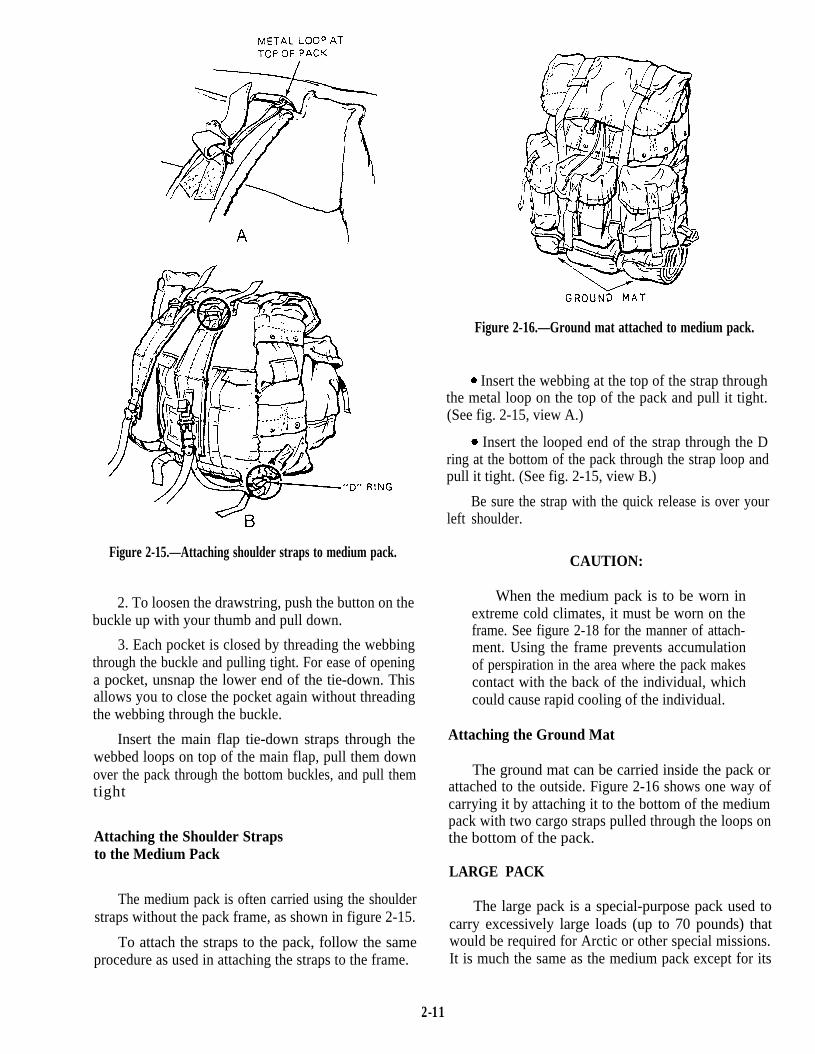
Figure 2-15.—Attaching shoulder straps to medium pack.
2. To loosen the drawstring, push the button on thebuckle up with your thumb and pull down.
3. Each pocket is closed by threading the webbingthrough the buckle and pulling tight. For ease of openinga pocket, unsnap the lower end of the tie-down. Thisallows you to close the pocket again without threadingthe webbing through the buckle.
Insert the main flap tie-down straps through thewebbed loops on top of the main flap, pull them downover the pack through the bottom buckles, and pull themtight
Attaching the Shoulder Strapsto the Medium Pack
The medium pack is often carried using the shoulderstraps without the pack frame, as shown in figure 2-15.
To attach the straps to the pack, follow the sameprocedure as used in attaching the straps to the frame.
Figure 2-16.—Ground mat attached to medium pack.
l Insert the webbing at the top of the strap throughthe metal loop on the top of the pack and pull it tight.(See fig. 2-15, view A.)
l Insert the looped end of the strap through the Dring at the bottom of the pack through the strap loop andpull it tight. (See fig. 2-15, view B.)
Be sure the strap with the quick release is over yourleft shoulder.
CAUTION:
When the medium pack is to be worn inextreme cold climates, it must be worn on theframe. See figure 2-18 for the manner of attach-ment. Using the frame prevents accumulationof perspiration in the area where the pack makescontact with the back of the individual, whichcould cause rapid cooling of the individual.
Attaching the Ground Mat
The ground mat can be carried inside the pack orattached to the outside. Figure 2-16 shows one way ofcarrying it by attaching it to the bottom of the mediumpack with two cargo straps pulled through the loops onthe bottom of the pack.
LARGE PACK
The large pack is a special-purpose pack used tocarry excessively large loads (up to 70 pounds) thatwould be required for Arctic or other special missions.It is much the same as the medium pack except for its
2-11
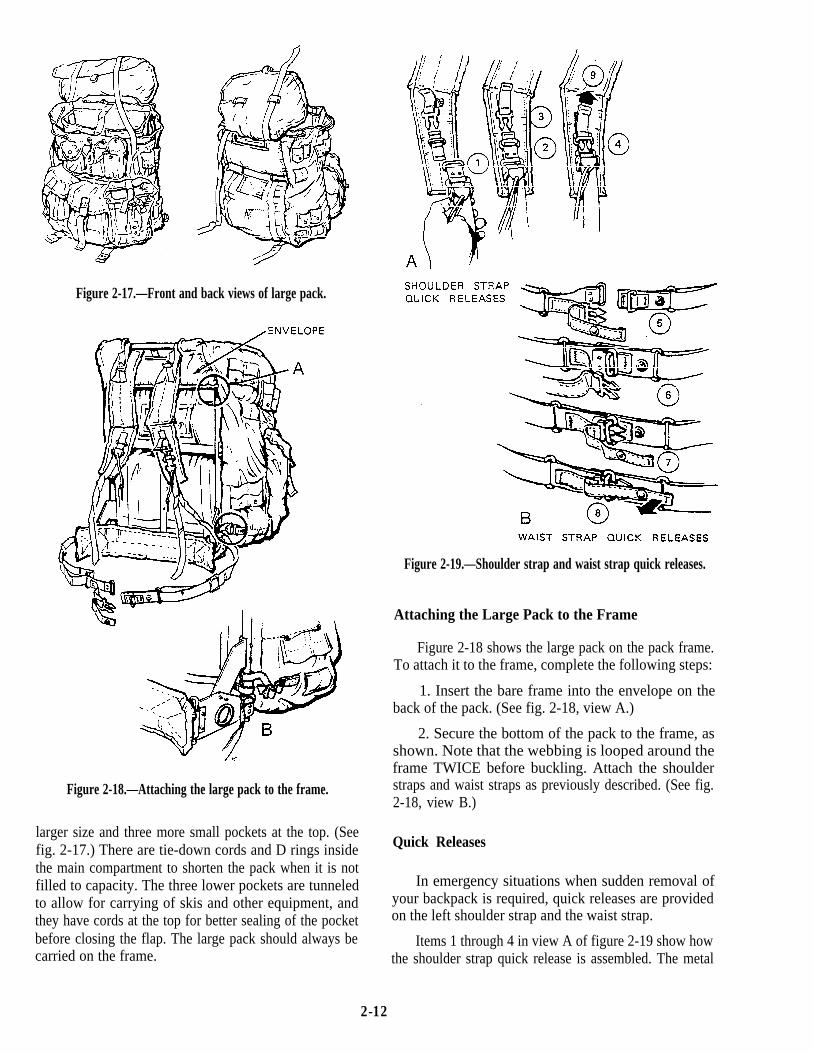
Figure 2-17.—Front and back views of large pack.
Figure 2-18.—Attaching the large pack to the frame.
larger size and three more small pockets at the top. (Seefig. 2-17.) There are tie-down cords and D rings insidethe main compartment to shorten the pack when it is notfilled to capacity. The three lower pockets are tunneledto allow for carrying of skis and other equipment, andthey have cords at the top for better sealing of the pocketbefore closing the flap. The large pack should always becarried on the frame.
Figure 2-19.—Shoulder strap and waist strap quick releases.
Attaching the Large Pack to the Frame
Figure 2-18 shows the large pack on the pack frame.To attach it to the frame, complete the following steps:
1. Insert the bare frame into the envelope on theback of the pack. (See fig. 2-18, view A.)
2. Secure the bottom of the pack to the frame, asshown. Note that the webbing is looped around theframe TWICE before buckling. Attach the shoulderstraps and waist straps as previously described. (See fig.2-18, view B.)
Quick Releases
In emergency situations when sudden removal ofyour backpack is required, quick releases are providedon the left shoulder strap and the waist strap.
Items 1 through 4 in view A of figure 2-19 show howthe shoulder strap quick release is assembled. The metal
2-12
loop at the top of the lower end of the strap (item 1) ishooked over the metal loop (item 2). The plastic prongs(item 3) are pushed down through the locked assembly(item 4) as shown.
Items 5 through 8 in view B of figure 2-19 and item9 in view A show how to assemble the quick release onthe waist strap.
For sudden release, first pull the tab on the waiststrap (item 8). Follow immediately by pulling up on thetab on the shoulder strap. (See item 9, view A.) Shift theload to your right and let it slip off your right shoulder.
CLEANING AND MAINTENANCE
Water repellent treated nylon duck and webbing wasused to fabricate all of the fabric items of equipment.The entrenching tool carrier is molded of ethylene-vinylacetate. The pack frame and cargo shelf are fabricatedfrom aluminum with solid steel rivets in certainhigh-stress areas.
The equipment can be cleaned by removing mud orother foreign matter with a brush, damp or dry cloth, orby scrubbing the exceedingly dirty areas using thefollowing procedure:
1. Scrape dirt or mud from the equipment with aflat stick or dull instrument that will not cut the fabricor webbing.
2. Remove loose dirt from soiled surfaces with acloth or soft brush.
3. Wet the surface and apply a warm solution ofdetergent, laundry, powdered, MIL-D-12182, Type II(FSN 7930-252-6797). Scrub with a soft brush, cloth,or sponge.
4. Flush the item thoroughly with clean, warmwater until all of the cleaning solution has been rinsedaway.
5. Dry the item or equipment away from directsunlight, direct heat, and open flames.
EXISTENCE/BIVOUAC EQUIPMENT
Existence/bivouac equipment is designed toprovide you with the minimum necessities while livingin the field. It is carried in or on the load-carryingequipment as explained below. Take care of yourequipment and it will take care of you. This equipmentconsists of the following items:
. Poncho and liner
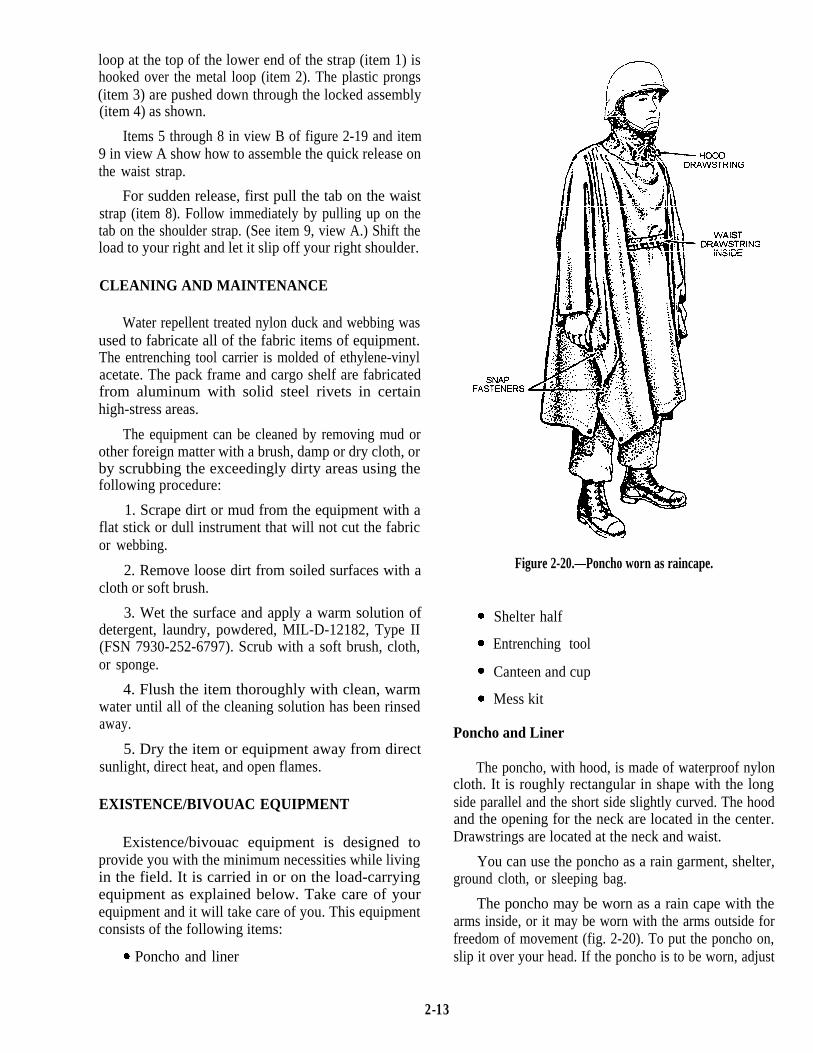
Figure 2-20.—Poncho worn as raincape.
Shelter half
Entrenching tool
Canteen and cup
Mess kit
Poncho and Liner
The poncho, with hood, is made of waterproof nyloncloth. It is roughly rectangular in shape with the longside parallel and the short side slightly curved. The hoodand the opening for the neck are located in the center.Drawstrings are located at the neck and waist.
You can use the poncho as a rain garment, shelter,ground cloth, or sleeping bag.
The poncho may be worn as a rain cape with thearms inside, or it may be worn with the arms outside forfreedom of movement (fig. 2-20). To put the poncho on,slip it over your head. If the poncho is to be worn, adjust
2-13

Figure 2-21.—One poncho used as one-man shelter.
Figure 2-22.—Two ponchos for two-man tent.
the hood drawstring to fit. The helmet is worn over thehood. Fasten the snap fasteners on the sides to preventthe poncho from flapping in high winds.
Various types of shelters and lean-tos can be madeby attaching ponchos to trees, tree branches, bushes,sticks or poles. Always dig a ditch around the edge tohelp drain off the rainwater. (See figs. 2-21, 2-22, and2-23.) The poncho may be used as a ground cover forshelters and as a waterproof barrier between the groundand sleeping bag.
The poncho may be used as a sleeping bag either byitself or in conjunction with a poncho liner (fig. 2-24).Spread the poncho flat on the ground, making sure thehood opening is tightly closed. If a liner is used, place iton top of the poncho, fold the poncho and liner in halflengthwise, and fasten the snaps together. If the ponchois being used without a liner, snap the sides togetheralong its entire length and tuck the foot end under to keepthe feet from sticking out.
When the poncho is being used as a sleeping bag ina combat area, DO NOT FASTEN THE SNAPFASTENERS TOGETHER; THEY CANNOT BEOPENED QUICKLY.
2-14
Figure 2-23.—Several ways ponchos can be used for shelter.
Figure 2-24.—Poncho used as sleeping bag.
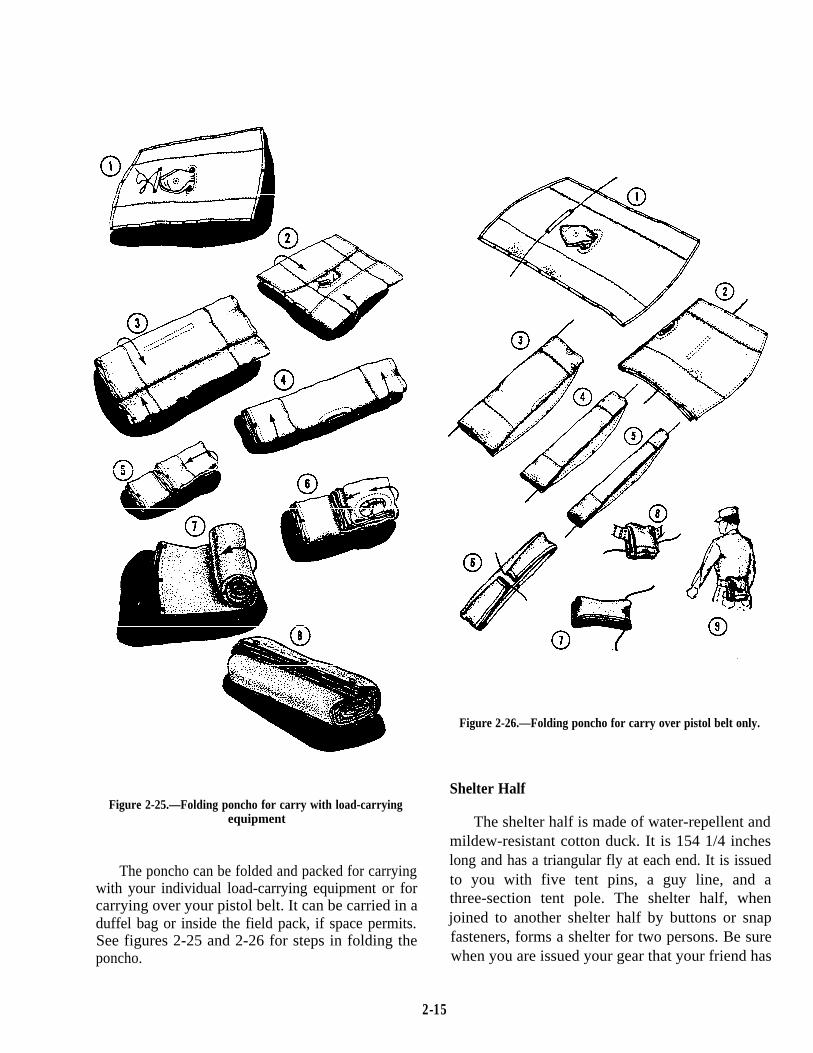
Figure 2-25.—Folding poncho for carry with load-carryingequipment
The poncho can be folded and packed for carryingwith your individual load-carrying equipment or forcarrying over your pistol belt. It can be carried in aduffel bag or inside the field pack, if space permits.See figures 2-25 and 2-26 for steps in folding theponcho.
Figure 2-26.—Folding poncho for carry over pistol belt only.
Shelter Half
The shelter half is made of water-repellent andmildew-resistant cotton duck. It is 154 1/4 incheslong and has a triangular fly at each end. It is issuedto you with five tent pins, a guy line, and athree-section tent pole. The shelter half, whenjoined to another shelter half by buttons or snapfasteners, forms a shelter for two persons. Be surewhen you are issued your gear that your friend has
2-15
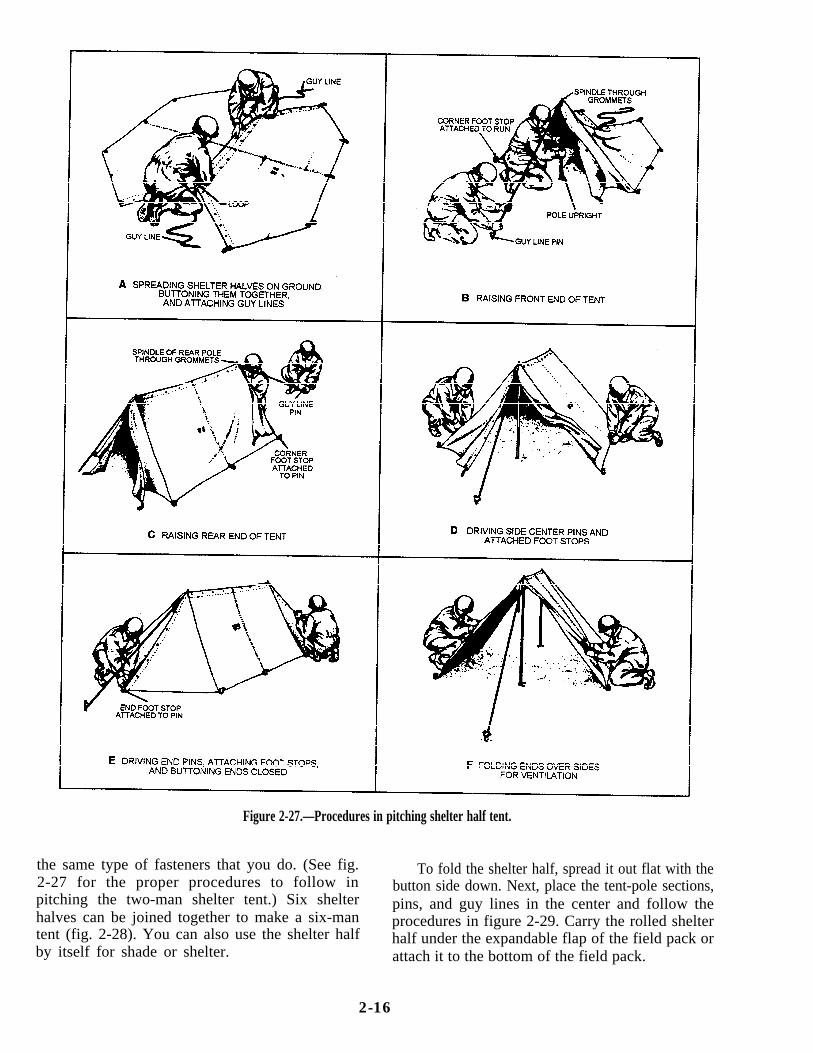
Figure 2-27.—Procedures in pitching shelter half tent.
the same type of fasteners that you do. (See fig. To fold the shelter half, spread it out flat with the2-27 for the proper procedures to follow in button side down. Next, place the tent-pole sections,pitching the two-man shelter tent.) Six shelter pins, and guy lines in the center and follow thehalves can be joined together to make a six-man procedures in figure 2-29. Carry the rolled sheltertent (fig. 2-28). You can also use the shelter half half under the expandable flap of the field pack orby itself for shade or shelter. attach it to the bottom of the field pack.
2-16
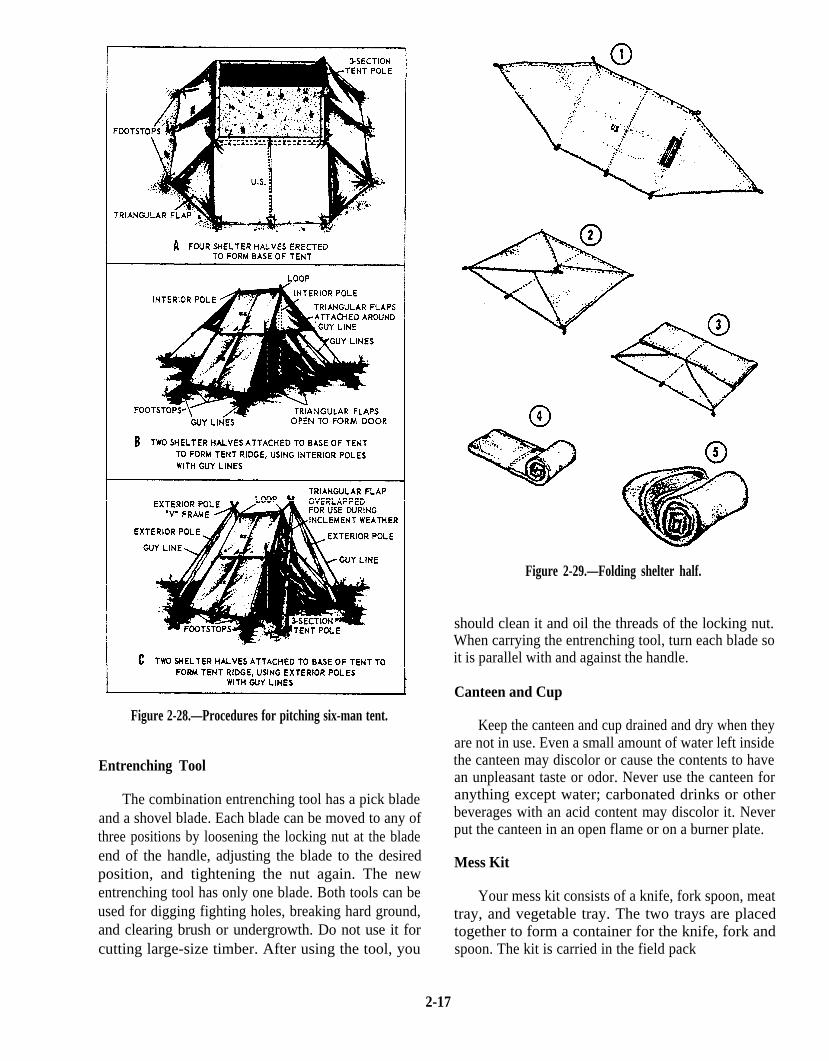
Figure 2-29.—Folding shelter half.
Figure 2-28.—Procedures for pitching six-man tent.
Entrenching Tool
The combination entrenching tool has a pick bladeand a shovel blade. Each blade can be moved to any ofthree positions by loosening the locking nut at the bladeend of the handle, adjusting the blade to the desiredposition, and tightening the nut again. The newentrenching tool has only one blade. Both tools can beused for digging fighting holes, breaking hard ground,and clearing brush or undergrowth. Do not use it forcutting large-size timber. After using the tool, you
should clean it and oil the threads of the locking nut.When carrying the entrenching tool, turn each blade soit is parallel with and against the handle.
Canteen and Cup
Keep the canteen and cup drained and dry when theyare not in use. Even a small amount of water left insidethe canteen may discolor or cause the contents to havean unpleasant taste or odor. Never use the canteen foranything except water; carbonated drinks or otherbeverages with an acid content may discolor it. Neverput the canteen in an open flame or on a burner plate.
Mess Kit
Your mess kit consists of a knife, fork spoon, meattray, and vegetable tray. The two trays are placedtogether to form a container for the knife, fork andspoon. The kit is carried in the field pack
2-17
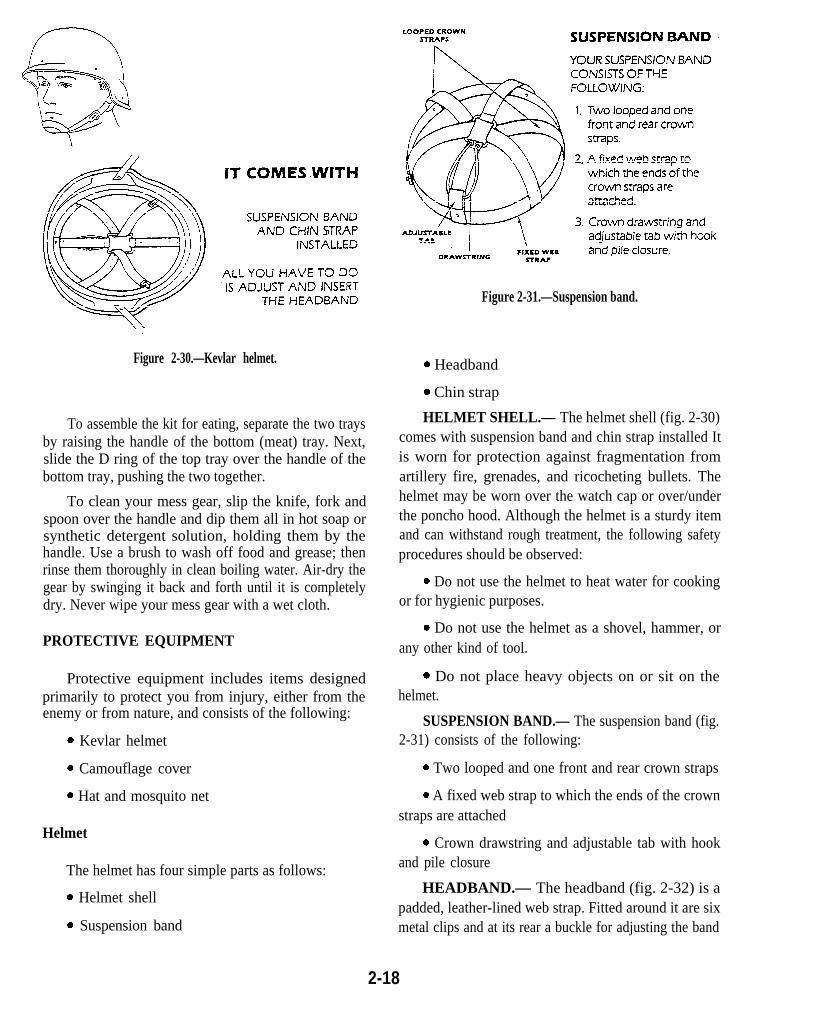
Figure 2-30.—Kevlar helmet.
To assemble the kit for eating, separate the two traysby raising the handle of the bottom (meat) tray. Next,slide the D ring of the top tray over the handle of thebottom tray, pushing the two together.
To clean your mess gear, slip the knife, fork andspoon over the handle and dip them all in hot soap orsynthetic detergent solution, holding them by thehandle. Use a brush to wash off food and grease; thenrinse them thoroughly in clean boiling water. Air-dry thegear by swinging it back and forth until it is completelydry. Never wipe your mess gear with a wet cloth.
PROTECTIVE EQUIPMENT
Protective equipment includes items designedprimarily to protect you from injury, either from theenemy or from nature, and consists of the following:
l Kevlar helmet
l Camouflage cover
* Hat and mosquito net
Helmet
The helmet has four simple parts as follows:
l Helmet shell
o Suspension band
Figure 2-31.—Suspension band.
l Headband
l Chin strap
HELMET SHELL.— The helmet shell (fig. 2-30)comes with suspension band and chin strap installed Itis worn for protection against fragmentation fromartillery fire, grenades, and ricocheting bullets. Thehelmet may be worn over the watch cap or over/underthe poncho hood. Although the helmet is a sturdy itemand can withstand rough treatment, the following safetyprocedures should be observed:
l Do not use the helmet to heat water for cookingor for hygienic purposes.
. Do not use the helmet as a shovel, hammer, orany other kind of tool.
l Do not place heavy objects on or sit on thehelmet.
SUSPENSION BAND.— The suspension band (fig.2-31) consists of the following:
l Two looped and one front and rear crown straps
. A fixed web strap to which the ends of the crownstraps are attached
l Crown drawstring and adjustable tab with hookand pile closure
HEADBAND.— The headband (fig. 2-32) is apadded, leather-lined web strap. Fitted around it are sixmetal clips and at its rear a buckle for adjusting the band
2-18
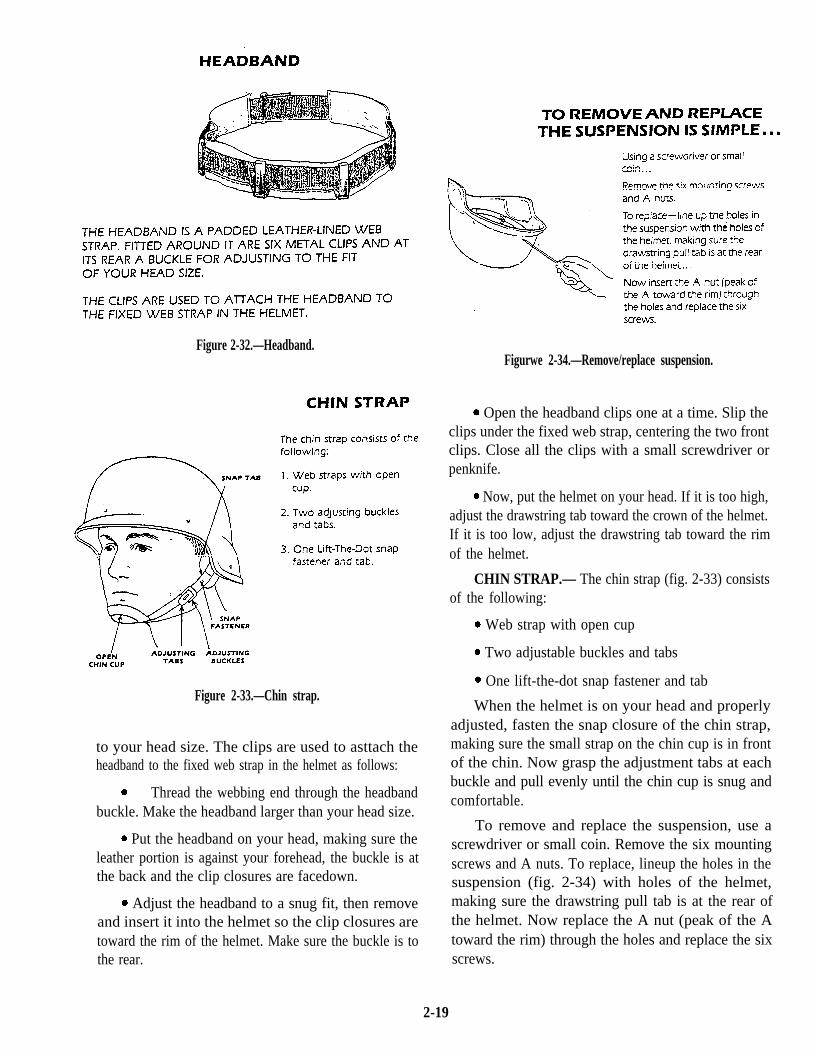
Figure 2-32.—Headband.Figurwe 2-34.—Remove/replace suspension.
Figure 2-33.—Chin strap.
to your head size. The clips are used to asttach theheadband to the fixed web strap in the helmet as follows:
Thread the webbing end through the headbandbuckle. Make the headband larger than your head size.
l Put the headband on your head, making sure theleather portion is against your forehead, the buckle is atthe back and the clip closures are facedown.
l Adjust the headband to a snug fit, then removeand insert it into the helmet so the clip closures aretoward the rim of the helmet. Make sure the buckle is tothe rear.
l Open the headband clips one at a time. Slip theclips under the fixed web strap, centering the two frontclips. Close all the clips with a small screwdriver orpenknife.
l Now, put the helmet on your head. If it is too high,adjust the drawstring tab toward the crown of the helmet.If it is too low, adjust the drawstring tab toward the rimof the helmet.
CHIN STRAP.— The chin strap (fig. 2-33) consistsof the following:
l Web strap with open cup
l Two adjustable buckles and tabs
l One lift-the-dot snap fastener and tab
When the helmet is on your head and properlyadjusted, fasten the snap closure of the chin strap,making sure the small strap on the chin cup is in frontof the chin. Now grasp the adjustment tabs at eachbuckle and pull evenly until the chin cup is snug andcomfortable.
To remove and replace the suspension, use ascrewdriver or small coin. Remove the six mountingscrews and A nuts. To replace, lineup the holes in thesuspension (fig. 2-34) with holes of the helmet,making sure the drawstring pull tab is at the rear ofthe helmet. Now replace the A nut (peak of the Atoward the rim) through the holes and replace the sixscrews.
2-19
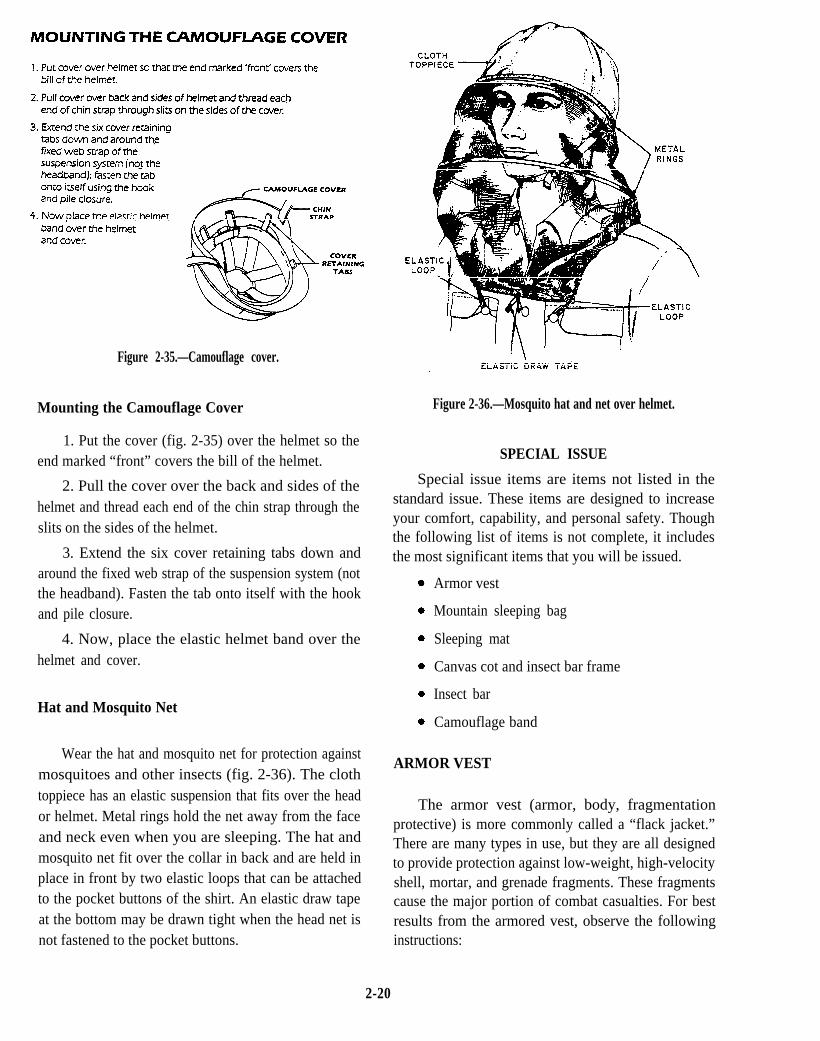
Figure 2-35.—Camouflage cover.
Mounting the Camouflage Cover
1. Put the cover (fig. 2-35) over the helmet so theend marked “front” covers the bill of the helmet.
2. Pull the cover over the back and sides of thehelmet and thread each end of the chin strap through theslits on the sides of the helmet.
3. Extend the six cover retaining tabs down andaround the fixed web strap of the suspension system (notthe headband). Fasten the tab onto itself with the hookand pile closure.
4. Now, place the elastic helmet band over thehelmet and cover.
Hat and Mosquito Net
Wear the hat and mosquito net for protection againstmosquitoes and other insects (fig. 2-36). The clothtoppiece has an elastic suspension that fits over the heador helmet. Metal rings hold the net away from the faceand neck even when you are sleeping. The hat andmosquito net fit over the collar in back and are held inplace in front by two elastic loops that can be attachedto the pocket buttons of the shirt. An elastic draw tapeat the bottom may be drawn tight when the head net isnot fastened to the pocket buttons.
Figure 2-36.—Mosquito hat and net over helmet.
SPECIAL ISSUE
Special issue items are items not listed in thestandard issue. These items are designed to increaseyour comfort, capability, and personal safety. Thoughthe following list of items is not complete, it includesthe most significant items that you will be issued.
Armor vest
Mountain sleeping bag
Sleeping mat
Canvas cot and insect bar frame
Insect bar
Camouflage band
ARMOR VEST
The armor vest (armor, body, fragmentationprotective) is more commonly called a “flack jacket.”There are many types in use, but they are all designedto provide protection against low-weight, high-velocityshell, mortar, and grenade fragments. These fragmentscause the major portion of combat casualties. For bestresults from the armored vest, observe the followinginstructions:
2-20
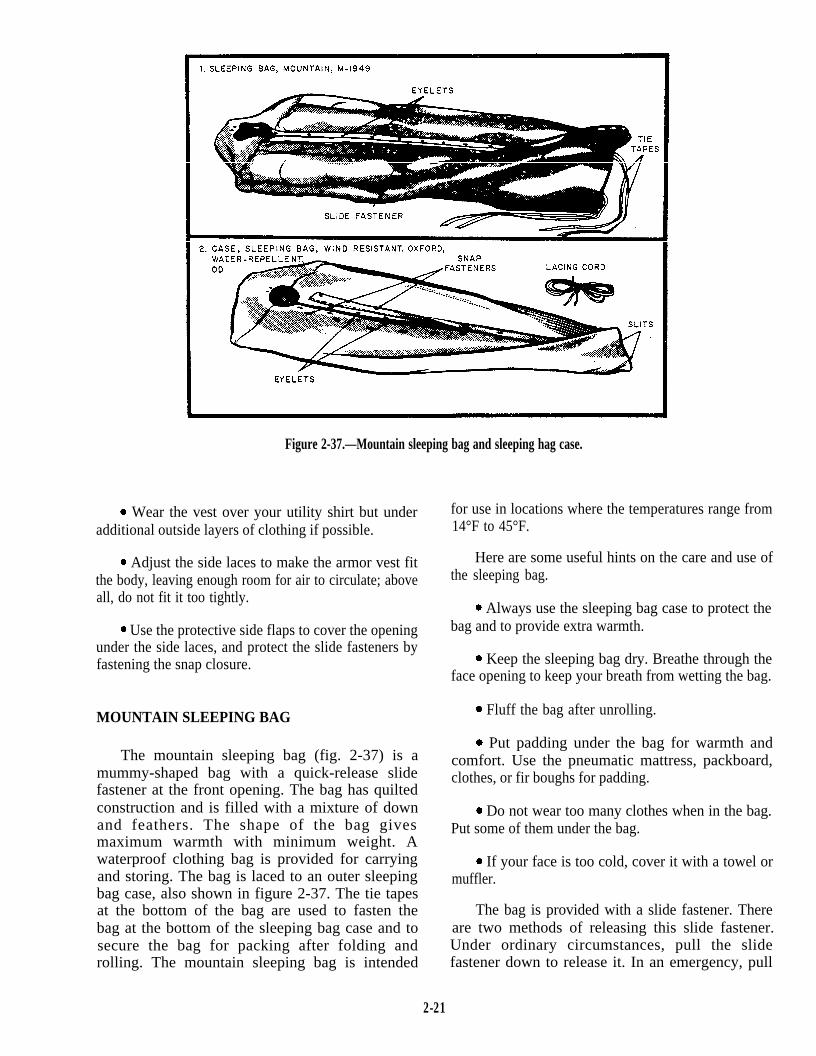
Figure 2-37.—Mountain sleeping bag and sleeping hag case.
l Wear the vest over your utility shirt but under for use in locations where the temperatures range fromadditional outside layers of clothing if possible.
l Adjust the side laces to make the armor vest fitthe body, leaving enough room for air to circulate; aboveall, do not fit it too tightly.
l Use the protective side flaps to cover the openingunder the side laces, and protect the slide fasteners byfastening the snap closure.
MOUNTAIN SLEEPING BAG
The mountain sleeping bag (fig. 2-37) is amummy-shaped bag with a quick-release slidefastener at the front opening. The bag has quiltedconstruction and is filled with a mixture of downand feathers. The shape of the bag givesmaximum warmth with minimum weight. Awaterproof clothing bag is provided for carryingand storing. The bag is laced to an outer sleepingbag case, also shown in figure 2-37. The tie tapesat the bottom of the bag are used to fasten thebag at the bottom of the sleeping bag case and tosecure the bag for packing after folding androlling. The mountain sleeping bag is intended
14°F to 45°F.
Here are some useful hints on the care and use ofthe sleeping bag.
l Always use the sleeping bag case to protect thebag and to provide extra warmth.
l Keep the sleeping bag dry. Breathe through theface opening to keep your breath from wetting the bag.
l Fluff the bag after unrolling.
l Put padding under the bag for warmth andcomfort. Use the pneumatic mattress, packboard,clothes, or fir boughs for padding.
. Do not wear too many clothes when in the bag.Put some of them under the bag.
l If your face is too cold, cover it with a towel ormuffler.
The bag is provided with a slide fastener. Thereare two methods of releasing this slide fastener.Under ordinary circumstances, pull the slidefastener down to release it. In an emergency, pull
2-21
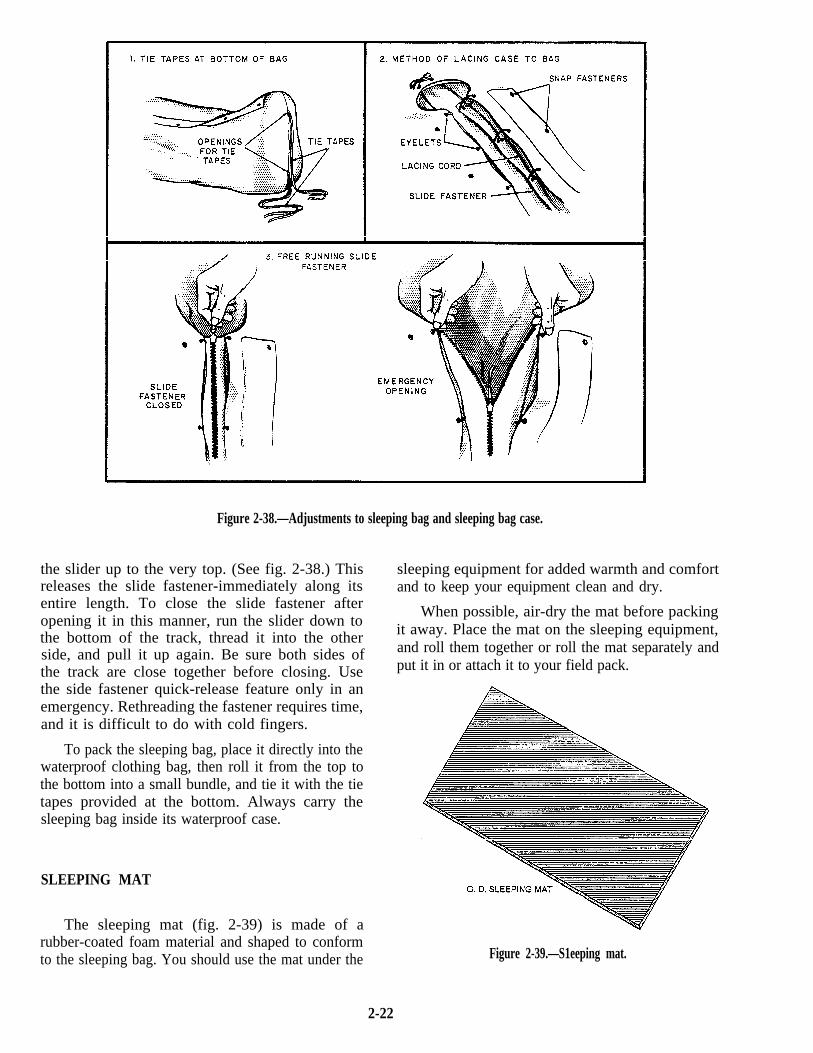
Figure 2-38.—Adjustments to sleeping bag and sleeping bag case.
the slider up to the very top. (See fig. 2-38.) This sleeping equipment for added warmth and comfortreleases the slide fastener-immediately along itsentire length. To close the slide fastener afteropening it in this manner, run the slider down tothe bottom of the track, thread it into the otherside, and pull it up again. Be sure both sides ofthe track are close together before closing. Usethe side fastener quick-release feature only in anemergency. Rethreading the fastener requires time,and it is difficult to do with cold fingers.
To pack the sleeping bag, place it directly into thewaterproof clothing bag, then roll it from the top tothe bottom into a small bundle, and tie it with the tietapes provided at the bottom. Always carry thesleeping bag inside its waterproof case.
SLEEPING MAT
The sleeping mat (fig. 2-39) is made of arubber-coated foam material and shaped to conformto the sleeping bag. You should use the mat under the
and to keep your equipment clean and dry.
When possible, air-dry the mat before packingit away. Place the mat on the sleeping equipment,and roll them together or roll the mat separately andput it in or attach it to your field pack.
Figure 2-39.—S1eeping mat.
2-22
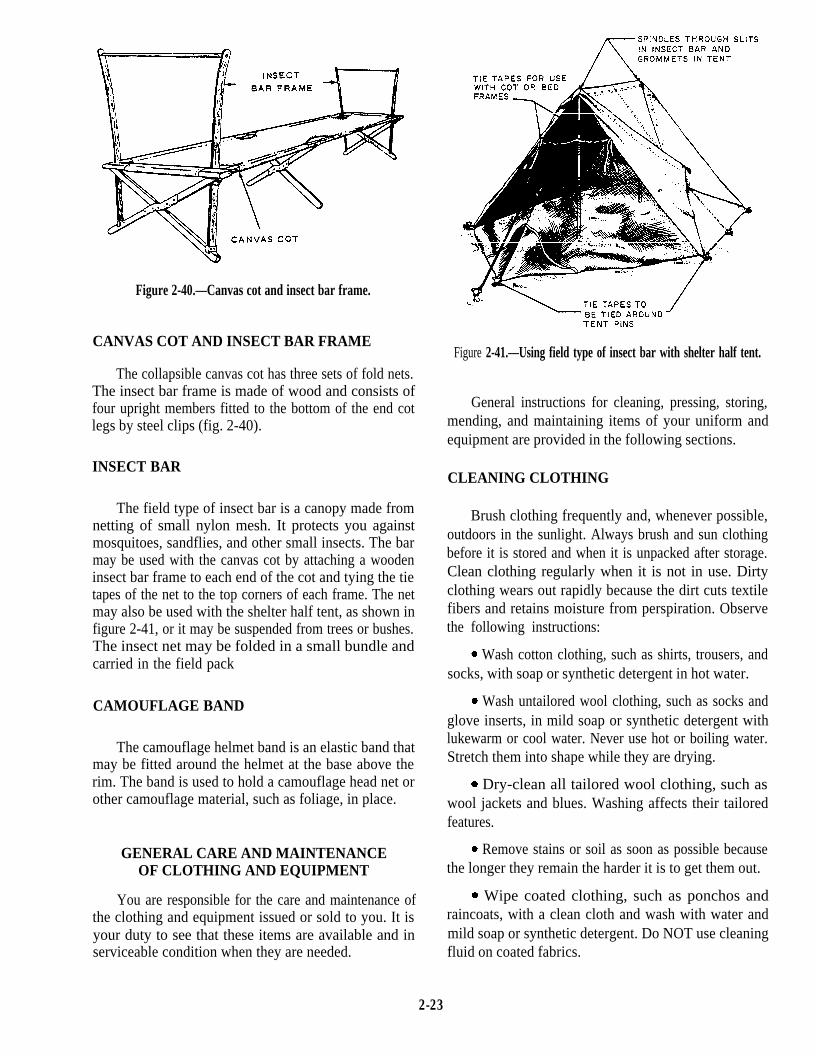
Figure 2-40.—Canvas cot and insect bar frame.
CANVAS COT AND INSECT BAR FRAME
The collapsible canvas cot has three sets of fold nets.The insect bar frame is made of wood and consists offour upright members fitted to the bottom of the end cotlegs by steel clips (fig. 2-40).
INSECT BAR
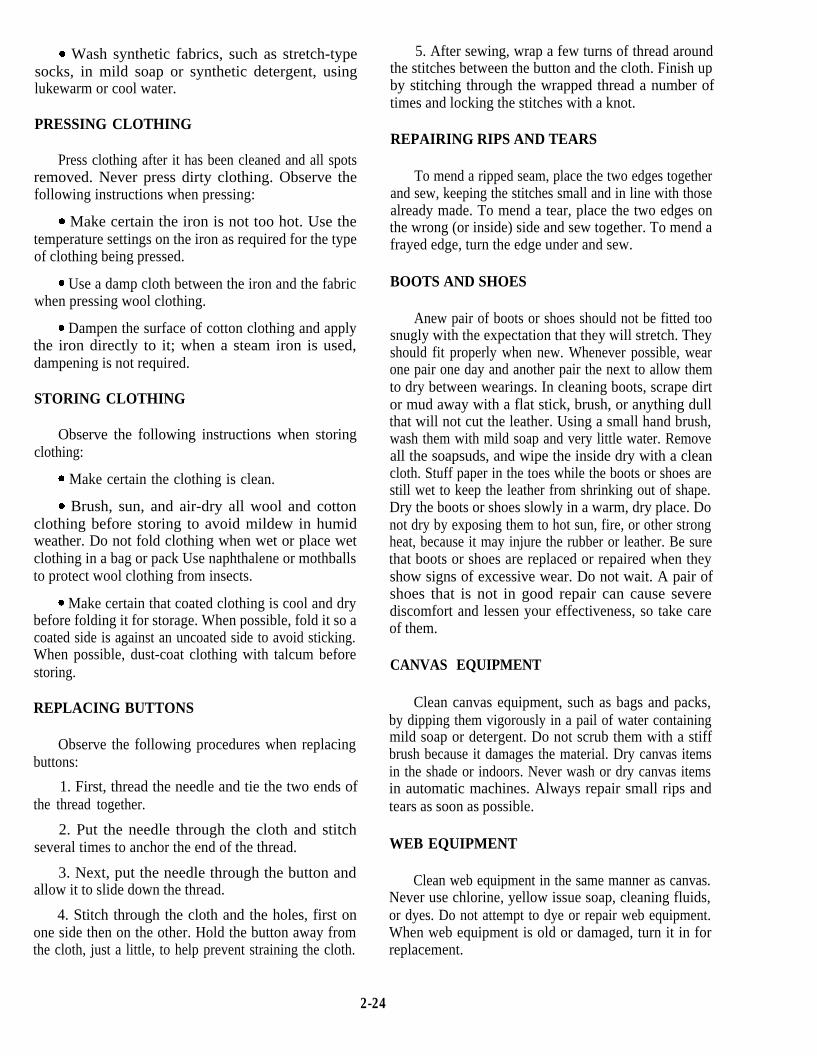
The field type of insect bar is a canopy made fromnetting of small nylon mesh. It protects you againstmosquitoes, sandflies, and other small insects. The barmay be used with the canvas cot by attaching a woodeninsect bar frame to each end of the cot and tying the tietapes of the net to the top corners of each frame. The netmay also be used with the shelter half tent, as shown infigure 2-41, or it may be suspended from trees or bushes.The insect net may be folded in a small bundle andcarried in the field pack
CAMOUFLAGE BAND
The camouflage helmet band is an elastic band thatmay be fitted around the helmet at the base above therim. The band is used to hold a camouflage head net orother camouflage material, such as foliage, in place.
GENERAL CARE AND MAINTENANCEOF CLOTHING AND EQUIPMENT
You are responsible for the care and maintenance ofthe clothing and equipment issued or sold to you. It isyour duty to see that these items are available and inserviceable condition when they are needed.
Figure 2-41.—Using field type of insect bar with shelter half tent.
General instructions for cleaning, pressing, storing,mending, and maintaining items of your uniform andequipment are provided in the following sections.
CLEANING CLOTHING
Brush clothing frequently and, whenever possible,outdoors in the sunlight. Always brush and sun clothingbefore it is stored and when it is unpacked after storage.Clean clothing regularly when it is not in use. Dirtyclothing wears out rapidly because the dirt cuts textilefibers and retains moisture from perspiration. Observethe following instructions:
l Wash cotton clothing, such as shirts, trousers, andsocks, with soap or synthetic detergent in hot water.
. Wash untailored wool clothing, such as socks andglove inserts, in mild soap or synthetic detergent withlukewarm or cool water. Never use hot or boiling water.Stretch them into shape while they are drying.
. Dry-clean all tailored wool clothing, such aswool jackets and blues. Washing affects their tailoredfeatures.
l Remove stains or soil as soon as possible becausethe longer they remain the harder it is to get them out.
l Wipe coated clothing, such as ponchos andraincoats, with a clean cloth and wash with water andmild soap or synthetic detergent. Do NOT use cleaningfluid on coated fabrics.
2-23
. Wash synthetic fabrics, such as stretch-typesocks, in mild soap or synthetic detergent, usinglukewarm or cool water.
PRESSING CLOTHING
Press clothing after it has been cleaned and all spotsremoved. Never press dirty clothing. Observe thefollowing instructions when pressing:
l Make certain the iron is not too hot. Use thetemperature settings on the iron as required for the typeof clothing being pressed.
l Use a damp cloth between the iron and the fabricwhen pressing wool clothing.
. Dampen the surface of cotton clothing and applythe iron directly to it; when a steam iron is used,dampening is not required.
STORING CLOTHING
Observe the following instructions when storingclothing:
l Make certain the clothing is clean.
l Brush, sun, and air-dry all wool and cottonclothing before storing to avoid mildew in humidweather. Do not fold clothing when wet or place wetclothing in a bag or pack Use naphthalene or mothballsto protect wool clothing from insects.
l Make certain that coated clothing is cool and drybefore folding it for storage. When possible, fold it so acoated side is against an uncoated side to avoid sticking.When possible, dust-coat clothing with talcum beforestoring.
REPLACING BUTTONS
Observe the following procedures when replacingbuttons:
1. First, thread the needle and tie the two ends ofthe thread together.
2. Put the needle through the cloth and stitchseveral times to anchor the end of the thread.
3. Next, put the needle through the button andallow it to slide down the thread.
4. Stitch through the cloth and the holes, first onone side then on the other. Hold the button away fromthe cloth, just a little, to help prevent straining the cloth.
5. After sewing, wrap a few turns of thread aroundthe stitches between the button and the cloth. Finish upby stitching through the wrapped thread a number oftimes and locking the stitches with a knot.
REPAIRING RIPS AND TEARS
To mend a ripped seam, place the two edges togetherand sew, keeping the stitches small and in line with thosealready made. To mend a tear, place the two edges onthe wrong (or inside) side and sew together. To mend afrayed edge, turn the edge under and sew.
BOOTS AND SHOES
Anew pair of boots or shoes should not be fitted toosnugly with the expectation that they will stretch. Theyshould fit properly when new. Whenever possible, wearone pair one day and another pair the next to allow themto dry between wearings. In cleaning boots, scrape dirtor mud away with a flat stick, brush, or anything dullthat will not cut the leather. Using a small hand brush,wash them with mild soap and very little water. Removeall the soapsuds, and wipe the inside dry with a cleancloth. Stuff paper in the toes while the boots or shoes arestill wet to keep the leather from shrinking out of shape.Dry the boots or shoes slowly in a warm, dry place. Donot dry by exposing them to hot sun, fire, or other strongheat, because it may injure the rubber or leather. Be surethat boots or shoes are replaced or repaired when theyshow signs of excessive wear. Do not wait. A pair ofshoes that is not in good repair can cause severediscomfort and lessen your effectiveness, so take careof them.
CANVAS EQUIPMENT
Clean canvas equipment, such as bags and packs,by dipping them vigorously in a pail of water containingmild soap or detergent. Do not scrub them with a stiffbrush because it damages the material. Dry canvas itemsin the shade or indoors. Never wash or dry canvas itemsin automatic machines. Always repair small rips andtears as soon as possible.
WEB EQUIPMENT
Clean web equipment in the same manner as canvas.Never use chlorine, yellow issue soap, cleaning fluids,or dyes. Do not attempt to dye or repair web equipment.When web equipment is old or damaged, turn it in forreplacement.
2-24

187.1Figure 2-42.—Bunk layout-rifleman.
NETTING
Wash netting with a warm solution of mild soapor detergent. Repair small hales or tears by placingpieces of adhesive tape or waterproof tape over bothsides of the hole. In an emergency, draw the edgestogether and tie them with string.
FASTENERS
Always use care in opening a snap fastener. Toopen, place your thumb and forefinger between thetwo layers of cloth close to the fastener and pry itapart. Do not tug at the cloth.
A slide fastener, even of sturdy construction,must be used carefully. When it snags, check it to seewhat is wrong. Do not try to force it. Usually bybacking it up, smoothing it out, and trying again, itwill work. If it works stiffly, rub a thin coating ofwax or graphite from a lead pencil on each side ofthe track and then work it back and forth a few times.
COATED ITEMS
Wipe soiled items with a clean cloth, wash themwith water and a mild soap or detergent, and rinsethoroughly. Dry the items as quickly as possible, but
do not use direct heat because the material will dryout and crack. Take special care to see that suchsubstances as grease, oil, acid, or insect repellant arewashed off as soon as possible.
ARMOR VEST
General instructions for taking care of the armorvest are usually sewn inside it near the collar.Observe these instructions carefully. Never dry thearmor vest over or near an open flame.
SEABAG AND 782 GEAR LAYOUT
COMSECONDNCB and COMTHIRDNCB haveagreed on a 782 gear layout for the NCF. A standardlayout consists of the items shown in table 2-1 andtable 2-2. Requirements may change with the missionof your command. Also, an environmental conditionmay require a modification to the layout. Whenchanges occur, local commands will direct the 782gear layout procedures.
For a rifleman, the standard bunk layout isdisplayed in figure 2-42 and the poncho layout in
2-25
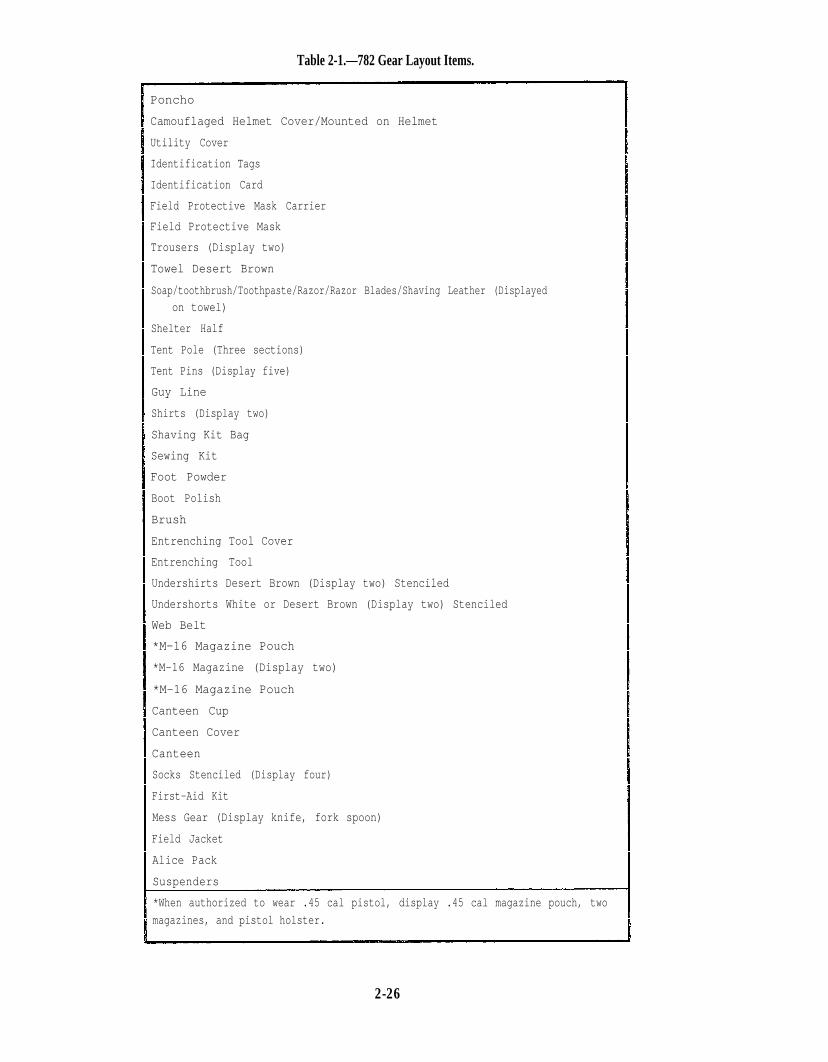
Table 2-1.—782 Gear Layout Items.
Poncho
Camouflaged Helmet Cover/Mounted on Helmet
Utility Cover
Identification Tags
Identification Card
Field Protective Mask Carrier
Field Protective Mask
Trousers (Display two)
Towel Desert Brown
Soap/toothbrush/Toothpaste/Razor/Razor Blades/Shaving Leather (Displayedon towel)
Shelter Half
Tent Pole (Three sections)
Tent Pins (Display five)
Guy Line
Shirts (Display two)
Shaving Kit Bag
Sewing Kit
Foot Powder
Boot Polish
Brush
Entrenching Tool Cover
Entrenching Tool
Undershirts Desert Brown (Display two) Stenciled
Undershorts White or Desert Brown (Display two) Stenciled
Web Belt
*M-16 Magazine Pouch
*M-16 Magazine (Display two)
*M-16 Magazine Pouch
Canteen Cup
Canteen Cover
Canteen
Socks Stenciled (Display four)
First-Aid Kit
Mess Gear (Display knife, fork spoon)
Field Jacket
Alice Pack
Suspenders
*When authorized to wear .45 cal pistol, display .45 cal magazine pouch, two
magazines, and pistol holster.
2-26
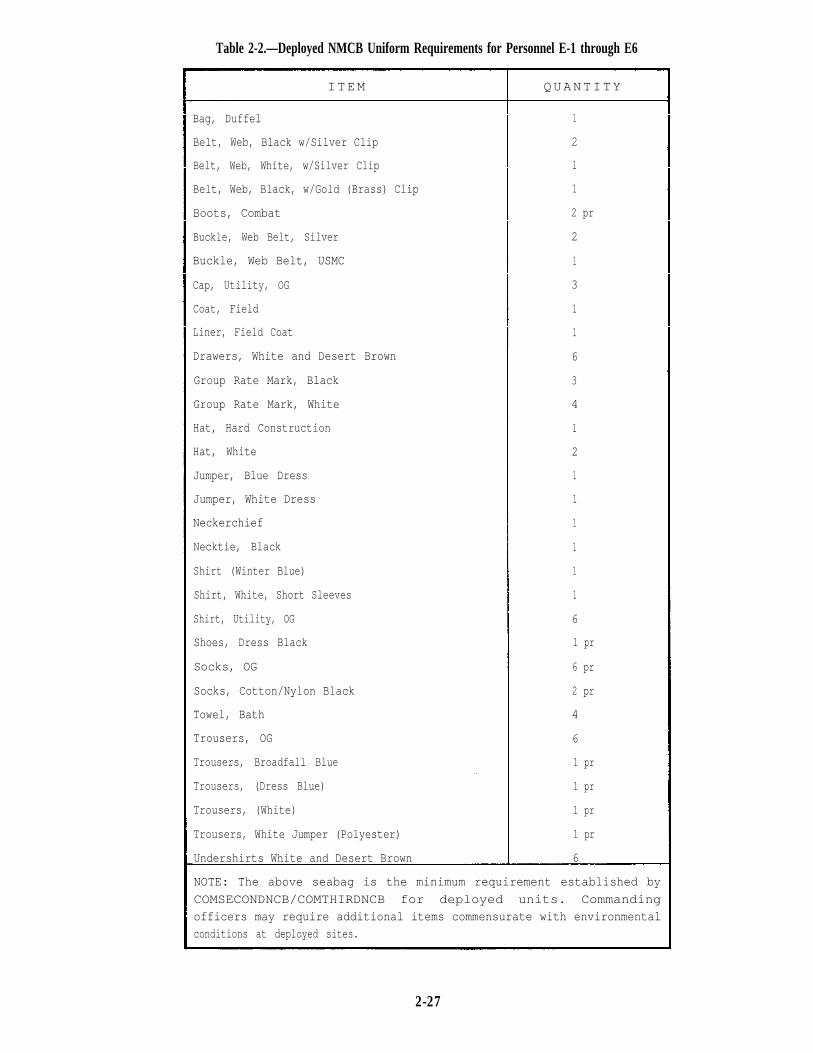
Table 2-2.—Deployed NMCB Uniform Requirements for Personnel E-1 through E6
ITEM QUANTITY
Bag, Duffel 1
Belt, Web, Black w/Silver Clip 2
Belt, Web, White, w/Silver Clip 1
Belt, Web, Black, w/Gold (Brass) Clip 1
Boots, Combat 2 pr
Buckle, Web Belt, Silver 2
Buckle, Web Belt, USMC 1
Cap, Utility, OG 3
Coat, Field 1
Liner, Field Coat 1
Drawers, White and Desert Brown 6
Group Rate Mark, Black 3
Group Rate Mark, White 4
Hat, Hard Construction 1
Hat, White 2
Jumper, Blue Dress 1
Jumper, White Dress 1
Neckerchief 1
Necktie, Black 1
Shirt (Winter Blue) 1
Shirt, White, Short Sleeves 1
Shirt, Utility, OG 6
Shoes, Dress Black 1 pr
Socks, OG 6 pr
Socks, Cotton/Nylon Black 2 pr
Towel, Bath 4
Trousers, OG 6
Trousers, Broadfall Blue 1 pr
Trousers, (Dress Blue) 1 pr
Trousers, (White) 1 pr
Trousers, White Jumper (Polyester) 1 pr
Undershirts White and Desert Brown 6
NOTE: The above seabag is the minimum requirement established by
COMSECONDNCB/COMTHIRDNCB for deployed units. Commandingofficers may require additional items commensurate with environmentalconditions at deployed sites.
2-27
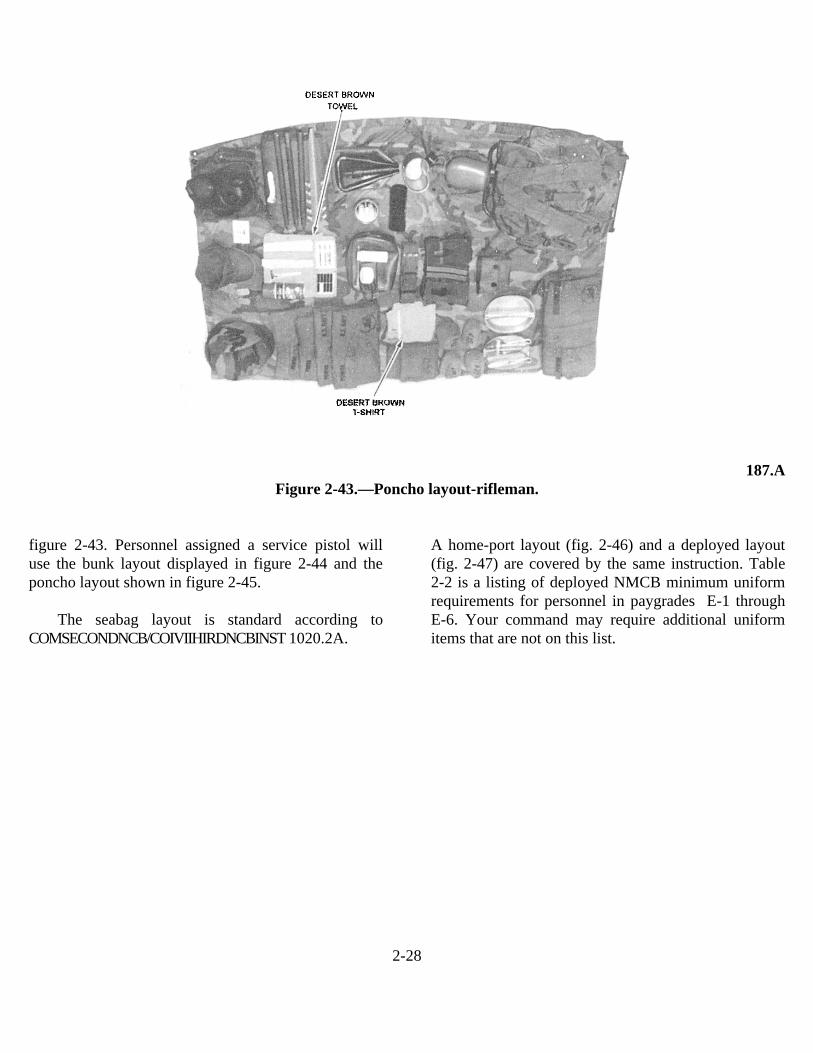
187.AFigure 2-43.—Poncho layout-rifleman.
figure 2-43. Personnel assigned a service pistol willuse the bunk layout displayed in figure 2-44 and theponcho layout shown in figure 2-45.
The seabag layout is standard according toCOMSECONDNCB/COIVIIHIRDNCBINST 1020.2A.
A home-port layout (fig. 2-46) and a deployed layout(fig. 2-47) are covered by the same instruction. Table2-2 is a listing of deployed NMCB minimum uniformrequirements for personnel in paygrades E-1 throughE-6. Your command may require additional uniformitems that are not on this list.
2-28
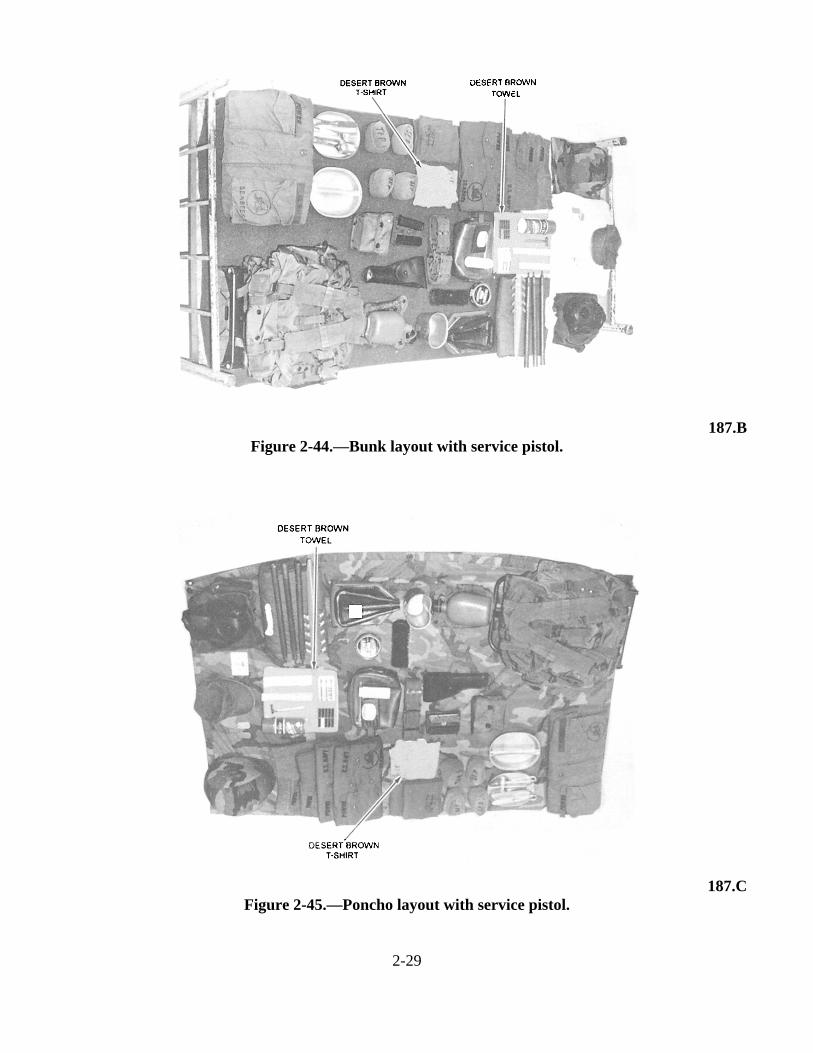
187.BFigure 2-44.—Bunk layout with service pistol.
187.CFigure 2-45.—Poncho layout with service pistol.
2-29

2-30
Figu
re 2
-46.—
Seab
ee s
eaba
g lay
out
(hom
e po
rt).
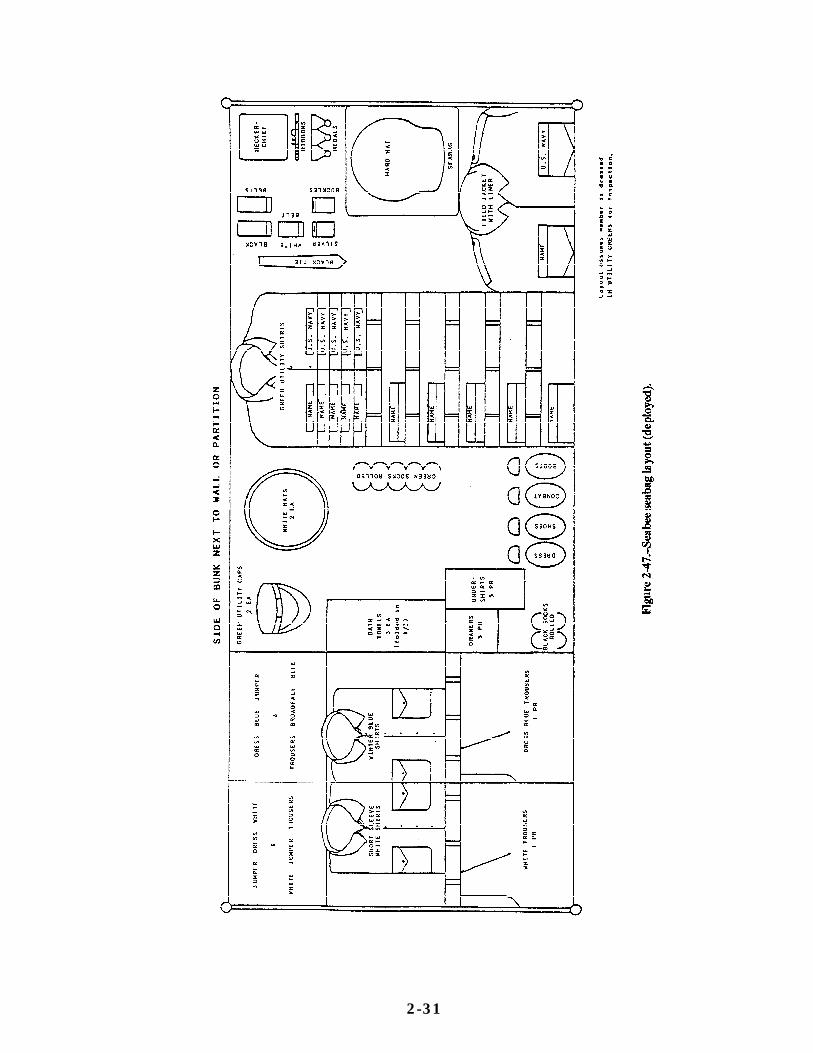
Figure 2-47.
2-31