Embed Size (px)
Citation preview

GB Sound module USM-RC-2
14.01.2020 BEIER-Electronic 1
Operating Manual
Sound module USM-RC-2
V1.71
BEIER-Electronic Winterbacher Str. 52/4, 73614 Schorndorf - Weiler
Telefon 07181/46232, Telefax 07181/45732 eMail: [email protected]
Internet: http://www.beier-electronic.de/modellbau

GB Sound module USM-RC-2
2 BEIER-Electronic 14.01.2020
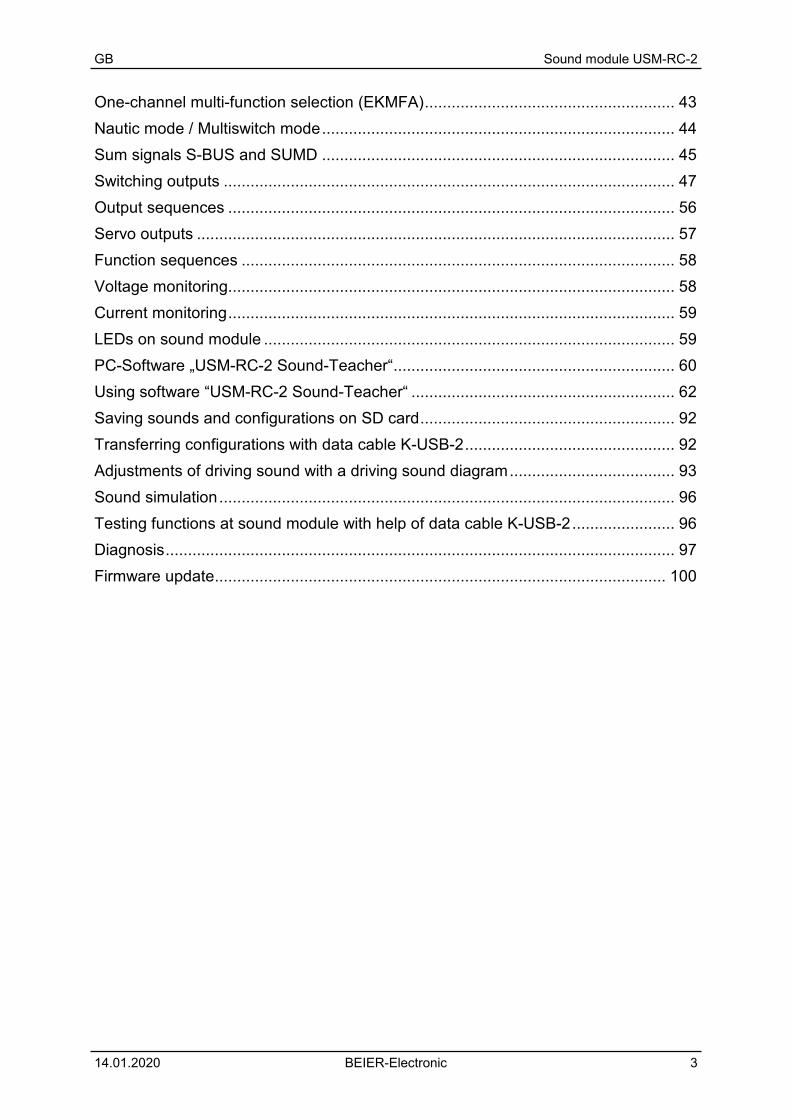
Table of Contents
Table of Contents ....................................................................................................... 2
Introduction ................................................................................................................. 4
Safety notes ............................................................................................................... 5
Additional information and help .................................................................................. 5
Technical data ............................................................................................................ 6
Operating modes: digital, digital mode with UFR speed controller, analogue and mix mode .......................................................................................................................... 7
Pin assignment in digital mode ................................................................................... 9
Wiring diagram for digital mode ................................................................................ 10
Pin assignment in digital mode with UFR speed controller ....................................... 11
Wiring diagram for digital mode with UFR speed controller ...................................... 12
Pin assignment in analogue mode ........................................................................... 13
Wiring diagram for analogue mode .......................................................................... 14
Pin assignment in mix mode ..................................................................................... 15
Wiring diagram for mix mode ................................................................................... 16
Installation of sound module ..................................................................................... 17
Connection of sound module .................................................................................... 17
Connection of sound module in digital mode ............................................................ 21
Connection of sound module in digital mode with UFR-1230 ................................... 23
Connection of sound module in analogue mode ...................................................... 24
Connection of sound module in mix mode ............................................................... 25
Loudspeaker ............................................................................................................. 26
Volume control ......................................................................................................... 27
Sounds ..................................................................................................................... 28
Engine sound ........................................................................................................... 29
Turning on/off engine sound ..................................................................................... 32
Adjusting engine sound to driving speed .................................................................. 33
Engine sound 2 ........................................................................................................ 34
Functions of sound module ...................................................................................... 35
Additional sounds 1 - 30 ........................................................................................... 36
Random sounds ....................................................................................................... 38
WAV-Player .............................................................................................................. 38
Functional assignment at proportional channels #1 - #4 .......................................... 40
Stick simulation via keys or switches ........................................................................ 42
GB Sound module USM-RC-2
14.01.2020 BEIER-Electronic 3
One-channel multi-function selection (EKMFA) ........................................................ 43
Nautic mode / Multiswitch mode ............................................................................... 44
Sum signals S-BUS and SUMD ............................................................................... 45
Switching outputs ..................................................................................................... 47
Output sequences .................................................................................................... 56
Servo outputs ........................................................................................................... 57
Function sequences ................................................................................................. 58
Voltage monitoring .................................................................................................... 58
Current monitoring .................................................................................................... 59
LEDs on sound module ............................................................................................ 59
PC-Software „USM-RC-2 Sound-Teacher“ ............................................................... 60
Using software “USM-RC-2 Sound-Teacher“ ........................................................... 62
Saving sounds and configurations on SD card ......................................................... 92
Transferring configurations with data cable K-USB-2 ............................................... 92
Adjustments of driving sound with a driving sound diagram ..................................... 93
Sound simulation ...................................................................................................... 96
Testing functions at sound module with help of data cable K-USB-2 ....................... 96
Diagnosis .................................................................................................................. 97
Firmware update ..................................................................................................... 100

GB Sound module USM-RC-2
4 BEIER-Electronic 14.01.2020
Introduction
The sound module USM-RC-2 is the successor of our popular USM-RC sound and light module with improved and extended functions and applications. The modul is developed especially for RC model construction in order to equip models for land, air and sea with realistic and speed-dependent driving and engine sounds. The sound module is suitable for all types of RC standard transmitter. Using the software USM-RC-2 Sound-Teacher, each model can be configurated with individual sound, light and servo functions. With a Windows PC and a SD card reader the settings can be changed at any time. For an authentic sound of the model, sounds can be selected for following areas: • Driving and engine sounds for up to two motors (speed-dependent) • Additional sounds (e.g. horns, hydraulic and compressed air noises) • Random sounds (e.g. squeaking, animal and ambient sounds) For an easy start we have more than 170 ready to use sound projects and 700 sound files for various types of models. Furthermore own recordings can be used. For a great sound output, one or two loudspeakers can be connected directly to the sound module. Up to four sounds can be played simultaneously in a sound quality of 44.1 kHz and 16 Bit. An integrated powerful amplifier guarantees optimal sound. To realize different light effects, the USM-RC-2 has 12 switching outputs to connect LEDs, lamps and other consumers. Light functions, such as low beam, rear light, brake light, indicator lights, warning lights, flickering lights, etc. can be easily implemented and controlled. All light functions can be activated or deactivated automatically with sounds and movements. With two additional servo outputs, movements can be synchronised to the played sound. The servo functions are also set with the USM-RC-2 Sound-Teacher. A variety of accessories are available to make the connection of the USM-RC-2 sound module easier and to expand the available functions. This includes terminal clamps, battery Y-cables and IR-light modules to pass the light signals to a trailer.

GB Sound module USM-RC-2
14.01.2020 BEIER-Electronic 5
Safety notes
• Please read this operating manual carefully and keep it for future use! • The integrated circuits on the sound module are sensitive to electrostatic
charge. Therefore it is important that you don’t touch these components, before discharging yourself (e.g. through a grip onto a grounded device).
• Under certain circumstances unfavourable placement and wiring of the sound module in the model may lead to restriction of transmitter range (mainly with 35/40 MHz transmitter).
• The sound module should only be used with supply voltages that are given in the technical data.
• Always switch off power first before connecting the module! • The sound module is not suitable for children under 14 years.
Additional information and help You have problems with your sound module and need additional information? No worries, we are here to help you! BEIER-Electronic forum Check out our BEIER-Electronic forum on our website.This is the most appropriate place to get quick and competent assistance. In our forum you can ask questions and receive practically proven answers from us and from other forum user. Through an intensive exchange of expertise and experience, all forum users can benefit from the information, presented solutions and ideas. Maybe your question / problem has already been described and you can find immediately the solution (e.g. in the FAQ). BEIER-Electronic on facebook: Also visit us on facebook. You can find news and additional information about our products there. Customers of us also founded a facebook group, where you can present your project and get help, just like in our forum. YouTube tutorials If you have questions about basic functions of the sound module USM-RC-2, please watch our YouTube video tutorials with English subtitles. In these videos we explain for example how to connect the sound module and how to program and control different functions.

GB Sound module USM-RC-2
6 BEIER-Electronic 14.01.2020
Technical data
Supply Voltage (Ub): 5 – 14V DC Power consumption: Standby-current: approx. 120 mA
Operation (only sound): up to 3,0 A Operation (Sound + switching outputs): Up to 6,0A The current consumption depends on volume and switched load.
Switching-inputs: 5 pieces LO-Signal = U < 2V HI-Signal = U > 5V Integrated pull-up resistors (4k7 / 10k)
Switching-outputs: 12 pieces (npn – open collector), Up to 1,5A for every output, the total current of all outputs is not allowed to exceed 3,0A
Proportional-inputs: 4 pieces (1,000 - 2,000ms) Proportional-outputs: 2 servo outputs (1,000 - 2,000ms) Voltage inputs for drive speed for analogue mode:
0 – 14V DC
Audio amplifier: Up to 2x20W (mono) Recommended loudspeakers: 4 – 8Ω Volume control: By external potentiometer (100kΩ) and/or
remote control possible Memory for sound files: Micro-SD-card (1 to 8 GB) Max. length for the sounds: Approx. 180 minutes per 1 GB Supported data files: WAV-Format, 8/16 Bit, Mono/Stereo, 22/44kHz Sound output: 16 Bit, Mono, 44kHz Number of possible sounds: • 5 running steps/gears (internally in up to
255 steps accelerated) • 8 change sounds between the running
steps/gears • Turn on noise, turn off noise, starting noise,
stopping noise, idling noise, brake noise, reverse engine noise, curve squeal, flashing lights sound
• 30 additional sounds (for example via prop.-channels)
• 8 random sounds (random generator) • 30 tracks for WAV-Player
Random generator: Times between 1 to 999s adjustable Interface: Universal Extension Interface Permissible ambient temperature: 0 – 60°C Permissible relative air humidity: max. 85% Dimensions: 66 x 42 x 17 mm Weight: 25g

GB Sound module USM-RC-2
14.01.2020 BEIER-Electronic 7
Operating modes: digital, digital mode with UFR speed controller, analogue and mix mode To make the sound module universal usable, four different operating modes are available. The operating mode is important for the possible functions and especially for connecting the sound module. Therefore you should decide at the beginning which operating mode is best for your model. The operating mode of the sound module is set in the USM-RC-2 Sound-Teacher (see page 64). If possible, please use digital or mix mode, owing to their extended selection of functions. Digital mode: The digital mode is always applied if you use standard RC remote control radios and receivers (for example 35MHz, 40MHz or 2,4GHz). In this case the sound module is connected directly to the RC-receiver, and it recognizes the driving speed directly from one or two proportional channels (parallel to the speed controller). Via two or three additional proportional channels (and the four switching inputs) it is possible to control different functions of the sound module (see page 65). Digital mode with UFR ESC: This digital mode offers additional advantages when using the sound module USM-RC-2 in combination with our speed controller UFR: • Automatic setting of zero point. No need to adjust the zero point separately in the driving sound diagram anymore. • More accurate transmission of speed data. • Additional outputs for lights. When using the combination, we recommend controlling lights with the UFR. In case more lights are required at the UFR, additional light outputs from the USM-RC-2 can be used. The corresponding output functions must be set in the USM-RC-2 Sound-Teacher. • When indicator lights are activated at the UFR, the sound module plays simultaneously the indicators sound. • No additional wiring of switching inputs is required in case light signals (indicator, brake, rear lights) need to be transferred from UFR, to USM-RC-2 and further to infrared light module SM-IR-16-2 (which is connected to the sound module). When using “Digital mode with UFR ESC” it is also necessary to activate the option in the Drive Teacher: Configuration Speed controller “Digital communication with sound module”. Disadvantage of digital mode with UFR: it is not possible to connect the extention module EXM-2 to the sound module with this setting. To use the EXM-2 the “normal” digitale mode must be used in the Sound-Teacher and “Digital communication with sound module” in the Drive-Teacher must be deactivated. In this case the throttle channel of the receiver is connected to servo cable X1 at the UFR, and not to sound module X2/1.

GB Sound module USM-RC-2
8 BEIER-Electronic 14.01.2020
Analogue mode: The analogue mode should be used, if you don’t have „standard” RC equipment, that means your receiver does not use standard proportional channels (1,0-2,0ms signals). In the analogue mode the driving speed is determined by a voltage measurement at one or two motors. In order to activate additional sounds or to turn on/off the engine sound the digital switching inputs of the sound module must be connected (e.g. with switching modules). Unfortunately due to the missing proportional channels, a few functions are not possible in the analogue mode. For instance you can activate just four or six additional sounds with the switching inputs. Mix mode: The mix mode is a combination of digital and analogue mode. Like in the analogue mode the driving speed is determined directly by the motor voltage. However, the proportional channels #2 - #4 still working in digital mode and can interpret straight signals of the RC receiver. The mix mode is used, if the speed controller has special functions such as cruise control and that’s why the controlling of the drive motor is different.

GB Sound module USM-RC-2
14.01.2020 BEIER-Electronic 9
Pin assignment in digital mode Connections on the sound module: X1/1 Supply voltage + (5 – 14V DC) X1/2 Supply voltage - X1/3 Input for engine sound on/off X1/4 Switching-input 1 X1/5 Switching-input 2 X1/6 Switching-input 3 X1/7 Switching-input 4 X1/8 Supply voltage + for outputs 1 - 12 (internally connected to X1/1) X1/9 Switching-output 11 X1/10 Switching-output 12 X2/1 Connection for proportional channel 1 (speed 1. motor) X2/2 Connection for proportional channel 2 (speed 2. motor) X2/3 Connection for proportional channel 3 X2/4 Connection for proportional channel 4 X3 Switching-outputs 1 - 10 X4 Slot for Micro SD-Card X5 Connection for loudspeaker 1 X6 Connection for loudspeaker 2 (optionally) X7 Connection for the potentiometer for the volume control X8/1 Connection for servo 1 X8/2 Connection for servo 2 X9 Universal Extension Interface (for example data cable, IR-transmitter diode)

GB Sound module USM-RC-2
10 BEIER-Electronic 14.01.2020
Pow
er s
uppl
y5
- 14V
DC +
-
-+
1
Volu
me
Tops
peed
100k
Switc
h m
odul
e
RC
rece
iver
brow
n
Engine sound on/off
Input 1
Input 2
Input 3
Input 4
6,3A
Spee
d co
ntro
ller
Spee
d co
ntro
ller
Mic
roS
D
red
oran
ge
yello
w
gree
n
blue
purp
le
grey
whi
te
blac
k
Out
put 1
Out
put 2
Out
put 3
Out
put 4
Out
put 5
Out
put 6
Out
put 7
Out
put 8
Out
put 9
Out
put 1
0
-+
Serv
o
Spea
ker
2
Output 11
Output 12
1 3 5 7 9
Dat
a ca
ble
/IR
-Dio
de
Serv
o
Wiring diagram for digital mode

GB Sound module USM-RC-2
14.01.2020 BEIER-Electronic 11
Pin assignment in digital mode with UFR speed controller Connections on the sound module: X1/1 Supply voltage + (5 – 14V DC) X1/2 Supply voltage - X1/3 Input for engine sound on/off X1/4 Switching-input 1 X1/5 Switching-input 2 X1/6 Switching-input 3 X1/7 Switching-input 4 X1/8 Supply voltage + for outputs 1 - 12 (internally connected to X1/1) X1/9 Switching-output 11 X1/10 Switching-output 12 X2/1 Connection for UFR speed controller (X4/1) X2/2 Connection for proportional channel 2 X2/3 Connection for proportional channel 3 X2/4 Connection for proportional channel 4 X3 Switching-outputs 1 - 10 X4 Slot for Micro SD-Card X5 Connection for loudspeaker 1 X6 Connection for loudspeaker 2 (optionally) X7 Connection for volume control potentiometer X8/1 Connection for servo 1 X8/2 Connection for servo 2 X9 Universal Extension Interface (for example data cable, IR-transmitter diode)

GB Sound module USM-RC-2
12 BEIER-Electronic 14.01.2020
Pow
er s
uppl
y5
- 14
V D
C +-
-+
1
Volu
me
Tops
peed
100k
Switc
h m
odul
e
RC
rece
iver
Engine sound on/off
4 A
Mic
roS
D
-+
Spea
ker
2
Output 11
Output 12
1 3 5 7 9
Dat
a ca
ble
/IR
-Dio
de
Serv
o
Thro
ttle
Stee
ring
Con
trol
Serv
o
Stee
ring
serv
o
X1 X2 X3
UFR
-123
0
Serv
o
X4/1
X4/2
brow
n
red
oran
ge
yello
w
gree
n
blue
purp
le
grey
whi
te
blac
k
Out
put 1
Out
put 2
Out
put 3
Out
put 4
Out
put 5
Out
put 6
Out
put 7
Out
put 8
Out
put 9
Out
put 1
0
Input 1
Input 2
Input 3
Input 4
Wiring diagram for digital mode with UFR speed controller

GB Sound module USM-RC-2
14.01.2020 BEIER-Electronic 13
Pin assignment in analogue mode Connections on the sound module: X1/1 Supply voltage + (5 – 14V DC) X1/2 Supply voltage - X1/3 Input for engine sound on/off X1/4 Motor 1 + (speed) X1/5 Motor 1 - (speed) X1/6 Motor 2 + (speed) / switching-input 5 X1/7 Motor 2 - (speed) / switching-input 6 X1/8 Supply voltage + for outputs 1 - 12 (internally connected to X1/1) X1/9 Switching-output 11 X1/10 Switching-output 12 X2/1 Switching-input 1 X2/2 Switching-input 2 X2/3 Switching-input 3 X2/4 Switching-input 4 X3 Switching-outputs 1 - 10 X4 Slot for Micro SD-Card X5 Connection for loudspeaker 1 X6 Connection for loudspeaker 2 (optionally) X7 Connection for the potentiometer for the volume control X8/1 Connection for servo 1 X8/2 Connection for servo 2 X9 Universal Extension Interface (for example data cable, IR-transmitter diode)

GB Sound module USM-RC-2
14 BEIER-Electronic 14.01.2020
Pow
er s
uppl
y5
- 14V
DC +
-
-+
1
Volu
me
Tops
peed
100k
Switc
hm
odul
e
Engine sound on/off
6,3A
Mic
roS
D
-+
Serv
o
Spea
ker
2
Output 11
Output 12
1 3 5 7 9
MM
Mot
or 1
Mot
or 2
Spee
d co
ntro
ller
(Opt
ion)
+-
+-
Dat
a ca
ble
/IR
-Dio
de
Serv
o
Switc
h m
odul
e
Inpu
t 1
Inpu
t 2In
put 3
Inpu
t 4
Switc
h m
odul
e
Input 5
Input 6
Out
put 1
Out
put 2
Out
put 3
Out
put 4
Out
put 5
Out
put 6
Out
put 7
Out
put 8
Out
put 9
Out
put 1
0
brow
n
red
oran
ge
yello
w
gree
n
blue
purp
le
grey
whi
te
blac
k
Wiring diagram for analogue mode

GB Sound module USM-RC-2
14.01.2020 BEIER-Electronic 15
Pin assignment in mix mode Connections on the sound module: X1/1 Supply voltage + (5 – 14V DC) X1/2 Supply voltage - X1/3 Input for engine sound on/off X1/4 Motor 1 + (speed) X1/5 Motor 1 - (speed) X1/6 Motor 2 + (speed) X1/7 Motor 2 - (speed) X1/8 Supply voltage + for outputs 1 - 12 (internally connected to X1/1) X1/9 Switching-output 11 X1/10 Switching-output 12 X2/1 - X2/2 Connection for proportional channel 2 X2/3 Connection for proportional channel 3 X2/4 Connection for proportional channel 4 X3 Switching-outputs 1 - 10 X4 Slot for Micro SD-card X5 Connection for loudspeaker 1 X6 Connection for loudspeaker 2 (optionally) X7 Connection for the potentiometer for the volume control X8/1 Connection for servo 1 X8/2 Connection for servo 2 X9 Universal Extension Interface (for example data cable, IR-transmitter diode)

GB Sound module USM-RC-2
16 BEIER-Electronic 14.01.2020
Pow
er s
uppl
y5
- 14V
DC +
-
-+
1
Volu
me
Tops
peed
100k
Switc
hm
odul
e
RC
rece
iver
Engine sound on/off
6,3A
Mic
roS
D
-+
Serv
o
Spea
ker
2
Output 11
Output 12
1 3 5 7 9
MM
Mot
or 1
Mot
or 2
Spee
d co
ntro
ller
(Opt
ion)
+-
+-
Dat
a ca
ble
/IR
-Dio
de
Serv
o
Out
put 1
Out
put 2
Out
put 3
Out
put 4
Out
put 5
Out
put 6
Out
put 7
Out
put 8
Out
put 9
Out
put 1
0
brow
n
red
oran
ge
yello
w
gree
n
blue
purp
le
grey
whi
te
blac
k
Wiring diagram for mix mode

GB Sound module USM-RC-2
14.01.2020 BEIER-Electronic 17
Installation of sound module In order to fix the sound module in the model, you can use self-adhesive Velcro, which you can tape on the synthetic cover of the sound module. Please pay attention that no components or conducting paths of the board touch any metal parts during the installation of the module! This can cause short-circuits which can destroy the sound module and connected devices. Connection of sound module The connection of the supply voltage, the loudspeaker and the outputs are always identical, independent on the used mode (digital, analogue or mix mode). By contrast the remaining wiring depends on the operating mode.
Always switch off power before connecting the module The terminal X1 is a spring cage terminal which allows a fast and simple connection of the sound module. To put a wire in or out, you simply push from above onto the actuating lever of the terminal with a small screwdriver. The wires should be approximately 7-8mm stripped and should ideally be tin-plated prior the connection. Connection of supply voltage (battery): The sound module is designed for a DC voltage from 5V to 14V. Just connect terminal X1/1 with the positive pole and terminal X1/2 with the negative pole of the supply voltage. Generally, the drive battery is used for supply voltage. The best thing is to use a Y-cable, to connect the sound module and the speed controller simultaneously to the battery. If the supply voltage is connected correctly, the green LED at the sound module is glowing. We absolutely recommend putting the supplied fuse (4A) between the positive pole of the battery and terminal X1/1. This action prevents damage to your model and the sound module, if the wiring is faulty or in case of a technical failure. As a further option you can also connect a switch into the power supply of the sound module to switch it off. It is a method which has the advantage of less power consumption if permanently no sound is needed. But the switching-outputs and servo-outputs are also disabled if switched off! If you use a separate battery for the sound module, please connect the negative poles from both batteries together.

GB Sound module USM-RC-2
18 BEIER-Electronic 14.01.2020
Connection of loudspeaker: You can connect one or two loudspeakers to the USM-RC-2. The first loudspeaker is connected to terminal X5. The second loudspeaker can be connected optionally to terminal X6. The red wire of the loudspeaker connection cable is connected to the positive pole of the loudspeaker. The black wire of the loudspeaker connection cable is connected to the negative pole of the loudspeaker.
Do not connect loudspeaker outputs to each other! So do not connect both loudspeaker outputs X5 and X6 to only one loudspeaker!
The supplied loudspeaker connection cables should not be extended to prevent interference of the receiver (especially by FM systems)! The loudspeaker connection cables should be installed far away from the receiver and the antenna. Informations about power supply of receiver: The voltage at the terminals X1/1 and X1/2 powers the audio amplifier for the sound playback, the switching outputs and the rest of the internal electronics of the sound module. The receiver is not powered with this voltage, so no current flows out at the prop. inputs X2. Also it does not matter, if e.g. a voltage is connected to X2 over a BEC or a receiver battery. A BEC voltage from the speed controller is directly connected to the receiver over the terminals of X2. Therefore you can plan your receiver's power supply just as if you connect no sound module. For example for 2 speed controllers with BEC, one BEC must be disabled. Connection of switching-outputs: The outputs one to ten of the module are located at the pin connector X3. The outputs 11 and 12 are located at X1/9 and X1/10. For outputs one to ten it is recommended to use the supplied ribbon cable, which is easy to mount on the pin connector. Of course other cables/plugs can be connected to X3. The sound module is always switching the negative pole to each output and thus to the connected load. The positive pole is always connected permanently to the load (see wiring diagram). The common positive pole for all outputs is located at X1/8. But you can also connect for example the load directly to the positive pole of the battery.

GB Sound module USM-RC-2
14.01.2020 BEIER-Electronic 19
Ribbon cable assignment:
Output Ribbon cable 1 brown 2 red 3 orange 4 yellow 5 green 6 blue 7 violet 8 grey 9 white
10 black In order to receive the right cable colors, the ribbon cable must be put on correctly to the connector. Theoretically it could be put on rotated by 180°; however, the configuration would be changed in this case. To put the cable on correctly the brown wire must face upwards (board middle), the black wire downwards (board edge). The switched voltage at the outputs (if 100% intensity) is always as high, as the supply voltage of the sound module. For example if the sound module is supplied with 12V, only lamps with 12V should be connected. If you want to connect LEDs, series resistors are always required. In addition attention must be paid at LEDs to the correct polarity. The series resistors for the LED’s are depended on the supply voltage, the LED-color and the LED-current. Modellers familiar with electronics will certainly be able to calculate the ideal value for the models’ LEDs, but everyone else should refer to the table below, which shows the resistance values required for standard LEDs (approx. 15mA rating):
Supply voltage Series resistor 6V 270 Ohm
7,2V 330 Ohm 8,4V 470 Ohm 9,6V 510 Ohm 12V 680 Ohm
If multiple LEDs are connected to one output (e.g. front and rear direction indicators), it is always better to use separate dropping resistors than to wire the LEDs in series.

GB Sound module USM-RC-2
20 BEIER-Electronic 14.01.2020
General references to wiring in the model: You should use cables with a core diameter of at least 0,75mm² for the connection of the power supply. For all other connections you can use smaller cables such as 0,25mm². Unfortunately the speed controllers and motors in the model are often strong interference sources, which could disturb the electronic of the sound module or the sound output (whistles, humming in the loudspeaker). Therefore all motors should be absolutely interference-suppressed! It is also important to pay attention to „clean" wire routing. You should use always short wires and avoid any unnecessary loops. The wires for the supply voltage of the sound module should be connected to the driving-battery as direct as possible. A separate installation of interfering cables (for example motor cables), can achieve significant improvements. Nevertheless, if you still have interferences made by a drive controller, you should connect an electrolytic capacitor (for example 1000µF or bigger) close to the positive pole at the drive controller and at the sound module.

GB Sound module USM-RC-2
14.01.2020 BEIER-Electronic 21
Connection of sound module in digital mode Connection of proportional channels Up to four proportional outputs of an RC receiver can be attached to connectors X2/1 - X2/4. Just use the two supplied servo patch cables for the connection. If more than two proportional channels should be connected, further servo patch cables are required. For your convenience the cables can be purchased in our online shop. A special label on the cover of the sound module indicates the locations of the four channels. The channels #1 and #2 are labeled twice, so as to transmit the proportional signal straight to the speed controller or servo. Y-cables are needed if further speed controllers or servos should be connected to the channels #3 and #4. Please attach the servo patch cables to the sound module with the brown wire face the board edge (to the right) and the orange wire to the board middle (to the left)! Following functions can be triggered with the four proportional channels on the sound module: Channel Model with 1 drive motor Model with 2 drive motors
#1 Speed for drive sound Speed for drive sound #2 Free assignment of functions Speed for drive sound #3 Free assignment of functions Free assignment of functions #4 Free assignment of functions Free assignment of functions
If you have a model with two motors (e.g. chain vehicle) and use the proportional channel #2 for the driving speed identification, unfortunately you can use only channel #3 and #4 for further functions (for example triggering additional sounds, using switching outputs, and so on). The channel numbers of the sound module have nothing to do with the channel numbers of your receiver. So you do not have to connect channel #1 of the receiver with channel #1 of the sound module. If the joystick (to accelerate your model) is for example at channel #3 of the receiver, you have to connect channel #3 of the receiver with channel #1 of the sound module.

GB Sound module USM-RC-2
22 BEIER-Electronic 14.01.2020
Connection of switching-inputs You can use the switching-inputs at the terminals X1/4 – X1/7 to trigger four different functions (see page 35). All switching-inputs of the sound module are negative switching. To trigger a function, you have to connect the negative pole of the power supply to the corresponding input. Generally switching units (such as our OKA-4, RC-SM-2 or other standard multi-switch-modules) are used for this purpose. These modules are normally negative switching, that’s why only the output of the switching module must be connected to the input of the sound module. Terminal X1/3 is the switching-input, to turn on and off the engine sound. For activation, the negative pole (e.g. by a switch module or switch) must be connected to this input. In digital mode you can also switch the engine sound with a proportional channel, a switch in nautic-mode, or with the EKMFA-Mode. The switching-input X1/3 does not need to be connected here.
As long as the engine sound is switched off, the sound module doesn’t play any driving or engine sounds!
Therefore the engine sound has to be switched on by a way available to you!
GB Sound module USM-RC-2
14.01.2020 BEIER-Electronic 23
Connection of sound module in digital mode with UFR-1230 Connection to UFR-1230 speed controller The sound moduel pin header X2/1 is connected to the pin strip X4/1 (bottom) of the speed controller with one of the supplied servo patch cables. With this connection the sound module receives all information about speed and light settings. At the sound module the servo patch cable must be plugged with the brown cable pointing to the board edge (right) and the orange cable to the board center (left). Connection of proportional inputs Up to three proportional channels of the RC receiver can be connected to X2/2 – X2/4 with servo patch cables. The sound module comes with two servo patch cables. Please order additional servo patch cables if you want to connect more than two proportional channels. The cables can be ordered in our online shop in two different lengths (15 cm and 30 cm).The servo patch cables must be plugged onto the sound module so that the brown cable points to the board edge (right) and the orange cable to the board center (left). The channel numbers of the sound module have nothing to do with the channel numbers of the receiver. It is therefore not necessary to connect channel #2 of the receiver to channel #2 of the sound module. Connection of switching inputs With the switching inputs on terminals X1/4 - X1/7 four different functions (see page 35) can be triggered. All switching-inputs of the sound module are negative switching. To trigger a function, you have to connect the negative pole of the power supply to the input. Generally switching units (such as our OKA-4, RC-SM-2 or other standard multiswitch-modules) are used for this purpose. These modules are normally negative switched, that’s why only the output of the switching module must be connected to the input of the sound module. Terminal X1/3 is the switching-input, to turn on and off the engine sound. For activation of the engine sound, the negative pole (e.g. by a switch module or switch) must be connected to this input. In digital mode you can also switch the engine sound with a proportional channel, a switch in nautic-mode, or with the EKMFA-Mode. The switching-input X1/3 does not need to be connected in this case.
As long as the engine sound is switched off, the sound module doesn’t play any driving or engine sounds!
Therefore the engine sound has to be switched on!

GB Sound module USM-RC-2
24 BEIER-Electronic 14.01.2020
Connection of sound module in analogue mode Connection of motors In the analogue mode, the driving speed is determined by the motor voltage. One or two DC motors can be connected to the terminals X1/4 and X1/5 or X1/6 and X1/7. The connection to the sound module is implemented parallel to the existing connections of the speed controllers which powers the motors. Only if you want to use the output for the reverse driving light or the reverse driving sound you have to pay attention to the polarity of the motor connections. If the reverse driving light shines at the forward drive, the connections must simply be changed. Connection of switching-inputs The switching-inputs at the terminals X2/1 – X2/4 can trigger four different functions (see page 35). The input is located at the left pin (in the direction of the center of the board). The other two pins have no function in this setup. If only one motor is used for determining the driving speed, the terminals X1/6 and X1/7 are available as additional switching-inputs. All switching-inputs of the sound module are negative switched. To trigger a function, you have to connect the negative pole of the power supply to the corresponding input. Generally switching units (such as our OKA-4, RC-SM-2 or other standard multi-switch-modules) are used for this purpose. These modules are normally negative switched, that’s why only the output of the switching module must be connected to the input of the sound module. Terminal X1/3 is the switching-input, to turn on and off the engine sound. For activation, the negative pole (e.g. by a switch module or switch) must be connected to this input.
As long as the engine sound is switched off, the sound module doesn’t play any driving or engine sounds!
Therefore the engine sound has to be switched on by a way available to you!

GB Sound module USM-RC-2
14.01.2020 BEIER-Electronic 25
Connection of sound module in mix mode Connection of motors In the analogue mode, the driving speed is determined by the motor voltage. One or two DC motors can be connected to the terminals X1/4 and X1/5 or X1/6 and X1/7. The connection to the sound module is implemented parallel to the existing connections of the speed controllers which powers the motors. Only if you want to use the output for the reverse driving light or the reverse driving sound you have to pay attention to the polarity of the motor connections. If the reverse driving light shines at the forward drive, the connections must simply be changed. Connection of proportional channels Up to three proportional outputs of an RC receiver can be attached to connectors X2/2 - X2/4. Just use the two supplied servo patch cables for the connection. If more than two proportional channels should be connected, further servo patch cables are required. For your convenience the cables can be purchased in our online shop. Please attach the servo patch cables to the sound module with the brown wire face the board edge (to the right) and the orange wire to the board middle (to the left)! Different functions can be triggered with the three proportional channels on the sound module (see page 35). The channel numbers of the sound module have nothing to do with the channel numbers of your receiver. So you do not have to connect channel #1 of the receiver with channel #1 of the sound module. Connection of switching-inputs Terminal X1/3 is the switching-input, to turn on and off the engine sound. For activation, the negative pole (e.g. by a switch module or switch) must be connected to this input. In mix mode you can also switch the engine sound with a proportional channel, a switch in nautic-mode, or with the EKMFA-Mode. The switching-input X1/3 does not need to be connected here.
As long as the engine sound is switched off, the sound module doesn’t play any driving or engine sounds!
Therefore the engine sound has to be switched on by a way available to you!

GB Sound module USM-RC-2
26 BEIER-Electronic 14.01.2020
Loudspeaker You can connect every loudspeaker to the sound module USM-RC-2, which has an impedance of at least 4 Ω and is designed for the respective maximal power. We recommend using full range loudspeakers with 4 or 8 Ω. Higher impedances are also possible, but the volume decreases with higher impedances. The maximum power and thus the volume of the sound module, is also heavily dependent on the height of the supply voltage. The following table shows which maximum sine-wave power per loudspeaker at different voltages and loudspeaker impedances can be reached. U=6V U=7,2V U=8,4V U=9,6V U=12V Power at 4Ω 4,5W 6,5W 8,8W 11,5W 18,0W Power at 8Ω 2,2W 3,2W 4,4W 5,8W 9,0W Power at 16Ω 1,1W 1,6W 2,2W 2,9W 4,5W These performance levels refer to a full scaled sine wave, but not to an overdriven sine wave. In practice, it is possible to overdrive the amplifier in somewhat whitout decreasing noticeable the quality of the sound playback of the module. So it is possible to reach a higher power output with low voltages (e.g. 7,2V) than listed in the table above. However, as there is a double amplifier on the sound module you have the choice of of connecting one or two loudspeakers. Using 2 loudspeakers, the output power has doubled. But doubling the output power doesn’t mean the volume has doubled, because the volume perceived by the human ear is unlinear. For doubling the volume, you need about the 4 to10-fold power. To reach a perfect level of volume and sound quality, you have to install the loudspeaker in a suitable resonant body (loudspeaker box). A loudspeaker, which lies only on the table, doesn’t reach optimum sound quality. At every amplifier heat arises through power dissipation. This heat must be dissipated by a cooling element into the air. Please pay always attention to a good air circulation to prevent overheating. Especially at higher voltages (e.g. above 9,6V) and two connected 4 Ohm loudspeakers, it is perhaps neccessary to use active cooling of the sound module, with a little fan.

GB Sound module USM-RC-2
14.01.2020 BEIER-Electronic 27
If the output power is still not enough for your application, it is possible to use a speaker to RCA line level converter (high/low) mit galvanic separation (used in car radios) and a small capacitor (10nF) at the input, in order to connect an additional amplifier. Volume control A volume control is possible by an external potentiometer (100kΩ). You connect this potentiometer to connector X7 (see wiring diagram, page 10). If no potentiometer is connected, always the maximum volume is used, which is configured in the Sound-Teacher (10-100%). The volume can also be controlled by the remote control. The functions “Volume +“ and “Volume -“, must be configured in the Sound-Teacher e.g. to a proportional channel or to a nautic switch. General notes to volume Please also notice that the sound data you transfer to the sound module should have an optimal modulation. For instance a common mistake is that the record of the sound is far too quiet and therefore it can not be played properly. In the Sound-Teacher you can easily adjust the volume of each sound (10-300%).

GB Sound module USM-RC-2
28 BEIER-Electronic 14.01.2020
Sounds All sounds are stored in the sound module with our software USM-RC Sound-Teacher, in so called „slots". You don’t have to occupy every slot with a sound. If you don’t want e.g. any starting-noise, just keep the starting-noise slot free. In both slots for “Idling noise“and “FG1“ (engine sound) you should place a sound, otherwise no sound in standing and driving is played. Here an overview, which sounds in which slots, can be stored:
Sound-Slots Engine start sound coldstart Engine start sound warmstart Idle sound Vehicle start sound (idling drive) Vehicle stop sound (drive idling) Engine stop sound Engine sound FG1 - 5 (different types: slow down, normal and speed up) Shift sounds between FG1 - FG5 Reverse engine sound Brake sound Cornering squeak Indicator noise Turn warning left / right Engine sound 2: Engine start/stop sound, idle sound, vehicle start/stop, engine sound Additional sounds 1 - 30 Sound from Servo 1 - 4 left / right Sound from IR-Servo 1 - 2 left / right Sound for controlling motor output at expansion module EXM-2 Sound for detection of hydraulic motion Undervoltage sound Overcurrent sound Random sound 1 - 8 Tracks 1-30 for WAV-Player Optionally, the engine sound while driving backwards can be different from the sound driving forwards. Again, you can put sounds in these slots, but you don’t have to. If the slot for driving backwards is empty, the sound module will play the normal engine sound. Using slots for driving backwards sounds only make sense if the sounds differ from driving forwards.

GB Sound module USM-RC-2
14.01.2020 BEIER-Electronic 29
Engine sound The engine sound consists of several single noises. Normally there is an engine start noise, an idling noise, a driving noise and an engine stop noise. This sound module also offers the possibility to imitate up to five different driving sounds (for example for gears), up to eight change sounds between the driving sounds (for example when you change the gears), a reverse engine sound, a break noise and cornering squeak (twin engine mode). All engine sounds (therefore also the reverse driving- and brake noise) are played only when the engine sound is switched on (see page 32). Start engine noise (cold –and warmstart) The start engine noise is played when the engine sound is switched on. After the starting noise is played, the sound changes into the idle sound. If the engine sound is switched on and the vehicle is already in motion, the starting noise will skip and the module directly plays the engine noise. As an option, two different start engine noises can be stored into the Sound-Teacher. One of these is the engine coldstart sound (e.g. the starting takes longer, until the engine runs smoothly), the second start engine sound is for a warmstart (engine starts immediately). Which starting sounds is played, depends on how long the engine was switched on before. This time can be configured in the Sound-Teacher. (Configuration Engine sound). If you don’t need two different engine start sounds, you can use one of the two slots for your engine start sound. The sound module always plays the soundslot, which is filled with a sound. Idle noise The idle noise is always played when the vehicle is in idle. The sound is played in an endless loop. Therefore just a short sound (approx. 1-5s) is required in this sound slot. Often the longer this sound is, the better is the quality of the idle noise. Vehicle start noise The starting sound is played uniquely when the vehicle sets off (idle drive).

GB Sound module USM-RC-2
30 BEIER-Electronic 14.01.2020
Engine noise / Gears FG1 - FG5 The engine noise is always played when the vehicle drives in an endless loop. The playing speed is dependent on the speed of the vehicle. The sound module recognizes how fast the vehicle moves, and plays the engine noise also in the corresponding speed. How fast the engine noise should be played at the corresponding speed can be set at the driving sound diagram (see page 93). You can set with the Sound-Teacher how many different sounds should be available for driving forwards and backwards. This could be for instant sounds for different gears for a truck or you can choose different driving sounds for each driving speed (e.g. slow, normal and fast). Please obey that the gears are just generated by the sound and not through a mechanic gearshift. Yet it is not possible to activate the different sounds through an engine control or a real gearshift. For each driving sound FG1 – FG5 you can use three different settings (normal, slow down and speed up). The latter options are just additional to generate a more authentic sound but in most cases the “normal” sound is sufficient. If you use the sound slot “slow down” and the model slows down, the driving sound switches automatically from “FGx normal” to “FGx slow down”. The same happens when the model accelerates and you have occupied the sound slot “speed up”. To divide the entire speed range into sections for the five engine sounds/gears you can use the engine sound diagram (see page 93). Sounds for changing running steps / gears If you use more than one running step/gear for your driving sound you can also use sounds to simulate the changing between the different running steps/gears. At all times when you change the running step/gear the changing noise will be played. Furthermore you can differentiate between acceleration- and deceleration sounds and therefore use for example different sounds for changing the gear from FG1 to FG2 and another for switching from FG2 to FG1. The changing sound will always be played once and completely when the running step/gear is changed. For this reason the sound should be preferably short (e.g. 1s). Otherwise, it might occur for example that the model is already standing but the changing sound is still played. Vehicle stopping noise The stopping noise is played uniquely when the vehicle stops (drive idle). Engine stopping noise The engine stopping noise is played when the engine sound is switched off. Reversing noise

GB Sound module USM-RC-2
14.01.2020 BEIER-Electronic 31
The reversing noise is played when the vehicle drives backwards. This could be e.g. the beeping of a reverse driving warn sound of a truck. The reversing noise is an additionally sound which is mixed/added to the engine sound. Brake noise The brake noise is played when the driving speed is strongly reduced. Cornering squeak The sound for the cornering squeak can only be played by the sound module, if the module is configured to “2 motors for engine sound”. The cornering squeak is always played, as soon as driving along curves is detected. The threshold level is configured in the Sound-Teacher (configuration Engine sound). In the folder “USM-RC-2 Sounds”, on the supplied DVD-ROM, you will find some exemplary sounds for different vehicle types. In order to store a new sound on the sound module, start the program “USM-RC-2 Sound-Teacher", open a *.usm project file in the respective folder and save the project files on the SD-card. A great advantage of this sound module is that you can edit and compile your own engine noises to make your model unique, individual and realistic. Meanwhile the sound module offers a lot of functions and setups, we recommend that you proceed step by step if you create your own projects. You should use the projects on the DVD as a template for creating own projects.

GB Sound module USM-RC-2
32 BEIER-Electronic 14.01.2020
Turning on/off engine sound The sound module can only play an engine sound, if it has been switched on before. There are different ways to switch on the engine sound: Using switching-input X1/3 to switch on engine sound: If the input X1/3 is tied to the negative pole (ground), the engine sound is switched on. If this input is open, the engine sound is turned off. There are several possibilities, how to set the input to the negative pole:
• With a simple wire: Just connect the negative pole of the battery with the switching input X1/3 of the sound module using a wire. The engine sound is switched on as soon as the sound module is connected to power. The disadvantage of this setup is that the engine sound cannot be turned off, except you switch off the complete supply voltage of the sound module. This is an easy way to test the sound module for the first time.
• Instead of the wire, of course you can use a simple switch between X1/3 and the negative pole, in order to switch the engine sound on or off. The disadvantage is, that it is not possible to switch the sound on or off by the remote control.
• If you replace the switch with a switching unit (e.g. Multiswitch), you can switch the sound via the remote control. It is important that the switching output of the switching unit is negative switched (usually they are)!
Using a proportional channel (X2/2 - X2/4) to switch on engine sound: If you have a joystick/slider/switch/rotary switch left, you can use it to switch the engine sound on or off. Therefore the corresponding receiver ouput must be connected to the corresponding proportional channel of the sound module with a servo patch cable. The desired proportional channel must be configured in the Sound-Teacher. There are four areas “A, B, C and D” (see page 40) and one area must be mapped to the function “Engine sound on/off“. If the corresponding proportional channel is brought in this area, the engine sound is switched on or off. This possibility is only available in digital- or mix mode. Using nautic-mode on proportional channel #3 (X2/3) to switch on engine sound: If you have a nautic swiching unit installed in your receiver, you can use the Sound-Teacher to add the function “engine sound on/off" to a nautic switch to turn the engine sound on or off with the selected switch. This possibility is only available in digital- or mix mode.

GB Sound module USM-RC-2
14.01.2020 BEIER-Electronic 33
Using EKMFA-mode on proportional channel #3 (X2/3) to switch on engine sound: With the One-channel multi-function selection (EKMFA) you can nearly control the whole sound module with only one free channel of the transmitter. “Counting” (and pressing the joystick a corresponding number of times) is used to determine, which function is triggered. In the Sound-Teacher you can set up, how often the joystick must be pressed, to turn on/off the engine sound. This possibility is only available in digital- or mix mode. Turn on engine sound automatically by motion: Is this option activated, the engine sound is switched on automatically, as soon as you accelerate the first time (that means for example moving the joystick out of the neutral position). The engine sound keeps switched on as long as you are driving. If the model is stopped, the engine sound will be turned of after an adjustable time (e.g. 10 seconds). If you start driving again, the sound will be switched on again. This method has the advantage, that no additional channels (or switching units) in the transmitter are needed to activate the engine sound. Adjusting engine sound to driving speed With the trimmer P1 the speed of the driving sound can be adjusted. However, in case you more than one driving sound (FG1-FG5) we recommend setting this trimmer to the middle and adjusting the speed of the driving sound by the driving sound diagram (see page 93).

GB Sound module USM-RC-2
34 BEIER-Electronic 14.01.2020
Engine sound 2 In addition to the actual engine/driving sound; a second speed-dependent sound can also be played. However, this second engine sound does not offer as many sound slots/options as the normal engine sound. The engine sound 2 must not necessarily be an engine sound that is played while "driving". Generally all speed adjustable sounds can be used for any kind of movement. This can for example be a speed-dependent turret rotation sound in a tank or the sound of a hydraulic pump in a construction vehicle. Following sounds are available for the engine sound 2:
• Engine start sound 2 • Idle sound 2 • Motion start sound • Engine sound 2 (speed dependent) • Motion stop sound • Engine stop sound 2
The functions of engine sound 2 correspond in principle with those of the normal engine sound (see page 29). Depending on type of movement, you do not have to use all of these sound slots. For example, in case of a tank turret rotation, only the sounds for motion starting, driving, and motion stopping are necessary because there are no idle and engine start/stop sounds when turning a tank turret. The speed for engine sound 2, can be controlled with one of the four proportional channels # 1 - # 4. Which channel, can be determined with the Sound-Teacher (see page 69).
There are 2 options to activate/deactivate engine sound 2: • by selecting the function "Engine Sound 2 on/off" for a position in “Configuration” - “Proportional channels”, “Nautic 1”, Nautic 2”, or “EKMFA mode” • by using the option "Turn on sound automatically by motion" in “Configuration” - “Engine Sound 2”. Furthermore, there is also the option when starting the engine sound 2, to shut off the normal engine sound automatically - and vice versa. Thus it is possible to change between two different engine sounds. However, functions as reversing sound/light or brake sound/light are not directly controlled by driving sound 2. These functions continue to be controlled through the throttle channel at the normal engine sound.

GB Sound module USM-RC-2
14.01.2020 BEIER-Electronic 35
Functions of sound module Additionally to the driving sound, the USM-RC-2 offers more features, which can be controlled by the remote control or the switching-inputs. Overview of all the functions: Additional sounds • Trigger additional sounds 1 - 30 Outputs / Lighting functions
• Switching the outputs 1 - 12 • Output sequence 1 - 2 • Light switch +/- • Parking light • Low beam headlight • High beam headlight / headlight flasher • Front fog light • Rear fog light • Indicator left • Indicator right • Hazard lights • Driving Backwards • Brake light • Locomotive: Driving light • Ship: At anchor • Ship: In operation • Ship: Aground • Ship: Restricted in ability to manoeuvre • Ship: Unable to manoeuvre • Ship: Constrained by draught • Ship: Towing • Ship: Assisting • Ship: Fishing • Smoke generator on
Functions of the sound module
• Engine sound on/off • Engine sound 2 on/off • Random sound enable • Volume + and – • Mute • Play with the accelerator • Engine sound rpm change • Disable reversing sound • Software-Reset (rebooting the module) • Multi function 1-4 • Function sequences 1 - 8
WAV-Player • Play / Stop • Pause • Track fwd • Track rev

GB Sound module USM-RC-2
36 BEIER-Electronic 14.01.2020
• Random Servo functions • Servo 1/2 position 1 - 4
• Servo 1/2 sequence Functions for the Infrared-Lightmodule SM-IR16-2
• Servo 1/2 position 1 - 2 • Rotating beacon • Blinker lights/flash lights • Chaser light •
Functions for the expansion module EXM-2
• Switching the outputs 13 - 22 • Servo 3/4 position 1 - 4 • Motor output left / right
All functions can be triggered by the proportional channels #2-#4, the Nautic-mode, the EKMFA-mode and the switching-inputs. The assignment in the Sound-Teacher is very flexible. But you have to be careful that a function is only triggered by one event. It is not possible for example to switch on the head light with a Nautic-switch and a proportional channel! Additional sounds 1 - 30 In addition to the engine sound, the USM-RC-2 can play up to 30 additional sounds. Typical sounds are e.g. horns, hydraulic and pneumatic noises, warning horns, shooting noises, Songs, radio calls, and so on. There are nearly no limits set to your imaginations. To play an additional sound, it must be started over a start impuls. This can be done by using the proportional channels #2 - #4, the Nautic-mode, the EKMFA-mode or the switching-inputs. Both additional sounds 1 and 2 offer a special feature: Each of these sounds consists of 3 single sound slots. When the additional sound 1 is started, the slot “start” is played first. Then the sound changes to the slot “loop” and plays this slot in an endless loop so long as the start signal for the additional sound 1 is still present. When the start signal for additional sound 1 disappears, the slot “stop” is played uniquely. Additional sound 2 works in the same way. In this way, a sound like a ship horn with variable length (without a hard cut at the end), can be realized. Also for example a MG fire can be fitted with a great reverberation. The start and stop slots are only options which can be used. You can let these slots also free.
GB Sound module USM-RC-2
14.01.2020 BEIER-Electronic 37
For additional sounds 3-30 various play-back modes can be set up using the USM-RC Sound-Teacher. Thereby it is possible to fine-tune every additional sound to produce a perfect match to your particular mode. The possible playback modes are now described. They differ also in that way, how the sound is started. Triggering with proportional channels #2 - #4 (as memory configured) or with EKMFA-mode:
Mode Function Once / complete When the sound is started, it is played exactly once,
from start to finish, and then it stops. It is not possible to halt the sound prematurely; it is always played completely.
Once / immed. stop When the sound is started, it is played exactly once, from start to finish, and then stops. However, if the sound is started again while it is already or still running, the sound is stopped immediately.
Loop / complete When the sound is started, it is played again and again from start to finish in an endless loop. To switch the sound off again it must be virtually “started” again. The sound then runs from start to finish once more completely, and then it stops.
Loop / immed. stop When the sound is started, it is played again and again from start to finish in an endless loop. To switch the sound off it must be virtually “started” again. The sound then stops immediately.
Triggering with proportional channels #2 - #4 (as static configured), nautic-mode or switching-inputs:
Mode Function Once / complete When the sound is started, it is played exactly once,
from start to finish, and then it stops. It is not possible to halt the sound prematurely; it is always played completely.
Once / immed. stop When the sound is started, it is played exactly once, from start to finish, and then stops. However, if the input is switched off while it is still running, the sound is then stopped immediately.
Loop / complete When the input is switched on, the sound is played again and again from start to finish in an endless loop. If the input is switched off again, the sound runs from start to finish once more completely, and then stops.
Loop / immed. stop When the input is switched on, the sound is played again and again from start to finish in an endless loop. If the input is switched off again, the sound then stops immediately.
GB Sound module USM-RC-2
38 BEIER-Electronic 14.01.2020
Random sounds Up to eight random sounds can be played with the sound module USM-RC-2. The time of the sound play-back is determined then by a random generator. The time spans (min/max) can programmed by 1 – 250s for every sound separately. In the same way the conditions (idling/drive - engine sound on/off) the sound should be played can be programmed for each of the 8 random sounds. For instance you can define that at a tank a randomized “chain squeaking” is played, but only during the drive and not in the idling. Because the 8 random sounds run completely independent from each other, it can happen that two or three of the random sounds are played simultaneously. This can be blocked by activating the option "Don't play 2 random sounds at the same time". In your Sound-Teacher you can also determine whether the random sounds should generally be enabled or you can activate/deactivate random sounds with your RC by setting the function "Random sound enable" for a position. WAV-Player The WAV-Player of the sound module can be imagined as a kind of “MP3 player“. The difference is that the sound module plays WAV files instead of MP3 files. The WAV-Player is primarily intended to play songs. But of course other sounds can be played, too. In the Sound-Teacher, up to 30 tracks can be stored for the WAV-Player. The WAV-Player is controlled by five functions:
• Play / Stop • Pause • Track forward • Track reverse • Random
These five functions can be done by using the proportional channels #2 - #4, the Nautic-mode, the EKMFA-mode or the switching-inputs. Function “Play / Stop“: If this function is activated, the WAV-Player will start playback of the first track. If this function is activated again, the playback will be stopped. The playback of a track starts always from the beginning of the track. If a track is played to the end, the player will jump to the next track. With the option “Stop play after each track“ you can choose, if the next track will be started automatically, or if the playback just stops.

GB Sound module USM-RC-2
14.01.2020 BEIER-Electronic 39
After track 30 the internal counter will jump back to track 1. By the way, the sound module always remembers the current track number. The next time the power supply is switched on, this track number “will be loaded“ again. If any changes are made to the SD card via the Sound-Teacher, the track counter will be reset to track number one. Function „Pause“: If you activate the function "Pause", the playback of the current track pauses. Another activation of this function starts the playback at the same position again. Function “Track fwd“: With this function, the player will jump to the next available track. It does not matter, if there are any gaps in the track list. Was previously the random function enabled, a new, random track will be played. Function “Track rev“: This function is normally used to go to the previous track. If this function is triggered while the current track is played for more than five seconds, the WAV-Player will not jump to the previous track; however it will go to the beginning of the current track. Was previously the random function enabled, a new, random track will be played. Function „Random“: With this function a sound from a tracklist is randomly choosen and played. If you activate the function „Random“ while a track is still playing, this title stops and a new one starts.

GB Sound module USM-RC-2
40 BEIER-Electronic 14.01.2020
Threshold 1
Threshold 2
Threshold 3
Threshold 4
N
C
B
A
D
Neutral position(1,5ms)
(1,0ms)
(2,0ms)
(0)
(20)
(20)
(60)
(60)
(100)
(100)
Functional assignment at proportional channels #1 - #4 The proportional channel #1 is only responsible for the speed recognition. If 2 drive motors are used, proportional channel #2 is additionally needed for the speed recognition. The remaining two or three channels can be configured in the Sound-Teacher with different functions. To occupy the proportional channels #2 - #4 with several functions, these channels are split into five areas "A, B, N, C and D". These areas represent the possible positions of a joy-stick. The area N is the neutral position that is the center position of the joy-stick. The same principle is also valid for a horizontal joy-stick. The area A is in this case to the left and area D to the right. The areas can also adjusted/optimized to your remote control, by setting the four thresholds in the USM-RC-2 Sound-Teacher. Assignment of channels #2 - #4:
Area Functions in position
(>0,5s) short in position
(0,5-2,0s) long in position
(>2,0s)
A function on (static)
function on/off (memory)
function on/off (memory)
B function on (static)
function on/off (memory)
function on/off (memory)
C function on (static)
function on/off (memory)
function on/off (memory)
D function on (static)
function on/off (memory)
function on/off (memory)
Theoretically it is possible to assign 12 functions to one proportional channel. But in practical terms this doesn’t make sense. You should avoid using an area with the static and the memory function at the same time.

GB Sound module USM-RC-2
14.01.2020 BEIER-Electronic 41
Difference between static and memory function: Static Memory
If a function is defined as static, it will be switched on as long as the joy-stick is in the corresponding area. If you leave the
area, the function will be switched off again.
If a function is defined as memory and you move the joy-stick for the specified time (short or long) in the corresponding area, it will be switched on. If you leave the area, the function remains switched on (it is saved). It remains on, until the
the joy-stick is moved in the corresponding area again. Exceptional are additional sounds with the setting
"once" in "Additional sound". Despite a memory setting in "Configuration" the
sound is played only once. You can read on page 35, which functions can be assigned to the 4 areas A, B, C and D. Neutral position of channel #1 In order to play the right driving sound, the neutral position of channel #1 must be correctly set at the Sound-Teacher. On page 93 you can see how the setting can be used. Neutral position of channel #2 - #4 In general, remote control manufacturer do not define a standard neutral position, due to this lack you can configure several neutral positions for the channels #2 - #4 (if you use two engines it is #3 - #4) with the Sound-Teacher by your own, varied from 1.3 to 1.7ms. In addition it is possible to recognize the neutral position automatically at the turn-on procedure. It is important to ensure that the remote control position is at the neutral position otherwise wrong data is used. Please check the right position before switching on the sound module. Tips: With the help of the diagnosis (see page 97), you can check which data the sound module receives from the remote control. This can be very helpful to find a malfunction as well. Furthermore it is a good practice to learn how to control the 5 areas A, B, N, C and D with the joy-stick.

GB Sound module USM-RC-2
42 BEIER-Electronic 14.01.2020
Stick simulation via keys or switches To use the functions of the proportional channels #2 - #4 conveniently, you can simulate the different potentiometer positions of a stick, through a simple keystroke. If you press the key S1, a joy-stick position is simulated for position A. Often the available joy-sticks are already taken by other functions, but mostly the remote control has still other free channels. This schematic can be used for the further channels to activate the additional sounds. You need only six resistors and four switches for each channel (or two reversing switches with middle position). The small circuit can be fastly build on a strip board. With the indicated resistors values, this schematic should work with all standard remote controls. If needed, you can also configure the thresholds of the five areas in the Sound-Teacher. How and where this schematic is connected in the remote control, is unfortunately always a little different according to manufacturer and model. However, in some (Robbe/Futaba) remote controls an additional 68k ohm resistor is neccessary, which has to be placed in the “S“- wire. Tips: Here again, we recommend using the diagnosis to check the circuit. You can buy this circuit as fully constructed module from us: SMS-R (for Robbe) and SMS-G (for Graupner and all other manufacturers).
GB Sound module USM-RC-2
14.01.2020 BEIER-Electronic 43
One-channel multi-function selection (EKMFA) If “One-channel multi-function selection” (EKMFA) is activated, you can control up to 30 functions of the sound module using just one proportional channel, namely channel #3 (see page 35). As in “normal” mode, the travel of the transmitter joy-stick is divided into five areas A, B, N, C and D (see page 40). Of course you can use the joy-stick simulation circuit from page 42, or other switches that are already fitted to the transmitter, to control the functions in this mode. Again, you can define in the Sound-Teacher which functions are triggered with the EKMFA-mode (see page 76). To trigger a particular sound or function, the transmitter joy-stick must be moved from position N to position A or D for a specific number. The last numerical value is always stored, enabling you to repeat the last sound or the last function as many times as you wish, without counting once more. Simply hold the joy-stick for one second in the position B, or C to repeat the last sound. In order to switch the 12 outputs directly, they must be configured in the Sound-Teacher as “static“, “flashing“ or “pulse“. This way, an output that is configured e.g. as reversing or brake light, cannot be switched on.

GB Sound module USM-RC-2
44 BEIER-Electronic 14.01.2020
Nautic mode / Multiswitch mode The Nautic mode or the Multiswitch mode is probably the most convenient method of operating the sound module when using your remote control. Here, the appropriate switch module at the transmitter is required. At present the USM-RC-2 supports the following switch modules (and modules compatible with them):
• BEIER-Electronic NMS-16-R, NMS-16-G and NMS-24-G • BEIER-Electronic EMS-16-R, EMS-16-G and EMS-24-G • BEIER-Electronic MSC-8-C, MSC-10-C and MSC-8-C-LCD • Graupner Nautic-Expert Modul (Nr. 4108) and Multikanal • Robbe Multi-Switch Module (Nr. 8084, 8101, 8413, F1511) • Mergen/CP 12-Kanal and 16-Kanal Multiswitch
The USM-RC-2 even supports two nautic/multiswitch-channels. So you can also install two switching modules in your transmitter to control even more functions. Some of the latest remote controls include a “software nautic module” as well. In most of these cases no additional hardware switch modules are necessary. Please refer to the operating instructions supplied with your transmitter for further details. If you want to use nautic mode, you will have to activate it in the Sound-Teacher. The activation is done under „Nautic 1“ or ”Nautic 2“ in the configuration. A particular function can now be assigned to each switch position (see page 35) in the Sound-Teacher (see page 75). Operating the corresponding switch triggers the function which is set at the sound module. A memory function can also be activated for each switch position. If the memory function is active, the function at the sound module is switched on or off when the switch is operated, and remains in that state until the switch is operated a second time. Use a servo patch lead to connect the corresponding receiver output (according to the channel which your switch module occupies at the remote control) to proportional channel #3 (X2/3) or channel #4 (X2/4) of the sound module. If the sound module is picking up the data correctly from your switch module, the blue LED on the sound module will allways flash briefly at regular intervals. But at our EMS modules, the LED flashes only if just a switch is triggered. If the blue LED does not flash regularly, or if the Nautic switches do not work, check the settings at your transmitter. If you are unsure about this, please read the operating instructions supplied with your transmitter, as they generally provide information on the settings required for Nautic modules (e.g. servo travel at maximum).

GB Sound module USM-RC-2
14.01.2020 BEIER-Electronic 45
If you you a equipment with Jeti Duplex 2.4GHz, the “output period” of the receiver must be set on “byTransmitter” by the Jeti-Box. Other important setting: ATV High Limit: 2,20 ms, ATV Low Limit: 0,80 ms. Sum signals S-BUS, SUMD/SUMD3 and i-BUS With the USM-RC-2 it is possible to evaluate the sum signals „S-BUS“, „SUMD/SUMD3“ and “i-BUS” of the receiver. Up to 16 channels can be transmittet via only one connection between USM-RC-2 and the receiver. In order to use sum signals, the receiver must be suitable for sum signals and an activation in the radio might be necessay. Using the sum signal up to 10 fully functional proportional channels, instead of 4, can be used to control functions. The sum signal output of the receiver is connected to „Prop #4“ (X2/4) at the sound module USM-RC-2. If the USM-RC-2 receives a correct sum signal, the blue LED will flash at regular intervals. Using the Sound-Teacher all 16 channels of the sum signal can be assigned to one of the 10 propotional channels of the sound module. It is important to use Prop #1 for the throttle channel of the transmitter. If a speed controller with sound module output is used, such as the UFR-1230, the soundmodule output of the speed controller must be connected with X2/1 of the sound module, so the actual speed can be transmitted even if a cruise control is used. In this case instead of an S-BUS/SUMD channel no function „-“must be selected in the Sound Teacher. Same applies to a speed controller for two motors (tracked vehicles), such as the UFR-1230-D. Both sound module oututs ot the speed controller must be connected to X2/1 und X2/2 at the sound module. For „Prop #1“and „Prop #2“no S-BUS/SUMD channel must be selected. Attention: With activated sum signal at X2/4, neither the extension module EXM-2 nor digital communication between a UFR speed controller and the sound module can be used.

GB Sound module USM-RC-2
46 BEIER-Electronic 14.01.2020
Digital switches at sum signal SUMD3 With the sum signal "SUMD3" some remote controls (for example Graupner mz-16, mz-32) can also transmit up to 64 digital switches. Each digital switch can be assigned with a function oft the USM-RC-2 (see page 72). Thus, these digital switches are ideal for controlling the various functions of the USM-RC-2. Each digital switch can be set on the transmitter, in the "On/Off", "Pulse" and "Flash" modes.
For the following functions of the USM-RC-2 the mode "Pulse" must be selected:
• Light switch + and Lightswitch - • All WAV-Player functions (play, pause, track rev / fwd, random) • Indicator left and indicator right • All additional sounds, in mode „once“
The default 0.5 s can be retained in the transmitter as pulse time. The pulse time can also be reduced to 0.1 s, which speeds up the transmission a bit.
For all other functions of the SFR-1 the mode "On/Off" should be selected.

GB Sound module USM-RC-2
14.01.2020 BEIER-Electronic 47
Switching outputs The sound module has 12 outputs, which can be used to drive electrical consumer units such as lamps, light-emitting diodes, relays etc. Different switching functions can be attached to the 12 outputs by using the Sound-Teacher (see page 77). The outputs 11 and 12 are internally connected in parallel to both servo outputs of the sound module. If the servo outputs are activated in the sound teacher, it is not allowed to connect anything to the corresponding switching output! The sound module is always switching the negative pole to each output and thus to the connected load (e.g. LED, lamp, relay). The positive pole is always connected permanently to the load. The intensity (PWM-control) of each output can be configured with the Sound-Teacher by steps of 2%, between 2% and 100%. If relays or other inductive loads (e.g. motors) should be connected to the switching outputs, free-wheeling diodes must (e.g. 1N4007) be used:
135
M+-
+-

GB Sound module USM-RC-2
48 BEIER-Electronic 14.01.2020
Following output types are possible: • Output static on • Output flashing • Output as pulse • Output flickering (sound dependend) • Daytime running light • Parking light • Low beam headlight • High beam headlight • Front fog light • Rear fog light • Brake light • Reversing light • Indicator left • Indicator right • Bending light left • Bending light right • Combined headlight • Combined rear light • Combined American rear light left • Combined American rear light right • In motion on • In stationary on • In stationary and motion on • At accelerating on • At driving speed on • Locomotive: Driving light foreward • Locomotive: Driving light backward • Ship: All-round light red top • Ship: All-round light red middle • Ship: All-round light red bottom • Ship: All-round light green top • Ship: All-round light white middle • Ship: All-round light white botom • Ship: 1. Masthead light • Ship: 2. Masthead light • Ship: Anchor light • Ship: Side light • Ship: Stern light • Ship: Towing light • Smoke generator • Military vehicle: Black out headlamp • Military vehicle: Disguise rear light • Military vehicle: Disguise brake light • Military vehicle: Guidance cross
GB Sound module USM-RC-2
14.01.2020 BEIER-Electronic 49
Output “Static“ on An output with this setup can be switched on using a sound, a proportional channel, a nautic switch, the EKMFA-mode or a switching-input. The output is always switched on as long as a sound is played, with which the output is activated in the Sound-Teacher or the output is switched on with one of the free allocable functions. Output “Flashing“ on An output with this setup can be switched on using a sound, a proportional channel, a nautic switch, the EKMFA-mode or a switching-input. The output flashes as long as a sound is played, with which the output is activated in the Sound-Teacher or the output is switched on with one of the free allocable functions. The flashing frequency can be set separately for each output in the Sound-Teacher. The value for the flashing frequency is entered in field “Option 1“. Values within the range 1 to 255 can be set: 1 corresponds to the fastest flashing frequency (50Hz) and 255 the slowest (0.196Hz). The flashing frequency can be calculated as following: f = 1 / (value x 0.02). Output as “Pulse“ An output with this setup can be switched on using a sound, a proportional channel, a nautic switch, the EKMFA-mode or a switching-input. If the output is activated, it will be switched on for a limited period of time and then goes off again. A typical application is a short muzzle flash from a canone. The pulse duration can be adjusted in the Sound-Teacher. The value for the pulse duration is entered in field “Option 1”. Values within the range 1 to 255 can be set: 1 corresponds to the shortest pulse duration (0.1s) and 255 to the longest pulse duration (25.5s). The pulse duration can be calculated by multiplying the entered value with 0.1s. A value of 5 means for example a pulse duration of 0.5s. Output “Flickering“ on An output with this setup can only be switched on using a sound. When this function is selected the outputs flicker at the same rhythm as the sound that is played currently. This can be used to generate very impressive light effects, such as a simulation of fire or a welding torch. The Sound-Teacher allows you to adjust the sensitivity of the flicker effect separately for each of the outputs. A value between 1 and 255 can be entered in the field “Option 1“.The higher the value the higher the sound volume must be to activate the flicker effect.

GB Sound module USM-RC-2
50 BEIER-Electronic 14.01.2020
Output „Daytime running light“ The output for the daytime running light will be switched on, if the parking light and the low beam headlight are not switched on. When the parking light or low beam headlight are turned on, the brightness changes to the value of "Option 1". If this value is 0, the daytime running light is switched off when the parking light or low beam headlight are switched on. When the indicators are activated, the brightness of the daytime running light is switched to the value of "Option 2". “Parking light“, “Low beam headlight“, “High beam headlight“, “Front fog light“ and “Rear fog light“ outputs The outputs for these lights are switched on as soon as the corresponding function is switched on. The function can be switched on using a proportional channel, a nautic switch, the EKMFA-mode or a switching-input. Of course, you do not have to keep to this order. That means for example if you don’t need a rear fog light, you can connect something else to the output. The lights can be switches with the programmable light switch under "Configuration", "General" and "Light switch" (see page 60). Output “Reversing light” The output for the reverse driving light is always switched on when the vehicle runs backwards. If the sound module is configured for 2 drive motors, the reversing light is only triggered when both motors are running in reverse. If the reversing light should be switched via an existing switching output of the speed controller, the output of the speed controller is directly connected to an input (X1/4 - X1/7) of the sound module and the function “driving backwards” must be assigned to the switching input in the Sound Teacher. The reversing light (and the reversing sound) is no longer controlled by the internal analysis of the driving direction, but by the switching input. Output “Brake light“ The brake light is always shortly turned on when the driving speed is reduced substantial. The sensitiveness can be configured in the USM-RC Sound-Teacher. If the brake light should be switched via an existing switching output of the speed controller, the output of the speed controller is directly connected to an input (X1/4 - X1/7) of the sound module and the function “brake light” must be assigned to the switching input in the Sound Teacher. The brake light is no longer controlled by the internal analysis of the driving direction, but by the switching input. Outputs “Indicator left“ and “Indicator right“ The outputs for the indicators can be switched on using a proportional channel, a nautic switch, the EKMFA-mode or a switching-input. If “American indicator mode” is selected, the indicator lights will come on, as soon as the parking light is switched on. The intensity for the “indicator parking light” can be adjusted in “Option 1“(e.g. 10%). If hazard lights are switched on, both indicators will start flashing at the same time.

GB Sound module USM-RC-2
14.01.2020 BEIER-Electronic 51

GB Sound module USM-RC-2
52 BEIER-Electronic 14.01.2020
Outputs "Bending light left" and "Bending light right" These outputs can be turned on at cornering. There are 2 ways in which the bending lights can be turned on:
1. By steering on proportional channel # 2 (X2/2) 2. By the indicator signal
For more information about these two options, please look on the page 79. The bending lights work only if the parking light or the low beams are turned on. The bending lights are also front fog lights and can thus also be switched by the function "front fog light". The switching on and off of the bending lights is not immediate, but with a dimming function. Output „Combined headlight“ Using the combined headlight, “parking light“, “low beam headlight“ and “high beam headlight“ can be switched using just one output. The Intensity for each of the 3 lights can be adjusted seperately: The intensity of the parking light is entered under “intensity“(e.g. 10%). The intensity of the low beam headlight is entered under “Option 1“(e.g. 30%). The intensity of the high beam headlight is entered under “Option 2“(z.B. 60%). However, it should be noted that these 3 intensities are added, if more than one light is switched on. Summing up, you should avoid a value that is over 100%. Output “Combined back light“ Using the combined rearlight, “parking light“, “brake light“ and “rear fog light“ can be switched using just one output. The Intensity for each of the three lights can be adjusted seperately: The intensity of the parking light is entered under “Intensity“(e.g. 10%). The intensity of the brake light is entered under “Option 1“(e.g. 30%). The intensity of the rear fog light is entered under “Option 2“(z.B. 60%). However, it should be noted that these three intensities are added, if more than one light is switched on. Summing up, you should avoid a value that is over 100%. Output „Combined American rear light left/right“ This setting switches three light functions, namely „parking light“, “brake light” and “indicator right” respectively “indicator left” via only one output. For each of this light functions you can set the intensity separately. The intensity for “Parking light” is set at “Intensity” for example 10%. The intensity for “Brake light” is set at “Option 1” for example 100%. The intensity for “Indicator light” is set at “Option 2” for example 50%. In contrast to other combined lights, the intensities are not summarised! Output „Locomotive – driving light forward/backward“ These two output types are triggered via the function "Locomotive - Driving light”. If the locomotive is moving forwards, the output "Locomotive - Driving light forward" is activated. If the locomotive runs backwards, the output "Locomotive - Driving light

GB Sound module USM-RC-2
14.01.2020 BEIER-Electronic 53
backward" is activated. In stand always the last switched output remains switched on. Output “In motion on“ This output is always switched on when the model is in motion, whether it is moving forwards or in reverse. Output “In stationary on“ This output is always switched on when the model is stationary. Output „Stationary/Motion“ With this function the output is always active, regardless of whether the model is moving or not. The value “Intensity” defines the light intensity during standing. “Option 1” defines the intensity when the model is in motion (0-100%). The change between both light intensities is executed smoothly. Output “At accelerating on“ This output is always switched on briefly as soon as the model accelerates from standing. Output “At driving speed on“ This output is switched on when the model exceeds a defined running speed level. This level is entered under “Option 1“. Output "Smoke generator - heater“ and „Smoke generator - fan“ These output types are for connecting a proportional smoke generator. Depending on the state (engine start, idle, accelerating and running speed) of the model, the output is controlled with varying intensity. Thus, smoke emissions (per fan) are produced to suit the particular situation. With the output type “fan” a trailing can be set (see page 77). The smoke emissions can be adjusted using the 3 parameters "Brightness", "Option 1" and "Option 2":
• At "Brightness" the intensity of the smoke emissions during engine start and acceleration can be set (e.g. 100%).
• At "Option 1" the intensity of the smoke emissions while standing (e.g. 20%) can be adjusted.
• At "Option 2" the maximum smoke intensity at full running speed (e.g. 90%) can be defined. The corresponding smoke intensity at each speed level between start and full running speed is calculated automatically.
The output is activated via the the function "Smoke generator on" or automatically when turning on the driving sound (see page 77). Outputs for military vehicles: „black out headlamp“, „disguise rear light“, „disguise brake light“ und „guidance cross“ These outputs can only be switches with the programmable light switch (see page 60) using the functions "light switch +" and "light switch -".
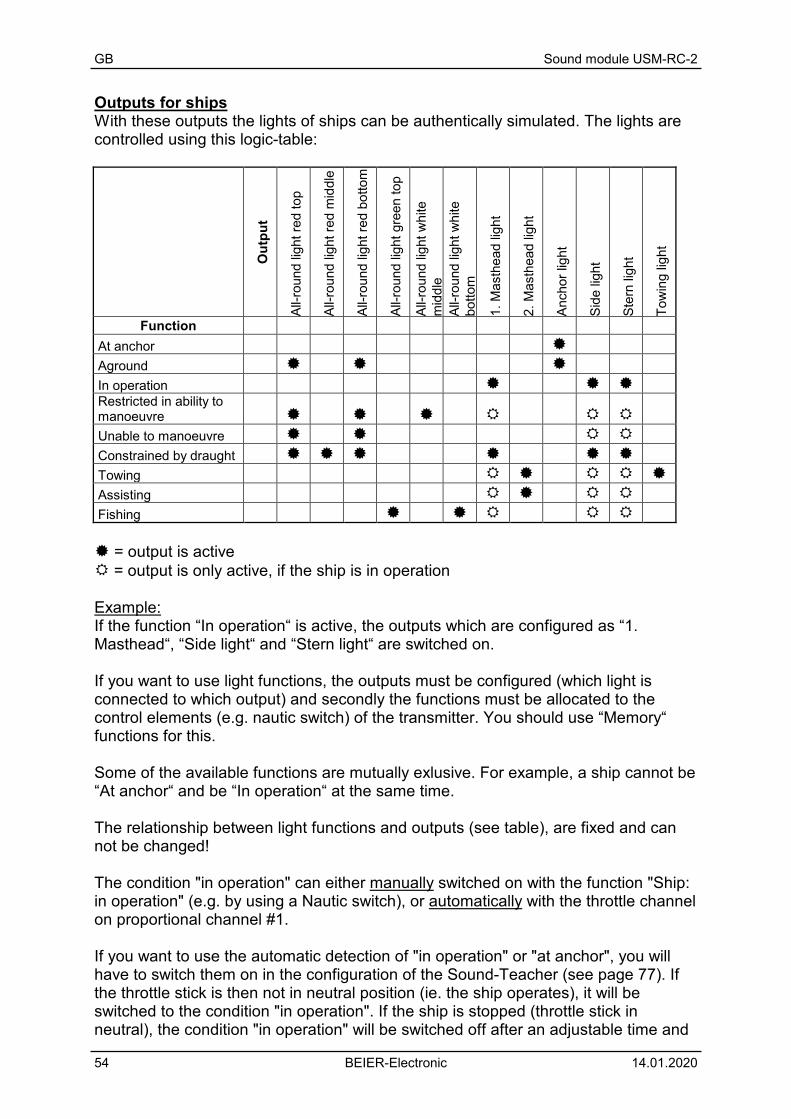
GB Sound module USM-RC-2
54 BEIER-Electronic 14.01.2020
Outputs for ships With these outputs the lights of ships can be authentically simulated. The lights are controlled using this logic-table:
O
utpu
t
All-r
ound
ligh
t red
top
All-r
ound
ligh
t red
mid
dle
All-r
ound
ligh
t red
bot
tom
All-r
ound
ligh
t gre
en to
p
All-r
ound
ligh
t whi
te
mid
dle
All-r
ound
ligh
t whi
te
botto
m
1. M
asth
ead
light
2. M
asth
ead
light
Anch
or li
ght
Side
ligh
t
Ster
n lig
ht
Tow
ing
light
Function
At anchor Aground In operation Restricted in ability to manoeuvre Unable to manoeuvre Constrained by draught Towing Assisting Fishing = output is active = output is only active, if the ship is in operation Example: If the function “In operation“ is active, the outputs which are configured as “1. Masthead“, “Side light“ and “Stern light“ are switched on. If you want to use light functions, the outputs must be configured (which light is connected to which output) and secondly the functions must be allocated to the control elements (e.g. nautic switch) of the transmitter. You should use “Memory“ functions for this. Some of the available functions are mutually exlusive. For example, a ship cannot be “At anchor“ and be “In operation“ at the same time. The relationship between light functions and outputs (see table), are fixed and can not be changed! The condition "in operation" can either manually switched on with the function "Ship: in operation" (e.g. by using a Nautic switch), or automatically with the throttle channel on proportional channel #1. If you want to use the automatic detection of "in operation" or "at anchor", you will have to switch them on in the configuration of the Sound-Teacher (see page 77). If the throttle stick is then not in neutral position (ie. the ship operates), it will be switched to the condition "in operation". If the ship is stopped (throttle stick in neutral), the condition "in operation" will be switched off after an adjustable time and

GB Sound module USM-RC-2
14.01.2020 BEIER-Electronic 55
usually it will be switched over to the condition "at anchor". However, if in this moment there is still another condition active, like e.g. "restricted in ability to manoeuvre" or "towing", the condition will remain active and it will only be switched over to "at anchor" until the other condition is switched off. If the automatic detection of "in operation" or "at anchor" is active, these conditions cannot be switched with the functions "Ship: in operation" and "Ship: at anchor". Additional informations to lights of ships can be found in the internet.

GB Sound module USM-RC-2
56 BEIER-Electronic 14.01.2020
Output sequences You can assign any number of outputs in up to eight sequence groups. In the Sound-Teacher up to 36 steps can be programmed for each of the eight sequences (see page 81). For every step, you can program which output is switched on and the intensity of the outputs. Moreover, the duration of every step until it goes on to the next one can be configured. Is an output sequence enabled, the sequence always takes precedence over the normal function (eg, indicators, parking lights, etc.) of the output. The normal function of the output is switched off during the active sequence. With these output sequences, the most amazing light effects can be generated. Examples:
• Rotating lights • Moving lights • Modern police flashlights • Beacon lights for airplanes • Switching on flickering of fluorescent lamps • Any flickering lights and flash lights
Only one output sequence can be active at one time. A sequence stops as soon as a new one is activated.

GB Sound module USM-RC-2
14.01.2020 BEIER-Electronic 57
Servo outputs The USM-RC-2 offers two servo outputs (X8/1 and X8/2). These two servo outputs share their function with the switching-outputs 11 and 12. If servo 1 is activated in the Sound-Teacher, the function of the switching-output 11 is deactivated. There shouldn’t be anything connected to switching-output 11 if servo 1 is activated! If you really want to use switching-output 11, you must disable servo output 1 and disconnect any connections to it. The same is valid for the servo output 2 and the switching-output 12. The servo outputs deliver usual pulses from 1,000 - 2,000ms, so you can connect standard servos or speed-controllers. The power for the servo outputs is supplied from the proportional inputs #1 - #4 using the connections X2/1 - X2-4. Generally these connections are attached directly to the receiver, so the receiver battery and the BEC in the speed-controller must deliver enough current for the servos! There are two different ways to control the servo outputs:
1. Driving to fixed positions 2. Running through a programed sequence
Driving to fixed positions: For each servo, up to five positions can be specified in the Sound-Teacher (see page 84), which can be approached via the freely assignable functions of the sound module. The positions have the following names:
• Home position • Position #1 • Position #2 • Position #3 • Position #4
Running a programed sequence: A flow sequence can be programmed for each servo output in the Sound-Teacher. Conceivable applications are e.g. a recoil system for a tank or an easy windshield wiper for a truck. A servo sequence can be triggered with the functions “Servo 1 sequence“, “Servo 2 sequence“ or with a sound (e.g. a cannon shot). A detailed description of the servo outputs can be found on page 86. A servo output can only be controlled either to fixed positions or as a sequence. Both versions are not possible on a servo output. The servo movement can also trigger a sound. The additional sounds “Sound from servo 1/2“are responsible for this. It also distinguishes between left and right movement. So you can play for every direction of running a different sound. If you don’t want sounds while moving the servos, just leave these sound-slots empty.

GB Sound module USM-RC-2
58 BEIER-Electronic 14.01.2020
Function sequences All functions that can be triggered with the sound module (see page 35) can be compiled to a special function sequence with defined order and time for each step. More information can be found in this manual starting on page 58. Voltage monitoring The connected supply voltage is measured permanently. If the voltage drops below an adjustable value for longer than ten seconds, different actions can be triggered:
• Playback of a warning sound at empty battery (z.B. „Please load battery“) • Playback of a warning sound at undervoltage (e.g. “Attention undervoltage“) • Switch off the sound module • Switch off all outputs
Some battery types (e.g. LiPo-batteries) should not be subjected to deep discharge, because this can damage the battery! With the help of the integrated voltage monitoring, it is now possible to warn the user. There are two thresholds in the Sound-Teacher:
• Threshold for charging battery • Threshold for undervoltage
The thresholds of the voltage monitoring are freely adjustable and lies between 4,5 and 14,0V. Here is a list with usual values for different battery types:
Battery typ Battery voltage Threshold for voltage monitoring
Nickel-cadmium and
nickel-metallhydrid
6,0V (5 cells) 7,2V (6 cells) 8,4V (7 cells) 9,6V (8 cells)
10,8V (9 cells) 12,0V (10 cells)
5,0V 6,0V 7,0V 8,0V 9,0V
10,0V Lead battery 6,0V (3 cells)
12,0V (6 cells) 5,0V
10,0V Lithium-Ionen 7,2V (2 cells)
10,8V (3 cells) 5,0V 7,5V
Lithium-polymer (Lipo) 7,4V (2 cells) 11,1V (3 cells)
6,4V 9,6V
These values are only guidelines, the best is to read the user manual of the battery, to find out the exact deep-discharge voltage.

GB Sound module USM-RC-2
14.01.2020 BEIER-Electronic 59
Current monitoring The current is monitored by each switching-output. In case of a detected overcurrent all outputs are switched off in order to protect them from damage. Nevertheless, the outputs are not completely short circuit proof! Therefore you have to avoid short circuits at the outputs! If an overcurrent is detected, the additional sound „Sound at overcurrent“ is played (if the slot is not empty) and the red LED on the sound module is also permanently switched on. LEDs on sound module There are three LEDs on the sound module to show different conditions. Green LED The green LED allways lights up while the supply voltage is connected to X1/1 and X1/2. Red and blue LED These two LEDs show different conditions and errors. If the voltage is switched on, the blue LED flashes a few times and then goes off again. In nautic mode or at activated sum signal the blue LED flashes regularly, if the data are receiving correctly from the receiver. Status:
Condition / Error Red LED Blue LED Overcurrent at switching outputs on off No SD-card plugged in No data on the SD-card Unable to read SD-card
fast flashing
on
File read or write error 3 - 9 times slow flashing
off

GB Sound module USM-RC-2
60 BEIER-Electronic 14.01.2020
PC-Software „USM-RC-2 Sound-Teacher“ With our software „USM-RC-2 Sound-Teacher“ the sound module can be configured and sound files can be tranfered to SD-card.
System requirements
• Windows compatible PC • Windows 2000, NT, XP, Vista,
Windows 7, Windows 8 or Windows 10
• about 20 MB of free HD space • SD-cardreader or a free USB
interface (1.0, 1.1, 2.0 or 3.0) • DVD-ROM drive
Software installation In most cases the “USM-Installer” starts automatically when you insert the DVD-ROM. If this does not occur, please start the file „USM-Installer.exe" which is in the main folder on the DVD-ROM. To install the Sound-Teacher, click on the „USM-RC-2 Sound-Teacher” button and follow the further instructions on the screen.

GB Sound module USM-RC-2
14.01.2020 BEIER-Electronic 61
Starting Sound-Teacher During the installation of the Sound-Teacher an entry is added to the Start menu, which can be used to start the program. Click on the “Start” button at the bottom left-hand corner of the screen then on “Programs”, on to “USM-RC-2 Sound-Teacher” and finally click on “USM-RC-2 Sound-Teacher”. The program should now start. If you chose to place an icon on the desktop during the installation procedure you can start the program by double-clicking on that icon. When the program starts, it automatically opens the project on which you last worked. Brief instructions for loading new sounds onto SD-card Please follow the instructions below, for transferring a new sound onto SD card:
1. Insert the SD card into a cardreader, which is connected to the PC. 2. Start the USM-RC-2 Sound-Teacher. 3. Chose the SD card in the menu “SD card“. 4. Klick in the menu “File“on “Open project“. 5. Now select the desired sound project (.usm file) e.g. from the “USM-RC-2-
Sounds” folder on the DVD-ROM, and click on the button “Open”. 6. If desired, the configuration of the project can be changed. 7. Press the button “Save project data onto SD card“.

GB Sound module USM-RC-2
62 BEIER-Electronic 14.01.2020
Using software “USM-RC-2 Sound-Teacher“ Menus
File
Create new project Creates a new project Open project Opens an existing project Save project Saves the current project Save project as Saves a copy of the current project with
a new name Print function assignment of the project
Prints an overview of the function assignments of all inputs and outputs
Upload project data via datacable
Uploads the complete project data via datacable to the sound module
Check automatically for updates
On every start of the Sound-Teacher, it will be checked if a new version is available
Check now manually for updates
Checks if a new version is available
Download sounds from the internet
Downloads new sounds from the internet
Open Sound-Center Opens the BEIER-Electronic Sound-Center, a sound data base from our cutomers
Close Closes the program
SD card Formating SD card Formates (erases) the SD card D: to Z: Choses the SD card
Language German Switches to german language English Switches to english language French Switches to french language
Help
Manual Opens this manual Diagnosis via datacable Shows live diagnostic data of the sound
module with the datacable Diagnosis via SD card Shows saved diagnostic data of the
sound module stored on a SD card Sound simulation You can check e. g. the drive sound with
the sound simulation without uploading data into the sound module
Info Shows informations about the software Configuring sounds A lot of different sounds can be saved in the sound slots of the USM-RC-2. The sounds are divided into five different ranges:
• Engine sound • Engine sound 2 • Additional sounds • Random sounds • WAV-Player
Click with the mouse on the corresponding tab, to configure a sound.

GB Sound module USM-RC-2
14.01.2020 BEIER-Electronic 63
Project folder Indicates the folder where the sound project is to be saved. Slot name Indicates the name of this slot, i.e. what sort of sound can
be saved here (e.g. engine start sound). File File name of the WAV file which is saved in this slot.
This button is used to load a new sound file into the slot. Erases the file from the slot. Plays back the file via the PC’s integral loudspeaker.
Playback mode At this point you can select the different play-back modes Outputs/Sequences Determines which outputs or output sequences are used
when particular sounds are played back. Volume The volume of every sound can be changed here. Soundlength Shows length of the sound.
Opening of sound files The folder „Sounds“on the DVD contains general examples of soundfiles. The folder „USM-RC-2 Sounds“contains drive sounds from a lot of different vehicles. With a click on the button, the Windows usual “file open dialog” opens, in which you can select the wanted sound file on your hard disk. All WAV-files with following properties can be opened:
• 22,050kHz or 44,100kHz • 8 Bit or 16 Bit • Mono or Stereo
The Sound-Teacher always converts the soundfile into the format 44,1 kHz, 16 Bit, mono. To get optimum sound, the WAV file should be in this format before. If you want to open a file, which is not in the necessary format, a message appears. If you still want to use this file, you must first convert it using a suitable program (e.g. audacity). We recommend, to store all sound files for a complete project, in an own separate folder on your hard disk. This increases the transparency. That’s why the Sound-Teacher asks if you save a project, to copy all files to the project directory.
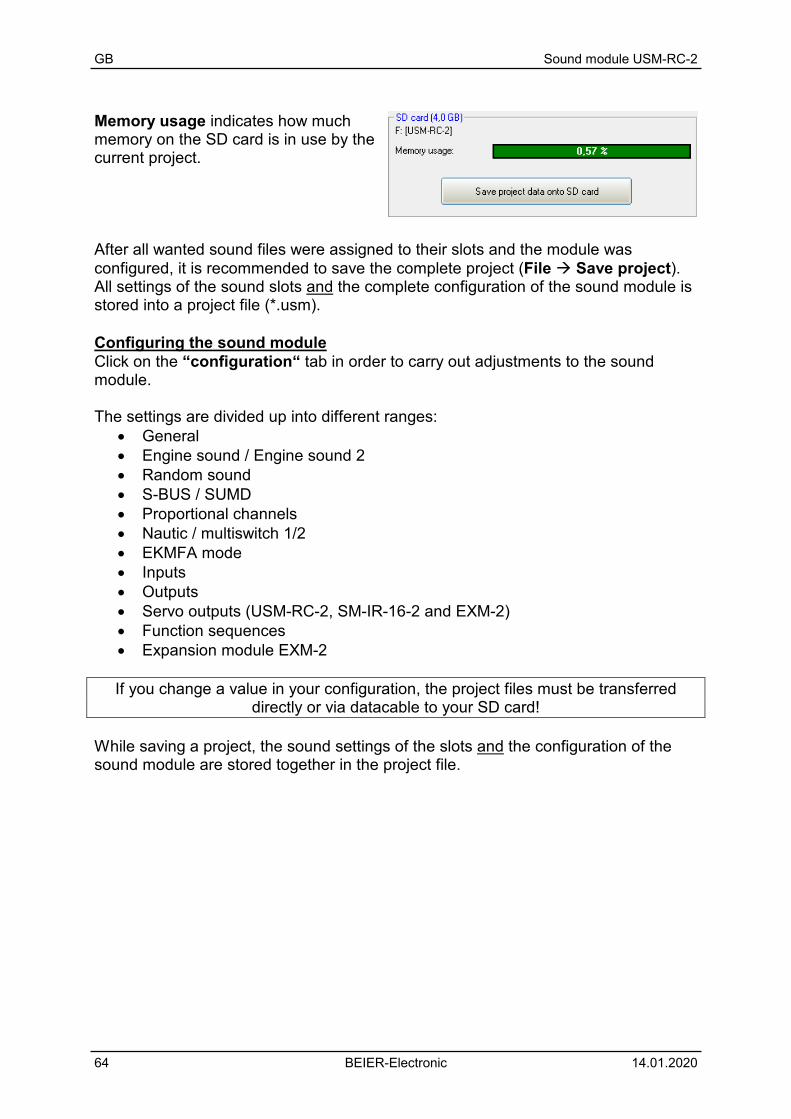
GB Sound module USM-RC-2
64 BEIER-Electronic 14.01.2020
Memory usage indicates how much memory on the SD card is in use by the current project. After all wanted sound files were assigned to their slots and the module was configured, it is recommended to save the complete project (File Save project). All settings of the sound slots and the complete configuration of the sound module is stored into a project file (*.usm). Configuring the sound module Click on the “configuration“ tab in order to carry out adjustments to the sound module. The settings are divided up into different ranges:
• General • Engine sound / Engine sound 2 • Random sound • S-BUS / SUMD • Proportional channels • Nautic / multiswitch 1/2 • EKMFA mode • Inputs • Outputs • Servo outputs (USM-RC-2, SM-IR-16-2 and EXM-2) • Function sequences • Expansion module EXM-2
If you change a value in your configuration, the project files must be transferred
directly or via datacable to your SD card! While saving a project, the sound settings of the slots and the configuration of the sound module are stored together in the project file.

GB Sound module USM-RC-2
14.01.2020 BEIER-Electronic 65
Configuration - General
Sound module-configuration Module mode: At this point you determine whether the module is to operate in digital, analogue or mixed mode (see page 7). The infrared transmission to the additional light module SM-IR-16-2 can be activated here. The IR transmission diode is connected to X9. For troubleshooting while the sound module is running, diagnostic data can be stored on the SD card. This data can be read out and displayed by the Sound-Teacher (see page 97).
Warning! Only use this diagnosis function for troubleshooting and switch it off afterwards!
If the diagnosis function is activated, the sound playback may be faulty.
If digital servos are connected to the servo outputs, the speed of the pulse output on the servo outputs can be reduced from the standard 20 ms to 10 ms. Some digital
servos work better with 10 ms than with 20 ms. Volume You can also configure the basic volume (10-100%) of the sound module here. This function is helpful if you don’t have a volume control potentiometer. The volume can also be adjusted e.g. with a proportional channel configured with the functions “Volume +“ and “Volume -“. Another option to change the volume with the transmitter is the "Direct volume control". One of the four proportional channels can be used for a stepless volume setting. You need a free slide or rotary control at your transmitter for that. However, this proportional channel can only be used for adjusting the volume and not for any other functions anymore! In mixed mode you can use proportional channel # 1, because in this setting it is not used for anything else.

GB Sound module USM-RC-2
66 BEIER-Electronic 14.01.2020
To obtain a more realistic driving sound a speed-dependent increase of volume can be activated with "Increase volume at topspeed". The volume of the driving sounds will be louder, the faster the model drives. In standing position the volume is automatically by this percentage less! Therefore, we recommend to select a low value at this setting. Battery voltage monitoring: Two thresholds can be configured for voltage monitoring. Additionally you can choose, whether the sound playback should be stopped and/or the switching outputs should be switched off at undervoltage. Multi function: Up to 3 functions can be assigned to each of the 4 multi functions. Thereby 3 functions can be activated at the same time, using only one function/slot at the transmitter. For instance: You would like to activate a searchlight and at the same time a servo sequence should be activated as well. This servo sequence controls a servo, which moves the searchlight. Without the multi function you would need 2 functions, triggered at the transmitter:
1. Output x on 2. Servo sequence x on
Using the multi function you can activate at the same time both, the output and the servo sequence by triggering only one function at the transmitter. WAV-Player: The WAV-Player settings can be configured here. You can choose whether the next track should start automatically after finishing the previous track or the playback should stop.

GB Sound module USM-RC-2
14.01.2020 BEIER-Electronic 67
Configuration – Engine sound
Driving sound At this point you can define whether the model is fitted with one or two motors whose speed dictates the driving sound. If two motors for engine sound are selected, you can decide if an average speed of both motors (and proportional channels) should be used to set the volume of the motor sound. Otherwise the faster motor will be used to define the sound speed of both motors. Additionally in two engine mode, you can chose if proportional channel #2 is only a steering channel, so after the sound module, the throttle channels and steering channels are superimposed using a mixer. In this case the direction of the vehicle is only defined by proportional channel #1. Thresholds for “slow down” and “speed up”: These thresholds set how strong the speed must be changed so that the normal driving sound is changed to deceleration or acceleration. If your speed controller has a special braking function, select this option here. Then after a forward motion, the sound module only switches to reverse when the throttle stick is for at least 0.5s in neutral position. If you activate “fast switching”, the module immediately switches when the speed changes. This is particularly useful for long sounds in the driving sound slots. If the module is required to simulate a slow-revving engine (e.g. single-cylinder motor), fast switching should be deactivated. In this case vehicle starting and stopping sounds are not played, as well. The brake sound threshold determines how strongly the vehicle must be decelerated before the brake sound is played. The higher this thresholds is set, the more must the vehicle be decelerated in order to trigger the brake sound.

GB Sound module USM-RC-2
68 BEIER-Electronic 14.01.2020
In two engine mode you can also define a threshold for cornering squeak. The higher the value is, the more the steering must be moved to trigger the cornering squeak. For the turn warning sound, which is triggered by the indicators, you can set the speed until which the turn warning sound will be played (0 - 100%). Automatic driving sound activation: As an option you can select an automatic driving sound activation (see page 32). The engine sound always switches on automatically, as soon as you move the accelerator shortly while standing. After an adjustable time the engine sound is turning off automatically. Time for warmstart: If both sounds “Engine coldstart sound“ and “Engine warmstart sound“ are used, the time can be specified which determines how long the driving sound had to be turned off in order to play the coldstart sound instead of the warmstart sound after a new start. Speed change when triggering function “Engine sound rpm change”: Here you can setup the change of the rpm for idle or driving sound between a range of -50% and +50%. Minus values make the sound slower and positive values faster. With this setting you change always the speed of the actual sound (idle or driving sound). It initiates no change between idle and driving sound. This function is quite useful for example if you want to change the speed of a hydraulic pump of a construction maschine. Speed steps/gears Gears forward / backward: Here you can choose how many different driving sounds or gears, the engine sound should have. When option "Play change sound parallel to engine sound" is activated, the driving sound changes immediately from the old to the new engine sound and the change sound is played simultaneously during this change. If this option is not activated, the old engine sound stops, the change-sound is played and after that the new engine sound starts. As an additional option, it is possible to skip gearshift and downshift at stopping. If this option is activated, the engine sound will directly jump to FG1 when you stop the model. Zero point deadband threshold: When your vehicle is standing, i.e. the drive motors are not running, the sound module should generate the idle sound. If it occasionally plays the driving sound instead, then this value should be raised slightly. On the other hand, if the idle sound continues to play even though the vehicle is no longer stationary, then this value can be reduced slightly. Before adjusting please check first if the neutral position is set correctly! Stationary/motion/gear hysteresis:

GB Sound module USM-RC-2
14.01.2020 BEIER-Electronic 69
When the vehicle is moving very slowly and the sound constantly alternates between idle and running sound, then this value should be raised slightly. Also if the engine sound alternates steadily between two speed steps/gears while driving, this value should be raised slightly, as well. Driving sound diagram: The diagram shows graphically which driving sound/gear is played at the corresponding speed. In addition it is possible to set the driving sound directly in the diagram. Configuration - Engine sound 2
Different parameters for engine sound 2 can be configured in this section. Speed via proportional channels: Proportional channels #1 - #4 can be used as source/recognition for speed. In mix and analogue mode the driving speed information for engine sound 2 comes from the motor voltage of motor 1 or motor 2. For motor 1 you have to set prop #1 and for motor 2 prop #2. Zero point: The neutral position of the throttle stick can be set between 1.00 - 2.00 ms. Most transmitter and speed controller have its zero point at 1.50 ms. Zero point deadband: For the throttle control an area can be defined with this deadband, where the stationary sound for engine sound 2 should be played. This area ranges between 1 and 30. Maximum sound speed: The sound speed at full power can be set between 60% and 300%. With the option "Turn on engine sound automatically by motion" it can be determined, that the second driving sound automatically turns on as soon as the

GB Sound module USM-RC-2
70 BEIER-Electronic 14.01.2020
throttle control for the engine sound 2 is out of neutral position. This is useful, for example, if you want to realize a tank turret rotation. Otherwise, you need to activate engine sound 2 first with the function “Engine sound 2 on/off”. Activate the option "When starting engine sound 1 or 2, turn off the other", when you never want to use both engine sounds at the same time. If you are runnig your model with engine sound 1 and you activate engine sound 2, the first engine sound is automatically turned off. If the first engine sound is activated again, the second engine sound goes off automatically. In order to turn off engine sound 1 with this function, it must not be activated by switch input X1/3! The change to engine sound 2 only works when the engine sound has been activated by the function “Engine sound on/off". Additionally you can choose whether changing sounds between the two engine sounds, like starting and stopping sounds should be played.

GB Sound module USM-RC-2
14.01.2020 BEIER-Electronic 71
Configuration – Random sounds
Random sounds If you want to play random sounds (see page 38), you can set the time in which interval a random sounds should be triggered. The time ranges between 1 and 999 seconds. With the checkboxes it is also possible to define conditions under which random sounds should be triggered, i.e. whether the random sounds are played only when the model is stationary and / or moving, or whether the engine sound must be on and / or off. If a random sound should be played, at least one checkbox must be activated. You can also select whether random sounds generally should be played or only when the function "Random sound enable" is activated, for example by a proportional channel. If the option "Don't play 2 random sounds at the same time" is activated, only one random sound can be played, otherwise 2 or more random sound could be played simultaneously.

GB Sound module USM-RC-2
72 BEIER-Electronic 14.01.2020
Configuration - S-BUS / SUMD
S-BUS / SUMD If sum signals should be used, they must be activated here. The sum signal channel of the receiver is connected to proportional channel #4 (X2/4) of the USM-RC-2. Each sum signal channel can be assignet to a proportional channel in the Sound-Teacher (see page 45Fehler! Textmarke nicht definiert.). Configuration - S-BUS / SUMD - Digital switches (only for Graupner SUMD3) The 64 digital switches of the sum signal SUMD3, the desired functions can be assigned here. Please follow the instructions on page 46.

GB Sound module USM-RC-2
14.01.2020 BEIER-Electronic 73
Configuration – Proportional channels
Assignments and thresholds for proportional channel #2 - #4 For proportional channel #2 - #4, the ranges A, B, C and D can be assigned to various functions of the sound module. The left picture shows five ranges of a joystick. You can define the thresholds for each range manually (see page 40) by moving the blue sliders up and down. The number on top shows the value of each threshold. The reset button restores the threshold standard values. Options The directions of the four proportional channels can also be inverted. If for example, the output for driving backwards light goes on, although you are driving forward, you can here invert the corresponding proportional channel. Neutral position of proportional channel #2 - #4 Here you can set, whether an automatic measured or a pre-defined value should be used to define the neutral position. This neutral position settings only apply to proportional channel #2 - #4 (for additional sounds and function) and not to your engine sound (prop. channel #1). The neutral position for driving speed must be configured seperately (see page 93). Caution: If you activate automatic neutral position, it is essential to check that all joysticks, sliders, switches etc. are really in neutral position when you turn on your RC and / or your sound module. If you ignore this, incorrect values are measured and might not be be possible to operate the sound module correctly. Activation delay Certain times can be set that determine how long the joystick or switch must be in the positions A, B, C and D in order to activate the corresponding functions. Times between 10 and 2500ms are possible.

GB Sound module USM-RC-2
74 BEIER-Electronic 14.01.2020
However, the values defined here are always valid for all proportional channels. It is not possible to define delays for one channel separately. The reset button will restore standard values.

GB Sound module USM-RC-2
14.01.2020 BEIER-Electronic 75
Configuration – Nautic/Multiswitch
If you want to use the nautic mode, you will first have to activate it here. Switch assignment Every switch position can be assigned to a function (see page 44). Depending on the function, a memory setting for the corresponding switch can be activated. Attention! It is not possible to use one function twice; therefore it is not possible to activate the same function with two different switches. Type Under type you need to select the type of your radio control system and your nautic switch module. Error correction If problems occur in receiving the nautic signal, you can activate error correction, as this may lead to a more reliable transmission of the nautic switch data. However, activating error correction slows down the transmission slightly (approx. +200 ms). Especially with some 2.4 GHz transmitters it is advisable to switch error correction on, as under certain circumstances incorrect switch positions are occasionally transmitted, and this could trigger undesired actions. Manual settings Opting for manual settings enables you to set values for the transmission protocol of the nautic mode manually. These values should only be altered as instructed. Normally it is not necessary to set the values manually.

GB Sound module USM-RC-2
76 BEIER-Electronic 14.01.2020
Configuration – EKMFA mode
If you want to use EMKFA mode, you have to activate it first. The used functions for EKMFA mode (see page 43) can be configured here. Of course, you don’t have to assign every position (2 x 15 positions). Activation delay Certain times can be set that determine how long the joystick or switch must be in the positions A, B, C and D in order to activate the corresponding functions. Times between 10 and 2500ms are possible. However, the values set here are always valid for all proportional channels. It is not possible to define delays for one channel separately. The reset button will restore the standard values. Configuration - Inputs
Here you can assign functions to switching-inputs. By checking the box "Memory", the function will be stored (if it makes sense) and reset after reactivating the input again.

GB Sound module USM-RC-2
14.01.2020 BEIER-Electronic 77
Configuration – Outputs USM-RC-2 / EXM-2
The colored small boxes next to each output indicate the color of the flat ribbon cable that is connected to each output at the sound module. Output type Under function you can assign 12 switching-outputs to various functions (see page 47). Intensity The intensity can be set in 2%-steps for every output. Option 1 and option 2 For some output types different values can be set. For more details, see the description of outputs starting on page 47. Light bulb effekt Optionally, a light bulb effect can be activated for each output. This behaves an LED when switching on and off, then like a light bulb (softer on and off). Labeling For certain output types (static, flashing, pulse and flickering) own labels can be given for the outputs. This makes it easier to "find" these outputs in the selection of functions.

GB Sound module USM-RC-2
78 BEIER-Electronic 14.01.2020
Configuration – Outputs – Output options
If the function “Light flickering when starting“ is activated, all 12 outputs will flicker while the starting noise (coldstart or warmstart) is played. The light bulb effect can be set in 3 levels: Light, medium and strong. If the selection „Brake light always on at stationary“ is activated, the brake light is always turned on whenever the model is standing. An adjustable afterglow of the brake light can also be activated. If "Emergency brake while heavy braking" is activated the brake light flashes at a frequency of 3Hz during heavy braking. The duration for the flashing is defined in "Brake light remains on for: X seconds". If in addition the option “Hazard warning lights automatically on after emergency brake light” the hazard lights turn automatically on after heavy braking. The lights remain on, as long as they are switched off manually or the vehicle starts moving. The brake light threshold determines how strongly the vehicle must be decelerated before the brake light turns on. The threshold for emergency brake light determines how strongly the vehicle must be slowed down so that the emergency brake light is triggered. The higher these thresholds are set, the more must the vehicle be decelerated in order to trigger the related functions. If the selection „Hazard light automatically on when reversing“ is activated, the two indicator lights are always on, once the model is reversing. The indicator can also (e.g. like in a real car) be switched off with the steering channel on prop. #2. Just switch on the indicator (e.g. using prop. #3) and it will flash as long as the steering goes back to the neutral position. It can also be specified that indicators will turn off automatically after a certain number of flashes.

GB Sound module USM-RC-2
14.01.2020 BEIER-Electronic 79
If the „American indicator mode“ is activated, the indicators will always light when the parking light is on. The flashing rate for the indicators can be set, too. The values for „on“ and „off“, multiplied by 10ms, is the duration of the light and dark phases of the indicator. Bending lights: If the option "Bendings light also work when the light is off" is not selected, then either the parking light or the low beam headlight must be on for bending light to work. You can choose here how the bending lights are switched on: With the option "Bending light via steering on prop. channel #2" the right bending light is activated as long as the area "A" of prop. channel #2 is reached and is switched off, if the area "A" is left. The left bending light is switched on, if the area "D" is reached and is switched off again, if the area "D" is left. The switching thresholds for this can be set individually under Configuration – Proportional channels. The option "Bending light via indicators" activates the bending light, as long as the corresponding indicator is active. Both variants can be combined. The bending lights can also be used as fog lights. When driving backwards both bending lights can be activated automatically. For the daytime running light there is the option that the light is only activated when also the driving sound is on. If the option "low beam with xenon HID turn-on effect" is activated, the typical xenon effect (short flash followed by dimming up) appears when turning on the low beam headlight. If desired, parking light and low beam headlight can always be switched on automatically as soon as the engine sound is on. If this option is activated, however, the parking light and low beam headlight can not be switched on or off, using the functions "Parking light " or " Low beam headlight "! The ship light functions can be configured to detect automatically the condition of "in operation" or "at anchor" using the throttle channel at prop. channel #1. The condition "in operation" is automatically switched off, if the throttle channel is in neutral for a set time. After the set time has expired (1-255s), it will be switched over for example from "in operation" to "at anchor". The smoke generator can be activated automatically with the engine sound 1 or engine sound 2. If this option is not used, the smoke generator needs to be switched on/off separately with the function “smoke generator on”.

GB Sound module USM-RC-2
80 BEIER-Electronic 14.01.2020
For the output type “smoke generator fan” a trailing between 0 and 255 seconds can be set. This helps to keep the hose free of condensation. Configuration - Outputs - Light switch
With the light switch various lights can be controlled with the function "light switch +" and "light switch -". The light switch has in total 11 steps, that can be individually programmed. The steps are divided in 6 positive and 4 negative steps. The number of steps that should be used, can be selected as well as the active lights in each step. An active output is indicated with a "" in the table. For "reversing light possible", "brake light possible" and "indicator light possible" a „“ does not mean that the lights are always switched on. Only when the corresponding movement is carried out, the lights are activated. In the standard setting for step -1 to -4 (blackout lighting for military vehicles) reversing, brake and indicator lights are for example completely switched off. All other lights are actually switched on if there is a „“ at the step. After turning on the sound module the light switch is automatically in step 0. With the reset button all settings are reset to standard.

GB Sound module USM-RC-2
14.01.2020 BEIER-Electronic 81
Configuration – output sequences
All outputs that are assigned to an output sequence, appear automatically in the corresponding table. Total steps For each sequence, the number of steps can be set here. In each case, up to 36 steps are possible. If you activate the sequence, the steps will start with step 1 and run sequentially. In each step you can set for each output the desired intensity. For this purpose, click with the mouse on the value that you want to change and select in the drop- down box the new value (0% - 100%). Likewise the duration for each step can be specified between 0,01s and 24,6s.

GB Sound module USM-RC-2
82 BEIER-Electronic 14.01.2020
Loop start and loop end Similar to the three-stage additional sounds, the complete sequence can be divided into three sections:
1. Start sequence 2. Loop 3. Stop sequence
In the table, these three sections are stored colored in red and green for easy identification. First the start sequence (red) is shown when turning on the ouput sequence and then the loop (green) as long as the sequence is still active. If the sequence is turned of, still the stop sequence (red) will be shown at the end. Loop start and loop end, can be set individually. If the three-stage option should not be used, the loop start must be set to one and loop end to the number of set steps in order to make the whole sequence run through. Stop immediately This option determines whether turning of the sequence will stop it immediately, or it will last up until the end of the loop. If you click with the right mouse button into the table, additional functions are offered: Delete step Deletes the step on which you clicked with the right mouse
button. All other steps are shifted one row upwards. Insert step Inserts a new step before the step, on which you clicked
with the right mouse button. All other steps are shifted one row downwards.
Copy this output to other output
The complete sequence from an output can be copied with this command to another output.
Export sequence Use this to save a complete sequence in a file (*.a_seq) on your hard disk.
Import sequence This opens a saved sequence (*.a_seq) again. You can see two simple examples for output sequences on the picture at page 81: Output sequence 1: This sequence is a simple rotating light with three lamps/LEDs. In the first step only output 1 is switched on. In the second step output 1 goes off again, and output 2 is switched on. In the third step output 2 is switched off and output 3 is switched on. After the third step, the sequence starts from the beginning and output 1 is switched on again. In this way, the light almost “turns” in a “circle”.

GB Sound module USM-RC-2
14.01.2020 BEIER-Electronic 83
Output sequence 2: This example shows a simple fluorescent lighting simulation. Here is only one output used, however, the lamp switches not only on and off but it simulates the typical start of a fluorescent lamp. In step 1, the intensity is set to a small value (4%). This is supposed to represent the preliminary annealing of the tube. In step 2 the lamp tries to ignite, so it becomes shortly brighter (50%), but it does not make it yet and it becomes darker in step 3 again (4%). In step 4 is another ignition attempt (70%) which does not succeed. Therefore, the intensity in step 5 is set back to 5%. Only in step 6 succeeds the "tube" to ignite. The beginning and the end of the loop are now set exactly to this step 6. Thus, the sequence now plays only this step 6 (lamp on) as long as the sequence is turned on. Only when the sequence is turned off, the steps 7 to 10 are reached and the lamp goes off in several stages (80% 60% 40% 20% 0%). These are just simple examples. Of course you can also expand such sequences much further to achieve even incredible effect.

GB Sound module USM-RC-2
84 BEIER-Electronic 14.01.2020
Configuration – Servo outputs – Servo 1 + 2
Here you can configure the two servo outputs of the USM-RC-2 (see page 56). If you want to use the servo outputs, you have to switch these on here. However, the functions of the two switching-outputs 11 and 12 would then be disabled. Home position The servo goes always to the home position after turning on the sound module. Positions #1 - #4 These positions can be approached by freely assigned functions (for example the proportional inputs # 2 - # 4, the Nautic switches, the EKMFA mode or the switching-inputs). To move the positions, click with the mouse on the slider and move the pointer to the desired position. Speed The speed, with which the servo is moved, can be adjusted in 20 steps. It should be noted that each servo by itself has certain inertia. So even at maximum speed, a certain amount of time is needed to reach the selected position. Expanded servo way The usual length for a standard servo pulse is 1.000 to 2.000ms. Sometimes it is desirable to expand this area so that the travel is a bit inreased. If this option is enabled, the servo positions can be set now between 0.700 - 2.300ms.
Caution! Not all servos are suitable for this enhanced servo range and may get
damaged! Therefore, use this function only with special care. Go automatically to home position if no other position is selected If this option is activated, the servo will go automatically in home position if currently no position #1 - #4 is selected.

GB Sound module USM-RC-2
14.01.2020 BEIER-Electronic 85
If this option is not activated, the servo will not go back to home position during deactivation, but rather stays in the current position. This means, any position can be allocated to the servo. For this, the speed should be set relatively slow. Sound at servo movement If this option is activated, the additional sound for the servo will be played as long as the servo is moving. Sound when not in home position With this function the additional sound will always be played, if the servo is not in home position. This version is very well suitable if you are using a speed controller with motor instead of a servo. In home position (1,500ms) the motor is switched off and no sound is played. For example, if position #1 is set to 1,800ms and you “select“ this position, the motor will turn and you can play a corresponding sound. Both servo outputs can be controlled directly and stepless by one of the proportional channels of the USM-RC-2. The prop signal from the receiver is passed on 1:1 to the servo. It is also possible to scale/limit the servoway between -100 % and +100 %. Negative values invert the running direction of the servo. This is helpful for example to control a steerable axle. However, controlling a servo requires the complete proportional channel. No other function can be triggered with this proportional channel.

GB Sound module USM-RC-2
86 BEIER-Electronic 14.01.2020
Configuration – Servo outputs – Servo sequences 1 + 2
For both servo outputs you can program a time controlled flow sequences. A sequence may consist of up to 10 steps. Now, for every step you must assign a servo position (1,000 - 2,000ms) which is approached in this step. Additionally the amount of time must be specified which the servo movement needs from the actual step, to the position of the next step. Therefore this results the speed of movement of the servo. The duration of the last step determines the time, which the servo needs to move to the position of the first step. The position of step 1 is the home position of the servo. Every sequence starts and ends from this position. Once/Loop Here it can be configured whether the servo sequence is only run once after it has been started (like a recoil of a tank during a cannon shot) or if the sequence continues in a loop (like a windshield wiper), as long as the start of the sequence is still present. Expanded servo way The normal pulse width for a standard servo is from 1.000 to 2.000 ms. Sometimes it is desirable to increase this area, and thus the travel distance too. When enabled, the servo positions can now be set between 0.700 - 2.300 ms.
Attention! Not all servos are suitable for this enhanced servo range and may get
damaged! Therefore, use this function only with special care.

GB Sound module USM-RC-2
14.01.2020 BEIER-Electronic 87
Sound at servo movement When enabled, the additional sound for the servo is always played as long as the servo moves. Sound when not in home position With this option, the additional sound will be played every time the servo is not located in the home position (position of step 1). If you click with the right mouse button in the table, the following functions are provided: Delete step Deletes the step you have clicked on with the right mouse
button. All other steps are shifted up one row. Insert step Inserts a new step before the step on which you have
clicked with the right mouse button. All other steps are shifted down one row.
Export sequence With this, a complete sequence can be stored in a file (*.s_seq) on a hard drive.
Import sequence With this, previously exported sequences (*.s_seq) can be read in again.
Example on page 86, servo 1 sequence: Recoil system of a tank The servo 1 sequence shows an example of a simple recoil system of a tank. In step 1, the servo is placed in home position 1.000 ms (tank barrel ahead). Now, if the cannon shot sound is triggered, the sequence for servo 1 can be activated on this sound slot. After that, the servo moves very quickly (0.1s) to the position of Step 2: 2.000 ms (tank barrel at the back). The duration of step 2 is 0.5 s. Since the position of step 3 is also 2.000 ms, the servo remains in this position for this time (tank barrel remains shortly at the back). After the expiry of 0.5s, the sequence is now in step 3. Since this is the last step the servo moves slowly in 0.8s back to the home position 1.000 ms (position 1, tank barrel ahead again). Example on page 86, servo 2 sequence: Windshield wiper The servo 2 sequence shows an example for a windshield wiper. In step 1, the servo is placed in the home position, which is 1.000 ms (wiper down). If the sequence is triggered by using the function "Servo 2 sequence", the servo moves in 1.0s to the position of step 2, which means 2.000 ms (wiper at the top). Since this is the last step, the servo will move back to the home position (position 1) in 1.0s, which means back to 1.000 ms (wiper down).

GB Sound module USM-RC-2
88 BEIER-Electronic 14.01.2020
Configuration - SM-IR-16-2
Both servo outputs of the light module SM-IR-16-2 can be configured similar to the servo outputs of the sound module. For details about the settings please read page 84 onwards. The only difference is that the SM-IR-16-2 has only 2 positions, #1 and #2. The positions #3 and #4 do not exist here.
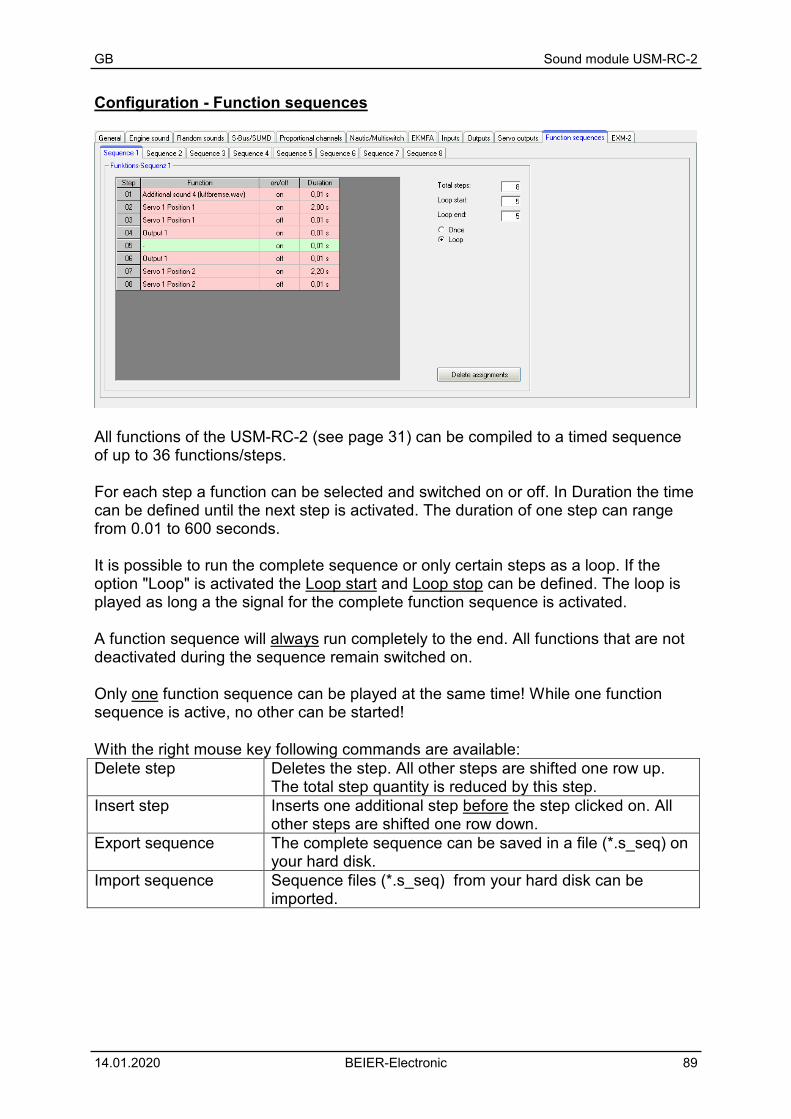
GB Sound module USM-RC-2
14.01.2020 BEIER-Electronic 89
Configuration - Function sequences
All functions of the USM-RC-2 (see page 31) can be compiled to a timed sequence of up to 36 functions/steps. For each step a function can be selected and switched on or off. In Duration the time can be defined until the next step is activated. The duration of one step can range from 0.01 to 600 seconds. It is possible to run the complete sequence or only certain steps as a loop. If the option "Loop" is activated the Loop start and Loop stop can be defined. The loop is played as long a the signal for the complete function sequence is activated. A function sequence will always run completely to the end. All functions that are not deactivated during the sequence remain switched on. Only one function sequence can be played at the same time! While one function sequence is active, no other can be started! With the right mouse key following commands are available: Delete step Deletes the step. All other steps are shifted one row up.
The total step quantity is reduced by this step. Insert step Inserts one additional step before the step clicked on. All
other steps are shifted one row down. Export sequence The complete sequence can be saved in a file (*.s_seq) on
your hard disk. Import sequence Sequence files (*.s_seq) from your hard disk can be
imported.

GB Sound module USM-RC-2
90 BEIER-Electronic 14.01.2020
Configuration - EXM-2
If you want to connect EXM-2 to X2/1 at the sound module, you have to activate the expansion module in your Sound Teacher configurations. There are four options to use EXM-2:
1. Control motor output via function „left“ / „right“: Using this option the motor can be controlled to the left and to the right with two functions, namely „motor output left“ and „motor output right“. The motor stops if neither of the two functions is activated. The motor rotating speed can be set to a fixed value between 10-100%. With this setting for example a turret rotation can be realised.
2. Control motor output via proportional channel:
The motor output can be controlled with one of the propotional channels #1-#10, as well. With this setting it is possible to control the motor rotating speed stepless and the motor output works like a small speed controller.
3. Motor output controls hydraulic pump:
In case the model is equiped with a hypraulic movement, it is possible to monitor hydraulic servo valves with a motor output. As soon as one of the hydraulic servos is outside the neutral position, the hydraulic pump motor is activated automatically. In order to observe one or more proportional channels #1 - #10 the corresponding checkboxes must be activated. It is possible to set the observing threshold manually, which specifies the way the servo must move away from neutral to activate the hydraulic cylinder. Also, a trailing of the hydraulic pump from 0 to 255 seconds can be set.
The hydraulic pump power can also be set with a proportional input. If “-“ is selected for channel, the power can be set on a fix value between 10 - 100 %. With the servo output X14/5 an external speed controller (e.g. brushless) can

GB Sound module USM-RC-2
14.01.2020 BEIER-Electronic 91
be connected to control the hydraulic pump. In case the speed controller is only “forward” going, it must be activated here. If a hydraulic movement is detected, the additional sound "hydraulic movement" is played. The speed of the driving sounds can be controlled, as well. Here you can setup the change of the rpm for idle or driving sound between a range of -50% and +50%. Minus values make the sound slower and positive values faster. With this setting you change always the speed of the actual sound (idle or driving sound). It initiates no change between idle and driving sound.
4. Motor output controls smoke generator: The smoke generator heater can be controlled with the motor output. The smoke intensity can be set with 3 parameters (see page 53). If the heater exceeds the maximum curret (1,5 A) of a switching output, it can also be connected to the motor output of the EXM-2.
Project notes
In project notes you have space for remarks about your project and settings.

GB Sound module USM-RC-2
92 BEIER-Electronic 14.01.2020
Saving sounds and configurations on SD card Please only use the USM-RC-2 Sound-Teacher to program the SD card and do not copy any files to SD card “by hand“. Please do not delete any files on the SD card. The sound module must be disconnected from the supply voltage before inserting or pulling out the SD card!
1. Pull out the SD card from the slot of the sound module. The card should be handled with care in order to prevent damage because the side with the golden contacts is very sensitive to scratches.
2. Insert the SD card in the card reader, which is connected to the PC. 3. Now start the USM-RC-2 Sound-Teacher and choose the desired project, the
new sounds or setup the configuration. 4. Choose (if necessary) the drive letter of your SD card in the menue “SD card”.
If you have connected additional removable devices (such as SD cards or USB sticks) to your computer, please pay attention to choose the right device.
5. The Button „Save project data onto SD card“ is used to write all sounds and configurations onto SD card. This can take up to serveral minutes. The speed depends on the amount of data.
6. Now you can remove the SD card from the card reader and insert it carefully into the slot of the sound module. The golden contacts must face downwards.
Transferring configurations with data cable K-USB-2 If you often want to change sounds and configurations in the Sound-Teacher, it will quickly become annoying inserting and pulling out the SD card between sound module and card reader. To avoid time consuming reconnecting, it is possible to transfer complete projects with the data cable K-USB-2. The transfer starts with Configuration General Data cable K-USB-2 and „Transfer project data”. Transferring sounds with the data cable K-USB-2 might take a few minutes! A sound with a length of 10 seconds takes about 60 seconds until it is transferred. Very long songs and large, new projects are only restrictively recommended to be transferred with the data cable.

GB Sound module USM-RC-2
14.01.2020 BEIER-Electronic 93
Adjustments of driving sound with a driving sound diagram
With the driving sound diagram you can set:
• The neutral position of joy sticks (just in digital mode). • The position of change sounds. • The start and end thresholds for the different speeds and their corresponding,
sounds for each driving sound (FG1 – FG5). Explanation of the Diagram
The diagram consists of two axes: 1. The horizontal axe (from the left to the right) shows the driving speed of
the model (respectively the position of the joy-stick). In digital mode the range goes from 1,0ms to 2,0ms. Resulting from the minimal and maximal pulse width of a proportional signal, coming from the RC receiver. In analogue and mix mode the range is from -12V to +12V (motor voltage).
2. The vertical axe (from up to down) shows the play-back speed of the
driving sound and the range comprises settings from 60% to 300%. This percent refers to the play-back speed of the driving sounds saved in the sound module. A higher play-back speed equals a higher engine speed.

GB Sound module USM-RC-2
94 BEIER-Electronic 14.01.2020
Explanation of the different coloured lines and quadrates in the diagram
Green line In our example you can see in the middle at 1,5ms a green line which indicates the neutral position of the joy-stick. In case the joy-stick is in the neutral position, the module idles and the sound module plays the idle noise. In digital mode the neutral position can be adjusted with the green quadrate (below the line). Just click with the left mouse button on the green quadrate, hold it and move the mouse to the right or the left to change the neutral position.
In analogue or mix mode the adjustment of the neutral position is not necessary and thus not possible. Red lines The both red lines on the outside left (1,0ms) and on the outside right (2,0ms) represent the maximal driving speed (backwards and forwards). The other red lines below with the small red quadrates indicate the driving speed at which the driving sound/gear should be changed. The thresholds can be adjusted at the red quadrates. As soon as the driving speed reaches/excess the red line, a change of the driving sound takes place. Depending on the adjusted amount of speed steps/gears the same amount of red lines will appear. Blue lines The blue lines show the play-back speed (60%-300%) of the driving sound corresponding to the model speed. 100% represent the original play-back speed (the same speed as the original sound is played at the PC). At 300% the sound is played three times as fast the original sound and the engine sounds faster. At values smaller than 100% the sound is played more slowly. On the right and on the left of each blue line is a blue quadrate where you can set the start and end play-back speed for each driving sound. At these quadrates you can set the different speeds with the left mouse button.
If the cursor is on one of the coloured quadrates further explanations of the value and the current value occurs below the diagram. Approach of setting driving sounds 1. Adjustment of operating mode: Please set in your sound teacher the required operating mode: digital, analogue or mix mode (see page 7 and 65). 2. Adjustment of neutral position: In digital mode you have to set the neutral position of the joy-stick in the driving sound diagram. In analogue and mix mode this adjustment is not necessary. Now slide the green line in the driving sound diagram, to the neutral position of your joystick. Most remote controls have their neutral position at 1,500 ms. In Case you do not know the neutral position of your transmitter, you can see the value with the help of the diagnosis function (page 97) of your Sound-Teacher.

GB Sound module USM-RC-2
14.01.2020 BEIER-Electronic 95
3. Adjustment of speed steps/gears: Please set the required speed steps/gears for backwards and forwards in the Sound-Teacher. 4. Adjustment of thresholds: If you choose more that one speed step/gear, red lines will occur automatically in the driving sound diagram to set the thresholds for each sound (FG1-FG5). 5. Adjustment of start and end speed of the play-back speed of driving sounds: The play-back speed of driving sounds can be adjusted by shifting the blue quadrates in the diagram and therefore the sounds can be adjusted to the driving speed of the model. The play-back speed can be affected by the trimmer P1 as well. Please consider that the change sounds may not fit exactly to the driving sounds anymore. Thus we recommend leaving the trimmer in the middle and adjust the sound speed with the driving sound diagram. 6. Control of driving sounds: Next you should check if all slots are occupied with the necessary driving sounds. For example if you like to have three gears for your driving sound you need to use FG1 - FG3 for your different sounds. Otherwise your sound module might get problems with finding the different sounds.

GB Sound module USM-RC-2
96 BEIER-Electronic 14.01.2020
Sound simulation The sound simulation can be started with a click on “Sound simulation” in the menu “Help”. You can play-back the driving sounds and the additional sounds 1 to 30 of your current project at your pc. This is an easy way to check your sounds and configurations without copying all files to SD card. The driving sound can be switched on and off and even the driving speed can be simulated by the slider. To trigger an additional sound, just click on the corresponding button. The additional sounds can also be triggerd by the keyboard:
• Button F1 - F10 Additional sound 1 - 10
• Button 1 - 0 Additional sound 11 - 20 Testing functions at sound module with help of data cable K-USB-2
The function “Control sound modle functions with data cable” can be found under menu “Help”. With the help of the data cable K-USB-2, all functions (see page 35) can now be controlled directly from the PC and not only via the remote control. This can be very helpful in tests without transmitter. As usual, the functions can be selected with drop boxes. It is possible to activate the functions static or in memory at the sound module. Warning: As long as the diagnosis window is open, the "normal" function triggering (eg. prop. channels, nautic, switching inputs) are deactivated!

GB Sound module USM-RC-2
14.01.2020 BEIER-Electronic 97
Diagnosis A diagnosis function is integrated in the Sound-Teacher and you can easily check different functions of your sound module with this feature. There are two different types of diagnosis:
1. Diagnosis with datacable (live) 2. Diagnosis with SD card
(recorded) The diagnosis window is divided into different areas: proportional channels, analog inputs, inputs, outputs, nautic mode and others. The following explains what is shown in the various areas. Proportional channels This shows what values are received at the proportional channels from the transmitter. On channel #1 (and also on channel #2 if 2 motors for engine sound are used) the received value in ms is displayed. This helps for example to setup the correct zero point in the driving sound diagram. On the other channels the values move (depending on the position of the joysticks, sliders, knobs and switches of the transmitter) between -100 and +100. The neutral position is located at 0. Additionally there is a letter on the right of the white textbox. This letter shows in which of the 5 areas (A, B, N, C and D) the corresponding channel is. This is helpful for troubleshooting if some functions or sounds cannot be triggered correctly using the proportional channels. A slight fluctuation of the values on these four channels is quite normal and does not usually indicate a problem! Analog inputs This is only interesting in analogue- or mix-mode. Here you can see which voltages are measured at the motor connections. The shown value, multiplied by 0.052 is equal to the measured voltage in volts.

GB Sound module USM-RC-2
98 BEIER-Electronic 14.01.2020
Inputs Here you can see the 5 switching-inputs of the USM-RC-2. If an input is switched (set to minus), it will be indicated with a green circle. Outputs Here you can see the 12 switching-outputs of the USM-RC-2 and the 10 outputs of the expansion module EXM-2. If an output is switched on, it will be indicated with a green circle. If "Test" is activated, all 12 outputs are switched on shortly one after another (like a chaser light). You can easily check your wiring with this function without using the transmitter. This works only with live diagnosis and datacable. Miscellaneous The values shown here are intended primarily for internal audit purposes. Nautic mode If Nautic mode is activated, you can see the received Nautic values here. But this is only necessary in exceptional cases, e.g. if you want to analyze a new switching module, or if errors occur on the transmitter side in nautic mode. Live-diagnosis with datacable The additional datacable K-USB-2 is needed for live-diagnosis. Connect the datacable to the connecter X9 so that the orange wire points towards the gray terminal block. A live-diagnosis using the data cable is generally only useful when the sound module in the model is completely installed; wired and all necessary equipment is switched on (e.g. transmitter and receiver). Approach for diagnosis using the datacable:
1. Switch on transmitter and receiver. 2. Connect sound module to supply voltage. 3. Connect datacable to X9 and to computer. 4. Start USM-RC-2 Sound-Teacher. 5. Go to "Help" and click on "Diagnosis via datacable". 6. The diagnosis window opens.
Optionally, the live diagnosis can also be recorded on the hard disk of the PC and played back later.

GB Sound module USM-RC-2
14.01.2020 BEIER-Electronic 99
Record diagnosis with SD card If you don’t have the datacable, you can record diagnosis data from sound module to SD card. This data can be watched later with the Sound-Teacher on the computer. During the recording of diagnosis data to the SD card some things have to be considered:
• The recording is disabled by default and must first be enabled in the Sound-Teacher.
• Since the recording of diagnosis data stresses the processor, it might come to interrupts in the sound playback. So this function should only be used for troubleshooting and then it should be switched off again.
• A maximum of 5 minutes can be recorded (1 separate record every 100ms). • Each time the supply voltage is switched on, the old diagnosis data is deleted
and the recording starts again. Approach for diagnosis using the SD card:
1. Activate “record diagnosis data on SD card” in the Sound-Teacher and save project data onto SD card.
2. Insert SD card in the sound module. 3. Switch on transmitter and receiver. 4. Connect sound module to supply voltage. 5. Now a maximum of 5 minutes can be recorded to SD card (red LED flickers
very slightly). 6. Disconnect sound module from power supply. 7. Remove SD card from sound module. 8. Start USM-RC-2 Sound-Teacher. 9. Insert SD card in the cardreader of the computer. 10. Go to "Help" and click on "Diagnosis via SD card". 11. The diagnosis window opens. 12. With the slider at the bottom, the diagnosis data can be displayed at any time
of the recording.

GB Sound module USM-RC-2
100 BEIER-Electronic 14.01.2020
Firmware update On the SD card is always located a firmware file for the sound module. The sound-Teacher writes the firmware file automatically while saving project data to SD card. Therefore you do not have to care about that. A firmware update of the sound module is always performed automatically when the version of a firmware file on the SD card is different from the current version of the sound module firmware. The firmware update will be started after the supply voltage is switched on and it takes about 10 seconds. The red and blue LEDs flashes during this period a few times alternating. Never disconnect the sound module from power supply while updating! A new firmware is mostly included if you are using a new version of the Sound-Teacher. If you are using a new version of the Sound-Teacher, take care that on the first turning on of your sound module, the firmware might be updated. Therefore the voltage should not be turned off for at least 10 seconds!