Embed Size (px)
Citation preview
Software Evaluation Guide for Adobe* Photoshop* Lightroom 1.1*
http://www.intel.com/performance/resources
Version 2006-05 Rev. 1.0
About this Document
This document is a guide measuring performance of the Intel® Processors on application software. The primary audience for this document includes individuals, publications, OEMs and technical analysts whose goal is to test or evaluate the performance benefits and features of the Pentium Processor. If there are questions that are not answered here on software application performance evaluation of the Pentium Processor, please contact your Intel representative.
Each software application test measures different aspects of processor and/or system performance. While no single numerical measurement can completely describe the performance of a complex device like a microprocessor or a personal computer, application tests can be useful tools for comparing different components and systems. The following results and procedures give a glimpse of the performance of certain software applications, however your own usage of each application may vary from what is shown here. The only totally accurate way to measure the performance of your system, is to test the actual software applications you use, in the way you use them, on your computer system. Test results published by Intel are measured on specific systems or components using specific hardware and software configurations, and any differences between those configurations (including software) and your configuration may make those results inapplicable to your component or system.
Software application tests are, at most, only one kind of information that you may use during the purchasing process. To get a true picture of the performance of a component or system you are considering purchasing, you must consult other sources of information (such as performance information on the exact system you are considering purchasing). If you have any questions about the performance of any Intel microprocessor, please view the detailed performance briefs and reports published by Intel or call Intel at (US) 1-800-628-8686 or 916-356-3104.

Chapter 1 Processor Performance on Photoshop Lightroom 1.1
1.0 Software Description
Adobe* Photoshop* Lightroom software is the professional photographer's essential toolbox, providing one easy application for managing, adjusting, and presenting large volumes of digital photographs. Use Lightroom to import, manage, adjust, and present large volumes of digital photographs, and use Photoshop to more thoroughly refine individual images.
1.1 Test Workload Description Posting your photos to Facebook.com* or your favorite website just got faster. Adobe* Photoshop* Lightroom* takes advantage of Intel® Core™2 Duo processor features like larger L2 Cache, Fast Radix-16 Divider, and Super Shuffle Engine to format and resize your photos much faster than before. A globetrotting shutterbug decides to document recent vacations on FaceBook.com. The vacation portfolio contains 200 JPEG photos, 125 of which are 10 Megapixel photos and 75 which are 6 Megapixel photos. The total size of all the photos is about 830MB. The photos will be resized to 480x360 resolution and 160 pixels per inch for posting to FaceBook.com and for viewing on portable devices such as an iPhone*. The photos will also be turned into an HTML web gallery that can be published to a personal website.
Chapter 2 Measurement Methodology
The following is a description of the measurement methodology that should be used to evaluate performance and energy efficiency of the mobile platform while running this scenario.
2.0 System Setup
This section outlines the system setup recommended for all mobile benchmarks under Microsoft Windows* Vista Ultimate Edition:
• Always start with a clean, formatted hard disk.
• Set your system to boot from CD/DVD drive in the bios.
• Begin installation Windows* Vista Ultimate Edition* from the operating system CD.
• Format the file system to NTFS during installation if the drive if you have not already done so.
• After installation of the OS is complete restart your system.
• Immediately after installing the Windows Vista operating system, install the latest drivers (INF files) to allow the operating system to recognize the chipset and all the components on the motherboard. The drivers can be downloaded from the chipset software link at http://downloadfinder.intel.com
• Install the latest Intel Matrix Storage Manager. The install file can be downloaded from the chipset software link at http://downloadfinder.intel.com. (Windows Vista installs the basic driver for Intel Matrix Storage, and you should update the driver once the OS boots up.) The Intel® Matrix Storage Driver can provide better system performance because features like Native Command. Some system benchmarks with an I/O component, like BAPCo* SYSmark*, may show increased performance with the Intel Matrix Storage Driver installed and the system set to raid-ready.
• Install the Intel integrated sound driver from http://support.intel.com or from your motherboard CD.
• Install the latest LAN driver from http://support.intel.com.
• Download and Install the latest Windows Vista graphics driver for your graphics card from the manufacturer website.
• The table below describes how to perform an initial setup of Windows Vista.

Microsoft Windows* Vista Setup Setting Description of how to set up Windows Vista
Windows Aero Enable
Ensure Windows Aero is enabled - Right click on desktop -> Personalize -> Window color and appearance -> click on "Open classic appearance properties for more color options - Ensure "Windows Aero" is checked. Note: In order for Aero to work on Intel Graphics Media Accelerator X3000 and 3000, Vista drivers should be installed prior to setup Aero feature in Vista.
Search Indexing Enable
Leave Search Indexing Enabled - You can check if Search Indexing is enabled by Open Control Panel -> System and Maintenance -> Indexing Options. The Indexing location will include: Offline Files, Start Menu, and Users.
Internet Offline Files Enable
Leave Internet Offline files Enabled - You can check if Offline files is enabled, Open Control Panel -> Network and Internet -> Offline Files. On the general tab, the "Disable Offline Files" button should appear.
Disable Screen saver Disable Right click on desktop -> Personalize -> Screen Saver. Set the screen saver to "None"
Disable Power Management
High Performance
Right click on desktop -> Personalize -> Screen Saver -> Change Power settings -> Select "High Performance" and click "Change plan settings" below this option. A new view will appear called "Edit Plan Settings." Change "Turn off display" to "Never." Click Save Change. (Note: Exceptions include MobileMark* and other standardized benchmarks that measure battery life; these should be run with their own power management settings.)
Vista Desktop Display resolution, monitor refresh Custom
Right click on desktop -> Personalize -> Display Settings. In the "Display Settings" dialog choose Resolution=1024x768 and Colors= Highest (32bit). Click the "Advanced Settings" button. Select the "Monitor" tab and change the "Screen refresh rate" to 75 Hz.
Remove always on top Disable
Right click on Windows task bar at the bottom -> Properties -> Taskbar -> uncheck "Keep the taskbar on top of other windows"
Remove hide inactive icons Disable
Right click on Windows task bar at the bottom -> Properties -> Select the "Notification area" tab and uncheck "Hide inactive icons"
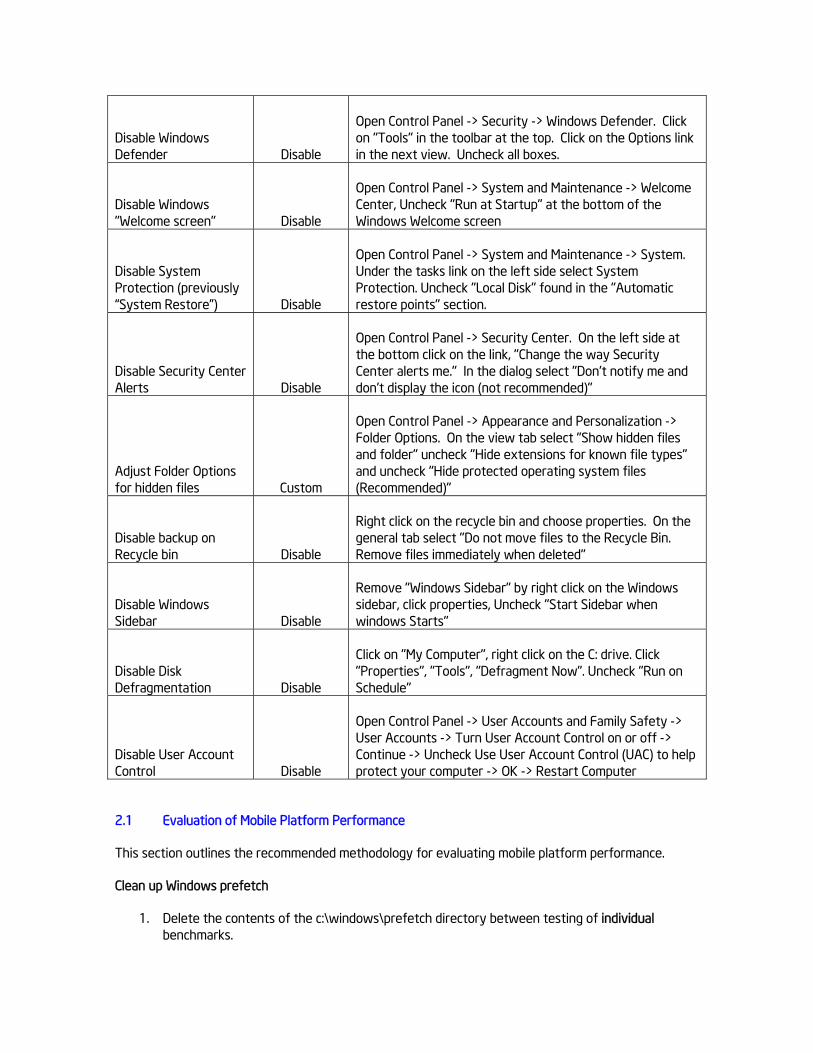
Disable Windows Defender Disable
Open Control Panel -> Security -> Windows Defender. Click on "Tools" in the toolbar at the top. Click on the Options link in the next view. Uncheck all boxes.
Disable Windows "Welcome screen" Disable
Open Control Panel -> System and Maintenance -> Welcome Center, Uncheck "Run at Startup" at the bottom of the Windows Welcome screen
Disable System Protection (previously “System Restore”) Disable
Open Control Panel -> System and Maintenance -> System. Under the tasks link on the left side select System Protection. Uncheck "Local Disk" found in the "Automatic restore points" section.
Disable Security Center Alerts Disable
Open Control Panel -> Security Center. On the left side at the bottom click on the link, "Change the way Security Center alerts me." In the dialog select "Don't notify me and don't display the icon (not recommended)"
Adjust Folder Options for hidden files Custom
Open Control Panel -> Appearance and Personalization -> Folder Options. On the view tab select "Show hidden files and folder" uncheck "Hide extensions for known file types" and uncheck "Hide protected operating system files (Recommended)"
Disable backup on Recycle bin Disable
Right click on the recycle bin and choose properties. On the general tab select "Do not move files to the Recycle Bin. Remove files immediately when deleted"
Disable Windows Sidebar Disable
Remove "Windows Sidebar" by right click on the Windows sidebar, click properties, Uncheck "Start Sidebar when windows Starts"
Disable Disk Defragmentation Disable
Click on "My Computer", right click on the C: drive. Click "Properties", "Tools", "Defragment Now". Uncheck "Run on Schedule"
Disable User Account Control Disable
Open Control Panel -> User Accounts and Family Safety -> User Accounts -> Turn User Account Control on or off -> Continue -> Uncheck Use User Account Control (UAC) to help protect your computer -> OK -> Restart Computer
2.1 Evaluation of Mobile Platform Performance
This section outlines the recommended methodology for evaluating mobile platform performance.
Clean up Windows prefetch
1. Delete the contents of the c:\windows\prefetch directory between testing of individual benchmarks.
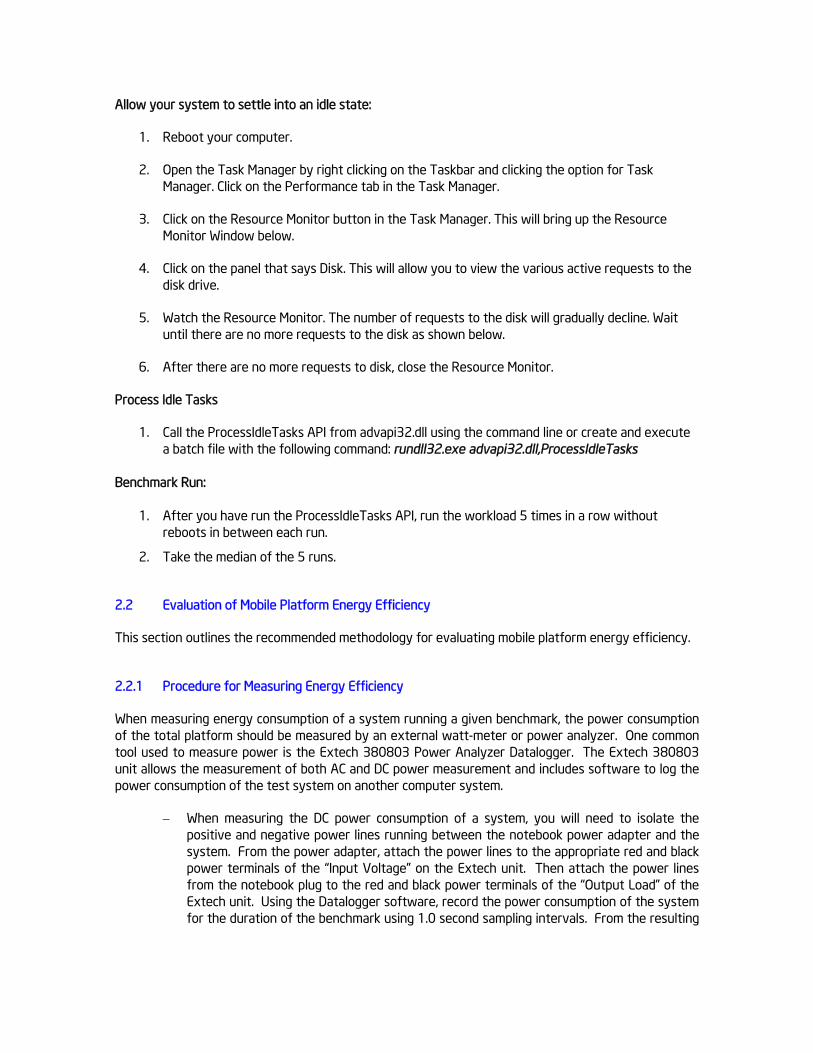
Allow your system to settle into an idle state:
1. Reboot your computer.
2. Open the Task Manager by right clicking on the Taskbar and clicking the option for Task Manager. Click on the Performance tab in the Task Manager.
3. Click on the Resource Monitor button in the Task Manager. This will bring up the Resource Monitor Window below.
4. Click on the panel that says Disk. This will allow you to view the various active requests to the disk drive.
5. Watch the Resource Monitor. The number of requests to the disk will gradually decline. Wait until there are no more requests to the disk as shown below.
6. After there are no more requests to disk, close the Resource Monitor.
Process Idle Tasks
1. Call the ProcessIdleTasks API from advapi32.dll using the command line or create and execute a batch file with the following command: rundll32.exe advapi32.dll,ProcessIdleTasks
Benchmark Run:
1. After you have run the ProcessIdleTasks API, run the workload 5 times in a row without reboots in between each run.
2. Take the median of the 5 runs.
2.2 Evaluation of Mobile Platform Energy Efficiency
This section outlines the recommended methodology for evaluating mobile platform energy efficiency.
2.2.1 Procedure for Measuring Energy Efficiency
When measuring energy consumption of a system running a given benchmark, the power consumption of the total platform should be measured by an external watt-meter or power analyzer. One common tool used to measure power is the Extech 380803 Power Analyzer Datalogger. The Extech 380803 unit allows the measurement of both AC and DC power measurement and includes software to log the power consumption of the test system on another computer system.
– When measuring the DC power consumption of a system, you will need to isolate the positive and negative power lines running between the notebook power adapter and the system. From the power adapter, attach the power lines to the appropriate red and black power terminals of the “Input Voltage” on the Extech unit. Then attach the power lines from the notebook plug to the red and black power terminals of the “Output Load” of the Extech unit. Using the Datalogger software, record the power consumption of the system for the duration of the benchmark using 1.0 second sampling intervals. From the resulting
power log, you can derive the average DC power consumption (in Watts) of the system while executing the benchmark.
– When measuring the AC power consumption of a system, plug a power cord into the “Input Voltage” on the Extech unit and into an electrical socket. Then plug in the system’s AC power adapter into the “Output Load” of the Extech unit. Using the Datalogger software, record the power consumption of the system for the duration of the benchmark using 1.0 second sampling intervals. From the resulting power log, you can derive the average AC power consumption (in Watts) of the system while executing the benchmark.
Power measurement should begin when the timed portion of the workload begins and should stop when the timed portion of the workload ends. If using the provided script for the scenario then you will be prompted by the script when to start and stop power measurement.
2.2.2 Calculating Workload Energy Consumption in Watt-Hours
Analysis of power consumption results should be performed using the following methodology:
• Calculate the Workload Energy Consumption (WEC) in Watt-seconds by multiplying the average total AC or DC power usage (Ptotal) times the time taken to complete the workload (tworkload).
WEC (Watt-seconds) = Ptotal × tworkload
• Convert the WEC measurement into Watt-hours (Wh) by dividing the WEC in Watt-seconds by 3600 (the number of seconds in an hour).
WEC (Wh) = WEC (Watt-seconds) ÷ 3600
The resulting quotient in Watt-hours is the amount of energy consumed by the system in completion of the workload.
Chapter 3 Procedure for Evaluating Performance
The following is a procedure for evaluating performance while running Adobe Photoshop Lightroom.*
1. Purchase Lightroom from www.adobe.com.
2. Install Lightroom with default installation settings.
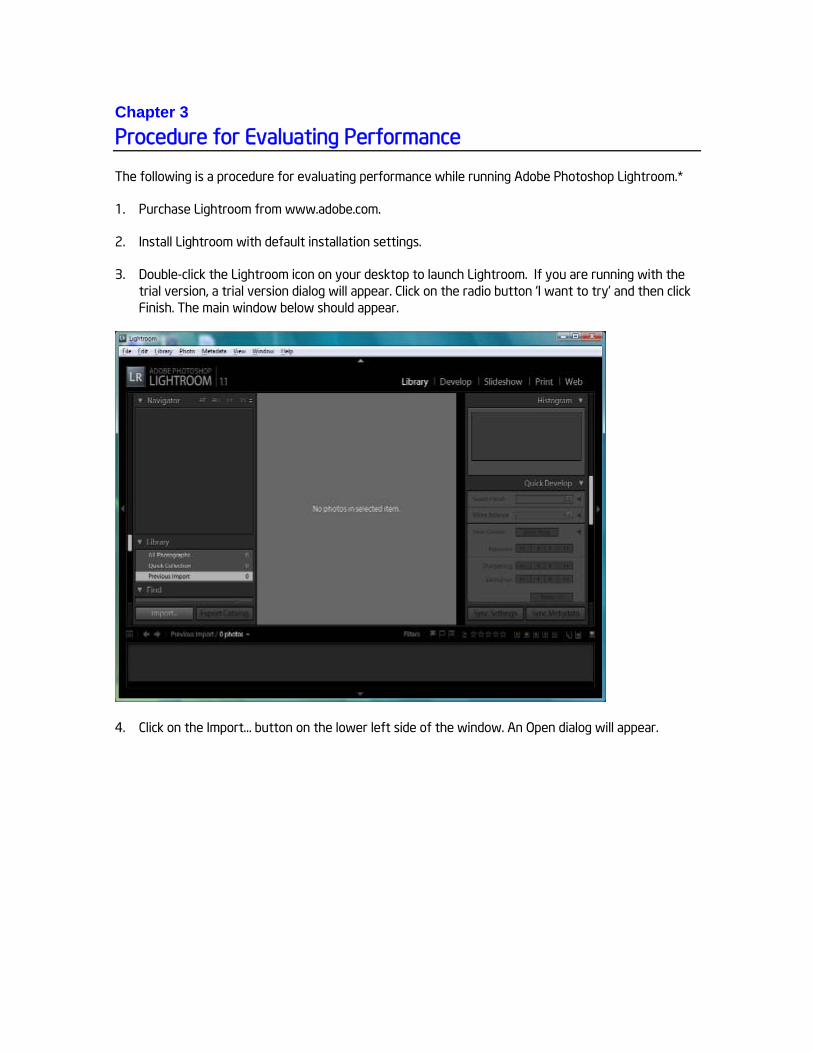
3. Double-click the Lightroom icon on your desktop to launch Lightroom. If you are running with the trial version, a trial version dialog will appear. Click on the radio button ‘I want to try’ and then click Finish. The main window below should appear.
4. Click on the Import… button on the lower left side of the window. An Open dialog will appear.
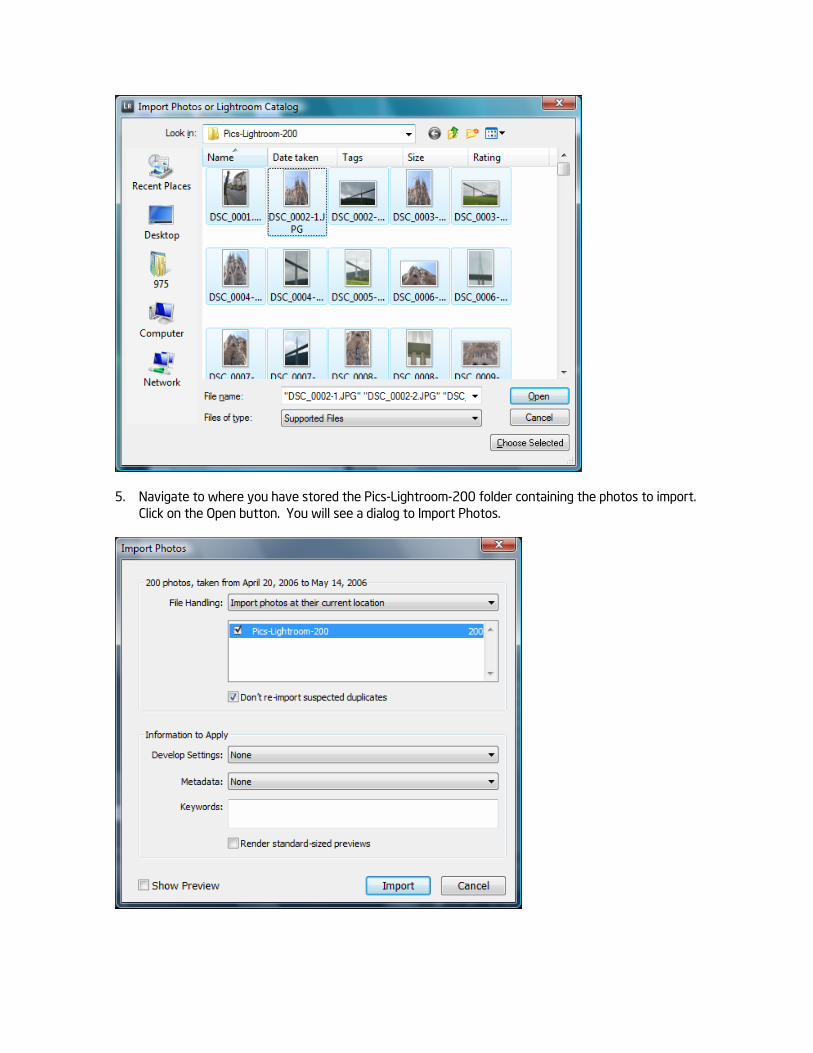
5. Navigate to where you have stored the Pics-Lightroom-200 folder containing the photos to import. Click on the Open button. You will see a dialog to Import Photos.
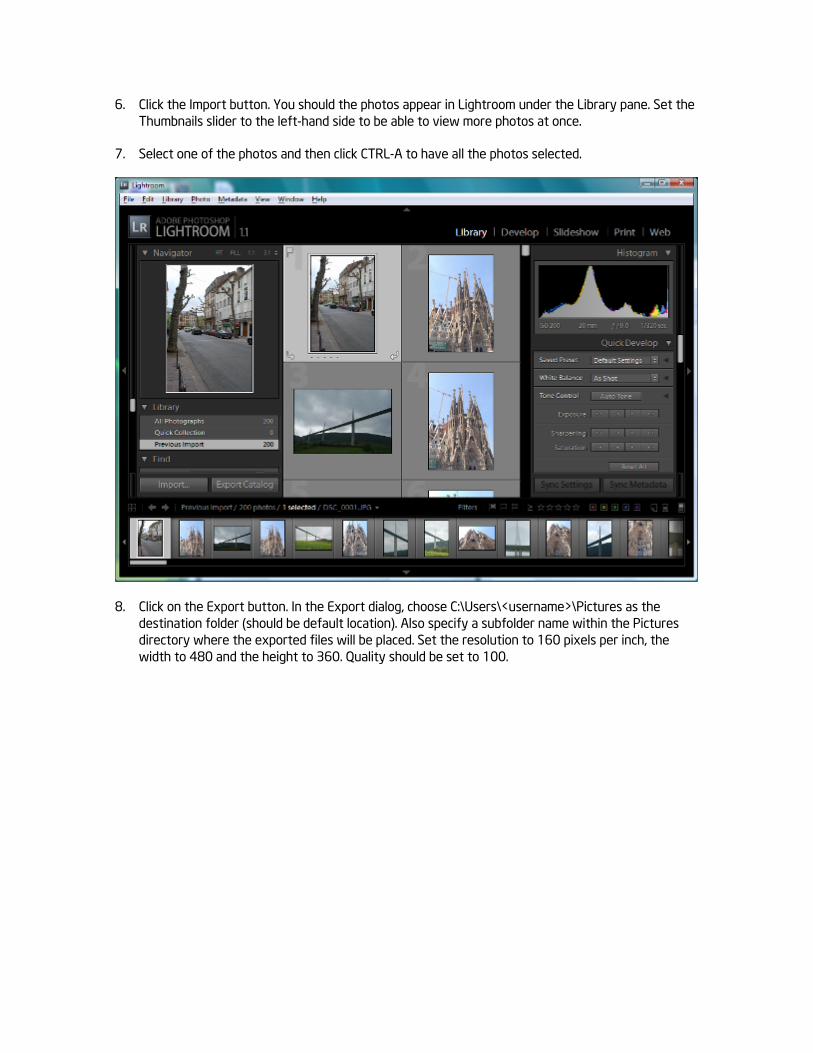
6. Click the Import button. You should the photos appear in Lightroom under the Library pane. Set the
Thumbnails slider to the left-hand side to be able to view more photos at once.
7. Select one of the photos and then click CTRL-A to have all the photos selected.
8. Click on the Export button. In the Export dialog, choose C:\Users\<username>\Pictures as the destination folder (should be default location). Also specify a subfolder name within the Pictures directory where the exported files will be placed. Set the resolution to 160 pixels per inch, the width to 480 and the height to 360. Quality should be set to 100.
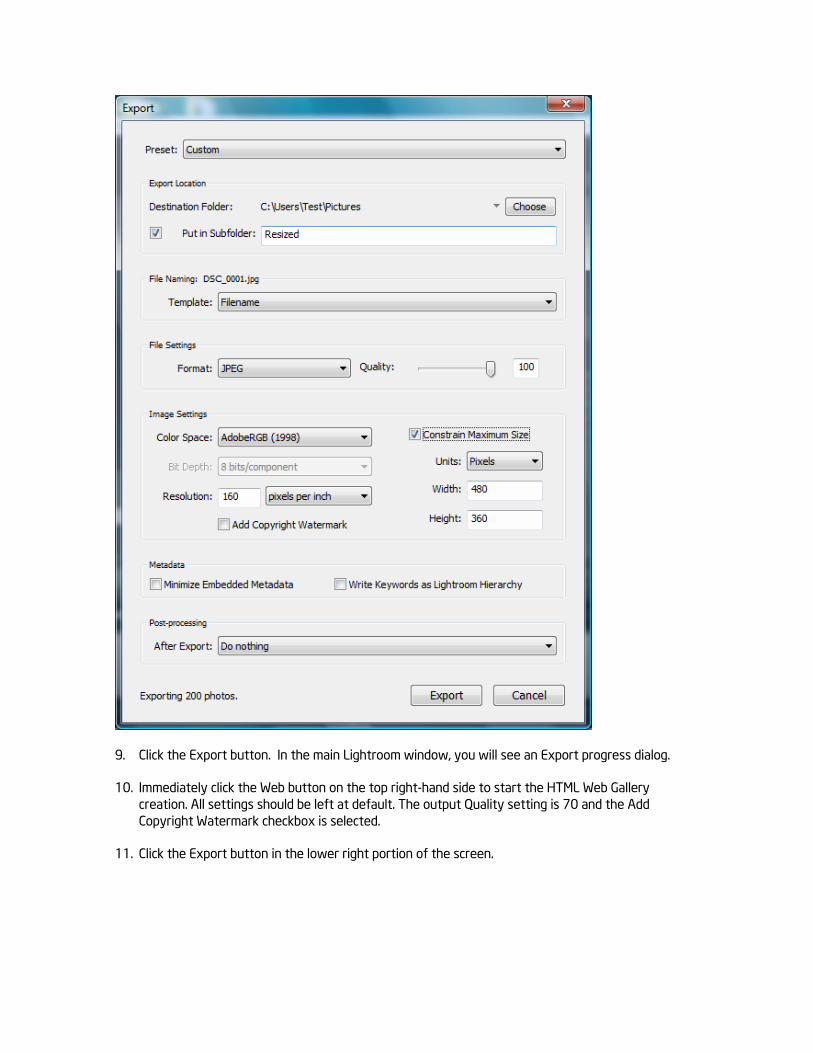
9. Click the Export button. In the main Lightroom window, you will see an Export progress dialog.
10. Immediately click the Web button on the top right-hand side to start the HTML Web Gallery creation. All settings should be left at default. The output Quality setting is 70 and the Add Copyright Watermark checkbox is selected.
11. Click the Export button in the lower right portion of the screen.
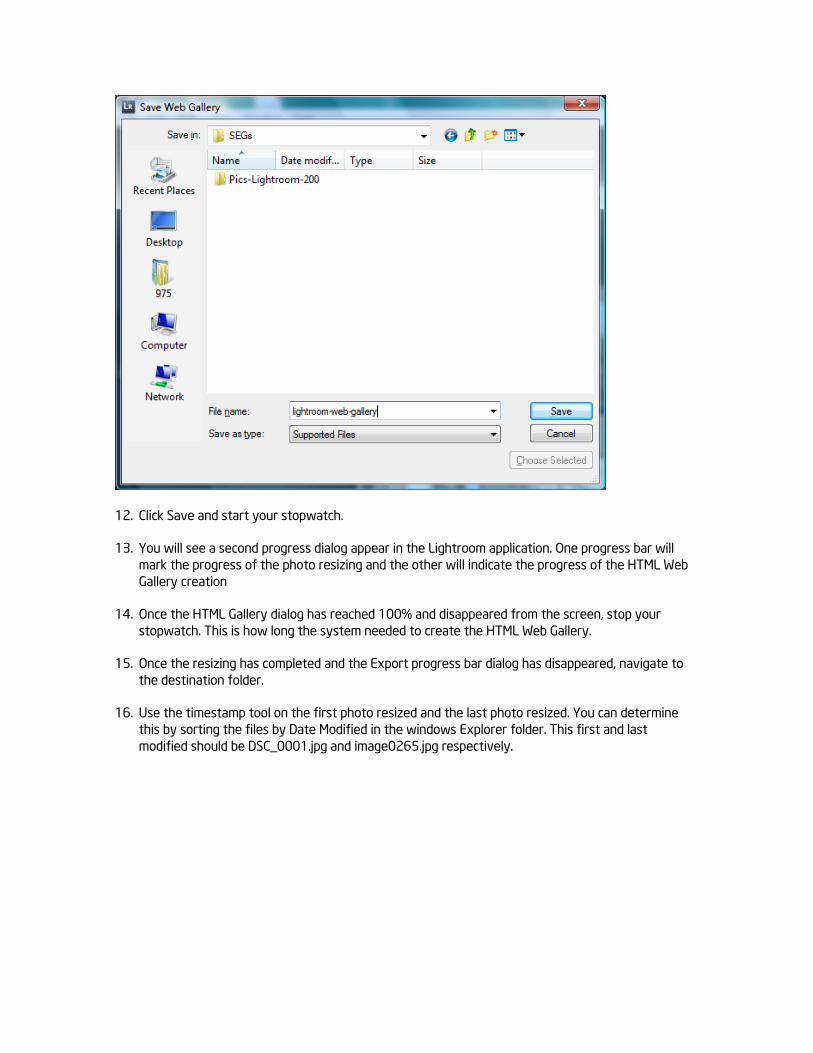
12. Click Save and start your stopwatch.
13. You will see a second progress dialog appear in the Lightroom application. One progress bar will mark the progress of the photo resizing and the other will indicate the progress of the HTML Web Gallery creation
14. Once the HTML Gallery dialog has reached 100% and disappeared from the screen, stop your stopwatch. This is how long the system needed to create the HTML Web Gallery.
15. Once the resizing has completed and the Export progress bar dialog has disappeared, navigate to the destination folder.
16. Use the timestamp tool on the first photo resized and the last photo resized. You can determine this by sorting the files by Date Modified in the windows Explorer folder. This first and last modified should be DSC_0001.jpg and image0265.jpg respectively.
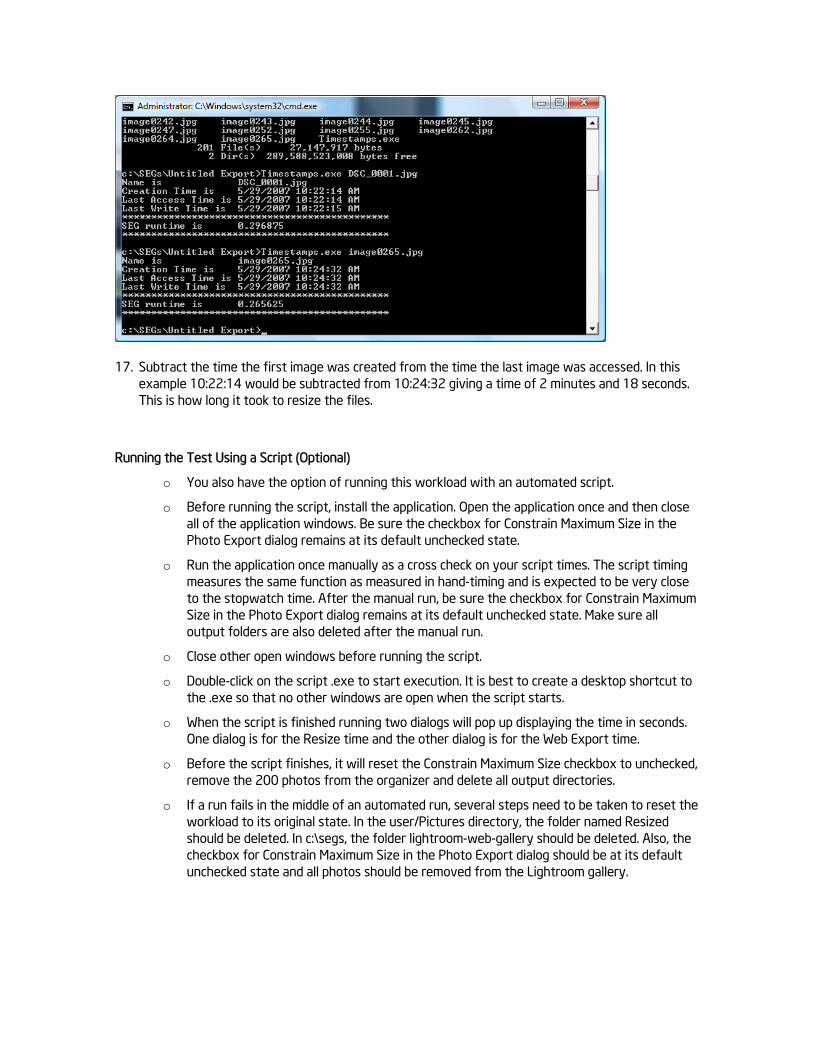
17. Subtract the time the first image was created from the time the last image was accessed. In this example 10:22:14 would be subtracted from 10:24:32 giving a time of 2 minutes and 18 seconds. This is how long it took to resize the files.
Running the Test Using a Script (Optional)
o You also have the option of running this workload with an automated script.
o Before running the script, install the application. Open the application once and then close all of the application windows. Be sure the checkbox for Constrain Maximum Size in the Photo Export dialog remains at its default unchecked state.
o Run the application once manually as a cross check on your script times. The script timing measures the same function as measured in hand-timing and is expected to be very close to the stopwatch time. After the manual run, be sure the checkbox for Constrain Maximum Size in the Photo Export dialog remains at its default unchecked state. Make sure all output folders are also deleted after the manual run.
o Close other open windows before running the script.
o Double-click on the script .exe to start execution. It is best to create a desktop shortcut to the .exe so that no other windows are open when the script starts.
o When the script is finished running two dialogs will pop up displaying the time in seconds. One dialog is for the Resize time and the other dialog is for the Web Export time.
o Before the script finishes, it will reset the Constrain Maximum Size checkbox to unchecked, remove the 200 photos from the organizer and delete all output directories.
o If a run fails in the middle of an automated run, several steps need to be taken to reset the workload to its original state. In the user/Pictures directory, the folder named Resized should be deleted. In c:\segs, the folder lightroom-web-gallery should be deleted. Also, the checkbox for Constrain Maximum Size in the Photo Export dialog should be at its default unchecked state and all photos should be removed from the Lightroom gallery.
Legal Disclaimers
This document is a guide measuring performance of the Intel® Processors on application software. The primary audience for this document includes individuals, publications, OEMs and technical analysts whose goal is to test or evaluate the performance benefits and features of the Core 2 Duo Processor. Buyers should consult other sources of information to evaluate the performance of systems or components they are considering purchasing. For more information on performance tests and on the performance of Intel products, visit Intel Performance Benchmark Limitations (http://www.intel.com/performance/resources/limits.htm).
Information in this document is provided in connection with Intel products. No license, express or implied, by estoppel or otherwise, to any intellectual property rights is granted by this document. Except as provided in Intel’s Terms and Conditions of Sale for such products, Intel assumes no liability whatsoever, and Intel disclaims any express or implied warranty, relating to sale and/or use of Intel products including liability or warranties relating to fitness for a particular purpose, merchantability, or infringement of any patent, copyright or other intellectual property right. Intel products are not intended for use in medical, life saving, or life sustaining applications.
Intel may make changes to specifications and product descriptions at any time, without notice.
Designers must not rely on the absence or characteristics of any features or instructions marked “reserved” or “undefined.” Intel reserves these for future definition and shall have no responsibility whatsoever for conflicts or incompatibilities arising from future changes to them.
Intel® Processors may contain design defects or errors known as errata. Current characterized errata are available on request.
Contact your local Intel sales office or your distributor to obtain the latest specifications and before placing your product order.
Copies of documents which have an ordering number and are referenced in this document, or other Intel literature, may be obtained by calling 1-800-548-4725 or by visiting Intel’s Website at http://www.intel.com.
Copyright © 2007 Intel Corporation.
* Other names and brands may be claimed as the property of others.