Embed Size (px)
Citation preview
AJA Control RoomSoftware
Version 15.2Published June 3, 2019
Installation and Operation Manual
AJA Control Room Software v15.2 2 www.aja.com
Notices
TrademarksAJA® and Because it matters.® are registered trademarks of AJA Video Systems, Inc. for use with most AJA products. AJA™ is a trademark of AJA Video Systems, Inc. for use with recorder, router, software and camera products. Because it matters.™ is a trademark of AJA Video Systems, Inc. for use with camera products.
CION®, Corvid Ultra®, lo®, Ki Pro®, KONA®, KUMO®, ROI® and T-Tap® are registered trademarks of AJA Video Systems, Inc.
AJA Control Room™, KiStor™, Science of the Beautiful™, TruScale™, TruZoom™, V2Analog™ and V2Digital™ are trademarks of AJA Video Systems, Inc.
All other trademarks are the property of their respective owners.
CopyrightCopyright © 2019 AJA Video Systems, Inc. All rights reserved. All information in this manual is subject to change without notice. No part of the document may be reproduced or transmitted in any form, or by any means, electronic or mechanical, including photocopying or recording, without the express written permission of AJA Video Systems, Inc.
Contacting AJA SupportWhen calling for support, have all information at hand prior to calling. To contact AJA for sales or support, use any of the following methods:
Telephone +1.530.271.3190
FAX +1.530.271.3140
Web https://www.aja.com
Support Email [email protected]
Sales Email [email protected]
AJA Control Room Software v15.2 3 www.aja.com
Notices . . . . . . . . . . . . . . . . . . . . . . . . . . . . . . . . . . . . . . 2Trademarks . . . . . . . . . . . . . . . . . . . . . . . . . . . . . . . . . . . . . . . . . . . 2Copyright . . . . . . . . . . . . . . . . . . . . . . . . . . . . . . . . . . . . . . . . . . . . 2Contacting AJA Support . . . . . . . . . . . . . . . . . . . . . . . . . . . . . . . . . . . 2
Chapter 1 – Introduction . . . . . . . . . . . . . . . . . . . . . . . . . . . 5Overview. . . . . . . . . . . . . . . . . . . . . . . . . . . . . . . . . . . . . . . . . . . . . 5
Supported Files and Systems . . . . . . . . . . . . . . . . . . . . . . . . . . . . . . 5Supported Hardware . . . . . . . . . . . . . . . . . . . . . . . . . . . . . . . . . . . 5Installation . . . . . . . . . . . . . . . . . . . . . . . . . . . . . . . . . . . . . . . . . . 5Control Room User Interface . . . . . . . . . . . . . . . . . . . . . . . . . . . . . . 6
Application Menus . . . . . . . . . . . . . . . . . . . . . . . . . . . . . . . . . . . . . . 8AJA Control Room (macOS) . . . . . . . . . . . . . . . . . . . . . . . . . . . . . . . 8File Menu . . . . . . . . . . . . . . . . . . . . . . . . . . . . . . . . . . . . . . . . . . . 9View Menu . . . . . . . . . . . . . . . . . . . . . . . . . . . . . . . . . . . . . . . . . . 9Transport Menu . . . . . . . . . . . . . . . . . . . . . . . . . . . . . . . . . . . . . . 11Clip Menu. . . . . . . . . . . . . . . . . . . . . . . . . . . . . . . . . . . . . . . . . . 11Device Menu . . . . . . . . . . . . . . . . . . . . . . . . . . . . . . . . . . . . . . . . 11Help Menu . . . . . . . . . . . . . . . . . . . . . . . . . . . . . . . . . . . . . . . . . 11
Preferences . . . . . . . . . . . . . . . . . . . . . . . . . . . . . . . . . . . . . . . . . . 12General Prefs . . . . . . . . . . . . . . . . . . . . . . . . . . . . . . . . . . . . . . . 12Capture Prefs 13Viewer Prefs . . . . . . . . . . . . . . . . . . . . . . . . . . . . . . . . . . . . . . . . 14Timecode Prefs . . . . . . . . . . . . . . . . . . . . . . . . . . . . . . . . . . . . . . 15Closed Captions Prefs . . . . . . . . . . . . . . . . . . . . . . . . . . . . . . . . . . 15Serial Prefs . . . . . . . . . . . . . . . . . . . . . . . . . . . . . . . . . . . . . . . . . 16Scripting Prefs . . . . . . . . . . . . . . . . . . . . . . . . . . . . . . . . . . . . . . . 16About AJA Control Room . . . . . . . . . . . . . . . . . . . . . . . . . . . . . . . . 17
Chapter 2 – Operation . . . . . . . . . . . . . . . . . . . . . . . . . . . . 18Startup . . . . . . . . . . . . . . . . . . . . . . . . . . . . . . . . . . . . . . . . . . . . . 18Using the Bin . . . . . . . . . . . . . . . . . . . . . . . . . . . . . . . . . . . . . . . . . 18Playback Tab . . . . . . . . . . . . . . . . . . . . . . . . . . . . . . . . . . . . . . . . . 20
Playback Controls. . . . . . . . . . . . . . . . . . . . . . . . . . . . . . . . . . . . . 20Capture Tab . . . . . . . . . . . . . . . . . . . . . . . . . . . . . . . . . . . . . . . . . . 22
Input Based Capture . . . . . . . . . . . . . . . . . . . . . . . . . . . . . . . . . . . 23Remote Control . . . . . . . . . . . . . . . . . . . . . . . . . . . . . . . . . . . . . . 23Capture Clip Settings . . . . . . . . . . . . . . . . . . . . . . . . . . . . . . . . . . 23Clip Naming . . . . . . . . . . . . . . . . . . . . . . . . . . . . . . . . . . . . . . . . 24Capture Controls . . . . . . . . . . . . . . . . . . . . . . . . . . . . . . . . . . . . . 25Batch Capture . . . . . . . . . . . . . . . . . . . . . . . . . . . . . . . . . . . . . . . 26
Edit-To-Tape Tab . . . . . . . . . . . . . . . . . . . . . . . . . . . . . . . . . . . . . . . 27Edit To Tape Settings Pane . . . . . . . . . . . . . . . . . . . . . . . . . . . . . . . 28
Tape Deck Timing Adjustment . . . . . . . . . . . . . . . . . . . . . . . . . . . . . . 28Capture Timing . . . . . . . . . . . . . . . . . . . . . . . . . . . . . . . . . . . . . . 29Edit-to-Tape Timing . . . . . . . . . . . . . . . . . . . . . . . . . . . . . . . . . . . 30
Keystroke Commands. . . . . . . . . . . . . . . . . . . . . . . . . . . . . . . . . . . . 30AJA Control Room (macOS) . . . . . . . . . . . . . . . . . . . . . . . . . . . . . . 31File Menu Keystroke Commands . . . . . . . . . . . . . . . . . . . . . . . . . . . 31View Menu Keystroke Commands . . . . . . . . . . . . . . . . . . . . . . . . . . 31Transport Menu Keystroke Commands . . . . . . . . . . . . . . . . . . . . . . . 31
Appendix A – Supported Read/Write Codecs . . . . . . . . . . . . . 33
Appendix B – Python Scripting Tutorial . . . . . . . . . . . . . . . . . 34Python Installation . . . . . . . . . . . . . . . . . . . . . . . . . . . . . . . . . . . . . 34
Windows . . . . . . . . . . . . . . . . . . . . . . . . . . . . . . . . . . . . . . . . . . 34macOS . . . . . . . . . . . . . . . . . . . . . . . . . . . . . . . . . . . . . . . . . . . . 35
AJA Control Room Setup for Python Scripting . . . . . . . . . . . . . . . . . . . . 35
Contents
AJA Control Room Software v15.2 4 www.aja.com
Macintosh Instructions . . . . . . . . . . . . . . . . . . . . . . . . . . . . . . . . . 35Windows Instructions . . . . . . . . . . . . . . . . . . . . . . . . . . . . . . . . . . 36Simple Modifications . . . . . . . . . . . . . . . . . . . . . . . . . . . . . . . . . . 36
SOFTWARE LICENSE AGREEMENT . . . . . . . . . . . . . . . . . . . . . 39
Index. . . . . . . . . . . . . . . . . . . . . . . . . . . . . . . . . . . . . . . 42
AJA Control Room Software v15.2 5 www.aja.com
Chapter 1 – Introduction
OverviewAJA Control Room™ is a simple software application for professional quality video and audio capture, conversion, playback, and output. With AJA Control Room you can:
• Capture from cameras, live and tape-based sources• Master-to-tape using a single application• Configure your video/audio I/O via an AJA device using the AJA Control Panel
launched from the AJA Control Room application
Supported Files and SystemsAJA Control Room supports a wide range of file-types and codecs including .mov, .mxf, QuickTime*, Apple ProRes, Avid DNxHD and DNxHR, DVCProHD, DPX, and more.
NOTE: Apple has ended QuickTime for Windows support Instead, AJA supports ProRes family capture and playback for macOS, Windows and Linux via AJA Control Room
See Table 1 on page 33 for a complete listing of Control Room codec and operating system support.
Supported HardwareYou can use AJA Control Room with a variety of AJA video and audio processing hardware products.
AJA Control Room supports the following AJA devices:• Io 4K Plus, Io 4K, Io IP, Io XT, Io Express• KONA 5, KONA 4, KONA HDMI, KONA IP, KONA 1, KONA LHi, KONA LHe Plus• T-TAP
AJA Control Room also work with: • Avid Artist | DNxIV• Avid Artist | DNxIP
InstallationAJA Control Room software is available from the AJA website:
AJA Control Room Software v15.2 6 www.aja.com
https://www.aja.com/en/products/software/
Control Room has four different installer packages available depending on your operating system:
• Mac (AJA recommends macOS 10.12 Sierra or later)• Win (AJA recommends Win 10 or later with all updates)• Linux Redhat/CentOS 7• Linux Ubuntu 14.04 LTS and Ubuntu 16.04 LTS
NOTE: Thunderbolt connected devices are not supported on Linux
1. Locate and download the appropriate installer for your OS.
2. Once the installer is on your machine, double-click the file to open it.
3. Follow the installation wizard instructions to install AJA Control Room along with the AJA drivers.
4. After installation, the applications are ready to run.
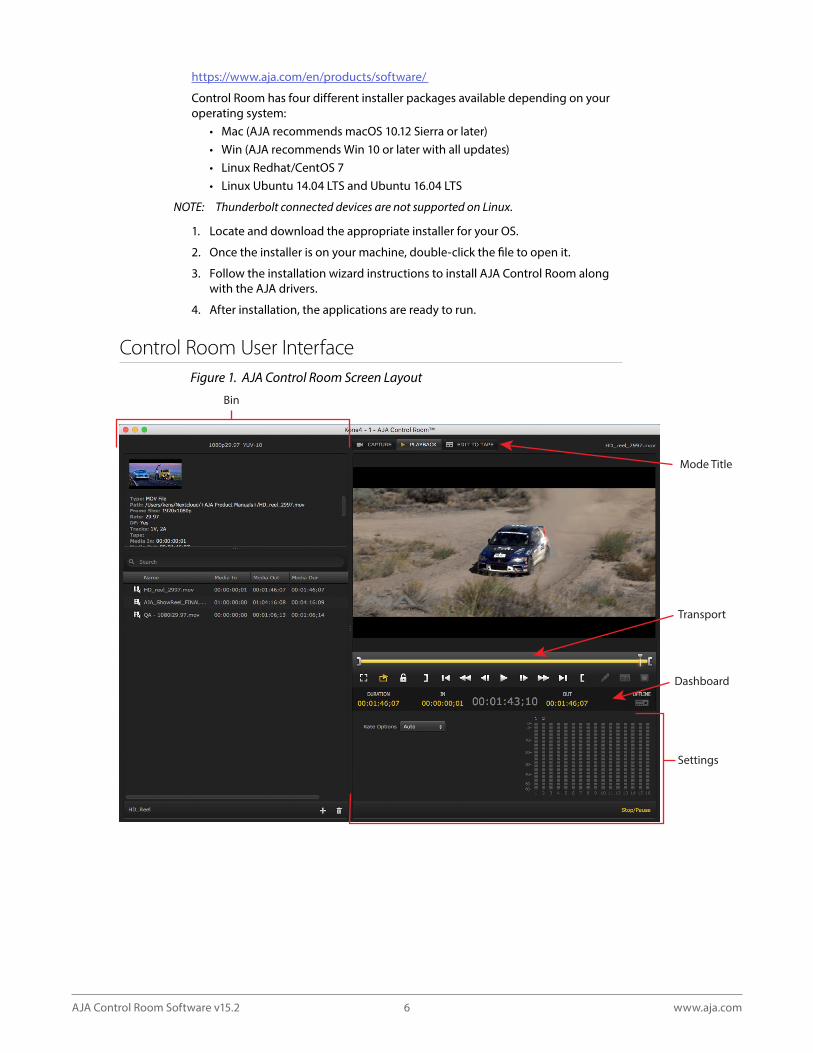
Control Room User Interface Figure 1 AJA Control Room Screen Layout
Bin
Mode Title
Transport
Dashboard
Settings

AJA Control Room Software v15.2 7 www.aja.com
Screen LayoutBesides displaying playback or capture video, the Control Room screen is divided into different panes, which can be shown or hidden as desired.
• Bin - Shows the clips currently imported into the bin and information for them• Mode Title - Shows the Capture, Playback and Edit to Tape selection tabs• Transport - Contains clip playback controls• Dashboard - Displays information for the currently loaded clip• Settings - Shows controls
Operating ModesControl Room has three operating modes. Mode Select Tabs at the top of the page allow you to easily switch between Capture, Playback and Edit To Tape modes.
Capture - The Capture screen allows capturing video and audio to the computer from an external video/audio source, such as a VTR/DDR, using the AJA hardware.
Playback - The Playback screen loads files from your computer and plays them out through your AJA hardware.
Edit To Tape - This is a workspace where you can perform an insert or assemble Edit to Tape to record your clips to a VTR/DDR.
Context Sensitive MenusRight clicking on different elements of the screen can display context sensitive menus of commands, available for quick execution. Examples include:
Right Click On Video Image
Right Click On Bin Clip
AJA Control Room Software v15.2 8 www.aja.com
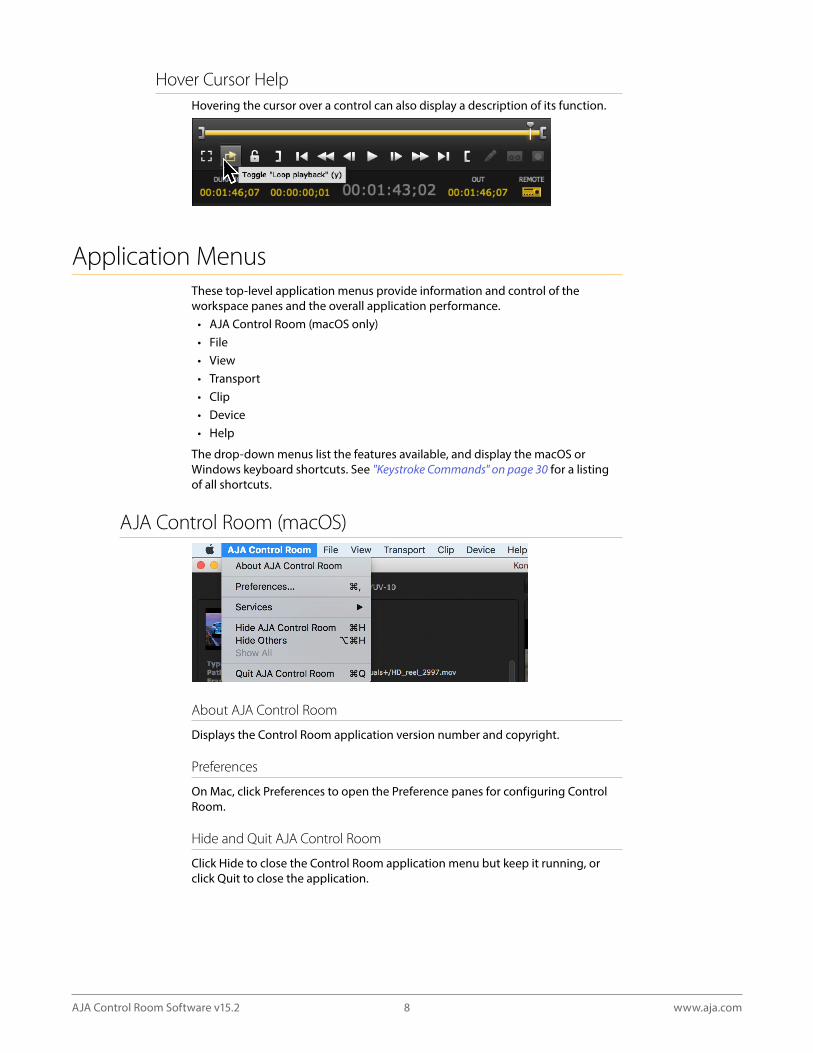
Hover Cursor HelpHovering the cursor over a control can also display a description of its function.
Application MenusThese top-level application menus provide information and control of the workspace panes and the overall application performance.
• AJA Control Room (macOS only)• File • View• Transport• Clip• Device• Help
The drop-down menus list the features available, and display the macOS or Windows keyboard shortcuts. See "Keystroke Commands" on page 30 for a listing of all shortcuts.
AJA Control Room (macOS)
About AJA Control Room
Displays the Control Room application version number and copyright.
Preferences
On Mac, click Preferences to open the Preference panes for configuring Control Room.
Hide and Quit AJA Control Room
Click Hide to close the Control Room application menu but keep it running, or click Quit to close the application.
AJA Control Room Software v15.2 9 www.aja.com
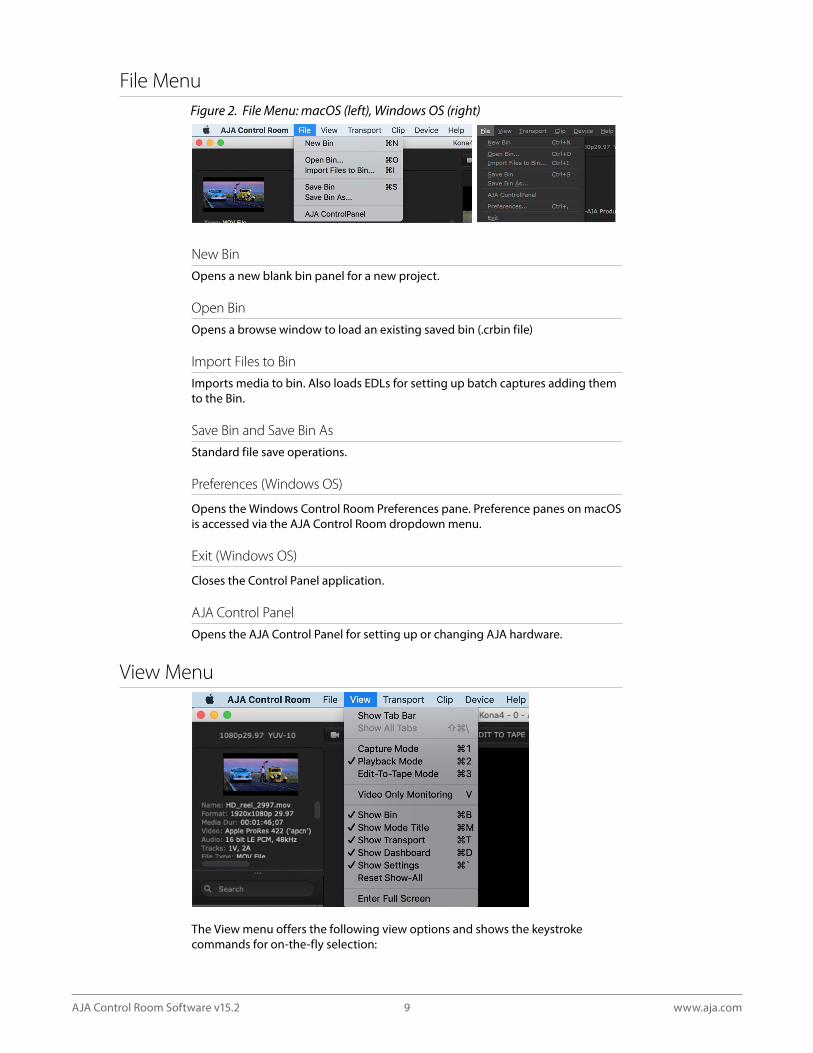
File MenuFigure 2 File Menu: macOS (left), Windows OS (right)
New Bin
Opens a new blank bin panel for a new project.
Open Bin
Opens a browse window to load an existing saved bin (.crbin file)
Import Files to Bin
Imports media to bin. Also loads EDLs for setting up batch captures adding them to the Bin.
Save Bin and Save Bin As
Standard file save operations.
Preferences (Windows OS)
Opens the Windows Control Room Preferences pane. Preference panes on macOS is accessed via the AJA Control Room dropdown menu.
Exit (Windows OS)
Closes the Control Panel application.
AJA Control Panel
Opens the AJA Control Panel for setting up or changing AJA hardware.
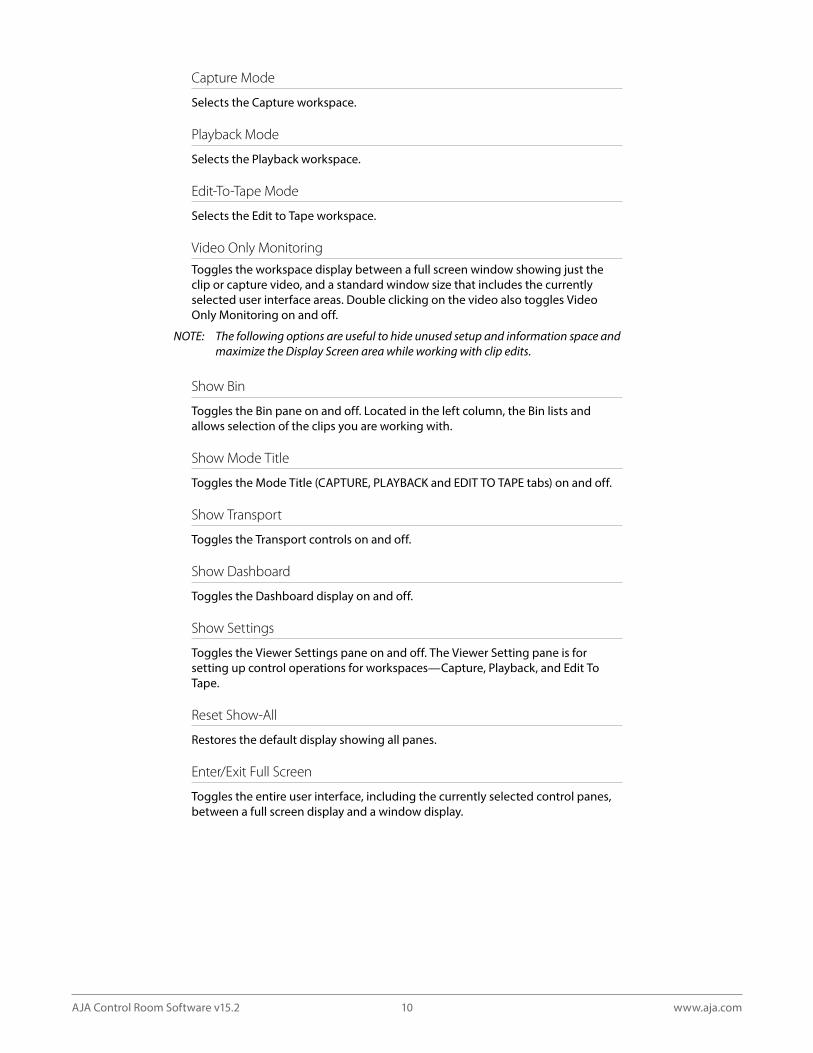
View Menu
The View menu offers the following view options and shows the keystroke commands for on-the-fly selection:
AJA Control Room Software v15.2 10 www.aja.com
Capture Mode
Selects the Capture workspace.
Playback Mode
Selects the Playback workspace.
Edit-To-Tape Mode
Selects the Edit to Tape workspace.
Video Only Monitoring
Toggles the workspace display between a full screen window showing just the clip or capture video, and a standard window size that includes the currently selected user interface areas. Double clicking on the video also toggles Video Only Monitoring on and off.
NOTE: The following options are useful to hide unused setup and information space and maximize the Display Screen area while working with clip edits
Show Bin
Toggles the Bin pane on and off. Located in the left column, the Bin lists and allows selection of the clips you are working with.
Show Mode Title
Toggles the Mode Title (CAPTURE, PLAYBACK and EDIT TO TAPE tabs) on and off.
Show Transport
Toggles the Transport controls on and off.
Show Dashboard
Toggles the Dashboard display on and off.
Show Settings
Toggles the Viewer Settings pane on and off. The Viewer Setting pane is for setting up control operations for workspaces—Capture, Playback, and Edit To Tape.
Reset Show-All
Restores the default display showing all panes.
Enter/Exit Full Screen
Toggles the entire user interface, including the currently selected control panes, between a full screen display and a window display.
AJA Control Room Software v15.2 11 www.aja.com
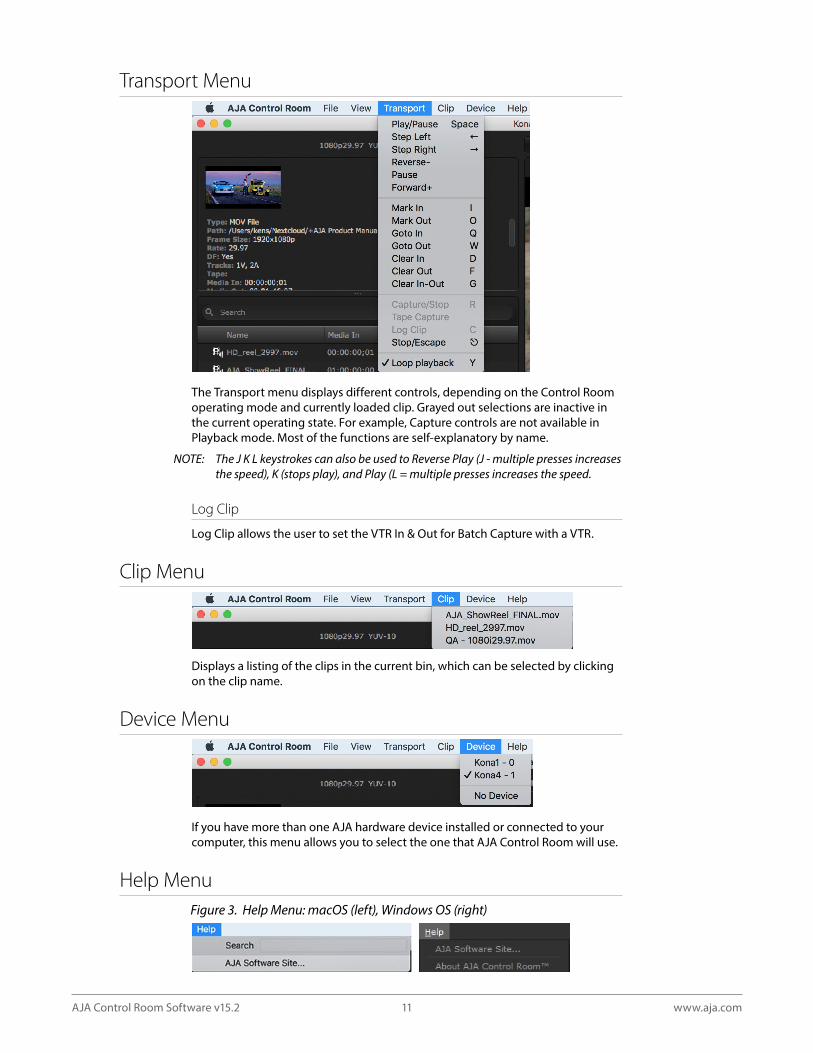
Transport Menu
The Transport menu displays different controls, depending on the Control Room operating mode and currently loaded clip. Grayed out selections are inactive in the current operating state. For example, Capture controls are not available in Playback mode. Most of the functions are self-explanatory by name.
NOTE: The J K L keystrokes can also be used to Reverse Play (J - multiple presses increases the speed), K (stops play), and Play (L = multiple presses increases the speed
Log Clip
Log Clip allows the user to set the VTR In & Out for Batch Capture with a VTR.
Clip Menu
Displays a listing of the clips in the current bin, which can be selected by clicking on the clip name.
Device Menu
If you have more than one AJA hardware device installed or connected to your computer, this menu allows you to select the one that AJA Control Room will use.
Help MenuFigure 3 Help Menu: macOS (left), Windows OS (right)
AJA Control Room Software v15.2 12 www.aja.com
Click the AJA Software Site link to visit the AJA website for the latest release notes, manual and AJA software downloads.
On Windows, click About AJA Control Room see the application version number and copyright information.
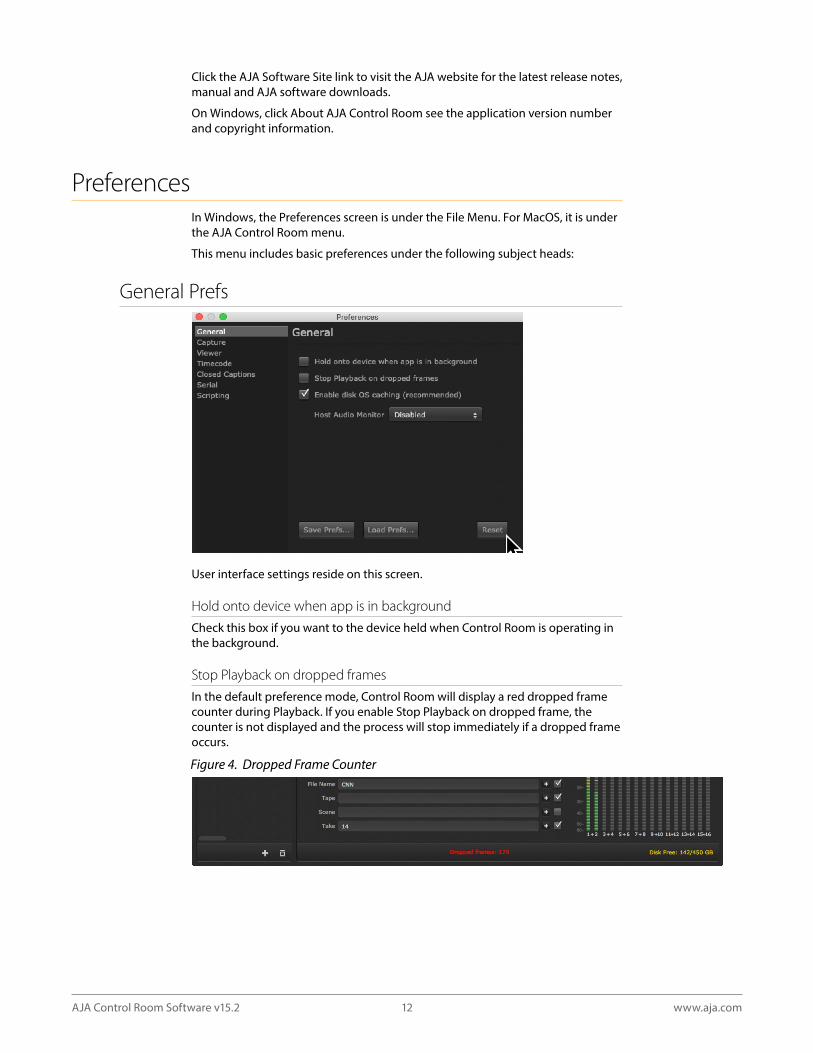
PreferencesIn Windows, the Preferences screen is under the File Menu. For MacOS, it is under the AJA Control Room menu.
This menu includes basic preferences under the following subject heads:
General Prefs
User interface settings reside on this screen.
Hold onto device when app is in background
Check this box if you want to the device held when Control Room is operating in the background.
Stop Playback on dropped frames
In the default preference mode, Control Room will display a red dropped frame counter during Playback. If you enable Stop Playback on dropped frame, the counter is not displayed and the process will stop immediately if a dropped frame occurs.
Figure 4 Dropped Frame Counter
AJA Control Room Software v15.2 13 www.aja.com
Enable disk OS caching
When checked, Control Room will use Disk Caching that is built into the operating system when reading and writing files. In many cases this aids short term file reading and writing performance (the feature defaults to ON). However in some situations with large raster files and many channels of audio this selection can reduce performance. In those cases turning disk OS caching OFF may help.
Host Audio Monitor
• Disabled - Playback or capture audio is routed only through the connected AJA device. On macOS, you may also need to select the AJA device in System Prefs to hear the audio. With this setting, video/audio sync should be maintained.
• Built-in Output (variously named, and you may also see multiple options depending on the sound cards installed) - Audio is also routed through the host computer's audio system. This allows the monitoring of incoming audio being captured by an AJA device, or the monitoring of playback audio, directly on the host computer. Computer audio playback monitoring is available even if no AJA hardware is connected. On macOS, you may also need to select the host system audio in System Prefs to hear the audio. With this setting, the computer audio may not have perfect video/audio sync, but should be close enough for general audio monitoring (when not editing picture with sound).
Save and Load Prefs
The Save Prefs and Load Prefs buttons let you manage your Control Room preferences, by saving and loading named prefs files.
Reset Button
The Reset button will return all Control Room prefs to their factory defaults.
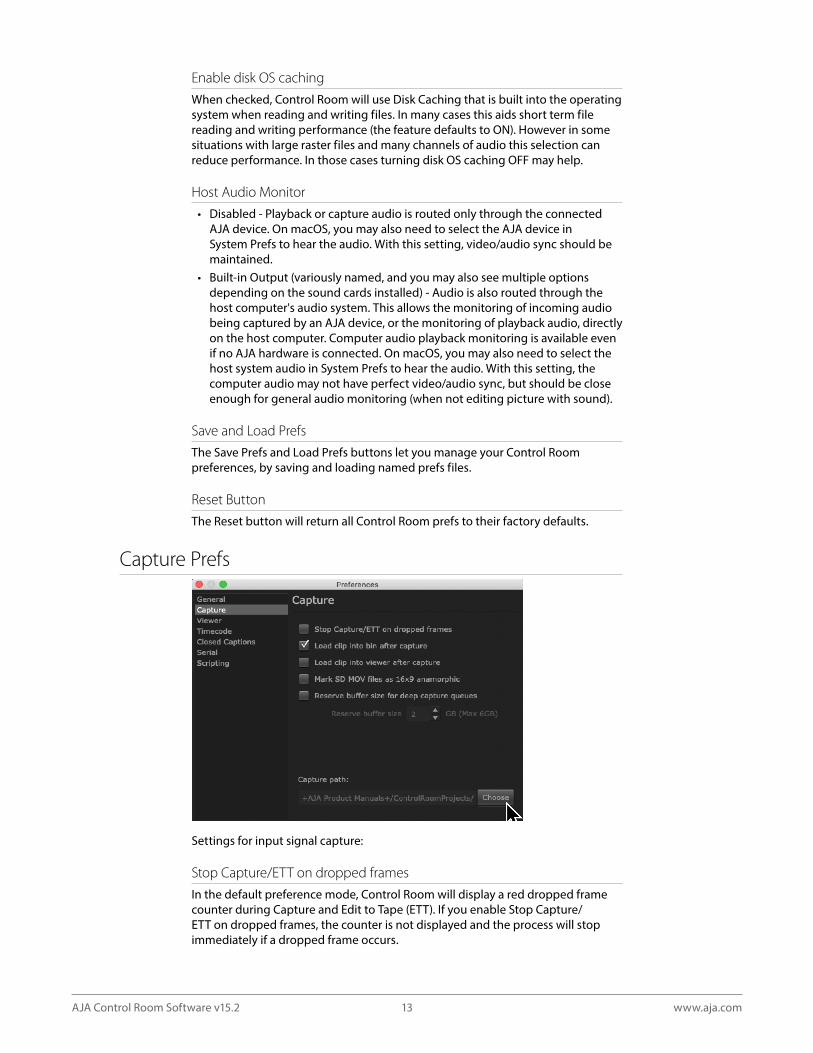
Capture Prefs
Settings for input signal capture:
Stop Capture/ETT on dropped frames
In the default preference mode, Control Room will display a red dropped frame counter during Capture and Edit to Tape (ETT). If you enable Stop Capture/ETT on dropped frames, the counter is not displayed and the process will stop immediately if a dropped frame occurs.
AJA Control Room Software v15.2 14 www.aja.com
Load Clip Settings
Check these boxes to automatically load a clip into the Bin and/or Viewer after capture.
Mark SD MOV files as 16:9 anamorphic
(Only available for SD input format.) When capturing an anamorphic signal, checking the box marks the captured file as anamorphic.
Reserve buffer size for deep capture queues
Checking this box lets you set a reserve buffer size, which can permit capture of high bandwidth video without dropped frames. When checked the Reserve buffer size parameter is activated (range 1 to 6GB, 2GB default which matches the earlier Control Room buffer size). Throughput delay increases as the buffer size increases.
To set this parameter properly, you need to know of how much RAM is installed in your host machine and how much RAM your main applications require, plus any OS overhead. You can then decide how much of the remaining RAM to be allocated. For example, for:
• Host system has 32GB RAM• Main application requires 16GB RAM• OS overhead is around 3GB RAM• A safe Reserve buffer size allocation is 10-12GB
Capture Path
Use the Choose button to select the directory path to be used for Capture.
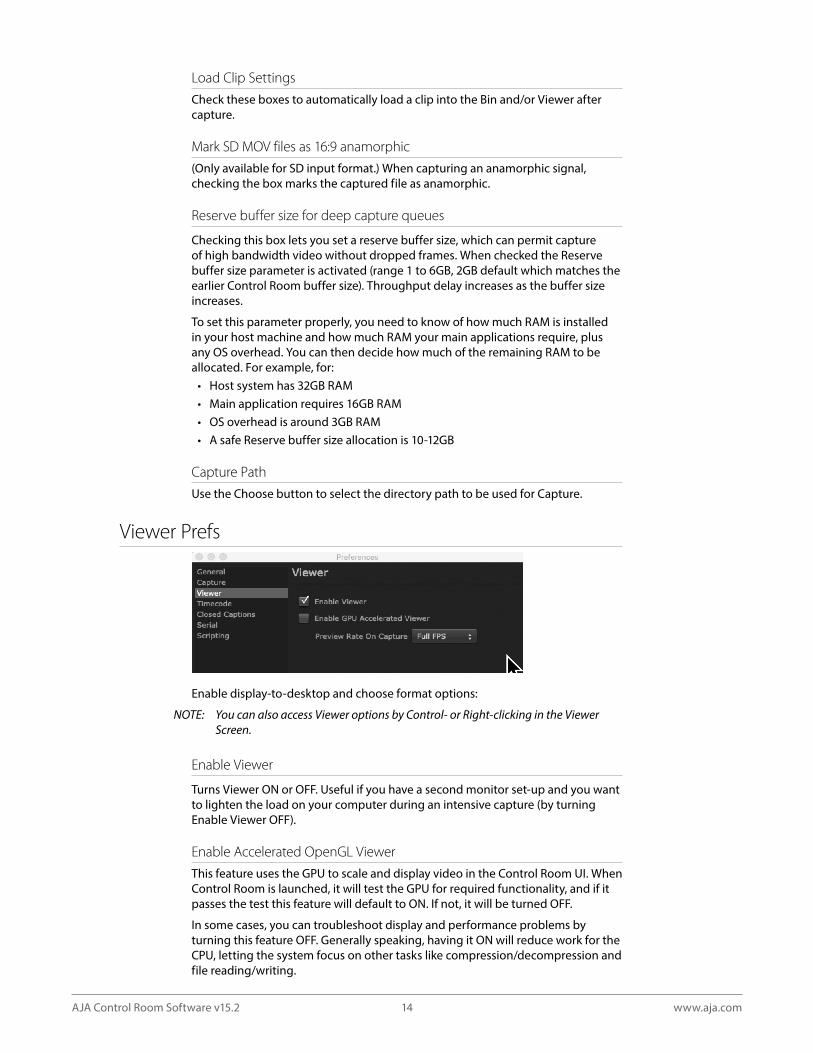
Viewer Prefs
Enable display-to-desktop and choose format options:
NOTE: You can also access Viewer options by Control- or Right-clicking in the Viewer Screen
Enable Viewer
Turns Viewer ON or OFF. Useful if you have a second monitor set-up and you want to lighten the load on your computer during an intensive capture (by turning Enable Viewer OFF).
Enable Accelerated OpenGL Viewer
This feature uses the GPU to scale and display video in the Control Room UI. When Control Room is launched, it will test the GPU for required functionality, and if it passes the test this feature will default to ON. If not, it will be turned OFF.
In some cases, you can troubleshoot display and performance problems by turning this feature OFF. Generally speaking, having it ON will reduce work for the CPU, letting the system focus on other tasks like compression/decompression and file reading/writing.
AJA Control Room Software v15.2 15 www.aja.com
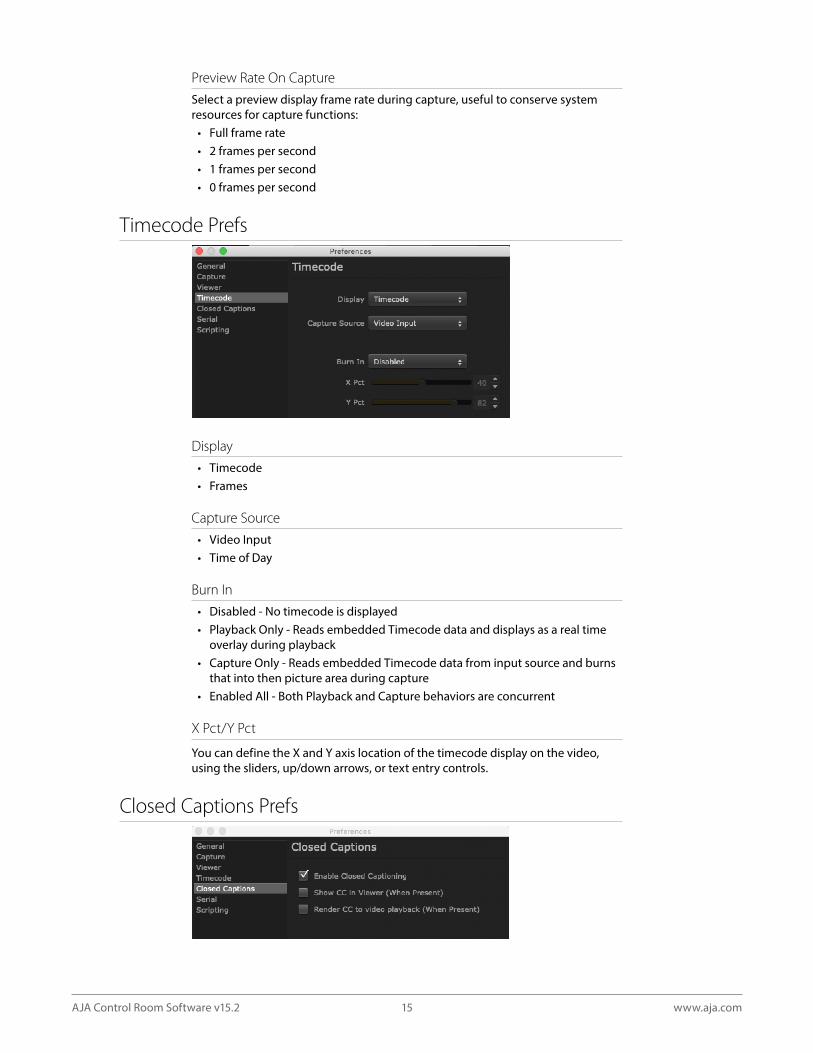
Preview Rate On Capture
Select a preview display frame rate during capture, useful to conserve system resources for capture functions:
• Full frame rate• 2 frames per second• 1 frames per second• 0 frames per second
Timecode Prefs
Display
• Timecode• Frames
Capture Source
• Video Input• Time of Day
Burn In
• Disabled - No timecode is displayed• Playback Only - Reads embedded Timecode data and displays as a real time
overlay during playback• Capture Only - Reads embedded Timecode data from input source and burns
that into then picture area during capture• Enabled All - Both Playback and Capture behaviors are concurrent
X Pct/Y Pct
You can define the X and Y axis location of the timecode display on the video, using the sliders, up/down arrows, or text entry controls.
Closed Captions Prefs
AJA Control Room Software v15.2 16 www.aja.com
Control Room supports closed captions in QuickTime files and creates side car files in .scc and .mcc formats that are stored in the same directory as your current project (Capture Path). The files are automatically named the same as the subject video clip with the appropriate suffix (.scc and .mcc).
Enable Closed Captioning
To capture and output Closed Captioning using compatible devices, check the Enable Closed Captioning (master enable) box.
Show CC In Viewer (When Present)
Displays in the Viewer any captions that are present in the video. In this mode, Control Room will detect and show captions in Control Room even when an external monitor does not support them.
Render CC to video playback (When Present)
Provides a real time overlay of the Closed Captioning data on the video output, rather than in the Control Room Viewer. This feature can be used to show Closed Captioning on the video monitor display in the bay for the producer, or you can output a screener with the Closed Captioning burned in.
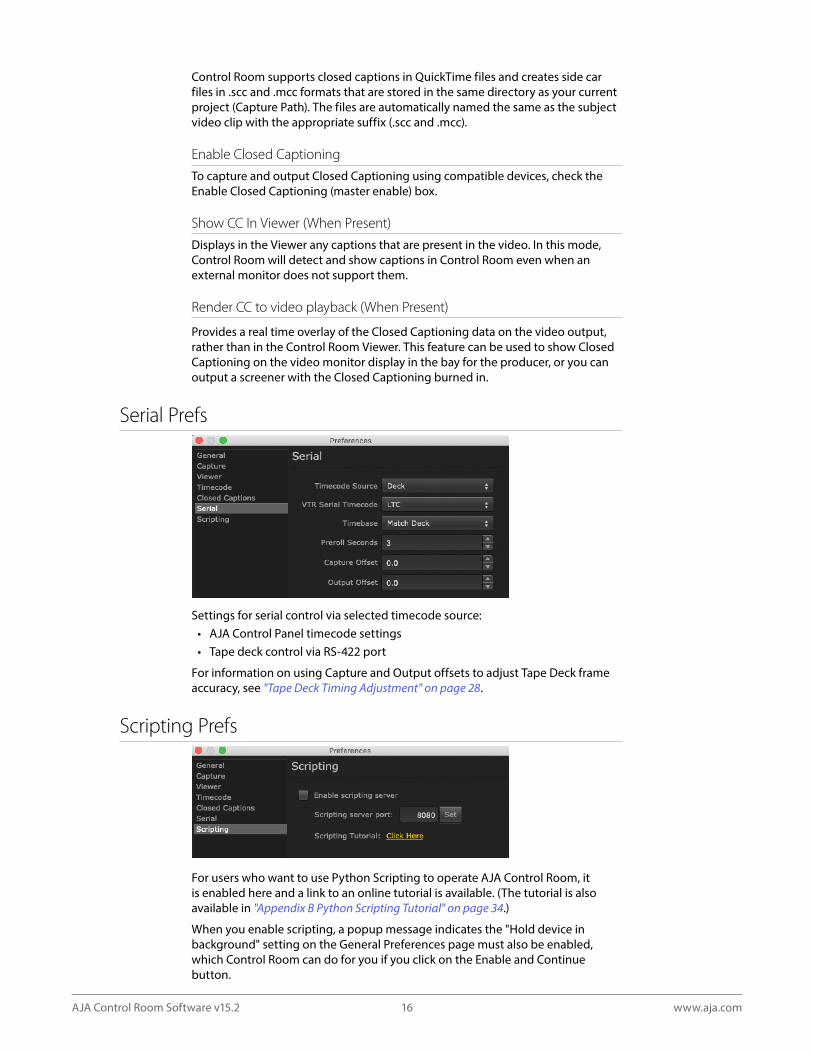
Serial Prefs
Settings for serial control via selected timecode source:• AJA Control Panel timecode settings • Tape deck control via RS-422 port
For information on using Capture and Output offsets to adjust Tape Deck frame accuracy, see "Tape Deck Timing Adjustment" on page 28.
Scripting Prefs
For users who want to use Python Scripting to operate AJA Control Room, it is enabled here and a link to an online tutorial is available. (The tutorial is also available in "Appendix B Python Scripting Tutorial" on page 34.)
When you enable scripting, a popup message indicates the "Hold device in background" setting on the General Preferences page must also be enabled, which Control Room can do for you if you click on the Enable and Continue button.
AJA Control Room Software v15.2 17 www.aja.com
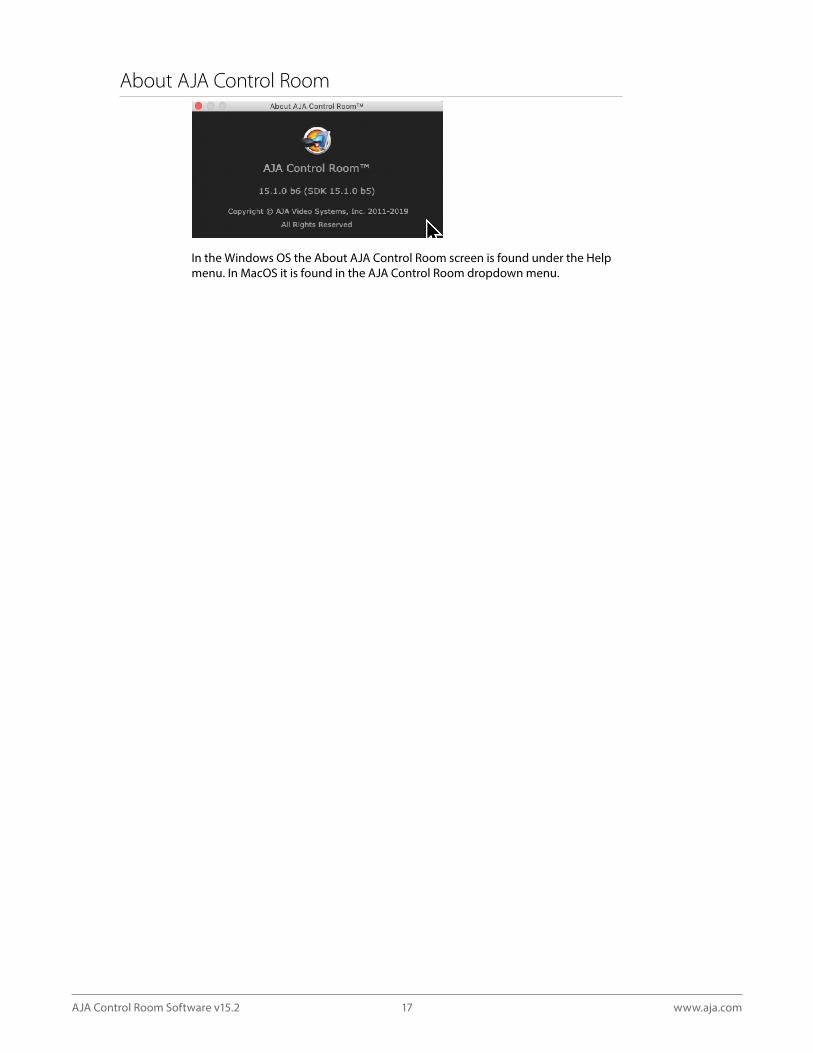
About AJA Control Room
In the Windows OS the About AJA Control Room screen is found under the Help menu. In MacOS it is found in the AJA Control Room dropdown menu.
AJA Control Room Software v15.2 18 www.aja.com
Chapter 2 – Operation
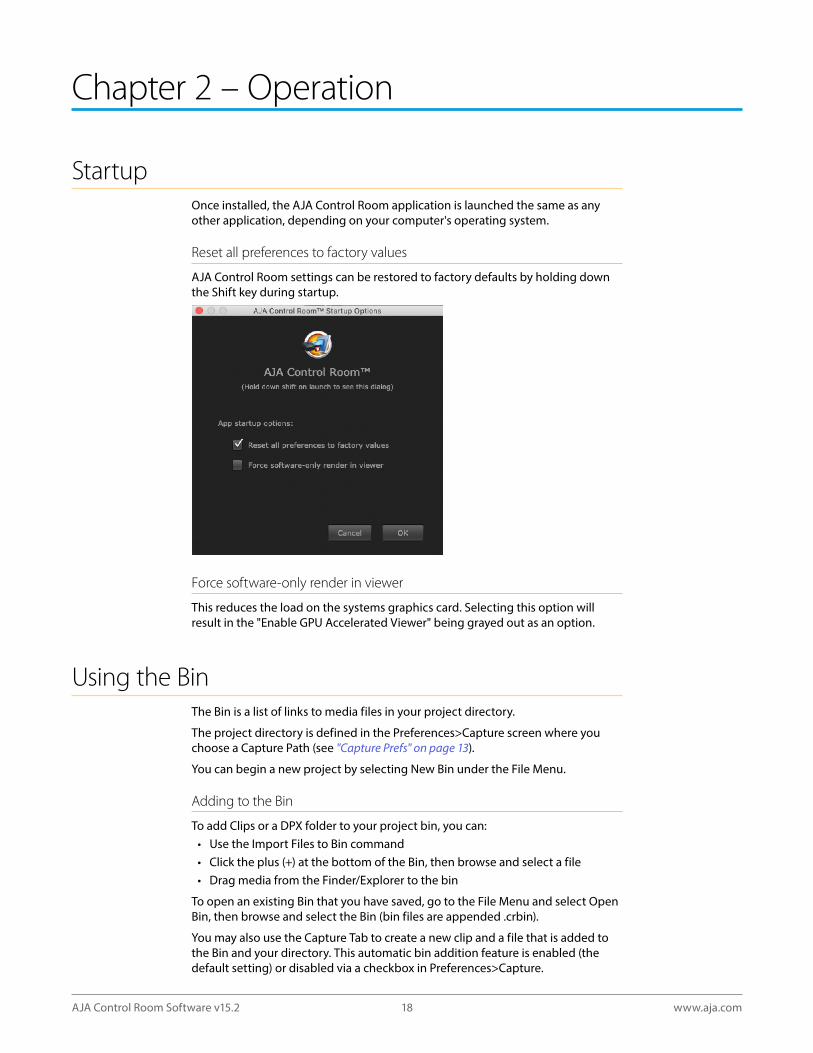
StartupOnce installed, the AJA Control Room application is launched the same as any other application, depending on your computer's operating system.
Reset all preferences to factory values
AJA Control Room settings can be restored to factory defaults by holding down the Shift key during startup.
Force software-only render in viewer
This reduces the load on the systems graphics card. Selecting this option will result in the "Enable GPU Accelerated Viewer" being grayed out as an option.
Using the BinThe Bin is a list of links to media files in your project directory.
The project directory is defined in the Preferences>Capture screen where you choose a Capture Path (see "Capture Prefs" on page 13).
You can begin a new project by selecting New Bin under the File Menu.
Adding to the Bin
To add Clips or a DPX folder to your project bin, you can:• Use the Import Files to Bin command• Click the plus (+) at the bottom of the Bin, then browse and select a file• Drag media from the Finder/Explorer to the bin
To open an existing Bin that you have saved, go to the File Menu and select Open Bin, then browse and select the Bin (bin files are appended .crbin).
You may also use the Capture Tab to create a new clip and a file that is added to the Bin and your directory. This automatic bin addition feature is enabled (the default setting) or disabled via a checkbox in Preferences>Capture.
AJA Control Room Software v15.2 19 www.aja.com
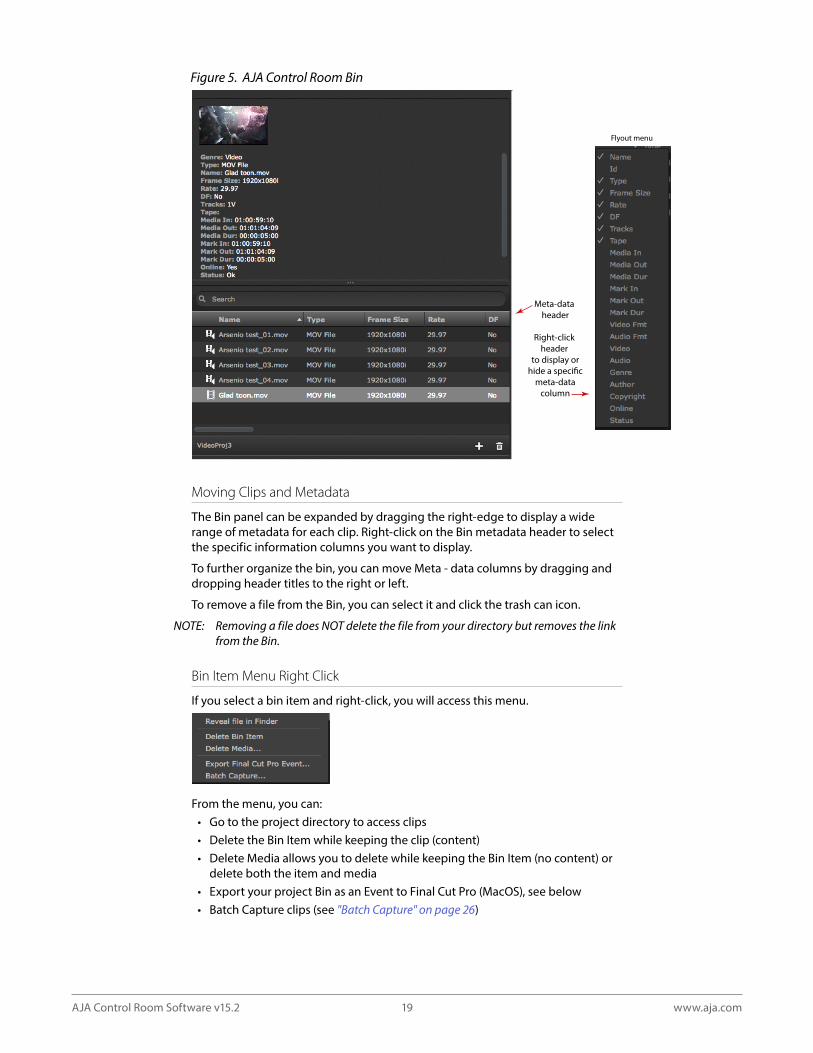
Figure 5 AJA Control Room Bin
Meta-data header
Right-click header
to display orhide a speci�c
meta-datacolumn
Flyout menu
Moving Clips and Metadata
The Bin panel can be expanded by dragging the right-edge to display a wide range of metadata for each clip. Right-click on the Bin metadata header to select the specific information columns you want to display.
To further organize the bin, you can move Meta - data columns by dragging and dropping header titles to the right or left.
To remove a file from the Bin, you can select it and click the trash can icon.
NOTE: Removing a file does NOT delete the file from your directory but removes the link from the Bin
Bin Item Menu Right Click
If you select a bin item and right-click, you will access this menu.
From the menu, you can:• Go to the project directory to access clips• Delete the Bin Item while keeping the clip (content)• Delete Media allows you to delete while keeping the Bin Item (no content) or
delete both the item and media• Export your project Bin as an Event to Final Cut Pro (MacOS), see below• Batch Capture clips (see "Batch Capture" on page 26)
AJA Control Room Software v15.2 20 www.aja.com
Export to Final Cut Pro Event (macOS)
Events in Final Cut Pro X (FCPX) are where you store your project footage. AJA Control Room can create an XML file that is read by FCPX which then generates an Event containing the selected files.
You can select a clip or group of clips in the bin then right-click to select Export Final Cut Pro Event.
The Final Cut Pro X application automatically launches when an Event is generated.
NOTE: In this process, files are not moved but links to them are created
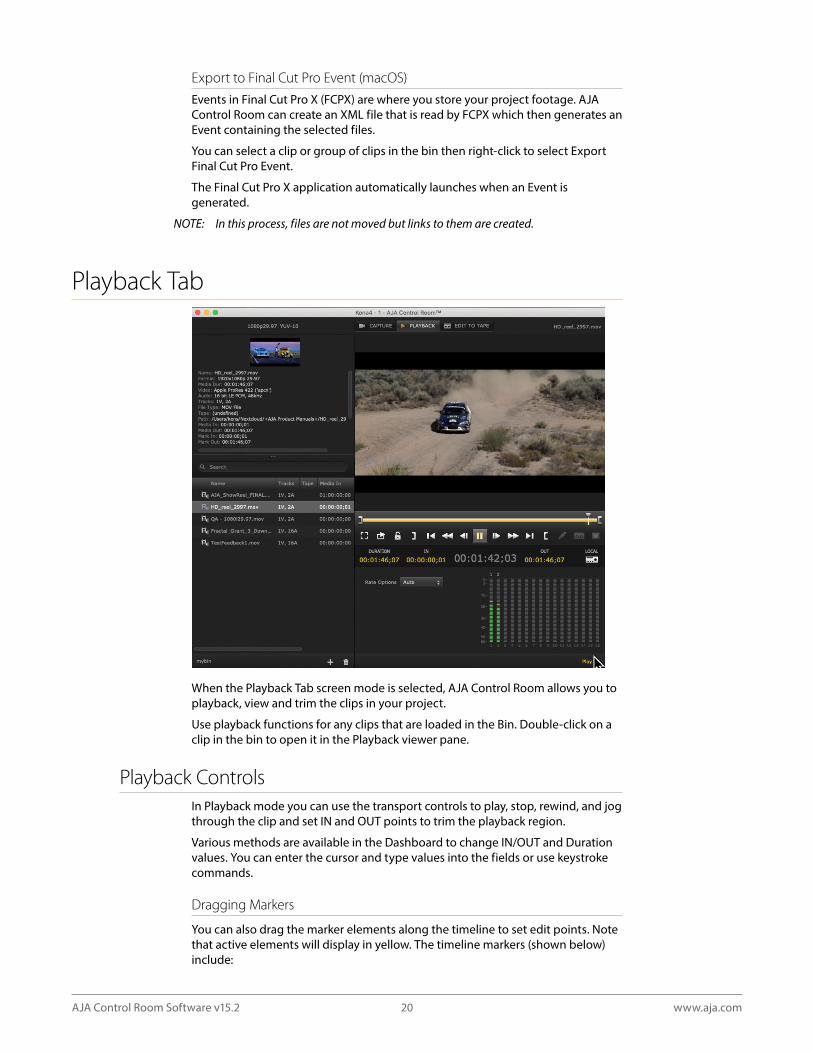
Playback Tab
When the Playback Tab screen mode is selected, AJA Control Room allows you to playback, view and trim the clips in your project.
Use playback functions for any clips that are loaded in the Bin. Double-click on a clip in the bin to open it in the Playback viewer pane.
Playback ControlsIn Playback mode you can use the transport controls to play, stop, rewind, and jog through the clip and set IN and OUT points to trim the playback region.
Various methods are available in the Dashboard to change IN/OUT and Duration values. You can enter the cursor and type values into the fields or use keystroke commands.
Dragging Markers
You can also drag the marker elements along the timeline to set edit points. Note that active elements will display in yellow. The timeline markers (shown below) include:
AJA Control Room Software v15.2 21 www.aja.com
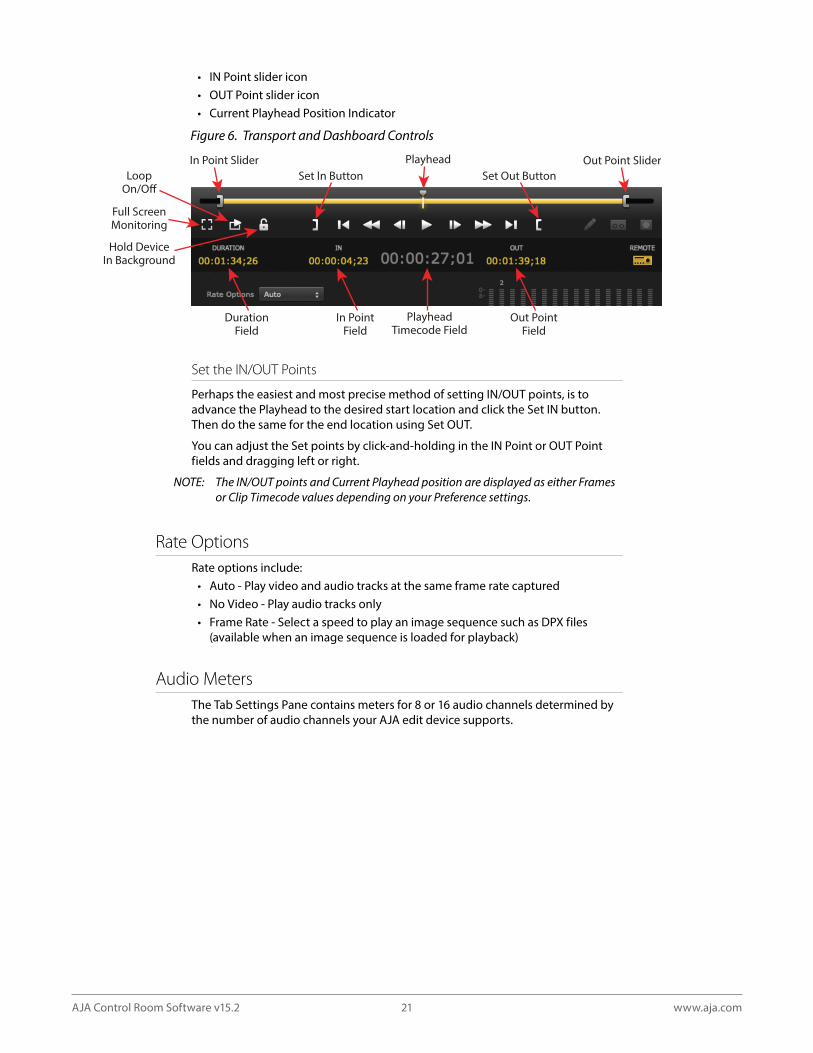
• IN Point slider icon• OUT Point slider icon• Current Playhead Position Indicator
Figure 6 Transport and Dashboard Controls
In Point SliderLoop
On/O�Set Out ButtonSet In Button
Hold DeviceIn Background
In PointField
DurationField
Out Point Field
Playhead
PlayheadTimecode Field
Out Point Slider
Full ScreenMonitoring
Set the IN/OUT Points
Perhaps the easiest and most precise method of setting IN/OUT points, is to advance the Playhead to the desired start location and click the Set IN button. Then do the same for the end location using Set OUT.
You can adjust the Set points by click-and-holding in the IN Point or OUT Point fields and dragging left or right.
NOTE: The IN/OUT points and Current Playhead position are displayed as either Frames or Clip Timecode values depending on your Preference settings
Rate OptionsRate options include:
• Auto - Play video and audio tracks at the same frame rate captured• No Video - Play audio tracks only• Frame Rate - Select a speed to play an image sequence such as DPX files
(available when an image sequence is loaded for playback)
Audio MetersThe Tab Settings Pane contains meters for 8 or 16 audio channels determined by the number of audio channels your AJA edit device supports.
AJA Control Room Software v15.2 22 www.aja.com
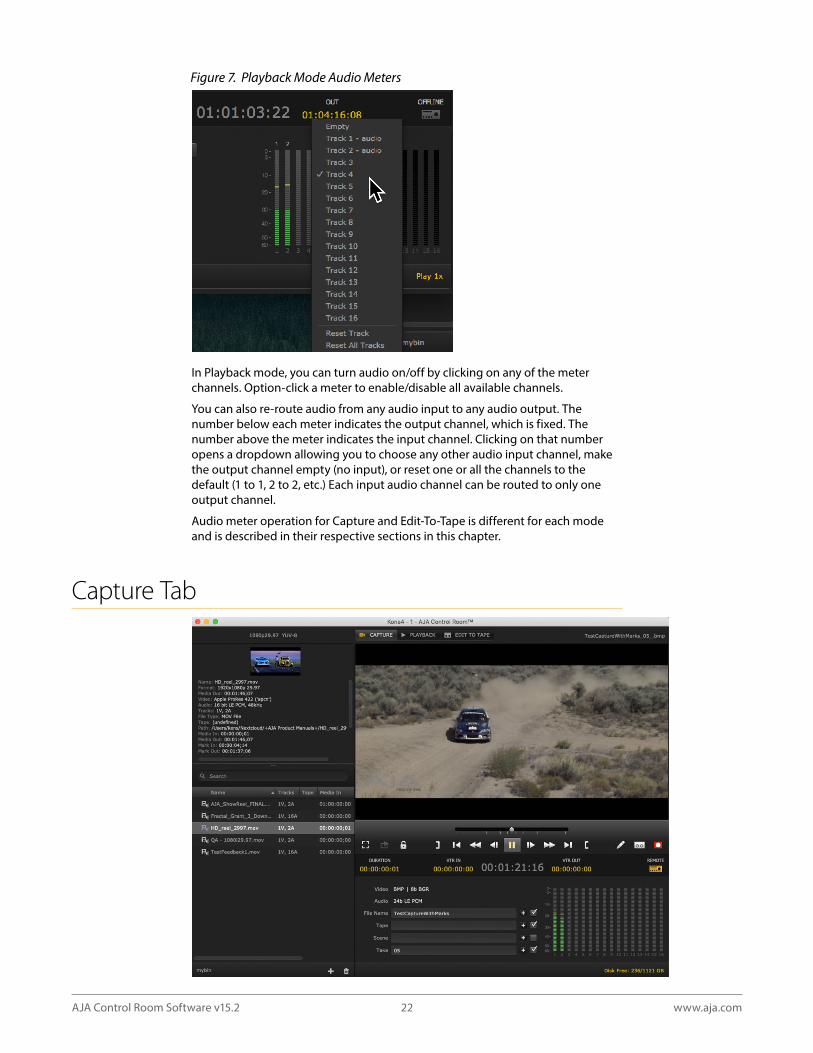
Figure 7 Playback Mode Audio Meters
In Playback mode, you can turn audio on/off by clicking on any of the meter channels. Option-click a meter to enable/disable all available channels.
You can also re-route audio from any audio input to any audio output. The number below each meter indicates the output channel, which is fixed. The number above the meter indicates the input channel. Clicking on that number opens a dropdown allowing you to choose any other audio input channel, make the output channel empty (no input), or reset one or all the channels to the default (1 to 1, 2 to 2, etc.) Each input audio channel can be routed to only one output channel.
Audio meter operation for Capture and Edit-To-Tape is different for each mode and is described in their respective sections in this chapter.
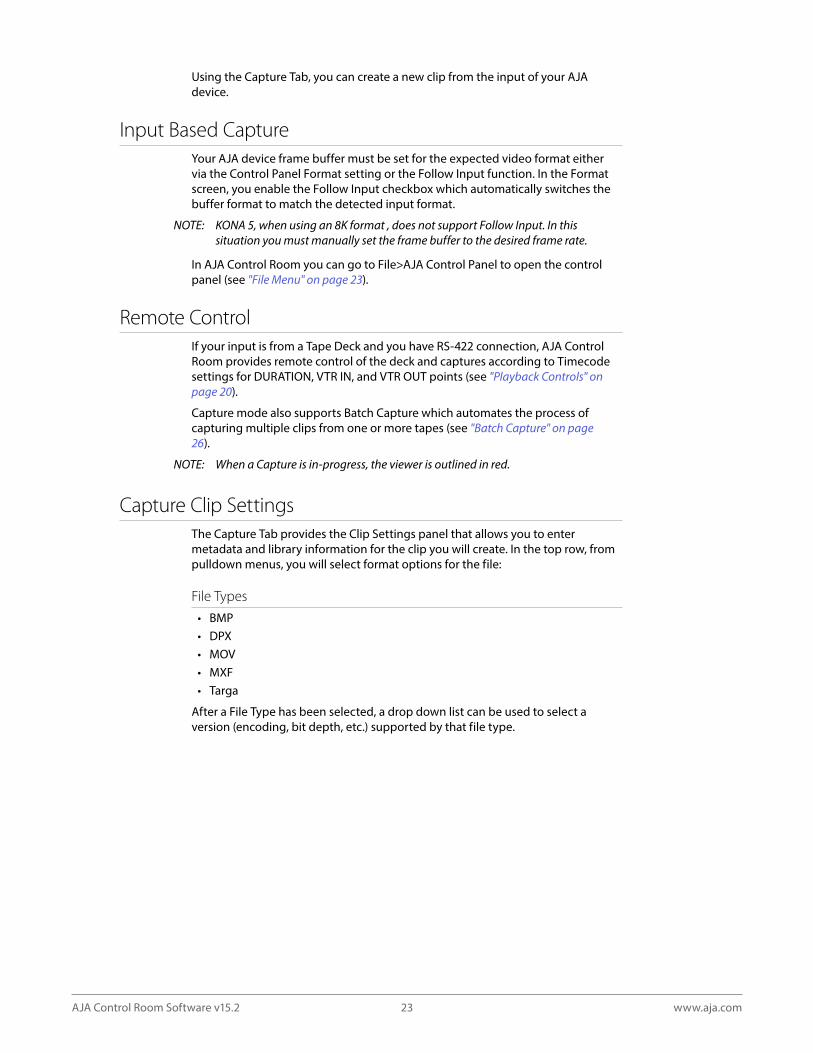
Capture Tab
AJA Control Room Software v15.2 23 www.aja.com
Using the Capture Tab, you can create a new clip from the input of your AJA device.
Input Based CaptureYour AJA device frame buffer must be set for the expected video format either via the Control Panel Format setting or the Follow Input function. In the Format screen, you enable the Follow Input checkbox which automatically switches the buffer format to match the detected input format.
NOTE: KONA 5, when using an 8K format , does not support Follow Input In this situation you must manually set the frame buffer to the desired frame rate
In AJA Control Room you can go to File>AJA Control Panel to open the control panel (see "File Menu" on page 23).
Remote Control If your input is from a Tape Deck and you have RS-422 connection, AJA Control Room provides remote control of the deck and captures according to Timecode settings for DURATION, VTR IN, and VTR OUT points (see "Playback Controls" on page 20).
Capture mode also supports Batch Capture which automates the process of capturing multiple clips from one or more tapes (see "Batch Capture" on page 26).
NOTE: When a Capture is in-progress, the viewer is outlined in red
Capture Clip SettingsThe Capture Tab provides the Clip Settings panel that allows you to enter metadata and library information for the clip you will create. In the top row, from pulldown menus, you will select format options for the file:
File Types
• BMP• DPX• MOV• MXF• Targa
After a File Type has been selected, a drop down list can be used to select a version (encoding, bit depth, etc.) supported by that file type.
AJA Control Room Software v15.2 24 www.aja.com
MOV Files
Control Room supports Apple ProRes, AVID DNxHD, and AVID DNxHR (for 4K/UltraHD only) files.
• Apple ProRes 422• Apple ProRes 422 HQ• Apple ProRes 422 LT• Apple ProRes 422 Proxy• Apple ProRes 4444• Apple ProRes 4444 XQ• AVID DNxHD HQ• AVID DNxHD HQX• AVID DNxHD SQ• AVID DNxHR 444• AVID DNxHR 444 12bit• AVID DNxHR HQ• AVID DNxHR HQX• AVID DNxHR LB• AVID DNxHR SQ
MXF Files
MXF files captured by AJA Control Room are type OP-1A. For MXF container files, Control Room supports the following codecs:
• AVID DNxHD HQ• AVID DNxHD HQX• AVID DNxHD SQ• AVID DNxHR HQ• AVID DNxHR HQX• AVID DNxHR 444• AVID DNxHR 444 12bit• AVID DNxHR LB• AVID DNxHR SQ
Clip NamingA Clip Name will be generated automatically or you can choose to enter your own designations for:
• File Name• Reel name• Scene description• Take designation
NOTE: If you want your information to be displayed as part of the Clip Name in AJA Control Room, you must enable the check boxes to the right of the entry field The plus (+) buttons are used to add/increment a numeric designation
AJA Control Room Software v15.2 25 www.aja.com
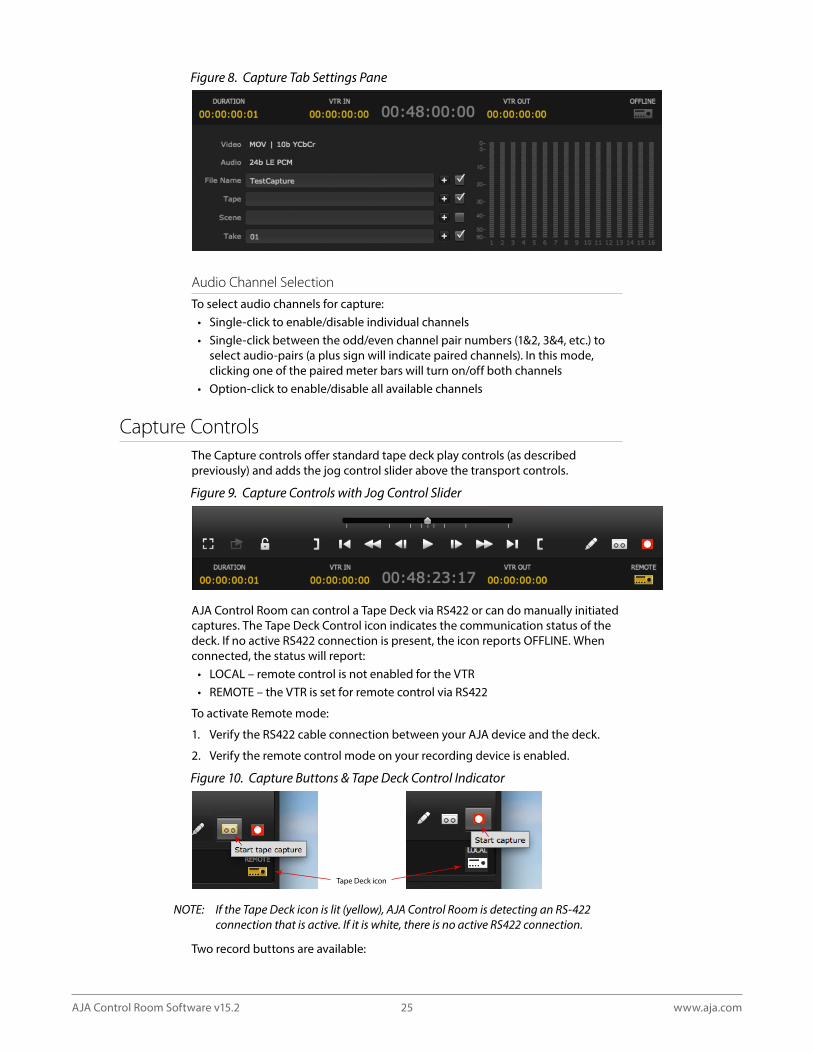
Figure 8 Capture Tab Settings Pane
Audio Channel Selection
To select audio channels for capture:• Single-click to enable/disable individual channels • Single-click between the odd/even channel pair numbers (1&2, 3&4, etc.) to
select audio-pairs (a plus sign will indicate paired channels). In this mode, clicking one of the paired meter bars will turn on/off both channels
• Option-click to enable/disable all available channels
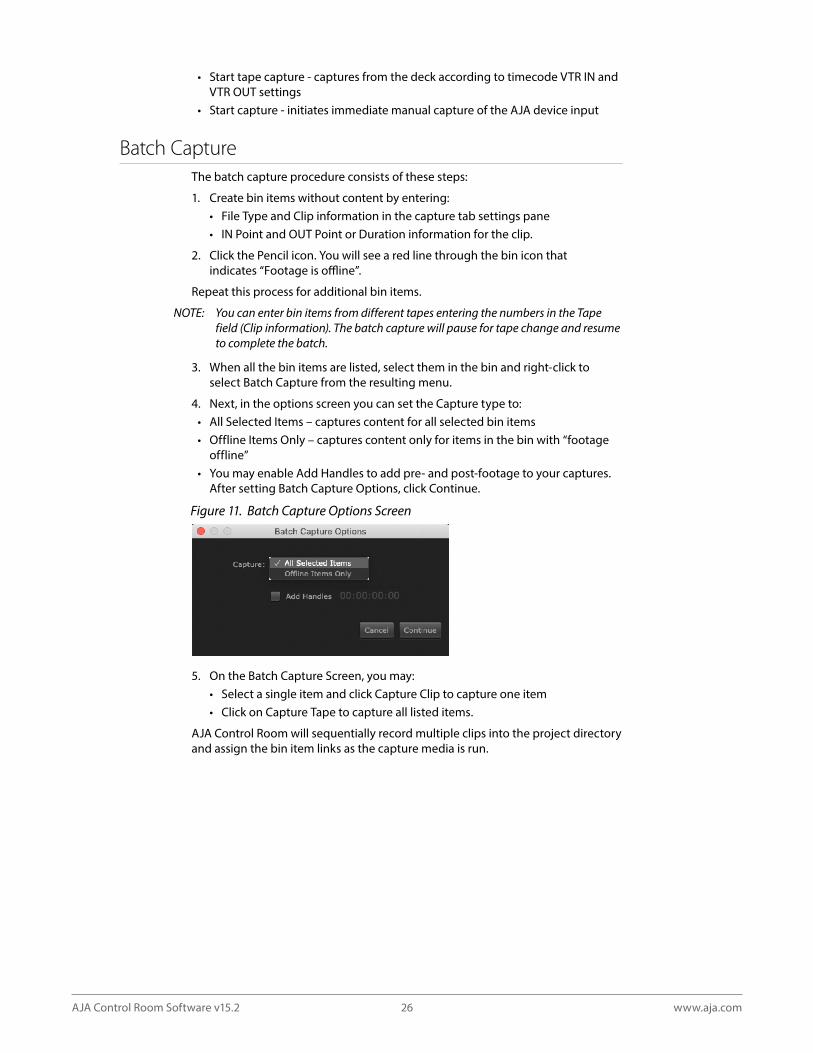
Capture ControlsThe Capture controls offer standard tape deck play controls (as described previously) and adds the jog control slider above the transport controls.
Figure 9 Capture Controls with Jog Control Slider
AJA Control Room can control a Tape Deck via RS422 or can do manually initiated captures. The Tape Deck Control icon indicates the communication status of the deck. If no active RS422 connection is present, the icon reports OFFLINE. When connected, the status will report:
• LOCAL – remote control is not enabled for the VTR• REMOTE – the VTR is set for remote control via RS422
To activate Remote mode:
1. Verify the RS422 cable connection between your AJA device and the deck.
2. Verify the remote control mode on your recording device is enabled.
Figure 10 Capture Buttons & Tape Deck Control Indicator
Tape Deck icon
NOTE: If the Tape Deck icon is lit (yellow), AJA Control Room is detecting an RS-422 connection that is active If it is white, there is no active RS422 connection
Two record buttons are available:
AJA Control Room Software v15.2 26 www.aja.com
• Start tape capture - captures from the deck according to timecode VTR IN and VTR OUT settings
• Start capture - initiates immediate manual capture of the AJA device input
Batch CaptureThe batch capture procedure consists of these steps:
1. Create bin items without content by entering:• File Type and Clip information in the capture tab settings pane• IN Point and OUT Point or Duration information for the clip.
2. Click the Pencil icon. You will see a red line through the bin icon that indicates “Footage is offline”.
Repeat this process for additional bin items.
NOTE: You can enter bin items from different tapes entering the numbers in the Tape field (Clip information) The batch capture will pause for tape change and resume to complete the batch
3. When all the bin items are listed, select them in the bin and right-click to select Batch Capture from the resulting menu.
4. Next, in the options screen you can set the Capture type to:• All Selected Items – captures content for all selected bin items• Offline Items Only – captures content only for items in the bin with “footage
offline”• You may enable Add Handles to add pre- and post-footage to your captures.
After setting Batch Capture Options, click Continue.
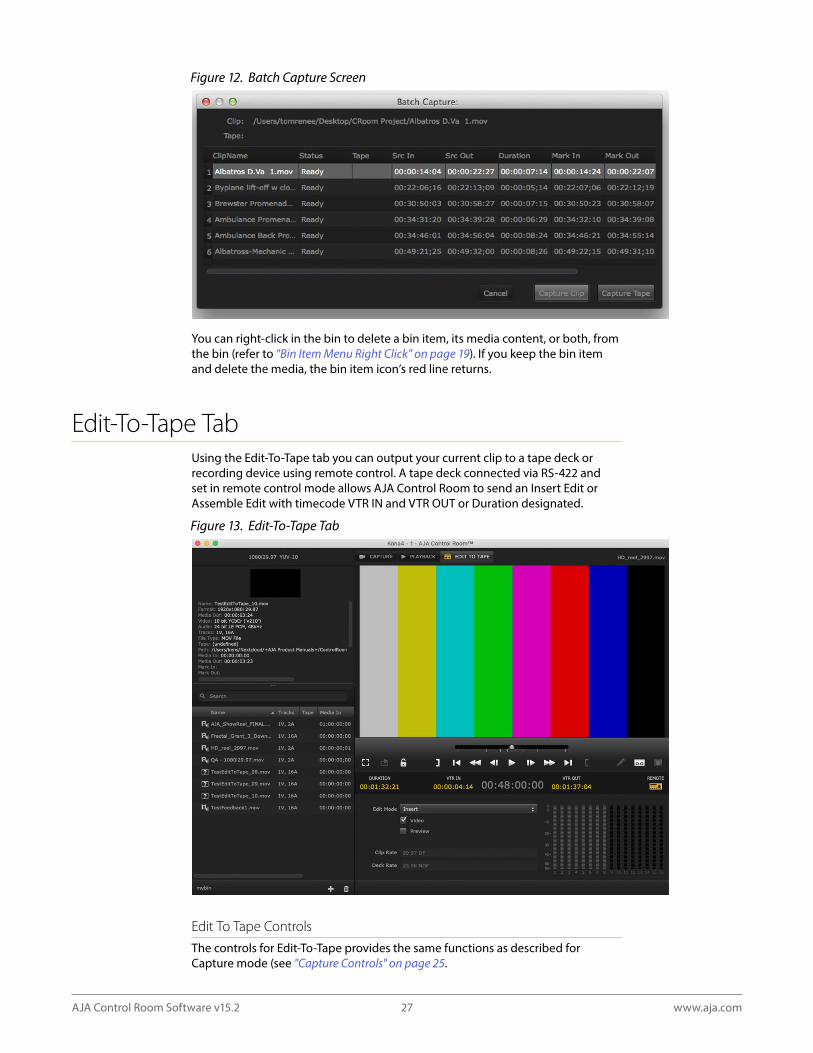
Figure 11 Batch Capture Options Screen
5. On the Batch Capture Screen, you may:• Select a single item and click Capture Clip to capture one item• Click on Capture Tape to capture all listed items.
AJA Control Room will sequentially record multiple clips into the project directory and assign the bin item links as the capture media is run.
AJA Control Room Software v15.2 27 www.aja.com
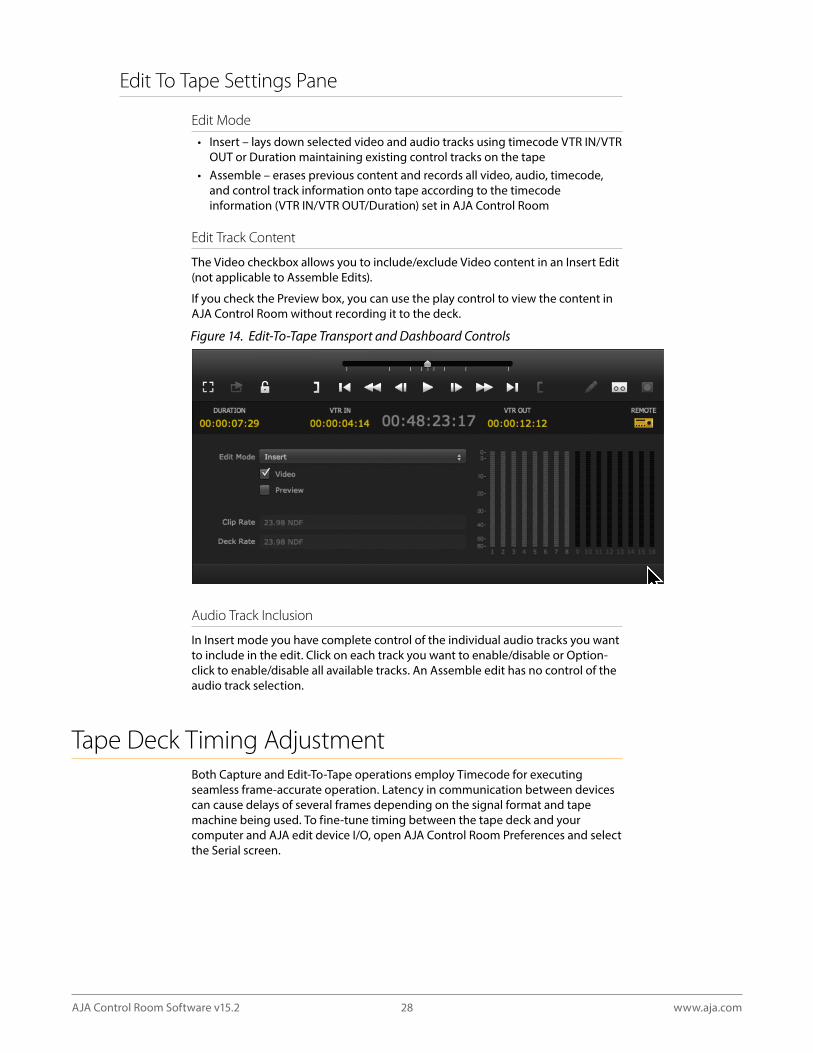
Figure 12 Batch Capture Screen
You can right-click in the bin to delete a bin item, its media content, or both, from the bin (refer to "Bin Item Menu Right Click" on page 19). If you keep the bin item and delete the media, the bin item icon’s red line returns.
Edit-To-Tape TabUsing the Edit-To-Tape tab you can output your current clip to a tape deck or recording device using remote control. A tape deck connected via RS-422 and set in remote control mode allows AJA Control Room to send an Insert Edit or Assemble Edit with timecode VTR IN and VTR OUT or Duration designated.
Figure 13 Edit-To-Tape Tab
Edit To Tape Controls
The controls for Edit-To-Tape provides the same functions as described for Capture mode (see "Capture Controls" on page 25.
AJA Control Room Software v15.2 28 www.aja.com
Edit To Tape Settings Pane
Edit Mode
• Insert – lays down selected video and audio tracks using timecode VTR IN/VTR OUT or Duration maintaining existing control tracks on the tape
• Assemble – erases previous content and records all video, audio, timecode, and control track information onto tape according to the timecode information (VTR IN/VTR OUT/Duration) set in AJA Control Room
Edit Track Content
The Video checkbox allows you to include/exclude Video content in an Insert Edit (not applicable to Assemble Edits).
If you check the Preview box, you can use the play control to view the content in AJA Control Room without recording it to the deck.
Figure 14 Edit-To-Tape Transport and Dashboard Controls
Audio Track Inclusion
In Insert mode you have complete control of the individual audio tracks you want to include in the edit. Click on each track you want to enable/disable or Option-click to enable/disable all available tracks. An Assemble edit has no control of the audio track selection.
Tape Deck Timing AdjustmentBoth Capture and Edit-To-Tape operations employ Timecode for executing seamless frame-accurate operation. Latency in communication between devices can cause delays of several frames depending on the signal format and tape machine being used. To fine-tune timing between the tape deck and your computer and AJA edit device I/O, open AJA Control Room Preferences and select the Serial screen.
AJA Control Room Software v15.2 29 www.aja.com
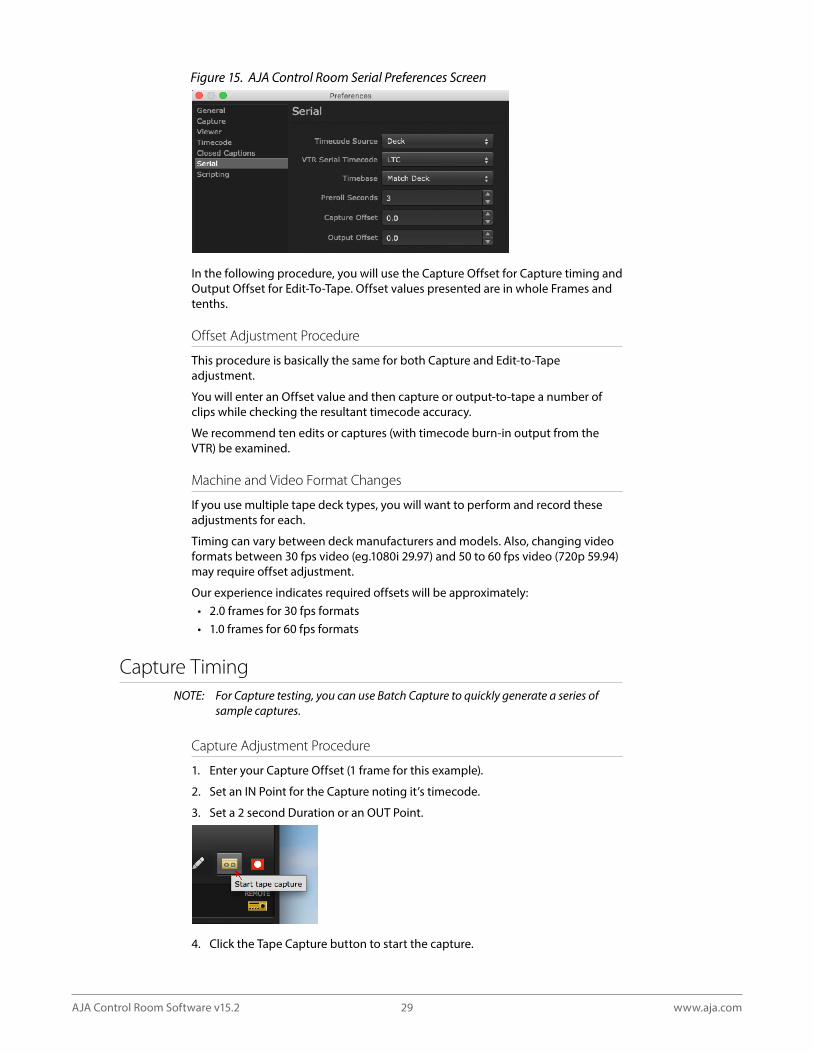
Figure 15 AJA Control Room Serial Preferences Screen
In the following procedure, you will use the Capture Offset for Capture timing and Output Offset for Edit-To-Tape. Offset values presented are in whole Frames and tenths.
Offset Adjustment Procedure
This procedure is basically the same for both Capture and Edit-to-Tape adjustment.
You will enter an Offset value and then capture or output-to-tape a number of clips while checking the resultant timecode accuracy.
We recommend ten edits or captures (with timecode burn-in output from the VTR) be examined.
Machine and Video Format Changes
If you use multiple tape deck types, you will want to perform and record these adjustments for each.
Timing can vary between deck manufacturers and models. Also, changing video formats between 30 fps video (eg.1080i 29.97) and 50 to 60 fps video (720p 59.94) may require offset adjustment.
Our experience indicates required offsets will be approximately:• 2.0 frames for 30 fps formats• 1.0 frames for 60 fps formats
Capture TimingNOTE: For Capture testing, you can use Batch Capture to quickly generate a series of
sample captures
Capture Adjustment Procedure
1. Enter your Capture Offset (1 frame for this example).
2. Set an IN Point for the Capture noting it’s timecode.
3. Set a 2 second Duration or an OUT Point.
4. Click the Tape Capture button to start the capture.
AJA Control Room Software v15.2 30 www.aja.com
5. When Capture is complete, double-click on the clip in the bin to enter Playback mode.
6. Compare the first two frames of the burned-in timecode of the capture with the timecode values in the dashboard’s Current Position Indicator (CPI).
7. If the capture resulted in a timecode beginning a frame before the CPI, adjust the offset by adding a frame. Conversely, if the clip was late, decrease the offset.
As you perform more trial captures, you may see a variance in frame accuracy. If so, you can use the tenth-of-a-frame offset (beginning with five-tenths) to make more subtle adjustment until the clip timecode and CPI consistently match.
NOTE: 720p 50 to 60 fps formats actually records 2 frames for each timecode frame value For frame accuracy you must check that the timecode value does not change for the first two frames of video
Edit-to-Tape TimingFor Edit-to-Tape Timing you enter frame values in the Output Offset field in Serial Preferences. AJA Control Room must begin playout so that the correct frame is on-air at the edit IN point.
Edit Adjustment Procedure
Begin the procedure by doing a test edit.
1. Using a clip with timecode burn-in, select a CPI point marking the desired edit IN.
2. Set a 2 second Duration or an OUT Point
.
3. Click the Tape start button to perform the edit.
4. When the edit is complete, roll the tape back to the edit IN point and verify that the first frame that was captured on tape was the frame you expected.
5. If the edit begins a frame early, adjust the offset by adding a frame. Conversely, if the clip was late, decrease the offset.
As you perform more trial edits, you may see a variance in frame accuracy. If so, you can use the tenth-of-a-frame offset (beginning with five-tenths) to make more subtle adjustment until the edit is consistently frame-accurate.
Again, for video formats of 720p 50 to 60 fps, refer to the NOTE above.
Keystroke CommandsMany Control Room functions can also be performed using computer keyboard shortcuts. Many are entered using the Cmd key ( on macOS) or the Ctrl key (Windows).
AJA Control Room Software v15.2 31 www.aja.com
AJA Control Room (macOS)
Function macOS
Preferences Cmd+,
Hide AJA Control Room Cmd+H
Hide Others Option+Cmd+H
Quit AJA Control Room Cmd+Q
File Menu Keystroke Commands
Function macOS Windows
New Bin Cmd+N Ctrl+N
Open Bin Cmd+O Ctrl+O
Import Files to Bin Cmd+I Ctrl+I
Save Bin Cmd+S Ctrl+S
Preferences Cmd+, Ctrl+,
View Menu Keystroke Commands
Function macOS Windows
Capture Mode Cmd+1 Ctrl+1
Playback Mode Cmd+2 Ctrl+2
Edit-To-Tape Mode Cmd+3 Ctrl+3
Video Only Monitoring V V
Show Bin Cmd+B Cmd+B
Show Mode Title Cmd+M Cmd+M
Show Transport Cmd+T Cmd+T
Show Dashboard Cmd+D Cmd+D
Show Settings Cmd+' Cmd+'
Toggle Fullscreen Ctrl+F
Transport Menu Keystroke Commands
Function macOS Windows
Play/Pause Space Space
Step Left Left Arrow Up Arrow
Left Arrow Up Arrow
Step Right Right Arrow Down Arrow
Right Arrow Down Arrow
Play Reverse (repeat faster)
J J
Pause K K
Play Forward (repeat faster)
L L
Mark In I I
AJA Control Room Software v15.2 32 www.aja.com
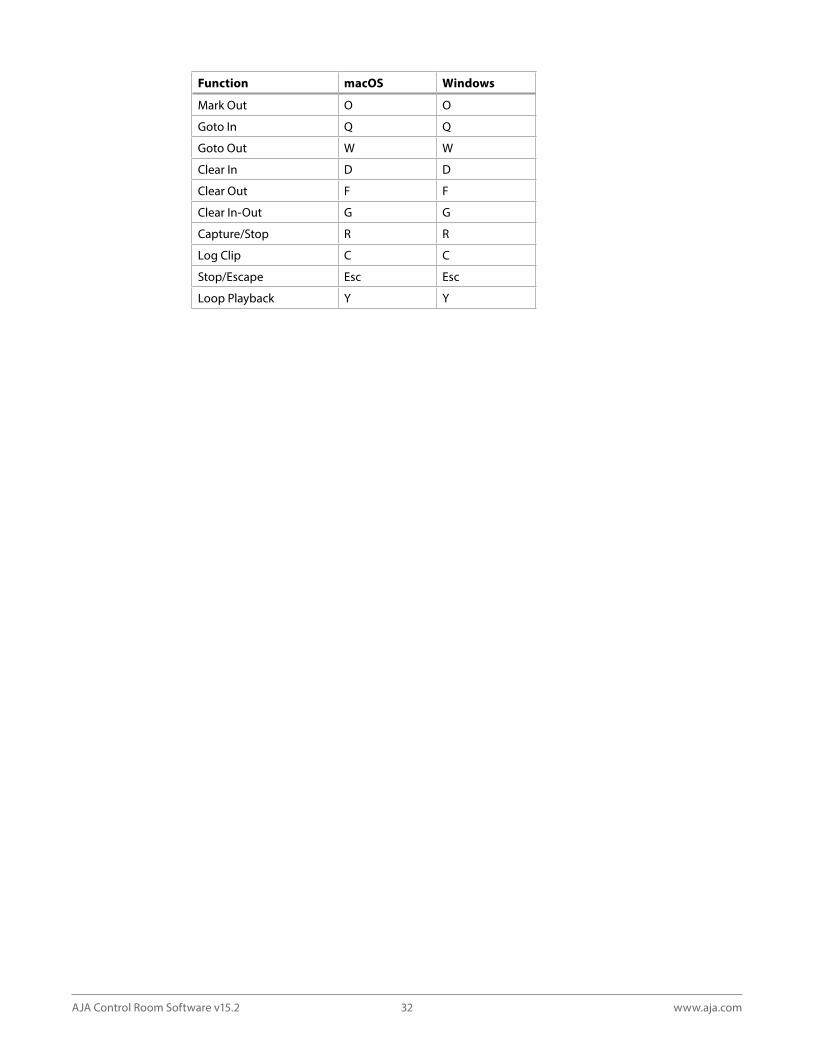
Function macOS Windows
Mark Out O O
Goto In Q Q
Goto Out W W
Clear In D D
Clear Out F F
Clear In-Out G G
Capture/Stop R R
Log Clip C C
Stop/Escape Esc Esc
Loop Playback Y Y
AJA Control Room Software v15.2 33 www.aja.com
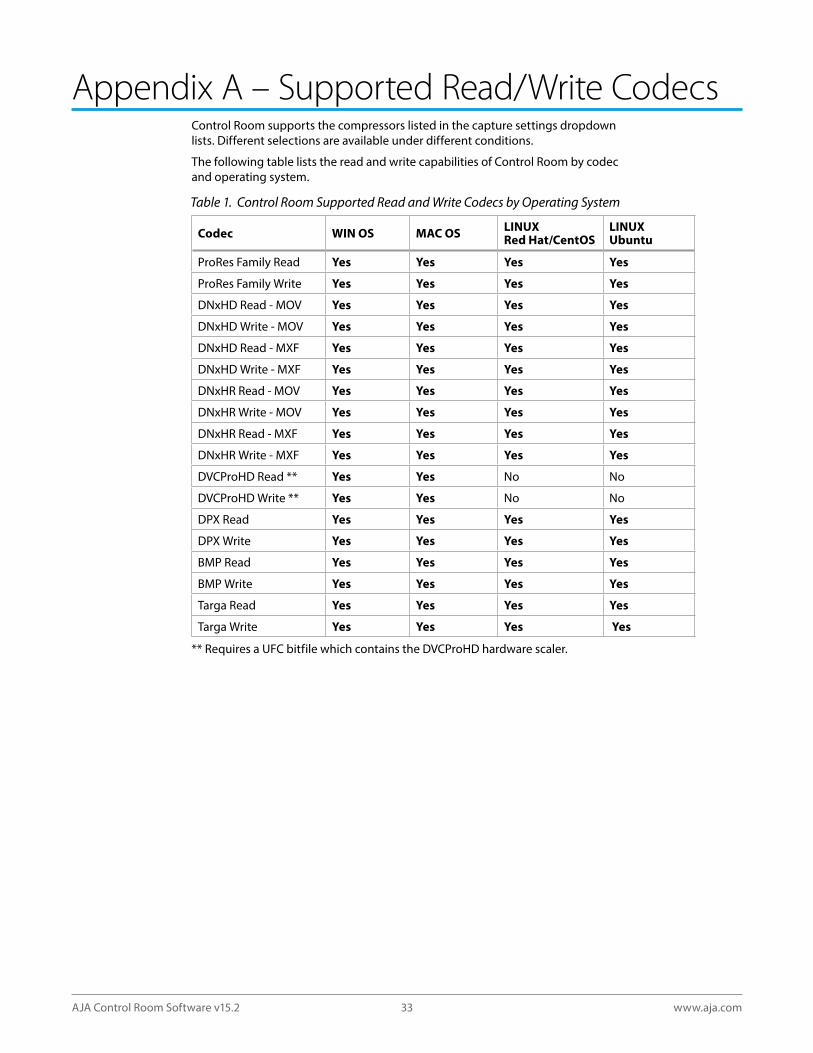
Appendix A – Supported Read/Write CodecsControl Room supports the compressors listed in the capture settings dropdown lists. Different selections are available under different conditions.
The following table lists the read and write capabilities of Control Room by codec and operating system.
Table 1 Control Room Supported Read and Write Codecs by Operating System
Codec WIN OS MAC OS LINUX Red Hat/CentOS
LINUX Ubuntu
ProRes Family Read Yes Yes Yes Yes
ProRes Family Write Yes Yes Yes Yes
DNxHD Read - MOV Yes Yes Yes Yes
DNxHD Write - MOV Yes Yes Yes Yes
DNxHD Read - MXF Yes Yes Yes Yes
DNxHD Write - MXF Yes Yes Yes Yes
DNxHR Read - MOV Yes Yes Yes Yes
DNxHR Write - MOV Yes Yes Yes Yes
DNxHR Read - MXF Yes Yes Yes Yes
DNxHR Write - MXF Yes Yes Yes Yes
DVCProHD Read ** Yes Yes No No
DVCProHD Write ** Yes Yes No No
DPX Read Yes Yes Yes Yes
DPX Write Yes Yes Yes Yes
BMP Read Yes Yes Yes Yes
BMP Write Yes Yes Yes Yes
Targa Read Yes Yes Yes Yes
Targa Write Yes Yes Yes Yes
** Requires a UFC bitfile which contains the DVCProHD hardware scaler.
AJA Control Room Software v15.2 34 www.aja.com
Appendix B – Python Scripting TutorialAJA has implemented a Python Scripting interface for the AJA Control Room application.
Under Python script control you can:• Name the file to be captured• Start Capturing• Stop Capturing• Load Files into the bin• Use transport controls• Get a list of files in the bin• Set the mode (Capture, Playback, Edit To Tape)• Show/Hide the Bin and Settings panes
NOTE: Our implementation is based upon Python v2 7 Version 3 4 will not work
This tutorial and the example files are available as a download in the Documents section from:
https://www.aja.com/software/control-room/tutorials
Python Installation
WindowsThe Python libraries are not installed with Windows by default. You can get the Python 2.7.6 installer from:
https://www.python.org/downloads/windows/
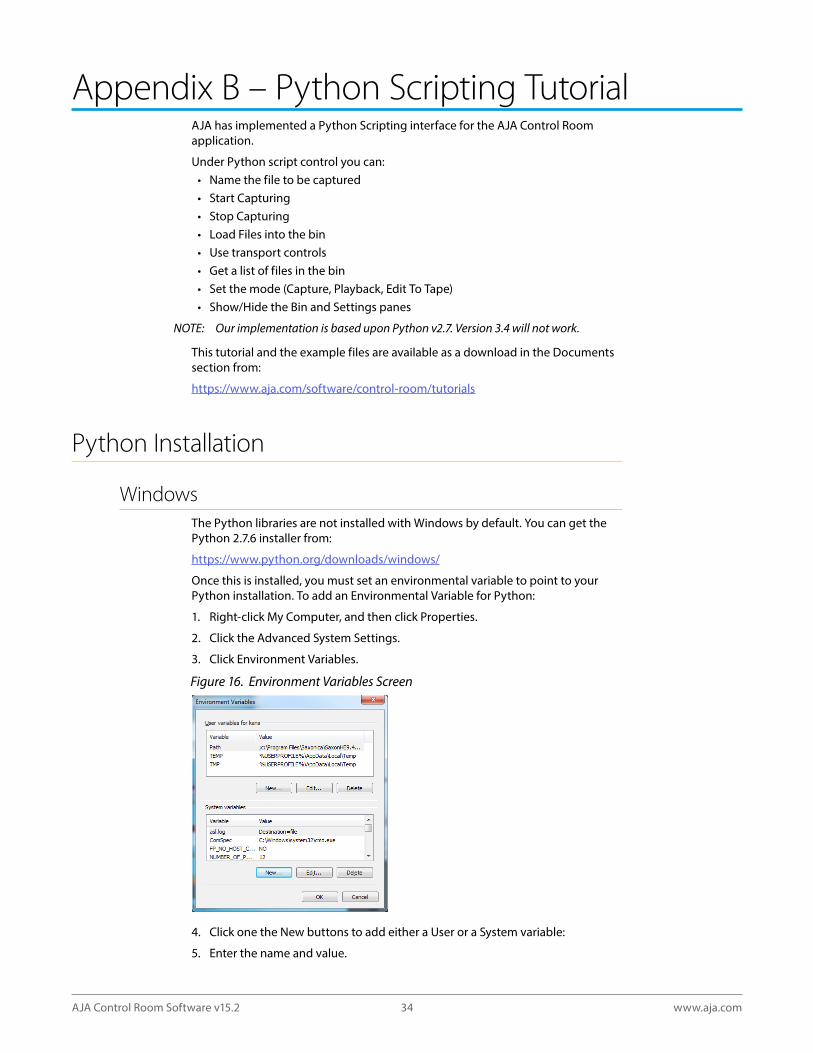
Once this is installed, you must set an environmental variable to point to your Python installation. To add an Environmental Variable for Python:
1. Right-click My Computer, and then click Properties.
2. Click the Advanced System Settings.
3. Click Environment Variables.
Figure 16 Environment Variables Screen
4. Click one the New buttons to add either a User or a System variable:
5. Enter the name and value.
AJA Control Room Software v15.2 35 www.aja.com
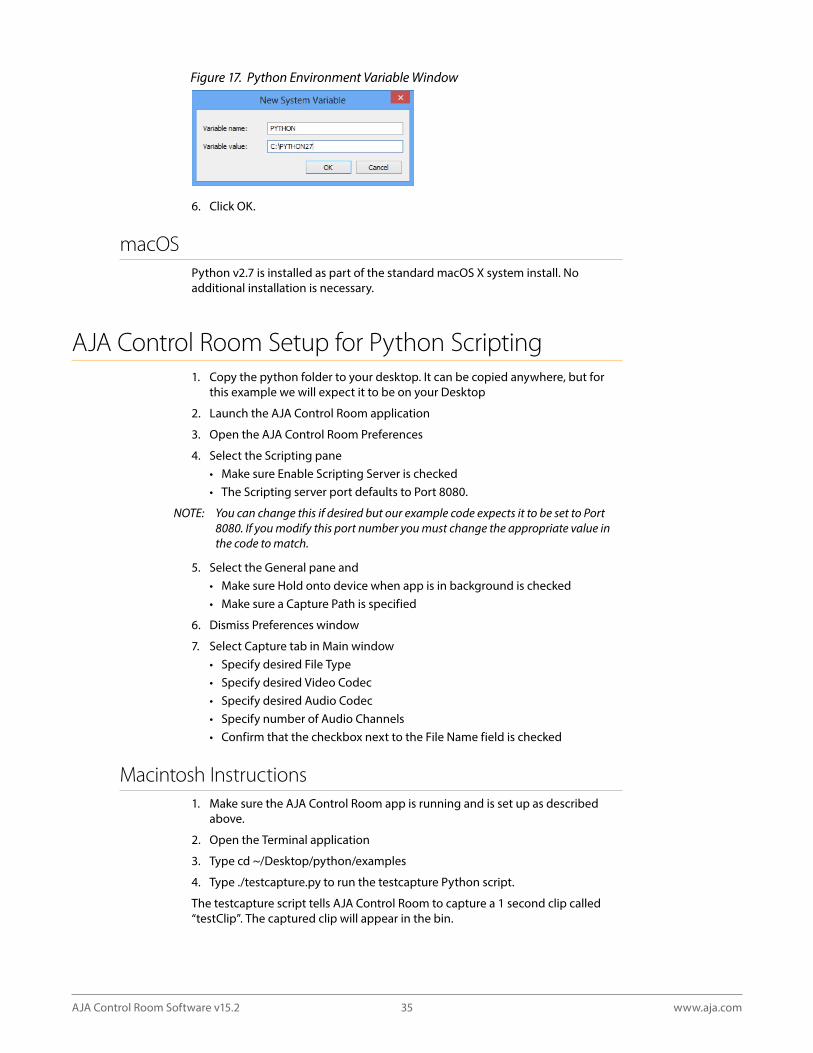
Figure 17 Python Environment Variable Window
6. Click OK.
macOSPython v2.7 is installed as part of the standard macOS X system install. No additional installation is necessary.
AJA Control Room Setup for Python Scripting1. Copy the python folder to your desktop. It can be copied anywhere, but for
this example we will expect it to be on your Desktop
2. Launch the AJA Control Room application
3. Open the AJA Control Room Preferences
4. Select the Scripting pane• Make sure Enable Scripting Server is checked• The Scripting server port defaults to Port 8080.
NOTE: You can change this if desired but our example code expects it to be set to Port 8080 If you modify this port number you must change the appropriate value in the code to match
5. Select the General pane and• Make sure Hold onto device when app is in background is checked• Make sure a Capture Path is specified
6. Dismiss Preferences window
7. Select Capture tab in Main window• Specify desired File Type• Specify desired Video Codec• Specify desired Audio Codec• Specify number of Audio Channels• Confirm that the checkbox next to the File Name field is checked
Macintosh Instructions1. Make sure the AJA Control Room app is running and is set up as described
above.
2. Open the Terminal application
3. Type cd ~/Desktop/python/examples
4. Type ./testcapture.py to run the testcapture Python script.
The testcapture script tells AJA Control Room to capture a 1 second clip called “testClip”. The captured clip will appear in the bin.
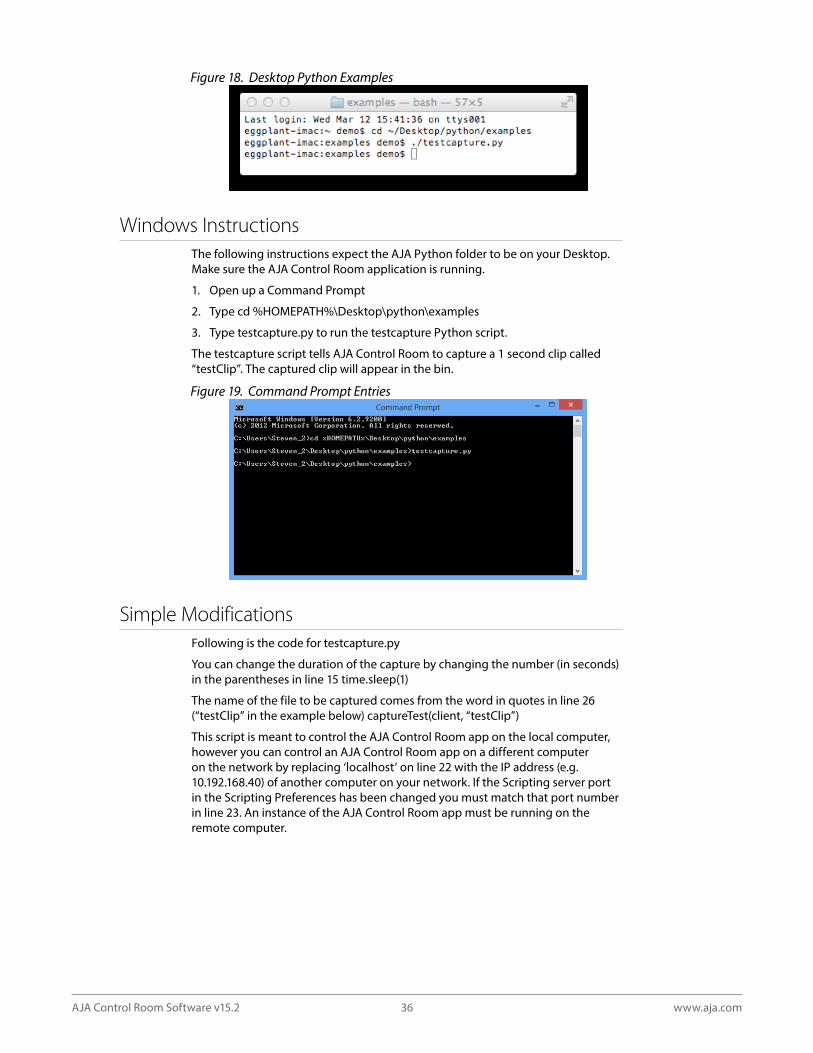
AJA Control Room Software v15.2 36 www.aja.com
Figure 18 Desktop Python Examples
Windows InstructionsThe following instructions expect the AJA Python folder to be on your Desktop. Make sure the AJA Control Room application is running.
1. Open up a Command Prompt
2. Type cd %HOMEPATH%\Desktop\python\examples
3. Type testcapture.py to run the testcapture Python script.
The testcapture script tells AJA Control Room to capture a 1 second clip called “testClip”. The captured clip will appear in the bin.
Figure 19 Command Prompt Entries
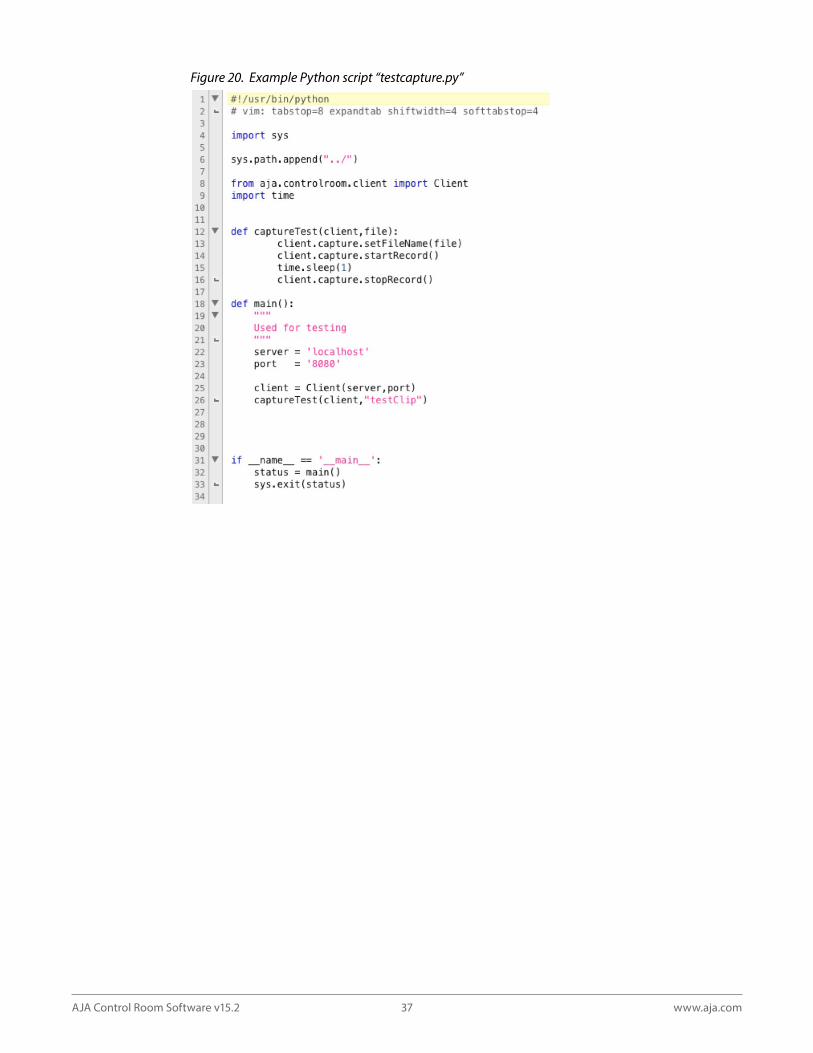
Simple ModificationsFollowing is the code for testcapture.py
You can change the duration of the capture by changing the number (in seconds) in the parentheses in line 15 time.sleep(1)
The name of the file to be captured comes from the word in quotes in line 26 (“testClip” in the example below) captureTest(client, “testClip”)
This script is meant to control the AJA Control Room app on the local computer, however you can control an AJA Control Room app on a different computer on the network by replacing ‘localhost’ on line 22 with the IP address (e.g. 10.192.168.40) of another computer on your network. If the Scripting server port in the Scripting Preferences has been changed you must match that port number in line 23. An instance of the AJA Control Room app must be running on the remote computer.
AJA Control Room Software v15.2 37 www.aja.com
Figure 20 Example Python script “testcapture py”
AJA Control Room Software v15.2 38 www.aja.com
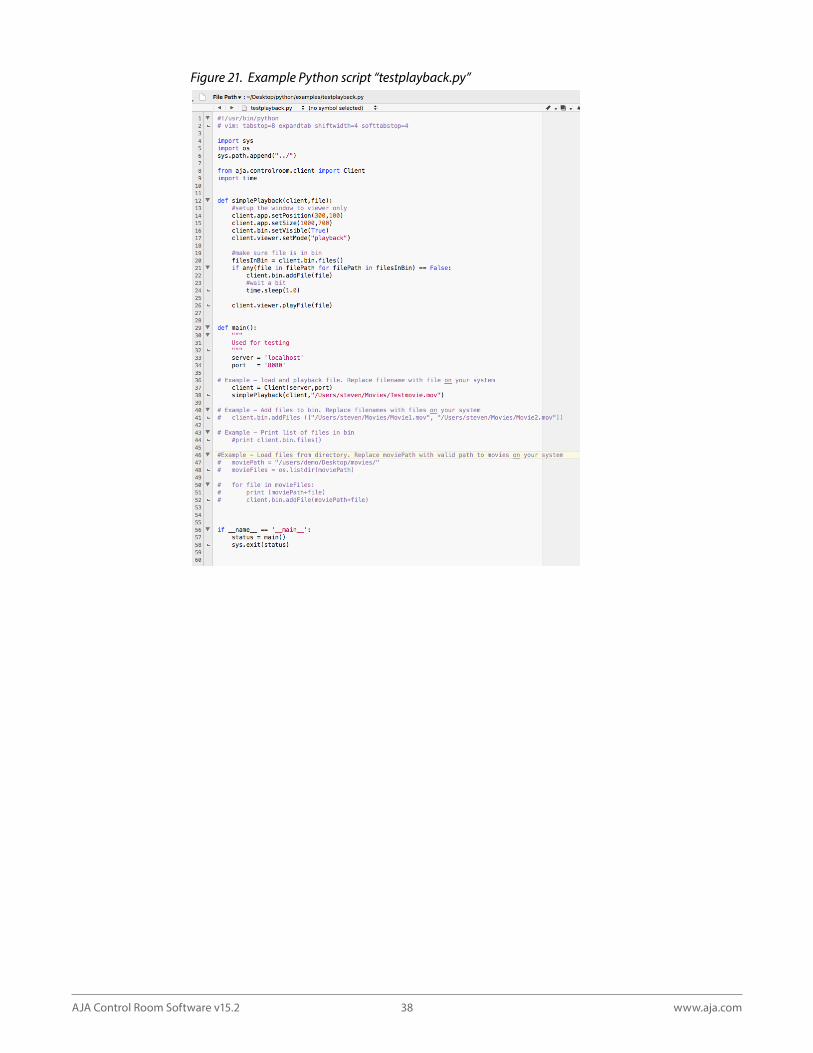
Figure 21 Example Python script “testplayback py”
AJA Control Room Software v15.2 39 www.aja.com
SOFTWARE LICENSE AGREEMENTAJA VIDEO SYSTEMS, INC.
THIS IS AN AGREEMENT BETWEEN YOU AND AJA VIDEO SYSTEMS, INC. (“AJA”) THAT GOVERNS YOUR USE OF the software ACCOMPANYING THIS LICENSE (E.G., AS installed on the device with which this license is provided).
The “AJA Software” referenced in this Agreement includes all such software, whether made available to you on disk, in read only memory, on any other media or in any other form, and all updates, corrections, enhancements and new versions of such software made available by AJA, together with all related documentation. BY INSTALLING OR USING THE AJA SOFTWARE, YOU ARE AGREEING TO BE BOUND BY THE TERMS OF THIS AGREEMENT. IF YOU DO NOT AGREE TO THE TERMS OF THIS AGREEMENT, DO NOT INSTALL OR USE IT AND, IF APPLICABLE, RETURN THE AJA SOFTWARE TO THE PLACE WHERE YOU OBTAINED IT FOR A REFUND.
1. License Grant. AJA hereby grants you a nonexclusive, personal, non-sublicenseable and limited license to install and use AJA Software on a computer or AJA device. The foregoing license also includes the right to make copies of the AJA Software in machine-readable form for installation and backup purposes only, and provided that each copy you make must include all copyright or other proprietary notices contained on the original.
2. Limitations. You may not decompile, reverse engineer, disassemble, modify, or create derivative works of the AJA Software or any part thereof except to the extent (if any) authorized by applicable law notwithstanding the foregoing restriction. You may not rent, lease, lend, loan, distribute or act as a service bureau or “cloud service” provider with respect to use of the AJA Software or any functionality thereof. THE AJA SOFTWARE IS NOT INTENDED FOR USE IN THE OPERATION OF NUCLEAR FACILITIES, AIRCRAFT NAVIGATION OR COMMUNICATION SYSTEMS, AIR TRAFFIC CONTROL SYSTEMS, LIFE SUPPORT MACHINES OR OTHER EQUIPMENT IN WHICH THE FAILURE OF THE AJA SOFTWARE COULD LEAD TO DEATH, PERSONAL INJURY, OR SEVERE PHYSICAL OR ENVIRONMENTAL DAMAGE.
3. Reservation of Rights. The AJA Software is protected by law, including without limitation copyright law. The AJA Software is licensed, not sold, to you. AJA and its licensors reserve all rights not expressly granted to you by this Agreement. You own the media on which the AJA Software is recorded but AJA and/or AJA's licensor(s) retain ownership of the AJA Software itself. You may not use the AJA Software for any illegal purpose.
4. Transfer. You may make a one-time permanent transfer of all of your license rights to the AJA Software to another person or entity, provided that: (a) you transfer all of the AJA Software, including all its component parts, original media, printed materials and this Agreement; (b) you do not retain any copies of the AJA Software, including any copies stored on a computer or other device; and (c) you transfer the AJA Software subject to this Agreement, and the person or entity receiving the AJA Software accepts the terms and conditions of this Agreement.
5. NFR (Not for Resale) Copies and Add-On Features: Notwithstanding anything to the contrary in this Agreement, (a) AJA Software that is labeled “Not for Resale” or otherwise provided to you on a promotional or demonstration basis may be used only for your demonstration, testing and evaluation purposes and may not be resold or transferred; and (b) AJA may make available certain software components (“Add-On Features”) under separate terms and conditions, in which case those separate terms and conditions apply and the Add-On Features are not considered AJA Software under this Agreement.
6. Termination. Your rights in the AJA Software are conditioned on complying with this Agreement, and those rights (together with this Agreement) will terminate automatically, without notice from AJA, if you fail to comply with any term(s) of this Agreement. Upon termination of this Agreement, you must cease all use of the AJA Software and destroy all copies, full or partial, of the AJA Software in your possession or control.
AJA Control Room Software v15.2 40 www.aja.com
7. Limited Warranty on AJA Software. If you comply with all terms of this Agreement and use the AJA Software in accordance with its documentation, and you install any patches or other updates made available to the AJA Software by AJA, AJA warrants that the AJA Software will perform substantially in accordance with its documentation for a period of ninety (90) days from the date of your original retail purchase. Your exclusive remedy under this warranty will be, at AJA’s option, a refund of the purchase price of the product containing the AJA Software or an update to or replacement of the AJA Software (or applicable component of it). THIS LIMITED WARRANTY AND ANY IMPLIED WARRANTIES ON THE AJA SOFTWARE INCLUDING, BUT NOT LIMITED TO, ANY WARRANTIES OF MERCHANTABILITY, OF SATISFACTORY QUALITY, OR OF FITNESS FOR A PARTICULAR PURPOSE, ARE LIMITED IN DURATION TO NINETY (90) DAYS FROM THE DATE OF ORIGINAL RETAIL PURCHASE. SOME JURISDICTIONS DO NOT ALLOW LIMITATIONS ON HOW LONG A WARRANTY LASTS, SO THE ABOVE LIMITATION MAY NOT APPLY TO YOU. THIS LIMITED WARRANTY GIVES YOU SPECIFIC LEGAL RIGHTS, AND YOU MAY ALSO HAVE OTHER RIGHTS WHICH VARY BY JURISDICTION.
8. Disclaimer of Other Warranties on Aja Software. EXCEPT FOR THE LIMITED WARRANTY ON AJA SOFTWARE SET FORTH ABOVE, AJA AND AJA'S LICENSORS (COLLECTIVELY REFERRED TO AS "AJA" FOR THE PURPOSES OF SECTIONS 8 AND 9) HEREBY DISCLAIM ALL WARRANTIES AND CONDITIONS WITH RESPECT TO THE AJA SOFTWARE, WHETHER EXPRESS, IMPLIED OR STATUTORY, INCLUDING, BUT NOT LIMITED TO, THE IMPLIED WARRANTIES AND/OR CONDITIONS OF MERCHANTABILITY, OF SATISFACTORY QUALITY, OF FITNESS FOR A PARTICULAR PURPOSE, OF ACCURACY, AND OF QUIET ENJOYMENT. FURTHER, AJA DOES NOT MAKE ANY WARRANTY REGARDING NON-INFRINGEMENT OF THIRD PARTY RIGHTS. SUBJECT ONLY TO THE LIMITED WARRANTY SET FORTH IN SECTION 7, YOU EXPRESSLY ACKNOWLEDGE AND AGREE THAT USE OF THE AJA SOFTWARE IS AT YOUR SOLE RISK. AJA DOES NOT WARRANT AGAINST INTERFERENCE WITH YOUR ENJOYMENT OF THE AJA SOFTWARE, THAT THE AJA SOFTWARE WILL MEET YOUR REQUIREMENTS, THAT THE OPERATION OF THE AJA SOFTWARE WILL BE UNINTERRUPTED OR ERROR-FREE, OR THAT DEFECTS IN THE AJA SOFTWARE WILL BE CORRECTED. NO ORAL OR WRITTEN INFORMATION OR ADVICE GIVEN BY AJA OR AN AJA AUTHORIZED REPRESENTATIVE WILL CREATE A WARRANTY. SOME JURISDICTIONS DO NOT ALLOW THE EXCLUSION OF IMPLIED WARRANTIES OR LIMITATIONS ON APPLICABLE STATUTORY RIGHTS OF A CONSUMER, SO SOME OR ALL OF THE TERMS OF THIS PARAGRAPH MAY NOT APPLY TO YOU.
9. Limitation of Liability. TO THE EXTENT NOT PROHIBITED BY LAW, IN NO EVENT WILL AJA BE LIABLE FOR PERSONAL INJURY, OR ANY INCIDENTAL, SPECIAL, INDIRECT OR CONSEQUENTIAL DAMAGES OR LOST PROFITS WHATSOEVER, INCLUDING, WITHOUT LIMITATION, DAMAGES FOR LOSS OF DATA, BUSINESS INTERRUPTION OR ANY OTHER COMMERCIAL DAMAGES OR LOSSES, ARISING OUT OF OR RELATED TO YOUR USE OR INABILITY TO USE THE AJA SOFTWARE, HOWEVER CAUSED, REGARDLESS OF THE THEORY OF LIABILITY (E.G., WHETHER UNDER CONTRACT, TORT OR OTHERWISE) AND EVEN IF AJA HAS BEEN ADVISED OF THE POSSIBILITY OF SUCH DAMAGES. In no event will AJA's total liability to you for all damages (INCLUDING WITHOUT LIMITATION BREACH OF WARRANTY) exceed the amount of fifty dollars ($50.00). The foregoing limitations will apply even if the any remedy set forth in this agreement fails of its essential purpose. SOME JURISDICTIONS DO NOT ALLOW THE LIMITATION OF LIABILITY FOR PERSONAL INJURY, OR OF INCIDENTAL OR CONSEQUENTIAL DAMAGES, SO SOME OR ALL OF THE TERMS OF THIS PARAGRAPH MAY NOT APPLY TO YOU.
10. Export Law Assurances. You may not use or otherwise export or reexport the AJA Software except as authorized by United States law and the laws of the jurisdiction in which the AJA Software was obtained. In particular, but without limitation, the AJA Software may not be exported or re-exported (a) into (or to a national or resident of) any U.S. embargoed countries, or (b) to anyone on the U.S. Treasury Department's list of Specially Designated Nationals or the U.S. Department of Commerce Denied Persons List or Entity List or any similar legal designation. By using the AJA Software, you represent and warrant that you are not located in, under control of, or a national or resident of any such country or on any such list.
AJA Control Room Software v15.2 41 www.aja.com
11. Government End Users. The AJA Software including its documentation is a "Commercial Item", as that term is defined at 48 C.F.R. § 2.101, consisting of "Commercial Computer Software" and "Commercial Computer Software Documentation", as such terms are used in 48 C.F.R. § 12.212 or 48 C.F.R. § 227.7202 (or their successors), as applicable. Consistent with these provisions, the AJA Software is licensed to U.S. Government end users (a) only as a Commercial Item and (b) with only those rights as are granted to all other end users pursuant to this Agreement. Unpublished-rights reserved under the copyright laws of the United States.
12. Controlling Law and Severability. This Agreement will be governed by and construed in accordance with the laws of the State of California, as applied to agreements entered into and to be performed entirely within California between California residents. This Agreement will not be governed by the United Nations Convention on Contracts for the International Sale of Goods, the application of which is expressly excluded. If for any reason a court of competent jurisdiction finds any provision, or portion thereof, to be unenforceable, the remainder of this Agreement will continue in full force and effect.
13. Complete Agreement; Governing Language. This Agreement constitutes the entire agreement between the parties with respect to the use of the AJA Software licensed hereunder and supersedes all prior or contemporaneous understandings regarding such subject matter. No amendment to or modification of this Agreement will be binding unless in writing and signed by AJA. Any translation of this Agreement is intended for convenience and to meet local requirements and in the event of a dispute between the English and any non-English versions, the English version of this Agreement will govern.
AJA Control Room Software v15.2 42 www.aja.com
IndexSymbols
.crbin 9, 18
.mcc 21
.scc 16
AAbout AJA Control Room 17AJA Control Room Menu 8AJA Support 2Application Menus 8Audio Channel Selection 25Audio Meter 21Audio Track Inclusion 28
BBatch Capture 26Bin 18
CCapture Clip Settings 23Capture Controls 25Capture In-Progress 23Capture Path 14Capture Prefs 13Capture Screen 7Capture Tab 22Capture Timing 29Clip Menu 11Clip Name 24Clip Naming 24Closed Captioning 16Closed Captions Prefs 15Context Sensitive Menu 7Control Room User Interface 6
DDevice Menu 11DNX HD 24DNX HR 24Dragging Markers 20Dropped Frame Counter 12, 13
EEdit to Tape 7Edit To Tape Settings Pane 28Edit-To-Tape Tab 27Edit-to-Tape Timing 30EDL 9
FFactory Default 18File Format
.crbin 9, 18DNX HD 24DNX HR 24.mcc 16
MOV 24MXF 24OP-1A 24.scc 16
File Menu 9Frame-Accurate Operation 28
GGeneral Prefs 12
HHelp Menu 11Hold Onto Device 12Hover Cursor Help 8
IIn Point 21Input Based Capture 23Insert Mode 28Installation 5Installation Wizard 6
JJog Control Slider 25
KKeystroke Commands 30
LLoad Clip Settings 14Log Clip 11
MMetadata 19, 23MOV 24MXF 24
NNew pPoject 9New Project 8
OOP-1A 24Operating Modes 7OUT Point 21
PPencil Icon 26Playback Screen 7Playback Tab 20Playback Tab Screen 20Preferences
Capture 13Closed Captions 15General 12
Reset 18Scripting 16Serial 16Timecode 15Viewer 14
Preferences Screen 12Project Directory 18Python Installation 34Python Scripting 16Python Tutorial 34
RRate Options 21Remote Control 23Reset Preferences 18RS-422 16, 27
SScreen Layout 7Scripting Prefs 16Serial Control 16Serial Prefs 16Side Car File 16Software-Only Render 18Startup 18Supported Files 5Supported Hardware 5Supported Systems 5
TTape Deck Timing Adjustment 28Technical Support 2Timecode Prefs 15Timeline Marker 20Timing Adjustment 28Transport Menu 11
UUsing the Bin 18
VViewer Prefs 14View Menu 9