Embed Size (px)
Citation preview
�
USER MANUAL
M930Smartphone

��
ASUS contact �nformat�onASUSTeK COMPUTER INC.Address 15Li-TeRoad,Peitou,Taipei,Taiwan11259Telephone +886-2-2894-3447Fax +886-2-2890-7798E-mail [email protected] www.asus.com.tw
Techn�cal SupportTelephone +86-21-38429911Onlinesupport support.asus.com
ASUS COMPUTER INTERNATIONAL (Amer�ca)Address 44370NobelDrive,Fremont,CA94538,USAFax +1-510-608-4555Website usa.asus.com
Techn�cal SupportTelephone +1-812-282-2787Supportfax +1-812-284-0883Onlinesupport support.asus.com
ASUS COMPUTER GmbH (Germany and Austr�a)Address HarkortStr.21-23,40880Ratingen,GermanyTelephone +49-2102-95990Fax +49-2102-959911Website www.asus.deOnlinecontact www.asus.de/sales
Techn�cal SupportTelephone +49-1805-010923SupportFax +49-2102-959911Onlinesupport support.asus.com
* AvailableonthissiteisanonlineTechnicalInquiryFormthatyoucanfillouttocontacttechnicalsupport.

���
E3494
F�rst ed�t�on
January 2008
Copyr�ght © 2008 ASUSTeK COMPUTER INC. All R�ghts Reserved.Nopartofthismanual,includingtheproductsandsoftwaredescribedinit,maybereproduced,transmitted,transcribed,storedinaretrievalsystem,ortranslatedintoanylanguageinanyformorbyanymeans,exceptdocumentationkeptbythepurchaserforbackuppurposes,withouttheexpresswrittenpermissionofASUSTeKCOMPUTERINC.(“ASUS”).
Productwarrantyorservicewillnotbeextendedif:(1)theproductisrepaired,modifiedoraltered,unlesssuchrepair,modificationofalterationisauthorizedinwritingbyASUS;or(2)theserialnumberoftheproductisdefacedormissing.
ASUSPROVIDESTHISMANUAL“ASIS”WITHOUTWARRANTYOFANYKIND,EITHEREXPRESSORIMPLIED,INCLUDINGBUTNOTLIMITEDTOTHEIMPLIEDWARRANTIESORCONDITIONSOFMERCHANTABILITYORFITNESSFORAPARTICULARPURPOSE.INNOEVENTSHALLASUS,ITSDIRECTORS,OFFICERS,EMPLOYEESORAGENTSBELIABLEFORANYINDIRECT,SPECIAL,INCIDENTAL,ORCONSEQUENTIALDAMAGES(INCLUDINGDAMAGESFORLOSSOFPROFITS,LOSSOFBUSINESS,LOSSOFUSEORDATA,INTERRUPTIONOFBUSINESSANDTHELIKE),EVENIFASUSHASBEENADVISEDOFTHEPOSSIBILITYOFSUCHDAMAGESARISINGFROMANYDEFECTORERRORINTHISMANUALORPRODUCT.
SPECIFICATIONSANDINFORMATIONCONTAINEDINTHISMANUALAREFURNISHEDFORINFORMATIONALUSEONLY,ANDARESUBJECTTOCHANGEATANYTIMEWITHOUTNOTICE,ANDSHOULDNOTBECONSTRUEDASACOMMITMENTBYASUS.ASUSASSUMESNORESPONSIBILITYORLIABILITYFORANYERRORSORINACCURACIESTHATMAYAPPEARINTHISMANUAL,INCLUDINGTHEPRODUCTSANDSOFTWAREDESCRIBEDINIT.
Microsoft,Activesync,Outlook,PocketOutlook,Windows,andtheWindowslogoareeitherregisteredtrademarksortrademarksofMicrosoftCorporationintheUnitedStatesand/orinothercountries.MicrosoftproductsarelicensedtoOEMsbyMicrosoftLicensing,Inc.,awhollyownedsubsidiaryofMicrosoftCorporation.

�v
Safety Informat�onSafety precaut�ons for the power supply un�t and batteryUsethecorrectexternalpowersource.Thepoweradapterofthisproductcanonlybeoperatedfromthetypeofpowersourceindicatedontheelectricalratingslabel.Ifyouarenotsureofthetypeofpowersourcerequired,consultyourauthorizedserviceprovider.
Batterypackcare.ThisproductcontainsaLi-IonPolymerbattery.Thereisariskoffireandburnsifthebatterypackishandledimproperly.Donotattempttoopenorservicethebatterypack.
WARNING DANGEROFEXPLOSIONIFBATTERYPACKISINCORRECTLYREPLACED.TOREDUCERISKOFFIREORBURNS,DONOTDISASSEMBLE,CRUSH,PUNCTURE,ORSHORTEXTERNALCONTACTSORCIRCUITS.DONOTDISPOSEOFINFIREORWATER,OREXPOSETOTEMPERATURESHIGHERTHAN60OC(140OF).REPLACETHEBATTERYPACKONLYWITHMANUFACTURERSPECIFIEDBATTERIES.RECYCLEORDISPOSEOFUSEDBATTERIESACCORDINGTOLOCALREGULATIONS.
A�rcraftSwitchoffyourwirelessdevicewheneveryouareinstructedtodosobyairportorairlinestaff.Ifyourdeviceoffersa“flightmode”orsimilarfeature,consultairlinestaffastoitsuseinflight.
Dr�v�ngFullattentionshouldbegiventodrivingatalltimes.Locallawsandregulationsrestrictingtheuseofwirelessdeviceswhiledrivingmustbeobserved.

v
Hosp�talsMobilephonesshouldbeswitchedoffwheneveryouarerequestedtodosoinhospitals,clinics,orhealthcarefacilities.Theserequestsaredesignedtopreventpossibleinterferencewithsensitivemedicalequipment.
Petrol Stat�onsObeyallpostedsignswithrespecttotheuseofwirelessdevicesorotherradioequipmentinlocationswithflammablematerialandchemicals.Switchoffyourwirelessdevicewheneveryouareinstructedbyauthorizedstaff.
InterferenceCaremustbetakenwhenusingthephoneincloseproximitytopersonalmedicaldevicessuchaspacemakersandhearingaids.
For PacemakersPacemakermanufacturersrecommendthataminimumspaceof15cmbemaintainedbetweenamobilephoneandapacemakertoavoidinterferencewiththepacemaker.Toachievethis,usethephoneontheoppositeeartoyourpacemakeranddonotcarrythephoneinabreastpocket.
For Hear�ng A�dsSomedigitalwirelessphonesmayinterferewithsomehearingaids.Intheeventofsuchinterference,youmaywanttoconsultyourhearingaidmanufacturertodiscussalternatives.
For Other Med�cal Dev�cesConsultyourphysicianandthedevicemanufacturertodetermineifoperationofyourphonemayinterferewiththeoperationofyourmedicaldevice.

vi
Specific Absorption Rate (SAR)Your M930 has been designed, manufactured and tested not to exceed the limits for exposure to electromagnetic fields recommended by the Council of the European Union. These limits are part of comprehensive guidelines developed by independent scientific organisations.
European standards provide for the amount of radio frequency electromagnetic energy absorbed by the body when using a phone to be measured by reference to the Specific Absorption Rate (SAR). The SAR limit for the general public is currently 2 watts per kilogram averaged over 10 grams of body tissue.
Radio Frequency (RF) radiation exposure for body-worn operation: To ensure compliance with RF exposure guidelines, this device must be used to with a minimum of 1.5 cm (0.6 inch) separation from the body. Failure to observe these instructions could result in your RF exposure exceeding the relevant guideline limits.
The maximum SAR value for M930 is GSM: 0.47W/kg@10g(CE); DCS: 0.403W/kg@10g(CE); and WCDMA: 0.496W/kg@10g(CE).

v��
Welcome!TheASUS®M9303.5GSmartphonecomeswiththelatestmobiletechnologythatfitsyourworldintoyourhands.TheM930isatri-bandmobilephonewithhighresolutionLCD,built-indualCMOScamerawithcamcorder,videocallingandmessagingcapability,organizer,USBwebcamera,andamicroSDcardslot.
Inadditionto256MBphonememory,themicroSDcardextendsstoragespace,allowingyoutosavephotos,messages,texts,graphics,andaudiofiles,makingitaperfectpartnerwhetheryouareonorofftheroad.
Withthesefeaturesandmanymore,theASUSM930issuretogiveyouasatisfyingmobilephoneexperience.

v���
Table of ContentsASUScontactinformation.................................................................................................................... ii
SafetyInformation............................................................................................................................... iv
ASUSM930specifications................................................................................................................ xiv
Packagecontents............................................................................................................................... xv
Chapter 1 Learn�ng to use your Smartphone ........................................................... 11-1 GettingtoknowyourSmartphone..............................................................................................1
1-2 InstallingtheSIMcardandbattery.............................................................................................6InstallingandremovingamicroSDcard.................................................................................8
1-3 ChargingyourSmartphone........................................................................................................9
1-4 TurningyourSmartphoneON/OFF..........................................................................................10
1-5 Homescreen............................................................................................................................11Statusindicatoricons...........................................................................................................12Startmenu............................................................................................................................13
Chapter 2 Enter�ng data ............................................................................................ 142-1 Navigating.................................................................................................................................14
Navigationpad.....................................................................................................................14Actionkey.............................................................................................................................14Homekey.............................................................................................................................15Backkey...............................................................................................................................15Callkey/Endkey.................................................................................................................15Softkeys...............................................................................................................................15Alphanumerickeypad...........................................................................................................15

�x
QWERTYkeypad.................................................................................................................16
2-2 Enteringtext,numbers,andsymbols.......................................................................................17UsingMultipressmode.........................................................................................................18UsingNumericmode............................................................................................................19Enteringsymbols..................................................................................................................19
Chapter 3 Personal�z�ng your Smartphone ............................................................. 203-1 Settingthedate,time,andalarm..............................................................................................20
3-2 Settingupadvancedsounds....................................................................................................21
3-3 Changingprofilesettings..........................................................................................................22Adjustingtheheadsetvolumelevel......................................................................................23
3-4 PersonalizingyourHomescreen..............................................................................................23
3-5 ChangingtheStartMenuview.................................................................................................24
3-6 Enteringyourcontactinformation.............................................................................................24
3-7 Assigningkeypadfunctions......................................................................................................24
Chapter 4 Us�ng call features ................................................................................... 254-1 Makingavoicecall...................................................................................................................25
CallingfromtheHomescreen..............................................................................................25CallingaContactentry.........................................................................................................26CallinganumberfromtheCallHistorylist...........................................................................26Callingusingspeeddial.......................................................................................................27Makingemergencycalls.......................................................................................................28Makinginternationalcalls.....................................................................................................28
4-2 Respondingtoavoicecall........................................................................................................29
4-3 Optionsduringacall.................................................................................................................30Managingmultiplecalls........................................................................................................31
x
4-4 Makingavideocall...................................................................................................................31
4-5 Respondingtoavideocall.......................................................................................................32
Chapter 5 Organ�z�ng your l�fe ................................................................................. 335-1 UsingContacts.........................................................................................................................33
ViewingContacts..................................................................................................................33
5-2 UsingCalendar.........................................................................................................................36Schedulinganappointment..................................................................................................36Viewinganappointment.......................................................................................................37Viewingyourschedule.........................................................................................................37
5-3 UsingTasks..............................................................................................................................38TheTaskslist........................................................................................................................38
5-4 UsingVoiceNotes....................................................................................................................39
Chapter 6 Messag�ng ................................................................................................ 406-1 Settingupaccounts..................................................................................................................40
Managingaccounts..............................................................................................................41
6-2 Textande-mailmessages........................................................................................................42
6-3 MMSmessaging.......................................................................................................................44AccessingMMS....................................................................................................................44ComposingandsendinganMMSmessage.........................................................................45
6-4 UsingMessenger......................................................................................................................47
6-5 Windows®Live..........................................................................................................................49UsingHotmail®.....................................................................................................................50
Chapter 7 Synchron�z�ng w�th Act�veSync® ............................................................................................................51
7-1 Microsoft®ActiveSync®.............................................................................................................51

x�
7-2 InstallingActiveSynconyourPC..............................................................................................52
7-3 Synchronizinginformation........................................................................................................52ConnectingyourSmartphonetoaPC..................................................................................52Creatingapartnership..........................................................................................................53SynchronizingwithaPC......................................................................................................54SynchronizingwithanExchangeServer..............................................................................56
7-4 Creatingasynchronizationschedule........................................................................................57
Chapter 8 Mult�med�a ................................................................................................ 598-1 Usingyourcamera...................................................................................................................59
Takingapicture....................................................................................................................59Recordingavideoclip..........................................................................................................61UsingPictures&Videos.......................................................................................................62
8-2 iCam—TheUSBWebcam......................................................................................................65
8-3 Windows®Media.......................................................................................................................66WindowsMediaPlayerscreens...........................................................................................66Playingmediafiles...............................................................................................................67Playbackscreenoptions......................................................................................................68Playbackcontrols.................................................................................................................69
8-4 StreamingPlayer......................................................................................................................70
Chapter 9 Bus�ness features .................................................................................... 719-1 Managingandbackingupfiles.................................................................................................71
UsingActiveSync..................................................................................................................71UsingFileExplorer...............................................................................................................72
9-2 Spb®Zip....................................................................................................................................73
9-3 VoiceCommander...................................................................................................................74Functions..............................................................................................................................74
x��
Email/SMS/Whattimeisit....................................................................................................81UsingtheVocabSettings.....................................................................................................85UsingtheDigitTrainer..........................................................................................................86
9-4 RemotePresenter....................................................................................................................87UsingtheRemotePresenter................................................................................................87CreatinganewCOMportmanually.....................................................................................89
Chapter 10 Gett�ng Connected ................................................................................... 9110-1 AutoConfiguration....................................................................................................................91
10-2 WirelessManager.....................................................................................................................91
10-3 Wi-Fi®connection......................................................................................................................92
10-4 UsingBluetooth®.......................................................................................................................93SettingBluetoothmode........................................................................................................93CreatingaBluetoothpartnership..........................................................................................94PairingwithaBluetoothheadset..........................................................................................95ListeningtostreamingaudiowithaBluetoothheadset........................................................95
10-5 USBSetting..............................................................................................................................97
10-6 ConnectingtotheInternet........................................................................................................97Dial-upconnection................................................................................................................98GPRS,Proxy,andVPNconnections....................................................................................98Changingoptionsettings......................................................................................................99AddingaURLexception.......................................................................................................99
10-7 UsingInternetExplorerMobile...............................................................................................101OpeningInternetExplorerMobile.......................................................................................101
10-8 InternetSharing......................................................................................................................103SettingupaUSBconnection.............................................................................................103SettingupaBluetooth®connection....................................................................................104
10-9 Networksetting.......................................................................................................................105
x���
10-10Networkconnectiontroubleshooting.....................................................................................105
Chapter 11 Sett�ng and manag�ng system .............................................................. 10611-1 Systemsetting........................................................................................................................106
PowerManagement...........................................................................................................106Brightnessadjustment........................................................................................................106ModeSwitcher....................................................................................................................107RestartingyourSmartphone..............................................................................................108ResettingyourSmartphone................................................................................................108
11-2 Managingthesystem.............................................................................................................109Addingandremovingprograms.........................................................................................109KeepingyourSmartphonesecure......................................................................................110Lockingthephone.............................................................................................................. 111Controllingoutgoingcalls................................................................................................... 111Blockingincoming/outgoingcalls.......................................................................................112
Chapter 12 Other Features ....................................................................................... 11312-1 TaskManager.........................................................................................................................113
WordViewer.......................................................................................................................114PDFViewer........................................................................................................................114
12-2 ClearVueOfficeApplications..................................................................................................114PPTViewer.........................................................................................................................115ExcelViewer.......................................................................................................................115
12-3 UsingJava(MIDletManager).................................................................................................116InstallingJavaMIDletsdirectlyfromtheInternet................................................................116InstallingJavaMIDletsfromaPC......................................................................................116RunningJavaMIDlets........................................................................................................117
Append�x ................................................................................................................. 118
x�v
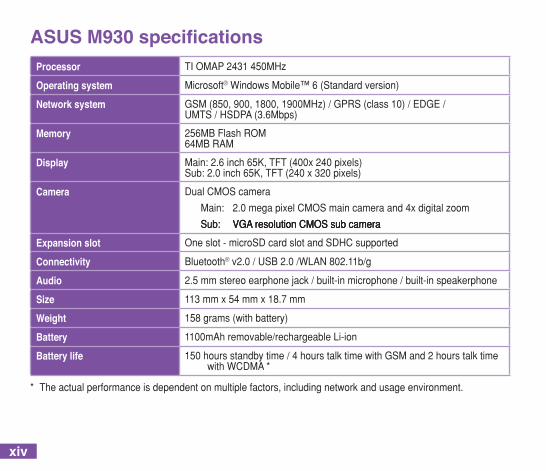
ASUS M930 specificationsProcessor TIOMAP2431450MHz
Operat�ng system Microsoft®WindowsMobile™6(Standardversion)
Network system GSM(850,900,1800,1900MHz)/GPRS(class10)/EDGE/UMTS/HSDPA(3.6Mbps)
Memory 256MBFlashROM64MBRAM
D�splay Main:2.6inch65K,TFT(400x240pixels)Sub:2.0inch65K,TFT(240x320pixels)
Camera DualCMOScamera
Main: 2.0megapixelCMOSmaincameraand4xdigitalzoom
Sub: VGA resolution CMOS sub cameraSub: VGA resolution CMOS sub cameraVGAresolutionCMOSsubcamera
Expans�on slot Oneslot-microSDcardslotandSDHCsupported
Connect�v�ty Bluetooth®v2.0/USB2.0/WLAN802.11b/g
Aud�o 2.5mmstereoearphonejack/built-inmicrophone/built-inspeakerphone
S�ze 113mmx54mmx18.7mm
We�ght 158grams(withbattery)
Battery 1100mAhremovable/rechargeableLi-ion
Battery l�fe 150hoursstandbytime/4hourstalktimewithGSMand2hourstalktime withWCDMA*
* Theactualperformanceisdependentonmultiplefactors,includingnetworkandusageenvironment.
xv
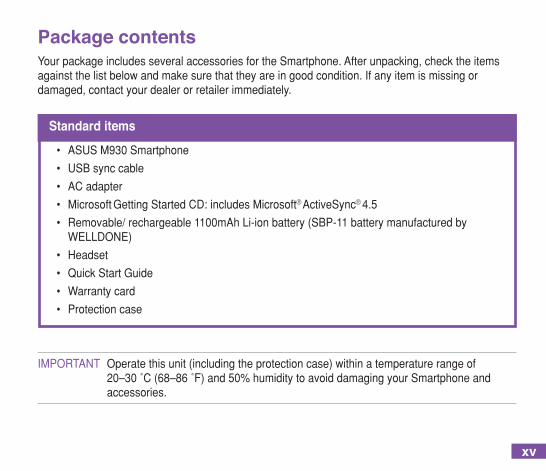
Package contentsYourpackageincludesseveralaccessoriesfortheSmartphone.Afterunpacking,checktheitemsagainstthelistbelowandmakesurethattheyareingoodcondition.Ifanyitemismissingordamaged,contactyourdealerorretailerimmediately.
Standard �tems• ASUSM930Smartphone
• USBsynccable
• ACadapter
• MicrosoftGettingStartedCD:includesMicrosoft®ActiveSync®4.5
• Removable/rechargeable1100mAhLi-ionbattery(SBP-11batterymanufacturedbyWELLDONE)
• Headset
• QuickStartGuide
• Warrantycard
• Protectioncase
IMPORTANT Operatethisunit(includingtheprotectioncase)withinatemperaturerangeof 20–30˚C(68–86˚F)and50%humiditytoavoiddamagingyourSmartphoneand accessories.

xv�

1
1-1 Gett�ng to know your Smartphone
Bottom features
13 14
1
5
6
R�ght s�de featuresFront features
7
8 10
11
12
15
16
17
4 9
2
Components:
Power/Qu�ck L�st button Speaker Sub screen Left soft key Call keyI Home key Nav�gat�on keys Act�on key R�ght soft key End key Back key Numer�c keypad Earphone slot M�n� USB port m�croSD card slot Volume controller Camera button
1
2
3
4
5
6
7
8
9
10
11
12
13
14
15
16
Chapter 1 Learn�ng to use your Smartphone
17
3
Chapter 1
2
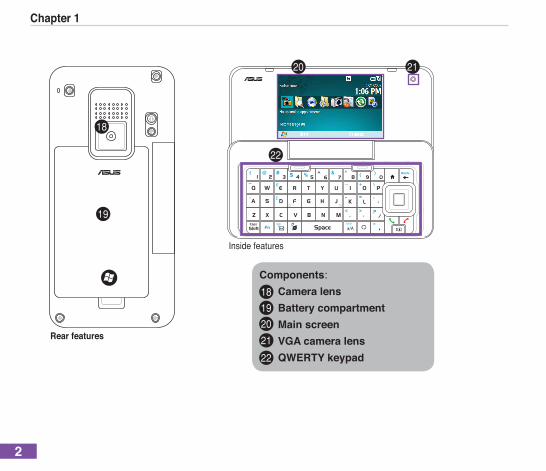
Components:
Camera lens Battery compartmentI Ma�n screen VGA camera lens QWERTY keypad
18
19
20
21
22
Insidefeatures
18
19
20
22
21
Rear features
3
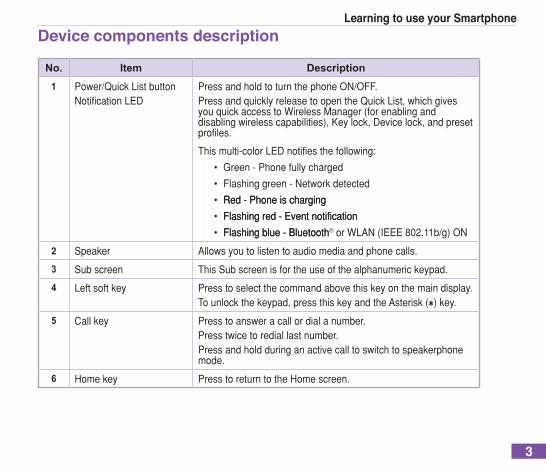
Learn�ng to use your SmartphoneDev�ce components descr�pt�on
No. Item Description
1 Power/QuickListbuttonNotificationLED
PressandholdtoturnthephoneON/OFF.PressandquicklyreleasetoopentheQuickList,whichgivesyouquickaccesstoWirelessManager(forenablinganddisablingwirelesscapabilities),Keylock,Devicelock,andpresetprofiles.
Thismulti-colorLEDnotifiesthefollowing:
• Green-Phonefullycharged
• Flashinggreen-Networkdetected
• Red - Phone is chargingRed-Phoneischarging
• Flashing red - Event notificationFlashingred-Eventnotification
• Flashing blue - BluetoothFlashingblue-Bluetooth®orWLAN(IEEE802.11b/g)ON
2 Speaker Allowsyoutolistentoaudiomediaandphonecalls.
3 Subscreen ThisSubscreenisfortheuseofthealphanumerickeypad.
4 Leftsoftkey Presstoselectthecommandabovethiskeyonthemaindisplay.Tounlockthekeypad,pressthiskeyandtheAsterisk( )key.
5 Callkey Presstoansweracallordialanumber.Presstwicetorediallastnumber.Pressandholdduringanactivecalltoswitchtospeakerphonemode.
6 Homekey PresstoreturntotheHomescreen.

Chapter 1
4
No. Item Description
7 Navigationkeys Usethistomoveup,down,right,andleftthroughselectionsonthedisplay.
8 Actionkey TheActionkeyactsmuchliketheEnterkeyonakeyboard.Ingeneral,presstoconfirmanaction.Whenyouscrolltoacheckbox,pressingtheActionkeyselectsorclearsthecheckbox.
9 Rightsoftkey Performsthetaskindicatedabovethekey.
10 Endkey Presstoendacall.
11 Backkey Presstogobacktothepreviousscreen.Inatextfield,presstodeletecharacterstotheleftofthecursor.
12 Alphanumerickeypad Presstoentertext,numbers,andsymbols.
13 Earphoneport Plugheadsetaccessorytothisport.
14 MiniUSBport Usethisporttosynchronizeyourdataortochargethebattery.
15 microSDcardslot InsertyourmicroSDcardintothisslot.
16 Volumecontroller Pressthearrowbuttonstoadjustthevolume.

5
Learn�ng to use your Smartphone
No. Item Description
17 Camerabutton/FunctionSidekey
Bydefault,thisbuttonisassignedtoactivatetheCameraapplication:
• Presstolaunchthecameraviewfinder.
• Presstotakeapictureifalreadyincameramode.
Tochangethekeyassignmentandactivateotherapplicationsusingthisbutton,pressStart>More>Settings>More>KeyAssignment.Fromthedropdownlist,selecttheapplicationyouwanttoactivateusingthisbutton.
18 Cameralens This2-megapixelcameracomeswithAuto-Focus(AF)lensandflashlightfeatures.
19 Batterycompartmentcover
Containsthebatterythatsuppliespowertothedevice.
20 Mainscreen ThisMainscreenisfortheuseoftheQWERTYkeypad.
21 VGAcameralens ThisVGAcameraisforvideoconferencing.
22 QWERTYkeypad Presstoentertext,numbers,andsymbols.

Chapter 1
6
1-2 Install�ng the SIM card and batteryThephoneoperatorprovidesyouwithaSubscriberIdentityModule(SIM)cardthatstoresyourmobilephonenumber,phonebookentries,andSMS/MMSmessages.InstalltheSIMcardbeforeyouinstallthebattery.
NOTE TheSIMcardusuallycomesembeddedonaplasticcard.ReadtheSIMcardocumentation beforeremovingtheSIMcard.RemoveanyroughedgesontheSIMcardbeforeyouinstall ittotheSmartphone.
1. Removethebatterycompartmentcover.
2. InserttheSIMcardintotheslotwiththegoldcontactsfacingdown.
To �nstall a SIM card and battery:
1 2

7
Learn�ng to use your Smartphone
WARNING • Riskofexplosionifbatteryisreplacedbyanincorrecttype. • Checklocalregulationsfordisposalofusedbatteries. • UseonlythebatterythatcomeswithyourASUSM930.
Battery Informat�onManufacturer: WELLDONECo.,Ltd.
Battery Model No.: SBP-11
3. Alignthegoldcontactsonthebatterywiththecontactsonthephone.
4. Slidethebatterycompartmentcoverintoyourphone.
3 4

Chapter 1
8
Install�ng and remov�ng a m�croSD card
WARNINGA microSD card fits only in one orientation, and slides smoothly into the slot if insertedAmicroSDcardfitsonlyinoneorientation,andslidessmoothlyintotheslotifinserted correctly.DONOTforcethecardintotheslot.
To �nstall a m�croSD card1. SlidethemicroSDslotcovercounterclockwise
upward.
2. Withthelabelside(usuallythesidewiththecardmanufacturer’sname)facingup,andthebarcode/serialnumbersidefacingdown,insertthecardintothemicroSDcardslotlocatedontherightsideofthephone.
3. Pushthecardallthewayintotheslotuntilitfitscompletely.
To remove the m�croSD card1. Pressthecardslightlyuntilitejects.Youmaythen
safelyremovethecard.
2. Replacethebatterycompartmentcover.
9
Learn�ng to use your Smartphone
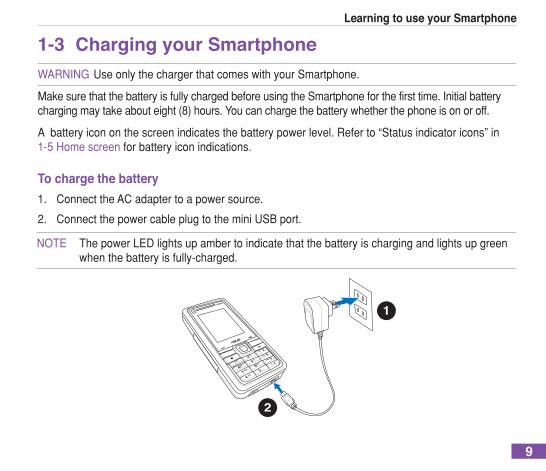
1-3 Charg�ng your SmartphoneWARNINGUseonlythechargerthatcomeswithyourSmartphone.
MakesurethatthebatteryisfullychargedbeforeusingtheSmartphoneforthefirsttime.Initialbatterychargingmaytakeabouteight(8)hours.Youcanchargethebatterywhetherthephoneisonoroff.
Abatteryicononthescreenindicatesthebatterypowerlevel.Referto“Statusindicatoricons”in1-5Homescreenforbatteryiconindications.
To charge the battery1. ConnecttheACadaptertoapowersource.
2. ConnectthepowercableplugtotheminiUSBport.
NOTE ThepowerLEDlightsupambertoindicatethatthebatteryischargingandlightsupgreen whenthebatteryisfully-charged.
1
2
Chapter 1
10
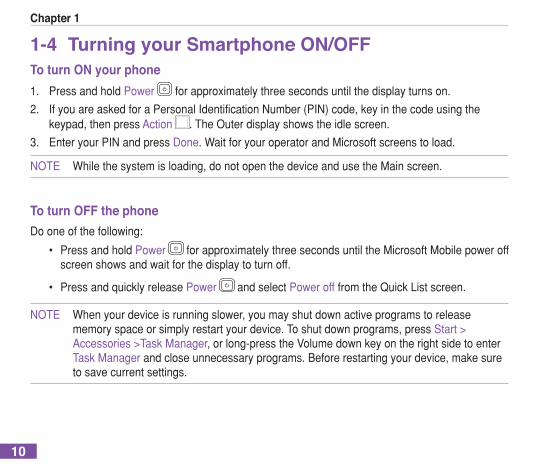
1-4 Turn�ng your Smartphone ON/OFFTo turn ON your phone1. PressandholdPower forapproximatelythreesecondsuntilthedisplayturnson.
2. IfyouareaskedforaPersonalIdentificationNumber(PIN)code,keyinthecodeusingthekeypad,thenpressAction .TheOuterdisplayshowstheidlescreen.
3. EnteryourPINandpressDone.WaitforyouroperatorandMicrosoftscreenstoload.
NOTE Whilethesystemisloading,donotopenthedeviceandusetheMainscreen.
To turn OFF the phoneDooneofthefollowing:
• PressandholdPower forapproximatelythreesecondsuntiltheMicrosoftMobilepoweroff screenshowsandwaitforthedisplaytoturnoff.
• PressandquicklyreleasePower andselectPowerofffromtheQuickListscreen.
NOTE Whenyourdeviceisrunningslower,youmayshutdownactiveprogramstorelease memoryspaceorsimplyrestartyourdevice.Toshutdownprograms,pressStart> Accessories>TaskManager,orlong-presstheVolumedownkeyontherightsidetoenter TaskManagerandcloseunnecessaryprograms.Beforerestartingyourdevice,makesure tosavecurrentsettings.

11
Learn�ng to use your Smartphone1-5 Home screenTheHomescreenautomaticallydisplayswhenyouturnonyourSmartphoneorleaveitidle.
ThetopoftheHomescreendisplaystheserviceproviderandthetime.Thecenterofthedisplayshowsthefivemostrecently-usedprograms,yournextappointment,yourcurrentprofile,andthenumberofnewtextmessages.ScrollingtoanyoftheseitemsandpressingAction openstheassociatedprogram.
NOTE • PressHome atanytimetakesyoubacktothisscreen. • TocustomizetheHomescreen(layout,colorscheme,backgroundimage),press Start>Settings>HomeScreen.
Status �nd�cators
T�me/Date
Your next appo�ntmentSelectandpressActiontoopenCalendar
Your serv�ce prov�der
Most recently-used programs
Left soft key commandPresstheLeftsoftkeytolaunchtheStartmenu,whichdisplaysalltheinstalledprograms
R�ght soft key commandPresstheRightsoftkeytoopenContacts,Messages,orCallHistory.
Network s�gnal strength
Power status

Chapter 1
12
Status �nd�cator �consStatusindicatorsappearatthetopofthescreenandontheHomescreen.Thefollowingtablelistscommonstatusindicatorsandtheirmeanings.
Newe-mailortextmessage(SMS) Signalstrength 3GRoaming
Newinstantmessage Nosignal 3Gnetworkavailable
Voicecall Noservice GPRSavailable
Voicecallinprogress abc Multipressinputmode,lowercase GPRSinuse
Datacallinprogress Synchronizationerror WiFiavailable
Callsareforwarded SoundON. Bluetoothon
Callonhold Ringeroff XT9 Inputmethod,XT9mode
Missedcall Pendingalarm Vibratingmodeselected
Batterylevel MissingSIMcard
Lowbattery FaultySIM
Batterycharging Roaming

13
Learn�ng to use your Smartphone
Start menuYourSmartphonecomeswithmanypreinstalledprogramsthatyoucanstartusingrightaway.TheseprogramscanbeaccessedfromtheStartmenu.
To use the Start menu1. OntheHomescreen,pressStart.
2. ScrolltoaprogramusingthenavigationkeypadandpressAction .
YoucanaddprogramstotheStartmenubydownloadingthemfromtheInternetonyourPCandusingActiveSynctocopyittoyourphone.
To remove programs• PressStart>Settings>RemovePrograms.Scrolltotheprogramtoremove,thenpressMenu>
Remove.
NOTE YoumaychangetheviewinglayoutoftheStartMenu.Todothis,pressStart>Settings> StartMenu,andselecteitherGridVieworListView.

14
Chapter 2 Enter�ng data
2-1 Nav�gat�ngYourSmartphonehasseveralkeystohelpyounavigatethroughyourSmartphone’sscreensandmakeselections.
Nav�gat�on padThenavigationpadconsistsoffourkeysandprovidesaneasywaytomoveorscrollthroughselectionsonthescreen.
TheUpandDownnavigationkeysareusedformovingwithinthemenusandgoingthroughthecontactslist.TheLeftandRightkeysareusedforchangingthesettingsandeditingtext.
Act�on keyTheActionkeyactsmuchliketheEnterkeyonakeyboard.Ingeneral,pressingtheActionkeyonahighlighteditemconfirmsthatyouwanttousethefunction.
Up
Down
Left Right
Action
15
Enter�ng data
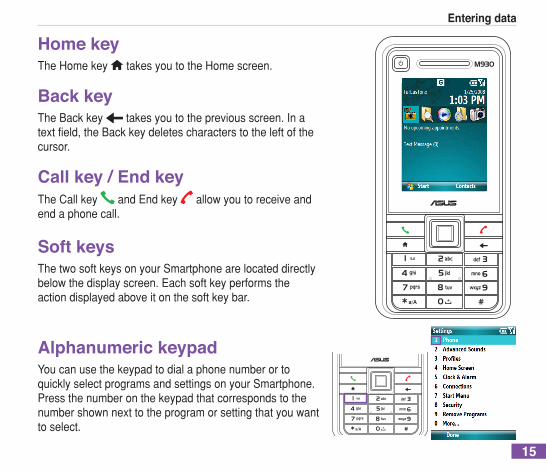
Home keyTheHomekey takesyoutotheHomescreen.
Back keyTheBackkey takesyoutothepreviousscreen.Inatextfield,theBackkeydeletescharacterstotheleftofthecursor.
Call key / End keyTheCallkey andEndkey allowyoutoreceiveandendaphonecall.
Soft keysThetwosoftkeysonyourSmartphonearelocateddirectlybelowthedisplayscreen.Eachsoftkeyperformstheactiondisplayedaboveitonthesoftkeybar.
Alphanumer�c keypadYoucanusethekeypadtodialaphonenumberortoquicklyselectprogramsandsettingsonyourSmartphone.Pressthenumberonthekeypadthatcorrespondstothenumbershownnexttotheprogramorsettingthatyouwanttoselect.

Chapter 2
16
QWERTY keypadYoucanusethekeypadtodialaphonenumberortoquicklyselectprogramsandsettingsonyourSmartphone.PressthenumberontheQWERTYkeypadthatcorrespondstothenumbershownnexttotheprogramorsettingthatyouwanttoselect.
TheQWERTYkeypadoffersseveralhotkeys,allowingyoutoeasilylaunchcertainfeatures.Thehotkeysareasfollows:
:Presstoshiftbetweenuppercaseandlowercaseordouble-clicktoenableCapsLock.
:PresstoopentheMessagingfeature.
+ : PresstoquicklylaunchWirelessManager.
:PresstostartMicrosoft®InternetExplorerMobile.
+ : PresstoquicklylaunchInternetSharing.
:Presswhileenteringtextstoswitchinputmethods.
+ : PresswhileenteringtextstoopentheSymbolstable.

17
Enter�ng data2-2 Enter�ng text, numbers, and symbolsUsethealphanumerickeypadorQWERTYkeypadtoentertext,numbers,andsymbols.
YourSmartphonesupportstwoinputmodesforenteringtextandnumbers:Multipress,andNumeric.Multipressisusedforenteringtext.Whenyouselectafieldthatrequirestextornumbers,thephoneautomaticallyselectstheappropriateinputmode.Thestatusindicatoronthetoprightsideofthedisplayscreenshowstheinputmodethatiscurrentlyactive.
Youmayentersymbolsfromthealphanumeric/QWERTYkeypadorfromthetableofavailablesymbols.
NOTE FromtheQWERTYkeypad,press + toquicklyopentheSymbolstable.
QWERTYkeypad(Mainscreen)
Alphanumerickeypad(Subscreen)
Chapter 2
18
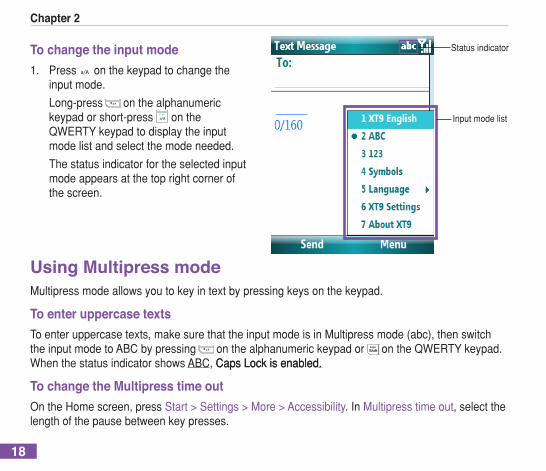
To change the �nput mode1. Press onthekeypadtochangethe
inputmode.
Long-press onthealphanumerickeypadorshort-press ontheQWERTYkeypadtodisplaytheinputmodelistandselectthemodeneeded.
Thestatusindicatorfortheselectedinputmodeappearsatthetoprightcornerofthescreen.
Us�ng Mult�press modeMultipressmodeallowsyoutokeyintextbypressingkeysonthekeypad.
To enter uppercase textsToenteruppercasetexts,makesurethattheinputmodeisinMultipressmode(abc),thenswitchtheinputmodetoABCbypressing onthealphanumerickeypador ontheQWERTYkeypad.WhenthestatusindicatorshowsABC,Caps Lock is enabledCapsLockisenabled.
To change the Mult�press t�me outOntheHomescreen,pressStart>Settings>More>Accessibility.InMultipresstimeout,selectthelengthofthepausebetweenkeypresses.
Statusindicator
Inputmodelist
19
Enter�ng data
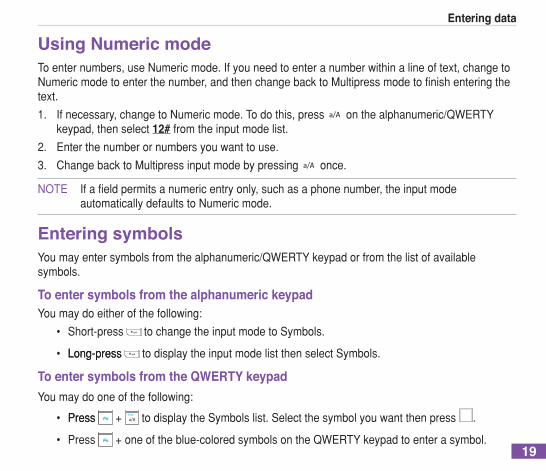
Us�ng Numer�c modeToenternumbers,useNumericmode.Ifyouneedtoenteranumberwithinalineoftext,changetoNumericmodetoenterthenumber,andthenchangebacktoMultipressmodetofinishenteringthetext.
1. Ifnecessary,changetoNumericmode.Todothis,press onthealphanumeric/QWERTYkeypad,thenselect12#fromtheinputmodelist.
2. Enterthenumberornumbersyouwanttouse.
3. ChangebacktoMultipressinputmodebypressing once.
NOTE Ifafieldpermitsanumericentryonly,suchasaphonenumber,theinputmode automaticallydefaultstoNumericmode.
Enter�ng symbolsYoumayentersymbolsfromthealphanumeric/QWERTYkeypadorfromthelistofavailablesymbols.
To enter symbols from the alphanumer�c keypadYoumaydoeitherofthefollowing:
• Short-press tochangetheinputmodetoSymbols.
• Long-pressLong-press todisplaytheinputmodelistthenselectSymbols.
To enter symbols from the QWERTY keypadYoumaydooneofthefollowing:
• PressPress + todisplaytheSymbolslist.Selectthesymbolyouwantthenpress .
• Press +oneoftheblue-coloredsymbolsontheQWERTYkeypadtoenterasymbol.

20
3-1 Sett�ng the date, t�me, and alarmTo set the date and t�me1. OntheHomescreen,pressStart>Settings>Clock&Alarm>DateandTime.
2. EntertheTimezone,Date,andTime.TochangethetimefromAMtoPM,highlightAMandpressthePkey.
To set the alarm1. OntheHomescreen,pressStart>Settings>ClockandAlarm>Alarm.
2. EnterthecorrectinformationandpressDone.
To change reg�onal sett�ngs1. OntheHomescreen,pressStart>Settings>More>RegionalSettings.
2. InLanguage,selectyourpreferredlanguageforthephoneinterfaceandmenus.
3. InLocale,selectyourcurrentlocation.Afteralocationisselected,optionslikedate,time,andcurrencywillbechangedaccordingly.
4. PressDoneafteryouhavefinishedmakingchanges.
NOTE Toactivatethenewlanguagesettings,youneedtoturnthephoneoffandturnitbackon.
Chapter 3 Personal�z�ng your Smartphone

21
Personal�z�ng your Smartphone
3-2 Sett�ng up advanced soundsUsetheAdvancedSoundssettingstocustomizethesoundsforringtones,notifications,reminders,alarmclock,alert,warnings,email,textmessage,andkeytones.Thephonecomeswith13preinstalledpolyphonicringtonesyoucanchoosefrom
To change the sound1. OntheHomescreen,pressStart>Settings>AdvancedSounds.
2. Highlighttheitemforwhichyouwanttochangethesound.
3. Dooneofthefollowing:
• Scrollleft/righttoselectadifferentsound.
• PressAction toopentheSelectanItemscreenandselectasoundfromthesoundlist.
To use other sounds1. LocatethemediafileonyourPCandcopythefile.
NOTE Thefilemustbein.wav, .mid, .wma, or .mp3, .aac, .amr, or .qcp format..wav,.mid,.wma,or.mp3,.aac,.amr,or.qcpformat..
2. ConnectyourSmartphonetoyourPC.
3. OpenActiveSynconyourPCandclickExplore.
4. PastethefiletoanydestinationyouwantonyourSmartphone.
5. OntheHomescreenofyourSmartphone,pressStart>Settings>AdvancedSounds.
6. Highlighttheitemwhichyouwanttoreplacebythemediafile.
7. Dooneofthefollowing:
• PressMenu>AddSoundstoopentheAddSoundsscreen.

Chapter 3
22
• PressAction toopentheSelectanItemscreen.Select<AddSounds>toopentheAdd Soundsscreen.
8. LocateandselectthemediafileonyourSmartphone.
9. PressDonetosavethechangesandexittheAdvancedSoundsscreen.
3-3 Changing profile settingsAprofiledetermineshowyougetnotifiedofeventssuchasincomingcalls,upcomingappointments,andnewmessages.YourcurrentprofileisdisplayedontheHomescreen.
To quickly change the current profileToquicklyswitchtoadifferentprofile,pressandquicklyreleasePower toopentheQuickList,thenhighlightthedesiredprofileandpressSelect.
NOTE WhenprofileissettoAutomatic,yourphonewillautomaticallyswitchtoSilentmode wheneveryouhaveameetingscheduledinCalendar.
To edit the current profileYoucanchangethesettingsofthecurrentprofile:
1. OntheHomescreen,pressStart>Settings>Profiles.
2. Scrolltotheprofileyouwanttochange,pressMenu> Edit> EditEdit.
3. ChangethesettingsandpressDone.
NOTE Torestorethedefaultsettingsofaprofile,pressMenuandselectResettodefault.
23
Personal�z�ng your Smartphone
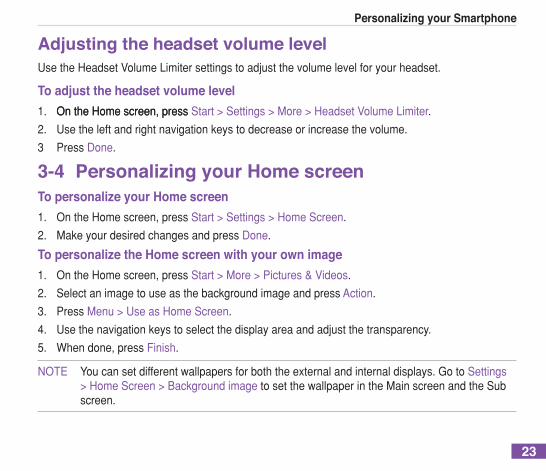
Adjust�ng the headset volume levelUsetheHeadsetVolumeLimitersettingstoadjustthevolumelevelforyourheadset.
To adjust the headset volume level1. On the Home screen, pressOntheHomescreen,pressStart>Settings>More>HeadsetVolumeLimiter.
2. Usetheleftandrightnavigationkeystodecreaseorincreasethevolume.
3 PressDone.
3-4 Personal�z�ng your Home screenTo personal�ze your Home screen1. OntheHomescreen,pressStart>Settings>HomeScreen.
2. MakeyourdesiredchangesandpressDone.
To personal�ze the Home screen w�th your own �mage1. OntheHomescreen,pressStart>More>Pictures&Videos.
2. SelectanimagetouseasthebackgroundimageandpressAction.
3. PressMenu>UseasHomeScreen.
4. Usethenavigationkeystoselectthedisplayareaandadjustthetransparency.
5. Whendone,pressFinish.
NOTE Youcansetdifferentwallpapersforboththeexternalandinternaldisplays.GotoSettings >HomeScreen>BackgroundimagetosetthewallpaperintheMainscreenandtheSub screen.

Chapter 3
24
3-5 Chang�ng the Start Menu v�ewUsetheStartMenusettingstochangetheviewinglayoutoftheStartmenu.YoucanviewtheStartmenueitherinGridVieworListView.
To change the Start Menu v�ew1. On the Home screen, pressOntheHomescreen,pressStart>Settings>StartMenu.
2. SelecteitherGridVieworListView,thenpressDone.
3-6 Enter�ng your contact �nformat�onTheOwnerInformationscreenisforenteringanddisplayingpersonalinformation,suchasyourname,phonenumber,ande-mailaddress.Enteringthisinformationisstronglyrecommendedasitallowswhoeverwhofindsyourphonetocontactyouwhenyoulostyourphone.
To enter owner �nformat�on1. OntheHomescreen,pressStart>Settings>More>OwnerInformation.
2. EnteryourdataandpressDone.
3-7 Ass�gn�ng keypad funct�onsYouSmartphonecomeswithpreinstalledprogramswhichmayhavedefaultkeypadfunctionsassignedtothem.UsetheKeypadAssignmentsettingstocustomizethekeypadfunctionstoopentheprogramsyouoftenuse,ortoperformshortcutssuchasgoingbacktotheHomescreenorlaunchingtheQuickList.
To ass�gn keypad funct�ons1. On the Home screen, pressOntheHomescreen,pressStart>Settings>More>KeyAssignment.
2. Selectthekeypadfunctionthatyouwanttoassigntoaprogram,thenpressDone.

25
Chapter 4 Us�ng call features
4-1 Mak�ng a vo�ce callCall�ng from the Home screenTo call from the Home screen1. OntheHomescreen,enterthephonenumberyouwanttocallusingthealphanumeric/
QWERTYkeypad.
Ifyouenteredthewrongnumber,pressBack todeletethelastdigit.Pressandholdtodeletealldigits.
2. Afterenteringthenumber,pressCall tomakethecall.
3. PressEnd toendthecall.
NOTE • Asyouenteraphonenumber,theSmartphonesearchesContacts,CallHistory,andthe SpeedDialliststofindamatchingnameornumber.Whenyouseethenameornumber ofthepersonyouwanttocallonthelist,selectitusingtheUp/Downnavigationkeys.
• Toredialthelastnumbercalled,pressCalltwicefromtheHomescreen.
• WhilehavingaphonecallfromtheMainscreen,yourSmartphopneautomatically switchestospeakerphonemodeifthereisnoearpiececonnectedtoit.

Chapter 4
26
Call�ng a Contact entryTo call a Contacts entry1. OntheHomescreen,pressContacts.
2. SelectthecontactnametocallusingtheUp/Downnavigationkeys.
NOTE Toquicklyfindacontactinalonglistofcontacts,youcanenterthefirstfewlettersofthe contact’snametonarrowthesearch.
3. PressCall todialthedefaultnumberassignedtotheselectedcontact.
NOTE Bydefault,themobiletelephonenumberofacontactisdialedwhenyoumakeacallfrom Contactsunlessyouspecifyotherwise.
To change the phone number of a Contact1. OntheHomescreen,pressContacts.
2. Selectthecontactwhosephonenumberyouwanttochange.
3. UsetheLeft/Rightnavigationkeystochangethedefaultnumber.Thelettertotherightofthecontact’snameindicatesthefollowing:m(mobile),w(work),orh(home).
Call�ng a number from the Call H�story l�stTo make a call from the Call H�story l�st1. OntheHomescreen,pressCall orpressStart>CallHistory.
2. Selectthenumberornameyouwanttocall,andpressCall .
27
Us�ng call features
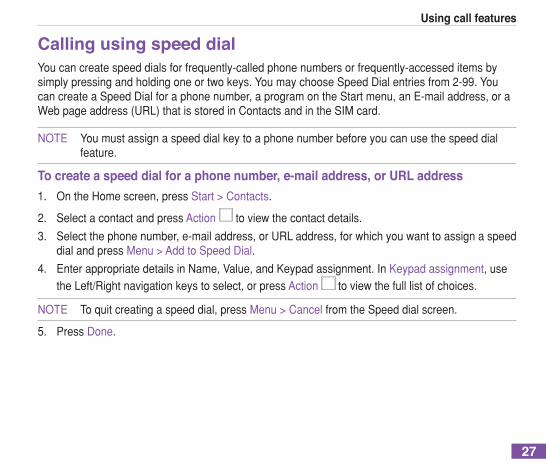
Call�ng us�ng speed d�alYoucancreatespeeddialsforfrequently-calledphonenumbersorfrequently-accesseditemsbysimplypressingandholdingoneortwokeys.YoumaychooseSpeedDialentriesfrom2-99.YoucancreateaSpeedDialforaphonenumber,aprogramontheStartmenu,anE-mailaddress,oraWebpageaddress(URL)thatisstoredinContactsandintheSIMcard.
NOTE Youmustassignaspeeddialkeytoaphonenumberbeforeyoucanusethespeeddial feature.
To create a speed d�al for a phone number, e-ma�l address, or URL address1. OntheHomescreen,pressStart>Contacts.
2. SelectacontactandpressAction toviewthecontactdetails.
3. Selectthephonenumber,e-mailaddress,orURLaddress,forwhichyouwanttoassignaspeeddialandpressMenu>AddtoSpeedDial.
4. EnterappropriatedetailsinName,Value,andKeypadassignment.InKeypadassignment,usetheLeft/Rightnavigationkeystoselect,orpressAction toviewthefulllistofchoices.
NOTE Toquitcreatingaspeeddial,pressMenu>Cancel fromtheSpeeddialscreen.
5. PressDone.

Chapter 4
28
To make a call us�ng speed d�alOntheHomescreen,pressandholdthespeeddialnumberonthekeypad.Ifthekeypadassignmentconsistsoftwodigits,pressthefirstdigitthenpressandholdtheseconddigit.
To create a speed d�al for an �tem on the Start menu1. OntheHomescreen,pressStart.
2. SelectanitemandpressMenu>AddSpeedDial.
4. EnterdetailsinName,Value,andKeypadassignment.InKeypadassignment,usetheLeft/Rightnavigationkeystoselect,orpressActiontoviewthefulllistofchoices.
5. PressDone.
Mak�ng emergency callsCallstoemergencyservicenumberscanbemadeunderanycircumstances,evenifyouhavelockedtheSIMcardoryourphone.
To place an emergency callEntertheemergencynumberforyourlocation,andpressCall .
Mak�ng �nternat�onal callsTomakeinternationalcalls,youmustfirstentertheinternationalprefix(+),followedbythecountrycode,areacode,andphonenumber.

29
Us�ng call features
To place an �nternat�onal call1. Pressandhold+onthekeypadtoenteraplussign.
2. Enterthephonenumberwiththecountrycode,areacode,andphonenumber,andthenpressCall.
4-2 Respond�ng to a vo�ce callDependingonyoursettings,thephonerings,vibrates,orringsandvibrateswhenitreceivesanincomingcall.Whenyoureceiveacall,thescreendisplaysthecaller’snameandphonenumber.IfthecallerisnotinyourContactslist,thescreendisplaysthenumberonly.Whenyoureceiveaphonecall,youhavetheoptiontoansweritorignoreit.
To answer a vo�ce callPressAnswerorCall .
To �gnore a vo�ce callPressIgnoreorEnd .
NOTE SelectingIgnoreorEndwillsendthecallertoyourvoicemailboxifitisenabled.Ifitisnot, thecallerwillhearabusytone.

Chapter 4
30
4-3 Opt�ons dur�ng a callListedinthetablebelowarethepossiblemenuoptionswhenacallisinprogress.Someoftheseoptionsareavailableonlywhenmultiplecallsareinprogressorduringaconferencecall.
IN-CALL MENU OPTION DESCRIPTIONHold Placestheactivecallonhold.
Unhold Activatesthecallthatisonhold.YoucanalsopressSendtoactivatethecallthatisonhold.
Mute Switchesoffthemicrophonefortheactivecall(youcanhearthecallerbutthecallercannothearyou).
Unmute Turnsthemicrophonefortheactivecallbackon.
SpeakerphoneOn/Off Activates/deactivatesthespeakerphone.
NOTE: YoucanalsopressandholdSendduringanactivecall.
WhilehavingaphonecallfromtheMaindisplay,your Smartphopneautomaticallyswitchestospeakerphone modeifthereisnoearpiececonnectedtoit.
Conference Joinstogetherallexistingcallsifyouhavesubscribedtothisservice.
TurnHands-freeOn/Off Turnonthehands-freefunction.
Contacts OpenstheContactslist.
SavetoContacts SavethecallertotheContactslist.
ViewCalendar OpenstheCalendarprogram.
CallHistory OpenstheCallHistorylist.

31
Us�ng call features
Manag�ng mult�ple callsTo answer another call1. PressAnswertoplacethefirstcallonholdandanswerthesecondcall.
2. Toendthesecondcallandreturntothefirstcall,pressEnd .
To hold a call to make a second call1. PressMenu>Holdtoplacethefirstcallonholdandcallasecondnumber.Whenyouhave
finishedthesecondcall,pressEnd totakeyoubacktothefirstcall.
To sw�tch between callsToswitchbetweentwocalls,pressSwap.
To set up a conference callWithmultiplecallsinprogress,pressMenu>Conference.
4-4 Mak�ng a v�deo callDuringavideocall,youseealivevideostreamofthepersonyouaretalkingtointheMainscreenandtheotherpersoncanseeyouaswell.Tobeabletomakeavideocall,youmustbeinthecoverageofaUMTSnetwork.Foravailabilityofandsubscriptiontovideocallservices,contactyournetworkoperatororserviceprovider.
To make a v�deo call1. OntheHomescreen,enterthephonenumberyouwanttocallusingtheQWERTY keypad orQWERTY keypad orkeypador
selectacontactentryfromyourContactslist.
NOTE YoucannotseeyourownimagefromtheSubscreen.OpentheQWERTYkeypadandview theimagefromtheMainscreen.

Chapter 4
32
2. Afterenteringthenumber,pressMenu>Videocallorpress tomakethecall.
Whenthelineisconnected,youcanseetwovideoimagesandhearthesoundthroughtheloudspeaker.
3. PressEnd toendthecall.
To set up the v�deo call1. On the Home screen, pressOntheHomescreen,pressStart>Settings>More>More>VideoPhone>General.2. IntheGeneralscreen,youmaychoosetosetupthefollowing:
• InMediainvideocall,youmaychoosetopresentapicture,usethedefaultmedium,ornotto useanymediumforboththeMainscreenandtheSubscreen.
• InDefaultaudiooutto,youmaychoosetheaudiosoundtobetransmittedfromyour Smartphone.YoumaychooseLoudspeaker,orReceiver.
4-5 Respond�ng to a v�deo callTo answer a v�deo callPressAnswerorCall .
To �gnore a v�deo callPressIgnoreorEnd .
33
Chapter 5 Organ�z�ng your l�fe
5-1 Us�ng ContactsContactsmaintainsalistofyourfriendsandcolleaguessothatyoucaneasilyfindtheinformationyoulookfor,whetheryouareatHomeorontheroad.UsingBluetoothonthedevice,youcanquicklyshareContactsinformationwithotherdeviceusers.IfyouuseOutlookonyourPC,youcansynchronizeContactsbetweenyourphoneandPC.
V�ew�ng ContactsToviewtheContactslist,dooneofthefollowing:
• OntheHomescreen,pressStart>Contacts.
• OntheHomescreen,pressContacts.
Thecontactlistdisplaysthenamesofyourcontactsalphabetically.Besideeachnameinthecontactlistisanabbreviationforthedefaultcommunicationmethod,suchastheperson’sworkphonenumber(w)orhomephonenumber(h).Ifthecontactinformationincludesaworkphonenumber,yourSmartphoneautomaticallysetsitasthedefaultnumber.
Chapter 5
34
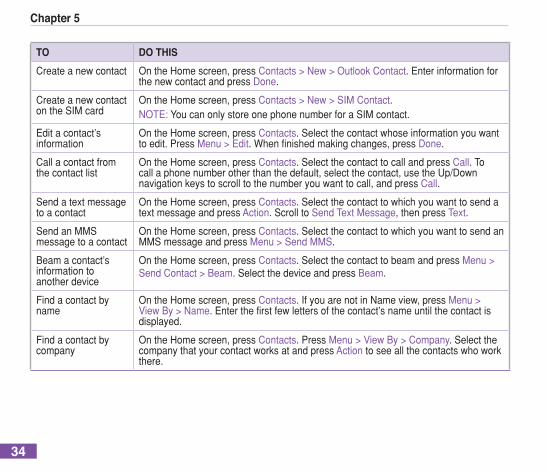
TO DO THISCreateanewcontact OntheHomescreen,pressContacts>New>OutlookContact.Enterinformationfor
thenewcontactandpressDone.
CreateanewcontactontheSIMcard
OntheHomescreen,pressContacts>New>SIMContact.NOTE:YoucanonlystoreonephonenumberforaSIMcontact.
Editacontact’sinformation
OntheHomescreen,pressContacts.Selectthecontactwhoseinformationyouwanttoedit.PressMenu>Edit.Whenfinishedmakingchanges,pressDone.
Callacontactfromthecontactlist
OntheHomescreen,pressContacts.SelectthecontacttocallandpressCall.Tocallaphonenumberotherthanthedefault,selectthecontact,usetheUp/Downnavigationkeystoscrolltothenumberyouwanttocall,andpressCall.
Sendatextmessagetoacontact
OntheHomescreen,pressContacts.SelectthecontacttowhichyouwanttosendatextmessageandpressAction.ScrolltoSendTextMessage,thenpressText.
SendanMMSmessagetoacontact
OntheHomescreen,pressContacts.SelectthecontacttowhichyouwanttosendanMMSmessageandpressMenu>SendMMS.
Beamacontact’sinformationtoanotherdevice
OntheHomescreen,pressContacts.SelectthecontacttobeamandpressMenu>SendContact>Beam.SelectthedeviceandpressBeam.
Findacontactbyname
OntheHomescreen,press Contacts.IfyouarenotinNameview,pressMenu>ViewBy>Name.Enterthefirstfewlettersofthecontact’snameuntilthecontactisdisplayed.
Findacontactbycompany
OntheHomescreen,pressContacts.PressMenu>ViewBy>Company.SelectthecompanythatyourcontactworksatandpressActiontoseeallthecontactswhoworkthere.

35
Organ�z�ng your l�fe
TO DO THISFindacontactusingfilter
FromtheContactlist,pressMenu>Filter.Selectthecategorythatyouhaveassignedtothecontact.Toshowallcontactsagain,selectAllContacts.
Assignaringtonetoacontact
OntheHomescreen,pressContacts.SelectthecontacttowhichyouwanttoassignacustomringtoneandpressAction.PressMenu>EditandscrolltoCustomringtone.UsetheLeft/RightnavigationkeystoselectaringtoneandpressDone.NOTE:YoucanonlyassignaringtonetocontactswhoareinyourOutlookContactlist.
Addapicturetoacontact
OntheHomescreen,pressContacts.SelectthecontacttowhichyouwanttoaddapictureandpressAction.PressMenu>EditandscrolltoPictureandpressAction.SelectanalreadyexistingpictureandpressSelectorselectCameraandtakeapicturetouse.NOTE:YoucanonlyaddapicturetocontactswhoareinyourOutlookContactlist.

Chapter 5
36
5-2 Us�ng CalendarUseCalendartoscheduleappointments,includingmeetingsandotherevents.YourappointmentsforthedaycanbedisplayedontheHomescreen.YoucanalsosetCalendartoremindyouofappointments.IfyouuseOutlookonyourPC,youcansynchronizeappointmentsbetweenyourphoneandPC.
ToopentheCalendarprogram,dooneofthefollowing:
• OntheHomescreen,pressStart>Organizer>Calendar.
• OntheHomescreen,scrolltotheupcomingappointmentandpressAction .
Schedul�ng an appo�ntmentTo schedule an appo�ntment1. OntheHomescreen,pressStart>
Organizer>Calendar.
2. PressMenu>NewAppointment.
3. Enterinformationabouttheappointment.
Toscheduleanall-dayevent,inEndtime,selectAlldayevent.
4. PressDone.
TO DO THISMakeanappointmentrecurring
SelecttheappointmentandpressAction.PressMenu>Edit.ScrolltoOccursandselectoneoftherecurrenceoptions.
Deleteanappointment
SelecttheappointmenttodeleteandpressMenu>DeleteAppointment.
Beamanappointment
SelecttheappointmenttobeamandpressAction.PressMenu>BeamAppointment.

37
Organ�z�ng your l�fe
V�ew�ng an appo�ntmentTo v�ew an appo�ntment1. OntheHomescreen,pressStart>Organizer>Calendar.
2. SelecttheappointmentandpressAction .
TO DO THISViewtoday’sagenda
FromanyCalendarview,pressMenu>GotoToday.
Viewyouragendaforaspecificdate
FromanyCalendarview,pressMenu>GotoDate.EnterthedatetoviewandpressDone.
Showweeknumbers
FromanyCalendarview,pressMenu>Tools>Options.ScrolltoMonthviewandselectShowweeknumbers.
Changethedisplayoftheworkweek
InanyCalendarview,pressMenu>Tools>Optionsanddothefollowing:• Tospecifythefirstdayofthe
week,inFirstdayofweek,selectSundayorMonday.
• Tospecifythenumberofdaysyouwanttoappearinaweek,inWeekview,select5-dayweek,6-dayweek,or7-dayweek.
V�ew�ng your scheduleYoucanviewyourscheduleinyourcalendarinthreedifferentviews:WeekView,MonthView,andAgendaView.
To v�ew your schedule1. OntheHomescreen,pressStart>Organizer
>Calendar.
2. PressMenuandthenselectyourdesiredview.
• Week V�ew
• Month V�ew
• Agenda V�ew
NOTE TheAgendaViewitemappearsonly afteryouselectWeekView/MonthView andenterMenu.
Chapter 5
38
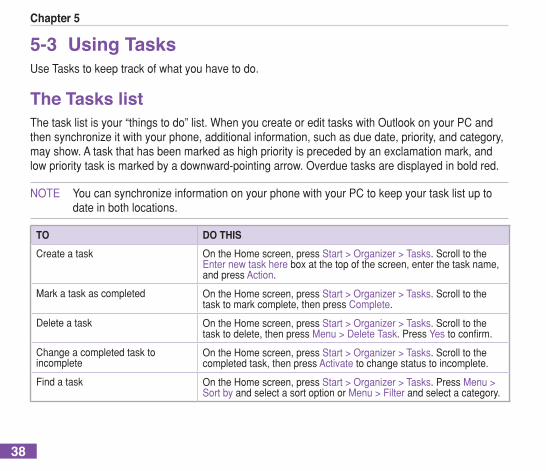
5-3 Us�ng TasksUseTaskstokeeptrackofwhatyouhavetodo.
The Tasks l�stThetasklistisyour“thingstodo”list.WhenyoucreateoredittaskswithOutlookonyourPCandthensynchronizeitwithyourphone,additionalinformation,suchasduedate,priority,andcategory,mayshow.Ataskthathasbeenmarkedashighpriorityisprecededbyanexclamationmark,andlowprioritytaskismarkedbyadownward-pointingarrow.Overduetasksaredisplayedinboldred.
NOTE YoucansynchronizeinformationonyourphonewithyourPCtokeepyourtasklistupto dateinbothlocations.
TO DO THISCreateatask OntheHomescreen,pressStart>Organizer>Tasks.Scrolltothe
Enternewtaskhereboxatthetopofthescreen,enterthetaskname,andpressAction.
Markataskascompleted OntheHomescreen,pressStart>Organizer>Tasks. Scrolltothetasktomarkcomplete,thenpressComplete.
Deleteatask OntheHomescreen,pressStart>Organizer>Tasks. Scrolltothetasktodelete,thenpressMenu>DeleteTask.PressYestoconfirm.
Changeacompletedtasktoincomplete
OntheHomescreen,pressStart>Organizer>Tasks. Scrolltothecompletedtask,thenpressActivate tochangestatustoincomplete.
Findatask OntheHomescreen,pressStart>Organizer>Tasks. PressMenu>SortbyandselectasortoptionorMenu>Filterandselectacategory.

39
Organ�z�ng your l�fe
5-4 Us�ng Vo�ce NotesYoucanuseVoiceNotestocreateandplaybackshortvoicerecordingsandverbalreminders.RecordingsareincludedintheAllNoteslistandarenamedconsecutivelyRecording1,Recording2,andsoon.
TO DOTHIS
Createavoicenote OntheHomescreen,pressStart>Organizer>VoiceNotes.TheAllNotesscreenisdisplayed.Holdthephone’smicrophonenearyourmouth.PressRecordtostartrecordingyourvoicenote.Acounterdisplaysthenumberofsecondselapsedduringrecording.PressStoptostoprecording.
Play,rename,ordeleteavoicenote FromtheAllNotesscreen,selectthevoicenoteandthenpressMenu>Play,Menu>Rename,orMenu>Delete.
Setavoicenoteasaringtone FromtheAllNotesscreen,selectthevoicenotetouseasyourcurrentringtoneandthenpressMenu>SetAsRingtone.PressOKtoconfirm.

40
Chapter 6 Messag�ng
YourSmartphoneiscapableofcomposing,sending,andreceivingOutlooke-mail,Internete-mail,MultimediaMessagingService(MMS)messages,andtextmessages.
6-1 Sett�ng up accountsBeforeyoucansendandreceivee-mails,youneedtosetupane-mailaccountthatyouhavewithanInternetserviceprovider(ISP)oranaccountthatyouaccessusingaVPNserverconnection(typicallyaworkaccount).Youcansende-mailmessagesbysynchronizingorbyconnectingdirectlytoanE-mailserverthroughyourInternetserviceprovideroracorporatenetwork.
NOTE Beforeyousetupane-mailaddressonyourSmartphone,youmusthaveanInternet e-mailaccountoranoutlooke-mailaccount.
To set up an e-ma�l account1. OntheHomescreen,pressStart>Messaging>NewE-mailAccount....
2. InE-mailaddress,enterthee-mailaddressforthisaccount.
3. SelectTrytogete-mailsettingsautomaticallyfromtheInternet.Thisfunctionautomaticallydownloadsnecessarye-mailserversettingssothatyoudonotneedtoenterthemmanually.
4. Followtheinstructionstocompletethesetup.
NOTE IfAutomaticsetupissuccessful,yourusernameisalreadyenteredandyoucanpress Next,andthenFinishtocompletesettingupyouraccount,orpressstoaccess additionalsettings.

41
Messag�ng
NOTE IfAutomaticsetupisunsuccessfuloryouhaveanaccountyouaccessusingaVPNserver connection,contactyourInternetServiceProvider(ISP)ornetworkadministratortoobtain informationforenteringsettingsmanually.
Manag�ng accountsTO DO THISViewalistofaccounts OntheHomescreen,pressStart>Messaging.Alistofaccountsisdisplayed
withthenumberofunreadmessagesintheInboxofeachaccountshowninparenthesis.
Send/receiveInternete-mailmessages
OntheHomescreen,pressStart>Messaging.SelecttheInternete-mailaccountforwhichyouwanttosendandreceivemessagesandpressMenu>Send/Receive.Tostopthisprocess,pressMenu>StopSend/Receive.
Deleteanaccount OntheHomescreen,pressStart>Messaging.SelectanaccountandpressMenu>Delete.
Switchbetweenaccounts Withanaccountopen,pressMenu>Tools>SwitchAccountsorusetheLeft/Rightnavigationkeystoquicklyswitchtoanotheraccount.
Changingaccountoptions OntheHomescreen,pressStart>Messaging.SelectanaccountandpressSelect.PressMenu>Tools>Optionsandthenselectthetypeofoptionyouwanttochange.SelectDonetoconfirm.

Chapter 6
42
6-2 Text and e-ma�l messagesTo compose and send a text or e-ma�l message1. OntheHomescreen,pressStart>Messaging.
2. SelectTextMessagesorane-mailaccountandpressAction orSelect.
3. PressMenu>New.
4. InTo,enterthemobilephonenumberore-mailaddressofthepersontowhichyouwanttosendthemessageorpressAction toselectthepersonfromyourcontacts.
NOTE Ifyouaresendingamessagetomorethanonerecipient,separatethemwithasemicolon (;).Youcanonlysendtextmessagestocontactswithamobilephonenumber.
5. PresstheDownnavigationkey,andenteryourmessage.
6. Whenfinished,pressSend.
NOTE Ifyouareworkingoffline,e-mailmessagesaresavedtotheOutboxfolderandsentthe nexttimeyouconnect.
TO DO THISInsertapictureintoane-mailmessage
Whilecomposingyourmessage,pressMenu>Insert>Picture.
Insertavoicerecordingintoane-mailmessage
Whilecomposingyourmessage,pressMenu>Insert>VoiceNote.
Setthepriority,security,andlanguageofane-mailmessage
Whilecomposingyourmessage,pressMenu>MessageOptions.

43
Messag�ng
TO DO THISCancelamessage Whilecomposingyourmessage,pressMenu>CancelMessage.
Saveamessage Whilecomposingyourmessage,pressMenu>SavetoDrafts.
Deleteamessage Withthemessageyouwanttodeleteselected,pressDelete.
Moveamessagetoanotherfolder Withthemessageyouwanttomoveselected,pressMenu>Move.ScrolltothenewfolderandpressSelect.
Sortmessages Onanyaccountscreen,pressMenu>Tools>Options>Display.InSortMessagesby,selectyourdesiredsortmethod.
Insertasignature Onanyaccountscreen,pressMenu>Tools>Options>Signatures.
Changemessageoptions Onanyaccountscreen,pressMenu>Tools>Options.

Chapter 6
44
6-3 MMS messag�ngMultimediaMessagingSystem(MMS)allowsyoutosendtextmessageswithmultipleslides.Includedoneachslidecanbeapicture,videooraudio,ortext.MMSmessagesaresentbyGeneralPacketRadioService(GPRS)toe-mailaccountsorotherMMS-enabledmobiledevices.
NOTE • YouneedtosubscribetotheGPRSandMMSserviceswithyourserviceproviderbefore youcansendandreceiveMMSmessages.Askyourphoneoperatoronhowtoactivate theMMSfeature.OnlymobilephoneswithMMSfeaturecansend/receiveMMS messages.
• Dependingontheservicethatyousubscribeto,youmaynotbeabletosendand receiveMMSmessagestouserswhoareusingadifferentmobilephonenetwork.
Access�ng MMSDooneofthefollowing:
• OntheHomescreen,pressStart>Messaging>MMS.
• Aftercapturingapictureorvideoclip,pressMenu>Send>MMS.
Ed�t�ng MMS sett�ngsOntheMMSmainscreen,pressMenu>Tools>Options toopenthePreferencesscreenandeditMMSsettings.Selectorclearcheckboxesaccordingtoyourneeds.
OntheMMSmainscreen,pressMenu>MMSSettings>MMSCSettings,andselectyourInternetServiceProviderfromthelist.PressMenu>EdittoaccessMultimediaMessagingServiceCenter(MMSC)settings.Youshouldcontactyourmobileserviceoperatorfordetailsettings.

45
Messag�ng
Compos�ng and send�ng an MMS messageTo compose and send an MMS message1. OntheHomescreen,pressStart>Messaging>MMS>Menu>New.
2. IntheTo:field,enterthemobilephonenumberore-mailofyourrecipient.YoucanenteritusingthekeypadorpressMenu>AddRecipienttoselectfromyourContacts.Ifyouhavemorethanonerecipient,separatethemwithsemicommas.
3. IntheSubjectfield,enterasubjectforthemessage.
4. SelecttheInsertPicture/VideoboxandpressAction .Allyourpicturesandvideoclipswillbedisplayedinthumbnailview.
5. SelectapictureorvideoclipandpressAction orSelect.
6. SelecttheInsertAudioboxandpressAction .Allyouravailableaudioclipswillbedisplayedinthumbnailview.
7. Selecttheaudioclipyouwanttoattach,thenpressAction orSelect.
NOTE Youwillnotbeabletoattachanaudiofiletoaslidewithavideoclip.
8. PresstheDownnavigationkeytoscrolldowntothetextfieldandenteryourmessage.
9. PressSendtosendthemessage.

Chapter 6
46
ThefollowingassumesthatyouareontheMMSmessagescreen.
TO DO THISCopythemessagetootherrecipients
UsetheUp/DownnavigationkeystoscrolluptodisplaytheCcfield.Entertherecipient‘sphonenumberore-mailaddressorpressActiontoselectarecipientfromyourContactslist.
Hidearecipient’scontactinformationfromothermessagerecipients
UsetheUp/DownnavigationkeystoscrolluptodisplaytheBccfield.Entertherecipient‘sphonenumberore-mailaddressorpressActiontoselectarecipientfromyourContactslist.
Hidesenderinformation Createamessage,andpressMenu>Options>SendOptions.SelecttheHideSendercheckbox.
Gotothenextslide PresstheRightnavigationkey.
Gotothepreviousslide PresstheLeftnavigationkey.
CreateanMMSmessagefromatemplate
Createamessage,thenpressMenu>Template>NewfromTemplatestocomposeamessageusingapredefinedtemplate.
CreateanMMSmessagetemplate Createamessageoropenanexistingmessage,andpressMenu>Template>SaveasTemplates.
Addpresetorfrequentlyusedtextstringstoamessage
Inatextfield,pressMenu>Insert>MyText.SelectthetextstringthatyouwanttoaddandpressAction orInsert.
Createoreditapresetmessagebeforeaddingittothemessagebody
Inatextfield,pressMenu>Insert>MyTexttoopentheMyTextscreen.PressMenu>AddMyText orMenu>EditMyText.
Requestmessagedeliverynotification
PressMenu>Options>SendOptions.SelecttheDeliveryReportcheckbox.
47
Messag�ng
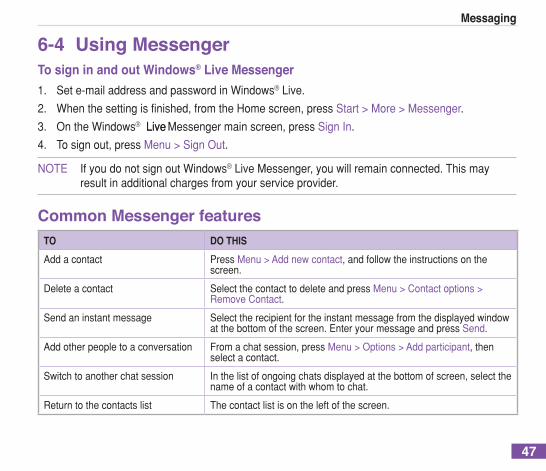
6-4 Us�ng MessengerTo s�gn �n and out W�ndows® L�ve Messenger1. Sete-mailaddressandpasswordinWindows®Live.
2. Whenthesettingisfinished,fromtheHomescreen,pressStart>More>Messenger.
3. OntheWindows® LiveLiveMessengermainscreen,pressSignIn.
4. Tosignout,pressMenu>SignOut.
NOTE IfyoudonotsignoutWindows®LiveMessenger,youwillremainconnected.Thismay resultinadditionalchargesfromyourserviceprovider.
Common Messenger featuresTO DO THISAddacontact PressMenu>Addnewcontact,andfollowtheinstructionsonthe
screen.
Deleteacontact SelectthecontacttodeleteandpressMenu>Contactoptions>RemoveContact.
Sendaninstantmessage Selecttherecipientfortheinstantmessagefromthedisplayedwindowatthebottomofthescreen.EnteryourmessageandpressSend.
Addotherpeopletoaconversation Fromachatsession,pressMenu>Options>Addparticipant,thenselectacontact.
Switchtoanotherchatsession Inthelistofongoingchatsdisplayedatthebottomofscreen,selectthenameofacontactwithwhomtochat.
Returntothecontactslist Thecontactlistisontheleftofthescreen.
Chapter 6
48
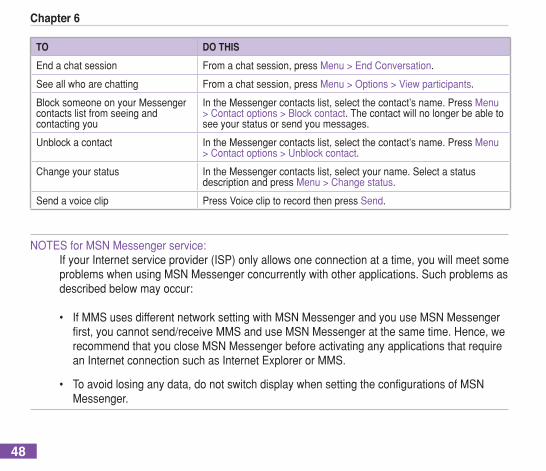
TO DO THISEndachatsession Fromachatsession,pressMenu>EndConversation.
Seeallwhoarechatting Fromachatsession,pressMenu>Options>Viewparticipants.
BlocksomeoneonyourMessengercontactslistfromseeingandcontactingyou
IntheMessengercontactslist,selectthecontact’sname.PressMenu>Contactoptions>Blockcontact.Thecontactwillnolongerbeabletoseeyourstatusorsendyoumessages.
Unblockacontact IntheMessengercontactslist,selectthecontact’sname.PressMenu>Contactoptions>Unblockcontact.
Changeyourstatus IntheMessengercontactslist,selectyourname.SelectastatusdescriptionandpressMenu>Changestatus.
Sendavoiceclip PressVoicecliptorecordthenpressSend.
NOTESforMSNMessengerservice:IfyourInternetserviceprovider(ISP)onlyallowsoneconnectionatatime,youwillmeetsomeproblemswhenusingMSNMessengerconcurrentlywithotherapplications.Suchproblemsasdescribedbelowmayoccur:• IfMMSusesdifferentnetworksettingwithMSNMessengerandyouuseMSNMessenger first,youcannotsend/receiveMMSanduseMSNMessengeratthesametime.Hence,we recommendthatyoucloseMSNMessengerbeforeactivatinganyapplicationsthatrequire anInternetconnectionsuchasInternetExplorerorMMS.
• Toavoidlosinganydata,donotswitchdisplaywhensettingtheconfigurationsofMSN Messenger.
49
Messag�ng
6-5 W�ndows® L�veWindows®LiveisaninstantmessagingsoftwarethatispreinstalledinyourSmartphone.Itallowsyouto:
• Sendandreceiveinstantmessagesto/fromyourcontactswhoareonline;and
• AccessyourHotmail®accounttosendandreceivee-mails.
TouseWindows®Live,youmusthaveaPassportaccount.IfyouhaveaHotmail®oranMSN®account,youalreadyhaveaPassport.OnceyouhaveobtainedeitheraMicrosoft®PassportorMicrosoft®ExchangeServeraccount,youarereadytosetupyouraccount.
NOTE YouneedaMicrosoft®PassportaccounttouseWindowsLive®application.Ifyoudonot haveapassportaccount,gotowww.passport.comtoobtainone.
To close MSN1. LogoutfromyourMSNaccount.
2. ClickthepowerkeyandchooseBtoenterWirelessDeviceManager.
3. CloseDataConnection.
4. Toactivateanapplication,launchDataConnectionagain.Thenopenyourdesiredconnectionservice(InternetExplorerorMMS).

Chapter 6
50
Us�ng Hotma�l®
UsetheWindows®LiveapplicationtoaccessyourHotmail®mailboxandaccessyoure-mailsononyourSmartphone..
To s�gn �n Hotma�l®
1. FromtheHomescreen,press Start>More>More>WindowsLive.
2. OntheWindowsLive-SignInscreen,pressSignintoWindowsLivetoenterWindowsLiveSetupsession.
3. PressAccept.Thenenterthee-mailaddressandpasswordforyourHotmail®account.
4. SelectSavepasswordifyoudonotwanttoenteryourpasswordagaininthefutureandpressNext.
5. SelectthecheckboxesifyouwanttheWindowsLivetoshowontheHomescreen.
6. Selectwhatyouwanttosynconyourdevicebycheckingthecheckboxes.
7. Synce-mailforHotmailaccount.

51
7-1 M�crosoft® Act�veSync®
WithActiveSync,youcansynchronizetheinformationonyourPCwiththeinformationonyourSmartphone.SynchronizationcomparesthedataonyourphonewithyourPCandupdatesbothwiththemostrecentinformation.Youcanalsousesynchronizationtoaddnewprogramstoyourphone.
BeforeyoucansynchronizeyourphonewithyourPC,youneedtocompletethefollowingsteps:
1. InstallActiveSynconyourPC.
2. ConnectyourphonetothePC.
3. Createapartnershipbetweenthetwodevices.
NOTE Formoreinformationaboutsynchronization,seetheActiveSyncHelponthePC.
Chapter 7 Synchron�z�ng w�th Act�veSync®
Chapter 7
52
7-2 Install�ng Act�veSync on your PCTheActiveSyncprogramisalreadyinstalledonyourSmartphone.TosynchronizeinformationonyourphonewithyourPC,youmustalsoinstallActiveSynconyourPC.InstallActiveSyncfromtheGettingStartedCDthatcomeswithyourproductpackage.
NOTE BeforestartingtheActiveSyncinstallation,makesurethatyouhaveMicrosoft®Outlook® installedonyourPC.
IMPORTANT DonotconnectyourphonetoyourPCuntilyouhavefinishedinstallingActiveSync.
To �nstall Act�veSync on your PC1. PlacetheGettingStartedCDintotheopticaldriveofyourPCandfollowtheonscreen
instructionstoinstallActiveSync.
2. ClickStartHeretodisplaytheOverviewscreen.
3. ClickInstallActiveSync,thenfollowtheonscreeninstructionstocompleteinstallation.
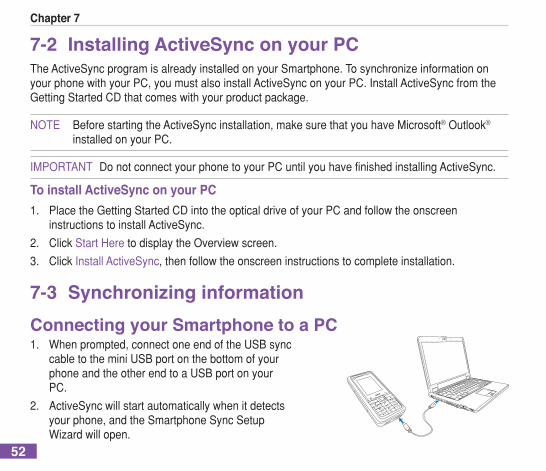
7-3 Synchron�z�ng �nformat�onConnect�ng your Smartphone to a PC1. Whenprompted,connectoneendoftheUSBsync
cabletotheminiUSBportonthebottomofyourphoneandtheotherendtoaUSBportonyourPC.
2. ActiveSyncwillstartautomaticallywhenitdetectsyourphone,andtheSmartphoneSyncSetupWizardwillopen.
HDMI
OFF ON
E-SATA
53
Synchron�z�ng w�th Act�veSync
Creat�ng a partnersh�pThewizardguidesyouthroughthestepstocreateapartnership.IntheSyncSetupWizard,youcandothefollowing:
• CreateasynchronizationrelationshipbetweenyourPCandyourphone.
• ConfigureanExchange®ServerconnectiontosynchronizedirectlywithExchangeServer. TosynchronizeyourphonewithExchangeServer,obtainthenameoftheExchangeServer, yourusername,password,anddomainnamefromyouradministratorbeforecompletingthe wizard.
• Chooseinformationtypes(Calendar,Contacts,Tasks,OutlookE-mail,Favorites)to synchronize.
Whenyoufinishthewizard,ActiveSyncsynchronizesyourphoneautomatically.Oncesynchronizationcompletes,youcandisconnectyourphonefromyourPC.Afterthefirstsynchronization,youwillnoticethattheinformationfromyourPCthatyouselectednowappearsonyourSmartphone.

Chapter 7
54
Synchron�z�ng w�th a PCChang�ng �nformat�on to synchron�zeBydefault,ActiveSyncdoesnotautomaticallysynchronizeallOutlookinformation.YoucanuseActiveSyncoptionstoturnsynchronizationforspecificinformationtypesonandoff:
1. OntheHomescreen,pressStart>ActiveSync.
2. PressMenu>Options.
3. Dooneormoreofthefollowing:
• Selectthecheckboxfortheitemsyouwanttosynchronize.
• Clearthecheckboxforanyitemsyoudonotwanttosynchronize.
• TocustomizesynchronizationofaPC,selectthePCnamethenpressMenu>Settings.
• Tocustomizesynchronizationofaparticulartypeofinformation,selecttheinformationtype thenpressSettings.
• TostopsynchronizingwithaPCcompletely,selectthePCnameandpressMenu>Delete.
NOTE E-mailcanbesynchronizedwithonlyonePC.
Us�ng USB sync cable1. ConnectyourphonetoaPCusingtheUSBsynccable.
2. ActiveSync will detect your phone automatically and start synchronizing. If not, on the HomeActiveSyncwilldetectyourphoneautomaticallyandstartsynchronizing.Ifnot,ontheHomescreen,pressStart>ActiveSync.
3. PressSynctostartsynchronizing.
4. PressStoptostopsynchronizing.

55
Synchron�z�ng w�th Act�veSync
Us�ng Bluetooth®
YoucansynchronizeyourphonewithaPCusingtheBluetoothwirelesstechnology.
1. FollowtheinstructionsinActiveSyncHelptoconfigureBluetoothsettingsonyourPCtosupportActiveSync.
2. OntheHomescreen,pressStart>ActiveSync.
3. PressMenu>ConnectviaBluetooth.EnsurethatthephoneandPCarecloseenough.
NOTE ThefirsttimeyouconnectyourphonetothePCusingBluetooth,completetheBluetooth wizardinstructionsonthephoneandsetupaBluetoothpartnershipwiththePCbefore synchronizing.FormoreinformationaboutsettingupaBluetoothpartnership,see“Creating aBluetoothpartnership”in10-4UsingBluetooth.
4. PressSync.
5. Whenfinished,pressMenu>DisconnectBluetooth.Topreservebatterypower,turnoffBluetooth.
Chapter 7
56
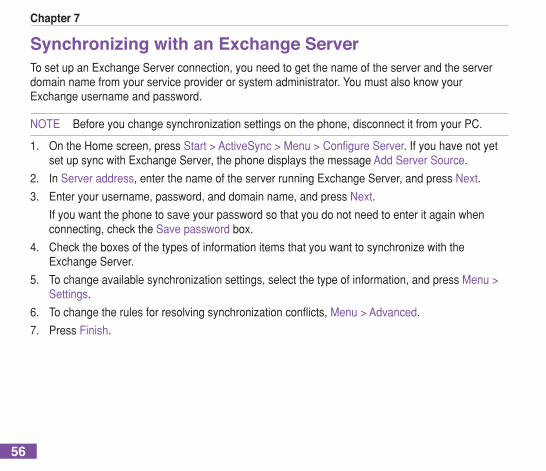
Synchron�z�ng w�th an Exchange ServerTosetupanExchangeServerconnection,youneedtogetthenameoftheserverandtheserverdomainnamefromyourserviceproviderorsystemadministrator.YoumustalsoknowyourExchangeusernameandpassword.
NOTE Beforeyouchangesynchronizationsettingsonthephone,disconnectitfromyourPC.
1. OntheHomescreen,pressStart>ActiveSync>Menu>ConfigureServer.IfyouhavenotyetsetupsyncwithExchangeServer,thephonedisplaysthemessageAddServerSource.
2. InServeraddress,enterthenameoftheserverrunningExchangeServer,andpressNext.
3. Enteryourusername,password,anddomainname,andpressNext.
Ifyouwantthephonetosaveyourpasswordsothatyoudonotneedtoenteritagainwhenconnecting,checktheSavepasswordbox.
4. ChecktheboxesofthetypesofinformationitemsthatyouwanttosynchronizewiththeExchangeServer.
5. Tochangeavailablesynchronizationsettings,selectthetypeofinformation,andpressMenu>Settings.
6. Tochangetherulesforresolvingsynchronizationconflicts,Menu>Advanced.
7. PressFinish.

57
Synchron�z�ng w�th Act�veSync
7-4 Creat�ng a synchron�zat�on scheduleYoucancreateascheduleforautomaticallysynchronizinginformationonyourSmartphonewithyourPCorwithMicrosoftExchangeServer.
TosetupasynchronizationschedulewithyourPC,youmustuseActiveSynconthePC.Formoreinformationonsynchronization,seeActiveSyncHelponthePC.
TosetupasynchronizationschedulewithanExchangeserver,youmustuseActiveSynconyourphone.Seethenextsectionfordetails.
Schedul�ng synchron�zat�onBeforechangingsynchronizationsettingsonthephone,disconnectthephonefromyourPC.
To schedule synchron�zat�on1. OntheHomescreen,pressStart>ActiveSync>Menu>Schedule.
2. Dooneormoreofthefollowing:
TO SYNC DO THISAutomaticallyasitemsarrive. UnderPeaktimes,selectAsitemsarrive.Itismorecost-efficientto
synchronizeatregularintervalswhenmailvolumeishigh.UnderOff-peaktimes,selectAsitemsarrive.Thiscanbemorecost-efficientthansynchronizingonaregularschedulewhenmailvolumeislow.
Whenyouareworking,ore-mailvolumeishigh.
SelectanappropriatelyfrequentintervalinthePeaktimeslist.
Whene-mailvolumeislow. SelectalongerintervalorAsitemsarriveintheOff-peaktimeslist.

Chapter 7
58
TO SYNC DO THISWhileroaming SelecttheUseabovesettingswhileroamingcheckbox.Tominimize
roamingcharges,clearthecheckbox,andsynchronizemanuallywhileroaming.
WhenyoupressSendinMessagingonthephone
SelecttheSend/receivewhenIclicksend checkbox.
NOTE Tochangepeaktimesettingstomoreaccuratelyadjusttoperiodsofe-mailvolumeforyou, pressMenu>PeakTimes.

59
8-1 Us�ng your cameraYourSmartphonefeaturesa2.0megapixelbuilt-indualCMOScamerawithflash,makingiteasytotakephotosandrecordvideoclipswithaudioandsharingthemwithyourfamilyandfriends.
Tak�ng a p�ctureTo take a p�cture1. Dooneofthefollowing:
• OntheHomescreen,pressStart>Multimedia>Camera.
• PresstheCamera buttonontherightsideofyourphone.
NOTE • IfthecameraiscurrentlyinVideomode,presstheupnavigationkeytoswitchto Cameramode. • TakingpicturesandrecordingvideoclipsareonlyallowedfromtheSubscreen.
2. PressActionbuttonorCamerabuttontotakeyourpicture.ThepictureisautomaticallysavedinJPEGformattothelocationspecified.
Chapter 8 Mult�med�a

Chapter 8
60
TO DO THISChangethezoomfactor InCameramode,pressMenu>Zoom andselectazoomfactoror
presstheUp/Downnavigationkeys.Themaximumsizeis1600x1200.
Changethebrightness InCameramode,pressMenu>Advanced>ColorAdjustment>Brightness.Presstheleftorrightnavigationkeystoadjustthelevelofbrightness.Thedefaultbrightnesslevelis3.
Specifythefileextension,filenameprefixtouse,dateandtimestamp,shuttersound,andburstinterval
InCameramode,pressMenu>Advanced>Camera.Toviewtheoptionsfromanitem’sdropdownlist,selecttheitemandpressAction.
Takeaseriesof(4and9continuous)pictures
InCameramode,pressMenu>Burst.
Setthetimer(5-10secondstimelag)
InCameramode,pressMenu>SelfTimer.
Setapicturesizetousewhentakingpicturesforemailing
InCameramode,press Menu>PictureSize.Selectthedesiredsize.
Changefilenameprefixforcapturedimages
InCameramode,press Menu>Advanced>Camera.InFileNamePrefix,enterthedesiredprefix.
Savethepictures InCameramode,press Menu>Saveto.Youmaysavethepicturestothephoneortothestoragecard.MakesurethatyouhaveinsertedamicroSDcardbeforechoosingtosavetothestoragecard.
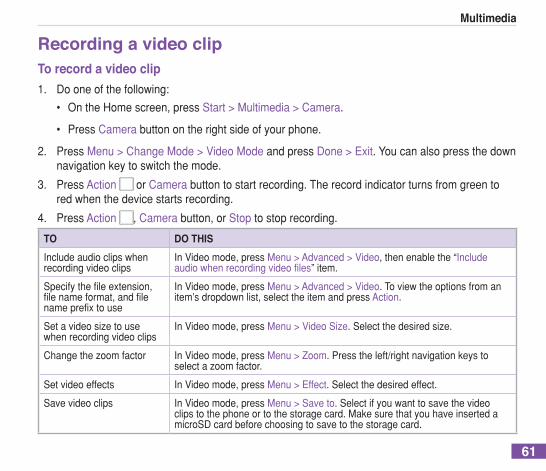
61
Mult�med�a
Record�ng a v�deo cl�pTo record a v�deo cl�p1. Dooneofthefollowing:
• OntheHomescreen,pressStart>Multimedia>Camera.
• PressCamerabuttonontherightsideofyourphone.
2. PressMenu>ChangeMode>VideoModeandpressDone>Exit.Youcanalsopressthedownnavigationkeytoswitchthemode.
3. PressAction orCamera buttontostartrecording.Therecordindicatorturnsfromgreentoredwhenthedevicestartsrecording.
4. PressAction ,Camerabutton,orStoptostoprecording.
TO DO THISIncludeaudioclipswhenrecordingvideoclips
InVideomode,pressMenu>Advanced>Video,thenenablethe“Includeaudiowhenrecordingvideofiles”item.
Specifythefileextension,filenameformat,andfilenameprefixtouse
InVideomode,pressMenu>Advanced>Video.Toviewtheoptionsfromanitem’sdropdownlist,selecttheitemandpressAction.
Setavideosizetousewhenrecordingvideoclips
InVideomode,pressMenu>VideoSize.Selectthedesiredsize.
Changethezoomfactor InVideomode,pressMenu>Zoom.Presstheleft/rightnavigationkeystoselectazoomfactor.
Setvideoeffects InVideomode,pressMenu>Effect.Selectthedesiredeffect.
Savevideoclips InVideomode,pressMenu>Saveto.Selectifyouwanttosavethevideoclipstothephoneortothestoragecard.MakesurethatyouhaveinsertedamicroSDcardbeforechoosingtosavetothestoragecard.

Chapter 8
62
Us�ng P�ctures & V�deosThePictures&VideosprogramallowsyoutoworkwithpicturesorvideoclipsonyourSmartphone.Afteryouhavetakenthepicturesandvideos,youcanorganize,edit,beam,aswellassendingthembyusingamessagingprogram.
ToopenthePictures&Videosprogram,dooneofthefollowing:
• PressStart>Multimedia>Pictures&Videos.
• PressCamerabutton,thenpressThumbnails.
TO DO THISViewapicture SelectthepictureyouwanttoseeandpressView.
Playavideoclip Selectthevideoclip,shownasaWindowsMediaPlayericon,youwanttoseeandpressPlay.
Deleteapictureorvideoclip SelectthepictureorvideoclipyouwanttodeleteandpressMenu>Delete.
Viewyourpicturesasaslideshow
PressMenu>PlaySlideShow.
SetapictureastheHomescreen
SelectthepictureyouwanttouseastheHomescreenandpressView>Menu>UseasHomeScreen.AdjustthetransparencyandpressFinish.
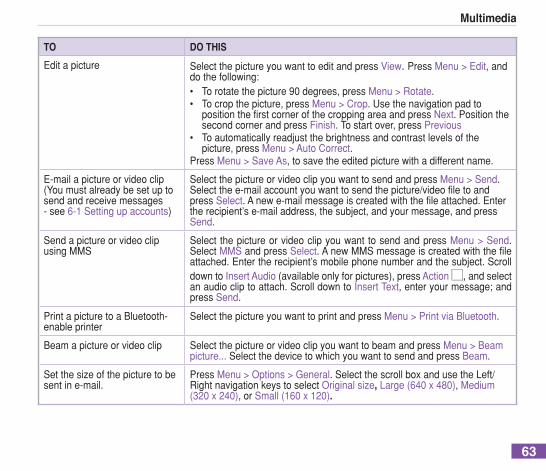
63
Mult�med�a
TO DO THISEditapicture SelectthepictureyouwanttoeditandpressView.PressMenu>Edit,and
dothefollowing:• Torotatethepicture90degrees,pressMenu>Rotate.• Tocropthepicture,pressMenu>Crop.Usethenavigationpadto
positionthefirstcornerofthecroppingareaandpressNext.PositionthesecondcornerandpressFinish. Tostartover,pressPrevious
• Toautomaticallyreadjustthebrightnessandcontrastlevelsofthepicture,pressMenu>AutoCorrect.
PressMenu>SaveAs,tosavetheeditedpicturewithadifferentname.
E-mailapictureorvideoclip(Youmustalreadybesetuptosendandreceivemessages-see6-1Settingupaccounts)
SelectthepictureorvideoclipyouwanttosendandpressMenu>Send.Selectthee-mailaccountyouwanttosendthepicture/videofiletoandpressSelect.Anewe-mailmessageiscreatedwiththefileattached.Entertherecipient’se-mailaddress,thesubject,andyourmessage,andpressSend.
SendapictureorvideoclipusingMMS
SelectthepictureorvideoclipyouwanttosendandpressMenu>Send.SelectMMSandpressSelect.AnewMMSmessageiscreatedwiththefileattached.Entertherecipient’smobilephonenumberandthesubject.ScrolldowntoInsertAudio(availableonlyforpictures),pressAction ,andselectanaudiocliptoattach.ScrolldowntoInsertText,enteryourmessage;andpressSend.
PrintapicturetoaBluetooth-enableprinter
SelectthepictureyouwanttoprintandpressMenu>PrintviaBluetooth.
Beamapictureorvideoclip SelectthepictureorvideoclipyouwanttobeamandpressMenu>Beampicture...SelectthedevicetowhichyouwanttosendandpressBeam.
Setthesizeofthepicturetobesentine-mail.
PressMenu>Options>General.SelectthescrollboxandusetheLeft/RightnavigationkeystoselectOriginalsize,Large(640x480),Medium(320x240),orSmall(160x120).

Chapter 8
64
TO DO THISSetwhetherpicturesarerotatedclockwiseorcounter-clockwise.
PressMenu>Options>General.SelectthescrollboxandusetheLeft/RightnavigationkeystoselectRight(clockwise)orLeft (counter-clockwise).
Optimizetheviewingpicturesinslideshowmode.
PressMenu>Options>SlideShow.SelectthescrollboxandusetheLeft/RightnavigationkeystoselectPortraitpicturesorLandscapepictures.
SetthescreensavertoplaywhenthephoneisconnectedtoaPCformorethantwominutes
PressMenu>Options>SlideShow,thenenablethe“PlayscreensaverwhenconnectedtomyPCandidlefor2minutes”item.

65
Mult�med�a
8-2 �Cam — The USB WebcamTheVGAcameracanbeusedasaUSBwebcamwhenconnectedwithaUSBcabletoyourPC.Meanwhile,youcanstilluseotherWindows®Mobilefunctions.
To act�vate the webcam funct�on1. Connect your phone to a PC using the USB syncConnectyourphonetoaPCusingtheUSBsync
cable.
2. OntheHomescreen,pressStart>Setting>USBsetting.
3. ScrolltoUSB-WebcammodeusingtheLeftandRightnavigationkeysandpressDone.
NOTE • Whenusingthephoneasawebcam,youcannottransmityourownimagesusingthe VGAcameraduringavideocall. • TheSkypeversionislimitedifyourPCisusingWindows®Vistaoperatingsystem.
VGA camera

Chapter 8
66
8-3 W�ndows® Med�aUseMicrosoft®WindowsMedia™PlayerMobileforSmartphonetoplaydigitalaudioandvideofilesthatarestoredonyourphoneorontheWeb.YoucanlistentomediafilesthroughthespeakeronthebackofyourSmartphoneorthroughastereoheadset.
WindowsMediaPlayerMobilecanplaythefollowingtypesoffiles:
• WindowsMediaAudio(WMA)
• WindowsMediaVideo(WMV)
• MotionPictureExpertsGroup-2AudioLayer-3(MP3)
• ThirdgenerationvideostandardH.263baseline(3GP)
UseMicrosoftWindowsMediaPlayeronyourPCtocopydigitalaudioandvideotoyourphone.
W�ndows Med�a Player screensPlayback screenThedefaultscreenthatdisplaystheplaybackcontrols(suchasPlay,Pause,Next,Previous,andVolume)andthevideowindow.Youcanchangetheappearanceofthisscreenbychoosingadifferentskin.
Now Play�ng screenThescreenthatdisplaystheNowPlayingplaylist.Thisspecialplaylistindicatesthecurrentlyplayingfileandanyfilesthatarequeueduptoplaynext.

67
Mult�med�a
L�brary screenThescreenthatletsyouquicklyfindyouraudiofiles,videofiles,andplaylists.ItcontainscategoriessuchasMyMusic,MyVideos,MyTV,andMyPlaylists.
Playing media filesTo play a media file1. OntheHomescreen,pressStart>Multimedia>WindowsMedia.
2. PressMenu>Library.
3. Dooneofthefollowing:
• Toplayafilefromalibrary,selectthelibraryyouwanttouseintheLibrarylistandpress Action .
• Toplayafilethatisnotinalibrary,pressMenu>OpenFile.
• Toplayafilefromtheweb,pressMenu>OpenURL.InURL,entertheWebaddress,or selectasiteyouhavevisitedbeforeinHistory.
4. Selectthefileyouwanttoplay,andthenpressPlay.
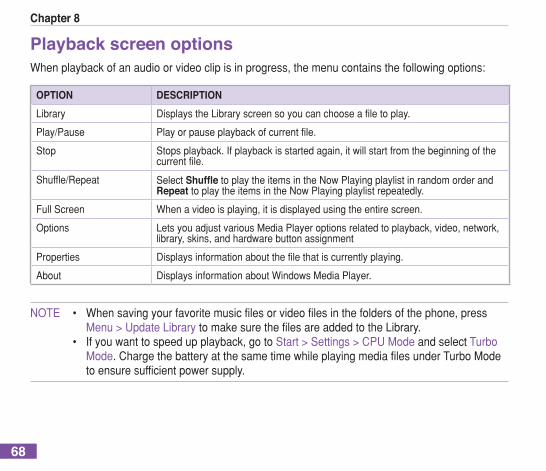
Chapter 8
68
Playback screen opt�onsWhenplaybackofanaudioorvideoclipisinprogress,themenucontainsthefollowingoptions:
OPTION DESCRIPTIONLibrary DisplaystheLibraryscreensoyoucanchooseafiletoplay.
Play/Pause Playorpauseplaybackofcurrentfile.
Stop Stopsplayback.Ifplaybackisstartedagain,itwillstartfromthebeginningofthecurrentfile.
Shuffle/Repeat SelectShuffletoplaytheitemsintheNowPlayingplaylistinrandomorderandRepeattoplaytheitemsintheNowPlayingplaylistrepeatedly.
FullScreen Whenavideoisplaying,itisdisplayedusingtheentirescreen.
Options LetsyouadjustvariousMediaPlayeroptionsrelatedtoplayback,video,network,library,skins,andhardwarebuttonassignment
Properties Displaysinformationaboutthefilethatiscurrentlyplaying.
About DisplaysinformationaboutWindowsMediaPlayer.
NOTE • Whensavingyourfavoritemusicfilesorvideofilesinthefoldersofthephone,press Menu>UpdateLibrarytomakesurethefilesareaddedtotheLibrary. • Ifyouwanttospeedupplayback,gotoStart>Settings>CPUModeandselectTurbo Mode.ChargethebatteryatthesametimewhileplayingmediafilesunderTurboMode toensuresufficientpowersupply.

69
Mult�med�a
Playback controls
NowPlayingPresstoaccessinformationabouttheplayingfile
MenuPresstoaccessplaybackoptions
Keypad controls Nav�gat�on controls
Play/PausePresstoplay/pausethecurrentfile
VolumePressup/downkeystoadjustvolume
Previous/NextPresstheleftsoftkeytogobacktopreviousfile.Presstherightsoftkeytogotothenextfile
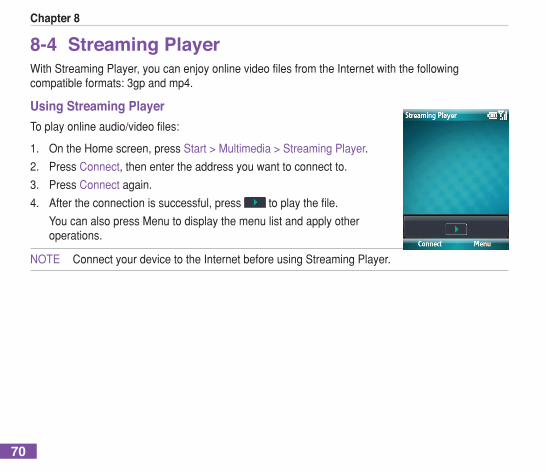
Chapter 8
70
8-4 Stream�ng PlayerWithStreamingPlayer,youcanenjoyonlinevideofilesfromtheInternetwiththefollowingcompatibleformats:3gpandmp4.
Us�ng Stream�ng PlayerToplayonlineaudio/videofiles:
1. OntheHomescreen,pressStart>Multimedia>StreamingPlayer.
2. PressConnect,thenentertheaddressyouwanttoconnectto.
3. PressConnect again.
4. Aftertheconnectionissuccessful,press toplaythefile.
YoucanalsopressMenutodisplaythemenulistandapplyotheroperations.
NOTE ConnectyourdevicetotheInternetbeforeusingStreamingPlayer.
71
Chapter 9 Bus�ness features
9-1 Managing and backing up filesThereareacoupleofwaystomanageyourfiles.YoucanusetheFileExploreronyourSmartphoneoruseActiveSynconyourPC.
YoucanbackupfilestoyourPCusingActiveSyncorcopyfilestoastoragecardonyourphone.YoucanalsoefficientlymanageyourfilesandfoldersusingtheFileExplorerprogramonyourphone.ChangesyoumaketotheinformationonyourphonewillnotaffecttheinformationonyourPC.IfyouwanttoautomaticallyupdateinformationonbothyourphoneandPC,synchronizetheinformationinstead.Formoreinformationaboutcopyingandsynchronizingfiles,seeActiveSyncHelponyourPC.
Us�ng Act�veSyncCopyingafileresultsinseparateversionsofafileonyourphoneandPC.Becausethefilesarenotsynchronized,changesmadetoonefilewillnotaffecttheother.
1. ConnectyourphonetoyourPCusingaUSBcable.
2. InActiveSync,clickExplore.
3. GotothefilethatyouwanttocopyonyourphoneorPC.
4. Dooneofthefollowing:
• Tocopythefiletoyourphone,right-clickthefile,andclickCopy.Right-clickthedesiredfolder onyourphone,andclickPaste.
Chapter 9
72
NOTE Tocopyfilestoastoragecard,insertamicroSDcard(seeToinstallamicroSDcardon page8).YoucanplayMP3andothermediafilesdirectlyfromamicroSDcardinsertedinto yourphone.
• TocopythefiletoyourPC,right-clickthefileandclickCopy.Right-clickthedesiredfolderon yourPC,andclickPaste.
Us�ng F�le ExplorerFileExplorerallowsyoutomanagethefilesandfoldersonyourphonejustlikeyoudoonyourPC.
To start F�le ExplorerOntheHomescreen,pressStart>More>FileExplorer.
YoucandothefollowingontheFileExplorer:
TO DO THISCreateanewfolder Gotowhereyouwanttocreatethenewfolder.PressMenu>Edit>
NewFolder.EnteranameforthenewfolderandpressAction .
Renameafileorfolder Selectthefileorfolderthatyouwanttorename,andpressMenu>Edit>Rename.EnteranewnameandpressAction .
Deleteafileorfolder Selectthefileorfolderthatyouwanttodelete,andpressMenu>Edit>Delete.
Beamafile Selectthefilethatyouwanttosend.PressMenu>Beam. SelectthedevicetowhichyouwanttosendandpressBeam.

73
Bus�ness features
TO DO THISSendafilebye-mail Selectthefiletosend,pressMenu>Send.Selectthee-mailaccountyou
wanttosendthefiletoandpressSelect.Anewe-mailmessageiscreatedwiththefilealreadyattached.
Displayinformationaboutafileorfolder
Selectthefileorfolder,andpressMenu>Properties.
Sortfilesandfolders PressMenu>SortBy,andselectasortoption.
Moveafileorfolderfromonelocationtoanother
Selectthefileorfolderthatyouwanttomove.PressMenu>Edit>Cut.NavigatetothenewlocationandpressMenu>Edit>Paste.
Duplicateafileorfolder Selectthefileorfolderthatyouwanttoduplicate.PressMenu>Edit>Copy.NavigatetothenewlocationandpressMenu>Edit>Paste.
9-2 Spb® Z�pTheSpb®ZipisacompressionutilitywhichenablesyoutoreduceyourfilesizesthusconservingthestoragespaceinyourSmartphone.
To launch the Spb Z�p1. FromtheHomescreen,pressStart>Accessories>SpbZip.Allyourfilefolderswillbe
displayed.
2. Selectthefiles/folderstocompress.
3. PressAddtoZIP.Thecompressionprocessstarts.
Chapter 9
74
9-3 Vo�ce CommanderTheVoiceCommanderenablesyoutousevoicecommandstomakephonecallsandtolaunchapplicationsinyourSmartphone.Itenablesyoutocustomizecommandsandpersonalizethedigitmodelbyadaptation.
TolaunchtheVoiceCommander,dooneofthefollowing:
• PressStart>Accessories>VoiceCommander.
• Longpressthevolumeupbutton.
NOTE Forefffectivevoicecommandrecognition,createavoicetagforcontactentries,orfor applicationsinyourSmartphone.Refertothe “TousetheVocabSettings” section on page85forinstructionsoncreatingvoicetags.
Funct�onsTheVoiceCommanderhasseveralfunctionssuchasvoicenamedialing,voiceshowcontact,voicedigitdial/redial/callback,andotherfunctions.
Vo�ce Name D�al�ngUsethisfunctiontocallacontactperson’sHome,work,ormobilenumber.
Usage: Call <Contact> at <Home/Work/Mob�le>Example1:CallapersonathisHome.
1. LaunchtheVoiceCommanderandgivethecommand.
2. Thefollowingexchangewilltakeplace:
System: “Sayyourcommand”

75
Bus�ness features
User: “CallJohnDoeatHome”
System: “CallJohnDoeatHome,isthiscorrect?”
User: “Yes”
System: “Dialing”,dialtoJohnDoe’sHomephone.
Example2:Callapersonwithonlyonecontactnumberinthesystem,suchashisofficephonenumber.
1. LaunchtheVoiceCommanderandgivethecommand.
2. Thefollowingexchangewilltakeplace:
System:“Sayyourcommand”
User: “CallJohnDoe”
System: “CallJohnDoeatwork,isthiscorrect?”<SystemhaddetectedthatJohnDoe onlyhasanofficephonenumber>
User: “Yes”
System: “Dialing”,dialtoJohnDoe’sofficenumber
Example3:Callapersonwithmultiplecontactnumbers.
1. LaunchtheVoiceCommanderandgivethecommand.
2. Thefollowingexchangewilltakeplace:
System: “Sayyourcommand”
User: “CallJohnDoe”
NOTE SystemwilldisplayallJohnDoe’scontactnumbers.
System: “CallJohnDoe,Home,work,mobile,orcancel?”
Chapter 9
76
User: “Home”
System: “Dialing”,dialtoJohnDoe’sHomenumber.
Example4:Callapersonwhosenamesoundsexactlythesameasanothercontactperson.Forexample:BryanLeeandBrianLi
1. LaunchtheVoiceCommanderandgivethecommand.
2. Thefollowingexchangewilltakeplace:
System: “Sayyourcommand”
User: “CallBryanLee”
System: “MorethanoneBryanLee,pleaseselect”
NOTE Systemwillshowallcontactpersonswhosenamessoundthesameasthatoftheperson youwanttocall.Youcandouble-clickonthecontactpersonyouwanttocall.Ifthiscontact personhasmorethanonephonenumber,thesystemwilldisplayallofthemandaskwhich phonenumberyouwanttocall.
System: “Home,work,mobile,orcancel?”
User: SelectMobilenumberfromthelist.
System: “Dialing”,dialBryanLee’smobilenumber
NOTES • Ifthecontactpersononlyhasonecontactnumber,thesystemwillautomaticallydialthat number. • Whenthesystemshowsallthecontactperson’sphonenumbers,youcanselectand double-clicktheselectedcontactnumber.Thesystemwilldialthisnumberautomatically.
Vo�ce Show ContactUsethisfunctiontoaskforacontactperson’sinformation.
77
Bus�ness features
Usage: Show <Contact> [at Home/at Work/at Mob�le]Example1:Showaperson’scontactinformation.
1. LaunchtheVoiceCommanderandgivethecommand.
2. Thefollowingexchangewilltakeplace:
System: “Sayyourcommand”
User: “ShowJohnDoe”
System: “JohnDoe”!
NOTE SystemwillshowJohnDoe’scontactinformation.
Example2:Askingforaspecificinformation.
1. LaunchtheVoiceCommanderandgivethecommand.
2. Thefollowingexchangewilltakeplace:
System: “Sayyourcommand”
User: “ShowJohnDoeatwork”
System: “JohnDoe,work,0229109088”
NOTE SystemwillshowJohnDoe’scontactinformation.
Example3:Thepersonhasnocontactnumber.
1. LaunchtheVoiceCommanderandgivethecommand.
2. Thefollowingexchangewilltakeplace:

Chapter 9
78
System: “Sayyourcommand”
User: “ShowJohnDoeatHome”
System: “JohnDoehasnoHomenumber”
NOTE SystemwillalsoshowJohnDoe’spersonalinformation.
Example4:Theperson’snamesoundsthesamewiththatofanothercontactpersonorpersons.Forexample:BryanLeeandBrianLi
1. LaunchtheVoiceCommanderandgivethecommand.
2. Thefollowingexchangewilltakeplace:
System: “Sayyourcommand”
User: “ShowBryanLeeatwork”
System: “MorethanoneBryanLee,pleaseselect”
NOTES • Thesystemwillshowallthecontactpersonswhosenamessoundsthesameasthatof thepersonyouareinquiringabout.Double-clickonthecontactpersonyouwant. • IfthecontactpersondoesnothavethecontactnumberyouwantsuchashisHome number,thesystemwillprompt:“<Contact>hasnoHomenumber”;butthesystemwill stillshowthatperson’sothercontactinformation.
Vo�ce D�g�t D�al/Red�al/CallbackUsethisfunctiontodirectlyvoiceaphonenumbertodial.
Usage: D�g�t D�al1. LaunchtheVoiceCommanderandgivethecommand.Thefollowingexchangewilltakeplace:
System: “Sayyourcommand”
User: “DigitDial”

79
Bus�ness features
System: “Whatnumber?”
User: “0229109088”
System: “0229109088.Confirm,Cancel,Redial?”
NOTE • Ifyousay“Confirm”,thesystemwilldialthenumberautomatically.Ifyousay“Cancel”, thesystemwillreturntotheVoiceCommander’smainscreenandwillpromptyoufora commandagain.Ifyousay“Redial”,thesystemwillpromptforanothernumber. • Toimprovetheaccuracyofthedigitdialer,trainapersonaldigitadaptationmodel.Refer tothe “the“UsingtheDigitTrainer”section on page 87 for more details.ectiononpage87formoredetails.
Usage: Red�alUsethiscommandtodialthelastoutgoingcallinthecallhistory.
1. LaunchtheVoiceCommanderandgivethecommand.
2. Thefollowingexchangewilltakeplace:
System: “Sayyourcommand”
User: “Redial”
System: “CallJohnDoeatHome,isthiscorrect?”
User: “Yes”
System: “Dialing”
Usage: CallbackUsethiscommandtodialthelastincomingnumberinthecallhistory.
1. LaunchtheVoiceCommanderandgivethecommand.
2. Thefollowingexchangewilltakeplace:
System:“Sayyourcommand”

Chapter 9
80
User: “Callback”
System:“CallBryanLeeatHome,isthiscorrect?”
User: “Yes
System: “Dialing”
Vo�ce Start Appl�cat�onUsethisfunctiontoquicklylaunchapplicationsinyourSmartphone.
Usage:Start <Appl�cat�on>1. LaunchtheVoiceCommanderandgivethecommand.
2. Thefollowingexchangewilltakeplace:
System: “Sayyourcommand”
User: “StartCalendar”
System: “Calendar”
NOTE ThesystemwilllaunchtheCalendarapplication.
Today’s/Tomorrow’s/Th�s week’s appo�ntmentsUsethisfunctiontodisplayyourappointmentsinyourCalendar.
Usage:Today’s/Tomorrow/Th�s week’s appo�ntmentsExample:Therearethreeappointmentsfortoday.
1. LaunchtheVoiceCommanderandgivethecommand.Thefollowingexchangewilltakeplace:
System: “Sayyourcommand”
User: “Today’sappointments”
81
Bus�ness features
System: “Thereare3appointments”(Thesystemwillplayeveryappointment’scontents)
NOTE LongpressthevolumeupbuttontostopthecurrentplaybackandgobacktotheVoice Commander’smainscreen.
Ema�l/SMS/What t�me �s �tUsethisfunctiontodisplayyourunreademailsandSMS,andtellyouthetime.
Usage: Read Ema�l / SMSUsethiscommandtoreadyoure-mailsandSMS.
Example:Therearethreeunreade-mails.
1. LaunchtheVoiceCommanderandgivethecommand.Thefollowingexchangewilltakeplace:
System: “Sayyourcommand”
User: “ReadE-mail”
System: “Youhave3e-mail”(Thesystemwillplayeverye-mail’scontents)
NOTE LongpressthevolumeupbuttontostopthecurrentplaybackandgobacktotheVoice Commander’smainscreen.
Usage: What t�me �s �tUsethiscommandtoaskaboutthecurrenttime
1. LaunchtheVoiceCommanderandgivethecommand.Thefollowingexchangewilltakeplace:
System: “Sayyourcommand”
User: “Whattimeisit?”(Thesystemwilltellyouthetime).
Chapter 9
82
Meet�ng modeUsethisfunctiontoturnoffyourphone’sringer.
1. LaunchtheVoiceCommanderandgivethecommand.Thefollowingexchangewilltakeplace:
System: “Sayyourcommand”
User: “Meetingmode”
NOTE Thesystemwillmuteyourphone’sringer.
Call H�storyUsethisfunctiontodisplayyourcallhistory.
Usage: Call H�story1. LaunchtheVoiceCommanderandgivethecommand.Thefollowingexchangewilltakeplace:
System: “Sayyourcommand”
User: “CallHistory”
NOTE Thesystemwilldisplayyourcallhistory.
Vo�ce Play Mus�cUsethisfunctiontoplaysongsinyourmusiclist.
NOTE Thesystemsupports.mp3and.wmafileformats.
Usage: Play <song’s file name>Example1:Youwanttoassignasongplayback.
1. LaunchtheVoiceCommanderandgivethecommand.Thefollowingexchangewilltakeplace:

83
Bus�ness features
System: “Sayyourcommand”
User: “PlayTheMoment”
System: “TheMoment”
NOTE Thescreenswitchestoplaymodeandplaysthesong.
Example2:Youwanttoassignallsongsforplayback.
1. LaunchtheVoiceCommanderandgivethecommand.Thefollowingexchangewilltakeplace:
System: “Sayyourcommand”
User: “Playmusic”
System: “Playmusic”
NOTE Thescreenswitchestoplaymodeandplaysallsongs.
Example3:Youwanttoskipasongduringplayback.
1. LaunchtheVoiceCommanderandgivethecommand.Thefollowingexchangewilltakeplace:
System: “Sayyourcommand”
User: Youcansay“Prev�ous”toplaytheprevioussongorsay“Next”toplaythenext song
Example4:Youwanttopauseorresumeplayingthesong.
1. LaunchtheVoiceCommanderandgivethecommand.Thefollowingexchangewilltakeplace:
System: “Sayyourcommand”
User: Youcansay“Pause”topauseplayingsongsorsay“Resume”toresume
playingsongs.
Chapter 9
84
What can I sayUsethisfunctionifyouhavetroubleusingtheVoiceCommander.Youcanusethisfunctiontolookforavailablevoicecommands
Usage: What can I say1. LaunchtheVoiceCommanderandgivethecommand.Thefollowingexchangewilltakeplace:
System: “Sayyourcommand”
User: “WhatcanIsay”
NOTE • Thesystemwilldisplayalltheavailablevoicecommands. • YoumayalsolookforavailablevoicecommandsfromMenu>HelpintheVoice Commander’smainscreen.
GoodbyeUsethisfunctiontoquittheVoiceCommander.
Usage: Goodbye1. LaunchtheVoiceCommanderandgivethecommand.Thefollowingexchangewilltakeplace:
System: “Sayyourcommand”
User: “Goodbye”
System: “Goodbye”

85
Bus�ness features
Us�ng the Vocab Sett�ngsTheVocabSettingsenablesyoutocreatevoicetagsforentriesinyourContactslist,orforapplicationsinyourSmartphone.Creatingvoicetagsmakesiteasierforyourdevicetorecognizevoicecommands.
To use the Vocab Sett�ngs1. PressVoiceCommand>Menu>Settings.
2. PressMenu,thenselectwhichmenuitemyouwanttocreateavoicetagfor.Alistofavailabledataforyourchosenitemisdisplayed.Forexample,ifyoupressMenu>Contacts,yourlistofcontactentriesisdisplayed.
3. Fromthelist,selectthedatayouwanttocreateavoicetagfor.
4. PressMenu>VoiceTag,thenstarttorecordyourvoice.Forexample,whenyouarecreatingavoicetagforacontactentry,speakthenameofthecontactclearly.
5. PressOKwhenyouaresatisfiedwithyourrecording.Otherwise,pressCancel.
Vo�ce Sens�t�v�tyYourSmartphoneallowsyoutosetthelevelofvoicesensitivity.Whenyouspeakacommandtoyourdevice,yourSmartphonecomparesyourspokencommandtothevoicetagsbasedontheselevelsofsensitivity:Normal,Accurate,andSensitive.
• WhensettoNormal,yourSmartphonewillrecordvoicetagswithoutanyofthebackground noise.
• WhensettoAccurate,yourSmartphonewillrecordvoicetagsexactlyasyourecordedthem.
• WhensettoSensitive,yourSmartphonewillrecordallsoundsincludingbackgroundnoise.

Chapter 9
86
To set the level of vo�ce sens�t�v�ty1. PressVoiceCommand>Menu>VocabSettings.
2. PressMenu,thenselectwhichmenuitemyouwanttocreateavoicetagfor.Alistofavailabledataforyourchosenitemisdisplayed.
3. PressMenu>AdvancedSettings.Choosethesensitivitylevel.
4. PressOKwhenfinished.
Us�ng the D�g�t Tra�nerTheDigitTrainerenablesyoutorecordadigitadaptationmodelforeasyspeechrecognition.
To use the D�g�t Tra�ner1. PressVoiceCommand>Menu>DigitTraining.
2. PressRecord,thensaythedigitsdisplayedonthescreen.
3. Aftertherecording,themessage“Isthisutterancecorrect?”,appears.PressYestoconfirm.

87
Bus�ness features
9-4 Remote PresenterFromyourSmartphone,RemotePresenterallowsyoutoremotelycontrolPowerPoint™presentationsrunningonyourdesktopornotebook.OperatingoveraBluetoothwirelessconnection,itpromotesconvenienceandfreedomofmovementduringyourpresentation.Italsoenablesyoutoreviewslidenoteswithoutaffectingtheaudience’sviewoftheslideshow.
Us�ng the Remote PresenterIMPORTANT • Before you start, make sure to install the Remote Presenter utility on your• Beforeyoustart,makesuretoinstalltheRemotePresenterutilityonyour
computer.YoucanfindtheinstallationfilesinthebundledsupportCD. • RemotePresenterworkswithBluetooth-enabledcomputersonly.
To use the Remote Presenter1. PressStart>Accessories>RemotePresenter.
2. DothefollowingbeforesearchingforBluetoothdevices:
•ActivateBluetoothinyourcomputer.
•LaunchtheRemotePresenterprograminyourcomputer.
Whendone,pressNext.
3. FromthelistofBluetoothdevicesfound,selectthenameofcomputercontainingyourPowerPointpresentationthenpressNext.
4. Whenrequested,keyintheauthenticationpasskeyonyourcomputerandyourSmartphone.
NOTE TheBluetoothauthenticationpasskeyisonlyrequiredifapairedrelationshipisnotyet establishedwiththeotherdevice.

Chapter 9
88
5. FromtheRemoteControllermenuonyourcomputer,clickStarttoestablishaconnection.PressOKtoexitreminder.
6. Whentheconnectionisestablished,pressOK.
7. TapthenameofPowerPoint(.ppt)filetoshowthenpressNext.
Uponselection,Microsoft®PowerPointisautomaticallylaunchedonyourcomputerwiththeselectedfileopen.
8. YoucannowremotelycontrolthePowerPointpresentationonyourcomputerusingyourdevice.
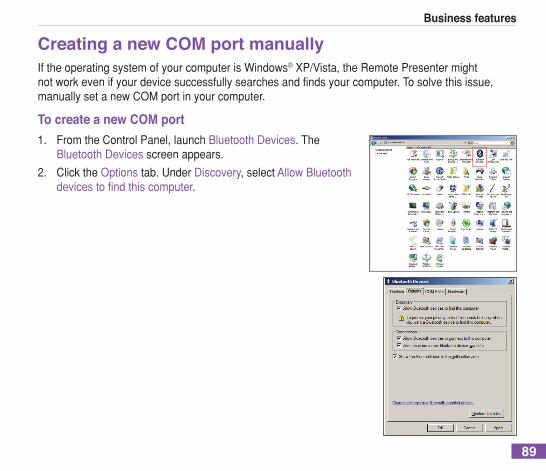
89
Bus�ness features
Creat�ng a new COM port manuallyIftheoperatingsystemofyourcomputerisWindows®XP/Vista,theRemotePresentermightnotworkevenifyourdevicesuccessfullysearchesandfindsyourcomputer.Tosolvethisissue,manuallysetanewCOMportinyourcomputer.
To create a new COM port1. FromtheControlPanel,launchBluetoothDevices.The
BluetoothDevicesscreenappears.
2. ClicktheOptionstab.UnderDiscovery,selectAllowBluetooth devicestofindthiscomputer.
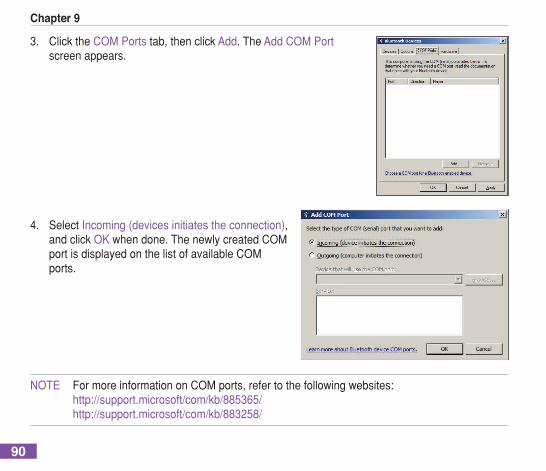
Chapter 9
90
3. ClicktheCOMPortstab,thenclickAdd.TheAddCOMPortscreenappears.
4. SelectIncoming(devicesinitiatestheconnection),andclick OKwhendone.ThenewlycreatedCOMportisdisplayedonthelistofavailableCOMports.
NOTE FormoreinformationonCOMports,refertothefollowingwebsites: http://support.microsoft/com/kb/885365/ http://support.microsoft/com/kb/883258/

91
Chapter 10 Gett�ng ConnectedYoucansetupconnectionstotheInternetandcorporatenetworkatworktodosuchactivitiesasbrowsingtheInternetorintranet,sendingandreceivingemailsandinstantmessages,andsynchronizeinformationusingActiveSync.
Withanactiveconnection,youcanbrowsetheweb,downloade-mails,chatusingMSNMessenger,orsynchronizewirelesslywiththeserver.CheckwithyourInternetServiceProvidertoseeifaconnectionhasalreadybeensetupforyou.
10-1 Auto ConfigurationThisfeatureautomaticallyadjuststhenetworksettingsofyourSmartphonebasedonyourmobileserviceoperatorandlocation.
10-2 W�reless ManagerTheWirelessManagerallowsyoutoenableordisableyourwirelessconnectionsinasinglelocation.Thisisaquickwaytopreservebatterypowerortoprepareyourdeviceforanairplaneflight.
To launch the W�reless ManagerTolaunchtheWirelessManager,youcaneither:
• FromtheHomescreen,pressStart>Settings>Connections>WirelessManager.
• FromtheQWERTYkeypad,press + toquicklylaunchtheWirelessManager.
Chapter 10
92
10-3 W�-F�® connect�onWi-Fi provides the very best connection available for computer networking and home entertainment applications alike - delivering the range, bandwith, and performance that today’s multimedia applications and products demand.
To turn on W�-F�UsetheWirelessManagertoenableordisableWi-Fiinyourdevice.YoucanaccesstheWirelessManagerbyperforminganyofthefollowing:
1. LaunchtheWirelessManager.Todothis,youcaneither:
• FromtheHomescreen,pressStart>Settings>Connections>WirelessManager.
• FromtheQWERTYkeypad,press + toquicklylaunchtheWirelessManager.
2. FromtheWirelessManagerscreen,selectWi-Fi,thenpressAction toturnWi-Fi on.
To add a w�reless network1. TolaunchtheWi-Fisettingspage,youcaneither:
• PressSettingsafterselectingawirelessnetworktoconnectyourdeviceto.
• FromtheHomescreen,pressStart>Settings>Connections>Wi-FiSettings.

93
Gett�ng connected
10-4 Us�ng Bluetooth®
Bluetooth®isashort-rangewirelesscommunicationstechnologythatallowsyoutocommunicatewithotherdevices,suchasheadsets,printers,PCs,GPSreceivers,andotherusers’mobiledevices.DeviceswithBluetoothcapabilitiescanexchangeinformationwithoutrequiringaphysicalconnection.Unlikeinfrared,youdonotneedtolineupdevicestoexchangeinformationthroughBluetooth.Thedevicesonlyneedtobewithinarangeofabout10meters(30feet)inanopenspaceenvironment.Youcanevenbeaminformationtoadeviceinadifferentroom,aslongasitiswithinthespecifiedrange.
Sett�ng Bluetooth modeBydefaultBluetoothisturnedoff.Ifyouturniton,andthenturnoffyourphone,Bluetoothalsoturnsoff.Whenyouturnonyourphoneagain,Bluetoothturnsonautomatically.
To set Bluetooth mode1. OntheHomescreen,pressStart>Settings>Connections>Bluetooth>Menu.
2. SelectTurnOn/OffBluetooth,TurnOn/OffVisibilityandpressDone.
NOTE YoucanalsoturnBluetoothonandoffbypressingandquicklyreleasingPower to accesstheQuickListandselectingWirelessManager.SelectSettings>BluetoothSettings tosetBluetoothmodeorselectBluetoothandpressAction toquicklytoggleBluetooth onandoff.

Chapter 10
94
BLUETOOTH MODE DESCRIPTIONTurnOnBluetooth TheBluetoothradioisturnedonandyoucanuseBluetoothfeatures.
TurnOffBluetooth TheBluetoothradioisturnedoff.Youmightwanttoturntheradiooffattimestoconservebatterypower,orinsituationswhereradiouseisprohibited,likeonairplanesandinhospitals.
TurnOnVisibility TheBluetoothradioisturnedon,andotherBluetoothdeviceswithinrange(about10meters)candetectyourphone.
TurnOffVisibility TheBluetoothradioisturnedon,butotherBluetoothdevicescannotdetectyourphone.
Creat�ng a Bluetooth partnersh�pBeforeyourphonecancommunicatewithanotherdevice,youneedtocreateapartnershipbetweenyourphoneandtheotherBluetooth-enableddevice.Yourphonecancreatepartnershipswithupto10otherBluetoothdevices.
To create a Bluetooth partnersh�p1. EnsurethatthetwodevicesarewithincloserangeandthatbothBluetooth-enableddevicesare
discoverable.
2. OntheHomescreen,pressStart>Settings>Connections>Bluetooth.
3. SelectAddnewDevice....YourphonesearchesforotherBluetooth-enableddevicesanddisplaystheminthelist.
4. SelectthedevicewithwhichyouwanttocreateaBluetoothpartnership,andpressNext.
5. Enterapersonalidentificationnumber(PIN)between1and16characters,andpressNext.
6. EnterthesamePINontheotherdevice.

95
Gett�ng connected
NOTE Onceyoucreateapartnership,youdon’tneedtoTurnonVisibilitytobeaminformation betweenthem.Bluetoothneedsonlytobeturnedon.
Pa�r�ng w�th a Bluetooth headset1. OntheHomescreen,pressStart>Settings>Connections>Bluetooth>MenuandselectTurn
OnBluetoothandTurnOnVisibility.
2. TurnonyourBluetoothheadsetandbringittowithin10metersofyourSmartphone.
3. PutyourBluetoothheadsetintopairingmode.RefertoyourBluetoothheadset’susermanualforinstructions.
4. Onyourphone,pressAddnewdevice....
5. SelecttheBluetoothheadsetontheAddDeviceslistandpressNext.
6. Enterthepasskeyprovidedintheheadsetusermanual.Thephonewillnowpairwiththeheadset.
7. SettheBluetoothmodeonyourphonetoOnandyouarereadytotalkhandsfree.
L�sten�ng to stream�ng aud�o w�th a Bluetooth headset1. MakesurethatyourphoneispairedwithaBluetoothheadsetbyfollowingtheinstructionsin
“PairingwithaBluetoothheadset.”
2. OntheHomescreen,pressStart>Settings>Connections>BluetoothandselectaBluetoothheadsetinBluetoothDevices.
3. OpenWindowsMediaPlayersandstartplayingmusic.

Chapter 10
96
TO DO THISBeaminformationusingBluetooth
MakesurethatBluetoothisturnedonandthatthedevicethatyouwanttobeamtoisdiscoverable.SelecttheitemthatyouwanttobeamandpressMenu>Beam[item].SelecttheBluetoothdevicetowhichyouwanttobeamtheitemandpressBeam.
AcceptaBluetoothpartnership
MakesurethatBluetoothisturnedonandthatyourphoneisdiscoverable.WhenpromptedtoacceptaBluetoothpartnershipwiththeotherdevice,pressYes.InPIN,enterapersonalidentificationnumber(PIN)between1and16characters,andpressDone.YoumustenterthesamePINthatwasenteredonthedevicerequestingtheBluetoothpartnership.
Receivebeamedinformation
OntheHomescreen,pressStart>Settings>Connections>Beam.SelectReceiveincomingbeams.PressYes.ToreceivebeamsbyusingBluetooth,ensureBluetoothisturnedonandthatyourphoneisdiscoverableandwithincloserange.
RenameaBluetoothdevice
OntheHomescreen,pressStart>Settings>Connections>Bluetooth.SelecttheBluetoothdevicetorenameandpressMenu>Edit.InName,enteranewnamefortheBluetoothdevice,pressNext,andthenpressDone.
SynchronizeusingBluetooth
OntheHomescreen,pressStart>ActiveSync>Menu>ConnectviaBluetooth.See“UsingBluetooth”onpage55formoreinformation.
EndaBluetoothpartnership
OntheHomescreen,pressStart>Settings>Connections>Bluetooth. SelecttheBluetoothdevicewithwhichyouwanttoendthepartnershipandpressMenu>Delete.

97
Gett�ng connected
10-5 USB Sett�ngTheUSBSettingfeatureenablesoutouseyourSmartphoneasamemorycardreaderorawebcamusingaUSBconnection.
To select a USB connect�on mode1. Connect your phone to a PC using the USB sync cable.ConnectyourphonetoaPCusingtheUSBsynccable.
2. OntheHomescreen,pressStart>Setting>USBsetting.
3. Scroll to the USB connection mode using the Left and Right navigation keys and pressScrolltotheUSBconnectionmodeusingtheLeftandRightnavigationkeysandpressDone.
• TouseyourSmartphoneasamemorycardreader,selectMassStoragedevice.
• TouseyourSmartphoneasawebcam,selectUSB-Webcam.
NOTE WhenusingtheActiveSync™application,makesurethattheUSBconnectionmodeisset eithertoActiveSync(Turbomode)orActiveSync(Normalmode).Otherwise,theapplication willnotfunctionnormally.
10-6 Connect�ng to the InternetOntheHomescreen,pressStart>Settings>ConnectionstoopentheConnectionsscreen.ConnectionssettingsallowyoutosetupWi-Fi®,Dial-up,VirtualPrivateNetwork(VPN),Bluetooth,Proxy,andGeneralPacketRadioService(GPRS)connections,soyoucanconnecttotheInternetoryourcorporatenetwork.
Chapter 10
98
D�al-up connect�onTo create a D�al-up connect�onEverynetworkconnectionisdifferent.Youshouldgatheralloftherelevantinformationornetworksettingsyouneedbeforestartingthisprocess.
1. OntheHomescreen,pressStart>Settings>Connections>Dial-up.
2. PressMenu>Add.
3. Entertherelevantinformation.
NOTE InConnectsto,selectTheInternettoconnectdirectlytotheInternet,Worktoconnectto yourcorporatenetwork,WAPNetworktoconnecttoaWirelessApplicationProtocol network,orSecureWAPNetworktoconnecttosecureWAPsites,suchasabank.
4. PressDone.
GPRS, Proxy, and VPN connect�onsYoucancreateGPRS,Proxy,andVPNconnectionsusingthesameprocedureasthatforaDial-upconnection.
GPRS connect�onGPRSisahigh-speedtransmissionthroughthemobilephonenetwork,whichprovidespermanentonlineconnection.TouseGPRStoconnecttothenetwork,youneedtoapplyforGPRSservicewithyourInternetServiceProvider.

99
Gett�ng connected
Proxy connect�onIfyourPCisconnectedtoyourISPorprivatenetworkduringsynchronization,yourSmartphoneshoulddownloadtheproperproxysettingsfromyourPC.IfthesesettingsarenotonyourPCorneedtobechanged,askyourInternetServiceProvider(ISP)ornetworkadministratorfortheproxyservername,servertype,port,typeofSocksprotocolused,andyourusernameandpassword.AproxyconnectionisusedtoaccesstheInternetusinganexistingconnectiontoyourcorporatenetwork.
VPN connect�onAVPNconnectionallowsyoutosecurelyconnecttoservers,suchasacorporatenetwork,usinganexistingInternetconnection.Askyournetworkadministratorforyourusername,password,domainname,TCP/IPsettings,andhostnameorIPaddressoftheVPNserver.
Chang�ng opt�on sett�ngsTheOptionsscreenenablesyoutospecifythenumberofredialattempts,timetowaitbeforedisconnection,andhowyourPCconnectstothenetwork.
To access the Opt�ons screen1. OntheHomescreen,pressStart>Settings>Connections.
2. PressMenu>Advanced>Menu>Options.
Add�ng a URL except�onSomecompaniesuseperiodsintheirintranetURLs(forexample,intranet.companyname.com).AWorkURLexceptiontellsInternetExplorerMobiletolookontheWorknetworktofindtheURLinsteadofsearchingtheInternet.

Chapter 10
100
To add a URL except�on1. OntheHomescreen,pressStart>Settings> ConnectionsConnectionsConnections.
2. PressMenu>Advanced>Menu>WorkURLExceptions.
3. PressMenu>Add.
4. InURLPattern,entertheURL,andpressDone.
NOTE • SeparatemultipleURLswithasemicolon(;).
• YoucannotcreateURLexceptionsforURLsontheInternet.

101
Gett�ng connected
10-7 Us�ng Internet Explorer Mob�leYoucanuseInternetExplorerMobiletobrowsemobilefavoritesandchannelsthathavebeendownloadedtoyourdevicewithoutconnectingtotheInternet.YoucanalsoconnecttotheInternetthroughanISPoranetworkconnectiontobrowsetheWeb.
NOTE MakesurethatyouhavesetupyourSmartphone’sconnection.Referto10-6Connecting totheInternet.
Open�ng Internet Explorer Mob�leTo open Internet ExplorerOntheHomescreen,pressStart>Internet>InternetExplorer.
WithInternetExplorerMobile,theFavoritesandHistorylistsaredisplayedasthemainscreeninsteadofaHomepage,soyoucaneasilygotoyourfavoriteWebsites.YoucanaddWebsitesthatyouvisitfrequentlytotheFavoriteslist.

Chapter 10
102
TO DO THISChangeconnectionoptions 1.PressMenu>Tools>Options>Connections.
2.Dooneofthefollowing:• ToallowInternetExplorertoselectnetworksettings,select
Automaticallydetectsettings.• Tomanuallychoosenetworksettings,inSelectnetwork,selectthe
networktowhichInternetExplorershouldconnect.
ViewyourFavoriteslist FromanyWebpage,pressFavorites.
GotoaWebpage InInternetExplorer,pressMenu>AddressBar.EntertheWebpageaddressandpressGo.
GotoaWebpageintheHistorylist
PressMenu>History.SelectaWebpage,andclickGo.
Clearhistory,cookies,ortemporaryfiles
PressMenu>Tools>Options>Memory.
AddaWebpagetotheFavoriteslist
FromtheWebpagethatyouwanttoadd,pressMenu>AddtoFavorites.
ChangethesizeoftextonWebpages
PressMenu>View>TextSizeandselectthesizeyouwant.
ShoworhidepicturesonWebpages
PressMenu>View>ShowPictures.AcheckmarknexttoShowPicturesindicatesthatpictureswillbedisplayedonWebpages.
Viewapageinfullscreenmode PressMenu>View>FullScreen.
Exitfullscreenmode Pressoneofthesoftkeys,andthenpressMenu>View>FullScreentocanceltheselection.
ChangeWebpagedisplayoptions
PressMenu>View.Selectoneofthedisplayoptions.
CreateanewfolderinFavorites PressFavorites>Menu>AddFolder.

103
Gett�ng connected
TO DO THISMoveafavoritetoafolder PressFavorites.Selectthefavoritetomove.PressMenu>Edit.Under
Folder,scrolltothefoldertowhichyouwanttomovethefavoriteandpressDone.
Sendalinkviae-mail GototheWebpageyouwanttosendandpressMenu>Tools>SendLink...>OutlookE-mail.
10-8 Internet Shar�ngTheInternetSharingfeatureenablesyoutouseyourSmartphoneasanexternalmodemforyourcomputertoconnecttotheInternet.ToconnectyourSmartphonetoyourPCforInternetconnectivity,youcanuseeitheraUSBoraBluetoothdevice.
NOTE YoucanquicklylaunchtheInternetSharingfeaturebypressing + fromthe QWERTYkeypad.
Sett�ng up a USB connect�onTo set up a USB connect�on1. OntheHomescreen,pressStart>More>InternetSharing.
2. InPCConnection,selectUSB.
3. InNetworkConnection,selectthetypeofconnectionthatyourSmartphonewillusetoconnecttotheInternet.
NOTE Youmustfirstcreateanetworkconnection.Referto10-6ConnectingtotheInternet.
4. PressConnect.

Chapter 10
104
5. ConnectyourSmartphonetoyourPCusingtheUSBsynccable.ThestatuswillchangetoConnected,andyourPCisnowconnectedtotheInternet.
Sett�ng up a Bluetooth® connect�onTo set up a Bluetooth® connect�on1. CreateaBluetooth®partnershipbetweenyourSmartphoneandyourcomputer.
NOTE Refertothesection“CreatingaBluetoothpartnership”under10-4UsingBluetooth®.
2. OntheHomescreen,pressStart>InternetSharing.
3. InPCConnection,selectBluetoothPAN.
4. InNetworkConnection,selectthetypeofconnectionthatyourSmartphonewillusetoconnecttotheInternet.
NOTE Youmustfirstcreateanetworkconnection.Referto10-6ConnectingtotheInternet.
5. PressConnect.

105
Gett�ng connected
10-9 Network sett�ngThisfunctionhelpsyoutoconfigurenetworksettingsmanuallyorautomaticallyaccordingtoyourSIMcardandyourlocation.
To use Network Sett�ng1. On the Home screen, pressOntheHomescreen,pressStart>Internet>AutoConfiguration.
2. PressMenu>AutoDetect.Thedeviceautomaticallydetectsyourlocationandthecorrectserviceoperator.
ChecktheListalloperatorsboxifyouwanttoseealloperatorsinacertaincountry.
Youcanmanuallychoosethecountryandoperatorsasyouneed.
3. PressDonewhenfinished.
10-10 Network connect�on trouble shoot�ngYoumayencounterthefollowingproblemswhenusingtheMSNmessengerviaGPRSconnection:
• MSNmessengerandMMScannotworksimultaneously.IfstartingtheMSNmessengerfirst, youcannotreceiveorsendMMSmessagesnormallyevenunderdifferentnetwork connections.
ItisrecommendedthatyouclosetheMSNmessengerfirst,thenstarttheMMSfunction.
TodisconnecttheMSNmessenger,dothefollowing:
1. SignouttheMSNaccount.
2. PressandquicklyreleasePower toopentheQuickList,thenselectWirelessManager.
3. TurnOfftheDataconnectionbypressingAction .

106
Chapter 11 Sett�ng and manag�ng system
11-1 System sett�ngPower ManagementUsePowerManagementtocheckthebatterylevelandtoconfigurepower-savingsettings,suchasbacklightanddisplaytime-outs.
1. OntheHomescreen,pressStart>Settings>More>PowerManagement.
2. Adjustthefollowingoptions:
• InBacklighttimeoutonbattery,settheamountoftimeforthephonetobeidlebeforethe backlightturnsoff.
• InBacklighttimeoutonAC,settheamountoftimeforthephonetobeidlebeforethe backlightturnsoffwhenusingACpower.
• InDisplaytimeout,setthetimelimitforthephonetobeidlebeforethescreenturnsoff.
3. PressDone.
Br�ghtness adjustmentYoucanreducethescreenbrightnessforpowersaving.
1. OntheHomescreen,pressStart>Settings>More>Brightness.
2. AdjustthebrightnessbypressingtheLeftandRightnavigationkeys.
Chapter 11 Sett�ng and manag�ng system
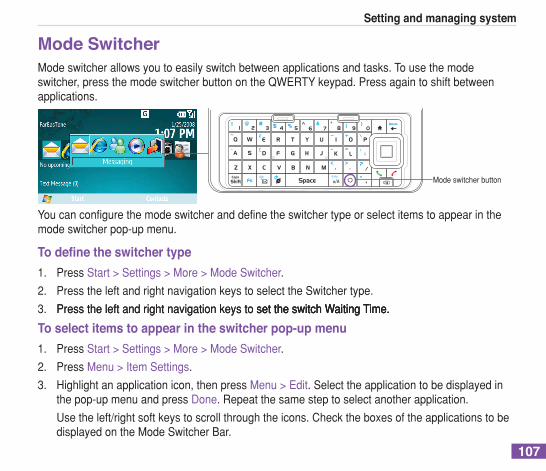
107
Chapter 11 Sett�ng and manag�ng system
Mode Sw�tcherModeswitcherallowsyoutoeasilyswitchbetweenapplicationsandtasks.Tousethemodeswitcher,pressthemodeswitcherbuttonontheQWERTYkeypad.Pressagaintoshiftbetweenapplications.
Youcanconfigurethemodeswitcheranddefinetheswitchertypeorselectitemstoappearinthemodeswitcherpop-upmenu.
To define the switcher type1. PressStart>Settings>More>ModeSwitcher.
2. PresstheleftandrightnavigationkeystoselecttheSwitchertype.
3. Press the left and right navigation keys to set the switch Waiting Time.Presstheleftandrightnavigationkeysto set the switch Waiting Time.settheswitchWaitingTime.
To select �tems to appear �n the sw�tcher pop-up menu1. PressStart>Settings>More>ModeSwitcher.
2. PressMenu>ItemSettings.
3. Highlightanapplicationicon,thenpressMenu>Edit.Selecttheapplicationtobedisplayedinthepop-upmenuandpressDone.Repeatthesamesteptoselectanotherapplication.
Usetheleft/rightsoftkeystoscrollthroughtheicons.ChecktheboxesoftheapplicationstobedisplayedontheModeSwitcherBar.
Modeswitcherbutton

108
Chapter 11 Sett�ng and manag�ng systemChapter 11 Sett�ng and manag�ng system
Restart�ng your SmartphoneOccasionally,youmayneedtorestartyourphone,suchaswhenaprogramisnotperformingproperly,orthephonedoesnotrespondtokeypresses.
To restart the phone1. Removethebattery.
2. Reinsertthebatteryandturnonyourphone.
Resett�ng your SmartphoneResettingyourphonewillremovealldatafrommemoryandrestorethephonebacktothefactorydefaultsettings.
NOTE Whenyouresetyourphone,alldatayouhaveenteredinRAM,includingallfiles,system settings,andadditionalprogramsyouhaveinstalled,willbeerased.
To reset your phone1. OntheHomescreen,pressStart>DefaultSettings.
2. Enter1234toconfirmthatyouwanttorestoredefaultsettingsandpressOK.
Thephonewillrestartautomaticallyafteritisreset.
Chapter 11 Sett�ng and manag�ng system
109
Chapter 11 Sett�ng and manag�ng system
11-2 Manag�ng the systemAdd�ng and remov�ng programsYoucanuseActiveSynctoaddprogramstoyourphoneoraddaprogramdirectlyfromtheInternet.
To add programs1. DownloadtheprogramtoyourPC.
2. Readanyinstallationinstructionsordocumentationthatcomeswiththeprogram.Manyprogramsprovidespecialinstallationinstructions.
3. ConnectyourSmartphonetothePCusingaUSBcable.
4. Double-clickthe*.exefile.
• Iftheexecutablefileisaninstallationwizard,followtheinstructionsonthescreen.Oncethe programhasbeeninstalledonyourPC,thewizardwillautomaticallytransfertheprogramto yourphone.
• Ifaninstallationwizarddoesnotstart,youwillseeanerrormessagestatingthattheprogram isvalidbutthatitisdesignedforadifferenttypeofPC.Youwillneedtocopythisprogramto yourphone.Ifyoucannotfindanyinstallationinstructionsfortheprogram,useActiveSyncto copytheprogramfiletotheProgramFilesfolderonyourphone.
To remove a program
NOTE PreinstalledapplicationsinyourSmartphonecannotberemoved.
1. OntheHomescreen,pressStart>Settings>More>RemovePrograms.
2. Scrolltotheprogramtoremove.
3. PressMenu>Remove.

110
Chapter 11 Sett�ng and manag�ng systemChapter 11 Sett�ng and manag�ng system
Keep�ng your Smartphone secureCustomizethelevelofsecurityyouwantyourphonetohavebylockingthekeypad,theSIMcard,ortheentirephone.
To lock the keypad and mult�med�a player controlsYoucandoeitherofthefollowing:
• Press and quickly releaseandquicklyreleasePower to display the Quick List screen and selecttodisplaytheQuickListscreenandselect Lock.
• PressandholdtheEndkey .
To unlock the keypad and mult�med�a player controlsPressUnlockfollowedquicklybytheAsteriskkey .
Lock�ng the SIM cardLockingtheSIMcardpreventsothersfromusingyourSmartphoneuntilthecorrectpasswordisentered,butyouwillstillbeabletomakeemergencycalls.Whenyouturnonthephone,youwillbeaskedtoenteryourPIN1password.
To lock the SIM card and set the PIN1. OntheHomescreen,pressStart>Settings>Security>EnableSIMPIN.
2. Enterthepassword(SIMcard’sPIN1),andpressDone.
OncethePINisenabled,yourSmartphonewillaskyoutoenterthePINwheneveryouturniton.
To unlock the SIM card1. OntheHomescreen,pressStart>Settings>Security>DisableSIMPIN.
2. Enterthepassword(SIMcard’sPIN1),andpressDone.
Chapter 11 Sett�ng and manag�ng system
111
Chapter 11 Sett�ng and manag�ng system
To change the PIN1. OntheHomescreen,pressStart>More>Settings>More>Security>ChangeSIMPIN.
2. EntertheoriginalPIN1code.
3. EnterandconfirmthenewPIN,andthenpressDone.
To change PIN21. OntheHomescreen,pressStart>More>Settings>Security>ChangePIN2.
2. EntertheoriginalPIN2code(SIMcard’sPIN2).
3. EnterandconfirmthenewPIN2,andthenpressDone.
Lock�ng the phoneTo lock the phone1. On the Home screen, pressOntheHomescreen,pressStart>More>Settings>More>Security>DeviceLock.
2. SelectthePromptifdeviceunusedforcheckboxbypressingAction .
3. Scrolldowntothefieldbelowandselecttheamountoftimeforthephonetobeinactivebeforeitlocksautomatically.
4. InPasswordtype,selectthetypeofpasswordyouwanttouse.
5. Enterandconfirmyourpassword,andthenpressDone.
Controll�ng outgo�ng callsFixeddialingallowsyoutorestrictyouroutgoingcallstoselectedphonenumbers,ifsupportedbyyourSIMcard.YouneedthePIN2codeforthisfunction.Whenthisfunctionisactive,youcanonlycallthosephonenumbersthatareincludedinthefixeddialinglist.Callbarring,ontheotherhand,blockscertaintypesofcall.Beforeyoucanuseit,youmustsetupaFixeddialinglist.
112
Chapter 11 Sett�ng and manag�ng system
1. OntheHomescreen,pressStart>Settings>Phone>More>FixedDialing.
2. SelectEnableFixedDialingbypressingAction and then pressandthenpressDone.
3. EnteryourSIMPIN2,andpressDone.Oncefixeddialinghasbeenturnedon,youcanbegintostorefixeddialingnumbers.
4. PressMenu>EditNumbers.
5. PressMenu>Addandenterthephonenumbertoaddtoyourfixeddialinglist.
6. PressDone.
7. Repeatsteps2to6toaddmorenumbers.
Block�ng �ncom�ng/outgo�ng callsEmergencycallscanstillbemadewithCallBarringon.
1. OntheHomescreen,pressStart>Settings>Phone>CallBarring.
2. InBlockincomingcalls,selectOff,Whenroaming,orAllcalls.
3. InBlockoutgoingcalls,selectOff,Int’lexcepttoHome,Int’lcalls,orAllcalls.
4. PressDone.
Chapter 11 Sett�ng and manag�ng system
113
Chapter 12 Other Features
12-1 Task ManagerTheTaskManagerdisplaystheavailableapplicationsinyourSmartphone,andenablesyoutoview,close,activate,orcloseallapplications;aswellasgivetheresourceinformationaboutanapplication.
To launch the Task Manager1. FromtheHomescreen,pressStart>Accessories>TaskManager.
2. Selecttheapplication,andpressMenu.FromtheMenuselection,choosewhatyouwanttodowiththeapplication.

Chapter 12
114
ICON DESCRIPTION
TheWordVieweropensawordfile.
ThePDFVieweropensapdffile.
ThePPTVieweropensaPowerpointpresentationfile.
TheExcelVieweropensanExcelspreadsheetfile.
12-2 ClearVue Office ApplicationsYourSmartphonecomeswithpreinstalledClearVueOfficeapplicationsthatenablesyoutoviewdocuments,spreadsheets,presentations,andpdffiles.
Word V�ewerThisviewershowsdocumentscreatedinMicrosoftWord97,2000,2002(XP),and2003.ItcanalsodisplaydocumentssavedinRichTextFormat(.rtf).
Tostartthisapplication,pressStart>Office>WordViewer.
PDF V�ewerThisviewerdisplaysPortableDocumentFormat(.pdf)files.
Tostartthisapplication,pressStart>Office>PDFViewer.
Other features
115
PPT V�ewerThisviewershowspresentationscreatedinMicrosoftPowerPoint97,2000,2002(XP),and2003.
Tostartthisapplication,pressStart>Office>PPTViewer.
Excel V�ewerThisviewerdisplaysspreadsheetscreatedinMicrosoftExcel97,2000,2002(XP),and2003..
Tostartthisapplication,pressStart>Office>ExcelViewer.

Chapter 12
116
12-3 Us�ng Java (MIDlet Manager)YourphonesupportsJava2Edition,J2ME.TheJavaMIDletManagerallowsyoutodownloadJavaapplications,suchasgamesandutilities,thatarespecificallydesignedformobilephonesandtheneasilyinstallandmanagethem.
Toinstall,run,andmanageMIDletprograms(MIDlets)onyourphone,youhavetofirstdownloadtheMIDletstoyourdevicedirectly
Install�ng Java MIDlets d�rectly from the InternetTo �nstall Java MIDlets d�rectly from the Internet1. OntheHomescreen,pressStart>Accessories>Java.TheJavascreenappears.
2. PressMenu>Install>InternettoopenInternetExplorer.
3. LocatetheMIDlet/MIDletsuitewhileconnectedtotheInternet.
4. SelecttheMIDlet/MIDletsuitetodownload.
5. PressYes tostartinstallingtheMIDlet/MIDletsuite.
6. PressDone toconfirm.
Install�ng Java MIDlets from a PCYoucaninstalltheMIDlets/MIDletsuitesonyourphonefromaPCusingtheUSBsynccable,orBluetooth.MIDletscopiedtoyourphoneusinginfrared,Bluetooth,ore-mailattachmentsareautomaticallysavedintheMyDocumentsfolder.
To �nstall Java MIDlets from your PC1. DownloadthegamesandutilitiesthatyouwanttoinstallonyourSmartphonefromyourPC.
Other features
117
2. OpenActiveSynconyourPCandclickExplore.
3. GototheMyDevice\MyDocumentsortheMyDevice\StorageCardfolderonyourSmartphoneandpastethefiles.
4. OntheHomescreenofyourphone,pressStart>Tools>Java.TheesmertecJavascreenappears.
5. PressMenu>Install>Local.AlistofallMIDlets/MIDletsuitesavailabledisplays.
6. SelecttheMIDlet/MIDletsuitetoinstallandpress Install.
7. PressYestoinstall.
8. PressDonetoconfirm.
Runn�ng Java MIDletsTo run Java MIDlets1. OntheHomescreen,pressStart>Accessories > JavaAccessories> Java>Java.ThephonedisplaysalistofMIDlets.
2. SelectaMIDlet,andthenpressAction .
TO DO THISUninstallaMIDlet FromtheJavamainscreen,selecttheMIDlettouninstallandpressMenu
>Uninstall.
UpdateaMIDlet FromtheJavamainscreen,selecttheMIDlettoupdateandpressMenu>Update.
ChangethedisplaynameofaMIDlet
FromtheJavamainscreen,selecttheMIDlettorenameandpressMenu>Edit.

118
Federal Commun�cat�ons Comm�ss�on StatementThisdevicecomplieswithPart15oftheFCCRules.Operationissubjecttothefollowingtwoconditions:
1) Thisdevicemaynotcauseharmfulinterference,and2) Thisdevicemustacceptanyinterferencereceived,includinginterferencethatmaycauseundesiredoperation.
Thisdeviceanditsantennamustnotbeco-locatedoroperatinginconjunctionwithanyotherantennaortransmitter.
ThisequipmenthasbeentestedandfoundtocomplywiththelimitsforaClassBdigitaldevice,pursuanttoPart15oftheFCCRules.Theselimitsaredesignedtoprovidereasonableprotectionagainstharmfulinterferenceinaresidentialinstallation.Thisequipmentgenerates,usesandcanradiateradiofrequencyenergyand,ifnotinstalledandusedinaccordancewithmanufacturer’sinstructions,maycauseharmfulinterferencetoradiocommunications.However,thereisnoguaranteethatinterferencewillnotoccurinaparticularinstallation.
Canad�an Department of Commun�cat�ons StatementThisdigitalapparatusdoesnotexceedtheClassBlimitsforradionoiseemissionsfromdigitalapparatussetoutintheRadioInterferenceRegulationsoftheCanadianDepartmentofCommunications.
Th�s class B d�g�tal apparatus compl�es w�th Canad�an ICES-003.
Append�x

119
UL Safety Not�cesRequiredforUL1459coveringtelecommunications(telephone)equipmentintendedtobeelectricallyconnectedtoatelecommunicationnetworkthathasanoperatingvoltagetogroundthatdoesnotexceed200Vpeak,300Vpeak-to-peak,and105Vrms,andinstalledorusedinaccordancewiththeNationalElectricalCode(NFPA70).
WhenusingtheSmartphone,basicsafetyprecautionsshouldalwaysbefollowedtoreducetheriskoffire,electricshock,andinjurytopersons,includingthefollowing:
• Do not usetheSmartphonenearwater,forexample,nearabathtub,washbowl,kitchensink or laundrytub,inawetbasementornearaswimmingpool.
• Do not usetheSmartphoneduringanelectricalstorm.Theremaybearemoteriskofelectric shock fromlightning.
• Do not usetheSmartphoneinthevicinityofagasleak.
RequiredforUL1642coveringprimary(non-rechargeable)andsecondary(rechargeable)lithiumbatteriesforuseaspowersourcesinproducts.Thesebatteriescontainmetalliclithium,oralithiumalloy,oralithiumion,andmayconsistofasingleelectrochemicalcellortwoormorecellsconnectedinseries,parallel,orboth,thatconvertchemicalenergyintoelectricalenergybyanirreversibleorreversiblechemicalreaction.
• Do not disposetheSmartphonebatterypackinafire,astheymayexplode.Checkwithlocal codes forpossiblespecialdisposalinstructionstoreducetheriskofinjurytopersonsduetofireor explosion.
• Do not usepoweradaptersorbatteriesfromotherdevicestoreducetheriskofinjuryto personsduetofireorexplosion.UseonlyULcertifiedpoweradaptersorbatteriessuppliedby the manufacturerorauthorizedretailers.

120
Proh�b�t�on of co-locat�onThisdevicemustnotbeco-locatedoroperatinginconjunctionwithanyotherantennaortransmitter
15.105 Federal Commun�cat�ons Comm�ss�on (FCC) Requ�rements, Part 15ThisequipmenthasbeentestedandfoundtocomplywiththelimitsforaclassBdigitaldevice,pursuanttopart15oftheFCCRules.Theselimitsaredesignedtoprovidereasonableprotectionagainstharmfulinterferenceinaresidentialinstallation.
Thisequipmentgenerates,usesandcanradiateradiofrequencyenergyand,ifnotinstalledandusedinaccordancewiththeinstructions,maycauseharmfulinterferencetoradiocommunications.However,thereisnoguaranteethatinterferencewillnotoccurinaparticularinstallation.Ifthisequipmentdoescauseharmfulinterferencetoradioortelevisionreception,whichcanbedeterminedbyturningtheequipmentoffandon,theuserisencouragedtotrytocorrecttheinterferencebyoneormoreofthefollowingmeasures:
—Reorientorrelocatethereceivingantenna.—Increasetheseparationbetweentheequipmentandreceiver.—Connecttheequipmentintoanoutletonacircuitdifferentfromthattowhichthereceiverisconnected.—Consultthedealeroranexperiencedradio/TVtechnicianforhelp.
Regulatory �nformat�on / D�scla�mersInstallationanduseofthisWirelessLANdevicemustbeinstrictaccordancewiththeinstructionsincludedintheuserdocumentationprovidedwiththeproduct.Anychangesormodifications(includingtheantennas)madetothisdevicethatarenotexpresslyapprovedbythemanufacturermayvoidtheuser’sauthoritytooperatetheequipment.Themanufacturerisnotresponsibleforanyradioortelevisioninterferencecausedbyunauthorizedmodificationofthisdevice,orthesubstitutionoftheconnectingcablesandequipmentotherthanmanufacturerspecified.Itistheresponsibilityoftheusertocorrectanyinterferencecausedbysuchunauthorizedmodification,substitutionorattachment.Manufactureranditsauthorizedresellersordistributorswillassumenoliabilityforanydamageorviolationofgovernmentregulationsarisingfromfailingtocomplywiththeseguidelines.
Checkl�st of Regulatory Statement 15.21
Youarecautionedthatanychangesormodificationsnotexpresslyapprovedinthismanualcouldvoidyourauthorizationtousethedevice.
CAUTION:Anychangesormodificationsnotexpresslyapprovedbythepartyresponsibleforcompliancecouldvoidtheuser’sauthoritytooperatetheequipment.

121
Replaceable batter�esIfanequipmentisprovidedwithareplaceablebatteryandifreplacementbyanincorrecttypecouldresultinanexplosion(suchasreplacingwithsomelithiumbatteries),thefollowingapplies:
– ifthebatteryisplacedinanOPERATORACCESSAREA,thereshallbeamarkingclosetothebatteryorastatementinboththeoperatingandtheservicinginstructions;
– ifthebatteryisplacedelsewhereintheequipment,thereshallbeamarkingclosetothebatteryorastatementintheservicinginstructions.
Themarkingorstatementshallincludethefollowingorsimilartext:CAUTION
RISK OF EXPLOSION IF BATTERY IS REPLACED BY AN INCORRECT TYPE.CHECK LOCAL REGULATIONS FOR DISPOSAL OF USED BATTERIES
CAUTION:TomaintaincompliancewithFCC’sRFexposureguidelines,thisequipmentshouldbeinstalledandoperatedwithminimumdistance20cmbetweentheradiatorandyourbody.Useonthesuppliedantenna.Unauthorizedantenna,modification,orattachmentscoulddamagethetransmitterandmayviolateFCCregulations.
Safety Informat�onInordertomaintaincompliancewithFCC’sRFexposureguidelines,thisequipmentshouldbeinstalledandoperatedwithminimumdistance20cmbetweentheradiatorandyourbody.Useonlywithsuppliedantenna.Unauthorizedantenna,modification,orattachmentscoulddamagethetransmitterandmayviolateFCCregulations.
Caut�on Statement of the FCC Rad�o Frequency ExposureThisWirelessLANradiodevicehasbeenevaluatedunderFCCBulletinOET65CandfoundcomplianttotherequirementsassetforthinCFR47Sections2.1091,2.1093,and15.247(b)(4)addressingRFExposurefromradiofrequencydevices.TheradiationoutputpowerofthisWirelessLANdeviceisfarbelowtheFCCradiofrequencyexposurelimits.Nevertheless,thisdeviceshallbeusedinsuchamannerthatthepotentialforhumancontactduringnormaloperation—asamobileorportabledevicebutuseinabody-wornwayisstrictlyprohibit.Whenusingthisdevice,acertainseparationdistancebetweenantennaandnearbypersonshastobekepttoensureRFexposurecompliance.InordertocomplywiththeRFexposurelimitsestablishedintheANSIC95.1standards,thedistancebetweentheantennasandtheusershouldnotbelessthan20cm.

122