Embed Size (px)
Citation preview

Takara Bio USA, Inc. 1290 Terra Bella Avenue, Mountain View, CA 94043, USA U.S. Technical Support: [email protected]
United States/Canada 800.662.2566
Asia Pacific +1.650.919.7300
Europe +33.(0)1.3904.6880
Japan +81.(0)77.565.6999
Page 1 of 47
Takara Bio USA, Inc.
SMART-Seq® ICELL8® cx Application Kit User Manual
Cat. Nos. 640222, 640223, 640224 for ICELL8 cx CELLSTUDIO™ v2.0 Software (031320)
SMART-Seq ICELL8 cx Application Kit User Manual
(031320) takarabio.com Takara Bio USA, Inc.
Page 2 of 47
Table of Contents I. Introduction ..................................................................................................................................................................... 4 II. List of Components ......................................................................................................................................................... 8 III. Additional Materials Required ........................................................................................................................................ 8 IV. General Considerations ................................................................................................................................................. 10
A. Protocol Best Practices .............................................................................................................................................. 10
B. Safety ........................................................................................................................................................................ 11
C. ICELL8 cx System Application Notes ...................................................................................................................... 11
D. Software .................................................................................................................................................................... 12
E. ICELL8 350v Chip.................................................................................................................................................... 12
V. Procedure ...................................................................................................................................................................... 13 A. Protocol: Stain Cells.................................................................................................................................................. 13
B. Protocol: Dilute and Dispense Cells (1st Dispense) .................................................................................................. 15
C. Protocol: Image Cells (If Necessary) ........................................................................................................................ 21
D. Protocol: Analyze Nanowells with ICELL8 cx CellSelect Software (Optional) ...................................................... 22
E. Protocol: Full-Length cDNA Synthesis by RT-PCR (2nd Dispense) ........................................................................ 23
F. Protocol: Forward Indexing Primers (3rd Dispense) ................................................................................................ 26
G. Protocol: Tagmentation (4th Dispense)...................................................................................................................... 28
H. Protocol: Reverse Indexing Primers (5th Dispense) and Library PCR 1 ................................................................... 30
I. Protocol: Library Extraction from the Chip .............................................................................................................. 33
J. Protocol: Purification of the Extracted Library ......................................................................................................... 33
K. Protocol: Library Amplification (Library PCR 2) .................................................................................................... 35
L. Protocol: Purification of the Sequencing-Ready Library .......................................................................................... 35
M. Protocol: Library Validation and Quantification ...................................................................................................... 37
Appendix A: Forward and Reverse Indexing Primers .......................................................................................................... 39 Appendix B: RT-PCR Cycling Guidelines ........................................................................................................................... 44 Appendix C: Guidelines for Library Sequencing .................................................................................................................. 44
A. Final Sequencing Library Structure .......................................................................................................................... 44
B. Compatible Illumina Platforms ................................................................................................................................. 44
C. Recommendations for Library Sequencing ............................................................................................................... 45
Appendix D: Demultiplexing and Data Analysis.................................................................................................................. 46
SMART-Seq ICELL8 cx Application Kit User Manual
(031320) takarabio.com Takara Bio USA, Inc.
Page 3 of 47
Table of Figures Figure 1. Complete SMART-Seq ICELL8 cx Application Kit workflow .............................................................................. 5 Figure 2. Protocols in the SMART-Seq ICELL8 cx Application Kit workflow. .................................................................... 7 Figure 3. ICELL8 cx Single-Cell System Stage Module ...................................................................................................... 12 Figure 4. ICELL8 350v Chip features .................................................................................................................................. 12 Figure 5. ICELL8 Chip Holder. ............................................................................................................................................ 13 Figure 6. Setting up the 384-Well Source Plate for dispensing cell samples and controls. .................................................. 18 Figure 7. Using CELLSTUDIO software to dispense cells into the ICELL8 350v Chip. .................................................... 19 Figure 8. Select index set workflow prompt.......................................................................................................................... 20 Figure 9. Imaging and RC films required for the dispenses.................................................................................................. 20 Figure 10. Preparing and adhering the RC film .................................................................................................................... 21 Figure 11. ICELL8 cx Centrifuge Chip Spinner. .................................................................................................................. 21 Figure 12. New stack info dialog window. ............................................................................................................................ 22 Figure 13. Aliquoting 50 µl of RT-PCR Master Mix into each of the orange source wells. ................................................ 24 Figure 14. Using CELLSTUDIO software to dispense the RT - PCR mix. ......................................................................... 25 Figure 15. SMART-Seq ICELL8 forward indexing primers ................................................................................................ 27 Figure 16. Using CELLSTUDIO software to dispense Index 1. .......................................................................................... 28 Figure 17. Adding Tagmentation Master Mix to the source plate wells shown in yellow. .................................................. 29 Figure 18. Using CELLSTUDIO software to dispense the Tagmentation mix. ................................................................... 30 Figure 19. SMART-Seq ICELL8 reverse indexing primers ................................................................................................. 31 Figure 20. Using CELLSTUDIO software to dispense Index 2. .......................................................................................... 32 Figure 21. Electropherogram from a library prepared from K-562 nuclei quantified using an Agilent 2100 Bioanalyzer. . 38 Figure 22. Structure of a final sequencing library ................................................................................................................. 44
Table of Tables Table 1. Available SMART-Seq ICELL8 cx Application Kit contents. ................................................................................. 8 Table 2. Sample preparation guidelines. ............................................................................................................................... 17 Table 3. SMART-Seq ICELL8 Indexing Primer Set – A and Set B forward indexing primers 1–72. .................................... 39 Table 4. SMART-Seq ICELL8 Indexing Primer Set – A reverse indexing primers 1–72. ................................................... 40 Table 5. SMART-Seq ICELL8 Indexing Primer Set – B reverse indexing primers 73–144. ............................................... 42 Table 6. Sequencing depth recommendations. ...................................................................................................................... 45 Table 7. Sequencing run parameters. .................................................................................................................................... 46
SMART-Seq ICELL8 cx Application Kit User Manual
(031320) takarabio.com Takara Bio USA, Inc.
Page 4 of 47
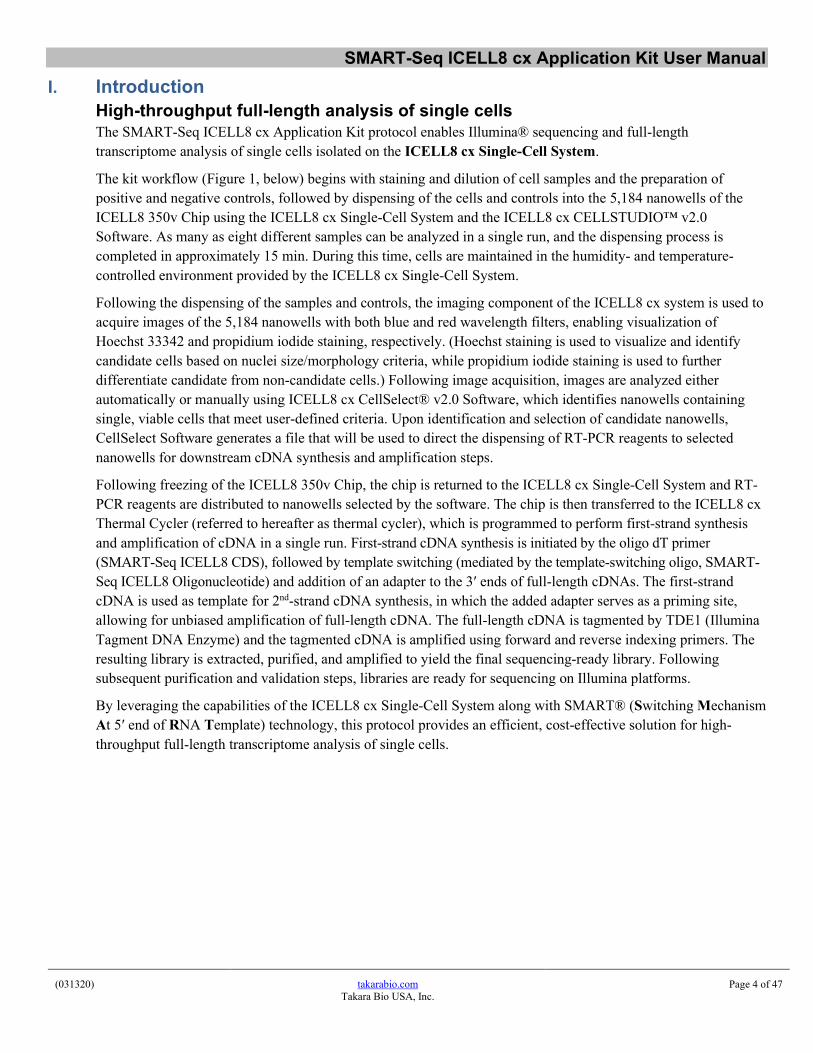
I. Introduction High-throughput full-length analysis of single cells The SMART-Seq ICELL8 cx Application Kit protocol enables Illumina® sequencing and full-length transcriptome analysis of single cells isolated on the ICELL8 cx Single-Cell System.
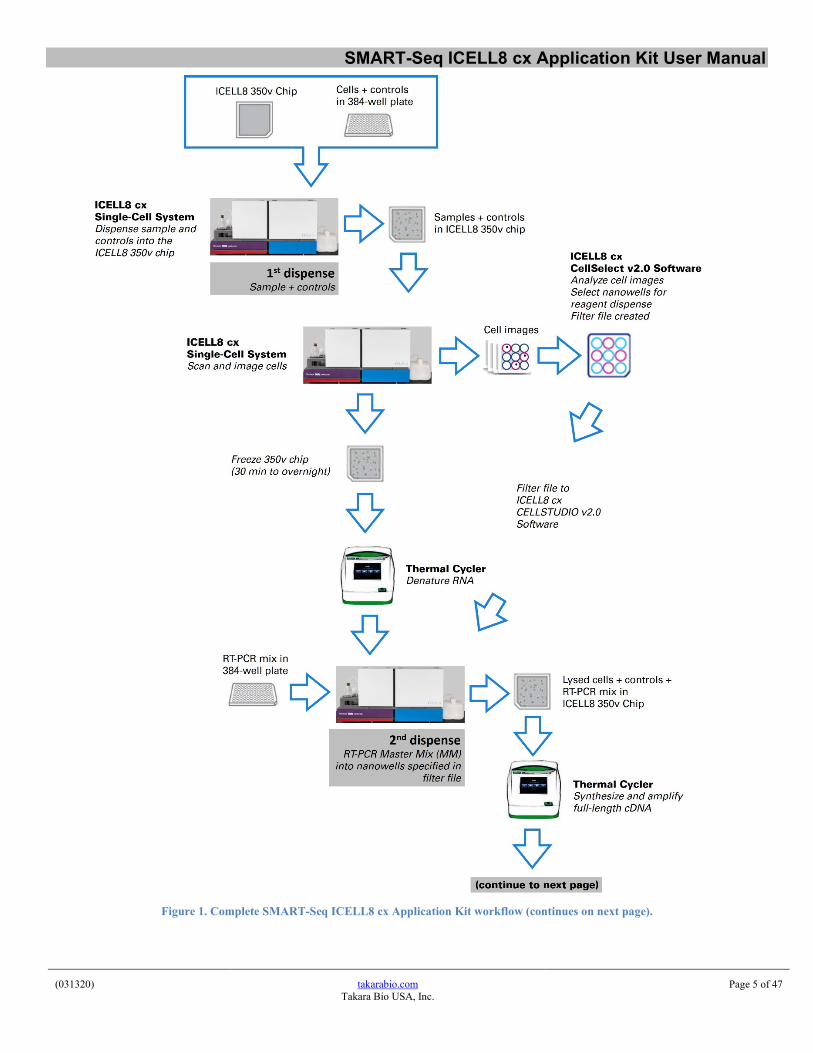
The kit workflow (Figure 1, below) begins with staining and dilution of cell samples and the preparation of positive and negative controls, followed by dispensing of the cells and controls into the 5,184 nanowells of the ICELL8 350v Chip using the ICELL8 cx Single-Cell System and the ICELL8 cx CELLSTUDIO™ v2.0 Software. As many as eight different samples can be analyzed in a single run, and the dispensing process is completed in approximately 15 min. During this time, cells are maintained in the humidity- and temperature-controlled environment provided by the ICELL8 cx Single-Cell System.
Following the dispensing of the samples and controls, the imaging component of the ICELL8 cx system is used to acquire images of the 5,184 nanowells with both blue and red wavelength filters, enabling visualization of Hoechst 33342 and propidium iodide staining, respectively. (Hoechst staining is used to visualize and identify candidate cells based on nuclei size/morphology criteria, while propidium iodide staining is used to further differentiate candidate from non-candidate cells.) Following image acquisition, images are analyzed either automatically or manually using ICELL8 cx CellSelect® v2.0 Software, which identifies nanowells containing single, viable cells that meet user-defined criteria. Upon identification and selection of candidate nanowells, CellSelect Software generates a file that will be used to direct the dispensing of RT-PCR reagents to selected nanowells for downstream cDNA synthesis and amplification steps.
Following freezing of the ICELL8 350v Chip, the chip is returned to the ICELL8 cx Single-Cell System and RT-PCR reagents are distributed to nanowells selected by the software. The chip is then transferred to the ICELL8 cx Thermal Cycler (referred to hereafter as thermal cycler), which is programmed to perform first-strand synthesis and amplification of cDNA in a single run. First-strand cDNA synthesis is initiated by the oligo dT primer (SMART-Seq ICELL8 CDS), followed by template switching (mediated by the template-switching oligo, SMART-Seq ICELL8 Oligonucleotide) and addition of an adapter to the 3′ ends of full-length cDNAs. The first-strand cDNA is used as template for 2nd-strand cDNA synthesis, in which the added adapter serves as a priming site, allowing for unbiased amplification of full-length cDNA. The full-length cDNA is tagmented by TDE1 (Illumina Tagment DNA Enzyme) and the tagmented cDNA is amplified using forward and reverse indexing primers. The resulting library is extracted, purified, and amplified to yield the final sequencing-ready library. Following subsequent purification and validation steps, libraries are ready for sequencing on Illumina platforms.
By leveraging the capabilities of the ICELL8 cx Single-Cell System along with SMART® (Switching Mechanism At 5′ end of RNA Template) technology, this protocol provides an efficient, cost-effective solution for high-throughput full-length transcriptome analysis of single cells.
SMART-Seq ICELL8 cx Application Kit User Manual
(031320) takarabio.com Takara Bio USA, Inc.
Page 5 of 47
Figure 1. Complete SMART-Seq ICELL8 cx Application Kit workflow (continues on next page).

SMART-Seq ICELL8 cx Application Kit User Manual
(031320) takarabio.com Takara Bio USA, Inc.
Page 6 of 47
Figure 1. Complete SMART-Seq ICELL8 cx Application Kit workflow (continued from previous page).
SMART-Seq ICELL8 cx Application Kit User Manual
(031320) takarabio.com Takara Bio USA, Inc.
Page 7 of 47
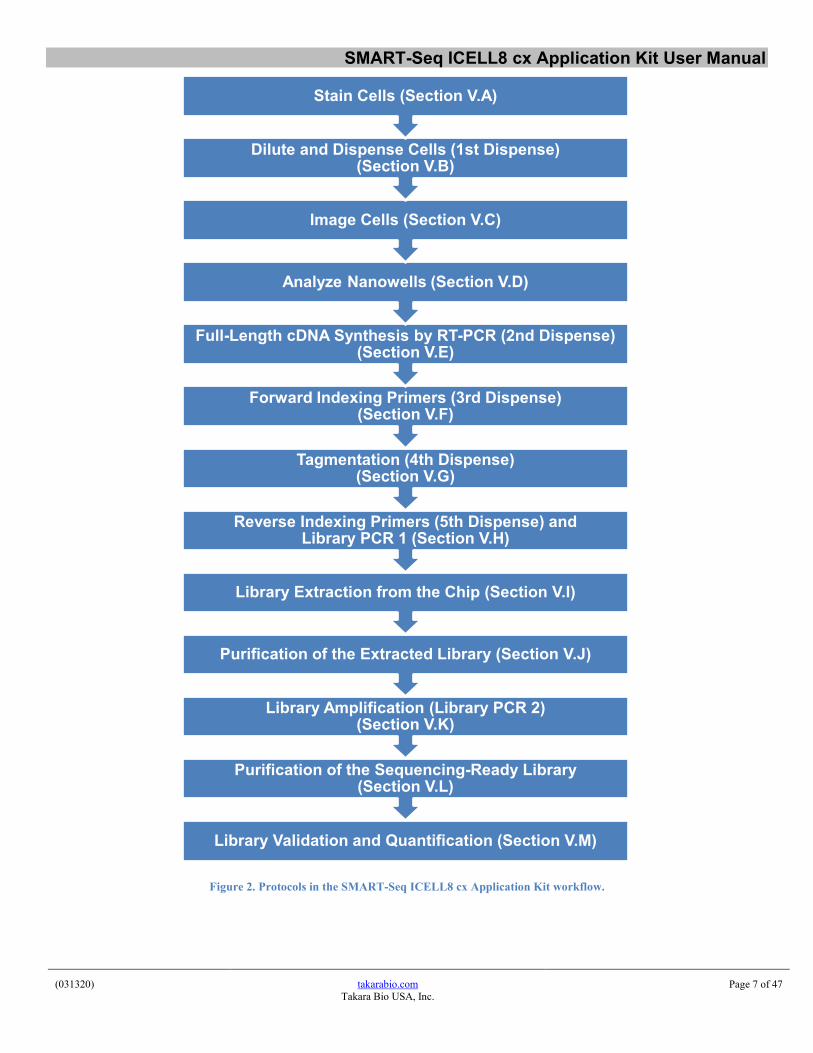
Figure 2. Protocols in the SMART-Seq ICELL8 cx Application Kit workflow.
Library Validation and Quantification (Section V.M)
Purification of the Sequencing-Ready Library (Section V.L)
Library Amplification (Library PCR 2) (Section V.K)
Purification of the Extracted Library (Section V.J)
Library Extraction from the Chip (Section V.I)
Reverse Indexing Primers (5th Dispense) and Library PCR 1 (Section V.H)
Tagmentation (4th Dispense)(Section V.G)
Forward Indexing Primers (3rd Dispense)(Section V.F)
Full-Length cDNA Synthesis by RT-PCR (2nd Dispense) (Section V.E)
Analyze Nanowells (Section V.D)
Image Cells (Section V.C)
Dilute and Dispense Cells (1st Dispense)(Section V.B)
Stain Cells (Section V.A)

SMART-Seq ICELL8 cx Application Kit User Manual
(031320) takarabio.com Takara Bio USA, Inc.
Page 8 of 47
II. List of Components The SMART-Seq ICELL8 cx Application workflow requires use of an ICELL8 cx Single-Cell System (Cat. No. 640188 or 640189) and the SMART-Seq ICELL8 cx Application Kit:
• SMART-Seq ICELL8 cx Application Kit – 1 Chip (Cat. No. 640222)
• SMART-Seq ICELL8 cx Application Kit – 3 Chip (Cat. No. 640223)
• SMART-Seq ICELL8 cx Application Kit – 5 Chip (Cat. No. 640224)
Each kit contains the necessary chip(s), reagents, and consumables required to run a total of 1, 3, or 5 experiments (respectively) of single-cell, full-length transcriptome analysis.
Table 1. Available SMART-Seq ICELL8 cx Application Kit contents.
SMART-Seq ICELL8 cx application kits 640222 (1 Chip)
640223 (3 Chip)
640224 (5 Chip)
Box 1 (ships at room temperature) ICELL8 350v Chip* (Cat. No. 640019) 1 3 5 ICELL8 Collection Kit – L* (Cat. No. 640212) 1 3 5 ICELL8 Loading Kit – B* (Cat. No. 640206) 1 3 5 Box 2 (ships at –70°C) SMART-Seq ICELL8 Reagent Kit* (Cat. No. 640202) 1 -- -- SMART-Seq ICELL8 Reagent Kit* (Cat. No. 640203) -- 1 -- SMART-Seq ICELL8 Reagent Kit* (Cat. No. 640204) -- -- 1 SMART-Seq ICELL8 Indexing Primer Set – A* (Cat. No. 640205) 1 2 3 SMART-Seq ICELL8 Indexing Primer Set – B* (Cat. No. 640218) -- 1 2
*Component can also be purchased separately.
III. Additional Materials Required The following reagents and materials are required but not supplied with the SMART-Seq ICELL8 cx Application Kits or the ICELL8 cx Single-Cell System: Required general lab supplies
• Personal protective equipment (PPE): powder-free gloves, safety glasses, lab coat, sleeve protectors, etc. • Film Sealing Roller for PCR Plates (“film sealing roller”) (Bio-Rad, Cat. No. MSR0001) • PCR thermal cycler compatible with 0.2-ml tubes • Minicentrifuges for 1.5-ml tubes and 0.2-ml tubes or strips • 384-well plate orbital shaker • Vortex mixer • Centrifuges, rotors, and adapters. Recommended:
o Eppendorf 5810R with swinging plate buckets, ≥2,600g, and room temperature & 4ºC operation o Kubota 3740 with rotor SF-240 for cell preparation o MICRO-TITER PLT BCKT PLT PK4 (VWR, Cat. No. 53513-874)
• ICELL8 384-Well Source Plate and Seal (Takara Bio, Cat. Nos. 640192, 640018, or 640037) • Nuclease-free, non-stick 0.2-ml PCR tubes • Nuclease-free LoBind 1.5-ml microcentrifuge tubes (Eppendorf) • Conical tubes, 50-ml and 15-ml sizes • 5-ml flip-cap tubes • Single-channel pipettes: 2 µl, 10 µl, 20 µl, 200 µl, and 1,000 µl
SMART-Seq ICELL8 cx Application Kit User Manual
(031320) takarabio.com Takara Bio USA, Inc.
Page 9 of 47
• Filter pipette tips: 2 µl, 20 µl, 200 µl, and 1,000 µl • Wide-bore pipette tips: 200 µl and 1,000 µl • Serological pipets and controller • Nuclease-decontamination solution • Exhaust hood system with UV
For staining and dispensing cells • ICELL8 Chip Holder (Takara Bio, Cat. No. 640008); two chip holders are included with the instrument, and
additional chip holders can be ordered separately. • 1X PBS (no Ca2+, Mg2+, phenol red, or serum, pH 7.4; Thermo Fisher Scientific, Cat. No. 10010-023)
• ReadyProbes Cell Viability Imaging Kit, Blue/Red (contains Hoechst 33342 and propidium iodide; Thermo Fisher Scientific, Cat. No. R37610)
• Appropriate cell culture medium*
• TrypLE Express (Thermo Fisher Scientific, Cat. No. 12604-021)* *Required only if performing dissociation of adherent cells.
For tagmentation • Illumina Tagment DNA TDE1 Enzyme and Buffer Small Kit (Illumina, Cat. No. 20034197) or Illumina
Tagment DNA TDE1 Enzyme and Buffer Large Kit (Illumina, Cat. No. 20034198).
NOTES:
- Illumina Tagment DNA TDE1 Enzyme and Buffer Kits include Tagment DNA Enzyme (TDE1) and Tagment DNA Buffer (TD).
o The Small Kit includes 0.17 ml (1 tube) of TDE1 and 1.24 ml (1 tube) of TD. o The Large Kit includes 0.65 ml (1 tube) of TDE1 and 1.24 ml (2 tubes) of TD.
- SMART-Seq ICELL8 cx Application Kit requires only TDE1. Do not use TD.
For library purification and validation • SMARTer-Seq® Magnetic Separator - PCR Strip (Takara Bio, Cat. No. 635011) • Agencourt AMPure XP PCR purification system (5 ml; Beckman Coulter, Cat. No. A63880)
NOTES: - Agencourt AMPure XP beads need to come to room temperature before the container is opened.
Therefore, we strongly recommend aliquoting the beads into 1.5-ml tubes upon receipt, and then refrigerating the aliquots. Individual tubes can be removed for each experiment, allowing them to come to room temperature more quickly (~30 min). This aliquoting process is also essential for minimizing the chances of bead contamination.
- Immediately prior to use, vortex the beads until they are well dispersed. The color of the liquid should appear homogeneous. Confirm that there is no remaining pellet of beads at the bottom of the tube. Mix well to disperse before adding the beads to your reactions. The beads are viscous, so pipette them slowly.
• 80% ethanol: prepared fresh from anhydrous ethanol for each experiment • Bioanalyzer instrument (Agilent) or similar
SMART-Seq ICELL8 cx Application Kit User Manual
(031320) takarabio.com Takara Bio USA, Inc.
Page 10 of 47
• Agilent High Sensitivity DNA Kit (110 samples; Agilent, Cat. No. 5067-4626)
NOTE: Alternatively, the libraries can be quantified by qPCR using the Library Quantification Kit (Takara Bio, Cat No. 638324).
• Qubit fluorometer (Thermo Fisher Scientific) or similar
• Qubit dsDNA HS Assay Kit (100 assays; Thermo Fisher Scientific, Cat. No. Q32851) For cell counting
• Recommended: Moxi Z Mini Automated Cell Counter Kit, U.S. Version (ORFLO, Cat. No. MXZ001) with Moxi Z Cell Count Cassettes, Type M (25 pack; ORFLO, Cat. No. MXC001) or Moxi Z Cell Count Cassettes, Type S (25 pack; ORFLO, Cat. No. MXC002)
NOTES: - Alternatively, you may use a hemocytometer or any preferred cell counter with demonstrated,
accurate cell counting. - Refer to a Moxi Z user guide for guidance in selecting an appropriate cassette size for the cells
being analyzed.
IV. General Considerations A. Protocol Best Practices
• Two different chips can be multiplexed together in a single sequencing run if one chip is indexed with primers from SMART-Seq ICELL8 Indexing Primer Set – A (Takara Bio, Cat. No. 640205) and the second is indexed with primers from SMART-Seq ICELL8 Indexing Primer Set – B (Takara Bio, Cat. No. 640218).
• Perform all experimental procedures in sterile environments with the proper personal protective equipment (PPE). Use designated UV hoods with proper ventilation for manipulating cells and setting up molecular biology reactions. Decontaminate gloves with nuclease decontamination solution, water, and ethanol. Change gloves routinely.
• Minimize the exposure time of unsealed chips, reservoirs, reagents, and other consumables to the open air. Wearing laboratory sleeve protectors may reduce the likelihood of introducing contaminants from exposed hands and arms.
• The assay is very sensitive to variations in pipette volume. Please make sure that all pipettes are calibrated for reliable reagent delivery and that nothing adheres to the outsides of the tips when dispensing liquids.
• All lab supplies related to cDNA synthesis need to be stored in a DNA-free, closed cabinet. Ideally, reagents for cDNA synthesis should be stored in a freezer/refrigerator that has not previously been used to store PCR amplicons.
• Use nuclease-free, molecular biology- or PCR-grade reagents to set up all molecular biology reactions.
• Add enzymes to reaction mixtures last and thoroughly incorporate them by gently pipetting the reaction mixture up and down.
• DO NOT change the amount or concentration of any of the components in the reactions; they have been carefully optimized for the SMART-Seq ICELL8 cx Application Kit workflow.
SMART-Seq ICELL8 cx Application Kit User Manual
(031320) takarabio.com Takara Bio USA, Inc.
Page 11 of 47
• Because of the large volume or viscosity of mixtures subject to purification using AMPure beads, each round of purification requires a very strong magnet. Place the samples on the magnetic separation device for ~5 min or longer, until the liquid appears completely clear and there are no beads left in the supernatant.
• UV-treat reagent reservoirs, seals, pipettes, filter tips, and compatible reagents prior to use.
B. Safety Refer to safety guidelines in the user manuals for all equipment used in this protocol.
WARNING: Perform all experimental procedures in sterile environments with the proper personal protective equipment (PPE). Use designated UV hoods with proper ventilation for manipulating cells and setting up molecular biology reactions. Decontaminate gloves with nuclease decontamination solution, water, and ethanol. Change gloves routinely.
WARNING: Use of equipment and reagents for cell preparation and isolation with the ICELL8 cx Single-Cell System may cause exposure to toxic or biohazardous chemicals, thereby presenting a hazard. Always wear appropriate personal protective equipment (PPE), which should at minimum include gloves, eye protection, and a lab coat, when handling equipment and reagents and operating instruments.
Note and heed all warning labels on the instruments used in this protocol.
C. ICELL8 cx System Application Notes Refer to the ICELL8 cx Single-Cell System User Manual for full details. Included below are general reminders.
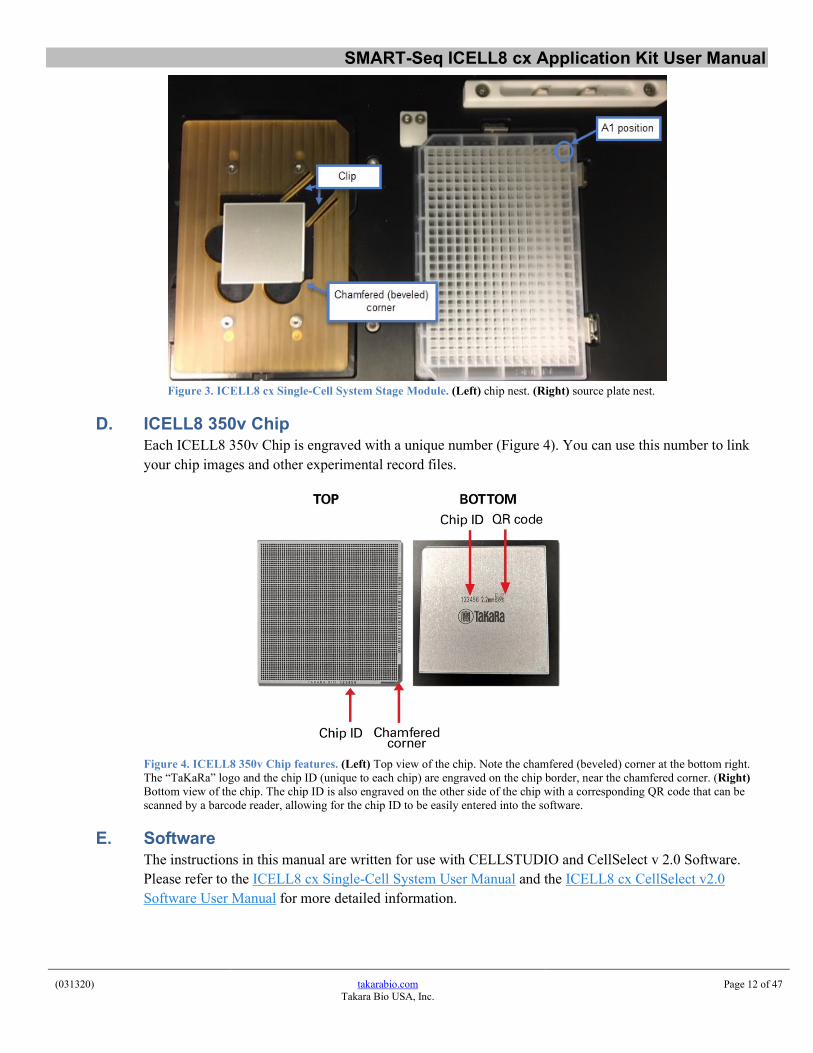
• All dispensing steps in the ICELL8 cx Single-Cell System Stage Module should be performed with a 384-Well Source Plate oriented with the A1 well positioned at the top-right corner of the 384-well plate nest (Figures 3 and 4, below). The source plate must be fully seated. This may be accomplished by pushing the source plate down after it has been placed on the plate nest.
• All dispensing steps in the ICELL8 cx Single-Cell System Stage Module should be performed with the chip oriented with the chamfered (beveled) corner positioned towards the bottom-right corner of the chip nest (Figures 3, next page).
SMART-Seq ICELL8 cx Application Kit User Manual
(031320) takarabio.com Takara Bio USA, Inc.
Page 12 of 47
Figure 3. ICELL8 cx Single-Cell System Stage Module. (Left) chip nest. (Right) source plate nest.
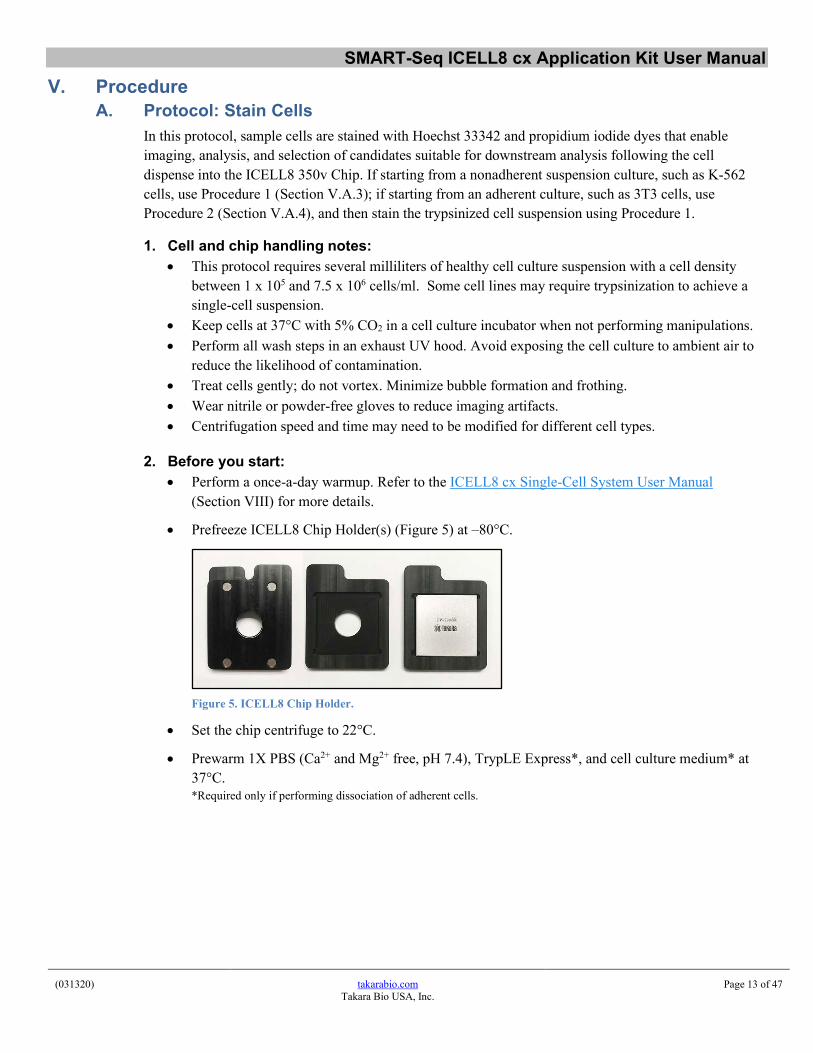
D. ICELL8 350v Chip Each ICELL8 350v Chip is engraved with a unique number (Figure 4). You can use this number to link your chip images and other experimental record files.
Figure 4. ICELL8 350v Chip features. (Left) Top view of the chip. Note the chamfered (beveled) corner at the bottom right. The “TaKaRa” logo and the chip ID (unique to each chip) are engraved on the chip border, near the chamfered corner. (Right) Bottom view of the chip. The chip ID is also engraved on the other side of the chip with a corresponding QR code that can be scanned by a barcode reader, allowing for the chip ID to be easily entered into the software.
E. Software The instructions in this manual are written for use with CELLSTUDIO and CellSelect v 2.0 Software. Please refer to the ICELL8 cx Single-Cell System User Manual and the ICELL8 cx CellSelect v2.0 Software User Manual for more detailed information.
SMART-Seq ICELL8 cx Application Kit User Manual
(031320) takarabio.com Takara Bio USA, Inc.
Page 13 of 47
V. Procedure A. Protocol: Stain Cells
In this protocol, sample cells are stained with Hoechst 33342 and propidium iodide dyes that enable imaging, analysis, and selection of candidates suitable for downstream analysis following the cell dispense into the ICELL8 350v Chip. If starting from a nonadherent suspension culture, such as K-562 cells, use Procedure 1 (Section V.A.3); if starting from an adherent culture, such as 3T3 cells, use Procedure 2 (Section V.A.4), and then stain the trypsinized cell suspension using Procedure 1.
1. Cell and chip handling notes: • This protocol requires several milliliters of healthy cell culture suspension with a cell density
between 1 x 10⁵ and 7.5 x 10⁶ cells/ml. Some cell lines may require trypsinization to achieve a single-cell suspension.
• Keep cells at 37°C with 5% CO2 in a cell culture incubator when not performing manipulations. • Perform all wash steps in an exhaust UV hood. Avoid exposing the cell culture to ambient air to
reduce the likelihood of contamination. • Treat cells gently; do not vortex. Minimize bubble formation and frothing. • Wear nitrile or powder-free gloves to reduce imaging artifacts. • Centrifugation speed and time may need to be modified for different cell types.
2. Before you start: • Perform a once-a-day warmup. Refer to the ICELL8 cx Single-Cell System User Manual
(Section VIII) for more details.
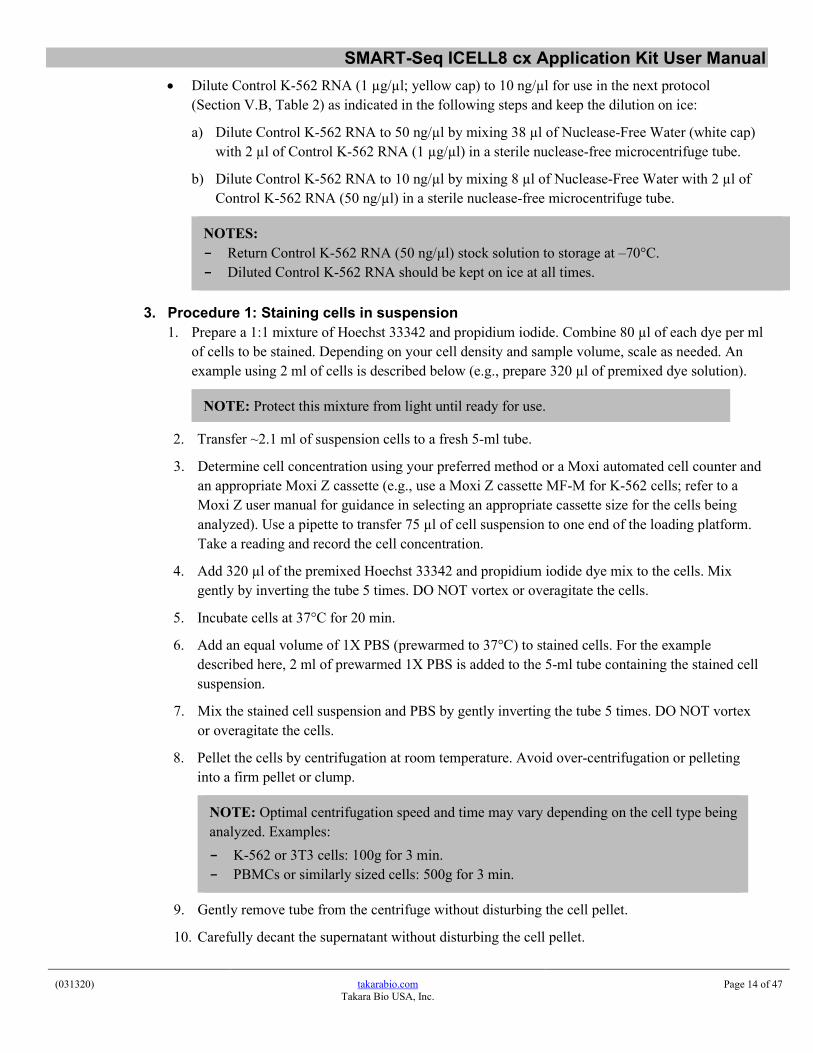
• Prefreeze ICELL8 Chip Holder(s) (Figure 5) at –80°C.
Figure 5. ICELL8 Chip Holder.
• Set the chip centrifuge to 22°C.
• Prewarm 1X PBS (Ca2+ and Mg2+ free, pH 7.4), TrypLE Express*, and cell culture medium* at 37°C. *Required only if performing dissociation of adherent cells.
SMART-Seq ICELL8 cx Application Kit User Manual
(031320) takarabio.com Takara Bio USA, Inc.
Page 14 of 47
• Dilute Control K-562 RNA (1 µg/µl; yellow cap) to 10 ng/µl for use in the next protocol (Section V.B, Table 2) as indicated in the following steps and keep the dilution on ice:
a) Dilute Control K-562 RNA to 50 ng/µl by mixing 38 µl of Nuclease-Free Water (white cap) with 2 µl of Control K-562 RNA (1 µg/µl) in a sterile nuclease-free microcentrifuge tube.
b) Dilute Control K-562 RNA to 10 ng/µl by mixing 8 µl of Nuclease-Free Water with 2 µl of Control K-562 RNA (50 ng/µl) in a sterile nuclease-free microcentrifuge tube.
NOTES: - Return Control K-562 RNA (50 ng/µl) stock solution to storage at –70°C. - Diluted Control K-562 RNA should be kept on ice at all times.
3. Procedure 1: Staining cells in suspension 1. Prepare a 1:1 mixture of Hoechst 33342 and propidium iodide. Combine 80 µl of each dye per ml
of cells to be stained. Depending on your cell density and sample volume, scale as needed. An example using 2 ml of cells is described below (e.g., prepare 320 µl of premixed dye solution).
NOTE: Protect this mixture from light until ready for use.
2. Transfer ~2.1 ml of suspension cells to a fresh 5-ml tube.
3. Determine cell concentration using your preferred method or a Moxi automated cell counter and an appropriate Moxi Z cassette (e.g., use a Moxi Z cassette MF-M for K-562 cells; refer to a Moxi Z user manual for guidance in selecting an appropriate cassette size for the cells being analyzed). Use a pipette to transfer 75 µl of cell suspension to one end of the loading platform. Take a reading and record the cell concentration.
4. Add 320 µl of the premixed Hoechst 33342 and propidium iodide dye mix to the cells. Mix gently by inverting the tube 5 times. DO NOT vortex or overagitate the cells.
5. Incubate cells at 37°C for 20 min.
6. Add an equal volume of 1X PBS (prewarmed to 37°C) to stained cells. For the example described here, 2 ml of prewarmed 1X PBS is added to the 5-ml tube containing the stained cell suspension.
7. Mix the stained cell suspension and PBS by gently inverting the tube 5 times. DO NOT vortex or overagitate the cells.
8. Pellet the cells by centrifugation at room temperature. Avoid over-centrifugation or pelleting into a firm pellet or clump.
NOTE: Optimal centrifugation speed and time may vary depending on the cell type being analyzed. Examples: - K-562 or 3T3 cells: 100g for 3 min. - PBMCs or similarly sized cells: 500g for 3 min.
9. Gently remove tube from the centrifuge without disturbing the cell pellet.
10. Carefully decant the supernatant without disturbing the cell pellet.
SMART-Seq ICELL8 cx Application Kit User Manual
(031320) takarabio.com Takara Bio USA, Inc.
Page 15 of 47
11. Wipe remaining fluid from the tube top using a fresh Kimwipe such that the last remaining drop on the tilted tube top is gently removed.
12. Gently add 1 ml of 1X PBS (prewarmed to 37°C) to the tube side wall.
13. Use a wide-bore 1-ml pipette tip to gently mix the cell suspension by slowly pipetting up and down ~5 times. DO NOT vortex or overagitate the cells.
14. Count the cells using a Moxi automated cell counter and an appropriate cassette (or your preferred method). Take two readings for each stained cell sample and average the results. The recommended concentration range of stained cell suspension is 1.2–5.0 x 10⁵ cells/ml. If the concentration is lower than 1.2 x 10⁵ cells/ml, repellet the stained cell suspension and resuspend in a lower volume of 1X PBS to achieve a concentration in the recommended range.
15. Proceed to the next protocol (Section V.B).
4. Procedure 2: Preparing adherent cell types from a 75-cm culture flask* *Adjust volumes accordingly for different-sized flasks.
1. Carefully remove culture media from a 75-cm flask containing adherent cells using a serological pipette.
2. Add 10 ml of 1X PBS prewarmed to 37°C by dispensing the PBS on the side walls of the flask. DO NOT pour PBS directly onto cells.
3. Wash the cells by tilting the flask gently. DO NOT mix by pipetting.
4. Remove the PBS from the cells using a serological pipette.
5. Add 3 ml of TrypLE Express prewarmed to 37°C to the flask to dissociate the cells.
6. The efficiency of cell dissociation from the flask surface may vary with cell type. Monitor the process visually using a microscope.
7. When cell dissociation is sufficient, neutralize the trypsinization reaction by gently adding 7 ml of complete media (containing 10% serum), prewarmed to 37°C. DO NOT vortex or overagitate cells.
8. Follow the Procedure: Staining cells in suspension (Section V.A.1, above) starting from Step 1.
B. Protocol: Dilute and Dispense Cells (1st Dispense) In this protocol, sample cells and controls are diluted and aliquoted into a 384-Well Source Plate and dispensed into the ICELL8 350v Chip using the ICELL8 cx Single-Cell System. Refer to the ICELL8 cx Single-Cell System User Manual for detailed information about instrument setup and operation.
1. Before you start • Confirm that initialization and setup procedures for the ICELL8 cx Single-Cell System have been
completed (see “Before you start” in Section V.A, above).
• Confirm the empty ICELL8 Chip Holder (Figure 5, above) is frozen at –80°C.
• Aliquot 300–500 µl of 1X PBS (Ca2+ and Mg2+ free, pH 7.4) on ice for positive and negative controls.

SMART-Seq ICELL8 cx Application Kit User Manual
(031320) takarabio.com Takara Bio USA, Inc.
Page 16 of 47
• This protocol requires a 384-Well Source Plate (with seal), a Plate Seal Applicator, a film sealing roller, and the following components: Control K-562 Total RNA (diluted to 10 ng/µl in the previous protocol), Second Diluent (100X; light blue cap), BSA (1%; red cap), RNase Inhibitor (white cap), SMART-Seq ICELL8 CDS (blue cap)—all from the SMART-Seq ICELL8 cx Reagent Kit—plus Blotting Paper and RC Film (from the ICELL8 Loading Kit – B).
• Thaw Second Diluent (100X), BSA (1%), and SMART-Seq ICELL8 CDS on ice. Once thawed, keep on ice for the remainder of the protocol
• Use the concentration of stained cell suspension measured at the end of the previous protocol (Section V.A) and the information in Table 2 (below) to calculate the volumes of stained cell suspension and 1X PBS that should be combined for a final concentration of 1.4 cells/50 nl in a total volume of 1 ml.
2. Procedure Prepare diluted stained cell suspension
1. Mix each component: Second Diluent, RNase Inhibitor, BSA (1%), and SMART-Seq ICELL8 CDS. Spin the tubes briefly to collect contents at the bottom.
2. In a 1.5-ml microcentrifuge tube, combine the volumes of Second Diluent, BSA (1%), RNase Inhibitor, SMART-Seq ICELL8 CDS, and prewarmed 1X PBS indicated in the corresponding column of Table 2 (below). Mix the combined reagents by vortexing, then spin the tubes briefly to collect contents at the bottom.
NOTE: The amount of 1X PBS added will depend on the starting concentration of stained cell suspension.
3. To the 1.5-ml microcentrifuge tube from the previous step (containing Second Diluent, BSA (1%), RNase Inhibitor, SMART-Seq ICELL8 CDS, and 1X PBS), add the calculated volume of stained cell suspension that will yield a final concentration of 1.4 cells/50 nl in a total volume of 1 ml (refer to the ICELL8 Cell Dilution Tool spreadsheet provided by the Field Application Specialist during training). DO NOT use a pipette to mix at this step.
NOTES: - Before obtaining the sample, mix the stained cell suspension gently by inverting the tube
several times. - Take the required volume of stained cell suspension from the center of the tube using a
20-µl or 200-µl pipette tip and add it slowly to the tube containing the other reagents. - Work quickly to avoid settling of cells.
SMART-Seq ICELL8 cx Application Kit User Manual
(031320) takarabio.com Takara Bio USA, Inc.
Page 17 of 47
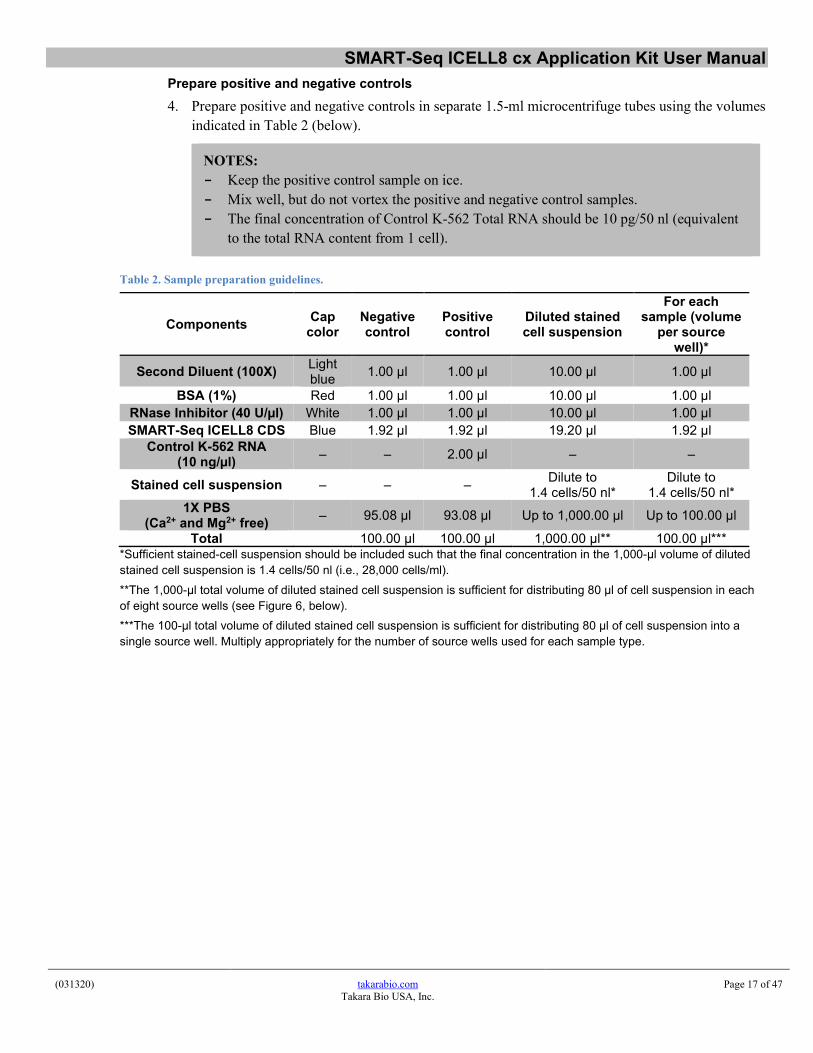
Prepare positive and negative controls 4. Prepare positive and negative controls in separate 1.5-ml microcentrifuge tubes using the volumes
indicated in Table 2 (below).
NOTES: - Keep the positive control sample on ice. - Mix well, but do not vortex the positive and negative control samples. - The final concentration of Control K-562 Total RNA should be 10 pg/50 nl (equivalent
to the total RNA content from 1 cell).
Table 2. Sample preparation guidelines.
Components Cap color
Negative control
Positive control
Diluted stained cell suspension
For each sample (volume
per source well)*
Second Diluent (100X) Light blue 1.00 µl 1.00 µl 10.00 µl 1.00 µl
BSA (1%) Red 1.00 µl 1.00 µl 10.00 µl 1.00 µl RNase Inhibitor (40 U/µl) White 1.00 µl 1.00 µl 10.00 µl 1.00 µl SMART-Seq ICELL8 CDS Blue 1.92 µl 1.92 µl 19.20 µl 1.92 µl
Control K-562 RNA (10 ng/µl) – – 2.00 µl – –
Stained cell suspension – – – Dilute to 1.4 cells/50 nl*
Dilute to 1.4 cells/50 nl*
1X PBS (Ca2+ and Mg2+ free) – 95.08 µl 93.08 µl Up to 1,000.00 µl Up to 100.00 µl
Total 100.00 µl 100.00 µl 1,000.00 µl** 100.00 µl*** *Sufficient stained-cell suspension should be included such that the final concentration in the 1,000-µl volume of diluted stained cell suspension is 1.4 cells/50 nl (i.e., 28,000 cells/ml). **The 1,000-µl total volume of diluted stained cell suspension is sufficient for distributing 80 µl of cell suspension in each of eight source wells (see Figure 6, below). ***The 100-µl total volume of diluted stained cell suspension is sufficient for distributing 80 µl of cell suspension into a single source well. Multiply appropriately for the number of source wells used for each sample type.
SMART-Seq ICELL8 cx Application Kit User Manual
(031320) takarabio.com Takara Bio USA, Inc.
Page 18 of 47
Prepare cell dispense source plate Refer to the ICELL8 cx Single-Cell System User Manual for detailed information about instrument setup and operation. 5. Using a wide-bore 1-ml pipette tip, gently mix the diluted stained cell suspension prepared in
Step 3 of this protocol (above) by slowly pipetting up and down ~5 times. DO NOT vortex or overagitate the cells.
IMPORTANT: Proceed to the next step quickly to avoid settling of cells.
6. Using a 200-µl pipette tip, slowly and carefully load 80 µl of cell suspension into wells A1, A2, B1, B2, C1, C2, D1, and D2 of a 384-Well Source Plate as indicated in Figure 6 (below).
NOTES: - Make sure to take each aliquot from the center of the tube containing the diluted stained
cell suspension. - Be careful not to splash liquid into neighboring wells. - Make sure not to introduce bubbles when adding the cell suspension to the 384-Well
Source Plate. - DO NOT vortex or spin down the 384-Well Source Plate. - DO NOT tap the plate. If any bubbles are present, remove using a pipette tip.
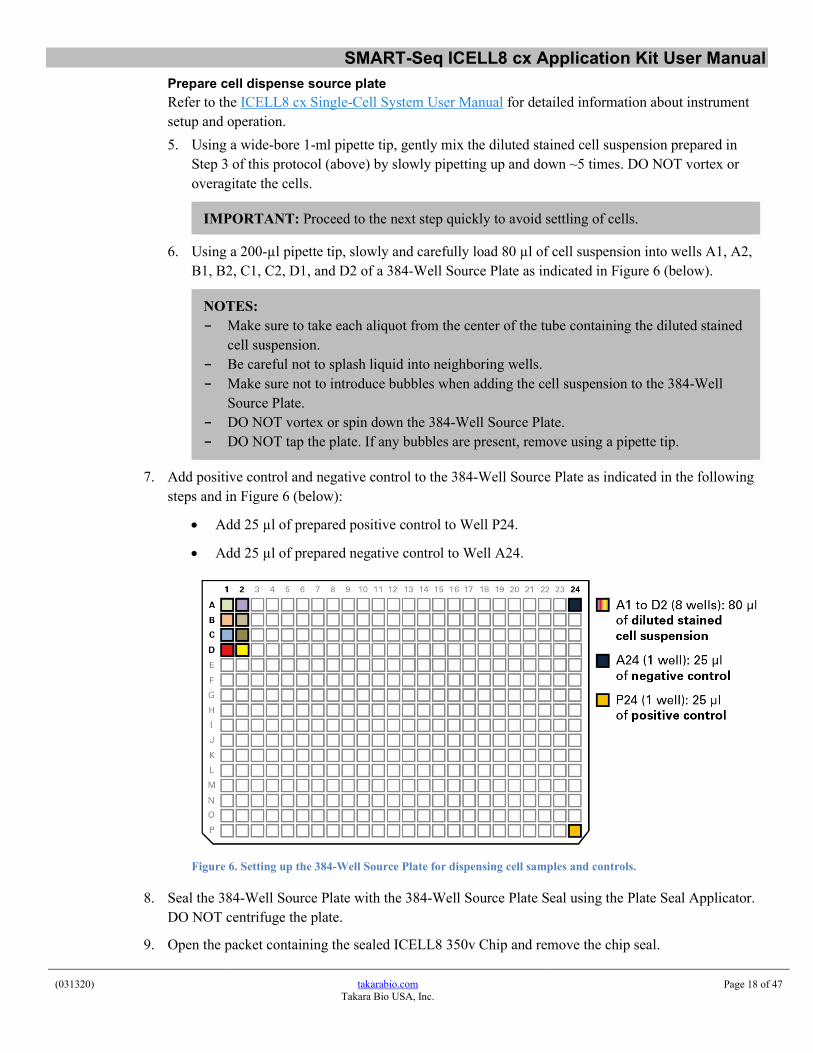
7. Add positive control and negative control to the 384-Well Source Plate as indicated in the following steps and in Figure 6 (below):
• Add 25 µl of prepared positive control to Well P24.
• Add 25 µl of prepared negative control to Well A24.
Figure 6. Setting up the 384-Well Source Plate for dispensing cell samples and controls.
8. Seal the 384-Well Source Plate with the 384-Well Source Plate Seal using the Plate Seal Applicator. DO NOT centrifuge the plate.
9. Open the packet containing the sealed ICELL8 350v Chip and remove the chip seal.

SMART-Seq ICELL8 cx Application Kit User Manual
(031320) takarabio.com Takara Bio USA, Inc.
Page 19 of 47
10. Place the chip on the chip nest in the ICELL8 cx Single-Cell System. The chamfered (beveled) corner of the chip should align with the chamfered corner of the chuck of the chip nest (refer to the ICELL8 cx Single-Cell System User Manual, Section X.A).
11. Remove the seal on the 384-Well Source Plate and place in the ICELL8 cx Single-Cell System with the A1 corner positioned at the top-right corner of the plate nest. The beveled corners of the 384-Well Source Plate should be on the left side (refer to the ICELL8 cx Single-Cell System User Manual, Section X.B).
12. In CELLSTUDIO software, click the [Dispense cells and Controls (50 nl)] button (Figure 7).
Figure 7. Using CELLSTUDIO software to dispense cells into the ICELL8 350v Chip.
A “Select index set” Workflow window will display asking you to indicate which SMART-Seq Index Kit you are using, SMART-seq\SetA (Cat. no. 640205) or SMART-seq\SetB (Takara Bio, Cat. No. 640218). Choose the appropriate kit from the drop-down menu, and then click [Done].

SMART-Seq ICELL8 cx Application Kit User Manual
(031320) takarabio.com Takara Bio USA, Inc.
Page 20 of 47
Figure 8. Select index set workflow prompt. The display defaults to using Set A. Ensure the correct one is selected before clicking [Done].
13. Follow the subsequent software prompts and check the orientation of the source plate and ICELL8 350v Chip to ensure they are correctly loaded on the Dispensing Platform. Click [Done] to proceed.
Refer to the ICELL8 cx Single-Cell System User Manual, Section X.C “Dispense the Sample Cells and Experimental Controls into the Chip” for details about the dispense step.
14. After the sample and control dispense is completed, remove the chip from the chip nest and blot with blotting paper. Refer to the ICELL8 cx Single-Cell System User Manual, Section X.D “Blot and Centrifuge the Chip” for instructions to do that.
15. Seal the loaded chip with the RC Film (Figure 9, right)
Figure 9. Imaging and RC films required for the dispenses. The Optical Imaging Film (left) has three layers. The RC Sealing Film (right) has a translucent backing. Please follow the instructions in each subprotocol regarding preparation and handling of the films.
Remove the liner from the RC Film and apply the exposed side of the film to the blotted chip (Figure 10, left, below).
SMART-Seq ICELL8 cx Application Kit User Manual
(031320) takarabio.com Takara Bio USA, Inc.
Page 21 of 47
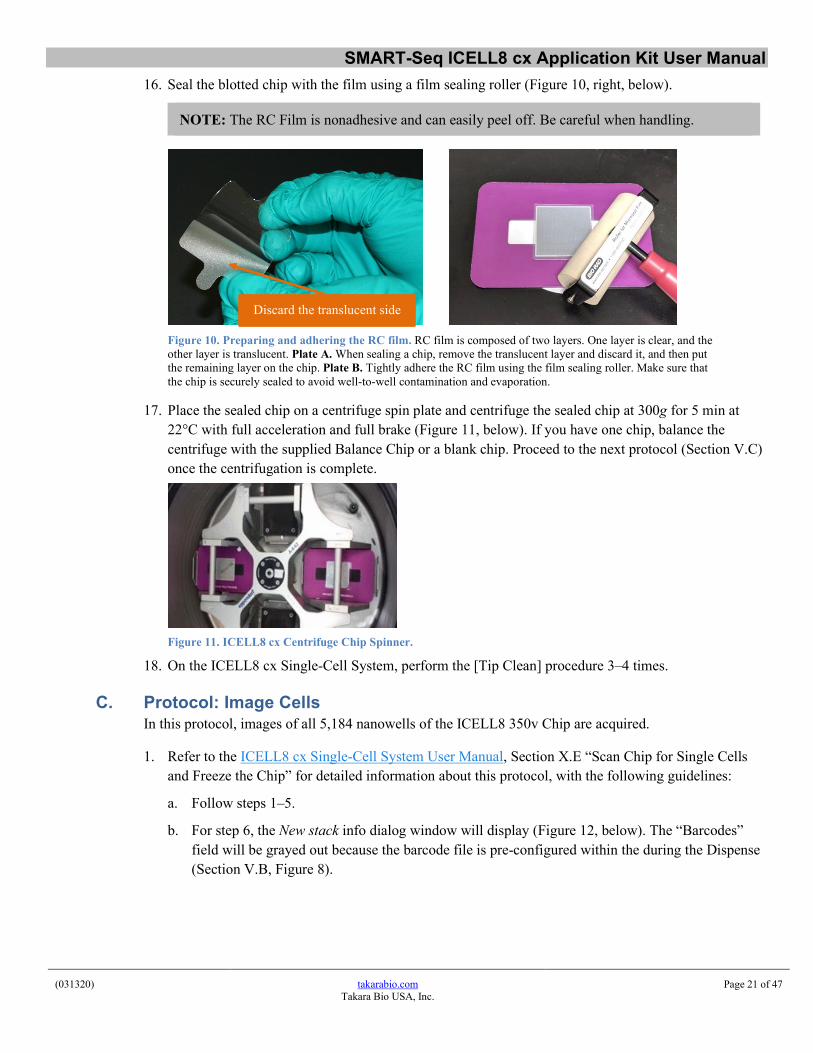
16. Seal the blotted chip with the film using a film sealing roller (Figure 10, right, below).
NOTE: The RC Film is nonadhesive and can easily peel off. Be careful when handling.
17. Place the sealed chip on a centrifuge spin plate and centrifuge the sealed chip at 300g for 5 min at
22°C with full acceleration and full brake (Figure 11, below). If you have one chip, balance the centrifuge with the supplied Balance Chip or a blank chip. Proceed to the next protocol (Section V.C) once the centrifugation is complete.
Figure 11. ICELL8 cx Centrifuge Chip Spinner.
18. On the ICELL8 cx Single-Cell System, perform the [Tip Clean] procedure 3–4 times.
C. Protocol: Image Cells In this protocol, images of all 5,184 nanowells of the ICELL8 350v Chip are acquired.
1. Refer to the ICELL8 cx Single-Cell System User Manual, Section X.E “Scan Chip for Single Cells and Freeze the Chip” for detailed information about this protocol, with the following guidelines:
a. Follow steps 1–5.
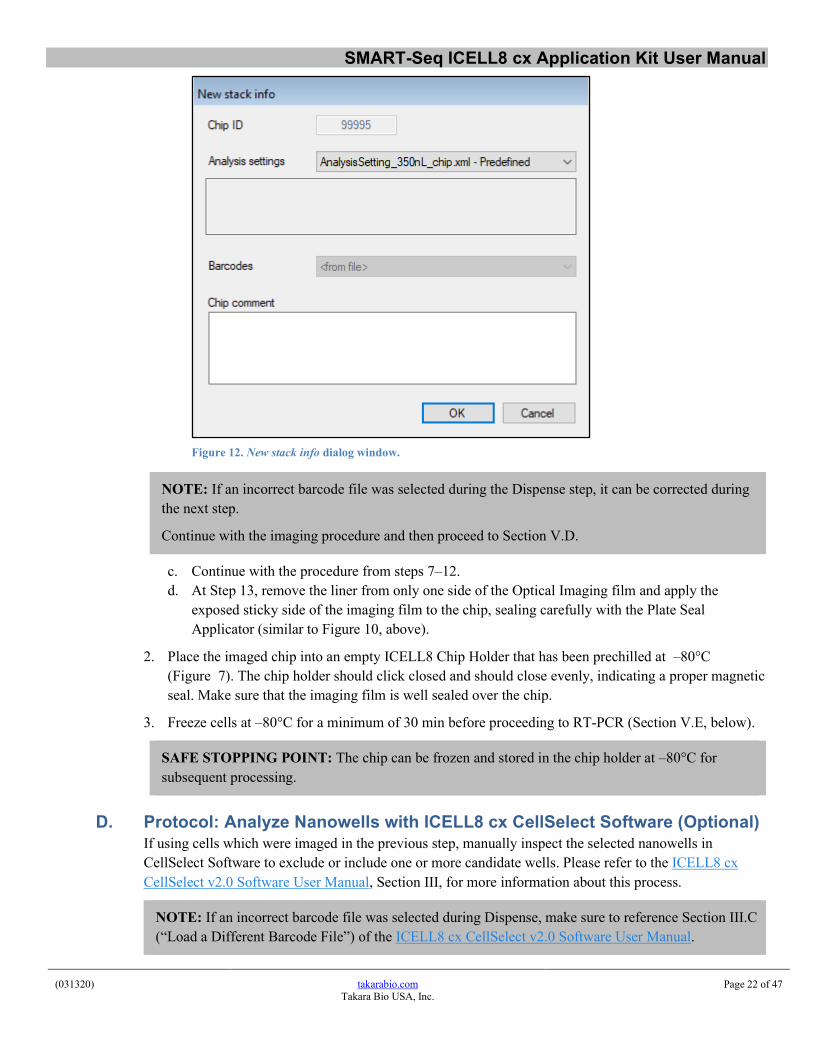
b. For step 6, the New stack info dialog window will display (Figure 12, below). The “Barcodes” field will be grayed out because the barcode file is pre-configured within the during the Dispense (Section V.B, Figure 8).
Figure 10. Preparing and adhering the RC film. RC film is composed of two layers. One layer is clear, and the other layer is translucent. Plate A. When sealing a chip, remove the translucent layer and discard it, and then put the remaining layer on the chip. Plate B. Tightly adhere the RC film using the film sealing roller. Make sure that the chip is securely sealed to avoid well-to-well contamination and evaporation.
Discard the translucent side
SMART-Seq ICELL8 cx Application Kit User Manual
(031320) takarabio.com Takara Bio USA, Inc.
Page 22 of 47
Figure 12. New stack info dialog window.
NOTE: If an incorrect barcode file was selected during the Dispense step, it can be corrected during the next step.
Continue with the imaging procedure and then proceed to Section V.D.
c. Continue with the procedure from steps 7–12. d. At Step 13, remove the liner from only one side of the Optical Imaging film and apply the
exposed sticky side of the imaging film to the chip, sealing carefully with the Plate Seal Applicator (similar to Figure 10, above).
2. Place the imaged chip into an empty ICELL8 Chip Holder that has been prechilled at –80°C (Figure 7). The chip holder should click closed and should close evenly, indicating a proper magnetic seal. Make sure that the imaging film is well sealed over the chip.
3. Freeze cells at –80°C for a minimum of 30 min before proceeding to RT-PCR (Section V.E, below).
SAFE STOPPING POINT: The chip can be frozen and stored in the chip holder at –80°C for subsequent processing.
D. Protocol: Analyze Nanowells with ICELL8 cx CellSelect Software (Optional) If using cells which were imaged in the previous step, manually inspect the selected nanowells in CellSelect Software to exclude or include one or more candidate wells. Please refer to the ICELL8 cx CellSelect v2.0 Software User Manual, Section III, for more information about this process.
NOTE: If an incorrect barcode file was selected during Dispense, make sure to reference Section III.C (“Load a Different Barcode File”) of the ICELL8 cx CellSelect v2.0 Software User Manual.

SMART-Seq ICELL8 cx Application Kit User Manual
(031320) takarabio.com Takara Bio USA, Inc.
Page 23 of 47
E. Protocol: Full-Length cDNA Synthesis by RT-PCR (2nd Dispense) First-strand cDNA is synthesized by the oligo dT primer (SMART-Seq ICELL8 CDS) and followed by the template switching oligo (SMART-Seq ICELL8 Oligonucleotide) for template switching at the 5′ end of transcripts. The first-strand cDNA is used as template for 2nd-strand cDNA synthesis and amplification during PCR.
1. Before you start • If needed, perform a once-a-day warmup on the ICELL8 cx instrument. • Set the centrifuge(s) used for spinning the chip and 384-Well Source Plate to 4°C.
• Preprogram the thermal cycler with Preheat (Step 1) and RT-PCR (Step 19) before the experiments.
• Run and hold the programs before the reactions.
• This protocol requires a 384-Well Source Plate (with seal), a Plate Seal Applicator, a film sealing roller, and the following components: Nuclease-Free Water (white cap), SMART-Seq ICELL8 RT-PCR Buffer (red cap), SMART-Seq ICELL8 Oligonucleotide (orange cap), RNase Inhibitor (white cap), Terra PCR Direct Polymerase Mix (pink cap), and SMARTScribe Reverse Transcriptase (purple cap)—all from the SMART-Seq ICELL8 Reagent Kit—plus Blotting Paper and RC Film (from the ICELL8 Loading Kit – B).
• Thaw all reagents on ice except for the enzymes. Remove the enzymes from –20°C storage just prior to use and keep them on ice at all times. Gently mix and spin down all thawed reagents and enzymes.
2. Procedure
1. If necessary, remove the ICELL8 Chip Holder containing the ICELL8 350v Chip from the –80°C freezer. Take the chip out of the chip holder and thaw the chip at room temperature for 10 min.
2. Use a Kimwipe to dry any liquid on the chip surface, and then centrifuge the chip at 3,220g (minimum 2,600g) for 3 min at 4°C. Keep the chip on ice until ready for Preheat.
3. Run and hold the Preheat program below. Place the ICELL8 350v Chip into the thermal cycler that has been preheated to 76°C and a heated-lid temperature of 72°C. Resume the following Preheat program:
76°C 5 sec 72°C 3 min
4. After the 3 min incubation at 72°C, immediately place the chip on an ICELL8 cx Cold Block on ice for at least 2 min.
5. Centrifuge the chip at 3,220g (minimum 2,600g) for 3 min at 4°C, and keep the chip on the cold block on ice until ready for the RT-PCR dispense.
6. Run and hold the program for RT-PCR.
7. Mix all components except for SMARTScribe Reverse Transcriptase in the order listed in Step 7, and then vortex it briefly.
8. Add the SMARTScribe Reverse Transcriptase to the Master Mix immediately prior to use. Mix it by vortexing gently.
SMART-Seq ICELL8 cx Application Kit User Manual
(031320) takarabio.com Takara Bio USA, Inc.
Page 24 of 47
IMPORTANT: Remove the reverse transcriptase and PCR polymerase from the freezer, gently tap the tubes to mix, and add to the RT-PCR reaction mix. Mix by gently vortexing for 1–2 seconds and spin the tube briefly in a minicentrifuge to collect contents.
83.6 μl Nuclease-Free Water (white)
105.6 μl SMART-Seq ICELL8 RT-PCR Buffer (red) 8.8 μl SMART-Seq ICELL8 Oligonucleotide (orange) 4.4 μl RNase Inhibitor (white) 8.8 μl Terra PCR Direct Polymerase Mix (pink) 8.8 μl SMARTScribe Reverse Transcriptase (200 U/µl; purple)
220.0 μl Total volume
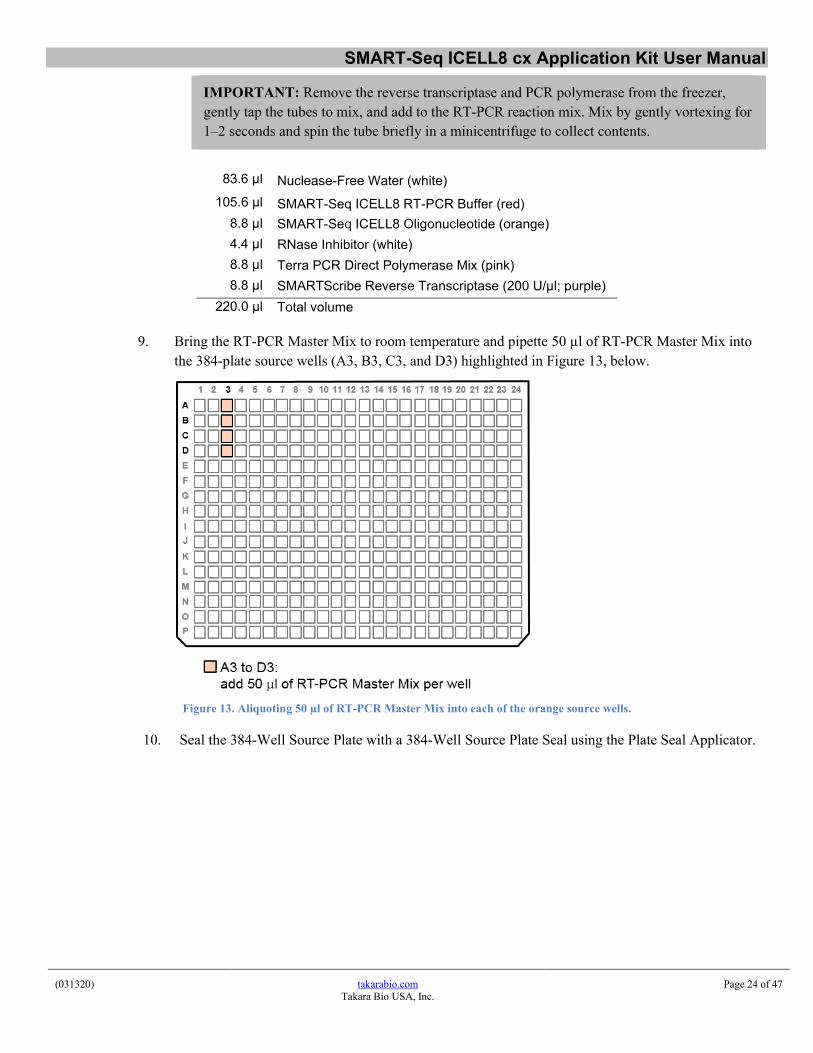
9. Bring the RT-PCR Master Mix to room temperature and pipette 50 µl of RT-PCR Master Mix into the 384-plate source wells (A3, B3, C3, and D3) highlighted in Figure 13, below.
Figure 13. Aliquoting 50 µl of RT-PCR Master Mix into each of the orange source wells.
10. Seal the 384-Well Source Plate with a 384-Well Source Plate Seal using the Plate Seal Applicator.
SMART-Seq ICELL8 cx Application Kit User Manual
(031320) takarabio.com Takara Bio USA, Inc.
Page 25 of 47
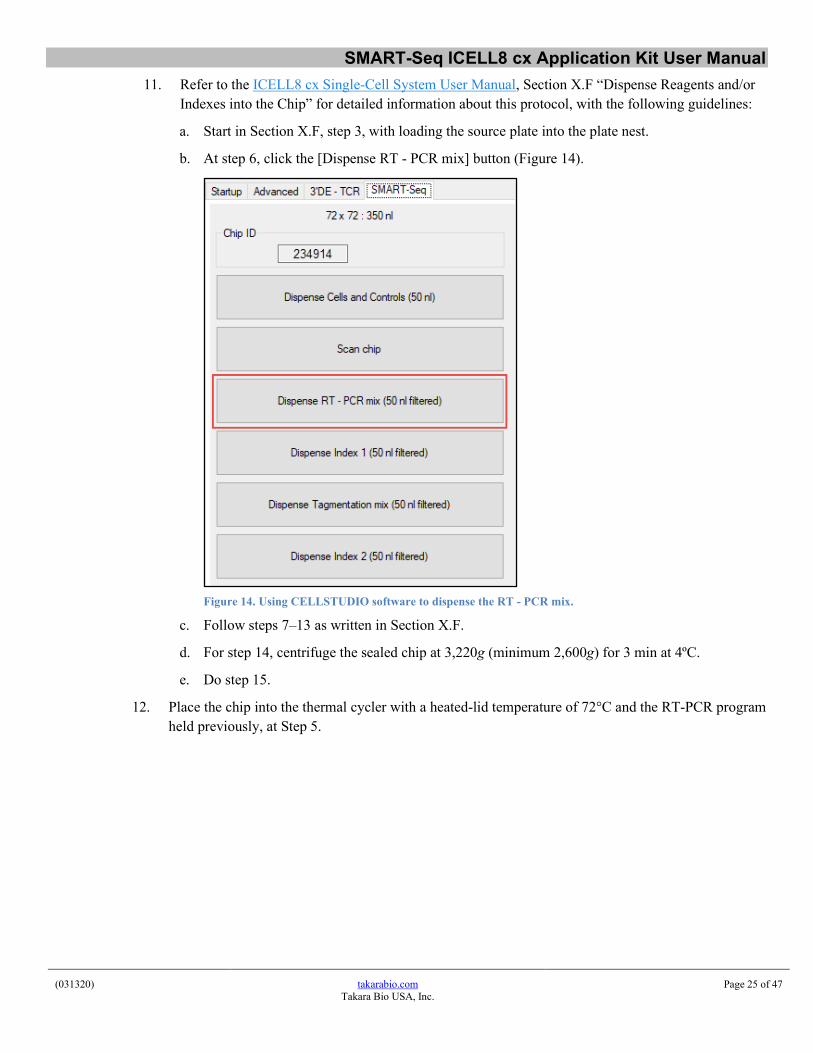
11. Refer to the ICELL8 cx Single-Cell System User Manual, Section X.F “Dispense Reagents and/or Indexes into the Chip” for detailed information about this protocol, with the following guidelines:
a. Start in Section X.F, step 3, with loading the source plate into the plate nest.
b. At step 6, click the [Dispense RT - PCR mix] button (Figure 14).
Figure 14. Using CELLSTUDIO software to dispense the RT - PCR mix.
c. Follow steps 7–13 as written in Section X.F.
d. For step 14, centrifuge the sealed chip at 3,220g (minimum 2,600g) for 3 min at 4ºC.
e. Do step 15.
12. Place the chip into the thermal cycler with a heated-lid temperature of 72°C and the RT-PCR program held previously, at Step 5.
SMART-Seq ICELL8 cx Application Kit User Manual
(031320) takarabio.com Takara Bio USA, Inc.
Page 26 of 47
13. Resume the RT-PCR program:
42.3°C 5 sec 36.6°C 3 hr
99°C 9 sec 95.5°C 1 min
14 cycles*: 100°C 5 sec
99°C 7 sec 59°C 5 sec 64°C 30 sec
69.5°C 5 sec 67.5°C 6 min
4°C forever
*See Appendix B for cycling guidelines.
SAFE STOPPING POINT: The chip can be left in the thermal cycler at 4°C overnight.
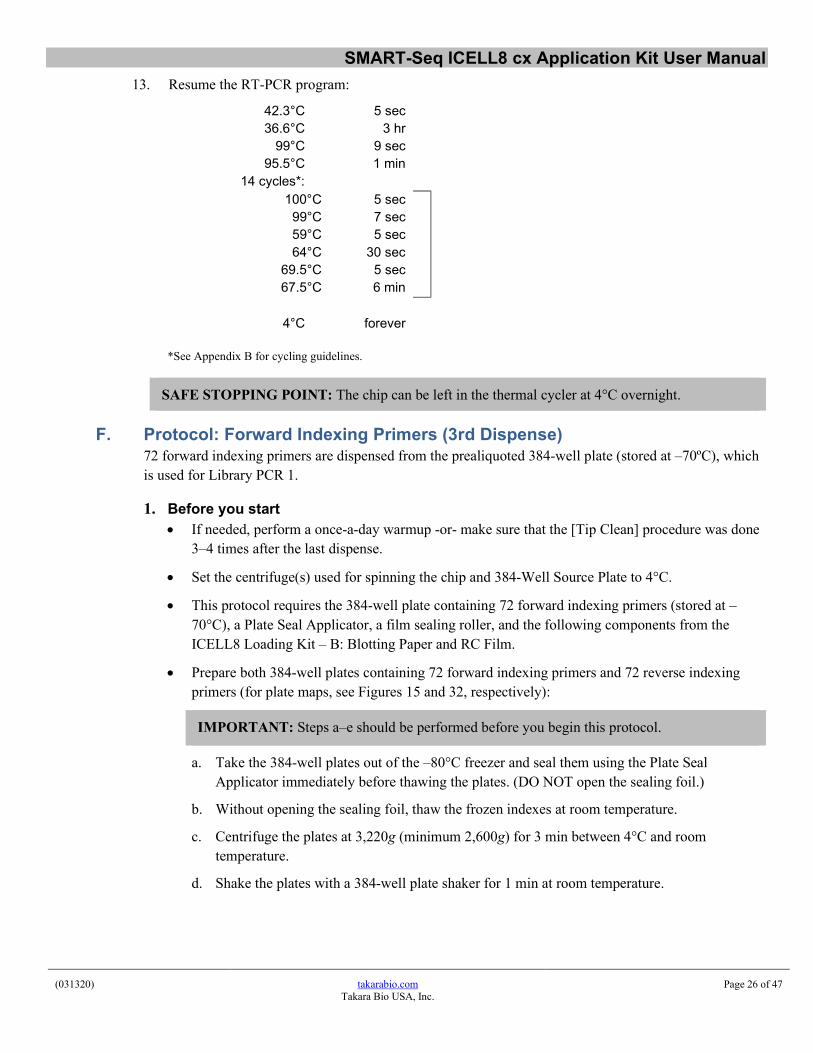
F. Protocol: Forward Indexing Primers (3rd Dispense) 72 forward indexing primers are dispensed from the prealiquoted 384-well plate (stored at –70ºC), which is used for Library PCR 1.
1. Before you start • If needed, perform a once-a-day warmup -or- make sure that the [Tip Clean] procedure was done
3–4 times after the last dispense.
• Set the centrifuge(s) used for spinning the chip and 384-Well Source Plate to 4°C.
• This protocol requires the 384-well plate containing 72 forward indexing primers (stored at –70°C), a Plate Seal Applicator, a film sealing roller, and the following components from the ICELL8 Loading Kit – B: Blotting Paper and RC Film.
• Prepare both 384-well plates containing 72 forward indexing primers and 72 reverse indexing primers (for plate maps, see Figures 15 and 32, respectively):
IMPORTANT: Steps a–e should be performed before you begin this protocol.
a. Take the 384-well plates out of the –80°C freezer and seal them using the Plate Seal Applicator immediately before thawing the plates. (DO NOT open the sealing foil.)
b. Without opening the sealing foil, thaw the frozen indexes at room temperature.
c. Centrifuge the plates at 3,220g (minimum 2,600g) for 3 min between 4°C and room temperature.
d. Shake the plates with a 384-well plate shaker for 1 min at room temperature.
SMART-Seq ICELL8 cx Application Kit User Manual
(031320) takarabio.com Takara Bio USA, Inc.
Page 27 of 47
e. Centrifuge the plates at 3,220g (minimum 2,600g) for 3 min between 4°C and room temperature. Keep the plate containing forward indexes at room temperature for use in this protocol, and store the plate containing reverse indexes at 4ºC until Section V.H. If centrifuging or stored at 4°C, bring the plate back to room temperature prior to the dispense.
IMPORTANT: If you observe that the sealing foil is not securely sealed, please contact TBUSA Technical Support at [email protected] or 800.662.2566.
Figure 15. SMART-Seq ICELL8 forward indexing primers. The 72 forward indexes shown are prealiquoted into a 384-well plate (20 µl per well). See Appendix A for barcode sequences.
2. Procedure 1. Remove the chip from the thermal cycler (Section V.E, Step 14). Centrifuge the chip at 3,220g
for 3 min at 4°C.
2. Remove the plate seal and place the 384-well plate containing forward indexing primers in the ICELL8 cx Single-Cell System with the A1 corner positioned at the top-right corner of the plate nest (see Figures 3 and 4).
3. Gently remove the RC Film from the chip and insert the chip into the chip nest.
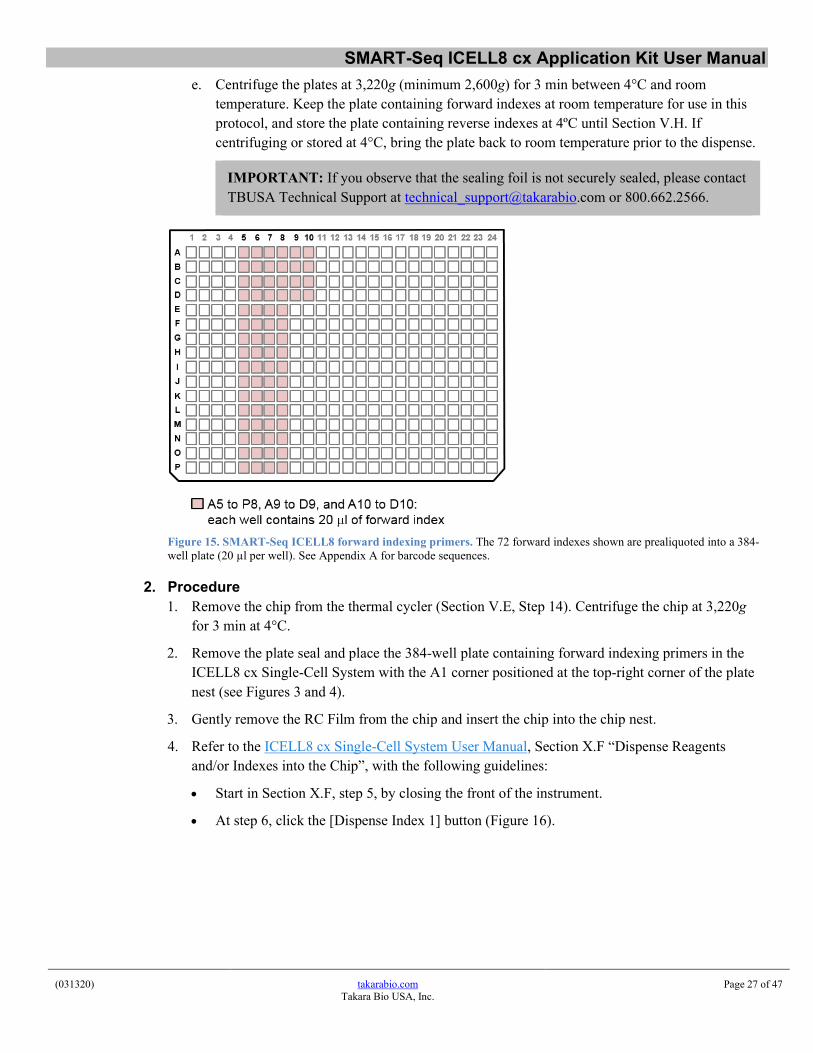
4. Refer to the ICELL8 cx Single-Cell System User Manual, Section X.F “Dispense Reagents and/or Indexes into the Chip”, with the following guidelines:
• Start in Section X.F, step 5, by closing the front of the instrument.
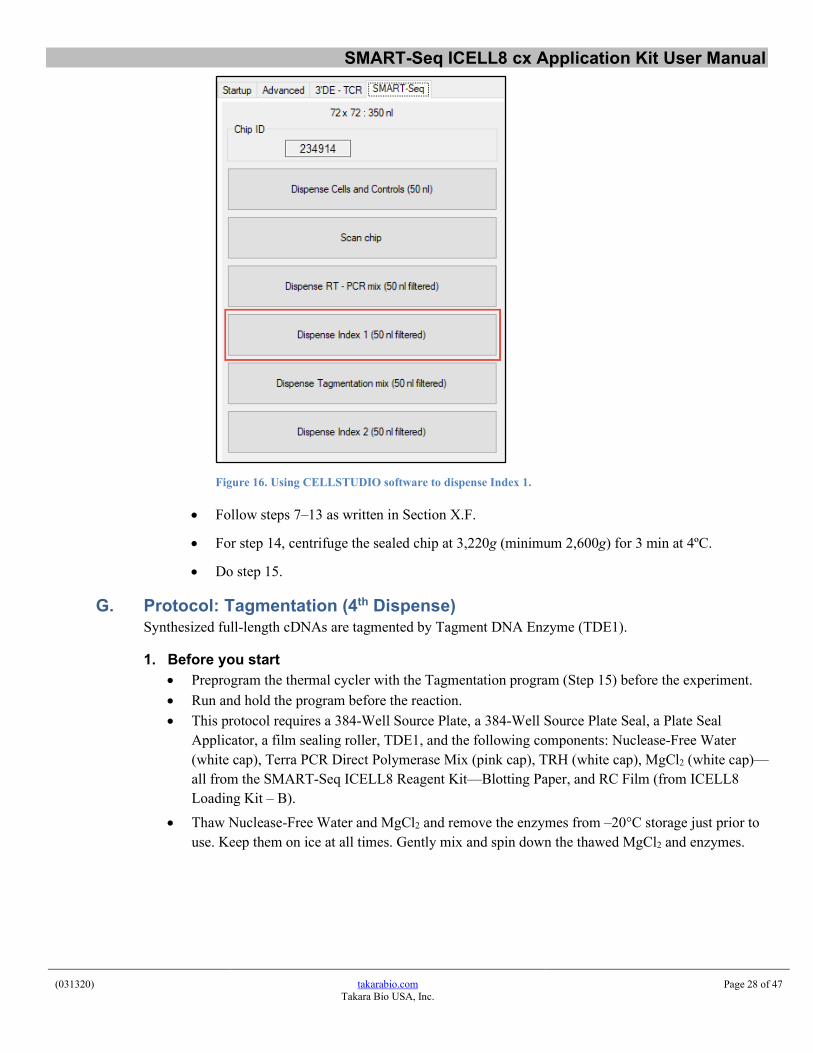
• At step 6, click the [Dispense Index 1] button (Figure 16).
SMART-Seq ICELL8 cx Application Kit User Manual
(031320) takarabio.com Takara Bio USA, Inc.
Page 28 of 47
Figure 16. Using CELLSTUDIO software to dispense Index 1.
• Follow steps 7–13 as written in Section X.F.
• For step 14, centrifuge the sealed chip at 3,220g (minimum 2,600g) for 3 min at 4ºC.
• Do step 15.
G. Protocol: Tagmentation (4th Dispense) Synthesized full-length cDNAs are tagmented by Tagment DNA Enzyme (TDE1).
1. Before you start • Preprogram the thermal cycler with the Tagmentation program (Step 15) before the experiment. • Run and hold the program before the reaction. • This protocol requires a 384-Well Source Plate, a 384-Well Source Plate Seal, a Plate Seal
Applicator, a film sealing roller, TDE1, and the following components: Nuclease-Free Water (white cap), Terra PCR Direct Polymerase Mix (pink cap), TRH (white cap), MgCl2 (white cap)—all from the SMART-Seq ICELL8 Reagent Kit—Blotting Paper, and RC Film (from ICELL8 Loading Kit – B).
• Thaw Nuclease-Free Water and MgCl2 and remove the enzymes from –20°C storage just prior to use. Keep them on ice at all times. Gently mix and spin down the thawed MgCl2 and enzymes.
SMART-Seq ICELL8 cx Application Kit User Manual
(031320) takarabio.com Takara Bio USA, Inc.
Page 29 of 47
2. Procedure 1. Make the Tagmentation Master Mix by mixing all components in the order listed in the table
below. Vortex briefly.
52.80 μl Nuclease-Free Water (white) 139.04 μl MgCl2 (white)
17.60 μl TDE1 8.80 μl Terra PCR Direct Polymerase Mix (pink) 1.76 μl TRH (white)
220.0 μl Total volume
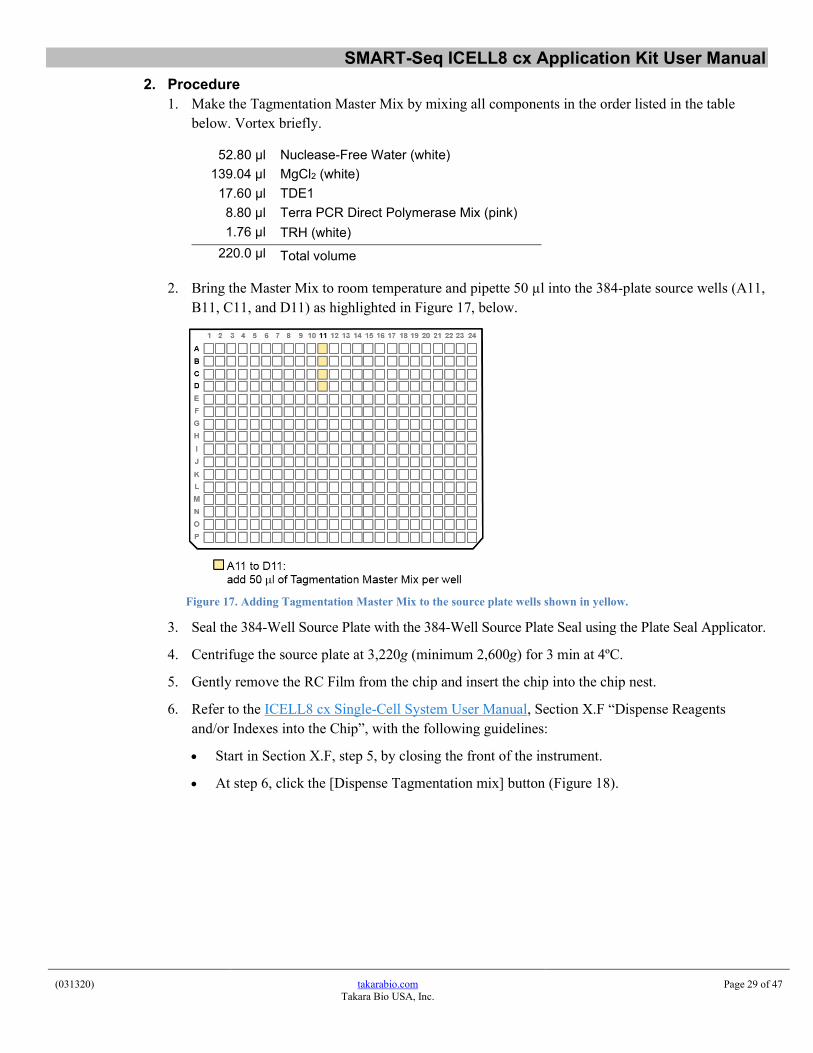
2. Bring the Master Mix to room temperature and pipette 50 µl into the 384-plate source wells (A11, B11, C11, and D11) as highlighted in Figure 17, below.
Figure 17. Adding Tagmentation Master Mix to the source plate wells shown in yellow.
3. Seal the 384-Well Source Plate with the 384-Well Source Plate Seal using the Plate Seal Applicator.
4. Centrifuge the source plate at 3,220g (minimum 2,600g) for 3 min at 4ºC.
5. Gently remove the RC Film from the chip and insert the chip into the chip nest.
6. Refer to the ICELL8 cx Single-Cell System User Manual, Section X.F “Dispense Reagents and/or Indexes into the Chip”, with the following guidelines:
• Start in Section X.F, step 5, by closing the front of the instrument.
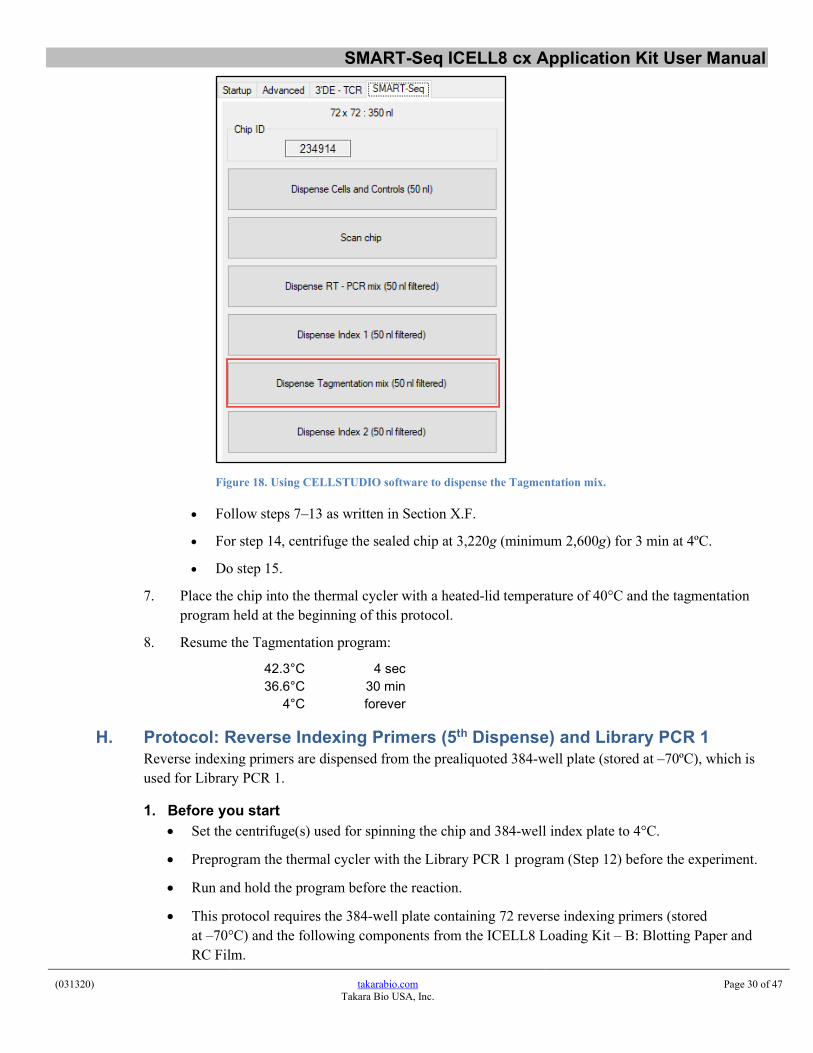
• At step 6, click the [Dispense Tagmentation mix] button (Figure 18).
SMART-Seq ICELL8 cx Application Kit User Manual
(031320) takarabio.com Takara Bio USA, Inc.
Page 30 of 47
Figure 18. Using CELLSTUDIO software to dispense the Tagmentation mix.
• Follow steps 7–13 as written in Section X.F.
• For step 14, centrifuge the sealed chip at 3,220g (minimum 2,600g) for 3 min at 4ºC.
• Do step 15.
7. Place the chip into the thermal cycler with a heated-lid temperature of 40°C and the tagmentation program held at the beginning of this protocol.
8. Resume the Tagmentation program:
42.3°C 4 sec 36.6°C 30 min
4°C forever
H. Protocol: Reverse Indexing Primers (5th Dispense) and Library PCR 1 Reverse indexing primers are dispensed from the prealiquoted 384-well plate (stored at –70ºC), which is used for Library PCR 1.
1. Before you start • Set the centrifuge(s) used for spinning the chip and 384-well index plate to 4°C.
• Preprogram the thermal cycler with the Library PCR 1 program (Step 12) before the experiment.
• Run and hold the program before the reaction.
• This protocol requires the 384-well plate containing 72 reverse indexing primers (stored at –70°C) and the following components from the ICELL8 Loading Kit – B: Blotting Paper and RC Film.
SMART-Seq ICELL8 cx Application Kit User Manual
(031320) takarabio.com Takara Bio USA, Inc.
Page 31 of 47
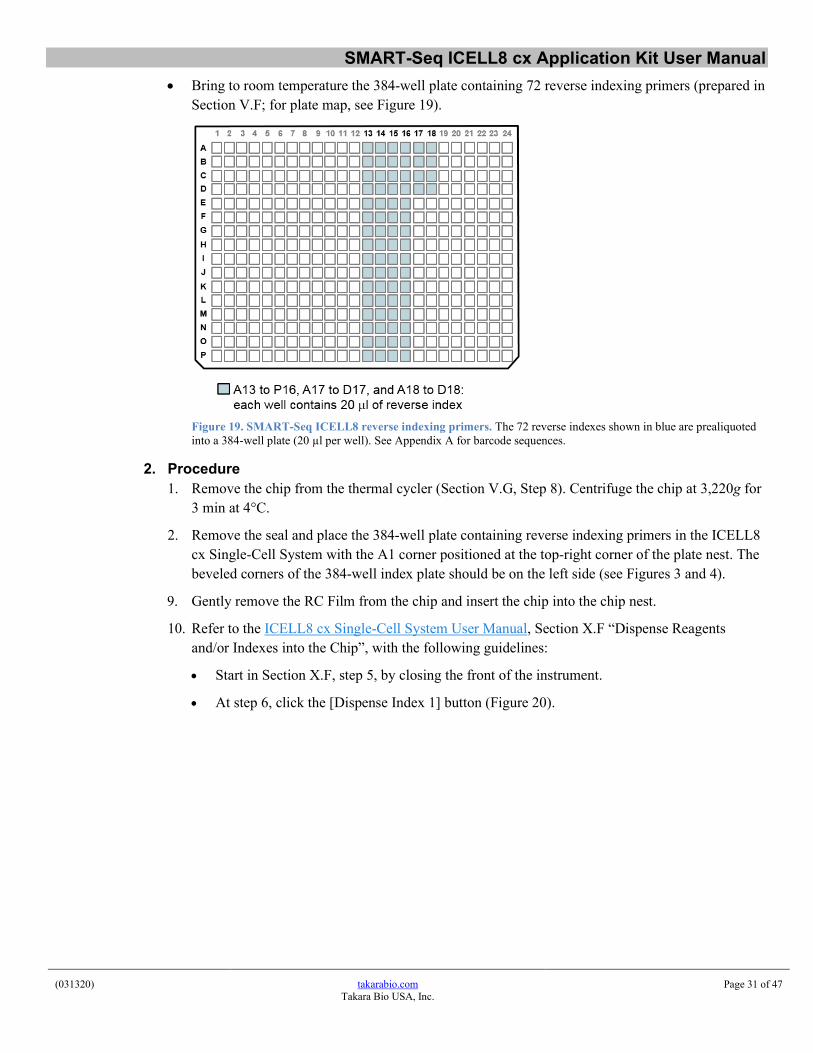
• Bring to room temperature the 384-well plate containing 72 reverse indexing primers (prepared in Section V.F; for plate map, see Figure 19).
Figure 19. SMART-Seq ICELL8 reverse indexing primers. The 72 reverse indexes shown in blue are prealiquoted into a 384-well plate (20 µl per well). See Appendix A for barcode sequences.
2. Procedure 1. Remove the chip from the thermal cycler (Section V.G, Step 8). Centrifuge the chip at 3,220g for
3 min at 4°C.
2. Remove the seal and place the 384-well plate containing reverse indexing primers in the ICELL8 cx Single-Cell System with the A1 corner positioned at the top-right corner of the plate nest. The beveled corners of the 384-well index plate should be on the left side (see Figures 3 and 4).
9. Gently remove the RC Film from the chip and insert the chip into the chip nest.
10. Refer to the ICELL8 cx Single-Cell System User Manual, Section X.F “Dispense Reagents and/or Indexes into the Chip”, with the following guidelines:
• Start in Section X.F, step 5, by closing the front of the instrument.
• At step 6, click the [Dispense Index 1] button (Figure 20).

SMART-Seq ICELL8 cx Application Kit User Manual
(031320) takarabio.com Takara Bio USA, Inc.
Page 32 of 47
Figure 20. Using CELLSTUDIO software to dispense Index 2.
• Follow steps 7–13 as written in Section X.F.
• For step 14, centrifuge the sealed chip at 3,220g (minimum 2,600g) for 3 min at 4ºC.
• Do step 15.
3. Place the chip into the thermal cycler with a heated-lid temperature of 72°C to perform Library PCR 1.
4. Resume the Library PCR 1 program:
77°C 12 sec 72°C 3 min 99°C 11 sec
95.5°C 1 min
6 cycles: 100°C 20 sec
99°C 10 sec 53.3°C 5 sec
58°C 15 sec 71°C 5 sec
67.5°C 2 min
4°C forever
SAFE STOPPING POINT: The chip can be left in the thermal cycler at 4°C overnight.
SMART-Seq ICELL8 cx Application Kit User Manual
(031320) takarabio.com Takara Bio USA, Inc.
Page 33 of 47
I. Protocol: Library Extraction from the Chip This protocol extracts the library amplified by Library PCR 1 from the chip.
Refer to the ICELL8 cx Single-Cell System User Manual, Section XI “Protocol: Extract library from the chip” for the procedure. The collected volume should be no less than 60% of the Maximum Potential Volume.
SAFE STOPPING POINT: The eluate can be frozen at –20°C.
J. Protocol: Purification of the Extracted Library In this protocol, the extracted library is purified twice using a 1:1 proportion of AMPure XP beads.
1. Before you start • Equilibrate an aliquot of AMPure XP beads to room temperature for ~30 min prior to use.
NOTE: Immediately prior to use, vortex the beads until they are well dispersed. The color of the liquid should appear homogeneous. Confirm that there is no remaining pellet of beads at the bottom of the tube. Mix well to disperse before adding the beads to your reactions. The beads are viscous, so pipette them slowly.
• Prepare fresh 80% (v/v) ethanol before each cleanup (1 ml each). Use an anhydrous ethanol stock.
• This protocol requires Elution Buffer from the SMART-Seq ICELL8 Reagent Kit.
• Use only half of the volume of the extracted library in the procedure below. Store the remaining half volume in a freezer in case further analysis is needed.
2. Procedure 1. Transfer half of the volume of the extracted library to 0.2-ml PCR tube(s) and store the remaining
half in a freezer.
NOTE: Add no more than 100 µl of library per tube. If you have more than 100 µl, split it into multiple tubes of less than 100 µl each.
2. Add 1:1 volume of well-vortexed AMPure XP Beads. (For example, add 100 µl of AMPure XP beads to 100 µl of the extracted library.)
3. Vortex the tube to mix well.
4. Incubate the tube at room temperature for 8 min to let the DNA bind to the beads.
5. Place the tube on the SMARTer-Seq Magnetic Separator - PCR Strip for ~5 min or longer, until the liquid appears completely clear, and there are no beads left in the supernatant.
NOTE: During the ~5 min incubation, if there are beads not against the magnet, use the supernatant to resuspend them and pipet them onto the magnet with the rest of the beads.
6. While the tube is sitting on the magnetic separator, pipette out the supernatant.
SMART-Seq ICELL8 cx Application Kit User Manual
(031320) takarabio.com Takara Bio USA, Inc.
Page 34 of 47
7. Keep the tube on the magnetic separator. Add 200 µl of freshly made 80% ethanol to each sample without disturbing the beads. Wait for 30 seconds and carefully pipette out the supernatant containing contaminants. DNA will remain bound to the beads during the washing process.
8. Repeat Step 7 one more time.
9. Spin down the tube briefly to collect the liquid at the bottom of the well.
10. Place the tube on the magnetic separator for 30 seconds, and then remove all remaining ethanol by using pipette.
NOTE: It is important to make sure all ethanol is removed so the beads elute well and recovery is efficient.
11. Leave the tube at room temperature for ~5 min or longer until the pellet appears dry.
NOTE: If the beads are overdried, there will be cracks in the pellet. If this occurs, the DNA may not elute well from the beads and recovery may be reduced.
12. Once the beads are dried, add 50 µl of Elution Buffer to cover the beads, with the following guidelines:
• If using a single tube, add all 50 ul of Elution Buffer to the tube and proceed to step 13.
• If the sample was split into multiple tubes at the beginning of this protocol, use a 50 µl aliquot of Elution Buffer to elute all library tubes. For example, if you have 150 ul library and had split it into two tubes of 75 ul, add 25 ul of Elution Buffer to each tube.
13. Incubate the PCR tube(s) with the beads and Elution Buffer at room temperature for 2 min to rehydrate.
14. Mix the pellet by pipetting up and down 10 times to elute DNA from the beads, then put the tube back on the magnetic separator for 1 minute or longer until the solution is completely clear.
NOTE: During the incubation on the magnet, there may be a small population of beads not pelleting against the magnet. Use the supernatant to resuspend them by pipetting up and down, and pipet them onto the magnet with the rest of the beads. Continue incubation until there are no beads left in the supernatant.
15. Transfer clear supernatant containing purified library to a fresh 0.2-ml PCR tube. If the extracted library was split at the beginning of this protocol, pool the supernatant of all extraction tubes into a single tube.
16. Add 50 µl of AMPure XP beads to the purified library.
17. Repeat Step 3–14 using fresh 80% ethanol at Step 7 and 14 µl of Elution Buffer at Step 12.
SMART-Seq ICELL8 cx Application Kit User Manual
(031320) takarabio.com Takara Bio USA, Inc.
Page 35 of 47
K. Protocol: Library Amplification (Library PCR 2) This PCR amplifies and yields the final sequencing-ready library.
1. Before you start • Preprogram the PCR thermal cycler with the Library PCR 2 program (Step 3) before the
experiment.
• Run and hold the program before the reaction.
• This protocol requires the following components from the SMART-Seq ICELL8 Reagent Kit: Terra PCR Direct Polymerase Mix (pink cap), 5X Primer Mix (green cap), and SeqAmp CB PCR Buffer (clear cap).
2. Procedure 1. Take out all reagents out from the freezer and thaw the 5X Primer Mix. Gently mix each reagent
tube and spin down briefly. Store on ice.
2. Add all reagents in the order below to the purified library after Library PCR 1 (Section V.J, Step 16):
14 μl Purified library after Library PCR 1 25 μl SeqAmp CB PCR Buffer (clear) 10 μl 5X Primer Mix (green) 1 μl Terra PCR Direct Polymerase Mix (pink)
50 μl Total volume
3. Place the tube in a preheated PCR thermal cycler with a heated lid and run the following Library PCR 2 program:
98°C 2 min
7 cycles: 98°C 10 sec 60°C 15 sec 68°C 2 min
4°C forever
SAFE STOPPING POINT: The tube can be stored at 4°C overnight.
L. Protocol: Purification of the Sequencing-Ready Library In this protocol, the sequencing-ready library is purified using a 1:1 proportion of AMPure XP beads.
1. Before you start • Equilibrate an aliquot of AMPure XP beads to room temperature for ~30 min prior to use.
NOTE: Immediately prior to use, vortex the beads until they are well dispersed. The color of the liquid should appear homogeneous. Confirm that there is no remaining pellet of beads at the bottom of the tube. Mix well to disperse before adding the beads to your reactions. The beads are viscous, so pipette them slowly.
SMART-Seq ICELL8 cx Application Kit User Manual
(031320) takarabio.com Takara Bio USA, Inc.
Page 36 of 47
• Prepare at least 400 µl of fresh 80% (v/v) ethanol from a stock of anhydrous ethanol. • This protocol requires Elution Buffer provided with the SMART-Seq ICELL8 Reagent Kit.
2. Procedure
1. Remove the PCR tube from the PCR thermal cycler (Section V.K, Step 3). Spin it down briefly. 2. Add 50 µl (1:1 v/v) of well-vortexed AMPure XP beads to the tube. 3. Vortex the tube to mix well. 4. Incubate the tube at room temperature for 8 min to let the DNA bind to the beads. 5. Place the tube on Magnetic Stand for ~5 min or longer, until the liquid appears completely clear,
and there are no beads left in the supernatant.
NOTE: During the ~5-minute incubation, if there are beads not against the magnet, use the supernatant to resuspend them and pipet them onto the magnet with the rest of the beads.
6. While the tube is sitting on the magnetic stand, pipette out the supernatant. 7. Keep the tube on the magnetic stand. Add 200 µl of freshly made 80% ethanol to each sample
without disturbing the beads. Wait for 30 seconds and carefully pipette out the supernatant containing contaminants. DNA will remain bound to the beads during the washing process.
8. Repeat Step 7 one more time. 9. Spin down the tube briefly to collect the liquid at the bottom of the well. 10. Place the tube on the magnetic stand for 30 seconds, and then remove all remaining ethanol
using a pipette.
NOTE: It is important to make sure all ethanol is removed so the beads elute well and recovery is efficient.
11. Leave the tube at room temperature for ~5 min or longer until the pellet appears dry.
NOTE: If beads were overdried, there will be cracks in the pellet. If this occurs, the DNA may not elute well from the beads and recovery may be reduced.
12. Once the beads are dried, add 17 µl Elution Buffer to cover the beads and incubate it at room temperature for 2 min to rehydrate.
13. Mix the pellet by pipetting up and down 10 times to elute DNA from the beads, then put the tube back on the magnetic stand for 1 minute or longer until the solution is completely clear.
NOTE: During the incubation on the magnet, there may be a small population of beads not pelleting against the magnet. Use the supernatant to resuspend them by pipetting up and down, and pipet them onto the magnet with the rest of the beads. Continue incubation until there are no beads left in the supernatant.
14. Transfer clear supernatant containing purified library to a clean 1.5-ml PCR tube.
SAFE STOPPING POINT: The samples may be stored at –20°C.
SMART-Seq ICELL8 cx Application Kit User Manual
(031320) takarabio.com Takara Bio USA, Inc.
Page 37 of 47
M. Protocol: Library Validation and Quantification To determine whether library production and purification were successful, we recommend analyzing and quantifying the final libraries using the Agilent 2100 Bioanalyzer and the High Sensitivity DNA Kit (Agilent, Cat. No. 5067-4626). Alternatively, the libraries can be quantified by qPCR using Takara Bio’s NGS Library Quantification Kit (Cat. No. 638324). Please refer to the corresponding user manuals for detailed instructions.
Procedure 1. Measure the concentration of the purified sequencing-ready library using 1 µl of the library, a Qubit
fluorometer, and the Qubit dsDNA HS Assay Kit (Thermo Fisher Scientific, Cat. No. Q32851). Refer to the Qubit dsDNA HS assay kit user manual for sample prep instructions.
2. Based on the Qubit measurement, dilute the amplicon to 0.2 to 2.0 ng/µl of library.
NOTE: We recommend using several concentrations for the Bioanalyzer (e.g., 0.2, 0.5, 1, and 2 ng/µl).
3. Use 1 µl of each concentration to load the Agilent 2100 Bioanalyzer and the High Sensitivity DNA Chip from Agilent’s High Sensitivity DNA Kit for validation. See the user manual for the Agilent High Sensitivity DNA Kit for instructions.
NOTE: Be careful not to transfer beads with your sample.
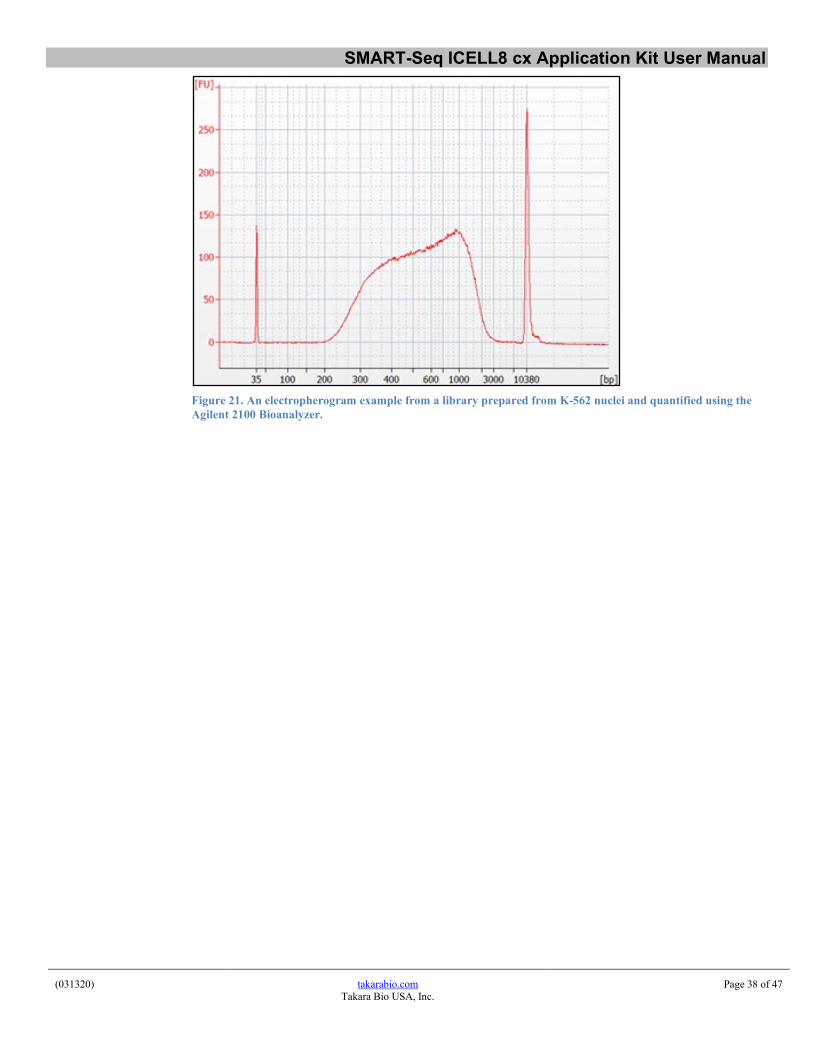
4. Use the Bioanalyzer results to determine library quality and average size. See Figure 21, below, for an example of a typical Bioanalyzer profile for an NGS library that has been successfully purified and size selected. • For libraries <850 base pairs as determined by the Bioanalyzer, use the Qubit concentration in
combination with the average size of the library to calculate the molar library concentration. • For libraries >850 base pairs as determined by the Bioanalyzer, use qPCR to accurately measure
the concentration of the sequencing library and ensure optimal loading on the sequencer. Use the Library Quantification Kit (Cat. No. 638324). Refer to the “Library Quantification Kit User Manual” on the takarabio.com website for instructions and use the average size as determined by the Bioanalyzer to calculate the molar library concentration.
5. Store the sequencing library at –20°C until ready for sequencing. Please review Appendix C for sequencing guidelines.
6. Please review Appendix D for data analysis guidelines.
SMART-Seq ICELL8 cx Application Kit User Manual
(031320) takarabio.com Takara Bio USA, Inc.
Page 38 of 47
Figure 21. An electropherogram example from a library prepared from K-562 nuclei and quantified using the Agilent 2100 Bioanalyzer.

SMART-Seq ICELL8 cx Application Kit User Manual
(031320) takarabio.com Takara Bio USA, Inc.
Page 39 of 47
Appendix A: Forward and Reverse Indexing Primers A shortened name is used for simplicity instead of the full name of each index. For example, “Forward Index 1” below stands for “SMART-Seq ICELL8 Forward Index 1”. Sample sheets will be required if Illumina’s bcl2fastq Conversion Software is used for demultiplexing the sequencing reads. Please refer to Appendix D for details.
Table 3. SMART-Seq ICELL8 Indexing Primer Set – A and SMART-Seq ICELL8 Indexing Primer Set – B forward indexing primers 1–72.
Forward indexing (i5) primers Forward indexes (i5) on sample sheet
Index number Well position
Index sequence in
primers
MiSeq®, HiSeq® 2000/2500,
NovaSeq™
MiniSeq™, NextSeq®,
HiSeq 3000/4000, HiSeq X
Forward Index 1 A5 AACCAACG AACCAACG CGTTGGTT Forward Index 2 B5 AACGATAG AACGATAG CTATCGTT Forward Index 3 C5 AAGAAGAC AAGAAGAC GTCTTCTT Forward Index 4 D5 AGAGCCTA AGAGCCTA TAGGCTCT Forward Index 5 E5 ATAGTCAA ATAGTCAA TTGACTAT Forward Index 6 F5 CAACTGCA CAACTGCA TGCAGTTG Forward Index 7 G5 CAGCATGA CAGCATGA TCATGCTG Forward Index 8 H5 CCGCCTAA CCGCCTAA TTAGGCGG Forward Index 9 I5 CCTAGCGA CCTAGCGA TCGCTAGG Forward Index 10 J5 CGCAACGG CGCAACGG CCGTTGCG Forward Index 11 K5 CTTGGCCT CTTGGCCT AGGCCAAG Forward Index 12 L5 GCGGTTCT GCGGTTCT AGAACCGC Forward Index 13 M5 GCTTGATG GCTTGATG CATCAAGC Forward Index 14 N5 GGCTCTCT GGCTCTCT AGAGAGCC Forward Index 15 O5 TCAATGCT TCAATGCT AGCATTGA Forward Index 16 P5 TGGTAATT TGGTAATT AATTACCA Forward Index 17 A6 TTCTGAAC TTCTGAAC GTTCAGAA Forward Index 18 B6 AACCAGAA AACCAGAA TTCTGGTT Forward Index 19 C6 AACCGAAC AACCGAAC GTTCGGTT Forward Index 20 D6 AACCGCCA AACCGCCA TGGCGGTT Forward Index 21 E6 AATAAGGA AATAAGGA TCCTTATT Forward Index 22 F6 ACCTTATT ACCTTATT AATAAGGT Forward Index 23 G6 TGGTCCTG TGGTCCTG CAGGACCA Forward Index 24 H6 CAACGAGG CAACGAGG CCTCGTTG Forward Index 25 I6 CCAATGGA CCAATGGA TCCATTGG Forward Index 26 J6 CGCCTATG CGCCTATG CATAGGCG Forward Index 27 K6 CTCTCCAA CTCTCCAA TTGGAGAG Forward Index 28 L6 GGCTTGAA GGCTTGAA TTCAAGCC Forward Index 29 M6 GTTAAGTT GTTAAGTT AACTTAAC Forward Index 30 N6 TCAAGTAT TCAAGTAT ATACTTGA Forward Index 31 O6 TCGCGGAT TCGCGGAT ATCCGCGA Forward Index 32 P6 TGAGTCCT TGAGTCCT AGGACTCA Forward Index 33 A7 AGTTGAAC AGTTGAAC GTTCAACT Forward Index 34 B7 AACCTCAG AACCTCAG CTGAGGTT Forward Index 35 C7 AACGGTCT AACGGTCT AGACCGTT
SMART-Seq ICELL8 cx Application Kit User Manual
(031320) takarabio.com Takara Bio USA, Inc.
Page 40 of 47
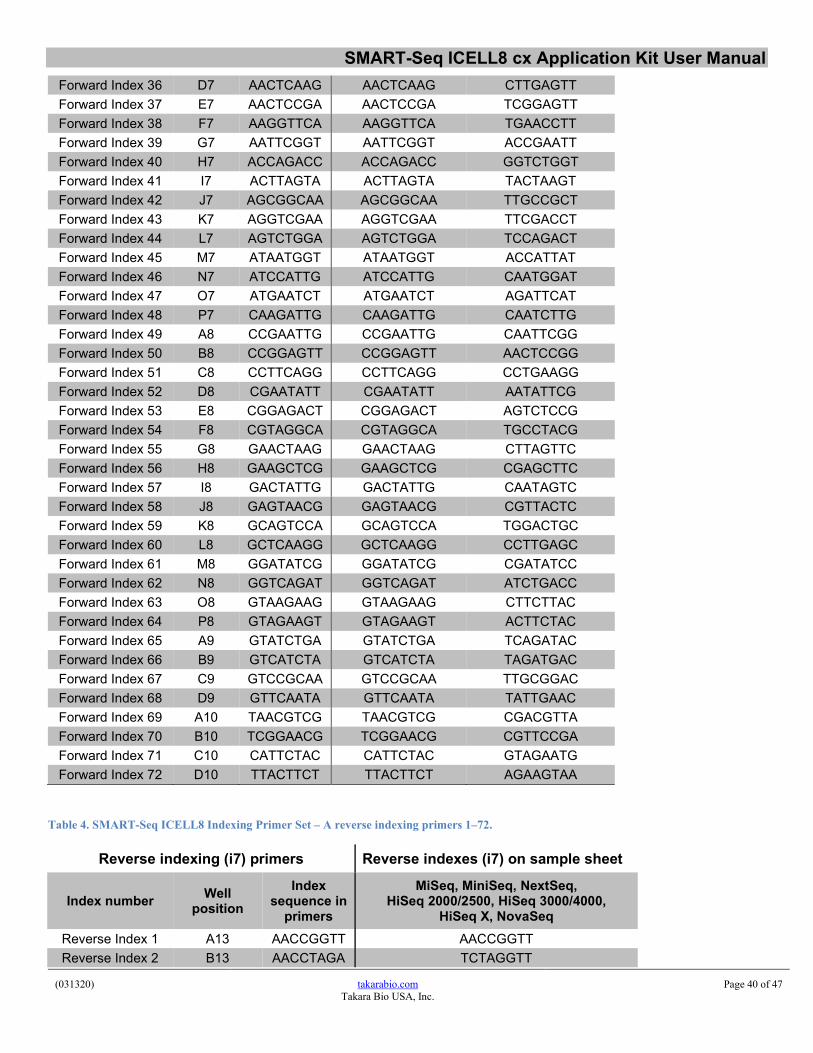
Table 4. SMART-Seq ICELL8 Indexing Primer Set – A reverse indexing primers 1–72.
Reverse indexing (i7) primers Reverse indexes (i7) on sample sheet
Index number Well position
Index sequence in
primers
MiSeq, MiniSeq, NextSeq, HiSeq 2000/2500, HiSeq 3000/4000,
HiSeq X, NovaSeq Reverse Index 1 A13 AACCGGTT AACCGGTT Reverse Index 2 B13 AACCTAGA TCTAGGTT
Forward Index 36 D7 AACTCAAG AACTCAAG CTTGAGTT Forward Index 37 E7 AACTCCGA AACTCCGA TCGGAGTT Forward Index 38 F7 AAGGTTCA AAGGTTCA TGAACCTT Forward Index 39 G7 AATTCGGT AATTCGGT ACCGAATT Forward Index 40 H7 ACCAGACC ACCAGACC GGTCTGGT Forward Index 41 I7 ACTTAGTA ACTTAGTA TACTAAGT Forward Index 42 J7 AGCGGCAA AGCGGCAA TTGCCGCT Forward Index 43 K7 AGGTCGAA AGGTCGAA TTCGACCT Forward Index 44 L7 AGTCTGGA AGTCTGGA TCCAGACT Forward Index 45 M7 ATAATGGT ATAATGGT ACCATTAT Forward Index 46 N7 ATCCATTG ATCCATTG CAATGGAT Forward Index 47 O7 ATGAATCT ATGAATCT AGATTCAT Forward Index 48 P7 CAAGATTG CAAGATTG CAATCTTG Forward Index 49 A8 CCGAATTG CCGAATTG CAATTCGG Forward Index 50 B8 CCGGAGTT CCGGAGTT AACTCCGG Forward Index 51 C8 CCTTCAGG CCTTCAGG CCTGAAGG Forward Index 52 D8 CGAATATT CGAATATT AATATTCG Forward Index 53 E8 CGGAGACT CGGAGACT AGTCTCCG Forward Index 54 F8 CGTAGGCA CGTAGGCA TGCCTACG Forward Index 55 G8 GAACTAAG GAACTAAG CTTAGTTC Forward Index 56 H8 GAAGCTCG GAAGCTCG CGAGCTTC Forward Index 57 I8 GACTATTG GACTATTG CAATAGTC Forward Index 58 J8 GAGTAACG GAGTAACG CGTTACTC Forward Index 59 K8 GCAGTCCA GCAGTCCA TGGACTGC Forward Index 60 L8 GCTCAAGG GCTCAAGG CCTTGAGC Forward Index 61 M8 GGATATCG GGATATCG CGATATCC Forward Index 62 N8 GGTCAGAT GGTCAGAT ATCTGACC Forward Index 63 O8 GTAAGAAG GTAAGAAG CTTCTTAC Forward Index 64 P8 GTAGAAGT GTAGAAGT ACTTCTAC Forward Index 65 A9 GTATCTGA GTATCTGA TCAGATAC Forward Index 66 B9 GTCATCTA GTCATCTA TAGATGAC Forward Index 67 C9 GTCCGCAA GTCCGCAA TTGCGGAC Forward Index 68 D9 GTTCAATA GTTCAATA TATTGAAC Forward Index 69 A10 TAACGTCG TAACGTCG CGACGTTA Forward Index 70 B10 TCGGAACG TCGGAACG CGTTCCGA Forward Index 71 C10 CATTCTAC CATTCTAC GTAGAATG Forward Index 72 D10 TTACTTCT TTACTTCT AGAAGTAA
SMART-Seq ICELL8 cx Application Kit User Manual
(031320) takarabio.com Takara Bio USA, Inc.
Page 41 of 47
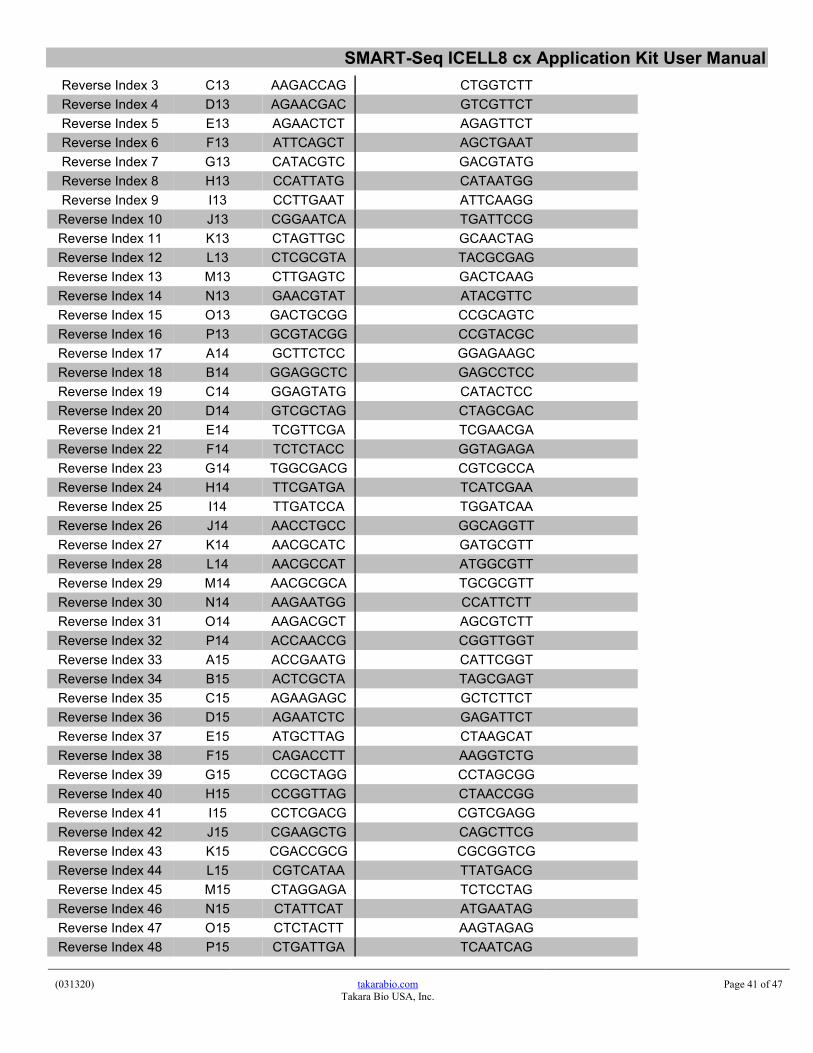
Reverse Index 3 C13 AAGACCAG CTGGTCTT Reverse Index 4 D13 AGAACGAC GTCGTTCT Reverse Index 5 E13 AGAACTCT AGAGTTCT Reverse Index 6 F13 ATTCAGCT AGCTGAAT Reverse Index 7 G13 CATACGTC GACGTATG Reverse Index 8 H13 CCATTATG CATAATGG Reverse Index 9 I13 CCTTGAAT ATTCAAGG Reverse Index 10 J13 CGGAATCA TGATTCCG Reverse Index 11 K13 CTAGTTGC GCAACTAG Reverse Index 12 L13 CTCGCGTA TACGCGAG Reverse Index 13 M13 CTTGAGTC GACTCAAG Reverse Index 14 N13 GAACGTAT ATACGTTC Reverse Index 15 O13 GACTGCGG CCGCAGTC Reverse Index 16 P13 GCGTACGG CCGTACGC Reverse Index 17 A14 GCTTCTCC GGAGAAGC Reverse Index 18 B14 GGAGGCTC GAGCCTCC Reverse Index 19 C14 GGAGTATG CATACTCC Reverse Index 20 D14 GTCGCTAG CTAGCGAC Reverse Index 21 E14 TCGTTCGA TCGAACGA Reverse Index 22 F14 TCTCTACC GGTAGAGA Reverse Index 23 G14 TGGCGACG CGTCGCCA Reverse Index 24 H14 TTCGATGA TCATCGAA Reverse Index 25 I14 TTGATCCA TGGATCAA Reverse Index 26 J14 AACCTGCC GGCAGGTT Reverse Index 27 K14 AACGCATC GATGCGTT Reverse Index 28 L14 AACGCCAT ATGGCGTT Reverse Index 29 M14 AACGCGCA TGCGCGTT Reverse Index 30 N14 AAGAATGG CCATTCTT Reverse Index 31 O14 AAGACGCT AGCGTCTT Reverse Index 32 P14 ACCAACCG CGGTTGGT Reverse Index 33 A15 ACCGAATG CATTCGGT Reverse Index 34 B15 ACTCGCTA TAGCGAGT Reverse Index 35 C15 AGAAGAGC GCTCTTCT Reverse Index 36 D15 AGAATCTC GAGATTCT Reverse Index 37 E15 ATGCTTAG CTAAGCAT Reverse Index 38 F15 CAGACCTT AAGGTCTG Reverse Index 39 G15 CCGCTAGG CCTAGCGG Reverse Index 40 H15 CCGGTTAG CTAACCGG Reverse Index 41 I15 CCTCGACG CGTCGAGG Reverse Index 42 J15 CGAAGCTG CAGCTTCG Reverse Index 43 K15 CGACCGCG CGCGGTCG Reverse Index 44 L15 CGTCATAA TTATGACG Reverse Index 45 M15 CTAGGAGA TCTCCTAG Reverse Index 46 N15 CTATTCAT ATGAATAG Reverse Index 47 O15 CTCTACTT AAGTAGAG Reverse Index 48 P15 CTGATTGA TCAATCAG
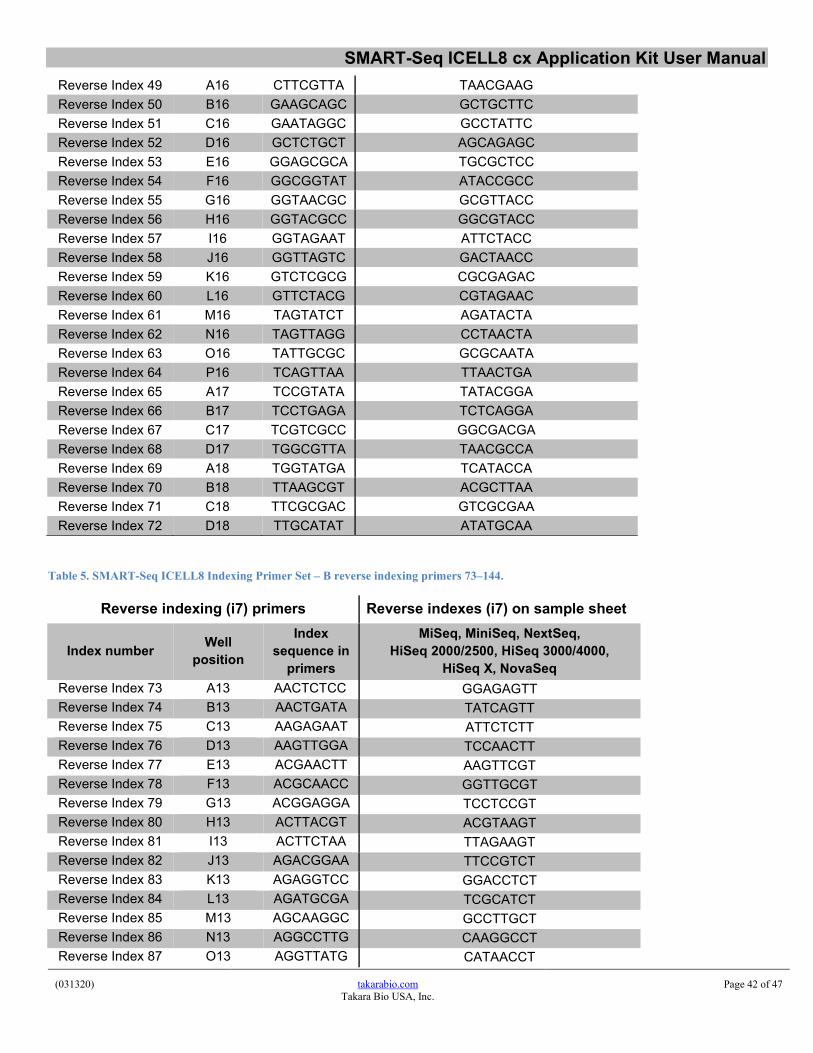
SMART-Seq ICELL8 cx Application Kit User Manual
(031320) takarabio.com Takara Bio USA, Inc.
Page 42 of 47
Reverse Index 49 A16 CTTCGTTA TAACGAAG Reverse Index 50 B16 GAAGCAGC GCTGCTTC Reverse Index 51 C16 GAATAGGC GCCTATTC Reverse Index 52 D16 GCTCTGCT AGCAGAGC Reverse Index 53 E16 GGAGCGCA TGCGCTCC Reverse Index 54 F16 GGCGGTAT ATACCGCC Reverse Index 55 G16 GGTAACGC GCGTTACC Reverse Index 56 H16 GGTACGCC GGCGTACC Reverse Index 57 I16 GGTAGAAT ATTCTACC Reverse Index 58 J16 GGTTAGTC GACTAACC Reverse Index 59 K16 GTCTCGCG CGCGAGAC Reverse Index 60 L16 GTTCTACG CGTAGAAC Reverse Index 61 M16 TAGTATCT AGATACTA Reverse Index 62 N16 TAGTTAGG CCTAACTA Reverse Index 63 O16 TATTGCGC GCGCAATA Reverse Index 64 P16 TCAGTTAA TTAACTGA Reverse Index 65 A17 TCCGTATA TATACGGA Reverse Index 66 B17 TCCTGAGA TCTCAGGA Reverse Index 67 C17 TCGTCGCC GGCGACGA Reverse Index 68 D17 TGGCGTTA TAACGCCA Reverse Index 69 A18 TGGTATGA TCATACCA Reverse Index 70 B18 TTAAGCGT ACGCTTAA Reverse Index 71 C18 TTCGCGAC GTCGCGAA Reverse Index 72 D18 TTGCATAT ATATGCAA
Table 5. SMART-Seq ICELL8 Indexing Primer Set – B reverse indexing primers 73–144.
Reverse indexing (i7) primers Reverse indexes (i7) on sample sheet
Index number Well position
Index sequence in
primers
MiSeq, MiniSeq, NextSeq, HiSeq 2000/2500, HiSeq 3000/4000,
HiSeq X, NovaSeq Reverse Index 73 A13 AACTCTCC GGAGAGTT Reverse Index 74 B13 AACTGATA TATCAGTT Reverse Index 75 C13 AAGAGAAT ATTCTCTT Reverse Index 76 D13 AAGTTGGA TCCAACTT Reverse Index 77 E13 ACGAACTT AAGTTCGT Reverse Index 78 F13 ACGCAACC GGTTGCGT Reverse Index 79 G13 ACGGAGGA TCCTCCGT Reverse Index 80 H13 ACTTACGT ACGTAAGT Reverse Index 81 I13 ACTTCTAA TTAGAAGT Reverse Index 82 J13 AGACGGAA TTCCGTCT Reverse Index 83 K13 AGAGGTCC GGACCTCT Reverse Index 84 L13 AGATGCGA TCGCATCT Reverse Index 85 M13 AGCAAGGC GCCTTGCT Reverse Index 86 N13 AGGCCTTG CAAGGCCT Reverse Index 87 O13 AGGTTATG CATAACCT

SMART-Seq ICELL8 cx Application Kit User Manual
(031320) takarabio.com Takara Bio USA, Inc.
Page 43 of 47
Reverse Index 88 P13 AGTATAGT ACTATACT Reverse Index 89 A14 ATGGTACT AGTACCAT Reverse Index 90 B14 ATTACGAA TTCGTAAT Reverse Index 91 C14 CATAACGT ACGTTATG Reverse Index 92 D14 CATTAGAA TTCTAATG Reverse Index 93 E14 CCAGGCAT ATGCCTGG Reverse Index 94 F14 CCGTACTA TAGTACGG Reverse Index 95 G14 CGCGCTCA TGAGCGCG Reverse Index 96 H14 CGCGGTTG CAACCGCG Reverse Index 97 I14 CGCTCTGG CCAGAGCG Reverse Index 98 J14 CGGCTAAC GTTAGCCG Reverse Index 99 K14 CGTCCTCC GGAGGACG Reverse Index 100 L14 CGTTGCGG CCGCAACG Reverse Index 101 M14 CTACGTCC GGACGTAG Reverse Index 102 N14 CTATCAAG CTTGATAG Reverse Index 103 O14 CTCGAGGT ACCTCGAG Reverse Index 104 P14 CTCGTCCA TGGACGAG Reverse Index 105 A15 CTCTGGCC GGCCAGAG Reverse Index 106 B15 CTGCAATG CATTGCAG Reverse Index 107 C15 CTGCCTCG CGAGGCAG Reverse Index 108 D15 CTTCATGG CCATGAAG Reverse Index 109 E15 GAAGTCGT ACGACTTC Reverse Index 110 F15 GAATCATG CATGATTC Reverse Index 111 G15 GACGGATT AATCCGTC Reverse Index 112 H15 GACGTACG CGTACGTC Reverse Index 113 I15 GAGGCCAA TTGGCCTC Reverse Index 114 J15 GATATATT AATATATC Reverse Index 115 K15 GCATTGGT ACCAATGC Reverse Index 116 L15 GCGAAGCA TGCTTCGC Reverse Index 117 M15 GCGCCTTC GAAGGCGC Reverse Index 118 N15 GCGCTCTT AAGAGCGC Reverse Index 119 O15 GCTAAGAC GTCTTAGC Reverse Index 120 P15 GGAATTGG CCAATTCC Reverse Index 121 A16 GGCAGGAC GTCCTGCC Reverse Index 122 B16 GGTACCAA TTGGTACC Reverse Index 123 C16 GGTCCTAG CTAGGACC Reverse Index 124 D16 GTAATCCG CGGATTAC Reverse Index 125 E16 GTCCTAAC GTTAGGAC Reverse Index 126 F16 GTTCAGGC GCCTGAAC Reverse Index 127 G16 TAATACGT ACGTATTA Reverse Index 128 H16 TACGAGTT AACTCGTA Reverse Index 129 I16 TACGGTAC GTACCGTA Reverse Index 130 J16 TATATGCC GGCATATA Reverse Index 131 K16 TATATTGA TCAATATA Reverse Index 132 L16 TCAGGCGA TCGCCTGA Reverse Index 133 M16 TCATGAAG CTTCATGA
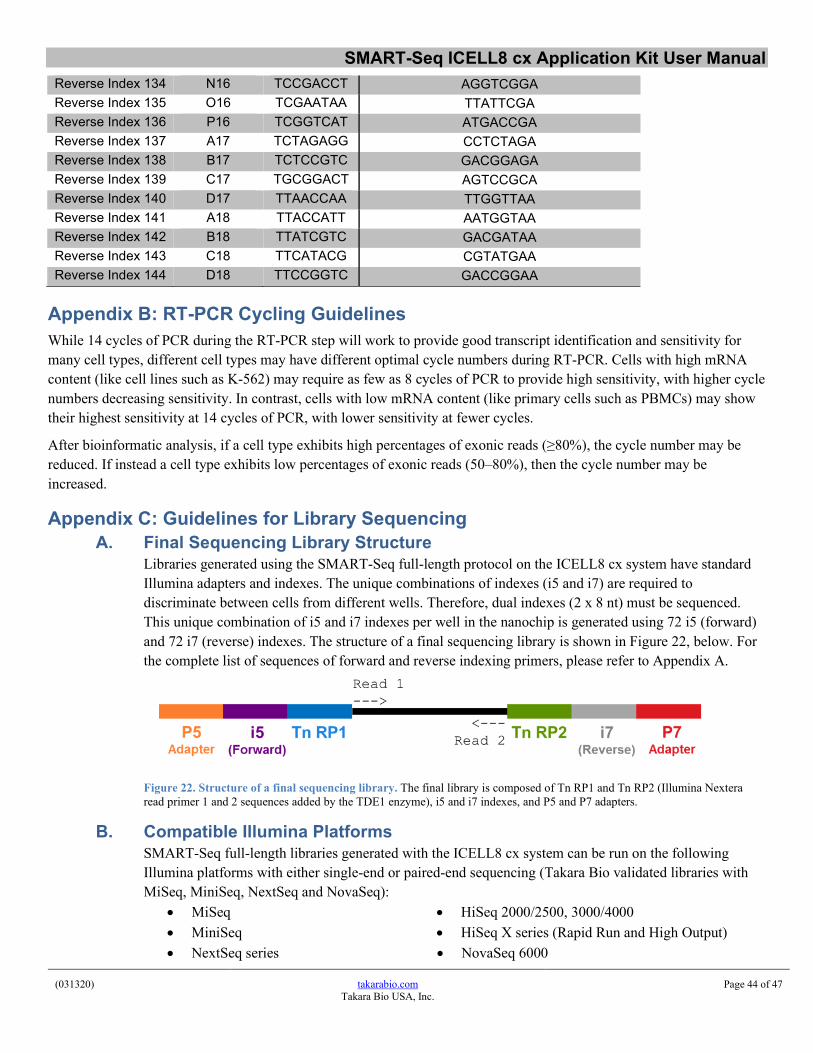
SMART-Seq ICELL8 cx Application Kit User Manual
(031320) takarabio.com Takara Bio USA, Inc.
Page 44 of 47
Reverse Index 134 N16 TCCGACCT AGGTCGGA Reverse Index 135 O16 TCGAATAA TTATTCGA Reverse Index 136 P16 TCGGTCAT ATGACCGA Reverse Index 137 A17 TCTAGAGG CCTCTAGA Reverse Index 138 B17 TCTCCGTC GACGGAGA Reverse Index 139 C17 TGCGGACT AGTCCGCA Reverse Index 140 D17 TTAACCAA TTGGTTAA Reverse Index 141 A18 TTACCATT AATGGTAA Reverse Index 142 B18 TTATCGTC GACGATAA Reverse Index 143 C18 TTCATACG CGTATGAA Reverse Index 144 D18 TTCCGGTC GACCGGAA
Appendix B: RT-PCR Cycling Guidelines While 14 cycles of PCR during the RT-PCR step will work to provide good transcript identification and sensitivity for many cell types, different cell types may have different optimal cycle numbers during RT-PCR. Cells with high mRNA content (like cell lines such as K-562) may require as few as 8 cycles of PCR to provide high sensitivity, with higher cycle numbers decreasing sensitivity. In contrast, cells with low mRNA content (like primary cells such as PBMCs) may show their highest sensitivity at 14 cycles of PCR, with lower sensitivity at fewer cycles.
After bioinformatic analysis, if a cell type exhibits high percentages of exonic reads (≥80%), the cycle number may be reduced. If instead a cell type exhibits low percentages of exonic reads (50–80%), then the cycle number may be increased.
Appendix C: Guidelines for Library Sequencing A. Final Sequencing Library Structure
Libraries generated using the SMART-Seq full-length protocol on the ICELL8 cx system have standard Illumina adapters and indexes. The unique combinations of indexes (i5 and i7) are required to discriminate between cells from different wells. Therefore, dual indexes (2 x 8 nt) must be sequenced. This unique combination of i5 and i7 indexes per well in the nanochip is generated using 72 i5 (forward) and 72 i7 (reverse) indexes. The structure of a final sequencing library is shown in Figure 22, below. For the complete list of sequences of forward and reverse indexing primers, please refer to Appendix A.
Figure 22. Structure of a final sequencing library. The final library is composed of Tn RP1 and Tn RP2 (Illumina Nextera read primer 1 and 2 sequences added by the TDE1 enzyme), i5 and i7 indexes, and P5 and P7 adapters.
B. Compatible Illumina Platforms SMART-Seq full-length libraries generated with the ICELL8 cx system can be run on the following Illumina platforms with either single-end or paired-end sequencing (Takara Bio validated libraries with MiSeq, MiniSeq, NextSeq and NovaSeq):
• MiSeq • MiniSeq • NextSeq series
• HiSeq 2000/2500, 3000/4000 • HiSeq X series (Rapid Run and High Output) • NovaSeq 6000
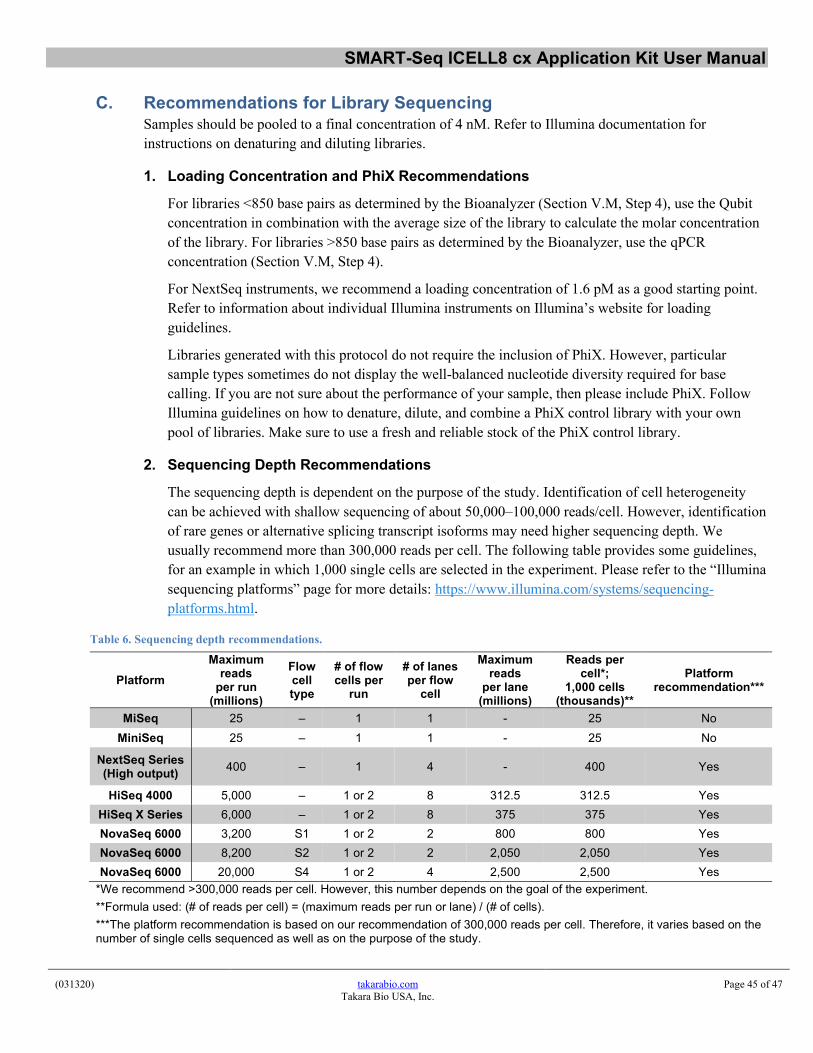
SMART-Seq ICELL8 cx Application Kit User Manual
(031320) takarabio.com Takara Bio USA, Inc.
Page 45 of 47
C. Recommendations for Library Sequencing Samples should be pooled to a final concentration of 4 nM. Refer to Illumina documentation for instructions on denaturing and diluting libraries.
1. Loading Concentration and PhiX Recommendations
For libraries <850 base pairs as determined by the Bioanalyzer (Section V.M, Step 4), use the Qubit concentration in combination with the average size of the library to calculate the molar concentration of the library. For libraries >850 base pairs as determined by the Bioanalyzer, use the qPCR concentration (Section V.M, Step 4).
For NextSeq instruments, we recommend a loading concentration of 1.6 pM as a good starting point. Refer to information about individual Illumina instruments on Illumina’s website for loading guidelines.
Libraries generated with this protocol do not require the inclusion of PhiX. However, particular sample types sometimes do not display the well-balanced nucleotide diversity required for base calling. If you are not sure about the performance of your sample, then please include PhiX. Follow Illumina guidelines on how to denature, dilute, and combine a PhiX control library with your own pool of libraries. Make sure to use a fresh and reliable stock of the PhiX control library.
2. Sequencing Depth Recommendations
The sequencing depth is dependent on the purpose of the study. Identification of cell heterogeneity can be achieved with shallow sequencing of about 50,000–100,000 reads/cell. However, identification of rare genes or alternative splicing transcript isoforms may need higher sequencing depth. We usually recommend more than 300,000 reads per cell. The following table provides some guidelines, for an example in which 1,000 single cells are selected in the experiment. Please refer to the “Illumina sequencing platforms” page for more details: https://www.illumina.com/systems/sequencing-platforms.html.
Table 6. Sequencing depth recommendations.
Platform Maximum
reads per run
(millions)
Flow cell type
# of flow cells per
run
# of lanes per flow
cell
Maximum reads
per lane (millions)
Reads per cell*;
1,000 cells (thousands)**
Platform recommendation***
MiSeq 25 – 1 1 - 25 No MiniSeq 25 – 1 1 - 25 No
NextSeq Series (High output) 400 – 1 4 - 400 Yes
HiSeq 4000 5,000 – 1 or 2 8 312.5 312.5 Yes HiSeq X Series 6,000 – 1 or 2 8 375 375 Yes NovaSeq 6000 3,200 S1 1 or 2 2 800 800 Yes NovaSeq 6000 8,200 S2 1 or 2 2 2,050 2,050 Yes NovaSeq 6000 20,000 S4 1 or 2 4 2,500 2,500 Yes
*We recommend >300,000 reads per cell. However, this number depends on the goal of the experiment. **Formula used: (# of reads per cell) = (maximum reads per run or lane) / (# of cells). ***The platform recommendation is based on our recommendation of 300,000 reads per cell. Therefore, it varies based on the number of single cells sequenced as well as on the purpose of the study.

SMART-Seq ICELL8 cx Application Kit User Manual
(031320) takarabio.com Takara Bio USA, Inc.
Page 46 of 47
3. Sequencing Run Parameters
SMART-Seq libraries generated with the ICELL8 cx system use standard Illumina sequencing primers and do not need custom primers. Dual indexes (2 x 8 cycles) must be sequenced and we recommend the number of cycles in Table 7, below. However, cycles of Read 1 and Read 2 can be flexible (e.g., 2 x 100, 2 x 150, and 2 x 250) depending on your experiments. Single-end sequencing can also be performed with SMART-Seq full-length libraries (e.g., 1 x 100, 1 x 150, and 1 x 250).
Table 7. Sequencing run parameters.
Sequencing read Recommended # of cycles Read 1 75 i7 Index 8 i5 Index 8 Read 2 75
Appendix D: Demultiplexing and Data Analysis There are two options to demultiplex your sequencing data and generate the files.
1. Use mappa™ Analysis Pipeline, Takara Bio’s single-cell RNA-seq analysis pipeline mappa Pipeline is an end-to-end analysis software that takes sequencing data as input and can perform de-multiplexing, alignment, counting, and report generation as an HTML-format report with the most commonly used statistics and plots in single-cell analysis. However, if desired, it can be used for de-multiplexing alone. This choice can be made while launching the pipeline.
Significant advantages of using mappa software:
• Perform end-to-end analysis or just de-multiplexing with ease
• Provide the well list generated during the experiment (using CellSelect software on the ICELL8 cx instrument) as the input without the need to manually handle barcodes and sample information
• mappa software automatically performs a reverse-complement check and correction of barcodes
• There is no limit on the number of barcodes one can process
• Output files generated by mappa pipeline can be loaded into hanta™ R kit, our software for extended analysis, to create classic t-SNE analysis popular in scRNASeq
Please make sure to keep your version of mappa Analysis Pipeline and hanta R Kit up-to-date to ensure full compatibility with CELLSTUDIO software. Installation and upgrade information can be found in the user guides for both mappa Analysis Pipeline and hanta R kit, available through the ICELL8 bioinformatics tools portal at takarabio.com
2. Use Illumina’s bcl2fastq Conversion Software After installing bcl2fastq Conversion Software for demultiplexing, a custom sample sheet needs to be generated in order to use the software. Sample sheets can be created by Illumina Experiment Manager https://support.illumina.com/sequencing/sequencing_software/experiment_manager.html.
SMART-Seq ICELL8 cx Application Kit User Manual
(031320) takarabio.com Takara Bio USA, Inc.
Page 47 of 47
SMART-Seq ICELL8 indexes are unique sequences that are different from Illumina indexes. Before demultiplexing, the sample sheets created in the Illumina Experiment Manager (above) have to be customized with SMART-Seq ICELL8 forward and reverse indexes (see Appendix A).
Please note that forward indexes (i5) in the sample sheet are dependent on Illumina sequencers, and on some sequencers, the indexes must be entered in the sample sheet in the reverse-complement. The SMART-Seq indexes of the wells selected during an experiment can be obtained from the well-list file generated by the ICELL8 cx CellSelect Software on the ICELL8 cx instrument. Additionally, some versions of bcl2fastq software handle only ~400 barcodes at a time, requiring it to be run multiple times with multiple sample sheets, when more than 400 wells are selected. Please see Illumina’s User Guide for more details (https://support.illumina.com/sequencing/sequencing_software/bcl2fastq-conversion-software.html).
The resulting demultiplexed FASTQ files can then be analyzed by other compatible custom pipelines, such as the mappa software.
Contact Us
Customer Service/Ordering Technical Support
tel: 800.662.2566 (toll-free) tel: 800.662.2566 (toll-free)
fax: 800.424.1350 (toll-free) fax: 800.424.1350 (toll-free)
web: takarabio.com web: takarabio.com
e-mail: [email protected] e-mail: [email protected]
Notice to Purchaser Our products are to be used for Research Use Only. They may not be used for any other purpose, including, but not limited to, use in humans, therapeutic or diagnostic use, or commercial use of any kind. Our products may not be transferred to third parties, resold, modified for resale, or used to manufacture commercial products or to provide a service to third parties without our prior written approval. Your use of this product is also subject to compliance with any applicable licensing requirements described on the product’s web page at takarabio.com. It is your responsibility to review, understand and adhere to any restrictions imposed by such statements © 2019 Takara Bio Inc. All Rights Reserved. All trademarks are the property of Takara Bio Inc. or its affiliate(s) in the U.S. and/or other countries or their respective owners. Certain trademarks may not be registered in all jurisdictions. Additional product, intellectual property, and restricted use information is available at takarabio.com. This document has been reviewed and approved by the Quality Department.