Embed Size (px)
Citation preview
PN 201115-001 Rev A » R7.3 1 of 22
QUICK START GUIDE
Silver Peak VX for Azure· Server Mode ·
(Single-Interface Deployment)
Silver Peak Systems, Inc. | 2860 De La Cruz Blvd. Suite 100. Santa Clara, CA 95050 | www.silver-peak.com/support
1.877.210.7325 (toll-free in USA) | +1.408.935.1850
© 2016 Silver Peak Systems, Inc.
A Silver Peak VX virtual appliance can be deployed within a Microsoft Azure cloud environment to accelerate the migration of data to the cloud, and accelerate access to that data from anywhere. Specifically, the Silver Peak VX is available as an image, created and launched from the Azure Marketplace.
Server mode uses a single virtual interface on the VX appliance.
An Azure account
A virtual network (VNet)
Network Security Groups(create new or use existing)
An SSH client, such as PuTTY, installed on your PC
SUMMARY OF TASKS
Prerequisites
1 Deploy the VX virtual appliance
2 View the contents of the Resource Group
3 Change the Silver Peak password
4 Configure the VX appliance from the browser wizard
5 Disable the Next-hop unreachable alarm
6 Enable IP forwarding on the VX
7 In a different subnet, deploy a Windows Server
8 Redirect traffic to the Azure-VX for optimization
9 Create tunnels between the local and remote appliances
10 Enable traffic from the Data Center to reach Azure-VX
11 Turn on subnet sharing for Azure-VX
12 Verify that the Windows server can reach the Windows client in the Data Center

VX on Microsoft Azure / Server Mode
1 Deploy the VX virtual appliance
a. After signing in to your Azure account, the Dashboard page opens. Click New at the top of the left navigation bar.
b. In the Search the Marketplace box, enter Silver Peak VX and select it from the results.
The page scrolls right to the Bring Your Own License enabled blade.
c. To begin creating your virtual machine, click Create. Step 1, Basics, appears.
Complete the following:
Name: Azure-VX
User name: azureuser
Authentication type: [Select] Password
Password: [Enter a password for creating the VX. This is not the Silver Peak (VX) login, so it is not and cannot be, “admin”.]
Subscription: [Select] Pay-As-You-Go
Resource Group: [Select] Create newSilver_Peak_Engineering[NOTE: You could also use an existing one.]
Location: [Select the Azure region where you want to deploy the VX] West US
d. Click OK. Step 2, Size, appears.
2 of 22 PN 201115-001 Rev A » R7.3

Quick Start Guide
e. Select a VM size to match your WAN link. In this example, we’ll choose A3 Standard and click Select.
f. When Step 3, Settings, appears, complete the following:
Storage
Disk type: Standard[See the VX Virtual Appliance Host System Requirements to select an appropriate size.]
Storage account: (new) silverpeakengineerin5601[We’re selecting the new, auto-generated storage, but you can choose an existing storageaccount.]
Network
Virtual network: (new) Silver_Peak_Engineering
Subnet: [Select] default (10.2.0.0/24)[NOTE: You must use a new subnet for the VX appliance. In Azure, you cannot place the VX and the application server(s) in the same subnet. Because Azure user-defined routes are applied at the subnet level, the devices must be in separate subnets.]
Public IP address: [Select] (new) Azure-VX[Azure assigns a static or dynamic Public IP address.]
Network security group: [Select] (new) Azure-VXSee details below for adding the necessary inbound and outbound rules to this field. during this Step, before clicking OK.
Extensions
Extensions: [Select] No extensions
Availability
Availability set: [Select] None
PN 201115-001 Rev A » R7.3 3 of 22

VX on Microsoft Azure / Server Mode
For the VX to optimize traffic, you must add rule(s) to the VX’s Security Group that:
• allow application traffic to and from the VX
• open ports to allow application traffic to and from your AWS application’s security group
To add the required inbound rules, click Network security group and click Create new. Default rules for SSH, HTTP, and HTTPS already exist in the security group.
In the Name field, enter Azure-VX. Click Add an inbound rule.
One by one, add the following additional inbound rules:
IPSEC-tunnel- IPSEC-tunnel-Name UDP-4500 UDP-500
Priority 1030 1040
Source Any Any
Protocol UDP UDP
Source port range * *
Destination Any Any
Destination port range 4500 500
Action Allow Allow
Add the following outbound rule:
Name Allow-all-outbound
Priority 1000
Destination Any
Destination port range *
Source Any
Protocol Any
Source port range *
Action Allow
4 of 22 PN 201115-001 Rev A » R7.3
Quick Start Guide
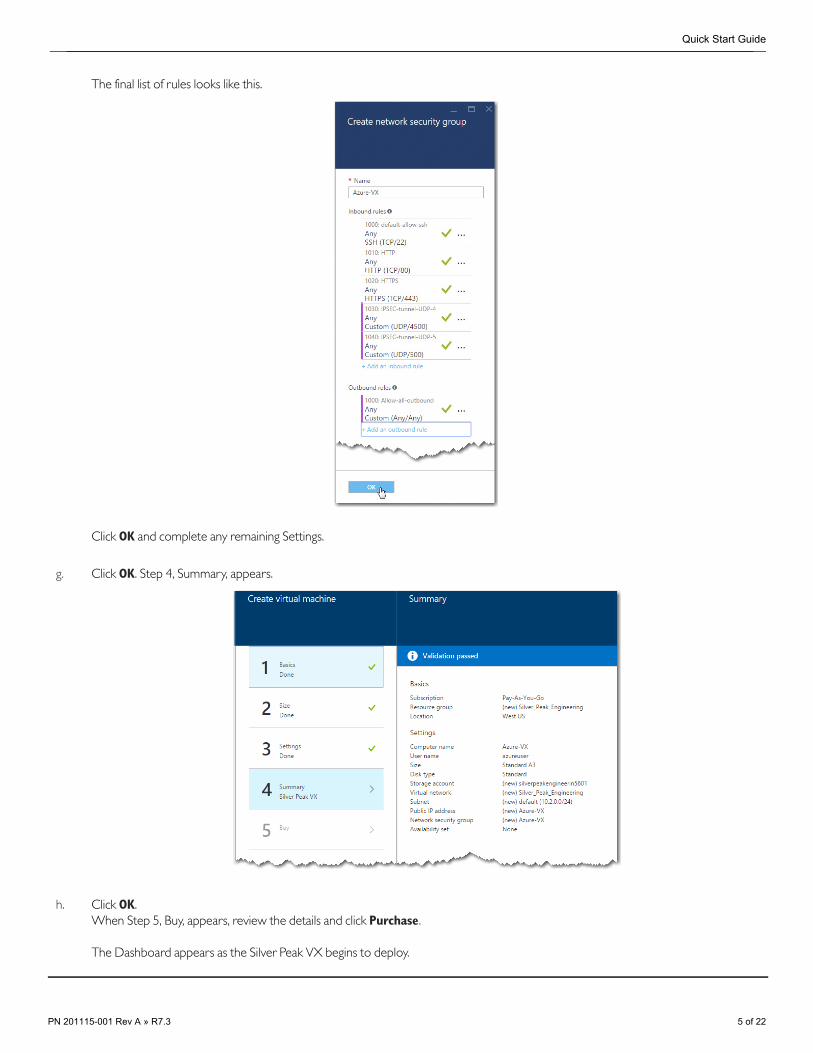
The final list of rules looks like this.
Click OK and complete any remaining Settings.
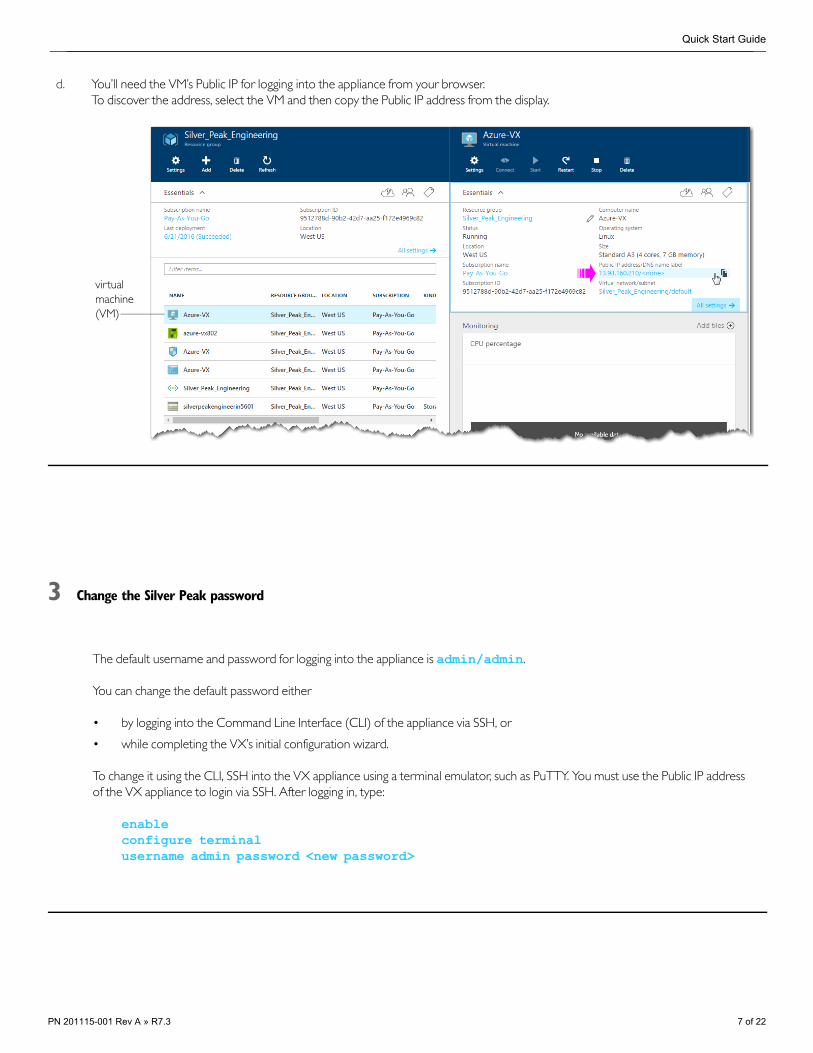
g. Click OK. Step 4, Summary, appears.
h. Click OK. When Step 5, Buy, appears, review the details and click Purchase.
The Dashboard appears as the Silver Peak VX begins to deploy.
PN 201115-001 Rev A » R7.3 5 of 22

VX on Microsoft Azure / Server Mode
2 View the contents of the Resource Group
To view the progress of the VM deployment, you can monitor the Resource Group you created earlier.
a. In the left navigation bar, click Resource groups.
b. From the Subscriptions list, select the name of the Resource Group you entered previously. In this example, it was Silver_Peak_Engineering. (Please allow a couple of minutes for the virtual machine to appear.)
c. If the VM deployed successfully, the following items display in your Resource Group.
virtual machine (VM)
NIC
Network security group
Public IP
VNet
Storage account
6 of 22 PN 201115-001 Rev A » R7.3
Quick Start Guide
3 Change the Silver Peak password
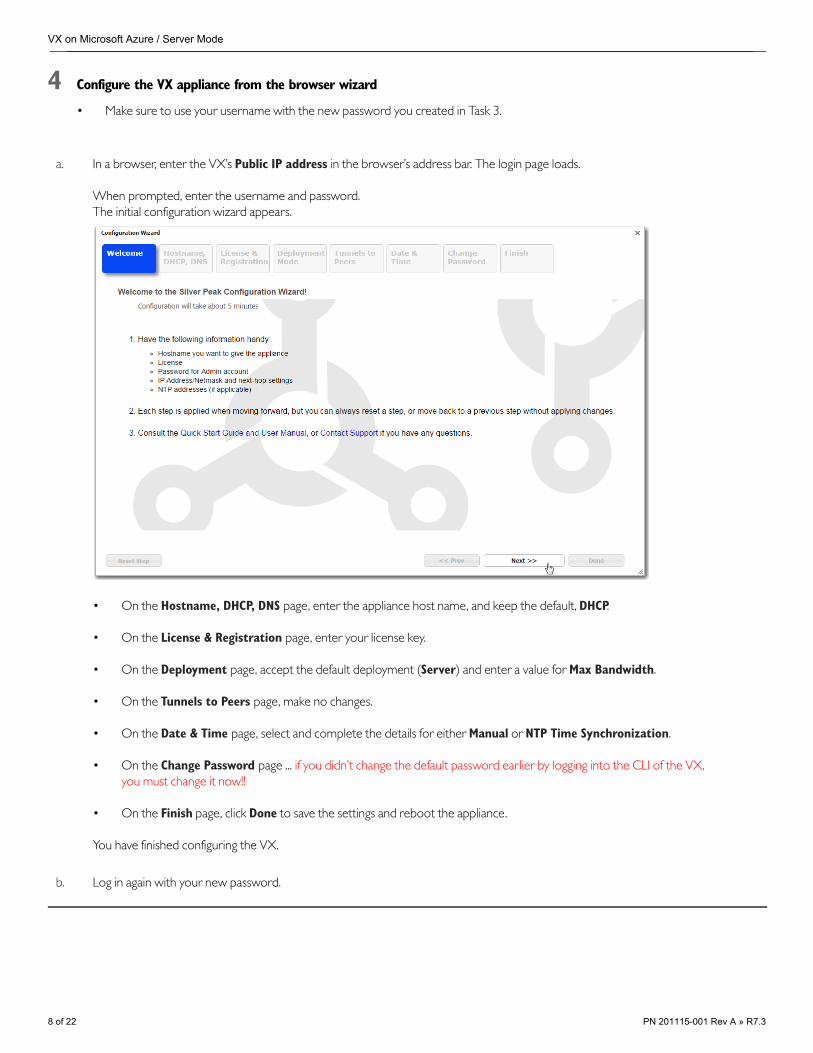
d. You’ll need the VM’s Public IP for logging into the appliance from your browser. To discover the address, select the VM and then copy the Public IP address from the display.
virtual machine (VM)
The default username and password for logging into the appliance is admin/admin.
You can change the default password either
To change it using the CLI, SSH into the VX appliance using a terminal emulator, such as PuTTY. You must use the Public IP address of the VX appliance to login via SSH. After logging in, type:
• by logging into the Command Line Interface (CLI) of the appliance via SSH, or
• while completing the VX’s initial configuration wizard.
enableconfigure terminalusername admin password <new password>
PN 201115-001 Rev A » R7.3 7 of 22
VX on Microsoft Azure / Server Mode
4 Configure the VX appliance from the browser wizard
• Make sure to use your username with the new password you created in Task 3.
a. In a browser, enter the VX’s Public IP address in the browser’s address bar. The login page loads.
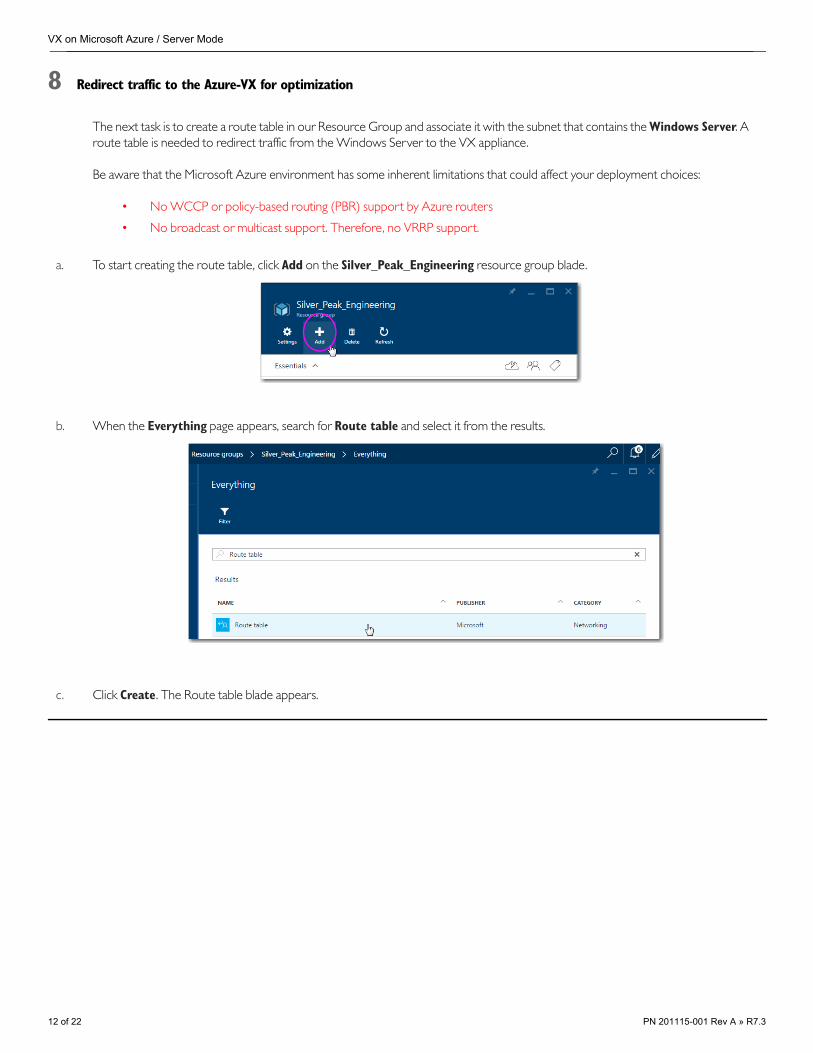
When prompted, enter the username and password. The initial configuration wizard appears.
• On the Hostname, DHCP, DNS page, enter the appliance host name, and keep the default, DHCP.
• On the License & Registration page, enter your license key.
• On the Deployment page, accept the default deployment (Server) and enter a value for Max Bandwidth.
• On the Tunnels to Peers page, make no changes.
• On the Date & Time page, select and complete the details for either Manual or NTP Time Synchronization.
• On the Change Password page ... if you didn’t change the default password earlier by logging into the CLI of the VX,you must change it now!!
• On the Finish page, click Done to save the settings and reboot the appliance.
You have finished configuring the VX.
b. Log in again with your new password.
8 of 22 PN 201115-001 Rev A » R7.3

Quick Start Guide
5 Disable the Next-hop unreachable alarm
Once every 10 seconds, the VX appliance sends an ICMP packet on each of its interfaces to verify if the next-hop is reachable. Because Azure blocks ICMP traffic to its gateway routers, the following alarm appears on the VX.
a. To disable the alarm, enter the appliance’s Public IP address in an SSH client such as puTTY and type the following CLI (Command Line Interface) commands:
enableconfigure terminalsystem watchdog datapath gateway-connect disable
NOTE: In more recent versions of the Silver Peak appliance, this can be done by opening the Configuration > Systems page and deselecting the Enable Health check option under WAN NextHop Health Check.
b. Check the banner to verify that the alarm has cleared.
PN 201115-001 Rev A » R7.3 9 of 22

VX on Microsoft Azure / Server Mode
6 Enable IP forwarding on the VX
By default, virtual machines deployed in Azure don’t participate in IP forwarding. This means, if an interface of a particular VM receives a packet that is not destined for that interface, it will discard that packet. However, since VX appliances receive traffic that needs to be forwarded to other destinations, we must enable IP forwarding.
To enable IP forwarding on the VX’s mgmt0 interface, do the following:
a. Scroll back to the Resource Group blade and select the vNIC.
b. On the Settings blade, select IP Addresses, go to IP forwarding settings and click Enabled, and then click Save.
1
2
3
10 of 22 PN 201115-001 Rev A » R7.3

Quick Start Guide
7 In a different subnet, deploy a Windows Server
The next task is to deploy a Windows Server in the Resource Group. In Azure, we use the Windows Server as the traffic originator.
Although this application Server will be deployed on the same virtual network as the Azure VX appliance, it cannot be deployed on the same subnet as the Azure VX.
This is because, currently, Azure cannot control the routing of packets through a virtual appliance using User-Defined Routes (UDR) if the sending and receiving VMs are running on the same subnet.
a. To create the application server, go to the Resource Group blade, click Add, and in the same VNet, deploy a Windows Server. In this example, we’ve named ours, Windows-Server.
In this example, the Azure-VX’s subnet is 10.2.0.0/24, and the Windows-Server’s subnet is 10.2.1.0/24.
b. After deploying Windows-Server in our Resource Group, the Essentials list looks like this.
PN 201115-001 Rev A » R7.3 11 of 22
VX on Microsoft Azure / Server Mode
8 Redirect traffic to the Azure-VX for optimization
The next task is to create a route table in our Resource Group and associate it with the subnet that contains the Windows Server. A route table is needed to redirect traffic from the Windows Server to the VX appliance.
Be aware that the Microsoft Azure environment has some inherent limitations that could affect your deployment choices:
• No WCCP or policy-based routing (PBR) support by Azure routers
• No broadcast or multicast support. Therefore, no VRRP support.
a. To start creating the route table, click Add on the Silver_Peak_Engineering resource group blade.
b. When the Everything page appears, search for Route table and select it from the results.
c. Click Create. The Route table blade appears.
12 of 22 PN 201115-001 Rev A » R7.3

Quick Start Guide
d. Complete the fields and click Create.
This route table, LAN_redirect_route_table, is now added to the Resource Group. Now you need to create a specific route to redirect all traffic from Windows-Server to the local Silver Peak appliance, Azure-VX.
PN 201115-001 Rev A » R7.3 13 of 22
VX on Microsoft Azure / Server Mode
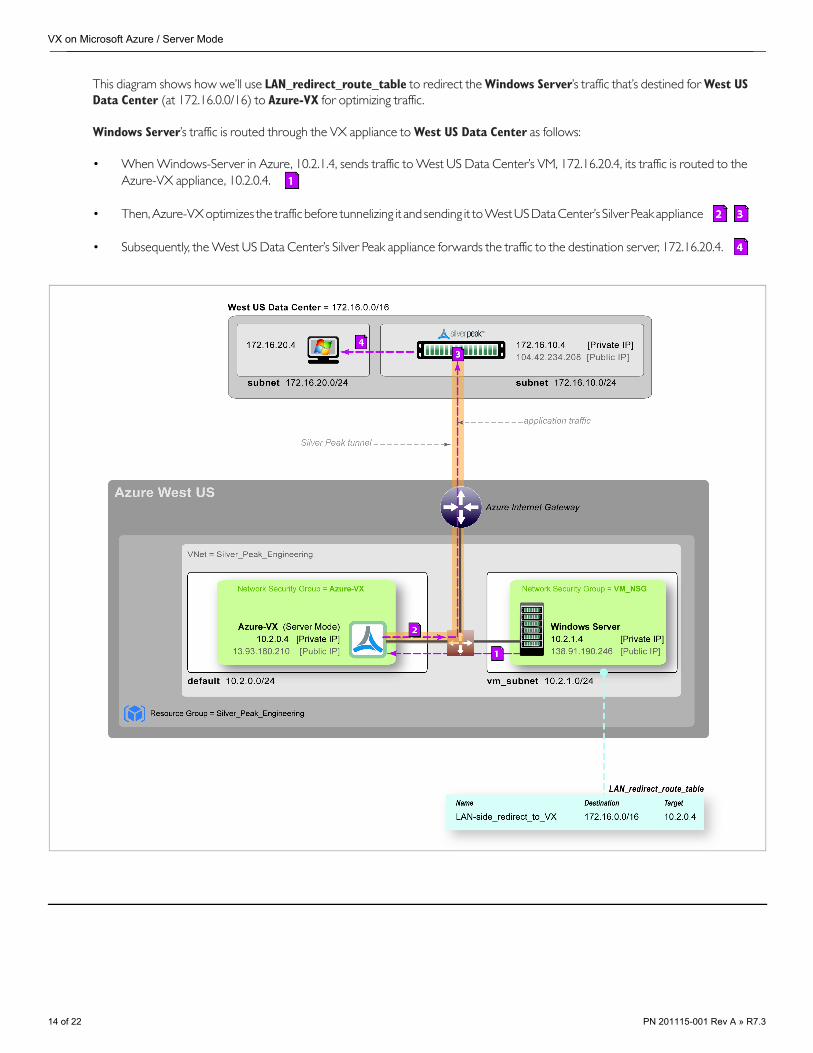
This diagram shows how we’ll use LAN_redirect_route_table to redirect the Windows Server’s traffic that’s destined for West US Data Center (at 172.16.0.0/16) to Azure-VX for optimizing traffic.
Windows Server’s traffic is routed through the VX appliance to West US Data Center as follows:
• When Windows-Server in Azure, 10.2.1.4, sends traffic to West US Data Center’s VM, 172.16.20.4, its traffic is routed to the Azure-VX appliance, 10.2.0.4.
• Then, Azure-VX optimizes the traffic before tunnelizing it and sending it to West US Data Center’s Silver Peak appliance
• Subsequently, the West US Data Center’s Silver Peak appliance forwards the traffic to the destination server, 172.16.20.4.
14 of 22 PN 201115-001 Rev A » R7.3
Quick Start Guide
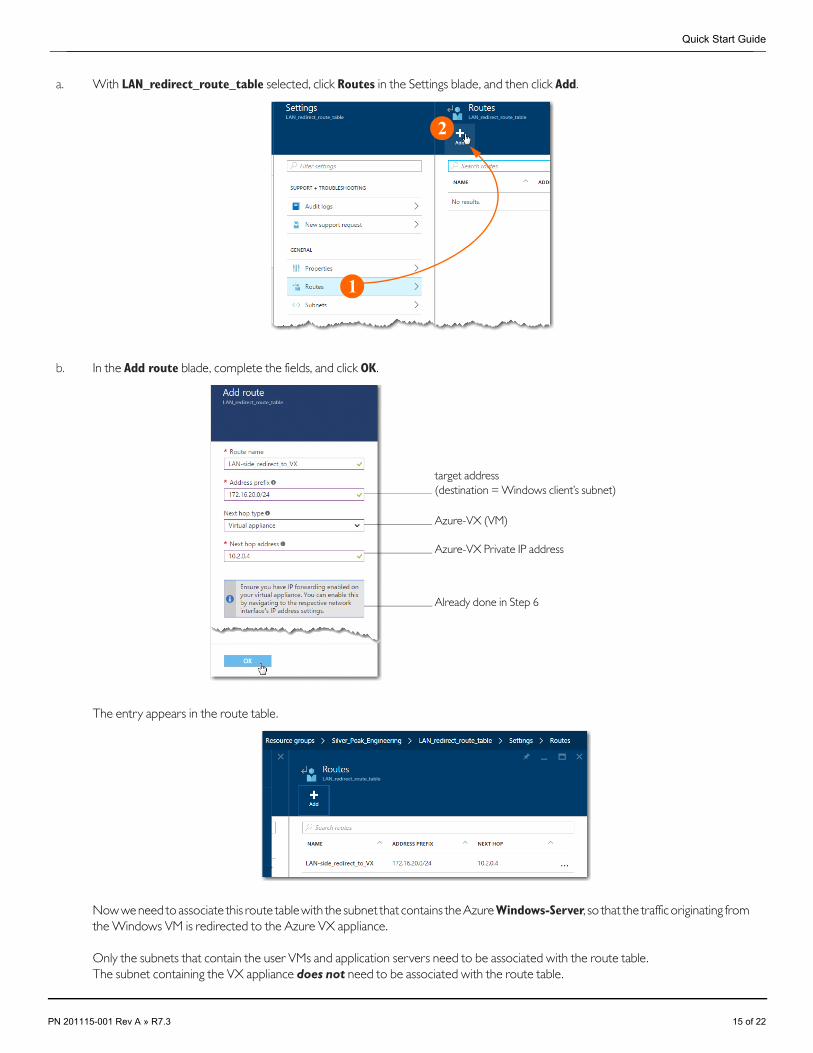
a. With LAN_redirect_route_table selected, click Routes in the Settings blade, and then click Add.
b. In the Add route blade, complete the fields, and click OK.
The entry appears in the route table.
Now we need to associate this route table with the subnet that contains the Azure Windows-Server, so that the traffic originating from the Windows VM is redirected to the Azure VX appliance.
Only the subnets that contain the user VMs and application servers need to be associated with the route table. The subnet containing the VX appliance does not need to be associated with the route table.
1
2
target address(destination = Windows client’s subnet)
Azure-VX (VM)
Azure-VX Private IP address
Already done in Step 6
PN 201115-001 Rev A » R7.3 15 of 22

VX on Microsoft Azure / Server Mode
c. Scroll back to the Resource Group blade, and select the virtual network, Silver_Peak_Engineering.
On the Settings blade, select Subnets .
On the Subnets blade, select the Windows VM’s subnet.
On the VM_subnet blade, click Route Table.
From Resource, select LAN_redirect_route_table.
Click Select.
Click Save.
16 of 22 PN 201115-001 Rev A » R7.3
Quick Start Guide
9 Create tunnels between the local and remote appliances
To verify connectivity and optimize traffic, you must build a tunnel from each Silver Peak to the other one.
a. Create a tunnel from the Silver Peak at the Data Center to Azure-VX.
In a browser, login to the Silver Peak at the West US Data Center. In this example, the Public IP of the Silver Peak is 104.42.234.208.
From the Configuration menu bar, select Tunnels.
Ensure that Automatically establish tunnels is deselected.
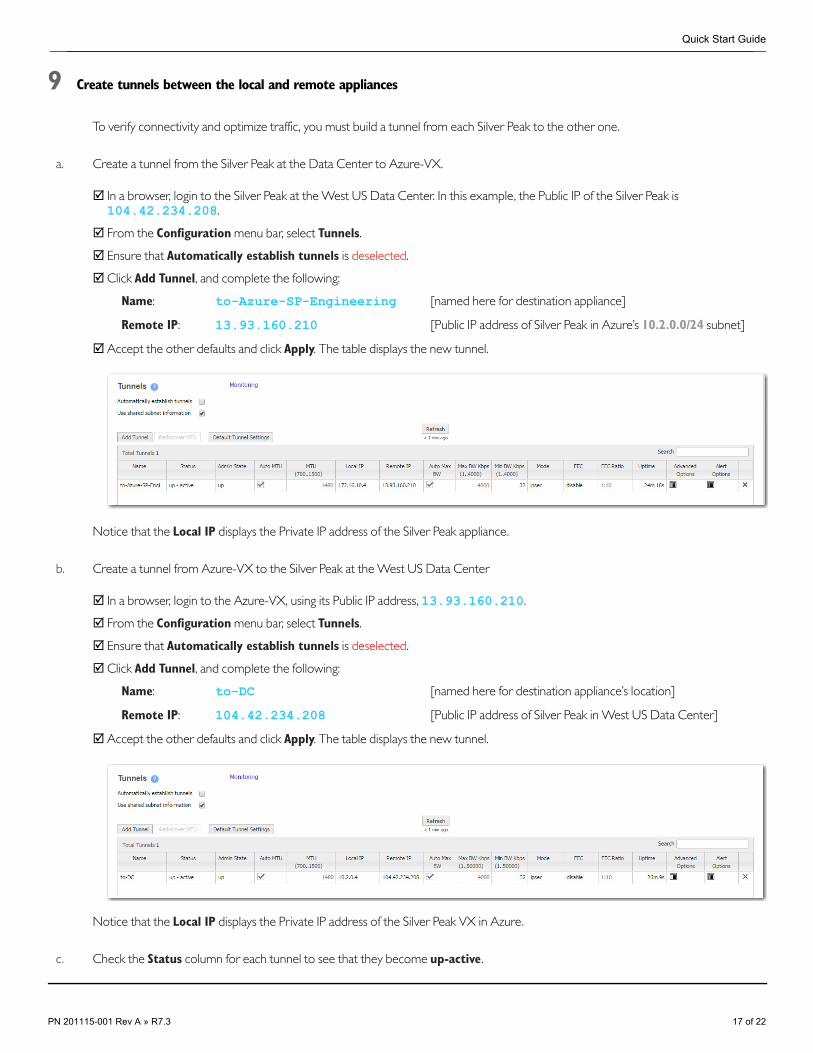
Click Add Tunnel, and complete the following:
Name: to-Azure-SP-Engineering [named here for destination appliance]
Remote IP: 13.93.160.210 [Public IP address of Silver Peak in Azure’s 10.2.0.0/24 subnet]
Accept the other defaults and click Apply. The table displays the new tunnel.
Notice that the Local IP displays the Private IP address of the Silver Peak appliance.
b. Create a tunnel from Azure-VX to the Silver Peak at the West US Data Center
In a browser, login to the Azure-VX, using its Public IP address, 13.93.160.210.
From the Configuration menu bar, select Tunnels.
Ensure that Automatically establish tunnels is deselected.
Click Add Tunnel, and complete the following:
Name: to-DC [named here for destination appliance’s location]
Remote IP: 104.42.234.208 [Public IP address of Silver Peak in West US Data Center]
Accept the other defaults and click Apply. The table displays the new tunnel.
Notice that the Local IP displays the Private IP address of the Silver Peak VX in Azure.
c. Check the Status column for each tunnel to see that they become up-active.
PN 201115-001 Rev A » R7.3 17 of 22

VX on Microsoft Azure / Server Mode
10Enable traffic from the Data Center to reach Azure-VX
This requires an inbound security rule on Azure-VX.
a. To create the inbound rule, do the following:
In Azure, select the Silver_Peak_Engineering Resource Group.
Select the Azure-VX network security group.
Scroll to the Settings blade.
Click Add an inbound rule, and complete the following:
Name Allow-inbound-from-West-US-DC
Priority 1050
Source 172.16.20.0/24
Protocol Any
Source port range *
Destination Any
Destination port range *
Action Allow
b. Click OK. The new rule appears in the table.
18 of 22 PN 201115-001 Rev A » R7.3
Quick Start Guide
11Turn on subnet sharing for Azure-VX
We want the VX to be able to add the local subnet(s) on its interfaces to the subnet table.
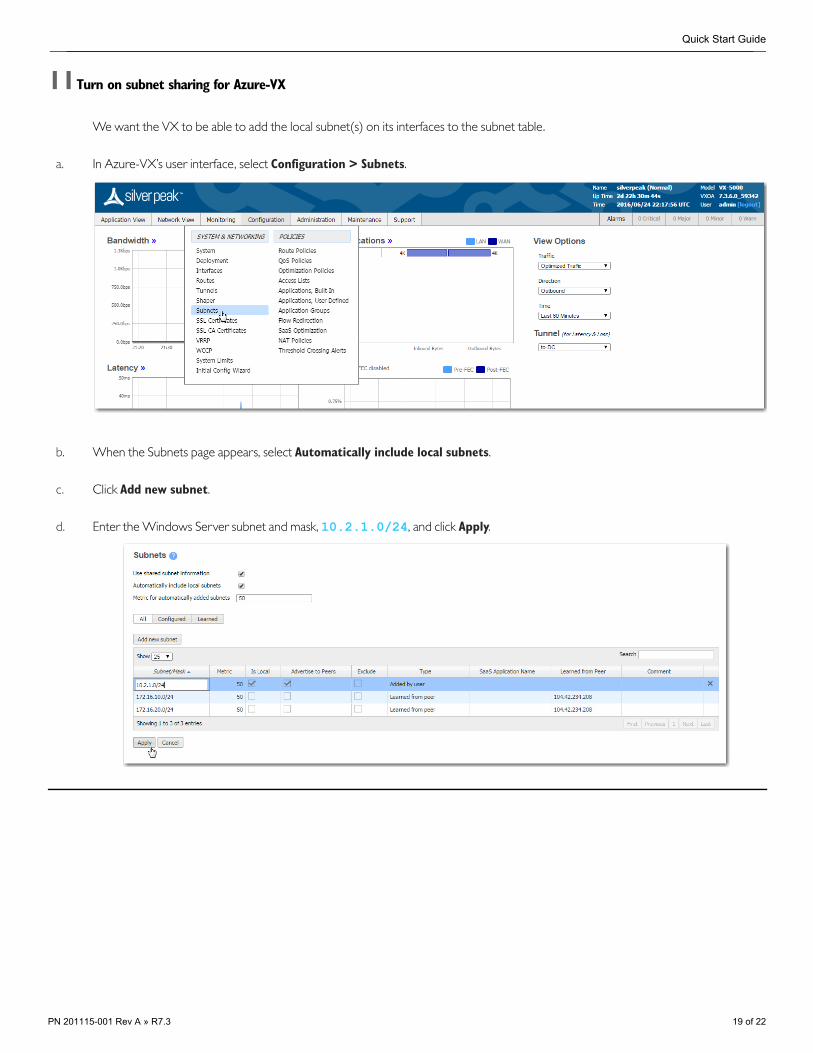
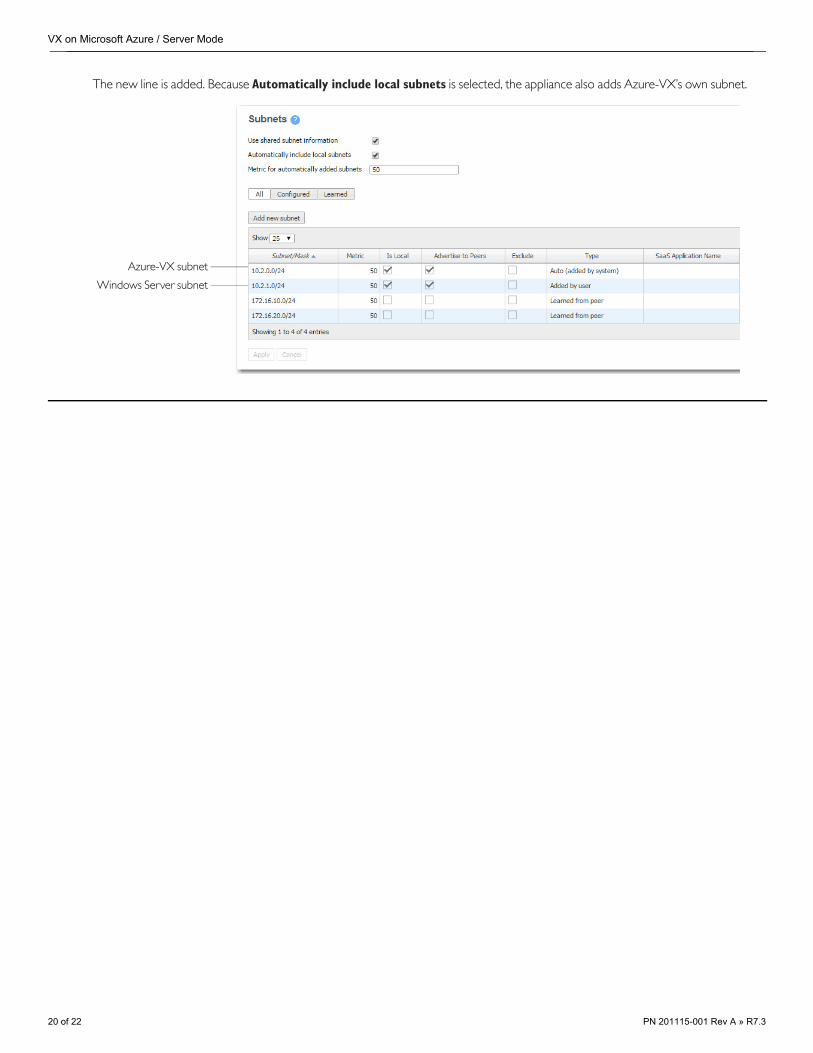
a. In Azure-VX’s user interface, select Configuration > Subnets.
b. When the Subnets page appears, select Automatically include local subnets.
c. Click Add new subnet.
d. Enter the Windows Server subnet and mask, 10.2.1.0/24, and click Apply.
PN 201115-001 Rev A » R7.3 19 of 22
VX on Microsoft Azure / Server Mode
The new line is added. Because Automatically include local subnets is selected, the appliance also adds Azure-VX’s own subnet.
Azure-VX subnet
Windows Server subnet
20 of 22 PN 201115-001 Rev A » R7.3
Quick Start Guide
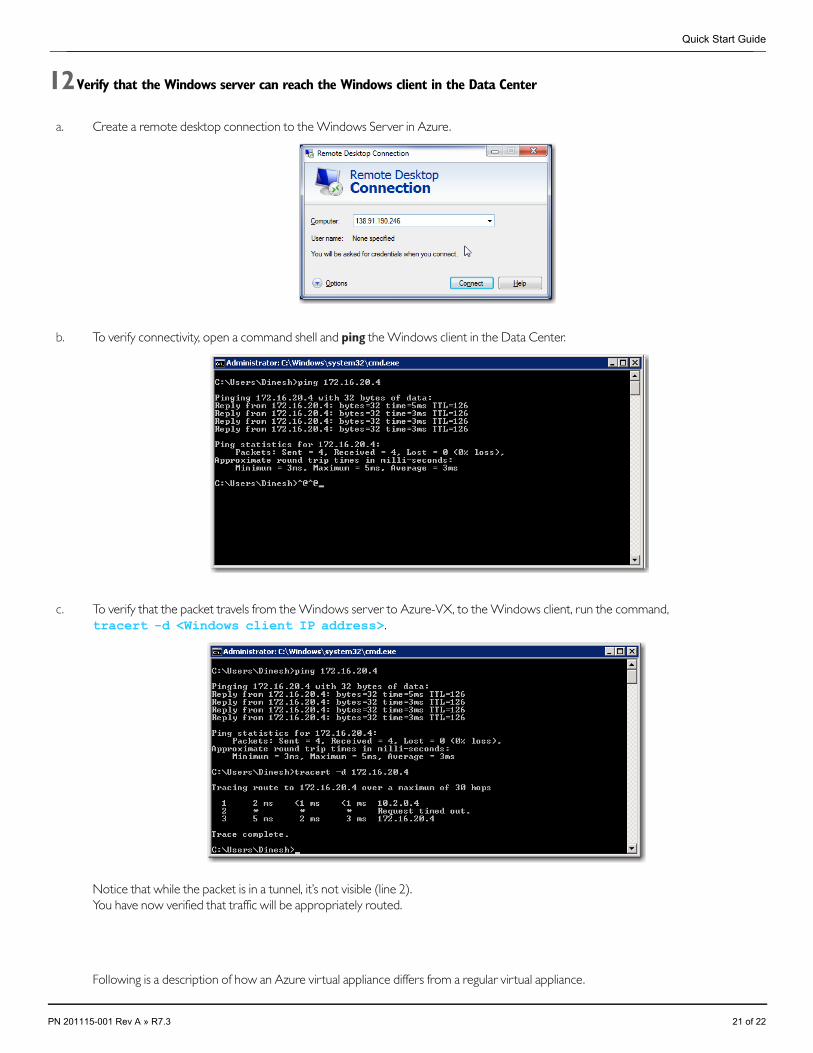
12Verify that the Windows server can reach the Windows client in the Data Center
a. Create a remote desktop connection to the Windows Server in Azure.
b. To verify connectivity, open a command shell and ping the Windows client in the Data Center.
c. To verify that the packet travels from the Windows server to Azure-VX, to the Windows client, run the command, tracert -d <Windows client IP address>.
Notice that while the packet is in a tunnel, it’s not visible (line 2). You have now verified that traffic will be appropriately routed.
Following is a description of how an Azure virtual appliance differs from a regular virtual appliance.
PN 201115-001 Rev A » R7.3 21 of 22

VX on Microsoft Azure / Server Mode
How an Azure–based virtual appliance differs from a regular virtual appliance, as of August 2016.
An Azure–based virtual appliance has the following limitations/characteristics:
• The application server and the Azure VX must be running on two different subnets on the same virtual network.
• New virtual interfaces cannot be added to the VM after the VM is powered on. To attach multiple vNICs, you must use an ARM-based template or Azure PowerShell commands.
• No WCCP or policy-based routing (PBR) support.
• No broadcast or multicast support. Therefore, no VRRP support.
• No VX auto-tunnel or auto-opt support. All traffic to be optimized must be assigned to a Silver Peak tunnel.
• Only one Public IP address can be assigned per VM.
22 of 22 PN 201115-001 Rev A » R7.3


![© 2014 Silver Peak Systems, Inc. Cisco UCS-E Blade€¦ · VX Virtual Appliance / VMware vSphere / vSphere Hypervisor / Server Mode [Single-Interface Deployment] Cisco UCS-E Blade](https://img.pdfslide.us/doc/110x75/5ad3d6e17f8b9a665f8e4a94/2014-silver-peak-systems-inc-cisco-ucs-e-vx-virtual-appliance-vmware-vsphere.jpg)