Embed Size (px)
Citation preview

SharePro Connect – The Online Branch Interface Please Note: The appearance of your page may differ from what is shown here, due to customizations. But the
textboxes, buttons and functions will not be different.
Requirements: Please install Microsoft Java Virtual Machine. It works best with IE 6 and upwards.
Type the URL in the address bar to browse to the login page
Type the User name and password given to you . Select Branch from Login Type and Select 1011 from
Accounting Year, then click on the Login button. You will be welcomed by a screen that looks like to
screen below. Your organization logo, name and other details may be visible in the blue box.
If the menu at the top (Data Entry, Share Reports, etc..) is not visible it indicates that MJVM is not
installed. Please install MJVM and the MJVM installation process will require a system reboot before the
menu becomes visible.
Your Username, Financial Year, Login Type and last Login time is indicated on the top right hand corner.

THE MENU SYSTEM
Familiarize yourself with the various menu options and reports available in the system.


THE CHEQUE ENTRY – STEP BY STEP
Most of these options are self explanatory. Most are reports and you can experiment with them by
generating the reports in various permutations and combinations.
Rememeber, what you are seeing in the report is directly from the main database. All data that you
enter and save are requests (except for the Password Change utility) that are subject to approval by HO.
You will not see the entries in the clients ledger immediately, but only after it is approved by HO.
Selecting various parameter and fields may be slightly different compared to the earlier system. We
shall take you through a client Receipt/Cheque entry so that, some of these methods become clear. We
also chose the client Receipt / Cheque entry as this is the most common task that as a branch you will do
on a daily basis.

Click on Data Entry -> Cheque Entries. This opens the Cheque Entry Dialog Box shown on the right:
By Default Receipt is already selected.
Clicking on the combo box shows the
Payment option.
By Default the current date is already selected.
Clciking on the box just beside the date opens up the
Data Selection box.
Entering part of the bank name opens
the Bank Selection list.
By default NSE is selected (NSE indicates
the Equity Segment of the National Stock
Exchange). If the cheque is for some other
segment, please select the appropriate
segment. An abbreiation list is given at the
end.
After selecting the market segment, Click on Enter Data to
enter the debits or credits.
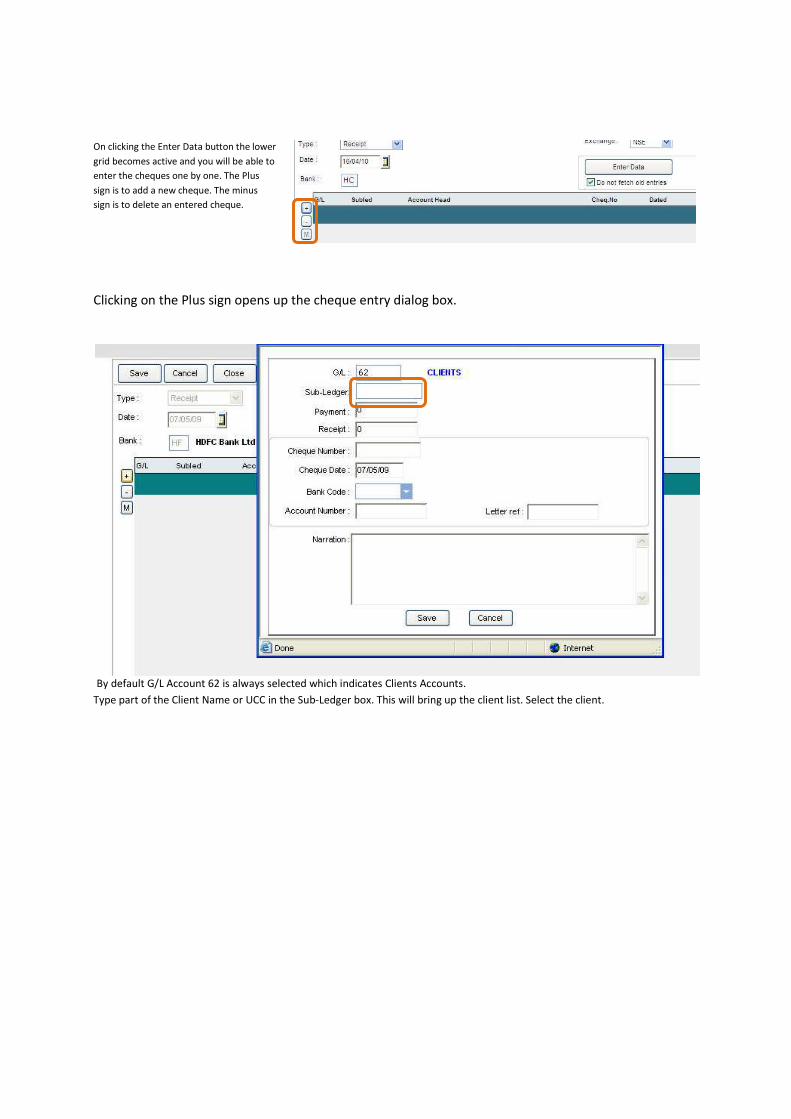
On clicking the Enter Data button the lower
grid becomes active and you will be able to
enter the cheques one by one. The Plus
sign is to add a new cheque. The minus
sign is to delete an entered cheque.
Clicking on the Plus sign opens up the cheque entry dialog box.
By default G/L Account 62 is always selected which indicates Clients Accounts.
Type part of the Client Name or UCC in the Sub-Ledger box. This will bring up the client list. Select the client.

Special Note:
In non-accounts related reports (Trade Register, etc.) and dialog boxes you will find a small box beside
the client text box:
Clicking this box opens up the alphabetically sorted client list as shown below, where you can select as
many clients s you would like by ticking in the tick box on the left side.


Enter the Cheque Amount, Cheque Number and Cheque Date. Omit the Bank Code and go to the Client’s
Bank Account Number (Enter as given on the cheque).
If the Account number is not the account number registered with us a popup box gives a warning and
wont allow you to continue. Now you may either verify the details and correct typing errors if any or
continue with the next cheque by keeping this cheque aside.

Enter a narration for this receipt entry
After the narration is entered, the cheque entry portion is complete. Clicking on the Save button will
update this cheque. After entering all the cheques, you must click on the Save button at the top to
update this voucher to the server.


THE CDSL REQUISITION SLIP

VIEWING THE DETAILS OF A CLIENT

CHOOSING MARKET SEGMENTS AND SETTLEMENTS

VIEWING THE DAILY TRADE REGISTER


You can select the clients you require alphabetwise

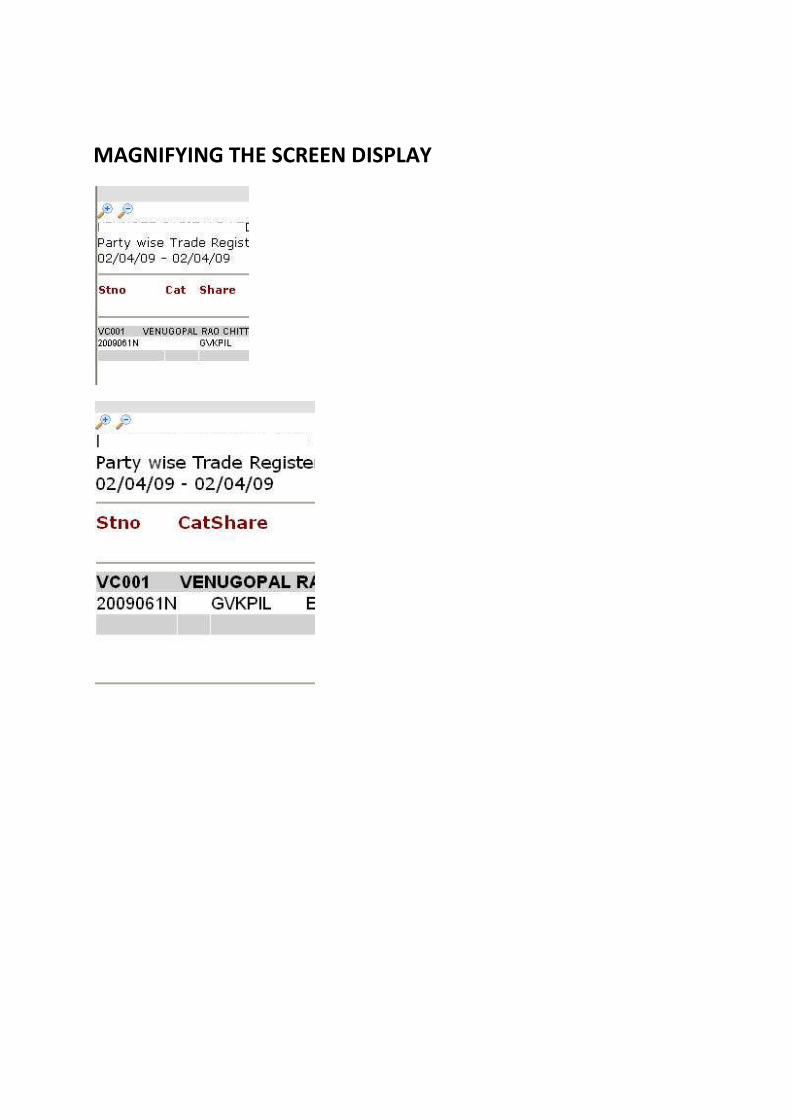
MAGNIFYING THE SCREEN DISPLAY


![Audit Report - in respect of Sharepro Services (India) Private Limited (Sharepro) [Result]](https://img.pdfslide.us/doc/110x75/577c78a01a28abe0549088b0/audit-report-in-respect-of-sharepro-services-india-private-limited-sharepro.jpg)


![[XLS] micr.xlsx · Web viewAJMER MAIN JLN.HOSPI.RD BRANCH AKLUJ AKOTA-BARODA KANDIVLI-EST BRANCH BANSMANDI, ALLAHABAD ALIPURA ALIPORE ALIGARH BRANCH ALKAPURI BRANCH ALLABAD MAIN BRANCH](https://img.pdfslide.us/doc/110x75/5ab79b957f8b9ac10d8beef0/xls-micrxlsxweb-viewajmer-main-jlnhospird-branch-akluj-akota-baroda-kandivli-est.jpg)