Embed Size (px)
Citation preview

SharePoint Services – The Basics Table of Contents
THE SHAREPOINT ENVIRONMENT ........................................................................................................... 2
THE DOCUMENTS LIBRARY ........................................................................................................................ 3
ADD A FILE TO A LIBRARY .................................................................................................................................. 3
Add files to a library through Windows Explorer .......................................................................................... 4
Add files to a library by sending e-mail ......................................................................................................... 4
WORKING WITH LISTS ................................................................................................................................. 5
ADD, EDIT, OR DELETE A LIST ITEM .................................................................................................................... 5
Add an item to a list........................................................................................................................................ 5
Edit an item in a list ........................................................................................................................................ 6
Delete an item in a list .................................................................................................................................... 6
The Actions menu ........................................................................................................................................... 7
THE CALENDAR .................................................................................................................................................. 7
Add an event to a calendar ............................................................................................................................. 8
Add an event by sending e-mail ..................................................................................................................... 8
Edit a calendar item ........................................................................................................................................ 8
Delete a calendar item .................................................................................................................................... 9
WORKING WITH TASKS ...................................................................................................................................... 9
Add tasks to a project task list ........................................................................................................................ 9
Edit or delete items in a project task list ...................................................................................................... 10
Update a task ................................................................................................................................................ 10
PARTICIPATE IN A DISCUSSION ......................................................................................................................... 10
Create a new discussion topic ...................................................................................................................... 10
Reply to a discussion .................................................................................................................................... 10
Participate in a discussion by using e-mail .................................................................................................. 11
Edit your own discussion topic .................................................................................................................... 12
Edit or delete your reply to a discussion ...................................................................................................... 12
Change how you view a discussion .............................................................................................................. 12
ANNOUNCEMENTS ............................................................................................................................................ 13
Add an announcement .................................................................................................................................. 13
LINKS ................................................................................................................................................................ 13
Add a link to the Links list ........................................................................................................................... 13
VIEW, RESTORE, OR DELETE ITEMS IN THE RECYCLE BIN .......................................................... 14
VIEW ITEMS IN THE RECYCLE BIN .................................................................................................................... 14
DELETE OR RESTORE ITEMS IN THE RECYCLE BIN ........................................................................................... 14

The SharePoint Environment
1 Title of site, which can include a logo. 5 Quick Launch / Navigation Tools
2 Breadcrumb Trail: a way of navigating
between site pages. Documents: an area where you can store
project related documents.
Lists: default lists include announcements,
calendar, links, and tasks.
Discussions: read, post and reply to
discussions in an online forum.
Sites: additional sites you may have access
to.
People and Groups: Visitors, Member, and
Owners related to the site.
Recycle Bin: anything you delete is placed
here, where it can be retrieved. Other
user’s deleted items do not appear here.
3 Web Parts: basic building blocks of Web
Pages.
4 Content area: By default, Announcements,
Calendar, and Links are displayed.
1
2
3
5
4

Handout - SharePoint Services: The Basics Topics came directly from SharePoint Server 2007 Help.
ICT Training, Maxwell School of Syracuse University Page 3
The Documents Library
By using a Document Library, you and your colleagues can coordinate the development of one or more
related documents. The site provides tools to share and update files. You can add a document to a library in
the following ways:
Work directly on the copy located in the shared document library.
Work on a local copy and update the copy regularly on the document library.
You can add a new file to a library or replace an existing file with a revised version of a file. If the library is
configured to track versions of files, you can add the revised file as a new version, which becomes part of the
version history of the file.
If you want to upload a file that has the same file name as an existing file in the library, and you don't want to
replace or add a new version of the existing file, you must rename one of the duplicate files.
When you add a file to a library, you may be required to fill out file properties. File properties can include
basic information about a file, such as its description or keywords to help people search for it, or properties
can include information that is specific to your organization, such as a department name or a project number.
Add a file to a library
1) If the library is not already open, click its name on the Quick Launch.
a) If the name of your library does not appear, click View All Site Content, and then click the name of
your library.
2) Click the Upload arrow.
a) Click Upload Document to upload a single
file.
b) Click Upload Multiple Documents to upload
more than one file at a time.
3) Click Browse to find the file(s) that you want to
add, select the file(s), and then click Open.
4) If you are uploading a revised version of an
existing file, do one of the following:
a) If your library is not configured to track
versions of files, you can replace the existing
file with the revised file. In the Upload
Document section, select the Overwrite
existing files check box.
b) If your library is configured to track versions of files, you can replace the existing file with the new
version as part of the document history. In the Upload Document section, select the Add as a new
version to existing files check box.

Handout - SharePoint Services: The Basics Topics came directly from SharePoint Server 2007 Help.
ICT Training, Maxwell School of Syracuse University Page 4
5) Click OK.
a) If a form appears that requests more information about the file, enter the information into the boxes,
such as the title. A red asterisk appears next to the name of each box that requires information.
Different boxes may appear, depending on how your library is set up and whether your group requires
custom properties.
b) Click OK.
6) If you do not see your files in the library, refresh the browser.
Add files to a library through Windows Explorer If you have a program installed that is compatible with Windows SharePoint Services, an option to upload
multiple files may appear when you click the arrow on the Upload menu. For example, if you have the 2007
Microsoft Office system installed, the Upload Multiple Documents option appears. If you do not see the
Upload Multiple Documents option, do the following:
1) If the library is not already open, click its name on the Quick Launch.
a) If the name of your library does not appear, click View All Site Content, and then click the name of
your library.
2) On the Actions menu , click Open with Windows
Explorer.
3) In the Windows Explorer window that appears, browse to find the
files that you want to upload, and then select them.
4) Right-click one of the files, and then click Copy on the shortcut
menu.
5) Click the Back button until you return to the library.
6) Right-click in a blank area in the folder window, and then click
Paste on the shortcut menu.
7) Close Windows Explorer.
8) If you do not see your files in the library, refresh the browser.
Tip: You can also drag files from another Explorer window, such as
Windows Explorer or My Documents, to the SharePoint site that is
displayed in Windows Explorer.
Add files to a library by sending e-mail Use the e-mail address of your SharePoint group to send the file as an attachment. Your organization may
have its own e-mail list, called a SharePoint group, which enables its members to send mail to each other. The
SharePoint group address can contain the addresses of libraries, so that when you send e-mail to members of
the group, attachments to the messages are automatically added to your Windows SharePoint Services site.
1) In your e-mail program, attach the file, such as a document or worksheet, to an e-mail message.
2) In the To or Cc box, enter the address of the library. If your SharePoint group already includes the
library, enter the e-mail address of the SharePoint group instead.
3) Send the message. In most e-mail applications, you click Send to send the message.
4) If you do not see your files in the library, refresh the browser.
a) Depending on the settings of your e-mail server, it may take a few moments for your files to appear.
Handout - SharePoint Services: The Basics Topics came directly from SharePoint Server 2007 Help.
ICT Training, Maxwell School of Syracuse University Page 5
Working with Lists
When you create a Microsoft Windows SharePoint Services site, several types of lists are created for you.
These default lists range from a discussion board to a calendar list. You can customize the default lists in
many ways, or you can create custom lists with the columns that you choose.
Lists can also take advantage of e-mail features, if incoming or outgoing mail is enabled on your site. Some
lists, such as calendars, announcements, blogs, and discussion boards, can be set up so that people can add
content to them by sending e-mail. Other lists, such as tasks and issue-tracking lists, can be set up to send e-
mail to people when items are assigned to them.
Lists can include many types of data, ranging from dates or pictures to calculations based on other columns.
Add, edit, or delete a list item A Microsoft Windows SharePoint Services site can include a variety of lists — from contacts and calendars to
announcements and issues-tracking lists. Regardless of the type of list you are updating, the process is similar
for adding, editing, and deleting list items.
To add, edit, or delete items in a list, you must have permission to contribute to the list.
Add an item to a list Some lists may appear in Web Parts, which are basic buildings blocks of Web pages on a Windows
SharePoint Services site. For example, the Announcements, Calendar, and Links lists appear in Web Parts on
the default home page. When a list appears in a Web Part, you can add items to the list without actually
opening up the list. If you do not see the link to add more items to a list, you need to open the list.
1) Do one of the following:
a) If your list appears in a Web Part, you may see a link in the Web Part that you can use to add more
items to it, such as Add new announcement or Add new event. Click Add new item, and then skip to
step 3.
b) If the list is not already open, click its name on the Quick Launch.
c) If the name of your list does not appear, click View All Site Content, and then click the name of your
list.
2) On the New menu click the arrow, and then click New item type, such as New Item.
3) Enter the information for the list item, if necessary. Information that is required has a red asterisk next to
it.
a) To attach a file to the list item, click Attach File, click Browse to locate the file, and then click OK.
4) Click OK.
Note:
Depending on how your list is set up, attachments may not be allowed for list items.
If multiple content types have been added to your list, you may have additional choices on the New menu.
Tip: Depending on how your list is set up, you may be able to create folders to organize your list items. To
add a folder, click New Folder on the New menu. You can then organize the list by opening it in Windows
Explorer, if you have Microsoft Windows installed on your hard disk.

Handout - SharePoint Services: The Basics Topics came directly from SharePoint Server 2007 Help.
ICT Training, Maxwell School of Syracuse University Page 6
Edit an item in a list
1) If the list is not already open, click its name on the Quick Launch.
2) If the name of your list does not appear, click View All Site Content, and then click the name of your
list.
3) Do one of the following:
a) Point to the item, click the arrow that appears, and then click Edit Item.
b) To edit an item in datasheet view, edit the item directly in the datasheet, or export the data to a
spreadsheet or database program for editing.
Datasheet view requires that you have installed on your computer a Windows SharePoint Services–
compatible datasheet program, such as Microsoft Office Access 2007.
c) To edit an event in a graphical display of a calendar, click the item on the calendar, and then click Edit
Item. To edit all instances of a recurring event, click Edit Series.
4) Make the changes that you want.
5) Click OK. In a survey, click Finish instead.
Note: If the list is set up to track versions, a new version of the list item is created each time you edit a list
item. You can view a history of how the list item has changed and restore a previous version if you make a
mistake in a newer version.
Delete an item in a list
1) If the list is not already open, click its name on the Quick Launch.
a) If the name of your list does not appear, click View All Site Content, and then click the name of your
list.
2) Do one of the following:
a) Point to the list item, click the arrow that appears, and then click Delete Item.
b) To delete an item in datasheet view, delete the item directly in the datasheet, or export the data to a
database or spreadsheet program and then delete it.
Datasheet view requires that you have installed on your computer a Windows SharePoint Services–
compatible datasheet program, such as Microsoft Office Access 2007.
c) To delete an event from a graphical display of a calendar, click the item in the calendar, and then click
Delete Item. To delete a recurring item, click Edit Series, and then click Delete Item.
3) When you are prompted with a warning and you are sure you want to send the item to the Recycle Bin or
to delete it, click OK.
Note: When you delete a list item, it is sent to the Recycle Bin for the site, where it can be restored if
necessary, unless your administrator has set up your site differently.
Handout - SharePoint Services: The Basics Topics came directly from SharePoint Server 2007 Help.
ICT Training, Maxwell School of Syracuse University Page 7
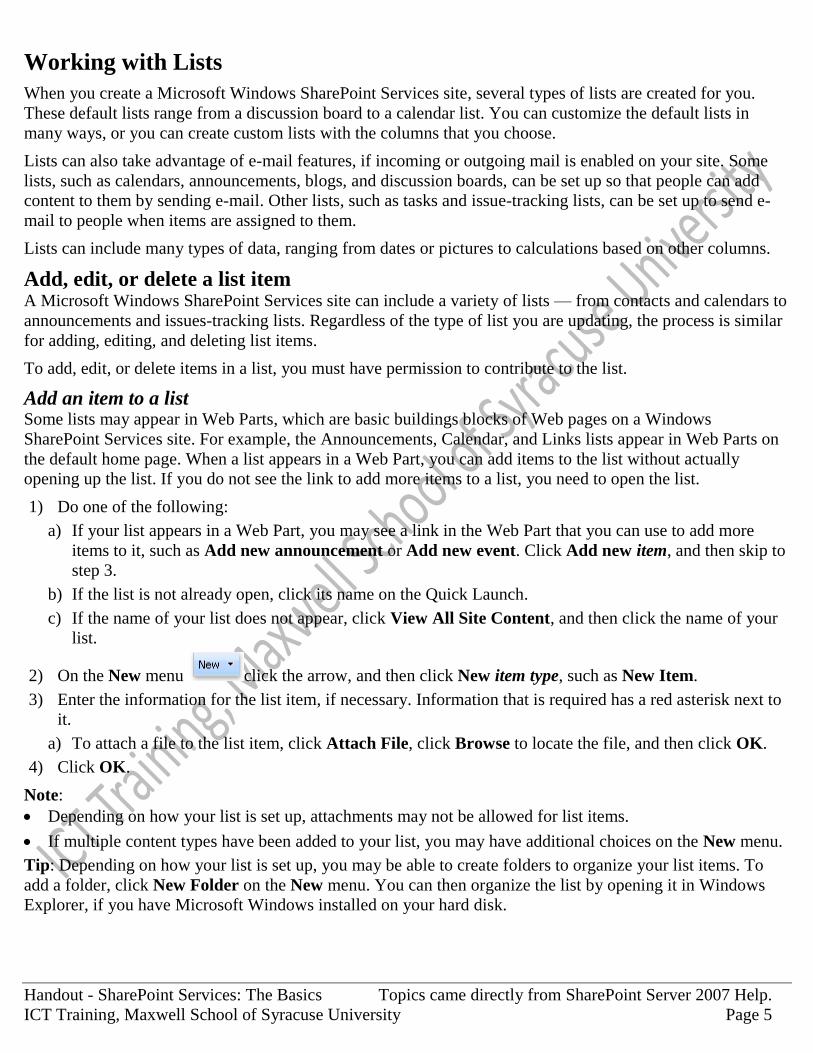
The Actions menu You can use the Actions menu to work with lists and shared documents in different ways:
Shared Documents Actions menu
Calendar Actions menu
Tasks Actions menu
Team Discussion Actions menu
Announcements Actions menu
Links Actions menu
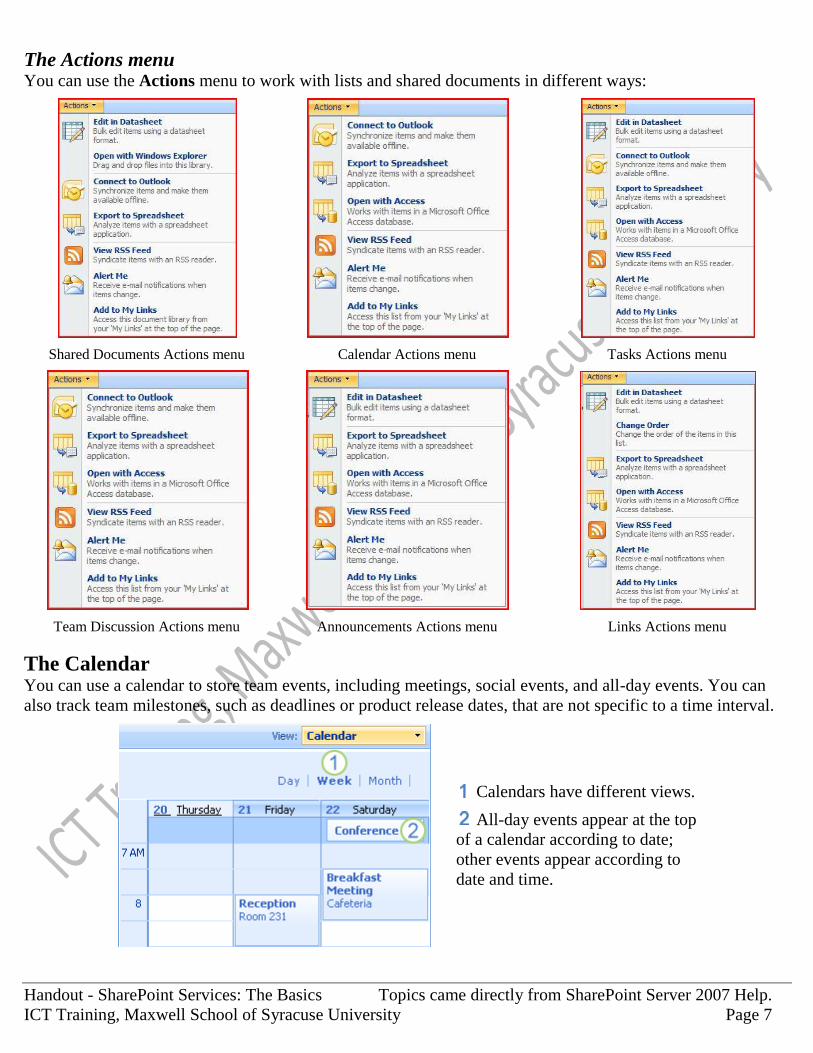
The Calendar You can use a calendar to store team events, including meetings, social events, and all-day events. You can
also track team milestones, such as deadlines or product release dates, that are not specific to a time interval.
Calendars have different views.
All-day events appear at the top
of a calendar according to date;
other events appear according to
date and time.
Handout - SharePoint Services: The Basics Topics came directly from SharePoint Server 2007 Help.
ICT Training, Maxwell School of Syracuse University Page 8
Add an event to a calendar
1) If the calendar is not already open, click its name on the Quick Launch.
a) If the name of your calendar does not appear, click View All Site Content, and then click the name of
the calendar.
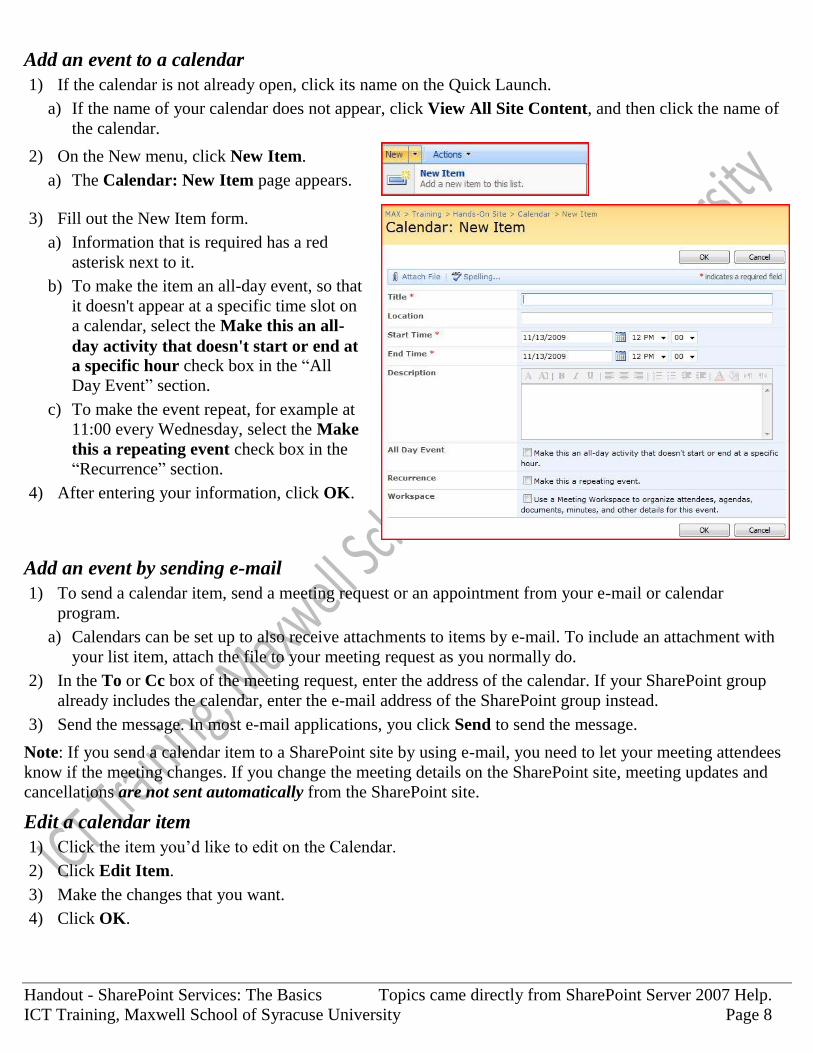
2) On the New menu, click New Item.
a) The Calendar: New Item page appears.
3) Fill out the New Item form.
a) Information that is required has a red
asterisk next to it.
b) To make the item an all-day event, so that
it doesn't appear at a specific time slot on
a calendar, select the Make this an all-
day activity that doesn't start or end at
a specific hour check box in the ―All
Day Event‖ section.
c) To make the event repeat, for example at
11:00 every Wednesday, select the Make
this a repeating event check box in the
―Recurrence‖ section.
4) After entering your information, click OK.
Add an event by sending e-mail
1) To send a calendar item, send a meeting request or an appointment from your e-mail or calendar
program.
a) Calendars can be set up to also receive attachments to items by e-mail. To include an attachment with
your list item, attach the file to your meeting request as you normally do.
2) In the To or Cc box of the meeting request, enter the address of the calendar. If your SharePoint group
already includes the calendar, enter the e-mail address of the SharePoint group instead.
3) Send the message. In most e-mail applications, you click Send to send the message.
Note: If you send a calendar item to a SharePoint site by using e-mail, you need to let your meeting attendees
know if the meeting changes. If you change the meeting details on the SharePoint site, meeting updates and
cancellations are not sent automatically from the SharePoint site.
Edit a calendar item
1) Click the item you’d like to edit on the Calendar.
2) Click Edit Item.
3) Make the changes that you want.
4) Click OK.

Handout - SharePoint Services: The Basics Topics came directly from SharePoint Server 2007 Help.
ICT Training, Maxwell School of Syracuse University Page 9
Delete a calendar item
1) Click the item you’d like to delete on the Calendar.
2) Click Delete Item.
3) Confirm you’d like to send the item to the Recycle Bin by clicking OK.
Working with Tasks You can use the Tasks list on the Quick Launch to assign work items to yourself or other members of the site.
Members can then update and share the status of their assigned tasks easily. By using the Tasks list, you can
set priority and due dates for tasks, as well as task status and percent complete.
Add tasks to a project task list
1) If the project task list is not open, click its name on the Quick Launch.
a) If the name of your list does not appear, click View All Site Content, and then click the name of your
list.
2) On the New menu click New Item.
a) The Tasks: New Item page appears.
b) Information that is required has a red asterisk next to it.
3) In the Title section, type a name for the
task.
4) In the Priority section, click High,
Normal, or Low to indicate the relative
importance of this task compared with
other tasks in your project task list.
5) In the Task Status section, click the status
of the task.
6) In the % Complete section, type a number
as a percentage value that indicates the
extent to which the task is complete.
7) In the Assigned To section, do one of the
following:
a) Type the e-mail address of the person to
whom you want to assign the task.
b) Type the full name of the person to whom you want to assign the task, and then click Check Names
.
If the person is found in the directory, the name resolves to that person's e-mail address. If the
person is not found in the directory, the message No exact match was found appears.
c) Click Browse to search for and select the person from the directory.
Note: Only one person can be assigned to a task.
8) In the Description section, type a description of the task.
9) In the Start Date and Due Date sections, enter the start date and finish date for the work that is
performed on the task. Use the date picker to quickly enter a date.

Handout - SharePoint Services: The Basics Topics came directly from SharePoint Server 2007 Help.
ICT Training, Maxwell School of Syracuse University Page 10
10) To attach a file to the task, click Attach File. Click Browse to locate the file, and then click OK.
Note: Depending on how your project task list is set up, you may not be able to attach a file to a task.
11) Click OK to add the task to your project task list.
Edit or delete items in a project task list
1) If the project task list is not already open, click its name on the Quick Launch.
a) If the name of your project task list does not appear, click View All Site Content, and then click the
name of your project task list.
2) Point to the task in the content area, click the arrow, and then click Edit Item.
3) Make the changes that you want.
4) Click OK.
Note: To delete an item, point to the task, click the arrow, and then click Delete Item.
Update a task
1) Click the task that you want to update.
2) Click Edit Item.
3) Enter the latest status, percentage complete, or other information about the task.
4) Click OK.
Participate in a discussion A discussion board is a place to share information and discuss topics with other people. When you create a
discussion topic or reply to an existing discussion, you can format your text, insert a hyperlink or table, and
link to a picture on the Web.
You can also subscribe to the discussion to see a summary of the content that has changed or to receive alerts
to find out when someone has added or changed an item.
Note: Depending on how the discussion board was set up, you may need to be a member of the site that
contains the discussion board, or the owner may have assigned other types of permission.
Create a new discussion topic
1) If your discussion board is not already open, click its title on the Quick Launch.
a) If the name of your discussion board does not appear, click View All Site Content, and then click the
name of your discussion board.
2) On the New menu, click Discussion.
a) The Team Discussion: New Item page appears.
3) Type the text that you want for the subject and body of the
message, and apply any formatting that you want.
4) Click OK.
Reply to a discussion
1) If the discussion board is not already open, click its name on the Quick
Launch.
a) If the name of your discussion board does not appear, click View All
Site Content, and then click the name of your discussion board.
Handout - SharePoint Services: The Basics Topics came directly from SharePoint Server 2007 Help.
ICT Training, Maxwell School of Syracuse University Page 11
2) Click the discussion topic that you want to reply to.
3) In the bar above the message that you want to reply to, click Reply.
4) Type the text of the reply, and then apply any formatting that you want.
5) Click OK.
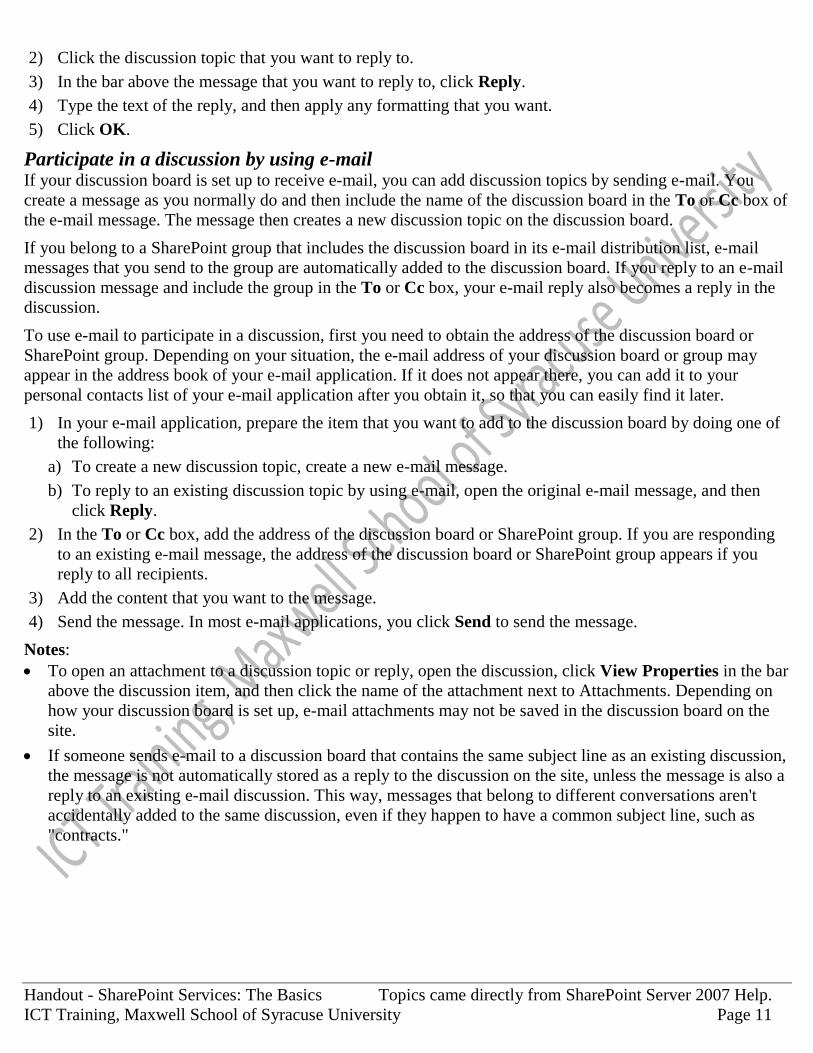
Participate in a discussion by using e-mail If your discussion board is set up to receive e-mail, you can add discussion topics by sending e-mail. You
create a message as you normally do and then include the name of the discussion board in the To or Cc box of
the e-mail message. The message then creates a new discussion topic on the discussion board.
If you belong to a SharePoint group that includes the discussion board in its e-mail distribution list, e-mail
messages that you send to the group are automatically added to the discussion board. If you reply to an e-mail
discussion message and include the group in the To or Cc box, your e-mail reply also becomes a reply in the
discussion.
To use e-mail to participate in a discussion, first you need to obtain the address of the discussion board or
SharePoint group. Depending on your situation, the e-mail address of your discussion board or group may
appear in the address book of your e-mail application. If it does not appear there, you can add it to your
personal contacts list of your e-mail application after you obtain it, so that you can easily find it later.
1) In your e-mail application, prepare the item that you want to add to the discussion board by doing one of
the following:
a) To create a new discussion topic, create a new e-mail message.
b) To reply to an existing discussion topic by using e-mail, open the original e-mail message, and then
click Reply.
2) In the To or Cc box, add the address of the discussion board or SharePoint group. If you are responding
to an existing e-mail message, the address of the discussion board or SharePoint group appears if you
reply to all recipients.
3) Add the content that you want to the message.
4) Send the message. In most e-mail applications, you click Send to send the message.
Notes:
To open an attachment to a discussion topic or reply, open the discussion, click View Properties in the bar
above the discussion item, and then click the name of the attachment next to Attachments. Depending on
how your discussion board is set up, e-mail attachments may not be saved in the discussion board on the
site.
If someone sends e-mail to a discussion board that contains the same subject line as an existing discussion,
the message is not automatically stored as a reply to the discussion on the site, unless the message is also a
reply to an existing e-mail discussion. This way, messages that belong to different conversations aren't
accidentally added to the same discussion, even if they happen to have a common subject line, such as
"contracts."

Handout - SharePoint Services: The Basics Topics came directly from SharePoint Server 2007 Help.
ICT Training, Maxwell School of Syracuse University Page 12
Edit your own discussion topic Use the following procedure to edit the original topic that you posted in a discussion. You may not have
permission to edit a topic that was created by someone else.
1) Do one of the following:
a) If the discussion board is not already open, click its name on the Quick Launch.
b) If the name of your discussion board does not appear, click View All Site Content, and then click the
name of your discussion board.
c) If you are already viewing the discussion board and have opened the topic that you want to edit, do the
following instead:
Click View Properties at the upper right of your topic, and then click Edit Item .
Skip to step 3.
2) In the Subject column, point to the discussion topic that you want to edit, click the arrow on the menu
that appears, and then click Edit Item .
3) Make the changes that you want, and then click OK.
Edit or delete your reply to a discussion Use the following procedure to edit a reply that you made to an existing discussion.
1) Do one of the following:
a) If the discussion board is not already open, click its name on the Quick Launch.
b) If the name of your discussion board does not appear, click View All Site Content, and then click the
name of your discussion board.
c) If you are already viewing the discussion and your reply, skip to step 3.
d) In the Subject column, click the discussion that contains the reply that you want to edit.
2) Locate your reply, and then click View Properties at the upper right of your reply.
3) Click Edit Item or Delete Item.
a) If editing, make the changes that you want.
4) Click OK.
Change how you view a discussion It is easy to sort and filter the discussions on the page, and you can create your own view. Do one or more of
the following to change the way that you view discussions:
To sort the discussions within a discussion board, click the heading above the column that you want to sort
by. A down arrow appears next to the heading for descending order (such as the newest discussions first)
and an up arrow appears for ascending order.
To filter the discussions so that you see only the items that meet specific criteria, point to the column that
you want to use, click the arrow that appears, and then click the item you want to filter by. For example,
you can see only discussions that were updated today by selecting the current date in the Last Updated
column.
To change the view of the topics in a discussion board, click the name of the view next to the View menu
in the upper-right corner of the discussion board, and then click Modify this View. Change any other
settings that you want, and then click OK.

Handout - SharePoint Services: The Basics Topics came directly from SharePoint Server 2007 Help.
ICT Training, Maxwell School of Syracuse University Page 13
To create your own view of a discussion board, click the name of the view next to the View menu in the
upper-right corner of the discussion board, and then click Create View. Under Choose a view format,
click the type of view you want to create. To always see the discussion with that view, if you have
permission to modify lists, click Make this the default view. Change any other settings that you want, and
then click OK.
To change the way that you view individual discussions, you can open a discussion topic and then switch
to another view, change the view, or create a new view by using the same procedures that you use to
change the view of a discussion board. Two key options are Threaded, in which the replies are indented
under each topic, and Flat, in which the topic and its replies are displayed at the same level, with
additional data about the participant.
Announcements Use the Announcements list to post important messages about the project for team members, such as
deadlines and changes in deliverables, introductions to new team members, and other information.
Add an announcement
1) On the home page of the Document Workspace
site, click Add new announcement.
a) The Announcements: New Item page appears.
2) In the Title box, type a title for your
announcement.
3) In the Body box, type the full text of your
announcement.
4) If you want the announcement to automatically
expire after a certain date, type the date in the
Expires box.
5) Click OK.
Links You can use the Links list to share links that are useful to team members. The list can provide quick and easy
access to related information and resources such as other Web sites.
Add a link to the Links list
1) In the content area of the site home page,
click Add new link.
a) The Links: New Item page appears.
2) In the URL section, type the address of
the Web page or other type of resource to

Handout - SharePoint Services: The Basics Topics came directly from SharePoint Server 2007 Help.
ICT Training, Maxwell School of Syracuse University Page 14
which you want to link, and then type a
description for the link.
Note: The text that you type in the Type
the description box appears as the name
of the link in the Links list. You can
include notes about the link in the Notes
section, but this information does not
appear in the default view of the Links list
that appears on the home page.
3) Click OK.
View, restore, or delete items in the Recycle Bin
The Recycle Bin provides a safety net when deleting documents, list items, lists, folders and files. When you
or site visitors delete any of these items from a Web site, the items are placed in the Recycle Bin.
Items in the Recycle Bin remain there until you decide to permanently delete them from your Web site, or
until the items are permanently deleted after a set number of days, which is based on a schedule defined in
Central Administration. When you delete an item from a Web site, the item is sent to the site's Recycle Bin. If
you click Recycle Bin on the Quick Launch, you can see all of the items that you’ve deleted from your site.
You can either restore or delete the item from the Recycle Bin. When you delete an item from the Recycle
Bin, the item is sent to the Site Collection Recycle Bin. The Site Collection Recycle Bin gives the
administrator of a site collection greater control over deleted items by providing you with a second stage
safety net before an item is permanently deleted from a site.
Users who delete an item in the Recycle Bin can contact their site administrator to restore the item back to its
original location as long as the item hasn't exceeded the original deleted date that the central administrator set.
By default, items in the Recycle Bin are deleted automatically after 30 days. Regardless of whether or not an
item is sent to the users' Recycle Bin or to the Site Collection Recycle Bin, items are deleted automatically
after the number of days that the central administrator specified.
View items in the Recycle Bin
1) On the Quick launch, click Recycle Bin.
Delete or Restore items in the Recycle Bin
1) On the Quick launch, click Recycle Bin.
2) Click the checkbox next to the item(s) on the page that you’d like to delete from the site, or restore to
their original location.
3) Click Restore Selection or Delete Selection
4) Confirm that you want to restore or delete the item by
clicking OK at the prompt.

![[MS-WSSO]: Windows SharePoint Services Overview... · Windows SharePoint Services File, Print, and User/Group administration capabilities. Windows SharePoint Services is a web-based](https://img.pdfslide.us/doc/110x75/5f48e41b522a451b3434d3f3/ms-wsso-windows-sharepoint-services-overview-windows-sharepoint-services.jpg)
![[MS-WSSPROG]: Windows SharePoint Services: Content ...... · Windows SharePoint Services: Content Database Communications Programmability Extensions ... [MS-WSSPROG]: Windows SharePoint](https://img.pdfslide.us/doc/110x75/5f842fbd5d7f1c0a1d3cae62/ms-wssprog-windows-sharepoint-services-content-windows-sharepoint.jpg)