Embed Size (px)
Citation preview
SharePoint 2013 Fundamentals Workshop

Page 2 of 88 | Sharepoint 2013 Fundamentals Workshop |
© 2012 Ellucian. All Rights Reserved - Confidential & Proprietary |
Table of Contents
KEY TERMINOLOGY 4
NAVIGATION 5
SETTINGS 5 FOCUS ON CONTENT 5 SHAREPOINT STORE 6 SEARCH 7 BREADCRUMBS 7 HOME LINKS 7 SITE FEATURES 8
POPULATING CONTENT (SITES) (APPS) 9
EXERCISE 1: CREATING SITES 9 EXERCISE 2: ADDING AN ANNOUNCEMENT 12 EXERCISE 3: ADD A TASK 13 EXERCISE 4: ADDING A TASK TO THE TIMELINE 15 EXERCISE 5: ADDING LINKS 16 EXERCISE 6: CALENDAR ENTRY (THREE ENTRIES) 18
EXERCISE 6A – SINGLE EVENT 18 EXERCISE 6B – FULL DAY EVENT 19 EXERCISE 6C – REPEATING EVENT 22
EXERCISE 7: CREATING A DISCUSSION LIST ITEM 24 EXERCISE 8: DISCUSSION LIST VIEWS 25 EXERCISE 9: CREATING A SURVEY 27 EXERCISE 10: POPULATING DOCUMENTS 30 EXERCISE 11: DOCUMENT LIBRARY SEARCH 32 EXERCISE 12: DOCUMENT LIBRARY VERSION CONTROL 33 EXERCISE 13: DOCUMENT LIBRARY CHECK-IN/CHECK-OUT 35 EXERCISE 14: ADDING CUSTOM COLUMNS 39 EXERCISE 15: POPULATING CUSTOM COLUMNS 42 EXERCISE 16: CREATING VIEWS 44 EXERCISE 17: CREATING ALERTS 49 EXERCISE 18: UPLOADING PICTURES 51 EXERCISE 19: CREATING CUSTOM LISTS 53 EXERCISE 20: DELETING DOCUMENTS, LIBRARIES AND SITES 56
DELETING THE LIBRARY 56 EXERCISE 21: MANAGING THE RECYCLE BIN 58
PAGE DESIGN (WEB PARTS) 59
EXERCISE 22: ADDING ANNOUNCEMENT WEB PART 59 EXERCISE 23: ADDING TASKS WEB PART 61 EXERCISE 24: EDIT LINKS WEB PART 63 EXERCISE 25: ADDING A SUMMARY LINKS WEB PART 65 EXERCISE 26: ADDING A DISCUSSION BOARD WEB PART 67 EXERCISE 27: ADDING A DOCUMENT LIBRARY WEB PART 68 EXERCISE 28: CHANGING THE DOCUMENT LIBRARY WEB PART VIEW 69
Page 3 of 88 | Sharepoint 2013 Fundamentals Workshop |
© 2012 Ellucian. All Rights Reserved - Confidential & Proprietary |
EXERCISE 29: ADDING RSS VIEWER WEB PART 71 EXERCISE 30: ADDING A CONTENT EDITOR WEB PART 74 EXERCISE 31: ADDING THE ELLUCIAN TABBED CONTAINER WEB PART 77
OPTIONAL EXERCISES 79
SITE FEED 79 TASK LIST FEATURE 81 CREATE A MEDIA LIBRARY 82 ADD MEDIA FILE TO ASSET LIBRARY 83 ADD MEDIA WEB PART 83 ADDING PICTURE LIBRARY SLIDESHOW WEB PART 86 REVIEW POPULARITY TRENDS 88

Page 4 of 88 | Sharepoint 2013 Fundamentals Workshop |
© 2012 Ellucian. All Rights Reserved - Confidential & Proprietary |
Key Terminology
To better understand the features of Microsoft SharePoint, it is important to first understand the key
terminology captured in the following table.
Definition Example
Portal An access point to information
under a unified theme.
MSN.com
WebMD.com
Site A “container” for sub-sites,
pages, lists, and libraries.
Library Info. Site
ACCT101 Class Site
Page A place where content and Web
Parts are displayed.
About Us page
Student Directory page
Library
App
A “container” for holding
documents and pictures.
Shared Documents
Picture Library
List App A “container” for SharePoint to
store data.
Announcements
Tasks
Metadata Data about data. Document owner
Announcement date
Views Different ways to show the
information in a list or library.
HR documents
Open tasks
Web Part A tool used for displaying content
on a page.
Picture library slideshow
RSS Viewer
Page 5 of 88 | Sharepoint 2013 Fundamentals Workshop |
© 2012 Ellucian. All Rights Reserved - Confidential & Proprietary |
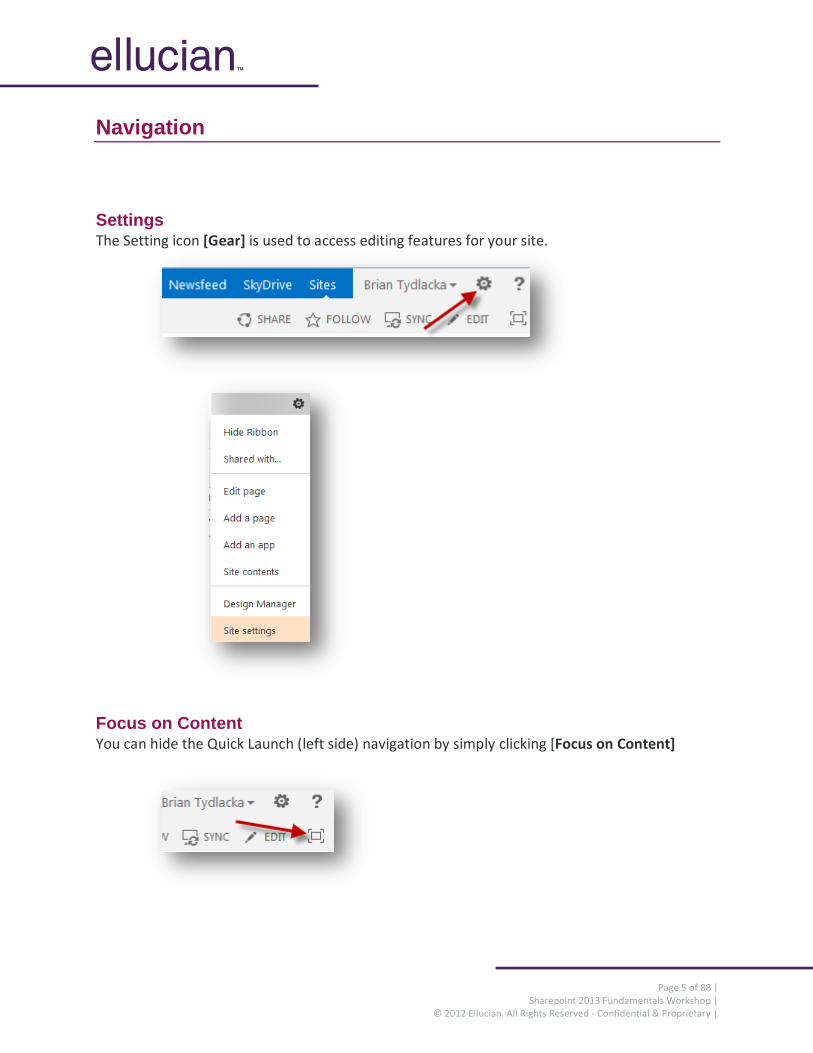
Navigation
Settings The Setting icon [Gear] is used to access editing features for your site.
Focus on Content You can hide the Quick Launch (left side) navigation by simply clicking [Focus on Content]
Page 6 of 88 | Sharepoint 2013 Fundamentals Workshop |
© 2012 Ellucian. All Rights Reserved - Confidential & Proprietary |
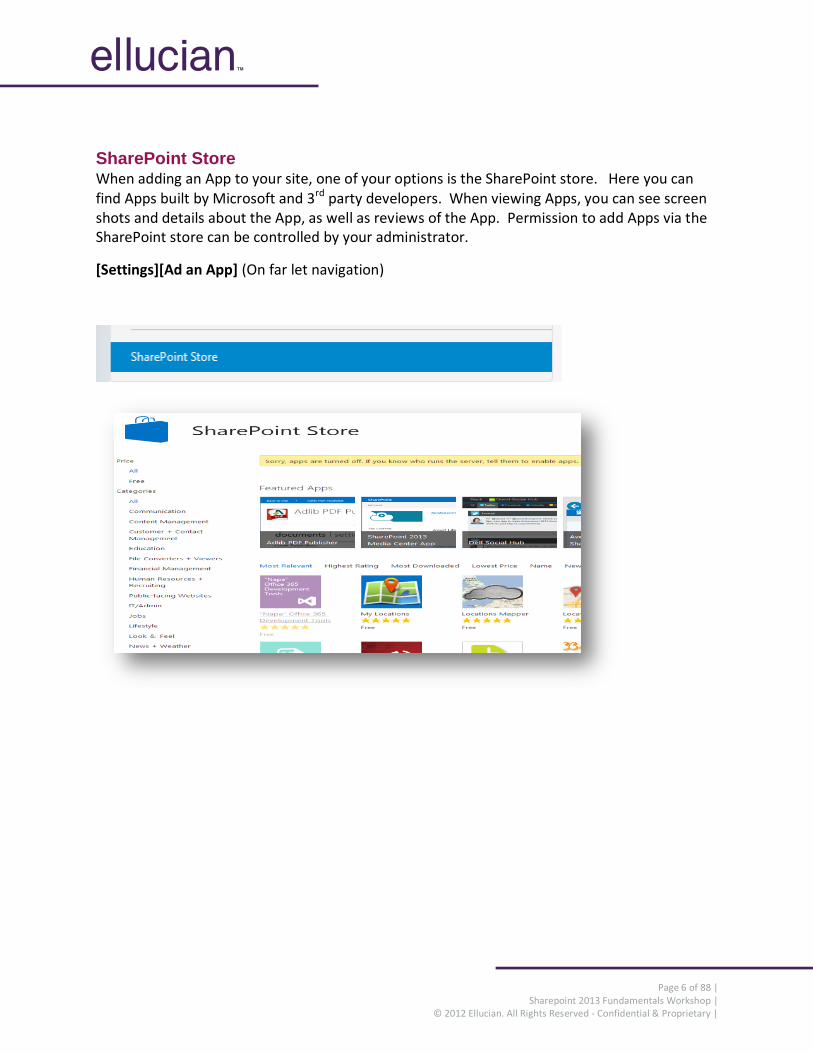
SharePoint Store When adding an App to your site, one of your options is the SharePoint store. Here you can find Apps built by Microsoft and 3rd party developers. When viewing Apps, you can see screen shots and details about the App, as well as reviews of the App. Permission to add Apps via the SharePoint store can be controlled by your administrator.
[Settings][Ad an App] (On far let navigation)
Page 7 of 88 | Sharepoint 2013 Fundamentals Workshop |
© 2012 Ellucian. All Rights Reserved - Confidential & Proprietary |
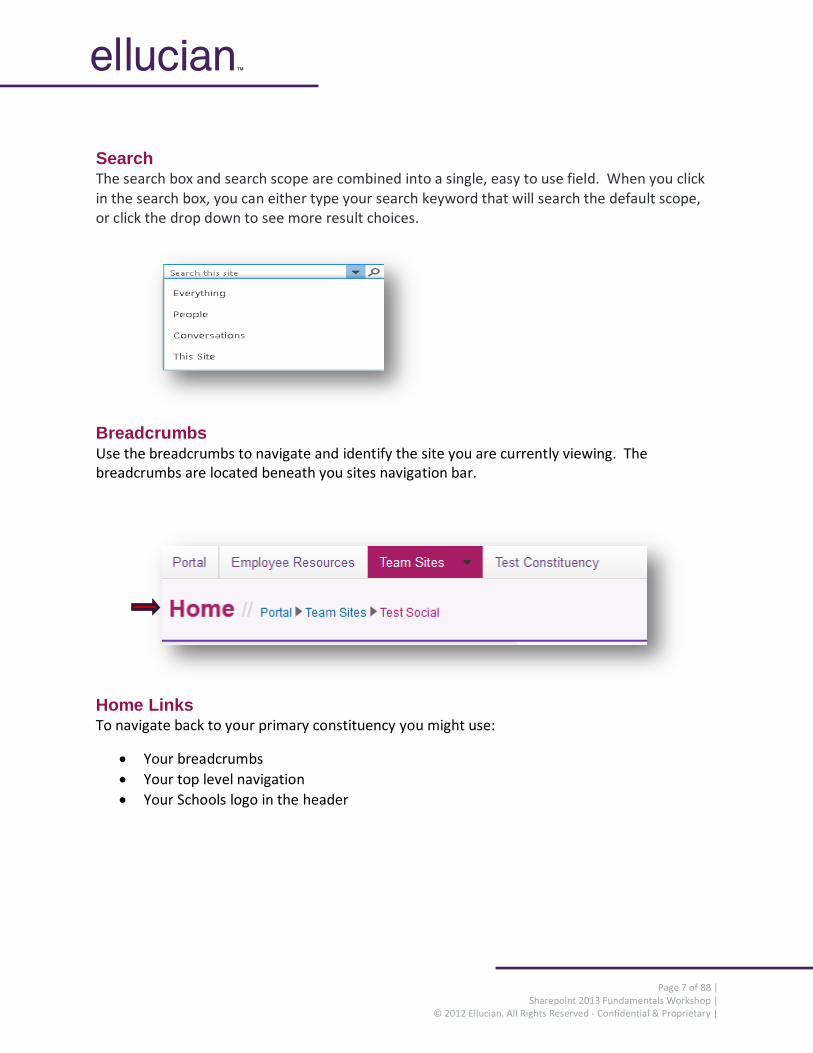
Search The search box and search scope are combined into a single, easy to use field. When you click in the search box, you can either type your search keyword that will search the default scope, or click the drop down to see more result choices.
Breadcrumbs Use the breadcrumbs to navigate and identify the site you are currently viewing. The breadcrumbs are located beneath you sites navigation bar.
Home Links To navigate back to your primary constituency you might use:
Your breadcrumbs
Your top level navigation
Your Schools logo in the header
Page 8 of 88 | Sharepoint 2013 Fundamentals Workshop |
© 2012 Ellucian. All Rights Reserved - Confidential & Proprietary |
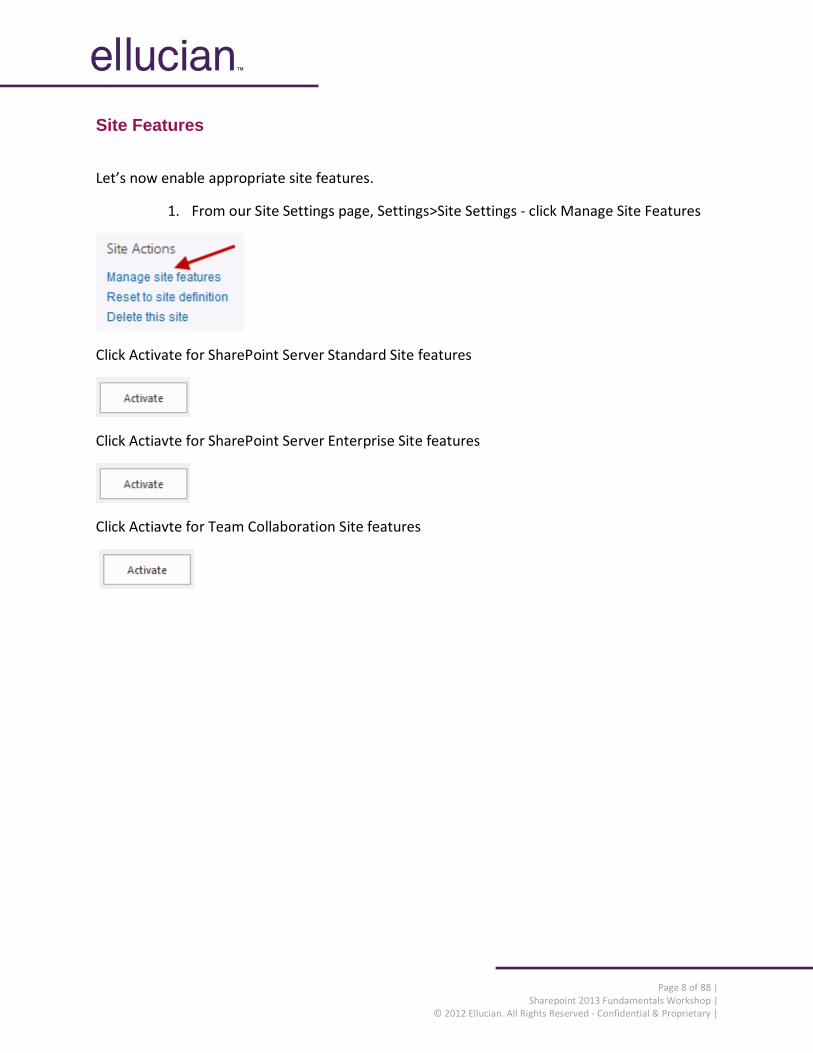
Site Features
Let’s now enable appropriate site features.
1. From our Site Settings page, Settings>Site Settings - click Manage Site Features
Click Activate for SharePoint Server Standard Site features
Click Actiavte for SharePoint Server Enterprise Site features
Click Actiavte for Team Collaboration Site features
Page 9 of 88 | Sharepoint 2013 Fundamentals Workshop |
© 2012 Ellucian. All Rights Reserved - Confidential & Proprietary |
Populating Content (Sites) (Apps)
For most users the ability to create sites will not be an option. Site request details should be defined in your governance charter.
Exercise 1: Creating Sites
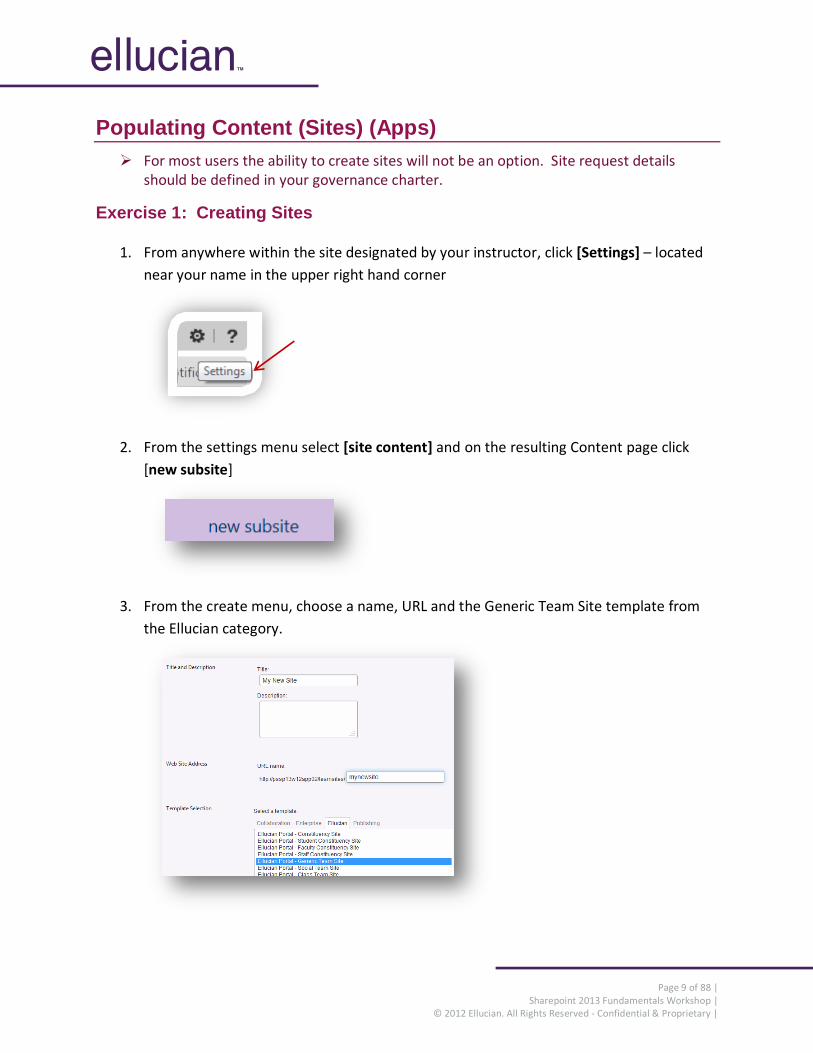
1. From anywhere within the site designated by your instructor, click [Settings] – located
near your name in the upper right hand corner
2. From the settings menu select [site content] and on the resulting Content page click
[new subsite]
3. From the create menu, choose a name, URL and the Generic Team Site template from
the Ellucian category.
Page 10 of 88 | Sharepoint 2013 Fundamentals Workshop |
© 2012 Ellucian. All Rights Reserved - Confidential & Proprietary |
Note: Avoid using special characters; try to use only letters and numbers, use lower
case and no spaces for the URL
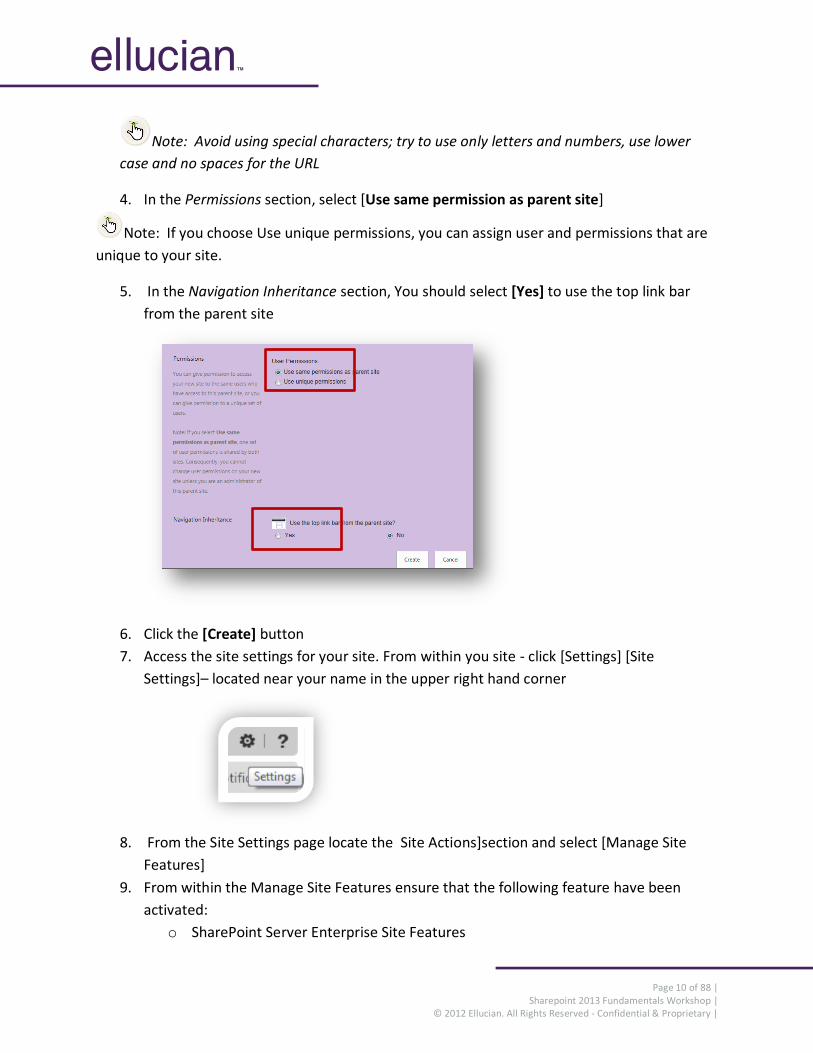
4. In the Permissions section, select [Use same permission as parent site]
Note: If you choose Use unique permissions, you can assign user and permissions that are
unique to your site.
5. In the Navigation Inheritance section, You should select [Yes] to use the top link bar
from the parent site
6. Click the [Create] button
7. Access the site settings for your site. From within you site - click [Settings] [Site
Settings]– located near your name in the upper right hand corner
8. From the Site Settings page locate the Site Actions]section and select [Manage Site
Features]
9. From within the Manage Site Features ensure that the following feature have been
activated:
o SharePoint Server Enterprise Site Features
Page 11 of 88 | Sharepoint 2013 Fundamentals Workshop |
© 2012 Ellucian. All Rights Reserved - Confidential & Proprietary |
o SharePoint Server Standard Site Features
o Team Collaboration Lists
Page 12 of 88 | Sharepoint 2013 Fundamentals Workshop |
© 2012 Ellucian. All Rights Reserved - Confidential & Proprietary |
Exercise 2: Adding an Announcement
This exercise for announcements is for team sites and other sub-sites. Constituency level announcements will be addressed separately
1. Within your Announcements web part click [Add new announcement]
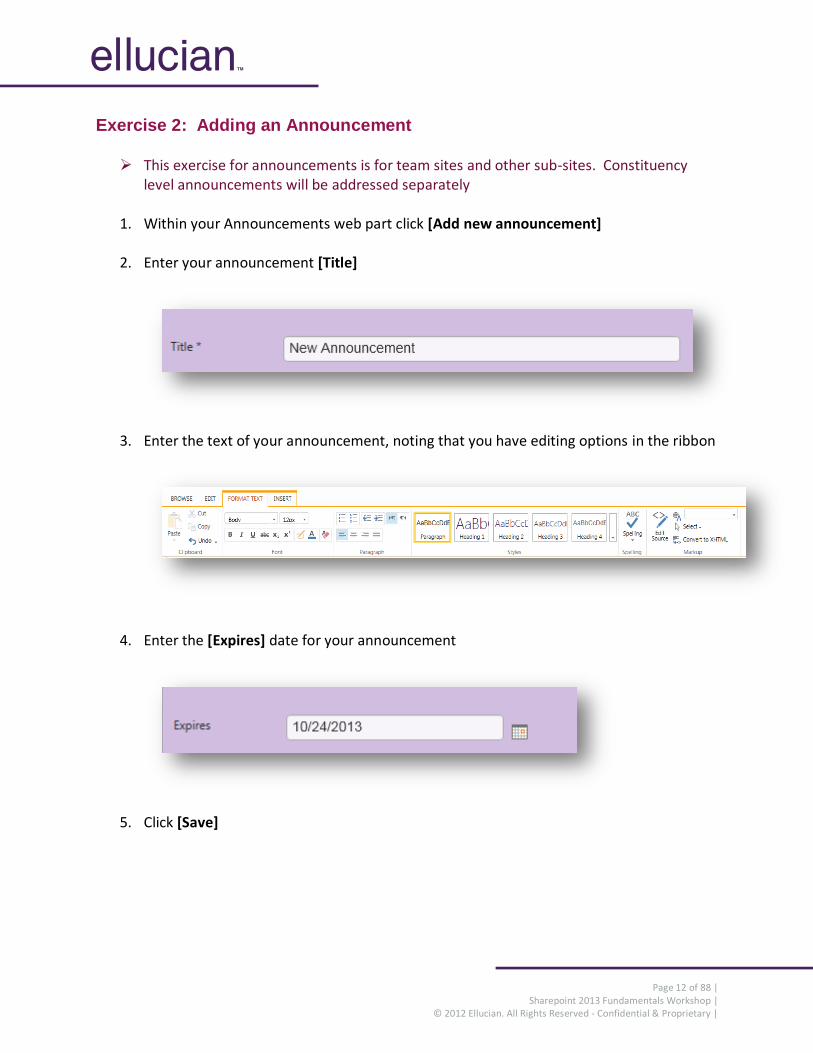
2. Enter your announcement [Title]
3. Enter the text of your announcement, noting that you have editing options in the ribbon
4. Enter the [Expires] date for your announcement
5. Click [Save]
Page 13 of 88 | Sharepoint 2013 Fundamentals Workshop |
© 2012 Ellucian. All Rights Reserved - Confidential & Proprietary |
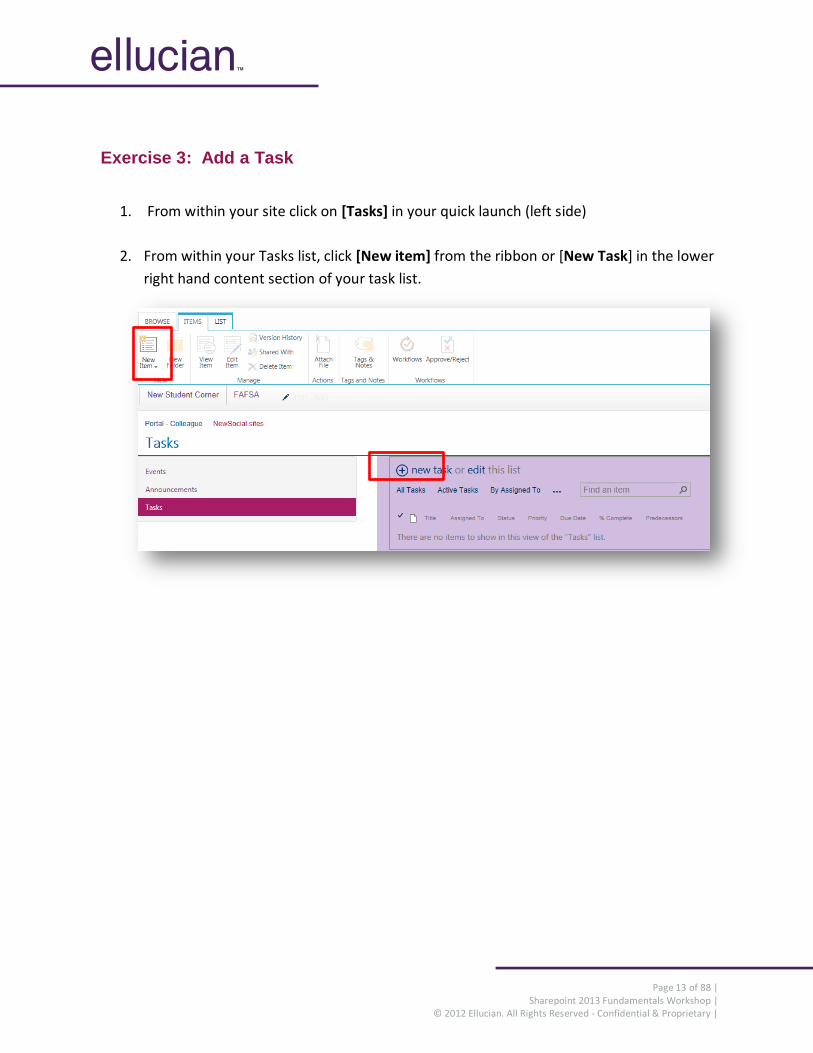
Exercise 3: Add a Task
1. From within your site click on [Tasks] in your quick launch (left side)
2. From within your Tasks list, click [New item] from the ribbon or [New Task] in the lower
right hand content section of your task list.
Page 14 of 88 | Sharepoint 2013 Fundamentals Workshop |
© 2012 Ellucian. All Rights Reserved - Confidential & Proprietary |
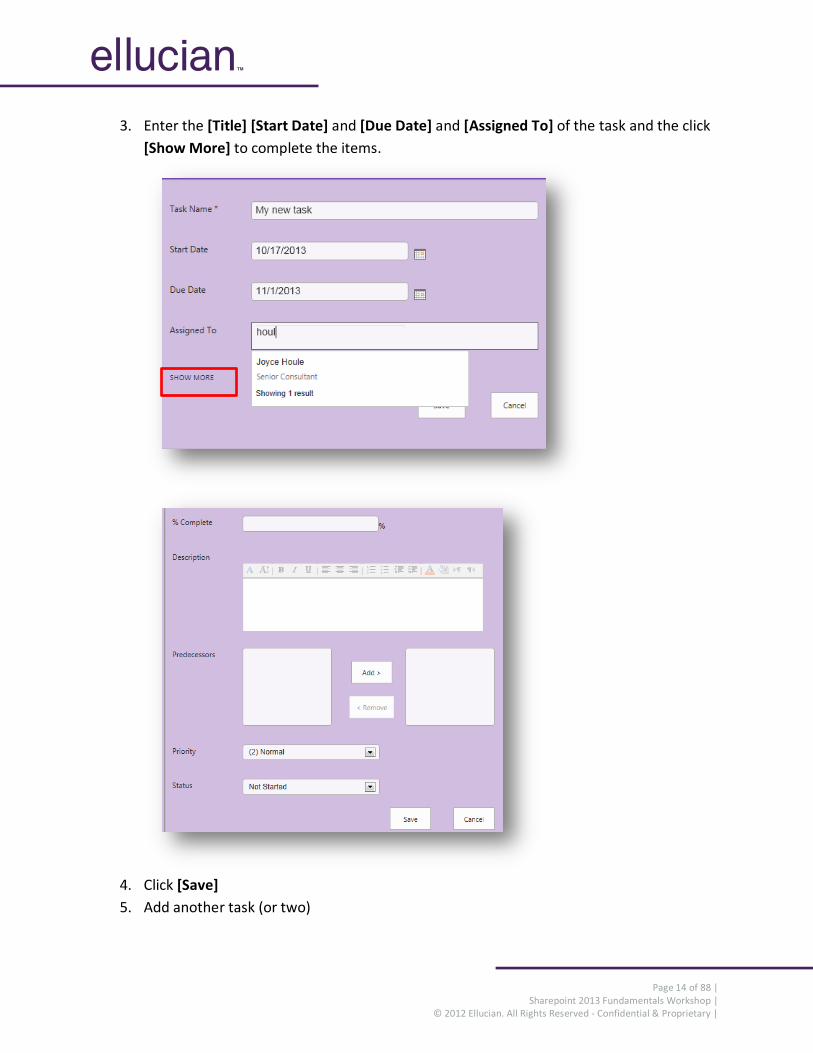
3. Enter the [Title] [Start Date] and [Due Date] and [Assigned To] of the task and the click
[Show More] to complete the items.
4. Click [Save]
5. Add another task (or two)
Page 15 of 88 | Sharepoint 2013 Fundamentals Workshop |
© 2012 Ellucian. All Rights Reserved - Confidential & Proprietary |
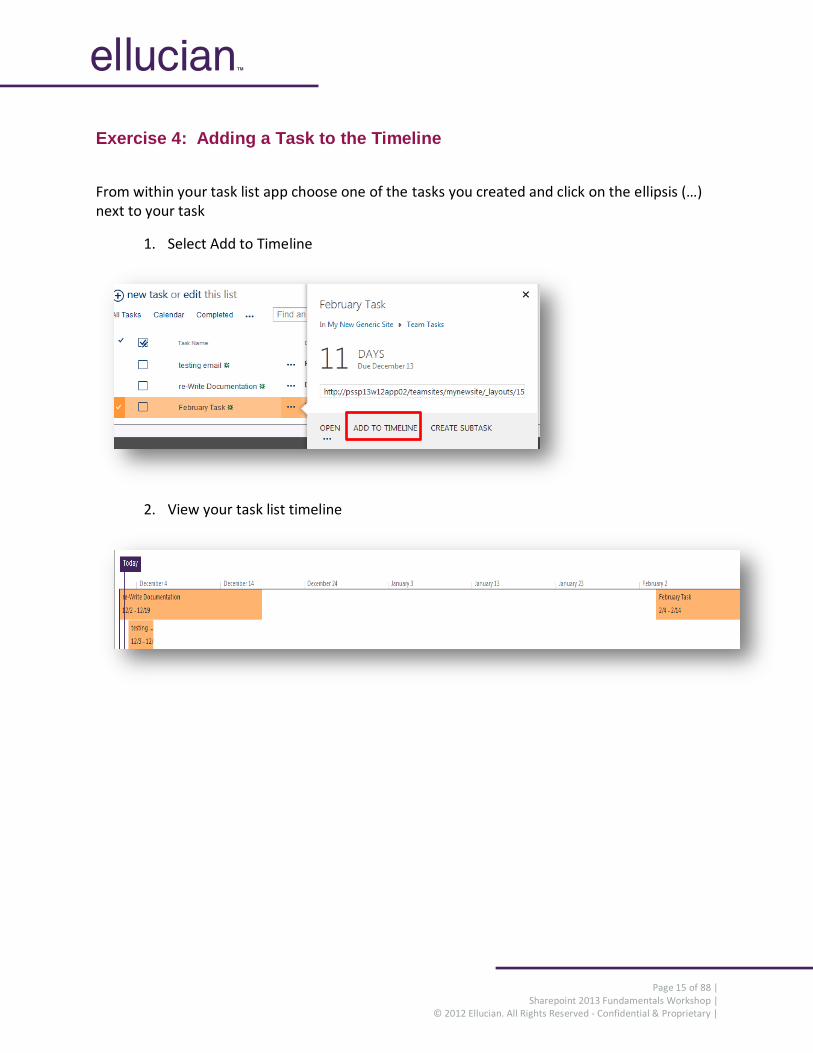
Exercise 4: Adding a Task to the Timeline
From within your task list app choose one of the tasks you created and click on the ellipsis (…) next to your task
1. Select Add to Timeline
2. View your task list timeline
Page 16 of 88 | Sharepoint 2013 Fundamentals Workshop |
© 2012 Ellucian. All Rights Reserved - Confidential & Proprietary |
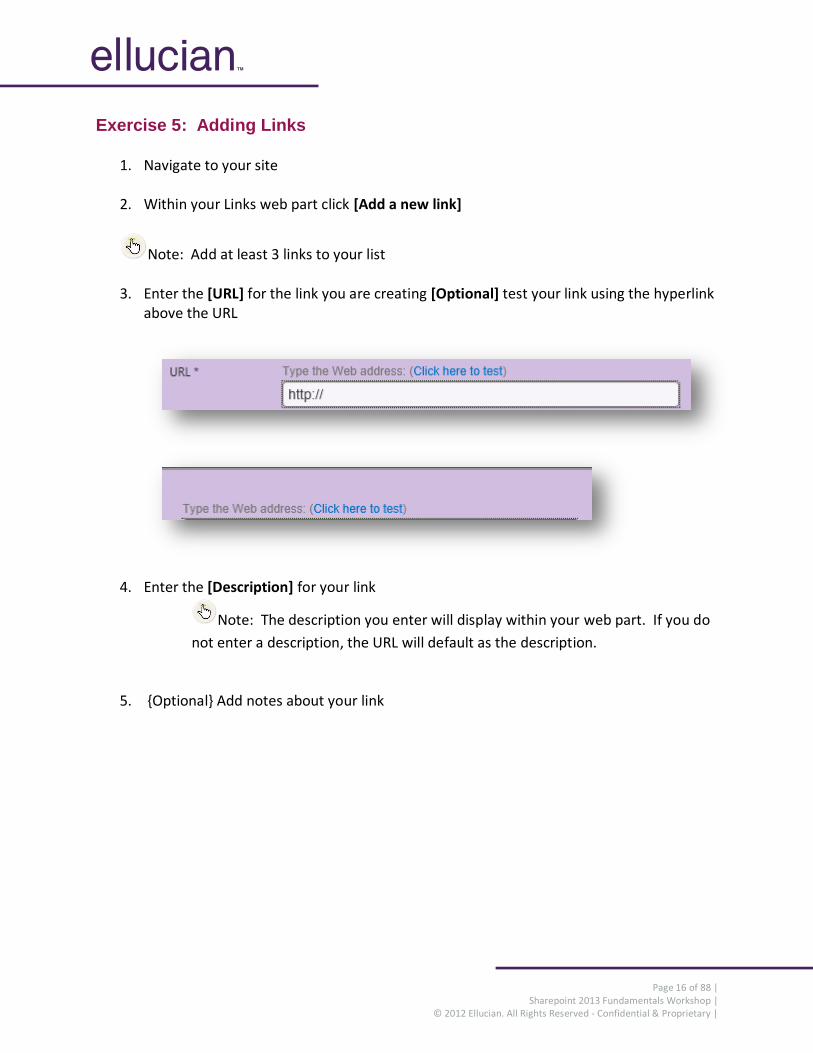
Exercise 5: Adding Links
1. Navigate to your site
2. Within your Links web part click [Add a new link]
Note: Add at least 3 links to your list
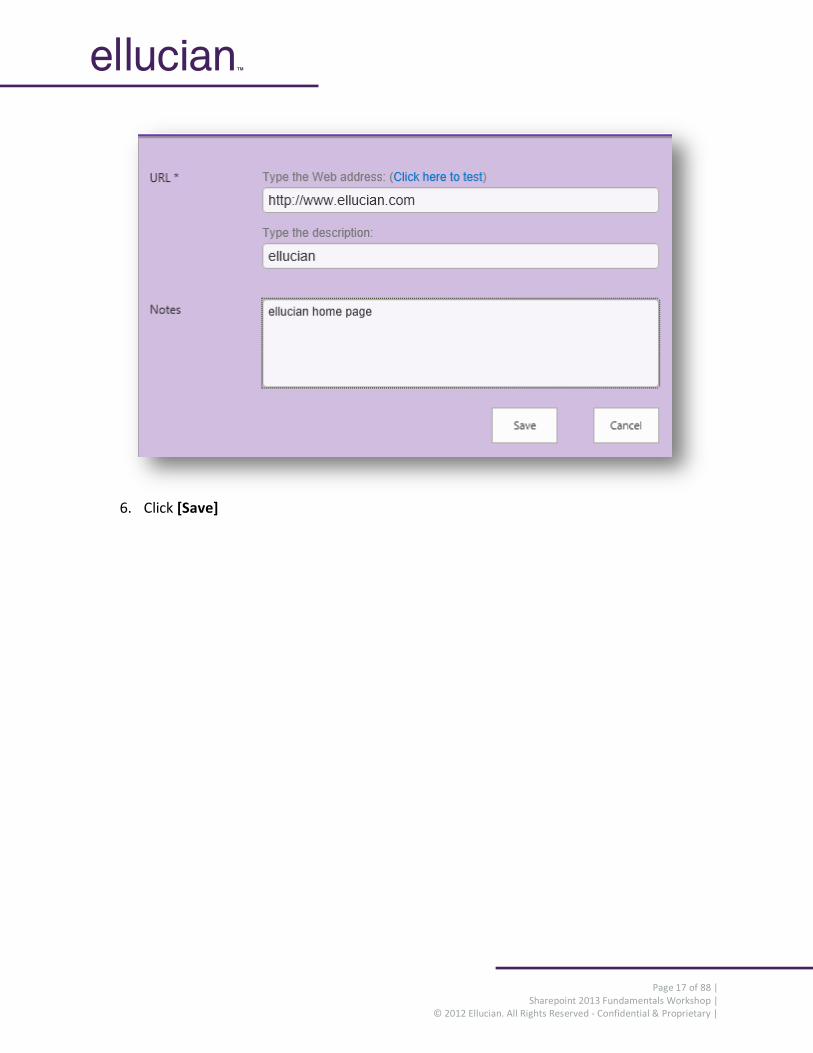
3. Enter the [URL] for the link you are creating [Optional] test your link using the hyperlink above the URL
4. Enter the [Description] for your link
Note: The description you enter will display within your web part. If you do
not enter a description, the URL will default as the description.
5. {Optional} Add notes about your link
Page 17 of 88 | Sharepoint 2013 Fundamentals Workshop |
© 2012 Ellucian. All Rights Reserved - Confidential & Proprietary |
6. Click [Save]

Page 18 of 88 | Sharepoint 2013 Fundamentals Workshop |
© 2012 Ellucian. All Rights Reserved - Confidential & Proprietary |
Exercise 6: Calendar Entry (Three Entries)
Exercise 6a – Single Event
1. Navigate to the home page of your team site
2. From your Quick Launch select [Events]
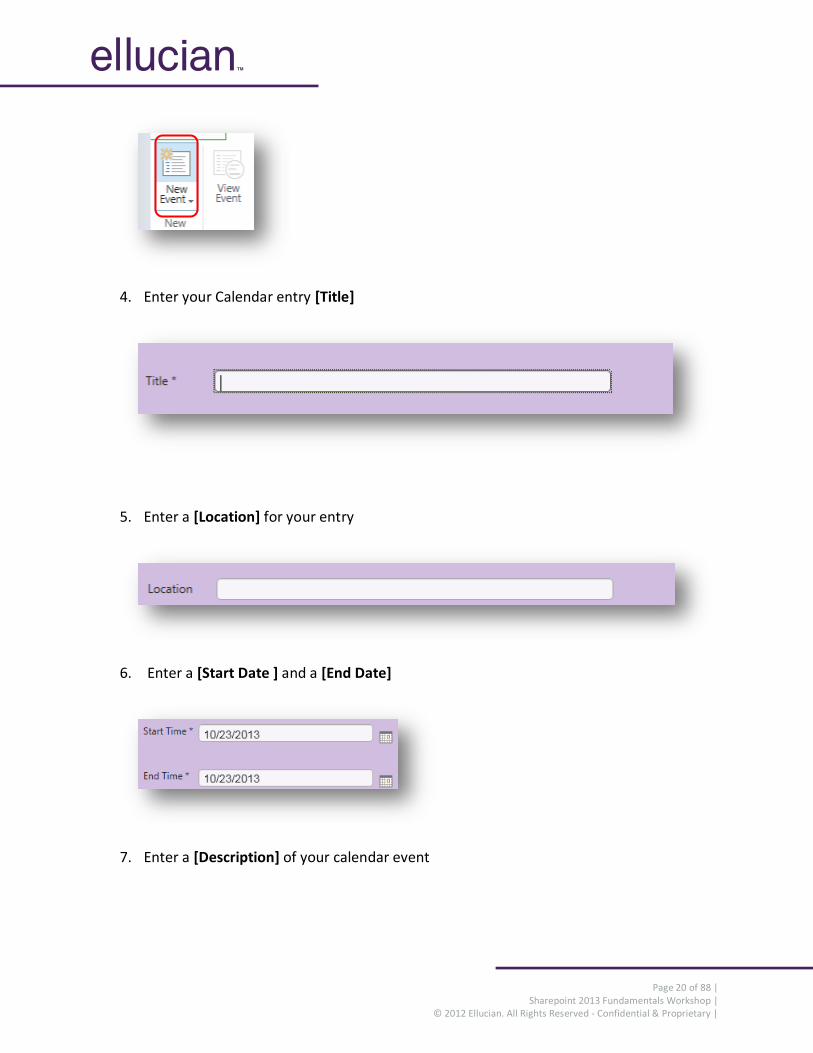
3. Click [Events] in the top left navigation then select [New event] from the ribbon below
4. Enter your Calendar entry [Title]
5. Enter a [Location] for your entry
Page 19 of 88 | Sharepoint 2013 Fundamentals Workshop |
© 2012 Ellucian. All Rights Reserved - Confidential & Proprietary |
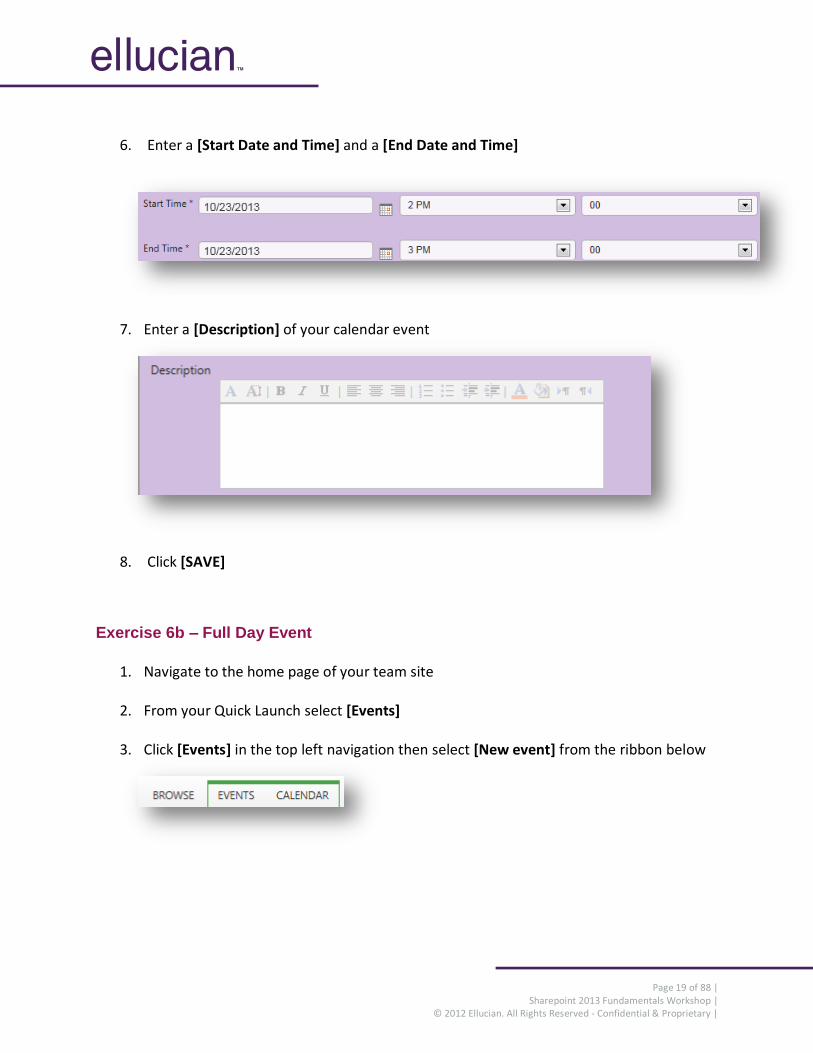
6. Enter a [Start Date and Time] and a [End Date and Time]
7. Enter a [Description] of your calendar event
8. Click [SAVE]
Exercise 6b – Full Day Event
1. Navigate to the home page of your team site
2. From your Quick Launch select [Events]
3. Click [Events] in the top left navigation then select [New event] from the ribbon below
Page 20 of 88 | Sharepoint 2013 Fundamentals Workshop |
© 2012 Ellucian. All Rights Reserved - Confidential & Proprietary |
4. Enter your Calendar entry [Title]
5. Enter a [Location] for your entry
6. Enter a [Start Date ] and a [End Date]
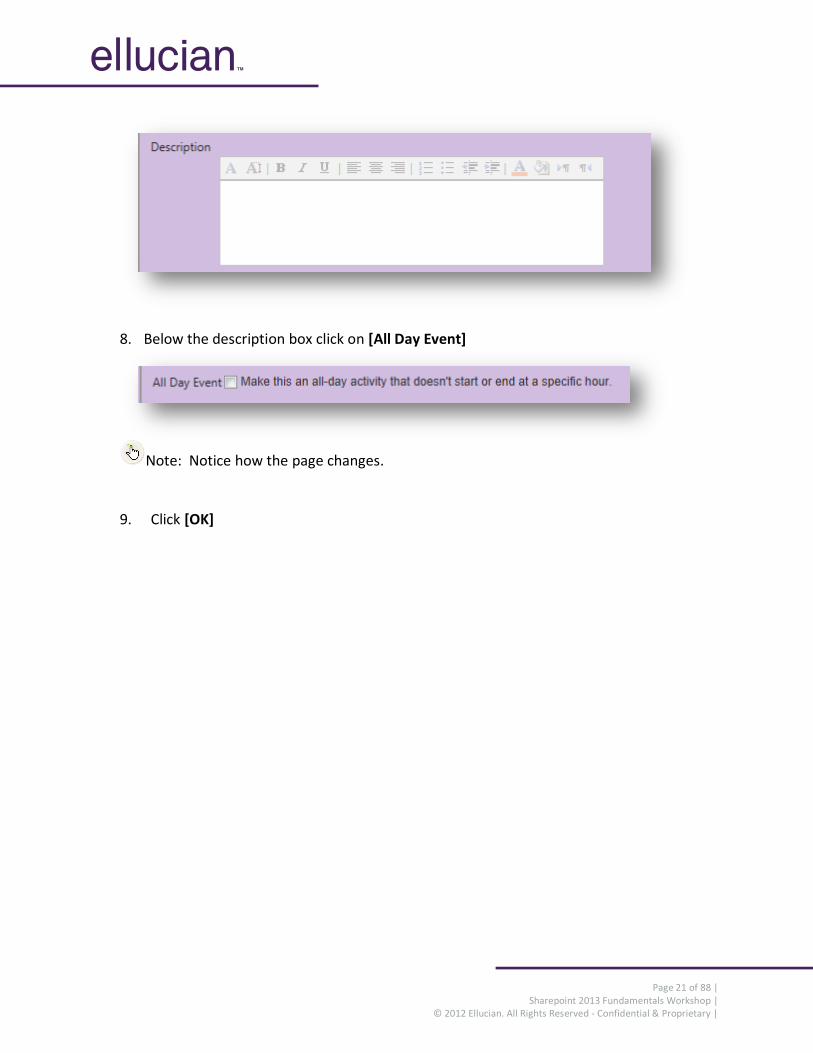
7. Enter a [Description] of your calendar event
Page 21 of 88 | Sharepoint 2013 Fundamentals Workshop |
© 2012 Ellucian. All Rights Reserved - Confidential & Proprietary |
8. Below the description box click on [All Day Event]
Note: Notice how the page changes.
9. Click [OK]
Page 22 of 88 | Sharepoint 2013 Fundamentals Workshop |
© 2012 Ellucian. All Rights Reserved - Confidential & Proprietary |
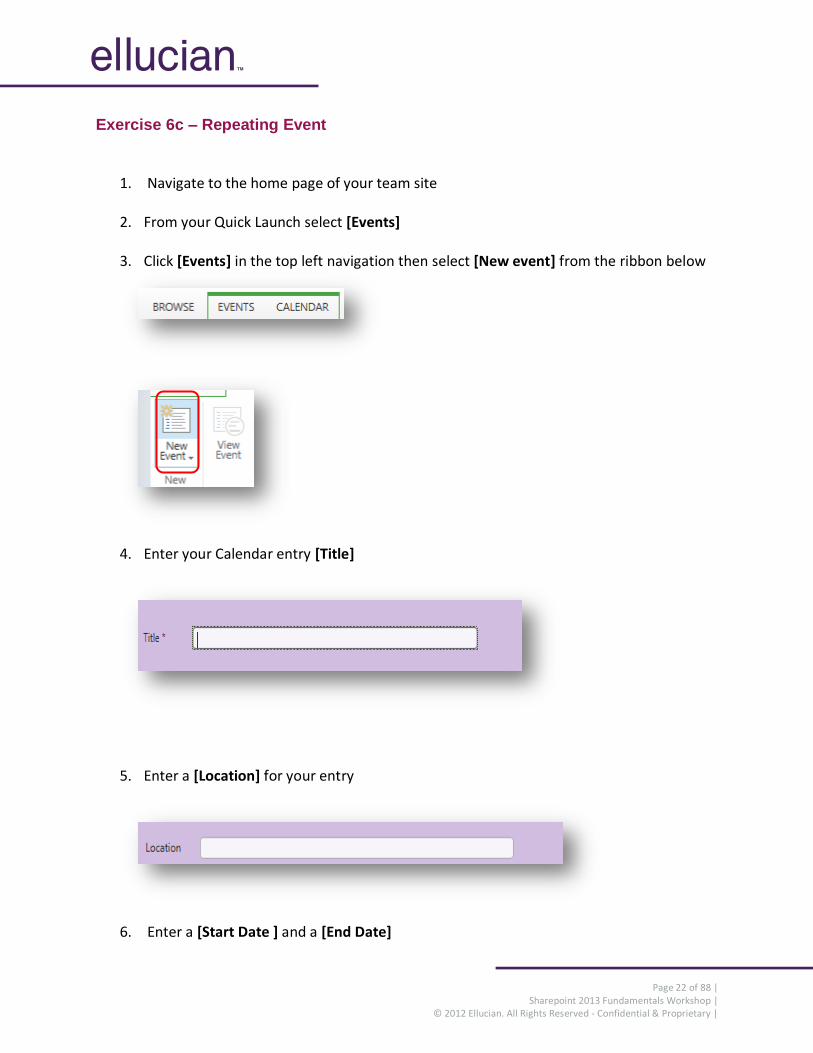
Exercise 6c – Repeating Event
1. Navigate to the home page of your team site
2. From your Quick Launch select [Events]
3. Click [Events] in the top left navigation then select [New event] from the ribbon below
4. Enter your Calendar entry [Title]
5. Enter a [Location] for your entry
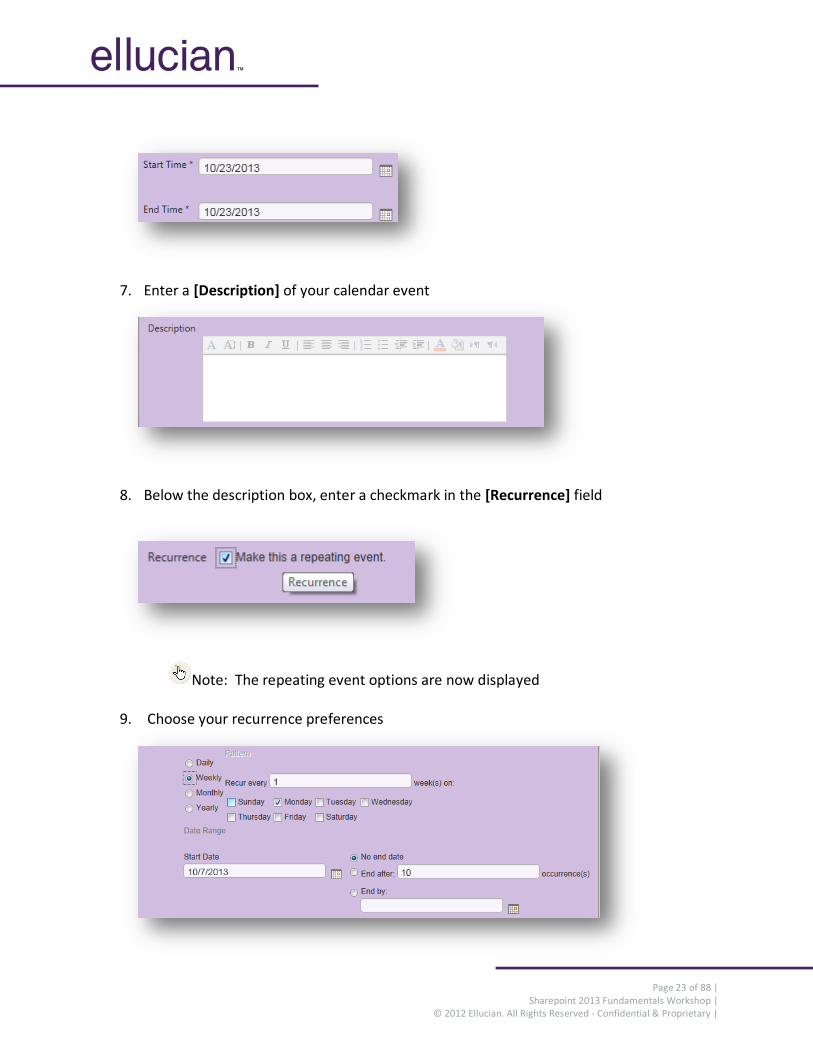
6. Enter a [Start Date ] and a [End Date]
Page 23 of 88 | Sharepoint 2013 Fundamentals Workshop |
© 2012 Ellucian. All Rights Reserved - Confidential & Proprietary |
7. Enter a [Description] of your calendar event
8. Below the description box, enter a checkmark in the [Recurrence] field
Note: The repeating event options are now displayed
9. Choose your recurrence preferences
Page 24 of 88 | Sharepoint 2013 Fundamentals Workshop |
© 2012 Ellucian. All Rights Reserved - Confidential & Proprietary |
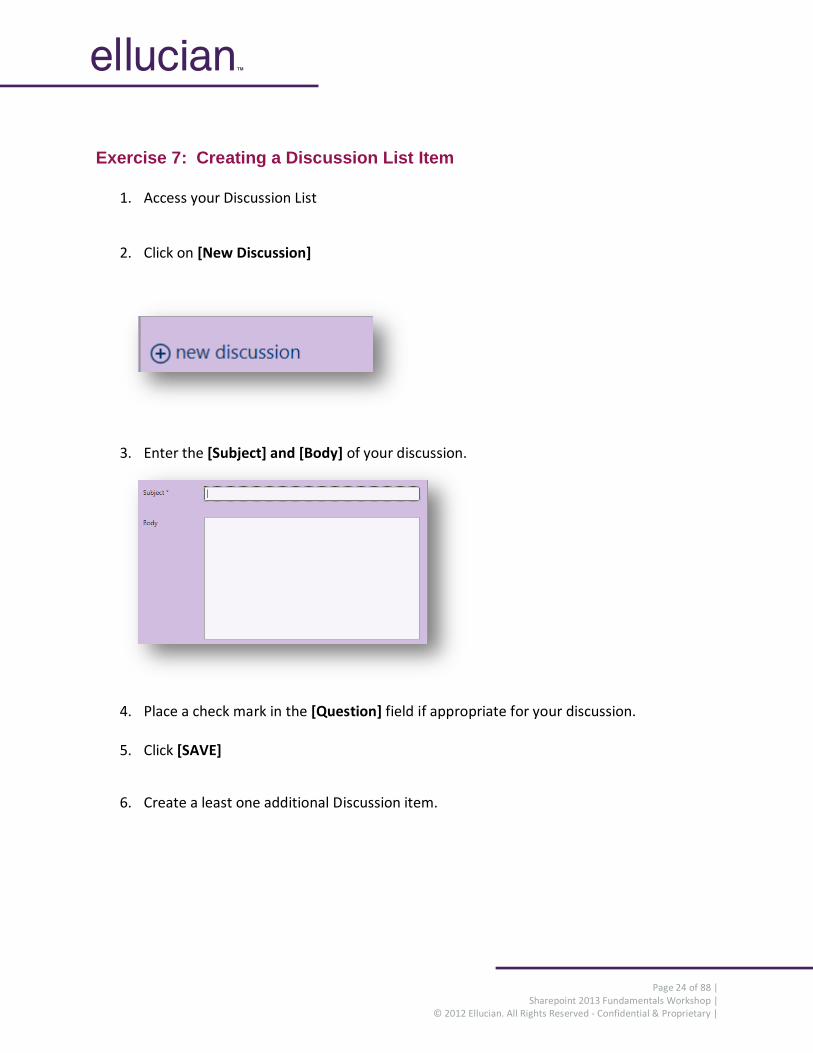
Exercise 7: Creating a Discussion List Item
1. Access your Discussion List
2. Click on [New Discussion]
3. Enter the [Subject] and [Body] of your discussion.
4. Place a check mark in the [Question] field if appropriate for your discussion.
5. Click [SAVE]
6. Create a least one additional Discussion item.
Page 25 of 88 | Sharepoint 2013 Fundamentals Workshop |
© 2012 Ellucian. All Rights Reserved - Confidential & Proprietary |
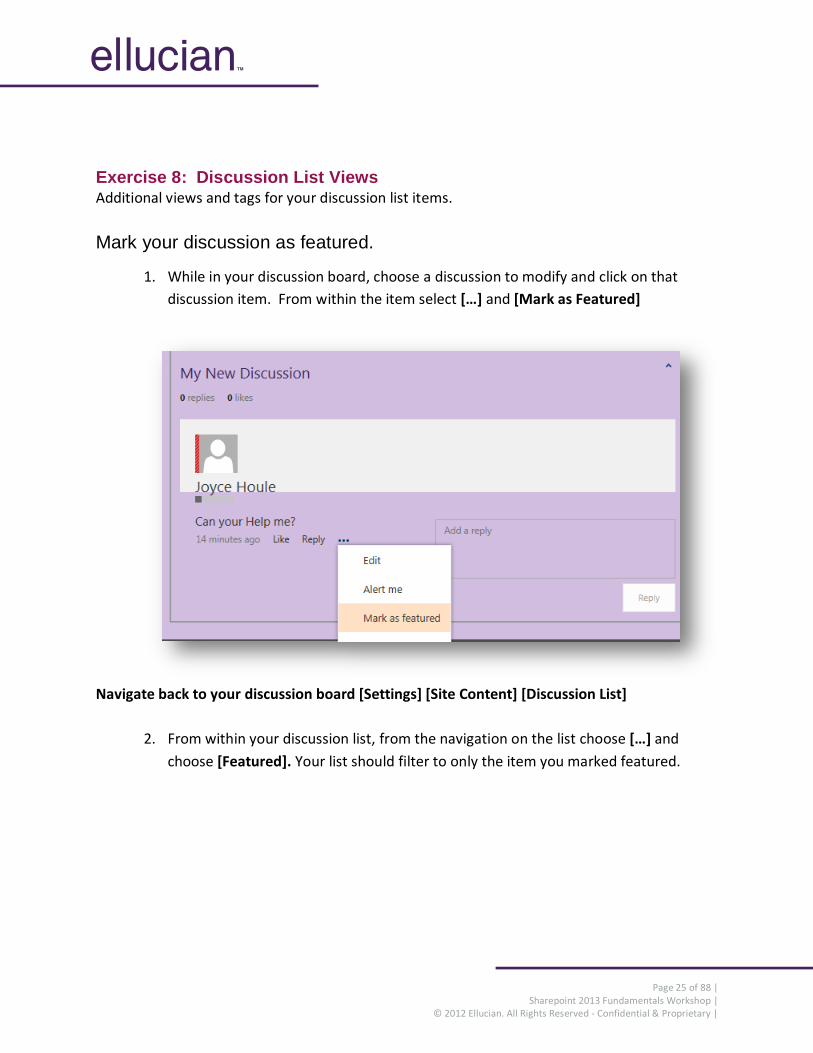
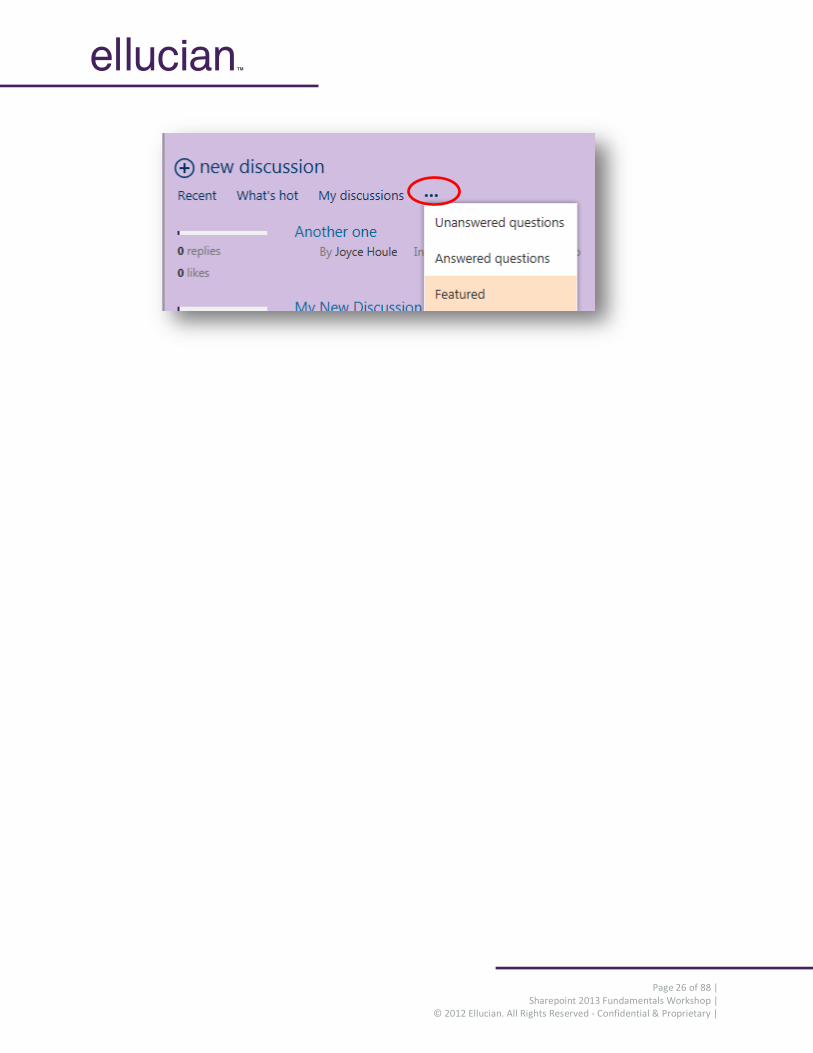
Exercise 8: Discussion List Views Additional views and tags for your discussion list items.
Mark your discussion as featured.
1. While in your discussion board, choose a discussion to modify and click on that
discussion item. From within the item select […] and [Mark as Featured]
Navigate back to your discussion board [Settings] [Site Content] [Discussion List]
2. From within your discussion list, from the navigation on the list choose […] and
choose [Featured]. Your list should filter to only the item you marked featured.
Page 26 of 88 | Sharepoint 2013 Fundamentals Workshop |
© 2012 Ellucian. All Rights Reserved - Confidential & Proprietary |
Page 27 of 88 | Sharepoint 2013 Fundamentals Workshop |
© 2012 Ellucian. All Rights Reserved - Confidential & Proprietary |
Exercise 9: Creating a Survey
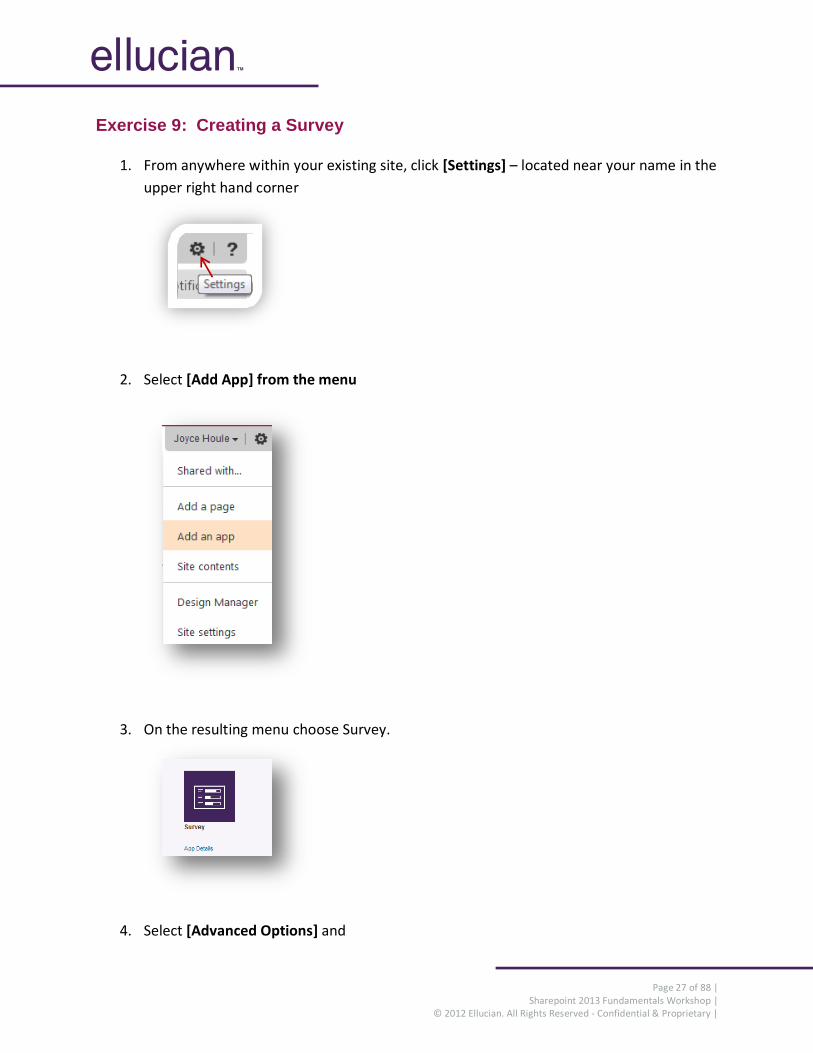
1. From anywhere within your existing site, click [Settings] – located near your name in the
upper right hand corner
2. Select [Add App] from the menu
3. On the resulting menu choose Survey.
4. Select [Advanced Options] and
Page 28 of 88 | Sharepoint 2013 Fundamentals Workshop |
© 2012 Ellucian. All Rights Reserved - Confidential & Proprietary |
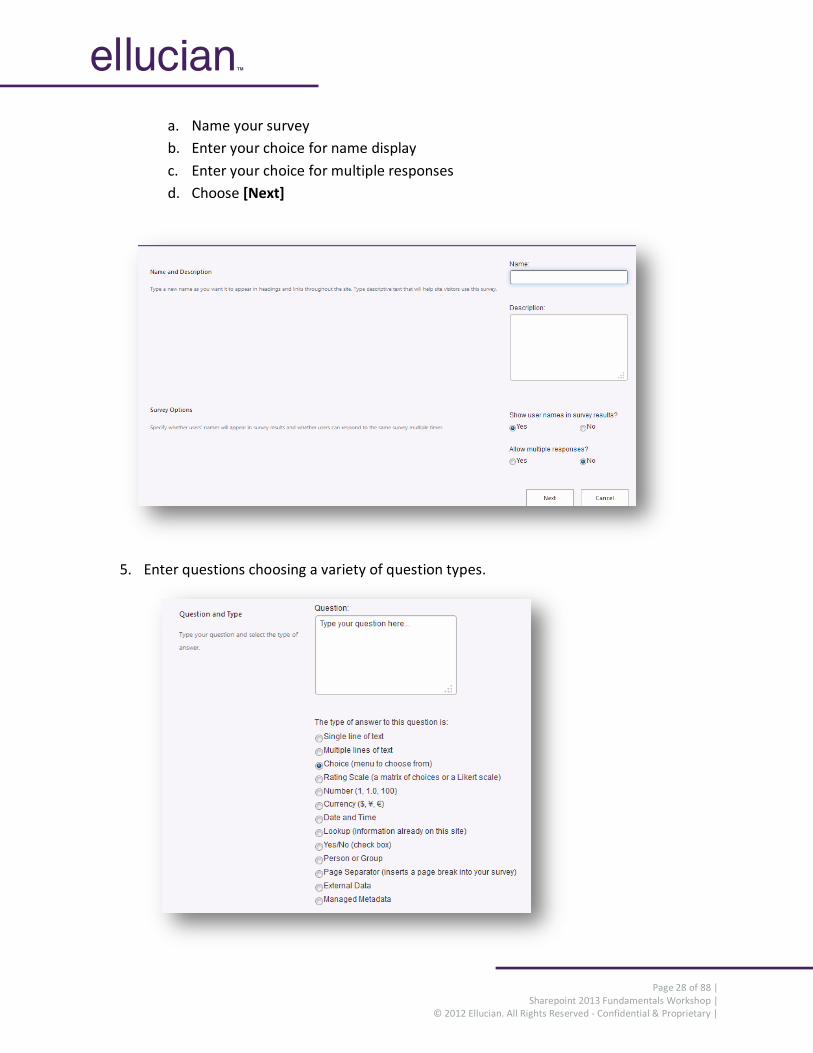
a. Name your survey
b. Enter your choice for name display
c. Enter your choice for multiple responses
d. Choose [Next]
5. Enter questions choosing a variety of question types.
Page 29 of 88 | Sharepoint 2013 Fundamentals Workshop |
© 2012 Ellucian. All Rights Reserved - Confidential & Proprietary |
6. Make your choice in the additional settings section
a) Require the response
b) Default Value
Consider leaving the default value blank so survey takers must make a choice rather than
accepting the default value.
7. Click [Next] to add another question or click [Finish] to complete
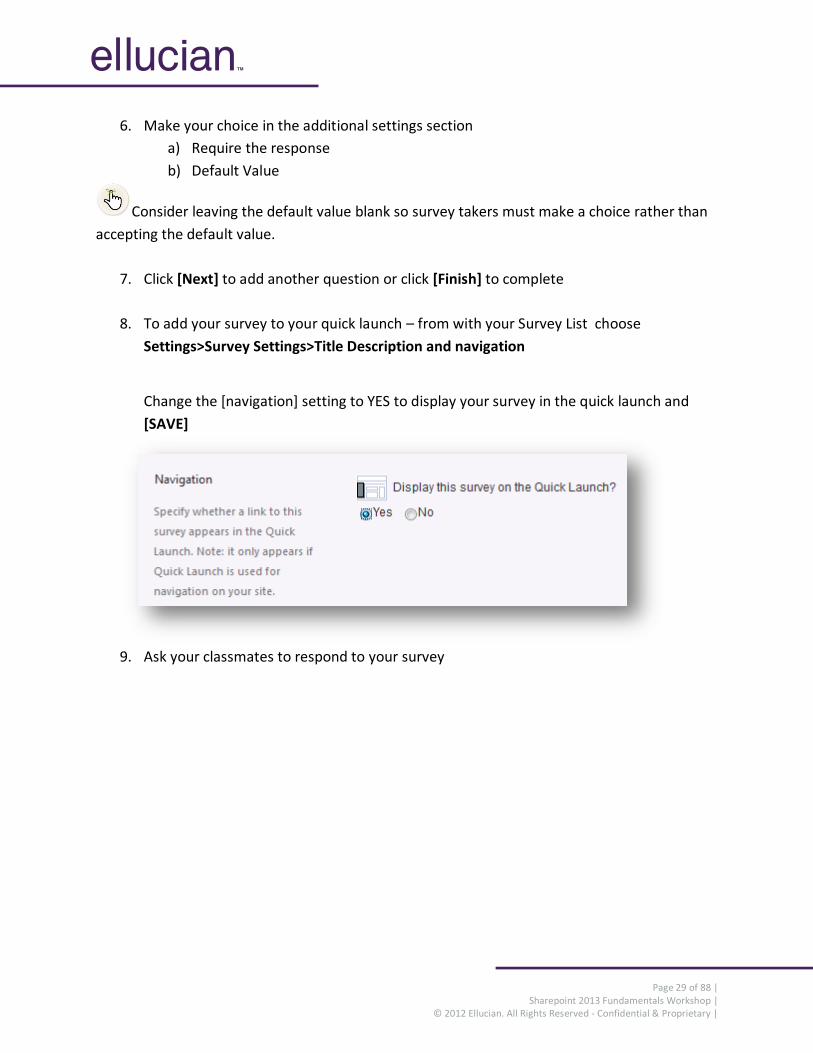
8. To add your survey to your quick launch – from with your Survey List choose
Settings>Survey Settings>Title Description and navigation
Change the [navigation] setting to YES to display your survey in the quick launch and
[SAVE]
9. Ask your classmates to respond to your survey
Page 30 of 88 | Sharepoint 2013 Fundamentals Workshop |
© 2012 Ellucian. All Rights Reserved - Confidential & Proprietary |
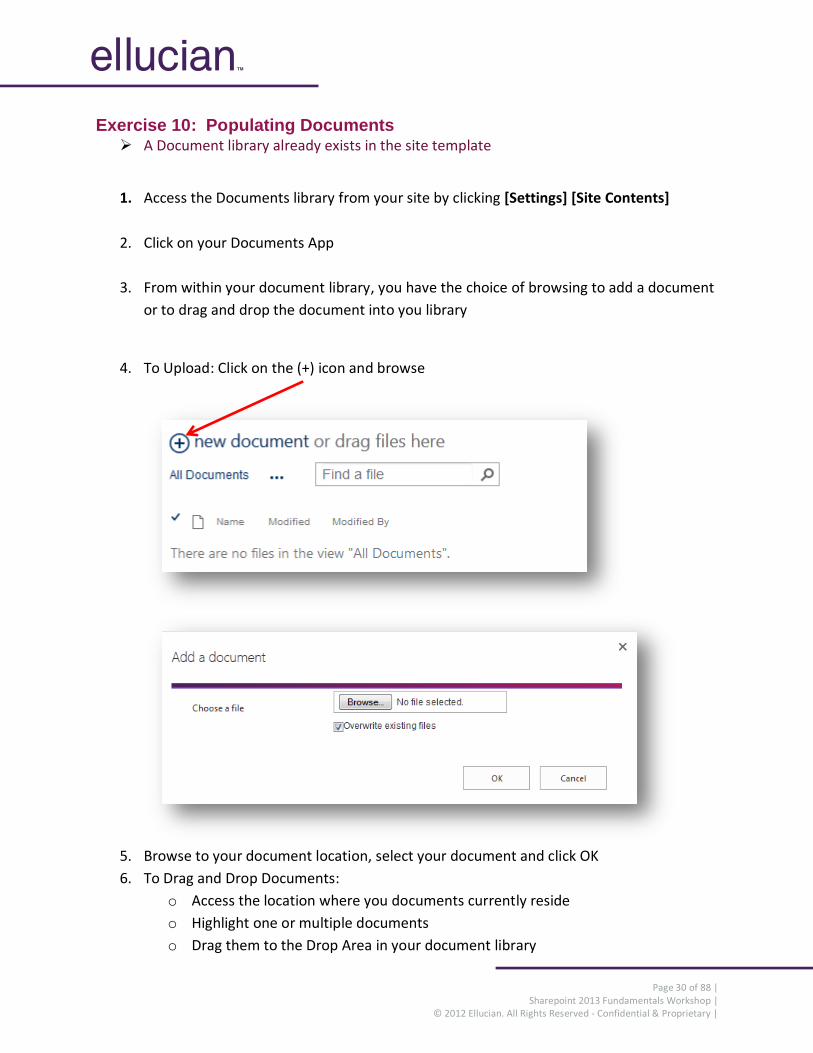
Exercise 10: Populating Documents A Document library already exists in the site template
1. Access the Documents library from your site by clicking [Settings] [Site Contents]
2. Click on your Documents App
3. From within your document library, you have the choice of browsing to add a document
or to drag and drop the document into you library
4. To Upload: Click on the (+) icon and browse
5. Browse to your document location, select your document and click OK
6. To Drag and Drop Documents:
o Access the location where you documents currently reside
o Highlight one or multiple documents
o Drag them to the Drop Area in your document library
Page 31 of 88 | Sharepoint 2013 Fundamentals Workshop |
© 2012 Ellucian. All Rights Reserved - Confidential & Proprietary |
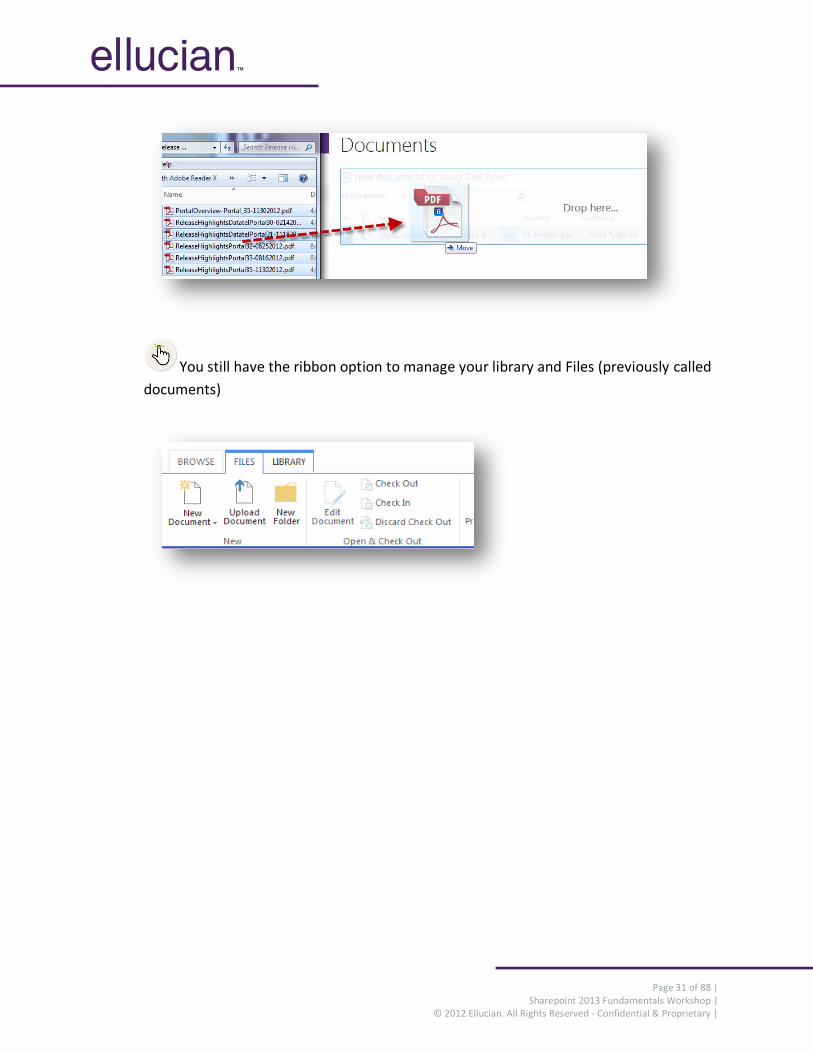
You still have the ribbon option to manage your library and Files (previously called
documents)
Page 32 of 88 | Sharepoint 2013 Fundamentals Workshop |
© 2012 Ellucian. All Rights Reserved - Confidential & Proprietary |
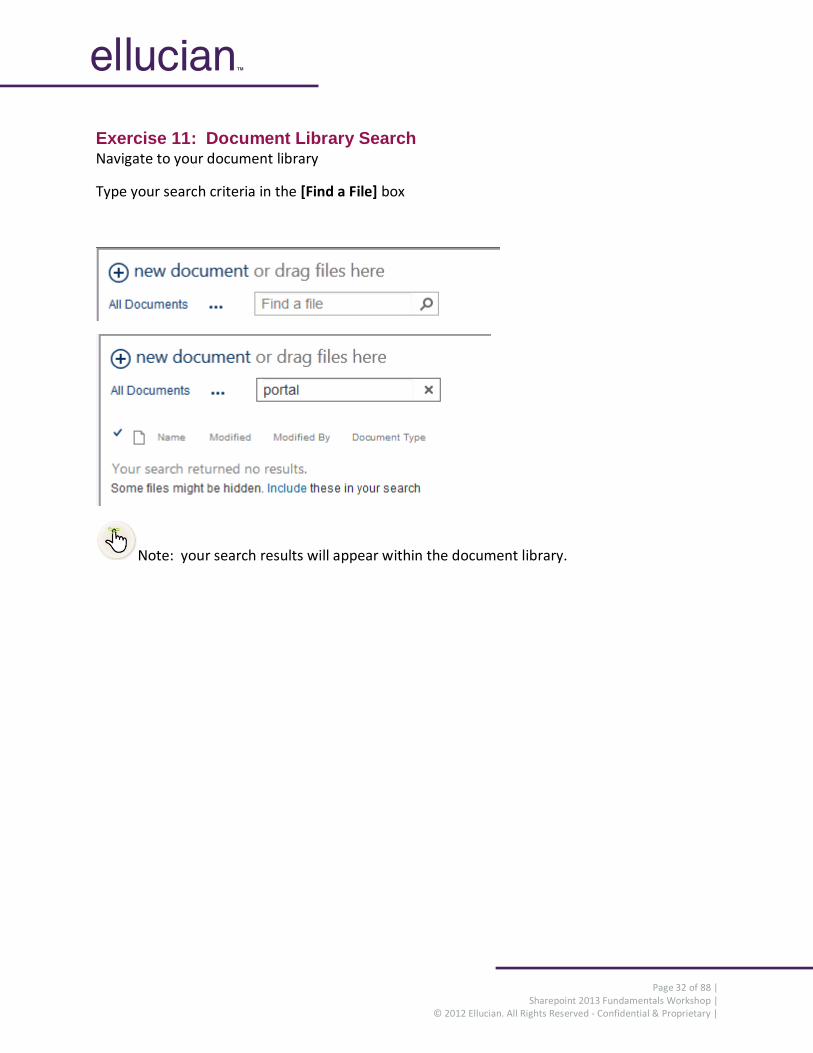
Exercise 11: Document Library Search Navigate to your document library
Type your search criteria in the [Find a File] box
Note: your search results will appear within the document library.
Page 33 of 88 | Sharepoint 2013 Fundamentals Workshop |
© 2012 Ellucian. All Rights Reserved - Confidential & Proprietary |
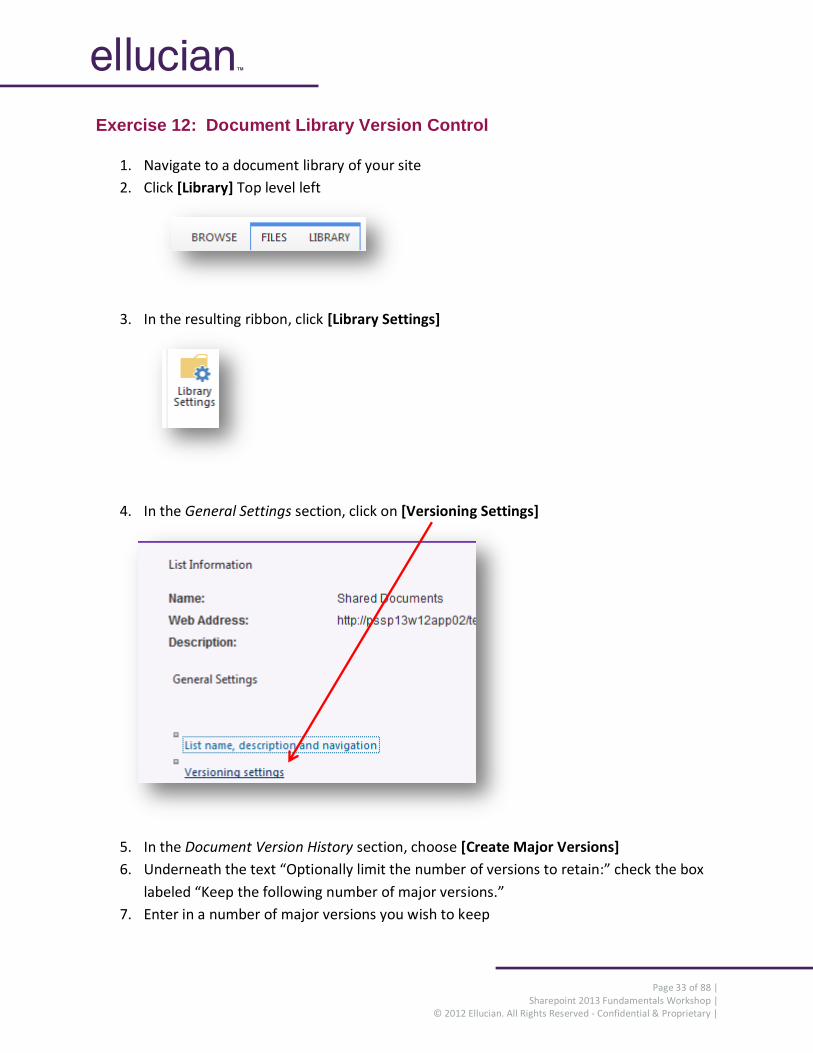
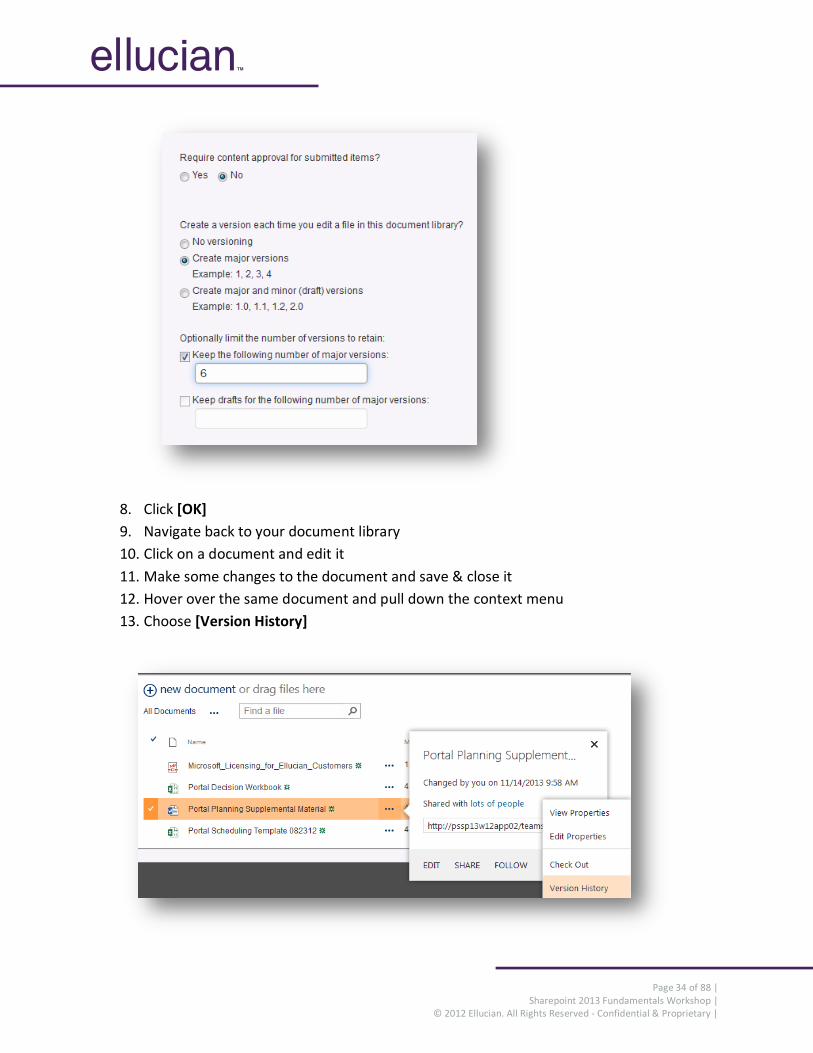
Exercise 12: Document Library Version Control
1. Navigate to a document library of your site
2. Click [Library] Top level left
3. In the resulting ribbon, click [Library Settings]
4. In the General Settings section, click on [Versioning Settings]
5. In the Document Version History section, choose [Create Major Versions]
6. Underneath the text “Optionally limit the number of versions to retain:” check the box
labeled “Keep the following number of major versions.”
7. Enter in a number of major versions you wish to keep
Page 34 of 88 | Sharepoint 2013 Fundamentals Workshop |
© 2012 Ellucian. All Rights Reserved - Confidential & Proprietary |
8. Click [OK]
9. Navigate back to your document library
10. Click on a document and edit it
11. Make some changes to the document and save & close it
12. Hover over the same document and pull down the context menu
13. Choose [Version History]
Page 35 of 88 | Sharepoint 2013 Fundamentals Workshop |
© 2012 Ellucian. All Rights Reserved - Confidential & Proprietary |
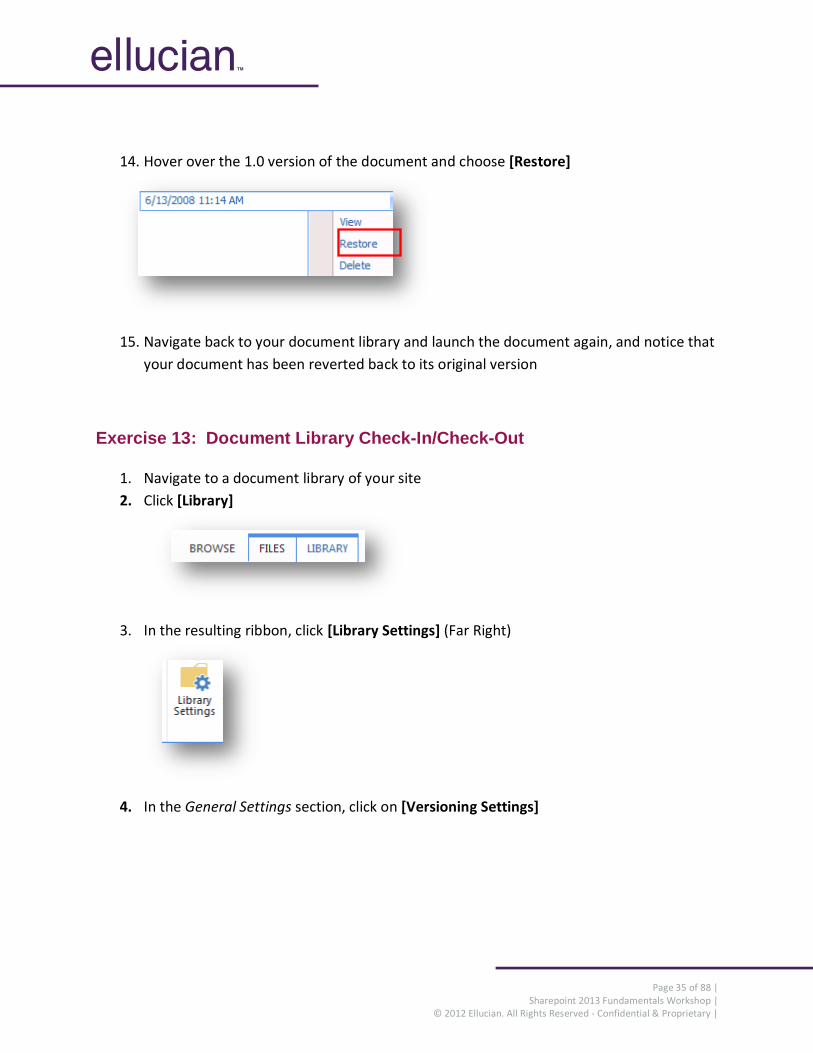
14. Hover over the 1.0 version of the document and choose [Restore]
15. Navigate back to your document library and launch the document again, and notice that
your document has been reverted back to its original version
Exercise 13: Document Library Check-In/Check-Out
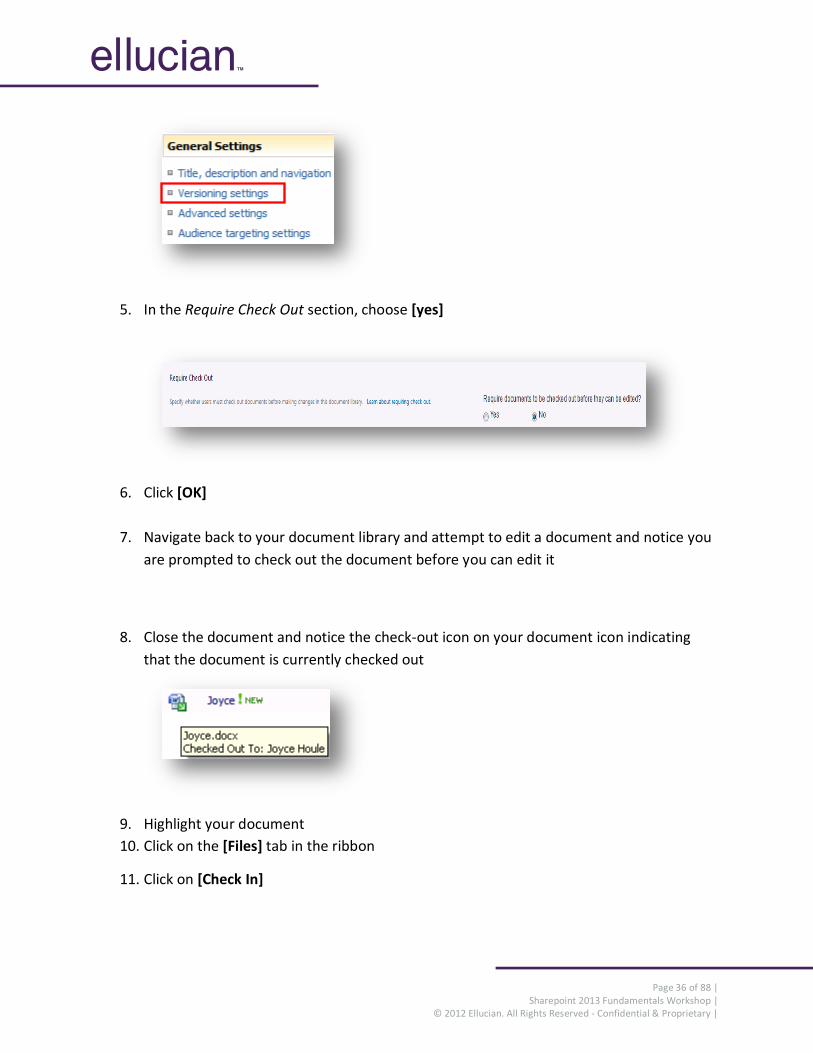
1. Navigate to a document library of your site
2. Click [Library]
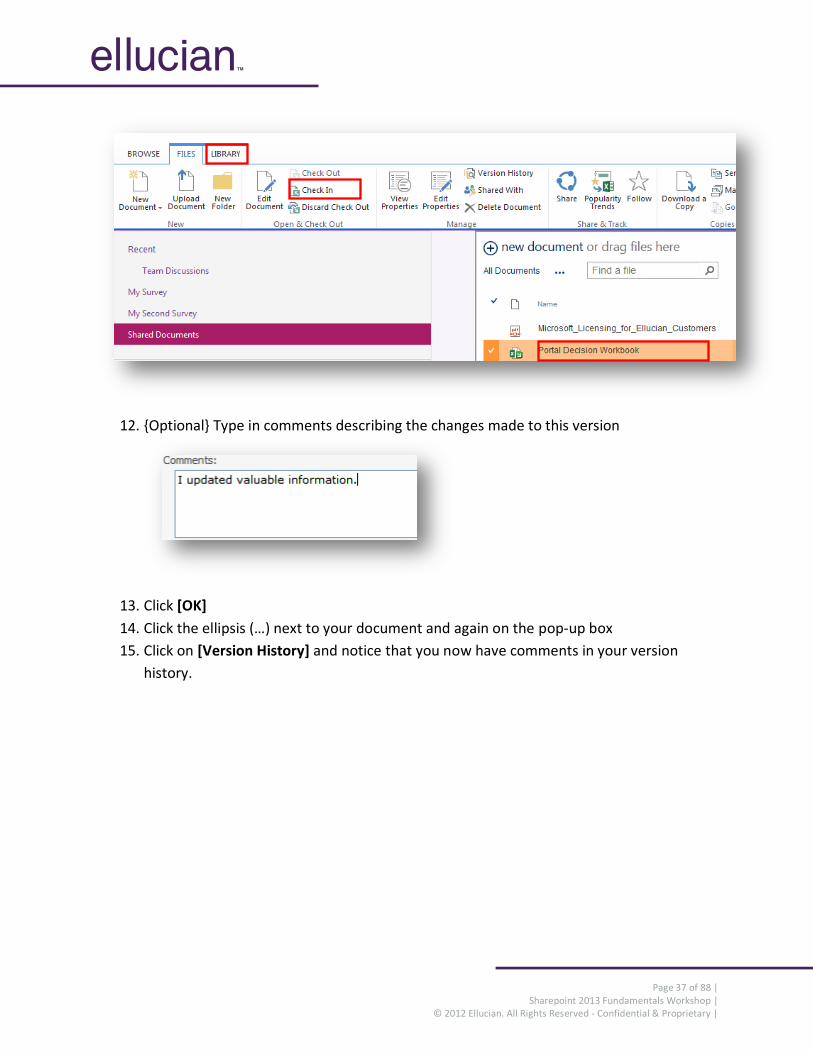
3. In the resulting ribbon, click [Library Settings] (Far Right)
4. In the General Settings section, click on [Versioning Settings]
Page 36 of 88 | Sharepoint 2013 Fundamentals Workshop |
© 2012 Ellucian. All Rights Reserved - Confidential & Proprietary |
5. In the Require Check Out section, choose [yes]
6. Click [OK]
7. Navigate back to your document library and attempt to edit a document and notice you
are prompted to check out the document before you can edit it
8. Close the document and notice the check-out icon on your document icon indicating
that the document is currently checked out
9. Highlight your document
10. Click on the [Files] tab in the ribbon
11. Click on [Check In]
Page 37 of 88 | Sharepoint 2013 Fundamentals Workshop |
© 2012 Ellucian. All Rights Reserved - Confidential & Proprietary |
12. {Optional} Type in comments describing the changes made to this version
13. Click [OK]
14. Click the ellipsis (…) next to your document and again on the pop-up box
15. Click on [Version History] and notice that you now have comments in your version
history.

Page 38 of 88 | Sharepoint 2013 Fundamentals Workshop |
© 2012 Ellucian. All Rights Reserved - Confidential & Proprietary |
NOTE: For this training only, return to step 1-6 and change the setting to NO. The reason for this is that later exercises will be affected by leaving the choice to yes. In your portal document libraries having the setting on YES is the recommended choice.
Page 39 of 88 | Sharepoint 2013 Fundamentals Workshop |
© 2012 Ellucian. All Rights Reserved - Confidential & Proprietary |
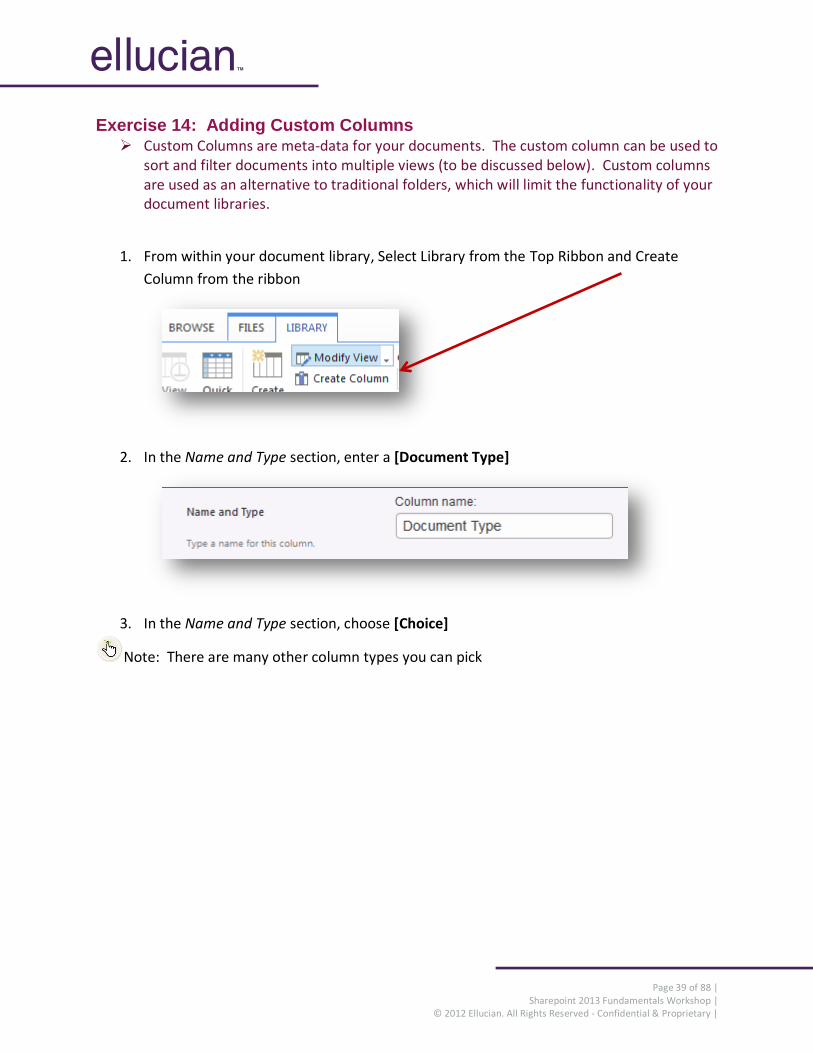
Exercise 14: Adding Custom Columns Custom Columns are meta-data for your documents. The custom column can be used to
sort and filter documents into multiple views (to be discussed below). Custom columns are used as an alternative to traditional folders, which will limit the functionality of your document libraries.
1. From within your document library, Select Library from the Top Ribbon and Create
Column from the ribbon
2. In the Name and Type section, enter a [Document Type]
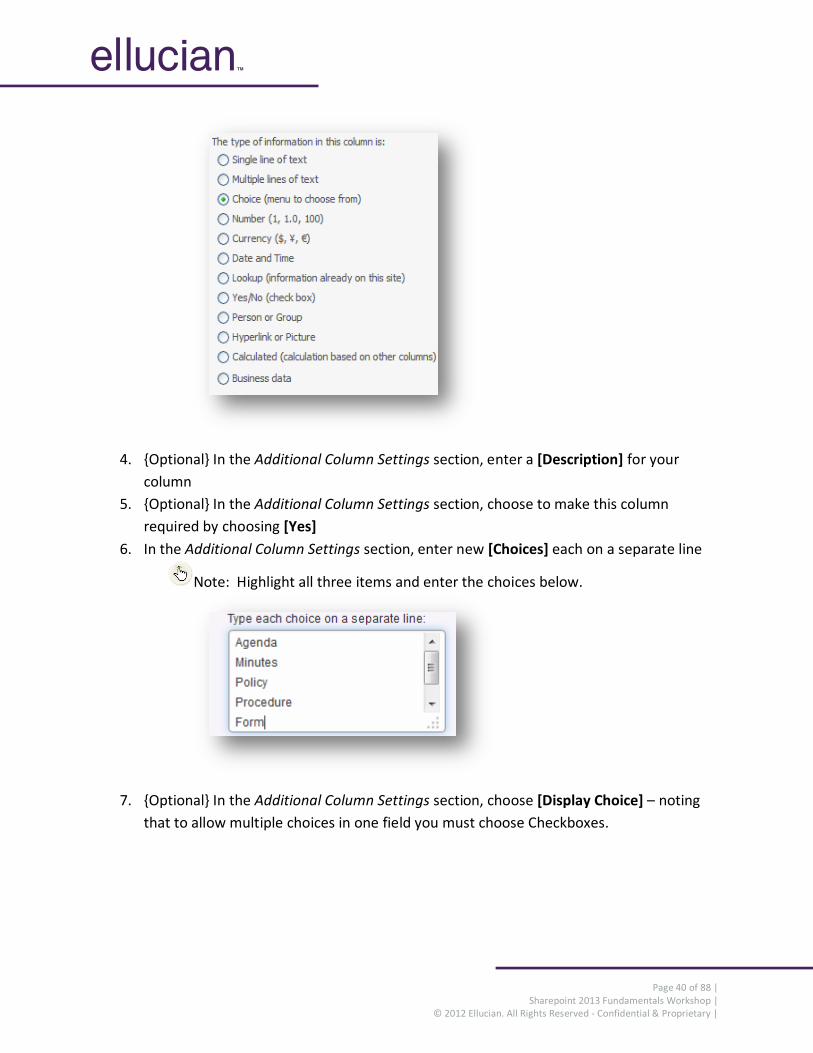
3. In the Name and Type section, choose [Choice]
Note: There are many other column types you can pick
Page 40 of 88 | Sharepoint 2013 Fundamentals Workshop |
© 2012 Ellucian. All Rights Reserved - Confidential & Proprietary |
4. {Optional} In the Additional Column Settings section, enter a [Description] for your
column
5. {Optional} In the Additional Column Settings section, choose to make this column
required by choosing [Yes]
6. In the Additional Column Settings section, enter new [Choices] each on a separate line
Note: Highlight all three items and enter the choices below.
7. {Optional} In the Additional Column Settings section, choose [Display Choice] – noting
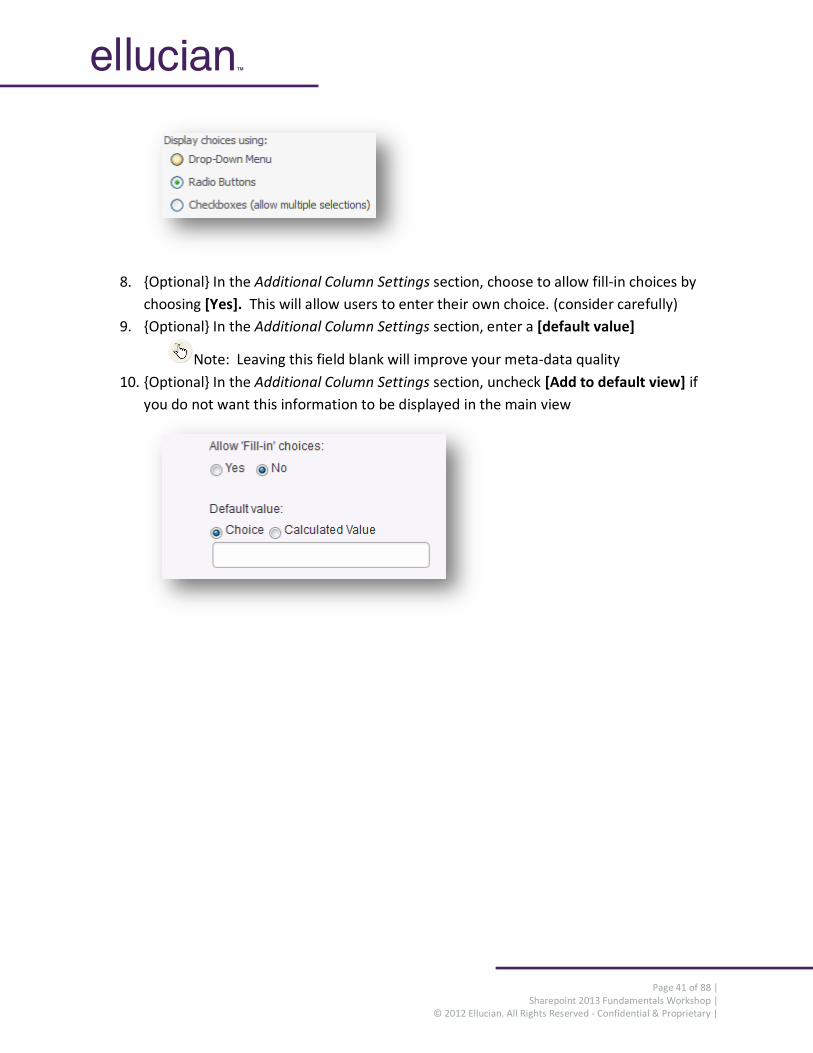
that to allow multiple choices in one field you must choose Checkboxes.
Page 41 of 88 | Sharepoint 2013 Fundamentals Workshop |
© 2012 Ellucian. All Rights Reserved - Confidential & Proprietary |
8. {Optional} In the Additional Column Settings section, choose to allow fill-in choices by
choosing [Yes]. This will allow users to enter their own choice. (consider carefully)
9. {Optional} In the Additional Column Settings section, enter a [default value]
Note: Leaving this field blank will improve your meta-data quality
10. {Optional} In the Additional Column Settings section, uncheck [Add to default view] if
you do not want this information to be displayed in the main view
Page 42 of 88 | Sharepoint 2013 Fundamentals Workshop |
© 2012 Ellucian. All Rights Reserved - Confidential & Proprietary |
Exercise 15: Populating Custom Columns
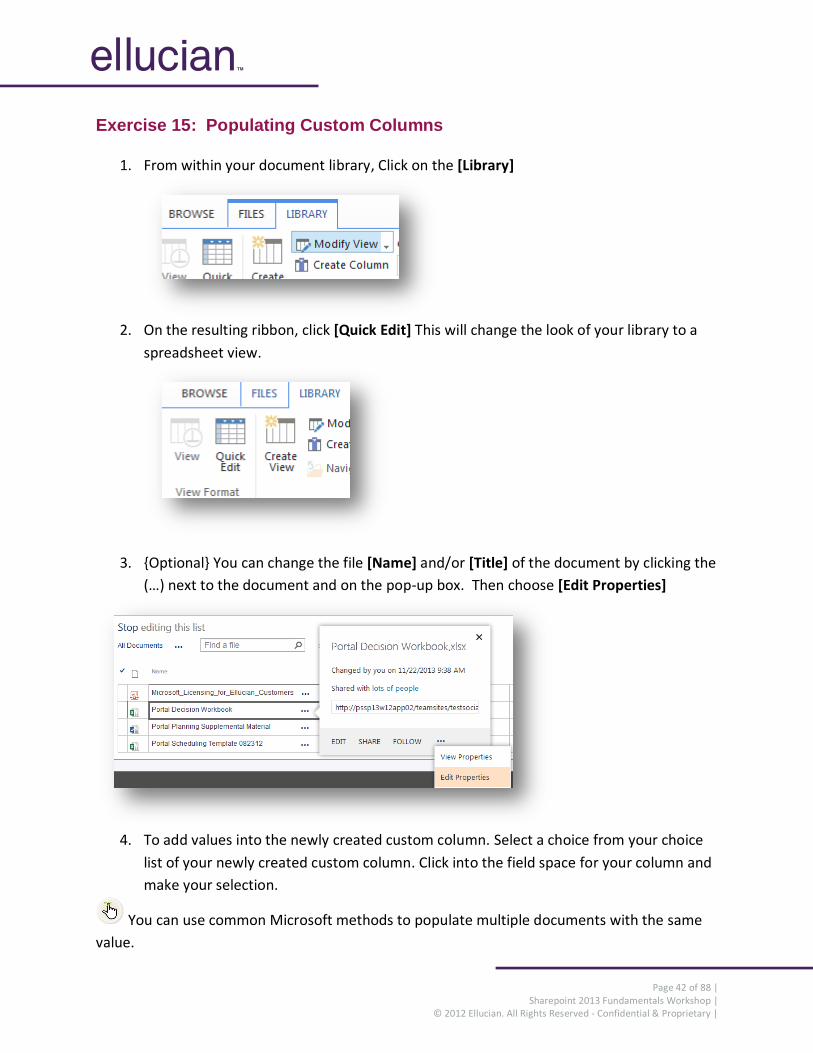
1. From within your document library, Click on the [Library]
2. On the resulting ribbon, click [Quick Edit] This will change the look of your library to a
spreadsheet view.
3. {Optional} You can change the file [Name] and/or [Title] of the document by clicking the
(…) next to the document and on the pop-up box. Then choose [Edit Properties]
4. To add values into the newly created custom column. Select a choice from your choice
list of your newly created custom column. Click into the field space for your column and
make your selection.
You can use common Microsoft methods to populate multiple documents with the same
value.
Page 43 of 88 | Sharepoint 2013 Fundamentals Workshop |
© 2012 Ellucian. All Rights Reserved - Confidential & Proprietary |
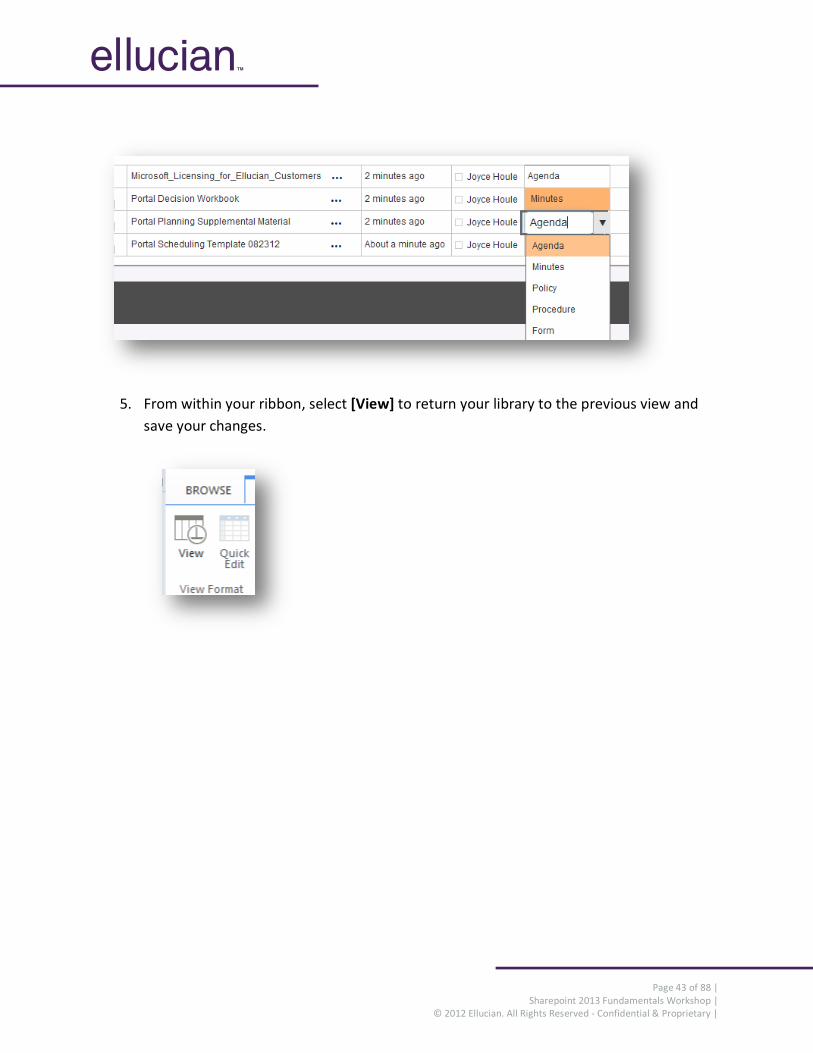
5. From within your ribbon, select [View] to return your library to the previous view and
save your changes.
Page 44 of 88 | Sharepoint 2013 Fundamentals Workshop |
© 2012 Ellucian. All Rights Reserved - Confidential & Proprietary |
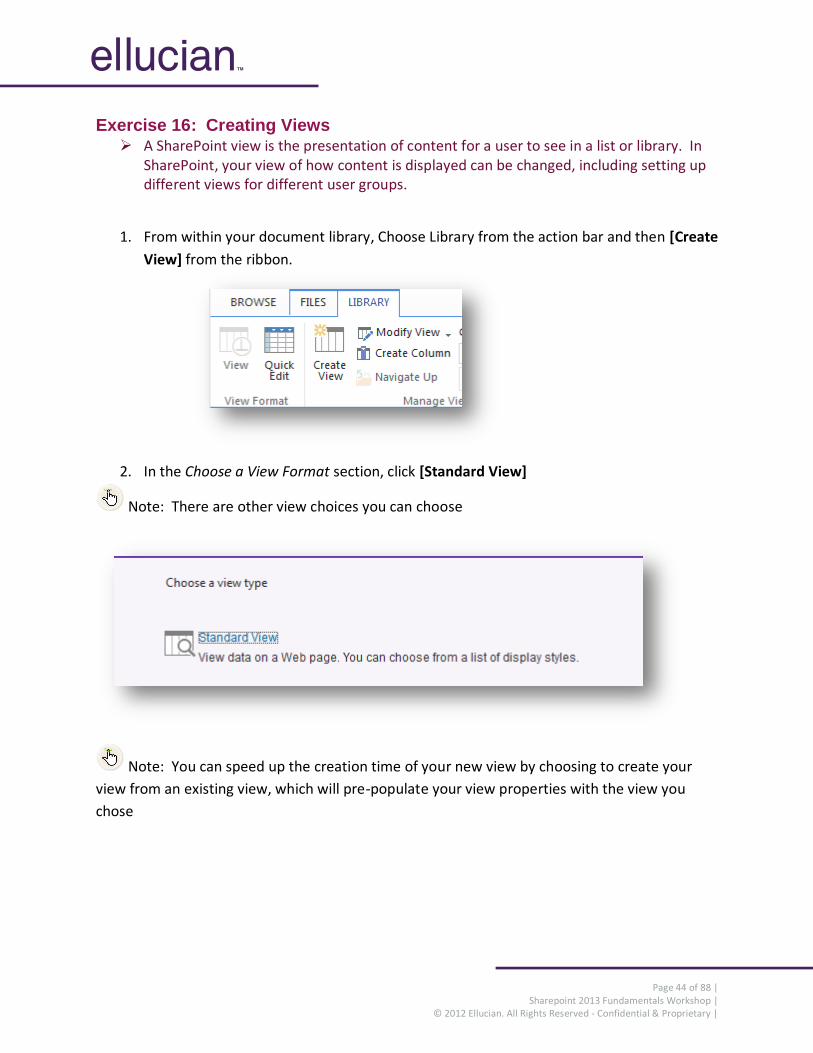
Exercise 16: Creating Views A SharePoint view is the presentation of content for a user to see in a list or library. In
SharePoint, your view of how content is displayed can be changed, including setting up different views for different user groups.
1. From within your document library, Choose Library from the action bar and then [Create
View] from the ribbon.
2. In the Choose a View Format section, click [Standard View]
Note: There are other view choices you can choose
Note: You can speed up the creation time of your new view by choosing to create your
view from an existing view, which will pre-populate your view properties with the view you
chose
Page 45 of 88 | Sharepoint 2013 Fundamentals Workshop |
© 2012 Ellucian. All Rights Reserved - Confidential & Proprietary |
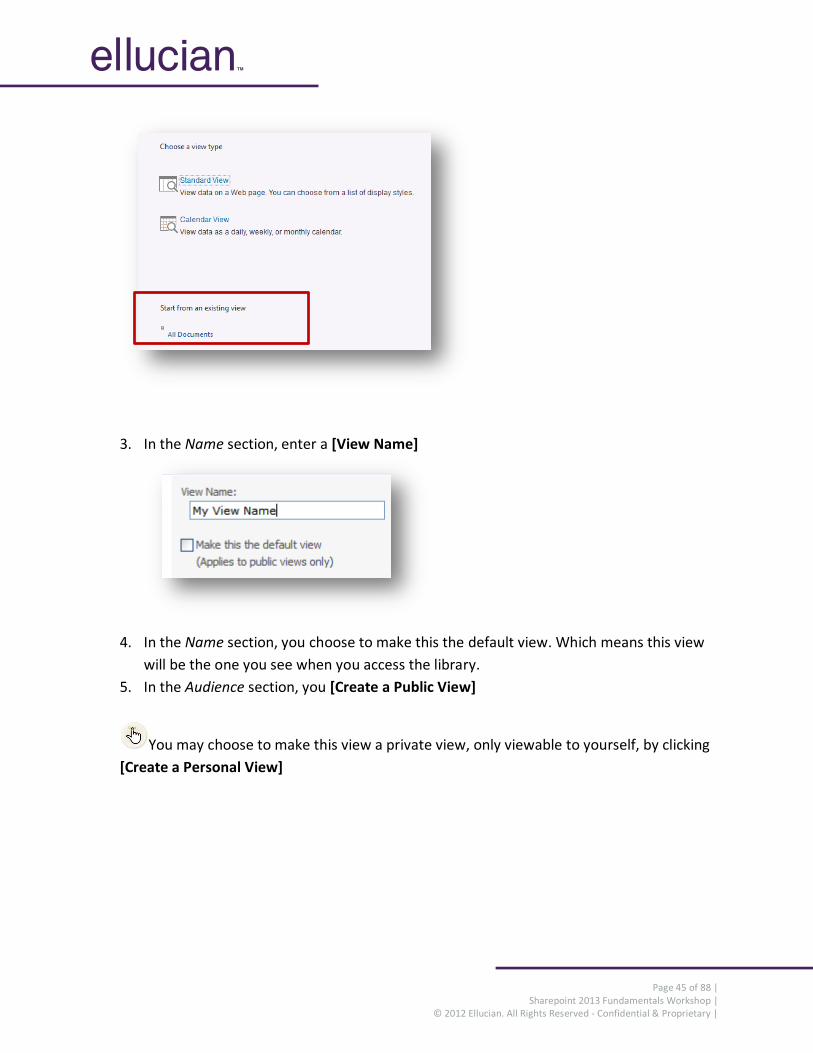
3. In the Name section, enter a [View Name]
4. In the Name section, you choose to make this the default view. Which means this view
will be the one you see when you access the library.
5. In the Audience section, you [Create a Public View]
You may choose to make this view a private view, only viewable to yourself, by clicking
[Create a Personal View]
Page 46 of 88 | Sharepoint 2013 Fundamentals Workshop |
© 2012 Ellucian. All Rights Reserved - Confidential & Proprietary |
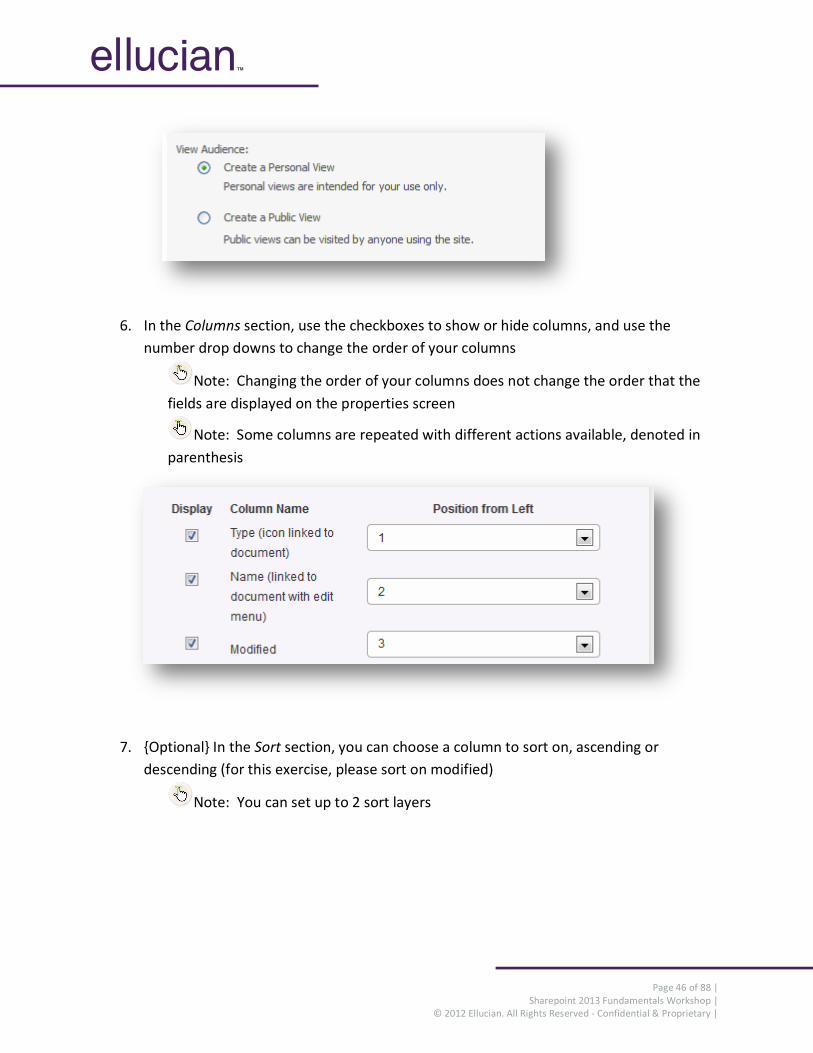
6. In the Columns section, use the checkboxes to show or hide columns, and use the
number drop downs to change the order of your columns
Note: Changing the order of your columns does not change the order that the
fields are displayed on the properties screen
Note: Some columns are repeated with different actions available, denoted in
parenthesis
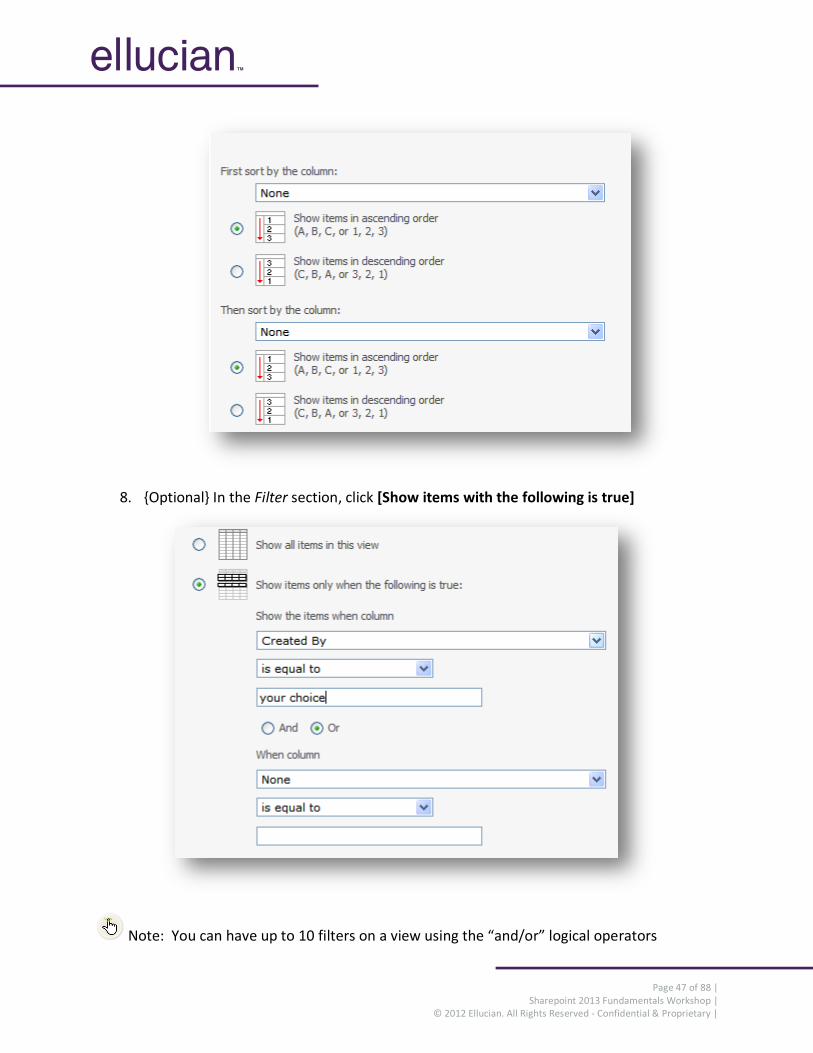
7. {Optional} In the Sort section, you can choose a column to sort on, ascending or
descending (for this exercise, please sort on modified)
Note: You can set up to 2 sort layers
Page 47 of 88 | Sharepoint 2013 Fundamentals Workshop |
© 2012 Ellucian. All Rights Reserved - Confidential & Proprietary |
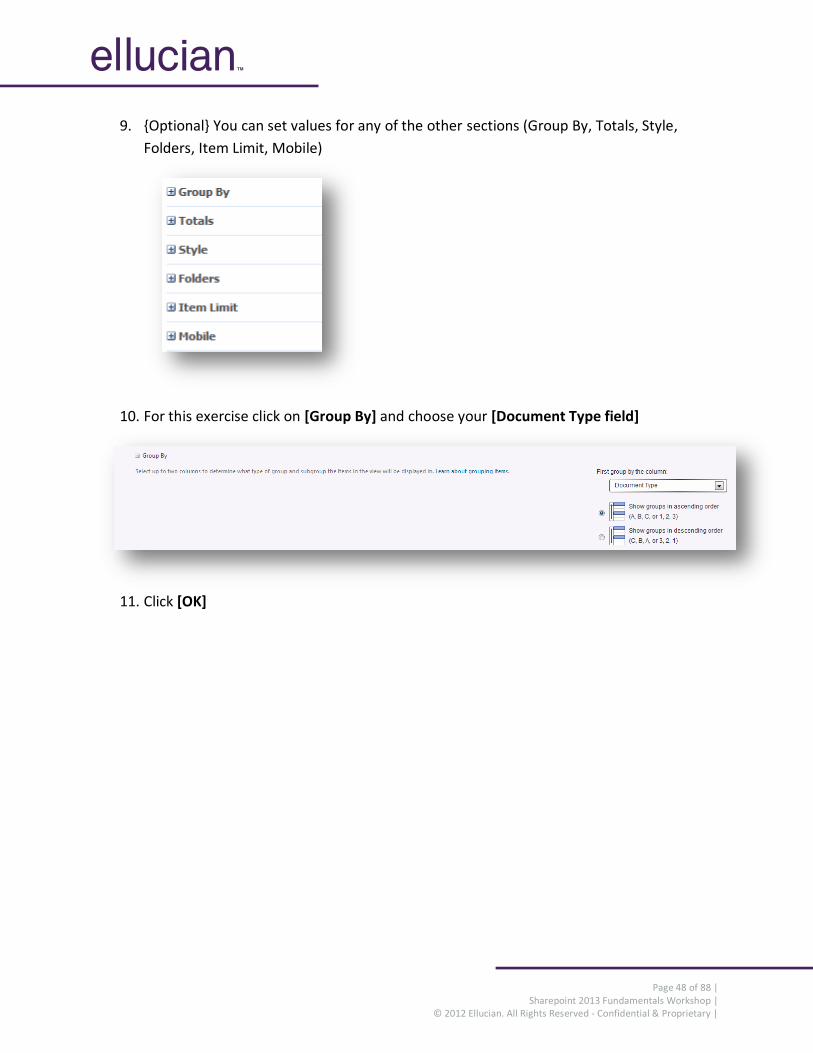
8. {Optional} In the Filter section, click [Show items with the following is true]
Note: You can have up to 10 filters on a view using the “and/or” logical operators
Page 48 of 88 | Sharepoint 2013 Fundamentals Workshop |
© 2012 Ellucian. All Rights Reserved - Confidential & Proprietary |
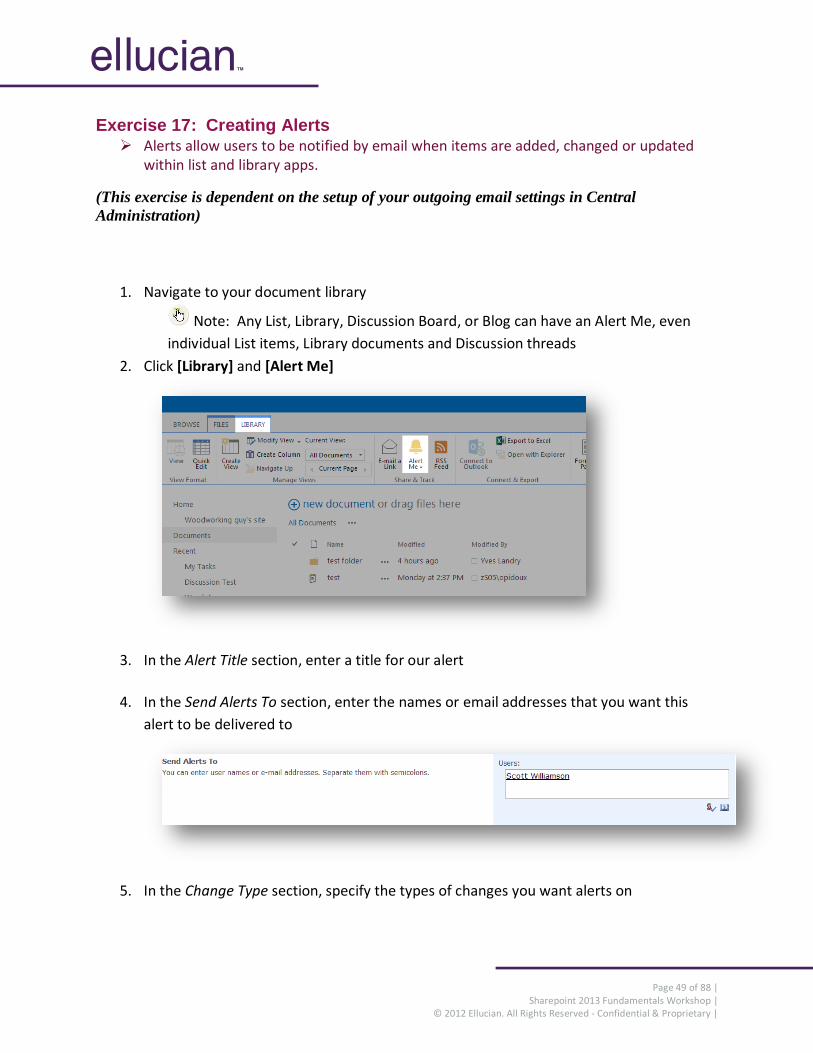
9. {Optional} You can set values for any of the other sections (Group By, Totals, Style,
Folders, Item Limit, Mobile)
10. For this exercise click on [Group By] and choose your [Document Type field]
11. Click [OK]
Page 49 of 88 | Sharepoint 2013 Fundamentals Workshop |
© 2012 Ellucian. All Rights Reserved - Confidential & Proprietary |
Exercise 17: Creating Alerts Alerts allow users to be notified by email when items are added, changed or updated
within list and library apps.
(This exercise is dependent on the setup of your outgoing email settings in Central
Administration)
1. Navigate to your document library
Note: Any List, Library, Discussion Board, or Blog can have an Alert Me, even
individual List items, Library documents and Discussion threads
2. Click [Library] and [Alert Me]
3. In the Alert Title section, enter a title for our alert
4. In the Send Alerts To section, enter the names or email addresses that you want this
alert to be delivered to
5. In the Change Type section, specify the types of changes you want alerts on
Page 50 of 88 | Sharepoint 2013 Fundamentals Workshop |
© 2012 Ellucian. All Rights Reserved - Confidential & Proprietary |
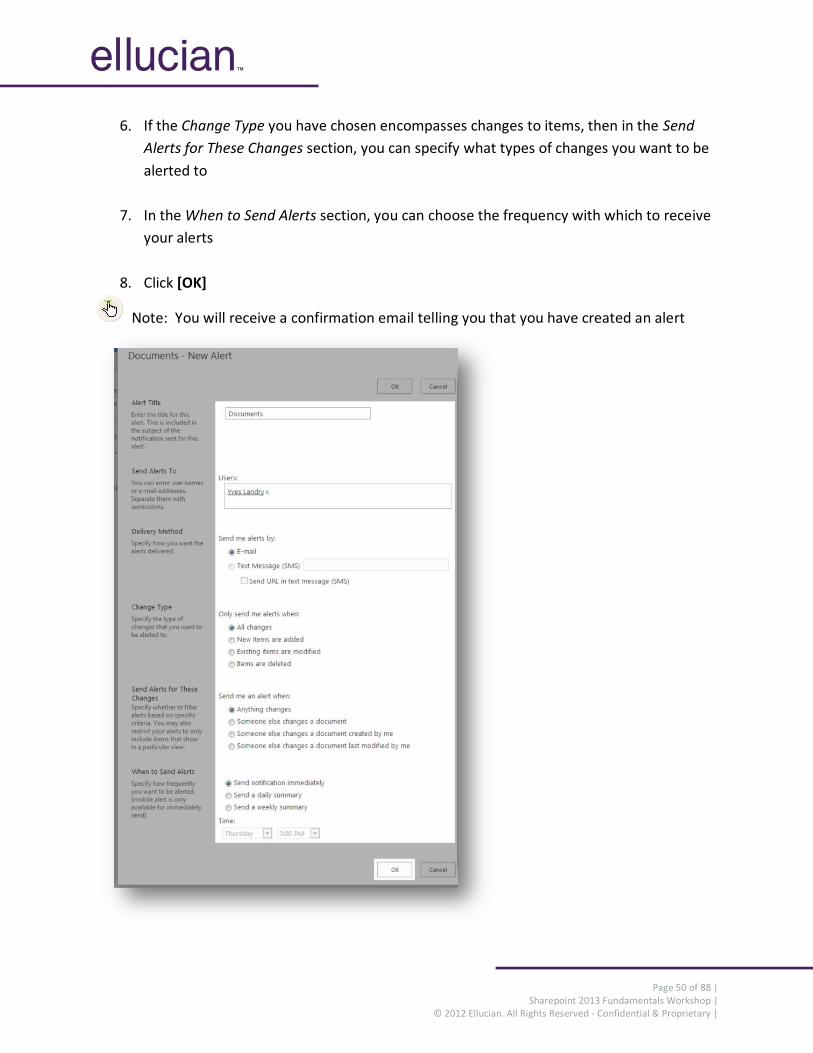
6. If the Change Type you have chosen encompasses changes to items, then in the Send
Alerts for These Changes section, you can specify what types of changes you want to be
alerted to
7. In the When to Send Alerts section, you can choose the frequency with which to receive
your alerts
8. Click [OK]
Note: You will receive a confirmation email telling you that you have created an alert
Page 51 of 88 | Sharepoint 2013 Fundamentals Workshop |
© 2012 Ellucian. All Rights Reserved - Confidential & Proprietary |
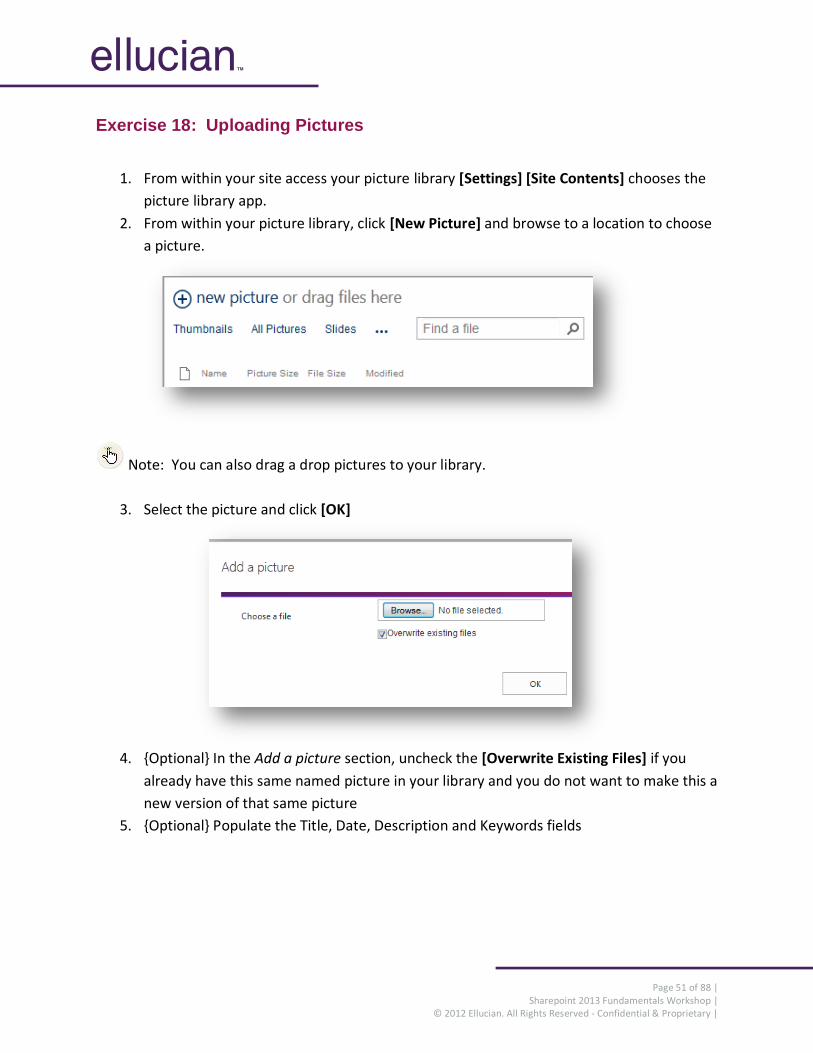
Exercise 18: Uploading Pictures
1. From within your site access your picture library [Settings] [Site Contents] chooses the
picture library app.
2. From within your picture library, click [New Picture] and browse to a location to choose
a picture.
Note: You can also drag a drop pictures to your library.
3. Select the picture and click [OK]
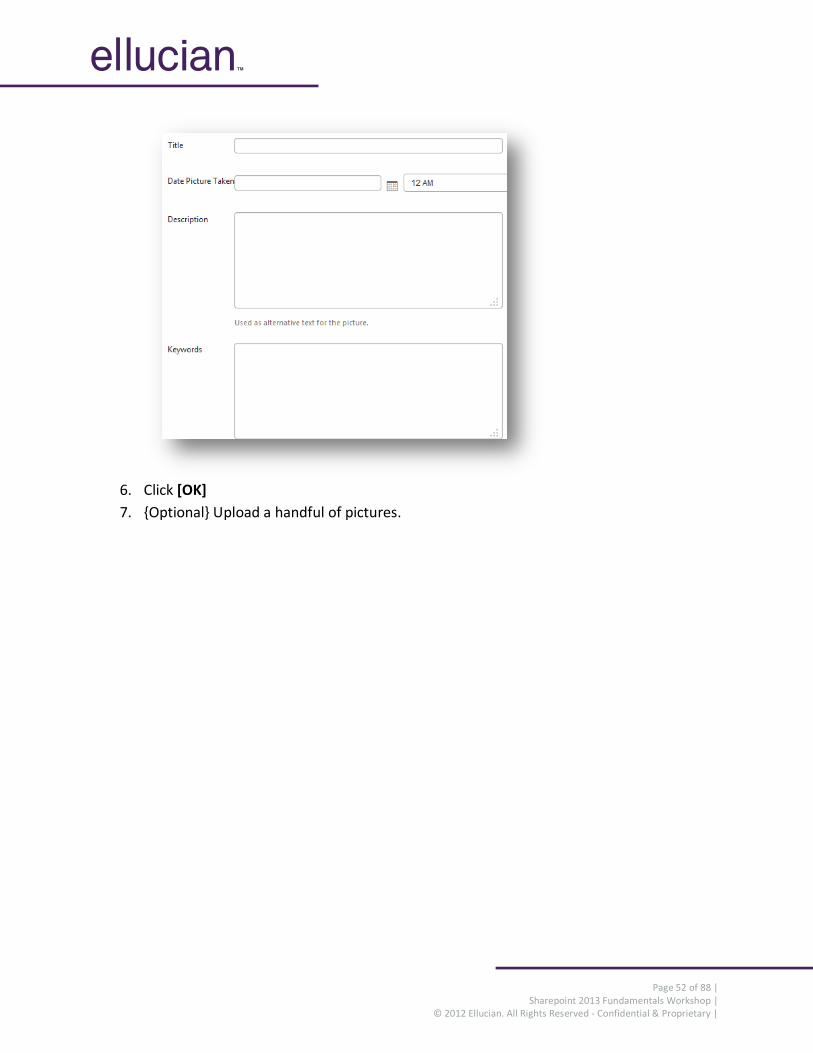
4. {Optional} In the Add a picture section, uncheck the [Overwrite Existing Files] if you
already have this same named picture in your library and you do not want to make this a
new version of that same picture
5. {Optional} Populate the Title, Date, Description and Keywords fields
Page 52 of 88 | Sharepoint 2013 Fundamentals Workshop |
© 2012 Ellucian. All Rights Reserved - Confidential & Proprietary |
6. Click [OK]
7. {Optional} Upload a handful of pictures.
Page 53 of 88 | Sharepoint 2013 Fundamentals Workshop |
© 2012 Ellucian. All Rights Reserved - Confidential & Proprietary |
Exercise 19: Creating Custom Lists Custom lists are used in SharePoint to gather information and to share information in a
designated format. Examples: A custom list can be a form that users must fill out (Suggestion Box) OR it can be a list of items displayed as content (List of campus organization with contact and description) for potential members to view.
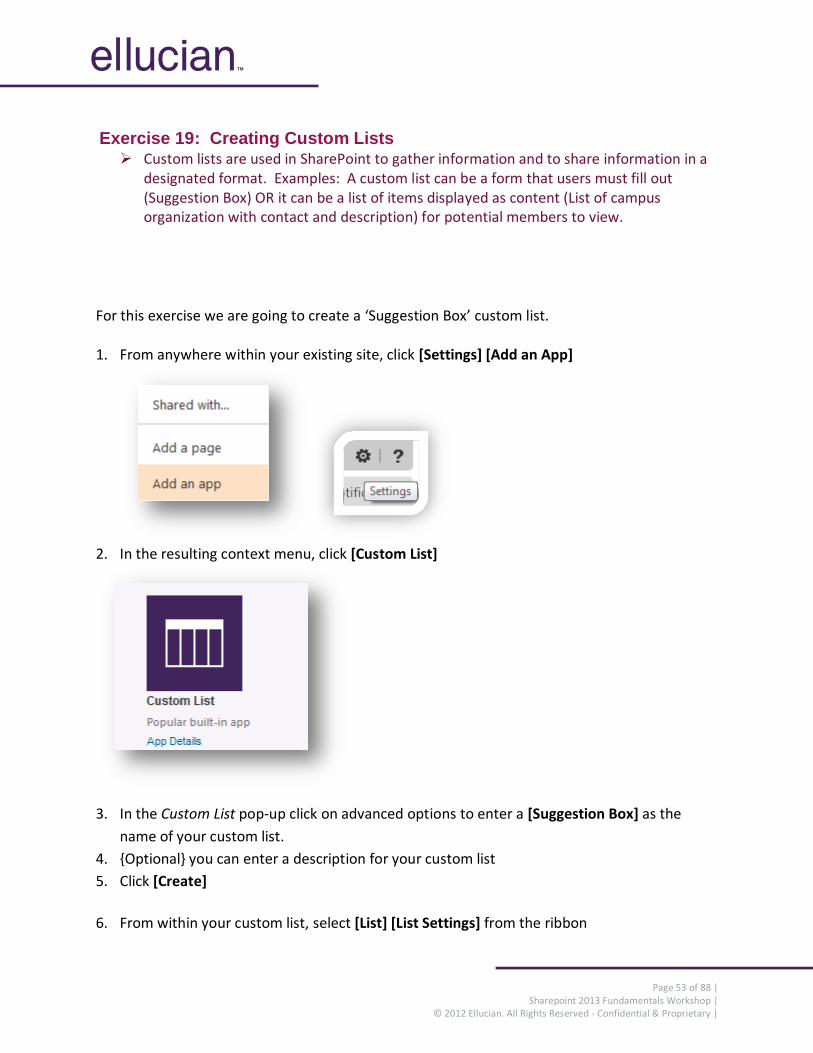
For this exercise we are going to create a ‘Suggestion Box’ custom list. 1. From anywhere within your existing site, click [Settings] [Add an App]
2. In the resulting context menu, click [Custom List]
3. In the Custom List pop-up click on advanced options to enter a [Suggestion Box] as the
name of your custom list.
4. {Optional} you can enter a description for your custom list
5. Click [Create]
6. From within your custom list, select [List] [List Settings] from the ribbon
Page 54 of 88 | Sharepoint 2013 Fundamentals Workshop |
© 2012 Ellucian. All Rights Reserved - Confidential & Proprietary |
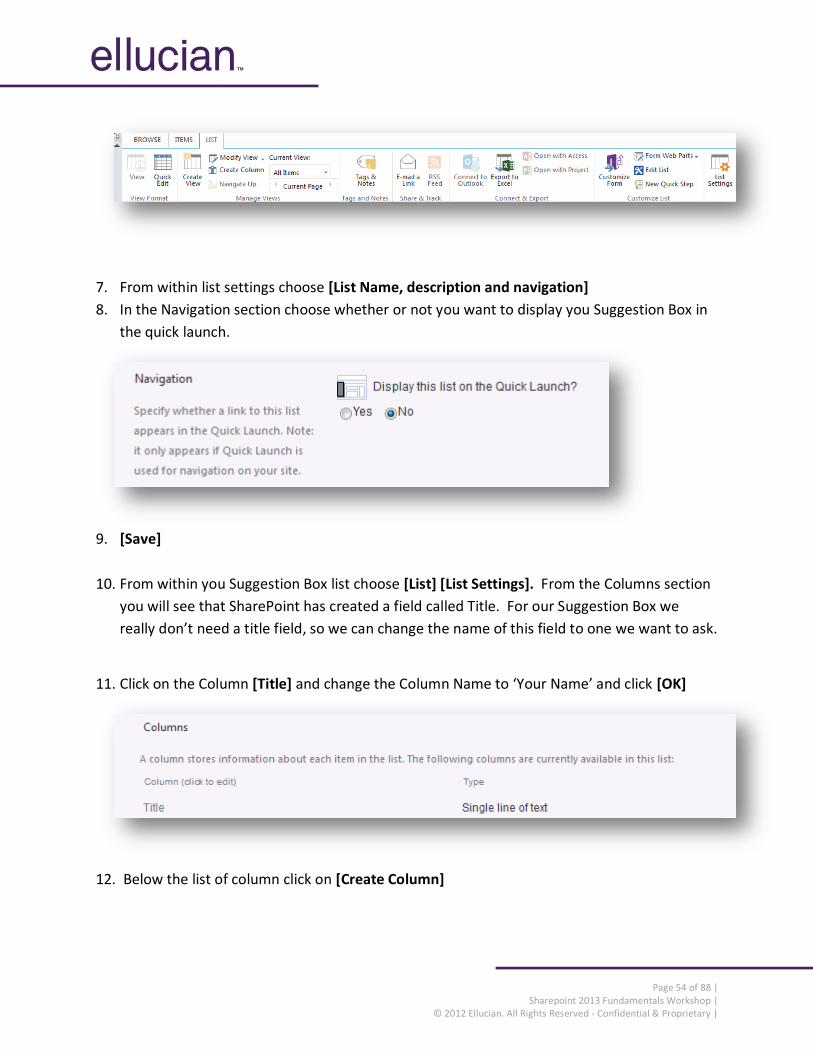
7. From within list settings choose [List Name, description and navigation]
8. In the Navigation section choose whether or not you want to display you Suggestion Box in
the quick launch.
9. [Save]
10. From within you Suggestion Box list choose [List] [List Settings]. From the Columns section
you will see that SharePoint has created a field called Title. For our Suggestion Box we
really don’t need a title field, so we can change the name of this field to one we want to ask.
11. Click on the Column [Title] and change the Column Name to ‘Your Name’ and click [OK]
12. Below the list of column click on [Create Column]
Page 55 of 88 | Sharepoint 2013 Fundamentals Workshop |
© 2012 Ellucian. All Rights Reserved - Confidential & Proprietary |
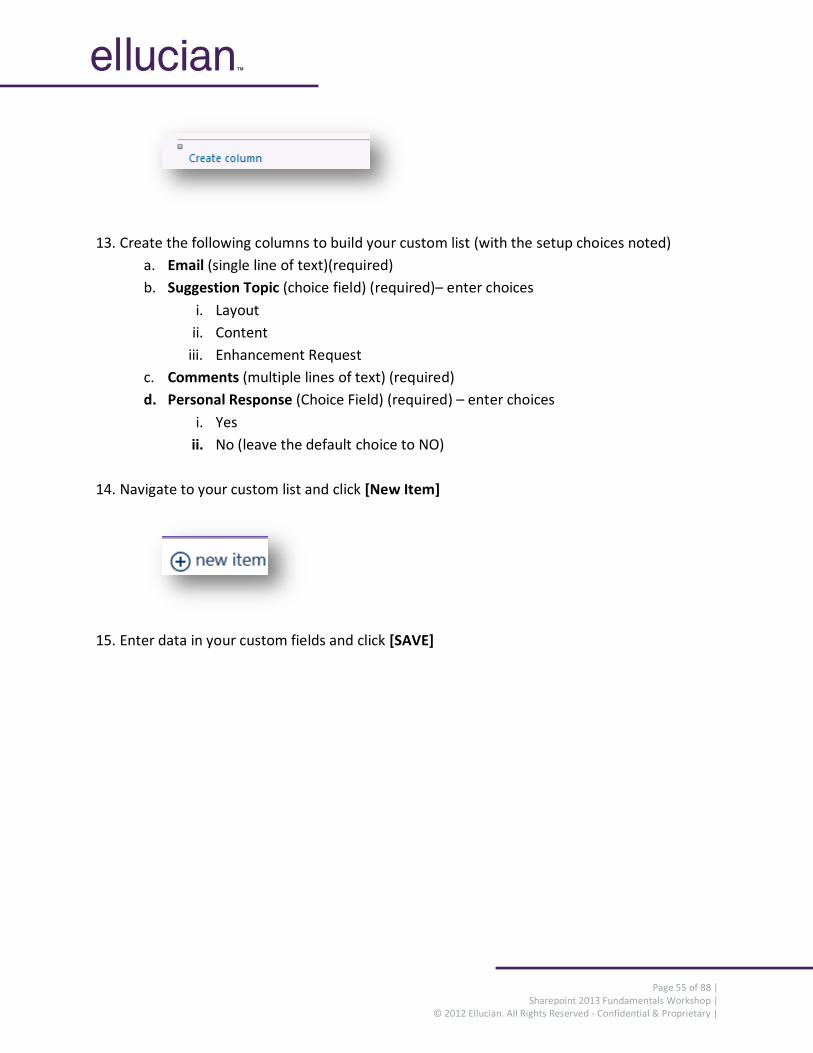
13. Create the following columns to build your custom list (with the setup choices noted)
a. Email (single line of text)(required)
b. Suggestion Topic (choice field) (required)– enter choices
i. Layout
ii. Content
iii. Enhancement Request
c. Comments (multiple lines of text) (required)
d. Personal Response (Choice Field) (required) – enter choices
i. Yes
ii. No (leave the default choice to NO)
14. Navigate to your custom list and click [New Item]
15. Enter data in your custom fields and click [SAVE]
Page 56 of 88 | Sharepoint 2013 Fundamentals Workshop |
© 2012 Ellucian. All Rights Reserved - Confidential & Proprietary |
Exercise 20: Deleting Documents, Libraries and Sites
Note: You can recover both your document and your documents library from the recycle
bin; however, a SharePoint administrator will be needed to recover your site if you delete it.
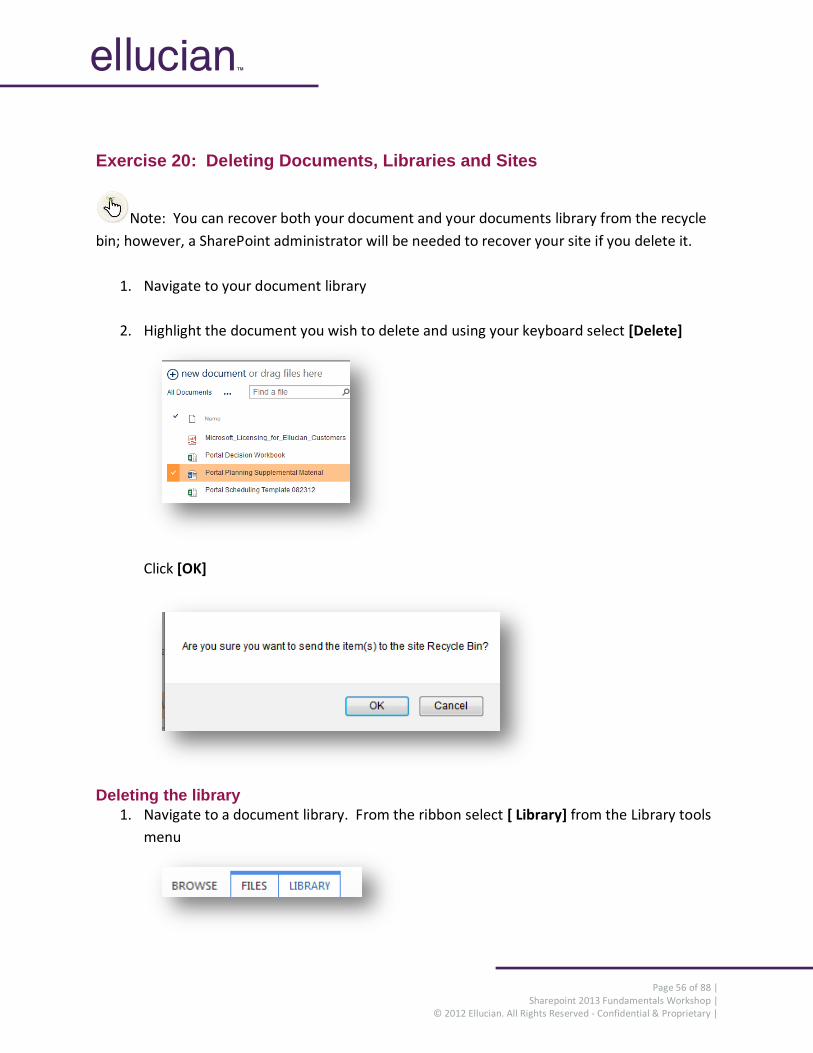
1. Navigate to your document library
2. Highlight the document you wish to delete and using your keyboard select [Delete]
Click [OK]
Deleting the library
1. Navigate to a document library. From the ribbon select [ Library] from the Library tools
menu
Page 57 of 88 | Sharepoint 2013 Fundamentals Workshop |
© 2012 Ellucian. All Rights Reserved - Confidential & Proprietary |
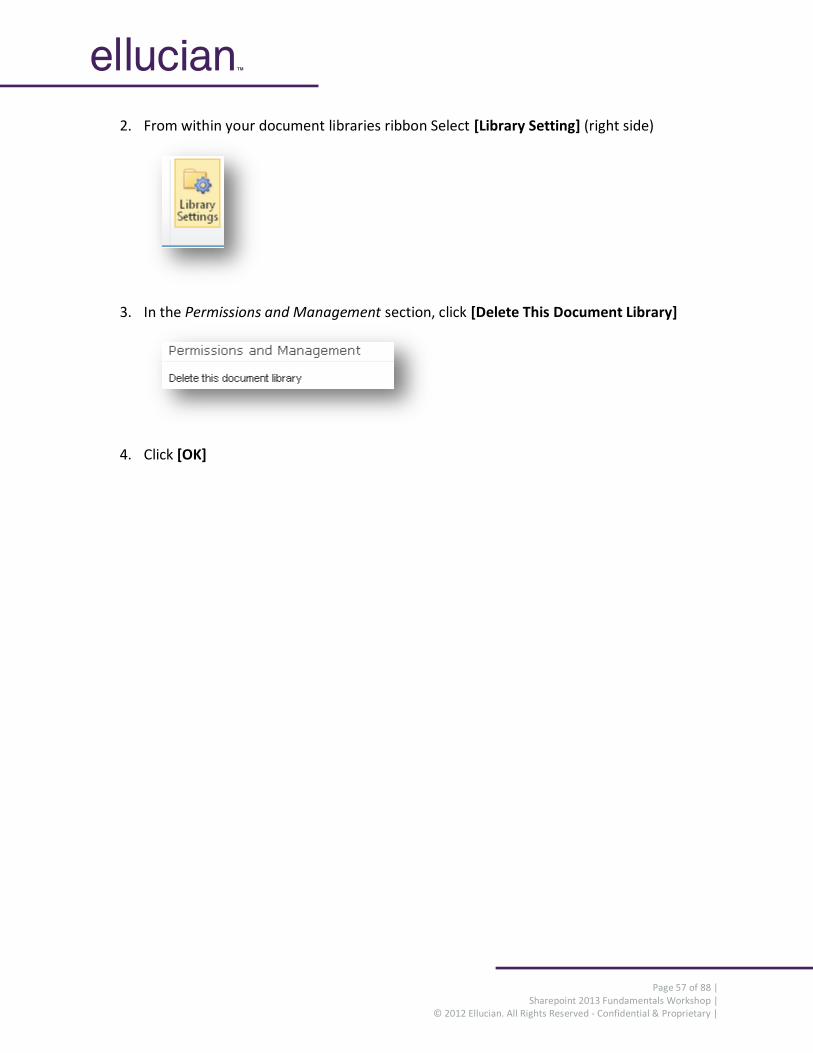
2. From within your document libraries ribbon Select [Library Setting] (right side)
3. In the Permissions and Management section, click [Delete This Document Library]
4. Click [OK]
Page 58 of 88 | Sharepoint 2013 Fundamentals Workshop |
© 2012 Ellucian. All Rights Reserved - Confidential & Proprietary |
Exercise 21: Managing the Recycle Bin
Restore Document or Document Library
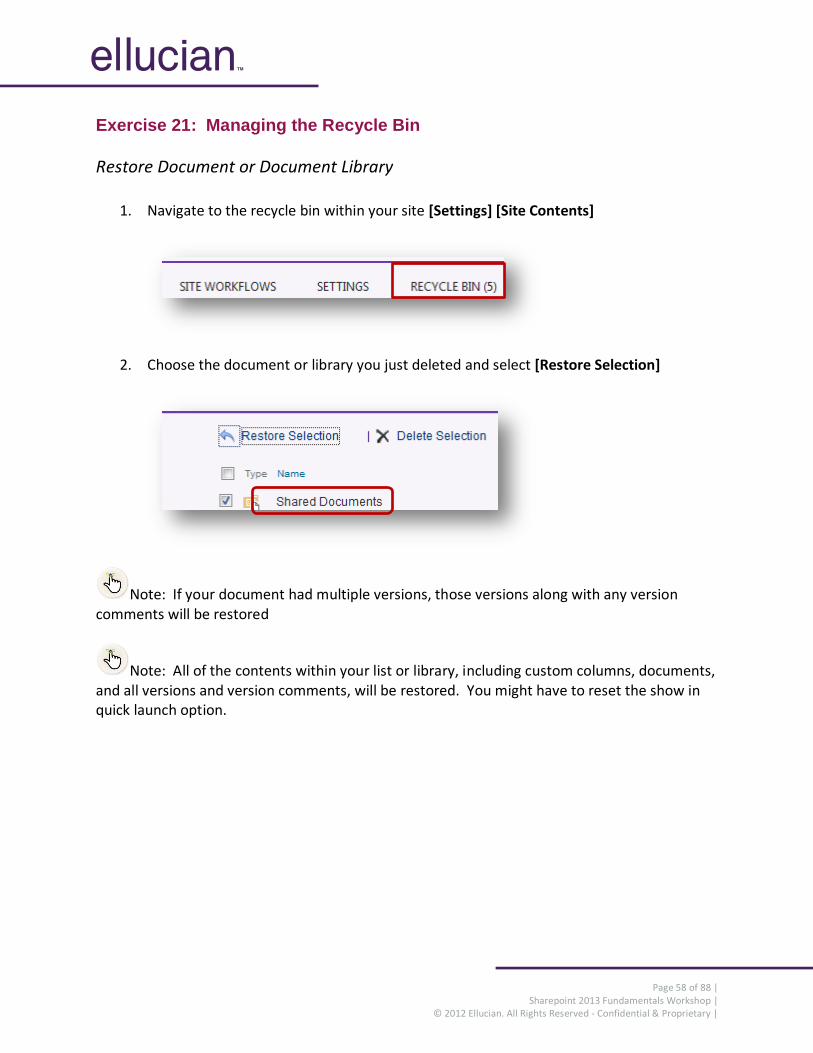
1. Navigate to the recycle bin within your site [Settings] [Site Contents]
2. Choose the document or library you just deleted and select [Restore Selection]
Note: If your document had multiple versions, those versions along with any version comments will be restored
Note: All of the contents within your list or library, including custom columns, documents, and all versions and version comments, will be restored. You might have to reset the show in quick launch option.
Page 59 of 88 | Sharepoint 2013 Fundamentals Workshop |
© 2012 Ellucian. All Rights Reserved - Confidential & Proprietary |
Page Design (Web Parts)
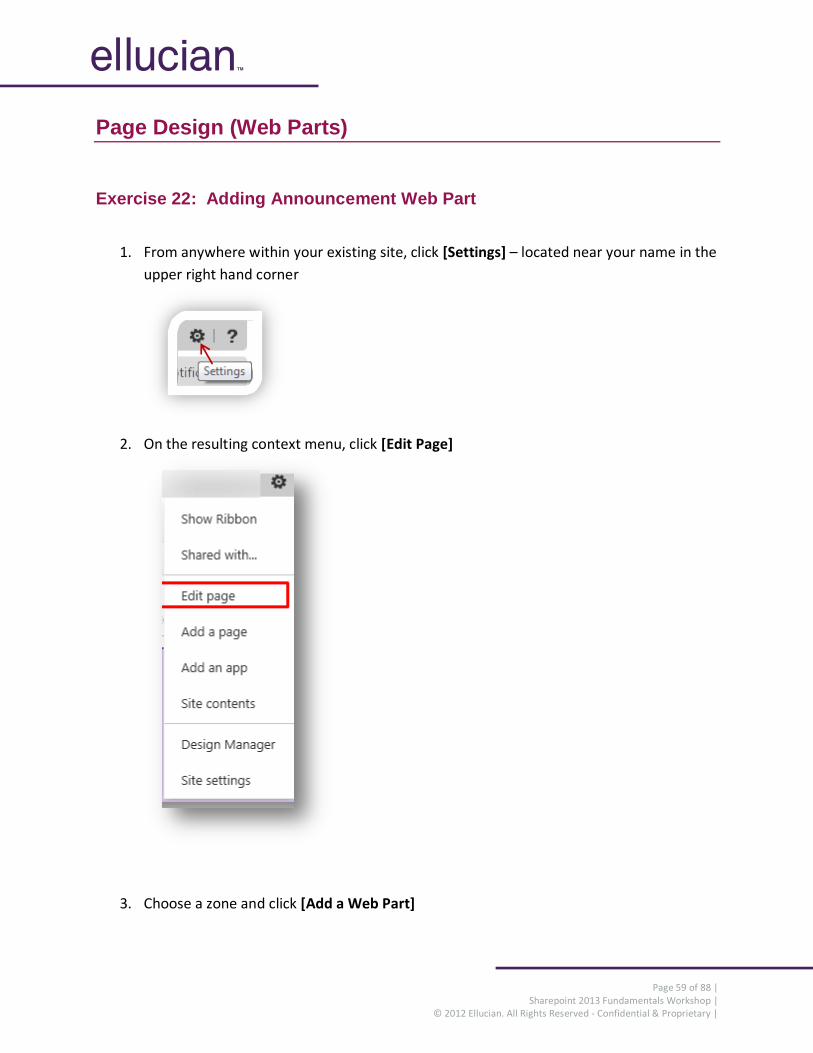
Exercise 22: Adding Announcement Web Part
1. From anywhere within your existing site, click [Settings] – located near your name in the
upper right hand corner
2. On the resulting context menu, click [Edit Page]
3. Choose a zone and click [Add a Web Part]
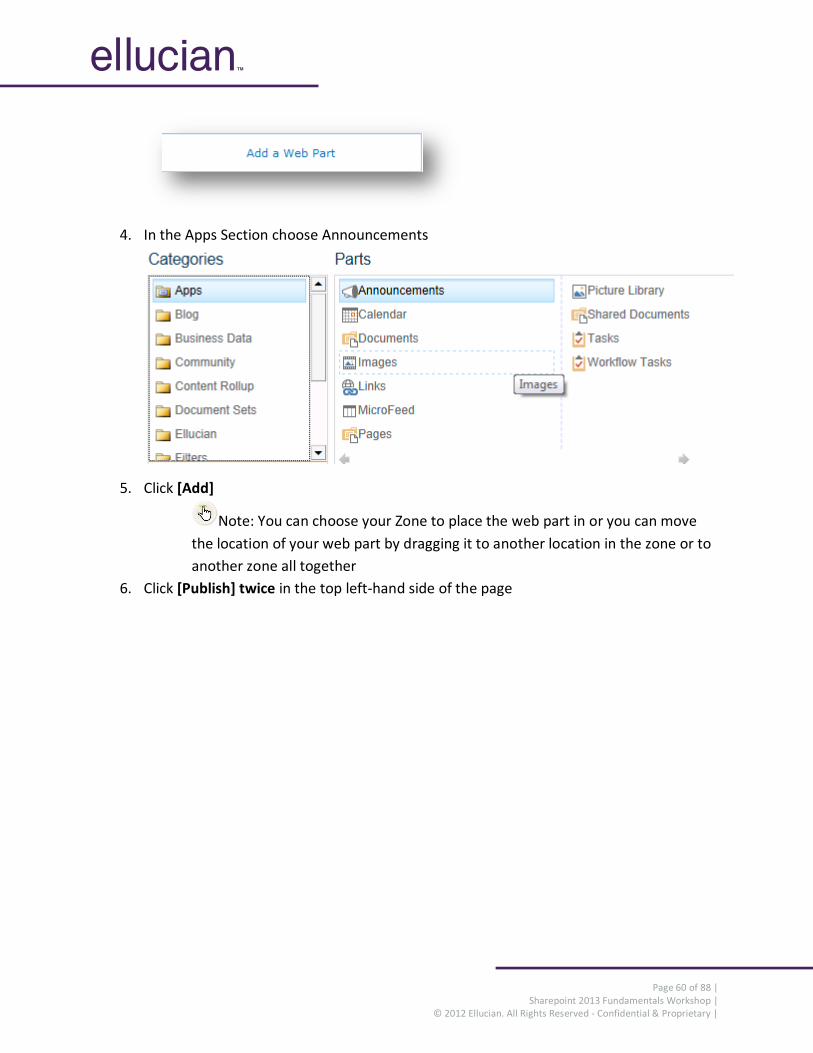
Page 60 of 88 | Sharepoint 2013 Fundamentals Workshop |
© 2012 Ellucian. All Rights Reserved - Confidential & Proprietary |
4. In the Apps Section choose Announcements
5. Click [Add]
Note: You can choose your Zone to place the web part in or you can move
the location of your web part by dragging it to another location in the zone or to
another zone all together
6. Click [Publish] twice in the top left-hand side of the page
Page 61 of 88 | Sharepoint 2013 Fundamentals Workshop |
© 2012 Ellucian. All Rights Reserved - Confidential & Proprietary |
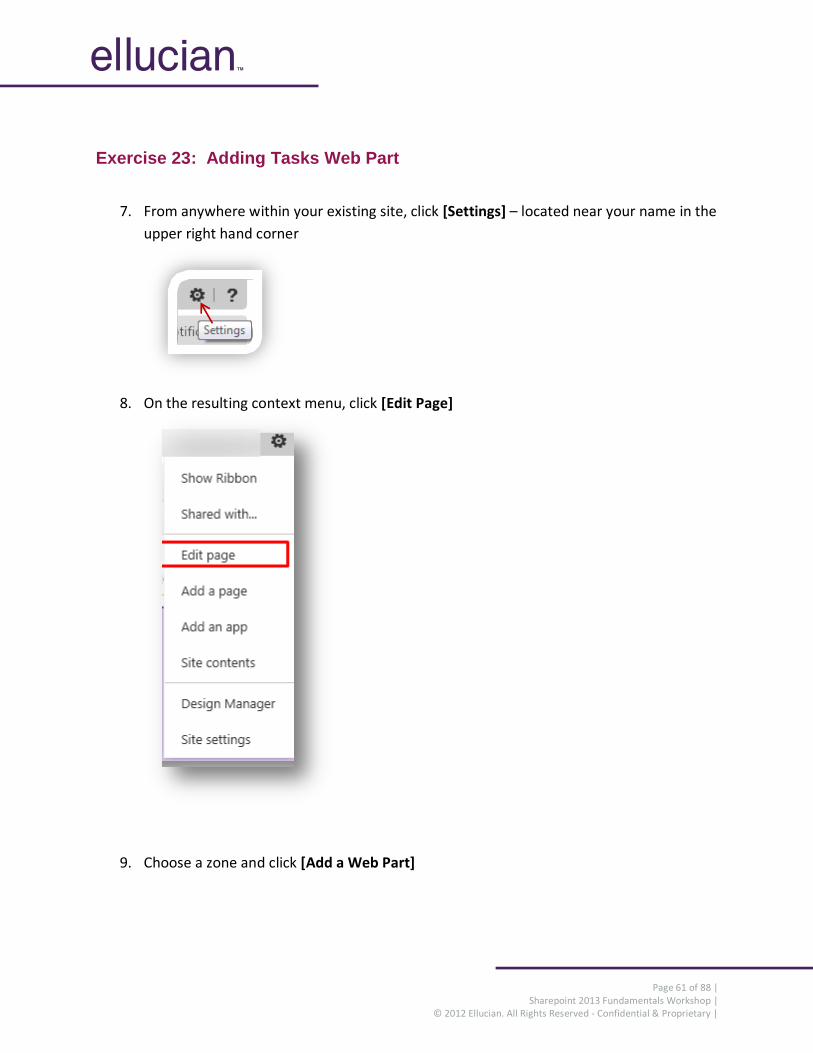
Exercise 23: Adding Tasks Web Part
7. From anywhere within your existing site, click [Settings] – located near your name in the
upper right hand corner
8. On the resulting context menu, click [Edit Page]
9. Choose a zone and click [Add a Web Part]
Page 62 of 88 | Sharepoint 2013 Fundamentals Workshop |
© 2012 Ellucian. All Rights Reserved - Confidential & Proprietary |
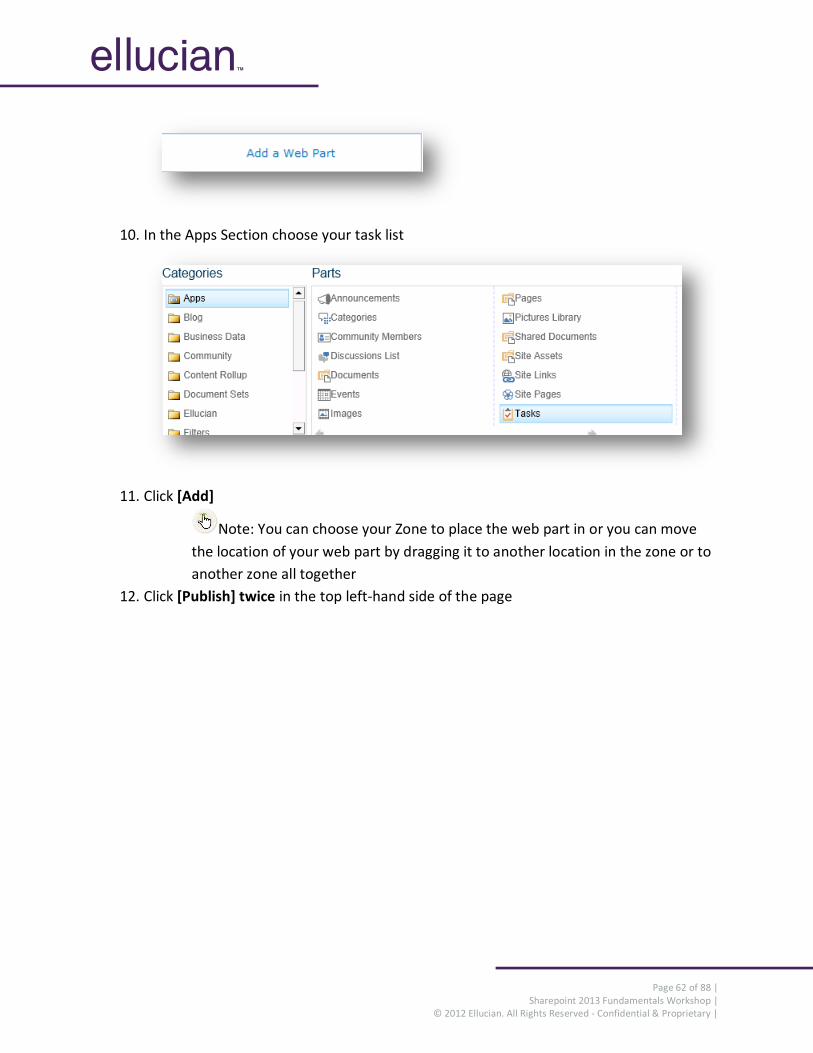
10. In the Apps Section choose your task list
11. Click [Add]
Note: You can choose your Zone to place the web part in or you can move
the location of your web part by dragging it to another location in the zone or to
another zone all together
12. Click [Publish] twice in the top left-hand side of the page
Page 63 of 88 | Sharepoint 2013 Fundamentals Workshop |
© 2012 Ellucian. All Rights Reserved - Confidential & Proprietary |
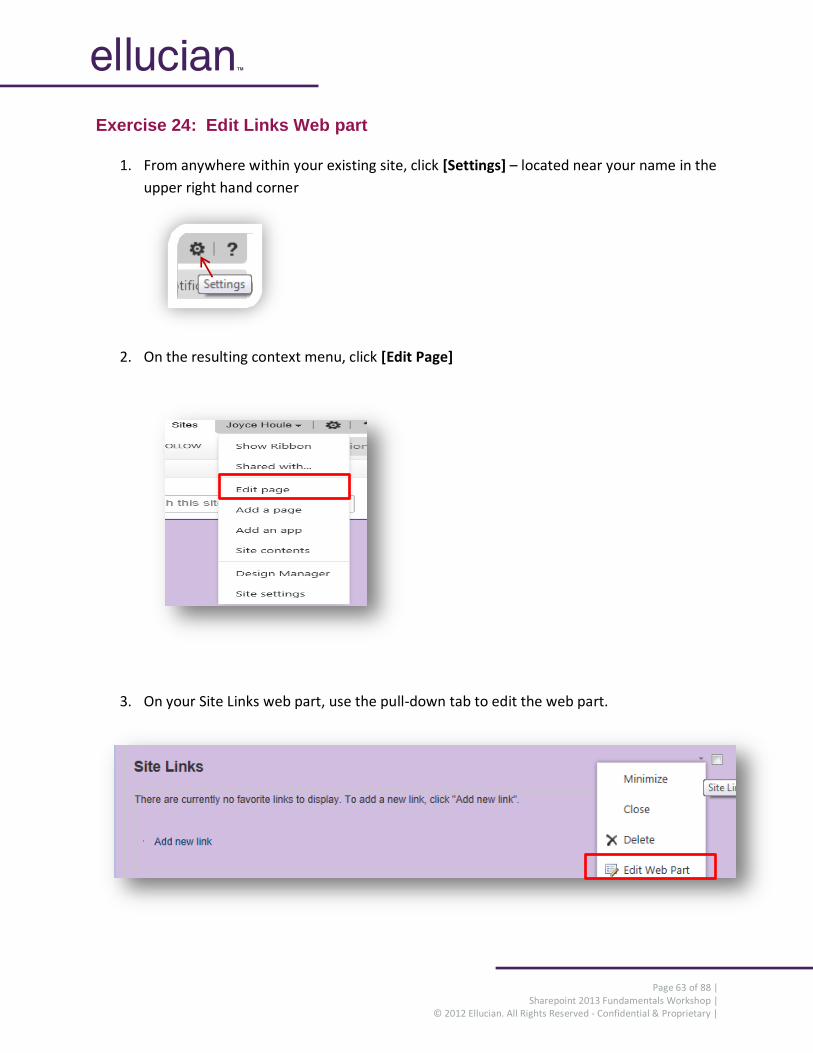
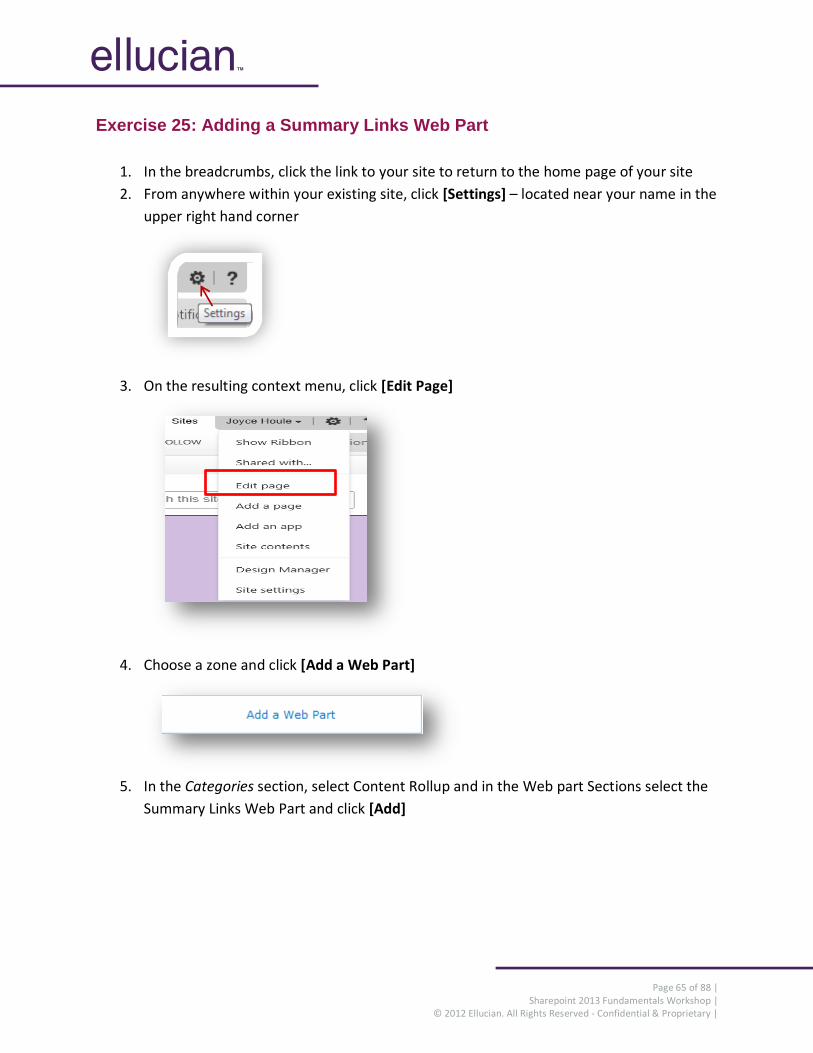
Exercise 24: Edit Links Web part
1. From anywhere within your existing site, click [Settings] – located near your name in the
upper right hand corner
2. On the resulting context menu, click [Edit Page]
3. On your Site Links web part, use the pull-down tab to edit the web part.
Page 64 of 88 | Sharepoint 2013 Fundamentals Workshop |
© 2012 Ellucian. All Rights Reserved - Confidential & Proprietary |
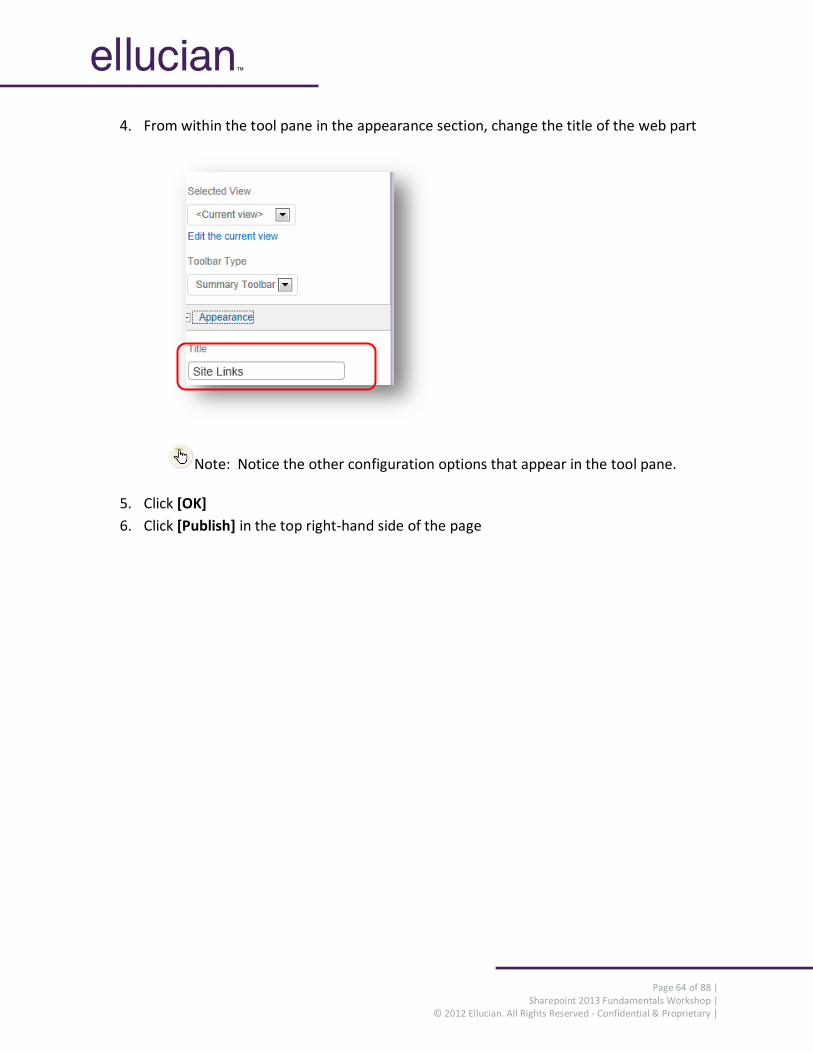
4. From within the tool pane in the appearance section, change the title of the web part
Note: Notice the other configuration options that appear in the tool pane.
5. Click [OK]
6. Click [Publish] in the top right-hand side of the page
Page 65 of 88 | Sharepoint 2013 Fundamentals Workshop |
© 2012 Ellucian. All Rights Reserved - Confidential & Proprietary |
Exercise 25: Adding a Summary Links Web Part
1. In the breadcrumbs, click the link to your site to return to the home page of your site
2. From anywhere within your existing site, click [Settings] – located near your name in the
upper right hand corner
3. On the resulting context menu, click [Edit Page]
4. Choose a zone and click [Add a Web Part]
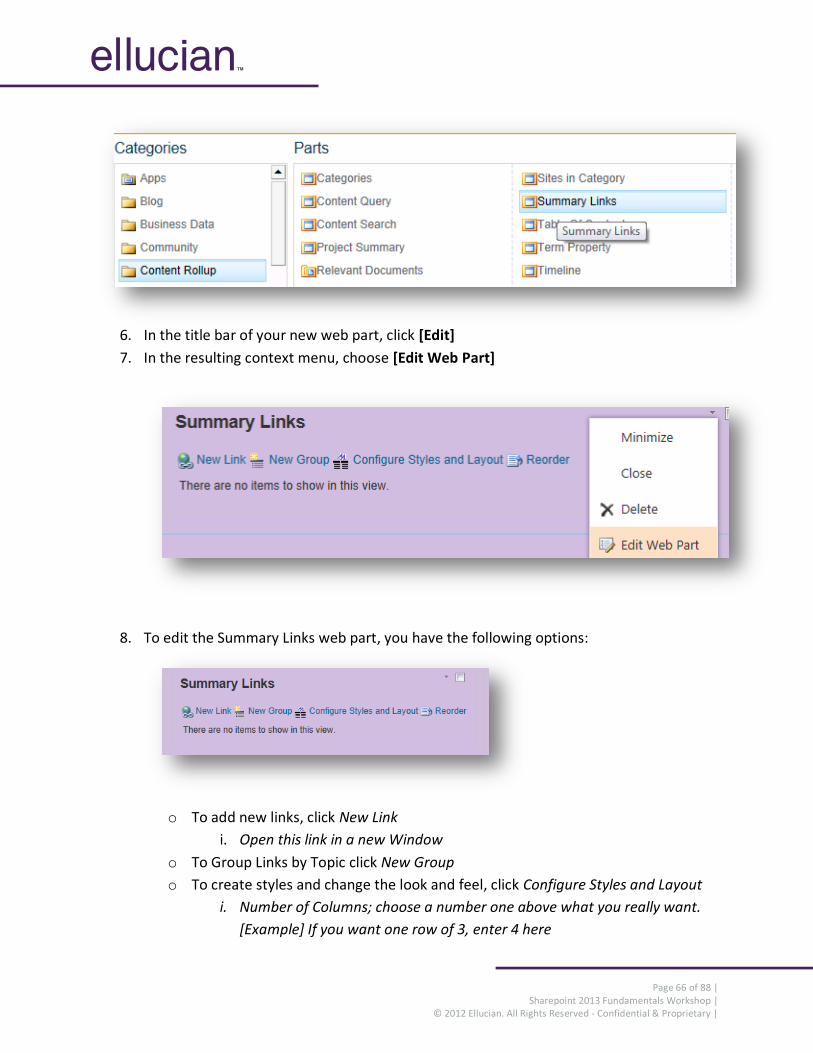
5. In the Categories section, select Content Rollup and in the Web part Sections select the
Summary Links Web Part and click [Add]
Page 66 of 88 | Sharepoint 2013 Fundamentals Workshop |
© 2012 Ellucian. All Rights Reserved - Confidential & Proprietary |
6. In the title bar of your new web part, click [Edit]
7. In the resulting context menu, choose [Edit Web Part]
8. To edit the Summary Links web part, you have the following options:
o To add new links, click New Link
i. Open this link in a new Window
o To Group Links by Topic click New Group
o To create styles and change the look and feel, click Configure Styles and Layout
i. Number of Columns; choose a number one above what you really want.
[Example] If you want one row of 3, enter 4 here
Page 67 of 88 | Sharepoint 2013 Fundamentals Workshop |
© 2012 Ellucian. All Rights Reserved - Confidential & Proprietary |
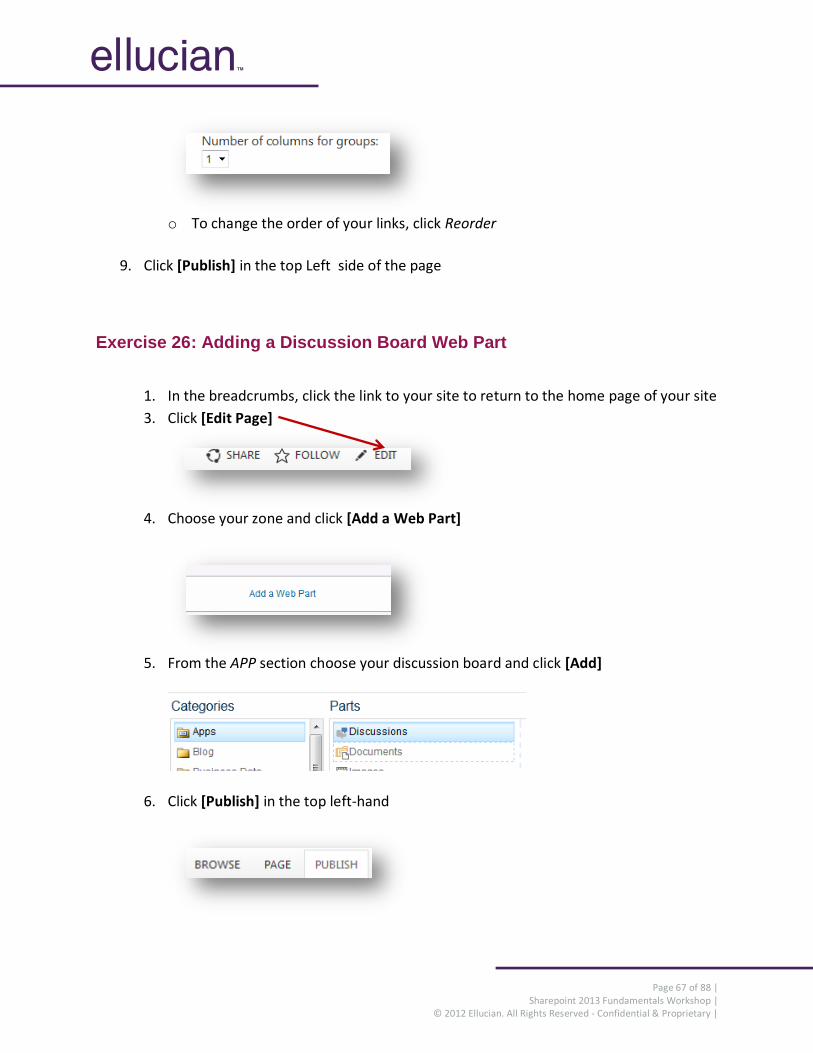
o To change the order of your links, click Reorder
9. Click [Publish] in the top Left side of the page
Exercise 26: Adding a Discussion Board Web Part
1. In the breadcrumbs, click the link to your site to return to the home page of your site
3. Click [Edit Page]
4. Choose your zone and click [Add a Web Part]
5. From the APP section choose your discussion board and click [Add]
6. Click [Publish] in the top left-hand
Page 68 of 88 | Sharepoint 2013 Fundamentals Workshop |
© 2012 Ellucian. All Rights Reserved - Confidential & Proprietary |
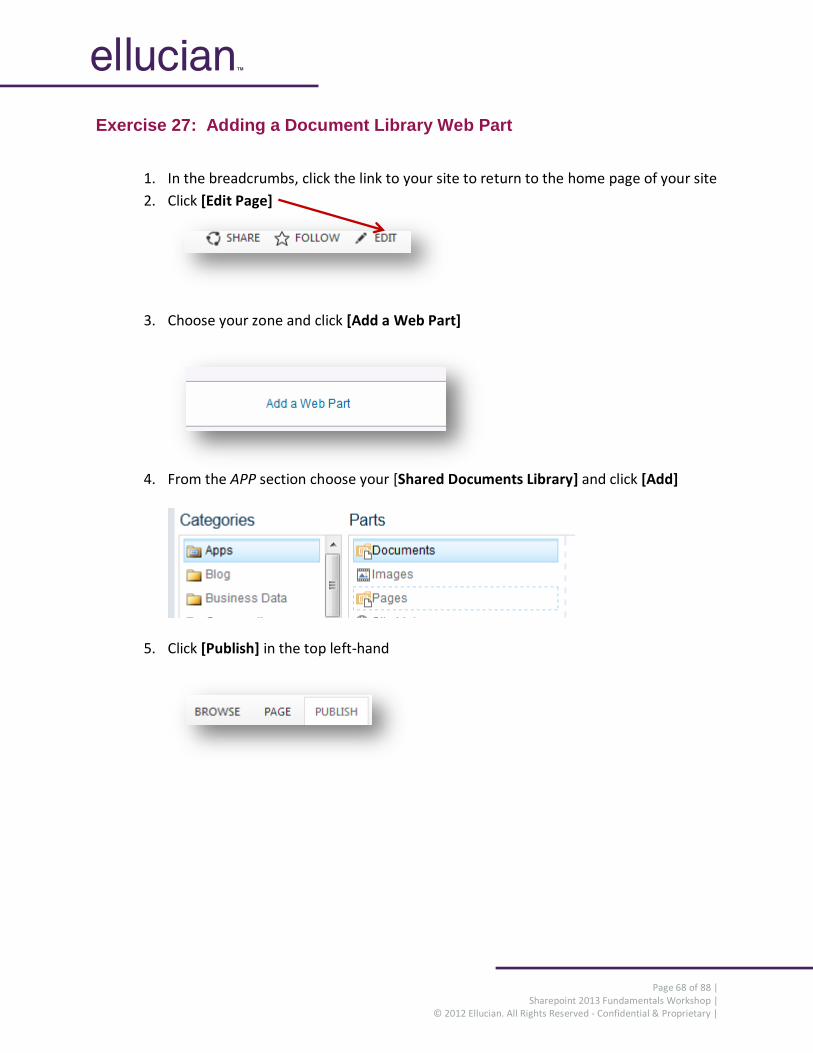
Exercise 27: Adding a Document Library Web Part
1. In the breadcrumbs, click the link to your site to return to the home page of your site
2. Click [Edit Page]
3. Choose your zone and click [Add a Web Part]
4. From the APP section choose your [Shared Documents Library] and click [Add]
5. Click [Publish] in the top left-hand
Page 69 of 88 | Sharepoint 2013 Fundamentals Workshop |
© 2012 Ellucian. All Rights Reserved - Confidential & Proprietary |
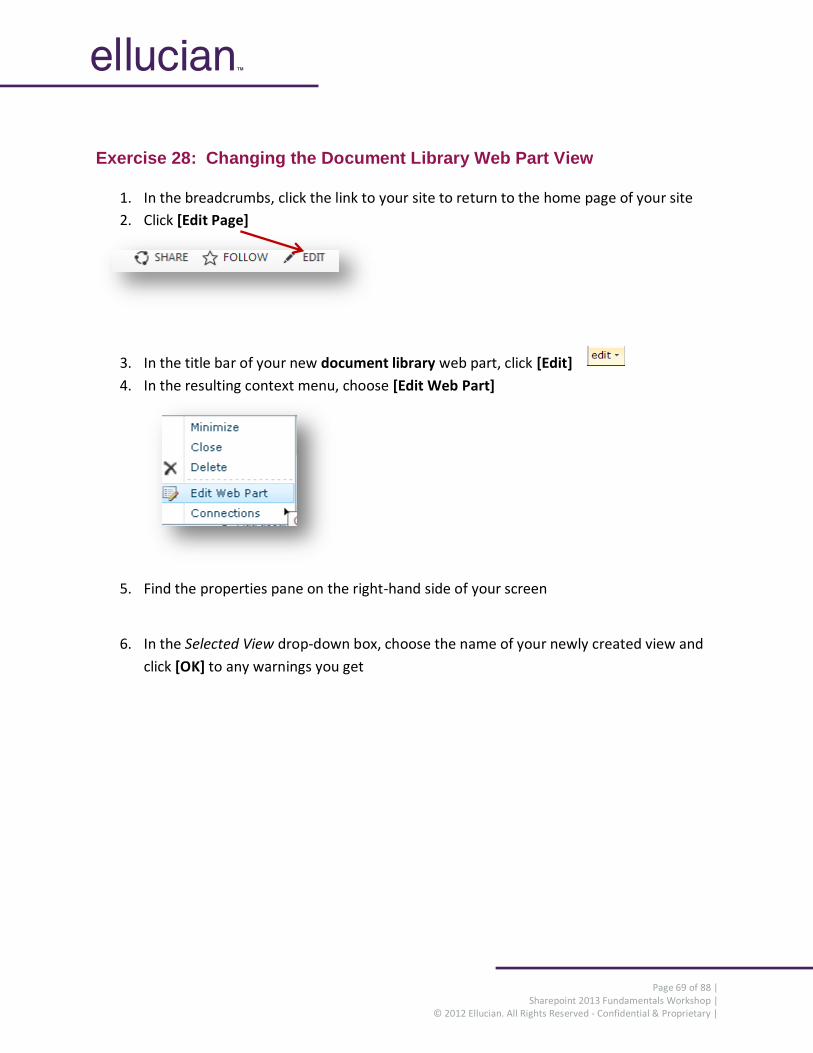
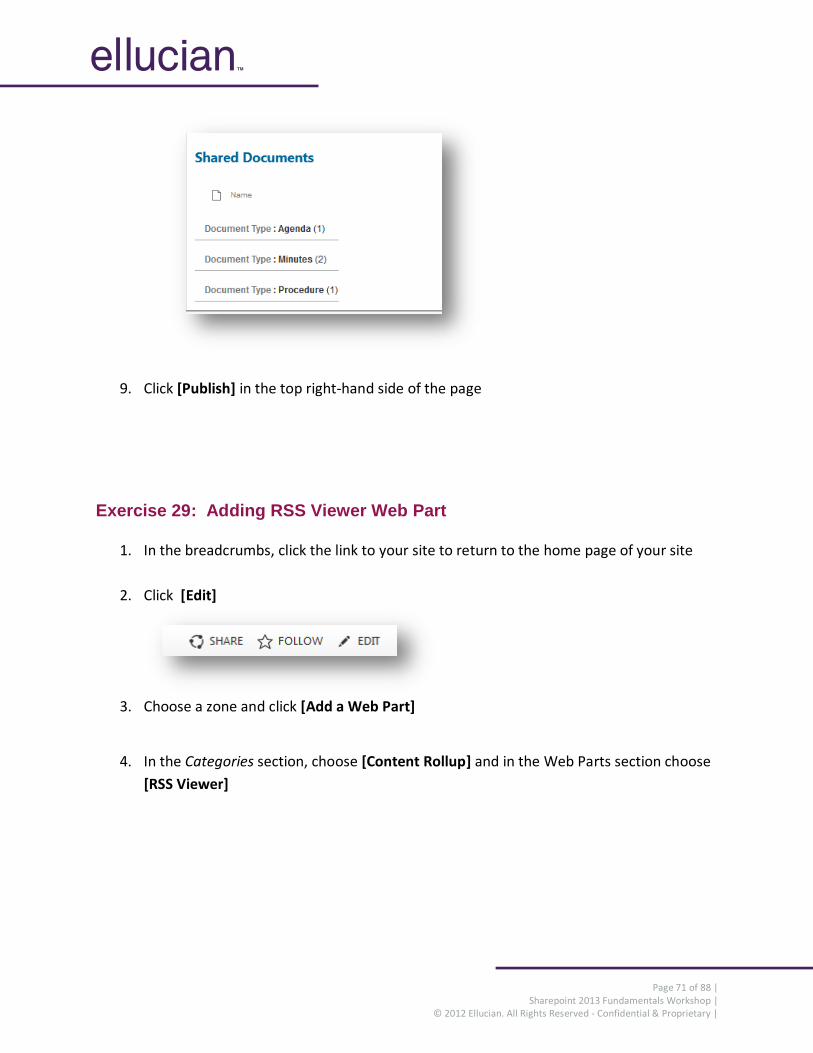
Exercise 28: Changing the Document Library Web Part View
1. In the breadcrumbs, click the link to your site to return to the home page of your site
2. Click [Edit Page]
3. In the title bar of your new document library web part, click [Edit]
4. In the resulting context menu, choose [Edit Web Part]
5. Find the properties pane on the right-hand side of your screen
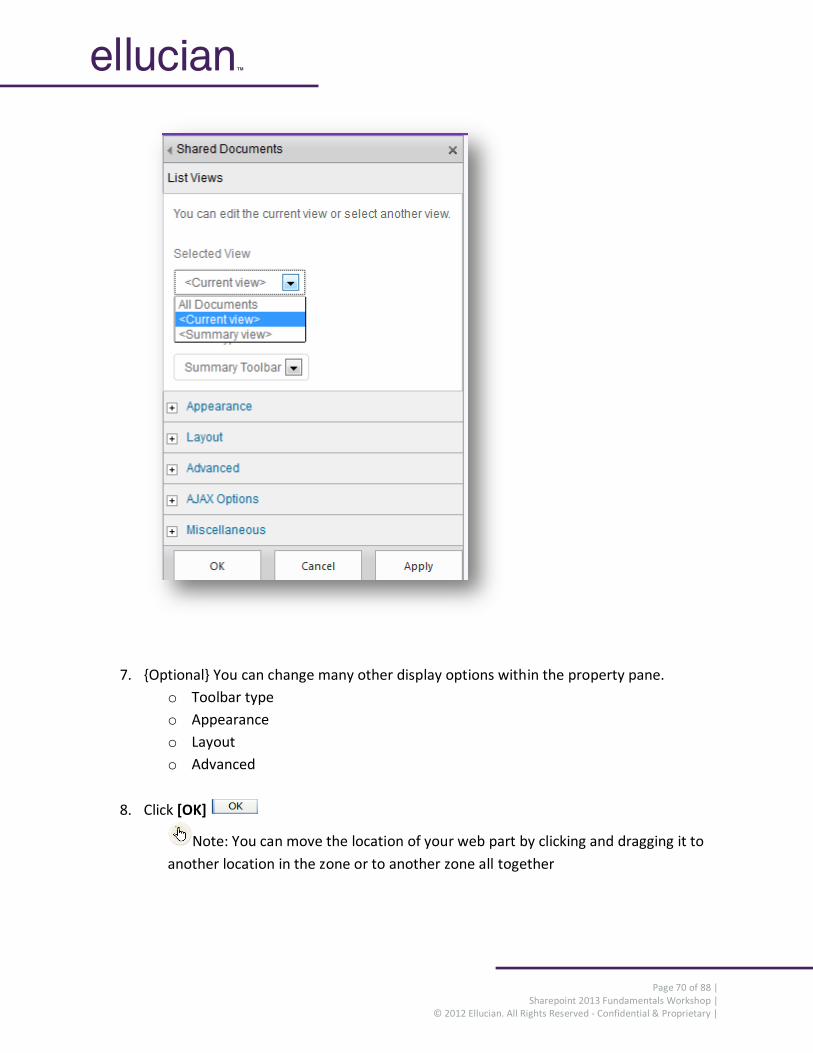
6. In the Selected View drop-down box, choose the name of your newly created view and
click [OK] to any warnings you get
Page 70 of 88 | Sharepoint 2013 Fundamentals Workshop |
© 2012 Ellucian. All Rights Reserved - Confidential & Proprietary |
7. {Optional} You can change many other display options within the property pane.
o Toolbar type
o Appearance
o Layout
o Advanced
8. Click [OK]
Note: You can move the location of your web part by clicking and dragging it to
another location in the zone or to another zone all together
Page 71 of 88 | Sharepoint 2013 Fundamentals Workshop |
© 2012 Ellucian. All Rights Reserved - Confidential & Proprietary |
9. Click [Publish] in the top right-hand side of the page
Exercise 29: Adding RSS Viewer Web Part
1. In the breadcrumbs, click the link to your site to return to the home page of your site
2. Click [Edit]
3. Choose a zone and click [Add a Web Part]
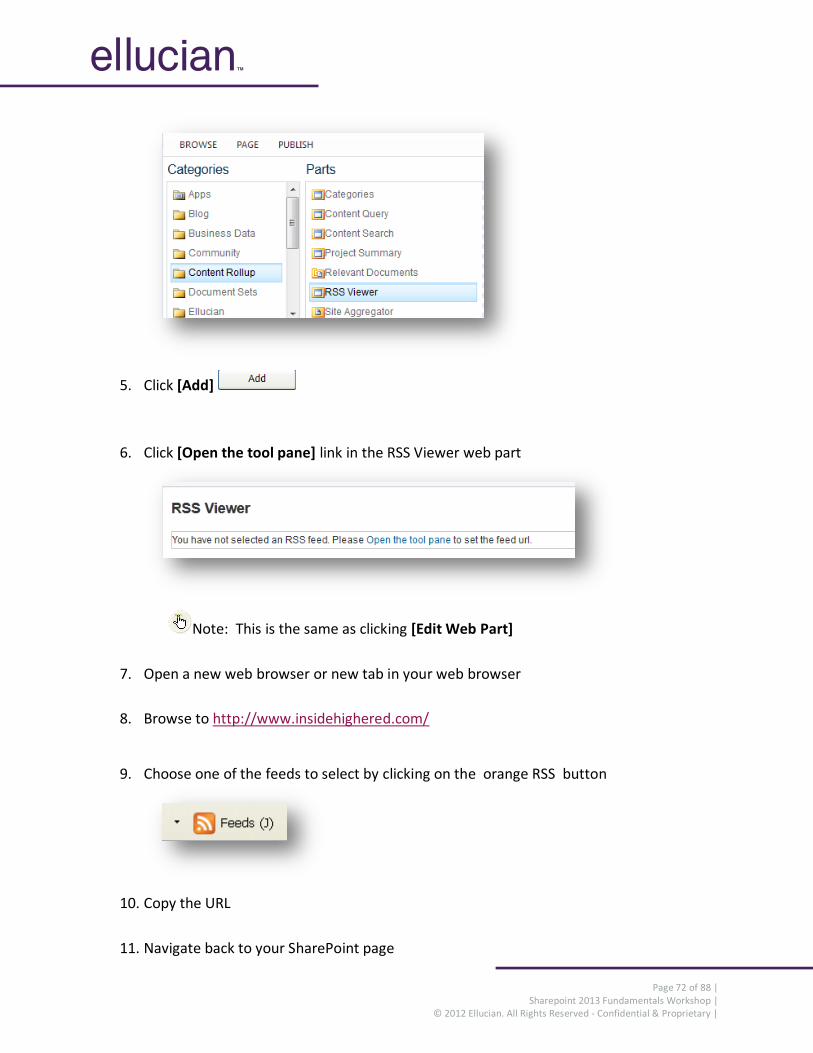
4. In the Categories section, choose [Content Rollup] and in the Web Parts section choose
[RSS Viewer]
Page 72 of 88 | Sharepoint 2013 Fundamentals Workshop |
© 2012 Ellucian. All Rights Reserved - Confidential & Proprietary |
5. Click [Add]
6. Click [Open the tool pane] link in the RSS Viewer web part
Note: This is the same as clicking [Edit Web Part]
7. Open a new web browser or new tab in your web browser
8. Browse to http://www.insidehighered.com/
9. Choose one of the feeds to select by clicking on the orange RSS button
10. Copy the URL
11. Navigate back to your SharePoint page
Page 73 of 88 | Sharepoint 2013 Fundamentals Workshop |
© 2012 Ellucian. All Rights Reserved - Confidential & Proprietary |
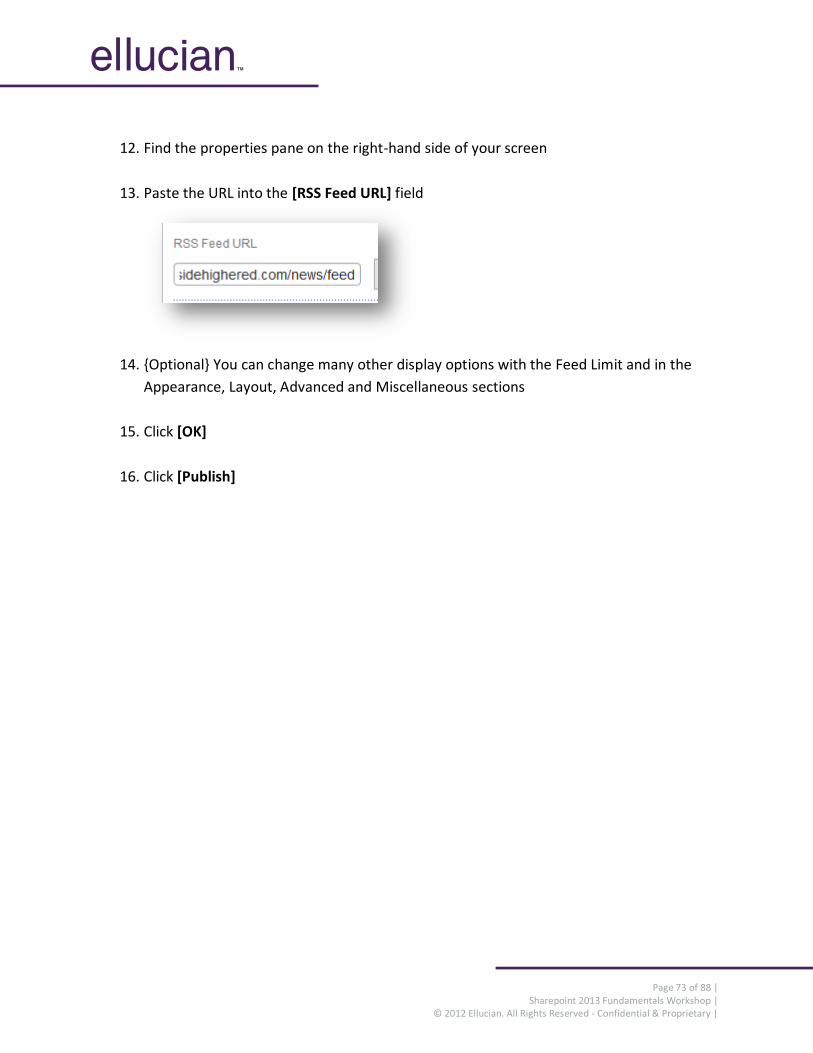
12. Find the properties pane on the right-hand side of your screen
13. Paste the URL into the [RSS Feed URL] field
14. {Optional} You can change many other display options with the Feed Limit and in the
Appearance, Layout, Advanced and Miscellaneous sections
15. Click [OK]
16. Click [Publish]
Page 74 of 88 | Sharepoint 2013 Fundamentals Workshop |
© 2012 Ellucian. All Rights Reserved - Confidential & Proprietary |
Exercise 30: Adding a Content Editor Web Part
1. In the breadcrumbs, click the link to your site to return to the home page of your site
2. Click [Edit ]
3. Choose a zone and click [Add a Web Part]
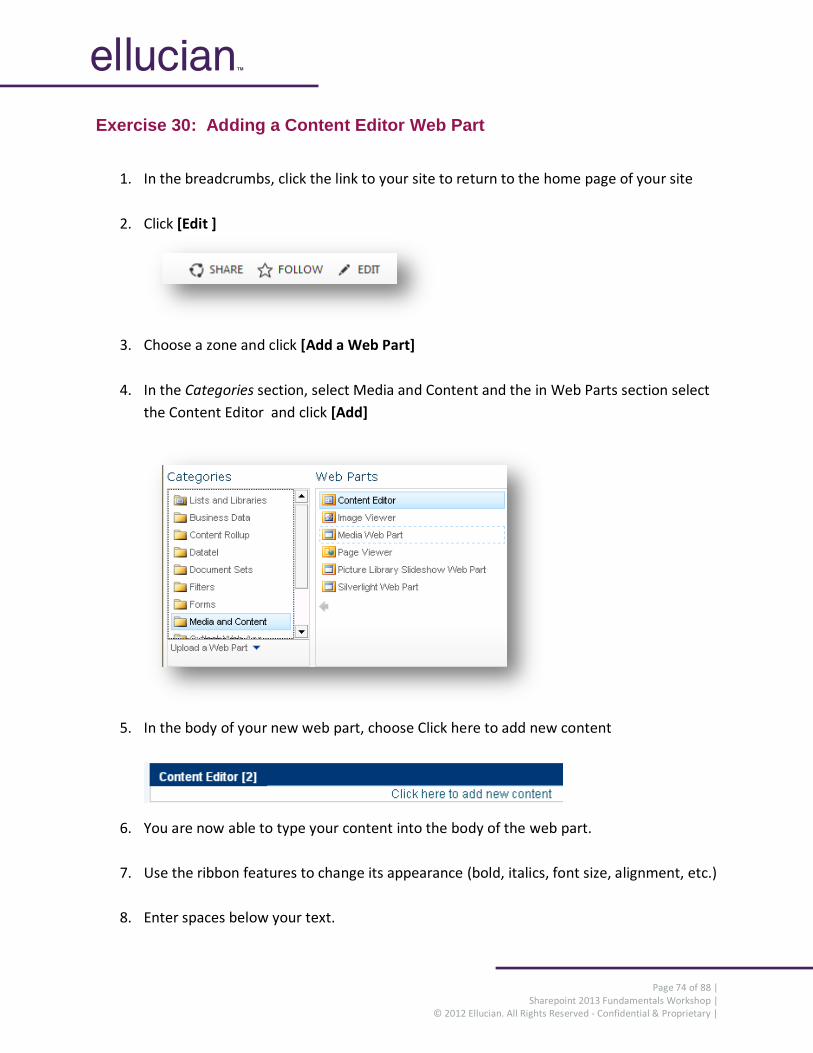
4. In the Categories section, select Media and Content and the in Web Parts section select
the Content Editor and click [Add]
5. In the body of your new web part, choose Click here to add new content
6. You are now able to type your content into the body of the web part.
7. Use the ribbon features to change its appearance (bold, italics, font size, alignment, etc.)
8. Enter spaces below your text.
Page 75 of 88 | Sharepoint 2013 Fundamentals Workshop |
© 2012 Ellucian. All Rights Reserved - Confidential & Proprietary |
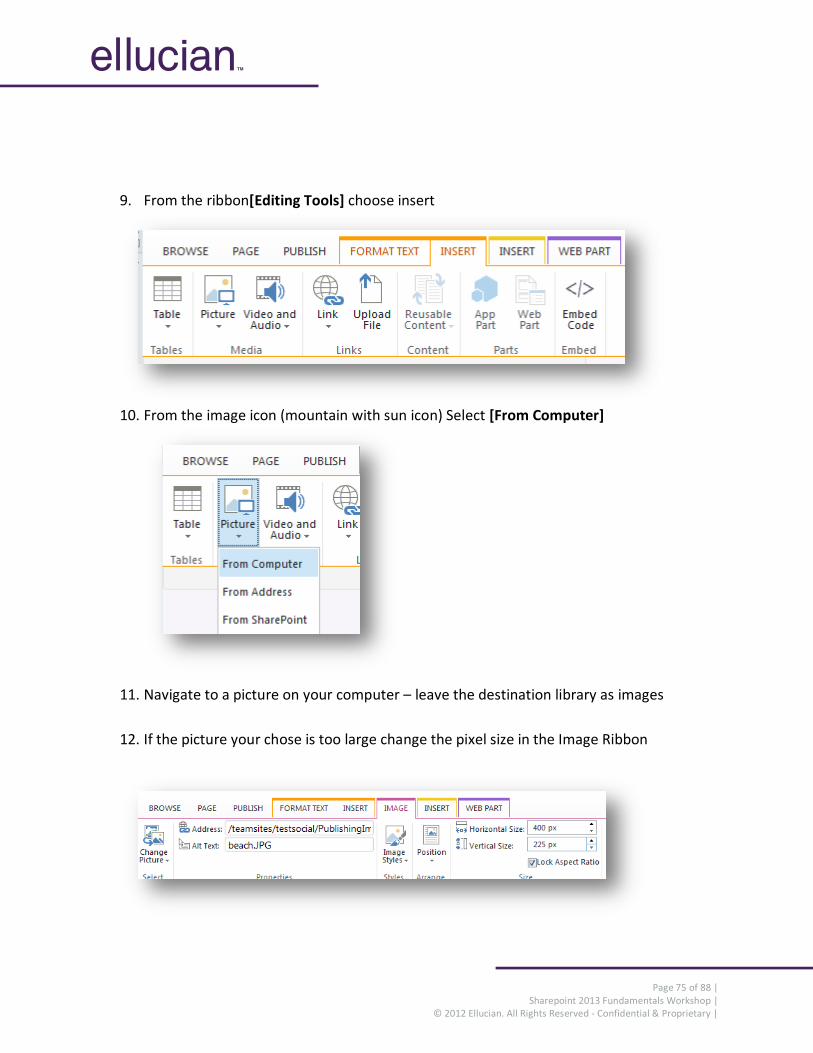
9. From the ribbon[Editing Tools] choose insert
10. From the image icon (mountain with sun icon) Select [From Computer]
11. Navigate to a picture on your computer – leave the destination library as images
12. If the picture your chose is too large change the pixel size in the Image Ribbon
Page 76 of 88 | Sharepoint 2013 Fundamentals Workshop |
© 2012 Ellucian. All Rights Reserved - Confidential & Proprietary |
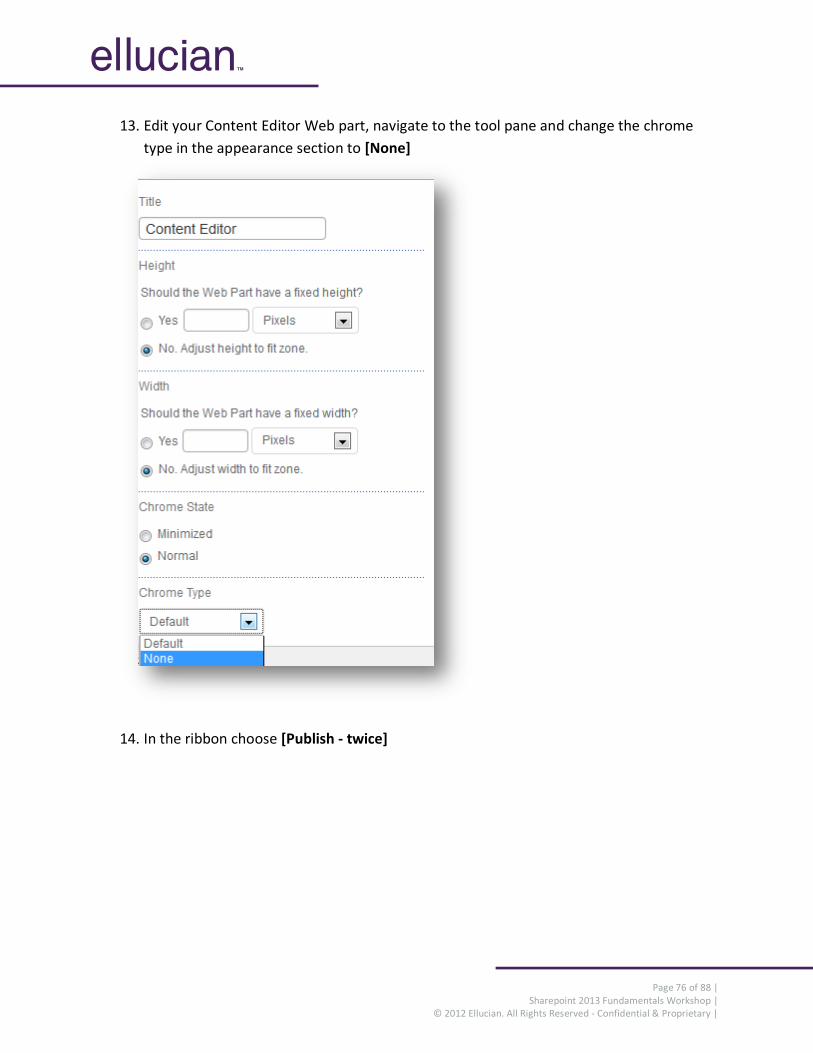
13. Edit your Content Editor Web part, navigate to the tool pane and change the chrome
type in the appearance section to [None]
14. In the ribbon choose [Publish - twice]
Page 77 of 88 | Sharepoint 2013 Fundamentals Workshop |
© 2012 Ellucian. All Rights Reserved - Confidential & Proprietary |
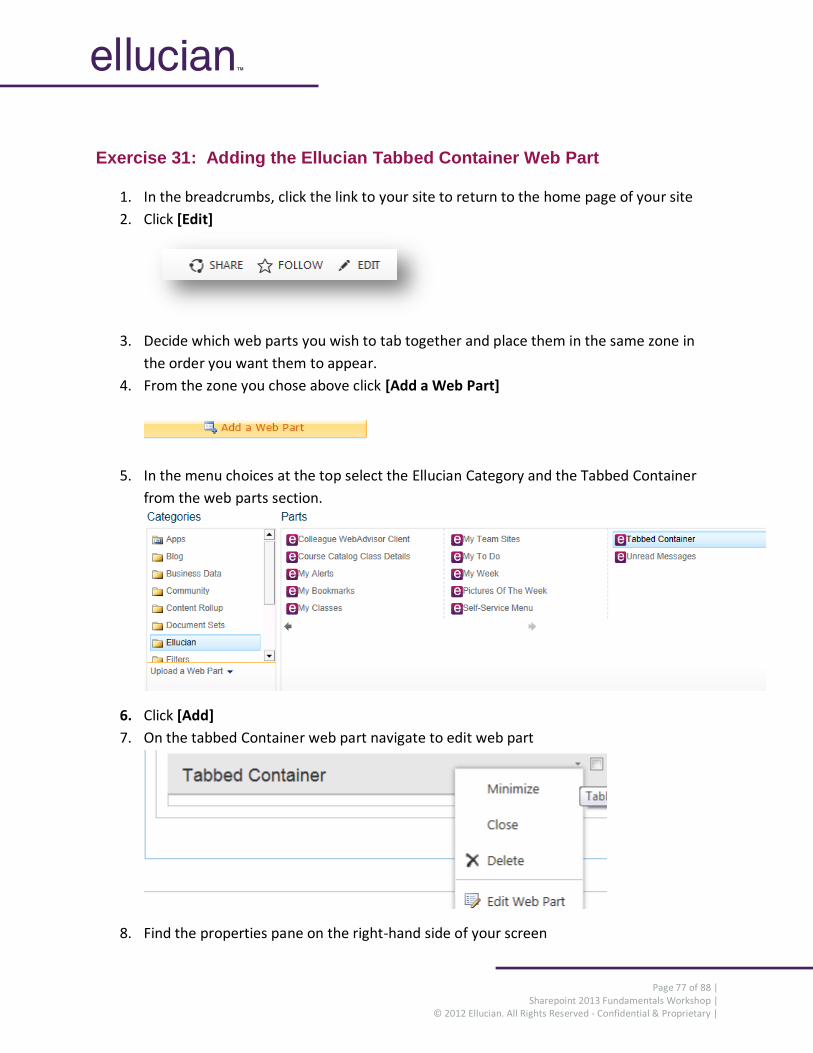
Exercise 31: Adding the Ellucian Tabbed Container Web Part
1. In the breadcrumbs, click the link to your site to return to the home page of your site
2. Click [Edit]
3. Decide which web parts you wish to tab together and place them in the same zone in
the order you want them to appear.
4. From the zone you chose above click [Add a Web Part]
5. In the menu choices at the top select the Ellucian Category and the Tabbed Container
from the web parts section.
6. Click [Add]
7. On the tabbed Container web part navigate to edit web part
8. Find the properties pane on the right-hand side of your screen
Page 78 of 88 | Sharepoint 2013 Fundamentals Workshop |
© 2012 Ellucian. All Rights Reserved - Confidential & Proprietary |
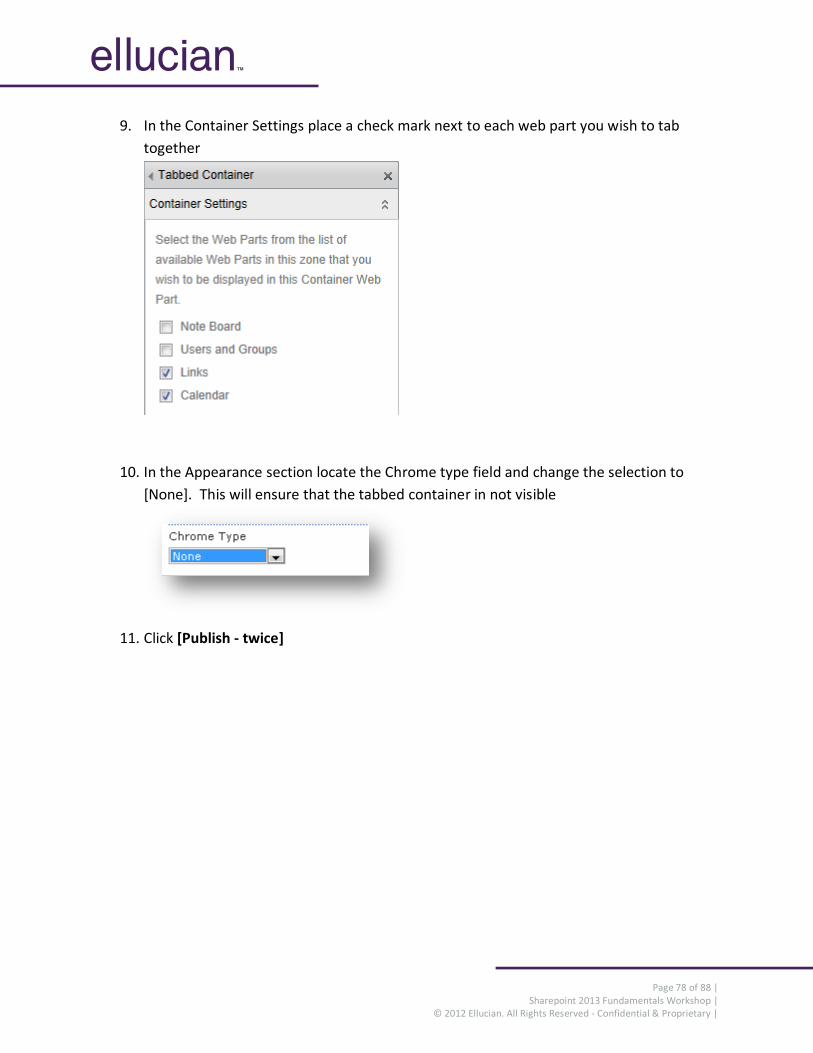
9. In the Container Settings place a check mark next to each web part you wish to tab
together
10. In the Appearance section locate the Chrome type field and change the selection to
[None]. This will ensure that the tabbed container in not visible
11. Click [Publish - twice]
Page 79 of 88 | Sharepoint 2013 Fundamentals Workshop |
© 2012 Ellucian. All Rights Reserved - Confidential & Proprietary |
Optional Exercises
Site Feed
An alternative to the discussion board is the Site Feed (Newsfeed) web part.
To active the site feed
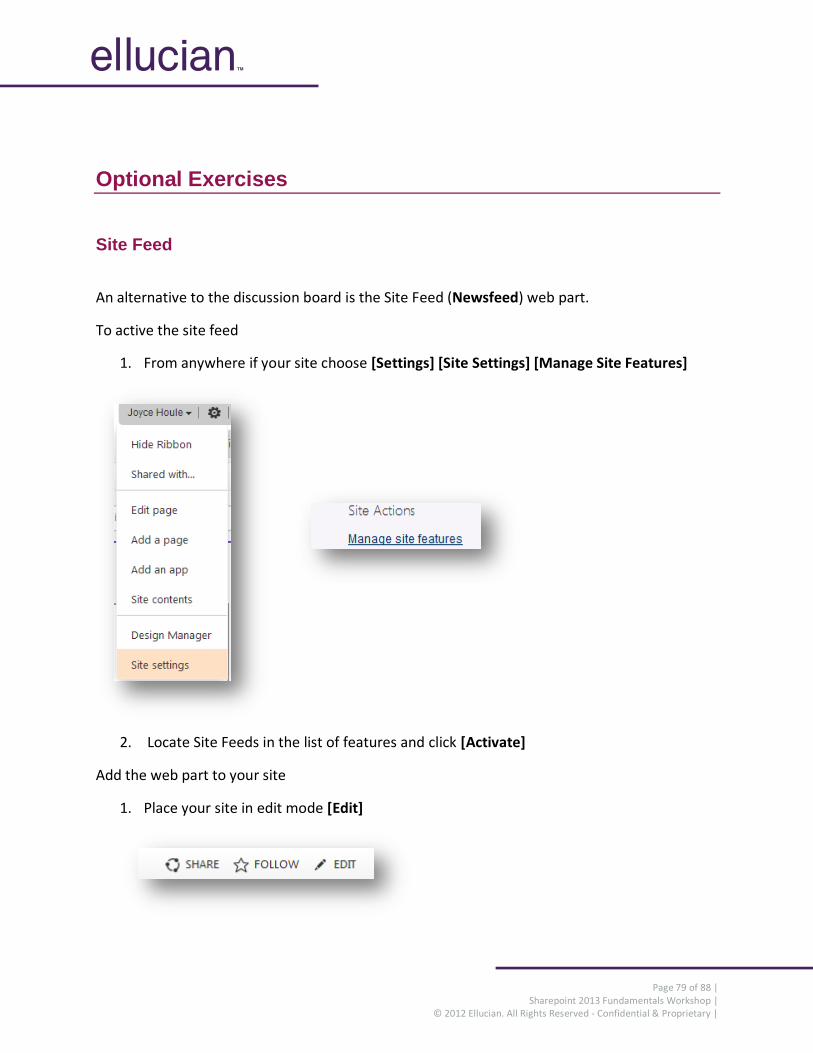
1. From anywhere if your site choose [Settings] [Site Settings] [Manage Site Features]
2. Locate Site Feeds in the list of features and click [Activate]
Add the web part to your site
1. Place your site in edit mode [Edit]
Page 80 of 88 | Sharepoint 2013 Fundamentals Workshop |
© 2012 Ellucian. All Rights Reserved - Confidential & Proprietary |
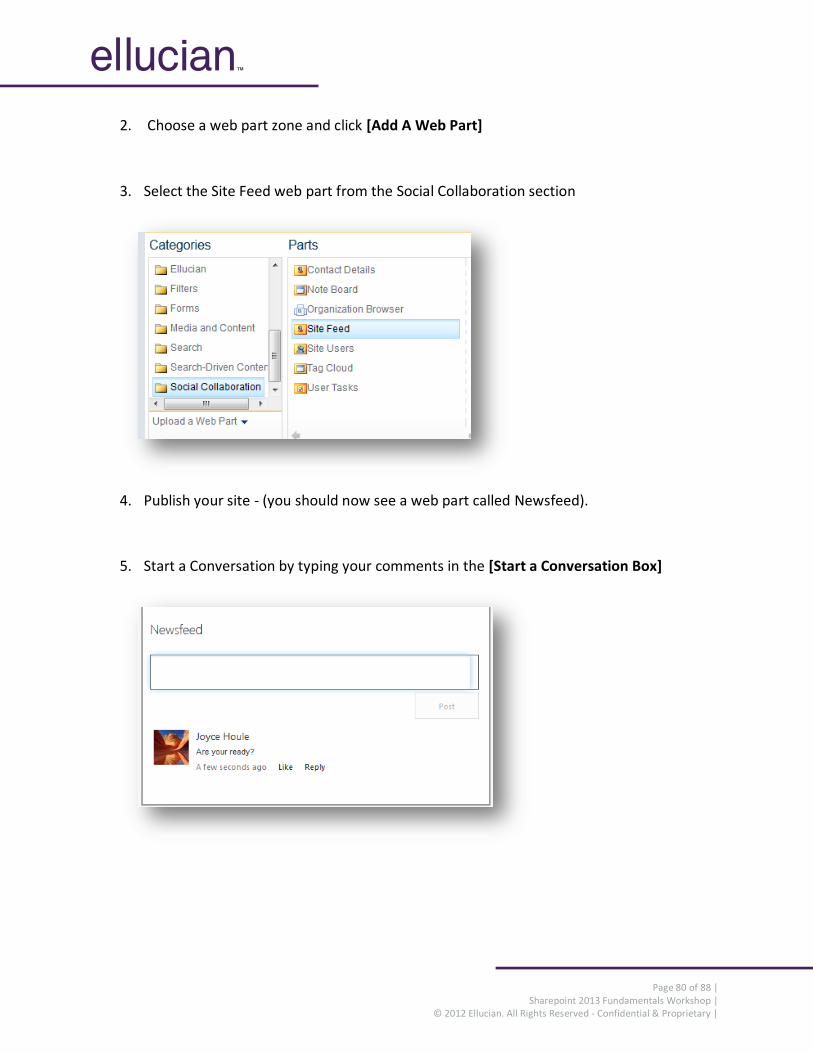
2. Choose a web part zone and click [Add A Web Part]
3. Select the Site Feed web part from the Social Collaboration section
4. Publish your site - (you should now see a web part called Newsfeed).
5. Start a Conversation by typing your comments in the [Start a Conversation Box]
Page 81 of 88 | Sharepoint 2013 Fundamentals Workshop |
© 2012 Ellucian. All Rights Reserved - Confidential & Proprietary |
Task List Feature
We can setup the task list to allow tasks to be assigned to multiple individuals
1. Access your Task List from your quick launch or your site contents
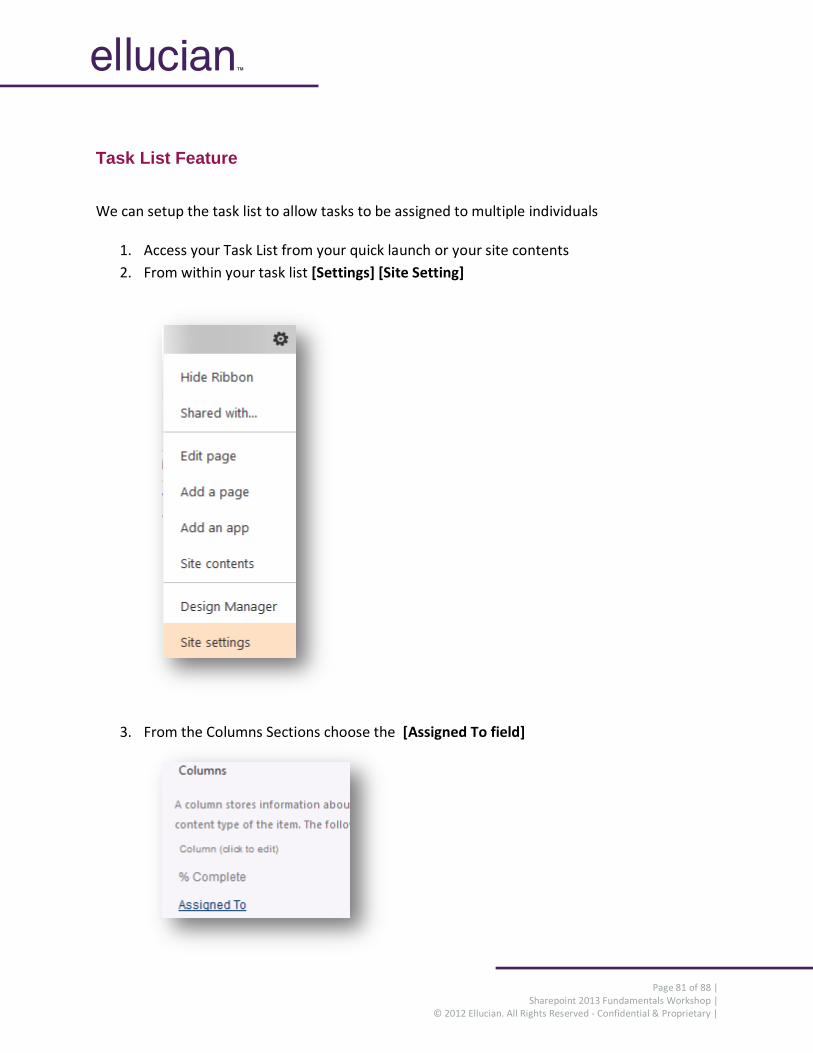
2. From within your task list [Settings] [Site Setting]
3. From the Columns Sections choose the [Assigned To field]
Page 82 of 88 | Sharepoint 2013 Fundamentals Workshop |
© 2012 Ellucian. All Rights Reserved - Confidential & Proprietary |
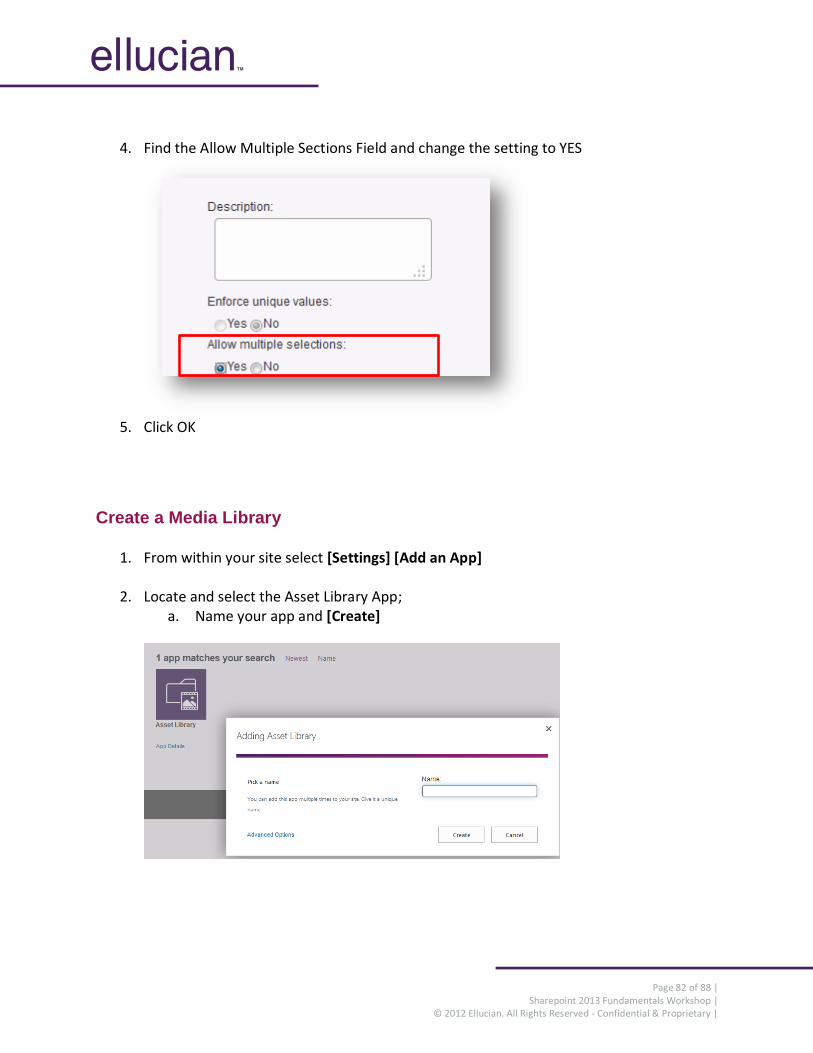
4. Find the Allow Multiple Sections Field and change the setting to YES
5. Click OK
Create a Media Library
1. From within your site select [Settings] [Add an App]
2. Locate and select the Asset Library App; a. Name your app and [Create]
Page 83 of 88 | Sharepoint 2013 Fundamentals Workshop |
© 2012 Ellucian. All Rights Reserved - Confidential & Proprietary |
Add Media File to Asset Library
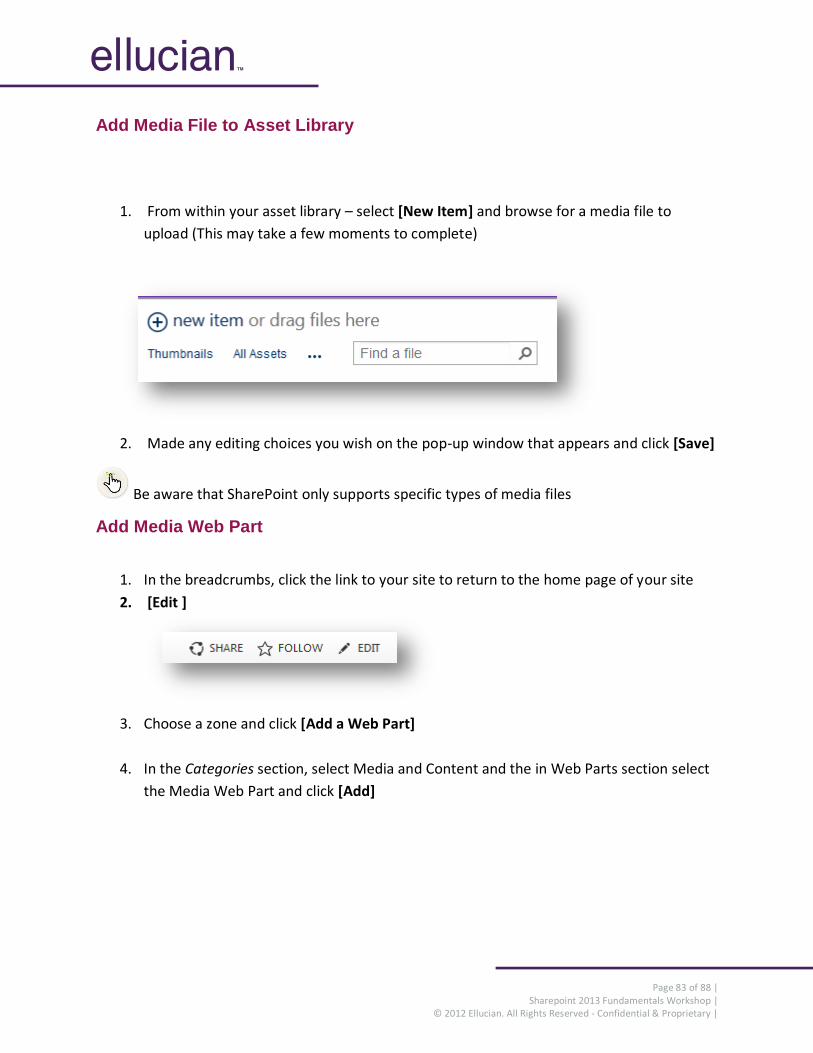
1. From within your asset library – select [New Item] and browse for a media file to
upload (This may take a few moments to complete)
2. Made any editing choices you wish on the pop-up window that appears and click [Save]
Be aware that SharePoint only supports specific types of media files
Add Media Web Part
1. In the breadcrumbs, click the link to your site to return to the home page of your site
2. [Edit ]
3. Choose a zone and click [Add a Web Part]
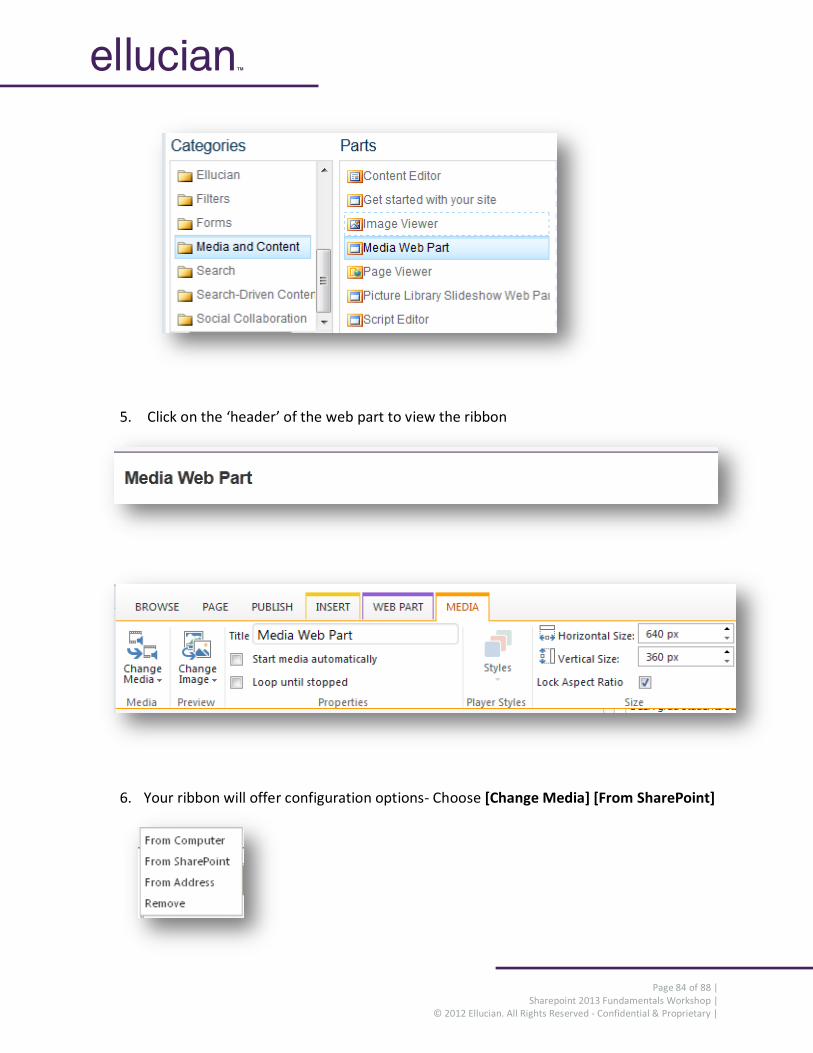
4. In the Categories section, select Media and Content and the in Web Parts section select
the Media Web Part and click [Add]
Page 84 of 88 | Sharepoint 2013 Fundamentals Workshop |
© 2012 Ellucian. All Rights Reserved - Confidential & Proprietary |
5. Click on the ‘header’ of the web part to view the ribbon
6. Your ribbon will offer configuration options- Choose [Change Media] [From SharePoint]
Page 85 of 88 | Sharepoint 2013 Fundamentals Workshop |
© 2012 Ellucian. All Rights Reserved - Confidential & Proprietary |
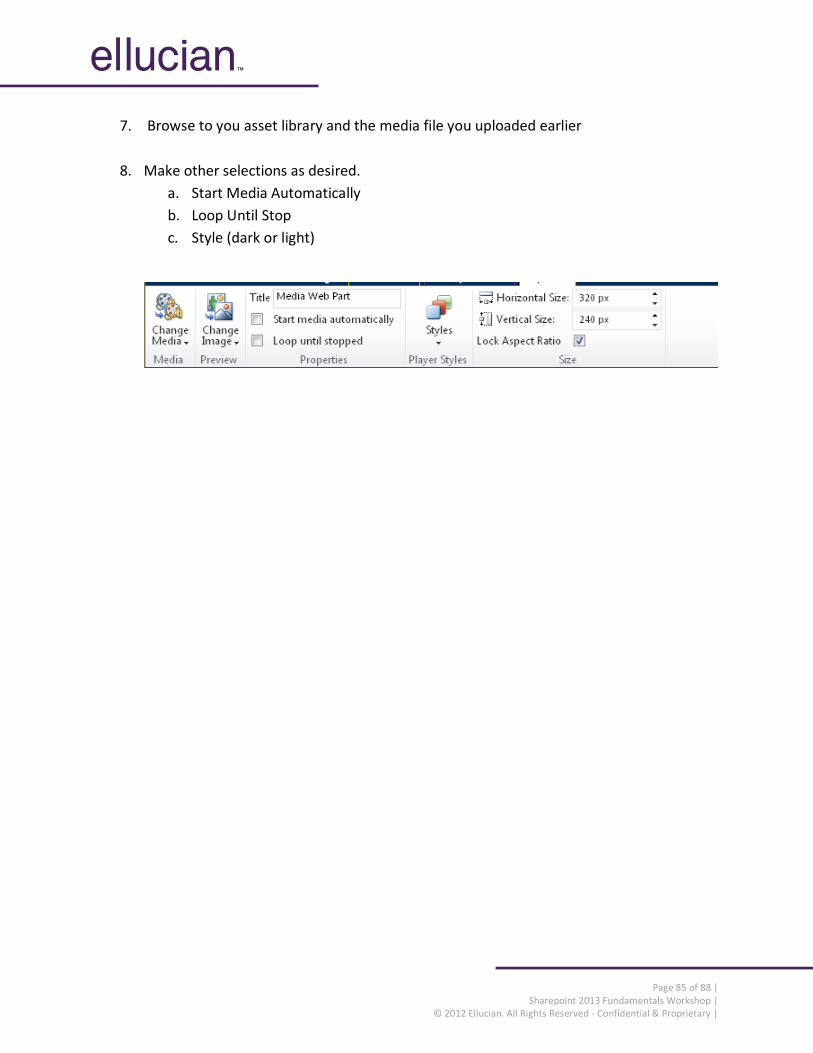
7. Browse to you asset library and the media file you uploaded earlier
8. Make other selections as desired.
a. Start Media Automatically
b. Loop Until Stop
c. Style (dark or light)
Page 86 of 88 | Sharepoint 2013 Fundamentals Workshop |
© 2012 Ellucian. All Rights Reserved - Confidential & Proprietary |
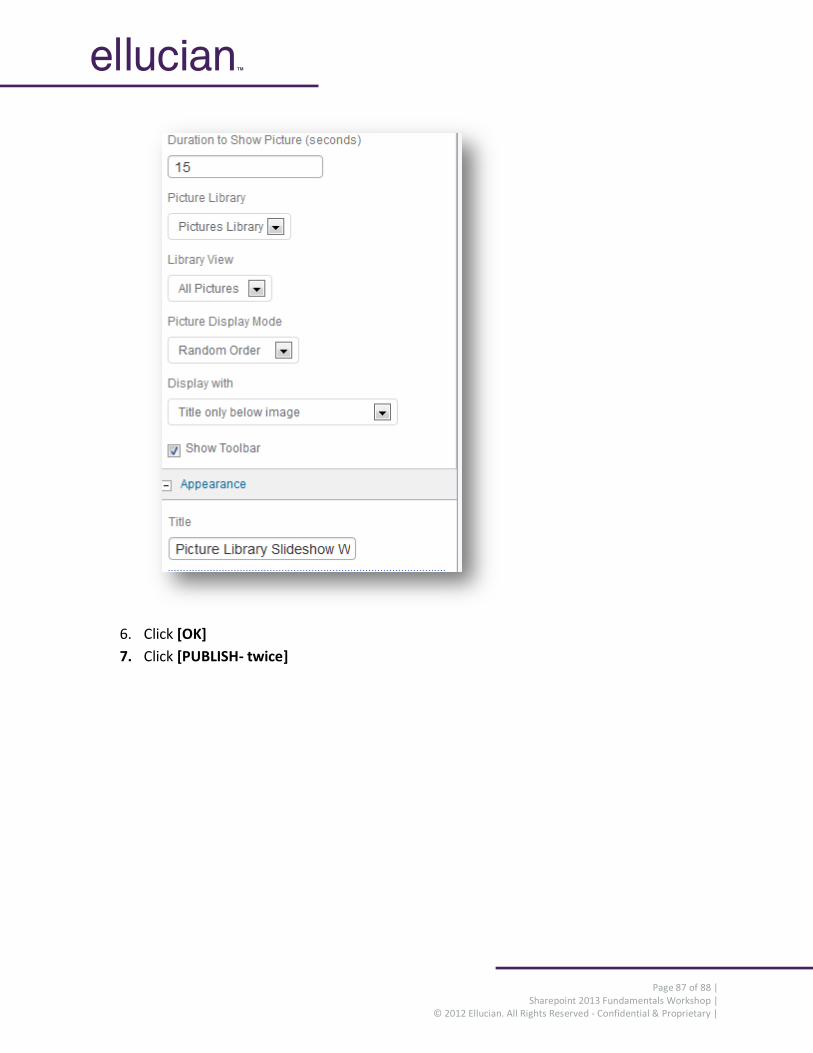
Adding Picture Library Slideshow Web Part
1. In the breadcrumbs, click the link to your site to return to the home page of your site
Click [Edit]
2. Choose a zone and click [Add a Web Part]
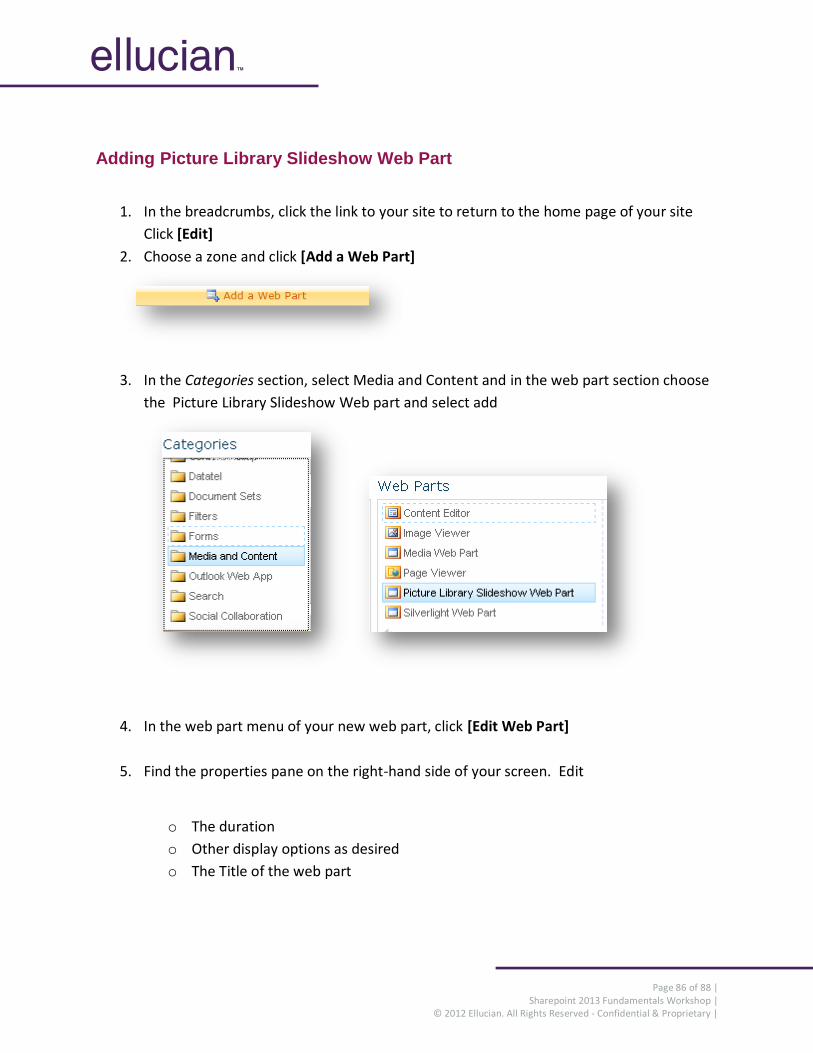
3. In the Categories section, select Media and Content and in the web part section choose
the Picture Library Slideshow Web part and select add
4. In the web part menu of your new web part, click [Edit Web Part]
5. Find the properties pane on the right-hand side of your screen. Edit
o The duration
o Other display options as desired
o The Title of the web part
Page 87 of 88 | Sharepoint 2013 Fundamentals Workshop |
© 2012 Ellucian. All Rights Reserved - Confidential & Proprietary |
6. Click [OK]
7. Click [PUBLISH- twice]
Page 88 of 88 | Sharepoint 2013 Fundamentals Workshop |
© 2012 Ellucian. All Rights Reserved - Confidential & Proprietary |
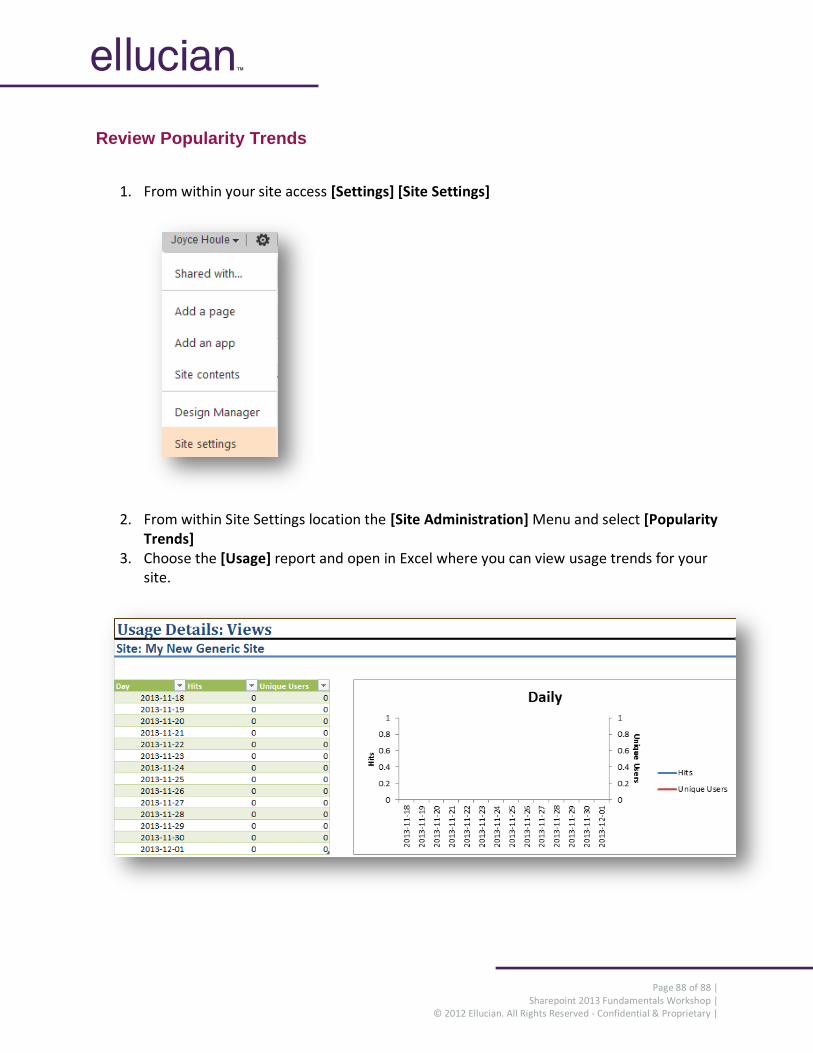
Review Popularity Trends
1. From within your site access [Settings] [Site Settings]
2. From within Site Settings location the [Site Administration] Menu and select [Popularity Trends]
3. Choose the [Usage] report and open in Excel where you can view usage trends for your site.