Embed Size (px)
Citation preview

download from www.sheltercentre.org
shelter centreMEDECINSSANS FRONTIERES
1
shade nets: use and deployment in humanitarian relief environments This booklet is the result of a collaborative project between Médecins Sans Frontières and Shelter Centre.
acknowledgements and contributors Médecins Sans Frontières (www.msf.org)
MSF is an independent humanitarian medical aid agency committed to two objectives: providing medical aid wherever needed, regardless of race, religion, politics or sex; and raising awareness of the plight of the people we help.
Shelter Centre (www.sheltercentre.org)
Shelter Centre is a humanitarian non-government organisation concerned with the transitional settlement and shelter of populations affected by conflict and natural disasters, supporting human rights, dignity, protection, health, environment and livelihoods.
Shelter Centre maintains the Shelter Library (www.shelterlibrary.org), an on-line resource of material from a wide range of humanitarian organisations. It also runs Shelter Training (www.sheltertraining.org), an educational resource for the transitional shelter sector.
The lead contributors were:
Neil Brighton Yannick Garbusinski Peter Mylon Dr Tom Corsellis Bethany Luxmoore Antonella VitaleJonathan Cox Jérôme Michon
Special thanks to:
Dr Samira Barakat John Howard Peter Strauss Mike Dickson Steven Hunt Henry Travers
The work of Shelter Centre is possible only with the continued support of its volunteers, who are in turn supported by charities such as Engineers Without Borders (EWB) and Architectes Sans Frontières (ASF).
MSF reference number:L043SHEB04E
first edition 2006
Comments on this field booklet should be directed to [email protected]
download from www.sheltercentre.org
2 shelter centreMEDECINS
SANS FRONTIERES
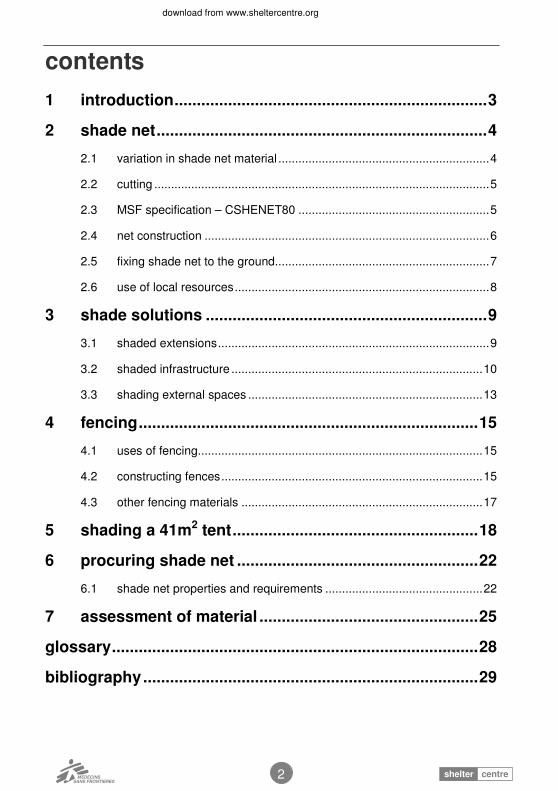
contents
1 introduction......................................................................3
2 shade net..........................................................................4
2.1 variation in shade net material ...............................................................4
2.2 cutting ....................................................................................................5
2.3 MSF specification – CSHENET80 .........................................................5
2.4 net construction .....................................................................................6
2.5 fixing shade net to the ground................................................................7
2.6 use of local resources............................................................................8
3 shade solutions ...............................................................9
3.1 shaded extensions.................................................................................9
3.2 shaded infrastructure ...........................................................................10
3.3 shading external spaces ......................................................................13
4 fencing............................................................................15
4.1 uses of fencing.....................................................................................15
4.2 constructing fences..............................................................................15
4.3 other fencing materials ........................................................................17
5 shading a 41m2 tent.......................................................18
6 procuring shade net ......................................................22
6.1 shade net properties and requirements ...............................................22
7 assessment of material .................................................25
glossary..................................................................................28
bibliography...........................................................................29
download from www.sheltercentre.org
shelter centreMEDECINS
SANS FRONTIERES
3
1 in
trod
uctio
n
2 n
et
3 s
olu
tion
s
4 fe
ncin
g
5 4
1m
2 ten
t 6 p
rocu
rem
en
t 7assessm
en
t
1 introduction
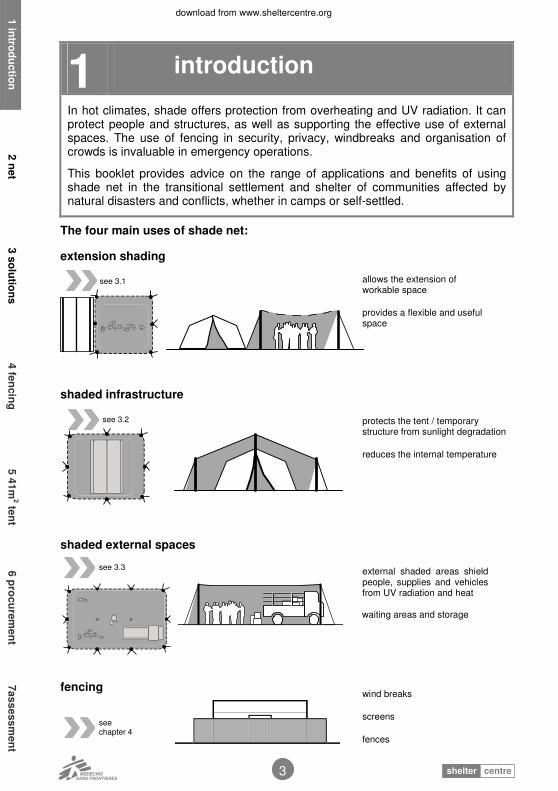
In hot climates, shade offers protection from overheating and UV radiation. It can protect people and structures, as well as supporting the effective use of external spaces. The use of fencing in security, privacy, windbreaks and organisation of crowds is invaluable in emergency operations.
This booklet provides advice on the range of applications and benefits of using shade net in the transitional settlement and shelter of communities affected by natural disasters and conflicts, whether in camps or self-settled.
The four main uses of shade net:
extension shading
shaded infrastructure
shaded external spaces
fencing
wind breaks
screens
fences
see
chapter 4
waiting areas and storage
external shaded areas shield people, supplies and vehicles from UV radiation and heat
see 3.3
protects the tent / temporary structure from sunlight degradation
reduces the internal temperature
see 3.2
see 3.1
allows the extension of workable space
provides a flexible and useful space
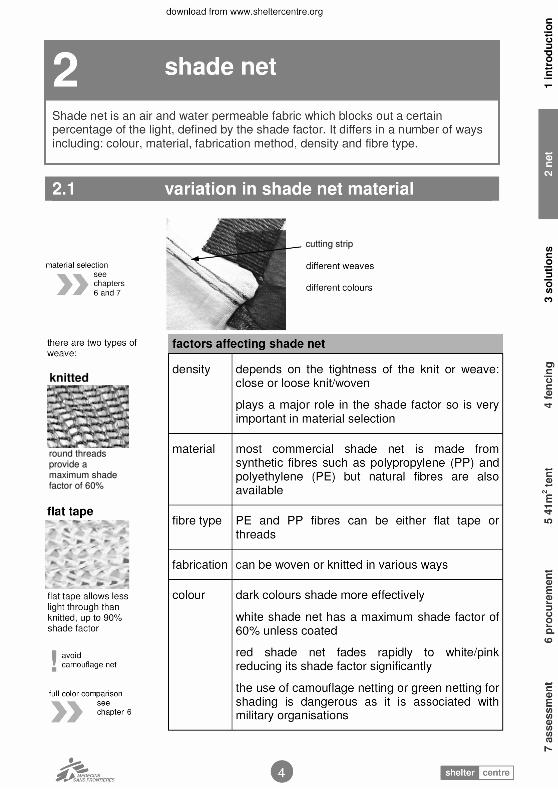
cutting strip
knitted
round threads provide a maximum shade factor of 60%
download from sheltercentre.org
shelter centreMEDECINS
SANS FRONTIERES
5
1 in
trod
uctio
n
2 n
et
3 s
olu
tion
s
4 fe
ncin
g
5 4
1m
2 ten
t 6 p
rocu
rem
en
t 7 a
ssessm
en
t
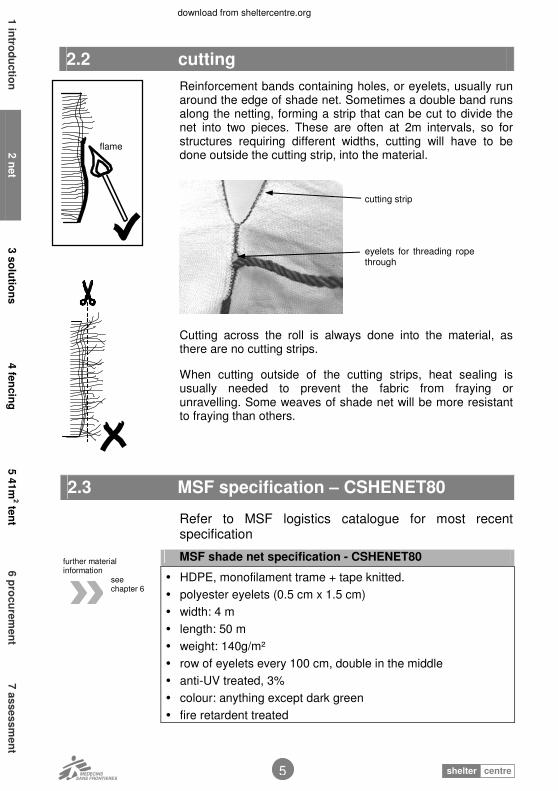
Reinforcement bands containing holes, or eyelets, usually run around the edge of shade net. Sometimes a double band runs along the netting, forming a strip that can be cut to divide the net into two pieces. These are often at 2m intervals, so for structures requiring different widths, cutting will have to be done outside the cutting strip, into the material.
Cutting across the roll is always done into the material, as there are no cutting strips.
When cutting outside of the cutting strips, heat sealing is usually needed to prevent the fabric from fraying or unravelling. Some weaves of shade net will be more resistant to fraying than others.
2.3 MSF specification – CSHENET80
Refer to MSF logistics catalogue for most recent specification
MSF shade net specification - CSHENET80
• HDPE, monofilament trame + tape knitted.
• polyester eyelets (0.5 cm x 1.5 cm)
• width: 4 m
• length: 50 m
• weight: 140g/m²
• row of eyelets every 100 cm, double in the middle
• anti-UV treated, 3%
• colour: anything except dark green
• fire retardent treated
2.2 cutting
flame
further material information
see chapter 6
eyelets for threading rope through
cutting strip
download from www.sheltercentre.org
6 shelter centreMEDECINS
SANS FRONTIERES
1 i
ntr
od
ucti
on
2 n
et
3 s
olu
tio
ns
4 f
en
cin
g
5 4
1m
2 t
en
t 6 p
rocu
rem
en
t 7 a
ssessm
en
t
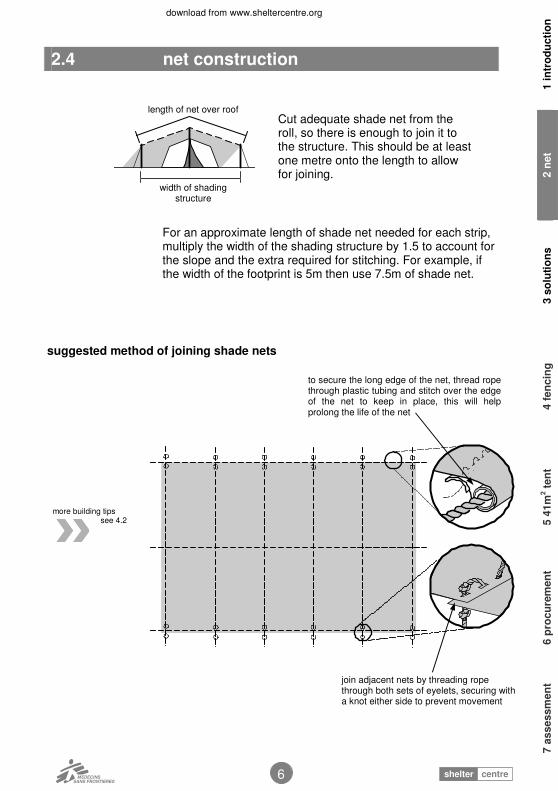
For an approximate length of shade net needed for each strip, multiply the width of the shading structure by 1.5 to account for the slope and the extra required for stitching. For example, if the width of the footprint is 5m then use 7.5m of shade net.
suggested method of joining shade nets
2.4 net construction
length of net over roof
width of shading structure
Cut adequate shade net from the roll, so there is enough to join it to the structure. This should be at least one metre onto the length to allow for joining.
join adjacent nets by threading rope through both sets of eyelets, securing with a knot either side to prevent movement
to secure the long edge of the net, thread rope through plastic tubing and stitch over the edge of the net to keep in place, this will help prolong the life of the net
more building tips
see 4.2
download from sheltercentre.org
shelter centreMEDECINS
SANS FRONTIERES
7
1 in
trod
uctio
n
2 n
et
3 s
olu
tion
s
4 fe
ncin
g
5 4
1m
2 ten
t 6 p
rocu
rem
en
t 7 a
ssessm
en
t
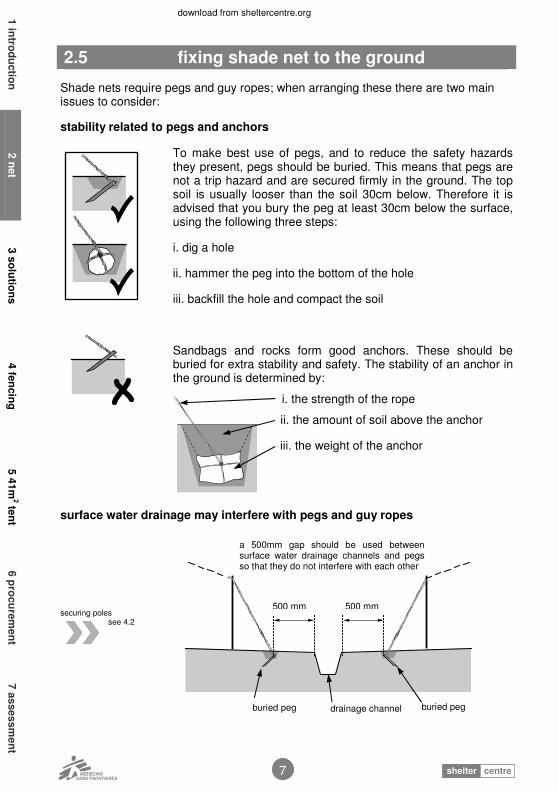
Shade nets require pegs and guy ropes; when arranging these there are two main issues to consider:
stability related to pegs and anchors
To make best use of pegs, and to reduce the safety hazards they present, pegs should be buried. This means that pegs are not a trip hazard and are secured firmly in the ground. The top soil is usually looser than the soil 30cm below. Therefore it is advised that you bury the peg at least 30cm below the surface, using the following three steps:
i. dig a hole
ii. hammer the peg into the bottom of the hole
iii. backfill the hole and compact the soil
Sandbags and rocks form good anchors. These should be buried for extra stability and safety. The stability of an anchor in the ground is determined by:
surface water drainage may interfere with pegs and guy ropes
2.5 fixing shade net to the ground
500 mm 500 mm
drainage channel buried peg buried peg
a 500mm gap should be used between surface water drainage channels and pegs so that they do not interfere with each other
i. the strength of the rope
ii. the amount of soil above the anchor
iii. the weight of the anchor
securing poles see 4.2

download from www.sheltercentre.org
8 shelter centreMEDECINS
SANS FRONTIERES
1 i
ntr
od
ucti
on
2 n
et
3 s
olu
tio
ns
4 f
en
cin
g
5 4
1m
2 t
en
t 6 p
rocu
rem
en
t 7 a
ssessm
en
t
Shade net is not the only method of providing shade. Local materials should also be considered, such as grass thatch, leaves and branches. These can be used alone or in combination with shade net, although care should be taken to avoid local materials damaging the net. The use of local skills and materials will make the solution more sustainable, as it can be repaired and altered by the local community. The use of locally procured materials can be bad for the local environment however, and this should be considered. Care should be taken to ensure that materials can be harvested sustainably from the local environment. Also, some materials, such as grass thatch may require a more robust structure than shade net.
2.6 use of local resources
thatch for shading is replaceable and uses local skills and materials
use any natural shading available, for example do not allow trees to be cut unnecessarily, either as part of preparing sites for camps, or for use as fire wood
local shade net see chapter 8
shading infrastructure see section 3.2
download from sheltercentre.org
shelter centreMEDECINS
SANS FRONTIERES
9
1 in
trod
uctio
n
2 n
et
3 s
olu
tion
s
4 fe
ncin
g
5 4
1m
2 ten
t 6 p
rocu
rem
en
t 7 a
ssessm
en
t
3 shade solutions
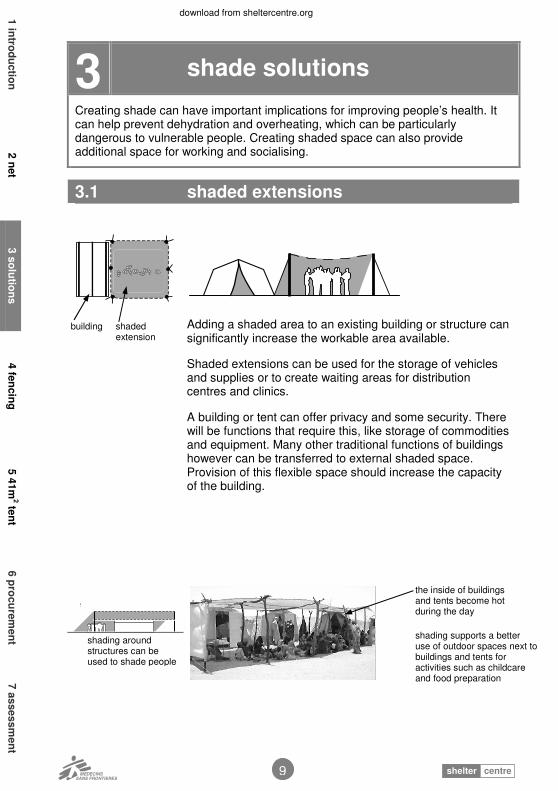
Creating shade can have important implications for improving people’s health. It can help prevent dehydration and overheating, which can be particularly dangerous to vulnerable people. Creating shaded space can also provide additional space for working and socialising.
3.1 shaded extensions
Adding a shaded area to an existing building or structure can significantly increase the workable area available.
Shaded extensions can be used for the storage of vehicles and supplies or to create waiting areas for distribution centres and clinics.
A building or tent can offer privacy and some security. There will be functions that require this, like storage of commodities and equipment. Many other traditional functions of buildings however can be transferred to external shaded space. Provision of this flexible space should increase the capacity of the building.
shaded extension
building
the inside of buildings and tents become hot during the day
shading supports a better use of outdoor spaces next to buildings and tents for activities such as childcare and food preparation
shading around structures can be used to shade people

download from www.sheltercentre.org
10 shelter centreMEDECINS
SANS FRONTIERES
1 i
ntr
od
ucti
on
2 n
et
3 s
olu
tio
ns
4 f
en
cin
g
5 4
1m
2 t
en
t 6 p
rocu
rem
en
t 7 a
ssessm
en
t
3.2 shaded infrastructure
Shading of infrastructure is important for the well-being of the people that use it. It can also be used to create waiting areas surrounding the infrastructure, which will be needed in cases such as clinics, and distribution centres where queues often form.
shaded tents
shaded water collection point
shaded water storage tanks
shaded waiting areas
facilities such as water collection points and feeding centres require people to wait for long periods, placing them at risk of dehydration in high temperatures
reduces the internal temperature of the tent
protects the tent from degradation in sunlight
may provide additional shaded waiting areas
heat reduces the effectiveness of chlorination
shading the water tank will prevent evaporation from the surface, and help save water.
waiting areas can be created by using the shade gained next to a shaded structure, or by extending the shade structure to increase the external shading. This can also extend the usable space of a building.
a frame identical to that of the tent can be used to support shade net
here the second frame is too close and the air gap is too small
download from sheltercentre.org
shelter centreMEDECINS
SANS FRONTIERES
11
1 in
trod
uctio
n
2 n
et
3 s
olu
tion
s
4 fe
ncin
g
5 4
1m
2 ten
t 6 p
rocu
rem
en
t 7 a
ssessm
en
t
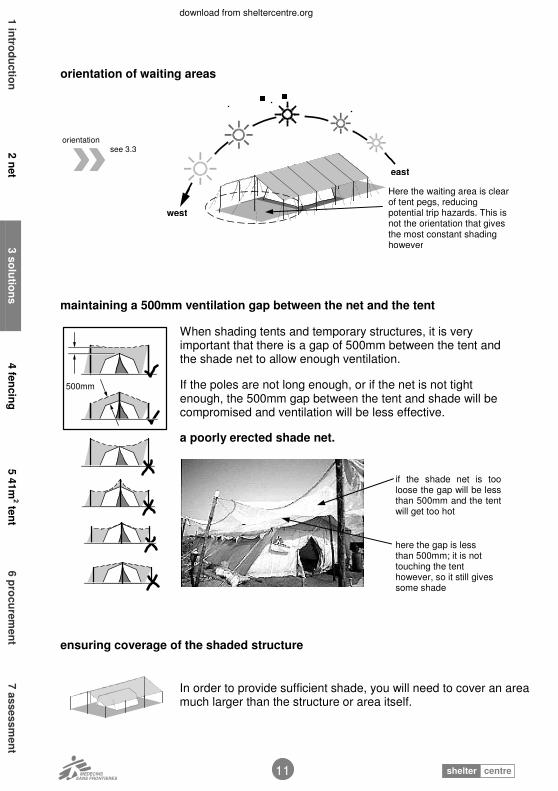
orientation of waiting areas
maintaining a 500mm ventilation gap between the net and the tent
When shading tents and temporary structures, it is very important that there is a gap of 500mm between the tent and the shade net to allow enough ventilation.
If the poles are not long enough, or if the net is not tight enough, the 500mm gap between the tent and shade will be compromised and ventilation will be less effective.
a poorly erected shade net.
ensuring coverage of the shaded structure
In order to provide sufficient shade, you will need to cover an area much larger than the structure or area itself.
500mm
here the gap is less than 500mm; it is not touching the tent however, so it still gives some shade
if the shade net is too loose the gap will be less than 500mm and the tent will get too hot
orientation see 3.3
Here the waiting area is clear of tent pegs, reducing potential trip hazards. This is not the orientation that gives the most constant shading however
east
west

download from www.sheltercentre.org
12 shelter centreMEDECINS
SANS FRONTIERES
1 i
ntr
od
ucti
on
2 n
et
3 s
olu
tio
ns
4 f
en
cin
g
5 4
1m
2 t
en
t 6 p
rocu
rem
en
t 7 a
ssessm
en
t
4545
shade net does not cover a large enough area to provide adequate cover
here much of the tent remains in direct sunlight
side areas can be used as waiting areas
the shaded area is sufficient to cover the whole tent during the hottest hours of the day
The area that a shaded structure is required to cover can be significantly reduced by continuing the shade net down the sides of the structure, creating vertical walls.
ridge profile without vertical walls
requires a larger surface area to provide adequate coverage
vertical walls are not needed if there is a large overhang
ridge
500mm
ridge profile with vertical walls use of vertical walls reduces the surface area of shade net required
for adequate ventilation allow at least 500mm between the ground and the edge of the net when using vertical sides
side walls may restrict access
under a strong wind the vertical sides will be heavily loaded

download from sheltercentre.org
shelter centreMEDECINS
SANS FRONTIERES
13
1 in
trod
uctio
n
2 n
et
3 s
olu
tion
s
4 fe
ncin
g
5 4
1m
2 ten
t 6 p
rocu
rem
en
t 7 a
ssessm
en
t
3.3 shading external spaces
A separate shade structure can be used instead of a building in some climates. This is often easier to implement than a new building.
Old or unused tent frames can provide a quick and mobile frame for support of shading.
area created for shading people
vehicle shading area
importance of pole height
net is too high
shaded area is too small
vehicles are not well shaded
less restriction on pole sizes
central supports can be used
separate shading provided for daytime activity
poles are too high, vehicle is not shaded
poles are correct length, vehicle is well shaded
protection from heat
provides cool space for people to congregate and wait
shaded areas increase the efficiency of using facilities and infrastructure and improve circulation around them

download from www.sheltercentre.org
14 shelter centreMEDECINS
SANS FRONTIERES
1 i
ntr
od
ucti
on
2 n
et
3 s
olu
tio
ns
4 f
en
cin
g
5 4
1m
2 t
en
t 6 p
rocu
rem
en
t 7 a
ssessm
en
t
orientation
Where possible, shade nets should be as close to the temporary structure or infrastructure that is being shaded, while maintaining the 500mm ventilation gap.
The position of shade varies as the position of the sun changes. This depends on the time of day, time of year and geographical position.
If the shade structure to be constructed is not square, the orientation of the structure with respect to the sun path is important. It will effect the size of the constantly shaded areas and the areas that are only shaded in the morning or afternoon.
If waiting areas are placed on the north- and south-facing sides, the area will remain approximately constant and the central part will be shaded throughout the day; this is useful for shading infrastructure such as water collection points or reception centres.
north to south orientation
E
area always in shade is large
using the same shading as above there is a larger constantly shaded area in this orientation
morning/afternoon shade is on the long edges
west
east
east to west orientation
area always in shade is small
sun shines into the short edges in the morning and afternoon
morning/afternoon shade is on the shorter edges
west
east
S
E
N
W
S
W
N
dowload from www.sheltercentre.com
1 in
trod
uctio
n
2 n
et
3 s
olu
tion
s
4 fe
ncin
g
5 4
1m
2 ten
t 6 p
rocu
rem
en
t 7 a
ssessm
en
t
shelter centreMEDECINS
SANS FRONTIERES
15
4 fencing
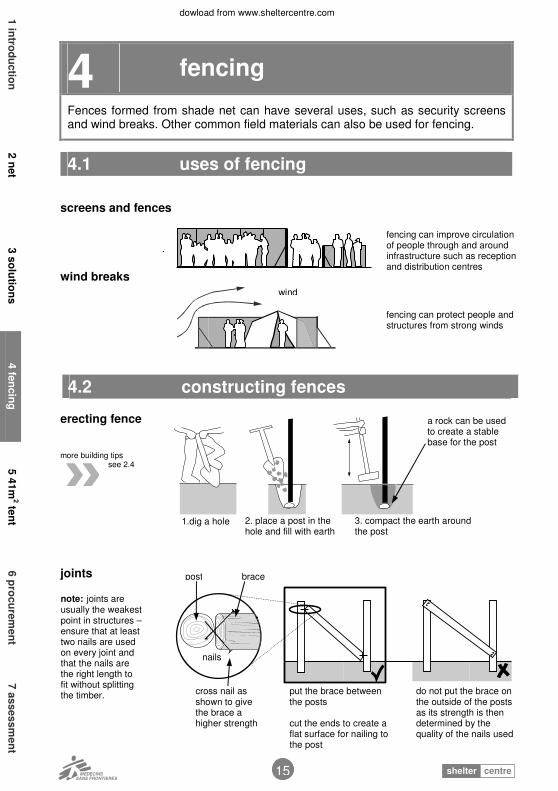
Fences formed from shade net can have several uses, such as security screens and wind breaks. Other common field materials can also be used for fencing.
4.1 uses of fencing
screens and fences
wind breaks
4.2 constructing fences
erecting fence
joints
fencing can protect people and structures from strong winds
wind
fencing can improve circulation of people through and around infrastructure such as reception and distribution centres
nails
more building tips see 2.4
1.dig a hole 2. place a post in the hole and fill with earth
3. compact the earth around the post
a rock can be used to create a stable base for the post
cross nail as shown to give the brace a higher strength
put the brace between the posts cut the ends to create a flat surface for nailing to the post
do not put the brace on the outside of the posts as its strength is then determined by the quality of the nails used
brace post
note: joints are usually the weakest point in structures – ensure that at least two nails are used on every joint and that the nails are the right length to fit without splitting the timber.

download from www.sheltercentre.org
16 shelter centreMEDECINS
SANS FRONTIERES
1 i
ntr
od
ucti
on
2 n
et
3 s
olu
tio
ns
4 f
en
cin
g
5 4
1m
2 t
en
t 6 p
rocu
rem
en
t 7 a
ssessm
en
t
fence bracing
protection of wooden posts
Wooden posts should be protected against damage from termites and white ants.
stiffening braces should be used at least at every 5 posts, particularly important in strong winds or for tall fences
bury the ends of the pole at least 30-40cm so that they do not move; the top layer of the soil is often loose
rocks can be used to provide additional a solid footing in sandy soil
braces should support posts at two thirds of the post’s height
2/3 height
1/3 height
fencing material should be trenched in the ground
a wire net fence showing a stiffening brace
shade net fence, showing a well constructed cross brace
cross bracing should be used at corners of fences
stiffening brace
treat with creosote
cover without entry points with metal such as from oil drums
cover without entry points with plastic sheeting
use metal poles
unprotected post
30cm
termite damage occurs rapidly on unprotected posts
!
dowload from www.sheltercentre.com
1 in
trod
uctio
n
2 n
et
3 s
olu
tion
s
4 fe
ncin
g
5 4
1m
2 ten
t 6 p
rocu
rem
en
t 7 a
ssessm
en
t
shelter centreMEDECINS
SANS FRONTIERES
17
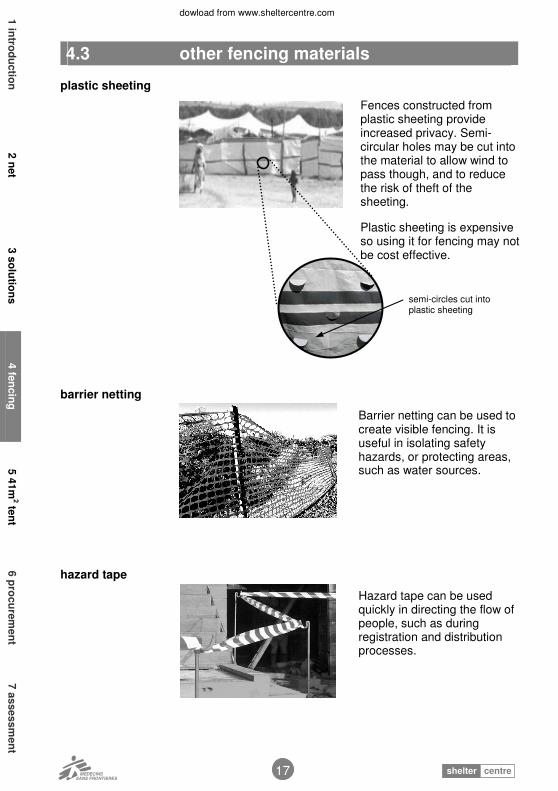
4.3 other fencing materials
plastic sheeting
barrier netting
hazard tape
Hazard tape can be used quickly in directing the flow of people, such as during registration and distribution processes.
Barrier netting can be used to create visible fencing. It is useful in isolating safety hazards, or protecting areas, such as water sources.
Fences constructed from plastic sheeting provide increased privacy. Semi-circular holes may be cut into the material to allow wind to pass though, and to reduce the risk of theft of the sheeting.
Plastic sheeting is expensive so using it for fencing may not be cost effective.
semi-circles cut into plastic sheeting
download from www.sheltercentre.org
18 shelter centreMEDECINS
SANS FRONTIERES
1 i
ntr
od
ucti
on
2 n
et
3 s
olu
tio
ns
4 f
en
cin
g
5 4
1m
2 t
en
t 6 p
rocu
rem
en
t 7 a
ssessm
en
t
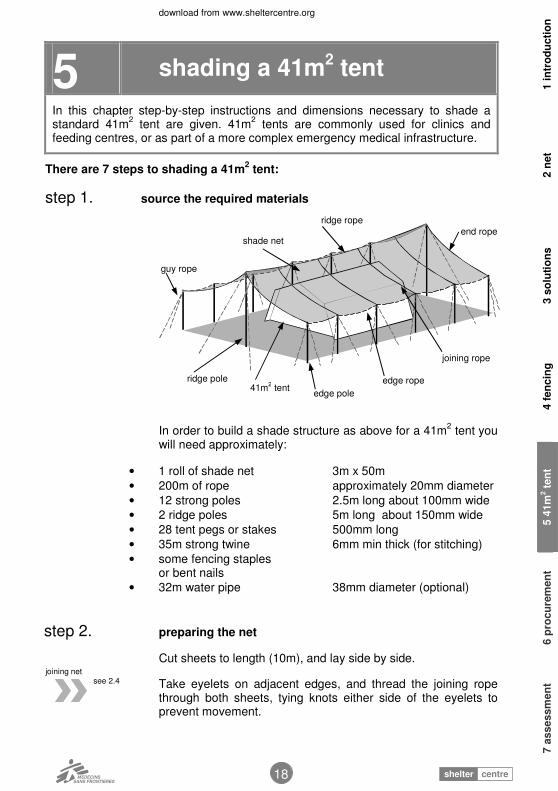
5 shading a 41m2 tent
In this chapter step-by-step instructions and dimensions necessary to shade a standard 41m
2 tent are given. 41m
2 tents are commonly used for clinics and
feeding centres, or as part of a more complex emergency medical infrastructure.
There are 7 steps to shading a 41m2 tent:
step 1. source the required materials
In order to build a shade structure as above for a 41m2 tent you
will need approximately:
• 1 roll of shade net 3m x 50m
• 200m of rope approximately 20mm diameter
• 12 strong poles 2.5m long about 100mm wide
• 2 ridge poles 5m long about 150mm wide
• 28 tent pegs or stakes 500mm long
• 35m strong twine 6mm min thick (for stitching)
• some fencing staples or bent nails
• 32m water pipe 38mm diameter (optional)
step 2. preparing the net
Cut sheets to length (10m), and lay side by side.
Take eyelets on adjacent edges, and thread the joining rope through both sheets, tying knots either side of the eyelets to prevent movement.
joining net see 2.4
shade net
ridge rope
joining rope
end rope
edge rope ridge pole
guy rope
edge pole 41m
2 tent
dowload from www.sheltercentre.com
shelter centreMEDECINS
SANS FRONTIERES
19
1 in
trod
uctio
n
2 n
et
3 s
olu
tion
s
4 fe
ncin
g
5 4
1m
2 ten
t 6 p
rocu
rem
en
t 7 a
ssessm
en
t 1 in
trod
uctio
n
2 n
et
3 s
olu
tion
s
4 fe
ncin
g
5 4
1m
2 ten
t 6 p
rocu
rem
en
t 7 a
ssessm
en
t
Pull both sheets tight, line up the eyelets and thread the rope through both sets of eyelets, along the edge of the sheets.
Continue all the way along, and tie knots as before.
Lay the net out straight, and find the centre line; thread the ridge rope through each eyelet band, at right angles to the joining ropes.
step 3. attach the ridge poles to the net
Securely attach the middle of the threaded end ropes to the top of the ridge poles.
Dig the holes for the ridge poles either side of the tent. These should be approximately 0.8m deep, along the line of the ridge and 16m apart.
Securely attach the ridge rope to the top of the ridge pole at one end. Pull the ridge rope until it is tight and tie it at the other end above the end rope.
step 4. erect the ridge poles
Securely attach the middle of the two long guy ropes to the top of the ridge poles.
Dig holes for the pegs approximately 2m out from the ridge poles.
Place the ridge poles in the holes and drape the shade net across the tent. You may wish to attach spare ropes to the long edges of the shade nets to help with this, as this will make it easier to pull the net over the structure.
Peg out the guy ropes at each end and tension them.
If the ridge rope is sufficiently tight, fill in the hole around each pole and pack it in; if not, bring the net down and adjust the ridge rope until it is tight.
pegs and anchors see 2.5
securing poles see 4.2
download from www.sheltercentre.org
20 shelter centreMEDECINS
SANS FRONTIERES
1 i
ntr
od
ucti
on
2 n
et
3 s
olu
tio
ns
4 f
en
cin
g
5 4
1m
2 t
en
t 6 p
rocu
rem
en
t 7 a
ssessm
en
t
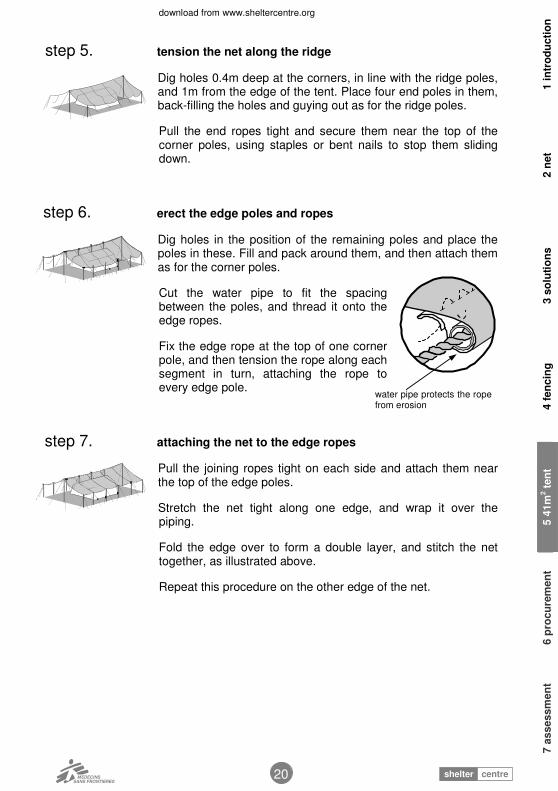
step 5. tension the net along the ridge
Dig holes 0.4m deep at the corners, in line with the ridge poles, and 1m from the edge of the tent. Place four end poles in them, back-filling the holes and guying out as for the ridge poles.
Pull the end ropes tight and secure them near the top of the corner poles, using staples or bent nails to stop them sliding down.
step 6. erect the edge poles and ropes
Dig holes in the position of the remaining poles and place the poles in these. Fill and pack around them, and then attach them as for the corner poles.
Cut the water pipe to fit the spacing between the poles, and thread it onto the edge ropes.
Fix the edge rope at the top of one corner pole, and then tension the rope along each segment in turn, attaching the rope to every edge pole.
step 7. attaching the net to the edge ropes
Pull the joining ropes tight on each side and attach them near the top of the edge poles.
Stretch the net tight along one edge, and wrap it over the piping.
Fold the edge over to form a double layer, and stitch the net together, as illustrated above.
Repeat this procedure on the other edge of the net.
water pipe protects the rope from erosion
do
wlo
ad
fro
m w
ww
.shelterc
entr
e.c
om
s
he
lte
rc
en
tre
ME
DE
CIN
S
SA
NS
FR
ON
TIE
RE
S
21
1 introduction 2 net 3 solutions 4 fencing 5 41m2 tent 6 procurement 7 assessment 1 introduction 2 net 3 solutions 4 fencing 5 41m
2 tent 6 procurement 7 assessment
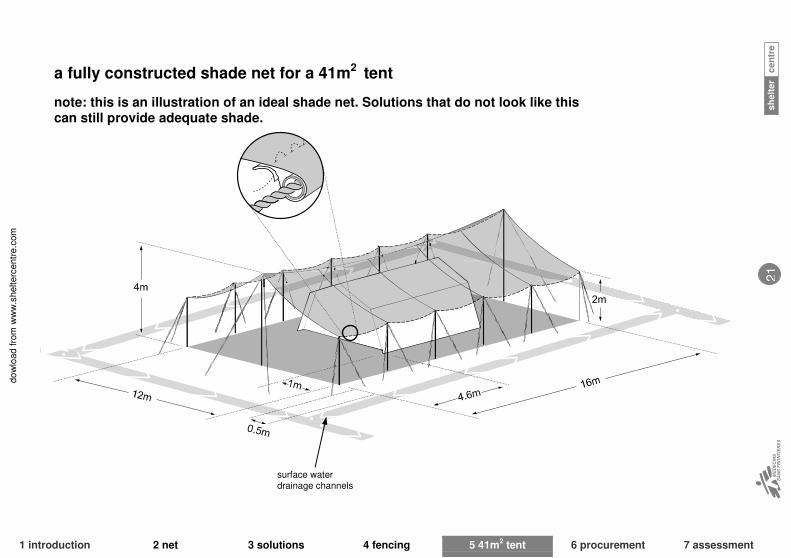
a fully constructed shade net for a 41m2 tent
note: this is an illustration of an ideal shade net. Solutions that do not look like this can still provide adequate shade.
surface water drainage channels
download from www.sheltercentre.org
22 shelter centreMEDECINS
SANS FRONTIERES
1 i
ntr
od
ucti
on
2 n
et
3 s
olu
tio
ns
4 f
en
cin
g
5 4
1m
2 t
en
t 6 p
rocu
rem
en
t 7 a
ssessm
en
t
6 procuring shade net
Where shade net is required, it is important to identify a reliable source of appropriate material. This chapter outlines what to look for when procuring shade net. A method of assessing the quality of shade net in the field is presented in chapter 7.
There are two ways of obtaining shade net:
i. from a stockpile/regular supply from international manufacturers
• recommended for large scale purchase
• ensures strength, UV durability, shade factor and strength meet specified standards and are consistent
• generally better equipped for large scale, emergency response
ii. local procurement
• may be necessary when supply from international manufacturers is not possible or accessible
• rigorous checks should be made to assess the quality of the netting
6.1 shade net properties and requirements
shade factor
Shade factor should be between 70% and 80% for most applications for a combination of strength, shading and air permeability.
70 – 80% shade factor can be achieved by layering shade net. This can often produce greater water permeability and sometimes a stronger mesh, but will require a stronger support structure and may be an inefficient use of materials.
coating / colouring
For shading applications, aluminised netting performs best. Aluminised netting is standard plastic netting that has been coated with a metallic finish, which reflects sunlight.
Where aluminised netting is not suitable, or for non-shade applications, black is best, as it performs best in terms of shading, UV protection and durability.
assessment tools see chapter 7
download from www.sheltercentre.org
1 in
trod
uctio
n
2 n
et
3 s
olu
tion
s
4 fe
ncin
g
5 4
1m
2 ten
t 6 p
rocu
rem
en
t 7 a
ssessm
en
t
shelter centreMEDECINS
SANS FRONTIERES
23
types of plastic fibre
The two types of plastics usually used in these nets are polyethylene (PE) and polypropylene (PP). It is not possible to tell which plastic is used from the appearance of the netting; however, it should be specified by the manufacturer. Netting with a high proportion of PP is best. For large-scale use of shade net, PE or PP netting is recommended as it can be stockpiled in large quantities and will need less testing in terms of strength and shade factor.
Locally procured netting can be useful. However, it will not usually be available on a large scale and will require thorough testing before use. Both durability and environmental impact should be considered before using large quantities of locally procured netting.
Alternative materials to plastic netting include grass thatch and cotton sheeting. Environmental impacts must be assessed if these are used in large quantities.
flat or round plastic fibres
Round fibres are best for the warp, as they are stronger.
Flat fibres are best for the weft, as they increase the surface area providing shade.
knitted or woven plastic fibres
Knitted fabric is generally stronger than woven
If using woven fabric, try to ensure that it is woven using a ‘full-lockstitch’ (refer to manufacturer’s specifications).
Warp spacing (the distance between continuous lengthways fibres) should be no more than 5mm.
eyelets and holes
Good net has a number of reinforced fixing holes or eyelets. The best net has eyelets along 2 parallel reinforced bands, spaced every 2m. This allows the net to be cut between the reinforcing bands and divided, to be used in 2m wide lengths.
assessment tools see chapter 7
use of local resources see 2.6
net variations see 2.1
use of eyelets see 2.4
do
wnlo
ad fro
m w
ww
.sh
elte
rce
ntre
.org
24
sh
elte
rcen
treM
ED
EC
INS
SA
NS
FR
ON
TIE
RE
S
1 introduction 2 net 3 solutions 4 fencing 5 41m2 tent 6 procurement 7 assessment
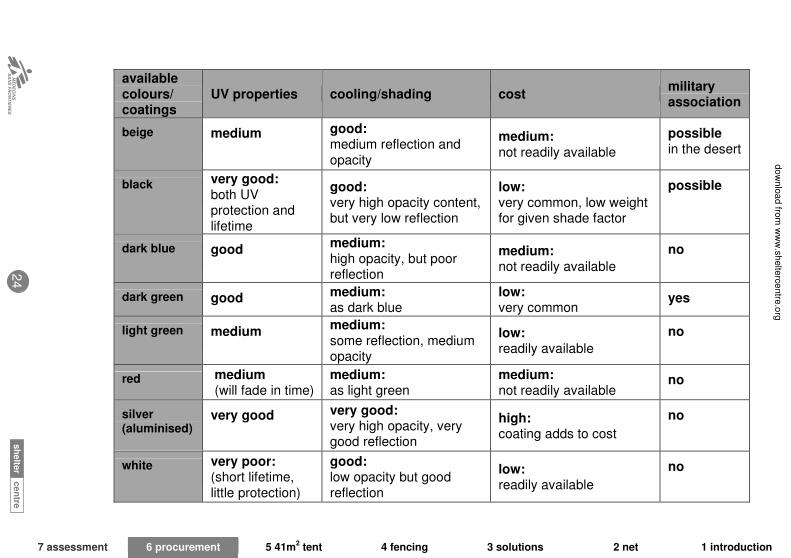
military association
possible in the desert
possible
no
yes
no
no
no
no
cost
medium: not readily available
low: very common, low weight for given shade factor
medium: not readily available
low: very common
low: readily available
medium: not readily available
high: coating adds to cost
low: readily available
cooling/shading
good: medium reflection and opacity
good: very high opacity content, but very low reflection
medium: high opacity, but poor reflection
medium: as dark blue
medium: some reflection, medium opacity
medium: as light green
very good: very high opacity, very good reflection
good: low opacity but good reflection
UV properties
medium
very good: both UV protection and lifetime
good
good
medium
medium (will fade in time)
very good
very poor: (short lifetime, little protection)
available colours/ coatings
beige
black
dark blue
dark green
light green
red
silver (aluminised)
white
download from www.sheltercentre.org
1 in
trod
uctio
n
2 n
et
3 s
olu
tion
s
4 fe
ncin
g
5 4
1m
2 ten
t 6 p
rocu
rem
en
t 7 a
ssessm
en
t
shelter centreMEDECINS
SANS FRONTIERES
25
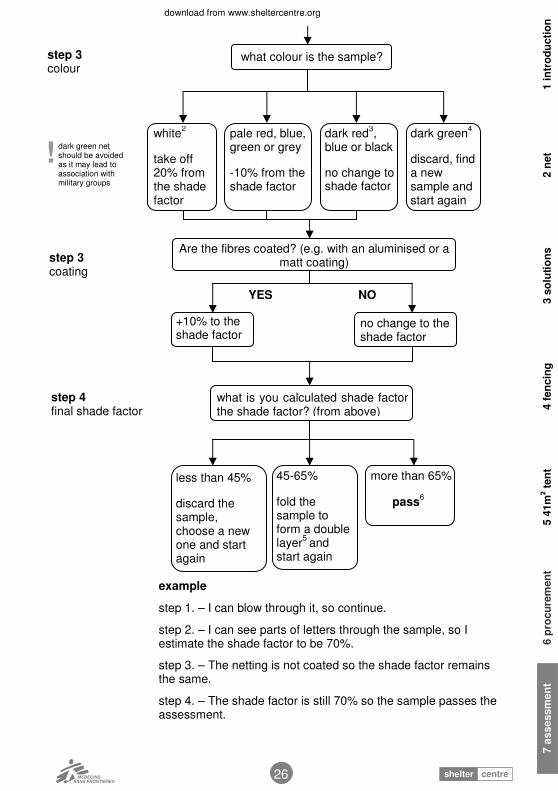
7 assessment of material
In this section a flow chart is provided for testing the suitability of material samples for shading purposes. The test is specific to plastic net samples and should not be used for other material types.
Go through the flow diagram and arrive at a shade net factor.
60% is acceptable 70% and over is good
The test will also tell you about the impacts of air permeability, colour and coating.
`
discard the sample choose a new one and start again
1
shade factor test
i. Place the sample in direct contact with a page of text in this booklet.
ii. Position yourself directly over the sample and keep still.
iii. Try to read the text through the sample.
iv. Use the scale to make an estimate of the shade factor of the sample.
YES NO
I can…
read the text
see some words
see whole letters
see only parts of letters see nothing
if pressed to your face can you blow through the sample material?
sample is air permeable
40
50
60
70
80
shade factor (%)
step 1 air permeability
step 2 shade factor test
download from www.sheltercentre.org
26 shelter centreMEDECINS
SANS FRONTIERES
1 i
ntr
od
ucti
on
2 n
et
3 s
olu
tio
ns
4 f
en
cin
g
5 4
1m
2 t
en
t 6 p
rocu
rem
en
t 7 a
ssessm
en
t
example
step 1. – I can blow through it, so continue.
step 2. – I can see parts of letters through the sample, so I estimate the shade factor to be 70%.
step 3. – The netting is not coated so the shade factor remains the same.
step 4. – The shade factor is still 70% so the sample passes the assessment.
what is you calculated shade factor the shade factor? (from above)
less than 45%
discard the sample, choose a new one and start again
45-65%
fold the sample to form a double layer
5 and
start again
more than 65%
pass6
YES NO
Are the fibres coated? (e.g. with an aluminised or a matt coating)
+10% to the shade factor
no change to the shade factor
white2
take off 20% from the shade factor
pale red, blue, green or grey
-10% from the shade factor
dark red3,
blue or black
no change to shade factor
dark green4
discard, find a new sample and start again
what colour is the sample? step 3 colour
step 3 coating
step 4 final shade factor
dark green net should be avoided as it may lead to association with military groups
!
download from www.sheltercentre.org
1 in
trod
uctio
n
2 n
et
3 s
olu
tion
s
4 fe
ncin
g
5 4
1m
2 ten
t 6 p
rocu
rem
en
t 7 a
ssessm
en
t
shelter centreMEDECINS
SANS FRONTIERES
27
assessment notes
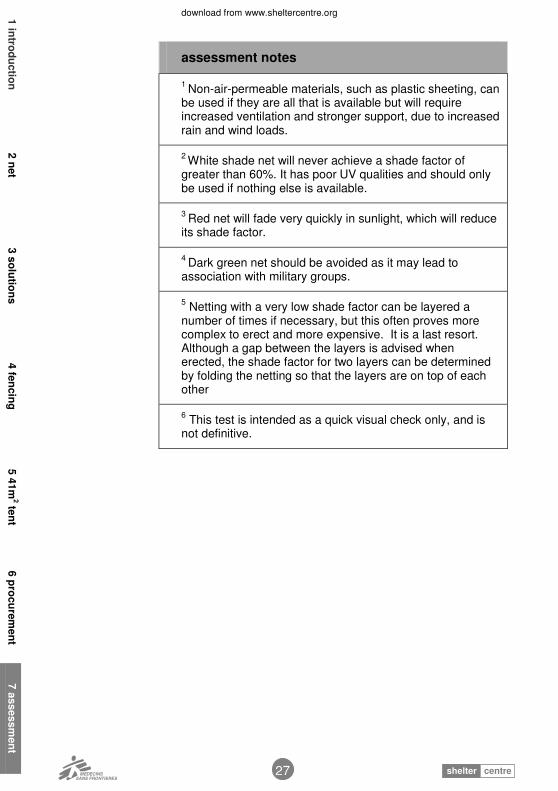
1 Non-air-permeable materials, such as plastic sheeting, can
be used if they are all that is available but will require increased ventilation and stronger support, due to increased rain and wind loads.
2 White shade net will never achieve a shade factor of
greater than 60%. It has poor UV qualities and should only be used if nothing else is available.
3 Red net will fade very quickly in sunlight, which will reduce
its shade factor.
4 Dark green net should be avoided as it may lead to
association with military groups.
5 Netting with a very low shade factor can be layered a
number of times if necessary, but this often proves more complex to erect and more expensive. It is a last resort. Although a gap between the layers is advised when erected, the shade factor for two layers can be determined by folding the netting so that the layers are on top of each other
6 This test is intended as a quick visual check only, and is
not definitive.
download from www.sheltercentre.org
28 shelter centreMEDECINS
SANS FRONTIERES
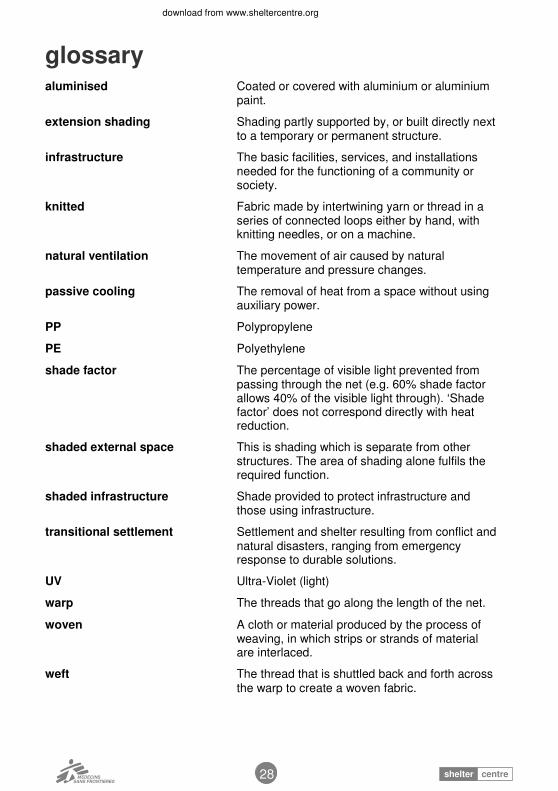
glossary aluminised Coated or covered with aluminium or aluminium
paint.
extension shading Shading partly supported by, or built directly next to a temporary or permanent structure.
infrastructure The basic facilities, services, and installations needed for the functioning of a community or society.
knitted Fabric made by intertwining yarn or thread in a series of connected loops either by hand, with knitting needles, or on a machine.
natural ventilation The movement of air caused by natural temperature and pressure changes.
passive cooling The removal of heat from a space without using auxiliary power.
PP Polypropylene
PE Polyethylene
shade factor The percentage of visible light prevented from passing through the net (e.g. 60% shade factor allows 40% of the visible light through). ‘Shade factor’ does not correspond directly with heat reduction.
shaded external space This is shading which is separate from other structures. The area of shading alone fulfils the required function.
shaded infrastructure Shade provided to protect infrastructure and those using infrastructure.
transitional settlement Settlement and shelter resulting from conflict and natural disasters, ranging from emergency response to durable solutions.
UV Ultra-Violet (light)
warp The threads that go along the length of the net.
woven A cloth or material produced by the process of weaving, in which strips or strands of material are interlaced.
weft The thread that is shuttled back and forth across the warp to create a woven fabric.

download from www.sheltercentre.org
29 shelter centreMEDECINS
SANS FRONTIERES
bibliography Corsellis, T. and Vitale, A. (2005). Transitional Settlement: Displaced Populations. Oxfam GB, Oxford
Davis. J and Lambert R. (Eds) (2002). Engineering in Emergencies: A Practical Guide for Relief Workers, 2nd Edition. RedR /ITDG, London
De Bernardo, A. and Isard, G. (1988). Temporary & semi-permanent buildings for health structures in refugee camps. Médecins Sans Frontières
Howard, J. and Spice, R. (1989). Plastic Sheeting: Its Use for Emergency Shelter and Other Purposes. Oxfam Technical Guide, Oxfam GB, Oxford
Killing, A. and Rand, A. (2003). Guidelines for the Construction of Emergency Relief Infrastructure. The University of Cambridge shelterproject, Cambridge
MSF (1997). Refugee Health. Macmillan, London
MSF (1998). Temporary and Semi Permanent Buildings for Health Infrastructures in Refugee Camps. Médecins sans Frontières Building Department, Brussels
MSF (2006) Logistics Catalogue, International Technical Co-ordination, Brussels
Sphere Project (2004). Humanitarian Charter and Minimum Standards in Disaster Response. Oxfam Publishing, Oxford
UNDRO (1982). Shelter After Disaster, Guidelines for Assistance. Office of the United Nations Disaster Relief Co-ordinator (UNDRO), New York (out of print, but downloadable free from the website of UN/OCHA Online)
UNHCR (1996). Environmental Guidelines. UNHCR, Geneva
UNHCR (2002). Cooking Options in Refugee Situations. UNHCR, Geneva
UN/OCHA (2004). Tents, a guide to the use and logistics of tents in humanitarian relief. UN/OCHA and shelterproject.org, Geneva
UN/OCHA (2006). Exploring key changes and developments in post-disaster settlement, shelter and housing, 1982 - 2006. UN/OCHA, Geneva
Camp Planning Toolkit (currently under development by Shelter Centre in collaboration with Médecins Sans Frontières, to be published in 2008)
Shelter After Disaster – Guidelines for assistance (currently under revision by Shelter Centre in collaboration with UN/OCHA, to be re-published by UN/OCHA in 2008)
download from www.sheltercentre.org
30 shelter centreMEDECINS
SANS FRONTIERES
notes: