Embed Size (px)
Citation preview

Setup Reference Guide for KX-NS1000 to SBC SIP Trunking
Method of connection by "WAN Global IP address directly" (i.e. SBC is the Perimeter Router device.)
Panasonic IP-PBX (KX-NS1000 Version2 series), Media5 Session Border Controller (Mediatrix501 series SBC)
Version 1.1 (PSNJ) 26.Febrary 2013
Attention: The content of this document is made up by verification results. It is no guarantee.
Models Used during verification:
Panasonic IP-PBX KX-NS1000 (Ver2)
Media5s SBC Mediatrix501 (Firmware 5.35-M4)
Panasonic SIP Phone KX-UT series SIP telephones (Version 01.221)
Panasonic System Networks Co., Ltd.

2
Change history
Support PSN (Japan) Version
NO. CONTENTS OF REVISION
Checked by Checked by Author
Oonishi Ver. 1.0 First edition Jan,24 2013
Oonishi Ver. 1.1
The item of “SIP Switch Advanced”
for Method 2 is added. Feb,26 2013

3
Table of Contents
Setup Reference Guide for KX-NS1000 to SBC SIP Trunking ...................................1
Change history ............................................................................................................2
Table of Contents ........................................................................................................3
Trademarks .................................................................................................................3
1. Introduction and Objective ......................................................................................4
2. Approach to interconnection ...................................................................................5
3. System configuration example ................................................................................6
3.1 Diagram of system configuration example .....................................................6
3.2 Settings ..........................................................................................................6
3.3 SBC Firmware Revision .................................................................................8
3.4 KX-NS1000 and UT-Extension Firmware Revision ... ....................................8
4. Procedure for Installing the media5’s SBC SIP Trunking .......................................9
5. SIP Trunk setting of the Medi5 SBC .....................................................................11
5.1 [Method1] Wizard Settings of SIP Trunking .................................................11
5.2 Manual Settings of SIP Trunking .................................................................20
6. Further SBC Information and Configuration ........................................................22
7. Virtual SIP Trunk set-up of the NS1000 ...............................................................23
8. Operation .............................................................................................................28
9. Management ........................................................................................................29
9.1 Reset SBC to Factory Default ......................................................................29
9.2 Time Setting .................................................................................................29
9.3 Configuration Backup ...................................................................................30
9.4 Restore Setting .............................................................................................31
9.5 How to clear the SIP Trunk Setting (SIP Trunk only) ...........................33
10. Troubleshooting ..................................................................................................32
10.1 REGISTER Flood Attack .............................................................................34
11. Media5 SBC SIP Trunk Configuration Sheet (Type: WAN Connection) ..............36
Trademarks
• Microsoft, Windows, Windows XP, Vista, 7 and Internet Explorer are either registered trademarks
or trademarks of Microsoft Corporation in the United States and/or other countries.
• All other trademarks identified herein are the property of their respective owners.
• Microsoft product screen shot(s) reprinted with permission from Microsoft Corporation.

4
1. Introduction
Objective:
The Media5 Session Border Controller (Mediatrix501 series SBC) supports a Back-To-Back User
Agent to normalize SIP Signaling differences between the Service Provider and customers’ specific
SIP implementations.
[Mainly benefits for IP-PBX]
1. Service Provider Demarcation Point
2. Normalization of SIP Signaling
3. Wide Interoperability with SIP vendors
4. Resolution of NAT traversal issues
This Setup Reference Guide describes the configuration to interconnect between the Panasonic
IP-PBX (KX-NS1000 Version2 series), the Media5 SBC (Mediatrix501 series), and ITSP (Internet
Telephony Service Provider) through PBX virtual SIP Gateway.
The items above are interconnected using SIP. The global IP address (also known as public IP
address) of the main office is used to interconnect them.
Results (confirmed operation):
1-1 Receiving and making a Call
Calls between SIP Trunking are possible. The Caller ID (external phone number) is displayed on the
LCD screen of SIP Phones in other party.
Incoming calls from SIP trunk lines also display the Caller ID (according to system settings).
* Require confirmation: ITSP Service requirement.
1-2 Conversation with G.711 and G.729
Use of the above codec is possible, providing PBX settings allow this. (e.g. KX-NS1000 (V-SIPGW)
settings)
1-3 Placing a call on-hold and retrieving a Call that is on-hold
These features are confirmed by KX-NS1000 control (Not support SIP Hold method for SIP Trunk).
Attention: The content of this document is made up by verification results. It is no guarantee.

5
2. Approach to Interconnection
(1) This document is on the premise that it’s completed the SBC functions and Network settings.
Refer the “Setup Reference Guide for KX-NS1000 to SBC interconnection” if required.
(2) The SBC is installed as the main router in the head office. For this setting of the SBC, WAN and
LAN (ET1) interface are used. All SIP traffic between the IP-PBX and the internet is routed
through the SBC. The SBC is set-up be a DHCP server and also as a NAT device.
(3) The SBC operates to ensure correct interconnection between the IP-PBX V-SIPGW16 virtual
Circuit card and the ITSP.
The SBC provides the following functions:
- ITSP and PBX SIP Trunk signaling solution and address translation within SIP messages.
- PBX (any PBX extension) and ITSP can be seamlessly connected by the use of the SBC
(4) We recommended that will be use the port number 5060 of receiving of SIP in SBC.
The SBC is likely to have some interoperability issues when using different SIP port of this.
The SBC will check all SIP messages and modify them even if as use the SIP Trunk in the PBX.
It means the SBC receiving Port Number is to use the same "5060" for SIP-Extension and SIP
Trunk. If require to change it, you need to do it in a specific way.
Therefore we strongly recommend that you set-up the port 5060 of SBC, due to the specification
of the Media5 SBC.
Refer the “Mediatrix Manual or Media5 Support Portal” if required.

3. System configuration example
3.1 Diagram of system configuration example
3.2 Settings:
This section describes the network address scheme. Refer to later sections regarding entry of these
and other settings.
3.2-1 SBC – Contents of Main Network Settings (Example)
Item Configuration Description
Operational mode Router SIP Trunk and SBC for WAN
WAN Interface: IP address 10.0.0.1 (Change to
Global IP address *1)
Required (Information offered by provider)
WAN Interface: Netmask 255.255.255.248 Required (Information offered by provider)
WAN Interface: Gateway 10.0.0.6 (*1) Required (Information offered by provider)
LAN interface IP address 192.168.0.254 SBC LAN IP address
LAN interface Netmask 255.255.255.0 SBC LAN side subnet mask
Receiving SIP port 5060 Used SIP Port(Do not use different number)
Recommended set value.
Used RTP port 35000 - 35999 Ports for use for RTP streams.
Primary DNS 172.16.255.1 Required (Information offered by provider)
DHCP IP Range From -To 192.168.0.2 - 50 SBC DHCP Server: Enable, Specify IP Range
6

7
3.2-2 SBC -- Configuration of SIP Trunk (Example)
Item Configuration example Description
ITSP Information
Service Name Example ITSP Comment only (Example)
SIP Provider domain sip.example.com FQDN or IP address Required
(Example)
Outbound Proxy FQDN or IP address if Required
(Example)
User Name 81929990001 Required, Example
Authentication User ID 81929990001 Required, Example
Password pass1234 Required, Example
Incoming Trunk Match 81929990001 If it’s different an Incoming number
and User Name, Required.
Forward to 123456 PBX Account Number, Required
(Same as PBX User Name)
SIP Incoming Number 81929990001 Required, Example
PSTN Incoming Number 0505551234 Required, Example
PBX Information
PBX’s local IP address 192.168.0.101 Required, Example
Account(Number) for PBX to
registration
123456 Required, Dummy Example
User ID Authentication 123456 Required, Dummy Example
Password 123456 Required, Dummy Example
DDI/DID Table / Destination 123456 / Destination:201 Example only
3.2-3 IP-PBX (NS1000) - Contents of Main Network Settings (Example)
PBXs IP Address/Ports Settings
Item Configuration example Description
PBX MPR IP address 192.168.0.101 Example only (Fixed IP)
PBX DSP IP address 192.168.0.102 - 105 Example only (Fixed IP)
Net Mask 255.255.255.0 Example only
Gateway 192.168.0.254 SBC LAN IP address
DNS Settings
(Preferred DNS IP Address)
172.16.255.1
or 192.168.0.254 (SBC LAN)
Information offered by provider
or SBC LAN IP address
PBX DHCP Server Feature
Starting IP address
Ending IP address
192.168.0.51
192.168.0.100
If required
Note) Set the different IP range
from SBC’s DHCP IP range.

8
3.2-4 IP-PBX (NS1000) – Configuration of Port Property – Virtual SIP Gateway – Main (Example)
Main item Configuration example Description
Channel Attribute Basic Default: Not Used
Provider Name SBC Comment only
SIP Server Name Blank
SIP Server IP Address 192.168.0.254 SBC LAN IP Address Example
SIP Server IP Port Number 5060 Default
3.2-5 IP-PBX (NS1000) – Configuration of Port Property – Virtual SIP Gateway –Account (Example)
Account item Configuration example Description
User Name 123456 Necessary dummy, example
Authentication ID 123456 Necessary dummy, example
Password 123456 Necessary dummy, example
3.2-6 IP-PBX (NS1000) – Configuration of Port Property – Virtual SIP Gateway –Register (Example)
Register item Configuration example Description
Register Sending Interval(s) 300 Recommended (Default:3600)
3.2-7 Maintenance PC - Contents of Network Settings (Example)
Item Configuration example Description
Maintenance PC IP address 192.168.0.200
(Example)
(DHCP or fixed ; For fixed, confirm
usable IP address first)
Subnet Mask 255.255.255.0 Example
Gateway Unused (in Fixed IP)
DNS Unused (in Fixed IP)
3.4 SBC Firmware Revision
Section Installed Firmware
Device Information 5.35-M4 or Later
3.5 KX-NS1000 and UT-Extension Firmware Revision
Section Installed Firmware
NS1000 PBX Version 002.02043 or Later
Version Information 01.221 or Later

9
4. Procedure for Installing the Media5’s SBC SIP Trunk.
There are 2 methods to install SBC at same local site as PBX.
[ Method 1 ] Using of Wizard
Connect to SBC and then configure SBCs SIP Trunk using the web online Wizard.
*Note) Require the internet access line at installation.
[ Method 2 ] Manual Setting
Connect to SBC and then manually configure the SIP Trunk of SBC using web user interface.

5. SIP Trunk setting of the Medi5 SBC
5.1 [Method 1] Wizard Settings of SIP Trunking
5.1-1 Access to Web Home and Click on [Log in]. Example http://192.168.0.254/
Here is on the premise that it’s completed of the SBC functions and Network settings.
Refer the “Setup Reference Guide for KX-NS1000 to SBC interconnection” if required.
10
5.1-2 Enter Network Password Username: admin / Password: admin (Default) and Click on [OK]
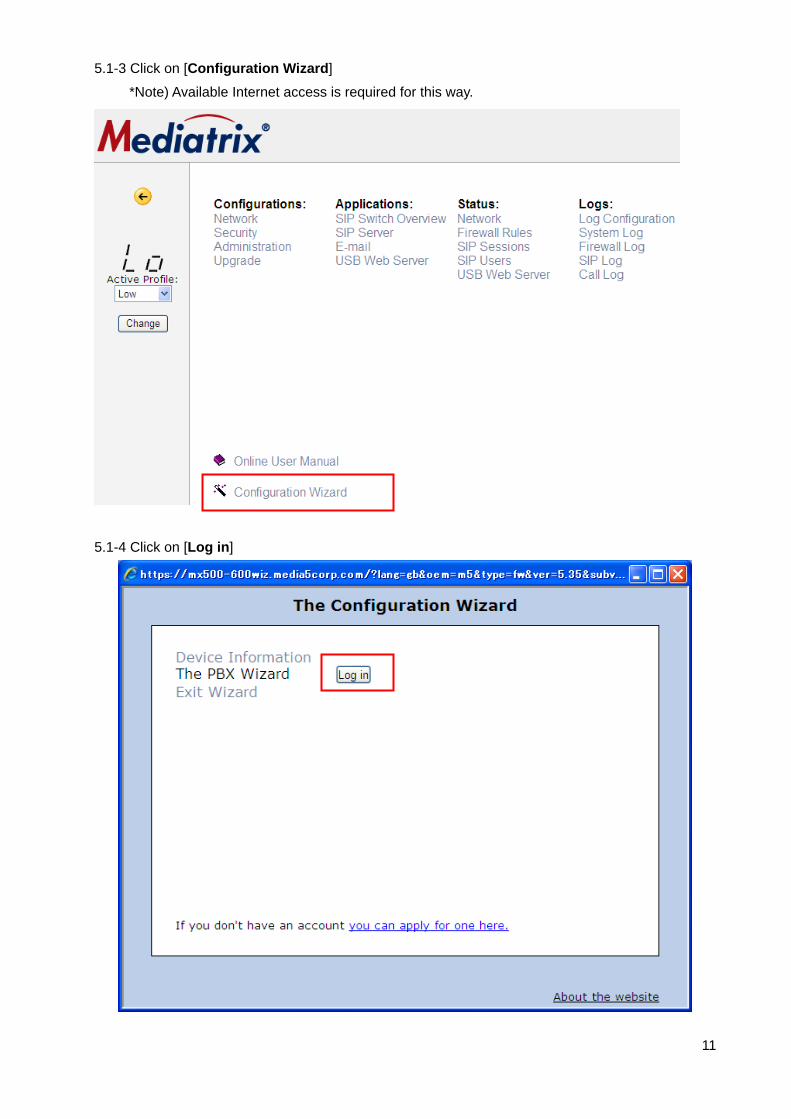
5.1-3 Click on [Configuration Wizard]
*Note) Available Internet access is required for this way.
11
5.1-4 Click on [Log in]

5.1-5 Enter Username: media5 / Password: wizard and then click on [Log in]
5.1-6 Appear the [PBX Wizard] window.
5.1-7 SELECT YOUR ITSP: [Generic] / SELECT YOUR PBX: [Generic PBX] and click on [Next].
12

5.1-8 Appear the [The Generic SIP-Trunking service] window.
5.1-9 Configure the Generic SIP-Trunking service
Item Configuration Description
SELECT YOUR TRUNK
SERVICE
Service 2 – One accounts to be registered Select
SIP Server sip.example.com Example
Outbound Proxy * If required
Select your firewall
configuration
Check the [Use the E-SBC as Firewall] Default
5.1-10 Click on [Next]
13

5.1-11 Click on WAN Port: Keep current settings (Default) and Click on [Next]
5.1-12 Configure the PBX Information (Example).
Item Configuration Description
The PBX’s Local IP address 192.168.0.101 (PBXs IP address)
The PBX’s SIP domain (*Blank)
Account (number) for PBX to register on 123456 (Same as PBX)
User ID for authentication at that account 123456 (Same as PBX)
Password for that account 123456 (Same as PBX)
Domain name(s) in From header that the
PBX may use when addressing the E-SBC
(*Blank)
14

5.1-13 Click on [Next]
5.1-14 Confirmation of Caller ID handling. Click on [Next]
5.1-15 Configure “Add your telephone numbers” and then Click on [Next]
Item Configuration Description
Telephone no 81929990001 Example
Authentication Id 81929990001 Example
Password pass1234 Example
15

5.1-16 Confirmation “Optional general settings” and then Click on [Next]
16
5.1-17 Confirmation “Dynamic DNS” and then Click on [Next]
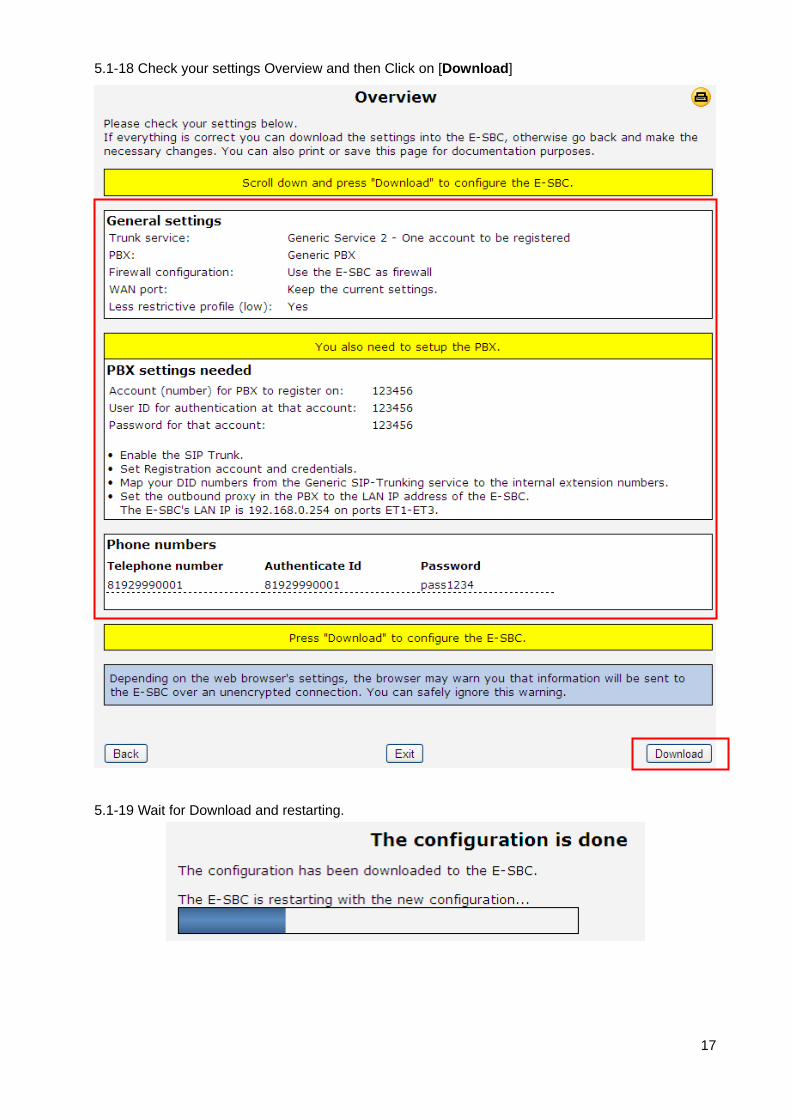
5.1-18 Check your settings Overview and then Click on [Download]
5.1-19 Wait for Download and restarting.
17

5.1-20 The configuration is done and then click on [Close the window and log out] menu.
5.1-21 Move the mouse over [Applications] and select [SIP Trunk].
5.1-22 Completed the SBCs SIP Trunk Settings using Wizard. (Example)
Cofigure and Confirm of SIP Trunking configuration.
- (1) SIP Trunking service (Confirmation)
- (2) Main Trunk Line (Configuration and confirmation)
Must set the “Forward to” same as value between SBC and PBXs User Name. *Important
Configure “81929990001” --> “123456” (It’s an entered account in PBX (Dummy))
- (3) Can add some Incoming Trunk match if required in PBX Lines. *Important
For example, ITSP provide some different Incoming number for PSTN: 0505551234
Add [Incoming Trunk match: 0505551234 / Forward to PBX Account: 123456]
18

- (4) Setup for the PBX (Confirmation)
19
5.1-23 Click on [Apply]
5.1-24 Click on [Click here to save permanently]
[SIP Trunking settings has been completed] Go to 23 page of “PBX Trunk settings” .

5.2 [Method 2] Manual Setting of SIP Trunking
5.2-1 Move the mouse over [Applications] and select [SIP Trunk].
5.2-2 Configure SIP Trunking Service
Item Configuration Description
Service name Example ITSP Comment only, Example
Service Provider domain sip example.com Example
5.2-3 Configure [Main Trunk line]
Item Configuration Description
Reg.Acc Check box: Enable Required
User Name 81929990001 ITSP’s Account information, Example
Authentication User ID 81929990001 ITSP’s Account information, Example
Authentication Password pass1234 ITSP’s Account information, Example
Incoming Trunk match 81929990001 ITSP’s Account information, Example
Forward to 123456 PBXs SIP Trunk Username
20

5.2-4 Can add some Incoming Trunk match if required in PBX Lines. *Important
For example, ITSP provide some different Incoming number for PSTN: 0505551234
Item Configuration Description
Incoming Trunk match 0505551234 PSTN Incoming Number
Forward to PBX Account 123456 PBXs SIP Trunk Username
5.2-5 Configure [Setup for the PBX]
Item Configuration Description
PBX name PBX Comment only, Example
PBX SIP Address [email protected] Username @ SBC LAN IP
Authentication User ID 123456 PBX User Name
Authentication Password 123456 PBX pass words
PBX IP address * No need to enter. As select the
“Registration Address” in the below
Forward incoming calls to PBX
using
Registered Address Select
Other settings Default If required
5.2-6 Click on [Apply]
5.2-7 Click on [Click here to save permanently]
21

5.2-8 Move the mouse over [Applications] and select [SIP Switch Advanced]
5.2-9 Configure SIP Switch Advanced
Item Configuration Description
Dial Plan On Default: Off
Tail Select: “ 0-9, + - # * ” Default: None
Minimum Tail 3 Default: Blank, Number of digits
Action A&Forward Default: Allow
Forward to SIPTRUNK1 Default: Blank Fill in SIPTRUNK1
5.2-10 Click on [Apply]
5.2-11 Click on [Click here to save permanently]
[SIP Trunking settings has been completed]
6. Further SBC Information and Configuration
All documents are available online on the Mediatrix Download Portal at
https://support.mediatrix.com/DownloadPlus/Download.asp.
Or on the web site at the following link
http://www.mediatrix.com/en/sessionbordercontroller Under the documentation tab.
22

7. Virtual SIP Trunk set-up of the NS1000
7.1 Start up software of web browser. (Internet Explorer Version 7 or later, Mozilla Firefox 6 or later)
7.2 Access the KX-NS1000 Web Maintenance Console page (using previously read IP address).
e.g. http://192.168.0.101/
7.3 Enter Username: INSTALLER, Password:1234 (Example) ---> Next, click on [Login].
23
7.4 Access to initial web page (HOME) and Click on [Setup].

7.5 Confirmation of Activation Key (To install if you need the Activation key.)
Click on [PBX Configuration] --> [1.Configuration] --> [1.Slot] --> [Activation Key]
7.6 Confirmation of “IP Trunk (ch) Activation key “(In this example case, IP Trunk (ch):4 ).
7.7 Confirm, then click on [OK] to close page.
Install the IP Trunk (ch) Activation key if required.
7.8 Configuration of Virtual SIP Gateway
Click on [PBX Configuration] --> [1.Configuration] --> [1.Slot] --> [Virtual]
--> [V-SIPGW16]
24

7.9 Configure [V-SIPGW16] of an additional card to PBX. -->
Select “Virtual 16-Chanel SIP Trunk Card Total number of cards”.
(How to make the new V-SIPGW when required) Add 1 card (Example)
25
7.10 Message window appears --> Click on [OK]
7.11 Move the mouse pointer over the installed [V-SIPGW16] and Click on [Port Property]

7.12 Click on No.1 Port / Connection of [Fault] --> and then Click on [OUS]
7.13 Click on [Channel Attribute] of No.1 --> and select [Basic channel]
7.14 Configure the Provider Name: SBC (Comment only, Example)
And SIP Server IP Address: 192.168.0.254 / Port: 5060 (SBC LAN IP Address/Port, Example).
7.15 Click on [Account] and configure the [User Name] / [Authentication ID] / [Password] (Example).
Username: 123456 / Authentication ID: 123456 / Password: 123456
26

7.16 Click on [Register] and configure the [Register Sending Interval(s)]: 300 (Recommended)
27
7.17 Click on [Apply]
7.18 Click on appropriate Number and Connection [OUS] of Connection --> Click on [INS]
7.19 Confirmation of Connection Status [INS]
Until SBC will be correctly set-up and registered, will be shown [Fault] status.
7.20 Click on [OK] to close page.

7.21 Configure [DDI/DID Table] if Required.
DDI / DID Number: 123456 , DDI /DID Destination(Day): 201 (Example)
8. Operation
Try the basic calls
8.1 Making calls
Can the Caller ID is displayed on the LCD screen of PBXs Extensions?
8.2 Incoming calls
Can the Caller ID is displayed on the LCD screen of PBXs Extensions?
8.3 Disconnected call
Can caller and callee are disconnected each other properly?
8.4 Cancel call
Can caller and callee cancel each other properly?
28

9. Management
9.1 Reset SBC to Factory Defaults
If you wish to you can reset all settings to their original values, so your Mediatrix 501 Series unit is
setup the same way as when delivered from the factory.
-1. Press and hold [SET] (1) pressed for 3 seconds, to enter setup mode.
-2. Press [SEL] (2) repeatedly until ”RST” appears in the display.
-3. Press [SET](1).
-4. The question ”Clear all?” appears, and then ”no”.
-5. Press [SEL](2) to choose ”YES”.
-6. Press [SET](1).
9.2 Time Setting
Time setting will be useful for analyzing some kind of problems.
9.2-1 Move the mouse [Configurations] --> [Administration] --> in the Time section.
9.2-2 Configure the Time Server IP address, this IP is PBX IP address.(Example)
9.2-3 Click on [Apply] 29

9.3 SBC Configuration Backup
9.3-1 Move Mouse over [Configurations] and Select [Administration].
30
9.3-2 Enter the Password: 123456 and then Click on [Backup to file]. Example
9.3-3 Click on [Save]

9.3-4 Save As
Select the Save Folder and Enter the File name [settings.txt] Example(Default).
And Click on [Save]
31

9.4 Restore Settings
9.4-1 Enter the Password: 123456 (When saving) and then Click on [Browse…].
32
9.4-2 Choose file: settings.txt (Example) and then Click on [Open].

9.4-3 Click on [Go]
33
9.4-4 Rebooting, please wait… after the restore was successful.
9.5 How to clear the SIP Trunk Settings (SIP Trunk only)
9.5-1 Move Mouse over [Applications] and Select [SIP Trunk].
9.5-2 Click on [Clear] and Can clear the SIP Trunk settings.

10 Troubleshooting
10.1 REGISTER Flood Attack
The Figure below shows a REGISTER Flood attack example.
The attack begins with OPTIONS message. Then, the attacker sends a great many REGISTER
messages. The source address changes irregularly.
The symptom of this type of attack is the PBX temporarily becomes un-responsive,
(It is very busy sending “404 Not Found” messages until the attacks over).
Countermeasure:
In the Switch Advanced, Configure a new entry in the Incoming Call Blacklist from captured packets.
10.1-1 Move mouse over Applications in SIP Advanced.
34

10.1-2 Configure a new entry in the Incoming Call Blacklist from captured packets.
User-Agent=*Attacker* (Example only)
These are default setting value.
Enter the new entry in Blacklist..
10.1-3 Click on [Click here to save permanently]
35

36
11. Media5 SBC SIP Trunk Configuration Sheet (Connection type: WAN Connection)
Item Configuration Description
SBC Network Setting
Operational mode Router SIP Trunk and SBC for WAN
WAN Interface: IP address Required (Information offered by provider)
WAN Interface: Netmask Required (Information offered by provider)
WAN Interface: Gateway Required (Information offered by provider)
LAN interface IP address SBC LAN IP address
LAN interface Netmask SBC LAN side subnet mask
Receiving SIP port 5060 Used SIP Port(Do not use different
number) Recommended set value.
Used RTP port Ports for use for RTP streams.
Primary DNS Required (Information offered by provider)
DHCP IP From
DHCP IP To
SBC’s DHCP Server: Enable
Specify an IP range.
ITSP Information
Service Name Comment only
SIP Provider domain FQDN or IP address Required
Outbound Proxy FQDN or IP address Required
User Name Required
Authentication User ID Required
Authentication Password Required
Incoming Trunk Match If it’s different an Incoming number and
User Name, Required.
Forward to PBX Account Number, Required
(Same as PBXs User Name)
PSTN Incoming Trunk Match If Required.
Forward to If Required
Setup for the PBX
PBX Name PBX Comment only, Example
PBX SIP Address [email protected] Username @ SBC LAN IP
Authentication User ID 123456 PBX Username
Authentication Password 123456 PBX Account password
PBX IP address No need
Forwarding incoming calls to
PBX using
Registered Address Select