Embed Size (px)
Citation preview

Audio Engineering 1 & Audio for Video Lab 2 Pro Tools I/O & Microphone Setup
An amateur practices until they get it right. A professional practices until they can’t it wrong.
Bradford Cox – Audio Engineering 1 & Audio for Video Page # 1 AE1_Lab02b_MicSetup.doc, v160802
Setting up Pro Tools I/O & connecting a microphone for Recording The purpose of this lab is to demonstrate the ability to correctly connect a microphone to the Fast Track Pro interface in such a way that it can be used for multi-track recording and playback. A second goal is to record a few tracks of audio through the microphone and console into the Pro Tools software and monitor each track separately. After experimenting with track volume and pan, you will reassign all of the tracks to the same output and use the mixing console to change the volume and pan of each track. The final goal is to make a bounced file of the Pro Tools session and bounce those tracks to disk. Take the opportunity to ask questions for clarification. Take notes and ask questions, often. Make sure the same Pro Tools setup options covered in lab one (page 2) are true here before you get started. Starting up Pro Tools: 1) Run Pro Tools
Depending on which lab station you are working on and depending on who was last on that station you will be presented with either no options or a window will come up asking you what kind of session you want to create. You want create a new blank session. Never create a session from the template. If no window came up asking you what kind of session you want to create then just press CMD + N to create a new session. Set your sample rate to be 48k and your bit depth to be 24bit, Stereo, .wav
2) Name the session AE1_Lab02_YourLastName and save it somewhere that you can recall it later. Just remember – Everything on the desktop gets erased when the computer reboots. Save your work to a folder on the Student Folder under YOUR name. NEVER let the school’s computers be the only copy you have. Copy your work to your flash drive often.
3) CMD + SHIFT + N to create tracks. In one step (before you hit return or Enter) create: a. 4 Mono Audio tracks (CMD SHIFT N, or CMD SHIFT KP + (Plus to add track types, minus
to take away track types). Where it says “in” you have a choice of Samples (audio tracks) or Ticks (MIDI tracks) to change the track clock base (samples/ticks) press CTRL OPT CMD á or â to go between the two. Audio tracks SHOULD be sample based.
b. 1 Mono Aux track - CMD Arrow keys (down/up, right/left) to change type of track and number of channels. Experiment to see which command does what.
c. 4 Stereo Audio tracks d. 1 Stereo Aux e. 1 Stereo Master Fader. Your screen should look like this:
If your screen doesn’t look like this try to make it look like this. You should NOT have to have used the mouse to get this done, but get it right. Use the mouse if you absolutely have to.
f. Press Enter and Pro Tools will churn a bit then all of these tracks appear in the edit window on your screen.
4) SAVE YOUR WORK OFTEN (CMD + S)
Audio Engineering 1 & Audio for Video Lab 2 Pro Tools I/O & Microphone Setup
An amateur practices until they get it right. A professional practices until they can’t it wrong.
Bradford Cox – Audio Engineering 1 & Audio for Video Page # 2 AE1_Lab02b_MicSetup.doc, v160802
Set up i/o: If you are using your Pro Tools rig, you may not have 8 channels, especially of you are using a computer with just an iLok, no audio interface. You have two channels only. The rules are the same, but you will be using only the two channels, L & R, instead of all 8 channels. As a general rule – Odd numbered tracks are “left”, even numbered tracks are “right”. 1) Under the Setup pull down menu, go to I/O. A window pops up. 2) Under the Input Tab. Press and hold OPT then Click on an unhighlighted input. All inputs should be
selected. Click on the “Delete Path” button in the lower left area of that window. 3) Under the Output Tab, do the same thing – delete all outputs. Continue to Insert & Bus tabs. You are
now starting from scratch, which is a good thing. You never know who has been doing what on this computer or how good/bad they are at running Pro Tools before you got there. It is always best to start from a known clean setup.
4) Proper order for creating new paths for inputs, outputs, busses & inserts. But first – What is a “path”? A path is the physical or virtual (software) audio plumbing through which audio will flow. Think of it like connecting hoses to spigots. If you follow this order you will create these paths very quickly.
a. With the Input tab selected, click on the New Path button in the lower left of this window.
b. A “New Path” window pops up like the image to the right here. Put a check in both boxes to “Add default channel assignments” and “Auto-create sub paths”.
c. Assign the number of channels: For now, always create a stereo input & outputs.
d. Click on “Create” and a window similar to this pops up: e. Click on the triangle next to the Input name and you will see it
expand to the Mono Left and Mono Right inputs. f. Double click on the name of the Input and change the
Input name to be your name. The sub-paths are automatically renamed.
g. Route the channels to the hardware: Click on box “1”. If you did the stereo creation correctly there will be an L R in columns 1 & 2.
h. Creating a Sub Path: Delete the input you just created by highlighting it and click on Delete Path. Create a New PathIn the lower left corner of this window click twice on “New Sub-Path” and two new paths will appear under the parent path you just created. They should already come up as mono assignments – The “M” in the column.
i. Route the odd numbered track to the “L” channel and the even number to the “R” channel. e.g. Input 1-2.L to Input #1 and Input 1-2.R to Input #2 and so on.
j. If you don’t like the .L & .R names just double click in the name field and type in whatever you like. Maybe instead of Input 1-2.L and Input 1-2.R you want to label them Input 1 and Input 2. Go for it. You can name them whatever you want. For the lab that you hand in label the input YOUR NAME.
5) If you had an interface that had multiple Inputs and Outputs you would repeat this process until you have all Inputs assigned. Continue to Output, Inserts and Busses. An example of Outputs would look like this with the .L and .R removed and replaced with the mono routing number:

Audio Engineering 1 & Audio for Video Lab 2 Pro Tools I/O & Microphone Setup
An amateur practices until they get it right. A professional practices until they can’t it wrong.
Bradford Cox – Audio Engineering 1 & Audio for Video Page # 3 AE1_Lab02b_MicSetup.doc, v160802
6) It would be a good idea to save this setup configuration, provided you did it correctly, so that when you come back to the lab station, all you have to do is load this preset configuration. Loading a known working configuration will avoid a lot of problems in the future. You need to get used to creating, exporting and importing I/O settings.
a. In the I/O Setup window, click on Export Settings. b. A window comes up asking you what you want to call it and where you want to save it. Doing
this is up to you and requires forethought in that should you save it to your USB Flash drive so no matter where you go, you have your configuration with you? Be sure to create a folder on your flash drive that contains all things associated with this class.
7) Click OK in the lower right corner. If you did everything correctly Pro Tools will go back to the Edit window. If anything is wrong you will get an error window that you must address. You must resolve the conflict in order to get out of this window. If you are totally frazzled and the lab guy can’t help, then just load a preset I/O and wait for a lab person or student who knows what they’re doing. The most common mistake is clicking the LR on an input or output that already has an LR associated with it. There can only be ONE L and One R for each vertical column.
8) If you clicked OK and no error message came up, go back to pull down menu - Setup > I/O and click on Export Settings. Browse to your USB/PIN drive and save that setup. This way, no matter who was on the lab station before you, all you have to do is import the known working and properly setup I/O and you will never have problems. Remember to save this to a folder on your flash drive that has all things associated with this class. Be very sure you give it a unique descriptive name so that you can find it again.
9) Your tracks will now have “no input” and “no output” assigned to them and will appear grey. That is okay for now. This exercise is to get you familiar with the plumbing in Pro Tools. We will address I/O issues in the next section “Setting up for this Lab”.
10) Save and close this session but leave Pro Tools running. CMD + S to save. CMD + SHIFT + W to close the session but leaves Pro Tools still running.
Setting up for this Lab: - If you try to run a session from your flash drive – Pro Tools will crash. 1. Create a new Pro Tools Session. CMD + N Sample rate 48k, Bit depth 24bit. File type .Wav. Save it,
calling it AE1_Lab02a_YourName (If the computer locks up the start this section again but use the sample rate of 44.1k and bit depth of 16bit)
2. Create eight new mono audio tracks: CMD + SHIFT + N. Type in the number 8. If the last field is set to ticks, change the timing to be samples (CTRL + OPT + CMD + á or â) and hit ENTER. You don’t have to use the mouse, as a matter of fact, stop using the mouse sooo much. If a click point is highlighted, like the CREATE button here, hitting the ENTER key is just like clicking on that button, but WAY faster.
3. All inputs need to be cascaded e.g. Track 1 is input 1, Track 2 is input 2, basically Odd numbered tracks go to the left, Even numbered tracks go to the right. We need to cascade the outputs. Press and hold OPT + CMD, click on Track 1 output and select Interface Output 1 (NOT Output 1-2 (Stereo)) and all outputs will have been cascaded.
You are now ready for the mic lab, input, recording portion of the lab.

Audio Engineering 1 & Audio for Video Lab 2 Pro Tools I/O & Microphone Setup
An amateur practices until they get it right. A professional practices until they can’t it wrong.
Bradford Cox – Audio Engineering 1 & Audio for Video Page # 4 AE1_Lab02b_MicSetup.doc, v160802
Set up a mic: You will have to check out a Mic from the lab dude for this next section. 1) Have the Lab guy help you select one dynamic mic
and mic cable 2) Make very sure Phantom Power is OFF on the Fast
Track Pro. Move this switch to OFF Input Sensitivity knobs
3) Looking at the front of the Fast Track Pro, identify the two inputs on the Fast Track Pro. These inputs are special in that they are XLR or ¼” jacks. The difference is that an XLR is balanced where a ¼” is not.
4) Hold one end of your cables and toss out the male (pins) end of the cable and remove any kinks. Never use a twisted cable or a cable that has knots. Get the cable untwisted before you start any work. How can you tell which end of the cable goes to the mic and which end goes to the Fast Track Pro? The pins ALWAYS point to the direction of the audio. If there are pins, then audio is coming from that device. If there are holes, audio is going into that device.
5) Connect the female end of the cable to the microphone. 6) Connect the male end of the cable to the mixing console input 1. 7) Check all possible switches on your mic for features like pads, bass roll-off, or pick up pattern
adjustments. The lab station microphones will be a Shure SM57, there are no switches. But you need to be aware that some microphones do have many options.
8) Verify that track 1 input is set to Input 1 9) To arm track 1 for record: F7 tool (Selector) click anywhere in the track
and the track name should highlight. If the track name doesn’t highlight then the buttons you were told to activate in Lab 1 are not highlighted. Refer to this diagram to be sure you have the proper features selected: With the track highlighted, press SHIFT + R. Arm Track 1 for Record
10) Start talking into the microphone and adjust the input gain of the Fast Track Pro until you are seeing a signal that just barely touches the yellow in the meters. These input sensitivity knobs amplify the signal coming into the system. If you are speaking softly then there isn’t much to amplify and the meters will barely move. You NEED to speak loud enough to be heard. Suppose there is no audio, what do you do?
a. Are you adjusting the correct knob? b. Does the mic have an on off button? c. Are all cables snug and in place and connected to the channel you are using? d. Is the Auto Input Monitoring on or off in Pro Tools? (CMD + K) e. Are you tweaking the correct input gain on the Fast Track Pro? f. Is the input on track one set to input No 1? g. If you are seeing the meter dancing as you speak, check your headphones and headphone
volume knob. h. Are your headphones plugged into the headphone jack? See Lab 1 for connections.
11) Start recording (CMD + Space Bar or F12 or KP 3 or click in the transport) and say the phrase “Recording Track One”
12) Press Stop (Space Bar or click on the Stop button in the transport and disable the “Record Arm” for that track (SHIFT + R toggles record arm on/off on the currently selected track(s).
13) Repeat steps 9 – 15 but move the mic to console channel 2. After you hear yourself say “Recording Track One”, say “Recording Track Two”. So, you will hear you say “Input One” then you will record you saying “Input Two”. Then continue doing this for inputs 3 through 8.
14) Save your work now.
Audio Engineering 1 & Audio for Video Lab 2 Pro Tools I/O & Microphone Setup
An amateur practices until they get it right. A professional practices until they can’t it wrong.
Bradford Cox – Audio Engineering 1 & Audio for Video Page # 5 AE1_Lab02b_MicSetup.doc, v160802
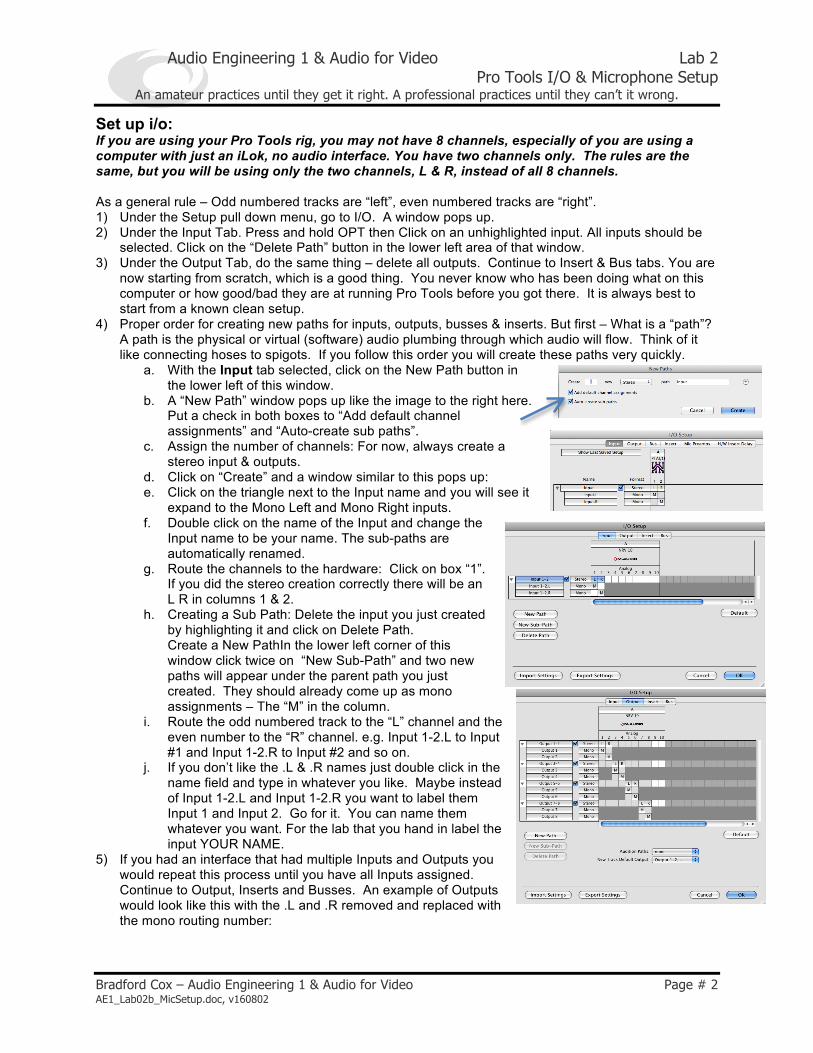
Suppose you don’t want to keep moving cables: Moving cables from input to input is a pain. Especially when you have many of them to do over and over. There is a way to record on different tracks by leaving the microphone where it is, yet route the audio to a different track in Pro Tools. 1. Put the microphone cable back into CH 1 on the Fast
Track Pro. 2. Arm Track 1 for record and record your voice as before. 3. Unarm Track 1 for record. 4. Go to Track 2’s input. Click once and drag your mouse
to Interface > Input 1 (mono) as pictured here. The name of the input may be different, depending on how someone named the I/0 in the steps above. Whatever it is named, it will be the first on in the list no matter how long that list may be.
5. Arm Track 2 for record. Go to the beginning of the session (Return Key, NOT Enter on the keypad), and hit record. Wait until you hear your voice from track 1 then record yourself on track 2.
6. Repeat these steps until you get to Track 5. 7. You have now overdubbed yourself on all five tracks. When you go to the start of the session you will
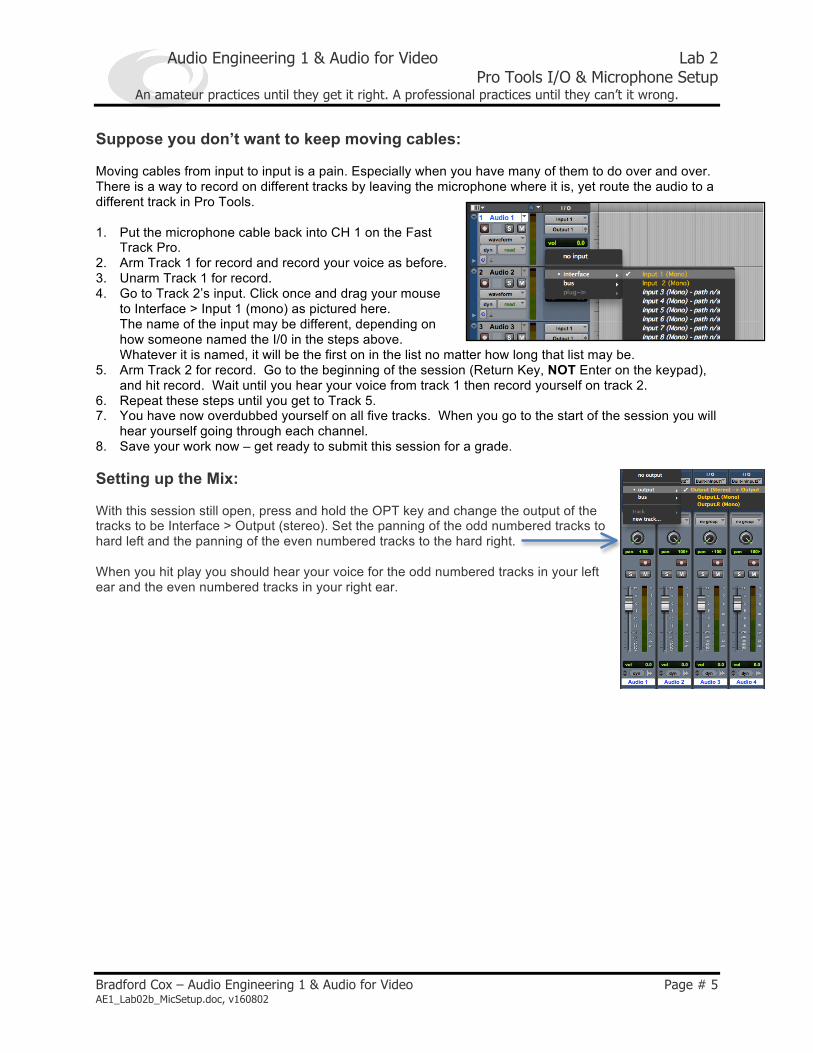
hear yourself going through each channel. 8. Save your work now – get ready to submit this session for a grade. Setting up the Mix: With this session still open, press and hold the OPT key and change the output of the tracks to be Interface > Output (stereo). Set the panning of the odd numbered tracks to hard left and the panning of the even numbered tracks to the hard right. When you hit play you should hear your voice for the odd numbered tracks in your left ear and the even numbered tracks in your right ear.
Audio Engineering 1 & Audio for Video Lab 2 Pro Tools I/O & Microphone Setup
An amateur practices until they get it right. A professional practices until they can’t it wrong.
Bradford Cox – Audio Engineering 1 & Audio for Video Page # 6 AE1_Lab02b_MicSetup.doc, v160802
What to hand in for a grade:
• Save this session now. • Press CMD SHIFT U – Selects unused audio • Press CMD SHIFT B – Clears selected audio • Press ENTER (The default response is to Remove, which is why
you can just press ENTER – In General – any time there is a button that is highlighted – in this case “BLUE” pressing the enter key is just like clicking on it. Become faster by just hitting ENTER)
• Keep repeating these steps until no window comes up. • You need to fit all the audio and tracks to the screen:
o Press CMD A to select all o OPT F to fit the audio to the screen horizontally. o CTRL OPT CMD â to fit all tracks to the screen vertically. o Save it again, now.
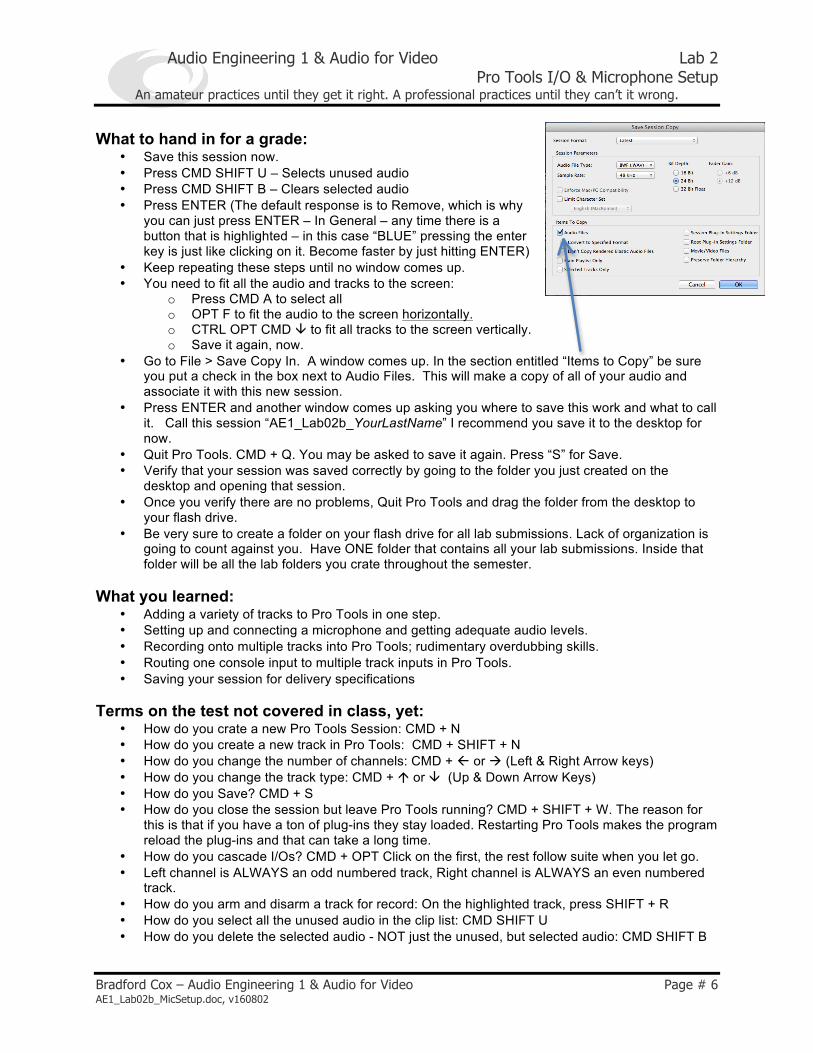
• Go to File > Save Copy In. A window comes up. In the section entitled “Items to Copy” be sure you put a check in the box next to Audio Files. This will make a copy of all of your audio and associate it with this new session.
• Press ENTER and another window comes up asking you where to save this work and what to call it. Call this session “AE1_Lab02b_YourLastName” I recommend you save it to the desktop for now.
• Quit Pro Tools. CMD + Q. You may be asked to save it again. Press “S” for Save. • Verify that your session was saved correctly by going to the folder you just created on the
desktop and opening that session. • Once you verify there are no problems, Quit Pro Tools and drag the folder from the desktop to
your flash drive. • Be very sure to create a folder on your flash drive for all lab submissions. Lack of organization is
going to count against you. Have ONE folder that contains all your lab submissions. Inside that folder will be all the lab folders you crate throughout the semester.
What you learned:
• Adding a variety of tracks to Pro Tools in one step. • Setting up and connecting a microphone and getting adequate audio levels. • Recording onto multiple tracks into Pro Tools; rudimentary overdubbing skills. • Routing one console input to multiple track inputs in Pro Tools. • Saving your session for delivery specifications
Terms on the test not covered in class, yet:
• How do you crate a new Pro Tools Session: CMD + N • How do you create a new track in Pro Tools: CMD + SHIFT + N • How do you change the number of channels: CMD + ß or à (Left & Right Arrow keys) • How do you change the track type: CMD + á or â (Up & Down Arrow Keys) • How do you Save? CMD + S • How do you close the session but leave Pro Tools running? CMD + SHIFT + W. The reason for
this is that if you have a ton of plug-ins they stay loaded. Restarting Pro Tools makes the program reload the plug-ins and that can take a long time.
• How do you cascade I/Os? CMD + OPT Click on the first, the rest follow suite when you let go. • Left channel is ALWAYS an odd numbered track, Right channel is ALWAYS an even numbered
track. • How do you arm and disarm a track for record: On the highlighted track, press SHIFT + R • How do you select all the unused audio in the clip list: CMD SHIFT U • How do you delete the selected audio - NOT just the unused, but selected audio: CMD SHIFT B
Audio Engineering 1 & Audio for Video Lab 2 Pro Tools I/O & Microphone Setup
An amateur practices until they get it right. A professional practices until they can’t it wrong.
Bradford Cox – Audio Engineering 1 & Audio for Video Page # 7 AE1_Lab02b_MicSetup.doc, v160802
Audio Engineering 1 – Lab 2a DO NOT USE PAGE 7 AND AFTER
Bradford Cox – Audio Engineering 1 & Audio for Video NOT USED - Page # 8 AE1_Lab02b_MicSetup.doc, v160610
Lab 02b In the previous lab you put the microphone onto a channel on the console then record that input signal onto that track in Pro Tools. What do you do if you have 24 instruments, but only 5 inputs? Instead of routing the signal on a 1:1 basis, e.g. hardware channel 1 goes to track 1, we can assign any track to any input we want. This can be a nightmare if you don’t keep a firm grip on what you’re doing. Getting signal: Connect your mic. into channel 1 of the Mackie console. Talk into the mic. and turn up the white gain knob (pot) at the top of the channel until you see a strong green light near the channel fader. Don’t pull the channel fader up yet. We’ll do that later. Next, route the channel signal to an output by pushing one of the routing switches by the channel fader. Route this signal to buss 1 by pushing the 1 / 2 switch and turning the pan pot to full left. This routes the signal to buss 1 and not to buss 2. You still won’t hear anything yet. You now have to turn up the Master Buss 1 fader which is on the right side of the console. This is one of the four Sub buss output fader on the far right of the Mackie console. Turn up to unity (U) on the fader. Next, arm track 1 in the ProTools software by pushing the R button on the left of the track control bar. It should flash Red. Now you can talk into your mic. and gradually pull up the channel 1 fader on the console until you get a good signal on the ProTools track meter. It should go into the yellow area but not hit red. You still WON’T HEAR ANYTHING YET ! Now we are ready to monitor the signal coming from track 1 of ProTools. ProTools track 1 is connected to channel 3 on your Mackie console. Route channel 3 (trk 1) to the L / R stereo buss by pushing the L / R routing switch near channel 3’s fader. Don’t turn up the channel 3 fader yet. You would still not hear it yet. First, Turn up the Main Mix (stereo main ) output fader on the far right side of the console. Set to unity (U). Next, make sure that you are monitoring the Main Mix by looking for a boxed in area in the master section of the console (right side). This area is labeled SOURCE. We want to monitor the Main Mix so push the button labeled Main Mix. NOW , talk into your mic. and Pull UP the channel 3 fader. As you talk you should begin seeing your signal on the Main Mix (stereo output) meters on the far right side of the console. If you still don’t hear yourself, you may need to turn up the headphone pot in your monitor section of the console. Look for a white pot that is labeled “Phones”. It is best if you get a good signal level on the meters first, then set the headphone level to a comfortable volume. Levels are the most important thing about your audio signal. How loud you monitor it is just a personal thing. LEVELS first, MONITOR LAST. Note: If you hear any “latency” in your monitor, use the Setup menu and choose: Playback Engine> set the H/W buffer size to a lower number. Click OK. Check All tracks: Before you record, you may want to check to make sure all your tracks are getting signal, proving that you have connected everything correctly. You can do this by routing the mic. to ALL tracks. Push the 1 / 2 AND the 3 /4 buttons on channel 1 and turn the pan pot to the center. DO NOT assign channel 1 to the L / R main output ! Turn up the other buss masters on the right side of the console. Buss 1 should already be up, now turn up 2, 3 and 4. Arm all 8 tracks in you ProTools session. Talk into the mic and see if all tracks are getting the signal. Remember that your 4 buss console allowed you to connect to all 8 inputs of the ProTools interface because each buss goes thru. a splitter so that 1-4 is duplicated onto 5 – 8. Therefore, Buss
Audio Engineering 1 – Lab 2a DO NOT USE PAGE 7 AND AFTER
Bradford Cox – Audio Engineering 1 & Audio for Video NOT USED - Page # 9 AE1_Lab02b_MicSetup.doc, v160610
1 feeds 1 and 5. Buss 2 also goes to 6. etc. Then make sure that all your ProTools tracks can be monitored thru. the console. Do this by using the routing switches again near the channel faders. Route the other Mackie console channels 3-10 to the L / R main mix. These are your ProTools return monitor channels. IMPORTANT: Do Not route these console channels to busses 1 – 4 as this could cause feedback ! Only channel 1 should be routed to a group busses. RECORDING First, un-arm all tracks except track 1 in ProTools if you did the previous testing. The goal is to be able to record one track at a time and build up a set of tracks like you would if you were recording a song all by yourself. You can record anything you want to and your recordings will be graded on whether or not you got each track recorded at a good level. (into the yellow on the ProTools track meter.) If you have a creative block, then a good thing to try is the Row-Your-Boat song as sung in a round. This means you start by recording the song on track one, then record again on another track but this time start singing one line later. Then add 3 or 4 more tracks, each start later and later. The goal again is to learn how to record onto each track and to set monitor levels and pan for each track. Record onto each of the tracks in your ProTools session by using proper routing. Record at least 4 tracks. Use the Mackie console channels 3-10 to set your monitor mix level and pan for each track. Play with this mix after recording is done, to make sure you understand the idea that you are using the Mackie console to mix the ProTools tracks. You are not using ProTools to make your mix. You are mixing “out of the Box”. ProTools Session _______________ TA sign here Using a Separate Cue mix: Re-connect your headphones to the Aux. output #1 on the back of the Mackie console. Locate and push each “”pre” switch on each channel of the console. Use the Aux. 1 pots. (black knobs on each channel) to set a different mix level as it would be for studio headphone cues or stage monitors. This is a mono mix so there is no panning and since the aux 1 output is mono, it will only be heard in one side of you headphones. This output also has a master level which should be set to unity. This is located on the right side of the console near the top. They are also colored black the channel pots. Each of the 4 aux.s have a master pot. This part is just an exercise, and not really needed when recording by yourself. Separate Cue mixing _______________ TA sign here Mixing inside ProTools and Bounce to Disc Re-place the headphones to the standard headphone output on the Mackie console. You are now going to repeat the mixing process, this time “in the box”. To mix in the box….all ProTools channels need to be set to the same output path. Set ALL ProTools tracks to outputs 1-2 in the ProTools software. Not on the console. When mixing “in the box” you will need to have a Master Fader track in your ProTools session. Use the menu bar and select : Track > New > set to : 1 - stereo - Master Fader This master fader channel will have a master meter for you to use to set you overall output levels. To monitor ProTools as a stereo output, set the playback of track 1 and 2 on the Mackie console to unity. (this would be channels 3 and 4, right?) Pan these two channels hard left and right for stereo monitoring of all ProTools track. Play your song and now use the Digidesign 002 surface controller to reset volumes and pans for each track. You are now mixing using the ProTools software in the computer. Create a Stereo file of your Final Mix in ProTools.

Audio Engineering 1 – Lab 2a DO NOT USE PAGE 7 AND AFTER
Bradford Cox – Audio Engineering 1 & Audio for Video NOT USED - Page # 10 AE1_Lab02b_MicSetup.doc, v160610
Use the “Bounce to disc” command from the file menu to make a mixed down file of your session. At the top menu bar select: File > Bounce > to disc.. In the dialogue box set as follows: Bounce source: 1 – 2 ( this is because you have all of your ProTools tracks set to output 1-2 right?) Format: Stereo Interleave (this is because you want to make a single stereo file) Resolution: 16 bit (this is because compact disc only supports this bit depth) Sample Rate: 44100 ( this is because compact disc only supports this sample rate Click save. In the next dialogue box you are simply giving your new stereo mix file a name and a folder to be in. Name you file “Mix 1” The default folder that is already selected to be the Audio files folder of your current session. This is a good place to put it since it will still be in your session folder. The reality is, you can put bounced files anywhere, as long as you remember were you have put them. Always practice good file management and kept things organized. Click Save. ProTools will now play the song all the way through to create the mix according to the volume and pans that you have set. Bounce to disc is only appropriate when mixing “in the box”. You can also record mixes back into your PT session, but this will be covered later. Burn your Files You will burn 2 separate cds using the “Toast” program. First, save and quit the ProTools software (com-Q) You do not have to use the Toast program. The mac operating system will also burn discs. Click on the Toaster program on the tool bar at the bottom of the screen. Burn a Data disc of a copy of your ProTools session on to a disc. Click on the “Data” tab at the top. Before dragging your session to the Toast program, click the “New Disc” button at the bottom, left. Drag the entire Session FOLDER to the burner. You may have to click on the hard drive icon at the top right of the screen to open it. Then locate your session. (audio 101 > class time > your name > etc.) When your ready, click the large Red button on the bottom right to burn your disc. Burn an Audio disc of your bounced “Mix1” file. After your have burnt your session backup. Clear the Toaster box by selecting the previous files and folders and clicking the “remove” button at the bottom left. Then click the “Audio Disc” tab at the Top of the box. Drag just your bounced file. It should be in the “Audio Files” sub folder of your session and labeled Mix1 Burning files _______________ TA sign here Also include your .pio file – the file that is your Pro Tools Input Output settings. GRADING: Data disc should have a single ProTools session in it’s Folder. Once the session has been re-transferred back to a hard drive, the session should open correctly with no missing files. Session should have at least 4 tracks, each recorded at good levels with no clipping or overloads. The audio disc should play in a standard cd play at relatively good levels. Terms and Shortcuts CMD + N = Create a new session CMD SHIFT N = Create New Tracks CMD Arrow Keys Left/Right = change number of track channels CMD Arrow Keys Up/Down = change the track type, e.g. Audio, AUX, Instrument, MIDI, Master CMD S = Save (Remember my changes) CMD SHIFT W – Closes a Pro Tools Session, but leaves Pro Tools running.
![Welcome! [iws.collin.edu]iws.collin.edu/childdevelopment/documents/EDUC_Lab_Manual... · Web viewThis Lab Manual has been compiled to give you the information that you will need to](https://img.pdfslide.us/doc/110x75/5b239e717f8b9ada758b5c23/welcome-iws-iws-web-viewthis-lab-manual-has-been-compiled-to-give-you-the.jpg)


![Welcome! [iws.collin.edu]iws.collin.edu/childdevelopment/documents/ServiceLearn… · Web viewThose of you who are required to submit your journal in Black Board can use the word](https://img.pdfslide.us/doc/110x75/5a7a03687f8b9a71348b9f03/welcome-iws-iws-web-viewthose-of-you-who-are-required-to-submit-your-journal.jpg)