Embed Size (px)
Citation preview

Audio Engineering Basics Lab 4 Pro Tools Inserts, Sends & Busses
An amateur practices until they get it right, a professional practices until they can’t get it wrong. Who would you hire?
Bradford Cox – Audio Engineering 1, Collin County College Page # 1 AE1_Lab04_Inserts_Sends_Busses.pdf
Objective: By the end of this lab you will be able to hide display Inserts & Sends, put an effect onto that track, route a track to an AUX track, put an effect onto that AUX track and control the blend of the “dry” track and “wet” tracks. Organize and duplicate Inserts and Sends. Load plug-in preset values to those inserts. Bounce your results to a new track. Setup and label I/Os. Open the AE1_Lab4_Inserts project. It is just Kick, Snare, High Hat, Bass & Piano. Use any project you like, but this lab will refer specifically to that session. On the keypad press the period 1 period. In not knowing how the previous session was saved we need to verify that certain things are being shown in this session. Go to the mixer (CMD + =) to toggle Mix/Edit windows. In the Edit Window the View Selector is located just above the tracks. In the Mix Window it is located in the lower left corner of the Mix window as shown below. The Edit window and Mix window have this option.
Mix window Edit window When you click on it this pops up Click on the View selector and click on the ALL option. You will see the screen fill up with all sorts of data. We only need Inserts A-E, Sends A-E & I/O. You could go through this same process of clicking in the view selector and unchecking various components, but there is a faster way. Go to the Mixer +/or Editor and OPT + Click on the name header of the ones you want to no longer display.
This also works for the different time rulers. Just OPT + Click on the ones you want to get rid of. The timeline ruler allows you to add components you want just like the Window View selector. Play around with these displays and see what is available. Eventually we only want Inserts A-E, Sends A-E & I/O. Everything else hidden.
What is the difference between a Plug-In and an Insert? A plug-in is a small program that modifies the audio. Audio Suite Plug-ins are not processing audio all the time. You have to select a region to modify, hit the Preview button to hear the changes and the Process button to commit the changes and this is a permanent change (new audio) and cannot be undone tomorrow. You will see the name of the region change to reflect that plug-in. RTAS (Real Time Audio Suite) plug-ins process audio during playback and you can adjust the parameters of the plug-in as it is being played back (on the fly) so that you can tweak as you go. Pro Tools HD uses TDM (Time Division Multiplexing) plug-ins that do the math on special chips where RTAS plug-ins use the computers CPU chip, which can get bogged down.
Audio Engineering Basics Lab 4 Pro Tools Inserts, Sends & Busses
An amateur practices until they get it right, a professional practices until they can’t get it wrong. Who would you hire?
Bradford Cox – Audio Engineering 1, Collin County College Page # 2 AE1_Lab04_Inserts_Sends_Busses.pdf
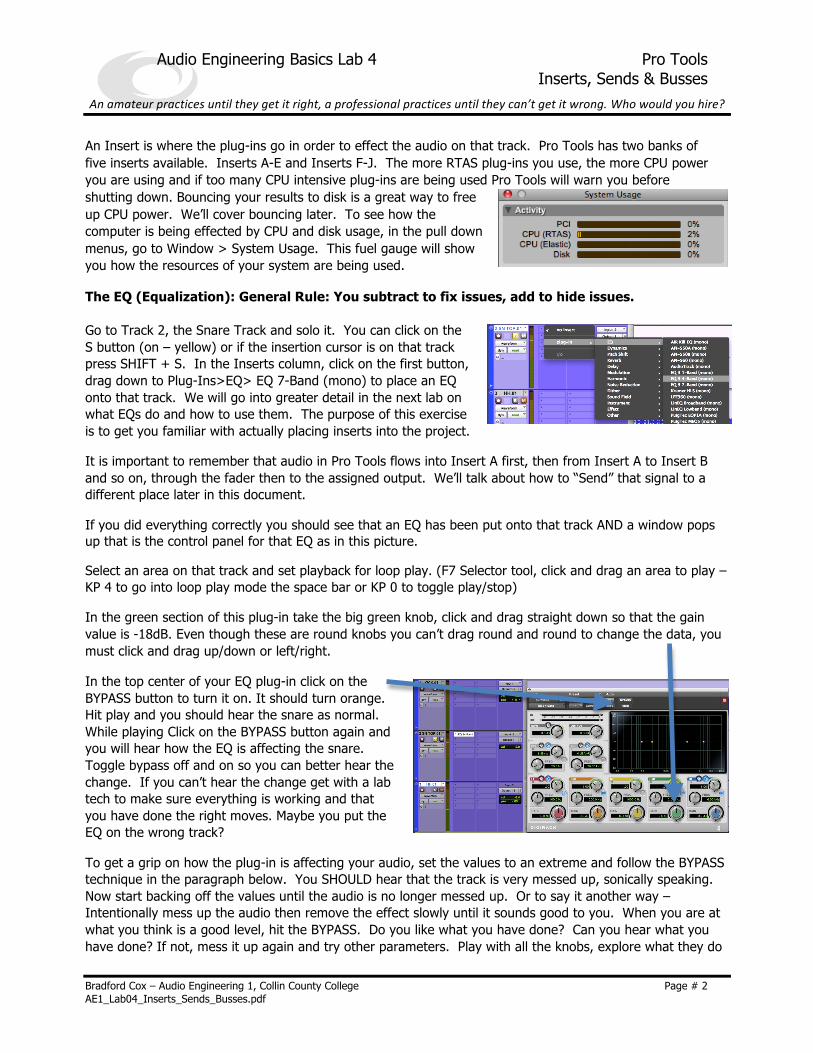
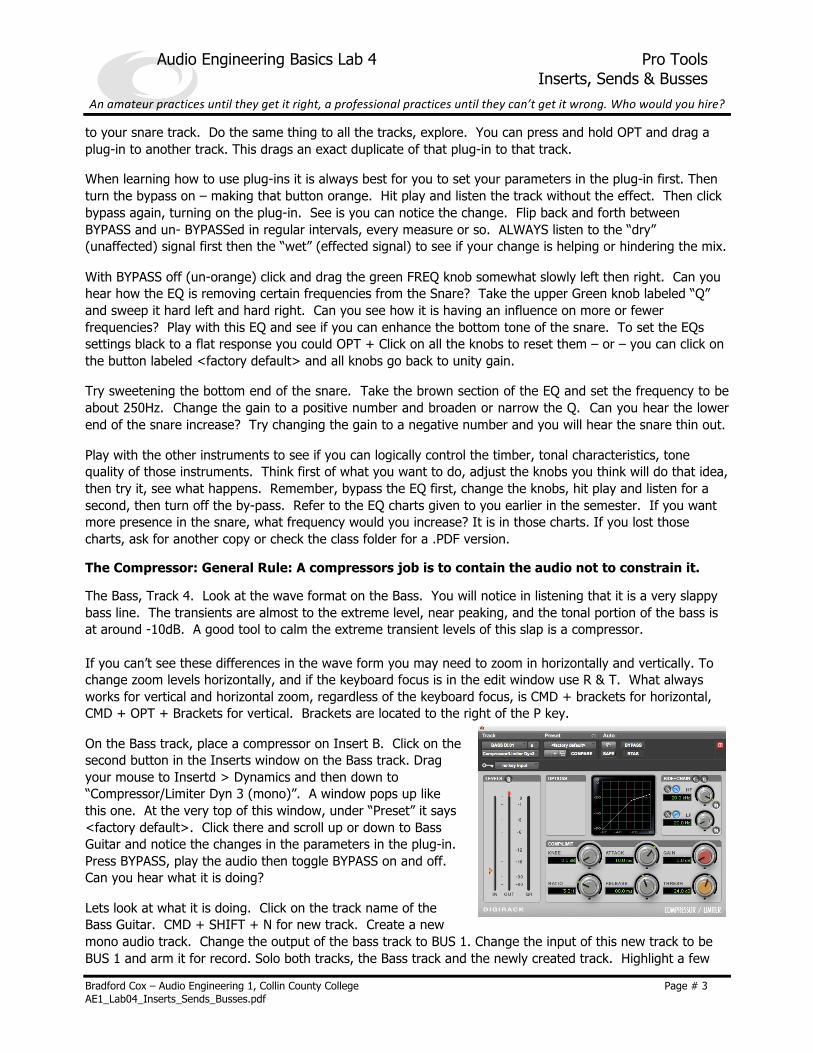
An Insert is where the plug-ins go in order to effect the audio on that track. Pro Tools has two banks of five inserts available. Inserts A-E and Inserts F-J. The more RTAS plug-ins you use, the more CPU power you are using and if too many CPU intensive plug-ins are being used Pro Tools will warn you before shutting down. Bouncing your results to disk is a great way to free up CPU power. We’ll cover bouncing later. To see how the computer is being effected by CPU and disk usage, in the pull down menus, go to Window > System Usage. This fuel gauge will show you how the resources of your system are being used. The EQ (Equalization): General Rule: You subtract to fix issues, add to hide issues. Go to Track 2, the Snare Track and solo it. You can click on the S button (on – yellow) or if the insertion cursor is on that track press SHIFT + S. In the Inserts column, click on the first button, drag down to Plug-Ins>EQ> EQ 7-Band (mono) to place an EQ onto that track. We will go into greater detail in the next lab on what EQs do and how to use them. The purpose of this exercise is to get you familiar with actually placing inserts into the project. It is important to remember that audio in Pro Tools flows into Insert A first, then from Insert A to Insert B and so on, through the fader then to the assigned output. We’ll talk about how to “Send” that signal to a different place later in this document. If you did everything correctly you should see that an EQ has been put onto that track AND a window pops up that is the control panel for that EQ as in this picture. Select an area on that track and set playback for loop play. (F7 Selector tool, click and drag an area to play – KP 4 to go into loop play mode the space bar or KP 0 to toggle play/stop) In the green section of this plug-in take the big green knob, click and drag straight down so that the gain value is -18dB. Even though these are round knobs you can’t drag round and round to change the data, you must click and drag up/down or left/right. In the top center of your EQ plug-in click on the BYPASS button to turn it on. It should turn orange. Hit play and you should hear the snare as normal. While playing Click on the BYPASS button again and you will hear how the EQ is affecting the snare. Toggle bypass off and on so you can better hear the change. If you can’t hear the change get with a lab tech to make sure everything is working and that you have done the right moves. Maybe you put the EQ on the wrong track? To get a grip on how the plug-in is affecting your audio, set the values to an extreme and follow the BYPASS technique in the paragraph below. You SHOULD hear that the track is very messed up, sonically speaking. Now start backing off the values until the audio is no longer messed up. Or to say it another way – Intentionally mess up the audio then remove the effect slowly until it sounds good to you. When you are at what you think is a good level, hit the BYPASS. Do you like what you have done? Can you hear what you have done? If not, mess it up again and try other parameters. Play with all the knobs, explore what they do
Audio Engineering Basics Lab 4 Pro Tools Inserts, Sends & Busses
An amateur practices until they get it right, a professional practices until they can’t get it wrong. Who would you hire?
Bradford Cox – Audio Engineering 1, Collin County College Page # 3 AE1_Lab04_Inserts_Sends_Busses.pdf
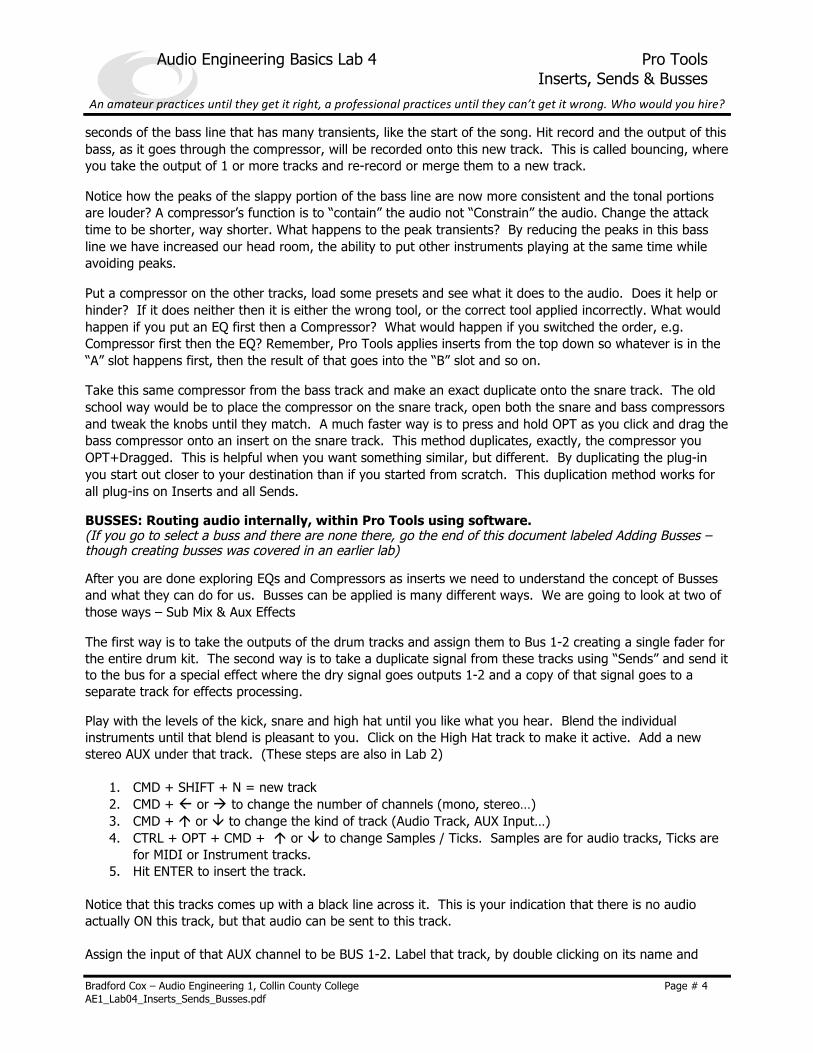
to your snare track. Do the same thing to all the tracks, explore. You can press and hold OPT and drag a plug-in to another track. This drags an exact duplicate of that plug-in to that track. When learning how to use plug-ins it is always best for you to set your parameters in the plug-in first. Then turn the bypass on – making that button orange. Hit play and listen the track without the effect. Then click bypass again, turning on the plug-in. See is you can notice the change. Flip back and forth between BYPASS and un- BYPASSed in regular intervals, every measure or so. ALWAYS listen to the “dry” (unaffected) signal first then the “wet” (effected signal) to see if your change is helping or hindering the mix. With BYPASS off (un-orange) click and drag the green FREQ knob somewhat slowly left then right. Can you hear how the EQ is removing certain frequencies from the Snare? Take the upper Green knob labeled “Q” and sweep it hard left and hard right. Can you see how it is having an influence on more or fewer frequencies? Play with this EQ and see if you can enhance the bottom tone of the snare. To set the EQs settings black to a flat response you could OPT + Click on all the knobs to reset them – or – you can click on the button labeled <factory default> and all knobs go back to unity gain. Try sweetening the bottom end of the snare. Take the brown section of the EQ and set the frequency to be about 250Hz. Change the gain to a positive number and broaden or narrow the Q. Can you hear the lower end of the snare increase? Try changing the gain to a negative number and you will hear the snare thin out. Play with the other instruments to see if you can logically control the timber, tonal characteristics, tone quality of those instruments. Think first of what you want to do, adjust the knobs you think will do that idea, then try it, see what happens. Remember, bypass the EQ first, change the knobs, hit play and listen for a second, then turn off the by-pass. Refer to the EQ charts given to you earlier in the semester. If you want more presence in the snare, what frequency would you increase? It is in those charts. If you lost those charts, ask for another copy or check the class folder for a .PDF version. The Compressor: General Rule: A compressors job is to contain the audio not to constrain it. The Bass, Track 4. Look at the wave format on the Bass. You will notice in listening that it is a very slappy bass line. The transients are almost to the extreme level, near peaking, and the tonal portion of the bass is at around -10dB. A good tool to calm the extreme transient levels of this slap is a compressor. If you can’t see these differences in the wave form you may need to zoom in horizontally and vertically. To change zoom levels horizontally, and if the keyboard focus is in the edit window use R & T. What always works for vertical and horizontal zoom, regardless of the keyboard focus, is CMD + brackets for horizontal, CMD + OPT + Brackets for vertical. Brackets are located to the right of the P key. On the Bass track, place a compressor on Insert B. Click on the second button in the Inserts window on the Bass track. Drag your mouse to Insertd > Dynamics and then down to “Compressor/Limiter Dyn 3 (mono)”. A window pops up like this one. At the very top of this window, under “Preset” it says <factory default>. Click there and scroll up or down to Bass Guitar and notice the changes in the parameters in the plug-in. Press BYPASS, play the audio then toggle BYPASS on and off. Can you hear what it is doing? Lets look at what it is doing. Click on the track name of the Bass Guitar. CMD + SHIFT + N for new track. Create a new mono audio track. Change the output of the bass track to BUS 1. Change the input of this new track to be BUS 1 and arm it for record. Solo both tracks, the Bass track and the newly created track. Highlight a few
Audio Engineering Basics Lab 4 Pro Tools Inserts, Sends & Busses
An amateur practices until they get it right, a professional practices until they can’t get it wrong. Who would you hire?
Bradford Cox – Audio Engineering 1, Collin County College Page # 4 AE1_Lab04_Inserts_Sends_Busses.pdf
seconds of the bass line that has many transients, like the start of the song. Hit record and the output of this bass, as it goes through the compressor, will be recorded onto this new track. This is called bouncing, where you take the output of 1 or more tracks and re-record or merge them to a new track. Notice how the peaks of the slappy portion of the bass line are now more consistent and the tonal portions are louder? A compressor’s function is to “contain” the audio not “Constrain” the audio. Change the attack time to be shorter, way shorter. What happens to the peak transients? By reducing the peaks in this bass line we have increased our head room, the ability to put other instruments playing at the same time while avoiding peaks. Put a compressor on the other tracks, load some presets and see what it does to the audio. Does it help or hinder? If it does neither then it is either the wrong tool, or the correct tool applied incorrectly. What would happen if you put an EQ first then a Compressor? What would happen if you switched the order, e.g. Compressor first then the EQ? Remember, Pro Tools applies inserts from the top down so whatever is in the “A” slot happens first, then the result of that goes into the “B” slot and so on. Take this same compressor from the bass track and make an exact duplicate onto the snare track. The old school way would be to place the compressor on the snare track, open both the snare and bass compressors and tweak the knobs until they match. A much faster way is to press and hold OPT as you click and drag the bass compressor onto an insert on the snare track. This method duplicates, exactly, the compressor you OPT+Dragged. This is helpful when you want something similar, but different. By duplicating the plug-in you start out closer to your destination than if you started from scratch. This duplication method works for all plug-ins on Inserts and all Sends. BUSSES: Routing audio internally, within Pro Tools using software. (If you go to select a buss and there are none there, go the end of this document labeled Adding Busses – though creating busses was covered in an earlier lab) After you are done exploring EQs and Compressors as inserts we need to understand the concept of Busses and what they can do for us. Busses can be applied is many different ways. We are going to look at two of those ways – Sub Mix & Aux Effects The first way is to take the outputs of the drum tracks and assign them to Bus 1-2 creating a single fader for the entire drum kit. The second way is to take a duplicate signal from these tracks using “Sends” and send it to the bus for a special effect where the dry signal goes outputs 1-2 and a copy of that signal goes to a separate track for effects processing. Play with the levels of the kick, snare and high hat until you like what you hear. Blend the individual instruments until that blend is pleasant to you. Click on the High Hat track to make it active. Add a new stereo AUX under that track. (These steps are also in Lab 2)
1. CMD + SHIFT + N = new track 2. CMD + ß or à to change the number of channels (mono, stereo…) 3. CMD + á or â to change the kind of track (Audio Track, AUX Input…) 4. CTRL + OPT + CMD + á or â to change Samples / Ticks. Samples are for audio tracks, Ticks are
for MIDI or Instrument tracks. 5. Hit ENTER to insert the track.
Notice that this tracks comes up with a black line across it. This is your indication that there is no audio actually ON this track, but that audio can be sent to this track. Assign the input of that AUX channel to be BUS 1-2. Label that track, by double clicking on its name and
Audio Engineering Basics Lab 4 Pro Tools Inserts, Sends & Busses
An amateur practices until they get it right, a professional practices until they can’t get it wrong. Who would you hire?
Bradford Cox – Audio Engineering 1, Collin County College Page # 5 AE1_Lab04_Inserts_Sends_Busses.pdf
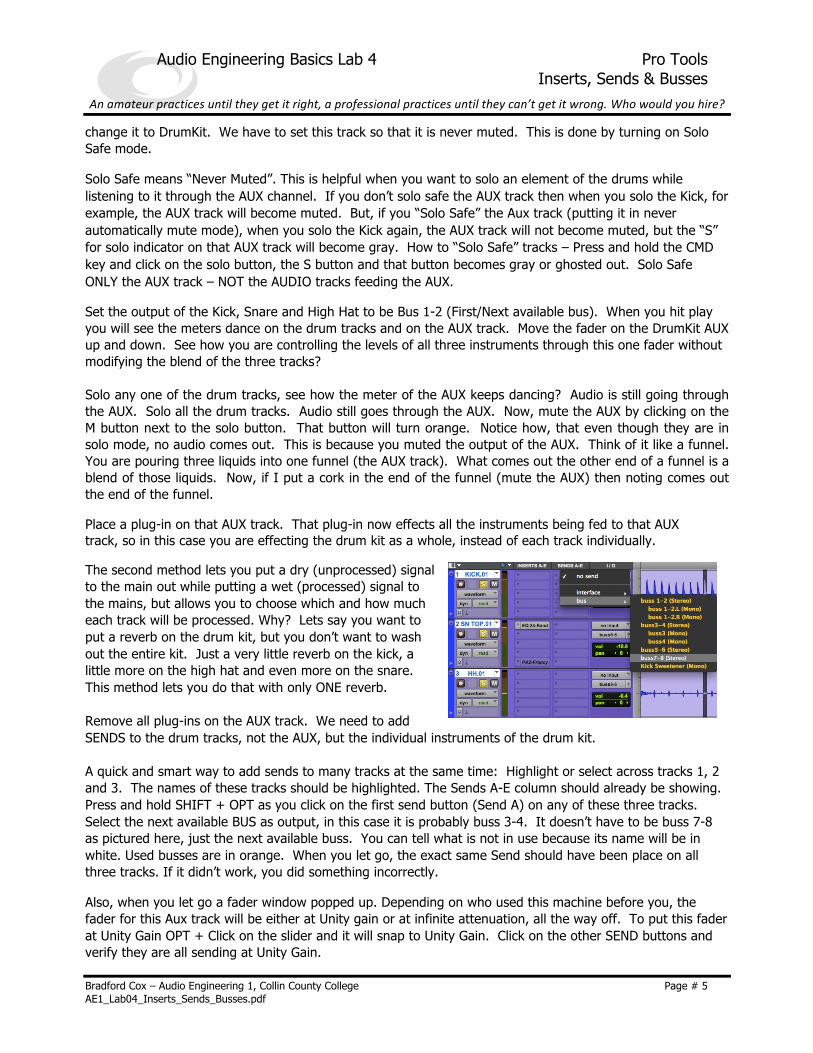
change it to DrumKit. We have to set this track so that it is never muted. This is done by turning on Solo Safe mode. Solo Safe means “Never Muted”. This is helpful when you want to solo an element of the drums while listening to it through the AUX channel. If you don’t solo safe the AUX track then when you solo the Kick, for example, the AUX track will become muted. But, if you “Solo Safe” the Aux track (putting it in never automatically mute mode), when you solo the Kick again, the AUX track will not become muted, but the “S” for solo indicator on that AUX track will become gray. How to “Solo Safe” tracks – Press and hold the CMD key and click on the solo button, the S button and that button becomes gray or ghosted out. Solo Safe ONLY the AUX track – NOT the AUDIO tracks feeding the AUX. Set the output of the Kick, Snare and High Hat to be Bus 1-2 (First/Next available bus). When you hit play you will see the meters dance on the drum tracks and on the AUX track. Move the fader on the DrumKit AUX up and down. See how you are controlling the levels of all three instruments through this one fader without modifying the blend of the three tracks? Solo any one of the drum tracks, see how the meter of the AUX keeps dancing? Audio is still going through the AUX. Solo all the drum tracks. Audio still goes through the AUX. Now, mute the AUX by clicking on the M button next to the solo button. That button will turn orange. Notice how, that even though they are in solo mode, no audio comes out. This is because you muted the output of the AUX. Think of it like a funnel. You are pouring three liquids into one funnel (the AUX track). What comes out the other end of a funnel is a blend of those liquids. Now, if I put a cork in the end of the funnel (mute the AUX) then noting comes out the end of the funnel. Place a plug-in on that AUX track. That plug-in now effects all the instruments being fed to that AUX track, so in this case you are effecting the drum kit as a whole, instead of each track individually. The second method lets you put a dry (unprocessed) signal to the main out while putting a wet (processed) signal to the mains, but allows you to choose which and how much each track will be processed. Why? Lets say you want to put a reverb on the drum kit, but you don’t want to wash out the entire kit. Just a very little reverb on the kick, a little more on the high hat and even more on the snare. This method lets you do that with only ONE reverb. Remove all plug-ins on the AUX track. We need to add SENDS to the drum tracks, not the AUX, but the individual instruments of the drum kit. A quick and smart way to add sends to many tracks at the same time: Highlight or select across tracks 1, 2 and 3. The names of these tracks should be highlighted. The Sends A-E column should already be showing. Press and hold SHIFT + OPT as you click on the first send button (Send A) on any of these three tracks. Select the next available BUS as output, in this case it is probably buss 3-4. It doesn’t have to be buss 7-8 as pictured here, just the next available buss. You can tell what is not in use because its name will be in white. Used busses are in orange. When you let go, the exact same Send should have been place on all three tracks. If it didn’t work, you did something incorrectly. Also, when you let go a fader window popped up. Depending on who used this machine before you, the fader for this Aux track will be either at Unity gain or at infinite attenuation, all the way off. To put this fader at Unity Gain OPT + Click on the slider and it will snap to Unity Gain. Click on the other SEND buttons and verify they are all sending at Unity Gain.
Audio Engineering Basics Lab 4 Pro Tools Inserts, Sends & Busses
An amateur practices until they get it right, a professional practices until they can’t get it wrong. Who would you hire?
Bradford Cox – Audio Engineering 1, Collin County College Page # 6 AE1_Lab04_Inserts_Sends_Busses.pdf
Also, verify that the PRE button is highlighted on each of those SENDs. PRE means that the level of audio coming out of the SEND fader is not effected by the fader on the individual instrument, but the level that is coming out is controlled by the SEND fader. The next section finishes up the second method of Sends. REVERB - using Sends: Gives a psychoacoustic sense of the size and make up of the room. Should be used as a garnish not as a main course. Noticed more when it is taken away than when it has been added.
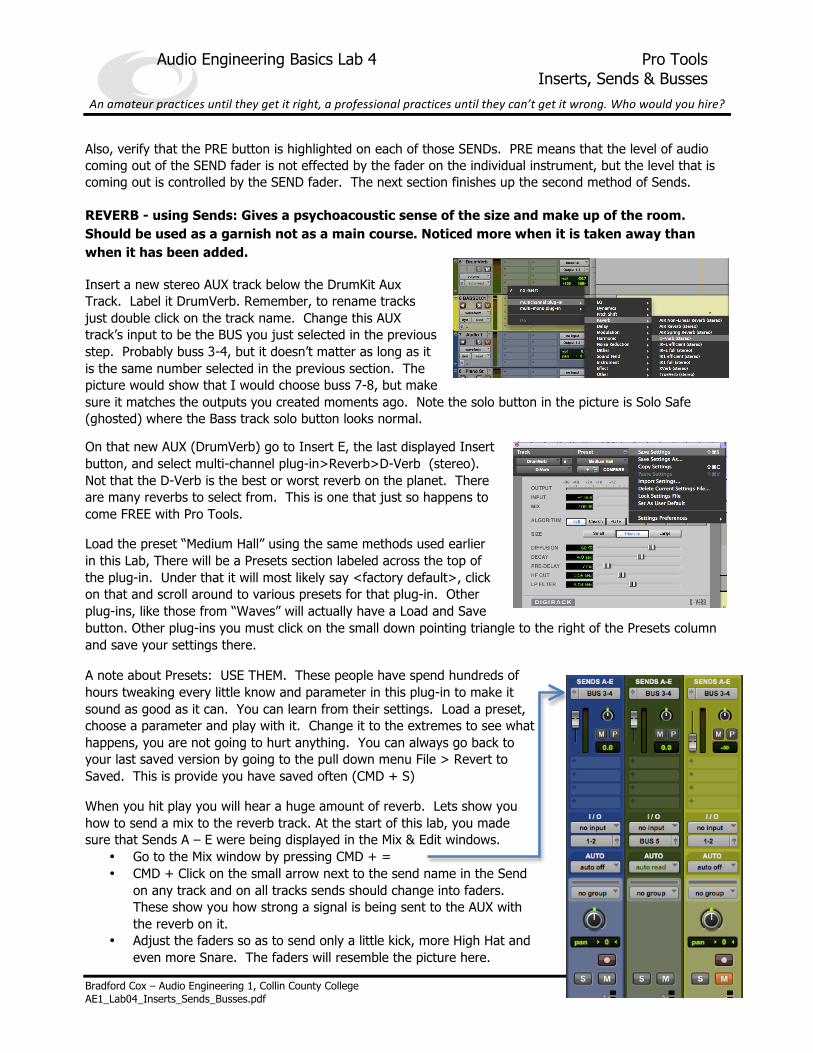
Insert a new stereo AUX track below the DrumKit Aux Track. Label it DrumVerb. Remember, to rename tracks just double click on the track name. Change this AUX track’s input to be the BUS you just selected in the previous step. Probably buss 3-4, but it doesn’t matter as long as it is the same number selected in the previous section. The picture would show that I would choose buss 7-8, but make sure it matches the outputs you created moments ago. Note the solo button in the picture is Solo Safe (ghosted) where the Bass track solo button looks normal. On that new AUX (DrumVerb) go to Insert E, the last displayed Insert button, and select multi-channel plug-in>Reverb>D-Verb (stereo). Not that the D-Verb is the best or worst reverb on the planet. There are many reverbs to select from. This is one that just so happens to come FREE with Pro Tools. Load the preset “Medium Hall” using the same methods used earlier in this Lab, There will be a Presets section labeled across the top of the plug-in. Under that it will most likely say <factory default>, click on that and scroll around to various presets for that plug-in. Other plug-ins, like those from “Waves” will actually have a Load and Save button. Other plug-ins you must click on the small down pointing triangle to the right of the Presets column and save your settings there. A note about Presets: USE THEM. These people have spend hundreds of hours tweaking every little know and parameter in this plug-in to make it sound as good as it can. You can learn from their settings. Load a preset, choose a parameter and play with it. Change it to the extremes to see what happens, you are not going to hurt anything. You can always go back to your last saved version by going to the pull down menu File > Revert to Saved. This is provide you have saved often (CMD + S) When you hit play you will hear a huge amount of reverb. Lets show you how to send a mix to the reverb track. At the start of this lab, you made sure that Sends A – E were being displayed in the Mix & Edit windows.
• Go to the Mix window by pressing CMD + = • CMD + Click on the small arrow next to the send name in the Send
on any track and on all tracks sends should change into faders. These show you how strong a signal is being sent to the AUX with the reverb on it.
• Adjust the faders so as to send only a little kick, more High Hat and even more Snare. The faders will resemble the picture here.
Audio Engineering Basics Lab 4 Pro Tools Inserts, Sends & Busses
An amateur practices until they get it right, a professional practices until they can’t get it wrong. Who would you hire?
Bradford Cox – Audio Engineering 1, Collin County College Page # 7 AE1_Lab04_Inserts_Sends_Busses.pdf
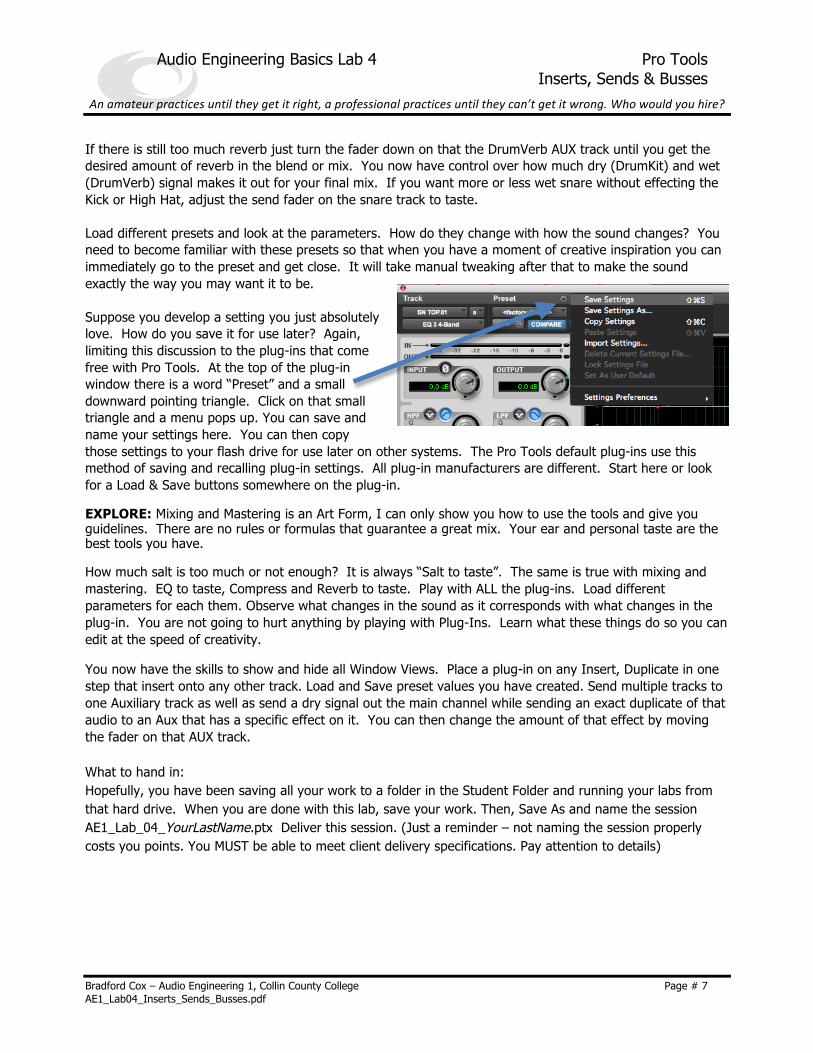
If there is still too much reverb just turn the fader down on that the DrumVerb AUX track until you get the desired amount of reverb in the blend or mix. You now have control over how much dry (DrumKit) and wet (DrumVerb) signal makes it out for your final mix. If you want more or less wet snare without effecting the Kick or High Hat, adjust the send fader on the snare track to taste. Load different presets and look at the parameters. How do they change with how the sound changes? You need to become familiar with these presets so that when you have a moment of creative inspiration you can immediately go to the preset and get close. It will take manual tweaking after that to make the sound exactly the way you may want it to be. Suppose you develop a setting you just absolutely love. How do you save it for use later? Again, limiting this discussion to the plug-ins that come free with Pro Tools. At the top of the plug-in window there is a word “Preset” and a small downward pointing triangle. Click on that small triangle and a menu pops up. You can save and name your settings here. You can then copy those settings to your flash drive for use later on other systems. The Pro Tools default plug-ins use this method of saving and recalling plug-in settings. All plug-in manufacturers are different. Start here or look for a Load & Save buttons somewhere on the plug-in. EXPLORE: Mixing and Mastering is an Art Form, I can only show you how to use the tools and give you guidelines. There are no rules or formulas that guarantee a great mix. Your ear and personal taste are the best tools you have. How much salt is too much or not enough? It is always “Salt to taste”. The same is true with mixing and mastering. EQ to taste, Compress and Reverb to taste. Play with ALL the plug-ins. Load different parameters for each them. Observe what changes in the sound as it corresponds with what changes in the plug-in. You are not going to hurt anything by playing with Plug-Ins. Learn what these things do so you can edit at the speed of creativity. You now have the skills to show and hide all Window Views. Place a plug-in on any Insert, Duplicate in one step that insert onto any other track. Load and Save preset values you have created. Send multiple tracks to one Auxiliary track as well as send a dry signal out the main channel while sending an exact duplicate of that audio to an Aux that has a specific effect on it. You can then change the amount of that effect by moving the fader on that AUX track. What to hand in: Hopefully, you have been saving all your work to a folder in the Student Folder and running your labs from that hard drive. When you are done with this lab, save your work. Then, Save As and name the session AE1_Lab_04_YourLastName.ptx Deliver this session. (Just a reminder – not naming the session properly costs you points. You MUST be able to meet client delivery specifications. Pay attention to details)
Audio Engineering Basics Lab 4 Pro Tools Inserts, Sends & Busses
An amateur practices until they get it right, a professional practices until they can’t get it wrong. Who would you hire?
Bradford Cox – Audio Engineering 1, Collin County College Page # 8 AE1_Lab04_Inserts_Sends_Busses.pdf
Adding Busses: In the unlikelihood your lab project has no busses, do this:
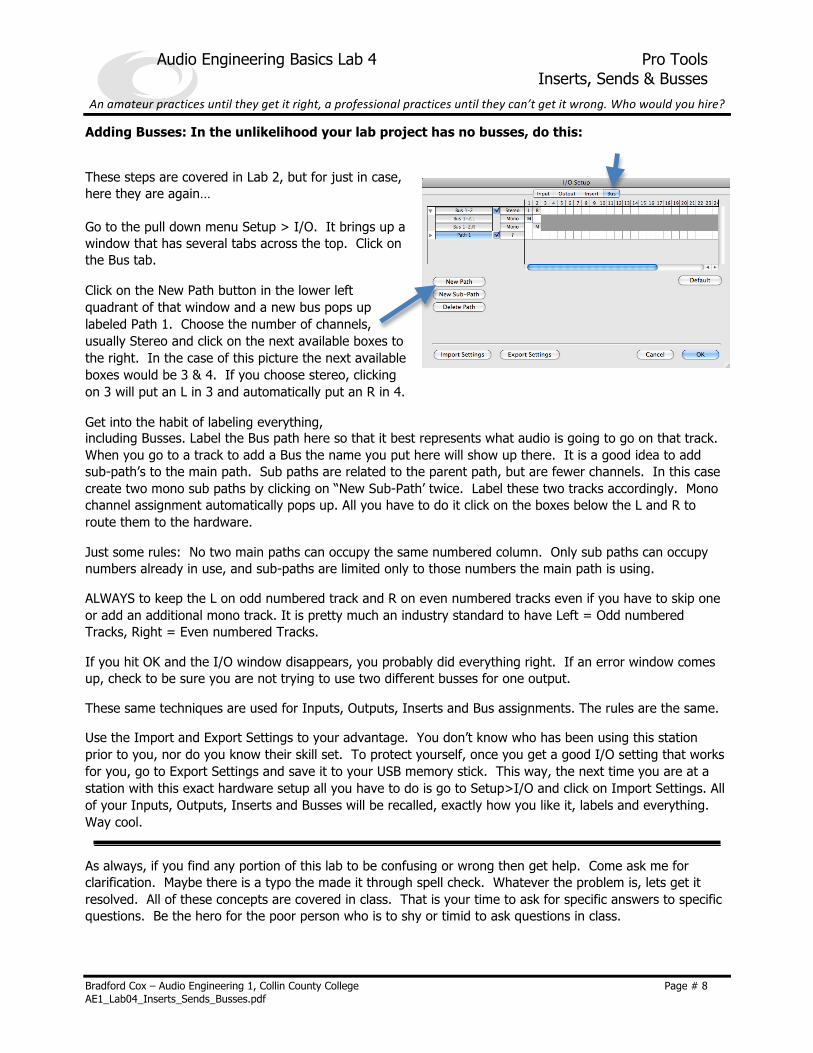
These steps are covered in Lab 2, but for just in case, here they are again… Go to the pull down menu Setup > I/O. It brings up a window that has several tabs across the top. Click on the Bus tab. Click on the New Path button in the lower left quadrant of that window and a new bus pops up labeled Path 1. Choose the number of channels, usually Stereo and click on the next available boxes to the right. In the case of this picture the next available boxes would be 3 & 4. If you choose stereo, clicking on 3 will put an L in 3 and automatically put an R in 4. Get into the habit of labeling everything, including Busses. Label the Bus path here so that it best represents what audio is going to go on that track. When you go to a track to add a Bus the name you put here will show up there. It is a good idea to add sub-path’s to the main path. Sub paths are related to the parent path, but are fewer channels. In this case create two mono sub paths by clicking on “New Sub-Path’ twice. Label these two tracks accordingly. Mono channel assignment automatically pops up. All you have to do it click on the boxes below the L and R to route them to the hardware. Just some rules: No two main paths can occupy the same numbered column. Only sub paths can occupy numbers already in use, and sub-paths are limited only to those numbers the main path is using. ALWAYS to keep the L on odd numbered track and R on even numbered tracks even if you have to skip one or add an additional mono track. It is pretty much an industry standard to have Left = Odd numbered Tracks, Right = Even numbered Tracks. If you hit OK and the I/O window disappears, you probably did everything right. If an error window comes up, check to be sure you are not trying to use two different busses for one output. These same techniques are used for Inputs, Outputs, Inserts and Bus assignments. The rules are the same. Use the Import and Export Settings to your advantage. You don’t know who has been using this station prior to you, nor do you know their skill set. To protect yourself, once you get a good I/O setting that works for you, go to Export Settings and save it to your USB memory stick. This way, the next time you are at a station with this exact hardware setup all you have to do is go to Setup>I/O and click on Import Settings. All of your Inputs, Outputs, Inserts and Busses will be recalled, exactly how you like it, labels and everything. Way cool. As always, if you find any portion of this lab to be confusing or wrong then get help. Come ask me for clarification. Maybe there is a typo the made it through spell check. Whatever the problem is, lets get it resolved. All of these concepts are covered in class. That is your time to ask for specific answers to specific questions. Be the hero for the poor person who is to shy or timid to ask questions in class.