Embed Size (px)
Citation preview
Set up Internet Connection of FLET’S Hikari Next* In the case of using Hikari Phone * Windows Vista screen images
321 321
Make initial setup of password for equipment setup.
[1] Input arbitrary character string (up to 64 alphanumeric characters) into“パスワード:Password”.
S h b d i h f ll i URL
When the above screen appears, input the following and then click “OK”:
[1] Input “user” into “ユーザ名:User Name”[2] Input the same character string as above [1] into
“パスワードの確認入力:Password Confirmation”.
[3] When you completed the input, click “設定:Setup”.
Start up the browser and input the following URL.https://ntt.setup/
4
[1] Input user into ユーザ名:User Name .
[2] Input the password set in into “パスワード:Password”.
(If the screen doesn’t appear, go to .)
2
<Document sent from your provider (Example)>
4
- Input 「接続先名:Connection Name」.※ Usually input your provider name, but
you can input a name you want.
-Input 「接続ユーザ名:Connection User Name」and「接続パスワード: Connection Password」h i th d t t f id
接続ユーザ名[Connection user name]
プロバイダ名[Provider name]
abcd1234@***.abc.ne.jp
ABCプロバイダ
接続ユーザ名[Connection user name]
プロバイダ名[Provider name]
abcd1234@***.abc.ne.jp
ABCプロバイダ
■お客さま情報(ご契約内容)[Customer information (Contract details)]
<Document sent from your provider (Example)>
Click “OK”.shown in the document sent from your provider.
- When you completed the input, click “設定:Setup”.
Attention Item names are different depending on the provider:
Possible examples of connection user name
Possible examples of connection password
接続パスワード[Connection password]
efgh5678接続パスワード[Connection password]
efgh5678
Click OK .
This complets the Internet Connection Setup.
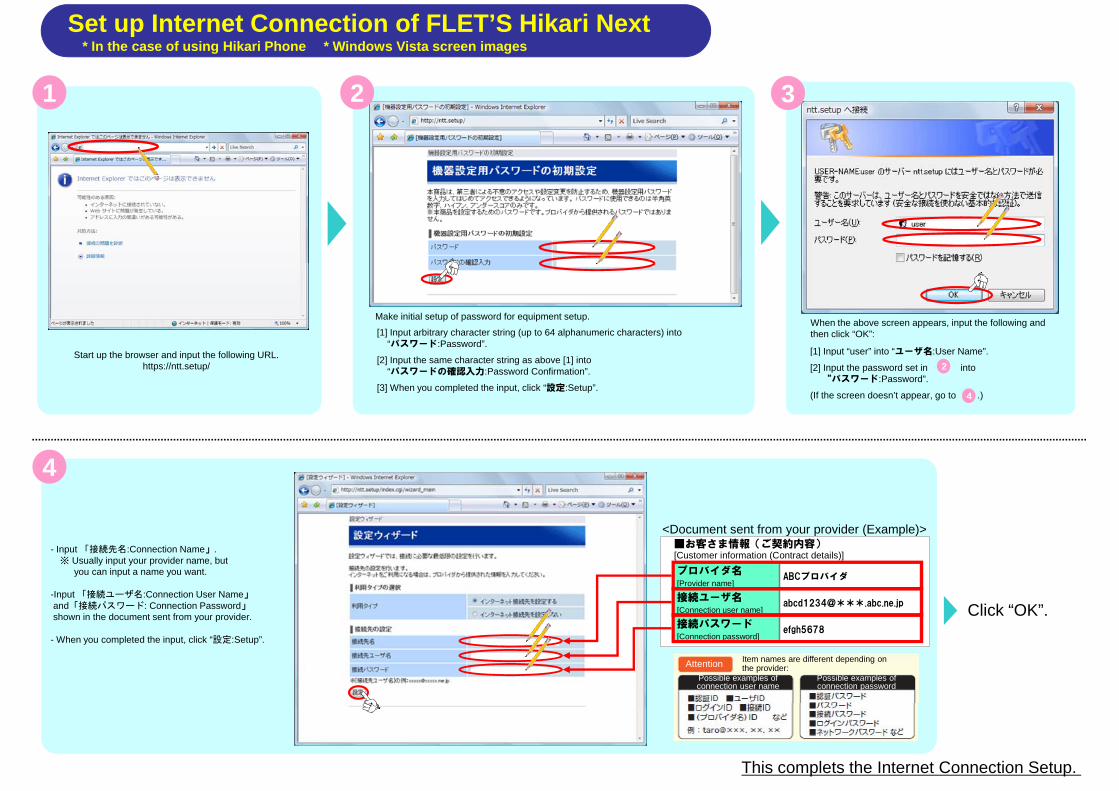
Set up Internet Connection of FLET’S Hikari Next* When you do not use Hikari Phone * Windows Vista screen images
321 321
Click “Broadband (PPPoE)”.
Click “Connection to the Internet”.
Click “Control Panel” on the Start Menu.
54
プロバイダ名[Provider name]
ABCプロバイダプロバイダ名[Provider name]
ABCプロバイダ
■お客さま情報(ご契約内容)[Customer information (Contract details)]
<Document sent from your provider (Example)>
54
接続パスワード[Connection password]
接続ユーザ名[Connection user name]
efgh5678
abcd1234@***.abc.ne.jp
接続パスワード[Connection password]
接続ユーザ名[Connection user name]
efgh5678
abcd1234@***.abc.ne.jp
Attention Item names are different depending on the provider:
Possible examples of Possible examples of
Click “Close”.
-Input [User Name] and [Password] shown in the document sent from your provider. C “ ” □
pconnection user name
pconnection password
認証ID ユーザIDログインID 接続ID(プロバイダID) ID, etc.
Ex.: [email protected]
認証パスワードパスワード接続パスワードログインパスワードネットワークパスワード etc. Wait for a while.
-Check the “Remember This Password” box□. -Input [Connection Name] and click “Connect”.
For [Connection Name], usually input your provider name, but you can input a name you want, too.
This complets the Internet Connection Setup.
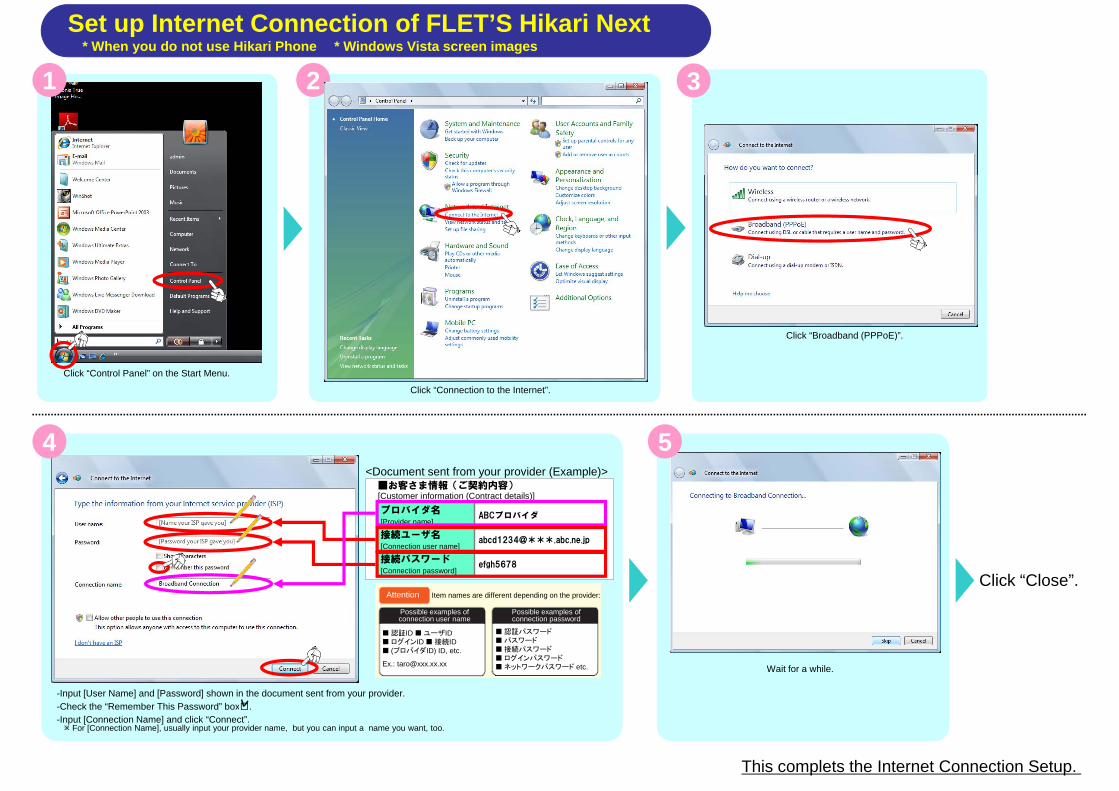
Set Up E-mail (1) Windows Mail (Vista)
1 32 4
Click 「Add」Click 「Accounts」 in 「Tools」 of the Menu Bar Select 「E mail Account」 and click 「Next」Click 「Add」. Click 「E-mail」 on the Start Menu. Click 「Accounts」 in 「Tools」 of the Menu Bar.
6
Select 「E-mail Account」 and click 「Next」.
5
メールアドレス[Mail address]
ijkl9012@***.abc.ne.jpメールアドレス[Mail address]
ijkl9012@***.abc.ne.jp
■お客さま情報(ご契約内容)[Customer information (Contract details)]
<Document sent from your provider (Example)>
[ ][ ]
Input the sender name (arbitrary) into 「Display name」, and click 「Next」.
Input the Mail Address shown in the document sent from your provider in 「E-mail address」,and click 「Next」.
■お客さま情報(ご契約内容)■お客さま情報(ご契約内容)
<Document sent from your provider (Example)> <Document sent from your provider (Example)>
87
メールパスワード[Mail password]
メールアカウント[Mail account]
mnop3456
ijkl9012
メールパスワード[Mail password]
メールアカウント[Mail account]
mnop3456
ijkl9012
■お客さま情報(ご契約内容)[Customer information (Contract details)]
送信メールサーバ[Outgoing mail server]
受信メールサーバ[Incoming mail server]
uvwx90.abc.ne.jp
qrst78.abc.ne.jp
送信メールサーバ[Outgoing mail server]
受信メールサーバ[Incoming mail server]
uvwx90.abc.ne.jp
qrst78.abc.ne.jp
客さ 情報( 契約内容)[Customer information (Contract details)]
Input 「E-mail usename」 and 「Password」 shown in the document sent from your provider, check the 「Remember Password」 box and click 「Next」.
Input 「Incoming Mail Server」 and 「Outgoing Mail Server」 shown in the document sent from your provider, and click 「Next」.
9 10
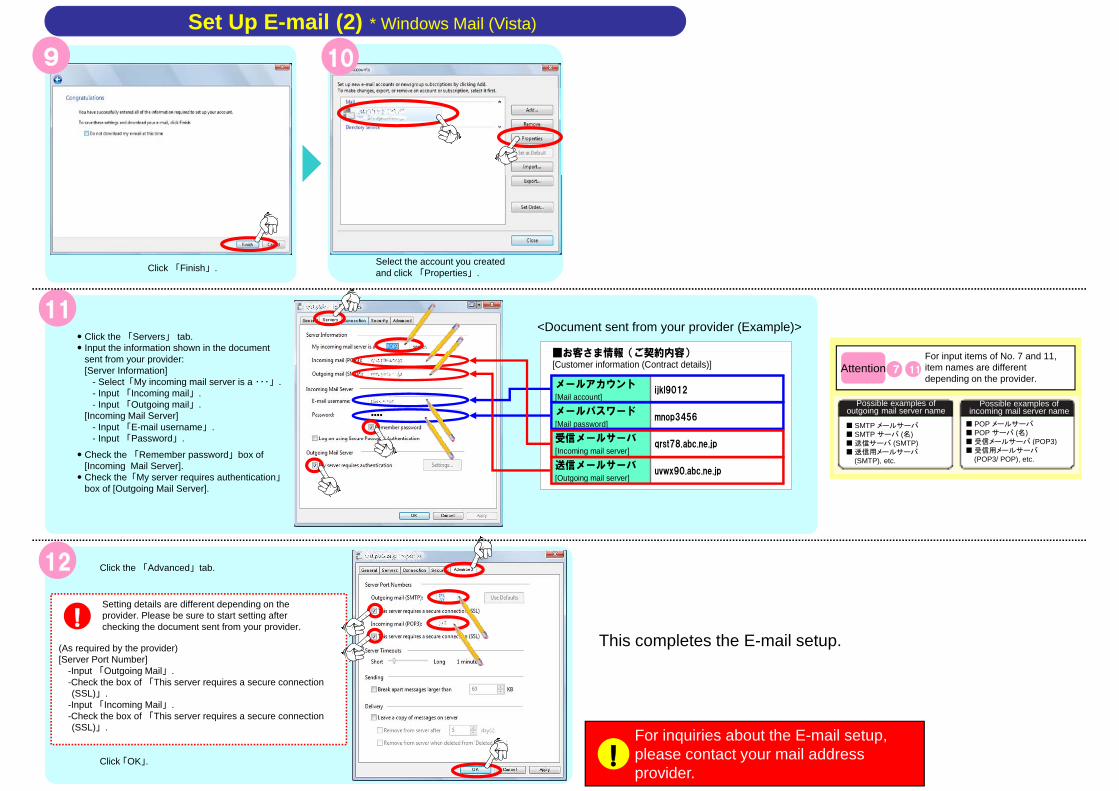
Set Up E-mail (2) * Windows Mail (Vista)
「Select the account you created
■お客さま情報(ご契約内容)
<Document sent from your provider (Example)> 11
Click the 「Servers」 tab. Input the information shown in the document
Click 「Finish」. Select the account you createdand click 「Properties」.
受信メールサーバ
メールパスワード[Mail password]
メールアカウント[Mail account]
mnop3456
ijkl9012
受信メールサーバ
メールパスワード[Mail password]
メールアカウント[Mail account]
mnop3456
ijkl9012
■お客さま情報(ご契約内容)[Customer information (Contract details)]
psent from your provider: [Server Information]
- Select「My incoming mail server is a ・・・」. - Input 「Incoming mail」. - Input 「Outgoing mail」.
[Incoming Mail Server] - Input 「E-mail username」. - Input 「Password」
7 11
For input items of No. 7 and 11, item names are different depending on the provider.
Attention
Possible examples of outgoing mail server name
SMTP メールサーバSMTP サーバ (名)
Possible examples of incoming mail server name
POP メールサーバPOP サーバ (名)受信メ ルサ バ (POP3)
送信メールサーバ[Outgoing mail server]
受信メ ルサ バ[Incoming mail server]
uvwx90.abc.ne.jp
qrst78.abc.ne.jp
送信メールサーバ[Outgoing mail server]
受信メ ルサ バ[Incoming mail server]
uvwx90.abc.ne.jp
qrst78.abc.ne.jp- Input 「Password」.
Check the 「Remember password」box of [Incoming Mail Server]. Check the「My server requires authentication」box of [Outgoing Mail Server].
送信サーバ (SMTP)送信用メールサーバ(SMTP), etc.
受信メールサーバ (POP3)受信用メールサーバ(POP3/ POP), etc.
12
Setting details are different depending on the provider Please be sure to start setting after!
Click the 「Advanced」tab.
provider. Please be sure to start setting after checking the document sent from your provider. !
(As required by the provider) [Server Port Number]
-Input 「Outgoing Mail」. -Check the box of 「This server requires a secure connection(SSL)」. I t 「I i M il」
This completes the E-mail setup.
-Input 「Incoming Mail」. -Check the box of 「This server requires a secure connection(SSL)」.
Click 「OK」.
For inquiries about the E-mail setup, please contact your mail address provider.
!


![Enjoy your instrument with Internet Direct Connection · Connection Internet Connection Guide 4 3 Use the [DATA ENTRY] dial to select “Set the Internet connection,” then press](https://img.pdfslide.us/doc/110x75/5f5af0173e789f430f4fdd70/enjoy-your-instrument-with-internet-direct-connection-connection-internet-connection.jpg)
 button to check the connection to the special website. The](https://img.pdfslide.us/doc/110x75/5edba963ad6a402d6665fe73/internet-connection-guide-connection-internet-connection-guide-5-7-press-the-gconnection.jpg)