Embed Size (px)
Citation preview

Service Information
Table of Contents
1.0 – Introduction This document describes the VAS 5054A Diagnostic Interface configuration processes on eligible diagnostic laptop and tablet devices with Offboard Diagnostic Information System Service (ODIS Service) software.
Subject: VAS 5054A Diagnostic Interface – Bluetooth® & EDIC
Configuration Date: Dec. 17, 2015
Section Page
1.0 Introduction 2
2.0 Preparation - Must Read! 2
3.0 Windows Bluetooth Configuration 3
3.1 General Information 3
3.2 Procedure 3
4.0 Diagnostic Interface (EDIC) Configuration 6
4.1 General Information 6
4.2 Procedure 6
Notes: • Please read these instructions carefully and in their entirety before performing any
procedures. If you do not understand these instructions, arrange to have a qualified person perform these procedures.
• Heed all prerequisite requirements and notes, and follow all instruction steps in the Section order given.
• Discard all printed copies of this document after use. Revised versions may be issued at any time. Always check ServiceNet for the latest version.

Service Information
Page 2 of 9
Configuration takes place in the following stages:
Configure Bluetooth connection in Windows.
Configure EDIC connection software with Softing EDIC Configuration Manager.
Confirm communication with ODIS Service.
Checkboxes are provided throughout this document to note fulfilled prerequisites and completed sections.
2.0 – Preparation Prerequisites:
Windows 7
Diagnostic device must have a functional USB functions.
Device connected to A/C power adapter and booted to Windows desktop.
ODIS Service V3.0.0 or higher installed.
ODIS Service NOT running.
Diagnostic tablets mounted in base station with USB mouse and keyboard connected.
Vehicle available.
1. Ensure the wireless operation switch is turned ON as applicable:
VAS 6150A
(Front panel behind handle)
VAS 6150B & VAS 6150C
(Middle right side behind WIRELESS door)
VAS 6160 & VAS 6160A
(Upper left side behind SC/EX door)
2. Note the VAS 5054A Serial Number (S#:) from a label on back of the transmitter housing.
3. Connect VAS 5054A to a vehicle Data Link Connector (DLC) and switch the ignition ON. The blue LED on the transmitter head must flash.
Preparation steps completed. Proceed to Section 3.0 – Page 3
Service Information
Page 3 of 9
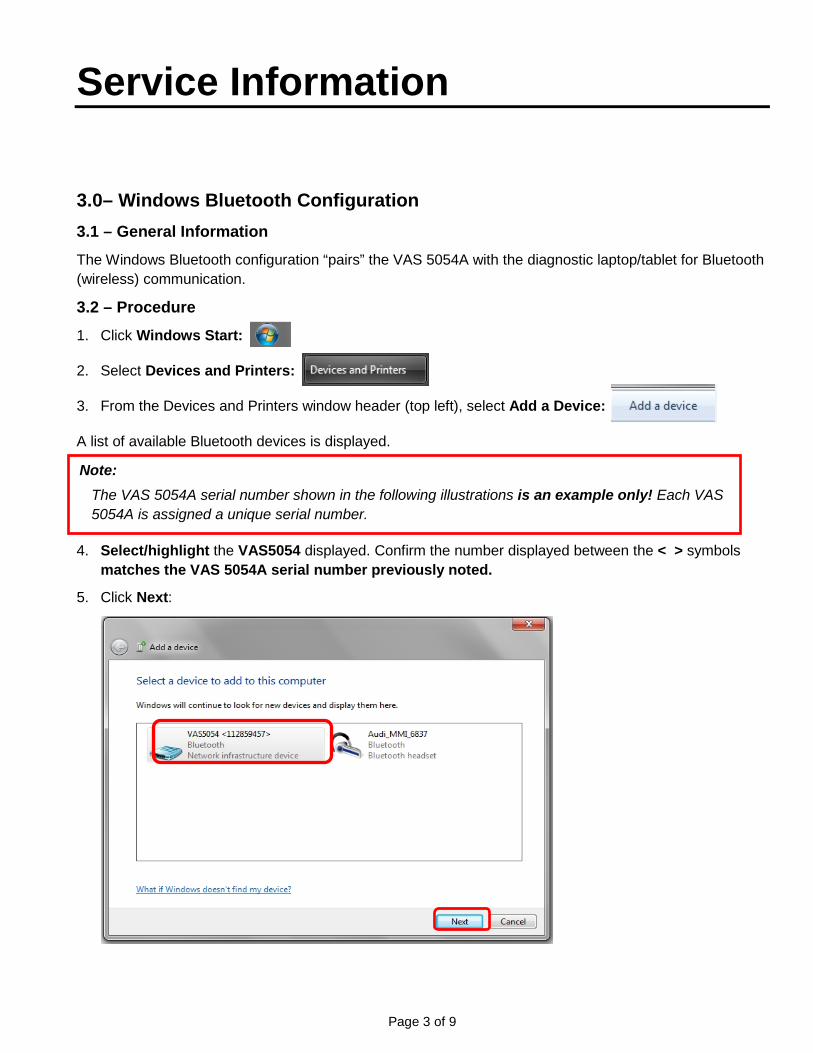
3.0– Windows Bluetooth Configuration 3.1 – General Information The Windows Bluetooth configuration “pairs” the VAS 5054A with the diagnostic laptop/tablet for Bluetooth (wireless) communication.
3.2 – Procedure 1. Click Windows Start:
2. Select Devices and Printers:
3. From the Devices and Printers window header (top left), select Add a Device:
A list of available Bluetooth devices is displayed.
4. Select/highlight the VAS5054 displayed. Confirm the number displayed between the < > symbols matches the VAS 5054A serial number previously noted.
5. Click Next:
Note: The VAS 5054A serial number shown in the following illustrations is an example only! Each VAS 5054A is assigned a unique serial number.

Service Information
Page 4 of 9
Carefully enter the VAS 5054A serial number as displayed (without < >) as the “pairing code”: 6. Click Next:
7. Click Close:

Service Information
Page 5 of 9
8. Wait a moment for the driver search and installation process to complete.
9. Return to the Devices and Printers window and double-click the newly-added VAS5054:
10. Select the Hardware Tab:
11. Note the COM port number:
12. Close the Properties window.
Bluetooth Configuration steps completed. Proceed to Section 4.0 – Page 6
Note: The COM port number illustrated is an example only!
Each configuration is unique, so it is important to note the COM port number assigned during your configuration.

Service Information
Page 6 of 9
4.0– Diagnostic Interface (EDIC) Configuration 4.1 – General Information
The EDIC configuration enables data to be exchanged between the Bluetooth (wireless) functions of the VAS 5054A and the ODIS Service diagnostic software.
Configuration is performed using the Softing EDIC Configuration Manager.
4.2 – Procedure 1. From the Windows desktop, double click the ODIS Service Diagnostic Interface
Configuration program icon:
2. Select the Add a new device…. icon:
3. Confirm the conditions listed, and then click OK:
Service Information
Page 7 of 9
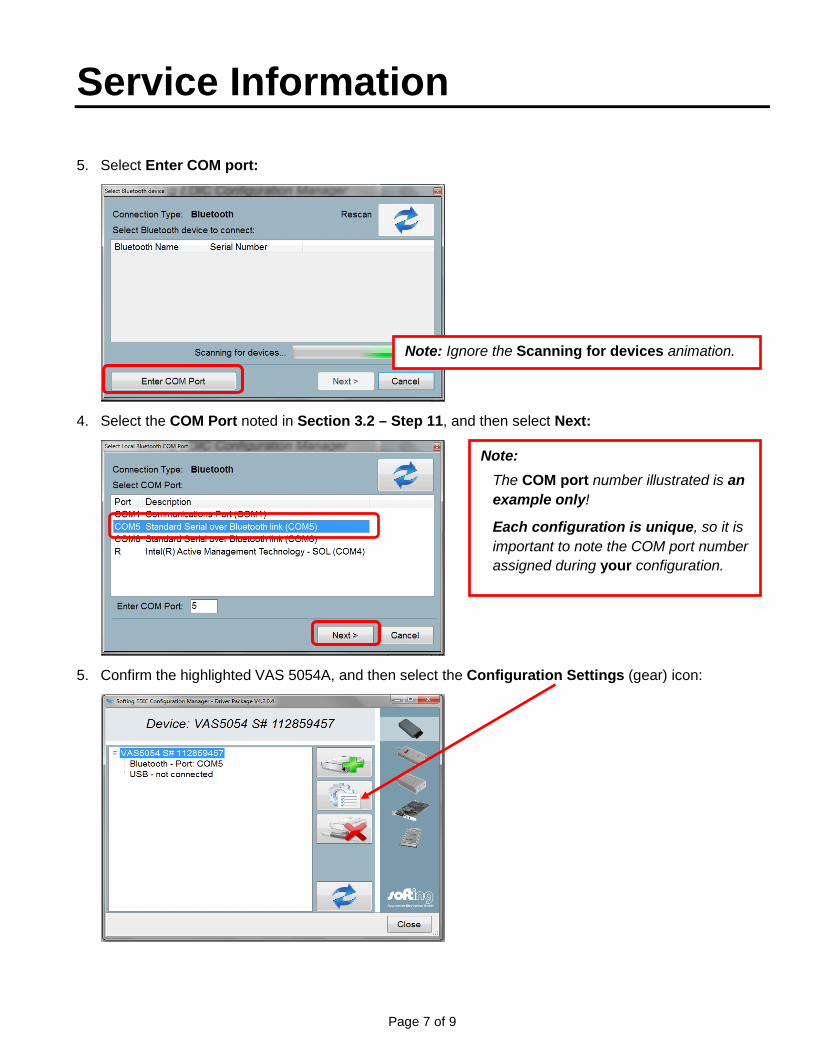
5. Select Enter COM port:
4. Select the COM Port noted in Section 3.2 – Step 11, and then select Next:
5. Confirm the highlighted VAS 5054A, and then select the Configuration Settings (gear) icon:
Note: Ignore the Scanning for devices animation.
Note: The COM port number illustrated is an example only!
Each configuration is unique, so it is important to note the COM port number assigned during your configuration.

Service Information
Page 8 of 9
6. Click the Device tab:
7. If desired, select Enable the Buzzer and enter a Buzzer Time. Then select Apply and Finish
respectively:
Notes: • The Enable Buzzer and Buzzer Time settings can be changed at any time by opening ODIS
Service Diagnostic Interface Configuration and selecting the Configuration Settings (gear) icon.
• To prevent loss of communication during extended ODIS Service diagnostic sessions, we recommend the PowerOff function remain disabled.

Service Information
Page 9 of 9
8. Select Close:
9. From the Windows desktop, double-click the ODIS Service icon:
10. Confirm that vehicle communication is established via the various Connection Status icons on the
ODIS Service Main / Welcome page, and that Starting diagnosis can be initiated: Main Page Header: Welcome Window:
EDIC Configuration steps completed.