Embed Size (px)
Citation preview
SER-Kits Landau Instructions © Text and pictures Dan Garrett 2010 Page 1 of 3
SER-Kits
Instructions for the Landau Horse Carriage Kit
Introduction
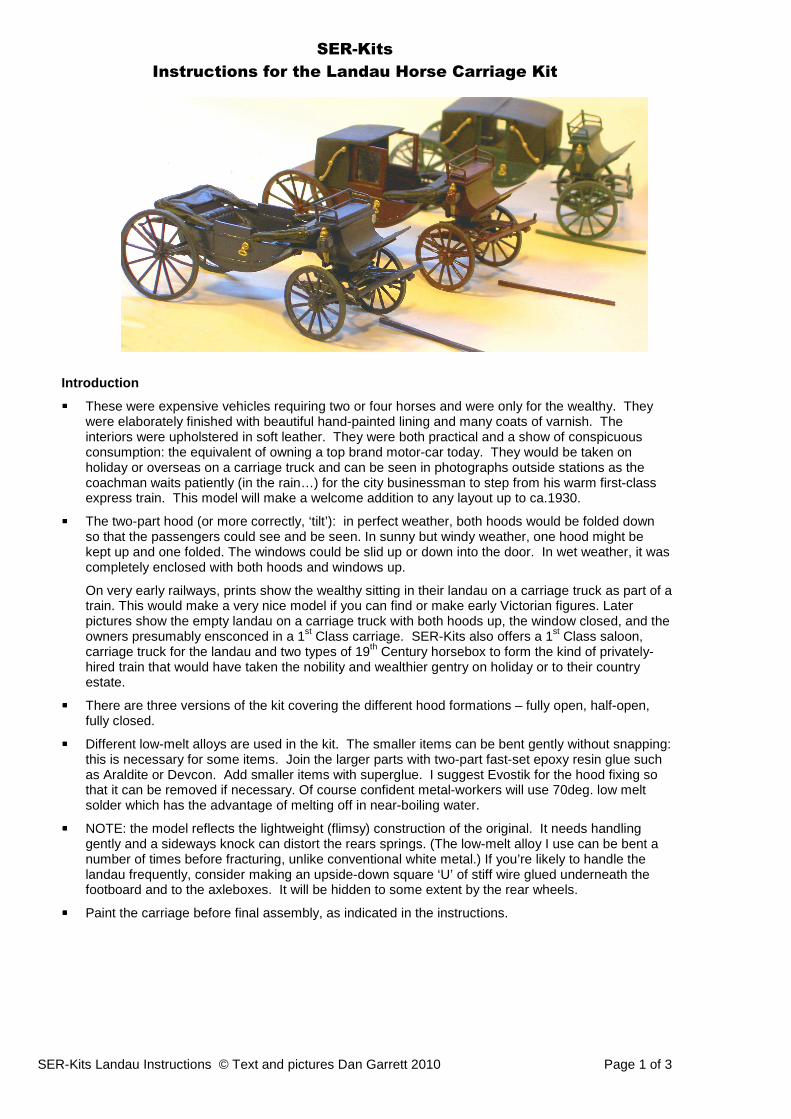
���� These were expensive vehicles requiring two or four horses and were only for the wealthy. They were elaborately finished with beautiful hand-painted lining and many coats of varnish. The interiors were upholstered in soft leather. They were both practical and a show of conspicuous consumption: the equivalent of owning a top brand motor-car today. They would be taken on holiday or overseas on a carriage truck and can be seen in photographs outside stations as the coachman waits patiently (in the rain…) for the city businessman to step from his warm first-class express train. This model will make a welcome addition to any layout up to ca.1930.
���� The two-part hood (or more correctly, ‘tilt’): in perfect weather, both hoods would be folded down so that the passengers could see and be seen. In sunny but windy weather, one hood might be kept up and one folded. The windows could be slid up or down into the door. In wet weather, it was completely enclosed with both hoods and windows up.
On very early railways, prints show the wealthy sitting in their landau on a carriage truck as part of a train. This would make a very nice model if you can find or make early Victorian figures. Later pictures show the empty landau on a carriage truck with both hoods up, the window closed, and the owners presumably ensconced in a 1st Class carriage. SER-Kits also offers a 1st Class saloon, carriage truck for the landau and two types of 19th Century horsebox to form the kind of privately-hired train that would have taken the nobility and wealthier gentry on holiday or to their country estate.
���� There are three versions of the kit covering the different hood formations – fully open, half-open, fully closed.
���� Different low-melt alloys are used in the kit. The smaller items can be bent gently without snapping: this is necessary for some items. Join the larger parts with two-part fast-set epoxy resin glue such as Araldite or Devcon. Add smaller items with superglue. I suggest Evostik for the hood fixing so that it can be removed if necessary. Of course confident metal-workers will use 70deg. low melt solder which has the advantage of melting off in near-boiling water.
���� NOTE: the model reflects the lightweight (flimsy) construction of the original. It needs handling gently and a sideways knock can distort the rears springs. (The low-melt alloy I use can be bent a number of times before fracturing, unlike conventional white metal.) If you’re likely to handle the landau frequently, consider making an upside-down square ‘U’ of stiff wire glued underneath the footboard and to the axleboxes. It will be hidden to some extent by the rear wheels.
���� Paint the carriage before final assembly, as indicated in the instructions.
SER-Kits Landau Instructions © Text and pictures Dan Garrett 2010 Page 2 of 3
Assembly
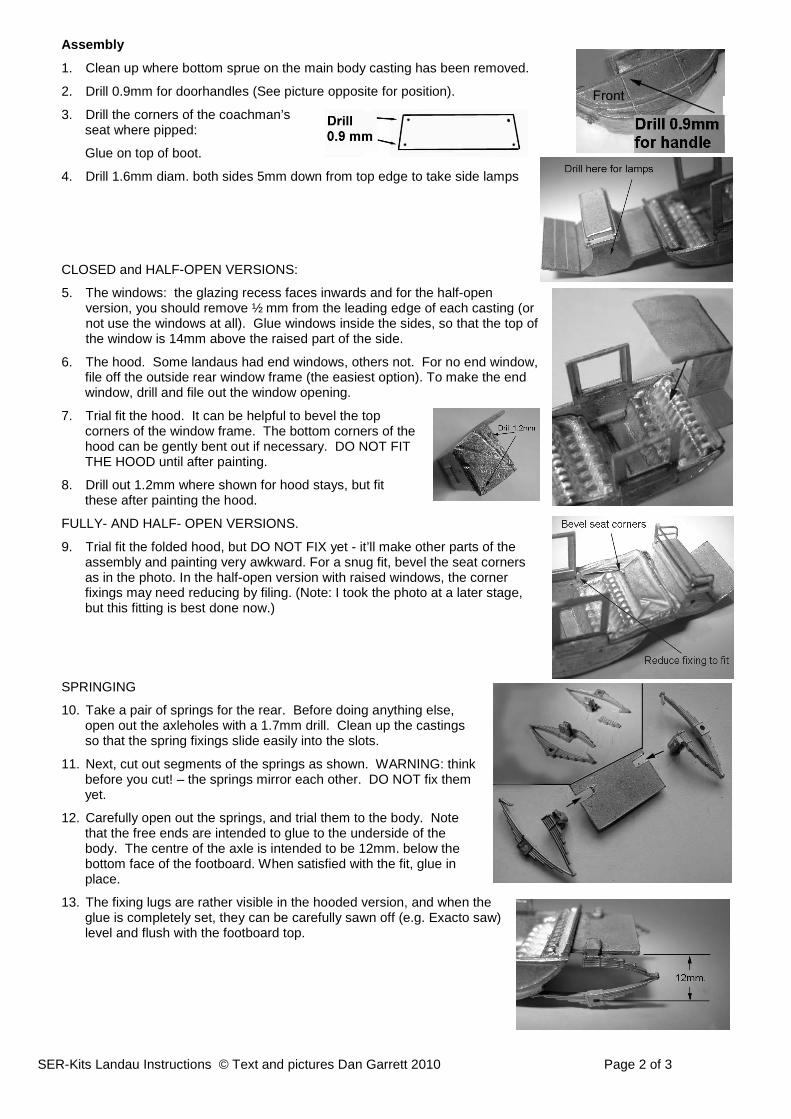
1. Clean up where bottom sprue on the main body casting has been removed.
2. Drill 0.9mm for doorhandles (See picture opposite for position).
3. Drill the corners of the coachman’s seat where pipped:
Glue on top of boot.
4. Drill 1.6mm diam. both sides 5mm down from top edge to take side lamps
CLOSED and HALF-OPEN VERSIONS:
5. The windows: the glazing recess faces inwards and for the half-open version, you should remove ½ mm from the leading edge of each casting (or not use the windows at all). Glue windows inside the sides, so that the top of the window is 14mm above the raised part of the side.
6. The hood. Some landaus had end windows, others not. For no end window, file off the outside rear window frame (the easiest option). To make the end window, drill and file out the window opening.
7. Trial fit the hood. It can be helpful to bevel the top corners of the window frame. The bottom corners of the hood can be gently bent out if necessary. DO NOT FIT THE HOOD until after painting.
8. Drill out 1.2mm where shown for hood stays, but fit these after painting the hood.
FULLY- AND HALF- OPEN VERSIONS.
9. Trial fit the folded hood, but DO NOT FIX yet - it’ll make other parts of the assembly and painting very awkward. For a snug fit, bevel the seat corners as in the photo. In the half-open version with raised windows, the corner fixings may need reducing by filing. (Note: I took the photo at a later stage, but this fitting is best done now.)
SPRINGING
10. Take a pair of springs for the rear. Before doing anything else, open out the axleholes with a 1.7mm drill. Clean up the castings so that the spring fixings slide easily into the slots.
11. Next, cut out segments of the springs as shown. WARNING: think before you cut! – the springs mirror each other. DO NOT fix them yet.
12. Carefully open out the springs, and trial them to the body. Note that the free ends are intended to glue to the underside of the body. The centre of the axle is intended to be 12mm. below the bottom face of the footboard. When satisfied with the fit, glue in place.
13. The fixing lugs are rather visible in the hooded version, and when the glue is completely set, they can be carefully sawn off (e.g. Exacto saw) level and flush with the footboard top.
SER-Kits Landau Instructions © Text and pictures Dan Garrett 2010 Page 3 of 3
THE FORECARRIAGE
14. Drill splinter bar as shown and glue to forecarriage frame.
15. Take the remaining pair of springs, run through with 1.7mm drill for axle, and clean up so that they slide nicely onto the forecarriage frame. Temporarily fix forecarriage to body with the 10BA nut or bolt.
WHEELS
16. Clean up the wheels. Run a 1.6mm drill through all four axleholes.
17. Cut two 38mm lengths of 1/16in. rod for the axles and trial the wheels on the body. The body will slope upwards to the front, so gently press down on the driver’s seat to close the front springs together, until the carriage is level. Be careful to support the rear so that the rear springs are not compressed during this process.
18. Remove wheels, axles and forecarriage for painting.
19. FINAL DETAILING
20. Glue the coachman’s seat end-rails into the holes drilled previously. Cut lengths of 0.7mm rod and thread through the holes in the seat end-rails to form the back.
21. After painting, add glazing (two pieces of 14 x 13mm), and the hoods and hood stays. Note that the hood stays are ‘handed’ – there are left and right versions. Also add side-lamps and the bent-down etched brass doorhandles. Glue the shaft to the splinter bar, unless the landau is to be on a carriage truck, in which case the shaft would be placed in the truck’s ‘tray’.
PAINTING
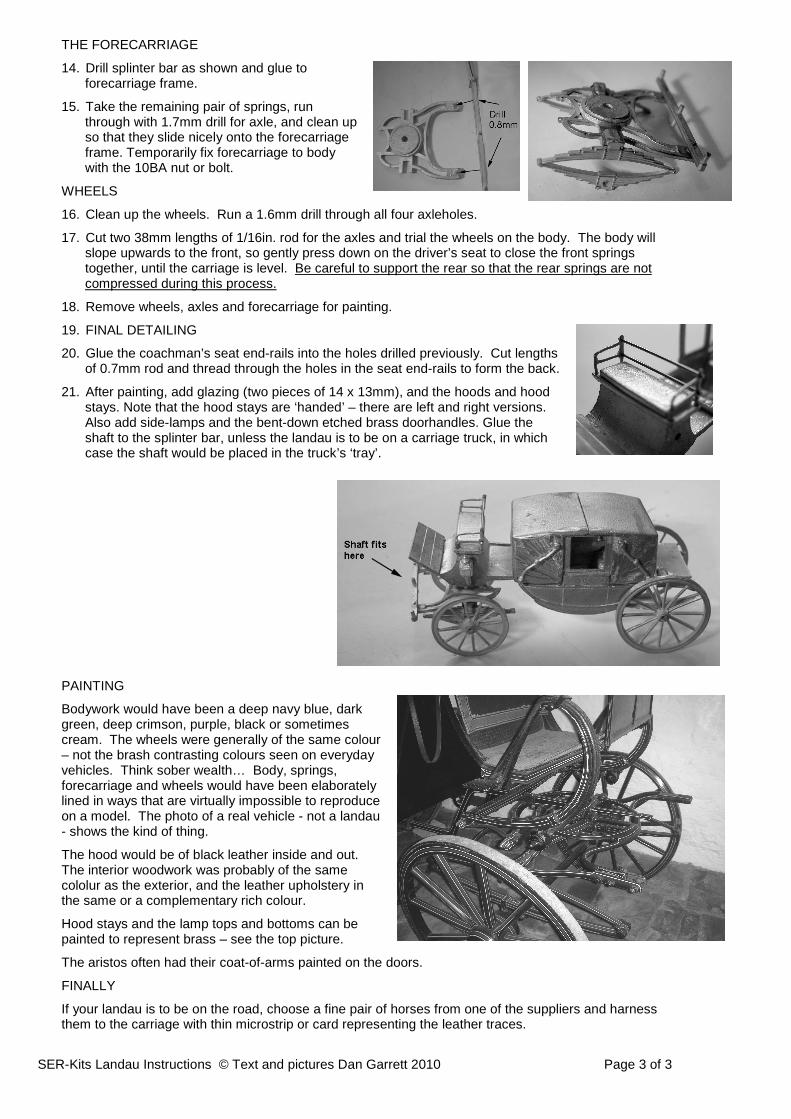
Bodywork would have been a deep navy blue, dark green, deep crimson, purple, black or sometimes cream. The wheels were generally of the same colour – not the brash contrasting colours seen on everyday vehicles. Think sober wealth… Body, springs, forecarriage and wheels would have been elaborately lined in ways that are virtually impossible to reproduce on a model. The photo of a real vehicle - not a landau - shows the kind of thing.
The hood would be of black leather inside and out. The interior woodwork was probably of the same cololur as the exterior, and the leather upholstery in the same or a complementary rich colour.
Hood stays and the lamp tops and bottoms can be painted to represent brass – see the top picture.
The aristos often had their coat-of-arms painted on the doors.
FINALLY
If your landau is to be on the road, choose a fine pair of horses from one of the suppliers and harness them to the carriage with thin microstrip or card representing the leather traces.