Embed Size (px)
Citation preview
Redbooks
Front cover
Securing Your CloudIBM z/VM Security for IBM z Systems and LinuxONE
Lydia Parziale
Edi Lopes Alves
Vic Cross
Klaus Egeler
Klaus Mueller
Willian Rampazzo

International Technical Support Organization
Securing Your Cloud: IBM z/VM Security for IBM z Systems and LinuxONE
October 2016
SG24-8353-00
© Copyright International Business Machines Corporation 2016. All rights reserved.Note to U.S. Government Users Restricted Rights -- Use, duplication or disclosure restricted by GSA ADP ScheduleContract with IBM Corp.
First Edition (October 2016)
This edition applies to Version 6, Release 3 of z/VM and the IBM Resource Access Control Facility Security Server for z/VM.
Note: Before using this information and the product it supports, read the information in “Notices” on page vii.
Contents
Notices . . . . . . . . . . . . . . . . . . . . . . . . . . . . . . . . . . . . . . . . . . . . . . . . . . . . . . . . . . . . . . . . . viiTrademarks . . . . . . . . . . . . . . . . . . . . . . . . . . . . . . . . . . . . . . . . . . . . . . . . . . . . . . . . . . . . . viii
IBM Redbooks promotions . . . . . . . . . . . . . . . . . . . . . . . . . . . . . . . . . . . . . . . . . . . . . . . . . ix
Preface . . . . . . . . . . . . . . . . . . . . . . . . . . . . . . . . . . . . . . . . . . . . . . . . . . . . . . . . . . . . . . . . . xiAuthors. . . . . . . . . . . . . . . . . . . . . . . . . . . . . . . . . . . . . . . . . . . . . . . . . . . . . . . . . . . . . . . . . . xiNow you can become a published author, too! . . . . . . . . . . . . . . . . . . . . . . . . . . . . . . . . . . . xiiComments welcome. . . . . . . . . . . . . . . . . . . . . . . . . . . . . . . . . . . . . . . . . . . . . . . . . . . . . . . . xiiStay connected to IBM Redbooks . . . . . . . . . . . . . . . . . . . . . . . . . . . . . . . . . . . . . . . . . . . . xiii
Chapter 1. Introduction to security on IBM z Systems . . . . . . . . . . . . . . . . . . . . . . . . . . 11.1 Why security matters. . . . . . . . . . . . . . . . . . . . . . . . . . . . . . . . . . . . . . . . . . . . . . . . . . . . 21.2 A brief overview of hardware security features . . . . . . . . . . . . . . . . . . . . . . . . . . . . . . . . 21.3 Principles of RACF operations . . . . . . . . . . . . . . . . . . . . . . . . . . . . . . . . . . . . . . . . . . . . 3
1.3.1 Principle of best matching profile . . . . . . . . . . . . . . . . . . . . . . . . . . . . . . . . . . . . . . 41.4 Why you should use RACF to secure your cloud infrastructure . . . . . . . . . . . . . . . . . . . 41.5 RACF DB organization and structure . . . . . . . . . . . . . . . . . . . . . . . . . . . . . . . . . . . . . . . 5
1.5.1 Database definition to the system. . . . . . . . . . . . . . . . . . . . . . . . . . . . . . . . . . . . . . 51.5.2 Internal organization of RACF database specifying class options . . . . . . . . . . . . . 5
Chapter 2. IBM z/VM hypervisor. . . . . . . . . . . . . . . . . . . . . . . . . . . . . . . . . . . . . . . . . . . . . 72.1 z/VM hypervisor . . . . . . . . . . . . . . . . . . . . . . . . . . . . . . . . . . . . . . . . . . . . . . . . . . . . . . . 8
2.1.1 Single System Image overview. . . . . . . . . . . . . . . . . . . . . . . . . . . . . . . . . . . . . . . . 82.1.2 Security settings in an SSI cluster. . . . . . . . . . . . . . . . . . . . . . . . . . . . . . . . . . . . . 102.1.3 Controlling the System Operator. . . . . . . . . . . . . . . . . . . . . . . . . . . . . . . . . . . . . . 102.1.4 The System Configuration file . . . . . . . . . . . . . . . . . . . . . . . . . . . . . . . . . . . . . . . . 112.1.5 Addressing password security . . . . . . . . . . . . . . . . . . . . . . . . . . . . . . . . . . . . . . . 132.1.6 Implementing CP LOGONBY . . . . . . . . . . . . . . . . . . . . . . . . . . . . . . . . . . . . . . . . 142.1.7 Role-based access controls and CP privilege classes . . . . . . . . . . . . . . . . . . . . . 16
2.2 Device management . . . . . . . . . . . . . . . . . . . . . . . . . . . . . . . . . . . . . . . . . . . . . . . . . . . 172.3 Securing the data . . . . . . . . . . . . . . . . . . . . . . . . . . . . . . . . . . . . . . . . . . . . . . . . . . . . . 18
2.3.1 Securing your minidisks . . . . . . . . . . . . . . . . . . . . . . . . . . . . . . . . . . . . . . . . . . . . 182.3.2 Securing GUEST LANS and virtual switches . . . . . . . . . . . . . . . . . . . . . . . . . . . . 18
2.4 Securing your communication. . . . . . . . . . . . . . . . . . . . . . . . . . . . . . . . . . . . . . . . . . . . 192.4.1 Encrypting your communication . . . . . . . . . . . . . . . . . . . . . . . . . . . . . . . . . . . . . . 192.4.2 z/VM Cryptographic definitions . . . . . . . . . . . . . . . . . . . . . . . . . . . . . . . . . . . . . . . 212.4.3 Checking the cryptographic card definitions in z/VM . . . . . . . . . . . . . . . . . . . . . . 25
2.5 z/VM connectivity . . . . . . . . . . . . . . . . . . . . . . . . . . . . . . . . . . . . . . . . . . . . . . . . . . . . . 262.5.1 DEVICE and LINK statements . . . . . . . . . . . . . . . . . . . . . . . . . . . . . . . . . . . . . . . 272.5.2 HiperSockets VSWITCH Bridge . . . . . . . . . . . . . . . . . . . . . . . . . . . . . . . . . . . . . . 272.5.3 Security considerations. . . . . . . . . . . . . . . . . . . . . . . . . . . . . . . . . . . . . . . . . . . . . 28
2.6 Remote Spooling Communications Subsystem . . . . . . . . . . . . . . . . . . . . . . . . . . . . . . 30
Chapter 3. IBM Resource Access Control Facility Security Server for IBM z/VM . . . . 333.1 RACF z/VM concepts . . . . . . . . . . . . . . . . . . . . . . . . . . . . . . . . . . . . . . . . . . . . . . . . . . 34
3.1.1 External security manager . . . . . . . . . . . . . . . . . . . . . . . . . . . . . . . . . . . . . . . . . . 343.1.2 Security policy . . . . . . . . . . . . . . . . . . . . . . . . . . . . . . . . . . . . . . . . . . . . . . . . . . . . 35
3.2 Activating and configuring RACF . . . . . . . . . . . . . . . . . . . . . . . . . . . . . . . . . . . . . . . . . 36
© Copyright IBM Corp. 2016. All rights reserved. iii
3.2.1 Post-activation tasks . . . . . . . . . . . . . . . . . . . . . . . . . . . . . . . . . . . . . . . . . . . . . . . 373.2.2 Building the RACF enabled CPLOAD MODULE. . . . . . . . . . . . . . . . . . . . . . . . . . 543.2.3 Updating the RACF database and options . . . . . . . . . . . . . . . . . . . . . . . . . . . . . . 573.2.4 Placing RACF into production. . . . . . . . . . . . . . . . . . . . . . . . . . . . . . . . . . . . . . . . 623.2.5 Using HCPRWAC . . . . . . . . . . . . . . . . . . . . . . . . . . . . . . . . . . . . . . . . . . . . . . . . . 64
3.3 RACF management processes . . . . . . . . . . . . . . . . . . . . . . . . . . . . . . . . . . . . . . . . . . . 673.3.1 DirMaint changes to work with RACF . . . . . . . . . . . . . . . . . . . . . . . . . . . . . . . . . . 673.3.2 RACF authorization concepts . . . . . . . . . . . . . . . . . . . . . . . . . . . . . . . . . . . . . . . . 693.3.3 Adding virtual machines and resources to the system and the RACF database . 693.3.4 Securing your minidisks with RACF . . . . . . . . . . . . . . . . . . . . . . . . . . . . . . . . . . . 763.3.5 Securing guest LANs and virtual switches with RACF . . . . . . . . . . . . . . . . . . . . . 783.3.6 Labeled security and mandatory access control . . . . . . . . . . . . . . . . . . . . . . . . . . 813.3.7 Backing up the RACF database . . . . . . . . . . . . . . . . . . . . . . . . . . . . . . . . . . . . . . 823.3.8 RACF recovery options. . . . . . . . . . . . . . . . . . . . . . . . . . . . . . . . . . . . . . . . . . . . . 85
Chapter 4. Security Policy Management on IBM z/VM . . . . . . . . . . . . . . . . . . . . . . . . . . 874.1 User ID management . . . . . . . . . . . . . . . . . . . . . . . . . . . . . . . . . . . . . . . . . . . . . . . . . . 88
4.1.1 Least privilege principle . . . . . . . . . . . . . . . . . . . . . . . . . . . . . . . . . . . . . . . . . . . . 884.1.2 RACF passwords and password phrases. . . . . . . . . . . . . . . . . . . . . . . . . . . . . . . 954.1.3 Implementing RACF LOGONBY. . . . . . . . . . . . . . . . . . . . . . . . . . . . . . . . . . . . . 103
4.2 Communication encryption . . . . . . . . . . . . . . . . . . . . . . . . . . . . . . . . . . . . . . . . . . . . . 1074.3 Single System Image Security . . . . . . . . . . . . . . . . . . . . . . . . . . . . . . . . . . . . . . . . . . 108
4.3.1 Overview . . . . . . . . . . . . . . . . . . . . . . . . . . . . . . . . . . . . . . . . . . . . . . . . . . . . . . . 1084.3.2 Background information . . . . . . . . . . . . . . . . . . . . . . . . . . . . . . . . . . . . . . . . . . . 1084.3.3 Relocation domains . . . . . . . . . . . . . . . . . . . . . . . . . . . . . . . . . . . . . . . . . . . . . . 1094.3.4 RACF in an SSI cluster . . . . . . . . . . . . . . . . . . . . . . . . . . . . . . . . . . . . . . . . . . . . 110
4.4 Auditing . . . . . . . . . . . . . . . . . . . . . . . . . . . . . . . . . . . . . . . . . . . . . . . . . . . . . . . . . . . . 1104.4.1 Auditing with journaling . . . . . . . . . . . . . . . . . . . . . . . . . . . . . . . . . . . . . . . . . . . . 1114.4.2 Auditing with RACF. . . . . . . . . . . . . . . . . . . . . . . . . . . . . . . . . . . . . . . . . . . . . . . 115
Chapter 5. Securing a Cloud on IBM z/VM environment . . . . . . . . . . . . . . . . . . . . . . . 1375.1 Cloud on z/VM components . . . . . . . . . . . . . . . . . . . . . . . . . . . . . . . . . . . . . . . . . . . . 1385.2 DirMaint . . . . . . . . . . . . . . . . . . . . . . . . . . . . . . . . . . . . . . . . . . . . . . . . . . . . . . . . . . . . 139
5.2.1 DirMaint controls . . . . . . . . . . . . . . . . . . . . . . . . . . . . . . . . . . . . . . . . . . . . . . . . . 1395.2.2 Delegating DirMaint authority . . . . . . . . . . . . . . . . . . . . . . . . . . . . . . . . . . . . . . . 141
5.3 Systems Management API . . . . . . . . . . . . . . . . . . . . . . . . . . . . . . . . . . . . . . . . . . . . . 1465.3.1 SFS . . . . . . . . . . . . . . . . . . . . . . . . . . . . . . . . . . . . . . . . . . . . . . . . . . . . . . . . . . . 1465.3.2 Looking at other SMAPI user IDs . . . . . . . . . . . . . . . . . . . . . . . . . . . . . . . . . . . . 1485.3.3 VSMGUARD . . . . . . . . . . . . . . . . . . . . . . . . . . . . . . . . . . . . . . . . . . . . . . . . . . . . 1485.3.4 SMAPI controls . . . . . . . . . . . . . . . . . . . . . . . . . . . . . . . . . . . . . . . . . . . . . . . . . . 1495.3.5 Security aspects involving SMAPI. . . . . . . . . . . . . . . . . . . . . . . . . . . . . . . . . . . . 149
5.4 z/VM Cloud Manager Appliance . . . . . . . . . . . . . . . . . . . . . . . . . . . . . . . . . . . . . . . . . 1535.4.1 Basic requirements and configuration options . . . . . . . . . . . . . . . . . . . . . . . . . . 154
5.5 Controller node . . . . . . . . . . . . . . . . . . . . . . . . . . . . . . . . . . . . . . . . . . . . . . . . . . . . . . 1555.5.1 DMSSICNF COPY for the controller node . . . . . . . . . . . . . . . . . . . . . . . . . . . . . 1555.5.2 DMSSICMO COPY file for the controller node . . . . . . . . . . . . . . . . . . . . . . . . . . 157
5.6 Compute node. . . . . . . . . . . . . . . . . . . . . . . . . . . . . . . . . . . . . . . . . . . . . . . . . . . . . . . 1585.6.1 DMSSICNF COPY file for the compute node . . . . . . . . . . . . . . . . . . . . . . . . . . . 1585.6.2 DMSSICMO COPY file for the compute node. . . . . . . . . . . . . . . . . . . . . . . . . . . 160
5.7 Securing your cloud components . . . . . . . . . . . . . . . . . . . . . . . . . . . . . . . . . . . . . . . . 161
Chapter 6. IBM z/VM and enterprise security . . . . . . . . . . . . . . . . . . . . . . . . . . . . . . . . 1636.1 z/Secure . . . . . . . . . . . . . . . . . . . . . . . . . . . . . . . . . . . . . . . . . . . . . . . . . . . . . . . . . . . 1646.2 LDAP. . . . . . . . . . . . . . . . . . . . . . . . . . . . . . . . . . . . . . . . . . . . . . . . . . . . . . . . . . . . . . 164
iv Securing Your Cloud: IBM z/VM Security for IBM z Systems and LinuxONE
6.2.1 LDAP on z/VM . . . . . . . . . . . . . . . . . . . . . . . . . . . . . . . . . . . . . . . . . . . . . . . . . . 1656.2.2 Integration of z/VM LDAP into an enterprise directory . . . . . . . . . . . . . . . . . . . . 166
6.3 Linux on z Systems security . . . . . . . . . . . . . . . . . . . . . . . . . . . . . . . . . . . . . . . . . . . . 1676.3.1 Authentication . . . . . . . . . . . . . . . . . . . . . . . . . . . . . . . . . . . . . . . . . . . . . . . . . . . 1676.3.2 Access control. . . . . . . . . . . . . . . . . . . . . . . . . . . . . . . . . . . . . . . . . . . . . . . . . . . 1686.3.3 User management . . . . . . . . . . . . . . . . . . . . . . . . . . . . . . . . . . . . . . . . . . . . . . . 1696.3.4 Update management . . . . . . . . . . . . . . . . . . . . . . . . . . . . . . . . . . . . . . . . . . . . . 1696.3.5 Data . . . . . . . . . . . . . . . . . . . . . . . . . . . . . . . . . . . . . . . . . . . . . . . . . . . . . . . . . . 1706.3.6 Audit . . . . . . . . . . . . . . . . . . . . . . . . . . . . . . . . . . . . . . . . . . . . . . . . . . . . . . . . . . 1706.3.7 Cryptographic hardware . . . . . . . . . . . . . . . . . . . . . . . . . . . . . . . . . . . . . . . . . . . 1716.3.8 Firewall . . . . . . . . . . . . . . . . . . . . . . . . . . . . . . . . . . . . . . . . . . . . . . . . . . . . . . . . 172
Related publications . . . . . . . . . . . . . . . . . . . . . . . . . . . . . . . . . . . . . . . . . . . . . . . . . . . . 173Other publications . . . . . . . . . . . . . . . . . . . . . . . . . . . . . . . . . . . . . . . . . . . . . . . . . . . . . . . 173Help from IBM . . . . . . . . . . . . . . . . . . . . . . . . . . . . . . . . . . . . . . . . . . . . . . . . . . . . . . . . . . 173
Index . . . . . . . . . . . . . . . . . . . . . . . . . . . . . . . . . . . . . . . . . . . . . . . . . . . . . . . . . . . . . . . . . 175
Contents v

vi Securing Your Cloud: IBM z/VM Security for IBM z Systems and LinuxONE
Notices
This information was developed for products and services offered in the US. This material might be available from IBM in other languages. However, you may be required to own a copy of the product or product version in that language in order to access it.
IBM may not offer the products, services, or features discussed in this document in other countries. Consult your local IBM representative for information on the products and services currently available in your area. Any reference to an IBM product, program, or service is not intended to state or imply that only that IBM product, program, or service may be used. Any functionally equivalent product, program, or service that does not infringe any IBM intellectual property right may be used instead. However, it is the user’s responsibility to evaluate and verify the operation of any non-IBM product, program, or service.
IBM may have patents or pending patent applications covering subject matter described in this document. The furnishing of this document does not grant you any license to these patents. You can send license inquiries, in writing, to:IBM Director of Licensing, IBM Corporation, North Castle Drive, MD-NC119, Armonk, NY 10504-1785, US
INTERNATIONAL BUSINESS MACHINES CORPORATION PROVIDES THIS PUBLICATION “AS IS” WITHOUT WARRANTY OF ANY KIND, EITHER EXPRESS OR IMPLIED, INCLUDING, BUT NOT LIMITED TO, THE IMPLIED WARRANTIES OF NON-INFRINGEMENT, MERCHANTABILITY OR FITNESS FOR A PARTICULAR PURPOSE. Some jurisdictions do not allow disclaimer of express or implied warranties in certain transactions, therefore, this statement may not apply to you.
This information could include technical inaccuracies or typographical errors. Changes are periodically made to the information herein; these changes will be incorporated in new editions of the publication. IBM may make improvements and/or changes in the product(s) and/or the program(s) described in this publication at any time without notice.
Any references in this information to non-IBM websites are provided for convenience only and do not in any manner serve as an endorsement of those websites. The materials at those websites are not part of the materials for this IBM product and use of those websites is at your own risk.
IBM may use or distribute any of the information you provide in any way it believes appropriate without incurring any obligation to you.
The performance data and client examples cited are presented for illustrative purposes only. Actual performance results may vary depending on specific configurations and operating conditions.
Information concerning non-IBM products was obtained from the suppliers of those products, their published announcements or other publicly available sources. IBM has not tested those products and cannot confirm the accuracy of performance, compatibility or any other claims related to non-IBM products. Questions on the capabilities of non-IBM products should be addressed to the suppliers of those products.
Statements regarding IBM’s future direction or intent are subject to change or withdrawal without notice, and represent goals and objectives only.
This information contains examples of data and reports used in daily business operations. To illustrate them as completely as possible, the examples include the names of individuals, companies, brands, and products. All of these names are fictitious and any similarity to actual people or business enterprises is entirely coincidental.
COPYRIGHT LICENSE:
This information contains sample application programs in source language, which illustrate programming techniques on various operating platforms. You may copy, modify, and distribute these sample programs in any form without payment to IBM, for the purposes of developing, using, marketing or distributing application programs conforming to the application programming interface for the operating platform for which the sample programs are written. These examples have not been thoroughly tested under all conditions. IBM, therefore, cannot guarantee or imply reliability, serviceability, or function of these programs. The sample programs are provided “AS IS”, without warranty of any kind. IBM shall not be liable for any damages arising out of your use of the sample programs.
© Copyright IBM Corp. 2016. All rights reserved. vii
Trademarks
IBM, the IBM logo, and ibm.com are trademarks or registered trademarks of International Business Machines Corporation, registered in many jurisdictions worldwide. Other product and service names might be trademarks of IBM or other companies. A current list of IBM trademarks is available on the web at “Copyright and trademark information” at http://www.ibm.com/legal/copytrade.shtml
The following terms are trademarks or registered trademarks of International Business Machines Corporation, and might also be trademarks or registered trademarks in other countries.
DB2®DirMaint™ECKD™FICON®GDPS®Geographically Dispersed Parallel
Sysplex™IBM®
IBM Blue™IBM z Systems™IBM z13™Parallel Sysplex®RACF®Redbooks®Redbooks (logo) ®Tivoli®
z Systems™z/Architecture®z/OS®z/VM®z/VSE®z13™zSecure™
The following terms are trademarks of other companies:
Linux is a trademark of Linus Torvalds in the United States, other countries, or both.
Microsoft, and the Windows logo are trademarks of Microsoft Corporation in the United States, other countries, or both.
Other company, product, or service names may be trademarks or service marks of others.
viii Securing Your Cloud: IBM z/VM Security for IBM z Systems and LinuxONE
IBM REDBOOKS PROMOTIONS
Find and read thousands of IBM Redbooks publications
Search, bookmark, save and organize favorites
Get personalized notifications of new content
Link to the latest Redbooks blogs and videos
DownloadNow
Get the latest version of the Redbooks Mobile App
iOS
Android
Place a Sponsorship Promotion in an IBM Redbooks publication, featuring your business or solution with a link to your web site.
Qualified IBM Business Partners may place a full page promotion in the most popular Redbooks publications. Imagine the power of being seen by users who download millions of Redbooks publications each year!
®
®
Promote your business in an IBM Redbooks publication
ibm.com/RedbooksAbout Redbooks Business Partner Programs
IBM Redbooks promotions

THIS PAGE INTENTIONALLY LEFT BLANK
Preface
As workloads are being offloaded to IBM® z Systems™ based cloud environments, it is important to ensure that these workloads and environments are secure.
This IBM Redbooks® publication describes the necessary steps to secure your environment for all of the components that are involved in a z Systems cloud infrastructure that uses IBM z/VM® and Linux on z Systems.
The audience for this book is IT architects and those planning to use z Systems for their cloud environments.
Authors
This book was produced by a team of specialists from around the world working at the International Technical Support Organization, Poughkeepsie Center.
Lydia Parziale is a Project Leader for the ITSO team in Poughkeepsie, New York. She has domestic and international experience in technology management, including software development, project leadership, and strategic planning. Her areas of expertise include business development and database management technologies. Lydia is a certified PMP and an IBM Certified IT Specialist with an MBA in Technology Management and has been employed by IBM for over 25 years in various technology areas.
Edi Lopes Alves is a Senior IT Specialist in Brazil working with IBM z Systems™ for the GTS team. She has +25 years of experience working as a z/VM and Linux on z Systems specialist. Edi is IBM L2 IT Specialist certified and has a master’s degree in e-Business from ESPM Sao Paulo. She has supported the Banco do Brasil z/VM environment and its cloud initiatives, IBM Global Accounts (IGA) for several years as part of IBM Green and IBM Blue™ Harmony projects, and z/VM Field Test at Endicott Lab. Edi has co-authored four IBM Redbooks publications: IBM Wave for z/VM Installation, Implementation, and Exploitation, SG24-8192, Using z/VM v 6.2 Single System Image (SSI) and Live Guest Relocation (LGR), SG24-8039, Linux on IBM System z: Performance Measurement and Tuning, SG24-6926 (2011), and Introduction to the New Mainframe: z/VM Basics, SG24-7316.
Vic Cross is an IT Specialist living in Brisbane, Australia. He works with the IBM Asia Pacific z Systems Solutions Team based in Singapore. Vic has 25 years of experience in general IT, 20 of which has been directly related to the IBM z Systems™ platform and its antecedents. He holds a degree in Computer Science from Queensland University of Technology. His areas of expertise include Linux and Networking on z Systems, specializing in security and high availability. He has written and contributed to several IBM Redbooks publications, including Security for Linux on System z, SG24-7728 and Linux on IBM eServer zSeries and S/390: Virtual Router Redundancy Protocol on VM Guest LANs, REDP-3657. Vic is also a regular presenter for ITSO Workshops and other technical events around the world.
Klaus Egeler is an IT Systems Management Specialist with IBM SO Delivery in Germany. He joined IBM in 1979. His areas of expertise are the mainframe operating systems IBM z/VSE®, z/VM, and Linux on z Systems. He has worked with Linux on z Systems for 15 years. Klaus has contributed to several z/VM related and Linux related IBM Redbooks publications. He is a presenter/instructor at ITSO workshops and customer events around the world regularly.
© Copyright IBM Corp. 2016. All rights reserved. xi
Klaus Mueller is a Systems programmer in Germany. He has 26 years of experience in z/VM installation, maintenance, and customization. He has worked for 16 years as a systems programmer for IBM z/OS® systems and IBM Resource Access Control Facility (IBM RACF®) administrator. His areas of expertise include z/OS, z/VM, RACF, IBM zSecure™ Suite, and Identity Management Systems integration for RACF.
Willian Rampazzo is a Software Engineer at the Linux Technology Center (LTC) at IBM and an Assistant Professor for a Computer Science bachelor course in Brazil. He has a bachelor’s degree in Computer Science and an MBA in Information Technology Security Management. He has been working with z Systems for 13 years at IBM, and has worked as a z/VM system programmer and a Linux on z Systems administrator. He is now focused on development for Linux on z Systems at LTC.
Thanks to the following people for their contributions to this project:
Robert Haimowitz and David BenninInternational Technical Support Organization, Poughkeepsie Center
Emily and Brian HugenbruchIBM Endicott
Peter G SperaIBM Poughkeepsie
Now you can become a published author, too!
Here’s an opportunity to spotlight your skills, grow your career, and become a published author—all at the same time! Join an ITSO residency project and help write a book in your area of expertise, while honing your experience using leading-edge technologies. Your efforts will help to increase product acceptance and customer satisfaction, as you expand your network of technical contacts and relationships. Residencies run from two to six weeks in length, and you can participate either in person or as a remote resident working from your home base.
Find out more about the residency program, browse the residency index, and apply online at:
ibm.com/redbooks/residencies.html
Comments welcome
Your comments are important to us!
We want our books to be as helpful as possible. Send us your comments about this book or other IBM Redbooks publications in one of the following ways:
� Use the online Contact us review Redbooks form found at:
ibm.com/redbooks
� Send your comments in an email to:
xii Securing Your Cloud: IBM z/VM Security for IBM z Systems and LinuxONE
� Mail your comments to:
IBM Corporation, International Technical Support OrganizationDept. HYTD Mail Station P0992455 South RoadPoughkeepsie, NY 12601-5400
Stay connected to IBM Redbooks
� Find us on Facebook:
http://www.facebook.com/IBMRedbooks
� Follow us on Twitter:
http://twitter.com/ibmredbooks
� Look for us on LinkedIn:
http://www.linkedin.com/groups?home=&gid=2130806
� Explore new Redbooks publications, residencies, and workshops with the IBM Redbooks weekly newsletter:
https://www.redbooks.ibm.com/Redbooks.nsf/subscribe?OpenForm
� Stay current on recent Redbooks publications with RSS Feeds:
http://www.redbooks.ibm.com/rss.html
Preface xiii

xiv Securing Your Cloud: IBM z/VM Security for IBM z Systems and LinuxONE
Chapter 1. Introduction to security on IBM z Systems
This chapter provides an introduction to security on IBM z Systems, describes the specifics of IBM z/VM security, and lists the benefits of using an external security manager (ESM), for example, IBM Resource Access Control Facility (RACF) for z/VM.
z/VM stands for IBM z/Architecture® Virtual Machine, and z/VM virtual machines are also referred to as guests, user IDs, or service machines.
With z/Architecture, you have many security features that you can use to secure your applications. However, you do not only set up the features; you must customize them correctly. This is the topic of this book.
Because operating systems alone cannot provide the necessary security, this chapter also provides a brief overview of hardware security features.
This chapter describes the following topics:
� Why security matters� A brief overview of hardware security features� Principles of RACF operations� Why you should use RACF to secure your cloud infrastructure� RACF DB organization and structure
1
Note: If you must comply with the requirements of the Common Criteria Operating System Protection Profile (OSPP), you must install RACF and the Single System Image (SSI) feature because evaluation for z/VM was done only with these features enabled. For more information, see z/VM Secure Configuration Guide, SC24-6230.
© Copyright IBM Corp. 2016. All rights reserved. 1
1.1 Why security matters
Security is essential in many ways. This is true for physical security, but because electronic services are more prevalent, it is evident that companies must secure and protect these services too.
Every company that handles customer information or offers services through Internet platforms must make sure that processed data is secured against all threats.
All precautions to prevent data leakage and to assure system and data integrity must be taken. It is no longer sufficient to state that data processing is secure today. You also must offer proof to auditors and comply with regulations to establish trust in your services.
Most important, you must prevent a loss of revenue and reputation due to security exposures.
Therefore, it is a preferred practice to establish the strongest security mechanisms at all levels of data processing, including the physical security of the machine rooms at your data center (controlling access to the facilities) and implementing appropriate access levels to applications, programs, data, archives, and so on. The principle of least privilege should be met at all levels.
This book provides guidelines about how to meet security demands in a cloud environment that is provided by z/VM and Linux on z Systems.
1.2 A brief overview of hardware security features
The hardware security features provide a fundamental part of the security definitions of software techniques and solutions, and the available operating systems for IBM z Systems (z/VM, Linux on z Systems, z/VSE, and z/OS) each use these hardware features to some degree.
Understanding z Systems hardware and z/Architecture is key to understanding how operating systems and applications maintain data, process, and application integrity. To learn more about z/Architecture, see z/Architecture Principles of Operation SA22-7832-10.
Despite being different classes of IBM hardware, z Systems and LinuxONE both adhere to z/Architecture. This book uses the terms z Systems and LinuxONE interchangeably.
Security features on the mainframe are integrated into the hardware. The following list provides some of the available hardware security features:
� With the Hardware Management Console (HMC), logical partitions (LPARs) can be defined and isolated from each other. Additionally, all the resources that are needed to run the operating systems are defined through LPAR profiles by the HMC. These resources are storage and processors and Direct Access Storage Device (DASD) and tape units.
� Crypto Express Cards can encrypt both session traffic and physical data on DASDs and tape. For better performance, cryptographic coprocessors are used. For more information, see 2.4.2, “z/VM Cryptographic definitions” on page 21.
� Signed microcode is applied to the hardware to ensure microcode authenticity.
2 Securing Your Cloud: IBM z/VM Security for IBM z Systems and LinuxONE
z/VM provides a host of features that isolates virtual machines (VMs) (also called guests) from one another. This isolation is implemented in the z/VM Control Program (CP), which can be considered the kernel of the hypervisor. Separation of guest workloads is a vital component of system integrity, and it provides the foundation of the security context on which the z Systems Integrity Statement is based. For more information about the z/VM CP, see z/VM CP Planning and Administration, SC24-6178.
1.3 Principles of RACF operations
Modern z/VM security requires an ESM, such as the RACF for z/VM feature. This security server functions as a Policy Decision Point and Policy Enforcement Point for all security relevant events in your virtual infrastructure (and, by extension, your cloud). RACF for z/VM can be configured to handle resource authorization, privileged command access, and logon controls.
RACF provides services for authentication and authorization to resources.
To have the services of z/VM RACF available, a RACF database must be set up, and a user ID, in which the RACF binary files are available, must be started. In z/VM RACF, this VM is RACFVM.
The RACF database is used to store all information about users, groups, and resources. Access to resources is controlled through entries in the following lists:
� Standard access control lists of the resource profiles
� Conditional access control lists of resource profiles (resource access is allowed only through a certain program)
For more information about how to get started with RACF and how to adopt RACF definitions to your business demands for a security structure, see Chapter 3, “IBM Resource Access Control Facility Security Server for IBM z/VM” on page 33 and z/VM RACF Security Server Security Administrator’s Guide, SC24-6218.
Note: If you have RACF installed, users’ passwords are never stored in clear text in the system; they are stored in encrypted form in the RACF database. The encryption algorithms are described in “Password encryption algorithm” on page 51. Additionally, the passwords in the USER directory are no longer in effect.
With the z/VM PTF for z/VM 6.3 APAR VM65719 / PTF UV61271, password encryption support for KDFAES is available. Using this algorithm provides better protection against brute-force attacks if an offline copy of the RACF database becomes exposed.
For more information, see the following website:
http://www.ibm.com/support/docview.wss?crawler=1&uid=isg1VM65719
Note: The preferred practice of RACF administrators is to give access rights to groups rather than users.
Chapter 1. Introduction to security on IBM z Systems 3
1.3.1 Principle of best matching profile
RACF uses the principle of best matching profiles to check whether access might be granted due to the access rights being stored in a RACF database.
A profile covering the name of a given resource is best used to check on the access. The access intent must at least meet the access that is stored in the RACF profile’s access list. This principle is described in z/VM RACF Security Server Security Administrator’s Guide, SC24-6218.
If you run z/VM in an SSI cluster environment, then RACFVM is an identity service machine, which means it runs on every z/VM image in the cluster. To provide this service, a RACF database is needed and shared among the SSI members. The RACF database and its backup are on two distinct DASD volumes, each of which is shared in an SSI cluster. For more information about RACF databases, see 1.5, “RACF DB organization and structure” on page 5.
1.4 Why you should use RACF to secure your cloud infrastructure
If you are running applications that must meet mandatory regulations, such as the rules of the Payment Card Industry Data Security Standard (PCI DSS), then you are obligated to adhere to a number of controls and evidences to pass auditor checks. You can meet this requirement by setting the auditing controls according to your installation’s needs, as described in 4.4, “Auditing” on page 110.
In addition to the operating system built-in security mechanisms, such as isolation of virtual storage by the z/VM CP, RACF provides ways to better control access to resources in your system. However, meeting the regulatory needs is not done by only setting up the RACF databases and defining profiles to protect resources. Your entire organization should implement a security policy and set up the RACF definitions according to a defined policy.
Implementing security processes is an ongoing process in your company and needs the full support of all managers of your organization. Implementing security processes needs much organizational work done with documentation processes and reviews, both of which are deeply integrated in your company’s structure. This process means a reasonable amount of work for security administrator staff and many departments of an organization.
With RACF installed, you can do the following tasks:
� Track who uses privileged accounts, that is, MAINT and MAINT630.
� Prevent technical support user IDs and VM guests from being revoked by a password revocation policy. To do so, you define these IDs as Protected user IDs. Together with the RACF class SURROGAT logonby policy, you can get full information about who used the VM.
� Provide logging mechanisms (SMF records) to show the following information:
– Who accessed what resources.
– Which access violations occurred.
� Meet Segregation of Duty needs by having defined Security Administrators separately from System Programmer staff.
4 Securing Your Cloud: IBM z/VM Security for IBM z Systems and LinuxONE
1.5 RACF DB organization and structure
This section describes the RACF database, how it is defined to the system, and its internal organization.
1.5.1 Database definition to the system
The RACF database is referenced by the database name table (ICHRDSNT) in the system. You can set up the RACF database by running the RACDSF, RACALLOC, and RACINITD RACF commands. For more information about these commands, see Chapter 4, “Operating Considerations unique to z/VM”, in RACF Security Server System Programmer’s Guide SC24-6219.
The number of physical extents of the RACF database is 1 by default. It is controlled through the RACF database range table (ICHRRNG), which is a load module. This table is in RACFLPA LOADLIB on the RACFVM 305 minidisk.
Details about the RACF database range table are listed in Chapter 3, “RACF Customization”, in RACF Security Server System Programmer’s Guide, SC24-6219.
1.5.2 Internal organization of RACF database specifying class options
RACF can protect resources of the following types:
� Users� Groups� General resources
Classes of general resources are defined in the class descriptor table (CDT). Each general resource class is defined by a unique entry in the CDT.
The CDT describes the structure of profiles for the general resource classes. If you do not comply to the settings in the CDT for the general resource class, one of the following might apply:
� You cannot define the profile.
� RACF cannot determine the matching profile for the access check, which leaves resources unprotected by RACF in the system.
For example, we define a resource entry for a VMLAN VSWITCH entry by using the command that is shown in Example 1-1.
Example 1-1 RACF VMLAN definition
RAC RDEF VMLAN SYSTEM.VSWITCH1.010 UACC(NONE) OW(SYS1)
Note: Allocation and DASD sharing options depend on the type of z/VM installation you use. Set up RACF database sharing correctly according to your system’s installation, or RACF database corruption might occur. In an SSI environment, the RACF database must be shared among all members of the cluster.
Additional changes to the definition of RACF database devices apply if you run an IBM Geographically Dispersed Parallel Sysplex™ (IBM GDPS®) controlled system.
Chapter 1. Introduction to security on IBM z Systems 5
Because CDT for VMLAN defines the last qualifier as a 4-digit value, RACF issues the message that is shown in Example 1-2.
Example 1-2 RACF error message
IKJ56702I INVALID ENTITY, SYSTEM.VSWITCH.010
To correct this error, ensure that you define the profile as SYSTEM.VSWITCH1.0010.
Additionally, the CDT is used to determine whether a RACF class may be RACLISTed or GENLISTed by running the SETEROPTS command. RACLIST is a performance option, profiles of the classes are kept in storage, and no I/O operation occurs on the RACF database when checking on these profiles. However, changes to the profiles need an in-storage refresh of RACLISTed profiles. This is done by running the SETROPTS REFRESH command.
In addition, there are two CDT entry types:
� ICHRRCDX is the name for the IBM-supplied class entries.� ICHRRCDE is the name for installation-defined class entries.
For a list of IBM-supplied class entries, see Appendix B, “Description of the RACF classes”, in RACF Security Server System Programmer’s Guide, SC24-6219.
Note: Do not delete or modify any of the class entries in the IBM-supplied load module ICHRRCDX.
6 Securing Your Cloud: IBM z/VM Security for IBM z Systems and LinuxONE
Chapter 2. IBM z/VM hypervisor
This chapter describes the security aspects of z/VM facilities. It introduces how the z/VM hypervisor can provide basic security in its virtualization environment on IBM z Systems and how it can be improved with the installation of an external security manager (ESM), such as IBM Resource Access Control Facility (RACF).
Protecting information from unintended use is one key element of a secure IT environment. Basically, there are two different methods to ensure privacy of information:
� Access control� Encryption methods
Access control mechanisms determine who has the right to access particular information or data. The access control mechanisms then verify who accesses the information (authentication) and whether they have the right to access this information (authorization). There are cases where proper access control cannot be ensured in all situations, especially if data is stored on movable media and also when data is transferred through a network that might not be protected. It is not possible to ensure that there is no unintended access to data while it is stored or transferred through a network. The only way to protect such information is by using encryption methods.
This chapter describes the following topics:
� z/VM hypervisor� Device management� Securing the data� Securing your communication� z/VM connectivity� Remote Spooling Communications Subsystem
2
© Copyright IBM Corp. 2016. All rights reserved. 7
2.1 z/VM hypervisor
z/VM is considered a hypervisor operating system and its security does not differ from the security of any other operating system on a server. However, the virtual infrastructure relies on the security of the hypervisor, so protecting the z/VM hypervisor typically prevents attempts to breach the security of the operating system and compromises to the integrity of the operating system and data.
Although each guest can have its own security configuration and faces threats particular to it, it is essential to protect the hypervisor itself as an equally important part of an overall end-to-end security policy because actions such as creating, changing, and removing virtual machines (VMs) are performed at the hypervisor level. Protecting the guests and not the hypervisor would be like locking all the windows to your home and then leaving the front door open. Access to the virtualization management system should be restricted to authorized administrators only.
Performing z/VM maintenance is part of the system administrator role. It is important to apply service to your z/VM system to ensure that the latest security measures are in place. Installing the corrections when they are released decreases the time frame that the vulnerability can be exploited.
Besides operating system setup and customization for security, monitoring the hypervisor for signs of compromise helps you promptly respond to a threat. Use monitoring tools to help monitor the hypervisor and look at the hypervisor logs for suspicious activities, both of which make the work of the hypervisor system administrator easier.
2.1.1 Single System Image overview
Since the introduction of z/VM 6.2 in December 2011, the architecture of Linux solutions on z Systems changed dramatically and introduced z/VM Single System Image (SSI) with live guest relocation (LGR).
An SSI cluster is a multi-system environment on which the z/VM systems can be managed as a single resource pool and guests can be moved from one system to another while they are running. Each SSI member is a z/VM logical partition (LPAR) connected through channel to channel (CTC) connections, and the z/VM SSI cluster consists of up to four z/VM systems in an Inter-System Facility for Communications (ISFC) collection. CTC connections are physical connections and because the channels are isolated from the “outside world”, there is no need to encrypt the traffic.
Each z/VM system is a member of the SSI cluster and is self-managed by the z/VM Control Program (CP). All members can access shared DASD volumes, the same Ethernet LAN segments, and the same storage area networks (SANs).
Live guest relocationWith the IBM z/VM SSI, a running Linux on z Systems VM can be relocated from one member system to any other, a process known as LGR. LGR occurs without disruption to the business and provides application continuity across planned z/VM and hardware outages and flexible workload balancing that allows work to be moved to available system resources.
There are several reasons why you might need to relocate a running virtual server:
� Maintenance of hardware or software� Fixing performance problems � Workload rebalancing
8 Securing Your Cloud: IBM z/VM Security for IBM z Systems and LinuxONE
Relocating virtual servers can be useful for load balancing and for moving workload off of a physical server or member system that requires maintenance. After maintenance is applied to a member, guests can be relocated back to that member, allowing you to maintain z/VM and keeping your Linux on z Systems virtual servers available.
LGR is described in Chapter 3, “Live guest relocation (LGR) overview”, in An Introduction to z/VM Single System Image (SSI) and Live Guest Relocation (LGR), SG24-8006 and Chapter 7, “z/VM live guest relocation”, of The Virtualization Cookbook for IBM z Systems Volume 1: IBM z/VM 6.3, SG24-8147.
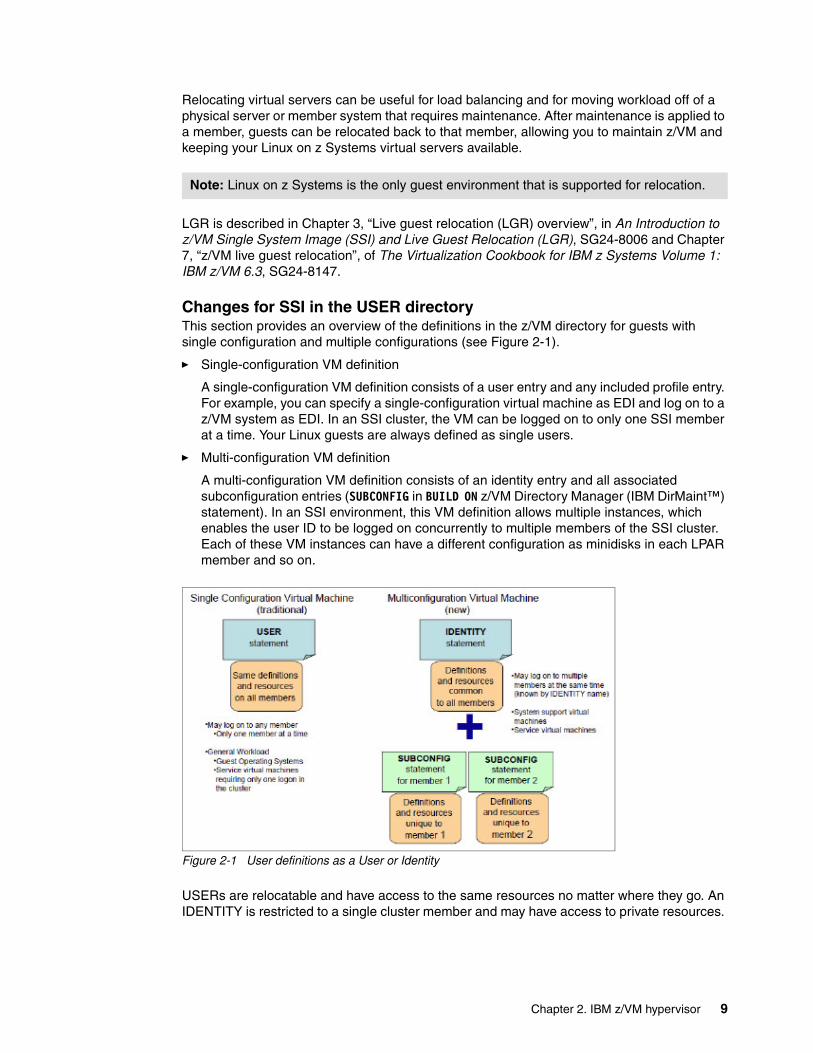
Changes for SSI in the USER directoryThis section provides an overview of the definitions in the z/VM directory for guests with single configuration and multiple configurations (see Figure 2-1).
� Single-configuration VM definition
A single-configuration VM definition consists of a user entry and any included profile entry. For example, you can specify a single-configuration virtual machine as EDI and log on to a z/VM system as EDI. In an SSI cluster, the VM can be logged on to only one SSI member at a time. Your Linux guests are always defined as single users.
� Multi-configuration VM definition
A multi-configuration VM definition consists of an identity entry and all associated subconfiguration entries (SUBCONFIG in BUILD ON z/VM Directory Manager (IBM DirMaint™) statement). In an SSI environment, this VM definition allows multiple instances, which enables the user ID to be logged on concurrently to multiple members of the SSI cluster. Each of these VM instances can have a different configuration as minidisks in each LPAR member and so on.
Figure 2-1 User definitions as a User or Identity
USERs are relocatable and have access to the same resources no matter where they go. An IDENTITY is restricted to a single cluster member and may have access to private resources.
Note: Linux on z Systems is the only guest environment that is supported for relocation.
Chapter 2. IBM z/VM hypervisor 9

2.1.2 Security settings in an SSI cluster
The following list provides some preferred practices to make your SSI cluster more secure and compliant with security rules:
� A user ID has the same password on all systems (Single or Multi-Configuration).
� A Single Configuration VM can log on to only one member of the cluster.
There are error messages as with logging on to a user ID on the same system.
� A Multi-Configuration Virtual Machine can have a different definition on each system.
� A user ID’s privilege classes are the same on every system.
There is a common source directory definition.
� The cluster maintains a single security context for the entire system.
An ESM, even in stand-alone systems, extends these capabilities.
� Consider Relocation Domains.
Relocation Domains can be built so that guests can be constrained to certain cluster members. It is a way of building security zones into the SSI by constraining data flow (where the data is the actual server).
A z/VM system is secured by using the security features of the z Systems or LinuxONE hardware by maintaining compliance to security policy within operating practices. The system administrator must lead the way in following security standards and guidelines.
When the Resource Access Control Facility (RACF) feature for z/VM is installed, it can be configured to control functions normally being checked in the directory for authorization. RACF can control the password field, the minidisk access, spool files, and commands privileges.
A preferred practice to extend the z/VM environment is installing an external security manager (ESM), such as IBM RACF for z/VM or other ESM product to maximize your security.
2.1.3 Controlling the System Operator
The System Operator is a highly privileged VM that runs under z/VM. It has all CP defined privilege classes (and access to every command), and it has special authorities over the hypervisor as well. It also receives informational and error messages from the components of z/VM as they occur. This user ID (most commonly OPERATOR) should be given special protections, which are described in this section.
Controlled areaRun the system operator in a physically controlled environment, for example, in a machine room or in an operator's work area. Provide proper access control through badges for authorized personnel entry only.
Note: A z/VM SSI cluster uses a single source directory to define VMs on the system. However, note that separate object directories are built on each member node of the cluster. As a result, care must be exercised when making changes to VMs on the system so that a new object directory is compiled on each member of the cluster at the same time.
10 Securing Your Cloud: IBM z/VM Security for IBM z Systems and LinuxONE
AutomationSet up an automation environment so that the operator close console files daily so that operator logs are ready for archiving processes. Using system user IDs, set the observer as TCPIP, IBM DirMaint on the operator user ID.
Log on by definitionz/VM can define logon by the system privileged user IDs, such as Operator, Maint, and Maint630.
RACF definition With RACF, define the operator user ID as protected and enable surrogate logon processing by defining the appropriate RACF profile. Give access to surrogate profiles only to operating staff and perhaps system programmers.
2.1.4 The System Configuration file
The System Configuration file is one of the major files of z/VM. It contains operating characteristics, such as the layout of the system residence disk, real storage, and I/O devices configuration.
The system configuration file is on a partition of a volume that is allocated as PARM. This minidisk is normally under user ID maint, and it is on minidisk address CF1. The file is called SYSTEM CONFIG by default, although you can change the name in your installation. The file is read at IPL time by the CP program that uses the statements that are contained in the file to configure the system.
The following sections summarize the statements that are contained in the configuration file that are relevant to security.
DEFINE COMMANDUse the DEFINE COMMAND or CMD statement to define a new CP command or a new version (by IBM class) of an existing CP command on the system during initialization.
DEFINE LANUse the DEFINE LAN statement to create a guest LAN that can be shared among virtual machines on the same VM system. Each guest LAN segment is identified by a unique combination of ownerid and lanname. A VM user can create a simulated network interface card (NIC) and connect it to this LAN segment.
Note: With RACF installed, set up an observer for operator user ID (by using Performance Toolkit for z/VM) to get an option of scrolling through the events that might have happened in the past. If you do not set up this configuration, then all RACF messages like ICH408I are directed to operator. Because the operator’s console is just spooled and only the most recent messages can be seen on the console, it is inconvenient to scroll through the history of system events. Think about using a tool that helps you manage the console log of the operator daily. The archiving of console logs can then be done either by z/VM (VMARC) or by transferring it to other archiving components on other systems.
Note: Since z/VM 6.2, SYSTEM CONFIG is on PMAINT’s CF0 minidisk. As a preferred practice, always run a CPSYNTAX check after modifying SYSTEM CONFIG.
Chapter 2. IBM z/VM hypervisor 11

DEFINE VSWITCHUse the DEFINE VSWITCH statement to create a CP system-owned switch (a virtual switch) to which VMs can connect. Each switch is identified by a switchname. A z/VM user can create a simulated QDIO NIC and connect it to this switch with the NICDEF directory statement. Under the DEFINE VSWITCH statement, the VLAN parameter is important if you want to isolate guests subnets based on VLAN IDs.
DISABLE COMMANDUse the DISABLE COMMAND or CMD statement to prevent CP from processing requests for the specified CP command during and after initialization.
DISABLE DIAGNOSEUse the DISABLE DIAGNOSE statement to prevent CP from processing requests for one or more locally developed DIAGNOSE codes during and after initialization.
ENABLE DIAGNOSEUse the ENABLE DIAGNOSE or CMD statement to permit CP to process requests for the specified CP command during and after initialization.
ENFORCE_BY_VOLidUse the ENFORCE_BY_VOLid configuration statement to enforce attachment of DASD devices by their VOLIDs on the ATTACH command.
FEATURESUse the FEATURES statement to set certain attributes of the system at system initialization.
JOURNALINGUse the JOURNALING statement to tell CP whether to include the journaling facility, whether to enable the system being initialized to set and query the journaling facility, and what to do if someone tries to log on to the system or link to a disk without a valid password.
MODIFY COMMANDUse the MODIFY COMMAND or CMD statement to redefine an existing CP command on the system during initialization.
MODIFY LANUse the MODIFY LAN statement to modify the attributes of an existing guest LAN during initialization.
MODIFY PRIV_CLASSESUse MODIFY PRIV_CLASSES to change the privilege classes that are authorizing the following CP functions:
� Logging on as the primary system operator� Intensive error recording� Using the read function of the CP IOCP utility� Using the write function of the CP IOCP utility� Specifying the default user class
Note: Journaling is not a sufficient replacement for ESM auditing, which is done by RACF.
12 Securing Your Cloud: IBM z/VM Security for IBM z Systems and LinuxONE
MODIFY VSWITCHUse the MODIFY VSWITCH statement to modify the attributes of an existing virtual switch.
PRIV_CLASSESUse the PRIV_CLASSES statement to change the privilege classes authorizing the following CP functions:
� Logging on as the primary system operator� Intensive error recording� Using the read function of the CP IOCP utility� Using the write function of the CP IOCP utility� Specifying the default user class
SYSTEM_USERIDSUse the SYSTEM_USERIDS statement to specify user IDs that perform special functions during and after IPL. These functions include accumulating accounting records, system dump files, EREP records, and symptom records, and specifying the primary system operator’s user ID and disconnect status.
USER_DEFAULTSUse the USER_DEFAULTS statement to define default attributes and permissions for all users on the system.
Password suppressionPassword suppression prevents any password from being visible on the terminal panel. To enable password suppression, place the following statement in the SYSTEM CONFIG file:
FEATURES PASSWORDS_ON_CMDS AUTOLOG NO LINK NO LOGON NO
Preventing users of T-disks and minidisks from seeing residual dataYou must ensure that each time the system assigns T-disk space, it clears the space of all residual data. To ensure that this occurs, place the following statement in the SYSTEM CONFIG file:
FEATURES ENABLE CLEAR_TDISK
Before the minidisk is released, it must be formatted to clear it of any residual data.
2.1.5 Addressing password security
All passwords in a standard z/VM system are default passwords that are defined by the installation process. Before moving your system into production, change those passwords immediately, and in compliance with your corporate security policies.
It might be mandatory based on your company policy, industry, or government regulations to change the following two types of password in the USER DIRECT file:
� userid: The password that is required to logo n.� minidisk: The minidisk password, which gives access to read, write, and multiple.
Note: For a complete description of the syntax and usage for the system configuration file, see z/VM CP Planning and Administration, SC24-6083.
Chapter 2. IBM z/VM hypervisor 13
Changing that password can be done manually by using XEDIT, which is the z/VM text editor, or by using a macro to automate the process. Alternatively, a directory management product, such as DirMaint, may be used.
Manually changing the password is tedious and error prone, so make a backup copy of the USER DIRECT file and only after changing the default passwords.
Special passwordsThere are special passwords in the User Direct file that have specific functions:
NOLOG When the user ID is set with NOLOG, it cannot be used to log in to a z/VM system until you set another password. As a preferred practice, set all unused VMs to NOLOG.
AUTOONLY The user ID starts running only when you issue the xautolog or autolog commands. You cannot issue logon or logoff for this userid.
LBYONLY This user ID can be logged on only by issuing the logon by command. You cannot log on this user ID with the logon command.
RACF control of passwords supersedes any password definitions in the CP User Directory. For more information, see “Password and password phrases rules” on page 95.
2.1.6 Implementing CP LOGONBY
The CP LOGONBY directory statement designates up to eight VMs to another VM. This function was originally a DirMaint implementation and was added to VM a number of releases ago (VM/ESA Version 2 Release 1). The CP LOGON BY function allows authorized VMs to log on to a shared VM by using their own password. This function is handy when you have several VMs that need to share the MAINT VM, but only one person can be logged on at a time.
To fully understand this function, you must become familiar with the following terms:
� Shared user: A user ID that can be logged on to by a different user.
� Surrogate user: A person logging on to the shared user ID.
� Direct logon: A traditional logon, in which you log on to your own user ID.
� Shared logon: A logon in which a surrogate user uses the BY option of the LOGON command to log on to a different user ID.
The implementation of CP LOGONBY can be done updating the user directory of the user that is intended to be used as the shared user with the LOGONBY entry. In Example 2-1, user MAINT is defined to be shared and user EDI is defined as one of its surrogate users.
Example 2-1 User directory of a shared user ID
USER OP1 LNX4ITSO 64M 96M BG INCLUDE IBMDFLT IPL CMS PARM AUTOCR
LOGONBY EDI WILLIANR
14 Securing Your Cloud: IBM z/VM Security for IBM z Systems and LinuxONE
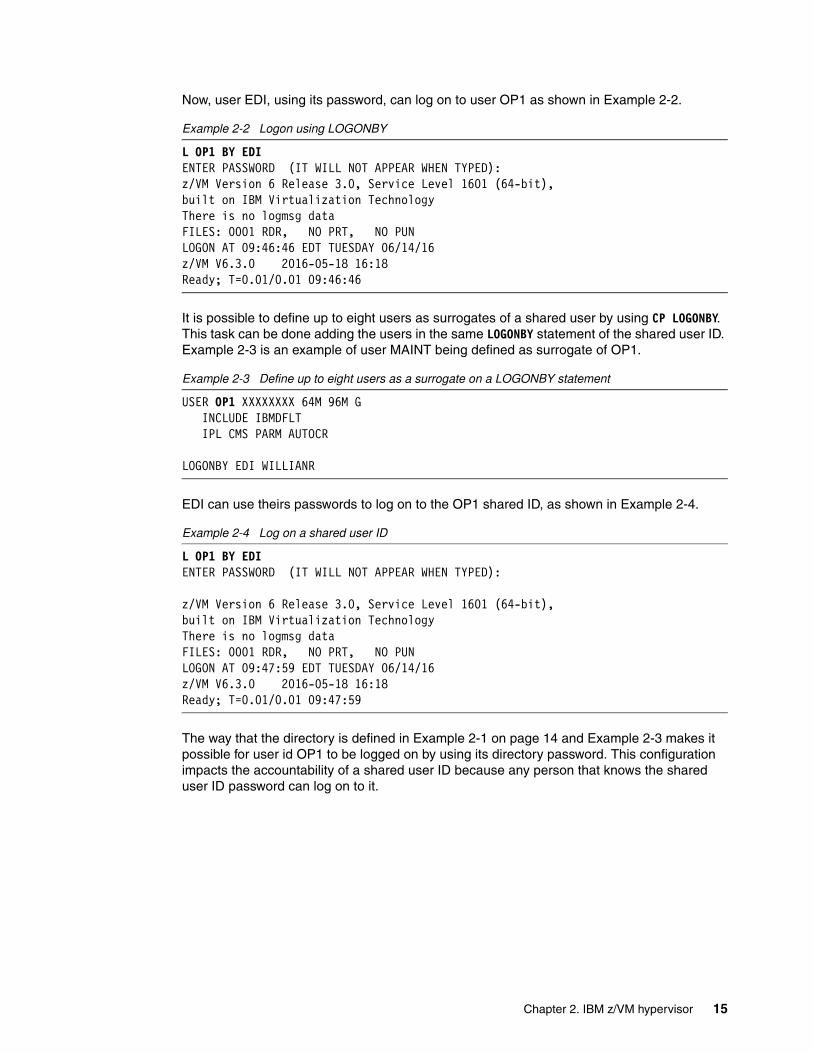
Now, user EDI, using its password, can log on to user OP1 as shown in Example 2-2.
Example 2-2 Logon using LOGONBY
L OP1 BY EDI ENTER PASSWORD (IT WILL NOT APPEAR WHEN TYPED): z/VM Version 6 Release 3.0, Service Level 1601 (64-bit), built on IBM Virtualization Technology There is no logmsg data FILES: 0001 RDR, NO PRT, NO PUN LOGON AT 09:46:46 EDT TUESDAY 06/14/16 z/VM V6.3.0 2016-05-18 16:18 Ready; T=0.01/0.01 09:46:46
It is possible to define up to eight users as surrogates of a shared user by using CP LOGONBY. This task can be done adding the users in the same LOGONBY statement of the shared user ID. Example 2-3 is an example of user MAINT being defined as surrogate of OP1.
Example 2-3 Define up to eight users as a surrogate on a LOGONBY statement
USER OP1 XXXXXXXX 64M 96M G INCLUDE IBMDFLT IPL CMS PARM AUTOCR LOGONBY EDI WILLIANR
EDI can use theirs passwords to log on to the OP1 shared ID, as shown in Example 2-4.
Example 2-4 Log on a shared user ID
L OP1 BY EDI ENTER PASSWORD (IT WILL NOT APPEAR WHEN TYPED): z/VM Version 6 Release 3.0, Service Level 1601 (64-bit), built on IBM Virtualization Technology There is no logmsg data FILES: 0001 RDR, NO PRT, NO PUN LOGON AT 09:47:59 EDT TUESDAY 06/14/16 z/VM V6.3.0 2016-05-18 16:18 Ready; T=0.01/0.01 09:47:59
The way that the directory is defined in Example 2-1 on page 14 and Example 2-3 makes it possible for user id OP1 to be logged on by using its directory password. This configuration impacts the accountability of a shared user ID because any person that knows the shared user ID password can log on to it.
Chapter 2. IBM z/VM hypervisor 15
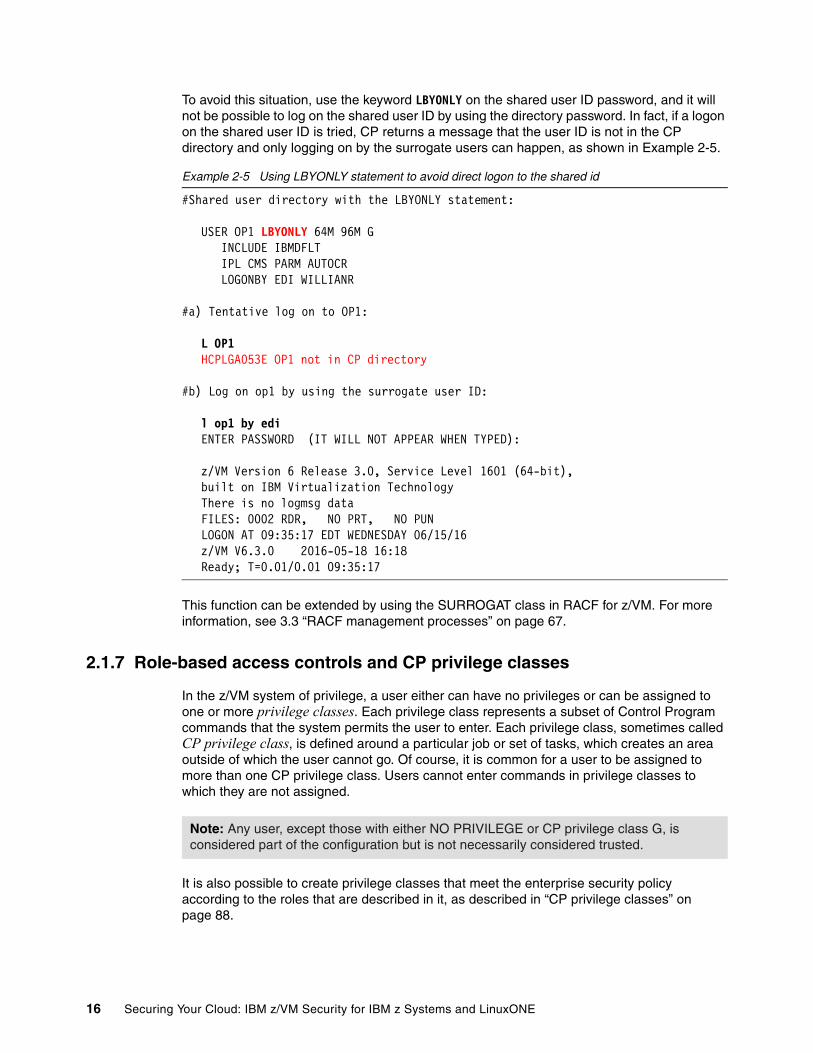
To avoid this situation, use the keyword LBYONLY on the shared user ID password, and it will not be possible to log on the shared user ID by using the directory password. In fact, if a logon on the shared user ID is tried, CP returns a message that the user ID is not in the CP directory and only logging on by the surrogate users can happen, as shown in Example 2-5.
Example 2-5 Using LBYONLY statement to avoid direct logon to the shared id
#Shared user directory with the LBYONLY statement:
USER OP1 LBYONLY 64M 96M G INCLUDE IBMDFLT IPL CMS PARM AUTOCR LOGONBY EDI WILLIANR
#a) Tentative log on to OP1:
L OP1 HCPLGA053E OP1 not in CP directory
#b) Log on op1 by using the surrogate user ID:
l op1 by edi ENTER PASSWORD (IT WILL NOT APPEAR WHEN TYPED): z/VM Version 6 Release 3.0, Service Level 1601 (64-bit), built on IBM Virtualization Technology There is no logmsg data FILES: 0002 RDR, NO PRT, NO PUN LOGON AT 09:35:17 EDT WEDNESDAY 06/15/16 z/VM V6.3.0 2016-05-18 16:18 Ready; T=0.01/0.01 09:35:17
This function can be extended by using the SURROGAT class in RACF for z/VM. For more information, see 3.3 “RACF management processes” on page 67.
2.1.7 Role-based access controls and CP privilege classes
In the z/VM system of privilege, a user either can have no privileges or can be assigned to one or more privilege classes. Each privilege class represents a subset of Control Program commands that the system permits the user to enter. Each privilege class, sometimes called CP privilege class, is defined around a particular job or set of tasks, which creates an area outside of which the user cannot go. Of course, it is common for a user to be assigned to more than one CP privilege class. Users cannot enter commands in privilege classes to which they are not assigned.
It is also possible to create privilege classes that meet the enterprise security policy according to the roles that are described in it, as described in “CP privilege classes” on page 88.
Note: Any user, except those with either NO PRIVILEGE or CP privilege class G, is considered part of the configuration but is not necessarily considered trusted.
16 Securing Your Cloud: IBM z/VM Security for IBM z Systems and LinuxONE
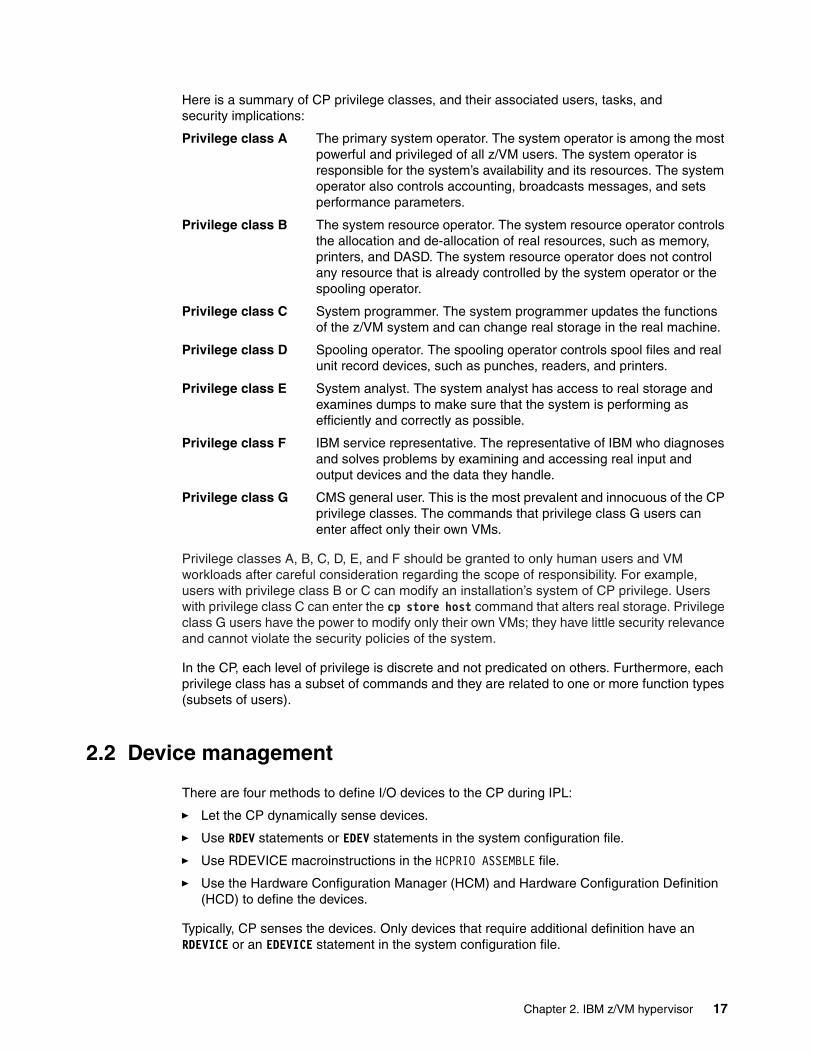
Here is a summary of CP privilege classes, and their associated users, tasks, and security implications:
Privilege class A The primary system operator. The system operator is among the most powerful and privileged of all z/VM users. The system operator is responsible for the system’s availability and its resources. The system operator also controls accounting, broadcasts messages, and sets performance parameters.
Privilege class B The system resource operator. The system resource operator controls the allocation and de-allocation of real resources, such as memory, printers, and DASD. The system resource operator does not control any resource that is already controlled by the system operator or the spooling operator.
Privilege class C System programmer. The system programmer updates the functions of the z/VM system and can change real storage in the real machine.
Privilege class D Spooling operator. The spooling operator controls spool files and real unit record devices, such as punches, readers, and printers.
Privilege class E System analyst. The system analyst has access to real storage and examines dumps to make sure that the system is performing as efficiently and correctly as possible.
Privilege class F IBM service representative. The representative of IBM who diagnoses and solves problems by examining and accessing real input and output devices and the data they handle.
Privilege class G CMS general user. This is the most prevalent and innocuous of the CP privilege classes. The commands that privilege class G users can enter affect only their own VMs.
Privilege classes A, B, C, D, E, and F should be granted to only human users and VM workloads after careful consideration regarding the scope of responsibility. For example, users with privilege class B or C can modify an installation’s system of CP privilege. Users with privilege class C can enter the cp store host command that alters real storage. Privilege class G users have the power to modify only their own VMs; they have little security relevance and cannot violate the security policies of the system.
In the CP, each level of privilege is discrete and not predicated on others. Furthermore, each privilege class has a subset of commands and they are related to one or more function types (subsets of users).
2.2 Device management
There are four methods to define I/O devices to the CP during IPL:
� Let the CP dynamically sense devices.
� Use RDEV statements or EDEV statements in the system configuration file.
� Use RDEVICE macroinstructions in the HCPRIO ASSEMBLE file.
� Use the Hardware Configuration Manager (HCM) and Hardware Configuration Definition (HCD) to define the devices.
Typically, CP senses the devices. Only devices that require additional definition have an RDEVICE or an EDEVICE statement in the system configuration file.
Chapter 2. IBM z/VM hypervisor 17
The capabilities support of real devices is done by CP on behalf of the virtual guests, which means to the virtual guests the device is transparent in use without having access to the physical device. CP provides the system services for the device, including error recovery for guest DIAGNOSE I/O requests and a full command set for the device. Devices can be dedicated to just one guest or shared amongst multiple guests (which is done for DASD).
If a device supports dedicated-only use by a single guest, this device must be logically attached to a single guest at any one time. The guest must be fully capable of running with the device. CP does not supply DIAGNOSE I/O services to the guest.
2.3 Securing the data
The protection and securing of an organization’s information is considered part of the foundation for business success. Ensuring strong security protection of your data is mandatory and should be deployed with a careful plan and overall understanding about the security and business requirements that your organization needs.
As a starting point for defining your security policies, a smart decision is to start with a closed security police and grant access and privileges as the business requires.
2.3.1 Securing your minidisks
The Z/VM system is designed to permit access to the minidisks when you provide the correct link password that is defined on the z/VM directory. The other way is having the link in your user direct definition. As this is a controlled environment, it sounds like a secure approach, but only with an appropriate external security manager (ESM) to make your configuration resilient and less prone to error.
2.3.2 Securing GUEST LANS and virtual switches
z/VM Virtual Switch supports access ports as USER-based or PORT-based. It can be VLAN-unaware, and the VSWITCH handles all VLAN tagging and trunk ports when it is VLAN-aware and processes its own VLAN tagging.
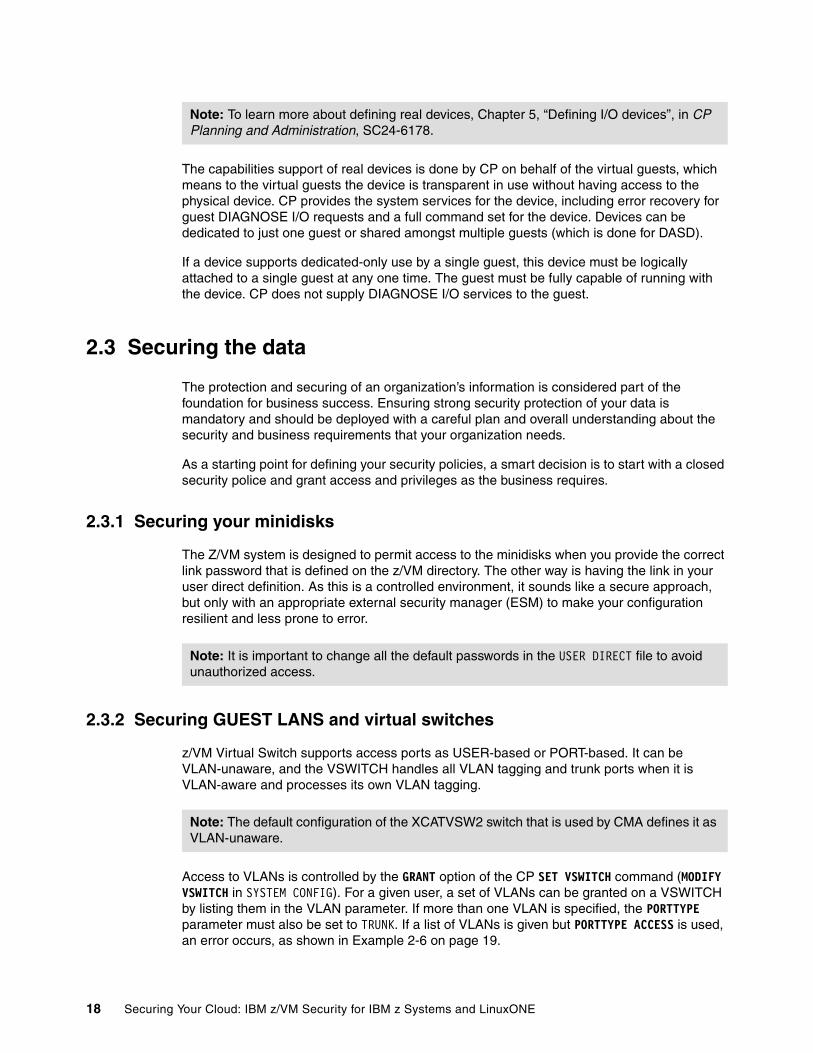
Access to VLANs is controlled by the GRANT option of the CP SET VSWITCH command (MODIFY VSWITCH in SYSTEM CONFIG). For a given user, a set of VLANs can be granted on a VSWITCH by listing them in the VLAN parameter. If more than one VLAN is specified, the PORTTYPE parameter must also be set to TRUNK. If a list of VLANs is given but PORTTYPE ACCESS is used, an error occurs, as shown in Example 2-6 on page 19.
Note: To learn more about defining real devices, Chapter 5, “Defining I/O devices”, in CP Planning and Administration, SC24-6178.
Note: It is important to change all the default passwords in the USER DIRECT file to avoid unauthorized access.
Note: The default configuration of the XCATVSW2 switch that is used by CMA defines it as VLAN-unaware.
18 Securing Your Cloud: IBM z/VM Security for IBM z Systems and LinuxONE
Example 2-6 SET VSWITCH GRANT with multiple VLANs and PORTTYPE ACCESS
set vswitch vlantst grant tcpip vlan 10 20 30HCPSWS2847E PORTTYPE ACCESS is not allowed when the user is authorizedHCPSWS2847E for more than one VLAN
2.4 Securing your communication
Security in individual layers might be enough to keep the data integrity, confidentiality, and availability at the destination, but it is important to secure the data while it is in transit during communication.
Some solutions can be implemented at the client side, but the organization cannot rely on client-side only security. Users can forget to update their security software or security operating system updates can unconsciously install malware on their devices that prevents the execution of the security software, or the users do not install the security software.
What the organization can do is make sure the communication between the client and the server is encrypted with a secure cryptographic protocol. New vulnerabilities are often discovered on cryptographic protocols, cipher algorithms, and protocol implementation, so the security team must be up to date about what is secure to be used, and new vulnerabilities that must be mitigated as soon as they are reported.
The IT infrastructure inside the organization is the responsibility of the organization, so all means to avoid security breaches are valid to protect the information. A well-planned network infrastructure also helps secure the data communication. The first point of contact with the internet should be the network security system. It controls the incoming and outgoing traffic to the organization’s network based on the application set of rules.
Separating the network into layers helps protect the information. Therefore, during network infrastructure planning, consider at least a layer for a DMZ, a layer for the web servers, a layer for the application servers, and a layer for database servers. This is not a rule and can be structured in different ways, but layering the network is important and must be considered when planning the network infrastructure.
Installing intrusion detection systems assists in monitoring for attacks and helps parse audit logs that can use a large amount of storage and have a huge amount of information that a human cannot read and find a pattern for an attack at the same time it is happening. Intrusion detection systems help system and network administrators detect attacks and alert them about it while it shows the techniques in use to exploit possible breaches.
2.4.1 Encrypting your communication
There are several ways to move data into and out of a mainframe. Since the early 1970s, terminals have connected to mainframes by using 3270 data streams. This high-performance protocol is still in use around the world and is how many developers connect to z/OS. By default, this data travels in clear text. Installations should evaluate the nature of the data that is transmitted over a 3270 connection and implement security measures, such as encryption, when warranted.
Note: Guest LANs are discouraged these days because they are more cumbersome to configure and less secure than a virtual switch.
Chapter 2. IBM z/VM hypervisor 19
Enabling encrypted sessions requires configuration changes on both the host side and the client side. Fortunately, terminal emulators such as IBM PCOMM, IBM Host on Demand, and the open source x3270 emulators all support encryption of host sessions with simple configuration options.
The Transport Layer Security/Secure Socket Layer (TLS/SSL) server provides the processing capability that allows secure (encrypted) communication between two TCP/IP connection participants (one of which is a server or client application on the local z/VM host). Such communication may be secured by a static SSL connection or through Dynamic SSL/TLS, which allows a client or server application to control the acceptance and establishment of connections that are encrypted by using SSL.
For static TLS connections, no changes to a z/VM application server are necessary to participate in TLS. The application server does not perform any data encryption or decryption; this is handled by the z/VM TLS/SSL server.
Dynamic TLS connections are supported by the following z/VM TCP/IP application servers and clients, which have been updated to accommodate this support:
� TCP/IP server� SSL server� FTP server� FTP client� Telnet server (Internal to the TCP/IP server)� Telnet client� SMTP server
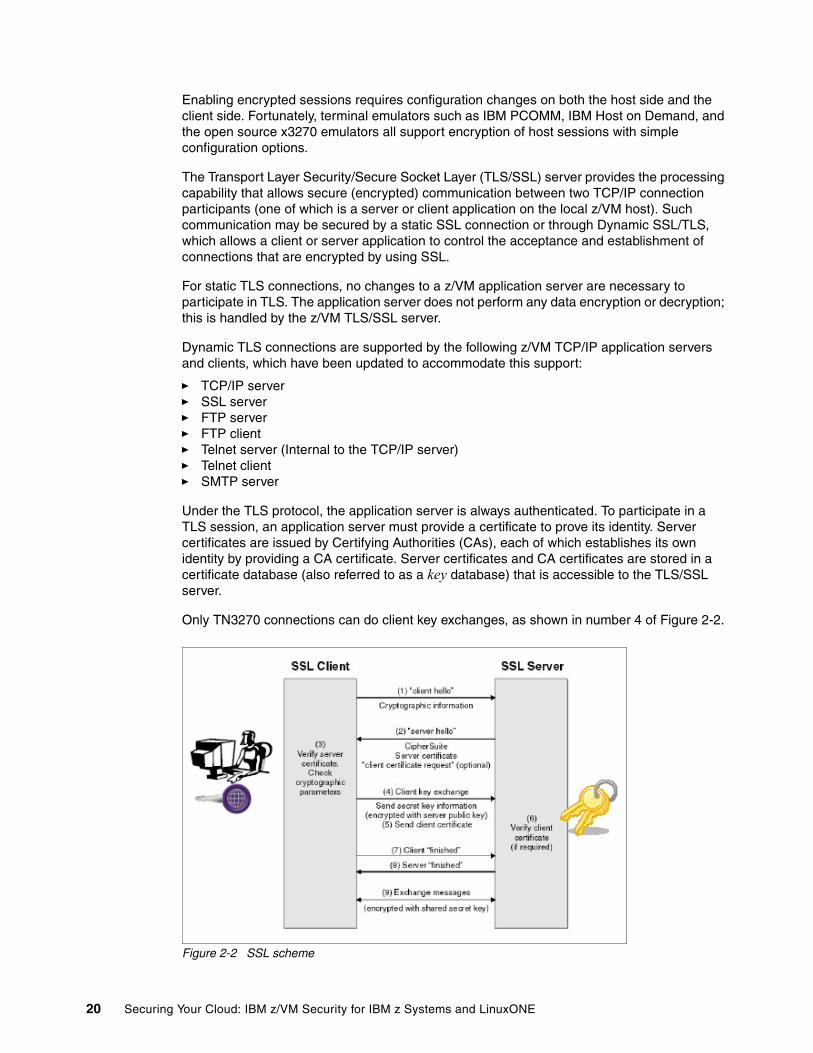
Under the TLS protocol, the application server is always authenticated. To participate in a TLS session, an application server must provide a certificate to prove its identity. Server certificates are issued by Certifying Authorities (CAs), each of which establishes its own identity by providing a CA certificate. Server certificates and CA certificates are stored in a certificate database (also referred to as a key database) that is accessible to the TLS/SSL server.
Only TN3270 connections can do client key exchanges, as shown in number 4 of Figure 2-2.
Figure 2-2 SSL scheme
20 Securing Your Cloud: IBM z/VM Security for IBM z Systems and LinuxONE

You can configure the TLS/SSL server to meet industry and governmental cryptographic security requirements by updating the VMSSL keywords and parameters that are related to cipher suites and protocol levels. z/VM V6.3 and onward support TLS 1.2; use this level of TLS/SSL for encrypting traffic to or within the hypervisor layer. Weaker cipher suites are disabled by default. If weaker encryption is required for compatibility purposes, it can be reenabled through the same keywords and parameters.
2.4.2 z/VM Cryptographic definitions
When an LPAR is configured to benefit from hardware cryptography support, z/VM running in such an LPAR can use the hardware support for cryptographic operations to provide it to its guests. This section focuses on how to set up the z/VM definitions for guests running Linux on z Systems.
Using the IBM z13 cryptographic hardware, you gain security from using the CPACF and Crypto-Express5S through in-kernel cryptography APIs and, for Linux on z Systems, the libica cryptographic functions library. Using these features provides these benefits:
� File system encryption� Communication encryption (to applications such as IBM HTTP Server)� System security by providing advanced cryptographic functions
The way that z/VM provides this support is by granting access to the Adjunct Processor (AP) domains to the guests. From a system implementation perspective, an AP of a Crypto-Express5S feature is one of its internal cryptography engines (cryptography coprocessor units). AP designates to the processor, while AP ID specifies the number associated with it.
In a z/VM environment, it is expected that the LPAR running z/VM has access to multiple AP queues. There are two ways z/VM can provide access for the guests to the AP queues:
� Shared queue support (APVIRTual operand on the CRYPTO directory control statement)
Shared queue support provides for one or more Linux guests hardware encryption support for clear key operation. Clear key indicates that the key exists somewhere in the software stack in the clear. z/VM decides which AP queue is used.
� Dedicated queue support (APDEDicated operand on the CRYPTO directory control statement)
Dedicated queue support for a guest must be used if the guest needs secure key support and relies on stored encryption keys in the hardware coprocessors. Secure key support means that the key can never be found in a readable form outside the actual cryptographic hardware. For guests that use dedicated-queue support, z/VM does not intercept the AP instructions in the queue and instead allows the guest to run the AP instructions under SIE. In this case, no virtualization of AP queues is done.
When a key is defined in a z Systems crypto-environment as a secure key, the key is protected by another key that is called a master key. A clear key has not been encrypted under another key and has no additional protection within the cryptographic environment. For clear keys, the security of the keys is provided by operational procedures.1
Note: For more information about how to customize and enable encrypted communications to and from z/VM, see Chapter 4, “Installing and configuring z/VM”, in The Virtualization Cookbook for IBM z Systems Volume 1: IBM z/VM 6.3, SG24-8147.
1 http://www.ibm.com/support/techdocs/atsmastr.nsf/WebIndex/WP100647
Chapter 2. IBM z/VM hypervisor 21
In an environment where the Linux guests on z/VM need only clear key support, use the shared queue support for hardware encryption. Even when z/VM virtualizes the AP queues for shared queue support, there must be at least one physical queue available for z/VM that is not dedicated to any guest.
Setup for a Linux guest to use cryptography cardsTo enable a z/VM guest (Linux guest) to use the hardware cryptography support that is provided by the Crypto-Express5s feature, there must be an entry in the user directory of the Linux guest in the VM USER statement. This is done with the CRYPTO statement for each guest (see z/VM CP Planning and Administration, SC24-6083).
Guests with dedicated-queues supportFor a Linux guest that needs access to dedicated-queues, the CRYPTO statement in the USER entry for the guest must contain which domain and which AP number is used, which means one or more AP queues are identified and reserved for this guest. There is no virtualization for these dedicated-queues, no sharing is done, and the queues are not available for other guests. With dedicated-queues, secure key and clear key operations can be performed by the Linux guest. The statement in the directory looks like the following one:
CRYPTO DOMAIN x APDED y
Where:
� DOMAIN x: x can be one or more domains that are defined for the z/VM LPAR.� APDED y: y can be one or more APs (CEX5C cards) that are defined for the z/VM LPAR.
The combination of AP numbers and domain numbers should be unique across all cryptography users in the directory. Although you can use directory processing to specify the same AP and DOMAIN combination for multiple users, these users should not be logged on at the same time. If they are, more than one user might have concurrent access to the same AP queue. Directory processing does not enforce this restriction because duplicate definitions can be useful for backup configurations.
You can have multiple CRYPTO statements within one single user statement. However, if you choose different domains to different APs, all APs are available for all defined domains:
CRYPTO DOMAIN 10 APDED 1CRYPTO DOMAIN 11 APDED 4
This means that AP 1 and 4 are defined to the domains 10 and 12. This can also be shown as:
CRYPTO DOMAIN 10 11 APDED 1 4
The directory entry for the guests looks as shown in Example 2-7.
Example 2-7 Sample directory entries for dedicated-queues for cryptography access
USER EDI xxxxxxxx 64M 96M ABCDEFG INCLUDE IBMDFLT CRYPTO DOMAIN 004 APDED 005 CRYPTO DOMAIN 3 APDED 0 7 IPL CMS PARM FILEPOOL VMSYSU AUTOCR OPTION LNKNOPAS QUICKDSP MDISK 0191 3390 71 10 ZVMUSR MR
22 Securing Your Cloud: IBM z/VM Security for IBM z Systems and LinuxONE

The privileged command, Q CRYPTO DOMAIN USERS shows the output that is shown in Example 2-8.
Example 2-8 Result of a Q CRYPTO DOMAIN command
q crypto dom users AP 000 CEX5C Domain 002 available shared unspecified AP 000 CEX5C Domain 003 available dedicated to EDI dedication AP 000 CEX5C Domain 004 available dedicated to EDI dedication AP 002 CEX5C Domain 002 available shared unspecified AP 002 CEX5C Domain 003 available free unspecified AP 002 CEX5C Domain 004 available free unspecified AP 003 CEX5C Domain 002 available free unspecified AP 003 CEX5C Domain 003 available free unspecified AP 003 CEX5C Domain 004 available free unspecified AP 005 CEX5C Domain 002 available free unspecified AP 005 CEX5C Domain 003 available dedicated to EDI dedication AP 005 CEX5C Domain 004 available dedicated to EDI dedication AP 006 CEX5C Domain 002 available free unspecified AP 006 CEX5C Domain 003 available free unspecified AP 006 CEX5C Domain 004 available free unspecified AP 007 CEX5C Domain 002 available free unspecified AP 007 CEX5C Domain 003 available dedicated to EDI dedication AP 007 CEX5C Domain 004 available dedicated to EDI dedication
Guests with shared-queue supportFor a Linux guest that needs access to clear key cryptography operations, shared access to AP queues is the preferred way to implement this access. For this case, the CRYPTO statement in the USER entry for the guest needs to indicate that access to virtual queues is wanted. No domain and no AP queue must be specified. The Linux guest gets one virtualized card and one random virtual queue on one random virtual AP. The AP number and domain are chosen by z/VM and are not identical to the one for the z/VM LPAR.
For this support, z/VM uses all available AP queues, which are not dedicated to other guests, and these are shared between all guests that use the shared support. If there are multiple AP types available for z/VM, then z/VM chooses the best AP type for acceleration for the Linux guest. When a type is selected, z/VM routes all cryptography requests from the guest to however many queues/cards of that type are available. The statement in the directory looks like this:
CRYPTO APVIRT
Note: As of the IBM z13, you can now specify a CRYPTO APVIRT statement in your System Configuration file, which allows the system administrator to designate particular AP domains that are attached to the LPAR as “Reserved for APVIRT”.
Chapter 2. IBM z/VM hypervisor 23
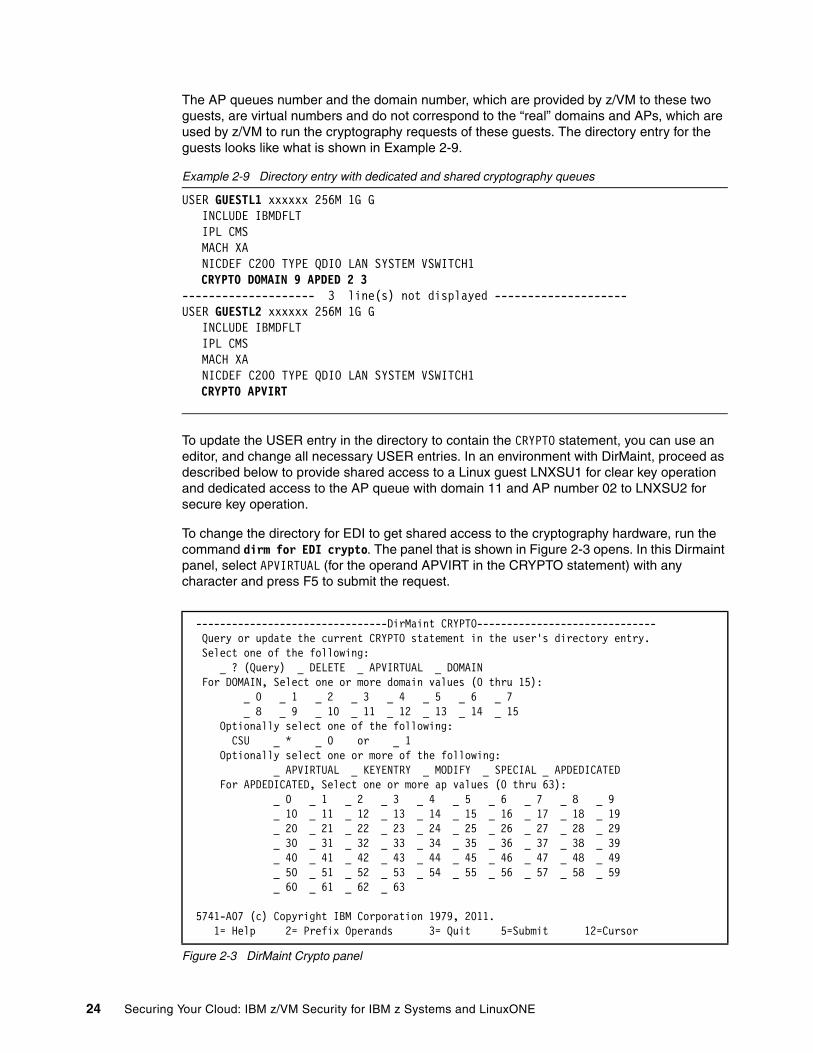
The AP queues number and the domain number, which are provided by z/VM to these two guests, are virtual numbers and do not correspond to the “real” domains and APs, which are used by z/VM to run the cryptography requests of these guests. The directory entry for the guests looks like what is shown in Example 2-9.
Example 2-9 Directory entry with dedicated and shared cryptography queues
USER GUESTL1 xxxxxx 256M 1G G INCLUDE IBMDFLT IPL CMS MACH XA NICDEF C200 TYPE QDIO LAN SYSTEM VSWITCH1
CRYPTO DOMAIN 9 APDED 2 3-------------------- 3 line(s) not displayed --------------------USER GUESTL2 xxxxxx 256M 1G G INCLUDE IBMDFLT IPL CMS MACH XA NICDEF C200 TYPE QDIO LAN SYSTEM VSWITCH1
CRYPTO APVIRT
To update the USER entry in the directory to contain the CRYPTO statement, you can use an editor, and change all necessary USER entries. In an environment with DirMaint, proceed as described below to provide shared access to a Linux guest LNXSU1 for clear key operation and dedicated access to the AP queue with domain 11 and AP number 02 to LNXSU2 for secure key operation.
To change the directory for EDI to get shared access to the cryptography hardware, run the command dirm for EDI crypto. The panel that is shown in Figure 2-3 opens. In this Dirmaint panel, select APVIRTUAL (for the operand APVIRT in the CRYPTO statement) with any character and press F5 to submit the request.
Figure 2-3 DirMaint Crypto panel
--------------------------------DirMaint CRYPTO------------------------------ Query or update the current CRYPTO statement in the user's directory entry. Select one of the following: _ ? (Query) _ DELETE _ APVIRTUAL _ DOMAIN For DOMAIN, Select one or more domain values (0 thru 15): _ 0 _ 1 _ 2 _ 3 _ 4 _ 5 _ 6 _ 7 _ 8 _ 9 _ 10 _ 11 _ 12 _ 13 _ 14 _ 15 Optionally select one of the following: CSU _ * _ 0 or _ 1 Optionally select one or more of the following: _ APVIRTUAL _ KEYENTRY _ MODIFY _ SPECIAL _ APDEDICATED For APDEDICATED, Select one or more ap values (0 thru 63): _ 0 _ 1 _ 2 _ 3 _ 4 _ 5 _ 6 _ 7 _ 8 _ 9 _ 10 _ 11 _ 12 _ 13 _ 14 _ 15 _ 16 _ 17 _ 18 _ 19 _ 20 _ 21 _ 22 _ 23 _ 24 _ 25 _ 26 _ 27 _ 28 _ 29 _ 30 _ 31 _ 32 _ 33 _ 34 _ 35 _ 36 _ 37 _ 38 _ 39 _ 40 _ 41 _ 42 _ 43 _ 44 _ 45 _ 46 _ 47 _ 48 _ 49 _ 50 _ 51 _ 52 _ 53 _ 54 _ 55 _ 56 _ 57 _ 58 _ 59 _ 60 _ 61 _ 62 _ 63 5741-A07 (c) Copyright IBM Corporation 1979, 2011. 1= Help 2= Prefix Operands 3= Quit 5=Submit 12=Cursor
24 Securing Your Cloud: IBM z/VM Security for IBM z Systems and LinuxONE
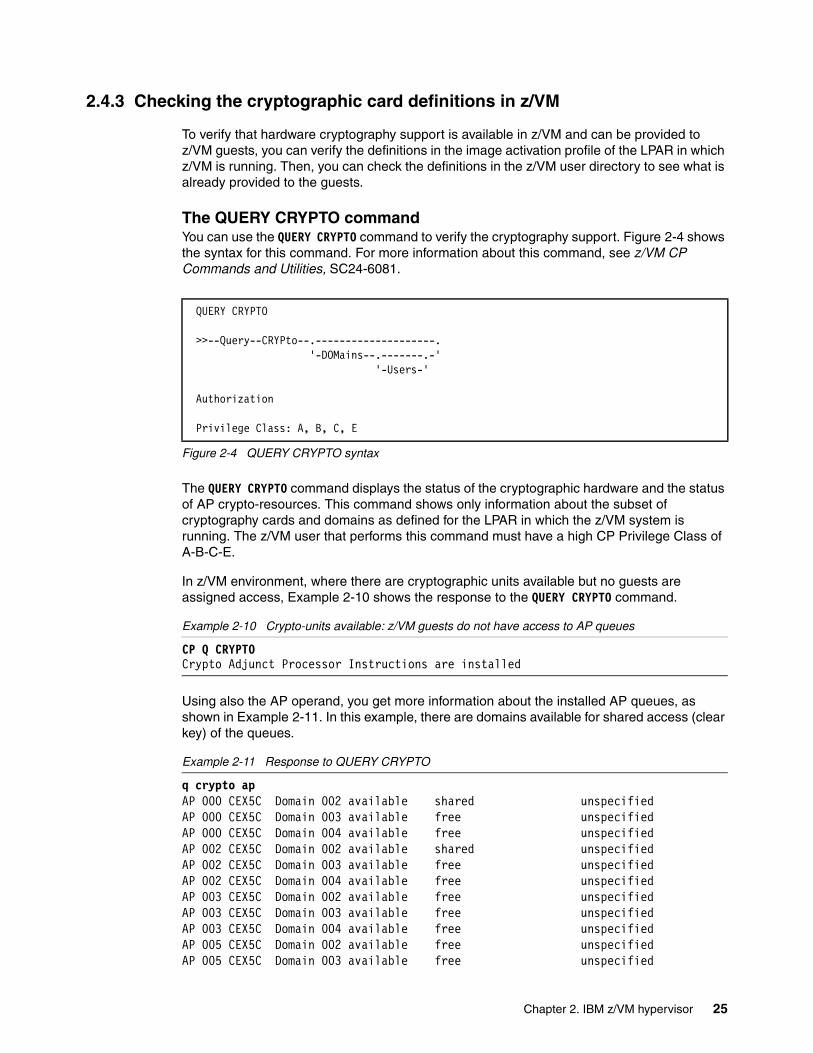
2.4.3 Checking the cryptographic card definitions in z/VM
To verify that hardware cryptography support is available in z/VM and can be provided to z/VM guests, you can verify the definitions in the image activation profile of the LPAR in which z/VM is running. Then, you can check the definitions in the z/VM user directory to see what is already provided to the guests.
The QUERY CRYPTO commandYou can use the QUERY CRYPTO command to verify the cryptography support. Figure 2-4 shows the syntax for this command. For more information about this command, see z/VM CP Commands and Utilities, SC24-6081.
Figure 2-4 QUERY CRYPTO syntax
The QUERY CRYPTO command displays the status of the cryptographic hardware and the status of AP crypto-resources. This command shows only information about the subset of cryptography cards and domains as defined for the LPAR in which the z/VM system is running. The z/VM user that performs this command must have a high CP Privilege Class of A-B-C-E.
In z/VM environment, where there are cryptographic units available but no guests are assigned access, Example 2-10 shows the response to the QUERY CRYPTO command.
Example 2-10 Crypto-units available: z/VM guests do not have access to AP queues
CP Q CRYPTO Crypto Adjunct Processor Instructions are installed
Using also the AP operand, you get more information about the installed AP queues, as shown in Example 2-11. In this example, there are domains available for shared access (clear key) of the queues.
Example 2-11 Response to QUERY CRYPTO
q crypto ap AP 000 CEX5C Domain 002 available shared unspecifiedAP 000 CEX5C Domain 003 available free unspecifiedAP 000 CEX5C Domain 004 available free unspecifiedAP 002 CEX5C Domain 002 available shared unspecifiedAP 002 CEX5C Domain 003 available free unspecifiedAP 002 CEX5C Domain 004 available free unspecifiedAP 003 CEX5C Domain 002 available free unspecifiedAP 003 CEX5C Domain 003 available free unspecifiedAP 003 CEX5C Domain 004 available free unspecifiedAP 005 CEX5C Domain 002 available free unspecifiedAP 005 CEX5C Domain 003 available free unspecified
QUERY CRYPTO >>--Query--CRYPto--.--------------------. '-DOMains--.-------.-' '-Users-' Authorization Privilege Class: A, B, C, E
Chapter 2. IBM z/VM hypervisor 25
AP 005 CEX5C Domain 004 available free unspecifiedAP 006 CEX5C Domain 002 available free unspecifiedAP 006 CEX5C Domain 003 available free unspecifiedAP 006 CEX5C Domain 004 available free unspecifiedAP 007 CEX5C Domain 002 available free unspecifiedAP 007 CEX5C Domain 003 available free unspecifiedAP 007 CEX5C Domain 004 available free unspecified
The QUERY VIRTUAL CRYPTO commandThe QUERY VIRTUAL CRYPTO command shows status information about the virtual cryptographic facilities of the z/VM guest. If the guest to which you are currently logged in to does not have access to cryptography queues, the response in Example 2-12 is shown.
Example 2-12 Guest does not have access to cryptography queues
CP Q V CRYPTO No AP Crypto Domains are available
Trusted Key Entry supportThe Trusted Key Entry (TKE) feature is a combination of workstation hardware and TKE Licensed Internal Code. It provides key management functions for operating systems such as Linux on z Systems and z/OS. Crypto-Express Cards are used to provide hardware support to most cryptographic functions through the Cryptographic Coprocessor Feature (CCF).
TKE provides a secure, remote, and flexible method for providing Master Key Part Entry, and to manage remotely PCIe cryptographic coprocessors for the crypto-domains, that is, through smartcards or other secured devices. The cryptographic functions on the TKE are run by one PCIe cryptographic coprocessor. The communication between the TKE workstation and z Systems servers happens through a TCP/IP connection, which is available through Ethernet LAN connectivity only.
To let guests running under z/VM benefit from cryptographic hardware, crpyto domains and crypto-coprocessors must be attached to z/VM LPARS through HMC dialogues. After this is done, crypto-domains can either be dedicated to or shared with other LPARs.
2.5 z/VM connectivity
Connectivity in z/VM can be provided by customizing TCP/IP. The TCP/IP VM provides the primary TCP/IP service that is called the stack. The stack controls the network interfaces, such as Open Systems Adapter (OSA), and supports the application programming interfaces (APIs).
For more information bout how to set up and define the stack, see Chapter 19, “Configuring the TCP/IP Server”, in TCP/IP Planning and Customization, SC24-6238.
Note: How to set up the TKE, manage master keys for crypto-domains, and much more is explained in TKE Workstations User’s Guide, SA22-7524.
26 Securing Your Cloud: IBM z/VM Security for IBM z Systems and LinuxONE
2.5.1 DEVICE and LINK statements
For TCP/IP to use network devices on z/VM, you must ensure that the device addresses are attached to the TCP/IP VM by doing one of the following actions:
� Modify the DTCPARMS file to enable the necessary devices to be attached by using the :Attach. tag.
� Add the appropriate DEDICATE control statements to the TCP/IP VM’s directory entry.
z/VM does not require a device definition in the system configuration file or HCPRIO. The device attributes are determined automatically during device initialization.
Example 2-13 demonstrates the Device and Link configuration statements for an OSA device that is found in the PROFILE TCPIP file.
Example 2-13 DEVICE and LINK statements for an OSA device in the PROFILE TCPIP
DEVICE DEV§04B0 OSD 04B0LINK OSA01 QDIOETHERNET DEV§04B0 PATHMTU 1500 VLAN 20
VLANIn z/VM environment, the virtual servers that are connected to each other form a virtual LAN (VLAN) which eliminates the requirement for any physical cabling or external networking connection among them. Functioning as an internal LAN, it moves data at memory speed between the virtual servers with high throughput and low latency communication path.
HiperSocketsIBM HiperSockets are an extension to the Quede Direct I/O (QDIO) Hardware Facility, providing a microcode only, low latency communications vehicle for internet protocol (IP) inter-program communication (IPC). With the use of HiperSockets, a program can directly communicate with a program running within the same LPAR and across any LPAR within the same central processor complex.
2.5.2 HiperSockets VSWITCH Bridge
A new type of connectivity was introduced with the IBM z13 and z/VM V6.3. The HiperSockets VSWITCH Bridge was introduced to allow an internal HiperSockets network to be extended outside the z Systems processor complex. Using this capability, a network configuration can be greatly simplified:
� Guests of z/VM that need access to both VSWITCH and HiperSockets hosts need be attached only to either connection type to have access to both, without routing.
� HiperSockets networks in different z Systems CPCs can be logically connected to each other, which means that z/VM guests that use LGR can treat the HiperSockets networks in different CPCs as the same because traffic is bridged between them.
The HiperSockets VSWITCH Bridge does not require a TCP/IP stack to function. The capability is provided by the CP system service that supports VSWITCH operation. The bridge is set up by defining a HiperSockets connection as an UPLINK port on a VSWITCH.
Note: While system configuration is not required from an I/O standpoint, in an SSI environment, you might need to code RDEVICE statements in SYSTEM CONFIG to set up the Equivalence ID (EQID) for the QDIO devices.
Chapter 2. IBM z/VM hypervisor 27
The HiperSockets VSWITCH Bridge takes care of all issues relating to moving a frame from QDIO OSA frame type to IQDIO HiperSockets mode (and vice versa).
2.5.3 Security considerations
Because HiperSockets are usually an isolated network with no exposure outside the z Systems CPC, there are security considerations for the use of the HiperSockets VSWITCH Bridge. Bridging a HiperSockets CHPID that is used for secure cross-system traffic within a z Systems CPC to an external network connection might be a cause of concern that the secure traffic may be exposed. However, because HiperSockets are a LAN segment, there are security considerations whether they are transmitting data in-memory or over OSA CHPIDs.
Because of the way the function works, it is not feasible that secure traffic on a HiperSockets CHPID could be exposed by the HiperSockets-VSWITCH Bridge:
� The function only copies frames to destinations that are unknown on the HiperSockets over to the VSWITCH.
� The HiperSockets network traffic analyzer (NTA) function, which the only method that is available for tracing or ‘sniffing’ traffic on a HiperSockets, only functions with Linux running natively in the LPAR authorized for NTA.
The number of HiperSockets networks that are available in a z Systems CPC makes it possible that a dedicated HiperSockets virtual network could be used for the HiperSockets VSWITCH Bridge function without any perceived risk to the traffic carried on HiperSockets already in use.
Interaction with Parallel Sysplex and IQDCHPIDThe z Systems Parallel Sysplex cluster contains multisystem data sharing technology that allows multiple databases to perform direct reads and writes to shared data.
The Cross-system Coupling Facility (XCF) is a component of z/OS that manages communications between applications in a Parallel Sysplex.
A common optimization technique that is used when TCP/IP traffic is carried over XCF in a z/OS Parallel Sysplex is to combine the DYNAMICXCF function with the VTAM IQDCHPID start option. IQDCHPID sets a particular HiperSockets CHPID to be used to carry TCP/IP traffic over the HiperSockets instead of over XCF, reducing the impact of large TCP/IP transfers on the performance of other XCF functions.
If a CHPIDthat is used for IQDCHPID is also used with the HiperSockets-VSWITCH Bridge function, there might be concern that XCF traffic would be exposed to the LAN or that large volumes of LAN traffic would be flooded onto the XCF internal connections. Also, if the Parallel Sysplex extends across multiple CPCs and HiperSockets-VSWITCH Bridge was used on each CPC, there might be concern about traffic loops occurring through the LAN.
Note: For more information, see IBM HiperSockets Implementation Guide, SG24-6816.
Note: The HiperSockets-VSWITCH Bridge is not a promiscuous bridge; it does not passively transfer all traffic appearing on the HiperSockets onto the VSWITCH or vice versa. It actively sends only frames with destinations that are unknown on the HiperSockets to the VSWITCH. Likewise, the VSWITCH sends only frames to the HiperSockets for addresses that the HiperSockets has registered to the VSWITCH.
28 Securing Your Cloud: IBM z/VM Security for IBM z Systems and LinuxONE
These issues do not occur because neither HiperSockets-VSWITCH Bridge or DYNAMICXCF with IQDCHPID are promiscuous bridges. In DYNAMICXCF with IQDCHPID, VTAM decides whether the packet is sent over XCF or over the HiperSockets to reach the other TCP/IP stack:
� If VTAM sends the packet over XCF, it never appears on the HiperSockets and cannot be presented to the VSWITCH.
� If VTAM sends the traffic over the HiperSockets, it is because the other system was directly addressable on the same HiperSockets. The HiperSockets-VSWITCH Bridge does not forward the traffic.
For similar reasons, traffic that is bridged onto the HiperSockets from the VSWITCH appears only on the HiperSockets:
� Traffic coming into a z/OS system through the HiperSockets-VSWITCH Bridge does not appear again on XCF because the Bridge placed only the traffic onto the HiperSockets because the destination was addressable directly on the HiperSockets.
� The HiperSockets-VSWITCH Bridge does not flood arbitrary VSWITCH or LAN traffic into the HiperSockets because it forwards only frames that are addressed to systems on the HiperSockets.
Despite the fact that you cannot see any significant unwanted effects of combining DYNAMICXCF and IQDCHPID with the HiperSockets-VSWITCH Bridge, there is not a particularly valid reason to do it either. DYNAMICXCF usually is implemented in support of critical z/OS high availability technologies such as Sysplex Distributor, so keeping this network isolated is important to the integrity and availability of the system.
Multihomed hostsz/OS systems that take advantage of HiperSockets usually have OSA Express connectivity directly to an outside LAN. In TCP/IP terms, a host that has multiple network interfaces in different subnets is described as a multihomed host.
z/OS systems were once one of the few systems in a network environment to be multihomed. It is becoming increasingly common for other servers to be set up this way. Cheaper networking hardware and virtual LAN technologies such as IEEE 802.1Q make it easier to set up systems that connect to more than one network at a time. The reasons for using multihoming include separation of backup and other management traffic from application delivery, and separating different application delivery zones from each other.
Note: If the traffic on the VSWITCH contains many broadcasts, this increases the activity on the HiperSockets because the broadcast traffic is forwarded by the Bridge.
Note: Most TCP/IP stacks support multihoming. Even mobile device OSes such as Android and iOS support multihoming to manage connectivity to mobile data and Wi-Fi networks at the same time. Multihoming by itself is not an availability technique, and is not a replacement for multiple network interfaces in the same subnet (z/OS uses a combination of multihoming and dynamic routing to achieve redundancy and high availability).
Chapter 2. IBM z/VM hypervisor 29
If you do decide to implement HiperSockets-VSWITCH Bridge around multihomed hosts (particularly z/OS systems), and these systems will be connected to HiperSockets and LANs at the same time, do not bridge between any HiperSockets and LANs that are attached to such multihomed hosts simultaneously. Bridging the HiperSockets and the LAN requires that the networks be defined as the same subnet, and interfaces of different technologies (in this example, HiperSockets and QDIO OSA-Express) do not operate well if defined to the same subnet.
2.6 Remote Spooling Communications Subsystem
Remote Spooling Communications Subsystem (RSCS) Networking for z/VM is a networking program that enables users on a z/VM system to send messages, files, commands, and jobs to other users within a network. It is an easy way to transfer data files (as spool files) among z/VM systems or other systems, such as, z/OS. It also acts as a print server for remote printers that are attached to other z/VM systems or a TCP/IP network. Through RSCS, users can send and receive messages, files, issue commands, and print and submit jobs within their networks.
RSCS can communicate with system nodes that are running under the control of network job entry (NJE) compatible subsystems, such as:
� JES2 or JES3� RSCS� VSE/POWER� IBM AS/400® Communications Utilities� Products that provide NJE functions for Linux or IBM AIX®
NJE is the native peer-to-peer networking protocol for IBM mainframes running RSCS. It is designed to be flexible so that you can customize it to meet the changing needs of your installation and network. Using exit facilities and control files, such as the configuration file and events file, you can set up and tailor the way RSCS works and establish security rules by using specifics exits.
Additionally, z/VM V6.3 supports the encryption of TCPNJE traffic. A TCPNJE link connects the local RSCS system to a remote NJE system through TCP/IP. Since TCPNJE uses the z/VM TCP/IP stack, this also supports encryption by the TLS/SSL server, as describe in 2.4.1 “Encrypting your communication” on page 19.
For more information about RSCS and the NJE communication protocol, see the following website:
http://www.ibm.com/common/ssi/cgi-bin/ssialias?subtype=WH&infotype=SA&htmlfid=ZSW03288USEN&attachment=ZSW03288USEN.PDF
Main functionsRSCS is a subsystem that can perform the following functions:
� Handle data being sent to, from, or through z/VM systems.
� Store and retrieve input and output data files on the z/VM system spool.
� Use communications equipment to transfer data between its z/VM system and remote users, devices, and other systems.
30 Securing Your Cloud: IBM z/VM Security for IBM z Systems and LinuxONE
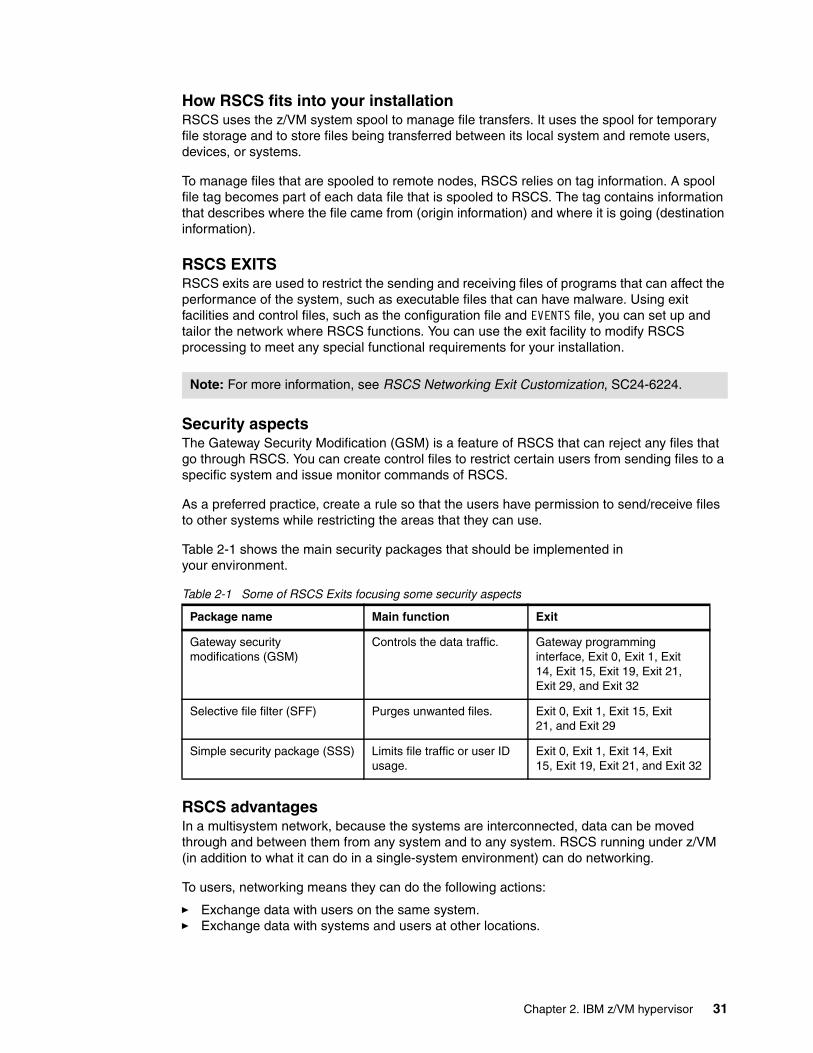
How RSCS fits into your installationRSCS uses the z/VM system spool to manage file transfers. It uses the spool for temporary file storage and to store files being transferred between its local system and remote users, devices, or systems.
To manage files that are spooled to remote nodes, RSCS relies on tag information. A spool file tag becomes part of each data file that is spooled to RSCS. The tag contains information that describes where the file came from (origin information) and where it is going (destination information).
RSCS EXITSRSCS exits are used to restrict the sending and receiving files of programs that can affect the performance of the system, such as executable files that can have malware. Using exit facilities and control files, such as the configuration file and EVENTS file, you can set up and tailor the network where RSCS functions. You can use the exit facility to modify RSCS processing to meet any special functional requirements for your installation.
Security aspectsThe Gateway Security Modification (GSM) is a feature of RSCS that can reject any files that go through RSCS. You can create control files to restrict certain users from sending files to a specific system and issue monitor commands of RSCS.
As a preferred practice, create a rule so that the users have permission to send/receive files to other systems while restricting the areas that they can use.
Table 2-1 shows the main security packages that should be implemented in your environment.
Table 2-1 Some of RSCS Exits focusing some security aspects
RSCS advantagesIn a multisystem network, because the systems are interconnected, data can be moved through and between them from any system and to any system. RSCS running under z/VM (in addition to what it can do in a single-system environment) can do networking.
To users, networking means they can do the following actions:
� Exchange data with users on the same system.� Exchange data with systems and users at other locations.
Note: For more information, see RSCS Networking Exit Customization, SC24-6224.
Package name Main function Exit
Gateway securitymodifications (GSM)
Controls the data traffic. Gateway programminginterface, Exit 0, Exit 1, Exit14, Exit 15, Exit 19, Exit 21,Exit 29, and Exit 32
Selective file filter (SFF) Purges unwanted files. Exit 0, Exit 1, Exit 15, Exit21, and Exit 29
Simple security package (SSS) Limits file traffic or user ID usage.
Exit 0, Exit 1, Exit 14, Exit15, Exit 19, Exit 21, and Exit 32
Chapter 2. IBM z/VM hypervisor 31
� Send jobs to other systems for processing.� Direct processed output to devices, such as printers and punches, that are connected to
another system.
Employees can get that data that they need from other systems. When work passes from one phase to another, moving as it does from department to department, RSCS can transfer data from one employee to the next, from one system to another system. Employees can do the following actions:
� Correspond electronically.
� Use programs on another system to process their jobs.
� Send jobs from a remote workstation at their location to the local or to a remote system.
� Direct output to RSCS-controlled 3270 printers or ASCII devices from jobs they have submitted to either local or remote systems.
� Send or receive output for other system-controlled printers through RSCS.
� Send an output file that they have created for another employee to print on that employee’s system.
You can buy and locate resources (processors, computer programs, and I/O devices) to fit your business needs, whether by departments or regions. Because these resources can be shared, you can distribute the workload of your business and improve your employees access to these resources. This can lead to greater efficiency and productivity in your business.
Note: For more information, see RSCS Networking Planning and Configuration, SC24-6227.
32 Securing Your Cloud: IBM z/VM Security for IBM z Systems and LinuxONE
Chapter 3. IBM Resource Access Control Facility Security Server for IBM z/VM
The IBM Resource Access Control Facility (RACF) Security Server feature, function level 630 for z/VM 6.3.0, builds on the function that is provided by previous releases. Significant System Programming Enhancements (SPEs) that were made in September 2015 further increase the capability and security of RACF.
This chapter describes the processes of installing, configuring, managing, monitoring, auditing, and controlling of RACF resources. This chapter follows the concepts that are outlined in Secure Configuration Guide for z/VM, SC24-6139.
A Directory Manager is recommended for a Single System Image (SSI) environment to maintain synchronization between object directories. Although the Common Criteria evaluation does not make any claims about z/VM, security administrators should determine what Directory Manager best fits their security policies and act accordingly.
This chapter assumes the use of the IBM z/VM Directory Manager (DirMaint) product for managing the user directory of the system, with RACF and DirMaint configured to work together. Unlike other operating systems, z/VM separates the processes of user definition and security administration. You must first define the virtual machine (VM) in the user directory, which provides basic resource control configuration. If you are using an external security manager (ESM), you must also add users and define users resources to the ESM database. You can find information about DirMaint installation and its use in Appendix A, “DirMaint implementation” in Security on z/VM, SG24-7471.
3
Note: Secure Configuration Guide for z/VM, SC24-6139 describes installing and customizing z/VM and RACF in a way that meets requirements for certification for the Common Criteria Operating System Protection Profile (OSPP). This chapter does not describe all of the steps that are involved in setting up the certified configuration. However, there are important basic steps that are outlined in Secure Configuration Guide for z/VM, SC24-6139 that are important even for a normal RACF installation.
© Copyright IBM Corp. 2016. All rights reserved. 33
For more information about the DirMaint-RACF Connector, see the following website:
https://www.ibm.com/support/knowledgecenter/SSB27U_6.3.0/com.ibm.zvm.v630.hcpk3/racfxxx.htm
This chapter describes the following topics:
� RACF z/VM concepts� Activating and configuring RACF� RACF management processes
3.1 RACF z/VM concepts
This section describes some concepts around using RACF to protect the security of a z/VM installation.
3.1.1 External security manager
An ESM is software that provides enhanced security access control over the functions that are provided by the operating system itself. z/VM, like z/OS, implements the ESM concept so that you can choose and configure a security manager that suits the needs of your organization. RACF Security Server for z/VM is the IBM ESM for the z/VM platform.
The ESM receives requests from resource managers on the system (CP, Shared File System, TCP/IP, FTP, and so on) on behalf of VMs that must access resources. In z/VM, each of the resource managers likely has a different VM and a person who is responsible for this support, rather than having a single superuser that is responsible for these processes. When the resource manager is enabled for an ESM, it calls the ESM to check whether the VM has the proper authorization to access the resource.
The ESM performs a number of operations to determine what happens next. It first checks to see whether it is set up to be responsible for the type of resources being requested (for example, minidisks or virtual switches). If the ESM is responsible, it checks whether the VM has direct access to the resource, or is a member of a group that has access to the resource. If the VM or a group of which the VM is a member has the authority, then access is granted to the resource.
The ESM can also be configured to control what happens when the ESM is not responsible for the type of resources being requested, or if there is not an explicit resource definition to control access to the particular resource being requested. The ESM can be configured to deny access to the resource in these situations. Alternatively, the ESM can defer authorization to CP, which means that the resource manager then must use the traditional access methods (for example, passwords that are configured in the user directory in the case of minidisks) to control access to the resource.
The z/VM resource managers interface with the ESM by using the RPI interface.
Note: The default action that is taken by RACF is to defer to CP. Section 3.2.5, “Using HCPRWAC” on page 64 describes this action in more detail, and how to change this default action.
34 Securing Your Cloud: IBM z/VM Security for IBM z Systems and LinuxONE

3.1.2 Security policy
An ESM must be configured to support its role in maintaining system security and integrity. In the case of RACF, there are several areas where this configuration takes place:
� RACF options
� Classes
� User definitions
� Resource definitions (profiles)
� Access control lists (ACLs)
� Audit settings
The combination of all of these configuration settings must follow your organization’s security policy. The policy is agreed to across operational and business areas in your organization, and covers issues such as the following ones:
� The default levels of access that should exist for different types of resources
� Whether access to resources should be managed through grouping them or by maintaining separate ACLs for each resource
� What level of tracking of access requests should take place (for example, auditing all access requests or just failures)
� The roles and responsibilities of administrators and users in the organization, including the separation of duties between those roles
The security policy is implemented by using the configurations and settings in RACF.
The “default” security policyThe process that is described in this chapter is based on the steps that are outlined in Program Directory for RACF Security Server for z/VM, GI13-3407-00. In this process, you use a utility that is supplied with RACF to create an initial database of RACF profiles and ACLs that are based on your system’s current CP directory. In effect, this process implements a “default” security policy. Likewise, the functions of other system components (such as the DirMaint-RACF connector.
The policy that is inferred by using the basic RACF utilities is sufficient for most installations. After all, it is based exactly on the policy as implemented by the CP directory, and most installations make no changes to the definitions that are contained there. Here are the basic rules that re inherent in this policy:
� All resources have profiles protecting that resource specifically (known as discrete profiles).
� The owner of a resource has full authority over that resource, including the authority to grant other users access to it.
� Administration roles (auditor and security administrator) are separated.
Some highly sensitive organizations, or those installations with experienced security administration staff, might want to adjust the output that is generated by the utilities so that they better reflect the specific needs of the organization.
Note: Chapter 2, “Organizing for RACF Implementation”, in RACF Security Server Security Administrator’s Guide, SC24-6218 contains an excellent reference about to how to start implementing a security policy by using RACF.
Chapter 3. IBM Resource Access Control Facility Security Server for IBM z/VM 35

Optimizing administrationAnother aspect of the “default” operation of RACF functions and utilities is that the number of resource profiles and ACLs is not optimized. With every resource having a discrete profile, the number of profiles in the database can grow, and it can become more complex to manage many resources. Section 3.3.4, “Securing your minidisks with RACF” on page 76 describes this topic, and a more streamlined way to manage resource protection.
If you use only the RACF utilities and tools for management, such as the DirMaint-RACF connector, there is not a significant issue here. Although the number of profiles in RACF might become large, the utilities keep them up to date. If you choose to optimize your RACF operation and use techniques such as generic profiles and group-based access control, be aware that you might have to do some work to implement your own system to manage your altered policy. For example, you might not be able to use the DirMaint-RACF connector to manage minidisk profiles (the VMMDISK class) if you use group membership to authorize minidisk access.
3.2 Activating and configuring RACF
RACF for z/VM is shipped with the z/VM 6.3.0 system deliverable and managed by using Virtual Machine Serviceability Enhancement Staged / Extended (VMSES/E). RACF for z/VM is a priced product that is supplied in a disabled state. It must be enabled and configured by the system programmer before you use it.
The Program Directory for the product describes the installation process and can be downloaded from the following website:
http://www.ibm.com/servers/eserver/zseries/zos/racf/vm.html
Program Directory for RACF Security Server for z/VM, GI13-3407-00 describes the step-by-step process to enable and configure the product.
Here are the main steps in the process:
1. Set RACF to the ENABLED state by using the VMSES/E tools.
2. Perform post activation steps, as describe din 3.2.1, “Post-activation tasks” on page 37.
3. Build the RACF enabled CPLOAD MODULE, as described in 3.2.2, “Building the RACF enabled CPLOAD MODULE” on page 54.
4. Update the RACF database and options, as described in 3.2.3, “Updating the RACF database and options” on page 57.
5. Place RACF into production, as described in 3.2.4, “Placing RACF into production” on page 62.
6. Update the authorization process, as described in 3.2.5, “Using HCPRWAC” on page 64.
You should print the procedural checklist from the RACF Security Server for z/VM Program Directory so that you do not miss any important steps in the process.
This chapter assumes that the reader has basic z/VM system programming knowledge. Experience with VMSES/E and its processes is helpful, but is not essential.
Note: Make sure that your installation has a license for RACF before you activate it.
36 Securing Your Cloud: IBM z/VM Security for IBM z Systems and LinuxONE
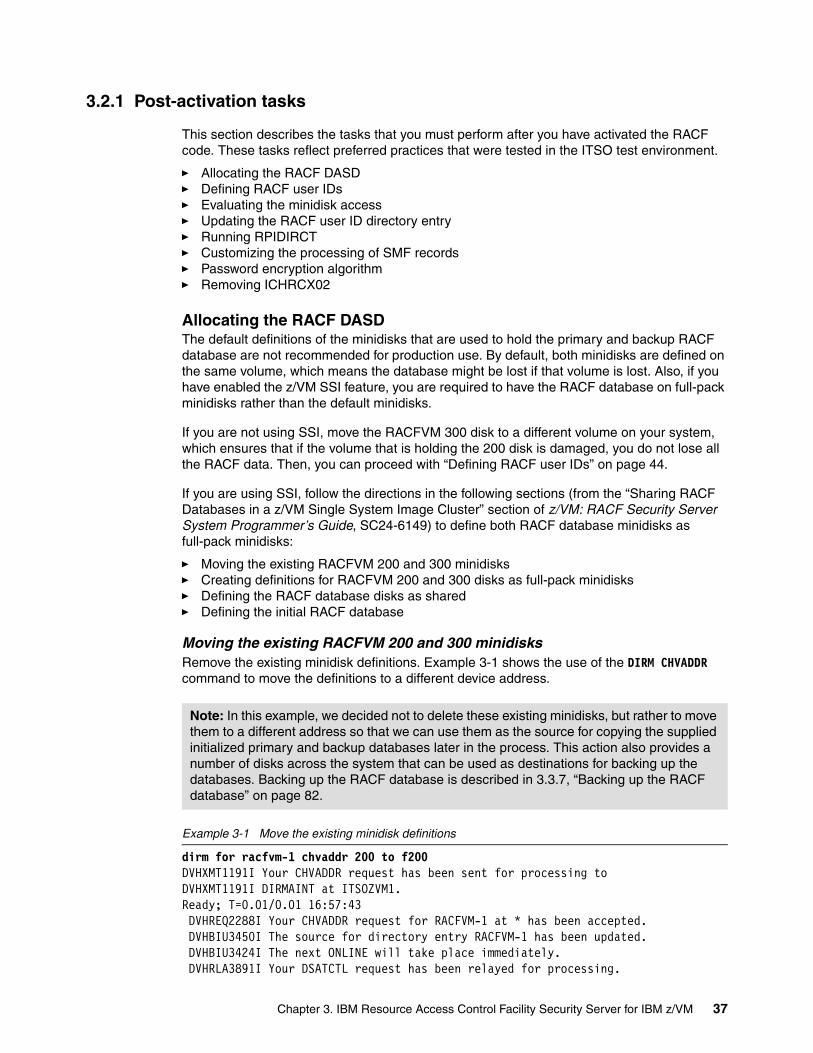
3.2.1 Post-activation tasks
This section describes the tasks that you must perform after you have activated the RACF code. These tasks reflect preferred practices that were tested in the ITSO test environment.
� Allocating the RACF DASD� Defining RACF user IDs� Evaluating the minidisk access� Updating the RACF user ID directory entry� Running RPIDIRCT� Customizing the processing of SMF records� Password encryption algorithm� Removing ICHRCX02
Allocating the RACF DASD The default definitions of the minidisks that are used to hold the primary and backup RACF database are not recommended for production use. By default, both minidisks are defined on the same volume, which means the database might be lost if that volume is lost. Also, if you have enabled the z/VM SSI feature, you are required to have the RACF database on full-pack minidisks rather than the default minidisks.
If you are not using SSI, move the RACFVM 300 disk to a different volume on your system, which ensures that if the volume that is holding the 200 disk is damaged, you do not lose all the RACF data. Then, you can proceed with “Defining RACF user IDs” on page 44.
If you are using SSI, follow the directions in the following sections (from the “Sharing RACF Databases in a z/VM Single System Image Cluster” section of z/VM: RACF Security Server System Programmer’s Guide, SC24-6149) to define both RACF database minidisks as full-pack minidisks:
� Moving the existing RACFVM 200 and 300 minidisks� Creating definitions for RACFVM 200 and 300 disks as full-pack minidisks� Defining the RACF database disks as shared� Defining the initial RACF database
Moving the existing RACFVM 200 and 300 minidisksRemove the existing minidisk definitions. Example 3-1 shows the use of the DIRM CHVADDR command to move the definitions to a different device address.
Example 3-1 Move the existing minidisk definitions
dirm for racfvm-1 chvaddr 200 to f200 DVHXMT1191I Your CHVADDR request has been sent for processing to DVHXMT1191I DIRMAINT at ITSOZVM1. Ready; T=0.01/0.01 16:57:43 DVHREQ2288I Your CHVADDR request for RACFVM-1 at * has been accepted. DVHBIU3450I The source for directory entry RACFVM-1 has been updated. DVHBIU3424I The next ONLINE will take place immediately. DVHRLA3891I Your DSATCTL request has been relayed for processing.
Note: In this example, we decided not to delete these existing minidisks, but rather to move them to a different address so that we can use them as the source for copying the supplied initialized primary and backup databases later in the process. This action also provides a number of disks across the system that can be used as destinations for backing up the databases. Backing up the RACF database is described in 3.3.7, “Backing up the RACF database” on page 82.
Chapter 3. IBM Resource Access Control Facility Security Server for IBM z/VM 37
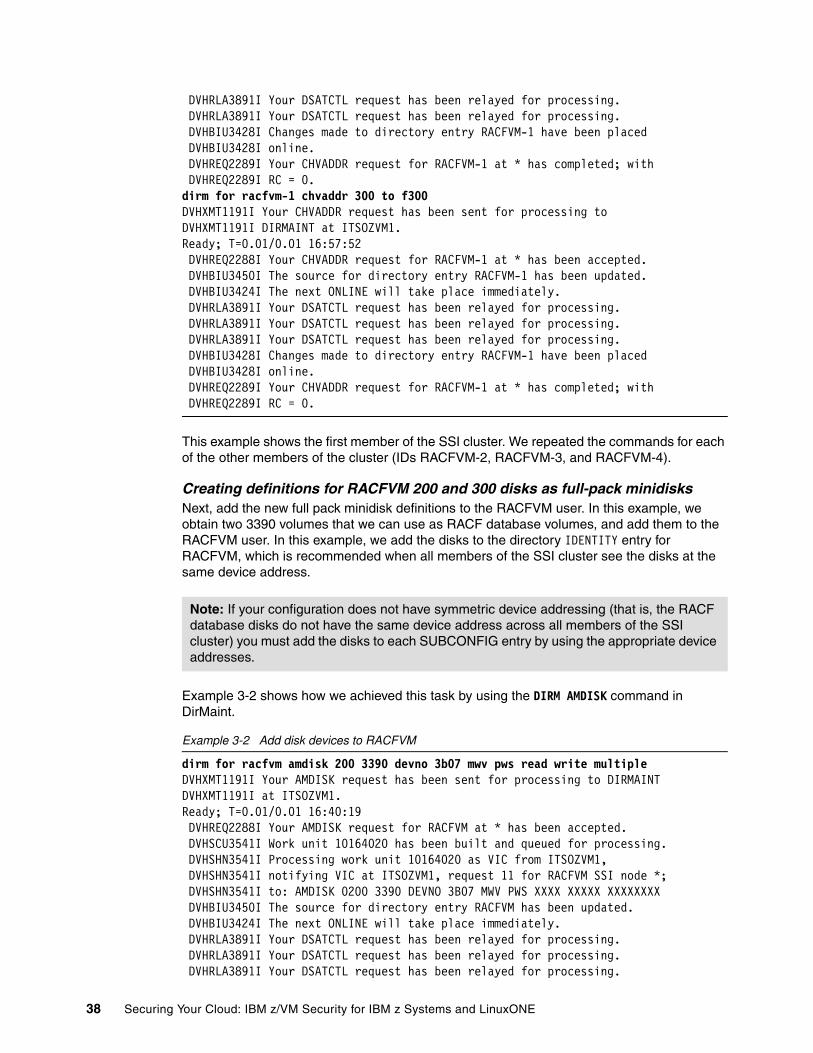
DVHRLA3891I Your DSATCTL request has been relayed for processing. DVHRLA3891I Your DSATCTL request has been relayed for processing. DVHBIU3428I Changes made to directory entry RACFVM-1 have been placed DVHBIU3428I online. DVHREQ2289I Your CHVADDR request for RACFVM-1 at * has completed; with DVHREQ2289I RC = 0. dirm for racfvm-1 chvaddr 300 to f300 DVHXMT1191I Your CHVADDR request has been sent for processing to DVHXMT1191I DIRMAINT at ITSOZVM1. Ready; T=0.01/0.01 16:57:52 DVHREQ2288I Your CHVADDR request for RACFVM-1 at * has been accepted. DVHBIU3450I The source for directory entry RACFVM-1 has been updated. DVHBIU3424I The next ONLINE will take place immediately. DVHRLA3891I Your DSATCTL request has been relayed for processing. DVHRLA3891I Your DSATCTL request has been relayed for processing. DVHRLA3891I Your DSATCTL request has been relayed for processing. DVHBIU3428I Changes made to directory entry RACFVM-1 have been placed DVHBIU3428I online. DVHREQ2289I Your CHVADDR request for RACFVM-1 at * has completed; with DVHREQ2289I RC = 0.
This example shows the first member of the SSI cluster. We repeated the commands for each of the other members of the cluster (IDs RACFVM-2, RACFVM-3, and RACFVM-4).
Creating definitions for RACFVM 200 and 300 disks as full-pack minidisksNext, add the new full pack minidisk definitions to the RACFVM user. In this example, we obtain two 3390 volumes that we can use as RACF database volumes, and add them to the RACFVM user. In this example, we add the disks to the directory IDENTITY entry for RACFVM, which is recommended when all members of the SSI cluster see the disks at the same device address.
Example 3-2 shows how we achieved this task by using the DIRM AMDISK command in DirMaint.
Example 3-2 Add disk devices to RACFVM
dirm for racfvm amdisk 200 3390 devno 3b07 mwv pws read write multiple DVHXMT1191I Your AMDISK request has been sent for processing to DIRMAINT DVHXMT1191I at ITSOZVM1. Ready; T=0.01/0.01 16:40:19 DVHREQ2288I Your AMDISK request for RACFVM at * has been accepted. DVHSCU3541I Work unit 10164020 has been built and queued for processing. DVHSHN3541I Processing work unit 10164020 as VIC from ITSOZVM1, DVHSHN3541I notifying VIC at ITSOZVM1, request 11 for RACFVM SSI node *; DVHSHN3541I to: AMDISK 0200 3390 DEVNO 3B07 MWV PWS XXXX XXXXX XXXXXXXX DVHBIU3450I The source for directory entry RACFVM has been updated. DVHBIU3424I The next ONLINE will take place immediately. DVHRLA3891I Your DSATCTL request has been relayed for processing. DVHRLA3891I Your DSATCTL request has been relayed for processing. DVHRLA3891I Your DSATCTL request has been relayed for processing.
Note: If your configuration does not have symmetric device addressing (that is, the RACF database disks do not have the same device address across all members of the SSI cluster) you must add the disks to each SUBCONFIG entry by using the appropriate device addresses.
38 Securing Your Cloud: IBM z/VM Security for IBM z Systems and LinuxONE
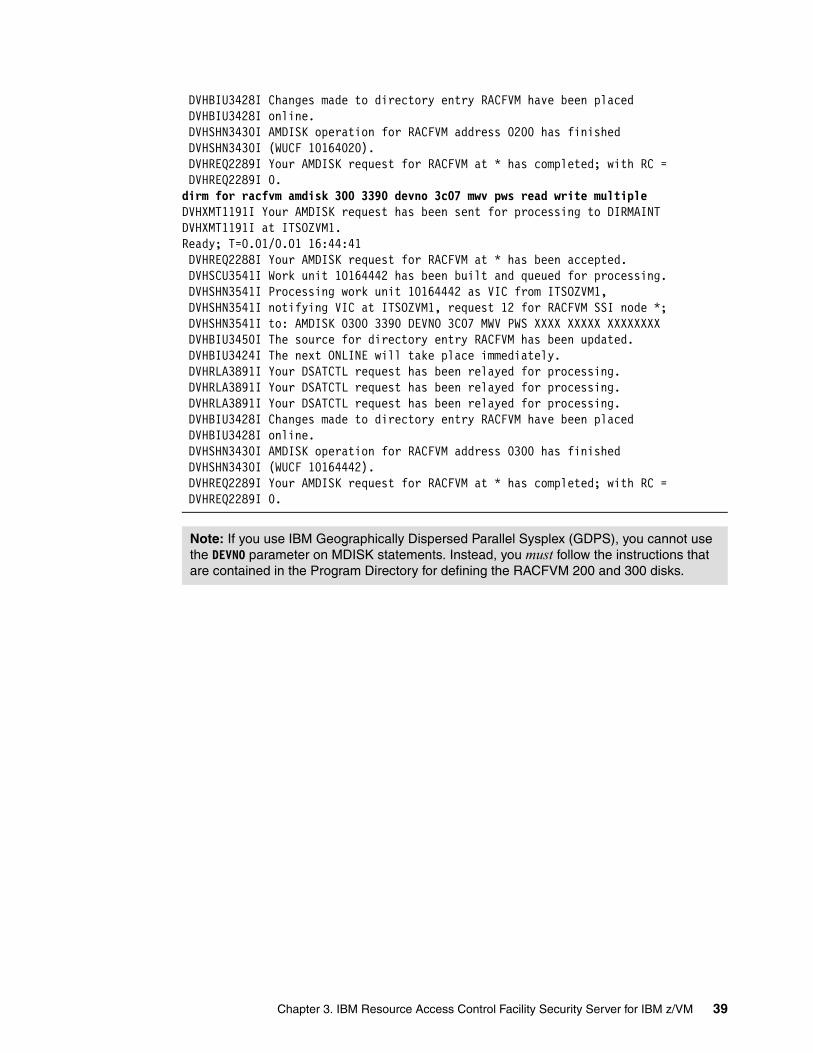
DVHBIU3428I Changes made to directory entry RACFVM have been placed DVHBIU3428I online. DVHSHN3430I AMDISK operation for RACFVM address 0200 has finished DVHSHN3430I (WUCF 10164020). DVHREQ2289I Your AMDISK request for RACFVM at * has completed; with RC = DVHREQ2289I 0. dirm for racfvm amdisk 300 3390 devno 3c07 mwv pws read write multiple DVHXMT1191I Your AMDISK request has been sent for processing to DIRMAINT DVHXMT1191I at ITSOZVM1. Ready; T=0.01/0.01 16:44:41 DVHREQ2288I Your AMDISK request for RACFVM at * has been accepted. DVHSCU3541I Work unit 10164442 has been built and queued for processing. DVHSHN3541I Processing work unit 10164442 as VIC from ITSOZVM1, DVHSHN3541I notifying VIC at ITSOZVM1, request 12 for RACFVM SSI node *; DVHSHN3541I to: AMDISK 0300 3390 DEVNO 3C07 MWV PWS XXXX XXXXX XXXXXXXX DVHBIU3450I The source for directory entry RACFVM has been updated. DVHBIU3424I The next ONLINE will take place immediately. DVHRLA3891I Your DSATCTL request has been relayed for processing. DVHRLA3891I Your DSATCTL request has been relayed for processing. DVHRLA3891I Your DSATCTL request has been relayed for processing. DVHBIU3428I Changes made to directory entry RACFVM have been placed DVHBIU3428I online. DVHSHN3430I AMDISK operation for RACFVM address 0300 has finished DVHSHN3430I (WUCF 10164442). DVHREQ2289I Your AMDISK request for RACFVM at * has completed; with RC = DVHREQ2289I 0.
Note: If you use IBM Geographically Dispersed Parallel Sysplex (GDPS), you cannot use the DEVNO parameter on MDISK statements. Instead, you must follow the instructions that are contained in the Program Directory for defining the RACFVM 200 and 300 disks.
Chapter 3. IBM Resource Access Control Facility Security Server for IBM z/VM 39
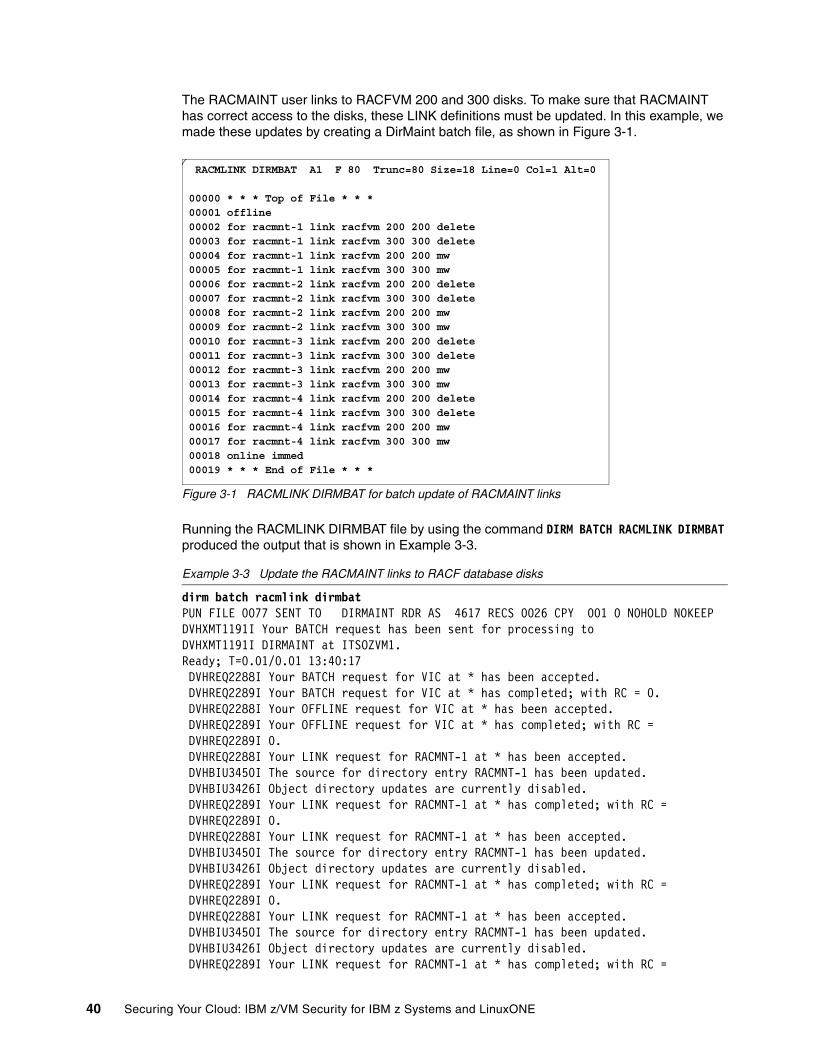
The RACMAINT user links to RACFVM 200 and 300 disks. To make sure that RACMAINT has correct access to the disks, these LINK definitions must be updated. In this example, we made these updates by creating a DirMaint batch file, as shown in Figure 3-1.
Figure 3-1 RACMLINK DIRMBAT for batch update of RACMAINT links
Running the RACMLINK DIRMBAT file by using the command DIRM BATCH RACMLINK DIRMBAT produced the output that is shown in Example 3-3.
Example 3-3 Update the RACMAINT links to RACF database disks
dirm batch racmlink dirmbat PUN FILE 0077 SENT TO DIRMAINT RDR AS 4617 RECS 0026 CPY 001 0 NOHOLD NOKEEPDVHXMT1191I Your BATCH request has been sent for processing to DVHXMT1191I DIRMAINT at ITSOZVM1. Ready; T=0.01/0.01 13:40:17 DVHREQ2288I Your BATCH request for VIC at * has been accepted. DVHREQ2289I Your BATCH request for VIC at * has completed; with RC = 0. DVHREQ2288I Your OFFLINE request for VIC at * has been accepted. DVHREQ2289I Your OFFLINE request for VIC at * has completed; with RC = DVHREQ2289I 0. DVHREQ2288I Your LINK request for RACMNT-1 at * has been accepted. DVHBIU3450I The source for directory entry RACMNT-1 has been updated. DVHBIU3426I Object directory updates are currently disabled. DVHREQ2289I Your LINK request for RACMNT-1 at * has completed; with RC = DVHREQ2289I 0. DVHREQ2288I Your LINK request for RACMNT-1 at * has been accepted. DVHBIU3450I The source for directory entry RACMNT-1 has been updated. DVHBIU3426I Object directory updates are currently disabled. DVHREQ2289I Your LINK request for RACMNT-1 at * has completed; with RC = DVHREQ2289I 0. DVHREQ2288I Your LINK request for RACMNT-1 at * has been accepted. DVHBIU3450I The source for directory entry RACMNT-1 has been updated. DVHBIU3426I Object directory updates are currently disabled. DVHREQ2289I Your LINK request for RACMNT-1 at * has completed; with RC =
RACMLINK DIRMBAT A1 F 80 Trunc=80 Size=18 Line=0 Col=1 Alt=0 00000 * * * Top of File * * * 00001 offline 00002 for racmnt-1 link racfvm 200 200 delete 00003 for racmnt-1 link racfvm 300 300 delete 00004 for racmnt-1 link racfvm 200 200 mw 00005 for racmnt-1 link racfvm 300 300 mw 00006 for racmnt-2 link racfvm 200 200 delete 00007 for racmnt-2 link racfvm 300 300 delete 00008 for racmnt-2 link racfvm 200 200 mw 00009 for racmnt-2 link racfvm 300 300 mw 00010 for racmnt-3 link racfvm 200 200 delete 00011 for racmnt-3 link racfvm 300 300 delete 00012 for racmnt-3 link racfvm 200 200 mw 00013 for racmnt-3 link racfvm 300 300 mw 00014 for racmnt-4 link racfvm 200 200 delete 00015 for racmnt-4 link racfvm 300 300 delete 00016 for racmnt-4 link racfvm 200 200 mw 00017 for racmnt-4 link racfvm 300 300 mw 00018 online immed 00019 * * * End of File * * *
40 Securing Your Cloud: IBM z/VM Security for IBM z Systems and LinuxONE
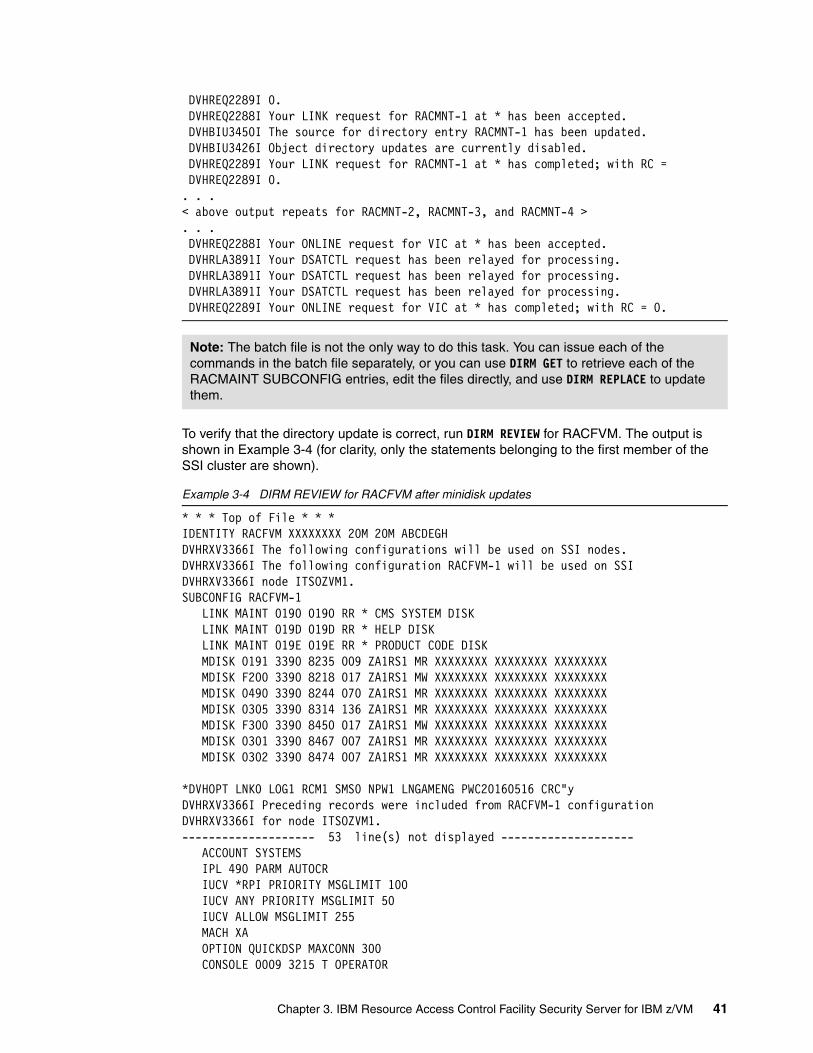
DVHREQ2289I 0. DVHREQ2288I Your LINK request for RACMNT-1 at * has been accepted. DVHBIU3450I The source for directory entry RACMNT-1 has been updated. DVHBIU3426I Object directory updates are currently disabled. DVHREQ2289I Your LINK request for RACMNT-1 at * has completed; with RC = DVHREQ2289I 0. . . .< above output repeats for RACMNT-2, RACMNT-3, and RACMNT-4 >. . .DVHREQ2288I Your ONLINE request for VIC at * has been accepted. DVHRLA3891I Your DSATCTL request has been relayed for processing. DVHRLA3891I Your DSATCTL request has been relayed for processing. DVHRLA3891I Your DSATCTL request has been relayed for processing. DVHREQ2289I Your ONLINE request for VIC at * has completed; with RC = 0.
To verify that the directory update is correct, run DIRM REVIEW for RACFVM. The output is shown in Example 3-4 (for clarity, only the statements belonging to the first member of the SSI cluster are shown).
Example 3-4 DIRM REVIEW for RACFVM after minidisk updates
* * * Top of File * * * IDENTITY RACFVM XXXXXXXX 20M 20M ABCDEGH DVHRXV3366I The following configurations will be used on SSI nodes. DVHRXV3366I The following configuration RACFVM-1 will be used on SSI DVHRXV3366I node ITSOZVM1. SUBCONFIG RACFVM-1 LINK MAINT 0190 0190 RR * CMS SYSTEM DISK LINK MAINT 019D 019D RR * HELP DISK LINK MAINT 019E 019E RR * PRODUCT CODE DISK MDISK 0191 3390 8235 009 ZA1RS1 MR XXXXXXXX XXXXXXXX XXXXXXXX MDISK F200 3390 8218 017 ZA1RS1 MW XXXXXXXX XXXXXXXX XXXXXXXX MDISK 0490 3390 8244 070 ZA1RS1 MR XXXXXXXX XXXXXXXX XXXXXXXX MDISK 0305 3390 8314 136 ZA1RS1 MR XXXXXXXX XXXXXXXX XXXXXXXX MDISK F300 3390 8450 017 ZA1RS1 MW XXXXXXXX XXXXXXXX XXXXXXXX MDISK 0301 3390 8467 007 ZA1RS1 MR XXXXXXXX XXXXXXXX XXXXXXXX MDISK 0302 3390 8474 007 ZA1RS1 MR XXXXXXXX XXXXXXXX XXXXXXXX *DVHOPT LNK0 LOG1 RCM1 SMS0 NPW1 LNGAMENG PWC20160516 CRC"y DVHRXV3366I Preceding records were included from RACFVM-1 configuration DVHRXV3366I for node ITSOZVM1. -------------------- 53 line(s) not displayed -------------------- ACCOUNT SYSTEMS IPL 490 PARM AUTOCR IUCV *RPI PRIORITY MSGLIMIT 100 IUCV ANY PRIORITY MSGLIMIT 50 IUCV ALLOW MSGLIMIT 255 MACH XA OPTION QUICKDSP MAXCONN 300 CONSOLE 0009 3215 T OPERATOR
Note: The batch file is not the only way to do this task. You can issue each of the commands in the batch file separately, or you can use DIRM GET to retrieve each of the RACMAINT SUBCONFIG entries, edit the files directly, and use DIRM REPLACE to update them.
Chapter 3. IBM Resource Access Control Facility Security Server for IBM z/VM 41
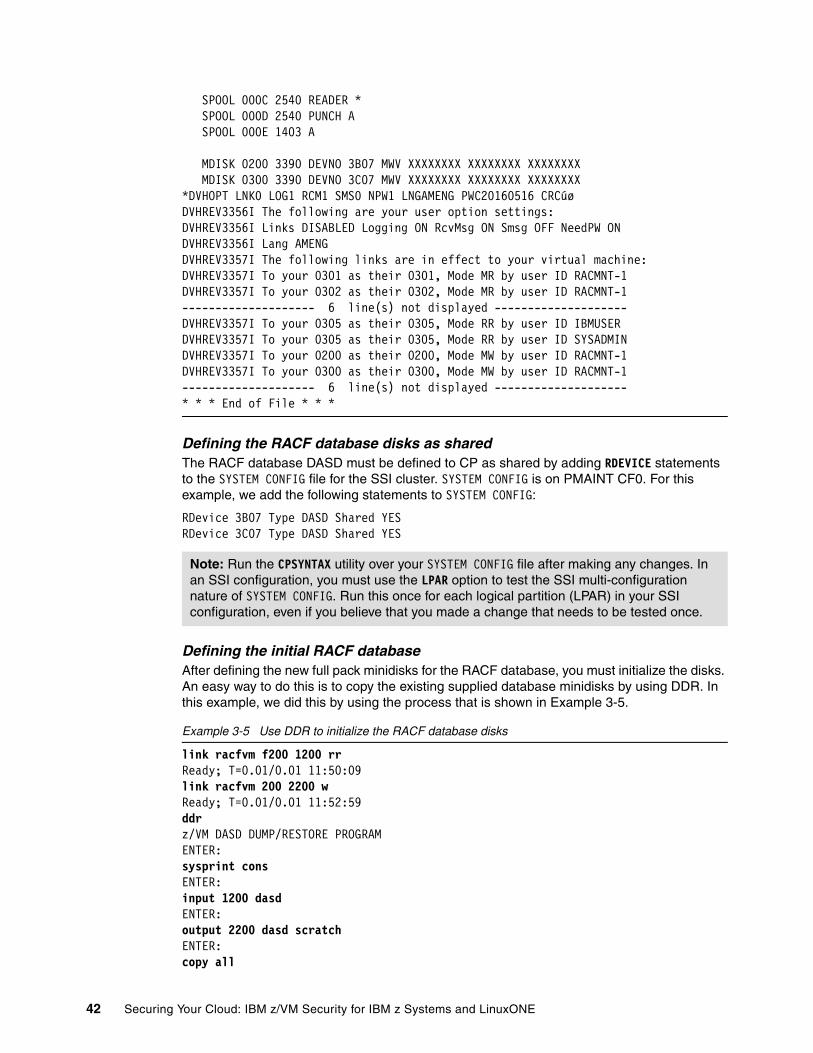
SPOOL 000C 2540 READER * SPOOL 000D 2540 PUNCH A SPOOL 000E 1403 A MDISK 0200 3390 DEVNO 3B07 MWV XXXXXXXX XXXXXXXX XXXXXXXX MDISK 0300 3390 DEVNO 3C07 MWV XXXXXXXX XXXXXXXX XXXXXXXX *DVHOPT LNK0 LOG1 RCM1 SMS0 NPW1 LNGAMENG PWC20160516 CRCúø DVHREV3356I The following are your user option settings: DVHREV3356I Links DISABLED Logging ON RcvMsg ON Smsg OFF NeedPW ON DVHREV3356I Lang AMENG DVHREV3357I The following links are in effect to your virtual machine: DVHREV3357I To your 0301 as their 0301, Mode MR by user ID RACMNT-1 DVHREV3357I To your 0302 as their 0302, Mode MR by user ID RACMNT-1 -------------------- 6 line(s) not displayed -------------------- DVHREV3357I To your 0305 as their 0305, Mode RR by user ID IBMUSER DVHREV3357I To your 0305 as their 0305, Mode RR by user ID SYSADMIN DVHREV3357I To your 0200 as their 0200, Mode MW by user ID RACMNT-1 DVHREV3357I To your 0300 as their 0300, Mode MW by user ID RACMNT-1 -------------------- 6 line(s) not displayed -------------------- * * * End of File * * *
Defining the RACF database disks as sharedThe RACF database DASD must be defined to CP as shared by adding RDEVICE statements to the SYSTEM CONFIG file for the SSI cluster. SYSTEM CONFIG is on PMAINT CF0. For this example, we add the following statements to SYSTEM CONFIG:
RDevice 3B07 Type DASD Shared YESRDevice 3C07 Type DASD Shared YES
Defining the initial RACF databaseAfter defining the new full pack minidisks for the RACF database, you must initialize the disks. An easy way to do this is to copy the existing supplied database minidisks by using DDR. In this example, we did this by using the process that is shown in Example 3-5.
Example 3-5 Use DDR to initialize the RACF database disks
link racfvm f200 1200 rr Ready; T=0.01/0.01 11:50:09link racfvm 200 2200 w Ready; T=0.01/0.01 11:52:59ddr z/VM DASD DUMP/RESTORE PROGRAM ENTER: sysprint cons ENTER: input 1200 dasd ENTER: output 2200 dasd scratch ENTER: copy all
Note: Run the CPSYNTAX utility over your SYSTEM CONFIG file after making any changes. In an SSI configuration, you must use the LPAR option to test the SSI multi-configuration nature of SYSTEM CONFIG. Run this once for each logical partition (LPAR) in your SSI configuration, even if you believe that you made a change that needs to be tested once.
42 Securing Your Cloud: IBM z/VM Security for IBM z Systems and LinuxONE
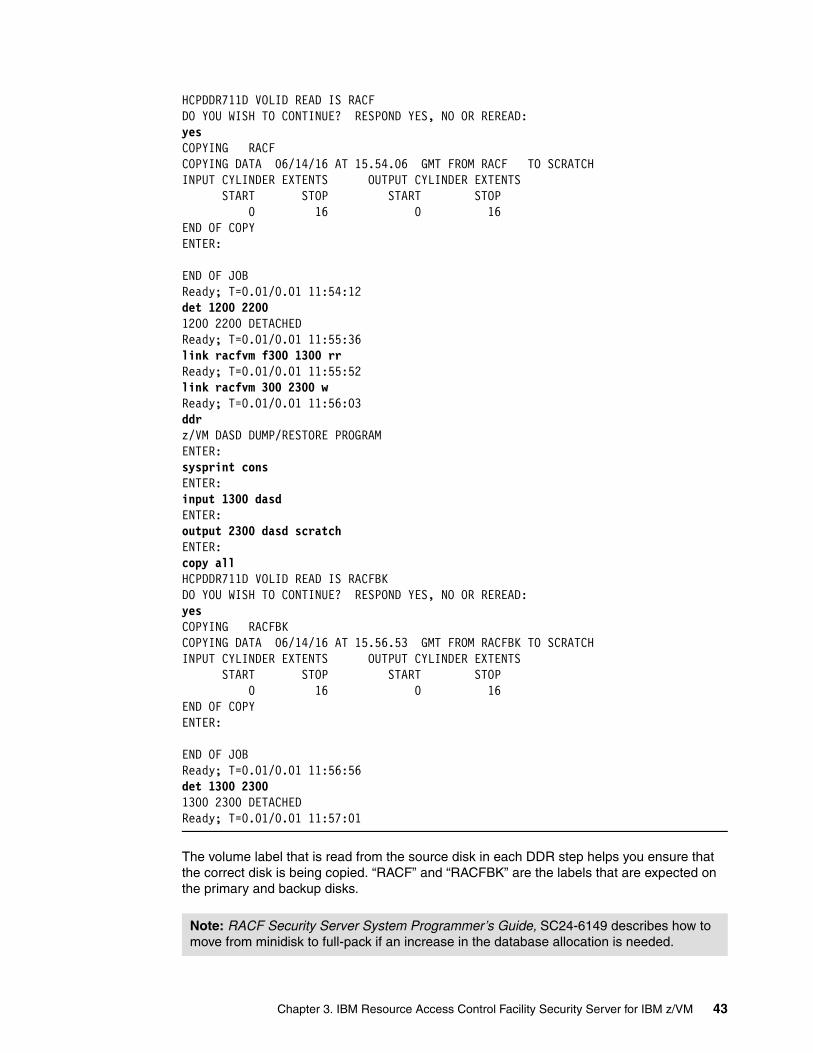
HCPDDR711D VOLID READ IS RACF DO YOU WISH TO CONTINUE? RESPOND YES, NO OR REREAD: yes COPYING RACF COPYING DATA 06/14/16 AT 15.54.06 GMT FROM RACF TO SCRATCHINPUT CYLINDER EXTENTS OUTPUT CYLINDER EXTENTS START STOP START STOP 0 16 0 16 END OF COPY ENTER:
END OF JOBReady; T=0.01/0.01 11:54:12det 1200 2200 1200 2200 DETACHED Ready; T=0.01/0.01 11:55:36link racfvm f300 1300 rr Ready; T=0.01/0.01 11:55:52link racfvm 300 2300 w Ready; T=0.01/0.01 11:56:03ddr z/VM DASD DUMP/RESTORE PROGRAM ENTER: sysprint cons ENTER: input 1300 dasd ENTER: output 2300 dasd scratch ENTER: copy all HCPDDR711D VOLID READ IS RACFBK DO YOU WISH TO CONTINUE? RESPOND YES, NO OR REREAD: yes COPYING RACFBK COPYING DATA 06/14/16 AT 15.56.53 GMT FROM RACFBK TO SCRATCHINPUT CYLINDER EXTENTS OUTPUT CYLINDER EXTENTS START STOP START STOP 0 16 0 16 END OF COPY ENTER: END OF JOB Ready; T=0.01/0.01 11:56:56 det 1300 2300 1300 2300 DETACHED Ready; T=0.01/0.01 11:57:01
The volume label that is read from the source disk in each DDR step helps you ensure that the correct disk is being copied. “RACF” and “RACFBK” are the labels that are expected on the primary and backup disks.
Note: RACF Security Server System Programmer’s Guide, SC24-6149 describes how to move from minidisk to full-pack if an increase in the database allocation is needed.
Chapter 3. IBM Resource Access Control Facility Security Server for IBM z/VM 43
Defining RACF user IDsThe following VMs are defined in a default CP directory:
6VMRAC30 Product owning VM (This is a release-specific user ID and changes with every new release of z/VM.)
RACFVM Production VM
RACFSMF SMF VM
RACMAINT Backup VM
IBMUSER Initial RACF administrator
AUTOLOG1 System startup machine
AUTOLOG2 System startup machine
SYSADMIN Authorized RACF administrator
Users with NOLOG passwordIn a normal z/VM installation, several user IDs are defined with the password NOLOG. RACF Security Server Security Administrator Guide, SC24-6218 describes two ways to handle such users:
� Leave the password as NOLOG.
RPIDIRCT defines these users as protected and revoked by setting the NOPASSWORD, NOPHRASE, and REVOKED attributes. However, because NOLOG is a special reserved password to CP that prevents access, a logon request from such a user cannot be passed to RACF. This means that if such a user must be able to access the system in the future, both the CP directory and RACF must be updated to activate the user.
� Change the password to UNLOG.
Similar to the NOLOG password, RPIDIRCT defines these users as protected and revoked by setting the NOPASSWORD, NOPHRASE, and REVOKED attributes. UNLOG is not a CP reserved password, so CP passes a logon request for such a user to RACF. This means that the user can be given system access in the future only by performing a RACF update.
What you decide to do here depends on the local security policy and procedure, and whether you intend to use the DirMaint-RACF connector. The password management code in the connector handles what to do with privileged passwords such as NOLOG, so changing the directory before setting up RACF yields little advantage.
If you decide to change the NOLOG passwords to UNLOG, proceed with “Changing NOLOG to UNLOG”. If you decide not to, continue with “Evaluating the minidisk access” on page 45.
Changing NOLOG to UNLOGTo perform this change, you must determine what file is used for the source directory while implementing RACF. If you implemented DirMaint, then you must obtain a copy of the USER WITHPASS file from the DIRMAINT VM, as shown in Example 3-6 on page 45. If you have not implemented DirMaint, you can use a copy of the USER DIRECT file on MAINT’s 2CC disk. When you receive this file, save it as an A2 file to allow the RACF user ID to access the file in later steps. This file is required when the RPIDIRCT EXEC runs later.
Note: RPIDIRCT creates a user with a NOLOG or UNLOG password with the NOPASS, NOPHRASE, and REVOKED set. However, the DirMaint-RACF connector sets only REVOKED for a NOLOG user. If your installation does all password management by using DirMaint, this is not an issue because the connector resets the password field in RACF if the user is migrated out of NOLOG status.
44 Securing Your Cloud: IBM z/VM Security for IBM z Systems and LinuxONE
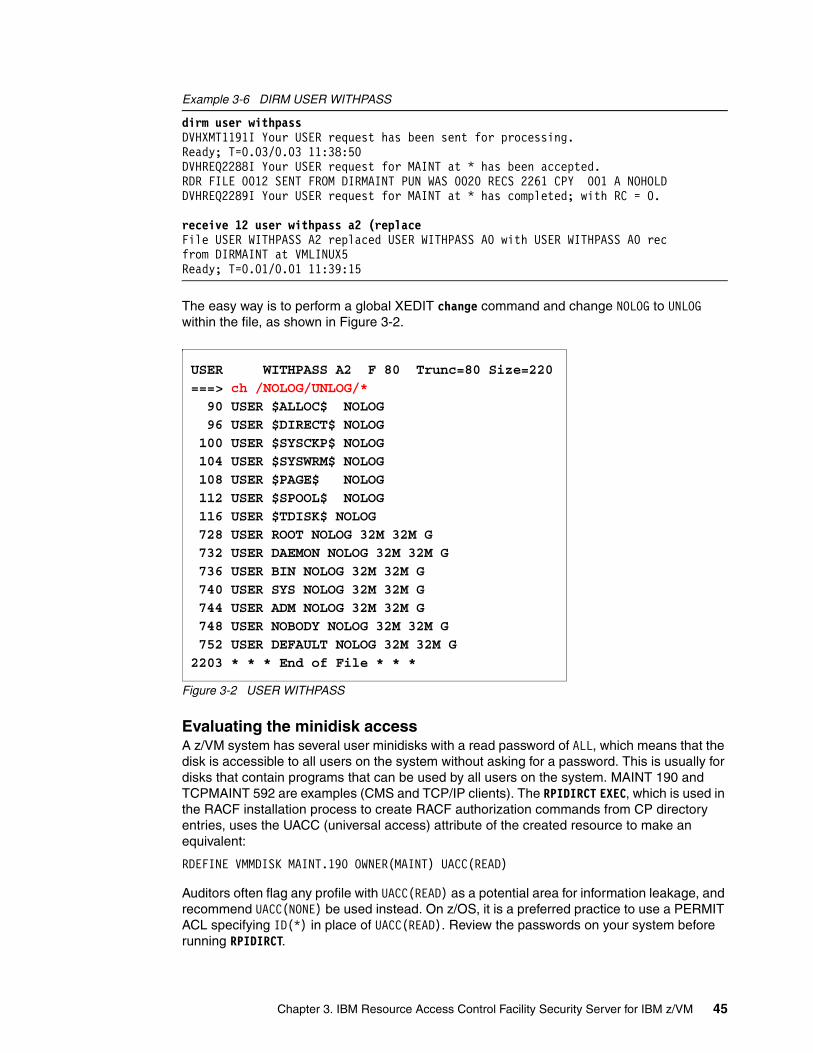
Example 3-6 DIRM USER WITHPASS
dirm user withpass DVHXMT1191I Your USER request has been sent for processing. Ready; T=0.03/0.03 11:38:50 DVHREQ2288I Your USER request for MAINT at * has been accepted. RDR FILE 0012 SENT FROM DIRMAINT PUN WAS 0020 RECS 2261 CPY 001 A NOHOLDDVHREQ2289I Your USER request for MAINT at * has completed; with RC = 0.
receive 12 user withpass a2 (replace File USER WITHPASS A2 replaced USER WITHPASS A0 with USER WITHPASS A0 recfrom DIRMAINT at VMLINUX5 Ready; T=0.01/0.01 11:39:15
The easy way is to perform a global XEDIT change command and change NOLOG to UNLOG within the file, as shown in Figure 3-2.
Figure 3-2 USER WITHPASS
Evaluating the minidisk accessA z/VM system has several user minidisks with a read password of ALL, which means that the disk is accessible to all users on the system without asking for a password. This is usually for disks that contain programs that can be used by all users on the system. MAINT 190 and TCPMAINT 592 are examples (CMS and TCP/IP clients). The RPIDIRCT EXEC, which is used in the RACF installation process to create RACF authorization commands from CP directory entries, uses the UACC (universal access) attribute of the created resource to make an equivalent:
RDEFINE VMMDISK MAINT.190 OWNER(MAINT) UACC(READ)
Auditors often flag any profile with UACC(READ) as a potential area for information leakage, and recommend UACC(NONE) be used instead. On z/OS, it is a preferred practice to use a PERMIT ACL specifying ID(*) in place of UACC(READ). Review the passwords on your system before running RPIDIRCT.
USER WITHPASS A2 F 80 Trunc=80 Size=220===> ch /NOLOG/UNLOG/* 90 USER $ALLOC$ NOLOG 96 USER $DIRECT$ NOLOG 100 USER $SYSCKP$ NOLOG 104 USER $SYSWRM$ NOLOG 108 USER $PAGE$ NOLOG 112 USER $SPOOL$ NOLOG 116 USER $TDISK$ NOLOG 728 USER ROOT NOLOG 32M 32M G 732 USER DAEMON NOLOG 32M 32M G 736 USER BIN NOLOG 32M 32M G 740 USER SYS NOLOG 32M 32M G 744 USER ADM NOLOG 32M 32M G 748 USER NOBODY NOLOG 32M 32M G 752 USER DEFAULT NOLOG 32M 32M G 2203 * * * End of File * * *
Chapter 3. IBM Resource Access Control Facility Security Server for IBM z/VM 45
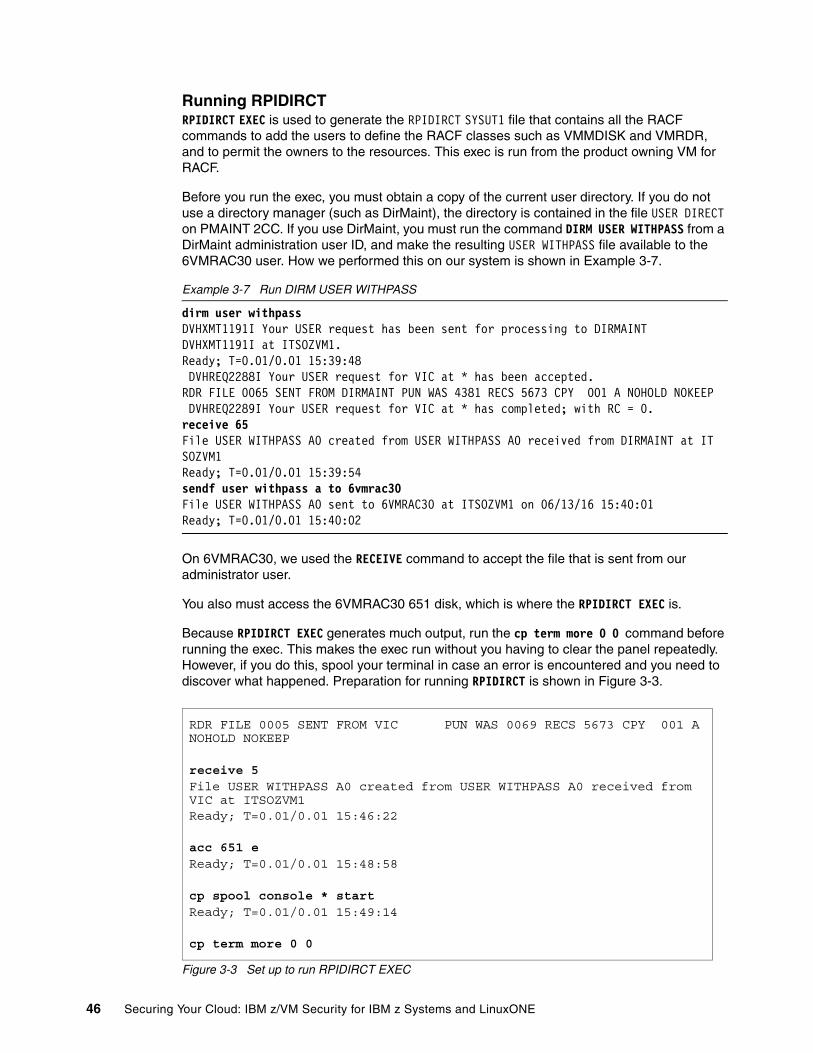
Running RPIDIRCTRPIDIRCT EXEC is used to generate the RPIDIRCT SYSUT1 file that contains all the RACF commands to add the users to define the RACF classes such as VMMDISK and VMRDR, and to permit the owners to the resources. This exec is run from the product owning VM for RACF.
Before you run the exec, you must obtain a copy of the current user directory. If you do not use a directory manager (such as DirMaint), the directory is contained in the file USER DIRECT on PMAINT 2CC. If you use DirMaint, you must run the command DIRM USER WITHPASS from a DirMaint administration user ID, and make the resulting USER WITHPASS file available to the 6VMRAC30 user. How we performed this on our system is shown in Example 3-7.
Example 3-7 Run DIRM USER WITHPASS
dirm user withpass DVHXMT1191I Your USER request has been sent for processing to DIRMAINT DVHXMT1191I at ITSOZVM1. Ready; T=0.01/0.01 15:39:48 DVHREQ2288I Your USER request for VIC at * has been accepted. RDR FILE 0065 SENT FROM DIRMAINT PUN WAS 4381 RECS 5673 CPY 001 A NOHOLD NOKEEP DVHREQ2289I Your USER request for VIC at * has completed; with RC = 0. receive 65 File USER WITHPASS A0 created from USER WITHPASS A0 received from DIRMAINT at ITSOZVM1 Ready; T=0.01/0.01 15:39:54 sendf user withpass a to 6vmrac30 File USER WITHPASS A0 sent to 6VMRAC30 at ITSOZVM1 on 06/13/16 15:40:01 Ready; T=0.01/0.01 15:40:02
On 6VMRAC30, we used the RECEIVE command to accept the file that is sent from our administrator user.
You also must access the 6VMRAC30 651 disk, which is where the RPIDIRCT EXEC is.
Because RPIDIRCT EXEC generates much output, run the cp term more 0 0 command before running the exec. This makes the exec run without you having to clear the panel repeatedly. However, if you do this, spool your terminal in case an error is encountered and you need to discover what happened. Preparation for running RPIDIRCT is shown in Figure 3-3.
Figure 3-3 Set up to run RPIDIRCT EXEC
RDR FILE 0005 SENT FROM VIC PUN WAS 0069 RECS 5673 CPY 001 A NOHOLD NOKEEP
receive 5 File USER WITHPASS A0 created from USER WITHPASS A0 received from VIC at ITSOZVM1 Ready; T=0.01/0.01 15:46:22
acc 651 e Ready; T=0.01/0.01 15:48:58
cp spool console * start Ready; T=0.01/0.01 15:49:14
cp term more 0 0
46 Securing Your Cloud: IBM z/VM Security for IBM z Systems and LinuxONE

When you run the RPIDIRCT EXEC, you must provide the file name and file type of the source directory file. It searches for the file on all accessed disks. The default output file mode is A. When the exec starts, it prompts you to change the default group ID. We used the default, so we replied N to the question.
Figure 3-4 shows an example of the rpidirct user withpass command.
Figure 3-4 Run RPIDIRCT EXEC
Secure Configuration Guide for z/VM, SC24-6139 suggests that, after running RPIDIRCT, you modify the resulting RPIDIRCT SYSUT1 file in the following ways:
� Alter the VMRDR profile for MAINT630 to specify UACC(UPDATE).
� Add any additional PERMITs that are required.
Updating the MAINT630 profile in VMRDR is required for the correct operation of the SERVICE EXEC, as described in Program Directory for RACF Security Server for z/VM, GI13-3407-00.
Make the same changes to the following VMs:
TCPMAINT The TCP/IP daemon VMs spool their console to TCPMAINT.DIRMAINT Makes the DIRM SEND command work.DATAMOVE Allows DIRMAINT to send files to DATAMOVE (2 3 4 too).DIRMSATn Allows the correct DirMaint operation across the SSI cluster.
Other additional permits are required.
RPIDIRCT processing of VMLANPrior to z/VM 6.2, RPIDIRCT did not create RACF statements in the VMLAN class for protection of virtual networks. This support was added in z/VM 6.2, but it detects only network connections that are defined by using the NICDEF directory control statement. If you use other methods for granting access to Virtual Switches or Guest LANs (such as SET VSWITCH GRANT commands in COMMAND directory control statements, or command scripts like AUTOLOG1 PROFILE EXEC or the files that are generated by IBM Wave), these are not processed by RPIDIRCT. You must analyze these other access control methods, and add appropriate RACF RDEFINE and PERMIT commands to RPIDIRCT SYSUT1 to give the required access.
USER WITHPASS Filemode defaulted to "*". Output defaulted to "A" disk. Default group ID = SYS1. Would you like to change this default? Enter Y/N N Default group ID = SYS1.
PROFILE IBMDFLT
PROFILE TCPCMSU
PROFILE TCPGCSU -------------------- 4277 line(s) not displayed ------------ ********** 5531 Directory records processed **************** *************** RPIDIRCT SYSUT1 CREATED ********************
Chapter 3. IBM Resource Access Control Facility Security Server for IBM z/VM 47
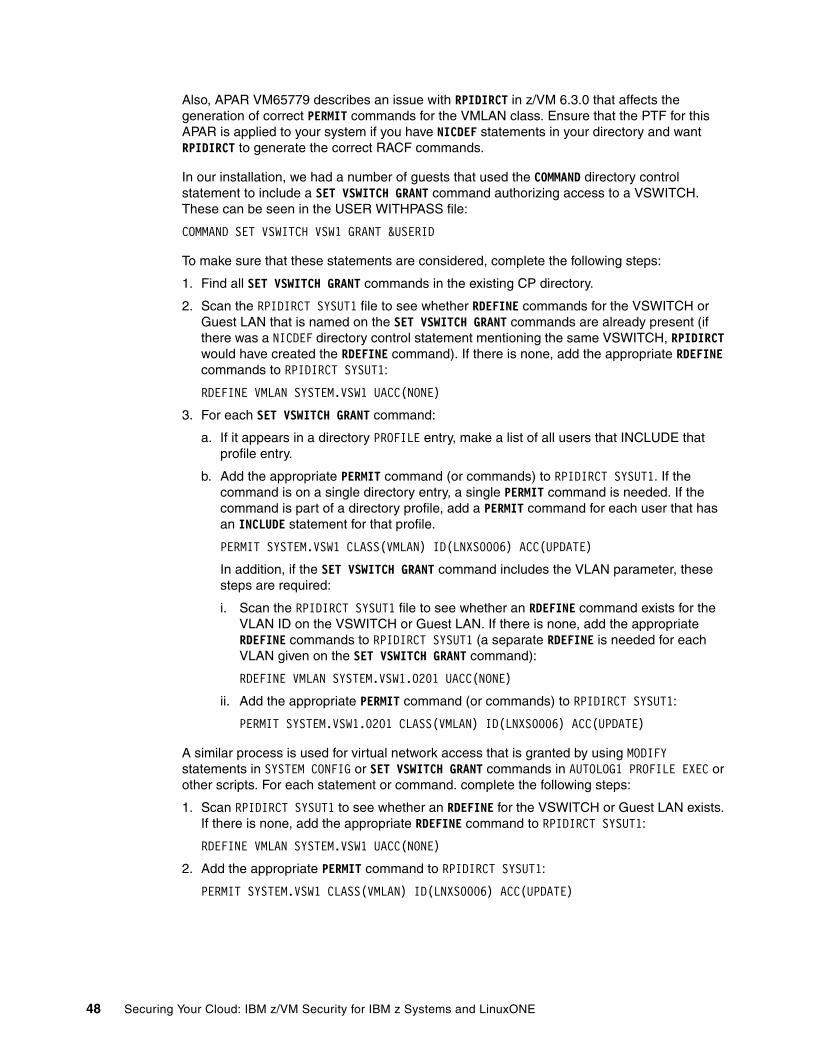
Also, APAR VM65779 describes an issue with RPIDIRCT in z/VM 6.3.0 that affects the generation of correct PERMIT commands for the VMLAN class. Ensure that the PTF for this APAR is applied to your system if you have NICDEF statements in your directory and want RPIDIRCT to generate the correct RACF commands.
In our installation, we had a number of guests that used the COMMAND directory control statement to include a SET VSWITCH GRANT command authorizing access to a VSWITCH. These can be seen in the USER WITHPASS file:
COMMAND SET VSWITCH VSW1 GRANT &USERID
To make sure that these statements are considered, complete the following steps:
1. Find all SET VSWITCH GRANT commands in the existing CP directory.
2. Scan the RPIDIRCT SYSUT1 file to see whether RDEFINE commands for the VSWITCH or Guest LAN that is named on the SET VSWITCH GRANT commands are already present (if there was a NICDEF directory control statement mentioning the same VSWITCH, RPIDIRCT would have created the RDEFINE command). If there is none, add the appropriate RDEFINE commands to RPIDIRCT SYSUT1:
RDEFINE VMLAN SYSTEM.VSW1 UACC(NONE)
3. For each SET VSWITCH GRANT command:
a. If it appears in a directory PROFILE entry, make a list of all users that INCLUDE that profile entry.
b. Add the appropriate PERMIT command (or commands) to RPIDIRCT SYSUT1. If the command is on a single directory entry, a single PERMIT command is needed. If the command is part of a directory profile, add a PERMIT command for each user that has an INCLUDE statement for that profile.
PERMIT SYSTEM.VSW1 CLASS(VMLAN) ID(LNXS0006) ACC(UPDATE)
In addition, if the SET VSWITCH GRANT command includes the VLAN parameter, these steps are required:
i. Scan the RPIDIRCT SYSUT1 file to see whether an RDEFINE command exists for the VLAN ID on the VSWITCH or Guest LAN. If there is none, add the appropriate RDEFINE commands to RPIDIRCT SYSUT1 (a separate RDEFINE is needed for each VLAN given on the SET VSWITCH GRANT command):
RDEFINE VMLAN SYSTEM.VSW1.0201 UACC(NONE)
ii. Add the appropriate PERMIT command (or commands) to RPIDIRCT SYSUT1:
PERMIT SYSTEM.VSW1.0201 CLASS(VMLAN) ID(LNXS0006) ACC(UPDATE)
A similar process is used for virtual network access that is granted by using MODIFY statements in SYSTEM CONFIG or SET VSWITCH GRANT commands in AUTOLOG1 PROFILE EXEC or other scripts. For each statement or command. complete the following steps:
1. Scan RPIDIRCT SYSUT1 to see whether an RDEFINE for the VSWITCH or Guest LAN exists. If there is none, add the appropriate RDEFINE command to RPIDIRCT SYSUT1:
RDEFINE VMLAN SYSTEM.VSW1 UACC(NONE)
2. Add the appropriate PERMIT command to RPIDIRCT SYSUT1:
PERMIT SYSTEM.VSW1 CLASS(VMLAN) ID(LNXS0006) ACC(UPDATE)
48 Securing Your Cloud: IBM z/VM Security for IBM z Systems and LinuxONE
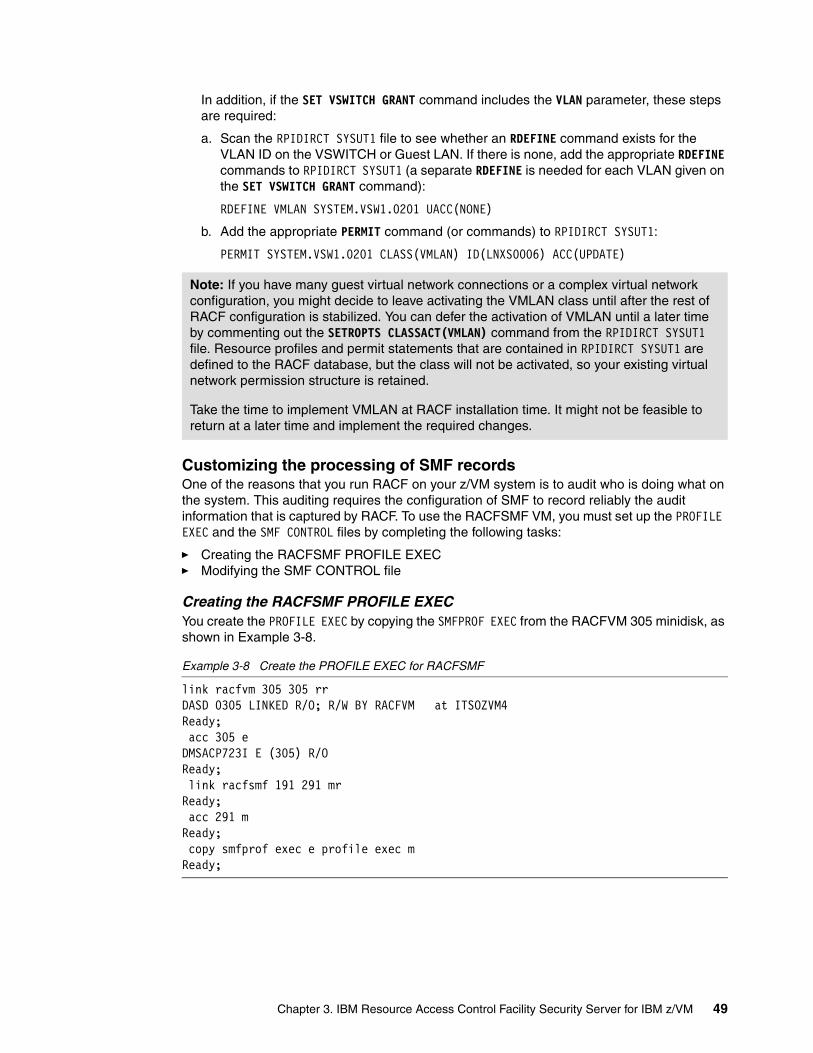
In addition, if the SET VSWITCH GRANT command includes the VLAN parameter, these steps are required:
a. Scan the RPIDIRCT SYSUT1 file to see whether an RDEFINE command exists for the VLAN ID on the VSWITCH or Guest LAN. If there is none, add the appropriate RDEFINE commands to RPIDIRCT SYSUT1 (a separate RDEFINE is needed for each VLAN given on the SET VSWITCH GRANT command):
RDEFINE VMLAN SYSTEM.VSW1.0201 UACC(NONE)
b. Add the appropriate PERMIT command (or commands) to RPIDIRCT SYSUT1:
PERMIT SYSTEM.VSW1.0201 CLASS(VMLAN) ID(LNXS0006) ACC(UPDATE)
Customizing the processing of SMF recordsOne of the reasons that you run RACF on your z/VM system is to audit who is doing what on the system. This auditing requires the configuration of SMF to record reliably the audit information that is captured by RACF. To use the RACFSMF VM, you must set up the PROFILE EXEC and the SMF CONTROL files by completing the following tasks:
� Creating the RACFSMF PROFILE EXEC� Modifying the SMF CONTROL file
Creating the RACFSMF PROFILE EXECYou create the PROFILE EXEC by copying the SMFPROF EXEC from the RACFVM 305 minidisk, as shown in Example 3-8.
Example 3-8 Create the PROFILE EXEC for RACFSMF
link racfvm 305 305 rr DASD 0305 LINKED R/O; R/W BY RACFVM at ITSOZVM4 Ready; acc 305 e DMSACP723I E (305) R/O Ready; link racfsmf 191 291 mr Ready; acc 291 m Ready; copy smfprof exec e profile exec m Ready;
Note: If you have many guest virtual network connections or a complex virtual network configuration, you might decide to leave activating the VMLAN class until after the rest of RACF configuration is stabilized. You can defer the activation of VMLAN until a later time by commenting out the SETROPTS CLASSACT(VMLAN) command from the RPIDIRCT SYSUT1 file. Resource profiles and permit statements that are contained in RPIDIRCT SYSUT1 are defined to the RACF database, but the class will not be activated, so your existing virtual network permission structure is retained.
Take the time to implement VMLAN at RACF installation time. It might not be feasible to return at a later time and implement the required changes.
Chapter 3. IBM Resource Access Control Facility Security Server for IBM z/VM 49
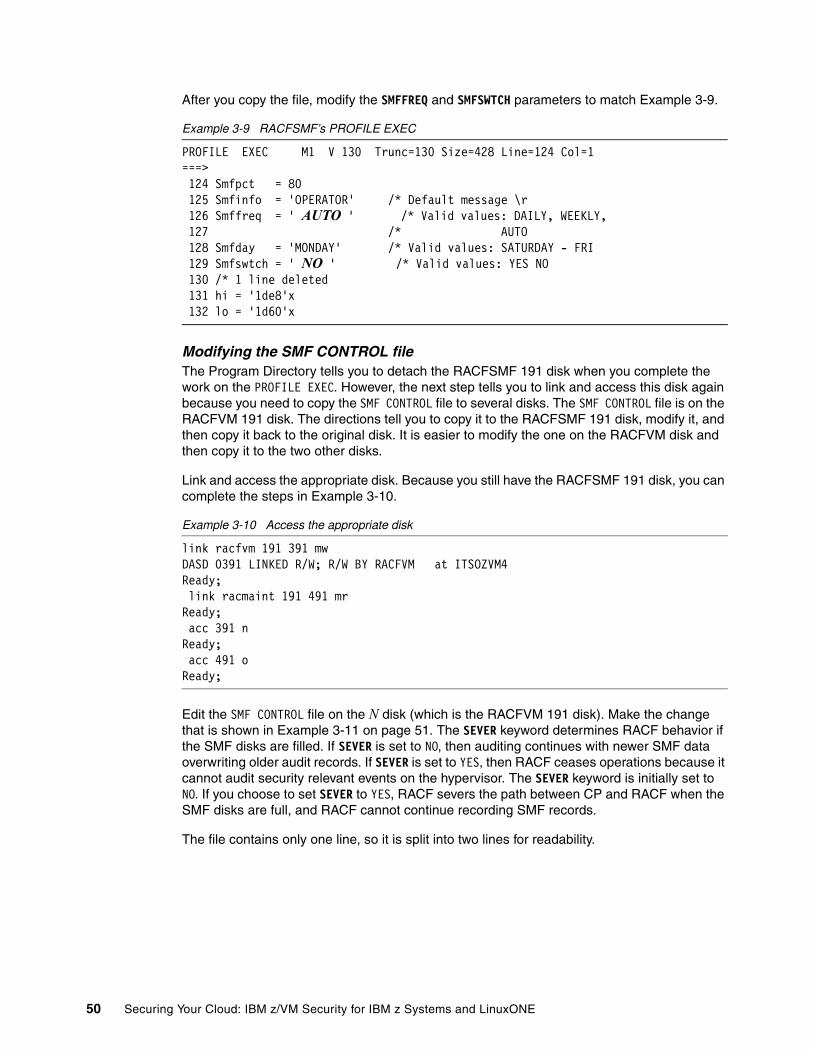
After you copy the file, modify the SMFFREQ and SMFSWTCH parameters to match Example 3-9.
Example 3-9 RACFSMF’s PROFILE EXEC
PROFILE EXEC M1 V 130 Trunc=130 Size=428 Line=124 Col=1===> 124 Smfpct = 80 125 Smfinfo = 'OPERATOR' /* Default message \r 126 Smffreq = ' AUTO ' /* Valid values: DAILY, WEEKLY, 127 /* AUTO 128 Smfday = 'MONDAY' /* Valid values: SATURDAY - FRI 129 Smfswtch = ' NO ' /* Valid values: YES NO 130 /* 1 line deleted 131 hi = '1de8'x 132 lo = '1d60'x
Modifying the SMF CONTROL fileThe Program Directory tells you to detach the RACFSMF 191 disk when you complete the work on the PROFILE EXEC. However, the next step tells you to link and access this disk again because you need to copy the SMF CONTROL file to several disks. The SMF CONTROL file is on the RACFVM 191 disk. The directions tell you to copy it to the RACFSMF 191 disk, modify it, and then copy it back to the original disk. It is easier to modify the one on the RACFVM disk and then copy it to the two other disks.
Link and access the appropriate disk. Because you still have the RACFSMF 191 disk, you can complete the steps in Example 3-10.
Example 3-10 Access the appropriate disk
link racfvm 191 391 mw DASD 0391 LINKED R/W; R/W BY RACFVM at ITSOZVM4Ready; link racmaint 191 491 mr Ready; acc 391 n Ready; acc 491 o Ready;
Edit the SMF CONTROL file on the N disk (which is the RACFVM 191 disk). Make the change that is shown in Example 3-11 on page 51. The SEVER keyword determines RACF behavior if the SMF disks are filled. If SEVER is set to NO, then auditing continues with newer SMF data overwriting older audit records. If SEVER is set to YES, then RACF ceases operations because it cannot audit security relevant events on the hypervisor. The SEVER keyword is initially set to NO. If you choose to set SEVER to YES, RACF severs the path between CP and RACF when the SMF disks are full, and RACF cannot continue recording SMF records.
The file contains only one line, so it is split into two lines for readability.
50 Securing Your Cloud: IBM z/VM Security for IBM z Systems and LinuxONE
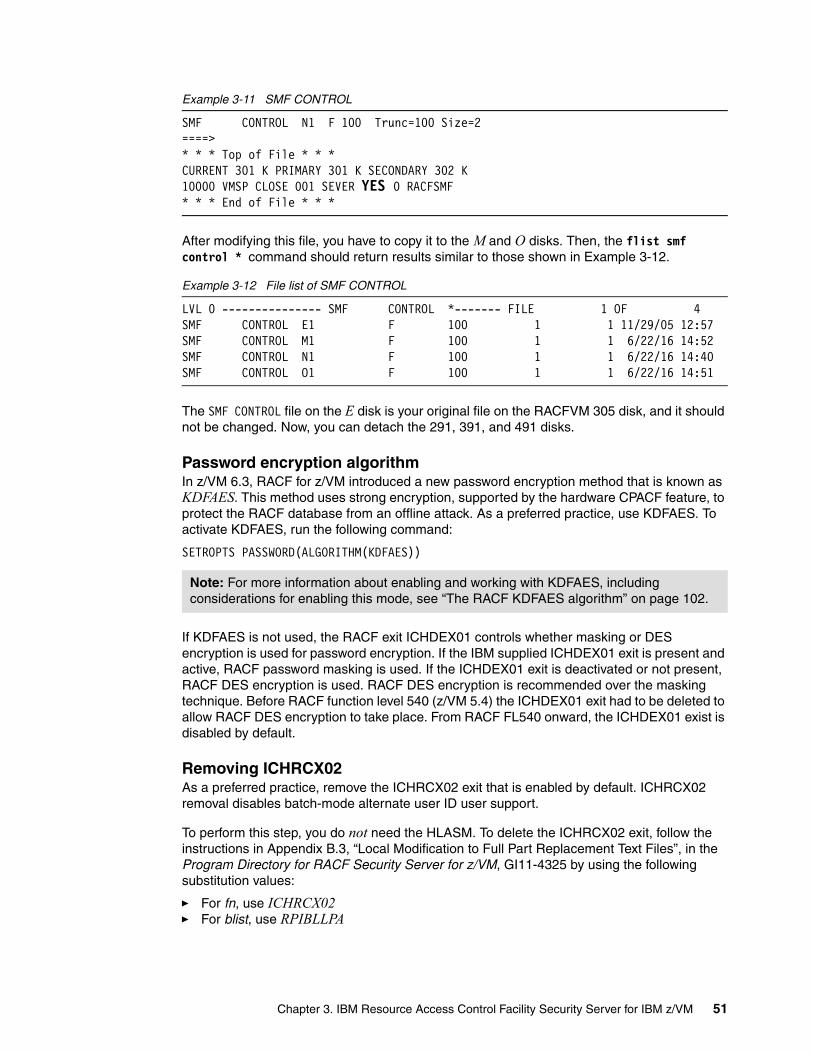
Example 3-11 SMF CONTROL
SMF CONTROL N1 F 100 Trunc=100 Size=2 ====> * * * Top of File * * * CURRENT 301 K PRIMARY 301 K SECONDARY 302 K10000 VMSP CLOSE 001 SEVER YES 0 RACFSMF * * * End of File * * *
After modifying this file, you have to copy it to the M and O disks. Then, the flist smf control * command should return results similar to those shown in Example 3-12.
Example 3-12 File list of SMF CONTROL
LVL 0 --------------- SMF CONTROL *------- FILE 1 OF 4 SMF CONTROL E1 F 100 1 1 11/29/05 12:57SMF CONTROL M1 F 100 1 1 6/22/16 14:52SMF CONTROL N1 F 100 1 1 6/22/16 14:40SMF CONTROL O1 F 100 1 1 6/22/16 14:51
The SMF CONTROL file on the E disk is your original file on the RACFVM 305 disk, and it should not be changed. Now, you can detach the 291, 391, and 491 disks.
Password encryption algorithmIn z/VM 6.3, RACF for z/VM introduced a new password encryption method that is known as KDFAES. This method uses strong encryption, supported by the hardware CPACF feature, to protect the RACF database from an offline attack. As a preferred practice, use KDFAES. To activate KDFAES, run the following command:
SETROPTS PASSWORD(ALGORITHM(KDFAES))
If KDFAES is not used, the RACF exit ICHDEX01 controls whether masking or DES encryption is used for password encryption. If the IBM supplied ICHDEX01 exit is present and active, RACF password masking is used. If the ICHDEX01 exit is deactivated or not present, RACF DES encryption is used. RACF DES encryption is recommended over the masking technique. Before RACF function level 540 (z/VM 5.4) the ICHDEX01 exit had to be deleted to allow RACF DES encryption to take place. From RACF FL540 onward, the ICHDEX01 exist is disabled by default.
Removing ICHRCX02 As a preferred practice, remove the ICHRCX02 exit that is enabled by default. ICHRCX02 removal disables batch-mode alternate user ID user support.
To perform this step, you do not need the HLASM. To delete the ICHRCX02 exit, follow the instructions in Appendix B.3, “Local Modification to Full Part Replacement Text Files”, in the Program Directory for RACF Security Server for z/VM, GI11-4325 by using the following substitution values:
� For fn, use ICHRCX02� For blist, use RPIBLLPA
Note: For more information about enabling and working with KDFAES, including considerations for enabling this mode, see “The RACF KDFAES algorithm” on page 102.
Chapter 3. IBM Resource Access Control Facility Security Server for IBM z/VM 51
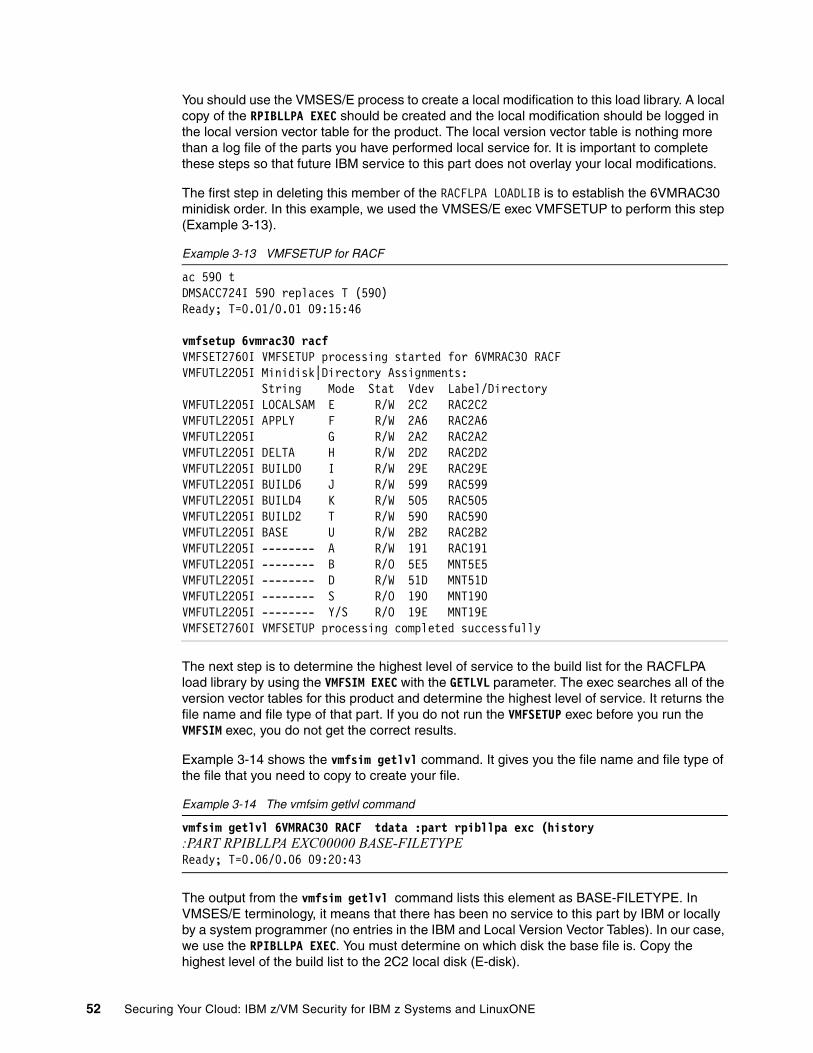
You should use the VMSES/E process to create a local modification to this load library. A local copy of the RPIBLLPA EXEC should be created and the local modification should be logged in the local version vector table for the product. The local version vector table is nothing more than a log file of the parts you have performed local service for. It is important to complete these steps so that future IBM service to this part does not overlay your local modifications.
The first step in deleting this member of the RACFLPA LOADLIB is to establish the 6VMRAC30 minidisk order. In this example, we used the VMSES/E exec VMFSETUP to perform this step (Example 3-13).
Example 3-13 VMFSETUP for RACF
ac 590 t DMSACC724I 590 replaces T (590) Ready; T=0.01/0.01 09:15:46
vmfsetup 6vmrac30 racf VMFSET2760I VMFSETUP processing started for 6VMRAC30 RACF VMFUTL2205I Minidisk|Directory Assignments: String Mode Stat Vdev Label/Directory VMFUTL2205I LOCALSAM E R/W 2C2 RAC2C2 VMFUTL2205I APPLY F R/W 2A6 RAC2A6 VMFUTL2205I G R/W 2A2 RAC2A2 VMFUTL2205I DELTA H R/W 2D2 RAC2D2 VMFUTL2205I BUILD0 I R/W 29E RAC29E VMFUTL2205I BUILD6 J R/W 599 RAC599 VMFUTL2205I BUILD4 K R/W 505 RAC505 VMFUTL2205I BUILD2 T R/W 590 RAC590 VMFUTL2205I BASE U R/W 2B2 RAC2B2 VMFUTL2205I -------- A R/W 191 RAC191 VMFUTL2205I -------- B R/O 5E5 MNT5E5 VMFUTL2205I -------- D R/W 51D MNT51D VMFUTL2205I -------- S R/O 190 MNT190 VMFUTL2205I -------- Y/S R/O 19E MNT19E VMFSET2760I VMFSETUP processing completed successfully
The next step is to determine the highest level of service to the build list for the RACFLPA load library by using the VMFSIM EXEC with the GETLVL parameter. The exec searches all of the version vector tables for this product and determine the highest level of service. It returns the file name and file type of that part. If you do not run the VMFSETUP exec before you run the VMFSIM exec, you do not get the correct results.
Example 3-14 shows the vmfsim getlvl command. It gives you the file name and file type of the file that you need to copy to create your file.
Example 3-14 The vmfsim getlvl command
vmfsim getlvl 6VMRAC30 RACF tdata :part rpibllpa exc (history :PART RPIBLLPA EXC00000 BASE-FILETYPE Ready; T=0.06/0.06 09:20:43
The output from the vmfsim getlvl command lists this element as BASE-FILETYPE. In VMSES/E terminology, it means that there has been no service to this part by IBM or locally by a system programmer (no entries in the IBM and Local Version Vector Tables). In our case, we use the RPIBLLPA EXEC. You must determine on which disk the base file is. Copy the highest level of the build list to the 2C2 local disk (E-disk).
52 Securing Your Cloud: IBM z/VM Security for IBM z Systems and LinuxONE

Use the following syntax:
copyfile blist ft * = exclnnnn 2c2_fm
Where blist is the file name to be copied, ft is the file type, nnnn is a local tracking number that you supply, and 2c2_fm is the filemode of the 2C2 minidisk. Because this is the first modification to this file, we use 0001 as the nnnn value and file mode e to reflect the 2C2 minidisk, as follows:
copyfile rpibllpa exec u = excl0001 e
Modify the RPIBLLPA EXCL0001 on the E disk and comment out the entry for the ICHRCX02 member, as shown in Example 3-15.
Example 3-15 RPIBLLPA EXCL0001
RPIBLLPA EXCL0001 E1 F 80 Trunc=80 Size=749 Line=456 C===> 456 * 457 *:OBJNAME. ICHRCX02 LEPARMS RENT REUS LET NCAL XREF 458 *:BLDREQ. RPIBLOBJ.ICHRCX02 459 *:OPTIONS. CONCAT SYSLIB RACFOBJ 460 *:OPTIONS. INCLUDE RACFOBJ(ICHRCX02) 461 *:OPTIONS. ENTRY ICHRCX02 462 *:EOBJNAME. 463 *
Log this local modification to the RPIBLLPA EXEC into the local version vector table. In prior releases of z/VM, the VMFSIM MODIFY command was used. Starting with z/VM 5.2.0, you can use the VMFSIM LOGMOD command with more user-friendly syntax:
vmfsim logmod 6VMRAC30 vvtlcl e tdata :mod lcl0001 :part rpibllpa exc
The 2C2 disk should now contain 6VMRAC30 VVTLCL and RPIBLLPA EXCL0001 files. Example 3-16 shows the content of the 6VMRAC30 file.
Example 3-16 File list of the 2C2 disk
6VMRAC30 FILELIST A0 V 169 Trunc=169 Size=2 Line=1 Col=1 Alt=0 Cmd Filename Filetype Fm Format Lrecl Records Blocks Date
6VMRAC30 VVTLCL E1 V 32 1 1 6/14/16 RPIBLLPA EXCL0001 E1 F 80 749 15 6/14/16
6VMRAC30 VVTLCL E1 V 80 Trunc=80 Size=1 ====> 0 * * * Top of File * * * 1 :PART.RPIBLLPA EXC :MOD.LCL0001 2 * * * End of File * * *
Chapter 3. IBM Resource Access Control Facility Security Server for IBM z/VM 53
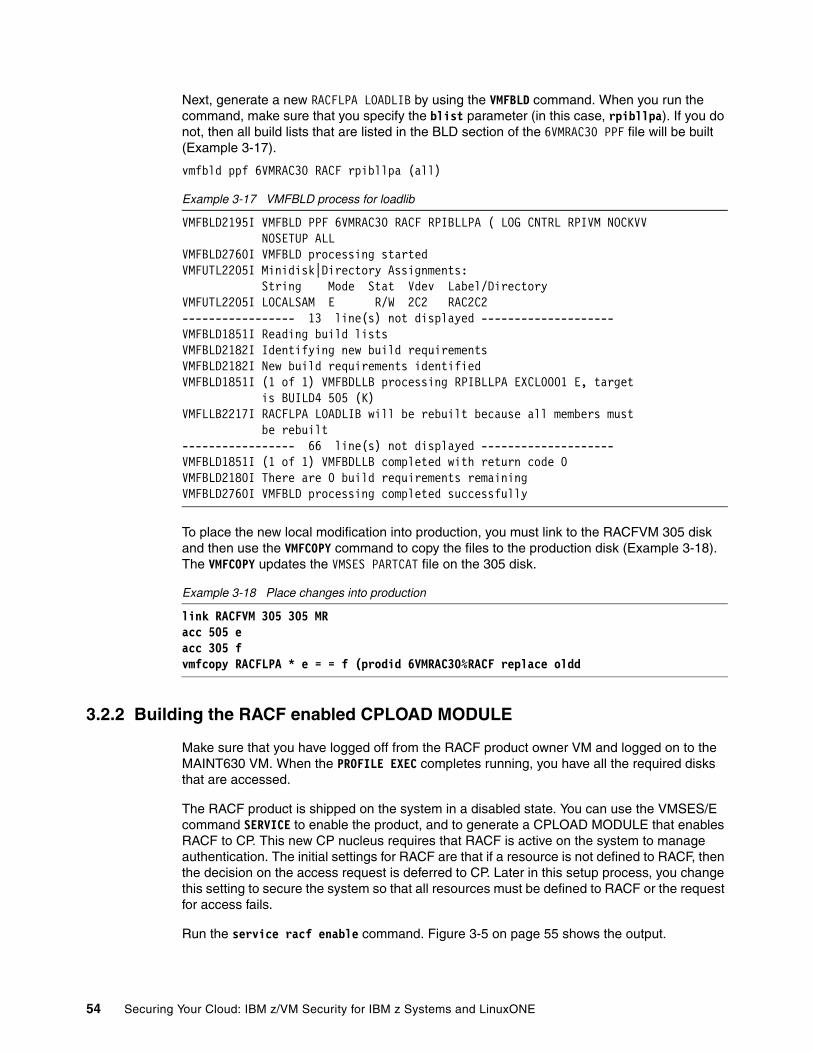
Next, generate a new RACFLPA LOADLIB by using the VMFBLD command. When you run the command, make sure that you specify the blist parameter (in this case, rpibllpa). If you do not, then all build lists that are listed in the BLD section of the 6VMRAC30 PPF file will be built (Example 3-17).
vmfbld ppf 6VMRAC30 RACF rpibllpa (all)
Example 3-17 VMFBLD process for loadlib
VMFBLD2195I VMFBLD PPF 6VMRAC30 RACF RPIBLLPA ( LOG CNTRL RPIVM NOCKVV NOSETUP ALL VMFBLD2760I VMFBLD processing started VMFUTL2205I Minidisk|Directory Assignments: String Mode Stat Vdev Label/Directory VMFUTL2205I LOCALSAM E R/W 2C2 RAC2C2 ----------------- 13 line(s) not displayed -------------------- VMFBLD1851I Reading build lists VMFBLD2182I Identifying new build requirements VMFBLD2182I New build requirements identified VMFBLD1851I (1 of 1) VMFBDLLB processing RPIBLLPA EXCL0001 E, target is BUILD4 505 (K) VMFLLB2217I RACFLPA LOADLIB will be rebuilt because all members must be rebuilt ----------------- 66 line(s) not displayed -------------------- VMFBLD1851I (1 of 1) VMFBDLLB completed with return code 0 VMFBLD2180I There are 0 build requirements remaining VMFBLD2760I VMFBLD processing completed successfully
To place the new local modification into production, you must link to the RACFVM 305 disk and then use the VMFCOPY command to copy the files to the production disk (Example 3-18). The VMFCOPY updates the VMSES PARTCAT file on the 305 disk.
Example 3-18 Place changes into production
link RACFVM 305 305 MRacc 505 eacc 305 fvmfcopy RACFLPA * e = = f (prodid 6VMRAC30%RACF replace oldd
3.2.2 Building the RACF enabled CPLOAD MODULE
Make sure that you have logged off from the RACF product owner VM and logged on to the MAINT630 VM. When the PROFILE EXEC completes running, you have all the required disks that are accessed.
The RACF product is shipped on the system in a disabled state. You can use the VMSES/E command SERVICE to enable the product, and to generate a CPLOAD MODULE that enables RACF to CP. This new CP nucleus requires that RACF is active on the system to manage authentication. The initial settings for RACF are that if a resource is not defined to RACF, then the decision on the access request is deferred to CP. Later in this setup process, you change this setting to secure the system so that all resources must be defined to RACF or the request for access fails.
Run the service racf enable command. Figure 3-5 on page 55 shows the output.
54 Securing Your Cloud: IBM z/VM Security for IBM z Systems and LinuxONE
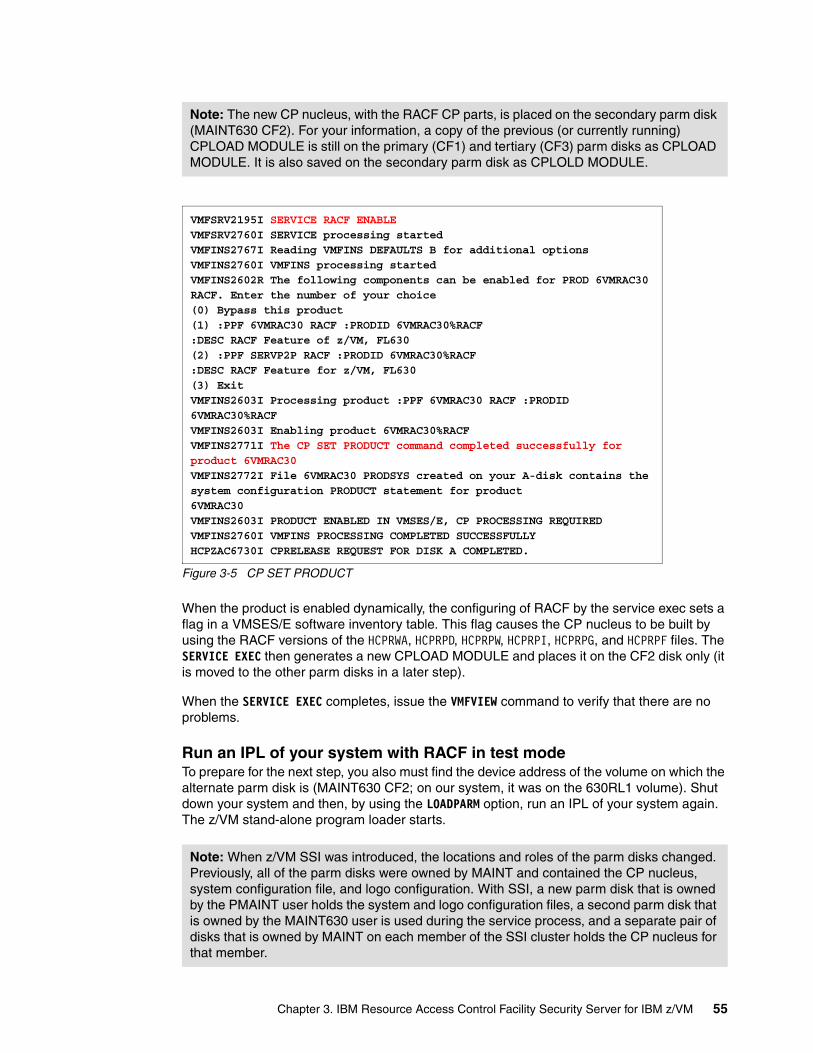
Figure 3-5 CP SET PRODUCT
When the product is enabled dynamically, the configuring of RACF by the service exec sets a flag in a VMSES/E software inventory table. This flag causes the CP nucleus to be built by using the RACF versions of the HCPRWA, HCPRPD, HCPRPW, HCPRPI, HCPRPG, and HCPRPF files. The SERVICE EXEC then generates a new CPLOAD MODULE and places it on the CF2 disk only (it is moved to the other parm disks in a later step).
When the SERVICE EXEC completes, issue the VMFVIEW command to verify that there are no problems.
Run an IPL of your system with RACF in test modeTo prepare for the next step, you also must find the device address of the volume on which the alternate parm disk is (MAINT630 CF2; on our system, it was on the 630RL1 volume). Shut down your system and then, by using the LOADPARM option, run an IPL of your system again. The z/VM stand-alone program loader starts.
Note: The new CP nucleus, with the RACF CP parts, is placed on the secondary parm disk (MAINT630 CF2). For your information, a copy of the previous (or currently running) CPLOAD MODULE is still on the primary (CF1) and tertiary (CF3) parm disks as CPLOAD MODULE. It is also saved on the secondary parm disk as CPLOLD MODULE.
Note: When z/VM SSI was introduced, the locations and roles of the parm disks changed. Previously, all of the parm disks were owned by MAINT and contained the CP nucleus, system configuration file, and logo configuration. With SSI, a new parm disk that is owned by the PMAINT user holds the system and logo configuration files, a second parm disk that is owned by the MAINT630 user is used during the service process, and a separate pair of disks that is owned by MAINT on each member of the SSI cluster holds the CP nucleus for that member.
VMFSRV2195I SERVICE RACF ENABLEVMFSRV2760I SERVICE processing startedVMFINS2767I Reading VMFINS DEFAULTS B for additional optionsVMFINS2760I VMFINS processing startedVMFINS2602R The following components can be enabled for PROD 6VMRAC30RACF. Enter the number of your choice(0) Bypass this product(1) :PPF 6VMRAC30 RACF :PRODID 6VMRAC30%RACF:DESC RACF Feature of z/VM, FL630(2) :PPF SERVP2P RACF :PRODID 6VMRAC30%RACF:DESC RACF Feature for z/VM, FL630(3) ExitVMFINS2603I Processing product :PPF 6VMRAC30 RACF :PRODID6VMRAC30%RACFVMFINS2603I Enabling product 6VMRAC30%RACFVMFINS2771I The CP SET PRODUCT command completed successfully forproduct 6VMRAC30VMFINS2772I File 6VMRAC30 PRODSYS created on your A-disk contains thesystem configuration PRODUCT statement for product6VMRAC30VMFINS2603I PRODUCT ENABLED IN VMSES/E, CP PROCESSING REQUIREDVMFINS2760I VMFINS PROCESSING COMPLETED SUCCESSFULLYHCPZAC6730I CPRELEASE REQUEST FOR DISK A COMPLETED.
Chapter 3. IBM Resource Access Control Facility Security Server for IBM z/VM 55
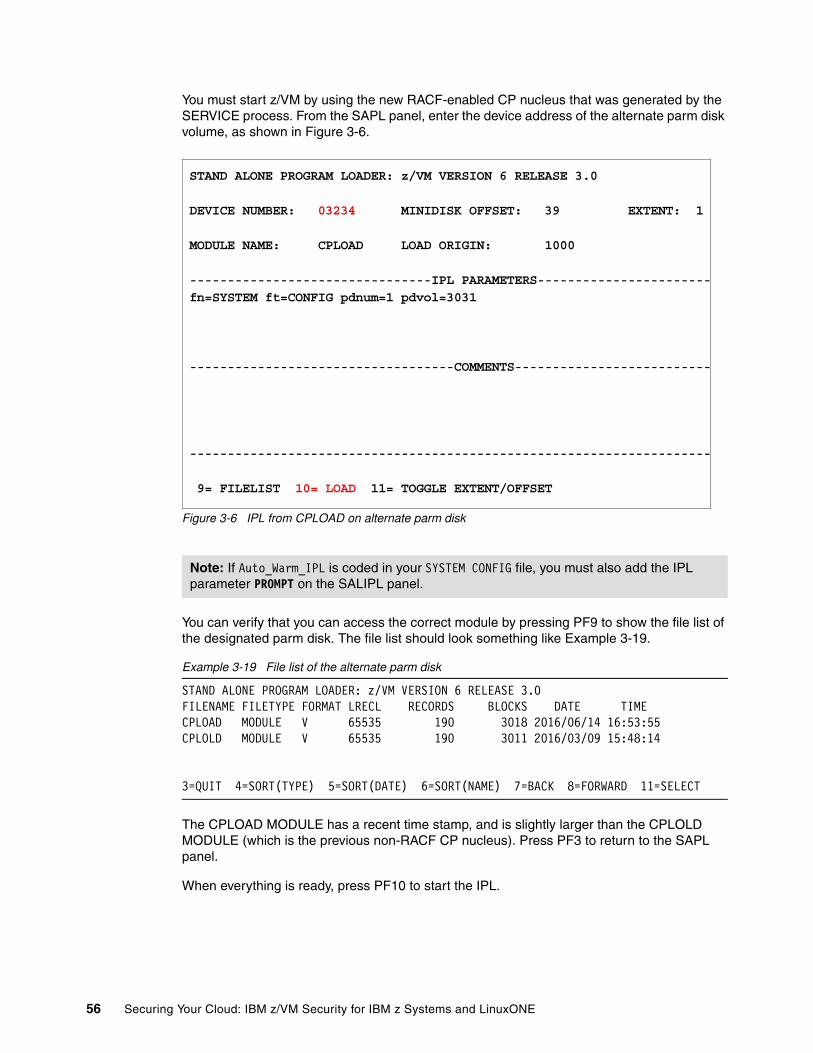
You must start z/VM by using the new RACF-enabled CP nucleus that was generated by the SERVICE process. From the SAPL panel, enter the device address of the alternate parm disk volume, as shown in Figure 3-6.
Figure 3-6 IPL from CPLOAD on alternate parm disk
You can verify that you can access the correct module by pressing PF9 to show the file list of the designated parm disk. The file list should look something like Example 3-19.
Example 3-19 File list of the alternate parm disk
STAND ALONE PROGRAM LOADER: z/VM VERSION 6 RELEASE 3.0 FILENAME FILETYPE FORMAT LRECL RECORDS BLOCKS DATE TIME CPLOAD MODULE V 65535 190 3018 2016/06/14 16:53:55 CPLOLD MODULE V 65535 190 3011 2016/03/09 15:48:14
3=QUIT 4=SORT(TYPE) 5=SORT(DATE) 6=SORT(NAME) 7=BACK 8=FORWARD 11=SELECT
The CPLOAD MODULE has a recent time stamp, and is slightly larger than the CPLOLD MODULE (which is the previous non-RACF CP nucleus). Press PF3 to return to the SAPL panel.
When everything is ready, press PF10 to start the IPL.
Note: If Auto_Warm_IPL is coded in your SYSTEM CONFIG file, you must also add the IPL parameter PROMPT on the SALIPL panel.
STAND ALONE PROGRAM LOADER: z/VM VERSION 6 RELEASE 3.0 DEVICE NUMBER: 03234 MINIDISK OFFSET: 39 EXTENT: 1 MODULE NAME: CPLOAD LOAD ORIGIN: 1000 --------------------------------IPL PARAMETERS-----------------------fn=SYSTEM ft=CONFIG pdnum=1 pdvol=3031
-----------------------------------COMMENTS-------------------------- --------------------------------------------------------------------- 9= FILELIST 10= LOAD 11= TOGGLE EXTENT/OFFSET
56 Securing Your Cloud: IBM z/VM Security for IBM z Systems and LinuxONE
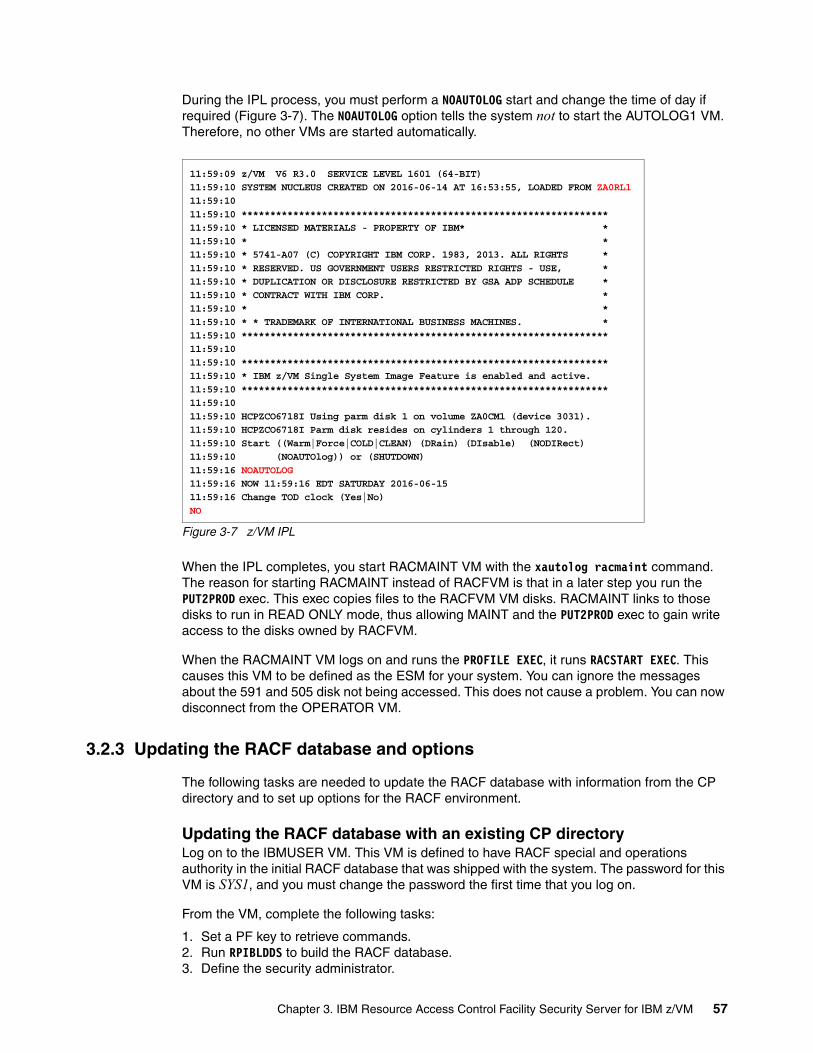
During the IPL process, you must perform a NOAUTOLOG start and change the time of day if required (Figure 3-7). The NOAUTOLOG option tells the system not to start the AUTOLOG1 VM. Therefore, no other VMs are started automatically.
Figure 3-7 z/VM IPL
When the IPL completes, you start RACMAINT VM with the xautolog racmaint command. The reason for starting RACMAINT instead of RACFVM is that in a later step you run the PUT2PROD exec. This exec copies files to the RACFVM VM disks. RACMAINT links to those disks to run in READ ONLY mode, thus allowing MAINT and the PUT2PROD exec to gain write access to the disks owned by RACFVM.
When the RACMAINT VM logs on and runs the PROFILE EXEC, it runs RACSTART EXEC. This causes this VM to be defined as the ESM for your system. You can ignore the messages about the 591 and 505 disk not being accessed. This does not cause a problem. You can now disconnect from the OPERATOR VM.
3.2.3 Updating the RACF database and options
The following tasks are needed to update the RACF database with information from the CP directory and to set up options for the RACF environment.
Updating the RACF database with an existing CP directory Log on to the IBMUSER VM. This VM is defined to have RACF special and operations authority in the initial RACF database that was shipped with the system. The password for this VM is SYS1, and you must change the password the first time that you log on.
From the VM, complete the following tasks:
1. Set a PF key to retrieve commands.2. Run RPIBLDDS to build the RACF database.3. Define the security administrator.
11:59:09 z/VM V6 R3.0 SERVICE LEVEL 1601 (64-BIT) 11:59:10 SYSTEM NUCLEUS CREATED ON 2016-06-14 AT 16:53:55, LOADED FROM ZA0RL1 11:59:10
11:59:10 **************************************************************** 11:59:10 * LICENSED MATERIALS - PROPERTY OF IBM* * 11:59:10 * * 11:59:10 * 5741-A07 (C) COPYRIGHT IBM CORP. 1983, 2013. ALL RIGHTS *
11:59:10 * RESERVED. US GOVERNMENT USERS RESTRICTED RIGHTS - USE, * 11:59:10 * DUPLICATION OR DISCLOSURE RESTRICTED BY GSA ADP SCHEDULE * 11:59:10 * CONTRACT WITH IBM CORP. * 11:59:10 * * 11:59:10 * * TRADEMARK OF INTERNATIONAL BUSINESS MACHINES. * 11:59:10 **************************************************************** 11:59:10
11:59:10 ****************************************************************11:59:10 * IBM z/VM Single System Image Feature is enabled and active. 11:59:10 **************************************************************** 11:59:10
11:59:10 HCPZCO6718I Using parm disk 1 on volume ZA0CM1 (device 3031). 11:59:10 HCPZCO6718I Parm disk resides on cylinders 1 through 120. 11:59:10 Start ((Warm|Force|COLD|CLEAN) (DRain) (DIsable) (NODIRect) 11:59:10 (NOAUTOlog)) or (SHUTDOWN) 11:59:16 NOAUTOLOG 11:59:16 NOW 11:59:16 EDT SATURDAY 2016-06-15 11:59:16 Change TOD clock (Yes|No)
NO
Chapter 3. IBM Resource Access Control Facility Security Server for IBM z/VM 57
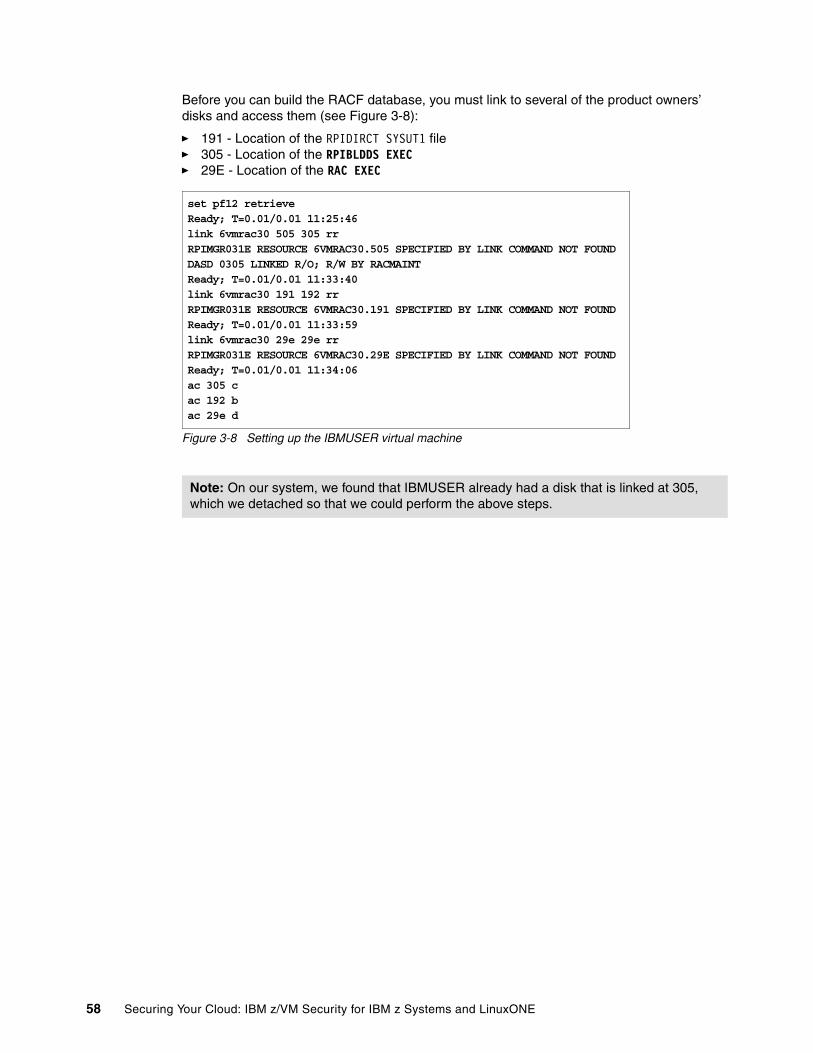
Before you can build the RACF database, you must link to several of the product owners’ disks and access them (see Figure 3-8):
� 191 - Location of the RPIDIRCT SYSUT1 file� 305 - Location of the RPIBLDDS EXEC� 29E - Location of the RAC EXEC
Figure 3-8 Setting up the IBMUSER virtual machine
Note: On our system, we found that IBMUSER already had a disk that is linked at 305, which we detached so that we could perform the above steps.
set pf12 retrieve Ready; T=0.01/0.01 11:25:46 link 6vmrac30 505 305 rr RPIMGR031E RESOURCE 6VMRAC30.505 SPECIFIED BY LINK COMMAND NOT FOUND DASD 0305 LINKED R/O; R/W BY RACMAINT Ready; T=0.01/0.01 11:33:40 link 6vmrac30 191 192 rr RPIMGR031E RESOURCE 6VMRAC30.191 SPECIFIED BY LINK COMMAND NOT FOUND Ready; T=0.01/0.01 11:33:59 link 6vmrac30 29e 29e rr RPIMGR031E RESOURCE 6VMRAC30.29E SPECIFIED BY LINK COMMAND NOT FOUND Ready; T=0.01/0.01 11:34:06 ac 305 c ac 192 b ac 29e d
58 Securing Your Cloud: IBM z/VM Security for IBM z Systems and LinuxONE
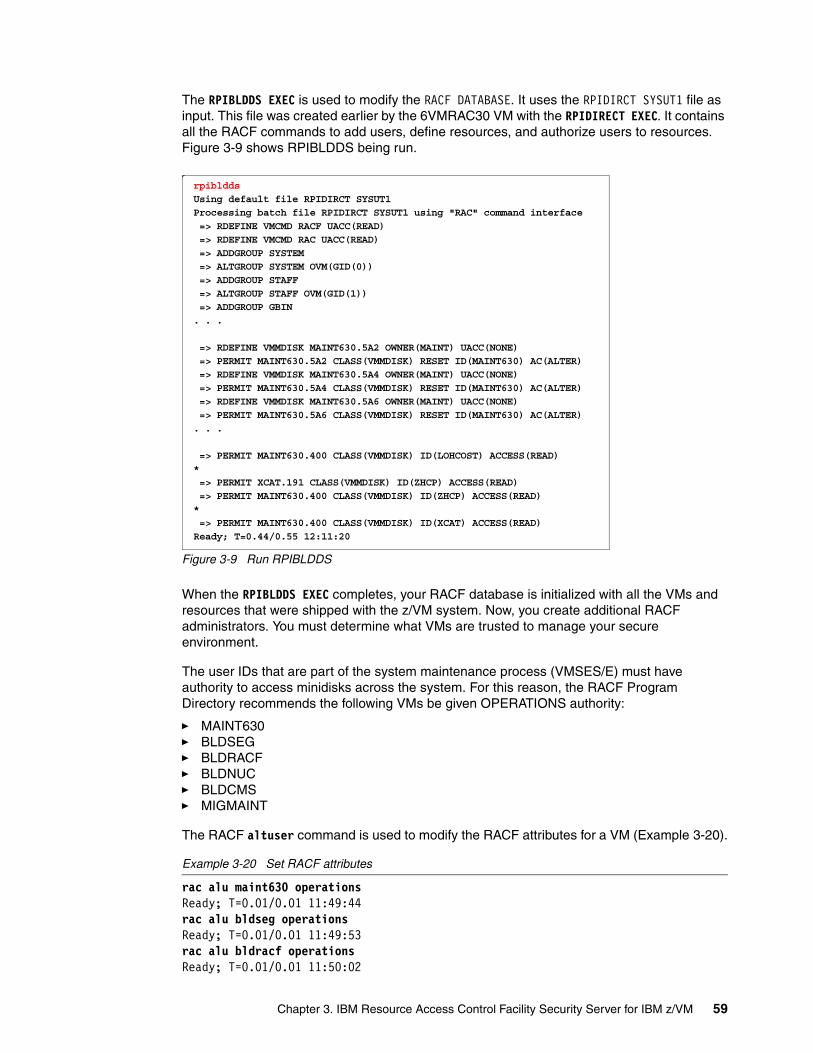
The RPIBLDDS EXEC is used to modify the RACF DATABASE. It uses the RPIDIRCT SYSUT1 file as input. This file was created earlier by the 6VMRAC30 VM with the RPIDIRECT EXEC. It contains all the RACF commands to add users, define resources, and authorize users to resources. Figure 3-9 shows RPIBLDDS being run.
Figure 3-9 Run RPIBLDDS
When the RPIBLDDS EXEC completes, your RACF database is initialized with all the VMs and resources that were shipped with the z/VM system. Now, you create additional RACF administrators. You must determine what VMs are trusted to manage your secure environment.
The user IDs that are part of the system maintenance process (VMSES/E) must have authority to access minidisks across the system. For this reason, the RACF Program Directory recommends the following VMs be given OPERATIONS authority:
� MAINT630� BLDSEG� BLDRACF� BLDNUC� BLDCMS� MIGMAINT
The RACF altuser command is used to modify the RACF attributes for a VM (Example 3-20).
Example 3-20 Set RACF attributes
rac alu maint630 operations Ready; T=0.01/0.01 11:49:44 rac alu bldseg operations Ready; T=0.01/0.01 11:49:53 rac alu bldracf operations Ready; T=0.01/0.01 11:50:02
rpibldds Using default file RPIDIRCT SYSUT1 Processing batch file RPIDIRCT SYSUT1 using "RAC" command interface => RDEFINE VMCMD RACF UACC(READ) => RDEFINE VMCMD RAC UACC(READ) => ADDGROUP SYSTEM => ALTGROUP SYSTEM OVM(GID(0)) => ADDGROUP STAFF => ALTGROUP STAFF OVM(GID(1)) => ADDGROUP GBIN . . .
=> RDEFINE VMMDISK MAINT630.5A2 OWNER(MAINT) UACC(NONE) => PERMIT MAINT630.5A2 CLASS(VMMDISK) RESET ID(MAINT630) AC(ALTER) => RDEFINE VMMDISK MAINT630.5A4 OWNER(MAINT) UACC(NONE) => PERMIT MAINT630.5A4 CLASS(VMMDISK) RESET ID(MAINT630) AC(ALTER) => RDEFINE VMMDISK MAINT630.5A6 OWNER(MAINT) UACC(NONE) => PERMIT MAINT630.5A6 CLASS(VMMDISK) RESET ID(MAINT630) AC(ALTER) . . .
=> PERMIT MAINT630.400 CLASS(VMMDISK) ID(LOHCOST) ACCESS(READ)* => PERMIT XCAT.191 CLASS(VMMDISK) ID(ZHCP) ACCESS(READ) => PERMIT MAINT630.400 CLASS(VMMDISK) ID(ZHCP) ACCESS(READ) * => PERMIT MAINT630.400 CLASS(VMMDISK) ID(XCAT) ACCESS(READ) Ready; T=0.44/0.55 12:11:20
Chapter 3. IBM Resource Access Control Facility Security Server for IBM z/VM 59
rac alu bldnuc operations Ready; T=0.01/0.01 11:50:04rac alu bldcms operations Ready; T=0.01/0.01 11:50:07rac alu migmaint operations Ready; T=0.01/0.01 11:50:12
OPERATOR and SPECIALIt is sometimes suggested that the OPERATOR ID be given the SPECIAL attribute. It is not a preferred practice because in most installations access to OPERATOR is broad and uncontrolled. Even with the access controls that are described in 2.1.7, “Role-based access controls and CP privilege classes” on page 16, OPERATOR is visible to users without security management responsibility.
One case that is cited as a reason for giving this access is when an operator inadvertently enters the incorrect time when z/VM is IPLed, resulting in all IDs on the system becoming revoked. This could be mitigated through the use of the Auto_Warm_IPL feature statement in SYSTEM CONFIG, combined with effective management of the Hardware Management Console (HMC) / SE time-of-day clock to provide accurate time to the LPAR ToD clocks. Alternatively, z/VM supports the Server Time Protocol (STP) hardware feature, which can provide an integrated solution for time-of-day management across all systems running on the z Systems server.
Unloading IBMUSERAfter the new RACF administrators are defined, log off from IBMUSER. Log on to MAINT, assuming that you gave MAINT RACF authority, and complete the installation of the product.
Because IBMUSER is a well-known user, it might be a target for unauthorized accesses to your system. To prevent further use of the IBMUSER VM, revoke this VM and remove the operations and special attributes (Example 3-21). Do not delete this VM from your system because IBMUSER ran the exec to generate the RACF database and it is now listed as the owner of all the other VMs on the system.
Example 3-21 RACF alter user for IBMUSER
link 6vmrac30 29e 29e rr RPIMGR031E RESOURCE 6VMRAC30.29E SPECIFIED BY LINK COMMAND NOT FOUND Ready; T=0.01/0.01 12:00:18 access 29e l DMSACP723I L (29E) R/O Ready; T=0.01/0.01 12:00:23 rac alu ibmuser revoke Ready; T=0.01/0.01 12:04:01
Note: A highly experienced RACF administrator with extensive knowledge of VMSES/E might be able to set up RACF profiles and permissions that allow access to the required resources without the OPERATIONS attribute. Because the maintenance of z/VM and its features is of critical importance to the system operation, this is not an area to be taken lightly. For the majority of installations, the recommended approach of using OPERATIONS is the preferred method.
Note: As a preferred practice, before granting the OPERATOR user the SPECIAL attribute, consider all possible alternatives. Giving OPERATOR the system-SPECIAL attribute can greatly impact the overall security and integrity of your z/VM system.
60 Securing Your Cloud: IBM z/VM Security for IBM z Systems and LinuxONE

rac alu ibmuser nospecial Ready; T=0.01/0.01 12:04:08 rac alu ibmuser nooperation Ready; T=0.01/0.01 12:04:14
Setting RACF optionsNow, you should also define which resources should be managed by RACF. The following list is a good starting point:
RAC SETROPTS CLASSACT(VMMDISK)RAC SETROPTS CLASSACT(VMRDR)RAC SETROPTS CLASSACT(VMLAN)
Other options can be VMBATCH and VMSEGMT. Also, if your CP directory had LOGONBY statements, RPIDIRCT created profiles in the SURROGAT class to provide the same function. You must activate the SURROGAT class for your LOGONBY function to work as it did before.
It also is a good task to make the corresponding updates to the VMXEVENT to tailor this entry to your installation. This avoids RACF calls for resources that are not RACF protected and avoids wasting CPU cycles and causing RACF contention. If you are using DirMaint for example, use VMXEVENT to exempt the DirMaint service machines from access checking. Because of the number of users in this example, we create a script to issue the required commands, as recommended in Directory Maintenance Facility Tailoring and Administration Guide, SC24-6190. The script is shown at Example 3-22.
Example 3-22 VMXEVENT EXEC
/* REXX */ Parse Upper Arg ID . If ID = '' Then Do Say "Please enter an ID!" Exit 1 End Say "ID" ID "will have a VMXEVENT profile created and populated," Say "Enter 'y' to continue:" Parse Upper Pull Reply If Left(Reply,1)="Y" Then Do Address CMS
"RAC RDEFINE VMXEVENT USERSEL." || ID "RAC RALTER VMXEVENT USERSEL." || ID || " ADDMEM(LINK/NOCTL)" "RAC RALTER VMXEVENT USERSEL." || ID || " ADDMEM(STORE.C/NOCTL)" "RAC RALTER VMXEVENT USERSEL." || ID || " ADDMEM(TAG/NOCTL)" "RAC RALTER VMXEVENT USERSEL." || ID || " ADDMEM(TRANSFER.D/NOCTL)""RAC RALTER VMXEVENT USERSEL." || ID || " ADDMEM(TRANSFER.G/NOCTL)""RAC RALTER VMXEVENT USERSEL." || ID || " ADDMEM(TRSOURCE/NOCTL)" "RAC RALTER VMXEVENT USERSEL." || ID || " ADDMEM(DIAG0D4/NOCTL)" "RAC RALTER VMXEVENT USERSEL." || ID || " ADDMEM(DIAG0E4/NOCTL)" "RAC RALTER VMXEVENT USERSEL." || ID || " ADDMEM(RSTDSEG/NOCTL)" "RAC RALTER VMXEVENT USERSEL." || ID || " ADDMEM(MDISK/NOCTL)" "RAC RALTER VMXEVENT USERSEL." || ID || " ADDMEM(APPCPWVL/NOCTL)"
Say "Complete." End
Chapter 3. IBM Resource Access Control Facility Security Server for IBM z/VM 61

We ran VMXEVENT EXEC once for each DirMaint user to be exempted. After the profiles are created for all users, you can activate the VMXEVENT class by using RAC SETROPTS CLASSACT(VMXEVENT). We also issued RAC SETEVENT REFRESH USERSEL.xxxxxxxx commands for the logged-on DirMaint service machines (replacing xxxxxxxx for each DirMaint service machine in turn) for the VMXEVENT definition to take place immediately.
Using group permissions rather than exemptionDepending on your security policy, it might not be appropriate to exempt the DirMaint users from checking. Similar to RPIDIRCT, a sufficiently experienced RACF administrator can define resource profiles with the correct access lists to avoid having to use exemption. This task is even easier through the use of group-based permissions. For example, a group called $DIRMSRV can be granted appropriate permissions over all the DirMaint server resources, and the DirMaint server user IDs are connected to that group.
This is a task requiring experience in RACF and DirMaint administration, and must not be taken lightly. Follow the installation instructions for DirMaint and use the documented method to exempt the DirMaint users from checking.
3.2.4 Placing RACF into production
Run PUT2PROD EXEC from the MAINT630 VM.
When PUT2PROD has completed, you should run vmfview put2prod to verify that everything was successful.
Note: The RAC SETEVENT REFRESH command must be executed on the z/VM system where the user is logged on to take effect. If the user is not logged on, or is logged on to a different member of the SSI cluster, an error message is received:
RPISET133E SETEVENT FAILED. USER IS NOT CURRENTLY LOGGED ON.
To do the refresh, log on to each system in your cluster and issue the refresh for the users who are logged on to that system. Alternatively, restart the affected servers (which can be done remotely from a central system by running the AT command).
Important: This step must be repeated for each member of an SSI cluster.
Note: Make sure that you run the PUT2PROD EXEC without any parameters because the $SERVICE PROD file on the MAINT630 191 disk already lists the components that must be put into production:
SERVICE $PRODS A1 V 80 Trunc=80 0 * * * Top of File * * * 1 SERVP2P RACF 2 SERVP2P CP 3 * * * End of File * * *
62 Securing Your Cloud: IBM z/VM Security for IBM z Systems and LinuxONE
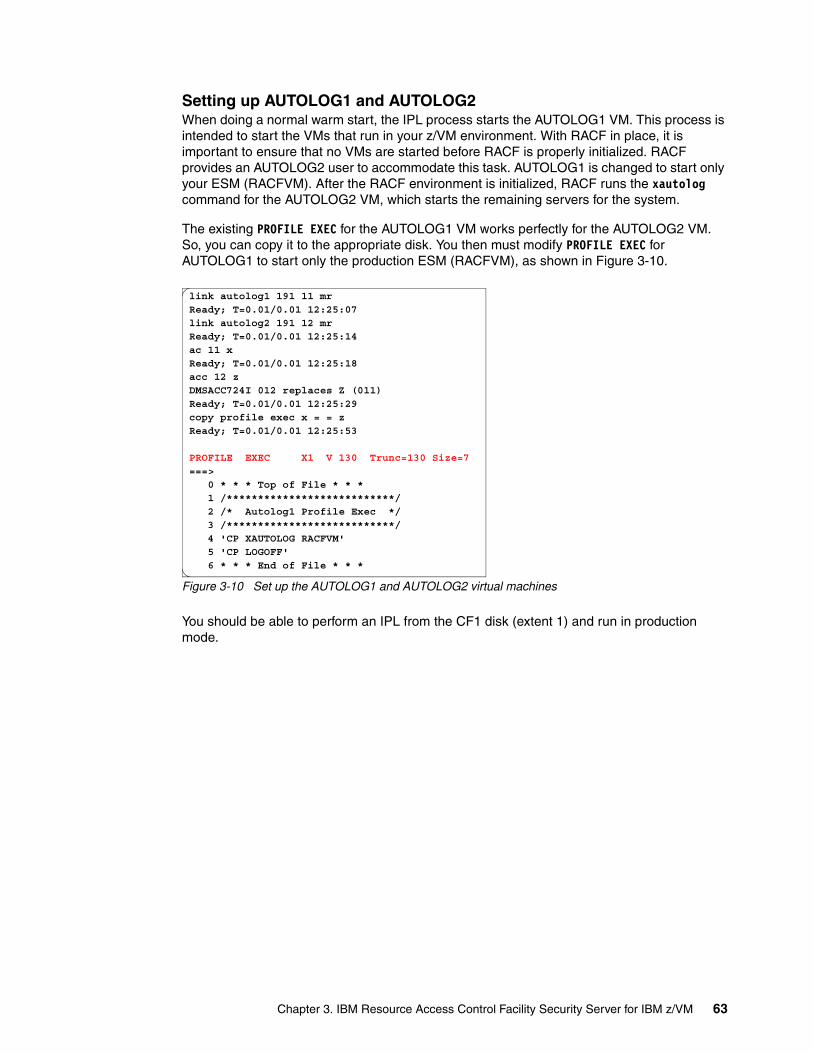
Setting up AUTOLOG1 and AUTOLOG2When doing a normal warm start, the IPL process starts the AUTOLOG1 VM. This process is intended to start the VMs that run in your z/VM environment. With RACF in place, it is important to ensure that no VMs are started before RACF is properly initialized. RACF provides an AUTOLOG2 user to accommodate this task. AUTOLOG1 is changed to start only your ESM (RACFVM). After the RACF environment is initialized, RACF runs the xautolog command for the AUTOLOG2 VM, which starts the remaining servers for the system.
The existing PROFILE EXEC for the AUTOLOG1 VM works perfectly for the AUTOLOG2 VM. So, you can copy it to the appropriate disk. You then must modify PROFILE EXEC for AUTOLOG1 to start only the production ESM (RACFVM), as shown in Figure 3-10.
Figure 3-10 Set up the AUTOLOG1 and AUTOLOG2 virtual machines
You should be able to perform an IPL from the CF1 disk (extent 1) and run in production mode.
link autolog1 191 11 mr Ready; T=0.01/0.01 12:25:07 link autolog2 191 12 mr Ready; T=0.01/0.01 12:25:14 ac 11 x Ready; T=0.01/0.01 12:25:18 acc 12 z DMSACC724I 012 replaces Z (011) Ready; T=0.01/0.01 12:25:29 copy profile exec x = = z Ready; T=0.01/0.01 12:25:53
PROFILE EXEC X1 V 130 Trunc=130 Size=7===> 0 * * * Top of File * * * 1 /***************************/ 2 /* Autolog1 Profile Exec */ 3 /***************************/ 4 'CP XAUTOLOG RACFVM' 5 'CP LOGOFF' 6 * * * End of File * * *
Chapter 3. IBM Resource Access Control Facility Security Server for IBM z/VM 63
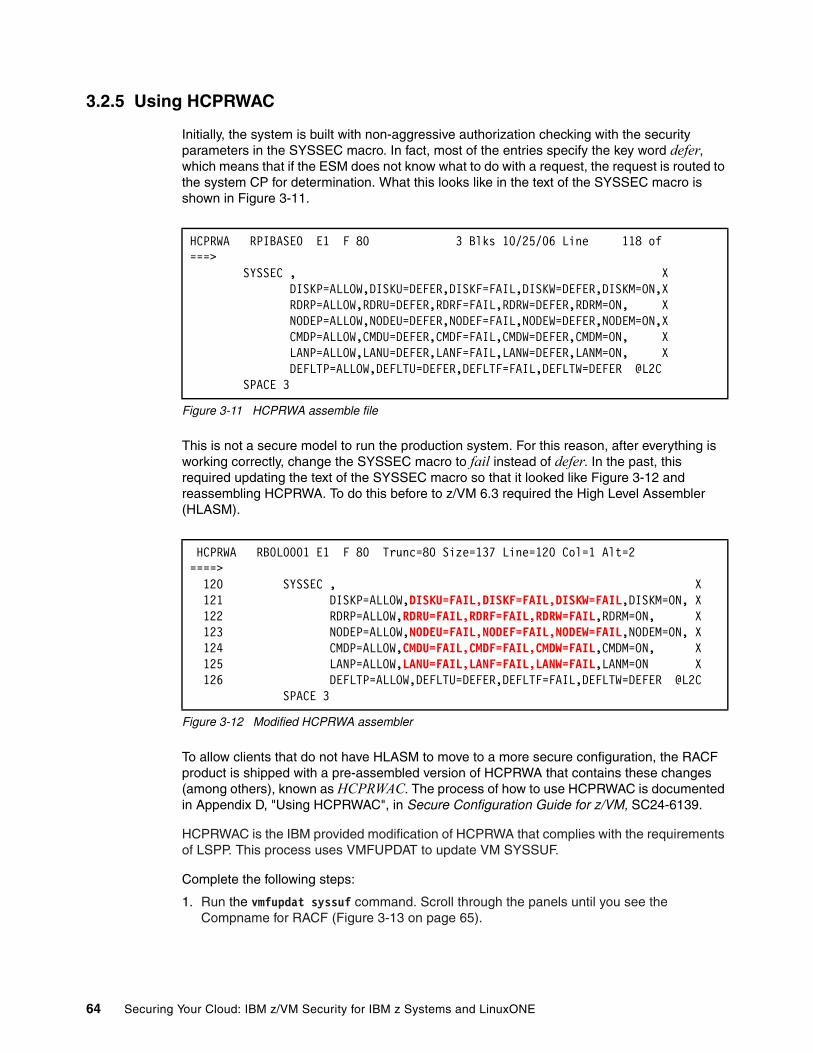
3.2.5 Using HCPRWAC
Initially, the system is built with non-aggressive authorization checking with the security parameters in the SYSSEC macro. In fact, most of the entries specify the key word defer, which means that if the ESM does not know what to do with a request, the request is routed to the system CP for determination. What this looks like in the text of the SYSSEC macro is shown in Figure 3-11.
Figure 3-11 HCPRWA assemble file
This is not a secure model to run the production system. For this reason, after everything is working correctly, change the SYSSEC macro to fail instead of defer. In the past, this required updating the text of the SYSSEC macro so that it looked like Figure 3-12 and reassembling HCPRWA. To do this before to z/VM 6.3 required the High Level Assembler (HLASM).
Figure 3-12 Modified HCPRWA assembler
To allow clients that do not have HLASM to move to a more secure configuration, the RACF product is shipped with a pre-assembled version of HCPRWA that contains these changes (among others), known as HCPRWAC. The process of how to use HCPRWAC is documented in Appendix D, "Using HCPRWAC", in Secure Configuration Guide for z/VM, SC24-6139.
HCPRWAC is the IBM provided modification of HCPRWA that complies with the requirements of LSPP. This process uses VMFUPDAT to update VM SYSSUF.
Complete the following steps:
1. Run the vmfupdat syssuf command. Scroll through the panels until you see the Compname for RACF (Figure 3-13 on page 65).
HCPRWA RPIBASE0 E1 F 80 3 Blks 10/25/06 Line 118 of ===> SYSSEC , X DISKP=ALLOW,DISKU=DEFER,DISKF=FAIL,DISKW=DEFER,DISKM=ON,X RDRP=ALLOW,RDRU=DEFER,RDRF=FAIL,RDRW=DEFER,RDRM=ON, X NODEP=ALLOW,NODEU=DEFER,NODEF=FAIL,NODEW=DEFER,NODEM=ON,X CMDP=ALLOW,CMDU=DEFER,CMDF=FAIL,CMDW=DEFER,CMDM=ON, X LANP=ALLOW,LANU=DEFER,LANF=FAIL,LANW=DEFER,LANM=ON, X DEFLTP=ALLOW,DEFLTU=DEFER,DEFLTF=FAIL,DEFLTW=DEFER @L2C SPACE 3
HCPRWA RB0L0001 E1 F 80 Trunc=80 Size=137 Line=120 Col=1 Alt=2 ====> 120 SYSSEC , X 121 DISKP=ALLOW,DISKU=FAIL,DISKF=FAIL,DISKW=FAIL,DISKM=ON, X 122 RDRP=ALLOW,RDRU=FAIL,RDRF=FAIL,RDRW=FAIL,RDRM=ON, X 123 NODEP=ALLOW,NODEU=FAIL,NODEF=FAIL,NODEW=FAIL,NODEM=ON, X 124 CMDP=ALLOW,CMDU=FAIL,CMDF=FAIL,CMDW=FAIL,CMDM=ON, X 125 LANP=ALLOW,LANU=FAIL,LANF=FAIL,LANW=FAIL,LANM=ON X
126 DEFLTP=ALLOW,DEFLTU=DEFER,DEFLTF=FAIL,DEFLTW=DEFER @L2C SPACE 3
64 Securing Your Cloud: IBM z/VM Security for IBM z Systems and LinuxONE
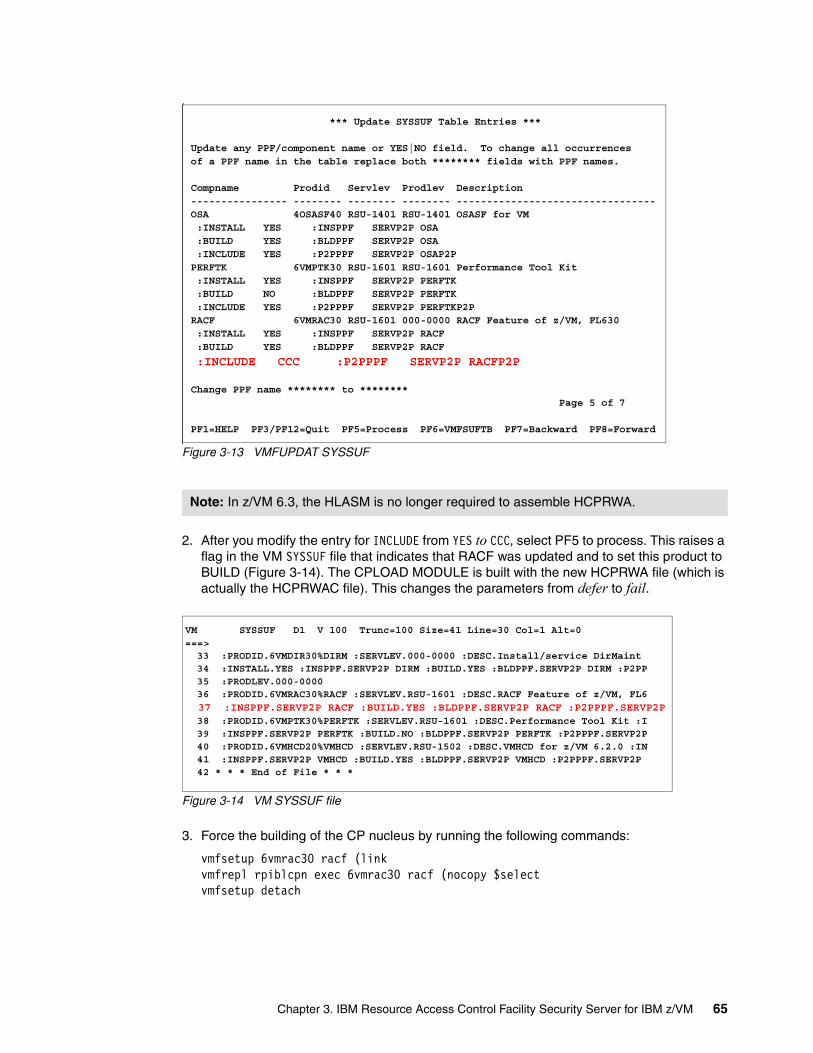
Figure 3-13 VMFUPDAT SYSSUF
2. After you modify the entry for INCLUDE from YES to CCC, select PF5 to process. This raises a flag in the VM SYSSUF file that indicates that RACF was updated and to set this product to BUILD (Figure 3-14). The CPLOAD MODULE is built with the new HCPRWA file (which is actually the HCPRWAC file). This changes the parameters from defer to fail.
Figure 3-14 VM SYSSUF file
3. Force the building of the CP nucleus by running the following commands:
vmfsetup 6vmrac30 racf (linkvmfrepl rpiblcpn exec 6vmrac30 racf (nocopy $selectvmfsetup detach
Note: In z/VM 6.3, the HLASM is no longer required to assemble HCPRWA.
*** Update SYSSUF Table Entries *** Update any PPF/component name or YES|NO field. To change all occurrences of a PPF name in the table replace both ******** fields with PPF names. Compname Prodid Servlev Prodlev Description ---------------- -------- -------- -------- --------------------------------- OSA 4OSASF40 RSU-1401 RSU-1401 OSASF for VM :INSTALL YES :INSPPF SERVP2P OSA :BUILD YES :BLDPPF SERVP2P OSA :INCLUDE YES :P2PPPF SERVP2P OSAP2P PERFTK 6VMPTK30 RSU-1601 RSU-1601 Performance Tool Kit :INSTALL YES :INSPPF SERVP2P PERFTK :BUILD NO :BLDPPF SERVP2P PERFTK :INCLUDE YES :P2PPPF SERVP2P PERFTKP2P RACF 6VMRAC30 RSU-1601 000-0000 RACF Feature of z/VM, FL630 :INSTALL YES :INSPPF SERVP2P RACF :BUILD YES :BLDPPF SERVP2P RACF
:INCLUDE CCC :P2PPPF SERVP2P RACFP2P Change PPF name ******** to ******** Page 5 of 7 PF1=HELP PF3/PF12=Quit PF5=Process PF6=VMFSUFTB PF7=Backward PF8=Forward
VM SYSSUF D1 V 100 Trunc=100 Size=41 Line=30 Col=1 Alt=0 ===> 33 :PRODID.6VMDIR30%DIRM :SERVLEV.000-0000 :DESC.Install/service DirMaint 34 :INSTALL.YES :INSPPF.SERVP2P DIRM :BUILD.YES :BLDPPF.SERVP2P DIRM :P2PP 35 :PRODLEV.000-0000 36 :PRODID.6VMRAC30%RACF :SERVLEV.RSU-1601 :DESC.RACF Feature of z/VM, FL6
37 :INSPPF.SERVP2P RACF :BUILD.YES :BLDPPF.SERVP2P RACF :P2PPPF.SERVP2P 38 :PRODID.6VMPTK30%PERFTK :SERVLEV.RSU-1601 :DESC.Performance Tool Kit :I 39 :INSPPF.SERVP2P PERFTK :BUILD.NO :BLDPPF.SERVP2P PERFTK :P2PPPF.SERVP2P 40 :PRODID.6VMHCD20%VMHCD :SERVLEV.RSU-1502 :DESC.VMHCD for z/VM 6.2.0 :IN 41 :INSPPF.SERVP2P VMHCD :BUILD.YES :BLDPPF.SERVP2P VMHCD :P2PPPF.SERVP2P 42 * * * End of File * * *
Chapter 3. IBM Resource Access Control Facility Security Server for IBM z/VM 65
The VMFREPL EXEC is used to support the local modification of replacement maintained parts. VMFREPL can be used to accomplish the following tasks:
– Copy the highest level of a part.
– Copy a specified part.
– Update a Version Vector Table.
– Update a Select Data file.
– Display the highest levels of a part.
RPIBLCPN EXEC is used to build the CPLOAD MODULE by using the RACF files and the version vector tables for RACF. The $SELECT operand adds an entry to the 6VMRAC30 $SELECT file (Example 3-23) on the RACFVMs apply disk (2A6), which defines to VMSES/E that there has been local service to the RPIBLCPN EXEC.
Example 3-23 6VMRAC30 $SELECT file
6VMRAC30 $SELECT F1 V 80 Trunc=80 Size=2===> 0 * * * Top of File * * * 1 :APPLYID.07/01/16 09:09:18 2 RPIBLCPN EXC EXC00000 BASE-FILETYPE 3 * * * End of File * * *
4. The SERVICE EXEC is used again, similar to when you enabled the RACF product. This time, use the BUILD operand to create the CPLOAD MODULE by running the following command:
service racf build
The new CP nucleus, with the RACF CP parts, is placed on the secondary parm disk (default disk address of CF2). For your information, a copy of the previous (or currently running) CPLOAD MODULE is still on the primary (CF1) and tertiary (CF3) parm disks as CPLOAD MODULE. It is also saved on the secondary parm disk as CPLOLD.
5. Shut down the currently running system.
6. Perform an IPL from the MAINT630 CF2 parm disk.
7. Start the system with the NOAUTOLOG parameter.
8. Run XAUTOLOG RACMAINT.
9. Run the PUT2PROD EXEC from the MAINT VM.
This completes the installation and configuration of the RACF product for z/VM 6.3.0.
66 Securing Your Cloud: IBM z/VM Security for IBM z Systems and LinuxONE
3.3 RACF management processes
This section describes how to make DirMaint and RACF work together and shows some basic setup in RACF to protect commonly used resources.
3.3.1 DirMaint changes to work with RACF
The DirMaint-RACF connector provides DirMaint exits that allow the DIRMAINT VM to run the appropriate RACF commands to perform the following tasks:
� Add a user.� Define MDISK.� Define VMRDR.� Define VMPOSIX.� Define SURROGAT.� Define VMBATCH.
The code to use this process is shipped with the base system as part of DirMaint. To implement this process, you update your DirMaint configuration (CONFIGxx DATADVH) with the statements that are defined in the CONFIGRC SAMPDVH file (Figure 3-15 on page 68). There is not a copy of the CONFIGRC SAMPDVH file on the DIRMAINT minidisks. It is on the 2C2 disk that is owned by the 6VMDIR30 VM. In this example, we run VMLINK to access this disk, and then copy the CONFIGRC SAMPDVH file to our A disk.
Note: The DirMaint-RACF connector is one of the reasons that you should use DirMaint with your RACF environment. Although it is fairly easy to write your own execs to provide a similar function, the connector is a maintained component of DirMaint.
Note: Here is the exact VMLINK command:
VMLINK 6VMDIR30 2C2 (FILEL CONFIGRC *
This command made it easy to then run COPYFile to copy the file and give it the name CONFIGRC DATADVH A.
Chapter 3. IBM Resource Access Control Facility Security Server for IBM z/VM 67
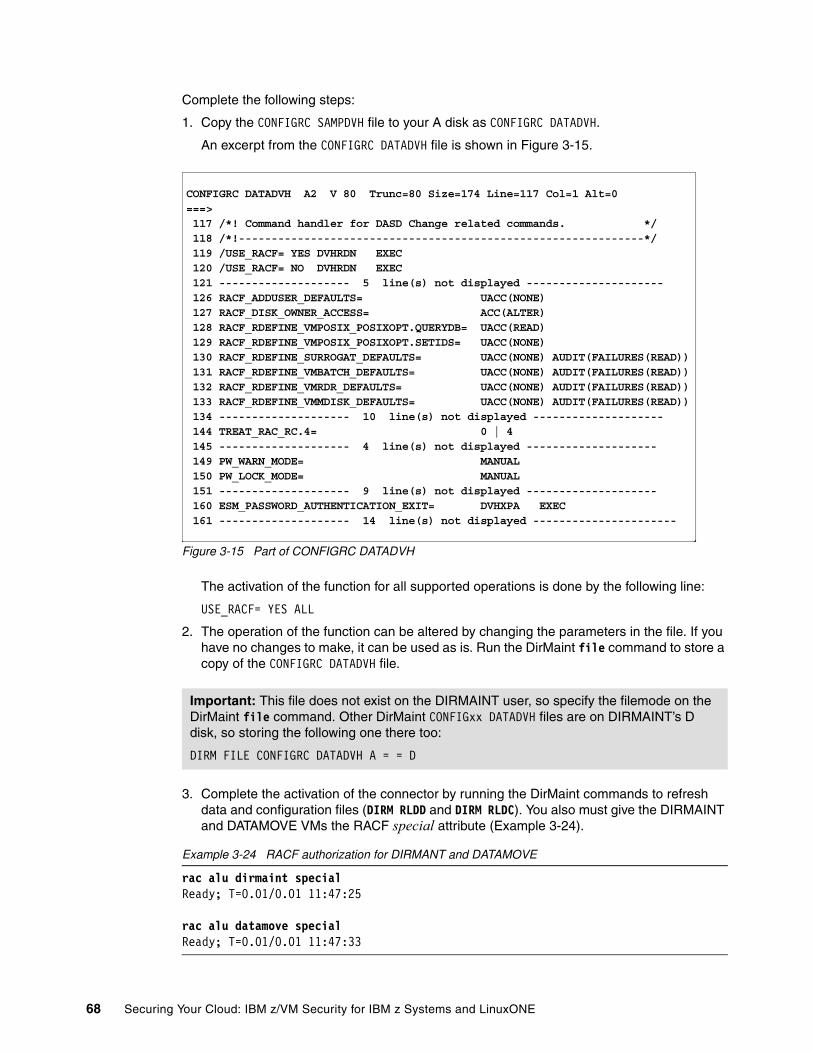
Complete the following steps:
1. Copy the CONFIGRC SAMPDVH file to your A disk as CONFIGRC DATADVH.
An excerpt from the CONFIGRC DATADVH file is shown in Figure 3-15.
Figure 3-15 Part of CONFIGRC DATADVH
The activation of the function for all supported operations is done by the following line:
USE_RACF= YES ALL
2. The operation of the function can be altered by changing the parameters in the file. If you have no changes to make, it can be used as is. Run the DirMaint file command to store a copy of the CONFIGRC DATADVH file.
3. Complete the activation of the connector by running the DirMaint commands to refresh data and configuration files (DIRM RLDD and DIRM RLDC). You also must give the DIRMAINT and DATAMOVE VMs the RACF special attribute (Example 3-24).
Example 3-24 RACF authorization for DIRMANT and DATAMOVE
rac alu dirmaint special Ready; T=0.01/0.01 11:47:25
rac alu datamove special Ready; T=0.01/0.01 11:47:33
Important: This file does not exist on the DIRMAINT user, so specify the filemode on the DirMaint file command. Other DirMaint CONFIGxx DATADVH files are on DIRMAINT’s D disk, so storing the following one there too:
DIRM FILE CONFIGRC DATADVH A = = D
CONFIGRC DATADVH A2 V 80 Trunc=80 Size=174 Line=117 Col=1 Alt=0 ===> 117 /*! Command handler for DASD Change related commands. */ 118 /*!--------------------------------------------------------------*/ 119 /USE_RACF= YES DVHRDN EXEC 120 /USE_RACF= NO DVHRDN EXEC 121 -------------------- 5 line(s) not displayed --------------------- 126 RACF_ADDUSER_DEFAULTS= UACC(NONE) 127 RACF_DISK_OWNER_ACCESS= ACC(ALTER) 128 RACF_RDEFINE_VMPOSIX_POSIXOPT.QUERYDB= UACC(READ) 129 RACF_RDEFINE_VMPOSIX_POSIXOPT.SETIDS= UACC(NONE) 130 RACF_RDEFINE_SURROGAT_DEFAULTS= UACC(NONE) AUDIT(FAILURES(READ)) 131 RACF_RDEFINE_VMBATCH_DEFAULTS= UACC(NONE) AUDIT(FAILURES(READ)) 132 RACF_RDEFINE_VMRDR_DEFAULTS= UACC(NONE) AUDIT(FAILURES(READ)) 133 RACF_RDEFINE_VMMDISK_DEFAULTS= UACC(NONE) AUDIT(FAILURES(READ)) 134 -------------------- 10 line(s) not displayed -------------------- 144 TREAT_RAC_RC.4= 0 | 4 145 -------------------- 4 line(s) not displayed -------------------- 149 PW_WARN_MODE= MANUAL 150 PW_LOCK_MODE= MANUAL 151 -------------------- 9 line(s) not displayed -------------------- 160 ESM_PASSWORD_AUTHENTICATION_EXIT= DVHXPA EXEC 161 -------------------- 14 line(s) not displayed ----------------------
68 Securing Your Cloud: IBM z/VM Security for IBM z Systems and LinuxONE
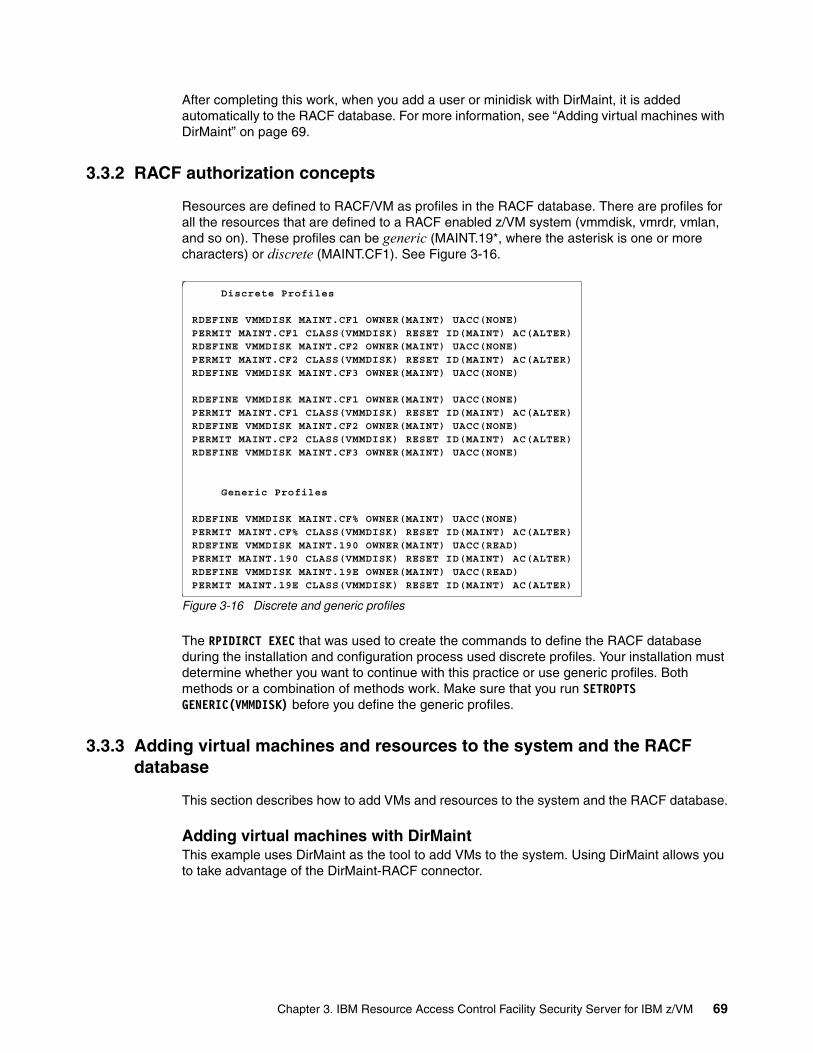
After completing this work, when you add a user or minidisk with DirMaint, it is added automatically to the RACF database. For more information, see “Adding virtual machines with DirMaint” on page 69.
3.3.2 RACF authorization concepts
Resources are defined to RACF/VM as profiles in the RACF database. There are profiles for all the resources that are defined to a RACF enabled z/VM system (vmmdisk, vmrdr, vmlan, and so on). These profiles can be generic (MAINT.19*, where the asterisk is one or more characters) or discrete (MAINT.CF1). See Figure 3-16.
Figure 3-16 Discrete and generic profiles
The RPIDIRCT EXEC that was used to create the commands to define the RACF database during the installation and configuration process used discrete profiles. Your installation must determine whether you want to continue with this practice or use generic profiles. Both methods or a combination of methods work. Make sure that you run SETROPTS GENERIC(VMMDISK) before you define the generic profiles.
3.3.3 Adding virtual machines and resources to the system and the RACF database
This section describes how to add VMs and resources to the system and the RACF database.
Adding virtual machines with DirMaintThis example uses DirMaint as the tool to add VMs to the system. Using DirMaint allows you to take advantage of the DirMaint-RACF connector.
Discrete Profiles
RDEFINE VMMDISK MAINT.CF1 OWNER(MAINT) UACC(NONE) PERMIT MAINT.CF1 CLASS(VMMDISK) RESET ID(MAINT) AC(ALTER) RDEFINE VMMDISK MAINT.CF2 OWNER(MAINT) UACC(NONE) PERMIT MAINT.CF2 CLASS(VMMDISK) RESET ID(MAINT) AC(ALTER) RDEFINE VMMDISK MAINT.CF3 OWNER(MAINT) UACC(NONE)
RDEFINE VMMDISK MAINT.CF1 OWNER(MAINT) UACC(NONE) PERMIT MAINT.CF1 CLASS(VMMDISK) RESET ID(MAINT) AC(ALTER) RDEFINE VMMDISK MAINT.CF2 OWNER(MAINT) UACC(NONE) PERMIT MAINT.CF2 CLASS(VMMDISK) RESET ID(MAINT) AC(ALTER) RDEFINE VMMDISK MAINT.CF3 OWNER(MAINT) UACC(NONE)
Generic Profiles
RDEFINE VMMDISK MAINT.CF% OWNER(MAINT) UACC(NONE) PERMIT MAINT.CF% CLASS(VMMDISK) RESET ID(MAINT) AC(ALTER) RDEFINE VMMDISK MAINT.190 OWNER(MAINT) UACC(READ) PERMIT MAINT.190 CLASS(VMMDISK) RESET ID(MAINT) AC(ALTER) RDEFINE VMMDISK MAINT.19E OWNER(MAINT) UACC(READ) PERMIT MAINT.19E CLASS(VMMDISK) RESET ID(MAINT) AC(ALTER)
Chapter 3. IBM Resource Access Control Facility Security Server for IBM z/VM 69
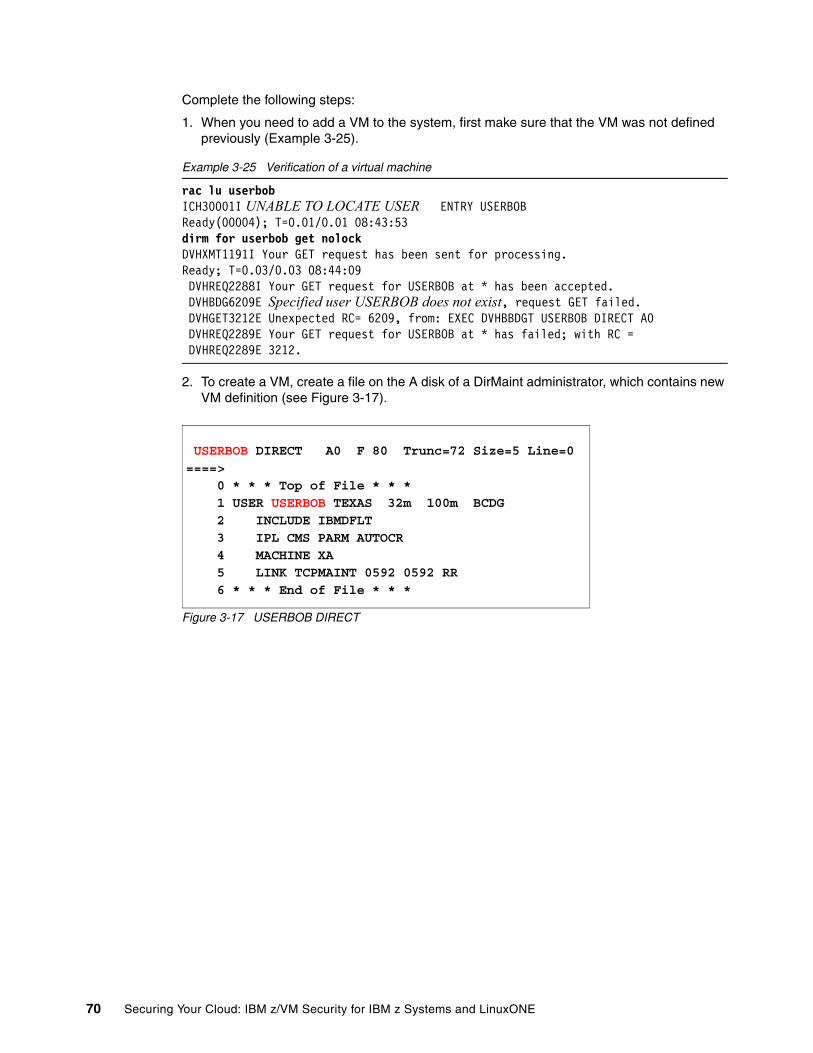
Complete the following steps:
1. When you need to add a VM to the system, first make sure that the VM was not defined previously (Example 3-25).
Example 3-25 Verification of a virtual machine
rac lu userbob ICH30001I UNABLE TO LOCATE USER ENTRY USERBOB Ready(00004); T=0.01/0.01 08:43:53 dirm for userbob get nolock DVHXMT1191I Your GET request has been sent for processing. Ready; T=0.03/0.03 08:44:09 DVHREQ2288I Your GET request for USERBOB at * has been accepted. DVHBDG6209E Specified user USERBOB does not exist, request GET failed. DVHGET3212E Unexpected RC= 6209, from: EXEC DVHBBDGT USERBOB DIRECT A0 DVHREQ2289E Your GET request for USERBOB at * has failed; with RC = DVHREQ2289E 3212.
2. To create a VM, create a file on the A disk of a DirMaint administrator, which contains new VM definition (see Figure 3-17).
Figure 3-17 USERBOB DIRECT
USERBOB DIRECT A0 F 80 Trunc=72 Size=5 Line=0 ====> 0 * * * Top of File * * * 1 USER USERBOB TEXAS 32m 100m BCDG 2 INCLUDE IBMDFLT 3 IPL CMS PARM AUTOCR 4 MACHINE XA 5 LINK TCPMAINT 0592 0592 RR 6 * * * End of File * * *
70 Securing Your Cloud: IBM z/VM Security for IBM z Systems and LinuxONE
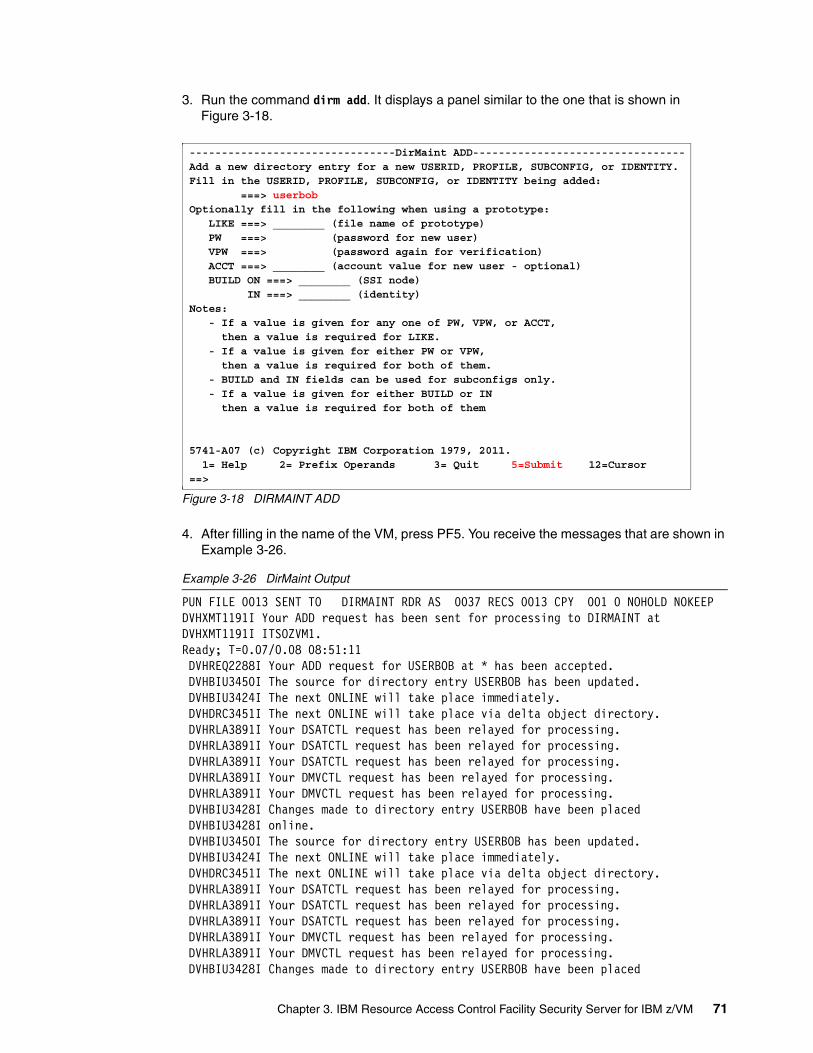
3. Run the command dirm add. It displays a panel similar to the one that is shown in Figure 3-18.
Figure 3-18 DIRMAINT ADD
4. After filling in the name of the VM, press PF5. You receive the messages that are shown in Example 3-26.
Example 3-26 DirMaint Output
PUN FILE 0013 SENT TO DIRMAINT RDR AS 0037 RECS 0013 CPY 001 0 NOHOLD NOKEEPDVHXMT1191I Your ADD request has been sent for processing to DIRMAINT atDVHXMT1191I ITSOZVM1.Ready; T=0.07/0.08 08:51:11 DVHREQ2288I Your ADD request for USERBOB at * has been accepted. DVHBIU3450I The source for directory entry USERBOB has been updated. DVHBIU3424I The next ONLINE will take place immediately. DVHDRC3451I The next ONLINE will take place via delta object directory. DVHRLA3891I Your DSATCTL request has been relayed for processing. DVHRLA3891I Your DSATCTL request has been relayed for processing. DVHRLA3891I Your DSATCTL request has been relayed for processing. DVHRLA3891I Your DMVCTL request has been relayed for processing. DVHRLA3891I Your DMVCTL request has been relayed for processing. DVHBIU3428I Changes made to directory entry USERBOB have been placed DVHBIU3428I online. DVHBIU3450I The source for directory entry USERBOB has been updated. DVHBIU3424I The next ONLINE will take place immediately. DVHDRC3451I The next ONLINE will take place via delta object directory. DVHRLA3891I Your DSATCTL request has been relayed for processing. DVHRLA3891I Your DSATCTL request has been relayed for processing. DVHRLA3891I Your DSATCTL request has been relayed for processing. DVHRLA3891I Your DMVCTL request has been relayed for processing. DVHRLA3891I Your DMVCTL request has been relayed for processing. DVHBIU3428I Changes made to directory entry USERBOB have been placed
--------------------------------DirMaint ADD---------------------------------Add a new directory entry for a new USERID, PROFILE, SUBCONFIG, or IDENTITY. Fill in the USERID, PROFILE, SUBCONFIG, or IDENTITY being added: ===> userbob Optionally fill in the following when using a prototype: LIKE ===> ________ (file name of prototype) PW ===> (password for new user) VPW ===> (password again for verification) ACCT ===> ________ (account value for new user - optional) BUILD ON ===> ________ (SSI node) IN ===> ________ (identity)Notes: - If a value is given for any one of PW, VPW, or ACCT, then a value is required for LIKE. - If a value is given for either PW or VPW, then a value is required for both of them. - BUILD and IN fields can be used for subconfigs only. - If a value is given for either BUILD or IN then a value is required for both of them
5741-A07 (c) Copyright IBM Corporation 1979, 2011. 1= Help 2= Prefix Operands 3= Quit 5=Submit 12=Cursor==>
Chapter 3. IBM Resource Access Control Facility Security Server for IBM z/VM 71
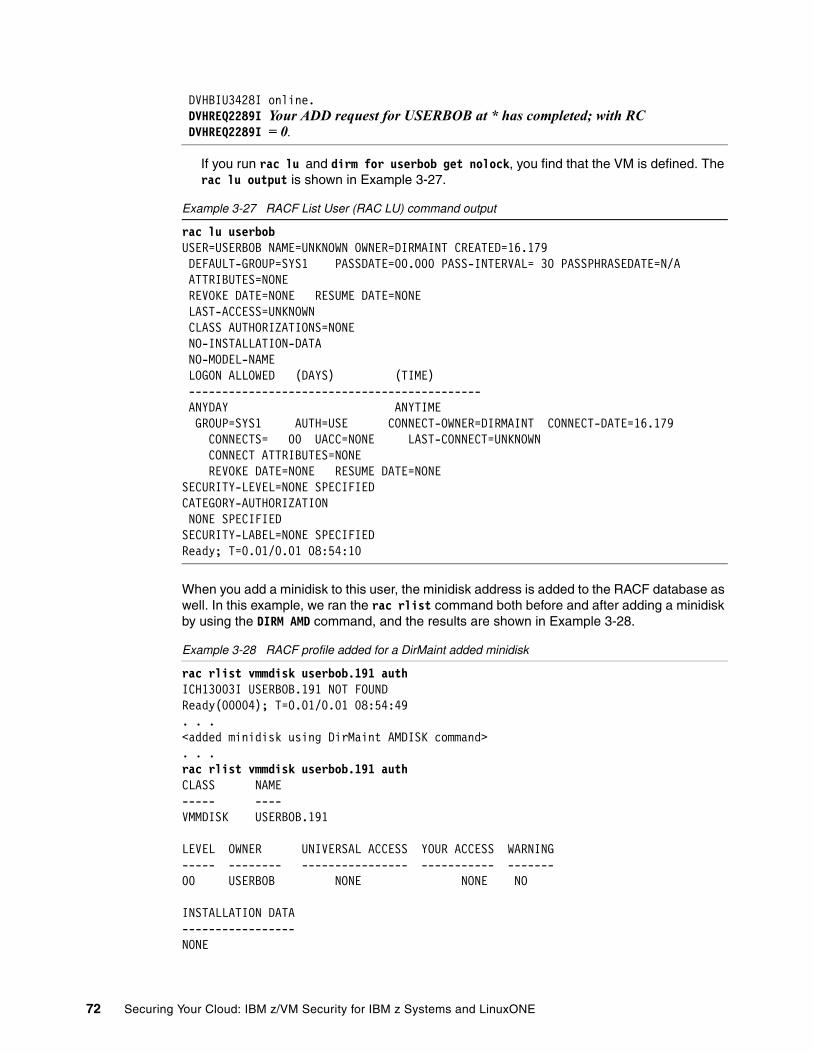
DVHBIU3428I online. DVHREQ2289I Your ADD request for USERBOB at * has completed; with RC DVHREQ2289I = 0.
If you run rac lu and dirm for userbob get nolock, you find that the VM is defined. The rac lu output is shown in Example 3-27.
Example 3-27 RACF List User (RAC LU) command output
rac lu userbobUSER=USERBOB NAME=UNKNOWN OWNER=DIRMAINT CREATED=16.179DEFAULT-GROUP=SYS1 PASSDATE=00.000 PASS-INTERVAL= 30 PASSPHRASEDATE=N/AATTRIBUTES=NONEREVOKE DATE=NONE RESUME DATE=NONELAST-ACCESS=UNKNOWNCLASS AUTHORIZATIONS=NONENO-INSTALLATION-DATANO-MODEL-NAMELOGON ALLOWED (DAYS) (TIME)--------------------------------------------ANYDAY ANYTIMEGROUP=SYS1 AUTH=USE CONNECT-OWNER=DIRMAINT CONNECT-DATE=16.179
CONNECTS= 00 UACC=NONE LAST-CONNECT=UNKNOWNCONNECT ATTRIBUTES=NONEREVOKE DATE=NONE RESUME DATE=NONE
SECURITY-LEVEL=NONE SPECIFIEDCATEGORY-AUTHORIZATIONNONE SPECIFIEDSECURITY-LABEL=NONE SPECIFIEDReady; T=0.01/0.01 08:54:10
When you add a minidisk to this user, the minidisk address is added to the RACF database as well. In this example, we ran the rac rlist command both before and after adding a minidisk by using the DIRM AMD command, and the results are shown in Example 3-28.
Example 3-28 RACF profile added for a DirMaint added minidisk
rac rlist vmmdisk userbob.191 authICH13003I USERBOB.191 NOT FOUNDReady(00004); T=0.01/0.01 08:54:49. . .<added minidisk using DirMaint AMDISK command>. . .rac rlist vmmdisk userbob.191 authCLASS NAME----- ----VMMDISK USERBOB.191
LEVEL OWNER UNIVERSAL ACCESS YOUR ACCESS WARNING----- -------- ---------------- ----------- -------00 USERBOB NONE NONE NO
INSTALLATION DATA-----------------NONE
72 Securing Your Cloud: IBM z/VM Security for IBM z Systems and LinuxONE
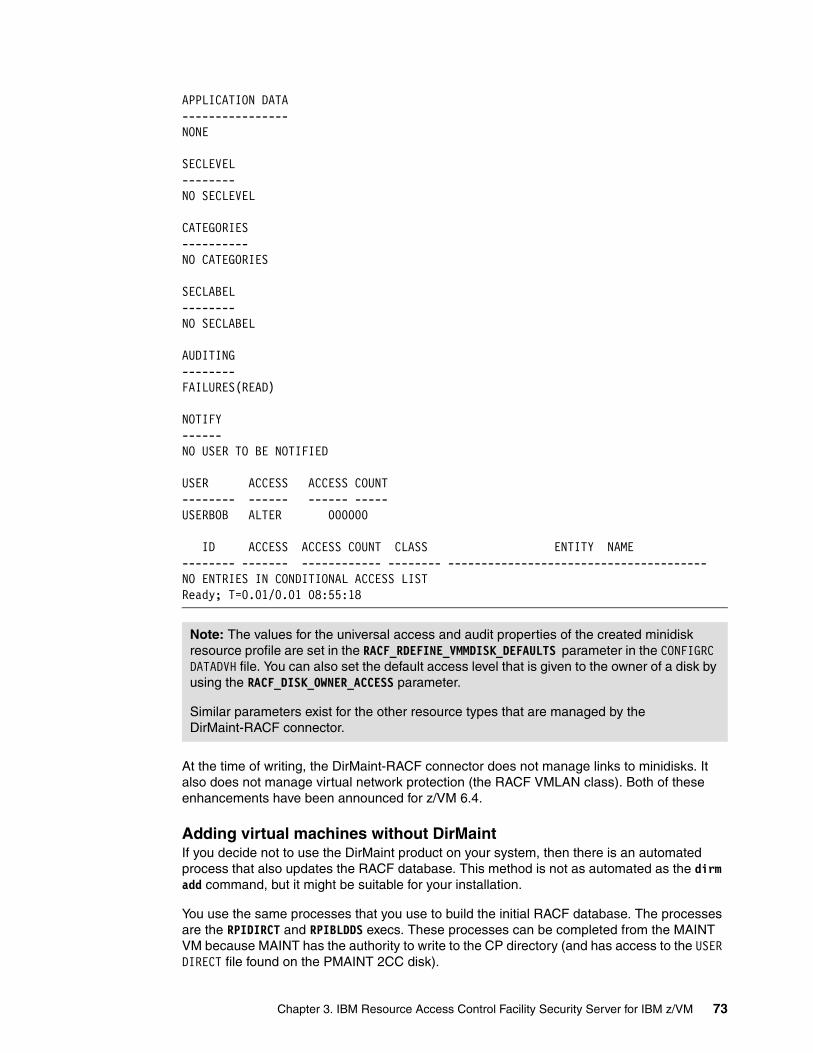
APPLICATION DATA----------------NONE
SECLEVEL--------NO SECLEVEL
CATEGORIES----------NO CATEGORIES
SECLABEL--------NO SECLABEL
AUDITING--------FAILURES(READ)
NOTIFY------NO USER TO BE NOTIFIED
USER ACCESS ACCESS COUNT-------- ------ ------ -----USERBOB ALTER 000000
ID ACCESS ACCESS COUNT CLASS ENTITY NAME-------- ------- ------------ -------- ---------------------------------------NO ENTRIES IN CONDITIONAL ACCESS LISTReady; T=0.01/0.01 08:55:18
At the time of writing, the DirMaint-RACF connector does not manage links to minidisks. It also does not manage virtual network protection (the RACF VMLAN class). Both of these enhancements have been announced for z/VM 6.4.
Adding virtual machines without DirMaintIf you decide not to use the DirMaint product on your system, then there is an automated process that also updates the RACF database. This method is not as automated as the dirm add command, but it might be suitable for your installation.
You use the same processes that you use to build the initial RACF database. The processes are the RPIDIRCT and RPIBLDDS execs. These processes can be completed from the MAINT VM because MAINT has the authority to write to the CP directory (and has access to the USER DIRECT file found on the PMAINT 2CC disk).
Note: The values for the universal access and audit properties of the created minidisk resource profile are set in the RACF_RDEFINE_VMMDISK_DEFAULTS parameter in the CONFIGRC DATADVH file. You can also set the default access level that is given to the owner of a disk by using the RACF_DISK_OWNER_ACCESS parameter.
Similar parameters exist for the other resource types that are managed by the DirMaint-RACF connector.
Chapter 3. IBM Resource Access Control Facility Security Server for IBM z/VM 73
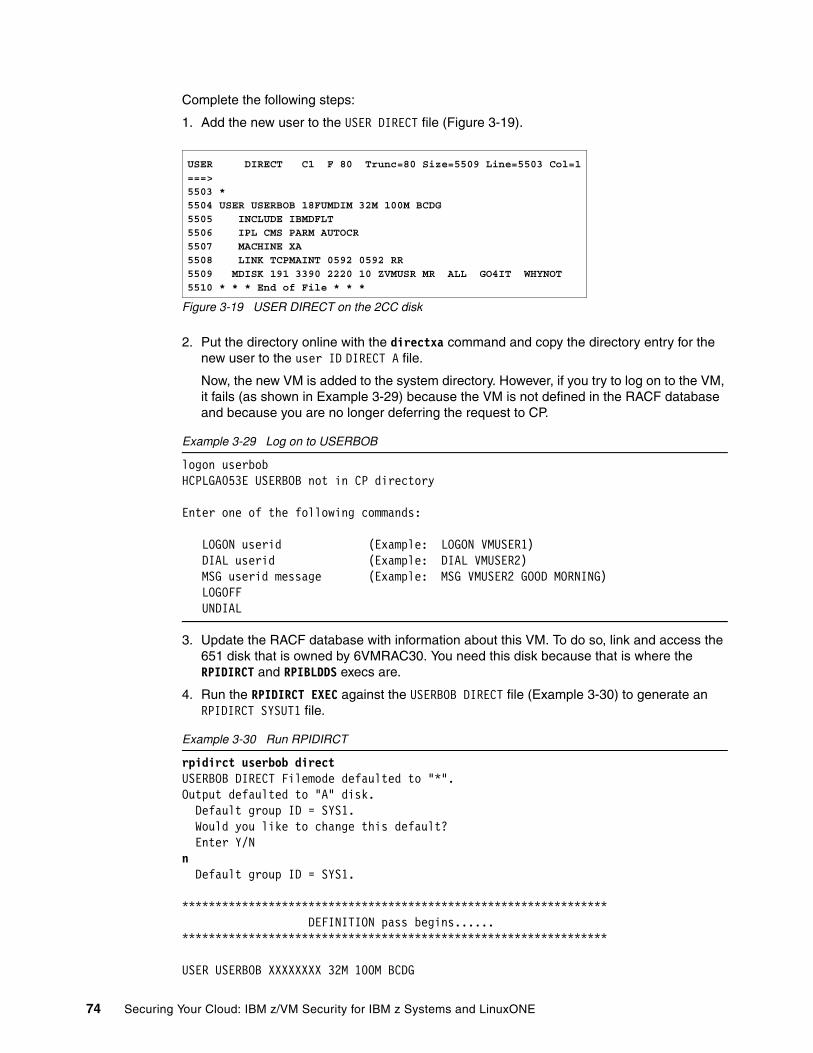
Complete the following steps:
1. Add the new user to the USER DIRECT file (Figure 3-19).
Figure 3-19 USER DIRECT on the 2CC disk
2. Put the directory online with the directxa command and copy the directory entry for the new user to the user ID DIRECT A file.
Now, the new VM is added to the system directory. However, if you try to log on to the VM, it fails (as shown in Example 3-29) because the VM is not defined in the RACF database and because you are no longer deferring the request to CP.
Example 3-29 Log on to USERBOB
logon userbob HCPLGA053E USERBOB not in CP directory Enter one of the following commands: LOGON userid (Example: LOGON VMUSER1) DIAL userid (Example: DIAL VMUSER2) MSG userid message (Example: MSG VMUSER2 GOOD MORNING) LOGOFF UNDIAL
3. Update the RACF database with information about this VM. To do so, link and access the 651 disk that is owned by 6VMRAC30. You need this disk because that is where the RPIDIRCT and RPIBLDDS execs are.
4. Run the RPIDIRCT EXEC against the USERBOB DIRECT file (Example 3-30) to generate an RPIDIRCT SYSUT1 file.
Example 3-30 Run RPIDIRCT
rpidirct userbob direct USERBOB DIRECT Filemode defaulted to "*". Output defaulted to "A" disk. Default group ID = SYS1. Would you like to change this default? Enter Y/N n Default group ID = SYS1.
**************************************************************** DEFINITION pass begins...... ****************************************************************
USER USERBOB XXXXXXXX 32M 100M BCDG
USER DIRECT C1 F 80 Trunc=80 Size=5509 Line=5503 Col=1 ===> 5503 * 5504 USER USERBOB 18FUMDIM 32M 100M BCDG 5505 INCLUDE IBMDFLT 5506 IPL CMS PARM AUTOCR 5507 MACHINE XA 5508 LINK TCPMAINT 0592 0592 RR 5509 MDISK 191 3390 2220 10 ZVMUSR MR ALL GO4IT WHYNOT 5510 * * * End of File * * *
74 Securing Your Cloud: IBM z/VM Security for IBM z Systems and LinuxONE
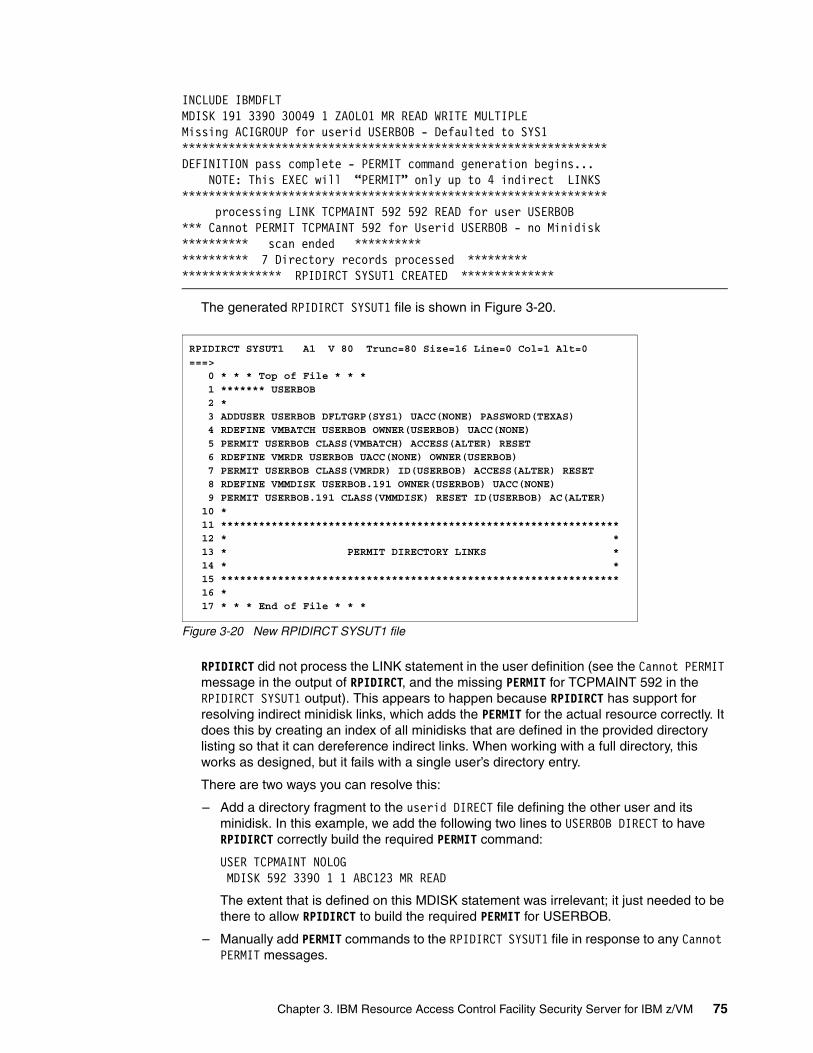
INCLUDE IBMDFLT MDISK 191 3390 30049 1 ZA0L01 MR READ WRITE MULTIPLE Missing ACIGROUP for userid USERBOB - Defaulted to SYS1**************************************************************** DEFINITION pass complete - PERMIT command generation begins...
NOTE: This EXEC will “PERMIT” only up to 4 indirect LINKS**************************************************************** processing LINK TCPMAINT 592 592 READ for user USERBOB *** Cannot PERMIT TCPMAINT 592 for Userid USERBOB - no Minidisk********** scan ended ********** ********** 7 Directory records processed ********* *************** RPIDIRCT SYSUT1 CREATED **************
The generated RPIDIRCT SYSUT1 file is shown in Figure 3-20.
Figure 3-20 New RPIDIRCT SYSUT1 file
RPIDIRCT did not process the LINK statement in the user definition (see the Cannot PERMIT message in the output of RPIDIRCT, and the missing PERMIT for TCPMAINT 592 in the RPIDIRCT SYSUT1 output). This appears to happen because RPIDIRCT has support for resolving indirect minidisk links, which adds the PERMIT for the actual resource correctly. It does this by creating an index of all minidisks that are defined in the provided directory listing so that it can dereference indirect links. When working with a full directory, this works as designed, but it fails with a single user’s directory entry.
There are two ways you can resolve this:
– Add a directory fragment to the userid DIRECT file defining the other user and its minidisk. In this example, we add the following two lines to USERBOB DIRECT to have RPIDIRCT correctly build the required PERMIT command:
USER TCPMAINT NOLOGMDISK 592 3390 1 1 ABC123 MR READ
The extent that is defined on this MDISK statement was irrelevant; it just needed to be there to allow RPIDIRCT to build the required PERMIT for USERBOB.
– Manually add PERMIT commands to the RPIDIRCT SYSUT1 file in response to any Cannot PERMIT messages.
RPIDIRCT SYSUT1 A1 V 80 Trunc=80 Size=16 Line=0 Col=1 Alt=0 ===> 0 * * * Top of File * * * 1 ******* USERBOB 2 * 3 ADDUSER USERBOB DFLTGRP(SYS1) UACC(NONE) PASSWORD(TEXAS) 4 RDEFINE VMBATCH USERBOB OWNER(USERBOB) UACC(NONE) 5 PERMIT USERBOB CLASS(VMBATCH) ACCESS(ALTER) RESET 6 RDEFINE VMRDR USERBOB UACC(NONE) OWNER(USERBOB) 7 PERMIT USERBOB CLASS(VMRDR) ID(USERBOB) ACCESS(ALTER) RESET 8 RDEFINE VMMDISK USERBOB.191 OWNER(USERBOB) UACC(NONE) 9 PERMIT USERBOB.191 CLASS(VMMDISK) RESET ID(USERBOB) AC(ALTER) 10 * 11 *************************************************************** 12 * * 13 * PERMIT DIRECTORY LINKS * 14 * * 15 *************************************************************** 16 * 17 * * * End of File * * *
Chapter 3. IBM Resource Access Control Facility Security Server for IBM z/VM 75
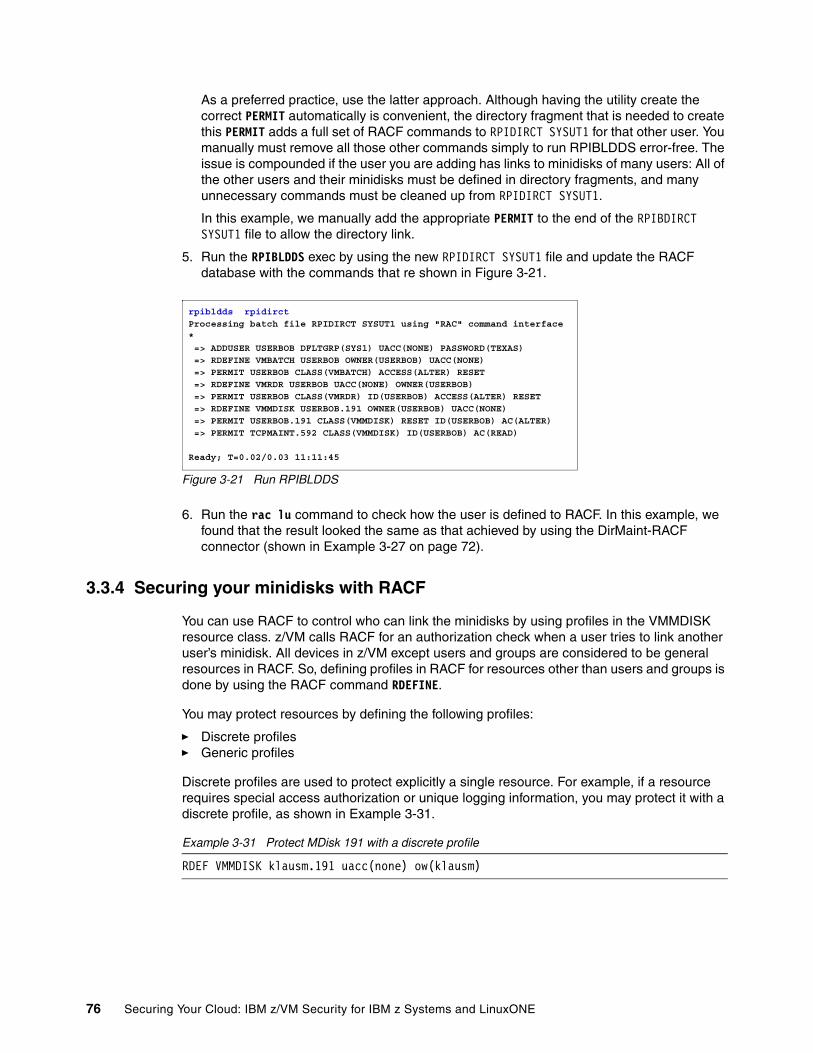
As a preferred practice, use the latter approach. Although having the utility create the correct PERMIT automatically is convenient, the directory fragment that is needed to create this PERMIT adds a full set of RACF commands to RPIDIRCT SYSUT1 for that other user. You manually must remove all those other commands simply to run RPIBLDDS error-free. The issue is compounded if the user you are adding has links to minidisks of many users: All of the other users and their minidisks must be defined in directory fragments, and many unnecessary commands must be cleaned up from RPIDIRCT SYSUT1.
In this example, we manually add the appropriate PERMIT to the end of the RPIBDIRCT SYSUT1 file to allow the directory link.
5. Run the RPIBLDDS exec by using the new RPIDIRCT SYSUT1 file and update the RACF database with the commands that re shown in Figure 3-21.
Figure 3-21 Run RPIBLDDS
6. Run the rac lu command to check how the user is defined to RACF. In this example, we found that the result looked the same as that achieved by using the DirMaint-RACF connector (shown in Example 3-27 on page 72).
3.3.4 Securing your minidisks with RACF
You can use RACF to control who can link the minidisks by using profiles in the VMMDISK resource class. z/VM calls RACF for an authorization check when a user tries to link another user’s minidisk. All devices in z/VM except users and groups are considered to be general resources in RACF. So, defining profiles in RACF for resources other than users and groups is done by using the RACF command RDEFINE.
You may protect resources by defining the following profiles:
� Discrete profiles� Generic profiles
Discrete profiles are used to protect explicitly a single resource. For example, if a resource requires special access authorization or unique logging information, you may protect it with a discrete profile, as shown in Example 3-31.
Example 3-31 Protect MDisk 191 with a discrete profile
RDEF VMMDISK klausm.191 uacc(none) ow(klausm)
rpibldds rpidirct Processing batch file RPIDIRCT SYSUT1 using "RAC" command interface * => ADDUSER USERBOB DFLTGRP(SYS1) UACC(NONE) PASSWORD(TEXAS) => RDEFINE VMBATCH USERBOB OWNER(USERBOB) UACC(NONE) => PERMIT USERBOB CLASS(VMBATCH) ACCESS(ALTER) RESET => RDEFINE VMRDR USERBOB UACC(NONE) OWNER(USERBOB) => PERMIT USERBOB CLASS(VMRDR) ID(USERBOB) ACCESS(ALTER) RESET => RDEFINE VMMDISK USERBOB.191 OWNER(USERBOB) UACC(NONE) => PERMIT USERBOB.191 CLASS(VMMDISK) RESET ID(USERBOB) AC(ALTER) => PERMIT TCPMAINT.592 CLASS(VMMDISK) ID(USERBOB) AC(READ) Ready; T=0.02/0.03 11:11:45
76 Securing Your Cloud: IBM z/VM Security for IBM z Systems and LinuxONE
However, in many installations, the preferred way to protect resources is by defining generic profiles. Generic profiles must contain one or more generic characters. This might be an appropriate way to protect all resources of the same type of a certain user by just defining one or two profiles.
Additionally, you may choose to grant permits to groups rather than users. Defining groups to the RACF database is a way to reflect definitions and permissions to your businesses organizational structure and your security policy. It gives you additional flexibility. So you may, as shown in the following examples, insert groups into the ID keyword of the RACF PERMIT command rather than single user IDs. If a user then newly joins a given organizational unit (that is, the DBADMN unit), then connecting this user ID to the defined group shall provide the user with all the access rights the user needs to do the work. The advantages of using group permissions rather than user permissions are described in “Advantages of using groups” on page 78.
To learn more about RACF group structure and security objectives, see Chapter 2, “Organizing for RACF Implementation”, in z/VM RACF Security Server Security Administrator’s Guide, SC24-6218.
Note: IBM provides the DirMaint-RACF connector, which takes on the work of defining RACF profiles whenever there is a change to your directory by DIRM commands. This is done if a user is added or deleted, for example, and when adding minidisk definitions to virtual guests. However, the DirMaint-RACF connector just creates discrete profiles, which provide a basic security implementation and makes sure that resources are protected.
Note: Valid generic characters are %, * and **.
Specify % in profile names to match any single non-blank character on the same position of the resource name.
Specify * or ** in the profile name to match more than one single character in the same position of the resource name.
For more information, see Chapter 6, “Defining Resources”, in z/VM RACF Security Server Security Administrator’s Guide, SC24-6218.
Note: If you decide to use generic profiles for class VMMDISK, you should genlist this class. Run the following command:
SETROPTS GENLIST(VMMDISK)
This command causes one copy of each generic profile for the VMMDISK class to be kept in the RACFVM service machine. Changes made to generic minidisk profiles are not reflected until a SERTROPTS refresh command is issued:
SETROPTS GENERIC(VMMDISK) REFRESH
Chapter 3. IBM Resource Access Control Facility Security Server for IBM z/VM 77
z/Linux guests often need to have many database volumes that are attached to their VMs, and have volumes that are the same kind and have the same protection level needs. You can do this configuration by defining profiles as shown in Example 3-32 and Example 3-33.
Example 3-32 Protect database volumes with a generic profile
RDEF VMMDISK LNX1.* UACC(NONE) OW(LINX1)
Example 3-33 Permit access to a database volume by using a generic profile access list
PERMIT LNX1.* CLASS(VMMDISK) ID(DBADMN) ACC(UPDATE)
If your system MDisks should not be updated by DBADMN but by SYSPROGS, and the virtual addresses of these types of minidisks start with 20, then use the commands that are shown in Example 3-34.
Example 3-34 Generic profile and group permission example
RDEFINE VMMDISK LNX1.20* uacc(none) ow(LINX1)PERMIT LNX1.20* CLASS(VMMDISK) ID(SYSPROG) ACC(UPDATE)
Advantages of using generic profilesThere are several advantages of using generic profiles:
� The number of profiles in the RACF database are reduced significantly.
� No RACF administrator action is needed when MDisks are added or removed.
� The principle of least privilege is met.
� There is always a good overview of the security setup in your RACF database, which might be helpful when showing security concepts to auditors.
This principle can be used for almost all of the general resource profiles except VMLAN VSWITCH devices.
Advantages of using groupsThere are several advantages of using groups:
� Access lists in resource profiles have fewer entries.
� Changes in your companies business organization can easier be reflected in permission structures.
� If people change departments in your organization, accesses are easily withdrawn and granted just by removing them from a group and connecting them to another group.
� RACF-DB is provided with a structure that is adopted to your business needs.
� They are a good overview of the security setup in your RACF database.
3.3.5 Securing guest LANs and virtual switches with RACF
RACF can be used to protect VLANs and virtual switches by using profiles in the VMLAN class. After defining the appropriate profiles, be sure to activate your VMLAN class by running the following command:
SETROPTS CLASSACT(VMLAN)
78 Securing Your Cloud: IBM z/VM Security for IBM z Systems and LinuxONE
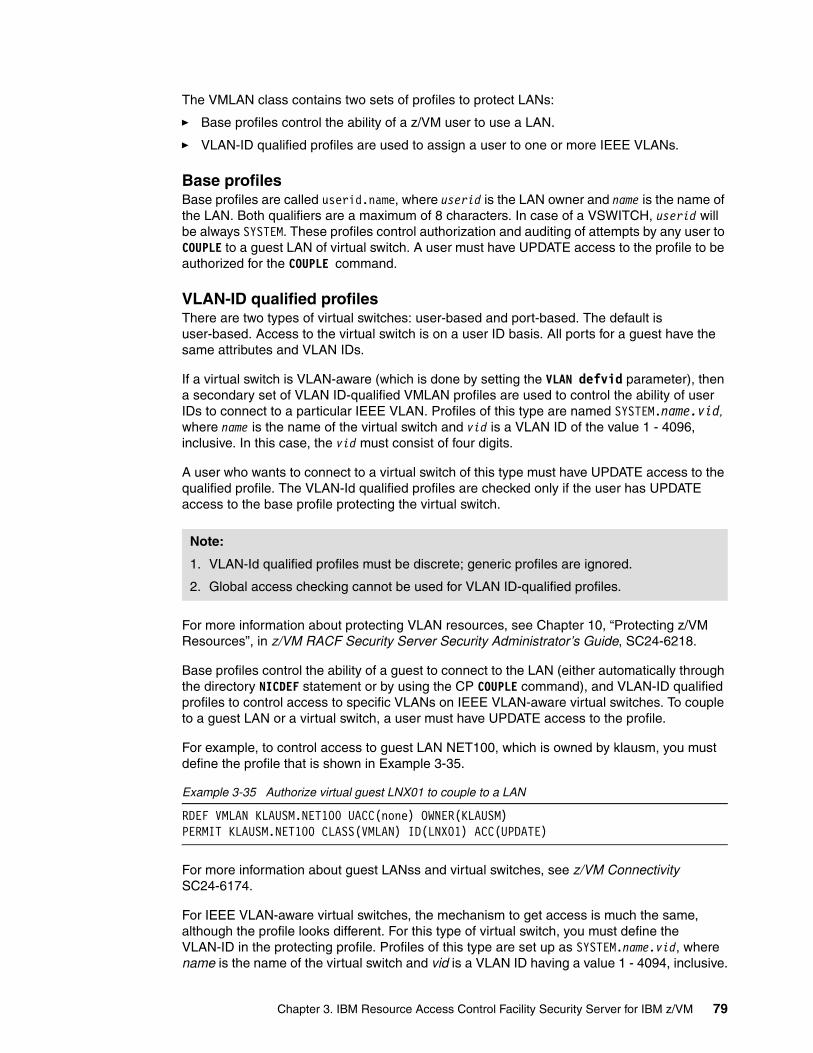
The VMLAN class contains two sets of profiles to protect LANs:
� Base profiles control the ability of a z/VM user to use a LAN.
� VLAN-ID qualified profiles are used to assign a user to one or more IEEE VLANs.
Base profilesBase profiles are called userid.name, where userid is the LAN owner and name is the name of the LAN. Both qualifiers are a maximum of 8 characters. In case of a VSWITCH, userid will be always SYSTEM. These profiles control authorization and auditing of attempts by any user to COUPLE to a guest LAN of virtual switch. A user must have UPDATE access to the profile to be authorized for the COUPLE command.
VLAN-ID qualified profilesThere are two types of virtual switches: user-based and port-based. The default is user-based. Access to the virtual switch is on a user ID basis. All ports for a guest have the same attributes and VLAN IDs.
If a virtual switch is VLAN-aware (which is done by setting the VLAN defvid parameter), then a secondary set of VLAN ID-qualified VMLAN profiles are used to control the ability of user IDs to connect to a particular IEEE VLAN. Profiles of this type are named SYSTEM.name.vid, where name is the name of the virtual switch and vid is a VLAN ID of the value 1 - 4096, inclusive. In this case, the vid must consist of four digits.
A user who wants to connect to a virtual switch of this type must have UPDATE access to the qualified profile. The VLAN-Id qualified profiles are checked only if the user has UPDATE access to the base profile protecting the virtual switch.
For more information about protecting VLAN resources, see Chapter 10, “Protecting z/VM Resources”, in z/VM RACF Security Server Security Administrator’s Guide, SC24-6218.
Base profiles control the ability of a guest to connect to the LAN (either automatically through the directory NICDEF statement or by using the CP COUPLE command), and VLAN-ID qualified profiles to control access to specific VLANs on IEEE VLAN-aware virtual switches. To couple to a guest LAN or a virtual switch, a user must have UPDATE access to the profile.
For example, to control access to guest LAN NET100, which is owned by klausm, you must define the profile that is shown in Example 3-35.
Example 3-35 Authorize virtual guest LNX01 to couple to a LAN
RDEF VMLAN KLAUSM.NET100 UACC(none) OWNER(KLAUSM)PERMIT KLAUSM.NET100 CLASS(VMLAN) ID(LNX01) ACC(UPDATE)
For more information about guest LANss and virtual switches, see z/VM Connectivity SC24-6174.
For IEEE VLAN-aware virtual switches, the mechanism to get access is much the same, although the profile looks different. For this type of virtual switch, you must define the VLAN-ID in the protecting profile. Profiles of this type are set up as SYSTEM.name.vid, where name is the name of the virtual switch and vid is a VLAN ID having a value 1 - 4094, inclusive.
Note:
1. VLAN-Id qualified profiles must be discrete; generic profiles are ignored.
2. Global access checking cannot be used for VLAN ID-qualified profiles.
Chapter 3. IBM Resource Access Control Facility Security Server for IBM z/VM 79
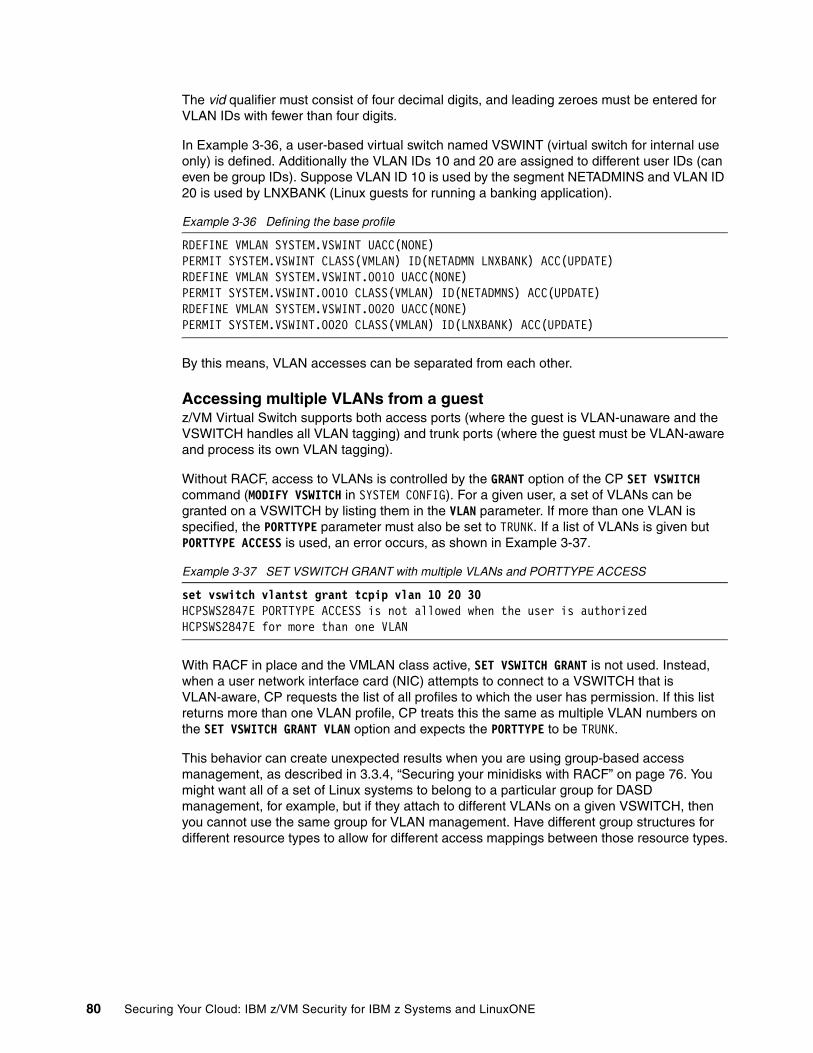
The vid qualifier must consist of four decimal digits, and leading zeroes must be entered for VLAN IDs with fewer than four digits.
In Example 3-36, a user-based virtual switch named VSWINT (virtual switch for internal use only) is defined. Additionally the VLAN IDs 10 and 20 are assigned to different user IDs (can even be group IDs). Suppose VLAN ID 10 is used by the segment NETADMINS and VLAN ID 20 is used by LNXBANK (Linux guests for running a banking application).
Example 3-36 Defining the base profile
RDEFINE VMLAN SYSTEM.VSWINT UACC(NONE)PERMIT SYSTEM.VSWINT CLASS(VMLAN) ID(NETADMN LNXBANK) ACC(UPDATE)RDEFINE VMLAN SYSTEM.VSWINT.0010 UACC(NONE)PERMIT SYSTEM.VSWINT.0010 CLASS(VMLAN) ID(NETADMNS) ACC(UPDATE)RDEFINE VMLAN SYSTEM.VSWINT.0020 UACC(NONE)PERMIT SYSTEM.VSWINT.0020 CLASS(VMLAN) ID(LNXBANK) ACC(UPDATE)
By this means, VLAN accesses can be separated from each other.
Accessing multiple VLANs from a guestz/VM Virtual Switch supports both access ports (where the guest is VLAN-unaware and the VSWITCH handles all VLAN tagging) and trunk ports (where the guest must be VLAN-aware and process its own VLAN tagging).
Without RACF, access to VLANs is controlled by the GRANT option of the CP SET VSWITCH command (MODIFY VSWITCH in SYSTEM CONFIG). For a given user, a set of VLANs can be granted on a VSWITCH by listing them in the VLAN parameter. If more than one VLAN is specified, the PORTTYPE parameter must also be set to TRUNK. If a list of VLANs is given but PORTTYPE ACCESS is used, an error occurs, as shown in Example 3-37.
Example 3-37 SET VSWITCH GRANT with multiple VLANs and PORTTYPE ACCESS
set vswitch vlantst grant tcpip vlan 10 20 30HCPSWS2847E PORTTYPE ACCESS is not allowed when the user is authorizedHCPSWS2847E for more than one VLAN
With RACF in place and the VMLAN class active, SET VSWITCH GRANT is not used. Instead, when a user network interface card (NIC) attempts to connect to a VSWITCH that is VLAN-aware, CP requests the list of all profiles to which the user has permission. If this list returns more than one VLAN profile, CP treats this the same as multiple VLAN numbers on the SET VSWITCH GRANT VLAN option and expects the PORTTYPE to be TRUNK.
This behavior can create unexpected results when you are using group-based access management, as described in 3.3.4, “Securing your minidisks with RACF” on page 76. You might want all of a set of Linux systems to belong to a particular group for DASD management, for example, but if they attach to different VLANs on a given VSWITCH, then you cannot use the same group for VLAN management. Have different group structures for different resource types to allow for different access mappings between those resource types.
80 Securing Your Cloud: IBM z/VM Security for IBM z Systems and LinuxONE
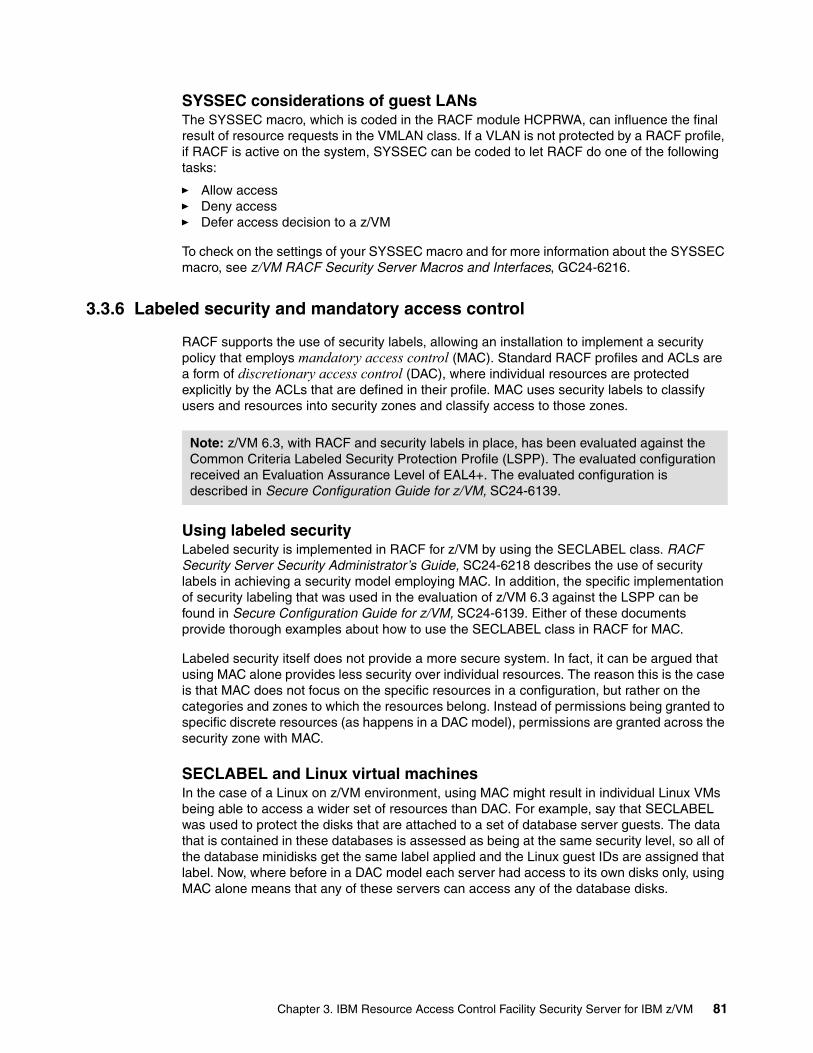
SYSSEC considerations of guest LANsThe SYSSEC macro, which is coded in the RACF module HCPRWA, can influence the final result of resource requests in the VMLAN class. If a VLAN is not protected by a RACF profile, if RACF is active on the system, SYSSEC can be coded to let RACF do one of the following tasks:
� Allow access� Deny access� Defer access decision to a z/VM
To check on the settings of your SYSSEC macro and for more information about the SYSSEC macro, see z/VM RACF Security Server Macros and Interfaces, GC24-6216.
3.3.6 Labeled security and mandatory access control
RACF supports the use of security labels, allowing an installation to implement a security policy that employs mandatory access control (MAC). Standard RACF profiles and ACLs are a form of discretionary access control (DAC), where individual resources are protected explicitly by the ACLs that are defined in their profile. MAC uses security labels to classify users and resources into security zones and classify access to those zones.
Using labeled securityLabeled security is implemented in RACF for z/VM by using the SECLABEL class. RACF Security Server Security Administrator’s Guide, SC24-6218 describes the use of security labels in achieving a security model employing MAC. In addition, the specific implementation of security labeling that was used in the evaluation of z/VM 6.3 against the LSPP can be found in Secure Configuration Guide for z/VM, SC24-6139. Either of these documents provide thorough examples about how to use the SECLABEL class in RACF for MAC.
Labeled security itself does not provide a more secure system. In fact, it can be argued that using MAC alone provides less security over individual resources. The reason this is the case is that MAC does not focus on the specific resources in a configuration, but rather on the categories and zones to which the resources belong. Instead of permissions being granted to specific discrete resources (as happens in a DAC model), permissions are granted across the security zone with MAC.
SECLABEL and Linux virtual machinesIn the case of a Linux on z/VM environment, using MAC might result in individual Linux VMs being able to access a wider set of resources than DAC. For example, say that SECLABEL was used to protect the disks that are attached to a set of database server guests. The data that is contained in these databases is assessed as being at the same security level, so all of the database minidisks get the same label applied and the Linux guest IDs are assigned that label. Now, where before in a DAC model each server had access to its own disks only, using MAC alone means that any of these servers can access any of the database disks.
Note: z/VM 6.3, with RACF and security labels in place, has been evaluated against the Common Criteria Labeled Security Protection Profile (LSPP). The evaluated configuration received an Evaluation Assurance Level of EAL4+. The evaluated configuration is described in Secure Configuration Guide for z/VM, SC24-6139.
Chapter 3. IBM Resource Access Control Facility Security Server for IBM z/VM 81
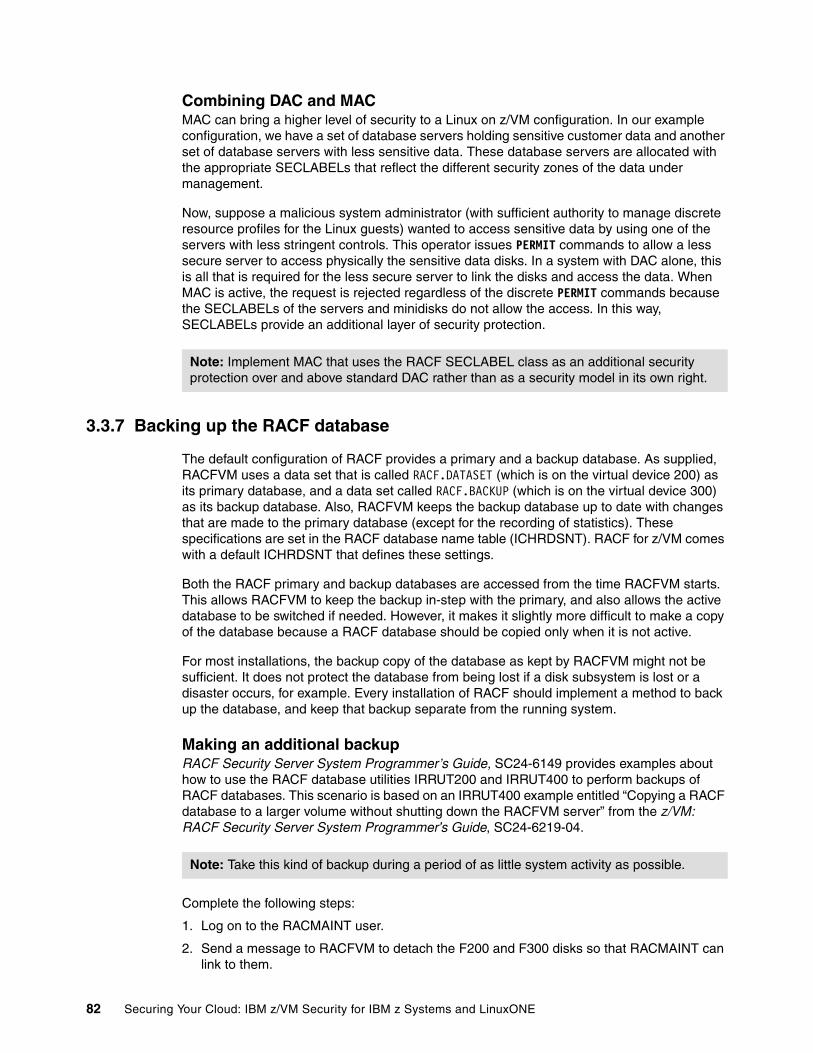
Combining DAC and MACMAC can bring a higher level of security to a Linux on z/VM configuration. In our example configuration, we have a set of database servers holding sensitive customer data and another set of database servers with less sensitive data. These database servers are allocated with the appropriate SECLABELs that reflect the different security zones of the data under management.
Now, suppose a malicious system administrator (with sufficient authority to manage discrete resource profiles for the Linux guests) wanted to access sensitive data by using one of the servers with less stringent controls. This operator issues PERMIT commands to allow a less secure server to access physically the sensitive data disks. In a system with DAC alone, this is all that is required for the less secure server to link the disks and access the data. When MAC is active, the request is rejected regardless of the discrete PERMIT commands because the SECLABELs of the servers and minidisks do not allow the access. In this way, SECLABELs provide an additional layer of security protection.
3.3.7 Backing up the RACF database
The default configuration of RACF provides a primary and a backup database. As supplied, RACFVM uses a data set that is called RACF.DATASET (which is on the virtual device 200) as its primary database, and a data set called RACF.BACKUP (which is on the virtual device 300) as its backup database. Also, RACFVM keeps the backup database up to date with changes that are made to the primary database (except for the recording of statistics). These specifications are set in the RACF database name table (ICHRDSNT). RACF for z/VM comes with a default ICHRDSNT that defines these settings.
Both the RACF primary and backup databases are accessed from the time RACFVM starts. This allows RACFVM to keep the backup in-step with the primary, and also allows the active database to be switched if needed. However, it makes it slightly more difficult to make a copy of the database because a RACF database should be copied only when it is not active.
For most installations, the backup copy of the database as kept by RACFVM might not be sufficient. It does not protect the database from being lost if a disk subsystem is lost or a disaster occurs, for example. Every installation of RACF should implement a method to back up the database, and keep that backup separate from the running system.
Making an additional backupRACF Security Server System Programmer’s Guide, SC24-6149 provides examples about how to use the RACF database utilities IRRUT200 and IRRUT400 to perform backups of RACF databases. This scenario is based on an IRRUT400 example entitled “Copying a RACF database to a larger volume without shutting down the RACFVM server” from the z/VM: RACF Security Server System Programmer's Guide, SC24-6219-04.
Complete the following steps:
1. Log on to the RACMAINT user.
2. Send a message to RACFVM to detach the F200 and F300 disks so that RACMAINT can link to them.
Note: Implement MAC that uses the RACF SECLABEL class as an additional security protection over and above standard DAC rather than as a security model in its own right.
Note: Take this kind of backup during a period of as little system activity as possible.
82 Securing Your Cloud: IBM z/VM Security for IBM z Systems and LinuxONE
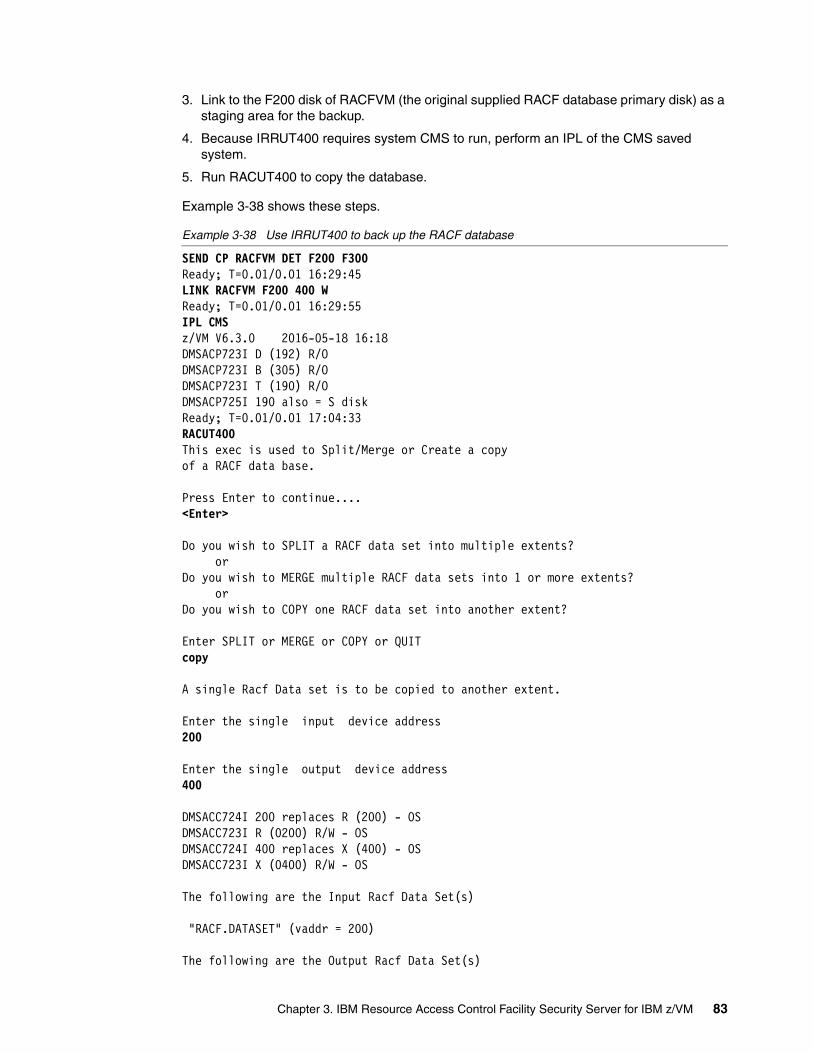
3. Link to the F200 disk of RACFVM (the original supplied RACF database primary disk) as a staging area for the backup.
4. Because IRRUT400 requires system CMS to run, perform an IPL of the CMS saved system.
5. Run RACUT400 to copy the database.
Example 3-38 shows these steps.
Example 3-38 Use IRRUT400 to back up the RACF database
SEND CP RACFVM DET F200 F300Ready; T=0.01/0.01 16:29:45LINK RACFVM F200 400 WReady; T=0.01/0.01 16:29:55IPL CMSz/VM V6.3.0 2016-05-18 16:18DMSACP723I D (192) R/O DMSACP723I B (305) R/O DMSACP723I T (190) R/O DMSACP725I 190 also = S disk Ready; T=0.01/0.01 17:04:33 RACUT400This exec is used to Split/Merge or Create a copyof a RACF data base. Press Enter to continue.... <Enter>
Do you wish to SPLIT a RACF data set into multiple extents? or Do you wish to MERGE multiple RACF data sets into 1 or more extents? or Do you wish to COPY one RACF data set into another extent? Enter SPLIT or MERGE or COPY or QUIT copy
A single Racf Data set is to be copied to another extent. Enter the single input device address 200
Enter the single output device address400
DMSACC724I 200 replaces R (200) - OS DMSACC723I R (0200) R/W - OS DMSACC724I 400 replaces X (400) - OS DMSACC723I X (0400) R/W - OS The following are the Input Racf Data Set(s) "RACF.DATASET" (vaddr = 200) The following are the Output Racf Data Set(s)
Chapter 3. IBM Resource Access Control Facility Security Server for IBM z/VM 83
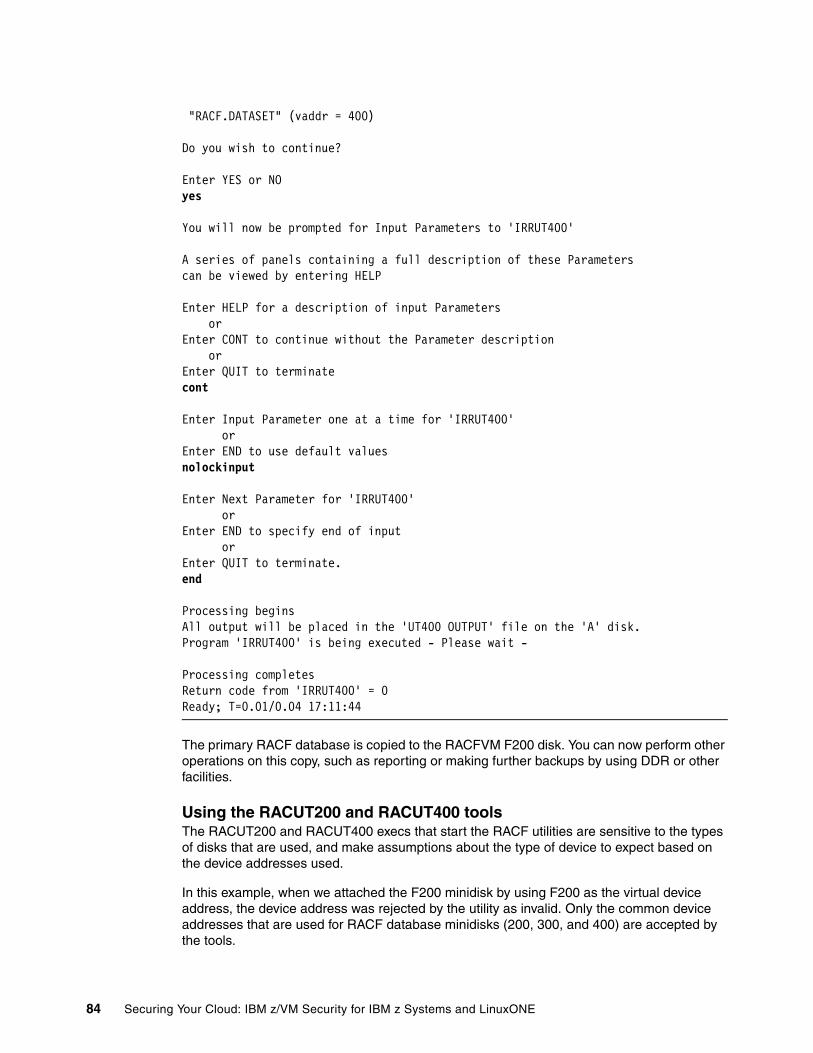
"RACF.DATASET" (vaddr = 400) Do you wish to continue? Enter YES or NO yes
You will now be prompted for Input Parameters to 'IRRUT400' A series of panels containing a full description of these Parameterscan be viewed by entering HELP
Enter HELP for a description of input Parameters or Enter CONT to continue without the Parameter description or Enter QUIT to terminate cont
Enter Input Parameter one at a time for 'IRRUT400' or Enter END to use default values nolockinput
Enter Next Parameter for 'IRRUT400' or Enter END to specify end of input or Enter QUIT to terminate. end
Processing begins All output will be placed in the 'UT400 OUTPUT' file on the 'A' disk.Program 'IRRUT400' is being executed - Please wait -
Processing completes Return code from 'IRRUT400' = 0 Ready; T=0.01/0.04 17:11:44
The primary RACF database is copied to the RACFVM F200 disk. You can now perform other operations on this copy, such as reporting or making further backups by using DDR or other facilities.
Using the RACUT200 and RACUT400 toolsThe RACUT200 and RACUT400 execs that start the RACF utilities are sensitive to the types of disks that are used, and make assumptions about the type of device to expect based on the device addresses used.
In this example, when we attached the F200 minidisk by using F200 as the virtual device address, the device address was rejected by the utility as invalid. Only the common device addresses that are used for RACF database minidisks (200, 300, and 400) are accepted by the tools.
84 Securing Your Cloud: IBM z/VM Security for IBM z Systems and LinuxONE
When we tried to do the copy in Example 3-38 on page 83 by using the full-pack minidisk that is attached at 200 and the F200 minidisk that is attached at 300, the utility failed with a message saying the output data set is invalid. It seems that there are safety checks that are built in to the utilities. If you use the 200 and 300 devices, the utilities seem to treat them as through they should be the pair of RACF primary and backup disks, and check the data set names to be as expected. In our case, both the real 200 disk and the F200 disk have the data set name RACF.DATASET, and this caused the utility to fail. Attaching the F200 minidisk at 400 instead worked fine because the utility makes no assumptions about the name of the data set that should appear at device 400.
3.3.8 RACF recovery options
If a system availability issue occurs, it might be necessary to recover RACF data from a backup. There might also be circumstances that prevent the RACFVM server from starting. This section introduces some basic methods to use to perform recovery of RACF.
Recovery of the RACF primary databaseIf the RACF primary database is unavailable or in error, there are a couple of options available:
� If the backup database is valid, you can use RACUT200 to copy the valid backup to the primary volume.
� If there is no backup, you can restore the most recent dump of the database by using either a DDR or RACF utility.
We illustrate a scenario where we must recover the RACF primary database disk from the backup we took by using the procedure in “Making an additional backup” on page 82.
If RACF cannot startRACF has an operation mode called failsoft processing that it adopts if there are no primary databases available. In failsoft processing, if RACF cannot authorize an access request by using in-memory tables, it prompts the operator for a decision on the access request.
Note: Chapter 7, “Recovery procedures”, in z/VM V6.3 RACF Security Server System Programmer's Guide, SC24-6219 outlines full details of the recovery procedures for events that can compromise RACF operation. For more information about RACF recovery, or for any specific scenarios that we have not covered here, see that book.
Chapter 3. IBM Resource Access Control Facility Security Server for IBM z/VM 85

86 Securing Your Cloud: IBM z/VM Security for IBM z Systems and LinuxONE
Chapter 4. Security Policy Management on IBM z/VM
Most organizations have a security policy that typically states the rules for controlling access to data. There also are statements for data ownership and there are rules about granting the least access that is necessary for each role.
However, there might be few instructions about the practical scenario of implementation. There might be little mention of any of the IT platforms that are involved. Thus, there might be little or no link between that policy and the security procedures that must exist.
Organizations find a great benefit in having documentation that relates the policy to the platform, and for each software product that needs security-related configuration. It should be possible to see the line from policy to procedures, and see that the policy is enforced in the implementation environment.
This chapter provides an overview of how to implement some of the common statements that are defined on a security policy.
This chapter describes the following topics:
� User ID management� Communication encryption� Single System Image Security� Auditing
4
© Copyright IBM Corp. 2016. All rights reserved. 87
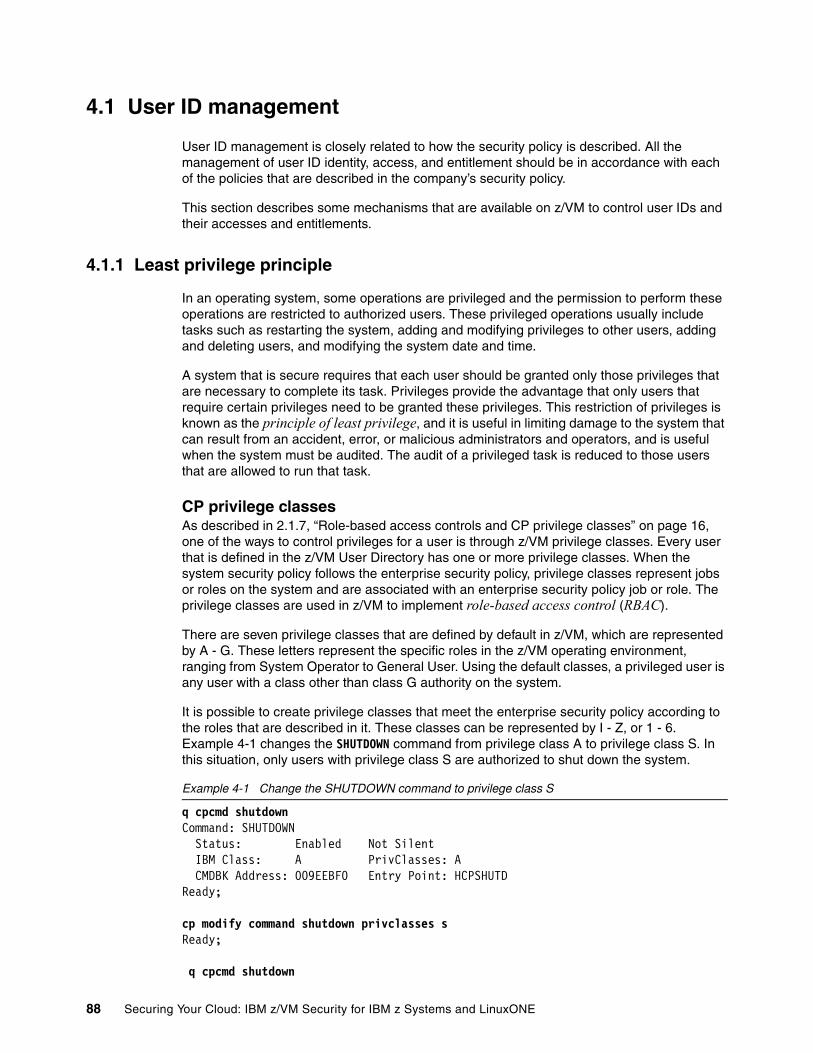
4.1 User ID management
User ID management is closely related to how the security policy is described. All the management of user ID identity, access, and entitlement should be in accordance with each of the policies that are described in the company’s security policy.
This section describes some mechanisms that are available on z/VM to control user IDs and their accesses and entitlements.
4.1.1 Least privilege principle
In an operating system, some operations are privileged and the permission to perform these operations are restricted to authorized users. These privileged operations usually include tasks such as restarting the system, adding and modifying privileges to other users, adding and deleting users, and modifying the system date and time.
A system that is secure requires that each user should be granted only those privileges that are necessary to complete its task. Privileges provide the advantage that only users that require certain privileges need to be granted these privileges. This restriction of privileges is known as the principle of least privilege, and it is useful in limiting damage to the system that can result from an accident, error, or malicious administrators and operators, and is useful when the system must be audited. The audit of a privileged task is reduced to those users that are allowed to run that task.
CP privilege classesAs described in 2.1.7, “Role-based access controls and CP privilege classes” on page 16, one of the ways to control privileges for a user is through z/VM privilege classes. Every user that is defined in the z/VM User Directory has one or more privilege classes. When the system security policy follows the enterprise security policy, privilege classes represent jobs or roles on the system and are associated with an enterprise security policy job or role. The privilege classes are used in z/VM to implement role-based access control (RBAC).
There are seven privilege classes that are defined by default in z/VM, which are represented by A - G. These letters represent the specific roles in the z/VM operating environment, ranging from System Operator to General User. Using the default classes, a privileged user is any user with a class other than class G authority on the system.
It is possible to create privilege classes that meet the enterprise security policy according to the roles that are described in it. These classes can be represented by I - Z, or 1 - 6. Example 4-1 changes the SHUTDOWN command from privilege class A to privilege class S. In this situation, only users with privilege class S are authorized to shut down the system.
Example 4-1 Change the SHUTDOWN command to privilege class S
q cpcmd shutdown Command: SHUTDOWN Status: Enabled Not Silent IBM Class: A PrivClasses: A CMDBK Address: 009EEBF0 Entry Point: HCPSHUTDReady;
cp modify command shutdown privclasses s Ready;
q cpcmd shutdown
88 Securing Your Cloud: IBM z/VM Security for IBM z Systems and LinuxONE
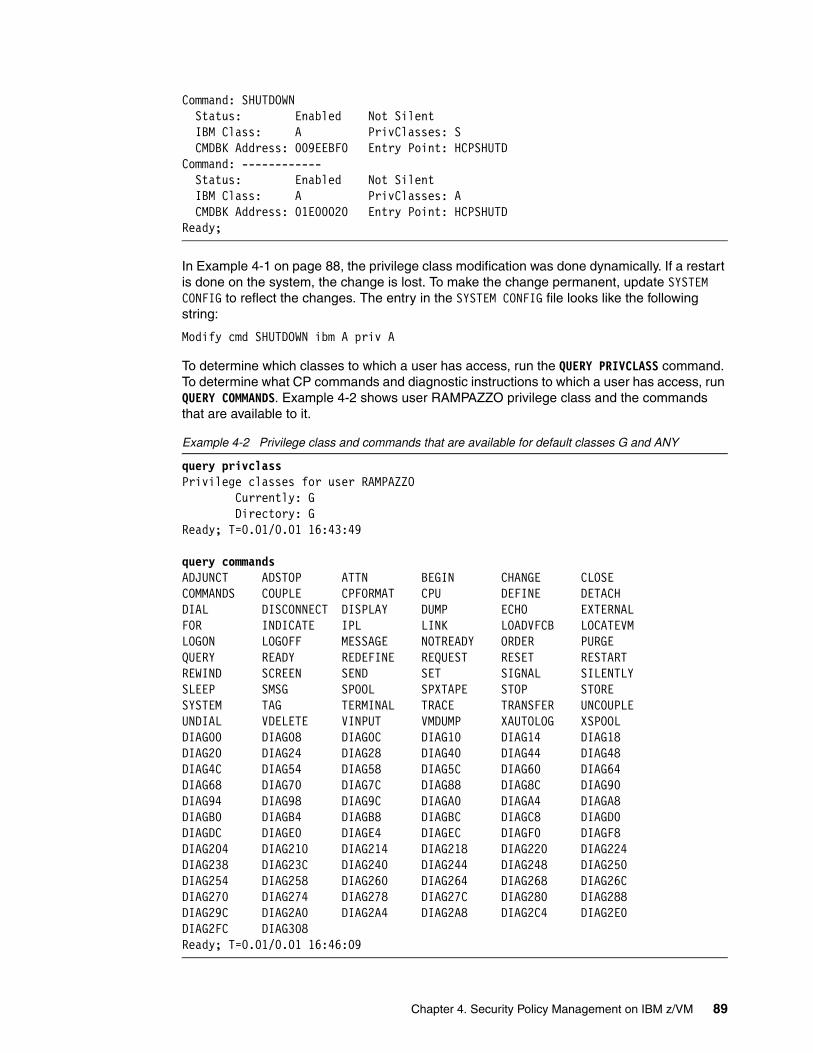
Command: SHUTDOWN Status: Enabled Not Silent IBM Class: A PrivClasses: S CMDBK Address: 009EEBF0 Entry Point: HCPSHUTDCommand: ------------ Status: Enabled Not Silent IBM Class: A PrivClasses: A CMDBK Address: 01E00020 Entry Point: HCPSHUTDReady;
In Example 4-1 on page 88, the privilege class modification was done dynamically. If a restart is done on the system, the change is lost. To make the change permanent, update SYSTEM CONFIG to reflect the changes. The entry in the SYSTEM CONFIG file looks like the following string:
Modify cmd SHUTDOWN ibm A priv A
To determine which classes to which a user has access, run the QUERY PRIVCLASS command. To determine what CP commands and diagnostic instructions to which a user has access, run QUERY COMMANDS. Example 4-2 shows user RAMPAZZO privilege class and the commands that are available to it.
Example 4-2 Privilege class and commands that are available for default classes G and ANY
query privclass Privilege classes for user RAMPAZZO Currently: G Directory: G Ready; T=0.01/0.01 16:43:49
query commands ADJUNCT ADSTOP ATTN BEGIN CHANGE CLOSE COMMANDS COUPLE CPFORMAT CPU DEFINE DETACH DIAL DISCONNECT DISPLAY DUMP ECHO EXTERNAL FOR INDICATE IPL LINK LOADVFCB LOCATEVM LOGON LOGOFF MESSAGE NOTREADY ORDER PURGE QUERY READY REDEFINE REQUEST RESET RESTART REWIND SCREEN SEND SET SIGNAL SILENTLY SLEEP SMSG SPOOL SPXTAPE STOP STORE SYSTEM TAG TERMINAL TRACE TRANSFER UNCOUPLE UNDIAL VDELETE VINPUT VMDUMP XAUTOLOG XSPOOL DIAG00 DIAG08 DIAG0C DIAG10 DIAG14 DIAG18 DIAG20 DIAG24 DIAG28 DIAG40 DIAG44 DIAG48 DIAG4C DIAG54 DIAG58 DIAG5C DIAG60 DIAG64 DIAG68 DIAG70 DIAG7C DIAG88 DIAG8C DIAG90 DIAG94 DIAG98 DIAG9C DIAGA0 DIAGA4 DIAGA8 DIAGB0 DIAGB4 DIAGB8 DIAGBC DIAGC8 DIAGD0 DIAGDC DIAGE0 DIAGE4 DIAGEC DIAGF0 DIAGF8 DIAG204 DIAG210 DIAG214 DIAG218 DIAG220 DIAG224 DIAG238 DIAG23C DIAG240 DIAG244 DIAG248 DIAG250 DIAG254 DIAG258 DIAG260 DIAG264 DIAG268 DIAG26C DIAG270 DIAG274 DIAG278 DIAG27C DIAG280 DIAG288 DIAG29C DIAG2A0 DIAG2A4 DIAG2A8 DIAG2C4 DIAG2E0 DIAG2FC DIAG308 Ready; T=0.01/0.01 16:46:09
Chapter 4. Security Policy Management on IBM z/VM 89
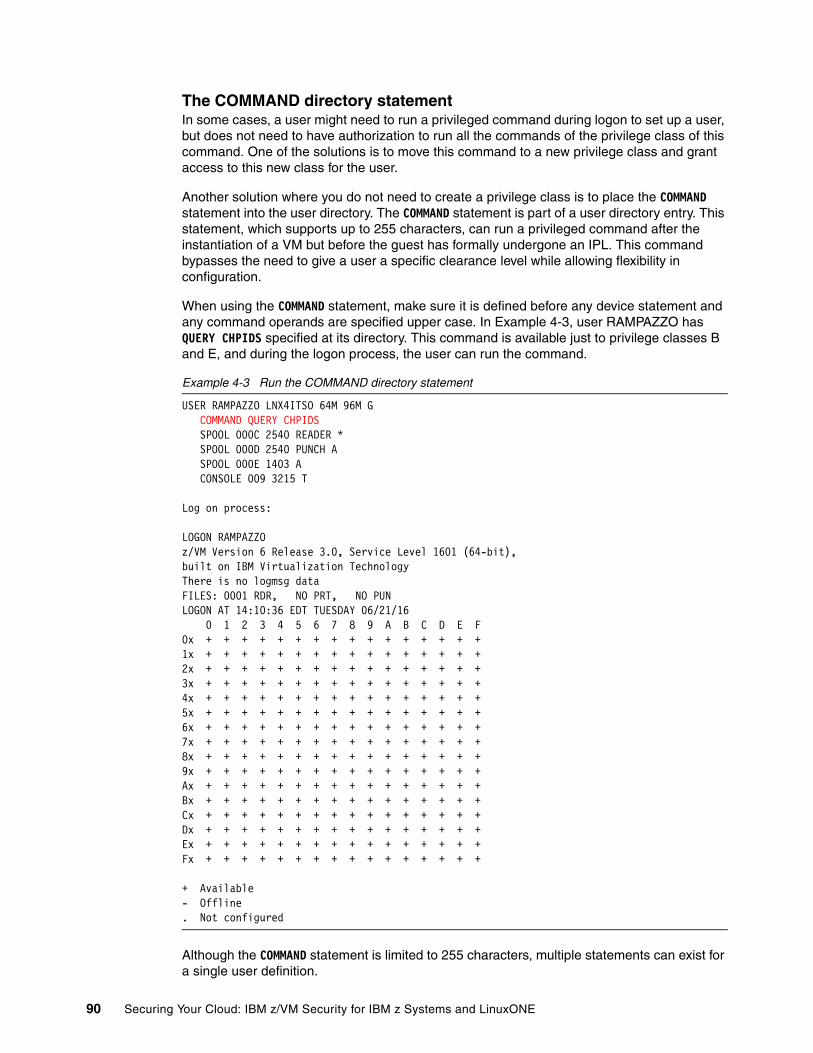
The COMMAND directory statementIn some cases, a user might need to run a privileged command during logon to set up a user, but does not need to have authorization to run all the commands of the privilege class of this command. One of the solutions is to move this command to a new privilege class and grant access to this new class for the user.
Another solution where you do not need to create a privilege class is to place the COMMAND statement into the user directory. The COMMAND statement is part of a user directory entry. This statement, which supports up to 255 characters, can run a privileged command after the instantiation of a VM but before the guest has formally undergone an IPL. This command bypasses the need to give a user a specific clearance level while allowing flexibility in configuration.
When using the COMMAND statement, make sure it is defined before any device statement and any command operands are specified upper case. In Example 4-3, user RAMPAZZO has QUERY CHPIDS specified at its directory. This command is available just to privilege classes B and E, and during the logon process, the user can run the command.
Example 4-3 Run the COMMAND directory statement
USER RAMPAZZO LNX4ITSO 64M 96M G COMMAND QUERY CHPIDS SPOOL 000C 2540 READER * SPOOL 000D 2540 PUNCH A SPOOL 000E 1403 A CONSOLE 009 3215 T
Log on process:
LOGON RAMPAZZO z/VM Version 6 Release 3.0, Service Level 1601 (64-bit),built on IBM Virtualization Technology There is no logmsg data FILES: 0001 RDR, NO PRT, NO PUN LOGON AT 14:10:36 EDT TUESDAY 06/21/16 0 1 2 3 4 5 6 7 8 9 A B C D E F 0x + + + + + + + + + + + + + + + + 1x + + + + + + + + + + + + + + + + 2x + + + + + + + + + + + + + + + + 3x + + + + + + + + + + + + + + + + 4x + + + + + + + + + + + + + + + + 5x + + + + + + + + + + + + + + + + 6x + + + + + + + + + + + + + + + + 7x + + + + + + + + + + + + + + + + 8x + + + + + + + + + + + + + + + + 9x + + + + + + + + + + + + + + + + Ax + + + + + + + + + + + + + + + + Bx + + + + + + + + + + + + + + + + Cx + + + + + + + + + + + + + + + + Dx + + + + + + + + + + + + + + + + Ex + + + + + + + + + + + + + + + + Fx + + + + + + + + + + + + + + + + + Available - Offline . Not configured
Although the COMMAND statement is limited to 255 characters, multiple statements can exist for a single user definition.
90 Securing Your Cloud: IBM z/VM Security for IBM z Systems and LinuxONE
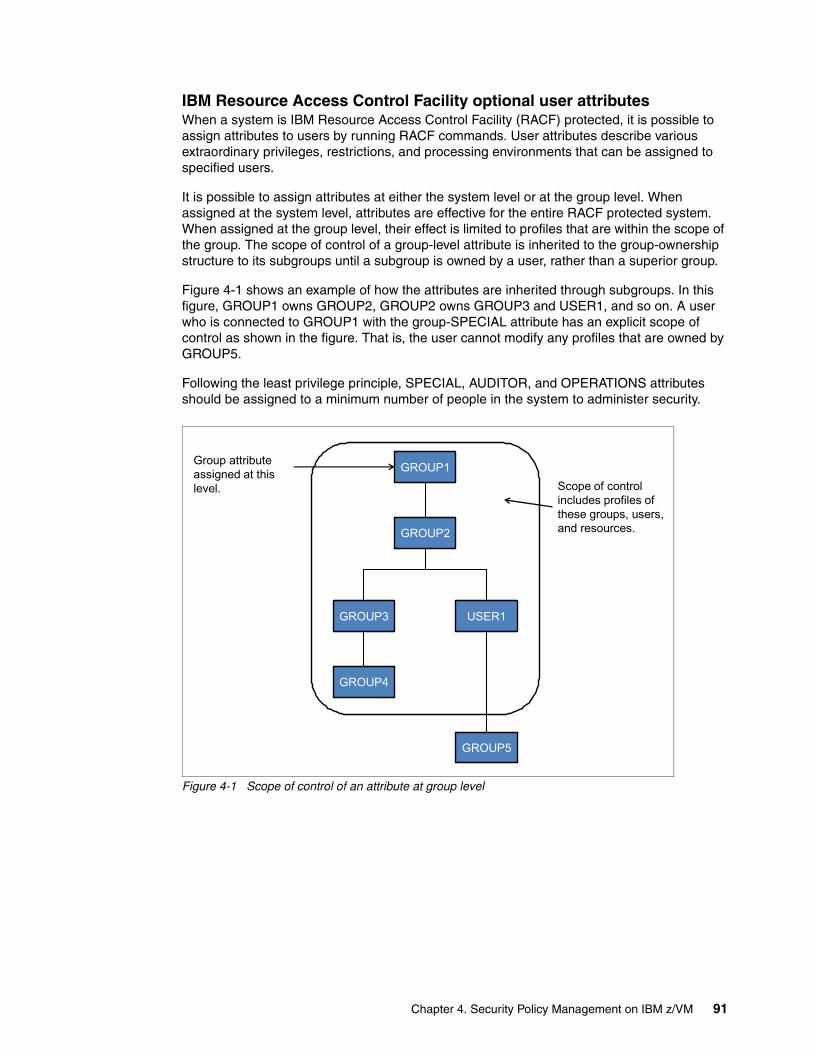
IBM Resource Access Control Facility optional user attributesWhen a system is IBM Resource Access Control Facility (RACF) protected, it is possible to assign attributes to users by running RACF commands. User attributes describe various extraordinary privileges, restrictions, and processing environments that can be assigned to specified users.
It is possible to assign attributes at either the system level or at the group level. When assigned at the system level, attributes are effective for the entire RACF protected system. When assigned at the group level, their effect is limited to profiles that are within the scope of the group. The scope of control of a group-level attribute is inherited to the group-ownership structure to its subgroups until a subgroup is owned by a user, rather than a superior group.
Figure 4-1 shows an example of how the attributes are inherited through subgroups. In this figure, GROUP1 owns GROUP2, GROUP2 owns GROUP3 and USER1, and so on. A user who is connected to GROUP1 with the group-SPECIAL attribute has an explicit scope of control as shown in the figure. That is, the user cannot modify any profiles that are owned by GROUP5.
Following the least privilege principle, SPECIAL, AUDITOR, and OPERATIONS attributes should be assigned to a minimum number of people in the system to administer security.
Figure 4-1 Scope of control of an attribute at group level
GROUP1
GROUP2
GROUP3
GROUP4
USER1
GROUP5
Group attribute assigned at this level. Scope of control
includes profiles of these groups, users, and resources.
Chapter 4. Security Policy Management on IBM z/VM 91
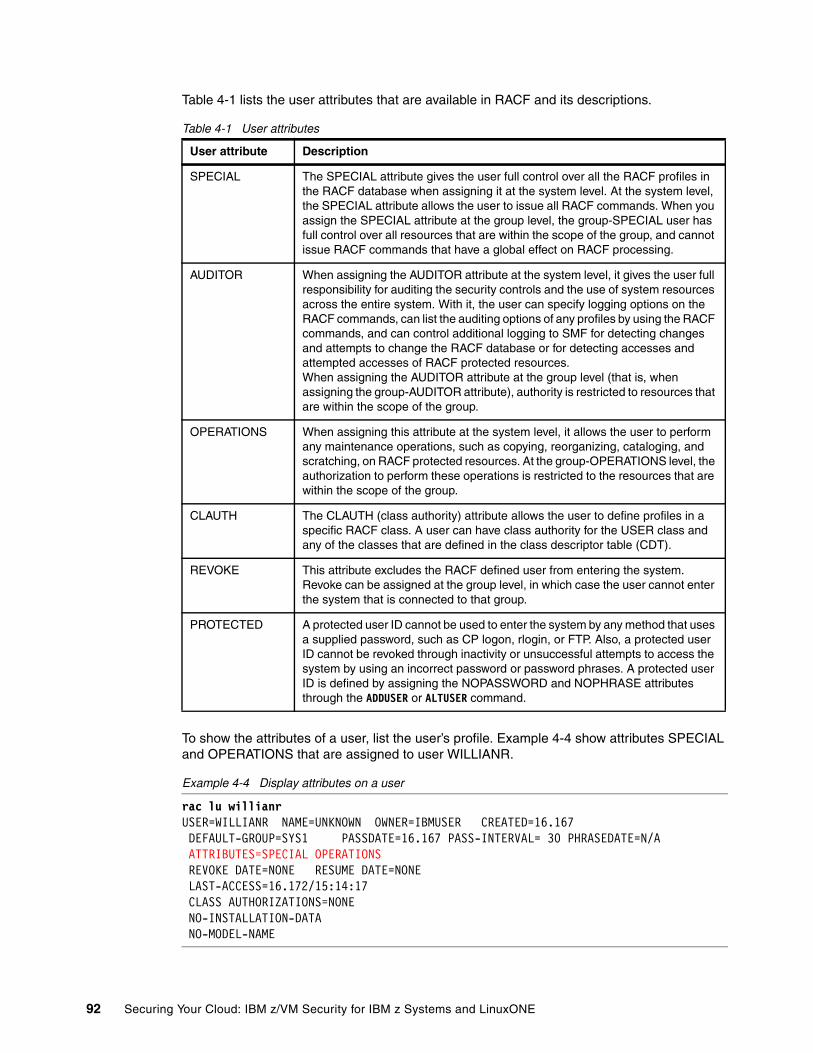
Table 4-1 lists the user attributes that are available in RACF and its descriptions.
Table 4-1 User attributes
To show the attributes of a user, list the user’s profile. Example 4-4 show attributes SPECIAL and OPERATIONS that are assigned to user WILLIANR.
Example 4-4 Display attributes on a user
rac lu willianr USER=WILLIANR NAME=UNKNOWN OWNER=IBMUSER CREATED=16.167 DEFAULT-GROUP=SYS1 PASSDATE=16.167 PASS-INTERVAL= 30 PHRASEDATE=N/A ATTRIBUTES=SPECIAL OPERATIONS REVOKE DATE=NONE RESUME DATE=NONE LAST-ACCESS=16.172/15:14:17 CLASS AUTHORIZATIONS=NONE NO-INSTALLATION-DATA NO-MODEL-NAME
User attribute Description
SPECIAL The SPECIAL attribute gives the user full control over all the RACF profiles in the RACF database when assigning it at the system level. At the system level, the SPECIAL attribute allows the user to issue all RACF commands. When you assign the SPECIAL attribute at the group level, the group-SPECIAL user has full control over all resources that are within the scope of the group, and cannot issue RACF commands that have a global effect on RACF processing.
AUDITOR When assigning the AUDITOR attribute at the system level, it gives the user full responsibility for auditing the security controls and the use of system resources across the entire system. With it, the user can specify logging options on the RACF commands, can list the auditing options of any profiles by using the RACF commands, and can control additional logging to SMF for detecting changes and attempts to change the RACF database or for detecting accesses and attempted accesses of RACF protected resources.When assigning the AUDITOR attribute at the group level (that is, when assigning the group-AUDITOR attribute), authority is restricted to resources that are within the scope of the group.
OPERATIONS When assigning this attribute at the system level, it allows the user to perform any maintenance operations, such as copying, reorganizing, cataloging, and scratching, on RACF protected resources. At the group-OPERATIONS level, the authorization to perform these operations is restricted to the resources that are within the scope of the group.
CLAUTH The CLAUTH (class authority) attribute allows the user to define profiles in a specific RACF class. A user can have class authority for the USER class and any of the classes that are defined in the class descriptor table (CDT).
REVOKE This attribute excludes the RACF defined user from entering the system. Revoke can be assigned at the group level, in which case the user cannot enter the system that is connected to that group.
PROTECTED A protected user ID cannot be used to enter the system by any method that uses a supplied password, such as CP logon, rlogin, or FTP. Also, a protected user ID cannot be revoked through inactivity or unsuccessful attempts to access the system by using an incorrect password or password phrases. A protected user ID is defined by assigning the NOPASSWORD and NOPHRASE attributes through the ADDUSER or ALTUSER command.
92 Securing Your Cloud: IBM z/VM Security for IBM z Systems and LinuxONE
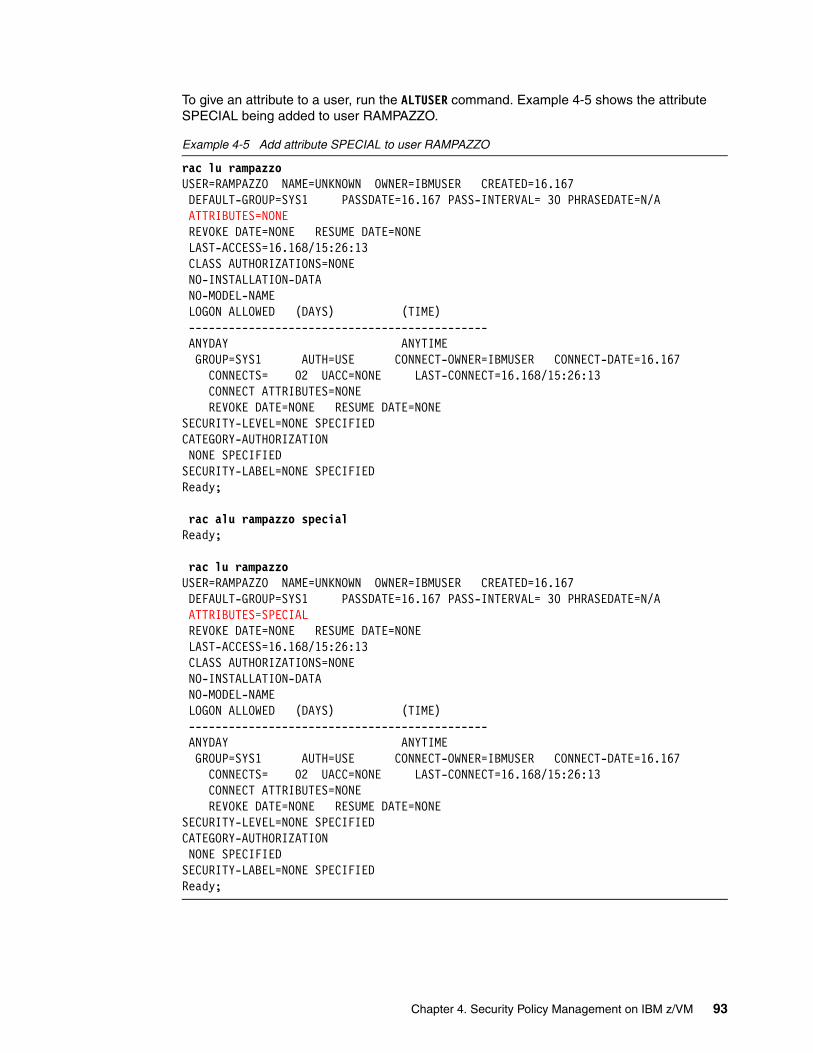
To give an attribute to a user, run the ALTUSER command. Example 4-5 shows the attribute SPECIAL being added to user RAMPAZZO.
Example 4-5 Add attribute SPECIAL to user RAMPAZZO
rac lu rampazzo USER=RAMPAZZO NAME=UNKNOWN OWNER=IBMUSER CREATED=16.167 DEFAULT-GROUP=SYS1 PASSDATE=16.167 PASS-INTERVAL= 30 PHRASEDATE=N/A ATTRIBUTES=NONE REVOKE DATE=NONE RESUME DATE=NONE LAST-ACCESS=16.168/15:26:13 CLASS AUTHORIZATIONS=NONE NO-INSTALLATION-DATA NO-MODEL-NAME LOGON ALLOWED (DAYS) (TIME) --------------------------------------------- ANYDAY ANYTIME GROUP=SYS1 AUTH=USE CONNECT-OWNER=IBMUSER CONNECT-DATE=16.167 CONNECTS= 02 UACC=NONE LAST-CONNECT=16.168/15:26:13 CONNECT ATTRIBUTES=NONE REVOKE DATE=NONE RESUME DATE=NONE SECURITY-LEVEL=NONE SPECIFIED CATEGORY-AUTHORIZATION NONE SPECIFIED SECURITY-LABEL=NONE SPECIFIED Ready;
rac alu rampazzo special Ready;
rac lu rampazzo USER=RAMPAZZO NAME=UNKNOWN OWNER=IBMUSER CREATED=16.167 DEFAULT-GROUP=SYS1 PASSDATE=16.167 PASS-INTERVAL= 30 PHRASEDATE=N/A ATTRIBUTES=SPECIAL REVOKE DATE=NONE RESUME DATE=NONE LAST-ACCESS=16.168/15:26:13 CLASS AUTHORIZATIONS=NONE NO-INSTALLATION-DATA NO-MODEL-NAME LOGON ALLOWED (DAYS) (TIME) --------------------------------------------- ANYDAY ANYTIME GROUP=SYS1 AUTH=USE CONNECT-OWNER=IBMUSER CONNECT-DATE=16.167 CONNECTS= 02 UACC=NONE LAST-CONNECT=16.168/15:26:13 CONNECT ATTRIBUTES=NONE REVOKE DATE=NONE RESUME DATE=NONE SECURITY-LEVEL=NONE SPECIFIED CATEGORY-AUTHORIZATION NONE SPECIFIED SECURITY-LABEL=NONE SPECIFIED Ready;
Chapter 4. Security Policy Management on IBM z/VM 93

To remove an attribute from a user, run the ALTUSER command. Example 4-6 shows removal of the SPECIAL attribute from user RAMPAZZO.
Example 4-6 Remove the SPECIAL attribute from user RAMPAZZO
rac lu rampazzo USER=RAMPAZZO NAME=UNKNOWN OWNER=IBMUSER CREATED=16.167 DEFAULT-GROUP=SYS1 PASSDATE=16.167 PASS-INTERVAL= 30 PHRASEDATE=N/A ATTRIBUTES=SPECIAL REVOKE DATE=NONE RESUME DATE=NONE LAST-ACCESS=16.168/15:26:13 CLASS AUTHORIZATIONS=NONE NO-INSTALLATION-DATA NO-MODEL-NAME LOGON ALLOWED (DAYS) (TIME) --------------------------------------------- ANYDAY ANYTIME GROUP=SYS1 AUTH=USE CONNECT-OWNER=IBMUSER CONNECT-DATE=16.167 CONNECTS= 02 UACC=NONE LAST-CONNECT=16.168/15:26:13 CONNECT ATTRIBUTES=NONE REVOKE DATE=NONE RESUME DATE=NONE SECURITY-LEVEL=NONE SPECIFIED CATEGORY-AUTHORIZATION NONE SPECIFIED SECURITY-LABEL=NONE SPECIFIED Ready;
rac alu rampazzo nospecial Ready;
rac lu rampazzo USER=RAMPAZZO NAME=UNKNOWN OWNER=IBMUSER CREATED=16.167 DEFAULT-GROUP=SYS1 PASSDATE=16.167 PASS-INTERVAL= 30 PHRASEDATE=N/A ATTRIBUTES=NONE REVOKE DATE=NONE RESUME DATE=NONE LAST-ACCESS=16.168/15:26:13 CLASS AUTHORIZATIONS=NONE NO-INSTALLATION-DATA NO-MODEL-NAME LOGON ALLOWED (DAYS) (TIME) --------------------------------------------- ANYDAY ANYTIME GROUP=SYS1 AUTH=USE CONNECT-OWNER=IBMUSER CONNECT-DATE=16.167 CONNECTS= 02 UACC=NONE LAST-CONNECT=16.168/15:26:13 CONNECT ATTRIBUTES=NONE REVOKE DATE=NONE RESUME DATE=NONE SECURITY-LEVEL=NONE SPECIFIED CATEGORY-AUTHORIZATION NONE SPECIFIED SECURITY-LABEL=NONE SPECIFIED Ready;
More information about RACF attributes can be found in RACF Security Server Security Administrator’s Guide, SC24-6218.
94 Securing Your Cloud: IBM z/VM Security for IBM z Systems and LinuxONE
4.1.2 RACF passwords and password phrases
Since RACF FL 530, it is possible to define password phrases for z/VM user IDs. With APAR VM65719 from September 2015, many password and security policy enhancements were introduced.
It is important to understand that passwords and password phrases are two different things. Passwords are upper case by default or can be mixed case, if enabled with the RAC SETROPTS PASSWORD(MIXEDCASE) command, and password phrases are mixed case by default. Passwords are 1 - 8 characters, and password phrases that use the default installation can be 14 - 100 characters. A user can be assigned a password, a password phrase, or both.
The default operation when creating a user profile is to not have a default value that is assigned to either the password or the password phrase. The user is a protected user and cannot log on. This is the preferable situation for disconnected service machines or guests user IDs.
For human IDs, the enterprise security policy defines what kind of authenticator should be used. The initial password or password phrase of a user is not assigned by them. When assigned a password or password phrase, the user can change that value at any time, but will not be able to remove it. When assigning the value for a user for the first time, make sure it is difficult to guess so the user has enough time to change it before someone else does. By default, the user ID is forced to change this initial value the first time it is used.
This section demonstrates how to implement both functions.
Password and password phrases rulesYour organization’s security policy is likely to have a section describing the rules that govern system passwords. On z/VM with RACF installed, these rules are implemented with the RACF SETROPTS commands by a user with the SPECIAL attribute. There are several parameters that control password requirements:
� Password change interval� Inactive virtual machine (VM) intervals� When access is revoked because of unsuccessful login attempts� Password history (password reuse)
For example, here is a list of password and password phrases policies:
� RAC SETROPTS PASSWORD(INTERVAL(90) defines the change interval to 90 days.
� RAC SETROPTS PASSWORD(MINCHANGE(5) specifies that users cannot change their passwords more than once in 5 days, for example).
� RAC SETROPTS INACTIVE(30) revokes a user ID if it is unused for more than 30 days.
� RAC SETROPTS PASSWORD(REVOKE(4)) defines the limit of successive incorrect use of passwords or password phrases before revoking the user.
� RAC SETROPTS PASSWORD(HISTORY(6)) defines the number of previous passwords and password phrases that RACF saves for each user to avoid duplication.
Password syntax rulesPassword syntax rules include (up to eight syntax rules) the following items:
� Password length
� Password character requirements (vowels, numbers, and so on)
� Password in mixed case
Chapter 4. Security Policy Management on IBM z/VM 95
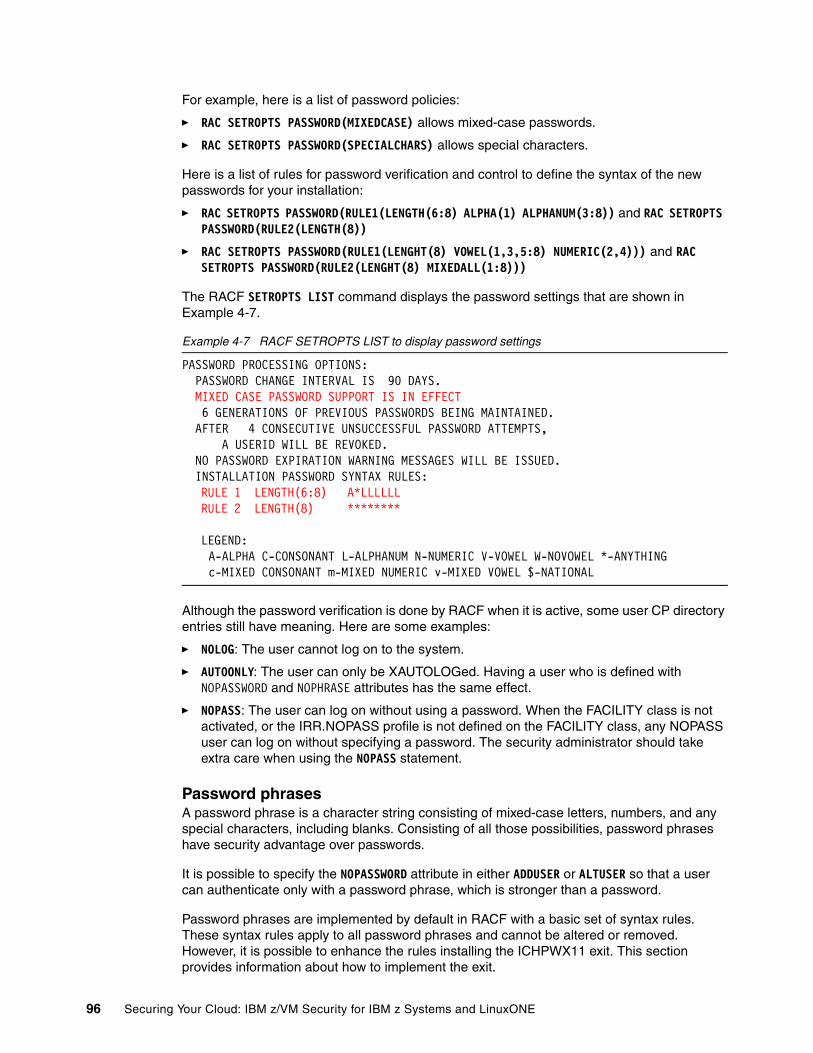
For example, here is a list of password policies:
� RAC SETROPTS PASSWORD(MIXEDCASE) allows mixed-case passwords.
� RAC SETROPTS PASSWORD(SPECIALCHARS) allows special characters.
Here is a list of rules for password verification and control to define the syntax of the new passwords for your installation:
� RAC SETROPTS PASSWORD(RULE1(LENGTH(6:8) ALPHA(1) ALPHANUM(3:8)) and RAC SETROPTS PASSWORD(RULE2(LENGTH(8))
� RAC SETROPTS PASSWORD(RULE1(LENGHT(8) VOWEL(1,3,5:8) NUMERIC(2,4))) and RAC SETROPTS PASSWORD(RULE2(LENGHT(8) MIXEDALL(1:8)))
The RACF SETROPTS LIST command displays the password settings that are shown in Example 4-7.
Example 4-7 RACF SETROPTS LIST to display password settings
PASSWORD PROCESSING OPTIONS: PASSWORD CHANGE INTERVAL IS 90 DAYS. MIXED CASE PASSWORD SUPPORT IS IN EFFECT 6 GENERATIONS OF PREVIOUS PASSWORDS BEING MAINTAINED. AFTER 4 CONSECUTIVE UNSUCCESSFUL PASSWORD ATTEMPTS, A USERID WILL BE REVOKED. NO PASSWORD EXPIRATION WARNING MESSAGES WILL BE ISSUED. INSTALLATION PASSWORD SYNTAX RULES:
RULE 1 LENGTH(6:8) A*LLLLLL RULE 2 LENGTH(8) ********
LEGEND: A-ALPHA C-CONSONANT L-ALPHANUM N-NUMERIC V-VOWEL W-NOVOWEL *-ANYTHING c-MIXED CONSONANT m-MIXED NUMERIC v-MIXED VOWEL $-NATIONAL
Although the password verification is done by RACF when it is active, some user CP directory entries still have meaning. Here are some examples:
� NOLOG: The user cannot log on to the system.
� AUTOONLY: The user can only be XAUTOLOGed. Having a user who is defined with NOPASSWORD and NOPHRASE attributes has the same effect.
� NOPASS: The user can log on without using a password. When the FACILITY class is not activated, or the IRR.NOPASS profile is not defined on the FACILITY class, any NOPASS user can log on without specifying a password. The security administrator should take extra care when using the NOPASS statement.
Password phrasesA password phrase is a character string consisting of mixed-case letters, numbers, and any special characters, including blanks. Consisting of all those possibilities, password phrases have security advantage over passwords.
It is possible to specify the NOPASSWORD attribute in either ADDUSER or ALTUSER so that a user can authenticate only with a password phrase, which is stronger than a password.
Password phrases are implemented by default in RACF with a basic set of syntax rules. These syntax rules apply to all password phrases and cannot be altered or removed. However, it is possible to enhance the rules installing the ICHPWX11 exit. This section provides information about how to implement the exit.
96 Securing Your Cloud: IBM z/VM Security for IBM z Systems and LinuxONE
RACF has the option of using the new password phrase exit, ICHPWX11, to enhance RACF function when validating a new password phrase. This exit runs a REXX exec IRRPHREX. A sample is shipped by IBM in source form on the RACFVM 305 disk and consists of the exit itself, ICHPWX11, and a REXX exec named IRRPHREX. ICHPWX11 must be installed as described in RACF Security Server System Programmer’s Guide, SC24-6219. As shipped, all the checks are disabled and the exec is functionally equivalent to having no exit, but the following checks can be enabled in the REXX exec:
� Minimum length� Maximum length� List of allowable characters� Leading blanks that are allowed or not� Trailing blanks that are allowed or not� Words in user name that is allowed or not� Triviality checks� Minimum unique characters by position from old password phrase� Minimum unique words from old password phrase� Dictionary check (hard coded list of words)
The exit gains control when a new password phrase is processed. It can examine the value that is specified for the password phrase and enforce installation rules in addition to the RACF rules. For example, although RACF does not allow the user ID to be part of the password phrase, the exit can perform more complex tests such disallow the company name, the names of months, and the current year in the password phrase.
The user of the new password phrase exit augments the RACF rules, but cannot override them. Be sure that the exit and the RACF rules do not contradict each other. For example, if the exit requires that the pass phrases contain all alphabetic characters, users cannot create password phrases because RACF requires at least two non-alphabetic characters. If you try to assign a phrase that conflicts the password rules, RACF does not accept the new phrase and displays the following message:
ICH21039I NEW PASS PHRASE REJECTED BY RACF RULES
The interval value that is specified on the PASSWORD command applies to both passwords and password phrases. It continues to be processed by the new password exit, ICHPWX01, and is not passed to the ICHPWX11 exit.
The steps to implement password phrases for RACF are documented in RACF Security Server System Programmer’s Guide, SC24-6149. The HLASM product is required to assemble the ICHPWX11 file. If HLASM is not available, IBM provides a TEXT file already assembled that can be used, as described on step 4.
Complete the following steps on the 6VMRAC30 VM:
1. Run access 590 t.
2. Run vmfsetup 6vmrac30 racf.
3. Run copy ichpwx11 assemble k = = e.
4. If HLASM is not available, then complete the following steps:
a. Run copy ichpwx11 text k = txt00000 e.
b. Go to step 11 on page 98.
Chapter 4. Security Policy Management on IBM z/VM 97
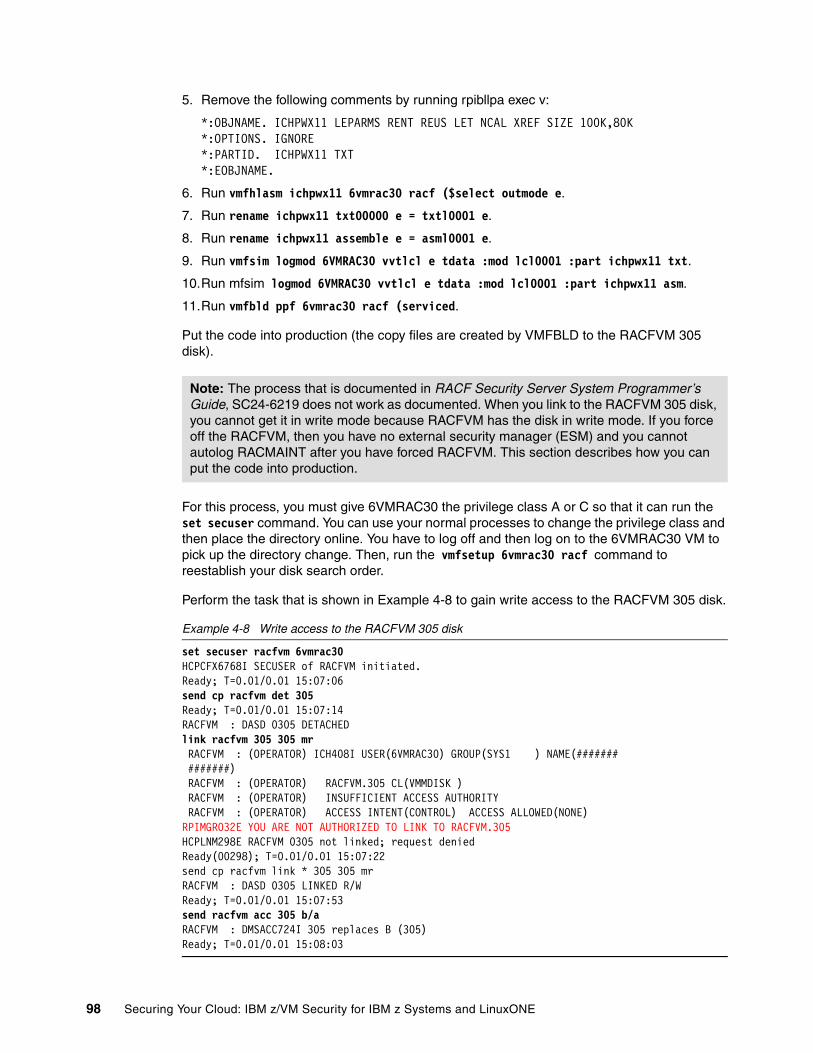
5. Remove the following comments by running rpibllpa exec v:
*:OBJNAME. ICHPWX11 LEPARMS RENT REUS LET NCAL XREF SIZE 100K,80K*:OPTIONS. IGNORE *:PARTID. ICHPWX11 TXT *:EOBJNAME.
6. Run vmfhlasm ichpwx11 6vmrac30 racf ($select outmode e.
7. Run rename ichpwx11 txt00000 e = txtl0001 e.
8. Run rename ichpwx11 assemble e = asml0001 e.
9. Run vmfsim logmod 6VMRAC30 vvtlcl e tdata :mod lcl0001 :part ichpwx11 txt.
10.Run mfsim logmod 6VMRAC30 vvtlcl e tdata :mod lcl0001 :part ichpwx11 asm.
11.Run vmfbld ppf 6vmrac30 racf (serviced.
Put the code into production (the copy files are created by VMFBLD to the RACFVM 305 disk).
For this process, you must give 6VMRAC30 the privilege class A or C so that it can run the set secuser command. You can use your normal processes to change the privilege class and then place the directory online. You have to log off and then log on to the 6VMRAC30 VM to pick up the directory change. Then, run the vmfsetup 6vmrac30 racf command to reestablish your disk search order.
Perform the task that is shown in Example 4-8 to gain write access to the RACFVM 305 disk.
Example 4-8 Write access to the RACFVM 305 disk
set secuser racfvm 6vmrac30 HCPCFX6768I SECUSER of RACFVM initiated. Ready; T=0.01/0.01 15:07:06 send cp racfvm det 305 Ready; T=0.01/0.01 15:07:14 RACFVM : DASD 0305 DETACHED link racfvm 305 305 mr RACFVM : (OPERATOR) ICH408I USER(6VMRAC30) GROUP(SYS1 ) NAME(####### #######) RACFVM : (OPERATOR) RACFVM.305 CL(VMMDISK ) RACFVM : (OPERATOR) INSUFFICIENT ACCESS AUTHORITY RACFVM : (OPERATOR) ACCESS INTENT(CONTROL) ACCESS ALLOWED(NONE) RPIMGR032E YOU ARE NOT AUTHORIZED TO LINK TO RACFVM.305 HCPLNM298E RACFVM 0305 not linked; request denied Ready(00298); T=0.01/0.01 15:07:22 send cp racfvm link * 305 305 mr RACFVM : DASD 0305 LINKED R/W Ready; T=0.01/0.01 15:07:53 send racfvm acc 305 b/a RACFVM : DMSACC724I 305 replaces B (305) Ready; T=0.01/0.01 15:08:03
Note: The process that is documented in RACF Security Server System Programmer’s Guide, SC24-6219 does not work as documented. When you link to the RACFVM 305 disk, you cannot get it in write mode because RACFVM has the disk in write mode. If you force off the RACFVM, then you have no external security manager (ESM) and you cannot autolog RACMAINT after you have forced RACFVM. This section describes how you can put the code into production.
98 Securing Your Cloud: IBM z/VM Security for IBM z Systems and LinuxONE
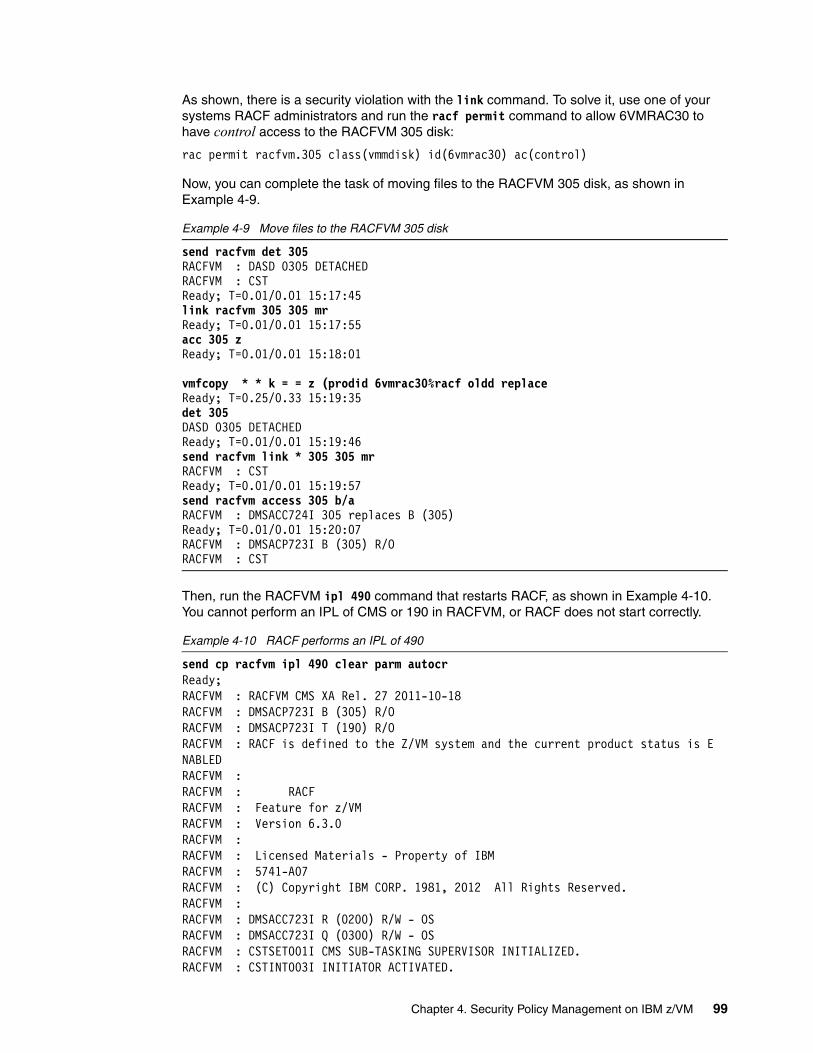
As shown, there is a security violation with the link command. To solve it, use one of your systems RACF administrators and run the racf permit command to allow 6VMRAC30 to have control access to the RACFVM 305 disk:
rac permit racfvm.305 class(vmmdisk) id(6vmrac30) ac(control)
Now, you can complete the task of moving files to the RACFVM 305 disk, as shown in Example 4-9.
Example 4-9 Move files to the RACFVM 305 disk
send racfvm det 305 RACFVM : DASD 0305 DETACHED RACFVM : CST Ready; T=0.01/0.01 15:17:45 link racfvm 305 305 mr Ready; T=0.01/0.01 15:17:55 acc 305 z Ready; T=0.01/0.01 15:18:01
vmfcopy * * k = = z (prodid 6vmrac30%racf oldd replace Ready; T=0.25/0.33 15:19:35 det 305 DASD 0305 DETACHED Ready; T=0.01/0.01 15:19:46 send racfvm link * 305 305 mr RACFVM : CST Ready; T=0.01/0.01 15:19:57 send racfvm access 305 b/a RACFVM : DMSACC724I 305 replaces B (305) Ready; T=0.01/0.01 15:20:07 RACFVM : DMSACP723I B (305) R/O RACFVM : CST
Then, run the RACFVM ipl 490 command that restarts RACF, as shown in Example 4-10. You cannot perform an IPL of CMS or 190 in RACFVM, or RACF does not start correctly.
Example 4-10 RACF performs an IPL of 490
send cp racfvm ipl 490 clear parm autocr Ready; RACFVM : RACFVM CMS XA Rel. 27 2011-10-18 RACFVM : DMSACP723I B (305) R/O RACFVM : DMSACP723I T (190) R/O RACFVM : RACF is defined to the Z/VM system and the current product status is ENABLED RACFVM : RACFVM : RACF RACFVM : Feature for z/VM RACFVM : Version 6.3.0 RACFVM : RACFVM : Licensed Materials - Property of IBM RACFVM : 5741-A07 RACFVM : (C) Copyright IBM CORP. 1981, 2012 All Rights Reserved. RACFVM : RACFVM : DMSACC723I R (0200) R/W - OS RACFVM : DMSACC723I Q (0300) R/W - OS RACFVM : CSTSET001I CMS SUB-TASKING SUPERVISOR INITIALIZED. RACFVM : CSTINT003I INITIATOR ACTIVATED.
Chapter 4. Security Policy Management on IBM z/VM 99

RACFVM : ICH508I ACTIVE RACF EXITS: ICHRCX02 RACFVM : ICH520I RACF 6.3.0 IS ACTIVE. RACFVM : RPISTR001I Program CSTDYNST Initiated. 15:37:15 * WNG FROM RACFVM : RACF/VM SERVICES ARE NOW AVAILABLE. RACFVM : * WNG FROM RACFVM : RACF/VM SERVICES ARE NOW AVAILABLE. RACFVM : RPISTR002I Program CSTDYNST Ended. Completion code = 000000. RACFVM : RPISTR003I Subtask RPIMSG Initiated. RACFVM : RPISTR003I Subtask RPIINIT Initiated. RACFVM : RPICLS104W - DEFAULT SETTINGS WERE MADE FOR ALL AUDITABLE AND RACFVM : CONTROLLABLE VM EVENTS. RACFVM : RPICLS123I RACF Extended password support registered with CP RACFVM : RPIMGR003I 15:37:15: CONNECTION COMPLETE TO CP ON PATHID 0000 RACFVM : RACF AUTHORIZATION COMMUNICATION INTERFACE READY set secuser racfvm reset
This completes the instructions about how to install the exit. At this point, the sample exit does not perform any additional function compared to having no exit. You should now adjust the exit to reflect your installation requirements.
Password phrase syntax rulesHere are password phrase syntax rules:
� Maximum length: 100 characters
� Minimum length:
– Nine characters when ICHPWX11 is present and allows the new value.
– Fourteen characters when ICHPWX11 is not present.
� Must not contain the user ID (as sequential uppercase or sequential lowercase characters).
� Must contain at least two alphabetic characters (A - Z, a - z).
� Must contain at least two non-alphabetic characters (numerics, punctuation, or special characters).
� Must not contain more than two consecutive characters that are identical.
� Must be enclosed in single quotation marks, with single quotation marks within the password phrase doubled. The quotation marks must be removed from the password phrases when RACF prompts at logon.
� Must not contain forward slashes, nulls (X’00’), or leading or trailing blanks.
Only a RACF administrator can assign the initial phrase. When assigned, the user can modify the phrase, and is prompted to change it by default the first time it is used to log on.
To disable the password function and enable a phrase, run the following command:
rac alu willianr nopassword phrase('it is friday')
When the VM WILLIANR logs on to the system, it is prompted to change the password. When changing the password from the logon prompt, do not use the quotation marks (for example, ‘red white blue’ should be red white blue).
Note: This process was the only way that you can allow the RACFVM 305 disk to be updated without a system outage. If you can accept the outage, then you should shut down the system and perform an IPL with the NOAUTOLOG parameter. Then, start RACMAINT as described previously.
100 Securing Your Cloud: IBM z/VM Security for IBM z Systems and LinuxONE
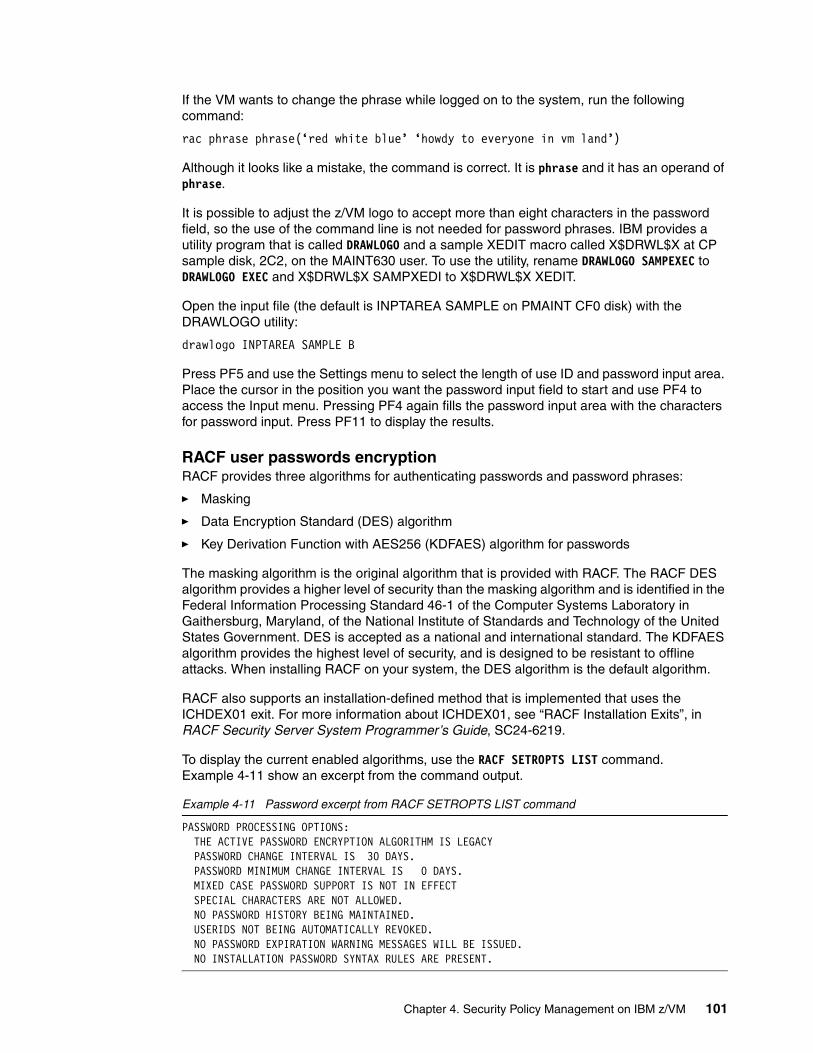
If the VM wants to change the phrase while logged on to the system, run the following command:
rac phrase phrase(‘red white blue’ ‘howdy to everyone in vm land’)
Although it looks like a mistake, the command is correct. It is phrase and it has an operand of phrase.
It is possible to adjust the z/VM logo to accept more than eight characters in the password field, so the use of the command line is not needed for password phrases. IBM provides a utility program that is called DRAWLOGO and a sample XEDIT macro called X$DRWL$X at CP sample disk, 2C2, on the MAINT630 user. To use the utility, rename DRAWLOGO SAMPEXEC to DRAWLOGO EXEC and X$DRWL$X SAMPXEDI to X$DRWL$X XEDIT.
Open the input file (the default is INPTAREA SAMPLE on PMAINT CF0 disk) with the DRAWLOGO utility:
drawlogo INPTAREA SAMPLE B
Press PF5 and use the Settings menu to select the length of use ID and password input area. Place the cursor in the position you want the password input field to start and use PF4 to access the Input menu. Pressing PF4 again fills the password input area with the characters for password input. Press PF11 to display the results.
RACF user passwords encryptionRACF provides three algorithms for authenticating passwords and password phrases:
� Masking
� Data Encryption Standard (DES) algorithm
� Key Derivation Function with AES256 (KDFAES) algorithm for passwords
The masking algorithm is the original algorithm that is provided with RACF. The RACF DES algorithm provides a higher level of security than the masking algorithm and is identified in the Federal Information Processing Standard 46-1 of the Computer Systems Laboratory in Gaithersburg, Maryland, of the National Institute of Standards and Technology of the United States Government. DES is accepted as a national and international standard. The KDFAES algorithm provides the highest level of security, and is designed to be resistant to offline attacks. When installing RACF on your system, the DES algorithm is the default algorithm.
RACF also supports an installation-defined method that is implemented that uses the ICHDEX01 exit. For more information about ICHDEX01, see “RACF Installation Exits”, in RACF Security Server System Programmer’s Guide, SC24-6219.
To display the current enabled algorithms, use the RACF SETROPTS LIST command. Example 4-11 show an excerpt from the command output.
Example 4-11 Password excerpt from RACF SETROPTS LIST command
PASSWORD PROCESSING OPTIONS: THE ACTIVE PASSWORD ENCRYPTION ALGORITHM IS LEGACY PASSWORD CHANGE INTERVAL IS 30 DAYS. PASSWORD MINIMUM CHANGE INTERVAL IS 0 DAYS. MIXED CASE PASSWORD SUPPORT IS NOT IN EFFECT SPECIAL CHARACTERS ARE NOT ALLOWED. NO PASSWORD HISTORY BEING MAINTAINED. USERIDS NOT BEING AUTOMATICALLY REVOKED. NO PASSWORD EXPIRATION WARNING MESSAGES WILL BE ISSUED. NO INSTALLATION PASSWORD SYNTAX RULES ARE PRESENT.
Chapter 4. Security Policy Management on IBM z/VM 101
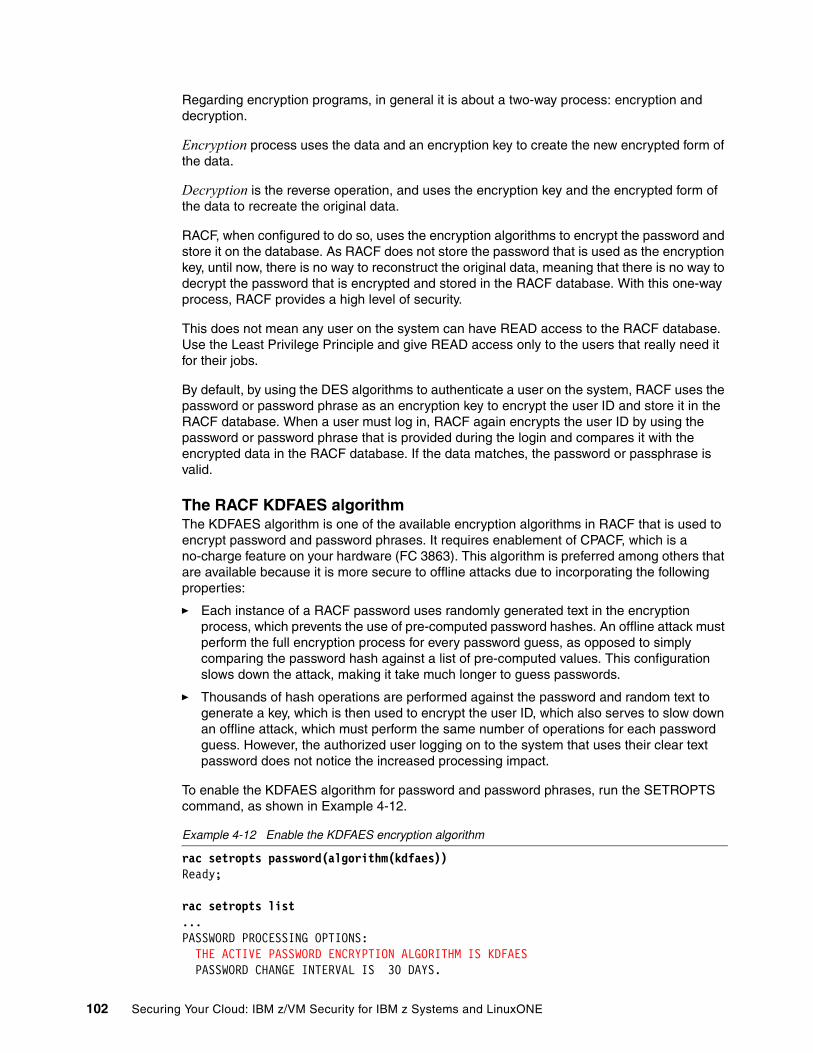
Regarding encryption programs, in general it is about a two-way process: encryption and decryption.
Encryption process uses the data and an encryption key to create the new encrypted form of the data.
Decryption is the reverse operation, and uses the encryption key and the encrypted form of the data to recreate the original data.
RACF, when configured to do so, uses the encryption algorithms to encrypt the password and store it on the database. As RACF does not store the password that is used as the encryption key, until now, there is no way to reconstruct the original data, meaning that there is no way to decrypt the password that is encrypted and stored in the RACF database. With this one-way process, RACF provides a high level of security.
This does not mean any user on the system can have READ access to the RACF database. Use the Least Privilege Principle and give READ access only to the users that really need it for their jobs.
By default, by using the DES algorithms to authenticate a user on the system, RACF uses the password or password phrase as an encryption key to encrypt the user ID and store it in the RACF database. When a user must log in, RACF again encrypts the user ID by using the password or password phrase that is provided during the login and compares it with the encrypted data in the RACF database. If the data matches, the password or passphrase is valid.
The RACF KDFAES algorithmThe KDFAES algorithm is one of the available encryption algorithms in RACF that is used to encrypt password and password phrases. It requires enablement of CPACF, which is a no-charge feature on your hardware (FC 3863). This algorithm is preferred among others that are available because it is more secure to offline attacks due to incorporating the following properties:
� Each instance of a RACF password uses randomly generated text in the encryption process, which prevents the use of pre-computed password hashes. An offline attack must perform the full encryption process for every password guess, as opposed to simply comparing the password hash against a list of pre-computed values. This configuration slows down the attack, making it take much longer to guess passwords.
� Thousands of hash operations are performed against the password and random text to generate a key, which is then used to encrypt the user ID, which also serves to slow down an offline attack, which must perform the same number of operations for each password guess. However, the authorized user logging on to the system that uses their clear text password does not notice the increased processing impact.
To enable the KDFAES algorithm for password and password phrases, run the SETROPTS command, as shown in Example 4-12.
Example 4-12 Enable the KDFAES encryption algorithm
rac setropts password(algorithm(kdfaes))Ready;
rac setropts list...PASSWORD PROCESSING OPTIONS: THE ACTIVE PASSWORD ENCRYPTION ALGORITHM IS KDFAES PASSWORD CHANGE INTERVAL IS 30 DAYS.
102 Securing Your Cloud: IBM z/VM Security for IBM z Systems and LinuxONE
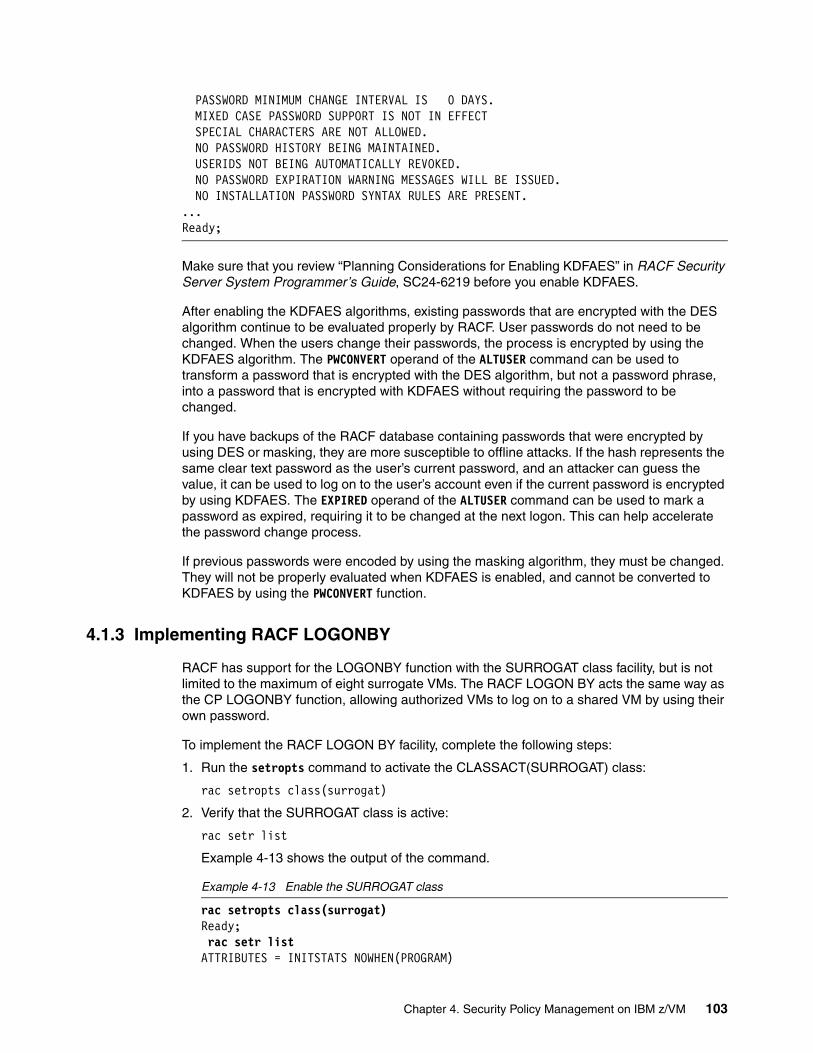
PASSWORD MINIMUM CHANGE INTERVAL IS 0 DAYS. MIXED CASE PASSWORD SUPPORT IS NOT IN EFFECT SPECIAL CHARACTERS ARE NOT ALLOWED. NO PASSWORD HISTORY BEING MAINTAINED. USERIDS NOT BEING AUTOMATICALLY REVOKED. NO PASSWORD EXPIRATION WARNING MESSAGES WILL BE ISSUED. NO INSTALLATION PASSWORD SYNTAX RULES ARE PRESENT. ...Ready;
Make sure that you review “Planning Considerations for Enabling KDFAES” in RACF Security Server System Programmer’s Guide, SC24-6219 before you enable KDFAES.
After enabling the KDFAES algorithms, existing passwords that are encrypted with the DES algorithm continue to be evaluated properly by RACF. User passwords do not need to be changed. When the users change their passwords, the process is encrypted by using the KDFAES algorithm. The PWCONVERT operand of the ALTUSER command can be used to transform a password that is encrypted with the DES algorithm, but not a password phrase, into a password that is encrypted with KDFAES without requiring the password to be changed.
If you have backups of the RACF database containing passwords that were encrypted by using DES or masking, they are more susceptible to offline attacks. If the hash represents the same clear text password as the user’s current password, and an attacker can guess the value, it can be used to log on to the user’s account even if the current password is encrypted by using KDFAES. The EXPIRED operand of the ALTUSER command can be used to mark a password as expired, requiring it to be changed at the next logon. This can help accelerate the password change process.
If previous passwords were encoded by using the masking algorithm, they must be changed. They will not be properly evaluated when KDFAES is enabled, and cannot be converted to KDFAES by using the PWCONVERT function.
4.1.3 Implementing RACF LOGONBY
RACF has support for the LOGONBY function with the SURROGAT class facility, but is not limited to the maximum of eight surrogate VMs. The RACF LOGON BY acts the same way as the CP LOGONBY function, allowing authorized VMs to log on to a shared VM by using their own password.
To implement the RACF LOGON BY facility, complete the following steps:
1. Run the setropts command to activate the CLASSACT(SURROGAT) class:
rac setropts class(surrogat)
2. Verify that the SURROGAT class is active:
rac setr list
Example 4-13 shows the output of the command.
Example 4-13 Enable the SURROGAT class
rac setropts class(surrogat) Ready; rac setr list ATTRIBUTES = INITSTATS NOWHEN(PROGRAM)
Chapter 4. Security Policy Management on IBM z/VM 103
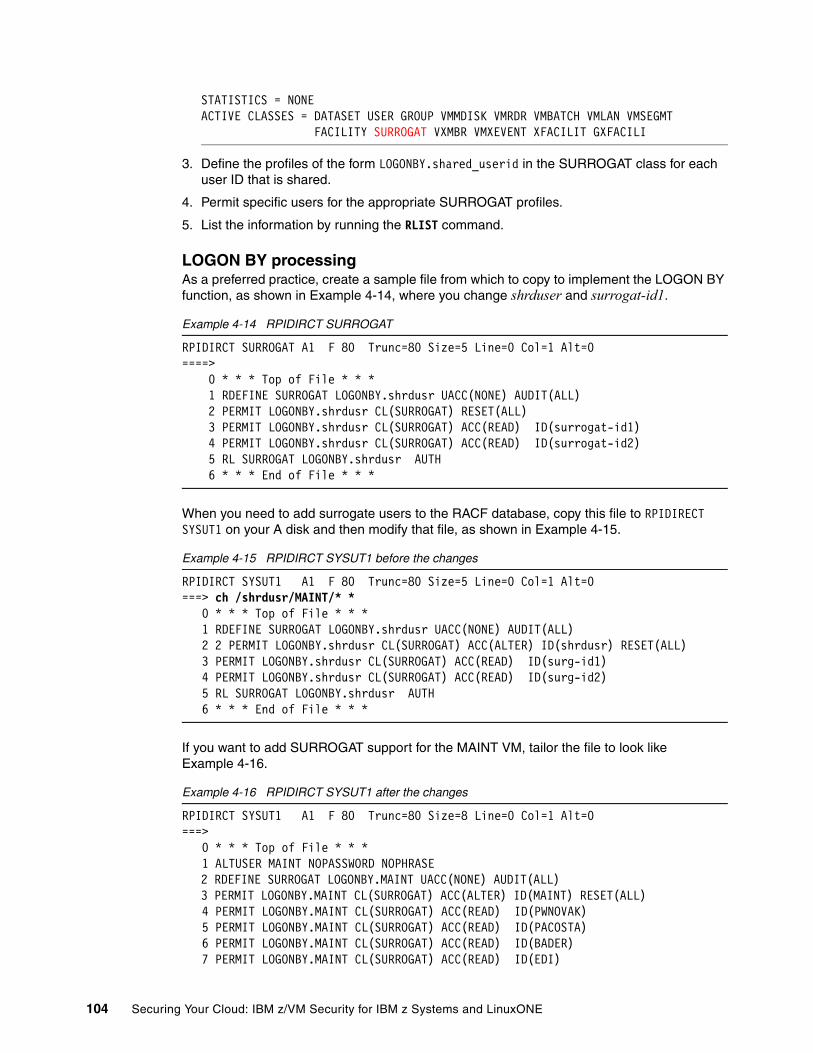
STATISTICS = NONE ACTIVE CLASSES = DATASET USER GROUP VMMDISK VMRDR VMBATCH VMLAN VMSEGMT FACILITY SURROGAT VXMBR VMXEVENT XFACILIT GXFACILI
3. Define the profiles of the form LOGONBY.shared_userid in the SURROGAT class for each user ID that is shared.
4. Permit specific users for the appropriate SURROGAT profiles.
5. List the information by running the RLIST command.
LOGON BY processingAs a preferred practice, create a sample file from which to copy to implement the LOGON BY function, as shown in Example 4-14, where you change shrduser and surrogat-id1.
Example 4-14 RPIDIRCT SURROGAT
RPIDIRCT SURROGAT A1 F 80 Trunc=80 Size=5 Line=0 Col=1 Alt=0 ====> 0 * * * Top of File * * * 1 RDEFINE SURROGAT LOGONBY.shrdusr UACC(NONE) AUDIT(ALL) 2 PERMIT LOGONBY.shrdusr CL(SURROGAT) RESET(ALL) 3 PERMIT LOGONBY.shrdusr CL(SURROGAT) ACC(READ) ID(surrogat-id1) 4 PERMIT LOGONBY.shrdusr CL(SURROGAT) ACC(READ) ID(surrogat-id2) 5 RL SURROGAT LOGONBY.shrdusr AUTH 6 * * * End of File * * *
When you need to add surrogate users to the RACF database, copy this file to RPIDIRECT SYSUT1 on your A disk and then modify that file, as shown in Example 4-15.
Example 4-15 RPIDIRCT SYSUT1 before the changes
RPIDIRCT SYSUT1 A1 F 80 Trunc=80 Size=5 Line=0 Col=1 Alt=0 ===> ch /shrdusr/MAINT/* * 0 * * * Top of File * * * 1 RDEFINE SURROGAT LOGONBY.shrdusr UACC(NONE) AUDIT(ALL) 2 2 PERMIT LOGONBY.shrdusr CL(SURROGAT) ACC(ALTER) ID(shrdusr) RESET(ALL) 3 PERMIT LOGONBY.shrdusr CL(SURROGAT) ACC(READ) ID(surg-id1) 4 PERMIT LOGONBY.shrdusr CL(SURROGAT) ACC(READ) ID(surg-id2) 5 RL SURROGAT LOGONBY.shrdusr AUTH 6 * * * End of File * * *
If you want to add SURROGAT support for the MAINT VM, tailor the file to look like Example 4-16.
Example 4-16 RPIDIRCT SYSUT1 after the changes
RPIDIRCT SYSUT1 A1 F 80 Trunc=80 Size=8 Line=0 Col=1 Alt=0 ===> 0 * * * Top of File * * * 1 ALTUSER MAINT NOPASSWORD NOPHRASE
2 RDEFINE SURROGAT LOGONBY.MAINT UACC(NONE) AUDIT(ALL) 3 PERMIT LOGONBY.MAINT CL(SURROGAT) ACC(ALTER) ID(MAINT) RESET(ALL)
4 PERMIT LOGONBY.MAINT CL(SURROGAT) ACC(READ) ID(PWNOVAK) 5 PERMIT LOGONBY.MAINT CL(SURROGAT) ACC(READ) ID(PACOSTA) 6 PERMIT LOGONBY.MAINT CL(SURROGAT) ACC(READ) ID(BADER) 7 PERMIT LOGONBY.MAINT CL(SURROGAT) ACC(READ) ID(EDI)
104 Securing Your Cloud: IBM z/VM Security for IBM z Systems and LinuxONE
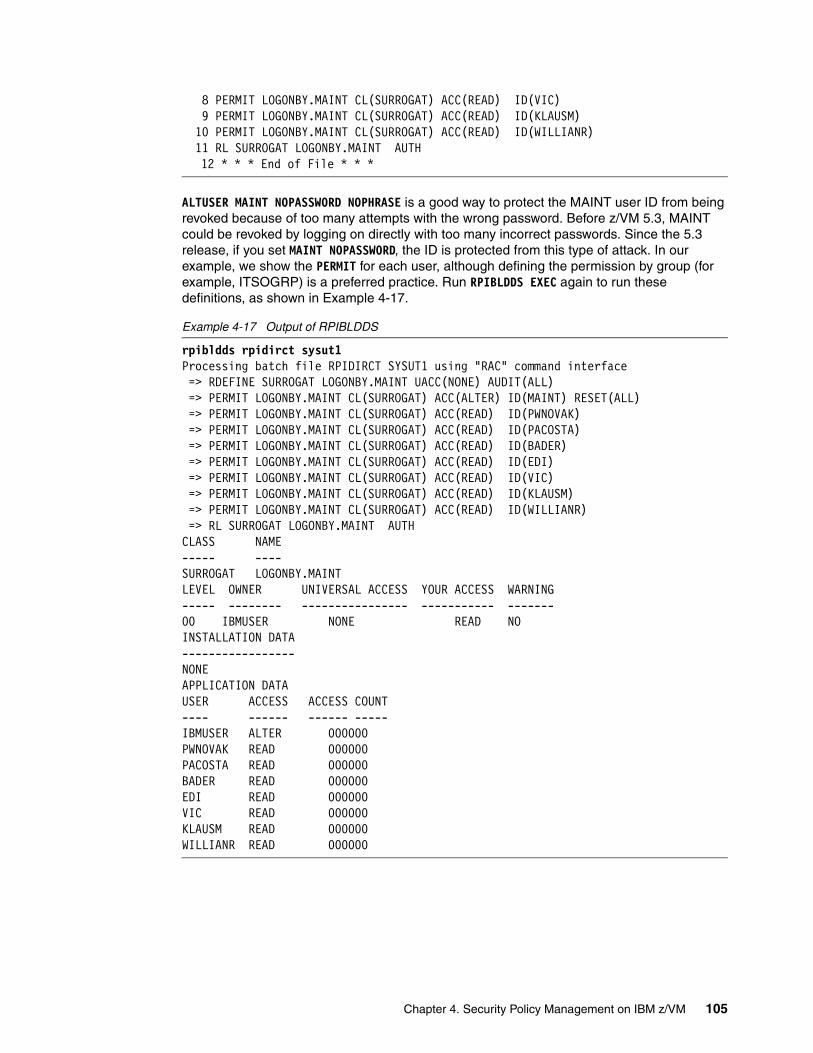
8 PERMIT LOGONBY.MAINT CL(SURROGAT) ACC(READ) ID(VIC) 9 PERMIT LOGONBY.MAINT CL(SURROGAT) ACC(READ) ID(KLAUSM) 10 PERMIT LOGONBY.MAINT CL(SURROGAT) ACC(READ) ID(WILLIANR) 11 RL SURROGAT LOGONBY.MAINT AUTH
12 * * * End of File * * *
ALTUSER MAINT NOPASSWORD NOPHRASE is a good way to protect the MAINT user ID from being revoked because of too many attempts with the wrong password. Before z/VM 5.3, MAINT could be revoked by logging on directly with too many incorrect passwords. Since the 5.3 release, if you set MAINT NOPASSWORD, the ID is protected from this type of attack. In our example, we show the PERMIT for each user, although defining the permission by group (for example, ITSOGRP) is a preferred practice. Run RPIBLDDS EXEC again to run these definitions, as shown in Example 4-17.
Example 4-17 Output of RPIBLDDS
rpibldds rpidirct sysut1 Processing batch file RPIDIRCT SYSUT1 using "RAC" command interface => RDEFINE SURROGAT LOGONBY.MAINT UACC(NONE) AUDIT(ALL) => PERMIT LOGONBY.MAINT CL(SURROGAT) ACC(ALTER) ID(MAINT) RESET(ALL) => PERMIT LOGONBY.MAINT CL(SURROGAT) ACC(READ) ID(PWNOVAK) => PERMIT LOGONBY.MAINT CL(SURROGAT) ACC(READ) ID(PACOSTA) => PERMIT LOGONBY.MAINT CL(SURROGAT) ACC(READ) ID(BADER) => PERMIT LOGONBY.MAINT CL(SURROGAT) ACC(READ) ID(EDI) => PERMIT LOGONBY.MAINT CL(SURROGAT) ACC(READ) ID(VIC) => PERMIT LOGONBY.MAINT CL(SURROGAT) ACC(READ) ID(KLAUSM) => PERMIT LOGONBY.MAINT CL(SURROGAT) ACC(READ) ID(WILLIANR) => RL SURROGAT LOGONBY.MAINT AUTH CLASS NAME ----- ---- SURROGAT LOGONBY.MAINT LEVEL OWNER UNIVERSAL ACCESS YOUR ACCESS WARNING ----- -------- ---------------- ----------- ------- 00 IBMUSER NONE READ NO INSTALLATION DATA ----------------- NONE APPLICATION DATA USER ACCESS ACCESS COUNT ---- ------ ------ -----IBMUSER ALTER 000000PWNOVAK READ 000000PACOSTA READ 000000BADER READ 000000EDI READ 000000VIC READ 000000KLAUSM READ 000000WILLIANR READ 000000
Chapter 4. Security Policy Management on IBM z/VM 105
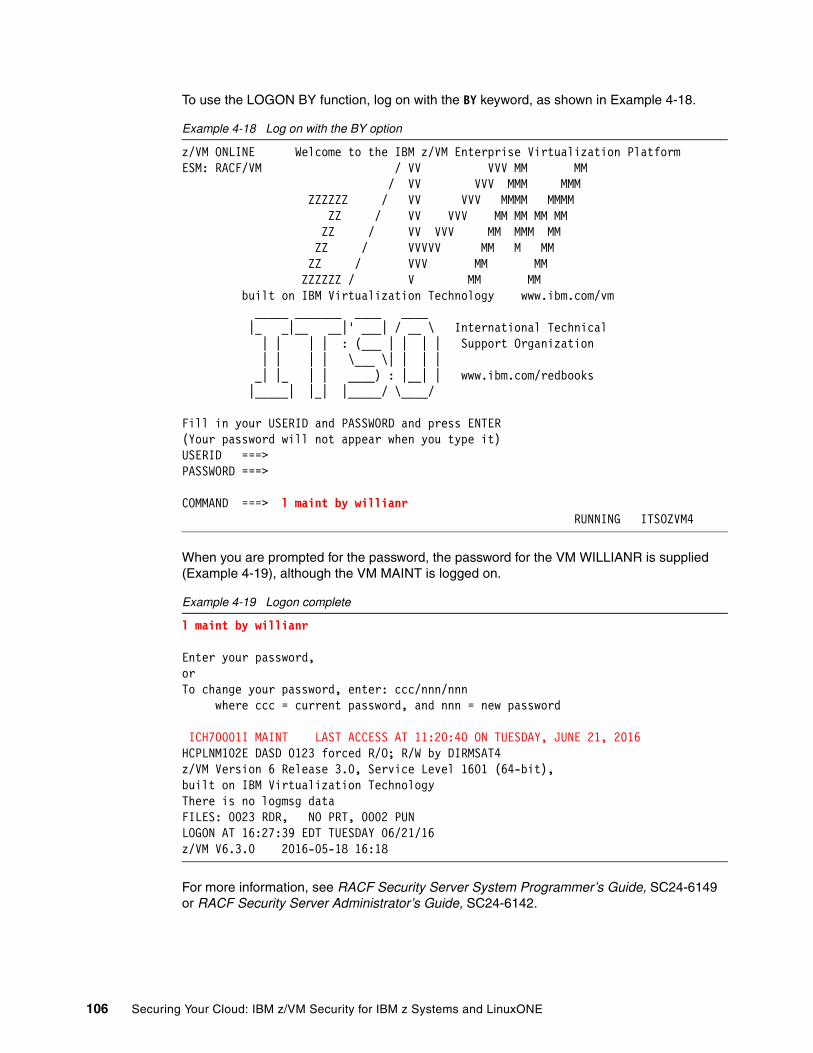
To use the LOGON BY function, log on with the BY keyword, as shown in Example 4-18.
Example 4-18 Log on with the BY option
z/VM ONLINE Welcome to the IBM z/VM Enterprise Virtualization Platform ESM: RACF/VM / VV VVV MM MM / VV VVV MMM MMM ZZZZZZ / VV VVV MMMM MMMM ZZ / VV VVV MM MM MM MM ZZ / VV VVV MM MMM MM ZZ / VVVVV MM M MM ZZ / VVV MM MM ZZZZZZ / V MM MM built on IBM Virtualization Technology www.ibm.com/vm _____ _______ ____ ____ |_ _|__ __|' ___| / __ \ International Technical | | | | : (___ | | | | Support Organization | | | | \___ \| | | | _| |_ | | ____) : |__| | www.ibm.com/redbooks |_____| |_| |_____/ \____/ Fill in your USERID and PASSWORD and press ENTER (Your password will not appear when you type it) USERID ===> PASSWORD ===> COMMAND ===> l maint by willianr RUNNING ITSOZVM4
When you are prompted for the password, the password for the VM WILLIANR is supplied (Example 4-19), although the VM MAINT is logged on.
Example 4-19 Logon complete
l maint by willianr Enter your password, or To change your password, enter: ccc/nnn/nnn where ccc = current password, and nnn = new password ICH70001I MAINT LAST ACCESS AT 11:20:40 ON TUESDAY, JUNE 21, 2016HCPLNM102E DASD 0123 forced R/O; R/W by DIRMSAT4 z/VM Version 6 Release 3.0, Service Level 1601 (64-bit), built on IBM Virtualization Technology There is no logmsg data FILES: 0023 RDR, NO PRT, 0002 PUN LOGON AT 16:27:39 EDT TUESDAY 06/21/16 z/VM V6.3.0 2016-05-18 16:18
For more information, see RACF Security Server System Programmer’s Guide, SC24-6149 or RACF Security Server Administrator’s Guide, SC24-6142.
106 Securing Your Cloud: IBM z/VM Security for IBM z Systems and LinuxONE
4.2 Communication encryption
Correctly implementing and managing security controls for the z/VM hypervisor is a mandatory cornerstone, no matter how large or small your enterprise is. Your security posture is only as strong as the weakest point, which means that the correct encryption of traffic must be implemented at all layers. Connectivity to the hypervisor layer and well-secured guests on an unsecured hypervisor are critical exposures. Furthermore, in nearly all circumstances, encrypting traffic as a default practice is common sense. Encryption requirements might also be mandated by company policy, clients, partners, vendors, industry regulations, or governing bodies.
The use of encrypted communication can increase the security of the IT infrastructure and should always be listed in the company security policy. By default, Telnet 3270 session data flows unencrypted over the network, in clear text, meaning that anyone who dumps the network traffic can see what is happening between the Telnet client and the z/VM 3270 connection.
Transport Layer Security (TLS), and its predecessor, Secure Sockets Layer (SSL), are cryptographic protocols to provide end-to-end encrypted communication. Digital certificates and trust hierarchies can be implemented to use encrypted communication. Dynamic SSL/TLS connections are supported by the following z/VM TCP/IP application servers and clients, which are updated to accommodate this support:
� TCP/IP server� SSL server� FTP server� FTP client� Telnet server (internal to the TCP/IP server)� Telnet client� Simple Mail Transfer Protocol (SMTP) server
When talking about SSL/TLS for z/VM, SSL* is a pool of CMS VMs that provide encrypted communication to clients connecting to z/VM. Its code is preinstalled as part of a standard z/VM installation and can be customized and enabled to provide SSL/TLS connections.
Most of the TCP/IP stack service machines can have security that is controlled by RACF. This allows RACF to process user ID authentication and authorization to the system and to resources, increasing the level of security on the system.
For more information about how to customize and enable encrypted communications to and from z/VM, see Chapter 4, “Installing and configuring z/VM”, in The Virtualization Cookbook for IBM z Systems Volume 1: IBM z/VM 6.3, SG24-8147.
Chapter 4. Security Policy Management on IBM z/VM 107

4.3 Single System Image Security
This section covers the security implications of using z/VM 6.3 with Single System Image (SSI) and live guest relocation (LGR).
This z/VM feature was introduced with z/VM 6.2 and it provides additional flexibility for your environment by allowing Linux guests to be moved from one logical partition (LPAR) to another. It also provides a set of shared resources for member systems and their Linux guests. Rather than managing security of a single implementation on a single device, administrators can manage the security of two or more operating systems. This control of access is a useful mechanism for helping to protect your data. In your SSI cluster, use storage area network (SAN) zoning and logical unit number (LUN) masking to ensure that data is available only for servers that should access it.
This section also explains the concept of relocating domains to control the relocation of Linux on z Systems guests to provide flexibility and availability to meet user demands for security and manageability.
4.3.1 Overview
VMs allow quick turnaround and flexibility for multiple projects andenvironments. To benefit from VMs, z/VM uses virtualization and gives administrators the power to manage their resources on the z Systems platform.
With the IBM z/VM SSI, which was introduced with z/VM v6.2, a running Linux on z Systems VM can be relocated from one member system to any other, a process known as LGR. Support for LGR allows you to move Linux virtual servers without disruption to the business, thus helping you to avoid planned outages. The z/VM systems are aware of each other and can benefit from their combined resources.
LGR enables clients to avoid loss of service due to planned outages by relocating guests from a system requiring maintenance to a system that remains active during the maintenance period. This capability can be used to move workloads from one z/VM LPAR to another when needed. It also helps to reduce planned outages during hardware changes or a z/VM initial program load (IPL). However, the environment becomes more complex and requires special attention with the shared resources. With this feature in place, it is important to know how to manage efficiently the configuration in a secure manner.
LGR brings more flexibility to your environment, not just Linux availability. Now, you can use this new feature to build a reliable and secure infrastructure for Linux guests running under z/VM by workload balancing. Additionally, hardware and z/VM changes can be run without affecting service availability.
4.3.2 Background information
This section provides background information about equivalency identifiers (EQIDs) and their association, which you need to understand before setting up and SSI cluster and user LGR.
108 Securing Your Cloud: IBM z/VM Security for IBM z Systems and LinuxONE
Equivalency identifiersWith an SSI cluster, you use EQIDs. EQIDs are used to ensure that all members of the cluster use both the same physical devices and the devices that are attached over IBM Fibre Channel Connection (IBM FICON®). During z/VM IPL, the EQID number is automatically generated and assigned to various devices, such as DASDs. However, for Fibre Channel Protocol (FCP) devices, you must explicitly set the EQID on the system config file on the PMAINT CF0 disk so that all cluster members can see the device as one device.
Before a Linux guest gets relocated to a different z/VM LPAR, the guest configuration is checked on the destination LPAR (Device condition) to ensure that the devices have the same EQIDs. Ensure that all necessary FCP configuration is planned to avoid problems when relocating your Linux guests. To update the NPIV devices, review and if necessary update your EQIDs as well.
For the list of conditions, see z/VM: CP Planning and Administration, SC24-6178.
4.3.3 Relocation domains
A relocation domain defines a set of members of an SSI cluster among which VMs can relocate freely. A domain can be used to define the subset of members of an SSI cluster to which a particular guest can be relocated. Relocation domains can be defined for business or technical reasons.
For example, a domain can be defined that has all of the architectural facilities necessary for a particular application, or a domain can be defined to allow access only to systems with a particular software tool. Whatever the reason for the definition of a domain, CP allows relocation among the members of the domain without any change to architectural characteristics or CP functions as seen by the guest.
The relocation domain for a VM can be defined with the VMRELOCATE directory statement. When the user ID logs on, CP assigns a virtual architecture level to the VM that is the maximal common subset of the architectural features (hardware architecture facilities and CP-supplied features) of all the members of the SSI cluster that belong to that relocation domain. The guest cannot use architectural features that are not included in this virtual architecture level. This ensures that the guest can be freely relocated to other members of the domain because they provide the same architectural features. A feature must be supported in every relevant component (processor, channel, and device hardware, and the z/VM software level) on every domain member to be usable to the guest.
Two types of relocation domains are defined implicitly:
� A domain that includes all of the members of the SSI cluster. The name of this domain is SSI.
� A domain that includes one member of the SSI cluster. A single-member domain is defined for each member. The name of the domain is the member’s system name.
When a user ID that is defined by a single-configuration VM definition logs on, the default associated relocation domain is the entire SSI cluster (domain SSI), unless a different relocation domain is set by a VMRELOCATE statement in the user’s VM definition.
If relocation of the VM has been disabled on the VMRELOCATE statement and no relocation domain is specified, the default relocation domain is the single-member domain of the system where the user logs on, and the user is assigned a virtual architecture level that is the set of all the architectural features of that system.
Chapter 4. Security Policy Management on IBM z/VM 109

4.3.4 RACF in an SSI cluster
When RACF is installed in a z/VM SSI environment, it is mandatory that the RACF database is shared. To ensure database integrity, the following requirements must be met:
� The RACF database DASD must be defined as shared in the I/O configuration.
� Both the primary RACF database (device 200) and the backup database (device 300) must be defined on full-pack minidisks.
� It is also required that these devices have virtual reserve/release enabled.
Use the DEVNO operand of the MDISK directory statement to define the DASD as full-pack minidisks.
If you are following the preferred practice of using the same real device numbers across LPARs to reference DASD, the MDISK statements for the RACF database disks can be placed in the identity entry for the RACF server. If the real device numbers are not the same across LPARs, the MDISK statements must be placed in the relevant subconfiguration entries.
4.4 Auditing
A defined information security policy is worthless if there is no way to assess whether the policies are effective, meaning that it was adhered to by all employees and they are playing the roles that they are expected to.
Tracking changes and authorized and unauthorized accesses is a way to make sure that the information security policy is followed. But again, with the increase of servers that are managed on the IT infrastructure, the amount of audit data that is generated makes it impossible for a human to analyze all of it, find a threat, and act on it while the intrusion is still happening. For that reason, define during the planning stage of the IT infrastructure which actions must be logged for audits.
The complexity in auditing is reduced when defined roles are available in the information security policy. Users under one role should not have access to override the mandatory access controls (MACs) and should not be able to manipulate the controls that are under the jurisdiction of another job role. With the separation of duties, the functions of the systems and integrity of audit logs are not compromised.
In z/VM, audit trails are generated by several CP command journaling options. They can be used to identify unsuccessful attempts of a CP command use. When journaling is turned on, more information is recorded with unsuccessful and successful attempts of specific CP commands. For a comprehensive audit trail, the use of an ESM is recommended. In this book, we cover the auditing with the use of RACF/VM. It can audit every command and security-relevant event happening within the hypervisor, in accordance with a predefined security policy.
Note: When a Linux guest is allowed to relocate to only a subset of the members in a cluster with the respective relocation domain, it can be overruled with the force option of the vmrelocate command.
110 Securing Your Cloud: IBM z/VM Security for IBM z Systems and LinuxONE
4.4.1 Auditing with journaling
z/VM offers a mechanism to track unauthorized LOGON attempts and unauthorized LINK commands. By enabling journaling, it is possible to configure how the system records LOGON and LINK attempts. Although it is fine for exploring LOGON attempts and unauthorized LINK commands, it really is not sufficient for the modern enterprise.
Enabling journalingTo use z/VM journaling, you must enable it in SYSTEM CONFIG and the system must have an IPL performed with the new configuration.
Example 4-20 shows an excerpt from a SYSTEM CONFIG file that is used to enable journaling (line numbers are not part of the SYSTEM CONFIG and are used to explain the statements on the lines).
Example 4-20 Configure journaling in SYSTEM CONFIG
1. Journaling,
2. Facility on,
3. Set_and_Query on,
4. Logon,
5. Message after 3 attempts to willianr,
6. Account after 5 attempts,
7. VM_Logo after 7 attempts,
8. Lockout after 9 attempts for 10,
9. Link,
10.Message after 3 attempts to willianr,
11. Account after 4 attempts,
12. Disable after 5 attempts
Here is an explanation of the lines:
� Line number 1 starts the journaling configuration statement in the SYSTEM CONFIG file.
� Line number 2 enables or disables journaling when the system undergoes an IPL.
� Line number 3 enables or disables the ability to set and query journaling. When disabled, the only configuration that takes effect is the configuration in the SYSTEM CONFIG file. It is not possible to use query journaling or set journaling commands, as shown in Example 4-21.
Example 4-21 Query and set journaling when Set_and_Query is off
q journal HCPJRL003E Invalid option - JOURNAL Ready(00003);
set journal link off HCPJRL003E Invalid option - JOURNALReady(00003);
set journal logon off
Chapter 4. Security Policy Management on IBM z/VM 111
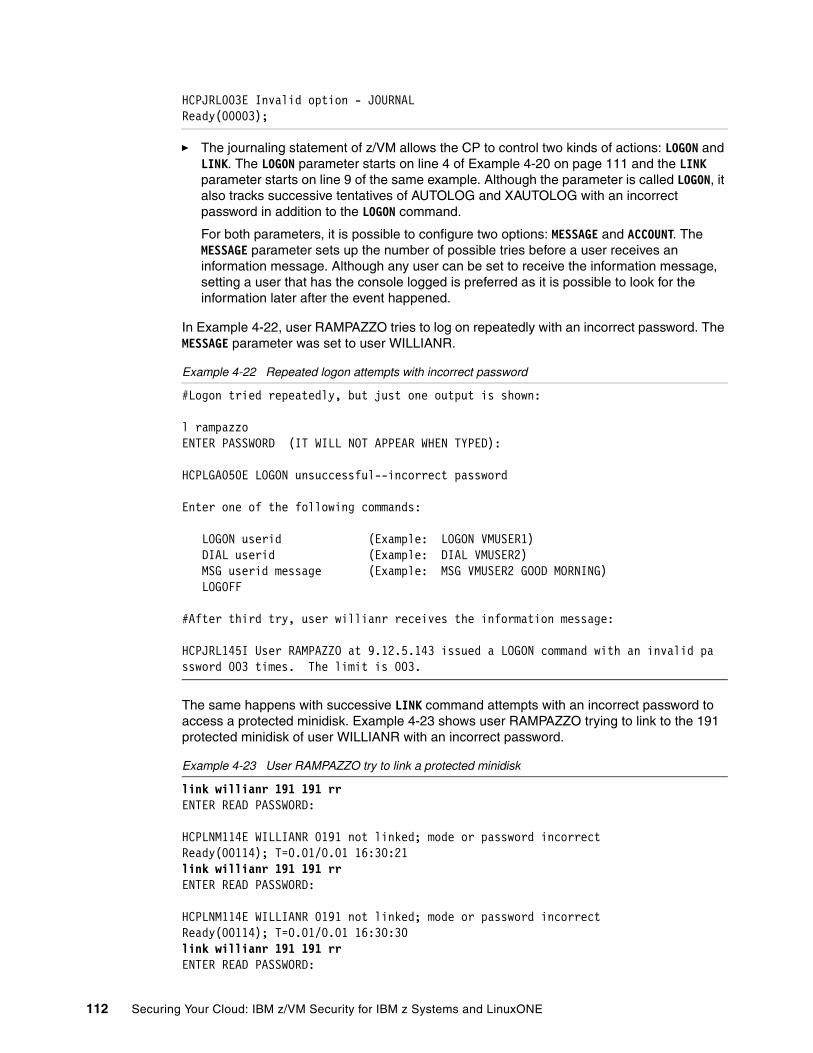
HCPJRL003E Invalid option - JOURNALReady(00003);
� The journaling statement of z/VM allows the CP to control two kinds of actions: LOGON and LINK. The LOGON parameter starts on line 4 of Example 4-20 on page 111 and the LINK parameter starts on line 9 of the same example. Although the parameter is called LOGON, it also tracks successive tentatives of AUTOLOG and XAUTOLOG with an incorrect password in addition to the LOGON command.
For both parameters, it is possible to configure two options: MESSAGE and ACCOUNT. The MESSAGE parameter sets up the number of possible tries before a user receives an information message. Although any user can be set to receive the information message, setting a user that has the console logged is preferred as it is possible to look for the information later after the event happened.
In Example 4-22, user RAMPAZZO tries to log on repeatedly with an incorrect password. The MESSAGE parameter was set to user WILLIANR.
Example 4-22 Repeated logon attempts with incorrect password
#Logon tried repeatedly, but just one output is shown:
l rampazzo ENTER PASSWORD (IT WILL NOT APPEAR WHEN TYPED): HCPLGA050E LOGON unsuccessful--incorrect password Enter one of the following commands: LOGON userid (Example: LOGON VMUSER1) DIAL userid (Example: DIAL VMUSER2) MSG userid message (Example: MSG VMUSER2 GOOD MORNING) LOGOFF
#After third try, user willianr receives the information message:
HCPJRL145I User RAMPAZZO at 9.12.5.143 issued a LOGON command with an invalid password 003 times. The limit is 003.
The same happens with successive LINK command attempts with an incorrect password to access a protected minidisk. Example 4-23 shows user RAMPAZZO trying to link to the 191 protected minidisk of user WILLIANR with an incorrect password.
Example 4-23 User RAMPAZZO try to link a protected minidisk
link willianr 191 191 rr ENTER READ PASSWORD: HCPLNM114E WILLIANR 0191 not linked; mode or password incorrectReady(00114); T=0.01/0.01 16:30:21 link willianr 191 191 rr ENTER READ PASSWORD: HCPLNM114E WILLIANR 0191 not linked; mode or password incorrectReady(00114); T=0.01/0.01 16:30:30 link willianr 191 191 rr ENTER READ PASSWORD:
112 Securing Your Cloud: IBM z/VM Security for IBM z Systems and LinuxONE
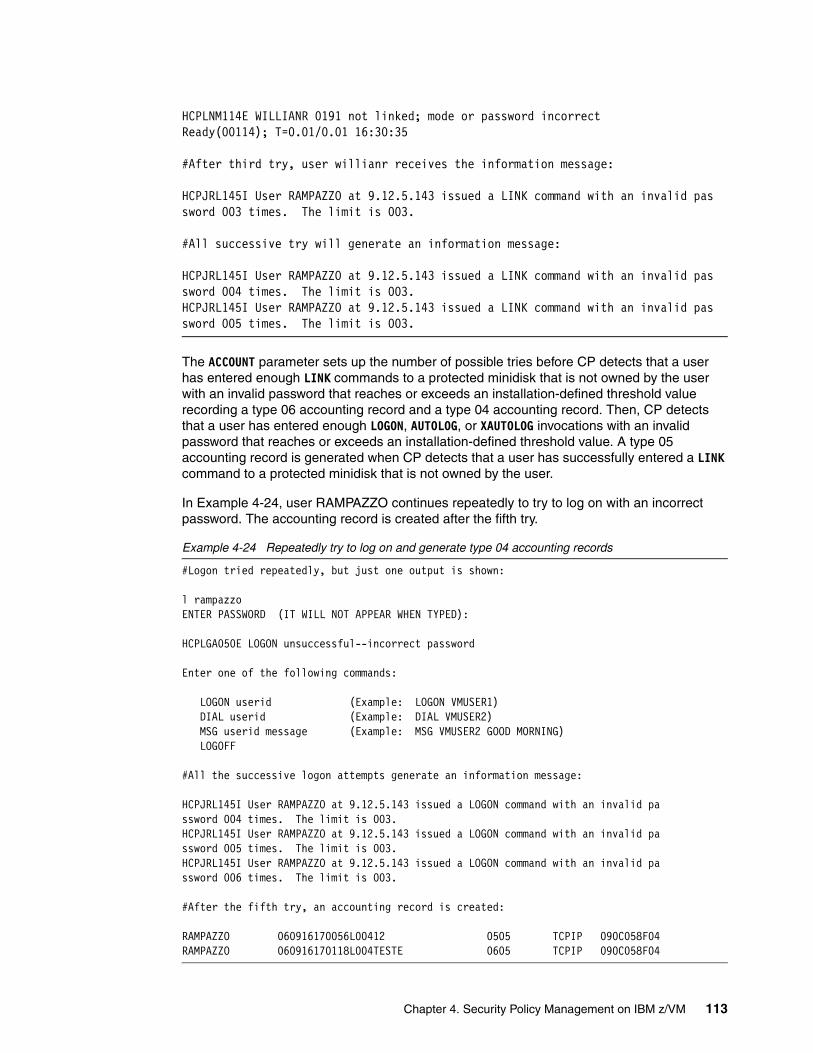
HCPLNM114E WILLIANR 0191 not linked; mode or password incorrectReady(00114); T=0.01/0.01 16:30:35
#After third try, user willianr receives the information message:
HCPJRL145I User RAMPAZZO at 9.12.5.143 issued a LINK command with an invalid password 003 times. The limit is 003.
#All successive try will generate an information message:
HCPJRL145I User RAMPAZZO at 9.12.5.143 issued a LINK command with an invalid password 004 times. The limit is 003. HCPJRL145I User RAMPAZZO at 9.12.5.143 issued a LINK command with an invalid password 005 times. The limit is 003.
The ACCOUNT parameter sets up the number of possible tries before CP detects that a user has entered enough LINK commands to a protected minidisk that is not owned by the user with an invalid password that reaches or exceeds an installation-defined threshold value recording a type 06 accounting record and a type 04 accounting record. Then, CP detects that a user has entered enough LOGON, AUTOLOG, or XAUTOLOG invocations with an invalid password that reaches or exceeds an installation-defined threshold value. A type 05 accounting record is generated when CP detects that a user has successfully entered a LINK command to a protected minidisk that is not owned by the user.
In Example 4-24, user RAMPAZZO continues repeatedly to try to log on with an incorrect password. The accounting record is created after the fifth try.
Example 4-24 Repeatedly try to log on and generate type 04 accounting records
#Logon tried repeatedly, but just one output is shown:
l rampazzo ENTER PASSWORD (IT WILL NOT APPEAR WHEN TYPED): HCPLGA050E LOGON unsuccessful--incorrect password Enter one of the following commands: LOGON userid (Example: LOGON VMUSER1) DIAL userid (Example: DIAL VMUSER2) MSG userid message (Example: MSG VMUSER2 GOOD MORNING) LOGOFF
#All the successive logon attempts generate an information message:
HCPJRL145I User RAMPAZZO at 9.12.5.143 issued a LOGON command with an invalid password 004 times. The limit is 003. HCPJRL145I User RAMPAZZO at 9.12.5.143 issued a LOGON command with an invalid password 005 times. The limit is 003. HCPJRL145I User RAMPAZZO at 9.12.5.143 issued a LOGON command with an invalid password 006 times. The limit is 003.
#After the fifth try, an accounting record is created:
RAMPAZZO 060916170056L00412 0505 TCPIP 090C058F04RAMPAZZO 060916170118L004TESTE 0605 TCPIP 090C058F04
Chapter 4. Security Policy Management on IBM z/VM 113
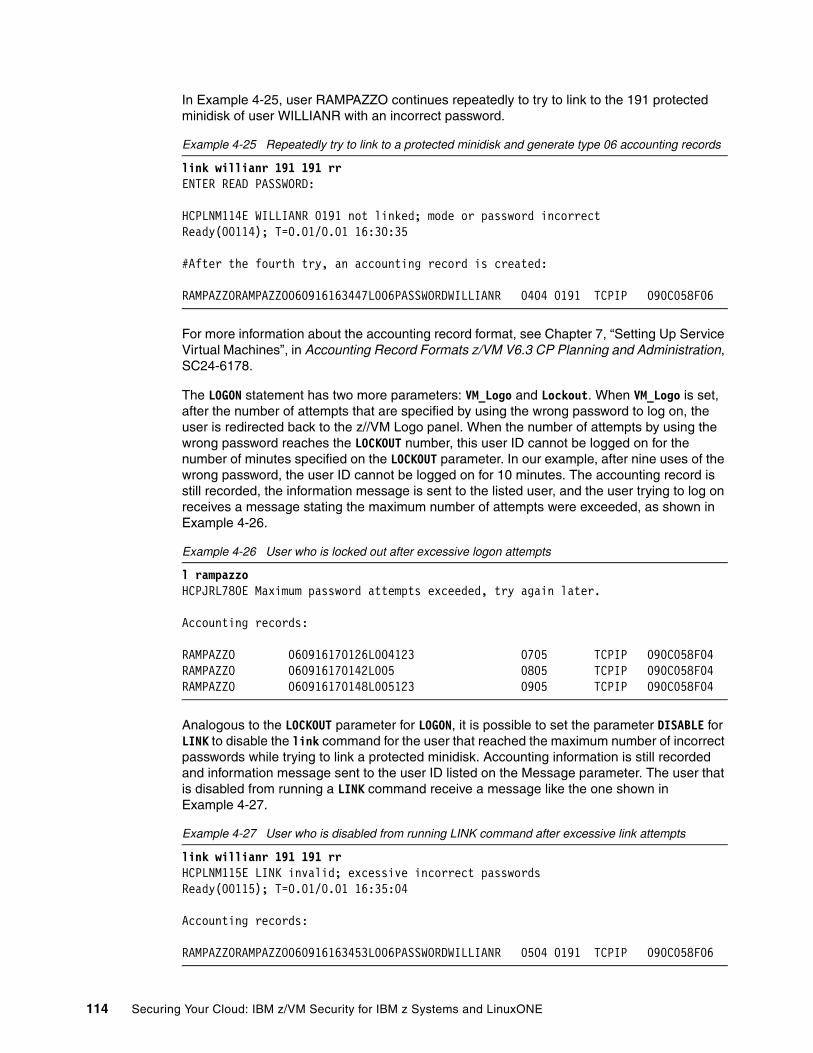
In Example 4-25, user RAMPAZZO continues repeatedly to try to link to the 191 protected minidisk of user WILLIANR with an incorrect password.
Example 4-25 Repeatedly try to link to a protected minidisk and generate type 06 accounting records
link willianr 191 191 rr ENTER READ PASSWORD: HCPLNM114E WILLIANR 0191 not linked; mode or password incorrectReady(00114); T=0.01/0.01 16:30:35
#After the fourth try, an accounting record is created:
RAMPAZZORAMPAZZO060916163447L006PASSWORDWILLIANR 0404 0191 TCPIP 090C058F06
For more information about the accounting record format, see Chapter 7, “Setting Up Service Virtual Machines”, in Accounting Record Formats z/VM V6.3 CP Planning and Administration, SC24-6178.
The LOGON statement has two more parameters: VM_Logo and Lockout. When VM_Logo is set, after the number of attempts that are specified by using the wrong password to log on, the user is redirected back to the z//VM Logo panel. When the number of attempts by using the wrong password reaches the LOCKOUT number, this user ID cannot be logged on for the number of minutes specified on the LOCKOUT parameter. In our example, after nine uses of the wrong password, the user ID cannot be logged on for 10 minutes. The accounting record is still recorded, the information message is sent to the listed user, and the user trying to log on receives a message stating the maximum number of attempts were exceeded, as shown in Example 4-26.
Example 4-26 User who is locked out after excessive logon attempts
l rampazzo HCPJRL780E Maximum password attempts exceeded, try again later.
Accounting records:
RAMPAZZO 060916170126L004123 0705 TCPIP 090C058F04RAMPAZZO 060916170142L005 0805 TCPIP 090C058F04RAMPAZZO 060916170148L005123 0905 TCPIP 090C058F04
Analogous to the LOCKOUT parameter for LOGON, it is possible to set the parameter DISABLE for LINK to disable the link command for the user that reached the maximum number of incorrect passwords while trying to link a protected minidisk. Accounting information is still recorded and information message sent to the user ID listed on the Message parameter. The user that is disabled from running a LINK command receive a message like the one shown in Example 4-27.
Example 4-27 User who is disabled from running LINK command after excessive link attempts
link willianr 191 191 rr HCPLNM115E LINK invalid; excessive incorrect passwords Ready(00115); T=0.01/0.01 16:35:04
Accounting records:
RAMPAZZORAMPAZZO060916163453L006PASSWORDWILLIANR 0504 0191 TCPIP 090C058F06
114 Securing Your Cloud: IBM z/VM Security for IBM z Systems and LinuxONE
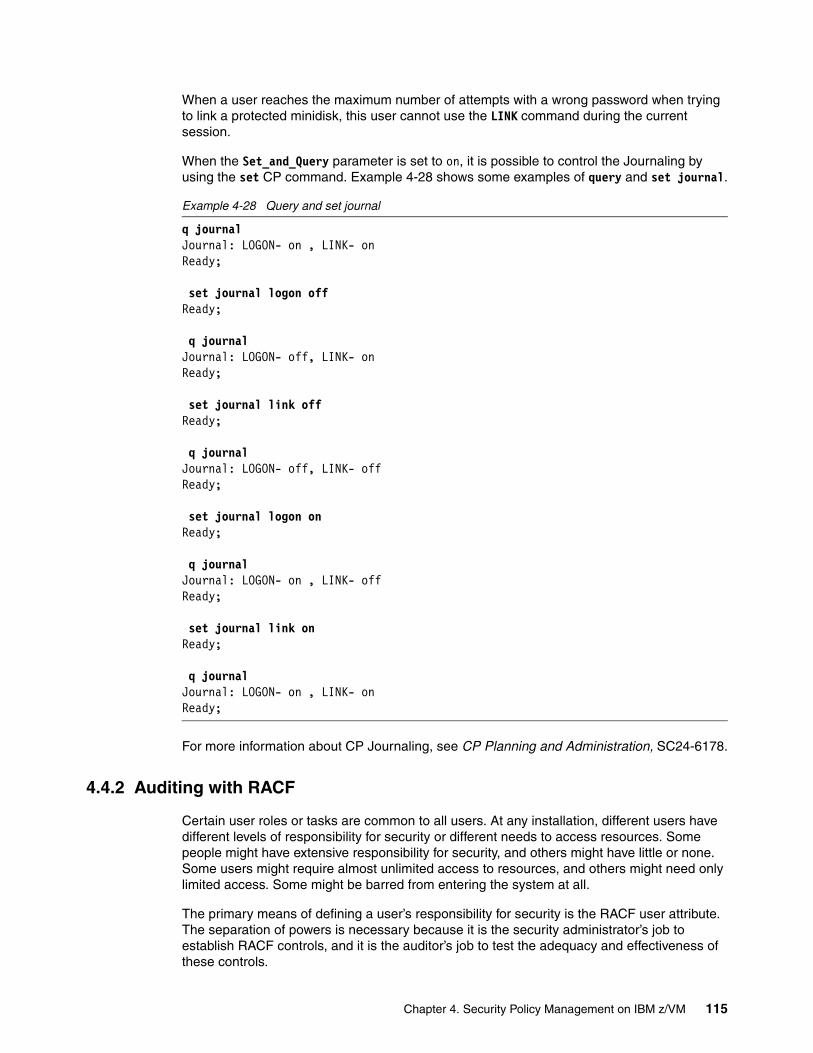
When a user reaches the maximum number of attempts with a wrong password when trying to link a protected minidisk, this user cannot use the LINK command during the current session.
When the Set_and_Query parameter is set to on, it is possible to control the Journaling by using the set CP command. Example 4-28 shows some examples of query and set journal.
Example 4-28 Query and set journal
q journal Journal: LOGON- on , LINK- on Ready;
set journal logon off Ready;
q journal Journal: LOGON- off, LINK- on Ready;
set journal link off Ready;
q journal Journal: LOGON- off, LINK- offReady;
set journal logon onReady;
q journal Journal: LOGON- on , LINK- offReady;
set journal link on Ready;
q journal Journal: LOGON- on , LINK- onReady;
For more information about CP Journaling, see CP Planning and Administration, SC24-6178.
4.4.2 Auditing with RACF
Certain user roles or tasks are common to all users. At any installation, different users have different levels of responsibility for security or different needs to access resources. Some people might have extensive responsibility for security, and others might have little or none. Some users might require almost unlimited access to resources, and others might need only limited access. Some might be barred from entering the system at all.
The primary means of defining a user’s responsibility for security is the RACF user attribute. The separation of powers is necessary because it is the security administrator’s job to establish RACF controls, and it is the auditor’s job to test the adequacy and effectiveness of these controls.
Chapter 4. Security Policy Management on IBM z/VM 115
The auditor’s responsibility is to verify that RACF is meeting the installation’s security goals, such as access control and accountability. The job of a RACF auditor is essentially the same, regardless of whether it is the AUDITOR attribute (with responsibility for checking RACF controls on a user or system-wide, level) or the group-AUDITOR attribute (with responsibility for checking RACF controls for a group and its subgroups).
An effective audit of security goals depends on how the events are logged. Logging all the necessary information and events improves the effectiveness of an audit.
Enabling auditingYou can enable (audit) or disable (noaudit) functions dynamically to meet the needs of your installation. When you enable collection of the audit records, SMF records are generated. This was an optional step in the configuration of your RACF environment, as described in “Customizing the processing of SMF records” on page 49. If you elected not to perform that step previously, you must implement it now before continuing.
RACF always logs information about certain events that are essential to an effective data-security mechanism. Here are the events that RACF always logs:
� Every use of the RVARY or SETROPTS command.
� Every time a RACROUTE REQUEST=VERIFY request fails.
� Every time the console operator grants access to a resource as part of the failsoft processing that is performed when RACF is inactive.
RACF never logs some events because knowing about these events is not essential to effective data security. RACF never logs any use of the following RACF commands:
� LISTDSD� LISTGRP� LISTUSER� RLIST� LDIRECT� LFILE� SRFILE� SRDIR� SEARCH
In addition to the events that RACF always logs and never logs, there are other events RACF can log optionally. Optional logging is under the control of either a resource-profile owner or the auditor.
The first step in establishing the auditing environment is to activate the RACF class for auditing with the SETROPTS command. With this command, you specify what functions within the AUDIT facility you want to monitor (above what RACF always monitors). These functions include the following ones:
� USERS� VMMDISK� VMLAN� VMRDR� VMCMD� VMNODES� SURROGAT
Use the SETROPTS LIST command as a user with the AUDITOR attribute to determine your current AUDIT environment, as shown in Example 4-29 on page 117.
116 Securing Your Cloud: IBM z/VM Security for IBM z Systems and LinuxONE
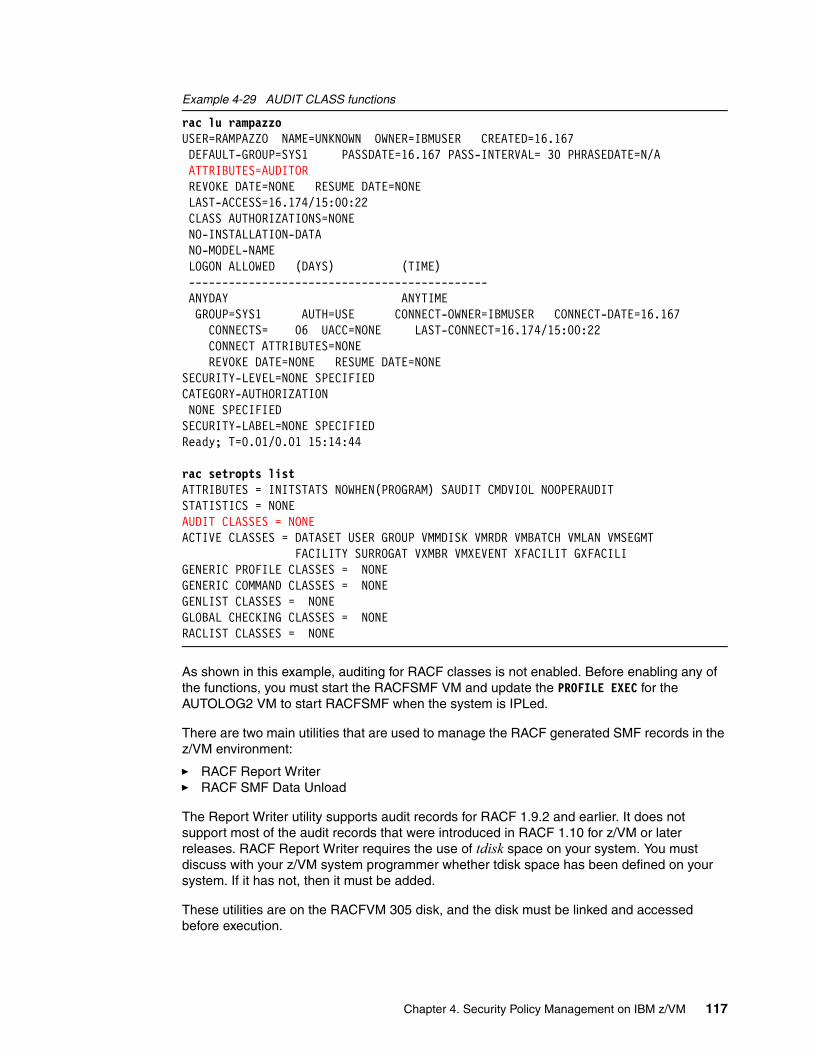
Example 4-29 AUDIT CLASS functions
rac lu rampazzo USER=RAMPAZZO NAME=UNKNOWN OWNER=IBMUSER CREATED=16.167 DEFAULT-GROUP=SYS1 PASSDATE=16.167 PASS-INTERVAL= 30 PHRASEDATE=N/A ATTRIBUTES=AUDITOR REVOKE DATE=NONE RESUME DATE=NONE LAST-ACCESS=16.174/15:00:22 CLASS AUTHORIZATIONS=NONE NO-INSTALLATION-DATA NO-MODEL-NAME LOGON ALLOWED (DAYS) (TIME) --------------------------------------------- ANYDAY ANYTIME GROUP=SYS1 AUTH=USE CONNECT-OWNER=IBMUSER CONNECT-DATE=16.167 CONNECTS= 06 UACC=NONE LAST-CONNECT=16.174/15:00:22 CONNECT ATTRIBUTES=NONE REVOKE DATE=NONE RESUME DATE=NONE SECURITY-LEVEL=NONE SPECIFIED CATEGORY-AUTHORIZATION NONE SPECIFIED SECURITY-LABEL=NONE SPECIFIED Ready; T=0.01/0.01 15:14:44
rac setropts list ATTRIBUTES = INITSTATS NOWHEN(PROGRAM) SAUDIT CMDVIOL NOOPERAUDIT STATISTICS = NONE AUDIT CLASSES = NONE ACTIVE CLASSES = DATASET USER GROUP VMMDISK VMRDR VMBATCH VMLAN VMSEGMT FACILITY SURROGAT VXMBR VMXEVENT XFACILIT GXFACILI GENERIC PROFILE CLASSES = NONE GENERIC COMMAND CLASSES = NONE GENLIST CLASSES = NONE GLOBAL CHECKING CLASSES = NONE RACLIST CLASSES = NONE
As shown in this example, auditing for RACF classes is not enabled. Before enabling any of the functions, you must start the RACFSMF VM and update the PROFILE EXEC for the AUTOLOG2 VM to start RACFSMF when the system is IPLed.
There are two main utilities that are used to manage the RACF generated SMF records in the z/VM environment:
� RACF Report Writer� RACF SMF Data Unload
The Report Writer utility supports audit records for RACF 1.9.2 and earlier. It does not support most of the audit records that were introduced in RACF 1.10 for z/VM or later releases. RACF Report Writer requires the use of tdisk space on your system. You must discuss with your z/VM system programmer whether tdisk space has been defined on your system. If it has not, then it must be added.
These utilities are on the RACFVM 305 disk, and the disk must be linked and accessed before execution.
Chapter 4. Security Policy Management on IBM z/VM 117
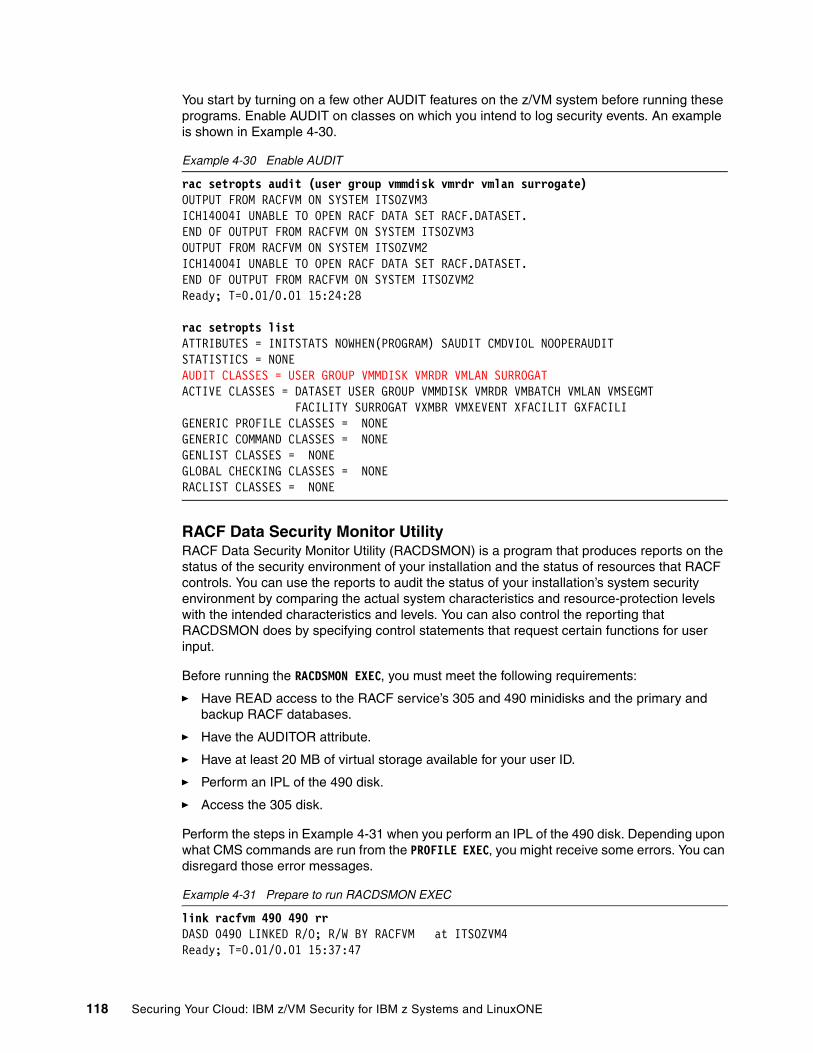
You start by turning on a few other AUDIT features on the z/VM system before running these programs. Enable AUDIT on classes on which you intend to log security events. An example is shown in Example 4-30.
Example 4-30 Enable AUDIT
rac setropts audit (user group vmmdisk vmrdr vmlan surrogate) OUTPUT FROM RACFVM ON SYSTEM ITSOZVM3 ICH14004I UNABLE TO OPEN RACF DATA SET RACF.DATASET. END OF OUTPUT FROM RACFVM ON SYSTEM ITSOZVM3 OUTPUT FROM RACFVM ON SYSTEM ITSOZVM2 ICH14004I UNABLE TO OPEN RACF DATA SET RACF.DATASET. END OF OUTPUT FROM RACFVM ON SYSTEM ITSOZVM2 Ready; T=0.01/0.01 15:24:28
rac setropts list ATTRIBUTES = INITSTATS NOWHEN(PROGRAM) SAUDIT CMDVIOL NOOPERAUDIT STATISTICS = NONE AUDIT CLASSES = USER GROUP VMMDISK VMRDR VMLAN SURROGAT ACTIVE CLASSES = DATASET USER GROUP VMMDISK VMRDR VMBATCH VMLAN VMSEGMT FACILITY SURROGAT VXMBR VMXEVENT XFACILIT GXFACILI GENERIC PROFILE CLASSES = NONE GENERIC COMMAND CLASSES = NONE GENLIST CLASSES = NONE GLOBAL CHECKING CLASSES = NONE RACLIST CLASSES = NONE
RACF Data Security Monitor UtilityRACF Data Security Monitor Utility (RACDSMON) is a program that produces reports on the status of the security environment of your installation and the status of resources that RACF controls. You can use the reports to audit the status of your installation’s system security environment by comparing the actual system characteristics and resource-protection levels with the intended characteristics and levels. You can also control the reporting that RACDSMON does by specifying control statements that request certain functions for user input.
Before running the RACDSMON EXEC, you must meet the following requirements:
� Have READ access to the RACF service’s 305 and 490 minidisks and the primary and backup RACF databases.
� Have the AUDITOR attribute.
� Have at least 20 MB of virtual storage available for your user ID.
� Perform an IPL of the 490 disk.
� Access the 305 disk.
Perform the steps in Example 4-31 when you perform an IPL of the 490 disk. Depending upon what CMS commands are run from the PROFILE EXEC, you might receive some errors. You can disregard those error messages.
Example 4-31 Prepare to run RACDSMON EXEC
link racfvm 490 490 rr DASD 0490 LINKED R/O; R/W BY RACFVM at ITSOZVM4Ready; T=0.01/0.01 15:37:47
118 Securing Your Cloud: IBM z/VM Security for IBM z Systems and LinuxONE
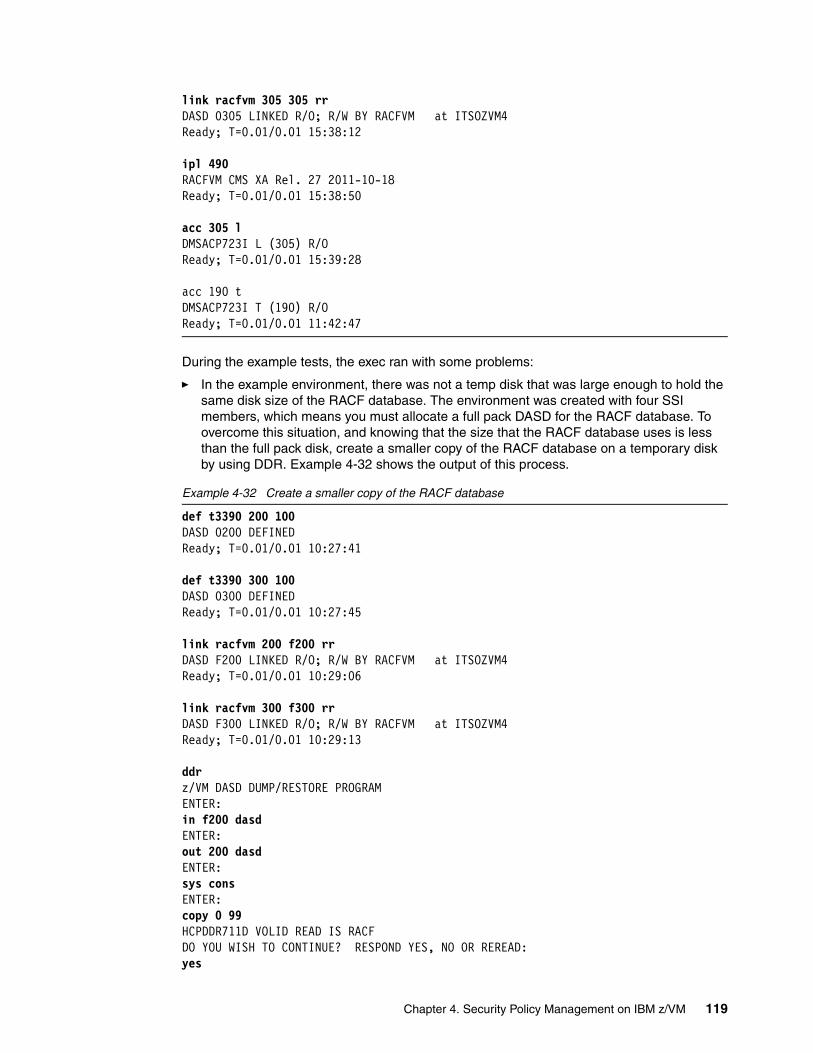
link racfvm 305 305 rr DASD 0305 LINKED R/O; R/W BY RACFVM at ITSOZVM4Ready; T=0.01/0.01 15:38:12
ipl 490 RACFVM CMS XA Rel. 27 2011-10-18 Ready; T=0.01/0.01 15:38:50
acc 305 l DMSACP723I L (305) R/O Ready; T=0.01/0.01 15:39:28
acc 190 t DMSACP723I T (190) R/O Ready; T=0.01/0.01 11:42:47
During the example tests, the exec ran with some problems:
� In the example environment, there was not a temp disk that was large enough to hold the same disk size of the RACF database. The environment was created with four SSI members, which means you must allocate a full pack DASD for the RACF database. To overcome this situation, and knowing that the size that the RACF database uses is less than the full pack disk, create a smaller copy of the RACF database on a temporary disk by using DDR. Example 4-32 shows the output of this process.
Example 4-32 Create a smaller copy of the RACF database
def t3390 200 100 DASD 0200 DEFINED Ready; T=0.01/0.01 10:27:41
def t3390 300 100 DASD 0300 DEFINED Ready; T=0.01/0.01 10:27:45
link racfvm 200 f200 rr DASD F200 LINKED R/O; R/W BY RACFVM at ITSOZVM4Ready; T=0.01/0.01 10:29:06
link racfvm 300 f300 rr DASD F300 LINKED R/O; R/W BY RACFVM at ITSOZVM4Ready; T=0.01/0.01 10:29:13
ddr z/VM DASD DUMP/RESTORE PROGRAM ENTER: in f200 dasd ENTER: out 200 dasd ENTER: sys cons ENTER: copy 0 99 HCPDDR711D VOLID READ IS RACF DO YOU WISH TO CONTINUE? RESPOND YES, NO OR REREAD: yes
Chapter 4. Security Policy Management on IBM z/VM 119
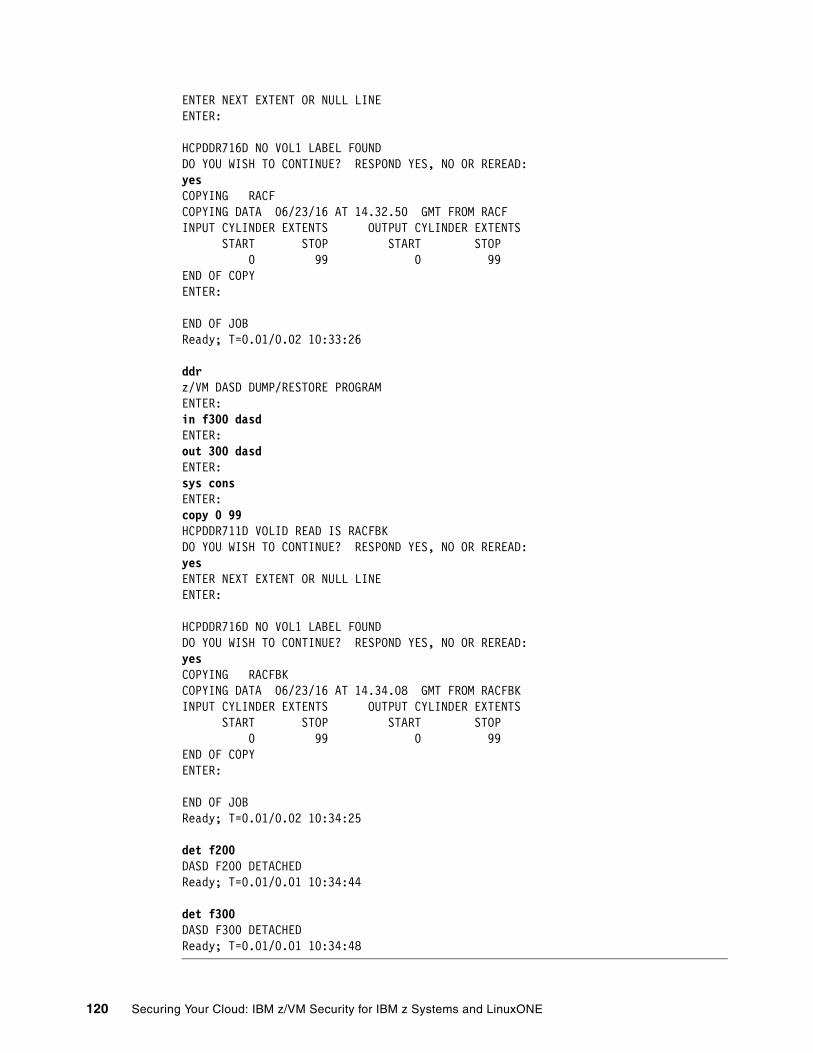
ENTER NEXT EXTENT OR NULL LINE ENTER: HCPDDR716D NO VOL1 LABEL FOUND DO YOU WISH TO CONTINUE? RESPOND YES, NO OR REREAD: yes COPYING RACF COPYING DATA 06/23/16 AT 14.32.50 GMT FROM RACF INPUT CYLINDER EXTENTS OUTPUT CYLINDER EXTENTS START STOP START STOP 0 99 0 99 END OF COPY ENTER: END OF JOB Ready; T=0.01/0.02 10:33:26
ddr z/VM DASD DUMP/RESTORE PROGRAM ENTER: in f300 dasd ENTER: out 300 dasd ENTER: sys cons ENTER: copy 0 99 HCPDDR711D VOLID READ IS RACFBK DO YOU WISH TO CONTINUE? RESPOND YES, NO OR REREAD:yes ENTER NEXT EXTENT OR NULL LINE ENTER: HCPDDR716D NO VOL1 LABEL FOUND DO YOU WISH TO CONTINUE? RESPOND YES, NO OR REREAD:yes COPYING RACFBK COPYING DATA 06/23/16 AT 14.34.08 GMT FROM RACFBK INPUT CYLINDER EXTENTS OUTPUT CYLINDER EXTENTS START STOP START STOP 0 99 0 99 END OF COPY ENTER: END OF JOB Ready; T=0.01/0.02 10:34:25
det f200 DASD F200 DETACHED Ready; T=0.01/0.01 10:34:44
det f300 DASD F300 DETACHED Ready; T=0.01/0.01 10:34:48
120 Securing Your Cloud: IBM z/VM Security for IBM z Systems and LinuxONE
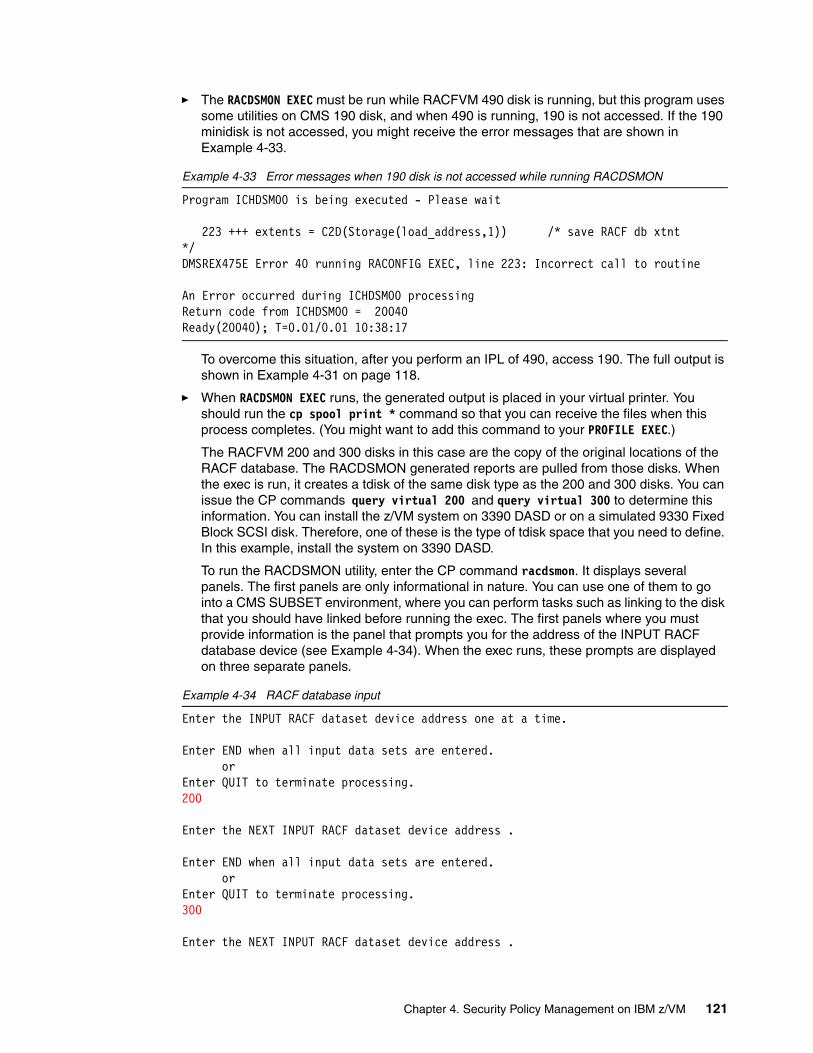
� The RACDSMON EXEC must be run while RACFVM 490 disk is running, but this program uses some utilities on CMS 190 disk, and when 490 is running, 190 is not accessed. If the 190 minidisk is not accessed, you might receive the error messages that are shown in Example 4-33.
Example 4-33 Error messages when 190 disk is not accessed while running RACDSMON
Program ICHDSM00 is being executed - Please wait 223 +++ extents = C2D(Storage(load_address,1)) /* save RACF db xtnt */ DMSREX475E Error 40 running RACONFIG EXEC, line 223: Incorrect call to routine An Error occurred during ICHDSM00 processing Return code from ICHDSM00 = 20040 Ready(20040); T=0.01/0.01 10:38:17
To overcome this situation, after you perform an IPL of 490, access 190. The full output is shown in Example 4-31 on page 118.
� When RACDSMON EXEC runs, the generated output is placed in your virtual printer. You should run the cp spool print * command so that you can receive the files when this process completes. (You might want to add this command to your PROFILE EXEC.)
The RACFVM 200 and 300 disks in this case are the copy of the original locations of the RACF database. The RACDSMON generated reports are pulled from those disks. When the exec is run, it creates a tdisk of the same disk type as the 200 and 300 disks. You can issue the CP commands query virtual 200 and query virtual 300 to determine this information. You can install the z/VM system on 3390 DASD or on a simulated 9330 Fixed Block SCSI disk. Therefore, one of these is the type of tdisk space that you need to define. In this example, install the system on 3390 DASD.
To run the RACDSMON utility, enter the CP command racdsmon. It displays several panels. The first panels are only informational in nature. You can use one of them to go into a CMS SUBSET environment, where you can perform tasks such as linking to the disk that you should have linked before running the exec. The first panels where you must provide information is the panel that prompts you for the address of the INPUT RACF database device (see Example 4-34). When the exec runs, these prompts are displayed on three separate panels.
Example 4-34 RACF database input
Enter the INPUT RACF dataset device address one at a time. Enter END when all input data sets are entered. or Enter QUIT to terminate processing. 200 Enter the NEXT INPUT RACF dataset device address . Enter END when all input data sets are entered. or Enter QUIT to terminate processing. 300 Enter the NEXT INPUT RACF dataset device address .
Chapter 4. Security Policy Management on IBM z/VM 121
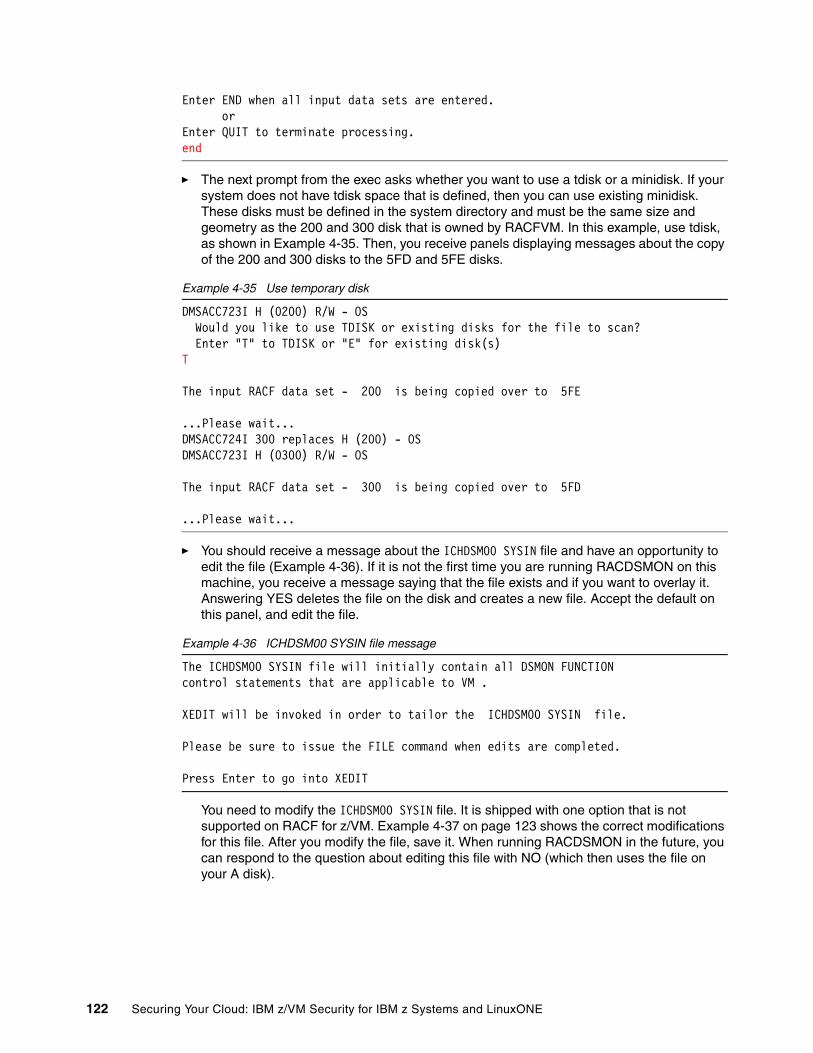
Enter END when all input data sets are entered. or Enter QUIT to terminate processing. end
� The next prompt from the exec asks whether you want to use a tdisk or a minidisk. If your system does not have tdisk space that is defined, then you can use existing minidisk. These disks must be defined in the system directory and must be the same size and geometry as the 200 and 300 disk that is owned by RACFVM. In this example, use tdisk, as shown in Example 4-35. Then, you receive panels displaying messages about the copy of the 200 and 300 disks to the 5FD and 5FE disks.
Example 4-35 Use temporary disk
DMSACC723I H (0200) R/W - OS Would you like to use TDISK or existing disks for the file to scan? Enter "T" to TDISK or "E" for existing disk(s) T The input RACF data set - 200 is being copied over to 5FE ...Please wait... DMSACC724I 300 replaces H (200) - OS DMSACC723I H (0300) R/W - OS The input RACF data set - 300 is being copied over to 5FD ...Please wait...
� You should receive a message about the ICHDSM00 SYSIN file and have an opportunity to edit the file (Example 4-36). If it is not the first time you are running RACDSMON on this machine, you receive a message saying that the file exists and if you want to overlay it. Answering YES deletes the file on the disk and creates a new file. Accept the default on this panel, and edit the file.
Example 4-36 ICHDSM00 SYSIN file message
The ICHDSM00 SYSIN file will initially contain all DSMON FUNCTION control statements that are applicable to VM . XEDIT will be invoked in order to tailor the ICHDSM00 SYSIN file. Please be sure to issue the FILE command when edits are completed. Press Enter to go into XEDIT
You need to modify the ICHDSM00 SYSIN file. It is shipped with one option that is not supported on RACF for z/VM. Example 4-37 on page 123 shows the correct modifications for this file. After you modify the file, save it. When running RACDSMON in the future, you can respond to the question about editing this file with NO (which then uses the file on your A disk).
122 Securing Your Cloud: IBM z/VM Security for IBM z Systems and LinuxONE
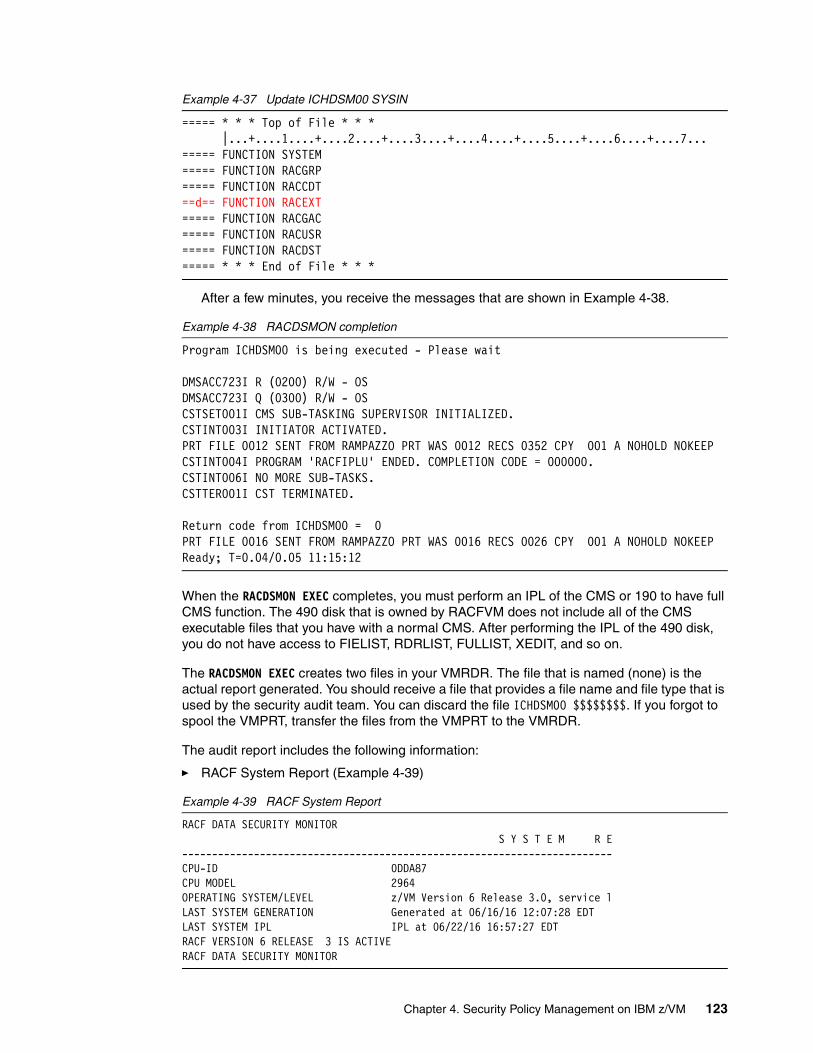
Example 4-37 Update ICHDSM00 SYSIN
===== * * * Top of File * * * |...+....1....+....2....+....3....+....4....+....5....+....6....+....7...===== FUNCTION SYSTEM ===== FUNCTION RACGRP ===== FUNCTION RACCDT ==d== FUNCTION RACEXT ===== FUNCTION RACGAC ===== FUNCTION RACUSR ===== FUNCTION RACDST ===== * * * End of File * * *
After a few minutes, you receive the messages that are shown in Example 4-38.
Example 4-38 RACDSMON completion
Program ICHDSM00 is being executed - Please wait DMSACC723I R (0200) R/W - OS DMSACC723I Q (0300) R/W - OS CSTSET001I CMS SUB-TASKING SUPERVISOR INITIALIZED. CSTINT003I INITIATOR ACTIVATED. PRT FILE 0012 SENT FROM RAMPAZZO PRT WAS 0012 RECS 0352 CPY 001 A NOHOLD NOKEEPCSTINT004I PROGRAM 'RACFIPLU' ENDED. COMPLETION CODE = 000000. CSTINT006I NO MORE SUB-TASKS. CSTTER001I CST TERMINATED. Return code from ICHDSM00 = 0 PRT FILE 0016 SENT FROM RAMPAZZO PRT WAS 0016 RECS 0026 CPY 001 A NOHOLD NOKEEPReady; T=0.04/0.05 11:15:12
When the RACDSMON EXEC completes, you must perform an IPL of the CMS or 190 to have full CMS function. The 490 disk that is owned by RACFVM does not include all of the CMS executable files that you have with a normal CMS. After performing the IPL of the 490 disk, you do not have access to FIELIST, RDRLIST, FULLIST, XEDIT, and so on.
The RACDSMON EXEC creates two files in your VMRDR. The file that is named (none) is the actual report generated. You should receive a file that provides a file name and file type that is used by the security audit team. You can discard the file ICHDSM00 $$$$$$$$. If you forgot to spool the VMPRT, transfer the files from the VMPRT to the VMRDR.
The audit report includes the following information:
� RACF System Report (Example 4-39)
Example 4-39 RACF System Report
RACF DATA SECURITY MONITOR S Y S T E M R E------------------------------------------------------------------------CPU-ID 0DDA87 CPU MODEL 2964 OPERATING SYSTEM/LEVEL z/VM Version 6 Release 3.0, service lLAST SYSTEM GENERATION Generated at 06/16/16 12:07:28 EDT LAST SYSTEM IPL IPL at 06/22/16 16:57:27 EDT RACF VERSION 6 RELEASE 3 IS ACTIVE RACF DATA SECURITY MONITOR
Chapter 4. Security Policy Management on IBM z/VM 123
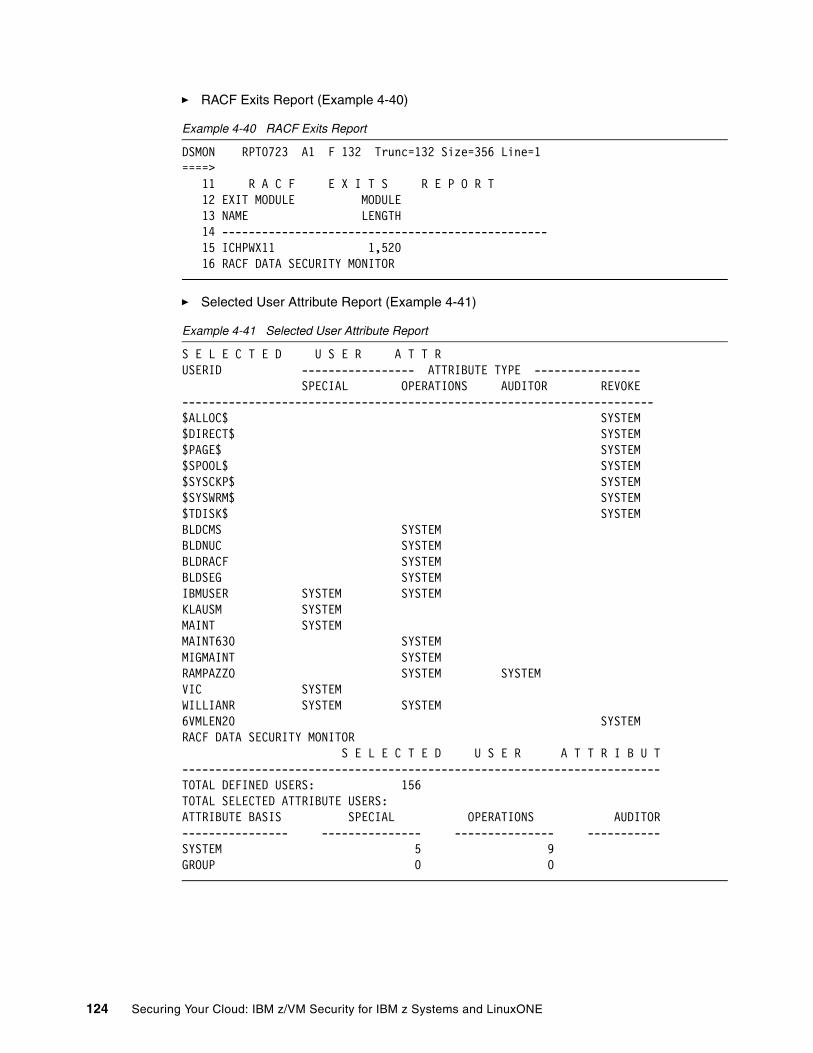
� RACF Exits Report (Example 4-40)
Example 4-40 RACF Exits Report
DSMON RPT0723 A1 F 132 Trunc=132 Size=356 Line=1====> 11 R A C F E X I T S R E P O R T 12 EXIT MODULE MODULE 13 NAME LENGTH 14 ------------------------------------------------- 15 ICHPWX11 1,520 16 RACF DATA SECURITY MONITOR
� Selected User Attribute Report (Example 4-41)
Example 4-41 Selected User Attribute Report
S E L E C T E D U S E R A T T RUSERID ----------------- ATTRIBUTE TYPE ---------------- SPECIAL OPERATIONS AUDITOR REVOKE -----------------------------------------------------------------------$ALLOC$ SYSTEM $DIRECT$ SYSTEM $PAGE$ SYSTEM $SPOOL$ SYSTEM $SYSCKP$ SYSTEM $SYSWRM$ SYSTEM $TDISK$ SYSTEM BLDCMS SYSTEM BLDNUC SYSTEM BLDRACF SYSTEM BLDSEG SYSTEM IBMUSER SYSTEM SYSTEM KLAUSM SYSTEM MAINT SYSTEM MAINT630 SYSTEM MIGMAINT SYSTEM RAMPAZZO SYSTEM SYSTEM VIC SYSTEM WILLIANR SYSTEM SYSTEM 6VMLEN20 SYSTEM RACF DATA SECURITY MONITOR S E L E C T E D U S E R A T T R I B U T------------------------------------------------------------------------TOTAL DEFINED USERS: 156 TOTAL SELECTED ATTRIBUTE USERS: ATTRIBUTE BASIS SPECIAL OPERATIONS AUDITOR---------------- --------------- --------------- -----------SYSTEM 5 9 GROUP 0 0
124 Securing Your Cloud: IBM z/VM Security for IBM z Systems and LinuxONE
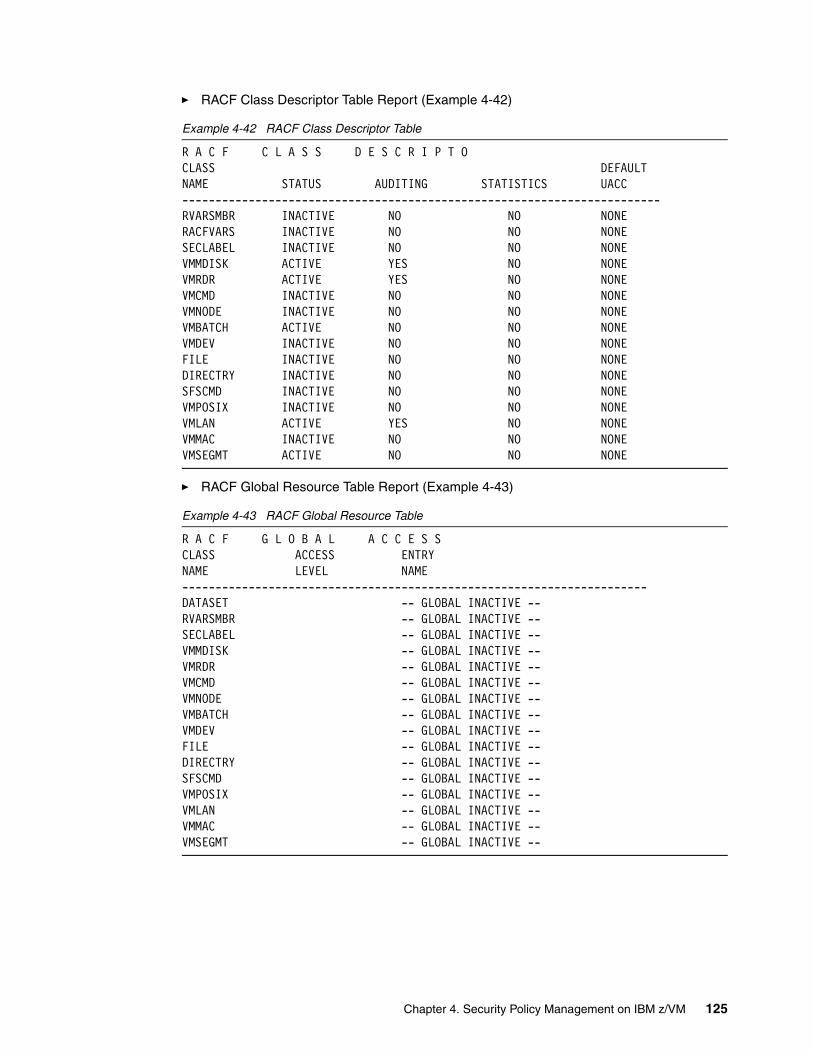
� RACF Class Descriptor Table Report (Example 4-42)
Example 4-42 RACF Class Descriptor Table
R A C F C L A S S D E S C R I P T OCLASS DEFAULT NAME STATUS AUDITING STATISTICS UACC ------------------------------------------------------------------------RVARSMBR INACTIVE NO NO NONE RACFVARS INACTIVE NO NO NONE SECLABEL INACTIVE NO NO NONE VMMDISK ACTIVE YES NO NONE VMRDR ACTIVE YES NO NONE VMCMD INACTIVE NO NO NONE VMNODE INACTIVE NO NO NONE VMBATCH ACTIVE NO NO NONE VMDEV INACTIVE NO NO NONE FILE INACTIVE NO NO NONE DIRECTRY INACTIVE NO NO NONE SFSCMD INACTIVE NO NO NONE VMPOSIX INACTIVE NO NO NONE VMLAN ACTIVE YES NO NONE VMMAC INACTIVE NO NO NONE VMSEGMT ACTIVE NO NO NONE
� RACF Global Resource Table Report (Example 4-43)
Example 4-43 RACF Global Resource Table
R A C F G L O B A L A C C E S SCLASS ACCESS ENTRY NAME LEVEL NAME ----------------------------------------------------------------------DATASET -- GLOBAL INACTIVE -- RVARSMBR -- GLOBAL INACTIVE -- SECLABEL -- GLOBAL INACTIVE -- VMMDISK -- GLOBAL INACTIVE -- VMRDR -- GLOBAL INACTIVE -- VMCMD -- GLOBAL INACTIVE -- VMNODE -- GLOBAL INACTIVE -- VMBATCH -- GLOBAL INACTIVE -- VMDEV -- GLOBAL INACTIVE -- FILE -- GLOBAL INACTIVE -- DIRECTRY -- GLOBAL INACTIVE -- SFSCMD -- GLOBAL INACTIVE -- VMPOSIX -- GLOBAL INACTIVE -- VMLAN -- GLOBAL INACTIVE -- VMMAC -- GLOBAL INACTIVE -- VMSEGMT -- GLOBAL INACTIVE --
Chapter 4. Security Policy Management on IBM z/VM 125
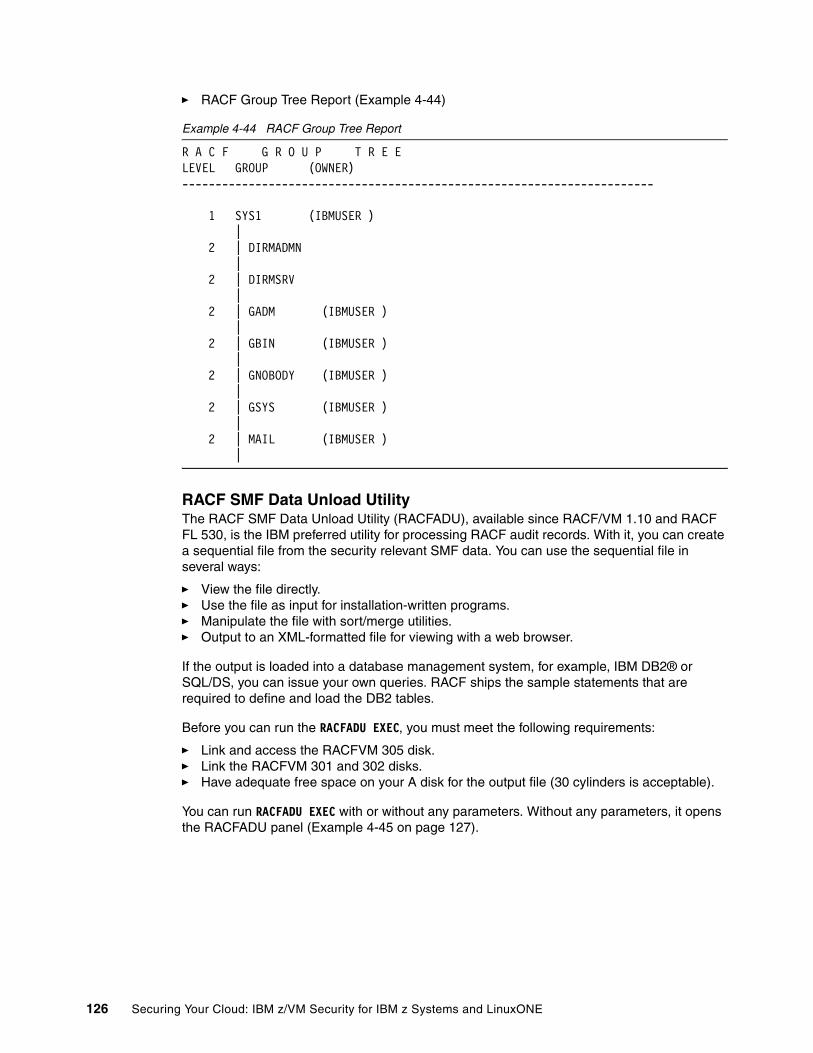
� RACF Group Tree Report (Example 4-44)
Example 4-44 RACF Group Tree Report
R A C F G R O U P T R E ELEVEL GROUP (OWNER) ----------------------------------------------------------------------- 1 SYS1 (IBMUSER ) | 2 | DIRMADMN | 2 | DIRMSRV | 2 | GADM (IBMUSER ) | 2 | GBIN (IBMUSER ) | 2 | GNOBODY (IBMUSER ) | 2 | GSYS (IBMUSER ) | 2 | MAIL (IBMUSER ) |
RACF SMF Data Unload UtilityThe RACF SMF Data Unload Utility (RACFADU), available since RACF/VM 1.10 and RACF FL 530, is the IBM preferred utility for processing RACF audit records. With it, you can create a sequential file from the security relevant SMF data. You can use the sequential file in several ways:
� View the file directly.� Use the file as input for installation-written programs.� Manipulate the file with sort/merge utilities. � Output to an XML-formatted file for viewing with a web browser.
If the output is loaded into a database management system, for example, IBM DB2® or SQL/DS, you can issue your own queries. RACF ships the sample statements that are required to define and load the DB2 tables.
Before you can run the RACFADU EXEC, you must meet the following requirements:
� Link and access the RACFVM 305 disk.� Link the RACFVM 301 and 302 disks.� Have adequate free space on your A disk for the output file (30 cylinders is acceptable).
You can run RACFADU EXEC with or without any parameters. Without any parameters, it opens the RACFADU panel (Example 4-45 on page 127).
126 Securing Your Cloud: IBM z/VM Security for IBM z Systems and LinuxONE
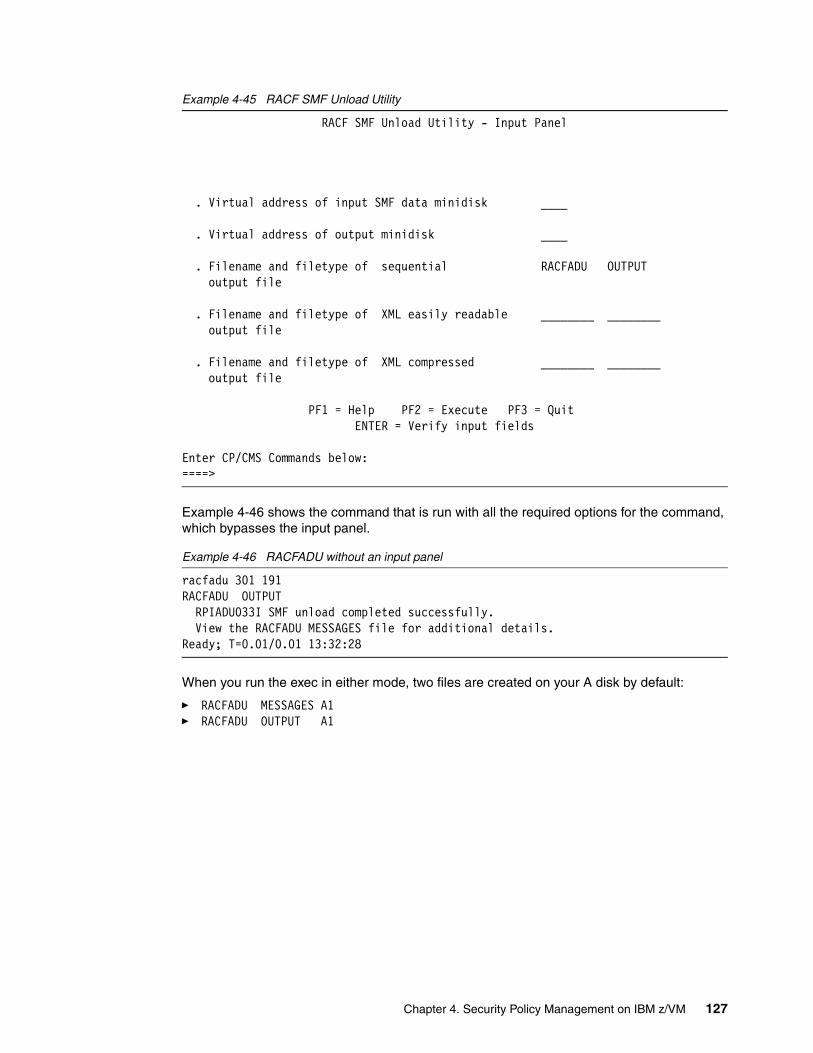
Example 4-45 RACF SMF Unload Utility
RACF SMF Unload Utility - Input Panel . Virtual address of input SMF data minidisk ____ . Virtual address of output minidisk ____ . Filename and filetype of sequential RACFADU OUTPUT output file . Filename and filetype of XML easily readable ________ ________ output file . Filename and filetype of XML compressed ________ ________ output file PF1 = Help PF2 = Execute PF3 = Quit ENTER = Verify input fields Enter CP/CMS Commands below: ====>
Example 4-46 shows the command that is run with all the required options for the command, which bypasses the input panel.
Example 4-46 RACFADU without an input panel
racfadu 301 191 RACFADU OUTPUT RPIADU033I SMF unload completed successfully. View the RACFADU MESSAGES file for additional details.Ready; T=0.01/0.01 13:32:28
When you run the exec in either mode, two files are created on your A disk by default:
� RACFADU MESSAGES A1 � RACFADU OUTPUT A1
Chapter 4. Security Policy Management on IBM z/VM 127
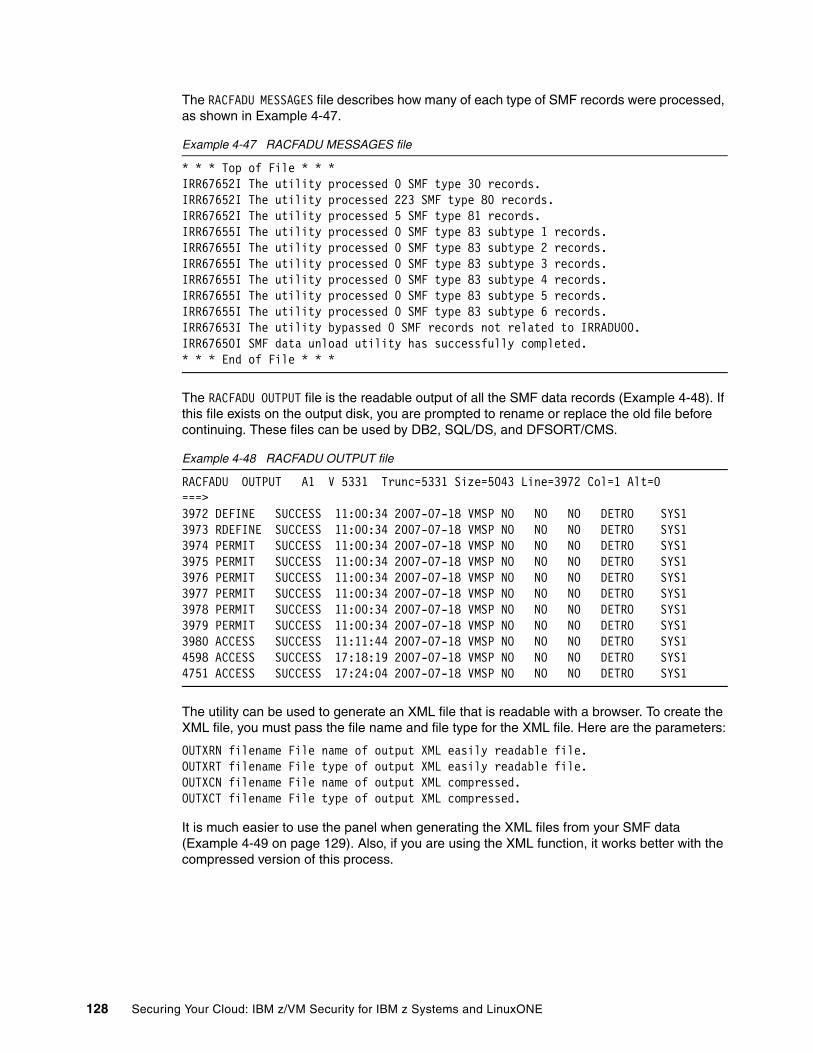
The RACFADU MESSAGES file describes how many of each type of SMF records were processed, as shown in Example 4-47.
Example 4-47 RACFADU MESSAGES file
* * * Top of File * * * IRR67652I The utility processed 0 SMF type 30 records. IRR67652I The utility processed 223 SMF type 80 records. IRR67652I The utility processed 5 SMF type 81 records. IRR67655I The utility processed 0 SMF type 83 subtype 1 records. IRR67655I The utility processed 0 SMF type 83 subtype 2 records. IRR67655I The utility processed 0 SMF type 83 subtype 3 records. IRR67655I The utility processed 0 SMF type 83 subtype 4 records. IRR67655I The utility processed 0 SMF type 83 subtype 5 records. IRR67655I The utility processed 0 SMF type 83 subtype 6 records. IRR67653I The utility bypassed 0 SMF records not related to IRRADU00.IRR67650I SMF data unload utility has successfully completed. * * * End of File * * *
The RACFADU OUTPUT file is the readable output of all the SMF data records (Example 4-48). If this file exists on the output disk, you are prompted to rename or replace the old file before continuing. These files can be used by DB2, SQL/DS, and DFSORT/CMS.
Example 4-48 RACFADU OUTPUT file
RACFADU OUTPUT A1 V 5331 Trunc=5331 Size=5043 Line=3972 Col=1 Alt=0 ===> 3972 DEFINE SUCCESS 11:00:34 2007-07-18 VMSP NO NO NO DETRO SYS1 3973 RDEFINE SUCCESS 11:00:34 2007-07-18 VMSP NO NO NO DETRO SYS1 3974 PERMIT SUCCESS 11:00:34 2007-07-18 VMSP NO NO NO DETRO SYS1 3975 PERMIT SUCCESS 11:00:34 2007-07-18 VMSP NO NO NO DETRO SYS1 3976 PERMIT SUCCESS 11:00:34 2007-07-18 VMSP NO NO NO DETRO SYS1 3977 PERMIT SUCCESS 11:00:34 2007-07-18 VMSP NO NO NO DETRO SYS1 3978 PERMIT SUCCESS 11:00:34 2007-07-18 VMSP NO NO NO DETRO SYS1 3979 PERMIT SUCCESS 11:00:34 2007-07-18 VMSP NO NO NO DETRO SYS1 3980 ACCESS SUCCESS 11:11:44 2007-07-18 VMSP NO NO NO DETRO SYS1 4598 ACCESS SUCCESS 17:18:19 2007-07-18 VMSP NO NO NO DETRO SYS1 4751 ACCESS SUCCESS 17:24:04 2007-07-18 VMSP NO NO NO DETRO SYS1
The utility can be used to generate an XML file that is readable with a browser. To create the XML file, you must pass the file name and file type for the XML file. Here are the parameters:
OUTXRN filename File name of output XML easily readable file. OUTXRT filename File type of output XML easily readable file. OUTXCN filename File name of output XML compressed. OUTXCT filename File type of output XML compressed.
It is much easier to use the panel when generating the XML files from your SMF data (Example 4-49 on page 129). Also, if you are using the XML function, it works better with the compressed version of this process.
128 Securing Your Cloud: IBM z/VM Security for IBM z Systems and LinuxONE
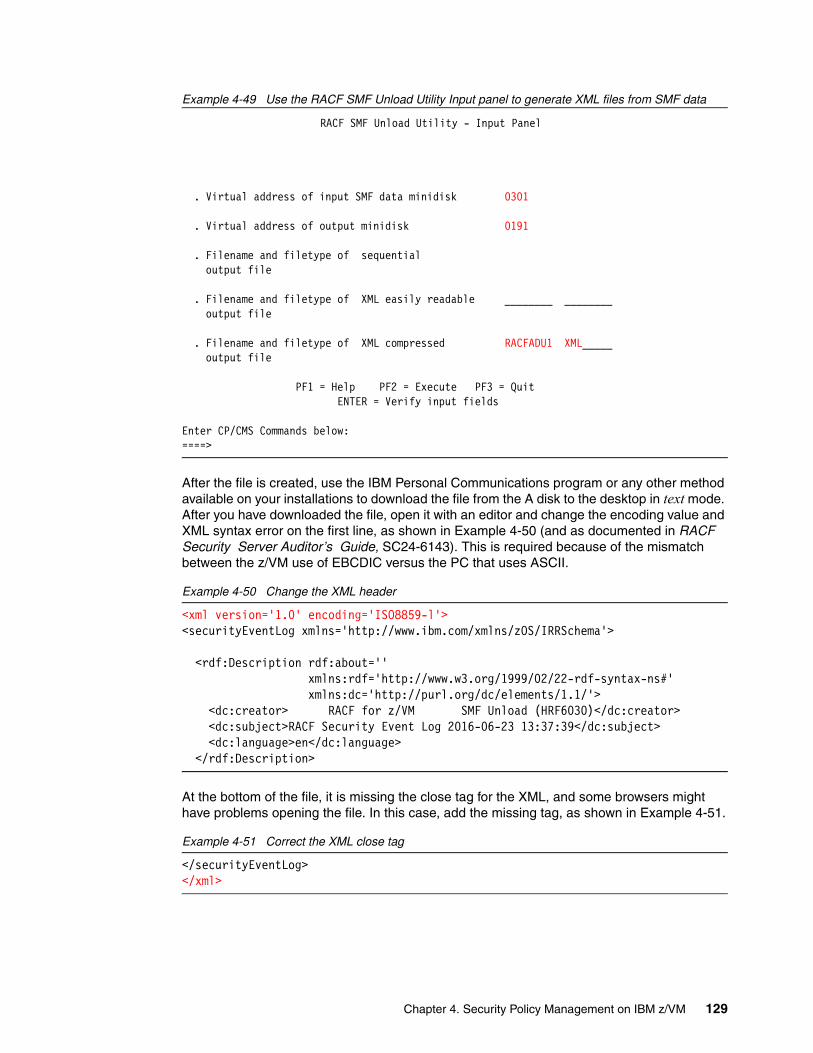
Example 4-49 Use the RACF SMF Unload Utility Input panel to generate XML files from SMF data
RACF SMF Unload Utility - Input Panel . Virtual address of input SMF data minidisk 0301 . Virtual address of output minidisk 0191 . Filename and filetype of sequential output file . Filename and filetype of XML easily readable ________ ________ output file . Filename and filetype of XML compressed RACFADU1 XML_____ output file PF1 = Help PF2 = Execute PF3 = Quit ENTER = Verify input fields Enter CP/CMS Commands below: ====>
After the file is created, use the IBM Personal Communications program or any other method available on your installations to download the file from the A disk to the desktop in text mode. After you have downloaded the file, open it with an editor and change the encoding value and XML syntax error on the first line, as shown in Example 4-50 (and as documented in RACF Security Server Auditor’s Guide, SC24-6143). This is required because of the mismatch between the z/VM use of EBCDIC versus the PC that uses ASCII.
Example 4-50 Change the XML header
<xml version='1.0' encoding='ISO8859-l'><securityEventLog xmlns='http://www.ibm.com/xmlns/zOS/IRRSchema'>
<rdf:Description rdf:about='' xmlns:rdf='http://www.w3.org/1999/02/22-rdf-syntax-ns#' xmlns:dc='http://purl.org/dc/elements/1.1/'> <dc:creator> RACF for z/VM SMF Unload (HRF6030)</dc:creator> <dc:subject>RACF Security Event Log 2016-06-23 13:37:39</dc:subject> <dc:language>en</dc:language> </rdf:Description>
At the bottom of the file, it is missing the close tag for the XML, and some browsers might have problems opening the file. In this case, add the missing tag, as shown in Example 4-51.
Example 4-51 Correct the XML close tag
</securityEventLog></xml>
Chapter 4. Security Policy Management on IBM z/VM 129
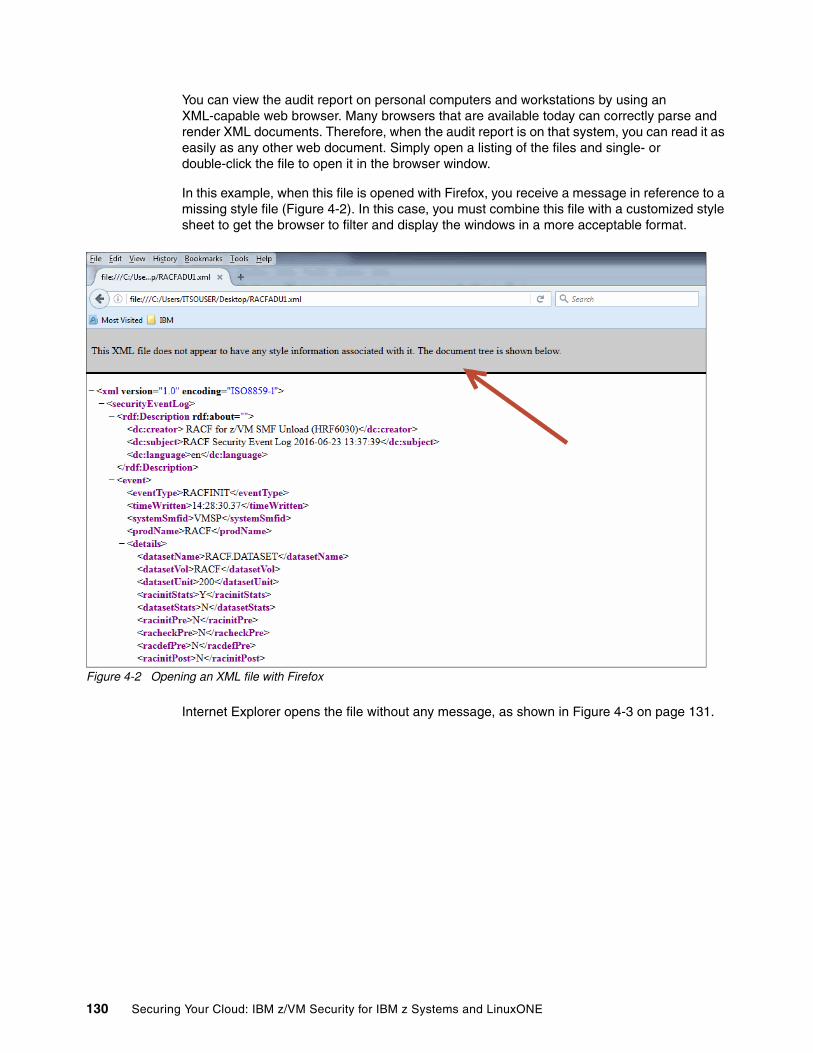
You can view the audit report on personal computers and workstations by using an XML-capable web browser. Many browsers that are available today can correctly parse and render XML documents. Therefore, when the audit report is on that system, you can read it as easily as any other web document. Simply open a listing of the files and single- or double-click the file to open it in the browser window.
In this example, when this file is opened with Firefox, you receive a message in reference to a missing style file (Figure 4-2). In this case, you must combine this file with a customized style sheet to get the browser to filter and display the windows in a more acceptable format.
Figure 4-2 Opening an XML file with Firefox
Internet Explorer opens the file without any message, as shown in Figure 4-3 on page 131.
130 Securing Your Cloud: IBM z/VM Security for IBM z Systems and LinuxONE
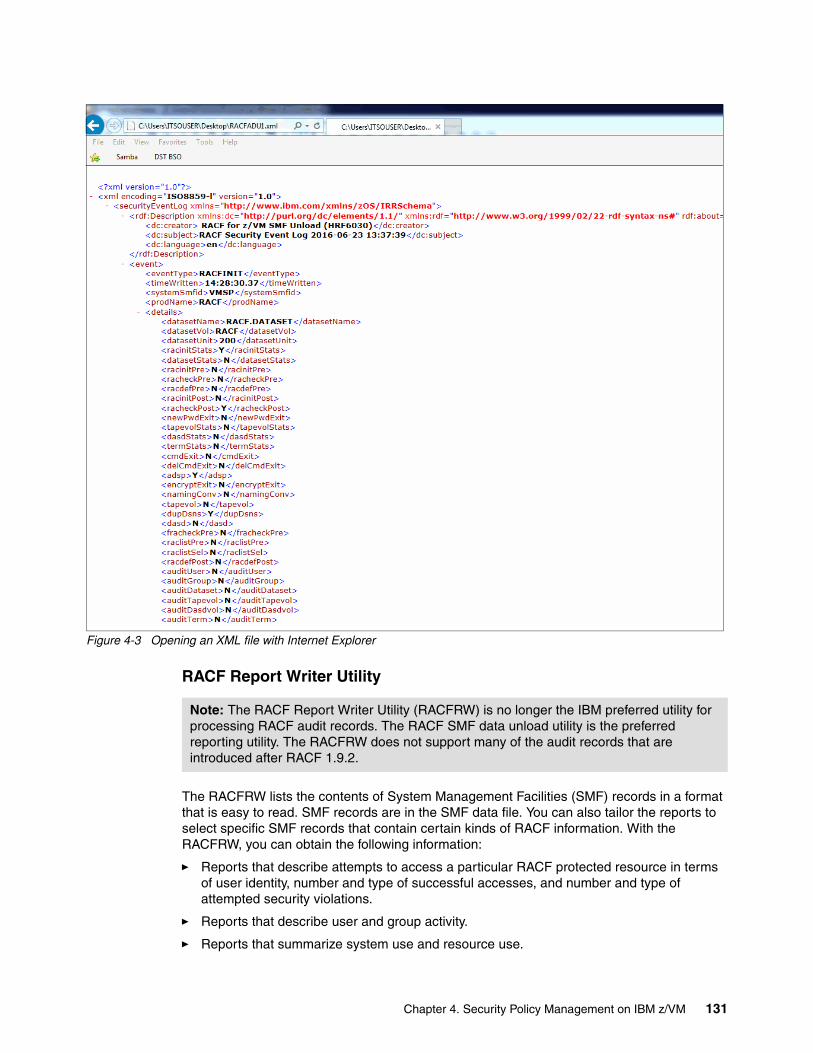
Figure 4-3 Opening an XML file with Internet Explorer
RACF Report Writer Utility
The RACFRW lists the contents of System Management Facilities (SMF) records in a format that is easy to read. SMF records are in the SMF data file. You can also tailor the reports to select specific SMF records that contain certain kinds of RACF information. With the RACFRW, you can obtain the following information:
� Reports that describe attempts to access a particular RACF protected resource in terms of user identity, number and type of successful accesses, and number and type of attempted security violations.
� Reports that describe user and group activity.
� Reports that summarize system use and resource use.
Note: The RACF Report Writer Utility (RACFRW) is no longer the IBM preferred utility for processing RACF audit records. The RACF SMF data unload utility is the preferred reporting utility. The RACFRW does not support many of the audit records that are introduced after RACF 1.9.2.
Chapter 4. Security Policy Management on IBM z/VM 131
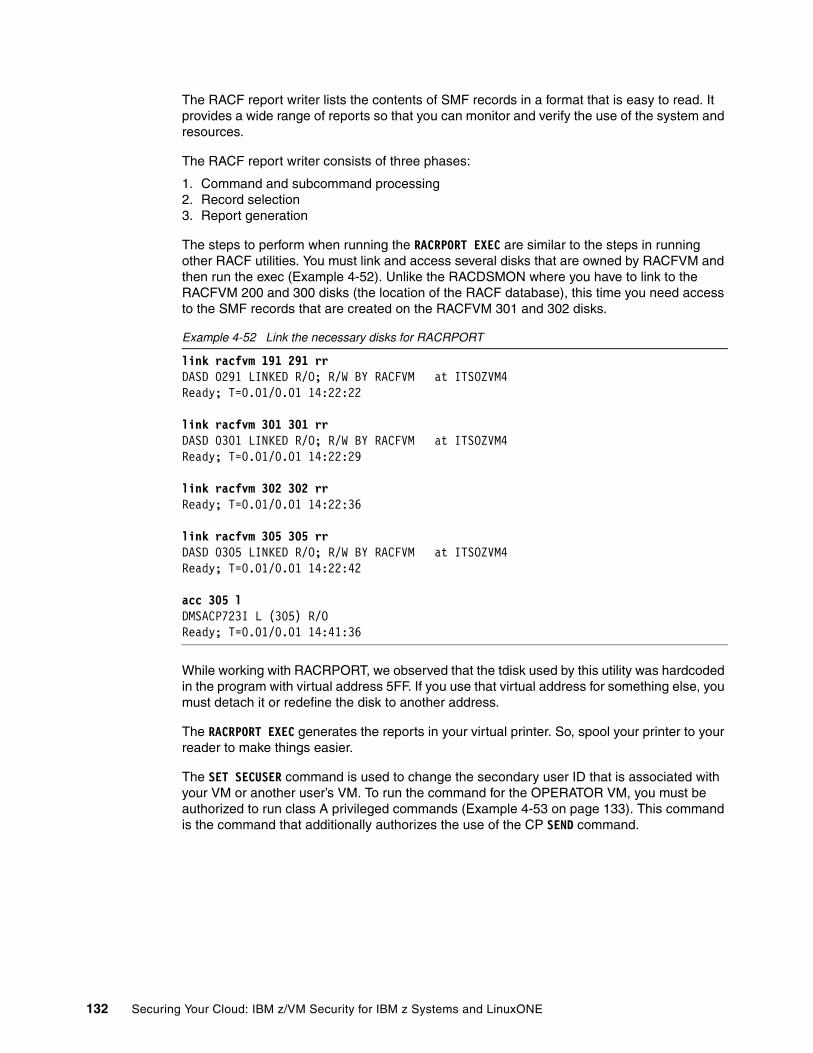
The RACF report writer lists the contents of SMF records in a format that is easy to read. It provides a wide range of reports so that you can monitor and verify the use of the system and resources.
The RACF report writer consists of three phases:
1. Command and subcommand processing 2. Record selection 3. Report generation
The steps to perform when running the RACRPORT EXEC are similar to the steps in running other RACF utilities. You must link and access several disks that are owned by RACFVM and then run the exec (Example 4-52). Unlike the RACDSMON where you have to link to the RACFVM 200 and 300 disks (the location of the RACF database), this time you need access to the SMF records that are created on the RACFVM 301 and 302 disks.
Example 4-52 Link the necessary disks for RACRPORT
link racfvm 191 291 rr DASD 0291 LINKED R/O; R/W BY RACFVM at ITSOZVM4Ready; T=0.01/0.01 14:22:22
link racfvm 301 301 rr DASD 0301 LINKED R/O; R/W BY RACFVM at ITSOZVM4Ready; T=0.01/0.01 14:22:29
link racfvm 302 302 rr Ready; T=0.01/0.01 14:22:36
link racfvm 305 305 rr DASD 0305 LINKED R/O; R/W BY RACFVM at ITSOZVM4Ready; T=0.01/0.01 14:22:42
acc 305 l DMSACP723I L (305) R/O Ready; T=0.01/0.01 14:41:36
While working with RACRPORT, we observed that the tdisk used by this utility was hardcoded in the program with virtual address 5FF. If you use that virtual address for something else, you must detach it or redefine the disk to another address.
The RACRPORT EXEC generates the reports in your virtual printer. So, spool your printer to your reader to make things easier.
The SET SECUSER command is used to change the secondary user ID that is associated with your VM or another user’s VM. To run the command for the OPERATOR VM, you must be authorized to run class A privileged commands (Example 4-53 on page 133). This command is the command that additionally authorizes the use of the CP SEND command.
132 Securing Your Cloud: IBM z/VM Security for IBM z Systems and LinuxONE
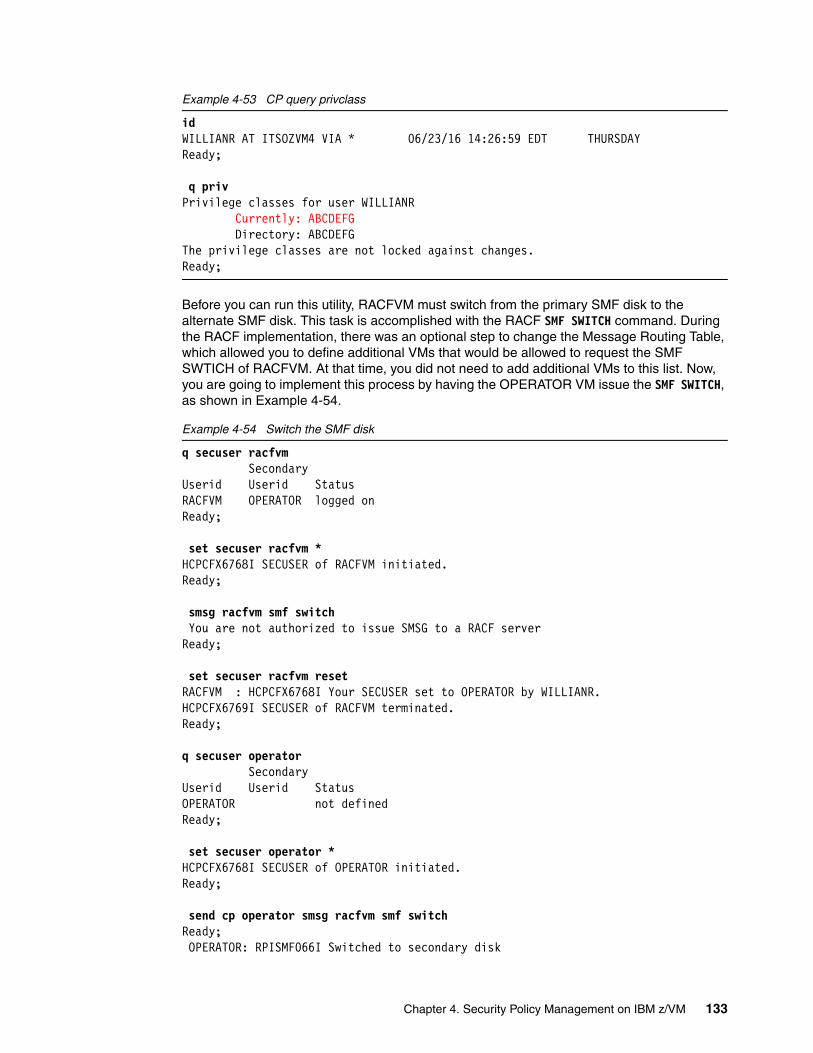
Example 4-53 CP query privclass
id WILLIANR AT ITSOZVM4 VIA * 06/23/16 14:26:59 EDT THURSDAYReady;
q priv Privilege classes for user WILLIANR Currently: ABCDEFG Directory: ABCDEFG The privilege classes are not locked against changes. Ready;
Before you can run this utility, RACFVM must switch from the primary SMF disk to the alternate SMF disk. This task is accomplished with the RACF SMF SWITCH command. During the RACF implementation, there was an optional step to change the Message Routing Table, which allowed you to define additional VMs that would be allowed to request the SMF SWTICH of RACFVM. At that time, you did not need to add additional VMs to this list. Now, you are going to implement this process by having the OPERATOR VM issue the SMF SWITCH, as shown in Example 4-54.
Example 4-54 Switch the SMF disk
q secuser racfvm Secondary Userid Userid Status RACFVM OPERATOR logged on Ready;
set secuser racfvm * HCPCFX6768I SECUSER of RACFVM initiated. Ready;
smsg racfvm smf switch You are not authorized to issue SMSG to a RACF server Ready;
set secuser racfvm reset RACFVM : HCPCFX6768I Your SECUSER set to OPERATOR by WILLIANR.HCPCFX6769I SECUSER of RACFVM terminated. Ready;
q secuser operator Secondary Userid Userid Status OPERATOR not defined Ready;
set secuser operator * HCPCFX6768I SECUSER of OPERATOR initiated. Ready;
send cp operator smsg racfvm smf switch Ready; OPERATOR: RPISMF066I Switched to secondary disk
Chapter 4. Security Policy Management on IBM z/VM 133
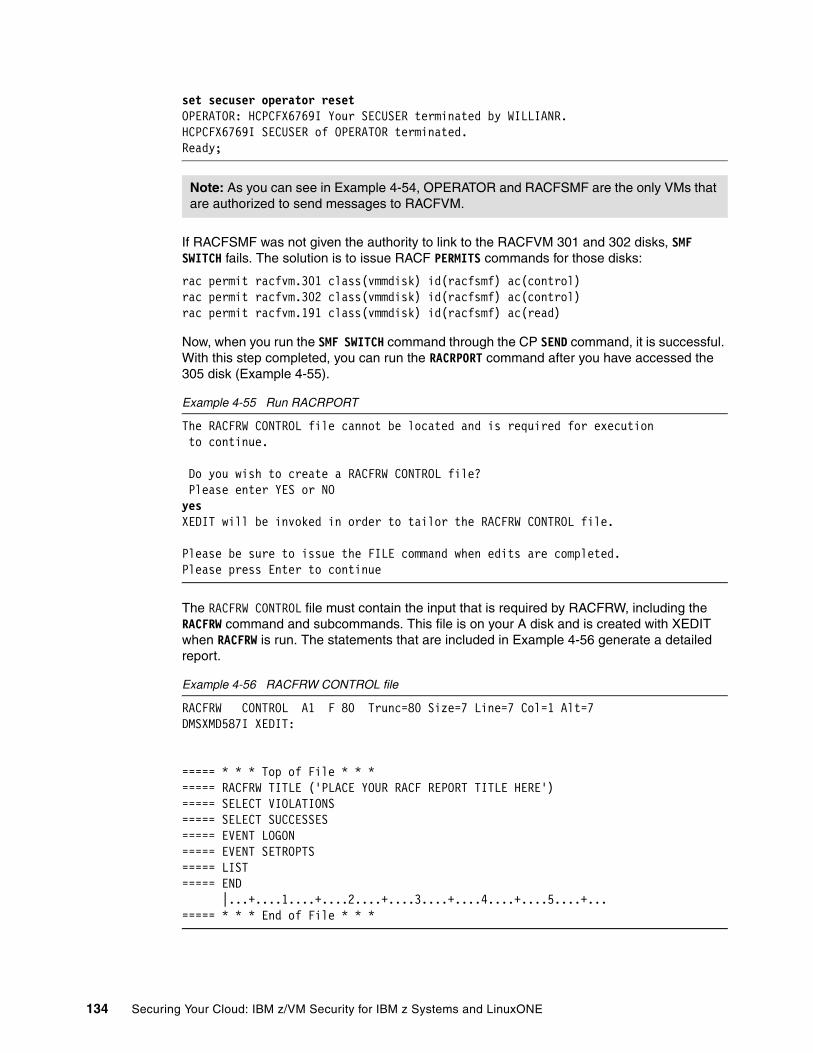
set secuser operator reset OPERATOR: HCPCFX6769I Your SECUSER terminated by WILLIANR.HCPCFX6769I SECUSER of OPERATOR terminated. Ready;
If RACFSMF was not given the authority to link to the RACFVM 301 and 302 disks, SMF SWITCH fails. The solution is to issue RACF PERMITS commands for those disks:
rac permit racfvm.301 class(vmmdisk) id(racfsmf) ac(control)rac permit racfvm.302 class(vmmdisk) id(racfsmf) ac(control)rac permit racfvm.191 class(vmmdisk) id(racfsmf) ac(read)
Now, when you run the SMF SWITCH command through the CP SEND command, it is successful. With this step completed, you can run the RACRPORT command after you have accessed the 305 disk (Example 4-55).
Example 4-55 Run RACRPORT
The RACFRW CONTROL file cannot be located and is required for execution to continue. Do you wish to create a RACFRW CONTROL file? Please enter YES or NO yes XEDIT will be invoked in order to tailor the RACFRW CONTROL file. Please be sure to issue the FILE command when edits are completed. Please press Enter to continue
The RACFRW CONTROL file must contain the input that is required by RACFRW, including the RACFRW command and subcommands. This file is on your A disk and is created with XEDIT when RACFRW is run. The statements that are included in Example 4-56 generate a detailed report.
Example 4-56 RACFRW CONTROL file
RACFRW CONTROL A1 F 80 Trunc=80 Size=7 Line=7 Col=1 Alt=7 DMSXMD587I XEDIT: ===== * * * Top of File * * * ===== RACFRW TITLE ('PLACE YOUR RACF REPORT TITLE HERE') ===== SELECT VIOLATIONS ===== SELECT SUCCESSES ===== EVENT LOGON ===== EVENT SETROPTS ===== LIST ===== END |...+....1....+....2....+....3....+....4....+....5....+...===== * * * End of File * * *
Note: As you can see in Example 4-54, OPERATOR and RACFSMF are the only VMs that are authorized to send messages to RACFVM.
134 Securing Your Cloud: IBM z/VM Security for IBM z Systems and LinuxONE
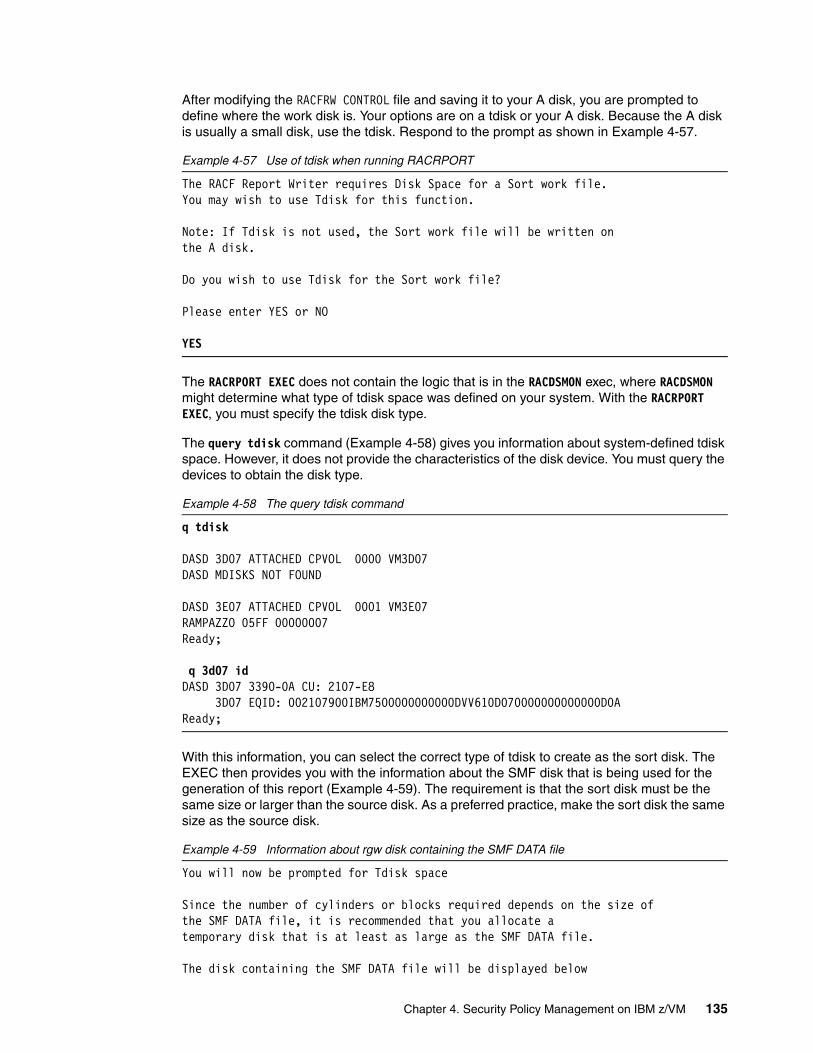
After modifying the RACFRW CONTROL file and saving it to your A disk, you are prompted to define where the work disk is. Your options are on a tdisk or your A disk. Because the A disk is usually a small disk, use the tdisk. Respond to the prompt as shown in Example 4-57.
Example 4-57 Use of tdisk when running RACRPORT
The RACF Report Writer requires Disk Space for a Sort work file. You may wish to use Tdisk for this function. Note: If Tdisk is not used, the Sort work file will be written on the A disk. Do you wish to use Tdisk for the Sort work file? Please enter YES or NO
YES
The RACRPORT EXEC does not contain the logic that is in the RACDSMON exec, where RACDSMON might determine what type of tdisk space was defined on your system. With the RACRPORT EXEC, you must specify the tdisk disk type.
The query tdisk command (Example 4-58) gives you information about system-defined tdisk space. However, it does not provide the characteristics of the disk device. You must query the devices to obtain the disk type.
Example 4-58 The query tdisk command
q tdisk DASD 3D07 ATTACHED CPVOL 0000 VM3D07 DASD MDISKS NOT FOUND DASD 3E07 ATTACHED CPVOL 0001 VM3E07 RAMPAZZO 05FF 00000007 Ready;
q 3d07 id DASD 3D07 3390-0A CU: 2107-E8 3D07 EQID: 002107900IBM7500000000000DVV610D070000000000000D0A Ready;
With this information, you can select the correct type of tdisk to create as the sort disk. The EXEC then provides you with the information about the SMF disk that is being used for the generation of this report (Example 4-59). The requirement is that the sort disk must be the same size or larger than the source disk. As a preferred practice, make the sort disk the same size as the source disk.
Example 4-59 Information about rgw disk containing the SMF DATA file
You will now be prompted for Tdisk space Since the number of cylinders or blocks required depends on the size of the SMF DATA file, it is recommended that you allocate a temporary disk that is at least as large as the SMF DATA file. The disk containing the SMF DATA file will be displayed below
Chapter 4. Security Policy Management on IBM z/VM 135
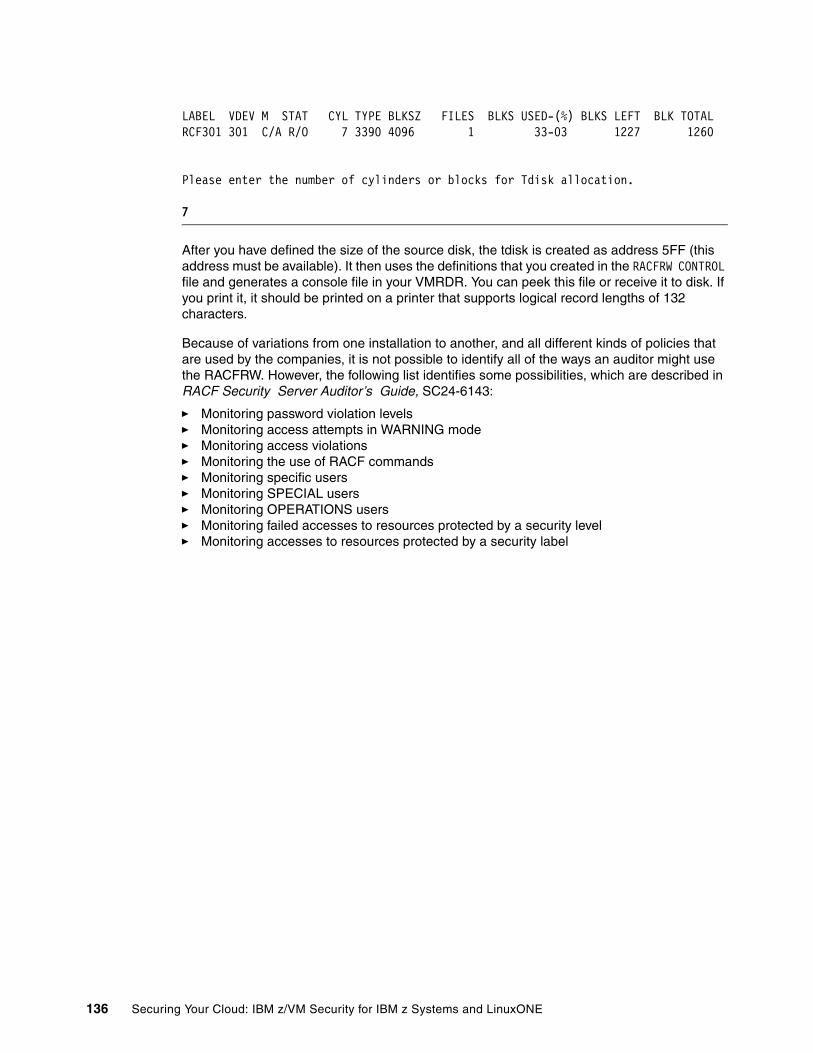
LABEL VDEV M STAT CYL TYPE BLKSZ FILES BLKS USED-(%) BLKS LEFT BLK TOTALRCF301 301 C/A R/O 7 3390 4096 1 33-03 1227 1260 Please enter the number of cylinders or blocks for Tdisk allocation.
7
After you have defined the size of the source disk, the tdisk is created as address 5FF (this address must be available). It then uses the definitions that you created in the RACFRW CONTROL file and generates a console file in your VMRDR. You can peek this file or receive it to disk. If you print it, it should be printed on a printer that supports logical record lengths of 132 characters.
Because of variations from one installation to another, and all different kinds of policies that are used by the companies, it is not possible to identify all of the ways an auditor might use the RACFRW. However, the following list identifies some possibilities, which are described in RACF Security Server Auditor’s Guide, SC24-6143:
� Monitoring password violation levels� Monitoring access attempts in WARNING mode� Monitoring access violations� Monitoring the use of RACF commands� Monitoring specific users� Monitoring SPECIAL users� Monitoring OPERATIONS users� Monitoring failed accesses to resources protected by a security level� Monitoring accesses to resources protected by a security label
136 Securing Your Cloud: IBM z/VM Security for IBM z Systems and LinuxONE
Chapter 5. Securing a Cloud on IBM z/VM environment
Today’s security requires consistent protection against threats and malware. Enterprises must be flexible while having a secure infrastructure to protect effectively the most valued asset of a company (the data), and their access through the cloud.
Running many distributed servers involves much effort to install, manage, maintain, and provide security for them. To contain this effort, many enterprises are consolidating these servers on z Systems or LinuxONE by using the z/VM as the hypervisor, taking advantage of the virtualization technologies to use the hardware effectively and to simplify administration tasks.
Implementing the enterprise security policy and following the least privilege principle increases the strength of security in your enterprise cloud.
This chapter describes the security of a Cloud on z/VM environment with its building blocks: z/VM Directory Manager (DirMaint), SMAPI, Extreme Cloud Administration Toolkit (xCAT), and Cloud Manager Appliance.
This chapter describes the following topics:
� Cloud on z/VM components� DirMaint� Systems Management API� z/VM Cloud Manager Appliance� Controller node� Compute node� Securing your cloud components
5
© Copyright IBM Corp. 2016. All rights reserved. 137
5.1 Cloud on z/VM components
An enterprise cloud might be composed of various components, depending on what is the main purpose of it. Implementing an Infrastructure as a Service (IaaS) cloud in z/VM demands the integration of some important components. The components that are listed here play a role in the integration of a cloud in z/VM:
� The z/VM Directory Manager (DirMaint) or a supported equivalent provides a command driven interface to manage z/VM directory entries.
� The z/VM Systems Management Application Programming Interface (SMAPI) provides programmatic access for managing many virtual images running on a single z/VM image by using a standard, platform-independent client interface, reducing the number of z/VM-specific programming skills that are required.
� The z/VM Cloud Manager Appliance (CMA) provides an easy method to deploy z/VM OpenStack enablement. OpenStack products and solutions can be constructed to use as many or as few of the services as is appropriate, whether that means that the CMA runs cloud controller services, compute node services, or only services that are needed by OpenStack z/VM drivers running in other virtual machines (VMs) or on other platforms.
z/VM CMA supports the following system roles, which control the set of services running inside xCAT VM:
– CMA controller: Runs cloud controller services (such as glance image services) in addition to all services that are listed under the compute_mn role. z/VM also runs the xCAT MN and ZHCP services to allow the controller to manage OpenStack z/VM hosts.
– CMA compute: Runs compute services (nova-compute service), networking services (neutron-zvm-agent service), and telemetry services (ceilometer-polling) for the z/VM hypervisor. z/VM also runs the ZHCP service to allow a remote xCAT MN service to manage hosts.
– CMA compute_MN: Runs compute, networking, and telemetry services (listed under the CMA compute role) for the z/VM hypervisor. It also runs xCAT and ZHCP services. This type of node is used in an environment where OpenStack controller services are run on a non-CMA node. The xCAT MN and ZHCP services allow a controller to manage the z/VM host without requiring cloud controller services to be running on the host.
– CMA mn: Runs the xCAT and ZHCP services. This is useful when all OpenStack services are running in non-CMA nodes or when you want to use xCAT and not OpenStack.
– CMA zhcp: Runs only the ZHCP service. This role is useful when all OpenStack services are running in non-CMA nodes or when you want xCAT and not OpenStack. In this case, another z/VM host must run xCAT MN service to manage the host through the ZHCP service.
� A virtual switch (VSWITCH) provides network connectivity between the management components to allow command-driven requests to come from the z/VM platform or other network connected locations. They also provide the networks on which newly provisioned instances are connected to.
� An External Security Manager (ESM) (such as IBM Resource Access Control Facility (RACF)) provides additional resource protection beyond DIRMAINT and SMAPI authorizations. An ESM is optional, but implementing it might ensure that the company security policy is met. Details about how to implement RACF are described in Chapter 3, “IBM Resource Access Control Facility Security Server for IBM z/VM” on page 33.
138 Securing Your Cloud: IBM z/VM Security for IBM z Systems and LinuxONE
5.2 DirMaint
DirMaint provides well-organized and secure interactive facilities for maintaining the z/VM system directory. Directory management is simplified by the DirMaint command interface and automated facilities. DirMaint supports all the z/VM directory statements. Most DirMaint directory commands have the same names and format as the z/VM directory.
5.2.1 DirMaint controls
To work correctly and grant correct authority to DirMaint, it has some control files that must be tailored. This section describes these control files.
When performing a new implementation of the product, you must modify or create the following files:
� CONFIG DATADVH (shipped with the product)� CONFIGnn DATADVH (must be created)� AUTHFOR CONTROL (must be updated� RPWLIST DATA (copied from MAINT’s 2CC disk)� EXTENT CONTROL (must be updated)
CONFIG DATADVHThe CONFIG DATADVH file is the most important file for the DirMaint configuration. It contains all of the tailorable parameters for the product. You should never modify this IBM supplied file because it might be updated through the service process and overwrite your changes. To change parameters on this file, create an override file instead where your installation-specific parameters are defined. The override file is named CONFIGnn DATADVH, where the nn can be any two digits you want to assign. The CONFIG DATADVH file is self-documented. For more information, see Directory Maintenance Facility Tailoring and Administration Guide, SC24-6135.
CONFIGSM DATADVH
The statements that are shown in Example 5-1 are a good starting point for your CONFIGSM DATADVH file. DirMaint accepts nn as AA, BB, and so on. This example uses SM to refer to SMAPI configuration.
Example 5-1 CONFIGSM DATADVH
ALLOW_ASUSER_NOPASS_FROM= VSMGUARD *ALLOW_ASUSER_NOPASS_FROM= VSMWORK1 *ALLOW_ASUSER_NOPASS_FROM= VSMWORK2 *ALLOW_ASUSER_NOPASS_FROM= VSMWORK3 *ALLOW_ASUSER_NOPASS_FROM= WAVEWRKS *ALLOW_ASUSER_NOPASS_FROM= WAVEWRKC *ALLOW_ASUSER_NOPASS_FROM= WAVEWRKL *ALLOW_ASUSER_NOPASS_FROM= EDI *ASYNCHRONOUS_UPDATE_NOTIFICATION_EXIT.TCP= DVHXNE EXECASYNCHRONOUS_UPDATE_NOTIFICATION_EXIT.UDP= DVHXNE EXEC
Note: The CONFIGSM DATADVH file must be on the 11F disk when it is created. It is updated by using the dirm send and dirm file commands. After changes are made, the DirMaint administrator must run the dirm rldata command. This command is used to instruct the DIRMAINT VM to reload all DATADVH files into memory.
Chapter 5. Securing a Cloud on IBM z/VM environment 139
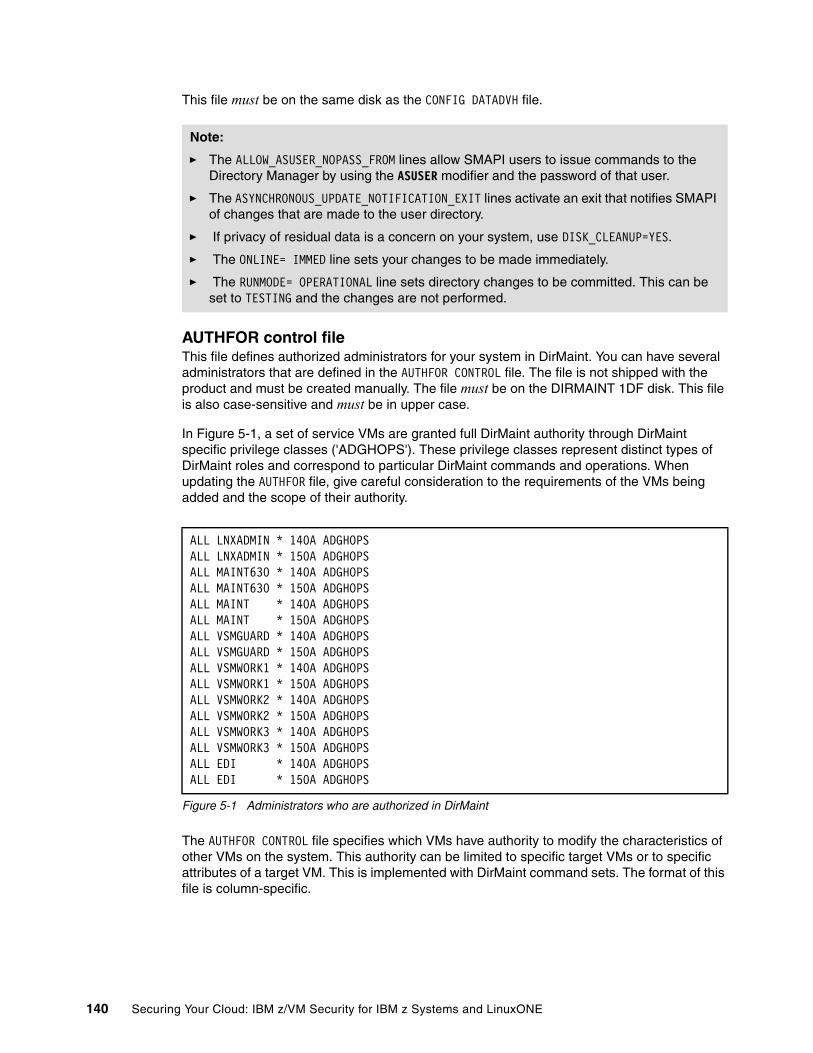
This file must be on the same disk as the CONFIG DATADVH file.
AUTHFOR control fileThis file defines authorized administrators for your system in DirMaint. You can have several administrators that are defined in the AUTHFOR CONTROL file. The file is not shipped with the product and must be created manually. The file must be on the DIRMAINT 1DF disk. This file is also case-sensitive and must be in upper case.
In Figure 5-1, a set of service VMs are granted full DirMaint authority through DirMaint specific privilege classes ('ADGHOPS'). These privilege classes represent distinct types of DirMaint roles and correspond to particular DirMaint commands and operations. When updating the AUTHFOR file, give careful consideration to the requirements of the VMs being added and the scope of their authority.
Figure 5-1 Administrators who are authorized in DirMaint
The AUTHFOR CONTROL file specifies which VMs have authority to modify the characteristics of other VMs on the system. This authority can be limited to specific target VMs or to specific attributes of a target VM. This is implemented with DirMaint command sets. The format of this file is column-specific.
Note:
� The ALLOW_ASUSER_NOPASS_FROM lines allow SMAPI users to issue commands to the Directory Manager by using the ASUSER modifier and the password of that user.
� The ASYNCHRONOUS_UPDATE_NOTIFICATION_EXIT lines activate an exit that notifies SMAPI of changes that are made to the user directory.
� If privacy of residual data is a concern on your system, use DISK_CLEANUP=YES.
� The ONLINE= IMMED line sets your changes to be made immediately.
� The RUNMODE= OPERATIONAL line sets directory changes to be committed. This can be set to TESTING and the changes are not performed.
ALL LNXADMIN * 140A ADGHOPS ALL LNXADMIN * 150A ADGHOPS ALL MAINT630 * 140A ADGHOPS ALL MAINT630 * 150A ADGHOPS ALL MAINT * 140A ADGHOPS ALL MAINT * 150A ADGHOPS ALL VSMGUARD * 140A ADGHOPS ALL VSMGUARD * 150A ADGHOPS ALL VSMWORK1 * 140A ADGHOPS ALL VSMWORK1 * 150A ADGHOPS ALL VSMWORK2 * 140A ADGHOPS ALL VSMWORK2 * 150A ADGHOPS ALL VSMWORK3 * 140A ADGHOPS ALL VSMWORK3 * 150A ADGHOPS ALL EDI * 140A ADGHOPS ALL EDI * 150A ADGHOPS
140 Securing Your Cloud: IBM z/VM Security for IBM z Systems and LinuxONE
RPWLIST DATAThe RPWLIST DATA file is on the MAINT 2CC minidisk. You should link and access this disk and copy the file to the 11F disk that is owned by DIRMAINT. It can be used to disable passwords that you deem to be trivial.
EXTENT CONTROL The EXTENT CONTROL file defines disks (volumes) to DirMaint for minidisk allocation. It also contains system and device default values that are used during allocation operations. There are two main sections that should be populated:
� Regions define the actual disks and their sizes to DirMaint. The AUTOR keyword can be used in user directory entries to take space from the regions. As a preferred practice, the region name and volume label always should be identical.
� Groups define pools of disks so that the AUTOG keyword can be used to take space from the pools, not from specific disks.
DirMaint-RACF ConnectorRACF can coexist with the DirMaint product installed. However, to avoid dual maintenance of password processing (and other RACF functions), complete the following steps:
1. Use the DirMaint supplied sample file CONFIGRC SAMPDVH. You must copy this file to the 6VMDIR30 11F disk as CONFIGRC DATADVH.
2. If RACF administration is centralized, you must give the DIRMAINT user ID RACF administrator SPECIAL authority. If RACF administration is decentralized, you must give the DIRMAINT user ID RACF group-SPECIAL authority.
3. If you want to record DirMaint activity in RACF SMF records, enable ESM_LOG_RECORDING_EXIT. To do this, remove the comment from the item ESM_LOG_RECORDING_EXIT in the CONFIGRC DATADVH file. For this to take effect, either perform an IPL of DirMaint or run the DIRM RLDDATA command.
4. You must also authorize the DirMaint service machines DIRMAINT, DATAMOVE, and DIRMSAT to use the RACROUTE interface.
5.2.2 Delegating DirMaint authority
There are three components of DirMaint access management:
� Command privilege classes� AUTHFOR CONTROL and AUTHBY CONTROL files� Exit routines
Note: For more information about DIRMAINT, see Directory Maintenance Facility Tailoring and Administration Guide, SC24-6135.
Note: For more information about this file, see Chapter 3, “Tailoring the DIRMAINT Service Machine”, in Directory Maintenance Facility Tailoring and Administration Guide, SC24-6135. For this file to take effect, either perform an IPL of DirMaint or run the DIRM RLDDATA command.
Note: For more information, see Directory Maintenance Facility Tailoring and Administration Guide, SC24-6135 and z/VM: Security Server RACROUTE Macro Reference, SC24-6231.
Chapter 5. Securing a Cloud on IBM z/VM environment 141
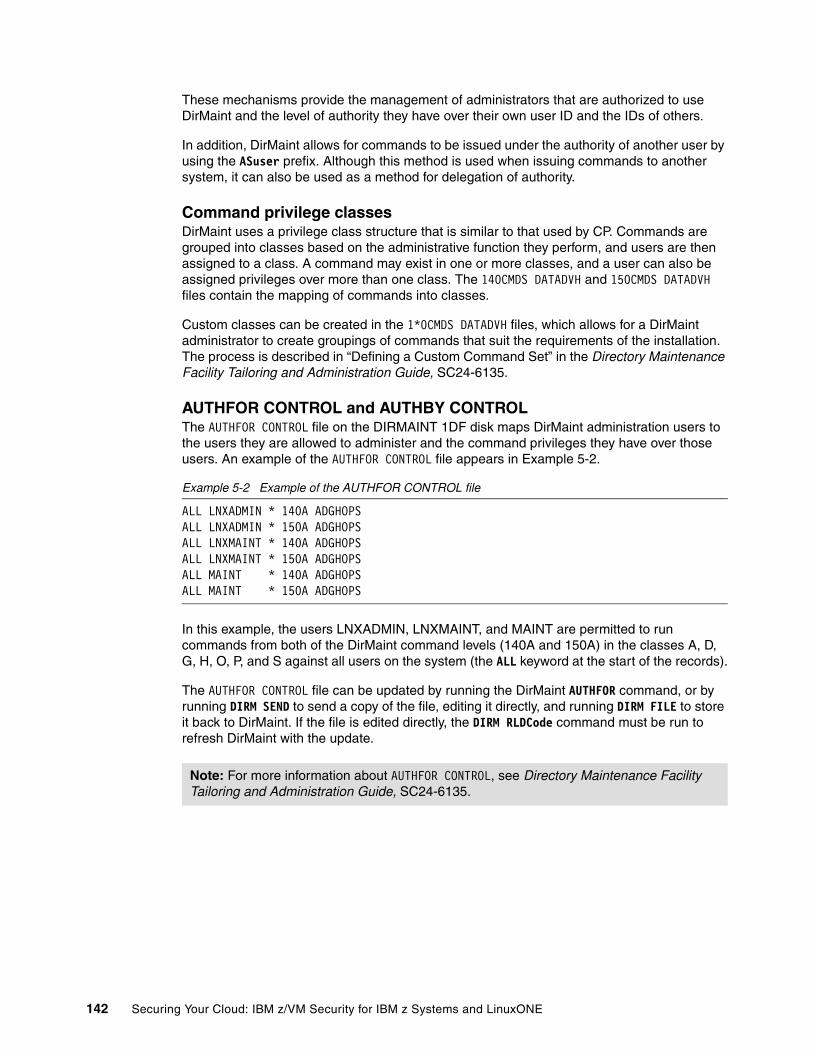
These mechanisms provide the management of administrators that are authorized to use DirMaint and the level of authority they have over their own user ID and the IDs of others.
In addition, DirMaint allows for commands to be issued under the authority of another user by using the ASuser prefix. Although this method is used when issuing commands to another system, it can also be used as a method for delegation of authority.
Command privilege classesDirMaint uses a privilege class structure that is similar to that used by CP. Commands are grouped into classes based on the administrative function they perform, and users are then assigned to a class. A command may exist in one or more classes, and a user can also be assigned privileges over more than one class. The 140CMDS DATADVH and 150CMDS DATADVH files contain the mapping of commands into classes.
Custom classes can be created in the 1*0CMDS DATADVH files, which allows for a DirMaint administrator to create groupings of commands that suit the requirements of the installation. The process is described in “Defining a Custom Command Set” in the Directory Maintenance Facility Tailoring and Administration Guide, SC24-6135.
AUTHFOR CONTROL and AUTHBY CONTROLThe AUTHFOR CONTROL file on the DIRMAINT 1DF disk maps DirMaint administration users to the users they are allowed to administer and the command privileges they have over those users. An example of the AUTHFOR CONTROL file appears in Example 5-2.
Example 5-2 Example of the AUTHFOR CONTROL file
ALL LNXADMIN * 140A ADGHOPSALL LNXADMIN * 150A ADGHOPSALL LNXMAINT * 140A ADGHOPSALL LNXMAINT * 150A ADGHOPSALL MAINT * 140A ADGHOPSALL MAINT * 150A ADGHOPS
In this example, the users LNXADMIN, LNXMAINT, and MAINT are permitted to run commands from both of the DirMaint command levels (140A and 150A) in the classes A, D, G, H, O, P, and S against all users on the system (the ALL keyword at the start of the records).
The AUTHFOR CONTROL file can be updated by running the DirMaint AUTHFOR command, or by running DIRM SEND to send a copy of the file, editing it directly, and running DIRM FILE to store it back to DirMaint. If the file is edited directly, the DIRM RLDCode command must be run to refresh DirMaint with the update.
Note: For more information about AUTHFOR CONTROL, see Directory Maintenance Facility Tailoring and Administration Guide, SC24-6135.
142 Securing Your Cloud: IBM z/VM Security for IBM z Systems and LinuxONE
Running commands by using ASuserOn the example system, Linux system administrators have the role of maintaining Linux VM definitions by using DirMaint. Currently, the AUTHFOR CONTROL file grants access to these administrators over all the VMs on the system (by using the ALL keyword). Suppose that you want to give these administrators access to operate only on the Linux VM users. Using AUTHFOR CONTROL, the only way this can be done is to list explicitly each Linux VM and the command privilege that applies, for each administrator. This introduces the following considerations:
� Each time a Linux system is added, AUTHFOR CONTROL must be updated to add authority to the new guest for all Linux administrators.
� If an administrator joins or leaves the team, AUTHFOR CONTROL must be modified to add or remove entries for all the Linux guests.
� If the command privilege level that the Linux administrators should be assigned over Linux guests changes, every corresponding line in AUTHFOR CONTROL has to be updated.
A method that can be used to implement a group membership approach is to define an administrator ID for each set of Linux guests. Individual administrators then use the ASuser prefix keyword on the DIRM command to issue their administrative commands to DirMaint under the authority of the group ID:
DIRM AS LNX1GRP FOR LNXS0030 REVIEW
This process works as a way to reduce the configuration effort because the only ID that appears in the AUTHFOR CONTROL file is the group administrator ID. However, there are a few drawbacks:
� The group administrator ID must be defined to RACF. It does not have to be defined to the CP directory.
� The ASuser prefix keyword forces a prompt for the administrator password every time it is used.
� The password that must be provided when ASuser is used as the password of the group administrator ID.
Using BYuserThe ASuser prefix can be combined with BYuser to avoid having to know the password of the administrator ID. Using BY with AS allows an administrator to override the password prompt that comes from using AS with a prompt for their own password, but the administrator must use their own ID as the option on the BY prefix. The DirMaint command then appear like this:
DIRM AS LNX1GRP BY VIC FOR LNXS0030 REVIEW
A DirMaint administrator must be authorized to run commands by using BYuser because the password of the administrator running the command is used, so administrators on the system must be protected from other admins running commands on their behalf. The authority is managed in a configuration file within DirMaint in a similar fashion to FOR by using the file AUTHBY CONTROL. The AUTHBY CONTROL file is maintained in a similar way to AUTHFOR CONTROL, either by using the DirMaint AUTHBY command or by directly editing the AUTHBY CONTROL file.
Note: Like AUTHFOR CONTROL, there is no supplied AUTHBY CONTROL file in a DirMaint installation. Use the AUTHBY command to create the first AUTHBY entry so that DirMaint creates the file on the correct disk. You can then use the SEND/FILE process to edit the file directly if you want.
Chapter 5. Securing a Cloud on IBM z/VM environment 143
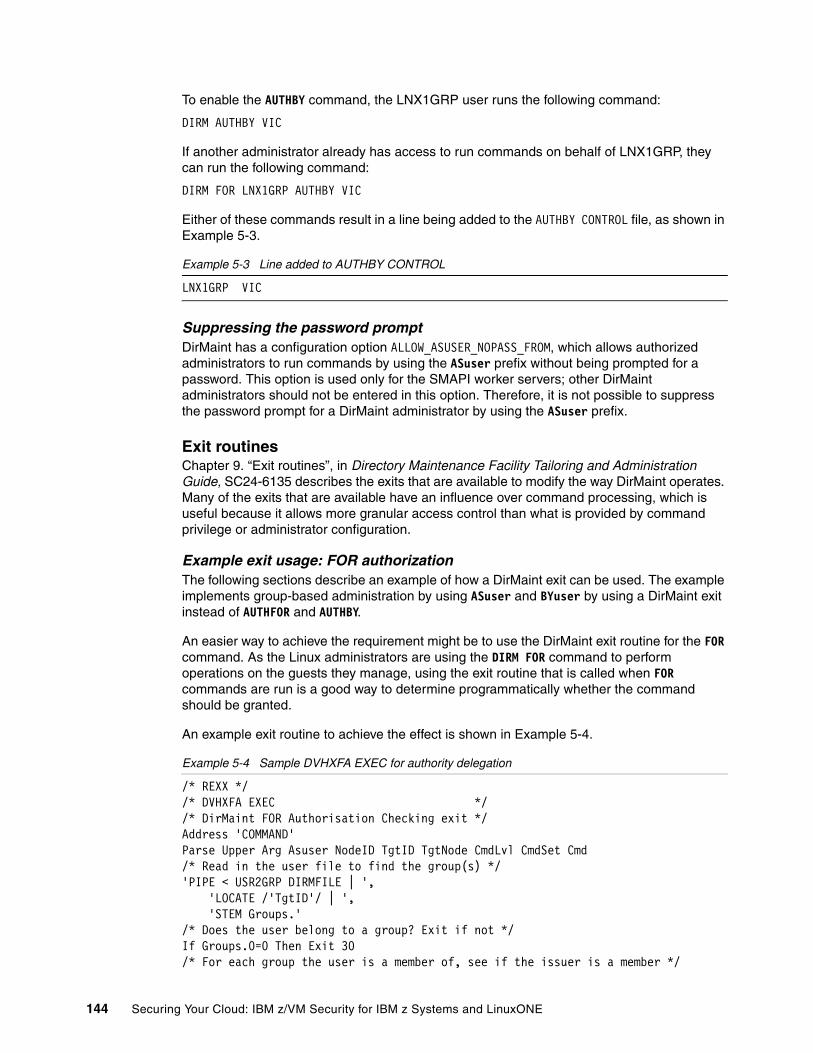
To enable the AUTHBY command, the LNX1GRP user runs the following command:
DIRM AUTHBY VIC
If another administrator already has access to run commands on behalf of LNX1GRP, they can run the following command:
DIRM FOR LNX1GRP AUTHBY VIC
Either of these commands result in a line being added to the AUTHBY CONTROL file, as shown in Example 5-3.
Example 5-3 Line added to AUTHBY CONTROL
LNX1GRP VIC
Suppressing the password promptDirMaint has a configuration option ALLOW_ASUSER_NOPASS_FROM, which allows authorized administrators to run commands by using the ASuser prefix without being prompted for a password. This option is used only for the SMAPI worker servers; other DirMaint administrators should not be entered in this option. Therefore, it is not possible to suppress the password prompt for a DirMaint administrator by using the ASuser prefix.
Exit routinesChapter 9. “Exit routines”, in Directory Maintenance Facility Tailoring and Administration Guide, SC24-6135 describes the exits that are available to modify the way DirMaint operates. Many of the exits that are available have an influence over command processing, which is useful because it allows more granular access control than what is provided by command privilege or administrator configuration.
Example exit usage: FOR authorizationThe following sections describe an example of how a DirMaint exit can be used. The example implements group-based administration by using ASuser and BYuser by using a DirMaint exit instead of AUTHFOR and AUTHBY.
An easier way to achieve the requirement might be to use the DirMaint exit routine for the FOR command. As the Linux administrators are using the DIRM FOR command to perform operations on the guests they manage, using the exit routine that is called when FOR commands are run is a good way to determine programmatically whether the command should be granted.
An example exit routine to achieve the effect is shown in Example 5-4.
Example 5-4 Sample DVHXFA EXEC for authority delegation
/* REXX *//* DVHXFA EXEC *//* DirMaint FOR Authorisation Checking exit */Address 'COMMAND'Parse Upper Arg Asuser NodeID TgtID TgtNode CmdLvl CmdSet Cmd/* Read in the user file to find the group(s) */'PIPE < USR2GRP DIRMFILE | ', 'LOCATE /'TgtID'/ | ', 'STEM Groups.'/* Does the user belong to a group? Exit if not */If Groups.0=0 Then Exit 30/* For each group the user is a member of, see if the issuer is a member */
144 Securing Your Cloud: IBM z/VM Security for IBM z Systems and LinuxONE
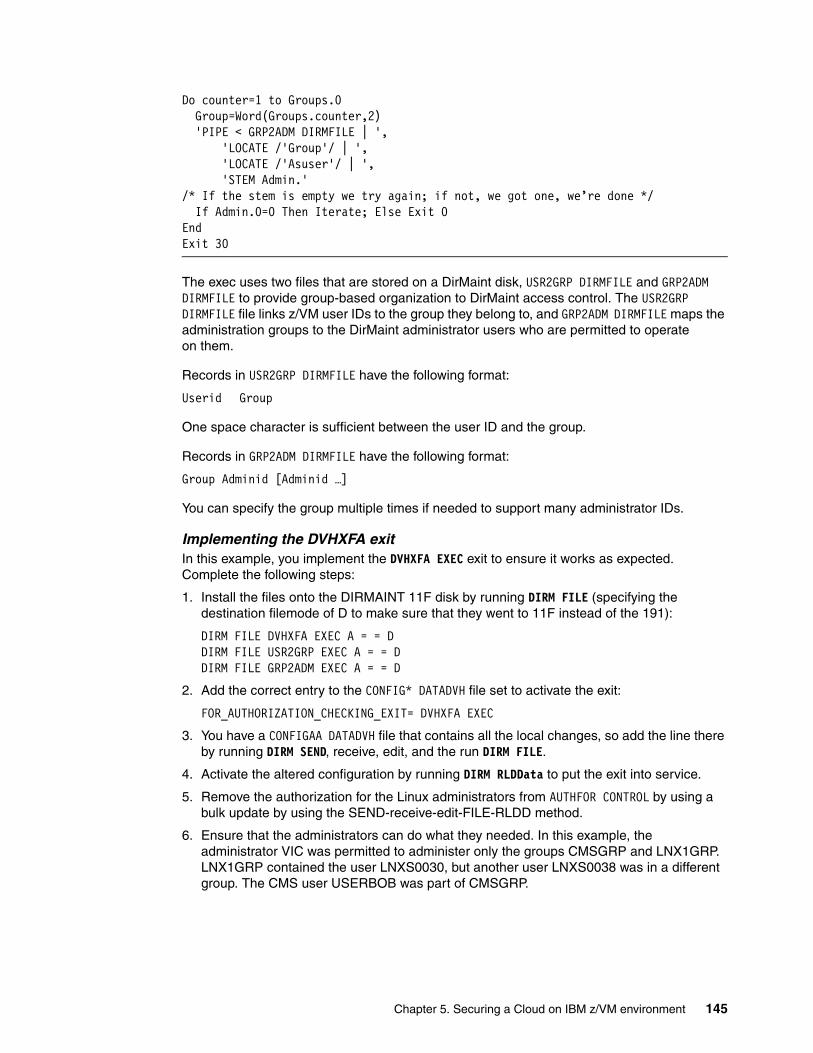
Do counter=1 to Groups.0 Group=Word(Groups.counter,2) 'PIPE < GRP2ADM DIRMFILE | ', 'LOCATE /'Group'/ | ', 'LOCATE /'Asuser'/ | ', 'STEM Admin.'/* If the stem is empty we try again; if not, we got one, we’re done */ If Admin.0=0 Then Iterate; Else Exit 0EndExit 30
The exec uses two files that are stored on a DirMaint disk, USR2GRP DIRMFILE and GRP2ADM DIRMFILE to provide group-based organization to DirMaint access control. The USR2GRP DIRMFILE file links z/VM user IDs to the group they belong to, and GRP2ADM DIRMFILE maps the administration groups to the DirMaint administrator users who are permitted to operate on them.
Records in USR2GRP DIRMFILE have the following format:
Userid Group
One space character is sufficient between the user ID and the group.
Records in GRP2ADM DIRMFILE have the following format:
Group Adminid [Adminid …]
You can specify the group multiple times if needed to support many administrator IDs.
Implementing the DVHXFA exitIn this example, you implement the DVHXFA EXEC exit to ensure it works as expected. Complete the following steps:
1. Install the files onto the DIRMAINT 11F disk by running DIRM FILE (specifying the destination filemode of D to make sure that they went to 11F instead of the 191):
DIRM FILE DVHXFA EXEC A = = DDIRM FILE USR2GRP EXEC A = = DDIRM FILE GRP2ADM EXEC A = = D
2. Add the correct entry to the CONFIG* DATADVH file set to activate the exit:
FOR_AUTHORIZATION_CHECKING_EXIT= DVHXFA EXEC
3. You have a CONFIGAA DATADVH file that contains all the local changes, so add the line there by running DIRM SEND, receive, edit, and the run DIRM FILE.
4. Activate the altered configuration by running DIRM RLDData to put the exit into service.
5. Remove the authorization for the Linux administrators from AUTHFOR CONTROL by using a bulk update by using the SEND-receive-edit-FILE-RLDD method.
6. Ensure that the administrators can do what they needed. In this example, the administrator VIC was permitted to administer only the groups CMSGRP and LNX1GRP. LNX1GRP contained the user LNXS0030, but another user LNXS0038 was in a different group. The CMS user USERBOB was part of CMSGRP.
Chapter 5. Securing a Cloud on IBM z/VM environment 145
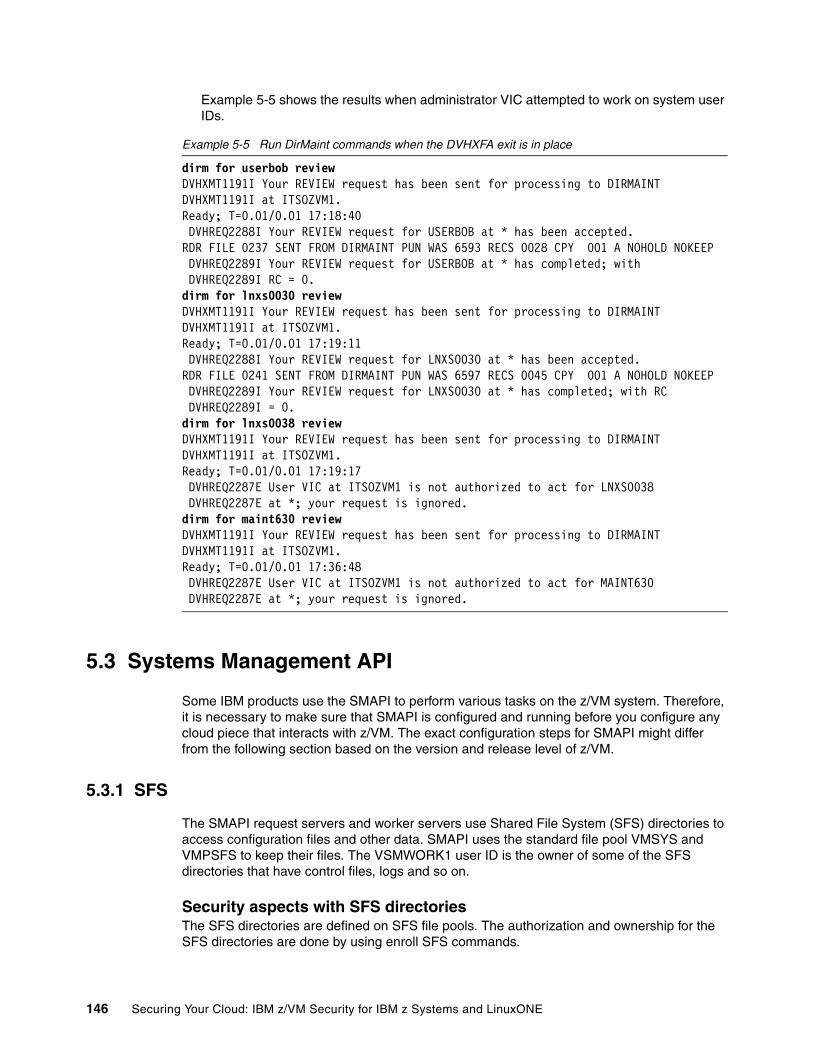
Example 5-5 shows the results when administrator VIC attempted to work on system user IDs.
Example 5-5 Run DirMaint commands when the DVHXFA exit is in place
dirm for userbob review DVHXMT1191I Your REVIEW request has been sent for processing to DIRMAINT DVHXMT1191I at ITSOZVM1. Ready; T=0.01/0.01 17:18:40 DVHREQ2288I Your REVIEW request for USERBOB at * has been accepted. RDR FILE 0237 SENT FROM DIRMAINT PUN WAS 6593 RECS 0028 CPY 001 A NOHOLD NOKEEP DVHREQ2289I Your REVIEW request for USERBOB at * has completed; with DVHREQ2289I RC = 0. dirm for lnxs0030 review DVHXMT1191I Your REVIEW request has been sent for processing to DIRMAINT DVHXMT1191I at ITSOZVM1. Ready; T=0.01/0.01 17:19:11 DVHREQ2288I Your REVIEW request for LNXS0030 at * has been accepted. RDR FILE 0241 SENT FROM DIRMAINT PUN WAS 6597 RECS 0045 CPY 001 A NOHOLD NOKEEP DVHREQ2289I Your REVIEW request for LNXS0030 at * has completed; with RC DVHREQ2289I = 0. dirm for lnxs0038 review DVHXMT1191I Your REVIEW request has been sent for processing to DIRMAINT DVHXMT1191I at ITSOZVM1. Ready; T=0.01/0.01 17:19:17 DVHREQ2287E User VIC at ITSOZVM1 is not authorized to act for LNXS0038 DVHREQ2287E at *; your request is ignored. dirm for maint630 review DVHXMT1191I Your REVIEW request has been sent for processing to DIRMAINTDVHXMT1191I at ITSOZVM1. Ready; T=0.01/0.01 17:36:48 DVHREQ2287E User VIC at ITSOZVM1 is not authorized to act for MAINT630 DVHREQ2287E at *; your request is ignored.
5.3 Systems Management API
Some IBM products use the SMAPI to perform various tasks on the z/VM system. Therefore, it is necessary to make sure that SMAPI is configured and running before you configure any cloud piece that interacts with z/VM. The exact configuration steps for SMAPI might differ from the following section based on the version and release level of z/VM.
5.3.1 SFS
The SMAPI request servers and worker servers use Shared File System (SFS) directories to access configuration files and other data. SMAPI uses the standard file pool VMSYS and VMPSFS to keep their files. The VSMWORK1 user ID is the owner of some of the SFS directories that have control files, logs and so on.
Security aspects with SFS directoriesThe SFS directories are defined on SFS file pools. The authorization and ownership for the SFS directories are done by using enroll SFS commands.
146 Securing Your Cloud: IBM z/VM Security for IBM z Systems and LinuxONE
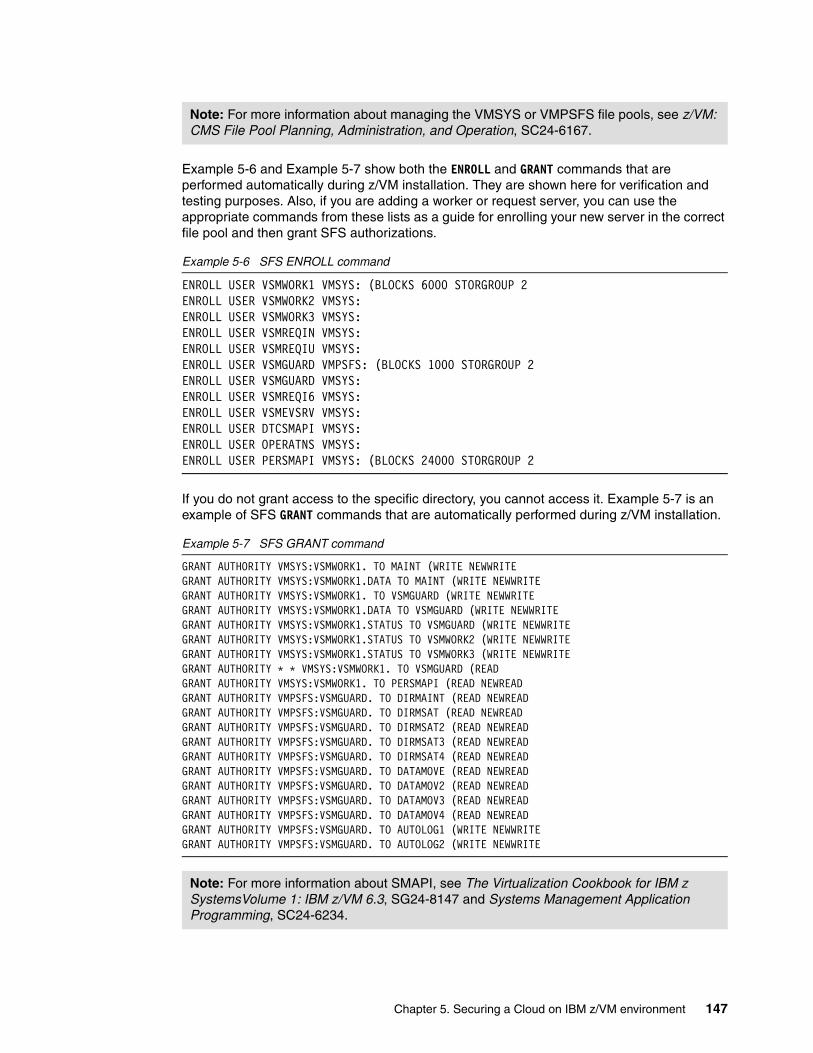
Example 5-6 and Example 5-7 show both the ENROLL and GRANT commands that are performed automatically during z/VM installation. They are shown here for verification and testing purposes. Also, if you are adding a worker or request server, you can use the appropriate commands from these lists as a guide for enrolling your new server in the correct file pool and then grant SFS authorizations.
Example 5-6 SFS ENROLL command
ENROLL USER VSMWORK1 VMSYS: (BLOCKS 6000 STORGROUP 2ENROLL USER VSMWORK2 VMSYS:ENROLL USER VSMWORK3 VMSYS:ENROLL USER VSMREQIN VMSYS:ENROLL USER VSMREQIU VMSYS:ENROLL USER VSMGUARD VMPSFS: (BLOCKS 1000 STORGROUP 2ENROLL USER VSMGUARD VMSYS:ENROLL USER VSMREQI6 VMSYS:ENROLL USER VSMEVSRV VMSYS:ENROLL USER DTCSMAPI VMSYS:ENROLL USER OPERATNS VMSYS:ENROLL USER PERSMAPI VMSYS: (BLOCKS 24000 STORGROUP 2
If you do not grant access to the specific directory, you cannot access it. Example 5-7 is an example of SFS GRANT commands that are automatically performed during z/VM installation.
Example 5-7 SFS GRANT command
GRANT AUTHORITY VMSYS:VSMWORK1. TO MAINT (WRITE NEWWRITEGRANT AUTHORITY VMSYS:VSMWORK1.DATA TO MAINT (WRITE NEWWRITEGRANT AUTHORITY VMSYS:VSMWORK1. TO VSMGUARD (WRITE NEWWRITEGRANT AUTHORITY VMSYS:VSMWORK1.DATA TO VSMGUARD (WRITE NEWWRITEGRANT AUTHORITY VMSYS:VSMWORK1.STATUS TO VSMGUARD (WRITE NEWWRITEGRANT AUTHORITY VMSYS:VSMWORK1.STATUS TO VSMWORK2 (WRITE NEWWRITEGRANT AUTHORITY VMSYS:VSMWORK1.STATUS TO VSMWORK3 (WRITE NEWWRITEGRANT AUTHORITY * * VMSYS:VSMWORK1. TO VSMGUARD (READGRANT AUTHORITY VMSYS:VSMWORK1. TO PERSMAPI (READ NEWREADGRANT AUTHORITY VMPSFS:VSMGUARD. TO DIRMAINT (READ NEWREADGRANT AUTHORITY VMPSFS:VSMGUARD. TO DIRMSAT (READ NEWREADGRANT AUTHORITY VMPSFS:VSMGUARD. TO DIRMSAT2 (READ NEWREADGRANT AUTHORITY VMPSFS:VSMGUARD. TO DIRMSAT3 (READ NEWREADGRANT AUTHORITY VMPSFS:VSMGUARD. TO DIRMSAT4 (READ NEWREADGRANT AUTHORITY VMPSFS:VSMGUARD. TO DATAMOVE (READ NEWREADGRANT AUTHORITY VMPSFS:VSMGUARD. TO DATAMOV2 (READ NEWREADGRANT AUTHORITY VMPSFS:VSMGUARD. TO DATAMOV3 (READ NEWREADGRANT AUTHORITY VMPSFS:VSMGUARD. TO DATAMOV4 (READ NEWREADGRANT AUTHORITY VMPSFS:VSMGUARD. TO AUTOLOG1 (WRITE NEWWRITEGRANT AUTHORITY VMPSFS:VSMGUARD. TO AUTOLOG2 (WRITE NEWWRITE
Note: For more information about managing the VMSYS or VMPSFS file pools, see z/VM: CMS File Pool Planning, Administration, and Operation, SC24-6167.
Note: For more information about SMAPI, see The Virtualization Cookbook for IBM z SystemsVolume 1: IBM z/VM 6.3, SG24-8147 and Systems Management Application Programming, SC24-6234.
Chapter 5. Securing a Cloud on IBM z/VM environment 147
5.3.2 Looking at other SMAPI user IDs
The interaction with SMAPI happens through a client server architecture and SMAPI has two types of servers:
� Request servers� Worker servers
Request serversA listening request server receives a connection request from a client, establishes a connection, and then accepts requests from that client. Here are the request servers:
� VSMREQIN� VSMREQI6� VSMREQIU� VSMEVSRV
Worker serversThe worker servers process API function requests. Three worker servers are defined in the default installation:
� VSMWORK1� VSMWORK2� VSMWORK3
A fourth worker server, VSMGUARD, is also defined. VSMGUARD is a “guard” server that helps provide better resiliency and error recovery. It is described in 5.3.3, “VSMGUARD” on page 148.
Other serversHere are some other servers:
� The LOHCOST server is used for caching the system directory contents that are required to satisfy the various query APIs. It is also used to store and retrieve data that is used by the metadata APIs.
� The DTCSMAPI server is used by several of the SMAPI servers for communication and workload balancing.
� The PERSMAPI server is used for performance monitoring.
� The VSMEVSRV server is used to listen for and then propagate VMEVENT and directory updates.
� The OPERATNS server is used to collect, format, and distribute ABEND dumps.
5.3.3 VSMGUARD
The VSMGUARD worker server grants authority to all the other SMAPI servers that are configured to access the SMAPI file space. Therefore, VSMGUARD must be made an administrator of the VMSYS: file pool. This is done by adding VSMGUARD to the list of users that are authorized for ADMIN authority.
Note: In the default environment, this is done by updating the VMSERVS DMSPARMS file on the VMSERVS 191 disk.
148 Securing Your Cloud: IBM z/VM Security for IBM z Systems and LinuxONE
VSMGUARD has an important role in the SMAPI environment. When you must recycle all SMAPI user IDs, you do it by recycling VSMGUARD (force and xautolog) and it recycles all the other SMAPI user IDs, save the SMAPI segment, and define the vSwitches that are listed in the configuration file.
5.3.4 SMAPI controls
Because xCAT uses SMAPI to interact with the system to enable xCAT on z/VM, you must configure the following SMAPI files:
� DMSSISVR NAMES
DMSSISVR NAMES is a CMS NAMES file that defines each specific request and worker servers in the z/VM environment. This file is on the MAINT 193 MDisk.
Modify the DMSSISVR NAMES file and uncomment the directory manager and the dump handler definitions. You can modify it manually or run the VMSES/E LOCALMOD command to change this file.
� DMSSICNF COPY
The DMSSICNF COPY file contains several global attributes that can be modified to better fit your installation, networking configurations such as IP addresses, gateway, netmask, domain name, and vSwitches. This file is the heart of SMAPI and xCAT because it is used to control the definition of the servers when it is initialized.
To make the DMSSISVR and DMSSINCF files changes available to SMAPI and the xCAT server user IDs, run the following VM/SES commands after the files are updated:
SERVICE CMS BUILDPUT2PROD
5.3.5 Security aspects involving SMAPI
An ESM controls who can have access, and what kind of access they can have, to specific resources. If an ESM is implemented at your installation, SMAPI must be given the appropriate access to the disks, SFS directories, and resources you want it to manage. In this example installation, use RACF as the ESM.
Besides the security aspects that you have by using SFS, you have other authority files on SMAPI that lists who is authorized to run commands on SMAPI. Make sure your installation grants access to authorized people only.
Note: For more information about SMAPI, see The Systems Management Application Programming for IBM z/VM 6.3, SC24-6234.
Note: Using VM/SES helps preserve your configuration changes if IBM makes service updates or future release update in this file.
Chapter 5. Securing a Cloud on IBM z/VM environment 149
VSMWORK1 AUTHLISTAuthenticated users must be authorized to issue API requests. A server authorization file is used for this purpose. The authorization file contains entries that authorize authenticated users to perform specific functions for specific virtual images (target users) or lists of virtual images. The authorization can be granted per requesting VM, per target, or per function. This file is in the VMSYS file pool, under the VSMWORK1 SFS directory and, during the installation, VSMGUARD is granted access to it, as shown in Example 5-8.
Example 5-8 VSMGUARD access to the VSMWORK1 directory
grant authority vmsys:vsmwork1. to vsmguard (write newwritegrant authority vmsys:vsmwork1.data to vsmguard (write newwritegrant authority * * vmsys:vsmwork1. to vsmguard (read
Using SMAPI with RACFRACF for z/VM can be used to enhance the security and integrity of your system in the following ways:
� Helping you to implement the company’s security policy� Identifying and authenticating each user� Controlling each user’s access to sensitive data� Logging and reporting events that are relevant to the system’s security
Enabling RACROUTEEnable the SMAPI service machines VSMREQI6, VSMREQIN, VSMREQIU, VSMEVSRV, DTCSMAPI, VSMWORK1, VSMWORK2, and VSMWORK3 to use RACROUTE services, as shown in Example 5-9.
Example 5-9 RACF RACROUTE definitions for SMAPI user IDs
RAC SETROPTS CLASSACT(FACILITY)RAC SETROPTS RACLIST(FACILITY)RAC RDEFINE FACILITY ICHCONN UACC(NONE)RAC PERMIT ICHCONN CLASS(FACILITY) ID(VSMREQI6) ACCESS(UPDATE)RAC PERMIT ICHCONN CLASS(FACILITY) ID(VSMREQIN) ACCESS(UPDATE)RAC PERMIT ICHCONN CLASS(FACILITY) ID(VSMREQIU) ACCESS(UPDATE)RAC PERMIT ICHCONN CLASS(FACILITY) ID(VSMEVSRV) ACCESS(UPDATE)RAC PERMIT ICHCONN CLASS(FACILITY) ID(DTCSMAPI) ACCESS(UPDATE)RAC PERMIT ICHCONN CLASS(FACILITY) ID(VSMWORK1) ACCESS(UPDATE)RAC PERMIT ICHCONN CLASS(FACILITY) ID(VSMWORK2) ACCESS(UPDATE)RAC PERMIT ICHCONN CLASS(FACILITY) ID(VSMWORK3) ACCESS(UPDATE)RAC SETROPTS RACLIST(FACILITY) REFRESH
The directory entry for the SMAPI service machines that use this capability must all contain the following statement:
IUCV ANY PRIORITY MSGLIMIT 255
An MSGLIMIT value of 255 is initially suggested. It may be adjusted as needed.
Making SMAPI user IDs exempt for some RACF checkingThe SMAPI service machines (DTCSMAPI, VSMWORK1, VSMWORK2, and VSMWORK3) should be made exempt from access checking. Even if access checking is not active on your system, make the SMAPI service machines exempt from access checking for the FOR (privilege class C), and LINK commands, as shown in Example 5-10 on page 151.
150 Securing Your Cloud: IBM z/VM Security for IBM z Systems and LinuxONE
Example 5-10 Make SMAPI user IDs exempt for FOR and LINK commands
RAC SETROPTS CLASSACT(VMXEVENT)RAC RDEFINE VMXEVENT USERSEL.DTCSMAPIRAC RALTER VMXEVENT USERSEL.DTCSMAPI ADDMEM(FOR.C/NOCTL)RAC RALTER VMXEVENT USERSEL.DTCSMAPI ADDMEM(LINK/NOCTL)RAC SETEVENT REFRESH USERSEL.DTCSMAPIRAC RDEFINE VMXEVENT USERSEL.VSMWORK1RAC RALTER VMXEVENT USERSEL.VSMWORK1 ADDMEM(FOR.C/NOCTL)RAC RALTER VMXEVENT USERSEL.VSMWORK1 ADDMEM(LINK/NOCTL)RAC SETEVENT REFRESH USERSEL.VSMWORK1RAC RDEFINE VMXEVENT USERSEL.VSMWORK2RAC RALTER VMXEVENT USERSEL.VSMWORK2 ADDMEM(FOR.C/NOCTL)RAC RALTER VMXEVENT USERSEL.VSMWORK2 ADDMEM(LINK/NOCTL)RAC SETEVENT REFRESH USERSEL.VSMWORK2RAC RDEFINE VMXEVENT USERSEL.VSMWORK3RAC RALTER VMXEVENT USERSEL.VSMWORK3 ADDMEM(FOR.C/NOCTL)RAC RALTER VMXEVENT USERSEL.VSMWORK3 ADDMEM(LINK/NOCTL)RAC SETEVENT REFRESH USERSEL.VSMWORK3
Making the xCAT and ZHCP user IDs exempt from transfer command access validationIf your system is using xCAT support, the ZHCP service machine must be made exempt from spool checking so that it can transfer files to various virtual machines. Do this by running the commands that are shown in Example 5-11.
Example 5-11 Exempt the ZHCP user ID for access command validation
RAC SETROPTS CLASSACT(VMXEVENT)RAC RDEFINE VMXEVENT USERSEL.ZHCPRAC RALTER VMXEVENT USERSEL.ZHCP ADDMEM(TRANSFER.G/NOCTL)RAC SETEVENT REFRESH USERSEL.ZHCP
If you are running xCAT in an integrated CMA, you must run the appropriate xCAT commands rather than the RACF commands (Example 5-11), as shown in Example 5-12.
Example 5-12 For CMA: Exempt the xCAT user ID for access command validation
RAC SETROPTS CLASSACT(VMXEVENT)RAC RDEFINE VMXEVENT USERSEL.XCATRAC RALTER VMXEVENT USERSEL.XCAT ADDMEM(TRANSFER.G/NOCTL)RAC SETEVENT REFRESH USERSEL.XCAT
Enabling SMAPI to access DIAGNOSE X'88'You must enable the SMAPI service machines for DIAGNOSE X'88' access. If RACF is being used to control DIAGNOSE X'88' access, enable DIAGNOSE X'88' access for SMAPI by completing the following steps:
1. Enable RACF/VM profile protection for DIAGNOSE X'88', as shown in Example 5-13.
Example 5-13 Create a profile DIAG88 in VMCMD class
RAC RDEFINE VMCMD DIAG088 UACC(NONE)RAC SETROPTS CLASSACT(VMCMD)
Chapter 5. Securing a Cloud on IBM z/VM environment 151
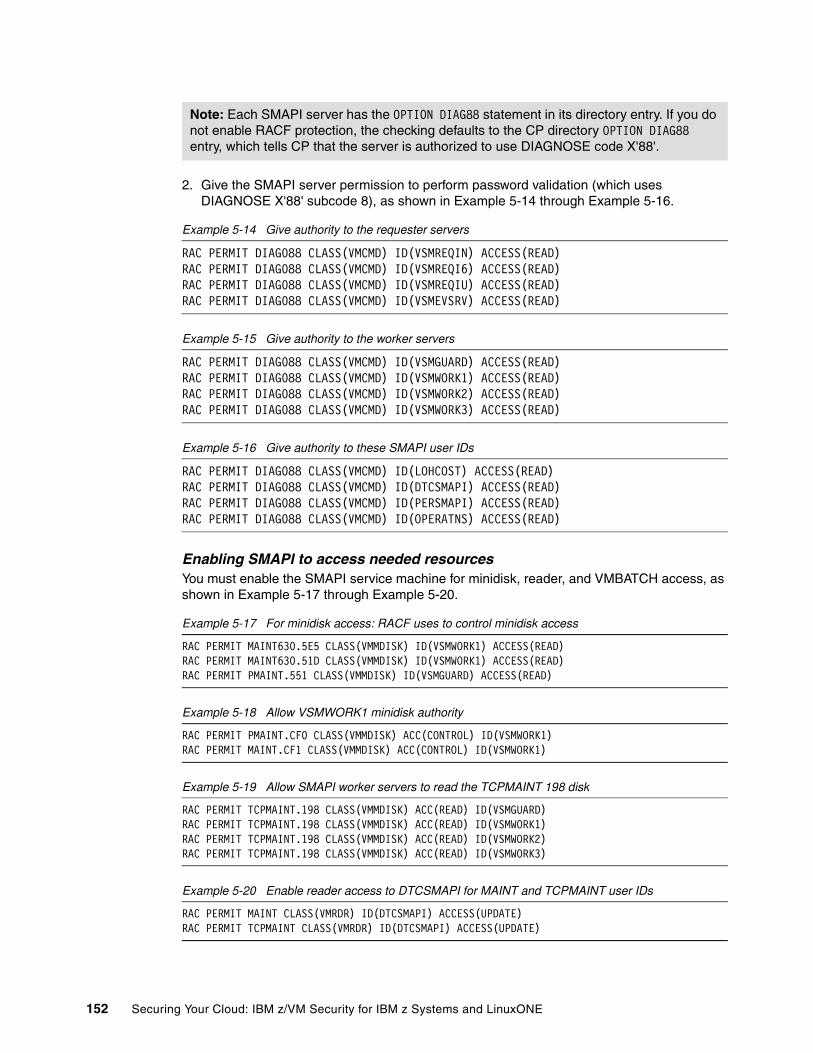
2. Give the SMAPI server permission to perform password validation (which uses DIAGNOSE X'88' subcode 8), as shown in Example 5-14 through Example 5-16.
Example 5-14 Give authority to the requester servers
RAC PERMIT DIAG088 CLASS(VMCMD) ID(VSMREQIN) ACCESS(READ)RAC PERMIT DIAG088 CLASS(VMCMD) ID(VSMREQI6) ACCESS(READ)RAC PERMIT DIAG088 CLASS(VMCMD) ID(VSMREQIU) ACCESS(READ)RAC PERMIT DIAG088 CLASS(VMCMD) ID(VSMEVSRV) ACCESS(READ)
Example 5-15 Give authority to the worker servers
RAC PERMIT DIAG088 CLASS(VMCMD) ID(VSMGUARD) ACCESS(READ)RAC PERMIT DIAG088 CLASS(VMCMD) ID(VSMWORK1) ACCESS(READ)RAC PERMIT DIAG088 CLASS(VMCMD) ID(VSMWORK2) ACCESS(READ)RAC PERMIT DIAG088 CLASS(VMCMD) ID(VSMWORK3) ACCESS(READ)
Example 5-16 Give authority to these SMAPI user IDs
RAC PERMIT DIAG088 CLASS(VMCMD) ID(LOHCOST) ACCESS(READ)RAC PERMIT DIAG088 CLASS(VMCMD) ID(DTCSMAPI) ACCESS(READ)RAC PERMIT DIAG088 CLASS(VMCMD) ID(PERSMAPI) ACCESS(READ)RAC PERMIT DIAG088 CLASS(VMCMD) ID(OPERATNS) ACCESS(READ)
Enabling SMAPI to access needed resourcesYou must enable the SMAPI service machine for minidisk, reader, and VMBATCH access, as shown in Example 5-17 through Example 5-20.
Example 5-17 For minidisk access: RACF uses to control minidisk access
RAC PERMIT MAINT630.5E5 CLASS(VMMDISK) ID(VSMWORK1) ACCESS(READ)RAC PERMIT MAINT630.51D CLASS(VMMDISK) ID(VSMWORK1) ACCESS(READ)RAC PERMIT PMAINT.551 CLASS(VMMDISK) ID(VSMGUARD) ACCESS(READ)
Example 5-18 Allow VSMWORK1 minidisk authority
RAC PERMIT PMAINT.CF0 CLASS(VMMDISK) ACC(CONTROL) ID(VSMWORK1)RAC PERMIT MAINT.CF1 CLASS(VMMDISK) ACC(CONTROL) ID(VSMWORK1)
Example 5-19 Allow SMAPI worker servers to read the TCPMAINT 198 disk
RAC PERMIT TCPMAINT.198 CLASS(VMMDISK) ACC(READ) ID(VSMGUARD)RAC PERMIT TCPMAINT.198 CLASS(VMMDISK) ACC(READ) ID(VSMWORK1)RAC PERMIT TCPMAINT.198 CLASS(VMMDISK) ACC(READ) ID(VSMWORK2)RAC PERMIT TCPMAINT.198 CLASS(VMMDISK) ACC(READ) ID(VSMWORK3)
Example 5-20 Enable reader access to DTCSMAPI for MAINT and TCPMAINT user IDs
RAC PERMIT MAINT CLASS(VMRDR) ID(DTCSMAPI) ACCESS(UPDATE)RAC PERMIT TCPMAINT CLASS(VMRDR) ID(DTCSMAPI) ACCESS(UPDATE)
Note: Each SMAPI server has the OPTION DIAG88 statement in its directory entry. If you do not enable RACF protection, the checking defaults to the CP directory OPTION DIAG88 entry, which tells CP that the server is authorized to use DIAGNOSE code X'88'.
152 Securing Your Cloud: IBM z/VM Security for IBM z Systems and LinuxONE
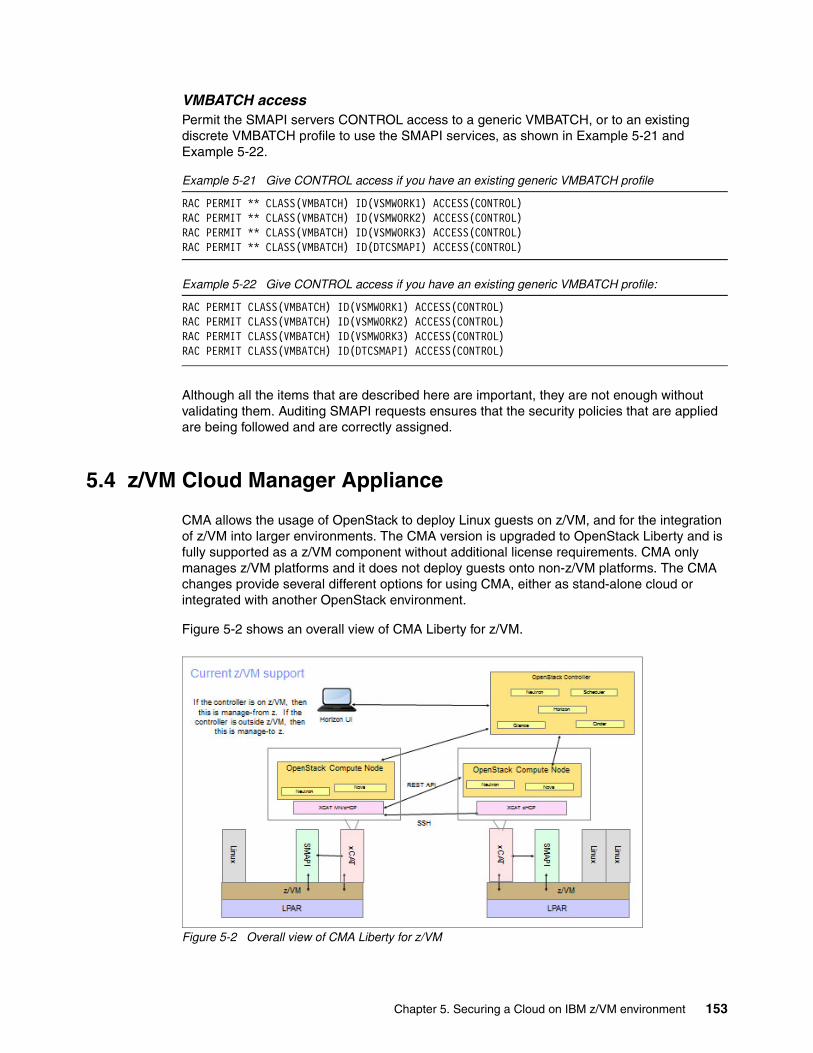
VMBATCH accessPermit the SMAPI servers CONTROL access to a generic VMBATCH, or to an existing discrete VMBATCH profile to use the SMAPI services, as shown in Example 5-21 and Example 5-22.
Example 5-21 Give CONTROL access if you have an existing generic VMBATCH profile
RAC PERMIT ** CLASS(VMBATCH) ID(VSMWORK1) ACCESS(CONTROL)RAC PERMIT ** CLASS(VMBATCH) ID(VSMWORK2) ACCESS(CONTROL)RAC PERMIT ** CLASS(VMBATCH) ID(VSMWORK3) ACCESS(CONTROL)RAC PERMIT ** CLASS(VMBATCH) ID(DTCSMAPI) ACCESS(CONTROL)
Example 5-22 Give CONTROL access if you have an existing generic VMBATCH profile:
RAC PERMIT CLASS(VMBATCH) ID(VSMWORK1) ACCESS(CONTROL)RAC PERMIT CLASS(VMBATCH) ID(VSMWORK2) ACCESS(CONTROL)RAC PERMIT CLASS(VMBATCH) ID(VSMWORK3) ACCESS(CONTROL)RAC PERMIT CLASS(VMBATCH) ID(DTCSMAPI) ACCESS(CONTROL)
Although all the items that are described here are important, they are not enough without validating them. Auditing SMAPI requests ensures that the security policies that are applied are being followed and are correctly assigned.
5.4 z/VM Cloud Manager Appliance
CMA allows the usage of OpenStack to deploy Linux guests on z/VM, and for the integration of z/VM into larger environments. The CMA version is upgraded to OpenStack Liberty and is fully supported as a z/VM component without additional license requirements. CMA only manages z/VM platforms and it does not deploy guests onto non-z/VM platforms. The CMA changes provide several different options for using CMA, either as stand-alone cloud or integrated with another OpenStack environment.
Figure 5-2 shows an overall view of CMA Liberty for z/VM.
Figure 5-2 Overall view of CMA Liberty for z/VM
Chapter 5. Securing a Cloud on IBM z/VM environment 153
5.4.1 Basic requirements and configuration options
Each z/VM logical partition (LPAR) requires a CMA. The extreme Cloud Administration Toolkit (xCAT) must always be active within the CMA. The OpenStack services are optional, and depend on the intended use. CMA can be configured in different ways, based on the needed function or integration requirements:
� Controller node: An OpenStack controller that can control itself as a compute node and control other compute node CMAs. It can also be integrated into other virtualization software whose interface is in an OpenStack controller.
� Compute node: An OpenStack compute node that is controlled by another OpenStack controller node (which can be another CMA in controller node or a non-CMA OpenStack controller node).
� Compute MN: An OpenStack compute node and xCAT MN and ZHCP (if you have a non-CMA controller).
� xCAT mode: Only the xCAT functions are active. None of the OpenStack services are running. In xCAT mode, CMA can function in two ways:
– xCAT managed node (MN) with a xCAT z Systems Hardware Control Point (ZHCP).
One xCAT MN can manage multiple xCAT ZHCPs, so in this configuration only one CMA must have the MN function active.
– ZHCP only.
It is xCAT ZHCP and must be connected to an xCAT MN, which drives deployments on the ZHCP LPAR.
Things to knowSince March 2016, z/VM supports OpenStack and OpenStack Liberty, which includes the following items:
� Support for the Liberty release of OpenStack
� Integration of the xCAT function into the z/VM Cloud Manager Appliance (CMA), which allows running a fully functional z/VM OpenStack solution in a single virtual server, so separate ZHCP servers are not required
� Support for provisioning Red Hat RHEL 7 and SUSE SLES 12 servers (previously, only servers up to RHEL 6.5 and SLES 11 were supported)
� Support for distributed Keystone, so that identity and security credentials do not have to be in a single place
� Support for Ceilometer, which can collect measurements to be used by tools such as the Platform Resource Scheduler (PRS) and the Hypervisor Performance Manager (HPM)
� Improved boot from volume (an alternative OpenStack way to boot servers)
� Installation Verification Program enhancements
Note: The CMA Liberty enhancements for z/VM are for z196 and later z Systems. In earlier platforms, you must use OpenStack Juno.
Note: The ZHCP user ID is no longer needed; the whole appliance runs from xCAT. With CMA, the ZHCP is running in the xCAT user ID together with XCATMN.
154 Securing Your Cloud: IBM z/VM Security for IBM z Systems and LinuxONE
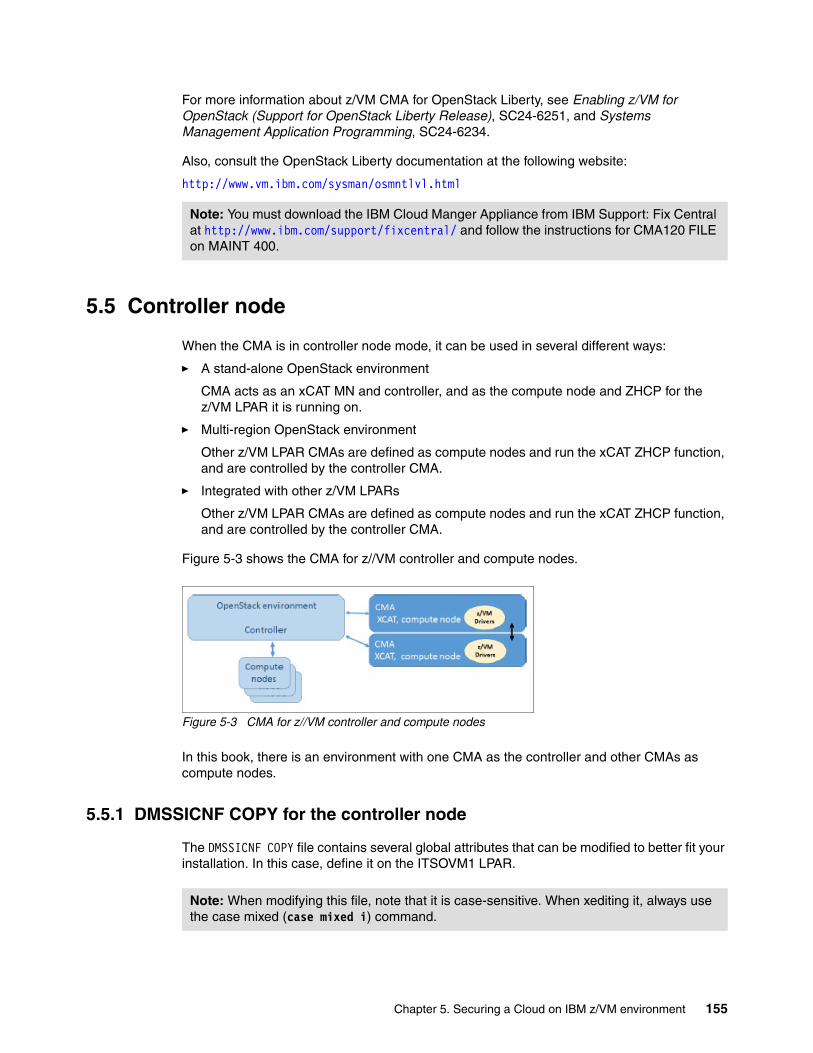
For more information about z/VM CMA for OpenStack Liberty, see Enabling z/VM for OpenStack (Support for OpenStack Liberty Release), SC24-6251, and Systems Management Application Programming, SC24-6234.
Also, consult the OpenStack Liberty documentation at the following website:
http://www.vm.ibm.com/sysman/osmntlvl.html
5.5 Controller node
When the CMA is in controller node mode, it can be used in several different ways:
� A stand-alone OpenStack environment
CMA acts as an xCAT MN and controller, and as the compute node and ZHCP for the z/VM LPAR it is running on.
� Multi-region OpenStack environment
Other z/VM LPAR CMAs are defined as compute nodes and run the xCAT ZHCP function, and are controlled by the controller CMA.
� Integrated with other z/VM LPARs
Other z/VM LPAR CMAs are defined as compute nodes and run the xCAT ZHCP function, and are controlled by the controller CMA.
Figure 5-3 shows the CMA for z//VM controller and compute nodes.
Figure 5-3 CMA for z//VM controller and compute nodes
In this book, there is an environment with one CMA as the controller and other CMAs as compute nodes.
5.5.1 DMSSICNF COPY for the controller node
The DMSSICNF COPY file contains several global attributes that can be modified to better fit your installation. In this case, define it on the ITSOVM1 LPAR.
Note: You must download the IBM Cloud Manger Appliance from IBM Support: Fix Central at http://www.ibm.com/support/fixcentral/ and follow the instructions for CMA120 FILE on MAINT 400.
Note: When modifying this file, note that it is case-sensitive. When xediting it, always use the case mixed (case mixed i) command.
Chapter 5. Securing a Cloud on IBM z/VM environment 155

Example 5-23 shows an example of DMSSICNF COPY that uses CMA.
Example 5-23 DMSSICNF COPY example of using CMA
/*********************************************************************//* XCAT server defaults *//*********************************************************************/XCAT_User = "XCAT" /* xCAT z/VM user ID */XCAT_Addr = "10.10.10.10" /* XCAT IP Address */XCAT_Host = "xcat1" /* xCAT hostname */XCAT_Domain = ".itso.ibm.com" /* xCAT domain name */XCAT_vswitch = "XCATVSW1" /* xCAT Vswitch name */XCAT_OSAdev = "2126" /* OSA address for xCAT */XCAT_zvmsysid = "itsozvm1" /* xCAT z/VM system id */XCAT_notify = "OPERATOR" /* Notify when xCAT started */XCAT_gateway = "10.10.10.1" /* Network gateway IP addr. */XCAT_netmask = "255.255.255.0" /* Default network mask */XCAT_vlan = "NONE" XCAT_iso = "" XCAT_MN_Addr = "9.12.7.44" /* xCAT mgmt node IP address */XCAT_MN_vswitch = "XCATVSW2" /* xCAT MN Vswitch name */XCAT_MN_OSAdev = "2106" /* OSA address for xCAT MN */XCAT_MN_gateway = "9.12.4.1" /* Network gateway IP addr. */XCAT_MN_Mask = "255.255.240.0" /* Netmask for xCAT MN */XCAT_MN_vlan = "NONE" XCAT_MN_admin = "mnadmin" /* MN administrator userid */XCAT_MN_pw = "yourppsw" /* MN admin password */ /* (if NOLOG, userid cannot */ /* ssh into XCAT MN) */ /*********************************************************************//* ZHCP server defaults *//*********************************************************************/ZHCP_User = "ZHCP" /* zhcp z/VM user ID */ZHCP_Addr = "10.10.10.20" /* zhcp IP ADDRESS */ZHCP_Host = "zhcp1" /* zhcp hostname */ZHCP_Domain = ".itso.ibm.com" /* zhcp domain name */ZHCP_gateway = "10.10.10.1" /* Network gateway IP addr. */ZHCP_netmask = "255.255.255.0" /* Default network mask */ZHCP_vswitch = "XCATVSW1" /* zhcp Vswitch name */ZHCP_OSAdev = "2126" /* OSA address for zhcp */ZHCP_vlan = "NONE" /*********************************************************************/
The meanings of the configuration options are as follows:
XCAT_Domain OpenStack controller domain name
XCAT_OSAdev XCATVSW1 (for xCAT internal network) real OSA device address
XCAT_zvmsysid z/VM SYSID where OpenStack controller runs (lowercase)
XCAT_MN_Addr OpenStack controller (xCAT Management Node) IP address
XCAT_MN_OSAdev XCATVSW2 (for management network) real OSA device address
XCAT_MN_gateway OpenStack controller default gateway
XCAT_MN_netmask OpenStack controller default netmask
156 Securing Your Cloud: IBM z/VM Security for IBM z Systems and LinuxONE
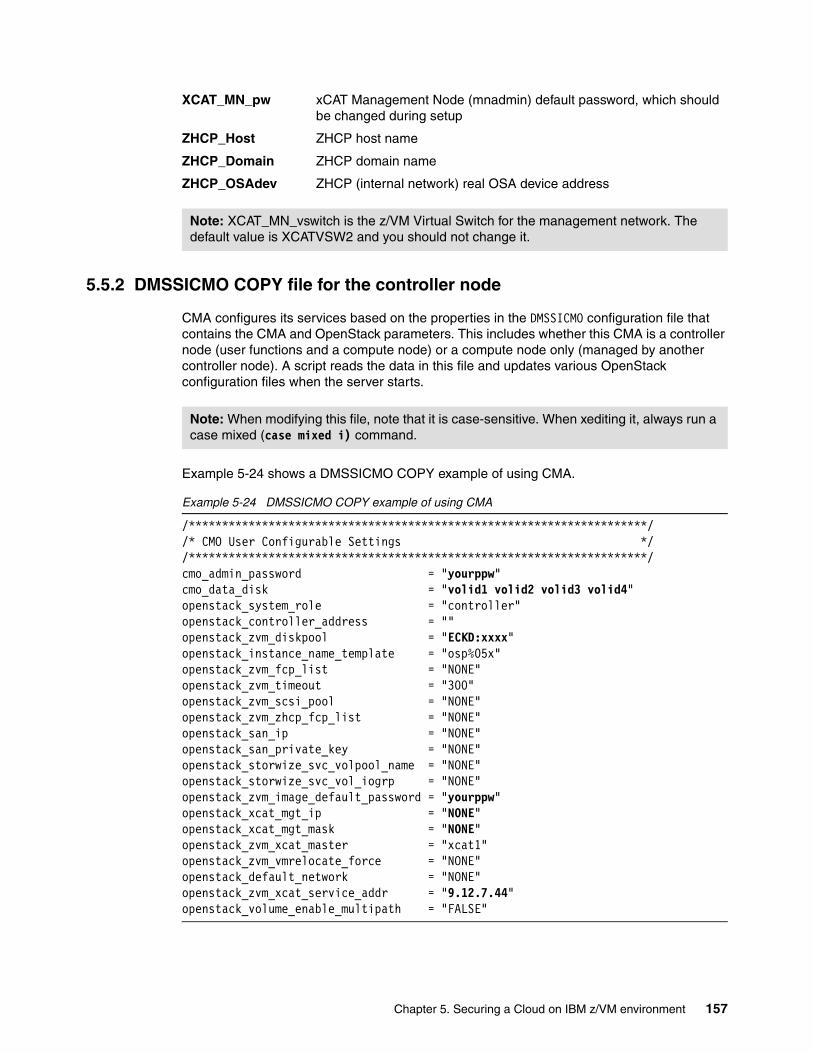
XCAT_MN_pw xCAT Management Node (mnadmin) default password, which should be changed during setup
ZHCP_Host ZHCP host name
ZHCP_Domain ZHCP domain name
ZHCP_OSAdev ZHCP (internal network) real OSA device address
5.5.2 DMSSICMO COPY file for the controller node
CMA configures its services based on the properties in the DMSSICMO configuration file that contains the CMA and OpenStack parameters. This includes whether this CMA is a controller node (user functions and a compute node) or a compute node only (managed by another controller node). A script reads the data in this file and updates various OpenStack configuration files when the server starts.
Example 5-24 shows a DMSSICMO COPY example of using CMA.
Example 5-24 DMSSICMO COPY example of using CMA
/*********************************************************************//* CMO User Configurable Settings *//*********************************************************************/cmo_admin_password = "yourppw" cmo_data_disk = "volid1 volid2 volid3 volid4" openstack_system_role = "controller" openstack_controller_address = "" openstack_zvm_diskpool = "ECKD:xxxx" openstack_instance_name_template = "osp%05x" openstack_zvm_fcp_list = "NONE" openstack_zvm_timeout = "300" openstack_zvm_scsi_pool = "NONE" openstack_zvm_zhcp_fcp_list = "NONE" openstack_san_ip = "NONE" openstack_san_private_key = "NONE" openstack_storwize_svc_volpool_name = "NONE" openstack_storwize_svc_vol_iogrp = "NONE" openstack_zvm_image_default_password = "yourppw" openstack_xcat_mgt_ip = "NONE" openstack_xcat_mgt_mask = "NONE" openstack_zvm_xcat_master = "xcat1" openstack_zvm_vmrelocate_force = "NONE" openstack_default_network = "NONE" openstack_zvm_xcat_service_addr = "9.12.7.44" openstack_volume_enable_multipath = "FALSE"
Note: XCAT_MN_vswitch is the z/VM Virtual Switch for the management network. The default value is XCATVSW2 and you should not change it.
Note: When modifying this file, note that it is case-sensitive. When xediting it, always run a case mixed (case mixed i) command.
Chapter 5. Securing a Cloud on IBM z/VM environment 157
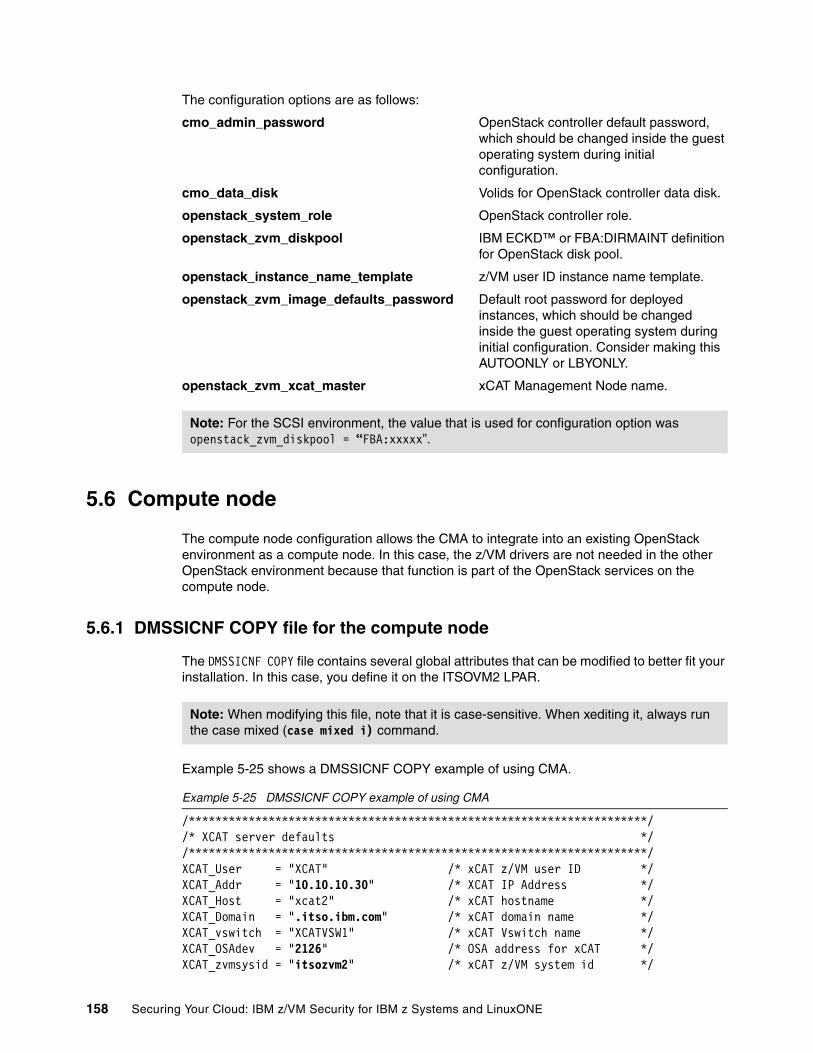
The configuration options are as follows:
cmo_admin_password OpenStack controller default password, which should be changed inside the guest operating system during initial configuration.
cmo_data_disk Volids for OpenStack controller data disk.
openstack_system_role OpenStack controller role.
openstack_zvm_diskpool IBM ECKD™ or FBA:DIRMAINT definition for OpenStack disk pool.
openstack_instance_name_template z/VM user ID instance name template.
openstack_zvm_image_defaults_password Default root password for deployed instances, which should be changed inside the guest operating system during initial configuration. Consider making this AUTOONLY or LBYONLY.
openstack_zvm_xcat_master xCAT Management Node name.
5.6 Compute node
The compute node configuration allows the CMA to integrate into an existing OpenStack environment as a compute node. In this case, the z/VM drivers are not needed in the other OpenStack environment because that function is part of the OpenStack services on the compute node.
5.6.1 DMSSICNF COPY file for the compute node
The DMSSICNF COPY file contains several global attributes that can be modified to better fit your installation. In this case, you define it on the ITSOVM2 LPAR.
Example 5-25 shows a DMSSICNF COPY example of using CMA.
Example 5-25 DMSSICNF COPY example of using CMA
/*********************************************************************//* XCAT server defaults *//*********************************************************************/XCAT_User = "XCAT" /* xCAT z/VM user ID */XCAT_Addr = "10.10.10.30" /* XCAT IP Address */XCAT_Host = "xcat2" /* xCAT hostname */XCAT_Domain = ".itso.ibm.com" /* xCAT domain name */XCAT_vswitch = "XCATVSW1" /* xCAT Vswitch name */XCAT_OSAdev = "2126" /* OSA address for xCAT */XCAT_zvmsysid = "itsozvm2" /* xCAT z/VM system id */
Note: For the SCSI environment, the value that is used for configuration option was openstack_zvm_diskpool = “FBA:xxxxx”.
Note: When modifying this file, note that it is case-sensitive. When xediting it, always run the case mixed (case mixed i) command.
158 Securing Your Cloud: IBM z/VM Security for IBM z Systems and LinuxONE
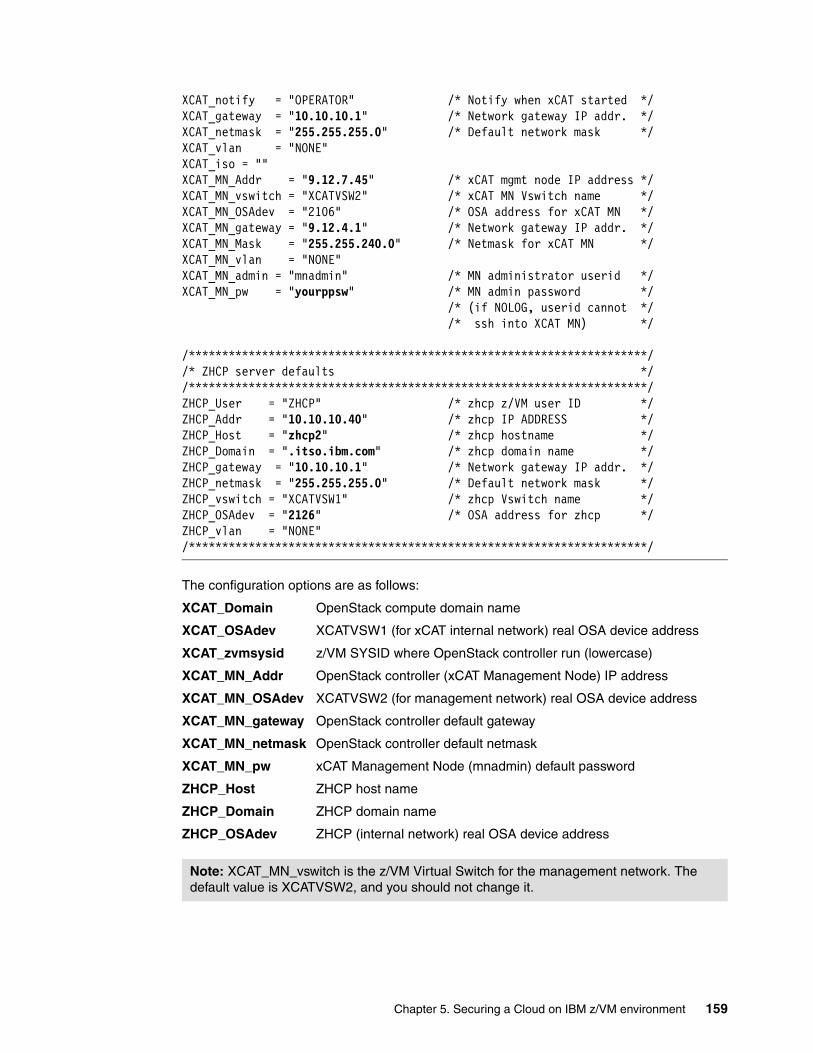
XCAT_notify = "OPERATOR" /* Notify when xCAT started */XCAT_gateway = "10.10.10.1" /* Network gateway IP addr. */XCAT_netmask = "255.255.255.0" /* Default network mask */XCAT_vlan = "NONE" XCAT_iso = "" XCAT_MN_Addr = "9.12.7.45" /* xCAT mgmt node IP address */XCAT_MN_vswitch = "XCATVSW2" /* xCAT MN Vswitch name */XCAT_MN_OSAdev = "2106" /* OSA address for xCAT MN */XCAT_MN_gateway = "9.12.4.1" /* Network gateway IP addr. */XCAT_MN_Mask = "255.255.240.0" /* Netmask for xCAT MN */XCAT_MN_vlan = "NONE" XCAT_MN_admin = "mnadmin" /* MN administrator userid */XCAT_MN_pw = "yourppsw" /* MN admin password */ /* (if NOLOG, userid cannot */ /* ssh into XCAT MN) */ /*********************************************************************//* ZHCP server defaults *//*********************************************************************/ZHCP_User = "ZHCP" /* zhcp z/VM user ID */ZHCP_Addr = "10.10.10.40" /* zhcp IP ADDRESS */ZHCP_Host = "zhcp2" /* zhcp hostname */ZHCP_Domain = ".itso.ibm.com" /* zhcp domain name */ZHCP_gateway = "10.10.10.1" /* Network gateway IP addr. */ZHCP_netmask = "255.255.255.0" /* Default network mask */ZHCP_vswitch = "XCATVSW1" /* zhcp Vswitch name */ZHCP_OSAdev = "2126" /* OSA address for zhcp */ZHCP_vlan = "NONE" /*********************************************************************/
The configuration options are as follows:
XCAT_Domain OpenStack compute domain name
XCAT_OSAdev XCATVSW1 (for xCAT internal network) real OSA device address
XCAT_zvmsysid z/VM SYSID where OpenStack controller run (lowercase)
XCAT_MN_Addr OpenStack controller (xCAT Management Node) IP address
XCAT_MN_OSAdev XCATVSW2 (for management network) real OSA device address
XCAT_MN_gateway OpenStack controller default gateway
XCAT_MN_netmask OpenStack controller default netmask
XCAT_MN_pw xCAT Management Node (mnadmin) default password
ZHCP_Host ZHCP host name
ZHCP_Domain ZHCP domain name
ZHCP_OSAdev ZHCP (internal network) real OSA device address
Note: XCAT_MN_vswitch is the z/VM Virtual Switch for the management network. The default value is XCATVSW2, and you should not change it.
Chapter 5. Securing a Cloud on IBM z/VM environment 159
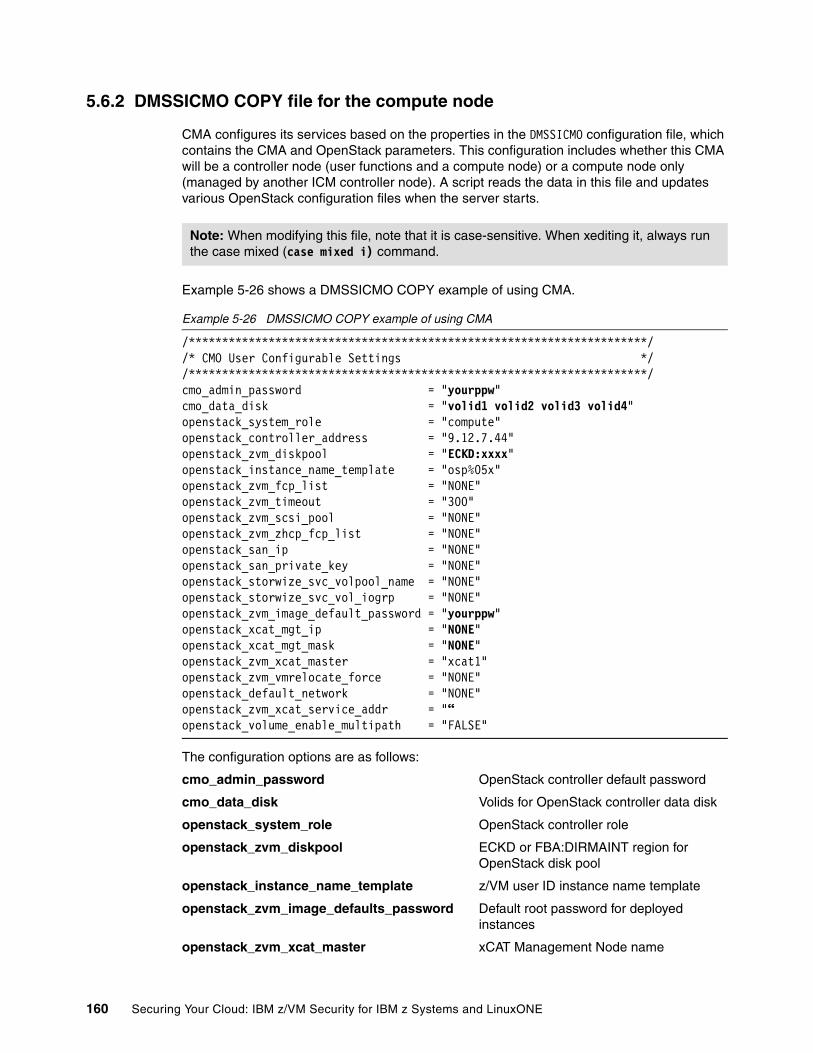
5.6.2 DMSSICMO COPY file for the compute node
CMA configures its services based on the properties in the DMSSICMO configuration file, which contains the CMA and OpenStack parameters. This configuration includes whether this CMA will be a controller node (user functions and a compute node) or a compute node only (managed by another ICM controller node). A script reads the data in this file and updates various OpenStack configuration files when the server starts.
Example 5-26 shows a DMSSICMO COPY example of using CMA.
Example 5-26 DMSSICMO COPY example of using CMA
/*********************************************************************//* CMO User Configurable Settings *//*********************************************************************/cmo_admin_password = "yourppw" cmo_data_disk = "volid1 volid2 volid3 volid4" openstack_system_role = "compute" openstack_controller_address = "9.12.7.44" openstack_zvm_diskpool = "ECKD:xxxx" openstack_instance_name_template = "osp%05x" openstack_zvm_fcp_list = "NONE" openstack_zvm_timeout = "300" openstack_zvm_scsi_pool = "NONE" openstack_zvm_zhcp_fcp_list = "NONE" openstack_san_ip = "NONE" openstack_san_private_key = "NONE" openstack_storwize_svc_volpool_name = "NONE" openstack_storwize_svc_vol_iogrp = "NONE" openstack_zvm_image_default_password = "yourppw" openstack_xcat_mgt_ip = "NONE" openstack_xcat_mgt_mask = "NONE" openstack_zvm_xcat_master = "xcat1" openstack_zvm_vmrelocate_force = "NONE" openstack_default_network = "NONE" openstack_zvm_xcat_service_addr = "“openstack_volume_enable_multipath = "FALSE"
The configuration options are as follows:
cmo_admin_password OpenStack controller default password
cmo_data_disk Volids for OpenStack controller data disk
openstack_system_role OpenStack controller role
openstack_zvm_diskpool ECKD or FBA:DIRMAINT region for OpenStack disk pool
openstack_instance_name_template z/VM user ID instance name template
openstack_zvm_image_defaults_password Default root password for deployed instances
openstack_zvm_xcat_master xCAT Management Node name
Note: When modifying this file, note that it is case-sensitive. When xediting it, always run the case mixed (case mixed i) command.
160 Securing Your Cloud: IBM z/VM Security for IBM z Systems and LinuxONE
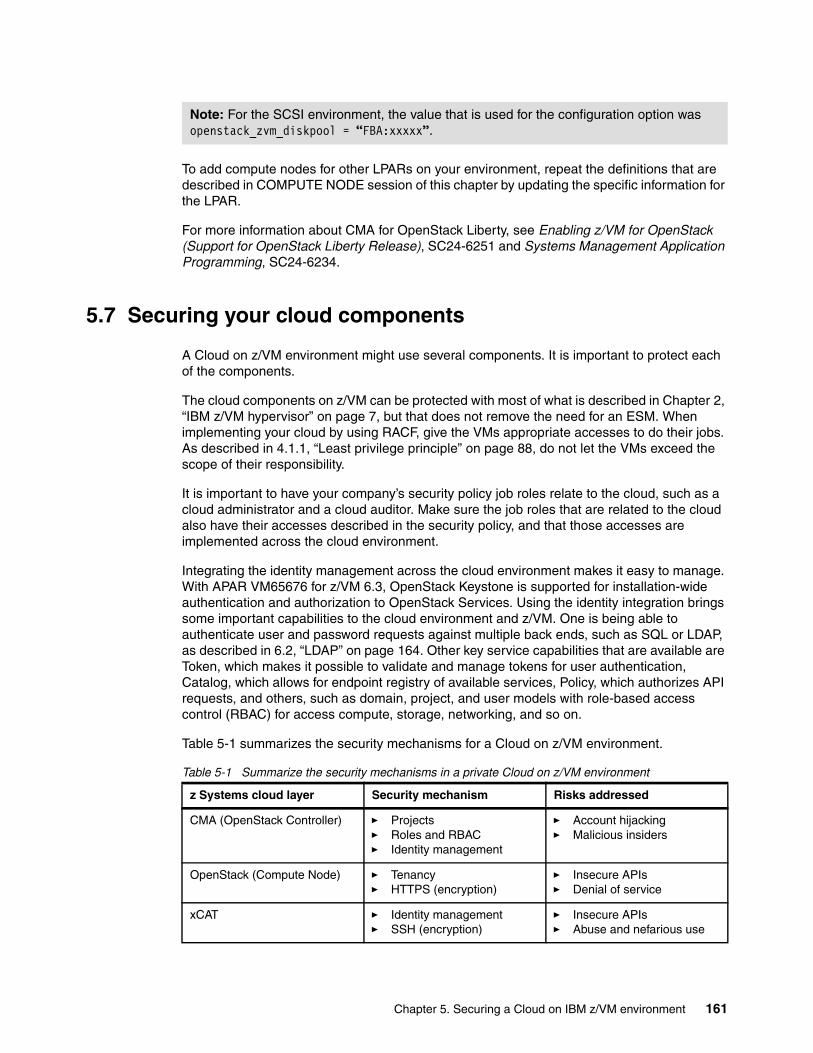
To add compute nodes for other LPARs on your environment, repeat the definitions that are described in COMPUTE NODE session of this chapter by updating the specific information for the LPAR.
For more information about CMA for OpenStack Liberty, see Enabling z/VM for OpenStack (Support for OpenStack Liberty Release), SC24-6251 and Systems Management Application Programming, SC24-6234.
5.7 Securing your cloud components
A Cloud on z/VM environment might use several components. It is important to protect each of the components.
The cloud components on z/VM can be protected with most of what is described in Chapter 2, “IBM z/VM hypervisor” on page 7, but that does not remove the need for an ESM. When implementing your cloud by using RACF, give the VMs appropriate accesses to do their jobs. As described in 4.1.1, “Least privilege principle” on page 88, do not let the VMs exceed the scope of their responsibility.
It is important to have your company’s security policy job roles relate to the cloud, such as a cloud administrator and a cloud auditor. Make sure the job roles that are related to the cloud also have their accesses described in the security policy, and that those accesses are implemented across the cloud environment.
Integrating the identity management across the cloud environment makes it easy to manage. With APAR VM65676 for z/VM 6.3, OpenStack Keystone is supported for installation-wide authentication and authorization to OpenStack Services. Using the identity integration brings some important capabilities to the cloud environment and z/VM. One is being able to authenticate user and password requests against multiple back ends, such as SQL or LDAP, as described in 6.2, “LDAP” on page 164. Other key service capabilities that are available are Token, which makes it possible to validate and manage tokens for user authentication, Catalog, which allows for endpoint registry of available services, Policy, which authorizes API requests, and others, such as domain, project, and user models with role-based access control (RBAC) for access compute, storage, networking, and so on.
Table 5-1 summarizes the security mechanisms for a Cloud on z/VM environment.
Table 5-1 Summarize the security mechanisms in a private Cloud on z/VM environment
Note: For the SCSI environment, the value that is used for the configuration option was openstack_zvm_diskpool = “FBA:xxxxx”.
z Systems cloud layer Security mechanism Risks addressed
CMA (OpenStack Controller) � Projects� Roles and RBAC� Identity management
� Account hijacking� Malicious insiders
OpenStack (Compute Node) � Tenancy� HTTPS (encryption)
� Insecure APIs� Denial of service
xCAT � Identity management� SSH (encryption)
� Insecure APIs� Abuse and nefarious use
Chapter 5. Securing a Cloud on IBM z/VM environment 161
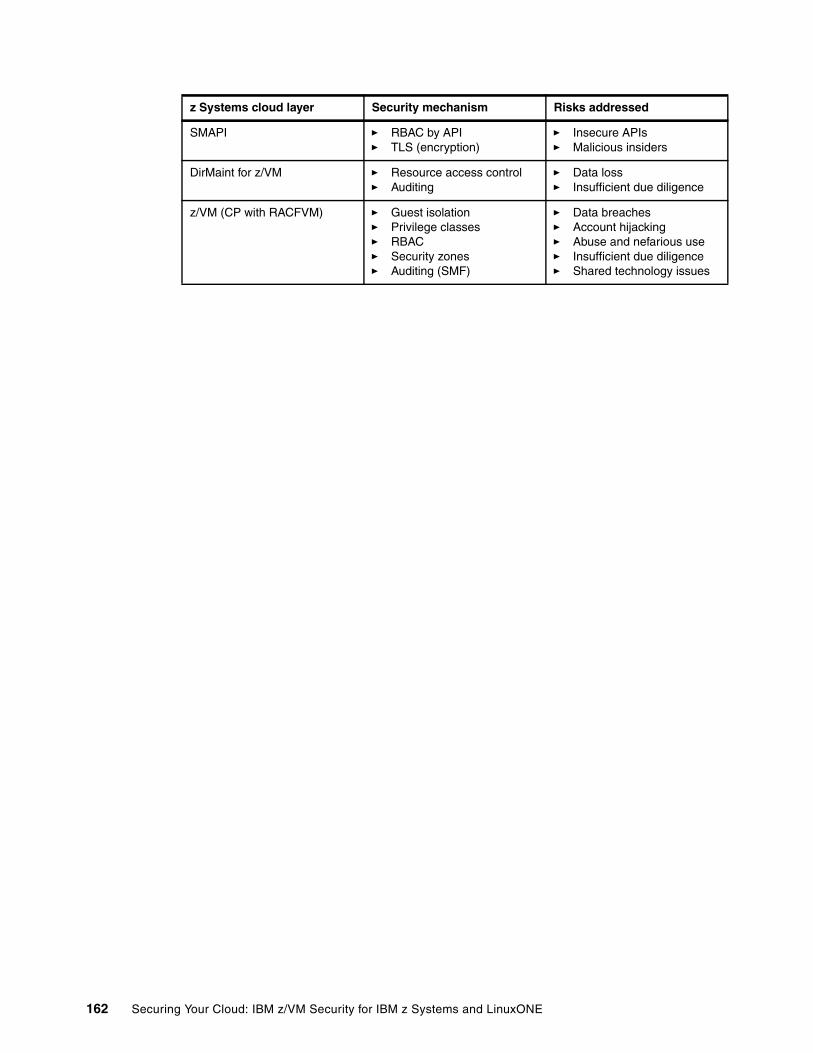
SMAPI � RBAC by API� TLS (encryption)
� Insecure APIs� Malicious insiders
DirMaint for z/VM � Resource access control� Auditing
� Data loss� Insufficient due diligence
z/VM (CP with RACFVM) � Guest isolation� Privilege classes� RBAC� Security zones� Auditing (SMF)
� Data breaches� Account hijacking� Abuse and nefarious use� Insufficient due diligence� Shared technology issues
z Systems cloud layer Security mechanism Risks addressed
162 Securing Your Cloud: IBM z/VM Security for IBM z Systems and LinuxONE
Chapter 6. IBM z/VM and enterprise security
This chapter provides information about IBM Security zSecure Manager for IBM Resource Access Control Facility (RACF) z/VM (zSecure), describes LDAP on z/VM, and describes Linux on z Systems security.
This chapter introduces zSecure and provides a brief overview with some benefits of using this feature. zSecure supports ease-of-administration of RACF and helps you meet audit demands.
This chapter also describes some aspects of using LDAP on z/VM, and how it can form part of enterprise security management.
Additionally, this chapter describes Linux on z Systems security from the perspective of the following items:
� Access control � Audit issues� Cryptographic functions available� User Management.
This chapter describes the following topics:
� z/Secure� LDAP� Linux on z Systems security
6
© Copyright IBM Corp. 2016. All rights reserved. 163
6.1 z/Secure
zSecure is an optional product that can help simplify administrative tasks.
It supports administrators in enabling more efficient and effective ways of setting up profiles and group structures in your RACF databases. Recurring administrative tasks can be automated by using zSecure. It helps minimize complexity and improve quality of service. Reports can be taken regularly or even on an automated basis, so changes to the RACF database can be visualized by comparing the reports.
Audit functions are included in the product, which provides material to auditors and meets auditors demands for reports.
zSecure supports these issues:
� Adding or deleting user IDs and groups
� Granting access to user IDs and groups
� Setting and resetting user IDs and passwords
� Running daily, weekly, and monthly reports
The audit functions of zSecure help identify potential security concerns and prioritize them by ranking the concerns that are identified. Inconsistencies in the security definitions or missing definitions can be addressed quickly. Vulnerabilities can be detected before they raise a serious security issue.
With the CARLa Auditing and Reporting Language (CARLa), you can create your own reports. These reports can be run under IBM Interactive System Productivity Facility (ISPF) or in batch by using data from any RACF database, or live or extracted RACF System Management Facility (SMF) data.
For more information about zSecure, see the product documentation, which can be found at the following website:
http://www.ibm.com/support/knowledgecenter/SS2RWS
6.2 LDAP
Lightweight Directory Access Protocol (LDAP) is a commonly used system for storing directory-style information, such as (user records) in a centralized database. Most directory and authentication systems use LDAP in some way to make directory information available for services such as network-based authentication.
Note: Microsoft Active Directory is based on Kerberos, a system for cryptographically secured access control in a distributed network, and LDAP. Other identity management systems, such as the open-source FreeIPA, are also based on LDAP and Kerberos.
164 Securing Your Cloud: IBM z/VM Security for IBM z Systems and LinuxONE
6.2.1 LDAP on z/VM
z/VM TCP/IP contains an LDAP server. This LDAP server supports secure access by using TLS, and has many available storage back ends that can present directory information:
SDBM (RACF DB) SDBM provides access to the RACF database by using a custom LDAP schema. A record of activities that are done on this back end is automatically maintained in the RACF audit stream.
LDBM (Byte FS) The LDBM back end stores data and schema in files in the Byte File System. In addition, it supports using RACF as the password store. The schema is easily extensible.
GDBM (logging) GDBM provides an audit and log capability for LDBM. Normal LDAP search operations can be done to review changes that are made to the directory data that is stored in LDBM.
CDBM (configuration) This back end stores the configuration of the LDAP server. The configuration can be updated by using LDAP modify operations, and the back end can be used in a clustering configuration to replicate configuration changes to other cluster members.
For more information about setting up the z/VM LDAP server, see Chapter 3, “Configuring and using the z/VM LDAP server”, in Security for Linux on System z, SG24-7728.
z/VM LDAP and authentication in your cloudThe z/VM LDAP server is lightweight and highly accessible in a z/VM Single System Image (SSI) environment. The ability to use the RACF password store (either directly with SDBM or through native authentication with LDBM) makes it a secure option for password management. Passwords are stored in a highly secure way, and a high level of auditing is available by using the z/VM LDAP server.
In 3.8, “Using an OpenLDAP server with the z/VM LDAP server” in Security for Linux on System z, SG24-7728, the authors describe many ways that you can use the z/VM LDAP server to augment the security of an authentication environment that is centered on LDAP. Those techniques are summarized here.
Using z/VM LDAP with RACF as a password vault for other LDAP serversThe OpenLDAP server supports features that allow a z/VM LDAP server with RACF (either directly with SDBM or through native authentication in LDBM) to be used as a separate and secure password store. Any LDAP server that supports the rewriting of LDAP URIs can use this technique.
Using RACF as a password store has many benefits:
� Passwords are no longer stored in the LDAP database. A compromise of the database that is stored on the Linux system does not yield password data that can be used by an attacker to further compromise the environment.
� Password management issues such as password reuse and expiry are handled by RACF, without any support required in the other LDAP database.
� Auditing of authentication requests can be done by using the RACF audit stream.
� RACF provides a high degree of resilience and recoverability for the password store.
Chapter 6. IBM z/VM and enterprise security 165
Using z/VM LDAP directly for Linux authenticationThe LDBM back end of the z/VM LDAP server can support common applications, including Linux authentication. The schema that is supplied by IBM with the z/VM LDAP server supports Linux authentication directly, but the schema can easily be extended by using schema files from other LDAP servers, such as OpenLDAP.
If LDBM is used with native authentication, then the benefits above regarding separation of LDAP and password data also apply.
6.2.2 Integration of z/VM LDAP into an enterprise directory
Every sufficiently large organization experiences the issue of having to manage the distribution of directory information between departments, or between directory servers of different technologies. This is especially true with z Systems installations where RACF on z/VM or z/OS may be used.
The thought that an enterprise directory must be stored on a single monolithic server and managed by a single application is not true. A good directory structure supports the ability for portions of the directory tree to be held in different servers according to geographic, organizational, or technical reasons. Likewise, a directory based on LDAP can be distributed across any number of LDAP implementations. This concept is a fundamental part of LDAP: The directory information tree (DIT) refers to the entire structure of an enterprise directory, encompassing parts of the directory that may be widely distributed across the enterprise.
It is not likely that z/VM LDAP would be used as the core directory store for an enterprise. However, for applications on Linux guests under z/VM, it makes an excellent choice due to its lightweight, proximity to the Linux systems, and password security.
Resource usageThe z/VM LDAP server is defined to the CP directory with a main storage size of 128 MB, and the disk space that is used by the LDAP server is already defined as part of the z/VM installation. Typical Linux guest configurations start at 1 GB main storage and at least 20 GB of disk space. Using z/VM LDAP for this function is much more lightweight than using a Linux virtual machine (VM).
Locality of referenceIn computer science, locality of reference refers to how far through its cache and memory structure a processor must descend to reach an item of data. In directory management, you can use the term to describe how far away a directory is from the application referring to it.
PerformanceIf an application must make many references to directory information, keeping that directory as close as possible to the application might have positive performance benefits.
A directory tree can be built so that the parts of the directory that are relevant to applications that are hosted on systems under z/VM is stored on the z/VM LDAP server. In addition, through referral records and other methods, systems across the enterprise can access all corporate directory data regardless of where it physically is. Systems within the z/VM environment still can access other parts of the directory, and systems in other parts of the business can access the z/VM-hosted parts of the directory, as required.
166 Securing Your Cloud: IBM z/VM Security for IBM z Systems and LinuxONE
AvailabilityLocality of reference also has an availability aspect. Bringing the portion of the DIT that is essential to application operation on to a server image that is physically and logically close to the application reduces the number of failures that might affect the application’s operation. z/VM LDAP in an SSI environment can be made highly available through two important features:
� Automatic sharing of the RACF database in SSI (for SDBM, and native authentication behind LDBM)
� z/VM LDAP replication (for an LDBM database)
Using z/VM LDAP as the directory store for application-critical directory data can improve the reliability and availability of the applications. The applications running on Linux guests in that environment can be configured to access z/VM LDAP directly over a vSwitch or guest LAN, eliminating any dependency on external network components for that access.
Directory integrationIf it is not feasible to make a clean break between portions of the DIT, directory integration is required. Directory integration is the practice of making updates across various directories.
IBM Security Directory IntegratorThe integration of directory information between RACF and other directory systems can be achieved by using technologies such as IBM Security Directory Integrator. Formerly known as IBM Tivoli® Directory Integrator, IBM Security Directory Integrator allows for the controlled propagation of directory information, including changes to existing records, between different directory systems.
IBM Security Directory Integrator provides a wide range of connectors for different types of directories. It uses a workflow-based methodology that is described as The AssemblyLine to manage the data flowing between information sources and targets, and how that data is transformed along the way if needed.
6.3 Linux on z Systems security
Running the enterprise cloud with Linux on z Systems servers provides some advantage over a physically distributed server farm when unique technologies within the platform are used to harden the overall security. Here are security topics that need attention when implementing a Linux environment on your enterprise cloud.
6.3.1 Authentication
Authentication is the process of determining whether someone really is who they claim to be. The users attempting to access a system or a resource must first give sufficient proof of their identity.
Note: More information about IBM Security Directory Integrator can be found at the IBM Knowledge Center:
http://www.ibm.com/support/knowledgecenter/SSCQGF
Chapter 6. IBM z/VM and enterprise security 167
A server authentication is done by using two of the following three categories, or factors, for providing identity:
� Something that you know: A password or PIN� Something that you have: A token, a user ID, a badge, or a certificate� Something that you are: Biometrics characteristics
The traditional way to authenticate on a Linux server is having a user ID on the system and knowing a password for it. Implementation of more than two of the factors is available for a Linux system, making it possible to request a user ID, a password, and a PIN that is generated by some electronic device, such as a token or an application on a cell phone, when authenticating. Use of more factors for authentication brings a high level of security to what is being accessed.
The Pluggable Authentication Modules (PAMs) can be used to reinforce compliance with the organization information security policy by increasing the number of factors that are used to authenticate and allowing access only to users meeting the specific characteristics that are defined with PAM. Applications that are enabled to use PAM can be plugged into new technologies without the need to modify the existing applications. This flexibility provides administrators with these advantages:
� Use any available authentication service for an application.� Use multiple authentication mechanisms for a service.� Add authentication service modules without needing to modify the application.� Use a single password for authentication on multiple modules.
Another factor that improves the security level is the use of PKI, such as an SSH key pair. The users must have a public and private key pair that ensures the user’s ID. Although it is possible to use an SSH key pair without setting a password to it, a password should be set to the key pair. This prevents an attacker who has access to the private key but does not know the password for the user ID from being authenticated at the server.
6.3.2 Access control
Defining each job role in Linux is complicated because everything converges to the root user ID. However, doing so is a preferred practice that defines the access and provides strong control over who can access a superuser account.
The discretionary access control (DAC) model, which is standard Linux security, does not provide protection from broken software or malware running as a normal user or root. Users can grant risky levels of access to files they own.
Use of mandatory access control (MAC) provides full control over all interactions of the software. Administratively defined policy closely controls users and process interactions within the system, and can protect the system from broken software or malware running as any user.
Security-Enhanced Linux (SELinux) on Red Hat Enterprise Linux (RHEL) is an implementation of MAC that uses Linux Security Models that is based on the principle of least privilege. When enabled in permissive mode, every access to a system resource by a user or process such as an I/O device must be controlled by SELinux. This can sometimes cause extra processing cycles on the system.
168 Securing Your Cloud: IBM z/VM Security for IBM z Systems and LinuxONE
AppArmor is a Linux application security framework that is included with SUSE Linux Enterprise and is an open source project. It takes a different approach from SELinux and provides an easy-to-use way for security applications in Linux. Here are some features that can be found in AppArmor:
� Yet another Setup Tool (YaST), which is an administration tool for configuration, maintenance, and automated development of a per-program security policy
� Predefined security policies for standard Linux programs and services
� Robust reporting and alerting capabilities to facilitate regulatory compliance
� Common Interface Model (CIM), which is a schema for clients that integrate with industry standard management consoles
� ZENworks Linux Management integration for profile distribution and report aggregation
� Path-name-based system that does not require labeling or relabeling of file systems
For more information about how to set up SELinux or AppArmor at Linux on z Systems, see Security for Linux on System z, SG24-7728.
6.3.3 User management
On a cloud environment, with the flexibility to increase and decrease its size, the number of user IDs and the complexity of managing the user IDs increase. It is important to have a way to manage user IDs, mainly from a security point of view.
Centralizing the repository of user IDs helps in the management activities, reducing the administration effort compared to distributed user IDs management. It is considered a preferred practice for the maintenance of the information security policies that are applied to user management.
The centralization of user ID management involves adding, deleting, changing account information, and resetting passwords. Doing that from a single and centralized point, such as an LDAP server, can help keep the security requirements and policies consistent throughout the cloud environment. This configuration avoids the need to spread sensitive information from users, such as passwords, to all servers.
When using a centralized user ID management server, all servers must connect to it by using an encrypted connection. Not all of the information flowing between the LDAP server and the servers on the cloud is sensitive, but enabling this protection is simpler to implement than using a mix of encrypted and non-encrypted connections.
6.3.4 Update management
Keeping the operating system updated helps prevent its exposure. An established update process under the servers tracks system updates and manages them in an acceptable time frame. Using a minimal system installation also helps keep control of security and system update. There are fewer potential points of security exposure when fewer packages are installed and managed.
The use of a centralized patch management tool can decrease the complexity and time spent to apply server patches when the number of servers being managed increases. It also helps to track patches that are applied and patches that are needed to all servers managed, avoiding the possibility to leaving a server without the updates.
Chapter 6. IBM z/VM and enterprise security 169

6.3.5 Data
Protecting the access to the disks is important, but another way to improve data security is encrypting it. Because encryption depends on a key, correct handling and implementation of a key management policy is important. Failing on encryption key management can result in an encryption deadlock and permanent loss of all encrypted data.
The use of encryption on z Systems has advantages because it uses cryptographic hardware and cryptographic functions that are built in the central processor, such as the Central Processor Assist for Cryptographic Function (CPACF). It handles the cryptographic cipher calculations, leaving the central processor available for other uses and reducing the central processor cycles compared to the same cipher calculations done by using software emulation.
Using tools to encrypt the Linux on z Systems data can increase the data security. The dm-crypt subsystem in Linux is implemented as a device mapper that can be stacked on the top of other devices that are managed through the device mapper framework. Therefore, you can encrypt from entire disks to software RAID volumes and LVM logical volumes, adding flexibility to the encryption strategy. In a dm-crypt environment, the data appears in the clear only when it is already in the program.
For more information and steps about how to encrypt data on disks by using dm-crypt, see Security for Linux on System z, SG24-7728.
Data on backup media must be encrypted. It is a security breach if a backup media with sensitive information leaves the data center and others outside the organization have access to that media. Protecting the data center and all devices within it is important, but allowing information to leave the data center without being protected is the same as ignoring all protection implemented in the organization data center.
6.3.6 Audit
A defined information security policy is worthless if there is no way to assess whether the policies are effective, meaning that it was adhered to by all employees and they are playing the roles that they are expected to.
Tracking changes, and authorized and unauthorized accesses, is a way to make sure that the information security policy is followed. But, with the increase in servers that are managed on the enterprise cloud, the amount of audit data that is generated makes it impossible for a human to analyze all of it, find a threat, and act on it while the intrusion is still happening. For that reason, define, during the planning stage of the enterprise cloud and the IT infrastructure, which actions must be logged for audits.
The complexity in auditing is reduced when defined roles are available in the information security policy. Users under one role should not have access to override the MACs and should not be able to manipulate the controls that are under the jurisdiction of another job role. With the separation of duties, the functions of the systems and integrity of audit logs are not compromised.
To create a separation of duties under Linux, use SELinux or AppArmor. If those tools are not used or enabled, the task to control and determine user privileges become more complicated. A preferred practice is to use sudo to control access to privileged commands. Use of sudo ensures better protection by limiting the privileged commands that a user can run and protecting the root password from being shared with system administrators. Use of sudo also ensures audit of accountability for users who run privileged commands.
170 Securing Your Cloud: IBM z/VM Security for IBM z Systems and LinuxONE
6.3.7 Cryptographic hardware
Linux on z Systems can benefit from the use of z Systems cryptographic hardware. It supports the use of CPACF and Crypto-Express5S (the latest available at the time of writing) by using in-kernel crypto-APIs and the libica cryptographic functions library. Use of these features provide these benefits:
� File system encryption� Communication encryption (to the applications such as IBM HTTP Server)� System security by providing advanced cryptographic functions
CPACF is available on every processor unit that is defined as a central processor (CP) and can be explicitly enabled by using the enablement feature #3863, for no additional charge. It provides a set of symmetric cryptographic functions that enhance the encryption and decryption performance of clear-key operations for SSL, virtual private network (VPN), and data storing applications that do not require a high level of security.
The CPACF coprocessor on the IBM z13™ was redesigned and has better performance compared to the zEC12.
CPACF offers the following data encryption and decryption algorithms for data privacy and confidentiality:
� Data Encryption Standard (DES):
– Single-length key DES
– Double-length key DES
– Triple-length key DES (TDES)
� Advanced Encryption Standard (AES) for 128-bit, 192-bit, and 256-bit keys
CPACF offers the following hashing algorithms for data integrity:
� SHA-1: 160 bit� SHA-2: 224, 256, 384, and 512 bit
For MAC, CPACF offers these options:
� Single-length key MAC� Double-length key MAC
For cryptographic key generation, CPACF offers Pseudorandom Number Generation (PRNG) algorithms.
Crypto-Express5S is an optional feature that is exclusive for z13 and z13s and is designed to complement the cryptographic capabilities of the CPACF. It is in the Peripheral Component Interconnect Express Generation 2 (PCIe Gen2) I/O drawer and can be configured in one of the following three ways:
� Secure IBM Common Cryptographic Architecture (CCA) coprocessor (CEX5C), supporting:
– Secure key functions
– FIPS 140-2 Security Level 4 certification
– User Defined Extension (UDX) services to implement custom cryptographic functions and algorithms
Chapter 6. IBM z/VM and enterprise security 171
� Secure IBM Enterprise Public Key Cryptography Standards (PKCS) #11 (EP11) coprocessor (CEX5P), providing open, industry-standard cryptographic services following the PKCS #11 specification V2.20 and more recent amendments. It is designed to extend FIPS and Common Criteria evaluations to meet public sector requirements. The new cryptographic coprocessor mode introduced the PKCS #11 secure key function.
� Accelerator (CEX5A), optimized for public and private key cryptographic operations, and used with SSL/TLS processing.
The optional PCIe cryptographic coprocessor Crypto-Express5S provides asynchronous cryptographic functions to z13 servers. Over 300 cryptographic algorithms and modes are supported.
For more information about CPACF and Crypto-Express5S, see the IBM z13 Technical Guide, SG24-8251. For more information about how to use those features at Linux on z Systems, see Security for Linux on System z, SG24-7728.
6.3.8 Firewall
The use of a firewall is defined by the IT Infrastructure and by the information security policy of an organization. Using the guest isolation feature under z/VM and z Systems architecture makes such a solution as secure as having a firewall running on every Linux on z Systems server. However, if the information security policy enforces the use of a firewall on any back-end server, including those running on a z Systems environment, that should be implemented.
There are several sophisticated firewall features solutions that are available for Linux that can filter and manipulate packets based on complex rules that are defined by the system administrator. A preferred practice is to use a restrictive firewall policy instead of a permissive policy. This ensures that packets that are explicitly not allowed to flow to the network are dropped instead of rejected.
Some tools help to automate firewall policy creation. SUSE Enterprise Linux offers a firewall configuration tool that uses YaST that can be used both in graphical mode or text mode. Red Hat Enterprise Linux offers a firewall configuration tool that is called system-config-firewall that can also be used in graphical or text mode. Another option is a tool that is called Firewall Builder. It is an open source tool and can be found at the following website:
http://www.fwbuilder.org
Firewall Builder can be downloaded and built for SUSE Enterprise Linux Server or Red Hat Enterprise Linux.
172 Securing Your Cloud: IBM z/VM Security for IBM z Systems and LinuxONE
Related publications
The publications that are listed in this section are considered suitable for a more detailed description of the topics that are covered in this book.
Other publications
These publications are also relevant as further information sources:
� Directory Maintenance Facility Tailoring and Administration Guide for z/VM 6.3, SC24-6190
� Enabling z/VM for OpenStack (Support for OpenStack Liberty Release), SC24-6251
� IBM Cloud Manager with OpenStack on z Systems V4.2, SC24-6251
� RACF Security Server Security Administrator’s Guide, SC24-6218
� RSCS Networking Planning and Configuration for z/VM 6.3, SC24-6227
� Secure Configuration Guide for z/VM 6.3, SC24-6230
� Systems Management Application Programming, SC24-6234
Help from IBM
IBM Support and downloads
ibm.com/support
IBM Global Services
ibm.com/services
© Copyright IBM Corp. 2016. All rights reserved. 173

174 Securing Your Cloud: IBM z/VM Security for IBM z Systems and LinuxONE

Index
Numerics5VMRAC30 file 53
Cclear key
cryptography 23CMS 99CMS command 118CP privilege
class 16class G 16
CPLOAD Module 36CRYPTO statement 22
operand APVIRT 24cryptography card 22
Ddirect access storage device (DASD) 17directory entry
BILLYBOB 71DirMaint administrator 70, 139DirMaint command
set 140DirMaint exit 67DirMaint implementation 14DirMaint product 33DIRMAINT Pun 45DirMaint virtual machine 44
EExternal Security Manager (ESM) 33–34
Ffilemode 47
LLinux guest
user directory 22
NNOAUTOLOG parameter 66
Ppassword phrase
current year 97single quotes 100
Privilege classB 17C 17E 17
© Copyright IBM Corp. 2016. All rights reserved.
F 17G 17
privilege class 16, 25, 98C user 17G user 17
PROFILE Exec 49
RRACF 36RACF 1.9.2 117
audit records 117RACF administrator 44RACF authorization
concept 69RACF data 37RACF database 36, 57, 69RACF Report Writer 117RACF rule 97RACF Security
Server 36RACF user
Id 37RACFADU OUTPUT
file 128Redbooks website
Contact us xiiResource Access Control Facility (RACF) 33REXX exec 97RPIBLLPA EXCL0001
file 53RPIDIRCT SYSUT1 47
file 47
SSETROPTS command 103shared file system (SFS) 34SMF Control 49System Configuration
file 13
Ttdisk space 117
UUSER request 45USER WITHPASS
A0 45A0 rec 45file 44Filemode 47
175
Vvirtual machine
following tasks 57virtual machine (VM) 57VLAN IDs 12VSWITCH statement 12
XXML file 128
Zz/VM 5.3.0 33
system 36z/VM environment
SMF records 117z/VM system
programmer 117
176 Securing Your Cloud: IBM z/VM Security for IBM z Systems and LinuxONE
(0.2”spine)0.17”<
->0.473”
90<->
249 pages
Securing Your Cloud: IBM z/VM
Security for IBM z System
s and LinuxONE


ibm.com/redbooks
Printed in U.S.A.
Back cover
ISBN 073844202X
SG24-8353-00
®